


Bahasa
Halaman
Hukum


SM100SAP Solution ManagerConfiguration for Operations
..
PARTICIPANT HANDBOOKINSTRUCTOR-LED TRAINING
.Course Version: 15Course Duration: 5 Day(s)e-book Duration: 41 Hours 30 MinutesMaterial Number: 50117850
SAP Copyrights and Trademarks
© 2016 SAP SE or an SAP affiliate company. All rights reserved.
No part of this publication may be reproduced or transmitted in any form or for any purposewithout the express permission of SAP SE or an SAP affiliate company.
SAP and other SAP products and services mentioned herein as well as their respectivelogos are trademarks or registered trademarks of SAP SE (or an SAP affiliate company) inGermany and other countries. Please see http://global12.sap.com/corporate-en/legal/copyright/index.epx for additional trademark information and notices.
Some software products marketed by SAP SE and its distributors contain proprietarysoftware components of other software vendors.
National product specifications may vary.
These materials are provided by SAP SE or an SAP affiliate company for informationalpurposes only, without representation or warranty of any kind, and SAP SE or its affiliatedcompanies shall not be liable for errors or omissions with respect to the materials. The onlywarranties for SAP SE or SAP affiliate company products and services are those that areset forth in the express warranty statements accompanying such products and services, ifany. Nothing herein should be construed as constituting an additional warranty.
In particular, SAP SE or its affiliated companies have no obligation to pursue any course ofbusiness outlined in this document or any related presentation, or to develop or release anyfunctionality mentioned therein. This document, or any related presentation, and SAP SE’sor its affiliated companies’ strategy and possible future developments, products, and/orplatform directions and functionality are all subject to change and may be changed by SAPSE or its affiliated companies at any time for any reason without notice. The information inthis document is not a commitment, promise, or legal obligation to deliver any material,code, or functionality. All forward-looking statements are subject to various risks anduncertainties that could cause actual results to differ materially from expectations. Readersare cautioned not to place undue reliance on these forward-looking statements, whichspeak only as of their dates, and they should not be relied upon in making purchasingdecisions.
Typographic Conventions
American English is the standard used in this handbook.
The following typographic conventions are also used.
This information is displayed in the instructor’s presentation
Demonstration
Procedure
Warning or Caution
Hint
Related or Additional Information
Facilitated Discussion
User interface control Example text
Window title Example text
© Copyright. All rights reserved. iii

iv © Copyright. All rights reserved.
Contents
xi Course Overview
1 Unit 1: The SAP Solution Manager Environment
2 Lesson: Planning the SAP Solution Manager Environment
7 Lesson: Assigning Composite Roles to SAP Solution Manager
System Users
17 Exercise 1: Assign Administrator Roles to Users in SAP Solution
Manager
22 Lesson: Planning the Installation of SAP Extensions and Adapters
for Third Party Extensions
33 Unit 2: The SAP Solution Manager System Landscape
34 Lesson: Planning the SAP Solution Manager Architecture and
Landscape
38 Lesson: Planning the Agent Infrastructure for the SAP Solution
Manager System Landscape
49 Unit 3: SAP Solution Manager Sizing, Installation, and Upgrade
50 Lesson: Sizing an SAP Solution Manager System
56 Lesson: Preparing to Install or Upgrade an SAP Solution Manager
System
58 Lesson: Preparing to Upgrade an SAP Solution Manager System
63 Unit 4: Management of System Data in the SAP Solution ManagerSystem Landscape
64 Lesson: Setting Up the System Landscape Directory
73 Exercise 2: Check the Configuration of the SLD
76 Lesson: Setting Up the Landscape Management Database
87 Lesson: Describing the Landscape Model, Landscape Management
Database, and Landscape Verification
© Copyright. All rights reserved. v
111 Unit 5: Guided Procedures for Configuration of SAP Solution Manager
112 Lesson: Performing Prerequisite Checks for Configuring SAP
Solution Manager
119 Exercise 3: Check Prerequisites for Guided Configuration
122 Lesson: Explaining the Guided Procedures for Configuring SAP
Solution Manager
125 Lesson: Performing the SAP Solution Manager System Preparation
137 Exercise 4: Check SAP Solution Manager System Preparation
Success
141 Lesson: Performing Basic Configuration of SAP Solution Manager
155 Exercise 5: Check SAP Solution Manager Basic Configuration
159 Lesson: Customizing SAP Solution Manager Work Centers
163 Unit 6: Preparation for The Setup of Managed Systems in SAP SolutionManager
164 Lesson: Preparing Managed Systems for Configuration in SAP
Solution Manager
169 Exercise 6: Check Managed Systems Setup Prerequisites
173 Unit 7: The Configuration of Dual-Stack Systems in SAP SolutionManager
174 Lesson: Configuring a Dual-Stack Managed System in SAP Solution
Manager
185 Unit 8: The Configuration of ABAP Systems in SAP Solution Manager
186 Lesson: Configuring an ABAP Managed System in SAP Solution
Manager
189 Unit 9: The Configuration of Java Systems in SAP Solution Manager
190 Lesson: Configuring a Java System in SAP Solution Manager
193 Exercise 7: Review Managed System Configuration
197 Unit 10: Business Partner Types in SAP Solution Manager
198 Lesson: Creating Business Partners in SAP Solution Manager
203 Exercise 8: Create a Business Partner Message Processor for
Issues, Top Issues, and Tasks
vi © Copyright. All rights reserved.
207 Unit 11: The SAP Solution Manager Administration Work Center
209 Lesson: Administering Systems in the SAP Solution Manager
Landscape
210 Lesson: Accessing Landscape Component Management Tools in
SAP Solution Manager
215 Lesson: Administering SAP Solution Manager Infrastructure
Components
229 Lesson: Performing Self Diagnosis in SAP Solution Manager
232 Lesson: Managing SAP Solution Manager Self-Monitoring
235 Lesson: Creating and Maintaining Solutions in SAP Solution
Manager
241 Exercise 9: Create a Solution in SAP Solution Manager
245 Exercise 10: Maintain a Business Process Structure in SAP
Solution Manager
249 Lesson: Creating and Maintaining Projects in SAP Solution Manager
257 Unit 12: SAP EarlyWatch Alerts (EWA)
258 Lesson: Monitoring Components with SAP EarlyWatch Alerts
270 Lesson: Managing SAP EarlyWatch Alert Reports
273 Exercise 11: Manually Produce an SAP EWA Report in an ABAP
System
282 Lesson: Using SAP EarlyWatch Alert for Solutions
291 Unit 13: SAP Solution Manager Engagement and Service Delivery
292 Lesson: Explaining Service Delivery and Engagement in SAP
Solution Manager
296 Lesson: Creating Issues in SAP Solution Manager
301 Exercise 12: Manually Create an Issue
305 Lesson: Summarizing Task Management Within the SAP
Engagement and Service Delivery Work Center
309 Lesson: Using Service Delivery Options in SAP Solution Manager
317 Unit 14: Change Management in SAP Solution Manager
318 Lesson: Controlling Maintenance Activities with Maintenance
Optimizer (MOpz)
329 Lesson: Managing Licenses and Maintenance Certificates
335 Lesson: Managing SAP Notes with System Recommendations in
SAP Solution Manager
© Copyright. All rights reserved. vii
345 Unit 15: The Management of Background Jobs with SAP SolutionManager
347 Lesson: Explaining Job Management Processes in SAP Solution
Manager
354 Lesson: Processing a Job Request in SAP Solution Manager
361 Exercise 13: Generate a Job Request
365 Exercise 14: Process a Job Request Incident
369 Lesson: Organizing Job Documentation in SAP Solution Manager
375 Exercise 15: Create Job Documentation and Schedule a Job in
SAP Solution Manager
379 Exercise 16: Schedule a Job in the SAP ERP Satellite System
383 Lesson: Monitoring Background Jobs with SAP Solution Manager
391 Lesson: Optimizing the Background Job Schedule with SAP Solution
Manager Tools
399 Lesson: Setting Up Job Scheduling Management in SAP Solution
Manager
402 Lesson: Using External Schedulers in SAP Solution Manager
409 Unit 16: The Technical Administration of the SAP System Landscape
410 Lesson: Configuring SAP Solution Manager Notification
Management
416 Lesson: Planning Work Modes with SAP Solution Manager
427 Lesson: Managing User Tasks with Central System Administration
(CSA)
435 Exercise 17: Configure and Use Central System Administration
442 Lesson: Managing Tasks with the Task Inbox
445 Lesson: Grouping Administrative Tools with Central Tool Access
viii © Copyright. All rights reserved.
449 Unit 17: End-to-End Diagnostics in SAP Solution Manager
451 Lesson: Describing the Architecture of SAP Solution Manager
Diagnostics
455 Lesson: Viewing Performance Data and Metrics With CA Wily
Introscope
461 Exercise 18: Locate the Total Heap Size and the Java Version for
the SAP Portal System with CA Wily Introscope
465 Lesson: Analyzing Changes to Managed Systems with End-to-End
Change Analysis
471 Exercise 19: Find the Current SAP Support Package Level and
the SAP Kernel Patch Level for the SAP ABAP System
475 Exercise 20: Find the Current SAP Support Package Level of the
SAP J2EE Engine
478 Lesson: Analyzing Statistical Performance Data with End-to-End
Workload Analysis
485 Lesson: Identifying the Cause of System Errors with End-to-End
Exception Analysis
491 Lesson: Analyzing Trace Data with End-to-End Trace Analysis
499 Lesson: Performing Client-Side Diagnostics with BMC AppSight
507 Unit 18: The SAP Solution Manager Monitoring and AlertingInfrastructure
508 Lesson: Creating an Integrated Landscape Monitoring Solution with
the Monitoring and Alerting Infrastructure
513 Lesson: Assigning Monitoring Templates to Systems
517 Lesson: Monitoring the System Landscape Using the Monitoring and
Alerting Infrastructure
523 Exercise 21: Analyze an Alert in the System Monitoring
Application
525 Exercise 22: Create an Incident in the System Monitoring
Application
528 Lesson: Analyzing Metrics with Interactive Reporting
536 Lesson: Accessing Key Reports Using Dashboards
543 Unit 19: SAP Solution Manager Mobile Applications
544 Lesson: Explaining How Mobile Apps Connect to SAP Solution
Manager
548 Lesson: Identifying the Mobile Apps Available for SAP Solution
Manager
557 Unit 20: Service Level Reporting in SAP Solution Manager
558 Lesson: Configuring Service Level Reporting
567 Exercise 23: Create a Service Level Report
572 Lesson: Accessing Service Level Reports
© Copyright. All rights reserved. ix

x © Copyright. All rights reserved.

Course Overview
TARGET AUDIENCEThis course is intended for the following audiences:
● System Administrator
● System Architect
● Technology Consultant
© Copyright. All rights reserved. xi

xii © Copyright. All rights reserved.

UNIT 1 The SAP Solution ManagerEnvironment
Lesson 1
Planning the SAP Solution Manager Environment 2
Lesson 2
Assigning Composite Roles to SAP Solution Manager System Users 7
Exercise 1: Assign Administrator Roles to Users in SAP Solution Manager 17
Lesson 3
Planning the Installation of SAP Extensions and Adapters for Third Party Extensions 22
UNIT OBJECTIVES
● Explain how SAP support levels affect the Solution Manager environment
● Plan application lifecycle management with SAP Solution Manager
● Add roles in SAP Solution Manager
● Plan the SAP extensions to be added to Solution Manager
● Plan the installation of adapters for third-party extensions
© Copyright. All rights reserved. 1
Unit 1Lesson 1
Planning the SAP Solution ManagerEnvironment
LESSON OVERVIEWSAP offers several levels of support, from SAP Standard support to SAP Enterprise Supportand SAP MaxAttention. This lesson introduces the support concepts, which helps you tochoose the level of support you need for your business.
LESSON OBJECTIVESAfter completing this lesson, you will be able to:
● Explain how SAP support levels affect the Solution Manager environment
● Plan application lifecycle management with SAP Solution Manager
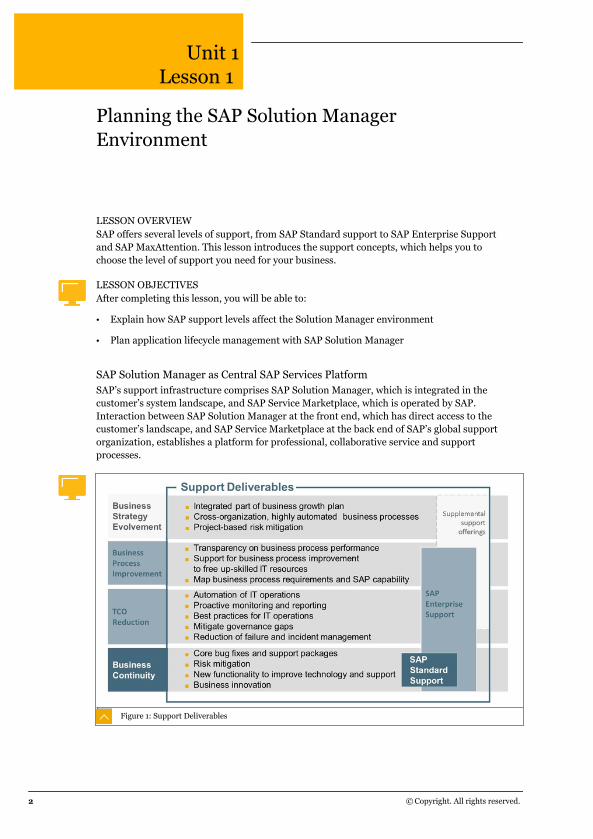
SAP Solution Manager as Central SAP Services PlatformSAP’s support infrastructure comprises SAP Solution Manager, which is integrated in thecustomer’s system landscape, and SAP Service Marketplace, which is operated by SAP.Interaction between SAP Solution Manager at the front end, which has direct access to thecustomer’s landscape, and SAP Service Marketplace at the back end of SAP’s global supportorganization, establishes a platform for professional, collaborative service and supportprocesses.
Figure 1: Support Deliverables
2 © Copyright. All rights reserved.
SAP Support Offerings and the Enterprise EnvironmentSAP provides three levels of support for your organization.
SAP Standard Supportis reactive, and ensures continuity of the customer's business, with afocus on technical risk mitigation.
SAP Standard Support comprises the following:
● 24x7 incident support, including SAP Notes and support packages
● Standard system health checks (SAP GoingLive Check, SAP EarlyWatch Check, SAPGoingLive Functional Upgrade Check, and SAP OS/DB Migration Check)
● Service and Support Report as self-service
● Knowledge database via SAP Service Marketplace
SAP Enterprise Supportgoes beyond standard support, adding the proactive view with:
● Improvement of business user productivity through business process analysis andmonitoring and continuous quality checks.
● Improvement of business processes with end--to-end operations standards, custom codereduction, Custom Code Management Cockpit, and Business Process Change Analyzer.
● Improvement of IT operational efficiencies with Run SAP/infrastructure operationsstandards, end-to-end solution application lifecycle management enablement, and QualityGate Management.
● Use of integrated SAP IT Expert-Guided Sessions (EGI) and operational scenarios. EGI is aspecial type of session with a combination of remote training and supported do-it-yourselfphases in which you work on your own system and contact the expert in case of questions.Other operational scenarios cover topics for analyzing and improving your IT operationand business processes.
SAP MaxAttentionoffers technical account management for the entire life cycle of yoursolution and supports you when implementing end-to-end solution operations. It goes aboveand beyond operations support by driving ongoing enhancement. It ensures increaseduptime, enhanced performance, greater data consistency, and improved maintainability tolower your organization's TOC. SAP MaxAttention mitigates the technical risk ofimplementation, upgrade, and operations.
Usage Rights for SAP Solution Manager Enterprise Edition
The extent to which you can use the software SAP Solution Manager 7.1 depends upon thetype of maintenance contract you have. You are authorized to use all the functions within SAPSolution Manager 7.1 if you have a contract for any one of the following:
● SAP Enterprise Support
● SAP Product Support for Large Enterprises
● SAP Premium Support
● SAP MaxAttention
If your organization has only a standard support contract, you can install Solution Manager7.1, but your access to certain functions will be restricted.
For more information, see the SAP Solution Manager Functional Baseline on SAP ServiceMarketplace at http://service.sap.com/solman-baseline .
Lesson: Planning the SAP Solution Manager Environment
© Copyright. All rights reserved. 3
SAP Enterprise Support Readiness CheckTo access SAP support services, you must complete the following checklist:
SAP Enterprise Support Readiness Check
1. Install, configure, and use SAP Solution Manager, Enterprise Edition: allows yourorganization to leverage the latest innovations in Solution Manager for ApplicationLifecycle Management.
2. Establish and maintain a connection between your SAP Solution Manager and SAP:enables SAP to collaborate efficiently with your IT department when required for RemoteService CQC delivery, production downs, or incident and problem management.
3. Activate SAP EarlyWatch Alert for the production systems: enables your IT departmentand SAP to proactively identify potential problems before they affect business continuity.
4. Establish and maintain an SAP-certified Customer Center of Expertise (CoE): drives valuefor your IT department and your business as well as providing defined interfaces to SAP.
5. Maintain adequate and current records of all modifications: enables your IT department toaccelerate resolution of problems, evaluate the effect of a change request, and accelerateunderstanding of custom code usage and potential impact in a production down situation.
To find out more about achieving CoE certification check the relevant documentation on SAPService Marketplace.
Application Lifecycle ManagementDue to the increasing complexity of solution landscapes, every business has integration needsspecific to its mission-critical applications. The more integrated and comprehensive thesoftware applications and solutions in customers' landscapes are, the more important theneed for a holistic approach to application lifecycle management.
Figure 2: Application Lifecycle Management with SAP Solution Manager
Unit 1: The SAP Solution Manager Environment
4 © Copyright. All rights reserved.
Application Lifecycle Management is a comprehensive support approach in the applicationenvironment that spans the entire life cycle of IT solutions, from concept to phase-out. Theapplication management lifecycle comprises the following phases:
● Requirements: Collect requirements for new applications or to adapt existing applications.
● Design: Convert requirements into detailed specifications.
● Build and Test: Configure the application and create an operating model according tospecifications.
● Deploy: Transfer changes and the operating model to the existing live IT landscape.
● Operate: Provide IT services for ongoing operations.
● Optimize: Analyze service-level fulfillment and perform any activities required to improveresults.
Dealing with Projects and Solutions
A project in SAP Solution Manager describes the grouping and organization of business,technical, and organizational tasks during the implementation of SAP software in anenterprise. In an implementation project, the project team performs tasks that are structuredaccording to a common project plan and roadmap.
In SAP Solution Manager, projects follow the ASAP methodology, starting with projectpreparation and completing the project in the go-live phase. From the lifecycle perspective, aproject covers the application management phases from requirements-gathering throughbuilding and testing. All the information you accumulate during the project is transferred intoa solution at the end of the deployment phase, including knowledge transfer to users via e-learning, implementation of the support organization, and more.
After you successfully complete a project, you preserve the knowledge gained during theproject and keep it up to date. The SAP Solution Manager solution concept helps you to do so.An SAP Solution Manager solution contains all of the information about systems, softwarecomponents, and business processes (scenarios) that you need for the operation andongoing optimization of your IT solution.
SAP provides the following processes to support both projects and solutions throughout thelife cycle:
Document the solution, including customer code
This process identifies and documents business processes for SAP solutions, includingpartner components, customer code, and interfaces.
Innovation Management
Innovation management identifies business requirements and prepares their realizationin collaborative procedures. The procedure aligns new requirements with enhancementsdelivered by SAP and its partners. You can use service-oriented architecture (SOA) tobuild innovative applications for new business processes.
Solution Configuration
This process guides you through the configuration of your project scope based on ASAPmethodology. During solution configuration, you adapt standard SAP processes to yourrequirements and define unit test requirements.
Test Management
Lesson: Planning the SAP Solution Manager Environment
© Copyright. All rights reserved. 5
During test management, you define the integration testing requirements and test scopebased on a change impact analysis, and develop automatic and manual test cases,manage testers, and report on the test progress and test results.
Deployment of Solution Updates
This process handles the synchronized propagation of technical objects, from thedevelopment environment to the production environment, across the technology stack.
Technical Operations
Technical operations includes system monitoring and routine system administrationtasks.
Business Process Operations
Running a sustainable process involves business process and interface monitoring, jobscheduling management, and data consistency management, including tried-and-testedSLA-based root cause analysis for customers, SAP, and partners via the SAP GlobalSupport Backbone.
Incident and Problem Management
This process provides integrated, cross-technology and solution-oriented incident andproblem management, including tried and tested SLA-based root cause analysis forcustomers, SAP, and partners via the SAP Global Support Backbone.
IT Reporting
This process demonstrates the value of IT to the business. Service-level agreements aremade between business and IT.
SAP Solution Maintenance
SAP solution maintenance covers the lifecycle management of software correctionpackages from discovery and retrieval to test scope optimization, possibly includingoptional automatic deployment into the production environment.
Improvements of Solutions
This process deals with workflow-based management of business and technology-drivenchanges with integrated project management and synchronized deploymentfunctionality.
Upgrade Process
The upgrade process provides comprehensive project support for release transitions.
LESSON SUMMARYYou should now be able to:
● Explain how SAP support levels affect the Solution Manager environment
● Plan application lifecycle management with SAP Solution Manager
Unit 1: The SAP Solution Manager Environment
6 © Copyright. All rights reserved.
Unit 1Lesson 2
Assigning Composite Roles to SAP SolutionManager System Users
LESSON OVERVIEWEvery organization should have its own authorization concepts tailored to its specific usescenario. In this lesson you learn to work with the single roles and composite roles used inSAP Solution Manager.
LESSON OBJECTIVESAfter completing this lesson, you will be able to:
● Add roles in SAP Solution Manager
Authorizations and Roles in SAP Solution ManagerAuthorizations in SAP Solution Manager are defined by authorization objects.
For example, authorization to execute function modules remotely is in authorization objectS_RFC. Authorization objects are in authorization roles, meaning that a role is anauthorization object container. You maintain authorizations by maintaining the fields of anauthorization object. The main consideration for designing an authorization concept is: Whichusers may perform which tasks in the SAP system?
To implement the authorization strategy successfully, you need a reliable authorization plan.You must assign the authorizations required for these tasks in the SAP system to each user.
How to create a matrix of authorizations and roles for SAP Solution Manager:
1. Identify which functions of SAP Solution Manager scenarios you use.
2. Create a menu matrix according to these functions.
3. Identify your roles.
4. Populate your menu matrix.
5. Create your roles from SAP template roles. Use a unique naming convention.
6. Maintain your roles.
7. Test your roles.
© Copyright. All rights reserved. 7
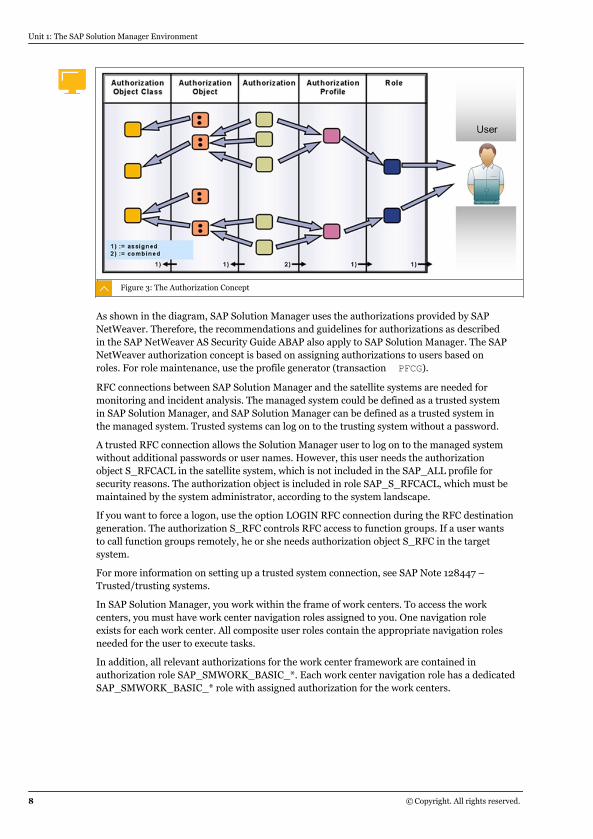
Figure 3: The Authorization Concept
As shown in the diagram, SAP Solution Manager uses the authorizations provided by SAPNetWeaver. Therefore, the recommendations and guidelines for authorizations as describedin the SAP NetWeaver AS Security Guide ABAP also apply to SAP Solution Manager. The SAPNetWeaver authorization concept is based on assigning authorizations to users based onroles. For role maintenance, use the profile generator (transaction PFCG).
RFC connections between SAP Solution Manager and the satellite systems are needed formonitoring and incident analysis. The managed system could be defined as a trusted systemin SAP Solution Manager, and SAP Solution Manager can be defined as a trusted system inthe managed system. Trusted systems can log on to the trusting system without a password.
A trusted RFC connection allows the Solution Manager user to log on to the managed systemwithout additional passwords or user names. However, this user needs the authorizationobject S_RFCACL in the satellite system, which is not included in the SAP_ALL profile forsecurity reasons. The authorization object is included in role SAP_S_RFCACL, which must bemaintained by the system administrator, according to the system landscape.
If you want to force a logon, use the option LOGIN RFC connection during the RFC destinationgeneration. The authorization S_RFC controls RFC access to function groups. If a user wantsto call function groups remotely, he or she needs authorization object S_RFC in the targetsystem.
For more information on setting up a trusted system connection, see SAP Note 128447 –Trusted/trusting systems.
In SAP Solution Manager, you work within the frame of work centers. To access the workcenters, you must have work center navigation roles assigned to you. One navigation roleexists for each work center. All composite user roles contain the appropriate navigation rolesneeded for the user to execute tasks.
In addition, all relevant authorizations for the work center framework are contained inauthorization role SAP_SMWORK_BASIC_*. Each work center navigation role has a dedicatedSAP_SMWORK_BASIC_* role with assigned authorization for the work centers.
Unit 1: The SAP Solution Manager Environment
8 © Copyright. All rights reserved.
Table 1: Examples of Navigation Roles
Role Name Function
SAP_SMWORK_JOB_MAN Navigation role for the Job Managementwork center
SAP_SMWORK_BASIC_JSCHED Authorization for work center use
For example, the navigation role for the Job Management work center, with the technical rolename SAP_SMWORK_JOB_MAN, must be assigned together with the authorization role forthe work center with the technical role name SAP_SMWORK_BASIC_JSCHED.
General Information
Work center navigation roles (naming convention: SAP_SMWORK_<work center>) are basedon the concept of authorization roles (transaction PFCG). In the description tab, you can findan introduction and some important information about the navigation role.
Folder Hierarchy in the Menu
The defining factor of navigation roles is the menu. The menu information in the role can befound on the Menu tab in the role. Therefore, you do not need to generate any profiles, butyou must execute a user comparison. The menu always consists of a two-folder hierarchy. Itdisplays the menu hierarchy/entries in the SAP NetWeaver Business Client (NWBC). The firstlevel is the home page Web Dynpro application (WDA) of the work center (for example,Incident Management). The second level consists of several related links, such as SAP ServiceMarketplace or the SAP Help Portal.
Adaptation of Related Links in the Navigation Panel
You can use the delivered navigation roles, but you can also define them for your ownpurposes. This means you can add new folders with applications in the Related Links area inthe work center navigation panel. You can also delete defined folders.
Inactive Authorization Objects
In contrast to authorization roles, which contain a number of authorization objects forauthorization purposes, work center navigation roles are only relevant for navigation in thework center via menu options. They do not contain active authorization objects, except forauthorization object S_TCODE with value SM_WORKCENTER. Nevertheless, you will findadditional transactions in some navigation role menus. These transactions must be present inthe menu tab because they define the transaction navigation in the User Interface workcenter. Having transactions in the menu tab allows the system to trace automatically allrelevant authorization objects that are connected to this transaction. Authorization objectsfor these transactions are set to inactive. Do not activate inactive authorization objects in thenavigation roles, as this may override your existing authorization concept.
Authorization Role for Navigation in the UI (Technical Role Name: SAP_SMWORK_BASIC_*
Each user who works with work centers needs the authorization roleSAP_SMWORK_BASIC_*, where the asterisk (*) stands for the individual work center. SAPSolution Manager 7.1 delivers a master role, SAP_SMWORK_BASIC, which currently containsauthorization objects that are relevant for all work centers. It does not contain authorizationobjects that are required for individual work centers. Basic authorization roles are alsocontained in the composite roles for users. These roles must be fully maintained, includingprofile generation and user comparison. Due to the nature of the role, governing all UserInterface authorizations for work center navigation, its menu is not required to be displayed tothe user. It is therefore hidden in the SAP Easy Access menu.
Lesson: Assigning Composite Roles to SAP Solution Manager System Users
© Copyright. All rights reserved. 9
Authorization Concept Solution Manager 7.1
Since SAP Solution Manager 7.1, user roles are defined by a user definition according to SAPprocesses. Each user definition a roles concept is assigned, which is a composite role. In thecontext of business processes, business users are relevant. These users represent humanusers within a business scenario, who are mapped in a system such as SAP Solution Managerby a user ID. All roles are delivered in the SAP name space starting with SAP_*. The technicalrole name represents the scenario it is used for, the level of authorizations it contains, andwhether it is a composite role or a single role.
For instance, the technical role name SAP_SERVICE_DESK_PROCESS_COMP is delivered bySAP, it is used for the Service Desk scenario, the user definition is "processor", and it is acomposite role.
SAP Solution Manager 7.1 – Composite Roles
Syntax: <DeliveredBy>_<Scenario>_<UserDefinition>_<RoleType>
SAP Solution Manager roles are composite roles that contain a number of single roles, andwhich easily allow further authorization restrictions for a user. Each single role defines theauthorization for one specific function/module/transaction, for example, technical role name*SOLAR01*. The composite roles then contain all relevant authorization for one user in ascenario.
As an example, take a closer look at composite role SAP_JOBMAN_ALL_COMP.
The following table shows all single roles belonging to this composite role, including the areathey belong to and the name of the single role.
Table 2: Example Role: SAP_JOBMAN_ALL_COMP
Type Role Name Name
BW SAP_BI_E2E SMD * E2E authorizations
BW SAP_BPMJSM_BW_ALL_RE-PORTING
BW for BP Operations/ JobScheduling
Tech SAP_SMSY_DIS Solution Manager SystemLandscape – display
Tech (Work Center) SAP_SMWORK_BA-SIC_JSCHED
Work Center: Basic Authori-zation Objects
Tech (Work Center) SAP_SMWORK_JOB_MAN Work Center: Job Manage-ment Navigation Role
CRM SAP_SM_CRM_UIU_FRAME-WORK
General authorization forCRM
CRM SAP_SM_CRM_UIU_SOL-MANPRO
CRM navigation role
CRM SAP_SM_CRM_UIU_SOL-MANPRO_ADMIN
Additional CRM UI
CRM SAP_SM_CRM_UIU_SOL-MANPRO_CHARM
Additional UIU_COMP au-thorizations for ChaRM
CRM SAP_SM_CRM_UIU_SOL-MANPRO_PROC
Additional CRM UI
Unit 1: The SAP Solution Manager Environment
10 © Copyright. All rights reserved.
Business SAP_SM_SCHEDULER_AD-MIN
Job Scheduling Administra-tor – full
Business SAP_SM_SOLUTION_ALL Solutions – Full authorization
SAP Solution Manager 7.1 - Authorization Concept
Since there is no general authorization configuration that fits all possible use scenarios, werecommend that you design an authorization concept tailored to your specific use scenario.
Each company has different priorities, departments, and functions, so each business requiresa different authorization concept. Therefore the roles delivered by SAP are only templates.Before you grant user authorizations, you must have a clear concept of who requires whichauthorizations, because company changes or extended use of Solution Manager functionsmay necessitate a change in authorizations over time.
The sequence of the navigation roles (SAP_SMWORK_[work_center_name]) in the Roles tabof User Maintenance (transaction SU01) defines the sequence shown in transactionSM_WORKCENTER. For example, the sequence in the transaction SU01 Roles tab is asfollows: Business Process Monitoring (*BPM), Change Management (*CHANGE_MAN), RootCause Analysis (*DIAG), Implementation (*IMPL) and Incident Management(*INCIDENT_MAN).
This results in the same sequence in transaction SM_WORKCENTER except the work centerMy Home, which is always the first one.
To change the sequence, you would need to change the names of these navigation roles.
The Role Menu in Role Maintenance (transaction PFCG) defines the links shown in the workcenter Related Links section.
In this example, we open the Role Maintenance transaction PFCG and have a look at the RoleSAP_SMWORK_BPM (Business Process Operations work center). In the Menu tab, we see allthe Links shown in the Business Process Operations work center in transactionSM_WORKCENTER.
For more information, see: SAP Note 1436270 – Comp. SAP Note: Solution Manager Release7.1: Authorizations and SAP Note 1486991 – Authorizations for Workcenters' links in SolMan7.1.
Default User in SAP Solution Manager System
You create users during system preparation, basic setup, and the configuration of themanaged systems. All users, except managed system users, BW users, SLD users, and S-users, are explained in this section.
For more information about the users created in the managed system, BW users, SLD users,and S-users, please check the security guide, which is available at: http://service.sap.com/instguides → SAP Components → SAP Solution Manager 7.1 → Media List → Security Guide .
Lesson: Assigning Composite Roles to SAP Solution Manager System Users
© Copyright. All rights reserved. 11
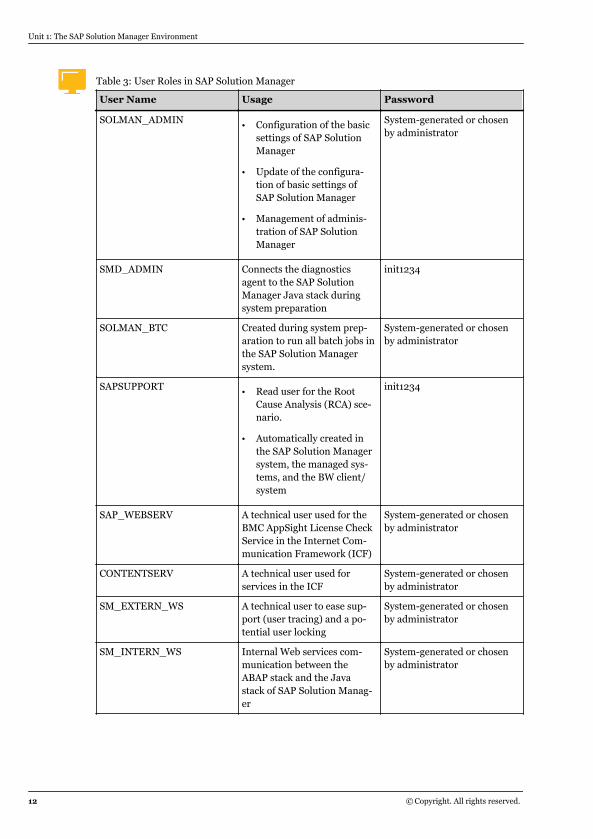
Table 3: User Roles in SAP Solution Manager
User Name Usage Password
SOLMAN_ADMIN● Configuration of the basic
settings of SAP SolutionManager
● Update of the configura-tion of basic settings ofSAP Solution Manager
● Management of adminis-tration of SAP SolutionManager
System-generated or chosenby administrator
SMD_ADMIN Connects the diagnosticsagent to the SAP SolutionManager Java stack duringsystem preparation
init1234
SOLMAN_BTC Created during system prep-aration to run all batch jobs inthe SAP Solution Managersystem.
System-generated or chosenby administrator
SAPSUPPORT● Read user for the Root
Cause Analysis (RCA) sce-nario.
● Automatically created inthe SAP Solution Managersystem, the managed sys-tems, and the BW client/system
init1234
SAP_WEBSERV A technical user used for theBMC AppSight License CheckService in the Internet Com-munication Framework (ICF)
System-generated or chosenby administrator
CONTENTSERV A technical user used forservices in the ICF
System-generated or chosenby administrator
SM_EXTERN_WS A technical user to ease sup-port (user tracing) and a po-tential user locking
System-generated or chosenby administrator
SM_INTERN_WS Internal Web services com-munication between theABAP stack and the Javastack of SAP Solution Manag-er
System-generated or chosenby administrator
Unit 1: The SAP Solution Manager Environment
12 © Copyright. All rights reserved.
User Name Usage Password
SMD_RFC● Communication between
RCA/Java and SAP Solu-tion Manager/ABAP
● Used to run the Job Ex-tractor Resource ManagerFramework
init1234
SMB_<SIDmanagedsystem> A technical user created dur-ing managed systems setupfor the BACK-RFC connec-tion from the managed sys-tem to the SAP Solution Man-ager system
System-generated or chosenby administrator
Solution Manager Security
You should treat your SAP Solution Manager system as a production system because thisallows you to connect to every system within your system landscape.
For more information, see the following guides:
https://service.sap.com/instguides → SAP Components → SAP Solution Manager → Release → Operations and How to Guide SAP Solution Manager Secure Configuration andSecurity Guide SAP Solution Manager.
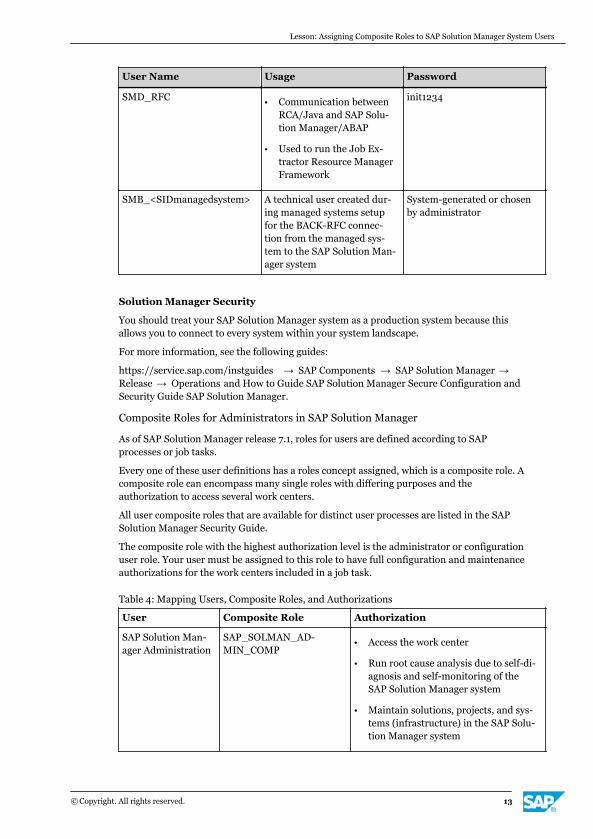
Composite Roles for Administrators in SAP Solution Manager
As of SAP Solution Manager release 7.1, roles for users are defined according to SAPprocesses or job tasks.
Every one of these user definitions has a roles concept assigned, which is a composite role. Acomposite role can encompass many single roles with differing purposes and theauthorization to access several work centers.
All user composite roles that are available for distinct user processes are listed in the SAPSolution Manager Security Guide.
The composite role with the highest authorization level is the administrator or configurationuser role. Your user must be assigned to this role to have full configuration and maintenanceauthorizations for the work centers included in a job task.
Table 4: Mapping Users, Composite Roles, and Authorizations
User Composite Role Authorization
SAP Solution Man-ager Administration
SAP_SOLMAN_AD-MIN_COMP
● Access the work center
● Run root cause analysis due to self-di-agnosis and self-monitoring of theSAP Solution Manager system
● Maintain solutions, projects, and sys-tems (infrastructure) in the SAP Solu-tion Manager system
Lesson: Assigning Composite Roles to SAP Solution Manager System Users
© Copyright. All rights reserved. 13
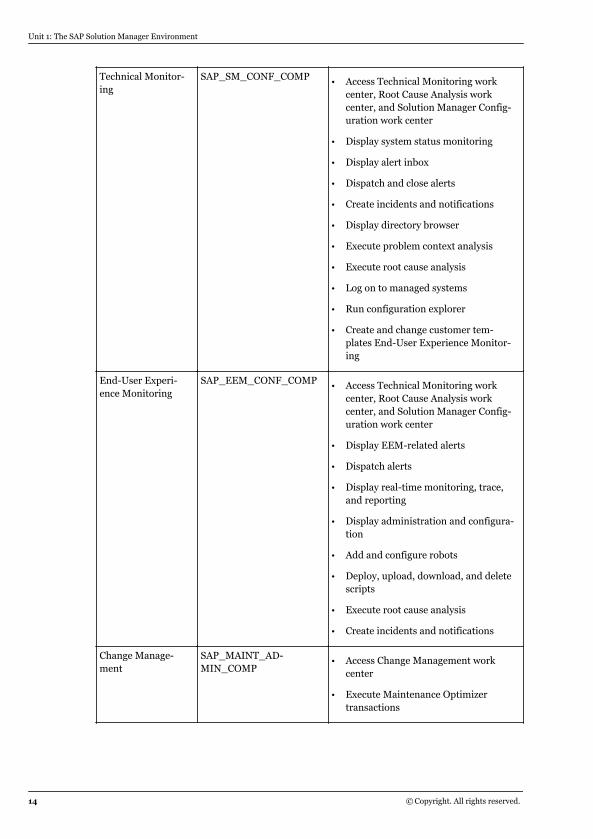
Technical Monitor-ing
SAP_SM_CONF_COMP● Access Technical Monitoring work
center, Root Cause Analysis workcenter, and Solution Manager Config-uration work center
● Display system status monitoring
● Display alert inbox
● Dispatch and close alerts
● Create incidents and notifications
● Display directory browser
● Execute problem context analysis
● Execute root cause analysis
● Log on to managed systems
● Run configuration explorer
● Create and change customer tem-plates End-User Experience Monitor-ing
End-User Experi-ence Monitoring
SAP_EEM_CONF_COMP● Access Technical Monitoring work
center, Root Cause Analysis workcenter, and Solution Manager Config-uration work center
● Display EEM-related alerts
● Dispatch alerts
● Display real-time monitoring, trace,and reporting
● Display administration and configura-tion
● Add and configure robots
● Deploy, upload, download, and deletescripts
● Execute root cause analysis
● Create incidents and notifications
Change Manage-ment
SAP_MAINT_AD-MIN_COMP
● Access Change Management workcenter
● Execute Maintenance Optimizertransactions
Unit 1: The SAP Solution Manager Environment
14 © Copyright. All rights reserved.
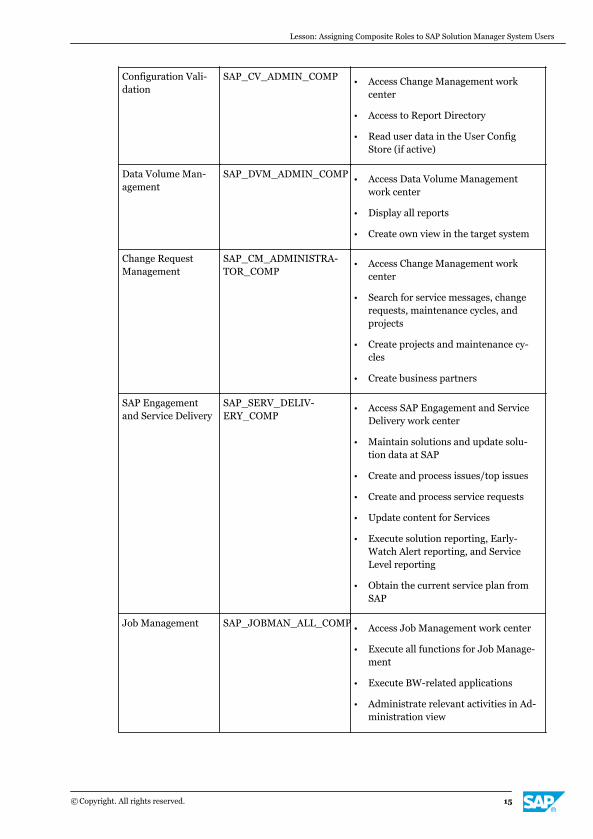
Configuration Vali-dation
SAP_CV_ADMIN_COMP● Access Change Management work
center
● Access to Report Directory
● Read user data in the User ConfigStore (if active)
Data Volume Man-agement
SAP_DVM_ADMIN_COMP● Access Data Volume Management
work center
● Display all reports
● Create own view in the target system
Change RequestManagement
SAP_CM_ADMINISTRA-TOR_COMP
● Access Change Management workcenter
● Search for service messages, changerequests, maintenance cycles, andprojects
● Create projects and maintenance cy-cles
● Create business partners
SAP Engagementand Service Delivery
SAP_SERV_DELIV-ERY_COMP
● Access SAP Engagement and ServiceDelivery work center
● Maintain solutions and update solu-tion data at SAP
● Create and process issues/top issues
● Create and process service requests
● Update content for Services
● Execute solution reporting, Early-Watch Alert reporting, and ServiceLevel reporting
● Obtain the current service plan fromSAP
Job Management SAP_JOBMAN_ALL_COMP● Access Job Management work center
● Execute all functions for Job Manage-ment
● Execute BW-related applications
● Administrate relevant activities in Ad-ministration view
Lesson: Assigning Composite Roles to SAP Solution Manager System Users
© Copyright. All rights reserved. 15
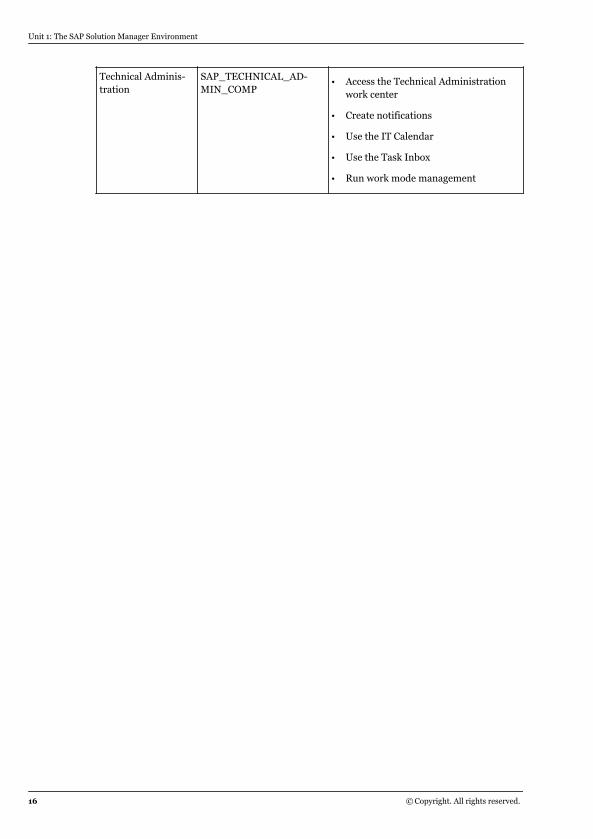
Technical Adminis-tration
SAP_TECHNICAL_AD-MIN_COMP
● Access the Technical Administrationwork center
● Create notifications
● Use the IT Calendar
● Use the Task Inbox
● Run work mode management
Unit 1: The SAP Solution Manager Environment
16 © Copyright. All rights reserved.

Unit 1Exercise 1
Assign Administrator Roles to Users in SAPSolution Manager
Business Example
You are a new technical administrator in your organization and you need the correctauthorizations within SAP Solution Manager to configure the system and its work centers.
Assign the necessary composite roles to your user.
1. Log on to SAP Solution Manager with <CourseID>-<GroupNumber> and <password>.If this is your first time logging on to SAP Solution Manager you may be prompted tochange your password.
2. On the SAP Easy Access screen, call transaction SU01.
Why should you use transaction SU01 at this time instead of transactionSM_WORKCENTER?
3. On the Maintain User screen, assign the following composite roles to your user:
● SAP_BP_OPERATIONS_ADMIN_COMP
● SAP_CM_ADMINISTRATOR_COMP
● SAP_CV_ADMIN_COMP
● SAP_DVM_ADMIN_COMP
● SAP_EEM_CONF_COMP
● SAP_ISSUE_MANAGEMENT_ALL_COMP
● SAP_ITMO_CONF_COMP
● SAP_JOBMAN_ALL_COMP
● SAP_MAINT_ADMIN_COMP
● SAP_PIM_CONF_COMP
● SAP_QGM_ADMIN_COMP
● SAP_RCA_EXE_COMP
© Copyright. All rights reserved. 17
● SAP_SERV_DELIVERY_COMP
● SAP_SM_BI_ITSM_ADMIN_COMP
● SAP_SM_BPMO_COMP
● SAP_SM_CONF_COMP
● SAP_SMWORK_ADMINISTRATOR_COMP
● SAP_SMWORK_BASICCONF_COMP
● SAP_SODOCA_ALL_COMP
● SAP_SOL_PM_COMP
● SAP_SOLMAN_ADMIN_COMP
● SAP_SUPPDESK_ADMIN_COMP
● SAP_SYSMON_ADMIN_COMP
● SAP_TECHNICAL_ADMIN_COMP
Unit 1: The SAP Solution Manager Environment
18 © Copyright. All rights reserved.
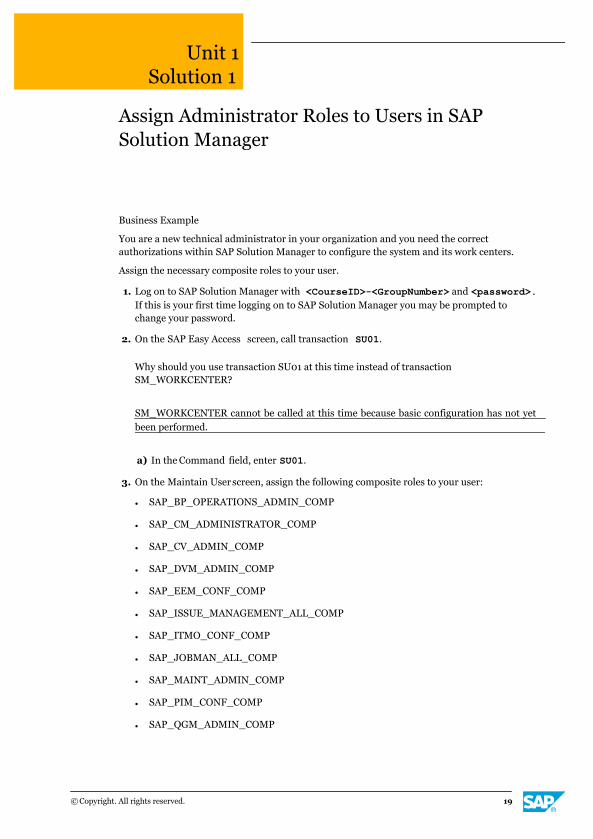
Unit 1Solution 1
Assign Administrator Roles to Users in SAPSolution Manager
Business Example
You are a new technical administrator in your organization and you need the correctauthorizations within SAP Solution Manager to configure the system and its work centers.
Assign the necessary composite roles to your user.
1. Log on to SAP Solution Manager with <CourseID>-<GroupNumber> and <password>.If this is your first time logging on to SAP Solution Manager you may be prompted tochange your password.
2. On the SAP Easy Access screen, call transaction SU01.
Why should you use transaction SU01 at this time instead of transactionSM_WORKCENTER?
SM_WORKCENTER cannot be called at this time because basic configuration has not yetbeen performed.
a) In the Command field, enter SU01.
3. On the Maintain User screen, assign the following composite roles to your user:
● SAP_BP_OPERATIONS_ADMIN_COMP
● SAP_CM_ADMINISTRATOR_COMP
● SAP_CV_ADMIN_COMP
● SAP_DVM_ADMIN_COMP
● SAP_EEM_CONF_COMP
● SAP_ISSUE_MANAGEMENT_ALL_COMP
● SAP_ITMO_CONF_COMP
● SAP_JOBMAN_ALL_COMP
● SAP_MAINT_ADMIN_COMP
● SAP_PIM_CONF_COMP
● SAP_QGM_ADMIN_COMP
© Copyright. All rights reserved. 19
● SAP_RCA_EXE_COMP
● SAP_SERV_DELIVERY_COMP
● SAP_SM_BI_ITSM_ADMIN_COMP
● SAP_SM_BPMO_COMP
● SAP_SM_CONF_COMP
● SAP_SMWORK_ADMINISTRATOR_COMP
● SAP_SMWORK_BASICCONF_COMP
● SAP_SODOCA_ALL_COMP
● SAP_SOL_PM_COMP
● SAP_SOLMAN_ADMIN_COMP
● SAP_SUPPDESK_ADMIN_COMP
● SAP_SYSMON_ADMIN_COMP
● SAP_TECHNICAL_ADMIN_COMP
a) In the User field, enter <CourseID>-<GroupNumber>.
b) Choose Change .
c) In the Roles tab, in an empty cell in the Role column, place the cursor and choosePossible Entries from the Input Helpmenu.
d) In the Composite Role field of the Composite Roles tab, enter SAP_*COMP.
e) Next to the roles listed, select the checkboxes and choose Copy.
f) Choose Save .
Unit 1: The SAP Solution Manager Environment
20 © Copyright. All rights reserved.
LESSON SUMMARYYou should now be able to:
● Add roles in SAP Solution Manager
Lesson: Assigning Composite Roles to SAP Solution Manager System Users
© Copyright. All rights reserved. 21
Unit 1Lesson 3
Planning the Installation of SAP Extensionsand Adapters for Third Party Extensions
LESSON OVERVIEWIn this lesson you will learn which extensions are available for SAP Solution Manager and howto implement them.
LESSON OBJECTIVESAfter completing this lesson, you will be able to:
● Plan the SAP extensions to be added to Solution Manager
● Plan the installation of adapters for third-party extensions
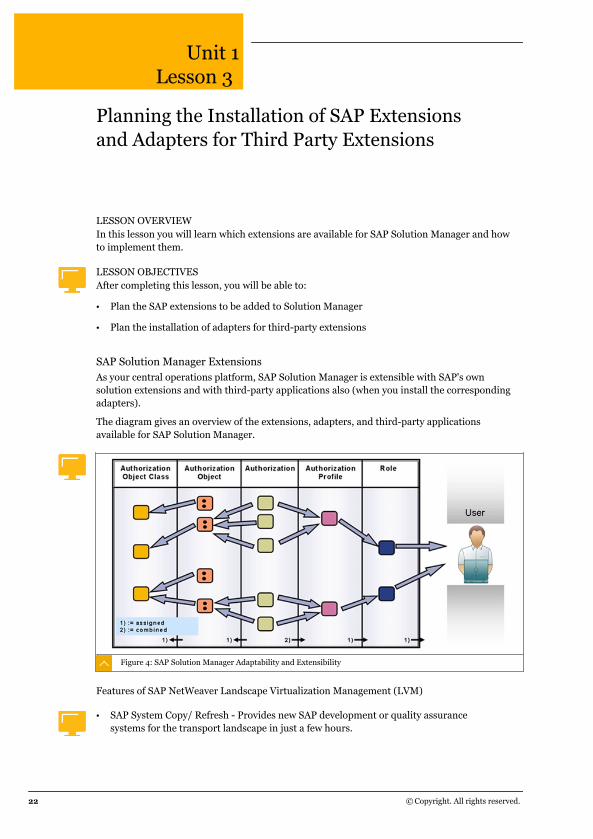
SAP Solution Manager ExtensionsAs your central operations platform, SAP Solution Manager is extensible with SAP's ownsolution extensions and with third-party applications also (when you install the correspondingadapters).
The diagram gives an overview of the extensions, adapters, and third-party applicationsavailable for SAP Solution Manager.
Figure 4: SAP Solution Manager Adaptability and Extensibility
Features of SAP NetWeaver Landscape Virtualization Management (LVM)
● SAP System Copy/ Refresh - Provides new SAP development or quality assurancesystems for the transport landscape in just a few hours.
22 © Copyright. All rights reserved.
● Automated Capacity Management - Offers automatic load balancing of SAP applicationresources without any need for user intervention.
● Start, Stop, and Relocate Systems - Includes mass operations and scheduling.
● Third-Party Support and Extensibility - Enables the use of non-SAP applications andcustomer scripts in a protected and transparent way, allowing for more centralizedmanagement of mixed environments.
● End-to-End Visibility and Monitoring - Offers perfect insight into each virtual layer of the ITinfrastructure stack, facilitating troubleshooting and corrective action.
● SAP System Cloning - Offers automated creation of test or training systems fromproduction systems in minutes.
This software helps you to
● Cut costs through standardized and automated technical operations.
● Automate routine administration tasks, thus eliminating cumbersome manual work andhuman errors.
● Save on hardware resources and power through optimization of computing resources invirtualized environments.
● Consolidate and simplify IT landscape management.
● Dynamically respond to changing business needs, thus avoiding large investments inadditional computing resources.
● Maintain high service levels at lower budgets.
The features you can access depend on whether you have licensed the standard or enterpriseedition of LVM.
For more information about LVM and the license model, visit http://scn.sap.com/community/it-management/virtualization
Features of SAP Test Data Migration Server (TDMS)
● Reduces data volume.
● Simulates the production environment.
● Automates system refreshes.
● Selectively refreshes individual clients.
● Extracts data based on business objects, organizational units, or timeslice.
● Scrambles sensitive data.
TDMS can help you create small, easy-to-maintain, non-production environments withconsistent, relevant extracts of business data. This minimizes infrastructure and maintenanceexpenses while maximizing the effectiveness and accuracy of your development, test, andtraining activities.
The system landscape for a TDMS installation consists of the following:
Lesson: Planning the Installation of SAP Extensions and Adapters for Third Party Extensions
© Copyright. All rights reserved. 23

● Sender system: the system from which the data supply for the nonproduction system istaken. This is normally a production system but it could be a quality assurance system thatis set up as a full copy of the production system.
● TDMS server: acts as the central system on which the settings and customizing for thesetup of the nonproduction system are stored, and the process control system.
● Receiver system: the non-production system.
The systems must be linked via RFC connections. From a technical perspective, it is possibleto combine the TDMS server with the sender system or the receiver system. From a datasecurity perspective, however, SAP strongly recommends that you implement the TDMSserver separately (for example, on SAP Solution Manager).
For more information, see SAP Note 1713981 - Composite Note for TDMS 4.0.
Features of SAP Test Acceleration and Optimization (SAP TAO)
● Automatic generation of test components for SAP-GUI based SAP business processes.
● Optimized maintenance of automated test cases.
● Accelerated approach to creating modularized test cases for SAP business processes.
SAP TAO helps SAP customers to create automated test cases for SAP solutions quickly. Thisacceleration is achieved by automatically creating test components for SAP transactionsselected by the customer. These test components are then automatically uploaded to SAPQuality Center for HP. These draft test cases are for single transactions, which can then beconsolidated to make up a scenario test case.
SAP TAO also supports maintenance of components and test cases through integration withSAP Solution Manager Business Process Change Analyzer.
For more information on SAP TAO, see SAP Note 1404715 - SAP TAO 2 InstallationInformation.
SAP Landscape Transformation (SAP LT)
SAP LT software supports SAP customers in effectively managing the impact of any businessor IT-driven transformation requirements on the existing SAP landscape.
Unit 1: The SAP Solution Manager Environment
24 © Copyright. All rights reserved.
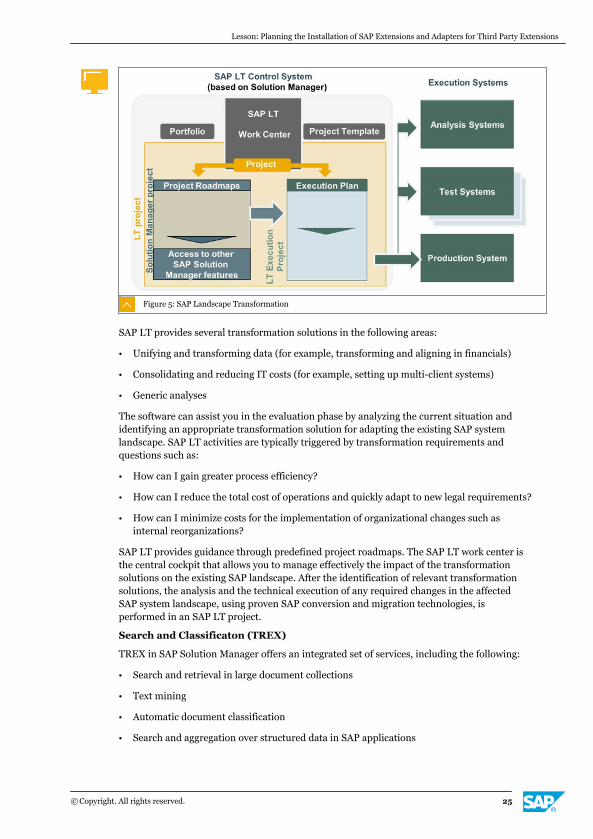
Figure 5: SAP Landscape Transformation
SAP LT provides several transformation solutions in the following areas:
● Unifying and transforming data (for example, transforming and aligning in financials)
● Consolidating and reducing IT costs (for example, setting up multi-client systems)
● Generic analyses
The software can assist you in the evaluation phase by analyzing the current situation andidentifying an appropriate transformation solution for adapting the existing SAP systemlandscape. SAP LT activities are typically triggered by transformation requirements andquestions such as:
● How can I gain greater process efficiency?
● How can I reduce the total cost of operations and quickly adapt to new legal requirements?
● How can I minimize costs for the implementation of organizational changes such asinternal reorganizations?
SAP LT provides guidance through predefined project roadmaps. The SAP LT work center isthe central cockpit that allows you to manage effectively the impact of the transformationsolutions on the existing SAP landscape. After the identification of relevant transformationsolutions, the analysis and the technical execution of any required changes in the affectedSAP system landscape, using proven SAP conversion and migration technologies, isperformed in an SAP LT project.
Search and Classificaton (TREX)
TREX in SAP Solution Manager offers an integrated set of services, including the following:
● Search and retrieval in large document collections
● Text mining
● Automatic document classification
● Search and aggregation over structured data in SAP applications
Lesson: Planning the Installation of SAP Extensions and Adapters for Third Party Extensions
© Copyright. All rights reserved. 25
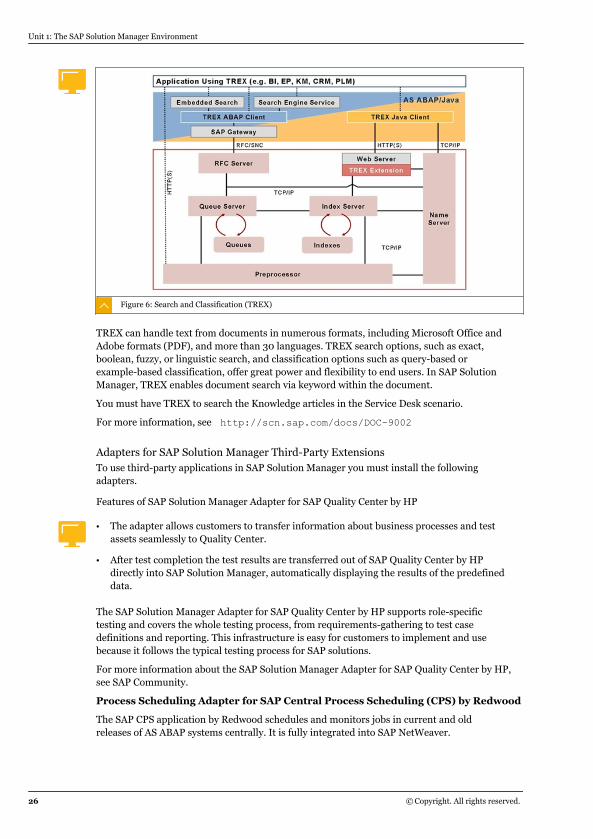
Figure 6: Search and Classification (TREX)
TREX can handle text from documents in numerous formats, including Microsoft Office andAdobe formats (PDF), and more than 30 languages. TREX search options, such as exact,boolean, fuzzy, or linguistic search, and classification options such as query-based orexample-based classification, offer great power and flexibility to end users. In SAP SolutionManager, TREX enables document search via keyword within the document.
You must have TREX to search the Knowledge articles in the Service Desk scenario.
For more information, see http://scn.sap.com/docs/DOC-9002
Adapters for SAP Solution Manager Third-Party ExtensionsTo use third-party applications in SAP Solution Manager you must install the followingadapters.
Features of SAP Solution Manager Adapter for SAP Quality Center by HP
● The adapter allows customers to transfer information about business processes and testassets seamlessly to Quality Center.
● After test completion the test results are transferred out of SAP Quality Center by HPdirectly into SAP Solution Manager, automatically displaying the results of the predefineddata.
The SAP Solution Manager Adapter for SAP Quality Center by HP supports role-specifictesting and covers the whole testing process, from requirements-gathering to test casedefinitions and reporting. This infrastructure is easy for customers to implement and usebecause it follows the typical testing process for SAP solutions.
For more information about the SAP Solution Manager Adapter for SAP Quality Center by HP,see SAP Community.
Process Scheduling Adapter for SAP Central Process Scheduling (CPS) by Redwood
The SAP CPS application by Redwood schedules and monitors jobs in current and oldreleases of AS ABAP systems centrally. It is fully integrated into SAP NetWeaver.
Unit 1: The SAP Solution Manager Environment
26 © Copyright. All rights reserved.
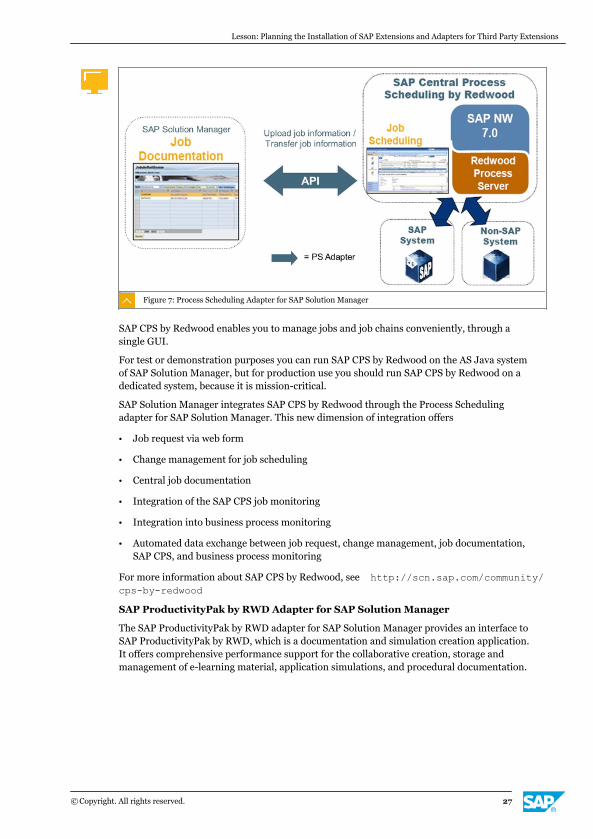
Figure 7: Process Scheduling Adapter for SAP Solution Manager
SAP CPS by Redwood enables you to manage jobs and job chains conveniently, through asingle GUI.
For test or demonstration purposes you can run SAP CPS by Redwood on the AS Java systemof SAP Solution Manager, but for production use you should run SAP CPS by Redwood on adedicated system, because it is mission-critical.
SAP Solution Manager integrates SAP CPS by Redwood through the Process Schedulingadapter for SAP Solution Manager. This new dimension of integration offers
● Job request via web form
● Change management for job scheduling
● Central job documentation
● Integration of the SAP CPS job monitoring
● Integration into business process monitoring
● Automated data exchange between job request, change management, job documentation,SAP CPS, and business process monitoring
For more information about SAP CPS by Redwood, see http://scn.sap.com/community/cps-by-redwood
SAP ProductivityPak by RWD Adapter for SAP Solution Manager
The SAP ProductivityPak by RWD adapter for SAP Solution Manager provides an interface toSAP ProductivityPak by RWD, which is a documentation and simulation creation application.It offers comprehensive performance support for the collaborative creation, storage andmanagement of e-learning material, application simulations, and procedural documentation.
Lesson: Planning the Installation of SAP Extensions and Adapters for Third Party Extensions
© Copyright. All rights reserved. 27

Figure 8: SAP ProductivityPak by RWD
SAP ProductivityPak by RWD allows you to
● Reduce the effort needed to create training material.
● Document configuration settings more quickly.
● Comprehensively document business processes.
● Enhance the end-user documentation experience with simulated business blueprints andconfiguration - the created documents are linked directly to the corresponding technicalobjects inside SAP Solution Manager.
For more information about SAP ProductivityPak by RWD, see http://www.sap.com/services/education/softwareproducts/rwd.epx
You purchase the adapter and activate it explicitly. For more information, open the SupportPortal and choose SAP Installations and Upgrades → Browse Our Download Catalog → SAPEducation Products → SAP ProductivityPAK by RWD
SAP LoadRunner by HP
This performance-testing application from SAP and HP helps you predict system behaviorand performance, allowing you to optimize the quality, performance, and scalability of yourend-to-end business processes whether they run on SAP or non-SAP software. SAPLoadRunner by HP enables you to deliver high-performing business processes and toperform, upgrade, and modify existing processes on time and within budget.
Although there is no direct integration with SAP Solution Manager, you can run SAPLoadRunner from the same system.
SAP can provide a remote load test during the Going Live service. In this case, the customerdoes not buy the SAP LoadRunner license. The load generation function is installed at thecustomer site, and the controller and evaluation tool remain at SAP.
For more information about SAP LoadRunner see the SAP Community Network.
LESSON SUMMARYYou should now be able to:
● Plan the SAP extensions to be added to Solution Manager
Unit 1: The SAP Solution Manager Environment
28 © Copyright. All rights reserved.

● Plan the installation of adapters for third-party extensions
Lesson: Planning the Installation of SAP Extensions and Adapters for Third Party Extensions
© Copyright. All rights reserved. 29

Unit 1: The SAP Solution Manager Environment
30 © Copyright. All rights reserved.
Unit 1
Learning Assessment
1. Which of the following levels of support allow you to access the full functionality of SAPSolution Manager 7.1 automatically?
Choose the correct answers.
X A SAP MaxAttention
X B SAP Enterprise Support
X C SAP Standard Support
X D SAP Product Support for Large Enterprises
2. What happens to project-related knowledge when the project is complete?
3. Which of the following extensions creates a simulated production environment containingconsistent, easy-to-use, relevant extracts of business data?
Choose the correct answer.
X A SAP NetWeaver Landscape Virtualization Management
X B TREX
X C SAP Test Acceleration and Optimization
X D SAP Test Data Migration Server
4. Which of the following are features of SAP CPS by Redwood via the Process SchedulingAdapter?
Choose the correct answers.
X A Central job documentation
X B Integration into business process monitoring
X C Change management for job scheduling
X D Comprehensive documentation of business processes
© Copyright. All rights reserved. 31
Unit 1
Learning Assessment - Answers
1. Which of the following levels of support allow you to access the full functionality of SAPSolution Manager 7.1 automatically?
Choose the correct answers.
X A SAP MaxAttention
X B SAP Enterprise Support
X C SAP Standard Support
X D SAP Product Support for Large Enterprises
2. What happens to project-related knowledge when the project is complete?
It is stored in a solution, which continues to be maintained.
3. Which of the following extensions creates a simulated production environment containingconsistent, easy-to-use, relevant extracts of business data?
Choose the correct answer.
X A SAP NetWeaver Landscape Virtualization Management
X B TREX
X C SAP Test Acceleration and Optimization
X D SAP Test Data Migration Server
4. Which of the following are features of SAP CPS by Redwood via the Process SchedulingAdapter?
Choose the correct answers.
X A Central job documentation
X B Integration into business process monitoring
X C Change management for job scheduling
X D Comprehensive documentation of business processes
32 © Copyright. All rights reserved.
UNIT 2 The SAP Solution ManagerSystem Landscape
Lesson 1
Planning the SAP Solution Manager Architecture and Landscape 34
Lesson 2
Planning the Agent Infrastructure for the SAP Solution Manager System Landscape 38
UNIT OBJECTIVES
● Design the landscape with SAP Solution Manager and the managed systems
● Outline the agent infrastructure for the SAP Solution Manager system landscape
© Copyright. All rights reserved. 33
Unit 2Lesson 1
Planning the SAP Solution ManagerArchitecture and Landscape
LESSON OVERVIEWSAP Solution Manager 7.1 consists of several software components, and so do the managedsystems. In this lesson, you learn how to design the system landscape with SAP SolutionManager and the managed systems.
LESSON OBJECTIVESAfter completing this lesson, you will be able to:
● Design the landscape with SAP Solution Manager and the managed systems
SAP Solution Manager ArchitectureSAP Solution Manager is an integrated lifecycle management solution, which collects andaggregates data from diagnostics agents. Solution Manager runs on a dual-stack SAPNetWeaver 7.02 system and is organized as shown.
SAP Solution Manager manages all data collection and aggregation. SAP Solution Manager isavailable as a complete solution in the latest release. The software component ST is alreadypart of the installation. Add on ST can only be used on the SAP CRM and SAP NetWeaverreleases listed in SAP Note 394616 - Release strategy for SAP Solution Manager releases.
Figure 9: Architecture of SAP Solution Manager
SAP Solution Manager consists of several additional software components:
34 © Copyright. All rights reserved.
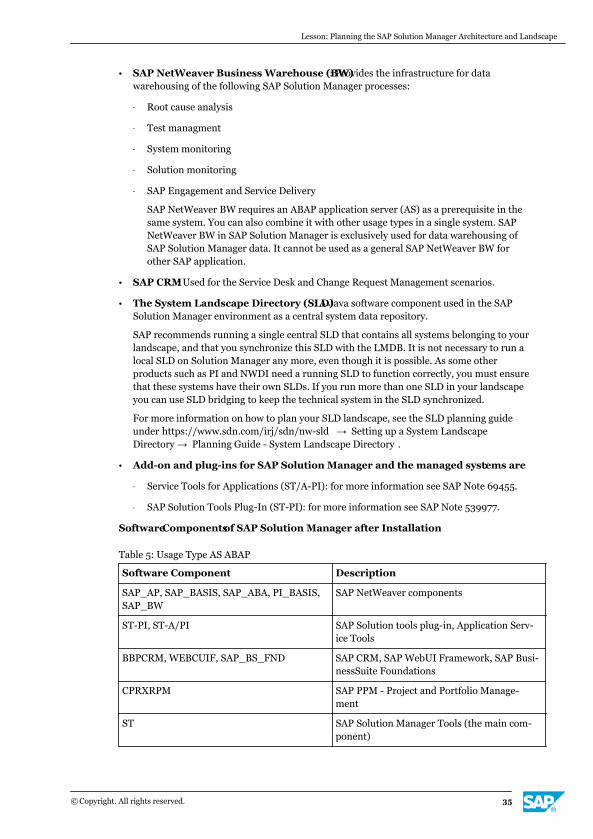
● SAP NetWeaver Business Warehouse (BW): Provides the infrastructure for datawarehousing of the following SAP Solution Manager processes:
- Root cause analysis
- Test managment
- System monitoring
- Solution monitoring
- SAP Engagement and Service Delivery
SAP NetWeaver BW requires an ABAP application server (AS) as a prerequisite in thesame system. You can also combine it with other usage types in a single system. SAPNetWeaver BW in SAP Solution Manager is exclusively used for data warehousing ofSAP Solution Manager data. It cannot be used as a general SAP NetWeaver BW forother SAP application.
● SAP CRM: Used for the Service Desk and Change Request Management scenarios.
● The System Landscape Directory (SLD): A Java software component used in the SAPSolution Manager environment as a central system data repository.
SAP recommends running a single central SLD that contains all systems belonging to yourlandscape, and that you synchronize this SLD with the LMDB. It is not necessary to run alocal SLD on Solution Manager any more, even though it is possible. As some otherproducts such as PI and NWDI need a running SLD to function correctly, you must ensurethat these systems have their own SLDs. If you run more than one SLD in your landscapeyou can use SLD bridging to keep the technical system in the SLD synchronized.
For more information on how to plan your SLD landscape, see the SLD planning guideunder https://www.sdn.com/irj/sdn/nw-sld → Setting up a System LandscapeDirectory → Planning Guide - System Landscape Directory .
● Add-on and plug-ins for SAP Solution Manager and the managed systems are:
- Service Tools for Applications (ST/A-PI): for more information see SAP Note 69455.
- SAP Solution Tools Plug-In (ST-PI): for more information see SAP Note 539977.
Software Componentsof SAP Solution Manager after Installation
Table 5: Usage Type AS ABAP
Software Component Description
SAP_AP, SAP_BASIS, SAP_ABA, PI_BASIS,SAP_BW
SAP NetWeaver components
ST-PI, ST-A/PI SAP Solution tools plug-in, Application Serv-ice Tools
BBPCRM, WEBCUIF, SAP_BS_FND SAP CRM, SAP WebUI Framework, SAP Busi-nessSuite Foundations
CPRXRPM SAP PPM - Project and Portfolio Manage-ment
ST SAP Solution Manager Tools (the main com-ponent)
Lesson: Planning the SAP Solution Manager Architecture and Landscape
© Copyright. All rights reserved. 35
ST-SER SAP Solution Manager Service Tools
ST-ICO SAP Implementation Content (can be updat-ed separately)
BI_CONT Business Intelligence Content
ST-BCO SAP Solution Manger BW Content
SOCO Solution Composer (Add-In to be used forSAP Business Process Blueprinting)
Table 6: Usage Type Additional Adapters (optional)
Software Component Description
ST-PSM SAP Process Scheduling by Redwood adapt-er for SAP Solution Manager (licensed)
ST-QCA SAP Quality Center by HP adapter for SAPSolution Manager (licensed)
ST-SPA SAP Productivity Pak by RWD adapter forSAP Solution Manager (licensed)
Table 7: Usage Type AS Java
Software Component Description
LMSERVICE Solution Manager Diagnostics
Standalone Engines
Standalone engines are additional software units that you can install in your landscape. Theydo not run on AS ABAP or AS Java.
The following standalone engines are available for SAP Solution Manager:
● CA Wily Introscope Manager (recommended)
● SAP LoadRunner by HP: Used to generate load for performance tests (optional)
● Search and Classification (TREX): Include search and retrieval in large documentcollections, text mining, automatic document classification, and search and aggregationover structured data in SAP applications (optional)
One, Two, and Three-System LandscapesThe number of SAP Solution Manager systems you need depends on the number of systemsin your landscape and the configuration you require for your Solution Manager scenarios.
Required Number of Solution Manager Systems
● Size of the system landscape
- Single-system
- Two-system
Unit 2: The SAP Solution Manager System Landscape
36 © Copyright. All rights reserved.
- Three-system (recommended)
● Configuration of scenarios
- All scenarios on one system (recommended)
- Scenarios run on multiple productive Solution Manager systems (possible, but onlywith complete segregation of business units)
To gain the benefit of tight functional integration, we recommend running all scenarios on thesame SAP Solution Manager system.
The SAP Solution Manager scenarios (change request management, root cause analysis, andso on) should be all executed on a single system. The reason for this is that it is best to haveall solution information (systems, business processes) as well as messages (incidents, issues,change requests) available to the entire support organization for efficient management of theproduction solutions.
Single-System Landscape:With this option, development, testing, and production operationsall run in parallel in one system. The advantage is mainly in the reduction of hardware andsupport costs. However, this option has some serious problems and risks. All activities(customizing and development) are done in one system, the production system. In addition,new support packages and SAP Notes are applied directly in production.
Two-system landscape:The test and training systems are separate. New requirements,optimization tasks, support packages, and SAP Notes are applied in the developmentenvironment first. This approach leads to a more stable system and provides a higher qualitysupport infrastructure for the customer. SAP Solution Manager does not support the clientconcept in this regard; there is no way to fully segregate development activities and data fromtesting and training activities.
Three-system landscape:With this option, all development, training, test, and productiveactivities are fully segregated, along with the data in dedicated systems. In addition, if thecustomer is using scenarios such as change request management, or is making manycustomizing changes to SAP Solution Manager, a separate test system is essential to validatethese changes fully.
For more information, see SAP Note 952859 – System infrastructure recommendation:Change Request Mgmt.
LESSON SUMMARYYou should now be able to:
● Design the landscape with SAP Solution Manager and the managed systems
Lesson: Planning the SAP Solution Manager Architecture and Landscape
© Copyright. All rights reserved. 37
Unit 2Lesson 2
Planning the Agent Infrastructure for the SAPSolution Manager System Landscape
LESSON OVERVIEWIn this lesson, you plan the agent infrastructure of SAP Solution Manager 7.1 and learn whereto install agents in your system landscape.
LESSON OBJECTIVESAfter completing this lesson, you will be able to:
● Outline the agent infrastructure for the SAP Solution Manager system landscape
The Agent Infrastructure of the SAP Solution Manager System Landscape andthe Managed Systems
SAP Solution Manager runs in a separate central system to which all other SAP systems areconnected. These systems, which are administered by SAP Solution Manager, are called themanaged or satellite systems, and these managed systems can be bundled together within asolution. Monitoring and diagnostics within this system landscape is performed by the agentinfrastructure.
Also included in the agent infrastructure of the SAP Solution Manager system landscape is CAWily Introscope Enterprise Manager. For performance measurement, Introscope is integratedinto your end-to-end diagnostics, but installed separately. The Introscope tool consists of adisplay, a server part (Introscope Enterprise Server) and a client part (Introscope agent). SAPand CA have signed an agreement allowing you to use Introscope with SAP-delivereddashboards and instrumentation as part of SAP Solution Manager.
Monitoring and diagnostics within this system landscape is performed by the following typesof agents:
Table 8: Monitoring and Diagnostics Agents
Agent Type Features
SAP host agent● Installed at host level, either physical or
virtual, where the operating system runs
● Replaces SAPOSCOL
● Collects data about the host and operat-ing system
● Used for outside discovery
38 © Copyright. All rights reserved.
Agent Type Features
SAP diagnostics agent● Installed at logical host name level
● Belongs logically to Solution Manager andis maintained centrally from SolutionManager
● Collects data in the context of managedcomponents and reports it to the SolutionManager system for analysis
● Contains an Introscope host adapter forsending data to CA Wily Introscope Enter-prise Manager
Introscope byte code adapter● Deployed to Java and .Net components
(managed code components)
● Provides dynamic byte code instrumenta-tion functionality (instrumentation basedon byte code instead of source code)
● Connects directly to CA Wily IntroscopeManager
The agent infrastructure of SAP Solution Manager is organized as shown in the diagram.
For clarity, the diagram does not display the connections between the components.
Lesson: Planning the Agent Infrastructure for the SAP Solution Manager System Landscape
© Copyright. All rights reserved. 39
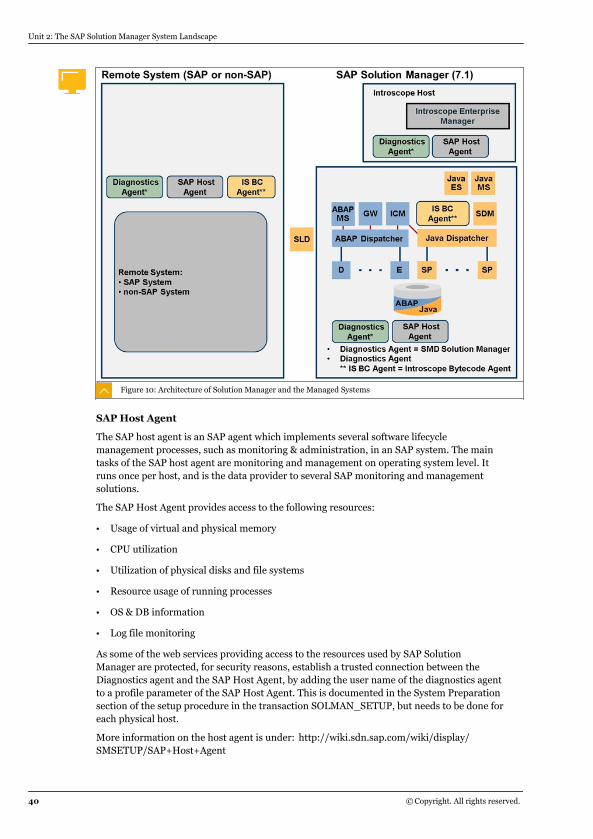
Figure 10: Architecture of Solution Manager and the Managed Systems
SAP Host Agent
The SAP host agent is an SAP agent which implements several software lifecyclemanagement processes, such as monitoring & administration, in an SAP system. The maintasks of the SAP host agent are monitoring and management on operating system level. Itruns once per host, and is the data provider to several SAP monitoring and managementsolutions.
The SAP Host Agent provides access to the following resources:
● Usage of virtual and physical memory
● CPU utilization
● Utilization of physical disks and file systems
● Resource usage of running processes
● OS & DB information
● Log file monitoring
As some of the web services providing access to the resources used by SAP SolutionManager are protected, for security reasons, establish a trusted connection between theDiagnostics agent and the SAP Host Agent, by adding the user name of the diagnostics agentto a profile parameter of the SAP Host Agent. This is documented in the System Preparationsection of the setup procedure in the transaction SOLMAN_SETUP, but needs to be done foreach physical host.
More information on the host agent is under: http://wiki.sdn.sap.com/wiki/display/SMSETUP/SAP+Host+Agent
Unit 2: The SAP Solution Manager System Landscape
40 © Copyright. All rights reserved.
SAP Diagnostics Agent
The Solution Manager Diagnostics Agent (diagnostics agent) is the remote component of thediagnostics infrastructure in SAP Solution Manager. It uses a connection between SAPSolution Manager, as the managing system, and the managed systems, to gather information.This information from the managed systems is then reported to the SAP Solution Managersystem for analysis.
For more information on the diagnostics agent see: http://wiki.sdn.sap.com/wiki/display/SMSETUP/Diagnostics+Agents
Hint:In cases where the SAP or third-party systems to be managed have been set upusing virtual host names, install one diagnostics agent instance per virtual hostname, not per physical host. You must also use the same SID (by default: DAA,for the first agent installed on a host) and the same administration user (bydefault: daaadm) for all agents reporting to one SAP Solution Manager system.This is because if the agent relocates (clustered environments), the connectionof the diagnostics agent to the SAP host agent is authenticated with the username. The password of the diagnostics agent administration user should besame on all hosts, for support reasons.
If you want to connect an SAP system to more than one SAP Solution Manager system, installone diagnostics agent for each Solution Manager system (e.g. DAA reporting to SAP SolutionManager Number 1, DAB reporting to SAP Solution Manager Number 2, on all virtual hosts ofthe system to be managed).
Agent Deployment Strategy
Install a diagnostics agent on each server (one agent per virtual host name) to be managed.For managed system installations based on SAP NetWeaver patch level 14 (for example,shipped with SR3) or later, the diagnostics agent is installed automatically with the managedsystem, and no manual installation is required.
For other installations, there are two ways of installing the agent:
● Manually, using SAPinst. This is only recommended for an installation with a small numberof managed systems.
● Automatically, with operating system deployment mechanisms. Automatic installation isperformed with the unattended mode of SAPinst in combination wiht the operatingsystem's deployment mechanisms. This is recommended for medium and largeinstallations, and is described in the following SAP Notes:
- SAP Note 1172764 - Mass Deployment of SAP Diagnostics Agent 7.0 & 7.1
- SAP Note 1486330 - Mass Installation of Diagnostics Agent 7.30.
You must also install an SAP host agent on each physical server, with the following result:
● One diagnostics agent per managed host, represented by a physical or logical host name
● One SAP host agent per physical host
● One diagnostics agent supporting multiple managed system components running on thesame named host
Lesson: Planning the Agent Infrastructure for the SAP Solution Manager System Landscape
© Copyright. All rights reserved. 41

Figure 11: Where to Install Diagnostics Agent and SAP HostAgent
Diagnostic Agent
You can use any version of the diagnostics agent (already installed agents do not need to beupdated). The agent applications are updated automatically from the Solution Manager.
Host Agent
You need to install at least patch level 86 of the SAP Host Agent 7.20 (see SAP Note1365123).
The installation files are available from http://service.sap.com/swdc . Then choose: SupportPackages and Patches → Browse Download Catalog → SAP Technology Components → SAPHOST AGENT → SAP HOST AGENT 7.20.
The host agent installation procedure is described in SAP Note 1031096 - Installing PackageSAPHOSTAGENT.
Automatic Updating of the Host Agent
SAP recommends that you enable the automatic update feature of the SAP host agent inorder to update the host agent centrally. This procedure is described in SAP Note 1473974 -Using the SAP Host Agent Auto Upgrade Feature.
Auto Update Process of the SAP Host Agent
● The running saphost.exec regularly checks a directory (by default $DIR_EXECUTABLE/../new) where it expects to find the newest executable of SAPHostAgent (unpackedSAPHOSTAGENT.SAR).
Unit 2: The SAP Solution Manager System Landscape
42 © Copyright. All rights reserved.
● By default saphost.exec performs its check every 5 minutes. This behavior can be changedusing the profile value hostexec/autoupgrade_delay=<minutes> in the SAPHostAgent profile.
● The directory location containing the newest SAPHostAgent version could be changedusing the profile value DIR_NEW=<path to a directory> within the SAPHostAgentprofile.
● Once the profile is changed a restart of SAPHostAgent is necessary.
Update Process for the Diagnostic Agent
1. On the SAP Solution Manager Administration work center Infrastructure view, open theAgent Admin screen (you can also use transaction E2E_AGENT_FWK).
2. Set Maintenance Mode to ON.
3. Download the new version of the LM-Services software component using http://service.sap.com/swdc
4. Apply the new version of LM-Services JSPM or SUM.
5. On the Agent Admin screen, set Maintenance Mode to OFF.
SAP Solution Manager distributes the new version of LM-Services to all the connectedagents.
In addition to the agents you need plug-ins on the managed system to receive all monitoreddata. In this context, consider the following about managed systems:
● They can be any kind of SAP or non-ABAP system.
● They can include a local SLD (for example, Process Integration).
● Depending on system type (ABAP/Java) different agents and plug-ins are necessary.
Plug-ins are deployed as follows:
Table 9: Plug-Ins on the Managed Systems
Plug-In Name Where Used Features
SA-A/PI & ST-PI ABAP system● Deployment depends on
the product information ofthe system
● Contain extractor codingwhich can be product-spe-cific (ST-A/PI) or product-independent (ST-PI)
● Extractors are called fromthe Extractor Framework
Lesson: Planning the Agent Infrastructure for the SAP Solution Manager System Landscape
© Copyright. All rights reserved. 43
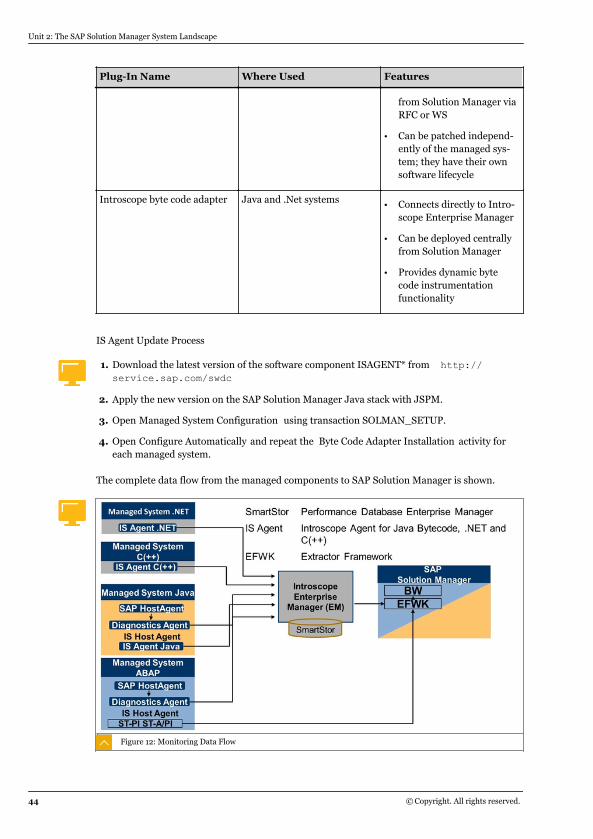
Plug-In Name Where Used Features
from Solution Manager viaRFC or WS
● Can be patched independ-ently of the managed sys-tem; they have their ownsoftware lifecycle
Introscope byte code adapter Java and .Net systems● Connects directly to Intro-
scope Enterprise Manager
● Can be deployed centrallyfrom Solution Manager
● Provides dynamic bytecode instrumentationfunctionality
IS Agent Update Process
1. Download the latest version of the software component ISAGENT* from http://service.sap.com/swdc
2. Apply the new version on the SAP Solution Manager Java stack with JSPM.
3. Open Managed System Configuration using transaction SOLMAN_SETUP.
4. Open Configure Automatically and repeat the Byte Code Adapter Installation activity foreach managed system.
The complete data flow from the managed components to SAP Solution Manager is shown.
Figure 12: Monitoring Data Flow
Unit 2: The SAP Solution Manager System Landscape
44 © Copyright. All rights reserved.
Installation of CA Wily Introscope Enterprise ManagerCA Wily Introscope Enterprise Manager collects, performs calculations on, and stores metricsreported by multiple agents. This application management solution is designed to manageapplication performance. Unlike development tools, Wily Introscope is designed to scale, withminimal performance impact, which allows you to monitor and manage you applicationperformance in live production environments.
The Right to View (RTV) version of Wily Introscope is a restricted, read-only form of the fullproduct and is bundled with SAP Solution Manager. With this version, support is limited toproducts that are licensed and supported by SAP. The instrumentation, dashboards, ProbeBuilder Directives (PBDs), management modules, and SmartStor data contained within theRTV version of CA Wily Introscope, as provided by SAP, is the intellectual property of SAP.Use of these functions is restricted by SAP, and you can only use these functions in anunrestricted manner by licensing SAP Extended Diagnostics by CA Wily from SAP.
CA Wily Introscope Manager is available from http://service.sap.com/swdc → SupportPackages and Patches → Browse Download Catalog → SAP Technology Components → Solution Manager → SAP Solution Manager 7.1 → Entry by Component → Wily Introscope
For installation details refer to Wily Introscope Installation for SAP Customers.
In a simple Introscope environment, a single standalone Enterprise Manager (EM) collects,persists, and processes all agent metrics, and presents them for viewing in the IntroscopeWorkstation or WebView browser instances.
In a more complex environment, two cluster scenarios are recommended by SAP, dependingon the nature of the managed systems landscape:
Multi-EMs
Managed systems are logically grouped to report their data to a specific EnterpriseManager. The number of Enterprise Managers is tuned to fit the total number of agentsand to ensure that agents belonging to the same solution report to the same EnterpriseManager. The Enterprise Managers are completely isolated from each other; SMDconnects to each of them individually. This allows you to operate independent EMs indifferent physical locations.
Manager of Managers (MoM) Collector
Enterprise Managers in the role of collectors can be clustered so that their collectedmetrics data is compiled in a single Manager of Managers (MoM) EM, which provides aunified view of all the metrics to the connected Workstation and WebView instances.Each collector is associated with a smart data store. In this configuration, all EMs in aMoM/collector setup should be located in the same LAN. SAP recommends thisconfiguration.
Diagnostics agents installed in the managed systems landscape collect extractor framework(EFWK) records and Introscope metrics. This data is aggregated into the Solution Manager BIdatabase and the Introscope SmartStor. The Introscope metrics data is reported every 15seconds, and EFWK records are extracted every hour.
Introscope Agents (IS) collect performance metrics from the various components inside therunning Web application and the application server, and performance and availability datafrom the surrounding computing environment. The agents report these metrics to EM.
The EFWK applications provides information about the data extraction across all managedsystems. The EFWK stores this data in a product instance perspective within InfoCubes of acentral NetWeaver BI instance.
Lesson: Planning the Agent Infrastructure for the SAP Solution Manager System Landscape
© Copyright. All rights reserved. 45
ST-PI and ST-A/PI transfer the collected performance metrics from the ABAP components toSolution Manager through the EFWK.
The Managed System StructureSeveral different types of connections (RFC, http, and so on) are used to establishcommunication between SAP Solution Manager (managing system) and managed systems:
Remote function call (RFC)
A remote function call is a procedure for data interchange between a client and a server.Solution Manager is connected to the managed systems via RFCs or direct server access,mostly with read-only access. SAP can only read data via a HTTP connection.
Trusted RFC
A trusted system always corresponds to a RFC client role, and the trusting system to theRFC server role. Passwords are no longer sent for logging on to the trusting system. Theserver system trusting system (the SAP Solution Manager system) trusts the useradministration of the client system trusted system (managed system), so trustedsystems can log on to the trusted system without passwords also.
HTTP
Hypertext Transfer Protocol (HTTP) is a communications protocol for the transfer ofinformation on the intranet and the World Wide Web. HTTP connection converts therequest connection to a transparent TCP/IP tunnel, usually to facilitate SSL-encryptedcommunication (HTTPS) through an unencrypted HTTP proxy.
P4
This is a distributed, peer-to-peer network protocol which defines how its P4 clientscommunicate.
For more information check the Security Guide for SAP Solution Manager.
LESSON SUMMARYYou should now be able to:
● Outline the agent infrastructure for the SAP Solution Manager system landscape
Unit 2: The SAP Solution Manager System Landscape
46 © Copyright. All rights reserved.
Unit 2
Learning Assessment
1. Diagnostics agents are installed and collect data on the central SAP Solution Managersystem only.
Determine whether this statement is true or false.
X True
X False
© Copyright. All rights reserved. 47

Unit 2
Learning Assessment - Answers
1. Diagnostics agents are installed and collect data on the central SAP Solution Managersystem only.
Determine whether this statement is true or false.
X True
X False
48 © Copyright. All rights reserved.
UNIT 3 SAP Solution Manager Sizing,Installation, and Upgrade
Lesson 1
Sizing an SAP Solution Manager System 50
Lesson 2
Preparing to Install or Upgrade an SAP Solution Manager System 56
Lesson 3
Preparing to Upgrade an SAP Solution Manager System 58
UNIT OBJECTIVES
● Identify the main factors that influence sizing
● Outline the SAP Solution Manager installation process
● Outline the SAP Solution Manager upgrade process
© Copyright. All rights reserved. 49
Unit 3Lesson 1
Sizing an SAP Solution Manager System
LESSON OVERVIEWSizing means determining the hardware requirements of an SAP system, such as physicalmemory, CPU power, and I/O capacity. The size of the hardware and the database isinfluenced by both business and technological factors - the number of users access thevarious application components and the data load must both be taken into account whensizing a system. In this lesson, you will learn the factors that influence sizing and how toperform a sizing for your system.
LESSON OBJECTIVESAfter completing this lesson, you will be able to:
● Identify the main factors that influence sizing
Sizing of an SAP Solution Manager SystemSizing an SAP Solution Manager installation involves determining the hardware requirementsof an SAP system, including the physical memory, CPU power, and I/O capacity. The size ofthe hardware and database is influenced by both business aspects and technological aspects.This means that the number of users accessing the various application components and thedata load must be taken into account.
Sizing of SAP Solution Manager does not include sizing of the managed systems, but it isstrongly dependent on the size of the managed systems and on the number of managedsystems connected to Solution Manager.
Some of the Key Factors That Influence Sizing
● The scenarios implemented in Solution Manager
● The number and role of concurrent users connecting to Solution Manager
● The solution landscape (managed systems)
● The number of systems
● The size of systems/system category (measured in t-shirt sizes)
● Products used on the system
Scenarios that Affect System SizingThe scenarios that affect system sizing include
Root Cause Analysis (RCA)/Basic Configuration
RCA provides standardized tools to enable a systematic and targeted end-to-endcomponent localization of the root cause of IT problems. RCA is a mandatory scenario toimplement SAP Solution Manager, so it also includes the basic configuration of Solution
50 © Copyright. All rights reserved.
Manager. The data that is analyzed in RCA is stored in Introscope Enterprise Managerand Business Warehouse (BW). Data in BW systems is aggregated. The BW Aggregationmechanism will add an additional monthly growth of 1 percent of the total size of the BIDatabase.
Collaboration
The Collaboration section of SAP Solution Manager is the point of access to SAP supportservices, including remote services, on-site services, self services, and best-practicedocuments.
Service Desk/Application Incident Management
The SAP Solution Manager Service Desk offers a complete infrastructure for organizingand operating solution-wide support. Service Desk sizing assumptions are based onusers and their activity category, as well as the number of documents (tickets) createdper day.
Change Request Management (ChaRM)
The objective of change management is to carry out changes quickly and economicallywith minimal risk. ChaRM includes processes for managing change requests, projectmanagement, and change logistics. ChaRM sizing assumptions are based on users andtheir activity category.
Implementation and Upgrade
The Implementation and Upgrade scenarios support the implementation of customerprojects and the definition of template projects and upgrade projects. These scenariosinclude roadmaps, an editor for creating and maintaining business blueprints, access tothe Implementation Guides (IMG), and tools for testing, monitoring, and distributingcustomizing. Implementation and Upgrade sizing assumptions are based on users andtheir activity category.
Solution Documentation
The Solution Documentation scenario provides functionality similar to Implementationand Upgrade, but with a focus on the documentation of existing business processes toenhance supportability. Solution Documentation sizing assumptions are based on thenumber of business processes to be documented.
Solution Monitoring
The Solution Monitoring scenario provides support for functions such as the following:
● Service-Level Reporting
● SAP EarlyWatch Alert
● Business Process Monitoring
● System Monitoring
● Central System Administration
● System Landscape Reporting
● User-defined alerts
The solution monitoring scenario produces additional monthly database growthdepending on the number of alerts per managed system.
Business Process Monitoring
Lesson: Sizing an SAP Solution Manager System
© Copyright. All rights reserved. 51
The Business Process Monitoring scenario provides alerting and reporting capabilities forthe activities of the core business processes of an SAP Solution. Business ProcessMonitoring sizing assumptions are based on the number of business processes to bemonitored
Technical Monitoring
Technical Monitoring sizing assumptions are based on the solution landscape to bemonitored, which is already defined for the sizing for the Root Cause Analysis/BasicConfiguration scenario.
End-User Experience Monitoring (EEM)
The EEM scenario controls the availability and the performance of the solution from auser's point of view. EEM sizing assumptions are based on the number of EEM robots(agents that do the actual execution and monitoring) to be used.
Concurrent Active UsersThe number of concurrent active users also influences SAP Solution Manager sizing.
Concurrent users work simultaneously or concurrently in the system and consume systemresources at the same time. Active users are defined as running a given number of businessprocesses in a given time period.
Categories of Active Users Recognized by SAP
● A Low or occasional user processes, on average, 10 interaction steps an hour, or one every6 minutes.
● A Medium user processes, on average, 120 interaction steps an hour, or one every 30seconds. Most users fall into this category.
● A High user processes an average of 360 interaction steps an hour, or one every 10seconds. This is typical for power users working in call centers or doing data entry.
These types of users represent typical activity patterns.
Depending on the type of scenario implemented in your Solution Manager, the behavior of theSolution Manager's users will differ. For this reason, you should consider certain user roleinformation for these scenarios when sizing SAP Solution Manager.
User Information for Solution Manager Scenarios
● Service Desk - number of Low, Medium, and High users and the number of days they work
● ChaRM - number of Low, Medium, and High users and the number of days they work
● Solution Documentation - number of Low, Medium, and High users and the number ofdays they work
● Business Process Monitoring - number of business processes
● End-User Experience Monitoring - number of robots
You can disregard root cause analysis and solution monitoring because they are not theuser's central application. The main factor influencing performance for those scenarios is thedata load produced by the managed systems.
Unit 3: SAP Solution Manager Sizing, Installation, and Upgrade
52 © Copyright. All rights reserved.
Load-Related System CategoriesThe products of the solution give you a good indication of the data sent by the agents, but toensure the correct amount of data, you need a user sizing or a throughput sizing on themanaged systems. The load of the solution influences the amount of data collected by rootcause analysis and technical monitoring in SAP Solution Manager. To simplify the process,you assume that the size of the managed system falls into one of the following categories:
Table 10: Landscape: Load per System
Load per System Description
M Development system, nonproduction system
L Production system with medium volume ofusers and/or transactions
XL Production system with large volume ofusers and/or transactions
XXL Production system with extra large volume ofusers and/or transactions
Table 11: Product and Number of Systems
Product Number of Systems
ECC, CRM, MDM, TREX, etc. Number of systems used in the landscape
The load on the system depends on the number of users and the transactional throughput onthe system. This measure depends, generally, on the role assigned to the system. Forexample, a production system will most likely produce L, XL or XXL data load. In the sameway, a sandbox or quality assurance system will be of type M.
The Effect of Root Cause Analysis on Managed SystemsDiagnostics agents, CA Wily Introscope Enterprise Manager agents, and Extractor tasks havea limited effect on the managed systems. The table summarizes the resources required bythese activities.
Table 12: Resources Required by Root Cause Analysis
Resources Description of Effect on Managed Systems
Disk (MB) Diagnostics Agent 7.1X: 500 MB per Host (orVirtual Host) where a Diagnostics Agent is in-stalled.
Diagnostics Agent 7.3X: 200 MB per Host (orVirtual Host) where a Diagnostics Agent is in-stalled.
Memory (MB) 256 MB in AIX environment or 128 MB in oth-er environments per Host (or Virtual Host)where a Diagnostics Agent is installed.
Lesson: Sizing an SAP Solution Manager System
© Copyright. All rights reserved. 53
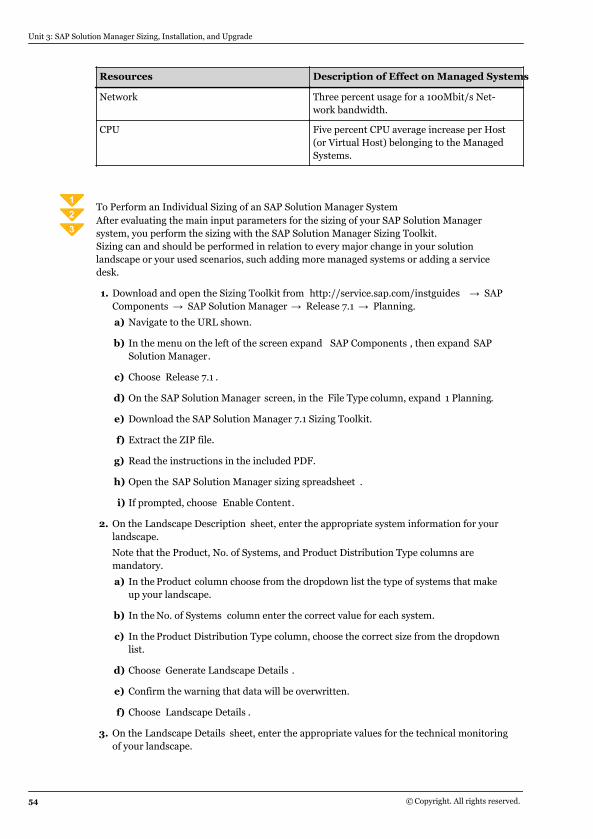
Resources Description of Effect on Managed Systems
Network Three percent usage for a 100Mbit/s Net-work bandwidth.
CPU Five percent CPU average increase per Host(or Virtual Host) belonging to the ManagedSystems.
To Perform an Individual Sizing of an SAP Solution Manager SystemAfter evaluating the main input parameters for the sizing of your SAP Solution Managersystem, you perform the sizing with the SAP Solution Manager Sizing Toolkit.Sizing can and should be performed in relation to every major change in your solutionlandscape or your used scenarios, such adding more managed systems or adding a servicedesk.
1. Download and open the Sizing Toolkit from http://service.sap.com/instguides → SAPComponents → SAP Solution Manager → Release 7.1 → Planning.
a) Navigate to the URL shown.
b) In the menu on the left of the screen expand SAP Components , then expand SAPSolution Manager.
c) Choose Release 7.1 .
d) On the SAP Solution Manager screen, in the File Type column, expand 1 Planning.
e) Download the SAP Solution Manager 7.1 Sizing Toolkit.
f) Extract the ZIP file.
g) Read the instructions in the included PDF.
h) Open the SAP Solution Manager sizing spreadsheet .
i) If prompted, choose Enable Content.
2. On the Landscape Description sheet, enter the appropriate system information for yourlandscape.
Note that the Product, No. of Systems, and Product Distribution Type columns aremandatory.
a) In the Product column choose from the dropdown list the type of systems that makeup your landscape.
b) In the No. of Systems column enter the correct value for each system.
c) In the Product Distribution Type column, choose the correct size from the dropdownlist.
d) Choose Generate Landscape Details .
e) Confirm the warning that data will be overwritten.
f) Choose Landscape Details .
3. On the Landscape Details sheet, enter the appropriate values for the technical monitoringof your landscape.
Unit 3: SAP Solution Manager Sizing, Installation, and Upgrade
54 © Copyright. All rights reserved.
a) In the Technical Monitoring column select Yes for each system that requires technicalmonitoring.
b) In each of the columns, accept the default value or enter the correct value for therelevant system, according to the Legend.
4. On the Scenario Configuration sheet, enter the appropriate values for your organization'suser profile.
a) Enter the appropriate values in the relevant fields.
b) Choose Sizing Recommendations .
5. On the Sizing Recommendations sheet view the computer recommendations for yourlandscape and scenarios.
a) In the Select Scenario dropdown list select the scenarios for which you want to viewrecommendations.
The SAP recommendations based on your input display.
In general, all assumptions are based on Unicode. For more information on specificdependencies, see http://service.sap.unicode: → Unicode at SAP → Unicode MediaLibrary → Unicode Information on Specific Topics → Unicode Hardware Requirements andCustomer Experience .
It is mandatory that the SAP Solution Manager runs on a 64-bit system.
See SAP Note 546685 – Archiving in the Solution Manager (Operation) and SAP Note – SAPSolution Manager – reduce data volumes to archive old EarlyWatch Alert/Service LevelReports.
LESSON SUMMARYYou should now be able to:
● Identify the main factors that influence sizing
Lesson: Sizing an SAP Solution Manager System
© Copyright. All rights reserved. 55
Unit 3Lesson 2
Preparing to Install or Upgrade an SAPSolution Manager System
LESSON OVERVIEWIn this lesson you will learn the sequence to follow when installing a new SAP SolutionManager installation, and where to find the necessary supporting documentation.
LESSON OBJECTIVESAfter completing this lesson, you will be able to:
● Outline the SAP Solution Manager installation process
Components of an SAP Solution Manager SystemInstallation of an SAP Solution Manager system is based on the standard SAPinst method.
SAP Solution Manager must be installed on a dedicated 64-bit system. Apart from add-ons,no components can be installed on top of Solution Manager.
After installation, you keep Solution Manager updated with a series of support andenhancement packages. Due to the integrated nature of SAP Solution Manager, all usagetypes are updated by the enhancement packages. You cannot update only parts of yourSolution Manager system.
Some usage types may require additional licensing.
Documentation for SAP Solution Manager Installation
The installation procedure for SAP Solution Manager is well documented. You can find therelevant documentation on the SAP Support Portal → Installation and Upgrade Guides → SAP Components → SAP Solution Manager → Release 7.1
The following documents are available on the SAP Service Marketplace and you are advisedto read them before and during an installation.
Recommended Documentation for SAP Solution Manager Installation
● Master Guide for SAP Solution Manager 7.1
● Media List SAP Solution Manager 7.1
● Installation SAP Solution Manager 7.1 OS-DB
● Wily Installation Guide
● Setup Guide Landscape Management Database
56 © Copyright. All rights reserved.
To Install SAP Solution Manager
1. Read the available documentation for planning and installation.
2. Check hardware prerequisites for your version of SAP Solution Manager using the SizingToolkit.
All assumptions about sizing are based on unicode. For more information about unicodesee service.sap.com/unicode
3. Perform installation of SAP Solution Manager using the SAPinst method.
4. Apply the latest support packages to SAP Solution Manager using SUM.
5. Install CA Wily Introscope Enterprise Manager using the Introscope installation tools.
6. Install diagnostics agents for the SAP Solution Manager system using SAPinst.
7. Perform system preparation and basic configuration of SAP Solution Manager usingtransaction SOLMAN_SETUP.
LESSON SUMMARYYou should now be able to:
● Outline the SAP Solution Manager installation process
Lesson: Preparing to Install or Upgrade an SAP Solution Manager System
© Copyright. All rights reserved. 57
Unit 3Lesson 3
Preparing to Upgrade an SAP SolutionManager System
LESSON OVERVIEWUpgrading is the task of "switching" the software in use to a higher release. Unlike supportpackages, which contain corrections and some small enhancements, a new release is full ofnew functionality and can also exclude some old, obsolete functions. In this lesson you willlearn the sequence for upgrading Solution Manager and where to find the necessarydocumentation.
LESSON OBJECTIVESAfter completing this lesson, you will be able to:
● Outline the SAP Solution Manager upgrade process
The Effect of an SAP Solution Manager UpgradeUpgrading is the process of switching the software in use to a higher release. In contrast toimporting support packages, which contain mostly corrections and some smallenhancements, a new release is full of new functionality and may exclude some old, obsoletefunctions.
You perform a Solution Manager upgrade in two major steps:
● The technical upgrade, which is simply switching the release without touching anyapplication configuration.
● The post-processing/delta configuration, where the new functionality is enabled.
SAP Solution Manager features some scenarios, such as ITSM/Service Desk and ChangeRequest Management, which require enhancements that can, depending on the currentconfiguration, make the post-processing complex. It is therefore crucial to plan theconfiguration ahead of time and reserve enough time and resources to handle the tasksinvolved.
As with every SAP product, the installation is well documented. You can find the installationdocumentation on the SAP Support Portal → Installation and Upgrade Guides → SAPSolution Manager → Release 7.1.
You are also advised to read the documentation listed in the previous lesson both before andduring the installation.
To Upgrade an SAP Solution Manager SystemThis procedure gives an overview of the tasks necessary to set up a new SAP SolutionManager system.
1. Read the available documentation for planning and upgrade.
58 © Copyright. All rights reserved.
2. Check hardware prerequisites for SAP Solution Manager 7.1 using the sizing procedures.
3. Check database requirements and upgrade your database if necessary.
4. Check the following components and upgrade them if necessary using the Introscopeinstallation tools, SUM, and SAPinst:
● Wily Introscope Enterprise Manager
● IS Agent
● Diagnostic agents
5. Upgrade System Landscape Directory CR content and model (to at least model 1.6.16 andcontent 7.0 or higher).
For more information, see SAP Note 669669 - Updating the SAP Component Repositoryin the SLD.
6. Perform an upgrade of SAP Solution Manager using SUM or SOLMANUP.
7. Apply the latest support package stacks for SAP Solution Manage using SUM or SPAM/SAINT and JSPM.
8. Perform delta configuration using transaction SOLMAN_SETUP.
LESSON SUMMARYYou should now be able to:
● Outline the SAP Solution Manager upgrade process
Lesson: Preparing to Upgrade an SAP Solution Manager System
© Copyright. All rights reserved. 59

Unit 3: SAP Solution Manager Sizing, Installation, and Upgrade
60 © Copyright. All rights reserved.
Unit 3
Learning Assessment
1. After performing the installation of SAP Solution Manager using SUM, what steps do youtake?
Arrange these steps into the correct sequence.
0 Perform system preparation and basic configuration of SAP Solution Manager usingtransaction SOLMAN_SETUP.
0 Apply the latest support packages to SAP Solution Manager using SUM.
0 Install diagnostics agents for the SAP Solution Manager system using SAPinst.
0 Install CA Wily Introscope Enterprise Manager using the Introscope installation tools.
2. You perform delta configuration using transaction SOLMAN_SETUP.
Determine whether this statement is true or false.
X True
X False
© Copyright. All rights reserved. 61
Unit 3
Learning Assessment - Answers
1. After performing the installation of SAP Solution Manager using SUM, what steps do youtake?
Arrange these steps into the correct sequence.
4 Perform system preparation and basic configuration of SAP Solution Manager usingtransaction SOLMAN_SETUP.
1 Apply the latest support packages to SAP Solution Manager using SUM.
2 Install diagnostics agents for the SAP Solution Manager system using SAPinst.
3 Install CA Wily Introscope Enterprise Manager using the Introscope installation tools.
2. You perform delta configuration using transaction SOLMAN_SETUP.
Determine whether this statement is true or false.
X True
X False
62 © Copyright. All rights reserved.
UNIT 4 Management of System Data inthe SAP Solution ManagerSystem Landscape
Lesson 1
Setting Up the System Landscape Directory 64
Exercise 2: Check the Configuration of the SLD 73
Lesson 2
Setting Up the Landscape Management Database 76
Lesson 3
Describing the Landscape Model, Landscape Management Database, and Landscape Verification 87
UNIT OBJECTIVES
● Describe the System Landscape Directory and its data consumers
● Determine the optimal System Landscape Directory configuration
● Determine the optimal configuration for the Landscape Management Database
● Describe the elements and relationships in an SAP solution
● Explain Landscape Verification
● Create data in the Landscape Management Database with the technical system editor
● Edit data in the Landscape Management Database with the technical system editor
© Copyright. All rights reserved. 63
Unit 4Lesson 1
Setting Up the System Landscape Directory
LESSON OVERVIEWIn this lesson, you will learn how to describe the system landscape directory and its dataconsumers. You will also learn how to determine the optimal system landscape directoryconfiguration.
LESSON OBJECTIVESAfter completing this lesson, you will be able to:
● Describe the System Landscape Directory and its data consumers
● Determine the optimal System Landscape Directory configuration
The System Landscape Directory (SLD) and its Data ConsumersThe SLD and the Common Information Model (CIM)
The SLD runs on top of the AS Java and is based on the Common Information Model (CIM).
The CIM is a standard of the Distributed Management Task Force and is based on the object-oriented modeling approach. The standard provides a neutral implementation schema todescribe management information within a computing environment. CIM is designed tomodel both hardware and software elements.
The Purpose of the SLD
The aim of the SLD is to provide a central source of system landscape information relevant forthe management of your system. The SLD contains the following:
● The description of your system landscape (that is, the software components that arecurrently installed)
● The repository of software components that can theoretically be installed in yourlandscape (such as the software components available from SAP, as well as customer-defined components)
● A name reservation service (also known as name server) to enable a conflict free way tocreate names for software objects
Since this data is updated automatically from the systems included in the landscape, the SLDprovides reliable and up-to-date system landscape information with as little effort for you aspossible. You no longer have to gather this information manually (for example, in MicrosoftExcel sheets or from SAP Service Marketplace). In this way, the SLD acts as a centralinformation provider for SAP and third-party tools that use this data to deliver the servicesnecessary to keep your landscape up and running.
SLD Data Consumers
Many applications need the system information data stored in the SLD, as shown in thediagram.
64 © Copyright. All rights reserved.

Figure 13: SLD: Data Consumers
SAP has decided to merge the central mode of SAP NetWeaver Administrator with the newwork centers available in SAP Solution Manager 7.0 SP Stack 15 and higher. Thus, it can beused in an administrative context together with non-Java based administration tools.
Although the central mode of SAP NetWeaver Administrator will be still available for sometime, SAP will not develop this tool any further. SAP will focus on optimizing theadministrative work centers of SAP Solution Manager instead.
The local mode of SAP NetWeaver Administrator will not be modified: it is available for currentand future releases of SAP NetWeaver. Nevertheless, local SAP NetWeaver Administratorservices do not require landscape data. As a result, the SLD is no longer required for SAPNetWeaver Administrator if you use the new work centers of SAP Solution Manager.
System Landscape Directory (SLD) – Component Information and Connecting Systems
Keeping Master Component Repository up to date
At SAP, a Master Component Repository mirrors the data from the SAP Product andProduction Management System (PPMS). This repository thus contains up-to-dateinformation about all available SAP products, including version numbers, patch levels, andtheir dependencies. The content of the Master Component Repository is published on theSAP Service Marketplace so that customers can update their component information in theirSLD.
For more information, see SAP Note 669669 - Updating the SAP Component Repository inthe SLD.
Lesson: Setting Up the System Landscape Directory
© Copyright. All rights reserved. 65
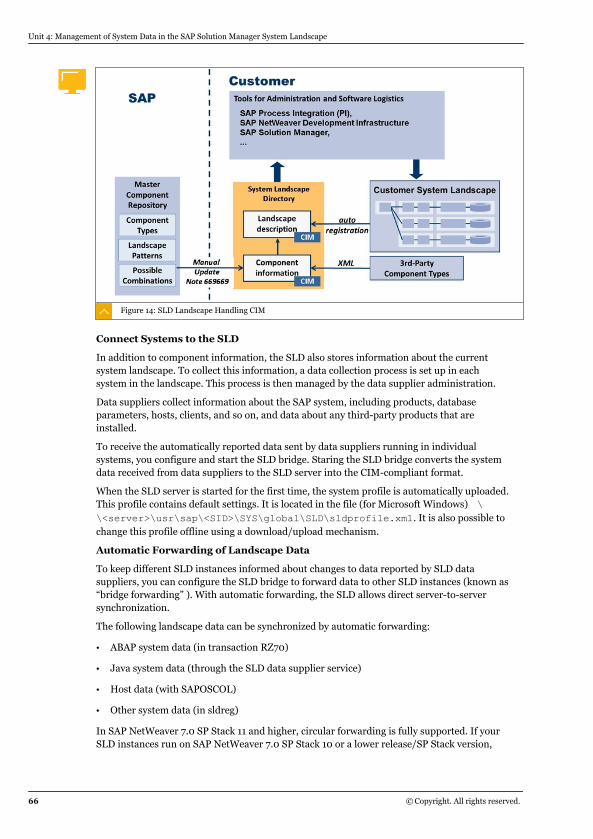
Figure 14: SLD Landscape Handling CIM
Connect Systems to the SLD
In addition to component information, the SLD also stores information about the currentsystem landscape. To collect this information, a data collection process is set up in eachsystem in the landscape. This process is then managed by the data supplier administration.
Data suppliers collect information about the SAP system, including products, databaseparameters, hosts, clients, and so on, and data about any third-party products that areinstalled.
To receive the automatically reported data sent by data suppliers running in individualsystems, you configure and start the SLD bridge. Staring the SLD bridge converts the systemdata received from data suppliers to the SLD server into the CIM-compliant format.
When the SLD server is started for the first time, the system profile is automatically uploaded.This profile contains default settings. It is located in the file (for Microsoft Windows) \\<server>\usr\sap\<SID>\SYS\global\SLD\sldprofile.xml. It is also possible tochange this profile offline using a download/upload mechanism.
Automatic Forwarding of Landscape Data
To keep different SLD instances informed about changes to data reported by SLD datasuppliers, you can configure the SLD bridge to forward data to other SLD instances (known as“bridge forwarding” ). With automatic forwarding, the SLD allows direct server-to-serversynchronization.
The following landscape data can be synchronized by automatic forwarding:
● ABAP system data (in transaction RZ70)
● Java system data (through the SLD data supplier service)
● Host data (with SAPOSCOL)
● Other system data (in sldreg)
In SAP NetWeaver 7.0 SP Stack 11 and higher, circular forwarding is fully supported. If yourSLD instances run on SAP NetWeaver 7.0 SP Stack 10 or a lower release/SP Stack version,
Unit 4: Management of System Data in the SAP Solution Manager System Landscape
66 © Copyright. All rights reserved.
we do not recommend that you set up a circular exchange of data between two or more SLDinstances with automatic forwarding. Although the original sender does not forward dataagain (after the original sender received the data from the other SLD), the original senderwrites an error message in its log file that the data received by automatic forwarding alreadyexists in its local SLD.
Changes and entries that you entered manually in the SLD (for example, business systemsrequired for SAP NetWeaver PI, component repository extensions, or name reservation data)cannot be forwarded automatically with this mechanism. Manual changes and entries staywithin the local SLD only. The same restriction applies for data written by other applicationssuch as SAP NetWeaver PI or SAP Solution Manager.
Automatic forwarding offers you the flexibility to run several SLD instances in your systemlandscape with little manual effort, if fully automatic synchronization cannot be used. Sinceonly landscape data received from SLD data suppliers is forwarded automatically, thisapproach is not suitable for all requirements and you may need to complement the automaticforwarding with other synchronization mechanisms (such as manual export/import). Inaddition, you must manually update the component information and the CIM model from SAPService Marketplace for every SLD (for more information, see SAP Note 669669).
ABAP-based SLD data supplier
The ABAP-based data supplier (transaction RZ70) is available for all SAP systems as of SAPBasis 4.0B. This data supplier uses an RFC connection to send data to the SLD bridge throughan SAP gateway and an RFC server. If no local gateway is available yet (for example, for anSLD running on an AS Java only), install a standalone gateway.
The initial configuration of the data supplier is performed by the SAP installation tool SAPinstduring installation. No further configuration is required, unless you want to change the defaultsettings. If your SAP system is running on an earlier release than SAP Web AS ABAP 6.30 andcontains the data supplier function, you perform an initial configuration of the SLD datasupplier. You can do this in transaction RZ70.
For more information, see SAP Note 584654 - Registration setup in the SAP SystemLandscape Directory for details.
Java-based SLD data supplier
Hint:Beginning with AS Java Release 7.10 every Java-only system has a local gatewayon the central service instance where an additional installation of a gatewayprocess is no longer necessary.
The J2EE-based SLD data supplier is available for all SAP J2EE servers as of SAP WebApplication Server 6.40.
The J2EE-based data supplier uses HTTP to send data to the SLD bridge through a HTTPservlet. The SLD bridge receives this data and converts it into the format defined in the Web-Based Enterprise Management standard (for more information on this standard, seewww.dmtf.org/standards/wbem). The SLD bridge then forwards the data to the SLDserver.
An initial configuration of the data supplier for AS Java-based systems is performed by theSAP installation tool SAPinst when you install the AS Java. However, if you want to change thedefault settings or you have installed the AS Java in a different way, you can use the J2EEadministration tool, the Visual Administrator, to configure the data supplier manually.
Lesson: Setting Up the System Landscape Directory
© Copyright. All rights reserved. 67
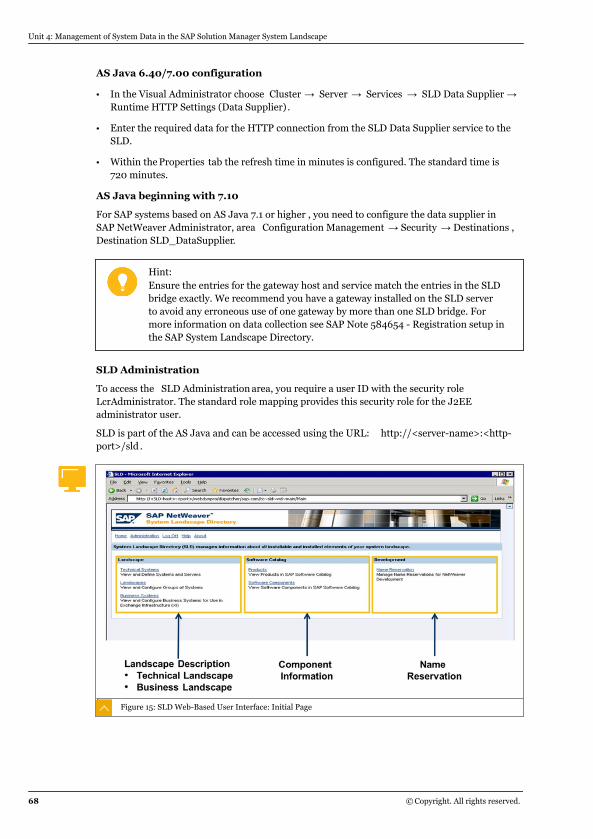
AS Java 6.40/7.00 configuration
● In the Visual Administrator choose Cluster → Server → Services → SLD Data Supplier → Runtime HTTP Settings (Data Supplier) .
● Enter the required data for the HTTP connection from the SLD Data Supplier service to theSLD.
● Within the Properties tab the refresh time in minutes is configured. The standard time is720 minutes.
AS Java beginning with 7.10
For SAP systems based on AS Java 7.1 or higher , you need to configure the data supplier inSAP NetWeaver Administrator, area Configuration Management → Security → Destinations ,Destination SLD_DataSupplier.
Hint:Ensure the entries for the gateway host and service match the entries in the SLDbridge exactly. We recommend you have a gateway installed on the SLD serverto avoid any erroneous use of one gateway by more than one SLD bridge. Formore information on data collection see SAP Note 584654 - Registration setup inthe SAP System Landscape Directory.
SLD Administration
To access the SLD Administration area, you require a user ID with the security roleLcrAdministrator. The standard role mapping provides this security role for the J2EEadministrator user.
SLD is part of the AS Java and can be accessed using the URL: http://<server-name>:<http-port>/sld .
Figure 15: SLD Web-Based User Interface: Initial Page
Unit 4: Management of System Data in the SAP Solution Manager System Landscape
68 © Copyright. All rights reserved.
The topology of the System Landscape Directory (SLD)Ideally, the SLD is used in a single cluster node.
If you use the SLD in a cluster, observe SAP Note 825116 - SLD in cluster mode (Release 6.40,NW2004).
Certain applications (for example, Web Dynpro applications with adaptive RFC calls or SAPProcess Integration (SAP PI)) need data from SLD at runtime. Therefore it is useful to ensurehigh availability of the SLD.
We recommend that the SLD has the latest AS Java release in the system landscape, becausedata suppliers from client systems with a later release than the SLD itself could causeproblems.
A correctly maintained system landscape is a prerequisite for some of the SAP SolutionManager functions. You can set up the automatic data transfer from the System LandscapeDirectory (SLD) to collect system data for the SAP Solution Manager system landscape. TheSAP Solution Manager can collect server, database, and system data automatically with thisdata transfer.
For more information about the SLD, see SAP Developer Network, Quick Link /nw-sld(https://www.sdn.sap.com/irj/sdn/nw-sld ).
Where to run the SLD
The simplest option is to maintain a single SLD for your landscape. The cost of running anSLD infrastructure increases with the number of SLD instances, because several SLDs mustbe maintained and updated. Depending on your requirements, you must also considersynchronization of SLD data stored in different SLDs. The SLD bridge can automaticallyforward data received by data suppliers to additional SLDs. However, data entered manuallyinto one SLD (such as PI business systems, name reservation data, products/softwarecomponents, and more) must be synchronized manually with the export/import functions ofthe SLD.
Your optimal SLD landscape depends on the actual requirements of your landscape (whatdata is required in which SLD, how often a manual synchronization is required, and so on).
Figure 16: System Landscape Directory Topology
Lesson: Setting Up the System Landscape Directory
© Copyright. All rights reserved. 69
The figure shows a hosting scenario with separate customer system landscapes. Eachcustomer landscape incorporates its own SLD containing data about this customer'slandscape only. The hosting provider must have access to the system landscape of allcustomers. To do this, you configure the sub-SLDs to forward all landscape dataautomatically to a master SLD for the hosting provider. This way, you can use a hierarchicalorganization of several SLDs to create different views of your landscape.
Having multiple SLDs gives you the ability to test content imports, CIM data model updates,and patches before performing them in the production environment. Sometimes it isnecessary to have more SLDs because there is an isolated production environment (firewallbetween development/test systems and production system).
Another option for multiple SLDs is to improve availability for applications relying on SLD data(SLD for Web Dynpro, SLD for SAP NetWeaver PI, and so on) or geographical distributedlocations (with local admin groups).
Choosing Where to Run the SLD
● Should the SLD be in a dedicated system with a business function, such as SAP NetWeaverPI?
● Should the SLD be with other central shared services?
● What applications rely on SLD data?
● Is high availability of SLD data necessary?
● What effect do planned or unplanned downtimes have on the SLD?
● What is the load of the corresponding host?
● How good is the network connection?
Data Synchronization in the SLDIf you decide to use more than one SLD, consider how to synchronize the data stored in yourSLDs. If you choose manual synchronization, an operation manual helps to establish whenand how synchronization should be performed, and by whom.
The table provides an overview of the various synchronization mechanisms available in theSLD.
Table 13: SLD: Different Synchronization Mechanisms
SynchronizationMechanism
What is synchron-ized?
How? When to use thismechanism?
Full automatic syn-chronization
All SLD data in anSLD namespace (da-ta reported by SLDdata suppliers, dataentered manually,SAP CR content up-dates, CIM model),uni- or bi-directional
Automatic propaga-tion of all changes inthe source system
● If your SLD instan-ces run on ASJava 7.1 or higher(source SLD canalso run on ASJava 7.0 SP Stack12 or higher)
Unit 4: Management of System Data in the SAP Solution Manager System Landscape
70 © Copyright. All rights reserved.
Automatic forwardingSpecific landscapedata (that is, only da-ta reported by SLDdata suppliers), uni-or bi-directional
Automatic forwarding(whenever the SLDbridge receives datafrom an SLD datasupplier, this data isforwarded to otherSLD instances)
● If your SLD instan-ces do not run onAS Java 7.1 orhigher
● If only landscapedata reported bySLD data suppli-ers requires syn-chronization (suchas for SAP Solu-tion Manager andany SLD used bydevelopment)
Manual export/import
You can choose theSLD content of eachsubcategory (LD, CR,NR), such as singlebusiness systems orsoftware compo-nents. You can alsoexport all SLD data(including SAP CRdelta archives).
Manual procedure –either incremental orselective
● If your SLD instan-ces do not run onAS Java 7.1 orhigher and moredata requires syn-chronization thanjust the data cov-ered by automaticforwarding
● If only a smallamount of SLD da-ta requires syn-chronization on anirregular basis
● Provides best flex-ibility but may re-quire considerableoperational effortEnhanced
Change and Trans-port System (CTS+),used to handle man-ual exports in trans-port requests
Transportable SLDobjects: Technicalsystems, businesssystems, softwarecomponents, andproducts, CIM Model(Note that the CIMdata must be addedto a transport requestmanually – there isno dedicated exportbutton in the SLD UI).
Manual procedure us-ing the enhancedCTS
● If you want to be incontrol when spe-cific SLD objectsare transported.
● If enhanced CTS isalready used forother transports inyour landscape,which also includeSLD objects (suchas in the contextof SAP NetWeaverPI development).
Lesson: Setting Up the System Landscape Directory
© Copyright. All rights reserved. 71

Unit 4: Management of System Data in the SAP Solution Manager System Landscape
72 © Copyright. All rights reserved.
Unit 4Exercise 2
Check the Configuration of the SLD
Business Example
To ensure that the information stored in the SLD is available to the Landscape ManagementDatabase (LMDB) later, you check the configuration of the SLD.
Replace <servername> and <InstanceNumber> with the values supplied by the instructor.
1. Log on to the SLD in SAP Solution Manager at http://<servername>.wdf.sap.corp:5<InstanceNumber>00/sld with <CourseName>-<GroupNumber> and <password>.
2. What is the model version and the SAP CR content version?
3. What gateway information is stored in your SLD?
© Copyright. All rights reserved. 73
Unit 4Solution 2
Check the Configuration of the SLD
Business Example
To ensure that the information stored in the SLD is available to the Landscape ManagementDatabase (LMDB) later, you check the configuration of the SLD.
Replace <servername> and <InstanceNumber> with the values supplied by the instructor.
1. Log on to the SLD in SAP Solution Manager at http://<servername>.wdf.sap.corp:5<InstanceNumber>00/sld with <CourseName>-<GroupNumber> and <password>.
a) Open a browser and navigate to the relevant URL.
b) Enter <CourseName>-<GroupNumber> and <password>.
2. What is the model version and the SAP CR content version?
The model version is the value of the field Model Version (sld/active) and the SAP CRcontent version is the value of the field SAP CR Content Version (sld/active).
a) On the System Landscape Directory screen, choose Administration.
b) Choose Details.
c) Open the Data tab and find the model version and the SAP CR content version.
3. What gateway information is stored in your SLD?
The gateway information is the value of the GatewayHost field and the GatewayServicefield.
a) At the top of the Data tab choose Administration.
b) Choose Server → Profile.
c) In the Section dropdown list select datasupplier .
d) Find the value of the GatewayHost and GatewayService fields.
74 © Copyright. All rights reserved.
LESSON SUMMARYYou should now be able to:
● Describe the System Landscape Directory and its data consumers
● Determine the optimal System Landscape Directory configuration
Lesson: Setting Up the System Landscape Directory
© Copyright. All rights reserved. 75
Unit 4Lesson 2
Setting Up the Landscape ManagementDatabase
LESSON OVERVIEWThe Landscape Management Database (LMDB) is a directory of elements of a systemlandscape. In this lesson you will learn about the concept and the use of the LM
LESSON OBJECTIVESAfter completing this lesson, you will be able to:
● Determine the optimal configuration for the Landscape Management Database
Installation and Customization of the Landscape Management Database (LMDB)The Landscape Management Database (LMDB) is a directory of elements of a systemlandscape. The main task of LMDB is to provide information about the system landscape. TheSolution Manager System Landscape (SMSY) and the System Landscape Directory (SLD)already provide comparable functions, with different technologies, for different purposes.LMDB aims for a more flexible extensibility of the landscape model and the unification of SLDand SMSY in SAP Solution Manager.
The LMDB is supplied with data automatically, if possible.
All of the work centers in Solution Manager Diagnostics use the LMDB as a source ofinformation for technical systems. Many of the steps in transaction SOLMAN_SETUP alsoobtain their information from the LMDB. Other applications in Solution Manager, however, stillread the landscape data from transaction SMSY.
Installation
The LMDB was introduced in SAP Solution Manager 7.1. and is required since then. If youupgrade SAP Solution Manager 7.0 to 7.1, install the LMDB.
It is possible, but not recommended, to migrate technical system data from SMSY to theLMDB. Instead, register the technical system by using the data supplier within the SLD.
You can adjust various configuration parameters in Customizing for SAP Solution Manager,using transaction SPRO → SAP Reference IMG, or by choosing SAP Solution Manager,Technical Settings → Landscape Management Database (LMDB) → Set Up Parameters .
LMDB Integration with System Landscape ComponentsThere are data suppliers for most technical systems, which register the system in the SLDautomatically, so the SLD is the central data source for the LMDB. Make changes to technicalsystems by registering them by registering in the SLD again.
Integration with the SLD
Two types of data supplier are available to register systems in the SLD: specific data suppliersfor AS ABAP and AS Java, and generic data suppliers for most other products in the SAPenvironment.
76 © Copyright. All rights reserved.
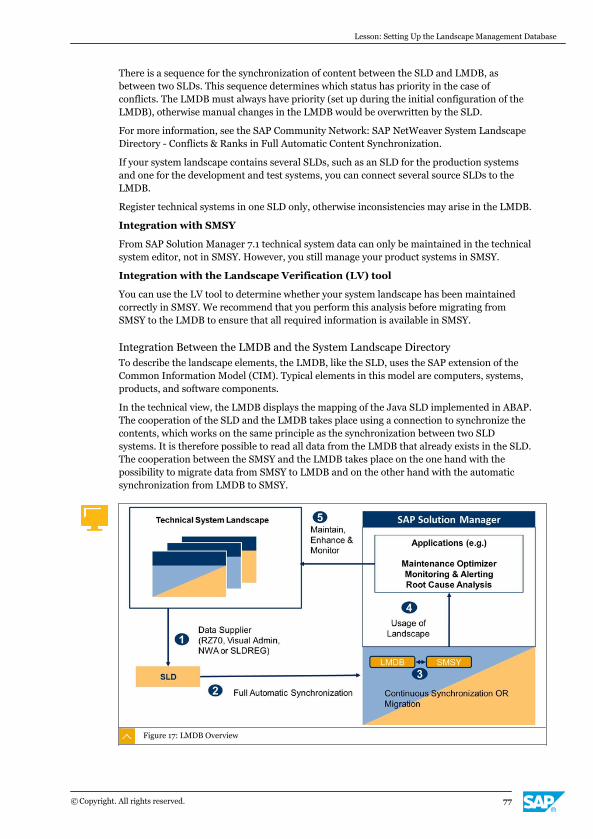
There is a sequence for the synchronization of content between the SLD and LMDB, asbetween two SLDs. This sequence determines which status has priority in the case ofconflicts. The LMDB must always have priority (set up during the initial configuration of theLMDB), otherwise manual changes in the LMDB would be overwritten by the SLD.
For more information, see the SAP Community Network: SAP NetWeaver System LandscapeDirectory - Conflicts & Ranks in Full Automatic Content Synchronization.
If your system landscape contains several SLDs, such as an SLD for the production systemsand one for the development and test systems, you can connect several source SLDs to theLMDB.
Register technical systems in one SLD only, otherwise inconsistencies may arise in the LMDB.
Integration with SMSY
From SAP Solution Manager 7.1 technical system data can only be maintained in the technicalsystem editor, not in SMSY. However, you still manage your product systems in SMSY.
Integration with the Landscape Verification (LV) tool
You can use the LV tool to determine whether your system landscape has been maintainedcorrectly in SMSY. We recommend that you perform this analysis before migrating fromSMSY to the LMDB to ensure that all required information is available in SMSY.
Integration Between the LMDB and the System Landscape DirectoryTo describe the landscape elements, the LMDB, like the SLD, uses the SAP extension of theCommon Information Model (CIM). Typical elements in this model are computers, systems,products, and software components.
In the technical view, the LMDB displays the mapping of the Java SLD implemented in ABAP.The cooperation of the SLD and the LMDB takes place using a connection to synchronize thecontents, which works on the same principle as the synchronization between two SLDsystems. It is therefore possible to read all data from the LMDB that already exists in the SLD.The cooperation between the SMSY and the LMDB takes place on the one hand with thepossibility to migrate data from SMSY to LMDB and on the other hand with the automaticsynchronization from LMDB to SMSY.
Figure 17: LMDB Overview
Lesson: Setting Up the Landscape Management Database
© Copyright. All rights reserved. 77
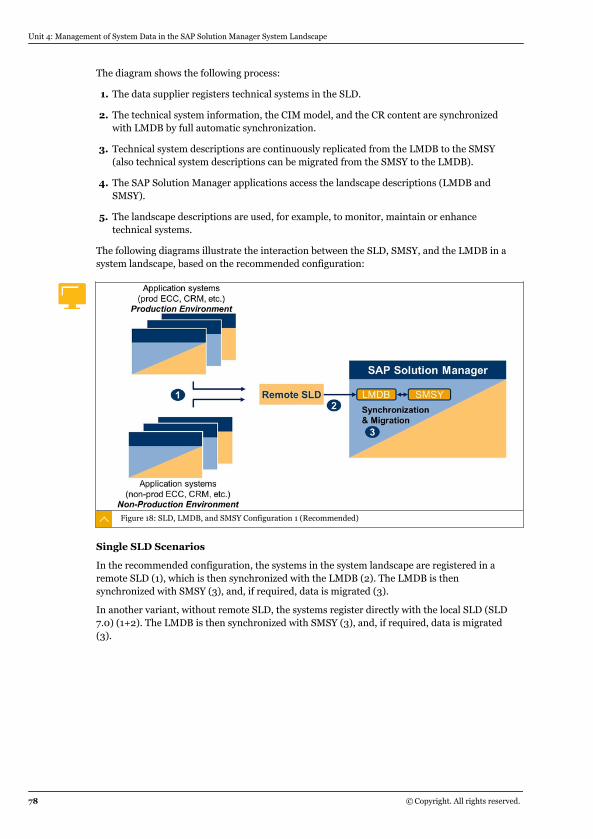
The diagram shows the following process:
1. The data supplier registers technical systems in the SLD.
2. The technical system information, the CIM model, and the CR content are synchronizedwith LMDB by full automatic synchronization.
3. Technical system descriptions are continuously replicated from the LMDB to the SMSY(also technical system descriptions can be migrated from the SMSY to the LMDB).
4. The SAP Solution Manager applications access the landscape descriptions (LMDB andSMSY).
5. The landscape descriptions are used, for example, to monitor, maintain or enhancetechnical systems.
The following diagrams illustrate the interaction between the SLD, SMSY, and the LMDB in asystem landscape, based on the recommended configuration:
Figure 18: SLD, LMDB, and SMSY Configuration 1 (Recommended)
Single SLD Scenarios
In the recommended configuration, the systems in the system landscape are registered in aremote SLD (1), which is then synchronized with the LMDB (2). The LMDB is thensynchronized with SMSY (3), and, if required, data is migrated (3).
In another variant, without remote SLD, the systems register directly with the local SLD (SLD7.0) (1+2). The LMDB is then synchronized with SMSY (3), and, if required, data is migrated(3).
Unit 4: Management of System Data in the SAP Solution Manager System Landscape
78 © Copyright. All rights reserved.
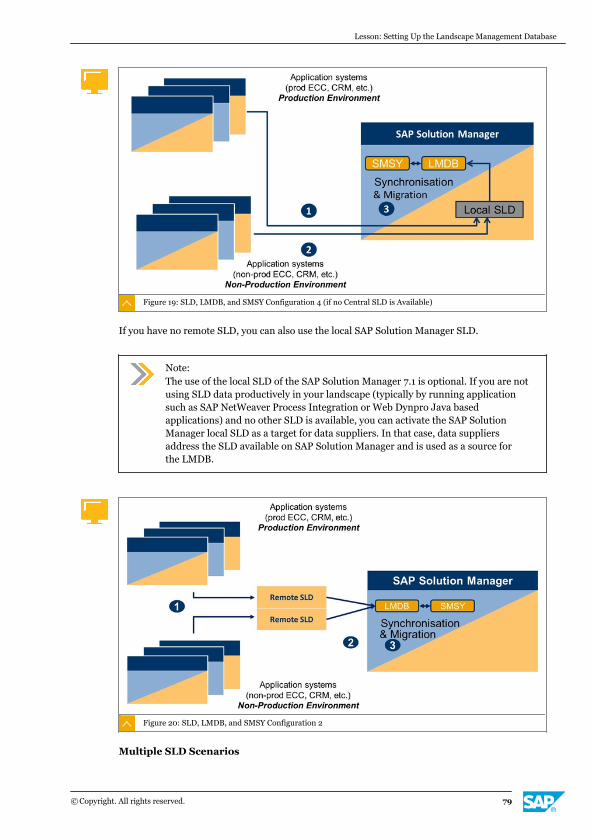
Figure 19: SLD, LMDB, and SMSY Configuration 4 (if no Central SLD is Available)
If you have no remote SLD, you can also use the local SAP Solution Manager SLD.
Note:The use of the local SLD of the SAP Solution Manager 7.1 is optional. If you are notusing SLD data productively in your landscape (typically by running applicationsuch as SAP NetWeaver Process Integration or Web Dynpro Java basedapplications) and no other SLD is available, you can activate the SAP SolutionManager local SLD as a target for data suppliers. In that case, data suppliersaddress the SLD available on SAP Solution Manager and is used as a source forthe LMDB.
Figure 20: SLD, LMDB, and SMSY Configuration 2
Multiple SLD Scenarios
Lesson: Setting Up the Landscape Management Database
© Copyright. All rights reserved. 79
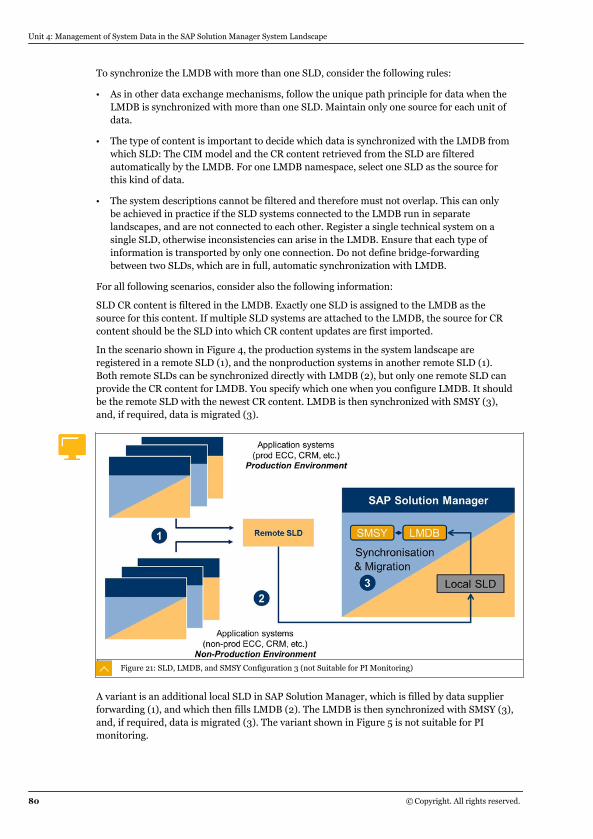
To synchronize the LMDB with more than one SLD, consider the following rules:
● As in other data exchange mechanisms, follow the unique path principle for data when theLMDB is synchronized with more than one SLD. Maintain only one source for each unit ofdata.
● The type of content is important to decide which data is synchronized with the LMDB fromwhich SLD: The CIM model and the CR content retrieved from the SLD are filteredautomatically by the LMDB. For one LMDB namespace, select one SLD as the source forthis kind of data.
● The system descriptions cannot be filtered and therefore must not overlap. This can onlybe achieved in practice if the SLD systems connected to the LMDB run in separatelandscapes, and are not connected to each other. Register a single technical system on asingle SLD, otherwise inconsistencies can arise in the LMDB. Ensure that each type ofinformation is transported by only one connection. Do not define bridge-forwardingbetween two SLDs, which are in full, automatic synchronization with LMDB.
For all following scenarios, consider also the following information:
SLD CR content is filtered in the LMDB. Exactly one SLD is assigned to the LMDB as thesource for this content. If multiple SLD systems are attached to the LMDB, the source for CRcontent should be the SLD into which CR content updates are first imported.
In the scenario shown in Figure 4, the production systems in the system landscape areregistered in a remote SLD (1), and the nonproduction systems in another remote SLD (1).Both remote SLDs can be synchronized directly with LMDB (2), but only one remote SLD canprovide the CR content for LMDB. You specify which one when you configure LMDB. It shouldbe the remote SLD with the newest CR content. LMDB is then synchronized with SMSY (3),and, if required, data is migrated (3).
Figure 21: SLD, LMDB, and SMSY Configuration 3 (not Suitable for PI Monitoring)
A variant is an additional local SLD in SAP Solution Manager, which is filled by data supplierforwarding (1), and which then fills LMDB (2). The LMDB is then synchronized with SMSY (3),and, if required, data is migrated (3). The variant shown in Figure 5 is not suitable for PImonitoring.
Unit 4: Management of System Data in the SAP Solution Manager System Landscape
80 © Copyright. All rights reserved.
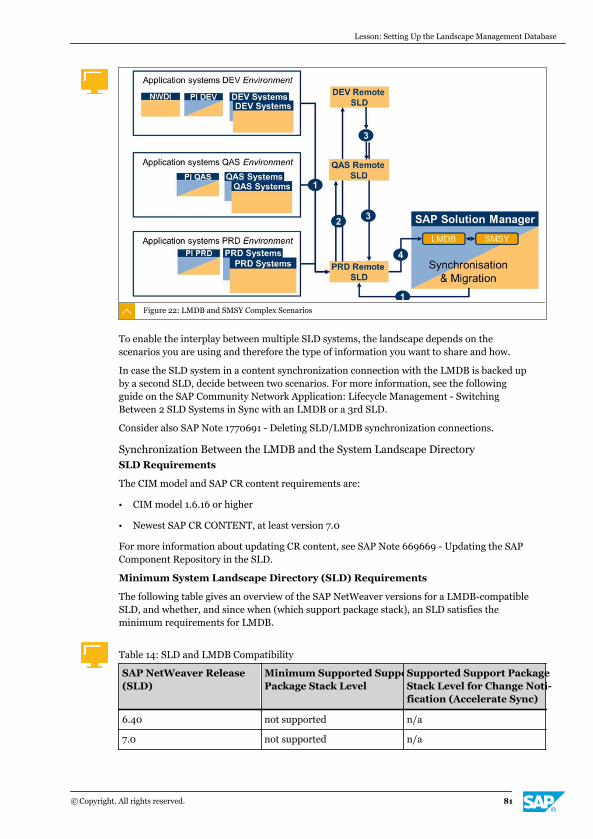
Figure 22: LMDB and SMSY Complex Scenarios
To enable the interplay between multiple SLD systems, the landscape depends on thescenarios you are using and therefore the type of information you want to share and how.
In case the SLD system in a content synchronization connection with the LMDB is backed upby a second SLD, decide between two scenarios. For more information, see the followingguide on the SAP Community Network Application: Lifecycle Management - SwitchingBetween 2 SLD Systems in Sync with an LMDB or a 3rd SLD.
Consider also SAP Note 1770691 - Deleting SLD/LMDB synchronization connections.
Synchronization Between the LMDB and the System Landscape DirectorySLD Requirements
The CIM model and SAP CR content requirements are:
● CIM model 1.6.16 or higher
● Newest SAP CR CONTENT, at least version 7.0
For more information about updating CR content, see SAP Note 669669 - Updating the SAPComponent Repository in the SLD.
Minimum System Landscape Directory (SLD) Requirements
The following table gives an overview of the SAP NetWeaver versions for a LMDB-compatibleSLD, and whether, and since when (which support package stack), an SLD satisfies theminimum requirements for LMDB.
Table 14: SLD and LMDB Compatibility
SAP NetWeaver Release(SLD)
Minimum Supported SupportPackage Stack Level
Supported Support PackageStack Level for Change Noti-fication (Accelerate Sync)
6.40 not supported n/a
7.0 not supported n/a
Lesson: Setting Up the Landscape Management Database
© Copyright. All rights reserved. 81
SAP NetWeaver Release(SLD)
Minimum Supported SupportPackage Stack Level
Supported Support PackageStack Level for Change Noti-fication (Accelerate Sync)
7.0.1 not supported n/a
7.0.2 SP6, patch 5 n/a
7.1 SP9 SP12
7.1.1 All SP's SP7
7.2 All SP's SP5
7.3 All SP's SP3
Change notification from SLD
The immediate notification of the LMDB about changes in the SLD accelerates thesynchronization of changes in the SLD - LMDB - SMSY chain, but active change notificationfrom SLD to LMDB requires a higher version.
Minimum and Immediate Notification System Landscape Directory (SLD) Requirements
If you cannot give your central SLD a required status, you can use another SLD thatdoessatisfy the minimum requirements, such as the SAP Solution Manager SLD, You can populatethis SLD with the data from your central SLD, using SLD bridge functionality.
For more information, see SAP Note 1546079 - Enable SLD sync notifications for LMDB.
Synchronization
SLD and LMDB content is synchronized in the same way as two SLD systems with fullautomatic content synchronization.
After installation or upgrade of SAP Solution Manager 7.1, the LMDB is empty, so in the firstphase of the process all contents are read from the source (SLD) into the target (LMDB). Thisprocess of full synchronization takes several hours and should be scheduled overnight. TheLMDB notes the starting time of the process, and switches to incremental synchronizationmode when full synchronization has finished. Changes are then propagated eitherimmediately, or at the latest every 10 minutes, in batch jobs.
The result of complete synchronization is that the CIM model and the entire content of theSLD are loaded into the LMDB. The LMDB has the status [Incremental Synch. Active].
Consider the following when configuring synchronization between the SLD and the LMDB inthe transaction SOLMAN_SETUP:
● You cannot configure notifications for SLD version 7.0.
● Setting the sequence of the source (SLD) lower than the sequence of the target (LMDB)prevents changes in the SLD from overwriting manual changes made in the LMDB in thetechnical system editor.
● Leaving large gaps in the sequence, such as SLD=100, LMDB=200. Large gaps off youflexibility when changing your synchronization landscape.
● Leave default sequences as they are to avoid affecting other, previous synchronizationconnections.
Although the minimum release requirements are lower, use a separate remote SLD withversion 7.1 or higher for synchronization, so that you have the latest SLD functional scope.
Unit 4: Management of System Data in the SAP Solution Manager System Landscape
82 © Copyright. All rights reserved.
The local SLD in Solution Manager has the version 7.0. In the remote SLD, all landscape datashould be consolidated. Ideally, all systems in the landscape register directly. If this is notpossible, the LMDB must be synchronized with several SLDs, but several SLDs may containcontradictory data. The contents of the LMDB depend on the sequence of the changes in thevarious SLD systems. Even if the procedure is theoretically unambiguously specified, thesearch for errors in several SLDs in the case of conflict can be time-consuming, so it is betterto use one SLD to supply the LMDB.
After configuration, synchronization between the SLD and the LMDB is automatic. The LMDBqueries the SLD for changes every 10 minutes. These changes are then copied into the LMDB.If the SLD has version 7.1 and notification is active, the SLD reports changes to the LMDB,which collects the data.
For more information, see the SAP Community Network: How to Ensure that SLD Data isAvailable During Maintenance.
Monitoring the Synchronization Process
You can monitor the procedure with standard transactions.
Transaction SM37 monitors jobs. The job log tells you, for example, the progress of acomplete synchronization, or any problems. The name of the synchronization job for thetarget namespace is SAP_LMDB_LDB_<namespace ID>, for example:SAP_LMDB_LDB_0000000001.
Transaction SLG1 (Display Logs) for the object AI_LMDB, shows synchronization errors bydefault. You can extend the analysis, and for example, also show warnings. Extending canimpair performance, so only do so if necessary.
In the view V_LMDB_LOG_CONF, you can configure the analysis per user. You can restrict itat user, subobject and log level.
Jobs usually run under the SOLMAN_BTC system user. If no user is configured, a job runsunder the user who activated the subscription.
Migration of SMSY Data to the LMDBMany SAP Solution Manager applications, such as the work center or transactionSOLMAN_SETUP, obtain their landscape information from the LMDB. Others do so fromSMSY, so all relevant technical system information must be copied from LMDB into SMSY.
The synchronization of LMDB and SMSY is completely automatic and unidirectional. Thereare two actions that copy changes from LMDB into SMSY:
● Automatic synchronization of changes from SLD.
When changes are written from the SLD to LMDB, they are logged in the LMDB change log.A check is made for new changes, at least every 5 minutes. If there are changes, alltechnical system data is written to SMSY.
● Automatic synchronization of changes written manually to LMDB by the technical systemeditor.
When you save the changes, the system writes them directly to SMSY, and they are loggedin the change log.
Status changes in the LMDB are in SMSY in less than 5 minutes, so changes in the SLD are inSMSY in less than 15 minutes.
Migrate SMSY Data to LMDB
If data has already been created manually in SMSY, and there is no data supplier, migrate thisdata from SMSY to the LMDB. You can migrate several technical systems at the same time.
Lesson: Setting Up the Landscape Management Database
© Copyright. All rights reserved. 83
SMSY Synchronization
Avoid creating landscape data manually because such data is not updated automatically.Instead, collect landscape data from data suppliers, so that it is regularly updated.
You can migrate the following types of technical systems:
● ABAP application servers (ABAP)
● Java application servers (JAVA)
● Master Data Management servers (MDM)
● Unspecific cluster systems (UNSPECIFIC)
Migration of the entities instance, database, software component, and other attributes aresupported for the type unspecific cluster system.
When migrating technical systems, take the following points into consideration:
● Only migrate system data for which there is no data supplier.
● Only system data sufficient to create an LMDB entry is migrated.
● System data which could not be migrated is post-processed in the technical system editor.
More Information to Maintenance of Product in the System Landscape can be found here:http://wiki.sdn.sap.com/wiki/display/SMSETUP/Maintenance+of+Product+in+the+System+Landscape
Entities in LMDB and where to define
All Solution Manager work centers, especially all SAP Solution Manager Diagnosticsapplications, which mainly use technical system data, obtain technical system informationfrom the LMDB. Many steps in the transaction SOLMAN_SETUP also obtain their informationfrom the LMDB.
Other SAP Solution Manager applications also obtain their landscape data, especially productsystem and logical component data, from SMSY.
The following table gives an overview of the entities and data sources relevant for the LMDB,and how to edit the entities:
Unit 4: Management of System Data in the SAP Solution Manager System Landscape
84 © Copyright. All rights reserved.
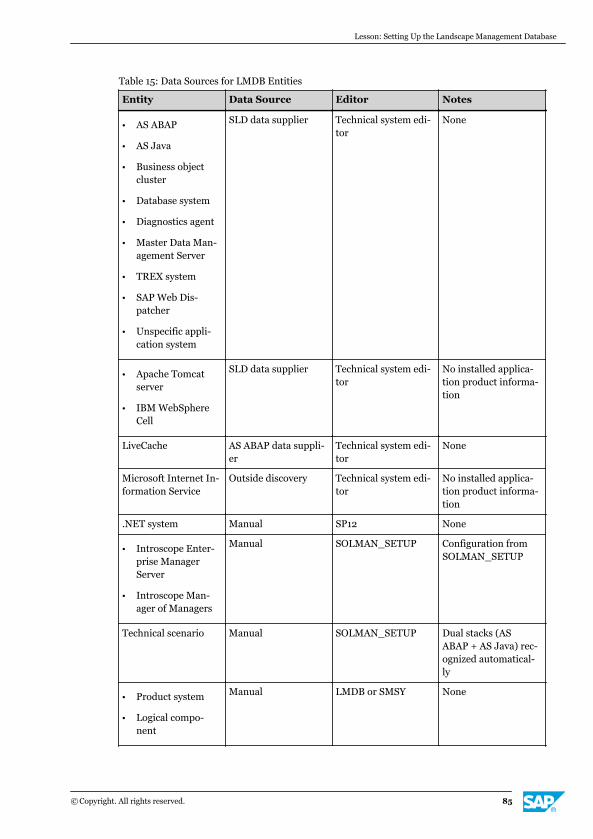
Table 15: Data Sources for LMDB Entities
Entity Data Source Editor Notes
● AS ABAP
● AS Java
● Business objectcluster
● Database system
● Diagnostics agent
● Master Data Man-agement Server
● TREX system
● SAP Web Dis-patcher
● Unspecific appli-cation system
SLD data supplier Technical system edi-tor
None
● Apache Tomcatserver
● IBM WebSphereCell
SLD data supplier Technical system edi-tor
No installed applica-tion product informa-tion
LiveCache AS ABAP data suppli-er
Technical system edi-tor
None
Microsoft Internet In-formation Service
Outside discovery Technical system edi-tor
No installed applica-tion product informa-tion
.NET system Manual SP12 None
● Introscope Enter-prise ManagerServer
● Introscope Man-ager of Managers
Manual SOLMAN_SETUP Configuration fromSOLMAN_SETUP
Technical scenario Manual SOLMAN_SETUP Dual stacks (ASABAP + AS Java) rec-ognized automatical-ly
● Product system
● Logical compo-nent
Manual LMDB or SMSY None
Lesson: Setting Up the Landscape Management Database
© Copyright. All rights reserved. 85
LESSON SUMMARYYou should now be able to:
● Determine the optimal configuration for the Landscape Management Database
Unit 4: Management of System Data in the SAP Solution Manager System Landscape
86 © Copyright. All rights reserved.

Unit 4Lesson 3
Describing the Landscape Model, LandscapeManagement Database, and LandscapeVerification
LESSON OVERVIEWIn this lesson you are introduced to the SAP Landscape Model, the Landscape ManagementDatabase (LMDB), and the Landscape Verification (LV) tool.
LESSON OBJECTIVESAfter completing this lesson, you will be able to:
● Describe the elements and relationships in an SAP solution
● Explain Landscape Verification
● Create data in the Landscape Management Database with the technical system editor
● Edit data in the Landscape Management Database with the technical system editor
Components of the SAP Landscape ModelSince the release of SAP ERP Enhancement Package 4 for SAP ERP, the MaintenanceOptimizer is a mandatory prerequisite for installation. As a result, the error-free and completemapping of your system landscape in SAP Solution Manager is of critical importance.Experience shows, however, that the landscape data available in SAP Solution Managerinstallations is not always complete and error-free, particularly where data has been enteredmanually.
A better understanding the components of the SAP landscape model can help reduce errorsin your SAP Solution Manager installation.
The SAP Landscape Model
When talking about the SAP portfolio, terms like solution map, business process, products,and software components are commonly used. The diagram illustrates how these entities areconnected in the SAP Solution Manager landscape.
© Copyright. All rights reserved. 87
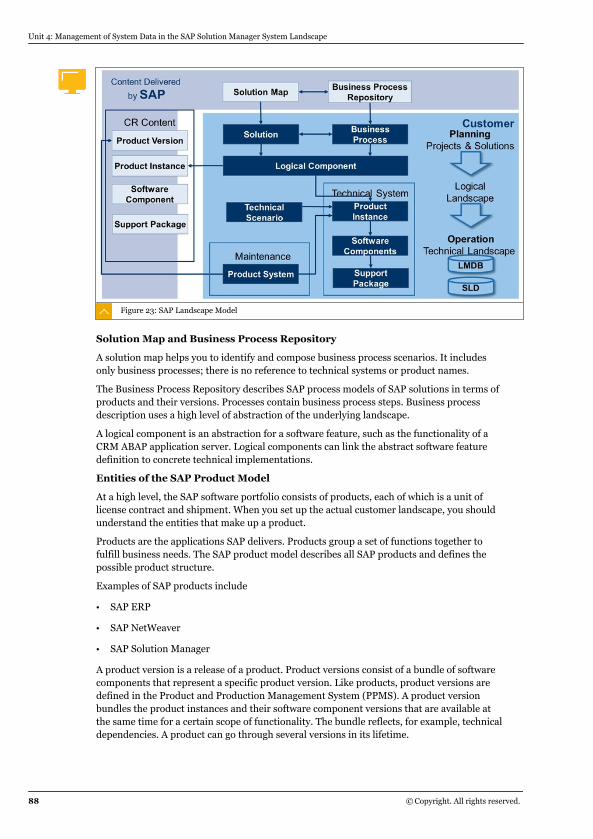
Figure 23: SAP Landscape Model
Solution Map and Business Process Repository
A solution map helps you to identify and compose business process scenarios. It includesonly business processes; there is no reference to technical systems or product names.
The Business Process Repository describes SAP process models of SAP solutions in terms ofproducts and their versions. Processes contain business process steps. Business processdescription uses a high level of abstraction of the underlying landscape.
A logical component is an abstraction for a software feature, such as the functionality of aCRM ABAP application server. Logical components can link the abstract software featuredefinition to concrete technical implementations.
Entities of the SAP Product Model
At a high level, the SAP software portfolio consists of products, each of which is a unit oflicense contract and shipment. When you set up the actual customer landscape, you shouldunderstand the entities that make up a product.
Products are the applications SAP delivers. Products group a set of functions together tofulfill business needs. The SAP product model describes all SAP products and defines thepossible product structure.
Examples of SAP products include
● SAP ERP
● SAP NetWeaver
● SAP Solution Manager
A product version is a release of a product. Product versions consist of a bundle of softwarecomponents that represent a specific product version. Like products, product versions aredefined in the Product and Production Management System (PPMS). A product versionbundles the product instances and their software component versions that are available atthe same time for a certain scope of functionality. The bundle reflects, for example, technicaldependencies. A product can go through several versions in its lifetime.
Unit 4: Management of System Data in the SAP Solution Manager System Landscape
88 © Copyright. All rights reserved.
Product version names typically start with SAP and have characteristics such as theirapplication function and a maintenance period. SAP ERP 6.0 and SAP ERP 2004 representproduct versions of the product SAP ERP.
Each product instance belongs to exactly one product version. It groups technicallydependent software component versions, which have to be installed and operated on a singletechnical system. They must be installed and updated as a whole to ensure a consistent state.(Still, patches can be applied to individual software components.)
Product instances are part of a product version and the smallest elements to be consideredwhen designing system landscapes. You can install the different product instances of aproduct version on different technical systems or on the same technical system, but aproduct instance and its software components must be installed together on one technicalsystem. You cannot distribute a product instance and its software components amongdifferent technical systems.
A product instance can contain other product instances and can be reused across productversions. For example, an ABAP-Java dual-stack is considered to be one technical system;one product instance can contain both ABAP and Java software components.
Examples of product instances include
● SAP ECC Server
● SAP XSS (Self-Services)
● TREX
A software component is a set of software objects grouped in packages and deliveredtogether. Software component versions are the smallest entities that can be installed on atechnical system. A software component version can be part of different product instances,and it can depend on other software component versions that must be installed with it. Thereare smaller shippable software entities than software component versions, such as supportpackages, patches and notes, which always refer to a software component version.
Examples of software components include
● SRM Server 7.01
● SAP BASIS 7.20
Additional Entities of the SAP Product Model
Technical systems, formerly known as system components in non-ABAP system, provide theruntime environment in which SAP applications are executed. A technical system is identifiedby its system identifier (SID). A technical system is assigned to a product system. A technicalsystem could run on one or more hardware boxes and have one database instance that isshared between the parts of the systems running on different boxes.
Technical systems are the central element of the solution landscape to deploy softwarecomponents and for operational activities, such as monitoring and alerting. They are typicallycreated by installation and they register themselves in SAP Solution Manager. Werecommend you register technical systems via automatic data suppliers and the SystemLandscape Directory (SLD). Registered data can then be enhanced manually in the SolutionManager Landscape Management Database (LMDB).
Technical systems are characterized by attributes such as SID, host name, installationnumber, and a technical system type, such as AS ABAP, AS Java or TREX server. Technicalsystems are extended by logical systems that represent views on the technical systems fromdifferent perspectives, such as ABAP clients.
Lesson: Describing the Landscape Model, Landscape Management Database, and Landscape Verification
© Copyright. All rights reserved. 89
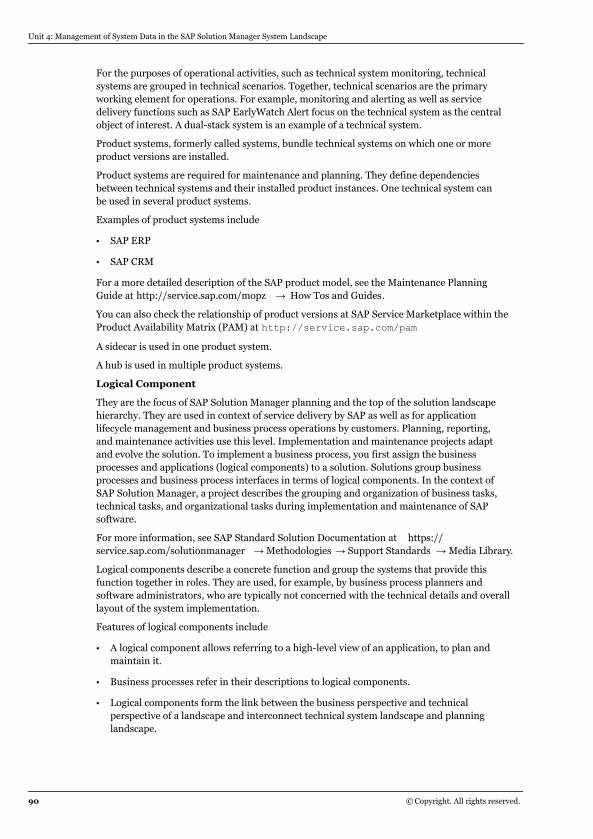
For the purposes of operational activities, such as technical system monitoring, technicalsystems are grouped in technical scenarios. Together, technical scenarios are the primaryworking element for operations. For example, monitoring and alerting as well as servicedelivery functions such as SAP EarlyWatch Alert focus on the technical system as the centralobject of interest. A dual-stack system is an example of a technical system.
Product systems, formerly called systems, bundle technical systems on which one or moreproduct versions are installed.
Product systems are required for maintenance and planning. They define dependenciesbetween technical systems and their installed product instances. One technical system canbe used in several product systems.
Examples of product systems include
● SAP ERP
● SAP CRM
For a more detailed description of the SAP product model, see the Maintenance PlanningGuide at http://service.sap.com/mopz → How Tos and Guides.
You can also check the relationship of product versions at SAP Service Marketplace within theProduct Availability Matrix (PAM) at http://service.sap.com/pam
A sidecar is used in one product system.
A hub is used in multiple product systems.
Logical Component
They are the focus of SAP Solution Manager planning and the top of the solution landscapehierarchy. They are used in context of service delivery by SAP as well as for applicationlifecycle management and business process operations by customers. Planning, reporting,and maintenance activities use this level. Implementation and maintenance projects adaptand evolve the solution. To implement a business process, you first assign the businessprocesses and applications (logical components) to a solution. Solutions group businessprocesses and business process interfaces in terms of logical components. In the context ofSAP Solution Manager, a project describes the grouping and organization of business tasks,technical tasks, and organizational tasks during implementation and maintenance of SAPsoftware.
For more information, see SAP Standard Solution Documentation at https://service.sap.com/solutionmanager → Methodologies → Support Standards → Media Library.
Logical components describe a concrete function and group the systems that provide thisfunction together in roles. They are used, for example, by business process planners andsoftware administrators, who are typically not concerned with the technical details and overalllayout of the system implementation.
Features of logical components include
● A logical component allows referring to a high-level view of an application, to plan andmaintain it.
● Business processes refer in their descriptions to logical components.
● Logical components form the link between the business perspective and technicalperspective of a landscape and interconnect technical system landscape and planninglandscape.
Unit 4: Management of System Data in the SAP Solution Manager System Landscape
90 © Copyright. All rights reserved.
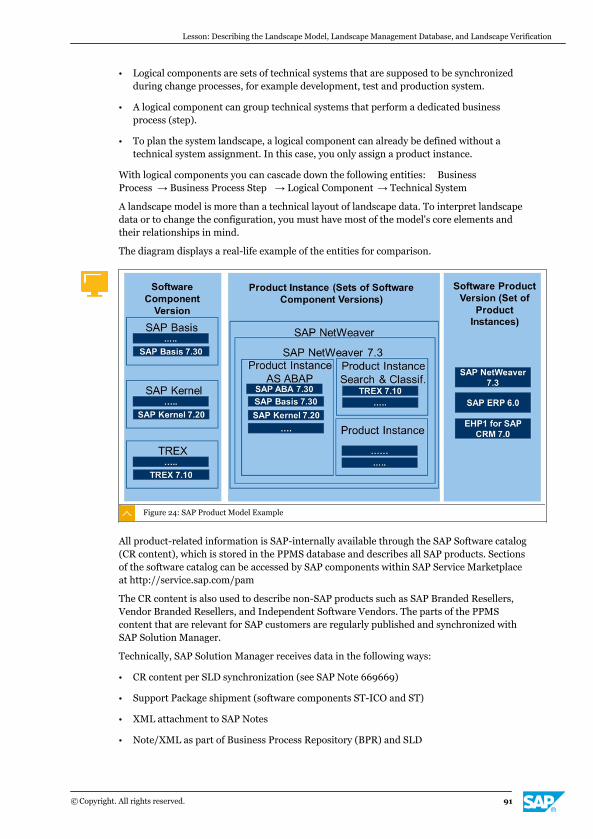
● Logical components are sets of technical systems that are supposed to be synchronizedduring change processes, for example development, test and production system.
● A logical component can group technical systems that perform a dedicated businessprocess (step).
● To plan the system landscape, a logical component can already be defined without atechnical system assignment. In this case, you only assign a product instance.
With logical components you can cascade down the following entities: BusinessProcess → Business Process Step → Logical Component → Technical System
A landscape model is more than a technical layout of landscape data. To interpret landscapedata or to change the configuration, you must have most of the model's core elements andtheir relationships in mind.
The diagram displays a real-life example of the entities for comparison.
Figure 24: SAP Product Model Example
All product-related information is SAP-internally available through the SAP Software catalog(CR content), which is stored in the PPMS database and describes all SAP products. Sectionsof the software catalog can be accessed by SAP components within SAP Service Marketplaceat http://service.sap.com/pam
The CR content is also used to describe non-SAP products such as SAP Branded Resellers,Vendor Branded Resellers, and Independent Software Vendors. The parts of the PPMScontent that are relevant for SAP customers are regularly published and synchronized withSAP Solution Manager.
Technically, SAP Solution Manager receives data in the following ways:
● CR content per SLD synchronization (see SAP Note 669669)
● Support Package shipment (software components ST-ICO and ST)
● XML attachment to SAP Notes
● Note/XML as part of Business Process Repository (BPR) and SLD
Lesson: Describing the Landscape Model, Landscape Management Database, and Landscape Verification
© Copyright. All rights reserved. 91
Within customer landscapes, the CR content is persisted in the following repositories:
● In each SLD
● In SMSY in Solution Manager 7.0
● In LMDB as of Solution Manager 7.1
Products and business processes are essential to maintain the solution landscape, that is, toplan and execute upgrades, updates, and more. It is therefore important to have the latestinformation on products and processes.
The Landscape Verification (LV) ToolThe landscape verification (LV) tool analyzes the description of your system landscape and,with the help of information from the SAP support system, searches for inconsistencies.Based on the results of these checks, a clear user interface shows an overview of allproblems, gaps, and inconsistencies in the description of your system landscape. Each ofthese errors is described in detail; the descriptions also contain procedures for solving theproblem.
The landscape verification works with wizards. These wizards enable you to correct thedetected problems directly.
Many SAP customers operate a variety of SAP applications, which usually consist of manydifferent systems. Many of these applications are therefore distributed across differenttechnical systems and exist as development, test, and production systems.
Consider the following points during maintenance or upgrades of applications of this type:
● To perform an upgrade of all elements of these applications, treat the correspondinggroups of technical systems as a unit.
● When upgrading technical systems that are used in more than one application, consider allof the roles of these systems.
To be able to do any of these things, it is vital to have a correct and complete landscapedescription, which forms the basis for the maintenance of your applications. This landscapedescription is the system landscape of SAP Solution Manager. However, parts of thislandscape description are created manually, and can therefore contain errors, which can, inturn, lead to errors when maintaining your applications.
Landscape verification for SAP Solution Manager can help you detect these errors and canprovide support in solving them. Landscape verification analyzes your landscape descriptionin your SAP Solution Manager, finds errors, and displays information about how to solvethem. This means that you can perform your maintenance processes more quickly with fewererrors and lower costs.
In addition, you can also correct the detected problems in the landscape verification byediting the description of technical systems and product systems in which problems weredetected. This means that the detection and correction of problems takes place within thesame tool.
Unit 4: Management of System Data in the SAP Solution Manager System Landscape
92 © Copyright. All rights reserved.
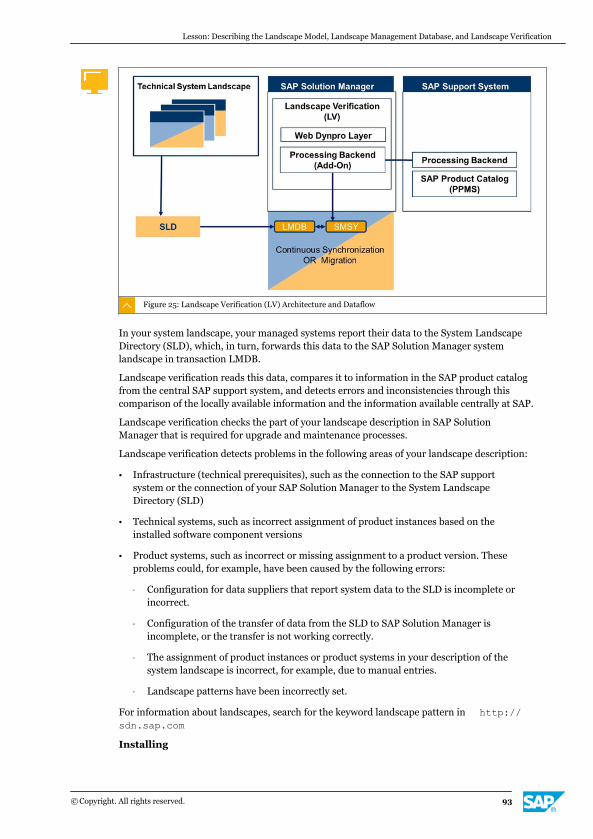
Figure 25: Landscape Verification (LV) Architecture and Dataflow
In your system landscape, your managed systems report their data to the System LandscapeDirectory (SLD), which, in turn, forwards this data to the SAP Solution Manager systemlandscape in transaction LMDB.
Landscape verification reads this data, compares it to information in the SAP product catalogfrom the central SAP support system, and detects errors and inconsistencies through thiscomparison of the locally available information and the information available centrally at SAP.
Landscape verification checks the part of your landscape description in SAP SolutionManager that is required for upgrade and maintenance processes.
Landscape verification detects problems in the following areas of your landscape description:
● Infrastructure (technical prerequisites), such as the connection to the SAP supportsystem or the connection of your SAP Solution Manager to the System LandscapeDirectory (SLD)
● Technical systems, such as incorrect assignment of product instances based on theinstalled software component versions
● Product systems, such as incorrect or missing assignment to a product version. Theseproblems could, for example, have been caused by the following errors:
- Configuration for data suppliers that report system data to the SLD is incomplete orincorrect.
- Configuration of the transfer of data from the SLD to SAP Solution Manager isincomplete, or the transfer is not working correctly.
- The assignment of product instances or product systems in your description of thesystem landscape is incorrect, for example, due to manual entries.
- Landscape patterns have been incorrectly set.
For information about landscapes, search for the keyword landscape pattern in http://sdn.sap.com
Installing
Lesson: Describing the Landscape Model, Landscape Management Database, and Landscape Verification
© Copyright. All rights reserved. 93
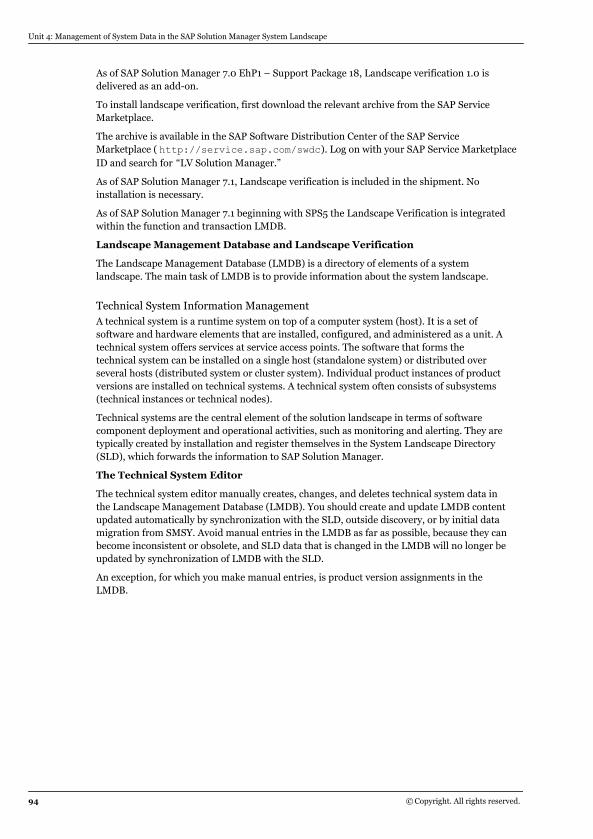
As of SAP Solution Manager 7.0 EhP1 – Support Package 18, Landscape verification 1.0 isdelivered as an add-on.
To install landscape verification, first download the relevant archive from the SAP ServiceMarketplace.
The archive is available in the SAP Software Distribution Center of the SAP ServiceMarketplace ( http://service.sap.com/swdc). Log on with your SAP Service MarketplaceID and search for “LV Solution Manager.”
As of SAP Solution Manager 7.1, Landscape verification is included in the shipment. Noinstallation is necessary.
As of SAP Solution Manager 7.1 beginning with SPS5 the Landscape Verification is integratedwithin the function and transaction LMDB.
Landscape Management Database and Landscape Verification
The Landscape Management Database (LMDB) is a directory of elements of a systemlandscape. The main task of LMDB is to provide information about the system landscape.
Technical System Information ManagementA technical system is a runtime system on top of a computer system (host). It is a set ofsoftware and hardware elements that are installed, configured, and administered as a unit. Atechnical system offers services at service access points. The software that forms thetechnical system can be installed on a single host (standalone system) or distributed overseveral hosts (distributed system or cluster system). Individual product instances of productversions are installed on technical systems. A technical system often consists of subsystems(technical instances or technical nodes).
Technical systems are the central element of the solution landscape in terms of softwarecomponent deployment and operational activities, such as monitoring and alerting. They aretypically created by installation and register themselves in the System Landscape Directory(SLD), which forwards the information to SAP Solution Manager.
The Technical System Editor
The technical system editor manually creates, changes, and deletes technical system data inthe Landscape Management Database (LMDB). You should create and update LMDB contentupdated automatically by synchronization with the SLD, outside discovery, or by initial datamigration from SMSY. Avoid manual entries in the LMDB as far as possible, because they canbecome inconsistent or obsolete, and SLD data that is changed in the LMDB will no longer beupdated by synchronization of LMDB with the SLD.
An exception, for which you make manual entries, is product version assignments in theLMDB.
Unit 4: Management of System Data in the SAP Solution Manager System Landscape
94 © Copyright. All rights reserved.
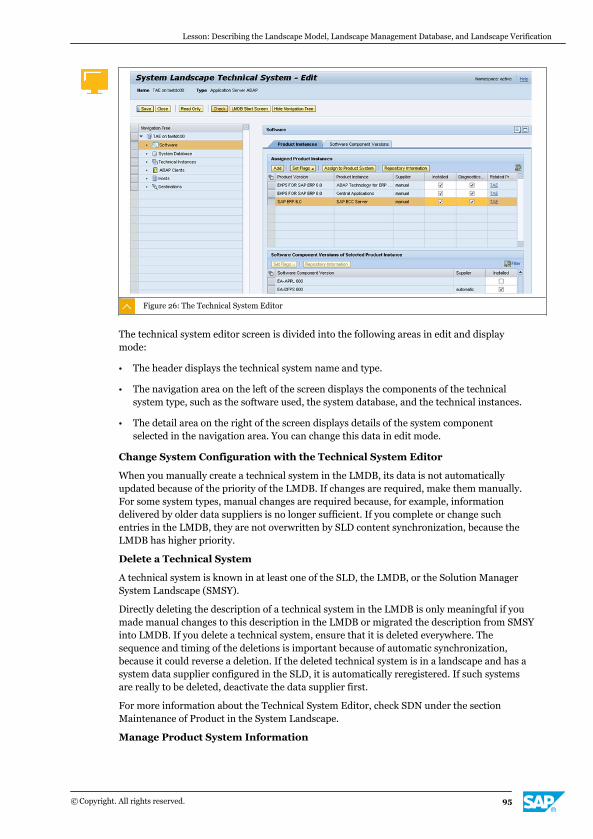
Figure 26: The Technical System Editor
The technical system editor screen is divided into the following areas in edit and displaymode:
● The header displays the technical system name and type.
● The navigation area on the left of the screen displays the components of the technicalsystem type, such as the software used, the system database, and the technical instances.
● The detail area on the right of the screen displays details of the system componentselected in the navigation area. You can change this data in edit mode.
Change System Configuration with the Technical System Editor
When you manually create a technical system in the LMDB, its data is not automaticallyupdated because of the priority of the LMDB. If changes are required, make them manually.For some system types, manual changes are required because, for example, informationdelivered by older data suppliers is no longer sufficient. If you complete or change suchentries in the LMDB, they are not overwritten by SLD content synchronization, because theLMDB has higher priority.
Delete a Technical System
A technical system is known in at least one of the SLD, the LMDB, or the Solution ManagerSystem Landscape (SMSY).
Directly deleting the description of a technical system in the LMDB is only meaningful if youmade manual changes to this description in the LMDB or migrated the description from SMSYinto LMDB. If you delete a technical system, ensure that it is deleted everywhere. Thesequence and timing of the deletions is important because of automatic synchronization,because it could reverse a deletion. If the deleted technical system is in a landscape and has asystem data supplier configured in the SLD, it is automatically reregistered. If such systemsare really to be deleted, deactivate the data supplier first.
For more information about the Technical System Editor, check SDN under the sectionMaintenance of Product in the System Landscape.
Manage Product System Information
Lesson: Describing the Landscape Model, Landscape Management Database, and Landscape Verification
© Copyright. All rights reserved. 95
You create product systems to define the scope of your maintenance projects for all involvedtechnical systems. Things would be simple if you could install any product version (for SAPERP or SAP CRM, for example) on a single technical system. However, that would be inflexiblebecause any reuse of installed software would be impossible. For example, it would beimpossible for multiple business systems to reuse one Enterprise Portal System. Productsystem definitions describe dependencies and reuse between technical systems, whichenables you to update the technical systems consistently and to keep the solution running. Ifyou disregard dependencies, incompatible software could be installed and the solution wouldfail.
Therefore, to enable reuse, often only certain parts of one product version are installed, andthe installation is distributed over several technical systems. For more information, see thewhite paper SAP Solution Landscape at http://scn.sap.com/docs/DOC-29495
Technical systems can automatically supply the SLDs with information about installedsoftware by the SLD data supplier (for example, with transaction RZ70 for AS ABAP). SLDsautomatically synchronize technical system data with the LMDB in SAP Solution Manager.Based on this technical system information, you create product system information in theLMDB to define landscape data that semantically describes interdependencies betweentechnical systems. Landscape data describes how a product version is installed on differenttechnical systems, or which technical systems build a dual-stack. One product systemdescribes the technical systems on that selected product instances of a product version areinstalled. Maintain the parts of one product system simultaneously as one unit.
Note:Technical system information is provided automatically by the SLD but you createproduct system descriptions manually.
Create Product System Information
With the product system editor of the LMDB in SAP Solution Manager, you can create,change, and delete information about product systems.
Before SAP Solution Manager 7.1 SP04, product system information was maintained inSMSY. For more information, see SAP Note 1679673 - LMDB System Landscape ProductSystem: Comparison with SMSY.
Verification Checks
To improve the quality of product system information and to enable system upgrade andupdates, you can run verification checks for product systems. This verification is especiallynecessary since most product system information is created manually, which can be a causeof errors.
The verification analyzes your system landscape description in the LMDB based on the latestSAP Software Catalog in the SAP Support Portal.
You can resolve most problems directly in the product system editor. Problems such as thefollowing can be detected:
● Infrastructure (technical requirement) problems, such as difficulty connecting to the SAPsupport system or when connecting your SAP Solution Manager to the SLD.
● Technical system problems, such as incorrect assignment of landscape patterns (hub orsidecar) or of incorrect product instances based on the installed software components.
Unit 4: Management of System Data in the SAP Solution Manager System Landscape
96 © Copyright. All rights reserved.
● Product system problems, such as incorrect or missing assignment to a product version orproduct instance, including missing instances that are a prerequisite for an assignedinstance, or insufficiently configured data suppliers that report system data to the SLD.
Manage Logical Components
Logical components describe a concrete functionality and group the systems providing thisfunctionality in different roles.
When business processe and software maintenance planners talk about systems, they aretypically not concerned with the technical details and overall layout of the systemimplementation. In fact, the logical component can be created before the systems existphysically.
A logical component allows referring to a high-level view of an application for the purpose ofplanning and maintenance.
In their descriptions, business processes refer to logical components as processing units.
Logical components are sets of technical systems that are synchronized during changeprocesses (the set can contain development system, test system, and production system).
Logical components form the link between the business perspective and the technicalperspective of a landscape. They are the interconnection between the technical systemlandscape and the planning landscape.
A logical component can group technical systems that belong together to perform a specificbusiness process step.
When you are planning a system landscape, a logical component can already be definedwithout a technical system assignment.
Display Logical Components Using a Product System
To see to which logical components a product system is assigned open the SAP SolutionManager Administration work center and choose Landscape → Product Systems .
Alternatively, you can use transaction LMDB to access the information directly.
Select an existing product system and choose Display and Where Used.
Assignment of Systems in a Logical Component
When you assign product systems to a logical component the input help includes thosesystems to which the same product versions are assigned as to the logical component.
If you have not assigned a product version to a product system yet, the input provides thoseproduct versions that can be assigned to the product instances.
A logical system identifies individual clients of a products system and AS ABAP technicalsystems. to an ABAP-based product instance in a logical component, you assign a logicalsystem. To a non-ABAP-based product instance, you assign the product system to which thetechnical system, on which the product instance is based, belongs.
You assign logical components to a project under Project Administration → SystemLandscape → Systems .
Manually Created Systems in SAP Solution ManagerIf there is no data supplier for a system, you can create a system manually in the LMDB usingthe technical system editor. However, manually created technical systems are notautomatically updated, so they can become obsolete. If you connect the system with a datasupplier later, all missing information is written from SLD to LMDB. If the information differsbetween the SLD and LMDB, the LMDB version is retained. If you want to copy the SLD status
Lesson: Describing the Landscape Model, Landscape Management Database, and Landscape Verification
© Copyright. All rights reserved. 97
to the LMDB, proceed as described in Troubleshooting: Restoring a Damaged TechnicalSystem Description.
To Manually Create Technical System Data
1. Open the technical system editor through the Managed Systems Configuration workcenter using transaction SOLMAN_SETUP.
a) Log on to SAP Solution Manager with your user name and password.
b) On the SAP Solution Manager Easy Access screen, call transaction SOLMAN_SETUP.
c) In the navigation area, choose Managed Systems Configuration .
d) On the Technical Systems tab, choose System Operations → Create System .
e) The Technical System Editor - Create System wizard appears.
2. Alternatively, you can open the technical system editor through the Solution ManagerAdministration work center.
a) On the SAP Easy Access screen, call transaction SM_WORKCENTER.
b) Open the Solution Manager Administration tab.
c) Select Landscape .
d) On the Technical Systems tab, choose System Operations → Create System .
e) The Technical System Editor - Create System wizard appears.
3. You can also open the technical system editor using transaction LMDB.
a) On the SAP Easy Access screen, call transaction LMDB.
b) Open the Technical Systems tab.
c) Choose Create Technical System .
d) The Technical System Editor - Create System wizard appears.
4. Create a technical system to your requirements.
a) On the Select System Type screen, select the relevant system type from the dropdownlist and choose Next.
b) On the Define System screen, read the onscreen documentation carefully and fill in themandatory fields according to SAP's naming specifications.
Right-click on one of the fields to display Quick Help.
c) Choose Next.
d) On the Define Extended SID screen enter the Extended System ID according to SAPspecifications.
e) Choose Next.
f) On the Confirmation screen, choose Save .The basic technical system information has been created.
Unit 4: Management of System Data in the SAP Solution Manager System Landscape
98 © Copyright. All rights reserved.
To Create Product System InformationYou create product system descriptions manually; they cannot be provided by an SLD.
1. Create a new product system in the LMDB, using the Solution Manager Administrationwork center.
Alternatively, you can open the LMDB directly from the SAP Easy Access screen usingtransaction LMDB.
a) In the SAP Solution Manager Administration work center, choose Landscape .
b) In the navigation area, in the Type Selection section, select the Product Systems radiobutton.The All Product Systems tab displays.
c) Choose Create .The Landscape Management Database appears.
d) Choose Create Product System .
e) Use Input Help to choose a Product System Name and choose Create Product System .
f) Save the change.
2. Define the technical systems and product instances that belong to the product system inthe LMDB, using the Solution Manager Administration work center.
The technical systems that are maintained together are well known in most cases, but ifthe correct product instances are not provided by the technical system, they can be hardto find. The product system editor and the technical system editor both provide proposalsfor the product instance selection. These proposals are calculated based on the set ofinstalled software components. Sometimes several valid configurations are possible. Inthis case, you must select the one that is correct for your product system.
a) Return to the Solution Manager Administration work center Landscape view and selectthe Product Systems radio button.
b) Select the product system you want to edit and choose Edit.
c) In the Navigation tree, select Technical Systems .
d) In the content area, in the Technical Systems of Product System table, choose Add.The Specify Technical System and Product Instance screen appears. For moreinformation, see the help text on this screen.
e) Select the required product instances.
For each product instance that you assign, choose Execute Verification Check .
f) When you have assigned all the required product instances, choose Close .The assigned product instances display in the table, sorted according to their technicalsystem and product version.
3. Confirm your edits.
a) To ensure that your changes persist in the database, choose Save .
b) If error messages display, follow the instructions to resolve them.
When you have finished editing the product system, the verification in the product systemeditor must deliver a positive result.
Lesson: Describing the Landscape Model, Landscape Management Database, and Landscape Verification
© Copyright. All rights reserved. 99
When you assign product instances and their technical systems to a product system, theseproduct instances also display in the Software screen of the technical system editor, but theInstalled indicator is not automatically set. Do not set the Installed indicator for productinstances in the technical system editor. It is sufficient to assign the product instances to aproduct system. However, if the automatic SLD data supplier delivers the product instanceinformation, the Installed indicator is usually set automatically.
To Create Logical ComponentsExcept for information about product systems and technical systems, logical componentscontinue to be maintained in transaction SMSY.
SAP delivers some predefined logical components.
1. Start transaction SMSY.
a) Log on to the SAP Solution Manager system with your user name and password.
b) On the SAP Easy Access screen, call transaction SMSY.
2. Create a new logical component.
a) On the System Landscape screen, choose System Groups and Logical Components .
b) Select and right-click Logical Components .
c) From the context menu, choose Create New Logical Components .
d) Select a product, product version, and product instance.
To create and assign a new product choose Create Product .
e) Save your changes.
Inconsistent Logical ComponentsUpgrading a product system can change the active product version.
Upgrading a product system can change the active product version. If you have assignedsystems to a logical component via this product system, the product versions of the logicalcomponent and the systems will no longer match, after the upgrade. The logical component isinconsistent.
SAP Recommendation:Only increment the product version of a logical component intransaction SMSY after you have upgraded all product systems.
Start transaction SMSY and switch to change mode. The affected logical component isindicated in the overview tree by an exclamation mark.
Case A: The active product version of the product system and the product version of the logicalcomponent do not match
Check that the product version is correct. There are the following possibilities:
The product system is being upgraded: Ignore the inconsistency until after the upgrade, andthen resolve it.
The product system is not being upgraded: To resolve the inconsistency, change the activeproduct version of the product system to match the product version of the logical componentin which you use systems of this group.
Case B: The logical component is internally inconsistent
Unit 4: Management of System Data in the SAP Solution Manager System Landscape
100 © Copyright. All rights reserved.
A logical component can be inconsistent if not all product instances exist in all productversions.
Example: The product instance E-Selling for product SAP CRM exists only in the productversion SAP CRM 4.0. If a logical component contains the product instance E-Selling withanother product version than SAP CRM 4.0 (such as SAP CRM 3.0) this logical component isinconsistent.
Existing product instances have the Product Instance Exists flag in the product version inputhelp.
Use another logical component, with a product instance that exists in this product version:
● Create a logical component
● Choose an existing product instance for this logical component.
● To see in which system groups of projects and solutions the logical component is used,generate a where-used list for the old, inconsistent logical component.
● To replace the old logical component with the new one in these system groups, chooseReplace Logical Component .
● The system shows a warning message if the logical component is used in a solution forwhich business process monitoring is active. Deactivate it before you can change thelogical component. Proceed as follows:
- Call the Business Process Operations work center for your solution.
- Under Common Tasks , choose Setup Business Process Monitoring . The system lists theactive solutions in a dialog box.
- Select your solution. The system opens a session in the background to set up businessprocess monitoring.
- In the new session, go via the Business Processes node to the Generation/Activation/Deactivation node, per process.
- Choose Deactivate Monitoring if it is available. If it is unavailable, the selected businessprocess is not being monitored, so it does not require deactivation.
- Delete all systems from the old, inconsistent logical component.
- The old logical component is no longer used. The inconsistency flag (exclamation mark)in the overview disappears.
To Modify Technical System DataWhen you manually create a technical system in the LMDB, you maintain it manually.Similarly, if changes are needed, you make them manually. You may also need to makemanual changes where, for example, information delivered by data suppliers is no longersufficient. If you complete or change such entries in the LMDB, they are not overwritten bySLD content synchronization, because the LMDB has higher priority.
1. Open the technical system you want to modify in the LMDB.
a) Log on to SAP Solution Manager with your user name and password.
b) On the SAP Easy Access screen, call transaction SOLMAN_SETUP.
Lesson: Describing the Landscape Model, Landscape Management Database, and Landscape Verification
© Copyright. All rights reserved. 101
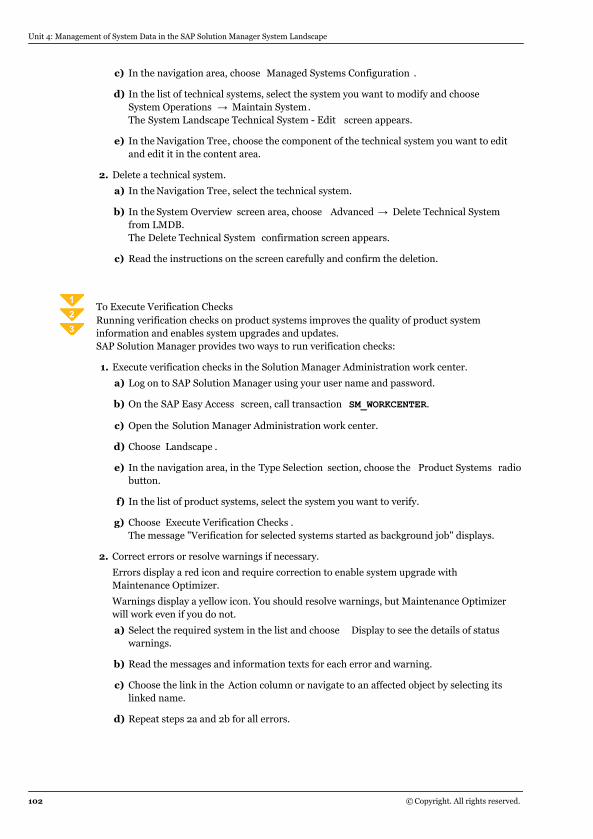
c) In the navigation area, choose Managed Systems Configuration .
d) In the list of technical systems, select the system you want to modify and chooseSystem Operations → Maintain System.The System Landscape Technical System - Edit screen appears.
e) In the Navigation Tree, choose the component of the technical system you want to editand edit it in the content area.
2. Delete a technical system.
a) In the Navigation Tree, select the technical system.
b) In the System Overview screen area, choose Advanced → Delete Technical Systemfrom LMDB.The Delete Technical System confirmation screen appears.
c) Read the instructions on the screen carefully and confirm the deletion.
To Execute Verification ChecksRunning verification checks on product systems improves the quality of product systeminformation and enables system upgrades and updates.SAP Solution Manager provides two ways to run verification checks:
1. Execute verification checks in the Solution Manager Administration work center.
a) Log on to SAP Solution Manager using your user name and password.
b) On the SAP Easy Access screen, call transaction SM_WORKCENTER.
c) Open the Solution Manager Administration work center.
d) Choose Landscape .
e) In the navigation area, in the Type Selection section, choose the Product Systems radiobutton.
f) In the list of product systems, select the system you want to verify.
g) Choose Execute Verification Checks .The message "Verification for selected systems started as background job" displays.
2. Correct errors or resolve warnings if necessary.
Errors display a red icon and require correction to enable system upgrade withMaintenance Optimizer.
Warnings display a yellow icon. You should resolve warnings, but Maintenance Optimizerwill work even if you do not.
a) Select the required system in the list and choose Display to see the details of statuswarnings.
b) Read the messages and information texts for each error and warning.
c) Choose the link in the Action column or navigate to an affected object by selecting itslinked name.
d) Repeat steps 2a and 2b for all errors.
Unit 4: Management of System Data in the SAP Solution Manager System Landscape
102 © Copyright. All rights reserved.
The warnings and errors messages in product system verification can be difficult tosolve.
3. Verify settings that you have just made to a system, directly in the product system editor.
a) On the System Landscape Product System - Edit screen, in the Navigation Tree, selectVerification completed on [date and time] .
b) In the content area, choose Execute Verification Check .
If you are in edit mode, the verification is done synchronously. If you are in displaymode, a batch job starts that saves the verification results, which you can checkasynchronously.
To Edit Logical Components
1. Choose a logical component to edit in transaction SMSY.
a) Log on to SAP Solution Manager with your user name and password.
b) On the SAP Easy Access screen, call transaction SMSY.
c) Open the System Groups and Logical Components section.
d) Expand the Logical Components tree and select the component you want to edit.
Use the Findfunction if necessary.
The Logical Component screen displays.
e) Choose Change to switch to edit mode.
2. Edit the logical component as required. You can make the following changes:
Options Description
Active/InactiveIndicator
To use a logical component in system groups or in project, setthe indicator to Active. To hide the logical component from theNew Uses input help across the system, but retain existing usesof the logical component, set the indicator to Inactive.
Product Version You can change the product version assigned to a specificproduct. For example, you can change the product version SAPCRM 5.1 to SAP CRM 7.0.
System Roles Assign systems to the logical components to form system roles,such as a development system.
Consistency Check Check the consistency of the system assignment.
Shipment Routes(relevant only toChange RequestManagement)
Display the transport routes in which the systems are involved.
Where-Used List Display the system groups in which the logical component isused. You can also use this function to navigate directly to thesystem groups and, if necessary, delete the usage.
System Roles Change system roles or their sequence, or assign system roletypes for Change Request Management.
Lesson: Describing the Landscape Model, Landscape Management Database, and Landscape Verification
© Copyright. All rights reserved. 103
Options Description
Namespaces Assign development namespaces to the logical component. Youcan request these namespaces from SAP.
Related LogicalComponents
Display and assign logical components that are related to thislogical component. For example, you can display all logicalcomponents to which you want to assign the same systems inthe future.
System Roles Define a maximum of ten system roles as required.
3. Define your own system roles.
The systems in a logical component are assigned to the following system roles and usuallylinked by transport routes:
Table 16: System Roles
System Role Use
Evaluation Business Blueprint
Development Configuration, upgrade
Quality Assurance Testing
Production Leading system role in operational proc-essing for system and business processmonitoring. EarlyWatch alerts are support-ed for all system roles
Training Training
Demo Demonstration
Reference Reference
a) In the content area, choose System Roles.The Change System Settings screen appears.
b) To change the type of role, select the Type of Role column and select your requiredoption from the dropdown list.
c) To move system roles into other systems, select the required role in the list andchoose Transport.
Although a Delete button displays on the screen, you cannot delete or changepredefined system roles. If you have user-defined system roles in the landscape, youcan delete them if the logical component is not used and the role you want to delete isnot used. Otherwise, you can rename user-defined roles, but you cannot delete them.
LESSON SUMMARYYou should now be able to:
● Describe the elements and relationships in an SAP solution
● Explain Landscape Verification
Unit 4: Management of System Data in the SAP Solution Manager System Landscape
104 © Copyright. All rights reserved.
● Create data in the Landscape Management Database with the technical system editor
● Edit data in the Landscape Management Database with the technical system editor
Lesson: Describing the Landscape Model, Landscape Management Database, and Landscape Verification
© Copyright. All rights reserved. 105

Unit 4: Management of System Data in the SAP Solution Manager System Landscape
106 © Copyright. All rights reserved.
Unit 4
Learning Assessment
1. Which of the following types of data can be synchronized by automatic forwarding in theSLD?
Choose the correct answers.
X A ABAP system data
X B Host data
X C Name reservation data
X D Java system data
X E Data from applications such as SAP NetWeaver PI
2. After installation or upgrade of SAP Solution Manager, the LMDB resumes incrementalsynchronization with the SLD immediately.
Determine whether this statement is true or false.
X True
X False
3. Which of the following SAP product entities describes a concrete function and groups thesystems that provide that function together in roles?
Choose the correct answer.
X A The SAP Product Catalog
X B A technical system.
X C A product system.
X D A logical component.
© Copyright. All rights reserved. 107
4. The landscape verification tool compares your system landscape data with which otherdata source?
Choose the correct answer.
X A Other system landscapes within your organization.
X B The SAP product catalog
X C Previously collected system landscape data
Unit 4: Learning Assessment
108 © Copyright. All rights reserved.
Unit 4
Learning Assessment - Answers
1. Which of the following types of data can be synchronized by automatic forwarding in theSLD?
Choose the correct answers.
X A ABAP system data
X B Host data
X C Name reservation data
X D Java system data
X E Data from applications such as SAP NetWeaver PI
2. After installation or upgrade of SAP Solution Manager, the LMDB resumes incrementalsynchronization with the SLD immediately.
Determine whether this statement is true or false.
X True
X False
3. Which of the following SAP product entities describes a concrete function and groups thesystems that provide that function together in roles?
Choose the correct answer.
X A The SAP Product Catalog
X B A technical system.
X C A product system.
X D A logical component.
© Copyright. All rights reserved. 109
4. The landscape verification tool compares your system landscape data with which otherdata source?
Choose the correct answer.
X A Other system landscapes within your organization.
X B The SAP product catalog
X C Previously collected system landscape data
Unit 4: Learning Assessment - Answers
110 © Copyright. All rights reserved.
UNIT 5 Guided Procedures forConfiguration of SAP SolutionManager
Lesson 1
Performing Prerequisite Checks for Configuring SAP Solution Manager 112
Exercise 3: Check Prerequisites for Guided Configuration 119
Lesson 2
Explaining the Guided Procedures for Configuring SAP Solution Manager 122
Lesson 3
Performing the SAP Solution Manager System Preparation 125
Exercise 4: Check SAP Solution Manager System Preparation Success 137
Lesson 4
Performing Basic Configuration of SAP Solution Manager 141
Exercise 5: Check SAP Solution Manager Basic Configuration 155
Lesson 5
Customizing SAP Solution Manager Work Centers 159
UNIT OBJECTIVES
● Perform prerequisite checks for SAP Solution Manager guided configuration
● Identify the elements of the SAP Solution Manager Guided Procedure interface
● Prepare the SAP Solution Manager system for configuration
● Configure basic settings in SAP Solution Manager
● Personalize SAP Solution Manager work centers
© Copyright. All rights reserved. 111
Unit 5Lesson 1
Performing Prerequisite Checks forConfiguring SAP Solution Manager
LESSON OVERVIEWBefore you perform the configuration of SAP Solution Manager you must ensure that certainprerequisites are met. In this lesson you will learn how to check and fulfill the prerequisites forSAP Solution Manager configuration.
LESSON OBJECTIVESAfter completing this lesson, you will be able to:
● Perform prerequisite checks for SAP Solution Manager guided configuration
Pre-Configuration Checks in SAP Solution ManagerBefore starting the SAP Solution Manager guided procedure you make sure that certainprerequisites are in place.
The following prerequisites are also described in the post-installation activities of most SAPsystem installations.
Check Transport Management System Configuration
You add the SAP Solution Manager system to a transport domain to import notes andperform automatic configuration steps such as import piece list.
You check the STMS configuration using transaction STMS.
We recommend that you configure your SAP Solution Manager system as a transport domaincontroller. TMS is a central service for all other systems in the landscape, and if you choosethe Enhanced Change Transport System (CTS+) function, you must configure an additionalweb service in the AS Java solution. As an add-in system, SAP Solution manager already hasits own AS Java solution, which makes it easier to configure and use in this scenario.
Check RFC Connection SAPOSS
This RFC destination is used to establish a connection between your SAP Solution Managersystem and the SAP support backbone, such as when transaction SNOTE uses it to downloadSAP Notes.
You check RFC destination SAPOSS by calling transaction SM59 and choosing ConnectionTest or Utilities Test → Authorization Test for the RFC SAPOSS as shown in Figure 1.
112 © Copyright. All rights reserved.

Figure 27: Prerequisite checks - RFC Destination SAPOSS
If the connection test fails, call transaction OSS1, where you can check and maintain thesettings, as shown in Figure 2.
Figure 28: Prerequisites - Maintain Router Data for Logon to SAP Service Marketplace
When you choose Parameter Settings → Technical Settings , you maintain router data for thelogon to SAP Service Marketplace. When you save this information, the RFC destinationSAPOSS is created.
For more information on RFC destination SAPOSS, see SAP Note 182308 - Incorrect logondata in R/3 destination SAPOSS and SAP Note 17285 - Logon to OSS (Transaction OSS1).
Create/ Check S-User
All SAP customers have S-users assigned to them to access SAP internal systems via RFCdestinations such as SAP-OSS and SAP-OSS-LIST-001. Ensure that each S- user has apassword and is assigned to a customer number. For security reasons these S-users shouldhave no authorizations in case they are misused for direct logon.
Lesson: Performing Prerequisite Checks for Configuring SAP Solution Manager
© Copyright. All rights reserved. 113
The S-User assigned to SAP Solution Manager, however, does require authorization to accessSAP Service Marketplace. This dedicated S-user is employed in a number of scenarios,including updating service sessions, updating the message status from support, andrequesting maintenance certificates. These functions are usually carried out in regularbackground jobs in SAP Solution Manager, so the SAP Solution Manager S-user is not usedfor normal logon to SAP Service Marketplace.
This dedicated SAP Solution Manager S-user can be connected to other system users such asthe batch processing user (SOLMAN_BTC) using transaction ASISUSER, without a password.
You check the authorization objects associated with the Solution Manager S-user on the UserData Maintenance screen of SAP Service Marketplace. Ensure that the Solution Manager S-user has at least the following authorization objects associated with it:
● Access Service Messages
● Confirm Customer Messages
● Maintain System Data
● Maintain User Data
● Maintain All Logon Data
● Maintain My Logon Data
● Open Service Connections
● Request License Keys
● Send Customer Messages to SAP
● Software Download
● Support Evaluation
For more information about the S-user concept and authorization in SAP Solution Manager,see the latest SAP Solution Manager Security Guide, which is available at http://service.sap.com/instguides → SAP Solution Manager → Release <ReleaseNumber> → Operations
Check Support Package Stack Levels
To ensure that SAP Solution Manager can manage the satellite systems properly, check thatthe support package levels of all systems are up to date according to SAP Note 1483508 -Root Cause Analysis Prerequisites.
The most important components to check on SAP Solution Manager are Support Packagesfor Solution Manager (ST) and Support Packages for SAP Solution Manager Service Tools(ST_SER).
To manage a satellite system with SAP Solution Manager, apply the following add-ons to theABAP stack of the satellite system:
Solution Tools Plug-In (ST-PI)
ST-PI provides basis and trace tools necessary for service delivery and systemmonitoring. It contains the latest version of the function modules for data collection,transaction SDCCN, Application-Specific Upgrade ASU-Toolbox, and the CustomDevelopment Management Cockpit (CDMC). For more information, see SAP Note539977 - Release strategy for add-on ST-PI.
Service Tools for Applications Plug-In (ST-A/PI)
Unit 5: Guided Procedures for Configuration of SAP Solution Manager
114 © Copyright. All rights reserved.
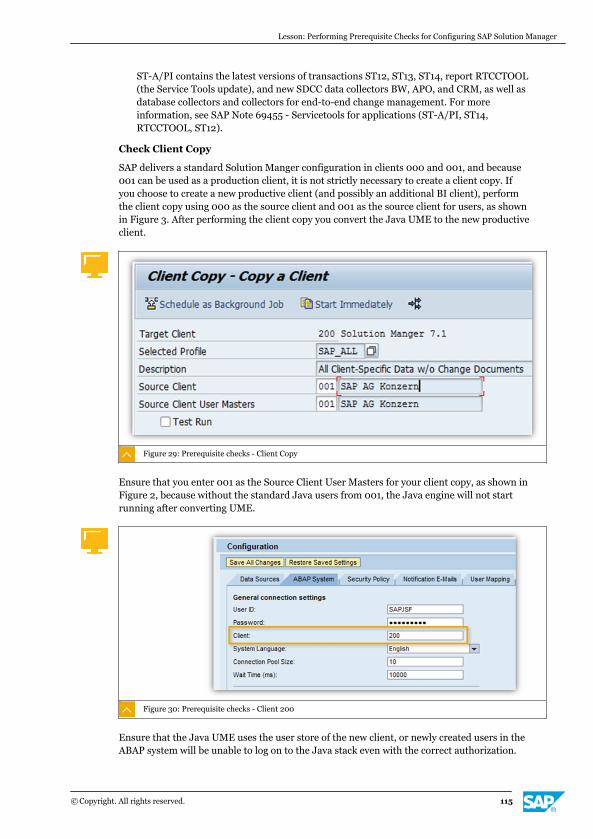
ST-A/PI contains the latest versions of transactions ST12, ST13, ST14, report RTCCTOOL(the Service Tools update), and new SDCC data collectors BW, APO, and CRM, as well asdatabase collectors and collectors for end-to-end change management. For moreinformation, see SAP Note 69455 - Servicetools for applications (ST-A/PI, ST14,RTCCTOOL, ST12).
Check Client Copy
SAP delivers a standard Solution Manger configuration in clients 000 and 001, and because001 can be used as a production client, it is not strictly necessary to create a client copy. Ifyou choose to create a new productive client (and possibly an additional BI client), performthe client copy using 000 as the source client and 001 as the source client for users, as shownin Figure 3. After performing the client copy you convert the Java UME to the new productiveclient.
Figure 29: Prerequisite checks - Client Copy
Ensure that you enter 001 as the Source Client User Masters for your client copy, as shown inFigure 2, because without the standard Java users from 001, the Java engine will not startrunning after converting UME.
Figure 30: Prerequisite checks - Client 200
Ensure that the Java UME uses the user store of the new client, or newly created users in theABAP system will be unable to log on to the Java stack even with the correct authorization.
Lesson: Performing Prerequisite Checks for Configuring SAP Solution Manager
© Copyright. All rights reserved. 115
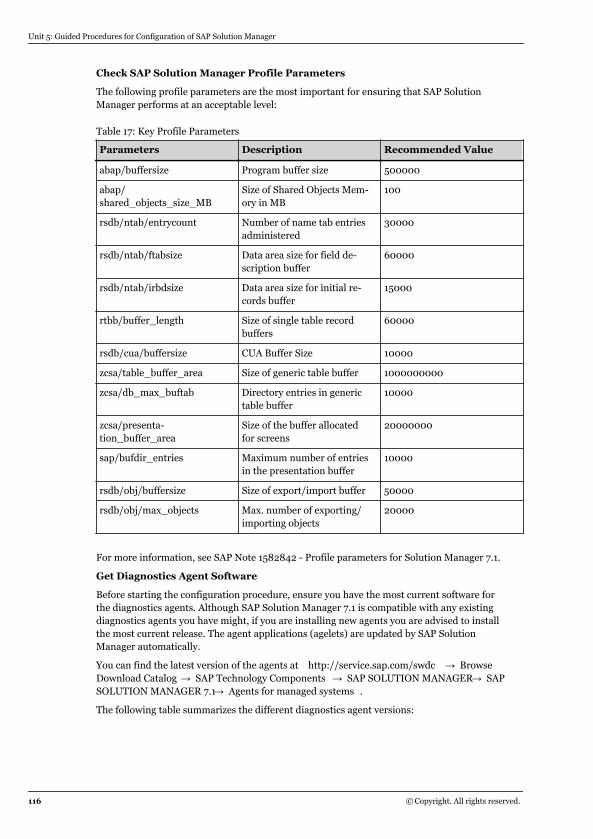
Check SAP Solution Manager Profile Parameters
The following profile parameters are the most important for ensuring that SAP SolutionManager performs at an acceptable level:
Table 17: Key Profile Parameters
Parameters Description Recommended Value
abap/buffersize Program buffer size 500000
abap/shared_objects_size_MB
Size of Shared Objects Mem-ory in MB
100
rsdb/ntab/entrycount Number of name tab entriesadministered
30000
rsdb/ntab/ftabsize Data area size for field de-scription buffer
60000
rsdb/ntab/irbdsize Data area size for initial re-cords buffer
15000
rtbb/buffer_length Size of single table recordbuffers
60000
rsdb/cua/buffersize CUA Buffer Size 10000
zcsa/table_buffer_area Size of generic table buffer 1000000000
zcsa/db_max_buftab Directory entries in generictable buffer
10000
zcsa/presenta-tion_buffer_area
Size of the buffer allocatedfor screens
20000000
sap/bufdir_entries Maximum number of entriesin the presentation buffer
10000
rsdb/obj/buffersize Size of export/import buffer 50000
rsdb/obj/max_objects Max. number of exporting/importing objects
20000
For more information, see SAP Note 1582842 - Profile parameters for Solution Manager 7.1.
Get Diagnostics Agent Software
Before starting the configuration procedure, ensure you have the most current software forthe diagnostics agents. Although SAP Solution Manager 7.1 is compatible with any existingdiagnostics agents you have might, if you are installing new agents you are advised to installthe most current release. The agent applications (agelets) are updated by SAP SolutionManager automatically.
You can find the latest version of the agents at http://service.sap.com/swdc → BrowseDownload Catalog → SAP Technology Components → SAP SOLUTION MANAGER → SAPSOLUTION MANAGER 7.1 → Agents for managed systems .
The following table summarizes the different diagnostics agent versions:
Unit 5: Guided Procedures for Configuration of SAP Solution Manager
116 © Copyright. All rights reserved.
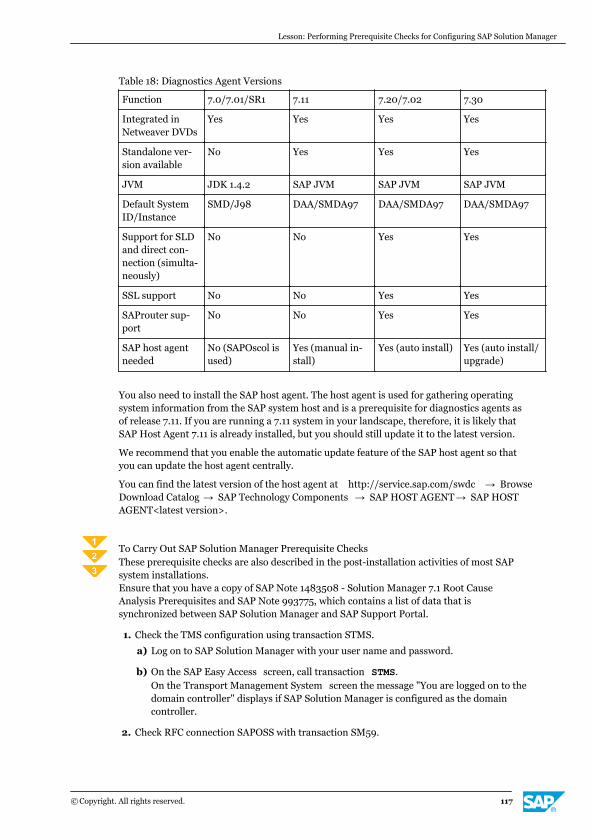
Table 18: Diagnostics Agent Versions
Function 7.0/7.01/SR1 7.11 7.20/7.02 7.30
Integrated inNetweaver DVDs
Yes Yes Yes Yes
Standalone ver-sion available
No Yes Yes Yes
JVM JDK 1.4.2 SAP JVM SAP JVM SAP JVM
Default SystemID/Instance
SMD/J98 DAA/SMDA97 DAA/SMDA97 DAA/SMDA97
Support for SLDand direct con-nection (simulta-neously)
No No Yes Yes
SSL support No No Yes Yes
SAProuter sup-port
No No Yes Yes
SAP host agentneeded
No (SAPOscol isused)
Yes (manual in-stall)
Yes (auto install) Yes (auto install/upgrade)
You also need to install the SAP host agent. The host agent is used for gathering operatingsystem information from the SAP system host and is a prerequisite for diagnostics agents asof release 7.11. If you are running a 7.11 system in your landscape, therefore, it is likely thatSAP Host Agent 7.11 is already installed, but you should still update it to the latest version.
We recommend that you enable the automatic update feature of the SAP host agent so thatyou can update the host agent centrally.
You can find the latest version of the host agent at http://service.sap.com/swdc → BrowseDownload Catalog → SAP Technology Components → SAP HOST AGENT → SAP HOSTAGENT<latest version>.
To Carry Out SAP Solution Manager Prerequisite ChecksThese prerequisite checks are also described in the post-installation activities of most SAPsystem installations.Ensure that you have a copy of SAP Note 1483508 - Solution Manager 7.1 Root CauseAnalysis Prerequisites and SAP Note 993775, which contains a list of data that issynchronized between SAP Solution Manager and SAP Support Portal.
1. Check the TMS configuration using transaction STMS.
a) Log on to SAP Solution Manager with your user name and password.
b) On the SAP Easy Access screen, call transaction STMS.On the Transport Management System screen the message "You are logged on to thedomain controller" displays if SAP Solution Manager is configured as the domaincontroller.
2. Check RFC connection SAPOSS with transaction SM59.
Lesson: Performing Prerequisite Checks for Configuring SAP Solution Manager
© Copyright. All rights reserved. 117
a) Return to the SAP Easy Access screen and call transaction SM59.
b) On the Configuration of RFC Connections screen, expand the ABAP Connections filestructure.
c) Double-click SAPOSS .
d) On the RFC Destination SAPOSS screen, choose Connection Test .
Alternatively, you can choose Utilities → Test → Connection Test or AuthorizationTest .
The Connection Test SAPOSS screen displays.
3. Check that the SAP Solution Manager S-user has the correct authorizations to access SAPService Marketplace.
a) Open a browser and navigate to http://service.sap.com/user-admin.
b) On the User Data Maintenance screen, choose Search and Maintain Users .
c) Choose Authorization Reports and check the authorization objects associated with theSAP Solution Manager S-user.
4. Check your support package level.
a) Return to the SAP Easy Access screen.
b) In the main menu, choose System → Status .The System Status screen displays. Compare the information on this screen with SAPNote 1483508.
5. If you have performed a client copy, check that the Java UME uses the user store of thenew client or they will be unable to log on to the Java stack.
a) Open a browser and navigate to the following URL:http:<solmanhost>:<solmanport>/useradmin
b) On the Configuration screen, open the ABAP System Tab.
c) Set the Client property to your new production client.
d) Restart the Java stack to let the changes take effect.
6. Check SAP Solution Manager profile parameters with transaction RSPFPAR.
a) On the SAP Easy Access screen, call transaction RSPFPAR.
b) On the Display Profile Parameter screen, enter the name of the parameter you want tocheck.
c) Choose Execute .
d) Check the profile parameter against the recommended parameters in SAP Note1582842 - Profile parameters for Solution Manager 7.1.
7. Check that the software for the diagnostics agents is up to date according to thespecifications shown.
Unit 5: Guided Procedures for Configuration of SAP Solution Manager
118 © Copyright. All rights reserved.
Unit 5Exercise 3
Check Prerequisites for Guided Configuration
Business Example
To ensure that the SAP Solution Manager configuration goes as smoothly as possible, youcarry out a number of prerequisite checks.
Check that your SAP Solution Manager installation is connected to the SAP service andsupport backbone, that you have access to the technical documentation you need, and thatthe correct production client is set in the SAP NetWeaver AS Java system.
1. Perform the connection test for ABAP connection SAPOSS using transaction SM59.
2. Locate and read the IMG documentation for the UME client copy using transaction SPRO.
3. Check that the correct production client has been entered in the SAP NetWeaver AS Javapart of the Solution Manager system.
Find and note the value of the Client field.
© Copyright. All rights reserved. 119
Unit 5Solution 3
Check Prerequisites for Guided Configuration
Business Example
To ensure that the SAP Solution Manager configuration goes as smoothly as possible, youcarry out a number of prerequisite checks.
Check that your SAP Solution Manager installation is connected to the SAP service andsupport backbone, that you have access to the technical documentation you need, and thatthe correct production client is set in the SAP NetWeaver AS Java system.
1. Perform the connection test for ABAP connection SAPOSS using transaction SM59.
a) In the SAP Solution Manager Easy Access screen, call transaction SM59.
a) In the Configuration of RFC Connections screen, expand the ABAP connections tree.
b) Open SAPOSS .
c) In the RFC Destination SAPOSS screen, choose Connection Test .The connection test for RFC connection SAPOSS is performed.
2. Locate and read the IMG documentation for the UME client copy using transaction SPRO.
a) In the SAP Solution Manager Easy Access screen, call transaction SPRO.
b) In the Customizing: Execute Project screen, choose SAP Reference IMG.
c) In the Display IMG screen, expand the file structure as follows: SAP SolutionManager → Technical Settings → Client Copy.
d) Open Convert UME and read the document.
3. Check that the correct production client has been entered in the SAP NetWeaver AS Javapart of the Solution Manager system.
a) Open a browser and navigate to the following URL: http://<servername>.wdf.sap.corp:5<InstanceNumber>00/useradmin
b) Log on with <CourseID>-<GroupNumber> and <password>.
c) In the Identity Management screen, choose Configuration.
d) Choose the ABAP system tab.
Find and note the value of the Client field.
This field should match the name of the SAP Solution Manager production client.
120 © Copyright. All rights reserved.
LESSON SUMMARYYou should now be able to:
● Perform prerequisite checks for SAP Solution Manager guided configuration
Lesson: Performing Prerequisite Checks for Configuring SAP Solution Manager
© Copyright. All rights reserved. 121
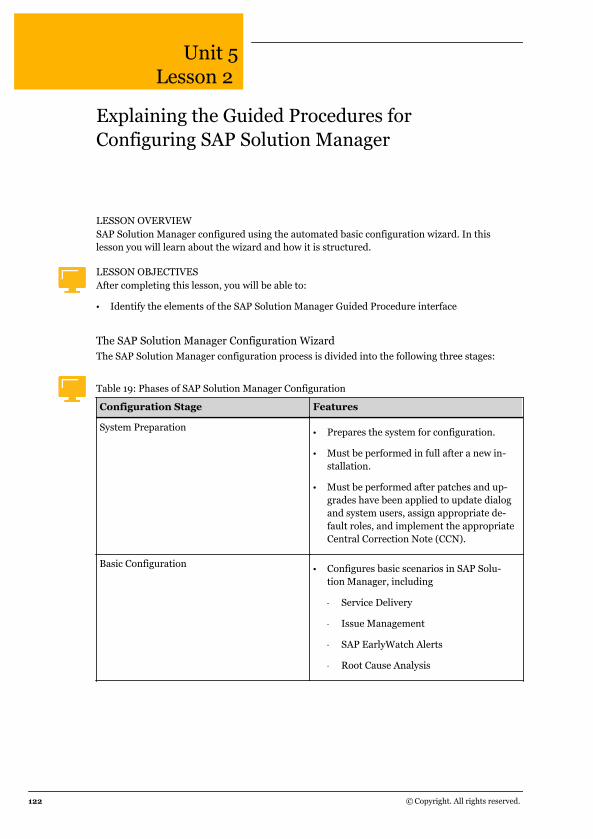
Unit 5Lesson 2
Explaining the Guided Procedures forConfiguring SAP Solution Manager
LESSON OVERVIEWSAP Solution Manager configured using the automated basic configuration wizard. In thislesson you will learn about the wizard and how it is structured.
LESSON OBJECTIVESAfter completing this lesson, you will be able to:
● Identify the elements of the SAP Solution Manager Guided Procedure interface
The SAP Solution Manager Configuration WizardThe SAP Solution Manager configuration process is divided into the following three stages:
Table 19: Phases of SAP Solution Manager Configuration
Configuration Stage Features
System Preparation● Prepares the system for configuration.
● Must be performed in full after a new in-stallation.
● Must be performed after patches and up-grades have been applied to update dialogand system users, assign appropriate de-fault roles, and implement the appropriateCentral Correction Note (CCN).
Basic Configuration● Configures basic scenarios in SAP Solu-
tion Manager, including
- Service Delivery
- Issue Management
- SAP EarlyWatch Alerts
- Root Cause Analysis
122 © Copyright. All rights reserved.
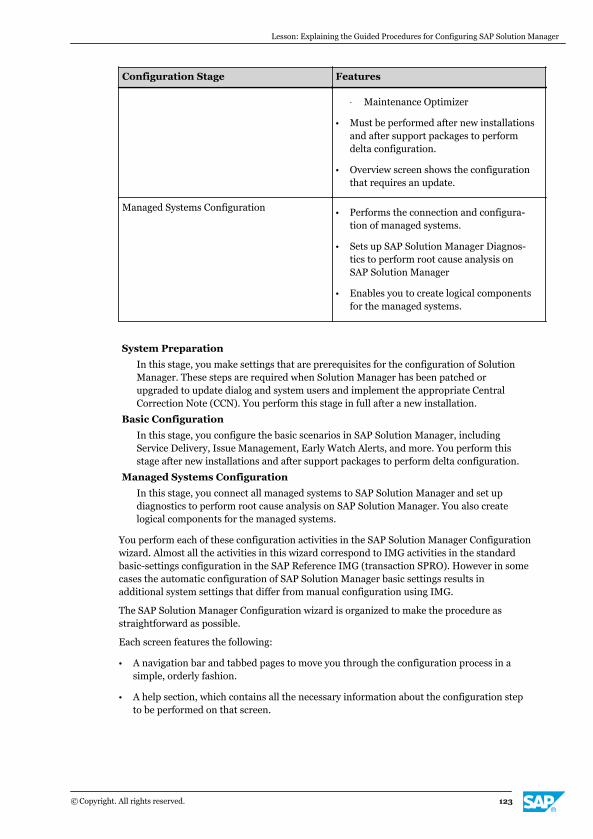
Configuration Stage Features
- Maintenance Optimizer
● Must be performed after new installationsand after support packages to performdelta configuration.
● Overview screen shows the configurationthat requires an update.
Managed Systems Configuration● Performs the connection and configura-
tion of managed systems.
● Sets up SAP Solution Manager Diagnos-tics to perform root cause analysis onSAP Solution Manager
● Enables you to create logical componentsfor the managed systems.
System Preparation
In this stage, you make settings that are prerequisites for the configuration of SolutionManager. These steps are required when Solution Manager has been patched orupgraded to update dialog and system users and implement the appropriate CentralCorrection Note (CCN). You perform this stage in full after a new installation.
Basic Configuration
In this stage, you configure the basic scenarios in SAP Solution Manager, includingService Delivery, Issue Management, Early Watch Alerts, and more. You perform thisstage after new installations and after support packages to perform delta configuration.
Managed Systems Configuration
In this stage, you connect all managed systems to SAP Solution Manager and set updiagnostics to perform root cause analysis on SAP Solution Manager. You also createlogical components for the managed systems.
You perform each of these configuration activities in the SAP Solution Manager Configurationwizard. Almost all the activities in this wizard correspond to IMG activities in the standardbasic-settings configuration in the SAP Reference IMG (transaction SPRO). However in somecases the automatic configuration of SAP Solution Manager basic settings results inadditional system settings that differ from manual configuration using IMG.
The SAP Solution Manager Configuration wizard is organized to make the procedure asstraightforward as possible.
Each screen features the following:
● A navigation bar and tabbed pages to move you through the configuration process in asimple, orderly fashion.
● A help section, which contains all the necessary information about the configuration stepto be performed on that screen.
Lesson: Explaining the Guided Procedures for Configuring SAP Solution Manager
© Copyright. All rights reserved. 123
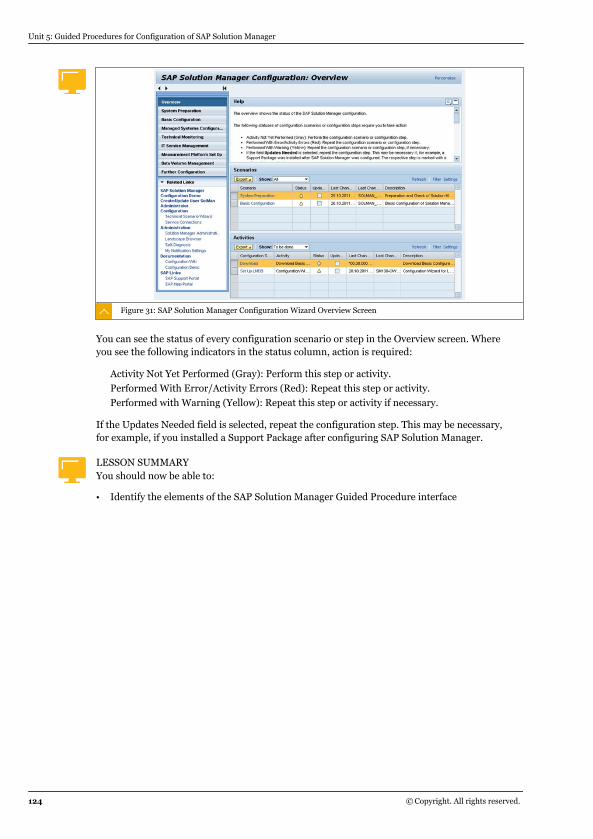
Figure 31: SAP Solution Manager Configuration Wizard Overview Screen
You can see the status of every configuration scenario or step in the Overview screen. Whereyou see the following indicators in the status column, action is required:
Activity Not Yet Performed (Gray): Perform this step or activity.
Performed With Error/Activity Errors (Red): Repeat this step or activity.
Performed with Warning (Yellow): Repeat this step or activity if necessary.
If the Updates Needed field is selected, repeat the configuration step. This may be necessary,for example, if you installed a Support Package after configuring SAP Solution Manager.
LESSON SUMMARYYou should now be able to:
● Identify the elements of the SAP Solution Manager Guided Procedure interface
Unit 5: Guided Procedures for Configuration of SAP Solution Manager
124 © Copyright. All rights reserved.
Unit 5Lesson 3
Performing the SAP Solution Manager SystemPreparation
LESSON OVERVIEWIn the system preparation you make settings that are prerequisites for the configuration ofSAP Solution Manager. In this lesson you will learn about the individual steps of systempreparation and how to perform them.
LESSON OBJECTIVESAfter completing this lesson, you will be able to:
● Prepare the SAP Solution Manager system for configuration
SAP Solution Manager System Preparation
System preparation consists of the following steps:
Create Users
Check Installation
Implement SAP Note
Configure Connectivity
Configure Web Service
Prepare Landscape
Complete
To run the system preparation, you need a user with authorizations to create users. Youcreate this user, called SOLMAN_ADMIN, in the first step. After creating SOLMAN_ADMIN,you can log on with this user to perform the other steps.
When you start transaction SOLMAN_SETUP, the Overview screen of the guided procedureappears. On the Overview screen, you can see which configuration steps have beenperformed up to this point and you can open all activities. After you implement a supportpackage or an upgrade, the Activities area displays all configuration steps that need anupdate.
In the navigation area, select System Preparation to begin the system preparation guidedprocedure.
Choose Edit to switch to Change mode. You only have to do this once; the system stays inchange mode for all further steps and locks the guided procedure to other users.
Create Users
You create or update dialog and system users and assign them the appropriate default roles.You are prompted to assign passwords where necessary. The following users are created inthis step:
© Copyright. All rights reserved. 125
SOLMAN_ADMIN
This user has all the necessary authorizations to perform the basic configuration andoperation of your SAP Solution Manager system, including the setup of managedsystems. However, this user is not authorized to use a trusted connection. If you requirethis level of authorization, you can assign role SAP_SM_S_RFCACL manually.
SMD_ADMIN
The diagnostics agents connect to SAP Solution Manager via this user. Record itspassword because you will need it during the agent installation step.
SOLMAN_BTC
This is the batch user, which is used to schedule jobs for background processing. You willnever need its password, so the password is automatically generated to maintainsecurity. If your organization's policy requires you to know its password, you can changeits password by choosing Update Password.
SM_EXTERN_WS
This user facilitates external web services communication between diagnostics agentsand SAP Solution Manager.
SM_INTERN_WS
This user facilitates internal web services communication between diagnostics agentsand SAP Solution Manager.
The SAP roles are copied into the ZSAP namespace by default. If your organization hasdifferent naming conventions you can adjust the role name before creating the user.
Newly-created dialog users should always be prompted to change their password during theirfirst logon. For more information, see SAP Note 1791477 - Creating new dialog users with anonproductive password.
Check Installation
You run an automatic installation check on the following:
TMS Configuration
If the TMS configuration check is unsuccessful, configure a transport domain controllerfor the SAP Solution Manager system by calling transaction STMS. The production anddevelopment systems must also be in the same transport domain, or connected by adomain link so the export history from the development system can be seen from theproduction system. For more information on configuring the transport domain, see theSAP Library under SAP NetWeaver → Solution Lifecycle Management → SoftwareChange Management → Change and Transport System → Transport ManagementSystem .
Profile Parameters
SAP Solution Manager uses Web Dynpro applications and Business Server Pages (BSP),which require profile parameters for Single Sign-On (SSO). If this check is unsuccessful,refer to the relevant documentation. For issues with SSO, see SAP Note 817529 -Checking the SSO Configuration. Restart the system to enable the parameters.
License Key
SAP Solution Manager needs a valid license. If this check is unsuccessful, request alicense key in SAP Service Marketplace and apply it using transaction SLICENSE.
Software Prerequisites
Unit 5: Guided Procedures for Configuration of SAP Solution Manager
126 © Copyright. All rights reserved.
This activity checks whether the SAP Solution Manager system satisfies all the softwareprerequisites for end-to-end diagnostics as outlined in SAP Note 1483508 - SolutionManager 7.1 Root Cause Analysis Prerequisites of SAP Solution Manager.
System Landscape Parameters
This activity determines whether synchronization of system data between SAP SolutionManager and the SAP Support Portal is active. Active synchronization allows SAPSupport Portal to maintain an up-to-date record of the system information stored in theLandscape Management Database (LMDB), which improves processes such as notesearches. We recommend that you synchronize all systems automatically and globally,although you can synchronize systems individually. For more information, see the SAPLibrary for SAP Solution Manager on SAP Help Portal at http://help.sap.com/solutionmanager71 → Application Help → <select language and SP> → SAP SolutionManager Operations → Managing System Landscape Information → Set Up theLandscape Management Infrastructure → Synchronize with SAP Support Portal .
Service Connection
This activity checks connection SAPOSS. If the check fails, adjust it as needed. For moreinformation, see SAP Note 33135 - OSS1 Guide. Check the distribution group: if it is notset to EWA, adjust it as required. For more information, see SAP Note 766505 - OSS1:Changes to RFC Connection SAPOSS.
Implement SAP Note
You implement the latest version of the central correction note (CCN) for your SAP SolutionManager support package. The note number changes from support package to supportpackage.
Check the CCN carefully for notes that require manual activities and perform all thenecessary manual activities. If the note contains an X in the Auto column, you can perform themanual activities automatically during the Implement SAP Note step.
To keep the CCN up to date, use transaction SNOTE. Choose Download Latest Version of SAPNotes and reimplement the CCN if a newer version displays. If a newer version of the CCN isavailable, SOLMAN_SETUP prompts you.
Configure Connectivity
You configure the following web services associated with SAP Solution Manager:
Configure Web Dispatcher
If SAP Solution Manager has one or more dialog instances (connections to applicationservers), it must have a Web Dispatcher. In this step, you provide the URL and portnumber of the SAP Web Dispatcher to allow the system to configure internal WS callsbetween the Solution Manager ABAP and Java stacks, and between diagnostics agentsand the Solution Manager ABAP stack.
Lesson: Performing the SAP Solution Manager System Preparation
© Copyright. All rights reserved. 127
Caution:The HTTPS protocol encrypts the web Service communication betweenthe Solution Manager ABAP stack and the Solution Manager Java stack,and between the Diagnostics Agent and the Solution Manager ABAP stack.Configure it as follows:
The Solution Manager ABAP stack must have a valid SSL Client(anonymous) certificate, with an appropriate CA certificate in thetransaction STRUST.
The diagnostics agents must have the IAIK libraries installed, and the classpath set. This can be guaranteed only by doing one of the following:
● Installing diagnostics agents using the needSSL=true option whenstarting the SAPInst installer
● Removing any IAIK libraries from the folder /usr/sap/<SID>/SMDA<instance_number>/SMDAgent/lib/iaik, for existingdiagnostics agents. You will then have to use the context menu InstallIAIK SSL Librariesin the Agent Administration UI for each diagnosticsagent.
Set Authentication Types for Web Services
In this manual activity you configure SAP Solution Manager to create web services usingthe authentication types Basic Authentication, X.509 Certificate Authentication, andTicket Authentication. This configuration is performed with transaction SOAMANAGER.
Enable Web Services
You create logical ports and end points to enable web services communication betweenthe SAP Solution Manager ABAP and Java stacks and between the diagnostics agentsand SAP Solution Manager. Creating these logical ports and end points enables such webservices calls as
● Consumer Proxy (defined by a logical port) enables SAP Solution Manager ABAPapplications to call web services on the SAP Solution Manager Java stack.
● Service Definition (defined by an end point) exposes web services implemented on theSAP Solution Manager ABAP stack, so that they can be called by the SAP SolutionManager Java stack and the diagnostics agents.
Set Authentication Policy for Agents
In setting the authentication policy for the diagnostic agents you can choose toauthenticate by certificate or by user and password. Authentication by certificate isrecommended and is the default option. Authenticate by user and password only wherethe certificate-based method cannot be used. If, for example, the user account isblocked, agents can no longer connect to SAP Solution Manager. When the certificate isabout to expire, an alert is generated.
Configure Gateway
You activate SAP NetWeaver gateway services for mobile devices. In a single-systemscenario, you can activate the gateway services automatically, but if the SAP NetWeaverGateway Services system and the SAP Solution Manager system are separate, activate
Unit 5: Guided Procedures for Configuration of SAP Solution Manager
128 © Copyright. All rights reserved.
the gateway services manually. An RFC connection of type NONE is createdautomatically. To deactivate gateway services use /IFWND/MAIN_SERVICE.
Prepare Landscape Description
You make SAP Solution Manager known to the system landscape and enable the transfer ofrelevant information between SAP Solution Manager and the system landscape.
Preparing the system landscape comprises the following steps:
Select SLD
SAP Solution Manager receives descriptions of the connected SLDs, and becomes knownin the connected SLDs. If you want to use the local SLD in SAP Solution Manager, youconfigure it here. Before performing this activity you should have read the SLD PlanningGuide and other relevant documentation at the SAP Community Network.
Set Up LMDB
The LMDB synchronizes with the SLD to collect the CIM model, the SAP SoftwareCatalog (CR Content), and the technical system landscape descriptions. The first timeyou activate a connection between LMDB and the SLDs, the system carries out a fullautomatic synchronization, which takes several hours. On subsequent activations,incremental synchronization imports new changes every 10 minutes. For moreinformation about synchronizing SLD and LMDB, see the Help section for this step.
Migrate Data into LMDB
In earlier releases of SAP Solution Manager, system landscape information was definedmanually in SMSY. In this step, you migrate this system landscape information intoLMDB. In current releases of SAP Solution Manager, this step is performed only inexceptional circumstances.
Configure Automatically
Several activities are configured automatically in this step, including
● Create Logical System: creates a logical system entry for the current SAP SolutionManager client.
● Update RFC: ensures that at least one RFC destination (type READ) is maintained intable SCDTSYSRFC.
● Turn Off maintenance mode: switch on before an update or upgrade of SAP SolutionManager, and switch off when the process is finished so that diagnostics agents canbe used again.
● Execute Landscape Fetch once: schedules a daily job that reads the LMDB and writesthe changes into the Solution Manager System Landscape (transaction SMSY).
● Activate SDCCN: activates the Service Data Control Center (SDCCN) in the managingsystem.
Prepare Outside Discovery
The activities performed in this step are required for managing CA Wily IntroscopeEnterprise Managers, third-party solutions, or standalone databases and hosts. Performthe following activities:
● Install diagnostics agents
● Establish a trusted connection
Lesson: Performing the SAP Solution Manager System Preparation
© Copyright. All rights reserved. 129
You perform these activities on all hosts that run one or more of the following systems:
● A managed system that connects to SAP Solution Manager (which is also a managedsystem)
● CA Wily Introscope Enterprise Manager
● A standalone database
● A third-party product not registered to an SLD
For the detailed steps to perform each of these activities, see the onscreendocumentation for each one.
Connect diagnostics agents to SAP Solution Manager
You connect all diagnostics agents to SAP Solution Manager. If you install a diagnosticsagent of release 7.30 SP02 or higher, this connection is established automatically. Werecommend that you connect all diagnostics agents to SAP Solution Manager. Wait anhour to check whether all diagnostics agents are connected correctly.
If diagnostics agents fail to connect, you can display a detailed error message in the logtable.
To check whether the diagnostics agent is running, choose More Details. The diagnosticsagent can only connect to SAP Solution Manager if it is running. If the diagnostics agent isstopped, restart it at the operating system level of the managed system. For moredetails, see http://wiki.sdn.sap.com/wiki/display/SMSETUP/Diagnostics+Agents
Complete
An overview of the status of all steps in the system preparation scenario displays.
To Prepare SAP Solution Manager for Configuration
Note:The initial, full, automatic synchronization of SLD system information to theLMDB, as performed in Step 21, takes approximately six hours.
1. Log on to SAP Solution Manager with your user name and password.
2. On the SAP Easy Access screen call transaction SOLMAN_SETUP.The Solution Manager Configuration overview screen appears.
3. In the navigation area, select System Preparation .The System Preparation wizard starts.
4. On the SAP Solution Manager Configuration: System Preparation screen, choose Edit.
5. Create dialog and system users with the appropriate passwords and authorizations.
a) Choose the Create Users tab.
b) Choose Create All Users .
c) Enter the appropriate passwords in the fields provided.
d) Choose OK.
The system assigns the passwords to the created users. This could take some time.
Unit 5: Guided Procedures for Configuration of SAP Solution Manager
130 © Copyright. All rights reserved.
6. To check the credentials of a system user, choose Test in the last row of the user table.
7. When all the users have been created, log off SAP Solution Manager and log back on asSOLMAN_ADMIN before continuing with SOLMAN_SETUP.
a) Follow the procedure for logging on to SAP Solution Manager using SOLMAN_ADMIN.
b) On the SAP Solution Manager Easy Access screen call transaction SOLMAN_SETUP.
c) On the SAP Solution Manager Configuration: System Preparation screen, choose Edit.
d) Choose the Check Installation tab.The Check Installation screen displays.
8. Check Installation.
a) Choose Execute All.
If any of the activities fail to perform correctly, check the documentation for therelevant activity to find out how to proceed.
9. If necessary, check TMS configuration.
a) Select the Check TMS Configuration row to display the log for this activity.
b) In the Navigation column choose Start Transaction to call transaction STMS.
c) If SAP Solution Manager is not configured as your domain controller, read thedocumentation for this activity and proceed accordingly.
10. If a warning to check profile parameters displays, check profile parameters.
a) Select the Check Profile Parameters row to display the log for this activity.
b) If the log displays incomplete parameters, in the Navigation column choose StartTransaction to call transaction RZ70.
c) On the Edit Profiles screen, choose Display Documents .
d) Double-click the default profile.
e) Select the Extended Maintenance radio button and choose Display.
f) Check the displayed profile parameters against SAP Note 1582842.If you change any parameters, restart SAP Solution Manager.
11. If necessary, check license key.
a) On the Check Installation screen of SAP Solution Manager Configuration: SystemPreparation, select the Check License Key row to display the log for this activity.
b) In the Navigation column choose Start Transaction to call transaction SLICENSE.
c) On the SAP License Administration screen you can see that the license is up to date.
12. If necessary, check software prerequisites.
a) Select the Check Software Prerequisites row to display the log for this activity.
b) In the Navigation column choose Open URLto access SAP Note 1483508 - SolutionManager 7.1: Root Cause Analysis Prerequisites.
c) Read through the prerequisites.If the log indicates that Solution Manager fails to fulfill the Diagnostics prerequisites,proceed according to the relevant IMG documentation.
Lesson: Performing the SAP Solution Manager System Preparation
© Copyright. All rights reserved. 131
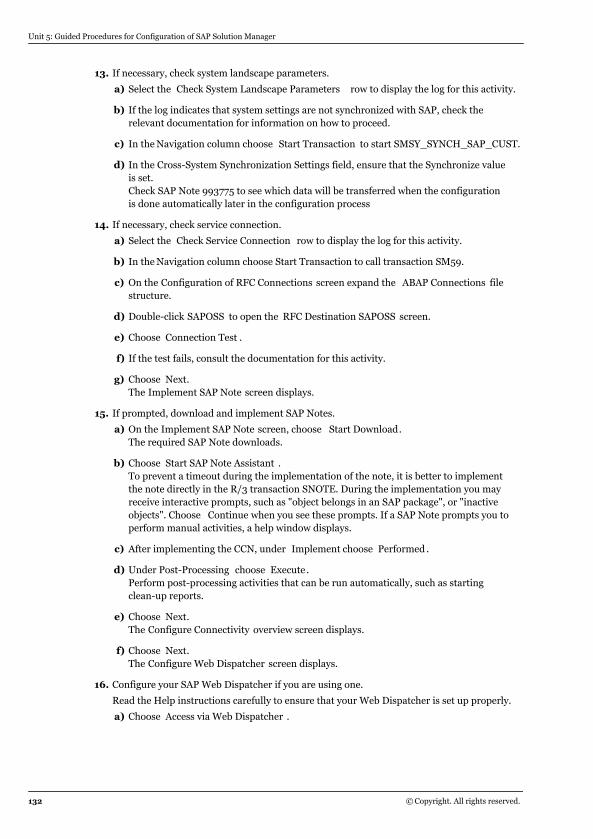
13. If necessary, check system landscape parameters.
a) Select the Check System Landscape Parameters row to display the log for this activity.
b) If the log indicates that system settings are not synchronized with SAP, check therelevant documentation for information on how to proceed.
c) In the Navigation column choose Start Transaction to start SMSY_SYNCH_SAP_CUST.
d) In the Cross-System Synchronization Settings field, ensure that the Synchronize valueis set.Check SAP Note 993775 to see which data will be transferred when the configurationis done automatically later in the configuration process
14. If necessary, check service connection.
a) Select the Check Service Connection row to display the log for this activity.
b) In the Navigation column choose Start Transaction to call transaction SM59.
c) On the Configuration of RFC Connections screen expand the ABAP Connections filestructure.
d) Double-click SAPOSS to open the RFC Destination SAPOSS screen.
e) Choose Connection Test .
f) If the test fails, consult the documentation for this activity.
g) Choose Next.The Implement SAP Note screen displays.
15. If prompted, download and implement SAP Notes.
a) On the Implement SAP Note screen, choose Start Download.The required SAP Note downloads.
b) Choose Start SAP Note Assistant .To prevent a timeout during the implementation of the note, it is better to implementthe note directly in the R/3 transaction SNOTE. During the implementation you mayreceive interactive prompts, such as "object belongs in an SAP package", or "inactiveobjects". Choose Continue when you see these prompts. If a SAP Note prompts you toperform manual activities, a help window displays.
c) After implementing the CCN, under Implement choose Performed .
d) Under Post-Processing choose Execute .Perform post-processing activities that can be run automatically, such as startingclean-up reports.
e) Choose Next.The Configure Connectivity overview screen displays.
f) Choose Next.The Configure Web Dispatcher screen displays.
16. Configure your SAP Web Dispatcher if you are using one.
Read the Help instructions carefully to ensure that your Web Dispatcher is set up properly.
a) Choose Access via Web Dispatcher .
Unit 5: Guided Procedures for Configuration of SAP Solution Manager
132 © Copyright. All rights reserved.
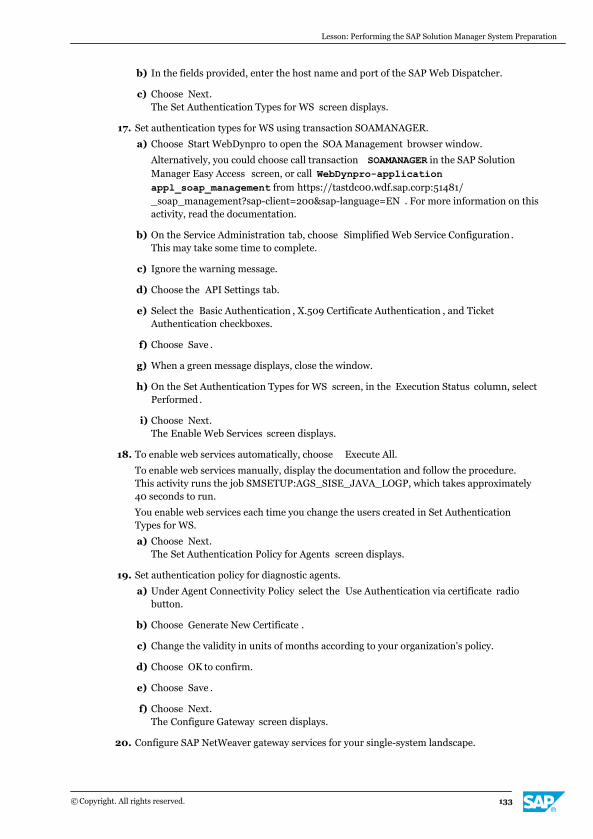
b) In the fields provided, enter the host name and port of the SAP Web Dispatcher.
c) Choose Next.The Set Authentication Types for WS screen displays.
17. Set authentication types for WS using transaction SOAMANAGER.
a) Choose Start WebDynpro to open the SOA Management browser window.
Alternatively, you could choose call transaction SOAMANAGER in the SAP SolutionManager Easy Access screen, or call WebDynpro-applicationappl_soap_management from https://tastdc00.wdf.sap.corp:51481/_soap_management?sap-client=200&sap-language=EN . For more information on thisactivity, read the documentation.
b) On the Service Administration tab, choose Simplified Web Service Configuration .This may take some time to complete.
c) Ignore the warning message.
d) Choose the API Settings tab.
e) Select the Basic Authentication , X.509 Certificate Authentication , and TicketAuthentication checkboxes.
f) Choose Save .
g) When a green message displays, close the window.
h) On the Set Authentication Types for WS screen, in the Execution Status column, selectPerformed .
i) Choose Next.The Enable Web Services screen displays.
18. To enable web services automatically, choose Execute All.
To enable web services manually, display the documentation and follow the procedure.This activity runs the job SMSETUP:AGS_SISE_JAVA_LOGP, which takes approximately40 seconds to run.
You enable web services each time you change the users created in Set AuthenticationTypes for WS.
a) Choose Next.The Set Authentication Policy for Agents screen displays.
19. Set authentication policy for diagnostic agents.
a) Under Agent Connectivity Policy select the Use Authentication via certificate radiobutton.
b) Choose Generate New Certificate .
c) Change the validity in units of months according to your organization's policy.
d) Choose OK to confirm.
e) Choose Save .
f) Choose Next.The Configure Gateway screen displays.
20. Configure SAP NetWeaver gateway services for your single-system landscape.
Lesson: Performing the SAP Solution Manager System Preparation
© Copyright. All rights reserved. 133
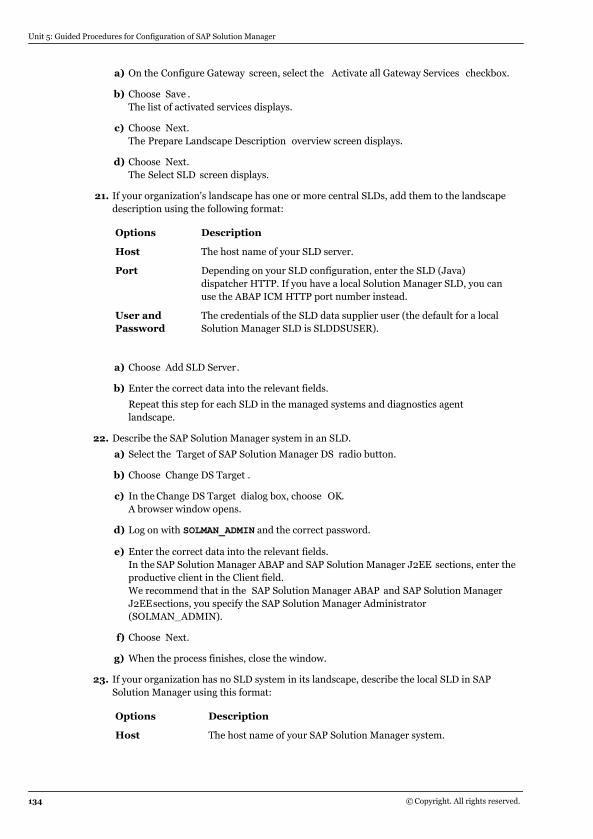
a) On the Configure Gateway screen, select the Activate all Gateway Services checkbox.
b) Choose Save .The list of activated services displays.
c) Choose Next.The Prepare Landscape Description overview screen displays.
d) Choose Next.The Select SLD screen displays.
21. If your organization's landscape has one or more central SLDs, add them to the landscapedescription using the following format:
Options Description
Host The host name of your SLD server.
Port Depending on your SLD configuration, enter the SLD (Java)dispatcher HTTP. If you have a local Solution Manager SLD, you canuse the ABAP ICM HTTP port number instead.
User andPassword
The credentials of the SLD data supplier user (the default for a localSolution Manager SLD is SLDDSUSER).
a) Choose Add SLD Server.
b) Enter the correct data into the relevant fields.
Repeat this step for each SLD in the managed systems and diagnostics agentlandscape.
22. Describe the SAP Solution Manager system in an SLD.
a) Select the Target of SAP Solution Manager DS radio button.
b) Choose Change DS Target .
c) In the Change DS Target dialog box, choose OK.A browser window opens.
d) Log on with SOLMAN_ADMIN and the correct password.
e) Enter the correct data into the relevant fields.In the SAP Solution Manager ABAP and SAP Solution Manager J2EE sections, enter theproductive client in the Client field.We recommend that in the SAP Solution Manager ABAP and SAP Solution ManagerJ2EEsections, you specify the SAP Solution Manager Administrator(SOLMAN_ADMIN).
f) Choose Next.
g) When the process finishes, close the window.
23. If your organization has no SLD system in its landscape, describe the local SLD in SAPSolution Manager using this format:
Options Description
Host The host name of your SAP Solution Manager system.
Unit 5: Guided Procedures for Configuration of SAP Solution Manager
134 © Copyright. All rights reserved.
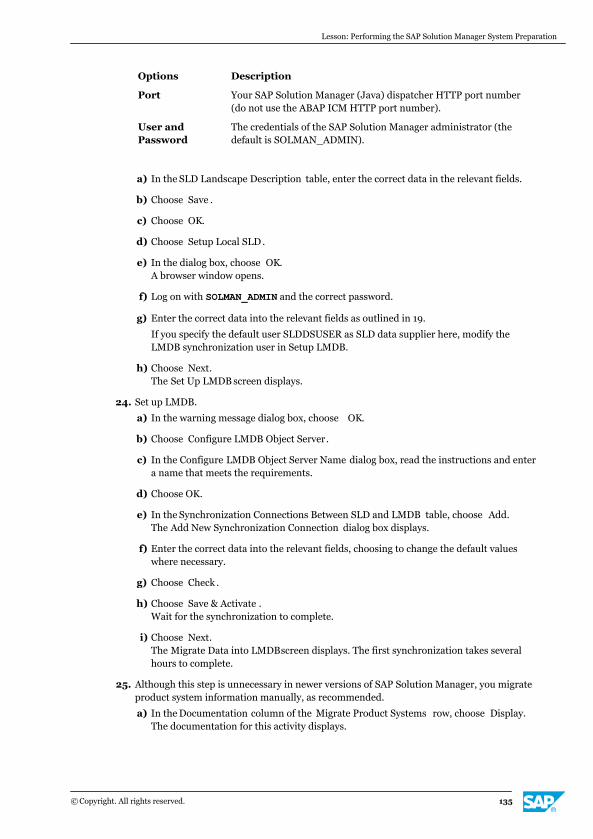
Options Description
Port Your SAP Solution Manager (Java) dispatcher HTTP port number(do not use the ABAP ICM HTTP port number).
User andPassword
The credentials of the SAP Solution Manager administrator (thedefault is SOLMAN_ADMIN).
a) In the SLD Landscape Description table, enter the correct data in the relevant fields.
b) Choose Save .
c) Choose OK.
d) Choose Setup Local SLD .
e) In the dialog box, choose OK.A browser window opens.
f) Log on with SOLMAN_ADMIN and the correct password.
g) Enter the correct data into the relevant fields as outlined in 19.
If you specify the default user SLDDSUSER as SLD data supplier here, modify theLMDB synchronization user in Setup LMDB.
h) Choose Next.The Set Up LMDB screen displays.
24. Set up LMDB.
a) In the warning message dialog box, choose OK.
b) Choose Configure LMDB Object Server.
c) In the Configure LMDB Object Server Name dialog box, read the instructions and entera name that meets the requirements.
d) Choose OK.
e) In the Synchronization Connections Between SLD and LMDB table, choose Add.The Add New Synchronization Connection dialog box displays.
f) Enter the correct data into the relevant fields, choosing to change the default valueswhere necessary.
g) Choose Check .
h) Choose Save & Activate .Wait for the synchronization to complete.
i) Choose Next.The Migrate Data into LMDBscreen displays. The first synchronization takes severalhours to complete.
25. Although this step is unnecessary in newer versions of SAP Solution Manager, you migrateproduct system information manually, as recommended.
a) In the Documentation column of the Migrate Product Systems row, choose Display.The documentation for this activity displays.
Lesson: Performing the SAP Solution Manager System Preparation
© Copyright. All rights reserved. 135
b) Follow the instructions in the documentation.
c) Depending on the outcome, set the relevant status in the Execution column:Performed or Performed with Errors.
d) Repeat this process for other necessary manual activities.
e) Choose Next.The Configure Automatically screen displays.
26. On the Configure Automatically screen, choose Execute All.After 2 minutes the status of all jobs displays as Performed.
27. Prepare Outside Discovery.
a) Choose Next.The Prepare Outside Discovery screen displays.
b) For each activity in the Manual Activities table, in the Documentation column, chooseDisplay.
c) Follow the instructions displayed.
d) When you complete the activity, set the Execution Status of the activity to Performed.
e) When you have performed all activities, choose Next.The Connect Diagnostics Agents to SAP Solution Manager screen displays.
28. Connect diagnostic agents to SAP Solution Manager.
To do this, you must have maintained the relevant SLD in Select SLD .
a) In the SLD Server field, select the SLD to which the diagnostics agent is registered.
b) Choose Get Agents .
c) Select the diagnostics agent.
d) Choose Connect .
If the connection fails, consult the Help section.
e) Choose Next.The Complete screen displays.
29. Complete the system preparation.
a) Choose Finish.
b) Log off SAP Solution Manager.
Unit 5: Guided Procedures for Configuration of SAP Solution Manager
136 © Copyright. All rights reserved.
Unit 5Exercise 4
Check SAP Solution Manager SystemPreparation Success
Business Example
Before beginning the configuration of SAP Solution Manager, you check that the system hasbeen prepared and that you have the information necessary to proceed.
Caution:Check the relevant values only without changing anything.
1. In SAP Solution Manager, verify that the following users exist using transaction SU01:
● SOLMAN_ADMIN
● SMD_ADMIN
● SOLMAN_BTC
2. Find and note the user type for SOLMAN_BTC.
Note the user type listed for SOLMAN_BTC.
3. Check that the SLD is running.
4. Check which systems are already registered in the SLD.
5. In SAP Solution Manager, check that the connection between the SLD and SAP SolutionManager exists, using the transaction SLDAPICUST.
6. Find the documentation related to migrating data into the Landscape ManagementDatabase, using the transaction SOLMAN_SETUP.
© Copyright. All rights reserved. 137
Unit 5Solution 4
Check SAP Solution Manager SystemPreparation Success
Business Example
Before beginning the configuration of SAP Solution Manager, you check that the system hasbeen prepared and that you have the information necessary to proceed.
Caution:Check the relevant values only without changing anything.
1. In SAP Solution Manager, verify that the following users exist using transaction SU01:
● SOLMAN_ADMIN
● SMD_ADMIN
● SOLMAN_BTC
a) Log on to SAP Solution Manager with <CourseID>-<GroupNumber> and<password>.
b) On the SAP Solution Manager Easy Access screen, call transaction SU01.
c) On the User Maintenance: Initial screen, in the User field, enter one of the user nameslisted.
d) Choose Display.
Repeat for each of the users listed.
2. Find and note the user type for SOLMAN_BTC.
a) On the Display User screen for SOLMAN_BTC, navigate to the Logon data tab.
Note the user type listed for SOLMAN_BTC.
In the User Type field, the user type System displays.
3. Check that the SLD is running.
a) Open a browser and navigate to the following URL: http://<ServerName>wdf.sap.corp:5<InstanceNumber>00/sld
b) Log on with <CourseID>-<GroupNumber> and <password>.
c) On the SLD Start page, choose Administration.On the Administration page, you can see that the SLD is running.
138 © Copyright. All rights reserved.

4. Check which systems are already registered in the SLD.
a) Navigate back to the SLD Start page.
b) On the SLD Start page, choose Landscapes → Technical Systems .
c) From the Technical System Type dropdown list, choose All.All systems connected to the SLD are displayed.
5. In SAP Solution Manager, check that the connection between the SLD and SAP SolutionManager exists, using the transaction SLDAPICUST.
a) Log on to SAP Solution Manager with <CourseID>-<GroupNumber> and<password>.
b) In the SAP Solution Manager Easy Access screen, call transaction SLDAPICUST.In the Maintain SLD Access Data screen, SLDAPIUSER displays.
a) Select the line containing SLDAPIUSER and choose Test .The SLD Connection Test is performed.
6. Find the documentation related to migrating data into the Landscape ManagementDatabase, using the transaction SOLMAN_SETUP.
a) In the SAP Solution Manager Easy Access screen, call transaction SOLMAN_SETUP.The SAP Solution Manager Configuration browser window opens.
b) In the navigation pane, choose System Preparation .
c) In the System Preparation numbered tabs, choose Prepare Landscape Description → Migrate Data into LMDB.
d) In the Manual Activities list, select Migrate Product Systems and display the IMGdocumentation.Information and recommendations related to this manual activity are displayed.
Lesson: Performing the SAP Solution Manager System Preparation
© Copyright. All rights reserved. 139
LESSON SUMMARYYou should now be able to:
● Prepare the SAP Solution Manager system for configuration
Unit 5: Guided Procedures for Configuration of SAP Solution Manager
140 © Copyright. All rights reserved.
Unit 5Lesson 4
Performing Basic Configuration of SAPSolution Manager
LESSON OVERVIEWDuring basic configuration you perform activities that allow the basic scenarios of SolutionManager to function. These basic scenarios are used by every customer and so must be setup in basic configuration. In this lesson you learn how to perform the basic configuration ofSolution Manager.
LESSON OBJECTIVESAfter completing this lesson, you will be able to:
● Configure basic settings in SAP Solution Manager
The SAP Solution Manager Basic Configuration ProcessIn the SAP Solution Manager Basic Configuration process, you configure settings to allow allbasic functionality to run immediately. You also create a project and a related solution.
The basic settings in SAP Solution Manager configuration include all technical settings and allsettings relevant to the major functions that run in your Solution Manager system. Thesefunctions include
● Maintenance Optimizer, to download support package stacks for all SAP systems in yoursystem landscape.
● EarlyWatch Alert, to create EarlyWatch Alert reports and send them to SAP.
● Root Cause Analysis, to perform root cause analysis.
● Basic Service Desk, to send messages to SAP.
● Expert on Demand, to contact an SAP expert when needed.
● Basic Business Blueprint and Configuration, to generate business blueprint documentsand configuration guides for your solutions.
Basic configuration consists of the following steps:
Specify Solution
You create the default SAP solution for the SAP Solution Manager configuration. SAP SolutionManager automatically adds to this solution all production systems in your landscape that areknown and are not already included in another solution.
Creating the default solution ensures that you can perform service delivery for all productionsystems and that SAP EarlyWatch Alert is scheduled for all production systems.
Specify User and Connectivity Data
© Copyright. All rights reserved. 141
Here you ensure that SAP Solution Manager can connect to SAP and to other systems. Youalso create various types of default users, which are needed during and after the SAP SolutionManager configuration. Default authorizations and roles are assigned automatically bydefault, but you can also configure them manually. If you configure dialog users manually,however, you must maintain the table AISUSER manually.
For more information, see the Security Guide at http://service.sap.com/instguides → SAPComponents → SAP Solution Manager → Release 7.1 → Operations or the SAP SolutionManager Wiki in SDN at http://wiki.sdn.sap.com/wiki/display/SMAUTH
This step is made up of the following substeps:
Specify Connectivity Data
To ensure that SAP Solution Manager can connect to SAP Service Marketplace, two S-users are needed. The S-user for the back end is maintained as the Solution Manageruser in the Solution Manager global settings, and is used for the RFC destinations SAP-OSS and SAP-OSS-LIST-001. The S-user for communication is maintained in transactionAISUSER and is assigned to the Solution Manager administration user (default:SOLMAN-ADMIN) and the background processing user (default: SOLMAN_BTC).
Specify SAP Business Warehouse (BW) System
You specify how the SAP NetWeaver BW is set up. To minimize the effort required tomaintain users, you can use the standard SAP Solution Manager BW environment.However, using the standard environment assumes that the BW is set up in the client youare using for basic configuration. See the Help section for this activity for the actions totake if you use the BW in a separate system or a separate SAP Solution Manager client.
Set Up Credentials
You assign or create administrator users that can be used for further automaticactivities. Using the default SOLMAN_ADMIN as the SAP Solution Manager administratorensures that the administrator has the required authorizations. If you have set up SAPNetWeaver in a separate SAP Solution Manager client or in a separate system, create anSAP NetWeaver BW administrator on the SAP BW system or update the role profile of anexisting BW administrator. See the Help section for this activity.
Create Users
You create or update dialog and system users and assign the appropriate default roles.See the Help section for this activity for more information on creating or updating users.The following users are created during this step:
● SAPSUPPORT: the support user for end-to-end tools. We recommend that youspecify a password for this user instead of generating one.
● SEP_WEBSERV: a system user for the BMC AppSight License Check Service in theInternet Communication Framework (ICF).
● SMD_RFC: a user for RFC communication between the ABAP stack and the Java stackof SAP Solution Manager.
● CONTENTSERV: a user for HTTP services such as Web Dynpro and BSP.
● SM_EFWK: a technical user for extractor execution.
● SAP SERVICE: a user for Service Delivery for SAP.
Solution Manager Internal Connectivity
Unit 5: Guided Procedures for Configuration of SAP Solution Manager
142 © Copyright. All rights reserved.
You perform this step each time you change the users created in the previous step.During this step, the following activities are performed automatically and the results arechecked:
● Create RFC connectivity: establishes RFC and JCo connections between the ABAPstack and the Java stack of SAP Solution Manager.
● Setup DPC/DCC Web Service URL: creates the URLs for the web services and storesthose URLs in the configuration store of the diagnostics agents.
● Turn off Maintenance Mode: switches off the maintenance mode of SAP SolutionManager so that the diagnostics agents can connect to SAP Solution Manager.
● Run Java Upgrade: executes a batch job that updates diagnostics data when you haveupgraded SAP Solution Manager.
Specify Landscape Data
You perform the following activities related to your system landscape:
Configure CA Wily Introscope
You connect existing CA Wily Introscope Enterprise Managers to SAP Solution Manager.Before performing this activity you must have diagnostics agents installed on all hosts ofyour CA Wily Introscope Enterprise Managers and these diagnostics agents mustconnect to SAP Solution Manager. If the existing enterprise managers are close tocapacity, you can install additional CA Wily Introscope Enterprise Managers. For moreinformation, see SAP Note 797147 - Wily Introscope Installation for SAP Customers.
Configure SAProuter
This activity allows Solution Manager to access the permission table saprouttab on thesaprouter server via FTP. The saprouttab is maintained by unsecured data transfer. If youallow access via FTP, FTP user names and passwords are transmitted unencrypted.
Configure SAPconnect
You set up the infrastructure that enables SAP Solution Manager to send notifications viae-mail and SMS.
Configure Manually
You perform the following manual configuration activities:
Maintain Logical Systems
You specify logical systems and assign them to clients.
Service Content Update Configuration
Instead of applying ST-SER support packages to keep EarlyWatch Alert up to date, youactivate the service content once and SAP Solution Manager always retrieves the latestcorrections for EarlyWatch Alert from SAP Service Marketplace.
Delete Session Documents and Download
The report RDSMOPREDUCEDDATA deletes sessions, session documents, downloaddata, and reporting documents of a solution or landscape that were created and edited inSAP Solution Manager. This activity creates a variant but does not schedule the job. Thisreport can run in a dialog transaction via SE38 or can be scheduled as a job variant usingtransaction SM36.
Setup BMC AppSight
Lesson: Performing Basic Configuration of SAP Solution Manager
© Copyright. All rights reserved. 143
Performs the necessary configuration to enable BMC AppSight for SAP ClientDiagnostics to analyze problems. See also SAP Note 1034902 - FAQ: BMC AppSight forSAP Client Diagnostics.
Enable Work Center Authorization Check
You can adjust the relevant authorization object to control the views and tasks in a workcenter, including views and tasks you add to your work centers. By default this is inactive,so you must activate a BAdl manually. You can define the views in a work centernavigation area by adapting the authorization object SM_WC_VIEW in theSAP_SMWORK_BASIC_<WorkCenter> role attached to the work center. For example, ifyou want to see only the views for Maintenance Optimizer in the Change Managementwork center, you can just select the relevant views.
Enable Remote HTTP Connection
Enables a remote HTTP connection from SAP to the Solution Manager system. For moreinformation, see SAP Note 59208 - Installing HTTP Connect Service.
Enable remote R/3 Connection
Enables a remote R/3 connection from SAP to the customer Solution Manager system.For more information, see SAP Note 812732 - R/3 Support service.
For detailed information on each of the manual configuration activities, read thedocumentation for each activity.
Configure Automatically
You configure the SAP Web Services communication between the ABAP stack and the Javastack of SAP Solution Manager. The following activities are performed automatically:
● Activate BW Source System
● Activate Piece Lists
● Create External Aliases
● Activate Services
● Prepare Business Partner Change
● Business Partner for SAP Support
● Generate Business Partner Screen
● Schedule SolMan Manager Background Jobs
● Connection to SAP
● Schedule NetWeaver Standard Jobs
● Clean-Up Priorities from Issue Schema
● SSO Setup
● Store BW Settings
● Check BW Work Processes
● Setup BW
● Setup Extractor Framework
● Prepare SAP Router Data
Unit 5: Guided Procedures for Configuration of SAP Solution Manager
144 © Copyright. All rights reserved.

● Replace Service Definitions
● BPO Dashboard Setup
● Connect SAP BW System to Solution Manager
● Customizing of BW Read Access
● Adjust BW Authorization Concept
● Create Self-Monitoring Scenario
● Basic DPC Configuration
● Push DPC Configuration to Wily
● Create Alert Calculation Job
● Create Metric Store Reorganization Job
● Create Alert Store Reorganization Job
● Apply Default Content Delivery
● Enable Solution Manager Usage
● Enable System Data Measurement
● Create iBase Components for SMSY Systems
● Create iBase Components for LMDB Systems
For detailed information on each of the automatic configuration activities, read thedocumentation for each activity.
Configure Engagement Reports
You perform the following activities manually:
Enable Usage and Landscape Data Transfer
This activity generates several entries in the extraction framework.
Enable Engagement Reports Data Transfer
SAP Enterprise Support Report provides you with a holistic overview and actual status ofthe application and lifecycle management of mission-critical operations.
This step also schedules the CCMS_BI_SETUP for activating the Info Cube. The job variantname is ESREPORT.
Create Configuration Users
In the optional step you can choose to create configuration users for scenarios in the SAPSolution Manager system. For example, if you have configured BI Reporting for your specificSAP Solution Manager scenario, you create configuration users in the relevant SAP BWsystem or client. If your BW is in the same client as SAP Solution Manager, the correspondingroles are assigned to the configuration user in the Solution Manager system.
For more information, see the Security Guide at http://services.sap.com/instguides → SAPComponents → SAP Solution Manager → Release 7.1 → Operations or the SAP SolutionManager Authorization Wiki in SDN at http://wiki.sdn.sap.com/wiki/display/SMAUTH
Scenario Specific Considerations
Lesson: Performing Basic Configuration of SAP Solution Manager
© Copyright. All rights reserved. 145
Incident Management
When configuring this scenario you may need to activate switches. The authorizationobject S_SWITCH restricts access to this function. It is delivered inactive in the roleSAP_SUPPDESK_CONFIG. If you need to activate switches you must adapt thisauthorization object manually in this role.
SAP IT Infrastructure Management and Infrastructure Monitoring
As a prerequisite for configuring these scenarios the required add-on is deployed. Checkif the following authorization values are contained in the specified roles. If not, add themmanually:
● In authorization object SM_WC_VIEW in role SAP_SMWORK_BASIC_CONFIG (valuesWC ID: WD_SISE_MAIN. Text: View - IT Infrastructure Management)
● In authorization object SM_WC_VIEW in role SAP_SMWORK_BASIC_CONFIG (valuesWC ID: WD_SISE_MAIN. Subview - Infrastructure)
● In authorization object SM_SETUP in role SAP_SM_ITMA_CONF-> value:CMDB_INF_MAIN, in role SAP_SM_ITMO_CONF-> value: E2E_MAI_SETUP5
Critical Authorization Assignment
Trusted RFC Specifics
If you run a remote BW scenario with BW in a separate system, both rolesSAP_SM_S_RFCACL (SM=Solution Manager) and SAP_SM_BW_S_RFCACL (BW=BWsystem) allow the use of a trusted RFC connection for use of dashboards and the MetricMonitor of the Alert Inbox.
If you connect managed systems, role SAP_SM_S_RFCACL is necessary in both systems, theSolution Manager system and the managed system if needed.
In all cases the user ID and password must be the same for both systems, respectively.
User Creation and Role Assignment Specifics
All configuration users receive role SAP_SM_USER_ADMIN, which contains authorizations tocreate users and assign roles. If your organization's security policies do not allow this, useaction Do Nothing for this role.
To Configure Basic Settings in SAP Solution Manager
Caution:
Ensure that the job SAP_LMDB is complete before starting Basic Configuration.
1. Log on to SAP Solution Manager with the Solution Manager administration user (defaultSOLMAN_ADMIN) created during system preparation and call transactionSOLMAN_SETUP.
2. Create the default SAP solution for the SAP Solution Manager Configuration using thefollowing format for your data:
Options Description
Solution The default name for the solution is SAP Solution.
Unit 5: Guided Procedures for Configuration of SAP Solution Manager
146 © Copyright. All rights reserved.
Options Description
Leading Role The default value is Production System, but if you have defined yourown role for your SAP Solution Manager system, you can use itinstead.
LogicalComponent
The default value is Z_SOLMAN_COMP. If a logical component doesnot exist, it is created here.
Language The language of the user interface. The default value is the logonlanguage.
a) From the menu in the navigation bar, choose Basic Configuration .The Specify Solution screen appears.
b) Choose Edit.
c) Enter the data in the format shown.
d) Choose Create .In the Log area messages related to the solution appear.
e) Choose Save .The Specify User & Connectivity Data overview screen appears.
f) Choose Next.
3. Specify Connectivity Data using the following S-user information:
Options Description
S-User for SAP Backend The name of the S-user you created in the prerequisitesteps.
Password The password for the S-user you created in the prerequisitesteps.
S-User for CommunicationThe name of the S-user you map to SOLMAN_ADMIN andSOLMAN_BTC
a) Enter the User Logon Information in the fields provided.
b) Choose Maintain Connections.
c) Choose Next.The Specify SAP BW System screen appears.
4. Specify the SAP BW system using the standard setup.
a) In the Specify SAP BW System dialog, select the Use Standard SAP Solution ManagerBW Environmentradio button.
b) Choose Save .
c) Choose Next.The Set Up Credentials screen appears.
5. Set up credentials using the standard setup.
Lesson: Performing Basic Configuration of SAP Solution Manager
© Copyright. All rights reserved. 147
a) In the fields provided, enter the name and password of your SAP Solution Manageradministration user.
b) Choose Test Login.
c) Choose Save .The log indicates that the credentials for the SAP Solution Manager administrationuser and the BW user have been saved.
d) Choose Next.
e) The Create Users screen appears.
6. Create users by following the instructions in the help section.
a) For dialog users, choose Create New User , enter a password for each user in the fieldprovided, and confirm the passwords.
b) For system users, choose Create New User With Generated Passwor d.
c) Choose Execute .
d) Choose Next.The Solution Manager Internal Connectivity screen appears.
7. Perform the Solution Manager internal connectivity activities automatically.
a) Choose Execute All.
b) In the Status column, check that activities have a green light.
c) For each activity that was not performed, in the Documentation column chooseDisplay.
d) Follow the instructions in the documentation for each activity until all activities havebeen performed.
e) Choose Next.The Specify Landscape Data overview screen appears.
f) Choose Next.The Configure CA Wily Introscope screen appears.
8. Install an additional CA Wily Introscope Enterprise Manager by following the instructionsin the installation guide.
You can find the CA Wily Introscope Enterprise Manager files at http://service.sap.com/swdc → SAP Software Download Center → Support Packages and Patches → Browse OurDownload Catalog → SAP Technology Components → SAP SOLUTION MANAGER → SOLUTION MANAGER 7.1 → Entry by SAP Component → ...
9. Configure CA Wily Introscope Enterprise Manager.
a) Choose Import Existing Installation.
If the system denies access, follow the instructions in the Help section.
A dialog box appears.
b) Locate Enterprise Manager on the host. Select the Diagnostics Agent that is installedon the host.
c) Choose Discover Installation.
Unit 5: Guided Procedures for Configuration of SAP Solution Manager
148 © Copyright. All rights reserved.
You automatically return to the Configure CA Wily Introscope screen.
d) Repeat step 8b to 8d for each CA Wily Introscope Enterprise Manager you want toconnect.
10. Assign a user to each CA Wily Introscope Enterprise Manager.
a) Choose User Management .A dialog box appears. The user definitions are read from CA Wily Introscope EnterpriseManager.
b) Select the Connection User field to assign the user that connects the CA WilyIntroscope Enterprise Manager to SAP Solution Manager.
We recommend that you select the admin user.
c) Enter the password of the selected user and confirm the password.
d) Choose OK.You automatically return to the Configure CA Wily Introscope screen.
e) Choose Save .
f) Repeat step 10a to 10e for all CA Wily Introscope Enterprise Managers.
g) Choose Refresh.The status of the CA Wily Introscope Manager is displayed.
h) If the Enterprise Manager is offline status displays, check the error log and fix the error.
i) Choose Next.The Configure SAProuter screen appears.
11. Configure SAProuter.
a) In the SAProuter screen area, select the SAProuter .
b) In the Active field, enter the required data.
c) Choose Check Data to see if saprouttab can be accessed via FTP.
d) Choose Save .
e) Choose Next.The Configure SAPconnect screen appears.
12. Configure SAPconnect.
a) In the Node field, enter the name of your mail server.
b) In the Port field, enter the port number at which your mail server can be accessed.
c) Select the SMTP Active field to enable SAP Solution Manager to send notifications bye-mail.
d) Select the Fax/Pager Active field to enable SAP Solution Manager to send notificationby SMS.
e) In the Domain field, enter the domain to which you want to restrict notifications (forexample, enter the domain name of your organization if you want to restrict possiblerecipients to your organization).
Lesson: Performing Basic Configuration of SAP Solution Manager
© Copyright. All rights reserved. 149
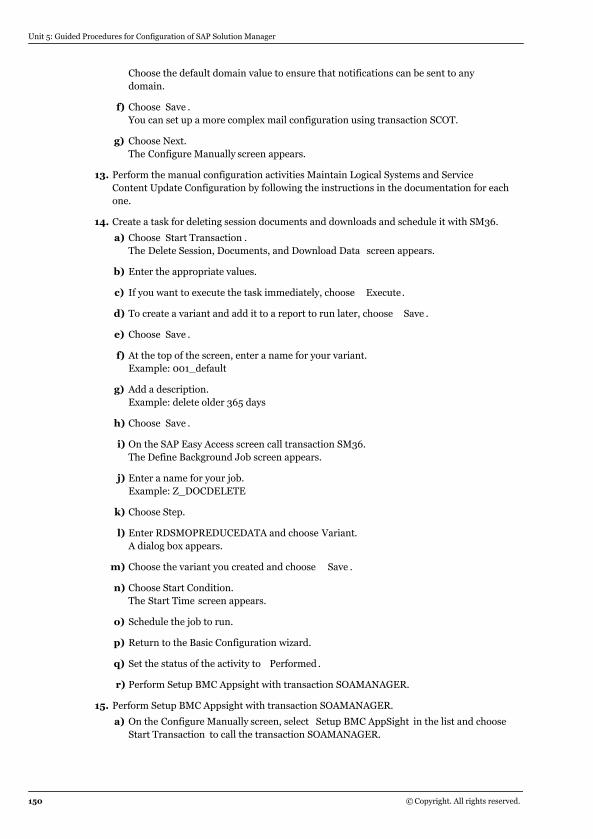
Choose the default domain value to ensure that notifications can be sent to anydomain.
f) Choose Save .You can set up a more complex mail configuration using transaction SCOT.
g) Choose Next.The Configure Manually screen appears.
13. Perform the manual configuration activities Maintain Logical Systems and ServiceContent Update Configuration by following the instructions in the documentation for eachone.
14. Create a task for deleting session documents and downloads and schedule it with SM36.
a) Choose Start Transaction .The Delete Session, Documents, and Download Data screen appears.
b) Enter the appropriate values.
c) If you want to execute the task immediately, choose Execute .
d) To create a variant and add it to a report to run later, choose Save .
e) Choose Save .
f) At the top of the screen, enter a name for your variant.Example: 001_default
g) Add a description.Example: delete older 365 days
h) Choose Save .
i) On the SAP Easy Access screen call transaction SM36.The Define Background Job screen appears.
j) Enter a name for your job.Example: Z_DOCDELETE
k) Choose Step.
l) Enter RDSMOPREDUCEDATA and choose Variant.A dialog box appears.
m) Choose the variant you created and choose Save .
n) Choose Start Condition.The Start Time screen appears.
o) Schedule the job to run.
p) Return to the Basic Configuration wizard.
q) Set the status of the activity to Performed .
r) Perform Setup BMC Appsight with transaction SOAMANAGER.
15. Perform Setup BMC Appsight with transaction SOAMANAGER.
a) On the Configure Manually screen, select Setup BMC AppSight in the list and chooseStart Transaction to call the transaction SOAMANAGER.
Unit 5: Guided Procedures for Configuration of SAP Solution Manager
150 © Copyright. All rights reserved.
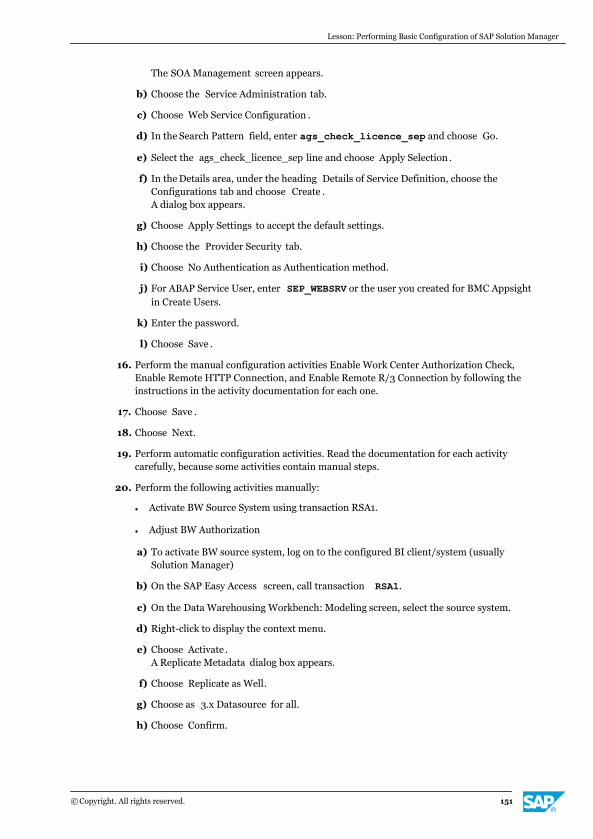
The SOA Management screen appears.
b) Choose the Service Administration tab.
c) Choose Web Service Configuration .
d) In the Search Pattern field, enter ags_check_licence_sep and choose Go.
e) Select the ags_check_licence_sep line and choose Apply Selection .
f) In the Details area, under the heading Details of Service Definition, choose theConfigurations tab and choose Create .A dialog box appears.
g) Choose Apply Settings to accept the default settings.
h) Choose the Provider Security tab.
i) Choose No Authentication as Authentication method.
j) For ABAP Service User, enter SEP_WEBSRV or the user you created for BMC Appsightin Create Users.
k) Enter the password.
l) Choose Save .
16. Perform the manual configuration activities Enable Work Center Authorization Check,Enable Remote HTTP Connection, and Enable Remote R/3 Connection by following theinstructions in the activity documentation for each one.
17. Choose Save .
18. Choose Next.
19. Perform automatic configuration activities. Read the documentation for each activitycarefully, because some activities contain manual steps.
20. Perform the following activities manually:
● Activate BW Source System using transaction RSA1.
● Adjust BW Authorization
a) To activate BW source system, log on to the configured BI client/system (usuallySolution Manager)
b) On the SAP Easy Access screen, call transaction RSA1.
c) On the Data Warehousing Workbench: Modeling screen, select the source system.
d) Right-click to display the context menu.
e) Choose Activate .A Replicate Metadata dialog box appears.
f) Choose Replicate as Well.
g) Choose as 3.x Datasource for all.
h) Choose Confirm.
Lesson: Performing Basic Configuration of SAP Solution Manager
© Copyright. All rights reserved. 151
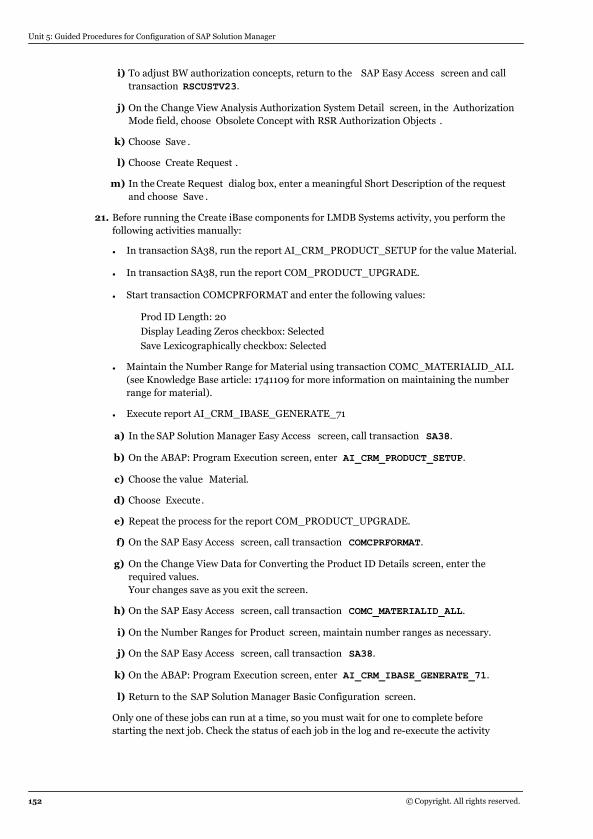
i) To adjust BW authorization concepts, return to the SAP Easy Access screen and calltransaction RSCUSTV23.
j) On the Change View Analysis Authorization System Detail screen, in the AuthorizationMode field, choose Obsolete Concept with RSR Authorization Objects .
k) Choose Save .
l) Choose Create Request .
m) In the Create Request dialog box, enter a meaningful Short Description of the requestand choose Save .
21. Before running the Create iBase components for LMDB Systems activity, you perform thefollowing activities manually:
● In transaction SA38, run the report AI_CRM_PRODUCT_SETUP for the value Material.
● In transaction SA38, run the report COM_PRODUCT_UPGRADE.
● Start transaction COMCPRFORMAT and enter the following values:
Prod ID Length: 20
Display Leading Zeros checkbox: Selected
Save Lexicographically checkbox: Selected
● Maintain the Number Range for Material using transaction COMC_MATERIALID_ALL(see Knowledge Base article: 1741109 for more information on maintaining the numberrange for material).
● Execute report AI_CRM_IBASE_GENERATE_71
a) In the SAP Solution Manager Easy Access screen, call transaction SA38.
b) On the ABAP: Program Execution screen, enter AI_CRM_PRODUCT_SETUP.
c) Choose the value Material.
d) Choose Execute .
e) Repeat the process for the report COM_PRODUCT_UPGRADE.
f) On the SAP Easy Access screen, call transaction COMCPRFORMAT.
g) On the Change View Data for Converting the Product ID Details screen, enter therequired values.Your changes save as you exit the screen.
h) On the SAP Easy Access screen, call transaction COMC_MATERIALID_ALL.
i) On the Number Ranges for Product screen, maintain number ranges as necessary.
j) On the SAP Easy Access screen, call transaction SA38.
k) On the ABAP: Program Execution screen, enter AI_CRM_IBASE_GENERATE_71.
l) Return to the SAP Solution Manager Basic Configuration screen.
Only one of these jobs can run at a time, so you must wait for one to complete beforestarting the next job. Check the status of each job in the log and re-execute the activity
Unit 5: Guided Procedures for Configuration of SAP Solution Manager
152 © Copyright. All rights reserved.
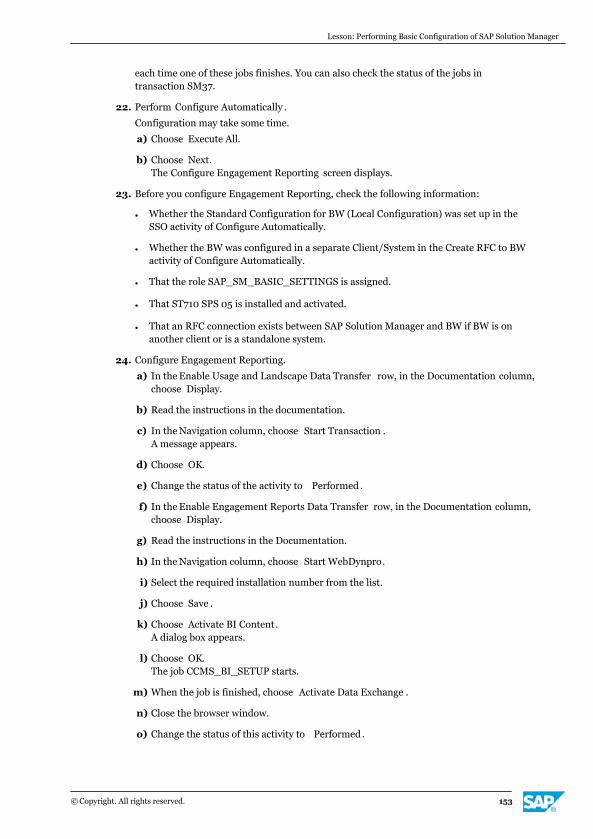
each time one of these jobs finishes. You can also check the status of the jobs intransaction SM37.
22. Perform Configure Automatically .
Configuration may take some time.
a) Choose Execute All.
b) Choose Next.The Configure Engagement Reporting screen displays.
23. Before you configure Engagement Reporting, check the following information:
● Whether the Standard Configuration for BW (Local Configuration) was set up in theSSO activity of Configure Automatically.
● Whether the BW was configured in a separate Client/System in the Create RFC to BWactivity of Configure Automatically.
● That the role SAP_SM_BASIC_SETTINGS is assigned.
● That ST710 SPS 05 is installed and activated.
● That an RFC connection exists between SAP Solution Manager and BW if BW is onanother client or is a standalone system.
24. Configure Engagement Reporting.
a) In the Enable Usage and Landscape Data Transfer row, in the Documentation column,choose Display.
b) Read the instructions in the documentation.
c) In the Navigation column, choose Start Transaction .A message appears.
d) Choose OK.
e) Change the status of the activity to Performed .
f) In the Enable Engagement Reports Data Transfer row, in the Documentation column,choose Display.
g) Read the instructions in the Documentation.
h) In the Navigation column, choose Start WebDynpro.
i) Select the required installation number from the list.
j) Choose Save .
k) Choose Activate BI Content .A dialog box appears.
l) Choose OK.The job CCMS_BI_SETUP starts.
m) When the job is finished, choose Activate Data Exchange .
n) Close the browser window.
o) Change the status of this activity to Performed .
Lesson: Performing Basic Configuration of SAP Solution Manager
© Copyright. All rights reserved. 153
p) Choose Next.The Create Configuration Users screen appears.
25. If you are creating configuration users, read the supporting documentation carefully andfollow the instructions.
26. Complete Basic Configuration.
a) On the Create Configuration Users screen, choose Next.The Complete screen appears.
b) When all jobs have been performed successfully, choose Finish.
Final Status of SAP Solution Manager Basic Configuration StepsOn the Complete screen, the status of all steps in the Basic Configuration of your SAPSolution Manager system is displayed.
Choose from the following options:
● To make yourself familiar with the functions now available in SAP Solution Manager,choose Go to SAP Solution Manager Demo Launch Pad .
● To connect managed systems to SAP Solution Manager, choose Go to Managed SystemsConfiguration.
Unit 5: Guided Procedures for Configuration of SAP Solution Manager
154 © Copyright. All rights reserved.
Unit 5Exercise 5
Check SAP Solution Manager BasicConfiguration
Business Example
To ensure that basic configuration of SAP Solution Manager has succeeded, you verify certainuser settings and RFC connections, and ensure that you can access important documentationrelated to the installation.
Caution:Verify the settings only. Do not change anything.
1. Verify that an S-user has been assigned to the user SOLMAN_ADMIN using transactionAISUSER.
Note the S-User assigned to SOLMAN_ADMIN.
2. Verify that the RFC connections SAP-OSS-LIST-001 and SAP-OSS are connected to theSAP Support Portal using transaction SM59.
3. Verify that SAP Solution Manager is the source system for BW using transaction RSA1.
4. Find the documentation related to deleting session documents and downloads usingtransaction SOLMAN_SETUP.A document containing information and recommendations related to the manual activitydisplays.
© Copyright. All rights reserved. 155
Unit 5Solution 5
Check SAP Solution Manager BasicConfiguration
Business Example
To ensure that basic configuration of SAP Solution Manager has succeeded, you verify certainuser settings and RFC connections, and ensure that you can access important documentationrelated to the installation.
Caution:Verify the settings only. Do not change anything.
1. Verify that an S-user has been assigned to the user SOLMAN_ADMIN using transactionAISUSER.
a) Log on to SAP Solution Manager with <CourseID>-<GroupNumber> and<password>.
b) On the SAP Soution Manager Easy Access screen, call transaction AISUSER.
c) On the Change View "SAP Support Portal Contact Person Assignment" Overviewscreen, find the user SOLMAN_ADMIN.
Note the S-User assigned to SOLMAN_ADMIN.
Note the S-User name as follows: S000<number in the Contact Person column>.
2. Verify that the RFC connections SAP-OSS-LIST-001 and SAP-OSS are connected to theSAP Support Portal using transaction SM59.
a) On the SAP Solution Manager Easy Access screen, call transaction SM59.
b) On the Configuration of RFC Connections screen, expand the ABAP Connections filestructure and open the RFC connection SAP-OSS-LIST-001.
c) On the RFC Destination screen, choose Connection Test .
Alternatively, you can choose Utilities → Test → Authorization Test.
The Connection test is performed.
d) Repeat this process for SAP-OSS.
3. Verify that SAP Solution Manager is the source system for BW using transaction RSA1.
a) On the SAP Solution Manager Easy Access screen, call transaction RSA1.If the Documentation on Modeling Area dialog box displays, choose No.
156 © Copyright. All rights reserved.
b) In the navigation panel of the Data Warehousing Workbench: Modeling screen, chooseModeling → Source Systems .
c) Expand the BI file structure.<SolutionManagerName> and <SolutionManagerClient> display as the BI system.
4. Find the documentation related to deleting session documents and downloads usingtransaction SOLMAN_SETUP.
a) On the SAP Solution Manager Easy Access screen, call transaction SOLMAN_SETUP.The SAP Solution Manager Configuration wizard opens in a browser window.
b) In the navigation panel, choose Basic Configuration .
c) On the Basic Configuration numbered tabs, choose Configure Manually.
d) In the Manual Activities list, select Delete Session Documents and Download anddisplay the documentation.
A document containing information and recommendations related to the manual activitydisplays.
Lesson: Performing Basic Configuration of SAP Solution Manager
© Copyright. All rights reserved. 157
LESSON SUMMARYYou should now be able to:
● Configure basic settings in SAP Solution Manager
Unit 5: Guided Procedures for Configuration of SAP Solution Manager
158 © Copyright. All rights reserved.
Unit 5Lesson 5
Customizing SAP Solution Manager WorkCenters
LESSON OVERVIEWIn this lesson you will learn how to customize work centers to display the information youwant.
LESSON OBJECTIVESAfter completing this lesson, you will be able to:
● Personalize SAP Solution Manager work centers
Work Centers in the SAP Solution Manager SystemWork centers in SAP Solution Manager are easy to navigate and support a task-oriented,streamlined approach to work. With SAP Solution Manager work centers, a user can completeall tasks relevant to a single business goal, such as managing alerts and processing incidents,within one work center. Work centers also improve collaboration through common inboxes,work lists, and status reporting.
Work centers are Web Dynpro ABAP applications, which display as tabbed pages in SAPSolution Manager. You can display work centers in
● A web browser
● The SAP GUI
● The SAP NetWeaver Business Client
For detailed documentation about the SAP NetWeaver Business Client, see SAP NetWeaverBusiness Client documentation at http://help.sap.com/SAP NetWeaver 7.0 → SAPNetWeaver by Key Capability → Application Platform by Key Capability → ABAP Technology → UI Technology → SAP NetWeaver Business Client
To access SAP Solution Manager work centers, do one of the following:
● Call transaction SM_WORKCENTER in SAP GUI to open a browser-based interface (theSAP recommendation).
● Call transaction SOLMAN_WORKCENTER in SAP GUI.
● Access work centers through the NetWeaver Business Client menu.
LESSON SUMMARYYou should now be able to:
● Personalize SAP Solution Manager work centers
© Copyright. All rights reserved. 159

Unit 5: Guided Procedures for Configuration of SAP Solution Manager
160 © Copyright. All rights reserved.
Unit 5
Learning Assessment
1. Which of the following activities is performed during basic configuration?
Choose the correct answers.
X A Install diagnostics agents
X B Configure basic scenarios
X C Create logical components on the managed systems.
X D Implement the Central Correction Note
2. A work center in Solution Manager is a Java application.
Determine whether this statement is true or false.
X True
X False
© Copyright. All rights reserved. 161
Unit 5
Learning Assessment - Answers
1. Which of the following activities is performed during basic configuration?
Choose the correct answers.
X A Install diagnostics agents
X B Configure basic scenarios
X C Create logical components on the managed systems.
X D Implement the Central Correction Note
2. A work center in Solution Manager is a Java application.
Determine whether this statement is true or false.
X True
X False
162 © Copyright. All rights reserved.

UNIT 6 Preparation for The Setup ofManaged Systems in SAPSolution Manager
Lesson 1
Preparing Managed Systems for Configuration in SAP Solution Manager 164
Exercise 6: Check Managed Systems Setup Prerequisites 169
UNIT OBJECTIVES
● Connect managed systems to the System Landscape Database and the LandscapeManagement Database
© Copyright. All rights reserved. 163
Unit 6Lesson 1
Preparing Managed Systems for Configurationin SAP Solution Manager
LESSON OVERVIEWBefore you can configure the managed systems, you must first add them to the runtimeSystem Landscape Directory (SLD) and Landscape Management Database (LMDB). In thislesson you will learn how to connect ABAP and Java systems to the SLD and the LMDB.
LESSON OBJECTIVESAfter completing this lesson, you will be able to:
● Connect managed systems to the System Landscape Database and the LandscapeManagement Database
Prerequisites for Connecting Managed Systems to the SLD and the LMDBBefore you perform the setup of managed systems, add the managed systems to the runtimeSystem Lanscape Directory (SLD) and Landscape Management Database (LMDB).
To prepare the managed systems for configuration, do the following:
Check Managed Systems Support Package Level
To connect managed systems to SAP Solution Manager and to perform root cause analysis,monitoring and alerting, and other scenarios, the managed systems require a minimumsupport package level. The support package level required varies from product to product.SAP Note lists all required support package levels.
In addition to the support package levels of SAP_BASIS and product-specific components,every system managed by SAP Solution Manager must have two add-ons installed, whichshould always have the latest release level. The ABAP add-ons in the managed systems are:
● ST-PI - see SAP Note 539977 - Release strategy for add-on ST-PI for more information.
● ST-A/PI - see SAP Note 69455 - Servicetools for applications (ST-A/PI, ST14, RTCCTOOL,ST12) for more information.
Connect ABAP Systems to the SLD
Before starting the managed systems configuration, the system must be known to SAPSolution Manager so that SAP Solution Manager can gather technical system data andinformation about the software installed on the managed system. SAP Solution Managergathers this information in the SLD, and synchronizes it to the LMDB (this synchronizationwas set up during system preparation).
The registration of the managed system in the SLD is set up in the managed system.
When the ABAP system is connected to the SLD, a data transfer is performed once every 12hours to ensure that technical information in the SLD remains current.
164 © Copyright. All rights reserved.
The RFC destination SLD_UC (in unicode systems) or SLD_NUC (in non-unicode systems) isused for the data transfer. This RFC destination is created during the SAP system installation.
Connect Java Systems Up to Release 7.0X to the SLD
Java systems have no RFC destinations, so the SLD data transfer is the only way to transferthe technical system data to SAP Solution Manager automatically. For older Java systems,you perform this transfer using the Visual Administrator, a management tool for Javasystems on the operating system level.
For more information on setting up your SLD, see https://www.sdn.sap.coirj/sdn/nw-sld
Connect Java Systems Release 7.1 and Higher to the SLD
As of release 7.1, you register Java systems in the SLD using the SAP NetWeaverAdministration, which is the administration tool for the Java stack in the Java stack itself.
To Connect ABAP Systems to the SLDBefore you begin managed system configuration, you connect your ABAP managed system tothe SLD, which can be on the SAP Solution Manager System or on a separate SLD.
1. In the ABAP managed system, maintain the data supplier target using transaction RZ70and the following information:
Options Description
Host Name of the SLD host system
Service This is usually in the form sapgw<Instance No. of the Central Instance>
a) Log on to the SAP ABAP managed system with your user name and password.
b) On the SAP ABAP managed system Easy Access screen, call transaction RZ70.
c) On the System Landscape Directory: Local Administration screen, select the StandardRFC Destination radio button.
d) In the SLD Bridge: Gateway Information section, enter the relevant information.
e) Choose Activate Current Configuration .
f) Choose Start Data Collection and Job Scheduling .
Alternatively, you can choose Start Data Collection without Job Scheduling to start thecollection immediately.
To Connect Java Systems to the SLD: Up to Release 7.0XUse the local Visual Administrator to connect older Java systems to the SLD.
1. Start the Visual Administrator on the server.
a) Open /usr/sap/<SID>/<Instance>/j2ee/admin
b) For UNIX-based operating systems, run the program go.sh
c) For Windows-based operating systems, run the program go.bat
Lesson: Preparing Managed Systems for Configuration in SAP Solution Manager
© Copyright. All rights reserved. 165
d) Log on to Visual Administrator.
The default user is J2EE_ADMIN for dual-stack systems and Administrator for singleJava stacks.
e) Choose Cluster → Server → Services → SLD Data Supplier → Runtime → HTTPSettings .
2. Enter the following data for the HTTP connection from the SLD Data Supplier service tothe runtime SLD:
Options Description
Host The name of the host where the corresponding SLD runs
Port The HTTP standard access port of the SLD
User SLDDSUSER (this user must be assigned to the datasupplierLD security role)
PasswordThe password for SLDDSUSER (to simplify password changes toSLDDSUSER, you should create a copy of this user for every Java system,such as SLDDSTAS.)
3. Test your settings by sending data to the SLD.
a) On the top left side of the Input screen, choose Trigger data transfer to SystemLandscape Directory (SLD) .
The data transfer to the SLD is automatically triggered once each day after setup is complete.
To Connect Java Systems to the SLD: Release 7.1 and HigherUse the online SAP NetWeaver Administrator tool to connect newer Java systems to the SLD.
1. In the NetWeaver Administrator, register your Java system using the followinginformation:
General Data
Hosting System Your local Java system
Destination Name SLD_DataSupplier
Destination Type HTTP
Authentication
Basic (User ID and Password)
Basic Authentication
User Name Specify the J2EE SLDDSUSER (must have the user roleSAP_SLD_DATA_SUPPLIER).
Password Enter the user password.
Unit 6: Preparation for The Setup of Managed Systems in SAP Solution Manager
166 © Copyright. All rights reserved.
Basic Authentication
a) Open SAP NetWeaver Administrator using the URL http://<Host>:<Port>/nwa
b) Log on with your user name and your productive password.
Your logon user must have configuration authorizations in the Java stack.
c) Choose Configuration → Security → Destinations.
d) In the Destination List, select the required server and choose Create .
e) In the General Data dialog box, enter the required information and choose Next.
These fields are case-sensitive.
f) In the Connection Information screen area, enter the URL of the SAP Solution ManagerSLD and choose Next.
g) On the Logon data screen, enter the required information and choose Finish.
2. Set up the AS Java access to the SLD by connecting it to a new SLD_Client destinationusing the following information:
General Data
Hosting System Your local Java system
Destination Name SLD_Client
Destination Type HTTP
Authentication
Basic (User ID and Password) - use the same configuration settings asyou used for SLD_DATA_SUPPLIER.
Basic Authentication
User Name sldapiuser (must have the user role SAP_SLD_GUEST or higher)
Password Enter the user password, which should be the same asSLD_DATA_SUPPLIER.
a) In the Destination List, select the required server and choose Create .
b) In the General Data dialog box, enter the required information and choose Next.
c) In the Connection Information screen area, enter the URL of the SAP Solution ManagerSLD and choose Next.
d) Choose the Logon Data tab.
e) Enter the required information and choose Save .
Lesson: Preparing Managed Systems for Configuration in SAP Solution Manager
© Copyright. All rights reserved. 167
The specified user must have the user role SAP_SLD_GUEST or higher. Certainapplications may require additional write access permissions. Check the correspondingapplication documentation for SLD access requirements.
3. In the NetWeaver Administrator, start the sending and collection of data.
a) Choose Configuration → Infrastructure → SLD Data Supplier Configuration.
Alternatively, in the Help section, use the Search function to search for SLD. Thisfunction connects you to the SLD data supplier.
b) Choose Collect and Send Data .
4. In the SLD, check whether data has been received, using the path http://<sld-hostname>:<sld-port>/sld → Home → Technical Systems .
a) Select the Technical System Type and choose Go.
The data transfer to the SLD is automatically triggered every 3 hours after setup is complete.
Unit 6: Preparation for The Setup of Managed Systems in SAP Solution Manager
168 © Copyright. All rights reserved.
Unit 6Exercise 6
Check Managed Systems Setup Prerequisites
Business Example
Before proceeding with the setup of managed systems, verify that the SAP ERP system isconnected to the System Landscape Directory (SLD).
1. Check the SLD data supplier settings for the SAP ERP system using transaction RZ70.
Locate and note the Host name and the Service name.
2. Check the last execution of the collection job SAP_SLD_DATA_COLLECT usingtransaction SM37.
Locate and note the most recent occurrence of this job.
© Copyright. All rights reserved. 169
Unit 6Solution 6
Check Managed Systems Setup Prerequisites
Business Example
Before proceeding with the setup of managed systems, verify that the SAP ERP system isconnected to the System Landscape Directory (SLD).
1. Check the SLD data supplier settings for the SAP ERP system using transaction RZ70.
a) Log on to SAP ERP using <CourseID>-<GroupNumber> and <password>.
b) In the SAP Easy Access screen, call transaction RZ70.
c) In the System Landscape Directory: Local Administration screen, locate and note theHost name and the Service name.
Locate and note the Host name and the Service name.
The Host name and Service name are displayed in the Host and Service fields of the SLDBridge: Gateway Information dialog box.
2. Check the last execution of the collection job SAP_SLD_DATA_COLLECT usingtransaction SM37.
a) Log on to SAP Solution Manager using <CourseID>-<GroupNumber> and<password>.
b) In the SAP Easy Access screen, call transaction SM37.
c) In the Simple Job Selection screen, enter the following information:
Job Name SAP_SLD_DATA_COLLECT
User Name *
a) Choose Execute.
Locate and note the most recent occurrence of this job.
Note the most recent entries in the Start date and Start time columns of the Job Overviewscreen.
170 © Copyright. All rights reserved.

LESSON SUMMARYYou should now be able to:
● Connect managed systems to the System Landscape Database and the LandscapeManagement Database
Lesson: Preparing Managed Systems for Configuration in SAP Solution Manager
© Copyright. All rights reserved. 171

Unit 6: Preparation for The Setup of Managed Systems in SAP Solution Manager
172 © Copyright. All rights reserved.
UNIT 7 The Configuration of Dual-Stack Systems in SAP SolutionManager
Lesson 1
Configuring a Dual-Stack Managed System in SAP Solution Manager 174
UNIT OBJECTIVES
● Perform a dual-stack system configuration in SAP Solution Manager
© Copyright. All rights reserved. 173
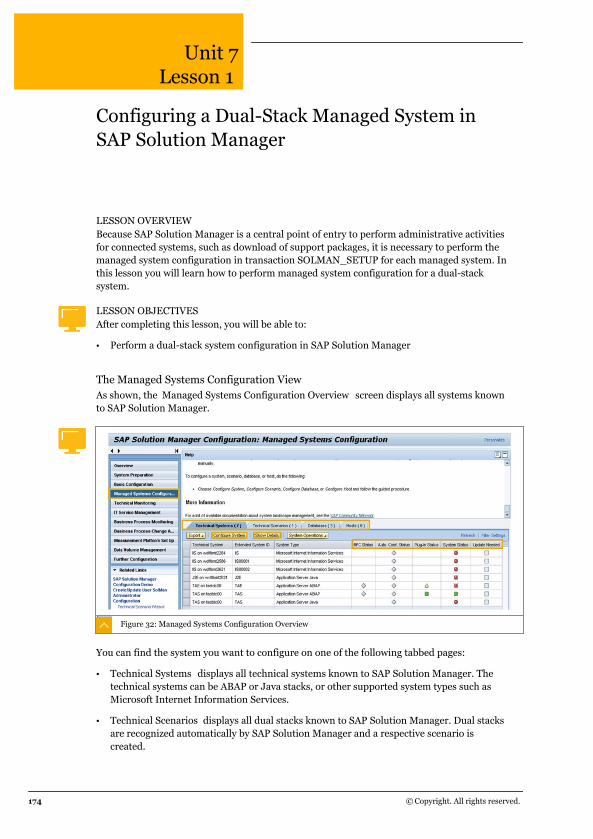
Unit 7Lesson 1
Configuring a Dual-Stack Managed System inSAP Solution Manager
LESSON OVERVIEWBecause SAP Solution Manager is a central point of entry to perform administrative activitiesfor connected systems, such as download of support packages, it is necessary to perform themanaged system configuration in transaction SOLMAN_SETUP for each managed system. Inthis lesson you will learn how to perform managed system configuration for a dual-stacksystem.
LESSON OBJECTIVESAfter completing this lesson, you will be able to:
● Perform a dual-stack system configuration in SAP Solution Manager
The Managed Systems Configuration ViewAs shown, the Managed Systems Configuration Overview screen displays all systems knownto SAP Solution Manager.
Figure 32: Managed Systems Configuration Overview
You can find the system you want to configure on one of the following tabbed pages:
● Technical Systems displays all technical systems known to SAP Solution Manager. Thetechnical systems can be ABAP or Java stacks, or other supported system types such asMicrosoft Internet Information Services.
● Technical Scenarios displays all dual stacks known to SAP Solution Manager. Dual stacksare recognized automatically by SAP Solution Manager and a respective scenario iscreated.
174 © Copyright. All rights reserved.

● Databases displays all databases, including standalone databases, known to SAP SolutionManager.
● Hosts displays all the host systems known to SAP Solution Manager.
The following technical system types cannot be configured in Managed SystemsConfiguration and do not display in the list of technical systems:
● Diagnostics agent
● CA Wily Introscope Enterprise Manager - Standalone
● CA Wily Introscope Enterprise Manager - Cluster
If, for example, incorrect data is displayed, technical systems and technical scenarios can bemaintained as required. To maintain technical systems and scenarios, choose SystemOperations → Maintain System or Scenario Operations → Maintain Scenario.
If, for example, the system type has no SLD data supplier, you can create systems andscenarios manually. For more information, see SAP Note 1472465 - SAP Solution Manager 7.1- System Landscape Setup Guide.
You can also find more information on the wiki at http://wiki.sdn.sap.com/wiki/display/SMSETUP/Maintenance+of+Product+in+the+System+Landscape
How you perform the steps in the configuration process depends on the type of scenario,system, host, or database you are working with.
Table 20: Different Configuration Steps for Different Systems
Host Database ABAP System Java System Scenario (ASABAP & ASJava)
1. Assign Diag-nostics Agent
1. Assign Diag-nostics Agent
1. Select Product 1. Select Product 1. Select Product
2. Enter SystemParameters
2. Enter SystemParameters
2. Check Prereq-uisites
2. Check Prereq-uisites
2. Check Prereq-uisites
3. Configure Au-tomatically
3. Configure Au-tomatically
3. Connect Man-aged System
3. Assign Diag-nostics Agent
3. Connect Man-aged System
4. Complete 4. Complete 4. Assign Diag-nostics Agent
4. Enter SystemParameters
4. Assign Diag-nostics Agent
5. Enter SystemParameters
5. Enter Land-scape Parame-ters
5. Enter SystemParameters
6. Enter Land-scape Parame-ters
6. Create Users 6. Enter Land-scape Parame-ters
7. Create Users 7. Configure Au-tomatically
7. Create Users
8. Configure Au-tomatically
8. ConfigureManually
8. Configure Au-tomatically
9. ConfigureManually
9. Create LogicalComponents
9. ConfigureManually
Lesson: Configuring a Dual-Stack Managed System in SAP Solution Manager
© Copyright. All rights reserved. 175
Host Database ABAP System Java System Scenario (ASABAP & ASJava)
10. Create Logi-cal Components
10. Check Con-figuration
10. Create Logi-cal Components
11. Check Config-uration
11. Complete 11. Check Config-uration
12. Complete 12. Complete
As the table indicates, performing a dual-stack configuration demonstrates the greatestnumber of steps and the greatest variation of activities in the Managed SystemsConfiguration wizard.
Select Product
You specify the software that is installed on your technical system. The specified software isdescribed by various entities in the Landscape Management Database (LMDB), from softwarecomponents at the lowest level, to product instances (groups of software componentversions that must be installed on a single technical system), to product systems (groups ofone or more installed product instances).
For more information, see the Help section for this activity.
Check Prerequisites
You automatically check the following prerequisites for the configuration of Solution Manager:
● Diagnostics Prerequisites (software components)
● Definition in the LMDB
Connect Managed System
This step creates RFC connections to multiple clients, and is necessary only in an ABAPsystem (or the ABAP part of a dual-stack system).
For more information on the functions of the created RFC connections, see the Help sectionfor this activity.
Assign Diagnostics Agent
You assign a diagnostics agent to each server (virtual host) on which the managed system isrunning.
Enter System Parameters
You specify the system parameters required to configure the managed system. The specificparameters that require configuration depend on whether you are configuring an ABAPsystem, a Java system, or a database.
Excursus Enhanced CTS (CTS+)
Unit 7: The Configuration of Dual-Stack Systems in SAP Solution Manager
176 © Copyright. All rights reserved.
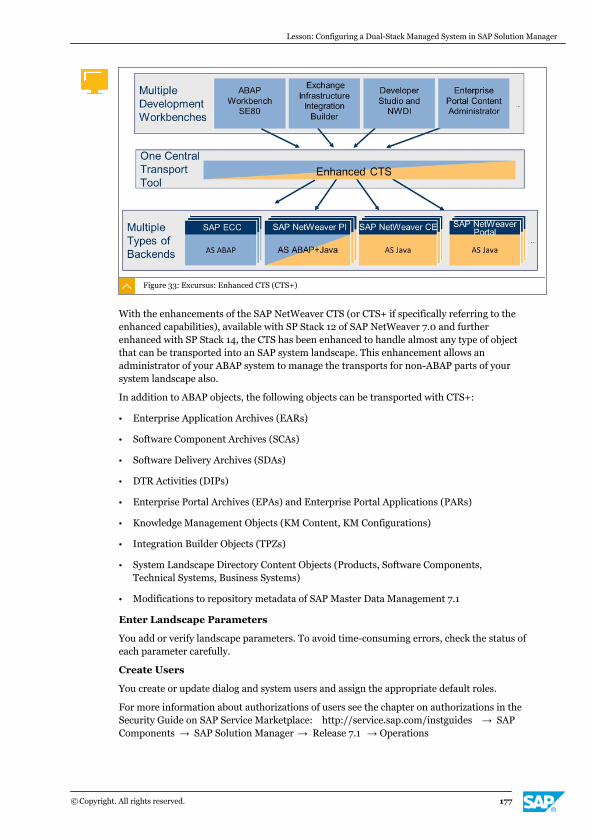
Figure 33: Excursus: Enhanced CTS (CTS+)
With the enhancements of the SAP NetWeaver CTS (or CTS+ if specifically referring to theenhanced capabilities), available with SP Stack 12 of SAP NetWeaver 7.0 and furtherenhanced with SP Stack 14, the CTS has been enhanced to handle almost any type of objectthat can be transported into an SAP system landscape. This enhancement allows anadministrator of your ABAP system to manage the transports for non-ABAP parts of yoursystem landscape also.
In addition to ABAP objects, the following objects can be transported with CTS+:
● Enterprise Application Archives (EARs)
● Software Component Archives (SCAs)
● Software Delivery Archives (SDAs)
● DTR Activities (DIPs)
● Enterprise Portal Archives (EPAs) and Enterprise Portal Applications (PARs)
● Knowledge Management Objects (KM Content, KM Configurations)
● Integration Builder Objects (TPZs)
● System Landscape Directory Content Objects (Products, Software Components,Technical Systems, Business Systems)
● Modifications to repository metadata of SAP Master Data Management 7.1
Enter Landscape Parameters
You add or verify landscape parameters. To avoid time-consuming errors, check the status ofeach parameter carefully.
Create Users
You create or update dialog and system users and assign the appropriate default roles.
For more information about authorizations of users see the chapter on authorizations in theSecurity Guide on SAP Service Marketplace: http://service.sap.com/instguides → SAPComponents → SAP Solution Manager → Release 7.1 → Operations
Lesson: Configuring a Dual-Stack Managed System in SAP Solution Manager
© Copyright. All rights reserved. 177
Especially when connecting Java systems see SAP Note 1647157 - How to Set Up Access tothe SPML Service on AS Java.
Depending on the scenario, this activity creates the following users in the managed system:
SAPSUPPORT
Enables Active Global Support to support in the managed system. This user can onlyread data. Enter the password manually.
SMDAGENT_<SID>
Used by the Wily Host Agent Application in the diagnostics agent to connect to ABAPmanaged systems for data retrieval.
SM_COLL_<SID>
Used by the Wily Host Agent Application in the diagnostics agent to connect to Javamanaged systems for data retrieval.
Configure Automatically
Depending on the system type, a number of the following activities are performedautomatically:
● Activate Services
● Single Sign On Setup
● Database Extractor Setup
● SAPRouter Setup
● JVM Parameters Setup
● HTTP Trace Setup
● Extractors Setup
● Introscope Host Adapter
● Byte Code Adapter Installation
● WEB Services Logical Port Creation
● Generate System-level Metrics
● Apply Settings for EWA Monitoring
For more information about each of these activities, display the documentation associatedwith each one.
Configure Manually
From the following list of manual activities, you perform the ones relevant to yourorganization and your system type:
● Maintain SAP Router Data
● Adjust HTTP Log Parameter
● Activate Flight Recorder
● Restart Java Stack
● Enable Exception Management
Unit 7: The Configuration of Dual-Stack Systems in SAP Solution Manager
178 © Copyright. All rights reserved.
● Enable Remote R/3 Connection
For more information about each of these activities, display the documentation associatedwith each one.
Create Logical Components
This step assigns the selected system to one or more logical components. Ddefine at leastone logical component for AS ABAP systems, AS Java systems, and Business ObjectsClusters. In addition, you need at least one logical component definition to enable SAPEarlyWatch Alert. For more information about this step, see the Help section.
Check Configuration
This step allows you to check the configuration steps automatically and update the statusesin the overview.
Complete
This screen displays the final status of all the steps of your managed systems configuration.
To Configure a Dual-Stack System in SAP Solution ManagerBefore starting managed systems configuration, log off the SAP system and close yourbrowser.
1. Log on to SAP Solution Manager with your user name and password.
2. On the SAP Easy Access screen call transaction SOLMAN_SETUP.
3. In the navigation area, choose Managed Systems Configuration .
4. Open the Technical Scenarios tab.
5. In the Technical Systems list, select the dual-stack system you want to configure andchoose Configure Scenario .
6. Choose Edit.
7. Assign the technical system to a product system.
a) In the Overview of Technical System Software list, select the technical systems youwant to configure and choose Edit.The System Landscape Technical System - Edit screen appears.
b) In the Software area, on the Product Instances tab, choose Assign to Product System .
c) Select an existing product system or create a new one according to the instructions inthe Help section.
d) In the Assigned Product Instances list, select the Diagnostics Relevant checkbox for allrelevant product instances.
e) Save your changes and close the System Landscape Technical System - Edit screen.
f) Check the log for errors and correct if necessary. See the help text for furtherinformation.
g) Choose Next.
8. Check software prerequisites.
Lesson: Configuring a Dual-Stack Managed System in SAP Solution Manager
© Copyright. All rights reserved. 179
a) On the Check Prerequisites screen, choose Execute All to perform configurationactivities automatically.The log displays the status of all the executed configuration activities.
b) If the Updates Needed field is selected, repeat the configuration step manually.
c) To perform an activity manually, in the Documentation column choose Display andfollow the instructions in the documentation.
d) When the activity is complete, in the Execution Status column, select ManuallyPerformed .
e) Choose Next.
9. Create the required RFC connections to clients according to the instructions in the Helpsection.
a) On the Connect Managed System screen, in the Clients and existing RFCs screen area,select the client you want to connect.
b) In the Help section, read and follow the instructions for this activity.
10. If necessary, create an administration user on the managed system.
a) In the Managed System Administrator section, choose Create or Update Administrator .
b) In the Help section, read and follow the instructions for this activity.
c) When you have created or updated your administrator user, save your changes andchoose Next.
11. Assign the diagnostics agents to the managed systems.
a) On the Agent Assignment tab, select the required server and choose Assign.A dialog box listing the available diagnostics agents appears.
b) Select the required diagnostics agent.
c) Choose Assign.
d) Choose Refresh to see the latest agent assignment state.
e) If the diagnostics agent required is not in the list, follow the instructions in the Helpsection.
f) Choose Next.
12. Enter system parameters, using the contextual quick help texts and the information in theHelp section.
You can check the status of the ping service with transaction SICF. If the service/sap/public/ping is not activated, activate it.
a) Choose Next.
13. Enter landscape parameters according to the instructions in the Help section.
a) Select the Check existence of paths when saving check box to avoid errors.
b) When all the parameters are set choose Save .
c) Choose Next.
14. Create or update system and/or dialog users according to the instructions in the Helpsection.
Unit 7: The Configuration of Dual-Stack Systems in SAP Solution Manager
180 © Copyright. All rights reserved.
a) Choose Next.
15. Perform the necessary automatic configuration activities for your installation using theinstructions in the Help section and the instructions in the Documentation column of eachactivity.
a) Choose Next.
16. Perform the necessary manual configuration activities for your installation using theinstructions in the Help section and the instructions in the Documentation column of eachactivity.
a) Set the execution status of each activity to Performed as you complete it.
b) Choose Next.
17. Assign your managed system to one or more logical components according to theinstructions in the Help section.
a) Choose Next.
18. Choose Execute All to check the configuration of the system.
a) Choose Next.The status of all the steps in the managed systems configuration displays on theComplete screen.
LESSON SUMMARYYou should now be able to:
● Perform a dual-stack system configuration in SAP Solution Manager
Lesson: Configuring a Dual-Stack Managed System in SAP Solution Manager
© Copyright. All rights reserved. 181

Unit 7: The Configuration of Dual-Stack Systems in SAP Solution Manager
182 © Copyright. All rights reserved.
Unit 7
Learning Assessment
1. Which of the following configuration activities is performed only in an ABAP system (or theABAP part of a dual-stack system)?
Choose the correct answer.
X A Creating RFC connections
X B Enter system parameters
X C Create dialog users
X D Maintain SAP router data
© Copyright. All rights reserved. 183
Unit 7
Learning Assessment - Answers
1. Which of the following configuration activities is performed only in an ABAP system (or theABAP part of a dual-stack system)?
Choose the correct answer.
X A Creating RFC connections
X B Enter system parameters
X C Create dialog users
X D Maintain SAP router data
184 © Copyright. All rights reserved.
UNIT 8 The Configuration of ABAPSystems in SAP SolutionManager
Lesson 1
Configuring an ABAP Managed System in SAP Solution Manager 186
UNIT OBJECTIVES
● Perform an ABAP system configuration in SAP Solution Manager
© Copyright. All rights reserved. 185
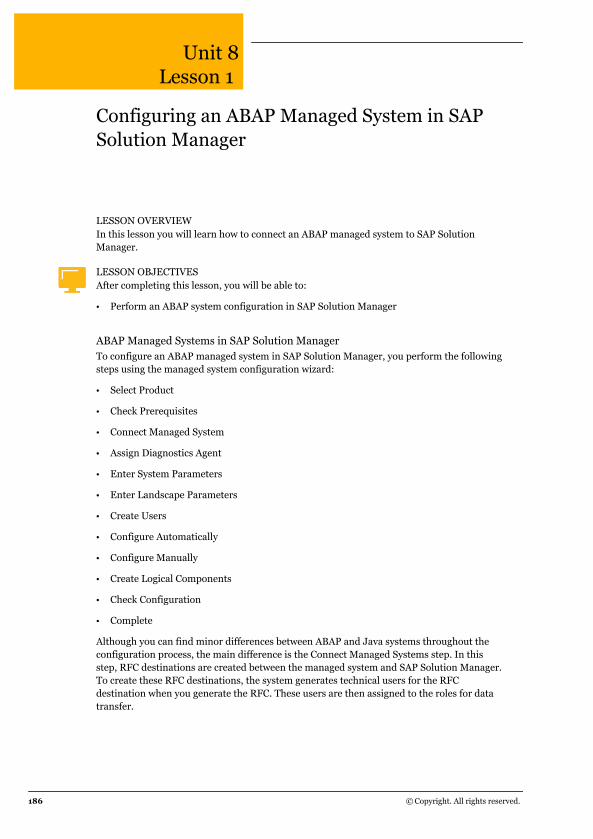
Unit 8Lesson 1
Configuring an ABAP Managed System in SAPSolution Manager
LESSON OVERVIEWIn this lesson you will learn how to connect an ABAP managed system to SAP SolutionManager.
LESSON OBJECTIVESAfter completing this lesson, you will be able to:
● Perform an ABAP system configuration in SAP Solution Manager
ABAP Managed Systems in SAP Solution ManagerTo configure an ABAP managed system in SAP Solution Manager, you perform the followingsteps using the managed system configuration wizard:
● Select Product
● Check Prerequisites
● Connect Managed System
● Assign Diagnostics Agent
● Enter System Parameters
● Enter Landscape Parameters
● Create Users
● Configure Automatically
● Configure Manually
● Create Logical Components
● Check Configuration
● Complete
Although you can find minor differences between ABAP and Java systems throughout theconfiguration process, the main difference is the Connect Managed Systems step. In thisstep, RFC destinations are created between the managed system and SAP Solution Manager.To create these RFC destinations, the system generates technical users for the RFCdestination when you generate the RFC. These users are then assigned to the roles for datatransfer.
186 © Copyright. All rights reserved.
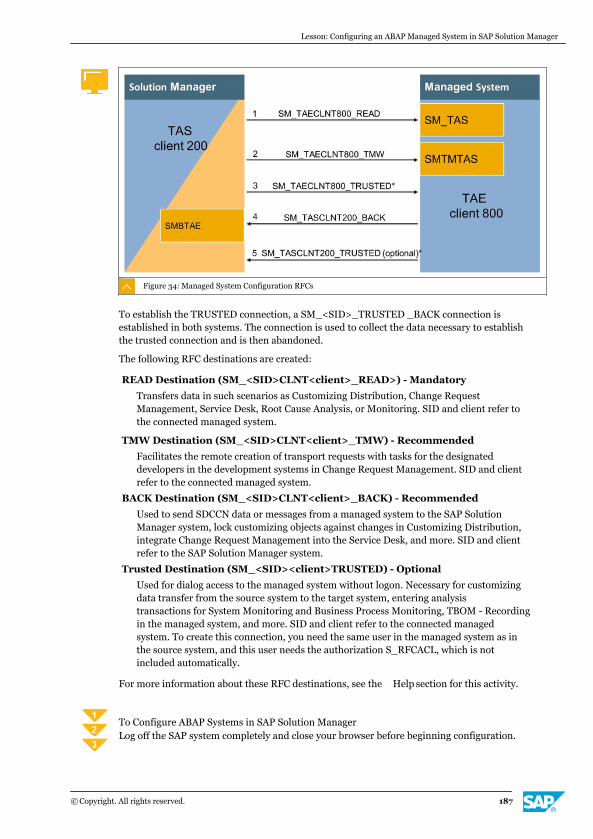
Figure 34: Managed System Configuration RFCs
To establish the TRUSTED connection, a SM_<SID>_TRUSTED _BACK connection isestablished in both systems. The connection is used to collect the data necessary to establishthe trusted connection and is then abandoned.
The following RFC destinations are created:
READ Destination (SM_<SID>CLNT<client>_READ>) - Mandatory
Transfers data in such scenarios as Customizing Distribution, Change RequestManagement, Service Desk, Root Cause Analysis, or Monitoring. SID and client refer tothe connected managed system.
TMW Destination (SM_<SID>CLNT<client>_TMW) - Recommended
Facilitates the remote creation of transport requests with tasks for the designateddevelopers in the development systems in Change Request Management. SID and clientrefer to the connected managed system.
BACK Destination (SM_<SID>CLNT<client>_BACK) - Recommended
Used to send SDCCN data or messages from a managed system to the SAP SolutionManager system, lock customizing objects against changes in Customizing Distribution,integrate Change Request Management into the Service Desk, and more. SID and clientrefer to the SAP Solution Manager system.
Trusted Destination (SM_<SID><client>TRUSTED) - Optional
Used for dialog access to the managed system without logon. Necessary for customizingdata transfer from the source system to the target system, entering analysistransactions for System Monitoring and Business Process Monitoring, TBOM - Recordingin the managed system, and more. SID and client refer to the connected managedsystem. To create this connection, you need the same user in the managed system as inthe source system, and this user needs the authorization S_RFCACL, which is notincluded automatically.
For more information about these RFC destinations, see the Help section for this activity.
To Configure ABAP Systems in SAP Solution ManagerLog off the SAP system completely and close your browser before beginning configuration.
Lesson: Configuring an ABAP Managed System in SAP Solution Manager
© Copyright. All rights reserved. 187
1. Log on to SAP Solution Manager with your user name and password.
2. On the SAP Easy Access screen, choose Managed Systems Configuration .
3. Open the Technical Systems tab.
4. In the Technical Systems list, choose the ABAP system you want to configure and chooseEdit.The System Landscape Technical System - Edit screen appears.
5. As with a dual-stack system configuration, follow the steps in the wizard, reading theonscreen documentation carefully before performing each activity.
When you choose Configure System , a dialog displays with the following text "By selectingEnables System for AGS Service Delivery below you plan on scheduling SAP Supportservices for your system. It is mandatory to execute all steps in the following guidedprocedure, except where specifically stated as Optional." This message refers theenablement steps available in ST710 SP8, some of which require manual processing. Inthe next version of Solution Manager (ST 710 SP 9) it is planned to include these manualsteps within the managed system and to automate them where possible.
LESSON SUMMARYYou should now be able to:
● Perform an ABAP system configuration in SAP Solution Manager
Unit 8: The Configuration of ABAP Systems in SAP Solution Manager
188 © Copyright. All rights reserved.
UNIT 9 The Configuration of JavaSystems in SAP SolutionManager
Lesson 1
Configuring a Java System in SAP Solution Manager 190
Exercise 7: Review Managed System Configuration 193
UNIT OBJECTIVES
● Perform a Java system configuration in SAP Solution Manager
© Copyright. All rights reserved. 189
Unit 9Lesson 1
Configuring a Java System in SAP SolutionManager
LESSON OVERVIEWIn this lesson you will learn how to connect a Java managed system to SAP Solution Manager.
LESSON OBJECTIVESAfter completing this lesson, you will be able to:
● Perform a Java system configuration in SAP Solution Manager
Java Managed Systems in SAP Solution ManagerOne of the steps that is obviously different between an ABAP and a Java system configurationis Configure Automatically . On a Java system, you can manually configure the activity ByteCode Adapter Installation to customize the default metric settings.
The Introscope Bytecode Agent runs on managed systems based on J2EE engines to reportdata to the CA Wily Introscope Enterprise Manager. Solution Manager Diagnostics (SMD)provides the Introscope Agent, which takes care of the installation of Introscope BytecodeAgents. The deployment and configuration of these Bytecode Agents is performed remotelywith the assistance of the diagnostics agent.
The automatic maintenance of VM parameters is not supported for SAP NetWeaver systemsbased on SAP J2EE 7.10, so you must manually maintain the profile parameters according tothis list. Check SAP Note 1565954 - Introscope 9 Release Notes and SAP Note 797147 - WilyIntroscope Installation for SAP Customers.
To empower diagnostics to deploy remotely and configure a given Introscope Bytecode Agentrelease, install (deploy) on Solution Manager the latest version of the Java SoftwareComponent Archive (SCA), named ISAGENTSMD7x.xxxxxx.SCA.
Caution:Avoid using the ISAGENTxxxxxx.SAR file by mistake.
Deploy the SCA with the Software Deployment Manager (SDM) of the Solution Manager J2EEengine.
Before you deploy this SCA file, ensure that the Maintenance mode has been activated withinDiagnostics.
For more information on this activity, see Deployment and Configuration for IntroscopeBytecode Agents within SOLMAN_SETUP.
For more information about deploying the CA Wily Introscope Byte Code Adapter to SAPNetWeaver 7.10 systems, see Maintain the Profile Parameters for SAP NetWeaver Systemswithin SOLMAN_SETUP.
190 © Copyright. All rights reserved.

To Configure Java Systems in SAP Solution ManagerLog off the SAP system completely and close your browser before beginning configuration.
1. Log on to SAP Solution Manager with your user name and password.
2. On the SAP Easy Access screen, choose Managed Systems Configuration .
3. Open the Technical Systems tab.
4. In the Technical Systems list, choose the Java system you want to configure and chooseEdit.The System Landscape Technical System - Edit screen appears.
5. Follow the steps in the wizard, reading the onscreen documentation carefully beforeperforming each activity.
Lesson: Configuring a Java System in SAP Solution Manager
© Copyright. All rights reserved. 191

Unit 9: The Configuration of Java Systems in SAP Solution Manager
192 © Copyright. All rights reserved.
Unit 9Exercise 7
Review Managed System Configuration
Business Example
You want to verify that the managed systems setup procedure was completed successfully,so you check for important documentation within SAP Solution Manager.
1. Find and read the documentation for deploying the CA Wily Introscope Byte Code Adapterto the J2EE engine using transaction SOLMAN_SETUP.
© Copyright. All rights reserved. 193
Unit 9Solution 7
Review Managed System Configuration
Business Example
You want to verify that the managed systems setup procedure was completed successfully,so you check for important documentation within SAP Solution Manager.
1. Find and read the documentation for deploying the CA Wily Introscope Byte Code Adapterto the J2EE engine using transaction SOLMAN_SETUP.
a) Log on to SAP Solution Manager using <CourseID>-<GroupNumber> and<password>.
b) On the SAP Solution Manager Easy Access screen, call transaction SOLMAN_SETUP.
c) In the navigation pane, choose Managed System Configuration .
d) On the SAP Solution Manager: Managed Systems Configuration page, select <SAPNetWeaver Enterprise Portal System Name> and choose Configure System .
e) On the Managed System Configuration page, choose the Configure Automaticallynumbered tab.
f) In the Automatic Activities list, select Byte Code Adapter Installation and display thedocumentation.Information and recommendations for this activity are displayed.
194 © Copyright. All rights reserved.
LESSON SUMMARYYou should now be able to:
● Perform a Java system configuration in SAP Solution Manager
Lesson: Configuring a Java System in SAP Solution Manager
© Copyright. All rights reserved. 195

Unit 9: The Configuration of Java Systems in SAP Solution Manager
196 © Copyright. All rights reserved.
UNIT 10 Business Partner Types in SAPSolution Manager
Lesson 1
Creating Business Partners in SAP Solution Manager 198
Exercise 8: Create a Business Partner Message Processor for Issues, Top Issues, and
Tasks
203
UNIT OBJECTIVES
● Create business partners for issue management
© Copyright. All rights reserved. 197
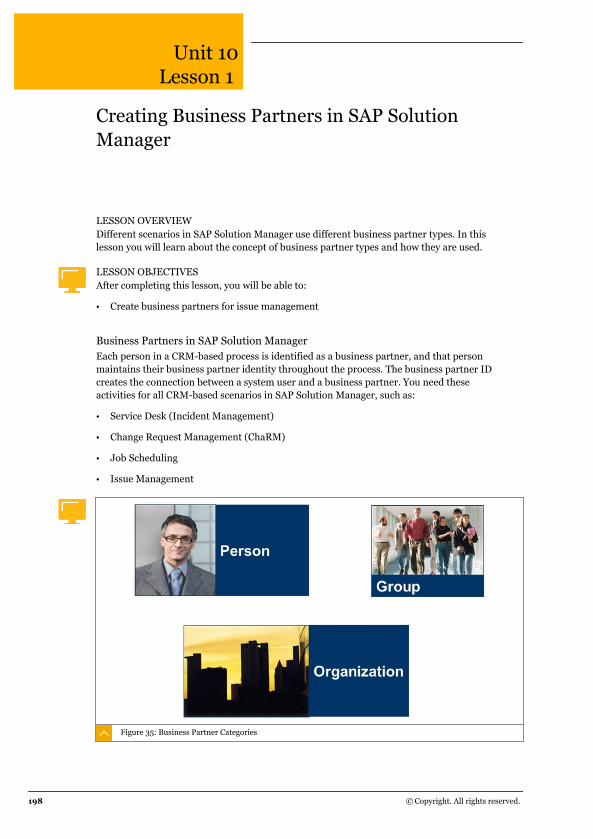
Unit 10Lesson 1
Creating Business Partners in SAP SolutionManager
LESSON OVERVIEWDifferent scenarios in SAP Solution Manager use different business partner types. In thislesson you will learn about the concept of business partner types and how they are used.
LESSON OBJECTIVESAfter completing this lesson, you will be able to:
● Create business partners for issue management
Business Partners in SAP Solution ManagerEach person in a CRM-based process is identified as a business partner, and that personmaintains their business partner identity throughout the process. The business partner IDcreates the connection between a system user and a business partner. You need theseactivities for all CRM-based scenarios in SAP Solution Manager, such as:
● Service Desk (Incident Management)
● Change Request Management (ChaRM)
● Job Scheduling
● Issue Management
Figure 35: Business Partner Categories
198 © Copyright. All rights reserved.
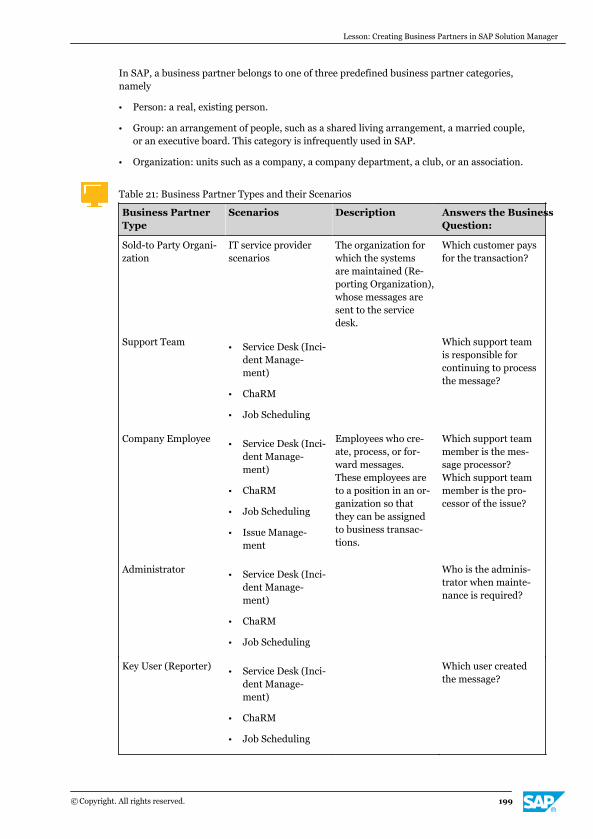
In SAP, a business partner belongs to one of three predefined business partner categories,namely
● Person: a real, existing person.
● Group: an arrangement of people, such as a shared living arrangement, a married couple,or an executive board. This category is infrequently used in SAP.
● Organization: units such as a company, a company department, a club, or an association.
Table 21: Business Partner Types and their Scenarios
Business PartnerType
Scenarios Description Answers the BusinessQuestion:
Sold-to Party Organi-zation
IT service providerscenarios
The organization forwhich the systemsare maintained (Re-porting Organization),whose messages aresent to the servicedesk.
Which customer paysfor the transaction?
Support Team● Service Desk (Inci-
dent Manage-ment)
● ChaRM
● Job Scheduling
Which support teamis responsible forcontinuing to processthe message?
Company Employee● Service Desk (Inci-
dent Manage-ment)
● ChaRM
● Job Scheduling
● Issue Manage-ment
Employees who cre-ate, process, or for-ward messages.These employees areto a position in an or-ganization so thatthey can be assignedto business transac-tions.
Which support teammember is the mes-sage processor?Which support teammember is the pro-cessor of the issue?
Administrator● Service Desk (Inci-
dent Manage-ment)
● ChaRM
● Job Scheduling
Who is the adminis-trator when mainte-nance is required?
Key User (Reporter)● Service Desk (Inci-
dent Manage-ment)
● ChaRM
● Job Scheduling
Which user createdthe message?
Lesson: Creating Business Partners in SAP Solution Manager
© Copyright. All rights reserved. 199
You can create business partners in the following ways:
● Call transaction SPRO and navigate to the correct step in the IMG.
● Call transaction BP_GEN to generate business partners automatically.
● Call transaction BP to generate business partners manually.
If you decide to create a business partner manually, remember the following:
● For the business partner to be identified automatically as a key user, it you maintain it onthe systems where that key user can log on.
● The identification of a business partner can be maintained on the Identification tab of theBusiness Partner (Gen) role.
● For each system, maintain the ID Type CRM001 (External System Identifier).
● The identification number is the System ID + BLANK + Installation Number + BLANK +Client + BLANK + Username. This information is necessary to identify the business partneras a system user in SAP Solution Manager. System users from other systems could alsobe placed here, which is important for scenarios like ChaRM.
You can also schedule mass maintenance for business partners, using either the transactionBP_GEN or the report AI_SDK_USER_BP_GEN.
When you execute the report AI_SDK_USER_BP_GEN, it checks the RFC connections to themanaged systems and, depending on the execution options, displays the followinginformation:
● The systems that were unreachable, and the reasons why they were unreachable (forexample, no current ST-PI plug-in installed).
● The total number of new users in each managed system, which can be processed further.
● New system users with a valid e-mail address or user name. These valid users can beautomatically created as users and business partners in SAP Solution Manager.
● New system users that have already been created as users and business partners in SAPSolution Manager. If a business partner has already been created, the report checkswhether the identification numbers in SAP Solution Manager match those in the managedsystems, and whether the Team Member role has been assigned to the user. If theidentification numbers fail to match, the report adds the correct identification number forthe business partner into SAP Solution Manager. If SAP Solution Manager is operated byan SAP partner, and data separation is active, the customer number is added in addition tothe identification number.
● Which new users and business partners the report would create because they have not yetbeen created in SAP Solution Manager.
● Whether Central User Administration (CUA) is active. If CUA is active, the CUA mastersystem displays and the report creates users in the system.
Caution:Use the report to create users and business partners automatically only ifallowed by your organization's policies. You undo this automatic creationmanually.
Unit 10: Business Partner Types in SAP Solution Manager
200 © Copyright. All rights reserved.
For more information, see SAP Note 1280638 - Automatic generation of users and businesspartners.
How to Maintain Business Partners and Users with Report AI_SDK_USER_BP_GENTo ensure that the users of managed systems can perform such tasks as checking theprocessing status of support messages in SAP Solution Manager, you create them as usersand business partners in SAP Solution Manager. Use the report AI_SDK_USER_BP_GEN todetermine new users in your managed systems.The report AI_SDK_USER_BP_GEN allows you to perform the following functions:
● List new users by comparing SAP Solution Manager with the managed systems.
● Check which managed systems have new users (if you are an administrator).
● Find new managed systems for a customer and/or find new users in a customer'smanaged systems (if you are an SAP partner).
● Automatically create or update new users and business partners in SAP Solution Manager(if permitted by your organization's policies).
1. Taking care to run the report in Test Mode initially, automatically maintain users andbusiness partners in the managed systems with report AI_SDK_USER_BP_GEN.
a) Log on to SAP Solution Manager with your user name and password.
b) On the SAP Solution Manager Easy Access screen, call transaction SE38.
c) On the ABAP Editor, Enter AI_SDK_USER_BP_GEN and choose Execute .
d) On the AI_SDK_USER_BP_GENscreen, in the Select Users from Managed Systemscreen area, select the Existing Read RFCs check box to specify the RFC destinationsthe report is to take into account.The system searches for users via existing RFC connections between SAP SolutionManager and the managed systems of type READ.
e) Select the Trusted RFCs check box to use enhanced authorizations to search for users.You choose this option if, for example, the report fails to find the expected users.
f) In the Users Changed Since field, enter the selection date.The report checks which users have been added since the entered date. The systemdate is set as the default.
g) To restrict the list of users by name, choose the Select via User Name radio button.
h) In the RFC Destinations field, select which RFC destinations the report should take intoaccount.
i) In the Users field, specify the users that the report should take into account.
j) In the Users screen area, choose either the E-Mail Address radio button or the UserName radio button depending on how you want to identify users and businesspartners.
k) Select the Create Business Partners (BP) check box to create business partnersautomatically.
Newly created business partners are created as users to log on to SAP SolutionManager.
Lesson: Creating Business Partners in SAP Solution Manager
© Copyright. All rights reserved. 201
l) Select the Update Business Partners (BP) check box to update the identificationnumbers of previously created business partners.
2. Create users automatically.
a) In the Users screen area, select the Create User check box.
b) In the Template User for Creation or the Reference User for Creation field, enter thename of a template or reference user on which to base new users.
c) Select the Send Mail to New Users check box if you want users to receive the SAPSolution Manager password by e-mail.
Only send the password by e-mail if your organization's policies allow it.
3. In the Program screen area, select report execution options.
a) Select the Display Details check box to display all details.
Deselect the Display Details check box to display only called RFC connections,summaries of subfunctions, and error messages.
b) Deselect the Hide Skipped Entries field to display invalid users without an e-mailaddress in the managed system.
c) Select the Test Mode check box.The report displays the result of a simulation.
4. Deselect the Test Mode check box and run the report again to create or update users andbusiness partners.
Unit 10: Business Partner Types in SAP Solution Manager
202 © Copyright. All rights reserved.
Unit 10Exercise 8
Create a Business Partner Message Processorfor Issues, Top Issues, and Tasks
Business Example
To use all aspects of SAP Solution Manager's issue management functionality, you need theauthorization to generate and process issues, top issues, and tasks in SAP Solution Manager.
Create a business user <CourseID>-<GroupNumber>, assign it to your existing SAP SolutionManager system user, record the ID and ID type of your business partner for future use, andensure that your business partner ID has a user name associated with it.
1. Create a business user <CourseID>-<GroupNumber> using transaction BP_GEN.
2. Locate and record the ID and ID type of your business partner using transaction BP.
Find and note the ID and ID type of your business partner.
3. Check that your business partner's user name exists in SAP Solution Manager.
© Copyright. All rights reserved. 203
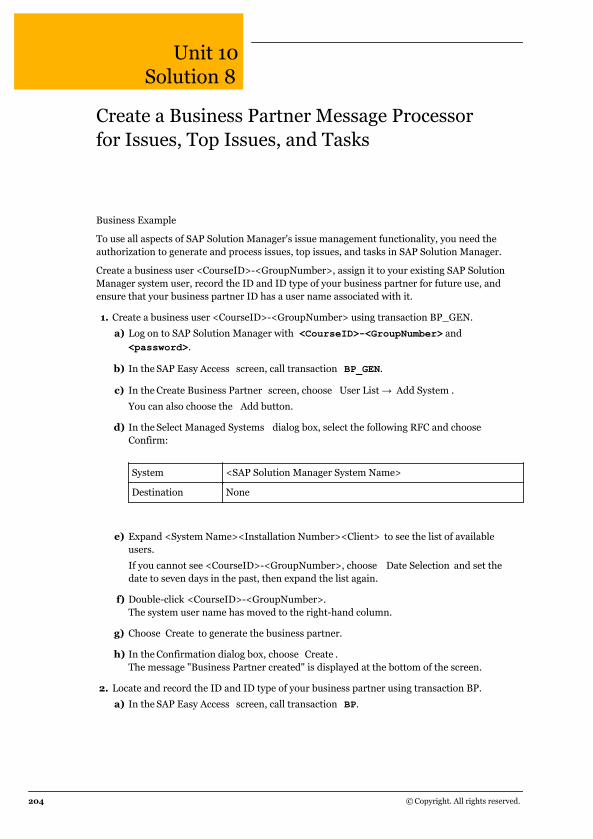
Unit 10Solution 8
Create a Business Partner Message Processorfor Issues, Top Issues, and Tasks
Business Example
To use all aspects of SAP Solution Manager's issue management functionality, you need theauthorization to generate and process issues, top issues, and tasks in SAP Solution Manager.
Create a business user <CourseID>-<GroupNumber>, assign it to your existing SAP SolutionManager system user, record the ID and ID type of your business partner for future use, andensure that your business partner ID has a user name associated with it.
1. Create a business user <CourseID>-<GroupNumber> using transaction BP_GEN.
a) Log on to SAP Solution Manager with <CourseID>-<GroupNumber> and<password>.
b) In the SAP Easy Access screen, call transaction BP_GEN.
c) In the Create Business Partner screen, choose User List → Add System .
You can also choose the Add button.
d) In the Select Managed Systems dialog box, select the following RFC and chooseConfirm:
System <SAP Solution Manager System Name>
Destination None
e) Expand <System Name><Installation Number><Client> to see the list of availableusers.
If you cannot see <CourseID>-<GroupNumber>, choose Date Selection and set thedate to seven days in the past, then expand the list again.
f) Double-click <CourseID>-<GroupNumber>.The system user name has moved to the right-hand column.
g) Choose Create to generate the business partner.
h) In the Confirmation dialog box, choose Create .The message "Business Partner created" is displayed at the bottom of the screen.
2. Locate and record the ID and ID type of your business partner using transaction BP.
a) In the SAP Easy Access screen, call transaction BP.
204 © Copyright. All rights reserved.
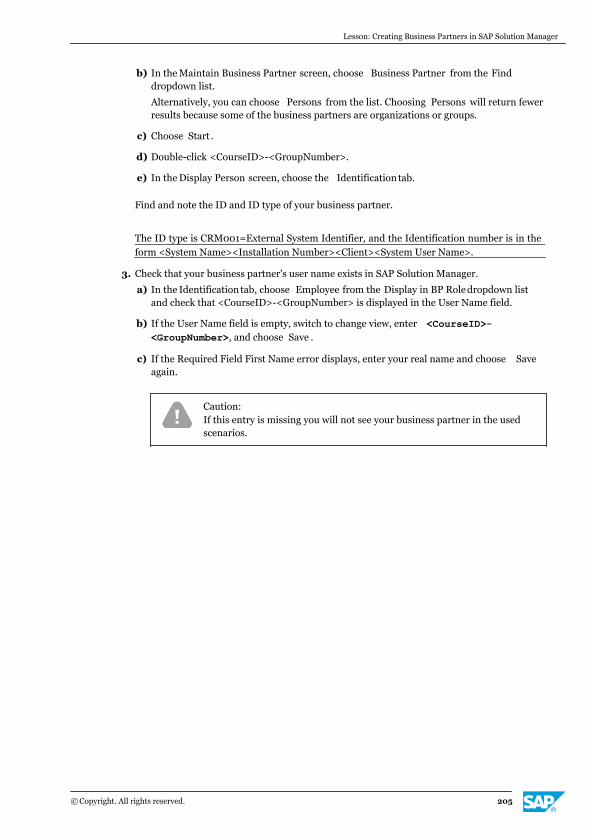
b) In the Maintain Business Partner screen, choose Business Partner from the Finddropdown list.
Alternatively, you can choose Persons from the list. Choosing Persons will return fewerresults because some of the business partners are organizations or groups.
c) Choose Start .
d) Double-click <CourseID>-<GroupNumber>.
e) In the Display Person screen, choose the Identification tab.
Find and note the ID and ID type of your business partner.
The ID type is CRM001=External System Identifier, and the Identification number is in theform <System Name><Installation Number><Client><System User Name>.
3. Check that your business partner's user name exists in SAP Solution Manager.
a) In the Identification tab, choose Employee from the Display in BP Role dropdown listand check that <CourseID>-<GroupNumber> is displayed in the User Name field.
b) If the User Name field is empty, switch to change view, enter <CourseID>-<GroupNumber>, and choose Save .
c) If the Required Field First Name error displays, enter your real name and choose Saveagain.
Caution:If this entry is missing you will not see your business partner in the usedscenarios.
Lesson: Creating Business Partners in SAP Solution Manager
© Copyright. All rights reserved. 205
LESSON SUMMARYYou should now be able to:
● Create business partners for issue management
Unit 10: Business Partner Types in SAP Solution Manager
206 © Copyright. All rights reserved.
UNIT 11 The SAP Solution ManagerAdministration Work Center
Lesson 1
Administering Systems in the SAP Solution Manager Landscape 209
Lesson 2
Accessing Landscape Component Management Tools in SAP Solution Manager 210
Lesson 3
Administering SAP Solution Manager Infrastructure Components 215
Lesson 4
Performing Self Diagnosis in SAP Solution Manager 229
Lesson 5
Managing SAP Solution Manager Self-Monitoring 232
Lesson 6
Creating and Maintaining Solutions in SAP Solution Manager 235
Exercise 9: Create a Solution in SAP Solution Manager 241
Exercise 10: Maintain a Business Process Structure in SAP Solution Manager 245
Lesson 7
Creating and Maintaining Projects in SAP Solution Manager 249
UNIT OBJECTIVES
● Describe the SAP Solution Manager Administration work center
● Administer system landscape components using the Landscape view
● Administer CA Wily Introscope Enterprise Manager installations in SAP Solution Manager
● Access infrastructure components from a central location
● Describe the management of the CCDB within the Infrastructure view
© Copyright. All rights reserved. 207
● Describe the management of the LMDB within the Infrastructure view
● Perform self-diagnosis in SAP Solution Manager
● Configure SAP Solution Manager self-monitoring
● Process alerts in SAP Solution Manager self-monitoring
● Explain the concept of solutions as used in SAP Solution Manager
● Create and maintain solutions in SAP Solution Manager
● Maintain solutions in SAP Solution Manager
● Describe the use of projects in SAP Solution Manager
● Create projects in SAP Solution Manager
● Maintain projects in SAP Solution Manager
Unit 11: The SAP Solution Manager Administration Work Center
208 © Copyright. All rights reserved.
Unit 11Lesson 1
Administering Systems in the SAP SolutionManager Landscape
LESSON OVERVIEWIn this lesson you will learn how to maintain the systems in your SAP Solution Managersolution landscape.
LESSON OBJECTIVESAfter completing this lesson, you will be able to:
● Describe the SAP Solution Manager Administration work center
The Administration work centerThe Solution Manager Administration work center is the central access point for all theinformation and functions necessary to run SAP Solution Manager. It is divided into views. Inthose views, you can set up and manage solutions, projects, and systems, and can performuser functions and common administration tasks.
The Solution Administrator work center provides the following functions:
● Overview: Provides access to the work center tools.
● Landscape : Provides management applications for all landscape-related elements, liketechnical systems, databases, hosts, and technical scenarios.
● Infrastructure: Gives access to the management applications of the SAP Solution Managerinfrastructure, such as the agent framework, Wily Introscope, and the ExtractorFramework.
● Self Diagnosis : Checks your SAP Solution Manager system and the managed systems forconfiguration or runtime errors.
● Self Monitoring: Provides access to SAP Solution Manager self-monitoring alerts andnotifications that were generated for the SAP Solution Manager system itself.
● Solutions: Gives an overview and access to the configured solutions.
● Projects : To create and maintain projects in SAP Solution Manager.
LESSON SUMMARYYou should now be able to:
● Describe the SAP Solution Manager Administration work center
© Copyright. All rights reserved. 209
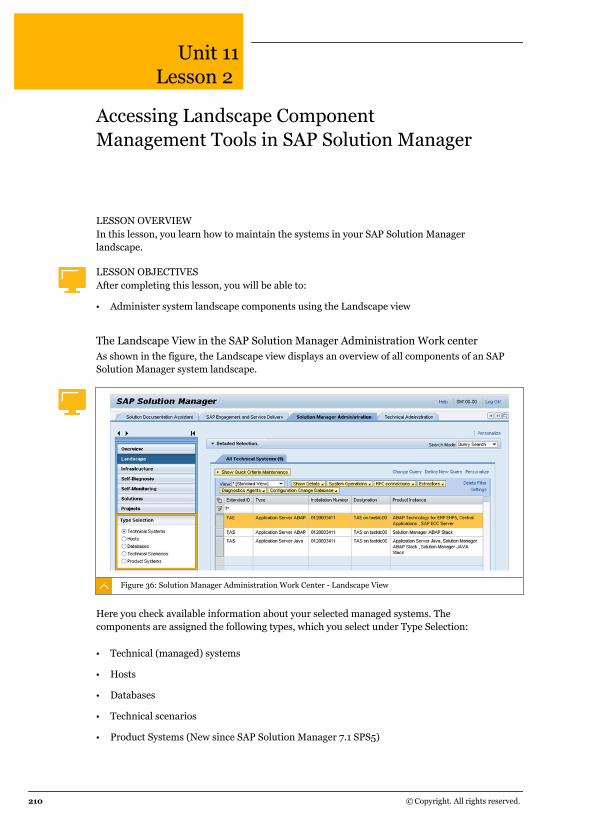
Unit 11Lesson 2
Accessing Landscape ComponentManagement Tools in SAP Solution Manager
LESSON OVERVIEWIn this lesson, you learn how to maintain the systems in your SAP Solution Managerlandscape.
LESSON OBJECTIVESAfter completing this lesson, you will be able to:
● Administer system landscape components using the Landscape view
The Landscape View in the SAP Solution Manager Administration Work centerAs shown in the figure, the Landscape view displays an overview of all components of an SAPSolution Manager system landscape.
Figure 36: Solution Manager Administration Work Center - Landscape View
Here you check available information about your selected managed systems. Thecomponents are assigned the following types, which you select under Type Selection:
● Technical (managed) systems
● Hosts
● Databases
● Technical scenarios
● Product Systems (New since SAP Solution Manager 7.1 SPS5)
210 © Copyright. All rights reserved.
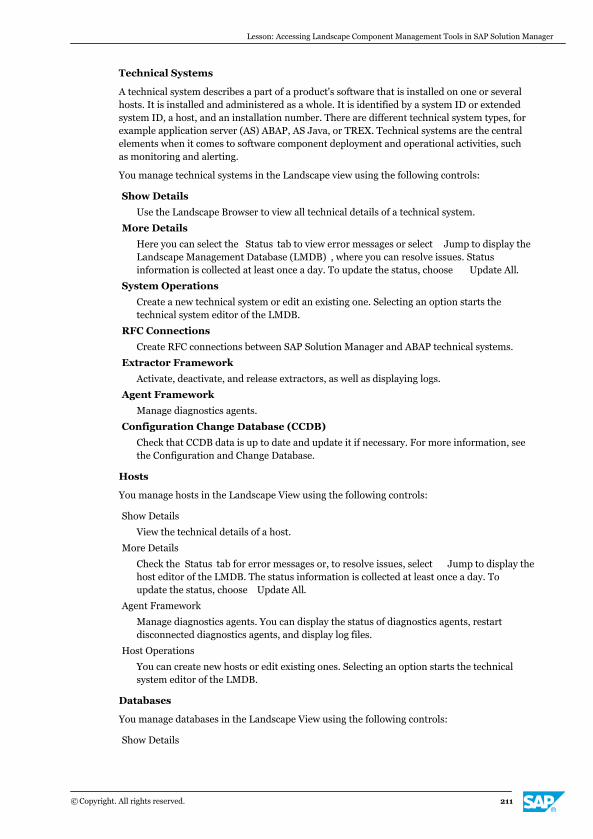
Technical Systems
A technical system describes a part of a product's software that is installed on one or severalhosts. It is installed and administered as a whole. It is identified by a system ID or extendedsystem ID, a host, and an installation number. There are different technical system types, forexample application server (AS) ABAP, AS Java, or TREX. Technical systems are the centralelements when it comes to software component deployment and operational activities, suchas monitoring and alerting.
You manage technical systems in the Landscape view using the following controls:
Show Details
Use the Landscape Browser to view all technical details of a technical system.
More Details
Here you can select the Status tab to view error messages or select Jump to display theLandscape Management Database (LMDB) , where you can resolve issues. Statusinformation is collected at least once a day. To update the status, choose Update All.
System Operations
Create a new technical system or edit an existing one. Selecting an option starts thetechnical system editor of the LMDB.
RFC Connections
Create RFC connections between SAP Solution Manager and ABAP technical systems.
Extractor Framework
Activate, deactivate, and release extractors, as well as displaying logs.
Agent Framework
Manage diagnostics agents.
Configuration Change Database (CCDB)
Check that CCDB data is up to date and update it if necessary. For more information, seethe Configuration and Change Database.
Hosts
You manage hosts in the Landscape View using the following controls:
Show Details
View the technical details of a host.
More Details
Check the Status tab for error messages or, to resolve issues, select Jump to display thehost editor of the LMDB. The status information is collected at least once a day. Toupdate the status, choose Update All.
Agent Framework
Manage diagnostics agents. You can display the status of diagnostics agents, restartdisconnected diagnostics agents, and display log files.
Host Operations
You can create new hosts or edit existing ones. Selecting an option starts the technicalsystem editor of the LMDB.
Databases
You manage databases in the Landscape View using the following controls:
Show Details
Lesson: Accessing Landscape Component Management Tools in SAP Solution Manager
© Copyright. All rights reserved. 211
View the technical details of a database.
More Details
Check the Status tab for error messages. To resolve an issue, select Jump, which opensthe technical system editor of the LMDB. The status information is collected at least oncea day. To update the status, choose Update All.
Agent Framework
Manage diagnostics agents. You can display the status of diagnostics agents, restartdisconnected diagnostics agents, and display log files.
System Operations
Create a new host or edit an existing one. Selecting an option starts the technical systemeditor of the LMDB.
Technical Scenarios
A technical scenario groups technical systems together for a technical purpose. It is theprimary working element for operations in SAP Solution Manager. Monitoring and alerting andservice delivery functions, such as SAP EarlyWatch Alert, all focus on the technical system asthe main point of interest.
You manage technical scenarios in the Landscape View with the following controls:
Show Details
Here you can view the technical details of a technical scenario.
You can also edit, create, or delete a scenario.
Product Systems
A product system is a group of technical systems on which a product version is installed.Product systems are used to maintain and plan products in the system landscape. When youopen the product version subview for the first time, you create a personal query, whichdefines the product systems to be displayed.
After that, you can choose to Display, Create , or Edit a product system. Selecting one of theseoptions starts the product system editor of the LMDB.
The Details area displays the technical details of a product system.
The Status column displays the result of the last verification run.
To start a new verification, choose Execute Verification Checks .
To resolve errors, select a product system and choose Edit. The product system editor opens.The details for the error correction display in the Verification step.
Checking the System Status and the System Details
Choose the System Details → System Status button to check the current status of thetechnical system. The system status contains error messages for the following checks:
● Landscape
● Self-Diagnosis
● Configuration
● Configuration Change Database
You can jump to the application to resolve the error by using the link in the URLcolumn.
Unit 11: The SAP Solution Manager Administration Work Center
212 © Copyright. All rights reserved.
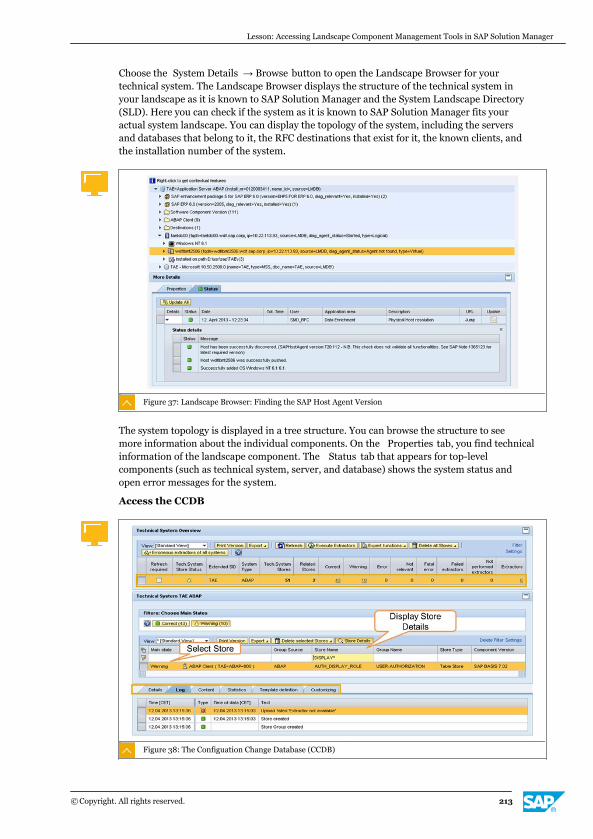
Choose the System Details → Browse button to open the Landscape Browser for yourtechnical system. The Landscape Browser displays the structure of the technical system inyour landscape as it is known to SAP Solution Manager and the System Landscape Directory(SLD). Here you can check if the system as it is known to SAP Solution Manager fits youractual system landscape. You can display the topology of the system, including the serversand databases that belong to it, the RFC destinations that exist for it, the known clients, andthe installation number of the system.
Figure 37: Landscape Browser: Finding the SAP Host Agent Version
The system topology is displayed in a tree structure. You can browse the structure to seemore information about the individual components. On the Properties tab, you find technicalinformation of the landscape component. The Status tab that appears for top-levelcomponents (such as technical system, server, and database) shows the system status andopen error messages for the system.
Access the CCDB
Figure 38: The Configuation Change Database (CCDB)
Lesson: Accessing Landscape Component Management Tools in SAP Solution Manager
© Copyright. All rights reserved. 213
The CCDB saves the configuration data of managed systems in configuration repositories andallows you to trace changes in the managed system configuration.
To Get Log Information for a Warning or ErrorThe configuration and change database (CCDB) saves the configuration data of managedsystems in configuration repositories and allows you to trace changes in the managed systemconfiguration.
1. Open the Configuration Change Database in the Solution Manager Administration workcenter in a new window.
a) Log on to SAP Solution Manager with your user name and password.
b) On the SAP Easy Access screen call transaction SM_WORKCENTER.
c) Open the Solution Manager Administration work center.
d) Select the Landscape view.
e) In the navigation area, in the Type Selection section, choose the Technical Systemsradio button.
f) Select the system you want to view and choose Configuration Change Database → Start New Window.The CCDB screen appears.
2. View the log for your chosen store (such as ABAP_INSTANCE_PROFILE).
a) On the CCDB screen, select your technical system in the Technical System Overviewtable or select one of the main states by opening the link in the relevant column.
Alternatively, you can choose a main state using one of the buttons.
b) Highlight your required store.
c) Choose Store Details .The Store Details screen appears.
d) Change to the Log tab to view the details.
To Check the Configuration Change Database (CCDB) for Changes in the SystemConfigurationWhile the CCDB is open you can check for changes in the system configuration.
1. Display changes for the system configuration.
a) On the Store Details screen, open the Content tab.The content is displayed. Buttons to open the history display, and the number ofchanges displays in the History column.
b) Choose one history button.The change history of the parameter displays.
LESSON SUMMARYYou should now be able to:
● Administer system landscape components using the Landscape view
Unit 11: The SAP Solution Manager Administration Work Center
214 © Copyright. All rights reserved.
Unit 11Lesson 3
Administering SAP Solution ManagerInfrastructure Components
LESSON OVERVIEWSAP Solution Manager infrastructure components support you in managing your systemlandscape. In this lesson you will learn how to administer the infrastructure components ofSAP Solution Manager itself.
LESSON OBJECTIVESAfter completing this lesson, you will be able to:
● Administer CA Wily Introscope Enterprise Manager installations in SAP Solution Manager
● Access infrastructure components from a central location
● Describe the management of the CCDB within the Infrastructure view
● Describe the management of the LMDB within the Infrastructure view
CA Wily Introscope Enterprise Manager (EM)CA Wily Introscope Enterprise Manager (EM) acts as the central repository for all Introscopeperformance data and metrics collected in an application environment. The Introscope EMsprocess performance data and make it available to SAP Solution Manager for monitoring andalerting and for root cause analysis.
Introscope EMs must connect to SAP Solution Manager for the agents to know theirIntroscope EM during setup, and for collected data to be forwarded to SAP Solution Managercorrectly.
The typical installation type for an Introscope EM is standalone collector node. A singlestandalone collector node can handle 400 - 500 Introscope agents or up to 250,000Introscope metrics. In complex system landscapes, several Wily Introscope EMs can beassigned to a Manager of Managers (MoM). MoMs balance the load of several collectors.
© Copyright. All rights reserved. 215

Figure 39: CA Wily Introscope EM
As shown in the figure, you open CA Wily Introscope EM through the Solution ManagerAdministration work center's Infrastructure view. Choose Introscope → Start Embedded/Start New.
To Import an Existing CA Wily Introscope EM into SAP Solution ManagerTo add an Introscope EM to SAP Solution Manager, you must have a diagnostics agentinstalled on the Introscope EM host and assigned to SAP Solution Manager. This agent is usedto discover or perform the installation and to set up Introscope EM to send its collected datato SAP Solution Manager.You can also choose to import an existing Introscope EM installation.
1. Open Introscope Administration in the Solution Manager Administration work center.
a) Log on to SAP Solution Manager with your user name and password.
b) On the SAP Easy Access screen call transaction SM_WORKCENTER.
c) Open the Solution Manager Administration work center.
d) Open the Infrastructure view.
e) Choose Introscope → Start Embedded .The Introscope screen displays.
2. Import an existing Wily Introscope EM installation.
a) Open the Configuration tab.
b) Choose Import Existing Installation.A dialog box appears.
c) Enter the installation path for your Wily Introscope EM.
For example: /usr/sap/ccms/wilyintroscope
d) Select the diagnostics agent, which is installed on the host.
Unit 11: The SAP Solution Manager Administration Work Center
216 © Copyright. All rights reserved.
e) Choose Discover Installation.You automatically return to the Introscope administration screen. Depending on theinstallation type, the Introscope EMs display hierarchically.
Note:If you import a MoM and collectors are found, they will appear in theapplication as children of the MoM, but they must also be imported in theapplication.
3. Assign a connection user to the Introscope EM.
a) Choose User Management .
b) Select the Connection User field if you want to assign the user that connects theIntroscope EM to SAP Solution Manager.By default, the administration user of the Introscope EM is assigned as the connectionuser.
4. Complete the installation.
a) Save your entries.
b) Choose Refresh List.The status of the Introscope EM displays.
To Install an Additional CA Wily Introscope EM in SAP Solution Manager
1. Download the following installation sources saved in the folder structure of SAP SolutionManager from http://service.sap.com/swdc
● Introscope Enterprise Manager
● Introscope customization for SAP (Management Modules)
2. Download the following third-party external component package files from http://opensrcd.ca.com/ips/osgi
● eula.txt
● The osgiPackages archive appropriate for your operating system
3. Configure the Introscope EM in the SAP Solution Manager Basic Configuration wizard,Specify Landscape Data step.
a) Log on to SAP Solution Manager with your user name and password.
b) On the SAP Easy Access screen call transaction SOLMAN_SETUP.
c) Choose Basic Configuration .
d) Open Specify Landscape Data → Configure CA Wily Introscope.
e) Select the diagnostics agent installed on the remote host where the Introscope EM willbe installed.
f) Enter the port to which the Introscope EM listens for data (the default is 6001).
Lesson: Administering SAP Solution Manager Infrastructure Components
© Copyright. All rights reserved. 217
g) Enter the port to start Introscope EM web view (the default is 8081).
h) Enter the desired installation path (the default for Wily 8 is /usr/sap/ccms/wilyintroscope).
Infrastructure Components of SAP Solution ManagerThe SAP Solution Manager Administration Infrastructure view gives you a central overview ofall SAP Solution Manager components. In contrast to the Landscape view, it is not specific toa particular managed system. If you receive an alert to the Alert Inboxconcerning one of theSAP Solution Manager components, the Infrastructure view helps you further analyze theissue.
You can perform any of the following tasks in the Infrastructure view:
● Activate, deactivate, and release extractors, and display logs. The extractor frameworkthat performs these functions is the central infrastructure of SAP Solution Manager fordata collection and data distribution.
● Centrally manage diagnostics agents that are installed on your managed systems.
● Check whether the configuration and change database data is up-to-date, and update it, ifrequired.
● Monitor the status of the alerting infrastructure.
● View the Enterprise Manager, which acts as the central repository for all Introscopeperformance data and metrics collected in an application environment.
● Use the Landscape Verification (LV) tool to create and check the description of yoursystem landscape.
● Obtain information about the status of the connections between SAP Solution Managerand the associated Business Warehouse (BW) with BW-based reporting. You can also seethe status of BW-based reporting broken down by different scenarios.
Using the Offline Log ViewerThe Offline Log Viewer gives you the ability to monitor logs in the system, written on operatingsystem level. To start the Offline Log Viewer, choose the Offline Log Viewer button. To open alog file, upload the log file from the file system. After uploading, you can set the type of the logfile, for example, if it is an SAP NetWeaver log or a Wily Log. When you set the type fo the logfile, the correct log reader is determined. To open the log file, select the log file from the listand choose the Show Selected File(s) button.
BW-Based Report MonitoringBW-based reporting provides you with many scenarios in SAP Solution Manager, in whichcross-system reporting data is collected in SAP NetWeaver Business Warehouse. The BIDiagnostics Center is available to support you in troubleshooting and administering BW-based reporting. To access the BI Diagnostics Center, choose BW Reporting → StartEmbedded/Start New Window .
Unit 11: The SAP Solution Manager Administration Work Center
218 © Copyright. All rights reserved.
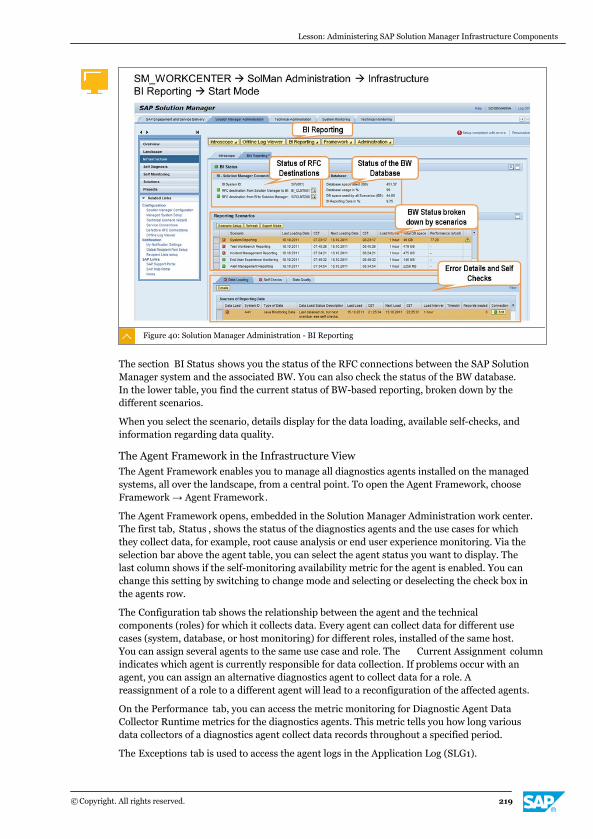
Figure 40: Solution Manager Administration - BI Reporting
The section BI Status shows you the status of the RFC connections between the SAP SolutionManager system and the associated BW. You can also check the status of the BW database.In the lower table, you find the current status of BW-based reporting, broken down by thedifferent scenarios.
When you select the scenario, details display for the data loading, available self-checks, andinformation regarding data quality.
The Agent Framework in the Infrastructure ViewThe Agent Framework enables you to manage all diagnostics agents installed on the managedsystems, all over the landscape, from a central point. To open the Agent Framework, chooseFramework → Agent Framework.
The Agent Framework opens, embedded in the Solution Manager Administration work center.The first tab, Status , shows the status of the diagnostics agents and the use cases for whichthey collect data, for example, root cause analysis or end user experience monitoring. Via theselection bar above the agent table, you can select the agent status you want to display. Thelast column shows if the self-monitoring availability metric for the agent is enabled. You canchange this setting by switching to change mode and selecting or deselecting the check box inthe agents row.
The Configuration tab shows the relationship between the agent and the technicalcomponents (roles) for which it collects data. Every agent can collect data for different usecases (system, database, or host monitoring) for different roles, installed of the same host.You can assign several agents to the same use case and role. The Current Assignment columnindicates which agent is currently responsible for data collection. If problems occur with anagent, you can assign an alternative diagnostics agent to collect data for a role. Areassignment of a role to a different agent will lead to a reconfiguration of the affected agents.
On the Performance tab, you can access the metric monitoring for Diagnostic Agent DataCollector Runtime metrics for the diagnostics agents. This metric tells you how long variousdata collectors of a diagnostics agent collect data records throughout a specified period.
The Exceptions tab is used to access the agent logs in the Application Log (SLG1).
Lesson: Administering SAP Solution Manager Infrastructure Components
© Copyright. All rights reserved. 219

Agent Administration in the Infrastructure ViewTo administer the agents themselves, such as restart agents, agent (agent applications), andagent connection settings, use Agent Administration. To access Agent Administration, selectthe Status tab and choose Agent Admin → All Agents/Selected Agent . The AgentAdministration opens in a new browser window.
Figure 41: Agent Administration with the Agent Context Menu
When you set up a new managed system and want to verify that an agent is correctly assignedto the managed system, you can display all connected agents and their respective statuses onthe Agents tab. You can also restart agents. To restart an agent, do the following:
● If the diagnostics agent is online, choose agent context menu → Reboot Agent .
● If the diagnostics agent is offline and cannot be rebooted, choose agent contextmenu → SAP Management Console → Restart Agent Process .
You can also perform the following agent administration tasks:
On the Agents tab
You switch the maintenance mode on and off to stop the agents temporarily when theSAP Solution Manager system is being updated.
On the Agent Connectivity tab
You change the connection type of an agent, for example, when agents do not connectcorrectly to the SAP Solution Manager system or you want to switch from insecure tosecure communication.
On the Application Viewer tab
You check whether all agent applications (agelets) available on the server are deployedon the selected diagnostics agent. You can check whether the version deployed on thediagnostics agent matches the server version.
On the Application Management tab
You upload agelets to diagnostics agents and remove them from diagnostics agents.
On the Applications Configuration tab
You change the configuration of each agelet and send the modifications to thediagnostics agents.
On the Agent Credentials tab
Unit 11: The SAP Solution Manager Administration Work Center
220 © Copyright. All rights reserved.
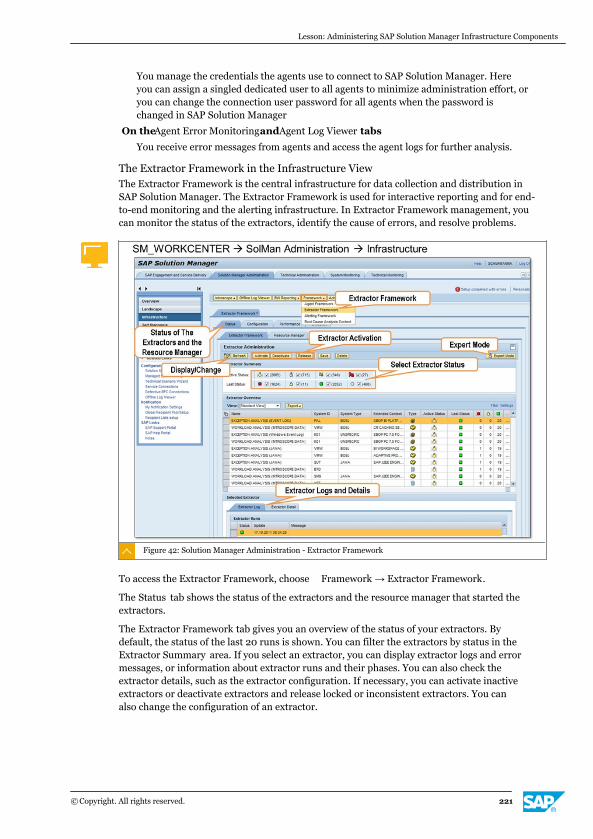
You manage the credentials the agents use to connect to SAP Solution Manager. Hereyou can assign a singled dedicated user to all agents to minimize administration effort, oryou can change the connection user password for all agents when the password ischanged in SAP Solution Manager
On the Agent Error Monitoringand Agent Log Viewer tabs
You receive error messages from agents and access the agent logs for further analysis.
The Extractor Framework in the Infrastructure ViewThe Extractor Framework is the central infrastructure for data collection and distribution inSAP Solution Manager. The Extractor Framework is used for interactive reporting and for end-to-end monitoring and the alerting infrastructure. In Extractor Framework management, youcan monitor the status of the extractors, identify the cause of errors, and resolve problems.
Figure 42: Solution Manager Administration - Extractor Framework
To access the Extractor Framework, choose Framework → Extractor Framework.
The Status tab shows the status of the extractors and the resource manager that started theextractors.
The Extractor Framework tab gives you an overview of the status of your extractors. Bydefault, the status of the last 20 runs is shown. You can filter the extractors by status in theExtractor Summary area. If you select an extractor, you can display extractor logs and errormessages, or information about extractor runs and their phases. You can also check theextractor details, such as the extractor configuration. If necessary, you can activate inactiveextractors or deactivate extractors and release locked or inconsistent extractors. You canalso change the configuration of an extractor.
Lesson: Administering SAP Solution Manager Infrastructure Components
© Copyright. All rights reserved. 221
Caution:Changing the configuration of an existing extractor can affect its functioning.Only change the configuration of existing extractors in consultation with SAPsupport.
On the Resource Manager tab, you can display the status and the next planned run of theresource manager. By default, the resource manager job called EFWK RESOURCE MANAGERruns once per minute. You can also see which extractors are currently running. If no extractoris running, you can call the job log. You can check whether a resource restriction has beenexceeded. If a resource restriction has been exceeded, the error Resource Cap Exceededdisplays in the job log, meaning that a resource bottleneck has occurred. If the error occursfor several RFC destinations, you can adjust the resource restrictions for the RFC resource onthe Configuration tab.
The Configuration tab allows you to change general settings for the Extractor Framework.
RFC management lists all RFC destinations used by the Extractor Framework to connect todiagnostics relevant managed systems. You specify a resource cap for each RFC resource.This cap defines the maximum number of extractors that can run in parallel using the sameRFC destination. If necessary, this cap can be changed.
Via Logon Group for EFWK, you can specify the SAP Solution Manager logon group to be usedby the Extractor Framework. The resource manager then only runs extractors in the instancesin the logon group. If you choose DEFAULT, all available technical instances will be used.
The setting in Configuration Parameter for EFWK Resource Manager specifies the maximumnumber of work items that the resource manager tries to process consecutively per run. TheNumber of worklist items field has the default value 50. To increase performance of theExtractor Framework in large system landscapes, you can increase the number of entries inthe worklist until all extractors can be restarted.
Caution:If the number of entries in the worklist is too high, the resource manager runtimeincreases, and can delay the next resource manager run. Only change this valuein consultation with SAP support.
On the Performance tab, you can check the performance of extractors and the resourcemanager. On the Extractor Framework sub tab, you can display how many data records theextractors created and saved in Solution Manager during a selected period. You can checkwhich systems have a heavy load and you can drill down to check which extractors arecausing it. On the Resource Manager sub tab, you can display the runtime and throughput ofthe resource managers in a selected period. The runtime is the time required by the resourcemanager to process the items in the worklist. The throughput is the percentage of extractorsstarted by the resource manager (1=100%). A low percentage indicates a bottleneck.
On the Exceptions tab, you find the application errors written to the application log (SLG1) bythe extractors or the resource manager.
To Identify Extractor Errors in the Infrastructure ViewIf extractors provide no data, check possible error sources.
Unit 11: The SAP Solution Manager Administration Work Center
222 © Copyright. All rights reserved.
1. Select an extractor to check in the Solution Manager Administration work centerInfrastructure view.
a) Log on to SAP Solution Manager with your user name and password.
b) On the SAP Easy Access screen call transaction SM_WORKCENTER.
c) Open the Solution Manager Administration work center.
d) Choose the Infrastructure view.
e) Choose Framework → Extractor Framework.
f) In the list, select an extractor to check and view the log for that extractor.
2. Check if the extractor is inactive.
Inactive extractors are indicated by a switched-off light bulb.
a) Choose Edit to switch to change mode.
b) To activate, select the inactive extractor and choose Activate .
Extractors cause system load. Only activate extractors if you actually use the scenariofor which the data is collected.
3. Check if the extractors are inconsistent.
Inconsistent extractors are indicated by a lightning bolt. Extractors become inconsistentwhen their configuration no longer matches the configuration of the system landscape.Inconsistencies can happen when, for example, you install an updated version of asoftware component.
After you resolve the cause of the inconsistency you must release the extractor.
a) Select the inconsistent extractor in the list.
b) Choose Delete.
c) On the SAP Easy Access screen call transaction SOLMAN_SETUP.
d) In the navigation area, choose Managed Systems Configuration .
e) In the list, select the system for which you deleted the inconsistent extractors andchoose Configure System .
f) Choose the Configure Automatically tab.
g) In the list of activities, select Extractors Setup and perform this activity again.The Resource Manager restarts the extractor automatically.
4. Check if the extractor is forbidden.
Forbidden extractors are indicated by a red flag. Extractors can be forbidden if, forexample, a downtime of the managed system caused an extractor timeout or because theextractor causes a dump in the managed system.
After you resolve the cause of the error you must release the extractor.
a) Choose Edit to switch to change mode.
b) Select the forbidden extractor.
c) Choose Release .
d) Save your entries.
Lesson: Administering SAP Solution Manager Infrastructure Components
© Copyright. All rights reserved. 223
5. Check if data can be collected from the managed system.
Extractors that are active and collecting data are indicated by a switched-on light bulb. Ifno data is provided but all extractors run without errors, check whether there is data in themanaged system. Data cannot be collected if there is no new data in the managed system,or if collecting the new data from the managed system would impair the performance ofthe managed system. In this case, the message shows that the extractor collects time-dependent chunks. Data is divided into chunks when, for example, a new managed systemis connected to SAP Solution Manager and large amounts of data must be uploaded intothe SAP Solution Manager Business Warehouse.
a) Select the relevant extractor.
The most recent extractor runs display under Selected Extractor on the Extractor Logtab.
b) Select an extraction to display the number of data records collected.If the number of data records in the Extractor row = 0, there is no new data in themanaged system.
The Alerting Framework in the Infrastructure ViewYou monitor the alerting infrastructure with the Alerting Framework. The followingcomponents belong to the alerting infrastructure:
Alert Consumer Connector (ACC)
The interface for all infrastructures that use alert information, such as the Alert Inbox, e-mail, or third-party applications. Depending on the relevant configuration settings, thealert information is transferred using a push or a pull mechanism.
Data Provider Connector (DPC)
This component is responsible for transferring monitoring data into the monitoring andalerting infrastructure (MAI). The required information can be transferred using a push ora pull mechanism. Various data sources are supported, such as the local CCMS,NetWeaver Management agents, or CA Wily Introscope Enterprise Manager.
Event Calculation Engine (ECE)
This component uses reported metric values to determine the status, events, and alertsof the administered objects based on the configuration settings in the Alerting Directory.
To open the Alerting Framework, choose Framework → Alerting Framework.
The Status tab gives you an overview over the status of the DPC and the alert calculationengine. On the Data Provider Connector tab, you can display the extractors used for alerting.You can display error messages and activate, release, or restart extractors. On the AlertCalculation Engine tab, you can check the results of traces that you start if production metricswere collected but no alerts were raised, or the expected status is not returned.
On the Configuration tab, you can set up load balancing for the Data Provider Connector.
You can set the value of parameter rdisp/http_check, which monitors the HTTP resources.The parameter rdisp/http_min_wait_dia_wp defines how many work processes have to befree during HTTP processing. If necessary, the number of work processes available for HTTPresources is restricted. On the Performance tab, you can display the values, over time, of themost important performance metrics for the Data Provider Connector, the Event CalculationEngine, and the Alert Consumer Calculator for a specified period. You can, for example,determine whether runtimes are longer at certain times of day, and analyze the causes.
The Exceptions tab gives you an overview over the log messages written to application logSLG1 from the Alerting Framework.
Unit 11: The SAP Solution Manager Administration Work Center
224 © Copyright. All rights reserved.

The Root Cause Analysis Content ToolThe Root Cause Analysis Content contains the templates for reporting and extractors and theconfiguration files for the End-to-End Workload Analysis, Change Analysis, and ExceptionAnalysis. If errors in templates occur, you can upload fixes delivered by SAP. You can also useit to download the configuration files to send them to SAP Support for a service.
Caution:Root Cause Analysis Content is an expert tool that you should use only incooperation with SAP support.
The URL Framework section provides an interface to integrate custom applications in the SAPSolution Manager work center infrastructure.
The CDDB in the Infrastructure ViewThe Configuration and Change Database (CCDB) saves the configuration data of managedsystems in configuration repositories and allows you to trace changes. CCDB management inthe SAP Solution Manager Administration work center is the central location for checking thestatus of the configuration repository.
The configuration data is collected daily by the Extractor Framework and is uploaded from themanaged systems to the CCDB. Several configuration repositories are usually collected at thesame time by a single extractor. Collection can sometimes fail for various reasons. Forexample, the managing system may not be available, or there is no authorization to accesscertain files. You use CCDB management in the following scenarios:
● Production processing: the Alerting framework monitors the status of configurationrepositories of a managed system automatically. If a configuration repository in themanaged system has a red status, an alert is raised and you can perform a root causeanalysis in CCDB management.
● Configuration of a managed system: the day after you configure a managed system, startCCDB management and check whether the overall status of the managed system is green.This check ensures that all configuration repositories are functional initially. This data isonly available in the CCDB the following day because the extractors run daily, in theevening.
As shown in the figure, you access CCDB Management by choosing Administration → Configuration Change Database .
Lesson: Administering SAP Solution Manager Infrastructure Components
© Copyright. All rights reserved. 225
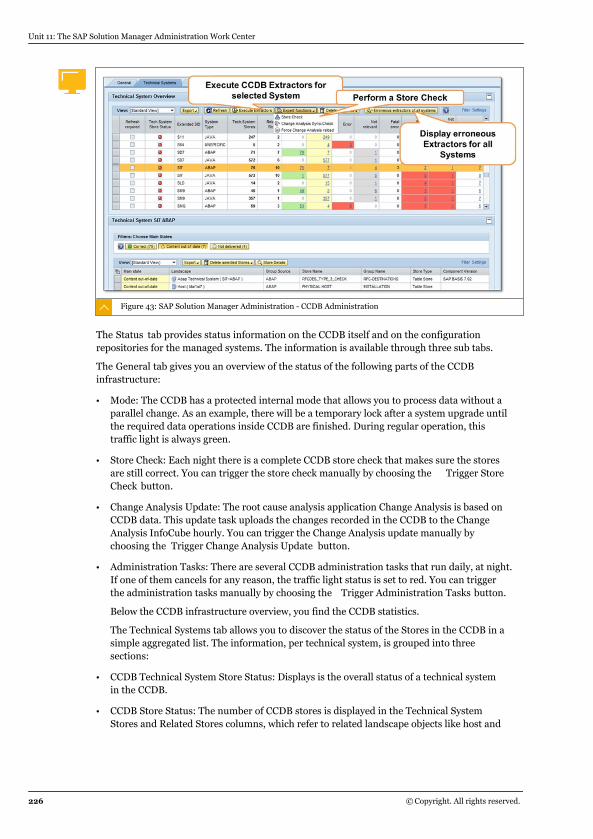
Figure 43: SAP Solution Manager Administration - CCDB Administration
The Status tab provides status information on the CCDB itself and on the configurationrepositories for the managed systems. The information is available through three sub tabs.
The General tab gives you an overview of the status of the following parts of the CCDBinfrastructure:
● Mode: The CCDB has a protected internal mode that allows you to process data without aparallel change. As an example, there will be a temporary lock after a system upgrade untilthe required data operations inside CCDB are finished. During regular operation, thistraffic light is always green.
● Store Check: Each night there is a complete CCDB store check that makes sure the storesare still correct. You can trigger the store check manually by choosing the Trigger StoreCheck button.
● Change Analysis Update: The root cause analysis application Change Analysis is based onCCDB data. This update task uploads the changes recorded in the CCDB to the ChangeAnalysis InfoCube hourly. You can trigger the Change Analysis update manually bychoosing the Trigger Change Analysis Update button.
● Administration Tasks: There are several CCDB administration tasks that run daily, at night.If one of them cancels for any reason, the traffic light status is set to red. You can triggerthe administration tasks manually by choosing the Trigger Administration Tasks button.
Below the CCDB infrastructure overview, you find the CCDB statistics.
The Technical Systems tab allows you to discover the status of the Stores in the CCDB in asimple aggregated list. The information, per technical system, is grouped into threesections:
● CCDB Technical System Store Status: Displays is the overall status of a technical systemin the CCDB.
● CCDB Store Status: The number of CCDB stores is displayed in the Technical SystemStores and Related Stores columns, which refer to related landscape objects like host and
Unit 11: The SAP Solution Manager Administration Work Center
226 © Copyright. All rights reserved.
database. The following columns group them into a status: Ok, Warning, Error, and Notrelevant.
● CCDB Extractor Status: The CCDB extractors are scheduled to run once a day, in theevening. Along with the total number of extractors, other columns tell you how manyextractors failed and how many extractors are outdated.
The gray status Not relevant has a special meaning. CCDB stores with this status are notavailable for external applications like Change Reporting and Change Analysis.
If an error occurs you first check that the extractors finished successfully. Click thenumber for the failed extractors to display the corresponding extractor log. Try to solvethe error in the extractor. The Execute Extractors button allows you to trigger all CCDBextractors for a technical system manually.
If there are red CCDB stores, you can follow the number link to display the stores. You candisplay the store details, including the log for further error analysis, in the store list.
You can search for configuration repositories in the Cross Selection tab. The search is notrestricted to one system, so you can display the contents of a configuration repository forall systems, or check which systems in your system landscape contain a specifiedconfiguration repository.
LMDB Administration in the Infrastructure ViewThe Landscape Management Database (LMDB) is a framework in SAP Solution ManagerABAP that stores landscape data. The store is compatible with the Common InformationModel (CIM). There is an implementation similar to LMDB on the Application Server Java: TheSystem Landscape Directory (SLD).
The LMDB is a generic data storage infrastructure. All business-related information is storedin CIM instances. Each instance belongs to one CIM class. The class defines the meta-modelof the instance. Complete business objects, such as AS ABAP technical systems, consist ofseveral CIM instances.
Each CIM instance may have several properties and qualifiers that define its content. CIMinstances can be linked to each other using associations. Associations are a special categoryof instances. Besides the fact that associations explicitly link other instances, they behavesimilarly to normal instances.
The LMDB administration application provides the following functions:
● Search functions to select CIM instances and associations
● Display CIM class and instance information
● Change CIM instance attributes
● Delete CIM instances, technical systems, and other entities
● Create, copy, merge, or rename CIM instances
● Create and delete CIM associations
Note:LMDB administration is an expert function. Only change information if you are in aposition to evaluate the consequences. Displaying data is secure and will notmanipulate any business data.
Lesson: Administering SAP Solution Manager Infrastructure Components
© Copyright. All rights reserved. 227
To access LMDB Administration, choose Administration → LMDB Administration. LMDBAdministration opens in a new browser window.
The LMDB Administration application consists of several tabs. The Overview tab providesapplication help and an overview of the status of the LMDB infrastructure. It containsinformation about the performance of the LMDB, for example, the LMDB Shared Memory, thestatus of the content synchronization, the namespace configuration, and the domain settings.
The Instance Browser tab gives you a search for CIM instances and the instance statistics perCIM class. In Edit mode, you can delete selected instances and associations.
The Change Log Browser tab displays changes to CIM instances. You can search for changesby class name and change user, or you can search for single change log entries.
LESSON SUMMARYYou should now be able to:
● Administer CA Wily Introscope Enterprise Manager installations in SAP Solution Manager
● Access infrastructure components from a central location
● Describe the management of the CCDB within the Infrastructure view
● Describe the management of the LMDB within the Infrastructure view
Unit 11: The SAP Solution Manager Administration Work Center
228 © Copyright. All rights reserved.
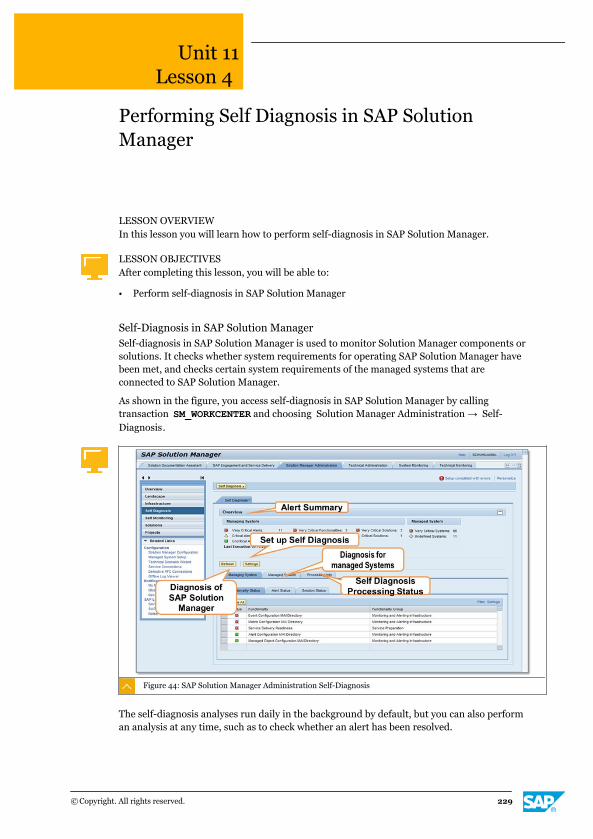
Unit 11Lesson 4
Performing Self Diagnosis in SAP SolutionManager
LESSON OVERVIEWIn this lesson you will learn how to perform self-diagnosis in SAP Solution Manager.
LESSON OBJECTIVESAfter completing this lesson, you will be able to:
● Perform self-diagnosis in SAP Solution Manager
Self-Diagnosis in SAP Solution ManagerSelf-diagnosis in SAP Solution Manager is used to monitor Solution Manager components orsolutions. It checks whether system requirements for operating SAP Solution Manager havebeen met, and checks certain system requirements of the managed systems that areconnected to SAP Solution Manager.
As shown in the figure, you access self-diagnosis in SAP Solution Manager by callingtransaction SM_WORKCENTER and choosing Solution Manager Administration → Self-Diagnosis.
Figure 44: SAP Solution Manager Administration Self-Diagnosis
The self-diagnosis analyses run daily in the background by default, but you can also performan analysis at any time, such as to check whether an alert has been resolved.
© Copyright. All rights reserved. 229
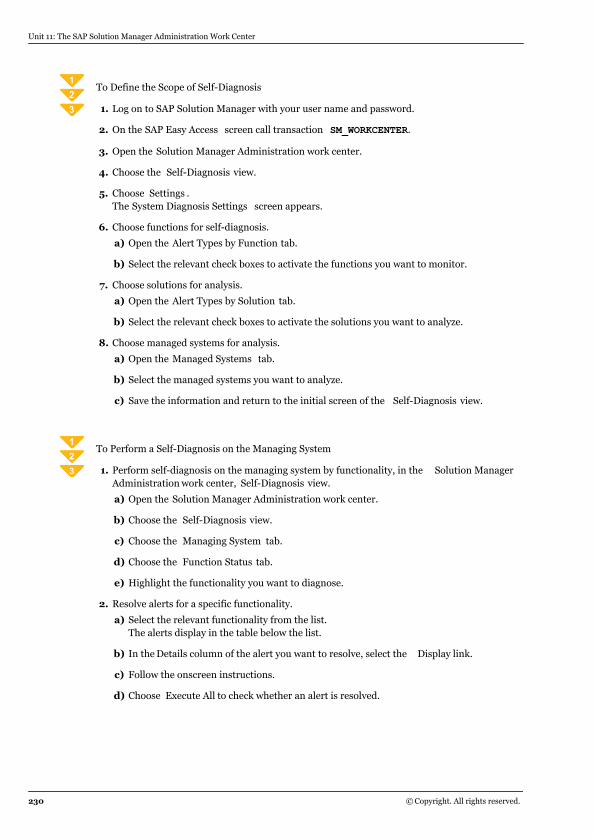
To Define the Scope of Self-Diagnosis
1. Log on to SAP Solution Manager with your user name and password.
2. On the SAP Easy Access screen call transaction SM_WORKCENTER.
3. Open the Solution Manager Administration work center.
4. Choose the Self-Diagnosis view.
5. Choose Settings .The System Diagnosis Settings screen appears.
6. Choose functions for self-diagnosis.
a) Open the Alert Types by Function tab.
b) Select the relevant check boxes to activate the functions you want to monitor.
7. Choose solutions for analysis.
a) Open the Alert Types by Solution tab.
b) Select the relevant check boxes to activate the solutions you want to analyze.
8. Choose managed systems for analysis.
a) Open the Managed Systems tab.
b) Select the managed systems you want to analyze.
c) Save the information and return to the initial screen of the Self-Diagnosis view.
To Perform a Self-Diagnosis on the Managing System
1. Perform self-diagnosis on the managing system by functionality, in the Solution ManagerAdministration work center, Self-Diagnosis view.
a) Open the Solution Manager Administration work center.
b) Choose the Self-Diagnosis view.
c) Choose the Managing System tab.
d) Choose the Function Status tab.
e) Highlight the functionality you want to diagnose.
2. Resolve alerts for a specific functionality.
a) Select the relevant functionality from the list.The alerts display in the table below the list.
b) In the Details column of the alert you want to resolve, select the Display link.
c) Follow the onscreen instructions.
d) Choose Execute All to check whether an alert is resolved.
Unit 11: The SAP Solution Manager Administration Work Center
230 © Copyright. All rights reserved.
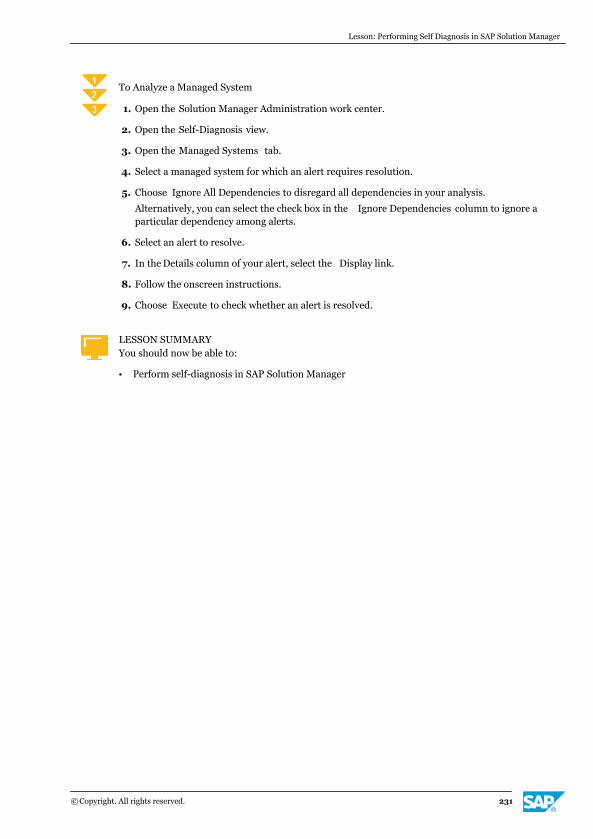
To Analyze a Managed System
1. Open the Solution Manager Administration work center.
2. Open the Self-Diagnosis view.
3. Open the Managed Systems tab.
4. Select a managed system for which an alert requires resolution.
5. Choose Ignore All Dependencies to disregard all dependencies in your analysis.
Alternatively, you can select the check box in the Ignore Dependencies column to ignore aparticular dependency among alerts.
6. Select an alert to resolve.
7. In the Details column of your alert, select the Display link.
8. Follow the onscreen instructions.
9. Choose Execute to check whether an alert is resolved.
LESSON SUMMARYYou should now be able to:
● Perform self-diagnosis in SAP Solution Manager
Lesson: Performing Self Diagnosis in SAP Solution Manager
© Copyright. All rights reserved. 231
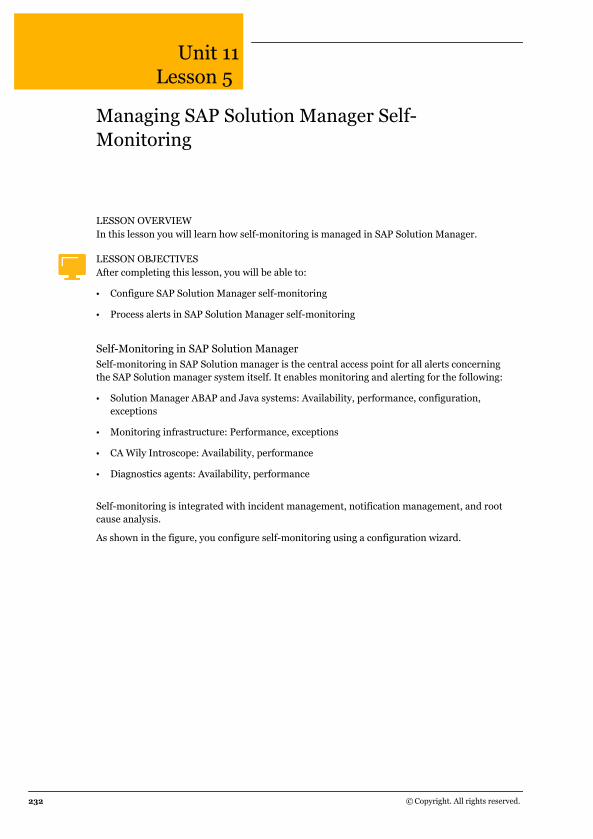
Unit 11Lesson 5
Managing SAP Solution Manager Self-Monitoring
LESSON OVERVIEWIn this lesson you will learn how self-monitoring is managed in SAP Solution Manager.
LESSON OBJECTIVESAfter completing this lesson, you will be able to:
● Configure SAP Solution Manager self-monitoring
● Process alerts in SAP Solution Manager self-monitoring
Self-Monitoring in SAP Solution ManagerSelf-monitoring in SAP Solution manager is the central access point for all alerts concerningthe SAP Solution manager system itself. It enables monitoring and alerting for the following:
● Solution Manager ABAP and Java systems: Availability, performance, configuration,exceptions
● Monitoring infrastructure: Performance, exceptions
● CA Wily Introscope: Availability, performance
● Diagnostics agents: Availability, performance
Self-monitoring is integrated with incident management, notification management, and rootcause analysis.
As shown in the figure, you configure self-monitoring using a configuration wizard.
232 © Copyright. All rights reserved.
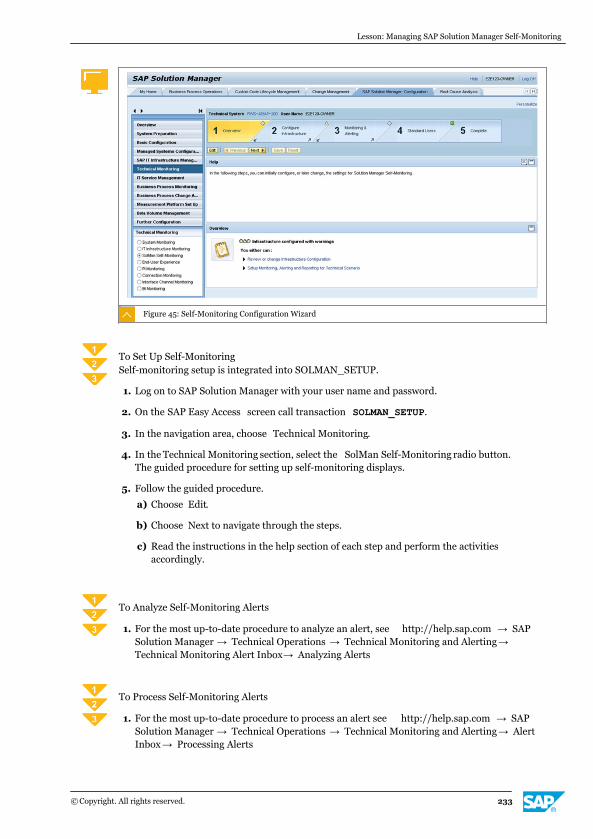
Figure 45: Self-Monitoring Configuration Wizard
To Set Up Self-MonitoringSelf-monitoring setup is integrated into SOLMAN_SETUP.
1. Log on to SAP Solution Manager with your user name and password.
2. On the SAP Easy Access screen call transaction SOLMAN_SETUP.
3. In the navigation area, choose Technical Monitoring.
4. In the Technical Monitoring section, select the SolMan Self-Monitoring radio button.The guided procedure for setting up self-monitoring displays.
5. Follow the guided procedure.
a) Choose Edit.
b) Choose Next to navigate through the steps.
c) Read the instructions in the help section of each step and perform the activitiesaccordingly.
To Analyze Self-Monitoring Alerts
1. For the most up-to-date procedure to analyze an alert, see http://help.sap.com → SAPSolution Manager → Technical Operations → Technical Monitoring and Alerting → Technical Monitoring Alert Inbox → Analyzing Alerts
To Process Self-Monitoring Alerts
1. For the most up-to-date procedure to process an alert see http://help.sap.com → SAPSolution Manager → Technical Operations → Technical Monitoring and Alerting → AlertInbox → Processing Alerts
Lesson: Managing SAP Solution Manager Self-Monitoring
© Copyright. All rights reserved. 233
LESSON SUMMARYYou should now be able to:
● Configure SAP Solution Manager self-monitoring
● Process alerts in SAP Solution Manager self-monitoring
Unit 11: The SAP Solution Manager Administration Work Center
234 © Copyright. All rights reserved.
Unit 11Lesson 6
Creating and Maintaining Solutions in SAPSolution Manager
LESSON OVERVIEWIn this lesson you will learn how to maintain solutions in SAP Solution Manager and how todocument your system landscape and your business processes in a solution.
LESSON OBJECTIVESAfter completing this lesson, you will be able to:
● Explain the concept of solutions as used in SAP Solution Manager
● Create and maintain solutions in SAP Solution Manager
● Maintain solutions in SAP Solution Manager
Solutions in SAP Solution ManagerIn SAP Solution Manager, a solution is an entity of information consisting of servers,databases, systems, software components, and business scenarios and processes. Thesolution is a virtual container, where the production business processes and the relatedsystems and software components information are documented.
A solution has the following properties:
● Every solution has a leading role as a unique characteristic. A leading role describes whichsystem type (such as production, preproduction, quality assurance, or development) is setas the main characteristic for the solution.
● Every solution has an authorization concept. User access to a solution can be restrictedwith roles and authorization objects.
● Solutions are independent of each other. The criteria for solution design, for example, takeinto account independent organizational or business units, among other things.
● Every solution has a solution life cycle. Starting with implementation projects, projectcontent can be created and taken over to the operations part (productive use of thesolution, that is, for monitoring). Later, the solution can be used as the basis for ongoingmaintenance, new implementations, or upgrades. This means that the current solutioncontent with regard to structures, documentation, and so on, can be handed over to aproject using the compare and adjust function.
As shown in the diagram, a solution should reflect a part or the entire company structure inrelation to the system landscape and business processes. Depending on the companystructure, there can be one or several solutions defined in SAP Solution Manager.
© Copyright. All rights reserved. 235
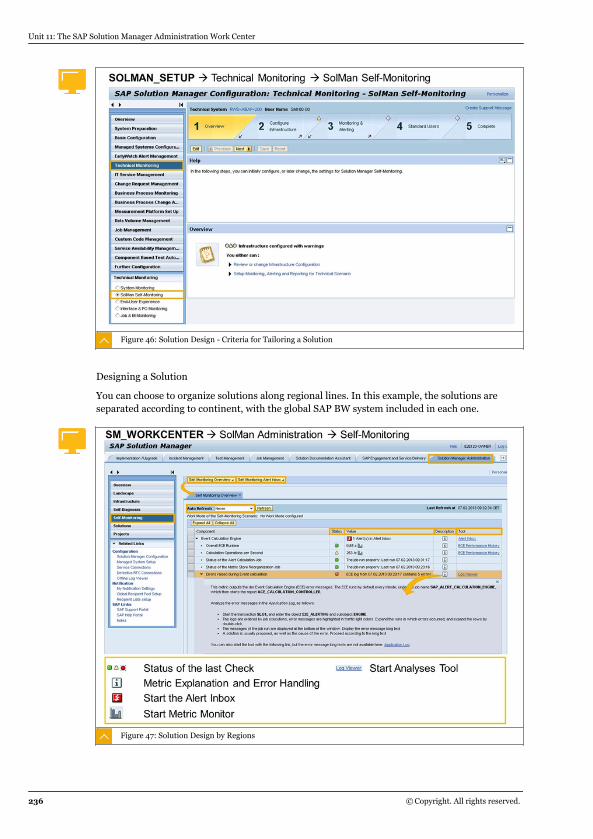
Figure 46: Solution Design - Criteria for Tailoring a Solution
Designing a Solution
You can choose to organize solutions along regional lines. In this example, the solutions areseparated according to continent, with the global SAP BW system included in each one.
Figure 47: Solution Design by Regions
Unit 11: The SAP Solution Manager Administration Work Center
236 © Copyright. All rights reserved.
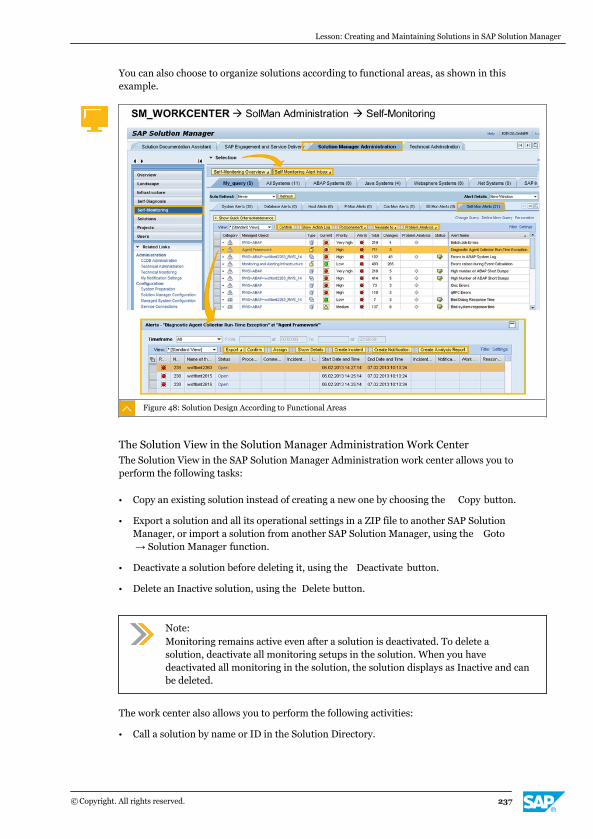
You can also choose to organize solutions according to functional areas, as shown in thisexample.
Figure 48: Solution Design According to Functional Areas
The Solution View in the Solution Manager Administration Work CenterThe Solution View in the SAP Solution Manager Administration work center allows you toperform the following tasks:
● Copy an existing solution instead of creating a new one by choosing the Copy button.
● Export a solution and all its operational settings in a ZIP file to another SAP SolutionManager, or import a solution from another SAP Solution Manager, using the Goto → Solution Manager function.
● Deactivate a solution before deleting it, using the Deactivate button.
● Delete an Inactive solution, using the Delete button.
Note:Monitoring remains active even after a solution is deactivated. To delete asolution, deactivate all monitoring setups in the solution. When you havedeactivated all monitoring in the solution, the solution displays as Inactive and canbe deleted.
The work center also allows you to perform the following activities:
● Call a solution by name or ID in the Solution Directory.
Lesson: Creating and Maintaining Solutions in SAP Solution Manager
© Copyright. All rights reserved. 237
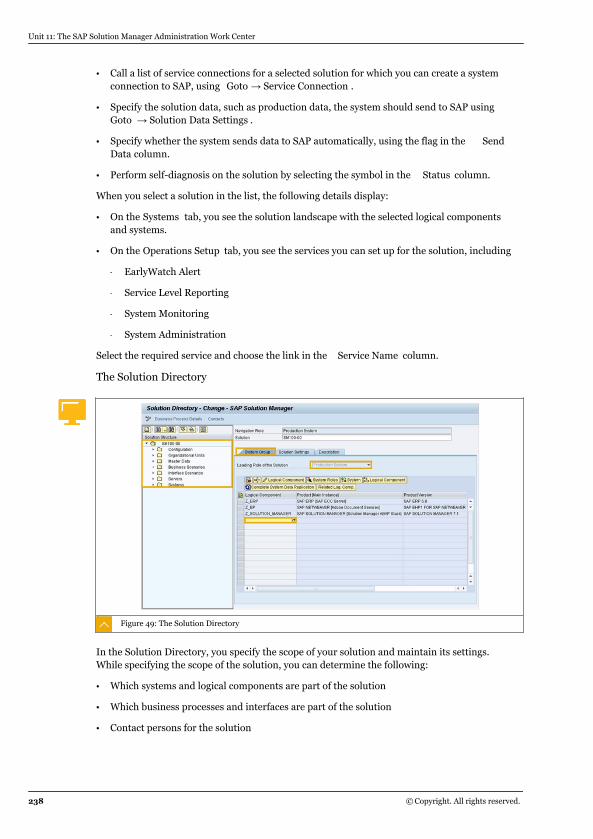
● Call a list of service connections for a selected solution for which you can create a systemconnection to SAP, using Goto → Service Connection .
● Specify the solution data, such as production data, the system should send to SAP usingGoto → Solution Data Settings .
● Specify whether the system sends data to SAP automatically, using the flag in the SendData column.
● Perform self-diagnosis on the solution by selecting the symbol in the Status column.
When you select a solution in the list, the following details display:
● On the Systems tab, you see the solution landscape with the selected logical componentsand systems.
● On the Operations Setup tab, you see the services you can set up for the solution, including
- EarlyWatch Alert
- Service Level Reporting
- System Monitoring
- System Administration
Select the required service and choose the link in the Service Name column.
The Solution Directory
Figure 49: The Solution Directory
In the Solution Directory, you specify the scope of your solution and maintain its settings.While specifying the scope of the solution, you can determine the following:
● Which systems and logical components are part of the solution
● Which business processes and interfaces are part of the solution
● Contact persons for the solution
Unit 11: The SAP Solution Manager Administration Work Center
238 © Copyright. All rights reserved.
● Which view you want to use for your systems and business processes in monitoring
● Which maintenance project you want to assign to your solution
On the Solution Settings tab at the top-level node of the solution, you can maintain thefollowing:
● Which data should be copied or linked when the solution is copied
● The language of the solution
● The visibility of the nodes in the Solution Directory itself
● The assigned maintenance project
● The check-out/check-in settings for the solution structure elements
The check-out/check-in functionality of solutions helps to keep your solution consistentbecause it ensures that individual productive business scenarios and processes aretransferred to a maintenance project for editing. When you have completed your activities inthe solution, you can return the updated structure elements to the solution.
Activating the check-out/check-in function permanently switches the solution to Displaymode in the Solution Directory, and it can no longer be edited there. You edit the solution onlyin the maintenance project.
You can choose whether to use a request for the check-out/check-in before the check-out/check-in.
Lesson: Creating and Maintaining Solutions in SAP Solution Manager
© Copyright. All rights reserved. 239

Unit 11: The SAP Solution Manager Administration Work Center
240 © Copyright. All rights reserved.
Unit 11Exercise 9
Create a Solution in SAP Solution Manager
Business Example
As a technical administrator in your organization, you generate EarlyWatch Alerts, servicelevel reporting, and other scenarios. To facilitate these tasks, you create a solution called<CourseName>-<GroupNumber> and add logical components to it.
1. Create a new solution using the Solutions view of the Solution Manager Administrationwork center.
2. Add the logical components to the solution <CourseName>-<GroupNumber>.
3. Verify the details of your solution.
In the Details for Solution: <CourseName>-<GroupNumber> section, all three logicalcomponents should display. The Product System column also displays the System IDs of thesystems.
© Copyright. All rights reserved. 241
Unit 11Solution 9
Create a Solution in SAP Solution Manager
Business Example
As a technical administrator in your organization, you generate EarlyWatch Alerts, servicelevel reporting, and other scenarios. To facilitate these tasks, you create a solution called<CourseName>-<GroupNumber> and add logical components to it.
1. Create a new solution using the Solutions view of the Solution Manager Administrationwork center.
a) Log on to the SAP Solution Manager system with <CourseID>-<GroupNumber> and<password>.
b) In the SAP Easy Access screen, call transaction SM_WORKCENTER.
c) In the SAP Solution Manager browser window, navigate to the Solution ManagerAdministration work center.
You may need to use the arrows at the top of the screen or the Forward button at thetop of the screen to navigate the tabs.
d) In the navigation pane, choose Solutions.
e) Choose New.
f) In the Create a Solution dialog box, enter <CourseID>-<GroupNumber> and chooseOK.Alternatively, you could call transaction SOLMAN_DIRECTORY. If you use this method,double-click your solution name <CourseID>-<GroupNumber> first.
2. Add the logical components to the solution <CourseName>-<GroupNumber>.
a) In the Solutions tab of the Solution Manager Administration work center, click yoursolution name, <CourseName>-<GroupNumber> .The solution name displays as a blue link.
b) If prompted to open or save the file ags_work_appln.sap, choose Open.
c) If prompted to allow the execution of an SAP shortcut file, choose Allow this one time.
d) In the System Group tab of the Solution Directory - Change - SAP Solution Managerscreen, place the cursor in an empty Logical Components field and choose PossibleEntries.
e) In the Select Logical Component for System Landscape window, open the Finddialogbox.
f) In the Finddialog box, enter Z_ and select Logical Component .
g) Choose Find.
242 © Copyright. All rights reserved.
h) Select SAP ECC Server and select the Z_ERPcheck box..
i) Choose Find Next.
j) Select SAP NetWeaver and select the Z_EPcheck box.
k) Choose Find Next.
l) Select SAP Solution Manager → Solution Manager ABAP Stack and select theZ_Solution Manager check box.
m) Choose OK.
n) Save your changes.
3. Verify the details of your solution.
a) In the SAP Easy Access screen, call transaction SM_WORKCENTER.
b) Navigate to the SAP Solution Manager Administration work center.
c) Choose Solutions.
d) In the Solutions screen area, highlight your solution to display the details.
In the Details for Solution: <CourseName>-<GroupNumber> section, all three logicalcomponents should display. The Product System column also displays the System IDs of thesystems.
Lesson: Creating and Maintaining Solutions in SAP Solution Manager
© Copyright. All rights reserved. 243
Business Processes in SAP Solution ManagerSAP Solution Manager allows you to maintain business processes within your solutions in anumber of ways. In addition to maintaining business processes manually, you can also copyover business processes from any of the following:
● An existing project
● The Business Process Repository
● Another solution
Unit 11: The SAP Solution Manager Administration Work Center
244 © Copyright. All rights reserved.
Unit 11Exercise 10
Maintain a Business Process Structure in SAPSolution Manager
Business Example
As a business user in your organization, you are responsible for maintaining businessprocesses in solutions. You create the business scenario Sales Order Processing, addbusiness processes to it using the following data:
Step Name Logical Component
Create Sales Order EP
Create Sales Order ERP
Create Outbound Delivery ERP
and add it to <YourSolutionName>, the solution you created in the previous exercise.
1. In the SAP Solution Manager Administration work center, create the business scenarioSales Order Processing and set its status to Production.
2. Add the required business processes to the Sales Order Processing business scenario.
© Copyright. All rights reserved. 245
Unit 11Solution 10
Maintain a Business Process Structure in SAPSolution Manager
Business Example
As a business user in your organization, you are responsible for maintaining businessprocesses in solutions. You create the business scenario Sales Order Processing, addbusiness processes to it using the following data:
Step Name Logical Component
Create Sales Order EP
Create Sales Order ERP
Create Outbound Delivery ERP
and add it to <YourSolutionName>, the solution you created in the previous exercise.
1. In the SAP Solution Manager Administration work center, create the business scenarioSales Order Processing and set its status to Production.
a) Log on to the SAP Solution Manager with <CourseID>-<GroupNumber> and<password>.
b) On the SAP Easy Access screen, call transaction SM_WORKCENTER.
c) Open the Solution Manager Administration work center.
d) Select the Solutions view.
e) Open <YourSolutionName> by clicking its name in the list.
f) If prompted, open the ags_work_appln.sap file.
g) On the Solution Directory - Change - SAP Solution Manager screen, in the SolutionStructure screen area, expand <YourSolutionName>.
h) Select Business Scenarios .
i) In the Structure tab, in the Scenario Name column, select the first empty row and enterSales Order Processing.
j) In the Status column, select Production from the dropdown list and choose Save .The Sales Order Processing business scenario displays in the Solution Structure.
2. Add the required business processes to the Sales Order Processing business scenario.
a) In the Solution Structure , expand Sales Order Processing and select BusinessProcesses .
246 © Copyright. All rights reserved.
b) In the Structure tab, on the first empty row of the Process Name column, enter CreateSales Order and choose Save .Create Sales Order displays in the Solution Structure screen area.
c) Select Create Sales Order .
d) In the Structure tab, In the Step Name column, enter Create Sales Order.
e) In the Logical Component column, choose Z_EPfrom the dropdown list.
f) In the Processing Type column, choose Dialog/Background from the dropdown list.
g) Repeat steps 2.d to 2.f until you have added all business processes to the scenario.
h) Choose Save .You can see a graphical view of your business scenario in the Component View tab.
Lesson: Creating and Maintaining Solutions in SAP Solution Manager
© Copyright. All rights reserved. 247
LESSON SUMMARYYou should now be able to:
● Explain the concept of solutions as used in SAP Solution Manager
● Create and maintain solutions in SAP Solution Manager
● Maintain solutions in SAP Solution Manager
Unit 11: The SAP Solution Manager Administration Work Center
248 © Copyright. All rights reserved.
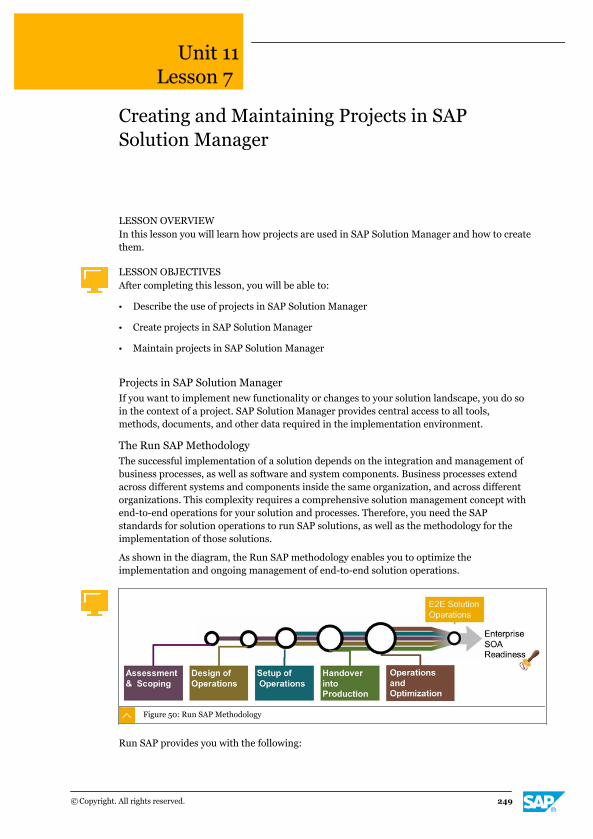
Unit 11Lesson 7
Creating and Maintaining Projects in SAPSolution Manager
LESSON OVERVIEWIn this lesson you will learn how projects are used in SAP Solution Manager and how to createthem.
LESSON OBJECTIVESAfter completing this lesson, you will be able to:
● Describe the use of projects in SAP Solution Manager
● Create projects in SAP Solution Manager
● Maintain projects in SAP Solution Manager
Projects in SAP Solution ManagerIf you want to implement new functionality or changes to your solution landscape, you do soin the context of a project. SAP Solution Manager provides central access to all tools,methods, documents, and other data required in the implementation environment.
The Run SAP MethodologyThe successful implementation of a solution depends on the integration and management ofbusiness processes, as well as software and system components. Business processes extendacross different systems and components inside the same organization, and across differentorganizations. This complexity requires a comprehensive solution management concept withend-to-end operations for your solution and processes. Therefore, you need the SAPstandards for solution operations to run SAP solutions, as well as the methodology for theimplementation of those solutions.
As shown in the diagram, the Run SAP methodology enables you to optimize theimplementation and ongoing management of end-to-end solution operations.
Figure 50: Run SAP Methodology
Run SAP provides you with the following:
© Copyright. All rights reserved. 249
● A set of standards for solution operations
● A roadmap for the implementation of those standards
● Training and certification services
● SAP Solution Manager as a tool to run SAP solution operations
The benefits of Run SAP include the following:
● Improved know-how and skills
● A high degree of standardization and quality
● Efficient tools and processes
● Successful implementation of holistic solution operations
● Reduction in costs of operating applications
Projects in the Administration Work CenterIn SAP Solution Manager, you can access your projects in the Solution ManagerAdministration work center, in the Projects view.
The Overview screen displays an overview of all the projects in your Solution Manager.
In the Projects table you find basic information for each project, including the project ID,name, type, and current status.
You can use SAP Solution Manager to create the following types of project:
● Implementation project: to implement business processes in an SAP landscape.
● Template project: to create a template so that other projects can access your projectstructure, or parts of it, with its assigned objects (such as documentation, test cases, orIMG activities.
● Upgrade project: to upgrade existing systems.
● Optimization project: to optimize the flow of business processes or the use of a softwaresolution.
● Safeguarding project: to resolve a critical situation in the implementation or use of an SAPsolution.
● Maintenance project: to maintain a solution in one of the following scenarios:
- In Change Request Management, where the project contains all maintenance activitiesand urgent corrections of a solution.
- As part of the check in/check out of business processes from the Solution Directory.
To Create a Project in SAP Solution Manager
1. In the SAP Solution Manager Administration work center, choose Projects .
2. In the Projects view, create and save a new project.
a) Choose New.
Unit 11: The SAP Solution Manager Administration Work Center
250 © Copyright. All rights reserved.
b) In the Create a New Project dialog box, enter a project ID, project name, and a projecttype.Depending on the type of project you create, you may be prompted to add a solution ora package to it.
c) Choose OK.The project is created.
After creating your project, you add systems to it and maintain the project parameters.
Project Maintenance in SAP Solution ManagerTo add systems to the project and maintain project parameters, you post-maintain yourproject.
On the Project Administration screen, you can maintain the following aspects of your project:
● Status - on the General Data tab
● Scope
● Project Team members
● Milestones
● Organizational units
● Project standards (such as keywords and document types)
You can also add your systems to the project by adding logical components to it on theSystem Landscape tab.
To Add a Logical Component to a Project in SAP Solution ManagerYou post-maintain your project to add systems to it and maintain the project parameters.
1. In the SAP Solution Manager Administration work center, open your project.
a) Choose the Projects tab to open the Projects view.
b) Select your project from the list.If necessary, use the Filter function to find your project in the list.
c) Select your project and choose Project Administration to open it.The Project <YourProjectName> SAP Solution Manager screen appears.
2. Add a logical component to the project.
a) Choose Edit.
b) Choose the System Landscape tab.
c) In the Logical Component column, choose Input Help.A list of all available logical components displays.
d) Select the logical component you want to add to the project.
The selected logical component displays in the list.
e) Choose Save .
You can maintain the project status, project scope, team members, project milestones,organizational units, and project standards such as keywords and document types using theother project administration tabs.
Lesson: Creating and Maintaining Projects in SAP Solution Manager
© Copyright. All rights reserved. 251
LESSON SUMMARYYou should now be able to:
● Describe the use of projects in SAP Solution Manager
● Create projects in SAP Solution Manager
● Maintain projects in SAP Solution Manager
Unit 11: The SAP Solution Manager Administration Work Center
252 © Copyright. All rights reserved.
Unit 11
Learning Assessment
1. Which of the following tasks can you perform from the Solution Manager Administrationwork center?
Choose the correct answers.
X A Configure notification settings.
X B Access the agent framework.
X C Check the SAP Solution Manager system for configuration or runtime errors.
X D View configured solutions.
2. Which of the following functions in the Landscape view allow you to open the technicaleditor of the LMDB?
Choose the correct answers.
X A Technical Systems → System Operations
X B Databases → System Operations
X C Product Systems Edit
X D Hosts → Host Operations
3. To add a CA Wily Introscope Enterprise Manager you must have a diagnostics agentinstalled on the Introscope EM host and assigned to Solution Manager.
Determine whether this statement is true or false.
X True
X False
© Copyright. All rights reserved. 253
4. Which of the following tasks can you perform in the Infrastructure view of the SAPSolution Manager Administration work center?
Choose the correct answers.
X A Administer CA Wily Introscope Enterprise Manager.
X B Access the Configuration Change Database.
X C Identify extractor errors.
X D Install new diagnostics agents.
X E Upload fixes to root-cause analysis templates.
5. Which of the following components of SAP Solution Manager are monitored with self-monitoring?
Choose the correct answers.
X A CA Wily Introscope
X B Diagnostics agents
X C Managed systems
X D Solution Manager monitoring infrastructure
6. Which of the following are features of solutions in SAP Solution Manager?
Choose the correct answers.
X A They are independent of each other.
X B They are always organized along geographical lines.
X C They each have a solution life cycle.
X D Each SAP Solution Manager installation can have only one solution associated withit.
7. Which of the following types of project can you create in SAP Solution Manager?
Choose the correct answers.
X A Safeguarding project
X B System project
X C Maintenance project
X D Template project
Unit 11: Learning Assessment
254 © Copyright. All rights reserved.

Unit 11
Learning Assessment - Answers
1. Which of the following tasks can you perform from the Solution Manager Administrationwork center?
Choose the correct answers.
X A Configure notification settings.
X B Access the agent framework.
X C Check the SAP Solution Manager system for configuration or runtime errors.
X D View configured solutions.
2. Which of the following functions in the Landscape view allow you to open the technicaleditor of the LMDB?
Choose the correct answers.
X A Technical Systems → System Operations
X B Databases → System Operations
X C Product Systems Edit
X D Hosts → Host Operations
3. To add a CA Wily Introscope Enterprise Manager you must have a diagnostics agentinstalled on the Introscope EM host and assigned to Solution Manager.
Determine whether this statement is true or false.
X True
X False
© Copyright. All rights reserved. 255
4. Which of the following tasks can you perform in the Infrastructure view of the SAPSolution Manager Administration work center?
Choose the correct answers.
X A Administer CA Wily Introscope Enterprise Manager.
X B Access the Configuration Change Database.
X C Identify extractor errors.
X D Install new diagnostics agents.
X E Upload fixes to root-cause analysis templates.
5. Which of the following components of SAP Solution Manager are monitored with self-monitoring?
Choose the correct answers.
X A CA Wily Introscope
X B Diagnostics agents
X C Managed systems
X D Solution Manager monitoring infrastructure
6. Which of the following are features of solutions in SAP Solution Manager?
Choose the correct answers.
X A They are independent of each other.
X B They are always organized along geographical lines.
X C They each have a solution life cycle.
X D Each SAP Solution Manager installation can have only one solution associated withit.
7. Which of the following types of project can you create in SAP Solution Manager?
Choose the correct answers.
X A Safeguarding project
X B System project
X C Maintenance project
X D Template project
Unit 11: Learning Assessment - Answers
256 © Copyright. All rights reserved.
UNIT 12 SAP EarlyWatch Alerts (EWA)
Lesson 1
Monitoring Components with SAP EarlyWatch Alerts 258
Lesson 2
Managing SAP EarlyWatch Alert Reports 270
Exercise 11: Manually Produce an SAP EWA Report in an ABAP System 273
Lesson 3
Using SAP EarlyWatch Alert for Solutions 282
UNIT OBJECTIVES
● Set up SAP EarlyWatch Alerts
● Create an SAP EarlyWatch Alert report in an ABAP system
● Access SAP EarlyWatch Alert reports
● List the SAP EarlyWatch Alert checks available for the SAP NetWeaver AS Java stack
● Monitor the system landscape status with SAP EarlyWatch Alert for Solutions
● Generate a report in SAP EarlyWatch Alert for Solutions
● Analyze SAP EarlyWatch for Solutions
© Copyright. All rights reserved. 257
Unit 12Lesson 1
Monitoring Components with SAP EarlyWatchAlerts
LESSON OVERVIEWSAP EarlyWatch Alert is an important part of making sure your core business processes work.This lesson explains the basic steps for configuring SAP EarlyWatch Alert and the use of theService Data Control Center in the satellite system.
LESSON OBJECTIVESAfter completing this lesson, you will be able to:
● Set up SAP EarlyWatch Alerts
SAP EarlyWatch Alerts (EWA)SAP EarlyWatch Alert (EWA) is an important part of making sure your core businessprocesses work. It is a tool that monitors the essential administrative areas of SAPcomponents and keeps you up to date on their performance and stability. SAP EarlyWatchAlert runs automatically to keep you informed, so you can react to issues proactively, beforethey become critical.
SAP EarlyWatch Alert is most effective when activated for all SAP components in yoursolution. It is covered by your maintenance agreement with SAP with no extra charge and it isa technical prerequisite to perform other remote delivery services.
You activate it yourself for each of your SAP components. It is processed in the SAP SolutionManager and it is from here that you activate it and read the weekly reports.
SAP EarlyWatch Alert can be scheduled in English, Japanese, or Chinese. You can generateand read the report from your SAP Solution Manager in HTML or Microsoft Word format.Alternatively you can automate sending HTML reports per e-mail to assigned recipients.
If you cannot process SAP EarlyWatch Alert data in a local SAP Solution Manager system, youcan send data for productive systems to SAP for processing. To learn about the restrictionsthat applies and to activate SAP EarlyWatch Alert data to be processed at SAP, please followsthe instructions in SAP Note 207223 - SAP EarlyWatch Alert processed at SAP.
Caution:SAP strongly recommends activating SAP EarlyWatch Alert for all productivesystems.
In SAP EarlyWatch Alert, important system data is transmitted from managed systems toSAP Solution Manager at regular intervals via remote connection. This transfer includes onlytechnical data with nonsensitive content that is transparent and manageable by the ServiceData Control Center (SDCCN). SAP Solution Manager then analyzes this data and produces a
258 © Copyright. All rights reserved.
report, which can be downloaded or e-mailed automatically to relevant members of yourorganization.
SAP EarlyWatch Alert gathers performance data using a data collecting mechanism that runsas a background job. This data is sent from the satellite systems to your central SAP SolutionManager system for processing and evaluation. The EarlyWatch Alerts for your satellitesystems are also the basis for further analysis, via EarlyWatch Alert for Solutions or ServiceLevel Reporting.
If the overall rating of the SAP EarlyWatch Alert is red, the service results could beautomatically sent to SAP support. If all sessions are rated yellow or green, results will be sentto SAP Support once every four weeks. Since the reports provide a history of a system’sperformance, EarlyWatch Alert aids the analysis of performance-related problems.
If you display the EarlyWatch Alert in SAP Solution Manager, you benefit from:
● Access to detailed download data on which EWA Reports are founded
● Higher availability of graphics (only a limited selection is available on SAP ServiceMarketplace)
● Concise, central administration and archiving
● Allocation and documentation of tasks (in EWA Session)
● Summary of EWAs and selection of content via SL Reporting
● Tracking of tasks in SL Reporting
SAP EarlyWatch Alert enables you to
● Identify potential problems at an early stage
● React to issues such as bottlenecks before they become critical
● Know what is affecting the performance and stability of your solution
SAP EarlyWatch Alert monitors the following regularly and automatically:
● Performance of SAP systems
● Essential administrative areas of SAP systems
To Configure SAP EarlyWatch Alerts
1. Complete the SOLMAN_SETUP system preparation and basic configuration.
2. Connect the managed systems to SAP Solution Manager.
During this setup, the RFC destinations that are required to transfer session data from thesatellite system to SAP Solution Manager are created.
3. Create a solution.
You need a solution to generate SAP EarlyWatch Alerts.
4. Activate the Service Data Control Center (SDCCN) in the satellite system to collectsession data.
5. Perform RTCCTOOL - Service preparation check.
Lesson: Monitoring Components with SAP EarlyWatch Alerts
© Copyright. All rights reserved. 259
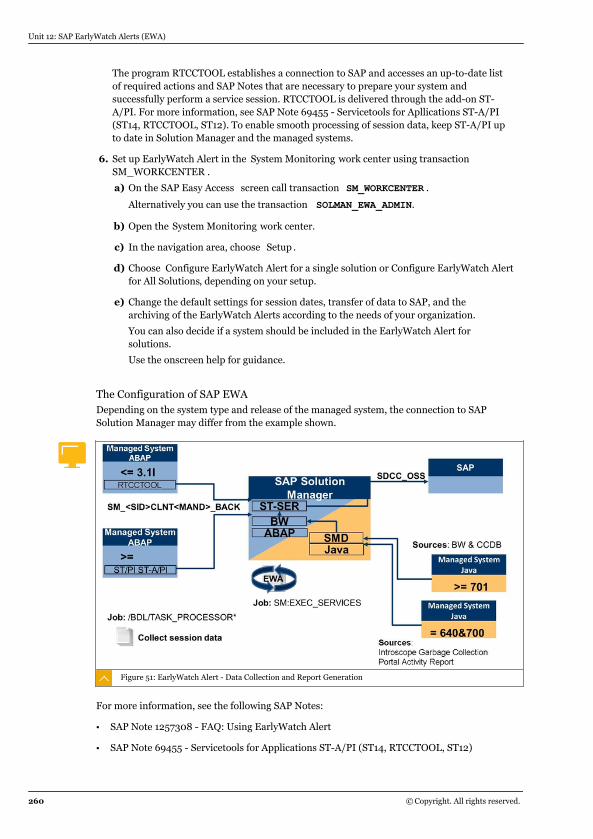
The program RTCCTOOL establishes a connection to SAP and accesses an up-to-date listof required actions and SAP Notes that are necessary to prepare your system andsuccessfully perform a service session. RTCCTOOL is delivered through the add-on ST-A/PI. For more information, see SAP Note 69455 - Servicetools for Apllications ST-A/PI(ST14, RTCCTOOL, ST12). To enable smooth processing of session data, keep ST-A/PI upto date in Solution Manager and the managed systems.
6. Set up EarlyWatch Alert in the System Monitoring work center using transactionSM_WORKCENTER .
a) On the SAP Easy Access screen call transaction SM_WORKCENTER .
Alternatively you can use the transaction SOLMAN_EWA_ADMIN.
b) Open the System Monitoring work center.
c) In the navigation area, choose Setup .
d) Choose Configure EarlyWatch Alert for a single solution or Configure EarlyWatch Alertfor All Solutions, depending on your setup.
e) Change the default settings for session dates, transfer of data to SAP, and thearchiving of the EarlyWatch Alerts according to the needs of your organization.
You can also decide if a system should be included in the EarlyWatch Alert forsolutions.
Use the onscreen help for guidance.
The Configuration of SAP EWADepending on the system type and release of the managed system, the connection to SAPSolution Manager may differ from the example shown.
Figure 51: EarlyWatch Alert - Data Collection and Report Generation
For more information, see the following SAP Notes:
● SAP Note 1257308 - FAQ: Using EarlyWatch Alert
● SAP Note 69455 - Servicetools for Applications ST-A/PI (ST14, RTCCTOOL, ST12)
Unit 12: SAP EarlyWatch Alerts (EWA)
260 © Copyright. All rights reserved.
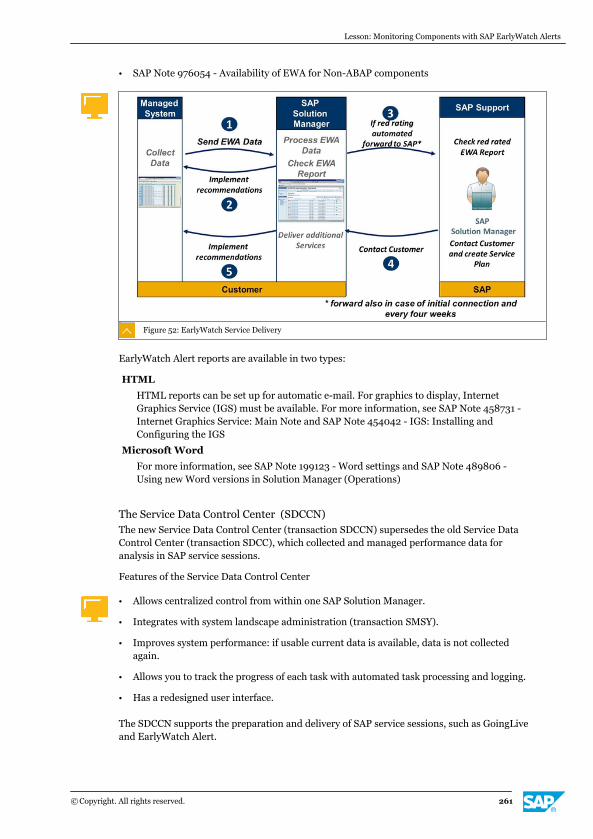
● SAP Note 976054 - Availability of EWA for Non-ABAP components
Figure 52: EarlyWatch Service Delivery
EarlyWatch Alert reports are available in two types:
HTML
HTML reports can be set up for automatic e-mail. For graphics to display, InternetGraphics Service (IGS) must be available. For more information, see SAP Note 458731 -Internet Graphics Service: Main Note and SAP Note 454042 - IGS: Installing andConfiguring the IGS
Microsoft Word
For more information, see SAP Note 199123 - Word settings and SAP Note 489806 -Using new Word versions in Solution Manager (Operations)
The Service Data Control Center (SDCCN)The new Service Data Control Center (transaction SDCCN) supersedes the old Service DataControl Center (transaction SDCC), which collected and managed performance data foranalysis in SAP service sessions.
Features of the Service Data Control Center
● Allows centralized control from within one SAP Solution Manager.
● Integrates with system landscape administration (transaction SMSY).
● Improves system performance: if usable current data is available, data is not collectedagain.
● Allows you to track the progress of each task with automated task processing and logging.
● Has a redesigned user interface.
The SDCCN supports the preparation and delivery of SAP service sessions, such as GoingLiveand EarlyWatch Alert.
Lesson: Monitoring Components with SAP EarlyWatch Alerts
© Copyright. All rights reserved. 261

It is intended primarily for SAP service engineers performing SAP service sessions, as well asfor system administrators and other qualified customer employees working in their own SAPSolution Manager systems.
The SDCCN first checks if the data collection has already occurred within the satellite systembefore it collects the data again.
Unfortunately, the job SM:EXEC_SERVICES within the SAP Solution Manager produces theEarlyWatch Alert data more often. To avoid producing EarlyWatch Alert data twice for onesystem, use transaction SOLMAN_EWA_ADMIN to check whether you need the EWA for eachsolution the satellite system has defined.
Before you can work with the SDCCN, you must activate it. You activate it just once afterinstalling the SDCCN.
You can activate the Service Data Control Center either from the SAP Solution Managersystem or by using the built-in activation function in the local system. If you use the SAPSolution Manager system, you can activate the Service Data Control Center for eachindividual system or centrally for several systems.
When the SDCCN is activated it performs the following actions:
● It deschedules AUTO_SESSION_MANAGER (ASM), the background job for the old ServiceData Control Center.
● It checks whether customizing settings exist.
● If no customizing settings exist, it fills in default values automatically.
● If customizing settings exist, they are left unchanged. Existing settings are not overwritten.
● It creates the following two tasks (if they are not already available):
- Maintenance Package task
- Service Preparation Check (RTCCTOOL)
The maintenance package is a periodic task, which should run every day. It consists of threehousekeeping subtasks, each of which is executed when necessary. The frequency of theindividual tasks is based on the customizing in task-specific settings. The subtasks are asfollows:
● Session refresh: checks all destinations known in the list of RFC destinations ( Goto → Settings → Task specific settings → RFC destinations). Destinations from SM59 can beadded to the list manually.
● Service definition refresh: based on the same list of destinations, it uses either thedestination for which the Master flag has been set or, where the flag has not been set, ituses SDCC_OSS.
● Delete data: executed according to the customizing in the task-specific setting.
The service preparation check task serves as a reminder to run the RTCCTOOL. The tasknotifies you to check if any action is required in the system, such as implementing new SAPNotes or performing a transport. We recommend that you schedule this task at regularintervals to ensure that the system is always prepared for service sessions.
We recommend that you perform this task each month.
For more information, see SAP Note 69455 - Servicetools for Applications ST-A/PI (ST14,RTCCTOOL, ST12) and SAP Note 91488 - SAP Support Services - Central preparatory note.
Unit 12: SAP EarlyWatch Alerts (EWA)
262 © Copyright. All rights reserved.
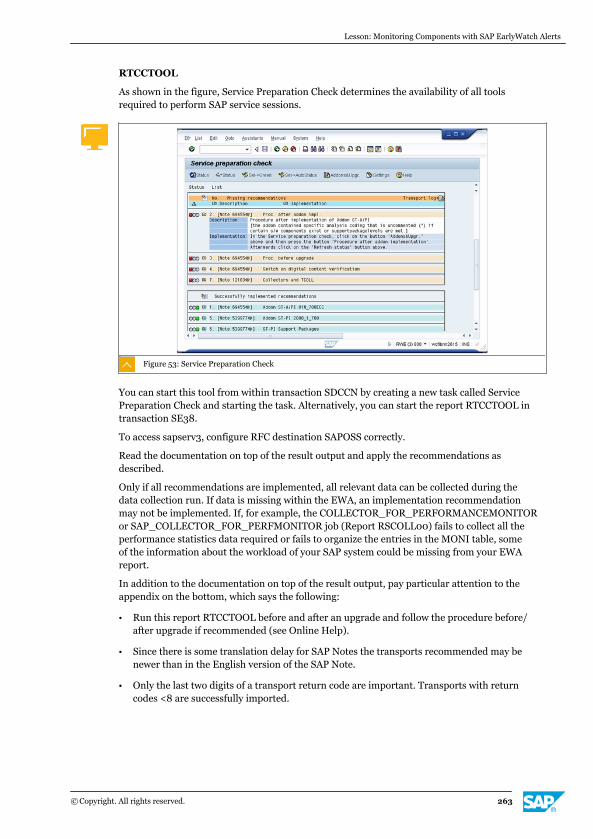
RTCCTOOL
As shown in the figure, Service Preparation Check determines the availability of all toolsrequired to perform SAP service sessions.
Figure 53: Service Preparation Check
You can start this tool from within transaction SDCCN by creating a new task called ServicePreparation Check and starting the task. Alternatively, you can start the report RTCCTOOL intransaction SE38.
To access sapserv3, configure RFC destination SAPOSS correctly.
Read the documentation on top of the result output and apply the recommendations asdescribed.
Only if all recommendations are implemented, all relevant data can be collected during thedata collection run. If data is missing within the EWA, an implementation recommendationmay not be implemented. If, for example, the COLLECTOR_FOR_PERFORMANCEMONITORor SAP_COLLECTOR_FOR_PERFMONITOR job (Report RSCOLL00) fails to collect all theperformance statistics data required or fails to organize the entries in the MONI table, someof the information about the workload of your SAP system could be missing from your EWAreport.
In addition to the documentation on top of the result output, pay particular attention to theappendix on the bottom, which says the following:
● Run this report RTCCTOOL before and after an upgrade and follow the procedure before/after upgrade if recommended (see Online Help).
● Since there is some translation delay for SAP Notes the transports recommended may benewer than in the English version of the SAP Note.
● Only the last two digits of a transport return code are important. Transports with returncodes <8 are successfully imported.
Lesson: Monitoring Components with SAP EarlyWatch Alerts
© Copyright. All rights reserved. 263
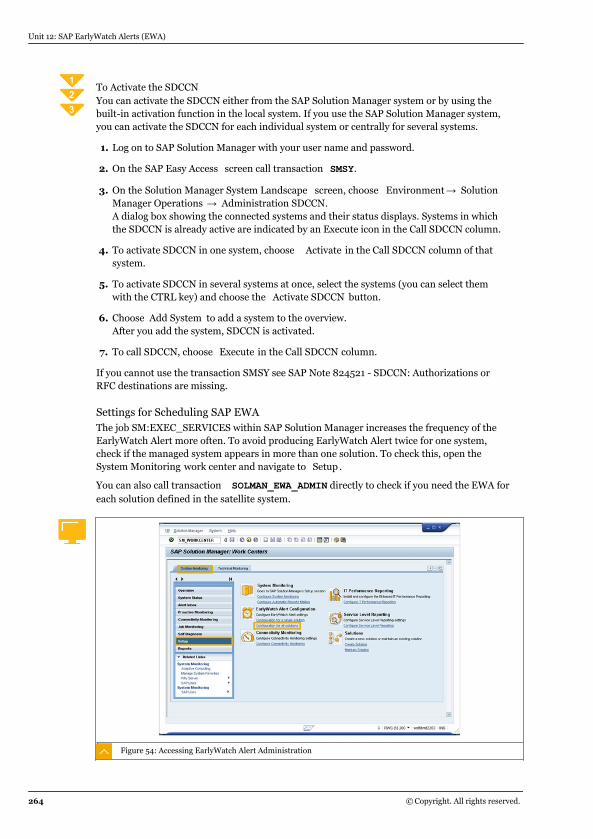
To Activate the SDCCNYou can activate the SDCCN either from the SAP Solution Manager system or by using thebuilt-in activation function in the local system. If you use the SAP Solution Manager system,you can activate the SDCCN for each individual system or centrally for several systems.
1. Log on to SAP Solution Manager with your user name and password.
2. On the SAP Easy Access screen call transaction SMSY.
3. On the Solution Manager System Landscape screen, choose Environment → SolutionManager Operations → Administration SDCCN.A dialog box showing the connected systems and their status displays. Systems in whichthe SDCCN is already active are indicated by an Execute icon in the Call SDCCN column.
4. To activate SDCCN in one system, choose Activate in the Call SDCCN column of thatsystem.
5. To activate SDCCN in several systems at once, select the systems (you can select themwith the CTRL key) and choose the Activate SDCCN button.
6. Choose Add System to add a system to the overview.After you add the system, SDCCN is activated.
7. To call SDCCN, choose Execute in the Call SDCCN column.
If you cannot use the transaction SMSY see SAP Note 824521 - SDCCN: Authorizations orRFC destinations are missing.
Settings for Scheduling SAP EWAThe job SM:EXEC_SERVICES within SAP Solution Manager increases the frequency of theEarlyWatch Alert more often. To avoid producing EarlyWatch Alert twice for one system,check if the managed system appears in more than one solution. To check this, open theSystem Monitoring work center and navigate to Setup .
You can also call transaction SOLMAN_EWA_ADMIN directly to check if you need the EWA foreach solution defined in the satellite system.
Figure 54: Accessing EarlyWatch Alert Administration
Unit 12: SAP EarlyWatch Alerts (EWA)
264 © Copyright. All rights reserved.
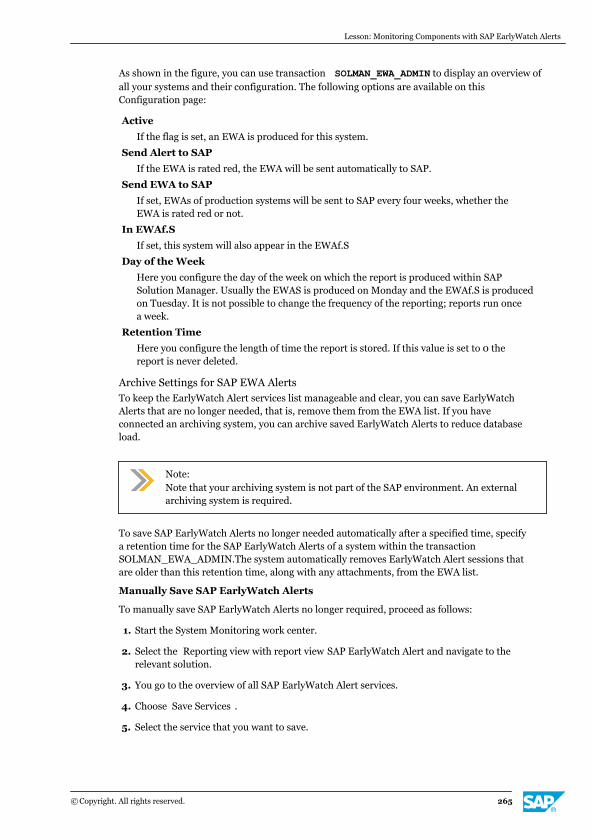
As shown in the figure, you can use transaction SOLMAN_EWA_ADMIN to display an overview ofall your systems and their configuration. The following options are available on thisConfiguration page:
Active
If the flag is set, an EWA is produced for this system.
Send Alert to SAP
If the EWA is rated red, the EWA will be sent automatically to SAP.
Send EWA to SAP
If set, EWAs of production systems will be sent to SAP every four weeks, whether theEWA is rated red or not.
In EWAf.S
If set, this system will also appear in the EWAf.S
Day of the Week
Here you configure the day of the week on which the report is produced within SAPSolution Manager. Usually the EWAS is produced on Monday and the EWAf.S is producedon Tuesday. It is not possible to change the frequency of the reporting; reports run oncea week.
Retention Time
Here you configure the length of time the report is stored. If this value is set to 0 thereport is never deleted.
Archive Settings for SAP EWA AlertsTo keep the EarlyWatch Alert services list manageable and clear, you can save EarlyWatchAlerts that are no longer needed, that is, remove them from the EWA list. If you haveconnected an archiving system, you can archive saved EarlyWatch Alerts to reduce databaseload.
Note:Note that your archiving system is not part of the SAP environment. An externalarchiving system is required.
To save SAP EarlyWatch Alerts no longer needed automatically after a specified time, specifya retention time for the SAP EarlyWatch Alerts of a system within the transactionSOLMAN_EWA_ADMIN.The system automatically removes EarlyWatch Alert sessions thatare older than this retention time, along with any attachments, from the EWA list.
Manually Save SAP EarlyWatch Alerts
To manually save SAP EarlyWatch Alerts no longer required, proceed as follows:
1. Start the System Monitoring work center.
2. Select the Reporting view with report view SAP EarlyWatch Alert and navigate to therelevant solution.
3. You go to the overview of all SAP EarlyWatch Alert services.
4. Choose Save Services .
5. Select the service that you want to save.
Lesson: Monitoring Components with SAP EarlyWatch Alerts
© Copyright. All rights reserved. 265
6. Choose Save Services .
You return automatically to the SAP EarlyWatch Alert Overview screen, in which a new button,Show Archive Queue , is displayed. You navigate to the overview of saved services by choosingShow Archive Queue .
Retrieve EarlyWatch Alert
1. Choose Show Archive Queue .
2. Choose Retrieve Service to retrieve the SAP EarlyWatch Alert.
The system returns automatically to the overview screen. The retrieved SAP EarlyWatch Alertservice appears in the overview: Archive Sessions.
Archive EarlyWatch Alert
You must put sessions in the repository before you can archive them. You have the followingoptions:
● Archive sessions manually
1. Choose Archive Services in the repository.
2. Specify a date and confirm your entries.
● Archive sessions automatically
1. Schedule the job RDARCH_ARCHIVE_DATA_SOLMAN with transaction SM37. You canschedule the job to execute regularly, such as daily, to archive all sessions older than 10days.
2. The job archives sessions and their attachments that are older than the limit youspecify. These sessions and attachments are archived in the repository and deletedfrom the database, which reduces the size of the database. You can access the savedsessions, but you cannot edit them.
Note:The job RDARCH_CLEAN_DATABASE, which runs daily, deletes archived sessionsand documents physically from the Solution Manager System database. You canthen no longer open the archived sessions. You can only display them.
E-mail Settings for SAP EWA AlertsTo send the EWA report via e-mail, first set up SAPconnect using transaction SCOT.
SAPconnect distinguishes between two different node types according to the type ofconnection with the SAP system:
SMTP
The connection between nodes of this type and the SAP system is based on the Internetmail protocol. There is one SMTP node in each client of an SAP system. This node iscreated automatically by the system. It cannot be deleted and no more nodes of this typecan be created.
RFC nodes
The connection between nodes of this type and the SAP system is based on the SAPremote function call protocol. There can be any number of RFC nodes in each client of anSAP system. These nodes can be deleted and more nodes of this type can be created.
Unit 12: SAP EarlyWatch Alerts (EWA)
266 © Copyright. All rights reserved.
Hint:You could check if SAPconnect is set up properly with a SPRO Configurationstep. To do so call the transaction SPRO and navigate to: SAP SolutionManager → Capabilities → SAP Engagement and Service Delivery → SendingService Reports by Internet E-Mail → Test System Configuration for Sending E-Mail.
When the report has been produced you can send it at any time by opening it and selectingthe E-Maillink within the report.
A new screen displays, on which you enter recipients and send the e-mail directly by choosingOK.
You can also send the EWA automatically by solution/session combination.
When you set up automatic e-mail transmission, you specify several e-mail addresses.However, the e-mail address is valid only for the selected solution. Follow the same process toset up automatic e-mailing for other solutions.
The system specifies the rating and the report type in the subject of the e-mail. The subjectrow has the format
[meaning of rating] [color] - [report type] - [system] - [report type]. For example: Uncritical(green) EW-ALERT - XXX - EarlyWatch Alert Report with Graphic.
To set up this automatic e-mail, call transaction SPRO.
Navigate to SAP Solution Manager → Capabilities → SAP Engagement and ServiceDelivery → Sending Service Reports by Internet E-Mail → Automatic E-Mailing of Reports.
Similarly, you could send the e-mail automatically by solution/system combination, using thesame menu path.
Read the documentation and start the IMG activity.
To Send EWA Reports Automatically by E-mail - (Solution/Session)Alternatively, you can follow this procedure.
1. Log on to SAP Solution Manager with your user name and password.
2. On the SAP Easy Access screen call transaction SE38.
3. Enter RDSMOP_REPORTS_BY_EMAIL.
4. Start the report.
5. Choose your solution.
6. Choose Create E-Mail Recipients.
7. Enter the recipients by Solution/Session type and Report type combination.
To Send EWA Reports Automatically by E-mail - (Solution/System)
1. On the SAP Easy Access screen call transaction SM30.
2. Enter Maintain Table Name DSWP_SYS_EMAIL.
Lesson: Monitoring Components with SAP EarlyWatch Alerts
© Copyright. All rights reserved. 267
3. Choose Maintain.
4. Maintain e-mail entries for Solution/System combination.
To Activate SAP EWA Monitoring FunctionalityThis function activates or deactivates alerts for SAP EarlyWatch Alert, Service LevelReporting, and SAP Solution Manager Jobs, for your solutions. The SAP Solution Managersystem creates predefined monitoring objects for each solution in the SAP Solution ManagerComputing Center Management System (CCMS) (transaction: RZ20), in the context SolMan.
1. On the SAP Easy Access screen call the transaction SOLMAN_WORKCENTER.The SAP Solution Manager Administration work center opens.
2. In the Navigation area,choose Solutions and follow the link to your solution.Following this link takes you to the Solution Directory (transaction codeSOLMAN_DIRECTORY).
3. In the Solution Structure area, select your solution.
4. Choose the Solution Settings tab.
5. Choose CCMS Monitoring of EWA.The SAP List Viewer screen appears.
6. Select the line of the solution name for which you want to activate or deactivatemonitoring and choose Activate or Deactivate .The Systems with EWA column displays the systems for which you have activated datadownload in the Solution Directory, in the solution attributes. The All System columnshows the systems in your solution.
7. Check the Activation/Deactivation log.This report allows you to activate monitoring for individual solutions. Monitoring objectsare created for each solution in the Solution Manager context.
8. To find monitoring information, on the SAP Easy Access screen call transaction RZ70.
9. Navigate to SAP CCMS Technical Expert Monitors → All Context on Local ApplicationServer → SOLMAN → <Solution Name>.
EWA Information in the CCMSThe Solution Manager system sends the following information to the SAP Solution ManagerCCMS:
● The SAP EarlyWatch Alert results
● The Service Level Report session results
● Messages about the download of SAP EarlyWatch Alert services
● Information about the status of jobs in SAP Solution Manager, including upgrades andchanges within solutions
● Systems removed from solutions
● Activated/deactivated SAP EarlyWatch Alert downloads for some systems
● Implementation of new Basis Support Package with new CCMS functionality
Unit 12: SAP EarlyWatch Alerts (EWA)
268 © Copyright. All rights reserved.
LESSON SUMMARYYou should now be able to:
● Set up SAP EarlyWatch Alerts
Lesson: Monitoring Components with SAP EarlyWatch Alerts
© Copyright. All rights reserved. 269
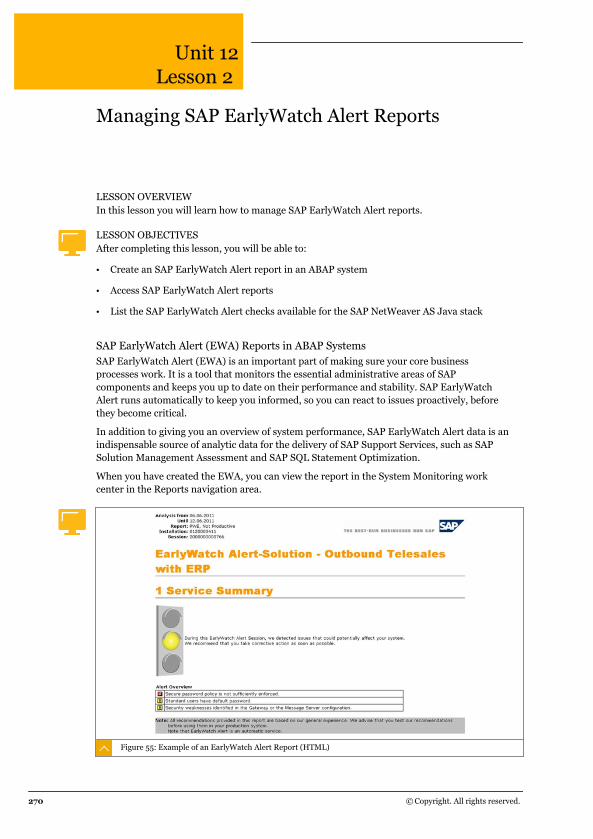
Unit 12Lesson 2
Managing SAP EarlyWatch Alert Reports
LESSON OVERVIEWIn this lesson you will learn how to manage SAP EarlyWatch Alert reports.
LESSON OBJECTIVESAfter completing this lesson, you will be able to:
● Create an SAP EarlyWatch Alert report in an ABAP system
● Access SAP EarlyWatch Alert reports
● List the SAP EarlyWatch Alert checks available for the SAP NetWeaver AS Java stack
SAP EarlyWatch Alert (EWA) Reports in ABAP SystemsSAP EarlyWatch Alert (EWA) is an important part of making sure your core businessprocesses work. It is a tool that monitors the essential administrative areas of SAPcomponents and keeps you up to date on their performance and stability. SAP EarlyWatchAlert runs automatically to keep you informed, so you can react to issues proactively, beforethey become critical.
In addition to giving you an overview of system performance, SAP EarlyWatch Alert data is anindispensable source of analytic data for the delivery of SAP Support Services, such as SAPSolution Management Assessment and SAP SQL Statement Optimization.
When you have created the EWA, you can view the report in the System Monitoring workcenter in the Reports navigation area.
Figure 55: Example of an EarlyWatch Alert Report (HTML)
270 © Copyright. All rights reserved.
The details at the bottom of the report contain the most important results of the EWA report.
You can see in the figure that the SAP EarlyWatch Alert works with traffic lights on eachchapter to show the overall status.
● A green light indicates that everything is normal.
● A yellow light indicates a warning.
● A red light indicates an error.
In the example shown, a yellow light indicates that some standard users have a standardpassword that poses a potential security risk. The report also indicates that the configurationof the gateway or message server shows security weakness.
In addition to the summary, an EWA report is divided into the following chapters:
● System Configuration
● Performance Overview
● Workload Distribution
● SAP System Operations
● Hardware Capacity
● Security
● Software Change Management
● Database Performance
● Database Administration
● Trend Analysis
● Database Server Load from Expensive SQL Statements
In evaluating SAP components, SAP EarlyWatch Alert monitors the following:
● General component status
● System configuration
● Hardware
● Performance development
● Average response times
● Current workload
● Critical error messages and process interruptions
● Database administration
Lesson: Managing SAP EarlyWatch Alert Reports
© Copyright. All rights reserved. 271

Unit 12: SAP EarlyWatch Alerts (EWA)
272 © Copyright. All rights reserved.
Unit 12Exercise 11
Manually Produce an SAP EWA Report in anABAP System
Business Example
In your role as system administrator, you need an EWA report today instead of waiting for theweekly report. To obtain the report, you create a manual EWA session, start manual datacollection, and manually generate a report scheduled for today's date.
1. Create an EarlyWatch Alert Session for your solution and find the following data:
Product System
Session Number
2. Start the data collection manually using transaction SMSY.
3. Manually generate an EWA report in SAP Solution Manager using transaction SE38 andthe report name RDSMOP_MAIN.
4. Check the Service Processing background job with transaction SM37 and job SM*.
5. Open the EWA report in the System Monitoring work center.
© Copyright. All rights reserved. 273
Unit 12Solution 11
Manually Produce an SAP EWA Report in anABAP System
Business Example
In your role as system administrator, you need an EWA report today instead of waiting for theweekly report. To obtain the report, you create a manual EWA session, start manual datacollection, and manually generate a report scheduled for today's date.
1. Create an EarlyWatch Alert Session for your solution and find the following data:
Product System
The product system is located in the Product System column (For example: TAE).
Session Number
Example: 200000000xxxx
a) Log on to SAP Solution Manager with <CourseID>-<GroupNumber> and<password>.
b) On the SAP Easy Access screen, call transaction SM_WORKCENTER.
c) On the SAP Solution Manager work center overview screen, choose the SystemMonitoringtab.
d) In the left-hand menu, choose Reports.
e) In the Report View pane, select the SAP EarlyWatch Alert radio button.
f) In the list of systems, select the SAP ERP system and note the product system.
g) In the relevant Solution column, select <YourSolutionName>.The Select Solution dialog box opens.
h) Select <YourSolutionName > and choose OK.
i) In the File Downloaddialog box, choose Open.
j) On the Solution <YourSolutionName> - SAP Solution Manager screen, choose Create.
k) Expand SAP EarlyWatch Alert and select the checkbox by the SAP ERP productsystem.
l) Choose Create .
274 © Copyright. All rights reserved.

m) On the Select Date for Service screen, enter today's date and choose Confirm.The session number is displayed in the scroll-over text of the SAP EarlyWatch Alarmwith the relevant date.
2. Start the data collection manually using transaction SMSY.
a) On the SAP Easy Access screen, call transaction SMSY.
b) In the top menu, choose Environment → Solution ManagerOperations → Administration SDCCN.The SDCCN Administration screen opens.
c) In the SAP ERP row, choose Execute to activate the SDCCN.The Service Data Control Center screen opens.
d) Choose Create .The Select task dialog box appears.
e) Double-click Refresh sessions .The Create a task to refresh sessions dialog box appears.
f) In the scheduling section, choose the Now radio button.
g) In the Target RFC Destination field, choose Input Helpto find the Solution Managerclient SM_<SID-SOLUTIONMANAGER>CLNT<CLIENTNUMBER>_BACK and enter it inthe field.
h) Choose Continue.Your task is created.
i) On the Service Data Control Center screen, choose Refresh to see new tasks in the list.
j) Check the session column for the session number you noted earlier.
k) Click the cell at the left of your task row to select the entire row, and right-click to openthe context menu.
l) Choose Start Now.A dialog box appears.
m) Choose Yes.This action schedules the job BDL/TASK_PROCESSOR00000000xx (xx is the Task IDof this job within transaction SDCCN), which takes approximately 400 seconds to run.You can check the status of this job with transaction SM37.
n) After a short time, refresh the task overview.When your task disappears from the list, this means that the session data in the SAPERP system has been collected and sent to the SAP Solution Manager system.
3. Manually generate an EWA report in SAP Solution Manager using transaction SE38 andthe report name RDSMOP_MAIN.
a) On the SAP Solution Manager Easy Access screen, call transaction SE38.
b) On the ABAP Editor Initialscreen, enter RDSMOP_MAIN and choose Execute .
c) On the Solution: <YourSolutionName> - SAP Solution Manager screen, chooseSolution Monitoring → EarlyWatch Alert.
d) Find your EWA session in the list using the session number you noted previously.
Lesson: Managing SAP EarlyWatch Alert Reports
© Copyright. All rights reserved. 275
The icon in front of your session indicates that data is available.
e) Click the name of your session.The solution window appears.
f) Choose Start Service Processing .
g) Choose OK to Start Background Job.
4. Check the Service Processing background job with transaction SM37 and job SM*.
a) On the SAP Solution Manager Easy Access screen, call transaction SM37.
b) In the job field, enter SM* and choose Execute.The Job Overview screen appears and you can see your job. When it finishes, thereport is generated.
5. Open the EWA report in the System Monitoring work center.
a) In the System Monitoring work center, open the Solution <YourSolutionName> screenas described previously.
b) On the Solution <YourSolutionName> screen, click the name of your EWA session.The Display Report screen appears. You can open a standard report or a short report.
Unit 12: SAP EarlyWatch Alerts (EWA)
276 © Copyright. All rights reserved.
To Access SAP EarlyWatch Alert (EWA) Reports through the System Monitoring WorkCenterWhen you have created an EarlyWatch Alert (EWA), you can access the report in several workcenters.In the System Monitoring work center, you can view the EWA report in the Reports navigationarea.
1. Log on to SAP Solution Manager with your user name and password.
2. On the SAP Easy Access screen call transaction SM_WORKCENTER.
3. Open the System Monitoring work center.
4. In the navigation area, choose Reports.
5. In the Report View section, select the SAP EarlyWatch Alert radio button.
6. In the list, select the product system for which you want to view EWA reports.
7. In the list, select the report you want to view.
8. Choose Display HTML Report.
9. Select the report type and confirm.
To Access SAP EWA Reports through the SAP Engagement and Service Delivery WorkCenterYou can also view EWA reports in the SAP Engagement and Service Delivery work center, inthe Reports navigation area.
1. In SAP Solution Manager, open the SAP Engagement and Service Delivery work center.
2. In the navigation area, choose Reports.
3. In the Reporting Tools section, choose the SAP EarlyWatch Alerts radio button.
4. Use the filtering settings to select the solution for which you want to view reports.
5. Select the SAP EarlyWatch Alert report you want to show.
6. Choose Display HTML Reportor choose Generate Report to create a Word document.
7. You can view the session by selecting the session ID.
The Details section at the bottom of the screen displays the most important results of theEWA report.
SAP EarlyWatch Alert (EWA) Reporting for Java ComponentsTo create an EarlyWatch Alert for a Java-based system, set up Solution Manager Diagnostics.For more information, see SAP Note 976054 - Availability of EWA for Non-ABAP Components.Attached to this SAP Note you will find the User Guide for SAP EarlyWatch Alert Reports fornon-ABAP components.
Lesson: Managing SAP EarlyWatch Alert Reports
© Copyright. All rights reserved. 277
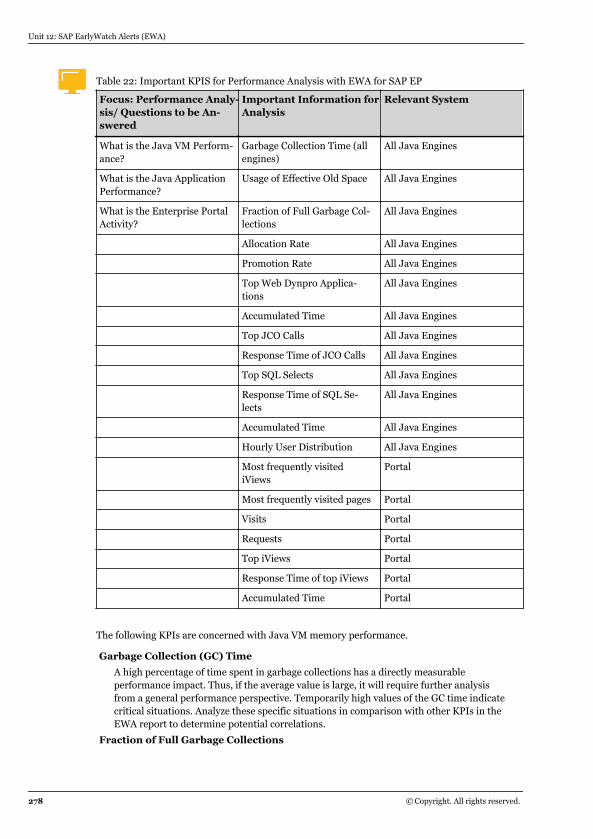
Table 22: Important KPIS for Performance Analysis with EWA for SAP EP
Focus: Performance Analy-sis/ Questions to be An-swered
Important Information forAnalysis
Relevant System
What is the Java VM Perform-ance?
Garbage Collection Time (allengines)
All Java Engines
What is the Java ApplicationPerformance?
Usage of Effective Old Space All Java Engines
What is the Enterprise PortalActivity?
Fraction of Full Garbage Col-lections
All Java Engines
Allocation Rate All Java Engines
Promotion Rate All Java Engines
Top Web Dynpro Applica-tions
All Java Engines
Accumulated Time All Java Engines
Top JCO Calls All Java Engines
Response Time of JCO Calls All Java Engines
Top SQL Selects All Java Engines
Response Time of SQL Se-lects
All Java Engines
Accumulated Time All Java Engines
Hourly User Distribution All Java Engines
Most frequently visitediViews
Portal
Most frequently visited pages Portal
Visits Portal
Requests Portal
Top iViews Portal
Response Time of top iViews Portal
Accumulated Time Portal
The following KPIs are concerned with Java VM memory performance.
Garbage Collection (GC) Time
A high percentage of time spent in garbage collections has a directly measurableperformance impact. Thus, if the average value is large, it will require further analysisfrom a general performance perspective. Temporarily high values of the GC time indicatecritical situations. Analyze these specific situations in comparison with other KPIs in theEWA report to determine potential correlations.
Fraction of Full Garbage Collections
Unit 12: SAP EarlyWatch Alerts (EWA)
278 © Copyright. All rights reserved.
Minor garbage collections must occur more frequently than full garbage collections. Aconsecutive number of full garbage collections is a clear indicator that the Java VirtualMachine (JVM) is not removing objects from the old space.
Old Space Growth Rate
The growth rate in the old space is calculated using a sliding window approach, in whichthe last 10 full garbage collections are analyzed. A linear trend analysis is performed onthis interval. This approach is chosen so that short intervals of rapid growth in the oldspace can be detected. This kind of growth is typical of out-of-memory situations.
Allocation/Promotion Rate
The allocation and promotion rate quantifies the amount of memory transported to theold space per second. Due to the infant mortality of Java objects, this value should alwaysbe much smaller than the allocation rate. One indicator of critical situations is a high ratioof promotion rate to allocation rate, as such a ratio implies that the Java Virtual Machinecannot make efficient use of the Eden space.
The following KPIs are concerned with Java application performance:
Top Web Dynpro Applications
This section measures and reports the average response time over the reporting intervaland the accumulated time of the identified Web Dynpro application.
● Response time: This table lists the top Web Dynpro applications sorted by the averageresponse time. We recommend investigating the tuning potential of Web Dynproapplications that have persistently high average response times.
● Accumulated time: This list is sorted by accumulated response time during thereporting interval. You can use this list to determine the application causing thegreatest load on the J2EE because it is influenced by the number of instances createdby the application at runtime as well as by the average response time. Web Dynproapplications with a large accumulated time potentially have a larger overallperformance impact, something that could be worth further investigation.
Top Servlets
Both the average response time over the reporting interval and the accumulated time ofthe identified servlet are measured and reported here.
● Response time: This table lists the top servlet/JSP Requests sorted by the averageresponse time. Note that the average was calculated across all application nodes ofthe SAP J2EE cluster. We recommend investigating the performance-tuning potentialof servlet/JSP requests with high average response times.
● Accumulated time: The top list here is sorted by the accumulated response timeduring the reporting interval. This indicator is useful for determining which applicationplaced the greatest load on the J2EE, because it is influenced by both the averageresponse time and the number of times that the application is created at runtime.Servlet/JSP requests with a high accumulated time potentially have a larger overallimpact on performance and may be worth investigating further.
The following KPI is concerned with enterprise portal activity reporting:
Hourly User Distribution
The hourly user distribution graph is calculated by stacking each day and constructinghourly averages. The time zone displayed refers to the time zone configured for sharedmaster data. A distinction is made between anonymous users and named users. This
Lesson: Managing SAP EarlyWatch Alert Reports
© Copyright. All rights reserved. 279

graph allows you to determine the hour of the expected peak load. If the critical situationsdetected are caused by user load, these events should correlate with the userdistribution measured.
You can find more information and sample EWA reports at http://service.sap.com/ewa
Unit 12: SAP EarlyWatch Alerts (EWA)
280 © Copyright. All rights reserved.
LESSON SUMMARYYou should now be able to:
● Create an SAP EarlyWatch Alert report in an ABAP system
● Access SAP EarlyWatch Alert reports
● List the SAP EarlyWatch Alert checks available for the SAP NetWeaver AS Java stack
Lesson: Managing SAP EarlyWatch Alert Reports
© Copyright. All rights reserved. 281

Unit 12Lesson 3
Using SAP EarlyWatch Alert for Solutions
LESSON OVERVIEWSAP EarlyWatch Alert for Solutions gives an overview of the current status of an entiresolution landscape in a single consolidated report. This lesson shows you the available KPIsfor this report.
LESSON OBJECTIVESAfter completing this lesson, you will be able to:
● Monitor the system landscape status with SAP EarlyWatch Alert for Solutions
● Generate a report in SAP EarlyWatch Alert for Solutions
● Analyze SAP EarlyWatch for Solutions
SAP EarlyWatch Alert for SolutionsSAP EarlyWatch Alert for Solutions (EWAfS) gives you an overview of the current status ofentire solution landscapes in one consolidated report. This overview includes historicaldevelopments, aggregated solution KPIs, and detailed statistics about dedicated systems ofthe solution. The solution-based report consolidates alerts generated by the regular SAPEarlyWatch Alert monitoring services and classifies them to identify potential areas forimprovement, such as performance or stability.
SAP EarlyWatch Alert for Solutions is particularly useful for monitoring systems thatparticipate in the processing of your documented business processes. The service accessesthe Solution Manager Solution Repository, where the business processes are documented,and thus provides a link between standard SAP EarlyWatch Alert Report data and individualcore business processes with regard to performance evaluations.
SAP EarlyWatch Alert for Solutions is composed of information coming from the datacollections of the individual SAP EarlyWatch Alerts, so you schedule it to run after the lastindividual SAP EarlyWatch Alert for the contributing systems has been processed.
The SAP EarlyWatch Alert for Solutions monitoring service depends, partly, on SAP SolutionManager root cause analysis together with SAP Solution Manager BW, because it analyzeshistorical developments of statistical information stored there. This service covers the areasworkload and performance analysis, exception analysis, and change analysis.
The functions and features of EWAfS include the following:
Functions and Features of EWAfS
● EWAfS is an automated and periodic offline monitoring service provided by SAP SolutionManager.
● EWAfS is solution-oriented and comprises all systems relevant to the production businessprocesses.
282 © Copyright. All rights reserved.
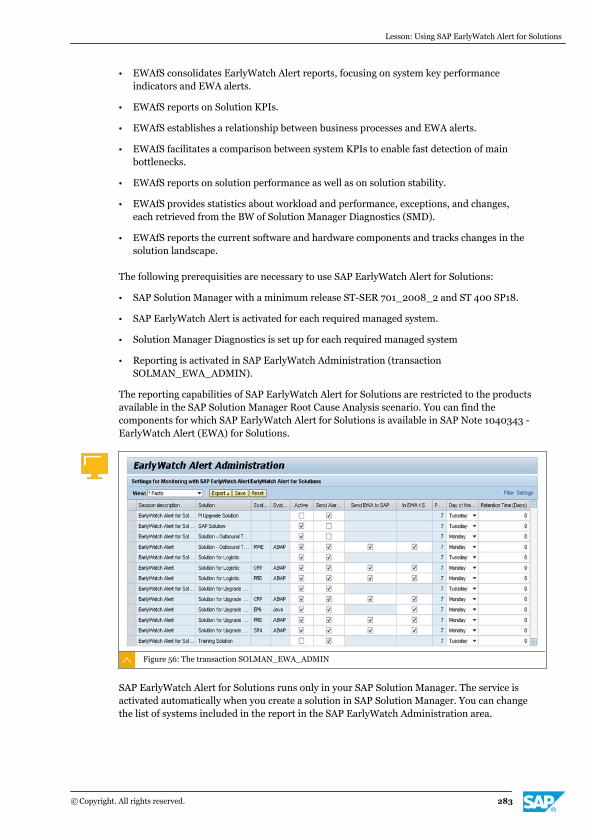
● EWAfS consolidates EarlyWatch Alert reports, focusing on system key performanceindicators and EWA alerts.
● EWAfS reports on Solution KPIs.
● EWAfS establishes a relationship between business processes and EWA alerts.
● EWAfS facilitates a comparison between system KPIs to enable fast detection of mainbottlenecks.
● EWAfS reports on solution performance as well as on solution stability.
● EWAfS provides statistics about workload and performance, exceptions, and changes,each retrieved from the BW of Solution Manager Diagnostics (SMD).
● EWAfS reports the current software and hardware components and tracks changes in thesolution landscape.
The following prerequisities are necessary to use SAP EarlyWatch Alert for Solutions:
● SAP Solution Manager with a minimum release ST-SER 701_2008_2 and ST 400 SP18.
● SAP EarlyWatch Alert is activated for each required managed system.
● Solution Manager Diagnostics is set up for each required managed system
● Reporting is activated in SAP EarlyWatch Administration (transactionSOLMAN_EWA_ADMIN).
The reporting capabilities of SAP EarlyWatch Alert for Solutions are restricted to the productsavailable in the SAP Solution Manager Root Cause Analysis scenario. You can find thecomponents for which SAP EarlyWatch Alert for Solutions is available in SAP Note 1040343 -EarlyWatch Alert (EWA) for Solutions.
Figure 56: The transaction SOLMAN_EWA_ADMIN
SAP EarlyWatch Alert for Solutions runs only in your SAP Solution Manager. The service isactivated automatically when you create a solution in SAP Solution Manager. You can changethe list of systems included in the report in the SAP EarlyWatch Administration area.
Lesson: Using SAP EarlyWatch Alert for Solutions
© Copyright. All rights reserved. 283
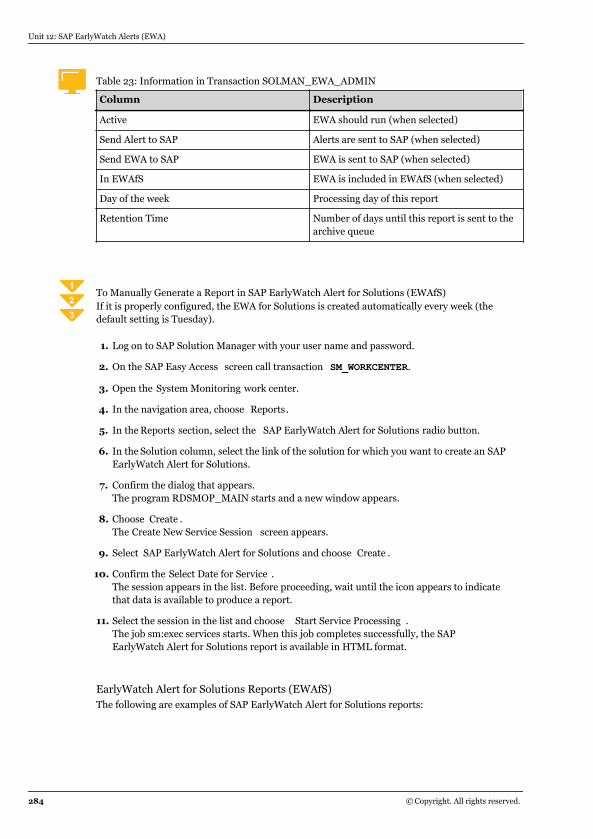
Table 23: Information in Transaction SOLMAN_EWA_ADMIN
Column Description
Active EWA should run (when selected)
Send Alert to SAP Alerts are sent to SAP (when selected)
Send EWA to SAP EWA is sent to SAP (when selected)
In EWAfS EWA is included in EWAfS (when selected)
Day of the week Processing day of this report
Retention Time Number of days until this report is sent to thearchive queue
To Manually Generate a Report in SAP EarlyWatch Alert for Solutions (EWAfS)If it is properly configured, the EWA for Solutions is created automatically every week (thedefault setting is Tuesday).
1. Log on to SAP Solution Manager with your user name and password.
2. On the SAP Easy Access screen call transaction SM_WORKCENTER.
3. Open the System Monitoring work center.
4. In the navigation area, choose Reports.
5. In the Reports section, select the SAP EarlyWatch Alert for Solutions radio button.
6. In the Solution column, select the link of the solution for which you want to create an SAPEarlyWatch Alert for Solutions.
7. Confirm the dialog that appears.The program RDSMOP_MAIN starts and a new window appears.
8. Choose Create .The Create New Service Session screen appears.
9. Select SAP EarlyWatch Alert for Solutions and choose Create .
10. Confirm the Select Date for Service .The session appears in the list. Before proceeding, wait until the icon appears to indicatethat data is available to produce a report.
11. Select the session in the list and choose Start Service Processing .The job sm:exec services starts. When this job completes successfully, the SAPEarlyWatch Alert for Solutions report is available in HTML format.
EarlyWatch Alert for Solutions Reports (EWAfS)The following are examples of SAP EarlyWatch Alert for Solutions reports:
Unit 12: SAP EarlyWatch Alerts (EWA)
284 © Copyright. All rights reserved.
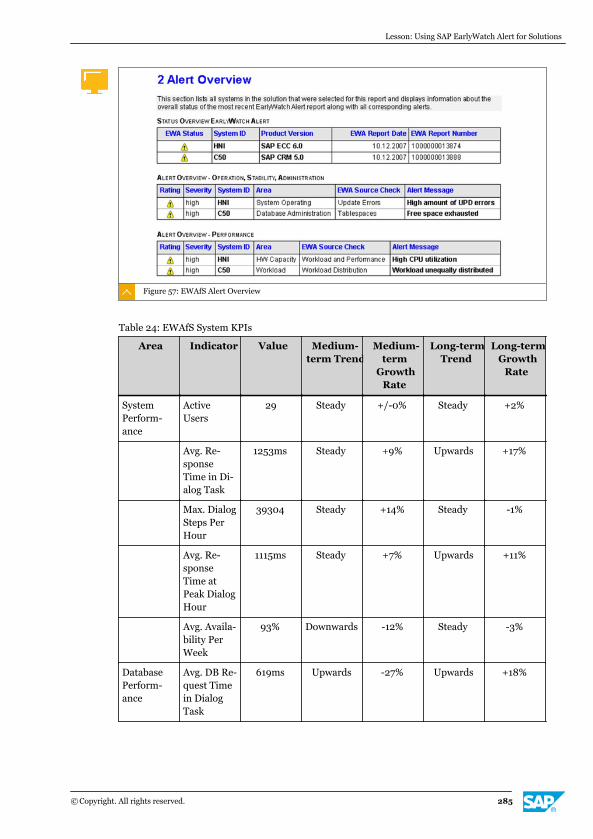
Figure 57: EWAfS Alert Overview
Table 24: EWAfS System KPIs
Area Indicator Value Medium-term Trend
Medium-term
GrowthRate
Long-termTrend
Long-termGrowth
Rate
SystemPerform-ance
ActiveUsers
29 Steady +/-0% Steady +2%
Avg. Re-sponseTime in Di-alog Task
1253ms Steady +9% Upwards +17%
Max. DialogSteps PerHour
39304 Steady +14% Steady -1%
Avg. Re-sponseTime atPeak DialogHour
1115ms Steady +7% Upwards +11%
Avg. Availa-bility PerWeek
93% Downwards -12% Steady -3%
DatabasePerform-ance
Avg. DB Re-quest Timein DialogTask
619ms Upwards -27% Upwards +18%
Lesson: Using SAP EarlyWatch Alert for Solutions
© Copyright. All rights reserved. 285
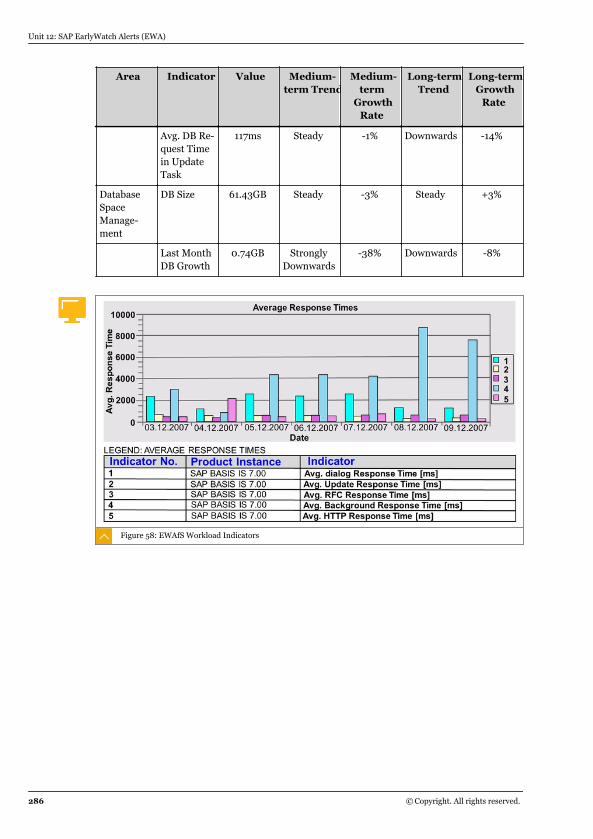
Area Indicator Value Medium-term Trend
Medium-term
GrowthRate
Long-termTrend
Long-termGrowth
Rate
Avg. DB Re-quest Timein UpdateTask
117ms Steady -1% Downwards -14%
DatabaseSpaceManage-ment
DB Size 61.43GB Steady -3% Steady +3%
Last MonthDB Growth
0.74GB StronglyDownwards
-38% Downwards -8%
Figure 58: EWAfS Workload Indicators
Unit 12: SAP EarlyWatch Alerts (EWA)
286 © Copyright. All rights reserved.
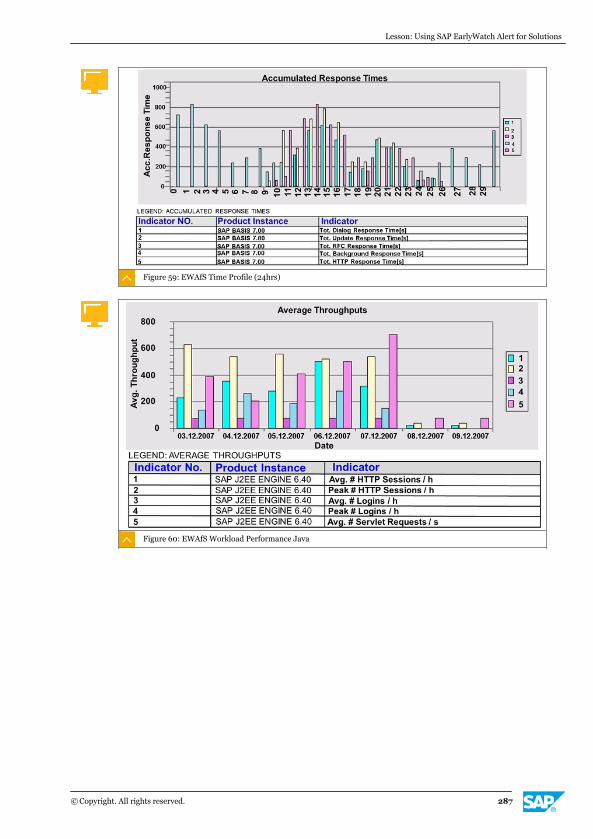
Figure 59: EWAfS Time Profile (24hrs)
Figure 60: EWAfS Workload Performance Java
Lesson: Using SAP EarlyWatch Alert for Solutions
© Copyright. All rights reserved. 287
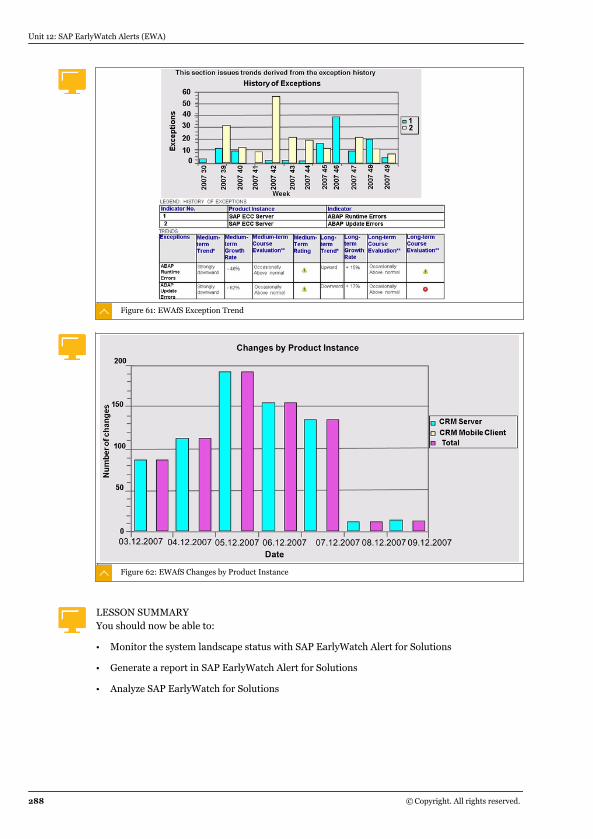
Figure 61: EWAfS Exception Trend
Figure 62: EWAfS Changes by Product Instance
LESSON SUMMARYYou should now be able to:
● Monitor the system landscape status with SAP EarlyWatch Alert for Solutions
● Generate a report in SAP EarlyWatch Alert for Solutions
● Analyze SAP EarlyWatch for Solutions
Unit 12: SAP EarlyWatch Alerts (EWA)
288 © Copyright. All rights reserved.

Unit 12
Learning Assessment
1. What actions does the Service Data Control Center perform after it is activated?
2. Which of the following KPIs are measured by an SAP EarlyWatch Alert for a Java system?
Choose the correct answers.
X A Solution performance
X B Java VM performance
X C Java application performance
X D Enterprise portal activity
3. The reporting capability of SAP EarlyWatch Alert for Solutions is limited to the productsavailable in the Root Cause Analysis scenario.
Determine whether this statement is true or false.
X True
X False
© Copyright. All rights reserved. 289
Unit 12
Learning Assessment - Answers
1. What actions does the Service Data Control Center perform after it is activated?
It performs the following actions: 1) Deschedules AUTO_SESSION_MANAGER, thebackground job for the old Service Data Control Center. 2) Checks whether customizingsettings exist.3) Fills in default customizing settings where none exist. 4) If necessary,creates the maintenance package task and RTCCTOOL.
2. Which of the following KPIs are measured by an SAP EarlyWatch Alert for a Java system?
Choose the correct answers.
X A Solution performance
X B Java VM performance
X C Java application performance
X D Enterprise portal activity
3. The reporting capability of SAP EarlyWatch Alert for Solutions is limited to the productsavailable in the Root Cause Analysis scenario.
Determine whether this statement is true or false.
X True
X False
290 © Copyright. All rights reserved.
UNIT 13 SAP Solution ManagerEngagement and ServiceDelivery
Lesson 1
Explaining Service Delivery and Engagement in SAP Solution Manager 292
Lesson 2
Creating Issues in SAP Solution Manager 296
Exercise 12: Manually Create an Issue 301
Lesson 3
Summarizing Task Management Within the SAP Engagement and Service Delivery Work Center 305
Lesson 4
Using Service Delivery Options in SAP Solution Manager 309
UNIT OBJECTIVES
● Describe the SAP Solution Manager engagement and service delivery process
● Create issues and top issues
● Describe how tasks are managed in SAP Solution Manager
● Access SAP-delivered services and self-services in SAP Solution Manager
© Copyright. All rights reserved. 291
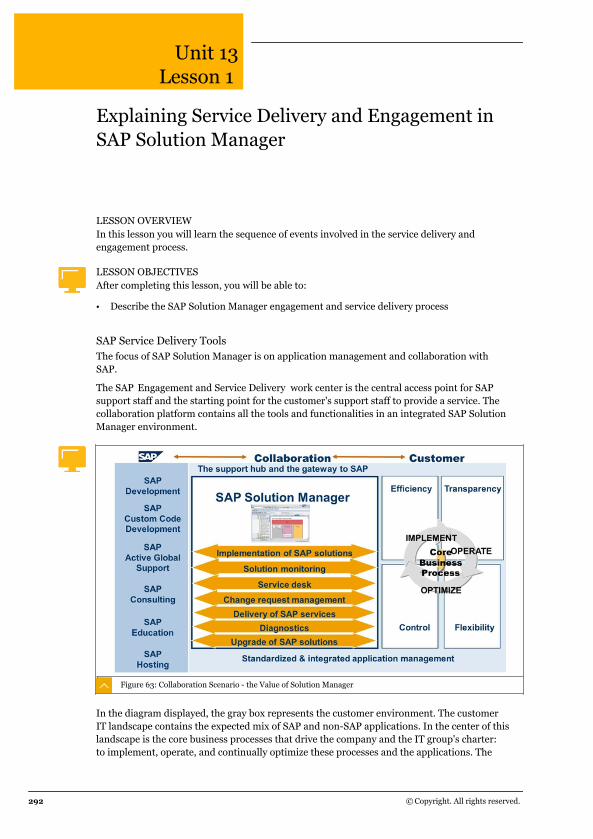
Unit 13Lesson 1
Explaining Service Delivery and Engagement inSAP Solution Manager
LESSON OVERVIEWIn this lesson you will learn the sequence of events involved in the service delivery andengagement process.
LESSON OBJECTIVESAfter completing this lesson, you will be able to:
● Describe the SAP Solution Manager engagement and service delivery process
SAP Service Delivery ToolsThe focus of SAP Solution Manager is on application management and collaboration withSAP.
The SAP Engagement and Service Delivery work center is the central access point for SAPsupport staff and the starting point for the customer's support staff to provide a service. Thecollaboration platform contains all the tools and functionalities in an integrated SAP SolutionManager environment.
Figure 63: Collaboration Scenario - the Value of Solution Manager
In the diagram displayed, the gray box represents the customer environment. The customerIT landscape contains the expected mix of SAP and non-SAP applications. In the center of thislandscape is the core business processes that drive the company and the IT group's charter:to implement, operate, and continually optimize these processes and the applications. The
292 © Copyright. All rights reserved.
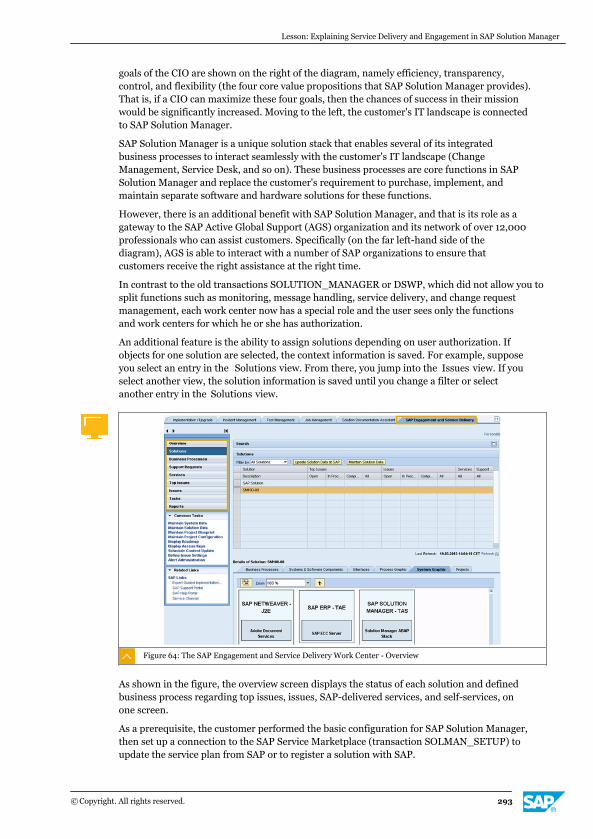
goals of the CIO are shown on the right of the diagram, namely efficiency, transparency,control, and flexibility (the four core value propositions that SAP Solution Manager provides).That is, if a CIO can maximize these four goals, then the chances of success in their missionwould be significantly increased. Moving to the left, the customer's IT landscape is connectedto SAP Solution Manager.
SAP Solution Manager is a unique solution stack that enables several of its integratedbusiness processes to interact seamlessly with the customer's IT landscape (ChangeManagement, Service Desk, and so on). These business processes are core functions in SAPSolution Manager and replace the customer's requirement to purchase, implement, andmaintain separate software and hardware solutions for these functions.
However, there is an additional benefit with SAP Solution Manager, and that is its role as agateway to the SAP Active Global Support (AGS) organization and its network of over 12,000professionals who can assist customers. Specifically (on the far left-hand side of thediagram), AGS is able to interact with a number of SAP organizations to ensure thatcustomers receive the right assistance at the right time.
In contrast to the old transactions SOLUTION_MANAGER or DSWP, which did not allow you tosplit functions such as monitoring, message handling, service delivery, and change requestmanagement, each work center now has a special role and the user sees only the functionsand work centers for which he or she has authorization.
An additional feature is the ability to assign solutions depending on user authorization. Ifobjects for one solution are selected, the context information is saved. For example, supposeyou select an entry in the Solutions view. From there, you jump into the Issues view. If youselect another view, the solution information is saved until you change a filter or selectanother entry in the Solutions view.
Figure 64: The SAP Engagement and Service Delivery Work Center - Overview
As shown in the figure, the overview screen displays the status of each solution and definedbusiness process regarding top issues, issues, SAP-delivered services, and self-services, onone screen.
As a prerequisite, the customer performed the basic configuration for SAP Solution Manager,then set up a connection to the SAP Service Marketplace (transaction SOLMAN_SETUP) toupdate the service plan from SAP or to register a solution with SAP.
Lesson: Explaining Service Delivery and Engagement in SAP Solution Manager
© Copyright. All rights reserved. 293
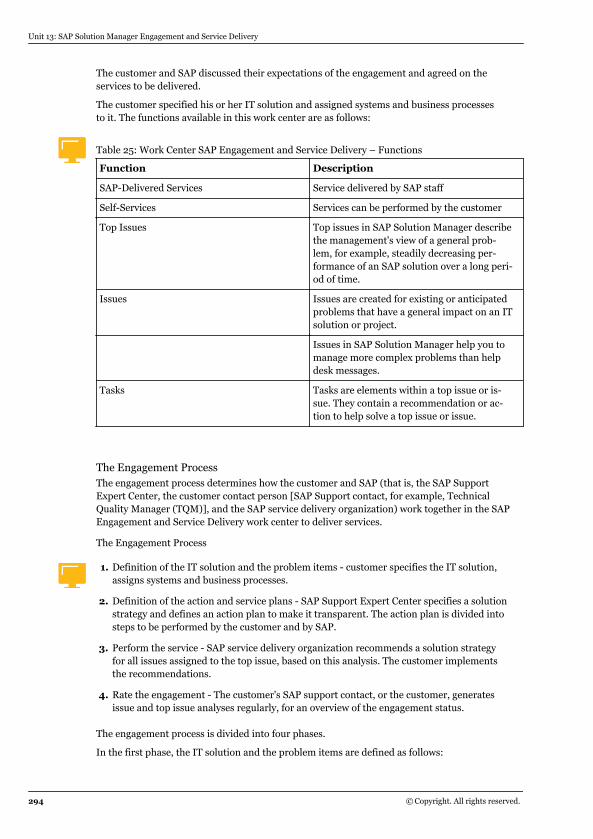
The customer and SAP discussed their expectations of the engagement and agreed on theservices to be delivered.
The customer specified his or her IT solution and assigned systems and business processesto it. The functions available in this work center are as follows:
Table 25: Work Center SAP Engagement and Service Delivery – Functions
Function Description
SAP-Delivered Services Service delivered by SAP staff
Self-Services Services can be performed by the customer
Top Issues Top issues in SAP Solution Manager describethe management's view of a general prob-lem, for example, steadily decreasing per-formance of an SAP solution over a long peri-od of time.
Issues Issues are created for existing or anticipatedproblems that have a general impact on an ITsolution or project.
Issues in SAP Solution Manager help you tomanage more complex problems than helpdesk messages.
Tasks Tasks are elements within a top issue or is-sue. They contain a recommendation or ac-tion to help solve a top issue or issue.
The Engagement ProcessThe engagement process determines how the customer and SAP (that is, the SAP SupportExpert Center, the customer contact person [SAP Support contact, for example, TechnicalQuality Manager (TQM)], and the SAP service delivery organization) work together in the SAPEngagement and Service Delivery work center to deliver services.
The Engagement Process
1. Definition of the IT solution and the problem items - customer specifies the IT solution,assigns systems and business processes.
2. Definition of the action and service plans - SAP Support Expert Center specifies a solutionstrategy and defines an action plan to make it transparent. The action plan is divided intosteps to be performed by the customer and by SAP.
3. Perform the service - SAP service delivery organization recommends a solution strategyfor all issues assigned to the top issue, based on this analysis. The customer implementsthe recommendations.
4. Rate the engagement - The customer's SAP support contact, or the customer, generatesissue and top issue analyses regularly, for an overview of the engagement status.
The engagement process is divided into four phases.
In the first phase, the IT solution and the problem items are defined as follows:
Unit 13: SAP Solution Manager Engagement and Service Delivery
294 © Copyright. All rights reserved.
1. At the beginning of the engagement the customer specifies his or her IT solution andassigns systems and business processes to it.
2. The customer informs SAP about problems before requesting support from SAP forserious problems. The customer creates top issues, in which the problems are describedin more details. The customer can specify the business processes and systems in whichthe problems occurred.
In the second phase, the action and service plans are defined as follows:
1. The SAP support expert specifies a solution strategy to resolve top issues and puts thissolution strategy into an action plan, to make it transparent for the customer and for SAP.This action plan is divided into steps to be performed by the customer and by SAP. Eachstep in the action plan is a task assigned to a top issue. Each of these top issue tasksshould have a processor and a performance data for the service assigned to it.
2. The SAP Support Expert Center specifies a service plan based on the action plan. Thisservice plan contains a service for each step in the action plan. The services in the serviceplan are performed later, at the time specified in the individual tasks.
3. The customer's SAP support contact goes through the action plan and the service planwith the customer.
4. The customer can adjust the action plan steps together with the SAP support contact.
5. The customer's SAP support contact can then adjust the service plan according to thecustomer's feedback.
In the next phase, the service is performed as follows:
1. To optimize the services to be delivered, SAP must know the scope of the problems in asmuch detail as possible. The customer creates issues for known problem areas. If otherproblems are identified later, this step and the following steps are repeated.
2. The customer's SAP support contact assigns the issues to the top issues and services.
3. To deliver a service, the SAP service delivery organization performs a technical analysis ofthe issues assigned to that service. This analysis provides more information aboutproblem areas, which allows the SAP service delivery organization to create further issuesor update existing issues. The SAP service delivery organization recommends a solutionstrategy for all issues assigned to the top issues, based on the analysis. The SAP servicedelivery organization creates each recommendation as an issue task.
4. The customer implements the recommendations. To show the progress of, and to rateissues, the processor updates issues and issue tasks (for example, their status).
5. To show the progress of, and to rate top issues, the customer's SAP support contactupdates top issues and top issue tasks.
In the final phase, the customer's SAP support contact, or the customer, generates issue andtop issue analyses regularly for an overview of the engagement status.
LESSON SUMMARYYou should now be able to:
● Describe the SAP Solution Manager engagement and service delivery process
Lesson: Explaining Service Delivery and Engagement in SAP Solution Manager
© Copyright. All rights reserved. 295
Unit 13Lesson 2
Creating Issues in SAP Solution Manager
LESSON OVERVIEWProblem monitoring, or issue management, is an interface between your support organizationand SAP support. In this lesson you will learn what issues are and how to create an issue.
LESSON OBJECTIVESAfter completing this lesson, you will be able to:
● Create issues and top issues
Issues and Top Issues in SAP Solution ManagerProblem monitoring (issue management) is an interface between your support organizationand SAP Support. SAP support staff can coordinate their cooperation with you using thisfunction, for example, by suggesting solutions for the problem. With this function, you canmonitor problems (issues and top issues) that were identified in a production businessprocess or solution. You can trace the entire life cycle of your problems (issues) and theirsolutions.
The components of issue management include the following:
Problem (issue)
An issue is a problem to which you must respond because it interrupts operationalprocessing, or because it may interrupt processing in the short or long term. Thisproblem type involves more than errors or interruptions that could be reported in aService Desk message.
Top problem (top issue)
A top problem is more serious than a normal problem or issue, or a set of relatedproblems. Top problems allow problems to be discussed, for example, at managementlevel.
An issue is an unplanned business or project situation that interrupts or affects operationalprocessing or project goals, or could do so in the short or long term. This problem type ismore than errors or interruptions that could be reported in a Service Desk message. Issuescan result from a delivered service, monitoring, or a ticket created in the Service Desk.
Possible Causes of Issues
● System administration: for example, hardware is inadequate for peak processing.
● Operational processing: for example, poor performance in some process steps.
● Operation or organization: for example, planning too little training for an implementationproject, or no clearly-defined responsibilities for monitoring systems and applications.
Issues are created for existing or anticipated problems that have a general impact on an ITsolution or project. Issues in SAP Solution Manager help you to manage more complex
296 © Copyright. All rights reserved.

problems than help desk messages. They allow you to document problems, organize howthese problems are handled, and analyze the problem-solving process. An example of anissue is the handling of a hardware capacity problem that was indicated by a weekly SAPEarlyWatch Alert report. Issues are a starting point, a tool, and a documentation medium forsolving complex problems in a comprehensive and traceable manner. Issues should describeproblems in detail from the time they are recorded to when they are resolved.
An issue can fully integrate the measures undertaken for analysis and problem solving, suchas Service Desk messages or change requests. SAP Solution Manager can record which SAPservices, tasks, and ordered consulting time (Expertise on Demand) were used by providingthe Service Desk messages and change requests created for the issue. Issues cannot beforwarded to SAP.
Top issues in SAP Solution Manager describe management's view of a general problem, forexample, steadily decreasing performance of an SAP solution over a long time. The issue cancontain a set of problems of a complex nature and the proposed solution for whichmanagement decisions are needed at a customer site. This is the type of problem that isviewed, at management level, as critical to the success of a project, business scenario, orbusiness process.
Top issues can also refer to an issue, or they can logically group issues. Issues can arise fromthe action plan (tasks) derived from a top issue. You can access the assigned issues thatbelong to a top issue from within that top issue. This ease of access helps ensure thatproblems can be tracked easily and comprehensively, which is one of the main goals of thework center. Top issues can be forwarded to SAP to facilitate communication between yourmanagement and management at SAP Active Global Support.
You structure issues and top issues in tasks. These tasks define each single step to solve theissue. They help you manage more complex problems and document each step, organize howthese problems are handled, and analyze the problem-solving process.
Table 26: What is Needed to Solve an Issue
Steps Solution Manager area
1. Understand the solution● System landscape
● Business processes
2. Knowing the customer issue Issue tracking
3. Service delivery Related service sessions
4. Expertise on Demand Request SAP expert
The following information is required to solve issues:
1. To solve an issue, it is necessary to understand the solution: the solution context, therelation of systems, and business processes.
2. Know the customer issue: Jointly analyze upcoming problems. Issues can result from adelivered service, monitoring, or a ticket created in the Service Desk. Issue Tracking is aninterface between the customer's support organization and SAP Support. SAP supportstaff can coordinate their cooperation with the customer using this function by, forexample, suggesting solutions for an issue. With this function, you can monitor issues andtop issues that were identified in a production business process or solution.
Lesson: Creating Issues in SAP Solution Manager
© Copyright. All rights reserved. 297
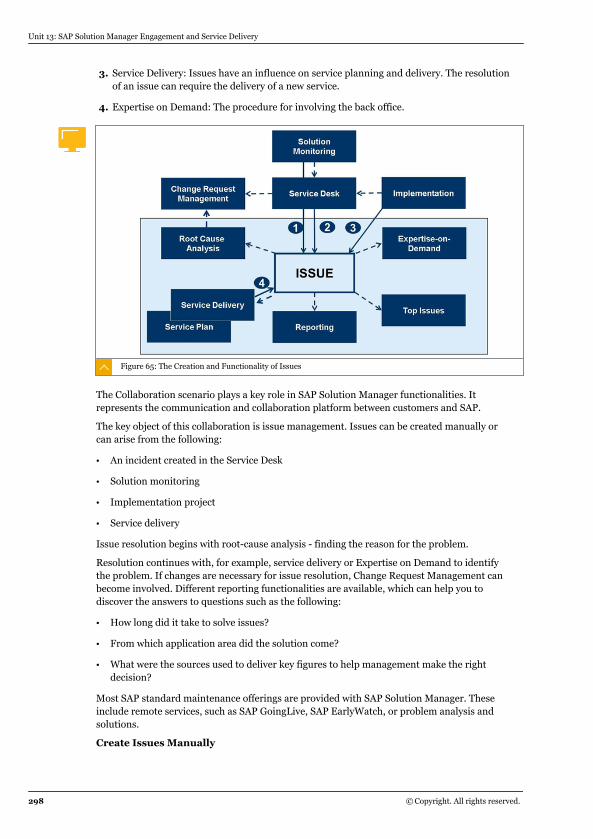
3. Service Delivery: Issues have an influence on service planning and delivery. The resolutionof an issue can require the delivery of a new service.
4. Expertise on Demand: The procedure for involving the back office.
Figure 65: The Creation and Functionality of Issues
The Collaboration scenario plays a key role in SAP Solution Manager functionalities. Itrepresents the communication and collaboration platform between customers and SAP.
The key object of this collaboration is issue management. Issues can be created manually orcan arise from the following:
● An incident created in the Service Desk
● Solution monitoring
● Implementation project
● Service delivery
Issue resolution begins with root-cause analysis - finding the reason for the problem.
Resolution continues with, for example, service delivery or Expertise on Demand to identifythe problem. If changes are necessary for issue resolution, Change Request Management canbecome involved. Different reporting functionalities are available, which can help you todiscover the answers to questions such as the following:
● How long did it take to solve issues?
● From which application area did the solution come?
● What were the sources used to deliver key figures to help management make the rightdecision?
Most SAP standard maintenance offerings are provided with SAP Solution Manager. Theseinclude remote services, such as SAP GoingLive, SAP EarlyWatch, or problem analysis andsolutions.
Create Issues Manually
Unit 13: SAP Solution Manager Engagement and Service Delivery
298 © Copyright. All rights reserved.
There are many ways to create an issue:
● In certain service sessions performed in the Service Session Workbench
● In the SAP Engagement and Service Delivery work center
● With transaction SOLMAN_ISSUE_MGMT
● In projects (transactions SOLAR01, SOLAR02)
● While performing a Central System Administation (CSA) task
That means issues can be created during Service Delivery, out of operations, and out ofprojects. Issues can belong to a certain solution or can be solution-independent. An issue hasto be prioritized, and you enter the date by which it must be resolved and a short text as adescription of the issue. You can assign the area to which the issue is related via the subject,and choose a status. On different tabs, it is possible to maintain a detailed issue description,attach documents, and maintain the context, and assign tasks, support messages, Expertiseon Demand (EoD), Change Requests, and processors.
Table 27: Example of Issues and Top Issues Using Tasks
Task Step Description Processor
Issue: Risks due to big size of Info-Cube ZICMICCOM
Quality Manager
1. Reconsider necessity of cubeZICMICCOM
Business Process Operations
2. Consider usage of logical par-titioning for cube ZICMIC-COM
Custom Development
3. Refine design of cube ZIC-MICCOM
Custom Development
4. Perform root cause analysis Technical Operation
When creating an issue, you can define tasks and assign a processor for each task, includingthe result you expect from this task. When the task is processed, the result will be statedthere too.
You can enter the following information:
● Detailed description
● Validity date
● The specific results achieved in processing
● Processor and processing log
By selecting a specific issue, you can display planned tasks or recommendations for resolvingthe issue. The ID, short text, priority, due date, and status are displayed for each task.
You can navigate directly to the task details through a hyperlink.
Issue Management – Inform Processor
Typically, the processor is informed by e-mail.
Lesson: Creating Issues in SAP Solution Manager
© Copyright. All rights reserved. 299
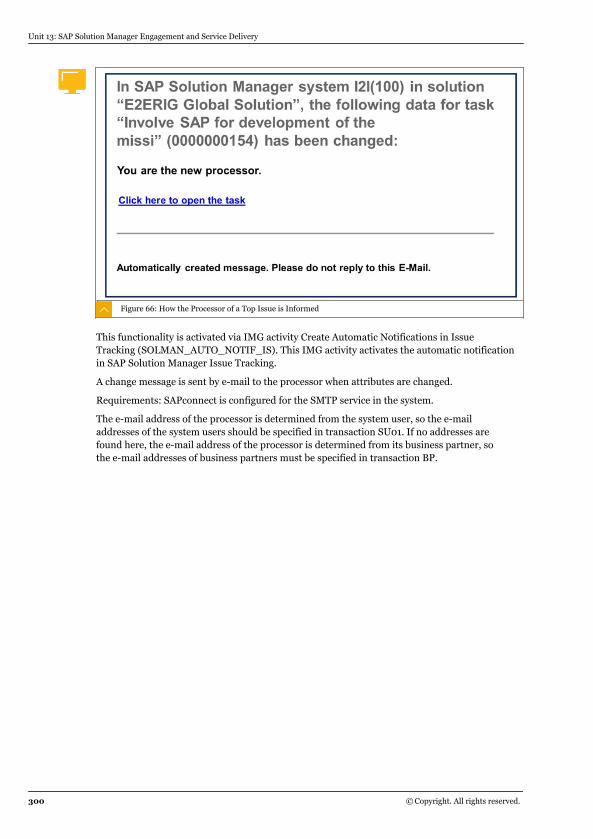
Figure 66: How the Processor of a Top Issue is Informed
This functionality is activated via IMG activity Create Automatic Notifications in IssueTracking (SOLMAN_AUTO_NOTIF_IS). This IMG activity activates the automatic notificationin SAP Solution Manager Issue Tracking.
A change message is sent by e-mail to the processor when attributes are changed.
Requirements: SAPconnect is configured for the SMTP service in the system.
The e-mail address of the processor is determined from the system user, so the e-mailaddresses of the system users should be specified in transaction SU01. If no addresses arefound here, the e-mail address of the processor is determined from its business partner, sothe e-mail addresses of business partners must be specified in transaction BP.
Unit 13: SAP Solution Manager Engagement and Service Delivery
300 © Copyright. All rights reserved.
Unit 13Exercise 12
Manually Create an Issue
Business Example
You experience significant performance problems in the BW System and decide to create anissue to resolve them.
1. Use the information in the following table to create an issue in the SAP Engagement andService Delivery work center and assign a task to the issue.
Field Value
Priority High
Due on One week from current date
Short Text Risk due to large size of InfoCube ZICMIC-COM
Subject Functional Realization
Status In Process
2. Add a context to your issue using the following information:
Field Value
Solution <CourseID> -<GroupNumber>
System/Software Component The relevant SAP ERP system
Processed by Customer Business Process Operations
© Copyright. All rights reserved. 301
Unit 13Solution 12
Manually Create an Issue
Business Example
You experience significant performance problems in the BW System and decide to create anissue to resolve them.
1. Use the information in the following table to create an issue in the SAP Engagement andService Delivery work center and assign a task to the issue.
Field Value
Priority High
Due on One week from current date
Short Text Risk due to large size of InfoCube ZICMIC-COM
Subject Functional Realization
Status In Process
a) Log on to the SAP Solution Manager with <CourseID>-<GroupNumber> and<password>.
b) On the SAP Easy Access screen, call transaction SM_WORKCENTER.
c) Choose the SAP Engagement and Service Delivery tab.
d) In the left-hand menu, choose Issues .
e) In the SAP Engagement and Service Delivery tab, choose Create .
f) Update the Issue Details dialog box with the information in the table and choose Save .
You can also add further details and documents related to this issue on the Descriptiontab.
2. Add a context to your issue using the following information:
Field Value
Solution <CourseID> -<GroupNumber>
System/Software Component The relevant SAP ERP system
Processed by Customer Business Process Operations
a) Choose the Context tab.
b) Update the Solution and System/Software Component fields with the information inthe table.
302 © Copyright. All rights reserved.
c) Choose the Processing Information tab (you may need to scroll through the tabs to findthis tab).
d) Choose Input Helpfor the Processed by field.
e) In the Issue Details dialog box, choose Start Search .
f) In the Partner table, select Customer Business Process Operations .The Issue screen appears with the Processor field filled in.
g) Choose Save and Back .Your issue appears in the list of issues in process.
Lesson: Creating Issues in SAP Solution Manager
© Copyright. All rights reserved. 303
LESSON SUMMARYYou should now be able to:
● Create issues and top issues
Unit 13: SAP Solution Manager Engagement and Service Delivery
304 © Copyright. All rights reserved.
Unit 13Lesson 3
Summarizing Task Management Within theSAP Engagement and Service Delivery WorkCenter
LESSON OVERVIEWTasks are operations to be performed by a specific person, to certain specifications andcompletion criteria, at specified times. In this lesson you will learn how tasks are managed inSAP Solution Manager.
LESSON OBJECTIVESAfter completing this lesson, you will be able to:
● Describe how tasks are managed in SAP Solution Manager
Task Management in SAP Solution ManagerTasks are operations to be performed by a specific person, to certain specifications andcompletion criteria, at specified times.
You use Task Management to handle tasks in these applications from a single point of accessto save time and avoid unnecessary maintenance across applications. You can create newtasks in their applications, or you can create application-independent, ad hoc tasks in TaskManagement.
Table 28: Scenarios Using Task Management
Task type Source (Work Center)
My issue and top issue management tasks SAP Engagement and Service Delivery → Is-sue / Top Issue
Recurring, preconfigured tasks System Administration → Setup CSA
My downtime management tasks System Landscape Management → Down-time Management
My scheduling management tasks Change Management → Change Request orJob Management → Job Documentation
My ad hoc, non-preconfigured tasks System Administration → Task Manage-ment → Create
The applications in SAP Solution Manager that use tasks are:
● Central System Administration (CSA): (Mostly) periodically recurrent tasks withpreconfigured content to support commonly performed system administrator tasks
© Copyright. All rights reserved. 305
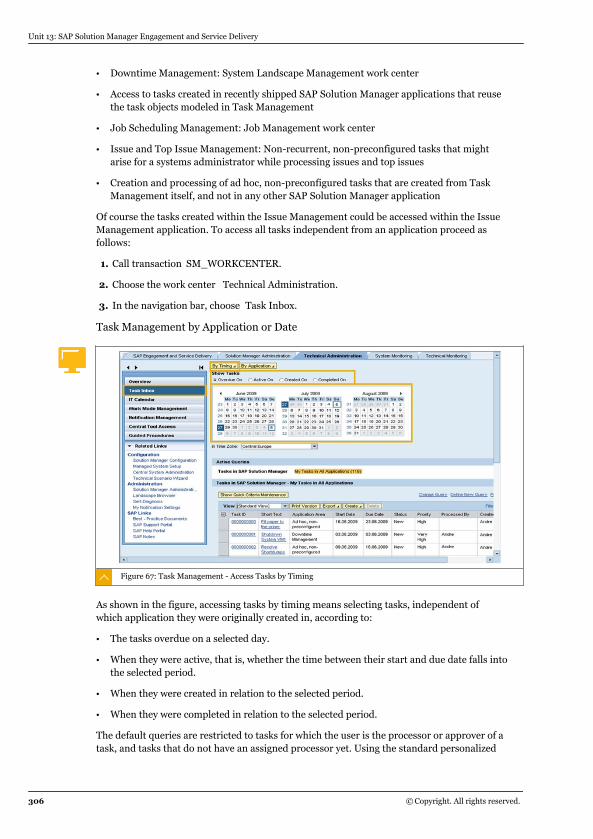
● Downtime Management: System Landscape Management work center
● Access to tasks created in recently shipped SAP Solution Manager applications that reusethe task objects modeled in Task Management
● Job Scheduling Management: Job Management work center
● Issue and Top Issue Management: Non-recurrent, non-preconfigured tasks that mightarise for a systems administrator while processing issues and top issues
● Creation and processing of ad hoc, non-preconfigured tasks that are created from TaskManagement itself, and not in any other SAP Solution Manager application
Of course the tasks created within the Issue Management could be accessed within the IssueManagement application. To access all tasks independent from an application proceed asfollows:
1. Call transaction SM_WORKCENTER.
2. Choose the work center Technical Administration.
3. In the navigation bar, choose Task Inbox.
Task Management by Application or Date
Figure 67: Task Management - Access Tasks by Timing
As shown in the figure, accessing tasks by timing means selecting tasks, independent ofwhich application they were originally created in, according to:
● The tasks overdue on a selected day.
● When they were active, that is, whether the time between their start and due date falls intothe selected period.
● When they were created in relation to the selected period.
● When they were completed in relation to the selected period.
The default queries are restricted to tasks for which the user is the processor or approver of atask, and tasks that do not have an assigned processor yet. Using the standard personalized
Unit 13: SAP Solution Manager Engagement and Service Delivery
306 © Copyright. All rights reserved.
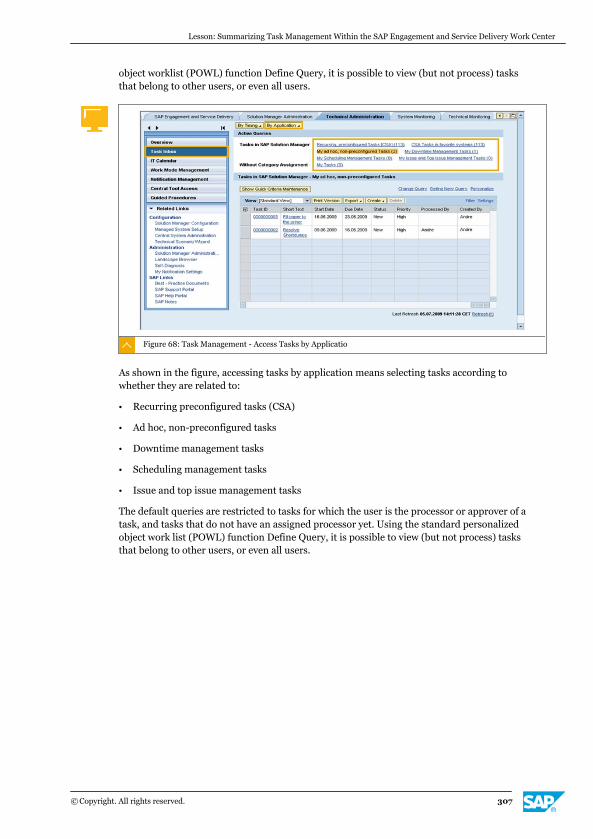
object worklist (POWL) function Define Query, it is possible to view (but not process) tasksthat belong to other users, or even all users.
Figure 68: Task Management - Access Tasks by Applicatio
As shown in the figure, accessing tasks by application means selecting tasks according towhether they are related to:
● Recurring preconfigured tasks (CSA)
● Ad hoc, non-preconfigured tasks
● Downtime management tasks
● Scheduling management tasks
● Issue and top issue management tasks
The default queries are restricted to tasks for which the user is the processor or approver of atask, and tasks that do not have an assigned processor yet. Using the standard personalizedobject work list (POWL) function Define Query, it is possible to view (but not process) tasksthat belong to other users, or even all users.
Lesson: Summarizing Task Management Within the SAP Engagement and Service Delivery Work Center
© Copyright. All rights reserved. 307
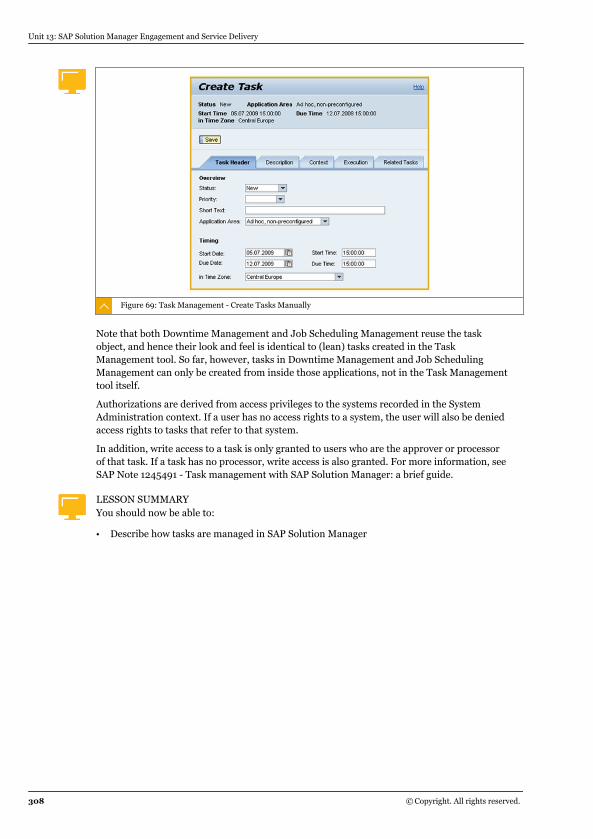
Figure 69: Task Management - Create Tasks Manually
Note that both Downtime Management and Job Scheduling Management reuse the taskobject, and hence their look and feel is identical to (lean) tasks created in the TaskManagement tool. So far, however, tasks in Downtime Management and Job SchedulingManagement can only be created from inside those applications, not in the Task Managementtool itself.
Authorizations are derived from access privileges to the systems recorded in the SystemAdministration context. If a user has no access rights to a system, the user will also be deniedaccess rights to tasks that refer to that system.
In addition, write access to a task is only granted to users who are the approver or processorof that task. If a task has no processor, write access is also granted. For more information, seeSAP Note 1245491 - Task management with SAP Solution Manager: a brief guide.
LESSON SUMMARYYou should now be able to:
● Describe how tasks are managed in SAP Solution Manager
Unit 13: SAP Solution Manager Engagement and Service Delivery
308 © Copyright. All rights reserved.
Unit 13Lesson 4
Using Service Delivery Options in SAP SolutionManager
LESSON OVERVIEWIn this lesson you will learn how to access SAP-delivered services and how to create a self-service.
LESSON OBJECTIVESAfter completing this lesson, you will be able to:
● Access SAP-delivered services and self-services in SAP Solution Manager
Service Delivery and Self-Service in SAP Solution ManagerThe SAP Engagement and Service Delivery work center contains SAP-delivered services andself-services. SAP-delivered services are delivered by SAP staff and self-services can beperformed by the customer, but they are all described as services in SAP Solution Manager.
You access SAP-delivered services and self-services in the Solution Manager Engagement andService Delivery work center, using the Services option in the navigation area.
SAP Services allows analysis of the current situation of customer systems and providesrecommendations and actions to improve performance or applications. Services help to solveissues or can be the result of other services. For example, a severe problem might beidentified that necessitates a special service, such as SQL optimization.
SAP-delivered services cover the entire software life cycle, from implementation tooperations, optimization, and upgrading. Most SAP services can be executed as self-services.
See the list of available services at the SAP Service Marketplace: http://service.sap.com/supportservices
SAP Active Global Support provides services that support the implementation and use of yourSAP software solutions. The services are delivered in your Solution Manager system. SAPmanages the service plan, which contains the services planned that are and provided for thesolution. SAP Active Global Support can only offer you services for components in yoursolution of which it is aware. If, for example, a system was recently included in your solution,SAP can only provide services for this system if you have informed SAP of its existence.
Before you can access services through the SAP Engagement and Service Delivery workcenter, do the following:
Service Delivery Procedures and Options
1. Define the service landscape within transaction LMDB.
2. Create a solution in the Solution Manager Administration work center Solutions view.
© Copyright. All rights reserved. 309
3. Update solution master data at SAP so that SAP Active Global Support know whichsolutions are in your system landscape. The more information stored in the SolutionManager the easier it is to find the right solution for a problem. You can transfer thelandscape and solution information in one of two ways:
● Manually: in the SAP Engagement and Service Delivery work center, in the Solutionsview, choose Update Solution Master Data at SAP .
● Automatically: using the scheduled job SM:SEND_SOLUTIONS_TO_SAP and theprogram RDSMOPCOLLECTSOLUTIONDATA. This job is scheduled duringSOLMAN_SETUP. This update is supported by Update Solution Data at SAP . For moreinformation, see SAP Note 942403 - Transfer of Solution Master Data to SAP fromSolution Manager.
4. Obtain the service plan from SAP, either manually or automatically.
● Manually: in the SAP Engagement and Service Delivery work center, in the Servicesview, choose Get Current Service Plan from SAP .
● Automatically: the transaction SOLMAN_SETUP schedules the job SM:SYNC SAPSESSIONS daily to receive the service plan. The program name isRDSWPCISERVICEPLAN.
5. Choose a service in the Services view of the SAP Engagement and Service Delivery workcenter.
6. Request a service.
The SAP Services portfolio represents all SAP service capabilities and has the specific goal ofpresenting one face to our customers.
The SAP Services portfolio is coordinated through Services Solution Management and wasdeveloped jointly by all SAP lines of service. The new portfolio is shown as a matrix that isorganized along solution lifecycle phases and engagement levels in a customer project. Theportfolio organizes all services with a similar focus into logical groupings called servicecategories. The SAP Services portfolio can be used as a template to create different views,with either external or internal focus.
The Customer Service view, shown here, displays the SAP Services portfolio, which includesall SAP services.
When using the Customer Service view, filter the view for a specific solution.
Unit 13: SAP Solution Manager Engagement and Service Delivery
310 © Copyright. All rights reserved.
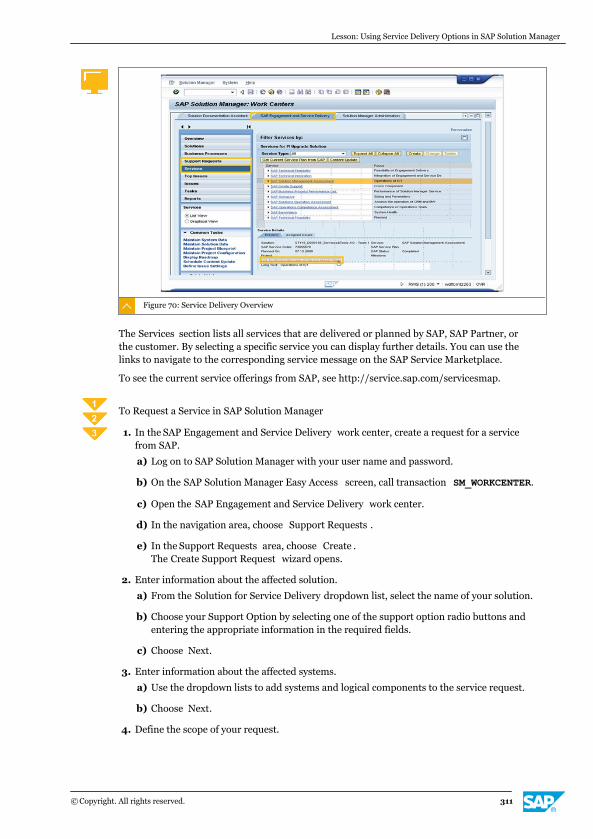
Figure 70: Service Delivery Overview
The Services section lists all services that are delivered or planned by SAP, SAP Partner, orthe customer. By selecting a specific service you can display further details. You can use thelinks to navigate to the corresponding service message on the SAP Service Marketplace.
To see the current service offerings from SAP, see http://service.sap.com/servicesmap.
To Request a Service in SAP Solution Manager
1. In the SAP Engagement and Service Delivery work center, create a request for a servicefrom SAP.
a) Log on to SAP Solution Manager with your user name and password.
b) On the SAP Solution Manager Easy Access screen, call transaction SM_WORKCENTER.
c) Open the SAP Engagement and Service Delivery work center.
d) In the navigation area, choose Support Requests .
e) In the Support Requests area, choose Create .The Create Support Request wizard opens.
2. Enter information about the affected solution.
a) From the Solution for Service Delivery dropdown list, select the name of your solution.
b) Choose your Support Option by selecting one of the support option radio buttons andentering the appropriate information in the required fields.
c) Choose Next.
3. Enter information about the affected systems.
a) Use the dropdown lists to add systems and logical components to the service request.
b) Choose Next.
4. Define the scope of your request.
Lesson: Using Service Delivery Options in SAP Solution Manager
© Copyright. All rights reserved. 311
a) Enter the required information into the relevant fields.
b) Using the help documentation, write a meaningful description of your problem, thesteps you have taken to resolve it, and the desired service day.
c) On the Contact Persons tab, include the details of everyone to be informed about theservice.
The creator's details display automatically.
a) Choose Next.
5. If applicable, add information about the affected business processes.
6. If applicable, add extra documentation or other attachments.
7. Review your service request.
You can choose to save a draft and/or print the service request for your records. Whenyou save the service request it displays in the list after a refresh.
a) Select your support request and choose Send to SAP .
b) Confirm the Data Changing Confirmation dialog.
c) Choose Send to SAP .
After service delivery is complete, a final report is included in the SAP Service Message. Theservice contact person can then give feedback on the service.
To Create a Self-Service in SAP Solution ManagerYou can use a self-service to optimize your solutions or to solve problems.
In theory all services can be executed as self-services, although some, such as SAP GoingLiveCheck - Optimization, require certification and an access code.
1. In the Solution Manager SAP Engagement and Service Deliver y work center, create a self-service.
a) In the navigation area, choose Services .
b) In the Services area, choose Create .The Create a Self-Service wizard opens.
2. Define the self-service.
a) In the list of available services, choose the service you want to use.
b) If necessary, download new session content.
c) Choose the solution where you want to perform the self-service.
d) Enter the date when you want to perform the self-service.
e) Assign a contact person or contact persons to the self-service.
f) Review the details of your self-service and choose Finish.The Guided Self-Service session opens.
g) Choose Refresh and your self-service displays in the Service list.
3. If applicable, in the Service Sessions Details view, configure options in the following tabs:
Unit 13: SAP Solution Manager Engagement and Service Delivery
312 © Copyright. All rights reserved.
Options Description
Focus/Notes Enter a long, meaningful text with your own information.
Context If you have linked the solution to projects, assign them here.
Issues If you have linked the solution to issues, assign them here orcreate them directly in the session.
Documents & SDCCNData
If you have created a report, you can view it here. You canupload or delete documents from your PC.
ProcessingInformation
Assign a processor.
4. Proceed with the self-service.
a) Click the self-service name in the detail area.The Session Workbench displays in a new window.
b) Perform the self-service using the help documentation for guidance. The checklistscan be complex and require special knowledge. Most of the checklists are highlyautomated if you provide the session with the necessary SDCC data.
After the session has been processed you can create and save the service as a Worddocument or view and save it as a HTML document.
LESSON SUMMARYYou should now be able to:
● Access SAP-delivered services and self-services in SAP Solution Manager
Lesson: Using Service Delivery Options in SAP Solution Manager
© Copyright. All rights reserved. 313

Unit 13: SAP Solution Manager Engagement and Service Delivery
314 © Copyright. All rights reserved.
Unit 13
Learning Assessment
1. What are four phases of the engagement process?
Arrange these steps into the correct sequence.
0 Rate the engagement
0 Perform the service
0 Definition of the IT solution and the problem issues
0 Definition of the action and service plans
© Copyright. All rights reserved. 315

Unit 13
Learning Assessment - Answers
1. What are four phases of the engagement process?
Arrange these steps into the correct sequence.
4 Rate the engagement
3 Perform the service
1 Definition of the IT solution and the problem issues
2 Definition of the action and service plans
That's correct.
316 © Copyright. All rights reserved.
UNIT 14 Change Management in SAPSolution Manager
Lesson 1
Controlling Maintenance Activities with Maintenance Optimizer (MOpz) 318
Lesson 2
Managing Licenses and Maintenance Certificates 329
Lesson 3
Managing SAP Notes with System Recommendations in SAP Solution Manager 335
UNIT OBJECTIVES
● Perform prerequisite checks for using MOpz
● Process maintenance transactions in SAP Solution Manager
● Check the distribution and status of SAP licenses and maintenance certificates
● Configure System Recommendations
© Copyright. All rights reserved. 317
Unit 14Lesson 1
Controlling Maintenance Activities withMaintenance Optimizer (MOpz)
LESSON OVERVIEWThe maintenance optimizer leads you through the planning, download, and implementation ofsupport package stacks, which contain a set of support packages for your systems. Thislesson describes the configuration steps for using the maintenance optimizer and how towork within the maintenance process.
LESSON OBJECTIVESAfter completing this lesson, you will be able to:
● Perform prerequisite checks for using MOpz
● Process maintenance transactions in SAP Solution Manager
MOpz in the System LandscapeThe customer has a complex system landscape with different systems, software products,versions, and components installed. SAP offers different support packages, stacks, andenhancement packages for maintenance. Maintenance Optimizer (MOpz) guides you throughthe procedure for planning and downloading these SAP support packages and patches foryour systems.
Figure 71: Why MOpz?
318 © Copyright. All rights reserved.
As shown in the diagram, MOpz in SAP Solution Manager is the central point of access for allmaintenance activities. It powerfully supports the installation of updates and upgrades andcompletely manages the maintenance activities for your whole solution, centrally accessiblefrom inside SAP Solution Manager.
MOpz controls the maintenance activities for your entire SAP solution and supports softwaremaintenance for all SAP product releases. MOpz automatically calculates all the files requiredfor maintenance operations, confirms the file selection, and adds them automatically to thedownload basket of the registered S-user.
MOpz calculates the required files for the following:
● Installation of support packages
● Installation of support package stacks
● Installation of SAP ERP HCM legal change packages
● Installation of enhancement packages
● Upgrade of SAP solutions
MOpz offers you the following benefits:
● A seamless software maintenance procedure, increasing transparency and traceability ofsoftware changes
● Automatic delta calculation of all relevant maintenance files
● Automatic support and inclusion in maintenance for installed add-ons on the system (as ofSAP NetWeaver 7.02 +7.3)
● Detection and addition of existing Java patches for Java systems
● Detection of landscape dependencies, and calculation of necessary updates for connectedsystems
● Integration of application logs and traces
● Generation of system-dependent XML stack files for maintenance
Prerequisites for using MOpzAll SAP systems that are part of the SAP Solution Manager system landscape are registered.With MOpz as a functional part of SAP Solution Manager, this information can then beprocessed.
Basic Prerequisites for MOpz
1. Perform SAP Solution Manager system preparation and basic configuration in transactionSOLMAN_SETUP.
2. Perform managed system configuration of the satellite systems (product version andlandscape pattern) in transaction SOLMAN_SETUP.
3. Define S-users to be able to use the SAP Support Portal function at http://service.sap.com/user-admin
4. Assign this S-user to your system user in transaction AISUSER.
5. Install the Download Manager locally in your workplace from http://service.sap.com/download-basket
Lesson: Controlling Maintenance Activities with Maintenance Optimizer (MOpz)
© Copyright. All rights reserved. 319
To perform a maintenance transaction, which then selects the required support packages, thefollowing steps are required:
1. To use the baseline scenario of SAP Solution Manager (which includes MOpz), thefollowing configuration scenarios must succeed:
● System preparation makes settings that are required for the configuration of SAPSolution Manager.
● In basic configuration, all required steps to use the baseline scenario on SAP SolutionManager are performed.
2. In the configuration of managed systems you connect managed systems with SAPSolution Manager. Run this scenario for each managed system separately. In thisconfiguration scenario you define, among other things, the product version of the systemto be managed. You also specify the landscape pattern, and whether a technical system isclosely associated with one product system (a sidecar) or multiple product systems (ahub). Thus, MOpz recognizes the system dependencies and the necessary maintenancetransactions.
3. For an SAP Solution Manager system user to perform a maintenance transaction he orshe must have an S-user in the SAP Support Portal. This S-user must have the followingadditional authorization objects:
● Activity: Execute Maintenance Optimizer
● Authorization: SWCATALOG - order software in the software catalog
S-users are managed in the SAP Support Portal at http://service.sap.com/user-admin
4. The transaction AISUSER is used to connect the S-user with the system user in SAPSolution Manager.
5. The selected transport packages can be stored in the download basket of the S-user. Youinstall this download basket locally. For details, see SAP Note 330793 - Download patches.The download basket can be downloaded and configured at http://service.sap.com/download-basket → Get Download Basket . Read the installation instructions carefully. Thesupport packages will be automatically approved during the maintenance transaction sothey can be downloaded with the Download Manager from the SAP Service Marketplace.Optionally they can be downloaded via the Software Lifecycle Manager (SLM)functionality.
For more details about MOpz, see http://service.sap.com/mopz
Maintenance Transactions in SAP Solution ManagerBefore you create your maintenance transaction, do the following so that MOpz can identifythe product system uniquely (use transaction LMDB):
Prerequisites for Automatic Calculation of Maintenance Files
1. Assign active product versions to the product system to be maintained in the systemlandscape.
2. Specify the required product instances for each product system to be maintained on theProduct Instance Selection tab in the LMDB.
Unit 14: Change Management in SAP Solution Manager
320 © Copyright. All rights reserved.
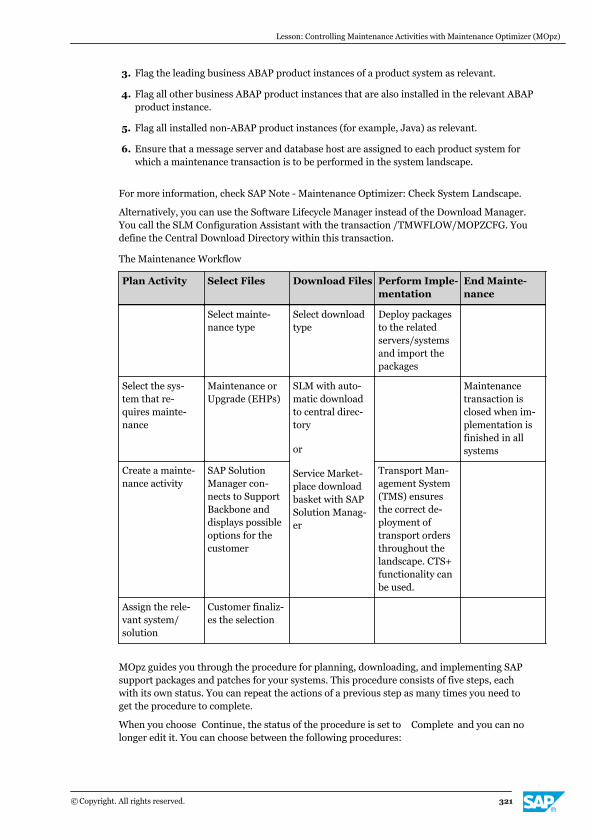
3. Flag the leading business ABAP product instances of a product system as relevant.
4. Flag all other business ABAP product instances that are also installed in the relevant ABAPproduct instance.
5. Flag all installed non-ABAP product instances (for example, Java) as relevant.
6. Ensure that a message server and database host are assigned to each product system forwhich a maintenance transaction is to be performed in the system landscape.
For more information, check SAP Note - Maintenance Optimizer: Check System Landscape.
Alternatively, you can use the Software Lifecycle Manager instead of the Download Manager.You call the SLM Configuration Assistant with the transaction /TMWFLOW/MOPZCFG. Youdefine the Central Download Directory within this transaction.
The Maintenance Workflow
Plan Activity Select Files Download Files Perform Imple-mentation
End Mainte-nance
Select mainte-nance type
Select downloadtype
Deploy packagesto the relatedservers/systemsand import thepackages
Select the sys-tem that re-quires mainte-nance
Maintenance orUpgrade (EHPs)
SLM with auto-matic downloadto central direc-tory
or
Service Market-place downloadbasket with SAPSolution Manag-er
Maintenancetransaction isclosed when im-plementation isfinished in allsystems
Create a mainte-nance activity
SAP SolutionManager con-nects to SupportBackbone anddisplays possibleoptions for thecustomer
Transport Man-agement System(TMS) ensuresthe correct de-ployment oftransport ordersthroughout thelandscape. CTS+functionality canbe used.
Assign the rele-vant system/solution
Customer finaliz-es the selection
MOpz guides you through the procedure for planning, downloading, and implementing SAPsupport packages and patches for your systems. This procedure consists of five steps, eachwith its own status. You can repeat the actions of a previous step as many times you need toget the procedure to complete.
When you choose Continue, the status of the procedure is set to Complete and you can nolonger edit it. You can choose between the following procedures:
Lesson: Controlling Maintenance Activities with Maintenance Optimizer (MOpz)
© Copyright. All rights reserved. 321
● Download files using the Download Basket.
● Download automatically using SLM, which is an integrated part of MOpz.
MOpz offers you a guided procedure for each of these options. These procedures guide youthrough planning and implementing maintenance. It compiles all the necessary information ina procedure, including the users involved, the product to be maintained, the affected systems,and the assigned SAP support packages.
If you manually select the product maintenance files, MOpz guides you directly to thecorresponding download area of the SAP Software Distribution Center for the product youwant to maintain.
If you automatically calculate Product Maintenance files, MOpz determines the file formaintaining your system landscape. It confirms and approves the items in the DownloadBasket of the SAP Software Distribution Center. It gives an overview of all open andcompleted product maintenance processes.
MOpz contains a report function so you can search for and display all product maintenanceprocesses in your SAP Solution Manager. If you automatically downloaded the productmaintenance files, the files are stored in the background in a central directory. You are notrequired to approve the download.
To retain an overview of all product maintenance transactions in your SAP Solution Managersystem, you can specify detailed queries, such as displaying product maintenancetransactions by specified criteria. For example:
● Maintenance transactions which are completed, or were canceled
● Maintenance transactions that belong to various solutions
● Maintenance transactions created by specified S-user
You can go directly from the overview to a step in an open product maintenance transactionin MOpz.
To Create Maintenance Transactions in SAP Solution ManagerTo use the Change Management function in SAP Solution Manager, you need a system userwith the SAP composite role SAP_MAINT_ADMIN_COMP. This user allows the system user toaccess the work center, start a maintenance transaction, and begin work.
Each step of the procedure displays the following information:
● The Systems tab displays the target constellation for your systems.
● The Log tab displays accumulated warnings and errors.
● The Stack Files tab allows you to download the generated XML files mnaually to update themanaged system.
● The Documentation tab displays general information about enhancement packages forMOpz.
1. In the SAP Solution Manager Change Management work center, start a new maintenancetransaction.
a) Log on to SAP Solution Manager with your user name and password.
b) On the SAP Solution Manager Easy Access screen, call transaction SM_WORKCENTER.
Unit 14: Change Management in SAP Solution Manager
322 © Copyright. All rights reserved.
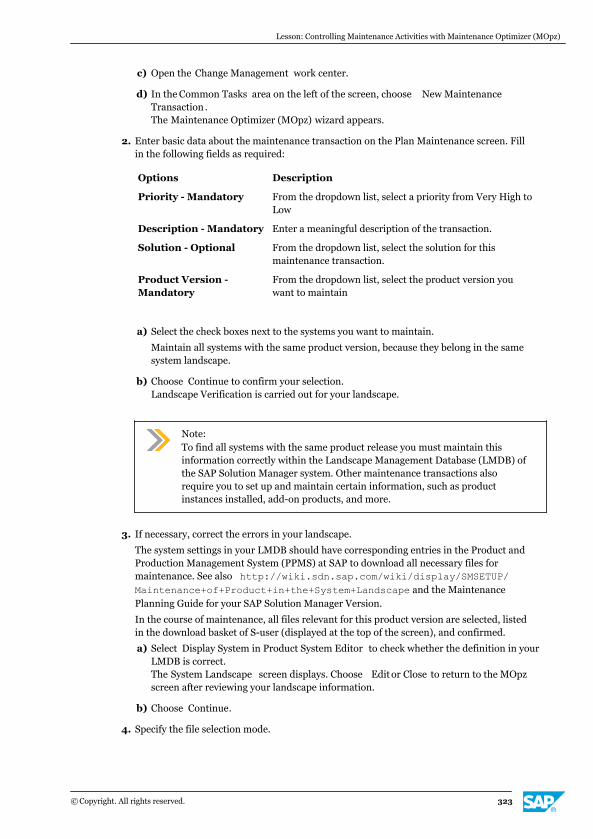
c) Open the Change Management work center.
d) In the Common Tasks area on the left of the screen, choose New MaintenanceTransaction .The Maintenance Optimizer (MOpz) wizard appears.
2. Enter basic data about the maintenance transaction on the Plan Maintenance screen. Fillin the following fields as required:
Options Description
Priority - Mandatory From the dropdown list, select a priority from Very High toLow
Description - Mandatory Enter a meaningful description of the transaction.
Solution - Optional From the dropdown list, select the solution for thismaintenance transaction.
Product Version -Mandatory
From the dropdown list, select the product version youwant to maintain
a) Select the check boxes next to the systems you want to maintain.
Maintain all systems with the same product version, because they belong in the samesystem landscape.
b) Choose Continue to confirm your selection.Landscape Verification is carried out for your landscape.
Note:To find all systems with the same product release you must maintain thisinformation correctly within the Landscape Management Database (LMDB) ofthe SAP Solution Manager system. Other maintenance transactions alsorequire you to set up and maintain certain information, such as productinstances installed, add-on products, and more.
3. If necessary, correct the errors in your landscape.
The system settings in your LMDB should have corresponding entries in the Product andProduction Management System (PPMS) at SAP to download all necessary files formaintenance. See also http://wiki.sdn.sap.com/wiki/display/SMSETUP/Maintenance+of+Product+in+the+System+Landscape and the MaintenancePlanning Guide for your SAP Solution Manager Version.
In the course of maintenance, all files relevant for this product version are selected, listedin the download basket of S-user (displayed at the top of the screen), and confirmed.
a) Select Display System in Product System Editor to check whether the definition in yourLMDB is correct.The System Landscape screen displays. Choose Edit or Close to return to the MOpzscreen after reviewing your landscape information.
b) Choose Continue.
4. Specify the file selection mode.
Lesson: Controlling Maintenance Activities with Maintenance Optimizer (MOpz)
© Copyright. All rights reserved. 323
a) Select the Calculate Files Automatically (Recommended) radio button.If you want to download individual files or support packages, choose Select FilesManually. The calculation of the required files for the maintenance transaction onlyworks if the system settings in the LMDB for these systems are maintained correctly.
b) Choose Continue.
5. Choose update options.
This list includes all maintenance options for the selected Product Version, includingupgrades and enhancement packages, if available.
a) From the list of maintenance options, choose the required option.
b) Choose Continue.
6. Choose a target stack for your product version.
a) From the dropdown list, select a target stack for your product version.
Choose the highest available support package stack.
b) Choose Continue.
7. If required, choose add-ons for the product version.
Existing add-ons are automatically detected and selected for update. New add-onproducts can be selected manually if available.
8. Manually select the correct kernel files for your SAP system.
The kernel files might have installed instances on different operating systems. You canread this information for each instance using transaction SM51, then choose Goto → Server → Information → Release Information
a) Select the required OS/DB-dependent files.
If you choose your SAP kernel the system automatically selects the appropriatedatabase-independent kernel. Choose the SAP IGS kernel and, optionally, the SAPHOST AGENT.
b) Choose Continue.
c) Select the required stack-independent files.
If you are selecting files for an ABAP system, check that the entry SAP SPAM/SAINTupdate is selected. This is done automatically.
9. Select stack-dependent files.
a) In the File Name field, check that all check boxes have been selected automatically.
Do not deselect any of the check boxes.
10. If you have non-ABAP (typically Java) components selected, you can select the latestpatches for the Java support packages for the download basket here.
a) Choose Add Java Patches .Choosing this triggers an automatic check for the latest patches for all the listed Javasoftware components.
b) Choose the Select All radio button to select all found Java patches.Choosing this includes all these Java patches in your download basket.
c) Choose the Include Selected Java Patches to stack xml radio button.
Unit 14: Change Management in SAP Solution Manager
324 © Copyright. All rights reserved.
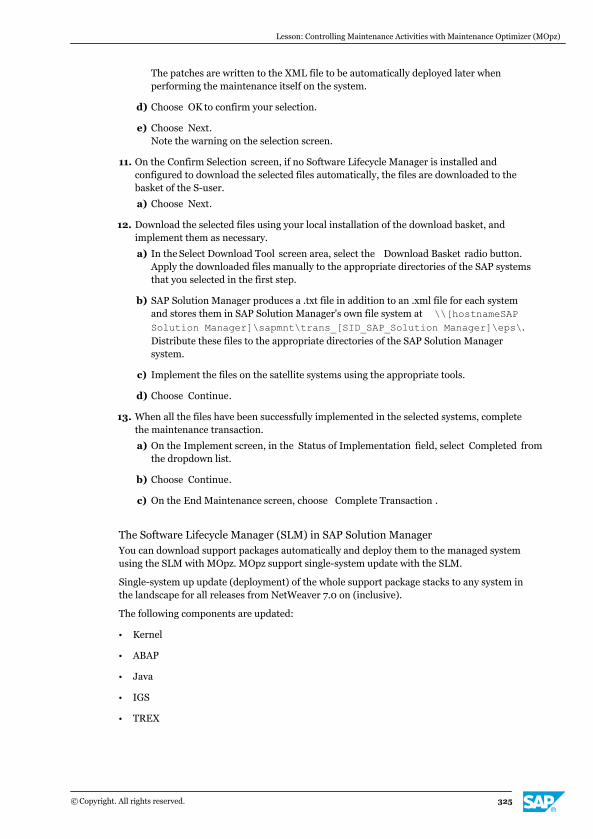
The patches are written to the XML file to be automatically deployed later whenperforming the maintenance itself on the system.
d) Choose OK to confirm your selection.
e) Choose Next.Note the warning on the selection screen.
11. On the Confirm Selection screen, if no Software Lifecycle Manager is installed andconfigured to download the selected files automatically, the files are downloaded to thebasket of the S-user.
a) Choose Next.
12. Download the selected files using your local installation of the download basket, andimplement them as necessary.
a) In the Select Download Tool screen area, select the Download Basket radio button.Apply the downloaded files manually to the appropriate directories of the SAP systemsthat you selected in the first step.
b) SAP Solution Manager produces a .txt file in addition to an .xml file for each systemand stores them in SAP Solution Manager's own file system at \\[hostnameSAPSolution Manager]\sapmnt\trans_[SID_SAP_Solution Manager]\eps\.Distribute these files to the appropriate directories of the SAP Solution Managersystem.
c) Implement the files on the satellite systems using the appropriate tools.
d) Choose Continue.
13. When all the files have been successfully implemented in the selected systems, completethe maintenance transaction.
a) On the Implement screen, in the Status of Implementation field, select Completed fromthe dropdown list.
b) Choose Continue.
c) On the End Maintenance screen, choose Complete Transaction .
The Software Lifecycle Manager (SLM) in SAP Solution ManagerYou can download support packages automatically and deploy them to the managed systemusing the SLM with MOpz. MOpz support single-system update with the SLM.
Single-system up update (deployment) of the whole support package stacks to any system inthe landscape for all releases from NetWeaver 7.0 on (inclusive).
The following components are updated:
● Kernel
● ABAP
● Java
● IGS
● TREX
Lesson: Controlling Maintenance Activities with Maintenance Optimizer (MOpz)
© Copyright. All rights reserved. 325
The only product that is not supported is Solution Manager on the central (managing) system,because MOpz and SLM are running on this system and are responsible for the updateoperation.
See SAP Note - Supported products for update by SLM 7.0x.
Installation of SLM
SLM is an SAP NetWeaver component. It is completely implemented with Java technologyand deployed as a Java component on NetWeaver Application Server Java (NW AS Java).
You can download the latest version from http://service.sap.com/swdc
In the navigation area, choose Support Packages and Patches → Browse our DownloadCatalog .
In the content area, choose SAP NetWeaver and complementary products → SAP NetWeaverSAP EHP1 for SAP NetWeaver 7.0 → Entry by Component → Application Server Java → LIFECYCLE MGMT TOOLS 7.01 → #OS independent .
Alternatively, you can search for Software Downloads by LIFECYCLE MGMT TOOLS 7.01.
1. In the work center Change Management , in the navigation pane choose Queries.
2. Choose Define new Query. After saving the query, all the maintenance transactions thatmeet your criteria display.
3. Select an entry from the list to display further details. The system opens thecorresponding step in MOpz, as last saved by the user.
You can specify a query with the following filter criteria:
● Download type: Source of maintenance files
● Update mode: Maintenance transaction scenario
● Automatic/Manual: Maintenance file determination
● S-User: SAP Support Portal user ID that MOpz uses when approving and confirming thedownload basket
● Solution: Solution in the SAP Solution Manager system for which you created themaintenance transaction
● Product: Product selected in the Plan Maintenance step
● Source product version
● Target product version
● Target stack: Support package stack to be installed
● Selected product system: Product system for which you perform the maintenancetransaction
● Technical system: Technical system in the target constellation that the maintenancetransaction affects
● Linked product system: Product system that is connected to other product systems via atechnical system classified as a hub
● Linked technical system: Technical system classified as a hub, and so linked to severalproduct systems
Unit 14: Change Management in SAP Solution Manager
326 © Copyright. All rights reserved.
All product maintenance transactions that satisfy your selection criteria are listed. You cansort the information by columns and pass the list to an external application for furtherprocessing.
Alternatively, you can use the transaction code /TMWFLOW/MAINTENANCE.
For more details check SAP Note 1296589 - MOPz: Not able to continue to step Select Files".
Figure 72: Software Lifecycle Manager an SAP NW AS Java Component
After the installation you can call the alias /slm on the AS Java system.
Configuration of SLM
Before performing auto-download and single-system update, perform the followingconfiguration steps:
1. Register the system landscape in the SLD.
2. Configure SLM.
3. Customize MOpz and configure authorization.
4. Configure logistic tools.
For more details, see http://service.sap.com/solutionmanager → Media Library → How toDocuments and download the latest version of the document How to Configure MaintenanceOptimizer to use SLM.
The prerequisites for SLM in the managed systems are as follows:
Support Package Manager - SPAM
To update ABAP stack components via SLM for the first time, update the SPAM tool tothe latest version. Perform this update manually if the tool is below release 7.0x/0029,without SLM self-update support. With SLM deployment, SPAM can be automaticallyself-updated each time before updating the application component. From SLM 7.01SP08, the standard communication between SPAM and SLM is by SAP Java Connector(JCo). There is no further configuration for SPAM.
Java Support Package Manager - JSPM
To update Java stack components via SLM for the first time, update the JSPM tool to thelatest version without SLM self-update support, manually. For a system based onNetWeaver release 7.00, update JSPM to the latest patch of a support package higherthan SP21. If the JSPM is lower than SP21, the SLM deployment is not offered in MOpztransaction step Implement.
Lesson: Controlling Maintenance Activities with Maintenance Optimizer (MOpz)
© Copyright. All rights reserved. 327
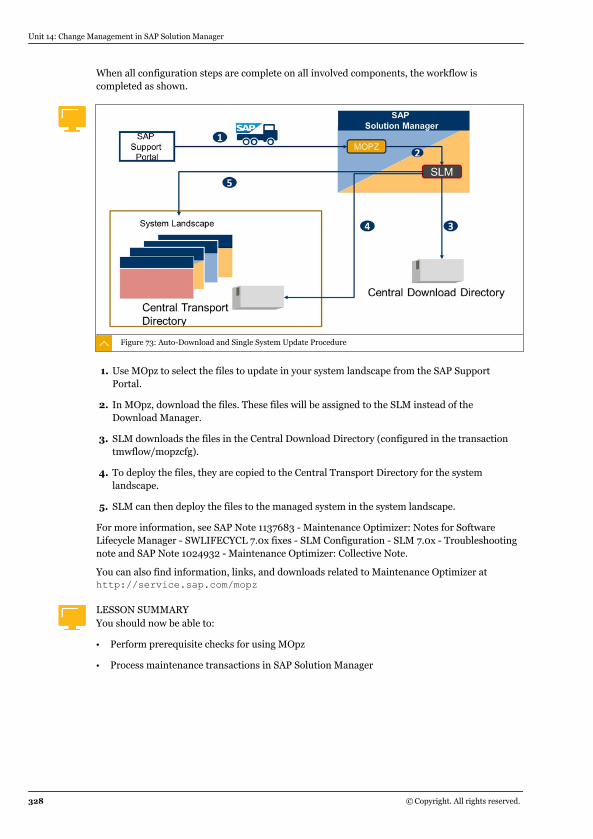
When all configuration steps are complete on all involved components, the workflow iscompleted as shown.
Figure 73: Auto-Download and Single System Update Procedure
1. Use MOpz to select the files to update in your system landscape from the SAP SupportPortal.
2. In MOpz, download the files. These files will be assigned to the SLM instead of theDownload Manager.
3. SLM downloads the files in the Central Download Directory (configured in the transactiontmwflow/mopzcfg).
4. To deploy the files, they are copied to the Central Transport Directory for the systemlandscape.
5. SLM can then deploy the files to the managed system in the system landscape.
For more information, see SAP Note 1137683 - Maintenance Optimizer: Notes for SoftwareLifecycle Manager - SWLIFECYCL 7.0x fixes - SLM Configuration - SLM 7.0x - Troubleshootingnote and SAP Note 1024932 - Maintenance Optimizer: Collective Note.
You can also find information, links, and downloads related to Maintenance Optimizer athttp://service.sap.com/mopz
LESSON SUMMARYYou should now be able to:
● Perform prerequisite checks for using MOpz
● Process maintenance transactions in SAP Solution Manager
Unit 14: Change Management in SAP Solution Manager
328 © Copyright. All rights reserved.
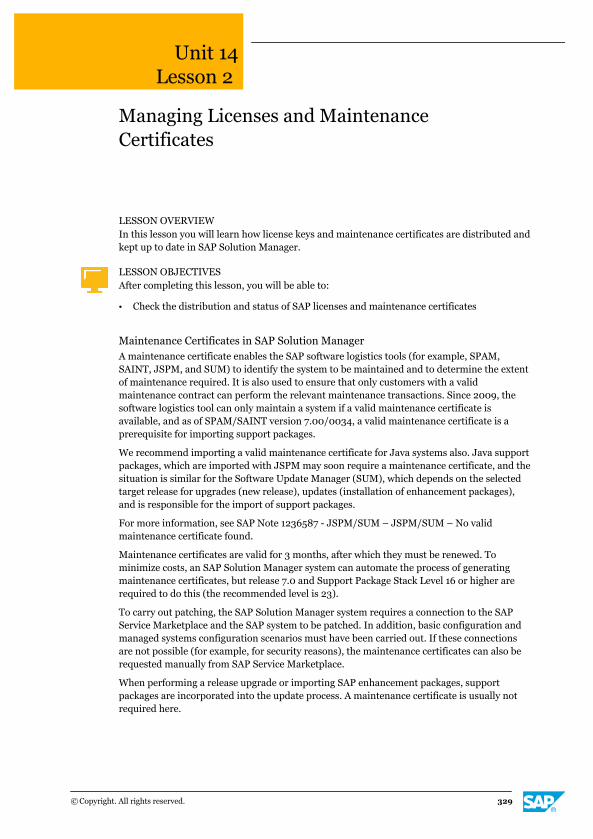
Unit 14Lesson 2
Managing Licenses and MaintenanceCertificates
LESSON OVERVIEWIn this lesson you will learn how license keys and maintenance certificates are distributed andkept up to date in SAP Solution Manager.
LESSON OBJECTIVESAfter completing this lesson, you will be able to:
● Check the distribution and status of SAP licenses and maintenance certificates
Maintenance Certificates in SAP Solution ManagerA maintenance certificate enables the SAP software logistics tools (for example, SPAM,SAINT, JSPM, and SUM) to identify the system to be maintained and to determine the extentof maintenance required. It is also used to ensure that only customers with a validmaintenance contract can perform the relevant maintenance transactions. Since 2009, thesoftware logistics tool can only maintain a system if a valid maintenance certificate isavailable, and as of SPAM/SAINT version 7.00/0034, a valid maintenance certificate is aprerequisite for importing support packages.
We recommend importing a valid maintenance certificate for Java systems also. Java supportpackages, which are imported with JSPM may soon require a maintenance certificate, and thesituation is similar for the Software Update Manager (SUM), which depends on the selectedtarget release for upgrades (new release), updates (installation of enhancement packages),and is responsible for the import of support packages.
For more information, see SAP Note 1236587 - JSPM/SUM – JSPM/SUM – No validmaintenance certificate found.
Maintenance certificates are valid for 3 months, after which they must be renewed. Tominimize costs, an SAP Solution Manager system can automate the process of generatingmaintenance certificates, but release 7.0 and Support Package Stack Level 16 or higher arerequired to do this (the recommended level is 23).
To carry out patching, the SAP Solution Manager system requires a connection to the SAPService Marketplace and the SAP system to be patched. In addition, basic configuration andmanaged systems configuration scenarios must have been carried out. If these connectionsare not possible (for example, for security reasons), the maintenance certificates can also berequested manually from SAP Service Marketplace.
When performing a release upgrade or importing SAP enhancement packages, supportpackages are incorporated into the update process. A maintenance certificate is usually notrequired here.
© Copyright. All rights reserved. 329
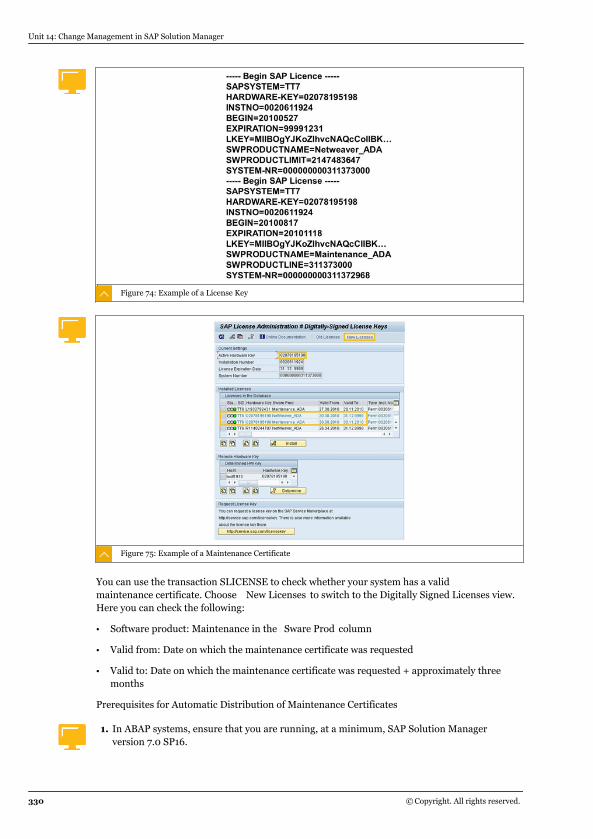
Figure 74: Example of a License Key
Figure 75: Example of a Maintenance Certificate
You can use the transaction SLICENSE to check whether your system has a validmaintenance certificate. Choose New Licenses to switch to the Digitally Signed Licenses view.Here you can check the following:
● Software product: Maintenance in the Sware Prod column
● Valid from: Date on which the maintenance certificate was requested
● Valid to: Date on which the maintenance certificate was requested + approximately threemonths
Prerequisites for Automatic Distribution of Maintenance Certificates
1. In ABAP systems, ensure that you are running, at a minimum, SAP Solution Managerversion 7.0 SP16.
Unit 14: Change Management in SAP Solution Manager
330 © Copyright. All rights reserved.
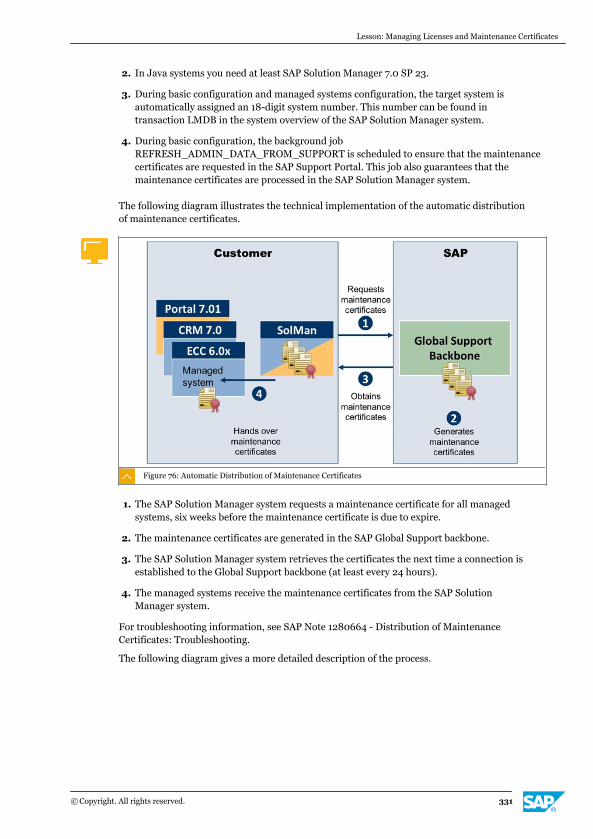
2. In Java systems you need at least SAP Solution Manager 7.0 SP 23.
3. During basic configuration and managed systems configuration, the target system isautomatically assigned an 18-digit system number. This number can be found intransaction LMDB in the system overview of the SAP Solution Manager system.
4. During basic configuration, the background jobREFRESH_ADMIN_DATA_FROM_SUPPORT is scheduled to ensure that the maintenancecertificates are requested in the SAP Support Portal. This job also guarantees that themaintenance certificates are processed in the SAP Solution Manager system.
The following diagram illustrates the technical implementation of the automatic distributionof maintenance certificates.
Figure 76: Automatic Distribution of Maintenance Certificates
1. The SAP Solution Manager system requests a maintenance certificate for all managedsystems, six weeks before the maintenance certificate is due to expire.
2. The maintenance certificates are generated in the SAP Global Support backbone.
3. The SAP Solution Manager system retrieves the certificates the next time a connection isestablished to the Global Support backbone (at least every 24 hours).
4. The managed systems receive the maintenance certificates from the SAP SolutionManager system.
For troubleshooting information, see SAP Note 1280664 - Distribution of MaintenanceCertificates: Troubleshooting.
The following diagram gives a more detailed description of the process.
Lesson: Managing Licenses and Maintenance Certificates
© Copyright. All rights reserved. 331
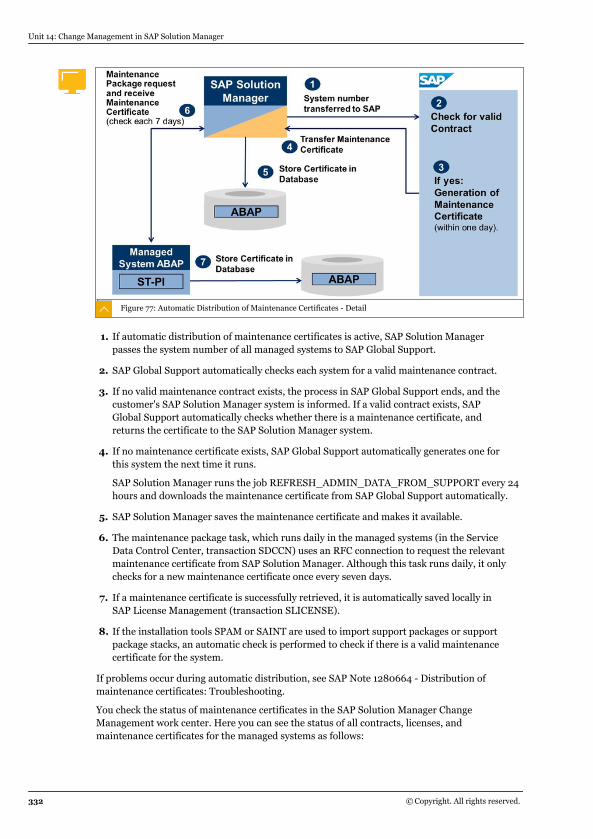
Figure 77: Automatic Distribution of Maintenance Certificates - Detail
1. If automatic distribution of maintenance certificates is active, SAP Solution Managerpasses the system number of all managed systems to SAP Global Support.
2. SAP Global Support automatically checks each system for a valid maintenance contract.
3. If no valid maintenance contract exists, the process in SAP Global Support ends, and thecustomer's SAP Solution Manager system is informed. If a valid contract exists, SAPGlobal Support automatically checks whether there is a maintenance certificate, andreturns the certificate to the SAP Solution Manager system.
4. If no maintenance certificate exists, SAP Global Support automatically generates one forthis system the next time it runs.
SAP Solution Manager runs the job REFRESH_ADMIN_DATA_FROM_SUPPORT every 24hours and downloads the maintenance certificate from SAP Global Support automatically.
5. SAP Solution Manager saves the maintenance certificate and makes it available.
6. The maintenance package task, which runs daily in the managed systems (in the ServiceData Control Center, transaction SDCCN) uses an RFC connection to request the relevantmaintenance certificate from SAP Solution Manager. Although this task runs daily, it onlychecks for a new maintenance certificate once every seven days.
7. If a maintenance certificate is successfully retrieved, it is automatically saved locally inSAP License Management (transaction SLICENSE).
8. If the installation tools SPAM or SAINT are used to import support packages or supportpackage stacks, an automatic check is performed to check if there is a valid maintenancecertificate for the system.
If problems occur during automatic distribution, see SAP Note 1280664 - Distribution ofmaintenance certificates: Troubleshooting.
You check the status of maintenance certificates in the SAP Solution Manager ChangeManagement work center. Here you can see the status of all contracts, licenses, andmaintenance certificates for the managed systems as follows:
Unit 14: Change Management in SAP Solution Manager
332 © Copyright. All rights reserved.
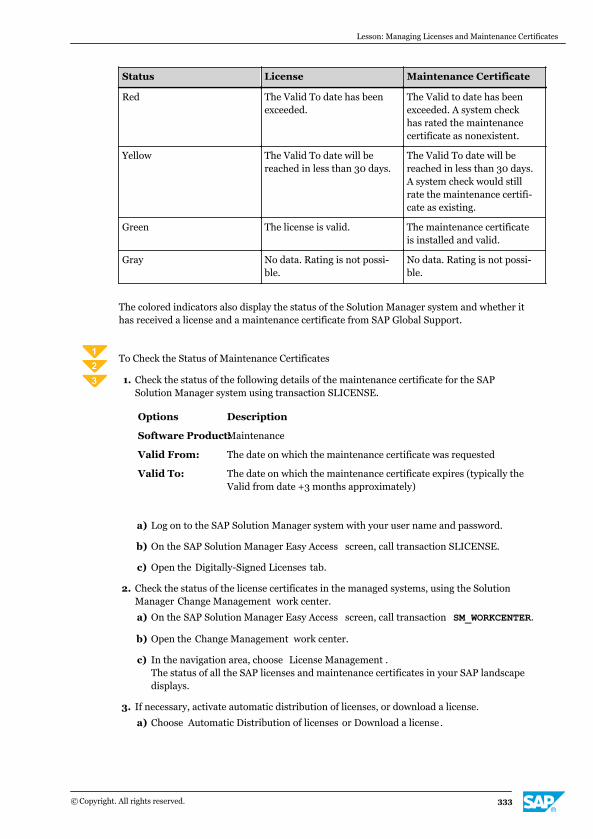
Status License Maintenance Certificate
Red The Valid To date has beenexceeded.
The Valid to date has beenexceeded. A system checkhas rated the maintenancecertificate as nonexistent.
Yellow The Valid To date will bereached in less than 30 days.
The Valid To date will bereached in less than 30 days.A system check would stillrate the maintenance certifi-cate as existing.
Green The license is valid. The maintenance certificateis installed and valid.
Gray No data. Rating is not possi-ble.
No data. Rating is not possi-ble.
The colored indicators also display the status of the Solution Manager system and whether ithas received a license and a maintenance certificate from SAP Global Support.
To Check the Status of Maintenance Certificates
1. Check the status of the following details of the maintenance certificate for the SAPSolution Manager system using transaction SLICENSE.
Options Description
Software Product:Maintenance
Valid From: The date on which the maintenance certificate was requested
Valid To: The date on which the maintenance certificate expires (typically theValid from date +3 months approximately)
a) Log on to the SAP Solution Manager system with your user name and password.
b) On the SAP Solution Manager Easy Access screen, call transaction SLICENSE.
c) Open the Digitally-Signed Licenses tab.
2. Check the status of the license certificates in the managed systems, using the SolutionManager Change Management work center.
a) On the SAP Solution Manager Easy Access screen, call transaction SM_WORKCENTER.
b) Open the Change Management work center.
c) In the navigation area, choose License Management .The status of all the SAP licenses and maintenance certificates in your SAP landscapedisplays.
3. If necessary, activate automatic distribution of licenses, or download a license.
a) Choose Automatic Distribution of licenses or Download a license.
Lesson: Managing Licenses and Maintenance Certificates
© Copyright. All rights reserved. 333
Here, you can download the certificate to a file, then log on to the managed system andapply the certificate manually using the transaction SLICENSE. This ability is useful ifcommunication between SAP Solution Manager and the managed system is disturbed.
Manual Download and Import of Maintenance CertificatesIf connections between your Solution Manager system and the managed system areinterrupted, or if there are problems with the automatic distribution of maintenancecertificates, you can request maintenance certificates manually from SAP ServiceMarketplace.
Request Maintenance Certificate Using Alias System-Data
1. Log on to www.service.sap.com/system-data with your S-user.
2. Choose the system for which you want to download maintenance certificates.
3. Select the License Key & Maintenance Certificate tab.
4. Choose Renew Maintenance Certificates .
5. Download license files - these files are sent to the S-user e-mail address.
Request Maintenance Certificate Using Alias Licensekey
1. Log on to www.service.sap.com/licensekey with your S-user.
2. Choose Request permanent licensekey .
3. Select the installation or search for your system.
4. On the next tab, choose Edit to change your system.
5. Choose Continue.
6. Choose Renew Maintenance Certificates .
7. License files are sent to the specified e-mail address.
On an ABAP system, the downloaded files are imported using transaction SLICENSE. On aJava system, installation is done by the Licensing Adapter.
LESSON SUMMARYYou should now be able to:
● Check the distribution and status of SAP licenses and maintenance certificates
Unit 14: Change Management in SAP Solution Manager
334 © Copyright. All rights reserved.
Unit 14Lesson 3
Managing SAP Notes with SystemRecommendations in SAP Solution Manager
LESSON OVERVIEWSystem Recommendations provides tailored recommendations for the SAP Notes to beapplied to a selected managed system. These recommendations are calculated based on theactual status of notes in the system. In this lesson you will learn how to access SystemRecommendations and maintain it automatically, as recommended by SAP.
LESSON OBJECTIVESAfter completing this lesson, you will be able to:
● Configure System Recommendations
System Recommendations in SAP Solution ManagerSystem Recommendations is a functionality in SAP Solution Manager, focusing on SAPNotes. It provides a tailored recommendation of notes that should be applied to a selectedmanaged system, and this recommendation is calculated based on the actual notes status ofthis system.
Questions like “Is a specific note already implemented in the system?” or “Which version dothe implemented notes have? Are there newer versions available?” are taken into accountwhen calculating the recommendation for a system.
System Recommendations collects required information from the managed systems via abackground job. You schedule this job on a regular basis (a direct refresh of the alreadycalculated information for a specific system can also be started directly). The calculation itselfis done in SAP’s Global Support Backbone, which means that there is no load being generatedon the SAP Solution Manager system or on the managed system.
After the recommendation has been calculated, the user can set various statuses for therecommended notes, like “to be implemented” , “not relevant” or “postponed” . Thesestatuses, in combination with a filter displaying only notes with a certain status, helps to keepan overview of all the recommendations and helps to keep track of tasks assigned to thoserecommendations.
Note:The HotNews function has been integrated into the system recommendations,and is no longer independently available. If you used HotNews, you need amigration to take over its filters.
The system recommendations are integrated as follows:
© Copyright. All rights reserved. 335
● System recommendations determine the valid notes for the selected technical system inthe SAP Support Portal, and the associated information is transferred to the SAP SolutionManager.
● The system recommendations are integrated into Change Request Management. You can,for example, create a request for change directly, after selecting relevant notes.
● In system recommendations, you download ABAP notes, to implement them with the NoteAssistant.
● For non-ABAP notes, you can confirm loadable Java patches in the MaintenanceOptimizer.
● If you use the Business Process Change Analyzer (BPCA), the system can determine thetest scope for selected ABAP notes.
The following system recommendations functions are available:
● Display and download notes, and implement them.
● Display results by application or application component, software component or as a list.In the list display, you can filter and sort the results.
● Assign a status to an entry and display note information with the status.
● Analyze the effects of implementing a note has on the system and business processes.
● Create a request for change or select a Java patch, and create a maintenance transaction.
● Specify background service to update note information automatically.
System Recommendations: Prerequisites
System Recommendations was initially delivered with SAP Solution Manager 7.0 SP26 and isalso included in SAP Solution Manager 7.1. The functionality is only available within theChange Management work center.
To ease the data collection and to speed up the delta calculation, a background job can bescheduled which automatically collects all needed information from the managed systems.
To control access to System Recommendations, the authorization object SM_TABS (in SAPSolution Manager 7.0) or SM_FUNCS (in SAP Solution Manager 7.1) can be used to grant ordeny access to the different tabs of System Recommendations.
We recommend that you configure your Solution Manager system to the automatic updatecheck.
For troubleshooting, check the application log (transaction SLG1) and choose the objectAGS_SR to see the configuration log and check logs. If you have a problem, create a customermessage under component SV-SMG-SR (System Recommendations for Managed Systems).
Automatic update regularly updates note information in Solution Manager as specified in afilter. The notes are then up to date and do not require manual updating in the query.
Automatic update updates all notes, manual update only updates notes from the last month.
To Automatically Update SAP Note InformationWe recommend that you use automatic note information update for all monitored systems.
1. Open the Systems Recommendations wizard in the SAP Solution Manager ChangeManagement work center.
Unit 14: Change Management in SAP Solution Manager
336 © Copyright. All rights reserved.
a) Log on to SAP Solution Manager with your user name and password.
b) On the SAP Solution Manager Easy Access screen, call transaction SM_WORKCENTER.
c) Open the Change Management work center.
d) In the navigation area, choose System Recommendations .
e) Select the Settings link on the top right of the screen.The System Recommendations Settings wizard appears.
2. Update Note automatically for all required technical systems.
a) Select the Turn on Automatic Check - Recommended radio button.Fields to specify the update interval appear.
b) Specify the update interval, start date, and start time.
We recommend that you choose the update interval Every Week.
c) Choose Next.
d) Choose Add Technical System to create a new filter definition.
e) Select a solution and a technical system and choose Add.The selected technical system is added to the list. You cannot select an applicationcomponent.
f) Repeat step 2d to add all the technical systems that require Note updates.
g) Save your entries.
This activity schedules the job SM:SYSTEM RECOMMENDATIONS (Report:AGSNO_RPT_COLLECT_DATA, variant, user ID SOLMAN_BTC). You can check this job usingtransaction SM37.
Display and Implementation of NotesThe filter settings specify which notes are displayed.
Specify the solution, product system, technical system, and application components forwhich you want to display notes.
If only All is displayed in the application components, the background job to update noteinformation automatically is not active.
You can choose several application components at once using the CTRL key and selectingapplication components with the left-hand mouse button.
Filter functions:
● Enter the period for which you want to display the documents. Choose Apply Filter.
● You can save and reload the current filter settings, to reuse a selected filter.
● By loading a filter, you can reuse its settings.
● Delete saved filters in the filter overview.
When you have set up and applied the filter the note information is displayed in the tabs,sorted by note type. The numbers in parentheses indicate the number of notes.
Lesson: Managing SAP Notes with System Recommendations in SAP Solution Manager
© Copyright. All rights reserved. 337
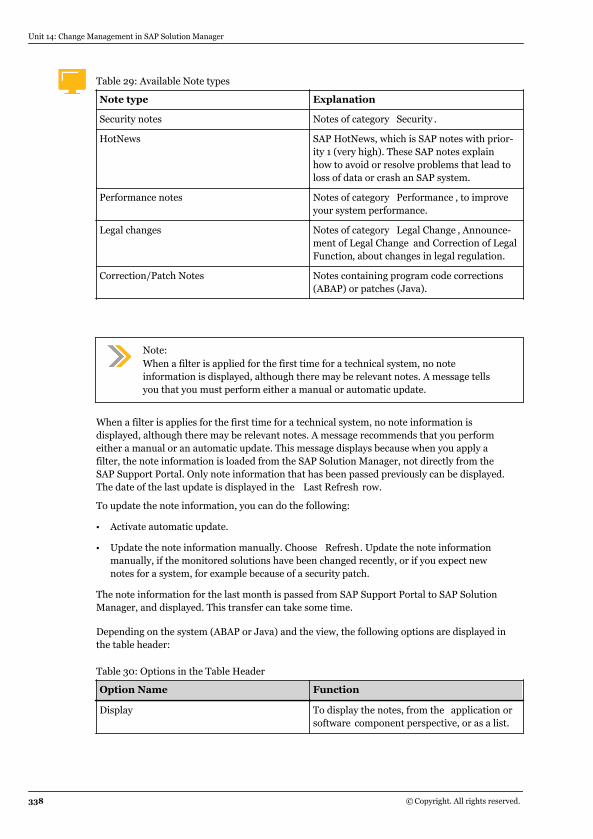
Table 29: Available Note types
Note type Explanation
Security notes Notes of category Security .
HotNews SAP HotNews, which is SAP notes with prior-ity 1 (very high). These SAP notes explainhow to avoid or resolve problems that lead toloss of data or crash an SAP system.
Performance notes Notes of category Performance , to improveyour system performance.
Legal changes Notes of category Legal Change , Announce-ment of Legal Change and Correction of LegalFunction, about changes in legal regulation.
Correction/Patch Notes Notes containing program code corrections(ABAP) or patches (Java).
Note:When a filter is applied for the first time for a technical system, no noteinformation is displayed, although there may be relevant notes. A message tellsyou that you must perform either a manual or automatic update.
When a filter is applies for the first time for a technical system, no note information isdisplayed, although there may be relevant notes. A message recommends that you performeither a manual or an automatic update. This message displays because when you apply afilter, the note information is loaded from the SAP Solution Manager, not directly from theSAP Support Portal. Only note information that has been passed previously can be displayed.The date of the last update is displayed in the Last Refresh row.
To update the note information, you can do the following:
● Activate automatic update.
● Update the note information manually. Choose Refresh. Update the note informationmanually, if the monitored solutions have been changed recently, or if you expect newnotes for a system, for example because of a security patch.
The note information for the last month is passed from SAP Support Portal to SAP SolutionManager, and displayed. This transfer can take some time.
Depending on the system (ABAP or Java) and the view, the following options are displayed inthe table header:
Table 30: Options in the Table Header
Option Name Function
Display To display the notes, from the application orsoftware component perspective, or as a list.
Unit 14: Change Management in SAP Solution Manager
338 © Copyright. All rights reserved.
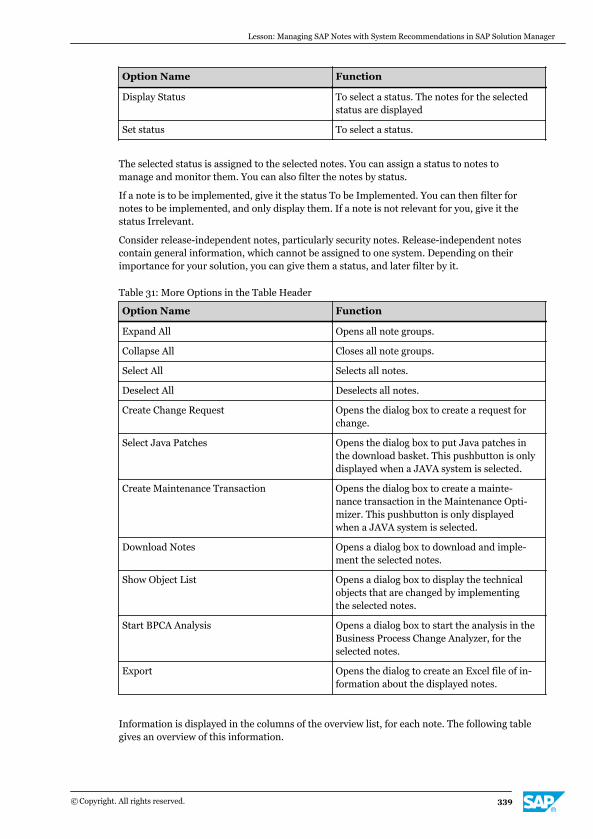
Option Name Function
Display Status To select a status. The notes for the selectedstatus are displayed
Set status To select a status.
The selected status is assigned to the selected notes. You can assign a status to notes tomanage and monitor them. You can also filter the notes by status.
If a note is to be implemented, give it the status To be Implemented. You can then filter fornotes to be implemented, and only display them. If a note is not relevant for you, give it thestatus Irrelevant.
Consider release-independent notes, particularly security notes. Release-independent notescontain general information, which cannot be assigned to one system. Depending on theirimportance for your solution, you can give them a status, and later filter by it.
Table 31: More Options in the Table Header
Option Name Function
Expand All Opens all note groups.
Collapse All Closes all note groups.
Select All Selects all notes.
Deselect All Deselects all notes.
Create Change Request Opens the dialog box to create a request forchange.
Select Java Patches Opens the dialog box to put Java patches inthe download basket. This pushbutton is onlydisplayed when a JAVA system is selected.
Create Maintenance Transaction Opens the dialog box to create a mainte-nance transaction in the Maintenance Opti-mizer. This pushbutton is only displayedwhen a JAVA system is selected.
Download Notes Opens a dialog box to download and imple-ment the selected notes.
Show Object List Opens a dialog box to display the technicalobjects that are changed by implementingthe selected notes.
Start BPCA Analysis Opens a dialog box to start the analysis in theBusiness Process Change Analyzer, for theselected notes.
Export Opens the dialog to create an Excel file of in-formation about the displayed notes.
Information is displayed in the columns of the overview list, for each note. The following tablegives an overview of this information.
Lesson: Managing SAP Notes with System Recommendations in SAP Solution Manager
© Copyright. All rights reserved. 339
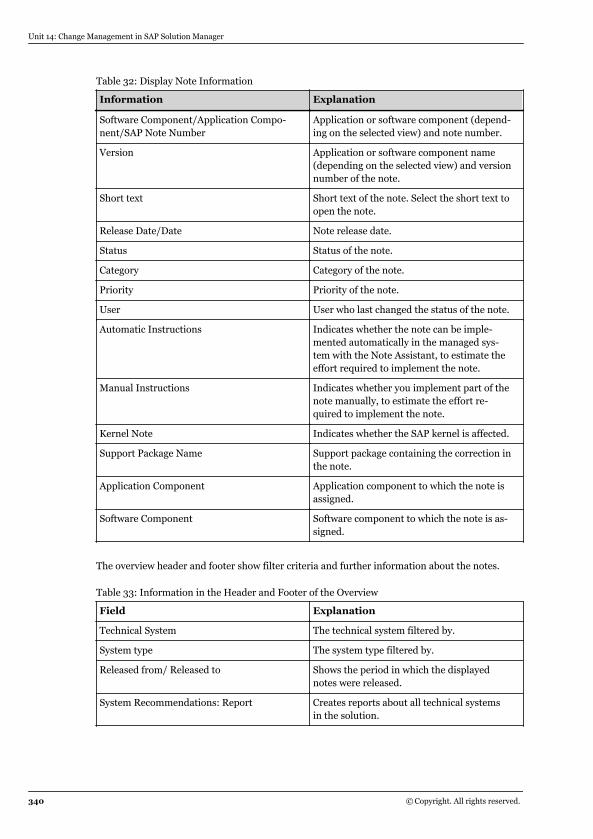
Table 32: Display Note Information
Information Explanation
Software Component/Application Compo-nent/SAP Note Number
Application or software component (depend-ing on the selected view) and note number.
Version Application or software component name(depending on the selected view) and versionnumber of the note.
Short text Short text of the note. Select the short text toopen the note.
Release Date/Date Note release date.
Status Status of the note.
Category Category of the note.
Priority Priority of the note.
User User who last changed the status of the note.
Automatic Instructions Indicates whether the note can be imple-mented automatically in the managed sys-tem with the Note Assistant, to estimate theeffort required to implement the note.
Manual Instructions Indicates whether you implement part of thenote manually, to estimate the effort re-quired to implement the note.
Kernel Note Indicates whether the SAP kernel is affected.
Support Package Name Support package containing the correction inthe note.
Application Component Application component to which the note isassigned.
Software Component Software component to which the note is as-signed.
The overview header and footer show filter criteria and further information about the notes.
Table 33: Information in the Header and Footer of the Overview
Field Explanation
Technical System The technical system filtered by.
System type The system type filtered by.
Released from/ Released to Shows the period in which the displayednotes were released.
System Recommendations: Report Creates reports about all technical systemsin the solution.
Unit 14: Change Management in SAP Solution Manager
340 © Copyright. All rights reserved.
BPCA Results Shows how often the Business ProcessChange Analyzer analysis has already beenperformed.
Change Request If you have already created requests forchange: Opens the list of requests forchange. You can then open the short text orthe request for change itself.
For more information, search for System Recommendations on http://help.sap.com
LESSON SUMMARYYou should now be able to:
● Configure System Recommendations
Lesson: Managing SAP Notes with System Recommendations in SAP Solution Manager
© Copyright. All rights reserved. 341

Unit 14: Change Management in SAP Solution Manager
342 © Copyright. All rights reserved.
Unit 14
Learning Assessment
1. What must a system user have to perform a maintenance transaction in SAP SolutionManager?
© Copyright. All rights reserved. 343
Unit 14
Learning Assessment - Answers
1. What must a system user have to perform a maintenance transaction in SAP SolutionManager?
An S-user in the Support Portal.That's correct.
344 © Copyright. All rights reserved.
UNIT 15 The Management ofBackground Jobs with SAPSolution Manager
Lesson 1
Explaining Job Management Processes in SAP Solution Manager 347
Lesson 2
Processing a Job Request in SAP Solution Manager 354
Exercise 13: Generate a Job Request 361
Exercise 14: Process a Job Request Incident 365
Lesson 3
Organizing Job Documentation in SAP Solution Manager 369
Exercise 15: Create Job Documentation and Schedule a Job in SAP Solution Manager 375
Exercise 16: Schedule a Job in the SAP ERP Satellite System 379
Lesson 4
Monitoring Background Jobs with SAP Solution Manager 383
Lesson 5
Optimizing the Background Job Schedule with SAP Solution Manager Tools 391
Lesson 6
Setting Up Job Scheduling Management in SAP Solution Manager 399
Lesson 7
Using External Schedulers in SAP Solution Manager 402
UNIT OBJECTIVES
● Outline the challenges of job management
● Describe the job management workflow
● Create a job request
● Process a job request incident in SAP Solution Manager
© Copyright. All rights reserved. 345
● Document background jobs in SAP Solution Manager
● Describe the options for monitoring background jobs in SAP Solution Manager
● Analyze background jobs in SAP Solution Manager
● Carry out job management health checks in SAP Solution Manager
● List the prerequisites for using job scheduling management applications in SAP SolutionManager
● Explain how external schedulers support job scheduling management
Unit 15: The Management of Background Jobs with SAP Solution Manager
346 © Copyright. All rights reserved.
Unit 15Lesson 1
Explaining Job Management Processes in SAPSolution Manager
LESSON OVERVIEWAfter this lesson you will be able to describe the challenges of job management and outlinethe process of job management in SAP Solution Manager.
LESSON OBJECTIVESAfter completing this lesson, you will be able to:
● Outline the challenges of job management
● Describe the job management workflow
The Challenges of Job ManagementIn a highly complex and distributed system landscape, job scheduling management isimportant to manage data and its processing. Even in today’s real-time data environment, theneed to have jobs running in the background is high. Furthermore, jobs are concatenated tohuge job chains, containing many dependencies on the sequence of jobs. If one or several jobsabort and cancel, the alert system has to inform the appropriate support level, or has to be ina position to start an automatic error handling procedure and restart the jobs.
Table 34: Focus on Job Scheduling Management - Applications and Challenges
Goal Application Challenge
Visibility Job Documentation● Provide standardized and
web-based documenta-tion
● Avoid unnecessary jobprocessing ("forgotten"jobs)
● Avoid unnecessarily slowsupport processes
● "Living documentationversus one-time docu-mentation
© Copyright. All rights reserved. 347
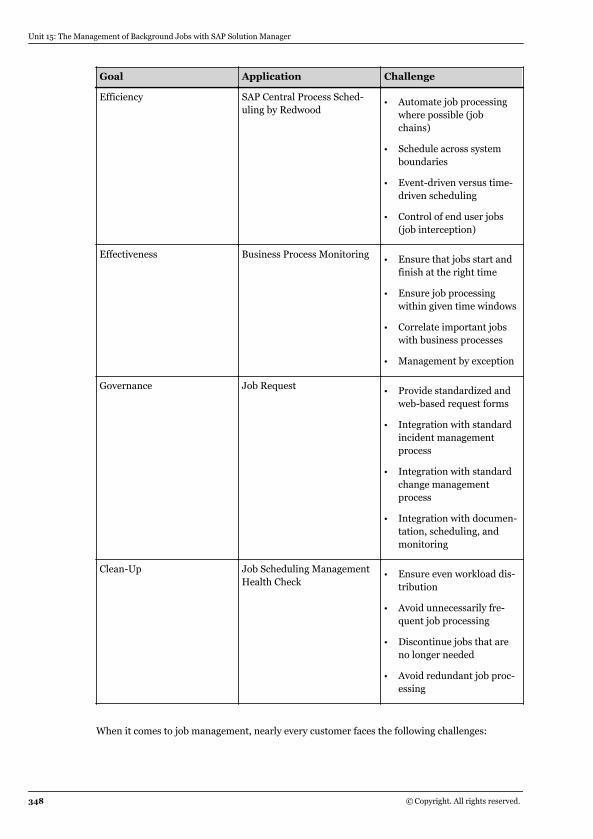
Goal Application Challenge
Efficiency SAP Central Process Sched-uling by Redwood
● Automate job processingwhere possible (jobchains)
● Schedule across systemboundaries
● Event-driven versus time-driven scheduling
● Control of end user jobs(job interception)
Effectiveness Business Process Monitoring● Ensure that jobs start and
finish at the right time
● Ensure job processingwithin given time windows
● Correlate important jobswith business processes
● Management by exception
Governance Job Request● Provide standardized and
web-based request forms
● Integration with standardincident managementprocess
● Integration with standardchange managementprocess
● Integration with documen-tation, scheduling, andmonitoring
Clean-Up Job Scheduling ManagementHealth Check
● Ensure even workload dis-tribution
● Avoid unnecessarily fre-quent job processing
● Discontinue jobs that areno longer needed
● Avoid redundant job proc-essing
When it comes to job management, nearly every customer faces the following challenges:
Unit 15: The Management of Background Jobs with SAP Solution Manager
348 © Copyright. All rights reserved.
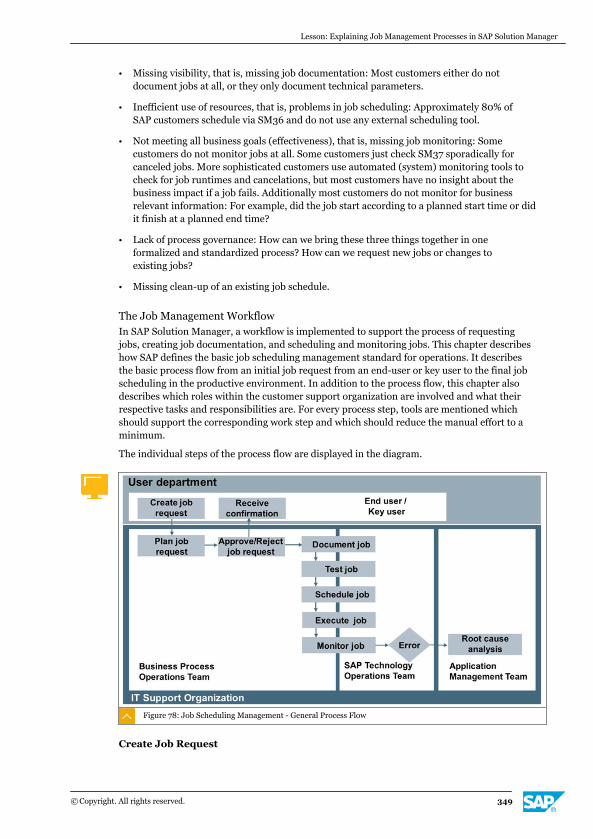
● Missing visibility, that is, missing job documentation: Most customers either do notdocument jobs at all, or they only document technical parameters.
● Inefficient use of resources, that is, problems in job scheduling: Approximately 80% ofSAP customers schedule via SM36 and do not use any external scheduling tool.
● Not meeting all business goals (effectiveness), that is, missing job monitoring: Somecustomers do not monitor jobs at all. Some customers just check SM37 sporadically forcanceled jobs. More sophisticated customers use automated (system) monitoring tools tocheck for job runtimes and cancelations, but most customers have no insight about thebusiness impact if a job fails. Additionally most customers do not monitor for businessrelevant information: For example, did the job start according to a planned start time or didit finish at a planned end time?
● Lack of process governance: How can we bring these three things together in oneformalized and standardized process? How can we request new jobs or changes toexisting jobs?
● Missing clean-up of an existing job schedule.
The Job Management WorkflowIn SAP Solution Manager, a workflow is implemented to support the process of requestingjobs, creating job documentation, and scheduling and monitoring jobs. This chapter describeshow SAP defines the basic job scheduling management standard for operations. It describesthe basic process flow from an initial job request from an end-user or key user to the final jobscheduling in the productive environment. In addition to the process flow, this chapter alsodescribes which roles within the customer support organization are involved and what theirrespective tasks and responsibilities are. For every process step, tools are mentioned whichshould support the corresponding work step and which should reduce the manual effort to aminimum.
The individual steps of the process flow are displayed in the diagram.
Figure 78: Job Scheduling Management - General Process Flow
Create Job Request
Lesson: Explaining Job Management Processes in SAP Solution Manager
© Copyright. All rights reserved. 349
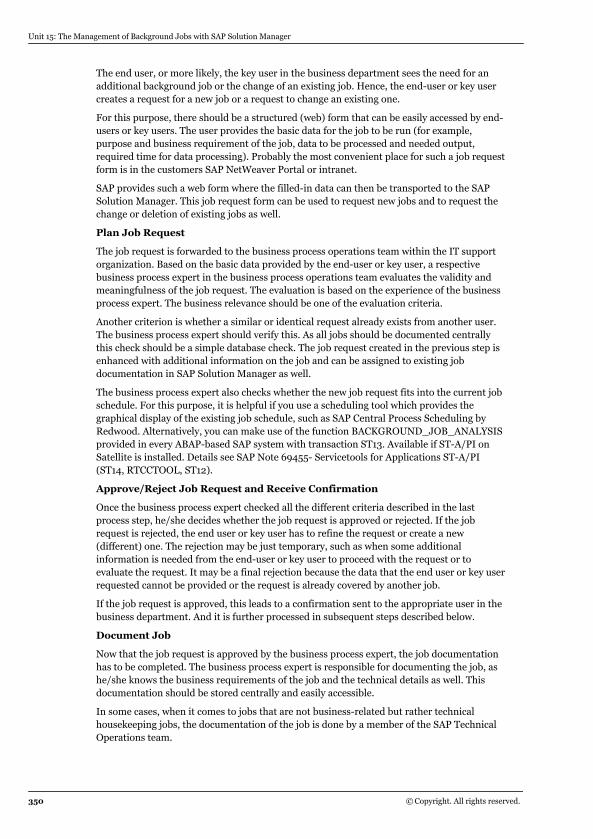
The end user, or more likely, the key user in the business department sees the need for anadditional background job or the change of an existing job. Hence, the end-user or key usercreates a request for a new job or a request to change an existing one.
For this purpose, there should be a structured (web) form that can be easily accessed by end-users or key users. The user provides the basic data for the job to be run (for example,purpose and business requirement of the job, data to be processed and needed output,required time for data processing). Probably the most convenient place for such a job requestform is in the customers SAP NetWeaver Portal or intranet.
SAP provides such a web form where the filled-in data can then be transported to the SAPSolution Manager. This job request form can be used to request new jobs and to request thechange or deletion of existing jobs as well.
Plan Job Request
The job request is forwarded to the business process operations team within the IT supportorganization. Based on the basic data provided by the end-user or key user, a respectivebusiness process expert in the business process operations team evaluates the validity andmeaningfulness of the job request. The evaluation is based on the experience of the businessprocess expert. The business relevance should be one of the evaluation criteria.
Another criterion is whether a similar or identical request already exists from another user.The business process expert should verify this. As all jobs should be documented centrallythis check should be a simple database check. The job request created in the previous step isenhanced with additional information on the job and can be assigned to existing jobdocumentation in SAP Solution Manager as well.
The business process expert also checks whether the new job request fits into the current jobschedule. For this purpose, it is helpful if you use a scheduling tool which provides thegraphical display of the existing job schedule, such as SAP Central Process Scheduling byRedwood. Alternatively, you can make use of the function BACKGROUND_JOB_ANALYSISprovided in every ABAP-based SAP system with transaction ST13. Available if ST-A/PI onSatellite is installed. Details see SAP Note 69455- Servicetools for Applications ST-A/PI(ST14, RTCCTOOL, ST12).
Approve/Reject Job Request and Receive Confirmation
Once the business process expert checked all the different criteria described in the lastprocess step, he/she decides whether the job request is approved or rejected. If the jobrequest is rejected, the end user or key user has to refine the request or create a new(different) one. The rejection may be just temporary, such as when some additionalinformation is needed from the end-user or key user to proceed with the request or toevaluate the request. It may be a final rejection because the data that the end user or key userrequested cannot be provided or the request is already covered by another job.
If the job request is approved, this leads to a confirmation sent to the appropriate user in thebusiness department. And it is further processed in subsequent steps described below.
Document Job
Now that the job request is approved by the business process expert, the job documentationhas to be completed. The business process expert is responsible for documenting the job, ashe/she knows the business requirements of the job and the technical details as well. Thisdocumentation should be stored centrally and easily accessible.
In some cases, when it comes to jobs that are not business-related but rather technicalhousekeeping jobs, the documentation of the job is done by a member of the SAP TechnicalOperations team.
Unit 15: The Management of Background Jobs with SAP Solution Manager
350 © Copyright. All rights reserved.
Test Job
Depending on the type of job, the job is then tested in the development and/or qualityassurance environment. The testing of the job is very important, especially if the underlyingprogram contains customer coding. It should be tested for the following aspects:
● Whether the program is working correctly from a functional point of view
● How much resources the job consumes (CPU time, memory) in order to make the job fit asgood as possible into the existing job schedule.
Schedule Job
Once the job is completely documented and properly tested, the SAP technical operationsteam can finally schedule the new or changed job in the productive environment. Theschedule has to fulfil the given business requirements and should make use of the givenhardware resources as efficiently as possible. Jobs are either scheduled by time or by event.
The scheduling itself is performed with one of the following tools:
● SAP transaction SM36
● SAP Solution Manager (via BC-XBP)
● SAP Central Process Scheduling by Redwood (via Business Automation Enabler - BAE)
● An external scheduling tool (via Solution Manager Scheduling Enable -SMSE)
Execute Job
Running the job should be an automated process step without any manual steps. At thescheduled date and time or triggered by a specific event, the job runs in the productiveenvironment. In an SAP system, the CCMS infrastructure supports this process step. It iseither controlled by the settings made in transaction SM36 or it is controlled by an externalscheduling tool.
Monitor Job
The job should then run successfully at the right (scheduled) time. If the job fails, identify theexception during the monitoring of the job. This job monitoring can be performed manually orautomatically and it consists of two parts – technical and functional monitoring. For every job,there should be at least one basic type of technical monitoring in place. This monitoring maybe an automated alert monitoring or at least a regular manual check if jobs canceled (abortedabnormally). Another kind of technical monitoring is to check for job runtimes that exceed anexpected maximum value. This kind of monitoring is more or less an exception basedmonitoring.
You monitor the most important jobs from a functional point of view. Therefore, you checkspecific log files for error messages (for example, job log, spool file or application log). Or youcheck manually if certain insert, update or delete operations have been performed.
Automated monitoring is provided via different tools, such as:
● SAP standard CCMS functionality monitoring
● Business Process Monitoring in SAP Solution Manager
● SAP Central Process Scheduling by Redwood
● External scheduling tools
Root Cause Analysis
Lesson: Explaining Job Management Processes in SAP Solution Manager
© Copyright. All rights reserved. 351
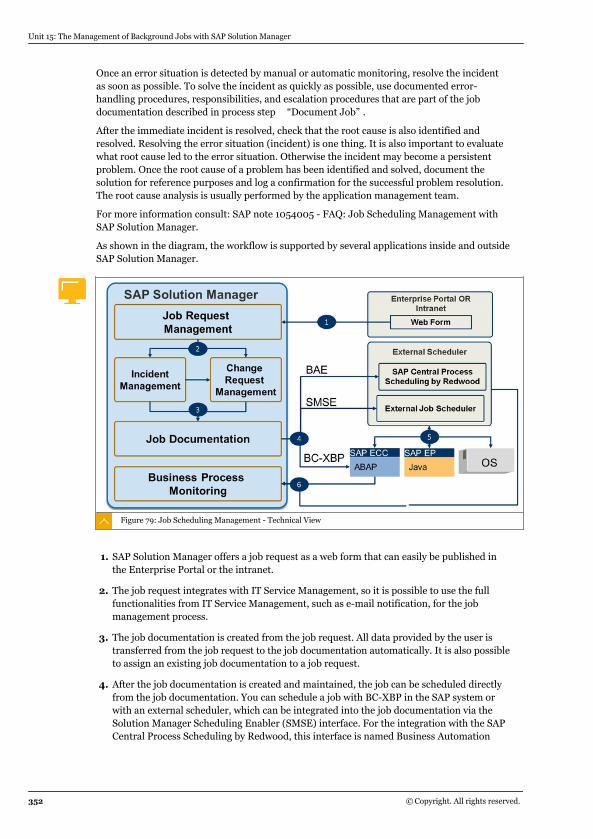
Once an error situation is detected by manual or automatic monitoring, resolve the incidentas soon as possible. To solve the incident as quickly as possible, use documented error-handling procedures, responsibilities, and escalation procedures that are part of the jobdocumentation described in process step “Document Job” .
After the immediate incident is resolved, check that the root cause is also identified andresolved. Resolving the error situation (incident) is one thing. It is also important to evaluatewhat root cause led to the error situation. Otherwise the incident may become a persistentproblem. Once the root cause of a problem has been identified and solved, document thesolution for reference purposes and log a confirmation for the successful problem resolution.The root cause analysis is usually performed by the application management team.
For more information consult: SAP note 1054005 - FAQ: Job Scheduling Management withSAP Solution Manager.
As shown in the diagram, the workflow is supported by several applications inside and outsideSAP Solution Manager.
Figure 79: Job Scheduling Management - Technical View
1. SAP Solution Manager offers a job request as a web form that can easily be published inthe Enterprise Portal or the intranet.
2. The job request integrates with IT Service Management, so it is possible to use the fullfunctionalities from IT Service Management, such as e-mail notification, for the jobmanagement process.
3. The job documentation is created from the job request. All data provided by the user istransferred from the job request to the job documentation automatically. It is also possibleto assign an existing job documentation to a job request.
4. After the job documentation is created and maintained, the job can be scheduled directlyfrom the job documentation. You can schedule a job with BC-XBP in the SAP system orwith an external scheduler, which can be integrated into the job documentation via theSolution Manager Scheduling Enabler (SMSE) interface. For the integration with the SAPCentral Process Scheduling by Redwood, this interface is named Business Automation
Unit 15: The Management of Background Jobs with SAP Solution Manager
352 © Copyright. All rights reserved.
Enabler (BAE). Interface SMSE has been available from SAP Solution Manager 7.1 SPS5.For more information about the SMSE interface see http://www.sap.com/partners/directories/searchpartner.epx → choose [Search for Solutions] → SAP-DefinedIntegration Scenarios: SM-SE.
5. In case the scheduling information has been transferred to an External Job Scheduler itwill start the Job within the Satellite System or even Operation System Level (dependingof the External Scheduler).
6. Job monitoring can also be fully integrated in the job documentation. The monitoring datais either gathered directly in the satellite system or is forwarded from the externalscheduling tool.
For more information about Job Scheduling Management (JSM) see SAP Note 1054005 -FAQ: Job Scheduling Management with SAP Solution Manager.
LESSON SUMMARYYou should now be able to:
● Outline the challenges of job management
● Describe the job management workflow
Lesson: Explaining Job Management Processes in SAP Solution Manager
© Copyright. All rights reserved. 353
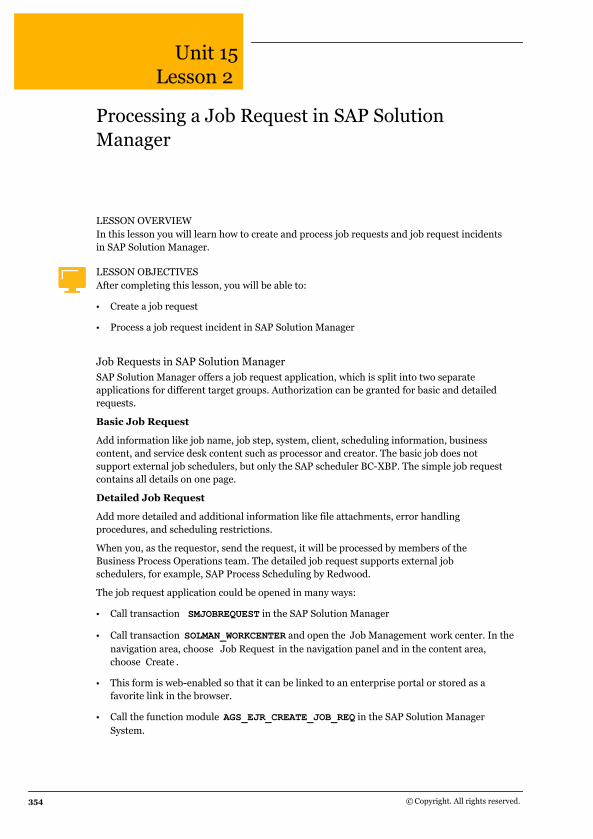
Unit 15Lesson 2
Processing a Job Request in SAP SolutionManager
LESSON OVERVIEWIn this lesson you will learn how to create and process job requests and job request incidentsin SAP Solution Manager.
LESSON OBJECTIVESAfter completing this lesson, you will be able to:
● Create a job request
● Process a job request incident in SAP Solution Manager
Job Requests in SAP Solution ManagerSAP Solution Manager offers a job request application, which is split into two separateapplications for different target groups. Authorization can be granted for basic and detailedrequests.
Basic Job Request
Add information like job name, job step, system, client, scheduling information, businesscontent, and service desk content such as processor and creator. The basic job does notsupport external job schedulers, but only the SAP scheduler BC-XBP. The simple job requestcontains all details on one page.
Detailed Job Request
Add more detailed and additional information like file attachments, error handlingprocedures, and scheduling restrictions.
When you, as the requestor, send the request, it will be processed by members of theBusiness Process Operations team. The detailed job request supports external jobschedulers, for example, SAP Process Scheduling by Redwood.
The job request application could be opened in many ways:
● Call transaction SMJOBREQUEST in the SAP Solution Manager
● Call transaction SOLMAN_WORKCENTER and open the Job Management work center. In thenavigation area, choose Job Request in the navigation panel and in the content area,choose Create .
● This form is web-enabled so that it can be linked to an enterprise portal or stored as afavorite link in the browser.
● Call the function module AGS_EJR_CREATE_JOB_REQ in the SAP Solution ManagerSystem.
354 © Copyright. All rights reserved.
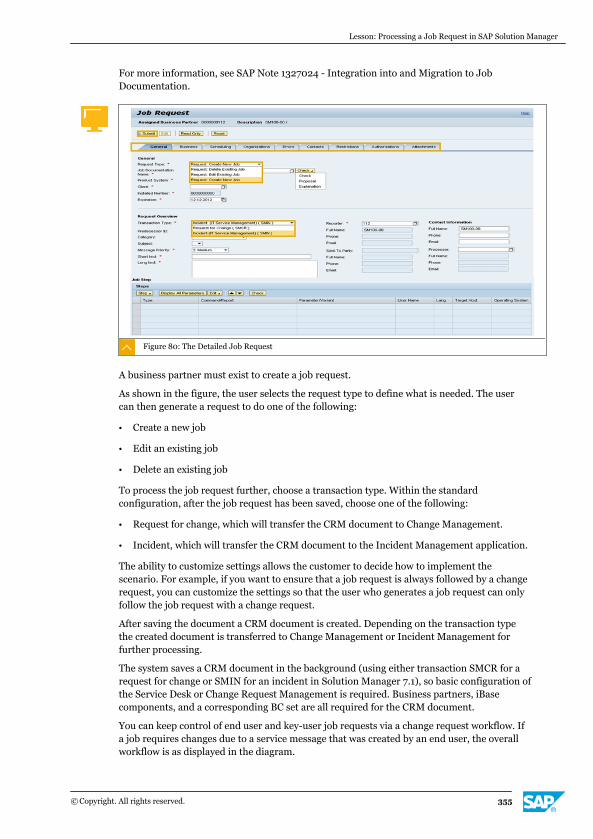
For more information, see SAP Note 1327024 - Integration into and Migration to JobDocumentation.
Figure 80: The Detailed Job Request
A business partner must exist to create a job request.
As shown in the figure, the user selects the request type to define what is needed. The usercan then generate a request to do one of the following:
● Create a new job
● Edit an existing job
● Delete an existing job
To process the job request further, choose a transaction type. Within the standardconfiguration, after the job request has been saved, choose one of the following:
● Request for change, which will transfer the CRM document to Change Management.
● Incident, which will transfer the CRM document to the Incident Management application.
The ability to customize settings allows the customer to decide how to implement thescenario. For example, if you want to ensure that a job request is always followed by a changerequest, you can customize the settings so that the user who generates a job request can onlyfollow the job request with a change request.
After saving the document a CRM document is created. Depending on the transaction typethe created document is transferred to Change Management or Incident Management forfurther processing.
The system saves a CRM document in the background (using either transaction SMCR for arequest for change or SMIN for an incident in Solution Manager 7.1), so basic configuration ofthe Service Desk or Change Request Management is required. Business partners, iBasecomponents, and a corresponding BC set are all required for the CRM document.
You can keep control of end user and key-user job requests via a change request workflow. Ifa job requires changes due to a service message that was created by an end user, the overallworkflow is as displayed in the diagram.
Lesson: Processing a Job Request in SAP Solution Manager
© Copyright. All rights reserved. 355
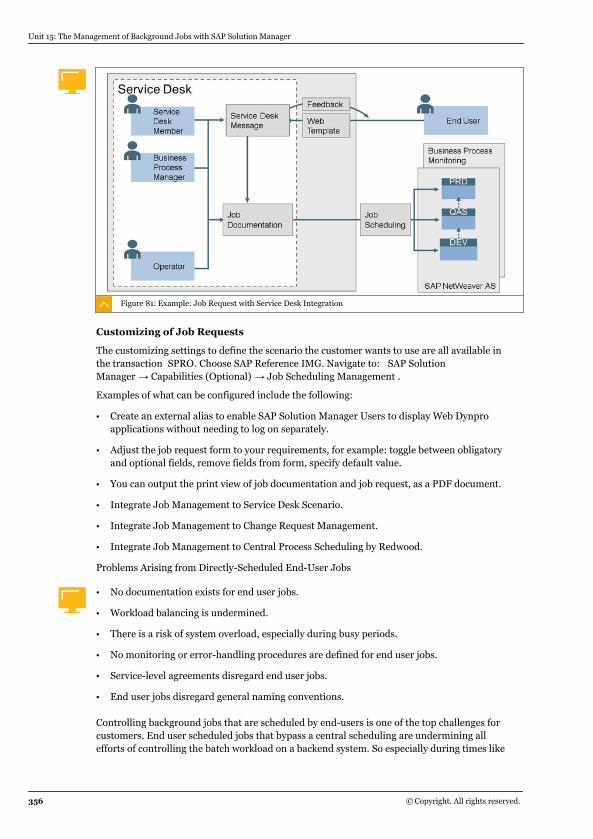
Figure 81: Example: Job Request with Service Desk Integration
Customizing of Job Requests
The customizing settings to define the scenario the customer wants to use are all available inthe transaction SPRO. Choose SAP Reference IMG. Navigate to: SAP SolutionManager → Capabilities (Optional) → Job Scheduling Management .
Examples of what can be configured include the following:
● Create an external alias to enable SAP Solution Manager Users to display Web Dynproapplications without needing to log on separately.
● Adjust the job request form to your requirements, for example: toggle between obligatoryand optional fields, remove fields from form, specify default value.
● You can output the print view of job documentation and job request, as a PDF document.
● Integrate Job Management to Service Desk Scenario.
● Integrate Job Management to Change Request Management.
● Integrate Job Management to Central Process Scheduling by Redwood.
Problems Arising from Directly-Scheduled End-User Jobs
● No documentation exists for end user jobs.
● Workload balancing is undermined.
● There is a risk of system overload, especially during busy periods.
● No monitoring or error-handling procedures are defined for end user jobs.
● Service-level agreements disregard end user jobs.
● End user jobs disregard general naming conventions.
Controlling background jobs that are scheduled by end-users is one of the top challenges forcustomers. End user scheduled jobs that bypass a central scheduling are undermining allefforts of controlling the batch workload on a backend system. So especially during times like
Unit 15: The Management of Background Jobs with SAP Solution Manager
356 © Copyright. All rights reserved.
Period End Closing, end user scheduled jobs have led to overload situations of customersystems. Besides the problem of undermining a meaningful workload distribution, jobs thatare run outside a central scheduling tool are not covered by any service level agreement andare hence not properly monitored by the corresponding scheduling team.
End user jobs are also nowhere documented and no error handling procedures exist. So evenif these jobs are covered by monitoring nobody knows how to react in case of an exception.
Document all periodic jobs and follow a standard procedure. Necessary one-time jobs shouldbypass the formal process, but still require controlling.
SAP introduced the job interception functionality for the first time with the eXternal BatchProcessing (XBP) interface version 2.0 in Q1/2003. At that time you could maintain entries intable TBCICPT1 to define which jobs should be intercepted. Every external scheduling toolcertified for XBP 2.0 could obtain a list of intercepted jobs and schedule or reschedule themaccording to defined rule-sets. Meanwhile the XBP version 3.0 was introduced which allows amore flexible maintenance of interception criteria via program CRITERIA_MANAGER.
For activating job interception on a specific backend system, execute program INITXBP2 first.There you select either XBP 2.0 or XBP 3.0 depending on whether the interception rules aremaintained via table TBCICPT1 or via program CRITERIA_MANAGER. The latter is onlyavailable for SAP_BASIS 7.0 or higher but is recommended when available. Instead ofswitching-on job interception manually an external scheduler like SAP Central ProcessScheduling by Redwood can use function module BAPI_XBP_NEW_FUNC_CHECK to switch-on or switch-off the functionality.
To intercept an end user job you have two options:
Intercept an End-User Job in Transaction SE16
1. Call transaction SE38, enter program INITXBP2 and choose Execute .
2. On the next screen, select activate 2.0 Change Settings and the switch On checkboxes andchoose F8.
3. Call transaction SE16.
4. Enter table name TBCICPT1.
5. Create a new entry defining the jobs, or the user whose jobs require interception.
6. Use the following fields to define it: Client, Jobname, Jobcreator.
Every field needs a value. If you want to intercept all jobs from a particular user enter =* in theJobname field.
Intercept an End-User Job by Maintaining the Criteria Profile in Transaction CRIT
1. Start transaction SE38, enter the program INITXBP2 and choose Execute.
2. On the following screen select activate 3.0 Change Settings and the switch On checkboxesand choose F8.
3. Add a new criterion of type Interception.
4. Add a new criterion specifying which jobs and/or the jobs of which user and/or of whichjob calls should be included in or excluded from job interception.
5. Activate the newly created profile.
Lesson: Processing a Job Request in SAP Solution Manager
© Copyright. All rights reserved. 357

You can combine criteria, so you could create an initial criterion preventing all users fromusing transaction SM37, then a second criterion allowing all users to use transaction SM37.
For availability of transaction CRIT refer to SAP note 1397918 - Criteria manager - transactionCRIT.
An external scheduler such as SAP Central Process Scheduling by Redwood would usefunction modules BAPI_CM_CRITERIA_SET, BAPI_CM_PROFILES_GET,BAPI_CM_PROFILE_CREATE, BAPI_CM_PROFILE_ACTIVATE to perform those activities.
The result in both cases is that the end user is not able to schedule jobs within the systemwhen you configure this.
We recommend using the Criteria Manager (transaction CRIT) instead of the table TBCICPT1.
Redirecting transactions SM36, SM37, SA38: Controlling end user scheduled jobs Theconcept is simple and will be explained with SM36 (the same mechanisms apply to SM37 andSA38). Many customers have policies in place where they cannot remove authorizations fortransactions like SM36 or the authorization cannot be removed because then no backgroundscheduling out of business transactions would be possible either. The solution described heredisables the direct scheduling functionality without removing authorizations, so end-userswith SM36 authorization can call transaction SM36 as before, but instead of accessing theSM36 screen they are redirected to a web form provided by SAP Solution Manager. This formcontains the same fields as SM36. Based on the data maintained by the end user (one-timejob vs. recurring job) this web form decides whether the job is directly scheduled in therespective backend system or whether a job request is created and the job needscomprehensive documentation (within SAP Solution Manager) before it is centrally scheduledby the corresponding scheduling team. This approach ensures that all recurring backgroundjobs (that end-users tried to schedule via SM36, SM37 or SA38) must follow a defined requestprocess and are centrally documented in SAP Solution Manager.
The technical prerequisites are at least twofold as at least two systems are involved - SAPSolution Manager on the one hand and at least one backend system on the other hand.
Your SAP Solution Manager needs to have software component ST400 (since SAP SolutionManager 7.0) on support package level 21 or higher.
Your respective backend system requires one of the following support package levels:
SAP_BASIS 700: SAPKB70021
SAP_BASIS 701: SAPKB70105
SAP_BASIS 710: SAPKB71009
SAP_BASIS 711: SAPKB7114
Controlling End-User Scheduled Jobs - Redirect
1. Execute program CRITERIA_MANAGER (transaction CRIT).
2. Add a new criterion of type Create Batchjobs via SolutionManager. For this type, add anew criterion specifying which users should be included in or excluded from redirection.
3. Activate the newly created profile.
Now the user cannot use transaction SM36 to create a job.
After the end user completes the Job Control wizard and saves the document, two differentscenarios are available:
Unit 15: The Management of Background Jobs with SAP Solution Manager
358 © Copyright. All rights reserved.
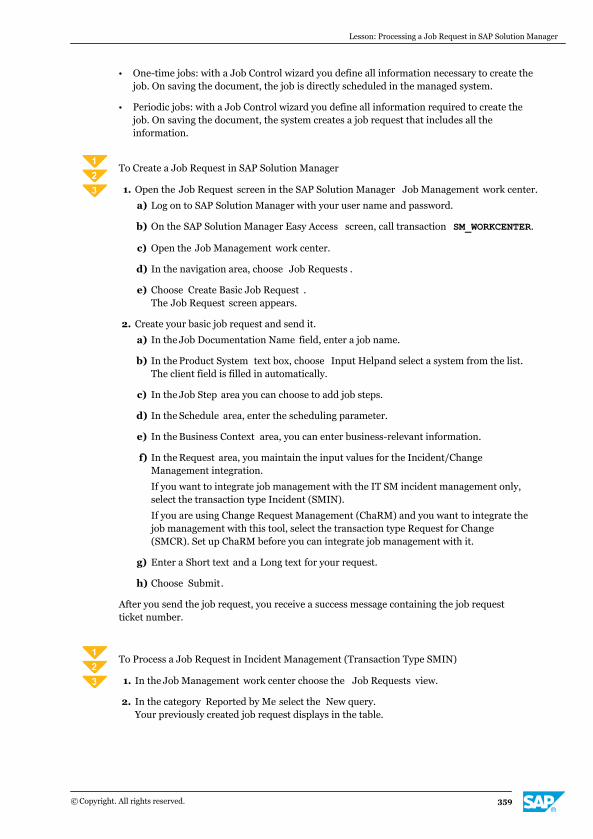
● One-time jobs: with a Job Control wizard you define all information necessary to create thejob. On saving the document, the job is directly scheduled in the managed system.
● Periodic jobs: with a Job Control wizard you define all information required to create thejob. On saving the document, the system creates a job request that includes all theinformation.
To Create a Job Request in SAP Solution Manager
1. Open the Job Request screen in the SAP Solution Manager Job Management work center.
a) Log on to SAP Solution Manager with your user name and password.
b) On the SAP Solution Manager Easy Access screen, call transaction SM_WORKCENTER.
c) Open the Job Management work center.
d) In the navigation area, choose Job Requests .
e) Choose Create Basic Job Request .The Job Request screen appears.
2. Create your basic job request and send it.
a) In the Job Documentation Name field, enter a job name.
b) In the Product System text box, choose Input Helpand select a system from the list.The client field is filled in automatically.
c) In the Job Step area you can choose to add job steps.
d) In the Schedule area, enter the scheduling parameter.
e) In the Business Context area, you can enter business-relevant information.
f) In the Request area, you maintain the input values for the Incident/ChangeManagement integration.
If you want to integrate job management with the IT SM incident management only,select the transaction type Incident (SMIN).
If you are using Change Request Management (ChaRM) and you want to integrate thejob management with this tool, select the transaction type Request for Change(SMCR). Set up ChaRM before you can integrate job management with it.
g) Enter a Short text and a Long text for your request.
h) Choose Submit.
After you send the job request, you receive a success message containing the job requestticket number.
To Process a Job Request in Incident Management (Transaction Type SMIN)
1. In the Job Management work center choose the Job Requests view.
2. In the category Reported by Me select the New query.Your previously created job request displays in the table.
Lesson: Processing a Job Request in SAP Solution Manager
© Copyright. All rights reserved. 359
3. Choose Job Request Display or select the job request name or the job request ID to reviewand edit the job request.
4. In the CRM Document column, select the number of your job request incident.The incident record opens on the CRM screen.
5. In the Details area, choose Edit.
6. In the Status dropdown list, set the status of the incident to In Process and choose Save .
7. In the Job Scheduling Management section, choose Edit.
8. Choose Create Job Documentation .The job documentation is created.
9. Save the incident.The job documentation and the job request are assigned to the incident record. The actualwork of dealing with the job documentation is performed.
10. Change the status of the incident to Proposed Solution and choose Save .
The incident can now be confirmed by the requestor.
To Process a Job Request in Change Request Management (Transaction Type SMCR).
1. For the most up-to-date procedure to manage job scheduling in Change RequestManagement, see http://help.sap.com → Application Lifecycle Management → SAPSolution Manager 7.1 → Application Help → <language>SAP Solution Manager 7.1 SPx → Business Process Operations → Job Scheduling Management → Job SchedulingManagement with Change Request Management.
Unit 15: The Management of Background Jobs with SAP Solution Manager
360 © Copyright. All rights reserved.

Unit 15Exercise 13
Generate a Job Request
Business Example
As a business user in your organization, you are required to ensure that the ABAP programSHOWCOLO runs daily. You create a job request to perform this task.
1. Use the information in the following table to create a Job Request.
Area Field Value
General Job Documentation Name <CourseID>-<GroupNum-ber>_Job
General Product System Your SAP Solution Manager
General Client Your SAP Solution ManagerProduction client
Job Step Description <CourseID>-<GroupNum-ber> Step 1
Job Step Command/Report SHOWCOLO
Job Step Parameter/Variant Leave this field blank.
Schedule Repeat Once
Schedule Frequency 01
Schedule Planned Start Date Current date
Schedule Planned Start Time 15:<GroupNumber>
Business Context Business Requirement Testing Job Management<CourseID>-<GroupNum-ber>
Business Context Business Process Not process specific
Request Overview Transaction Type Incident (IT ) (SMIN)
Request Overview Message Priority 2: High
Request Overview Short Text <CourseID>-<GroupNum-ber> Test Job
Request Overview Long Text A job to run an SAP stand-ard ABAP program calledSHOWCOLO.
© Copyright. All rights reserved. 361
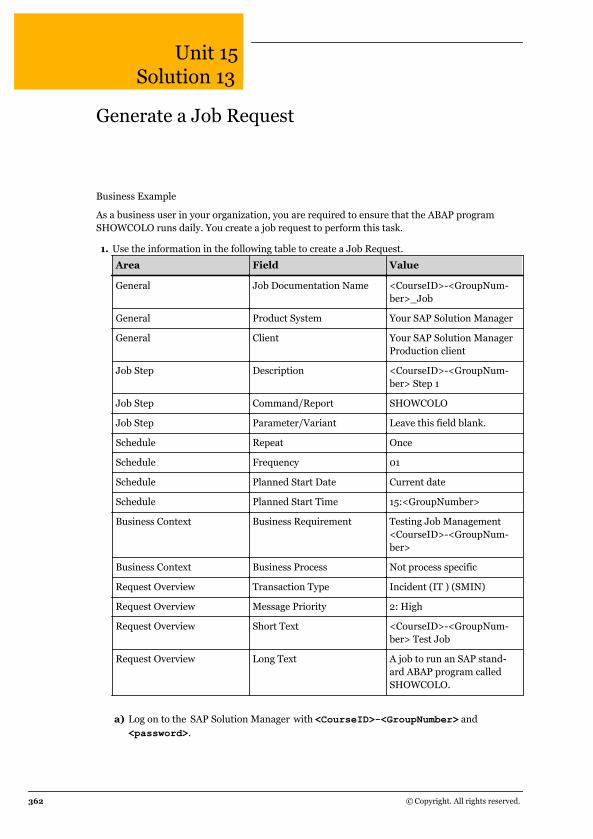
Unit 15Solution 13
Generate a Job Request
Business Example
As a business user in your organization, you are required to ensure that the ABAP programSHOWCOLO runs daily. You create a job request to perform this task.
1. Use the information in the following table to create a Job Request.
Area Field Value
General Job Documentation Name <CourseID>-<GroupNum-ber>_Job
General Product System Your SAP Solution Manager
General Client Your SAP Solution ManagerProduction client
Job Step Description <CourseID>-<GroupNum-ber> Step 1
Job Step Command/Report SHOWCOLO
Job Step Parameter/Variant Leave this field blank.
Schedule Repeat Once
Schedule Frequency 01
Schedule Planned Start Date Current date
Schedule Planned Start Time 15:<GroupNumber>
Business Context Business Requirement Testing Job Management<CourseID>-<GroupNum-ber>
Business Context Business Process Not process specific
Request Overview Transaction Type Incident (IT ) (SMIN)
Request Overview Message Priority 2: High
Request Overview Short Text <CourseID>-<GroupNum-ber> Test Job
Request Overview Long Text A job to run an SAP stand-ard ABAP program calledSHOWCOLO.
a) Log on to the SAP Solution Manager with <CourseID>-<GroupNumber> and<password>.
362 © Copyright. All rights reserved.
b) On the SAP Easy Access screen, call transaction SM_WORKCENTER.
c) Choose the Job Management tab.
d) In the left-hand menu, choose Create Basic Job Request .
e) Update the General area of the Job Request screen with the information in the table.
f) In the Job Steps area of the Job Request screen, choose Add.
g) Update the Add Job Step dialog box with the information in the table.
h) Update the Schedule , Business Context and Request Overview areas of the JobRequest screen with the information in the table.
i) Choose Submit.
Lesson: Processing a Job Request in SAP Solution Manager
© Copyright. All rights reserved. 363

Unit 15: The Management of Background Jobs with SAP Solution Manager
364 © Copyright. All rights reserved.
Unit 15Exercise 14
Process a Job Request Incident
Business Example
You process job requests created by other business users in your organization. You processthe job request created in the previous exercise and add documentation to it.
1. Open the job request in Edit mode, set the Incident to In Process, and create JobDocumentation.
2. Check the job documentation that you created from the Incident.
© Copyright. All rights reserved. 365
Unit 15Solution 14
Process a Job Request Incident
Business Example
You process job requests created by other business users in your organization. You processthe job request created in the previous exercise and add documentation to it.
1. Open the job request in Edit mode, set the Incident to In Process, and create JobDocumentation.
a) In the Job Management work center, in the Job Requests view, choose the Refreshbutton at the bottom of the table.
b) In the CRM Document field, select your job request incident number.The incident window opens.
c) In the Details screen area, choose Edit.
d) Change the value of the Status field to In Process .
e) In the Job Scheduling Management screen area, choose Edit.
f) At the top of the screen area, choose the Create Job Documentation button.The Change Job Documentation 2 screen appears.
g) In the Description text area, enter "This is a sample job documentation".
h) Choose Save .
i) Choose Close .
j) On the Incident <IncidentNumber>screen, find the Job Scheduling Managementscreen area.Your Job Request displays on one line and your Job Documentation displays onanother.
k) In the Details screen area, in the Processing Data section, change the value of theStatus field to Proposed Solution .
l) Choose Save .
m) Close the Incident <IncidentNumber>browser window.
2. Check the job documentation that you created from the Incident.
a) In the Job Management work center, in the Navigation area, choose JobDocumentation.The Job Documentation screen appears.
b) Choose Refresh.Your job documentation displays in the list.
366 © Copyright. All rights reserved.
c) In the Job Documentation column, select your Job Documentation Name .The Show Job Documentation 2 screen appears, displaying your job documentation.
Lesson: Processing a Job Request in SAP Solution Manager
© Copyright. All rights reserved. 367
LESSON SUMMARYYou should now be able to:
● Create a job request
● Process a job request incident in SAP Solution Manager
Unit 15: The Management of Background Jobs with SAP Solution Manager
368 © Copyright. All rights reserved.
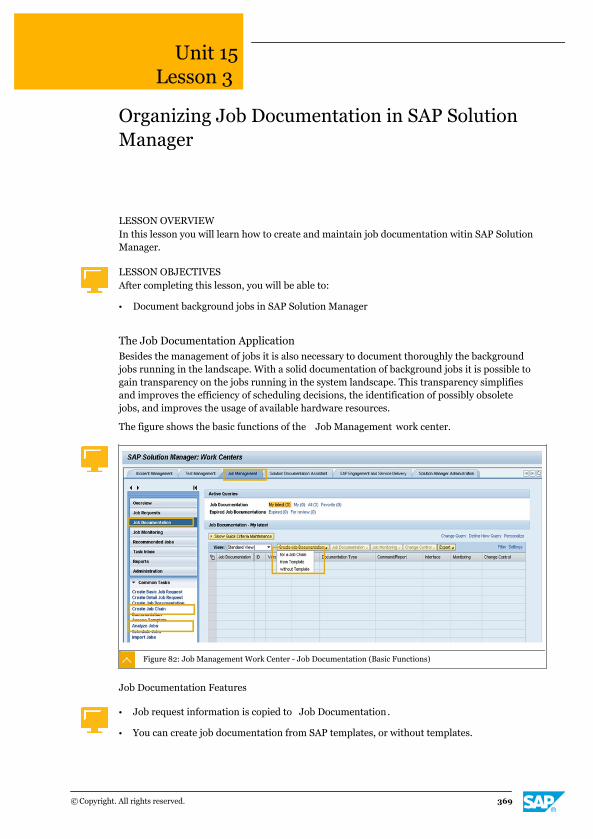
Unit 15Lesson 3
Organizing Job Documentation in SAP SolutionManager
LESSON OVERVIEWIn this lesson you will learn how to create and maintain job documentation witin SAP SolutionManager.
LESSON OBJECTIVESAfter completing this lesson, you will be able to:
● Document background jobs in SAP Solution Manager
The Job Documentation ApplicationBesides the management of jobs it is also necessary to document thoroughly the backgroundjobs running in the landscape. With a solid documentation of background jobs it is possible togain transparency on the jobs running in the system landscape. This transparency simplifiesand improves the efficiency of scheduling decisions, the identification of possibly obsoletejobs, and improves the usage of available hardware resources.
The figure shows the basic functions of the Job Management work center.
Figure 82: Job Management Work Center - Job Documentation (Basic Functions)
Job Documentation Features
● Job request information is copied to Job Documentation.
● You can create job documentation from SAP templates, or without templates.
© Copyright. All rights reserved. 369
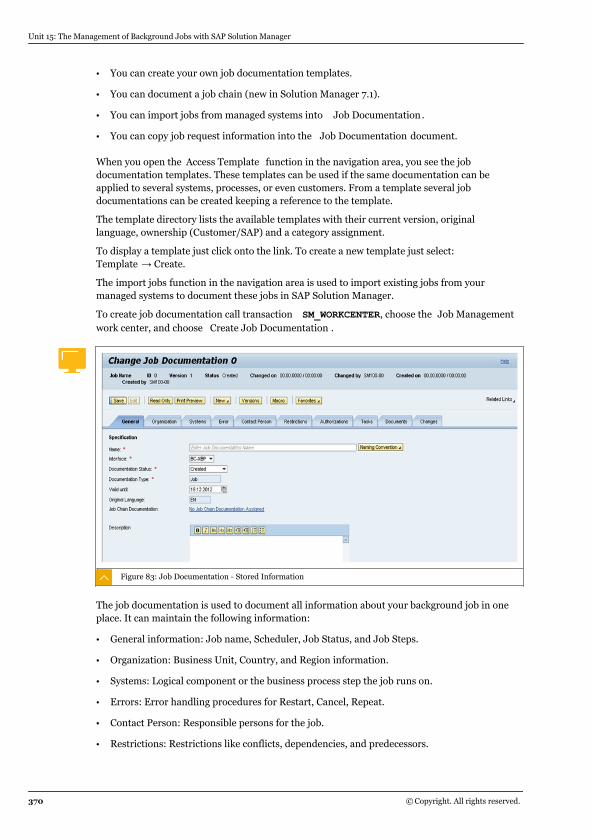
● You can create your own job documentation templates.
● You can document a job chain (new in Solution Manager 7.1).
● You can import jobs from managed systems into Job Documentation.
● You can copy job request information into the Job Documentation document.
When you open the Access Template function in the navigation area, you see the jobdocumentation templates. These templates can be used if the same documentation can beapplied to several systems, processes, or even customers. From a template several jobdocumentations can be created keeping a reference to the template.
The template directory lists the available templates with their current version, originallanguage, ownership (Customer/SAP) and a category assignment.
To display a template just click onto the link. To create a new template just select:Template → Create.
The import jobs function in the navigation area is used to import existing jobs from yourmanaged systems to document these jobs in SAP Solution Manager.
To create job documentation call transaction SM_WORKCENTER, choose the Job Managementwork center, and choose Create Job Documentation .
Figure 83: Job Documentation - Stored Information
The job documentation is used to document all information about your background job in oneplace. It can maintain the following information:
● General information: Job name, Scheduler, Job Status, and Job Steps.
● Organization: Business Unit, Country, and Region information.
● Systems: Logical component or the business process step the job runs on.
● Errors: Error handling procedures for Restart, Cancel, Repeat.
● Contact Person: Responsible persons for the job.
● Restrictions: Restrictions like conflicts, dependencies, and predecessors.
Unit 15: The Management of Background Jobs with SAP Solution Manager
370 © Copyright. All rights reserved.
● Authorizations: Authorization objects for the job.
● Tasks: Tasks for the background job.
● Documents: Additional documents for the job.
● Changes: Assigned Service Desk messages, change requests, and issues.
You can decide whether the respective tab strip of the job document is visible or not. Youdefine visibility in transaction SPRO under SAP Solution Manager → Capabilities(Optional) → Job Scheduling Management → Extended Configuration → Adapt Jobdocumentation → Adjust Job Documentation Tab Visibility.
Job Scheduling with Job DocumentationIn SAP Solution Manager, you can schedule a job directly from the job documentation. Howthe job is technically scheduled in the satellite system depends on the schedule type that isused for the job documentation.
If the scheduler used is interface BC-XBP, SAP Solution Manager accesses the satellitesystem directly via SM36.
If an external scheduler is used (interface BAE/SMSE) SAP Solution Manager transfers thescheduling information to the external scheduler and the job scheduler takes care of theactual scheduling in the satellite system.
SAP Central Process Scheduling (CPS) by Redwood is the only external scheduling tool that istightly integrated with SAP Solution Manager. Nevertheless, you can also use Job Request,Job Documentation, and Business Process Monitoring functionality in combination with everyother external scheduling tool. However, you then have to transfer scheduling informationmanually from the job document to your respective scheduling tool (just as you wouldtransfer data between MS Excel and your own scheduler). Moreover, other externalscheduling tools do not provide any feedback loop to SAP Solution Manager as SAP CPS byRedwood does.
If you plan to document Business Warehouse jobs, use an external scheduler via the interfaceBAE.
For more information, see the following:
● SAP Note 1122497 - Process Scheduling for SAP Solution Manager
● SAP Note 1265635 - How to setup BAE (Business Automation Enabler)
If you create many job documentations, you can assign contact persons, organizations, orlogical components (systems), to them automatically.
The job documentation can be accessed via an automation framework that executes XMLscripts. In Job Scheduling Management these XML scripts are responsible for the automaticscheduling of standard jobs but are also used to provide the job documentation macrofunctionality. You can even call the XML automation interface from remote system. Thisfacility could be used to create job documentations from a remote system.
See SAP note 1327024 for more information on remote APIs and the XML schema.
To create your first macro, just start report AGS_CREATE_JOBDOC_MACRO in transactionSE38 and enter the desired parameters for business priority, logical component, region,country, and contact person, and provide a unique macro ID and a description.
You can assign macros either to a single user or to all users in the SAP Solution Managersystem.
Lesson: Organizing Job Documentation in SAP Solution Manager
© Copyright. All rights reserved. 371
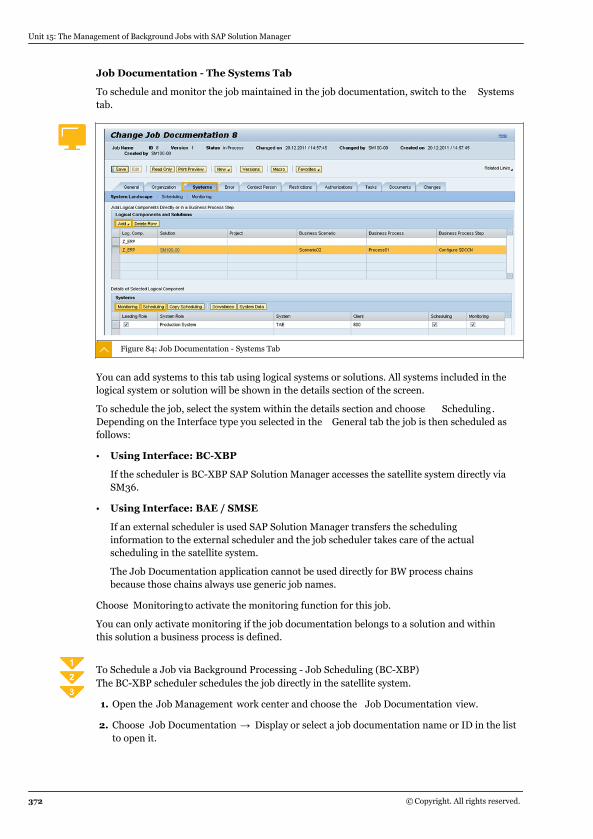
Job Documentation - The Systems Tab
To schedule and monitor the job maintained in the job documentation, switch to the Systemstab.
Figure 84: Job Documentation - Systems Tab
You can add systems to this tab using logical systems or solutions. All systems included in thelogical system or solution will be shown in the details section of the screen.
To schedule the job, select the system within the details section and choose Scheduling .Depending on the Interface type you selected in the General tab the job is then scheduled asfollows:
● Using Interface: BC-XBP
If the scheduler is BC-XBP SAP Solution Manager accesses the satellite system directly viaSM36.
● Using Interface: BAE / SMSE
If an external scheduler is used SAP Solution Manager transfers the schedulinginformation to the external scheduler and the job scheduler takes care of the actualscheduling in the satellite system.
The Job Documentation application cannot be used directly for BW process chainsbecause those chains always use generic job names.
Choose Monitoringto activate the monitoring function for this job.
You can only activate monitoring if the job documentation belongs to a solution and withinthis solution a business process is defined.
To Schedule a Job via Background Processing - Job Scheduling (BC-XBP)The BC-XBP scheduler schedules the job directly in the satellite system.
1. Open the Job Management work center and choose the Job Documentation view.
2. Choose Job Documentation → Display or select a job documentation name or ID in the listto open it.
Unit 15: The Management of Background Jobs with SAP Solution Manager
372 © Copyright. All rights reserved.
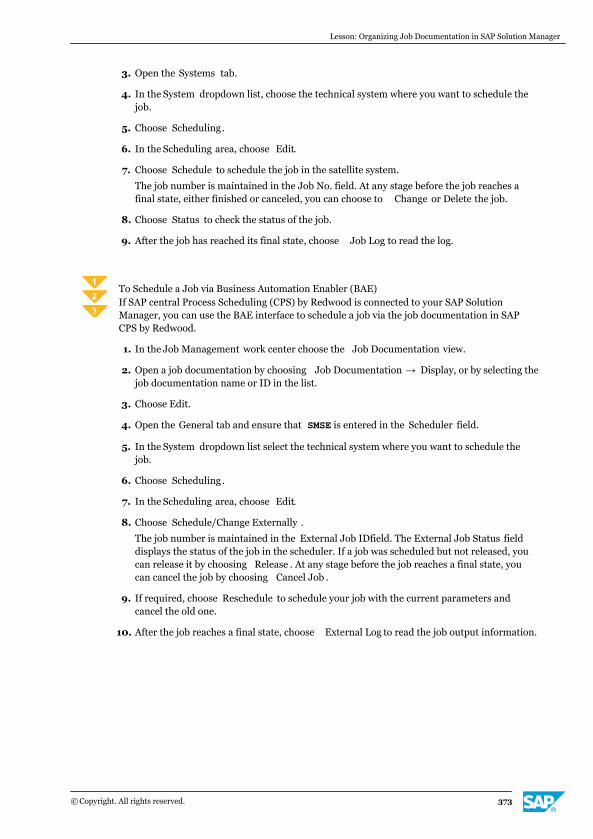
3. Open the Systems tab.
4. In the System dropdown list, choose the technical system where you want to schedule thejob.
5. Choose Scheduling.
6. In the Scheduling area, choose Edit.
7. Choose Schedule to schedule the job in the satellite system.
The job number is maintained in the Job No. field. At any stage before the job reaches afinal state, either finished or canceled, you can choose to Change or Delete the job.
8. Choose Status to check the status of the job.
9. After the job has reached its final state, choose Job Log to read the log.
To Schedule a Job via Business Automation Enabler (BAE)If SAP central Process Scheduling (CPS) by Redwood is connected to your SAP SolutionManager, you can use the BAE interface to schedule a job via the job documentation in SAPCPS by Redwood.
1. In the Job Management work center choose the Job Documentation view.
2. Open a job documentation by choosing Job Documentation → Display, or by selecting thejob documentation name or ID in the list.
3. Choose Edit.
4. Open the General tab and ensure that SMSE is entered in the Scheduler field.
5. In the System dropdown list select the technical system where you want to schedule thejob.
6. Choose Scheduling.
7. In the Scheduling area, choose Edit.
8. Choose Schedule/Change Externally .
The job number is maintained in the External Job IDfield. The External Job Status fielddisplays the status of the job in the scheduler. If a job was scheduled but not released, youcan release it by choosing Release . At any stage before the job reaches a final state, youcan cancel the job by choosing Cancel Job .
9. If required, choose Reschedule to schedule your job with the current parameters andcancel the old one.
10. After the job reaches a final state, choose External Log to read the job output information.
Lesson: Organizing Job Documentation in SAP Solution Manager
© Copyright. All rights reserved. 373

Unit 15: The Management of Background Jobs with SAP Solution Manager
374 © Copyright. All rights reserved.
Unit 15Exercise 15
Create Job Documentation and Schedule a Jobin SAP Solution Manager
Business Example
In the previous exercise, you created a job request, then created job documentation for thatjob request. Here, you build a job document directly in the SAP Solution Manager system,schedule the job in the SAP ERP satellite system, and check the success of the scheduling.
1. In the SAP Solution Manager Job Management work center, create a Job Documentationwithout template, using the following information:
In the General Tab
Name <CourseName>-<GroupNumber>-showcolo
Scheduler BC-XBP
Description Show ABAP colors
In the Job Step section
Description showcolo
Type ABAP Program
Command/Report showcolo (Do not use the F4 button on this field.)
Parameter/Variant Leave blank
Client-Dependent Leave unselected
© Copyright. All rights reserved. 375
Unit 15Solution 15
Create Job Documentation and Schedule a Jobin SAP Solution Manager
Business Example
In the previous exercise, you created a job request, then created job documentation for thatjob request. Here, you build a job document directly in the SAP Solution Manager system,schedule the job in the SAP ERP satellite system, and check the success of the scheduling.
1. In the SAP Solution Manager Job Management work center, create a Job Documentationwithout template, using the following information:
In the General Tab
Name <CourseName>-<GroupNumber>-showcolo
Scheduler BC-XBP
Description Show ABAP colors
In the Job Step section
Description showcolo
Type ABAP Program
Command/Report showcolo (Do not use the F4 button on this field.)
Parameter/Variant Leave blank
Client-Dependent Leave unselected
a) Log on to SAP Solution Manager with <CourseID>-<GroupNumber> and <password>.
b) On the SAP Solution Manager Easy Access screen, call transaction SM_WORKCENTER.
c) Open the Job Management work center.
d) In the navigation area, choose Job Documentation.
e) In the content area, choose Create Job Documentation and select without template .A browser window opens.
f) In the General tab, fill in the relevant fields with the information provided.
g) At the bottom of the window, in the Step Overview area, choose Add.A new window opens.
h) In the Job Step section, fill in the relevant fields with the information provided.
376 © Copyright. All rights reserved.
i) Choose OK.
j) Review the job documentation and add any further relevant information. The Systemstab is completed in the next exercise.
k) Choose Save .
Lesson: Organizing Job Documentation in SAP Solution Manager
© Copyright. All rights reserved. 377

Unit 15: The Management of Background Jobs with SAP Solution Manager
378 © Copyright. All rights reserved.
Unit 15Exercise 16
Schedule a Job in the SAP ERP SatelliteSystem
Business Example
Having created the job documentation, you add a logical component to your job and scheduleyour job in the SAP ERP system.
1. Add a logical component to your job and schedule the job in the SAP ERP system using thefollowing information:
On the Scheduling tab
RFC Connection SM_<ERP_SID>CLNT<ProductiveClientNumber>_TRUSTED
Time The time now plus 10 minutes
Period unit weeks
Period 01
2. Check the success of scheduling the job in the SAP ERP system, using transaction SM37.
© Copyright. All rights reserved. 379

Unit 15Solution 16
Schedule a Job in the SAP ERP SatelliteSystem
Business Example
Having created the job documentation, you add a logical component to your job and scheduleyour job in the SAP ERP system.
1. Add a logical component to your job and schedule the job in the SAP ERP system using thefollowing information:
On the Scheduling tab
RFC Connection SM_<ERP_SID>CLNT<ProductiveClientNumber>_TRUSTED
Time The time now plus 10 minutes
Period unit weeks
Period 01
a) In the Job Management work center, in the Job Documentation view, select your jobdocumentation name link.The Change Job Documentation 2 screen appears.
b) On the Change Job Documentation 2 screen, choose Edit.
c) Choose the Systems tab.
d) In the Logical Components and Solutions area, choose Add Logical Component .
e) In the dialog box, open Input Help.
f) Choose the logical component for the SAP ERP system, such as Z_ERP.
g) Choose Copy.
h) Select the SAP ERP system in the Systems list and choose the Scheduling buttonbelow the list.The Show Scheduling... screen appears.
i) Choose Edit.
j) Fill in the relevant fields with the information provided.Ensure you choose the TRUSTED RFC connection, which is not the default option.
k) Choose Save .
l) Choose Schedule .The Job <JobName> scheduled under ID <Number> message displays.
380 © Copyright. All rights reserved.
2. Check the success of scheduling the job in the SAP ERP system, using transaction SM37.
a) Log on to the SAP ERP system production client with the user <CourseID>-<GroupNumber> and <password>.
b) Call transaction SM37.
c) On the Simple Job Selection screen, in the Job Name field enter <YourJobName>.
d) Choose Execute .Your job displays.
e) Select your job and choose Job Change .The message You can only create/change jobs in Solution appears.
f) Confirm the message.The Job Control screen appears.
g) On the Job Control screen, check that the date, time, and job frequency match yourprevious entries.
h) Return to the Simple Job Selection screen.
i) In the Job doc column, double-click the symbol to view your job documentation.
Lesson: Organizing Job Documentation in SAP Solution Manager
© Copyright. All rights reserved. 381
LESSON SUMMARYYou should now be able to:
● Document background jobs in SAP Solution Manager
Unit 15: The Management of Background Jobs with SAP Solution Manager
382 © Copyright. All rights reserved.
Unit 15Lesson 4
Monitoring Background Jobs with SAPSolution Manager
LESSON OVERVIEWTo ensure that background jobs run properly, you must monitor them. In this lesson you willlearn how to include job monitoring in your job documentation.
LESSON OBJECTIVESAfter completing this lesson, you will be able to:
● Describe the options for monitoring background jobs in SAP Solution Manager
Background Job Monitoring in SAP Solution ManagerAfter you schedule a job, ensure it is running as scheduled and without errors. The JobManagement suite of SAP Solution Manager contains the following tools for job monitoring:
Tools for Job Monitoring
● Monitoring via BC-XBP interface
● Business Process Monitoring
● Monitoring via external scheduling tools such as SAP Central Process Scheduling byRedwood
Job Monitoring via BC-XBP Interface
One option for job monitoring view in the Job Management work center, SAP Job Scheduler,allows you to access the SM37 of the satellite systems connected to SAP Solution Managercentrally from the work center.
© Copyright. All rights reserved. 383
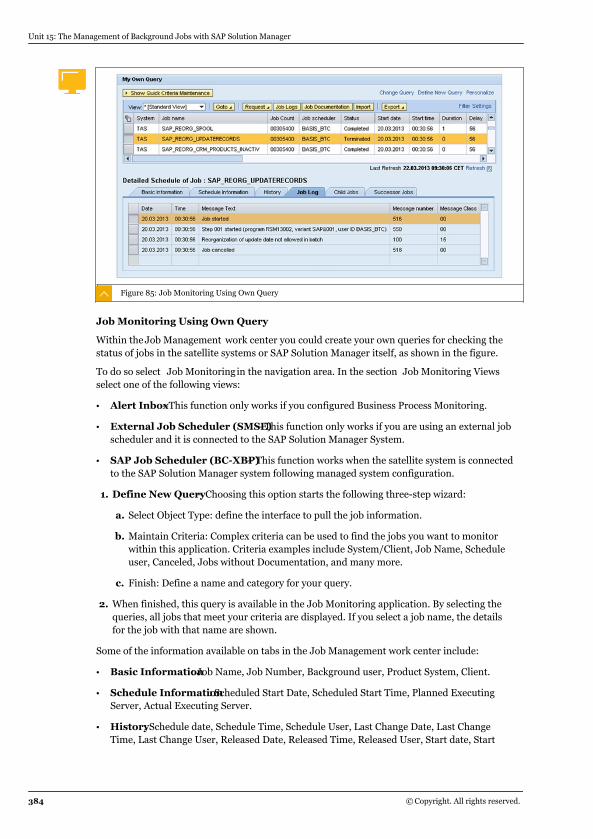
Figure 85: Job Monitoring Using Own Query
Job Monitoring Using Own Query
Within the Job Management work center you could create your own queries for checking thestatus of jobs in the satellite systems or SAP Solution Manager itself, as shown in the figure.
To do so select Job Monitoringin the navigation area. In the section Job Monitoring Viewsselect one of the following views:
● Alert Inbox–This function only works if you configured Business Process Monitoring.
● External Job Scheduler (SMSE)– This function only works if you are using an external jobscheduler and it is connected to the SAP Solution Manager System.
● SAP Job Scheduler (BC-XBP)– This function works when the satellite system is connectedto the SAP Solution Manager system following managed system configuration.
1. Define New Query– Choosing this option starts the following three-step wizard:
a. Select Object Type: define the interface to pull the job information.
b. Maintain Criteria: Complex criteria can be used to find the jobs you want to monitorwithin this application. Criteria examples include System/Client, Job Name, Scheduleuser, Canceled, Jobs without Documentation, and many more.
c. Finish: Define a name and category for your query.
2. When finished, this query is available in the Job Monitoring application. By selecting thequeries, all jobs that meet your criteria are displayed. If you select a job name, the detailsfor the job with that name are shown.
Some of the information available on tabs in the Job Management work center include:
● Basic Information: Job Name, Job Number, Background user, Product System, Client.
● Schedule Information: Scheduled Start Date, Scheduled Start Time, Planned ExecutingServer, Actual Executing Server.
● History: Schedule date, Schedule Time, Schedule User, Last Change Date, Last ChangeTime, Last Change User, Released Date, Released Time, Released User, Start date, Start
Unit 15: The Management of Background Jobs with SAP Solution Manager
384 © Copyright. All rights reserved.
time, Periodic Job, Successor Job, Previous job, Latest Date, Latest Time, Duration,seconds Delay, seconds Status.
● Job Log: Shows the complete Job log as is the transaction SM37
● If Child Jobsand Successor Jobsexist for the selected job, they display here.
To Create a Query for Job MonitoringWithin the Job Management work center you can create queries to check the status of jobs inthe satellite systems or within Solution Manager itself.
1. In the SAP Solution Manager Job Management work center, in the SAP Job Scheduler(BC_XBP) monitoring view, start the Define New Query wizard.
a) Log on to SAP Solution Manager with your user name and password.
b) On the SAP Solution Manager Easy Access screen, call transaction SM_WORKCENTER.
c) Open the Job Management work center.
d) In the navigation area, choose Job Monitoring.
e) In the Job Monitoring Views area, choose the SAP Job Scheduler (BC-XBP) radiobutton.
f) From the row of links above the My Jobs table, select Define New Query.The Define New Query wizard appears.
2. Enter at least the following information in the wizard:
Select Object Type
Select Object Type field Work Center - JSM - Job XBP (default)
Maintain Criteria
System:Client fieldEnter the name of the client for which you want to monitor jobs.
Maintaining additional fields allows you to restrict the result list further.
Select Jobs Without Documentation to display all jobs that do not yet have documentationin SAP Solution Manager.
Next
Enter Query DescriptionEnter a meaningful description of your query.
Select Category Select a category from the dropdown list or define a newcategory.
a) Choose Finish.The query is created.
Lesson: Monitoring Background Jobs with SAP Solution Manager
© Copyright. All rights reserved. 385

Job Monitoring Using Business Process MonitoringBusiness Process Monitoring in SAP Solution Manager offers enhanced job monitoring.Besides the monitoring of key figures like job cancellation and maximum duration, it is alsopossible to monitor job log messages, which enables you to monitor if certain messagesappear in the job log. It is possible to monitor the start and end delay on a technical level (suchas SM37) and on a business-related level. It is also possible to assign planned start and endtimes, independent of the technical start time of the job, to meet business requirements.
There are two ways to set up Business Process Monitoring in SAP Solution Manager. You canset up monitoring directly in SAP Solution Manager job documentation, or you can include jobmonitoring in your business process and interface monitoring concept. Then, you set up thejob monitoring together with all business process monitoring functionalities in the BusinessProcess Monitoring setup session.
Currently there are more than 500 out-of-the-box key figures shipped with Business ProcessMonitoring. Some of the most important are as follows:
Business Process Monitoring - KPIs for Job Monitoring
● Start/End delay
● Out of time window
● Not started on time
● Maximum duration
● Cancellation
● Parallel processing
● Job log messages
● Job log content
● Job active status (for BW process chains only)
● Records processed (for BW process chains only)
● Data packages processed (for BW process chains only)
● Application log error messages (SLG1 - can only be used when business processmonitoring is configured in the Business Process Monitoring work center)
● Update errors during job processing (can only be used when business process monitoringis configured in the Business Process Monitoring work center)
The KPIs you choose to monitor depend on the overall monitoring concept in yourorganization. Regardless of the scenario you use, however, ensure you meet the necessaryprerequisites to set up job monitoring in the job documentation. Job monitoring in the jobdocumentation is technically based on business process monitoring, so the technicalprerequisites for Business Process Monitoring must be fulfilled, as follows:
Prerequisites for Business Process Monitoring
1. Correct user authorizations in SAP Solution Manager and in the managed system, throughtransaction PFCG.
2. Correct versions of the necessary software components in all involved systems. For moreinformation check SAP Note 521820.
Unit 15: The Management of Background Jobs with SAP Solution Manager
386 © Copyright. All rights reserved.
3. Correctly maintained system landscape in SAP Solution Manager, using transaction SMSYor LMDB.
4. Required RFC connections in transactions SU01 and SM59, including the following:
● Read connection
● Dialog login connection
● Local RFC connection BPM_LOCAL_<Client>
5. Correctly maintained general settings in the relevant transactions, including
● Time settings
● Integrate SAP Connect
● Integrate Service Desk
For more information, see SAP Note 784752 - BPMon in SAP Solution Manager -Prerequisites
To Set Up Job Monitoring in Job Documentation
1. In the SAP Solution Manager Job Management work center, open a job documentation.
a) In the Job Management work center, in the navigation area, choose JobDocumentation.
b) Choose Job Documentation → Display.
Alternatively, you can click the name or ID of the documentation you want to display.
2. Assign a business process step to the job documentation.
a) On the Show Job Documentation screen, choose the Systems tab.
b) Check that the System Landscape view displays.
c) Choose Edit.
d) Choose Add → Solution.
e) Select the solution that contains your business processes.
f) Select the business process step that contains your logical component.
g) Choose Assign.
h) Choose Save .
3. On the Show Job Documentation screen, set up monitoring as required.
a) In the Systems screen area, select the technical system belonging to a solution forwhich you want to set up monitoring and choose Monitoring.The Job Monitoring Configurationscreen appears.
b) Choose Change to switch to edit mode.
c) On the Data Collection tab, maintain the active monitoring period and the data source,such as SAP CPS by Redwood.
Lesson: Monitoring Background Jobs with SAP Solution Manager
© Copyright. All rights reserved. 387
d) On the Alert Configuration tab, maintain the thresholds for the key performanceindicators for the monitoring.
e) On the Notifications tab, maintain auto-notification methods such as e-mails andservice desk tickets.
f) Save the change, generate the monitoring object, and choose Activate Monitoring.
To Process an Alert in Job ManagementIf an alert occurs, you can find it in the Job Management work center, in the Job Monitoringarea, in the Alert Inbox view.
1. For the most up-to-date procedure to process an alert in job management, see http://help.sap.com → SAP Solution Manager → Business Process Operations → JobScheduling Management → Job Management Work Center → Configuring Job Monitoring.
Job Monitoring with Business Process and Interface MonitoringYou can use Business Process and Interface Monitoring (BPMon) with SAP Solution Managerto detect and solve problems before critical situations arise. Avoid costly system or businessprocess downtimes and reduce the risk of data inconsistencies.
Graphical displays in the Business Process and Interface Monitoring application provide anoverview of entire business processes. They automatically collect application-specific keyfigures.
Business process and interface monitoring can be called from the Business Process workcenter.
You can add information to business processes and interfaces that you specified in solutions.
You can select business processes and interfaces and create reports for them.
Business process monitoring (including interface monitoring) in SAP Solution Manager usesthe Computing Center Management System (CCMS) architecture (transaction: RZ20). Thismeans that the RFC connection forwards alerts in the local CCMS to the SAP SolutionManager. You can process alerts without having to go to the local CCMS, and you can manageand monitor non-SAP systems in a central CCMS (CEN).
Business Process and Interface Monitoring
The prerequisites for using business process and interface monitoring are as follows:
1. Administration has technically set up business process monitoring. For more information,see the SAP Solution Manager Configuration work center.
2. You have created a solution that includes documented business processes. For moreinformation, see Creating Solutions from a Work Center.
3. You have taken into account SAP Note 1486845 and SAP Note 521820.
4. You are authorized to set up business process monitoring. For more information, see theSAP Solution Manager Security Guide in the SAP Service Marketplace at http://service.sap.com/instguides → SAP Components → SAP Solution Manager <CurrentRelease> and SAP Note 1436270.
To configure Business Process Monitoring call transaction SM_WORKCENTER and choosethe work center Business Process Operation.
Unit 15: The Management of Background Jobs with SAP Solution Manager
388 © Copyright. All rights reserved.
In the navigation area, choose Setup Business Process Monitoring in the Common Task area.
A new browser window opens where, in the navigation area, you choose a solution thatcontains your business processes.
You have 300 KPIs sorted by different application areas available to you from which to createan alert for a business process step or interface. Examples include the following:
● Application logs
● Dialog Performance
● Background Processing
● Document Volume
● CCMS Monitor
● Update Errors
● Data Consistency
Specify and Display Technical Requirements
As the person responsible for a business process, you create a concept to monitor it:
● Determine which business processes and interfaces are particularly critical and requiremonitoring.
● For specified business process steps, specify as technical requirements which key figuresare important, and the threshold values that they must reach or not exceed.
Example
For optimum support of sales discussions with customers, ensure that it takes no longer than1 second to switch to the screen of a transaction.
SAP Solution Manager supports your conceptual work by assigning the technicalrequirements to structure objects in a solution, and saving them in the system. In the nextstep, you implement your verbally formulated requirements technically. Determine keyfigures that address your requirements, and implement monitoring objects to collect the keyfigures, and generate alerts, if required.
Note:To be able to configure Business Process Monitoring, set up a business processwithin the transaction SOLMAN_DIRECTORY.
Lesson: Monitoring Background Jobs with SAP Solution Manager
© Copyright. All rights reserved. 389

Figure 86: Using Business Process Monitoring
After you configure Business Process Monitoring, you can use the Business ProcessOperations work center to display an overview of the current status of your businessprocesses.
To do so, call transaction SM_WORKCENTER and choose the Business Process Operations workcenter.
To display a graphical overview, in the navigation area choose Business Processes and choosethe Graphical Overview tab in the content area.
You can also use the Alert Inboxto view all alerts belonging to the various solutions youspecified during the setup.
For more information, see the SAP Solution Manager Support Portal in the SAP ServiceMarketplace at http://service.sap.com/bpm
Business process and interface monitoring is also covered in more detail in the coursesSM300 and E2E300.
Job Monitoring via SAP CPS by Redwood
SAP Central Process Scheduling by Redwood can be integrated into Business ProcessMonitoring in SAP Solution Manager. Using the Process Scheduling Adapter, you can pushthe monitoring information directly from SAP CPS into SAP Solution Manager, so additionaldata collection by Business Process Monitoring in the managed system is unnecessary.
To use this mechanism, select the data collection method Source is CPS by Redwood duringthe monitoring setup in the job documentation.
Additionally, the External Job Scheduler (BAE) job monitoring view in the Job Managementwork center allows you to access the monitoring functionality in an SAP CPS by Redwood thatis connected to SAP Solution Manager remotely.
LESSON SUMMARYYou should now be able to:
● Describe the options for monitoring background jobs in SAP Solution Manager
Unit 15: The Management of Background Jobs with SAP Solution Manager
390 © Copyright. All rights reserved.
Unit 15Lesson 5
Optimizing the Background Job Schedule withSAP Solution Manager Tools
LESSON OVERVIEWIn this lesson you will learn how to analyze and optimize your background job schedule withSAP Solution Manager tools.
LESSON OBJECTIVESAfter completing this lesson, you will be able to:
● Analyze background jobs in SAP Solution Manager
● Carry out job management health checks in SAP Solution Manager
Background Processing AnalysisImproving the existing job schedule is a key task in the Job Scheduling Managementenvironment. This improvement may be attempted through technical optimization of a job’sruntime or the optimization of the overall job schedule so that hardware resources are usedmore efficiently or hardware bottlenecks are avoided. This optimization can also involve thediscontinuation of jobs that are no longer needed, so you are running as few jobs as possibleand as many jobs as necessary.
Improvement of the job schedule comprises the following areas:
● Discontinuation of jobs that are no longer needed.
● Rescheduling of jobs to a different server or to a different point in time.
The first step toward discontinuing jobs is to identify those jobs that are no longer needed.This task can be simplified if detailed job documentation is available for all jobs and if thisdocumentation contains some information about the validity of jobs.
A decision for rescheduling is supported by the BACKGROUND_JOB_ANALYSIS function,which is provided in every ABAP-based SAP system with transaction ST13. This functionchecks the job distribution on the involved system and helps you locate a free time slot for thejob to be rescheduled.
The job runtime and its time components can be analyzed via standard SAP tracefunctionality, especially transactions ST05 and ST12 for SQL and ABAP analysis, respectively.
Additionally, SAP Solution Manager offers enhanced BI reporting functionality that can beused to run long-term analyses of job runtimes and support rescheduling considerations.
Background Job AnalysisThe BACKGROUND_JOB_ANALYSIS tool is available locally in every SAP back-end systemwith a recent ST-A/PI plug-in. It was first introduced with the plug-in ST-A/PI 01G.
© Copyright. All rights reserved. 391
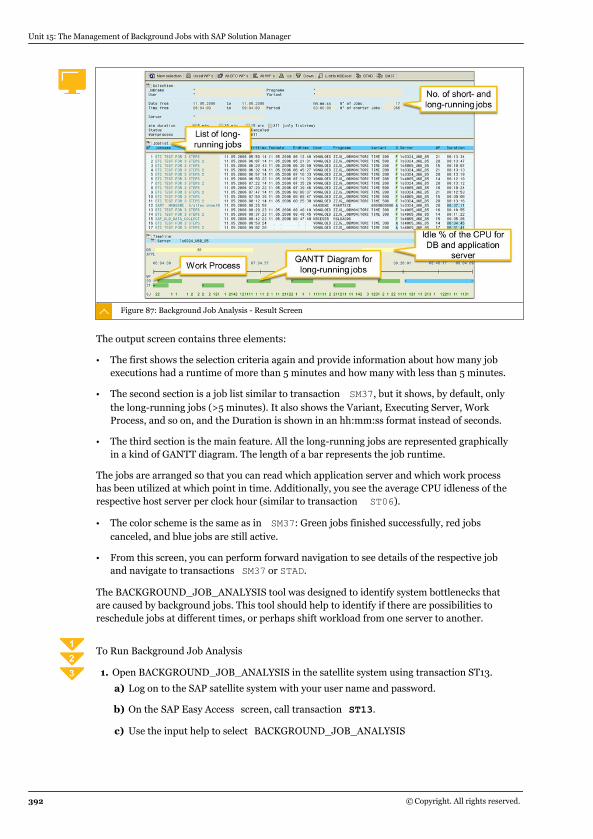
Figure 87: Background Job Analysis - Result Screen
The output screen contains three elements:
● The first shows the selection criteria again and provide information about how many jobexecutions had a runtime of more than 5 minutes and how many with less than 5 minutes.
● The second section is a job list similar to transaction SM37, but it shows, by default, onlythe long-running jobs (>5 minutes). It also shows the Variant, Executing Server, WorkProcess, and so on, and the Duration is shown in an hh:mm:ss format instead of seconds.
● The third section is the main feature. All the long-running jobs are represented graphicallyin a kind of GANTT diagram. The length of a bar represents the job runtime.
The jobs are arranged so that you can read which application server and which work processhas been utilized at which point in time. Additionally, you see the average CPU idleness of therespective host server per clock hour (similar to transaction ST06).
● The color scheme is the same as in SM37: Green jobs finished successfully, red jobscanceled, and blue jobs are still active.
● From this screen, you can perform forward navigation to see details of the respective joband navigate to transactions SM37 or STAD.
The BACKGROUND_JOB_ANALYSIS tool was designed to identify system bottlenecks thatare caused by background jobs. This tool should help to identify if there are possibilities toreschedule jobs at different times, or perhaps shift workload from one server to another.
To Run Background Job Analysis
1. Open BACKGROUND_JOB_ANALYSIS in the satellite system using transaction ST13.
a) Log on to the SAP satellite system with your user name and password.
b) On the SAP Easy Access screen, call transaction ST13.
c) Use the input help to select BACKGROUND_JOB_ANALYSIS.
Unit 15: The Management of Background Jobs with SAP Solution Manager
392 © Copyright. All rights reserved.
d) Choose Execute .
2. Enter the details of the jobs for analysis.
a) On the Select screen, enter selection criteria of jobs.You can choose the job name or the program name. You can also use wildcards here.
b) In the Job Options screen area, select the time frame and the duration of the jobs to beconsidered. The time frame cannot exceed 24 hours. The date is freely definable. Theminimum duration allows you to decide that shorter jobs should be ignored in theselection.
c) In the Options screen area, you can select a job status of Active, Finished, and/orCanceled .
d) Choose Execute .
Job Management Health CheckThe job scheduling management (JSM) health check is an analytical functionality in SAPSolution Manager. It provides reporting dashboards based on key performance indicators(KPIs) related to job execution data collected from selected managed SAP systems. TheseKPIs provide an overall picture of the actual system workload caused by backgroundprocessing to identify possible optimization potential in specified managed systemsconnected to SAP Solution Manager.
The JSM health check benefits your system by identifying:
● Longest running jobs
● Jobs that run and/or cancel most often
● Jobs with longest start delay times
The JSM health check also shows the distribution of background jobs across applicationservers and across the creating or scheduling users.
The JSM health check helps you to do the following:
● Reduce the overall system workload caused by background jobs.
● Ensure even workload distribution across system servers.
● Identify system bottlenecks such as lack of work processes.
● Handle user-scheduled jobs that bypass central scheduling and cause high workload.
Lesson: Optimizing the Background Job Schedule with SAP Solution Manager Tools
© Copyright. All rights reserved. 393
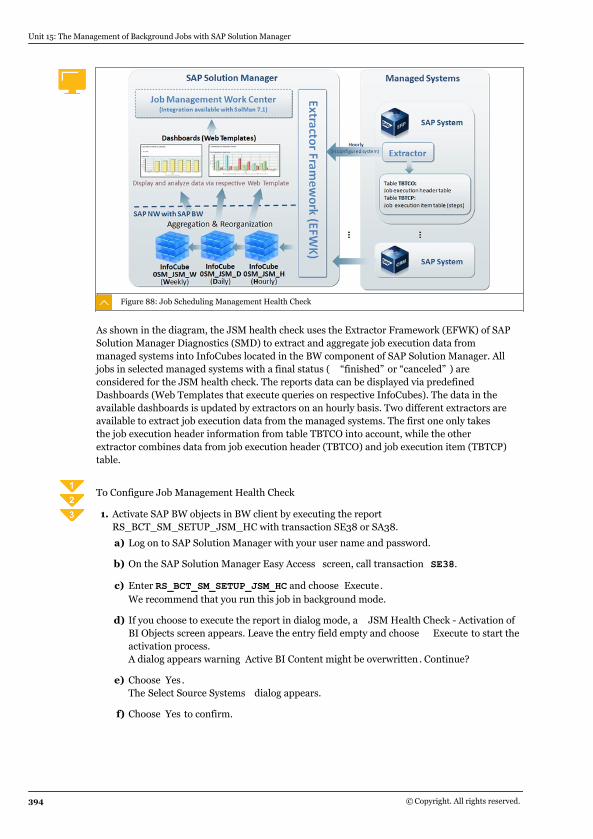
Figure 88: Job Scheduling Management Health Check
As shown in the diagram, the JSM health check uses the Extractor Framework (EFWK) of SAPSolution Manager Diagnostics (SMD) to extract and aggregate job execution data frommanaged systems into InfoCubes located in the BW component of SAP Solution Manager. Alljobs in selected managed systems with a final status ( “finished” or “canceled” ) areconsidered for the JSM health check. The reports data can be displayed via predefinedDashboards (Web Templates that execute queries on respective InfoCubes). The data in theavailable dashboards is updated by extractors on an hourly basis. Two different extractors areavailable to extract job execution data from the managed systems. The first one only takesthe job execution header information from table TBTCO into account, while the otherextractor combines data from job execution header (TBTCO) and job execution item (TBTCP)table.
To Configure Job Management Health Check
1. Activate SAP BW objects in BW client by executing the reportRS_BCT_SM_SETUP_JSM_HC with transaction SE38 or SA38.
a) Log on to SAP Solution Manager with your user name and password.
b) On the SAP Solution Manager Easy Access screen, call transaction SE38.
c) Enter RS_BCT_SM_SETUP_JSM_HC and choose Execute .We recommend that you run this job in background mode.
d) If you choose to execute the report in dialog mode, a JSM Health Check - Activation ofBI Objects screen appears. Leave the entry field empty and choose Execute to start theactivation process.A dialog appears warning Active BI Content might be overwritten . Continue?
e) Choose Yes .The Select Source Systems dialog appears.
f) Choose Yes to confirm.
Unit 15: The Management of Background Jobs with SAP Solution Manager
394 © Copyright. All rights reserved.
When all objects are configured, the message All steps successfully performeddisplays.
Alternatively, you can run the report RAGS_JSM_CONFIG_CUSTOMIZE by checkingBW Content Activation and entering RFC destination to BW to start reportRS_BCT_SM_SETUP_JSM_HC as a background job.
2. Check the result in the Data Warehousing Workbench, using transaction RSA1.
a) Return to the SAP Easy Access screen and call transaction RSA1.The Data Warehousing Workbench: Modeling screen appears.
b) In the Modeling screen area choose InfoProvider.
c) In the main screen area, expand SAP Solution Manager → SAP Solution Manager JobScheduling Management .The following JSM objects display:
● JSM Health Check Daily
● JSM Health Check Hourly
● JSM Health Check Weekly
● JSM Health Check for BPMon
● JSM Health Check for BW Chain Monitor
● JSM Health Check for Banking
The JSM Health Check on Jobs has three dashboard views with differentaggregation levels and timeframes based on the data collected by the extractors.To enable this functionality, the EFWK and housekeeping jobs must be working tostart the automatic aggregation and reorganization process.
3. Check the following Extractor Framework (EFWK) and housekeeping jobs in transactionSM37.
● EFWK_RESOURCE_MGR starts extraction cycle of EFWK and executes the dataextractor according to scheduling. This job should run every minute.
● E2E_BI_HOUSEKEEPING performs data aggregation and reorganization within EFWKregarding the configuration of the underlying tables E2E_BI_AGGREGATE andE2E_BI_DELETE. This job should run once a day, shortly after midnight.
a) Return to the SAP Easy Access screen and call transaction SM37.
b) Use the input help or enter the names of the required jobs and check that they arescheduled. If they are not, schedule and activate them.
4. Check the following settings in the table E2E_RESOURCES, which contains RFC resourcesavailable for data extraction with EFWK, using transaction SE16:
● NONE
● SOLMANDIAG
● SOLMAN_DIALOG_WORKPROCESSES
The naming convention for the RFCRESOURCE is SM_SIDCLNT000_READ (where SID isthe system ID and 000is the client number). Make sure that the list includes the needed
Lesson: Optimizing the Background Job Schedule with SAP Solution Manager Tools
© Copyright. All rights reserved. 395
system as well as the required settings. If the BW client is different from the SolutionManager client (if the RFC destination to BI is not NONE) an entry should exist in this tablefor RFC destination to BW client under RFCRESOURCE (see field String in tableE2E_WA_CONFIG where type=SAP_BID).
a) Return to the SAP Easy Access screen and call transaction SE16.
b) On the Data Browser screen, enter E2E_RESOURCES and check the settings.
c) If an entry is missing you can manually create it, but you should create such entriesduring the managed systems setup.
5. Configure the system-specific data extraction process for the JSM Health Check byupdating the E2E_ACTIVE_WLI table for active worklist items within the EFWK, as follows:
● In the Job Daily/Weekly/Monthly view, add the scheduling of the JSM Health Checkextractors to trigger data transfer between SAP Solution Manager and the managedsystems.
● Schedule the extractor for either job or job step execution data for one specific systemyou want to include in the JSM Health Check. The extractor for job execution data onlycollects information from the table TBTCO, but the extractor for job step executiondata collects job step data also by joining tables TBTCO and TBTCP.
● For BPMon Job and BW Process Chain reports, the extractors collect information fromthe table DWSP_BPM_JOSCHCG in Solution Manager.
In SAP Solution Manager 7.1, extractor entries are created automatically during setup, sono manual creation using function module DSWP_BPM_JSM_HC_ADD_EXTRACTOR isnecessary. You carry out maintenance on the active worklist items table E2E_ACTIVE_WLIin the EFWK Administration work center, in the administration view.
a) In SAP Solution Manager, open the Job Management work center.
b) In the navigation area, choose Administration.
c) In the Job Scheduling Management Analytics section, choose Manage Data Collectionfor Analytics.
d) In the Extractor Overview list, select the Filter link.
e) In the Name field, enter *jsm*.
f) Select the extractor you want to activate.
g) Choose Change to enter change mode.
h) For each report you want to use, choose Activate .The extractor is activated, which is indicated by the light bulb in the Active Statuscolumn.
6. Check that the web service was activated during setup, using transaction SICF to view thefollowing services:.
● default_host → sap → bw → BEx (Business Explorer)
● default_host → sap → bw → MIME
a) On the SAP Solution Manager Easy Access screen, call transaction SICF.
Unit 15: The Management of Background Jobs with SAP Solution Manager
396 © Copyright. All rights reserved.
b) On the Maintain Services screen, in the Hierarchy Type field, select SERVICE.
c) Choose Execute .
d) Check that the required services are activated.
e) If the required services are not activated, right-click them and select Activate .
7. Activate and manage Job Scheduling Management reports by defining the views you wantto see on each aggregation level in the work center.
a) In the Job Management work center, in the navigation area, choose Administration.
b) In the content area, choose Manage Reports for Job Scheduling Management .The Manage Reports for Job Scheduling Management Health Check screen appears.
c) Choose without step to see only data from the job header information extractor or withstep to see extraction job header and item information.
d) Maintain the Business Process Monitoring Reports Assignment view.
e) Choose OK.
For more information check SAP Note 1516666 - Job Scheduling Management Health Check -Setup Guide, and the document mentioned within this note, https://service.sap.com/jsm → Media Library → Setup Guide → Job Scheduling Management Health Check .
To Access Job Management Health Check ReportsWhen you have activated the JSM Health Check you can access reporting views with differentlevels of granularity directly from the Job Management work center.
1. Access JSM Health Check reports in the SAP Solution Manager Job Management workcenter.
a) Log on to SAP Solution Manager with your user name and password.
b) On the SAP Solution Manager Easy Access screen, call transaction SM_WORKCENTER.
c) Open the Job Management work center.
d) In the navigation area, choose Reports.
e) In the Reporting View area, choose BW Reports.
f) In the Reports table, select the Report link to the right of the report name to open it.
g) Select the System ID for which you want to see reports.
Job Management Health Check ReportsHere you can see some examples of JSM Health Check reports.
Lesson: Optimizing the Background Job Schedule with SAP Solution Manager Tools
© Copyright. All rights reserved. 397
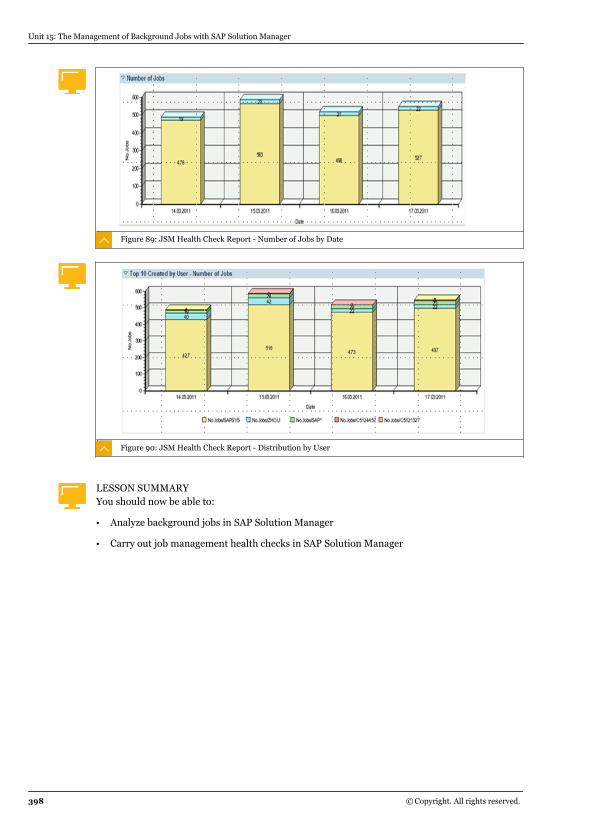
Figure 89: JSM Health Check Report - Number of Jobs by Date
Figure 90: JSM Health Check Report - Distribution by User
LESSON SUMMARYYou should now be able to:
● Analyze background jobs in SAP Solution Manager
● Carry out job management health checks in SAP Solution Manager
Unit 15: The Management of Background Jobs with SAP Solution Manager
398 © Copyright. All rights reserved.
Unit 15Lesson 6
Setting Up Job Scheduling Management inSAP Solution Manager
LESSON OVERVIEWIn this lesson you will learn how to set up job scheduling management in SAP SolutionManager.
LESSON OBJECTIVESAfter completing this lesson, you will be able to:
● List the prerequisites for using job scheduling management applications in SAP SolutionManager
Job Scheduling Management ApplicationsThe basic functionalities of job scheduling management in SAP Solution Manager areavailable without additional setup, but some other applications require additional setup.
You perform many of the functions of job scheduling management in the Administration viewof the Job Management work center.
Figure 91: Job Management Work Center Administration
The following table lists the job scheduling management applications and their prerequisites:
© Copyright. All rights reserved. 399
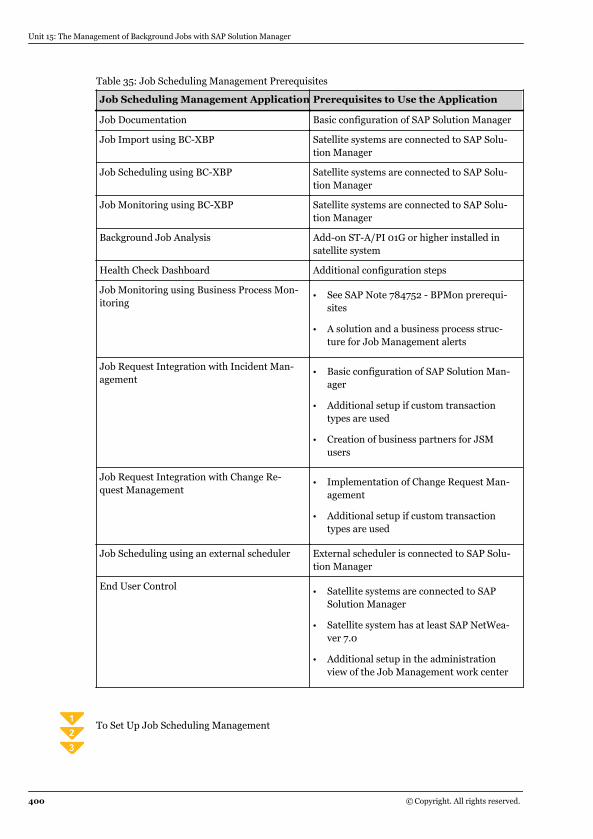
Table 35: Job Scheduling Management Prerequisites
Job Scheduling Management Application Prerequisites to Use the Application
Job Documentation Basic configuration of SAP Solution Manager
Job Import using BC-XBP Satellite systems are connected to SAP Solu-tion Manager
Job Scheduling using BC-XBP Satellite systems are connected to SAP Solu-tion Manager
Job Monitoring using BC-XBP Satellite systems are connected to SAP Solu-tion Manager
Background Job Analysis Add-on ST-A/PI 01G or higher installed insatellite system
Health Check Dashboard Additional configuration steps
Job Monitoring using Business Process Mon-itoring
● See SAP Note 784752 - BPMon prerequi-sites
● A solution and a business process struc-ture for Job Management alerts
Job Request Integration with Incident Man-agement
● Basic configuration of SAP Solution Man-ager
● Additional setup if custom transactiontypes are used
● Creation of business partners for JSMusers
Job Request Integration with Change Re-quest Management
● Implementation of Change Request Man-agement
● Additional setup if custom transactiontypes are used
Job Scheduling using an external scheduler External scheduler is connected to SAP Solu-tion Manager
End User Control● Satellite systems are connected to SAP
Solution Manager
● Satellite system has at least SAP NetWea-ver 7.0
● Additional setup in the administrationview of the Job Management work center
To Set Up Job Scheduling Management
Unit 15: The Management of Background Jobs with SAP Solution Manager
400 © Copyright. All rights reserved.
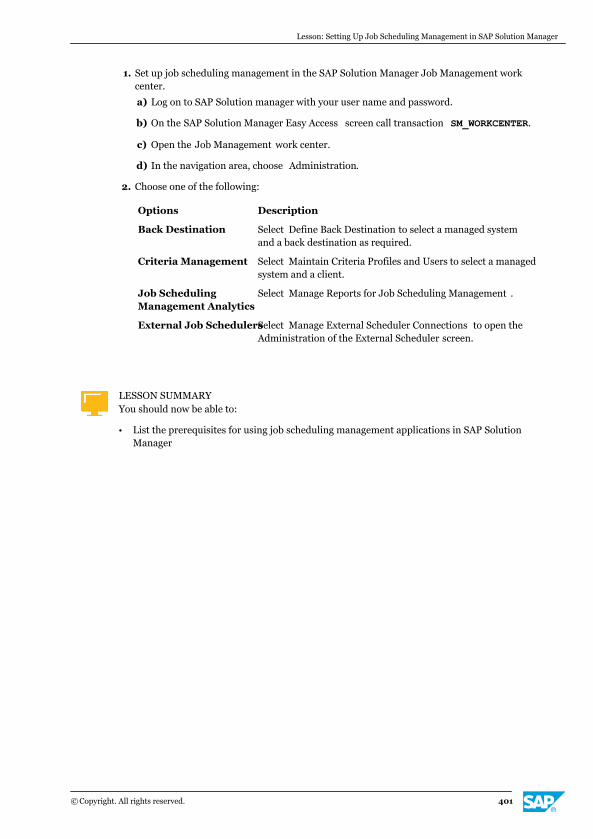
1. Set up job scheduling management in the SAP Solution Manager Job Management workcenter.
a) Log on to SAP Solution manager with your user name and password.
b) On the SAP Solution Manager Easy Access screen call transaction SM_WORKCENTER.
c) Open the Job Management work center.
d) In the navigation area, choose Administration.
2. Choose one of the following:
Options Description
Back Destination Select Define Back Destination to select a managed systemand a back destination as required.
Criteria Management Select Maintain Criteria Profiles and Users to select a managedsystem and a client.
Job SchedulingManagement Analytics
Select Manage Reports for Job Scheduling Management .
External Job SchedulersSelect Manage External Scheduler Connections to open theAdministration of the External Scheduler screen.
LESSON SUMMARYYou should now be able to:
● List the prerequisites for using job scheduling management applications in SAP SolutionManager
Lesson: Setting Up Job Scheduling Management in SAP Solution Manager
© Copyright. All rights reserved. 401
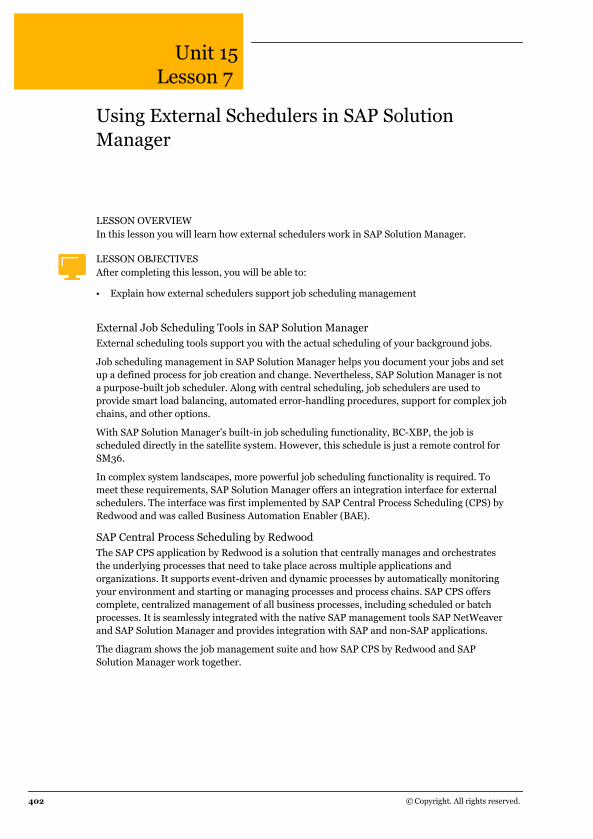
Unit 15Lesson 7
Using External Schedulers in SAP SolutionManager
LESSON OVERVIEWIn this lesson you will learn how external schedulers work in SAP Solution Manager.
LESSON OBJECTIVESAfter completing this lesson, you will be able to:
● Explain how external schedulers support job scheduling management
External Job Scheduling Tools in SAP Solution ManagerExternal scheduling tools support you with the actual scheduling of your background jobs.
Job scheduling management in SAP Solution Manager helps you document your jobs and setup a defined process for job creation and change. Nevertheless, SAP Solution Manager is nota purpose-built job scheduler. Along with central scheduling, job schedulers are used toprovide smart load balancing, automated error-handling procedures, support for complex jobchains, and other options.
With SAP Solution Manager's built-in job scheduling functionality, BC-XBP, the job isscheduled directly in the satellite system. However, this schedule is just a remote control forSM36.
In complex system landscapes, more powerful job scheduling functionality is required. Tomeet these requirements, SAP Solution Manager offers an integration interface for externalschedulers. The interface was first implemented by SAP Central Process Scheduling (CPS) byRedwood and was called Business Automation Enabler (BAE).
SAP Central Process Scheduling by RedwoodThe SAP CPS application by Redwood is a solution that centrally manages and orchestratesthe underlying processes that need to take place across multiple applications andorganizations. It supports event-driven and dynamic processes by automatically monitoringyour environment and starting or managing processes and process chains. SAP CPS offerscomplete, centralized management of all business processes, including scheduled or batchprocesses. It is seamlessly integrated with the native SAP management tools SAP NetWeaverand SAP Solution Manager and provides integration with SAP and non-SAP applications.
The diagram shows the job management suite and how SAP CPS by Redwood and SAPSolution Manager work together.
402 © Copyright. All rights reserved.
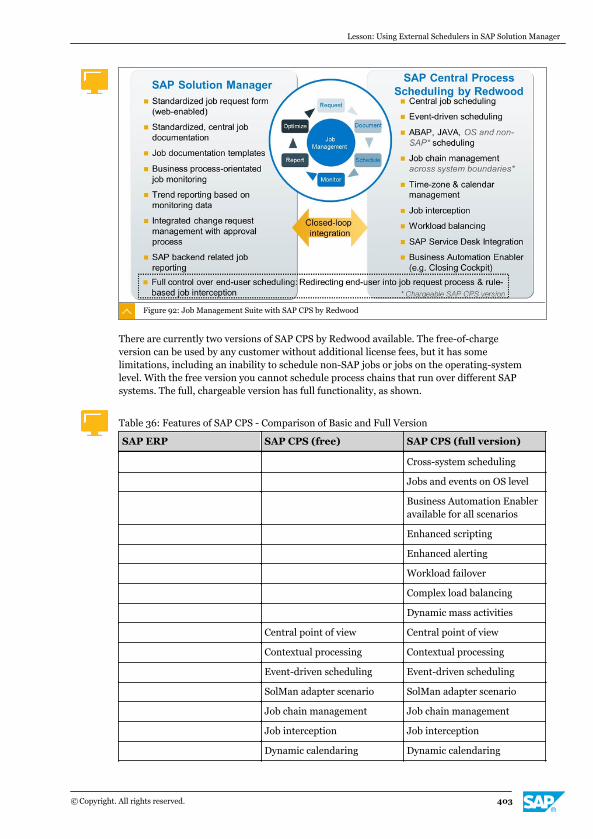
Figure 92: Job Management Suite with SAP CPS by Redwood
There are currently two versions of SAP CPS by Redwood available. The free-of-chargeversion can be used by any customer without additional license fees, but it has somelimitations, including an inability to schedule non-SAP jobs or jobs on the operating-systemlevel. With the free version you cannot schedule process chains that run over different SAPsystems. The full, chargeable version has full functionality, as shown.
Table 36: Features of SAP CPS - Comparison of Basic and Full Version
SAP ERP SAP CPS (free) SAP CPS (full version)
Cross-system scheduling
Jobs and events on OS level
Business Automation Enableravailable for all scenarios
Enhanced scripting
Enhanced alerting
Workload failover
Complex load balancing
Dynamic mass activities
Central point of view Central point of view
Contextual processing Contextual processing
Event-driven scheduling Event-driven scheduling
SolMan adapter scenario SolMan adapter scenario
Job chain management Job chain management
Job interception Job interception
Dynamic calendaring Dynamic calendaring
Lesson: Using External Schedulers in SAP Solution Manager
© Copyright. All rights reserved. 403
SAP ERP SAP CPS (free) SAP CPS (full version)
Basic load balancing Basic load balancing
Show parent-child dependen-cies
Show parent-child dependen-cies
Local queue management Local queue management
Time zone management Time zone management
Java scheduling Java scheduling
Intuitive Web UI Intuitive Web UI
Execution control optimiza-tion
Execution control optimiza-tion
Intelligent job definition Intelligent job definition
E/SOA E/SOA
CCMS CCMS CCMS
Basic job scheduling Basic job scheduling Basic job scheduling
The main differences between standard SM36 and SAP CPS by Redwood are shown in thefollowing table:
Table 37: Differences between SM36 and SAP CPS by Redwood
SM36 SAP CPS by Redwood
Scheduling of SAP jobs only Scheduling of SAP and non-SAP jobs
Local scheduling for one system only Central scheduling for entire system land-scape
Mainly time-driven scheduling Mainly event-driven scheduling (higherthroughput)
Only three different job classes: A, B, C Job prioritization from 1 to 100
Only two queues (class A vs. B and C) Several logical queues can be created (for ex-ample, per application)
Local job chain functionality Job chain functionality within and across sys-tem boundaries
No automation possible Process automation with raised eventsacross system landscape
Not possible to schedule periodic jobs duringcertain time frames (such as business hours)
Several time windows and submit frames canbe defined and included/excluded in eachother
One job per variant (for example, per plant) One job definition can be used with differentparameters
Simple workload distribution (depending onfree BTC work processes)
Sophisticated workload distribution (depend-ing on CPU utilization, memory paging, andmore)
Unit 15: The Management of Background Jobs with SAP Solution Manager
404 © Copyright. All rights reserved.
SM36 SAP CPS by Redwood
Job dependencies hardly considered (SAPonly)
Job dependencies across systems consid-ered
No control over jobs that are directly sched-uled by end-users
End user jobs can be intercepted
No control over parent-child jobs Possible to check if all related child jobs aresuccessfully finished
To Use SAP Central Process Scheduling by Redwood
1. Open SAP Central Process Scheduling (CPS) by Redwood in a new browser window.
a) Open a browser window and navigate to the following URL: http://FQDN/:Port/Scheduler where FQDN = the server hosting Redwood.
b) Enter your user name and password and choose Log In.
c) If you have never used CPS by Rewood before, enter the required details to generate aRequest Key for Enterprise License or to Activate Free of Charge License .When you enter the correct logon details, the CPS by Redwood interface appears.
2. Set up a connection to the SAP ERP system.
a) In the navigation area, choose Environment.
b) Right-click Process Servers and enter the required information.
c) Right-click SAP System and enter the required information.
For more information, see http://help.sap.com → SAP NetWeaver → Platform 7.0including Enhancement Package 1 → SAP Central Process Scheduling by Redwood → Getting Started → Working With Tools and Features → Connecting to SAP Systems
3. Start the scheduling wizard.
a) In the application menu choose Submit job.The scheduling wizard opens and you can choose the jobs to view.
LESSON SUMMARYYou should now be able to:
● Explain how external schedulers support job scheduling management
Lesson: Using External Schedulers in SAP Solution Manager
© Copyright. All rights reserved. 405

Unit 15: The Management of Background Jobs with SAP Solution Manager
406 © Copyright. All rights reserved.
Unit 15
Learning Assessment
1. After a job has been approved and documented, what are the next four steps in theprocess flow?
Arrange these steps into the correct sequence.
0 Monitor job
0 Execute job
0 Schedule job
0 Test job
© Copyright. All rights reserved. 407

Unit 15
Learning Assessment - Answers
1. After a job has been approved and documented, what are the next four steps in theprocess flow?
Arrange these steps into the correct sequence.
4 Monitor job
3 Execute job
2 Schedule job
1 Test job
408 © Copyright. All rights reserved.
UNIT 16 The Technical Administration ofthe SAP System Landscape
Lesson 1
Configuring SAP Solution Manager Notification Management 410
Lesson 2
Planning Work Modes with SAP Solution Manager 416
Lesson 3
Managing User Tasks with Central System Administration (CSA) 427
Exercise 17: Configure and Use Central System Administration 435
Lesson 4
Managing Tasks with the Task Inbox 442
Lesson 5
Grouping Administrative Tools with Central Tool Access 445
UNIT OBJECTIVES
● Configure notification settings in SAP Solution Manager
● Set up work modes in SAP Solution Manager
● Set up central system administration to manage user tasks
● Process tasks with the Task Inbox
● Locate administrative tools in the Central Tool Access area
© Copyright. All rights reserved. 409
Unit 16Lesson 1
Configuring SAP Solution ManagerNotification Management
LESSON OVERVIEWNotification settings in SAP Solution Manager help you to keep users informed about definedsystem events. In this lesson you will learn how to configure notification settings.
LESSON OBJECTIVESAfter completing this lesson, you will be able to:
● Configure notification settings in SAP Solution Manager
Notification Management in SAP Solution ManagerCentral Notification Management stores and structures recipient information in a centrallocation, where personal data can be maintained and changed by each recipient. Anadministrator with the required roles can manage the Global Recipient Pool, add recipients torecipient lists and define substitutes for recipients who are off duty.
Notification Management in SAP Solution Manager helps you to notify interested orresponsible recipients automatically about specific events at the right time. You can sendnotifications from Work Mode Management, System Monitoring, and Downtime Management.
Central Notification Management - Main Features:
● Maintain external recipients, system users, and business partners.
● Avoid duplication of effort by maintaining recipients in a global recipient pool.
● Copy distribution lists from mail server such as Microsoft Exchange or Lotus DominoServer in your system.
● Define availability of users based on factory and holiday calendars.
● Define absence of users.
● Automatically forward notifications to substitutes if a user is not available.
● Add recipients or recipient lists to a recipient list.
To open Central Notification, do the following:
To Open Central Notification
1. Call transaction SM_WORKCENTER.
2. Open the Technical Administration work center.
3. In the navigation area, choose Notification Management.
410 © Copyright. All rights reserved.
The Global Recipient Pool in Notification ManagementEvery user to whom you want to send information through Notification Management must bea member of the global recipient pool. The administrator can add recipients directly to theglobal recipient pool in any of the following categories:
● SAP Solution Manager users (transaction SU01)
● ABAP system users (transaction SU01)
● Business partners (transaction BP, BP_GEN, and BP_USER_GEN)
● External users
Users must have a phone number and an e-mail address associated with them to receivenotifications by SMS or e-mail respectively.
To Add a Recipient to the Global Recipient Pool
1. In the SAP Solution Manager Technical Administration work center, open NotificationManagement.
a) Log on to SAP Solution Manager with your user name and password.
b) On the SAP Solution Manager Easy Access screen, call transaction SM_WORKCENTER.
c) Open the Technical Administration work center.
d) In the navigation area, choose Notification Management.
2. Open the Global Recipient Pool and add a user.
a) Choose Global Recipient Pool → Start Embedded .
b) Open the tab for the type of user you want to add to the global recipient pool.Fo example, if you want to add a managed system business partner, open theManaged Systems Business Partners tab.
c) Choose Add Recipient.The Add User from <System Name> screen appears.
d) Search for users by name, system, and client number, then select the recipients youwant to add.
e) Choose Add.The selected users are added to the global recipient pool.
You can also maintain existing recipient settings on the Global Recipient Pool screen.
Recipient Lists in Notification ManagementYou can also group users in recipient lists, which allows you to activate or deactivate entirelists instead of individual recipients, and to target notifications more precisely.
You can create a recipient list template, to which you can add users as needed withoutneeding to change the template itself. You can also add distribution lists from exchangeservers.
To Manually Add a Recipient to a Recipient List
1. In the SAP Solution Manager Technical Administration work center, create a recipient list.
Lesson: Configuring SAP Solution Manager Notification Management
© Copyright. All rights reserved. 411
a) In the navigation area, choose Notification Management.
b) Choose Notification Administration → Start Embedded .
c) In the Notification Administration tab choose, Create .
d) Assign a name and description to your list and choose OK.
2. Add users or existing recipient lists to the new recipient list.
a) Select your list in the table and choose Add Recipients/Recipient Lists .
b) Search for the relevant system, client, and user, then select the users you want to add.
You can also maintain existing lists here.
To Copy a Recipient from a Mail Server
1. In the Technical Administration work center choose Notification Management.
2. Choose Recipient Lists.
3. Choose Add Mail Server Distribution Lists.
4. In the Add Distribution List window add the relevant distribution list.
The distribution lists are copied as recipient lists in Notification Management. The recipientsin the distribution list are added as external recipients to the global recipient pool. Therecipient lists, or distribution lists, in Notification Management are automatically updatedregularly.
LDAP and SMS Server ConfigurationCentral notification allows you to import distribution lists from LDAP servers, providing thefollowing prerequisites are met:
● Required data is stored hierarchically in the LDAP directory, which means that users andgroups are stored under at least one organizational unit.
● The LDAP connector is configured. For more information, see SAP Note 188371 -Configuring the LDAP Connector).
To Configure the LDAP Server to Import Distribution Lists
1. Configure the LDAP Connector.
2. Maintain LDAP Server properties in SAP Solution Manager as follows:
a. Open the Technical Administration work center.
b. Select Notification Management.
c. Select Configure Servers .
d. Select LDAP Server.
e. Maintain Connection Entries, such as Server Name and Connector.
f. Save your changes.
For more information, see SAP Note 9833808 - Certified LDAP Servers.
Unit 16: The Technical Administration of the SAP System Landscape
412 © Copyright. All rights reserved.
You can send notifications by SMS providing the following prerequisites are met:
● SAP Connect is configured, using transaction SOLMAN_SETUP.
● The SMS server is configured in the Technical Administration work center.
For more information, see SAP Note 455140 - Configuration of e-mail, fax, paging, or SMSusing SMTP.
Personalization of Notification SettingsEven if you are not authorized to access Notification Management, you can add your user tothe global recipient pool providing you meet the following prerequisites:
● You have maintained user details in the SAP Solution Manager system and the managedsystem using transaction SU01.
● You have added your phone number and activated SMS.
● You are authorized to access at least one of the following work centers:
- SAP Solution Manager - Configuration
- Solution Manager Administration
- Technical Administration
To Add a User to the Global Recipient PoolIf you have met the necessary conditions, you can add yourself to the global recipient pool.
1. In any of the listed work centers, in the navigation area, choose Administration → MyNotification settings .
2. In the Notification Settings, select a status
Status Description
Active Enables the recipient to retrieve notifications
Inactive Prevents the recipient from retrieving notifications
Forward Forward the notifications to a substitute
3. To define your availability, you can do the following;
a) On the When Present (On-Duty) tab choose Define On-Duty Timing.
b) Define your availability.
4. To define your absences, do the following:
a) On the During Personal Absences (Off-Duty) tab choose Create Absence .
b) Enter the required data.
c) To forward notifications to another recipient during your absence choose AddSubstitute .
d) In the Add Recipients/Recipient List window add the substitute recipient and chooseSave .
Lesson: Configuring SAP Solution Manager Notification Management
© Copyright. All rights reserved. 413
SAP allows you to define location-specific calendars (such as the factory calendar). Thesecalendars can incorporate both regional holiday regulations and location-specific organizationregulations.
To Define Recipient AbsencesAs an administrator in your organization, you may need to define a recipient's absences ifthey have not done so for themselves, for example, as the result of sick leave.
1. In the Technical Administration work center choose Notification Management.
2. Choose Global Recipient Pool → Start Embedded .
3. From the following user group tabs, choose the one the recipient belongs to:
● Solution Manager Users
● Managed System Users
● SAP Solution Manager Business Partner
● Managed System Business Partners
● External
4. Select the relevant user in the list by clicking the user ID.A Notification Settings screen for the relevant user appears.
5. You can perform the necessary actions here, including the following:
a) Change the status from Active to Inactive or to Forward to a Substitute .
b) Choose the During Personal Absences (Off-Duty) tab to see if a substitute is defined.
c) If no substitute is defined, add a substitute and choose Save .
Remember to change the recipient's status back to Active when they return to duty.
If you know when the recipient will be on duty again, leave the status at Active and enter theabsence interval in Planned Absences on the During Personal Absences (Off-Duty). Then therecipient will automatically start receiving notifications again when they return.
Factory Calendar Settings in Notification ManagementThe holiday and factory calendars delivered with SAP Solution Manager 7.1 extend only to theend of 2010. To extend them further, do one of the following:
● If the calendar entries were not changed manually after installation, you can importcalendar entries valid to the year 2050 from SAP Note 1426524.
● If the calendar entries were changed manually after installation and you do not want to usethe SAP calendars, you can maintain the calendars manually. See SAP Note 501670 fordetails.
You maintain calendar settings in transaction SCAL.
Caution:Importing SAP-delivered calendars will overwrite any customized settings youhave made in your calendars after installation.
Unit 16: The Technical Administration of the SAP System Landscape
414 © Copyright. All rights reserved.

LESSON SUMMARYYou should now be able to:
● Configure notification settings in SAP Solution Manager
Lesson: Configuring SAP Solution Manager Notification Management
© Copyright. All rights reserved. 415
Unit 16Lesson 2
Planning Work Modes with SAP SolutionManager
LESSON OVERVIEWWork mode management prevents the creation of unnecessary alerts, notifications, andincidents during planned system downtimes, and helps to adapt monitoring settings toseveral work modes. In this lesson you will learn how to schedule work modes and view workmode reports.
LESSON OBJECTIVESAfter completing this lesson, you will be able to:
● Set up work modes in SAP Solution Manager
Work Mode Management in SAP Solution ManagerWork mode management provides a single point of entry to review up-to-date operationalplanning data for productive systems. You use work mode management to plan and executework modes for technical components such as technical systems, databases, technicalscenarios, instances, and logon groups during such activities as the following:
● Patch upgrades
● Database, hardware, or operating system maintenance
● Configuration or customizing changes
● Migration
Technical work mode management helps you to inform users of planned downtimes andmaintenance windows. Additionally, work mode management is used to define business workmodes, which helps you to adapt the monitoring thresholds of the involved systems to thecurrent system load. Work mode management supports the system types ABAP and Java.You can schedule single as well as recurring work modes and perform mass copy of workmodes across technical components.
To work with work mode management, your user must have the role SAP_SM_DTM_ALL.
416 © Copyright. All rights reserved.
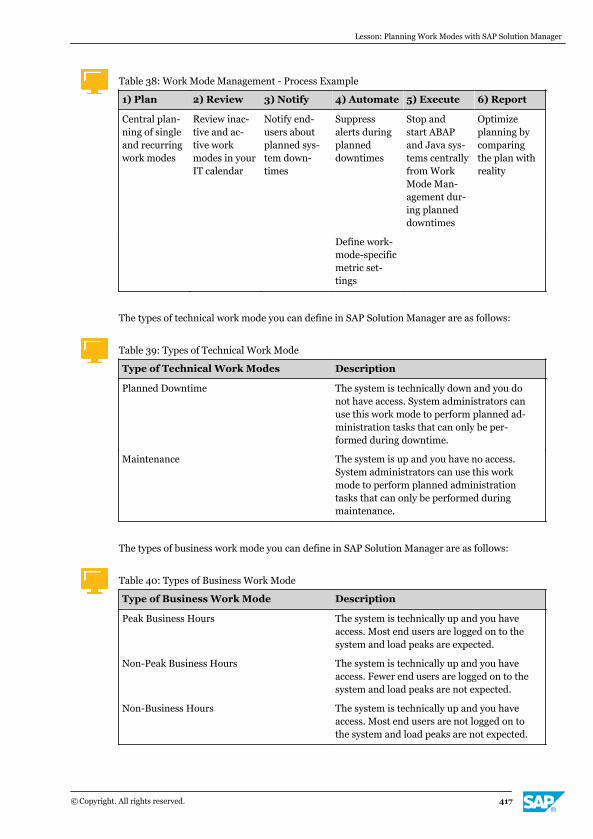
Table 38: Work Mode Management - Process Example
1) Plan 2) Review 3) Notify 4) Automate 5) Execute 6) Report
Central plan-ning of singleand recurringwork modes
Review inac-tive and ac-tive workmodes in yourIT calendar
Notify end-users aboutplanned sys-tem down-times
Suppressalerts duringplanneddowntimes
Stop andstart ABAPand Java sys-tems centrallyfrom WorkMode Man-agement dur-ing planneddowntimes
Optimizeplanning bycomparingthe plan withreality
Define work-mode-specificmetric set-tings
The types of technical work mode you can define in SAP Solution Manager are as follows:
Table 39: Types of Technical Work Mode
Type of Technical Work Modes Description
Planned Downtime The system is technically down and you donot have access. System administrators canuse this work mode to perform planned ad-ministration tasks that can only be per-formed during downtime.
Maintenance The system is up and you have no access.System administrators can use this workmode to perform planned administrationtasks that can only be performed duringmaintenance.
The types of business work mode you can define in SAP Solution Manager are as follows:
Table 40: Types of Business Work Mode
Type of Business Work Mode Description
Peak Business Hours The system is technically up and you haveaccess. Most end users are logged on to thesystem and load peaks are expected.
Non-Peak Business Hours The system is technically up and you haveaccess. Fewer end users are logged on to thesystem and load peaks are not expected.
Non-Business Hours The system is technically up and you haveaccess. Most end users are not logged on tothe system and load peaks are not expected.
Lesson: Planning Work Modes with SAP Solution Manager
© Copyright. All rights reserved. 417
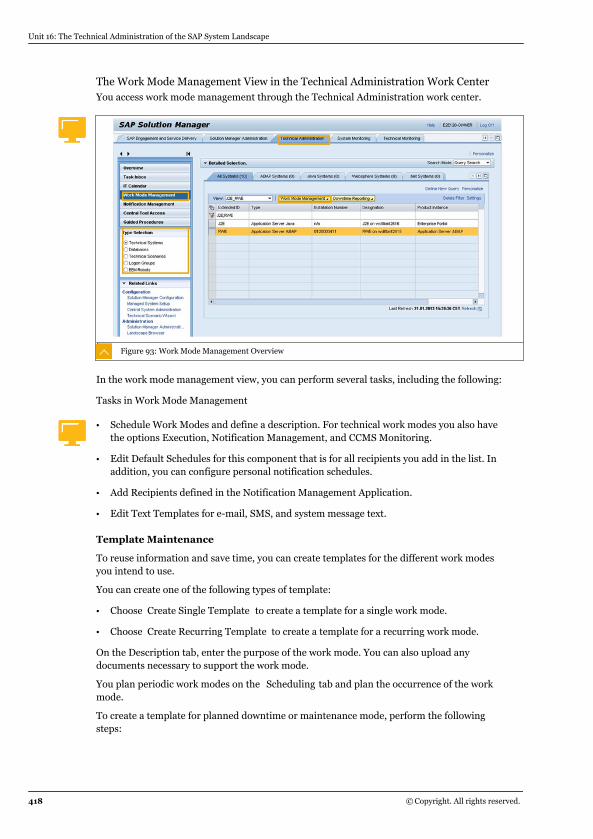
The Work Mode Management View in the Technical Administration Work CenterYou access work mode management through the Technical Administration work center.
Figure 93: Work Mode Management Overview
In the work mode management view, you can perform several tasks, including the following:
Tasks in Work Mode Management
● Schedule Work Modes and define a description. For technical work modes you also havethe options Execution, Notification Management, and CCMS Monitoring.
● Edit Default Schedules for this component that is for all recipients you add in the list. Inaddition, you can configure personal notification schedules.
● Add Recipients defined in the Notification Management Application.
● Edit Text Templates for e-mail, SMS, and system message text.
Template Maintenance
To reuse information and save time, you can create templates for the different work modesyou intend to use.
You can create one of the following types of template:
● Choose Create Single Template to create a template for a single work mode.
● Choose Create Recurring Template to create a template for a recurring work mode.
On the Description tab, enter the purpose of the work mode. You can also upload anydocuments necessary to support the work mode.
You plan periodic work modes on the Scheduling tab and plan the occurrence of the workmode.
To create a template for planned downtime or maintenance mode, perform the followingsteps:
Unit 16: The Technical Administration of the SAP System Landscape
418 © Copyright. All rights reserved.
● On the Notifications tab set the recipients.
● On the CCMS Monitoring Settings tab set the monitoring level.
To Set Up a Work Mode Notification
1. Log on to SAP Solution Manager with your user name and password.
2. On the SAP Easy Access screen call transaction SM_WORKCENTER.
3. Choose the Technical Administration work center.
4. In the navigation area, choose Work Mode Management.
5. In the All Systems view, choose the technical component you want to manage and chooseWork Mode Management → Start New Window.
6. In the Components Whose Work Modes are Managed section, select the required technicalcomponent and choose Set Up Notifications.
7. In the Recipient List for Notification section, choose Edit Text Templates and select e-mail,SMS, or system messages.
8. Edit the relevant template as required.
9. Choose Save .
10. Choose Edit Default Schedule and specify the notification types and times.
11. Choose Save .
The notification can also be sent to different recipients at different times.
To Schedule a Work ModeYou can define business work modes for systems if you want to adapt monitoring thresholdsto the system workload.
1. In the Work Mode Management view, choose a technical component for which to schedulea work mode.
a) In the Detailed Selection area, open the relevant tab or choose Define New Query todisplay the technical component you require.
b) In the tabular view of your selection, select the relevant technical component andchoose Work Management → Start New Window.
c) Select the component from the list.
d) Choose Schedule Work Mode(s) .The Work Mode Management screen appears.
2. Schedule and activate a work mode for your component.
a) On the Work Mode Management screen, enter the relevant information for your workmode.
b) Activate the work mode and save your settings.
During creation of a work mode template, you can compare the entered data to the actualsystem load of the last 4 or 12 weeks.
Lesson: Planning Work Modes with SAP Solution Manager
© Copyright. All rights reserved. 419
To Schedule a Technical Work Mode
1. In the Solution Manager Technical Administration work center, schedule a work mode fora technical component.
a) Choose Work Mode Management from the navigation area.
b) In the Type Selection area, select a component type.
c) In the Detailed Selection area, select the relevant tab or choose Define New Query.
d) In the tabular view of your selection, select the relevant technical component andchoose Work Mode Management → Start New Window.
e) Select your component from the list.
f) Choose Schedule Work Mode(s) .The Work Mode Management screen appears.
2. Plan and activate a downtime.
a) Enter the relevant information for your work mode.
b) In the Title field, enter a meaningful title for your work mode.
c) In the Type/Phase field, enter Downtime.
d) Select a category to specify the kind of downtime or maintenance.
e) Select a start date and an end date for the downtime.
f) On the description tab, enter a reason for the work mode and the business impact itwill have.
g) Select the Active status.
h) Save your entries.
It is not possible to plan a technical work mode in this way on the scenario level.
When the Planned Downtime work mode is saved, you can switch to the Execution tab andstop the entity (system or instance) via SAP Control if applicable, with Adaptive Computing.You can also use task management to define a shutdown component task and a restartcomponent task.
Notification ManagementOn the Notification Management tab, you can add additional recipients that are valid only forthis specific technical work mode. You can also send instant notifications such as systemmessages. To use this function, ensure SAP Connect is configured correctly.
CCMS Monitoring Settings
Here you have the following options:
● Monitoring Pause: to prevent the collection of monitoring data.
● Suppress Alerts: to allow collection of monitoring data, but avoid alerts relevant to theplanned work mode.
● Full Monitoring: to allow CCMS-based monitoring and receive alerts for the planned workmode.
Unit 16: The Technical Administration of the SAP System Landscape
420 © Copyright. All rights reserved.
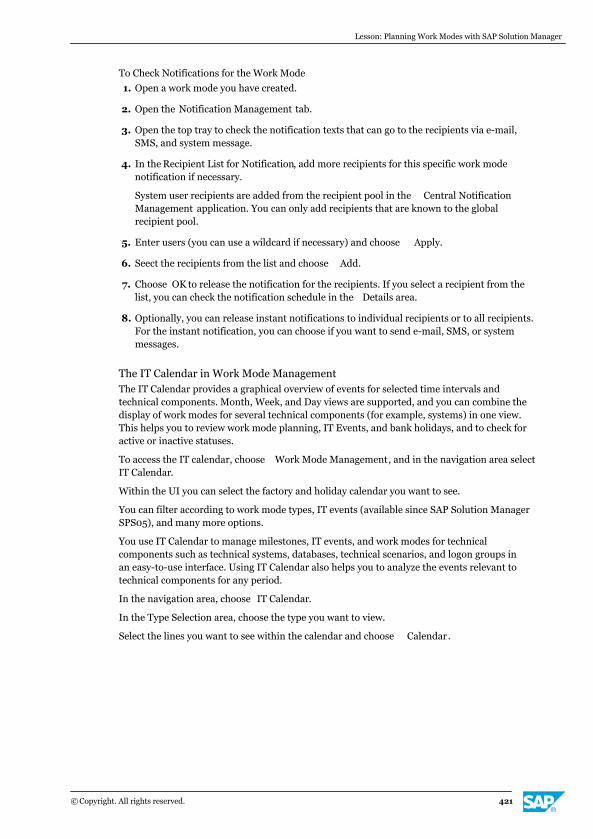
To Check Notifications for the Work Mode
1. Open a work mode you have created.
2. Open the Notification Management tab.
3. Open the top tray to check the notification texts that can go to the recipients via e-mail,SMS, and system message.
4. In the Recipient List for Notification, add more recipients for this specific work modenotification if necessary.
System user recipients are added from the recipient pool in the Central NotificationManagement application. You can only add recipients that are known to the globalrecipient pool.
5. Enter users (you can use a wildcard if necessary) and choose Apply.
6. Seect the recipients from the list and choose Add.
7. Choose OK to release the notification for the recipients. If you select a recipient from thelist, you can check the notification schedule in the Details area.
8. Optionally, you can release instant notifications to individual recipients or to all recipients.For the instant notification, you can choose if you want to send e-mail, SMS, or systemmessages.
The IT Calendar in Work Mode ManagementThe IT Calendar provides a graphical overview of events for selected time intervals andtechnical components. Month, Week, and Day views are supported, and you can combine thedisplay of work modes for several technical components (for example, systems) in one view.This helps you to review work mode planning, IT Events, and bank holidays, and to check foractive or inactive statuses.
To access the IT calendar, choose Work Mode Management, and in the navigation area selectIT Calendar.
Within the UI you can select the factory and holiday calendar you want to see.
You can filter according to work mode types, IT events (available since SAP Solution ManagerSPS05), and many more options.
You use IT Calendar to manage milestones, IT events, and work modes for technicalcomponents such as technical systems, databases, technical scenarios, and logon groups inan easy-to-use interface. Using IT Calendar also helps you to analyze the events relevant totechnical components for any period.
In the navigation area, choose IT Calendar.
In the Type Selection area, choose the type you want to view.
Select the lines you want to see within the calendar and choose Calendar.
Lesson: Planning Work Modes with SAP Solution Manager
© Copyright. All rights reserved. 421
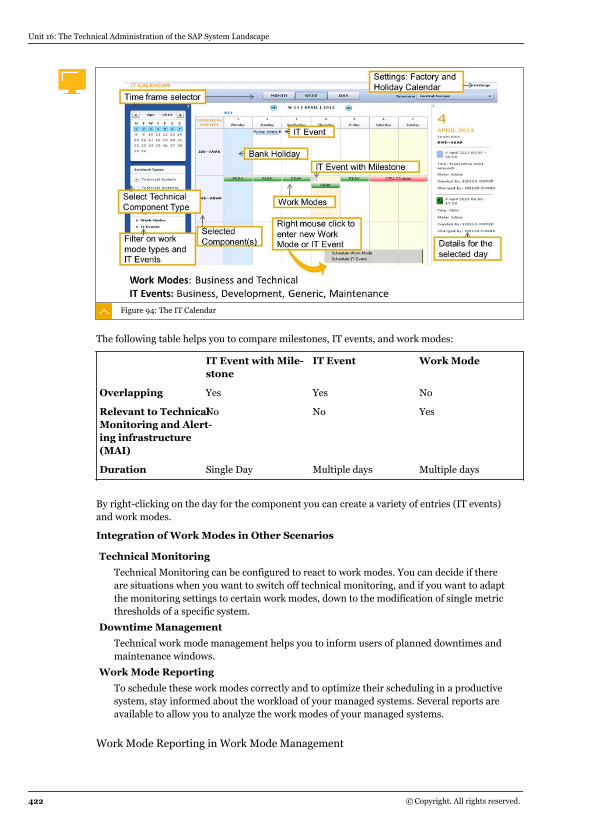
Figure 94: The IT Calendar
The following table helps you to compare milestones, IT events, and work modes:
IT Event with Mile-stone
IT Event Work Mode
Overlapping Yes Yes No
Relevant to TechnicalMonitoring and Alert-ing infrastructure(MAI)
No No Yes
Duration Single Day Multiple days Multiple days
By right-clicking on the day for the component you can create a variety of entries (IT events)and work modes.
Integration of Work Modes in Other Scenarios
Technical Monitoring
Technical Monitoring can be configured to react to work modes. You can decide if thereare situations when you want to switch off technical monitoring, and if you want to adaptthe monitoring settings to certain work modes, down to the modification of single metricthresholds of a specific system.
Downtime Management
Technical work mode management helps you to inform users of planned downtimes andmaintenance windows.
Work Mode Reporting
To schedule these work modes correctly and to optimize their scheduling in a productivesystem, stay informed about the workload of your managed systems. Several reports areavailable to allow you to analyze the work modes of your managed systems.
Work Mode Reporting in Work Mode Management
Unit 16: The Technical Administration of the SAP System Landscape
422 © Copyright. All rights reserved.
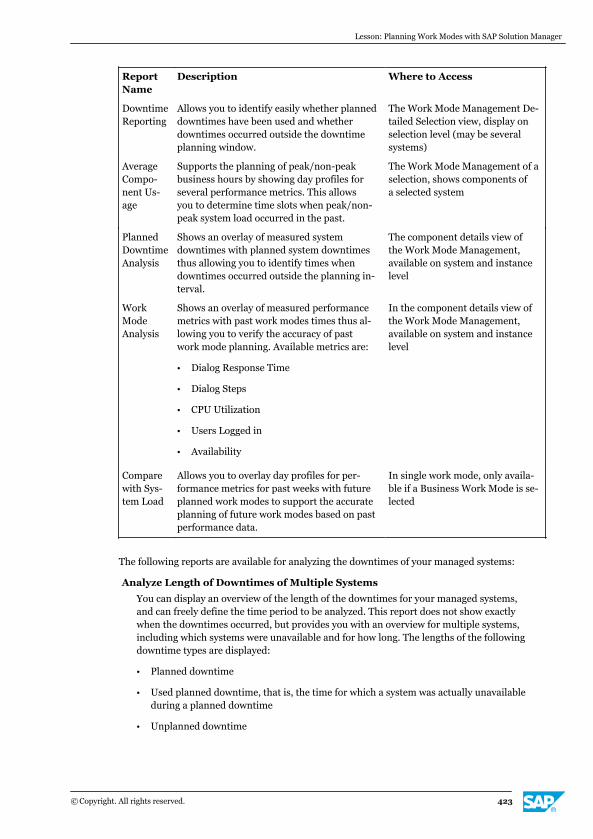
ReportName
Description Where to Access
DowntimeReporting
Allows you to identify easily whether planneddowntimes have been used and whetherdowntimes occurred outside the downtimeplanning window.
The Work Mode Management De-tailed Selection view, display onselection level (may be severalsystems)
AverageCompo-nent Us-age
Supports the planning of peak/non-peakbusiness hours by showing day profiles forseveral performance metrics. This allowsyou to determine time slots when peak/non-peak system load occurred in the past.
The Work Mode Management of aselection, shows components ofa selected system
PlannedDowntimeAnalysis
Shows an overlay of measured systemdowntimes with planned system downtimesthus allowing you to identify times whendowntimes occurred outside the planning in-terval.
The component details view ofthe Work Mode Management,available on system and instancelevel
WorkModeAnalysis
Shows an overlay of measured performancemetrics with past work modes times thus al-lowing you to verify the accuracy of pastwork mode planning. Available metrics are:
● Dialog Response Time
● Dialog Steps
● CPU Utilization
● Users Logged in
● Availability
In the component details view ofthe Work Mode Management,available on system and instancelevel
Comparewith Sys-tem Load
Allows you to overlay day profiles for per-formance metrics for past weeks with futureplanned work modes to support the accurateplanning of future work modes based on pastperformance data.
In single work mode, only availa-ble if a Business Work Mode is se-lected
The following reports are available for analyzing the downtimes of your managed systems:
Analyze Length of Downtimes of Multiple Systems
You can display an overview of the length of the downtimes for your managed systems,and can freely define the time period to be analyzed. This report does not show exactlywhen the downtimes occurred, but provides you with an overview for multiple systems,including which systems were unavailable and for how long. The lengths of the followingdowntime types are displayed:
● Planned downtime
● Used planned downtime, that is, the time for which a system was actually unavailableduring a planned downtime
● Unplanned downtime
Lesson: Planning Work Modes with SAP Solution Manager
© Copyright. All rights reserved. 423
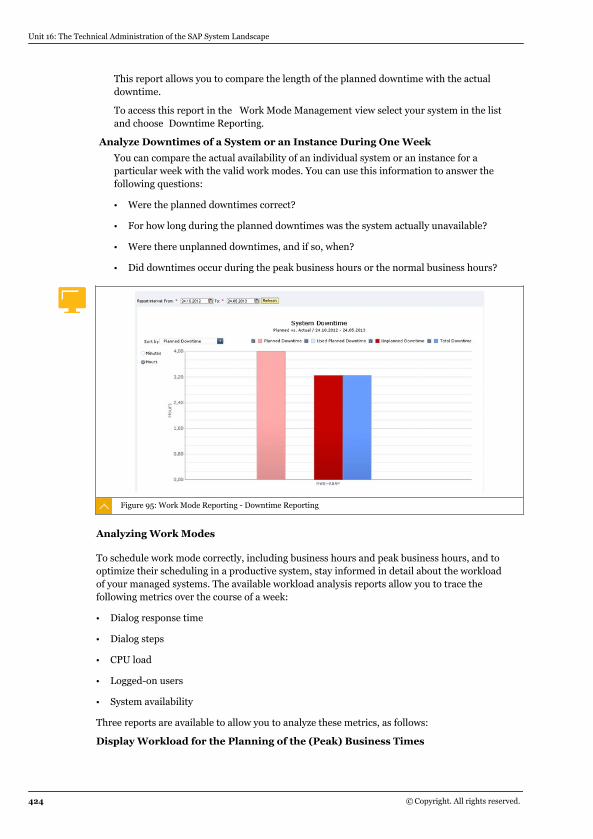
This report allows you to compare the length of the planned downtime with the actualdowntime.
To access this report in the Work Mode Management view select your system in the listand choose Downtime Reporting.
Analyze Downtimes of a System or an Instance During One Week
You can compare the actual availability of an individual system or an instance for aparticular week with the valid work modes. You can use this information to answer thefollowing questions:
● Were the planned downtimes correct?
● For how long during the planned downtimes was the system actually unavailable?
● Were there unplanned downtimes, and if so, when?
● Did downtimes occur during the peak business hours or the normal business hours?
Figure 95: Work Mode Reporting - Downtime Reporting
Analyzing Work Modes
To schedule work mode correctly, including business hours and peak business hours, and tooptimize their scheduling in a productive system, stay informed in detail about the workloadof your managed systems. The available workload analysis reports allow you to trace thefollowing metrics over the course of a week:
● Dialog response time
● Dialog steps
● CPU load
● Logged-on users
● System availability
Three reports are available to allow you to analyze these metrics, as follows:
Display Workload for the Planning of the (Peak) Business Times
Unit 16: The Technical Administration of the SAP System Landscape
424 © Copyright. All rights reserved.
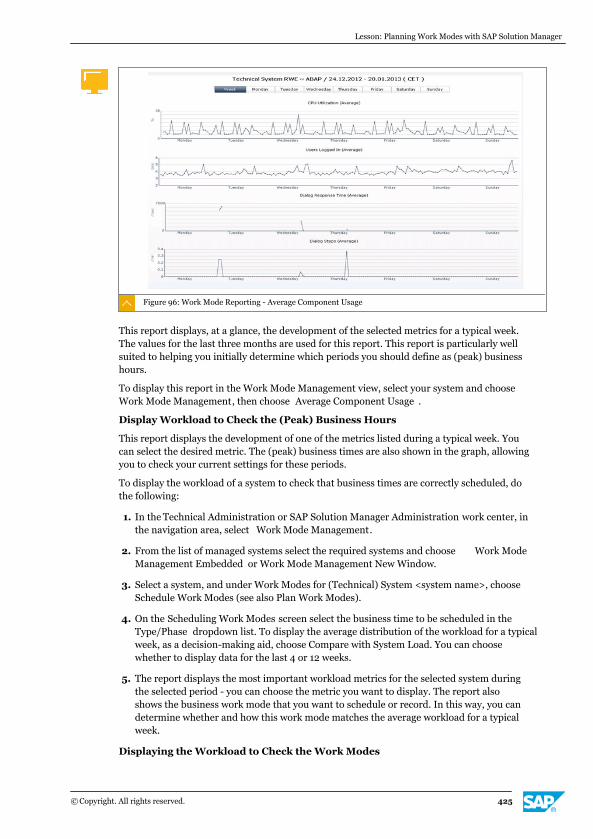
Figure 96: Work Mode Reporting - Average Component Usage
This report displays, at a glance, the development of the selected metrics for a typical week.The values for the last three months are used for this report. This report is particularly wellsuited to helping you initially determine which periods you should define as (peak) businesshours.
To display this report in the Work Mode Management view, select your system and chooseWork Mode Management, then choose Average Component Usage .
Display Workload to Check the (Peak) Business Hours
This report displays the development of one of the metrics listed during a typical week. Youcan select the desired metric. The (peak) business times are also shown in the graph, allowingyou to check your current settings for these periods.
To display the workload of a system to check that business times are correctly scheduled, dothe following:
1. In the Technical Administration or SAP Solution Manager Administration work center, inthe navigation area, select Work Mode Management.
2. From the list of managed systems select the required systems and choose Work ModeManagement Embedded or Work Mode Management New Window.
3. Select a system, and under Work Modes for (Technical) System <system name>, chooseSchedule Work Modes (see also Plan Work Modes).
4. On the Scheduling Work Modes screen select the business time to be scheduled in theType/Phase dropdown list. To display the average distribution of the workload for a typicalweek, as a decision-making aid, choose Compare with System Load. You can choosewhether to display data for the last 4 or 12 weeks.
5. The report displays the most important workload metrics for the selected system duringthe selected period - you can choose the metric you want to display. The report alsoshows the business work mode that you want to schedule or record. In this way, you candetermine whether and how this work mode matches the average workload for a typicalweek.
Displaying the Workload to Check the Work Modes
Lesson: Planning Work Modes with SAP Solution Manager
© Copyright. All rights reserved. 425
This report displays one of the listed metrics for a particular week - you can choose thedesired metric. The periods you choose to display should allow you to answer the followingquestions:
● Were there downtimes during (peak) business hours?
● Do the (peak) business hours for the week match the times with the maximum workload?
To display the most important metrics for the workload of a system or an instance withrespect to a work mode for a particular week, do the following:
1. On the Work Mode Management screen, select the technical system or instance for whichyou want to analyze the workload and choose Work Mode Management. You can choose toStart Embedded or Start New Window.
2. Select the relevant technical system or instance in the list and expand the Present WorkModes in Calendar area.
3. Choose the time period you want to analyze by selecting the number of the calendar week.
4. The work modes for the chosen week are displayed in a separate area. To display theworkload and the work modes for this week, choose Workload Analysis.
5. The report displays the most important workload metrics for the selected system orinstance for the selected week - choose the metric you want to display. The work modesthat were in effect during the relevant period are also displayed, so that you can determinewhether and how the various work modes matched the actual workload. To allow you toobtain a better overview you can show or hide the individual work modes in the displayedreport.
You can also adjust the weeks for which the data is displayed by entering the calendar day onwhich the week starts or navigating to the next or previous week with the arrow keys.
LESSON SUMMARYYou should now be able to:
● Set up work modes in SAP Solution Manager
Unit 16: The Technical Administration of the SAP System Landscape
426 © Copyright. All rights reserved.
Unit 16Lesson 3
Managing User Tasks with Central SystemAdministration (CSA)
LESSON OVERVIEWIn this lesson you will learn how to access and set up Central System Administration, whichhelps you to perform the tasks that are assigned to your user.
LESSON OBJECTIVESAfter completing this lesson, you will be able to:
● Set up central system administration to manage user tasks
Central System Administration SetupCentral System Administration (CSA) in SAP Solution Manager is designed to manage taskscentrally for the systems in your solution. Administration tasks are displayed graphically or inlist view. They are preconfigured and grouped in a logical collection, which makes it easier todeal with open tasks. A report of fulfilled, new, and open tasks gives you an overview of theworkload and additional information.
You use CSA as follows:
● Start Central System Administration by selecting the desired system from your solution.
● Depending on the type of system, the dedicated tasks are assigned.
● Define execution cycles for important tasks to be executed within the system.
● Define user tasks and assign them to user task groups.
Tasks fall into one of the following categories:
● General Basis Administration Tasks
● Database Administration Tasks
● Performance Monitoring Tasks
● Component-Specific Administration Tasks
You can define the frequency of all tasks using either SAP default vales or your own definedvalues.
The Typical Workflow in CSA
● The responsible system administrator periodically views the alerts in the operations part ofSAP Solution Manager.
● When the system administrator selects a specific alert, they are directed to the CSAsession.
© Copyright. All rights reserved. 427
● From there, the analysis transaction in the satellite system (such as View Log Entries -transaction SM21), can be launched.
● After performing analysis and taking the appropriate action, the task can be set to Donewithin the session.
● The system administrator can enter a comment.
CSA sessions have been designed to help you set up and process the functions for a topic,such as
● Solution Monitoring (for example, System Monitoring) session: Set up and processSolution Monitoring.
● Services (for example, Health Check) session: Service procedure where the system readsand analyzes data.
The CSA session is organized as a hierarchical tree structure that classifies important systemand component tasks into logical areas.
You access the CSA through the Technical Administration work center. Your user must havethe correct role assigned to display this work center.
The system generates component-specific administration tasks, depending on the SAPsystem type. SAP delivers all tasks with inactive task frequencies, so you must define theinitial customizing settings.
To Set Up CSA
1. Call transaction SM_WORKCENTER.
2. Open the Technical Administration work center.
3. In the configuration section of the navigation area, select the Central SystemAdministration link.
4. Select the solution for which you want to set up CSA.
Before setting up CSA, ensure that your systems are included in a solution landscape inSAP Solution Manager, and you have configured the RFC connections between SAPSolution Manager and the managed systems.
5. Choose the system that you want to configure.
6. Read the instructions carefully and perform the requested checks.
7. After performing each check, choose Save + Next to save your changes and open the nextcheck.
Unit 16: The Technical Administration of the SAP System Landscape
428 © Copyright. All rights reserved.
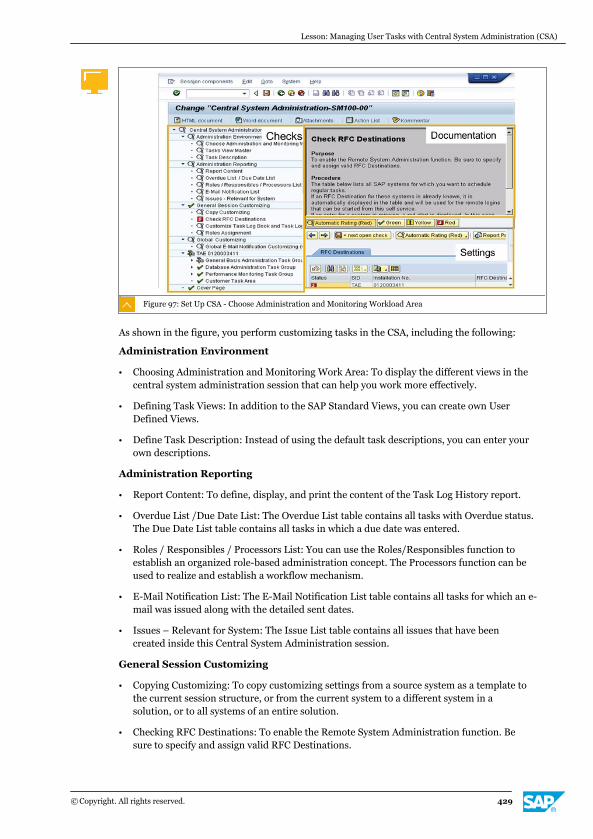
Figure 97: Set Up CSA - Choose Administration and Monitoring Workload Area
As shown in the figure, you perform customizing tasks in the CSA, including the following:
Administration Environment
● Choosing Administration and Monitoring Work Area: To display the different views in thecentral system administration session that can help you work more effectively.
● Defining Task Views: In addition to the SAP Standard Views, you can create own UserDefined Views.
● Define Task Description: Instead of using the default task descriptions, you can enter yourown descriptions.
Administration Reporting
● Report Content: To define, display, and print the content of the Task Log History report.
● Overdue List /Due Date List: The Overdue List table contains all tasks with Overdue status.The Due Date List table contains all tasks in which a due date was entered.
● Roles / Responsibles / Processors List: You can use the Roles/Responsibles function toestablish an organized role-based administration concept. The Processors function can beused to realize and establish a workflow mechanism.
● E-Mail Notification List: The E-Mail Notification List table contains all tasks for which an e-mail was issued along with the detailed sent dates.
● Issues – Relevant for System: The Issue List table contains all issues that have beencreated inside this Central System Administration session.
General Session Customizing
● Copying Customizing: To copy customizing settings from a source system as a template tothe current session structure, or from the current system to a different system in asolution, or to all systems of an entire solution.
● Checking RFC Destinations: To enable the Remote System Administration function. Besure to specify and assign valid RFC Destinations.
Lesson: Managing User Tasks with Central System Administration (CSA)
© Copyright. All rights reserved. 429

● Customizing Task Log Book and Task Log History: To define the general sizes of thestandard task log book and task log history.
● Roles Assignment: To use the Roles Assignment function to establish an organized role-based administration concept. The tasks can be grouped by assigning roles orresponsibilities into a distributed administration environment.
Global Customizing
● Global E-Mail Notifications: To configure general Customizing settings for e-mailnotifications for Central System Administration Task Management.
Task Customizing (<SID><installation number>)
● Specifying System Data and Initially Setting Up Tasks
● Creating User-Specific Tasks
Setting Up Report Cover Page
● You customize the cover page for the generated MS Word reports Task Log History andTask Session Report. For the Task Log History report you can specify the tasks to bedisplayed.
The next steps are the most important part of the customization process, and must be carriedout carefully. For specific customizing needs, such as Role Assignment or E-MailNotifications, refer to the documentation within each step.
Step: Check RFC Destinations
To enable the Remote System Administration function. Be sure to specify and assign validRFC Destinations.
The table lists all SAP systems for which you want to schedule regular tasks.
If an RFC destination for these systems is already known, it is automatically displayed in thetable and will be used for the remote logins that can be started from this self service.
If an entry for a system is missing, a red alert is displayed. In this case you have to fill in a validRFC Destination, which allows a dialog user to logon to the corresponding system. (Forsecurity reasons, this destination should be created without any user or passwordinformation.)
Step: (<SID><installation number>)
To add and complete general system Customizing settings for the administrationenvironment.
Load Default Frequencies
Ensure that you load the SAP Default Frequencies for the SAP system or assign your owndefined frequencies to the tasks when you configure system administration for the first time.The default setting of the Task Frequency in the task list for each task is Not Active.
System Type Table
In the System Type table, select one of the given system types or set your own system typefor your SAP system. The system type is displayed in the administration structure next to thesystem ID.
Default SAP R/3 system types:
1. Production System
Unit 16: The Technical Administration of the SAP System Landscape
430 © Copyright. All rights reserved.
2. Quality Assurance System
3. Development System
4. Demo System
Specify Frequency of Single Task
To change the frequency of a check or activate a check open the Task area (ex. General BasicAdministration Task Group) and choose the check you want to activate or change thefrequency. For detailed instructions, read the documentation for this step.
Step: (<SID><installation number>)
In this step, you can define your own user tasks.
Defining User Task Area Table
You can define your own User Task Areas in plain text.
In the second table column, you can enter the definition of an Alias User Area name. You canchange this alias name whenever necessary and it is displayed instead of the primary UserTask Area Name. For more detailed instructions, read the documentation for this step.
Defining User Task Groups Table
You define user task groups within a user task area that you have created previously.
Use the input help to select a predefined user task area, then assign your user task groups tothis area. For more detailed information, read the documentation for this step.
After saving the check table, you can assign one or more user tasks to this predefined taskgroup by entering the next table, Assigning User Tasks .
Assigning User Tasks Table
Use the input help to select a predefined user task group and then assign one or more of yourown tasks to this group.
After saving the check table, the new task group structure is added as a substructure to theCustomer Task Area check group.
Name Customer Area Table
You can use this table to overwrite the default SAP check group Customer Task Area with aname of your choice.
URL Table
When defining an action of type URL, a length of 120 characters is standard. If you requirelonger URLs, you can define them using the separate URL table. For more detailedinformation, read the documentation for this step.
Copy Customizing
Here you copy customizing settings from a source system as a template to the currentsession structure, or from the current system to a different system in a solution, or to allsystems in a solution. You can only perform this function in the entire view.
For detailed instructions on copying customizing, see the onscreen documentation for thisstep.
Report Content
To define, display, and print the content of the Task Log History report.
Lesson: Managing User Tasks with Central System Administration (CSA)
© Copyright. All rights reserved. 431

If you have entered external document links in the Comments area for the task log book, youcan access these documents by double-clicking the dedicated Task Log Book Comment tablerow field.
A more detailed description of using external documents can be found in the general CentralSystem Administration check in the Task Log Book section at the top of this session.
Define Content for Task Log History
On the Define Content for Task Log History tab page, you can choose whether the reportcontains only Task Log Book entries that have task comments, or all entries. Task logcomments contain information about errors, for example.
In addition, you can use the Define Content for Task Log History tab page to define a dedicatedtime frame for the log book entries that should appear in the report.
Furthermore, for listing task log entries in the report, you can define the number of days thatyou want to appear.
Define Order of Report
You can use this tab to set the sort order of the Task Log History dynamically according toyour own preferences and needs.
In the Cover Page check, which is the last check of this session, enter your company nameand address so that it appears on the cover page of the report.
Function Area
General functions for the whole CSA session, for example, generate reports for the session,view attached documents, or create and maintain an action list.
Step: Cover Page
The information displayed is automatically included on the cover page of generated reports.Check whether the Customer table is filled correctly and completely. If not, enter the datamanually and save the check.
The rating is set to DONE when you save the check.
Figure 98: CSA Generated Report
General Central System Administrative Report
The following reports are available for generation and printing:
Unit 16: The Technical Administration of the SAP System Landscape
432 © Copyright. All rights reserved.
● Task Log History
● Task Session Report
You can generate and print the documents as an MS Word report, using the MS WordDocument or HTML Documentbutton in the upper part of the session.
To Process Open Tasks in Central System AdministrationYou routinely complete open system tasks in the CSA session as follows:
1. In SAP Solution Manager, open the Technical Administration work center.
2. In the navigation area, choose Task Inbox.
3. Choose By Application → Start Embedded or By Application → Start New Window.
4. Choose one of the following:
● Recurring, preconfigured tasks (CSA)
● CSA Tasks in favorite systems
The open task list displays.
5. Choose your preferred view from the following options:
● Standard View: Tasks can be independently sorted by solution, system, or task name.
● Solution Hierarchy: Tasks are grouped by solution.
● System Hierarchy: Tasks are grouped by system.
● Task Name Hierarchy: Tasks are grouped by task name.
All open tasks that match your selection criteria are listed in order of priority.
6. Select the task you want to work with and choose Process Task .
7. The Central System Administration session opens and takes you directly to the selectedtask. You can process the tasks as follows:
a) Execute the assigned transaction remotely in the managed system via the Start<function> button, and do your analyses and task-specific work.
b) After exiting the managed system, write a short comment in the Comment for Logbookfield.
c) If necessary, use the Task Notepad tab to make more detailed notes about the task.
d) To inform or request assistance from someone else, you can start a workflow byentering a processor in the Processor field.The processor automatically receives an e-mail notification about the task.
e) When you have performed all the necessary activities, mark the task as Done.
8. Save your entries.In the navigation area, the task is marked as green.
9. Exit the CSA session.
10. To update your Task Inbox, choose Refresh.The completed task is removed from the open task list.
Lesson: Managing User Tasks with Central System Administration (CSA)
© Copyright. All rights reserved. 433

Unit 16: The Technical Administration of the SAP System Landscape
434 © Copyright. All rights reserved.
Unit 16Exercise 17
Configure and Use Central SystemAdministration
Business Example
As the systems administrator of your organization, you improve the effectiveness of yourmanual daily check routines by implementing Central System Administration (CSA) tomanage user tasks. You run the initial setup, activate several monitoring tasks, copycustomized routines from the SAP ERP system to SAP Solution Manager, and run a report.
1. Activate CSA in the SAP Solution Manager Technical Administration work center.
2. Activate several monitoring tasks with SAP standard frequency, specify the RFCdestination for the SAP ERP system and change the frequency of checking for ABAP shortdumps to daily.
3. To define your own checks, define a User Task Area, a User Task Group, and a User Taskwith the following information:
Options Description
User Task Area General Group
User Task Group Description Task Group 01
Action SLG1
Action Type Transaction
User Task Application Log
Hint:In the CSA you must choose Save after each step.
4. Change the frequency of the task Task Group 01 to daily.
5. Copy the Customizing Settings from the SAP ERP system to SAP Solution Manager.
Ensure the settings for Copy Mode are correct..
6. Execute the Application Log task in CSA in the SAP Solution Manager TechnicalAdministration work center.
7. Generate a report for the last 30 days of your Application Log task.
© Copyright. All rights reserved. 435
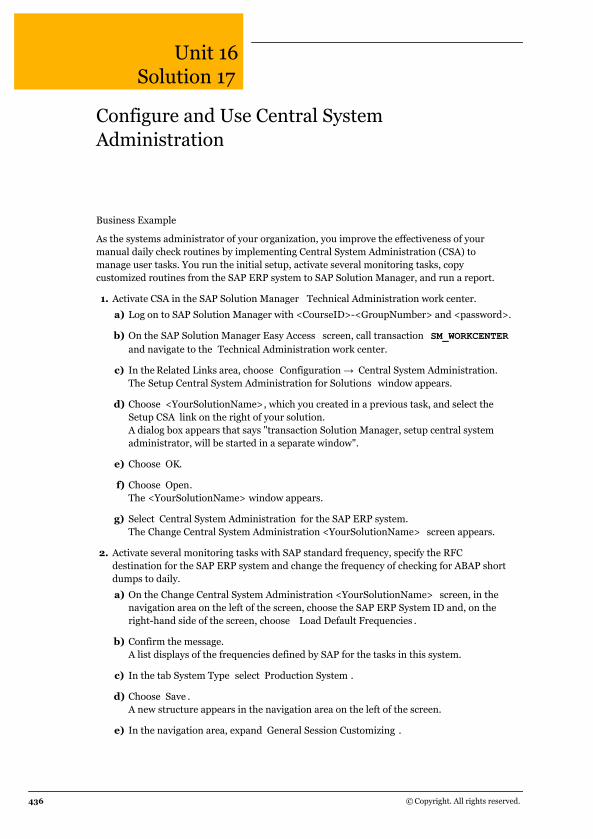
Unit 16Solution 17
Configure and Use Central SystemAdministration
Business Example
As the systems administrator of your organization, you improve the effectiveness of yourmanual daily check routines by implementing Central System Administration (CSA) tomanage user tasks. You run the initial setup, activate several monitoring tasks, copycustomized routines from the SAP ERP system to SAP Solution Manager, and run a report.
1. Activate CSA in the SAP Solution Manager Technical Administration work center.
a) Log on to SAP Solution Manager with <CourseID>-<GroupNumber> and <password>.
b) On the SAP Solution Manager Easy Access screen, call transaction SM_WORKCENTERand navigate to the Technical Administration work center.
c) In the Related Links area, choose Configuration → Central System Administration.The Setup Central System Administration for Solutions window appears.
d) Choose <YourSolutionName>, which you created in a previous task, and select theSetup CSA link on the right of your solution.A dialog box appears that says "transaction Solution Manager, setup central systemadministrator, will be started in a separate window".
e) Choose OK.
f) Choose Open.The <YourSolutionName> window appears.
g) Select Central System Administration for the SAP ERP system.The Change Central System Administration <YourSolutionName> screen appears.
2. Activate several monitoring tasks with SAP standard frequency, specify the RFCdestination for the SAP ERP system and change the frequency of checking for ABAP shortdumps to daily.
a) On the Change Central System Administration <YourSolutionName> screen, in thenavigation area on the left of the screen, choose the SAP ERP System ID and, on theright-hand side of the screen, choose Load Default Frequencies .
b) Confirm the message.A list displays of the frequencies defined by SAP for the tasks in this system.
c) In the tab System Type select Production System .
d) Choose Save .A new structure appears in the navigation area on the left of the screen.
e) In the navigation area, expand General Session Customizing .
436 © Copyright. All rights reserved.
f) Choose Check RFC Destinations .
g) In the content area, in the RFC Destination column, choose Input Help.
h) In the list of RFC destinations, chooseSM_<ECC_SID>CLNT<ProductionClientNumber>_TRUSTEDand copy it to the list.
i) Choose Save .
The RFC destination allows you to call the administration transaction, such as SLG1,when the setup is complete.
The status of this check changes to Activated.
j) In the navigation area, expand <SID><installation number>.A list of tasks appears.
k) Expand General Base Administration Task Group .A list of tasks appears.
l) Choose Checking for ABAP Short Dumps .
m) In the content area, in the Frequency column, choose Input Help.
n) From the Schedule Value Help table, choose daily and copy it to the list.
o) Choose Save .The status of this check changes to Activated.
3. To define your own checks, define a User Task Area, a User Task Group, and a User Taskwith the following information:
Options Description
User Task Area General Group
User Task Group Description Task Group 01
Action SLG1
Action Type Transaction
User Task Application Log
Hint:In the CSA you must choose Save after each step.
a) On the Change Central System Administration <YourSolutionName> screen, in thenavigation area, select <SID><installation number>.
b) In the content area, choose the Defining User Task Area tab.
c) In the User Task Area column, in the first row, enter the value provided.
d) Choose Save .
e) Choose the Defining User Task Groups tab.
Lesson: Managing User Tasks with Central System Administration (CSA)
© Copyright. All rights reserved. 437
f) In the User Task Area row, choose Input Help.
g) In the Defining User Task Area menu, choose General Group and copy it to the table.
h) In the first row of the table, fill in the User Task Group Description, Action, and ActionType fields using the data provided.
i) Select Rename User Task Groups and choose Save .
j) Choose the Assigning User Tasks tab.
k) In the User Task Area column, in the first row, choose Input Help.
l) In the menu, choose your User Task Area and copy it to the list.
m) In the User Task column for this task, enter Application Log.
n) Choose Save .
4. Change the frequency of the task Task Group 01 to daily.
a) On the Change Central System Administration <YourSolutionName> screen, in thenavigation area, expand <SID><installation number>.
b) Expand Customer Task Area .
c) Expand General Group.
d) Select Task Group 01.
e) In the content area, select the Frequency field and choose Input Help.
f) Change the Frequency from not active to daily and choose Save .The status of this step changes to a toolbox, indicating that a check is activated.
5. Copy the Customizing Settings from the SAP ERP system to SAP Solution Manager.
Ensure the settings for Copy Mode are correct..
a) On the Change Central System Administration <YourSolutionName> screen, in thenavigation area, expand General Session Customizing .
b) Select Copy Customizing .
c) In the content area, choose the Copy Customizing to Systems tab.
d) In the Target Solution column, in the first row, choose Input Help.
e) In the Value Help with R3 Systems menu, select <YourSolution><SAP SolutionManager installation number><Session number> and copy it to the table.
f) Choose the Copy Mode tab.
g) Select the Copy General Session Customizing? and Copy User Tasks? checkboxes.
h) Choose Save .
i) Confirm your choice.
j) Choose Back to return to the Solution - <YourSolutionName> - SAP Solution
Manager screen.
k) Select Central System Administration for the SAP Solution Manager system.
Unit 16: The Technical Administration of the SAP System Landscape
438 © Copyright. All rights reserved.
The Copy Customizing dialog appears.
l) Choose Execute: YES.
m) Confirm the Copy of Customizing completed successfully message.The SAP Solution Manager system Change Central System Administration<YourSolutionName> screen appears.
n) In the navigation area, expand <SID of SAP Solution Manager><installationnumber> → Customer Task Area → General Group → Task Group 01 to see that yourtask has copied successfully.
o) Choose Save .
6. Execute the Application Log task in CSA in the SAP Solution Manager TechnicalAdministration work center.
a) Return to the SAP Solution Manager Technical Administration work center, chooseTask Inbox.
b) In the content area choose By Application → Start Embedded .
c) If it is not already selected, select the Recurring, preconfigured tasks CSA query.
d) Choose Refresh.
e) In the tasks table, choose Application Log.
If the ags_work_appln.sap dialog appears, choose Open.
The Change Central System Administration <YourSolutionName> screen appears.
f) Choose Start SLG1 to process the task.
The name of this button changes according to the task you are processing.
The Analyze Application Log screen appears. Here you can analyze the log as needed.
g) When you have completed your analysis, close the Analyze Application Log screen.
h) Choose Back to return to the Change Central System Administration<YourSolutionName> screen.
i) In the Application Log task row, select the Done checkbox.
j) Choose Save .
7. Generate a report for the last 30 days of your Application Log task.
a) On the Change Central System Administration <YourSolutionName> screen, in thenavigation area, expand Administration Reporting and choose Report Content .
b) In the content area, choose the Task Log History tab.Your Application Log task displays in the list.
c) Choose the Define Content for Tasks Log History tab.
d) In the Number of Days column, enter 30.
e) Choose Save .
f) At the top of the screen, choose HTML Document.The Select a Report Type dialog box displays.
Lesson: Managing User Tasks with Central System Administration (CSA)
© Copyright. All rights reserved. 439

g) Choose Task Log History.The HTML report displays in a new window.
h) Confirm that the report includes Application Log.
Unit 16: The Technical Administration of the SAP System Landscape
440 © Copyright. All rights reserved.
LESSON SUMMARYYou should now be able to:
● Set up central system administration to manage user tasks
Lesson: Managing User Tasks with Central System Administration (CSA)
© Copyright. All rights reserved. 441
Unit 16Lesson 4
Managing Tasks with the Task Inbox
LESSON OVERVIEWThe Task Inbox provides a central entry point for viewing and managing tasks created indifferent applications. In this lesson you will learn how to manage tasks in the Task Inbox byapplication and by timing.
LESSON OBJECTIVESAfter completing this lesson, you will be able to:
● Process tasks with the Task Inbox
The Task Inbox in SAP Solution ManagerYou use the Task Inbox to view and manage tasks centrally that were created in the followingapplications:
● Issue Management
● Change Request Management
● Central System Administration
● Work Mode Management
● Job Scheduling Management
You can create application-dependent tasks only in their respective applications.
For more information, see SAP Note 1245491 - Task management with SAP SolutionManager: a brief guide.
442 © Copyright. All rights reserved.
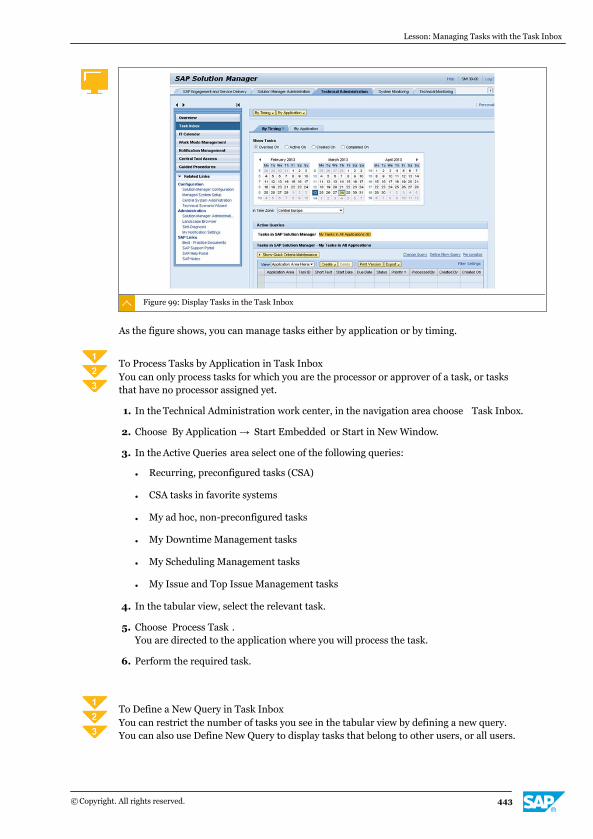
Figure 99: Display Tasks in the Task Inbox
As the figure shows, you can manage tasks either by application or by timing.
To Process Tasks by Application in Task InboxYou can only process tasks for which you are the processor or approver of a task, or tasksthat have no processor assigned yet.
1. In the Technical Administration work center, in the navigation area choose Task Inbox.
2. Choose By Application → Start Embedded or Start in New Window.
3. In the Active Queries area select one of the following queries:
● Recurring, preconfigured tasks (CSA)
● CSA tasks in favorite systems
● My ad hoc, non-preconfigured tasks
● My Downtime Management tasks
● My Scheduling Management tasks
● My Issue and Top Issue Management tasks
4. In the tabular view, select the relevant task.
5. Choose Process Task .You are directed to the application where you will process the task.
6. Perform the required task.
To Define a New Query in Task InboxYou can restrict the number of tasks you see in the tabular view by defining a new query.You can also use Define New Query to display tasks that belong to other users, or all users.
Lesson: Managing Tasks with the Task Inbox
© Copyright. All rights reserved. 443
1. At the top of the Task Inbox tabular view choose Define New Query.
2. Select one of the following object types:
● Task in CSA
● Tasks in Issue Management
● Task in new applications
3. Select an existing query as a template or leave the selection empty.
4. Choose Next.
5. Maintain the criteria you want to use in your query and choose Next.
6. Enter a meaningful description for your query.
7. Leave the Activate Query check box selected.
8. Select a category or choose Create a new category and enter a name for the new category.
9. Choose Finish.
Your new query displays in the Active Queries area. If you created a new category, thiscategory displays along with the new query in the Active Queries area. The results of thequery display in the tabular tasks view.
To View Tasks by Timing in Task Inbox
1. In the Task Inbox choose By Timing → Start Embedded or Start in New Window.
2. In the Show Tasks area, select the required time frame.
The default view is Overdue On.
3. To see your active tasks, change the filter to Active On.
4. Select the appropriate query in the Active Queries area.
5. Choose Show Quick Criteria Maintenance to search for tasks based on application areas.
Here you can filter by application area, business partner, or system user.
6. Select the short text of a task to open it.
7. If no processor is defined, or you are the processor, you can change the status of the taskto In Progress or Completed and document your execution in the Process Log.
LESSON SUMMARYYou should now be able to:
● Process tasks with the Task Inbox
Unit 16: The Technical Administration of the SAP System Landscape
444 © Copyright. All rights reserved.
Unit 16Lesson 5
Grouping Administrative Tools with CentralTool Access
LESSON OVERVIEWCentral Tool Access provides a central location to group tools relevant for particularadministrative tasks, managing users, and transportation tasks in the SAP Solution Managersystem and the managed systems. In this lesson you will learn how to access a tool in CentralTool Access and how to add a tool to Central Tool Access.
LESSON OBJECTIVESAfter completing this lesson, you will be able to:
● Locate administrative tools in the Central Tool Access area
Central Tool Access in SAP Solution ManagerThe Central Tool Access offers you unified access to tools relevant for administrative tasks,managing users, and transportation tasks in the central (SAP Solution Manager) system andmanaged systems.
To use the ABAP tools in the managed system, you must have maintained an RFC connectionof type Trusted or Logon.
SAP provides a list of tools in the Central Tool Access, but you can also add other tools to themanaged system, such as the following:
● ABAP transaction
● ABAP transaction (such as SAP GUI for Microsoft Windows)
● ABAP Web Dynpro URL
● External (non-SAP) application
To Access an Administration Tool via Central Tool AccessBefore logging on to the system where you want to run the tool, check that the following ICFnodes are activated in transaction SICF:
● sap/public/bc
● sap/public/bc/ur
© Copyright. All rights reserved. 445
Note:The User Management and Transport Management tabs may display Zero (0)tools available initially, but when you open them, you see that there are toolsavailable.
1. In the SAP Solution Manager Technical Administration work center, open Central ToolAccess .
a) Log on to SAP Solution Manager with <CourseID>-<GroupNumber> and<password>.
b) On the SAP Solution Manager Easy Access screen, call transaction SM_WORKCENTER.
c) Open the Technical Administration work center.
d) Choose Central Tool Access .
e) In the list of systems, select the SAP ERP system and choose Central Tool Access .The Central Tool Access <SystemName> screen appears.
f) In the Client Selection dropdown list, select the name of the client you want to access.
g) Click the name of the tool you want to access to open it on the system.
h) If a Trusted Connection exists, the tool opens.
i) If no Trusted Connection exists, log on before using the tool.
You now have access to all of the pre-shipped tools, such as SU01, SMICM, and more.
To Add a Tool to Central Tool AccessYou can add a user-defined tool to Central Tool Access.
1. On the Central Tool Access <SystemName> screen, add a new tool.
a) Choose Add Tool.
b) In the Add Tool dialog box, enter the relevant information for your tool.
c) Expand the Tool Area to select an area where the tool is used.
d) Expand the Tool Parameters to select parameters for your tool.
e) Choose Save .
LESSON SUMMARYYou should now be able to:
● Locate administrative tools in the Central Tool Access area
Unit 16: The Technical Administration of the SAP System Landscape
446 © Copyright. All rights reserved.
Unit 16
Learning Assessment
1. You use the Task Inbox to view and manage tasks centrally that were created in thefollowing applications: Issue Management, Change Request Management, Central SystemAdministration, Work Mode Management, and Job Scheduling Management.
Determine whether this statement is true or false.
X True
X False
© Copyright. All rights reserved. 447
Unit 16
Learning Assessment - Answers
1. You use the Task Inbox to view and manage tasks centrally that were created in thefollowing applications: Issue Management, Change Request Management, Central SystemAdministration, Work Mode Management, and Job Scheduling Management.
Determine whether this statement is true or false.
X True
X False
448 © Copyright. All rights reserved.
UNIT 17 End-to-End Diagnostics in SAPSolution Manager
Lesson 1
Describing the Architecture of SAP Solution Manager Diagnostics 451
Lesson 2
Viewing Performance Data and Metrics With CA Wily Introscope 455
Exercise 18: Locate the Total Heap Size and the Java Version for the SAP Portal
System with CA Wily Introscope
461
Lesson 3
Analyzing Changes to Managed Systems with End-to-End Change Analysis 465
Exercise 19: Find the Current SAP Support Package Level and the SAP Kernel Patch
Level for the SAP ABAP System
471
Exercise 20: Find the Current SAP Support Package Level of the SAP J2EE Engine 475
Lesson 4
Analyzing Statistical Performance Data with End-to-End Workload Analysis 478
Lesson 5
Identifying the Cause of System Errors with End-to-End Exception Analysis 485
Lesson 6
Analyzing Trace Data with End-to-End Trace Analysis 491
Lesson 7
Performing Client-Side Diagnostics with BMC AppSight 499
UNIT OBJECTIVES
● Explain end-to-end root-cause analysis in SAP Solution Manager
● Access key performance information using CA Wily Introscope
● Identify changes to managed systems with end-to-end change analysis
© Copyright. All rights reserved. 449
● Access performance data with end-to-end workload analysis
● Perform end-to-end exception analysis
● Perform end-to-end trace analysis
● Trace client-side applications with BMC Appsight
Unit 17: End-to-End Diagnostics in SAP Solution Manager
450 © Copyright. All rights reserved.
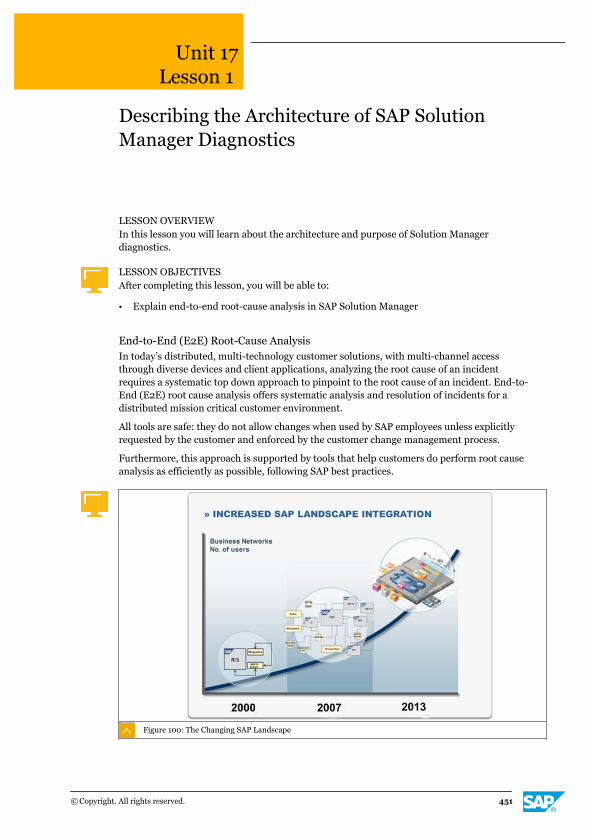
Unit 17Lesson 1
Describing the Architecture of SAP SolutionManager Diagnostics
LESSON OVERVIEWIn this lesson you will learn about the architecture and purpose of Solution Managerdiagnostics.
LESSON OBJECTIVESAfter completing this lesson, you will be able to:
● Explain end-to-end root-cause analysis in SAP Solution Manager
End-to-End (E2E) Root-Cause AnalysisIn today’s distributed, multi-technology customer solutions, with multi-channel accessthrough diverse devices and client applications, analyzing the root cause of an incidentrequires a systematic top down approach to pinpoint to the root cause of an incident. End-to-End (E2E) root cause analysis offers systematic analysis and resolution of incidents for adistributed mission critical customer environment.
All tools are safe: they do not allow changes when used by SAP employees unless explicitlyrequested by the customer and enforced by the customer change management process.
Furthermore, this approach is supported by tools that help customers do perform root causeanalysis as efficiently as possible, following SAP best practices.
Figure 100: The Changing SAP Landscape
© Copyright. All rights reserved. 451
As shown in the diagram, SAP has become increasingly integrated into this moresophisticated system landscape.
● Every customer has mission-critical applications along with integration needs.
● SAP landscapes have become more sophisticated as they have become more integratedand comprehensive.
● SAP provides advanced support options to manage innovation and integration, risk, andTCO.
Each system or software component that relies on a particular technology stack (ABAP,Java, .net, or C++) provides proprietary diagnostics to fulfill common diagnostics tasks onthat component.
SAP Solution Manager introduces a new layer of diagnostics that aims to isolate thecomponent that is the root cause of an incident.
Root-Cause Analysis Tools in SAP Solution ManagerEnd-to-End Root Cause Analysiscontains four cross-component capabilities for analysisactivities to be conducted on the managing system (cross-component analysis activities) andanalysis activities to be conducted on the managed system (single-component analysisactivities). The aim of RCA is fast problem resolution. End-to-End (E2E) means from the clientthrough network to application servers and databases, and back. The four main tools are asfollows:
● E2E Change Analysistracks all changes (for example, technical configuration, code, andcontent) that are applied to the managed systems. This information is especially useful if afew ad hoc changes result in disruption of a productive system, as it is possible to comparedifferent systems and generate a report that contains the results. This approach identifiesthe problem by comparison instead of by drilling down, which is faster and easier in mostcases. For example, “Yesterday it worked; today it does not work. What has changed?”
● E2E Workload Analysisaggregates server-side performance statistics of managedsystems to identify general server-side performance bottlenecks, such as sizing issues. If acustomer faces a performance problem, E2E Workload Analysis might be the tool to startwith. In other words, E2E Workload Analysis isolates general performance bottlenecks in asolution landscape.
● E2E Exception Analysisallows centralized analysis of all exceptions thrown in the managedsystems, including ABAP Dumps and ABAP Syslog errors, and Java application errorscollected from the default trace (and much more). You can access specific log and dumpviewers from the E2E Exception Analysis section, too. In the presence of functionalproblems, E2E Exception Analysis offers a unified view of the exceptions of all systems anddisplays them using different time diagrams.
● E2E Trace Analysisisolates a single user request through a complete landscape, providingtrace information on each of the involved system parts. The measurement is started at theend users interface (Internet Explorer or SAP GUI). With the help of an individualcorrelation ID, each request is traced throughout the SAP server landscape. This functionenables the customer to identify quickly the component causing the problem. While End-to-End Change Analysis, End-to-End Workload Analysis, and End-to-End ExceptionAnalysis cover the server side, End-to-End Trace Analysis spans the full cycle of a userrequest – from client to server to disk.
Component-Specific Tools
Unit 17: End-to-End Diagnostics in SAP Solution Manager
452 © Copyright. All rights reserved.

You can also add ABAP, Java, .net, and C++ component-specific diagnostics tools to yourSAP Solution Manager landscape.
Figure 101: E2E Root Cause Analysis Tools Overview
SAP has licensed two third-party products to complete the key capabilities in root causeanalysis: CA Wily Introscope for server-side root cause analysis and BMC AppSight for client-side root cause analysis. Both products are highly adaptable and are delivered by SAP fullypreconfigured for SAP products and SAP Partners (containing instrumentation anddashboards for SAP). CA Wily Introscope is fully integrated in the server-side root causeanalysis infrastructure of SAP Solution Manager.
Wily Introscope is included in SAP Solution Manager for SAP standard components.
With BMC AppSight, the customer can record and analyze client-side activities of SAPsoftware.
SAP engineers have full access to both Wily Introscope and BMC AppSight analysis features.
Table 41: Third-Party Diagnostics Tools - Features
Wily Introscope BMC AppSight
Scope A performance managementsolution that enables you tomonitor complex web appli-cations in production envi-ronments 24x7
A system built on a uniqueproblem resolution architec-ture designed from theground up with patentedblack-box technology to opti-mize the problem resolutionprocess.
Website www.wilytech.com
Part of CA
www.identify.com
Part of BMC
SAP Standard for: Server performance diagnos-tics
Client performance diagnos-tics
Lesson: Describing the Architecture of SAP Solution Manager Diagnostics
© Copyright. All rights reserved. 453
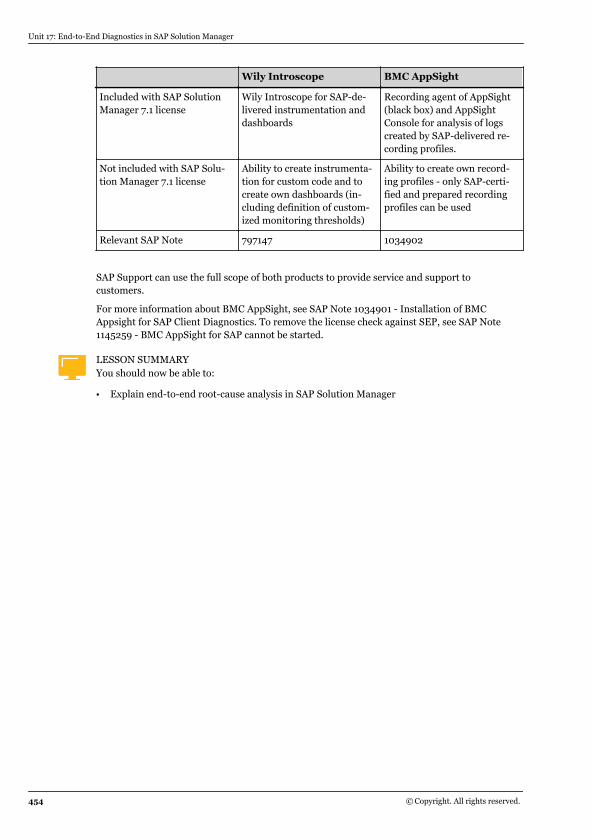
Wily Introscope BMC AppSight
Included with SAP SolutionManager 7.1 license
Wily Introscope for SAP-de-livered instrumentation anddashboards
Recording agent of AppSight(black box) and AppSightConsole for analysis of logscreated by SAP-delivered re-cording profiles.
Not included with SAP Solu-tion Manager 7.1 license
Ability to create instrumenta-tion for custom code and tocreate own dashboards (in-cluding definition of custom-ized monitoring thresholds)
Ability to create own record-ing profiles - only SAP-certi-fied and prepared recordingprofiles can be used
Relevant SAP Note 797147 1034902
SAP Support can use the full scope of both products to provide service and support tocustomers.
For more information about BMC AppSight, see SAP Note 1034901 - Installation of BMCAppsight for SAP Client Diagnostics. To remove the license check against SEP, see SAP Note1145259 - BMC AppSight for SAP cannot be started.
LESSON SUMMARYYou should now be able to:
● Explain end-to-end root-cause analysis in SAP Solution Manager
Unit 17: End-to-End Diagnostics in SAP Solution Manager
454 © Copyright. All rights reserved.
Unit 17Lesson 2
Viewing Performance Data and Metrics WithCA Wily Introscope
LESSON OVERVIEWCA Wily Introscope Enterprise Manager provides a central repository for all Introscopeperformance data and metrics collected in an application environment. In this lesson you willlearn how to access performance information using
LESSON OBJECTIVESAfter completing this lesson, you will be able to:
● Access key performance information using CA Wily Introscope
CA Wily Introscope as Part of SAP Solution Manager
CA and SAP have an agreement that allows you to use Introscope with SAP-developeddashboards and instrumentation as part of SAP Solution Manager. The available componentsfor Wily Introscope are Enterprise Manager, Agent, Workstation, and WebView.
The setup, installation, and configuration of these components is described in SAP Note797147 - Wily Introscope Installation for SAP Customers (and Related Notes).
The diagram shows the position of the CA Wily Introscope Enterprise Manager in the SAPSolution Manager landscape.
© Copyright. All rights reserved. 455
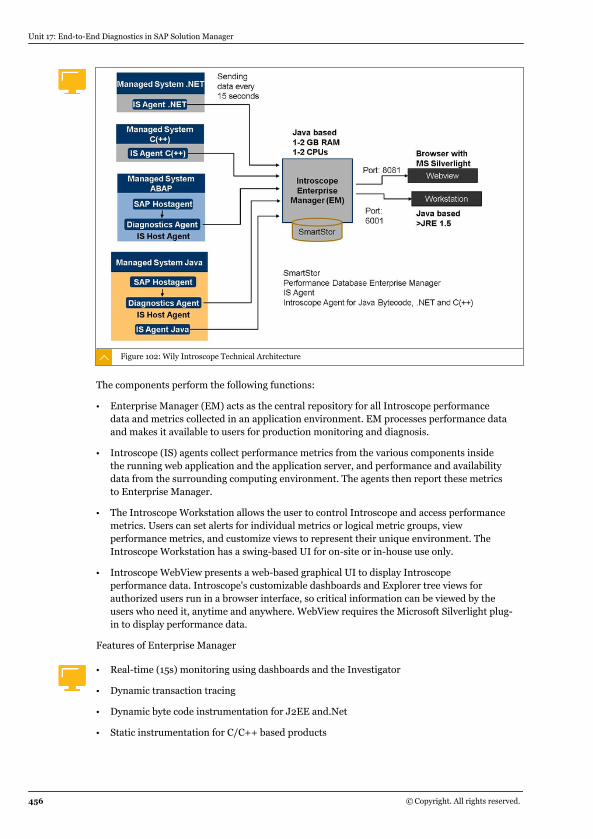
Figure 102: Wily Introscope Technical Architecture
The components perform the following functions:
● Enterprise Manager (EM) acts as the central repository for all Introscope performancedata and metrics collected in an application environment. EM processes performance dataand makes it available to users for production monitoring and diagnosis.
● Introscope (IS) agents collect performance metrics from the various components insidethe running web application and the application server, and performance and availabilitydata from the surrounding computing environment. The agents then report these metricsto Enterprise Manager.
● The Introscope Workstation allows the user to control Introscope and access performancemetrics. Users can set alerts for individual metrics or logical metric groups, viewperformance metrics, and customize views to represent their unique environment. TheIntroscope Workstation has a swing-based UI for on-site or in-house use only.
● Introscope WebView presents a web-based graphical UI to display Introscopeperformance data. Introscope's customizable dashboards and Explorer tree views forauthorized users run in a browser interface, so critical information can be viewed by theusers who need it, anytime and anywhere. WebView requires the Microsoft Silverlight plug-in to display performance data.
Features of Enterprise Manager
● Real-time (15s) monitoring using dashboards and the Investigator
● Dynamic transaction tracing
● Dynamic byte code instrumentation for J2EE and.Net
● Static instrumentation for C/C++ based products
Unit 17: End-to-End Diagnostics in SAP Solution Manager
456 © Copyright. All rights reserved.
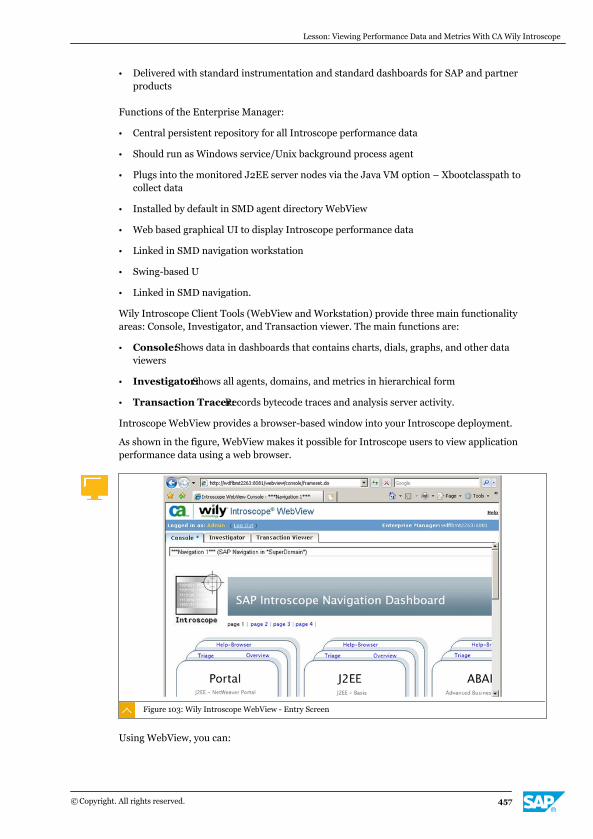
● Delivered with standard instrumentation and standard dashboards for SAP and partnerproducts
Functions of the Enterprise Manager:
● Central persistent repository for all Introscope performance data
● Should run as Windows service/Unix background process agent
● Plugs into the monitored J2EE server nodes via the Java VM option – Xbootclasspath tocollect data
● Installed by default in SMD agent directory WebView
● Web based graphical UI to display Introscope performance data
● Linked in SMD navigation workstation
● Swing-based U
● Linked in SMD navigation.
Wily Introscope Client Tools (WebView and Workstation) provide three main functionalityareas: Console, Investigator, and Transaction viewer. The main functions are:
● Console:Shows data in dashboards that contains charts, dials, graphs, and other dataviewers
● Investigator:Shows all agents, domains, and metrics in hierarchical form
● Transaction Tracer:Records bytecode traces and analysis server activity.
Introscope WebView provides a browser-based window into your Introscope deployment.
As shown in the figure, WebView makes it possible for Introscope users to view applicationperformance data using a web browser.
Figure 103: Wily Introscope WebView - Entry Screen
Using WebView, you can:
Lesson: Viewing Performance Data and Metrics With CA Wily Introscope
© Copyright. All rights reserved. 457
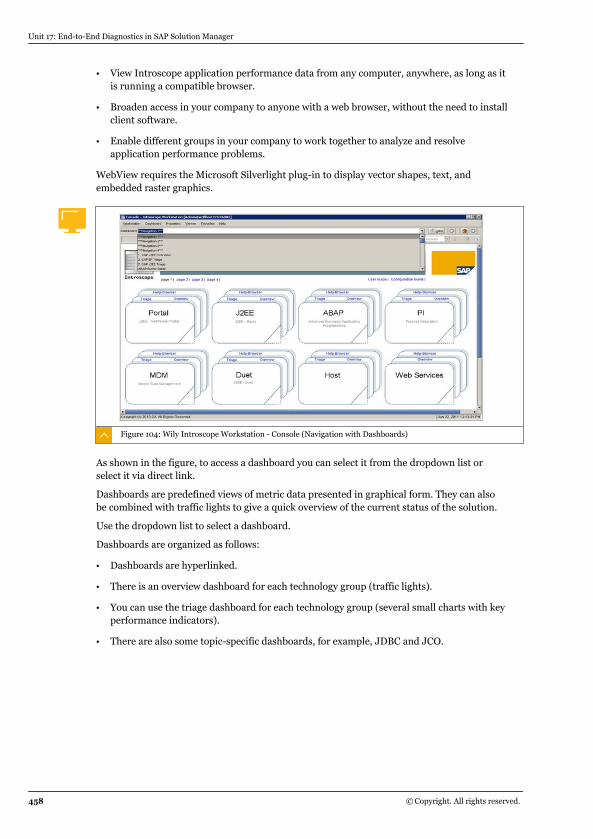
● View Introscope application performance data from any computer, anywhere, as long as itis running a compatible browser.
● Broaden access in your company to anyone with a web browser, without the need to installclient software.
● Enable different groups in your company to work together to analyze and resolveapplication performance problems.
WebView requires the Microsoft Silverlight plug-in to display vector shapes, text, andembedded raster graphics.
Figure 104: Wily Introscope Workstation - Console (Navigation with Dashboards)
As shown in the figure, to access a dashboard you can select it from the dropdown list orselect it via direct link.
Dashboards are predefined views of metric data presented in graphical form. They can alsobe combined with traffic lights to give a quick overview of the current status of the solution.
Use the dropdown list to select a dashboard.
Dashboards are organized as follows:
● Dashboards are hyperlinked.
● There is an overview dashboard for each technology group (traffic lights).
● You can use the triage dashboard for each technology group (several small charts with keyperformance indicators).
● There are also some topic-specific dashboards, for example, JDBC and JCO.
Unit 17: End-to-End Diagnostics in SAP Solution Manager
458 © Copyright. All rights reserved.
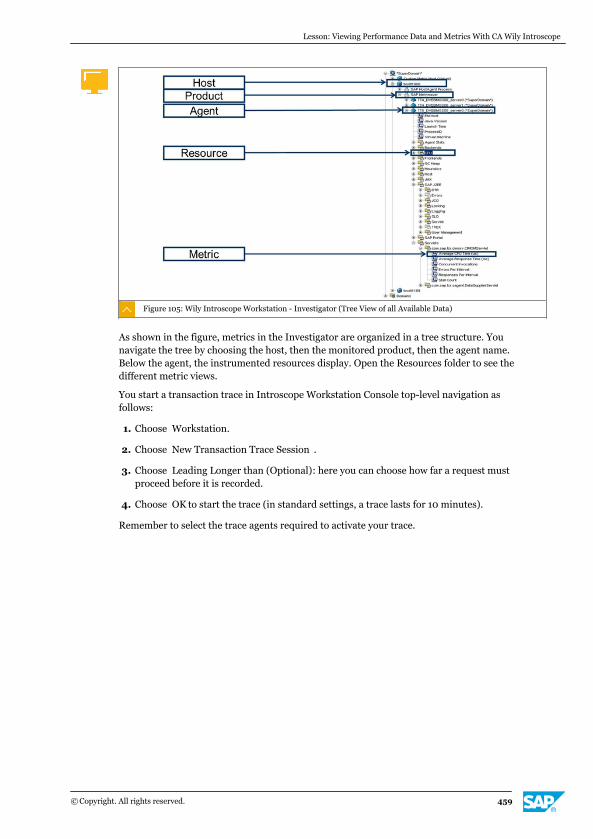
Figure 105: Wily Introscope Workstation - Investigator (Tree View of all Available Data)
As shown in the figure, metrics in the Investigator are organized in a tree structure. Younavigate the tree by choosing the host, then the monitored product, then the agent name.Below the agent, the instrumented resources display. Open the Resources folder to see thedifferent metric views.
You start a transaction trace in Introscope Workstation Console top-level navigation asfollows:
1. Choose Workstation.
2. Choose New Transaction Trace Session .
3. Choose Leading Longer than (Optional): here you can choose how far a request mustproceed before it is recorded.
4. Choose OK to start the trace (in standard settings, a trace lasts for 10 minutes).
Remember to select the trace agents required to activate your trace.
Lesson: Viewing Performance Data and Metrics With CA Wily Introscope
© Copyright. All rights reserved. 459
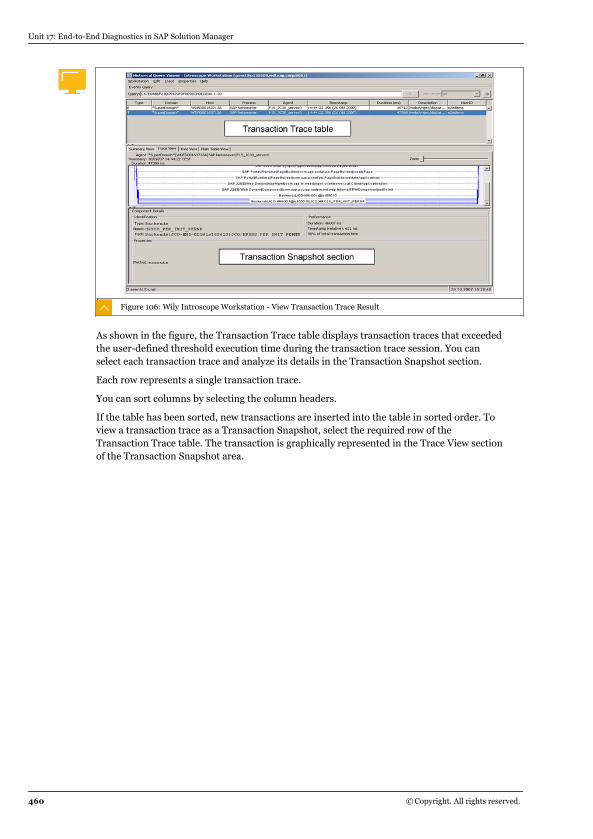
Figure 106: Wily Introscope Workstation - View Transaction Trace Result
As shown in the figure, the Transaction Trace table displays transaction traces that exceededthe user-defined threshold execution time during the transaction trace session. You canselect each transaction trace and analyze its details in the Transaction Snapshot section.
Each row represents a single transaction trace.
You can sort columns by selecting the column headers.
If the table has been sorted, new transactions are inserted into the table in sorted order. Toview a transaction trace as a Transaction Snapshot, select the required row of theTransaction Trace table. The transaction is graphically represented in the Trace View sectionof the Transaction Snapshot area.
Unit 17: End-to-End Diagnostics in SAP Solution Manager
460 © Copyright. All rights reserved.
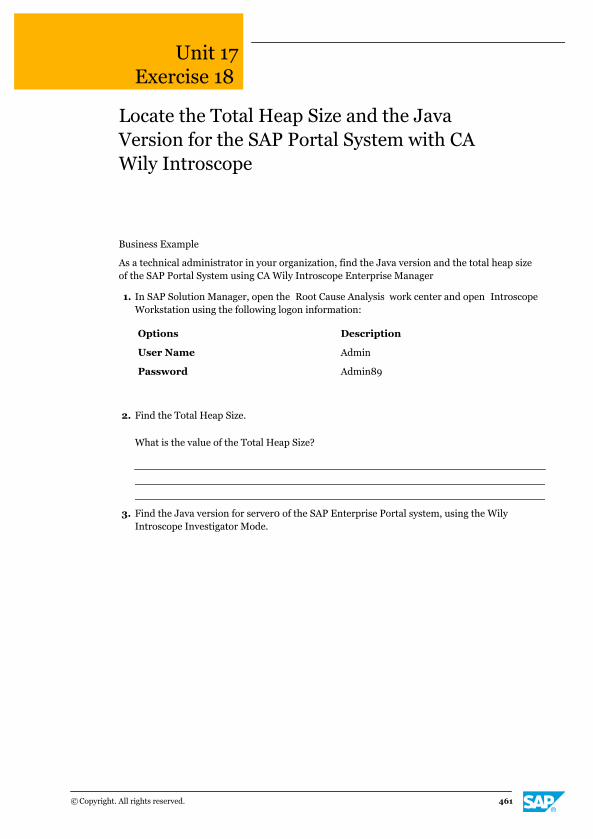
Unit 17Exercise 18
Locate the Total Heap Size and the JavaVersion for the SAP Portal System with CAWily Introscope
Business Example
As a technical administrator in your organization, find the Java version and the total heap sizeof the SAP Portal System using CA Wily Introscope Enterprise Manager
1. In SAP Solution Manager, open the Root Cause Analysis work center and open IntroscopeWorkstation using the following logon information:
Options Description
User Name Admin
Password Admin89
2. Find the Total Heap Size.
What is the value of the Total Heap Size?
3. Find the Java version for server0 of the SAP Enterprise Portal system, using the WilyIntroscope Investigator Mode.
© Copyright. All rights reserved. 461
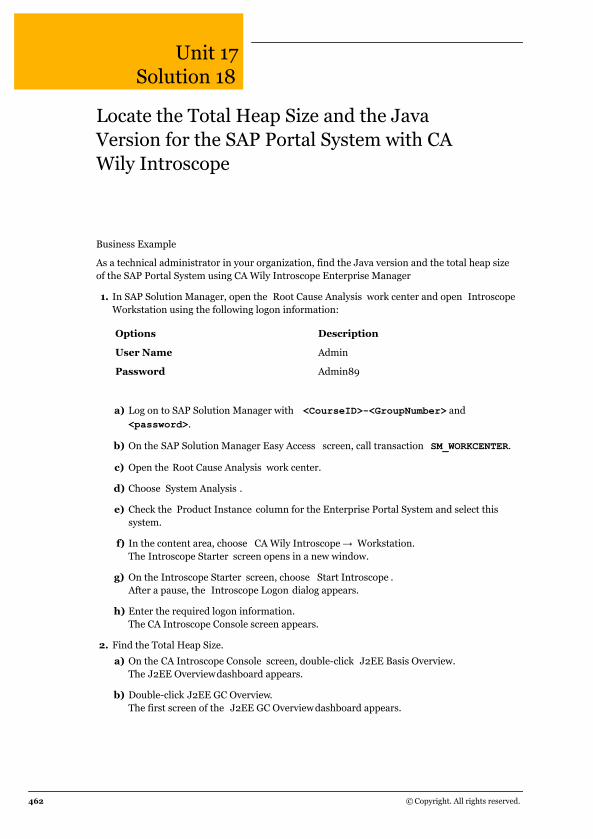
Unit 17Solution 18
Locate the Total Heap Size and the JavaVersion for the SAP Portal System with CAWily Introscope
Business Example
As a technical administrator in your organization, find the Java version and the total heap sizeof the SAP Portal System using CA Wily Introscope Enterprise Manager
1. In SAP Solution Manager, open the Root Cause Analysis work center and open IntroscopeWorkstation using the following logon information:
Options Description
User Name Admin
Password Admin89
a) Log on to SAP Solution Manager with <CourseID>-<GroupNumber> and<password>.
b) On the SAP Solution Manager Easy Access screen, call transaction SM_WORKCENTER.
c) Open the Root Cause Analysis work center.
d) Choose System Analysis .
e) Check the Product Instance column for the Enterprise Portal System and select thissystem.
f) In the content area, choose CA Wily Introscope → Workstation.The Introscope Starter screen opens in a new window.
g) On the Introscope Starter screen, choose Start Introscope .After a pause, the Introscope Logon dialog appears.
h) Enter the required logon information.The CA Introscope Console screen appears.
2. Find the Total Heap Size.
a) On the CA Introscope Console screen, double-click J2EE Basis Overview.The J2EE Overview dashboard appears.
b) Double-click J2EE GC Overview.The first screen of the J2EE GC Overviewdashboard appears.
462 © Copyright. All rights reserved.

c) The Total Heap Sizes graph displays.
What is the value of the Total Heap Size?
The value displays when you place the cursor over the top line of the graph.
3. Find the Java version for server0 of the SAP Enterprise Portal system, using the WilyIntroscope Investigator Mode.
a) On the CA Introscope Overview Dashboard , from the main menu, chooseWorkstation → New Investigator.The Investigator window appears.
b) In the metric browser screen area, expand *SuperDomain* → <wdfxxxx> → SAPNetWeaver → Java Version.
What Java version is the SAP Enterprise Portal System using?
The Java version displays in the General section in the form Java Version =1.x.y_<PatchNumber>.
Lesson: Viewing Performance Data and Metrics With CA Wily Introscope
© Copyright. All rights reserved. 463
LESSON SUMMARYYou should now be able to:
● Access key performance information using CA Wily Introscope
Unit 17: End-to-End Diagnostics in SAP Solution Manager
464 © Copyright. All rights reserved.
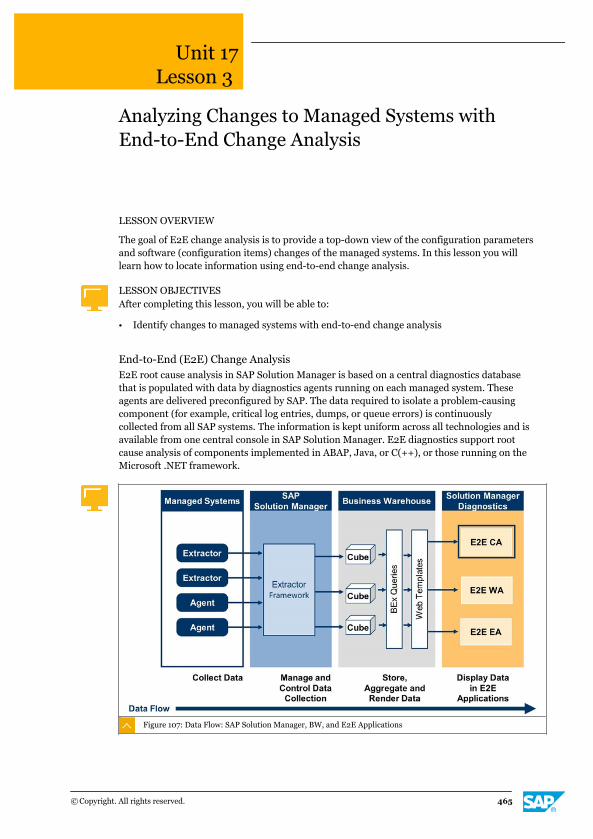
Unit 17Lesson 3
Analyzing Changes to Managed Systems withEnd-to-End Change Analysis
LESSON OVERVIEW
The goal of E2E change analysis is to provide a top-down view of the configuration parametersand software (configuration items) changes of the managed systems. In this lesson you willlearn how to locate information using end-to-end change analysis.
LESSON OBJECTIVESAfter completing this lesson, you will be able to:
● Identify changes to managed systems with end-to-end change analysis
End-to-End (E2E) Change AnalysisE2E root cause analysis in SAP Solution Manager is based on a central diagnostics databasethat is populated with data by diagnostics agents running on each managed system. Theseagents are delivered preconfigured by SAP. The data required to isolate a problem-causingcomponent (for example, critical log entries, dumps, or queue errors) is continuouslycollected from all SAP systems. The information is kept uniform across all technologies and isavailable from one central console in SAP Solution Manager. E2E diagnostics support rootcause analysis of components implemented in ABAP, Java, or C(++), or those running on theMicrosoft .NET framework.
Figure 107: Data Flow: SAP Solution Manager, BW, and E2E Applications
© Copyright. All rights reserved. 465
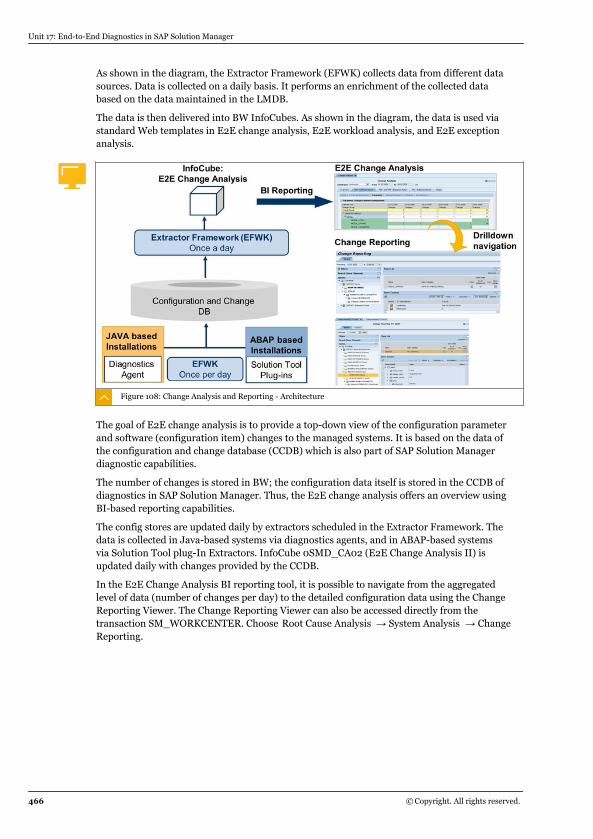
As shown in the diagram, the Extractor Framework (EFWK) collects data from different datasources. Data is collected on a daily basis. It performs an enrichment of the collected databased on the data maintained in the LMDB.
The data is then delivered into BW InfoCubes. As shown in the diagram, the data is used viastandard Web templates in E2E change analysis, E2E workload analysis, and E2E exceptionanalysis.
Figure 108: Change Analysis and Reporting - Architecture
The goal of E2E change analysis is to provide a top-down view of the configuration parameterand software (configuration item) changes to the managed systems. It is based on the data ofthe configuration and change database (CCDB) which is also part of SAP Solution Managerdiagnostic capabilities.
The number of changes is stored in BW; the configuration data itself is stored in the CCDB ofdiagnostics in SAP Solution Manager. Thus, the E2E change analysis offers an overview usingBI-based reporting capabilities.
The config stores are updated daily by extractors scheduled in the Extractor Framework. Thedata is collected in Java-based systems via diagnostics agents, and in ABAP-based systemsvia Solution Tool plug-In Extractors. InfoCube 0SMD_CA02 (E2E Change Analysis II) isupdated daily with changes provided by the CCDB.
In the E2E Change Analysis BI reporting tool, it is possible to navigate from the aggregatedlevel of data (number of changes per day) to the detailed configuration data using the ChangeReporting Viewer. The Change Reporting Viewer can also be accessed directly from thetransaction SM_WORKCENTER. Choose Root Cause Analysis → System Analysis → ChangeReporting.
Unit 17: End-to-End Diagnostics in SAP Solution Manager
466 © Copyright. All rights reserved.
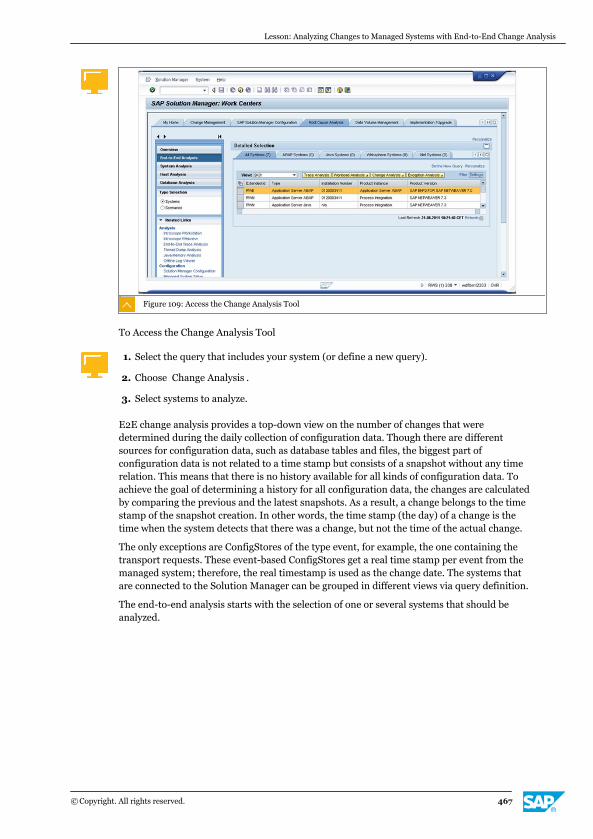
Figure 109: Access the Change Analysis Tool
To Access the Change Analysis Tool
1. Select the query that includes your system (or define a new query).
2. Choose Change Analysis .
3. Select systems to analyze.
E2E change analysis provides a top-down view on the number of changes that weredetermined during the daily collection of configuration data. Though there are differentsources for configuration data, such as database tables and files, the biggest part ofconfiguration data is not related to a time stamp but consists of a snapshot without any timerelation. This means that there is no history available for all kinds of configuration data. Toachieve the goal of determining a history for all configuration data, the changes are calculatedby comparing the previous and the latest snapshots. As a result, a change belongs to the timestamp of the snapshot creation. In other words, the time stamp (the day) of a change is thetime when the system detects that there was a change, but not the time of the actual change.
The only exceptions are ConfigStores of the type event, for example, the one containing thetransport requests. These event-based ConfigStores get a real time stamp per event from themanaged system; therefore, the real timestamp is used as the change date. The systems thatare connected to the Solution Manager can be grouped in different views via query definition.
The end-to-end analysis starts with the selection of one or several systems that should beanalyzed.
Lesson: Analyzing Changes to Managed Systems with End-to-End Change Analysis
© Copyright. All rights reserved. 467
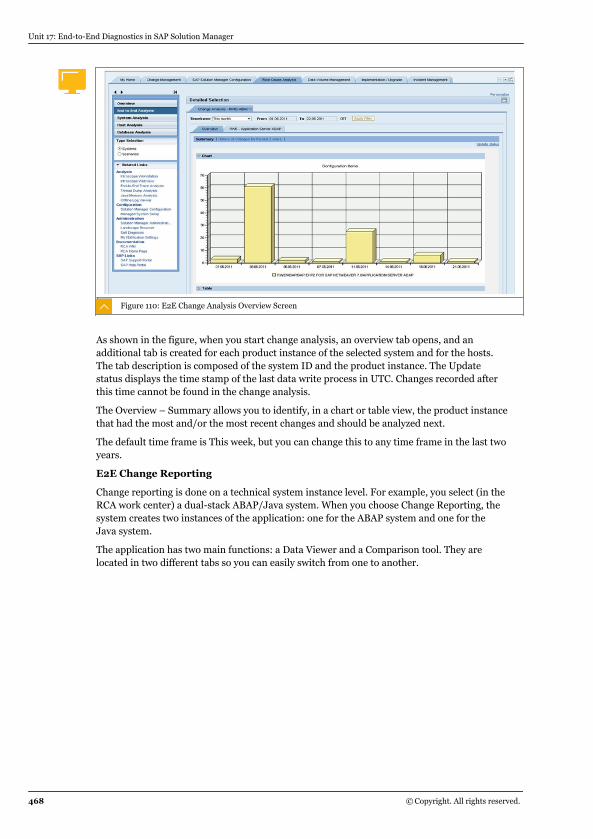
Figure 110: E2E Change Analysis Overview Screen
As shown in the figure, when you start change analysis, an overview tab opens, and anadditional tab is created for each product instance of the selected system and for the hosts.The tab description is composed of the system ID and the product instance. The Updatestatus displays the time stamp of the last data write process in UTC. Changes recorded afterthis time cannot be found in the change analysis.
The Overview – Summary allows you to identify, in a chart or table view, the product instancethat had the most and/or the most recent changes and should be analyzed next.
The default time frame is This week, but you can change this to any time frame in the last twoyears.
E2E Change Reporting
Change reporting is done on a technical system instance level. For example, you select (in theRCA work center) a dual-stack ABAP/Java system. When you choose Change Reporting, thesystem creates two instances of the application: one for the ABAP system and one for theJava system.
The application has two main functions: a Data Viewer and a Comparison tool. They arelocated in two different tabs so you can easily switch from one to another.
Unit 17: End-to-End Diagnostics in SAP Solution Manager
468 © Copyright. All rights reserved.
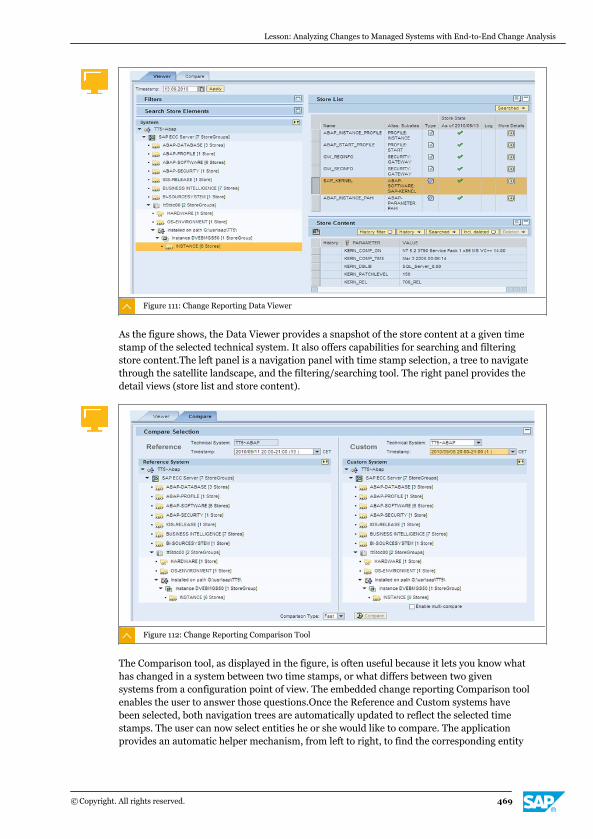
Figure 111: Change Reporting Data Viewer
As the figure shows, the Data Viewer provides a snapshot of the store content at a given timestamp of the selected technical system. It also offers capabilities for searching and filteringstore content.The left panel is a navigation panel with time stamp selection, a tree to navigatethrough the satellite landscape, and the filtering/searching tool. The right panel provides thedetail views (store list and store content).
Figure 112: Change Reporting Comparison Tool
The Comparison tool, as displayed in the figure, is often useful because it lets you know whathas changed in a system between two time stamps, or what differs between two givensystems from a configuration point of view. The embedded change reporting Comparison toolenables the user to answer those questions.Once the Reference and Custom systems havebeen selected, both navigation trees are automatically updated to reflect the selected timestamps. The user can now select entities he or she would like to compare. The applicationprovides an automatic helper mechanism, from left to right, to find the corresponding entity
Lesson: Analyzing Changes to Managed Systems with End-to-End Change Analysis
© Copyright. All rights reserved. 469

to compare. Once the user has selected two comparable entities (that is, entities having thesame type), the Compare button is enabled.
Figure 113: Access Change Reporting Tool
To access the Change Reporting Tool, do the following:
1. Select the query that includes your system, or define a new query.
2. Select the systems you want to analyze.
3. Choose Change Reporting .
List of change groups and change types:
● ABAP-SOFTWARE: COMPONENT-RELEASE, SUPPORT-PACKAGE-LEVEL, ABAP-NOTES,ABAP-TRANSPORTS, SAP-KERNEL
● ABAP-PARAMETER: PAHI (parameter history)
● ABAP-DATABASE: DB6, MAXDB, MSSQL, ORACLE, HANA, and SAP Sybase ASE
● BI: RSADMIN
● J2EE-SOFTWARE: SUPPORT-PACKAGE-LEVEL , J2EE-TRANSPORTS
● PROFILE: DEFAULT, INSTANCE, START
● OS: ENVIRONMENT, SAPOSCOL.
Unit 17: End-to-End Diagnostics in SAP Solution Manager
470 © Copyright. All rights reserved.
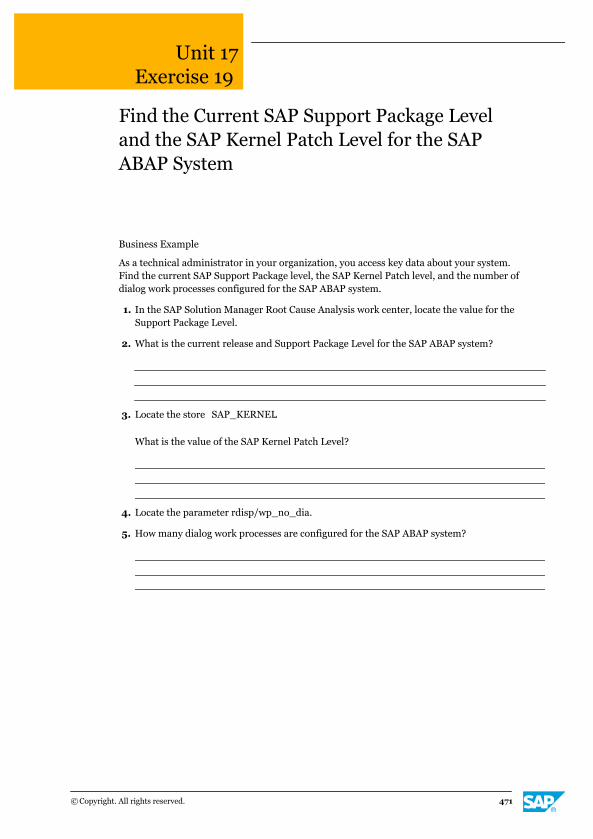
Unit 17Exercise 19
Find the Current SAP Support Package Leveland the SAP Kernel Patch Level for the SAPABAP System
Business Example
As a technical administrator in your organization, you access key data about your system.Find the current SAP Support Package level, the SAP Kernel Patch level, and the number ofdialog work processes configured for the SAP ABAP system.
1. In the SAP Solution Manager Root Cause Analysis work center, locate the value for theSupport Package Level.
2. What is the current release and Support Package Level for the SAP ABAP system?
3. Locate the store SAP_KERNEL.
What is the value of the SAP Kernel Patch Level?
4. Locate the parameter rdisp/wp_no_dia.
5. How many dialog work processes are configured for the SAP ABAP system?
© Copyright. All rights reserved. 471
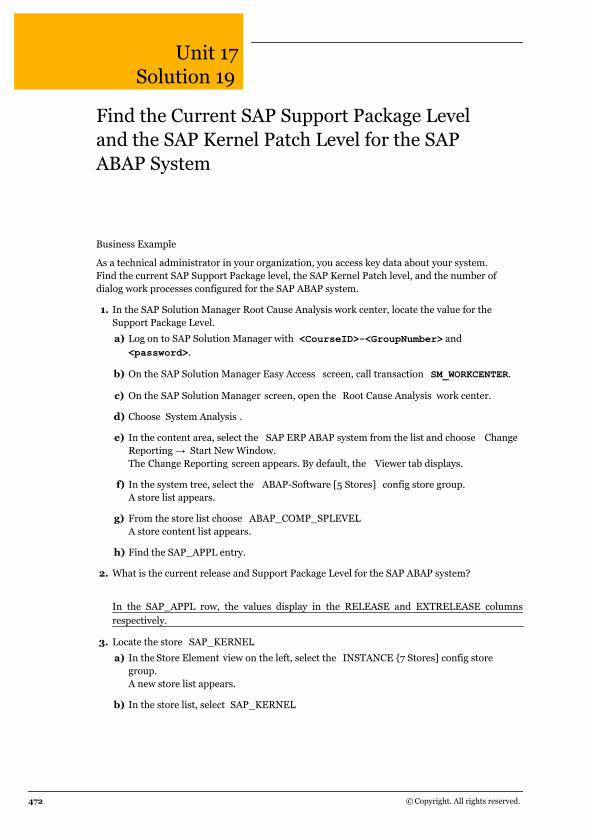
Unit 17Solution 19
Find the Current SAP Support Package Leveland the SAP Kernel Patch Level for the SAPABAP System
Business Example
As a technical administrator in your organization, you access key data about your system.Find the current SAP Support Package level, the SAP Kernel Patch level, and the number ofdialog work processes configured for the SAP ABAP system.
1. In the SAP Solution Manager Root Cause Analysis work center, locate the value for theSupport Package Level.
a) Log on to SAP Solution Manager with <CourseID>-<GroupNumber> and<password>.
b) On the SAP Solution Manager Easy Access screen, call transaction SM_WORKCENTER.
c) On the SAP Solution Manager screen, open the Root Cause Analysis work center.
d) Choose System Analysis .
e) In the content area, select the SAP ERP ABAP system from the list and choose ChangeReporting → Start New Window.The Change Reporting screen appears. By default, the Viewer tab displays.
f) In the system tree, select the ABAP-Software [5 Stores] config store group.A store list appears.
g) From the store list choose ABAP_COMP_SPLEVEL.A store content list appears.
h) Find the SAP_APPL entry.
2. What is the current release and Support Package Level for the SAP ABAP system?
In the SAP_APPL row, the values display in the RELEASE and EXTRELEASE columnsrespectively.
3. Locate the store SAP_KERNEL.
a) In the Store Element view on the left, select the INSTANCE {7 Stores] config storegroup.A new store list appears.
b) In the store list, select SAP_KERNEL.
472 © Copyright. All rights reserved.
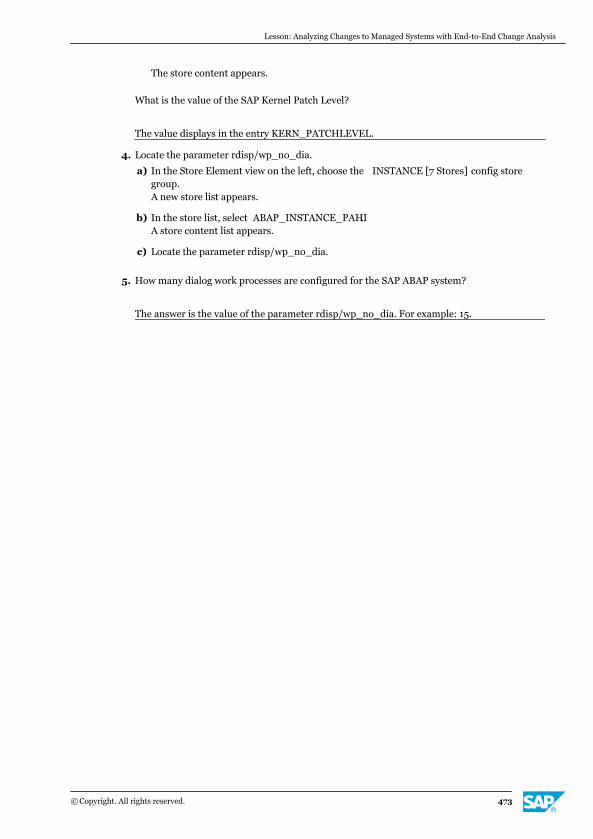
The store content appears.
What is the value of the SAP Kernel Patch Level?
The value displays in the entry KERN_PATCHLEVEL.
4. Locate the parameter rdisp/wp_no_dia.
a) In the Store Element view on the left, choose the INSTANCE [7 Stores] config storegroup.A new store list appears.
b) In the store list, select ABAP_INSTANCE_PAHI.A store content list appears.
c) Locate the parameter rdisp/wp_no_dia.
5. How many dialog work processes are configured for the SAP ABAP system?
The answer is the value of the parameter rdisp/wp_no_dia. For example: 15.
Lesson: Analyzing Changes to Managed Systems with End-to-End Change Analysis
© Copyright. All rights reserved. 473

Unit 17: End-to-End Diagnostics in SAP Solution Manager
474 © Copyright. All rights reserved.
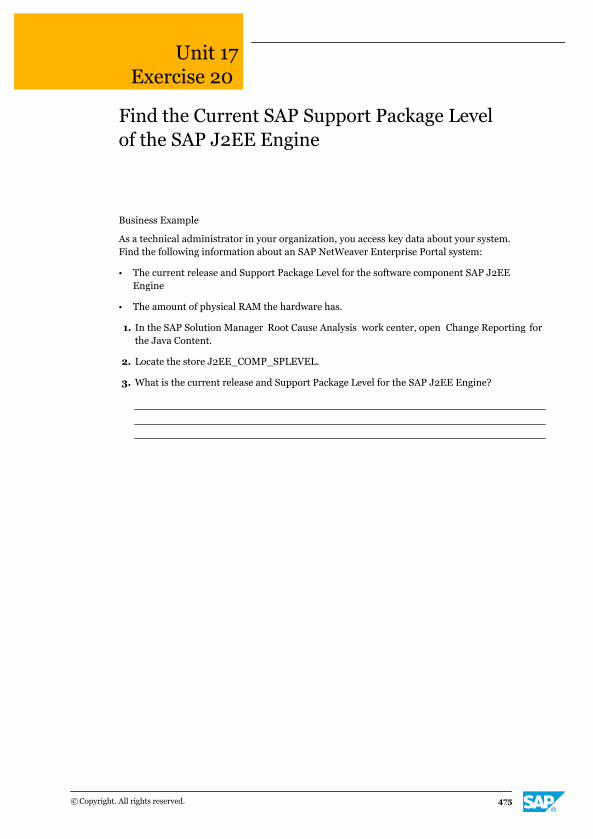
Unit 17Exercise 20
Find the Current SAP Support Package Levelof the SAP J2EE Engine
Business Example
As a technical administrator in your organization, you access key data about your system.Find the following information about an SAP NetWeaver Enterprise Portal system:
● The current release and Support Package Level for the software component SAP J2EEEngine
● The amount of physical RAM the hardware has.
1. In the SAP Solution Manager Root Cause Analysis work center, open Change Reporting forthe Java Content.
2. Locate the store J2EE_COMP_SPLEVEL.
3. What is the current release and Support Package Level for the SAP J2EE Engine?
© Copyright. All rights reserved. 475
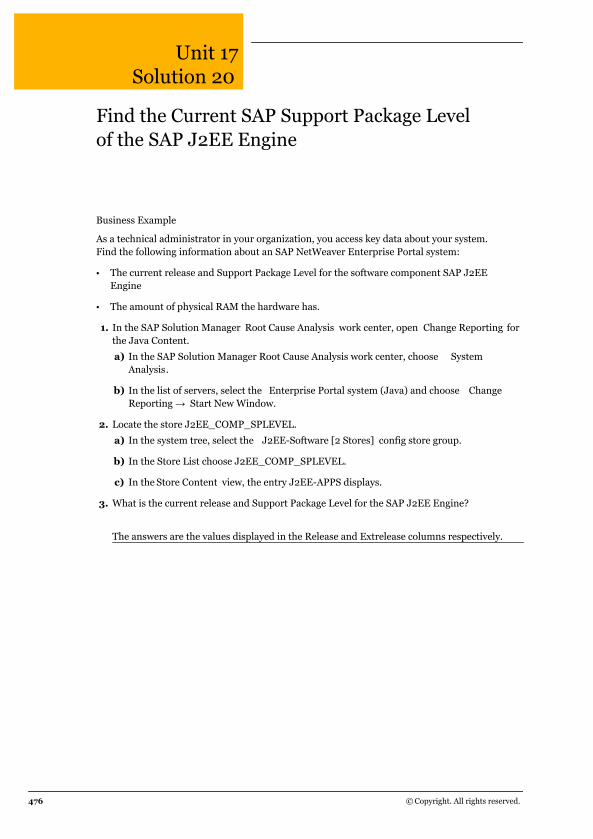
Unit 17Solution 20
Find the Current SAP Support Package Levelof the SAP J2EE Engine
Business Example
As a technical administrator in your organization, you access key data about your system.Find the following information about an SAP NetWeaver Enterprise Portal system:
● The current release and Support Package Level for the software component SAP J2EEEngine
● The amount of physical RAM the hardware has.
1. In the SAP Solution Manager Root Cause Analysis work center, open Change Reporting forthe Java Content.
a) In the SAP Solution Manager Root Cause Analysis work center, choose SystemAnalysis.
b) In the list of servers, select the Enterprise Portal system (Java) and choose ChangeReporting → Start New Window.
2. Locate the store J2EE_COMP_SPLEVEL.
a) In the system tree, select the J2EE-Software [2 Stores] config store group.
b) In the Store List choose J2EE_COMP_SPLEVEL.
c) In the Store Content view, the entry J2EE-APPS displays.
3. What is the current release and Support Package Level for the SAP J2EE Engine?
The answers are the values displayed in the Release and Extrelease columns respectively.
476 © Copyright. All rights reserved.

LESSON SUMMARYYou should now be able to:
● Identify changes to managed systems with end-to-end change analysis
Lesson: Analyzing Changes to Managed Systems with End-to-End Change Analysis
© Copyright. All rights reserved. 477
Unit 17Lesson 4
Analyzing Statistical Performance Data withEnd-to-End Workload Analysis
LESSON OVERVIEW
The goal of end-to-end workload analysis is to provide access to statistical performance datafor different systems. In this lesson you will learn how to find information using end-to-endworkload analysis.
LESSON OBJECTIVESAfter completing this lesson, you will be able to:
● Access performance data with end-to-end workload analysis
End-to-End (E2E) Workload AnalysisThe goal of E2E workload analysis in SAP Solution Manager is to provide access to statisticalperformance data from different systems. E2E root cause analysis in SAP Solution Manager isbased on a central diagnostics database that is populated with data by diagnostics agentsrunning on each managed system. These agents are delivered preconfigured by SAP.
The data required to isolate a problem-causing component--such as critical log entries,dumps, or queue errors--is continuously collected from all SAP systems. The information iskept uniform across all technologies and is available from one central console in SAP SolutionManager. E2E diagnostics supports root cause analysis of components implemented in ABAPor Java, C(++), or those running on the Microsoft .NET framework. Dedicated keyperformance indicators (KPIs) are calculated and displayed, allowing you to gauge quicklywhich system or product instance is the root cause of a potential performance problem.
Performance data is collected based on a Product Instance Perspective, which gives youaccess to data specific to the component in question, for example, CRM or XI, ABAP, or Java-based systems. The technical infrastructure to collect the data is the Extractor Framework.
478 © Copyright. All rights reserved.
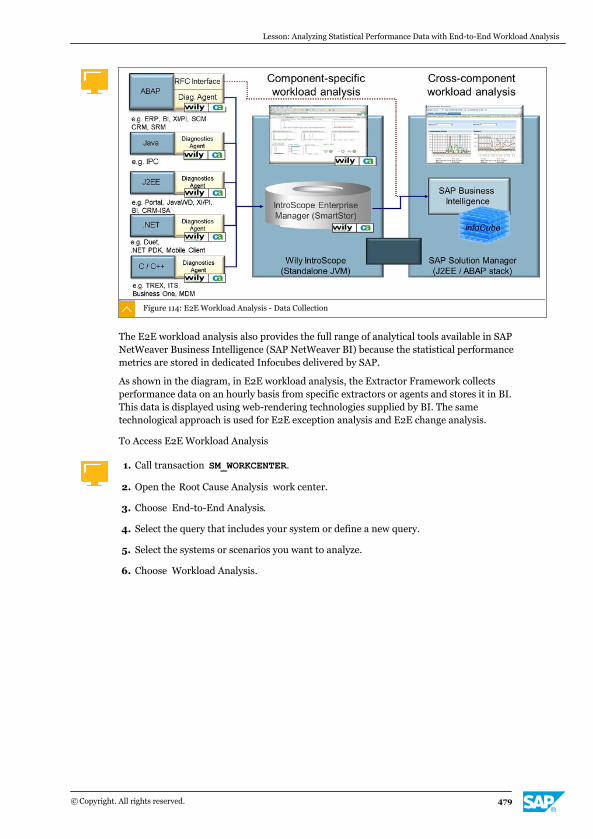
Figure 114: E2E Workload Analysis - Data Collection
The E2E workload analysis also provides the full range of analytical tools available in SAPNetWeaver Business Intelligence (SAP NetWeaver BI) because the statistical performancemetrics are stored in dedicated Infocubes delivered by SAP.
As shown in the diagram, in E2E workload analysis, the Extractor Framework collectsperformance data on an hourly basis from specific extractors or agents and stores it in BI.This data is displayed using web-rendering technologies supplied by BI. The sametechnological approach is used for E2E exception analysis and E2E change analysis.
To Access E2E Workload Analysis
1. Call transaction SM_WORKCENTER.
2. Open the Root Cause Analysis work center.
3. Choose End-to-End Analysis.
4. Select the query that includes your system or define a new query.
5. Select the systems or scenarios you want to analyze.
6. Choose Workload Analysis.
Lesson: Analyzing Statistical Performance Data with End-to-End Workload Analysis
© Copyright. All rights reserved. 479
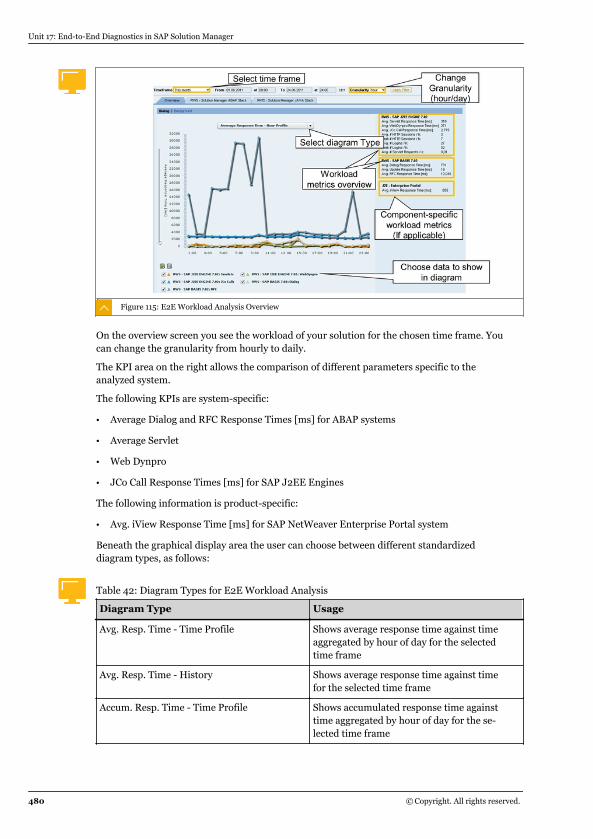
Figure 115: E2E Workload Analysis Overview
On the overview screen you see the workload of your solution for the chosen time frame. Youcan change the granularity from hourly to daily.
The KPI area on the right allows the comparison of different parameters specific to theanalyzed system.
The following KPIs are system-specific:
● Average Dialog and RFC Response Times [ms] for ABAP systems
● Average Servlet
● Web Dynpro
● JCo Call Response Times [ms] for SAP J2EE Engines
The following information is product-specific:
● Avg. iView Response Time [ms] for SAP NetWeaver Enterprise Portal system
Beneath the graphical display area the user can choose between different standardizeddiagram types, as follows:
Table 42: Diagram Types for E2E Workload Analysis
Diagram Type Usage
Avg. Resp. Time - Time Profile Shows average response time against timeaggregated by hour of day for the selectedtime frame
Avg. Resp. Time - History Shows average response time against timefor the selected time frame
Accum. Resp. Time - Time Profile Shows accumulated response time againsttime aggregated by hour of day for the se-lected time frame
Unit 17: End-to-End Diagnostics in SAP Solution Manager
480 © Copyright. All rights reserved.
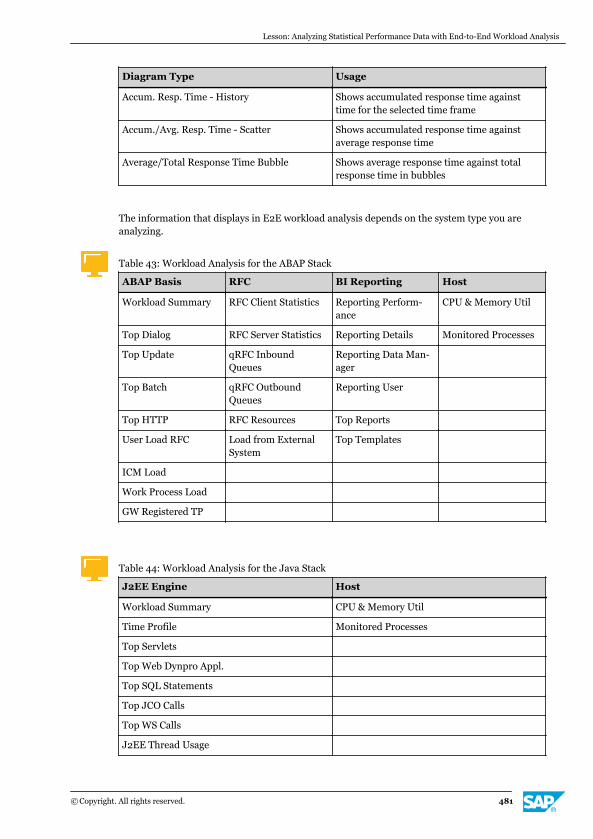
Diagram Type Usage
Accum. Resp. Time - History Shows accumulated response time againsttime for the selected time frame
Accum./Avg. Resp. Time - Scatter Shows accumulated response time againstaverage response time
Average/Total Response Time Bubble Shows average response time against totalresponse time in bubbles
The information that displays in E2E workload analysis depends on the system type you areanalyzing.
Table 43: Workload Analysis for the ABAP Stack
ABAP Basis RFC BI Reporting Host
Workload Summary RFC Client Statistics Reporting Perform-ance
CPU & Memory Util
Top Dialog RFC Server Statistics Reporting Details Monitored Processes
Top Update qRFC InboundQueues
Reporting Data Man-ager
Top Batch qRFC OutboundQueues
Reporting User
Top HTTP RFC Resources Top Reports
User Load RFC Load from ExternalSystem
Top Templates
ICM Load
Work Process Load
GW Registered TP
Table 44: Workload Analysis for the Java Stack
J2EE Engine Host
Workload Summary CPU & Memory Util
Time Profile Monitored Processes
Top Servlets
Top Web Dynpro Appl.
Top SQL Statements
Top JCO Calls
Top WS Calls
J2EE Thread Usage
Lesson: Analyzing Statistical Performance Data with End-to-End Workload Analysis
© Copyright. All rights reserved. 481
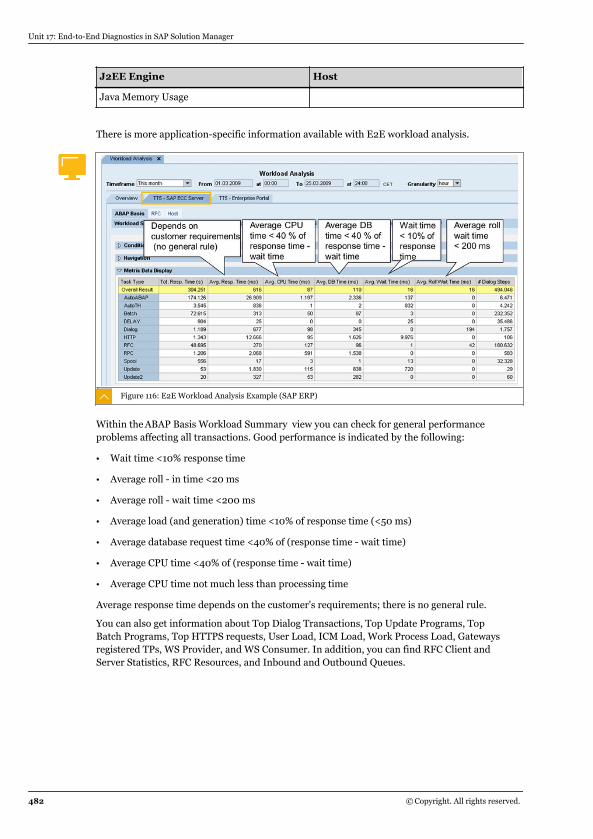
J2EE Engine Host
Java Memory Usage
There is more application-specific information available with E2E workload analysis.
Figure 116: E2E Workload Analysis Example (SAP ERP)
Within the ABAP Basis Workload Summary view you can check for general performanceproblems affecting all transactions. Good performance is indicated by the following:
● Wait time <10% response time
● Average roll - in time <20 ms
● Average roll - wait time <200 ms
● Average load (and generation) time <10% of response time (<50 ms)
● Average database request time <40% of (response time - wait time)
● Average CPU time <40% of (response time - wait time)
● Average CPU time not much less than processing time
Average response time depends on the customer's requirements; there is no general rule.
You can also get information about Top Dialog Transactions, Top Update Programs, TopBatch Programs, Top HTTPS requests, User Load, ICM Load, Work Process Load, Gatewaysregistered TPs, WS Provider, and WS Consumer. In addition, you can find RFC Client andServer Statistics, RFC Resources, and Inbound and Outbound Queues.
Unit 17: End-to-End Diagnostics in SAP Solution Manager
482 © Copyright. All rights reserved.
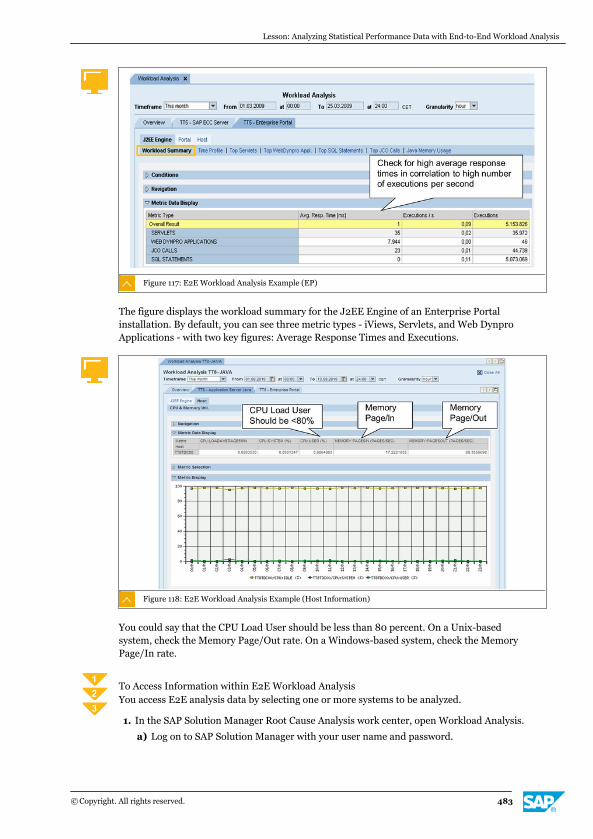
Figure 117: E2E Workload Analysis Example (EP)
The figure displays the workload summary for the J2EE Engine of an Enterprise Portalinstallation. By default, you can see three metric types - iViews, Servlets, and Web DynproApplications - with two key figures: Average Response Times and Executions.
Figure 118: E2E Workload Analysis Example (Host Information)
You could say that the CPU Load User should be less than 80 percent. On a Unix-basedsystem, check the Memory Page/Out rate. On a Windows-based system, check the MemoryPage/In rate.
To Access Information within E2E Workload AnalysisYou access E2E analysis data by selecting one or more systems to be analyzed.
1. In the SAP Solution Manager Root Cause Analysis work center, open Workload Analysis.
a) Log on to SAP Solution Manager with your user name and password.
Lesson: Analyzing Statistical Performance Data with End-to-End Workload Analysis
© Copyright. All rights reserved. 483
b) On the SAP Solution Manager Easy Access screen, call transaction SM_WORKCENTER.
c) On the SAP Solution Manager overview screen, choose the Root Cause Analysis workcenter.
d) Choose End-to-End analysis.
e) In the navigation area, select the Systems or Scenarios radio button.
f) Select the systems or scenarios you want to view and choose Workload Analysis → Start New Window.
g) The Workload Analysis <SystemName> screen appears.
h) Select Click here to load data from Business Warehouse .
i) On the Overview tab, use the Timeframe and Granularity dropdown lists to change thetime frame displayed.If you change the time frames, remember to choose Apply Filter.
j) In the KPI area on the right, compare different parameters specific to the managedsystem.
k) Choose the <SystemName> tab to the right of Overview to review the various statisticsthat are available for your chosen system type.
LESSON SUMMARYYou should now be able to:
● Access performance data with end-to-end workload analysis
Unit 17: End-to-End Diagnostics in SAP Solution Manager
484 © Copyright. All rights reserved.
Unit 17Lesson 5
Identifying the Cause of System Errors withEnd-to-End Exception Analysis
LESSON OVERVIEWThe goal of end-to-end exception analysis is to easily and efficiently identify the most frequenterrors and the applications that are causing them. In this lesson you will learn how to accessinformation using end-to-end exception analysis.
LESSON OBJECTIVESAfter completing this lesson, you will be able to:
● Perform end-to-end exception analysis
To Perform Exception Analysis
1. Log on to SAP Solution Manager with your user name and password.
2. On the SAP Easy Access screen call transaction SM_WORKCENTER.
3. Open the Root Cause Analysis work center.
4. Choose End-to-End Analysis.
5. Choose a predefined query tab or define a new query to include the system you want toanalyze.
6. Select the required system in the list and choose Exception Analysis → Start New Window.The Exception Analysis tool opens.
7. If prompted, load data from Business Warehouse.
8. Navigate to the area you want to analyze.
End-to-End (E2E) Exception Analysis in Java and ABAP Systems
The goal of E2E exception analysis is to easily and efficiently identify the most frequent errorsand the applications that are causing them. It provides an overview of dumps and exceptionsfrom both ABAP-based and J2EE-based instances and adds application-specific views if themonitored system is running CRM or BI components (for example, status information forBDocs and qRFC queues).
Dedicated key performance indicators (KPIs) are calculated and displayed, allowing you toisolate quickly locations that cause many errors or an unusual number of critical systemerrors.
E2E exception analysis serves as a central hub for the analysis of errors, exceptions, anddumps across all monitored systems. All data is extracted at regular intervals and can bedisplayed either in a condensed view or in greater detail, according to requirements. You can
© Copyright. All rights reserved. 485
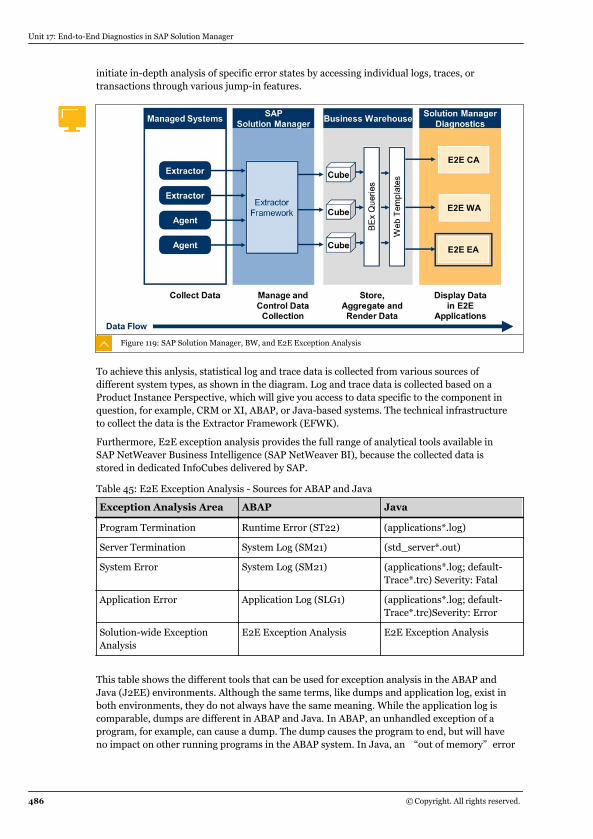
initiate in-depth analysis of specific error states by accessing individual logs, traces, ortransactions through various jump-in features.
Figure 119: SAP Solution Manager, BW, and E2E Exception Analysis
To achieve this anlysis, statistical log and trace data is collected from various sources ofdifferent system types, as shown in the diagram. Log and trace data is collected based on aProduct Instance Perspective, which will give you access to data specific to the component inquestion, for example, CRM or XI, ABAP, or Java-based systems. The technical infrastructureto collect the data is the Extractor Framework (EFWK).
Furthermore, E2E exception analysis provides the full range of analytical tools available inSAP NetWeaver Business Intelligence (SAP NetWeaver BI), because the collected data isstored in dedicated InfoCubes delivered by SAP.
Table 45: E2E Exception Analysis - Sources for ABAP and Java
Exception Analysis Area ABAP Java
Program Termination Runtime Error (ST22) (applications*.log)
Server Termination System Log (SM21) (std_server*.out)
System Error System Log (SM21) (applications*.log; default-Trace*.trc) Severity: Fatal
Application Error Application Log (SLG1) (applications*.log; default-Trace*.trc)Severity: Error
Solution-wide ExceptionAnalysis
E2E Exception Analysis E2E Exception Analysis
This table shows the different tools that can be used for exception analysis in the ABAP andJava (J2EE) environments. Although the same terms, like dumps and application log, exist inboth environments, they do not always have the same meaning. While the application log iscomparable, dumps are different in ABAP and Java. In ABAP, an unhandled exception of aprogram, for example, can cause a dump. The dump causes the program to end, but will haveno impact on other running programs in the ABAP system. In Java, an “out of memory” error
Unit 17: End-to-End Diagnostics in SAP Solution Manager
486 © Copyright. All rights reserved.
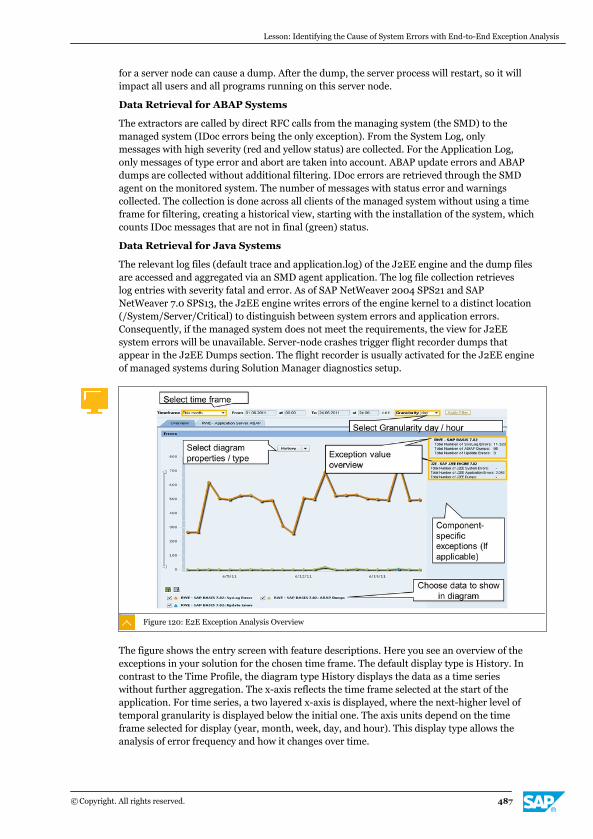
for a server node can cause a dump. After the dump, the server process will restart, so it willimpact all users and all programs running on this server node.
Data Retrieval for ABAP Systems
The extractors are called by direct RFC calls from the managing system (the SMD) to themanaged system (IDoc errors being the only exception). From the System Log, onlymessages with high severity (red and yellow status) are collected. For the Application Log,only messages of type error and abort are taken into account. ABAP update errors and ABAPdumps are collected without additional filtering. IDoc errors are retrieved through the SMDagent on the monitored system. The number of messages with status error and warningscollected. The collection is done across all clients of the managed system without using a timeframe for filtering, creating a historical view, starting with the installation of the system, whichcounts IDoc messages that are not in final (green) status.
Data Retrieval for Java Systems
The relevant log files (default trace and application.log) of the J2EE engine and the dump filesare accessed and aggregated via an SMD agent application. The log file collection retrieveslog entries with severity fatal and error. As of SAP NetWeaver 2004 SPS21 and SAPNetWeaver 7.0 SPS13, the J2EE engine writes errors of the engine kernel to a distinct location(/System/Server/Critical) to distinguish between system errors and application errors.Consequently, if the managed system does not meet the requirements, the view for J2EEsystem errors will be unavailable. Server-node crashes trigger flight recorder dumps thatappear in the J2EE Dumps section. The flight recorder is usually activated for the J2EE engineof managed systems during Solution Manager diagnostics setup.
Figure 120: E2E Exception Analysis Overview
The figure shows the entry screen with feature descriptions. Here you see an overview of theexceptions in your solution for the chosen time frame. The default display type is History. Incontrast to the Time Profile, the diagram type History displays the data as a time serieswithout further aggregation. The x-axis reflects the time frame selected at the start of theapplication. For time series, a two layered x-axis is displayed, where the next-higher level oftemporal granularity is displayed below the initial one. The axis units depend on the timeframe selected for display (year, month, week, day, and hour). This display type allows theanalysis of error frequency and how it changes over time.
Lesson: Identifying the Cause of System Errors with End-to-End Exception Analysis
© Copyright. All rights reserved. 487
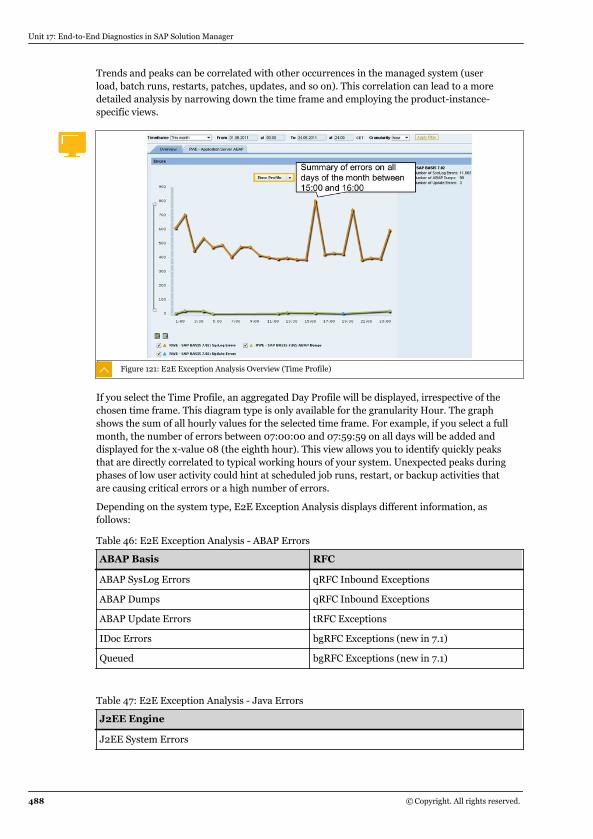
Trends and peaks can be correlated with other occurrences in the managed system (userload, batch runs, restarts, patches, updates, and so on). This correlation can lead to a moredetailed analysis by narrowing down the time frame and employing the product-instance-specific views.
Figure 121: E2E Exception Analysis Overview (Time Profile)
If you select the Time Profile, an aggregated Day Profile will be displayed, irrespective of thechosen time frame. This diagram type is only available for the granularity Hour. The graphshows the sum of all hourly values for the selected time frame. For example, if you select a fullmonth, the number of errors between 07:00:00 and 07:59:59 on all days will be added anddisplayed for the x-value 08 (the eighth hour). This view allows you to identify quickly peaksthat are directly correlated to typical working hours of your system. Unexpected peaks duringphases of low user activity could hint at scheduled job runs, restart, or backup activities thatare causing critical errors or a high number of errors.
Depending on the system type, E2E Exception Analysis displays different information, asfollows:
Table 46: E2E Exception Analysis - ABAP Errors
ABAP Basis RFC
ABAP SysLog Errors qRFC Inbound Exceptions
ABAP Dumps qRFC Inbound Exceptions
ABAP Update Errors tRFC Exceptions
IDoc Errors bgRFC Exceptions (new in 7.1)
Queued bgRFC Exceptions (new in 7.1)
Table 47: E2E Exception Analysis - Java Errors
J2EE Engine
J2EE System Errors
Unit 17: End-to-End Diagnostics in SAP Solution Manager
488 © Copyright. All rights reserved.
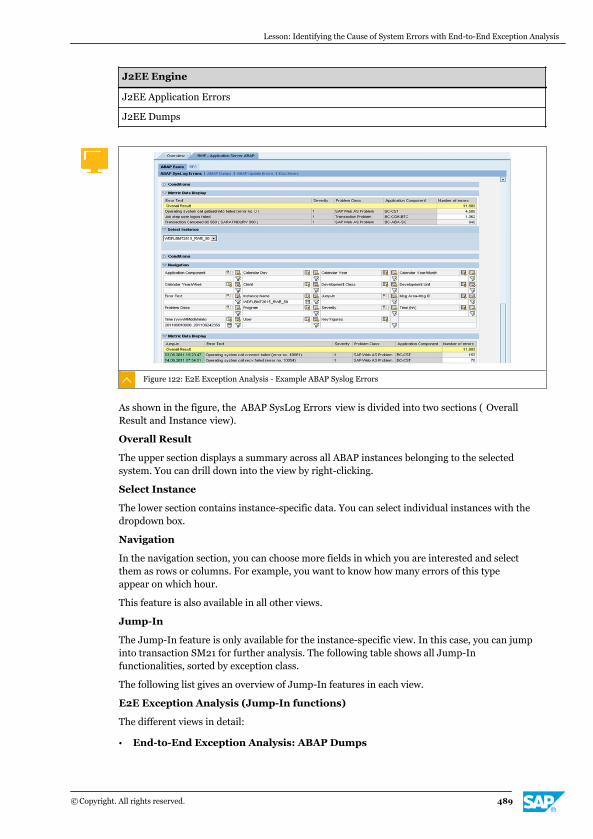
J2EE Engine
J2EE Application Errors
J2EE Dumps
Figure 122: E2E Exception Analysis - Example ABAP Syslog Errors
As shown in the figure, the ABAP SysLog Errors view is divided into two sections ( OverallResult and Instance view).
Overall Result
The upper section displays a summary across all ABAP instances belonging to the selectedsystem. You can drill down into the view by right-clicking.
Select Instance
The lower section contains instance-specific data. You can select individual instances with thedropdown box.
Navigation
In the navigation section, you can choose more fields in which you are interested and selectthem as rows or columns. For example, you want to know how many errors of this typeappear on which hour.
This feature is also available in all other views.
Jump-In
The Jump-In feature is only available for the instance-specific view. In this case, you can jumpinto transaction SM21 for further analysis. The following table shows all Jump-Infunctionalities, sorted by exception class.
The following list gives an overview of Jump-In features in each view.
E2E Exception Analysis (Jump-In functions)
The different views in detail:
● End-to-End Exception Analysis: ABAP Dumps
Lesson: Identifying the Cause of System Errors with End-to-End Exception Analysis
© Copyright. All rights reserved. 489
ABAP dumps are collected without further aggregation. Each dump is displayedindividually. Thus, the Jump-In feature allows you to launch transaction SM21 for eachsingle dump (provided it still exists in the managed system).
● End-to-End Exception Analysis: ABAP Update Error
Displays the number of erroneous update operations. The Jump-In feature takes you tothe entry mask of transaction SM13 on the managed system.
● End-to-End Exception Analysis: J2EE System Errors
E2E Exception Analysis identifies J2EE system errors that the engine is writing to thededicated log category /System/Server/Critical (defaultTrace). This feature is supportedif the managed system has versions SAP NetWeaver.
2004 SPS21 or SAP NetWeaver 7.0 SPS13 or above. If an earlier version is detected by theException Analysis application, the View will not be displayed. The Jump-In takes you tothe NWA Log Viewer by passing the location and the error text as search patterns for thecorresponding log file.
● End-to-End Exception Analysis: J2EE Appl. Errors
The source logs for the J2EE Application Errors are the same as for the J2EE SystemErrors (application.log and defaultTrace). All errors that do not belong to the category /System/Server/Critical qualify as application errors. Analogous to the J2EE System ErrorsView, the Jump-In takes you to the SAP NetWeaver Administrator (NWA) Log Viewer bypassing the location and the error text as search patterns for the corresponding log file.
● End-to-End Exception Analysis: J2EE Dumps
Displays dumps written during or after J2EE node crashes or other unexpected restarts. Ifyou click the time stamp in the Time Stamp column, you are taken directly to the ThreadDump Analyzer for a more involved analysis of the selected J2EE dump if a full threaddump is available. If available, the link will also show you the native dump file (for example,hs_err file) written by the flight recorder.
For more Information, visit http://wiki.sdn.sap.com/wiki/display/TechOps/RCA_Home
LESSON SUMMARYYou should now be able to:
● Perform end-to-end exception analysis
Unit 17: End-to-End Diagnostics in SAP Solution Manager
490 © Copyright. All rights reserved.
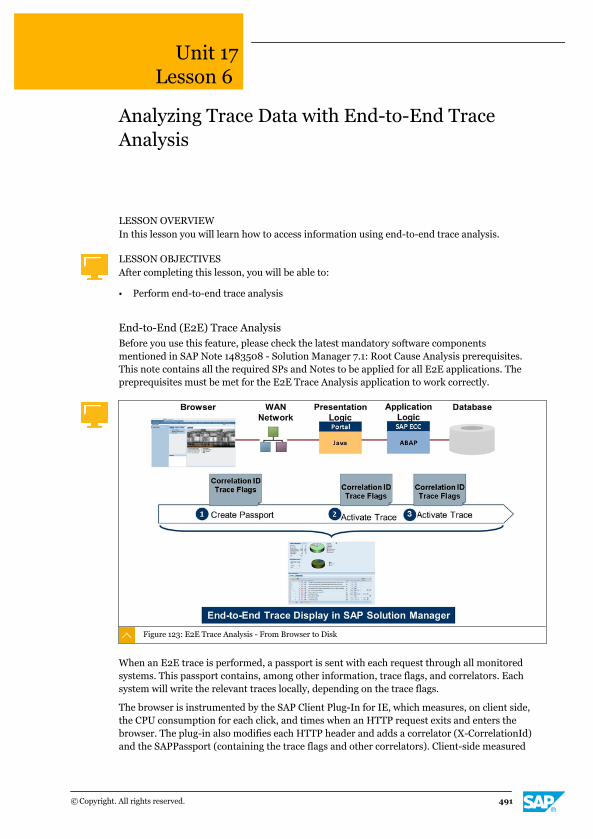
Unit 17Lesson 6
Analyzing Trace Data with End-to-End TraceAnalysis
LESSON OVERVIEWIn this lesson you will learn how to access information using end-to-end trace analysis.
LESSON OBJECTIVESAfter completing this lesson, you will be able to:
● Perform end-to-end trace analysis
End-to-End (E2E) Trace AnalysisBefore you use this feature, please check the latest mandatory software componentsmentioned in SAP Note 1483508 - Solution Manager 7.1: Root Cause Analysis prerequisites.This note contains all the required SPs and Notes to be applied for all E2E applications. Thepreprequisites must be met for the E2E Trace Analysis application to work correctly.
Figure 123: E2E Trace Analysis - From Browser to Disk
When an E2E trace is performed, a passport is sent with each request through all monitoredsystems. This passport contains, among other information, trace flags, and correlators. Eachsystem will write the relevant traces locally, depending on the trace flags.
The browser is instrumented by the SAP Client Plug-In for IE, which measures, on client side,the CPU consumption for each click, and times when an HTTP request exits and enters thebrowser. The plug-in also modifies each HTTP header and adds a correlator (X-CorrelationId)and the SAPPassport (containing the trace flags and other correlators). Client-side measured
© Copyright. All rights reserved. 491
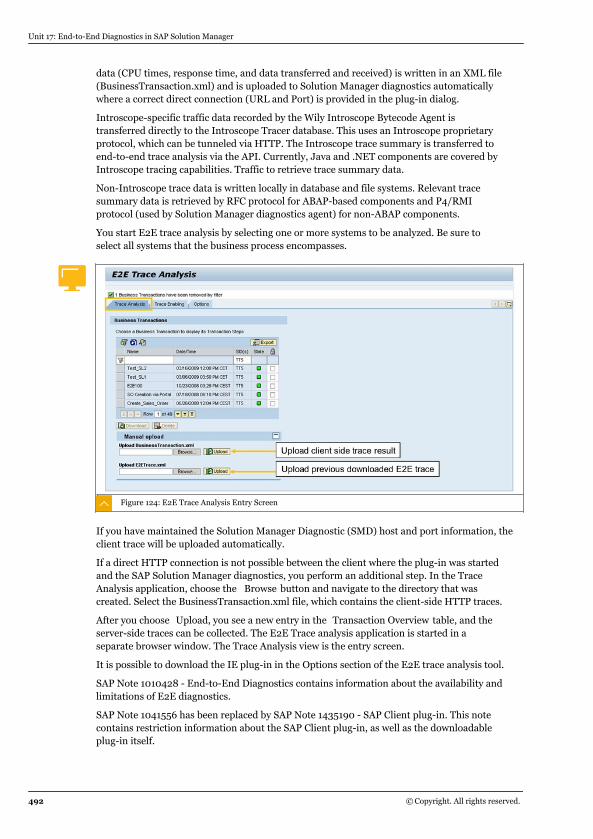
data (CPU times, response time, and data transferred and received) is written in an XML file(BusinessTransaction.xml) and is uploaded to Solution Manager diagnostics automaticallywhere a correct direct connection (URL and Port) is provided in the plug-in dialog.
Introscope-specific traffic data recorded by the Wily Introscope Bytecode Agent istransferred directly to the Introscope Tracer database. This uses an Introscope proprietaryprotocol, which can be tunneled via HTTP. The Introscope trace summary is transferred toend-to-end trace analysis via the API. Currently, Java and .NET components are covered byIntroscope tracing capabilities. Traffic to retrieve trace summary data.
Non-Introscope trace data is written locally in database and file systems. Relevant tracesummary data is retrieved by RFC protocol for ABAP-based components and P4/RMIprotocol (used by Solution Manager diagnostics agent) for non-ABAP components.
You start E2E trace analysis by selecting one or more systems to be analyzed. Be sure toselect all systems that the business process encompasses.
Figure 124: E2E Trace Analysis Entry Screen
If you have maintained the Solution Manager Diagnostic (SMD) host and port information, theclient trace will be uploaded automatically.
If a direct HTTP connection is not possible between the client where the plug-in was startedand the SAP Solution Manager diagnostics, you perform an additional step. In the TraceAnalysis application, choose the Browse button and navigate to the directory that wascreated. Select the BusinessTransaction.xml file, which contains the client-side HTTP traces.
After you choose Upload, you see a new entry in the Transaction Overview table, and theserver-side traces can be collected. The E2E Trace analysis application is started in aseparate browser window. The Trace Analysis view is the entry screen.
It is possible to download the IE plug-in in the Options section of the E2E trace analysis tool.
SAP Note 1010428 - End-to-End Diagnostics contains information about the availability andlimitations of E2E diagnostics.
SAP Note 1041556 has been replaced by SAP Note 1435190 - SAP Client plug-in. This notecontains restriction information about the SAP Client plug-in, as well as the downloadableplug-in itself.
Unit 17: End-to-End Diagnostics in SAP Solution Manager
492 © Copyright. All rights reserved.
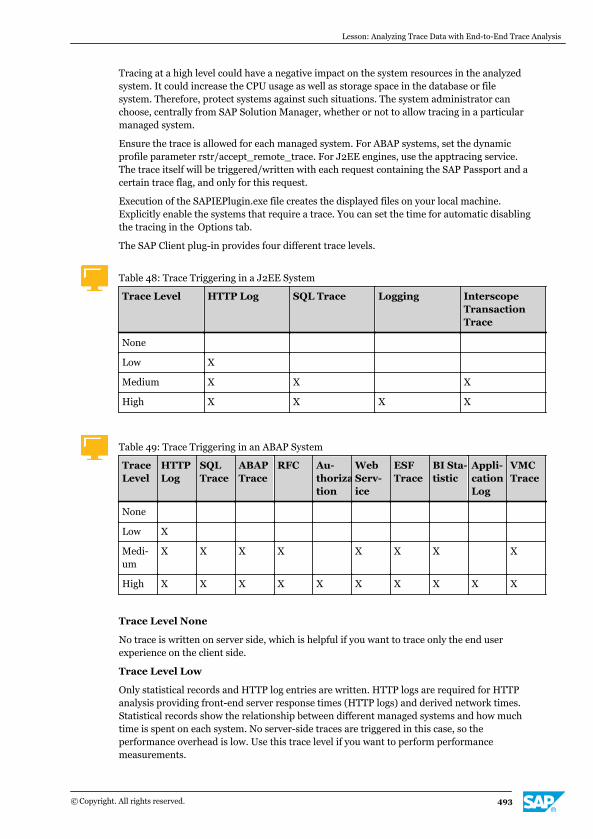
Tracing at a high level could have a negative impact on the system resources in the analyzedsystem. It could increase the CPU usage as well as storage space in the database or filesystem. Therefore, protect systems against such situations. The system administrator canchoose, centrally from SAP Solution Manager, whether or not to allow tracing in a particularmanaged system.
Ensure the trace is allowed for each managed system. For ABAP systems, set the dynamicprofile parameter rstr/accept_remote_trace. For J2EE engines, use the apptracing service.The trace itself will be triggered/written with each request containing the SAP Passport and acertain trace flag, and only for this request.
Execution of the SAPIEPlugin.exe file creates the displayed files on your local machine.Explicitly enable the systems that require a trace. You can set the time for automatic disablingthe tracing in the Options tab.
The SAP Client plug-in provides four different trace levels.
Table 48: Trace Triggering in a J2EE System
Trace Level HTTP Log SQL Trace Logging InterscopeTransactionTrace
None
Low X
Medium X X X
High X X X X
Table 49: Trace Triggering in an ABAP System
TraceLevel
HTTPLog
SQLTrace
ABAPTrace
RFC Au-thoriza-tion
WebServ-ice
ESFTrace
BI Sta-tistic
Appli-cationLog
VMCTrace
None
Low X
Medi-um
X X X X X X X X
High X X X X X X X X X X
Trace Level None
No trace is written on server side, which is helpful if you want to trace only the end userexperience on the client side.
Trace Level Low
Only statistical records and HTTP log entries are written. HTTP logs are required for HTTPanalysis providing front-end server response times (HTTP logs) and derived network times.Statistical records show the relationship between different managed systems and how muchtime is spent on each system. No server-side traces are triggered in this case, so theperformance overhead is low. Use this trace level if you want to perform performancemeasurements.
Lesson: Analyzing Trace Data with End-to-End Trace Analysis
© Copyright. All rights reserved. 493
Trace Level Medium
This trace level represents a performance trace. In the table below, you can see which tracesare triggered when you use this trace level. Use this trace level when you have identified aperformance bottleneck and you want to perform a drilldown.
Trace Level High
This trace level represents a functional trace. Depending on the location you choose, thistrace could have significant impact on the response time. The following table gives anoverview of the traces written per trace level.
For more details, including the aggregation level, see the Trace Analysis User Guide athttp://wiki.sdn.com/wiki/display/TechOps/RCA_Home
Figure 125: E2E Trace Analysis - Collect Data
To analyze a new recorded trace, collect the trace data from the server side by selecting thebusiness transaction in the table and then confirm the dialog window. Confirm the TraceCollection dialog with Yes to start the collection.
To evaluate a trace, follow these steps:
● Choose end-to-end analysis, choose a system, and choose Trace analysis .
● Select the transaction in the table. It is also possible to upload a recorded transaction(BusinessTransaction.xml) in the SAPIEPlugin folder logs (transaction name).
● After you select a transaction, the transaction steps are displayed in tab form. Choose thestep you want to analyze.
● Choose Display to analyze the transaction step.
Unit 17: End-to-End Diagnostics in SAP Solution Manager
494 © Copyright. All rights reserved.
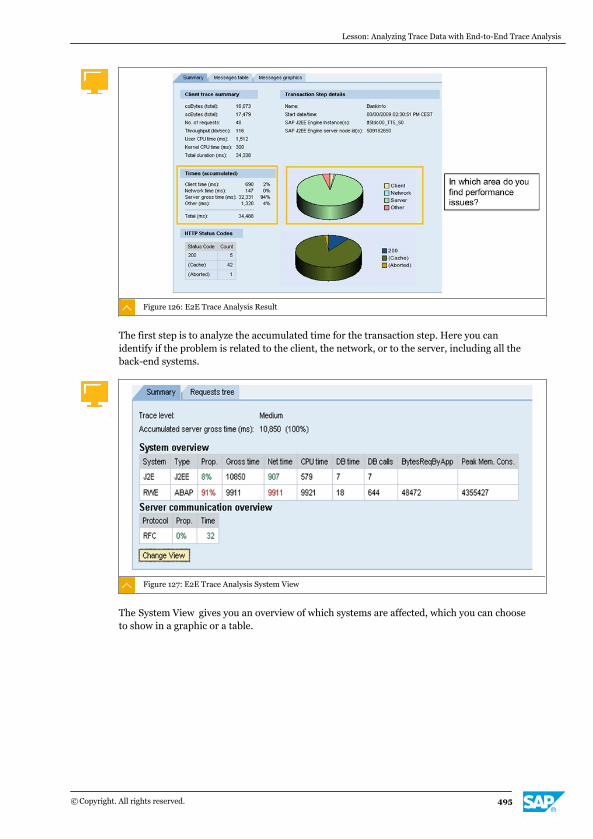
Figure 126: E2E Trace Analysis Result
The first step is to analyze the accumulated time for the transaction step. Here you canidentify if the problem is related to the client, the network, or to the server, including all theback-end systems.
Figure 127: E2E Trace Analysis System View
The System View gives you an overview of which systems are affected, which you can chooseto show in a graphic or a table.
Lesson: Analyzing Trace Data with End-to-End Trace Analysis
© Copyright. All rights reserved. 495
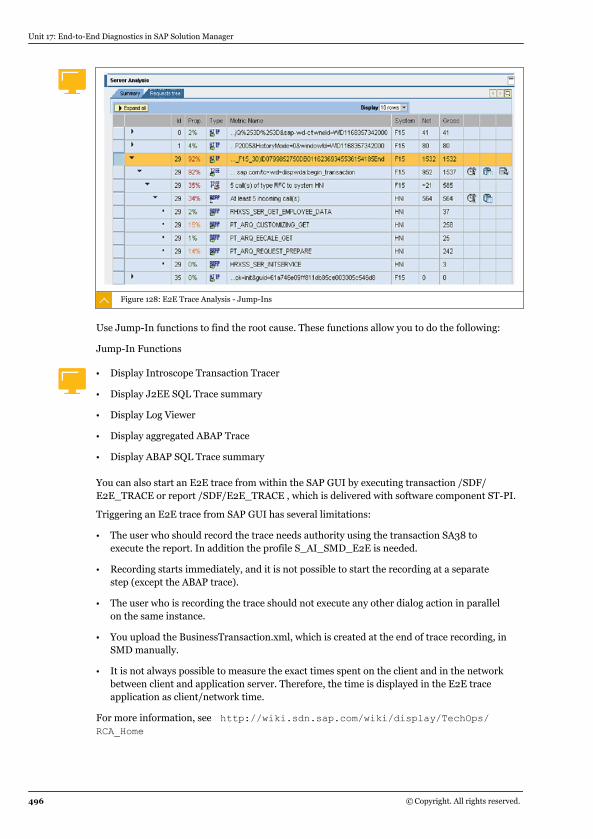
Figure 128: E2E Trace Analysis - Jump-Ins
Use Jump-In functions to find the root cause. These functions allow you to do the following:
Jump-In Functions
● Display Introscope Transaction Tracer
● Display J2EE SQL Trace summary
● Display Log Viewer
● Display aggregated ABAP Trace
● Display ABAP SQL Trace summary
You can also start an E2E trace from within the SAP GUI by executing transaction /SDF/E2E_TRACE or report /SDF/E2E_TRACE , which is delivered with software component ST-PI.
Triggering an E2E trace from SAP GUI has several limitations:
● The user who should record the trace needs authority using the transaction SA38 toexecute the report. In addition the profile S_AI_SMD_E2E is needed.
● Recording starts immediately, and it is not possible to start the recording at a separatestep (except the ABAP trace).
● The user who is recording the trace should not execute any other dialog action in parallelon the same instance.
● You upload the BusinessTransaction.xml, which is created at the end of trace recording, inSMD manually.
● It is not always possible to measure the exact times spent on the client and in the networkbetween client and application server. Therefore, the time is displayed in the E2E traceapplication as client/network time.
For more information, see http://wiki.sdn.sap.com/wiki/display/TechOps/RCA_Home
Unit 17: End-to-End Diagnostics in SAP Solution Manager
496 © Copyright. All rights reserved.
To Perform Trace Analysis
1. Select a system for end-to-end trace analysis in the SAP Solution Manager Root CauseAnalysis work center.
a) Log on to SAP Solution Manager with your user name and password.
b) On the SAP Solution Manager Easy Access screen, call transaction SM_WORKCENTER.
c) Open the Root Cause Analysis work center.
d) In the navigation area, choose end-to-end analysis.
e) Select the system you want to analyze and choose Trace Analysis .The E2E Trace Analysis screen appears.
2. Download the SAP Client Plug-In for trace analysis.
a) On the E2E Trace Analysis screen, select the Option tab.
b) In the Download section, select SAP Note 1435190 to download the latest version ofthe SAP Client Plug-In.
c) Save the plug-in locally.
d) Execute the plug-in on your local system.
3. On the Solution Manager E2E Trace Analysis screen, enable the trace for specific systems.
a) Open the Trace Enabling tab.
b) Choose Enable All.Systems that are ready for tracing have a green indicator in the State column.
4. Create an end-to-end trace on the client side.
a) On your local system open ie-https to start a new browser window that includes theclient plug-in.
b) Navigate to the URL of the system you want to analyze.
c) In the Http Analysis Plugin for IE dialog box, enter the name of the transaction and thetransaction step you want to record.
d) Choose a session trace level.For a performance trace, choose Medium.
e) Enter the Solution Manager diagnostics host and HTTP port (assuming a networkconnection is available between the client to be analyzed and SAP Solution Manager).
f) Start recording the transaction.
g) Execute the task that you want to trace.
h) If you want to trace another task, repeat 4c to 4g now.
i) When all tasks have completed, choose Stop .The recorded transaction is transferred to the E2E trace analysis tool.
j) Choose Exit.The recorded transaction.xml file is uploaded automatically to your host (if youentered a host). If no host is entered, upload the trace manually.
Lesson: Analyzing Trace Data with End-to-End Trace Analysis
© Copyright. All rights reserved. 497
5. Collect the analysis data on the server side.
a) On the Solution Manager E2E Trace Analysis screen, choose the Trace Analysis tab.
b) In the table, select the required business transaction.
c) In the confirmation dialog box choose Yes .
d) If the client data was not uploaded automatically choose Manual Upload to start it.
e) In the Transaction Steps table, select the step you want to analyze and choose Display.Graphs analyzing the step appear.
6. Analyze the collected data.
a) Analyze the accumulated time for the transaction step.
Here you can see if the problem is related to the client, network, or server (including allinvolved back-end systems).
b) Choose the System View to see which systems are affected.
c) Use Jump-In functions to find the root cause.
Alternatively, you can start an E2E trace from within the SAP GUI using transaction /SDF/E2E_TRACE or report /SDF/E2E_TRACE, which is delivered with software component ST-PI.For more information, see http://wiki.sdn.sap.com/wiki/display/TechOps/RCA_Home.
If you fail to enter the connection parameter to the SAP Solution Manager you upload thetrace manually.
LESSON SUMMARYYou should now be able to:
● Perform end-to-end trace analysis
Unit 17: End-to-End Diagnostics in SAP Solution Manager
498 © Copyright. All rights reserved.
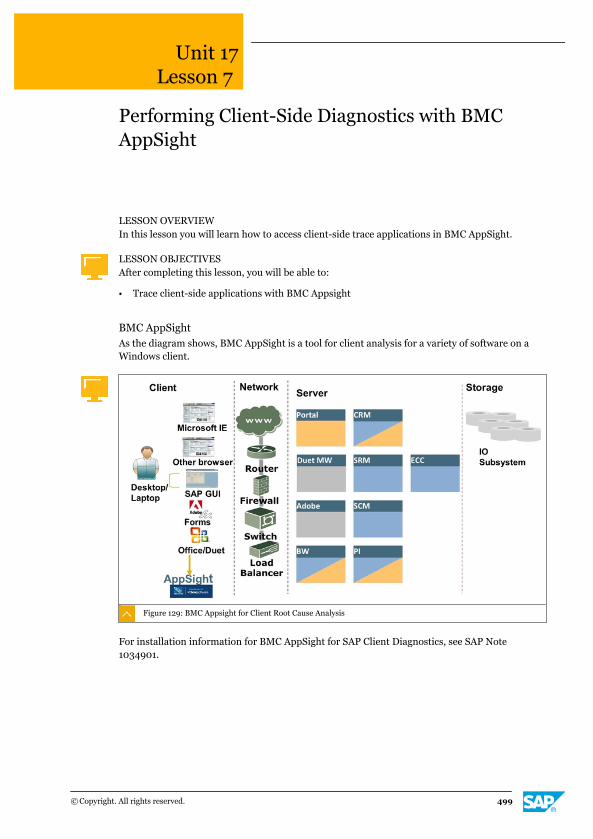
Unit 17Lesson 7
Performing Client-Side Diagnostics with BMCAppSight
LESSON OVERVIEWIn this lesson you will learn how to access client-side trace applications in BMC AppSight.
LESSON OBJECTIVESAfter completing this lesson, you will be able to:
● Trace client-side applications with BMC Appsight
BMC AppSightAs the diagram shows, BMC AppSight is a tool for client analysis for a variety of software on aWindows client.
Figure 129: BMC Appsight for Client Root Cause Analysis
For installation information for BMC AppSight for SAP Client Diagnostics, see SAP Note1034901.
© Copyright. All rights reserved. 499

Figure 130: BMCAppSight Client-Side Issues at Support Workflow
As the diagram shows, BMC AppSight consists of a black box and a console. The black box isthe agent on the client that records diagnostics data. It uses the generic hooks in theoperating systems and does not need modifications to the application on the client. Youdefine details to be recorded in recording profiles. The activities on the user's desktop canalso be recorded.
The AppSight Console is a tool to analyze the client-side log recorded by the black box. Youcan jump from the AppSight Console into AppSight Code, which is used for in-depth analysisof information from the execution of the application (for example, "When was a functioncalled? How long did the function run?")
Figure 131: The BMC AppSight Console
Unit 17: End-to-End Diagnostics in SAP Solution Manager
500 © Copyright. All rights reserved.
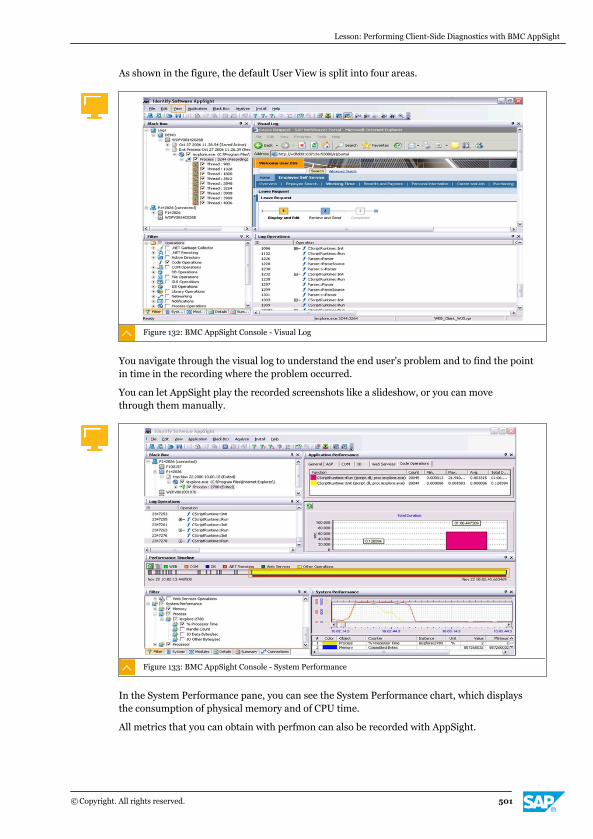
As shown in the figure, the default User View is split into four areas.
Figure 132: BMC AppSight Console - Visual Log
You navigate through the visual log to understand the end user's problem and to find the pointin time in the recording where the problem occurred.
You can let AppSight play the recorded screenshots like a slideshow, or you can movethrough them manually.
Figure 133: BMC AppSight Console - System Performance
In the System Performance pane, you can see the System Performance chart, which displaysthe consumption of physical memory and of CPU time.
All metrics that you can obtain with perfmon can also be recorded with AppSight.
Lesson: Performing Client-Side Diagnostics with BMC AppSight
© Copyright. All rights reserved. 501
The advantage of BMC AppSight is that it is correlated to the other operations by time, so youcan always check what was actually executed on the workstation at that moment.
The System Performance pane shows:
● System performance data
● The correlation to other system activities.
The Performance Timeline shows:
● Which operations took place during the timeline
● Different types of operations, marked in different colors
● Gray areas, which indicate that no activity was recorded
● White areas that summarize many short operations
● A horizontal red line that shows the correlation to other panes
It is possible to set a filter for a specific time period.
The Performance Timeline is a timeline over the entire recording (or for a particular timeframe, if you set an Advanced Filter on the time) that indicates what type of activity took placeover the time.
● A gray indicator means that either the system was waiting for user activity, or nothing wasrecorded at this time because the type of operation was not enabled in the recordingprofile.
● A white indicator means that many different and short-running activities took place, andthey cannot be visualized in separate colors.
● The red line visualizes how long an activity that you marked in another pane (for example,the Log Operations pane) has taken on the timeline.
● Using an advanced filter, you can limit the time frame to the particular period in which youare interested. With such a filter, you avoid becoming confused by too many log entries. Ofcourse, a prerequisite is to first identify the relevant period in the recording via the VisualLog. You can find this filter by choosing View → More Filters → Advanced .
The Application Performance pane shows application operations, categorized by type ofoperation. The operations can be sorted, for example, by duration.
Unit 17: End-to-End Diagnostics in SAP Solution Manager
502 © Copyright. All rights reserved.

Figure 134: Code Operations in BMC AppSight Console
Code operations are recorded during the black box recording, and these operations can beviewed in the Log Operations panel, as shown. For a real code analysis, however, right-clickand choose Show Event in AppSight Code.
In the figure, you can see the source code of the makeBusy method. This method isJavaScript, so you can obtain the method from the HTML page. You see that expensivemethods explain the observed problem. In a real case, you would need to discuss how theseJavaScript functions could be optimized for better performance.
LESSON SUMMARYYou should now be able to:
● Trace client-side applications with BMC Appsight
Lesson: Performing Client-Side Diagnostics with BMC AppSight
© Copyright. All rights reserved. 503

Unit 17: End-to-End Diagnostics in SAP Solution Manager
504 © Copyright. All rights reserved.
Unit 17
Learning Assessment
1. Which of the following root-cause analysis tools identifies general server-sideperformance bottlenecks?
Choose the correct answer.
X A E2E Workload analysis
X B E2E Trace analysis
X C E2E Exception analysis
X D E2E Change analysis
© Copyright. All rights reserved. 505

Unit 17
Learning Assessment - Answers
1. Which of the following root-cause analysis tools identifies general server-sideperformance bottlenecks?
Choose the correct answer.
X A E2E Workload analysis
X B E2E Trace analysis
X C E2E Exception analysis
X D E2E Change analysis
506 © Copyright. All rights reserved.
UNIT 18 The SAP Solution ManagerMonitoring and AlertingInfrastructure
Lesson 1
Creating an Integrated Landscape Monitoring Solution with the Monitoring and Alerting
Infrastructure
508
Lesson 2
Assigning Monitoring Templates to Systems 513
Lesson 3
Monitoring the System Landscape Using the Monitoring and Alerting Infrastructure 517
Exercise 21: Analyze an Alert in the System Monitoring Application 523
Exercise 22: Create an Incident in the System Monitoring Application 525
Lesson 4
Analyzing Metrics with Interactive Reporting 528
Lesson 5
Accessing Key Reports Using Dashboards 536
UNIT OBJECTIVES
● Describe the SAP Solution Manager monitoring and alerting infrastructure
● Configure monitoring templates
● Set up system monitoring in SAP Solution Manager
● Configure interactive reporting
● Configure dashboards to display key reports at a glance
© Copyright. All rights reserved. 507
Unit 18Lesson 1
Creating an Integrated Landscape MonitoringSolution with the Monitoring and AlertingInfrastructure
LESSON OVERVIEWIn this lesson you will learn about the new monitoring and alerting infrastructure offered bySAP Solution Manager 7.1.
LESSON OBJECTIVESAfter completing this lesson, you will be able to:
● Describe the SAP Solution Manager monitoring and alerting infrastructure
Architecture of the Monitoring and Alerting Infrastructure (MAI)Many improvements and new functions became available with SAP Solution Manager 7.1. Oneof these innovations is the monitoring and alerting infrastructure (MAI), which will become thestandard for system monitoring with Solution Manager. The old CCMS-based work center isstill available, the monitoring functions within CCMS, such as transaction RZ20, are also stillavailable and will be maintained through bug-fixing.
New Infrastructure for Technical Monitoring and Alerting
● Introduced with SAP Solution Manager 7.1
● Based on E2E Diagnostics architecture
● SAP's new standard for central monitoring and alerting
● Old system monitoring work center based on central CCMS still available
● New Technical Monitoring work center has been introduced, featuring the newapplications
The infrastructure integrates new components almost automatically, provided the newcomponents have been installed correctly and meet the prerequisites, such as being properlyconnected to SLD/LMDB.
Features of MAI in SAP Solution Manager 7.1
● Landscape awareness
● Easy integration of new technologies
● Configuration of different alert consumers
● Central, automatically distributed configuration
508 © Copyright. All rights reserved.
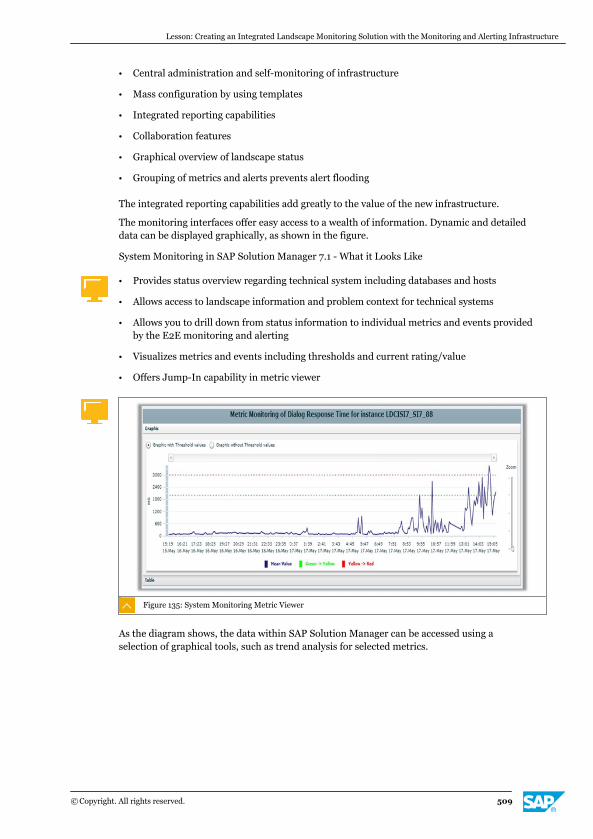
● Central administration and self-monitoring of infrastructure
● Mass configuration by using templates
● Integrated reporting capabilities
● Collaboration features
● Graphical overview of landscape status
● Grouping of metrics and alerts prevents alert flooding
The integrated reporting capabilities add greatly to the value of the new infrastructure.
The monitoring interfaces offer easy access to a wealth of information. Dynamic and detaileddata can be displayed graphically, as shown in the figure.
System Monitoring in SAP Solution Manager 7.1 - What it Looks Like
● Provides status overview regarding technical system including databases and hosts
● Allows access to landscape information and problem context for technical systems
● Allows you to drill down from status information to individual metrics and events providedby the E2E monitoring and alerting
● Visualizes metrics and events including thresholds and current rating/value
● Offers Jump-In capability in metric viewer
Figure 135: System Monitoring Metric Viewer
As the diagram shows, the data within SAP Solution Manager can be accessed using aselection of graphical tools, such as trend analysis for selected metrics.
Lesson: Creating an Integrated Landscape Monitoring Solution with the Monitoring and Alerting Infrastructure
© Copyright. All rights reserved. 509
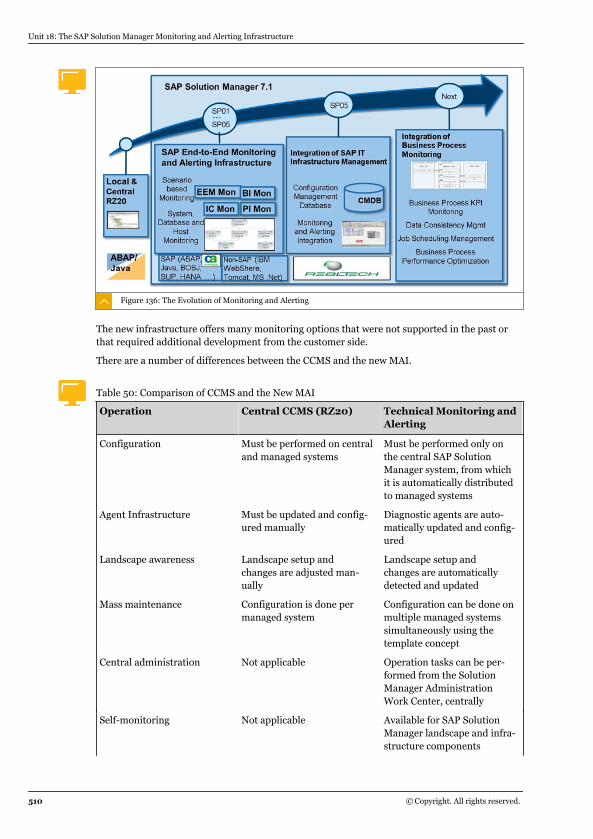
Figure 136: The Evolution of Monitoring and Alerting
The new infrastructure offers many monitoring options that were not supported in the past orthat required additional development from the customer side.
There are a number of differences between the CCMS and the new MAI.
Table 50: Comparison of CCMS and the New MAI
Operation Central CCMS (RZ20) Technical Monitoring andAlerting
Configuration Must be performed on centraland managed systems
Must be performed only onthe central SAP SolutionManager system, from whichit is automatically distributedto managed systems
Agent Infrastructure Must be updated and config-ured manually
Diagnostic agents are auto-matically updated and config-ured
Landscape awareness Landscape setup andchanges are adjusted man-ually
Landscape setup andchanges are automaticallydetected and updated
Mass maintenance Configuration is done permanaged system
Configuration can be done onmultiple managed systemssimultaneously using thetemplate concept
Central administration Not applicable Operation tasks can be per-formed from the SolutionManager AdministrationWork Center, centrally
Self-monitoring Not applicable Available for SAP SolutionManager landscape and infra-structure components
Unit 18: The SAP Solution Manager Monitoring and Alerting Infrastructure
510 © Copyright. All rights reserved.
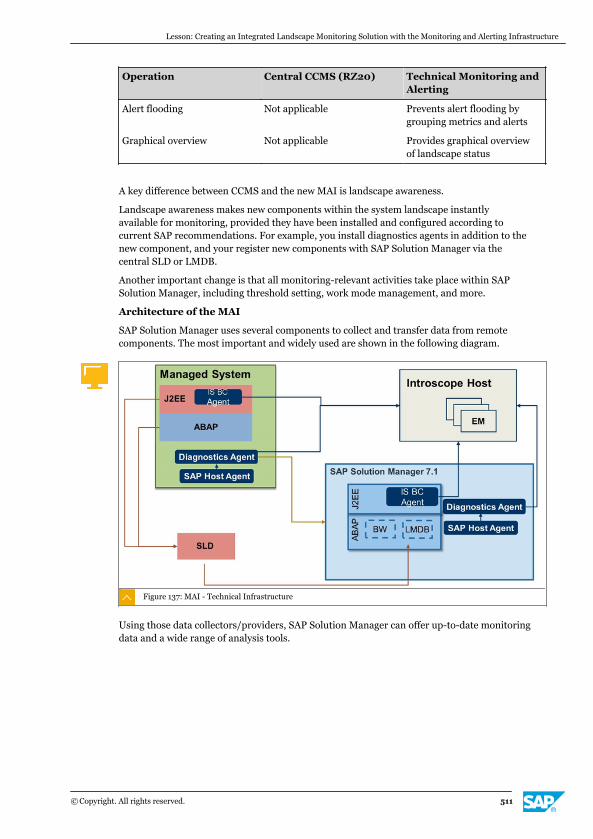
Operation Central CCMS (RZ20) Technical Monitoring andAlerting
Alert flooding Not applicable Prevents alert flooding bygrouping metrics and alerts
Graphical overview Not applicable Provides graphical overviewof landscape status
A key difference between CCMS and the new MAI is landscape awareness.
Landscape awareness makes new components within the system landscape instantlyavailable for monitoring, provided they have been installed and configured according tocurrent SAP recommendations. For example, you install diagnostics agents in addition to thenew component, and your register new components with SAP Solution Manager via thecentral SLD or LMDB.
Another important change is that all monitoring-relevant activities take place within SAPSolution Manager, including threshold setting, work mode management, and more.
Architecture of the MAI
SAP Solution Manager uses several components to collect and transfer data from remotecomponents. The most important and widely used are shown in the following diagram.
Figure 137: MAI - Technical Infrastructure
Using those data collectors/providers, SAP Solution Manager can offer up-to-date monitoringdata and a wide range of analysis tools.
Lesson: Creating an Integrated Landscape Monitoring Solution with the Monitoring and Alerting Infrastructure
© Copyright. All rights reserved. 511
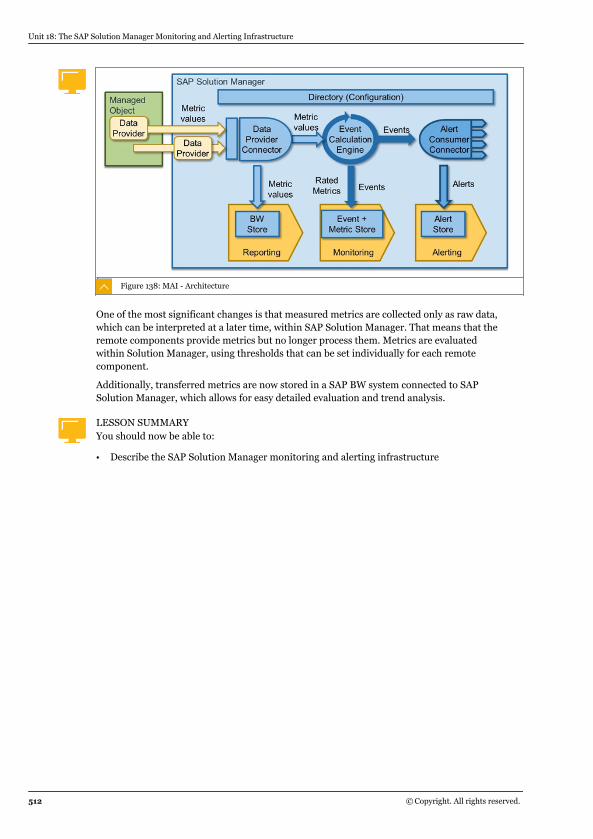
Figure 138: MAI - Architecture
One of the most significant changes is that measured metrics are collected only as raw data,which can be interpreted at a later time, within SAP Solution Manager. That means that theremote components provide metrics but no longer process them. Metrics are evaluatedwithin Solution Manager, using thresholds that can be set individually for each remotecomponent.
Additionally, transferred metrics are now stored in a SAP BW system connected to SAPSolution Manager, which allows for easy detailed evaluation and trend analysis.
LESSON SUMMARYYou should now be able to:
● Describe the SAP Solution Manager monitoring and alerting infrastructure
Unit 18: The SAP Solution Manager Monitoring and Alerting Infrastructure
512 © Copyright. All rights reserved.

Unit 18Lesson 2
Assigning Monitoring Templates to Systems
LESSON OVERVIEWSAP delivers a set of monitoring templates to help you to configure monitoring. In this lessonyou will learn the benefits of those templates and how to assign them to systems.
LESSON OBJECTIVESAfter completing this lesson, you will be able to:
● Configure monitoring templates
Monitoring TemplatesSAP provides predefined monitor attributes using SAP monitoring templates. Thesetemplates include all the best practice metrics, events and alerts for hosts, databases, andsystems.
Table 51: Monitoring Templates Delivered by SAP
Host Database Instance System
AIX IBM DB2 for LUW SAP ABAP Basis SAP ABAP Basis
HP-UX IBM DB2 for z/OS SAP J2EE Basis SAP J2EE Basis
Linux MS SQL Server SAP Portal Platform Apache Tomcat
Solaris Oracle SAP PI Adapter En-gine
Business Objects
Windows SAP HANA DB (STSP5 or higher)
SAP TREX (ST SP3 orhigher)
SAP NetWeaver CE
SAP MaxDB Business Objects IBM WebSphere (STSP2 or higher)
Sybase ASE (ST SP4or higher)
Sybase Unwired Plat-form (ST SP5 or high-er)
SAP NetWeaver PI(ST SP2 or higher)
MDM Server (ST SP5or higher)
SAP Gateway (STSP5 or higher)
IBM WebSphere AS(ST SP2 or higher)
SAP LiveCache (STSP5 or higher)
Microsoft IIS (ST SP5or higher)
© Copyright. All rights reserved. 513
You use Template Maintenance to manage the content of E2E MAI for adapting to yourspecific needs. This content management is achieved using templates that contain themetrics, events, and alerts for managed objects such as technical systems, instances,databases, and hosts (server).
Templates have the following features:
● They contain SAP-delivered content for technical monitoring.
● They contain out-of-the-box SAP best practices and standards for host, database, andsystem monitoring.
● They can be updated regularly as new content is provided by SAP.
● They are transportable.
● They are version-controlled.
You can do the following with templates:
● View SAP-delivered content.
● Modify SAP-delivered content or create your own content using custom templates.
● Back up your custom templates.
● Change incident and notification settings in SAP or custom templates.
● Create multiple copies of a custom template.
● Create custom descriptions for adding instructions or links to help with problemresolutions.
● Maintain auto-reactions for alerts, both in SAP and in custom templates.
● Integrate third-party connectors for specific needs, either in SAP or in custom templates.
● Maintain settings for individual work modes, in custom templates.
● Check whether a managed object is running with outdated configuration.
● Deactivate or activate metrics or alerts, only in custom templates.
● Modify thresholds, only in custom templates.
You can find a current list of all the SAP-delivered templates at http://wiki.sdn.com/wiki/display/TechOps/SysMon_Supported Products
Use Guided Procedures for Setting Up Monitoring Templates
Unit 18: The SAP Solution Manager Monitoring and Alerting Infrastructure
514 © Copyright. All rights reserved.
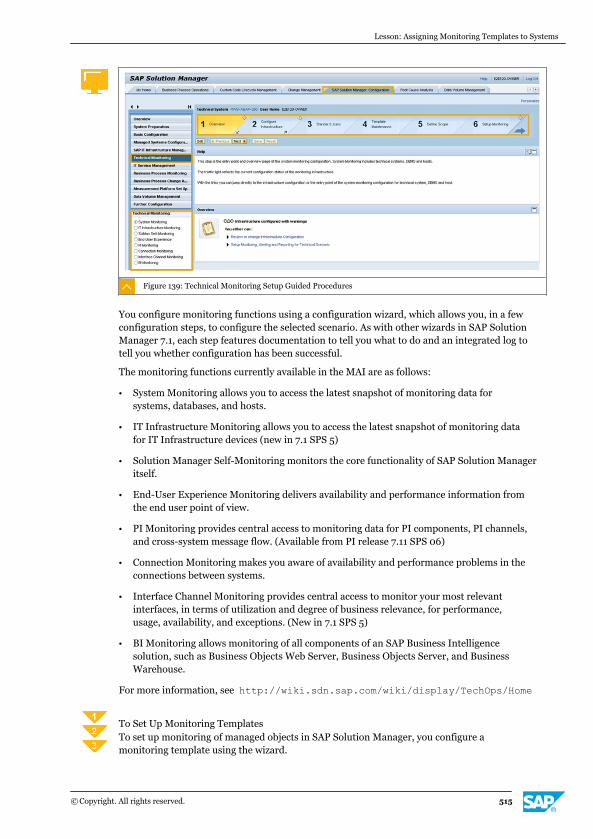
Figure 139: Technical Monitoring Setup Guided Procedures
You configure monitoring functions using a configuration wizard, which allows you, in a fewconfiguration steps, to configure the selected scenario. As with other wizards in SAP SolutionManager 7.1, each step features documentation to tell you what to do and an integrated log totell you whether configuration has been successful.
The monitoring functions currently available in the MAI are as follows:
● System Monitoring allows you to access the latest snapshot of monitoring data forsystems, databases, and hosts.
● IT Infrastructure Monitoring allows you to access the latest snapshot of monitoring datafor IT Infrastructure devices (new in 7.1 SPS 5)
● Solution Manager Self-Monitoring monitors the core functionality of SAP Solution Manageritself.
● End-User Experience Monitoring delivers availability and performance information fromthe end user point of view.
● PI Monitoring provides central access to monitoring data for PI components, PI channels,and cross-system message flow. (Available from PI release 7.11 SPS 06)
● Connection Monitoring makes you aware of availability and performance problems in theconnections between systems.
● Interface Channel Monitoring provides central access to monitor your most relevantinterfaces, in terms of utilization and degree of business relevance, for performance,usage, availability, and exceptions. (New in 7.1 SPS 5)
● BI Monitoring allows monitoring of all components of an SAP Business Intelligencesolution, such as Business Objects Web Server, Business Objects Server, and BusinessWarehouse.
For more information, see http://wiki.sdn.sap.com/wiki/display/TechOps/Home
To Set Up Monitoring TemplatesTo set up monitoring of managed objects in SAP Solution Manager, you configure amonitoring template using the wizard.
Lesson: Assigning Monitoring Templates to Systems
© Copyright. All rights reserved. 515
1. Start the Technical Monitoring wizard in the SAP Solution Manager Configuration workcenter.
a) Log on to SAP Solution Manager with your user name and password.
b) On the SAP Easy Access screen call transaction SM_WORKCENTER.
c) Open the SAP Solution Manager: Configuration work center.
Alternatively, you can call SOLMAN_SETUP and open Technical Monitoring.
d) In the navigation area, choose Technical Monitoring.The Technical Monitoring wizard appears.
2. Configure technical monitoring using the steps in the wizard.
The guided procedures for technical monitoring allow you to configure the selectedscenario in a few configuration steps. Each step has documentation available to tell youwhat it does, and the integrated log functionality shows you why a step has not succeeded.The scenario is activated when the setup wizard has been run completely and withouterrors. You can then use the scenario in the Technical Monitoring work center.
3. Select components to monitor with the template.
a) On the Define Scope tab, you assign your template or a default template to a managedsystem.
You can also select multiple managed systems, which is useful for dual-stack systems.See the Help section for more information. All templates valid for the installed productdisplay in the Selected Template dropdown list.
4. On the Setup Monitoring tab, apply and activate the template.
Reporting settings are maintained in the template, but the actual activation of the reporting isdone in the Reporting tab.
LESSON SUMMARYYou should now be able to:
● Configure monitoring templates
Unit 18: The SAP Solution Manager Monitoring and Alerting Infrastructure
516 © Copyright. All rights reserved.
Unit 18Lesson 3
Monitoring the System Landscape Using theMonitoring and Alerting Infrastructure
LESSON OVERVIEWIn this lesson you will be introduced to the functions of the monitoring and alertinginfrastructure.
LESSON OBJECTIVESAfter completing this lesson, you will be able to:
● Set up system monitoring in SAP Solution Manager
The System Monitoring ApplicationTo access the monitoring and alerting infrastructure (MAI), call transactionSM_WORKCENTER and open theTechnical Monitoring work center.
By default, SAP delivers many queries for system types including ABAP, Java, MDM, andmore. If the standard queries do not meet your needs, you can define your own queries.Within a query you can also filter by system IDs, system types, depending on what you wantto display. Within a query you can filter by system IDs or system types, such as SAP HanaDatabase, Sybase Unwired Platform, TREX, external services, or Microsoft InformationServices.
To start System Monitoring, open the Technical Monitoring work center and choose SystemMonitoringfrom the navigation area.
Select the managed object or managed objects you want to view, then choose SystemMonitoringto launch the application. Alternatively, you can choose Workstation to launch CAWily Introscope workstation.
When you open System Monitoring the system list displays a summary of your selectedsystems. It also displays the category (Availability, Performance, Configuration, or Exception)in which the highest alert has been triggered.
Selecting the product version displays the system hierarchy, which is the graphical systemmonitoring application. Here you can navigate through individual metrics and their stateeither in the graphical tree or on the tree hierarchy, as shown in the figure.
© Copyright. All rights reserved. 517
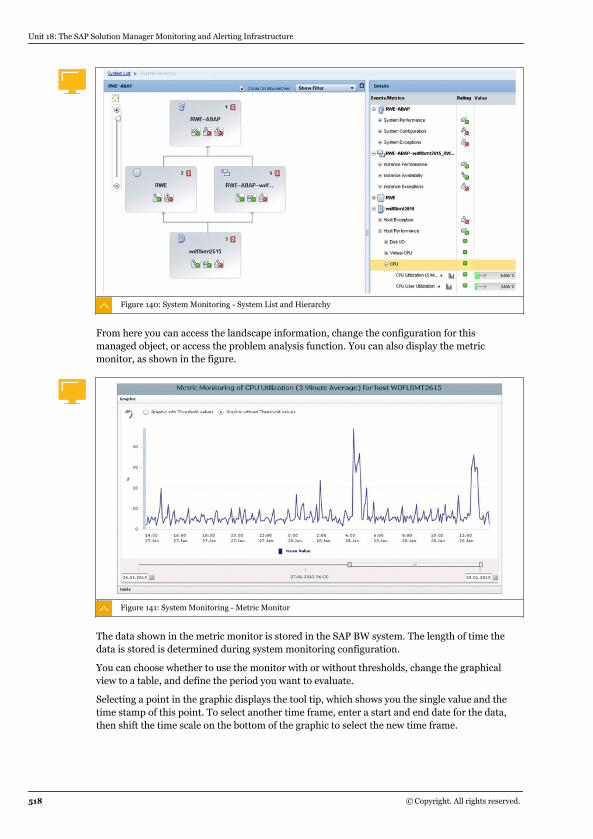
Figure 140: System Monitoring - System List and Hierarchy
From here you can access the landscape information, change the configuration for thismanaged object, or access the problem analysis function. You can also display the metricmonitor, as shown in the figure.
Figure 141: System Monitoring - Metric Monitor
The data shown in the metric monitor is stored in the SAP BW system. The length of time thedata is stored is determined during system monitoring configuration.
You can choose whether to use the monitor with or without thresholds, change the graphicalview to a table, and define the period you want to evaluate.
Selecting a point in the graphic displays the tool tip, which shows you the single value and thetime stamp of this point. To select another time frame, enter a start and end date for the data,then shift the time scale on the bottom of the graphic to select the new time frame.
Unit 18: The SAP Solution Manager Monitoring and Alerting Infrastructure
518 © Copyright. All rights reserved.
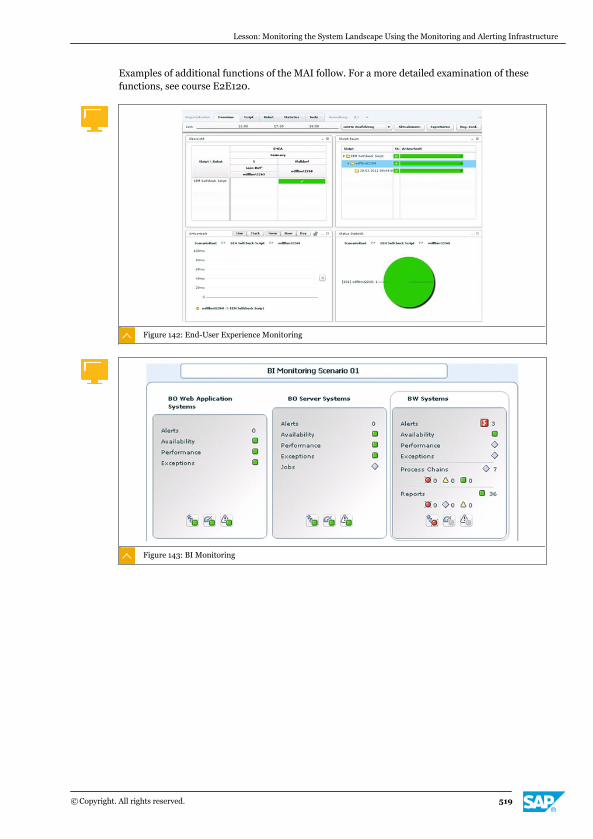
Examples of additional functions of the MAI follow. For a more detailed examination of thesefunctions, see course E2E120.
Figure 142: End-User Experience Monitoring
Figure 143: BI Monitoring
Lesson: Monitoring the System Landscape Using the Monitoring and Alerting Infrastructure
© Copyright. All rights reserved. 519
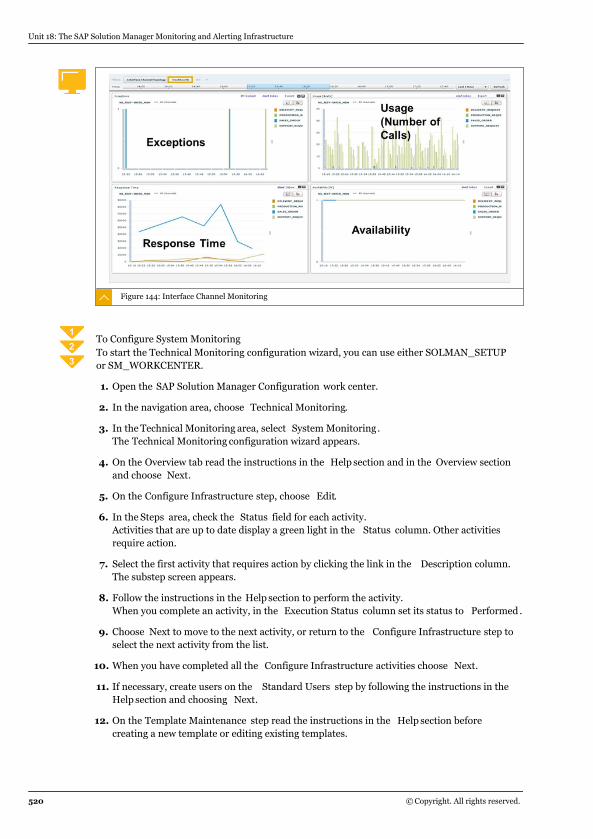
Figure 144: Interface Channel Monitoring
To Configure System MonitoringTo start the Technical Monitoring configuration wizard, you can use either SOLMAN_SETUPor SM_WORKCENTER.
1. Open the SAP Solution Manager Configuration work center.
2. In the navigation area, choose Technical Monitoring.
3. In the Technical Monitoring area, select System Monitoring.The Technical Monitoring configuration wizard appears.
4. On the Overview tab read the instructions in the Help section and in the Overview sectionand choose Next.
5. On the Configure Infrastructure step, choose Edit.
6. In the Steps area, check the Status field for each activity.Activities that are up to date display a green light in the Status column. Other activitiesrequire action.
7. Select the first activity that requires action by clicking the link in the Description column.The substep screen appears.
8. Follow the instructions in the Help section to perform the activity.When you complete an activity, in the Execution Status column set its status to Performed .
9. Choose Next to move to the next activity, or return to the Configure Infrastructure step toselect the next activity from the list.
10. When you have completed all the Configure Infrastructure activities choose Next.
11. If necessary, create users on the Standard Users step by following the instructions in theHelp section and choosing Next.
12. On the Template Maintenance step read the instructions in the Help section beforecreating a new template or editing existing templates.
Unit 18: The SAP Solution Manager Monitoring and Alerting Infrastructure
520 © Copyright. All rights reserved.
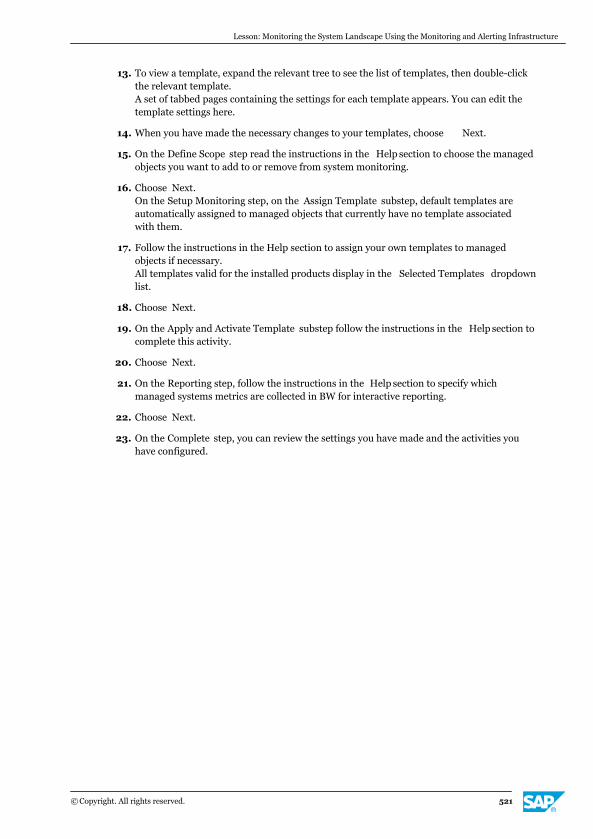
13. To view a template, expand the relevant tree to see the list of templates, then double-clickthe relevant template.A set of tabbed pages containing the settings for each template appears. You can edit thetemplate settings here.
14. When you have made the necessary changes to your templates, choose Next.
15. On the Define Scope step read the instructions in the Help section to choose the managedobjects you want to add to or remove from system monitoring.
16. Choose Next.On the Setup Monitoring step, on the Assign Template substep, default templates areautomatically assigned to managed objects that currently have no template associatedwith them.
17. Follow the instructions in the Help section to assign your own templates to managedobjects if necessary.All templates valid for the installed products display in the Selected Templates dropdownlist.
18. Choose Next.
19. On the Apply and Activate Template substep follow the instructions in the Help section tocomplete this activity.
20. Choose Next.
21. On the Reporting step, follow the instructions in the Help section to specify whichmanaged systems metrics are collected in BW for interactive reporting.
22. Choose Next.
23. On the Complete step, you can review the settings you have made and the activities youhave configured.
Lesson: Monitoring the System Landscape Using the Monitoring and Alerting Infrastructure
© Copyright. All rights reserved. 521

Unit 18: The SAP Solution Manager Monitoring and Alerting Infrastructure
522 © Copyright. All rights reserved.
Unit 18Exercise 21
Analyze an Alert in the System MonitoringApplication
Business Example
As a technical administrator in your organization, you are required to analyze the availabilityof your managed systems. The System Alert tab shows that an ABAP system was unavailablefor a period. You examine the details of the alert to find out when and for how long the systemwas unavailable.
1. In the SAP Solution Manager Technical Monitoring work center, open the Alert Inboxandexamine the details of the relevant alert.
2. Create an analysis report for archiving purposes.
© Copyright. All rights reserved. 523
Unit 18Solution 21
Analyze an Alert in the System MonitoringApplication
Business Example
As a technical administrator in your organization, you are required to analyze the availabilityof your managed systems. The System Alert tab shows that an ABAP system was unavailablefor a period. You examine the details of the alert to find out when and for how long the systemwas unavailable.
1. In the SAP Solution Manager Technical Monitoring work center, open the Alert Inboxandexamine the details of the relevant alert.
a) Log on to SAP Solution Manager with <CourseID>-<GroupNumber> and<password>.
b) On the SAP Solution Manager Easy Access screen, call transaction SM_WORKCENTER.
c) Choose the Technical Monitoring work center.
d) Choose the Alert Inbox.
e) On the System Alert tab, select the ABAP System not available row and choose ShowDetails.The Alert Detail screen appears.
f) In the Alert Details table, on the ABAP System remote RFC availability line, selectManaged Object to display a description of the metric.
g) Select ABAP system remote RFC availability to open the Metric Viewer.
h) Use the slide to change the displayed time interval and resolution and see if there wasa green status at any time during the monitoring period.
2. Create an analysis report for archiving purposes.
a) Close the Metric Viewer screen.
b) On the Alert Detail screen, choose Create Analysis Report .
524 © Copyright. All rights reserved.

Unit 18Exercise 22
Create an Incident in the System MonitoringApplication
Business Example
Analysis reveals that there is an issue with component SV-SMG-SUP-TST, so you create anincident for this component.
1. With the Alert Inbox Group View still open, create an incident on component SV-SMG-SUP-TST.
© Copyright. All rights reserved. 525
Unit 18Solution 22
Create an Incident in the System MonitoringApplication
Business Example
Analysis reveals that there is an issue with component SV-SMG-SUP-TST, so you create anincident for this component.
1. With the Alert Inbox Group View still open, create an incident on component SV-SMG-SUP-TST.
a) In the Alert Group view, choose Create Incident.
b) Select the component SV-SMG-SUP-TST.
c) Select the transaction type Incident and confirm.
d) Select Category Alert .An analysis report is automatically attached to your message.
e) Save the incident.
526 © Copyright. All rights reserved.
LESSON SUMMARYYou should now be able to:
● Set up system monitoring in SAP Solution Manager
Lesson: Monitoring the System Landscape Using the Monitoring and Alerting Infrastructure
© Copyright. All rights reserved. 527
Unit 18Lesson 4
Analyzing Metrics with Interactive Reporting
LESSON OVERVIEWIn this lesson you will learn how to access information using interactive reporting.
LESSON OBJECTIVESAfter completing this lesson, you will be able to:
● Configure interactive reporting
To Set Up Interactive ReportingThe metrics collected by the new monitoring and alerting infrastructure are transferred to abusiness warehouse. The most important metrics have been selected for interactivereporting, and reports have been created that provide you with a quick and comprehensiveoverview of the status of your managed objects in the following areas:
● Availability
● Performance
● Exceptions
● Capacity
● Usage
1. Log on to SAP Solution Manager with your user name and password.
2. On the SAP Easy Access screen call transaction SOLMAN_SETUP.
3. In the navigation area, choose Technical Monitoring.
4. In the Technical Monitoring wizard open the 2.4 Reporting - Settings tab.
5. Choose Edit.The health check results of the BI-based reporting display, so you can see whether theconditions for activating BI-based reporting are met. These conditions include
● BI client setup
● working RFC connections between BI and SAP Solution Manager
● ICF Service availability
● error-free health checks
6. If the health checks are error free, in the BI Content Activation area, choose Start .
Watch the result in the Log display. The BI Content activation job is scheduled and the BIContent activation should complete successfully.
528 © Copyright. All rights reserved.
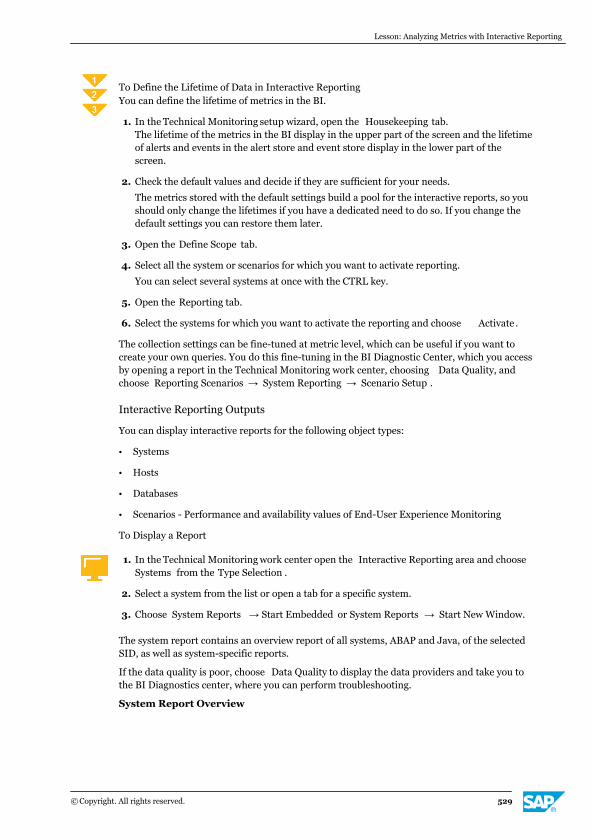
To Define the Lifetime of Data in Interactive ReportingYou can define the lifetime of metrics in the BI.
1. In the Technical Monitoring setup wizard, open the Housekeeping tab.The lifetime of the metrics in the BI display in the upper part of the screen and the lifetimeof alerts and events in the alert store and event store display in the lower part of thescreen.
2. Check the default values and decide if they are sufficient for your needs.
The metrics stored with the default settings build a pool for the interactive reports, so youshould only change the lifetimes if you have a dedicated need to do so. If you change thedefault settings you can restore them later.
3. Open the Define Scope tab.
4. Select all the system or scenarios for which you want to activate reporting.
You can select several systems at once with the CTRL key.
5. Open the Reporting tab.
6. Select the systems for which you want to activate the reporting and choose Activate .
The collection settings can be fine-tuned at metric level, which can be useful if you want tocreate your own queries. You do this fine-tuning in the BI Diagnostic Center, which you accessby opening a report in the Technical Monitoring work center, choosing Data Quality, andchoose Reporting Scenarios → System Reporting → Scenario Setup .
Interactive Reporting Outputs
You can display interactive reports for the following object types:
● Systems
● Hosts
● Databases
● Scenarios - Performance and availability values of End-User Experience Monitoring
To Display a Report
1. In the Technical Monitoring work center open the Interactive Reporting area and chooseSystems from the Type Selection .
2. Select a system from the list or open a tab for a specific system.
3. Choose System Reports → Start Embedded or System Reports → Start New Window.
The system report contains an overview report of all systems, ABAP and Java, of the selectedSID, as well as system-specific reports.
If the data quality is poor, choose Data Quality to display the data providers and take you tothe BI Diagnostics center, where you can perform troubleshooting.
System Report Overview
Lesson: Analyzing Metrics with Interactive Reporting
© Copyright. All rights reserved. 529
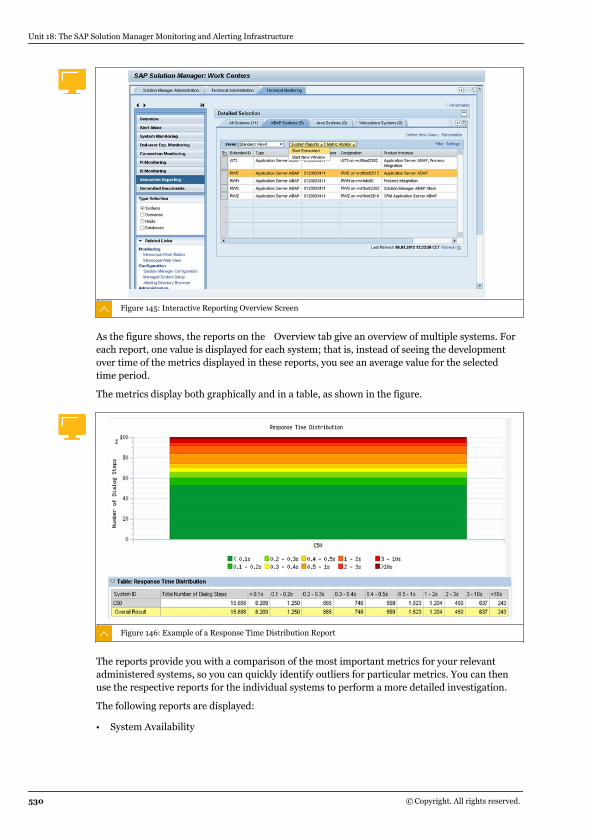
Figure 145: Interactive Reporting Overview Screen
As the figure shows, the reports on the Overview tab give an overview of multiple systems. Foreach report, one value is displayed for each system; that is, instead of seeing the developmentover time of the metrics displayed in these reports, you see an average value for the selectedtime period.
The metrics display both graphically and in a table, as shown in the figure.
Figure 146: Example of a Response Time Distribution Report
The reports provide you with a comparison of the most important metrics for your relevantadministered systems, so you can quickly identify outliers for particular metrics. You can thenuse the respective reports for the individual systems to perform a more detailed investigation.
The following reports are displayed:
● System Availability
Unit 18: The SAP Solution Manager Monitoring and Alerting Infrastructure
530 © Copyright. All rights reserved.
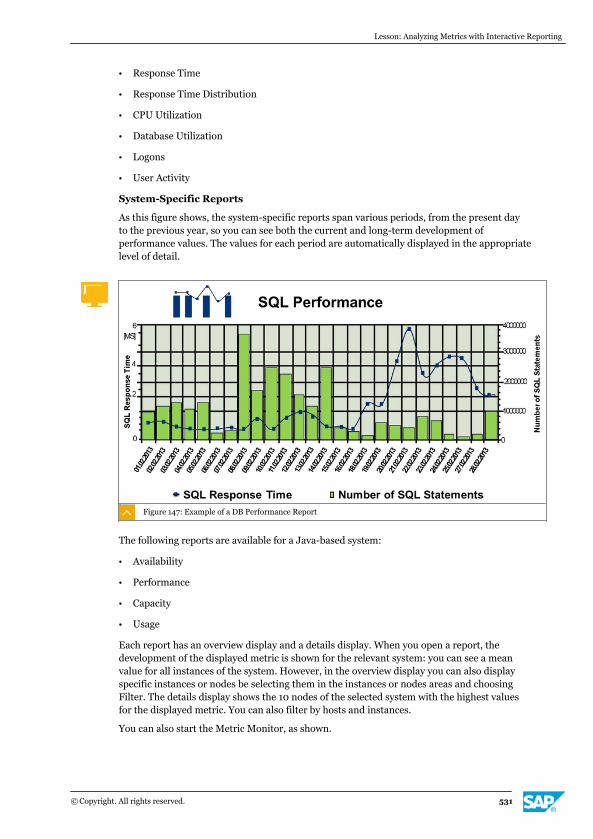
● Response Time
● Response Time Distribution
● CPU Utilization
● Database Utilization
● Logons
● User Activity
System-Specific Reports
As this figure shows, the system-specific reports span various periods, from the present dayto the previous year, so you can see both the current and long-term development ofperformance values. The values for each period are automatically displayed in the appropriatelevel of detail.
Figure 147: Example of a DB Performance Report
The following reports are available for a Java-based system:
● Availability
● Performance
● Capacity
● Usage
Each report has an overview display and a details display. When you open a report, thedevelopment of the displayed metric is shown for the relevant system: you can see a meanvalue for all instances of the system. However, in the overview display you can also displayspecific instances or nodes be selecting them in the instances or nodes areas and choosingFilter. The details display shows the 10 nodes of the selected system with the highest valuesfor the displayed metric. You can also filter by hosts and instances.
You can also start the Metric Monitor, as shown.
Lesson: Analyzing Metrics with Interactive Reporting
© Copyright. All rights reserved. 531
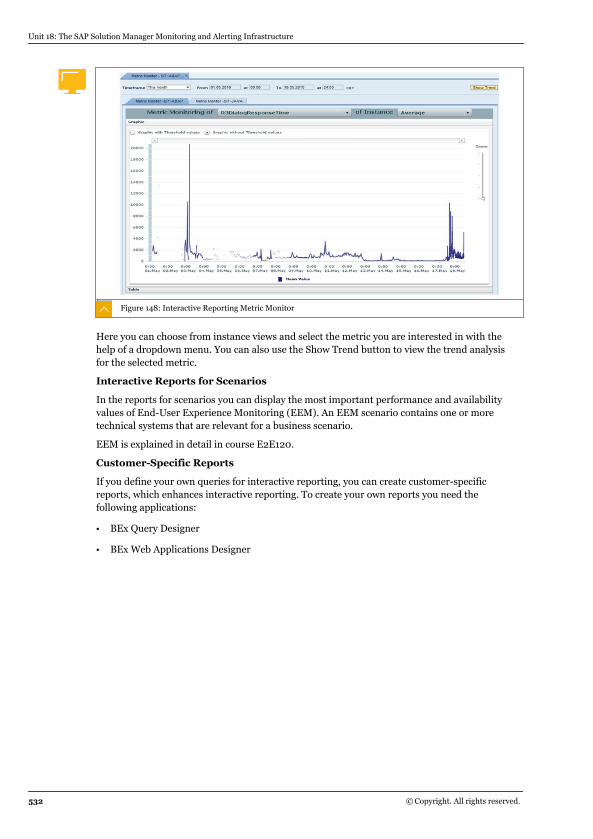
Figure 148: Interactive Reporting Metric Monitor
Here you can choose from instance views and select the metric you are interested in with thehelp of a dropdown menu. You can also use the Show Trend button to view the trend analysisfor the selected metric.
Interactive Reports for Scenarios
In the reports for scenarios you can display the most important performance and availabilityvalues of End-User Experience Monitoring (EEM). An EEM scenario contains one or moretechnical systems that are relevant for a business scenario.
EEM is explained in detail in course E2E120.
Customer-Specific Reports
If you define your own queries for interactive reporting, you can create customer-specificreports, which enhances interactive reporting. To create your own reports you need thefollowing applications:
● BEx Query Designer
● BEx Web Applications Designer
Unit 18: The SAP Solution Manager Monitoring and Alerting Infrastructure
532 © Copyright. All rights reserved.
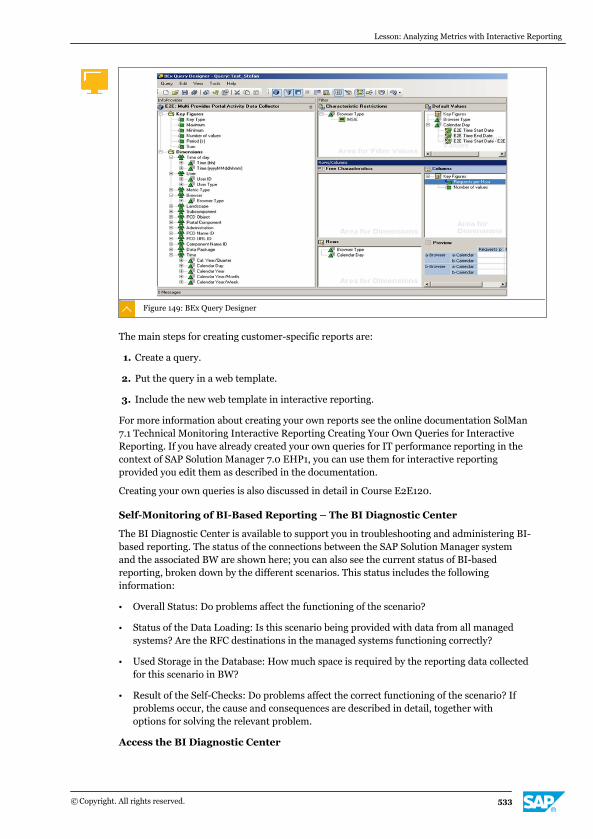
Figure 149: BEx Query Designer
The main steps for creating customer-specific reports are:
1. Create a query.
2. Put the query in a web template.
3. Include the new web template in interactive reporting.
For more information about creating your own reports see the online documentation SolMan7.1 Technical Monitoring Interactive Reporting Creating Your Own Queries for InteractiveReporting. If you have already created your own queries for IT performance reporting in thecontext of SAP Solution Manager 7.0 EHP1, you can use them for interactive reportingprovided you edit them as described in the documentation.
Creating your own queries is also discussed in detail in Course E2E120.
Self-Monitoring of BI-Based Reporting – The BI Diagnostic Center
The BI Diagnostic Center is available to support you in troubleshooting and administering BI-based reporting. The status of the connections between the SAP Solution Manager systemand the associated BW are shown here; you can also see the current status of BI-basedreporting, broken down by the different scenarios. This status includes the followinginformation:
● Overall Status: Do problems affect the functioning of the scenario?
● Status of the Data Loading: Is this scenario being provided with data from all managedsystems? Are the RFC destinations in the managed systems functioning correctly?
● Used Storage in the Database: How much space is required by the reporting data collectedfor this scenario in BW?
● Result of the Self-Checks: Do problems affect the correct functioning of the scenario? Ifproblems occur, the cause and consequences are described in detail, together withoptions for solving the relevant problem.
Access the BI Diagnostic Center
Lesson: Analyzing Metrics with Interactive Reporting
© Copyright. All rights reserved. 533
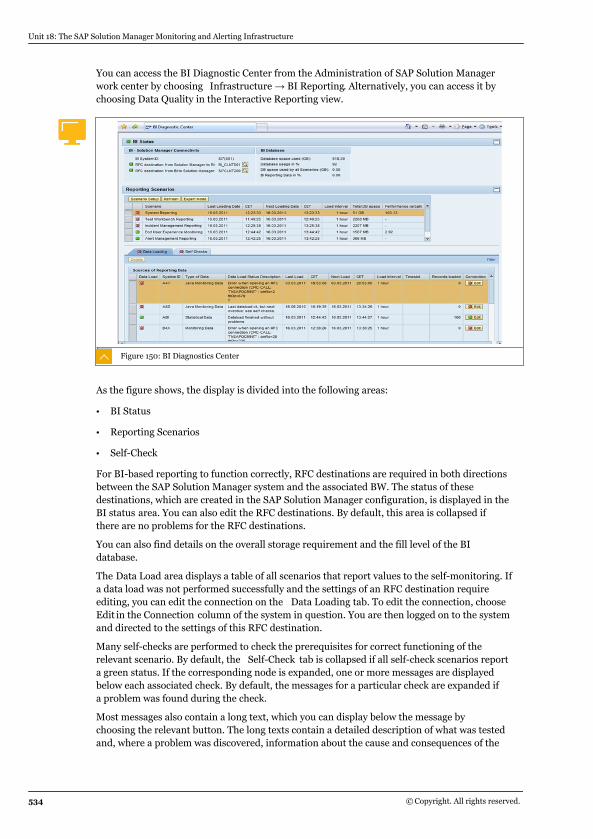
You can access the BI Diagnostic Center from the Administration of SAP Solution Managerwork center by choosing Infrastructure → BI Reporting. Alternatively, you can access it bychoosing Data Quality in the Interactive Reporting view.
Figure 150: BI Diagnostics Center
As the figure shows, the display is divided into the following areas:
● BI Status
● Reporting Scenarios
● Self-Check
For BI-based reporting to function correctly, RFC destinations are required in both directionsbetween the SAP Solution Manager system and the associated BW. The status of thesedestinations, which are created in the SAP Solution Manager configuration, is displayed in theBI status area. You can also edit the RFC destinations. By default, this area is collapsed ifthere are no problems for the RFC destinations.
You can also find details on the overall storage requirement and the fill level of the BIdatabase.
The Data Load area displays a table of all scenarios that report values to the self-monitoring. Ifa data load was not performed successfully and the settings of an RFC destination requireediting, you can edit the connection on the Data Loading tab. To edit the connection, chooseEdit in the Connection column of the system in question. You are then logged on to the systemand directed to the settings of this RFC destination.
Many self-checks are performed to check the prerequisites for correct functioning of therelevant scenario. By default, the Self-Check tab is collapsed if all self-check scenarios reporta green status. If the corresponding node is expanded, one or more messages are displayedbelow each associated check. By default, the messages for a particular check are expanded ifa problem was found during the check.
Most messages also contain a long text, which you can display below the message bychoosing the relevant button. The long texts contain a detailed description of what was testedand, where a problem was discovered, information about the cause and consequences of the
Unit 18: The SAP Solution Manager Monitoring and Alerting Infrastructure
534 © Copyright. All rights reserved.
problem and ways to solve it. If you have solved the problem, you can repeat the check at anytime by choosing Check Again . To perform all checks again, choose Refresh on the ReportingScenarios tab page.
LESSON SUMMARYYou should now be able to:
● Configure interactive reporting
Lesson: Analyzing Metrics with Interactive Reporting
© Copyright. All rights reserved. 535
Unit 18Lesson 5
Accessing Key Reports Using Dashboards
LESSON OVERVIEWIn this lesson you will learn how to access information using the standard dashboardsdelivered with SAP Solution Manager 7.1.
LESSON OBJECTIVESAfter completing this lesson, you will be able to:
● Configure dashboards to display key reports at a glance
SAP Solution Manager Standard DashboardsDashboards can display large amounts of information in a concise form, giving you a quickoverview of important topics.
SAP Solution Manager 7.1 provides a dashboard framework composed of three maincomponents: the dashboard itself, dashboard apps, and configuration apps.
You can call dashboards directly from a work center. Small images of the available apps arethen displayed in a single screen, and you choose individual apps to expand them. You canconfigure a dashboard by adding additional apps, changing the order of the apps, or removingapps you do not need (see Configuring Dashboards for more information).
The dashboards apps output information. All the relevant information of an app is displayedwithout further user input.
Most delivered apps have a configuration app, with which you can adjust the app to yourrequirements, such as specifying headers or other texts to be displayed, or to change the appdata.
SAP provides dashboards and apps about various topics in various work centers. Apart fromusing and configuring the dashboards and apps delivered by SAP, you can also change thelayout of existing apps or create your own apps and register them in the DashboardFramework.
The Business Warehouse is the source of the data for most dashboards, but you can alsoprovide the data required at a BAdi interface. You create the user interface of the apps withthe program Dashboard and Presentation Design (Xcelsisus), an SAP BusinessObjectsproduct.
Dashboards require no specific setup, but the associated application requires configuration tocollect the data displayed by the apps.
For example, the End-User Experience Monitoring (EEM) and Alert Management Reportingdashboards use the monitoring and alerting infrastructure data in the Business Warehouse.To use these apps, set up Technical Monitoring in the SAP Solution Manager setup(transaction SOLMAN_SETUP).
536 © Copyright. All rights reserved.
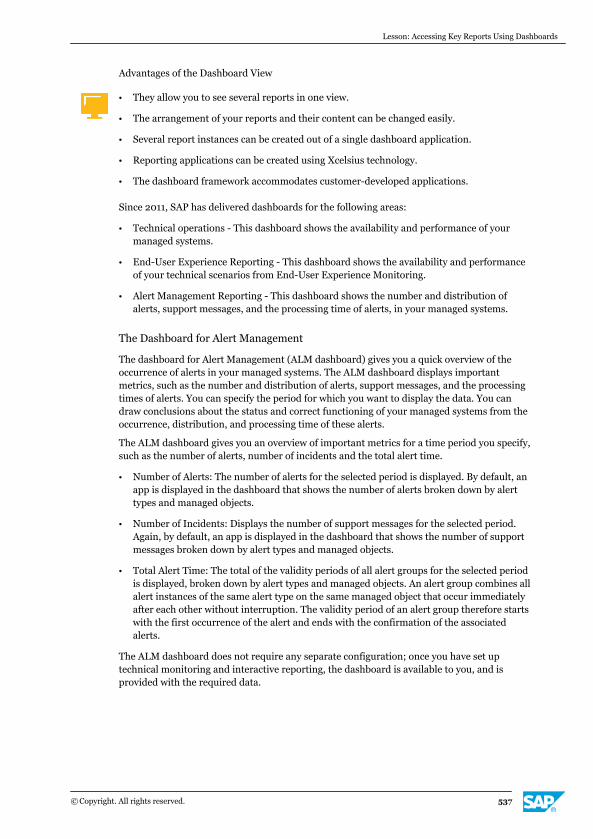
Advantages of the Dashboard View
● They allow you to see several reports in one view.
● The arrangement of your reports and their content can be changed easily.
● Several report instances can be created out of a single dashboard application.
● Reporting applications can be created using Xcelsius technology.
● The dashboard framework accommodates customer-developed applications.
Since 2011, SAP has delivered dashboards for the following areas:
● Technical operations - This dashboard shows the availability and performance of yourmanaged systems.
● End-User Experience Reporting - This dashboard shows the availability and performanceof your technical scenarios from End-User Experience Monitoring.
● Alert Management Reporting - This dashboard shows the number and distribution ofalerts, support messages, and the processing time of alerts, in your managed systems.
The Dashboard for Alert Management
The dashboard for Alert Management (ALM dashboard) gives you a quick overview of theoccurrence of alerts in your managed systems. The ALM dashboard displays importantmetrics, such as the number and distribution of alerts, support messages, and the processingtimes of alerts. You can specify the period for which you want to display the data. You candraw conclusions about the status and correct functioning of your managed systems from theoccurrence, distribution, and processing time of these alerts.
The ALM dashboard gives you an overview of important metrics for a time period you specify,such as the number of alerts, number of incidents and the total alert time.
● Number of Alerts: The number of alerts for the selected period is displayed. By default, anapp is displayed in the dashboard that shows the number of alerts broken down by alerttypes and managed objects.
● Number of Incidents: Displays the number of support messages for the selected period.Again, by default, an app is displayed in the dashboard that shows the number of supportmessages broken down by alert types and managed objects.
● Total Alert Time: The total of the validity periods of all alert groups for the selected periodis displayed, broken down by alert types and managed objects. An alert group combines allalert instances of the same alert type on the same managed object that occur immediatelyafter each other without interruption. The validity period of an alert group therefore startswith the first occurrence of the alert and ends with the confirmation of the associatedalerts.
The ALM dashboard does not require any separate configuration; once you have set uptechnical monitoring and interactive reporting, the dashboard is available to you, and isprovided with the required data.
Lesson: Accessing Key Reports Using Dashboards
© Copyright. All rights reserved. 537
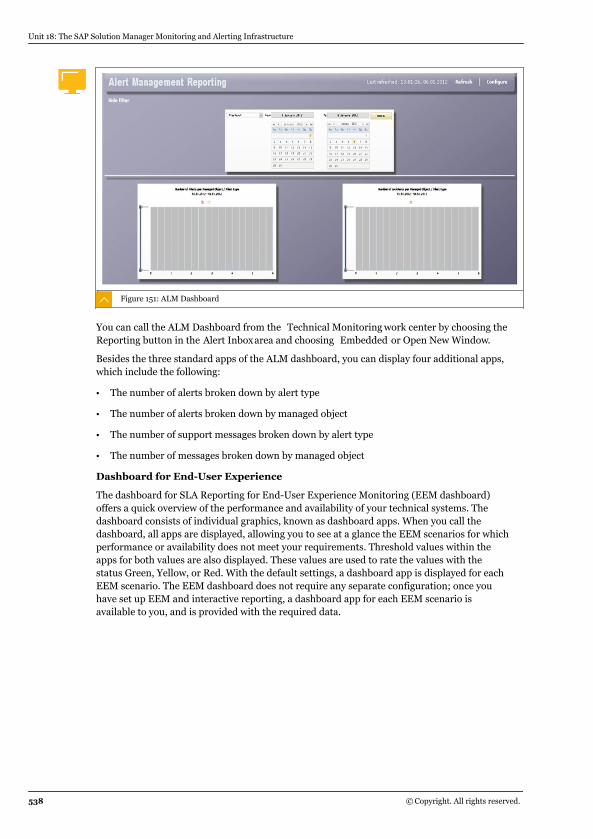
Figure 151: ALM Dashboard
You can call the ALM Dashboard from the Technical Monitoring work center by choosing theReporting button in the Alert Inboxarea and choosing Embedded or Open New Window.
Besides the three standard apps of the ALM dashboard, you can display four additional apps,which include the following:
● The number of alerts broken down by alert type
● The number of alerts broken down by managed object
● The number of support messages broken down by alert type
● The number of messages broken down by managed object
Dashboard for End-User Experience
The dashboard for SLA Reporting for End-User Experience Monitoring (EEM dashboard)offers a quick overview of the performance and availability of your technical systems. Thedashboard consists of individual graphics, known as dashboard apps. When you call thedashboard, all apps are displayed, allowing you to see at a glance the EEM scenarios for whichperformance or availability does not meet your requirements. Threshold values within theapps for both values are also displayed. These values are used to rate the values with thestatus Green, Yellow, or Red. With the default settings, a dashboard app is displayed for eachEEM scenario. The EEM dashboard does not require any separate configuration; once youhave set up EEM and interactive reporting, a dashboard app for each EEM scenario isavailable to you, and is provided with the required data.
Unit 18: The SAP Solution Manager Monitoring and Alerting Infrastructure
538 © Copyright. All rights reserved.
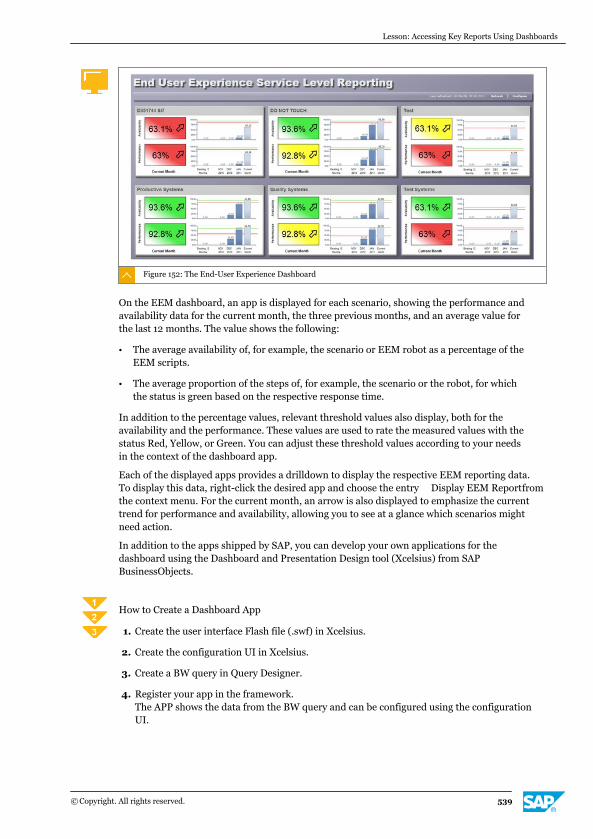
Figure 152: The End-User Experience Dashboard
On the EEM dashboard, an app is displayed for each scenario, showing the performance andavailability data for the current month, the three previous months, and an average value forthe last 12 months. The value shows the following:
● The average availability of, for example, the scenario or EEM robot as a percentage of theEEM scripts.
● The average proportion of the steps of, for example, the scenario or the robot, for whichthe status is green based on the respective response time.
In addition to the percentage values, relevant threshold values also display, both for theavailability and the performance. These values are used to rate the measured values with thestatus Red, Yellow, or Green. You can adjust these threshold values according to your needsin the context of the dashboard app.
Each of the displayed apps provides a drilldown to display the respective EEM reporting data.To display this data, right-click the desired app and choose the entry Display EEM Reportfromthe context menu. For the current month, an arrow is also displayed to emphasize the currenttrend for performance and availability, allowing you to see at a glance which scenarios mightneed action.
In addition to the apps shipped by SAP, you can develop your own applications for thedashboard using the Dashboard and Presentation Design tool (Xcelsius) from SAPBusinessObjects.
How to Create a Dashboard App
1. Create the user interface Flash file (.swf) in Xcelsius.
2. Create the configuration UI in Xcelsius.
3. Create a BW query in Query Designer.
4. Register your app in the framework.The APP shows the data from the BW query and can be configured using the configurationUI.
Lesson: Accessing Key Reports Using Dashboards
© Copyright. All rights reserved. 539
User-Created Dashboard AppsIf you want to put your own apps into the dashboard framework, you should understand thearchitecture of the dashboard framework.
An app typically comprises two parts: the standard app itself, which shows performance oravailability values in a dashboard, and a configuration app, in which the user can set texts,threshold values, filters, and other values, to determine the values displayed by the standardapp. These two apps are a pair of partner apps.
The data displayed comes mostly from the SAP NetWeaver Business Warehouse. To use thisdata in an app, you create a BW query.
You create the user interface of the apps with the program Dashboard and PresentationDesign (Xcelsius). You create connections for the data transfer of the app in Xcelsius also.Data can be transferred from, for example, the configuration app to the standard app, from aBW query (the source of the data to be displayed), to the app, or from the configuration appto the BW query, to filter the BW data. All data from or to an app or configuration app istransferred using Xcelsius connections.
Another type of app is the context app. Like the configuration app, it sets the conditions forthe app data to be displayed, but for all apps with relevant connections in a dashboard, notjust one app. A context app in a dashboard is always displayed.
You export the user interface as a Flash file (.swf) in Xcelsius to display the app user interfacein a dashboard.
You register your app in the dashboard framework using the registration tool. You specifyhow the data is transferred via the Excelsius connections.
A tutorial for the development of dashboard applications in the online documentation. Searchfor Enhancing the Dashboard Framework with User Apps.
LESSON SUMMARYYou should now be able to:
● Configure dashboards to display key reports at a glance
Unit 18: The SAP Solution Manager Monitoring and Alerting Infrastructure
540 © Copyright. All rights reserved.
Unit 18
Learning Assessment
1. Which of the following are features of the SAP Solution Manager 7.1 monitoring andalerting infrastructure?
Choose the correct answers.
X A Landscape setup and changes are automatically detected and updated.
X B Alert flooding is prevented by grouping metrics and alerts.
X C Graphical overview of the landscape status is available.
X D You configure and update agents manually.
X E Self-monitoring is available for the SAP Solution Manager landscape andinfrastructure components.
© Copyright. All rights reserved. 541
Unit 18
Learning Assessment - Answers
1. Which of the following are features of the SAP Solution Manager 7.1 monitoring andalerting infrastructure?
Choose the correct answers.
X A Landscape setup and changes are automatically detected and updated.
X B Alert flooding is prevented by grouping metrics and alerts.
X C Graphical overview of the landscape status is available.
X D You configure and update agents manually.
X E Self-monitoring is available for the SAP Solution Manager landscape andinfrastructure components.
542 © Copyright. All rights reserved.
UNIT 19 SAP Solution Manager MobileApplications
Lesson 1
Explaining How Mobile Apps Connect to SAP Solution Manager 544
Lesson 2
Identifying the Mobile Apps Available for SAP Solution Manager 548
UNIT OBJECTIVES
● Explain how mobile apps connect to SAP Solution Manager
● Describe the scenario-specific mobile apps available for SAP Solution Manager
© Copyright. All rights reserved. 543
Unit 19Lesson 1
Explaining How Mobile Apps Connect to SAPSolution Manager
LESSON OVERVIEWAfter this lesson you will have an understanding of where mobile apps are positioned in theSAP Solution Manager landscape.
LESSON OBJECTIVESAfter completing this lesson, you will be able to:
● Explain how mobile apps connect to SAP Solution Manager
Mobile Apps in the SAP Solution Manager LandscapeWith SAP mobile apps for iPhone, iPad, and Android, you can monitor important scenario-specific information anywhere at any time. These apps connect to the SAP Solution ManagerApplication management solution and allow administrators to check alerts and monitormetrics from their mobile devices.
To use these apps with your business data, however, check that you are a user of the SAPSolution Manager Application management solution, and that you have mobile servicesenabled by your IT department. You can try it first with sample data.
The mobile applications are available for mobile devices running iOS or Android operatingsystems. The mobile application can be deployed in all available deployment scenarios.
For Android mobile devices, the direct access scenario is only supported for mobile devicesrunning the Android 4 operating system or higher.
Data Storage Security
Mobile applications access data and functions in the back end via the OData channel. Whilethey do not replicate a large volume of data on the device, some data does have to be storedthere. Mobile data has special requirements, because it is exposed to additional risks. Forexample, because the device is carried around by the user, it can be lost or stolen.Furthermore, attackers could find new ways to compromise mobile devices, despite theongoing efforts of mobile-device vendors to make them more secure.
Please read the specific information about the scenario you intend to use in the followingguides: https://service.sap.com/instguides → SAP Components → SAP MobileApplications → SAP Solution Manager.
Business Configuration of SAP Solution Manager
The mobile application requires no special customizing. It is based on the same customizingas the SAP Solution Manager application.
Technical System Landscape
544 © Copyright. All rights reserved.
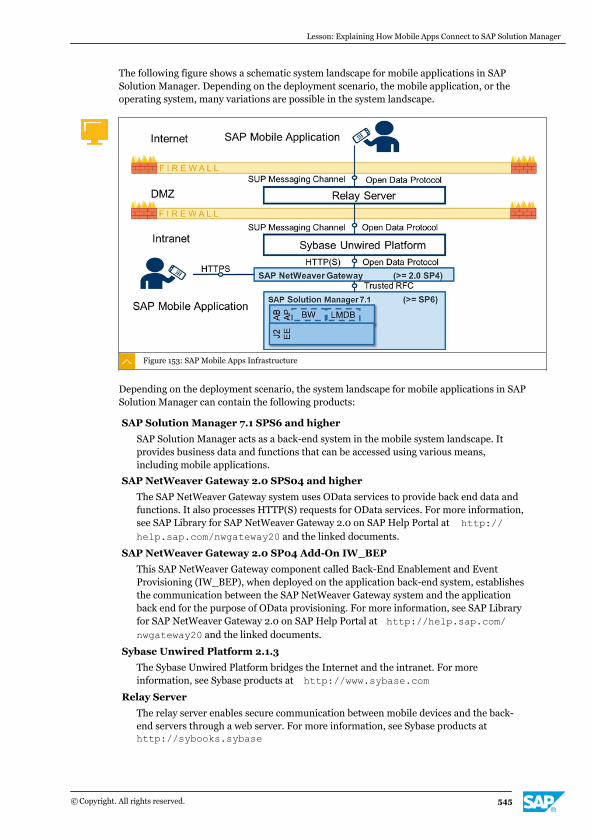
The following figure shows a schematic system landscape for mobile applications in SAPSolution Manager. Depending on the deployment scenario, the mobile application, or theoperating system, many variations are possible in the system landscape.
Figure 153: SAP Mobile Apps Infrastructure
Depending on the deployment scenario, the system landscape for mobile applications in SAPSolution Manager can contain the following products:
SAP Solution Manager 7.1 SPS6 and higher
SAP Solution Manager acts as a back-end system in the mobile system landscape. Itprovides business data and functions that can be accessed using various means,including mobile applications.
SAP NetWeaver Gateway 2.0 SPS04 and higher
The SAP NetWeaver Gateway system uses OData services to provide back end data andfunctions. It also processes HTTP(S) requests for OData services. For more information,see SAP Library for SAP NetWeaver Gateway 2.0 on SAP Help Portal at http://help.sap.com/nwgateway20 and the linked documents.
SAP NetWeaver Gateway 2.0 SP04 Add-On IW_BEP
This SAP NetWeaver Gateway component called Back-End Enablement and EventProvisioning (IW_BEP), when deployed on the application back-end system, establishesthe communication between the SAP NetWeaver Gateway system and the applicationback end for the purpose of OData provisioning. For more information, see SAP Libraryfor SAP NetWeaver Gateway 2.0 on SAP Help Portal at http://help.sap.com/nwgateway20 and the linked documents.
Sybase Unwired Platform 2.1.3
The Sybase Unwired Platform bridges the Internet and the intranet. For moreinformation, see Sybase products at http://www.sybase.com
Relay Server
The relay server enables secure communication between mobile devices and the back-end servers through a web server. For more information, see Sybase products athttp://sybooks.sybase
Lesson: Explaining How Mobile Apps Connect to SAP Solution Manager
© Copyright. All rights reserved. 545
SAP Mobile Application
The mobile application exposes business data and functions. Communication betweenthe different software components in the mobile system landscape uses differentcommunication channels. Provided you have made the required settings during theinstallation, communication between the components in the mobile system landscapeproceeds as follows:
● A request for an OData service is sent from the mobile application on the device to theback end, and its response is sent from the back end to the mobile application.
● The request channel from the SAP NetWeaver Gateway system to SAP SolutionManager relies on a trusted RFC connection. As a result, the user name must be thesame in both systems.
● SAP Solution Manager provides a general device application programming interface(GDAPI) that some of the mobile applications can use to handle the connection to SAPNetWeaver Gateway.
● The request channel between the mobile application and Sybase Unwired Platformrelies on the HTTP(S) protocol. The Sybase Unwired Platform server sends the usercredentials to the SAP NetWeaver Gateway system for authentication.
● The request channel between the mobile application and Sybase Unwired Platformrelies on SUP Messaging Channel, an HTTPS-based protocol. The data exchangebetween the client and Sybase Unwired Platform is secure, since the data is encryptedat content level using symmetric key encryption.
The system landscape for mobile applications in SAP Solution Manager can be set upaccording to the following deployment scenarios:
Sybase Unwired Platform
SAP NetWeaver Gateway as central hub
For a productive environment with multiple back ends, we recommend deploying SAPNetWeaver Gateway on a standalone server, separated from the rest of the applicationback-end systems. Such a deployment is better able to scale, and the SAP NetWeaverGateway is more independent of SAP Solution Manager for certain things, such asupdates. To use this scenario, configure the connection between SAP NetWeaverGateway and SAP Solution Manager and activate the OData services in SAP NetWeaverGateway.
Embedded system scenario
SAP NetWeaver Gateway, with all its runtime components, and SAP Solution Managershare the same system. Therefore, SAP NetWeaver Gateway is already connected to SAPSolution Manager.
SAP NetWeaver GatewayIn this configuration scenario, the mobile device connects directly to SAP NetWeaverGateway at the customer site, instead of connecting via Sybase Unwired Platform or RelayServer.
To avoid direct connection between the Internet and SAP NetWeaver Gateway or the SAPSolution Manager system, only deploy this system for intranet use: that is, only if the mobiledevices are connected through your intranet.
In this scenario, the SAP NetWeaver Gateway can be deployed as either a central hub or as anembedded system.
Unit 19: SAP Solution Manager Mobile Applications
546 © Copyright. All rights reserved.
LESSON SUMMARYYou should now be able to:
● Explain how mobile apps connect to SAP Solution Manager
Lesson: Explaining How Mobile Apps Connect to SAP Solution Manager
© Copyright. All rights reserved. 547
Unit 19Lesson 2
Identifying the Mobile Apps Available for SAPSolution Manager
LESSON OVERVIEWIn this lesson you will learn which mobile apps are available for use with SAP SolutionManager 7.1.
LESSON OBJECTIVESAfter completing this lesson, you will be able to:
● Describe the scenario-specific mobile apps available for SAP Solution Manager
SAP Solution Manager Mobile AppsSAP provides mobile applications for tools that are part of SAP Solution Manager. This meansthat some processes in SAP Solution Manager are also available on mobile devices, allowingemployees to access data from anywhere in the world at any time.
The SAP System Monitoring mobile applications in SAP Solution Manager for iOS and Androiddevices allow administrators to do the following:
● Display status overview for technical systems, instances, databases, and hosts.
● Drill down to single metrics and events.
● Display overviews of alerts for technical systems, instances, databases, and hosts.
● Display alert details for deep-dive analysis of certain symptoms.
Available platforms include
● SAP System Monitoring for Android (1.0.0) - Android (2.2). Depending on the device, ahigher operating system may be required.
● SAP System Monitoring for iPhone and iPad (1.0.0) - Minimum required operating systemiOS 5.0.1.
The following figures indicate how the System Monitoring app looks on different mobiledevices.
548 © Copyright. All rights reserved.
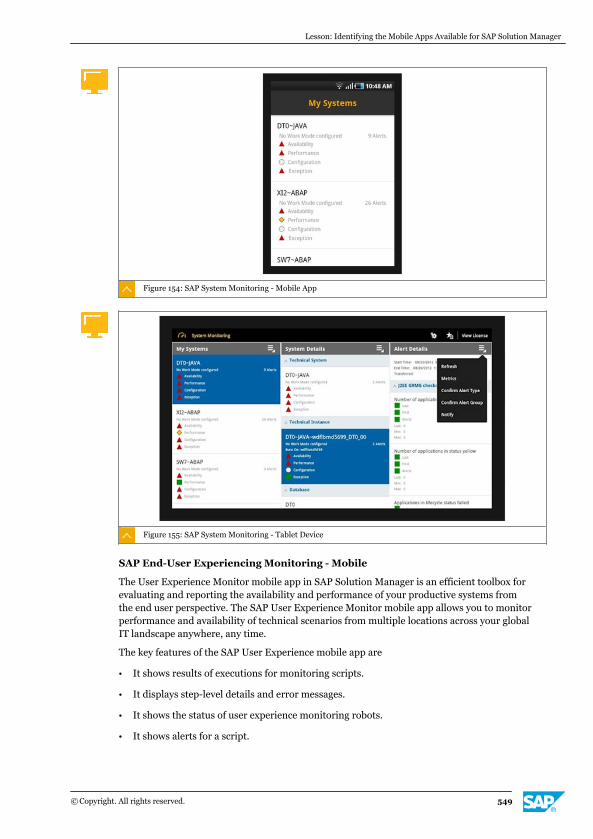
Figure 154: SAP System Monitoring - Mobile App
Figure 155: SAP System Monitoring - Tablet Device
SAP End-User Experiencing Monitoring - Mobile
The User Experience Monitor mobile app in SAP Solution Manager is an efficient toolbox forevaluating and reporting the availability and performance of your productive systems fromthe end user perspective. The SAP User Experience Monitor mobile app allows you to monitorperformance and availability of technical scenarios from multiple locations across your globalIT landscape anywhere, any time.
The key features of the SAP User Experience mobile app are
● It shows results of executions for monitoring scripts.
● It displays step-level details and error messages.
● It shows the status of user experience monitoring robots.
● It shows alerts for a script.
Lesson: Identifying the Mobile Apps Available for SAP Solution Manager
© Copyright. All rights reserved. 549
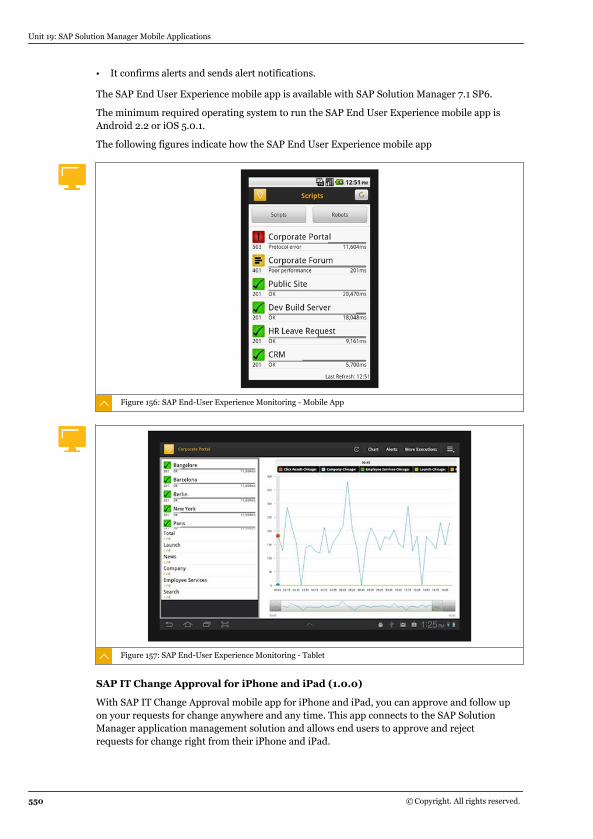
● It confirms alerts and sends alert notifications.
The SAP End User Experience mobile app is available with SAP Solution Manager 7.1 SP6.
The minimum required operating system to run the SAP End User Experience mobile app isAndroid 2.2 or iOS 5.0.1.
The following figures indicate how the SAP End User Experience mobile app
Figure 156: SAP End-User Experience Monitoring - Mobile App
Figure 157: SAP End-User Experience Monitoring - Tablet
SAP IT Change Approval for iPhone and iPad (1.0.0)
With SAP IT Change Approval mobile app for iPhone and iPad, you can approve and follow upon your requests for change anywhere and any time. This app connects to the SAP SolutionManager application management solution and allows end users to approve and rejectrequests for change right from their iPhone and iPad.
Unit 19: SAP Solution Manager Mobile Applications
550 © Copyright. All rights reserved.
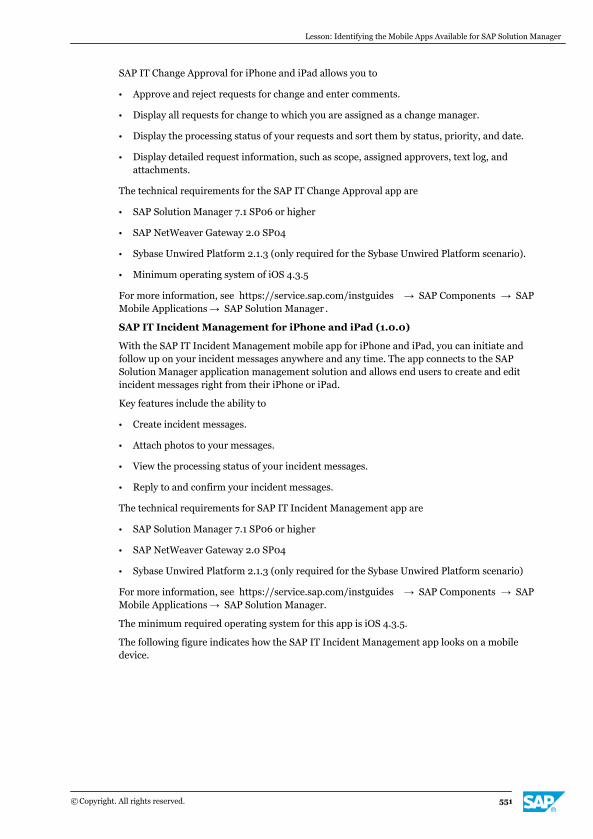
SAP IT Change Approval for iPhone and iPad allows you to
● Approve and reject requests for change and enter comments.
● Display all requests for change to which you are assigned as a change manager.
● Display the processing status of your requests and sort them by status, priority, and date.
● Display detailed request information, such as scope, assigned approvers, text log, andattachments.
The technical requirements for the SAP IT Change Approval app are
● SAP Solution Manager 7.1 SP06 or higher
● SAP NetWeaver Gateway 2.0 SP04
● Sybase Unwired Platform 2.1.3 (only required for the Sybase Unwired Platform scenario).
● Minimum operating system of iOS 4.3.5
For more information, see https://service.sap.com/instguides → SAP Components → SAPMobile Applications → SAP Solution Manager .
SAP IT Incident Management for iPhone and iPad (1.0.0)
With the SAP IT Incident Management mobile app for iPhone and iPad, you can initiate andfollow up on your incident messages anywhere and any time. The app connects to the SAPSolution Manager application management solution and allows end users to create and editincident messages right from their iPhone or iPad.
Key features include the ability to
● Create incident messages.
● Attach photos to your messages.
● View the processing status of your incident messages.
● Reply to and confirm your incident messages.
The technical requirements for SAP IT Incident Management app are
● SAP Solution Manager 7.1 SP06 or higher
● SAP NetWeaver Gateway 2.0 SP04
● Sybase Unwired Platform 2.1.3 (only required for the Sybase Unwired Platform scenario)
For more information, see https://service.sap.com/instguides → SAP Components → SAPMobile Applications → SAP Solution Manager.
The minimum required operating system for this app is iOS 4.3.5.
The following figure indicates how the SAP IT Incident Management app looks on a mobiledevice.
Lesson: Identifying the Mobile Apps Available for SAP Solution Manager
© Copyright. All rights reserved. 551
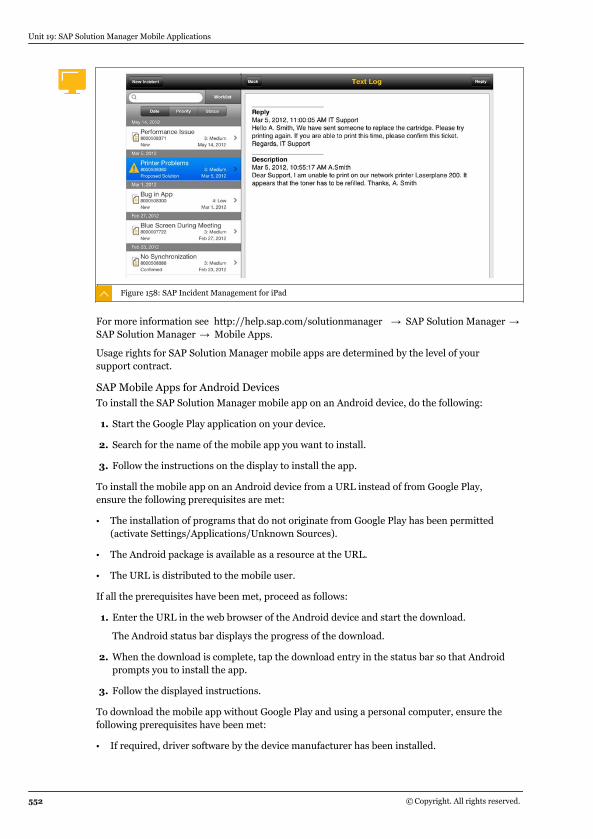
Figure 158: SAP Incident Management for iPad
For more information see http://help.sap.com/solutionmanager → SAP Solution Manager → SAP Solution Manager → Mobile Apps.
Usage rights for SAP Solution Manager mobile apps are determined by the level of yoursupport contract.
SAP Mobile Apps for Android DevicesTo install the SAP Solution Manager mobile app on an Android device, do the following:
1. Start the Google Play application on your device.
2. Search for the name of the mobile app you want to install.
3. Follow the instructions on the display to install the app.
To install the mobile app on an Android device from a URL instead of from Google Play,ensure the following prerequisites are met:
● The installation of programs that do not originate from Google Play has been permitted(activate Settings/Applications/Unknown Sources).
● The Android package is available as a resource at the URL.
● The URL is distributed to the mobile user.
If all the prerequisites have been met, proceed as follows:
1. Enter the URL in the web browser of the Android device and start the download.
The Android status bar displays the progress of the download.
2. When the download is complete, tap the download entry in the status bar so that Androidprompts you to install the app.
3. Follow the displayed instructions.
To download the mobile app without Google Play and using a personal computer, ensure thefollowing prerequisites have been met:
● If required, driver software by the device manufacturer has been installed.
Unit 19: SAP Solution Manager Mobile Applications
552 © Copyright. All rights reserved.
● You download the Android application and install the driver software on a PC.
● You attach the device to the PC with a USB cable.
● The device is connected to the PC by the driver software.
● The Android application is uploaded and installed on the device by the driver software.
● The installation of programs that do not originate from Google Play has been permittedand a file manager is installed.
If all the prerequisites have been met, proceed as follows:
1. Connect the device to the computer using a USB cable.
2. On the device display, when asked whether to mount the memory card, choose Yes.
The memory card is connected as a disk drive.
3. Copy the .apk file to the memory card.
4. Safely remove the USB storage and disconnect the USB cable.
5. Using a file manager on the mobile device, open the file that you copied to the memorycard and follow the instructions.
SAP Mobile Apps for iOS DevicesTo install the mobile app on an iOS device, do the following:
1. Start the App Store application on your device.
2. Search for the name of the mobile app that you want to install.
3. Download and install the app on the Home Screen.
For more information, see Apple Documentation at http://www.apple.com/support Manualsand then the App Store section of the appropriate manual for your device.
SAP System Monitoring - Mobile Apps
LESSON SUMMARYYou should now be able to:
● Describe the scenario-specific mobile apps available for SAP Solution Manager
Lesson: Identifying the Mobile Apps Available for SAP Solution Manager
© Copyright. All rights reserved. 553

Unit 19: SAP Solution Manager Mobile Applications
554 © Copyright. All rights reserved.

Unit 19
Learning Assessment
1. We recommend connecting mobile devices to SAP NetWeaver Gateway at the customersite only when the mobile devices are connected through the customer's intranet.
Determine whether this statement is true or false.
X True
X False
© Copyright. All rights reserved. 555

Unit 19
Learning Assessment - Answers
1. We recommend connecting mobile devices to SAP NetWeaver Gateway at the customersite only when the mobile devices are connected through the customer's intranet.
Determine whether this statement is true or false.
X True
X False
556 © Copyright. All rights reserved.
UNIT 20 Service Level Reporting in SAPSolution Manager
Lesson 1
Configuring Service Level Reporting 558
Exercise 23: Create a Service Level Report 567
Lesson 2
Accessing Service Level Reports 572
UNIT OBJECTIVES
● Configure service level reporting
● Create a service level report
● Locate service level reports in different work centers
© Copyright. All rights reserved. 557
Unit 20Lesson 1
Configuring Service Level Reporting
LESSON OVERVIEWService level reporting helps you to optimize and simplify long-term system monitoring and tofulfill your internal and external service level agreements. In this lesson you will learn how toproduce a service-level report.
LESSON OBJECTIVESAfter completing this lesson, you will be able to:
● Configure service level reporting
● Create a service level report
Prerequisites for Setting Up Service Level ReportingService Level Reporting (SLR) is based on SAP EarlyWatch Alert, which has to be configuredbefore SLR can be used. Service Level Reporting regularly checks the specified technical keyperformance indicators (KPI), such as system availability and performance thresholds. Youcan set up various service level report types for reporting, schedule service level reports forautomatic generation, and process them in sessions, according to your requirements.
With the SLR functionality in SAP Solution Manager, you can measure the KPIs of your SAPsolution and communicate the agreed service goals. Service Level Reporting is the databaseto control and prove the keeping of your service level agreements.
Features of Service Level Reporting
● Task:
- Comprehensive service level management and reporting to administrators, managers,and customers.
● Target Group:
- IT organizations
- IT service provider
- Customers of IT service providers
● Benefits
- Summarizes several EWAs in one report
- Offers additional data, target values, and rating possibilities
- Provides detailed BW reporting
- Provides support for strategic decisions
558 © Copyright. All rights reserved.
- Offers recommendations for optimizations
- Follows up tasks
All of which eases service level management
SLR has the following features:
● It is based on the EarlyWatch Alert knowledge engine.
● It is triggered regularly, for example, once a week or once a month.
● It can summarize several systems in one automated report.
● It is aimed at different areas of management (both IT and application management).
● It evaluates KPIs and derives recommendations, such as ordering standard SAP servicesor implementation of certain support packages and notes.
● It generates preconfigured recommendations that can be individually tailored andextended.
● It facilitates forecasting.
SLR is based on solutions - without solutions, no SLR can be defined. Depending on the datato be included in SLR, you configure additional data sources.
Prerequisites for Service Level Reporting
1. Configure Solution Manager and connect the managed systems in transactionSOLMAN_SETUP.
2. Create a solution to generate service level reports in transactionSOLMAN_WORKCENTER.
3. Activate SAP EarlyWatch Alert in the satellite systems in transaction SMSY/SDCCN.
4. Configure SAP EarlyWatch Alert in transaction SOLMAN_EWA_ADMIN.
5. Optional: Configure Business Process Monitoring (BPMon) in transactionSOLMAN_WORKCENTER.
6. Optional: Configure CCMS Monitoring and BI content in transactionSOLMAN_WORKCENTER.
To use SLR, do the following:
1. Configure SAP Solution Manager and connect the managed systems to the SAP SolutionManager.
2. Create a solution. A solution is necessary to generate service level reports.
3. Activate the Service Data Control Center (SDCCN) in the satellite system. Activate theSDCCN to collect the session data within the satellite systems.
4. Configure SOLMAN_EWA_ADMIN to activate SAP EarlyWatch Alert Reporting for thesatellite systems for which you want to create a service level report, as this informationwill be included in the service level report.
5. Configure BPMon to include information about it in your SLR (optional).
Lesson: Configuring Service Level Reporting
© Copyright. All rights reserved. 559
6. Configure CCMS Monitoring Metrics or BI content if you want to include them in your SLR(optional).
How to Generate a Service Level Report
1. Select the content.
2. Configure target KPIs.
3. Configure thresholds.
4. Produce the report.
You can include information from various data sources in your service level report.
Table 52: Data Sources for SLR
Data Source Type of Data Collected
System configuration● Server type, database server
● Software configuration
EWA content● Alert overview
● KPIs
● Top load transactions
● Response time
● Hardware capacity
● Trend analysis
● ABAP runtime errors
● Update errors, transports
Monitoring content from CCMS All monitoring content available
Business Process Monitoring All content available
BI content● Standard queries
● Customer queries
All metric content available
System availability On a CCMSPING basis
The service level report represents a customized collection of statistics about technicalsystem indicators and business process indicators for a dedicated solution.
The regularly running Solution Manager Operations framework produces periodic servicelevel reports that are based on current customizing settings. Report variants facilitatedifferent views on a solution regarding report content and time horizon.
Service Level Report ConfigurationSLR exploits the EWA, BPM, local, and remote CCMS, as well as local and remote BI as datasources for producing solution-bound service level reports. The user can customize the
Unit 20: Service Level Reporting in SAP Solution Manager
560 © Copyright. All rights reserved.
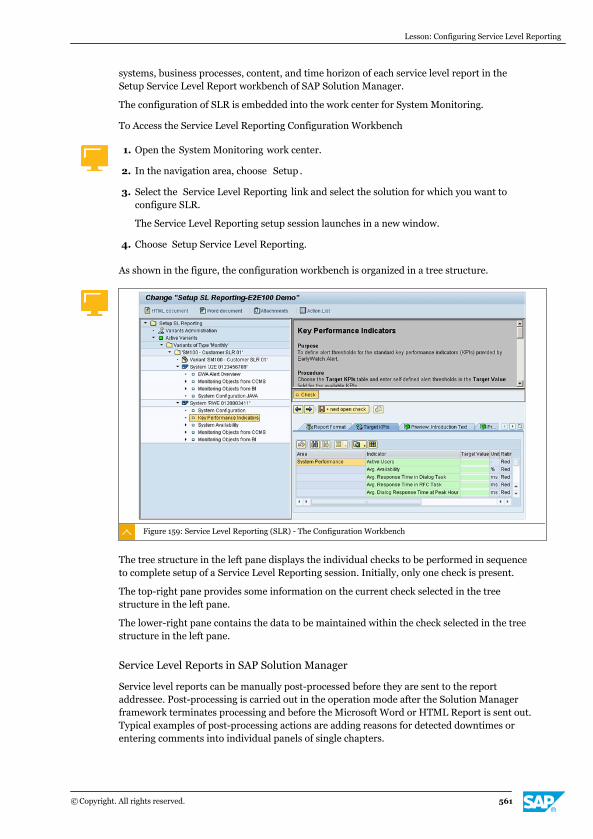
systems, business processes, content, and time horizon of each service level report in theSetup Service Level Report workbench of SAP Solution Manager.
The configuration of SLR is embedded into the work center for System Monitoring.
To Access the Service Level Reporting Configuration Workbench
1. Open the System Monitoring work center.
2. In the navigation area, choose Setup .
3. Select the Service Level Reporting link and select the solution for which you want toconfigure SLR.
The Service Level Reporting setup session launches in a new window.
4. Choose Setup Service Level Reporting.
As shown in the figure, the configuration workbench is organized in a tree structure.
Figure 159: Service Level Reporting (SLR) - The Configuration Workbench
The tree structure in the left pane displays the individual checks to be performed in sequenceto complete setup of a Service Level Reporting session. Initially, only one check is present.
The top-right pane provides some information on the current check selected in the treestructure in the left pane.
The lower-right pane contains the data to be maintained within the check selected in the treestructure in the left pane.
Service Level Reports in SAP Solution Manager
Service level reports can be manually post-processed before they are sent to the reportaddressee. Post-processing is carried out in the operation mode after the Solution Managerframework terminates processing and before the Microsoft Word or HTML Report is sent out.Typical examples of post-processing actions are adding reasons for detected downtimes orentering comments into individual panels of single chapters.
Lesson: Configuring Service Level Reporting
© Copyright. All rights reserved. 561
Depending on your requirements for the service-level report, you choose a system to include.
For each system, a sub check is created with individual checks and alert limits for the systemavailability and system performance thresholds.
In the next step, you choose one of the business processes as the basis for the service levelreport. For each single step in the business process, define the following:
● The step name
● Transaction/report/query name
● System information
● Response time analysis (check box)
● Update errors (check box)
● Query analysis (check box)
When you execute this report, the appropriate EWA reports of these systems are analyzed independency of the service level report definition. No additional load is put on the back-endsystems.
Choose Active variants → Variants of type <type> → <Name of Report>. In the table ofsystems included in the solution landscape in the SAP Systems tab, select the desiredsystems in the Select for Reporting column.
In the Business Processes tab, select the desired processes in the Select for Reporting columnand choose Save . This step will generate new checks in the tree structure, representing theselected systems and business processes.
You can adjust the visual customization of the service level report by choosing ActiveVariants → Reports of type <type> → <Report Name> → Variant → <Report Name> andmaintain the tables to customize the front page, header, and footer of the report.
For each system selected for the report, select the content to be included.
Choose Active Variants → Reports of type <type> → <Report Name> → System <SID andInstallation Number>. In the tabs, select the content of the report via the check boxes.
Customization is available for all selected report content.
The amount and type of customization depends on the specific content.
Table 53: Set Up Service Level Report - Available Content
Content Source Content Type
Solution Manager● System configuration
● System configuration Java
CCMS● System availability
● Monitoring objects from CCMS
BW● Monitoring objects from BW
Unit 20: Service Level Reporting in SAP Solution Manager
562 © Copyright. All rights reserved.

Content Source Content Type
List of EarlyWatch Alert Chapters● EWA alert overview
● System life monitor
● KPIs
● Top load transactions
● History of activity and response times
● Maximum resource consumption of thehardware
● Accounting profile
● Trend analysis
● Dump statistics (ABAP runtime errors)
● Update errors and involved programs/transactions
● Transactional RFC errors
● Transports
● Java application performance
● CRM Java application performance
● Enterprise portal activity reporting
● IPC performance
In the Monitoring System table, maintain the monitoring system from which the CCMSindicators for the selected system are to be retrieved, and the RFC destinations used toaccess the managed system.
In the Monitoring Table Elements table, select content from CCMS to be included in the reportby defining the monitoring segment, context, and object, and marking the object for inclusion.
Any monitoring object that is currently available in the CCMS of either the selected managedsystems or the central monitoring system is available for inclusion in the report.
The following customization options are available in the resulting monitoring object check:
● Description (text field)
● Output as table (check box)
● Output as graphic (check box)
● Threshold level definitions
● Measurement type
● Option to show three-month history (check box)
In the Monitoring system tab, maintain the monitoring system from which CCMS content forthe selected system is to be retrieved, and the RFC destination used to access this system.
Lesson: Configuring Service Level Reporting
© Copyright. All rights reserved. 563
In the Availability Types table, select the tables to be included in the report.
In the Availability Maintenance tab, select the tool to maintain downtime schedules.
Optionally, you can maintain the alert thresholds for the desired availability types in theTemplate: Thresholds table.
Optionally, you can maintain the desired output properties in the Template: Report Formattable.
In the resulting System Availability subchecks, maintain the properties of the selectedavailability types.
In the BI Source Systems table, declare the RFC connections to the BW systems from whichthe queries are to be retrieved, depending on the type of query.
In the Standard Queries table, use the input help to create and include predefined queries bydefining the category, prefix, metric, and target object, and marking the entry for selection/inclusion in the report.
In the Custom Queries table, you can create any queries to monitoring objects by specifyingthe InfoProvider, custom prefix, custom metric, and target object.
Adding entries to either of these tables and saving them creates new navigational nodesunder the parent Monitoring Objects from BI node.
The following customization options are available in the resulting Monitoring Object check inthe hierarchical tree structure:
● Technical name
● Operator (to combine two key figures)
● Technical name (of second key figure/operand)
● Key figure description (text field)
● Unit
● Scaling factor
● Output as table (check box)
● Output as graphic (check box)
● Threshold level definitions
● Option to show three-month history (check box)
To include elements of BPMon in the service level report, set up BPMon.
Choose Active variants → Reports of type <type> → <Report Name> → Process <ProcessName>.
In the Content tab, select the content of the report via the BPMon Alert Statistics, BPMonTrend Analysis, and Runtime Analysis check boxes.
Unit 20: Service Level Reporting in SAP Solution Manager
564 © Copyright. All rights reserved.

Figure 160: Service Level Reporting - Customizing KPI Thresholds
You can maintain specific target metrics in the additional Target KPIs tab. It is also possible tocustomize your own thresholds for some standard KPIs (system target KPIs).
You can only set the threshold for Red alert. There is no yellow alert for this check.
Figure 161: Service Level Reporting - Manually Generate SLR
When you have finished configuring the service level report, you are prompted by the systemto generate it, as shown in the figure.
The system automatically produces the report on the day you specified during configuration,and as often (weekly or monthly) as you specified.
To produce the report manually, follow the same process as for producing EarlyWatch Alertreports:
To Produce a Service Level Report Manually
1. Call transaction SE38.
Lesson: Configuring Service Level Reporting
© Copyright. All rights reserved. 565

2. Enter the report RDSMOP_MAIN and choose Execute.
3. Choose the solution for which the report has been configured.
4. In the content area in the middle choose Solution Monitoring → Service Level Reporting .
5. Select the report you want to produce and choose Start service processing .
The job SM:EXEC SERVICES starts. When this job is finished, the report has beenproduced.
Unit 20: Service Level Reporting in SAP Solution Manager
566 © Copyright. All rights reserved.
Unit 20Exercise 23
Create a Service Level Report
Business Example
You create a service level report variant for the solution you created previously. You createthe report, add systems to it, add content to it, edit the content, check that the report wascreated properly, and start the report.
1. In the SAP Solution Manager System Monitoring work center, open the Setup SL Reporting<YourSolutionName> screen.
2. Create a new variant with the name <CourseID>_SLR_xx (where xx is your group number),and schedule the service level report weekly with a start date of one day after the SAPEarlyWatch report.
3. Add the SAP Solution Manager system and one additional system to the report.
4. Include the following content from SAP Solution Manager in your report:
● System Configuration
● Top Load Transactions
● Key Performance Indicators (KPIs)
● Hardware Capacity
● ABAP Runtime Errors
You can also choose content from the other system in your report.
5. Set the following target for the KPIs in the report.
Options Description
Avg. Response Time in Dialog Task 1500
6. Check the content of your report.
7. Check that your report is set up correctly.
8. Start the service level report now using transaction SE38.
The job SM:EXEC_SERVICES <Solution_ID_Number> is triggered. You can check the status ofthe job in transaction SM37. When the job completes, the service level report is available inthe System Monitoring work center.
© Copyright. All rights reserved. 567
Unit 20Solution 23
Create a Service Level Report
Business Example
You create a service level report variant for the solution you created previously. You createthe report, add systems to it, add content to it, edit the content, check that the report wascreated properly, and start the report.
1. In the SAP Solution Manager System Monitoring work center, open the Setup SL Reporting<YourSolutionName> screen.
a) Log on to SAP Solution Manager in client 200 with <CourseID>-<GroupNumber> and<password>.
b) On the SAP Solution Manager Easy Access screen, call transaction SM_WORKCENTER.
c) On the SAP Solution Manager overview screen, open the System Monitoring workcenter.
d) In the navigation area, choose Setup .
e) In the content area on the right select Configure Service Level Reporting .
f) In the Select Solution dialog box, select <YourSolutionName> and choose OK.A dialog box appears.
g) Choose Open.The Solution <YourSolutionName> screen appears.
h) Choose Setup Service Level Reporting.The Setup SL Reporting <YourSolutionName> screen appears.
2. Create a new variant with the name <CourseID>_SLR_xx (where xx is your group number),and schedule the service level report weekly with a start date of one day after the SAPEarlyWatch report.
a) In the navigation area, select Variants Administration.
b) In the Overview of Report Variants table, select an empty row.
c) In the Name column of the empty row, Enter <CourseID>_SLR_xx.
d) In the Type column select Weekly and in the Weekday column select the day of theEarlyWatch Alert report +1 day.
e) Select the Active checkbox.
f) Choose Save .In the navigation area, under Variants Administration, a new sub tree called ActiveVariants → Variants of Type appears.
3. Add the SAP Solution Manager system and one additional system to the report.
568 © Copyright. All rights reserved.
a) In the navigation area, expand Active Variants → Variants of Type Weekly → <YourReportName>.The SAP Systems tab appears.
b) In the SAP Systems list, in the Select for Reporting column, select the SAP SolutionManager system and one other system.
c) Choose Save .A new node for each of the systems appears in the navigation area.
4. Include the following content from SAP Solution Manager in your report:
● System Configuration
● Top Load Transactions
● Key Performance Indicators (KPIs)
● Hardware Capacity
● ABAP Runtime Errors
You can also choose content from the other system in your report.
a) In the navigation area, expand Active Variants → Variants of Type Weekly → <YourReportName> → System<SID of SAP Solution Manager System><installationnumber>.
b) Choose the Content from Solution Manager tab.
c) On the Content from Solution Manager tab, in the System Configuration row, select theSelect for Reporting checkbox.
d) Choose the Content from EWA tab.
e) Select the required areas for reporting.
f) Choose Save .
g) In the navigation area, select the other system you included in your report.
h) Select the required areas for reporting and choose Save .
5. Set the following target for the KPIs in the report.
Options Description
Avg. Response Time in Dialog Task 1500
a) In the navigation area, expand Active Variants → Variants of Type Weekly → <YourReportName> → System<SID of SAP Solution Manager System><installationnumber> → Key Performance Indicators .
b) Select the Target KPIs tab.
c) In the Target Value field of the relevant row, enter the required value.
d) Choose Save.
6. Check the content of your report.
Lesson: Configuring Service Level Reporting
© Copyright. All rights reserved. 569
a) At the top of the screen, choose HTML Document.A preview of your report displays.
b) Check that all the content you chose for your report is included.The preview contains no live data.
7. Check that your report is set up correctly.
a) In the System Monitoring work center, in the Report Views section, choose ServiceLevel Reporting.
b) Select the line of <YourSolutionName>.The list of service level reports appears below the solution selection pane. You can seethat your report is scheduled, but not yet available. It may take several minutes foryour report to display and you may need to refresh the list.
8. Start the service level report now using transaction SE38.
a) On the SAP Solution Manager Easy Access screen, call transaction SE38.The Queue screen appears.
b) In the Queue field, enter RDSMOP_MAIN and choose Execute .
c) On the next screen, choose Solution Monitoring → Service Level Reporting .
d) Find <YourReportName> in the list and select it by its name.
e) On the next screen, choose Start Service Processing .
f) On the next screen choose OK.
The job SM:EXEC_SERVICES <Solution_ID_Number> is triggered. You can check the status ofthe job in transaction SM37. When the job completes, the service level report is available inthe System Monitoring work center.
Unit 20: Service Level Reporting in SAP Solution Manager
570 © Copyright. All rights reserved.
LESSON SUMMARYYou should now be able to:
● Configure service level reporting
● Create a service level report
Lesson: Configuring Service Level Reporting
© Copyright. All rights reserved. 571
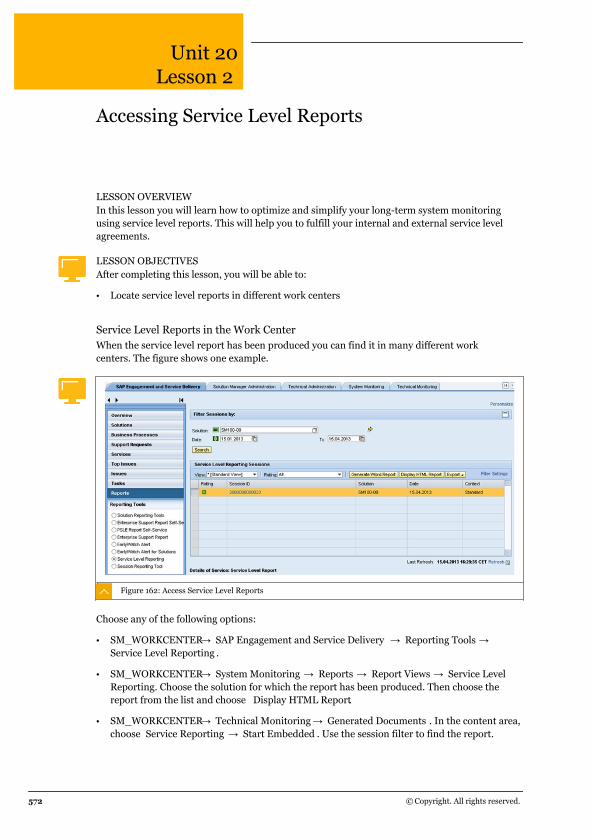
Unit 20Lesson 2
Accessing Service Level Reports
LESSON OVERVIEWIn this lesson you will learn how to optimize and simplify your long-term system monitoringusing service level reports. This will help you to fulfill your internal and external service levelagreements.
LESSON OBJECTIVESAfter completing this lesson, you will be able to:
● Locate service level reports in different work centers
Service Level Reports in the Work CenterWhen the service level report has been produced you can find it in many different workcenters. The figure shows one example.
Figure 162: Access Service Level Reports
Choose any of the following options:
● SM_WORKCENTER → SAP Engagement and Service Delivery → Reporting Tools → Service Level Reporting .
● SM_WORKCENTER → System Monitoring → Reports → Report Views → Service LevelReporting. Choose the solution for which the report has been produced. Then choose thereport from the list and choose Display HTML Report.
● SM_WORKCENTER → Technical Monitoring → Generated Documents . In the content area,choose Service Reporting → Start Embedded . Use the session filter to find the report.
572 © Copyright. All rights reserved.
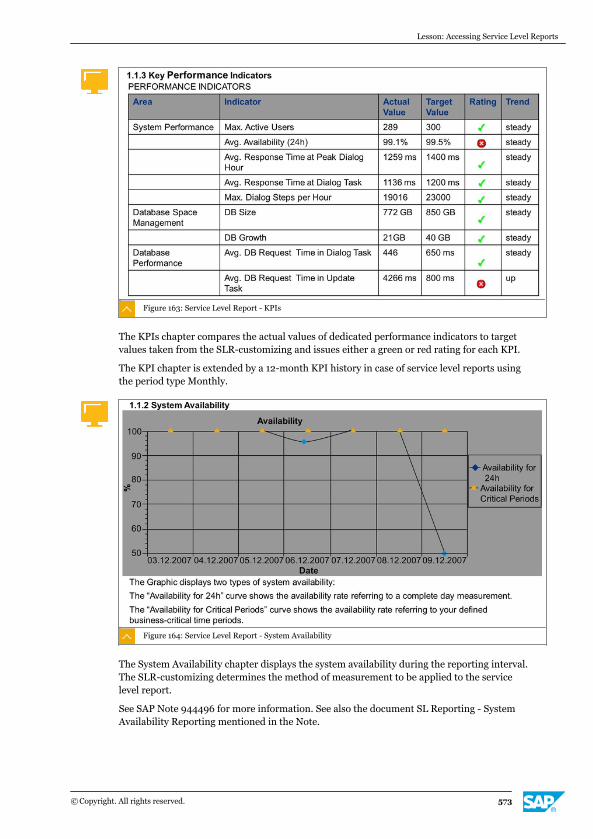
Figure 163: Service Level Report - KPIs
The KPIs chapter compares the actual values of dedicated performance indicators to targetvalues taken from the SLR-customizing and issues either a green or red rating for each KPI.
The KPI chapter is extended by a 12-month KPI history in case of service level reports usingthe period type Monthly.
Figure 164: Service Level Report - System Availability
The System Availability chapter displays the system availability during the reporting interval.The SLR-customizing determines the method of measurement to be applied to the servicelevel report.
See SAP Note 944496 for more information. See also the document SL Reporting - SystemAvailability Reporting mentioned in the Note.
Lesson: Accessing Service Level Reports
© Copyright. All rights reserved. 573
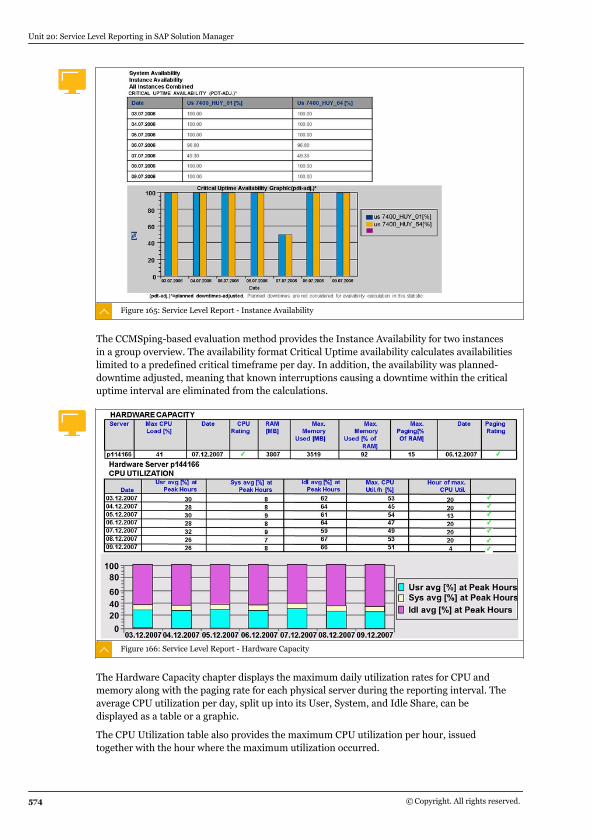
Figure 165: Service Level Report - Instance Availability
The CCMSping-based evaluation method provides the Instance Availability for two instancesin a group overview. The availability format Critical Uptime availability calculates availabilitieslimited to a predefined critical timeframe per day. In addition, the availability was planned-downtime adjusted, meaning that known interruptions causing a downtime within the criticaluptime interval are eliminated from the calculations.
Figure 166: Service Level Report - Hardware Capacity
The Hardware Capacity chapter displays the maximum daily utilization rates for CPU andmemory along with the paging rate for each physical server during the reporting interval. Theaverage CPU utilization per day, split up into its User, System, and Idle Share, can bedisplayed as a table or a graphic.
The CPU Utilization table also provides the maximum CPU utilization per hour, issuedtogether with the hour where the maximum utilization occurred.
Unit 20: Service Level Reporting in SAP Solution Manager
574 © Copyright. All rights reserved.
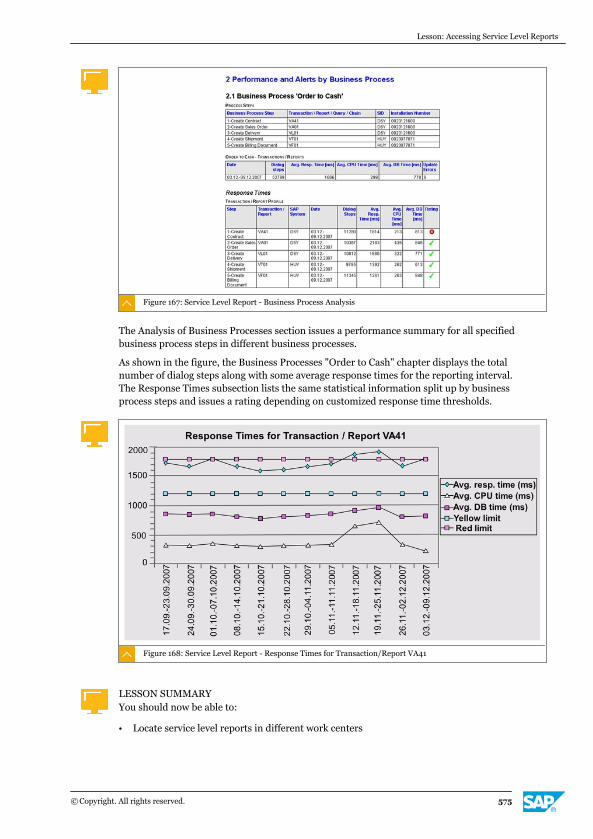
Figure 167: Service Level Report - Business Process Analysis
The Analysis of Business Processes section issues a performance summary for all specifiedbusiness process steps in different business processes.
As shown in the figure, the Business Processes "Order to Cash" chapter displays the totalnumber of dialog steps along with some average response times for the reporting interval.The Response Times subsection lists the same statistical information split up by businessprocess steps and issues a rating depending on customized response time thresholds.
Figure 168: Service Level Report - Response Times for Transaction/Report VA41
LESSON SUMMARYYou should now be able to:
● Locate service level reports in different work centers
Lesson: Accessing Service Level Reports
© Copyright. All rights reserved. 575

Unit 20: Service Level Reporting in SAP Solution Manager
576 © Copyright. All rights reserved.
Unit 20
Learning Assessment
1. Which of the following is essential for setting up service level reporting?
Choose the correct answer.
X A Business Process Monitoring
X B CCMS Monitoring
X C BI Content
X D A solution
© Copyright. All rights reserved. 577

Unit 20
Learning Assessment - Answers
1. Which of the following is essential for setting up service level reporting?
Choose the correct answer.
X A Business Process Monitoring
X B CCMS Monitoring
X C BI Content
X D A solution
578 © Copyright. All rights reserved.
Top Related
Copyright © 2022 FDOKUMEN

