SAP FICO total configuration
183
SAP -FI / CO Prepared by: Rao MH 1 Instructor : Mr. Satyanarayana Comp-u-Learn S.R.Nagar Hyderabad Prepared by : Rao M.H Satyanagar Hyderabad Mob: 90300 39225 [email protected] Prepared by: Rao MH 1
-
Upload
independent -
Category
Documents
-
view
1 -
download
0
Transcript of SAP FICO total configuration
SAP -FI / CO
Prepared by: Rao MH 1
Instructor :Mr. SatyanarayanaComp-u-LearnS.R.NagarHyderabad
Prepared by :Rao M.HSatyanagarHyderabadMob: 90300 [email protected]
Prepared by: Rao MH 1

SAP : stands for Systems Application and Products in Data ProcessingFI : stands for FinancialsCO: stands for Controlling i.e, in noraml terminology Costing
First time SAP was released in 1972 in Germany. SAP Head Qauarters are in Germany.Version ECC-6.0 is the latest as on 01.07.2009ECC : stands for ERP Central Component
ERP : stands for Enterprise Resource Planning. It integrates all the systems in onesystem. It facilitates free flow of data among departments.
Various Types of ERP Packages:SAP, Oracle-Financials,JD Edwards, BAAN, Peoplesoft are various types of ERP packages available in the Market. Among them SAP is Famous in the World.
Opening of SAP : To open SAP click on the SAP Log on Icon on Desktop
800Client
SAP Logon|
ECC|
INTRODUCTION-FINANCIALS
Prepared by: Rao MH 2
800SAPUSER ( Not Case Sensitive)india123 (Case Sensitive)
What is Client # ?
PENNAR ( Purchaser) for Module WIPRO( Implementor)
1. Accounts Manager FICO 1) FI Consultant2. Costing Manger FICO 2) CO Consultant3. Purchase Manager MM 3) MM Consultant4. Sales Manager SD 4) SD Consultant5. IT Staff Implementation 5) Basis Consultant6.Project Manager Oversee Project 6)ABAP Programmer
7) Project Manager
UserNamePassword
Normally when a Company ( ex., PENNAR) intends to start SAP in its Company, it purchases SAP software from SAP-India. Price of SAP software is based on the Number of Users. Once company purchased the software, it recruits / engage another Company (ex., WIPRO) for implementation purpose. Both the purchaser and implementor will delegate/ recruit some employees for implementation of SAP. They are called as Core Team Members. Structure of Core Team will be like below:
Client
Prepared by: Rao MH 2

Core Team from Purchaser analyze the present situation in the Company and preparethe Process Document for SAP Implementation .Basis Consultant will install or copy the SAP in Server and Create the Client Numbers.There are Minimum 2 type of Clients will be created by Basis Consultant. 1. Development Client -----> for Customization & Testing purpose2. Production Client -----> for Live Data i.e, entering day to day activities
By default SAP-India is allotting 000 (or) 001 (or) 067 (or) 800 as Development Client #Number of Production Client will be given by Basis Consultant after Discussing with Purchaser. There will be Minimum of 2 Clients. Some companys are creating 3 clients.1. Development Client ------> for Customization purpose2. Testing Client ------> for Testing purpose3. Production Client ------> for Live Data i.e, entering day to day activities
After Basic Consultant done the Customization in Development Client , he copy it toProduction Client. All the Customization will be done at Development Client only butnot at Prodouction Client.
USER NAME: As we discussed earlier, cost of the SAP is based on Number of Users.
Major Benefit of Users is it fixes the responsibilty of the employee. Who has done what , can be identified. So the responsibility will be fixed on employees. User name is not case Sensitive. We can use either Small Letters or Capital Letters.
PASSWORD: Benefit of Passwords are for restricting the Un-authorized use of Users.
Prepared by: Rao MH 3
PASSWORD: Benefit of Passwords are for restricting the Un-authorized use of Users.
Length of the Password can be Minimum 6 and Maximum 40 characters. It is case sensitive. We can use Alphabetics, Numerics, Alphanumerics or Special Characters like " * " or "#" etc.,
Note 1: It is not possible to change the password morethan once in a DayNote 2: System will not permit us to use the latest 5 passwords.Note 3: If we lost Password it can not be restored. Basis Consultant has to allot New
Password.
LANGUAGE: Along with package SAP has given 41 languages . If we do not specify
the language, by default system will use English ( EN) as language
Once we enter User Name and Password and press enter , system will log on to SAP.On Screen1st Row ====> Menu Bar2nd Row ====> Standard Tool Bar3rd Row ====> Title Bar4th Row ====> Application Tool BarLast Row ====> Status Bar
In 2nd Row there is √ . It is for Enter symbol. Beside+A954 There is one Box called Command
field.
Prepared by: Rao MH 3

If, any one enter User Name and Password of which some other is logged in SAPsystem will warn with a message of 3 options. Action will be depending on the option we select. Status on Selecting Employee A Employee BRadio Button1st Radio Button Cannot Work Can Work2nd Radio Button ( Monitored by SAP-India) Can Work Can Work3rd Radio Button Can Work Cannot Work
Normally in institutes 2nd Radio Button has to select.
If any user want to work on different screens at a single time, he can open upto a max of 6 windows or Sessions.
WHAT IS SESSION :A session is a window or screen where SAP user will do day to day activities.One user can open 6 Sessions at a time.
HOW TO CREATE NEW SESSION:To create new session path is Menu Bar---->System---->Create Session
HOW TO MOVE FROM ONE SESSION TO ANOTHER:Press Alt+Tab to move from One session to another session easily
Prepared by: Rao MH 4
HOW TO CLOSE SESSION:To close one session path is Menu Bar---->System---->End Session
WHAT IS TRANSACTION CODE: Transaction Code is a code number given for each activity . SAP has given some Transaction Codes ( TC's ) which are common in SAP throught the world . If customer / Purchaser want to give their own TC's it should start either with "Y" or "Z". Other Alphabets are not allowed in SAP.
Note: It is not advisable to give customer's own TC's as it is difficult to update wheneverversion is changed.
GOING BACK TO SAP EASY ACCESS SCREEN:Use /N ( Forward Slash & N) in Command Window . N is not case sensitive.
CHANGING SESSION ( WINDOW)
Posting the Document ( F-02)A/c Balance Display ( FS10N)
Prepared by: Rao MH 4

After Posting the Document in F-02, to change the session and see the account balancedisplay, instead of going back to Easy Access and press new code FS10N in command window, we can type" /NFS10N" to go directly to the new window of FS10N. If we want to change the session we have to give \N before the New Command TC in Command Window.
Use /OFS10N in command window for creating new session directly with New TC/N ----> for change the session and /O for Creating the session
ACTIVATING TRASACTION CODES IN SAP MENU :Some times TC's will not appear in SAP Easy Access Menu. To activate them path isMenu Bar---->Extras---->Settings---->Display Technical Names Check Box and Press Enter
How to Set Start Transaction Window:Making 1 session as default screen is called Start Transaction. To Set start transactionMenu Bar---->Extras---->Set Start Transaction---->Transaction Code (ex F-02)-->EnterWe will get message T F-02 set as start Transaction. From next time onwards whenever SAP is logged in, F-02 session will open directly.
How to Colse SAP : For closing SAP path Menu Bar---->System--->Log Off ----> YES for the message Log Off
UNLOCKING SCREENS:Tools---->Administration---->Monitor---->Lock Entries(TC=SM12)---->List Buttons
Prepared by: Rao MH 5
Tools---->Administration---->Monitor---->Lock Entries(TC=SM12)---->List Buttons
Menu Bar---->Lock Entry---->Delet All---->Select "YES"Button for the message Delete All Lock Entries.
PROJECT CREATION:
Normal Organization Structure will be as follows
Normal in SAP Example
Group Company Pennar Group
Company Comp Code Pennar Steel Pennar Pennar Ltd CementsLtd Ind. Ltd
↓ ↓ ↓
Units Business Areas HYD BGL HYD BGL HYD BGL
Company Code is the Legal Entity. FICO Consultant will do customization at Company Code Level. Company /Group is only for information purpose.
↓ ↓ ↓
↓ ↓
Prepared by: Rao MH 5
Consultant will do customization for one company code and copies the customization to including Accounting to other Company Codes and makes modification wherever required.
CUSTOMIZATION OF PENNAR STEEL LTD::Define Company( Group in Normal ): When project is started Group Company Name in SAP Company should be defined. Path for defining Company as in Example Project PENNAR .
TOOLS---->CUSTOMIZING---->IMG(Implementation Guide)---->Execute Project (SPRO)-->SAP Reference IMG Button---->Enterprise Structure---->Definitions---->Financial Acc---->Define Company----> Select IMG Activity Button---->Select New Entries Button----->
Company → PENNARCompany Name → Pennar GroupStreet → AmeerpetPostal Code → 500000City → HyderabadCountry → IN ( Select IN from Dropdown/ Pulldown
Button for India)Language → EN ( Select EN from Dropdown/ Pulldown
Button for English)Currency → INR ( Select INR from Dropdown/ Pulldown
Prepared by: Rao MH 6
Currency → INR ( Select INR from Dropdown/ Pulldown Button for Indian Rupee)
Select Save Button ( or) Ctrl + S Buttons for saving the Company Information.
Once the Company information is saved, SAP will generate one Transport Request. Everytime it saves 2 files. One in Client 800 and 2nd one in Transport Request with Key Number.
For Example Project we create 6 requests like below.1. Basic Settings 3. Accounts Payable 5. Asset Accounting 2. General Ledger 4. Accounts Receivable 6. Controlling
Creating Request : Select create request ButtonShort Description: FI Basic Settings for Pennar Steels Ltd -----> press Enter again to save the request. We get message Data Saved.
DEFINE COMPANY CODE (PENNAR STEELS LTD)
SPRO---> to go directly to SAP Reference IMG Button. So whenever we are customizing , no need to give full path upto SPRO. We can give SPRO directly in command field to go directly to SAP reference IMG Button Screen.
SPRO option will be activated only for Consultants . End User Job is without SPRO Option.So Path for defining the Company Code is as follows:
Prepared by: Rao MH 6

SPRO--->Enterprise Structure----> Definition ----> Financial Accounting---->Edit, Copy,Delete,Check Company Code( Select IMG Activity Button here)--->Double click on Edit Company Code Data---->Select New Entry Button ( Screen like below will open…)
Company Code → PSLCompany Name → PENNAR STEELS LIMITEDAddress → AmeerpetCity → HyderabadCountry → INCurrency → INRLanguage → EN
Select Save Button or CTRL + S for saving. Once Saved New Screen Will open.
Title → CompanyName → PENNAR STEELS LIMITEDStreet → AmeerpetPinCode → 500000City → HyderabadCountry → IN
Once Completed all the data, press Enter Button. System will generate Transport Request.To Choose our request select it from Drop Down Button. Beside Request# Select your request# .Press enter to save in your request.
Prepared by: Rao MH 7
request# .Press enter to save in your request.
Assagin Company Code to Company:--> ( Creating Link between Company Code to Co)
Path to assaign Company Code to CompanySPRO---->Enterprise Structure---->Assaignment---->Financial Accounting---->Assaign Company Code to Company---->Select Position Button---->Give Company Code PSL and Presss Enter .For Company Code PSL Assaign Company----> Pennnar Steels Limited Select Save ButtonPress Enter to saving your request.
DEFINE BUSINESS AREAS:SPRO---->Enterprise Structure---->Definition---->Financial Accounting---->Define BusinessArea--->Select New Entries Button----> New Window will open Business Area Description Select Save Button or CTRL+S . PSLH HYD.BUSINESS AREA Press Enter to sale your requestPSLB BLG. BUSINESS AREA
Assagining Business area to Company Code is not required. Reason is explained below.
If company is having 2 business areas. 1 in Hyderabad and 2 in Banglore.PSC PCL
Prepared by: Rao MH 7
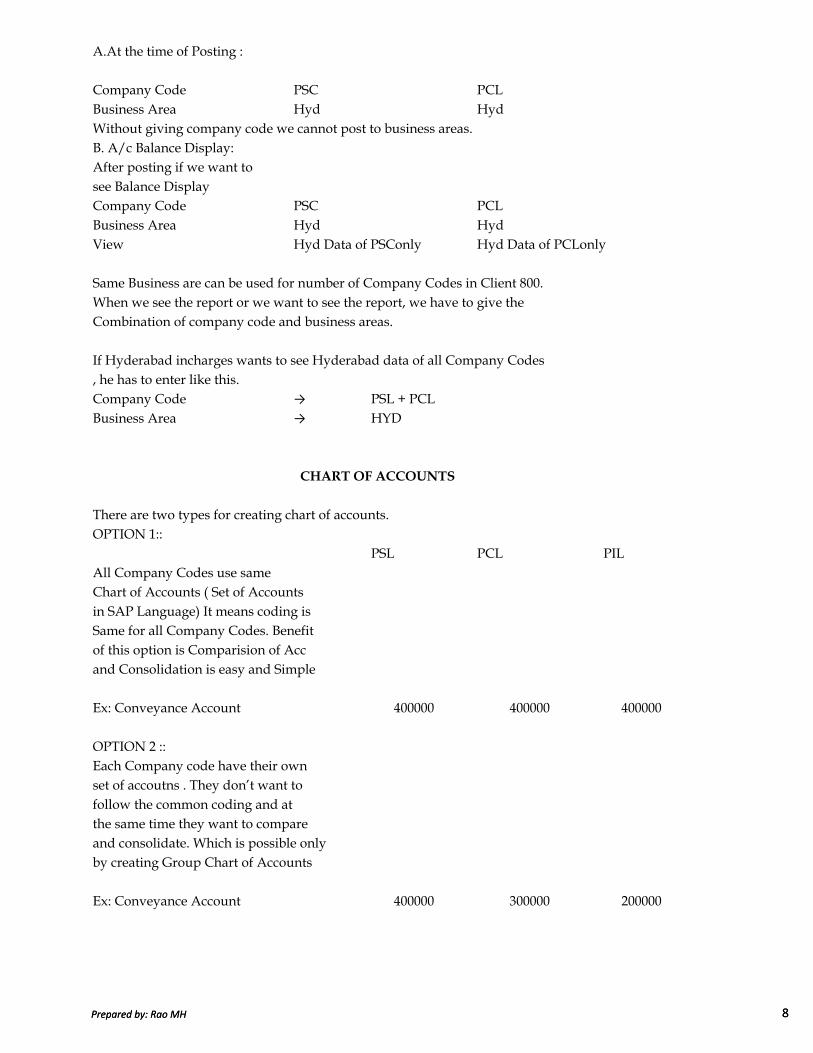
A.At the time of Posting :
Company Code PSC PCLBusiness Area Hyd HydWithout giving company code we cannot post to business areas.B. A/c Balance Display:After posting if we want tosee Balance DisplayCompany Code PSC PCLBusiness Area Hyd HydView Hyd Data of PSConly Hyd Data of PCLonly
Same Business are can be used for number of Company Codes in Client 800.When we see the report or we want to see the report, we have to give the Combination of company code and business areas.
If Hyderabad incharges wants to see Hyderabad data of all Company Codes, he has to enter like this.Company Code → PSL + PCLBusiness Area → HYD
CHART OF ACCOUNTS
Prepared by: Rao MH 8
There are two types for creating chart of accounts.OPTION 1::
PSL PCL PILAll Company Codes use sameChart of Accounts ( Set of Accountsin SAP Language) It means coding isSame for all Company Codes. Benefitof this option is Comparision of Acc and Consolidation is easy and Simple
Ex: Conveyance Account 400000 400000 400000
OPTION 2 ::Each Company code have their ownset of accoutns . They don’t want to follow the common coding and at the same time they want to compareand consolidate. Which is possible onlyby creating Group Chart of Accounts
Ex: Conveyance Account 400000 300000 200000
Prepared by: Rao MH 8

Under Group Chart of accounts At the time of Account creation PSL PCL PIL Group We have to give 2 numbers Ex: Conveyance Account1. Company Code 400000 300000 200000 1000002. Group Code 100000 100000 100000
Normally all companies will follow option 1 i.e, SAP SET OF ACCOUNTS as consultant will do Customization in 1 company and copy customization along with accounts to allOther Company Codes. It is Easy process.
Process: Chart of Account CodesDescription of Chart of AccountsWeather we are following option 1 or 2.Maintainence LanguageLength of account Number---> Normally SAP will allow Max of 10 Digits But we
are using 6 digits only.PATH: SPRO---->Financial Accounting---->General Ledger A/c----> GL Accounts---->
Master Data---->Preparations---->Edit Chart of Accounts List( TC is OB13)---->
Select New Entries Button---->Chart of Accounts → PSLDescription → Chart of Accounts for Pennar GroupMaintenance Language → EN ( Select from Drop Down Box)
Prepared by: Rao MH 9
Maintenance Language → EN ( Select from Drop Down Box)Length of GL A/c # → 6 ( Max allowed in SAP is 10)Group Chart of A/c → Leave it Blank for Option 1Select Save Button of CTRL+ S. Select your request and press enter to save your request.
Assagining Company Code to Chart of Accounts:
Same path for above ---> Assaign Company ( TC-OB62)----> Select Position Button ---->Company Code == PSL Press Enter Select Save Button or CTRL+S. Press Enter to Save yourRequest.
Account Groups:
If we create Account Codes without Groups like below:Equity Share Capital 100000Cash Account 100001Pref. Share Capital 100002SBI Current A/c 100003
If we want to see the Current Assets Balances or Transactions of Current Assets, it is not possible to get directly without Group Creation. We have to verify each and every accountand go on adding the respective accounts. In the above example, we have to add 100001and 100003 which takes much time in practical.
(OR)
Prepared by: Rao MH 9
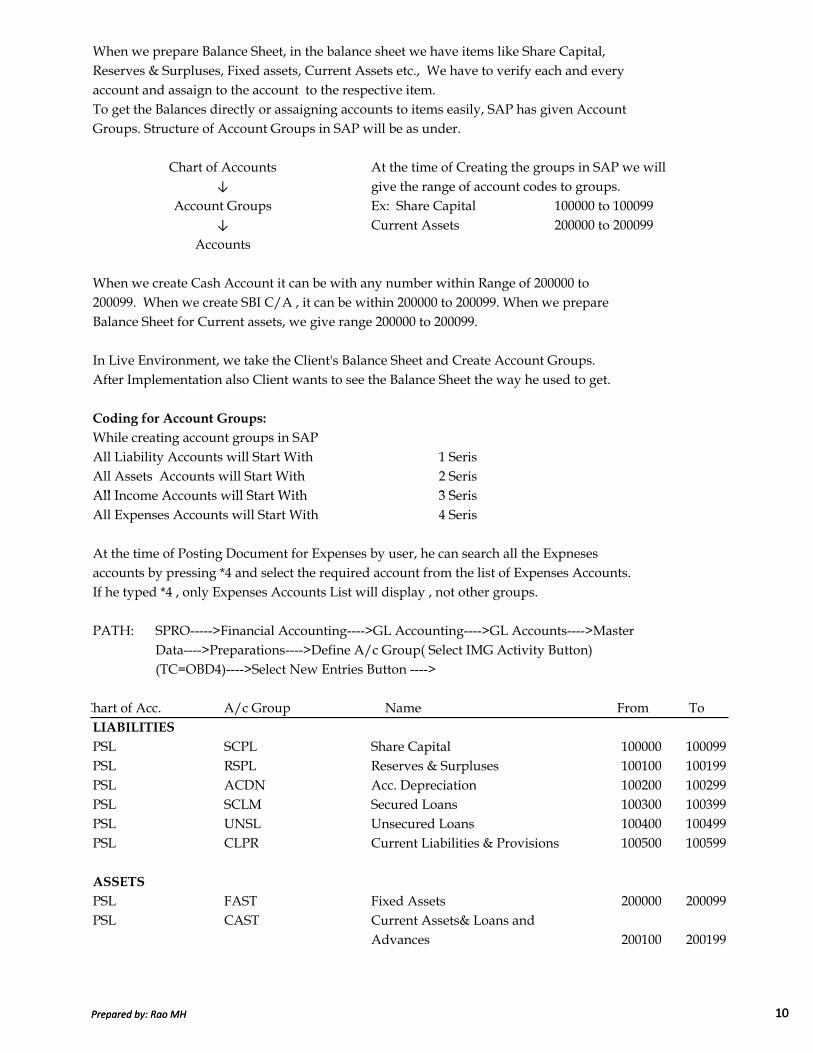
When we prepare Balance Sheet, in the balance sheet we have items like Share Capital,Reserves & Surpluses, Fixed assets, Current Assets etc., We have to verify each and every account and assaign to the account to the respective item.To get the Balances directly or assaigning accounts to items easily, SAP has given Account Groups. Structure of Account Groups in SAP will be as under.
At the time of Creating the groups in SAP we willgive the range of account codes to groups. Ex: Share Capital 100000 to 100099Current Assets 200000 to 200099
When we create Cash Account it can be with any number within Range of 200000 to200099. When we create SBI C/A , it can be within 200000 to 200099. When we prepareBalance Sheet for Current assets, we give range 200000 to 200099.
In Live Environment, we take the Client's Balance Sheet and Create Account Groups. After Implementation also Client wants to see the Balance Sheet the way he used to get.
Coding for Account Groups:
While creating account groups in SAPAll Liability Accounts will Start With 1 SerisAll Assets Accounts will Start With 2 SerisAll Income Accounts will Start With 3 Seris
Accounts↓
Account Groups↓
Chart of Accounts
Prepared by: Rao MH 10
All Income Accounts will Start With 3 SerisAll Expenses Accounts will Start With 4 Seris
At the time of Posting Document for Expenses by user, he can search all the Expneses accounts by pressing *4 and select the required account from the list of Expenses Accounts.If he typed *4 , only Expenses Accounts List will display , not other groups.
PATH: SPRO----->Financial Accounting---->GL Accounting---->GL Accounts---->MasterData---->Preparations---->Define A/c Group( Select IMG Activity Button) (TC=OBD4)---->Select New Entries Button ---->
Chart of Acc. A/c Group Name From ToLIABILITIES
PSL SCPL Share Capital 100000 100099PSL RSPL Reserves & Surpluses 100100 100199PSL ACDN Acc. Depreciation 100200 100299PSL SCLM Secured Loans 100300 100399PSL UNSL Unsecured Loans 100400 100499PSL CLPR Current Liabilities & Provisions 100500 100599
ASSETS
PSL FAST Fixed Assets 200000 200099PSL CAST Current Assets& Loans and
Advances 200100 200199
Prepared by: Rao MH 10

INCOMES
PSL SALE Sales 300000 300099PSL OTHR Other Income 300100 300199PSL INCR Increase / Decrease in Stock 300200 300299
EXPENDITURES
PSL RMEM Raw Material Consumption 400000 400099PSL PRSN Personnel Cost ( Manpower) 400100 400199PSL MFRG Manufacturing 400200 400299PSL ADMN Administration 400300 400399PSL INTR Interest 400400 400499PSL DEPR Depreciation 400500 400599
Select Save Button or CTRL+S. Select your request and press enter to save your request.
Reason for Selection of 6 Digits Coding:
If we planned to use 4 digits coding to chart of accounts, it is difficult to create new groups in future. As we are assaiging 100 accounts to each group, if any group is completed with100 accounts, it is difficult to create more group if the account digits is 4.
If account group # is of 10 Digits, it is difficult to remember the account group. So we suggested / recommend to use 6 digits.
Prepared by: Rao MH 11
If we created Account Groups for Liabilities upto 1599 ( as Liabilities will start with 1 seriesand coding is 4 digits) , We can not create morethan 4 another groups 1999-1599=400/100 ( as we are assaiging 100 accounts to each group)Suppose if we are using 6 digit number for group, we can create 199999-100599=99400/100994 groups. SO WE SUGGESTED TO GO FOR 6 DIGIT ACCOUNT GROUPS.
RETAINED EARNINGS ACCOUNT:
In the Year End, all P& L A/c Balances to be transferred to Surplus in Reserves & Surplus ( Retained Earnings) Account.All Balance Sheet item balances to be carried forward to Next Year to the same accounts asOpening Balances.This step is required to do at the end of the year. But in SAP , it has made mandatory at the time of Implementation itself. The reason behind this is Consultant will not be availableat the time of Closing the books of accounts for the year. System does not know whichaccount balances to be transferred to "Surplus in Resreves & Surplus" Account and whichaccount balances to be carryforward to next year as opening balances of the same account.
We can specify any Account Number within the Range of Given for Reserves & Surplusi.e., 100100 to 100199. Generally we specicy A/c # 100100. When we start crating accountthe first account to be created is 100100, surplus in P&L Account.
PATH: SPRO---->Financial Accounting---->GL Accounting---->GL Accounts---->MasterData---->Preparations---->Define Retained Earnings A/c ( TC=OB53)
Prepared by: Rao MH 11
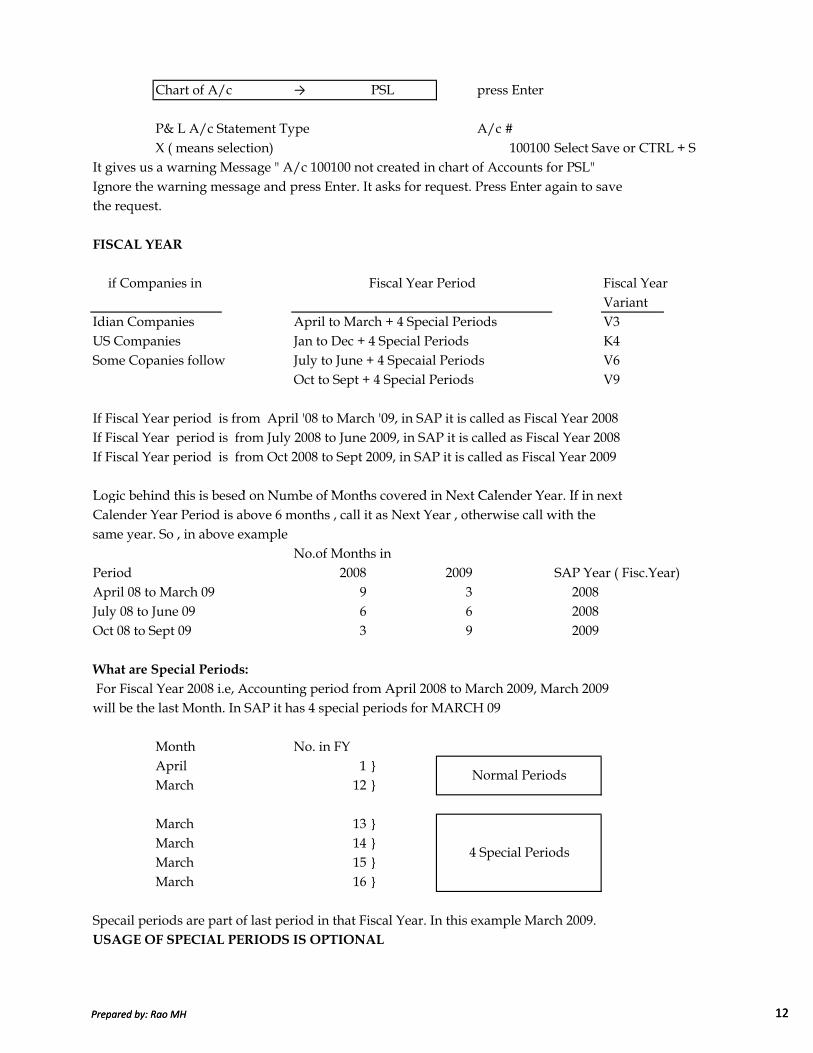
Chart of A/c → PSL press Enter
P& L A/c Statement Type A/c #X ( means selection) 100100 Select Save or CTRL + S
It gives us a warning Message " A/c 100100 not created in chart of Accounts for PSL"Ignore the warning message and press Enter. It asks for request. Press Enter again to savethe request.
FISCAL YEAR
Fiscal Year Variant
Idian Companies April to March + 4 Special Periods V3US Companies Jan to Dec + 4 Special Periods K4Some Copanies follow July to June + 4 Specaial Periods V6
Oct to Sept + 4 Special Periods V9
If Fiscal Year period is from April '08 to March '09, in SAP it is called as Fiscal Year 2008If Fiscal Year period is from July 2008 to June 2009, in SAP it is called as Fiscal Year 2008If Fiscal Year period is from Oct 2008 to Sept 2009, in SAP it is called as Fiscal Year 2009
Logic behind this is besed on Numbe of Months covered in Next Calender Year. If in next
if Companies in Fiscal Year Period
Prepared by: Rao MH 12
Logic behind this is besed on Numbe of Months covered in Next Calender Year. If in next Calender Year Period is above 6 months , call it as Next Year , otherwise call with the same year. So , in above example
No.of Months in Period 2008 2009 SAP Year ( Fisc.Year)April 08 to March 09 9 3 2008July 08 to June 09 6 6 2008Oct 08 to Sept 09 3 9 2009
What are Special Periods:
For Fiscal Year 2008 i.e, Accounting period from April 2008 to March 2009, March 2009 will be the last Month. In SAP it has 4 special periods for MARCH 09
Month No. in FYApril 1
March 12
March 13
March 14
March 15
March 16
Specail periods are part of last period in that Fiscal Year. In this example March 2009.USAGE OF SPECIAL PERIODS IS OPTIONAL
Normal Periods
4 Special Periods
Prepared by: Rao MH 12

WHY SPECIAL PERIODS REQUIRED:
Why SAP has allowed Special period is explained below with the example.Date Status of Accountingon 20.03.09 Accounts department released profitability upto the Feb'09 to the Mgt.
Figures upto Feb'09 can not be changed as profitability is finalised uptoFeb 09. In that sence, We open period for March 2009 to March 2009 for data entry purpose so as to not to change the previous data by any one.So End user can entere transactions only for the month of March 2009.for Opening March 2009 to March 2009 means open period is 12.2008 to 12.2008
on 30.03.09 New accounting year April 2009 to March 2010 ( Fisc. Year 2009) willstart after 2 days. So to open the period for Fisc.Year 2009, we have to open period from March 2009 to March 2010 as , for Fisc. Year 2008B/S is not finalised and still some entries have to make for March 2009.So period to open would be 12.2008 to 12.2009
on 16.04.09 Accounts Department has closed the Balance Sheet and declared Profitability for the Fisc. Year 2008 to the Management. Management has suggested to make some adjustments for which adjustment entrieshast to be passed by A/c Dept. This Adjustments may be for increase /
Prepared by: Rao MH 13
hast to be passed by A/c Dept. This Adjustments may be for increase /decrease the profitability.
on 05.05.09 Accounts Dept made passed adjustment entries as suggested by the Management . Data entered on 05.05.09 but posting dated will be 31.03.09 so as to updated the 2008 Fisc. Year ledgers.
on 12.05.09 Audit has completed and Auditors suggested to make Rectification Entries. These rectification entries were done on 12.05.09 but the posting date will be 31.03.09 so as to update the Fisc.Year 2008 ledgers.
On 10.07.09 If Management wants to see the Profitability finalized by the AccountsDepartment, it is not possible to see as subsequently adjustment entrieswere made as suggested by the Management and Rectification Entries were made as suggested by the Auditors. All the data was changed.
TO OVERCOME THIS PROBLEM SAP HAS GIVEN 4 SPECIAL PERIODS WHICH ARE
PART OF THE LAST PERIOD OF THAT PARTICULAR FISCAL YEAR.
Prepared by: Rao MH 13

HOW SPECIAL PERIODS WILL BE USEFUL:Entries made upto the Profitability of Accounts Department will be posted upto period 12.Entries made for Management Adjustements will be in the period 13.Entries made for Auditors Rectifictions will be in the period 14.
When we want to see the Report:
Report we viewFrom To1 12 Profitability finalized by Accounts Department1 13 Profitability suggested by Management1 14 Profitability finalized by the Auditors14 14 To see the list of Rectification Entries suggested by
Auditors
How to Convert Calender Year to Accounting Year Periods:
SAP by default Know only Calender Year ( Jan - Dec) as Accounting Year ( Fiscal Year)Below is the process to convert the Calender year to Accounting Year.
Conversion for A/c Year from Apr 2009 to March 2010 ( Fisc. Year 2009)Month Days Period in Year Shift
SAPJan 1 31 10 -1 For Accounting Year 2009-2010,
Period
Prepared by: Rao MH 14
Jan 1 31 10 -1 For Accounting Year 2009-2010,Feb 2 29 11 -1 April will be the 1st Month Mar 3 31 12 -1 For April Calender year =2009Apr 4 30 1 0 For April Fiscal Year = 2009May 5 31 2 0 So, Year Shift is "0" ( 2009-2009)June 6 30 3 0July 7 31 4 0 But for Jan to March , Cal Year =2010August 8 31 5 0 Fiscal Year = 2009Sept 9 30 6 0 So, Year Shift = "-1" ( 2009-2010)Oct 10 31 7 0 When we post document for Jan-2010Nov 11 30 8 0 it should updated the FY. 2009 ledgerDec 12 31 9 0 But not the 2010, so Year shift= -1.
Prepared by: Rao MH 14
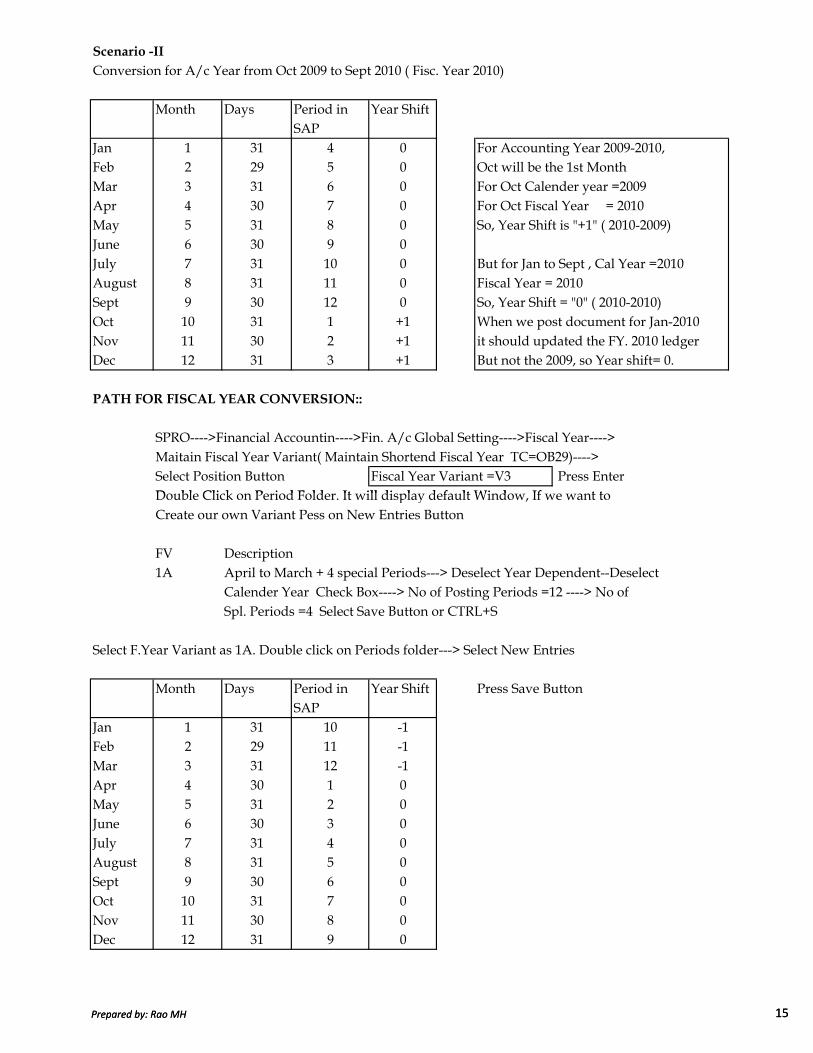
Scenario -II
Conversion for A/c Year from Oct 2009 to Sept 2010 ( Fisc. Year 2010)
Month Days Period in Year ShiftSAP
Jan 1 31 4 0 For Accounting Year 2009-2010,Feb 2 29 5 0 Oct will be the 1st Month Mar 3 31 6 0 For Oct Calender year =2009Apr 4 30 7 0 For Oct Fiscal Year = 2010May 5 31 8 0 So, Year Shift is "+1" ( 2010-2009)June 6 30 9 0July 7 31 10 0 But for Jan to Sept , Cal Year =2010August 8 31 11 0 Fiscal Year = 2010Sept 9 30 12 0 So, Year Shift = "0" ( 2010-2010)Oct 10 31 1 +1 When we post document for Jan-2010Nov 11 30 2 +1 it should updated the FY. 2010 ledgerDec 12 31 3 +1 But not the 2009, so Year shift= 0.
PATH FOR FISCAL YEAR CONVERSION::
SPRO---->Financial Accountin---->Fin. A/c Global Setting---->Fiscal Year---->Maitain Fiscal Year Variant( Maintain Shortend Fiscal Year TC=OB29)---->Select Position Button Fiscal Year Variant =V3 Press EnterDouble Click on Period Folder. It will display default Window, If we want to
Prepared by: Rao MH 15
Double Click on Period Folder. It will display default Window, If we want to Create our own Variant Pess on New Entries Button
FV Description1A April to March + 4 special Periods---> Deselect Year Dependent--Deselect
Calender Year Check Box----> No of Posting Periods =12 ----> No of Spl. Periods =4 Select Save Button or CTRL+S
Select F.Year Variant as 1A. Double click on Periods folder---> Select New Entries
Month Days Period in Year Shift Press Save ButtonSAP
Jan 1 31 10 -1Feb 2 29 11 -1Mar 3 31 12 -1Apr 4 30 1 0May 5 31 2 0June 6 30 3 0July 7 31 4 0August 8 31 5 0Sept 9 30 6 0Oct 10 31 7 0Nov 11 30 8 0Dec 12 31 9 0
Prepared by: Rao MH 15
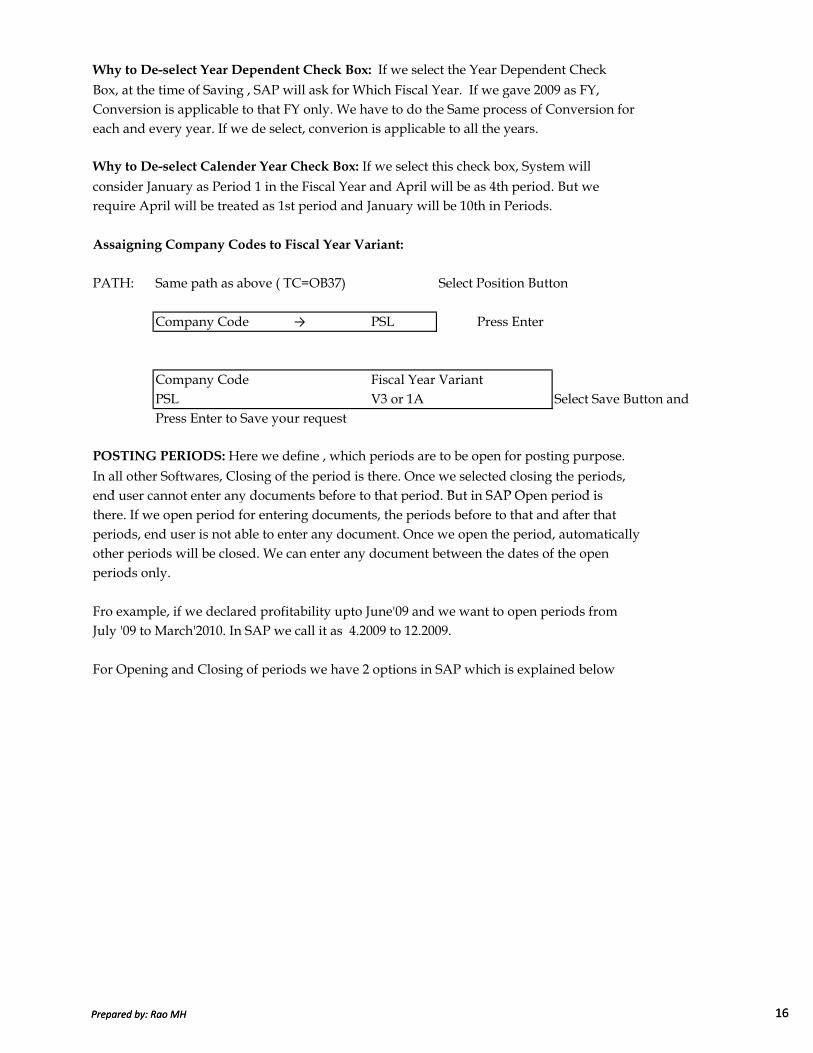
Why to De-select Year Dependent Check Box: If we select the Year Dependent Check
Box, at the time of Saving , SAP will ask for Which Fiscal Year. If we gave 2009 as FY, Conversion is applicable to that FY only. We have to do the Same process of Conversion for each and every year. If we de select, converion is applicable to all the years.
Why to De-select Calender Year Check Box: If we select this check box, System will
consider January as Period 1 in the Fiscal Year and April will be as 4th period. But we require April will be treated as 1st period and January will be 10th in Periods.
Assaigning Company Codes to Fiscal Year Variant:
PATH: Same path as above ( TC=OB37) Select Position Button
Company Code → PSL Press Enter
Company Code Fiscal Year VariantPSL V3 or 1A Select Save Button and Press Enter to Save your request
POSTING PERIODS: Here we define , which periods are to be open for posting purpose.
In all other Softwares, Closing of the period is there. Once we selected closing the periods, end user cannot enter any documents before to that period. But in SAP Open period is
Prepared by: Rao MH 16
end user cannot enter any documents before to that period. But in SAP Open period is there. If we open period for entering documents, the periods before to that and after that periods, end user is not able to enter any document. Once we open the period, automaticallyother periods will be closed. We can enter any document between the dates of the open periods only.
Fro example, if we declared profitability upto June'09 and we want to open periods fromJuly '09 to March'2010. In SAP we call it as 4.2009 to 12.2009.
For Opening and Closing of periods we have 2 options in SAP which is explained below
Prepared by: Rao MH 16
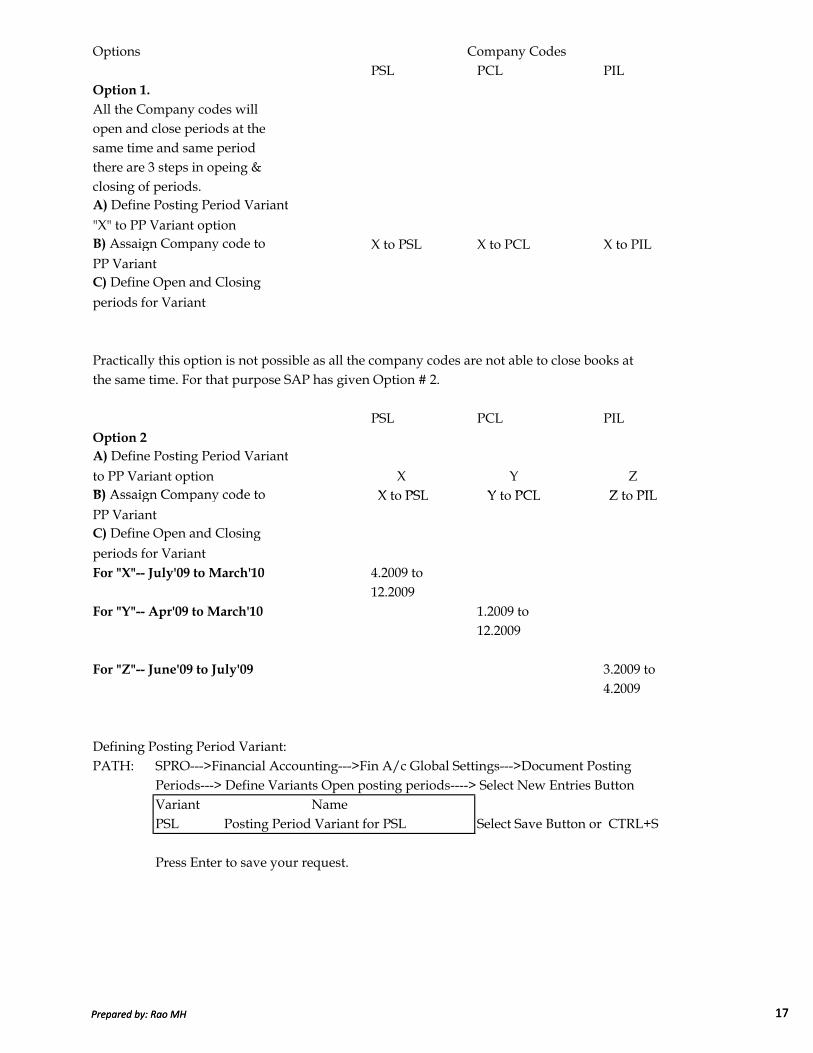
OptionsPSL PCL PIL
Option 1.
All the Company codes willopen and close periods at the same time and same periodthere are 3 steps in opeing & closing of periods.A) Define Posting Period Variant
"X" to PP Variant optionB) Assaign Company code to X to PSL X to PCL X to PILPP VariantC) Define Open and Closing
periods for Variant
Practically this option is not possible as all the company codes are not able to close books at the same time. For that purpose SAP has given Option # 2.
PSL PCL PILOption 2
A) Define Posting Period Variant
to PP Variant option X Y ZB) Assaign Company code to X to PSL Y to PCL Z to PIL
Company Codes
Prepared by: Rao MH 17
B) Assaign Company code to X to PSL Y to PCL Z to PILPP VariantC) Define Open and Closing
periods for VariantFor "X"-- July'09 to March'10 4.2009 to
12.2009For "Y"-- Apr'09 to March'10 1.2009 to
12.2009
For "Z"-- June'09 to July'09 3.2009 to4.2009
Defining Posting Period Variant:PATH: SPRO--->Financial Accounting--->Fin A/c Global Settings--->Document Posting
Periods---> Define Variants Open posting periods----> Select New Entries ButtonVariantPSL Posting Period Variant for PSL Select Save Button or CTRL+S
Press Enter to save your request.
Name
Prepared by: Rao MH 17

Assaigning Posting Period Variant to Company Code:
Path: Same as above- (Next step) and Select Position ButtonCompany Code PSL Press Enter
CoC Company Name City VariantPSL Pennar Steels Ltd Hyd PSL ( Assaign) Select Save or CTRL+S
Press Enter to save your request.
Open and Close Posting Periods:
Same Path ----> Select New Entries ButtonVariant A/c From To From Year To Year From Year
Type A/c A/c Period1 Period 1 Period2
PSL + Valid Keep it Keep it 4 2009 12 2009 12 2008to all A/c Blank BlankTyes
To Year AU Group ( Authorization Group)Period 2
12 2008 Keep itBlank
Prepared by: Rao MH 18
BlankPress Save and Enter to save your request.
After declaring results upto June'09 to the managemen. We want to open period from July'09to March'10. We also want to open for March'09 as Audit is not completed. In this scenarioSAP has given 2 Options.From Period 1 which is MANDATORY IN SAP
July-2009 to March 20094.2009 to 12.2009
From Period 2 Which is OPTIONAL IN SAPMarch-2009 to March-200912.2008 to 12.2008
At the time of Opening Posting Periods , Authorisation Group is kept as Blank. When JuneProfitability is declared period to be open will be July'09 to March'2010. After July'09 profitability Period to be open will be Aug'09 to March'10. So Opening and Closing of periodsScreen is regularly used in SAP. As this screen is widely used, SAP has given the access of this screen at the End User level also. It may be Misused by End User. To resctrict the misuseAuthorization Group is Helpful.
Basis Consultant will create Authorization Group Say "X" and assaign user ID's say ManagerDy.Manager of Accounts to this Group. Hence these 2 people only can access the screen and make changes in opening periods.
Prepared by: Rao MH 18
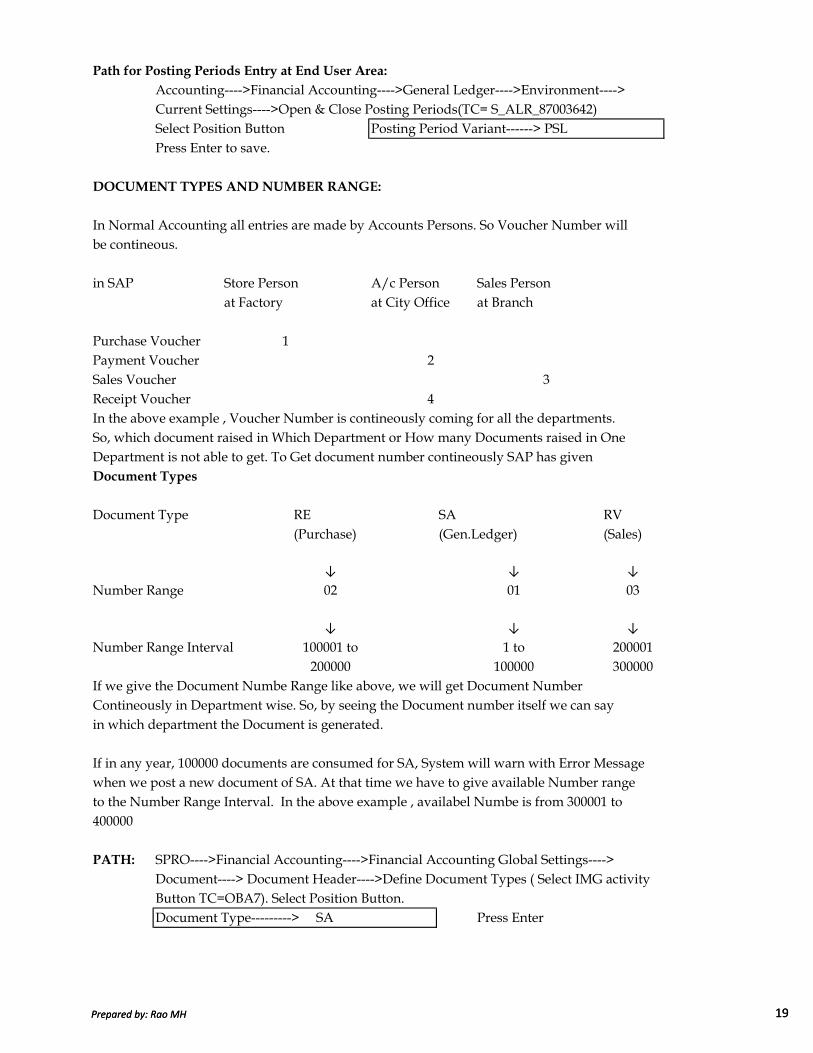
Path for Posting Periods Entry at End User Area:
Accounting---->Financial Accounting---->General Ledger---->Environment---->Current Settings---->Open & Close Posting Periods(TC= S_ALR_87003642)Select Position Button Posting Period Variant------> PSLPress Enter to save.
DOCUMENT TYPES AND NUMBER RANGE:
In Normal Accounting all entries are made by Accounts Persons. So Voucher Number willbe contineous.
in SAP Store Person A/c Person Sales Personat Factory at City Office at Branch
Purchase Voucher 1Payment Voucher 2Sales Voucher 3Receipt Voucher 4In the above example , Voucher Number is contineously coming for all the departments.So, which document raised in Which Department or How many Documents raised in OneDepartment is not able to get. To Get document number contineously SAP has givenDocument Types
Prepared by: Rao MH 19
Document Type RE SA RV(Purchase) (Gen.Ledger) (Sales)
↓ ↓ ↓
Number Range 02 01 03
↓ ↓ ↓
Number Range Interval 100001 to 1 to 200001200000 100000 300000
If we give the Document Numbe Range like above, we will get Document Number Contineously in Department wise. So, by seeing the Document number itself we can sayin which department the Document is generated.
If in any year, 100000 documents are consumed for SA, System will warn with Error Messagewhen we post a new document of SA. At that time we have to give available Number rangeto the Number Range Interval. In the above example , availabel Numbe is from 300001 to400000
PATH: SPRO---->Financial Accounting---->Financial Accounting Global Settings---->Document----> Document Header---->Define Document Types ( Select IMG activityButton TC=OBA7). Select Position Button.Document Type---------> SA Press Enter
Prepared by: Rao MH 19

Select Details Button ( Ctrl+Shift+F2)Select Number Range----> 01Select Number Range Information Button
↓
Company Code -------> PSLSelect Change Interval Button →→ Select Interval Button
Number Range →→ 01Year →→ 2009From Number →→ 1To Number →→ 100000Current Number →→ 0External Chk Box →→ De select it Press EnterSelect Save or CTRL+S Ignore Warning Message Press Enter
Number Range Interval cannot be transported to Production Client . Reasons:-
1. Consultant is outsider. He does not know how many Docs. are required for each type.2. All the Deparment pepole want to have the number range from 1 to 100000 which is not possible in practical.
IN live environment before going to live Production Clients all Department Heads will sittogether and decide the Document Numbering.What ever we have given in Client 800 are applicable only for Development Client for testing
Prepared by: Rao MH 20
What ever we have given in Client 800 are applicable only for Development Client for testingof documents.
Why to De-select External Check Box: If we select the External Check Box, at the time of Posting end user has to give the Document Number manually. If we deselct, System willgenerate Numbering automatically.
For Documents Numbering SAP has given 2 Options.
Option 1 Option 2
Year Specific Numbers used01-2008-1-100000 49000 01-9999-1-100000 5000001-2009-1-100000 1000
Posting the Document::A) Entry Date 11.07.2009Posting Date 11.07.2009Document Number 1001 50001
B) Entry Date 11.07.2009Posting Date 31.03.2009Document Number 49001 50002
Numbers usedYear Specific
Prepared by: Rao MH 20

In Option 1, last number in 2008 is 49000 and in 2009 is 1000. When we posted document on 11.07.2009 for the date of Posting 11.07.2009 ( FY2009) New Document Number will be 1001. If we post the document on 11.07.2009 for Posting Date 31.03.2009, New document number will be the next number of last years last number i.e, 49001 only, but not 1001.
In option number 2, Contineous numbering is there ,whenever we posted the document andfor which Fiscal Year It may relate to . So , in practical, it is difficult to maintain which document relates to which Fiscal Year. Hence Most of Companies will choose OPTION-1.
FIELD STATUS VARIANT AND FIELD STATUS GROUPS:
At the time of Posting in all Screens, we get around 70 Fields for Debit and 70 for Credit.so For any Document we have Debit 70 Fields
Credit 70 FieldsTotal 140 Fields
If we start entering all the 140 fields , it takes so much time to post a document. So SAP has given a chance to make any field
Suppress (or) Required (or) Optional
When We select Supress →→ Field will not be visible on Screen at the tiem of Posting
When We select Required →→ Field will appear with ? Or √ Mark. Withoutentering data in the field , we can not go to next field.
Prepared by: Rao MH 21
When We select Optional →→ Field will appear on Screen, but it is our choice to enter the data or not
Field selection is not commone to all accounts. It varies Account to Account. So For Purchaseaccounts/ Sales Accounts Field "Qty" is required but Not for Equity Share Capital Account.If we have 1000 Accounts in Chart of accounts, We have to create 1000 Scenarios for each account separately. This is very difficult in Practical. To overcome this problem, SAP has given Shortcut method called " Field Status Group"
A) For Field Status Groups we specify which field is Required/Optional/Suppress.B) Field Status Groups will be created under Field Status Variant ( F St.V) and Field Status Variant will be assaigned to Company Codes.C) In Account Creation we specify Field Status GroupD) At the time of Posting, when user give the Account #, the Screen will appear based on Field Selection to the Field Status Group which is specified in Account.
SAP has given 4 Common Groups.1. General 2. Material Accounts 3. Bank Accounts 4. Cost Accounts
Prepared by: Rao MH 21

Accounts Field St.Group Field Supress Required OptionalSales/ Purchase Material A/c Qty -- √ --Equity Share Capital General Qty √ -- --
As an Example we are going to Create Accounts and Post:-
Cash Account Dr.↓
↓ Equity Share Capital A/c Cr.↓ ↓
↓ ↓
Bank Accounts General Accounts↓ ↓
↓ ↓
Text Business Value Text BusinessField Area Date Field Area
For the above acounts , we make the above fields are as Compulsory ( REQUIRED) wetherclient inform to make them compulsory or not . Other fields are based on client information.
PATH: SPRO---->Financial Accounting---->Financial A/c. Global Settings---->Document-->Line Item---->Control---->Define Field Status Variants
Prepared by: Rao MH 22
Line Item---->Control---->Define Field Status VariantsSelect Field Status Variant===> 1000 IDSE Group----> Select Copy As Button ( F6)
↓
Change the Field Status Variant to "PSL"↓
Change the Field Status Name to " Field Status Variant for PSL". Press Enter↓
Select Copy all Button to copy all 47 Groups↓
We will get a Message No. of Dependent Entries Copied 47 Enter
Press Save Button or CTRL+S----> Press Enter to save our Request.
Select FstV= PSL Double Click on --> Field Status Group Folder
Double Click on FstGroup=G001----> General ( With Text, allocation)↓
Double Click on "General Data" Make " Text" Field as Required Entry.
Select Next Group Button on Left Top ( Shift+F6)Select Next Page or Pagedown Button 2 times
↓
Mark "Business Area" as "Required Entry filed. ----> Select Save Button.
Prepared by: Rao MH 22

Double Click on FstGroup G005= Bank Account(Obligatory, Value Date)Double Click on General Data----> Make Text as Required EntrySelect Next Group ButtonSelect Next Page Button or Page Down 2 timesMark Business Area as Required Entry Fieled.
Select Next Group Button 2 timesMark Value Date as Requried Entry FieldSelect Save or CTRL+S
Value Date means Effective Date. Suppose if we took a Loan from IDBI on 11.07.09Cheque Date of IDBI is 11.07.2009.On 13.07.2009 we are postin the document and depositing the cheque in Bank.At the time of Posting Document Date-------> 13.07.09 Once date is entered in Document Dated Posting Date-----------> 13.07.09 and Posting Dated column, it can not be Modifiable. We have to reverse the entry only.
IDBI Calculate Interest from 11.07.2009, whereas SAP will calculate interest from 13.07.2009 as posting date is 13.07.2009. So In interest amount , there will be a differene between IDBI and Systems calculation. To overcome this problem, SAPhas given Effective Date i.e, Value Date ( in SAP Terminalogy) . IF we select the Value Date option Compulsory and enter it at the time of posting. SAP will calculate interest from Value Date entry. Value date can be modifiable if
Prepared by: Rao MH 23
calculate interest from Value Date entry. Value date can be modifiable ifnecessary but not Document Date or Posting Date.
Assaign Filed Status Variant to Company Code:
Same Path ----> Select Position Button ----> Company Code-->PSL(Next Step to Last Path)
FstVFor Company Code PSL PSL Press Save and Press Enter to Save in ur
Request
Assaign Sales Tax Procedure:
in Financials we are going to Cover 1. General Ledger 2. A/c Payable 3. A/c Receivables 4. Asset A/c
Sale Tax is required for Both Accounts Payable and Accounts Receivbale. But system will not allow to enter any transactions in India ( for Country Code IN)withou Sales Tax Procedures even for General Accounts.So, we assaign some Tax Procedure which is available in system temporarily.Afterwards, when we go for Accounts Payable , or Receivable we make ourown Tax Procedures.
For Country IN--> Assaign Tax Procedure TaxUS( Sales Tax USA) or TaxINN(Sales Tax India)---> as Temporary assaignment.
Prepared by: Rao MH 23

PATH: SPRO---->Financial Accounting---->Financial A/c Global Settings---->Tax on Sales/Purchases---->Basic Settings---->Assaign Country to Calculation Procedure---->Select Position Button Country----> IN Press EnterFor Counry IN Assaign Procedure ----> TaxUS-Sales Tax
Select Save Button or CTRL+S. Press Enter to save in your request.
TOLERANCE GROUPS: SAP has given 2 types of Tolerance Groups
1. General Ledger Account Tolerance 2. Employee Tolerance
General Ledger Account Tolerance is mandatory in SAP which is applicable in Receipts & Payments. Before understanding Tolerance Groups, we need to know about "Open Item
Management".
OPEN ITEM MANAGEMENT: This is used for Vendors/ Customers/Balance Sheet Itemswhere Clearing is Required.Suppose by the Month end 31.07.2009 we have to pay Salaries 500000
Wages 400000Rent 25000
Entry for Payable amounts:
Salaries A/c 500000
Prepared by: Rao MH 24
Salaries A/c 500000Wages A/c 400000Rent A/c 25000
To Outstanding Expeneses A/c 925000
If we see the account in the Month End,we will have Number of Credit items and Number ofDebit Items. We don’t know which item is pending and How much is Pending. IN SAP, if we select Open Item Management, at the time of payment , system will ask against which item the payment is made. When we specify the payment is made against Rent that item will be cleared upto the extent we paid.If we paid 25000 against Rent A/c , We can see accounts in 3 ways. A) Open Items Payable Amounts Salaries and Wages in ExampleB) Cleared Items Paid Amounts Rent and Bank Accounts in ExampleC) All Items Payable + Paid
Once we selected Open Item Management, we can see Bill Wise Payable of Vendors, BillwiseReceivbales of Customers.
As discussed earlier, SAP has given Tolerance Groups. Tolerance means Pament Diffrence.It can be " Amount Tolerance" to "Percentage Tolerance". It can be Debit or Credit
Prepared by: Rao MH 24

We create Tolerance for Tolerance Groups
Tolerance Amount PercentageGroup Tolerance Tolerance
A 100B 2%C 0 0
1. Create Tolerance group and give the tolerance amount or Percentage or both2. Tolerance group will be specified in General Ledger A/c.
Ex: Salaries 500000Wages 400000 Outstanding Expneses as on 31.07.09Rent 25000Commission 100005
IN General Ledger a/c for Outstanding Expenses account we have specified Tolerance Group " A". When we make payment of 100000 to Commission , System check
Howmuch is payable 100005Howmuch is Paid 100000Difference 5
If the difference amount is withing the Tolerance Group Amount ( 100 Rs for "A" Tolerance)
Prepared by: Rao MH 25
If the difference amount is withing the Tolerance Group Amount ( 100 Rs for "A" Tolerance)The difference will be transferred to Sundry Balances Written off account and clear the Item-Commission automatically.
Dis-advantages of Tolerance System:
1. Tolerance group is given at A/c Level and not at Transactions Level.2. No Flexibility in Tolerance Groups.
If the Tolerance amount is within the Tolerence Group Limit, system will automaticallytransfer the Difference amount to Sundry Balances Written Off account. It should ask theend user before Transferring. In Live Environment, we use Tolerance Group "C" in whichTolerance amount and Tolerance Percentage both are ZERO. If we specify Tolerance Amount (or) Tolerance Percentage as ZERO, system will show the balance "5" as Outstanding in Account. It the Customer or Enduser decision to Pay or not to Pay. If we want to Pay Rs. 5------> we show 100000 paid as part payment and balance show as
outstanding amount.If we don’t want to pay Rs.5 -----> Transfer this amount to Sundry Balances Written off A/c
and clear Tranaction.
Say we have 1000 General Ledger A/c , 1000 Vendors and 1000 Customers. In all Accountswe have to assaign Tolerance Group "C" which is highly difficult. So we keep Tolerance Group as Blank and Amount "ZERO"
Prepared by: Rao MH 25

For Company Tolerance Tolerance Tolerance Code Group Amount Percentage
PSL Blank "0" "0"
When we create the account, Tolerance Group will be " Blank". System expects we have created Blank Tolerance Group and Assaigned in the Account.
PATH: SPRO----->Financial Accounting----->General Ledger accounts---->Business Transactions---->Open Item Clearing---->Clearing Differences---->Define ToleranceGroup for GL A/c----> Select New Entries Button.
Company Code PSLTolerance Group BlankDescription Tolerance Group for PSLDebit Posting "0" Debit % "0"Credit Posting "0" Credit % "0"
Select "Save" (or) CTRL+S Prese Enter to Save in your Request.
TOLERANCE GROUP FOR EMPLOYEES:Mainly, Tolerance Group for Employees is to restrict/control the users for posting the documents. Here, we give userwise upperlimit for posting. We can create Maximum Limit
Prepared by: Rao MH 26
documents. Here, we give userwise upperlimit for posting. We can create Maximum Limitfor Tolerance group.
A B
Max Amount per Document 100000 1000000Max Amount per Open Item 100000 1000000Max Cash Discount 0 5Max Payment Difference Allowed 0 0
If we have 1000 users we have to create 1000 Scenarios. So SAP has given short cut to Tolerance as Groups. We create 3 Groups "A", "B" & "C" and assaign to Users.If we have following people in Accounts Dept we can assaign Tolerance Groups to them like
1. Cashier in City Office A In Live Environment ( or) in Training
2. Cashier at Factory A Institutes, We keep Tolerance Group as
3. Cashier at Branch A Blank as Number of Students will logon
4. Accountant- 1 A with Same Username. If we have given
5. Accountant -2 A one Tolerance Group to One Company
6. Dy. Manager Accounts B Code, we have to give same Group to all
7. Manager Accounts B Comp. Codes as , Tolerance Group works
8. General Manager-Acc C at User ID level but not for Company Code
10000000
1010000000
0
Tolerance GroupsParticularsC
Employee Designation Tolerance Group
Prepared by: Rao MH 26

PATH: SPRO---->Financial Accounting---->General Ledger Accounting---->Business Transactions---->Open Item Clearing---->Clearing Differences--->Define ToleranceGroup for Employees----> Select Position ButtonSelect New Entries Button
Group Select Save Button (or)Company Code CTRL + SCurrency Press Enter to save your Amount Per Document request Amount per Open Item A/cCash Discount per Line Item 10 %Permitted Payment Differene
Enter Global Parameters:
Path: SPRO---->Financial Accounting---->Financial Accounting---->Company Code---->Enter Global Parameters----> Select Position Button
Company Code-----> PSL Select Company Code PSLSelect Details(F2) Button.
Select Business Area Financial Statement √
Select Propose Fiscal Year √
Define Default Value Date √
Keep Blank
INR9999999999
Keep BlankPSL
9999999999
Prepared by: Rao MH 27
Define Default Value Date √
Negative Postings Permitted √
Additional Data Button Click
TDS Number PSL123456CPAN Number PSL654321PSelect Back arrow and Save.Press Enter to save ur request.
***************End of Basic Settings Section******************
Prepared by: Rao MH 27

Following are the steps to follow for compleating the Basic Settings in Financials
Step # TC
1 Define Company ( In normal terminology-Group) /NOX152 Define Company Code ( in normal terminalogy Company in Group) /NOX023 Assaign Company to Company Code /NOX164 Define Business Area /NOX035 Define Chart of Accounts OB136 Assaign Company Code to Chart of Accounts OB627 Define Account Groups with Number Ranges OBD48 Define Retained Earning Account OB539 Define Fiscal Year Variant with Fiscal Year Conversion OB2910 Assaign Company Code to Fiscal Year Variant OB3711 Define Posting Period Variant SPRO12 Assaign company Code to Posting Period Variant SPRO13 Define Open and Close Posting Periods SPRO14 Define Document Types and Number Range OBA715 Define Field Status Variant SPRO16 Assaign Company Code to Field Status Variant SPRO17 Assaign Company Code to Sales Tax Procedure SPRO18 Define Tolerance Groups SPRO19 Assaign Company Code to Tolerance Groups SPRO
IMPORTANT STEPS IN BASIC SETTINGS
Action to be Done
Prepared by: Rao MH 28
19 Assaign Company Code to Tolerance Groups SPRO20 Check the Global Parameters of Company Code and Enter SPRO
TDS and PAN Numbers
Prepared by: Rao MH 28

GENERAL LEDGER CONCEPTS:
HOW TO CREATE GENERAL LEDGER MASTERS :
We can create Chart of Accounts at A) Chart of Accounts LevelB) At Company Code LevelC) Centrally
At Chrt of A/c Level At Company Code CentrallyLevel
1. Account Number 1. A/c Currency All Fields of 2. Account Group 2. Only Balance in Local Cht. ofA/c +3. Company Code Currency Company Code Level4. Wether it is P& L A/c 3. Tolerance Group are available in 5. Wether it is B/S Item 4. Line Item Display Centrally Area6. Description 5. Open Item Management A) Short Text - Max 20 Char 6. Sork Key B) Long Text- Max 50 Char 7. Field Status Group
A/c to be Created : Range1. Surplus in P& L Account under Reserves and Surplus Group 100100 to 1001992. Eqity Share Capital A/c Under Share Capital Group 100000 to 1000993. Cash A/c Under Current Assets, Loans & Advances Group 200100 to 200199
Prepared by: Rao MH 29
3. Cash A/c Under Current Assets, Loans & Advances Group 200100 to 200199
1ST STEP: Checking the A/c Groups to see the A/c Numbers to allot
PATH: SPRO----->Financial Accounting---->General Ledger Accounting----->General Ledger Accounts----> Master Data---->Preparations---->Define A/c Groups ( TC=OBD4) Select Position Button
Chart of Accounts PSL
2nd STEP: Creation of General Ledger Masters:PATH: Accounting ---->Financial Accounting---->General Ledger---->Maser
Records---->GL A/c---->Individual Processing---->Centrally(TC=FS00)
General Ledger Account 100100Company Code PSLFrom Menu Select ----> Create General Ledger account Create
Accoun Group---->Select Reserves & Surplus Short Text Will appear at the time of
Select Balance Sheet Account Radio Button Document Display
Short Text----> Surplus in P& L A/c Long Text will appear at the time of
Long Text----> Surplu in P& L A/c for PSL Ledger Display
Prepared by: Rao MH 29

Select Control Data tab Select Only Balances in Local Currency Chk Box
Tolerance Group Keep it BlankLine Item Display √
Sort Key 001 ON Posting Date
Select Create/Bank/Interest tab
Field Status Group G001 for General Select Save or CTRL+S
For Creating 2nd Account ----> Equity Share Captial ( A/c # 100100)
GL A/c 100100Company Code PSLSelect With Template Button
GL A/c 100100Company Code PSL Press Enter
Select Type/Descripton TabChange A/c Group to Share Capital Short Text Equity Share Capital Long Text Equity Share Capital of PSL
Prepared by: Rao MH 30
Long Text Equity Share Capital of PSL
Other Fields are Common so Select Save Button or Ctrl+S
3rd A/c GL A/c Number 200100Company Code PSL
Select With Template Button
GL A/c 100100 Copty this Acc to New A/cCompany Code PSL Press Enter
Select Type/Descripton TabChange A/c Group to →→ Current Assets Loand & AdvShort Text →→ Cash AccountLong Text →→ Cash Account of PSLSelect Create/Bank/Interest Tab Button
Field sTatus Group →→ Change to G005Select Relevant Cash flow →→ √
Other Fields are Common so Select Save Button or Ctrl+SHow to view the Accounts Created:
Select Dropdown button beside GL A/c , we will get match code. Give Company CodePSL It shows List of Accounts Created under PSL
Prepared by: Rao MH 30
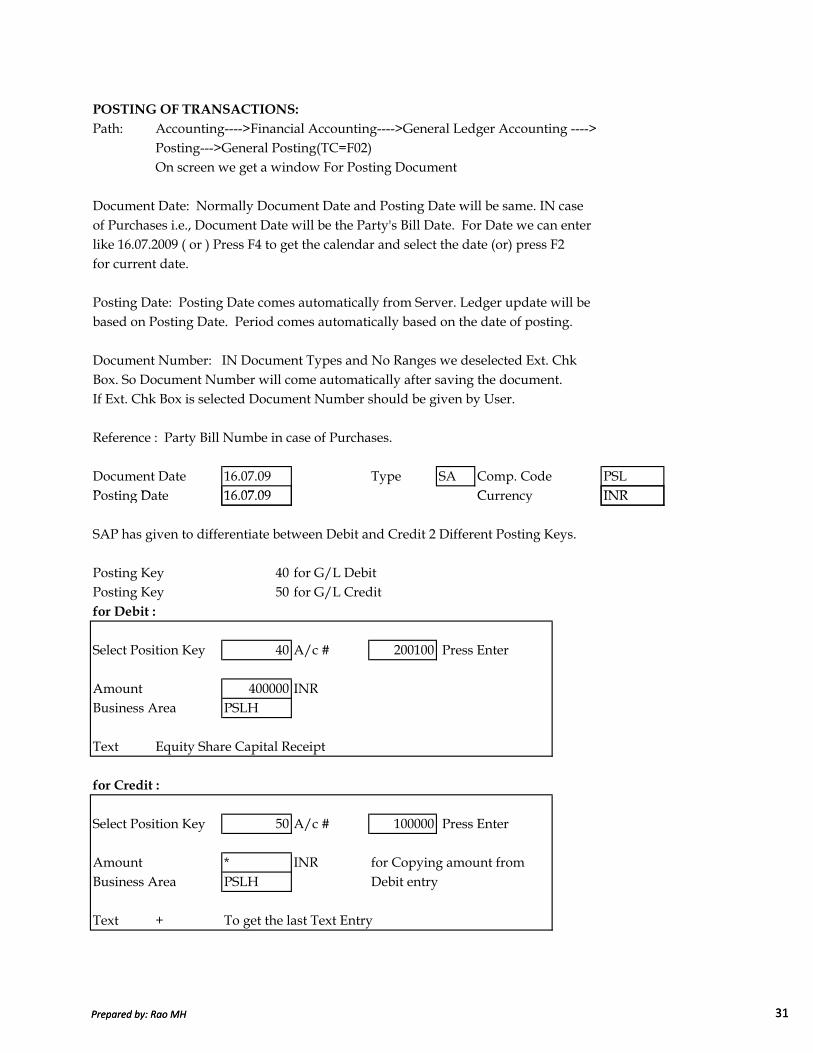
POSTING OF TRANSACTIONS:
Path: Accounting---->Financial Accounting---->General Ledger Accounting ---->Posting--->General Posting(TC=F02)On screen we get a window For Posting Document
Document Date: Normally Document Date and Posting Date will be same. IN caseof Purchases i.e., Document Date will be the Party's Bill Date. For Date we can enterlike 16.07.2009 ( or ) Press F4 to get the calendar and select the date (or) press F2for current date.
Posting Date: Posting Date comes automatically from Server. Ledger update will be based on Posting Date. Period comes automatically based on the date of posting.
Document Number: IN Document Types and No Ranges we deselected Ext. ChkBox. So Document Number will come automatically after saving the document.If Ext. Chk Box is selected Document Number should be given by User.
Reference : Party Bill Numbe in case of Purchases.
Document Date 16.07.09 Type SA Comp. Code PSLPosting Date 16.07.09 Currency INR
Prepared by: Rao MH 31
Posting Date 16.07.09 Currency INR
SAP has given to differentiate between Debit and Credit 2 Different Posting Keys.
Posting Key 40 for G/L DebitPosting Key 50 for G/L Creditfor Debit :
Select Position Key 40 A/c # 200100 Press Enter
Amount 400000 INRBusiness Area PSLH
Text Equity Share Capital Receipt
for Credit :
Select Position Key 50 A/c # 100000 Press Enter
Amount * INR for Copying amount from Business Area PSLH Debit entry
Text + To get the last Text Entry
Prepared by: Rao MH 31

From Menu---->Document--->Simulate(Shift+F9) to post the DocumentDebit amount willl be posted without any SymbolCredit Amount will be posted with "- " Symbol
Select Save or Ctrl+S. We will get a message "Document 1 was posted in Company Code PSL"
Note: IN ONE DOCUMENT WE CAN POST 999 LINE ITEMS
How to View the Latest Posted Document:
Menu---->Document---->Display---->Select Display Document Header(F5)
How to Change the Document:
PATH: Accounting---->Financial Accounting---->GL Accounting---->Document---->Change ( TC=FB-02)
Document # 1 Enter Comp. Code PSL Double Click on 1st line item ( Cash Account)Fiscal Year 2009
**** We can change Value Date, Assaignment Numb, Text Fields only, but not other ****
Display Document: Accounting----> Financial A/c---->GL A/c---->Document--->Display
Prepared by: Rao MH 32
Display Document: Accounting----> Financial A/c---->GL A/c---->Document--->Display(TC=FB03) Select Document List Button
Company Code PSL Type SA Select Execute Button or F8
To Give Last One Week Posted Documents List:Entry Date 10.07.09 To Date 17.08.09
Select Execute Button or F8
To View Documents Posted by a Specific User:Menu---->Edit---->Dynamic Selection( Shift+F4)User Name SAPUSER Select Execute Button or F8Display Document #1.
To Display Account Blanace :Accounting----> Financial Accountin----> GL A/C---> Display Balance(TC=FS10N)
To View Number of Accounts at a time:Select Right Arrow ( Multiple Selection) Button beside GL Account.
To View Random A/c Transactions:Under Single Value give account Numbers 100100, 200100 and select copy as ( F8)
Prepared by: Rao MH 32

To View Contineous Transactions ( Range of A/c)Press " Select Intervals" Tab and give Lower Limit Upper Limit
100000 100099To Exclude One account from the Range:
Select Exclude Single Values tabUnder Single Value give A/c # 100500. It will not come in the listSelect Copy Button.
To Exclude a Range of accounts from Range of accounts Display: Select Interval TabLower Limit Upper Limit
100050 100059 Select Copy Button
To View only one A/c Transactions: Select Drop down button beside GL A/cComp Code PSL Enter Select A/c # 100000 Eq. Share CapitalComp Code PSL Seleclt Execute ButtonFiscal Year 2009Business Area PSLHDoubleClick on Cum.Balance 400000DoubleClick on Document# 1Select call up document overview button (F9) Select Back Arrow
How to Creat our own Line Layout:
Select Change Layout Button. Select the Fields which are not required under
Prepared by: Rao MH 33
Select Change Layout Button. Select the Fields which are not required under Column Content. Ex. Document Type and Document DateSelect Right Arrow ( or) Hide Selected Field Button.
From Hidden Fields Column----> Select 1) Posting Date 2) Select TextSelect Left Arrow (or) show selected fields button.
Change Column Positions LengthDocument # 1Posting Date 2Text 3 35Amount in Local 4 Select Totals CheckBox for Amount in Local CurrencySelect copy Button
How to save the Layout:
Select Save Layout Button ( Ctrl + F12). There are 2 options for saving layout
Option 1 Option 2User Specific- Available to only Common to all usersSpecific UsersA) Select User Specific check Box A) Deselect User specific Check BoxB) Save with any number or name B) Save with any number or nameFor our purpose, Select Option 2 and save with PSL. Deselect the User specific Chk Box.Description: GL A/c Standard for PSL Enter. We can see Report in our Lay Out.
Prepared by: Rao MH 33
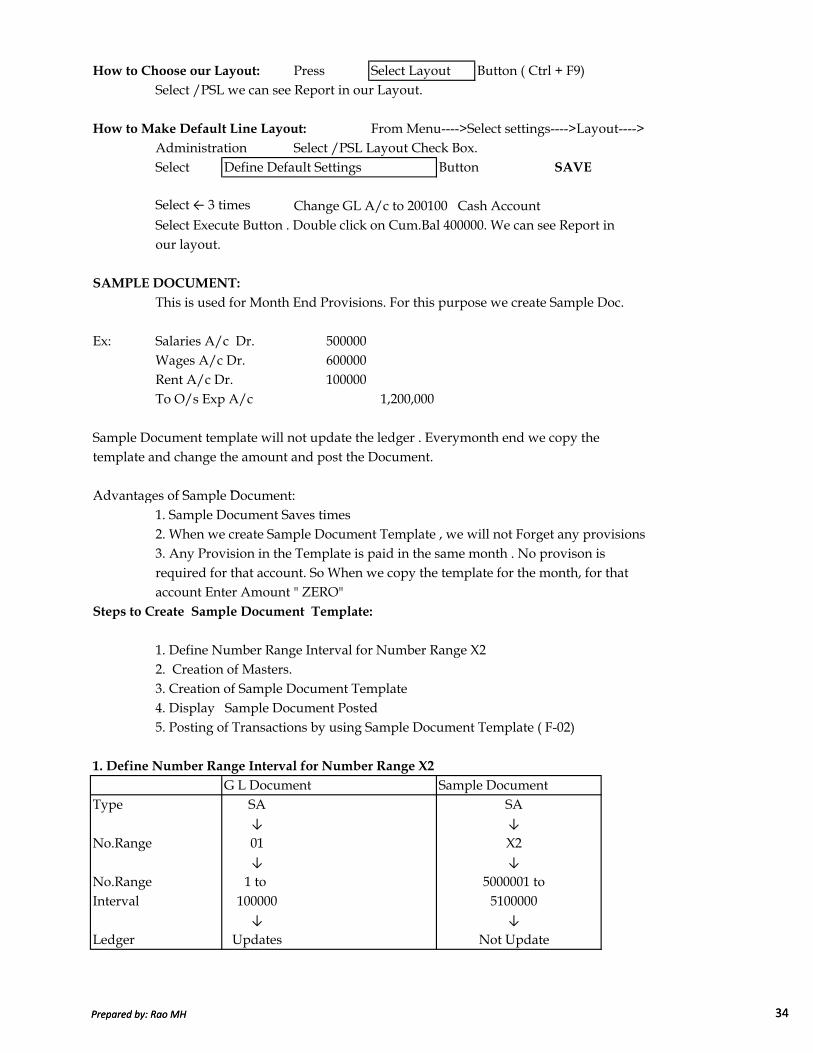
How to Choose our Layout: Press Select Layout Button ( Ctrl + F9)Select /PSL we can see Report in our Layout.
How to Make Default Line Layout: From Menu---->Select settings---->Layout---->Administration Select /PSL Layout Check Box. Select Define Default Settings Button SAVE
Select ← 3 times Change GL A/c to 200100 Cash AccountSelect Execute Button . Double click on Cum.Bal 400000. We can see Report in our layout.
SAMPLE DOCUMENT:
This is used for Month End Provisions. For this purpose we create Sample Doc.
Ex: Salaries A/c Dr. 500000Wages A/c Dr. 600000Rent A/c Dr. 100000To O/s Exp A/c 1,200,000
Sample Document template will not update the ledger . Everymonth end we copy the template and change the amount and post the Document.
Advantages of Sample Document:
Prepared by: Rao MH 34
Advantages of Sample Document:1. Sample Document Saves times2. When we create Sample Document Template , we will not Forget any provisions3. Any Provision in the Template is paid in the same month . No provison is required for that account. So When we copy the template for the month, for thataccount Enter Amount " ZERO"
Steps to Create Sample Document Template:
1. Define Number Range Interval for Number Range X22. Creation of Masters.3. Creation of Sample Document Template4. Display Sample Document Posted5. Posting of Transactions by using Sample Document Template ( F-02)
1. Define Number Range Interval for Number Range X2
G L Document Sample DocumentType SA SA
↓ ↓
No.Range 01 X2↓ ↓
No.Range 1 to 5000001 toInterval 100000 5100000
↓ ↓
Ledger Updates Not Update
Prepared by: Rao MH 34

Path: SPRO---->Financial Accounting--->Financial Accounting Global Settings--->Document---->Document Number Ranges---> Define Doc. No Range ( FBN1)Press Enter
Company Code PSL↓
Select Change Intervals Button↓
Select Interval Button
No Year From # To #RangeX2 2009 5000001 5100000 Enter and Save
2. Creation of Masters.
GL A/c Group NameA) Salaries A/c Under Personell CostB) Rent A/c Under Adminstration CostC) O/S. Exp Under Current Liabilities & Provisions
a) Check the A/c Groups for Giving Account Numbers ( OBD4)select Position Button Chart of A/c PSL Press Enter to get List of A/c Groups
Prepared by: Rao MH 35
Chart of A/c PSL Press Enter to get List of A/c Groups
GL A/c Group Name Number RangeA) Salaries A/c Under Personell Cost 400100 to 400199B) Rent A/c Under Adminstration Cost 400300 to 400399C) O/S. Exp Under C/L & Provisions 100500 to 100599
After Note down the Number Range for Required GL A/c to create, create GL accoutnsfrom FS001st Account
GL A/c # 400100 → Salaries AccountComp. Code PSL Click on With Template Button
GL A/c # 100000Comp. Code PSL → Press Enter
Change A/c Groupt to Personnel CostSelect Radio Button P & L Statement A/cShort Text Salaries AccountLong text Salaries Account of PSL → Save
Prepared by: Rao MH 35
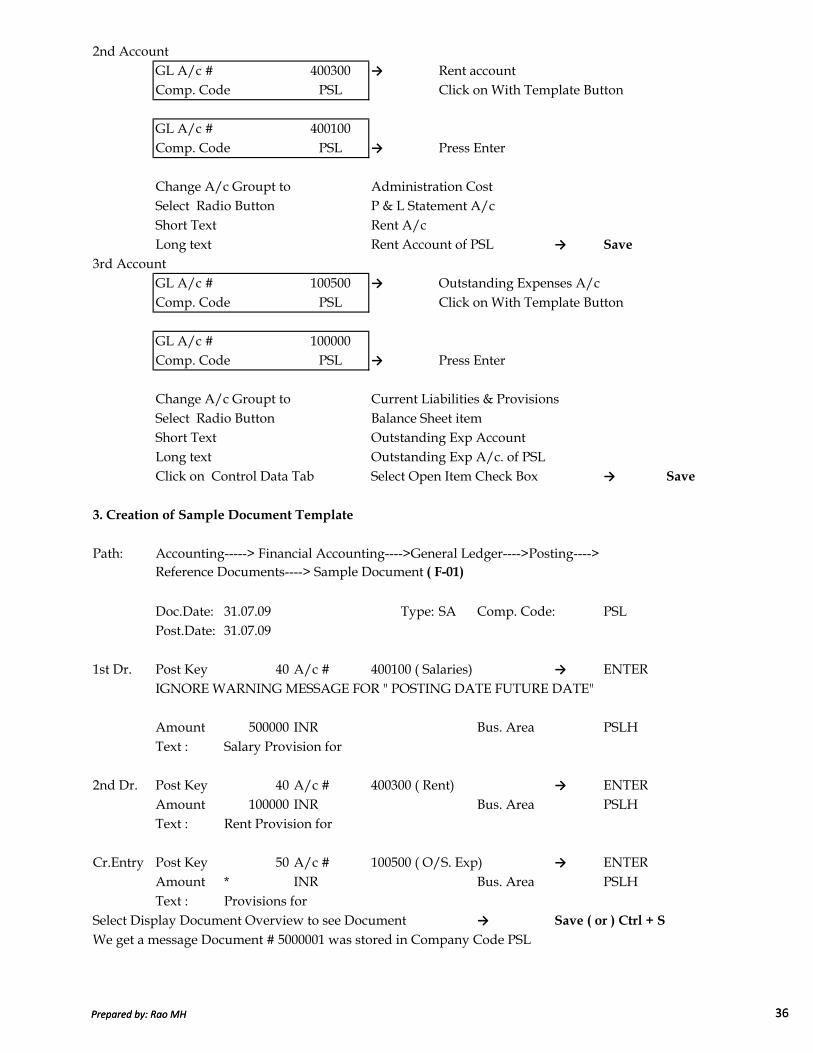
2nd AccountGL A/c # 400300 → Rent accountComp. Code PSL Click on With Template Button
GL A/c # 400100Comp. Code PSL → Press Enter
Change A/c Groupt to Administration CostSelect Radio Button P & L Statement A/cShort Text Rent A/cLong text Rent Account of PSL → Save
3rd AccountGL A/c # 100500 → Outstanding Expenses A/cComp. Code PSL Click on With Template Button
GL A/c # 100000Comp. Code PSL → Press Enter
Change A/c Groupt to Current Liabilities & ProvisionsSelect Radio Button Balance Sheet itemShort Text Outstanding Exp AccountLong text Outstanding Exp A/c. of PSLClick on Control Data Tab Select Open Item Check Box → Save
Prepared by: Rao MH 36
3. Creation of Sample Document Template
Path: Accounting-----> Financial Accounting---->General Ledger---->Posting---->Reference Documents----> Sample Document ( F-01)
Doc.Date: 31.07.09 Type: SA Comp. Code: PSLPost.Date: 31.07.09
1st Dr. Post Key 40 A/c # 400100 ( Salaries) → ENTERIGNORE WARNING MESSAGE FOR " POSTING DATE FUTURE DATE"
Amount 500000 INR Bus. Area PSLHText : Salary Provision for
2nd Dr. Post Key 40 A/c # 400300 ( Rent) → ENTERAmount 100000 INR Bus. Area PSLHText : Rent Provision for
Cr.Entry Post Key 50 A/c # 100500 ( O/S. Exp) → ENTERAmount * INR Bus. Area PSLHText : Provisions for
Select Display Document Overview to see Document → Save ( or ) Ctrl + S
We get a message Document # 5000001 was stored in Company Code PSL
Prepared by: Rao MH 36

4. Display Sample Document Posted ( FBM3):
Document # 5000001Company Code PSL → ENTER
We can see the Sample Document Stored in SAP. We can check the Ledger A/c'sof 400100 (Salaries), 400300( Rent) or 100500( O/S. Exp) because of this Sample Document Storage, Ledgers are not updated ( FS10N)
5. Posting of Transactions by using Sample Document Template ( F-02)
From Menu---->Document----> Post With Reference ( Shift+F9)
Document # 5000001Comp. Code PSLF.Year 2009Select Display Line Item Check Box → ENTER → ENTER
Ignore warning Message about Future Date and → ENTER
Change Salaries Provision for 450000 Text : Add July to Text → ENTER
If Rent Provision is not required for the month of July Change the Amount to "0"→ ENTER Ignore message for " Amount is Zero, Line Item Ignored"
Prepared by: Rao MH 37
→ ENTER Ignore message for " Amount is Zero, Line Item Ignored"→ ENTER
for Post Key 50 i.e, Outstandings Expenses (Credit Entry)
Amount *Text Add July → ENTER
Select Save or Ctrl + S to get message Document# 2 was posted.
PARKING OF DOCUMENTS : Parking of Documents are used where approval by Sr. Person is reqired for the Posted Documents. For Example, if in any company Cashier or Accountant and Accounts Manager/ Sr. Person are there .
Cashier/ Accountant Acc.Manager/ Sr. Person
Enter the Transaction and After Parking Cashier Sr. Verify the Parked DocPark the Document for will Send Message to and make corrections if Approval of Senior Senior for Release / need and Releases the Doc.
Approval of Doc.
Parking will not Update After Releasing Sr. will Releasing will updated the the Ledger send reply to Cashier Ledger
→
←
Prepared by: Rao MH 37

Steps to Cover this Topic :1 Entering Document and Parking by Cashier/Accountant2 Display G L A/c to check wether Ledgers updated or Not. 3 Sending Message to Senior for Releasing Parked Document4 Display Parked Documents, Make Corrections in Amount, Head of Account, Dateand Releasing by Sr. Person
5 Display G L A/c to check wether Ledgers updated or Not. 6 Sending Message to Cashier regarding the Releasing of Document by Sr. Person7 Display changes made by Senior Person in Parked Document for Cashier
1 Entering Document and Parking by Cashier/Accountant
Path: Accounting ----> Financial Accounting---->General Ledger----> Posting---->General Document Parking ( F-65)
Doc.Date: 18.07.09 Type: SA Comp.Code: PSLPost.Dt: 18.07.09
Post Key: 40 Account No: 400100 → ENTERAmount: 1111 Business Area: PSLHText: Parking Document Testing
Post Key: 50 Account No: 200100 → ENTERAmount: * Business Area: PSLHText: +
Prepared by: Rao MH 38
Text: +Select Document Overview ( Shift+F2) Button which is on Left TopWe get a message Document 3 was parked in PSL
2 Display G L A/c to check wether Ledgers updated or Not. ( FS10N)
GL A/c 400100 Comp. Code: PSLF.Year 2009 Business Area: PSLHSelect Execute Button We can see that Ledger is not updated
3 Sending Message to Senior for Releasing Parked Document
Menu-----> System-----> Short messageTitle: Please Release Document # 3
Rece: Enter User Id of Sr. PersonRec. Type: SAP Log On Name
Select Express Mail Check Box to show Message to Sr. Person that Message ReceivedSelect Send Button
Prepared by: Rao MH 38

4 Display Parked Document and Release after correcions:
PATH: Accounting---->Financial Accounting---->General Ledger---->Document---->Park Documents---->Post/Delet ( FBV0)Select Documents List ButtonCompany Code: PSLEntered by: Use id of Cashier Press Execute ButtonDouble Click on Document# 3
To Change the Date click on Document Header Button( Shift + F7)Change the Document Date and posting date Select Back arrow
To change the Head of Account, select Fast Data Entry ButtonChange Dr. Account Number to 400300 ( Rent A/c) and Amount to 600 for Debitand Credit Amounts.-----> Save---> We get a message Document was Posted.
5 Display G L A/c to check wether Ledgers updated or Not. (FS10N)
GL A/c 400300 Comp. Code: PSLF.Year 2009 Business Area: PSLHSelect Execute Button We can see that Ledger is updated with 600 not 1111.
6 Message to Cashier regarding the Releasing of Document by Sr. Person
Menu-----> System-----> Short message
Prepared by: Rao MH 39
Menu-----> System-----> Short messageTitle: Released Document # 3 with changes
Rece: Enter User Id of CashierRec. Type: SAP Log On Name
Select Express Mail Check Box to show Message to Sr. Person that Message ReceivedSelect Send Button
7 Display changes made by Senior Person in Parked Document for Cashier
PATH: Accounting---->Financial Accounting----->General Ledger----->Documents----->Parked Documents----->Display Changes( FBV5)
Company Code: PSLDocument No: 3Fiscal Year: 2009Select all changes button ( F6) to see changes made by senior for parked document.
HOLD DOCUMENTS: This is used for the purpose of Adjustment Entries. Hold Documents are for Debit and Credit or only Credit also. When we hold the document, it willask for a Temporary Document Number which can be anything. We have the option to delet the hold document also. Hold document will not update the ledger until it is posted as normal Document.If we made Hold document for Cash Account, then Physical Cash Balance will be SAP Balance + Hold Documents amount.
Prepared by: Rao MH 39

Steps for Hold Documents :1 Run Program "RFTMPBLU" for conversion of Hold Documents. 2 Creation of Hold Document(A) One document with Debit and Credit Entries(B) One document with Credit entry only
3 Display Hold Documents, Delet document ( A) in Point 2, and Complete 2 (B)
Step 1. Run Program "RFTMPBLU" for conversion of Hold Documents. This Option is for converting the Documents of older version SAP4.7 to New Version ECC6.0This is given at Client Level but not at Company Code level. This is one time Exercise for each client.
PATH: Tools----> ABAP Work Bench---->Development---->ABAP Editor ( SE38)--->Program Select Execute ButtonSelect No termination for Read Error Check Box----> Select Execute
Step 2. Creation of Hold Document ( F-02)
2A. Doc. Dt: 20.07.09 Type SA Comp Code: PSLPost.Dt: 20.07.09Post Key: 40 Account No: 400100 → ENTERAmount 20000 Bussiness Area: PSLHText: Hold Document Testing
Post Key: 50 Account No: 200100 → ENTERAmount * Bussiness Area: PSLH
RFTMPBLU
Prepared by: Rao MH 40
Amount * Bussiness Area: PSLHText: +Menu----> Document----> Hold ----> Give Hold Document Temp Numb 1234We will get message that Doc 1234 was Held.
2B. Doc. Dt: 20.07.09 Type SA Comp Code: PSLPost.Dt: 20.07.09
Post Key: 50 Account No: 200100 → ENTERAmount 5000 Bussiness Area: PSLHText: Amount Paid to Mr. XMenu----> Document----> Hold ----> Give Hold Document Temp Numb 12345We will get message that Doc 12345 was Held.
Step 3. Display Hold Documents, Delet document ( A) in Point 2, and Complete 2 (B) ( F-02)
Menu-------> Documents------> Get Held Documents(F5)Select Documents List → ENTERKeep Cursoon on Document 1234 and select Delet Button. Confirm by prssing Yes for the message. Document 1234 will be deleted. To confirm check with back arrow
Prepared by: Rao MH 40

Double Click on Document 12345Post Key: 40 Account No: 400100 → ENTERAmount * Bussiness Area: PSLHText: +Menu---> Document----> Simulate SAVEPress Enter when we get message.
Check the Document List again by pressing Back Arrow to see Held document was released from there or not. Once Held Document was posted, it will disappearfrom Held Documents List.
RECURRING DOCUMENTS: Recurring Documents are used when date and amount are fixed. Ex: Prepaid Expenses / Hire Purchase Installments.
Steps for Recurring Documents:1 Define Number Range Interval for Number Range X1 ( For Recurring Document Template)
2 Creation of Recurring Document3 Posting of Transactions by using Recurring Document Templates by the way of Batch input Session.
Step 1. Define Number Range Interval for Number Range X1 ( FBN1)
Company Code: PSLSelect Change Intervals Button -----> Select Intervals Button
Prepared by: Rao MH 41
Select Change Intervals Button -----> Select Intervals Button
No Year From No To NoX1 2009 5100001 5200000 → ENTERIgnore the Warning Message and press Enter
Step 2. Creation of Recurring Document ( FBD1)
Accounting ----> Financial Accounting--->General Ledger--->Posting--->Reference Documents--->Recurring DocumentCompany Code: PSLFirst Run on : 31.07.09Last Run on : 30.06.10Interval in Months: 01 for MonthlyDocument Type: SAPost Key: 40 Account No: 400300 → ENTERAmount 10000 Bussiness Area: PSLHText: Recurring Area Testing
Post Key: 50 Account No: 200100 → ENTERAmount * Bussiness Area: PSLHText: + Select Display Document Overview Button---> Save
We get a message 5100001 was stored in Company Code PSL
Prepared by: Rao MH 41

Step 3. Display & Posting Recurring Document
Display: Accounting---> Fianancial Accounting---->General Ledger---->Periodic Processing----->Recurring Entries----> Lists( F.15)
Posting: Accounting---> Fianancial Accounting---->General Ledger---->Periodic Processing----->Recurring Entries----> Execute( F.14)Company Code: PSLDocument Numb: 5100001 (Number Generated by Creation of Recurring Doc)Session Name PSL → Select Process ButtonSelect Display Errors only Radio ButtonSelect Process Button againWe get a message "Processing of Batch Input Session Completed"Exit from Batch Input Session.
To View the Document Posted use the Transction Code FB-03 → ENTER
FOREIGN CURRENCY TRANSACTIONS:
There are 3 types of Exchange Rates defined by SAPType Purpsose Type Defined by SAP
1 Bank Buying Rate Exports Purpose G Type2 Bank Selling Rate Imports/ Exp B Type3 Average Rate MM / SD users only M Type
PATH: SPRO---->Sap Net Weaver---->General Settings--->Currencies--->Check Exchange
Prepared by: Rao MH 42
PATH: SPRO---->Sap Net Weaver---->General Settings--->Currencies--->Check ExchangeRate Types Select Position ButtonExchange Rate Type B → ENTERWe will get the details of Exchange Rate Type B
Define Translation Ratios for Currency Translation:
Here we give Conversion Factors for 2 CurrenciesForeign INR JPY → Japanees YenCurrency GBP → Great Britan PoundUS$ 1 : 1 ITL → Italian LeeraJPY 100 : 1EUR 1 : 1 We can give in SAP Like belowGBP 1 : 1 JPY INR RateITL 1000 : 1 100 == 1 35 ( OR)
1 == 0.01 0.35
Once we follow one Conversion Factor , follow contineously for all the years. Don’t Changein between. If we change in between, it gives wrong Results.
Conversion Factors are given at Client Level but not at Company Code Level.PATH: Same as above ignore the warning message and press Yes. Select New Entries
Button
Prepared by: Rao MH 42

Ex. Rate From To Valid Type From From : ToG US$ INR 01.07.09 1 : 1B US$ INR 01.07.09 1 : 1M US$ INR 01.07.09 1 : 1 → Save
Create Request ButtonShort Description: Foreign Exchange Customization for PSL
ENTER 2 times to save in your request.
Enter Exchange Rates: This is called Forex Table. We can enter Foreign Exchange Rates Daily, Weekly, Monthly. For Each Type we can enter only one rate in a day.
PATH: Same Path as above ( Next Step to last Path)
Ex.Rate Valid Indirect From Direct ToType From Quot QuotG 10.07.09 US$ 49.40 INRB 10.07.09 US$ 49.50 INRM 10.07.09 US$ 49.42 INR → ENTERSAVE and press Enter to save in your request. Indirect Quot is for INR to US$ Rate .
Exchange Rate Entry at End User Area (S_BCE_68000174)
PATH Accounting ---->Financial Accounting---->General Ledger---->Environment---->Current Settings--->Enter Translation Rates
Ratio
Prepared by: Rao MH 43
Current Settings--->Enter Translation RatesSelect Positon ButtonEx.Rate Tyep GFrom Currency US$To Currency INRValid From 10.07.09 → ENTER
Foreign Currency Postings : There are two typs of options for Foreign currency postings.OPTION -1 OPTION-2When Exchange Rate is not entered When Exchange Rate is entered at the time of Posting the Document at the time of Posting the Document
In Option 1, system take the Ex. Rate Rates are entered by End User , but not from Forex Table the System.
It takes the Latest Rate from TableEx. on 09.07.09 Rate is 45
on 21.07.09 Rate is 49If we want to enter document on 20.07.09, system will take the rate of 45 not 49
Prepared by: Rao MH 43
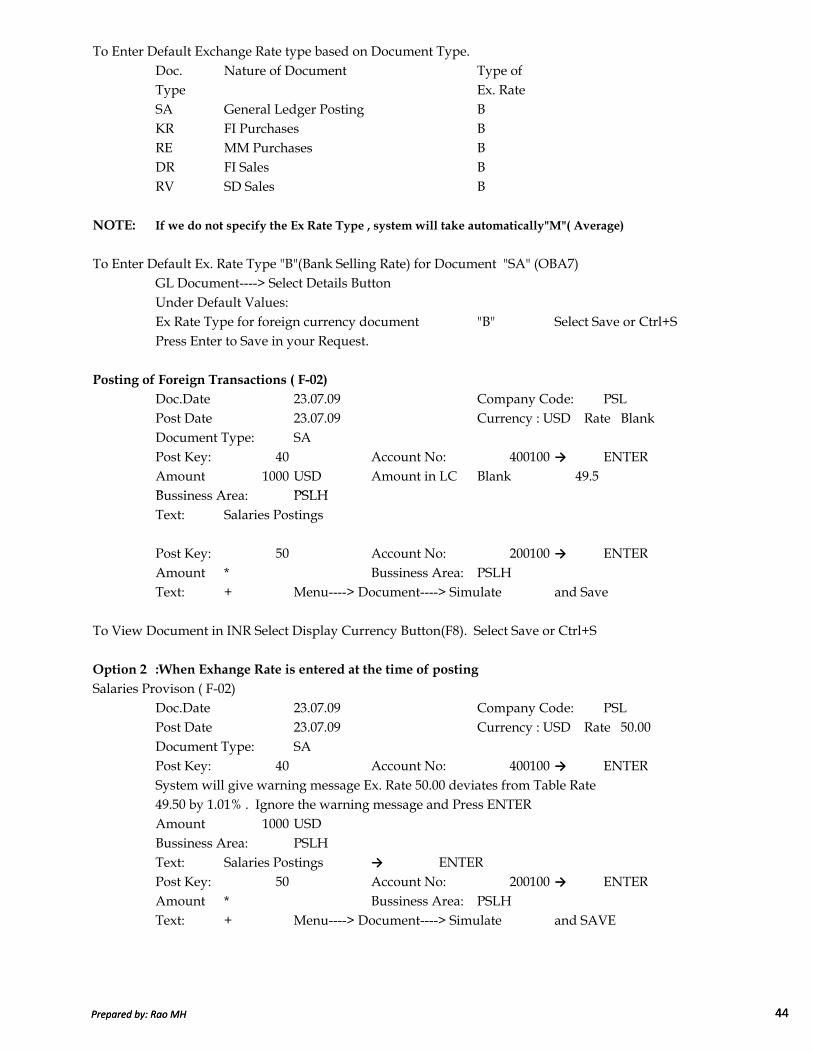
To Enter Default Exchange Rate type based on Document Type.Doc. Nature of Document Type of Type Ex. RateSA General Ledger Posting BKR FI Purchases BRE MM Purchases BDR FI Sales BRV SD Sales B
NOTE: If we do not specify the Ex Rate Type , system will take automatically"M"( Average)
To Enter Default Ex. Rate Type "B"(Bank Selling Rate) for Document "SA" (OBA7)GL Document----> Select Details Button Under Default Values:Ex Rate Type for foreign currency document "B" Select Save or Ctrl+SPress Enter to Save in your Request.
Posting of Foreign Transactions ( F-02)
Doc.Date 23.07.09 Company Code: PSLPost Date 23.07.09 Currency : USD Rate BlankDocument Type: SAPost Key: 40 Account No: 400100 → ENTERAmount 1000 USD Amount in LC Blank 49.5Bussiness Area: PSLH
Prepared by: Rao MH 44
Bussiness Area: PSLHText: Salaries Postings
Post Key: 50 Account No: 200100 → ENTERAmount * Bussiness Area: PSLHText: + Menu----> Document----> Simulate and Save
To View Document in INR Select Display Currency Button(F8). Select Save or Ctrl+S
Option 2 :When Exhange Rate is entered at the time of posting
Salaries Provison ( F-02)Doc.Date 23.07.09 Company Code: PSLPost Date 23.07.09 Currency : USD Rate 50.00Document Type: SAPost Key: 40 Account No: 400100 → ENTERSystem will give warning message Ex. Rate 50.00 deviates from Table Rate49.50 by 1.01% . Ignore the warning message and Press ENTERAmount 1000 USDBussiness Area: PSLHText: Salaries Postings → ENTERPost Key: 50 Account No: 200100 → ENTERAmount * Bussiness Area: PSLHText: + Menu----> Document----> Simulate and SAVE
Prepared by: Rao MH 44
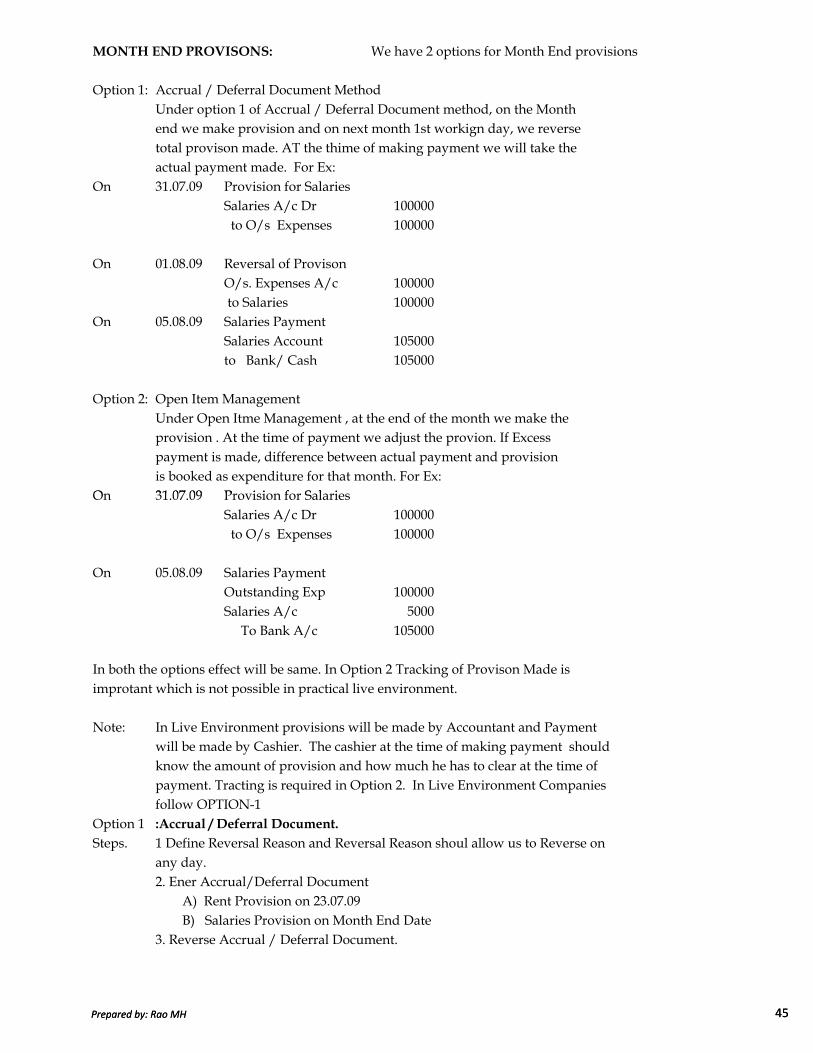
MONTH END PROVISONS: We have 2 options for Month End provisions
Option 1: Accrual / Deferral Document MethodUnder option 1 of Accrual / Deferral Document method, on the Month end we make provision and on next month 1st workign day, we reversetotal provison made. AT the thime of making payment we will take the actual payment made. For Ex:
On 31.07.09 Provision for SalariesSalaries A/c Dr 100000 to O/s Expenses 100000
On 01.08.09 Reversal of ProvisonO/s. Expenses A/c 100000 to Salaries 100000
On 05.08.09 Salaries Payment Salaries Account 105000to Bank/ Cash 105000
Option 2: Open Item Management Under Open Itme Management , at the end of the month we make the provision . At the time of payment we adjust the provion. If Excess payment is made, difference between actual payment and provision is booked as expenditure for that month. For Ex:
On 31.07.09 Provision for Salaries
Prepared by: Rao MH 45
On 31.07.09 Provision for SalariesSalaries A/c Dr 100000 to O/s Expenses 100000
On 05.08.09 Salaries Payment Outstanding Exp 100000Salaries A/c 5000 To Bank A/c 105000
In both the options effect will be same. In Option 2 Tracking of Provison Made is improtant which is not possible in practical live environment.
Note: In Live Environment provisions will be made by Accountant and Payment will be made by Cashier. The cashier at the time of making payment shouldknow the amount of provision and how much he has to clear at the time of payment. Tracting is required in Option 2. In Live Environment Companiesfollow OPTION-1
Option 1 :Accrual / Deferral Document.Steps. 1 Define Reversal Reason and Reversal Reason shoul allow us to Reverse on
any day.2. Ener Accrual/Deferral Document A) Rent Provision on 23.07.09 B) Salaries Provision on Month End Date3. Reverse Accrual / Deferral Document.
Prepared by: Rao MH 45

1 Define Reversal Reason and Reversal Reason shoul allow us to Reverse on any day.
PATH: SPRO---->Financial Accounting--->GL Accounts---->Business Transactions--->Adjustment Posting/ Reversal---->Define Reason for ReversalSelect New Entries Button → ENTER
Reason 15 ( Last Number in the Reasons list of the System. Number
May differ from system to system in institutue)Text: Accrual / Deferral Reversal for PSL
† Negative Posting √
‡ Alt. Posting √ → Save
Press Enter to save in your request.
† When we reverse the transaction it reduces from the same side instead of Showing it on credit Side. Ex.Period Debit Credit Balance Cum.Bal
4 100000 ---- 100000 Dr 100000 Dr5 -100000 ---- - -
When we reverse the Salaries Provison on 1st of of August, it shows on Debit Side as Negative Balance instead of on Credit Side. If it shows on Credit Side, in Cash Flow Statement, it shows as " Cash Incoming " from
Prepared by: Rao MH 46
Credit Side, in Cash Flow Statement, it shows as " Cash Incoming " from Salaries, which seems to be awkward in reports. If it shows on Debit Side as Negative Balance, Net Effect will come in Cash Flow Statement.
‡ If we don’t select the Aleternative Check Box, system will allow us to reverse posting only on " ORIGINAL POSTING DATE". If we select the check box, it allows the reversal entry on any date.
2 Enter Accrual / Deferral DocumentPATH: Accounting ---->Financial Accounting ---->General Ledger---->Periodic Posting---->
Closing ---->Valuate---->Enter Accrual /Deferral Document (FBS1)
For Rent Provision ( FBS1):
Doc.Date 23.07.09 Type SA Company Code: PSLPost Date 23.07.09 Currency : USD Rate BlankINRReversal Reason 15 Reversal Date 01.08.09Post Key: 40 Account No: 400300 → ENTERAmount 50000 INR Bussiness Area: PSLHText: Rent Provision for July
Post Key: 50 Account No: 100500 → ENTERAmount * Bussiness Area: PSLHText: + Menu----> Document----> Simulate and Save
Prepared by: Rao MH 46

For Salaries Provision ( FBS1):
Doc.Date 31.07.09 Type SA Company Code: PSLPost Date 31.07.09 Currency : USD Rate BlankINRReversal Reason 15 Reversal Date 01.08.09Post Key: 40 Account No: 400100 → ENTERIgnore Warning Message and Press EnterAmount 300000 INR Bussiness Area: PSLHText: Salaries Provison for JULY
Post Key: 50 Account No: 100500 → ENTERAmount * Bussiness Area: PSLHText: + Menu----> Document----> Simulate and Save
3 Reversal of Accrual / Deferral Document ( F.81)
PATH: Same Path ( Next Level to the last Path)
Company. Code: PSLReverse Posting Dt: 01.08.09
Test Run √ → Select Execute Button ( F8)
Select Reverse Docs. Button
We get a Message that Documents Were reversed with another Document Number
OPTION-2: Open Item Management
Prepared by: Rao MH 47
OPTION-2: Open Item Management
This is used for Vendors / Customers / Balance Sheet Accounts, where Clearing is Required. IN Balance Sheet Accounts it is applicable like1. Where there is Provision and Payment will be made in future Ex. O/S. Exp2. Where there is Recovery and Payment Afterwards Ex: TDS/PF Etc.,
Concept of Open Item Management is like Bill Wise Adjustments in Other AccountingSoftwares.For Making Open Item Management active, we have to select the " Open Item Management" Check Box at the time of GL Master Creations.
Suppose Consider Outstanding Expenses Account, if we see account at the end of the year, there will be so many debits and credits. We don’t know which item is paid and which is payable. If we select the Open Item Management check Box at the time of GL Master Creation, while at the time of making payment system will ask about the payment is against which provision. Once we selected payementagaisnt Rent Provison, that item will be cleared from Open Items List.
We can see the Outstanding Expneses in 3 ways.a) Open Items : Payable Items b) Cleared Items: Amount paid Itemsc) All Items: All items of Payable and Paid items.
Prepared by: Rao MH 47
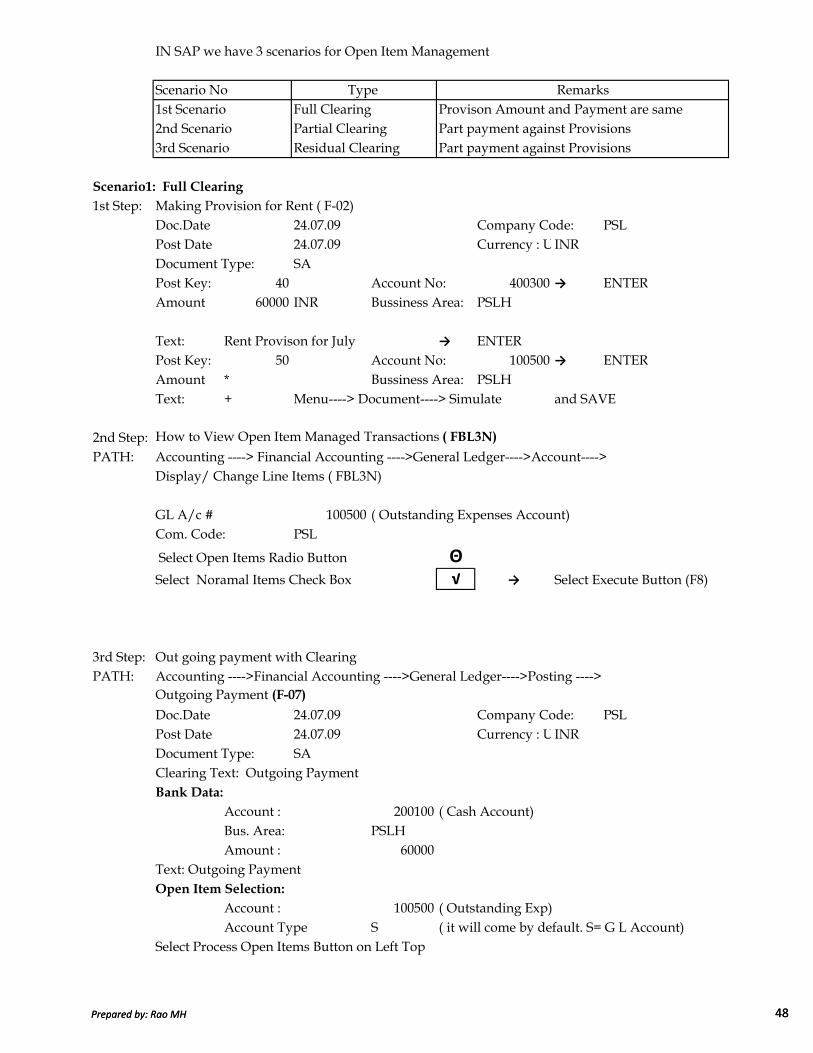
IN SAP we have 3 scenarios for Open Item Management
Scenario No1st Scenario Full Clearing Provison Amount and Payment are same2nd Scenario Partial Clearing Part payment against Provisions3rd Scenario Residual Clearing Part payment against Provisions
Scenario1: Full Clearing
1st Step: Making Provision for Rent ( F-02)Doc.Date 24.07.09 Company Code: PSLPost Date 24.07.09 Currency : USD Rate 50.00INRDocument Type: SAPost Key: 40 Account No: 400300 → ENTERAmount 60000 INR Bussiness Area: PSLH
Text: Rent Provison for July → ENTERPost Key: 50 Account No: 100500 → ENTERAmount * Bussiness Area: PSLHText: + Menu----> Document----> Simulate and SAVE
2nd Step: How to View Open Item Managed Transactions ( FBL3N)
PATH: Accounting ----> Financial Accounting ---->General Ledger---->Account---->Display/ Change Line Items ( FBL3N)
Type Remarks
Prepared by: Rao MH 48
GL A/c # 100500 ( Outstanding Expenses Account)Com. Code: PSL
Select Open Items Radio Button Θ
Select Noramal Items Check Box √ → Select Execute Button (F8)
3rd Step: Out going payment with Clearing PATH: Accounting ---->Financial Accounting ---->General Ledger---->Posting ---->
Outgoing Payment (F-07)
Doc.Date 24.07.09 Company Code: PSLPost Date 24.07.09 Currency : USD Rate 50.00INRDocument Type: SAClearing Text: Outgoing PaymentBank Data:
Account : 200100 ( Cash Account)Bus. Area: PSLHAmount : 60000
Text: Outgoing PaymentOpen Item Selection:
Account : 100500 ( Outstanding Exp)Account Type S ( it will come by default. S= G L Account)
Select Process Open Items Button on Left Top
Prepared by: Rao MH 48
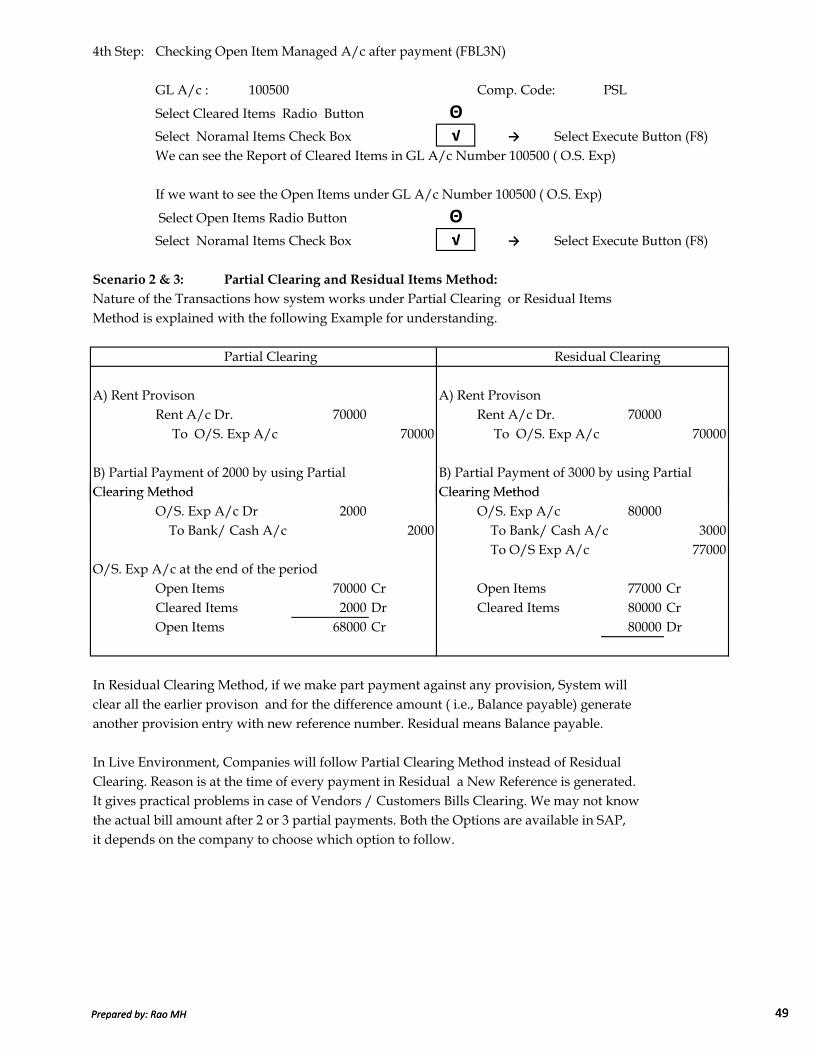
4th Step: Checking Open Item Managed A/c after payment (FBL3N)
GL A/c : 100500 Comp. Code: PSL
Select Cleared Items Radio Button Θ
Select Noramal Items Check Box √ → Select Execute Button (F8)We can see the Report of Cleared Items in GL A/c Number 100500 ( O.S. Exp)
If we want to see the Open Items under GL A/c Number 100500 ( O.S. Exp)
Select Open Items Radio Button Θ
Select Noramal Items Check Box √ → Select Execute Button (F8)
Scenario 2 & 3: Partial Clearing and Residual Items Method:
Nature of the Transactions how system works under Partial Clearing or Residual Items Method is explained with the following Example for understanding.
Partial Clearing Residual Clearing
A) Rent Provison A) Rent ProvisonRent A/c Dr. 70000 Rent A/c Dr. 70000 To O/S. Exp A/c 70000 To O/S. Exp A/c 70000
B) Partial Payment of 2000 by using Partial B) Partial Payment of 3000 by using Partial Clearing Method Clearing Method
Prepared by: Rao MH 49
Clearing Method Clearing MethodO/S. Exp A/c Dr 2000 O/S. Exp A/c 80000 To Bank/ Cash A/c 2000 To Bank/ Cash A/c 3000
To O/S Exp A/c 77000O/S. Exp A/c at the end of the period
Open Items 70000 Cr Open Items 77000 CrCleared Items 2000 Dr Cleared Items 80000 CrOpen Items 68000 Cr 80000 Dr
In Residual Clearing Method, if we make part payment against any provision, System willclear all the earlier provison and for the difference amount ( i.e., Balance payable) generateanother provision entry with new reference number. Residual means Balance payable.
In Live Environment, Companies will follow Partial Clearing Method instead of Residual Clearing. Reason is at the time of every payment in Residual a New Reference is generated. It gives practical problems in case of Vendors / Customers Bills Clearing. We may not knowthe actual bill amount after 2 or 3 partial payments. Both the Options are available in SAP, it depends on the company to choose which option to follow.
Prepared by: Rao MH 49
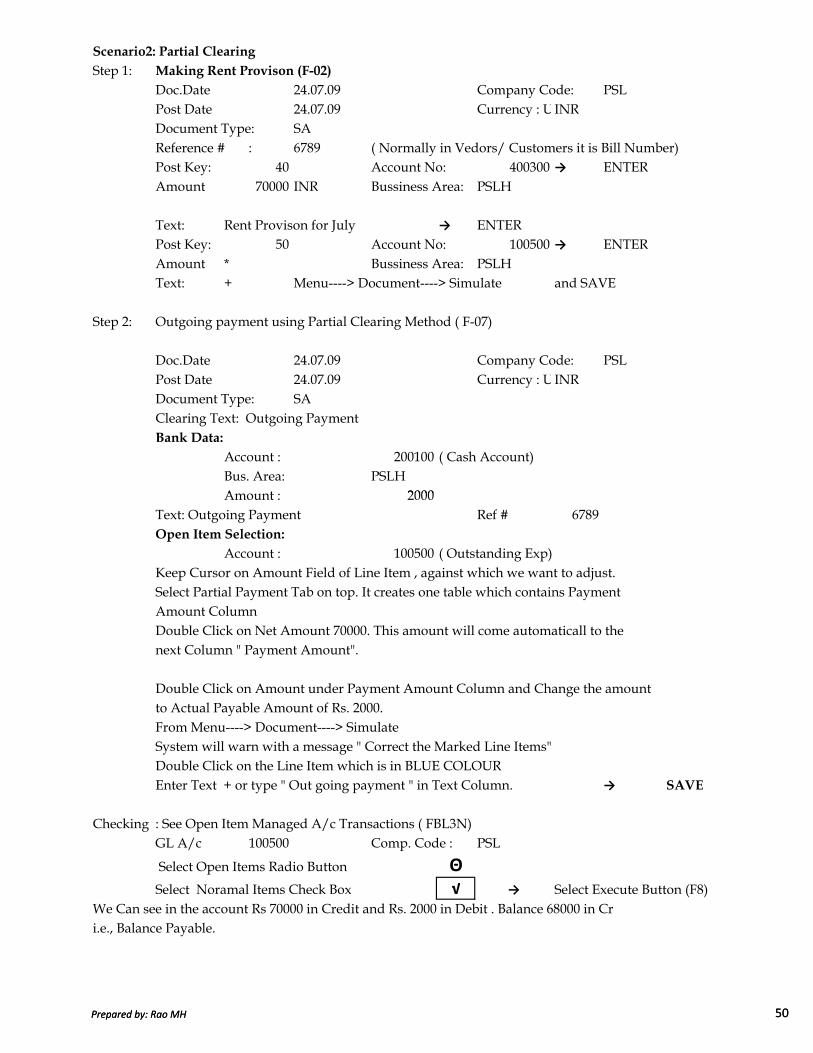
Scenario2: Partial Clearing
Step 1: Making Rent Provison (F-02)
Doc.Date 24.07.09 Company Code: PSLPost Date 24.07.09 Currency : USD Rate 50.00INRDocument Type: SAReference # : 6789 ( Normally in Vedors/ Customers it is Bill Number)Post Key: 40 Account No: 400300 → ENTERAmount 70000 INR Bussiness Area: PSLH
Text: Rent Provison for July → ENTERPost Key: 50 Account No: 100500 → ENTERAmount * Bussiness Area: PSLHText: + Menu----> Document----> Simulate and SAVE
Step 2: Outgoing payment using Partial Clearing Method ( F-07)
Doc.Date 24.07.09 Company Code: PSLPost Date 24.07.09 Currency : USD Rate 50.00INRDocument Type: SAClearing Text: Outgoing PaymentBank Data:
Account : 200100 ( Cash Account)Bus. Area: PSLHAmount : 2000
Prepared by: Rao MH 50
Amount : 2000Text: Outgoing Payment Ref # 6789Open Item Selection:
Account : 100500 ( Outstanding Exp)Keep Cursor on Amount Field of Line Item , against which we want to adjust.Select Partial Payment Tab on top. It creates one table which contains Payment Amount ColumnDouble Click on Net Amount 70000. This amount will come automaticall to the next Column " Payment Amount".
Double Click on Amount under Payment Amount Column and Change the amountto Actual Payable Amount of Rs. 2000.From Menu----> Document----> SimulateSystem will warn with a message " Correct the Marked Line Items"Double Click on the Line Item which is in BLUE COLOUREnter Text + or type " Out going payment " in Text Column. → SAVE
Checking : See Open Item Managed A/c Transactions ( FBL3N)GL A/c 100500 Comp. Code : PSL
Select Open Items Radio Button Θ
Select Noramal Items Check Box √ → Select Execute Button (F8)We Can see in the account Rs 70000 in Credit and Rs. 2000 in Debit . Balance 68000 in Cri.e., Balance Payable.
Prepared by: Rao MH 50
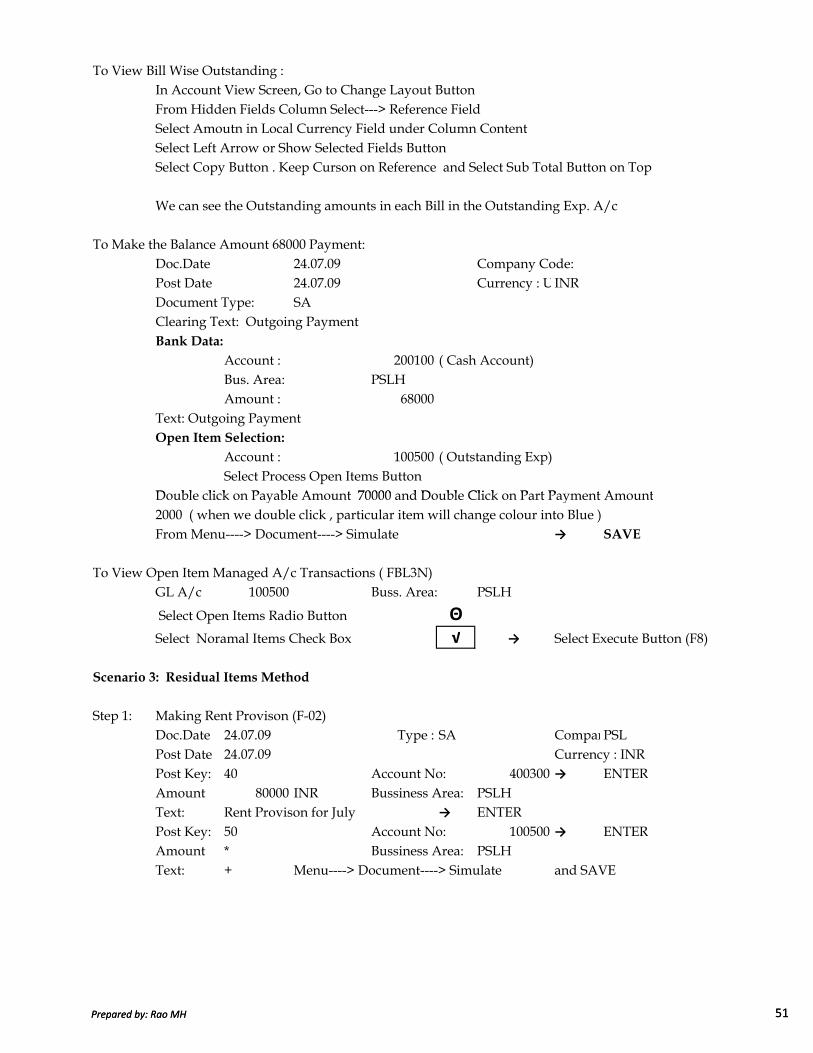
To View Bill Wise Outstanding :In Account View Screen, Go to Change Layout Button From Hidden Fields Column Select---> Reference Field Select Amoutn in Local Currency Field under Column ContentSelect Left Arrow or Show Selected Fields ButtonSelect Copy Button . Keep Curson on Reference and Select Sub Total Button on Top
We can see the Outstanding amounts in each Bill in the Outstanding Exp. A/c
To Make the Balance Amount 68000 Payment:Doc.Date 24.07.09 Company Code: Post Date 24.07.09 Currency : USD Rate 50.00INRDocument Type: SAClearing Text: Outgoing PaymentBank Data:
Account : 200100 ( Cash Account)Bus. Area: PSLHAmount : 68000
Text: Outgoing PaymentOpen Item Selection:
Account : 100500 ( Outstanding Exp)Select Process Open Items Button
Double click on Payable Amount 70000 and Double Click on Part Payment Amount
Prepared by: Rao MH 51
Double click on Payable Amount 70000 and Double Click on Part Payment Amount2000 ( when we double click , particular item will change colour into Blue )From Menu----> Document----> Simulate → SAVE
To View Open Item Managed A/c Transactions ( FBL3N)GL A/c 100500 Buss. Area: PSLH
Select Open Items Radio Button Θ
Select Noramal Items Check Box √ → Select Execute Button (F8)
Scenario 3: Residual Items Method
Step 1: Making Rent Provison (F-02)Doc.Date 24.07.09 Type : SA Company Code: PSLPost Date 24.07.09 Currency : INRPost Key: 40 Account No: 400300 → ENTERAmount 80000 INR Bussiness Area: PSLHText: Rent Provison for July → ENTERPost Key: 50 Account No: 100500 → ENTERAmount * Bussiness Area: PSLHText: + Menu----> Document----> Simulate and SAVE
Prepared by: Rao MH 51

Step 2: Making Part Payment using Residual Method ( F-07)Doc.Date 24.07.09 Type SA Company Code: PSLPost Date 24.07.09 Currency : USD Rate 50.00INRClearing Text: Outgoing PaymentBank Data:
Account : 200100 ( Cash Account)Bus. Area: PSLHAmount : 3000
Text: Part Payment for Rent ProvOpen Item Selection:
Account : 100500 Process Open Item Button / Tab
Select Amound Field of Line Item appear to shich we want to adjust--->Select Residual Items Tab, System Will generate one table which containsResidual Items Column.Double click on Net Amount 80000 which is to be adjusted Double Clik on Residual Items Amount Field. Blance amount ( Acutal Provison Less Amount paid ) will show in that column automatically ( i.e, 77000 in exp)
From Menu----> Document ----> Simulate System will warn with a message " Correct the Marked Line Items"Double Click on the Line Item which is in BLUE COLOUREnter Text + or type " Out going payment " in Text Column. → SAVE
Prepared by: Rao MH 52
REVERSALS: When we post a Wrong Entry in SAP, we have to go for Reversal or pass a Rectification Entry. There are so many Types of Reversals allowedin SAP. They are
1 Individual Document Reversal2 Reversal of Reversed Document ( Work Around Method -- Indirect Method)3 Mass Reversal4 Cleared Items Reversals5 Accrual / Deferral Documents Reversal ( Topic covered at Month End Provisons)
Type 1: Individual Document Reversal
A) Under This Method, we can reverse one document at a time B) At the time of Reversal we have to give the Reversal Reason .C) At the time of Reversal , we have to specify Reversal Date. If we don’t specify reversal date, System will generate reversal Document on Original Document Posting Date. In that case, that Original Document Posting Period should be open at the time of reversing the document.
PATH: Accounting ---->Financial accounting---->General Ledger---->Document---->Reverse---->Individual Reversal ( FB08)
***** XXXX****
Prepared by: Rao MH 52

Reversal of Document # 1
Documnt No : 1 Comp Code: PSL F.Year 2009Reversal Reason 01 ( Reversal In Current Period)Posting Date: BlankSelect Display Before Reversal Button on Top
Select ← ( Back arrow) and Select Save Button
To See the reversed Document : Menu---> Document----> DisplayReversed Document Type : AB
For General Ledger Postings Document Type is SA . Eventhough Reversal Document is part of the GL Documents, System will specify automaticallyfor Reversal Documents Type as AB. Why?
Reversal Documents are part of General Ledger Postings. If System generate Document Type SA for reversal Document , as number will come in Serial either for Normal Posting or for Reversal Postings. If I want to see only the ReversalDocuments it is not possible if it allots type SA for all Documents. To identify the Reversal Documents Separately System is allotting Type AB for reversal Documents.Ex: Doc. No. Type
1 SA SA is for General Postings2 SA AB is for Reversal Documents.3 SA
Prepared by: Rao MH 53
3 SA4 SA Even though Document number is in 5 SA Serial, we can identify the Reversed 6 SA Documents with Document Type "AB"7 AB as shown in Example8 AB9 SA10 AB
Type 2: Reversal of Reversed Document (F-02)
From Menu-----> Document ----> Post with ReferenceDoc # 19 Comp Code: PSL F.Year 2009Select Generate Reverse Posting Check BoxSelect Display Line Items Check Box → Press ENTER 2 TimesText: Change to Reversal of Document # 19 → ENTERText : + Enter , we can see the reversal of Reversed Document
SAVE We get the message that Document was Saved.
Menu---> Document----> Display to see the Reversed Document.
Prepared by: Rao MH 53
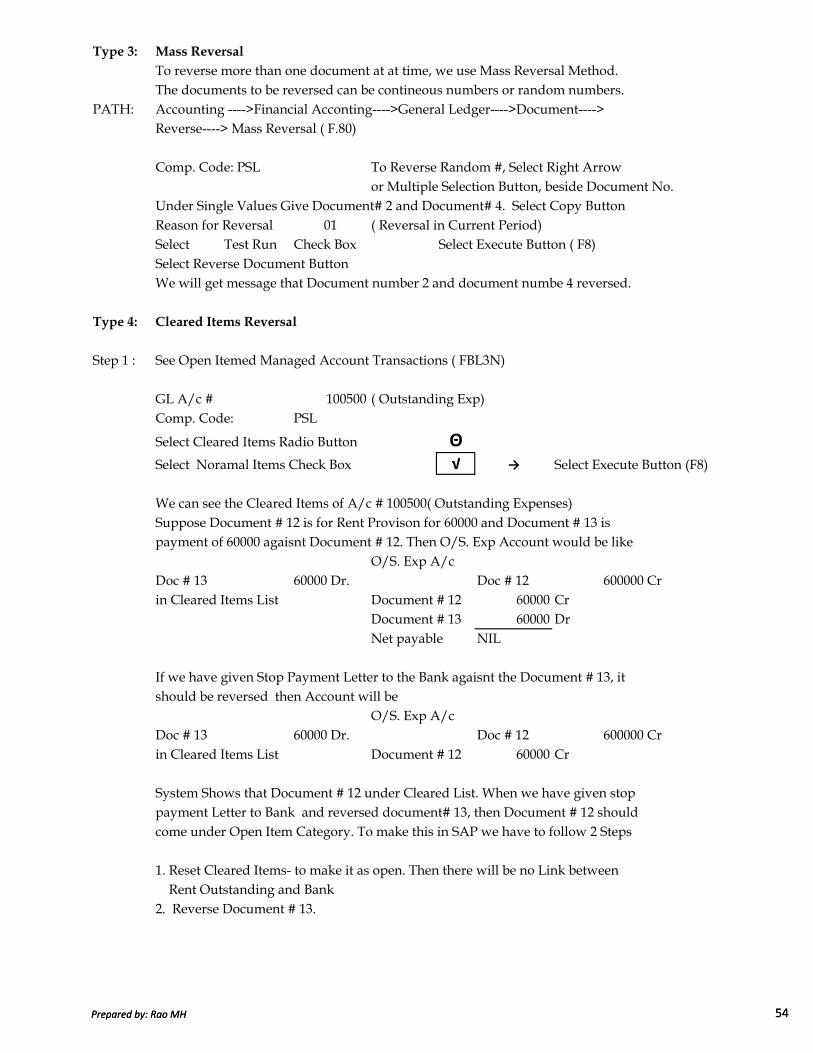
Type 3: Mass Reversal
To reverse more than one document at at time, we use Mass Reversal Method.The documents to be reversed can be contineous numbers or random numbers.
PATH: Accounting ---->Financial Acconting---->General Ledger---->Document---->Reverse----> Mass Reversal ( F.80)
Comp. Code: PSL To Reverse Random #, Select Right Arrowor Multiple Selection Button, beside Document No.
Under Single Values Give Document# 2 and Document# 4. Select Copy ButtonReason for Reversal 01 ( Reversal in Current Period)Select Test Run Check Box Select Execute Button ( F8)Select Reverse Document ButtonWe will get message that Document number 2 and document numbe 4 reversed.
Type 4: Cleared Items Reversal
Step 1 : See Open Itemed Managed Account Transactions ( FBL3N)
GL A/c # 100500 ( Outstanding Exp)Comp. Code: PSL
Select Cleared Items Radio Button Θ
Select Noramal Items Check Box √ → Select Execute Button (F8)
Prepared by: Rao MH 54
We can see the Cleared Items of A/c # 100500( Outstanding Expenses)Suppose Document # 12 is for Rent Provison for 60000 and Document # 13 is payment of 60000 agaisnt Document # 12. Then O/S. Exp Account would be like
O/S. Exp A/cDoc # 13 60000 Dr. Doc # 12 600000 Crin Cleared Items List Document # 12 60000 Cr
Document # 13 60000 DrNet payable NIL
If we have given Stop Payment Letter to the Bank agaisnt the Document # 13, it should be reversed then Account will be
O/S. Exp A/cDoc # 13 60000 Dr. Doc # 12 600000 Crin Cleared Items List Document # 12 60000 Cr
System Shows that Document # 12 under Cleared List. When we have given stoppayment Letter to Bank and reversed document# 13, then Document # 12 shouldcome under Open Item Category. To make this in SAP we have to follow 2 Steps
1. Reset Cleared Items- to make it as open. Then there will be no Link between Rent Outstanding and Bank2. Reverse Document # 13.
Prepared by: Rao MH 54
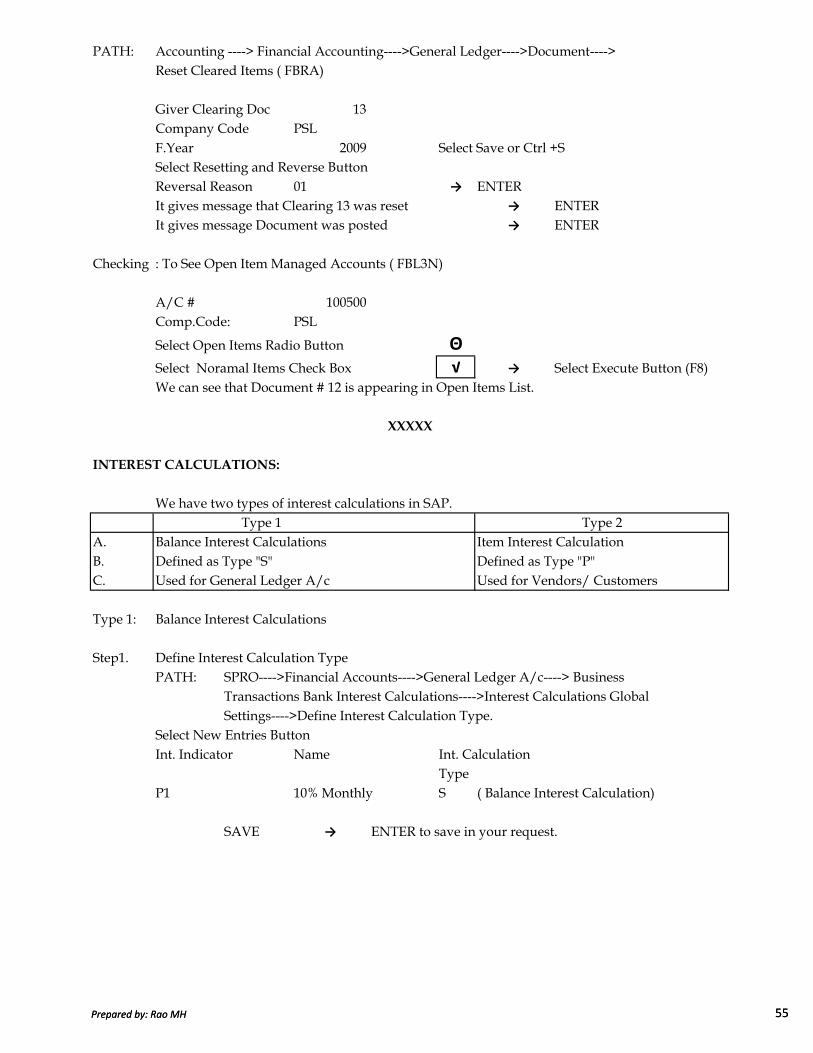
PATH: Accounting ----> Financial Accounting---->General Ledger---->Document---->Reset Cleared Items ( FBRA)
Giver Clearing Doc 13Company Code PSLF.Year 2009 Select Save or Ctrl +SSelect Resetting and Reverse Button Reversal Reason 01 → ENTERIt gives message that Clearing 13 was reset → ENTERIt gives message Document was posted → ENTER
Checking : To See Open Item Managed Accounts ( FBL3N)
A/C # 100500Comp.Code: PSL
Select Open Items Radio Button Θ
Select Noramal Items Check Box √ → Select Execute Button (F8)We can see that Document # 12 is appearing in Open Items List.
INTEREST CALCULATIONS:
XXXXX
Prepared by: Rao MH 55
We have two types of interest calculations in SAP.
A. Balance Interest Calculations Item Interest CalculationB. Defined as Type "S" Defined as Type "P"C. Used for General Ledger A/c Used for Vendors/ Customers
Type 1: Balance Interest Calculations
Step1. Define Interest Calculation TypePATH: SPRO---->Financial Accounts---->General Ledger A/c----> Business
Transactions Bank Interest Calculations---->Interest Calculations GlobalSettings---->Define Interest Calculation Type.
Select New Entries Button Int. Indicator Name Int. Calculation
TypeP1 10% Monthly S ( Balance Interest Calculation)
SAVE → ENTER to save in your request.
Type 1 Type 2
Prepared by: Rao MH 55

Step2. Prepare A/c Balance Interest Calculation PATH: Next step to last path ( TC=OBAA)Select New Entries Button Int. Cal Indicator P1Int. Cal Frequency 01 ( 1 Month) Under Period DeterminationCalender Tyep GSelect Balance Interest Check Box under Output Section
SAVE → ENTER to save in your request.
Step3. Define Reference Interest Rates
For Example there is SBI Term Loan which was take on 15.4.2009 for Rs. 100000.ON 15.07.2009 we repaid 1st Installment of Rs. 10,000Interest Calculation for the Whole year:Method 1. Aprox. On 100000 from 15.04.09 to 31.03.10 @ 10% 15000 On paid 10000 from 15.07.09 to 31.03.10 @ 10% -3000 Balance Interest Payable 12000
Method 2. On 100000 from 15.04.09 to 15.07.09 @ 10% 4000 On 90000 from 15.07.09 to 31.03.10 @ 10% 8000
Balance Interest Payable 12000
In Both the Methods Interest Rate will be Same.
Prepared by: Rao MH 56
In Both the Methods Interest Rate will be Same.In the above Example the Rate of Interest we are paying interest on Loan takenfrom SBI and the Rate of Interest we are received from SBI on amout repaid to Bankare same.i.e, Interest Charged by Bank 10%Interest Given by Bank 10%
If both are Different ie., When Loan acount is having Credit Balance 10% When Loan account is having Debit Balance 8%
We have to define Reference Indicators for Inerest.P2 for A/c having Credit Balance 10%P3 for A/c having Debit Balance 8%
Following are Steps to follow for Interest Calculation under Type I1 Interest rates are given to Reference Interest Rates- for P2 -10% & for P3-8%2 Reference Interest Rates are assaigned to Accounts P2 to Accounts having Credit Balances P3 to Accounts having Debit Balances
3 Accounts having Credit Balance and Accounts Having Debit Balance are assaignedto interest indicators
4 Interest Indicator will be specified in Loan Account.
Prepared by: Rao MH 56
Step 1. Define Interest Rates:PATH: SPRO---->Financial Accounting--->Gen Ledger a/c--->Business Transactions---->
Bank A/c Interest Calculation--->Interest Calculation---->Reference Int. Rates(OBAC) Select New Entries Button
Ref. Interest Rate: P2Long Text Int: 10% A/c Having Credit BalanceDescription : 10% Accounts Credit BalanceDate From: 01.04.09Currency: INRSelect Save or Ctrl +S-----> press Enter to Save in your request.
Select New Entries ButtonRef. Interest Rate: P3Long Text Int: 8% A/c Having Debit BalanceDescription : 8% Accounts Debit BalanceDate From: 01.04.09Currency: INRSelect Save or Ctrl +S-----> press Enter to Save in your request.
Define Time Dependent Terms: Same Path ( Next Line to Last Path)Select New Entries Button 1Int. Cal Indicator P1Currency Key INR
Prepared by: Rao MH 57
Currency Key INREffective From 01.04.09Sequential No 1Term Select Cr. Interest : Balance Interest Calculation Ref. Int. Rate P2Select Save or Ctrl +S-----> press Enter to Save in your request.
Select New Entries Button Int. Cal Indicator P1Currency Key INREffective From 01.04.09Sequential No 2Term Select Dr. Interest : Balance Interest Calculation Ref. Int. Rate P3Select Save or Ctrl +S-----> press Enter to Save in your request.
Enter Interest Values: Same Path ( next line to last path) ( TC=OB83)Select New Entries Button
Reference Interest Rate P2 P3Valid From 01.04.09 01.04.09Interest Rate 10% 8%
Select Save or Ctrl +S-----> press Enter to Save in your request.
Prepared by: Rao MH 57
Step 2. Creation of GL Masters: ( FS00)As we have not created GL Masters for SBI Term Loan and Interest Account , we have to create now. Before Creating the GL Master check the Available A/c Nos in OBD 4 and see the Number Ranges for Account Groups. Select the available Account Number from that Range
GL Master A/c Group A/c NoSBI Rupee Term loan A/c Secured Loans 100300Interest Account Interest Group 400400
1st A/cGL A/c# 100300 Comp.Code: PSL F.Year: 2009Select With Template Button GL A/c# 100000Comp.Code: PSL Press Enter
Select Type/ Description TabChange Account Group to Secured LoansChange Short Text & Long Text to SBI Rupee Term LoanSelect Create/Bank/Interest Tab
Change Field Status Group to G005Int. Indicator P1 → SAVE
2nd A/c
Prepared by: Rao MH 58
2nd A/cGL A/c# 400400 Comp.Code: PSL F.Year: 2009Select With Template Button GL A/c# 400300Comp.Code: PSL Press Enter
Select Type/ Description TabChange Account Group to InterestChange Short Text & Long Text to Interest Account → SAVE
Step 3. Assaignment of Accounts for Automatic Postings:
PATH: SPRO---->Financial Accounting--->General Ledger Accounting---->Business Transactions--->Bank A/c Interest Calculation--->Interest Posting--->PrepareGL A/c Balance Interest Calculation ( OBV2)
Select Symbols Button ( F8)Select A/c. ButtonsChart of Accounts: PSL → ENTERA/c Symbol 002 (Interest Paid) Currency INRGL A/c 400400A/c Symbol 2000 ( GL A/c Paid) Currenty INRGL A/c ++++++++++ ( 10 Times)Save -----> Enter
Prepared by: Rao MH 58
Interest A/c Debit 002 Assaign to 400400SBI Rupee Term Loan A/c Credit 2000 Assaign to 100300If More than One Term Loan in Against 2000 '++++++++++ ( 10 Times)
We are giving + symbol 10 times as Max length of A/c Number would be 10 digits But we are using 6 digits only. If at the time of Posting Cash A/c Dr and Equity Share Capital Credit, system take Cash account as 0000200100 and Equity Share Capital as 0000100000 and when we see it shows 200100 Dr and 100000 Cr
Suppose if we give 6 times + Symbol for SBI Rupee Term Loan . It takes 000010which it cannot post.
100300 SBI Rupee Term Loan A/c 100301 IDBI Rupee Term Loan A/c100302 IFCI Rupee Term Loan A/c
At the time of Interest Calculations, we have to specify for which Loan Account Interest to be calculated and when.
End User Area: To Open Posting Periods for April ( OB52)Select Positon Button PP.Variant PSLFor Variant PSL From Period 1Save Press Enter to save in your request.
Step 4 SBI Rupee Term Loan Receipt Entry ( F-02)
Prepared by: Rao MH 59
Step 4 SBI Rupee Term Loan Receipt Entry ( F-02)SBI has given Cheque Dated 15.04.09 but we deposited in on 17.04.09.At the time of Posting Document Date 17.04.09Posting Date 17.04.09 Posting Date is not Modifiable once document posted
in this case, SBI Calculate Interest from 15.04.09 but SAP calculate Interest from 17.04.09. So to match the Interest, SAP Has given the option of Value Date. Value date is 15.04.09. So system will calculate interest from Value Date but not from Posting Date. Value date is modifiable after positng the document also.
F-02 ----> Doc.Dt: 17.04.09 Type : SA Comp.Code: PSLPost.Dt: 17.04.09 Currency : INRP.Key: 40 A/c No: 200100 → ENTERAmount 100000 Business Area: PSLHValue Dt: 15.04.09 Text: SBI Rupee Term Loan Receipt
P.Key: 50 A/c No: 100300 → ENTERAmount * Business Area: PSLHValue Dt: 15.04.09 Text: +Menu----> Document -----> Simulate and Save
Prepared by: Rao MH 59
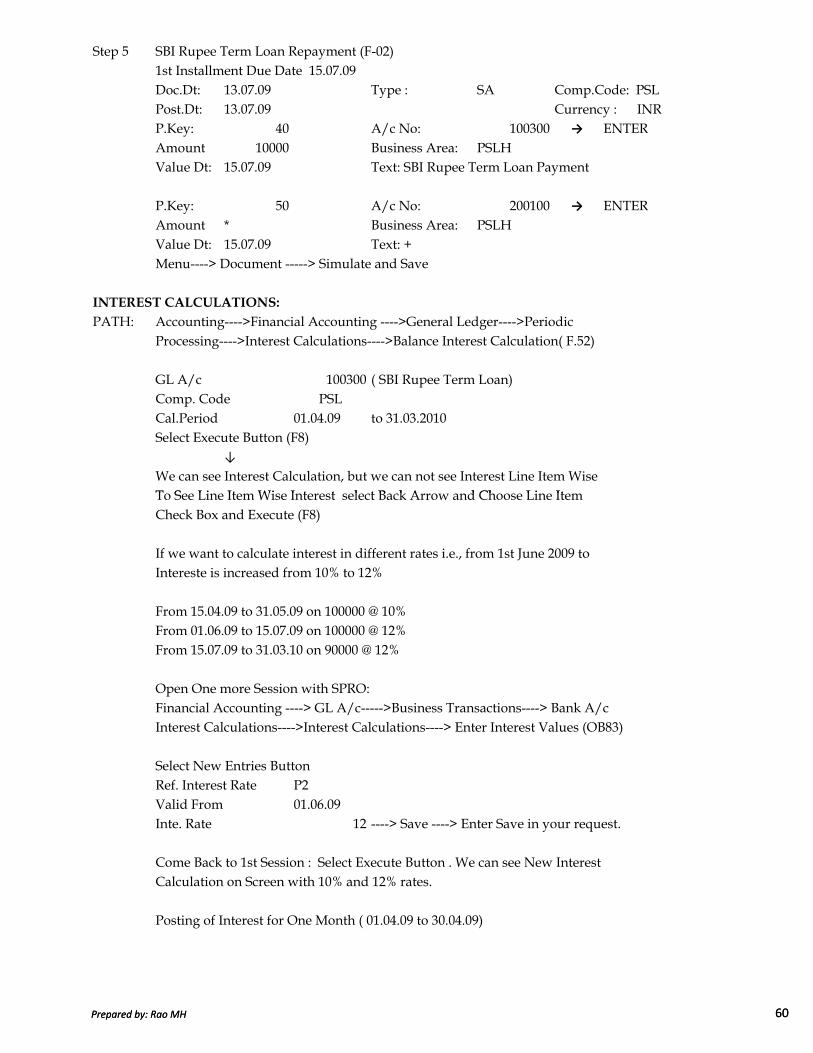
Step 5 SBI Rupee Term Loan Repayment (F-02)1st Installment Due Date 15.07.09Doc.Dt: 13.07.09 Type : SA Comp.Code: PSLPost.Dt: 13.07.09 Currency : INRP.Key: 40 A/c No: 100300 → ENTERAmount 10000 Business Area: PSLHValue Dt: 15.07.09 Text: SBI Rupee Term Loan Payment
P.Key: 50 A/c No: 200100 → ENTERAmount * Business Area: PSLHValue Dt: 15.07.09 Text: +Menu----> Document -----> Simulate and Save
INTEREST CALCULATIONS:
PATH: Accounting---->Financial Accounting ---->General Ledger---->Periodic Processing---->Interest Calculations---->Balance Interest Calculation( F.52)
GL A/c 100300 ( SBI Rupee Term Loan)Comp. Code PSLCal.Period 01.04.09 to 31.03.2010Select Execute Button (F8)
↓
We can see Interest Calculation, but we can not see Interest Line Item WiseTo See Line Item Wise Interest select Back Arrow and Choose Line Item
Prepared by: Rao MH 60
To See Line Item Wise Interest select Back Arrow and Choose Line Item Check Box and Execute (F8)
If we want to calculate interest in different rates i.e., from 1st June 2009 to Intereste is increased from 10% to 12%
From 15.04.09 to 31.05.09 on 100000 @ 10%From 01.06.09 to 15.07.09 on 100000 @ 12%From 15.07.09 to 31.03.10 on 90000 @ 12%
Open One more Session with SPRO:Financial Accounting ----> GL A/c----->Business Transactions----> Bank A/c Interest Calculations---->Interest Calculations----> Enter Interest Values (OB83)
Select New Entries Button Ref. Interest Rate P2Valid From 01.06.09Inte. Rate 12 ----> Save ----> Enter Save in your request.
Come Back to 1st Session : Select Execute Button . We can see New Interest Calculation on Screen with 10% and 12% rates.
Posting of Interest for One Month ( 01.04.09 to 30.04.09)
Prepared by: Rao MH 60

Select Back Arrow Cal.Period 01.04.09 to 30.04.09
Post Interest Check Box √
Update Master Records √
Session Name PSLPosting to Buss Area PSLHPosting Dt. Of Session 30.04.09Document Dt. Of Session 30.04.09Posting Segment Text Interest of April 2009Execute ( F8) it shows the interest amount calculated
To Post the Batch Input Session:
Menu----> System----> Services----> Batch Input ----> SessionSelect Session Name PSLSelect Process Button Select Display Errors Only Radio ButtonSelect Process Button ----> We will get a message that Batch Input Session CompletedSelect Exit Batch Input Session
To View Document Posted ( FB03):
We can see the Document latest posted
Go and see GL Master ( FS00):
Prepared by: Rao MH 61
Go and see GL Master ( FS00):
GL A/c 100300 ( SBI Rupee Term Loan)Comp.Code: PSLMenu----> GL A/c----> ChangeSelect Create/Bank/Interest Tab
Key Date of Last Int. Cal 30.04.09 (Upto which date we have calculated interest)Date of Last Run 31.07.09 (ON which date we have run the Interest Cal)
SAP Methods for Interest Calculation:
1 Simple Interest and Compound InterestSimple Interest Compound Interest15.04.09 SBI RT Loan 100000 Cr 15.04.09 100000For Symbol 2000 Assaign A/c # 100520 30.04.09 438Int Payable Int. 438 Posted to 100300 on 30.04.09For May It Calculate on 100000 only For May it Calculates on 100438
2 Interest Rates Based on SlabsIf Interest Rate is varied from Amount to Amount this system is usefulfor ex: on INR 30,000 Int. Rate 10% P2on 30001 to 50000 Int .Rate 12% P4In SPRO---> Define Time Dependent Terms---> Amount from 30001
Prepared by: Rao MH 61
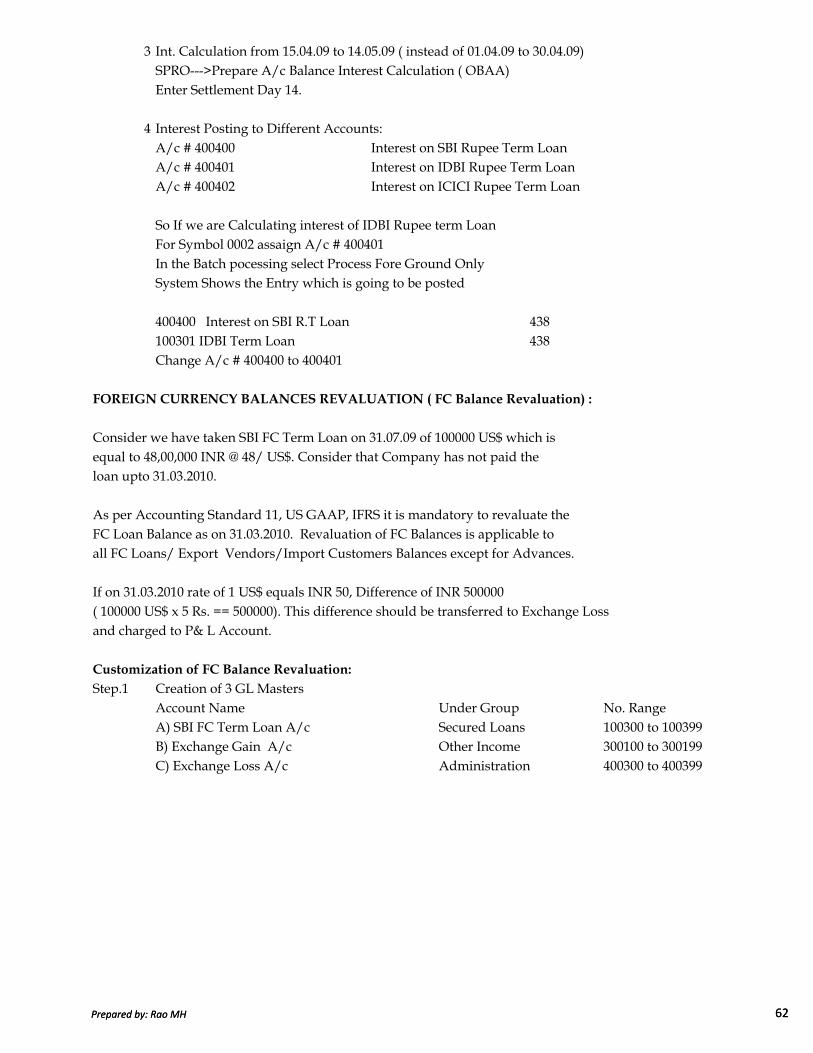
3 Int. Calculation from 15.04.09 to 14.05.09 ( instead of 01.04.09 to 30.04.09)SPRO--->Prepare A/c Balance Interest Calculation ( OBAA)Enter Settlement Day 14.
4 Interest Posting to Different Accounts:A/c # 400400 Interest on SBI Rupee Term LoanA/c # 400401 Interest on IDBI Rupee Term LoanA/c # 400402 Interest on ICICI Rupee Term Loan
So If we are Calculating interest of IDBI Rupee term Loan For Symbol 0002 assaign A/c # 400401In the Batch pocessing select Process Fore Ground OnlySystem Shows the Entry which is going to be posted
400400 Interest on SBI R.T Loan 438100301 IDBI Term Loan 438Change A/c # 400400 to 400401
FOREIGN CURRENCY BALANCES REVALUATION ( FC Balance Revaluation) :
Consider we have taken SBI FC Term Loan on 31.07.09 of 100000 US$ which is equal to 48,00,000 INR @ 48/ US$. Consider that Company has not paid the loan upto 31.03.2010.
Prepared by: Rao MH 62
As per Accounting Standard 11, US GAAP, IFRS it is mandatory to revaluate the FC Loan Balance as on 31.03.2010. Revaluation of FC Balances is applicable to all FC Loans/ Export Vendors/Import Customers Balances except for Advances.
If on 31.03.2010 rate of 1 US$ equals INR 50, Difference of INR 500000 ( 100000 US$ x 5 Rs. == 500000). This difference should be transferred to Exchange Loss and charged to P& L Account.
Customization of FC Balance Revaluation:
Step.1 Creation of 3 GL MastersAccount Name Under Group No. RangeA) SBI FC Term Loan A/c Secured Loans 100300 to 100399B) Exchange Gain A/c Other Income 300100 to 300199C) Exchange Loss A/c Administration 400300 to 400399
Prepared by: Rao MH 62

1st A/cGL A/c# 100301 Comp.Code: PSL F.Year: 2009Select With Template Button GL A/c# 100300Comp.Code: PSL Press Enter
Change Short Text & Long Text to SBI FC Term LoanSelect Control Data TabChange Account Currency to USDDe select in Only Blances in Local Currency Check Box
Select Create/Bank/Interest TabRemove Interest Indicators and Dates → SAVE
2nd A/cGL A/c# 300100 Comp.Code: PSL F.Year: 2009Select With Template Button GL A/c# 400300Comp.Code: PSL Press Enter
Step 3. Select Type/ Description TabChange Account Group to Other IncomeChange Short Text & Long Text to Exchange Gain → SAVE
Prepared by: Rao MH 63
3rd A/cGL A/c# 400301 Comp.Code: PSL F.Year: 2009Select With Template Button GL A/c# 400300Comp.Code: PSL Press Enter
Change Short Text & Long Text to Exchange Loss → SAVE
Step 2. Define Accounting Principles:
SPRO---->Financial Accounting ( New)---->Financial A/c Global Settings(New)--->Ledgers--->Parallel Accounting--->Define Accounting PrinciplesSelect New Entries ButtonA/c Principle P1 (Text field any thing can enter)Name / Descriptionof A/c Principle: Indian Accounting StandardsSAVE and Press Enter to save in your request.
Step 3. Assaign Accounting Principles to Ledger Groups:Same Path ( Next Level to last path)Select New Enteries ButtonA/c Principle : P1Target: Ledger GroupSelect OL for Indian Accounting Standards ( By default all Indian CompaniesSAVE and Press Enter to save in your request. IAS is defined by SAP)
Prepared by: Rao MH 63

Step 4. Define Valuation Methods:
SPRO---->Financial Accounting(New)---->GL A/c ( New)---->Periodic Processing---->valuate--->Define Valuating MethodsSelect New Entries ButtonValuation Method PSL1 (Text Field)Description FC Valuation for PSL (Bank Selling Method)Select Always Evaluate Radio ButtonDocument Type SAEx Rate type for Dr. Balance B (Bank Selling Rate)Ex Rate type for Cr. Balance B (Bank Selling Rate)select Determine Exchange Rate Type for A/c Balance Radio Button
→ SAVE → Enter to save in your request.Step 5. Define Valuation Areas:
Same Path ( Next Line to Old path)Select New Entries Button
Valuation Area : PA ( Text Filed)Valuation Method: PSL1Currency type : Select Company Code Currency → SAVE
→ Enter to save in your request.
Step 6. Assaign Valuation Areas & Accounting Principles :
Same Path ( Next Line to Old path)
Prepared by: Rao MH 64
Same Path ( Next Line to Old path)Select New Entries ButtonValuation Area : PAA/c Principles: P1 → SAVE
→ Enter to save in your request.
Step 7. Prepare Automatic Posting for Foreign Currency Valuation:
SPRO---->Financial Accounting(New)---->GL A/c ( New)---->Periodic Processing-----> valuate--->FC Valuation----> Prepare Automatic Posting for Foreign Currency Valuation ( TC=OBA1)
Double Click on Exchange Rate Difference UG Exchange Rate KeyChart of Accounts : PSLSelect Right Arrow at Down and Change Valuation Area ButtonValuation Area PA → ENTER
Ex.Rate Expense A/c Exchange Diff. Key (Exchange Loss) Rate GainA/cUSD ( Text Field) 400301 300100 → SAVE
→ Enter to save in your request.
Prepared by: Rao MH 64

Step 8. Assaign Exchange Rate Difference Key in Loan A/c ( FS00)GL A/c : 100301Comp. Code : PSLFrom Menu----> GL Account----> ChangeSelect Control Data Tab
Exchange RateDifference KeyUSD → SAVE
END USER AREA FOR FC REVALUATION :
1 FC Term loan Receipt ( F-02)Doc.Date: 01.08.09 Comp. Code: PSL Currency : USDPost.DT: 01.08.09 Type : SA Rate: 45.00
Post Key: 40 A/c # 200100 → EnterIgnore Warning Message → Enter
Amount : 100000 USD Buss.Area: PSLHText: SBI FC Term Loan Receipt → Enter
Post Key: 50 A/c # 100301 → Enter
Prepared by: Rao MH 65
Amount : * USD Buss.Area: PSLHText: + → Menu----> Document ---->Simulate and SAVE
2 Enter Year End Exchange Rates in Forex Table ( OB08)Select New Entries ButtonEx. Rate Valid From Direct To Type From Currency Quot CurrencyG( Bank Buying Rate) 31.03.10 USD 49.50 INRB( Bank Selling Rate) 31.03.10 USD 50.00 INR
↓
SAVE
3 FC Valuation:
Accounting ----> Financial Accounting---->Gen Ledger---->Periodic Processing---->Closing--->Valuate---> FC Valuation(New) ( TC=FAGL_FC_VAL)
Comp. Code: PSLValuation Period: 31.03.10Valuation Area: PASelect GL Balance tab
Select Valuate GL A/c Balance Check Box → Execute ( F8)Select on Postings Button and Select Back Arrow 2 Times
Prepared by: Rao MH 65

There are 2 types of FC Valuations. 1) Month End Valuation 2) Year End Valuation
If we made Month End Valuation, Exchange Gain / Loss will be double unlesswe reverse in next month. So We will reverse the Exchange Gain/ Loss under Month End Valuation until the Year End. There will be no Reversal on Year End.
Procedure for Month End Valuation:Step 1. Month End Exchange Rates in Forex Table ( OB08)
Enter Month End Exchange Rates then go to FC Valuation Screen
IN FAGL_FC_Val ScreenComp. Code: PSL Valuation Key Date: 31.08.09 ( Every Month End)Valuation Area: PASelect Create Posting Check BoxPost.Date: 31.08.09 Reverse Posting Date: 01.09.09select Reverse Posting check BoxSelect GL Balance TabSelect valuate GL A/c Balance Check BoxGL A/c: 100301 → Select Execute Button ( F8)
Procedure for Year End Valuation:Step 1. Year End Exchange Rates in Forex Table ( OB08)
Prepared by: Rao MH 66
Step 1. Year End Exchange Rates in Forex Table ( OB08)Year End Exchange Rates then go to FC Valuation Screen
IN FAGL_FC_Val ScreenComp. Code: PSL Valuation Key Date: 31.03.10 (F.Y.End Date)Valuation Area: PASelect Create Posting Check BoxPost.Date: 31.03.10 Reverse Posting Date: BlankDe select Reverse Posting check BoxSelect GL Balance TabSelect valuate GL A/c Balance Check BoxGL A/c: 100301 → Select Execute Button ( F8)
From Menu--->System---->BatchInput----> Sessions
Session : PSL → Click on Process Button ( F8)Select Display Errors only Radio Button Select Process Button → EnterBusiness Area: PSLH → Enter
Again Business Area: PSLH → Enter
We will get a message that Processing of Batch Input Session is CompletedSelect Exit Batch Input Button
Prepared by: Rao MH 66

To View the Document Posted ( TC=FB03) → EnterDouble Click on 1st Line ItemWe can see the FC Revaluation Document Posted.
SOME IMPORTANT POINTS TO BE NOTED IN SAP:
HOW TO VIEW THE STEPS SAVED IN OUR REQUEST:
At the time of various Basic Settings and GL a/c Settings, we saved some stepsin our request. What are the points we saved in our request can be seen with thefolloing pathTools---->ABAP Work Bench---->Overview---->Transport Organizer ( SE09)Under client 800
Select Customizing FolderSelect Modifiable FolderSelect GL Customization for PSL FolderSelect Customizing Task Sub FolderDouble Click on Enter Interest ValuesDouble Click on Enter Interest Values under GL A/cSelect Enter Interest Value Activity
HOW TO VIEW PATH:
SAP Easy Acess Screen Customization Area( End User Area) ( SPRO Area)
↓ ↓
Prepared by: Rao MH 67
↓ ↓We know TC but not the Path Use Transaction Code SPRO
In that case, How to view Path. ↓↓ ↓
In Command Field use Select Cntr + F (or) Find
Search_SAP_Menu --> Enter ↓Serach Text Entry--> F-02 ( use TC) --> Enter Search Term Fiscal Year---> Enter
We can see the Path from Lower Level to ↓Upper Level in Descending order Select Fiscal Year Under Financial
A/c Global Settings Area ---> Enter
END OF GENERAL LEDGER ACCOUNTING
Prepared by: Rao MH 67
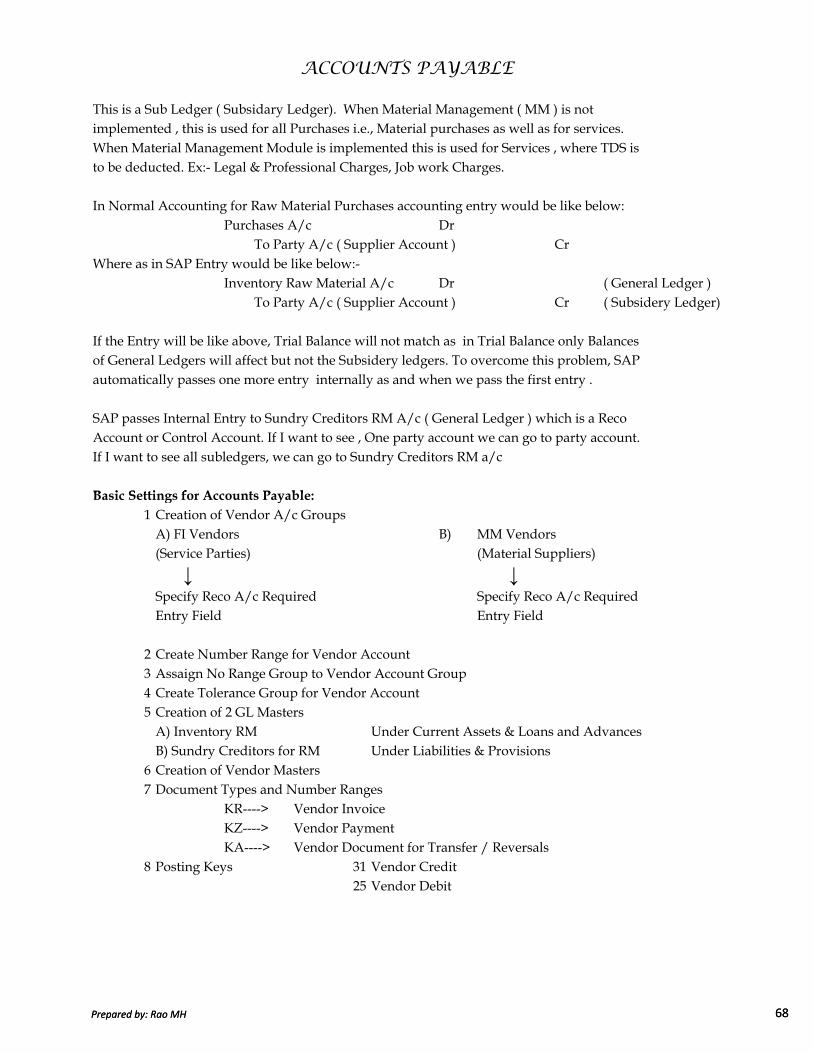
This is a Sub Ledger ( Subsidary Ledger). When Material Management ( MM ) is not implemented , this is used for all Purchases i.e., Material purchases as well as for services.When Material Management Module is implemented this is used for Services , where TDS is to be deducted. Ex:- Legal & Professional Charges, Job work Charges.
In Normal Accounting for Raw Material Purchases accounting entry would be like below:Purchases A/c Dr To Party A/c ( Supplier Account ) Cr
Where as in SAP Entry would be like below:-Inventory Raw Material A/c Dr ( General Ledger ) To Party A/c ( Supplier Account ) Cr ( Subsidery Ledger)
If the Entry will be like above, Trial Balance will not match as in Trial Balance only Balancesof General Ledgers will affect but not the Subsidery ledgers. To overcome this problem, SAPautomatically passes one more entry internally as and when we pass the first entry .
SAP passes Internal Entry to Sundry Creditors RM A/c ( General Ledger ) which is a Reco Account or Control Account. If I want to see , One party account we can go to party account.If I want to see all subledgers, we can go to Sundry Creditors RM a/c
Basic Settings for Accounts Payable:
ACCOUNTS PAYABLE
Prepared by: Rao MH 68
Basic Settings for Accounts Payable:
1 Creation of Vendor A/c Groups A) FI Vendors B) MM Vendors(Service Parties) (Material Suppliers)
↓ ↓Specify Reco A/c Required Specify Reco A/c Required Entry Field Entry Field
2 Create Number Range for Vendor Account 3 Assaign No Range Group to Vendor Account Group4 Create Tolerance Group for Vendor Account 5 Creation of 2 GL Masters A) Inventory RM Under Current Assets & Loans and AdvancesB) Sundry Creditors for RM Under Liabilities & Provisions
6 Creation of Vendor Masters7 Document Types and Number Ranges
KR----> Vendor InvoiceKZ----> Vendor Payment KA----> Vendor Document for Transfer / Reversals
8 Posting Keys 31 Vendor Credit 25 Vendor Debit
Prepared by: Rao MH 68

Step 1. Creation of Vendor Account Groups:SPRO----> Financial Accounting---->Account Receivable & Accounts Payable---->Vendor Accounts---> Master Data---->Preparation for Creating Vendor MasterData---->Define Account Groups with Screen Lay Out ( Vendors)---->Select New EntriesAccount Group → PSL1 (Text Field)Name → FI Vendors for PSLDouble Click on Company Code DataDouble Click on Account Management
Make Reconciliation Account as "Required Entry" Field (Select Radio Button)Cash Management Group "Supress" (Select Radio Button)
Select SAVE or CTRL+S----> Select Create Request Button and save in your request.Short Description : AP Customization for PSL → ENTERPress Enter to Save in your request.
Select Next Entry Button to create one more Group of MM Vendors for PSL
Account Group → PSL2 (Text Field)Name → MM Vendors for PSLDouble Click on Company Code DataDouble Click on Account Management
Prepared by: Rao MH 69
Make Reconciliation Account as "Required Entry" Field (Select Radio Button)Cash Management Group "Supress" (Select Radio Button)Select SAVE or CTRL+S
Step 2. Create Number Range for Vendor Account :SPRO----> Financial Accounting---->Account Receivable & Accounts Payable---->Vendor Accounts---> Master Data---->Preparation for Creating Vendor MasterData---->Create Number Range for Vendor A/c ( TC=XKN1)
Select Change Intervals Button Select Intervals Button No Range From To
15 4400001 4400100 → ENTER
Select Intervals Button No Range From To
16 4400101 4400200 → ENTER → SAVE
Ignore Warning Message and Press Enter to SAVE
Prepared by: Rao MH 69
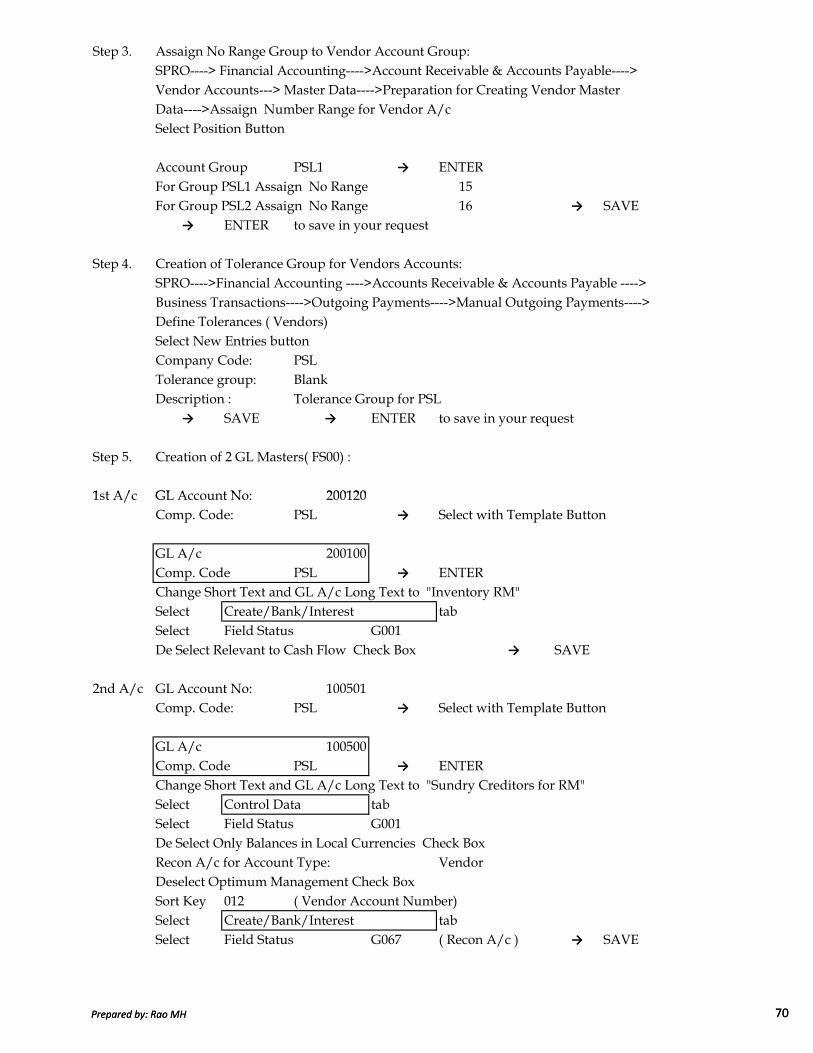
Step 3. Assaign No Range Group to Vendor Account Group:SPRO----> Financial Accounting---->Account Receivable & Accounts Payable---->Vendor Accounts---> Master Data---->Preparation for Creating Vendor MasterData---->Assaign Number Range for Vendor A/c Select Position Button
Account Group PSL1 → ENTERFor Group PSL1 Assaign No Range 15For Group PSL2 Assaign No Range 16 → SAVE
→ ENTER to save in your request
Step 4. Creation of Tolerance Group for Vendors Accounts:SPRO---->Financial Accounting ---->Accounts Receivable & Accounts Payable ---->Business Transactions---->Outgoing Payments---->Manual Outgoing Payments---->Define Tolerances ( Vendors)Select New Entries button Company Code: PSLTolerance group: BlankDescription : Tolerance Group for PSL
→ SAVE → ENTER to save in your request
Step 5. Creation of 2 GL Masters( FS00) :
1st A/c GL Account No: 200120
Prepared by: Rao MH 70
1st A/c GL Account No: 200120Comp. Code: PSL → Select with Template Button
GL A/c 200100Comp. Code PSL → ENTERChange Short Text and GL A/c Long Text to "Inventory RM"Select Create/Bank/Interest tabSelect Field Status G001De Select Relevant to Cash Flow Check Box → SAVE
2nd A/c GL Account No: 100501Comp. Code: PSL → Select with Template Button
GL A/c 100500Comp. Code PSL → ENTERChange Short Text and GL A/c Long Text to "Sundry Creditors for RM"Select Control Data tabSelect Field Status G001De Select Only Balances in Local Currencies Check BoxRecon A/c for Account Type: VendorDeselect Optimum Management Check BoxSort Key 012 ( Vendor Account Number)Select Create/Bank/Interest tabSelect Field Status G067 ( Recon A/c ) → SAVE
Prepared by: Rao MH 70

Step 6. Creation of Vendor Masters:PATH: Accounting ----> Financial Accounting ---->Accounts Payable----> MasterRecords--->Maintain Centrally---->Create ( TC=XK01)Company Code: PSLA/c Group: PSL1 FI Vendors for PSL → ENTERTitle : Company ( Select from Drop Down Box)Name : Godrej Steel LimitedStreet /House #: Ameerpet Postal Code: 500000Country: IN Communication: EN ( English)Telephone: 66611983
Select Next Screen Button 3 TimesReconciliation Account : 100501 ( Sundry Creditors RM A/c)Sort Key : 012 ( Vendor Number)Select Next Screen Button Payment Terms: Select 001 ( Payable Immediately Due Net)Tolerance Group: BlankCheck Double Inv: √ → SAVE
Step 7. Document Types and Number Ranges: ( TC=OBA7)
Doc.1 Select Type KR ( Vendor Invoice)Select Details ButtonNumber Range 19
Prepared by: Rao MH 71
Number Range 19Select No Range Information Button Company Code PSLSelect Change Interval Button Select Interval Button Give No Range 19Year 2009From No 100001To No 200000 → ENTER → SAVEIgnore Warning Message and Press Enter .
Select Back Arrow 3 TimesDoc.2 Select Type KZ ( Vendor Payment)
Select Details ButtonNumber Range 15Select No Range Information Button Company Code PSLSelect Change Interval Button Select Interval Button Give No Range 15Year 2009From No 200001To No 300000 → ENTER → SAVEIgnore Warning Message and Press Enter .
Prepared by: Rao MH 71

Select Back Arrow 3 TimesDoc.3 Select Type KA ( Vendor Document)
Select Details ButtonNumber Range 17Select No Range Information Button Company Code PSLSelect Change Interval Button Select Interval Button Give No Range 17Year 2009From No 300001To No 400000 → ENTER → SAVEIgnore Warning Message and Press Enter .
HOUSE BANKS :-HOUSE BANKS :-HOUSE BANKS :-HOUSE BANKS :-
Scenario 1:SBI Main Branch
↓
A/c Ids C. A/c 1 C. A/c 2 C. A/c 3
Scenario 2:SBI Main Branch SBI Begumpet Branch
Prepared by: Rao MH 72
SBI Main Branch SBI Begumpet BranchBank St. Hyd Hyd
↓ ↓
Current A/c #1 Current A/c #11 House Bank 1 House Bank1 A/c Id 1 A/c Id
House Banks will be created Branch wise
Steps in creating House Banks :1 Creating of A/c Masters 2 Details of House Bank3 Creation of Check Lots ( In Normal English Cheque= In SAP Check)
Check From #Check To #
Step 1. Creation of GL Master( FS00): SBI Current account under Current Assets and Loans and AdvancesGL A/c : 200105 Comp.Code: PSL Select With Template ButtonGL A/c : 200100Comp.Code : PSL → ENTER
Change Short Text & Long Text to SBI Current Account and Save
Prepared by: Rao MH 72

Step 2 Define House Bank:
SPRO---->Financial Accounting--->Bank A/c---->Define House Bank ( TC=FI12)
Comp. Code: PSLSelect New Entries ButtonHouse Bank SBIBank Country IN ( IN for India)Bank Key BSR Code of Bank ( PSL123) → SAVEBank Name State Bank of India LtdStreet Bank StreetCity HyderabadBank Branch Main Branch → ENTER Enter again to save in your
RequestDouble Click on Bank FolderSelect New Entries ButtonA/c ID SBI1Description SBI Current Account #1Bank A/c # 123456Currency INR ( INR for Indian Rupees)GL A/c 200105 → SAVE
Step 3 Creation of Check Lots:PATH: Accounting---->Financial Accounting---->Accounts Payable---->Periodic
Processing---->Payments ( FI10)
Prepared by: Rao MH 73
Processing---->Payments ( FI10)
From Menu--->Environment---->Check Information---->No RangeCompany Code: PSLHouse Bank SBIA/c ID SBI 1 → Select Change ButtonSelect Create ButtonLot # 1Check From 500001Check To 500100Select Non Sequential Check BoxShort Index SBIPurchase Date 04.08.2009 → SAVE
PAYMENT METHODS :
Manual Payment Method Automatic Payment Method1 Check Lot can be Sequential or 1 Check Lot should be only SequentialNon Sequential
2 We can issue any cheque any time 2 First Cheque will be 500001 and 2ndCheck should be 500002. It should be In sequential
Prepared by: Rao MH 73

END USER AREA:
Step 1. Purchase Invoice Posting :Accounting ---> Financial Accounting--->Accounts Payable---->Document Entry--->Invoice General ( F-43)
Doc. Dt: 05.08.09 Type : KR Comp. Code: PSLPost Dt: 05.08.09 Currency: INRPost Key: 31 ( Vendor Credit) A/c 4400001 ( Godrej Steels Ltd)
→ ENTER Amount: 3000 Buss. Area: PSLHText: Purchase Invoice PostingPost Key: 40 A/c 200120 ( Inventory RM) ENTER
Amount * Buss.Area: PSLH Text : +Menu---->Document ----->Simulate and SAVE
Step 2. How to view Vendor A/c Transactions: ( FBL1N)PATH: Accounting ---->Financial Accounting ---->Accounts Payable--->Account
----->Display/Change Line Items ( FBL1N)Vendor a/c # 4400001 Comp. Code: PSLSelect Open Items Radio Button Select Normal Items Check Box → Execute ( F8)
Step 3. Go and See General Ledger account ( FS10N)
Prepared by: Rao MH 74
GL A/c # 100501 Comp. Code: PSL F.Year 2009Buss.Area: PSLH → Execute ( F8)
Double Click on Cum.Balance Amount: 3000
To View Party Wise: Select Change Layout Button From Hidden Fields Column select Assaignment Fieldunder Column Contents Select Amount in Local CurrencySelect Left Arrow Button or Show Selected Fields Buttonselect Copy Button
While at the time of Creating the Vendor Master, We mentioned Sort Key 012(Vendor Number). Sort Key update the Assaignment Fields Automatically
Step 4. Outgoing Payment With Clearing ( F-53):PATH: Accounting---->Financial Accounting--->Accounts Payable--->
Document Entry----> Outgoing Payment---->Post ( F-53)
Doc.Dt: 05.08.09 Type : KZ Comp. Code: PSLPost.Dt: 05.08.09 Period: 5 Currency: INR
Clearing Text: Outgoing Payment
Prepared by: Rao MH 74

Under Bank Data
A/c # 200105 ( SBI Current A/c) Buss.Area: PSLHAmount: 3000Value Dt :05.08.09 Text: Outgoing Payment
Under Open Item Selection
Account: 4400001 A/c Type: K ( It come by default)( K stand for Vendors)
Select Process Open Items Button Double Click on Payable Amount 3000
From Menu---->Document---->Simulate → SAVE
Step 5. Go and see Vendor A/c Transactions: ( FBL1N)Vendor a/c # 4400001 Comp. Code: PSLSelect Cleared Items Radio Button Select Normal Items Check Box → Execute ( F8)
Step 6. Manual Check Creation:PATH: Accounting---->Financial Accounting--->Accounts Payable--->EnvironmentCheck Information--->Create--->Manual Checks( FCH5)
Prepared by: Rao MH 75
House Bank SBI A/c ID SBI1Check No 500001 → SAVE
Step 7. Display Check Register:PATH: Accounting---->Financial Accounting--->Accounts Payable--->EnvironmentCheck Information--->Display Check Register(FCHN)Paying Comp. Code: PSL → Execute ( F8)Double Click on Check 500020Select Acompanying Documents Button
Step 8. Check Encashment Date Updation: Here we specify on which date the checkis debited in our Bank Account, Based on Bank Statement .
Advantages:A) If party says payment was not received , we can say on which date payment was debited to our account easily.B) BRS can be done easily
PATH: Accounting---->Financial Accounting--->Accounts Payable--->EnvironmentCheck Information--->Change--->Additional Info / Cash(FCH6)Paying Comp. Code: PSL House Bank: SBI A/c ID# SBI1Check No: 500020 ------> ENTERCheck Encashment Date: 06.08.09-------> SAVE
Prepared by: Rao MH 75

Go and see Check Register ( FCHN) :Paying Comp. Code: PSL -----> Execute ( F8)We can see Report Showing Check Encashed Date
Step 9. Cancellation of Unissued Checks: While writing checks before issuing to party, we commit some mistakes. Because of that we cancell checks.
PATH: Accounting---->Financial Accounting--->Accounts Payable--->EnvironmentCheck Information--->Void---->Unused Checks ( FCH3)
Paying Company Code: PSL House Bank: SBI A/c ID SBI1Check From 500001Void Reference 06 ( Destroyed or Unusable- Option given by SAP )
We can define our own Void Reason. Explained Below)Select Void Button → Check will be voidGo and see Check Register ( FCHN) :Paying Comp. Code: PSL -----> Execute ( F8)We can see Report Showing Check Cancelled
Once the Check Lot is over , Keep the Curosor on Check No From To Select Sorting Ascending Order Button. We can see all the chek details in Sr. No of ChecksIf any chck Number is missing in order, it means Chck is misused.
Creation of Void Reason Codes:
Prepared by: Rao MH 76
Creation of Void Reason Codes:
SPRO---->Financial Accounting--->Accounts Receivable & Accounts Payable----->Business Transactions---->Outgoing Payment----->Automatic Outgoing Payments----->Payment Media---->Check Management---->Define void Reason Codes( FCHV)
Select New Entries ButtonReason Void ReasonCode
16 Stop Payment of PSL → SAVE→ Enter to save in your request.
Deletion of Encashment Date: Some times by Mistake at the time of entering Encashment Date , Instead of giving to One Check, we will give to some other Check . For Ex:Check NO Amount Encahshed Date
500019 3000 on 06.08.09500020 3000 by mistake entered to 06.08.09500021 5000
So We have to delete the encashed date for Check No 500020 and enter EncashedDate to Check # 50019 as normal check encashement dated entry.PATH: Accounting---->Financial Accounting--->Accounts Payable--->Environment
Check Information--->Delete----> Reset Date ( FCHG)Paying Company Code: PSL House Bank : SBIA/c ID: SBI1 Check #: 500020 → Select Reset Cashing Data Radio ButtonSelect Execute ( F8) Button Select YES to Message
Prepared by: Rao MH 76

Go and see Check Register ( FCHN) :Paying Comp. Code: PSL -----> Execute ( F8)We can see Report where Check # 500020 encashement Date is Removed
Cancellation of Issued Checks : Encashed Checks cannot be cancelled.Steps : 1 Purchase Invoice Posting ( F-43)
2 Outgoing Payment with Clearing ( F-53)3 Manual Check Creation ( FCH5)4 Display Check Register ( FCHN) Before encashment by party, we have given stop payment letter to Bank.
5 Issued Check Cancellation A Reset Cleared Items---> To make it as open , Delink the Transaction in
Vendor accountB Reverse TransactionC Cancell the CheckPATH: Accounting---->Financial Accounting--->Accounts Payable--->Environment
Check Information--->Void----> Cancel Payment ( FCH8)Paying Comp Code :PSL House Bank: SBI A/c ID: SBI1Check No: 500020 Void Reason: 16Reversal Reason: 01 → Select Cancel Payment Button
Go and See Vendor A/c Transactions: ( FBL1N)Vendor A/c# 4400001 Comp. Code: PSLSelect Open Items Radio Buton
Prepared by: Rao MH 77
Select Open Items Radio Buton Select Normal Items Check Box → Execute( F8) Button
Advance Payment to Vendors( Down Payment to Vendors) :
Steps:1 Creation of GL Master " Advances to Vendors" under Current Assets , Loans & Adv2 Link Betwwen Sundry Creditors & Advance to Vendors
Sundry Creditors Advances to Vendors(Reconciliaton Account) ( Alternative Reconciliation Account
or Special GL A/c)A
( Advance - Special GL Indicator)A/c # 100501 ( Sundry Creditor Invenory Raw Materials A/c)A/c # 200150 ( Advances to Vendors A/c)
At the time of Making Payment, we know the purpose wether it is advance or against Bill. If payment is made against Bill Number , as we assaigned A/c# 100501in Creditor Accoutn 4400001, it will updated the A/c # 100501.If we are making payment as advance, while at the time of payment against Creditor A/c 4400001, we mention "A" for advance. System automatically update A/c # 200150 ( Advances for Vendors Account) instead of Account # 100501(Sundry Creditors Inventory Raw Materials Account)
Prepared by: Rao MH 77
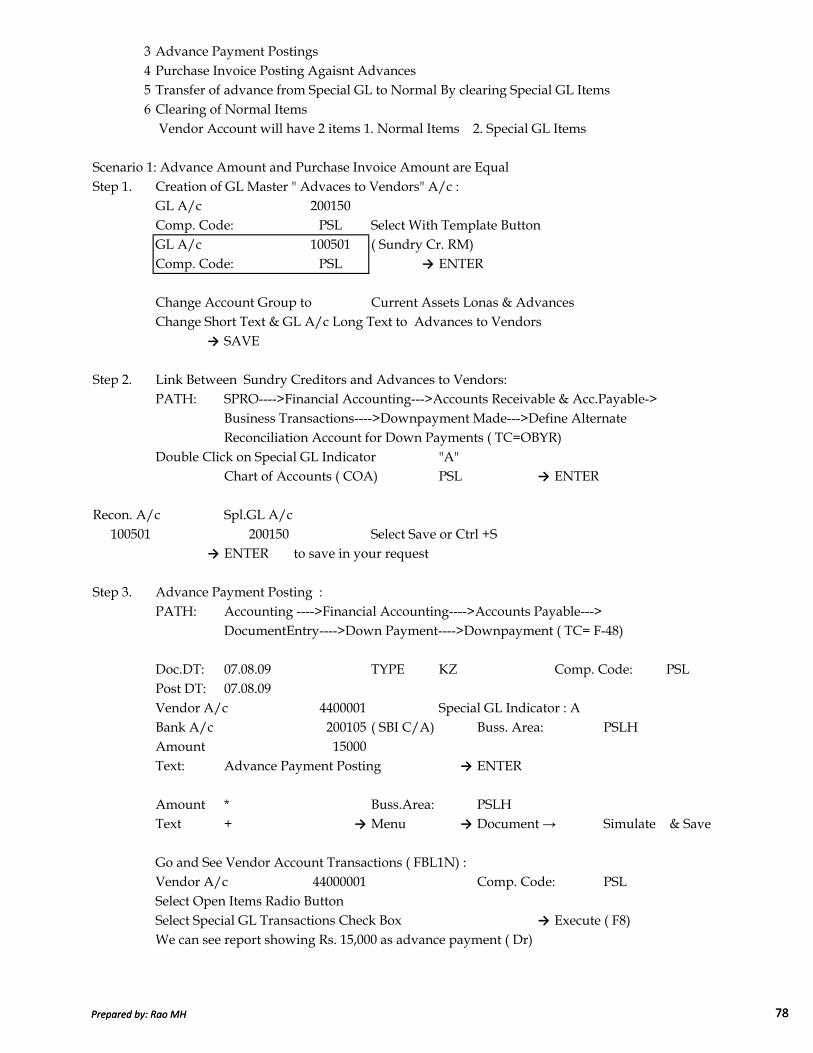
3 Advance Payment Postings4 Purchase Invoice Posting Agaisnt Advances5 Transfer of advance from Special GL to Normal By clearing Special GL Items6 Clearing of Normal Items Vendor Account will have 2 items 1. Normal Items 2. Special GL Items
Scenario 1: Advance Amount and Purchase Invoice Amount are EqualStep 1. Creation of GL Master " Advaces to Vendors" A/c :
GL A/c 200150Comp. Code: PSL Select With Template Button GL A/c 100501 ( Sundry Cr. RM)Comp. Code: PSL → ENTER
Change Account Group to Current Assets Lonas & AdvancesChange Short Text & GL A/c Long Text to Advances to Vendors
→ SAVE
Step 2. Link Between Sundry Creditors and Advances to Vendors:PATH: SPRO---->Financial Accounting--->Accounts Receivable & Acc.Payable->
Business Transactions---->Downpayment Made--->Define AlternateReconciliation Account for Down Payments ( TC=OBYR)
Double Click on Special GL Indicator "A"Chart of Accounts ( COA) PSL → ENTER
Prepared by: Rao MH 78
Recon. A/c Spl.GL A/c100501 200150 Select Save or Ctrl +S
→ ENTER to save in your request
Step 3. Advance Payment Posting :PATH: Accounting ---->Financial Accounting---->Accounts Payable--->
DocumentEntry---->Down Payment---->Downpayment ( TC= F-48)
Doc.DT: 07.08.09 TYPE KZ Comp. Code: PSLPost DT: 07.08.09Vendor A/c 4400001 Special GL Indicator : ABank A/c 200105 ( SBI C/A) Buss. Area: PSLHAmount 15000Text: Advance Payment Posting → ENTER
Amount * Buss.Area: PSLHText + → Menu → Document → Simulate & Save
Go and See Vendor Account Transactions ( FBL1N) :Vendor A/c 44000001 Comp. Code: PSLSelect Open Items Radio Button Select Special GL Transactions Check Box → Execute ( F8)We can see report showing Rs. 15,000 as advance payment ( Dr)
Prepared by: Rao MH 78

Step 4. Purchase Invoice Posting agaisnt Advance Amount (F-43):
Doc.Date: 07.08.09 Comp. Code: PSL TYPE: KRPost. Key: 31 A/c # 4400001 → ENTERAmount: 15000 Buss.Area: PSLHText: Purchase Invoice Posting Post Key: 40 Account No: 200120 → ENTERAmount: * Buss.Area: PSLH Text : +→ Menu → Document → Simulate & Save
Go and See Vendor Account Transactions ( FBL1N) :
Vendor A/c 44000001 Comp. Code: PSLSelect Open Items Radio Button Select Normal Items Check Box → Execute ( F8)We can see Purchase Invoice of Rs 15,000 outstanding in Report
Select Back Arrow---->Special GL A/c Transactions Check Box along with Normal Items Check Box → Execute ( F8)
We can see Rs. 15,0000 ( Dr) and Rs. 15,000 ( Cr). Net Effect will be Zero , but presentation in Balance Sheet will be Wrong. As 15,000 ( Dr.) Balance will appear on Assets Side and 15,000 Cr will appear on Liabilities Side.
Step 5. Transfer of Advance from Special GL A/c to Normal by Clearing Special Clearing
Prepared by: Rao MH 79
Step 5. Transfer of Advance from Special GL A/c to Normal by Clearing Special Clearing Items ( F-54):
Doc.Dt: 07.08.09 Comp. Code: PSL Type : KAVendor A./c: 4400001 Text: Advance Payment Clearing Select Process Down Payment Button Amount Available Transfer
Amount Posting 15000 15000 15000 → SAVE
Go and See Vendor Account Transactions ( FBL1N) :
Vendor A/c 44000001 Comp. Code: PSLSelect Cleared Items Radio Button Select Special GL Transactions Check Box → Execute ( F8)We can see report. Select ← (Back arrow)Select Open Items Radio Button Select Normal Itemes Check Box → Execute ( F8)We can see report showing 15,000 Debit and Credit under open items
Step 6. Clearing of Normal Items ( F-44):PATH: Accounting---->Financial Accounting ---->Accounts----> Clear ( F-44)
A/c # 4400001 Comp. Code: PSL
Prepared by: Rao MH 79

Double Clik on 15000 ( Cr) and 15,000 ( Dr) → SAVE
Go and See Vendor Account Transactions ( FBL1N) :
Vendor A/c 44000001 Comp. Code: PSLSelect Cleared Items Radio Button Select Normal Items Check Box → Execute ( F8)We can see report showing 15,000 Debit and Credit under Cleared items
Scenario 2: Advance Amount is More and Purchase Invoice is LessAdvance =100000 Bill Amount : 25000
( Advance may be for 4 Items)Steps:
1 Advance Payment Posting of Rs. 100,000 ( F-48)2 Purchase Invoice Posting for Rs. 25,000 ( F-43)3 Transfer of advance of Rs. 25000 from Special GL A/c to Normal Items ( F-54)4 Clearing of Normal Items( F-44)
Final Result: Vendor Special GL A/c shows a balance of Rs. 75,000 as Advance to Vendors
Vendor A/c
3- 25,000 2-25,000 1-100,000 3-25,0000
Special GL A/c
75,000
Prepared by: Rao MH 80
0
(Balance)
Scenario-3: Advance Amount is Less and Bill Amount is MoreAdvance = 8000 ( 10%) Bill Amount =80,000
Step 1. Advance Payment of Rs. 8,000 ( F-48)2 Purchase Invoice Posting for Rs. 80,000( F-43)3 Transfer of Advance From Special GL A/c to Normal by clearing Special GL Items(F-54)4 While we make Balance payment of 72,000 Rs. Double Click on Bill Amount 80,000and advance amount 8,000. All 3 line items will go to Cleared Iems ( F-53)
Normal Items
2- 80,000 3-8,000 1-8,000 3-8,0004-72,000
0
(Balance)
Special GL A/c
0
75,000
(Balance)
(Balance)
Prepared by: Rao MH 80

TERMS OF PAYMENT:TERMS OF PAYMENT:TERMS OF PAYMENT:TERMS OF PAYMENT:
PATH: SPRO---->Financial Accounting---->Accounts Receivable & Accounts Payable---->Business Transactions---->Incoming Invoices/Credit Memos----->Maintain Terms of Payment
Select New Entries ButtonPayment Terms: PSL1 ( Text Field)Select Vendor Check Box If we want to use same payment terms Select Customer Check Box for both Customers and Vendors
Under Default for Base line Data:Select Posting Date Radio Button
Term: If we make payment within 10 days we get 3% Cash DiscountIf we make payment within 20 days we get 2% Cash Discount
Due within 30 days
Term % No.of Days1 3% 102 2% 203 -- 30
Press Enter and See Explanation changes according to our TermsSave and Press Enter to Save In our request.
** Under Default for Base Line Date There are 4 Options
Prepared by: Rao MH 81
** Under Default for Base Line Date There are 4 Options
A. No Default: Number of Purchases during the Month Terms: 10 days from the Month End 3% C.Discount
20 days from the Month End 2% C.DiscountDue within 30 days from the Month End .
Base Line Date : Keep Blank (If Enter Month End Date -10/20/30 will be calculated from Month End)
B. Document Date: Party Bill Date
C. Posting Date: Goods Receipt Date → Select This OptionD. Entry Date: Quality Approval Date
ΩΩΩΩΩ
Cash Discount Received:
Trade Discounts are to be adjusted against Purchases wherere as Cash Discountsare to be shown under Other Income
1 Creation of GL Master " Cash Discount Received" under Other Income( FS00)GL A/c: 300101 Comp Code: PSL Select With Template GL A/c: 300100Comp Code: PSL → ENTER
Change Short Text & Long Text to "Cash Discount Received" → SAVE
Prepared by: Rao MH 81

2 Assaignment of Accounts for Automatic Postings:PATH: SPRO---->Financial Accounting---->Accounts Receivble & Accounts
Payable--->Business Transactions---->Outgoing Payments----> OutgoingPayments Global Settings---->Define A/c's for Cash Discounts taken(OBXU)
Chart of Accounts : PSL → ENTER → SAVEA/c # 300101 ( Cash Discount Received ) → SAVE
→ ENTER to save in your request
END USER AREA:
1 Purchase Invoice Posting (F-43)Normal Date in SAPTerminologyParty Bill Date 01.08.09 Doc. DateGoods Rec.Date 05.08.09 Posting DateQuality Ap.Date 08.08.09 Entry Date
Doc.Dt 01.08.09 Type: KR Comp. Code: PSLPost.Dt 05.08.09Post.Key 31 A/c# 4400001 → ENTER
Amount: 100000 Bus.Area: PSLH Payment Terms: PSL1Text: Purchase Invoice Posting → ENTERIgnore Warning Message and → ENTER
Prepared by: Rao MH 82
Ignore Warning Message and → ENTER
Post Key: 40 A/c # 200120 → ENTERAmount: * Buss.Area PSLH Text: +From Menu → Document→Simulate & SAVE
2 Go and See Vendor A/c Transactions(FBL1N)Vendor A/c# 4400001 Comp. Code: PSLselect Open Items Radio ButtonSelect Normal Items Check Box → Execute(F8)We can see Rs. 100,000 shwos in Open Items
Select Change Layout Button : From Hidden Fields Column Select " Currnet CashDiscount Amount"
Select Amount in Local Document in Currency under Column Contents SideSelect Left Arrow or Show Selected Fields Button Select Copy Button
Prepared by: Rao MH 82
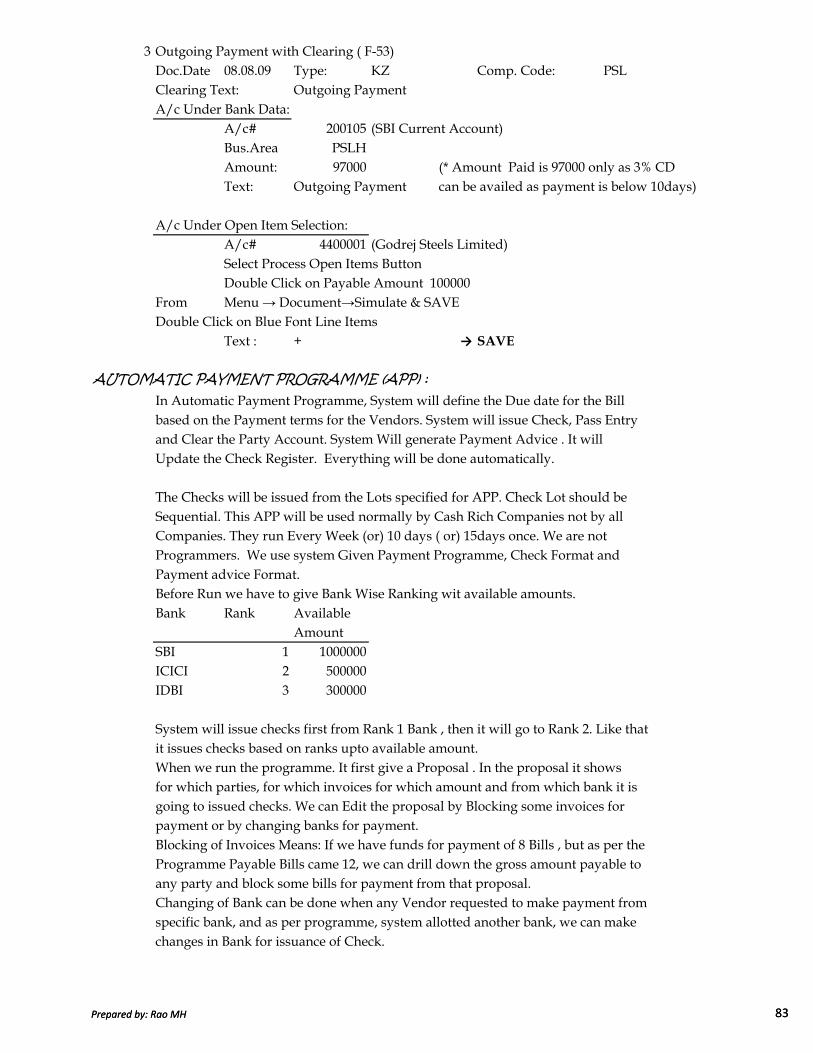
3 Outgoing Payment with Clearing ( F-53)Doc.Date 08.08.09 Type: KZ Comp. Code: PSLClearing Text: Outgoing PaymentA/c Under Bank Data:
A/c# 200105 (SBI Current Account)Bus.Area PSLHAmount: 97000 (* Amount Paid is 97000 only as 3% CDText: Outgoing Payment can be availed as payment is below 10days)
A/c Under Open Item Selection:A/c# 4400001 (Godrej Steels Limited)Select Process Open Items Button Double Click on Payable Amount 100000
From Menu → Document→Simulate & SAVEDouble Click on Blue Font Line Items
Text : + → SAVE
AUTOMATIC PAYMENT PROGRAMME (APP) :
In Automatic Payment Programme, System will define the Due date for the Bill based on the Payment terms for the Vendors. System will issue Check, Pass Entry and Clear the Party Account. System Will generate Payment Advice . It will Update the Check Register. Everything will be done automatically.
The Checks will be issued from the Lots specified for APP. Check Lot should be
Prepared by: Rao MH 83
The Checks will be issued from the Lots specified for APP. Check Lot should be Sequential. This APP will be used normally by Cash Rich Companies not by all Companies. They run Every Week (or) 10 days ( or) 15days once. We are not Programmers. We use system Given Payment Programme, Check Format and Payment advice Format.Before Run we have to give Bank Wise Ranking wit available amounts.Bank Rank Available
AmountSBI 1 1000000ICICI 2 500000IDBI 3 300000
System will issue checks first from Rank 1 Bank , then it will go to Rank 2. Like thatit issues checks based on ranks upto available amount.When we run the programme. It first give a Proposal . In the proposal it shows for which parties, for which invoices for which amount and from which bank it isgoing to issued checks. We can Edit the proposal by Blocking some invoices forpayment or by changing banks for payment.Blocking of Invoices Means: If we have funds for payment of 8 Bills , but as per the Programme Payable Bills came 12, we can drill down the gross amount payable to any party and block some bills for payment from that proposal.Changing of Bank can be done when any Vendor requested to make payment from specific bank, and as per programme, system allotted another bank, we can make changes in Bank for issuance of Check.
Prepared by: Rao MH 83
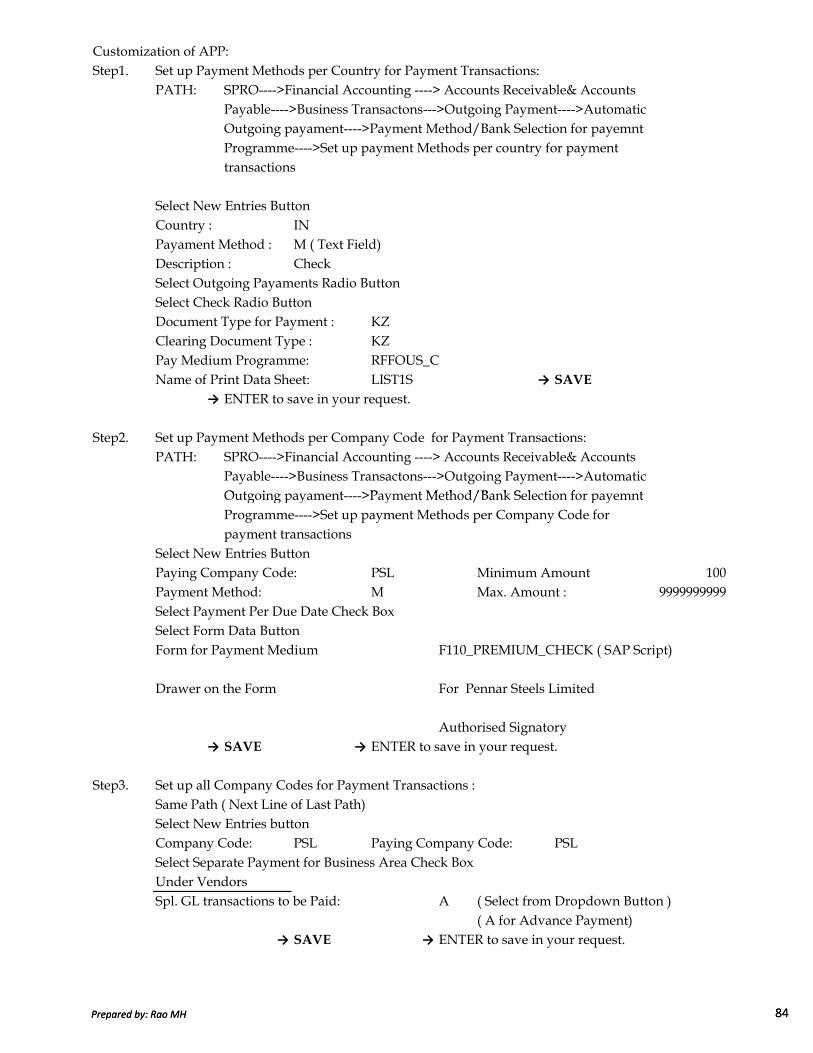
Customization of APP:Step1. Set up Payment Methods per Country for Payment Transactions:
PATH: SPRO---->Financial Accounting ----> Accounts Receivable& Accounts Payable---->Business Transactons--->Outgoing Payment---->AutomaticOutgoing payament---->Payment Method/Bank Selection for payemntProgramme---->Set up payment Methods per country for payment transactions
Select New Entries Button Country : INPayament Method : M ( Text Field)Description : CheckSelect Outgoing Payaments Radio Button Select Check Radio Button Document Type for Payment : KZClearing Document Type : KZPay Medium Programme: RFFOUS_CName of Print Data Sheet: LIST1S → SAVE
→ ENTER to save in your request.
Step2. Set up Payment Methods per Company Code for Payment Transactions:PATH: SPRO---->Financial Accounting ----> Accounts Receivable& Accounts
Payable---->Business Transactons--->Outgoing Payment---->AutomaticOutgoing payament---->Payment Method/Bank Selection for payemnt
Prepared by: Rao MH 84
Outgoing payament---->Payment Method/Bank Selection for payemntProgramme---->Set up payment Methods per Company Code for payment transactions
Select New Entries Button Paying Company Code: PSL Minimum Amount 100Payment Method: M Max. Amount :Select Payment Per Due Date Check BoxSelect Form Data Button Form for Payment Medium F110_PREMIUM_CHECK ( SAP Script)
Drawer on the Form For Pennar Steels Limited
Authorised Signatory→ SAVE → ENTER to save in your request.
Step3. Set up all Company Codes for Payment Transactions :Same Path ( Next Line of Last Path)Select New Entries button Company Code: PSL Paying Company Code: PSLSelect Separate Payment for Business Area Check BoxUnder VendorsSpl. GL transactions to be Paid: A ( Select from Dropdown Button )
( A for Advance Payment)→ SAVE → ENTER to save in your request.
9999999999
Prepared by: Rao MH 84
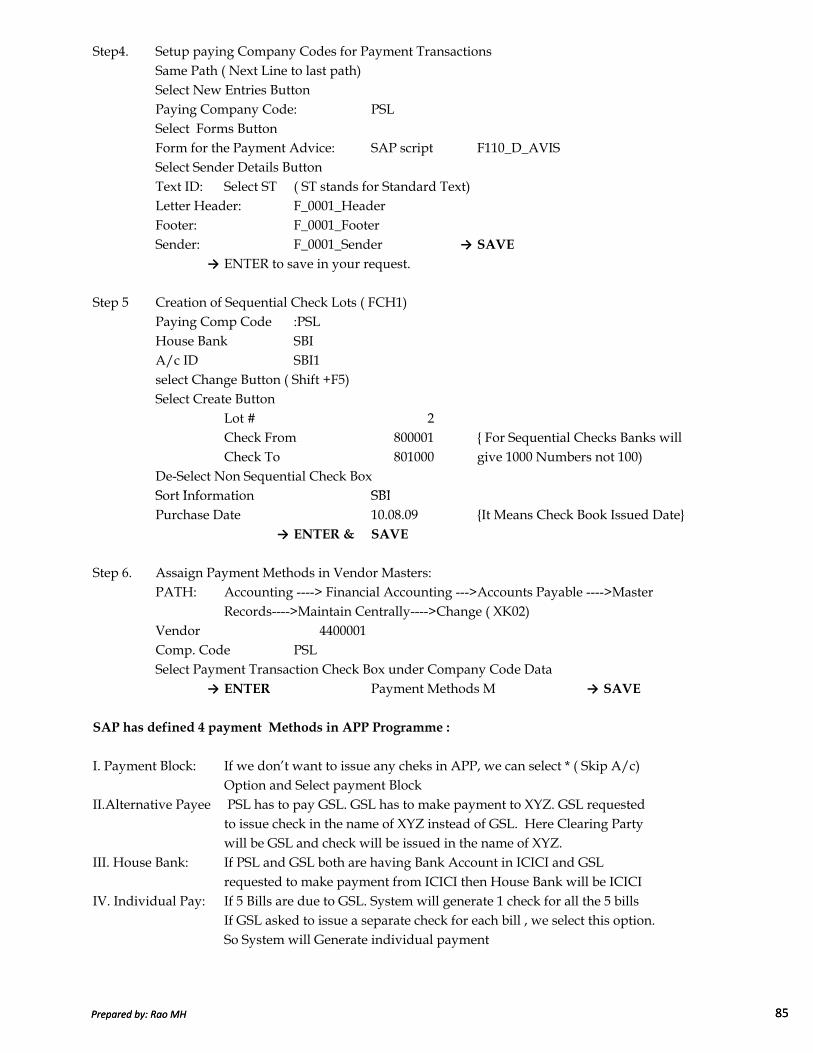
Step4. Setup paying Company Codes for Payment TransactionsSame Path ( Next Line to last path)Select New Entries Button Paying Company Code: PSLSelect Forms Button Form for the Payment Advice: SAP script F110_D_AVISSelect Sender Details Button Text ID: Select ST ( ST stands for Standard Text)Letter Header: F_0001_HeaderFooter: F_0001_FooterSender: F_0001_Sender → SAVE
→ ENTER to save in your request.
Step 5 Creation of Sequential Check Lots ( FCH1)Paying Comp Code :PSLHouse Bank SBIA/c ID SBI1select Change Button ( Shift +F5)Select Create Button
Lot # 2Check From 800001 For Sequential Checks Banks will Check To 801000 give 1000 Numbers not 100)
De-Select Non Sequential Check BoxSort Information SBI
Prepared by: Rao MH 85
Sort Information SBIPurchase Date 10.08.09 It Means Check Book Issued Date
→ ENTER & SAVE
Step 6. Assaign Payment Methods in Vendor Masters:PATH: Accounting ----> Financial Accounting --->Accounts Payable ---->Master
Records---->Maintain Centrally---->Change ( XK02)Vendor 4400001Comp. Code PSLSelect Payment Transaction Check Box under Company Code Data
→ ENTER Payment Methods M → SAVE
SAP has defined 4 payment Methods in APP Programme :
I. Payment Block: If we don’t want to issue any cheks in APP, we can select * ( Skip A/c)Option and Select payment Block
II.Alternative Payee PSL has to pay GSL. GSL has to make payment to XYZ. GSL requestedto issue check in the name of XYZ instead of GSL. Here Clearing Party will be GSL and check will be issued in the name of XYZ.
III. House Bank: If PSL and GSL both are having Bank Account in ICICI and GSL requested to make payment from ICICI then House Bank will be ICICI
IV. Individual Pay: If 5 Bills are due to GSL. System will generate 1 check for all the 5 billsIf GSL asked to issue a separate check for each bill , we select this option.So System will Generate individual payment
Prepared by: Rao MH 85

END USER AREA :
1. Purchase Invoice Entry ( F-43)
Doc.DT: 10.08.09 Type : KR Company Cod: PSLPost.Key: 31 A/c No: 4400001 → ENTER
Amount : 40000 Buss.Area: PSLHText: Purchase Invoice Posting Post.Key: 40 A/c No: 200120 → ENTER
Amount : * Buss.Area PSLHText: + From Menu → Document→Simulate & SAVE
2. Set up Bank Determinations for Payment Transactions:Accounting ---->Financial Accounting--->Accounts Payable---->Periodic Processing----> PaymentsFrom Menu--->Environment--->Maintain Configuration ( FBZP)Select Bank Determination Button Select Company Code PSL Double Click on Ranking Order FolderSelect New Entries Button Payment Currency Rank HouseMethod Order BankM INR 1 SBI → SAVE
→ ENTER to save in your RequestDouble Click on Bank Account Folder
Prepared by: Rao MH 86
Double Click on Bank Account FolderSelect New Entries Button House Bank SBIPayment Method MCurrency INRBank A/c ID SBI1Bank A/c # 200105Buss.Area PSLH → SAVE
Double Click on Available Amounts FolderSelect New Entries Button House Bank A/c ID Days Currency Available AmountSBI SBI1 999 INR 10,00,000
→ SAVE
Automatic Payment Programme Run:
Accounting ---->Financial Accounting--->Accounts Payable---->Periodic Processing---->Payments (F110)Run Date: 11.08.09 Identification : PSL1Select Payment Tab Company Code: PSL
Payment Method: M Next Payment Date: 21.08.09 ?Vendor a/c: 4400001 to 4400100 → SAVE
Select Back Arrow ----> select Proposal Button Select Start immediately Check Box Go on pressing Enter until we get the message ." Payment Proposal has been created"
Prepared by: Rao MH 86
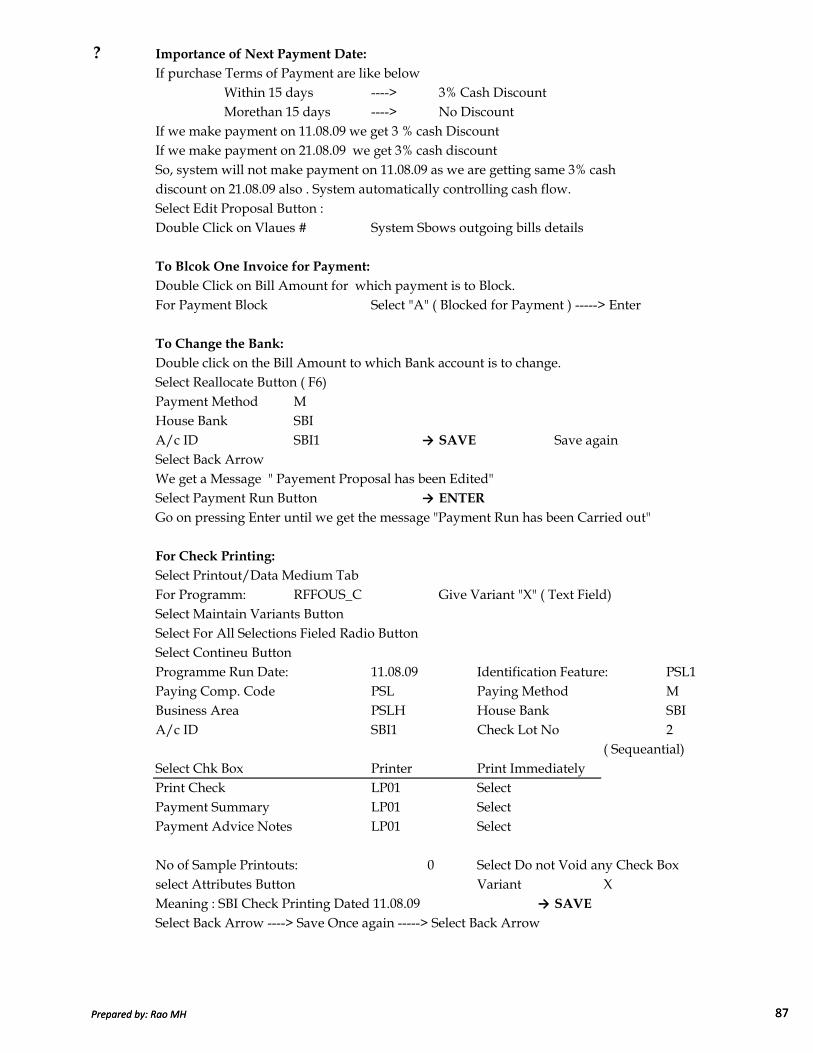
? Importance of Next Payment Date:
If purchase Terms of Payment are like belowWithin 15 days ----> 3% Cash DiscountMorethan 15 days ----> No Discount
If we make payment on 11.08.09 we get 3 % cash DiscountIf we make payment on 21.08.09 we get 3% cash discountSo, system will not make payment on 11.08.09 as we are getting same 3% cash discount on 21.08.09 also . System automatically controlling cash flow.Select Edit Proposal Button :Double Click on Vlaues # System Sbows outgoing bills details
To Blcok One Invoice for Payment:
Double Click on Bill Amount for which payment is to Block.For Payment Block Select "A" ( Blocked for Payment ) -----> Enter
To Change the Bank:
Double click on the Bill Amount to which Bank account is to change. Select Reallocate Button ( F6)Payment Method MHouse Bank SBIA/c ID SBI1 → SAVE Save again Select Back Arrow We get a Message " Payement Proposal has been Edited"Select Payment Run Button → ENTER
Prepared by: Rao MH 87
Select Payment Run Button → ENTER
Go on pressing Enter until we get the message "Payment Run has been Carried out"
For Check Printing:
Select Printout/Data Medium TabFor Programm: RFFOUS_C Give Variant "X" ( Text Field)Select Maintain Variants Button Select For All Selections Fieled Radio Button Select Contineu Button Programme Run Date: 11.08.09 Identification Feature: PSL1Paying Comp. Code PSL Paying Method MBusiness Area PSLH House Bank SBIA/c ID SBI1 Check Lot No 2
( Sequeantial)Select Chk Box Printer Print Immediately Print Check LP01 SelectPayment Summary LP01 SelectPayment Advice Notes LP01 Select
No of Sample Printouts: 0 Select Do not Void any Check Boxselect Attributes Button Variant XMeaning : SBI Check Printing Dated 11.08.09 → SAVE
Select Back Arrow ----> Save Once again -----> Select Back Arrow
Prepared by: Rao MH 87

To take Printing : Select Printout Button For Job Number : In place of "?" Enter Variant "X" → ENTER
→ ENTER Once again
To View the Check on System: From Menu---->System---->Services---->Output Control Select Execute ( F8)
Select Spool No. Check Box for Title CheckSelect Display Contents Button
Go and See Vendor A/c ( FBL1N):
Vendor A/c No: 4400001 Comp. Code: PSLSelect Cleared Items Radio Button Clearing Date: 11.08.09Select Normal Items Check Box Select Execute ( F8)Double Click on Type KZSelect Callup Document Overview Button → ENTER
Menu----> Environment---->Check Information
Go and See Check Register ( FCHN):
Paying Company Code: PSL → Execute(F8)We can see that Chck was posted against the outstandign amount
CREDIT MEMO POSTINGS :
We have purchased Material from GSL. But the Material is not good in quality. Wereduced the price of material or return the material to GSL. In that case in Accounting
Prepared by: Rao MH 88
reduced the price of material or return the material to GSL. In that case in AccountingCredit Memo will raise on GSL
PSL Raises Debit → OR → GSL Raises Credit Note on GSL Not of PSL
Document Type: KG KANumber Range 17 17
As Earlier for Document Type KA, No range defined is 17. So There is no need to define No range 17 again for Document Type KGPATH: Accounting--->Financial Accounting---->Accounts Payable---->Document
Entry---->Credit Memo General ( F-41)Doc.Dt: 11.08.09 Type: KG Comp. Code: PSLPost. Key: 21 ( Vendor Debit) A/c# 4400001 → ENTER
Amount: 1000 Buss.Area: PSLHText: Credit Memo Posting Post Key: 50 A/c# 200120 → ENTER
Amount * Buss.Area: PSLH Text: +
Menu-----> Document-----> Simulate & SAVE
( Credit Memo)
Prepared by: Rao MH 88

Sr. No TC
1 Creation of General Ledger ( GL) Masters FS00
2 Posting of Trans. to GL A/c. ( Menu->Document->Simulate) F-02
3 Changing the Document Posted FB02
4 Display Document Posted FB03
5 Display Account Balance FS10N
6 Defining Document Number Range FBN1
7 Creation of Sample Document F-01
8 Parking Document Entry F-65
9 Display/Change Parked Document FBV0
10 Hold Document Entry ( Menu--->Document---->Hold) F-02
11 Creation of Recurring Document FBD1
12 Display Recurring Document Created F.15
13 Check Foreign Exchange Rate Types SPRO
14 Define Translation Ratios for Currency Translation SPRO
15 Entering Exchange Rates SPRO
16 Exchange Rates Entry at End User Area
17 Enter Default Exchange Rate type "B"for Doc. Type SA OBA7
18 Defining Reversal Reason SPRO
19 Entering Accrual / Deferral Documents FBS1
20 Reversal of Accrual / Deferral Document F.81
21 Display of Open Item Managed A/c Transactions FBL3N
Nature of Transaction
S_BCE_68000174
IMPORTANT TRANSACTION CODES IN GL ACCOUNTING & ACCOUNTS PAYABLE
Prepared by: Rao MH 89
21 Display of Open Item Managed A/c Transactions FBL3N
22 Outgoing Payment with Full /Partial/Residual Clearing F-07
23 Individual Document Reversal FB08
24 Reversal of Reverse Document F-02
25 Mass Reversal F.80
26 Cleared Items Reversal ( For Resetting Cleared Items) FBRA
27 Defining Interest Calculation SPRO
28 Prepare A/c Balance for Interest Calculation OBAA
29 Define Interest Rates ( OBAC) SPRO
30 Deine Time Dependent Terms ( Next Step to Last Transaction) SPRO
31 Enter Interest Values OB83
32 Assaignment of Account for Automatic Interest Posting OBV2
33 To Open Posting Periods at End User Area OB52
34 Interest Calculation F.52
35 Checking of Account Groups for Availability of A/c Numbers OBD4
36 Define A/c Principles for FC Balance Revaluation SPRO
37 Assaing Accounting Principle to Ledger Groups SPRO
38 Deine FC Valuation Methods SPRO
39 Define FC Valuation Areas SPRO
40 Assaigning Valuation Areas & Accounting Principles SPRO
41 Prepare Automatic Postings for F C Valuation OBA1
42 Entering Year End Exchange Rates in Forex Table OB08
43 FC Valuation at End User Area FAGL_FC_PAL
Prepared by: Rao MH 89

Sr. No TC
44 To see the steps saved in our request SE09
46 Posting Key for General Ledger Debit Posting in F-02 40
47 Posting Key for General Ledger Credit Posting in F-02 50
48 Creation of Vendor Account Groups SPRO
49 Create Number Ranges for Vendor Accounts XKN1
50 Assaign Number Range to Vendor Account Groups SPRO
51 Creation of Tolerance group for Vendor Accounts SPRO
52 Creation of Vendor Master XK01
53 Document Types and Number Ranges OBA7
54 Defining House Bank F112
55 Creation of Check Lots F110
56 Purchase Invoice Posting F-43
57 How to View Vendor Account Transactions FBL1N
58 Outgoing Vendor Payment with Clearing F-53
59 Manual Check Creation FCH5
60 Display Check Register FCHN
61 Check Encashment Date Updation FCH6
62 Cancellation of Unissued Checks FCH3
63 Creation of Void Reason for Check Cancellation FCHV
64 Deletion of Encashment Date of Check FCHG
Nature of Transaction
To view Path for any TC: in Commad Field enter Search_Sap_Menu --->
ENTER Type TC for Search Text
Entry Field
45
Prepared by: Rao MH 90
64 Deletion of Encashment Date of Check FCHG
65 Cancellation of issued Checks before encashment FCH8
66 Creating Link between Sundry Cr and Advances to Vendors OBYR
67 Advance Payment Postings to Vendors F-48
68 F-54
69 Clearing of Normal Items under Accounts Payable F-44
70 Assaignment of Account for Automatic Payment OBXU
71 Setup Payment methods per country for payment transactions SPRO
72 Setup Payment methods per Comp. Code for payment transacts SPRO
73 Setup all Company Codes for payment Transactions SPRO
74 Setup Paying Company Codes for payment Transactions SPRO
75 Creation of Sequential Check Lots FCHI
76 Assaign Payment Methods in Vendor Masters XK02
77 Setup Bank Determination for Payment Transactions FBZP
78 Automatic Payment Programme Run F110
79 Credit Memo Posting F-41
80 Posting Key for Vendor Credit 31
81 Posting Key for Vendor Debit 25
END OF ACCOUNTS PAYABLES
Transfer of advances from Spl.GL to Normal by Clearing Sppecial Clearing
Items
Prepared by: Rao MH 90

This is also subledger ( Subsidary Ledger) . This is used when Sales & Distribution Moduleis not implemented for all types of Sales. Ex: for Product Sales / Scrap Sales/ Asset SaleWhen SD Module is implementing , this is used for Scrap Sale / Asset Sales, Other than Product Sales. Product Sales will be used in SD Module.
in case of Sales:Customer A/c Dr. → Sub Ledger → Sundry Dr. A/c
(General Ledger) To Sales A/c → Gen. Ledger A/c Reconciliatino Account or
control account.
Basic Settings for Accounts Receivable:Basic Settings for Accounts Receivable:Basic Settings for Accounts Receivable:Basic Settings for Accounts Receivable:
1 Creation of Customer Account Groupsa) FI Customers----> for Scrap Sale/ Asset Sale Parties b) SD Customers----> for Product sale parties In Both the cases, make Reconciliation account required entry field
2 Create Number Ranges for Customer Account 3 Assaign No Ranges to Customer Account Groups4 Creation of 2 GL Master
ACCOUNTS RECEIVABLE
Prepared by: Rao MH 91
4 Creation of 2 GL Master a) Sundry Debtors → Under Current Assets, Loans & Advances b) Sales Account → Under Sales
5 Creation of Customer Masters6 Document Types & Number Ranges
DR → Customer InvoiceDZ → Customer Payment DA → Customer Document for Transfers/ Reversals
7 Posting Keys → 01 : Customer Debit 15 : Customer Credit
We are testing a Scenario where Vendor is a Customer alsoGSL
Purchases 100000 Sales 100000Sales 20000 Purchases 20000Net Payable 80000 Net Receivable 80000
When we make net payment or when we receive Net amount , we have to clear Vendor as well as Customer Transactions.
Prepared by: Rao MH 91

Customization :Customization :Customization :Customization :
Step 1. Creation of Customer Account GroupsPATH: SPRO---->Financial accounting ---->Accounts Receivable & Accounts
Payable----> Customer Accounts ---->Master Data---->Preparations for Creating Customer Master Data---->Define Account Groups with Screen Lay Out ( Customers)
Select New Entries Button Account Group: PSL1 ( Text Field)Name : FI Customers for PSLDouble Click on Company Code DataDouble Click on Account Management Reconciliation Account Make it Required Entry Field → SAVE
Select Create Request Button Short Description : AR Customization for PSL → ENTER
Press ENTER to save in your request.
Select Next Entry Button A/c Group: PSL2Name : SD Customers for PSLDouble Click on Company Code DataDouble Click on Account Management Reconciliation Account Make it Required Entry Field → SAVE
Step 2. Create Number Ranges for Customer Accoounts:
Prepared by: Rao MH 92
Step 2. Create Number Ranges for Customer Accoounts:PATH: SPRO---->Financial accounting ---->Accounts Receivable & Accounts
Payable----> Customer Accounts ---->Master Data---->Preparations for Creating Customer Master Data---->Create No. Ranges for Customers(TC=XDN1)Select Change Interval Button Select Interval Button No. Range From No To No
35 3000001 3000100 → ENTER
Select Drop Down Button Select Interval Button No. Range From No To No
36 3000101 3000200 → ENTER & SAVE
Step 3 Assaign Number Ranges to Customer Accounts:PATH: SPRO---->Financial accounting ---->Accounts Receivable & Accounts
Payable----> Customer Accounts ---->Master Data---->Preparations for Creating Customer Master Data---->Assaign Number Ranges to Cust A/cSelect Position Button
Account Group: PSL1 → ENTER
For Group AssaignPSL1 35PSL2 36 → SAVE
→ ENTER to Save in your Request.
Prepared by: Rao MH 92
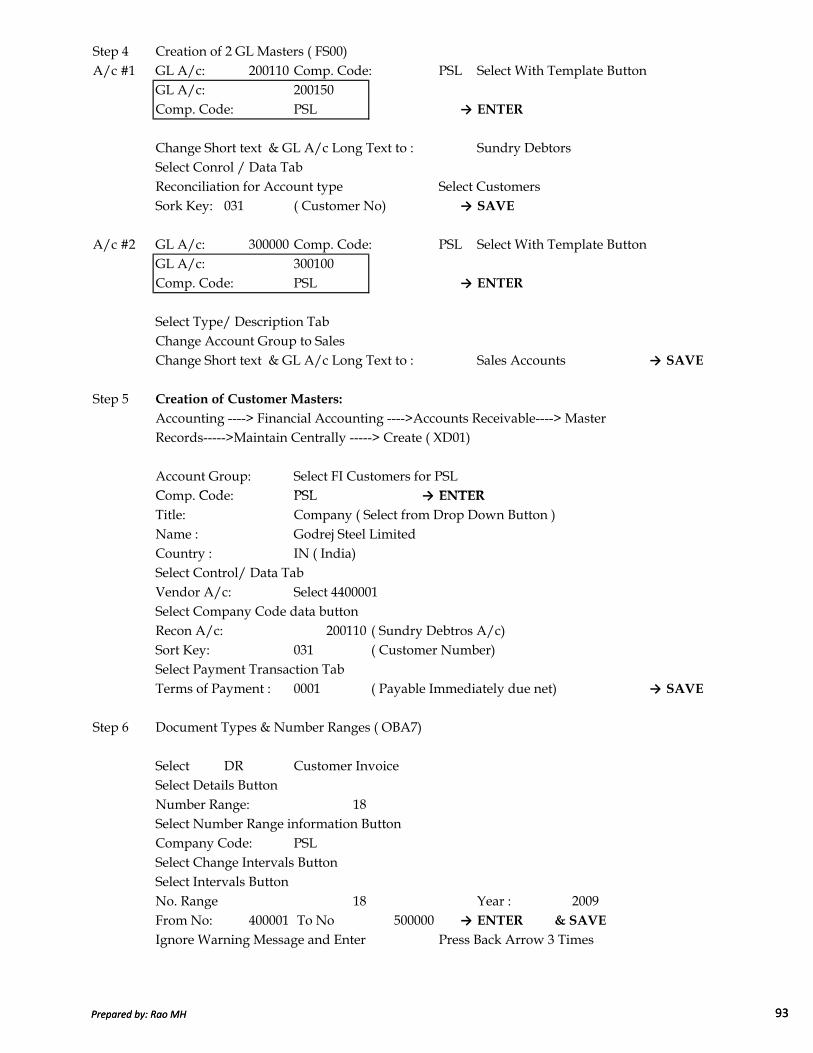
Step 4 Creation of 2 GL Masters ( FS00)A/c #1 GL A/c: 200110 Comp. Code: PSL Select With Template Button
GL A/c: 200150Comp. Code: PSL → ENTER
Change Short text & GL A/c Long Text to : Sundry DebtorsSelect Conrol / Data TabReconciliation for Account type Select CustomersSork Key: 031 ( Customer No) → SAVE
A/c #2 GL A/c: 300000 Comp. Code: PSL Select With Template ButtonGL A/c: 300100Comp. Code: PSL → ENTER
Select Type/ Description TabChange Account Group to SalesChange Short text & GL A/c Long Text to : Sales Accounts → SAVE
Step 5 Creation of Customer Masters:
Accounting ----> Financial Accounting ---->Accounts Receivable----> Master Records----->Maintain Centrally -----> Create ( XD01)
Account Group: Select FI Customers for PSLComp. Code: PSL → ENTER
Prepared by: Rao MH 93
Comp. Code: PSL → ENTER
Title: Company ( Select from Drop Down Button )Name : Godrej Steel LimitedCountry : IN ( India)Select Control/ Data TabVendor A/c: Select 4400001Select Company Code data button Recon A/c: 200110 ( Sundry Debtros A/c)Sort Key: 031 ( Customer Number)Select Payment Transaction TabTerms of Payment : 0001 ( Payable Immediately due net) → SAVE
Step 6 Document Types & Number Ranges ( OBA7)
Select DR Customer InvoiceSelect Details Button Number Range: 18Select Number Range information Button Company Code: PSLSelect Change Intervals Button Select Intervals Button No. Range 18 Year : 2009From No: 400001 To No 500000 → ENTER & SAVE
Ignore Warning Message and Enter Press Back Arrow 3 Times
Prepared by: Rao MH 93

Select DZ Customer Payment Select Details Button Number Range: 14Select Number Range information Button Company Code: PSLSelect Change Intervals Button Select Intervals Button No. Range 14 Year : 2009From No: 500001 To No 600000 → ENTER & SAVE
Ignore Warning Message and Enter Press Back Arrow 3 Times
Select DA Customer Document Select Details Button Number Range: 16Select Number Range information Button Company Code: PSLSelect Change Intervals Button Select Intervals Button No. Range 16 Year : 2009From No: 600001 To No 700000 → ENTER & SAVE
Ignore Warning Message and Enter
END USER AREA:END USER AREA:END USER AREA:END USER AREA:
Step1: Sales Invoice Posting :
Prepared by: Rao MH 94
Step1: Sales Invoice Posting :Accounting ----> Financial Accounting ---> Accounts Receivable---->Document Entry--->Invoice General ( F-22)
Doc. Date: 12.08.09 Type : DR Company Code: PSLPost.Date: 12.08.09Post.Key: 01 ( Customer Debit) A/c # 3000001 → ENTER
Amount : 200000 Buss. Area: PSLHText: Sales Invoice Posting
Post.Key: 50 ( Sales) A/c# 300000 ( Sales A/c) → ENTER
Amount: * Buss. Area: PSLH Text: +From Menu----> Document----> Simulate & SAVE
Step2: How to view Customer Account Transactions:Accounting ----> Financial Accounting ---> Accounts Receivable---->Accounting ---->Display/ Change Line Items ( FBL5N)
Customer A/c # 3000001 Company Code:Select Open Items Radio Button Select Normal Items Check Box -----> Execute ( F8)
We can see report that 200000 receivable . If We select Vendor Items Check Box alsowe can see Vendor A/c & Customer transactions Together.
Prepared by: Rao MH 94

Incoming Payment and Clearing Vendor & Customer Transactions:
Step A: Document Type DZ( Customer Payment should allow Vendor Trnasactions also
We have 5 Account types of Number Ranges.When we receive Payment from Customer When we made payment to VendorBank A/c Dr Vendor A/c Dr. To Customer A/c To Bank A/c
A: Assets A: AssetsD: Customers---> Selected D: Customers---> to be SelectedK: Vendors----> to be selected K: Vendors----> SelectedM: Materials---> M: Materials--->S: GL Masters---> Selected S: GL Masters---> Selected
Use TC= OBA7 Select Type: DZSelect Details Button Select Vendor Check Box-----> SAVE
Press Enter to Save in your request.
Step B: Incoming Payment :
Accounting ----> Financial Accounting ---> Accounts Receivable----> Doc. Entry---->Incoming Payment ( F-28)
Prepared by: Rao MH 95
---->Incoming Payment ( F-28)
Doc.Dt: 12.08.09 Type: DZ Comp. Code: PSLClearing Text: Incoming Payment A/c : 200105 ( SBI C/A) Buss.Area: PSLHAmount: 198000 Text: Incoming Payment
Under Open Items Selection A/c # 3000001 ( GSL)A/c Type: D ( It come by Default) D Stands for CustomerSelect Other A/c Check BoxSelect Process Open Items Button
A/c Type Comp. Code Standard OI A/cK ( Vendors) PSL √ 4400001Select Contineu Button Double Click on all Open Items Menu----> Document -----> Simulate & Save
Go and See Customer A/c Transactions ( FBL5N):Go and See Customer A/c Transactions ( FBL5N):Go and See Customer A/c Transactions ( FBL5N):Go and See Customer A/c Transactions ( FBL5N):
Cust. A/c: 3000001 Comp. Code PSLSelect Cleared Items Radio Button Select Noram Items Check BoxSelect Vendor Items Check Box------> Execute ( F8)
Prepared by: Rao MH 95

Advance Receipt from Customers ( Down Payments Received ) :Advance Receipt from Customers ( Down Payments Received ) :Advance Receipt from Customers ( Down Payments Received ) :Advance Receipt from Customers ( Down Payments Received ) :
Normally after sales we receive payment from Customer. In this case, we received advance from Customer and after that sales were made.
Step 1. Creation of Advance from Customers under Current Liabilities and ProvisionsFS00
GL A/c # 100502Comp.Code: PSL Select With Template Button
GL A/c # 200110Comp.Code: PSL
Change Account Group to Current Liabilities and Provisions Change Short Text and GL Account Long Text to Advances from CustomersSAVE
Step 2. Link Between Sundry Debtors & Advances from Customers:SPRO--->Financial Account---->Acounts Receivable & Accounts Payable---->Business Transactions---> Down Payment Received ---->Define Reconciliation A/cfor Customer Downpayments ( TC=OBXR)
Double Click on Special GL Indicator "A" ( A for Advance)Chart of Accounts PSL → ENTER
Recon A/c Spl.GL A/c
Prepared by: Rao MH 96
Recon A/c Spl.GL A/c200110 100502 → SAVE
→ ENTER to save in your request.
Step 3 Advance Receipt Posting ( F-29)Accounting ---->Accounts Receivable---->Document Entry---->DownPayment(F-29)
Doc.Dt: 13.08.09 Type: DZ Comp.Code: PSLUnder Customer :A/c # 30000001 Spl.GL Indicator: A
Under Bank:A/c# 200105 Buss. Area: PSLHAmount: 30000 Text: Advance Receipt Pisting
→ ENTER
Amount : * Buss. Area: PSLH Text : +Menu----> Document -----> Simulate & SAVE
Prepared by: Rao MH 96
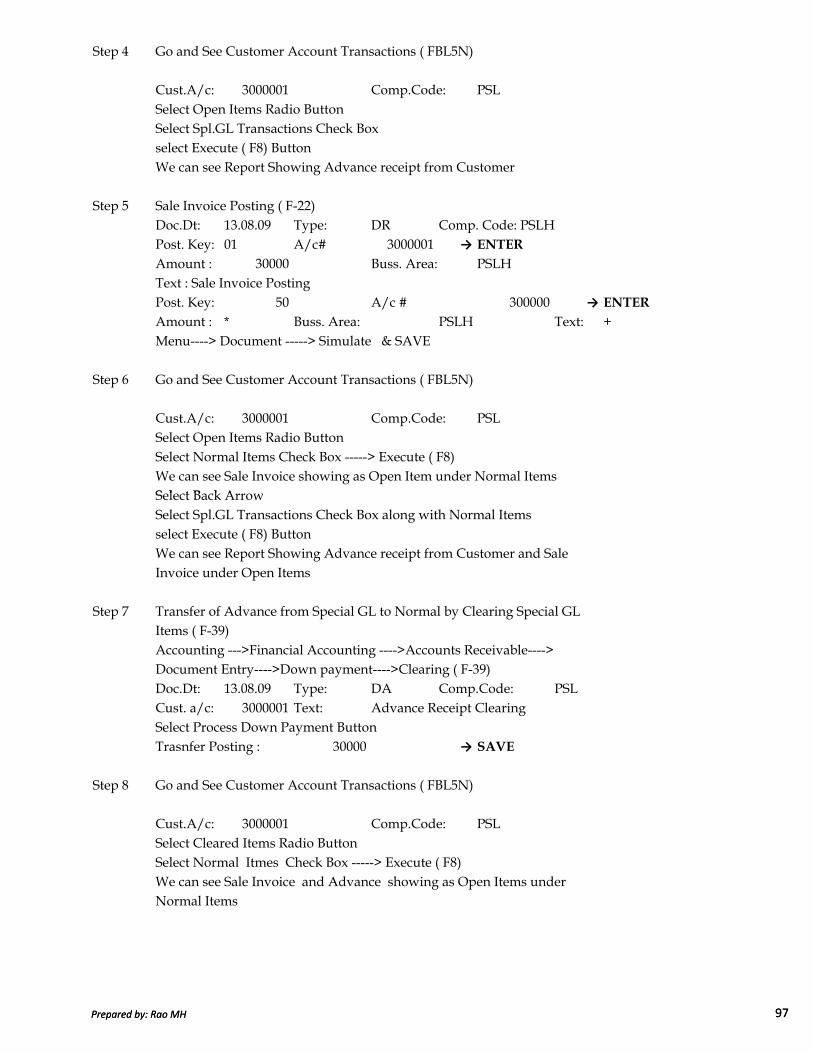
Step 4 Go and See Customer Account Transactions ( FBL5N)
Cust.A/c: 3000001 Comp.Code: PSLSelect Open Items Radio Button Select Spl.GL Transactions Check Boxselect Execute ( F8) Button We can see Report Showing Advance receipt from Customer
Step 5 Sale Invoice Posting ( F-22)Doc.Dt: 13.08.09 Type: DR Comp. Code: PSLHPost. Key: 01 A/c# 3000001 → ENTER
Amount : 30000 Buss. Area: PSLHText : Sale Invoice Posting Post. Key: 50 A/c # 300000 → ENTER
Amount : * Buss. Area: PSLH Text: +Menu----> Document -----> Simulate & SAVE
Step 6 Go and See Customer Account Transactions ( FBL5N)
Cust.A/c: 3000001 Comp.Code: PSLSelect Open Items Radio Button Select Normal Items Check Box -----> Execute ( F8)We can see Sale Invoice showing as Open Item under Normal ItemsSelect Back Arrow
Prepared by: Rao MH 97
Select Back ArrowSelect Spl.GL Transactions Check Box along with Normal Items select Execute ( F8) Button We can see Report Showing Advance receipt from Customer and SaleInvoice under Open Items
Step 7 Transfer of Advance from Special GL to Normal by Clearing Special GL Items ( F-39)Accounting --->Financial Accounting ---->Accounts Receivable---->Document Entry---->Down payment---->Clearing ( F-39)Doc.Dt: 13.08.09 Type: DA Comp.Code: PSLCust. a/c: 3000001 Text: Advance Receipt Clearing Select Process Down Payment Button Trasnfer Posting : 30000 → SAVE
Step 8 Go and See Customer Account Transactions ( FBL5N)
Cust.A/c: 3000001 Comp.Code: PSLSelect Cleared Items Radio Button Select Normal Itmes Check Box -----> Execute ( F8)We can see Sale Invoice and Advance showing as Open Items under Normal Items
Prepared by: Rao MH 97
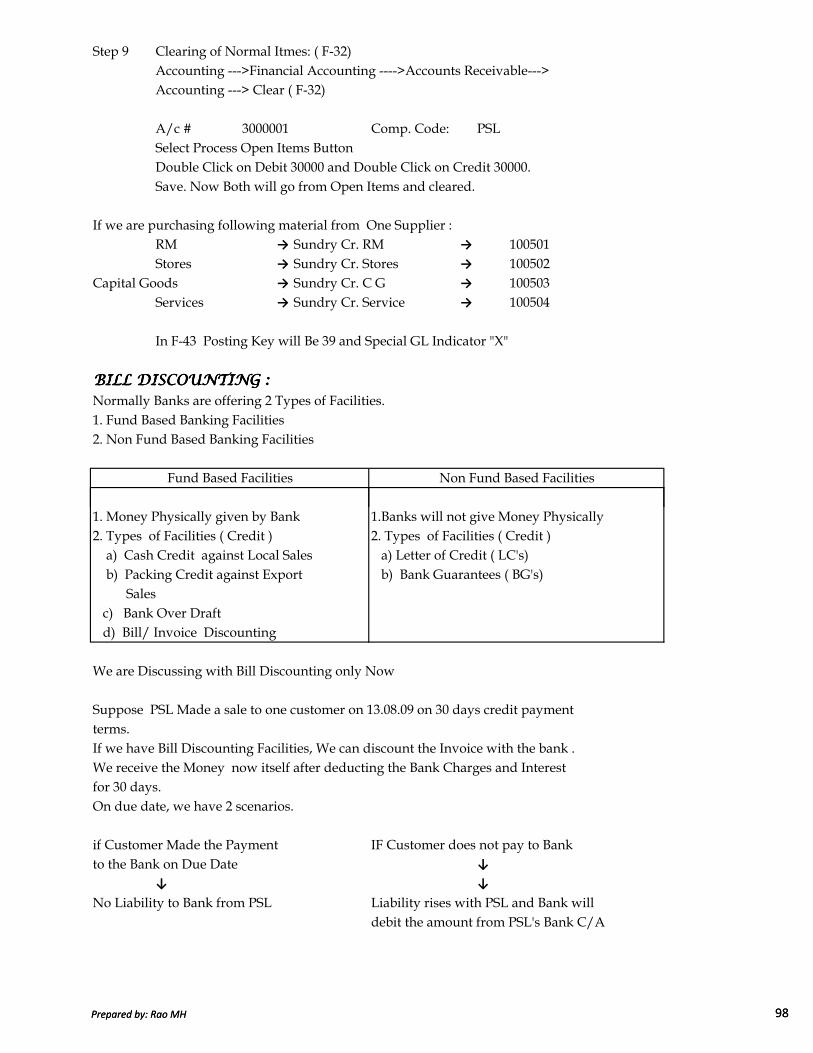
Step 9 Clearing of Normal Itmes: ( F-32)Accounting --->Financial Accounting ---->Accounts Receivable--->Accounting ---> Clear ( F-32)
A/c # 3000001 Comp. Code: PSLSelect Process Open Items Button Double Click on Debit 30000 and Double Click on Credit 30000. Save. Now Both will go from Open Items and cleared.
If we are purchasing following material from One Supplier :RM → Sundry Cr. RM → 100501Stores → Sundry Cr. Stores → 100502
Capital Goods → Sundry Cr. C G → 100503Services → Sundry Cr. Service → 100504
In F-43 Posting Key will Be 39 and Special GL Indicator "X"
BILL DISCOUNTING :BILL DISCOUNTING :BILL DISCOUNTING :BILL DISCOUNTING :Normally Banks are offering 2 Types of Facilities. 1. Fund Based Banking Facilities 2. Non Fund Based Banking Facilities
Non Fund Based FacilitiesFund Based Facilities
Prepared by: Rao MH 98
1. Money Physically given by Bank 1.Banks will not give Money Physically2. Types of Facilities ( Credit ) 2. Types of Facilities ( Credit ) a) Cash Credit against Local Sales a) Letter of Credit ( LC's) b) Packing Credit against Export b) Bank Guarantees ( BG's) Sales c) Bank Over Draft d) Bill/ Invoice Discounting
We are Discussing with Bill Discounting only Now
Suppose PSL Made a sale to one customer on 13.08.09 on 30 days credit payment terms.If we have Bill Discounting Facilities, We can discount the Invoice with the bank .We receive the Money now itself after deducting the Bank Charges and Interest for 30 days.On due date, we have 2 scenarios.
if Customer Made the Payment IF Customer does not pay to Bankto the Bank on Due Date ↓
↓ ↓
No Liability to Bank from PSL Liability rises with PSL and Bank will debit the amount from PSL's Bank C/A
Prepared by: Rao MH 98

Suppose , if we disounted some of bills with the bank. Out of them, some of the billsdue date is after the date of Fiscal Year Closing Date. The amount which is outstanding after Fiscal Year Closing date, will be contingent liability of the Customeras , we do not know, wether customer will pay to the bank or not. So we will showthat amount as Contingent Liability in Notes to the Balance Sheet as " Bills Discountedwith Banks"
Entries in Normal A/c Entries in SAP1. For Sales: 1. For Sales:Customer A/c Dr. 50000 Customer A/c Dr. 50000 to Sales A/c 50000 to Sales A/c 50000
2 For Bill of Exchange Payament 2 For Bill of Exchange Payament No Entry in Accounting Customer Spl GL( W) Dr. 50000
to Customer with Clg 50000
3 Bills of Exchange Discount 3 Bills of Exchange DiscountSBI C/A Dr. 48000 SBI C/A Dr. 48000Interest A/c Dr. 2000 Interest A/c Dr. 2000 To SBI Bill Discounting A/c 50000 To SBI Bill Discounting A/c 50000
Entry No 2 & 3 will pass together in SAP
4. We can see Report Customer Wise 4. Same Reports available in SAPBill Wise, Due Date wise, and Bank
Prepared by: Rao MH 99
Bill Wise, Due Date wise, and BankWise outstanding
5 Reverse of Contingent Liability 5 SBI Bill Discounting with Clg 50000SBI Bill Discounting A/c Dr. 50000 To Cust. Spl GL( W) with clg 50000 to SBI C/A 50000 ( Sundry Dr. Bill of Exchange)
Presentation of Bills of Exchanges in Balance Sheet:If we received Bills of Exchange from Customer and discounted in Bankwe have 2 types of presentation in Balance Sheet
A We will show Sundry Debtors including the Bills of Exchange Amountsand Sundry Dr. Bills of Exchange 50000 Dr.
SBI Bills Discounting 50000 Cr. Net ZEROOR
B Some Companies show normal Debtors and Bills Discounting will not show in B/S. It will be appeared in Notes to B/S under Contingent Liabilities.
Prepared by: Rao MH 99

Customization:
Step 1. Creation of 2 GL Masters ( FS00)1st A/c GL A/c: 200111 Comp. Code: PSL
Select With Template Button GL A/c: 200110Comp. Code: PSL → ENTER
Change short Text to Sundry Dr. B/EChange Long Text to Sundry Debtors Bills of Exchange
SAVE
2nd A/cGL A/c: 100302 Comp. Code: PSLSelect With Template Button GL A/c: 100300Comp. Code: PSL → ENTER
Change short Text to SBI Bill Discounting A/cChange Long Text to SBI Bill Discounting A/cSelect Control Data TabSelect Open Items Management Check BoxSelect Line Items Check BoxSelect Create/Bank/Interest TabSelect Post Automatically Check Box → SAVE
Prepared by: Rao MH 100
Step 2. Link Between Sundry Debtors and Sundry Debtors Bills of Exchange:
PATH: SPRO---> Financial Accounting--->Bank A/c---> Business Transactions--->Bills of Exchange Transactions---->Bills of Exchange Receivables---> Post Bill of Exchange Receivable--->Define AlternativeReconciliation Account for Bills of Exchange Receivable ( OBYN)
Double Click on Special GL Indicator " W"Chart of Accounts : PSL → ENTERRecon A/c Spl. GL A/c
200110 200111 → SAVE
→ ENTER to save in your request.
Step 3 Define Banks of Sub Accounts:Upto Bills of Exchange Receivable Path is same----> Present Bill of Exchange Receivable Bank---->Define Bank sub Account ( TC=OBYK)Select New Entries Button
COA Bank A/c Usage SGL Ind Customer Bank Sub A/c Recon A/c for Liability
PSL 200105 DiscountingW 200110 100302( SBI Bill Discounting A/c)
→ SAVE → ENTER to save in your request
Prepared by: Rao MH 100
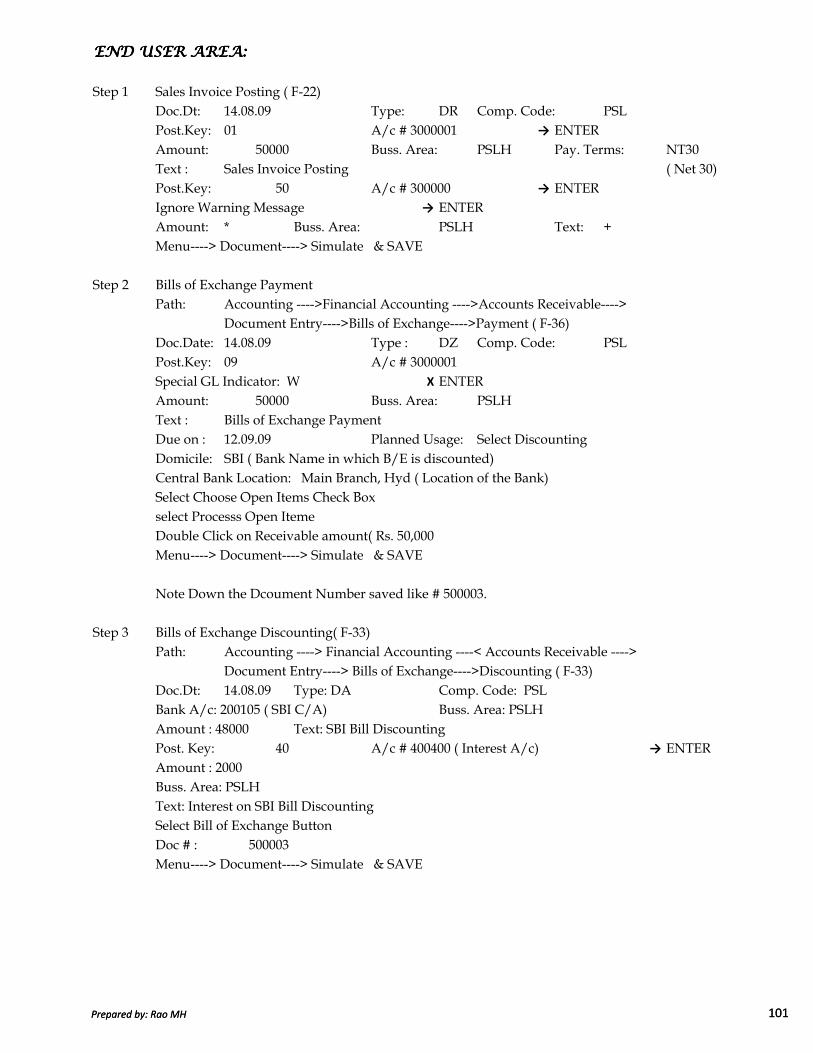
END USER AREA:END USER AREA:END USER AREA:END USER AREA:
Step 1 Sales Invoice Posting ( F-22)Doc.Dt: 14.08.09 Type: DR Comp. Code: PSLPost.Key: 01 A/c # 3000001 → ENTERAmount: 50000 Buss. Area: PSLH Pay. Terms: NT30Text : Sales Invoice Posting ( Net 30)Post.Key: 50 A/c # 300000 → ENTERIgnore Warning Message → ENTERAmount: * Buss. Area: PSLH Text: +Menu----> Document----> Simulate & SAVE
Step 2 Bills of Exchange PaymentPath: Accounting ---->Financial Accounting ---->Accounts Receivable---->
Document Entry---->Bills of Exchange---->Payment ( F-36)Doc.Date: 14.08.09 Type : DZ Comp. Code: PSLPost.Key: 09 A/c # 3000001Special GL Indicator: W X ENTERAmount: 50000 Buss. Area: PSLHText : Bills of Exchange PaymentDue on : 12.09.09 Planned Usage: Select Discounting Domicile: SBI ( Bank Name in which B/E is discounted)Central Bank Location: Main Branch, Hyd ( Location of the Bank)Select Choose Open Items Check Box
Prepared by: Rao MH 101
Select Choose Open Items Check Boxselect Processs Open Iteme Double Click on Receivable amount( Rs. 50,000Menu----> Document----> Simulate & SAVE
Note Down the Dcoument Number saved like # 500003.
Step 3 Bills of Exchange Discounting( F-33)Path: Accounting ----> Financial Accounting ----< Accounts Receivable ---->
Document Entry----> Bills of Exchange---->Discounting ( F-33)Doc.Dt: 14.08.09 Type: DA Comp. Code: PSLBank A/c: 200105 ( SBI C/A) Buss. Area: PSLHAmount : 48000 Text: SBI Bill Discounting Post. Key: 40 A/c # 400400 ( Interest A/c) → ENTERAmount : 2000Buss. Area: PSLHText: Interest on SBI Bill Discounting Select Bill of Exchange Button Doc # : 500003Menu----> Document----> Simulate & SAVE
Prepared by: Rao MH 101

Step 4 Report to View Customer wise, Bill Wise, Due Date Wise and Bank Wise O/s:Path: Accounting ---> Financial Accounting --->Accounts Receivable ---> PeriodicProcessing--->Bills of Exchange Processing --->Korea---->B/E Management( TC= S_ALR_87012213)COA : PSL GL A/c: 200111 Comp. Code: PSLSpecial GL Indicator : W Usage: D ( Discounting )select Discounted/ Collected Radio Button → Execute ( F8)Select Change Layout Button Keep fields Due Date, Doc # , Customer No, Received from, Doc Dt, Domicile,Amount in Local Currency Select Copy Button
REVERSE OF CONTINGENT LIABILITY:
Accounting --->Financial Accounting---->Accounts Receivable---> Document Entry--->Bills of Exchange--->Reverse Contingent Liability ( TC=F-20)Doc.Dt: 11.09.09 Type: DA Comp. Code: PSLBills of Exchange Selection GL A/c : 200111 Usage: Discounting Customer: 3000001 Due By: 30.09.09Select Edit Line Items Button → Ignore Warning Message Press ENTER
*** Command: + ( Set Items to Active) → SAVEMENU----> Document ----> Display
If the Bill is Dishonour by Customer :The Contingent Liability Becomes Actual Liability when the Bill is dishonoured by Customer. We have to Reverse Contingent Liability and Pass Customer A/c Dr.
Prepared by: Rao MH 102
Customer A/c Dr. To SBI C/A
*** Why to Select "+" in Command Field:
+ set items to active++ set items in block to active- set items to inactive-- set items in block to inactive
If customer paid to Bank for Bill Nos 2,3 & 4, then we can select like belowBill No OR OR
1 - If we are using "++" or "--" it 2 + ++ should be marked from and to 3 + Bill. In between the marks all bills4 + ++ will be active or inactive.5 -
Later If customer made payment for Bill Nos 1 & 5 thenBill No OR OR
1 +2 - -3 -4 - -5 +
Prepared by: Rao MH 102

Dunning means Reminder. If the customer does not make the payment as per the payment terms, we can issue Dunning ( Reeminder) Letter to Customer from SAP.
Dunning Area: Dunning area can be Company Code, as a
whole (or ) Region (or) Location
In Case of Big Companies Separate Marketing Head from Each Region wants to issue Dunning Letters to his Area Customers. In this Case Dunning area will be Region
In Case of Small Companies, One Marketing Head for all the Regions . In this case Dunning area will be Company Code as a whole
Dunning Levels: Dunning Levels means Types of Letters. There are Maximum
9 levels in SAP. But we are using 4 levels.
Dunning Intervals: Dunning Intervals means Frequency of Letters to be generated
Every 10 days or 15 daysGrace Period: 3 days
Ex: if Sale is made on 17.08.09 and Terms of Payment 0001 ( payable immediately)
1st Letter 2nd Letter 3rd Letter 4th LetterAfter 20th Aug After 30th After 9th After 19th
DUNNING DUNNING DUNNING DUNNING
Prepared by: Rao MH 103
After 20th Aug After 30th After 9th After 19th(including 3days Aug Sept Septfor Grace)
Note: Grace Period is calculated only for the 1st Letter but not for all letters.
Dunning Charges: For Sending the letters we can collect Dunnig Charges from
Customers. Dunning Charges can be a Fixed Amount or Percentage BasisAmount or Percentage can be based on Levels of Dunning .Dunning Charges will be levied only in the Letters and will not be posted to Accounts. It will be Done to Threaten the Customer to make the Payment with in Due Date. If the Customer paid Dunning Charges in Real, then only posting willbe done to " Dunning Charges A/c " as Other Income.
CUSTOMIZATION OF DUNNING PROCEDURE:
Step 1. Define Dunning Area: SPRO---->Financial Accounting ---->AccountsReceivable& Accounts Payable--->Business Trnsactions---->Dunning ---> Basicsettings for Dunning---> Define Dunning Area
Select New Entries Buton Company Code: PSL Area : Blank (Blank Area is for Creating Text: Dunning Area for PSL Dunning area at Comp Code Level)SAVE ----> Ignore Warning Message and Press EnterPress Enter to Save in your Request.
Prepared by: Rao MH 103
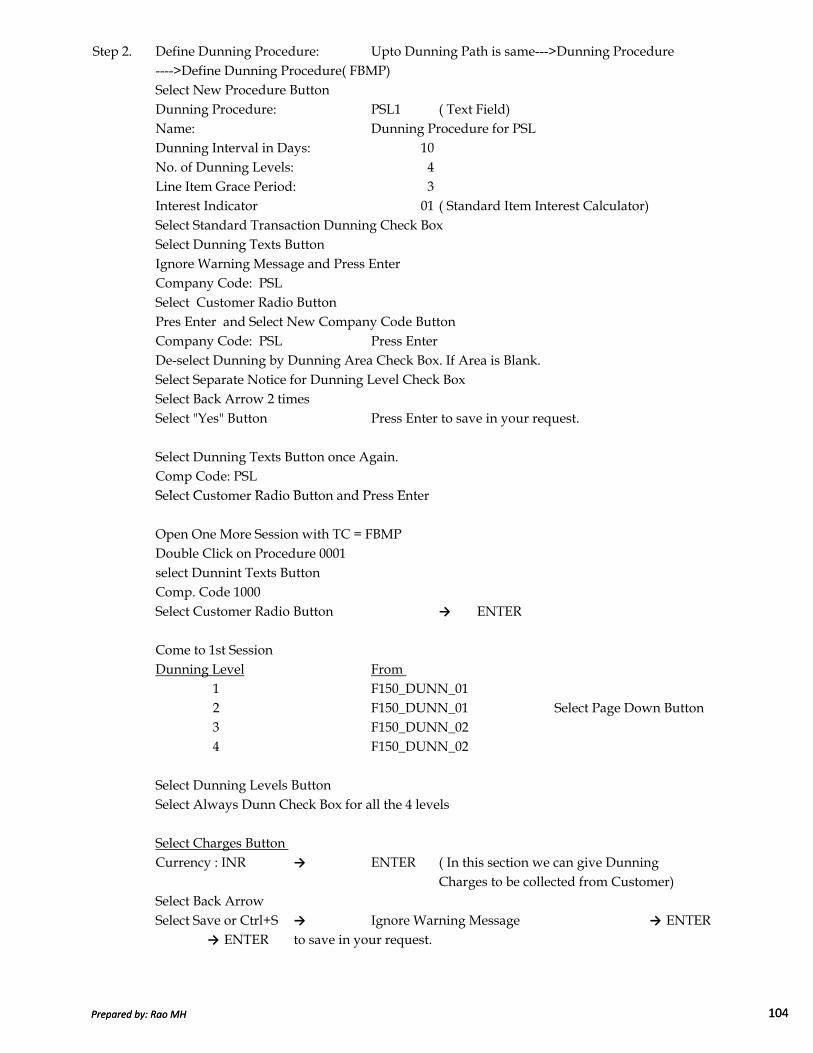
Step 2. Define Dunning Procedure: Upto Dunning Path is same--->Dunning Procedure---->Define Dunning Procedure( FBMP)Select New Procedure Button Dunning Procedure: PSL1 ( Text Field)Name: Dunning Procedure for PSLDunning Interval in Days: 10No. of Dunning Levels: 4Line Item Grace Period: 3Interest Indicator 01 ( Standard Item Interest Calculator)Select Standard Transaction Dunning Check BoxSelect Dunning Texts Button Ignore Warning Message and Press EnterCompany Code: PSLSelect Customer Radio Button Pres Enter and Select New Company Code Button Company Code: PSL Press EnterDe-select Dunning by Dunning Area Check Box. If Area is Blank.Select Separate Notice for Dunning Level Check BoxSelect Back Arrow 2 timesSelect "Yes" Button Press Enter to save in your request.
Select Dunning Texts Button once Again.Comp Code: PSLSelect Customer Radio Button and Press Enter
Prepared by: Rao MH 104
Select Customer Radio Button and Press Enter
Open One More Session with TC = FBMPDouble Click on Procedure 0001select Dunnint Texts Button Comp. Code 1000Select Customer Radio Button → ENTER
Come to 1st Session Dunning Level From
1 F150_DUNN_012 F150_DUNN_01 Select Page Down Button3 F150_DUNN_024 F150_DUNN_02
Select Dunning Levels Button Select Always Dunn Check Box for all the 4 levels
Select Charges Button Currency : INR → ENTER ( In this section we can give Dunning
Charges to be collected from Customer)Select Back ArrowSelect Save or Ctrl+S → Ignore Warning Message → ENTER
→ ENTER to save in your request.
Prepared by: Rao MH 104

Step3. Assaign Dunning Procedure in Customer Master:Accounting ---->Financial Accounting ---->Accounts Receivable--->Master records---->Maintain Centrally--->Change ( XD02)
Customer A/c#: 3000001Comp. Code: PSL → ENTERselect Company Code Data Button Select Correspondence TabDunning Procedure: PSL1 → SAVE
END USER AREA:
Step1. Sales Invoice Posting ( F-22)Doc.DT: 10.08.09 Type: DR Comp. Code: PSLPost. Key: 01 Account # 3000001 → ENTERAmount : 9999 Buss. Area: PSLHText: Sales Invoice Posting Post. Key: 50 Account # 300000 → ENTERAmount : * Buss. Area: PSLH Text: +Menu----> Document----> Simulate & SAVE
Step2. Dunning : Accounting --->Financial Accounting ---->Accounts Receivable--->Periodic Processing ---->Dunning ( F150)
Run ON : 18.08.09 Identification: PSL1 ( Text Field)Select Payment Tab
Prepared by: Rao MH 105
Select Payment TabDunning Date( Letter Date): 18.08.09Documents Posted Upto: 18.08.09Company Code: PSLCustomer A/c: 3000001 to 3000100 → SAVESelect Back ArrowSelect Schedule Button Output Device : LP01Select Contineu Button Select Start Immediately Check BoxSelect Schedule Button Go and Press Enter till we get message " Dunning Selection is Compleate"Select Dunning Printout ButtonOutput Device : LP01Select Contineu Button Select Print Button Go on Press Enter till we get theMessage " Dunning Printout is Complete"
Prepared by: Rao MH 105

Select Dunning History Button Comp. Code: PSL → Execute ( F8)Keep the Cursor on Amount 9999Select Display Dunning Notice Button Keep the Cursor on Doc #Select Print Preview Button , Output Device : LP01Select Contineu Button
Go and See Customer Master ( XD02):
Customer A/c # 3000001Comp. Code: PSL → ENTERSelect Comp Code Data Button Select Correspondence TabWe can see the Letter to the Customer regarding the Outstanding Payment
Sales Tax is part of CIN in SAP. CIN mans Country India Version.
If we made Local Purchases or Local Sales i.e., Within State Purchases / Sales VAT is applicable ( VAT Purchases/ Vat Sales
SALES TAX
Prepared by: Rao MH 106
If we made Out of State Purchases/ Sales Central Sales Tax( CST Purchases/ Sales)
SalesLocal Outside Local Outside Purchase Purchase Sales Sales
Basic Price 100 100 Basic Price 200 200Excise Duty ( 6%apx) 6 6 Excise Duty ( 8%apx) 16 16
106 106 216 216VAT 4% * 4.24 VAT 12.5% ? 27CST 2 % ** 2.12 CST( 2%) ( ??) 4.32Vendor account 110.24 108.12 Customer Account 243 220.32
Note *: will go to VAT Receivable A/c Note ?: Will go to VAT Payable Account Note **: to be added to Inventory only, No Note??: will go to CSTG Payable Account adjustment is possible for CST.
VAT payable and VAT Receivable eventhough 2 accounts, everymonth, we will reconicile these accounts and adusted against other. Net amount only be payable or receivable.Where as In the case of CST Payable , we cannot able to adjust this amount agaisnt otheraccount . CST Receivable can be adjusted against VAT Payable.
Purchases
Prepared by: Rao MH 106
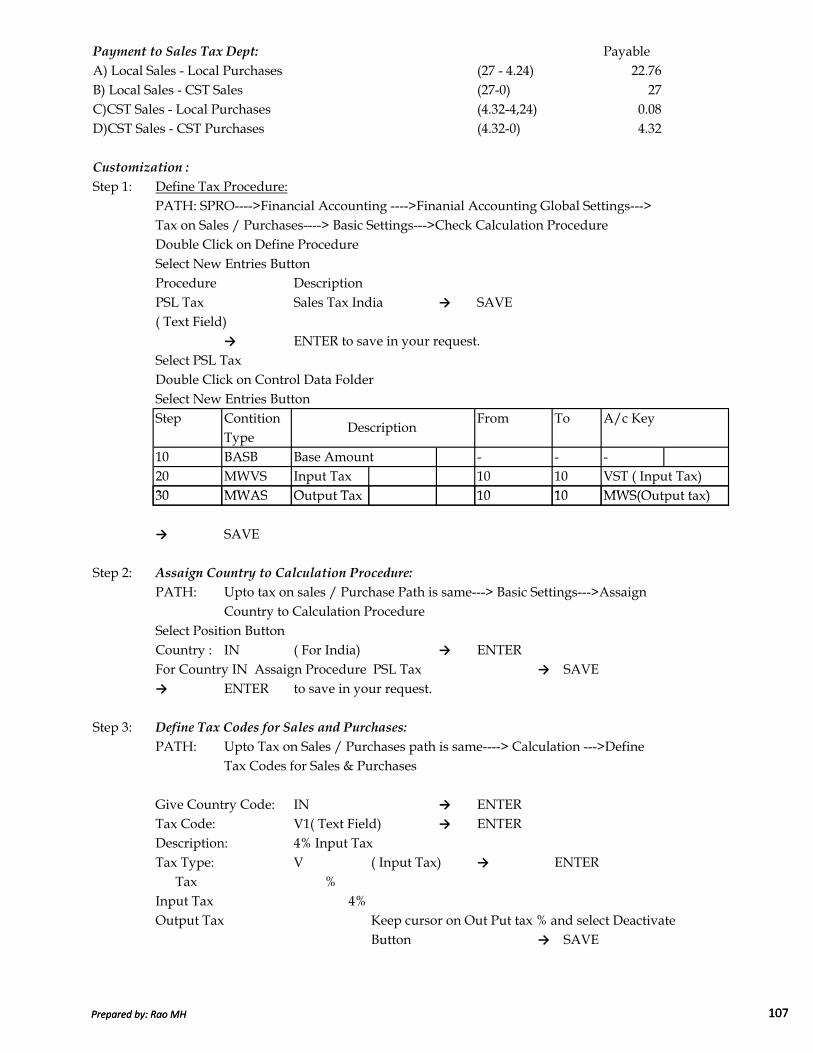
Payment to Sales Tax Dept: PayableA) Local Sales - Local Purchases (27 - 4.24) 22.76B) Local Sales - CST Sales (27-0) 27C)CST Sales - Local Purchases (4.32-4,24) 0.08D)CST Sales - CST Purchases (4.32-0) 4.32
Customization :
Step 1: Define Tax Procedure:PATH: SPRO---->Financial Accounting ---->Finanial Accounting Global Settings--->Tax on Sales / Purchases----> Basic Settings--->Check Calculation ProcedureDouble Click on Define Procedure Select New Entries Button Procedure DescriptionPSL Tax Sales Tax India → SAVE( Text Field)
→ ENTER to save in your request.Select PSL Tax Double Click on Control Data FolderSelect New Entries Button Step Contition From To A/c Key
Type10 BASB Base Amount - - -20 MWVS Input Tax 10 10 VST ( Input Tax)30 MWAS Output Tax 10 10 MWS(Output tax)
Description
Prepared by: Rao MH 107
30 MWAS Output Tax 10 10 MWS(Output tax)
→ SAVE
Step 2: Assaign Country to Calculation Procedure:
PATH: Upto tax on sales / Purchase Path is same---> Basic Settings--->AssaignCountry to Calculation Procedure
Select Position Button Country : IN ( For India) → ENTERFor Country IN Assaign Procedure PSL Tax → SAVE→ ENTER to save in your request.
Step 3: Define Tax Codes for Sales and Purchases:
PATH: Upto Tax on Sales / Purchases path is same----> Calculation --->DefineTax Codes for Sales & Purchases
Give Country Code: IN → ENTERTax Code: V1( Text Field) → ENTERDescription: 4% Input TaxTax Type: V ( Input Tax) → ENTER
Tax %Input Tax 4%Output Tax Keep cursor on Out Put tax % and select Deactivate
Button → SAVE
Prepared by: Rao MH 107

Tax Code: V0 → ENTERDescription : 0% Input TaxTax Type: V ( Input Tax) → ENTER
Tax %Input Tax 0%Output Tax Keep cursor on Out Put tax % and select Deactivate
Button → SAVE
Tax Code: A1 → ENTERDescription: 12.5% Output TaxTax Type A ( Output Tax) → ENTER
Tax %Output Tax 12.5%Input Tax Keep cursor on InPut tax % and select Deactivate
Button → SAVE
Tax Code: A0 → ENTERDescription: 0% output TaxTax Type: A ( Output Tax) → ENTER
Tax %Output Tax 0.0%Input Tax Keep cursor on InPut tax % and select Deactivate
Button → SAVE
Prepared by: Rao MH 108
Step 4: Assaign Tax Codes for Non Taxable Transactions:PATH: Upto Tax on Sales / Purchases path is same----> Posting ---->Assaign
Tax Codes for Non Taxable Transactions (OBCL)Select Positon Button
Comp. Code: PSL → ENTER
For Company Code PSL Input tax Output taxCode CodeV0 A0
→ SAVE → ENTER to save in your request.
Step 5: Creation of 2 GL Masters:A VAT Receivables Under Current Assets Loans & AdvancesB VAT Payable Under Current Liabilities & Provisions
Enter TC=FS001st a/c GL A/c : 200155 Comp. Code : PSL Select with template
GL A/c : 200120Comp. Code : PSL → ENTER
Change Short Text and GL A/c Long Text to " VAT Receivable Account"Select Control Data tabTax Category: * ( All Tax types allowed)
Prepared by: Rao MH 108
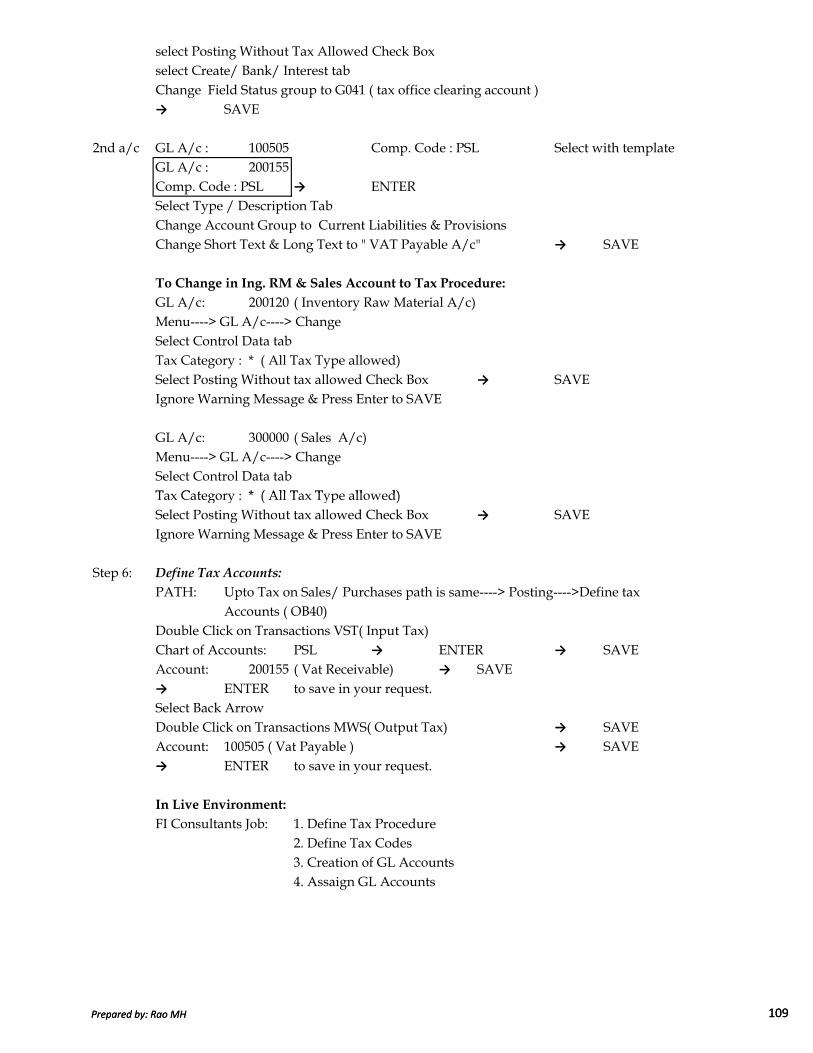
select Posting Without Tax Allowed Check Boxselect Create/ Bank/ Interest tabChange Field Status group to G041 ( tax office clearing account )→ SAVE
2nd a/c GL A/c : 100505 Comp. Code : PSL Select with template GL A/c : 200155Comp. Code : PSL → ENTERSelect Type / Description TabChange Account Group to Current Liabilities & ProvisionsChange Short Text & Long Text to " VAT Payable A/c" → SAVE
To Change in Ing. RM & Sales Account to Tax Procedure:
GL A/c: 200120 ( Inventory Raw Material A/c)Menu----> GL A/c----> ChangeSelect Control Data tabTax Category : * ( All Tax Type allowed)Select Posting Without tax allowed Check Box → SAVEIgnore Warning Message & Press Enter to SAVE
GL A/c: 300000 ( Sales A/c)Menu----> GL A/c----> ChangeSelect Control Data tabTax Category : * ( All Tax Type allowed)
Prepared by: Rao MH 109
Tax Category : * ( All Tax Type allowed)Select Posting Without tax allowed Check Box → SAVEIgnore Warning Message & Press Enter to SAVE
Step 6: Define Tax Accounts:
PATH: Upto Tax on Sales/ Purchases path is same----> Posting---->Define taxAccounts ( OB40)
Double Click on Transactions VST( Input Tax)Chart of Accounts: PSL → ENTER → SAVEAccount: 200155 ( Vat Receivable) → SAVE→ ENTER to save in your request.Select Back ArrowDouble Click on Transactions MWS( Output Tax) → SAVEAccount: 100505 ( Vat Payable ) → SAVE→ ENTER to save in your request.
In Live Environment:
FI Consultants Job: 1. Define Tax Procedure2. Define Tax Codes3. Creation of GL Accounts4. Assaign GL Accounts
Prepared by: Rao MH 109
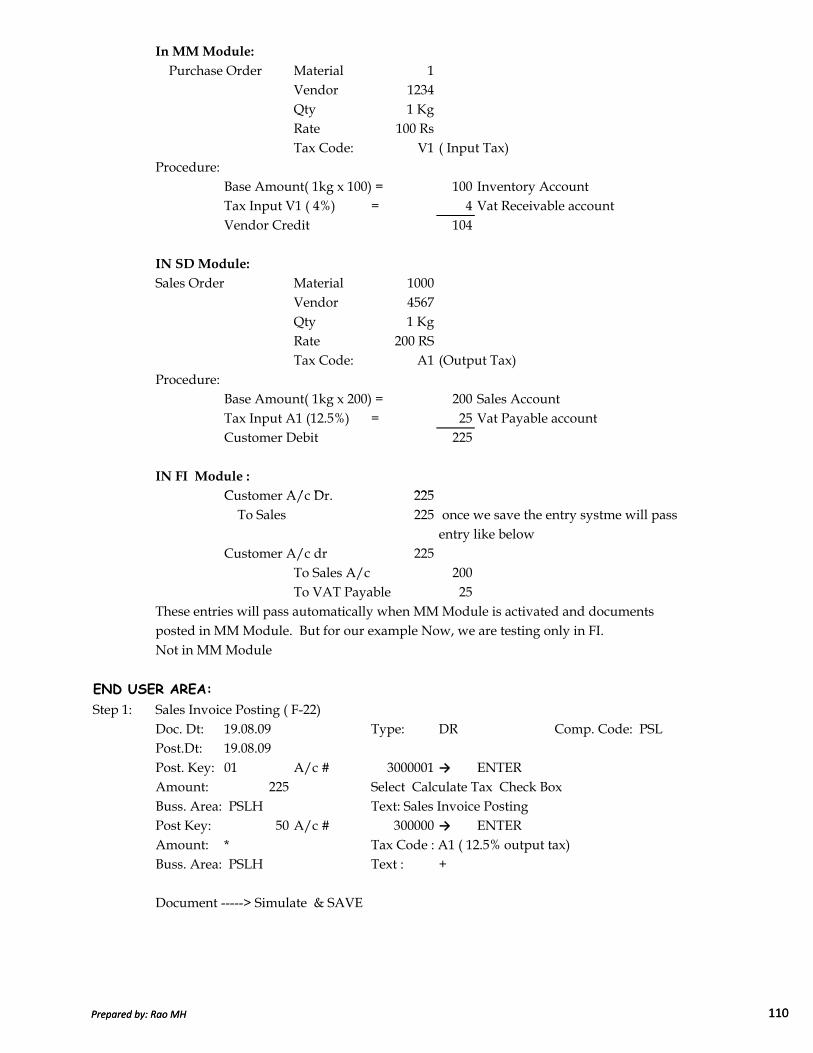
In MM Module:
Purchase Order Material 1Vendor 1234Qty 1 KgRate 100 RsTax Code: V1 ( Input Tax)
Procedure:Base Amount( 1kg x 100) = 100 Inventory Account Tax Input V1 ( 4%) = 4 Vat Receivable accountVendor Credit 104
IN SD Module:
Sales Order Material 1000Vendor 4567Qty 1 KgRate 200 RSTax Code: A1 (Output Tax)
Procedure:Base Amount( 1kg x 200) = 200 Sales AccountTax Input A1 (12.5%) = 25 Vat Payable accountCustomer Debit 225
IN FI Module :
Customer A/c Dr. 225
Prepared by: Rao MH 110
Customer A/c Dr. 225 To Sales 225 once we save the entry systme will pass
entry like belowCustomer A/c dr 225
To Sales A/c 200To VAT Payable 25
These entries will pass automatically when MM Module is activated and documentsposted in MM Module. But for our example Now, we are testing only in FI. Not in MM Module
END USER AREA:
Step 1: Sales Invoice Posting ( F-22)Doc. Dt: 19.08.09 Type: DR Comp. Code: PSLPost.Dt: 19.08.09Post. Key: 01 A/c # 3000001 → ENTERAmount: 225 Select Calculate Tax Check BoxBuss. Area: PSLH Text: Sales Invoice Posting Post Key: 50 A/c # 300000 → ENTERAmount: * Tax Code : A1 ( 12.5% output tax)Buss. Area: PSLH Text : +
Document -----> Simulate & SAVE
Prepared by: Rao MH 110

TDS is part of CIN ( Country India Version)
TDS stands for Tax Deducted at Source
TCS stands for Tax Collected at Source
We collect TDS for Vedor Payments to Services like Legal , Professional
charges ,& Job work charges
We collect TCS from Customers of Slaes from Scrap & Waste Sales.
Upto SAP Version 4.7C , SAP has given 2 packages in India. SAP +CIN
from Version 4.7EE on wards CIN is part of SAP
There are 2 types of Withholding tax in SAP
Classic Withholding Tax
SAP was released in India in 1995
in 1996 after Finance Budget , For changes in Tax SAP Released
PATCHES (Programme). Like that Upto year 2000 SAP has released patches
and providing along with SAP pack. A new company which purchased SAP
in the Year 2000 got SAP+CIN+ Attach of All the Patches from 1996 to 1999.
Extended Withholding Tax
SAP modified existing programme with the changes in all Finance Budgets.
Later on in Finance Budgets Surcharge, Education Cess, Higher education Cess was
WITH HOLDING TAX ( TDS)WITH HOLDING TAX ( TDS)WITH HOLDING TAX ( TDS)WITH HOLDING TAX ( TDS)
Prepared by: Rao MH 111
Later on in Finance Budgets Surcharge, Education Cess, Higher education Cess was introduced by Govt.of India in Taxes. In the Present Budget for Financial Year
2010, Surcharge, EducationCess and Higher Ed Cess removed.
Earlier we have Annual TDS Return on Contractors a Separate Form 26C
Later it changed to Common TDS Form of 26. From Year 2009 Quarterly
Return of 26Q was introduced.
Procedure of TDS on Contractors/Interest/Rent/Professional Charges is
same except for Salaries. Only Rates are Different. TDS on salaries is part of
"Pay Roll Module" which we are not Covering in Training.
As Procedure is same, we are Testing only " TDS on Contractors" for Testing
Purpose ( IT Sec 194C)
1. Status Company/Partnership Firm Individuals
2. Rates Basic 2% 2%
3 TDS is to be deducted at the time of Invoice Posting / Advance Payment
Posting which ever is earlier
4. If the Bill amount is less than Rs. 20,000 and the Whole Year Contract
Value with the same party is less than 50,000. No TDS to be deducted.
5. If the Contractor does not have taxable income, we can get exemption
certificate from Income Tax Department for lower rate of Deduction or NIL
Rate of Deduction. In that case we have to deduct TDS at Lower Rate or NIL
rate . Income Tax Dept give exemption for each year.
Prepared by: Rao MH 111

6. TDS Deducted should be deposited within 7 days from the month end.
in case of Year End credits, to be deposited within 2 months from the end of
the year.
7. If 7th day come on Holiday choice to make payment 1 day before or after.
8. If the Bill amount includes material cost and conversion charges, we have
the option to deduct TDS on Full Amount or only on Conversion Charges
9 Issue TDS Certificates in Form 16A should be issued within 1 month or
we can issue consolidated certificate for the whole year within 1 month from
the end of Closing Financial Year.
10. File Quarterly Return in form 26Q
11. Tax deducted at source can be obtained at company code level/ Business
Area Level/Business Place Level.
CUSTOMIZATION:
Step 1: Maintain Calendar:
SPRO--->SAP Netweaver---->General Settings--->Maintain Calender
( TC= SCAL)
Select Public Holidays Radio Button
Select Change Button
Select Create Button
Select With Fixed Date Radio Button
Select Create Button
Day 01
Prepared by: Rao MH 112
Day 01
Month 05( May)
Short Holiday Name: May Day
Long Holiday Name: May Day → ENTER
Ignore Warning Message Select Button → ENTER
Select Back Arrow
Select Holiday Calendar Radio Button
Select Change Button
Select Create Button
Calendar ID P2 ( Text Field)
Description : PSL HYD Factory Holiday Calendar
Select Assaign Holiday Button
Salect May Day Check Box
Select Assaign Public Holiday Button → SAVE
Ignore Warning Message → ENTER
Select Back Arrow 2 times
Select Factory Calender Radio Button
Select Change Button
Select Create Button
Calendar ID P3 ( Text Field)
Description : PSL Hyd Factory Calendar
Holiday Calendar ID: P2
Select Monday to Saturday Check Box → SAVE
Ignore Warning Message → ENTER
Prepared by: Rao MH 112

Step 2: Check Withholding Tax Countries:
SPRO--->Financial Accounting--->Financial A/c Global Settings--->
Withholding Tax---->Extended Withholding Tax---->Basic Settings--->
Check withholding tax countries
Select New Entries Button
Country : IN
W/Tax Country: IN
Description : India → SAVE
Save in AP Customization Request
Step 3: Define Withholding Tax Keys → Same Path
Country Key: IN → ENTER
Select New Entries Button
Off. Withold Name
Tax Key
194C TDS on Contractors → ENTER
→ ENTER to save in your request.
Step 4: Define Business Places ( Section Code)
Upto Extended Withholding Tax Path is Same---->Basic Settings---->
India--->Define Business Places
Select New Entries Button
Comp.code: PSL
Prepared by: Rao MH 113
Comp.code: PSL
Section Code: PSL ( Text Field)
Name: PSL Hyderabad Factory → SAVE
Name: PSL Hyderabad Factory
Country : IN → ENTER
→ ENTER to save in your request.
Step 5: Assaign Factory Calender to Business Place( Section Code)
Same Path → Select New Entries
Comp. Section Fact. Cal Rule
Code Code IDPSL PSLF PS Day Before ( Select from Dropdown Button)
→ SAVE → ENTER to save in ur request
Prepared by: Rao MH 113
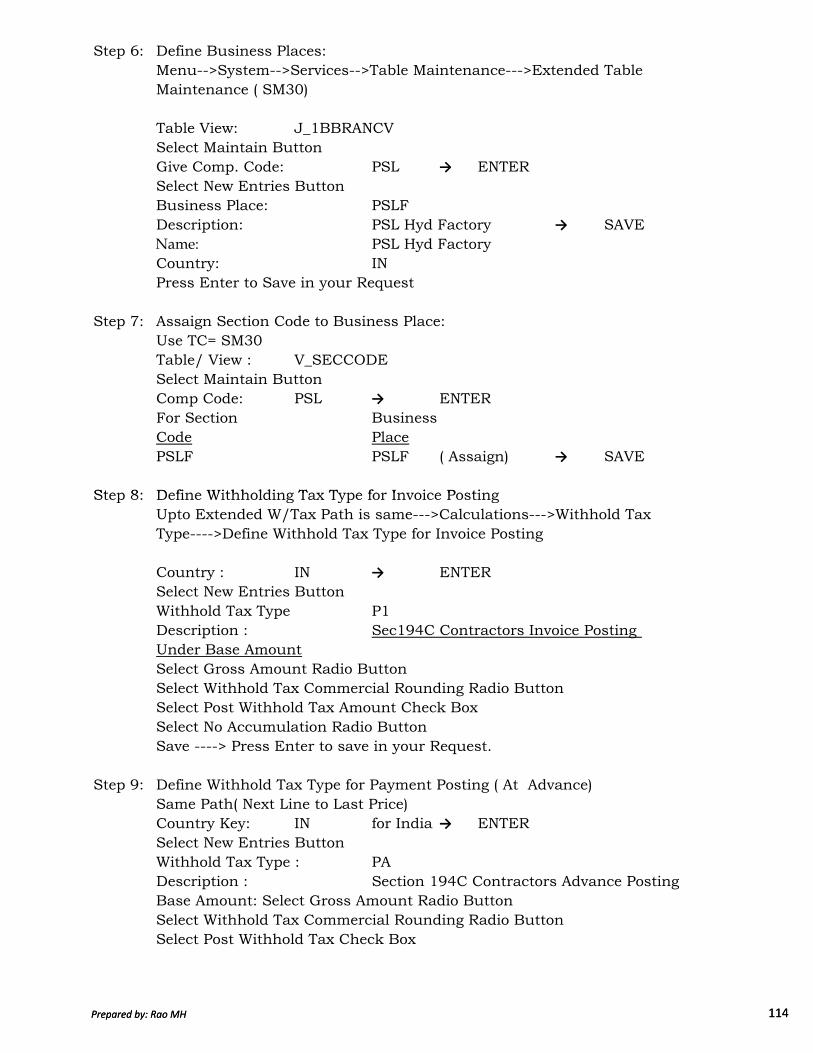
Step 6: Define Business Places:
Menu-->System-->Services-->Table Maintenance--->Extended Table
Maintenance ( SM30)
Table View: J_1BBRANCV
Select Maintain Button
Give Comp. Code: PSL → ENTER
Select New Entries Button
Business Place: PSLF
Description: PSL Hyd Factory → SAVE
Name: PSL Hyd Factory
Country: IN
Press Enter to Save in your Request
Step 7: Assaign Section Code to Business Place:
Use TC= SM30
Table/ View : V_SECCODE
Select Maintain Button
Comp Code: PSL → ENTER
For Section Business
Code Place
PSLF PSLF ( Assaign) → SAVE
Step 8: Define Withholding Tax Type for Invoice Posting
Prepared by: Rao MH 114
Step 8: Define Withholding Tax Type for Invoice Posting
Upto Extended W/Tax Path is same--->Calculations--->Withhold Tax
Type---->Define Withhold Tax Type for Invoice Posting
Country : IN → ENTER
Select New Entries Button
Withhold Tax Type P1
Description : Sec194C Contractors Invoice Posting
Under Base Amount
Select Gross Amount Radio Button
Select Withhold Tax Commercial Rounding Radio Button
Select Post Withhold Tax Amount Check Box
Select No Accumulation Radio Button
Save ----> Press Enter to save in your Request.
Step 9: Define Withhold Tax Type for Payment Posting ( At Advance)
Same Path( Next Line to Last Price)
Country Key: IN for India → ENTER
Select New Entries Button
Withhold Tax Type : PA
Description : Section 194C Contractors Advance Posting
Base Amount: Select Gross Amount Radio Button
Select Withhold Tax Commercial Rounding Radio Button
Select Post Withhold Tax Check Box
Prepared by: Rao MH 114

Select No Accumulatio Radio Button
** Select Central Invoice Proportionate Radio Button
→ SAVE → ENTER to save in your request
** Importance of Central Invoice Proportionate Radio Button
on 10.07.09 Advance Payemnt Posting ( F-48)
Vendor Special GL A/c Dr. 100000
To Bank A/c 98000
To TDS Payable A/c 2000 ( to be paid to Govt
before 07.08.09)
on 21.08.09 Posting of Coversion Charges ( F-43)
Conversion Charges A/c Dr 500000
To Vendor A/c 490000
To TDS A/c 10000 ( to be paid to Govt
before 07.09.09)
Transfer of Advance from Special GL to Normal by Clearing Special GL Items
( F-54)
Vendor A/c Dr. 98000
TDS A/c 2000
To Vendor Special GL A/c 100000
Debit to TDS Account will be done automatically when we select the
Central Invoice Proportionate Radio Button
Effect on 07.09.09 to be paid : 10000 Cr Total to be payable
2000 Dr advance paid
Prepared by: Rao MH 115
2000 Dr advance paid
8000 Cr Balance to be paid
Step10: Define Withholding Tax Codes:
Upto Extended Withholding Tax Path is same--->Calculation ---->
Withholding Tax---->Define Withholding tax codes
Country Key: IN ( For India) → ENTER
Select New Entries Button
Withholding Tax Type: P1
Withholding Tax Code: P1
Description : Select 194C Contractors Invoice Posting
Official W/Tax Key: 194C ( Standard Posting : Bank/Vendor/
Customer Line Items Reduced)
Base Amount
Percentage Subject to Tax: 100% Posting Indicator: 1
Calculation :
Withholding Tax Rate: 2% → SAVE
→ ENTER to save in your request.
Select Back Arrow Select Withhold Tax Type P1
Select Copy as Button
Change Withhold Tax Type to PA
Change Withhold Tax Code to PA
Description : Sec 194C Contractors Advance Posting
→ ENTER & SAVE
Prepared by: Rao MH 115

Step11: Check Receipient Types :
Upto Extendted Withholding Tax Path is same--->Basic Settings--->
Check Recipient Types
Country Key: IN ( India) → Enter
Select New Entries Button
Withholding Tax Type: P1
Receipient Type: CO ( Text Field)
Text : Company
2nd : Withholding Tax Type: P2
Receipient Type: CO ( Text Field)
Text : Company
SAVE → Enter to save in your request.
Step12: Maintain Tax Due Dates:
Upto Extended Withholding Tax Path is same---> Basinc settings--->
India--->Maintain Tax Due Dates
Select New Entries Button
Country: IN ( for India)
Official W/tax Key : 194C
Receipient Type : CO ( Company)
No. of Days Until Tax
Due Date: 777 ( 7 Days from the Month End)
Select SAVE or Ctrl+S → Enter to save in your request.
Prepared by: Rao MH 116
Step13: Assaign Withhold Tax Types to Company Codes:
Upto Extended Withholding Tax Path is same---> Company Code--->
Assaign Withhold Tax Types to Company Codes
Select New Entries Button
Company Code: PSL
W/Tax Type: P1
Recipient Type: CO
Select W/Tax Agent Check Box
W/Tax Obligated from : 01.04.09
W/Tax Obligated to : 31.03.09
Select SAVE or Ctrl+S → Enter to save in your request.
Select back Arrow Button
Select Company Code: PSL
Select Copy As Button
Change W/tax type to PA and SAVE
Step14: Activate Extended Withholding Tax
Same Path
select Position Button
Company Code: PSL → Enter
For Comp Code PSL Select Extended W/Tax Check Box
SAVE ---> Ignore Warning Message
→ Enter to save in your request.
Prepared by: Rao MH 116
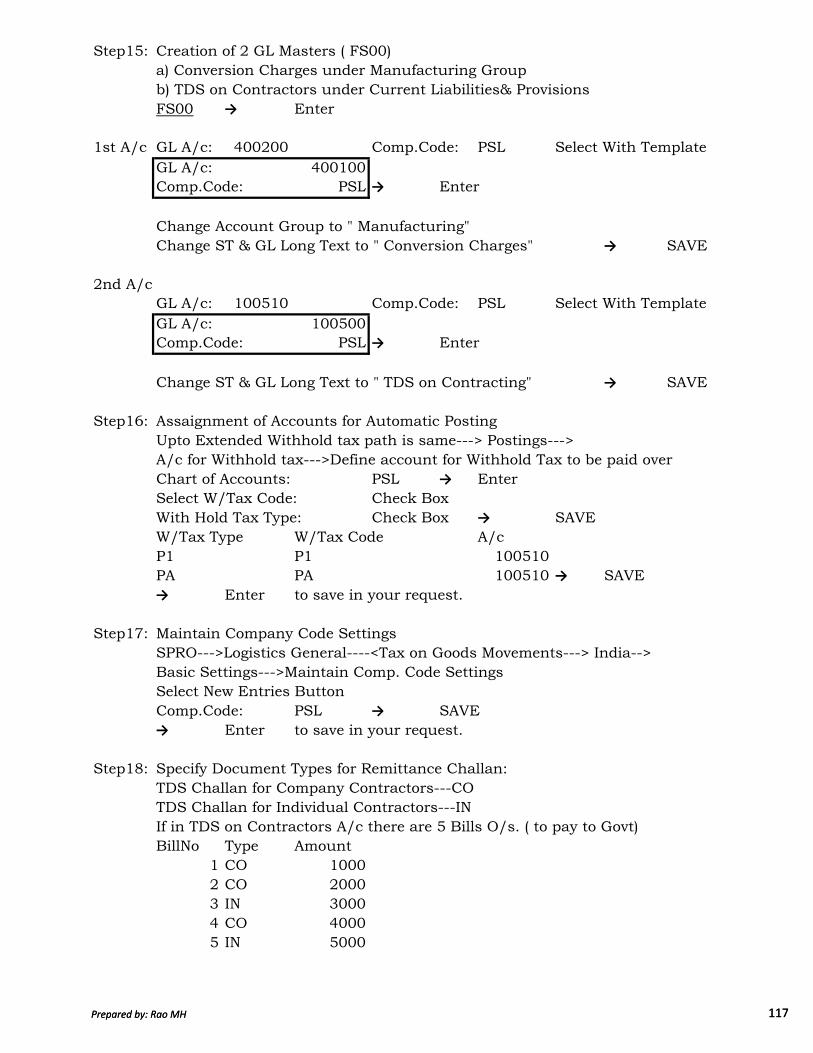
Step15: Creation of 2 GL Masters ( FS00)
a) Conversion Charges under Manufacturing Group
b) TDS on Contractors under Current Liabilities& Provisions
FS00 → Enter
1st A/c GL A/c: 400200 Comp.Code: PSL Select With Template
GL A/c: 400100
Comp.Code: PSL → Enter
Change Account Group to " Manufacturing"
Change ST & GL Long Text to " Conversion Charges" → SAVE
2nd A/c
GL A/c: 100510 Comp.Code: PSL Select With Template
GL A/c: 100500
Comp.Code: PSL → Enter
Change ST & GL Long Text to " TDS on Contracting" → SAVE
Step16: Assaignment of Accounts for Automatic Posting
Upto Extended Withhold tax path is same---> Postings--->
A/c for Withhold tax--->Define account for Withhold Tax to be paid over
Chart of Accounts: PSL → Enter
Select W/Tax Code: Check Box
Prepared by: Rao MH 117
Select W/Tax Code: Check Box
With Hold Tax Type: Check Box → SAVE
W/Tax Type W/Tax Code A/c
P1 P1 100510
PA PA 100510 → SAVE
→ Enter to save in your request.
Step17: Maintain Company Code Settings
SPRO--->Logistics General----<Tax on Goods Movements---> India-->
Basic Settings--->Maintain Comp. Code Settings
Select New Entries Button
Comp.Code: PSL → SAVE
→ Enter to save in your request.
Step18: Specify Document Types for Remittance Challan:
TDS Challan for Company Contractors---CO
TDS Challan for Individual Contractors---IN
If in TDS on Contractors A/c there are 5 Bills O/s. ( to pay to Govt)
BillNo Type Amount
1 CO 1000
2 CO 2000
3 IN 3000
4 CO 4000
5 IN 5000
Prepared by: Rao MH 117

At the time of making payment We seelct receipt type = CO
Bills to select 1,2,4== 7000
Document type we use to enter SA as Debit A/c and Credit A/c
Both are general Ledger Accounts.
Entry: TDS on Contractors A/c 7000
To Bank A/c 7000
PATH: Upto Extended W/Tax path is same--->Postings---> India--->
Remittance Challans--->Document Types----> Specify
Document Types ( A/c Payable)
Select New Entries Button
CoCode RC Doc Type
PSL SA → SAVE
→ Enter to save in your request.
Step19: Maintain Number Ranges : Same Path
Select Maintain Groups Button
Select Group Without Text Having 005 Check Box
Menu---->Interval---->Maintain
Comp. Code: PSL → Enter
Select Interval Button
Year From No To No
Prepared by: Rao MH 118
Year From No To No
2009 1 100000 → Enter & SAVE
Ignore Warning Message and Press Enter
Step20: Assaign No Group to Business Place:
Use TC= SM30
Table / View == J_1IEWTNUMGR
select maintain button
select new entries button
Comp. Code: PSL Off W/ Tax Key: 194C
Buss. Place: PSLF No. Group: 005
Select Save or Ctrl+S
Step21 Assaign No Group to Section Code:
Use TC=SM30
Table / View=== J_1IEWTNUMGR_1
Select Maintain Button
Select New Entries Button
Co.Code Sect. Code Off. Key No.Group
PSL PSLF 194C 005
→ SAVE → Enter to save in your request.
Prepared by: Rao MH 118

Step22 Maintain Numbe Groups & SAP Script Forms( for TDS Certificates)
Upto Extended W/Tax Path is same--->Postings--->India---->W/Tax
Certificates for Vendors & Customers--->Maintain No. Groups & SAP
Script Forms
Select New Entries Button
Co.Code Sect. Code Off. Key Form
PSL PSLF 194C J_1IEWT_CERT
→ SAVE → Enter to save in your request.
Step23 Assaign Number Ranges to Number Groups:
Same Path
Select New Entries Button
No. Group: 004
Internal No. Range 04
→ SAVE → Enter to save in your request.
Step24 Maintain Number Ranges:
Same Path
Select Maintain Groups Button
Select Group W/tax having '004 Check box
Menu--->Internal---> Maintain
Comp. Code: PSL → Enter
Select Internal Button
Year From To
2009 100001 200000 → Enter & Save
Prepared by: Rao MH 119
2009 100001 200000 → Enter & Save
Ignore Warning Message and Press Enter
Step25 Assaign Tax Codes in Vendor Master:
Accounting --->Financial Accounting--->Accounts Payable---->Master
Records--->Maintain Centrally---->Change ( XK02)
Vendor No: 4400001
Comp. Code: PSL
Select Withhold Tax Check Box → Enter
W/Tax Country : IN
W/ Tax Type: P1
W/tax Code: P1
Select Liable Check Box
Recepient Type: CO
W/Tax Type PA
W/tax Code: PA
Select Liable Check Box
Recepient Type: CO
Select CIN Details
Ignore Warnign Message and Press Enter
Select W/tax Tab
PAN of Vendor : PSL123456C ( Text Field)
Select Back Arrow: Select Save or Ctrl+S
Prepared by: Rao MH 119
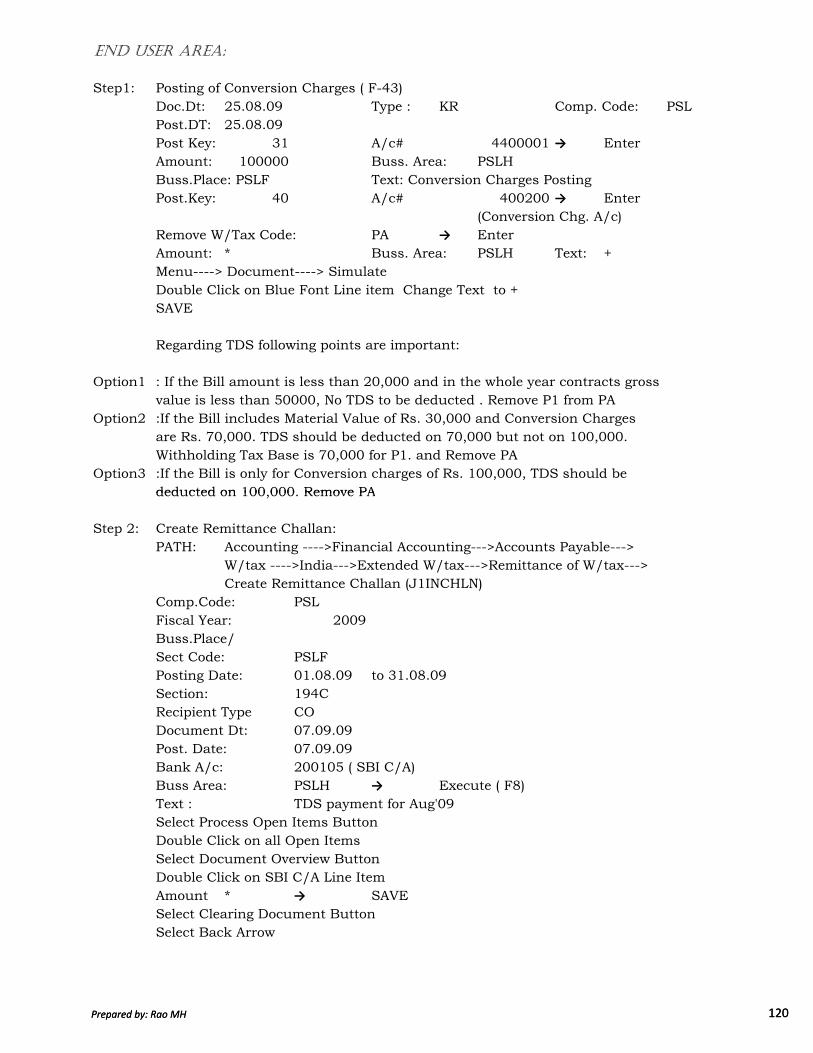
END USER AREA:
Step1: Posting of Conversion Charges ( F-43)
Doc.Dt: 25.08.09 Type : KR Comp. Code: PSL
Post.DT: 25.08.09
Post Key: 31 A/c# 4400001 → Enter
Amount: 100000 Buss. Area: PSLH
Buss.Place: PSLF Text: Conversion Charges Posting
Post.Key: 40 A/c# 400200 → Enter
(Conversion Chg. A/c)
Remove W/Tax Code: PA → Enter
Amount: * Buss. Area: PSLH Text: +
Menu----> Document----> Simulate
Double Click on Blue Font Line item Change Text to +
SAVE
Regarding TDS following points are important:
Option1 : If the Bill amount is less than 20,000 and in the whole year contracts gross
value is less than 50000, No TDS to be deducted . Remove P1 from PA
Option2 :If the Bill includes Material Value of Rs. 30,000 and Conversion Charges
are Rs. 70,000. TDS should be deducted on 70,000 but not on 100,000.
Withholding Tax Base is 70,000 for P1. and Remove PA
Option3 :If the Bill is only for Conversion charges of Rs. 100,000, TDS should be
deducted on 100,000. Remove PA
Prepared by: Rao MH 120
deducted on 100,000. Remove PA
Step 2: Create Remittance Challan:
PATH: Accounting ---->Financial Accounting--->Accounts Payable--->
W/tax ---->India--->Extended W/tax--->Remittance of W/tax--->
Create Remittance Challan (J1INCHLN)
Comp.Code: PSL
Fiscal Year: 2009
Buss.Place/
Sect Code: PSLF
Posting Date: 01.08.09 to 31.08.09
Section: 194C
Recipient Type CO
Document Dt: 07.09.09
Post. Date: 07.09.09
Bank A/c: 200105 ( SBI C/A)
Buss Area: PSLH → Execute ( F8)
Text : TDS payment for Aug'09
Select Process Open Items Button
Double Click on all Open Items
Select Document Overview Button
Double Click on SBI C/A Line Item
Amount * → SAVE
Select Clearing Document Button
Select Back Arrow
Prepared by: Rao MH 120

Step 3: Enter Bank Challan : Same Path ( J1INBANR)
Comp. Code: PSL
Fiscal Year: 2009
Challan Clg. No: Select 31
Once we select Challan Clrg. No Internal Challan No and Internal Challan
Date will be updated Automatically
Bank Challan NO: 567 ( Text Field)
Bank Challan Dt: 07.09.09
Bank Key Select SBI → Execute ( F8)
Step 4: Print TDS Certificates : Upto Extended W/tax path is same--->
Certificates---> Print ( J1INCERT)
Comp. Code: PSL Buss Place/Sect Code: PSLF
Fiscal Year: 2009 Section 194C
Post Date: 01.04.09 to 31.03.2010
Bank Challan Dt: 01.05.09 to 30.04.2010
Certificate Date: 30.04.2010
Signatory: Mr. X
Designation : Manager Accounts
Place of Printing: Hyderabad → Execute ( F8)
Output Device: LP01 → Select Print Button
To View the printout From Menu--->System--->Services--->Output Control
Prepared by: Rao MH 121
To View the printout From Menu--->System--->Services--->Output Control
→ Execute ( F8)
Select Spool No Check Box
Select Display Contents Button
from 2009 New Quarterly Return ( Form 26Q) introduced which is not in the
learning package for which TC=J1INQEFILE
We can get Daily Cash positions by Opening Balance+Receipts-Payments
Some Companies will use this for Petty Cash purpose
Cash Journal will not accept Negative Cash Balance
Step1: Create GL Masters- Hyderabad City Office Cash Account( FS00)
GL A/c: 200101 Comp. Code: PSL Select With Template
GL A/c: 200100
Comp. Code: PSL → Enter
Change Short Text & GL A/c Long Text to "Hyd City Office Cash A/c"
Select Create/Bank/Interest Tab
Select Post Automatically only Check Box → SAVE
→ Enter to save in your request.
CASH JOURNALCASH JOURNALCASH JOURNALCASH JOURNAL
Prepared by: Rao MH 121

Step2: Define Number Range Intervals for Cash Journal Documents:
SPRO--->Financial Accounting --->Bank Account--->Business Transactions
--->Cash Journal--->Define No Range Interval for --->Cash Journal Doc
Comp. Code: PSL
Select Change Interval Button
Select Interval Button
No Range: 01
From No : 500001 To No: 600000 → Enter & SAVE
Ignore Warning message → Enter
Step3: Set up Cash Journal: Path is same as above
Select New Entries Button
Comp. Code: PSL
Cash Journal: 0001
GL A/c 200101
Currency INR
Doc. Type for GL A/c: SA
Doc. Type for Vendor Payment KZ
Doc. Type from Vendor Payment KZ
Doc. Type from Customer Payment DZ
Doc. Type to Customer Payment DZ
Cash Journal Name: PSL Hyd City Office Cash Book
SAVE → Enter to save in your request.
Prepared by: Rao MH 122
Step 4: Create Change Delete Business Transaction
same Path----> Select New Entries Button
Comp. Code: Bus. Tran Type GL A/c Cash Journal
Transactions
i) PSL R( Revenues) 300000 Revenues
Select Account Modifiable Check Box
ii) PSL E ( Expenses) 400100 Expenses
Select Account Modifiable Check Box → SAVE
→ Enter to save in your request.
Note: If I select Account Modifiable, We need not give all Revenue Accounts ( or)
All Expenses Account
IF I don’t Select Account Modifiable Check Box, We need to give for Revenue
and Expenses Account Numbers
300000 400100
300001 400101
300002 400102
300003 400103
Step 5: Set up Print Parameters for Cash Journal:
Same Path
CoCode Cash Jrn Report Correspondence
Print Prg Variant
PSL RFCASHOO DEMOEN SAP18 ( Cash Document)
Press Enter and Save
Prepared by: Rao MH 122

END USER AREA:
Posting to Cash Journal(FBCJ)
Path: Accounting-->Financial Accounting --->General Ledger---> Posting -->
Cash Journal Posting (FBCJ)
From Menu--->Extras--->Change Cash Journal
Comp. Code: PSL
Cash Journal: 0001 → ENTER
Select Today Button
Select Cash Receipts Tab
Business Transactions: Select
Business Amount G/L A/c Text Buss.
Transaction Area
Revenues 5000 300000 Cash PSLH
Sales
Select Post Button
Select Print Cash Journal Button
Ignore Warning Message and Press Enter
Check Deposit can be of two types
a) Manual Check Deposit b) Electronic Check Deposit
Bank Statement can be of two types
BANK RECONCILIATION BANK RECONCILIATION BANK RECONCILIATION BANK RECONCILIATION
Prepared by: Rao MH 123
Bank Statement can be of two types
a) Manual Statement b) Electronic Statement
We are testing now with Manual Check Deposit/Manual Bank Statement
We have to create 4 GL accounts for each Bank Current Account
1 Main Bank Account
2 Check Issue Account as Open Item
3 Check Deposit Account as Open Item
4 Clearing Account as Open Item
Bank Charges Account to be Created
If we have 100 Bank Current accounts, we have to assaign account 100 times
Instead we can assaign account only one time for all 100 Bank Accounts like below.
1 Main Bank Account +++++ ++++0 ( 9 times Plus Symbol)
2 Check Issue Account +++++ ++++1
3 Check Receipt Account +++++ ++++2
4 Clearing Account +++++ ++++3
Always Main Bank account Balance and Bank Statement Balance will be same.
Sales Scenario:
1.Sales Invoice Posting ( F-22)
Customer A/c Dr. 200000
to Sales A/c 200000
2
3
A/c No Should
End With
1
0
Prepared by: Rao MH 123
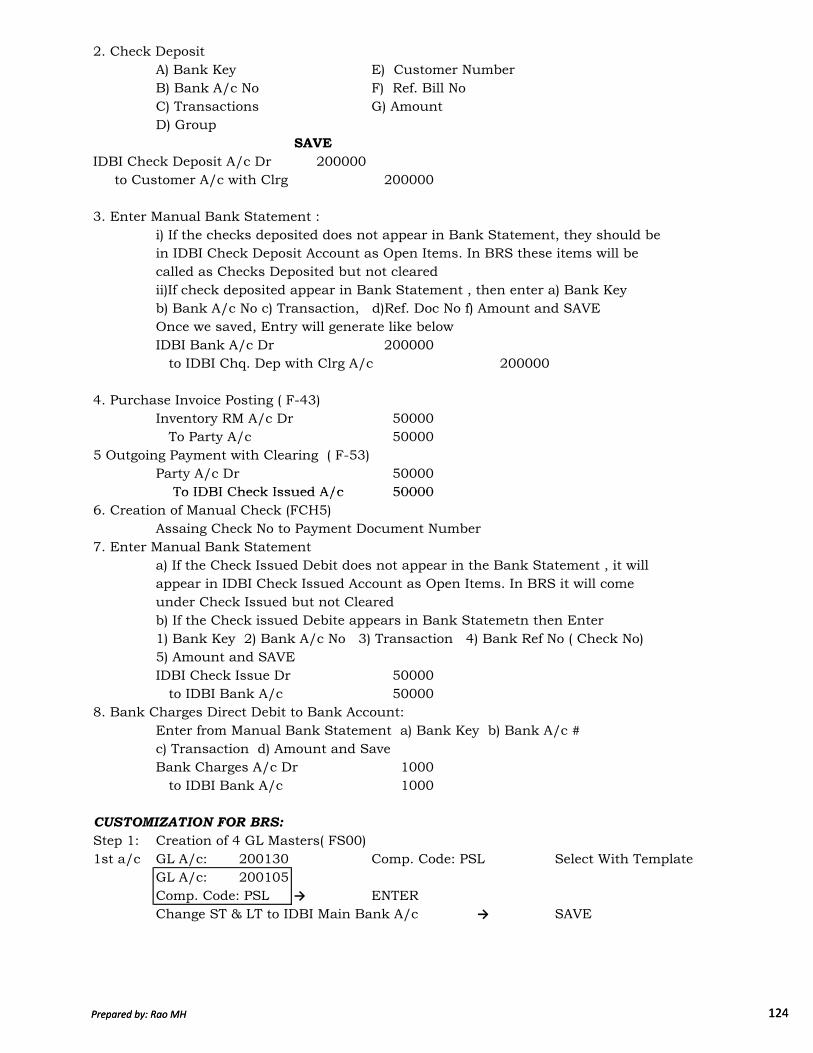
2. Check Deposit
A) Bank Key E) Customer Number
B) Bank A/c No F) Ref. Bill No
C) Transactions G) Amount
D) Group
SAVE
IDBI Check Deposit A/c Dr 200000
to Customer A/c with Clrg 200000
3. Enter Manual Bank Statement :
i) If the checks deposited does not appear in Bank Statement, they should be
in IDBI Check Deposit Account as Open Items. In BRS these items will be
called as Checks Deposited but not cleared
ii)If check deposited appear in Bank Statement , then enter a) Bank Key
b) Bank A/c No c) Transaction, d)Ref. Doc No f) Amount and SAVE
Once we saved, Entry will generate like below
IDBI Bank A/c Dr 200000
to IDBI Chq. Dep with Clrg A/c 200000
4. Purchase Invoice Posting ( F-43)
Inventory RM A/c Dr 50000
To Party A/c 50000
5 Outgoing Payment with Clearing ( F-53)
Party A/c Dr 50000
To IDBI Check Issued A/c 50000
Prepared by: Rao MH 124
To IDBI Check Issued A/c 50000
6. Creation of Manual Check (FCH5)
Assaing Check No to Payment Document Number
7. Enter Manual Bank Statement
a) If the Check Issued Debit does not appear in the Bank Statement , it will
appear in IDBI Check Issued Account as Open Items. In BRS it will come
under Check Issued but not Cleared
b) If the Check issued Debite appears in Bank Statemetn then Enter
1) Bank Key 2) Bank A/c No 3) Transaction 4) Bank Ref No ( Check No)
5) Amount and SAVE
IDBI Check Issue Dr 50000
to IDBI Bank A/c 50000
8. Bank Charges Direct Debit to Bank Account:
Enter from Manual Bank Statement a) Bank Key b) Bank A/c #
c) Transaction d) Amount and Save
Bank Charges A/c Dr 1000
to IDBI Bank A/c 1000
CUSTOMIZATION FOR BRS:
Step 1: Creation of 4 GL Masters( FS00)
1st a/c GL A/c: 200130 Comp. Code: PSL Select With Template
GL A/c: 200105
Comp. Code: PSL → ENTER
Change ST & LT to IDBI Main Bank A/c → SAVE
Prepared by: Rao MH 124

2nd a/c GL A/c: 200131 Comp. Code: PSL Select With Template
GL A/c: 200130
Comp. Code: PSL → ENTER
Change ST & LT to IDBI Check Issue A/c
Selct Control Data Tab
Select Open Items Management Check Box → SAVE
3rd a/c GL A/c: 200132 Comp. Code: PSL Select With Template
GL A/c: 200131
Comp. Code: PSL → ENTER
Select Type/ Description Tab
Change ST & LT to IDBI Check Deposit A/c → SAVE
4th a/c GL A/c: 400304 Comp. Code: PSL Select With Template
GL A/c: 400300
Comp. Code: PSL → ENTER
Select Type/ Description Tab
Change ST & LT to Bank Charges Account → SAVE
Step 2: Define House Bank ( FI12)
Comp. Code: PSL → ENTER
Select New Entries Button
House Bank : IDBI
Bank Country: IN
Bank Key: PSLIDBI1
Prepared by: Rao MH 125
Bank Key: PSLIDBI1
Save
Bank Name: IDBI Bank Name
Street: Basheerbagh
City: Hyderabad
Branch: Main Branch → ENTER
→ ENTER to save in your request.
Double Click on Bank Account Folder
Select New Entries Button
A/c ID: IDBI1
Description: IDBI Current A/c # 1
Bank A/c #: IDBI12345 ( Text Field)
Currency: INR
GL A/c : 200130 ( IDBI Main Bank A/c)
SAVE
Step 3: Creation of Check Lots ( FCHI)
Paying Comp. Code: PSL House Bank: IDBI
A/c ID IDBI1
Select Change Button Select Create Button
Lot Number: 1
Check No from : 600001 Check No to : 600100
Select Non Sequention Check Box
Short Information : IDBI Bank
Purchase Dt: 27.08.09 → ENTER & Save
Prepared by: Rao MH 125

Step 4: Define Posting Keys and Posting Rules for Check Deposit:
SPRO--->Financial Accounting--->Bank Accounting--->Business
Transactions--->Check Deposit--->Define Positng Keysand Posting Rules
for Check Deposits
Chart of Accounts: PSL → ENTER
Select New Entries Button
Account Text
( Text Field)
PSLA Main Bank
PSLB Check Issue
PSLC Check Deposit
PSLD Bank Charges → SAVE
→ ENTER to save in your request
Double Click on Accounts to Assaign A/c Symbols Folder
Select New Entries Button
A/c Symbol Currency GL A/c
PSLA INR +++++ ++++0
PSLB INR +++++ ++++1
PSLC INR +++++ ++++2
PSLD INR 400304 → SAVE
Double Click on Create Keys for Posting Rules Folder
Posting
Rule(TF) Text
PSL1 Check Deposit---> Clear Customer
Prepared by: Rao MH 126
PSL1 Check Deposit---> Clear Customer
PSL2 Check Deposit---> Credited in Bank
PSL3 Check Issue-----> Debited in Bank
PSL4 Bank Charges Direct Debits → SAVE
Double click on Define Posting Rules Folder
Select New Entries Button
Posting Rule : PSL1
Posting Area: 2 ( sub Ledger A/c)
Debit Posting Key: 40
A/c Symbol: PSLC
Doc. Type: DZ
Post. Type: 8 ( Clear Credit Sub Ledger A/c)
Select Next Entries Button
Post Rule : PSL2 Check Deposit Contidin is Bank
Posting Area: 1
Doc. Posting Type: SA
Posting Key: 5
Select New Entries Button
Post Rule : PSL3
Posting Area: 1
Debit Posting Key: Blanck Cr. Posting Key : 50
Debit Account Key; PSLB Cr a/c symbol PSLA
Doc. Type: SA
Post Key : SA Post Type: 4
Prepared by: Rao MH 126

Select New Entries Button
Post. Rule : PSL4 Post Area 1 ( Bank a/c)
Doo. Post Key: 40 Cr. Posting Key : 50
DrA/c Symbol PSLD Cr. A/c Symbol" PSLA
Doc. Type: SA
Post Typ:: 1 ( Posting → SAVE
Step 5: Create and Assaign Business Transactions
Upto Business Transactions Path is same---->Check Depsosit--->Create &
Assaign Business Transactions
Select New Entries
Transactions +/- Post Rule Text
PSL1 + PSL1 Cheque Deposit Clear Customer
PSL1 - PSL1 Chq. Dep Clear Cust Reversal
Select SAVE or Ctrl+S
Select Cancel Button & Select "YES" Button. Select Save Again
Select your request and save in your request.
Step 6: Define Variants for Check Deposit: Same Path
Select Create Button
Variant: PSL1 (Text Field)
Name: Cheq Deposit Variant for PSL → ENTER
From Possible Fields Column
Double click on Ref. Doc No ( Sel) → ENTER
second Column offset change to 20
Prepared by: Rao MH 127
second Column offset change to 20
From Possible Fields Column
Double click on Customer No ( Sel) → ENTER
From Possible Fields Column
Double Click on Business Area → ENTER
→ ENTER to save in your request.
Keep the Cursor on PSL1 and Select Activate Button
Step 7: Create and Assaign Business Transactions for Manual Bank Statement
Upto Business Transactions Path is same--->Payment Transactions--->
Manual Bank Statement---->Credit and Assaign Business Transactions
Select New Entries Button
Transaction +/- Post Int. Algor- Text
Rule ithm
PSL2 + PSL2 Chq. Dep Cr in Bank
PSL2 - PSL2 Chq. Dep Cr in Bank(reversal)
PSL3 - PSL3 "0"Level Cheque issue Dr. In Bank
PSL3 + PSL3 "0"Level Cheque issue Dr. In Bank(Reversal)
PSL4 - PSL4 Bank Charges Direct Debit
PSL4 + PSL4 Bank Charges Direct Debit(Reversal)
SAVE and Enter to Save in your request.
ZERO Level mean 011- outgoing check. Check no different from Payment Doc. No
Prepared by: Rao MH 127
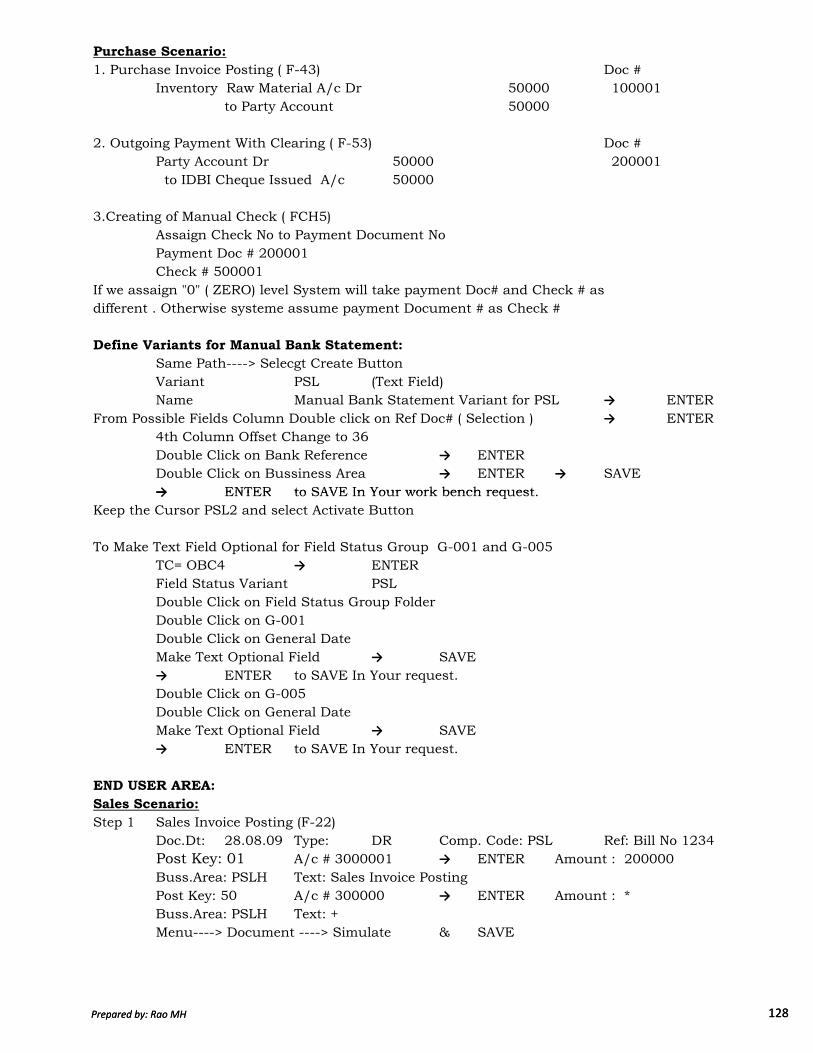
Purchase Scenario:
1. Purchase Invoice Posting ( F-43) Doc #
Inventory Raw Material A/c Dr 50000 100001
to Party Account 50000
2. Outgoing Payment With Clearing ( F-53) Doc #
Party Account Dr 50000 200001
to IDBI Cheque Issued A/c 50000
3.Creating of Manual Check ( FCH5)
Assaign Check No to Payment Document No
Payment Doc # 200001
Check # 500001
If we assaign "0" ( ZERO) level System will take payment Doc# and Check # as
different . Otherwise systeme assume payment Document # as Check #
Define Variants for Manual Bank Statement:
Same Path----> Selecgt Create Button
Variant PSL (Text Field)
Name Manual Bank Statement Variant for PSL → ENTER
From Possible Fields Column Double click on Ref Doc# ( Selection ) → ENTER
4th Column Offset Change to 36
Double Click on Bank Reference → ENTER
Double Click on Bussiness Area → ENTER → SAVE
→ ENTER to SAVE In Your work bench request.
Prepared by: Rao MH 128
→ ENTER to SAVE In Your work bench request.
Keep the Cursor PSL2 and select Activate Button
To Make Text Field Optional for Field Status Group G-001 and G-005
TC= OBC4 → ENTER
Field Status Variant PSL
Double Click on Field Status Group Folder
Double Click on G-001
Double Click on General Date
Make Text Optional Field → SAVE
→ ENTER to SAVE In Your request.
Double Click on G-005
Double Click on General Date
Make Text Optional Field → SAVE
→ ENTER to SAVE In Your request.
END USER AREA:
Sales Scenario:
Step 1 Sales Invoice Posting (F-22)
Doc.Dt: 28.08.09 Type: DR Comp. Code: PSL Ref: Bill No 1234
Post Key: 01 A/c # 3000001 → ENTER Amount : 200000
Buss.Area: PSLH Text: Sales Invoice Posting
Post Key: 50 A/c # 300000 → ENTER Amount : *
Buss.Area: PSLH Text: +
Menu----> Document ----> Simulate & SAVE
Prepared by: Rao MH 128

Step 2 Manual Check Deposit ( FF68)
Accounting ---->Financial Accounting ---->Banks--->Incomings---->Check
Deposit---->Manual Entry
From Menu---> Settings---> Specifications
Short Variant : PSL1 → ENTER
Bank Key: PSLIDBI1
Bank A/c: IDBI12345
Currency: INR
Group: 1
Transaction : PSL1 ( Check Deposit Clear Customer )
Posting Date: 28.08.09
Value Date: 28.08.09
Currency: INR → ENTER
Amount : 200000
Ref. Doc # 1234
Customer : 3000001
Buss. Area: PSLH → SAVE
SAVE Once again
From MENU---> System---->Services--->Batch Input--->Sessions
Select Session Name : IDBI/IDBI1
Select Process Button
Select Display Errors only Radio Button
Select Process Button
Prepared by: Rao MH 129
Select Process Button
Ignore Warning Message
Select Exit Batch Input Button
Step 3 Go and See Customer Account Trnasactions ( FBL5N)
Customer A/c: 3000001
Comp. Code: PSL
Select Cleared Items Radio Button
Clearing Date : 28.08.09
Select Normal Items Check Box → Execute ( F8)
Double Click on Type DZ
Select Callup Document Overview Button to see the Entry Posted
Step 4 Go and See IDBI Check Deposit Account ( FBL3N)
GL A/c : 200132 ( IDBI Check Deposit Account )
Comp. Code: PSL
Select Open Items Radio Button
Select Normal Items Check Box → Execute ( F8)
We can see IDBI Check Deposit Report
Prepared by: Rao MH 129
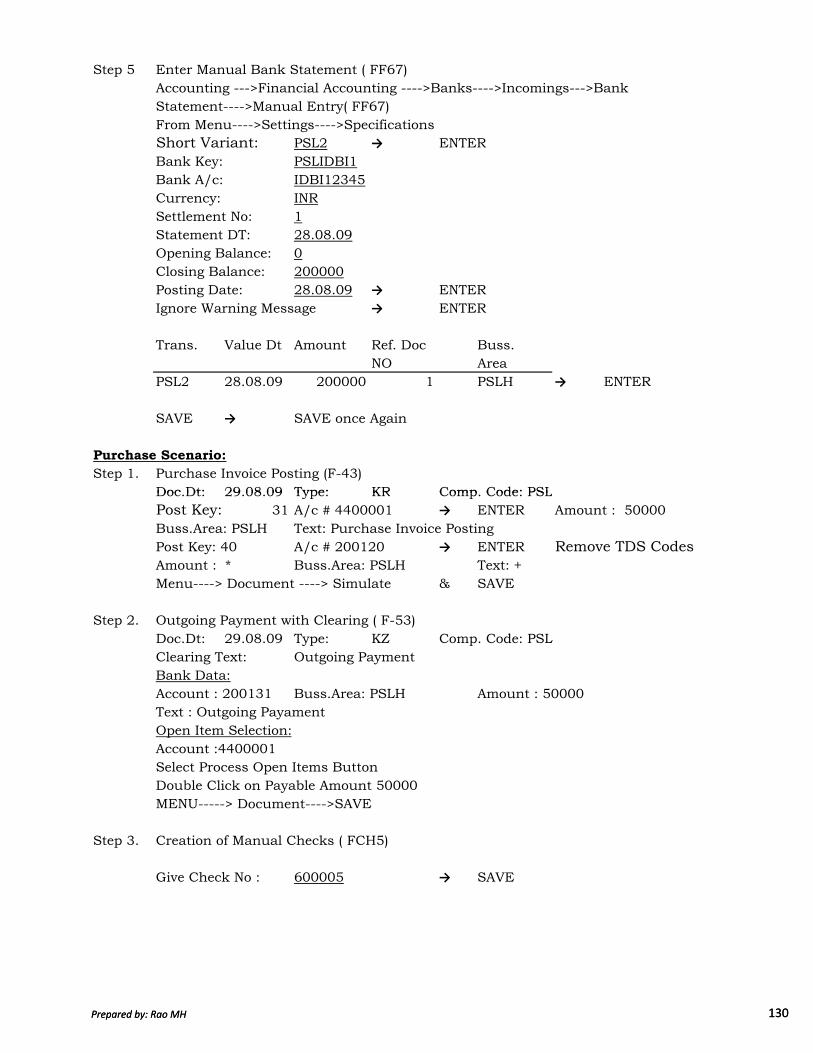
Step 5 Enter Manual Bank Statement ( FF67)
Accounting --->Financial Accounting ---->Banks---->Incomings--->Bank
Statement---->Manual Entry( FF67)
From Menu---->Settings---->Specifications
Short Variant: PSL2 → ENTER
Bank Key: PSLIDBI1
Bank A/c: IDBI12345
Currency: INR
Settlement No: 1
Statement DT: 28.08.09
Opening Balance: 0
Closing Balance: 200000
Posting Date: 28.08.09 → ENTER
Ignore Warning Message → ENTER
Trans. Value Dt Amount Ref. Doc Buss.
NO Area
PSL2 28.08.09 200000 1 PSLH → ENTER
SAVE → SAVE once Again
Purchase Scenario:
Step 1. Purchase Invoice Posting (F-43)
Doc.Dt: 29.08.09 Type: KR Comp. Code: PSL
Prepared by: Rao MH 130
Doc.Dt: 29.08.09 Type: KR Comp. Code: PSL
Post Key: 01 31 A/c # 4400001 → ENTER Amount : 50000
Buss.Area: PSLH Text: Purchase Invoice Posting
Post Key: 40 A/c # 200120 → ENTER Remove TDS Codes
Amount : * Buss.Area: PSLH Text: +
Menu----> Document ----> Simulate & SAVE
Step 2. Outgoing Payment with Clearing ( F-53)
Doc.Dt: 29.08.09 Type: KZ Comp. Code: PSL
Clearing Text: Outgoing Payment
Bank Data:
Account : 200131 Buss.Area: PSLH Amount : 50000
Text : Outgoing Payament
Open Item Selection:
Account :4400001
Select Process Open Items Button
Double Click on Payable Amount 50000
MENU-----> Document---->SAVE
Step 3. Creation of Manual Checks ( FCH5)
Give Check No : 600005 → SAVE
Prepared by: Rao MH 130

Step 4. Enter Manual Bank Statement ( FF67)
Select Overview Button
Keep the Cursor on Company Code PSL- IDBI Bank Limited
Selecgt New Statement Button
Give Closing Balance : 149000 Receipt → 200000
Posting Date: 29.08.09 Less:
Payment → 50000
Bank Chg → 1000
149000
Transaction Value DT Amount Bank Ref Buss.
Area
PSL3 29.08.09 -50000 600005 PSLH
PSL4 29.08.09 -1000 PSLH → ENTER
SAVE → SAVE Once Again
From MENU---->System--->Services---> Batch Input---->Sessions
Select Session Name: IDBI/IDBI1
Select Process Button
Select Display Errors only Radio Button
Selecgt Process Button → ENTER
→ ENTER Once Again
Ignore the message and select Exit Batch Input Button
Step 5. Go and See Check Issue Account ( FBL3N)
Prepared by: Rao MH 131
Step 5. Go and See Check Issue Account ( FBL3N)
GL A/c: 200131
Comp. Code: PSL
Select Cleared Items Radio Button
Execute( F8)
Step 6. Go and See Main Bank Account ( FS10N)
GL A/c: 200130
Comp. Code: PSL
Fiscal Year: 2009 → Execute(F8)
Double Click on Cumilative Balance 51000
Double Click on 1000 Cr
Select Column Document Overview Button
We can see Bank Charges Entry
How to View the Bank Statement in SAP (FF67)
Select Overview Button
Double Click on PSL-IDBI Bank Ltd
Double Click on Statement No 2
We can see the Bank Statement in SAP
END OF BANK RECONCILIATION
Prepared by: Rao MH 131
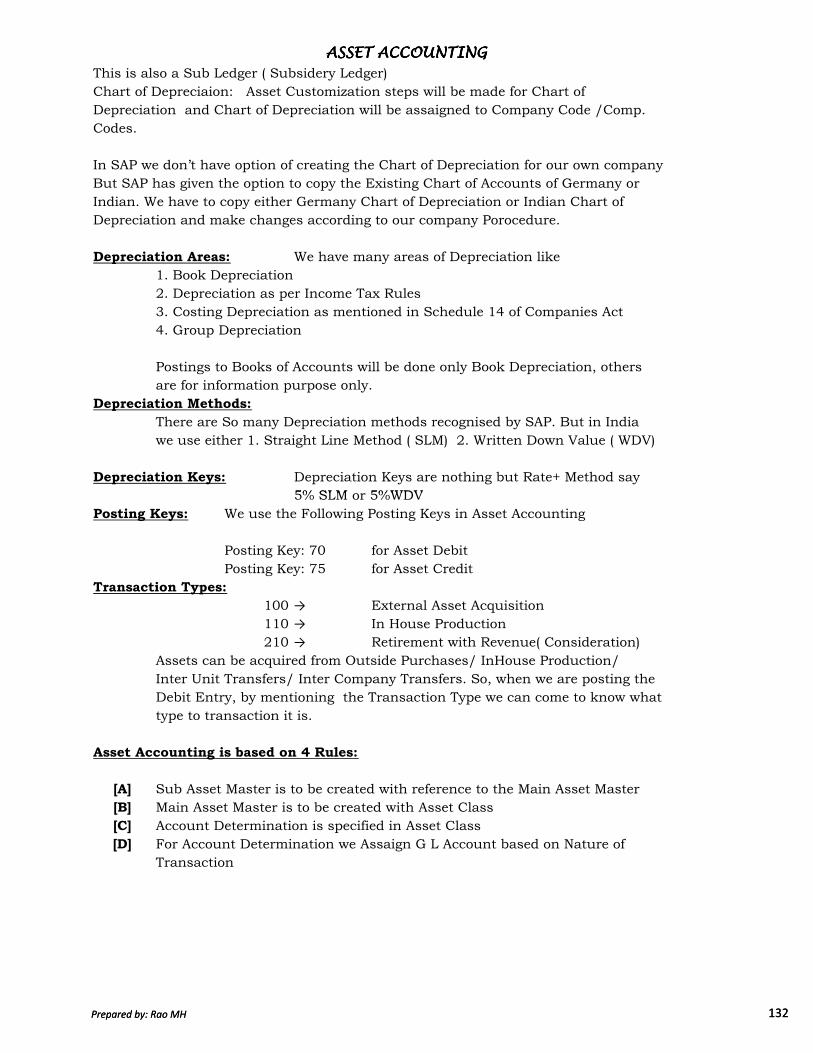
This is also a Sub Ledger ( Subsidery Ledger)
Chart of Depreciaion: Asset Customization steps will be made for Chart of
Depreciation and Chart of Depreciation will be assaigned to Company Code /Comp.
Codes.
In SAP we don’t have option of creating the Chart of Depreciation for our own company
But SAP has given the option to copy the Existing Chart of Accounts of Germany or
Indian. We have to copy either Germany Chart of Depreciation or Indian Chart of
Depreciation and make changes according to our company Porocedure.
Depreciation Areas: We have many areas of Depreciation like
1. Book Depreciation
2. Depreciation as per Income Tax Rules
3. Costing Depreciation as mentioned in Schedule 14 of Companies Act
4. Group Depreciation
Postings to Books of Accounts will be done only Book Depreciation, others
are for information purpose only.
Depreciation Methods:
There are So many Depreciation methods recognised by SAP. But in India
we use either 1. Straight Line Method ( SLM) 2. Written Down Value ( WDV)
Depreciation Keys: Depreciation Keys are nothing but Rate+ Method say
5% SLM or 5%WDV
ASSET ACCOUNTING ASSET ACCOUNTING ASSET ACCOUNTING ASSET ACCOUNTING
Prepared by: Rao MH 132
5% SLM or 5%WDV
Posting Keys: We use the Following Posting Keys in Asset Accounting
Posting Key: 70 for Asset Debit
Posting Key: 75 for Asset Credit
Transaction Types:
100 → External Asset Acquisition
110 → In House Production
210 → Retirement with Revenue( Consideration)
Assets can be acquired from Outside Purchases/ InHouse Production/
Inter Unit Transfers/ Inter Company Transfers. So, when we are posting the
Debit Entry, by mentioning the Transaction Type we can come to know what
type to transaction it is.
Asset Accounting is based on 4 Rules:
[A] Sub Asset Master is to be created with reference to the Main Asset Master
[B] Main Asset Master is to be created with Asset Class
[C] Account Determination is specified in Asset Class
[D] For Account Determination we Assaign G L Account based on Nature of
Transaction
Prepared by: Rao MH 132
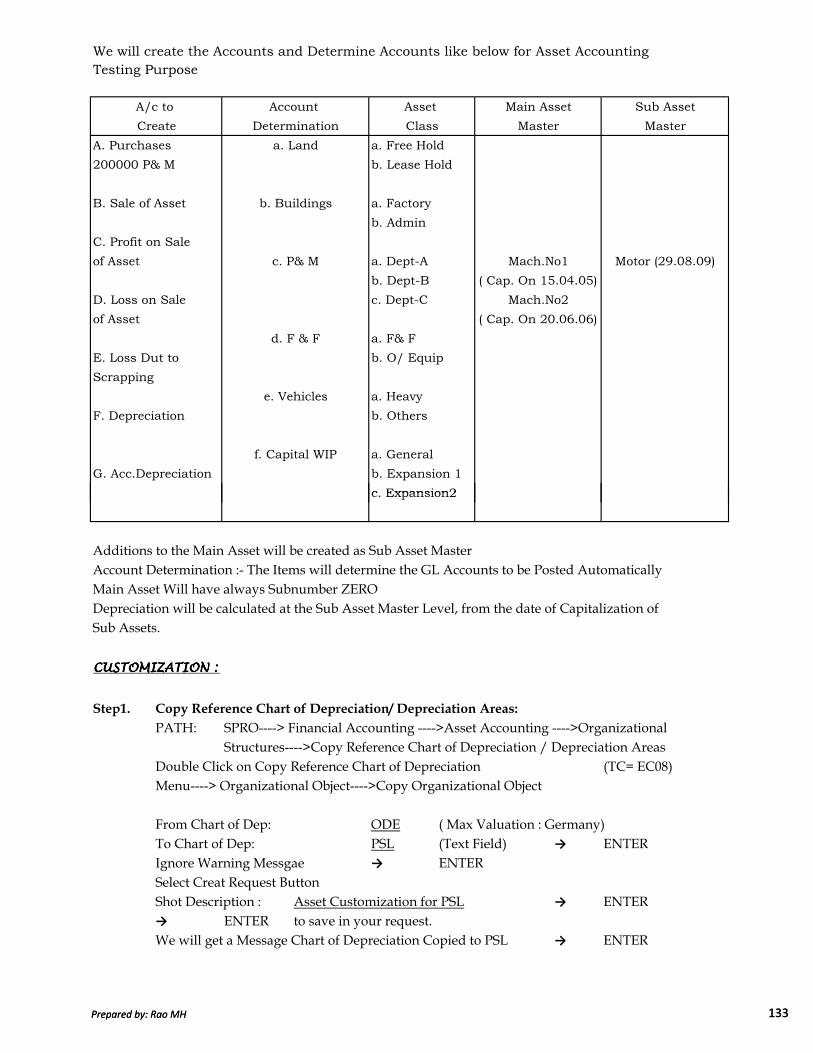
We will create the Accounts and Determine Accounts like below for Asset Accounting
Testing Purpose
c. Expansion2
( Cap. On 20.06.06)
Mach.No2
( Cap. On 15.04.05)
Mach.No1 Motor (29.08.09)
A/c to
Create
Account
Determination
Asset
Class
Main Asset
Master
Sub Asset
Master
F. Depreciation
G. Acc.Depreciation
f. Capital WIP
e. Vehicles
d. F & F
c. P& M
b. Buildings
a. Land
a. Heavy
b. Others
a. General
b. Expansion 1
A. Purchases
200000 P& M
B. Sale of Asset
C. Profit on Sale
of Asset
D. Loss on Sale
of Asset
E. Loss Dut to
Scrapping
a. Free Hold
b. Lease Hold
a. Factory
b. Admin
a. Dept-A
b. Dept-B
c. Dept-C
a. F& F
b. O/ Equip
Prepared by: Rao MH 133
Additions to the Main Asset will be created as Sub Asset MasterAccount Determination :- The Items will determine the GL Accounts to be Posted AutomaticallyMain Asset Will have always Subnumber ZERODepreciation will be calculated at the Sub Asset Master Level, from the date of Capitalization of Sub Assets.
CUSTOMIZATION :CUSTOMIZATION :CUSTOMIZATION :CUSTOMIZATION :
Step1. Copy Reference Chart of Depreciation/ Depreciation Areas:
PATH: SPRO----> Financial Accounting ---->Asset Accounting ---->OrganizationalStructures---->Copy Reference Chart of Depreciation / Depreciation Areas
Double Click on Copy Reference Chart of Depreciation (TC= EC08)Menu----> Organizational Object---->Copy Organizational Object
From Chart of Dep: ODE ( Max Valuation : Germany)To Chart of Dep: PSL (Text Field) → ENTERIgnore Warning Messgae → ENTERSelect Creat Request Button Shot Description : Asset Customization for PSL → ENTER→ ENTER to save in your request.We will get a Message Chart of Depreciation Copied to PSL → ENTER
c. Expansion2
Prepared by: Rao MH 133

Select Back ArrowDouble Click on Specify Description of Chart of Depreciation Select Position Button Chart of Depreciation PSL → ENTERChange Description to : Chart of Description for PSLSelect SAVE or CTRL + S → ENTERto save in your request.Select Back ArrowDouble Click on Copy / Delet Depreciation AreasGive Chart of Depreciation PSL → ENTERSelect Depreciation Areas 3,10,15,20,31,32,41 & 51From MENU---->EDIT----->DELET SAVE
Ignore Warning Messgae → ENTER→ ENTER to save in your request.
Step 2. Asaign Chart of Depreciaton to Company Codes :
Same Path (TC=OAOB )Select Position Button Company Code: PSL → ENTERfor Company Code PSL Assaign Chart of Dep PSLSelect SAVE or CTRL+S→ ENTER to save in your request.
Step 3. Specify Account Determination
Upto Organizational Structure Path is Same -----> Asset Class---->Specify Account
Prepared by: Rao MH 134
Upto Organizational Structure Path is Same -----> Asset Class---->Specify Account Determination Select New Entries Button A/c Detrmination Name for Account Determination PSL10000 LandPSL11000 BuildingsPSL20000 Plant & MachineryPSL30000 Funiture & FittingsPSL31000 VehiclesPSL40000 Capital Work In Progress
SAVE → ENTER to save in your request.
Prepared by: Rao MH 134

Step 4. Create Screen Layout rules :
Same Path Select Layout 1000, 1100,2000,2100,2500,3000Select Copy as Button
Change Screen Change the Name toLayout
1000 to PSL1 Land1100 to PSL2 Buildings2000 to PSL3 Plant & Machinery2100 to PSL4 Furniture & Fittings2500 to PSL5 Vehicles3000 to PSL6 Capital WIP → ENTER
SAVE → ENTER to save in your request.
Step 5. Define Number Range Interval: Same Path ( TC=AS08)Company Code: PSL Select Change Interval Button Select Interval Button No. Range : 01From No: 1To No: 100000 → ENTERSelect Interval Button once Again No. Range : 02From No: 100001
Prepared by: Rao MH 135
From No: 100001To No: 200000 → ENTERSelect Interval Button once Again No. Range : 03From No: 200001To No: 300000 → ENTERSelect Interval Button once Again No. Range : 04From No: 300001To No: 400000 → ENTERSelect Interval Button once Again No. Range : 05From No: 400001To No: 500000 → ENTERSelect Interval Button once Again No. Range : 06From No: 500001To No: 600000 → ENTER & SAVE
→ ENTER to save in your request.
Prepared by: Rao MH 135

Step 6. Define Asset Class:
Path is Same (TC=OAOA)Select New Entries Button
1st Asset: Asset Class: PSL1000 ( Text Field)Description : Free Hold LandShort Text: Free Hold LandA/c Determination: Select PSL10000 (LAND)Screen Layout Rule: Select PSL1 (LAND)No. Range: 01
** Select Include Asset and Inventory Data Check BoxSelect No AUC or Summary Management of AUC Radio Button
(AUC Stands for Asset Under Construction)Select SAVE or Ctrl +S → ENTER to save in your request.
Select Next Entry Button
2nd Asset: Asset Class: PSL1100 ( Text Field)Description : Factory BuildingsShort Text: Factory BuildingsA/c Determination: Select PSL11000 (BUILDINGS)Screen Layout Rule: Select PSL2 (BUILDINGS)No. Range: 02Select Include Asset and Inventory Data Check BoxSelect No AUC or Summary Management of AUC Radio Button
Prepared by: Rao MH 136
Select No AUC or Summary Management of AUC Radio Button Select SAVE or Ctrl +S → ENTER to save in your request.Select Next Entry Button
3rd Asset: Asset Class: PSL2000 ( Text Field)Description : Dept-AShort Text: Dept-AA/c Determination: Select PSL20000 (PLANT & MACHINERY)Screen Layout Rule: Select PSL3 (PLANT & MACHINERY)No. Range: 03Select Include Asset and Inventory Data Check BoxSelect No AUC or Summary Management of AUC Radio Button Select SAVE or Ctrl +S → ENTER to save in your request.Select Next Entry Button
4th Asset: Asset Class: PSL2001 ( Text Field)Description : Dept-BShort Text: Dept-BA/c Determination: Select PSL20000 (PLANT & MACHINERY)Screen Layout Rule: Select PSL3 (PLANT & MACHINERY)No. Range: 03Select Include Asset and Inventory Data Check BoxSelect No AUC or Summary Management of AUC Radio Button Select SAVE or Ctrl +S → ENTER to save in your request.Select Next Entry Button
Prepared by: Rao MH 136

5th Asset: Asset Class: PSL3000 ( Text Field)Description : Furniture & FixturesShort Text: Furniture & FixturesA/c Determination: Select PSL30000 (FUNITURE & FIXTURES)Screen Layout Rule: Select PSL4 (FUNITURE & FIXTURES)No. Range: 04Select Include Asset and Inventory Data Check BoxSelect No AUC or Summary Management of AUC Radio Button Select SAVE or Ctrl +S → ENTER to save in your request.Select Next Entry Button
6th Asset: Asset Class: PSL3100 ( Text Field)Description : Vehicles OthersShort Text: Vehicles OthersA/c Determination: Select PSL31000 (VEHICLES)Screen Layout Rule: Select PSL5 (VEHICLES)No. Range: 05Select Include Asset and Inventory Data Check BoxSelect No AUC or Summary Management of AUC Radio Button Select SAVE or Ctrl +S → ENTER to save in your request.Select Next Entry Button
7th Asset: Asset Class: PSL4000 ( Text Field)Description : Capital Work In Process
Prepared by: Rao MH 137
Description : Capital Work In ProcessShort Text: Capital Work In ProcessA/c Determination: Select PSL40000 (CAPITAL WIP)Screen Layout Rule: Select PSL6 (CAPITAL WIP)No. Range: 06De-Select Include Asset and Inventory Data Check BoxSelect Line Items Settlement Radio Button Select SAVE or Ctrl +S
** WHY WE SELECTED " INCLUDE ASSET INVENTORY" CHECK BOXHere inventory means Fixed Assets Inventory List. Once we select the Check box,what ever asset we creat under this asset class, will be included in Fixed Assets Inventory ListAs per Companies Auditors Report Order ( CARO), Auditor should specify in his report wether the Fixed Assets have been physically verified by the Management or NotIn Big Companies , Physical Verification will be done in a Phased Manner.When we create an asset master , there is a field called Last Verification date.Asset Master Last Verification Date
1 31.03.2009 In the report if we give the verification date 2 31.03.2008 01.04.08 to 31.03.09 we will get the list of 3 31.03.2009 assets physically verified between those days4 31.03.2009 like 1,3&4
5 31.03.2008
Prepared by: Rao MH 137

Step7. Select Line Item Settlement for Capital Work in Progress:
on 01.08.09 Machinery Purchased xxxxxAdd: on 05.08.09 Freight Charges paid xxxxAdd: on 31.08.09 Commission Charges paid xxxxon 02.09.09 Asset Commissioned as Mach. No 1 xxxxxSettle CWIP to Machine No 1. Line Item WiseDe select Include Asset Check Box under Inventory Data.
Step8. Define Screen Layout for Asset Master Data:
PATH: SPRO---->Financial Accounts---->Asset Accounting---->Master Data---->Screen Layout---->Define Screen Layout for Asset Master DataDouble Click on Define Screen Layout for Asset Master DataSelect Positon Button Give Screen Layout: PSL1 → ENTERSelect PSL1 LandDouble Click on Logical Field Groups FolderSelect 2 Positing Information Double Click on Field Group Rules Folder
Capitalization Field Required ¥ We have created PSL1 Land Layout Select Main No Check Box by Copying Layout 1000 Land . Afterwards if we areSelect Sub No Check Box creating Layout XYZ by copying Layout PSL1, what
¥ Select Copy Check Box ever fields we have choosen for PSL1, will be copied toXYZ only if we select Copy Check BOX
Select SAVE or Ctrl +S → ENTER to save in your request.
Prepared by: Rao MH 138
Select SAVE or Ctrl +S → ENTER to save in your request.Select Back Arrow Select 3 Time Dependent DataDouble Click on Field Group Rules Folder Cost Centre Mate it Optional Entry FieldSelect Main No Check BoxSelect Sub No Check BoxSelect Copy Check BoxBussiness Area Make it Required Entry Field Select Main No Check BoxSelect Sub No Check BoxSelect Copy Check BoxSAVE-----> Selecgt Back Arrow 2 Times
NOTE: SAME PROCEDURE TO BE FOLLOWED FOR LAYOUTS PSL2-BUILDINGS, PSL3-PLANT & MACHINERY, PSL4-FURNITURE& FIXTURES, PSL5-VEHICLES, PSL6-CAPITAL WIP.
Prepared by: Rao MH 138
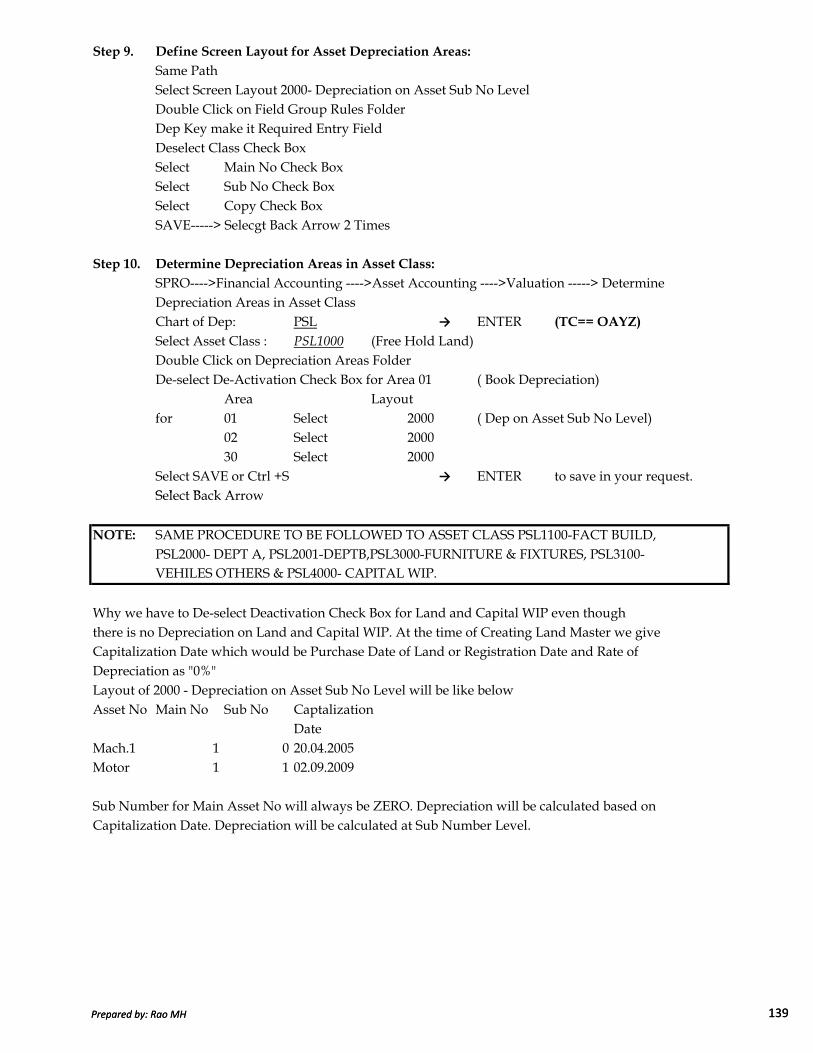
Step 9. Define Screen Layout for Asset Depreciation Areas:
Same PathSelect Screen Layout 2000- Depreciation on Asset Sub No LevelDouble Click on Field Group Rules FolderDep Key make it Required Entry Field Deselect Class Check BoxSelect Main No Check BoxSelect Sub No Check BoxSelect Copy Check BoxSAVE-----> Selecgt Back Arrow 2 Times
Step 10. Determine Depreciation Areas in Asset Class:
SPRO---->Financial Accounting ---->Asset Accounting ---->Valuation -----> DetermineDepreciation Areas in Asset ClassChart of Dep: PSL → ENTER (TC== OAYZ)
Select Asset Class : PSL1000 (Free Hold Land)Double Click on Depreciation Areas FolderDe-select De-Activation Check Box for Area 01 ( Book Depreciation)
Area Layoutfor 01 Select 2000 ( Dep on Asset Sub No Level)
02 Select 200030 Select 2000
Select SAVE or Ctrl +S → ENTER to save in your request.Select Back Arrow
Prepared by: Rao MH 139
Select Back Arrow
NOTE: SAME PROCEDURE TO BE FOLLOWED TO ASSET CLASS PSL1100-FACT BUILD,PSL2000- DEPT A, PSL2001-DEPTB,PSL3000-FURNITURE & FIXTURES, PSL3100-VEHILES OTHERS & PSL4000- CAPITAL WIP.
Why we have to De-select Deactivation Check Box for Land and Capital WIP even though there is no Depreciation on Land and Capital WIP. At the time of Creating Land Master we giveCapitalization Date which would be Purchase Date of Land or Registration Date and Rate of Depreciation as "0%"Layout of 2000 - Depreciation on Asset Sub No Level will be like belowAsset No Main No Sub No Captalization
DateMach.1 1 0 20.04.2005Motor 1 1 02.09.2009
Sub Number for Main Asset No will always be ZERO. Depreciation will be calculated based on Capitalization Date. Depreciation will be calculated at Sub Number Level.
Prepared by: Rao MH 139

Step 11. Creation of 15 GL Masters ( FS00)
Create 15 GL Masters as mentioned below under the TC=FS00
A/c to A/c to
Create Copy
200000 200110
200005 200000 Group- Fixed Assets
200010 200000 Reconciliation A/c Type- Assets
200015 200000 Sort Key- 018 ( Asset No)
200020 200000 Field Status Group: G067 ( Reco Account)
200025 200000
100200 200000 Group- Accumulated Depreciation
100205 100200 Reconciliation A/c Type- Assets
100210 100200 Sort Key- 018 ( Asset No)
100215 100200 Field Status Group:G067 ( Reco Account)
300102 300100 ( Exchange Gain A/c)
Group- Other Income Sork Key-018
Field Status Group-G052
300103 300100 Field Status Group-G001 Others as above
400302 300103 Group- Admn Sork Key-018
Field Status Group-G001
400303 400302
400500 400302 Group- Depreciation Sork Key-018
Field Status Group-G001
------> Like Above <------
Parameters to Maintain
Asset Sale A/c
Profit on Asset Sale
Loss on Asset Sale
Loss Due to Scrap
Depreciation A/c
Description
Land
Buildings
Plant & Machinery
Furniture & Fixtures
Capital WIP
Vehicles
Acc. Dep Vehicles
Acc. Dep F & F
Acc. Dep P & M
Acc. Dep Buildings
Prepared by: Rao MH 140
Field Status Group-G001
Step 12. Assaignment of Accounts for Automatic Postings:
SPRO---->Financial Accounting ---->Asset accounting ----->Integration with the General Ledger---->Assaing GL AccountsSelect Position Button (TC==AO90)
Chart of Depreciation : PSL → ENTERSeelct Chart of Accounts PSLDouble Click on Account Determination FolderSelect Account Determination PSL10000 ( Land )Double Click on B/S Accounts Folder
A/c to DetermineAcquisition: Acquisition & Production Costs 200000 ( Land)Loss Made on Asset Retirement w/o Revenue 400303 ( Loss due to Scrap)Clearing Account Revenue from Asset Sale 300102 ( Asset Sale A/c)Gain from Asset Sale 300103 ( Profit on Asset Sale)Loss from Asset Sale 400302 ( Loss on Asset Sale)→ ENTER & SAVE Ignore Warning Message and Press Enter→ ENTER to save in your request.
Prepared by: Rao MH 140

Double Click on Account Determination FolderSelect Account Determination PSL11000 ( Buildings )Double Click on B/S Accounts Folder
A/c to DetermineAcquisition: Acquisition & Production Costs 200005 ( Buildings)Loss Made on Asset Retirement w/o Revenue 400303 ( Loss due to Scrap)Clearing Account Revenue from Asset Sale 300102 ( Asset Sale A/c)Gain from Asset Sale 300103 ( Profit on Asset Sale)Loss from Asset Sale 400302 ( Loss on Asset Sale)→ ENTER & SAVE Ignore Warning Message and Press EnterDouble Click on Depreciation Folder
Accumulated Dep A/c for Ordinary Depr. 100200 (Acc. Dep Buildings A/c)Exp. A/c for Ordinary Depreciation 400500 ( Depreciation A/c)SAVE--> Ignore the Warning Message
Double Click on Account Determination FolderSelect Account Determination PSL20000 (Plant & Machinery )Double Click on B/S Accounts Folder
A/c to DetermineAcquisition: Acquisition & Production Costs 200010 ( Plant & Machinery)Loss Made on Asset Retirement w/o Revenue 400303 ( Loss due to Scrap)Clearing Account Revenue from Asset Sale 300102 ( Asset Sale A/c)Gain from Asset Sale 300103 ( Profit on Asset Sale)Loss from Asset Sale 400302 ( Loss on Asset Sale)
Prepared by: Rao MH 141
Loss from Asset Sale 400302 ( Loss on Asset Sale)→ ENTER & SAVE Ignore Warning Message and Press EnterDouble Click on Depreciation Folder
Accumulated Dep A/c for Ordinary Depr. 100205 (Acc. Dep P & M A/c)Exp. A/c for Ordinary Depreciation 400500 ( Depreciation A/c)SAVE--> Ignore the Warning Message
Double Click on Account Determination FolderSelect Account Determination PSL30000 (Furniture & Fixtures )Double Click on B/S Accounts Folder
A/c to DetermineAcquisition: Acquisition & Production Costs 200015 ( Furniture & Fixtures)Loss Made on Asset Retirement w/o Revenue 400303 ( Loss due to Scrap)Clearing Account Revenue from Asset Sale 300102 ( Asset Sale A/c)Gain from Asset Sale 300103 ( Profit on Asset Sale)Loss from Asset Sale 400302 ( Loss on Asset Sale)→ ENTER & SAVE Ignore Warning Message and Press EnterDouble Click on Depreciation Folder
Accumulated Dep A/c for Ordinary Depr. 100210 (Acc. Dep F & F A/c)Exp. A/c for Ordinary Depreciation 400500 ( Depreciation A/c)SAVE--> Ignore the Warning Message
Prepared by: Rao MH 141
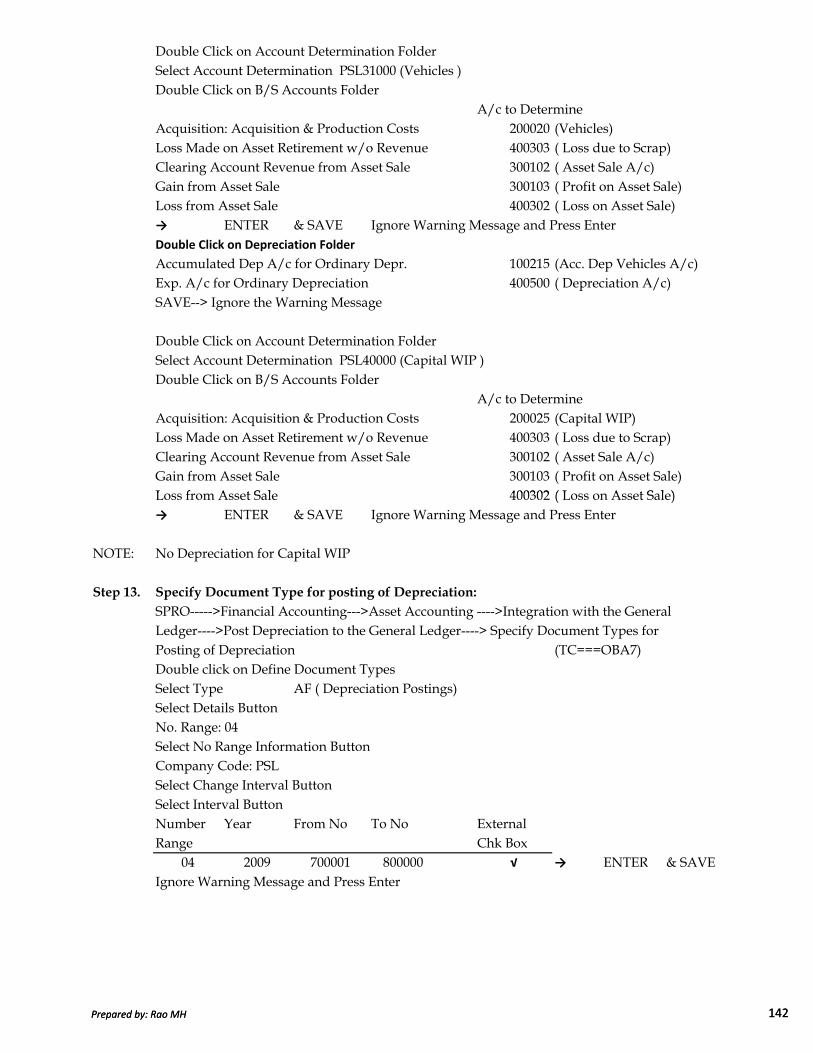
Double Click on Account Determination FolderSelect Account Determination PSL31000 (Vehicles )Double Click on B/S Accounts Folder
A/c to DetermineAcquisition: Acquisition & Production Costs 200020 (Vehicles)Loss Made on Asset Retirement w/o Revenue 400303 ( Loss due to Scrap)Clearing Account Revenue from Asset Sale 300102 ( Asset Sale A/c)Gain from Asset Sale 300103 ( Profit on Asset Sale)Loss from Asset Sale 400302 ( Loss on Asset Sale)→ ENTER & SAVE Ignore Warning Message and Press EnterDouble Click on Depreciation Folder
Accumulated Dep A/c for Ordinary Depr. 100215 (Acc. Dep Vehicles A/c)Exp. A/c for Ordinary Depreciation 400500 ( Depreciation A/c)SAVE--> Ignore the Warning Message
Double Click on Account Determination FolderSelect Account Determination PSL40000 (Capital WIP )Double Click on B/S Accounts Folder
A/c to DetermineAcquisition: Acquisition & Production Costs 200025 (Capital WIP)Loss Made on Asset Retirement w/o Revenue 400303 ( Loss due to Scrap)Clearing Account Revenue from Asset Sale 300102 ( Asset Sale A/c)Gain from Asset Sale 300103 ( Profit on Asset Sale)Loss from Asset Sale 400302 ( Loss on Asset Sale)
Prepared by: Rao MH 142
Loss from Asset Sale 400302 ( Loss on Asset Sale)→ ENTER & SAVE Ignore Warning Message and Press Enter
NOTE: No Depreciation for Capital WIP
Step 13. Specify Document Type for posting of Depreciation:
SPRO----->Financial Accounting--->Asset Accounting ---->Integration with the GeneralLedger---->Post Depreciation to the General Ledger----> Specify Document Types for Posting of Depreciation (TC===OBA7)Double click on Define Document TypesSelect Type AF ( Depreciation Postings)Select Details Button No. Range: 04Select No Range Information Button Company Code: PSLSelect Change Interval Button Select Interval Button Number Year From No To No ExternalRange Chk Box
04 2009 700001 800000 √ → ENTER & SAVEIgnore Warning Message and Press Enter
Prepared by: Rao MH 142

**** As per ECC 6.0 of SAP Documentation , we should not select External Check Box at thetime of Number Range Intervals. Upto Version 4.7EE selection is required. When we select the External Check Box, at the time of posting the document , we have to specifywhat should be the document number. There is an exception to this for Depreciation Documents Postings.IN F-02, when we are posting a Document, We can post one document at a time. Where as for Depreciation Postings systme will post Number of Documents at a timebased on the Account Determination.PSL10000 LandPSL11000 BuildingsPSL20000 P&M → System Will generate 4 documents at a time monthlyPSL30000 F&F as Account Determinations are 4PSL31000 VehiclesPSL40000 CapitalWIP
Step 14. Specify Intervals and Posting Rules: Same Path (TC== OAYR)Select Company Code: PSLDoubel Click on Posting Rules FolderSelect Monthly Posting Radio Button SAVE → ENTER to save in your request.
Step 15. Specify Rounding Off Net Book Valeu and/ or Depreciation:
PATH: SPRO---->Financial Accounting---->Asset Accounting---->Valuation---->Amount Specifications(Comp.Code/Dep.Area)---->Specify Rounding off Net Book
Prepared by: Rao MH 143
Amount Specifications(Comp.Code/Dep.Area)---->Specify Rounding off Net BookValue and /or Depreciation (TC===OAYO)
Ignore Message and Press EnterCompany Code: PSLDouble Click on Rounding Specifications FolderSelect Area: 01 ( Book Depreciation)Select Details Button Select Automatically Calculated Depreciation Check BoxSelect Rounding Radio Button SAVE → ENTER to save in your request.
Step 16. Creation of Depreciation Keys:
In Creation of Depreciation Keys we have 5 steps.Step 1. Define Base MethodsStep 2. Define Declining Balance Method All the 4 steps will be assaigned in Step 5Step 3. Define Multilevel MethodsStep 4. Maintain Period Control MethodStep 5. Maintain Depreciatio Key 5th Step will be assaigned in Asset Master
Customization of 5 steps is detailed below
Prepared by: Rao MH 143

Step 1. Define Base Methods
SPRO----> Financial Accounting ----> Asset Accounting ---->Depreciation --->ValuationMethods---->Depreciation Key---->Calculation Methods---->Define Base Methods0014 Ordinary:Explicity Percentage( after end of life)
* Ordinary -- Means Ordinary Depreciation Explicit Percentage--- We follow percentages specified in Com. Act Schedule 14.After End of Life--- No depreciation should be calculated if Net Book Value = ZERO
Step 2. Define Declining Balance Method: Same Path (TC==AFAMD)Chart of Depreciation : PSL → ENTERNote Down the Number '001 ( in this Step Nothing to save)We will mention this number in 5th Step
Step 3. Define Multilevel Methods: Same Path (TC==AFAMS)Select New Entries Button Multilevel Method P1 Description: 5% SLMValidity Satart: Select from Ordinary Depreciation DateSAVE → ENTER to save in your request.Double Click on Levels FolderSelect New Entries Button Acquisition Year Period Base Value PercentYear
9999 999 12 01 5 → SAVE
Prepared by: Rao MH 144
9999 999 12 01 5 → SAVE
Double Click on Multilevel Method FolderSelect Next Entry Button Multilevel Method P2 (Text Field)Description : 5% WDVValidity Satart: Select from Ordinary Depreciation DateSAVE → ENTER to save in your request.Double Click on Levels FolderSelect New Entries Button Acquisition Year Period Base Value PercentYear
9999 999 12 24 5 → SAVE(N.B.V)
Prepared by: Rao MH 144

Note: Some of the Fields in above steps are briefed below for information.
Point 1. Validity Start From : Ordinary Depreciation Start DateHere Ordinary Depreciation Date means , the date from which system should calculatedepreciation. Normally it should be the Capitalization Date. In some Countries it will befrom 1st of Next month of Capitalization .Asset Master in India Some other Countries
A. Capitalization DT: 05.09.2009 05.09.2009B. Ordinary Dep DT: 05.09.2009 01.10.2009
Point 2. Levels
Acquisition Year: 9999 . If we give Acquisition Year as 2009. 5% depreciation
Rate is applicable to only for the assets purchased in 2009. If we mention 9999 , 5% is applicable to any asset acquired in any year.Years: 999 (Maximum No. of Years)
If the Depreciation Method is Straight Line Method and Dep Rate is 5% - Life of asset can be assuemed as 20 Years, if rate is 1% Life would be 100 Years. But in Written Down value Method Life of the Asset is difficult to calculate as there would always be some remining value. If we select 999 for Years, it will calculate upto any number of Years.Period: 12 Means the number of MonthsBasic Value: 01 - Acquisition Value-- it is applicable to Straight Line Method.
In SLM, Dep will be calculated always on Acquisition Value24- Net Book Value-- it is applicable to Written Down Method.in WDV dep will be calculated on the Net Book value.
Prepared by: Rao MH 145
in WDV dep will be calculated on the Net Book value.Percent: Rate of DepreciationReduction: Ex: Acquisition Value of the Asset: 100000
Less: Estimated Scrap Value at the end of the Life of the Asset. 1000Actual Asset Value for Depreciation Purpose 99000
If we are following 5% Dep Rate in Reduction Method, Dep will be calculatedon 99,000 but not on 100,000. In India this method is not applicable.
Rem Life: Depreciation will be calculated in 2 ways. One is Percentage Method Second One is Useful Life Method. In India at Present 2nd Method is not using by most of the Companies. For Example. If an Asset is Purchased in 2004 for Rs. 100,000 which is having Useful Life of 20 Years. So DepreciationPer Anum is Rs. 5,000. If this Company is Implementing SAP from 2009 onwards. Already 5years accounting was done in Other Accounting Software.AT the time of Creation of Asset Master in SAP we should mention likeAcquisiton Value : 100,000 , Acc. Depreciation : 25,000. Select Remaining Life check Box. System will Know Raining Life of Asset is 15 years.System will calculate depreciation for 15 years only. This system is applicableif Depreciation Method is Straight Line Method in which life of asset can beassumed. In WDV it is not possible.
Prepared by: Rao MH 145

Step 4. Maintain Period Control Methods: Same Path (TC== AFAMP)Chart of Depreciation: PSL → ENTERSelect New Entries Button Period Acq. Additions Retirement TransfersControl YearMethod006 PSL Period Control 01 01 01 01
MethodSAVE → ENTER to save in your request.
Step 5. Maintain Depreciation Keys: Same Path (TC==AFAMA)Select New Entries Button Dep. Key : PSL1Description: 5% Straight Line MethodSelect Period Control According to Fiscal Year √
Select Depreciation to the Day √
SAVE → Ignore Warning Message → ENTER→ ENTER to save in your request.Double Click on Assaignment of Calculation Methos FolderSelect New Entries Button Depreciation Type: Ordinary Depreciaton ( Select from Drop Down Phase: From the Start of Depreciation Button)Base Method: 0014Decl.Bal Method: 001
Description
( Prorata at Period Start Date)
Prepared by: Rao MH 146
Decl.Bal Method: 001Period Control Method: 006Multilevel Method: P1Class: Straight Line Depreciation ( Select from DD Button)SAVE → Select Back Arrow 4 timesSelect Depreciation Key: PSL1Select Activate Button → SAVE
Select New Entries Button Dep. Key : PSL2Description: 5% Written Down Value MethodSelect Period Control According to Fiscal Year √
Select Depreciation to the Day √
SAVE → Ignore Warning Message → ENTER→ ENTER to save in your request.Double Click on Assaignment of Calculation Methos FolderSelect New Entries Button Depreciation Type: Ordinary Depreciaton ( Select from Drop Down Phase: From the Start of Depreciation Button)Base Method: 0014Decl.Bal Method: 001Period Control Method: 006Multilevel Method: P2
Prepared by: Rao MH 146
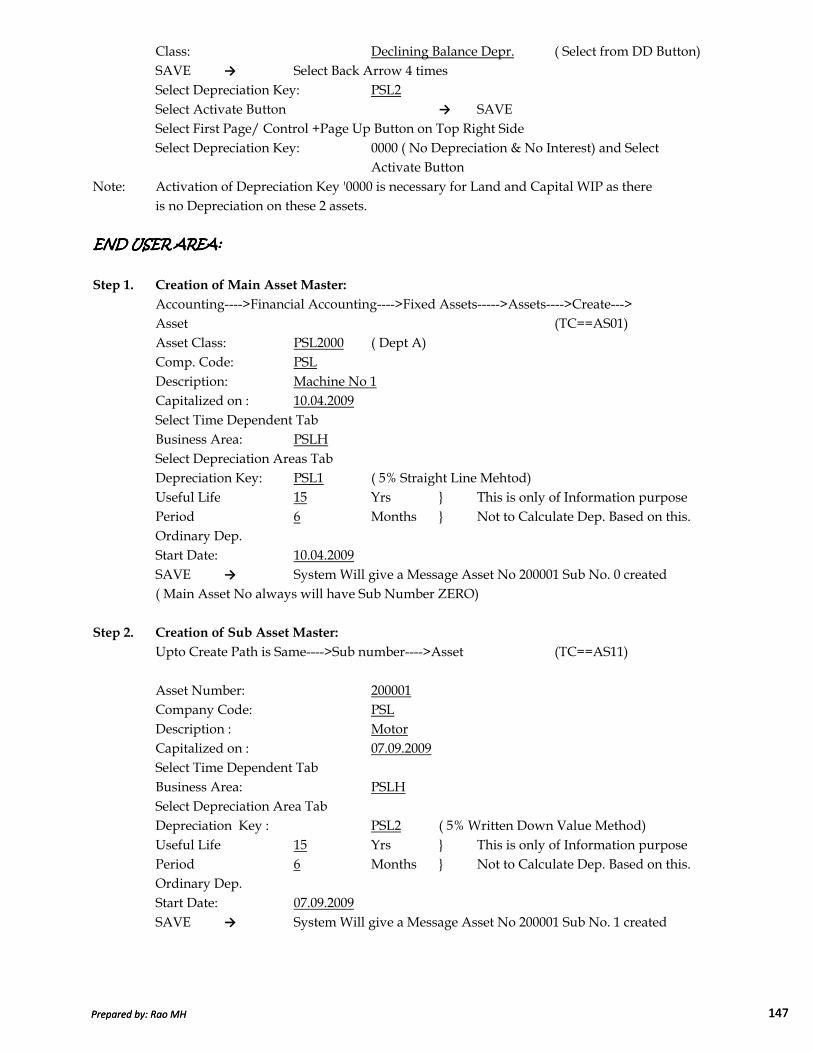
Class: Declining Balance Depr. ( Select from DD Button)SAVE → Select Back Arrow 4 timesSelect Depreciation Key: PSL2Select Activate Button → SAVE Select First Page/ Control +Page Up Button on Top Right SideSelect Depreciation Key: 0000 ( No Depreciation & No Interest) and Select
Activate Button Note: Activation of Depreciation Key '0000 is necessary for Land and Capital WIP as there
is no Depreciation on these 2 assets.
END USER AREA:END USER AREA:END USER AREA:END USER AREA:
Step 1. Creation of Main Asset Master:
Accounting---->Financial Accounting---->Fixed Assets----->Assets---->Create--->Asset (TC==AS01)Asset Class: PSL2000 ( Dept A)Comp. Code: PSLDescription: Machine No 1Capitalized on : 10.04.2009Select Time Dependent TabBusiness Area: PSLHSelect Depreciation Areas TabDepreciation Key: PSL1 ( 5% Straight Line Mehtod)Useful Life 15 Yrs This is only of Information purpose
Prepared by: Rao MH 147
Useful Life 15 Yrs This is only of Information purpose Period 6 Months Not to Calculate Dep. Based on this.Ordinary Dep. Start Date: 10.04.2009SAVE → System Will give a Message Asset No 200001 Sub No. 0 created( Main Asset No always will have Sub Number ZERO)
Step 2. Creation of Sub Asset Master:
Upto Create Path is Same---->Sub number---->Asset (TC==AS11)
Asset Number: 200001Company Code: PSLDescription : MotorCapitalized on : 07.09.2009Select Time Dependent TabBusiness Area: PSLHSelect Depreciation Area TabDepreciation Key : PSL2 ( 5% Written Down Value Method)Useful Life 15 Yrs This is only of Information purpose Period 6 Months Not to Calculate Dep. Based on this.Ordinary Dep. Start Date: 07.09.2009SAVE → System Will give a Message Asset No 200001 Sub No. 1 created
Prepared by: Rao MH 147

Step 3. Posting of Main Asset Purchase :
Accounting----->Financial Accounting---->Fixed Assets---->Posting---->Acquisition---->External Acquisition---->With Vendor (TC==F-90)
Doc. Dt: 10.04.09 Type: KR Comp. Code: PSLPost. Dt: 10.04.09Post Key: 31 A/c: 4400001 → ENTERIgnore Warning Message → ENTERAmount: 500000 Business Area: PSLHText: Machinery Purchase Posting Post Key: 70 (Debit Asset) A/c: 200001-0Transaction Type: 100 ( External Acquisition of Asset) → ENTERRemove TDS Codes → ENTERAmount: * Text: +From MENU----> DOCUMENT---->SIMULATE----> SAVE
Asset No 200001-0 updates GL account No 200010 Plant & Machinery AutomaticallyBecause of :2nd Rule: Main Asset Master to Create With Reference to the Asset Class 200001-0created with reference to Asset Class PSL2000( Dept A).3rd Rule: Account Determination is specified in Asset Class. Account DeterminationPSL20000 P& M specified in Asset Class PSL2000 ( Dept-A)4th Rule: For Account Determination we assaign GL Account Based on the Nature of Transaction. For Account Determination PSL2000 in case of Acquisition , we have
Prepared by: Rao MH 148
Transaction. For Account Determination PSL2000 in case of Acquisition , we havegiven GL A/c 200010 Plant & Machinery.
Step 4. Posting of Sub Asset Purchase ( F-90)
Doc. Dt: 07.09.09 Type: KR Comp. Code: PSLPost. Dt: 07.09.09Post Key: 31 A/c: 4400001 → ENTERIgnore Warning Message → ENTERAmount: 60000 Business Area: PSLHText: Motor Purchase Posting Post Key: 70 (Debit Asset) A/c: 200001-1Transaction Type: 100 ( External Acquisition of Asset) → ENTERRemove TDS Codes → ENTERAmount: * Text: +From MENU----> DOCUMENT---->SIMULATE----> SAVE
Note 1st Rule: Sub Asset Master is to Create with reference to the Main Asset Master.200001-1 created with reference to Main Asset 200001 Machine No 1.The other Rules 2nd, 3rd & 4th are same as above .
Prepared by: Rao MH 148

Report1: Report to view Each Sub Asset Wise , Year-wise Values:
Accounting---->Financial Accounting---->Fixed Assets---->Asset---->Asset Explorer(TC==AW01N)
Give Asset No: 200001-0 → ENTERTo view Depreciation CalculationsSelect Display Dep. Calculation Button Select Period Information Button We can see the Report of Depreciation Calculation Select Back ArrowSelect Comparisions TabChange the Asset to 200001-1We can see the Depreciation for Sub Number 1Select Planned Values TabChange the Fiscal Year to 2010 → ENTERSelect Display Dep. Calculation Button We can see the Report of Depreciation Calculation Select Back Arrow
Report2: Report to view All Assets for a Particular Period
Accounting---->Financial Accounting--->Fixed Assets--->Information Systems--->Report on Asset Accounting --->Asset Balances---->Balance Lists--->Asset Balances--->By Business Area (TC==S_ALR_87011965)
Press All Selections Button Give the Company Code: PSL
Prepared by: Rao MH 149
Give the Company Code: PSLChange Report Date: 30.09.09Select Execute Button We can see Summary Report for all assetsDouble Click on Dept-A, we can see for that particular areaDouble Click on Machine No 1, we can see the report for Machine No 1Select Back Arrow 3 timesGive Report Date 30.04.09Select Execute Button Double Click on Dept-A
Step 5. Depreciation RUN:
Accounting--->Financial Accounting---->Fixed Assets---->Periodic Processing--->Depreciation Run---->Execute (TC==AFAB)Comp. Code: PSLFiscal Year: 2009Posting Period: 01Select Planned Posting Run Radio Button Select Test Run Check BoxSelect Execute Button Ignore Warning Message and Select "YES" to the MessageIf any Errors has come, to View the ErrorsSelect Eroor Lists Button ( F7)Select Back Arrow
Prepared by: Rao MH 149

Deselect Test Run Check BoxFrom Menu---->Program Execute in Background Output Device: LP01 → ENTER → ENTER once again
Depreciation Run Programme will take some time to Compleate. In Live Environmentwhere Assets are more, it take much time. So SAP has given an option to keep the programme scheduled to run in nights when no data entry will take place. Dep run programme will take place in Server system not at User System level. To make Schedules , follow the below process.Select Date and Time Button Schedule Start Date: 08.09.09 Time : 23hrs 00 min 00ssSAVETo Run Immediately, Select Immediate Button Select Save or Ctrl+SWe get a Message " Background Tab was scheduled for Programme :"RAPOST2000"
To Check the Job is Processed or Not:
from Menu---->System---->Servicess---->Jobs--->Job OverviewSelect Execute Button
To View the Document Posted (TC==FB03)To view the Document posted by System for Depreciation use TC=FB03.Select Document List Button Comp. Code: PSL
Prepared by: Rao MH 150
Comp. Code: PSLDoc. Type: AF (depreciation Document type)Select Execute Button Double Click on Document Number for Drilldown and see the Entry for the Doc. PostedDouble Click on Document Number for Drilldown and see the Entry for the Doc. Posted
In Depreciation Run Screen WE have 4 options for Depreciation Calculation( AFAB)1. Planned Posting Run
Comp. Code: PSLFiscal Year : 2009Posting Period: 02 (May)Select Planned Posting Run Check BoxBefore Executing depreciation run for May and after Eexuting Depreciation Run for April , if we commissioned New Asset with April Date. Ex: Mach. No 2 dated 25.04.09if we run Depreciation Programme for May system will calculated Dep like belowFor Asset 200001-0: Dep from 01.05.09 to 31.05.09 ( As for Apr dep already calculated)For Asset 200002-0: Dep from 25.04.09 to 31.05.09 ( As for Apr dep Not calculated)
2. Repeat Run :
Instead of Selecting Planned Posting like in Earlier Case for Asset No 200002-0, we canSelect Repeat Run for April. If we selected Repeat Run, System will check the Assetsfor which Depreciation is not calculated in April and post the Depreciation in that Period. Repeate Run is possible only for the Latest Planned Run i.e, in this case for April onlyBefore Repeat Run, there should be Planned Posting Run for that Period.
Prepared by: Rao MH 150

Period for which Repeat Run is going on should be in Open .In the Present Example. When we Selected Repeat Run System will calculate Depre.for Machine No 200002-0 from 25.04.09 to 30.04.09 and post in April MonthWhen we run for May , we have to choose Planned Posting then system will considerFor Asset 200001-0: Dep from 01.05.09 to 31.05.09For Asset 200002-0: Dep from 01.05.09 to 31.05.09
3.Restart :
This Option is useful when we have Scheduled Depreciation Run and because of any Reasons ( Either Technical or Power Problems) the scheduled Job is not Finished, System gives a Message that Job is not Completed. Select the Restart Radio Button
4 Unplanned Posting :
This option is to be selected when the Depreciation Posting is not as per Planned oneIn Live Environment, monthly we pass a Provisional Entry in F-02 in stead of Running Depreciation Programme in SAP. Entry will be like below
Depreciation Provision A/c Dr to Accumulated Depreciation Provision AccountOnce Audit is over, we will reverse the manual Entries and Run Depreiciation in SAPComp. Code: PSLFiscal Year: 2009Period : 12 (upto March)Select Unplanned Psting Run
Prepared by: Rao MH 151
Select Unplanned Psting Run
SALE OF ASSET:SALE OF ASSET:SALE OF ASSET:SALE OF ASSET: When we sale the Asset , we will transfer the Acc. Depreciation to the Particular Asset and transfer the Proft or Loss on sale of Asset to P& L A/c
Ex: Suppose if we sold Asset No: 200001-0Acquistion Value 500000Less: Accumulated Dep upto 30.04.09 1438Net Book Value as on 30.04.09 498562Asset Sale on 01.05.09 501000Profit on Sale of Asset ( 501000-498562) 2438
Step 1. To Make Asset Retirement Field as Required Field for Field Status Group G052( Accounts for Fixed Assets Retirement ) (TC==OBC4)
Select Field Status Variant: PSLDouble Click on Field Satus Group FolderDouble Click on Field Satus Group G-052Double Click on Asset Accounting Make Asset Retirement as Required Entry Field SAVE or Ctrl+S → ENTER to save in your Request.
Prepared by: Rao MH 151
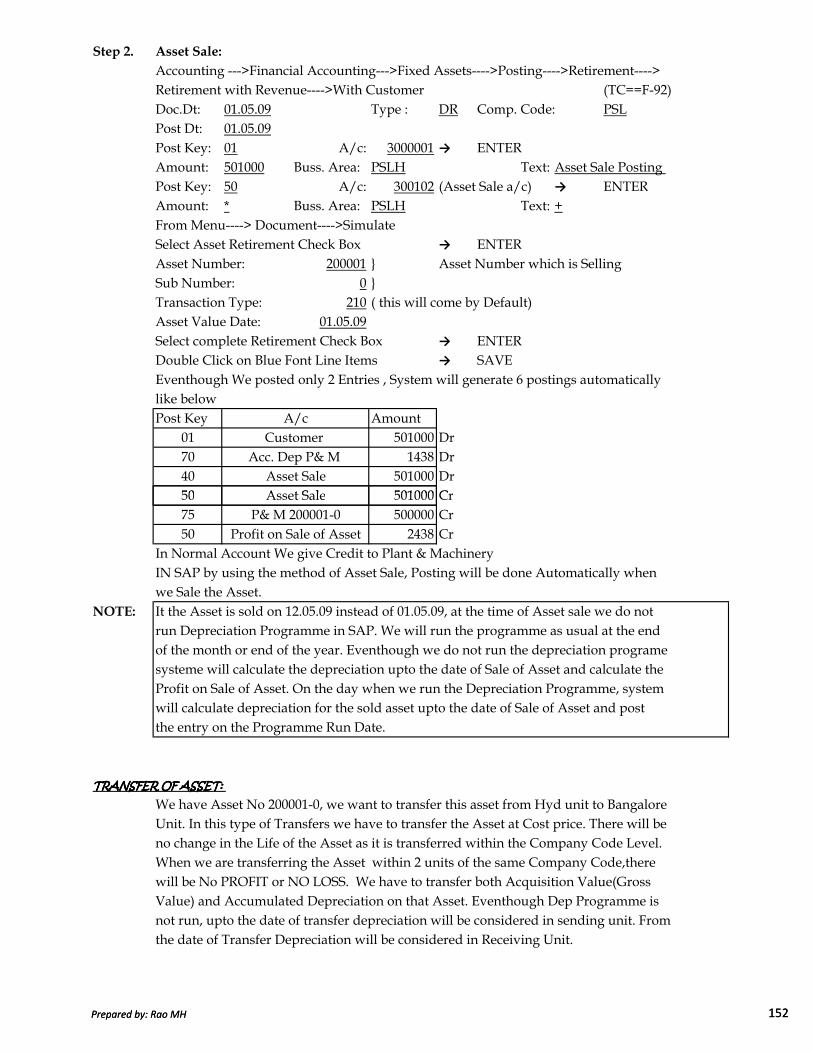
Step 2. Asset Sale:
Accounting --->Financial Accounting--->Fixed Assets---->Posting---->Retirement---->Retirement with Revenue---->With Customer (TC==F-92)Doc.Dt: 01.05.09 Type : DR Comp. Code: PSLPost Dt: 01.05.09Post Key: 01 A/c: 3000001 → ENTERAmount: 501000 Buss. Area: PSLH Text: Asset Sale Posting Post Key: 50 A/c: 300102 (Asset Sale a/c) → ENTERAmount: * Buss. Area: PSLH Text: +From Menu----> Document---->SimulateSelect Asset Retirement Check Box → ENTERAsset Number: 200001 Asset Number which is Selling Sub Number: 0 Transaction Type: 210 ( this will come by Default)Asset Value Date: 01.05.09Select complete Retirement Check Box → ENTERDouble Click on Blue Font Line Items → SAVEEventhough We posted only 2 Entries , System will generate 6 postings automaticallylike belowPost Key Amount
01 501000 Dr70 1438 Dr40 501000 Dr50 501000 Cr
A/cCustomer
Acc. Dep P& M Asset SaleAsset Sale
Prepared by: Rao MH 152
50 501000 Cr75 500000 Cr50 2438 Cr
In Normal Account We give Credit to Plant & MachineryIN SAP by using the method of Asset Sale, Posting will be done Automatically when we Sale the Asset.
NOTE: It the Asset is sold on 12.05.09 instead of 01.05.09, at the time of Asset sale we do not run Depreciation Programme in SAP. We will run the programme as usual at the end of the month or end of the year. Eventhough we do not run the depreciation programesysteme will calculate the depreciation upto the date of Sale of Asset and calculate the Profit on Sale of Asset. On the day when we run the Depreciation Programme, system will calculate depreciation for the sold asset upto the date of Sale of Asset and post the entry on the Programme Run Date.
TRANSFER OF ASSET:TRANSFER OF ASSET:TRANSFER OF ASSET:TRANSFER OF ASSET:
We have Asset No 200001-0, we want to transfer this asset from Hyd unit to BangaloreUnit. In this type of Transfers we have to transfer the Asset at Cost price. There will beno change in the Life of the Asset as it is transferred within the Company Code Level.When we are transferring the Asset within 2 units of the same Company Code,therewill be No PROFIT or NO LOSS. We have to transfer both Acquisition Value(Gross Value) and Accumulated Depreciation on that Asset. Eventhough Dep Programme is not run, upto the date of transfer depreciation will be considered in sending unit. Fromthe date of Transfer Depreciation will be considered in Receiving Unit.
Asset SaleP& M 200001-0
Profit on Sale of Asset
Prepared by: Rao MH 152
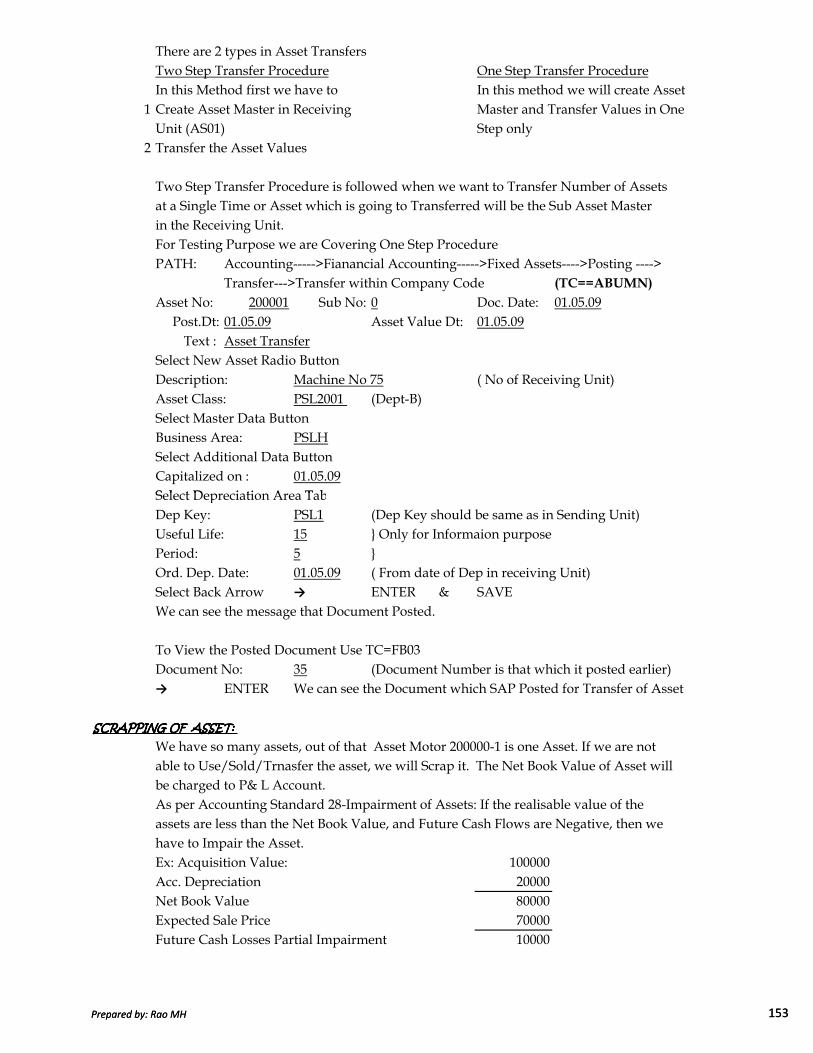
There are 2 types in Asset TransfersTwo Step Transfer Procedure One Step Transfer ProcedureIn this Method first we have to In this method we will create Asset
1 Create Asset Master in Receiving Master and Transfer Values in One Unit (AS01) Step only
2 Transfer the Asset Values
Two Step Transfer Procedure is followed when we want to Transfer Number of Assetsat a Single Time or Asset which is going to Transferred will be the Sub Asset Master in the Receiving Unit.For Testing Purpose we are Covering One Step ProcedurePATH: Accounting----->Fianancial Accounting----->Fixed Assets---->Posting ---->
Transfer--->Transfer within Company Code (TC==ABUMN)
Asset No: 200001 Sub No: 0 Doc. Date: 01.05.09Post.Dt: 01.05.09 Asset Value Dt: 01.05.09Text : Asset Transfer
Select New Asset Radio Button Description: Machine No 75 ( No of Receiving Unit)Asset Class: PSL2001 (Dept-B)Select Master Data ButtonBusiness Area: PSLHSelect Additional Data ButtonCapitalized on : 01.05.09Select Depreciation Area Tab
Prepared by: Rao MH 153
Select Depreciation Area TabDep Key: PSL1 (Dep Key should be same as in Sending Unit)Useful Life: 15 Only for Informaion purposePeriod: 5 Ord. Dep. Date: 01.05.09 ( From date of Dep in receiving Unit)Select Back Arrow → ENTER & SAVEWe can see the message that Document Posted.
To View the Posted Document Use TC=FB03Document No: 35 (Document Number is that which it posted earlier)→ ENTER We can see the Document which SAP Posted for Transfer of Asset
SCRAPPING OF ASSET:SCRAPPING OF ASSET:SCRAPPING OF ASSET:SCRAPPING OF ASSET:
We have so many assets, out of that Asset Motor 200000-1 is one Asset. If we are not able to Use/Sold/Trnasfer the asset, we will Scrap it. The Net Book Value of Asset willbe charged to P& L Account. As per Accounting Standard 28-Impairment of Assets: If the realisable value of the assets are less than the Net Book Value, and Future Cash Flows are Negative, then wehave to Impair the Asset.Ex: Acquisition Value: 100000Acc. Depreciation 20000Net Book Value 80000Expected Sale Price 70000Future Cash Losses Partial Impairment 10000
Prepared by: Rao MH 153
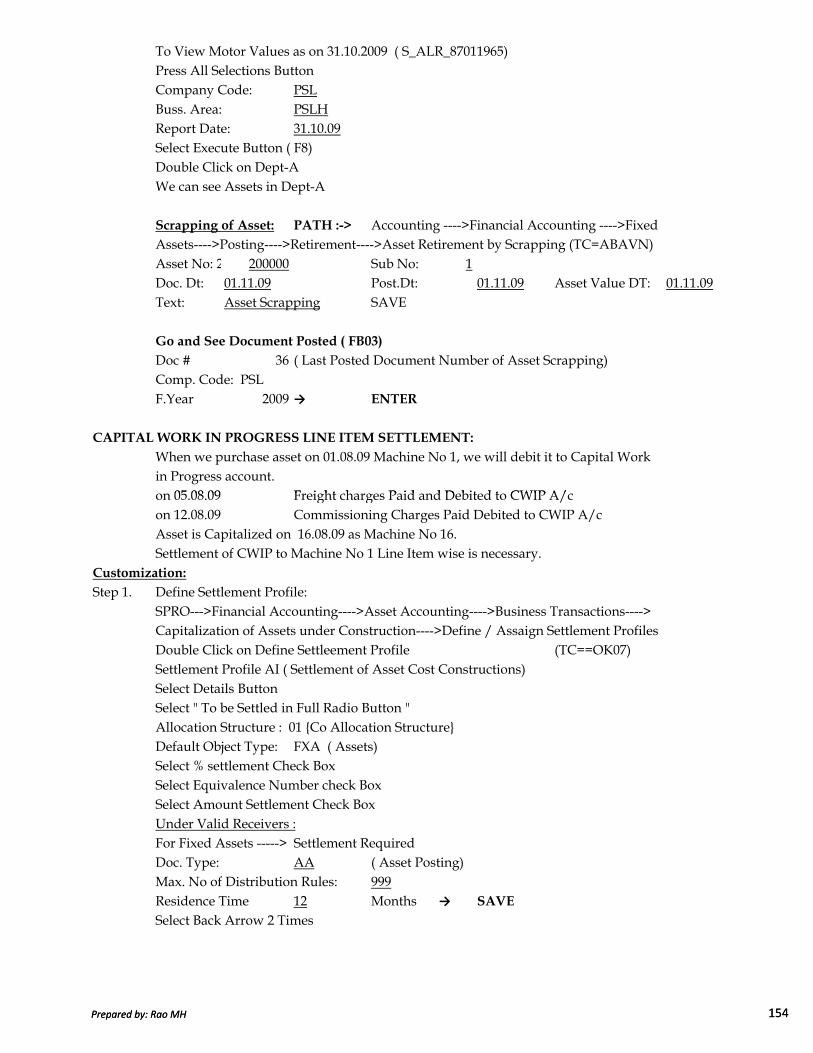
To View Motor Values as on 31.10.2009 ( S_ALR_87011965)Press All Selections Button Company Code: PSLBuss. Area: PSLHReport Date: 31.10.09Select Execute Button ( F8)Double Click on Dept-AWe can see Assets in Dept-A
Scrapping of Asset: PATH :-> Accounting ---->Financial Accounting ---->Fixed Assets---->Posting---->Retirement---->Asset Retirement by Scrapping (TC=ABAVN)Asset No: 200000-1200000 Sub No: 1Doc. Dt: 01.11.09 Post.Dt: 01.11.09 Asset Value DT: 01.11.09Text: Asset Scrapping SAVE
Go and See Document Posted ( FB03)
Doc # 36 ( Last Posted Document Number of Asset Scrapping)Comp. Code: PSLF.Year 2009 → ENTER
CAPITAL WORK IN PROGRESS LINE ITEM SETTLEMENT:
When we purchase asset on 01.08.09 Machine No 1, we will debit it to Capital Work in Progress account. on 05.08.09 Freight charges Paid and Debited to CWIP A/c
Prepared by: Rao MH 154
on 05.08.09 Freight charges Paid and Debited to CWIP A/con 12.08.09 Commissioning Charges Paid Debited to CWIP A/cAsset is Capitalized on 16.08.09 as Machine No 16. Settlement of CWIP to Machine No 1 Line Item wise is necessary.
Customization:
Step 1. Define Settlement Profile:SPRO--->Financial Accounting---->Asset Accounting---->Business Transactions---->Capitalization of Assets under Construction---->Define / Assaign Settlement ProfilesDouble Click on Define Settleement Profile (TC==OK07)Settlement Profile AI ( Settlement of Asset Cost Constructions)Select Details Button Select " To be Settled in Full Radio Button "Allocation Structure : 01 Co Allocation StructureDefault Object Type: FXA ( Assets)Select % settlement Check BoxSelect Equivalence Number check BoxSelect Amount Settlement Check BoxUnder Valid Receivers :For Fixed Assets -----> Settlement RequiredDoc. Type: AA ( Asset Posting)Max. No of Distribution Rules: 999Residence Time 12 Months → SAVE
Select Back Arrow 2 Times
Prepared by: Rao MH 154
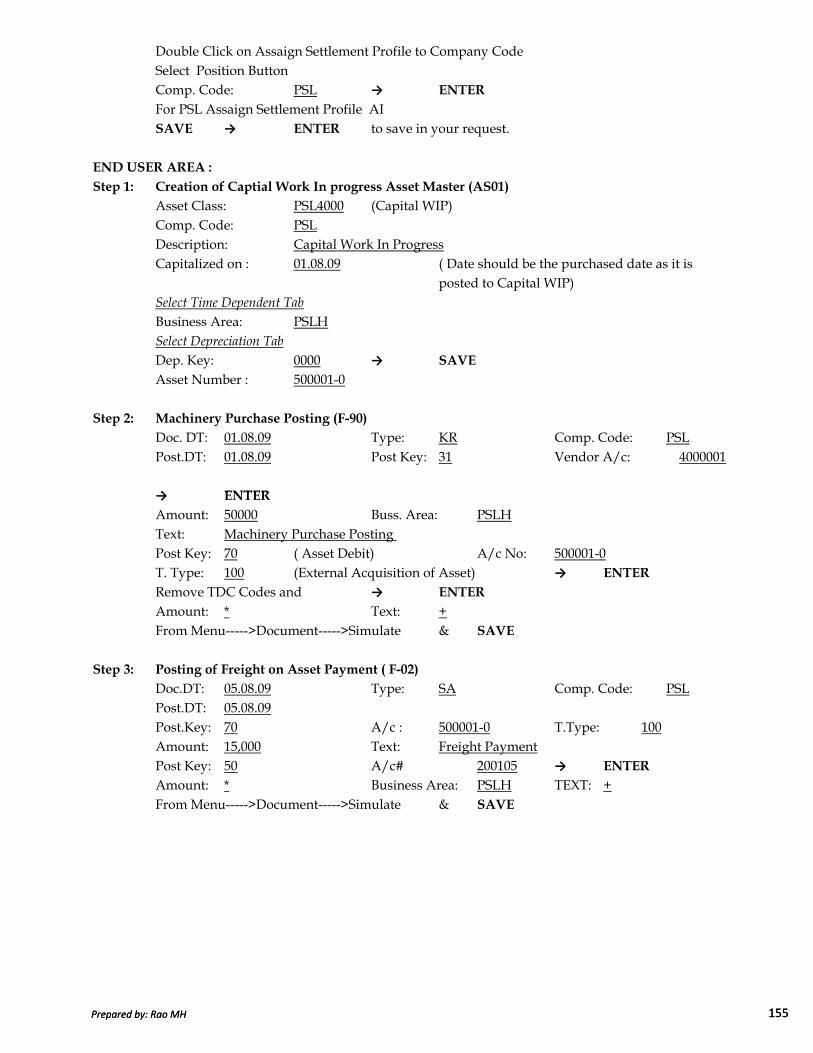
Double Click on Assaign Settlement Profile to Company CodeSelect Position Button Comp. Code: PSL → ENTER
For PSL Assaign Settlement Profile AISAVE → ENTER to save in your request.
END USER AREA :
Step 1: Creation of Captial Work In progress Asset Master (AS01)
Asset Class: PSL4000 (Capital WIP)Comp. Code: PSLDescription: Capital Work In ProgressCapitalized on : 01.08.09 ( Date should be the purchased date as it is
posted to Capital WIP)Select Time Dependent Tab
Business Area: PSLHSelect Depreciation Tab
Dep. Key: 0000 → SAVE
Asset Number : 500001-0
Step 2: Machinery Purchase Posting (F-90)
Doc. DT: 01.08.09 Type: KR Comp. Code: PSLPost.DT: 01.08.09 Post Key: 31 Vendor A/c: 4000001
→ ENTER
Prepared by: Rao MH 155
→ ENTER
Amount: 50000 Buss. Area: PSLHText: Machinery Purchase Posting Post Key: 70 ( Asset Debit) A/c No: 500001-0T. Type: 100 (External Acquisition of Asset) → ENTER
Remove TDC Codes and → ENTER
Amount: * Text: +From Menu----->Document----->Simulate & SAVE
Step 3: Posting of Freight on Asset Payment ( F-02)
Doc.DT: 05.08.09 Type: SA Comp. Code: PSLPost.DT: 05.08.09Post.Key: 70 A/c : 500001-0 T.Type: 100Amount: 15,000 Text: Freight PaymentPost Key: 50 A/c# 200105 → ENTER
Amount: * Business Area: PSLH TEXT: +From Menu----->Document----->Simulate & SAVE
Prepared by: Rao MH 155

Step 4: Creation of Machinery Asset Master( AS01)
Asset Class: PSL2000Comp. Code: PSL → ENTER
Description: Machine No 16Capitalized on : 16.08.09Select Time Dependent Tab
Business Area: PSLHSelect Depreciation Tab
Dep. Key: PSL1Useful Life: 16 Years
Period: 6 Months
Ord. Dep Start Dt: 16.08.09 → SAVE
We will get the message that Asset Number : 200004-0 Created
Step 5: Settlement of Capital Work In Progress to Machine No 16.
Accounting---->Financial Accounting---->Fixed Assets----->Posting---->Capitalized Asset Under Construction---->Distribute. (TC==AIAB)
Comp. Code: PSL Asset :500001 Sub.No : 0→ Execute (F8)Menu--->Edit---->Select---->Select AllSelect ENTER Button on Screen
Category Settlement Rec.ST %
Prepared by: Rao MH 156
Category Settlement Rec.ST %Receiver
FXA 200004-0 Mach.#16 100 → Select Back Arrow & SAVE
select Settlement Button Asset Value Date: 16.08.09Text: Capital Work In progress for 16 Settlement Deselect Test Run Check BoxExecute--- > We will Get Message Transaction was Posted.
Go And See the Document Posted : Use TC=FB03
NOTE: Before Transfering the CWIP Settlement, We have to Assaign Settlement Document Number Ranges in Controlling for Posting the Settlement Document. Othewise Systemwill give Error
Prepared by: Rao MH 156
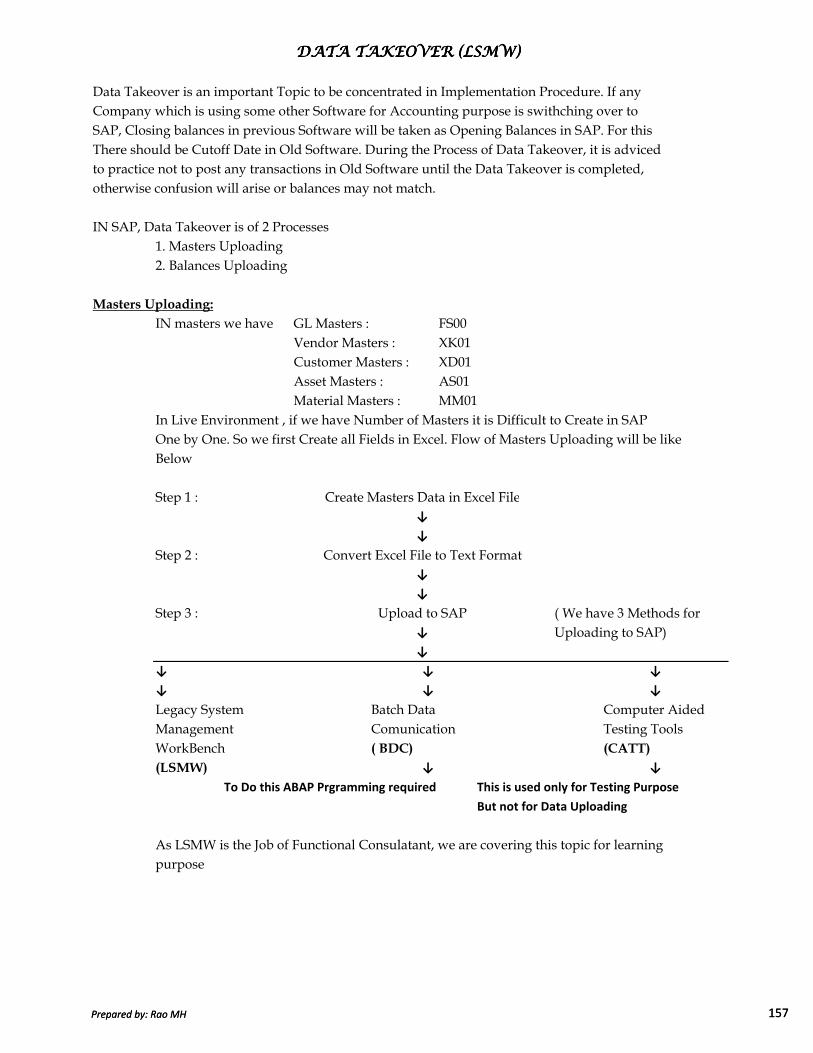
Data Takeover is an important Topic to be concentrated in Implementation Procedure. If any Company which is using some other Software for Accounting purpose is swithching over to SAP, Closing balances in previous Software will be taken as Opening Balances in SAP. For thisThere should be Cutoff Date in Old Software. During the Process of Data Takeover, it is advicedto practice not to post any transactions in Old Software until the Data Takeover is completed, otherwise confusion will arise or balances may not match.
IN SAP, Data Takeover is of 2 Processes1. Masters Uploading 2. Balances Uploading
Masters Uploading:
IN masters we have GL Masters : FS00Vendor Masters : XK01Customer Masters : XD01Asset Masters : AS01Material Masters : MM01
In Live Environment , if we have Number of Masters it is Difficult to Create in SAPOne by One. So we first Create all Fields in Excel. Flow of Masters Uploading will be likeBelow
Step 1 :
DATA TAKEOVER (LSMW)DATA TAKEOVER (LSMW)DATA TAKEOVER (LSMW)DATA TAKEOVER (LSMW)
Create Masters Data in Excel File
Prepared by: Rao MH 157
Step 1 :
Step 2 :
Step 3 : ( We have 3 Methods for Uploading to SAP)
↓ ↓ ↓
↓ ↓ ↓
Legacy System Batch Data Computer AidedManagement Comunication Testing ToolsWorkBench ( BDC) (CATT)
(LSMW) ↓ ↓
To Do this ABAP Prgramming required This is used only for Testing Purpose
But not for Data Uploading
As LSMW is the Job of Functional Consulatant, we are covering this topic for learning purpose
↓
↓
Upload to SAP
Convert Excel File to Text Format
Create Masters Data in Excel File↓
↓
↓
↓
Prepared by: Rao MH 157

Step 1 : Open a New Excel File and Note Down the Values to be Uploaded
GLA/c# Comp. A/c P& L St B/S Short Text Long Text A/cCode Group A/c A/c Currency
1 2 3 4 5 6 7 8100001 PSL SCPL X Pref.Share Cap Pref.Share Cap INR200125 PSL CAST X Inventory Stores Inventory Stores INR300001 PSL SALE X Sales Trading Sales Trading INR400101 PSL PRSN X Wages A/c Wages A/c INR
Only Bal Line Sort Fieldin Loc Item Key StatusCurrency Display Group9 10 11 12X X 001 G001X X 001 G001X X 001 G001X X 001 G001
Remove Column Headings and Delete Other Sheets in Excel FileSelect the Total Sheet by clicking on the left CornerClick Right Mouse Button and Select format CellsSelect Text-------> Select OK Button from Menu ----> SAVE as Save As type : Text ( tab Delimited)Give the File Name: PSLText Select Save Button
Prepared by: Rao MH 158
Give the File Name: PSLText Select Save Button Select No for the message " to Keep Wrokbook Format"Select cancel Button From Menu---->File---->CloseSelect No Button for the Message Save Excel File.
Step 2. Open a New Excel File and Note Down the Technical Name of EachField. It should bein the same order of fields in Text File. To Check the Technical Names go to the Screenof FS00. In FS00 Screen keep the Cursor on GL A/c and Press F1. Select Technical Information Button . Double Click on Field Name SAKNR. Like that we can see technical names of other fields.Component Data type Length Field Name
SAKNR C 10 GL A/cBUKRS C 4 Comp.CodeKTOKS C 4 A/c GroupXPLACCT C 1 P& L A/cXBILK C 1 B/S A/cTXT_20ML C 20 Short TextTXT_50ML C 50 Long TextWAERS C 5 A/c CurrencyXSALH C 1 Only Bal. in Local CurrencyXKRES C 1 Line Item DisplayZUAWA C 3 Sort KeyFSTAG C 4 Field StatusSave the File in Excel Format as PSL Excel
Prepared by: Rao MH 158

Step 3. Masters Uploading:
Use TC= LSMW in SAPIgnore the Warning MessageProject: PSLSub Project: FIObject: GL MastersSelect Create Entry Button Give Project Description: PSL Project → ENTER
Sub Project Description: FI Area → ENTER
Object Name: GL Masters Uploading → ENTER
Select Contineu or Execute Button Select Execute Button Select Batch Input Recording Radio Button MENU----->GOTO----->RECORDINGS OVERVIEWselect Create Recording Button Recording Name: PSLGLDescription: PSLGL Masters Uploading → ENTER
Transaction Code: FS00 → ENTER
GL A/c 100310 Comp. Code: PSLMenu ---->GL A/c----->CreateAccount Group: Secured LoansSelect B/S Account Θ
Short Text: IDBI Rupee Term Loan
Prepared by: Rao MH 159
Short Text: IDBI Rupee Term Loan Long Text: IDBI Rupee Term Loan
Select control Data tab
Account Currency: INRSelect Only Balances in Local Currecny √
Select Line Item Display √
Sort Key: 001Select Create/Interest/Bank tab
Field Status Group: G001 → SAVE
Keep the Cursor on FS00 . Select Default All Button → SAVE
Select Back Arrow 2 TimesGive Recording Name PSLGL → ENTER & SAVE
Select Back Arrow Select Execute Button Select Create a Structure Button Source Structure : PSLSTRDescription: PSLGL Structure → ENTER & SAVE
Select Back ArrowSelect Execute Button Keep the Cursor on PSLSTRSelect Table Maintenance Button
Prepared by: Rao MH 159

Copy Component Column in Excel File in SAP Field Name ColumnCopy Data Tyep Column in Excel File in SAP Type ColumnCopy Length in Excel File in SAP Length Column → SAVE
Select Back Arrow → SAVE
Select Back Arrow Select Execute Button → SAVE
Select Back Arrow Select Execute Button Menu---->Extras---->Auto Field Mapping → ENTER
Select Accept Proposal Button till we get the Message "Auto Field Mapping Completed" → ENTER & SAVE
Select Back Arrow SKIP Maintain Fixed Values , Translation User Defined RoutinesSelect Specify Files Radio Button Select Execute Button Keep the Cursor on the PC(Front End)Select Add Entry Button ( Ctrl+F2)File : PSLText.txt ( The same Text File Earlier created)Name: PSLGL MastersSelect Tabulator Radio Button → ENTER & SAVE
Select Back Arrow Select Execute Button → SAVE
Select Back Arrow Select Execute Button → Select Execute Button once again
Prepared by: Rao MH 160
Select Execute Button → Select Execute Button once again Select Back Arrow 2 timesSKIP Display Read DataSelect Conver Data Radio Button Select Execute Button → Select Execute Button once again Select Back Arrow 2 timesSKIP Display Converted Data Select Create Batch Input Session Button Select Execute Button → Select Execute Button once again We will get a message " 1 Batch Input Folder with 4 Transactions Created" → ENTER
Select Execute Button for Run Batch Input Selection Select Session Name: GLMasters → Select Process Button Select Display Errors Only Radio Button Select Process Button Ignore the Message and Select Exit Batch Input Button
To View the Accounts Created use TC=FS00
Select Drop Down Button Beside GL a/cComp. Code : PSL → ENTER
We can see the Masters Created in List.In the Same Way , We can Upload the Vendor Masters, Customer Masters, Asset Masters and Material Masters. Technical Names Can be known from the Screen of Particular Master Creation.
Prepared by: Rao MH 160

Balances Uploading : If the Company is a Going Concern and is implementing SAP on 01.04.09 --- Upload only Balance Sheet Items Balanceson 01.08.09 --- Upload Balance Sheet Items Balances and P& L A/c Balances as
Uploading is in the Middle of the Fiscal YearSAP Suggets only to upload the Balances but not the Transactional Data except for Vendors and Customers where we need Open Item Transactions.
NOTE: Reasons given by SAP for suggesting the Uploading of Balances not Transactions for some Masters :
A. In Normal Accounting Vendors, Customers and Asset Balances are part of GL A/c's where as in SAP we have them as SUB Ledgers
B. In Normal Accounting for Vendors and Customers, we keep Payables/ Receivables and Advances in One Account. But in SAP Payables/ Receivables will be shown under Normal Items and Advances will be shown under Special GL Items
C. In Normal Accounting we show Accountwise Gross Block and Accumulated Dep. Ex: P& M Wise, Where as in SAP we maintain each Sub Asset Wise Gross Block and Accumulated Depreciation.
D. In Normal Accounting Depreciation is a Provisional Figure, where as in SAP Depreciation is Actually Calculated figure.
E. In Normal Accounting Consumption is a Balance Sheet Figure. Where as in SAP ActualConsumption entries will be passed. Ex: Raw Material Consumption in Normal Accounting
Opening Stock xxxxxAdd: Purchases xxxxx
Prepared by: Rao MH 161
Add: Purchases xxxxxLess: Closing Stock xxxxx
RM Consumption xxxxx
F. In Normal Accounting for Closing Stock only One Entry will be passed Closing Stock Dr. ( B/S Account) To Closing Stock Cr (P& L Account)
IN SAP Closing Stock will be Maintained Each Material wise-Quantity, Rate and Closing Amount
G. In Normal Accounting Production Entries and Delivery Entries will not be passed.The Difference between Production and Delivery is Increase/Decrease In Stock.in SAP Production Entries and Delivery Entires will be passed at Product Cost.
Procedure for Balances Uploading :
1 Prepare a Statement Showing Each Vendors - Billwise Payables and Advances whichshould match with the Trial Balance
2 Prepare a Statement Showing Each Customers - Billwise Receivables &Advances whichshould match with the Trial Balance
3 Prepare a Statement Showing each Sub Assetwise, Purchase Cost, and Accumulated Depreciation and the Total Should match with Trial Balance Fixed Assets Account and Accumulated Depreciation Account.
4 Prepare a Statement showing each material wise Quantity, Rate and Amount, whichshould match with the Trial Balances Inventory Account.
Prepared by: Rao MH 161

5 Create 5 Dummy GL Accounts . It can be under any Account Group. Generally wecreate under Liabilities.a) GL Clearing A/c b) Vendor Clearing A/c c) Customer Clearing A/cd) Asset Clearing A/c e) Stock Taking A/c
6 If Balances Uploaded is Correct, Balances of 5 Dummy Accounts will become ZERO. If in Any Dummy Account Balance is not become ZERO, it means there is some mistakein uploading that Balances. Balances of the Masters will Upload but with Mistakes. We have to Check manually the Balances to identify the Mistake and make the Rectification Entry .
7 We should not allow users to enter day to day transactions until the Balances are uploaded.Example of Simple Normal Trial Balance
Particulars Debit Credit A/c TypeEquity Share Capital 500000 GL A/cParty A 100000 Sub LedgerAcc. Dep. P& M No 40 200000 Sub LedgerSales 300000 GL A/cFixed Assets P& M No 40 500000 Sub LedgerInv.Raw Meterials 100000 Sub LedgerParty X 250000 Sub LedgerSBI Current Account 50000 GL A/cR M Consumption A/c 200000 Sub Ledger
1100000 1100000
Prepared by: Rao MH 162
1100000 1100000
Step 1. Create 5 Dummy Accounts by using TC=FS00Step2. Credit GL Balances Uploading in F-02 Fast Data Entry
GL Clearing A/c Dr 1100000 To Equity Share Capital Account 500000 To Vendor Clearing Acount 100000 To Asset Clearing Account 200000 To Sales Account 300000
(All Credit Balances of Trial Balances Transferred to GL Clearing Account)
Step3. Debit Balances Uploading in F-02 Fast Data EntryAsset Clearing Account Dr 500000Stock Taking A/c Dr 100000Customer Clearing A/c Dr 250000SBI Current Account Dr 50000RM Consumption A/c Dr 200000
To GL Clearing Account 1100000(All Debit Balances of Trial Balances Transferred to GL Clearing Account)
Prepared by: Rao MH 162

Why The above 2 Entries are Requrired?
As we discussed in Point No 6 of Procedure above, First We will Transfer the Total Amount to the Particular Clearing Account in the 5 Dummy Accounts Created. Whenwe transfer the Individual Balances of Customers/ Vendors/Assets/Materials line itemwise we will make programming to transfer the total to the particular Clearing AccountWhne Debit amount and Credit Amount equals automatically that Particular Clearing Account ( Dummy) will become ZERO. If any Clearing Account shows balance , it means there is some mistake in uploading the balances in that partcular category. We can easily check the balances manually to sort out the difference and make the adjustment Entry. Point to be noted is that, even if the Balances total does not match with the amount existing in that Clearing Accoount also, at the time of uploading line itemwise, data will automatically upload. We can not revert it back. We have to pass the Adjustment Entry only for rectifing the Mistakes.
Step 4A. Prepare a Statement showing each Vendor Bill Wise Open Items and AdvancesEx: Party A account as in Trial BalanceBill No 1 50000Bill No 2 40000Bill No 3 30000Advance 20000
Step 4B. Vendor Transactions Uploading F-43Vendor Clearing Account Dr. 105000 ( Balancing Figure)Party A Spl Gl A/c Dr 20000 Advance to Vendors
Prepared by: Rao MH 163
Party A Spl Gl A/c Dr 20000 Advance to Vendors To Party A Bill No 1 50000 Sundry Cr
To Party A Bill No 2 40000 Sundry CrTo Party A Bill No 3 35000 Sundry Cr
Step 4C. Rectification Entry:As we Discussed earlier , at the time of Uploading the Line Items, if any mistake is there, data will upload as we mentioned. In this Example, we can see as per Trial Balance Party A balance is Rs. 100,000/-. But as per the Data Uploading Bill wiseTotal Uploaded is Rs. 105,000/-. So Vendor Clearing Account will not be Zero showing5000 Debit Balance Which should be rectified with Rectification Entry as Data alreadyuploaded.
Party A A/c Bill No 3 Dr. 5000 To Vendor Clearing Account 5000
NOTE:
Like the Above we have to Transfer the Item wise Balances of all the Vendors. In Live, as the
Data Base would be more, it is difficult to upload the Data through TC=F-43. Like what we had
done in GL Masters uploading, we will prepare an Excel Sheet and Upload the data from there in One
Lot. For this, ABAP Programmer is required.
Prepared by: Rao MH 163

Step 5A. Prepare a Statement Showing Each Customerwise, billwise open items and AdvancesParty X A/c :
Bill No 1 170000 Closing Balance is Rs. 250,000 DR whichBill No 2 110000 is equal to Trial BalanceAdvance 30000
Step 5B Customer Transactions Uploading F-22Party X a/c ( Bill No 1) 170000Party X a/c ( Bill No 2) 110000
To Party X Spl GL a/c 30000To Customer Clearing A/c 250000
The Debit Balance in Customer Clearing A/c what we transferred through the Entry in Step 3 is Rs. 250,000 which was equal to the Credit Entry in the above Entry. So in Customer Clearing Account Balance would be ZERO ( Dr. 250000 - Cr 250000)
Step 6A To Enter the Fixed Assets Balances, we have to Enter Plant & Machinery GL A/c and Acc. Dep on P & M GL A/c with the below Entry
Post. Key 40 Plant & Machinery A/c 50000050 To Acc. Dep on P & M A/c 20000050 Asset Clearing Account 300000
For Uploading the Fixed Assets Item Wise, first we have to Remove the Reconciliations Accounts
Prepared by: Rao MH 164
For Uploading the Fixed Assets Item Wise, first we have to Remove the Reconciliations Accounts for Assets.( See Step 6C for further Details) USE TC= OAMK OR
SPRO---->Financial Accounting--->Preparing for Production Start up----> Set or Reset Reconciliations Account Comp. Code: PSLDouble Click on Change Control of Reconciliation A/c FolderFrom Menu----> Edit---->Selections---->Select AllSelect Delect Reconciliation Indicator for All Account → SAVE
→ ENTER to save in your request.
Step 6B Creation of Asset Master TC=AS01 → ENTERAsset Class: PSL2000Comp. Code: PSL → ENTERDescription : Machine No 40Capitalized on : 20.07.09Select Time Dependent Tab Business Area: PSLH
Select Depreciation Area tab
Dep.Key Useful Period Ord. Dep St. DtLife
PSL1 10Yrs 4 Months 01.04.2009 → SAVE
It Shows Asset "200003" Sub No "0" Created
Prepared by: Rao MH 164

Step 6C To Upload Acquisition Value and Acc. Depreciatio ValuesThis will not update the GL A/c as we have earlier Removed the Reconciliation A/c forAccount Type Assets. It will updated only the SubLedger of Asset .PATH: SPRO---->Financial Accounting---->Asset Accounting---->Asset Data Transfer ----->Manual Online Transfer---->Create/Change/Display Legacy Asset
Double Click on Change Legacy Asset ( TC==AS92)Asset No: 200003Sub Asset No: 0Comp. Code: PSLSelect Takeover Values Button Ignore the Warning Message → ENTER
Cum. Acquisition Value: 500000Accu. Ordinary Dep: 200000 → SAVE
Step 6D To Make Fixed Assets P& M A/c and Acc. Dep P& M GL A/c as Reconciliation A/c
After Uploading the Balances for Assets, again change the Assets as Reconciliation A/cUSE TC= OAMK → ENTER
Comp. Code: PSLDouble Click on Change/Control of Reconciliatio of A/c FolderFrom Menu---->Selections---->Select All ( F7)Select Set Reconciliation Indicator for Accounts Button SAVE → ENTER to save in your request.
Prepared by: Rao MH 165
SAVE → ENTER to save in your request.
Step 7A Prepare a Statement showing the Each Materialwise , Quantity, Rate and Amount. The Total should match with the Trial Balance Amount.Ex. Statement of Stock
Material No Qty Rate AmountRM 1 200 50 10000RM 2 3000 20 60000RM 3 1000 30 30000Total which is equal to TB Figure 100000
Step 7B Create Material Masters and In Accounting View Enter Moving Avg Price ( TC=MM01)Item Mvg. PriceRM 1 50RM 2 20RM 3 30
Data Take over regarding the Stock is the Job of MM Consultant . But we are briefly
explaining the Procedure
Prepared by: Rao MH 165
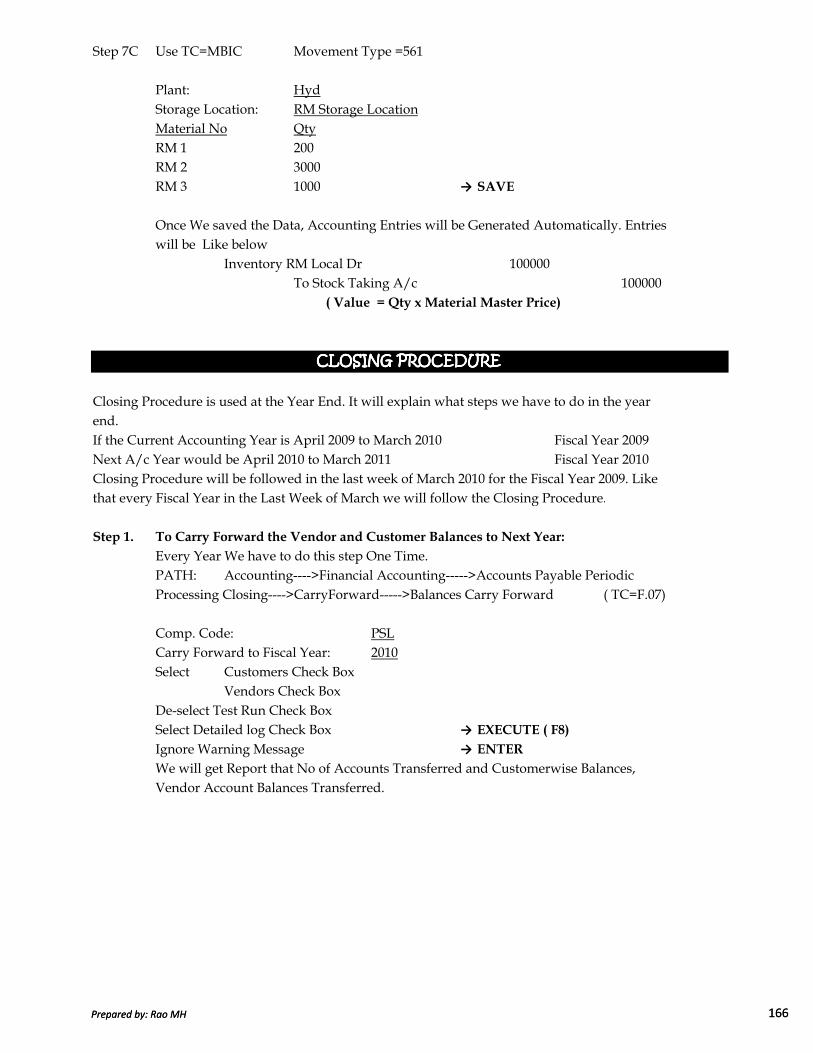
Step 7C Use TC=MBIC Movement Type =561
Plant: HydStorage Location: RM Storage LocationMaterial No QtyRM 1 200RM 2 3000RM 3 1000 → SAVE
Once We saved the Data, Accounting Entries will be Generated Automatically. Entrieswill be Like below
Inventory RM Local Dr 100000To Stock Taking A/c 100000
Closing Procedure is used at the Year End. It will explain what steps we have to do in the year end.If the Current Accounting Year is April 2009 to March 2010 Fiscal Year 2009Next A/c Year would be April 2010 to March 2011 Fiscal Year 2010Closing Procedure will be followed in the last week of March 2010 for the Fiscal Year 2009. Likethat every Fiscal Year in the Last Week of March we will follow the Closing Procedure.
( Value = Qty x Material Master Price)
CLOSING PROCEDURECLOSING PROCEDURECLOSING PROCEDURECLOSING PROCEDURE
Prepared by: Rao MH 166
that every Fiscal Year in the Last Week of March we will follow the Closing Procedure.
Step 1. To Carry Forward the Vendor and Customer Balances to Next Year:
Every Year We have to do this step One Time.PATH: Accounting---->Financial Accounting----->Accounts Payable Periodic Processing Closing---->CarryForward----->Balances Carry Forward ( TC=F.07)
Comp. Code: PSLCarry Forward to Fiscal Year: 2010Select Customers Check Box
Vendors Check BoxDe-select Test Run Check BoxSelect Detailed log Check Box → EXECUTE ( F8)
Ignore Warning Message → ENTER
We will get Report that No of Accounts Transferred and Customerwise Balances,Vendor Account Balances Transferred.
Prepared by: Rao MH 166

Step 2. Asset Closing Balances Transfer (or) Carry Forward:
For Asset Accounting We can Open 2 Fiscal Years at a time . So For Opening the Fiscal Year 2010 we have to Close the Fiscal Year 2008 for Asset Accounting .
Step2A To Check Which Years is Closed for Asset Accounting :
Accounting---->Financial Accounting---->Fixed Assets---->Periodic Processing ---->Year End Closing---->Undo--->Entire Company Code (TC=OAAQ)
Select Position Button Comp. Code: PSL → ENTER
We can see Which Year is Last Closed
Step2B To Close Fiscal Year 2008 for Asset Accounting :
Path: Upto Periodic Processing Path is Same---->Year End Closing ---->Execute(TC=AJAB)
Comp. Code: PSLFiscal Year to be Closed: 2008De-Select Test Run Check BoxFrom Menu---->Programme--->Execute in Background (F9)Output Device: LP01 → ENTER → ENTER Again
Select Immediate Button → SAVE
We get a Message " Background Job was Scheduled for Programm RAJABS00"
To Check weather the JOB is processed or not :
Menu--->System---->Services--->Jobs--->Job Overview
Prepared by: Rao MH 167
Menu--->System---->Services--->Jobs--->Job OverviewExecute(F8)-----> We can see that JOB is Finished
To View the Result of the Job :
Select Job " RAJABS00" Check BoxSelect Spool Button Select Sppl No Check Box-----> Select Display Contents Button
To Close Any Fiscal Year for Asset Accounting , We have to Post Depreciation for all Assets for all the Periods in that Fiscal Year.
Step 3 To Open Fiscal Year 2010 for Asset Accounting:
PATH: Upto Periodic Processing Path is Same----> Fiscal Year Change (TC=AJRW)Comp. Code: PSLNew Fiscal Year : 2010De-Select Test Run Check BoxMenu--->Programme--->Execute----> BackgroundOutput Device: LP01 → ENTER → ENTER Again
Select Immediate Button → SAVE
We will get a Message " Background Job was Scheduled for Programm RAJAWE00"
Prepared by: Rao MH 167
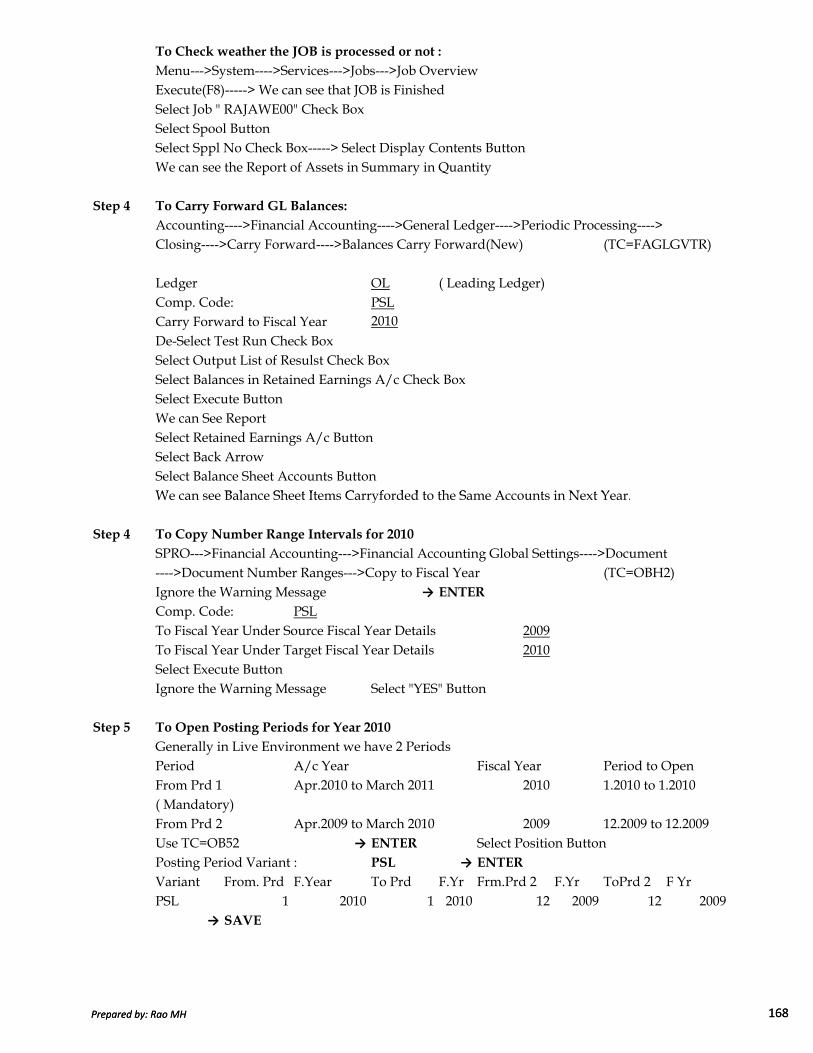
To Check weather the JOB is processed or not :
Menu--->System---->Services--->Jobs--->Job OverviewExecute(F8)-----> We can see that JOB is FinishedSelect Job " RAJAWE00" Check BoxSelect Spool Button Select Sppl No Check Box-----> Select Display Contents Button We can see the Report of Assets in Summary in Quantity
Step 4 To Carry Forward GL Balances:
Accounting---->Financial Accounting---->General Ledger---->Periodic Processing---->Closing---->Carry Forward---->Balances Carry Forward(New) (TC=FAGLGVTR)
Ledger OL ( Leading Ledger)Comp. Code: PSLCarry Forward to Fiscal Year 2010De-Select Test Run Check BoxSelect Output List of Resulst Check BoxSelect Balances in Retained Earnings A/c Check BoxSelect Execute Button We can See Report Select Retained Earnings A/c Button Select Back ArrowSelect Balance Sheet Accounts Button We can see Balance Sheet Items Carryforded to the Same Accounts in Next Year.
Prepared by: Rao MH 168
We can see Balance Sheet Items Carryforded to the Same Accounts in Next Year.
Step 4 To Copy Number Range Intervals for 2010
SPRO--->Financial Accounting--->Financial Accounting Global Settings---->Document ---->Document Number Ranges--->Copy to Fiscal Year (TC=OBH2)Ignore the Warning Message → ENTER
Comp. Code: PSLTo Fiscal Year Under Source Fiscal Year Details 2009To Fiscal Year Under Target Fiscal Year Details 2010Select Execute Button Ignore the Warning Message Select "YES" Button
Step 5 To Open Posting Periods for Year 2010
Generally in Live Environment we have 2 PeriodsPeriod A/c Year Fiscal Year Period to OpenFrom Prd 1 Apr.2010 to March 2011 2010 1.2010 to 1.2010( Mandatory)From Prd 2 Apr.2009 to March 2010 2009 12.2009 to 12.2009Use TC=OB52 → ENTER Select Position Button Posting Period Variant : PSL → ENTER
Variant From. Prd F.Year To Prd F.Yr Frm.Prd 2 F.Yr ToPrd 2 F YrPSL 1 2010 1 2010 12 2009 12 2009
→ SAVE
Prepared by: Rao MH 168
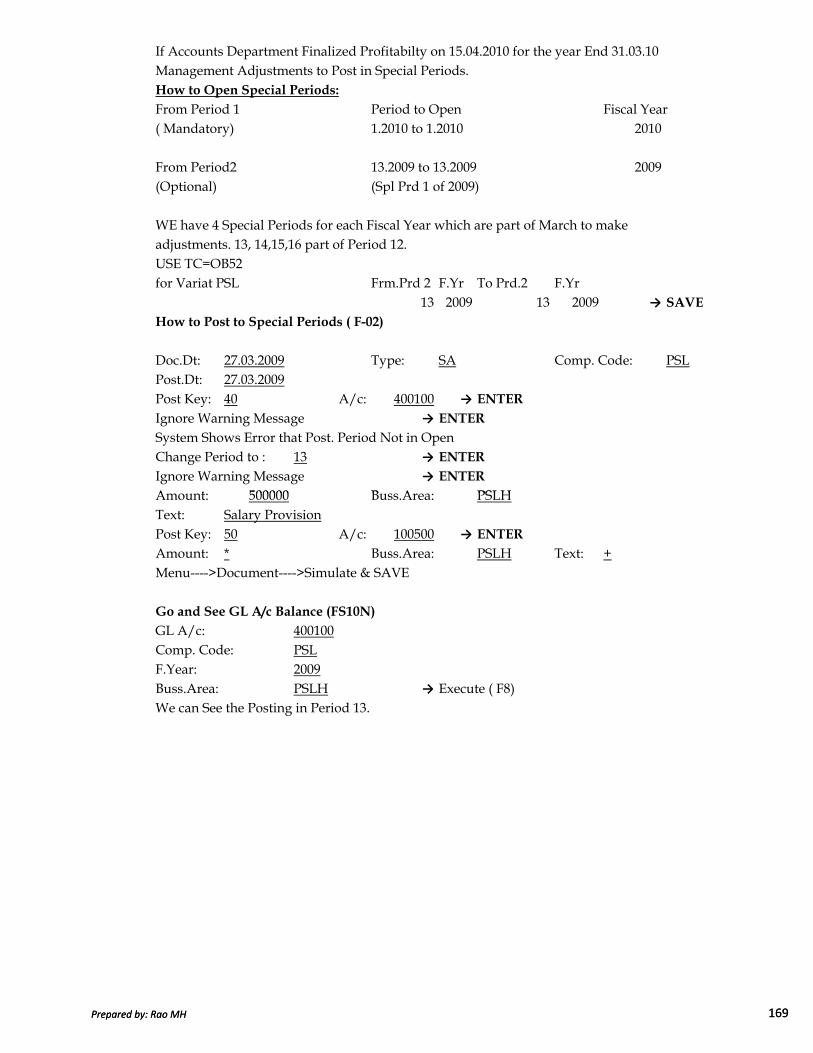
If Accounts Department Finalized Profitabilty on 15.04.2010 for the year End 31.03.10Management Adjustments to Post in Special Periods.How to Open Special Periods:
From Period 1 Period to Open Fiscal Year( Mandatory) 1.2010 to 1.2010 2010
From Period2 13.2009 to 13.2009 2009(Optional) (Spl Prd 1 of 2009)
WE have 4 Special Periods for each Fiscal Year which are part of March to make adjustments. 13, 14,15,16 part of Period 12.USE TC=OB52for Variat PSL Frm.Prd 2 F.Yr To Prd.2 F.Yr
13 2009 13 2009 → SAVE
How to Post to Special Periods ( F-02)
Doc.Dt: 27.03.2009 Type: SA Comp. Code: PSLPost.Dt: 27.03.2009Post Key: 40 A/c: 400100 → ENTER
Ignore Warning Message → ENTER
System Shows Error that Post. Period Not in Open Change Period to : 13 → ENTER
Ignore Warning Message → ENTER
Amount: 500000 Buss.Area: PSLH
Prepared by: Rao MH 169
Amount: 500000 Buss.Area: PSLHText: Salary ProvisionPost Key: 50 A/c: 100500 → ENTER
Amount: * Buss.Area: PSLH Text: +Menu---->Document---->Simulate & SAVE
Go and See GL A/c Balance (FS10N)
GL A/c: 400100Comp. Code: PSLF.Year: 2009Buss.Area: PSLH → Execute ( F8)We can See the Posting in Period 13.
Prepared by: Rao MH 169

Point 1 How to Creat a Folder:
In Live Environment for Generating Reports or Statements is common and Frequently Required. So it is Difficult to remember or go to the Particular Report through Path or Remembering the Transaction Codes. So create a Folder and Keep all the Reports frequently required by Management in that Folder so as to acess them easily.
Keep The Cursor on FavouritesMenu---->Favourites---->Insert FolderGive the Folder Name : FI Reports → ENTER
Point 2 How to Attach the Report to Folder :
Keep the Cursor on FI Reports FolderMenu---->Favourites---->Insert TransactionsTransaction Code : S_ALR_87011965 ( Asset Balances Report)Double click on Asset Balances ReportWe can see that System will go Directly to the Asset Balances Report
Point 3 How to Attach a Report on Desktop:
Go the The Asset Balances Report (Any Report which we want on Desktop)Select Generate a Shortcut Button On Right Top
Some Important Topics & Reports in SAP Some Important Topics & Reports in SAP Some Important Topics & Reports in SAP Some Important Topics & Reports in SAP
Prepared by: Rao MH 170
Select Generate a Shortcut Button On Right TopDescription: Select ECC Server → ENTER
Select OK to the Message --->SAP will Create Desktop Short cut of the ReportLog Off the SAPDouble Click on Asset Balances Icon on DesktopGive the Login Password → ENTER
We can see that System will Go directly in to the Asset Balances Report.
Point 4 How to View the Chart of Accounts:
Accounting ---->Financial Accounting--->General Ledger--->Information System---->General Ledger Reports----> Master Data--->Chart of Accounts---->Chart of Accounts(TC=S_ALR_87012326)
Chart of Accounts: PSLSelect Execute Button We can See the Report of List of Accounts Created
Point 5 How to Generate Trial Balance:
Upto General Ledger Report Path is Same---->Account Balances---->Korea--->Trial Balance South Korea (TC=S_ALR_87012310)Comp. Code: PSL → EXECUTEIgnore the Warning Message → ENTER
Select Current Lay Out Button Keep the Fields GL A/c, GL Long Text, Cl Balances, and Hid other Fields → ENTER
Prepared by: Rao MH 170

For Trial Balance We have 2 types of Reports1st General ReportA/c No Descr. Op. Bal 16th Mnt 16th Mnt Acc. Acc. Cl. Bal
Debit Credit Debit Credit
2nd Korea RepotIt gives all Fields like in General Report but we can Hide the Fields which are not required. Hiding of Fields is not possible in General Report
Point 6 Exporting Statements to Excel:
From Menu--->Lists--->Export to Spread SheetsIgnore the Warning Message → ENTER
Select Table Radio Button → ENTER → ENTER Once Again and SAVE
Point 7 Printing the Ledger:
Accounting ---->Financial Accounting ---->General Ledger---->Periodic Processing ---->Closing ---->Document---->Balances Audit Trial---->All Accounts--->General Ledgerfrom Document File (TC=S_ALR_87100205)
Comp. Code: PSL → EXECUTESelect Current Layout Button Keep the Fields Doc. No , Post. DateFrom Hidden Fields Column Select Text Field
Prepared by: Rao MH 171
From Hidden Fields Column Select Text FieldSelect Left ArrowFrom Hidden Fields Column Select Dr. Amount in Local CurrencySelect Left Arrowfrom Hidden Fields Column Select Cr. Amount in Local CurrencySelect Left ArrowFor Debit Amount in Local Currency and For Cr. Amount in Local Currency selectTotals Check BoxSelect Copy Button Double Click on Doc. No to drill down into Voucher Select Callup Document Overview Button We can See the Voucher Report
Point 8 How to View the Vendors List:
Accounting---->Financial Accounting----->Accounts Payable---->Information System-->Reports for Accounts Payable Accounting ---->Master Data---->Vendors List (TC=S_ALR_87012086)
Comp. Code: PSL → EXECUTE
Point 9 How to View Vendorwise Purchases Report:
Upto Reports for Accounts Payable Accounting Path is Same----> Vendor Balances--->Vendor Business (TC=S_ALR_87012093)
Comp. Code: PSL → EXECUTE
Prepared by: Rao MH 171

Point 10 How to View the Outstanding List of Vendors:
Upto Reports for Accounts Payable Accounting Path is Same--->Vendors Items--->List of Vendor Open Items for Printing (TC=S_ALR87012083)
Comp. Code: PSL → EXECUTE
Point 11 Agewise Analysis of Vendors:
Upto Reports for Accounts Payable Accounting Path is Same--->Vendors Items--->Vendor Payment History with Open Items Sorted List (TC=S_ALR_87012085)
Comp. Code: PSLSummarization Level: 0Select Days Over Due Sorted List Check Box only but not Other Check Boxes
→ EXECUTE
Point 12 Vendor Advances Report:
Upto Reports for Accounts Payable Accounting Path is Same--->Vendors Items--->List of Down Payments Open on Key Data-Vendors (TC=S_ALR_87012105)
Comp. Code: PSL → EXECUTE
Point 13 Vendors Ledger ( Payables + Paid):
Upto Reports for Accounts Payable Accounting Path is Same--->Vendors Items--->List of Vendor Line Items (TC=S_ALR_87012103)
Prepared by: Rao MH 172
List of Vendor Line Items (TC=S_ALR_87012103)
Comp. Code: PSL → EXECUTE
Assets Reports
Point 14 Depreciation Forecast:
Accounting --->Financial Accounting --->Fixed Assets---->Information System---->Reports on Asset Accounting ---->Depreciation Forecast---->Depreciation on Capitalized Assets ( Depreciation Simulation ) (TC=S_ALR_87012936)
Comp. Code: PSLReport Date: 31.03.2012 → EXECUTE
( Report for FY. 2009,2010,2011)
Point 15 Depreciation Schedule as per Schedule VI of Companies Act:
Information Systems--->Accounting ---->Financial Accounting ---->Fixed Assets---->Asset History Sheet ( TC=AR02)
Comp. Code: PSLReport Date: 31.03.2010Select Group Totals Only Radio button → EXECUTEWe can See Report in Schedule VI FormatSelect Assets Button Double Click on Asset RetirementsWe can see the Asset Retirement Report
Prepared by: Rao MH 172
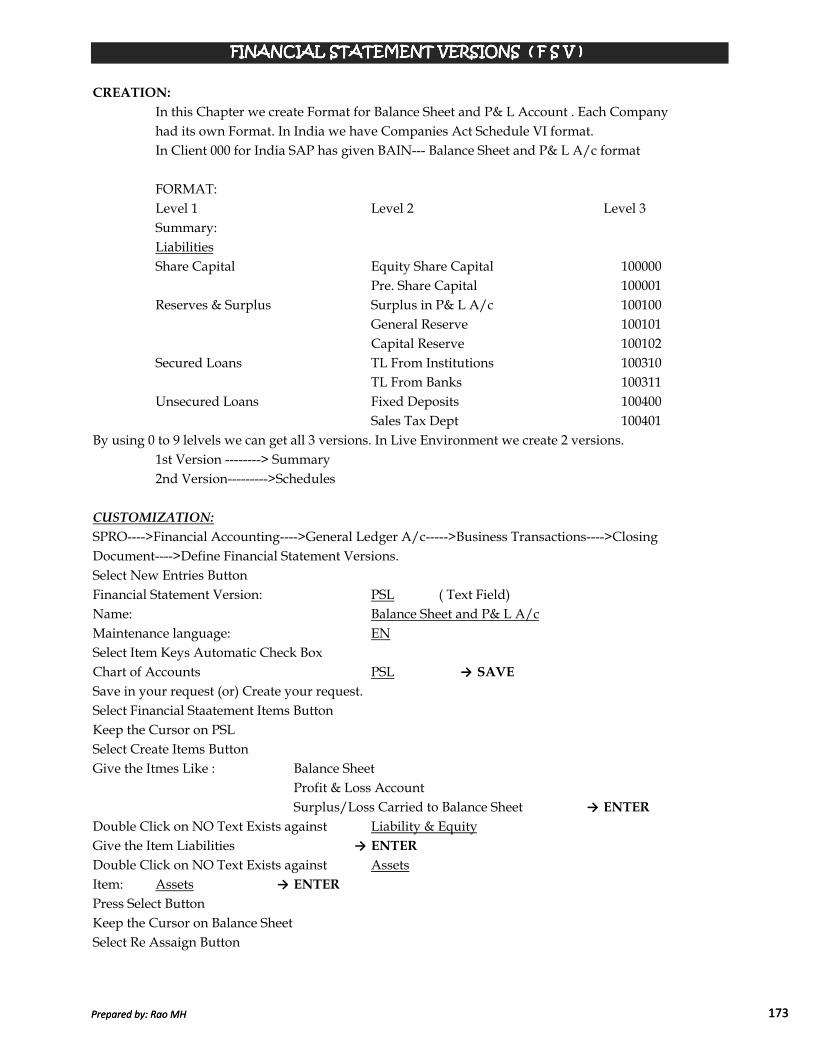
CREATION:
In this Chapter we create Format for Balance Sheet and P& L Account . Each Companyhad its own Format. In India we have Companies Act Schedule VI format.In Client 000 for India SAP has given BAIN--- Balance Sheet and P& L A/c format
FORMAT:Level 1 Level 2 Level 3Summary:LiabilitiesShare Capital Equity Share Capital 100000
Pre. Share Capital 100001Reserves & Surplus Surplus in P& L A/c 100100
General Reserve 100101Capital Reserve 100102
Secured Loans TL From Institutions 100310TL From Banks 100311
Unsecured Loans Fixed Deposits 100400Sales Tax Dept 100401
By using 0 to 9 lelvels we can get all 3 versions. In Live Environment we create 2 versions.1st Version --------> Summary2nd Version--------->Schedules
FINANCIAL STATEMENT VERSIONS ( F S V )FINANCIAL STATEMENT VERSIONS ( F S V )FINANCIAL STATEMENT VERSIONS ( F S V )FINANCIAL STATEMENT VERSIONS ( F S V )
Prepared by: Rao MH 173
CUSTOMIZATION:
SPRO---->Financial Accounting---->General Ledger A/c----->Business Transactions---->ClosingDocument---->Define Financial Statement Versions.Select New Entries Button Financial Statement Version: PSL ( Text Field)Name: Balance Sheet and P& L A/cMaintenance language: ENSelect Item Keys Automatic Check BoxChart of Accounts PSL → SAVE
Save in your request (or) Create your request.Select Financial Staatement Items Button Keep the Cursor on PSLSelect Create Items Button Give the Itmes Like : Balance Sheet
Profit & Loss Account Surplus/Loss Carried to Balance Sheet → ENTER
Double Click on NO Text Exists against Liability & EquityGive the Item Liabilities → ENTER
Double Click on NO Text Exists against AssetsItem: Assets → ENTER
Press Select Button Keep the Cursor on Balance SheetSelect Re Assaign Button
Prepared by: Rao MH 173

Select Subordinate Radio Button → ENTER
keep the Cursor on LiabilitiesPress Select Button (F9)Keep the Cursor on Balance SheetSelect Re Assaign Button ( Shift +F6)Select Subordinate Radio Button → ENTER
Keep the Cursor on P& L Account Select Create Items Button Give the Heads Like Income
Expenditure → ENTER
Keep the Cursor on LiablilitesSelect Create Iems Button Give the Heads Like Share Capital
Reserves & SurplusSecured LoansUnsecured Loans → ENTER
Keep the Cursor on AssetsSelect Create Items Button Give the Heads Like Net Fixed Assets
Net Current assetsMisc. Exp to the Extent Not Writtedn off → ENTER
Keep the Cursor on Income
Prepared by: Rao MH 174
Keep the Cursor on IncomeSelect Create Item Buton Give the Heads Like Sales
Other IncomeInc/Dec in Stock → ENTER
Keep the Cursor on Expenditure Select Create Item Button Give the Heads Like RM Consumption
Personal CostManufacturing ExpAdministration ExpInterestDepreciation → ENTER
→ ENTER to save in your requestDouble Click on No Text Exists against Net Result ProfitItems: Surplus Transfer from P & L A/c → ENTER
Keep the Cursor on Surplus Trnsfer from P& L A/cPress Select Button Keep the Cursor on Reserves & SurplusSelect Reassaign Button Select Subordinate Radio Button → ENTER
Prepared by: Rao MH 174
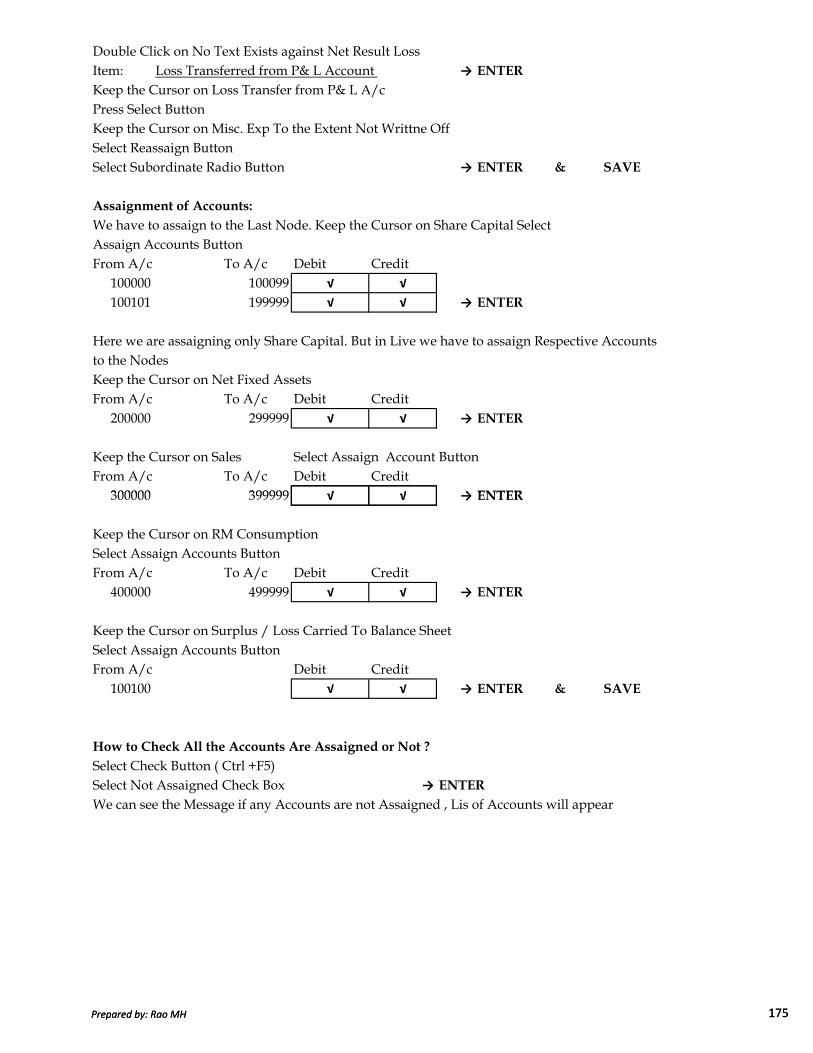
Double Click on No Text Exists against Net Result LossItem: Loss Transferred from P& L Account → ENTER
Keep the Cursor on Loss Transfer from P& L A/cPress Select Button Keep the Cursor on Misc. Exp To the Extent Not Writtne Off Select Reassaign Button Select Subordinate Radio Button → ENTER & SAVE
Assaignment of Accounts:
We have to assaign to the Last Node. Keep the Cursor on Share Capital Select Assaign Accounts Button From A/c To A/c Debit Credit
100000 100099 √ √
100101 199999 √ √ → ENTER
Here we are assaigning only Share Capital. But in Live we have to assaign Respective Accounts to the NodesKeep the Cursor on Net Fixed AssetsFrom A/c To A/c Debit Credit
200000 299999 √ √ → ENTER
Keep the Cursor on Sales Select Assaign Account Button From A/c To A/c Debit Credit
300000 399999 √ √ → ENTER
Prepared by: Rao MH 175
300000 399999 √ √ → ENTER
Keep the Cursor on RM Consumption Select Assaign Accounts Button From A/c To A/c Debit Credit
400000 499999 √ √ → ENTER
Keep the Cursor on Surplus / Loss Carried To Balance Sheet Select Assaign Accounts Button From A/c Debit Credit
100100 √ √ → ENTER & SAVE
How to Check All the Accounts Are Assaigned or Not ?
Select Check Button ( Ctrl +F5)Select Not Assaigned Check Box → ENTER
We can see the Message if any Accounts are not Assaigned , Lis of Accounts will appear
Prepared by: Rao MH 175
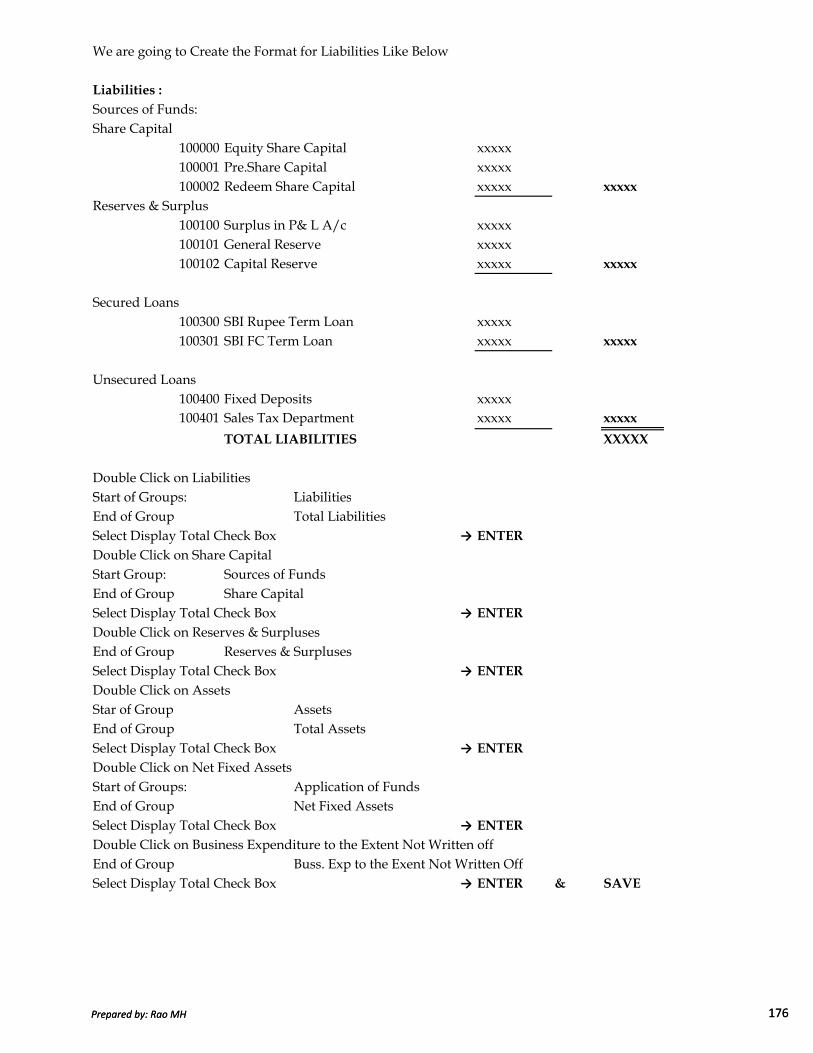
We are going to Create the Format for Liabilities Like Below
Liabilities :
Sources of Funds:Share Capital
100000 Equity Share Capital xxxxx100001 Pre.Share Capital xxxxx100002 Redeem Share Capital xxxxx xxxxx
Reserves & Surplus100100 Surplus in P& L A/c xxxxx100101 General Reserve xxxxx100102 Capital Reserve xxxxx xxxxx
Secured Loans100300 SBI Rupee Term Loan xxxxx100301 SBI FC Term Loan xxxxx xxxxx
Unsecured Loans100400 Fixed Deposits xxxxx100401 Sales Tax Department xxxxx xxxxx
TOTAL LIABILITIES XXXXX
Double Click on LiabilitiesStart of Groups: Liabilities
Prepared by: Rao MH 176
Start of Groups: LiabilitiesEnd of Group Total LiabilitiesSelect Display Total Check Box → ENTER
Double Click on Share Capital Start Group: Sources of FundsEnd of Group Share CapitalSelect Display Total Check Box → ENTER
Double Click on Reserves & SurplusesEnd of Group Reserves & SurplusesSelect Display Total Check Box → ENTER
Double Click on AssetsStar of Group AssetsEnd of Group Total AssetsSelect Display Total Check Box → ENTER
Double Click on Net Fixed AssetsStart of Groups: Application of FundsEnd of Group Net Fixed AssetsSelect Display Total Check Box → ENTER
Double Click on Business Expenditure to the Extent Not Written offEnd of Group Buss. Exp to the Exent Not Written OffSelect Display Total Check Box → ENTER & SAVE
Prepared by: Rao MH 176
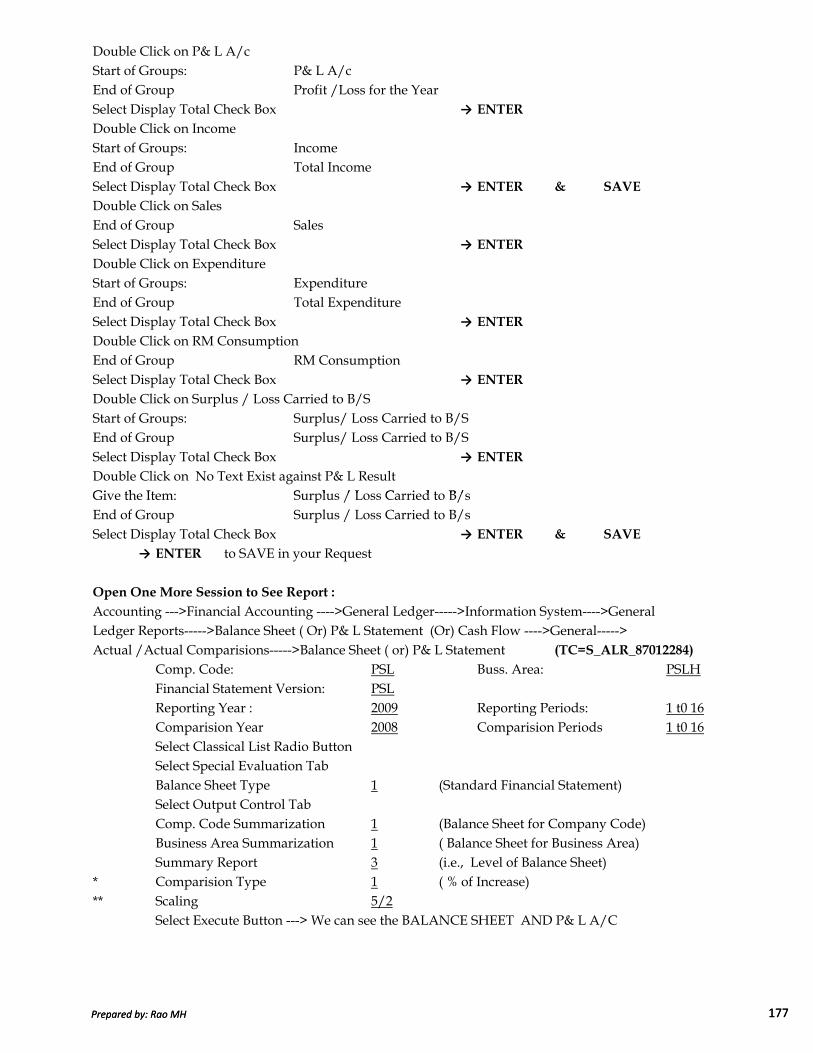
Double Click on P& L A/cStart of Groups: P& L A/cEnd of Group Profit /Loss for the Year Select Display Total Check Box → ENTER
Double Click on Income Start of Groups: IncomeEnd of Group Total IncomeSelect Display Total Check Box → ENTER & SAVE
Double Click on SalesEnd of Group SalesSelect Display Total Check Box → ENTER
Double Click on ExpenditureStart of Groups: ExpenditureEnd of Group Total ExpenditureSelect Display Total Check Box → ENTER
Double Click on RM Consumption End of Group RM Consumption Select Display Total Check Box → ENTER
Double Click on Surplus / Loss Carried to B/SStart of Groups: Surplus/ Loss Carried to B/SEnd of Group Surplus/ Loss Carried to B/SSelect Display Total Check Box → ENTER
Double Click on No Text Exist against P& L ResultGive the Item: Surplus / Loss Carried to B/s
Prepared by: Rao MH 177
Give the Item: Surplus / Loss Carried to B/sEnd of Group Surplus / Loss Carried to B/sSelect Display Total Check Box → ENTER & SAVE
→ ENTER to SAVE in your Request
Open One More Session to See Report :
Accounting --->Financial Accounting ---->General Ledger----->Information System---->General Ledger Reports----->Balance Sheet ( Or) P& L Statement (Or) Cash Flow ---->General----->Actual /Actual Comparisions----->Balance Sheet ( or) P& L Statement (TC=S_ALR_87012284)
Comp. Code: PSL Buss. Area: PSLHFinancial Statement Version: PSLReporting Year : 2009 Reporting Periods: 1 t0 16Comparision Year 2008 Comparision Periods 1 t0 16Select Classical List Radio Button Select Special Evaluation TabBalance Sheet Type 1 (Standard Financial Statement)Select Output Control TabComp. Code Summarization 1 (Balance Sheet for Company Code)Business Area Summarization 1 ( Balance Sheet for Business Area)Summary Report 3 (i.e., Level of Balance Sheet)
* Comparision Type 1 ( % of Increase)** Scaling 5/2
Select Execute Button ---> We can see the BALANCE SHEET AND P& L A/C
Prepared by: Rao MH 177
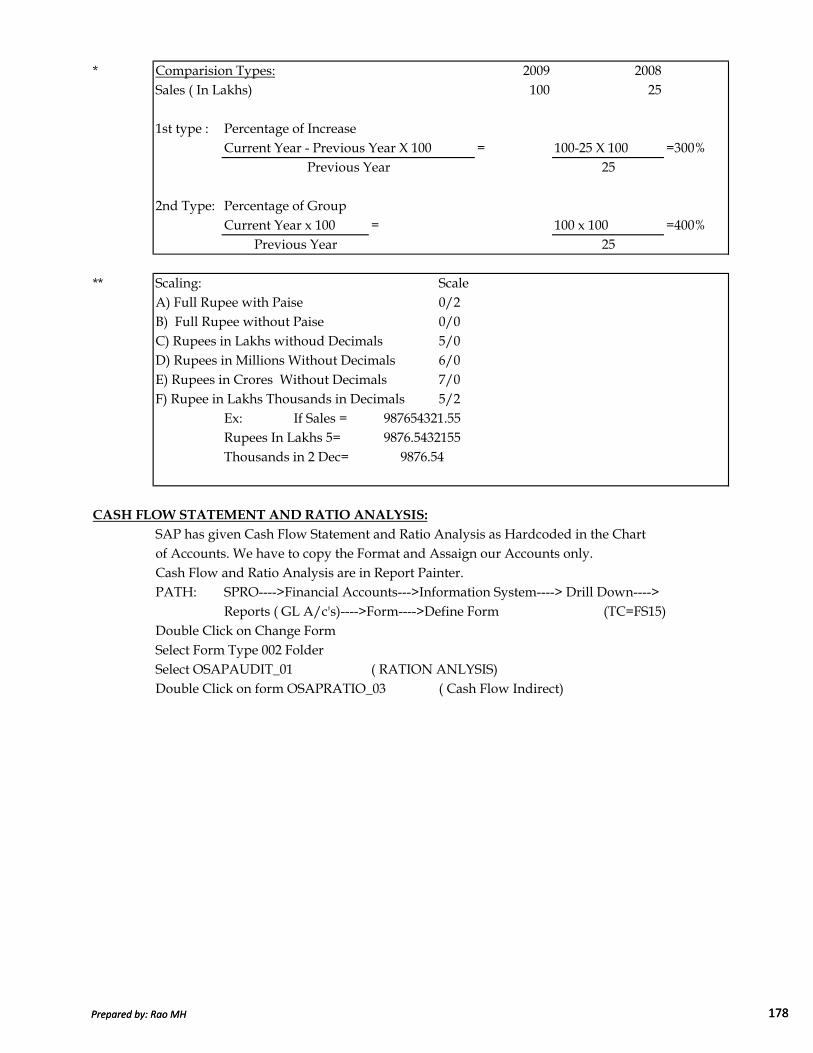
* Comparision Types: 2009 2008Sales ( In Lakhs) 100 25
1st type : Percentage of IncreaseCurrent Year - Previous Year X 100 = 100-25 X 100 =300%
2nd Type: Percentage of GroupCurrent Year x 100 = 100 x 100 =400%
** Scaling: ScaleA) Full Rupee with Paise 0/2B) Full Rupee without Paise 0/0C) Rupees in Lakhs withoud Decimals 5/0D) Rupees in Millions Without Decimals 6/0E) Rupees in Crores Without Decimals 7/0F) Rupee in Lakhs Thousands in Decimals 5/2
Ex: If Sales =Rupees In Lakhs 5=Thousands in 2 Dec=
Previous Year 25
Previous Year 25
987654321.559876.5432155
9876.54
Prepared by: Rao MH 178
CASH FLOW STATEMENT AND RATIO ANALYSIS:
SAP has given Cash Flow Statement and Ratio Analysis as Hardcoded in the Chart of Accounts. We have to copy the Format and Assaign our Accounts only.Cash Flow and Ratio Analysis are in Report Painter.PATH: SPRO---->Financial Accounts--->Information System----> Drill Down---->
Reports ( GL A/c's)---->Form---->Define Form (TC=FS15)Double Click on Change FormSelect Form Type 002 FolderSelect OSAPAUDIT_01 ( RATION ANLYSIS)Double Click on form OSAPRATIO_03 ( Cash Flow Indirect)
Prepared by: Rao MH 178

New General Ledger ( Multiple Ledgers): This is the Concept given in ECC6.0 by SAP. For Indian Companies Financial Year is April to March. If an Indian Company is Registered in US Stock Exchange, it has to Submit Reports to Stock Exchange according to the Financial Year there in US ( ie., Jan to Dec). If The Same Company had its Group HeadQuarters in UK, it has to Submit Reports according to the Financial Year there ( i.e., July to June). So For One Companywe are Creating Reports according to the Financial Year. In India Period of April is 01 but in USit is '04' and in UK it "10". So When we are posting a Transaction in the Period "04" for the Fiscal Year Variant V3( which is for India), it has to update the Posting Period '01' for the Fiscal Year Variant K4 ( for US) and Posting Period '10' for the PP Variant V6(for UK).
Here we have the Concept of Leading Ledger and Non Leading Ledgers.
Example:Company Location Financial Year FYVariant Ledger GroupIn India 1st April to31st March V3 0L Leading LedgerIn US 1St Jan to 31st Dec K4 J1 Non Leading LedIN UK 1st July to 30th June V6 J2 Non Leading Led
When we Create Ledger J1, Automatically Ledger Group J1 will be created and J1 ledger will beassaigned . At the Time of Posting , if we do not give any Ledger Group it will updates all the Ledgers.For Example, Gain on FC Revaluation in India and US it will be Trnasferred to P& L A/c as
ECC 6.0 New FeaturesECC 6.0 New FeaturesECC 6.0 New FeaturesECC 6.0 New Features
Prepared by: Rao MH 179
For Example, Gain on FC Revaluation in India and US it will be Trnasferred to P& L A/c as Other Income. But in UK it will Add to the Fixed Assets and calculate Depreciation Over the Life of Asset.
We create a New Ledger Group J3 and assaign Ledgers 0L and J1. At the Time of Posting Whenwe give Leder Group J3, and Post , it updates Ledgers 0L and J1. In Ledger Group One Ledger will be Representative Ledger and others will be Non Representative Ledgers. We have toOpen the Periods in which Posting is done in Representative Ledgers. Eventhough the Periods for Non Representative Ledgers is not open, it will update the records. When the Ledger Groupis Consisiting of Ledgers 0L an J1 always 0L will be the Leading Ledger or Representative LedgerWhen we Post a Document, System will generate Documents in non leading ledgers. In Live Environment, for All document types we will give only One Number Range for No range intervalto post in Non Leading Ledgers.
Customization:
Step 1: Define Ledgers for GL Account:
SPRO---->Financial Acccounting ( New)---->Financial Accounting Global Settings(New)---->Ledgers---->Ledger--->Define Ledgers for GL A/cSelect New Entries Button Ledger DescriptionJ1 (Text Field) Non Leading Ledger 1 for PSLTotals Table: FAGLFLEXT
Prepared by: Rao MH 179

Ledger DescriptionJ2 (Text Field) Non Leading Ledger 2 for PSLTotals Table: FAGLFLEXT
→ SAVE → ENTER to SAVE in your RequestIgnore the Warning Message → ENTER Once Again Ignore the Warning Message → ENTER
Step 2. Define and Activate Non Leading Ledgers:
Same Path ( Next Level to he Old Path)Ledger : J1 → ENTER
select New Entries Button Comp. Fiscal Yr PPV Code VariantPSL K4 PSL → SAVE
→ ENTER to SAVE in your Request
Select Back Arrow Button Ledger : J2 → ENTER
select New Entries Button Comp. Fiscal Yr PPV Code VariantPSL V6 PSL → SAVE
→ ENTER to SAVE in your Request
Prepared by: Rao MH 180
Step 3. Define Ledger Groups: Same Path ( Next Level to Last path)Select New Entries Button Ledger Group: J3Description: Ledger Group for PSL → SAVE
→ ENTER to SAVE in your RequestSelect Ledger Group J3Double Click on Ledger Assaignment FolderSelect New Entries Button Ledger : 0LSelect Representative Ledger Check BoxLedger: J1De-select Representative Ledger Check Box → SAVE
Step 4. Define Document Types for Entry View in a Ledger:
SPRO--->Financial Accounting( New)---->Financaial Accounting Global Settings (New)---->Document---->Document Types---->Define Doc. Types for Entry View in a LedgerLedger: J1 → ENTER
Select New Entries Button Type No. Range Type No. Range Type No. RangeSA 61 ER 61 RE 61AA 61 WA 61 RV 61KR 61 WE 61 WL 61 → SAVE
→ ENTER to SAVE in your Request
Prepared by: Rao MH 180
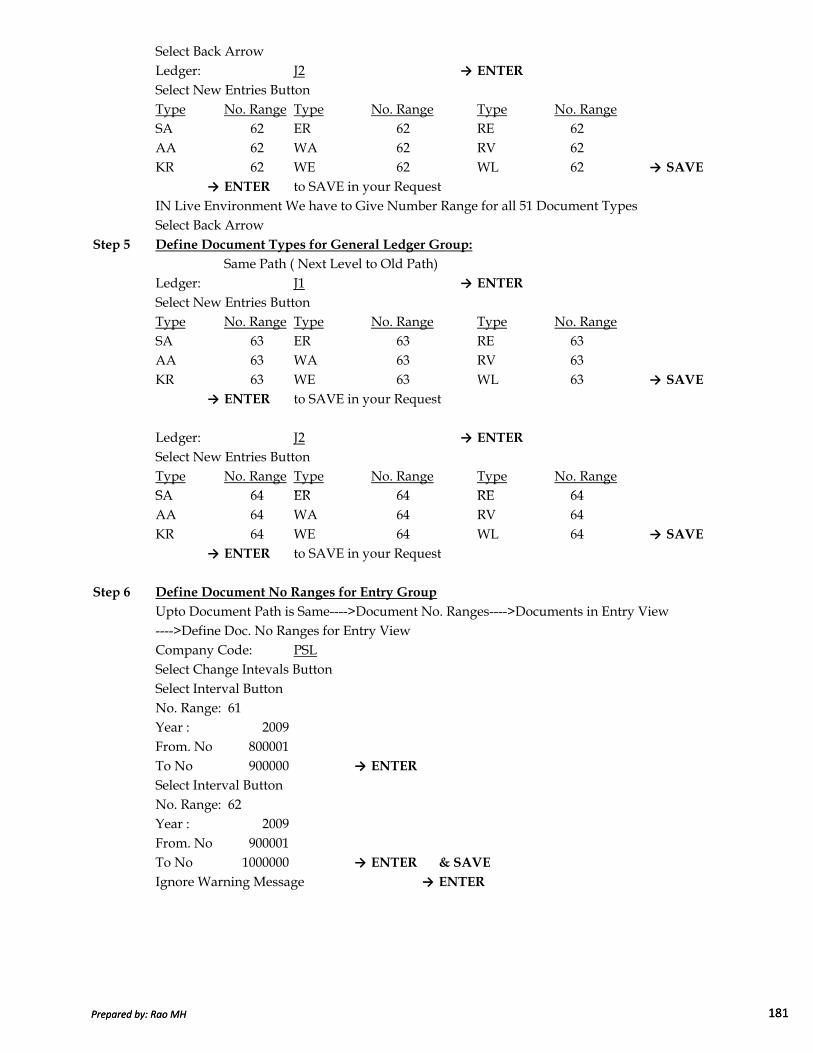
Select Back ArrowLedger: J2 → ENTER
Select New Entries Button Type No. Range Type No. Range Type No. RangeSA 62 ER 62 RE 62AA 62 WA 62 RV 62KR 62 WE 62 WL 62 → SAVE
→ ENTER to SAVE in your RequestIN Live Environment We have to Give Number Range for all 51 Document TypesSelect Back Arrow
Step 5 Define Document Types for General Ledger Group:
Same Path ( Next Level to Old Path)Ledger: J1 → ENTER
Select New Entries Button Type No. Range Type No. Range Type No. RangeSA 63 ER 63 RE 63AA 63 WA 63 RV 63KR 63 WE 63 WL 63 → SAVE
→ ENTER to SAVE in your Request
Ledger: J2 → ENTER
Select New Entries Button Type No. Range Type No. Range Type No. RangeSA 64 ER 64 RE 64
Prepared by: Rao MH 181
SA 64 ER 64 RE 64AA 64 WA 64 RV 64KR 64 WE 64 WL 64 → SAVE
→ ENTER to SAVE in your Request
Step 6 Define Document No Ranges for Entry Group
Upto Document Path is Same---->Document No. Ranges---->Documents in Entry View---->Define Doc. No Ranges for Entry ViewCompany Code: PSLSelect Change Intevals Button Select Interval Button No. Range: 61Year : 2009From. No 800001To No 900000 → ENTER
Select Interval Button No. Range: 62Year : 2009From. No 900001To No 1000000 → ENTER & SAVE
Ignore Warning Message → ENTER
Prepared by: Rao MH 181

Step 7 Define Document Number Ranges for General Ledger View:
Upto Document Path is Same---->Document Number Range---->Doc. In General LedgerView---->Define Document Number Ranges for General Ledger ViewComp. Code: PSLSelect Change Interval Button No. Range Year From.No To No
63 2009 1 100000→ENTER
Select Inteval Button 64 2009 100001 200000→ENTER & SAVE
Ignore Warning Message and Press Enter
As the Company is in India, it has Currncy of Indian Rupee. As it is Listed in USStock Exchange, Trnasactions has to pass to that Ledger in USD. For UK, system should Pass Entries in GBP. So We need to Maintain Group Currency in SAP when we are using New GL Accounts
Step 8 How to Maintain Group Currency GBP:
Path: Tools ---->Administration--->Administration---->Client Administration--->Client Maintenance(Sec4)Select Client : 800
Select Details Button Menu---->Table View---->Display/ChangeStandard Currency: Change to GBP → SAVE
Prepared by: Rao MH 182
Step 9 How to Maintain Hard Currency USD per Country India:
SPRO---->SAP Net weaver---->General Settings---->Set Countries--->Define Countries in my SAP SystemsSelect Positon Button Country : IN ( India) → ENTER
Select IN Select Details Button Language : EN Hard Currency: USD → SAVE
→ ENTER to save in your Request.Step 10 Define Currencies for Leading Ledger:
SPRO--->Financial Accounting(New)-->Financial Accounting Global Settings(New)--->Ledger---->Ledger---->Define Currencies of Leading LedgerSelect Company Code: 1000Select Copy As Button Change Company Code to : PSLSelect Save or Ctrl + S → ENTER to save in your Request.
Step 11 Define and Activate Non Leading Ledgers: Same PathLedger : J1 → ENTER
For Currency 2C2: 40 ( Select for USD) → SAVE
→ ENTER to save in your Request.Select Back ArrowLedger : J2 → ENTER
For Currency 2C2: 30 ( Select for GBP) → SAVE
→ ENTER to save in your Request.
Prepared by: Rao MH 182

END USER AREA:
Step 1. Posting to New General Ledger:
Accounting ---->Financial Accounting --->General Ledger---->Posting --->Enter GL Posting for Ledger Group (TC=FB01L)
1st Doc. Doc. Dt: 15.08.09 Type: SA Comp. Code: PSLLedger Group: Keep Blank (to Update all Ledgers)Post Key: 40 A/c: 200105 → ENTER
Amount: 200000 Buss.Area: PSLHText: Equity Share Capital Receipt Post.Key: 50 A/c: 100000 → ENTER
Amount: * Buss.Area: PSLHText: +Menu----->Document----->Simulate & SAVE
2nd Doc. Doc. Dt: 15.08.09 Type: SA Comp. Code: PSLLedger Group: J3Post Key: 40 A/c: 200105 → ENTER
Amount: 100000 Buss.Area: PSLHText: Equity Share Capital Receipt Post.Key: 50 A/c: 100000 → ENTER
Amount: * Buss.Area: PSLHText: +Menu----->Document----->Simulate & SAVE
Prepared by: Rao MH 183
How to View the New Ledger:
Accounting ---->Financial Accounting---->General Ledger---->Accounting ---->Display Balances ( New) (TC=FAGLB03)
A/c # 100000 ( Equity Share Capital)Comp. Code: PSLFiscal Year: 2009 → EXECUTE (F8)
Double Click on Cumilative Balance 500000
How to View the Document:
Select Document Number Check BoxSelect Display Document Button Select Callup Document Overview Button select Back Arrow 3 timesSelect Choose Ledger Button Change Ledger to J2 → ENTER → EXECUTE(F8)
Double Click on Cumilative Balance 200000
NOTE: IT IS ADVICED TO PRACTICE ECC 6.0 FEATURES AFTER COMPLEATING ALL
OTHER TOPICS AS THERE WILL BE SOME CONFIGURATION PROBLEMS.
END OF FINANCIALS
Prepared by: Rao MH 183