


Bahasa
Halaman
Hukum


Recommended procedures and techniquesfor morphological studies of Eriophyoidea(Acari: Prostigmata)
E. de Lillo Æ C. Craemer Æ J. W. Amrine Jr. Æ G. Nuzzaci
Received: 13 April 2009 / Accepted: 1 September 2009 / Published online: 22 September 2009� Springer Science+Business Media B.V. 2009
Abstract Methods used for sample storage, specimen clearing, slide mounting, species
illustration and morphometric description in alpha-taxonomic studies are essential for the
Eriophyoidea. Eriophyoid mites are very tiny and delicate, for which truly permanent
specimen slides currently cannot be prepared, resulting in eventual loss of material,
including type specimens. Often, published descriptions and drawings have not achieved
the required level of quality, and thus many relevant taxonomic details have been per-
manently lost or neglected. These shortcomings can make certain identifications impos-
sible and cause significant confusion. Consequently, there is a considerable need for
accurate and uniform descriptive and illustrative data for the Eriophyoidea. Based on their
expertise on this topic, the authors provide guidelines and advices, assisted also by illus-
trations, of the main critical aspects in managing eriophyoid mites in order to supplement
and improve techniques for handling and preparation of specimens, and for improving their
taxonomic study. The effects of the short- and long-term preservation methods (i.e., fresh,
dried and liquid preservative choices) on digesting the internal tissues of the mites are
discussed. Clearing and mounting procedures are analyzed, and special tips are suggested
for handling mites and designing tools needed during these steps. Methods for recovering
specimens from unsuitable slides (i.e., undercleared and overcleared specimens) are pro-
posed and described. Techniques and tricks to produce descriptive line drawings of good
E. de Lillo (&) � G. NuzzaciDipartimento di Biologia e Chimica Agro-forestale e Ambientale, Facolta di Agraria,Universita degli Studi di Bari, via Amendola, 165/a, 70126 Bari, Italye-mail: [email protected]
G. Nuzzacie-mail: [email protected]
C. CraemerARC-Plant Protection Research Institute, Private Bag X134, Pretoria Queenswood 0121, South Africae-mail: [email protected]
J. W. Amrine Jr.Division Plant and Soil Sciences, College of Agriculture and Forestry, West Virginia University,P.O. Box 6108, Morgantown, WV 26506, USAe-mail: [email protected]
123
Exp Appl Acarol (2010) 51:283–307DOI 10.1007/s10493-009-9311-x
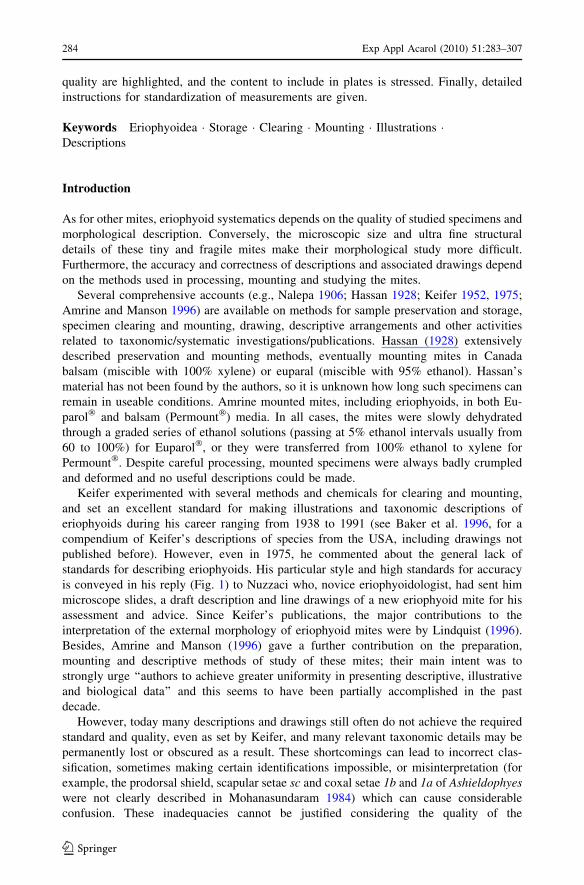
quality are highlighted, and the content to include in plates is stressed. Finally, detailed
instructions for standardization of measurements are given.
Keywords Eriophyoidea � Storage � Clearing � Mounting � Illustrations �Descriptions
Introduction
As for other mites, eriophyoid systematics depends on the quality of studied specimens and
morphological description. Conversely, the microscopic size and ultra fine structural
details of these tiny and fragile mites make their morphological study more difficult.
Furthermore, the accuracy and correctness of descriptions and associated drawings depend
on the methods used in processing, mounting and studying the mites.
Several comprehensive accounts (e.g., Nalepa 1906; Hassan 1928; Keifer 1952, 1975;
Amrine and Manson 1996) are available on methods for sample preservation and storage,
specimen clearing and mounting, drawing, descriptive arrangements and other activities
related to taxonomic/systematic investigations/publications. Hassan (1928) extensively
described preservation and mounting methods, eventually mounting mites in Canada
balsam (miscible with 100% xylene) or euparal (miscible with 95% ethanol). Hassan’s
material has not been found by the authors, so it is unknown how long such specimens can
remain in useable conditions. Amrine mounted mites, including eriophyoids, in both Eu-
parol� and balsam (Permount�) media. In all cases, the mites were slowly dehydrated
through a graded series of ethanol solutions (passing at 5% ethanol intervals usually from
60 to 100%) for Euparol�, or they were transferred from 100% ethanol to xylene for
Permount�. Despite careful processing, mounted specimens were always badly crumpled
and deformed and no useful descriptions could be made.
Keifer experimented with several methods and chemicals for clearing and mounting,
and set an excellent standard for making illustrations and taxonomic descriptions of
eriophyoids during his career ranging from 1938 to 1991 (see Baker et al. 1996, for a
compendium of Keifer’s descriptions of species from the USA, including drawings not
published before). However, even in 1975, he commented about the general lack of
standards for describing eriophyoids. His particular style and high standards for accuracy
is conveyed in his reply (Fig. 1) to Nuzzaci who, novice eriophyoidologist, had sent him
microscope slides, a draft description and line drawings of a new eriophyoid mite for his
assessment and advice. Since Keifer’s publications, the major contributions to the
interpretation of the external morphology of eriophyoid mites were by Lindquist (1996).
Besides, Amrine and Manson (1996) gave a further contribution on the preparation,
mounting and descriptive methods of study of these mites; their main intent was to
strongly urge ‘‘authors to achieve greater uniformity in presenting descriptive, illustrative
and biological data’’ and this seems to have been partially accomplished in the past
decade.
However, today many descriptions and drawings still often do not achieve the required
standard and quality, even as set by Keifer, and many relevant taxonomic details may be
permanently lost or obscured as a result. These shortcomings can lead to incorrect clas-
sification, sometimes making certain identifications impossible, or misinterpretation (for
example, the prodorsal shield, scapular setae sc and coxal setae 1b and 1a of Ashieldophyeswere not clearly described in Mohanasundaram 1984) which can cause considerable
confusion. These inadequacies cannot be justified considering the quality of the
284 Exp Appl Acarol (2010) 51:283–307
123

microscopes and cameras available today. Moreover, a method universally accepted and
used for preparing and mounting mites is not available and those methods commonly
applied fail to give permanent slides.
Appropriately, Lindquist (2001) emphasized the importance of optimizing the quality of
description of mites, including Eriophyoidea. Therefore, standardized descriptions are
always imperative and must be continuously promoted, especially in view of the current
high rate of description of new eriophyoid genera and species (de Lillo and Skoracka
2009), and also because the best slide mounted specimens rarely last very long and fre-
quently become opaque or precipitated, or too transparent for study (Amrine and Manson
1996). Keifer’s slide collection at the US National Museum of Natural History, in Belts-
ville, Maryland, USA, is a sad example of these shortcomings (Fig. 2). In addition, it
should be emphasized that proper interpretation of morphological details certainly support
systematic studies, but they are also required for many non-systematic investigations
including plant-mite relationships and pest control, identification for quarantine purposes,
vectored pathogens, and biological control of weeds.
The present paper provides guidelines and recommendations for techniques that
researchers should employ when preparing, studying and describing eriophyoids that
supplement techniques previously presented in other articles (e.g., Keifer 1975; Amrine
and Manson 1996).
Preservation
Temporary preservation
When working with fresh, mite-infested plant samples, the researcher needs to prevent
damage caused by desiccation or fungal degradation.
Fig. 1 Letter by Keifer commenting on slides, description and descriptive drawings of a new species byNuzzaci
Exp Appl Acarol (2010) 51:283–307 285
123

Fresh samples should be brought to the laboratory as soon as possible. They should not
be exposed to heat and, therefore, they should be contained in plastic bags and stored in a
cooler. Similarly, fresh plant material shipped by courier should be kept cold in a thermally
insulated package with a frozen fluid pack or dry ice pack during extended shipment. Mites
on plant samples not properly packed and shipped in luggage usually do not survive high
altitude aircraft flights or ground transport because of excessive low or high temperatures
during transport. Live mites can be extracted from plant samples using a washing solution
(Monfreda et al. 2007) and can be stored in water containing a few drops of a commercial
surfactant (household detergent or polisorbate as Tween�). Eriophyoids preserved in this
manner were able to survive the shipment and stayed alive for 3–4 weeks in a refrigerator
at about 4�C. Finally, live mites were successfully collected directly in the field by washing
bunches of grapes without cutting them from the plant (de Lillo et al. 2005).
When fresh plant samples with live mites are returned to the laboratory, the mites must
be processed within a short time after field collecting. In order to keep the material fresh,
the sample can be wrapped in damp (not wet) paper towel, or other paper-like material,
then sealed in a plastic bag, preventing it from drying out, and stored in a cold place (e.g.,
a refrigerator, climate controlled room or cabinet) without freezing the material. Fine
holes can be punched in the plastic bag to reduce humidity if necessary (S. Ozman-
Sullivan, pers. comm.). Depending on the type of sample and its quality, live mites can
still be collected from the plant samples even after a month’s, or as in the case of filbert
big bud mites (Phytoptus avellanae Nalepa), 2 months’ storage (S. Ozman-Sullivan, pers.
comm.).
Permanent preservation as dried samples
In addition to slide mounted specimens, there is a requirement for additional long term
preservation of mite-infested plant material or of mites themselves. Permanent preservation
Fig. 2 Slides in the original eriophyoid collection of Keifer at the US National Museum of Natural History,Beltsville, Maryland, USA. Many slides cannot be used any more because they appear to be completely darkor the mounting medium is dried out
286 Exp Appl Acarol (2010) 51:283–307
123

may be necessary because mite specimens cannot always be processed and slide mounted
before being stored or accessed in a collection (also see Keifer 1975), and additional
material can be used when slide mounted specimens deteriorate or become totally
destroyed, or are lost.
For practical convenience, mainly related to sample transportation, handling and
storage, mite samples are often permanently preserved and managed as dried (mummi-
fied) specimens on leaves and other plant organs. Particular care must be taken on how
the plant sample is dried out. In case of improper desiccation, the mite body may be
destroyed or nearly completely invaded by fungi (Fig. 3). As a consequence, morpho-
logical details can be obscured, making mite identification frequently difficult or
impossible. Therefore, plant samples should be dried out as soon as possible after field
collecting and prepared as herbarium specimens for sending to specialists for mite
identification or for deposition in a dry specimen collection (i.e., a zoo-cecidotheca).
Dehydration of plant material should be carried out applying all possible techniques to
prevent fungal infection of the mites (e.g., use of desiccating papers, frequent paper
change, sample pressing between absorbent pads, slight warming in sunlight or in an
oven). The properly dried samples should afterwards be enclosed in an envelope (letter
envelope, transparent paper envelope, transparent plastic specimen bag, etc.) and labeled
with all relevant data. A repellent or a deterrent compound (PDB, thymol, etc.) or other
protective methods should be applied for preventing museum beetle attacks and deteri-
oration over time. Trotter and Cecconi, authors of the Cecidotheca Italica (Fig. 4), were
familiar with this method (Trotter 1904) and their dried specimens are still well suited for
the identification of species after about one century, as demonstrated by Boczek and
Nuzzaci (1988), and Petanovic et al. (1993).
Well dried and properly preserved specimens, similarly to freshly collected mites, need
usually only a few minutes in a mounting or clearing medium on a hot plate in order to
become perfectly cleared and to return to their original shape and size.
Fig. 3 A Metaculus specimen completely invaded by fungi obscuring its morphological details
Exp Appl Acarol (2010) 51:283–307 287
123

Permanent preservation in liquid preservatives
In contrast with the general good and relatively quick results of clearing fresh and dried
specimens, the digestion of non-cuticular structures of specimens preserved and fixed for
years in alcoholic solutions (60–70% ethanol in water) requires much more time. This
difficulty increases proportionally with length of preservation, and the results are often
poor or insufficient for an exhaustive and reliable identification and description (Keifer
1975). Moreover, the alcoholic solutions tend to evaporate, and specimens usually
become completely dried out (Fig. 5). Amrine needed to prepare a few specimens of the
genus Phytoptochetus from a sample preserved in a vial, originally containing ethanol, for
about 70 years and belonging to Nalepa’s collections (Amrine and Manson 1996; Amrine
et al. 2003). A few specimens were found after careful examination of a yellow powder;
clearing took a period of 2 months and needed particularly careful and extensive pro-
cessing. Specimens were heated at about 90�C in a few drops of Keifer’s booster (Amrine
and Manson 1996) for a few days. Then they were washed in water and transferred to a
few drops of lactic acid, heated for a few days, washed in water once more, and hereafter
transferred back to Keifer’s booster again. This entire procedure was repeated many
times. Eventually a collection of suitable mite fragments were found to correctly illustrate
the shield, the coxi-genital region, the legs and the opisthosoma to make adequate
drawings to define the essential characteristics of Phytoptochetus. On the contrary, not-
withstanding similar attempts, the re-description of Aceria sonchi (Nalepa) from original
powder remnants of dried ethanol preserved material was not possible (D. Knihinicki,
pers. comm.).
Fig. 4 Cecidotheca Italica: front page of a publication by Trotter and Cecconi (1902) (on the left); originalsample of Geranium sanguineum L. from which specimens of Aceria dolichosoma (Canestrini) were slidemounted and re-described by Petanovic et al. (1993) (on the right)
288 Exp Appl Acarol (2010) 51:283–307
123

Usually, the addition of glycerol to the preservatives (as in AGA and Oudeman’s
solution) makes the tissues softer and less rigidly fixed, allowing them to be more sus-
ceptible to the clearing agents. Glycerol also prevents the specimens from completely
drying out, as usually happens when other solvents evaporate over time.
In addition, Keifer (1975) found that a mixture of thin sorbitol syrup in a 25% solution
of isopropyl alcohol kept the eriophyoids well preserved and suitable for slide preparation.
Craemer commonly uses this fluid, composed by 25% solution of propan-2-ol in water to
D-sorbitol powder (e.g., add about 4 ml propan-2-ol diluted with 12 ml water to 30 g D-
sorbitol powder) until forming a thin syrup with the consistency of heated honey, at most.
When the liquid is added to the powder, the mixture is milky white and after a few hours it
dissolves properly, becoming clear and slightly thick. At warm and humid environmental
conditions, a very small amount of potassium iodide and an iodine crystal should be added
to the mixture to prevent mould growth. The mixture should be kept in a sealed and well
closed container, because it quickly becomes too thick and crystallizes when exposed to
air. Mites are very easily transferred to and from a small amount of this ‘‘sorbitol fluid’’. S.
Neser (pers. comm.) uses a novel way to collect and transport mites in this fluid also
facilitating easy recovery. A small droplet of this solution is placed inside the lid of a
polypropylene micro centrifuge tube (Fig. 6). About 100 specimens can easily be collected
in this droplet, and when the vessel is closed, it can be safely transported and mailed. The
droplet becomes very sticky, dries out over time and it can be re-hydrated by breathing
over it. Otherwise, the entire droplet, even when crystallized, can be added to the clearing
medium and processed as normal. The suitability of the mites to be slide mounted over
extended periods of preservation in sorbitol has not been tested yet, but the mites are well
suited if mounted within a few months.
Alternatively and for populations of a few dozen to a few hundred specimens, erio-
phyoids can also be kept on work slides (Amrine and Manson 1996). Unfortunately, high
Fig. 5 Original vials from Nalepa’s collection containing ethanol preserved Galium cruciata (L.) Scop. andassociated mites
Exp Appl Acarol (2010) 51:283–307 289
123

environmental humidity and temperature can reduce the quality of the specimen preser-
vation on these work slides.
Finally, specimens can be preserved in ATL buffer (a buffer containing edetic acid and
sodium dodecyl sulphate) stored in a refrigerator some time before DNA isolation
according to Dabert et al. (2008). After the DNA extractions, the mite exoskeleton can be
mounted and its morphology can be efficiently studied (Skoracka and Dabert 2009).
Handling eriophyoids and tools
Mites are usually found on plant samples with the aid of a stereo dissecting microscope, and
can be picked up using pin-like or other tools, even if the plant material is deformed. The
moistening of the tip of the tool with water or other media can enhance the ease with which
the mites are picked up. When mites are rare on the plant sample or the plant organs are
severely modified and architecturally intricate, especially when dried, finding and collecting
eriophyoids can become time-consuming and inefficient. Then, collecting can be greatly
improved by concentrating the mites (Monfreda et al. 2009). In the case of dried material,
mites can be easily recovered as described by Amrine and Manson (1996), or by soaking
part of the sample overnight in a water solution with a few drops of a surfactant and bleach
at room temperature (Monfreda et al. 2009). Hereafter the suspension is stirred and sieved:
the specimens can be more easily detected, because of their restored shape, and picked up
from a filter paper or from a filtered sediment (through a 20–25 lm sieve) poured into a
Petri dish using water plus a small amount of a surfactant (Monfreda et al. 2007).
Commercially available laboratory needles are usually too thick and robust to be used in
picking up, transferring and generally handling eriophyoid mites. Several types of appa-
ratus can be specifically made for this purpose, and each laboratory usually has its own
design. Some of these tools are mentioned in the materials and methods of many articles
concerning Eriophyoidea. They include an eyelash, or several kinds of fine needles or pins,
attached to or stuck into some sort of pen-like rod or wooden dowel in different ways
(Fig. 7; Keifer 1975; Amrine and Manson 1996).
Insect mounting pins are suitable for constructing an eriophyoid handling tool. These
come in different sizes and materials and stainless steel is recommended. Keifer (1975)
proposed a size 00 insect pin for ‘‘needling’’ mites from solution to solution and slide to
slide. A pair of size 3 insect pins in wooden dowels is useful for dissecting galls and
unrolling leaf margins. These needles can be sharpened as needed on Arkansas soap-stones
or other fine grindstones. They are commonly used for mounting delicate insect specimens
such as microlepidoptera and small flies. Stainless steel micro-pins, known as Austerlitz�
minutens or minuten pins, headless, 0.1 mm in diameter and about 12 mm long, with one
sharpened end, can be particularly recommended. They do not chemically react with the
preserving, clearing, and mounting media, and they can be manipulated to suit a
Fig. 6 A small droplet of‘‘sorbitol fluid’’ into whicheriophyoid specimens can becollected (arrow), positioned inthe side corner of the lid of a1.5 ml micro centrifuge tube
290 Exp Appl Acarol (2010) 51:283–307
123

researcher’s needs, and their physical properties allow them to be dipped into reagents
without being altered. These needle probes should be personally prepared by each
researcher for making specimen handling comfortable and convenient. They can be
mounted on wood or plastic handles. In particular, exhausted fine- or medium-tip markers
can be re-cycled, and the blunt end of the micro-pin can be inserted into their felt-tip and
fixed to it by a drop of a cyanoacrylic glue which hardens the felt. If preferred or needed,
the sharp end of the pin can be curved or bent into a loop for producing a sort of spoon
(Fig. 7A), using tweezers or micropliars under a dissecting microscope. Pointed and looped
pins are suitable for transferring individuals without injuring or damaging them.
Disposable plastic micropipette tips (1 ml or c. 60 mm long 9 8 mm diameter) can also
be used for making a variety of handling tools (S. Neser, pers. comm.). A firm, pointed
short hair (e.g., from an eyebrow), or micro-pins as above can be inserted into the narrow
end and held in place by inserting a toothpick, or other probes of appropriate length from
the other end (Fig. 7C). Alternatively root canal files (size 30, c. 0.3 mm in diameter, or
thinner) as discarded by dentists, or available from dentist tool suppliers, may be inserted
into holders as above.
Comprehensive information on equipment (hot plates, coverslips, plain and cavity
slides, tweezers, etc.) and other useful facilities and supplies can be found in Keifer (1975),
and Amrine and Manson (1996).
Clearing
An historical review of this aspect is in Keifer (1975), and in Amrine and Manson (1996) in
which they underlined the difficulties in preparing adequately cleared specimens on slides.
Currently, many researchers have developed and improved a preferred medium on the
basis of the personal experience and convenience, sometimes changing method over time.
Eriophyoidologists have been applying the following media with satisfactory results:
Heinze’s medium (A. Skoracka, S.-G. Wei, pers. comm.), F-medium with Booster medium
plus phenol according to Keifer (1975) (C. Craemer, P. Natchev, S. Ozman-Sullivan, pers.
comm.), lactic acid (M. Lewandowski, P. Natcheff, R. Petanovic, C.-Q. Wang, pers.
comm.), modified Berlese’s medium (J.W. Amrine Jr., A. Chandrapatya, pers. comm.),
Fig. 7 Handling tools for eriophyoid mites: A details of variously shaped micropins; B details of an eyelashheld in place with nail polish (on the left) and short minuten pin held in place with epoxy (on the right);C eyebrow hair (on the left), micropin (on the center) and bent pin (on the right) inserted into the narrow endof a micropipette and held in place by inserting a toothpick from the other end
Exp Appl Acarol (2010) 51:283–307 291
123

modified Keifer’s Booster solution including water saturated phenol (E. de Lillo,
E. Denizhan, R. Monfreda, G. Nuzzaci, pers. comm.), Nesbitt’s medium (C.-Q. Wang,
pers. comm.), and a stained mixture of Nesbitt’s medium with lactophenol (Faraji and
Bakker 2008). The applied clearing procedure should always be reported in publications.
A modified Berlese’s medium was described by Amrine and Manson (1996). To about
15 ml of freshly made medium, 10–20 drops of glacial acetic acid, ca 100 mg of metallic
iodine crystals and 100 mg of potassium iodide powder are added. This medium is placed
on a hot plate at 90�C for about 30 min to dissolve the metallic iodine (or left from
overnight to 48 h at room temperature). Iodine, included also in Keifer’s medium, stains
the fine sculptured details of the cuticle, the microtubercles and other cuticular structures,
especially the internal apodemes and genitalia (Keifer 1975). Consequently, the brown
color often enhances the contrast of fine or delicate features.
A further improvement of the image quality can be offered by digital cameras on
microscopes. They can be adjusted to correct the ‘white balance’ or intensity and contrast
adjustments to obtain excellent micrographs, even though the specimen may appear too
dark or too pale at first glance.
When the medium used for digesting the mite internal tissue serves also for mounting
(e.g., Heinze’s medium), most eriophyoids can be placed directly into a small, shallow
drop of medium on the slide. Live mites will right themselves and orient in proper position
as they attempt to crawl in the thin film to leave the medium; this will not happen if they
are immersed or are previously killed. Their orientation can be adjusted by stroking with
the sharp tip of a micropin; the opisthosoma can be stroked several times to ‘‘right’’ a
lateral mite into dorso-ventral orientation. In some cases, the uncovered slide with adjusted
mites can be put on the hot plate margin for a few moments to thicken the medium and
hold specimens in proper position. A small drop of the final medium can be added to a
clean coverslip. A drop of glacial acetic acid can be added to this drop (e.g., modified
Berlese’s medium) which is stirred on the coverslip. Then, the coverslip is placed over the
uncovered mounted specimen, using the tips of the forceps to guide specimen orientation
and position as the coverslip settles. This step allows more rapid spread of the medium
(eliminating air bubbles), keeps the orientation of the mites, and aids more rapid and
complete clearing of the mites. The fresh slide is then placed on the edge of a hot plate at
about 80–90�C to clear within about 30 min. Most live mites can be prepared in this way to
make excellent slides in about 1 h. The boiling of the slide must be avoided because it
moves the mites from the center to the margin of the coverslip where they cannot be
studied.
In case the medium used for clearing is different from that used for mounting, (e.g.,
mounting in F-medium, after clearing with Keifer’s booster medium with added phenol)
cavity slides can be used for the clearing process. Mites can be placed directly into a drop
of clearing medium and the slide can be heated until the mites are cleared. The mixture
must not boil or become too viscous or hard. When the mite body is sufficiently cleared,
drops of water or fresh medium can be added to the mixture to make it fluid enough for
further passages. Then, mites are transferred to the mounting medium by means of mi-
cropins and a coverslip is added.
A few modifications to clearing procedures are used by eriophyoidologists: live mites
are cleared, or alternatively are killed in a preserving solution before clearing; mites are
cleared at room temperature taking a long time (days or weeks); mites in the clearing
medium are heated carefully over an open alcohol flame, or they are kept in an oven or on a
hot plate set at 40–60�C.
292 Exp Appl Acarol (2010) 51:283–307
123

Overheating and overclearing can easily occur and are the major sources of error. If the
covered slide is placed on a spot of the hot plate that is too hot for too long (about 1 h or
more), numerous small air bubbles can develop and cannot be removed. These can often
obliterate fine details needed for descriptions or photographs. Using new infrared ther-
mometers, the researcher can carefully map the temperatures on a hot plate and know
exactly where to place the slide(s) for best results.
For species difficult to clear using this technique, slides can be left in a cooler portion of
the hot plate at about 70�C overnight or for 24–48 h. If your hot plate is too hot at the
lowest setting, a thick thermal glass can be placed on the plate and will drop the surface
temperatures for several degrees. Alternatively, the temperature of the hot plate can also be
regulated by means of a rheostat between the receptacle and the hot plate (be sure to match
wattage of the rheostat to that of the hot plate).
These methods are tedious, but they allow a researcher to routinely make excellent
slides from which type specimens can be selected. This part of specimen preparation
represents 90% of quality control for professional preparation of eriophyoid specimens,
and a successful method needs to be learnt well. Amrine and de Lillo have prepared slides
using the above methods as early as 1987, and these slides are still well suited for
microscopic studies.
Mounting
For the final mounting, eriophyoidologists have also been applying different water based
mixtures such as Heinze’s medium (R. Petanovic, A. Skoracka, C.-Q. Wang, S.-G. Wei,
pers. comm.), F-medium according to Keifer (1975) (C. Craemer, E. de Lillo, E. Denizhan,
R. Monfreda, P. Natchev, G. Nuzzaci, R. Petanovic, S. Ozman-Sullivan, pers. comm.),
modified Berlese’s medium (J. W. Amrine Jr., A. Chandrapatya, M. Lewandowski, A.
Skoracka, pers. comm.), and a stained Hoyer’s medium (Faraji and Bakker 2008). The
applied mounting procedure should always be reported in publications.
Most researchers add more or less mounting medium to alter the amount of pressure of
the coverslip on the specimens. A few short fibers can be also mounted underneath at the
borders of the coverslip to support it above the mite specimens, according to Keifer (1975).
The diameter of the fibers can be chosen according to the thickness and width of the
specimens to be mounted. Following Keifer’s advice, de Lillo and Nuzzaci have selected
three different fibers with different thicknesses cut into short lengths: fiberglass (about
10 lm in diameter), kapok (about 20 lm in diameter) and ‘‘wool’’ used for aquariums
(about 40 lm in diameter). The main aim in using these fibers is to avoid excessive
specimen flattening (Keifer 1975) which can alter feature proportions and the general
shape of the mite. For example, ridges and furrows on the dorsal side of the opisthosoma,
especially when they are slight, can be often ‘‘lost’’ during examination of flattened
specimens. Moreover, the addition of fibers allows the coverslip to be moved more easily
on the slide face by pushing one side of the coverslip with a pin or tweezers; of course, the
coverslip must not be sealed and the medium must be fluid. In this way the mite can be
rolled around its longitudinal axis, allowing observations and descriptions of a species
from a single holotype specimen (Amrine and Manson 1996). However, even when fibers
have not been added under the coverslip, if the mounting medium is still fluid and the slide
has not been sealed yet, the coverslip can be moved changing the mite position, as reported
by Nalepa (1906).
Exp Appl Acarol (2010) 51:283–307 293
123

It is more difficult, and sometimes impossible, however, to study (draw and photograph)
fine details (e.g., prodorsal shield features, female internal genitalia and the ray arrange-
ment of particularly fine empodia presenting intricate details) on specimens that have not
been flattened to some extent. It is probably most advisable to mount some specimens
without and others with fibers. This will not always be feasible, depending on the speci-
mens and time available. If important, and of consequence, it should also be mentioned in
the description which method was used to obtain the particular morphological aspects
described, because these can differ considerably, as in the example of the dorsal shield
patterns in Aceria angustifoliae (Denizhan et al. 2008). It may even be arguable which
method will render the best results for identification and comparative purposes. Both
methods are difficult to standardize, and likely will vary depending on the mounting
medium and amount used, the degree of clearing, and the skill of the worker.
Information on labeling and sealing methods is in Amrine and Manson (1996).
Overcleared slides
In the case of overcleared specimens, slide sealing can be carefully removed by a large pin,
scalpel, razor or by other means. Then the coverslip can be loosened using water and heat on
a hotplate, and excess water removed. A drop of medium containing iodine stain (preferably
using the same medium originally used to prepare the slide) can be placed to one side of the
coverslip. An absorbent paper can be held against the other side of the coverslip while the
slide is heated to boiling very briefly. In this way, the iodine stained medium is drawn over
the mites and fills the coverslip, while the excess medium is removed by blotting. As result,
the freshly stained mites can be observed, drawn and photographed. This may not work with
very old slides, difficult media such as polyvinyl alcohol, or overly faded specimens; but if
the slide is not usable, this technique is worth a try.
Dismounting specimens from slides
Slides can be dismounted when specimens are undercleared or overcleared, or are at the
coverslip edges, or when the researcher might need to view a different aspect of a mite, or
would apply a different microscopic technique, as Nuzzaci and de Lillo did for the study by
scanning electron microscopy of Aceria caulobia (Nalepa) and P. avellanae (Nuzzaci et al.
1991).
After removing the slide sealant, the water-based media can be made less viscous by
addition of water and/or heating, such as in the procedures previously described, or by
leaving the slide under a high humidity glass dome for a few hours at room temperature.
These media are hygroscopic, absorbing water from the air at the coverslip margin and
eventually becoming quite fluid, allowing the coverslip to slide freely, so that it can be
propped up by insertion of a small pin from one side so that it can be lifted and removed
with a forceps.
Line drawings
Adequately descriptive line drawings of good quality are not easy to produce and appear to
be one of the weak points in eriophyoid systematics. The importance of this part of a
294 Exp Appl Acarol (2010) 51:283–307
123

description was highlighted by Keifer (1975) and Amrine and Manson (1996), but even
stronger emphasis should be made.
Slide mounted eriophyoid specimens, including type material, usually deteriorate over
time, and are eventually not adequate for study, and may ultimately be totally destroyed.
This deterioration can be caused by several factors, including: the water-based mounting
media which may dry out rather quickly, air may penetrate under the coverslip, and, under
certain conditions, specimens may continue to be cleared by the chemicals in the mounting
medium, and fade away. Other representations of the original type series, including digital
images of slide mounted specimens and electron microscope images, should also be
archived in addition to slide mounted specimens and they have a support value, as pre-
viously mentioned by Amrine and Manson (1996). In the absence of type material,
however, the original description and, particularly the drawings, become critically
important, usually being the only representation of the described species. In many cases,
drawings presented in the original description become the nearest equivalent of a holotype.
Moreover, drawings are rather clearly understood by everyone, and they are useful for a
primary comparison whatever language is utilized, and regardless of the interpretation of
characters in the text description. Certainly, line drawings in the style of Keifer (Fig. 8) are
permanent and universally understandable. They are the core of each description and must
be the best basic representation of an eriophyoid species (Keifer 1975; Amrine and Manson
1996).
The adequacy and value of drawing depends largely on the skill and experience of the
researcher and on the quality of the slide mounted specimens.
Edward Baker and Richard Newkirk (pers. comm.) observed Keifer working and both
related that the researcher made his final drawings directly using a drawing tube
(=camera lucida) device with extraordinary care and accuracy. In some cases, Keifer
drew freehand from the eyepiece using no drawing aids. But Keifer’s talent was certainly
unique!
Because of the minute size of these mites and their features, when studying, drawing
and describing them, the researcher should always use a good-quality, phase contrast light
microscope equipped with an oil immersion 1009 objective at a large numerical aperture
(one of the best is a fluorite objective with 1.30 numerical aperture or higher), and a
drawing tube. A zoom lens on the microscope or drawing tube is very helpful. A 29
objective can additionally be mounted on some drawing tubes to allow the enlargement of
very small details to prevent their obstruction by the pencil’s point. In addition Amrine
employs a chemical apparatus clamp to hold a reversed binocular at the appropriate
position and angle to form a small field visible through the drawing tube (Fig. 9). Very
detailed structures such as of the empodia (Fig. 9), male genitalia, female genital apode-
mes, etc. can be drawn using this method.
The illustrator should try to prepare an image eventually on a lower plane than that of
the microscope-base level: in this way the illustrator can sketch a larger preliminary draft,
and the much larger drawing scale usually helps in reducing the visibility of mistakes and
irregular lines when reduced for the final plate. The drawing plane should be illuminated
by a table lamp adjustable for light direction and intensity in order to clearly and con-
currently see the pencil marks superimposed below the cuticular structures of the mite,
both with good contrast. It is advisable for the aspiring illustrator to be taught by an
experienced researcher using these techniques if at all possible.
The microscope stage and the slide mounted specimen should be oriented on the hor-
izontal plane in such a way as to make the outlines of the specimen well suited to the
illustrator’s drawing technique (usually, lines on a paper are more easily drawn when the
Exp Appl Acarol (2010) 51:283–307 295
123

hand moves from left below to right above for right-handed people). An initial focus plane
on the slide is chosen, and the illustrator draws the visible cuticular details in that plane on
the paper. The illustrator can then focus on a higher or lower plane and add more details to
the original drawing. Progressively, plane by plane, the illustrator can portray all the
morphological features critical to the identity of the mite.
During drawing, one can cover the tube opening by one’s hand to reduce the external
light noise on the slide and to increase the contrast of specimen details. One can addi-
tionally cover the field diaphragm by the hand to obscure the mite and see just the sketch
through the tube. The repeated, fast alternate movement of the hands facilitates detection
of the presence or absence of some details on the line drawing by alternately flashing the
two superimposed images.
Fig. 8 Diptacus swensoni Keifer: original inked line drawings by Keifer at the US National Museum ofNatural History, Beltsville, Maryland, USA
296 Exp Appl Acarol (2010) 51:283–307
123

Descriptive drawings are usually semischematic, but they should be sufficiently detailed
to portray the real morphology of the holotype specimen as closely as possible, and care
should be taken not to ‘‘correct’’, ‘‘exaggerate’’ or interpret the features too much, so that
some information is altered (see Keifer’s recommendations in Fig. 1). The drawings should
show the typical deviation from bilateral symmetry, and drawing one half, then copying the
flip side of it to the other side becomes a fabrication, not science. Very often one specimen
is not enough to get satisfactory information and additional specimens must be drawn, or
even their features can be combined within one plate. This depends on the clearness,
orientation and integrity of the specimen, contrast of the cuticle with the mounting media,
and, of course, on the ability of the illustrator. This procedure also allows confirmation of
some details.
In addition to the holotype specimen, other specimens should be studied to determine
intraspecific variation in morphological features, at least in this one sample. Systematically
important variations may be depicted in additional drawings if necessary.
Content that should be included in eriophyoid descriptive drawings
Often the content of eriophyoid plates can differ slightly depending on whether the
depicted mite belongs to the Phytoptidae, Eriophyinae (Fig. 10), Phyllocoptinae or Dip-
tilomiopidae (Fig. 11).
Amrine and Manson (1996) listed the most important body parts that should be
illustrated by line drawings. Attempting to standardize the figure layout will make it
Fig. 9 Apparatus for drawing fine details: inverted binocular placed under the drawing tube opening (on theleft) to decrease the size of the pencil or pen relative to small structures, such as empodia (on the right)
Exp Appl Acarol (2010) 51:283–307 297
123

easier to compare the depiction of different species with each other, and for finding
particular details in a drawing. Additional information to enhance their list is provided
below.
Fig. 10 Line drawings of a phytoptid (Phytoptus corniseminis Keifer-redrawn; on the left) and an eriophyidmite (Aceria ficus [Cotte], drawing by E. de Lillo; on the right)
Fig. 11 Line drawings of a phyllocoptid (Tegonotus heptacanthus [Nalepa]; on the left) and a diptilomiopidmite (Rhynchaphytoptus ficifoliae Keifer; on the right) (drawings by E. de Lillo)
298 Exp Appl Acarol (2010) 51:283–307
123

Scanning electron microscopy pictures can assist in the understanding and perception of
all features included in a table, but should never be used to the exclusion of line drawings,
light microscopy, or other illustrations.
Prodorsal shield
The prodorsal shield must be depicted dorsally, including all ornamentations such as
ridges, lines, granules, dots, cells, frontal lobe, anterior (vi and ve) and scapular (sc) setae
and their tubercles, paying attention to the shape and size of these parts. The description of
complex prodorsal shield ornamentation is almost always obscure if it is not accompanied
by quality line drawings which are a fundamental requirement for a species’ description,
discrimination and identification although intraspecific variations may occur. Particular
care should also be taken in depicting the frontal lobe margin and its shape. This lobe is
frequently obscured by underlying gnathosomal and prodorsal elements, and may addi-
tionally be very thin and almost translucent, and its presence and margin may be very
difficult to detect. It may help to study several specimens in this regard. Additionally, the
illustrator must watch out for extremely tiny or obscure features like spines and extensions
that may occur on the anterior edge of this lobe.
Coxal area and genitalia
The coxal and genital regions have to be carefully drawn on the ventral view position of
the specimen. When illustrating these structures, coxal ornamentation should be studied
in detail (e.g., ornamentations on coxae I may differ from that on coxae II) and care
should be taken to determine whether lines are internal apodemes (e.g., near the base of
coxae II) or surface lines or ridges. The following information should also be depicted:
presence, shape and position of coxal tubercles, coxal seta robustness and length, shape
and length of the internal coxisternal apodeme (sternal line), number of coxi-genital
semiannuli or other structures set between coxae II and female or male external genitalia,
and number and shape of microtubercles on these semiannuli. Regarding the genital
region, the following features should be depicted: female and male (if found) external
genitalia, particularly including details of the female genital coverflap, whether the
coverflap seems to be divided in more than one region (e.g., basal and distal region), the
ornamentation on these regions, ornamentation just anteriad of the coverflap and whether
it is part of the area between coxae II. The length of setae 3a should also be depicted
accurately.
The genital apodemes, and softer parts like the spermathecae, are often difficult to
observe and draw because of their size and their internal position and variability. Dis-
secting a clarified specimen at the level of the coxae or just posterior to the genital region is
recommended, in order to have fewer disturbing elements (Keifer 1975). The length of the
spermathecal tube and the size of the anterior part of the apodemes should be carefully
observed, too.
Legs
For legs in lateral view, the ornamentations (e.g., spines, ridges) along the segments and at
the level of the articulations, size of solenidia and shape of its tip, presence, position, and
length of all leg setae must be depicted.
Exp Appl Acarol (2010) 51:283–307 299
123

Concerning the empodium, particular care is needed in distinguishing the central shaft
shape (whether divided or simple), the number of rays, and eventually the shape of branch
tips.
Dorso-ventral view of the Diptilomiopidae
The large gnathosoma of the diptilomiopidae usually makes it difficult to have specimens
oriented in true dorso-ventral position. In this case, the distal part of their large gnathosoma
can be carefully removed or cut by a pin. Even though this is a tedious process, a bit of
practice will allow the illustrator to get good results. A sharpened insect pin or fine
dissecting scalpel should be used.
Lateral view drawings
With regard to the anterior part of the body, the illustrator needs to represent the lateral
view of the gnathosoma, legs, prodorsal shield with its frontal lobe and setae (when
present), lateral seta, first annuli after the prodorsal shield, and genital area. When printed,
the anterior part of the mite should preferably be oriented to the left of the drawing.
Particular care must be paid to the gnathosomal details, including the presence and shape
of the palp coxal seta (ep), dorsal palp genual seta (d) and subapical palp tarsal seta (v),
shape and size of the prodorsal shield, and any other surface detail (e.g., ornamentation on
the pedipalp segments).
The anal lobes and the annuli up to the setae f have to be drawn in lateral view taking
care to depict microtubercles, setae and any other detail. The posterior part of the anal
lobes should preferably be orientated to the right side of the drawing.
Moreover, a few annuli need to be drawn trying to elucidate the shape and the size of
the microtubercles (elliptical, roundish, pointed, etc.), their distribution, orientation, size of
dorsal and ventral semiannuli, and details of lateral lobes, if they are present. These should
be portrayed in lateral view to show the possible contrast between dorsal and ventral
opisthosomal arrangement. Usually, the area chosen to be depicted is between the annuli at
the level of opisthosomal setae c2 and d.
For species with large dorsal semiannuli (e.g., Phyllocoptinae and some Diptilomi-
opidae) it might be better to draw the whole specimen in dorsal and/or in lateral view;
using particular care to point out ridges, furrows, and lateral lobes on the opisthosoma. If
the illustrator draws the specimen in lateral view, the body should be horizontally placed in
the plate and the anterior part should preferably be directed to the left. In case of the dorsal
view, the body should be orientated in the vertical plane of the table and it should have the
anterior part placed near the top of it.
Preparation of the final plate
An initial draft with many notes and details is the result of the work at the drawing tube.
The draft might be redrawn by pencil with special attention to the fine details. It should be
compared at the microscope with mounted specimens without the light interference of the
drawing tube in order to get more contrast and richness in details seen on the slide mounted
specimen. Comparison of several specimens will allow you to note details of possible
variation of key elements; this information can be presented in the description, or in some
cases, a second drawing may be necessary.
300 Exp Appl Acarol (2010) 51:283–307
123

After checking the initial draft, a smooth tracing paper can be put over the line drawing
and final inking done on it, and not directly on the line drawing itself. For a better result, a
large light table can be used for illuminating the draft and the final drawings to increase the
line perception. Some researchers draw the final drawing by means of a technical pen (i.e.,
the well known rapidograph line pens, RotringTM and SteadtlerTM pens). Nuzzaci and de
Lillo prefer metal nibs with pointed tips, of at least two sizes, mounted on a holder without
an ink reservoir. The nib needs to be repeatedly refilled with a small amount of ink while
drawing. Actually, nibs have the advantages of being easier to clean and to preserve than
the tips of technical pens, and for making the size of the line variable by simply changing
the pressure applied to the nib tip on the paper. Moreover, the dorsal, ventral and lateral
parts of the nibs can be used according to the needed thickness of the line. Opaque black
Indian ink is adequate and any mistaken and imperfect line can be removed from the
tracing paper using a razor blade. Alternatively, mistakes can be removed from drawings
after digitization using appropriate software applications.
The illustrator can initially prepare a large plate, with the drawings arranged on it,
generally 42 cm wide and 58 cm high (an A2 sheet size). This large canvas allows the
illustrator to reduce or mask defects such as those caused by a trembling hand, line
imperfections, dirty marks, wrong lines, corrections, and so on. The large size of the
drawing may be a problem for the printer. A scanner can be used to digitize the drawings
(also single drawn body parts, if necessary), combine the plate, and to reduce their size
keeping the high resolution required for printing. In preparing the final plate, the pro-
portions of the single details should be carefully considered. Usually, the first leg and the
microtubercle details are two times larger, and the empodium is four times larger than the
other parts. Finally scale bars should be added, too.
Line drawings can be also made on a computer (Li et al. 2006; Wei et al. 2007; Wang
et al. 2007) using a digitizer tablet with a digital pen. Drawing digitally can replace the
inking process of the initial pencil draft as described above, but first of all it still remains of
utmost importance to accurately interpret critical detailed morphology. It should theoret-
ically be possible to take digital images of the slide mounted specimen, and electronically
draw directly on the image. However, this procedure is limited by the tiny and intricate
morphology of Eriophyoidea and by the need of high magnifications with limited field
depth. Images can be stacked, but it has not been tested whether the final image will be
sufficiently detailed and contrasted to replace the carefully made initial pencil draft and
final inked drawings.
Measurements
Measurement instructions for typical descriptive features of Eriophyoidea were described
by Amrine and Manson (1996). Figures demarcating the positions of features that may
cause confusion or need better definition or standardization are surely more helpful and
will overcome any linguistic misinterpretation (Figs. 12, 13, 14, 15).
Many interpretative doubts on the measurements of some features came out during the
present authors’ experiences and several of these have relevant importance, especially for
phylogenetic studies on the Eriophyoidea. Most of them require a careful consideration
about the standardization and correct definition of homologies between taxa.
However, each group, genus or species will present different problems and one precise
solution will not fit all. Therefore, the author of a new mite must be flexible and able to
Exp Appl Acarol (2010) 51:283–307 301
123

adapt and see the unique characteristics of the specimen at hand. This means, also, that the
description paper should give note to the views and ways the measurements were taken.
A stage micrometer slide is used to calibrate the eyepiece reticule. Then, to make
measurements of the specimen, the calibrated reticule is simply superimposed over any
image viewed through the light path of the microscope and the linear dimensions (length
and width) of a specimen feature can be measured. When making many measurements, the
researcher often finds tedious, tiring and time consuming all the little movements and
rotations needed with the microscope stage and with the eyepiece for matching the reticule
scale with the features to be measured, especially when the morphological details are very
fine and short.
To alleviate the tedium, the stage micrometer slide is used to draw a scale paper strip
through the drawing tube for each objective lens. Then, the operator can measure more
details of the same specimen by just re-positioning the scale strip and without changing the
position of the slide or of the eyepiece. This technique saves time and makes measurements
much more convenient.
Measurements can also be taken with an electronic image analysis set up. A digital
camera is mounted on the microscope, and images are captured and transferred to a
computer. Then, they are viewed and manipulated on screen to various angles and levels,
and details are measured using different techniques, depending on the digital image
Fig. 12 Body length: from the rear end of the anal lobe to the maximum extent of the gnathosoma (abovefor Rhyncaphytoptus ficifoliae Keifer) or from the rear end of the anal lobe to the tip of the pedipalps (belowfor Tegonotus heptacanthus [Nalepa]; de Lillo’s original drawings)
302 Exp Appl Acarol (2010) 51:283–307
123

software application used. Care should be taken that the system has been correctly cali-
brated by comparing with a set of manual measurements, and that the digital images are
clear and have sufficient contrast to show each minor detail to be measured completely
(e.g., very fine setae). Craemer conducted more accurate measurements on live/videoimages (where the image can still be focused up and down on the screen), rather than on a
captured images, which may not be able to capture the entire structure to be measured at
once, even when using different stacking methods.
Concerning measurements of the holotype, de Lillo measures selected specimens of a
population and chooses the holotype within this group as the specimen with closest
measurements to the average value for the greatest number of details.
Fig. 13 A, B Aceria novellae Denizhan, Monfreda, Cobanoglu and de Lillo, C Aculops pelekassi (Keifer),D Bariella farnei de Lillo. Gnathosoma length: from the proximal margin of the cheliceral bases to themidpoint of the pedipalp tips. Prodorsal shield length: from the most anterior margin (of the prodorsal shieldor frontal lobe) to the anterior margin of the first complete annulus posterior to the shield. Prodorsal shieldwidth: from side to side at the level of the first distinct lateral annulus or at the widest level if the shieldmargins are protruded. Body width: from side to side at the level of setae c2 or widest dimension if c2 isabsent. Body thickness: from dorsal to ventral aspect of the opisthosoma at the level of setae c2, if present.Distance between setae sc: from the inside margins of the setal bases. Distance between tubercles of setaesc: from the inside margins of the tubercles (de Lillo’s original drawings)
Exp Appl Acarol (2010) 51:283–307 303
123

Finally, when taking many measurements of many specimens, a spreadsheet such as
Microsoft Office’s Excel� is very convenient for taking averages and ranges of values for
each characteristic; properly designed, the files can be printed as tables to support the
description.
Fig. 14 A Aculops pelekassi (Keifer), B Bariella farnei de Lillo, C Diptacus gigantorhynchus (Nalepa).Distance between coxal setae: from the inside margins of the setal bases. Distance between tubercles ofcoxal setae: from the inside margins of the tubercles. Arrows indicate the short apodeme exactly where thetwo legs come together, at their contact, or where they pivot; the apodeme is usually quite distinctive and theanterior edge of this apodeme is used as a reference point for measuring both leg I and leg II length inventral-dorsal view. Prodorsal shield length: from the most anterior margin (of the prodorsal shield or frontallobe) to the anterior margin of the first complete annulus posterior to the shield. Frontal lobe length: from themotivator (gnathosomal base) to the anterior edge of the frontal lobe. Genital coverflap width: from itslateral margins. Coverflap length: from the transverse line anteriorly placed to the rear line of the coverflap(de Lillo’s original drawings)
304 Exp Appl Acarol (2010) 51:283–307
123

Language
Every researcher is free to choose to publish eriophyoid taxonomic papers in the author’s
mother tongue. Fortunately, taxonomic articles published in English have been increasing
considerably in the past decade, allowing for a wider and more convenient dissemination of
information. Nevertheless, many older papers need to be translated because the drawings
are often incomplete and cannot show data usually indicated in the morphometric
description, and the English abstracts usually lack needed and detailed information. One
particular language is not more important than another but, in the scientific environment,
English is so widespread and most often understood that it is worth while to have an
abstract which contains an English translation, taking care that it should be as complete as
possible in order to be useful for identification purposes and morphological comparisons.
Considering the costs of having a paper translated, or of obtaining interlibrary loans, a
shared web archive should be arranged and promoted within the copyright rules. The
electronic information facilities of public institutions should be preferably used to ensure
non-profit designations. This can allow researchers to upload/download translated and
other papers in a sort of peer to peer network. Such a network would greatly facilitate
sharing important biological and descriptive data, or key publications, and ultimately to
promote greater advances in eriophyoid research. Many authorities provide digital copies
of their key publications on their web sites, which is enormously helpful.
Completeness of descriptions
Strong recommendations were given by Keifer (1975) and Amrine and Manson (1996)
about the need to include knowledge on the host plant identification, mite habit and host
plant relationships. Particular care should be taken in finding and collecting males; their
morphology often helps to understand the female status as protogyne/deutogyne mites.
Fig. 15 Aceria ficus (Cotte). Length of legs from the trochanter proximal margin to the distal margin of thetarsus excluding the empodium and solenidion. Femur and tarsus length: measured ventrally. Tibial length:measured dorsally. Genu length: measured dorsally or ventrally. Solenidion and empodium lengths: from thepigmented base where inserted to the distal tip (de Lillo’s original drawings)
Exp Appl Acarol (2010) 51:283–307 305
123

Often, in literature, many species are described based on a small population and/or without
the male. Such descriptions often have very limited biological data and lack information
about the intraspecific morphometric variability. A new species should ideally be described
based on widely dispersed samples in order to avoid describing an accidental presence of a
mite on an improper host.
Considering the general availability of GPS devices, collection localities should also
include latitude and longitude data at least to the level of minutes.
The rules of the International Code of Zoological Nomenclature (ICZN 1999), currently
on line at http://www.iczn.org/iczn/index.jsp, must always be followed for nomenclature
decisions, name assignment and for gender agreement between genus and species name.
Often, patronymic and locality names are assigned after their latinization. Researchers
should try to avoid applying genus and species names characterized by a series of con-
tiguous consonants or vowels in order to reduce typing mistakes when these names are
listed in tables, indexes and catalogues, as sometimes happens.
Finally, in order to reduce confusion in eriophyoid systematics, species identity should
be clearly established when biological observations are specifically carried out, and pub-
lications of unnamed or unidentified species should be avoided, such as recently happened
for an Acalitus sp. of Carpinus tschonoskii Maxim (Kawashima and Amano 2004).
Concluding remarks
The information and recommendations given in this article may seem overly demanding
and meticulous at first glance. However, these come from our collective and shared
experience in studying Eriophyoidea for systematic purposes. It is not meant to be a text
book recipe, but hopefully it will spur new ideas and techniques in attaining proper and
exact descriptions that will add value and stability in eriophyoid systematics and reduce
confusion which is currently prevalent in some groupings.
Acknowledgments The authors are strongly in debt to Mrs. Margherita Baldari (Bari, Italy), Dr. GiuseppeBari (University of Bari, Italy), Dr. Angie Chandrapatya (Kasetsart University, Bangkok, Thailand),Dr. Danuta Knihinicki (ASCU, New South Wales, Australia), Dr. Mariusz Lewandowski (Warsaw Universityof Life Sciences, Poland), Dr. Rosita Monfreda (University of Bari, Italy), Professor Peter Natchev (Sofia,Bulgaria), Dr. Stefan Neser (ARC-PPRI, Pretoria, South Africa), Professor Sebahat Ozman-Sullivan (OMU,Samsun, Turkey), Professor Radmila Petanovic (University of Belgrade, Serbia), Mr. Giacomo Rondinone(University of Bari, Italy), Dr. Anna Skoracka (Adam Mickiewicz University, Poznan, Poland), Mrs. TerryStasny (Morgantown, West Virginia, USA), Dr. Guo-Quan Wang (China Agricultural University, Beijing,China), Dr. Sui-Gai Wei (Guangxi University, Nanning, Guangxi, China) for their consistent contribution intesting and applying some technical solutions to collecting, preparing and studying eriophyoid mites. Theauthors would like to express their gratitude to Dr. Lincoln Smith (USDA-ARS Western Regional ResearchCenter, Albany, California, USA) and the two anonymous reviewers for their contribution to improving thepaper. The study was supported by the University of Bari (2008 and 2009).
References
Amrine JW Jr, Manson DCM (1996) Preparation, mounting and descriptive study of eriophyoid mites. In:Lindquist EE, Sabelis MW, Bruin J (eds) Eriophyoid mites—their biology, natural enemies andcontrol. Elsevier, Amsterdam. World Crop Pest 6:383–396
Amrine JW Jr, Stasny TA, Flechtmann CHW (2003) Revised keys to world genera of Eriophyoidea (Acari:Prostigmata). Indira Publishing House, West Bloomfield
306 Exp Appl Acarol (2010) 51:283–307
123

Baker EW, Kono T, Amrine JW Jr, Delfinado-Baker M, Stasny TA (1996) Eriophyoid mites of the UnitedStates. Indira Publishing House, West Bloomfield
Boczek J, Nuzzaci G (1988) A new genus and five new species of eriophyid mites (Acari: Eriophyoidea).Entomologica 23:123–138
Dabert J, Ehrnsberger R, Dabert M (2008) Glaucalges tytonis sp. n. (Analgoidea, Xolalgidae) from the barnowl Tyto alba (Strigiformes, Tytonidae): compiling morphology with DNA barcode data for taxondescriptions in mites (Acari). Zootaxa 1719:41–52
de Lillo E, Skoracka A (2009) What’s ‘‘cool’’ on eriophyoid mites? Exp Appl Acarol. doi:10.1007/s10493-009-9297-4
de Lillo E, Bari G, Monfreda R (2005) Preliminary study on the distribution of Calepitrimerus vitis (Nalepa)on tendone trained vineyards in Apulia, Southern Italy. Phytophaga XIV(2004):605–610
Denizhan E, Monfreda R, de Lillo E, Cobanoglu S (2008) Two new species of eriophyoid mites (Acari:Eriophyoidea) associated with Elaeagnaceae in Turkey. Zootaxa 1698:41–48
Faraji F, Bakker F (2008) A modified method for clearing, staining and mounting plant-inhabiting mites. EurJ Entomol 105:793–795
Hassan AS (1928) The biology of the Eriophyidae with special reference to Eriophyes tristriatus (Nalepa).Univ Calif Publ Entomol 4(11):341–394
International Commission on Zoological Nomenclature (ICZN) (1999) International code of zoologicalnomenclature. International Trust for Zoological Nomenclature, London
Kawashima M, Amano H (2004) Seasonal occurrence and association of a gall-forming eriophyid mite andpredacious phytoseiid mites (Acari: Eriophyidae, Phytoseiidae) in Japan. Int J Acarol 30(1):9–15
Keifer HH (1952) The Eriophyid mites of California (Acarina: Eriophyidae). Bull Calif Insect Surv 2(1):1–123
Keifer HH (1975) Eriophyoidea Nalepa. Injurious eriophyoid mites. In: Jeppson LR, Keifer HH, Baker EW(eds) Mites injurious to economic plants. University of California Press, Berkeley, pp 327–533
Li D-W, Wei S-G, Wang G-Q (2006) A new genus and four new species of Phyllocoptinae (Acari:Eriophyoidea) from China. Zootaxa 1303:35–43
Lindquist EE (1996) External anatomy and notation of structures. In: Lindquist EE, Sabelis MW, Bruin J(eds) Eriophyoid mites—their biology, natural enemies and control. Elsevier, Amsterdam. World CropPest 6:1–30
Lindquist EE (2001) Poising for a new century: diversification in Acarology. In: Halliday RB, Walter DE,Proctor HC, Norton RA, Colloff MJ (eds) Acarology: proceedings of the 10th international congress.CSIRO Publishing, Melbourne, pp 17–34
Mohanasundaram M (1984) New eriophyid mites from India (Acarina: Eriophyoidea). Orient Insects18:251–283
Monfreda R, Nuzzaci G, de Lillo E (2007) Detection, extraction, and collection of Eriophyoid mites.Zootaxa 1662:35–43
Monfreda R, Lekveishvili M, Petanovic R, Amrine JW Jr (2009) Collection and detection of eriophyoidmites. Exp Appl Acarol. doi:10.1007/s10493-009-9315-6
Nalepa A (1906) Uber das praparieren und Konservieren der Gallmilben. Marcellia 5(2):49–61Nuzzaci G, de Lillo E, Mariani RG (1991) Scanning microscopy in acarology: a new technique for prep-
aration of eriophyids preserved in different ways. Boll Soc Ent Ital 123(1):3–8Petanovic R, Stadelbacher EA, Boczek J (1993) Eriophyid mites (Acari: Eriophyidae) on Geranium spp.
Geraniaceae: redescription of three known species and description of a new species. Ann Entomol SocAm 86(4):411–416
Skoracka A, Dabert M (2009) The cereal rust mite Abacarus hystrix (Acari: Eriophyoidea) is a complex ofspecies: evidence from mitochondrial and nuclear DNA sequences. Bull Entomol Res: 1–10. doi:10.1017/S0007485309990216
Trotter A (1904) ‘‘Cecidotheca Italica’’ di A. Trotter e Cecconi G. Marcellia 3:76–81 (it is a list of gallmakers included in the Cecidotheca Italica up to issue IX–XII, gall number 300)
Trotter A, Cecconi G (1902) ‘‘Cecidotheca Italica’’ o raccolta di galle italiane determinate, preparate edillustrate. Fasc XVI–XVIII (n. 376–450). Padua
Wang G-Q, Li D-W, Wei S-G (2007) Two new species of Disella (Eriophyidae: Nothopodinae: Notho-podini) from South China. Zootaxa 1426:63–67
Wei S-G, Li D-W, Wang G-Q (2007) Description of five new species of eriophyid mites (Acari: Erio-phyidae) from Guangxi, China. Int J Acarol 33(2):115–122
Exp Appl Acarol (2010) 51:283–307 307
123
Top Related
Copyright © 2022 FDOKUMEN

