


Bahasa
Halaman
Hukum


How to createa virtual classroom and run online classes
Along with schools, universities, and
companies coming back on track, the
ClickMeeting team has also come
together to help all of its customers
reach their goals and needs. We have
prepared the manual you're currently
reading to help teachers,
didacticians, or trainers to make their
online events even more efficient.
Read on to find out how you can
achieve your goals.

What should I know at the very beginning?
Hosting an event is an exciting thing itself. However, choosing which event type is the best for
your needs and goals seems to be a little bit more complicated. Read on to find out which event
type is the best for you!
Live webinar As the name suggests, it is an event that is hosted live, and you can gather there to even up to
1000 attendees. It is a great option if you hold lectures at universities or events for larger
groups. You, as the host, and your presenters are the ones who talk, and your audience listens
to you, watches your presentations, and interacts with you through chat, statuses, surveys, or
Q&A mode.
On-demand webinarShare your pre-recorded event and let your audience watch it anytime and anywhere. Enrich
your on-demand webinar with video files and an enticing CTA button.
Automated webinar Create an automated event with an event recording, video, survey, and a CTA button. Set up a
specific date and hour and run your event on autopilot.
Planned meeting Schedule an online meeting with up to 40 attendees, where everyone can see, hear, and talk to
each other. Plan and run your virtual class with your team, trainees, or students.
Meet now A spontaneous and ad-hoc event where you invite your attendees and run the event on the
move. Simply, meet with your audience now.
For the needs of this manual and our customers, we have decided to describe mainly online meetings
on the upcoming pages. We hope this instruction will help you achieve your goals, and working with
small groups will become an exceptional and flawless experience for you and your team. We wish you
good luck and encourage you to continue reading until the very last page!
2
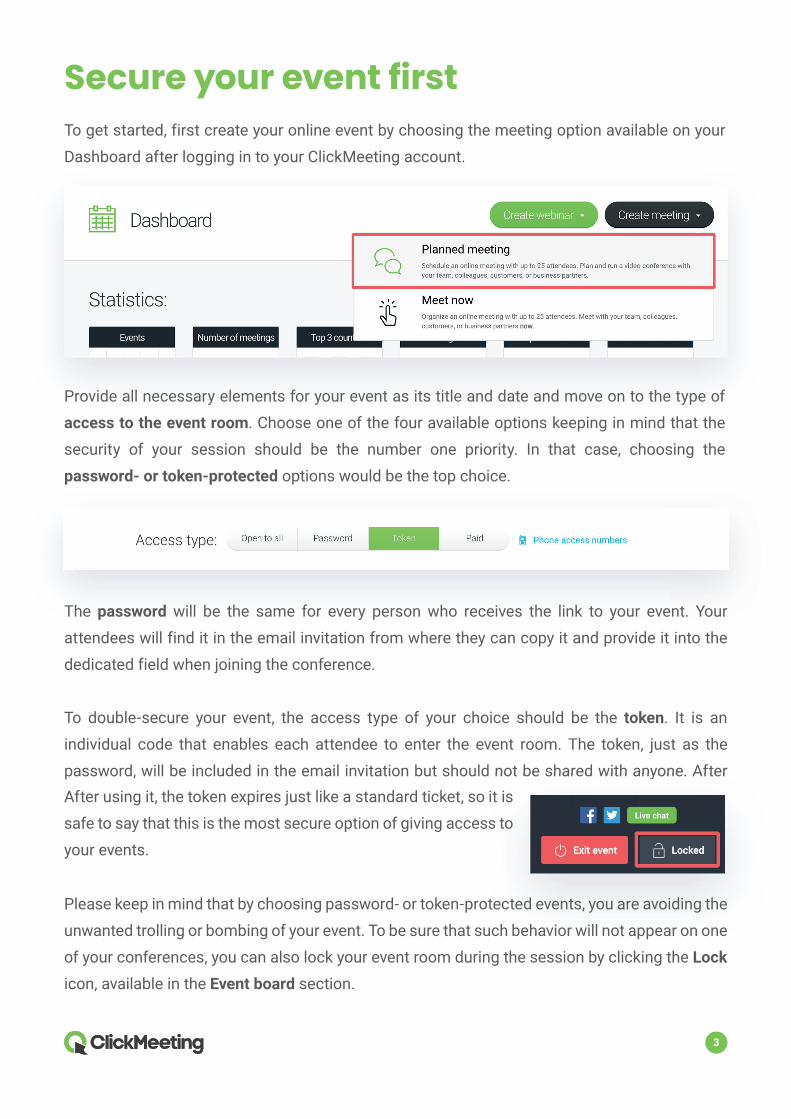
Secure your event firstTo get started, first create your online event by choosing the meeting option available on your
Dashboard after logging in to your ClickMeeting account.
Provide all necessary elements for your event as its title and date and move on to the type of
access to the event room. Choose one of the four available options keeping in mind that the
security of your session should be the number one priority. In that case, choosing the
password- or token-protected options would be the top choice.
3
Provide all necessary elements for your event as its title and date and move on to the type of
The password will be the same for every person who receives the link to your event. Your
attendees will find it in the email invitation from where they can copy it and provide it into the
dedicated field when joining the conference.
To double-secure your event, the access type of your choice should be the token. It is an
individual code that enables each attendee to enter the event room. The token, just as the
password, will be included in the email invitation but should not be shared with anyone. After After using it, the token expires just like a standard ticket, so it is
safe to say that this is the most secure option of giving access to
your events.
d not be shared with anyone. After it is
s to
Please keep in mind that by choosing password- or token-protected events, you are avoiding the
unwanted trolling or bombing of your event. To be sure that such behavior will not appear on one
of your conferences, you can also lock your event room during the session by clicking the Lock
icon, available in the Event board section.
Test your connection for the complete comfort of running an event
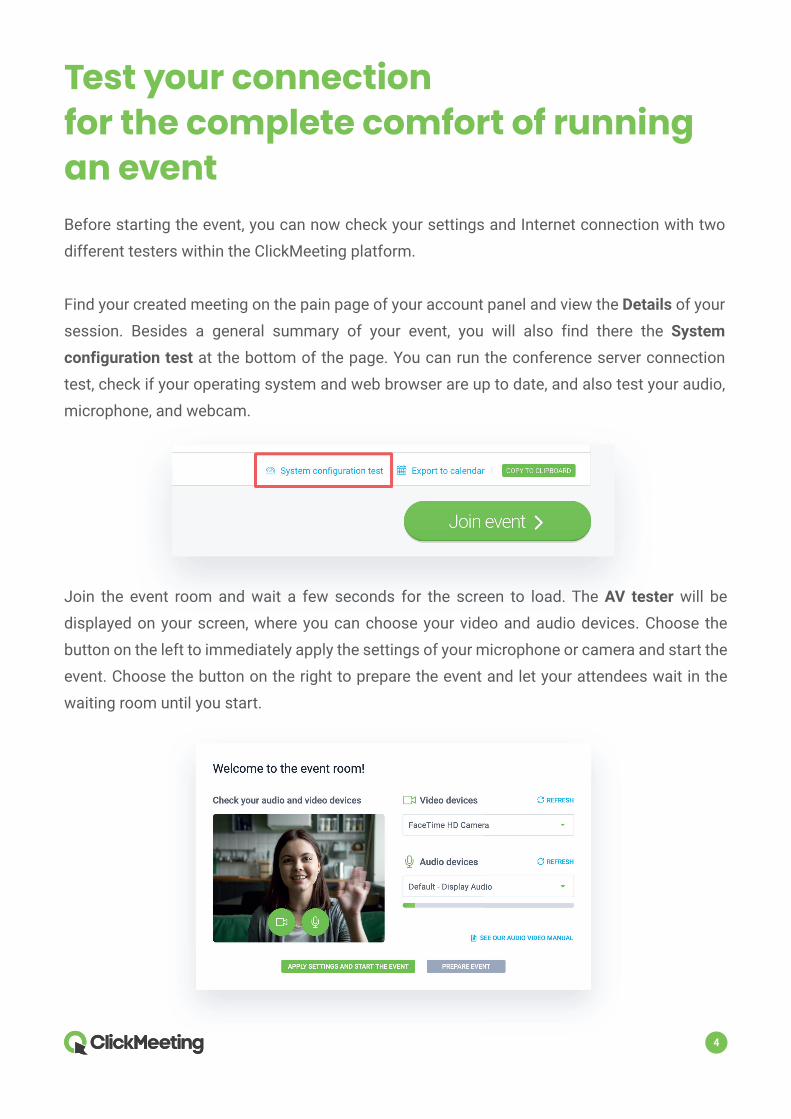
Before starting the event, you can now check your settings and Internet connection with two
different testers within the ClickMeeting platform.
Find your created meeting on the pain page of your account panel and view the Details of your
session. Besides a general summary of your event, you will also find there the System
configuration test at the bottom of the page. You can run the conference server connection
test, check if your operating system and web browser are up to date, and also test your audio,
microphone, and webcam.
4
Join the event room and wait a few seconds for the screen to load. The AV tester will be
displayed on your screen, where you can choose your video and audio devices. Choose the
button on the left to immediately apply the settings of your microphone or camera and start the
event. Choose the button on the right to prepare the event and let your attendees wait in the
waiting room until you start.
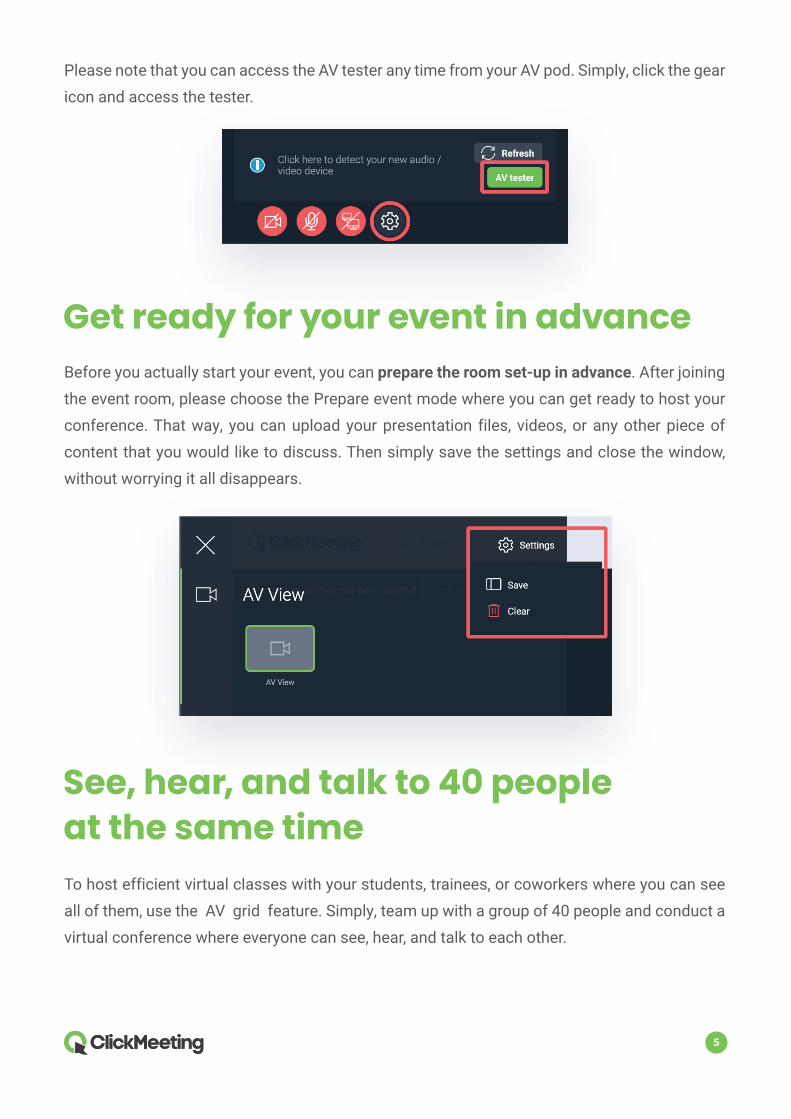
Please note that you can access the AV tester any time from your AV pod. Simply, click the gear
icon and access the tester.
5
Get ready for your event in advance
Before you actually start your event, you can prepare the room set-up in advance. After joining
the event room, please choose the Prepare event mode where you can get ready to host your
conference. That way, you can upload your presentation files, videos, or any other piece of
content that you would like to discuss. Then simply save the settings and close the window,
without worrying it all disappears.
See, hear, and talk to 40 people at the same time
To host efficient virtual classes with your students, trainees, or coworkers where you can see
all of them, use the AV grid feature. Simply, team up with a group of 40 people and conduct a
virtual conference where everyone can see, hear, and talk to each other.
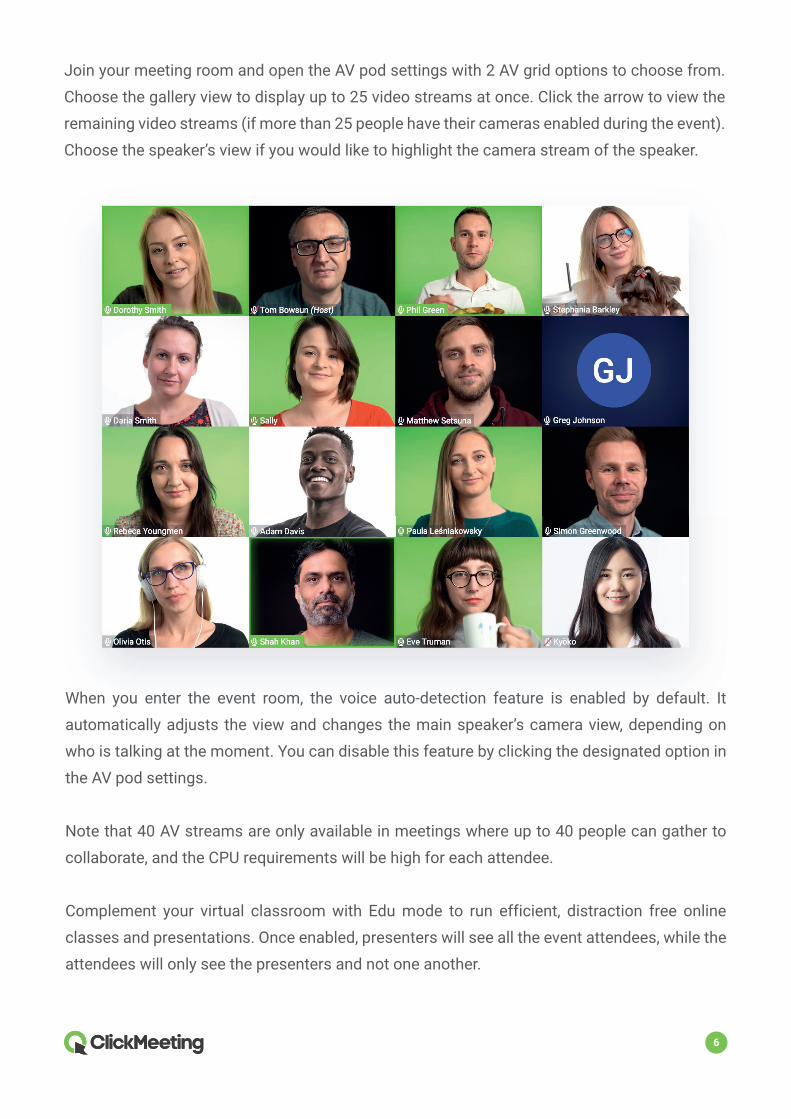
Join your meeting room and open the AV pod settings with 2 AV grid options to choose from.
Choose the gallery view to display up to 25 video streams at once. Click the arrow to view the
remaining video streams (if more than 25 people have their cameras enabled during the event).
Choose the speaker’s view if you would like to highlight the camera stream of the speaker.
6
When you enter the event room, the voice auto-detection feature is enabled by default. It
automatically adjusts the view and changes the main speaker’s camera view, depending on
who is talking at the moment. You can disable this feature by clicking the designated option in
the AV pod settings.
Note that 40 AV streams are only available in meetings where up to 40 people can gather to
collaborate, and the CPU requirements will be high for each attendee.
Complement your virtual classroom with Edu mode to run efficient, distraction free online
classes and presentations. Once enabled, presenters will see all the event attendees, while the
attendees will only see the presenters and not one another.
As soon as an attendee enables camera, they will see their video stream in the event room.
Presenter’s video stream will show up as larger compared to that of an attendee.
Note that presenters can ask an attendee (or multiple attendees) to speak to the entire group.
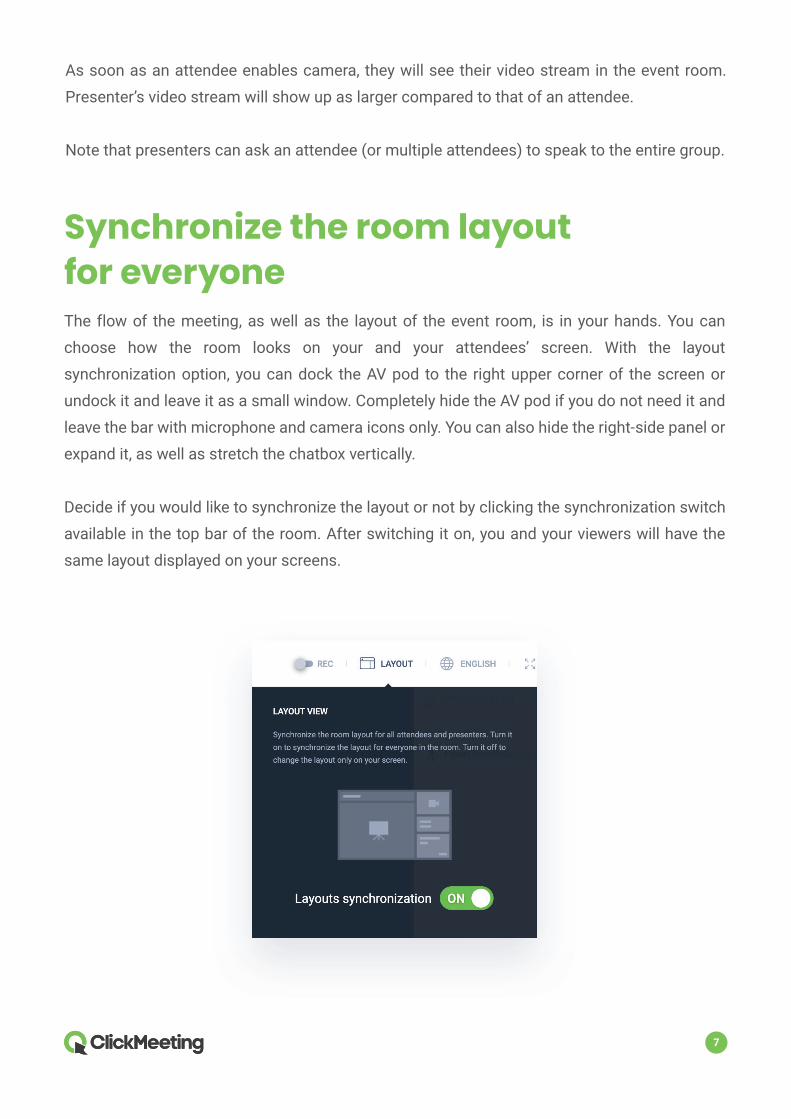
Synchronize the room layout for everyone The flow of the meeting, as well as the layout of the event room, is in your hands. You can
choose how the room looks on your and your attendees’ screen. With the layout
synchronization option, you can dock the AV pod to the right upper corner of the screen or
undock it and leave it as a small window. Completely hide the AV pod if you do not need it and
leave the bar with microphone and camera icons only. You can also hide the right-side panel or
expand it, as well as stretch the chatbox vertically.
Decide if you would like to synchronize the layout or not by clicking the synchronization switch
available in the top bar of the room. After switching it on, you and your viewers will have the
same layout displayed on your screens.
7
Boost engagement with interactive featuresDuring your online meeting, it is always a good idea to keep your audience engaged and be at
the top of your game. With below-described features, you can make the most of your
conference:
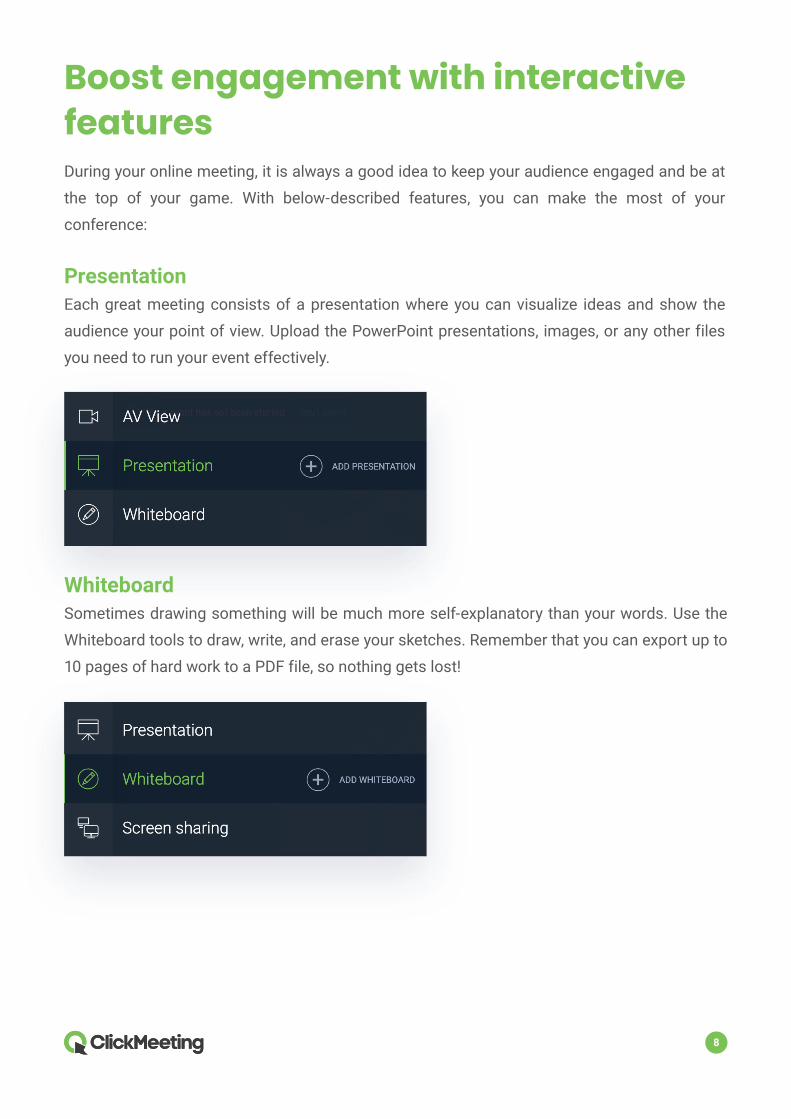
Presentation Each great meeting consists of a presentation where you can visualize ideas and show the
audience your point of view. Upload the PowerPoint presentations, images, or any other files
you need to run your event effectively.
8
Whiteboard Sometimes drawing something will be much more self-explanatory than your words. Use the
Whiteboard tools to draw, write, and erase your sketches. Remember that you can export up to
10 pages of hard work to a PDF file, so nothing gets lost!
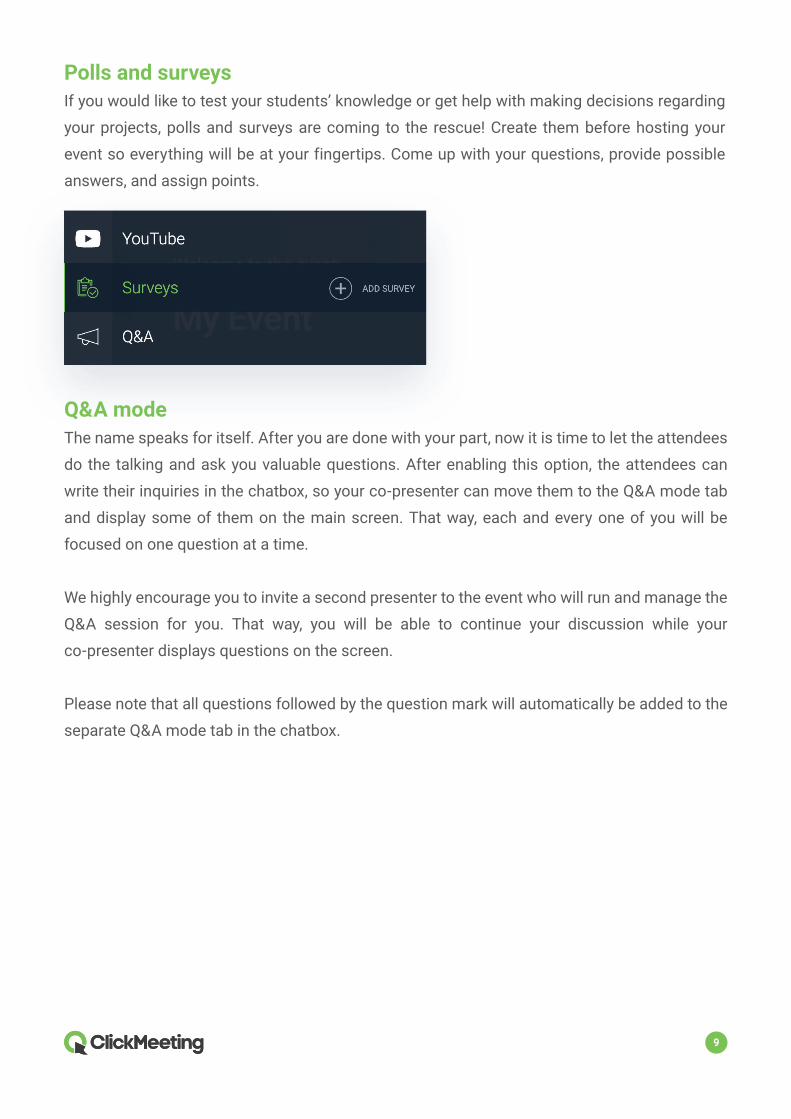
Polls and surveys If you would like to test your students’ knowledge or get help with making decisions regarding
your projects, polls and surveys are coming to the rescue! Create them before hosting your
event so everything will be at your fingertips. Come up with your questions, provide possible
answers, and assign points.
9
Q&A mode The name speaks for itself. After you are done with your part, now it is time to let the attendees
do the talking and ask you valuable questions. After enabling this option, the attendees can
write their inquiries in the chatbox, so your co-presenter can move them to the Q&A mode tab
and display some of them on the main screen. That way, each and every one of you will be
focused on one question at a time.
We highly encourage you to invite a second presenter to the event who will run and manage the
Q&A session for you. That way, you will be able to continue your discussion while your
co-presenter displays questions on the screen.
Please note that all questions followed by the question mark will automatically be added to the
separate Q&A mode tab in the chatbox.
10
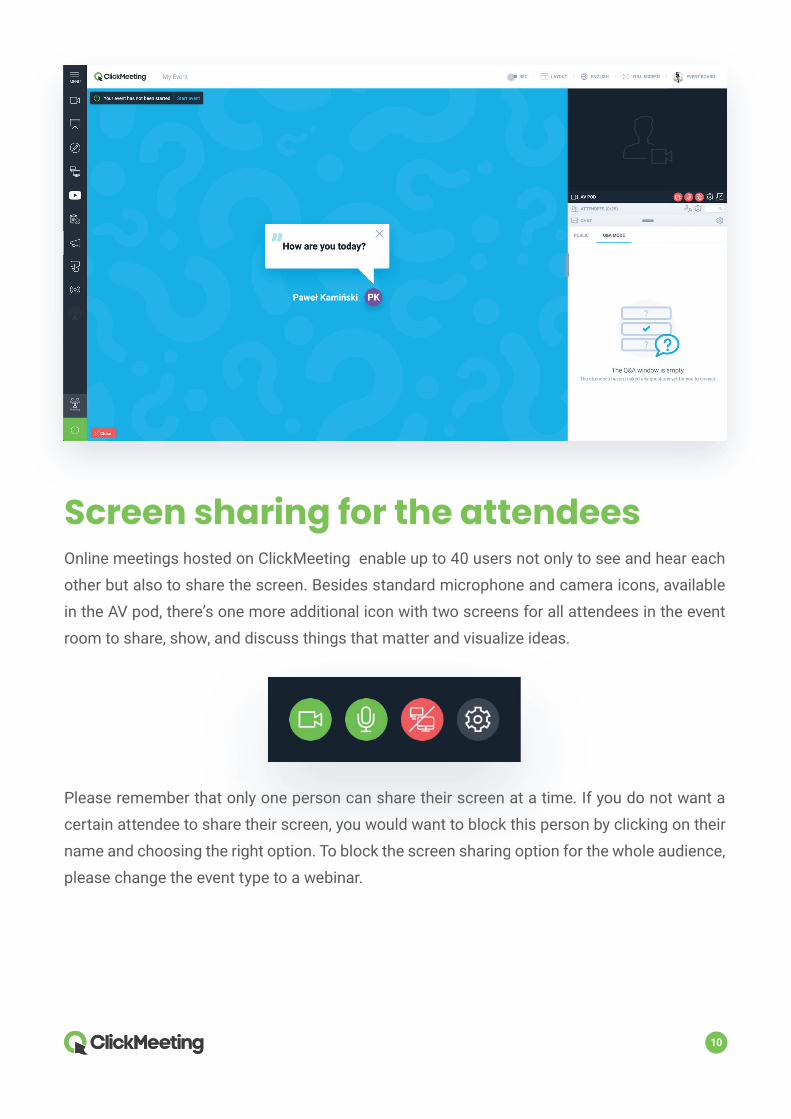
Screen sharing for the attendeesOnline meetings hosted on ClickMeeting enable up to 40 users not only to see and hear each
other but also to share the screen. Besides standard microphone and camera icons, available
in the AV pod, there’s one more additional icon with two screens for all attendees in the event
room to share, show, and discuss things that matter and visualize ideas.
Please remember that only one person can share their screen at a time. If you do not want a
certain attendee to share their screen, you would want to block this person by clicking on their
name and choosing the right option. To block the screen sharing option for the whole audience,
please change the event type to a webinar.
w, and discuss things that matter and visualize ideas.
hat only one person can shhare thheiir screen at a time. I
share their screen, you would want to block this person
the right option. To block the screen sharing option for

11
Please note that blocking the user (or changing the event type to the webinar) takes away the
right to turn on the camera and microphone or share the screen.
The attendees can communicate with you not only by enabling their cameras and microphones
or by writing messages in chat but also through statuses. In the chatbox, they will find a few
options which will let you know that your audience agrees or disagrees with you, needs your
help, or wants you to speak louder or softer.
Work in workshop groupsIf you would like to work in smaller, interactive groups, you can divide your audience into
breakout rooms.
Click the menu on the left side of the event room and choose Breakout rooms. Decide how
many breakout rooms you would like to create and how you want to assign attendees to them.
You can drag and drop your attendees to selected breakout rooms, assign them manually, or do
it randomly. Decide how much time the attendees should spend in the breakout rooms while
working on projects in smaller groups.
When the time is over, move all your attendees back to the main event room and discuss the
results of their hard work.
Top Related
Copyright © 2022 FDOKUMEN

