


Bahasa
Halaman
Hukum

95
CHAPTER 3
PROCEDURAL STEPS
3.1 MS-WINDOWS
3.2 MS-WORD
3.3 MS-EXCEL
3.4 MS-ACCESS
3.1 MS-WINDOWS
Explain the steps to perform the following
1. To move a file using right mouse button.
Ans: Locate the file within My computer and right Click the mouse button. A short cut
menu will be displayed, select the option cut. Open the destination folder and right
click the mouse button in blank area of the window. From short cut menu-click on
paste.
2. To delete a file.
Ans:
From My computer or Explorer, select a file by clicking on it. Select File Menu and click on
Delete OR
Alternatively, you can press the Del key on your keyboard. A message to confirm deletion is
displayed. Confirm deletion by clicking on Yes.
3. To add a new program group to the program option
Ans:
Right click on the start button to display short cut menu. From the short – cut menu, click on
Open - to display the Start Menu folder. Double click on the programs Select File Menu
select New select Folder It results into a folder named New Folder, being added to the
programs Folder. Type any name and press enter. It results into creating an empty folder.
4. To print a document file.
Ans:
Select File select Print. Click on the Printer icon in the tool bar. Now, the ‘Print’ Dialog
Box is displayed. It contains options such as Print what, copies, page range, Printer, Option
(Quality of printing, whether hidden characters are to be printed etc.)After entering all the
details, the actual printing starts.
5. Explain the steps to create a shortcut to a file/folder.
Ans: Place mouse pointer on file / folder and right click.
6. Explain the steps to delete a file permanently from C:
Ans: Select the file to be deleted, click on File, Click on Delete and confirm it.
96
7. Move a file from C: to D:
Ans: Click on Start, Move the cursor to Program, click on Window Explorer, select the file
from C: keep the mouse pressed, and Drag the file to D:
8. Copy a folder to desktop.
Ans: Click on Start, Move the cursor to Program, click on Window Explorer, Select the
folder to be copied, Click on Copy button on the standard toolbar, click on Desktop,
click on Paste Button on the standard Toolbar.
9. Create a shortcut on desktop.
Ans: Place mouse pointer on Desktop icon, right click, short cut menu appears.
10. Restore a deleted file.
Ans: Click on Start, Move the cursor to Program, Click on Window Explorer, Double click
on Recycle Bin in the left panel, all the files and folders in it will appear on right panel,
select the deleted file, click on File, click on Restore.
11. Select all files in a folder.
Ans: Click on Start, Move the cursor to Program, Click on Window Explorer, Select the
folder in left panel, click on Edit, click on Select all.
12. Copying a file from A: to C: in folder “ EXAM” using mouse.
Ans: Click on Start, Move the cursor to Program, click on Window Explorer, Double click
on A: the Files and folders in A: will appear in left panel, Select the folder “EXAM”,
Click on Copy button on Standard Toolbar, Click C: Click on Paste button on Standard
Toolbar.
13. To search a document file.
Ans: Click on Start, Click on Find Click on Files and Folders, ‘find: all files’ dialog box
opens. Answer the questions like NAME , EXT. etc.
14. To change the background of desktop.
Ans: Click on Start, Move the cursor to setting, Click on Control Panel, Double click on
Display, ‘Display Properties’ dialog box opens, Select the background of your choice.
Click on OK.
15. To change system date/time.
Ans: Click on Start, Move the cursor to Setting, click on Control panel, Double Click on
Date/ Time icon.’ Date/time properties’ dialog box opens, make the necessary change
and click on OK.
16. To create a new folder in A:
Ans: Click on Start, Move to Programs, Click on Window Explorer, Highlight A: all folders
and files in A: will be displayed. Click on File, select New, Select Folder.
97
17. To Shutdown the computer.
Ans: Click on Start, Click on Shut Down. ‘Shut Down’ Dialog box opens, select Shut Down,
Click on
OK. A message appears on the screen “It is now safe to switch off the computer”.
Turn off the
computer only after this message.
18. To create a folder ‘ABC’ in C:
Ans: Click on Start, Move to Programs, Click on Window Explorer, Click on C: Select File,
Move to New, Click on Folder, New Folder appears, Type ABC.
19 To open a file/folder from My Computer.
Ans: Double click on My Computer on the desktop, dialog box opens, double click on the
drive that contains the file/folder, double click on the file/folder you want to open.
20: To create a new folder on desktop.
Ans: Click on Start, Move to Programs, Click on Window Explorer, Highlight Desk Top
Icon, Click on File, Move the cursor to New, Click on Folder.
21: To search for an Excel File starting with B.
Ans: Click on Start, Click on Find Click on Files and Folders, ‘Find: all files’ dialog
box opens, Type B*.XLS, Press Enter Key.
22: To delete a file permanently.
Ans: Select the file(s) you want to delete. Hold down the Shift key while you press the Del
key. The highlighted file or folder will be deleted and not found in the Recycle Bin.
23: To delete a file permanently in one-step.
Ans: Select the file(s) you want to delete. Hold down the Shift key while you press the Del
key. The highlighted file or folder will be deleted and not found in the Recycle Bin.
24: To rename folder called MAX.
Ans: Select the Folder MAX, in Windows Explorer, right click on the Folder and Click on
Rename.
25: To see size of file “ EXAM” in bytes.
Ans: Click on Start, Move to Programs, Click on Window Explorer, Select the file EXAM,
Right Click on it, Click on Properties.
26: To see all files in folder ABC with details i.e. size, time etc.
Ans: Click on Start, Move to Programs, Click on window Explorer, Select Folder ABC,
Click View, Click on Details.
27: To move a file from folder TY to folder SY.
Ans: Click on Start, Move to Programs, Click on window Explorer, Adjust Window
Explorer so that both folders are visible, Select TY Folder on the Left Panel, all the Files
in this Folder are displayed on the Right Panel, Click on the File you want to Move,
Keep the Mouse Button pressed and Drag the File to Folder SY.

98
28: How to start Microsoft Excel through Windows?
Ans: Click on Start Button. Move the mouse pointer to Programs. Move the mouse pointer
until Ms-
Excel application is highlighted and double click left mouse button.
29. How to access the Printers Folder in Windows?
Ans: Click on Start , Select setting, Select Control Panel Double Click Printers Folder .
30: Explain how do you delete a folder permanently in Windows 95?
Ans: Select the folder you want to delete. Hold down the Shift key while you press the Del
key. The highlighted folder will be deleted and not found in the Recycle Bin..
31:.Explain how to rename a folder in window ?
Ans: First open Explorer or My Computer. Select the required folder and right click on it.
Click on Rename. Type the Name.
32. To restore deleted text
Ans: Highlight the text and click on Undo button.
33. Create a shortcut in a folder.
Ans: In My Computer click the folder in which you want to create the shortcut, click file
menu, choose New and click shortcut. ‘Create Shortcut’ dialog box opens; type the name of
the item you want to create the shortcut. Select a name for the shortcut.
34.Add a new submenu to the programs menu.
Ans:
Right click Start and then click Open.
Click programs folder to select it.
Click file menu, point to new, and then click folder
Type a name for submenu.
Press enter and open the folder you have just created.
On the file menu, point to new and then click shortcut.
Use the create shortcut wizard to add items to the submenu.
35. To move the taskbar
Ans: Position the mouse pointer on the taskbar (not over the clock or the start button), press
and hold the left mouse button and move the mouse pointer to a side or the top of the
desktop. When an outline of task bar appears on the side or top of the desktop, release the
mouse button.
36. Quit a program.
Ans: Click on close button at the top right corner of the title bar or select File and click on
Exit.
Home work: (Windows)
1. Start the computer to see the Windows screen and note the various areas of the screen.
99
2. Shutdown the computer
3. Using the mouse open the Calculator.
4. Move it to a new location.
5. Open the Note pad in accessories option and resize it.
6. Create a new folder called “Neelam” under your folder/hard disk.
7. Create another folder under “ Neelam” called “ Lina”
8. Rename “ Lina” to “ Yogita”
9. View the items present in My Computer in small format.
10. Delete “Lina” folder.
11. Permanently delete “ Neelam” folder.
12. Copying a file from C: to A: using a keyboard.
13. Suppose a row contains some numbers calculate its total in the table.
14. Change the label of C:
3.2 MS-WORD
Explain the steps to perform the following
1. Currently you are editing a Word Document. Now you want to enter at the top of the each page
the text “ECONOMIC SURVEY 2001”
Ans: Select the View Menu, Select the option Header and Footer, and click the Switch between
Header and Footer button to move to Header area, type ECONOMIC SURVEY 2001, click on
Close button.
2. Insert Page Numbers at the bottom of your text.
Ans: For page numbers, Choose Insert Menu, select Page Numbers. In the dialog box, select the
position as bottom of page (Footer), Select the Alignment as required (Left, Center, Right) etc,
click on OK.
3. Bring the text “ The main problem is “ at the center of the line.
Ans: Select the text “ The main problem is” and Click on Center Alignment button on formatting
Toolbar.
4. Make the word “Record” in Italics.
Ans: Select the word “ Record” and Click on Italics button on Formatting Toolbar.
5. Change the Font size to 14 of the word “Record”
Ans: Select the word “Record”, Click on the drop down arrow of Font size button, with default size
10 and click on 14 as Font size.
6. Make the word “Record” Bold.
Ans: Select the word “Record” and Click on Bold button on Formatting Toolbar.
7. In A3 + B = 8 make 3 as the superscript of A.
Ans: Select 3, Click on Format Menu, click on Font. The Font dialog box opens, In Effects select
Superscript Click OK.
8. In Aij make ij as the subscript of A.
Ans: Select ij and Click on Format Menu, click on Font, come to Effects, click on Subscript –
OK.
100
9. Make “Happy Birthday” in Font “Signature”
Ans: Select “Happy Birthday”, Click on Drop Down Arrow of Font Icon on Formatting Toolbar,
and choose Font “ Signature”.
10. Display the current Date and Time with DD/MM/YY HRS: MIN: SECS format.
Ans: Click on Insert menu – Choose Date and Time option and choose the required format for date
and time from available format. Click on OK.
11. In the text “How is life?” make the first alphabet of every word in upper case and all other in
lower case.
Ans: Select the text “How is life?”, Click on Format Menu , Choose Change Case, from the
given options choose Title Case , Click OK.
12. Underline the text “ How is life?”
Ans: Select the Text “How is life?” and select Underline Button from formatting Toolbar.
13. Make the text “How is life?” in Uppercase
Ans: Select the text “ How is life?” and then Select the Format Menu, choose Change Case. From
the given options choose Uppercase. Click OK.
14. Create a 2 X 3 Table?
Ans: Place the cursor to the desired position; Select Table menu, Select Insert Table. It displays
a dialog box in which enter the number of column: 2 and Number of Rows: 3, Click OK.
15 You have entered five Questions in five different lines. How will you make a table for the above
questions?
Ans: Select the five questions, Click on Table menu. Select Insert Table.
16 Divide your document in two columns.
Ans: Select the document, select Table menu, Choose Convert, choose Text to Table option,
‘Convert text to table’ dialog box opens, enter 2 as the number of columns, Click on OK.
17 Write steps to type “Suyash Tours” at the beginning of every page.
Ans: Select the View menu, Select the option Header and Footer, Type “Suyash Tours”, Click on
Close Button.
18. How to access Microsoft-word, through Windows 95?
Ans: When Windows 95 screen is displayed, click on the Start Button, Select Program group
Click on Microsoft Office. Double click on Microsoft-Word.
19. How to select a text in word?
Ans: Method 1.
Move the cursor to the desired First character of the text, Drag the mouse horizontally across
the text, holding down the left button, at the end up to last character of the text, after dragging
release the mouse button.
Method 2.
The text can also be selected by holding the Shift key, while moving the cursor with arrow key.
101
20. Write steps to delete a Character.
Ans: Method 1.
Backspace key can be used to erase a character to the left to the cursor.
Method 2.
The Del key can be used to erase a character to the right of the cursor.
21. Write steps to delete a word.
Ans: Press Ctrl + Del to delete the next word.
And
Press Ctrl +Backspace to delete the previous word.
22. Write steps to delete a paragraph.
Ans: First select the Paragraph, and then press the Del Key.
23. How do undo the last action?
Ans: Method 1
Click the Undo button from the Standard Toolbar.
Method 2
Press Ctrl + Z
24. Explain the steps to insert a row in a table in Word?
Ans: Select Table Menu, select Insert Row, Click on OK.
25. How to insert a page break?
Ans: Select Insert Menu; Select Break, dialog box opens, select Page Break.
26. How to print the current document quickly.
Ans: Select File Menu; Select Print. ‘Print’ Dialog Box appears, Select Current page, Click OK.
27. Explain the steps to open an existing file.
Ans: Select File Menu, Choose Open, and Double Click on the required file name.
28. How to close a file?
Ans: Select File Menu, Choose Close.
29. How to exit word?
Ans: Select File Menu, Select Exit.
30. How to redo the last action?
Ans: Click the Redo button from the Standard Toolbar or Press Ctrl + Y.
31. Print the First alphabet of every sentence in capital form.
Ans: Select the entire paragraph, Click on Format menu, Choose Change case, Choose Sentence
Case, Click on OK.
32. How to create a new file?
Ans: Select File menu, then click on New.
102
33. How to save a file?
Ans: Click on Save button from Standard Toolbar, dialog box appears, enter the required name for
your file, click on Save.
34. How to open an existing file?
Ans: Select File menu, Click on Open, dialog box appears, Double Click on required file.
35. How to rename a file?
Ans: Select File Menu, Select Save As, type new file name, Click on Save.
36. How to insert an existing file in the currently opened file.
Ans: Move the cursor to required position, in the current file, select Insert. Choose File. ‘Insert File’
dialog box opens. Select the file to be inserted, click on Insert.
37. How to import a file from another word processing program?
Ans: Select File Menu; Select Open, and Type file name along with name of the drive and proper
extension and Click Open.
38. How to achieve hyphenation on a particular paragraph?
Ans: Select Tools Menu, Select Language Hyphenation.
39. How to count the numbers of words of entire document?
Ans: Select Tools Menu, select Word Count.
40. How to delete 2 rows from the table?
Ans: Select the rows, which you want to delete, Select Table, and Select Delete and select Rows.
41. How to delete 1 column from the table?
Ans: Select the column, which you want to delete, Select Table, Select Delete and Select Column.
42. How to insert a column?
Ans: Put the cursor where you want to insert a column, select Table Menu, select Insert Column.
43. How to Insert a Cell in the table?
Ans: Put the cursor where you want to insert a cell, select Table menu, select Insert Cell.
44. How to delete a cell from the table?
Ans: Select a cell, which you want to delete, select Table menu, select Delete and Select Cell.
45. How to split a cell?
Ans: Position the insertion pointer in the cell you want to split, choose Table menu Split Cells.
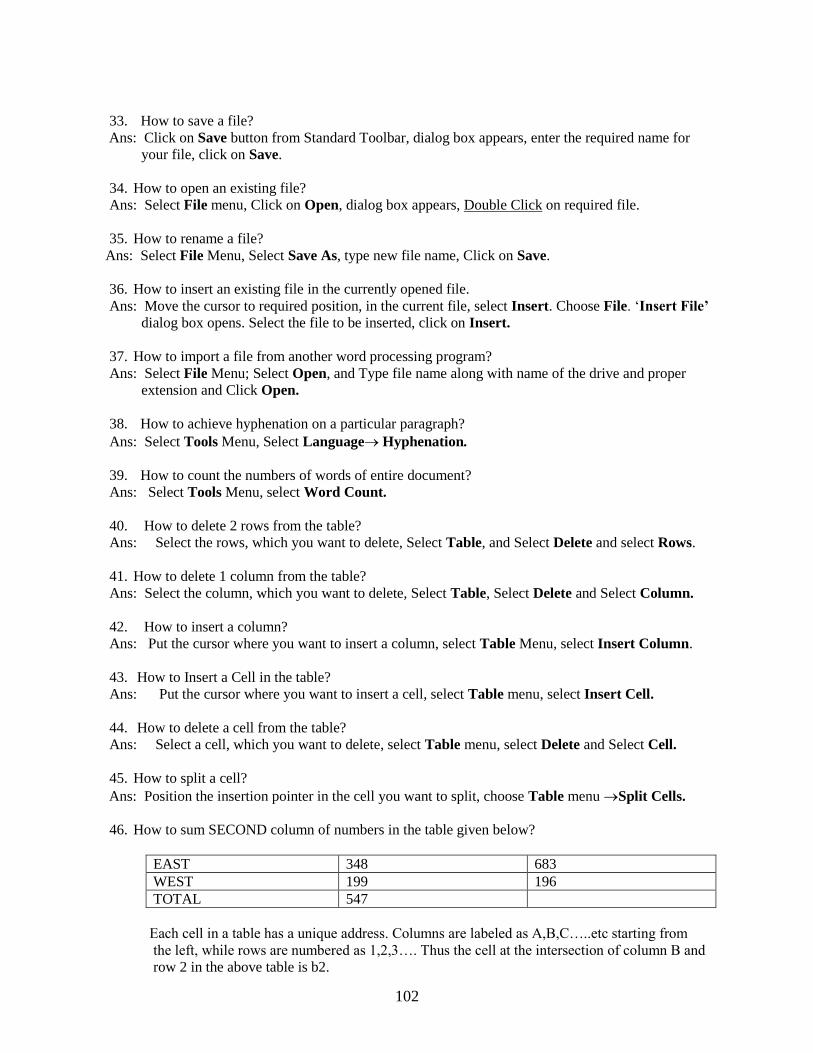
46. How to sum SECOND column of numbers in the table given below?
EAST 348 683
WEST 199 196
TOTAL 547
Each cell in a table has a unique address. Columns are labeled as A,B,C…..etc starting from
the left, while rows are numbered as 1,2,3…. Thus the cell at the intersection of column B and
row 2 in the above table is b2.
103
Ans: Place the cursor in the table where you want the sum to appear, choose TableFormula. The
Word suggests the formula =SUM (b1:b2) Click OK
47. How to split a cell?
Ans: Position the insertion point in the row where you want the new table to start, choose Table
menuSplit Table.
48. How to merge cells in the same row of the table?
Ans: Select the cells to be merged ,(you can select more then one row of cells , but cells will be
merged only horizontally), from the Table menu ,choose Merge Cells.
49. Write steps to change all uppercase alphabets to lowercase and all lowercase to uppercase of the
sentence “HAPPY birthDAY to yOU”.
Ans: Select the sentence “HAPPY birth DAY to yOU”, Select Format menu. Select Change Case,
select Toggle case, Click on OK.
50. How to zoom the screen to 75%?
Ans: Select View, Select Zoom, dialog box opens. Select option 75%, click on OK.
51. How to insert a row in a table in word?
Ans: Select Table Menu, Select Insert Row, It will display two options: Rows above, Rows
Below, Select the required option, Click on OK.
52. Explain the procedure to move and copy a text in document.
Ans: To move:
Select the text which you want to move, Move the mouse pointer on it and drag if to the
destination point, drop it by releasing the mouse button.
As a result the required text is moved from source to destination.
To Copy:
There are 3 ways to copy:
Using Edit menu
Right click of mouse
Drag and drop method
Select the text to be copied Select Edit Menu – Select Copy or press Ctrl +C keys,. Bring the
cursor to the
Destination and Select Edit menu- select Paste or press Ctrl +V keys.
OR
Select the text, Right click the mouse button and select Copy. It copies the selected text in the
clipboard, Take the cursor to the destination, Right click, and select Paste.
OR
Copy the selected text (Drag and Drop method)
Select the text to be copied, move the cursor on it and drag it from the source by holding the Ctrl
Key down to the destination. Drop it by releasing the button and the key.
104
53. Check spelling and grammar for the following text in the file:
“ One of the major advantages of word processor over a tpewriter is that a word processor enables
you to make changes to docment without retyping the entire document.”
Ans:
a. for checking the spelling:
Type the above sentence as it is, Select the entire sentence, Click on Tool Menu and click on the
option Spelling and Grammar from the pull down menu, the ‘spelling and grammar’ dialog
box will open. If the spelling is wrong, different correct options are suggested. Choose the desired
option, and click on Change.
It will display a box asking you whether you want to check further yes or no?, Click on No.
b. For checking the grammatical mistakes / using Grammar option:
Select the entire sentence given above, Click on Tools Menu and click on the option Spelling and
grammar, the ‘spelling and grammar’ dialog box will appear. Click on desired options from
suggestion box and click on Change. It will display a box asking you whether you want to check
further yes or no?, Click on No.
54. How the points and items can be bulleted?
Ans: Type the following two sentences on two separate lines “ Old is gold” & “Tit for Tat.” Select
these two lines, Click on the Bullets button from Formatting Toolbar or Click on Format menu,
Select Bullets and numbering, ‘Bullets and numbering’ dialog box will appear, select bullet
option and select desired format of bullets and then Click on OK.
For numbering the text ,select Numbered option in the ‘Bullets and numbering’ dialog box and
follow the same steps as given for bullets.
55. To find a certain word:
Ans: Highlight the text from which you want to find, then click on Edit menu and select Find option
from menu it will ask you, ‘find what’. Enter the word, which you want to find, and Click on find
next button and click on Cancel. It will find the exact word .
56 Explain the steps to insert special symbol .
Ans: Place the cursor where you want to type special symbol , click on Insert, Click on Symbol,
‘Symbol’ dialog box opens , Click on , Click on Insert , Click on Close.
57. Explain the steps to align the text along both the margin.
Ans: Select the text and Click on Justify button on the Formatting Toolbar.
58. Explain the steps to give a space of 2 lines for the document.
Ans: Select the document, Click on Format, Select Paragraph, ‘Paragraph’ dialog box opens, Click
on Indents and Spacing, Click on Line Spacing as Double, Click on OK.
59. Explain the steps to print 5th line onwards of 1
st paragraph from new page.
Ans: Highlight the 1st paragraph from 5
th Lines onwards, Click on File, Click on Print, Click on
Current Page and Click on Selection, Click on OK.
60. Explain the steps to bring a block of text back, which was deleted accidentally.
Ans: By pressing Undo Button on Standard Toolbar.
61. Explain the steps to look up for a similar meaning/synonym of a word ‘sufficient’.
Ans: Click on Tools, Language, Thesaurus, and the synonyms for word sufficient are suggested
as ‘enough , adequate, plenty, ample, satisfactory’ .

105
62. Explain the steps to make first character of 1st paragraph larger so as to extend over a number of
lines.
Ans: Select the first character of the paragraph, Click on Format, Click on Drop Cap, dialog box
opens, select Dropped, and fill in the required details and Click on OK.
63. Explain the steps to remove Bold Formatting of a word.
Ans: Highlight the word and Click on Bold Button on Formatting Toolbar.
64. Explain the steps for splitting of a cell in 3 columns in a table.
Ans: Select the Cell, Click on Table, Click on Split Cell, dialog box opens, Select 3 as a numbers of
columns, click OK.
65. Recording a Macro.
Ans:
Double click the REC button on the status bar, or, choose Tools Macro Record
a new Macro.
In the ‘Record Macro’ dialog box, type a name for the macro.
Type a description of the macro in the description box
If you want to assign a shortcut key to the macro, choose keyboard button under
Assign Macro to.
Choose the OK
Perform the actions you want to record
Double click the REC button on the status bar to stop recording the macro.
66. Running a Macro.
Ans:
From the Tools menu, choose Macro
In the ‘Macro’ dialog box select the macro you want to run
Choose the Run button
67. Create a Macro to convert a sentence into all upper case.
Ans:
Create a new document called CHECK 1.doc and type in the following sentence:
“This is to test my Macro”
Select the sentence
Double click the REC button on the status bar
In the record macro window, type a name for the macro, such as, ALLCAPS (macro
names can not contain spaces)
In the description box, type the shortcut key that you will be using. Let us assign the
key combination ALT+C.
Click on key board button in the Assign Macro To box
In the ‘Customize keyboard’ dialog box, you have to type in the key combination to
run this macro. In the Press New Shortcut key box, type the keys ALT and C
Click assign button to assign your keyboard combination to your new macro.
Click close

106
The Stop Recording button appears on the screen; each key stroke you make will be
recorded until you tell word to stop recording by clicking the blue square on the Stop
Recording button
From the menu bar, choose Format Change case and select the option
UPPERCASE and click OK
Click the Stop Recording button. Your macro is saved
Type a word and try macro on it
68. To print a range of pages.
Ans:
Click File Print, dialog box opens, under Page Range, specify the portion of the
document you want to print, e.g. current page or pages 12-17 or all pages.
69. Setting paper size and page orientation.
Ans:
Select File Page Setup, dialog box opens. Select the paper size button. Select a
paper size
Select Portrait or Landscape paper orientation.
70. Setting margins.
Ans:
Select File Page Setup
On the margin tab, type or select margin measurement and then choose the OK button
71. To Find text.
Ans:
Click Edit Find
In the Find What box, enter the text you want to search for
Click Find Next
72. To Replace Text.
Ans:
Click Edit Replace
In the Find What box, enter the text you want to search for
In the Replace With Box, enter the replacement text
Click Find Next, Replace
73. Correct typing errors automatically.
Ans:
Choose Tools AutoCorrect
Select ‘Replace text as you type’
Type the word delet
In the ‘With’ box ,type the correct spelling delete.
Click Add
107
74. To create an AutoText entry
Ans:
Select the text or graphic you want to store as an AutoText entry
On the Insert menu point to AutoText and click New
When Word proposes a name for the AutoText entry, accept the name or type a new
one.
75. Insert an AutoText entry.
Ans:
Click where you want to insert the AutoText entry
On Insert menu point to AutoText
Click the name of the AutoText entry you want.
76. To delete an AutoText entry.
Ans:
On the Insert menu point to AutoText and click AutoText
In the ‘Enter AutoText Entries Here’, enter the name of AutoText entry you want to
delete.
Click Delete. Click OK.
77.To remove character formatting for Delete
Ans:
Select the character ‘Delete’
Press ctrl + spacebar
78.Convert Bullets to numbers
Ans:
Select the items that have bullets
Click on the numbering button on the standard toolbar
3.3 MS-EXCEL
Explain the steps to perform the following
5.3.1 Navigating Worksheet
1. How to insert cells?
A: Select Insert, Click on Cells, Select Shift cells right, or Shift cells down. Click OK.
2. Selecting cells A3:A7, B5, C2:C7.
A: Highlight A1:A7, Press Control key, Highlight B5 and C2:C7 by keeping Control
Key pressed.
3. Changing alignment of values in a cell to center.
A: Select the Cell, Click on Format, Click Cells, Dialog Box opens, Click Alignment,
Click on Center, Click OK.
108
4. Construct a single large cell A1.
A: Bring the cursor at the lower left hand corner of cell A1, it changes shape.
And Drag it down to A2, Bring the Cursor to upper right hand corner of A1, it
changes shape and Drag it to the right.
5. Editing cell contents.
A: Bring the cursor on the cell and do Editing.
6. How to move cells?
A: Moving and Copying cells with Cut / Copy and Paste.
Select the data you want to move or copy.
Click the Cut Button, or Choose Edit – Cut, or Right –Click and Select cut from the
Shortcut menu, Place the cursor where you want to data to move, Click on Paste Button from
Standard Toolbar.
7. How to copy cells?
Click the Copy button, or, choose Edit- Copy, or Right Click and select copy from shortcut
menu, Place the cursor where you want to copy the data and, Click on Paste Button.
8. To rename a worksheet.
A: Click right mouse button, Short cut menu appears, Click on Rename, Type the
name and Press enter.
9. To copy a worksheet.
A: Click right mouse button, short cut menu appears, click on copy.
10. To hide/unhide a worksheet.
A: Click on Format, Move to sheet, Hide/ Unhide.
11. To Add Header/Footer.
A: Click on View, Click on Header/ Footer, ‘Page Set up’ Window Opens, Type
Header/Footer, Click OK.
12. How to name a worksheet? A: Double click the Sheet Tab to select it, type a new name for the worksheet and
Press enter.
13. Selecting entire worksheet.
A: Bring cursor to top extreme left hand corner of A1 cell and click .
14. Insert a new worksheet.
A: Click on Insert, select Worksheet.
15 Protect a worksheet.
A: Choose Tools, select Protection Protect sheet . Select appropriate options. Type the
password ,click OK
16. Write the procedure for deleting worksheet.
A: Click on Edit – Delete sheet.
109
17. How to add Borders, colors and Font colors to Excel worksheet?
A: To apply a Font color and Fill color, Select the cells to be formatted, click the color button’s
drop down and select a color from the menus, To add a border, select the cells to be
formatted, click the borders button’s drop down and select a border from the menu.
18. To protect a workbook.
A: Click Tools, Move to Protection, Protect Workbook, Select appropriate options,
Enter Password, Click OK.
19. Insert a new row/column in a worksheet.
A: Click on Insert and click on Row/Column.
20. Save a Workbook
A: Press CTRL+S shortcut key combination or choose File, click on Save or, Click the Save
button on Standard Toolbar.
21. Change the height of row 3 at the same time width of column E.
A: Bring the cursor at the bottom left corner of A3, It changes shape to , Drag it down or
up to change height. Also bring cursor to Top right corner of E Column, it changes
shape to , Move it right or left to change the width.
22. How to delete rows and columns? A: Select the row or column, which you want to delete, and then right click, and choose delete.
23. How to align text in Excel?
A: Select the Range of cells to be formatted, Choose Format – Cells from the menu bar, Click the
Alignment page tab, Choose Horizontal, Vertical, Orientation, merge, and Wrap options
and then click Ok.
24. Display fractions in cell range A7: H20 with 4 decimal.
A: Highlight A7:H20, Click on Format, Cells, Dialog Box opens, Click on Number,
Enter Decimal Places 4, click OK.
25. Display fractions as % with 2 places after decimal.
A: Highlight A7: H20, Click on Format, Click on Cells, dialog box opens, click on
Percentage, enter decimal places 2, Click OK.
26. Selecting a range B4: E7 with keyboard.
A: Select B4 hold down Shift key press right arrow and down arrow key to reach cell E7,
release Shift Key.
27. Selecting a range B4: E7 with mouse.
A: Highlight the Cell B4, Keep the mouse button pressed and Drag and mouse to E7 and
release the button.
28. Create a name for range.
A: Highlight Range, Click Insert, Name, Define, Dialog box opens, Type Name and
click OK.
110
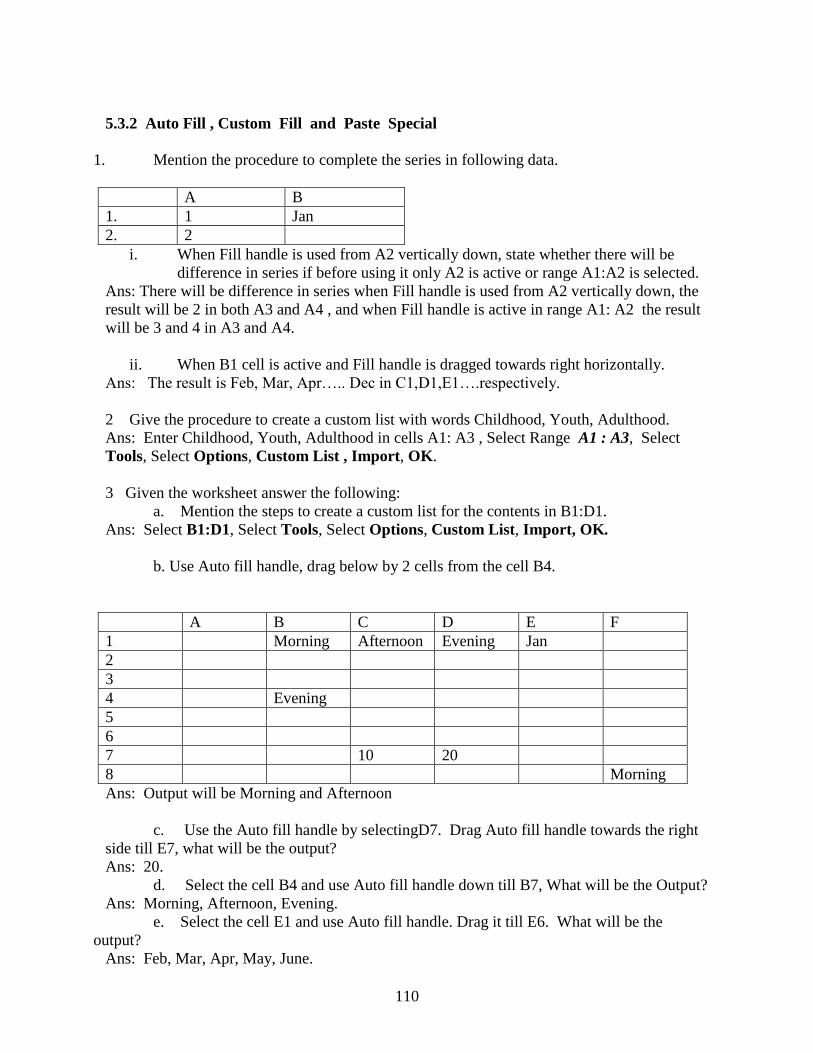
5.3.2 Auto Fill , Custom Fill and Paste Special
1. Mention the procedure to complete the series in following data.
A B
1. 1 Jan
2. 2
i. When Fill handle is used from A2 vertically down, state whether there will be
difference in series if before using it only A2 is active or range A1:A2 is selected.
Ans: There will be difference in series when Fill handle is used from A2 vertically down, the
result will be 2 in both A3 and A4 , and when Fill handle is active in range A1: A2 the result
will be 3 and 4 in A3 and A4.
ii. When B1 cell is active and Fill handle is dragged towards right horizontally.
Ans: The result is Feb, Mar, Apr….. Dec in C1,D1,E1….respectively.
2 Give the procedure to create a custom list with words Childhood, Youth, Adulthood.
Ans: Enter Childhood, Youth, Adulthood in cells A1: A3 , Select Range A1 : A3, Select
Tools, Select Options, Custom List , Import, OK.
3 Given the worksheet answer the following:
a. Mention the steps to create a custom list for the contents in B1:D1.
Ans: Select B1:D1, Select Tools, Select Options, Custom List, Import, OK.
b. Use Auto fill handle, drag below by 2 cells from the cell B4.
A B C D E F
1 Morning Afternoon Evening Jan
2
3
4 Evening
5
6
7 10 20
8 Morning
Ans: Output will be Morning and Afternoon
c. Use the Auto fill handle by selectingD7. Drag Auto fill handle towards the right
side till E7, what will be the output?
Ans: 20.
d. Select the cell B4 and use Auto fill handle down till B7, What will be the Output?
Ans: Morning, Afternoon, Evening.
e. Select the cell E1 and use Auto fill handle. Drag it till E6. What will be the
output?
Ans: Feb, Mar, Apr, May, June.

111
f. Select C7:E7, use Auto fill handle, drag it till the cell F7, what will be the output?
Ans: 40
g. Select cell F8, use auto fill handle to fill entries in the cells E8:C8, what will be the
output?
Ans: Afternoon, Morning, Evening.
4.Given the worksheet below, do the following using Paste Special.
A B C D E
1 Emp.no Sal(pm) Sal(pa) Tax Net
2 E1 4000 12 20%
3 E2 5000 12 20%
4 E3 3000 12 20%
5 E4 1000 12 20%
Using Paste special, give steps for following. Also give the output.
a) Compute the annual salary in C2:C5.
Ans: Select B2 : B5, Select Copy Option from Edit Menu, Select C2, Again select Edit
Menu, Click on Paste Special, Select Values and Operation Multiply and Click on OK.
b) Tax is 20% of the annual salary. Compute it in column D2:D5.
Ans: Same as answer a.
c) Compute the net salary.
Ans: = C2 – D2 Enter, Select E2, Select Copy from Edit Menu, Select E3:E5, Select Paste
from Standard Toolbar.
Net Salary is 19200, 28800,67200, and 48000.
5.3.3 Charts
1.Draw bar chart for the following data:
A B C D E F
1 Roll Test 1 Test 2 C-Test 1 C-Test 2 Final
2 1 56 80 0.5 0.7
3 2 43 91 0.5 0.7
4 3 36 86 0.5 0.7
5 4 49 74 0.5 0.7
Ans: Select A1: C5, Click chart wizard button, Select Bar chart, Select Next, Give response for
Data, Legends, Title, X axis label, Y axis table, select Finish.
2. Write procedure for adding data to chart?
Ans: Select the data series to be added, Drag the series and drop it in the chart.
112
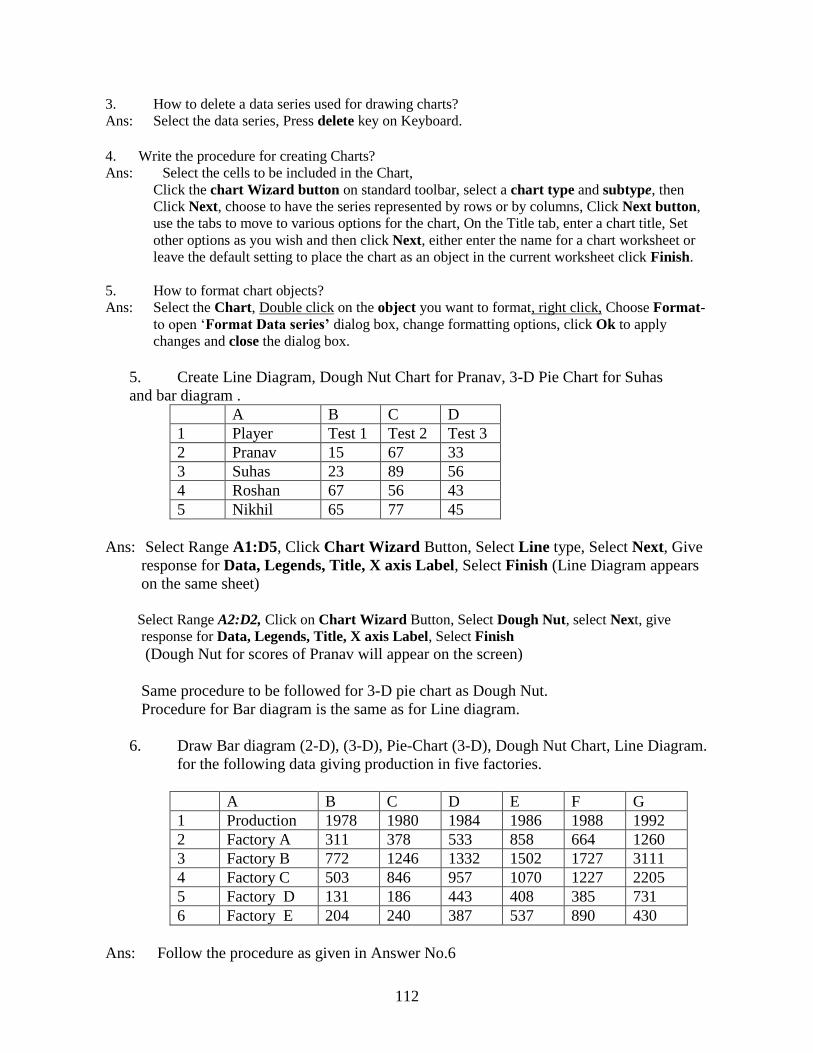
3. How to delete a data series used for drawing charts?
Ans: Select the data series, Press delete key on Keyboard.
4. Write the procedure for creating Charts?
Ans: Select the cells to be included in the Chart,
Click the chart Wizard button on standard toolbar, select a chart type and subtype, then
Click Next, choose to have the series represented by rows or by columns, Click Next button,
use the tabs to move to various options for the chart, On the Title tab, enter a chart title, Set
other options as you wish and then click Next, either enter the name for a chart worksheet or
leave the default setting to place the chart as an object in the current worksheet click Finish.
5. How to format chart objects?
Ans: Select the Chart, Double click on the object you want to format, right click, Choose Format-
to open ‘Format Data series’ dialog box, change formatting options, click Ok to apply
changes and close the dialog box.
5. Create Line Diagram, Dough Nut Chart for Pranav, 3-D Pie Chart for Suhas
and bar diagram .
A B C D
1 Player Test 1 Test 2 Test 3
2 Pranav 15 67 33
3 Suhas 23 89 56
4 Roshan 67 56 43
5 Nikhil 65 77 45
Ans: Select Range A1:D5, Click Chart Wizard Button, Select Line type, Select Next, Give
response for Data, Legends, Title, X axis Label, Select Finish (Line Diagram appears
on the same sheet)
Select Range A2:D2, Click on Chart Wizard Button, Select Dough Nut, select Next, give
response for Data, Legends, Title, X axis Label, Select Finish
(Dough Nut for scores of Pranav will appear on the screen)
Same procedure to be followed for 3-D pie chart as Dough Nut.
Procedure for Bar diagram is the same as for Line diagram.
6. Draw Bar diagram (2-D), (3-D), Pie-Chart (3-D), Dough Nut Chart, Line Diagram.
for the following data giving production in five factories.
A B C D E F G
1 Production 1978 1980 1984 1986 1988 1992
2 Factory A 311 378 533 858 664 1260
3 Factory B 772 1246 1332 1502 1727 3111
4 Factory C 503 846 957 1070 1227 2205
5 Factory D 131 186 443 408 385 731
6 Factory E 204 240 387 537 890 430
Ans: Follow the procedure as given in Answer No.6
113
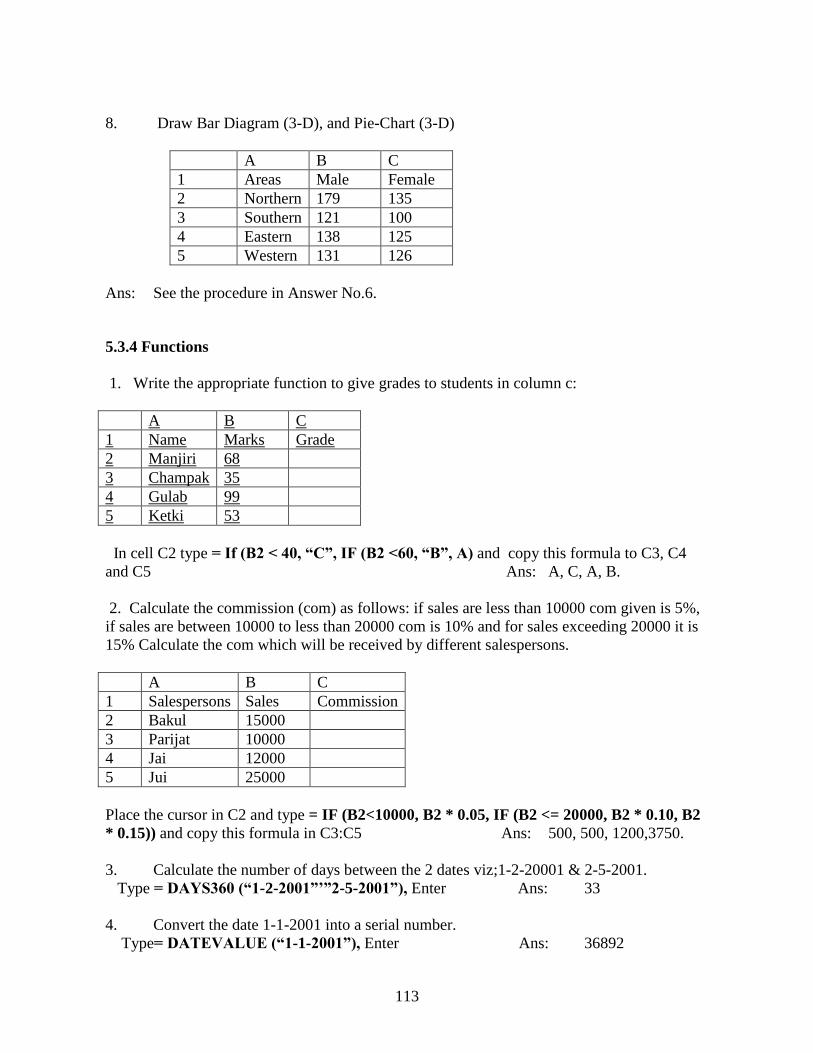
8. Draw Bar Diagram (3-D), and Pie-Chart (3-D)
A B C
1 Areas Male Female
2 Northern 179 135
3 Southern 121 100
4 Eastern 138 125
5 Western 131 126
Ans: See the procedure in Answer No.6.
5.3.4 Functions
1. Write the appropriate function to give grades to students in column c:
A B C
1 Name Marks Grade
2 Manjiri 68
3 Champak 35
4 Gulab 99
5 Ketki 53
In cell C2 type = If (B2 < 40, “C”, IF (B2 <60, “B”, A) and copy this formula to C3, C4
and C5 Ans: A, C, A, B.
2. Calculate the commission (com) as follows: if sales are less than 10000 com given is 5%,
if sales are between 10000 to less than 20000 com is 10% and for sales exceeding 20000 it is
15% Calculate the com which will be received by different salespersons.
A B C
1 Salespersons Sales Commission
2 Bakul 15000
3 Parijat 10000
4 Jai 12000
5 Jui 25000
Place the cursor in C2 and type = IF (B2<10000, B2 * 0.05, IF (B2 <= 20000, B2 * 0.10, B2
* 0.15)) and copy this formula in C3:C5 Ans: 500, 500, 1200,3750.
3. Calculate the number of days between the 2 dates viz;1-2-20001 & 2-5-2001.
Type = DAYS360 (“1-2-2001”’”2-5-2001”), Enter Ans: 33
4. Convert the date 1-1-2001 into a serial number.
Type= DATEVALUE (“1-1-2001”), Enter Ans: 36892
114
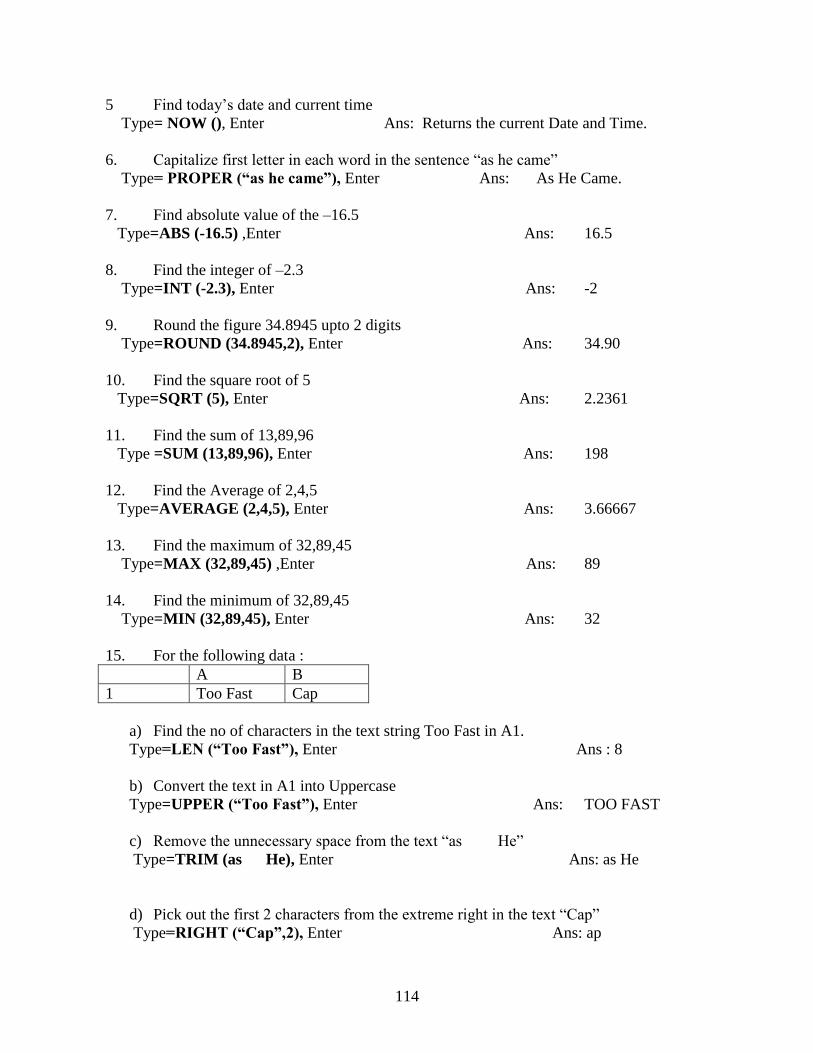
5 Find today’s date and current time
Type= NOW (), Enter Ans: Returns the current Date and Time.
6. Capitalize first letter in each word in the sentence “as he came”
Type= PROPER (“as he came”), Enter Ans: As He Came.
7. Find absolute value of the –16.5
Type=ABS (-16.5) ,Enter Ans: 16.5
8. Find the integer of –2.3
Type=INT (-2.3), Enter Ans: -2
9. Round the figure 34.8945 upto 2 digits
Type=ROUND (34.8945,2), Enter Ans: 34.90
10. Find the square root of 5
Type=SQRT (5), Enter Ans: 2.2361
11. Find the sum of 13,89,96
Type =SUM (13,89,96), Enter Ans: 198
12. Find the Average of 2,4,5
Type=AVERAGE (2,4,5), Enter Ans: 3.66667
13. Find the maximum of 32,89,45
Type=MAX (32,89,45) ,Enter Ans: 89
14. Find the minimum of 32,89,45
Type=MIN (32,89,45), Enter Ans: 32
15. For the following data :
A B
1 Too Fast Cap
a) Find the no of characters in the text string Too Fast in A1.
Type=LEN (“Too Fast”), Enter Ans : 8
b) Convert the text in A1 into Uppercase
Type=UPPER (“Too Fast”), Enter Ans: TOO FAST
c) Remove the unnecessary space from the text “as He”
Type=TRIM (as He), Enter Ans: as He
d) Pick out the first 2 characters from the extreme right in the text “Cap”
Type=RIGHT (“Cap”,2), Enter Ans: ap
115
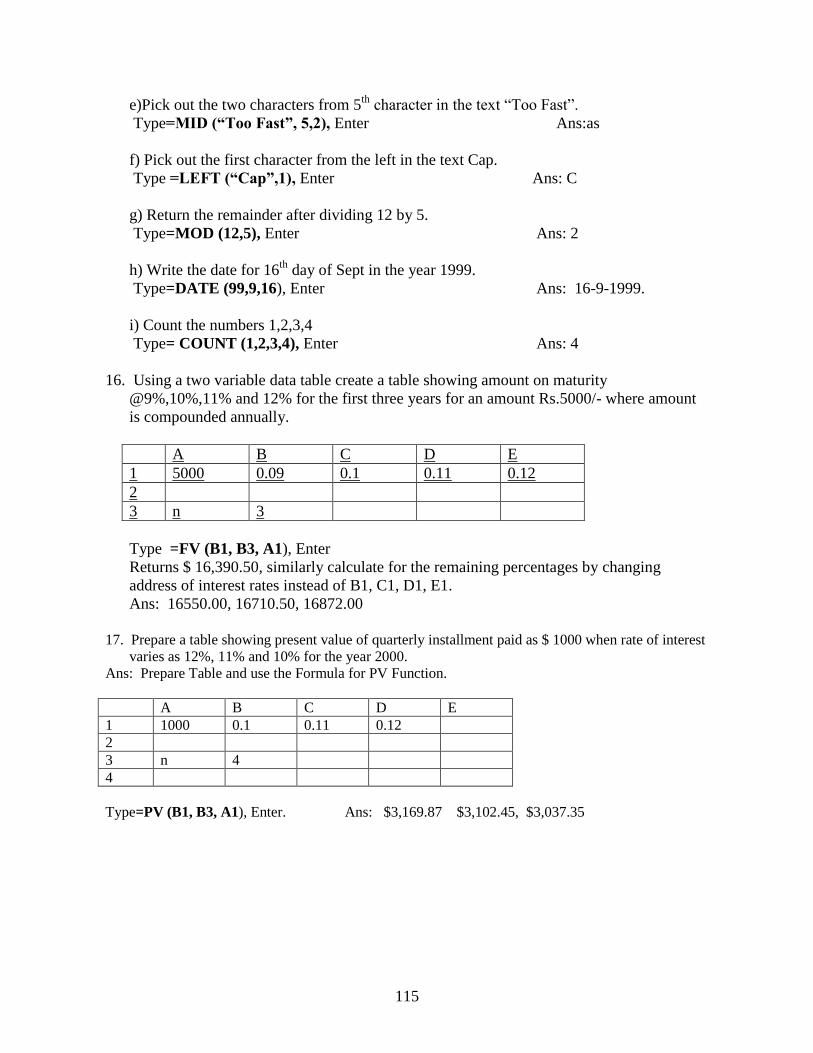
e)Pick out the two characters from 5th
character in the text “Too Fast”.
Type=MID (“Too Fast”, 5,2), Enter Ans:as
f) Pick out the first character from the left in the text Cap.
Type =LEFT (“Cap”,1), Enter Ans: C
g) Return the remainder after dividing 12 by 5.
Type=MOD (12,5), Enter Ans: 2
h) Write the date for 16th
day of Sept in the year 1999.
Type=DATE (99,9,16), Enter Ans: 16-9-1999.
i) Count the numbers 1,2,3,4
Type= COUNT (1,2,3,4), Enter Ans: 4
16. Using a two variable data table create a table showing amount on maturity
@9%,10%,11% and 12% for the first three years for an amount Rs.5000/- where amount
is compounded annually.
A B C D E
1 5000 0.09 0.1 0.11 0.12
2
3 n 3
Type =FV (B1, B3, A1), Enter
Returns $ 16,390.50, similarly calculate for the remaining percentages by changing
address of interest rates instead of B1, C1, D1, E1.
Ans: 16550.00, 16710.50, 16872.00
17. Prepare a table showing present value of quarterly installment paid as $ 1000 when rate of interest
varies as 12%, 11% and 10% for the year 2000.
Ans: Prepare Table and use the Formula for PV Function.
A B C D E
1 1000 0.1 0.11 0.12
2
3 n 4
4
Type=PV (B1, B3, A1), Enter. Ans: $3,169.87 $3,102.45, $3,037.35
116
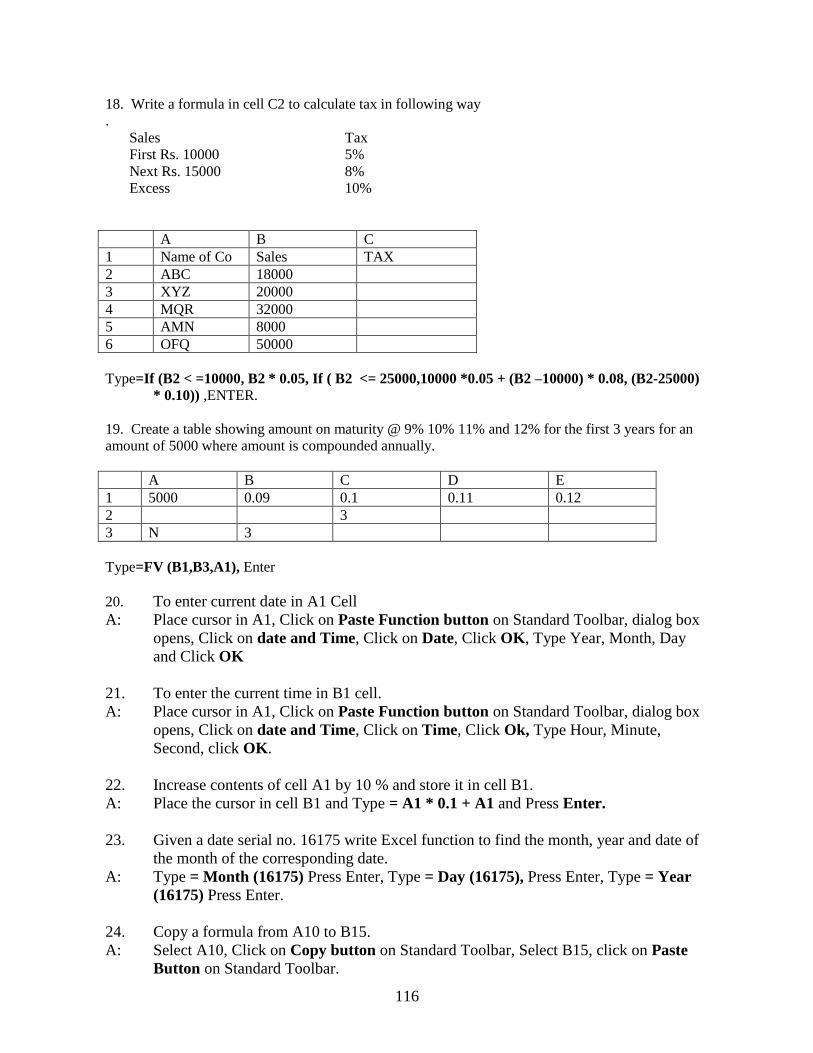
18. Write a formula in cell C2 to calculate tax in following way
.
Sales Tax
First Rs. 10000 5%
Next Rs. 15000 8%
Excess 10%
A B C
1 Name of Co Sales TAX
2 ABC 18000
3 XYZ 20000
4 MQR 32000
5 AMN 8000
6 OFQ 50000
Type=If (B2 < =10000, B2 * 0.05, If ( B2 <= 25000,10000 *0.05 + (B2 –10000) * 0.08, (B2-25000)
* 0.10)) ,ENTER.
19. Create a table showing amount on maturity @ 9% 10% 11% and 12% for the first 3 years for an
amount of 5000 where amount is compounded annually.
A B C D E
1 5000 0.09 0.1 0.11 0.12
2 3
3 N 3
Type=FV (B1,B3,A1), Enter
20. To enter current date in A1 Cell
A: Place cursor in A1, Click on Paste Function button on Standard Toolbar, dialog box
opens, Click on date and Time, Click on Date, Click OK, Type Year, Month, Day
and Click OK
21. To enter the current time in B1 cell.
A: Place cursor in A1, Click on Paste Function button on Standard Toolbar, dialog box
opens, Click on date and Time, Click on Time, Click Ok, Type Hour, Minute,
Second, click OK.
22. Increase contents of cell A1 by 10 % and store it in cell B1.
A: Place the cursor in cell B1 and Type = A1 * 0.1 + A1 and Press Enter.
23. Given a date serial no. 16175 write Excel function to find the month, year and date of
the month of the corresponding date.
A: Type = Month (16175) Press Enter, Type = Day (16175), Press Enter, Type = Year
(16175) Press Enter.
24. Copy a formula from A10 to B15.
A: Select A10, Click on Copy button on Standard Toolbar, Select B15, click on Paste
Button on Standard Toolbar.
117
25. Round the contents of cell A7 to 2 decimal places in cell B7.
A: Keep the cursor in B7 and type @ROUND (A7, 2) Press Enter.
26. Calculate Standard Deviation of numbers in cells B3:D7 and place it in B9.
A: Keep the cursor in B9 and type @ STD (B3:D7) Press Enter.
27. Cell C4 should display “ Go Ahead” if contents of cell C3 are either “Y” or “y”. Otherwise it
should display “ Stop”.
A: Place the cursor in cell C4, Type = IF (C3 = Y or y, “ Go Ahead”, “Stop”) Press
Enter.
28. Calculate the highest values and lowest value of range A1 and A10 and place them in
B2 and B3. Respectively.
A: Place the cursor in B2 and type = MAX (A1:A10) Press Enter, Place the cursor in B3
and Type = MIN (A1: A10) Press Enter.
5.3.5 Templates
1. How to open and use a template?
A: Excel includes predesigned templates that you can use or modify.
To Open a Template: Choose File , click on New to open ‘New’ Dialog box, Click
Spreadsheets solutions tab to view the built-in Excel Templates, Click once on any template
icon to preview the template, To Open an existing Template, Select the template in the
Spreadsheets solutions Window, And then click OK.
2. How to customize a template?
A: The Invoice template is a typical example. There are two worksheets in templates: Invoice
and Customize.
Your Invoice
To add your personal information, Click Customize button in Invoice Spreadsheet to move to
customize your Invoice spreadsheet, enter your custom information,
Click the Lock / Save Sheet button, Choose Lock but don’t Save or Lock and Save
Template, then Click OK.
5.3.6 Linking Sheets in a Workbook
1.Add contents of A1 of sheet 2 and contents of B1 of sheet 3 and store the result in A3 of
sheet 1.
Ans: On Sheet 1 select area A3 and Type =, Click on Shift to, Select area A1 and Type +,
Click on Sheet 3, Select area B1.

118
2. Find Total sales receipts on sheet three from using the data given on sheets 1 and 2.
The following data is on sheet 1 of folder “Sales receipts”
A B
1 Years No.of units sold
2 1 100
3 2 150
4 3 200
5 4 250
This data is on sheet 2 of the same folder.
A B
1 Years Price per unit
2 1 100
3 2 150
4 3 200
5 4 250
Ans: Select sheet 1., Select range B2:B5, Click on formula bar type =, Click on sheet 2, Select
B2:B5, Type *, select sheet 3, Select B2:B5 enter, Click on B6, Click Auto sum, Select B2:B5
Enter, It gives total sales receipts.
5.3.7 Subtotal
1. How to do subtotal?
Ans: Select a cell anywhere in database, Choose Data, Click on Subtotals to open the subtotal
dialog box. ‘At each change in’ tab, select the field where the database is sorted , Select a
type of subtotal from use function dropdown list, In ‘add subtotal to’ tab, select each field
you want to subtotal, Click on summary below data. Click on OK.
2. Write procedure for obtaining state wise subtotal.
A B C D
1 Salesman State Sales Sex
2 Abhay M.P. 1.80 M
3 Lopa U.P. 7.3 F
4 Narayan Gujarat 9.2 M
5 Tara A.P. 5.6 M
6 John Maharashtra 4.5 M
7 Pushpa H.P. 8.8 F
Ans : Select A2:D7, Click on Data, Subtotal, Subtotal dialog opens, Enter state, Function sum,
Click on summary below data, Click on Ok.
3. How to remove subtotal?
Ans: To remove subtotals Choose Data ,click on Subtotals, Dialog box opens and then Click on
Remove All tab.
119
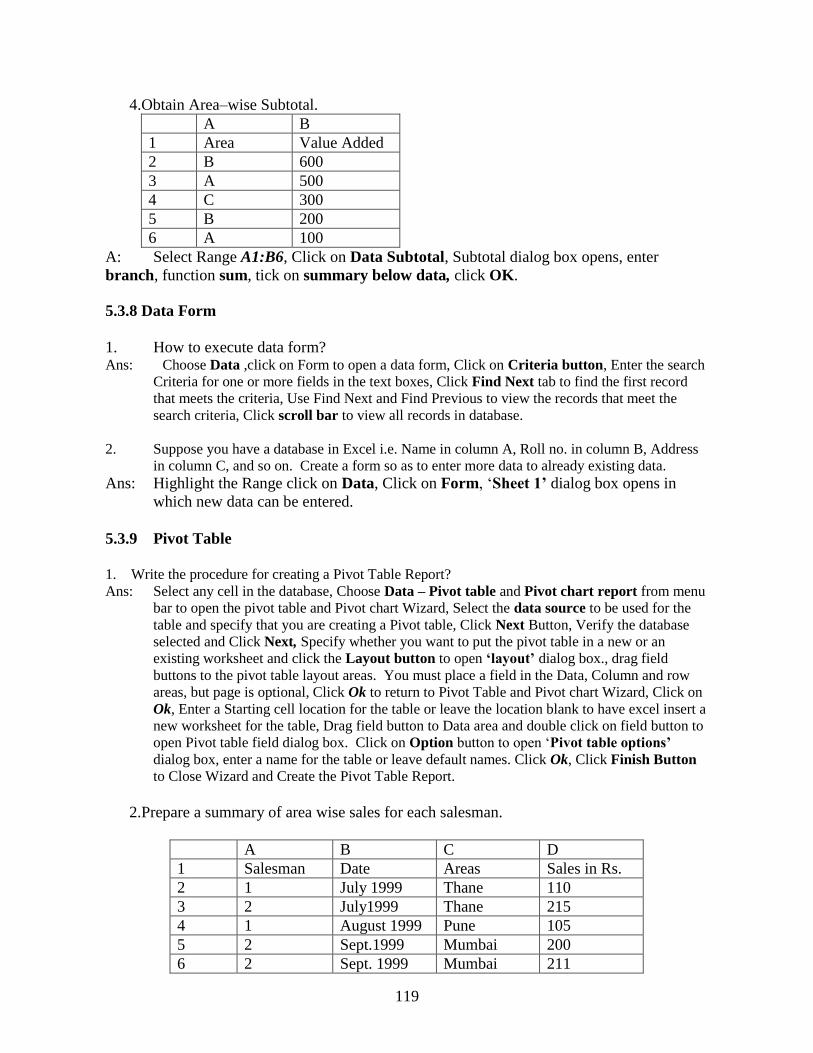
4.Obtain Area–wise Subtotal.
A B
1 Area Value Added
2 B 600
3 A 500
4 C 300
5 B 200
6 A 100
A: Select Range A1:B6, Click on Data Subtotal, Subtotal dialog box opens, enter
branch, function sum, tick on summary below data, click OK.
5.3.8 Data Form
1. How to execute data form? Ans: Choose Data ,click on Form to open a data form, Click on Criteria button, Enter the search
Criteria for one or more fields in the text boxes, Click Find Next tab to find the first record
that meets the criteria, Use Find Next and Find Previous to view the records that meet the
search criteria, Click scroll bar to view all records in database.
2. Suppose you have a database in Excel i.e. Name in column A, Roll no. in column B, Address
in column C, and so on. Create a form so as to enter more data to already existing data.
Ans: Highlight the Range click on Data, Click on Form, ‘Sheet 1’ dialog box opens in
which new data can be entered.
5.3.9 Pivot Table
1. Write the procedure for creating a Pivot Table Report?
Ans: Select any cell in the database, Choose Data – Pivot table and Pivot chart report from menu
bar to open the pivot table and Pivot chart Wizard, Select the data source to be used for the
table and specify that you are creating a Pivot table, Click Next Button, Verify the database
selected and Click Next, Specify whether you want to put the pivot table in a new or an
existing worksheet and click the Layout button to open ‘layout’ dialog box., drag field
buttons to the pivot table layout areas. You must place a field in the Data, Column and row
areas, but page is optional, Click Ok to return to Pivot Table and Pivot chart Wizard, Click on
Ok, Enter a Starting cell location for the table or leave the location blank to have excel insert a
new worksheet for the table, Drag field button to Data area and double click on field button to
open Pivot table field dialog box. Click on Option button to open ‘Pivot table options’
dialog box, enter a name for the table or leave default names. Click Ok, Click Finish Button
to Close Wizard and Create the Pivot Table Report.
2.Prepare a summary of area wise sales for each salesman.
A B C D
1 Salesman Date Areas Sales in Rs.
2 1 July 1999 Thane 110
3 2 July1999 Thane 215
4 1 August 1999 Pune 105
5 2 Sept.1999 Mumbai 200
6 2 Sept. 1999 Mumbai 211
120
Ans: Select Range A1:D6, Select Data, Click on Pivot Table.
Step.1. Pivot table Wizard will appear, Click on Database and on Pivot Table, Click
next.
Step.2. Data Range will appear in the dialog box, Ensure its corrections and Click on
Next.
Step.3. Click Layout button, Drag the field buttons to following areas to layout your
pivot table.
Row Labels, Column: Areas Labels, Data: Sales in Rs, Page: Date Select OK,
Select ne: Salesman xt.
Step 4. Provide reference in A8 in existing worksheet for the Pivot Table or select
new worksheet, click on finish.
5.3.10 Sorting & Filtering
1 How to sort data typed in A1:A3 as 56,28,684?
Ans: Select A1:A3, Click on Data, Click on Sort, dialog box opens, give sort order. Click OK
2. How to undo sorting? .
Ans: Select Edit, Undo Sorting.
3. How to do quick sorting?
Ans: Select sort ascending or descending buttons from tool bar.
4. You have to display only those rows whose marks in subject stored in column B are at
least 35. How will you do it?
Ans: Highlight the Range B1:B10, click on Data, Click on Auto filter, click on Custom
Filter, Click on Marks < or = 35, Click on OK.
5. Remove the applied auto filter.
Ans: Click on Data, click on for auto filter.
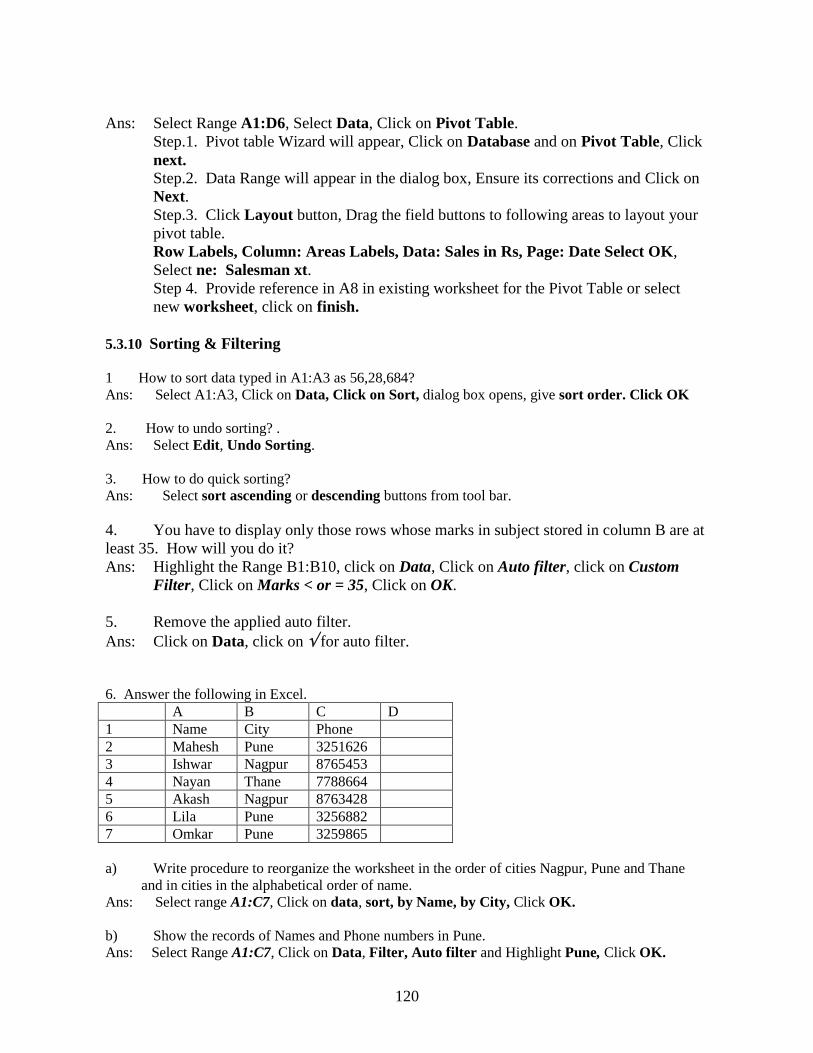
6. Answer the following in Excel.
A B C D
1 Name City Phone
2 Mahesh Pune 3251626
3 Ishwar Nagpur 8765453
4 Nayan Thane 7788664
5 Akash Nagpur 8763428
6 Lila Pune 3256882
7 Omkar Pune 3259865
a) Write procedure to reorganize the worksheet in the order of cities Nagpur, Pune and Thane
and in cities in the alphabetical order of name.
Ans: Select range A1:C7, Click on data, sort, by Name, by City, Click OK.
b) Show the records of Names and Phone numbers in Pune.
Ans: Select Range A1:C7, Click on Data, Filter, Auto filter and Highlight Pune, Click OK.
121
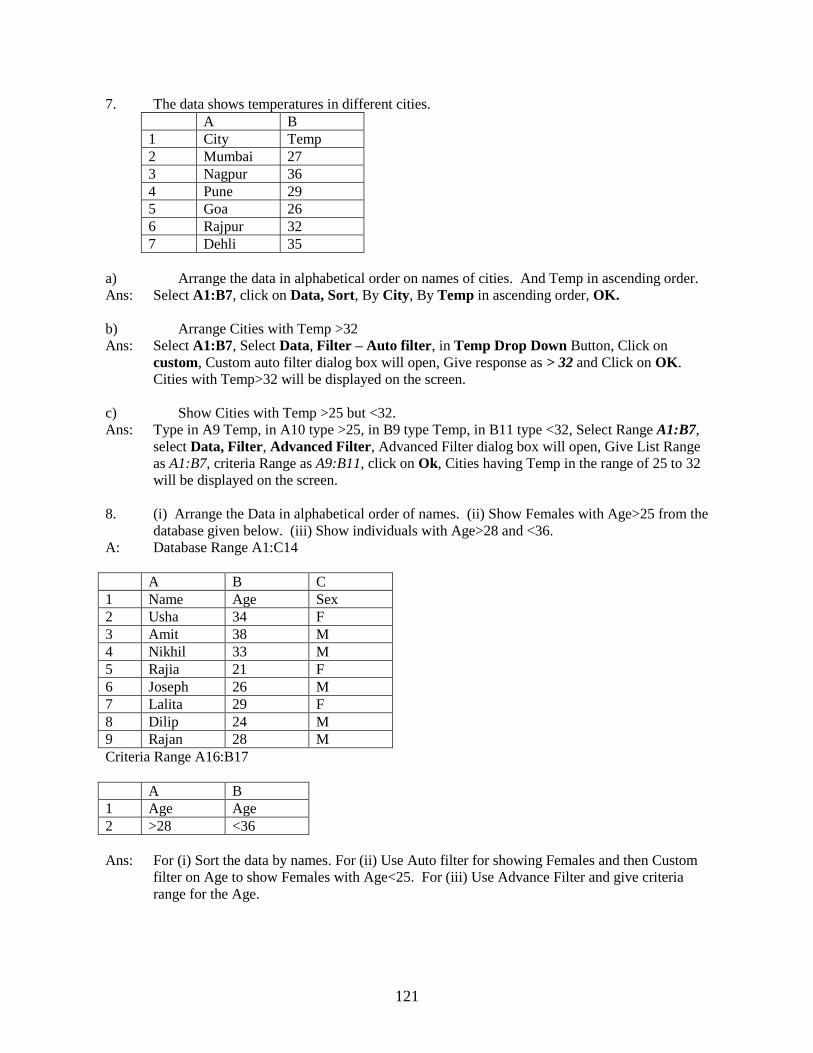
7. The data shows temperatures in different cities.
A B
1 City Temp
2 Mumbai 27
3 Nagpur 36
4 Pune 29
5 Goa 26
6 Rajpur 32
7 Dehli 35
a) Arrange the data in alphabetical order on names of cities. And Temp in ascending order.
Ans: Select A1:B7, click on Data, Sort, By City, By Temp in ascending order, OK.
b) Arrange Cities with Temp >32
Ans: Select A1:B7, Select Data, Filter – Auto filter, in Temp Drop Down Button, Click on
custom, Custom auto filter dialog box will open, Give response as > 32 and Click on OK.
Cities with Temp>32 will be displayed on the screen.
c) Show Cities with Temp >25 but <32.
Ans: Type in A9 Temp, in A10 type >25, in B9 type Temp, in B11 type <32, Select Range A1:B7,
select Data, Filter, Advanced Filter, Advanced Filter dialog box will open, Give List Range
as A1:B7, criteria Range as A9:B11, click on Ok, Cities having Temp in the range of 25 to 32
will be displayed on the screen.
8. (i) Arrange the Data in alphabetical order of names. (ii) Show Females with Age>25 from the
database given below. (iii) Show individuals with Age>28 and <36.
A: Database Range A1:C14
A B C
1 Name Age Sex
2 Usha 34 F
3 Amit 38 M
4 Nikhil 33 M
5 Rajia 21 F
6 Joseph 26 M
7 Lalita 29 F
8 Dilip 24 M
9 Rajan 28 M
Criteria Range A16:B17
A B
1 Age Age
2 >28 <36
Ans: For (i) Sort the data by names. For (ii) Use Auto filter for showing Females and then Custom
filter on Age to show Females with Age<25. For (iii) Use Advance Filter and give criteria
range for the Age.
122
5.3.11 Cell References:
Cell referencing is all about how a cell address will be referred to when a formula is being
constructed. A formula is constructed using cell addresses. Each cell has an address,
made up of its row and columns number. The cell address has to be accurate for the
formula to be correct. One a formula is created, it is usually copied whenever required in
any other part of the worksheet. This is where the concept of relative and absolute
referencing comes into play. These topics are discussed in the following sections.
Relative References: Whenever a formula is copied from one part of the worksheet to the
other, the address of the cell changes relative to where it has been copied. This ability to
adjust a formula from one location to another is called Relative Addressing. The formula
is always adjusted relative to its location.
Absolute References: An absolute address points to only one address. It does not change
even though the position of the cell containing the formula changes. That means whenever
an absolute address is used, it instructs the spreadsheet program not to update the address
if the formula is to be copied or moved.
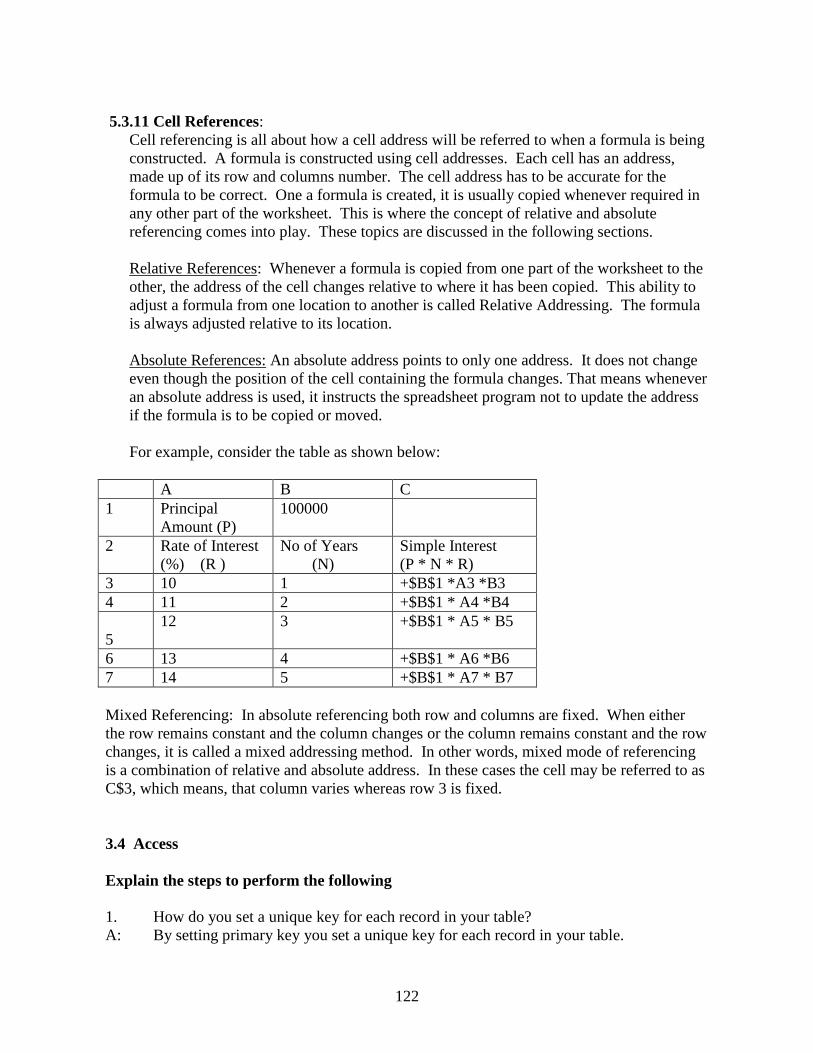
For example, consider the table as shown below:
A B C
1 Principal
Amount (P)
100000
2 Rate of Interest
(%) (R )
No of Years
(N)
Simple Interest
(P * N * R)
3 10 1 +$B$1 *A3 *B3
4 11 2 +$B$1 * A4 *B4
5
12 3 +$B$1 * A5 * B5
6 13 4 +$B$1 * A6 *B6
7 14 5 +$B$1 * A7 * B7
Mixed Referencing: In absolute referencing both row and columns are fixed. When either
the row remains constant and the column changes or the column remains constant and the row
changes, it is called a mixed addressing method. In other words, mixed mode of referencing
is a combination of relative and absolute address. In these cases the cell may be referred to as
C$3, which means, that column varies whereas row 3 is fixed.
3.4 Access
Explain the steps to perform the following
1. How do you set a unique key for each record in your table?
A: By setting primary key you set a unique key for each record in your table.
123
2. How do you add a new field to an existing table? A: You can add a new field to an existing table by inserting a field, which involves two steps:
Step 1. Click on the row beneath which you want to add a field. An arrow
will appear in field selector column.
Step 2. Click on the insert rows buttons. A blank row will be added.
3. How do you change the data type of an existing table field?
A: It requires three steps to be taken.
Click on the field whose data type you want to change.
Click on the down arrow to the right of data type field, whose data type you
want to change. A menu will appear.
Click on the new data type.
4. How can you add new records to the end of a table?
A: Using Edit mode you can add records at the end of the existing table.
5. How to correct a mistake you made while editing a table? A: While using Undo feature one can undo the last edit made. Depending on the last action the
Undo button may display Undo typing, Undo current field- record or Undo save record. If
there is nothing to undo, the button label will display can’t undo.
6. How can you filter your table data based on more than one criterion? A: The Filter by Form feature lets you filter data based on more than one criterion. Using this
feature you can filter based on both AND and AND OR cirteiron if you specify AND criterion
access will display only those records that meet all the specified criterion.
For example if you filter on both customers located in Maharashtra and customers in the real
estate industry, customers satisfying both criterion will be displayed. But if you specify OR
criterion then you filter on customers in Maharashtra or in the real estate industry then
customers that meet either condition will be displayed.
7. 7. How can you quickly find a specific word in a table that contains thousands of records?
A: Using the Find feature, you can quickly search for specific data in a table that is open in Data
sheet View.
8. What command makes a column perpetually visible as you scroll?
A: By freezing the column/s we can make them always visible. For freezing the column/s following steps are necessary.
a. Step 1. Highlight the column/s you want to freeze.
b. Step 2. Click on Format.
c. Step 3. Click on Freeze Column.
9. How can you temporarily remove certain columns from view?
A: We can temporarily hide certain columns that you don’t want to give by taking
following steps:
d. Step 1. Highlight the column/s you want to hide.
e. Step 2. Click on Format.
f. Step 3. Click on Hide Columns.
124
10. How do you change the name of a field column in Datasheet view?
A: You can rename a filed column by taking following steps;
g. Step.1 Click on the column header you want to rename.
h. Step 2. Click on format.
i. Step 3. Click on Rename column.
j. Step 4. Type in a new column name and enter.
11. How do you set the overall appearance of your form in the Form Wizard? A: Access includes several predefined form styles from which you can use. The ten form styles
range from causal to serious and include both colors and gray tones.
12. In which view do you open a form when you want to modify its appearance? A: To modify the design of an existing form one should open it in Design View. In this view you
can apply a special format; modify fonts; bold, Italicize, or underline text; Set alignment and
more.
13. How can you add a drop-down list based on your own values to your form? A: One can add a drop down list based on your own values to your form by creating a Combo
box or list box. A combo Box or list box wizard creates a list box of choices from which the
user can select one and also allow the user to type in his own values.
14. How to import external data?
A: Choose File, Get external data, Import to open ‘import’ dialog box, Click the type of
files you want to import, Select the file, Click on import.
15. How to link to a spreadsheet or database?
A: Choose File, Get external data, Link tables, Select the type of data source you want to
link, Select the file you want to link to and click link to open the Link Wizard, Select
the worksheet, named range or table you wish to link to. Click Link; enter the name
for external table or worksheet, Click Finish.
16. How do you start the Database Wizard?
A: For starting the Database Wizard two steps are necessary; Click on New Database Button, The new dialog box will open, Click on Databases Tab.
17. How do you use database templates?
A: One can use database templates by taking following steps;
Click on New database button, Click on Databases Tab, Click on the icon for the
Database Template you want to use, Click on OK, Enter a name for a new database in
the file name Text box, Click on Create, Click on Next to continue.
18. How can you choose styles for screens and reports?
A: The following steps are necessary for customizing the database;
Step 1. Click on the style that you want to use in database wizard.
Step 2. Click on Next to continue.
Step 3. Click on the Style that you want to use in the printed reports.
Step 4. Click on Next.
Step 5. Enter the title of your database in the text box .
Step 6. Click on Finish.

125
19. How to use the Main Switchboard?
A: For using the Main Switchboard you can
Enter and view data using forms.
Preview reports.
Change Switchboard items.
Exit the Database.
20. If you’re already working in Access, how do you create a database from scratch?
A: To create a database from scratch the following steps are taken;
Step 1. Click on the New button. The ‘New’ dialog box will open.
Step 2. Double click on Database button under General Tab.
Step 3. Click on folder in which you want to store your new database.
Step 4. Enter an appropriate name for the database in the file name text box.
Step. 5. Click on create.
21. After you’ve saved a database, how do you open it again? A: You can open an existing Access database from initial ‘Microsoft Access’ dialog box.
22. What are three things you can do in the database windows?
A: After you open a database you can open or create tables, queries, Forms, Reports and
Pages which can be done by taking following three steps;
Steps 1. Click on the Object button you want to view.
Step 2. Click on the Object you want to access.
Step 3. Click on Open to open a table or query in Datasheet View, a form in Form View,
or a page in Page View.
OR
Click on Preview to view a report.
OR
Click on Design to display the object in Design View.
OR
Click on New to create a new database object.
23.What are the two ways you can open a finished query?
A: The two ways to open a finished query are as follows;
a. The first is, to open the query in Datasheet View and
b. The second is to open the query in Design View.
24. How do you create a query that summarizes information in a spreadsheet format? A: Using the Crosstab Query Wizard you can summarize information in a spreadsheet format.
25. How do you use the design grid in creating a query?
A: One can use the design grid in creating a query by taking following steps;
Step 1. Click on Query Tab.
Step 2. Click on Query you want to include in your new query.
Step 3. Click on Add
126
The bottom portion of select query window displays the designed grid which is similar to a
spreadsheet. One can add fields to the query by dragging them from the field list to the
designed grid.
Step 4. Click on Close.
26. How can you set calculation criteria in a query?
A: In Access one can specify the following calculations types;
a. Group By: identifies the group to calculate
b. Sum: totals the values.
c. Avg: Averages the values.
d. Min: finds the minimum value.
e. Max: finds the maximum value.
f. Count: counts the number of values,
g. STD: calculates the standard deviations of values.
h. VAR: calculates the variance of values.
i. First: finds the first field value
j. Last: finds the last field value
The steps to set calculation criteria in a query are as follows;
Step 1. Click on the total button on toolbar. Step 2. Click on the total row for the first field whose calculations type you want to
specify.
Step 3. Click on the calculation type you want to apply to that field.
27. How do you specify report groupings?
A: To specify report grouping following steps are taken; Step 1. Click on the field on which you want to group from the list of available fields.
Step 2. Click on right arrow button, the selected field will be displayed in the preview box.
Step 3. Repeat steps one and two until you select all the fields on which you want to group.
Step 4. Click on Next to continue.
.
28. How can you apply a new report Auto format?
A: There are three steps to do this.
Step 1. Click on the AutoFormat button.
Step 2. Click on New report Format in Report AutoFormats List.
Step 3. Click on OK to apply the new format.
29. How can you specify the exact pages to print in a report?
A: To do this, following steps are taken;
Step 1. Click on File
Step 2. Click on Print
Step 3. Click on printer
Step 4. Click on pages option and enter the specific pages in the text boxes to print.
Step 5. Choose the number of copies to print from the copies scroll box.
Step 6. Click on OK.
127
30. Explain the procedure of creating crosstab query.
A: Click New Object button drop down list, select New Query, Select Crosstab Query
Wizard identify the table/query that contains columns you want to summarize, Click
Next, Select three Fields from the table to use as rows, Click next, Select the single field
that you wish to use for column headings, click Next. Enter a name for the Query.
31. What is a database? A; A database is essentially a collection of information. In an Access database, you collect
information in tables, enter information into these tables by using forms, query tables to
analyze their contents, create reports based on the tables and queries and design data access
pages to view your access data from the Web. You may create Macros to automate tasks or
modules to create database applications using Access.
32. What object can you access in the database windows?
A: We can access seven objects from database window namely:
Table: A table is a container of raw data. When you enter data in Access, a table
stores it in logical groupings of similar data by organizing it in rows and columns.
Query: Lets you search, sort, and retrive specific data.
Form: Lets you enter and display data in a customized format.
Report: Lets you display and print formatted data, including calculations and
totals.
Macro: Gives you easy to use commands to automate tasks without programming.
Module: Program written in VBA.
33.How many different summary methods do crosstab queries provide?
A: The summary methods provided by Crosstab Queries are as follows;
a. Average
b. Count
c. First
d. Last
e. Maximum
f. Minimum
g. Standard Deviation
h. Summary
i. Variance
34.Explain the different data types in Access?
Text: Alphanumeric characters ( 0-255 Characters ) .
Memo : Alphanumeric characters (0-64000 Characters)
Number : Numeric Values ( 1,2,4 or 8 bytes )
Date/Time : Date and time data. ( 8 bytes )
Currency : Monetary data (8 bytes)
Autonumber : Automatic number increments (4 bytes)
Yes/No : Logical values : Yes / No , T/F ( 1 bit)
OLE Objects : Pictures, graphs, sound, video. ( upto 1 GB)
Hyperlink : Link to an internet resource. ( 0 – 6, 144 Characters.)
Lookup wizard : Displays data from another table. ( Generally 4bytes)
128
35. Explain the following field properties?
A:
Field Size: Limits size of field.
Numeric: Specification of numeric type.
Format: Changes the way the data appears as you enter it.(Upper case, dates etc.)
Input Mask: Used for data entry into a predefined and validated format.
Decimal places: Specifies decimal numbers.
Validation Rule: Validates data based on rules created through macros or
expressions.
Validation text : Displays a message when data fails validation.
Default Value : The value filled in automatically for new data entry.
Required : specifies whether you must enter a value into a field.
Caption : Labels for fields
Allow zero length : Determines whether you may enter the value into a field to
distinguish it from a null value.
Indexed : Speeds up data access.
36. Explain in 2 or 3 lines, how different types of queries can be created.
A:
Select Query: Selects information from one or more tables.
Total Query: Provides capability to sum.
Action Query: Creates new tables.
Crosstab Query: Displays summery data in cross tabular form.
SQL Query: Advanced SQL database manipulation.
Top Query: Lets you specify a number of percentage of top records you want to see in
any query.
37.What are options of queries in Design view OR Explain structure of Design view of a
query?
A: Structure of design view of a query:
Table / Query entry pane: where their design structures are displayed.
Query by example grid: used for the fields and criterion that query will display in dynaset.
38. Explain in one line each what are different ways of creating a report.
A:
Tabular reports: these print data in rows and columns with groupings and totals.
Columnar reports: these print data as a form can include totals and graphs.
Mail-merge reports: these create form reports.
Mailing labels: Multi column labels or snaked column reports.
39. Given below are types of input mask with sample data what will be the output.
Sample Data Data Type Input Mask
(a) 0225708619 Text \(999\) 000\ =0000;0;”-“
(b) Windows 95 Text >L< ?????\# #

129
A:
Data Data Type Format specified Output
0225708619 Text \(999\) 000\=0000 022 570 8619
Windows 95 Text <????? \ # # Window 95
40. Write a note on formats used in input masks in Access.
0 Digit 0-9 entry required
9 Digit or space (entry not required)
# Digit or Space
L Letter (A-Z) (entry required)
? Letter (A-Z) (entry optional)
A Letter or digit (entry required)
A Letter or digit (entry optional)
& Any character or a space (entry required)
(Any character or a space (entry optional)
< Causes all characters that follow to be converted to lowercase.
> Opposite
! Causes input mask to fill from
\ Causes character that follows to be displayed as the literal character \A = A
41. Write input masks for the following:
a) All characters appear in capital letters.
A: Format specified Data as entered Formatted Data as displayed
> Adam Smith ADAM SMITH
b) Entries of characters must be alphabets only
A: Format specified Data as entered Formatted Data as Displayed
Starting and Exiting Access, Creating Tables
1. Starting Access: Click on Start Button, Click on Programs, Click on Ms-Access.
2. Exiting Access: Click on File, Click on Exit OR Click on Close (x) button.
3. Creating Tables: Table can be created in following three ways;
By entering Data
By using Table Wizard.
Using Design View
It is necessary to create a file for creating table. To create a file, take following steps.
Click on blank Access Database option in ‘Microsoft Access’ dialog box.
Click on OK.
‘File New Database’ dialog box will open.
Enter name for the file as ‘db1’ click on create.
130
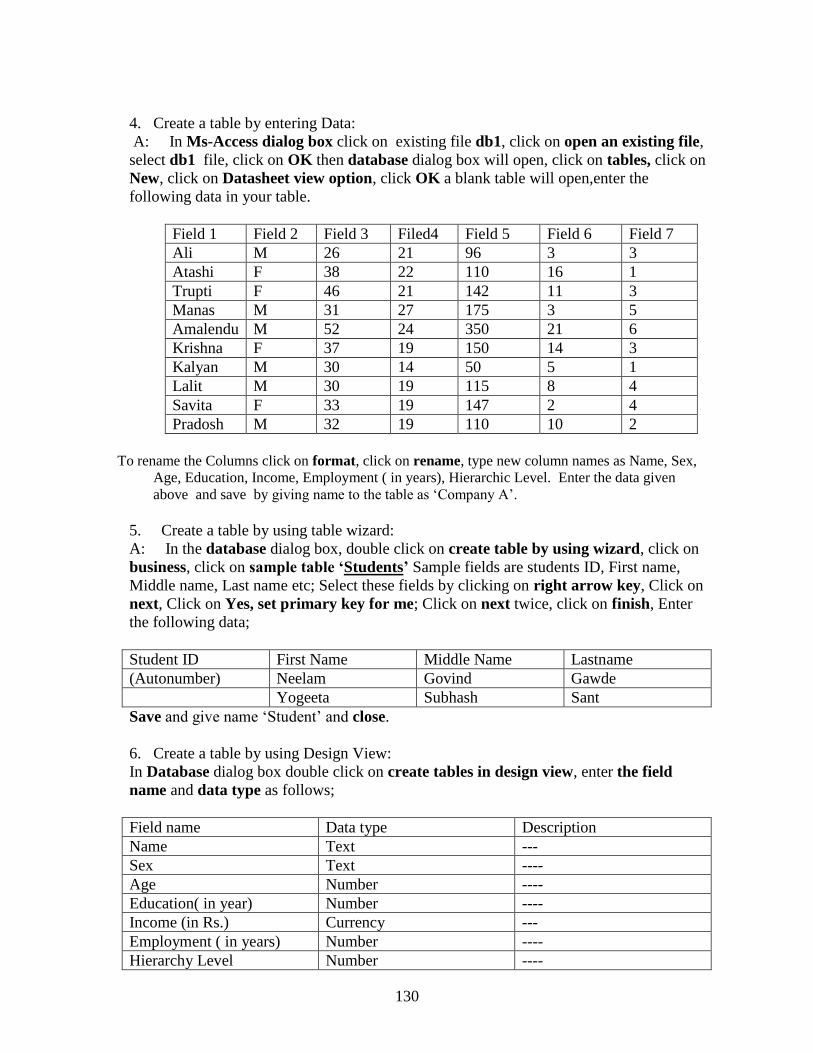
4. Create a table by entering Data:
A: In Ms-Access dialog box click on existing file db1, click on open an existing file,
select db1 file, click on OK then database dialog box will open, click on tables, click on
New, click on Datasheet view option, click OK a blank table will open,enter the
following data in your table.
Field 1 Field 2 Field 3 Filed4 Field 5 Field 6 Field 7
Ali M 26 21 96 3 3
Atashi F 38 22 110 16 1
Trupti F 46 21 142 11 3
Manas M 31 27 175 3 5
Amalendu M 52 24 350 21 6
Krishna F 37 19 150 14 3
Kalyan M 30 14 50 5 1
Lalit M 30 19 115 8 4
Savita F 33 19 147 2 4
Pradosh M 32 19 110 10 2
To rename the Columns click on format, click on rename, type new column names as Name, Sex,
Age, Education, Income, Employment ( in years), Hierarchic Level. Enter the data given
above and save by giving name to the table as ‘Company A’.
5. Create a table by using table wizard:
A: In the database dialog box, double click on create table by using wizard, click on
business, click on sample table ‘Students’ Sample fields are students ID, First name,
Middle name, Last name etc; Select these fields by clicking on right arrow key, Click on
next, Click on Yes, set primary key for me; Click on next twice, click on finish, Enter
the following data;
Student ID First Name Middle Name Lastname
(Autonumber) Neelam Govind Gawde
Yogeeta Subhash Sant
Save and give name ‘Student’ and close.
6. Create a table by using Design View:
In Database dialog box double click on create tables in design view, enter the field
name and data type as follows;
Field name Data type Description
Name Text ---
Sex Text ----
Age Number ----
Education( in year) Number ----
Income (in Rs.) Currency ---
Employment ( in years) Number ----
Hierarchy Level Number ----
131
Save and name the table as ‘company A1’, a screen tip will appear and ask do you want
to create a primary key now, click on No, click on view and click on datasheet view,
enter the data.
Creating Auto forms, using form wizard for creating forms.
Creating Auto forms:
1. Create columnar Auto form:
A. In database dialog box click on forms button, click on new, New form dialog box will
open, click on Auto form.; Columnar option, click on down arrow next to choose the
table where the object data comes from list box a menu will appear , click on company A ,
click OK a columnar form will appear based on table company A.
2. Create Tabular Auto form:
A. Click on forms button in database window, click on new, click Auto form Tabular
option , click on down narrow to choose Table, click on company A table , Click OK a
tabular form based on company A table will appear.
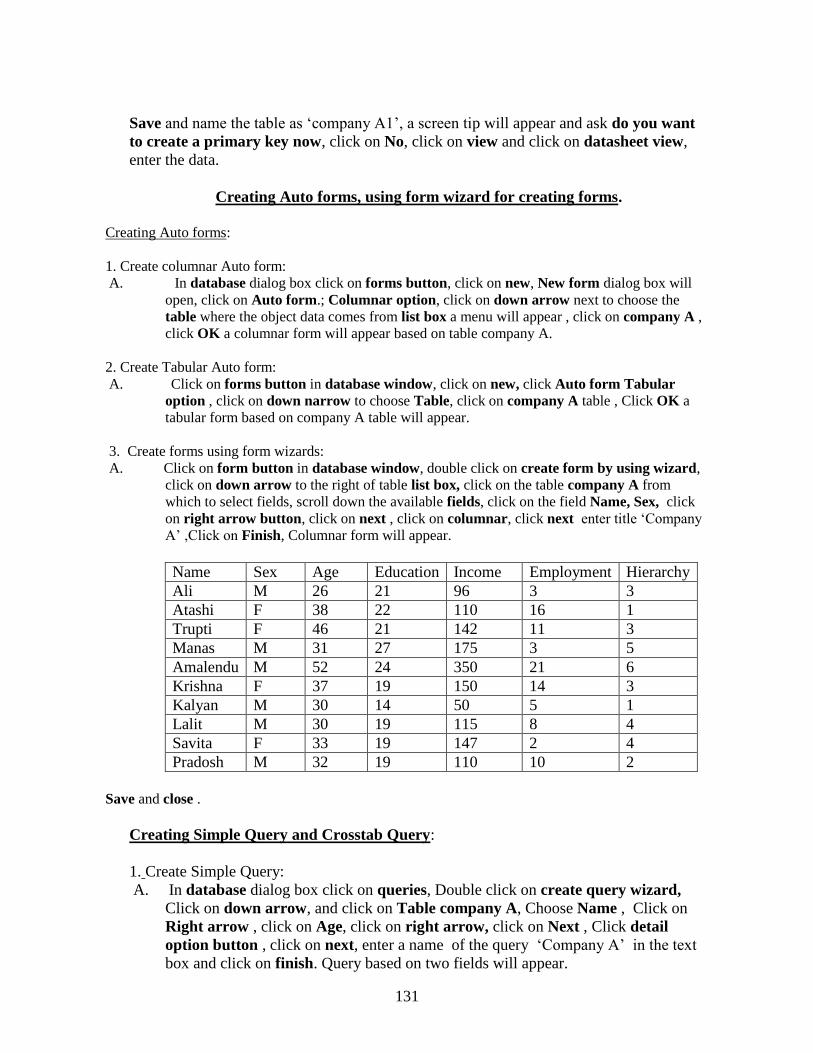
3. Create forms using form wizards:
A. Click on form button in database window, double click on create form by using wizard,
click on down arrow to the right of table list box, click on the table company A from
which to select fields, scroll down the available fields, click on the field Name, Sex, click
on right arrow button, click on next , click on columnar, click next enter title ‘Company
A’ ,Click on Finish, Columnar form will appear.
Name Sex Age Education Income Employment Hierarchy
Ali M 26 21 96 3 3
Atashi F 38 22 110 16 1
Trupti F 46 21 142 11 3
Manas M 31 27 175 3 5
Amalendu M 52 24 350 21 6
Krishna F 37 19 150 14 3
Kalyan M 30 14 50 5 1
Lalit M 30 19 115 8 4
Savita F 33 19 147 2 4
Pradosh M 32 19 110 10 2
Save and close .
Creating Simple Query and Crosstab Query:
1. Create Simple Query:
A. In database dialog box click on queries, Double click on create query wizard,
Click on down arrow, and click on Table company A, Choose Name , Click on
Right arrow , click on Age, click on right arrow, click on Next , Click detail
option button , click on next, enter a name of the query ‘Company A’ in the text
box and click on finish. Query based on two fields will appear.

132
2. Creating Summary Query: A: Repeat the steps of 1 above till click on next then click on summary button click on
AVG, check box against the two fields name and Age ,click ok, click next, enter a name for
the query ‘Company A’ in the text box and click on finish, Summary query will appear.
3. Creating a Crosstab Query:
In database window click on queries , click on new button, click on Crosstab query
wizard, click OK; click on queries option button, click on Table company A on
which we want to base our query , click next choose name, click right arrow, choose
age, click right arrow , click next, enter a name for a query ‘company A Crosstab’ ,
click on view the query button and click on finish.
Creating Auto report and creating Report with Report wizard:
1. Creating Auto report:
A. Click on reports button in database window, click on New, click on Auto report
columnar , click on down arrow and click on the table ‘company A’ , Click OK Save and enter name ‘Company A’ and Close.
Similarly create Tabular Auto report.
2. Creating Report using Report Wizard:
A: Click on Reports button in database window, double click on create report by using
wizard., Click on down arrow , Click on Table Company A, Choose Name, Click Right
Arrow Button , Click on Age, Click on right arrow button, Click on Next¸ and Enter
Name for the report ‘Company A’ , and Click on Finish.
Home work
Explain the procedure to do the following:
1. To create a new table.
2. To delete a record.
3. To add fields.
4. To save a query.
5. To print a report.
6. Explain the structure of RDBMS
7. Explain look up field & give with suitable example how to create it.
8. Write input masks for: the entry field should have sentence case only.
Top Related
Copyright © 2022 FDOKUMEN

