


Bahasa
Halaman
Hukum


North Dakota State University
Departmental Administration Reference Guide
Human Resources, Payroll & Budget How-To Guide
HR/Payroll Office June 16, 2021

Page 2
ContentsHuman Resources Contact Guide .............................................................................................. 4 Payroll Contact Guide ................................................................................................................. 5 NDSU Budget Office Contact Guide ........................................................................................... 6 Ag Budget Office Contact Guide ................................................................................................. 6 Early Employee ID Request ........................................................................................................ 7 Security Access Requests .......................................................................................................... 8 Security Roles ............................................................................................................................. 8 Payroll Form Action/Reason Table ............................................................................................. 9 Logging into the System ............................................................................................................ 11 Problems with Access or Forgotten Password .......................................................................... 11 Setting up Favorites .................................................................................................................. 11
WORKFORCE ADMINISTRATION .......................................................................................... 12
Modify A Person ........................................................................................................................ 12 Personal Relationships – Emergency Contact Information ....................................................... 16 Job Information ......................................................................................................................... 18 Job Data .................................................................................................................................... 18 Multiple Job Summary ............................................................................................................... 26
COMPENSATION ..................................................................................................................... 29
PAYROLL FOR NORTH AMERICA ......................................................................................... 30
Employee Pay Data USA/Create Additional Pay ...................................................................... 30 Payroll Processing USA/Update Paysheets (Time Entry) ......................................................... 34 Earnings Codes ......................................................................................................................... 37 Payroll Period Reports .............................................................................................................. 44 Payroll Distribution .................................................................................................................... 45
WORKFORCE DEVELOPMENT .............................................................................................. 46
Broadbanded Staff Responsibility Reviews ............................................................................... 46 Faculty Events ........................................................................................................................... 49 Calculate Tenure Data .............................................................................................................. 49 Review Rank/Status History ..................................................................................................... 51
ORGANIZATIONAL DEVELOPMENT ..................................................................................... 52
Maintain Positions/Budgets ....................................................................................................... 52 Add/Update Position Information .............................................................................................. 52 Review Positions/Budget Information ........................................................................................ 56 Position History ......................................................................................................................... 56 Vacant Budgeted Positions ....................................................................................................... 57
MANAGER’S SELF SERVICE ................................................................................................. 63
Introduction ............................................................................................................................... 63 Adding Approvers and Reviewers ............................................................................................. 67 Termination Approve/Review ................................................................................................... 71 Delegate Termination Approval ................................................................................................ 73 Viewing/Editing Proxies ............................................................................................................ 77
SET UP HRMS .......................................................................................................................... 75
Combination Code Table ........................................................................................................... 75 Department Budget Table ......................................................................................................... 82
REPORTS ................................................................................................................................. 82
Funding Summary Report ......................................................................................................... 82

Page 3
HE Pay Register 2 ..................................................................................................................... 84 HE Actuals Report (Salary/Fringe Report) ................................................................................ 99 HE Leave Accrual Report (Department Leave Accrual Report) .............................................. 105 Gross and Fringe Report ......................................................................................................... 115
ORG CHARTING WITH ORG PLUS ...................................................................................... 123
APPENDIX .............................................................................................................................. 138
What form do I use for……… .................................................................................................. 138 Sample Hiring Form 100 ......................................................................................................... 139 Sample Change Form 101 ...................................................................................................... 145 Sample Funding Change Form ............................................................................................... 147 Sample Retroactive Distribution Form .................................................................................... 144

Page 4
Human Resources Contact Guide
Hastings Hall Fax Number (701) 231-9686
www.ndsu.edu/hr
Appointments are recommended in order to provide employees with the best possible service.
Vacant – Director of HR/Payroll (701) 231-8788 E-mail: Salary administration, FMLA, and Shared Leave contact, grievance, policy interpretation, Responsibility Review process, PeopleSoft HRMS security access, employee relations and supervisor coaching.
Lydia Hendricks - Office Assistant (701) 231-8961 E-mail: [email protected] Receptionist, appointment scheduling, non-benefited hiring paperwork, website maintenance, discount ticket sales, Genuine Leadership program and Quarter Century Club Banquet.
Sara Oestrich – HR Assistant (701) 231-6293 E-mail: [email protected] HR recruitment support, Tuition Waivers, department billing, cost transfers, employment records management.
Kristina Astrup — Associate Director of Employee Development (701) 231-8965 E-mail: [email protected] Leave administration, ADA, ACA, training administration, performance management, salary administration/compensation, employee relations, unemployment, compliance and special projects.
Jill Sackenreuter – Associate Director of Recruitment and Administration (701) 231-8525 E-mail: [email protected] Recruitment process, employee relations, grievance coordination, job family assignment and departmental billing.
Cindy Breyer – Recruitment Coordinator (701) 231-5678 E-mail: [email protected] Recruitment and retention, onboarding process, PeopleAdmin training, support and administration, and benefits assistance.
Maria Wingenbach – Benefits Specialist (701) 231-5602 E-Mail: [email protected] Benefits administration, COBRA processing, exit interviews, retirements and Supplemental Retirement Accounts.
Liz Thompson – HRMS Technician (701) 231-5922 E-mail: [email protected] PeopleSoft HRMS contact, PeopleSoft HRMS security access and training, assist Director of Human Resources and Payroll, Org Charting, salary administration support, PeopleAdmin technical support, position descriptions, website updates, non-benefited position number creation and filing/scanning.

Page 5
Payroll Contact Guide
Hastings Hall Fax Number (701) 231-9686
www.ndsu.edu/payrollAppointments are recommended in order to provide employees with the best possible service.
Pat Hanson –Director of Payroll Services (701) 231-8990E-mail: [email protected] management for university, W-2 process oversight, paycheck adjustments, off-cycle checks, Employee Self Service,Manager Self Service, payroll processes and procedures.
Kari Schmitz-Eilertson – Payroll Specialist (701) 231-6251E-mail: [email protected] checks, Kronos electronic timekeeping system, Worker's Compensation, wage garnishments, W-2 reprints andpayroll voucher/vendor check processing.
Laura Garske-Hermanson – International Payroll Specialist (701) 231-7328E-mail: [email protected] employment eligibility, international tax treaties and tax status.
Deanna Boucher – Payroll Accountant (701) 231-7119E-mail: [email protected] deductions processing and reconciliation.
Tina Berger - Payroll/Benefits Associate (701) 231-7543E-mail: [email protected] deductions processing and reconciliation.
Vacant - Benefits Associate (701) 231-6297E-mail: @ndsu.eduBenefits deductions processing and reconciliation.
Sheila Tindall – Senior Payroll Records Technician (701) 231-5657E-mail: [email protected] hiring forms, benefited change forms, summer salary, early employee ID requests and contract pay-over-12 option,Daycare newsletters and billing.
Kimberly Pithey – Payroll Records Technician (701) 231-5677E-Mail: [email protected] assistants and part-time academic hiring and change forms, DCE and summer school payments, directdeposits, coaches cars/travel logs, taxable meals/moving expenses and employment verifications.
Julie Giffey – Employment Records Technician (701) 231-8958E-mail: [email protected]/9000 job bands hiring, change forms, time slips and leave slips.

Page 6
NDSU Budget Office Contact Guide
Old Main 205 Email: [email protected]
Cynthia Rott - Budget Director (701) 231-7458 E-mail: [email protected]
Aubrey Ketterling – Budget Analyst (701) 231-8204
E-mail: [email protected]
Carol Haukebo – Budget Analyst (701) 231-8571 E-mail: [email protected]
Ag Budget Office Contact Guide Morrill 301
Fax Number (701) 231-7510
David Ruhland – Director of Ag Budget Office (701) 231-6408 E-mail: [email protected]
Cherie Fischer – Assistant Director, Ag Budget (701) 231-7327 E-mail: [email protected]
Ona Vig – Grant & Contract Officer (701) 231-8528
E-mail: [email protected]
Leann Frieler - Accountant (701) 231-8108 E-mail: [email protected]
Angela Scott – Account Technician (701) 231-7739
E-mail: [email protected]
The duties of the NDSU Budget Office and Ag Budget Office include the funding and budget portions of payroll forms. They are responsible for processing funding changes, budget adjustments and retroactive distributions in relation to payroll. They are also responsible for the activation and/or inactivation of Combination Codes.

Page 7
Do you have current or past employment at any North Dakota State Government Agency? No Yes
Agency:
Employment Dates:
Average Hours Worked per Week:
Insurance Coverage Dates: (if applicable)
Do you have current or past employment at any North Dakota University System Campus or Office? No Yes
Campus/Office Name:
Employment Dates:
Average Hours Worked per Week:
Insurance Coverage Dates: (if applicable)
Do you have current or past employment at any North Dakota State University Department? No Yes
Department Name:
Employment Dates:
Average Hours Worked per Week:
Insurance Coverage Dates: (if applicable)
Are you performing work for NDSU outside the United States? Details:
No Yes
Are you performing work for NDSU outside the state of North Dakota? Details:
No Yes
Are you a previous TIAA participant? No Yes If yes, list dates:
Additional space for information on any of the above:
The facts stated on this form are true and complete, to the best of my knowledge. I understand that making an omission of fact or a false statement may be sufficient cause for dismissal after employment. I understand the hours per week for this position (or percent of time) are and determined by my supervisor.
Print First Name
Middle Initial Last Name
Empl ID/Student ID (if known)
Signature Date
E-Mail Address (for hiring/onboarding emails) Retype E-Mail Address for verification (both must match Phone Number
For Department Use Only Supervisor Name: Compensation Rate:
HR-EmploymentInfo- REV 05/2016 Page 1 of 1
Employment Information
Page 8
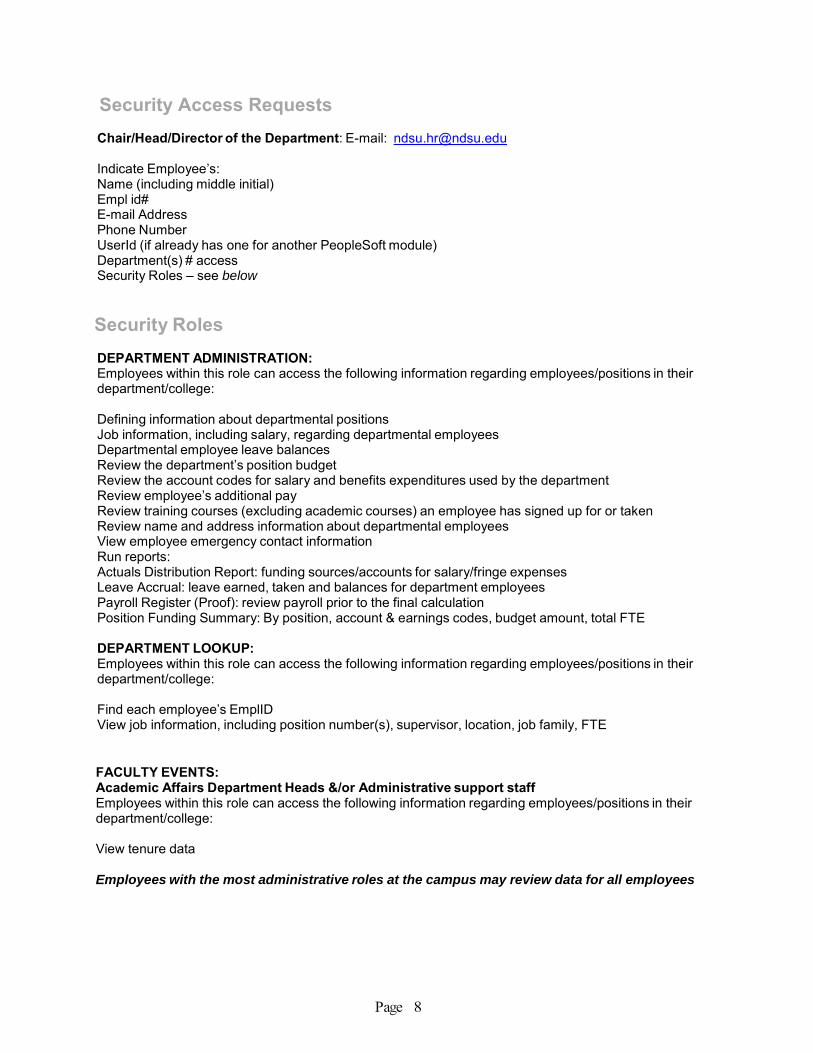
Security Access Requests
Chair/Head/Director of the Department: E-mail: [email protected]
Indicate Employee’s: Name (including middle initial) Empl id# E-mail Address Phone Number UserId (if already has one for another PeopleSoft module) Department(s) # access Security Roles – see below
Security Roles
DEPARTMENT ADMINISTRATION: Employees within this role can access the following information regarding employees/positions in their department/college:
Defining information about departmental positions Job information, including salary, regarding departmental employees Departmental employee leave balances Review the department’s position budget Review the account codes for salary and benefits expenditures used by the department Review employee’s additional pay Review training courses (excluding academic courses) an employee has signed up for or taken Review name and address information about departmental employees View employee emergency contact information Run reports: Actuals Distribution Report: funding sources/accounts for salary/fringe expenses Leave Accrual: leave earned, taken and balances for department employees Payroll Register (Proof): review payroll prior to the final calculation Position Funding Summary: By position, account & earnings codes, budget amount, total FTE
DEPARTMENT LOOKUP: Employees within this role can access the following information regarding employees/positions in their department/college:
Find each employee’s EmplID View job information, including position number(s), supervisor, location, job family, FTE
FACULTY EVENTS: Academic Affairs Department Heads &/or Administrative support staff Employees within this role can access the following information regarding employees/positions in their department/college:
View tenure data
Employees with the most administrative roles at the campus may review data for all employees

Page 9
Action Reason Definition 1. Data Change a. Correction–Department
b. Correction--Job Code c. Correction–Pay Rate d. Correction--Position Number e. Correction–Standard Hrs f. Status Change
a. Department correction/update b. Job code correction/update c. Typically used during fiscal year rollover d. Position number correction/update e. Standard work hours correction/update f. Percent time change, NON-BENEFITTED employees only
2. Leave of Absence
a. Family/Medical Leave b. Military Service c. Personal Reasons
a. Unpaid. Requires advanced approval by HR. HR will notify department of approval and give clearance for submission of payroll form b. Unpaid military service c. Unpaid. Request in writing, requires prior approval by department and HR
3. Paid Leave of Absence
a. Administrative Leave b. Developmental Leave c. Family/Medical Leave d. Military Service
a. Personnel action b. Request submitted for approval prior to leave (Policy 132) c. FMLA d. Employee must supply copy of orders
4. Pay Rate Change
a. Leg/General Increase b. Market Increase c. Merit d. Reduction in Pay e. Responsibility Increase f. Other
a. Across-the-board fiscal year increase, benefitted employees only b. Requires salary documentation provided by HR/EDGO, benefitted employees only c. Work performance fiscal year increase, benefitted employees only d. Decrease in pay (documentation required) e. Change in pay due to change in responsibilities (documentation required) f. Anything other than the above reasons
5. Position Change
a. Job Re-Classification b. Position Status Change c.Reorganization/Restructure d. Title Change d. Transfer
a. Job family reassignment after review by HR b. Percent time change, BENEFITTED employees only c. Change of funding breakdown for position d. Functional Title change – must meet guidelines d. NON-BENEFITTED employees changing positions as well as any combination of changes including job family, pay rate and title
6. Promotion a. Career Ladder Promotion a. Change in job family and salary or change in position title and salary
7. Retirement a. Normal Retirement a. Normal Retirement
Payroll Form Action/Reason Table Gives the PeopleSoft Action and Reason from the Payroll form and how each should be used.

Page 10
Action Reason Definition 8. Return from
Leave a. Return from Leave a. Return from leave of absence
9. Termination a. Death b. Discharge c. Elimination of Position d. End Temporary Employment e. Failure to Return From Leave f. Job Abandonment g. Resignation
a. Death b. Dismissal c. Reduction in force d. End temporary position e. Employee does not return from leave f. Employee leaves without giving notice g. Attach resignation letter
10. Transfer a. Internal Recruitment b. Re-Organization c. Intra-Agency Transfer d. Non-to-Benefitted
a. Present employee recruited and hired through a search, also includes temp 1 yr appt going through search being hired as permanent employee in the position b. Department restructure/reorganize c. Transfer of position from within campus d. Transferring from a non-benefitted position to benefitted
Page 11
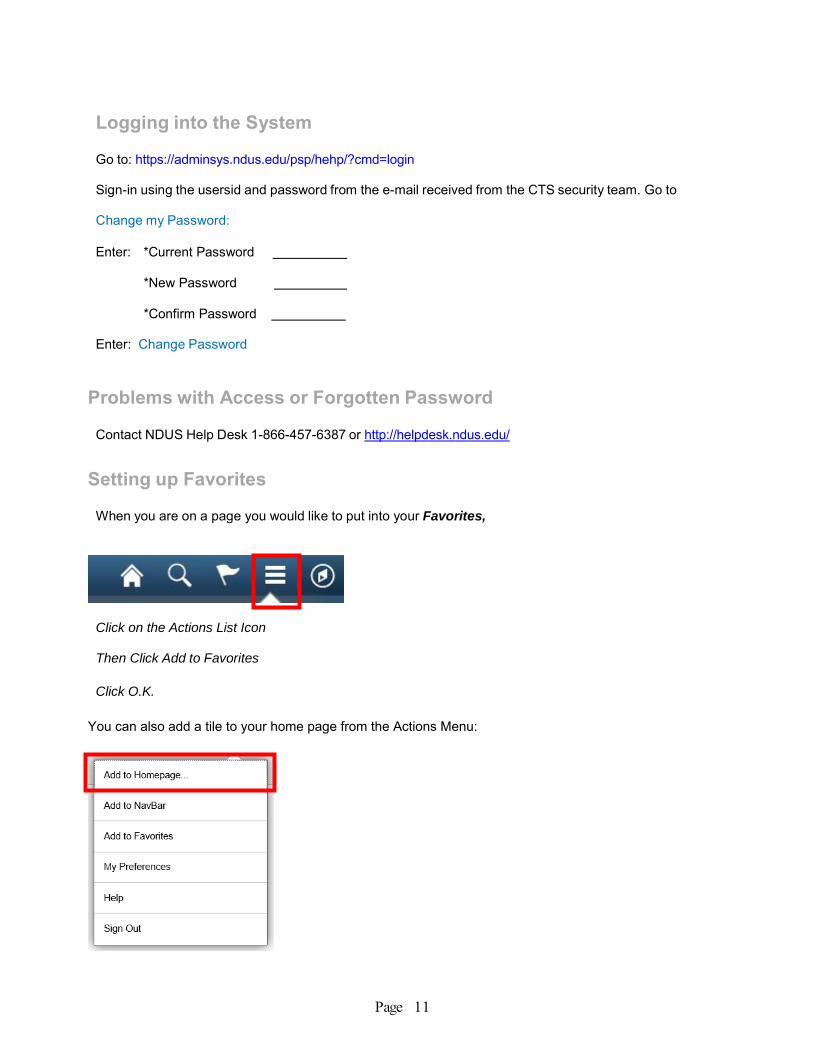
Logging into the System
Go to: https://adminsys.ndus.edu/psp/hehp/?cmd=login
Sign-in using the usersid and password from the e-mail received from the CTS security team. Go to
Change my Password:
Enter: *Current Password
*New Password
*Confirm Password
Enter: Change Password
Problems with Access or Forgotten Password
Contact NDUS Help Desk 1-866-457-6387 or http://helpdesk.ndus.edu/
Setting up Favorites
When you are on a page you would like to put into your Favorites,
Click on the Actions List Icon Then Click Add to Favorites
Click O.K.
You can also add a tile to your home page from the Actions Menu:

Page 12
Modify A Person Navigator>Workforce Administration>Personal Information>Biographical>Modify a Person
To find an employee, enter the employee’s last name or enter the employee’s EmplID, then hit the search button:
Select the person from the list and hit the Enter key.
WORKFORCE ADMINISTRATION

Page 13
You have view-only access to this screen. If this information needs to be updated, please contact the HR/Payroll Office.
Employee’s Contact Information:
• Name • Current Addresses • Phone Information • Email Addresses
To request a name change, complete a Notice of Change form located in the Human Resources/Payroll Section under the Benefits heading, at the following link: http://www.ndsu.edu/hr/forms. Please provide a copy of your new Social Security Card and Marriage Certificate or Divorce Decree.
Changes can also be made through Self-Service. Once the changes have been made PeopleSoft will remind you that you need to provide documentation to the HR/Payroll Office.
Page 14

Page 15
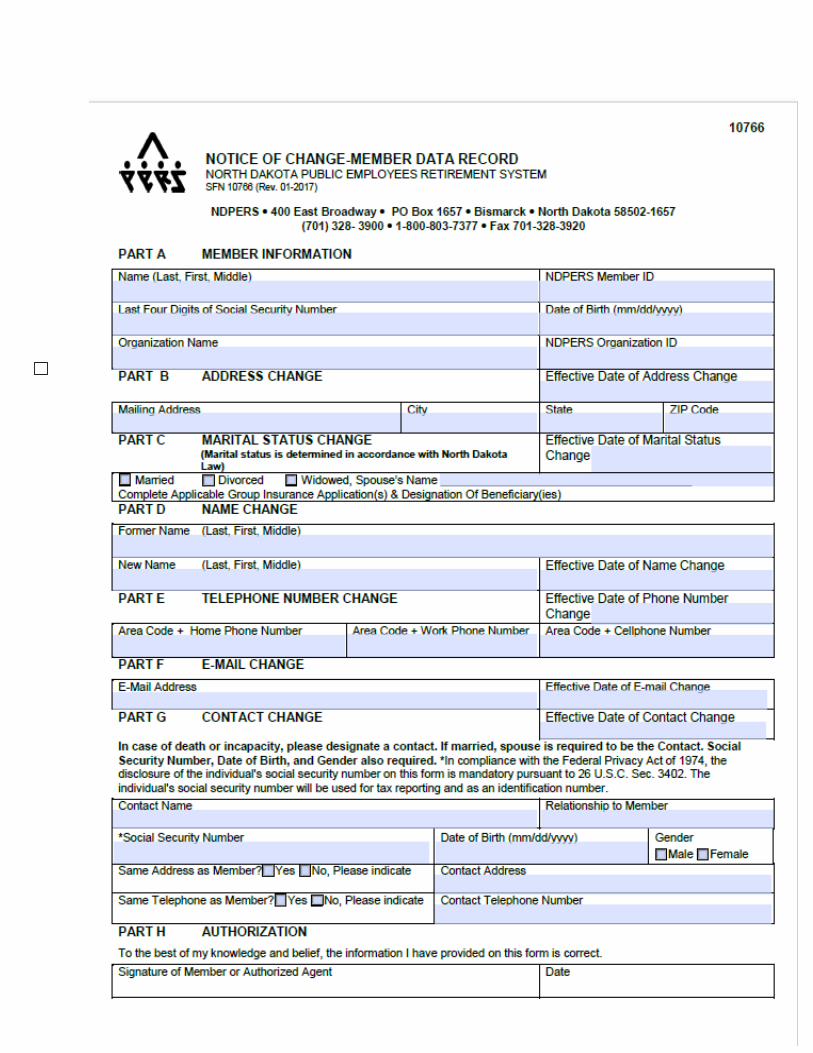
Instructions
Part A Member Identification Enter member’s current name, NDPERS member ID, date of birth, and last four digits of social security number, department name, and NDPERS Organization ID.
Part B Address Change Enter effective date. Enter member’s new
mailing address.
Part C Marital Status Change
Enter effective date.
In cases of marital status change, it is necessary that the member complete new designations of beneficiary. (Designation for the Group Retirement Plan SFN 2560 and/or Life Insurance Enrollment/Change SFN 53803) Part D NameChange
Enter effective date. Enter member’s former and new name. Use full name, including middle name. Part E Telephone Number Change
Enter effective date. Select category(ies) and enter new telephone number. Part F E-Mail Change
Enter effective date. Enter new e-mail address. (NDPERS only maintains one e-mail address on member’s record) Part G Contact Change
Enter effective date. Enter new contact information. If married, the spouse is required to be the contact. Part H Authorization
Either the employer’s authorized agent or the member must sign SFN 10766 to be valid

Page 16
Personal Relationships – Emergency Contact Information Navigator>Workforce Administration>Personal Information>Personal Relationships>Emergency Contact
An employee’s Emergency Contact, address and phone numbers are identified. This information can be updated by the department
Type in either the EMPLID, or the name and hit the Enter key.
Select the correct employee and then hit the Enter key

Page 17
Make any changes or additions to the contact, relationship, address and phone number. If you have additional phone numbers for this contact, you can click on the other phone numbers tab and type in the different phone types and phone numbers.

Page 18
Job Information
Job Data
Navigator>Workforce Administration>Job Information>Job Data
In this area you will find information regarding the employees Work Location, Job Information, Compensation, Benefit status, etc.
A search page will open. To find an employee, enter the employee’s last name or enter the employee’s EmplID, then hit the search button.

Page 19
Across the Top, click on tab: Work Location
Work Location • Primary job or secondary job • Position number • Job Title • Department number and name • Location • Latest action/reason
Click on the Include History button in the lower right corner of the screen. This will include the history of the changes that have been made. You can look through them by clicking the arrow button on the blue Work Information title bar.
There is also a notes button next to the right of the Sequence Number; it looks like a little notepad (circled in red). This notepad allows us to do some documenting. If there were special circumstances that required the change to be made, we can document it in the notes, for future reference.

Page 20
Click on next tab: Job Information
Job Information
• Job code (Job Family is the first four digits of the job code) • Who the employee reports to • Regular/Temporary status • Full-time or Part-time position • Standard hours • FTE or full-time equivalent • FLSA status: exempt/nonexempt

Page 21
Click on next tab: Payroll
Payroll
• Indicates salaried or hourly • Position is eligible for paid holidays or not • Position is subject to or exempt from FICA taxes

Page 22
Click on next tab: Salary Plan
Salary Plan
• FLSA status – exempt/nonexempt − Exempt employee – SLEX - those employees who do not receive overtime compensation. − Non-exempt employee – SLNE - those employees who receive compensation for working
overtime (which is defined as over 40 hours worked in a week), either in wages or comp time, also holiday and campus closures count as worked time.
• Job Band (Grade - lists only 3 digits, add a 0 to the end for full band number)

Page 23
Click on next tab: Compensation
Compensation
• Compensation Rate • Frequency of Compensation: Annual, Contract, Hour or Month

Page 24
Next go to the bottom of the page. Click on: Employment Data
Employment Information
• Original Start Date • Company Seniority Date: Years of Service Recognition. • Benefits Service Date: Date Used to Calculate Leave Accrual Rate. • Probationary Date for Broadbanded Employees, which is 6 months after start date • Professional Experience Date: TIAA-CREF Retirement Program Only • Business Title (Position Title)

Page 25
Contract Pay Workforce Administration>Job Information>Contract Administration>Update Contract Pay NA
Update Contract Pay NA
• Shows the contract dates • Shows if they are pay over contract or if they are pay over 12 months • If they are set to renew automatically
Emplid EMP Name

Page 26
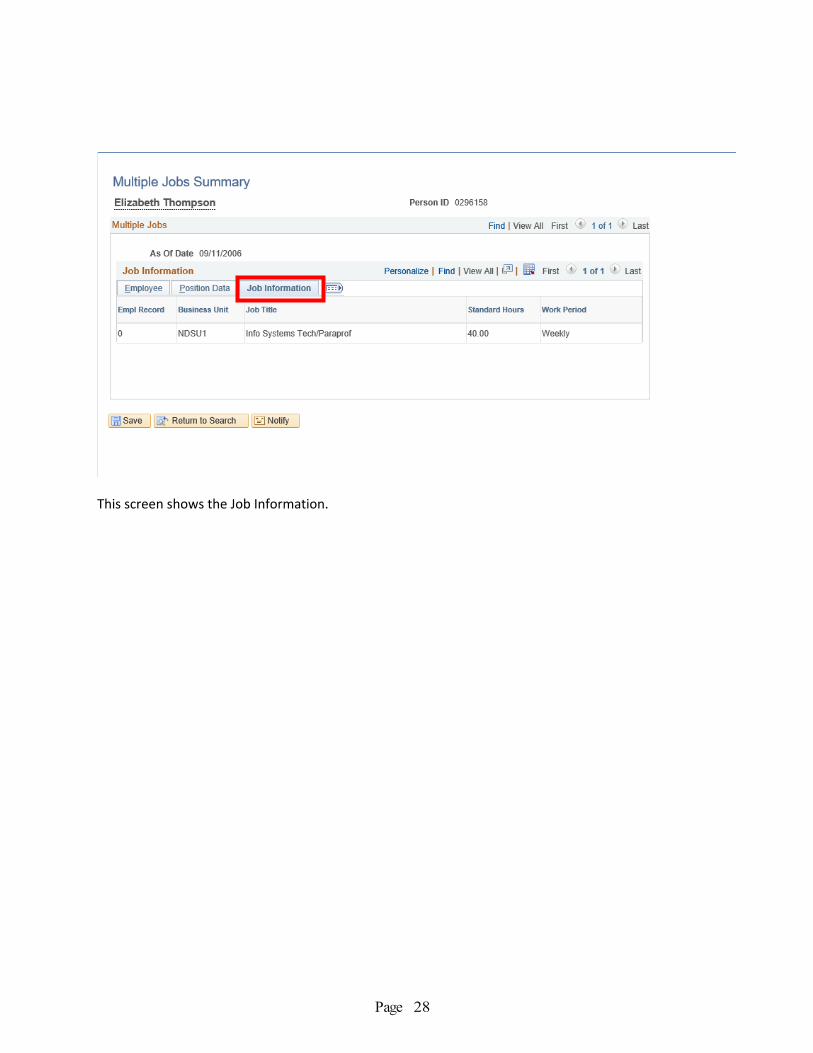
Multiple Job Summary
Navigator>Workforce Administration>Job Information>Review Job Information>Multiple Job Summary
Click on Multiple Job Summary Enter the EMPLID or employees name, then hit the Enter key

Page 27
It shows that this employee only has one active position as of effective date 09/11/2006.
This screen shows information about the position(s).
Page 28
This screen shows the Job Information.

Page 29
Compensation>Base Compensation>Review Salary Information>Employee Compensation History
Type in the employee id or name and hit the Enter key
Compensation history lists salary change dates with action/reason. You can browse through the changes by clicking the right arrow key, or you can click on View All to see the entire history.
COMPENSATION

Page 30
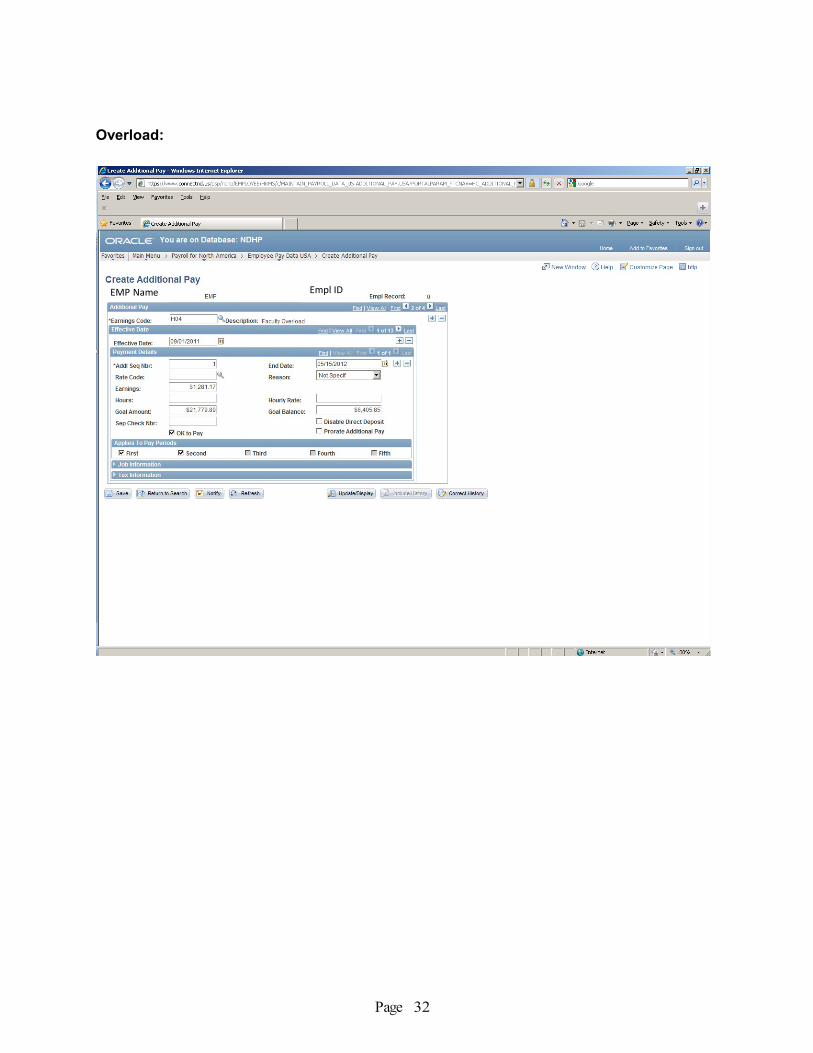
Employee Pay Data USA/Create Additional Pay Payroll for North America>Employee Pay Data USA>Create Additional Pay
Please refer to page 119 for guidelines of when to use different forms for payroll.
PAYROLL FOR NORTH AMERICA

Page 31
Contract Earnings:
EMPLI
Everyone who is on a contract has an additional pay page created during the pay sheet creation process. In addition, this page is used for:
• Overloads • Summer Salary • Summer School • Interim Increase • Distance & Continuing Education
All of the above are setup manually.
Also Shows: • Amount per pay period (earnings) • Total amount supposed to get (goal amount) • Amount paid out so far (goal balance)
Empl ID Empl Name
Page 32
Overload:
EMP Name Empl ID

Page 33
Summer Salary:
Empl IDEMP Name
Page 34
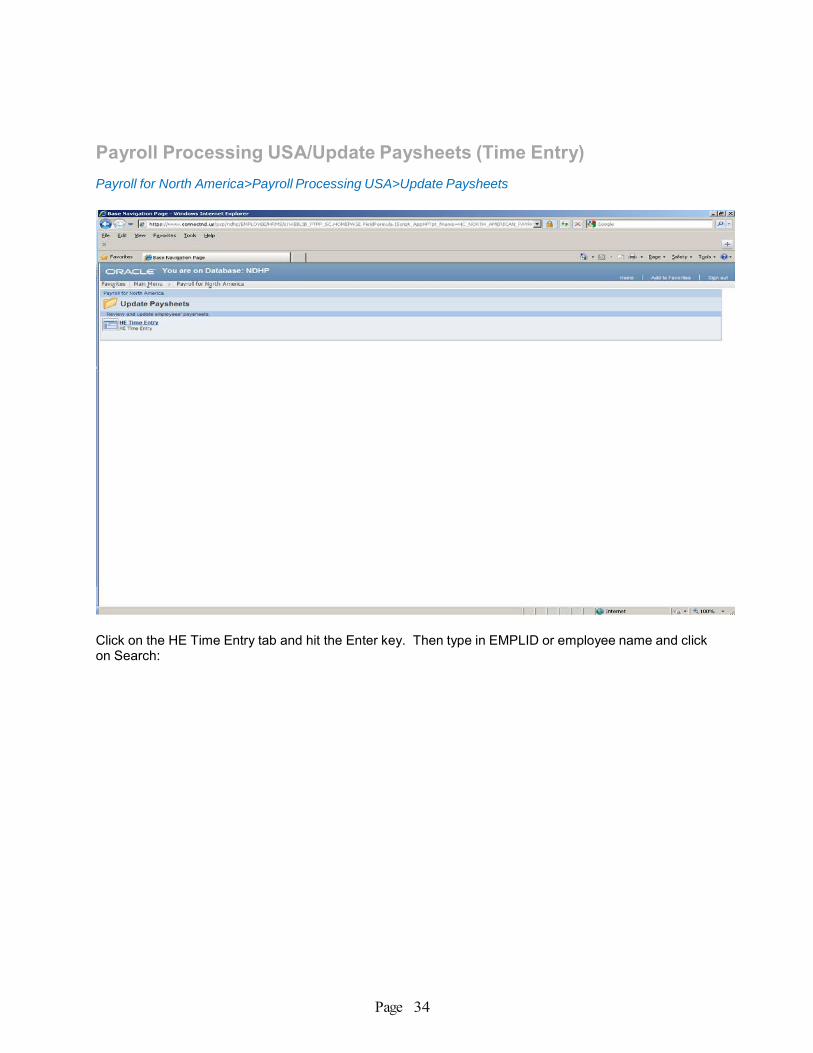
Payroll Processing USA/Update Paysheets (Time Entry)
Payroll for North America>Payroll Processing USA>Update Paysheets
Click on the HE Time Entry tab and hit the Enter key. Then type in EMPLID or employee name and click on Search:

Page 35

Page 36
North Dakota State University Notification of Employee Leave
Last Name First Name
Employee ID# _________ _____
Time of leave: from
Date Hour to Dat e Hour
Total leave time (working hours absent) _____
Leave to be charged to: 0 Annual leave
0 Employee sick leave 0 Dependent sick leave
0 Military leave 0 Funeral leave
I certify that the above is a true statement of the leave taken.
Employee's signature Date Supervisor's signature Date
White - Department copy • Yellow -Duplicate copy Submit this form promptly to your supervisor or department head

Page 37
Earnings Codes Earnings Code
Description
Where would I see this Earnings Code ?
What would I use it for?
H01 Regular Earnings HE Actuals H02 Contract Earnings HE Actuals H03 Overtime HE Actuals H04 Faculty Overload HE Actuals H05 Summer Salary HE Actuals H14 Workstudy HE Actuals HE Time Entry H28 Staff Overload HE Actuals H20 Sick Leave - Salaried HE Actuals H21 Dependent Sick Leave - Salaried HE Actuals H22 Annual Leave - Salaied HE Actuals H23
Compensatory Time Taken-Salaried
HE Time Entry to Enter Hours Used
H24 Holiday-Salaried HE Actuals H25
Funeral Leave-Salaried
HE Time Entry to Enter Hours Used
H26
Military Leave Pd-Salaried
HE Time Entry to Enter Hours Used
H27
Jury Duty-Salaried
HE Time Entry to Enter Hours Used
H30 Sick Leave - Hourly HE Actuals H31 Dependent Sick Leave - Hourly HE Actuals H32 Annual Leave - Hourly HE Actuals H33
Compensatory Time Taken-Hourly
HE Time Entry to Enter Hours Used
H34 Holiday - Hourly He Actuals H35
Funeral Leave-Hourly
HE Time Entry to Enter Hours Used
H36
Military Leave Paid-Hourly
HE Time Entry to Enter Hours Used
H37
Jury Duty Leave-Hourly
HE Time Entry to Enter Hours Used
H40 Sick Leave -Contract HE Actuals H41 Dependent Sick Leave - Contract HE Actuals H42 Annual Leave - Contract HE Actuals H43
Comp Time Taken-Contract
HE Time Entry to Enter Hours Used
H44 Holiday - Contract HE Actuals H45
Funeral Leave-Contract
HE Time Entry to Enter Hours Used
H46
Military Leave-Contract
HE Time Entry to Enter Hours Used
H47
Jury Duty - Contract
HE Time Entry to Enter Hours Used
H53
Compensatory Time Earned
HE Time Entry to Enter Hours Banked

Page 38
Funeral leave, jury duty, workstudy hours, and comp time are all examples of other hours.
On this screen we enter:
• Time & leave hours include: − Regular pay hours − Overtime hours − Annual leave hours − Sick and dependent sick hours
• Other hours include:
− Funeral leave − Jury duty − Workstudy hours − Comp time
EMP Name

Page 39
Overtime (Salaried):
Empl Name
Empl ID

Page 40
Comp Time: Enter the number of hours in the Other Hours box per pay period effective [Enter the number of hours earned/taken only, the system will automatically figure it at 1.5).
Empl Name
Empl ID

Page 41
Funeral Leave:
Below is the link to the HR/Payroll Web page earnings codes (to be entered in the Oth Earns Cd box):
http://www.ndsu.edu/hr/peoplesoft/index
Then you will select “Earnings Codes” from the list.
The box with the Other Hours will remain red, it does not mean that there is a problem with your entry.
Empl Name
Empl ID
Page 42
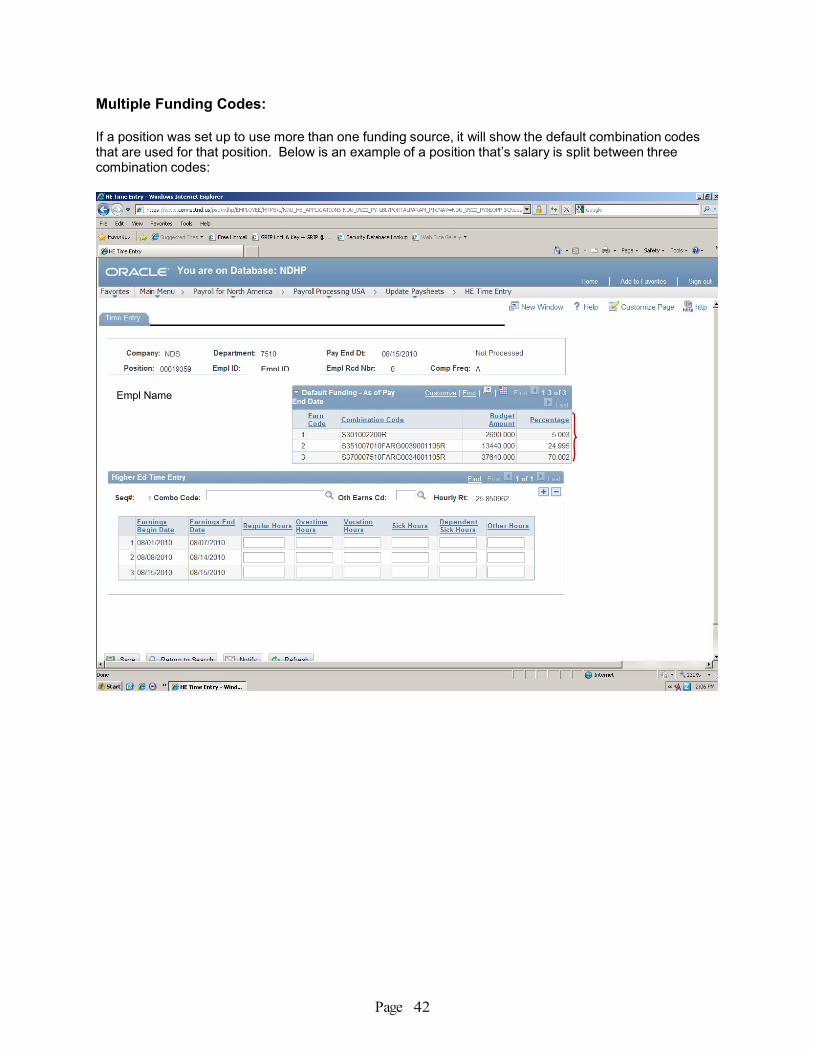
Multiple Funding Codes: If a position was set up to use more than one funding source, it will show the default combination codes that are used for that position. Below is an example of a position that’s salary is split between three combination codes:
Empl Name
Empl ID
Page 43
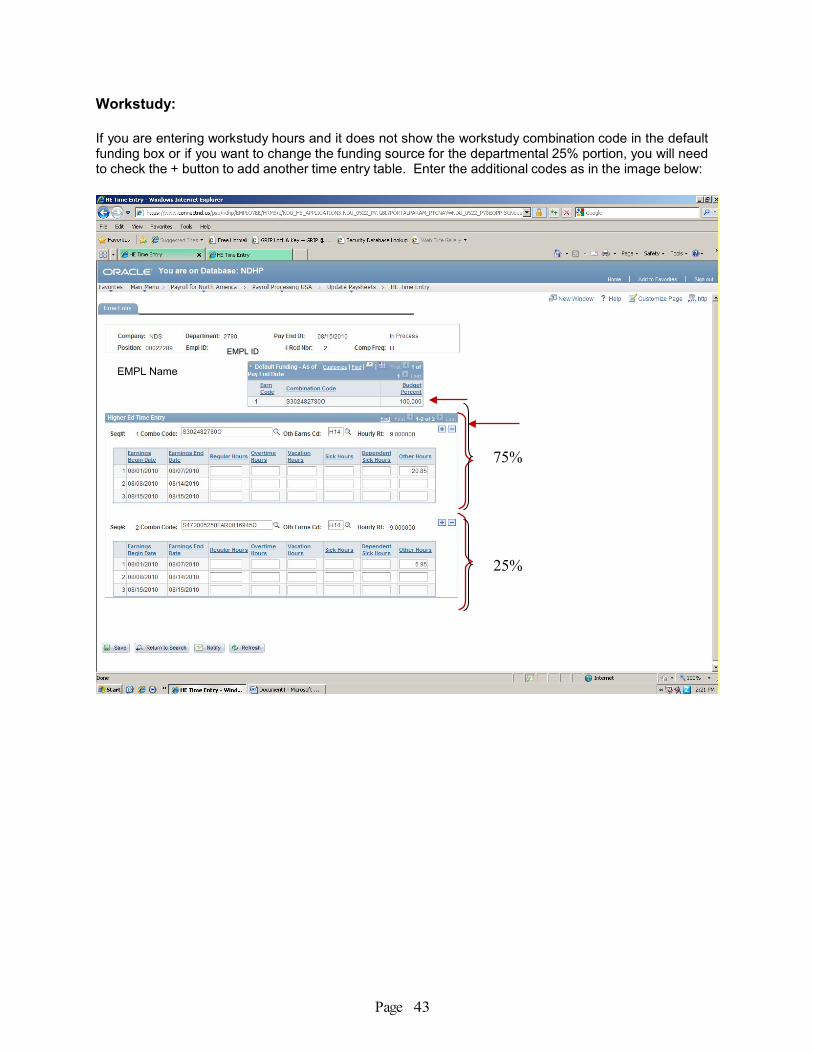
Workstudy: If you are entering workstudy hours and it does not show the workstudy combination code in the default funding box or if you want to change the funding source for the departmental 25% portion, you will need to check the + button to add another time entry table. Enter the additional codes as in the image below:
75%
25%
EMPL Name
EMPL ID

Page 44
Payroll Period Reports Payroll for North America>Payroll Processing USA>Pay Period Reports>HE Pay Register 2
The instructions for running the HE Pay Register 2 Report are on Page 74.

Page 45
Payroll Distribution Payroll for North America>Payroll Distribution
The instructions for running the Gross and Fringe Report are on page 101.
The instructions for the HE Actuals Report are on page 83.

Page 46
Broadbanded Staff Responsibility Reviews Workforce Development>Performance Management>Performance Documents>HE EE Review
Type in the EmplID number or the employee name and hit Enter key
WORKFORCE DEVELOPMENT

Page 47
Employee Review tab is used to verify the employee review information for broadbanded staff employees. It shows:
• Effective Date (Date that it was received in HR Office) • Review Type (Probation, Extended Probation and Annual)
− Probation review is given after a probationary period is over, the supervisor needs to perform a review of the employee’s performance and submit to HR.
− The probationary period can be extended for up to one year. Contact Director of HR and submit a probationary responsibility review indicating the extension.
− An annual review is required per policy to be given once a year. • Department • Position Number • Rating Scale being used (Satisfactory/Unsatisfactory) • Review Rating (S/U)
Empl Name Empl ID

Page 48
Across the top, click on tab: Reviewers
This tab will tell us:
Effective Date: when the review was received in HR Office Next Review Date: when the next review is due Evaluation Type: Supervisor Reviewer ID: Supervisors EmplID Reviewer Name: Supervisor’s name
We do not use the comments and goals tabs at this time.
.
Empl Name EMPL ID

Page 49
Faculty Events
Calculate Tenure Data Faculty Events are used only by departments with tenured-track faculty.

Page 50
Some of the fields that may be of interest are:
Tenure Status – whether they are on a tenure track Track Start Date – the date that they started their tenure process Tenure Home – which department they were tenured in Granted Date – date that tenure was granted Total Required – number of years
Empl ID Empl Name
Page 51
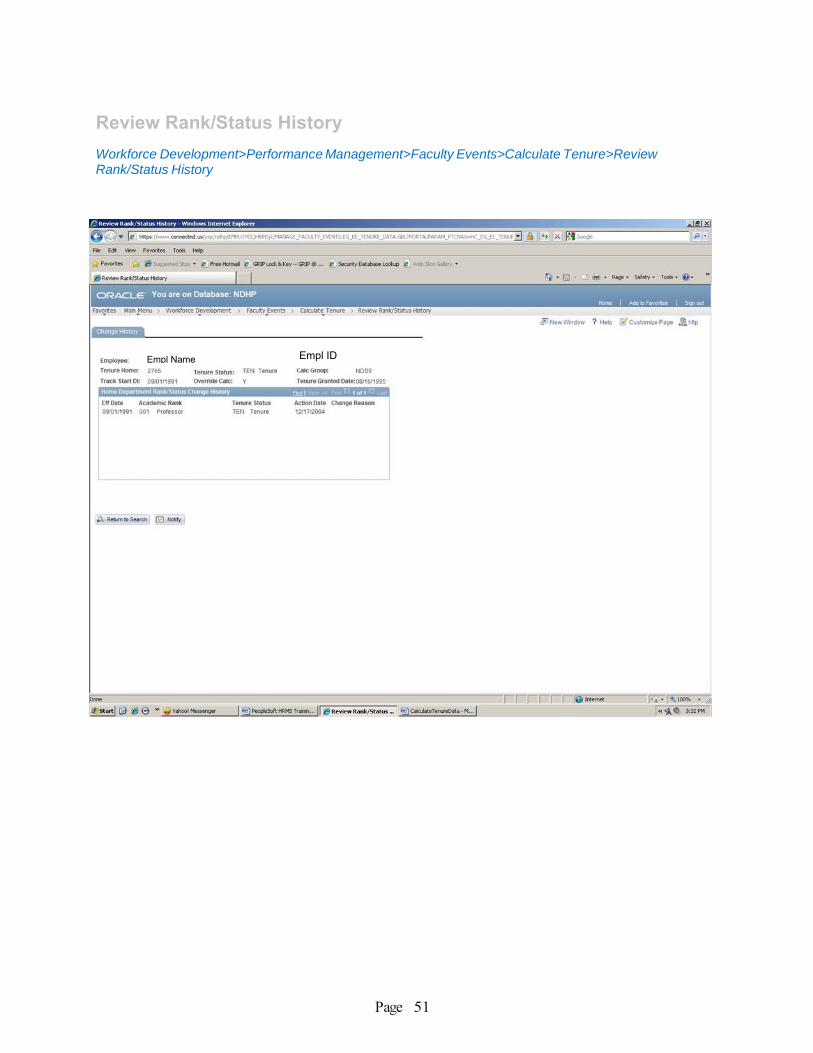
Review Rank/Status History Workforce Development>Performance Management>Faculty Events>Calculate Tenure>Review Rank/Status History
This screen gives a synopsis of the employee
Empl Name Empl ID

Page 52
Maintain Positions/Budgets
Add/Update Position Information
Organizational Development>Position Management>Maintain Positions/Budgets>Add/Update Position Info
Enter your Department Number. Hit search button. All the department positions appear. Shows:
Position Number Description (Functional Title) Position Status Business Unit (always NDSU1) Department Number Job Code Reports to Position Number
Or you can just select a position number: 00021481, then Hit Enter
ORGANIZATIONAL DEVELOPMENT

Page 53
Click on tab: Description
Position Information: • Indicates if the position is filled or if it is vacant • Indicates whether it is a position that allows multiple incumbents - 1 out of 999 (pool) or a single
incumbent - 1 out of 1 • Indicates status of the position (active or inactive) • Title of the position • Who the position reports to – only for benefitted employees, non-benefitted employees usually
report to the Account Technician or Administrative Secretary/Assistant of that department
Job Information • Job Code (Job Family is the first 4 digits of the job code) • Regular/Temporary status • Full-time or Part-time position • FLSA status: exempt/nonexempt EX = exempt or NE = nonexempt at the end of salary plan • Standard hours • Reports To
Work Location
• What department the position is in • Location of the position

Page 54
Click on tab: Specific Information
• This tells you the number of people in a position • FTE

Page 55
Click on tab: Budget and Incumbents
Indicates ‘who’ is in the position (if it is not vacant).
Ignore the Current Budget box, it does not have correct data. The correct budget information follows on Page 65.

Page 56
Review Positions/Budget Information
Position History Organizational Development>Position Management>Review Position/Budget Info>Position History
This screen will show the history of the position.
Empl ID Empl Name
Page 57
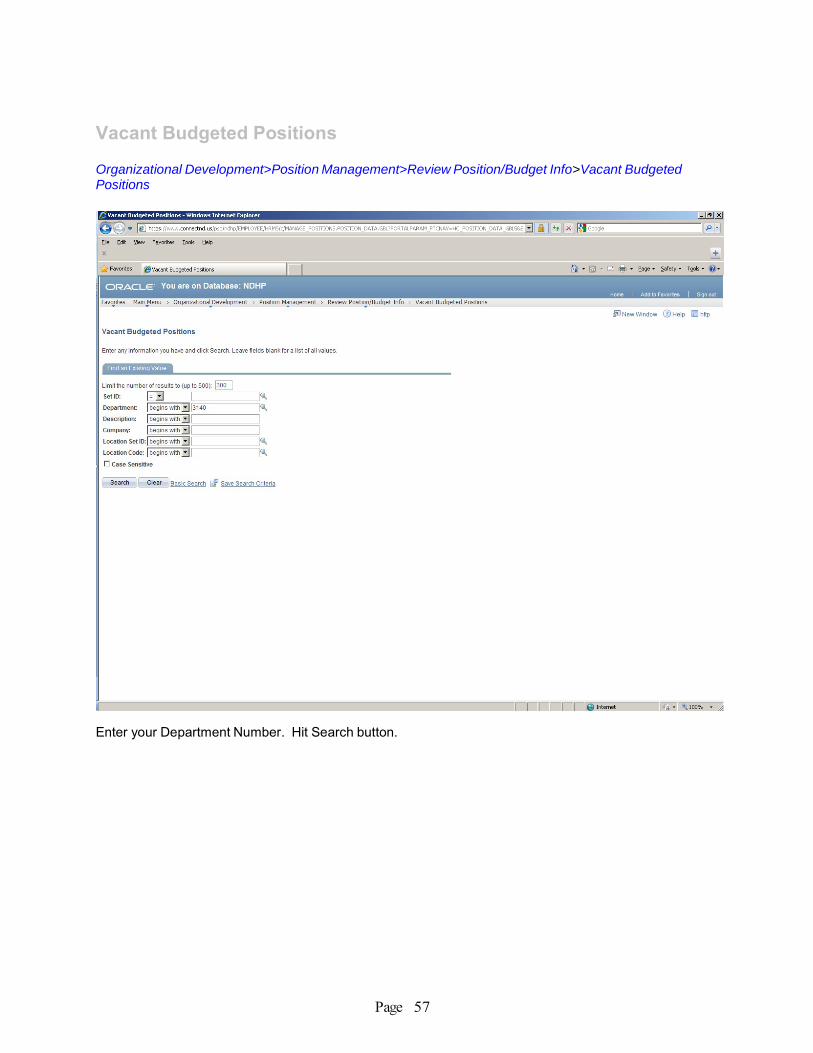
Vacant Budgeted Positions Organizational Development>Position Management>Review Position/Budget Info>Vacant Budgeted Positions
Enter your Department Number. Hit Search button.

Page 58
This will bring up a list of positions that have vacancies in them: Regular and Temporary.

Page 59
Introduction
Manager Self Service is a module in HRMS for electronic Work Flow of employee hire, change and termination information.
Work Flow will streamline the way employee information is managed in HR by ensuring accurate data, initiating and tracking approvals, and limiting mistakes that can be made with manual data entry.
Work Flow users pre-approved workflow paths. All workflows are routed automatically after the event has been submitted by a Supervisor. The initiating Supervisor will receive an e-mail alert when the event has been denied by no email is sent if/when the event initiated or approved.
Initiate Termination
Click the Terminate Employee link
MANAGER’S SELF SERVICE
Page 60
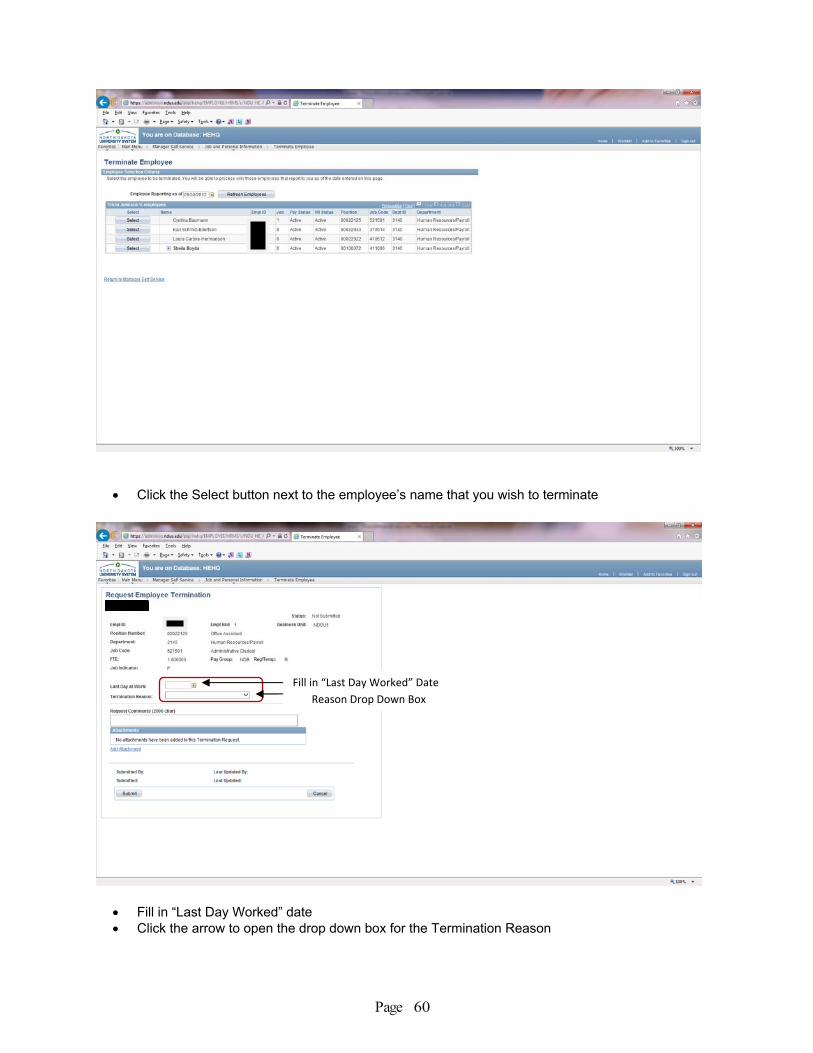
Click the Select button next to the employee’s name that you wish to terminate
Fill in “Last Day Worked” date Click the arrow to open the drop down box for the Termination Reason
Fill in “Last Day Worked” Date
Reason Drop Down Box

Page 61
Select appropriate Termination Reason from drop down box
You can view the Action/Reason table on our website, by selecting Forms on the left side of menu and then under the PAYROLL section click on the (Action/Reason Table) section of the: 101 – Change Form (Action/Reason Table) or click he link below: http://www.ndsu.edu/forms/#human9 Below is a copy of the termination action/reason section: Action Reason Definition Termination a. Death
b. Discharge c. Elimination of Position d. End Temporary Employment e. Failure to Return From Leave f. Job Abandonment g. Resignation h. Normal Retirement
a. Death b. Dismissal c. Reduction in force d. End temporary position e. Employee does not return from leave f. Employee leaves without giving notice g. Attach resignation letter h. Retirement

Page 62
Add Comments (if necessary/desired). Equivalent to Remarks box on Change Form 101 Add Attachment(s) (if required/desired):
- Attachments are not required for non-benefitted employees. Examples of an attachment for a benefitted employee would be a resignation letter, Reduction-In-Force document, discharge document, leave agreement, comp time spreadsheet, etc.
To Add an Attachment: - Click the “Add Attachment” link - Click the “Browse” button. Navigate to the saved document for uploading. Select the
document - Once the document path has loaded, click “Upload” - The document will display with the description and document extension type
Click Submit button to submit the termination request for approval - The termination has now been sent to HR/Payroll. Department’s portion of the termination
process is now finished, if there is no other approval or review to be added
If additional approval or review is required, see next steps If additional employees need to be terminated, click Cancel button to return to the list
Equivalent to Remarks box on Change Form 101

Page 63
Adding Approvers and Reviewers Approvers and Reviewers can be added by a department/Supervisor after the initial submission. Approvers or Reviewers can also be added by the next pending Approver. Approvers can view comments and attachments that have been added to a termination. Reviewers can view comments but cannot view attachments that have been added to a termination.
Add Approvers and/or Reviewers after the termination has been submitted but BEFORE navigating away from the page
Click the “plus” sign near the bottom of the screen

Page 64
Enter the User ID of the person you want to add as an Approver or Reveiwer Or click the magnifying glass to search for user by name

Page 65
Narrow down the search by selecting Contains in the conditions box and typing in part of the name Select Search

Page 66
An Approver must approve the transaction before it moves to the next approver Approvers and Reviewers are provided with a link on the home page in HRMS, when they log in, to
review or approve the transaction Approvers can view comments and attachments Reviewers can view comments but cannot view attachments Click the “minus” sign near the bottom of the screen to delete an Approver or Reviewer

Page 67
Termination Approve/Review Once a termination has been initiated and submitted it needs to be approved by the next level. Departments can view where the termination is in the approval process; whether pending, approved or denied.
Click the Termination Approve/Review link

Page 68
Click the Workflow Status drop down box and select: Pending, Approved or Denied
- Brings up the applicable list of terminations submitted
To return to the list, select the magnifying glass at the top
Page 69
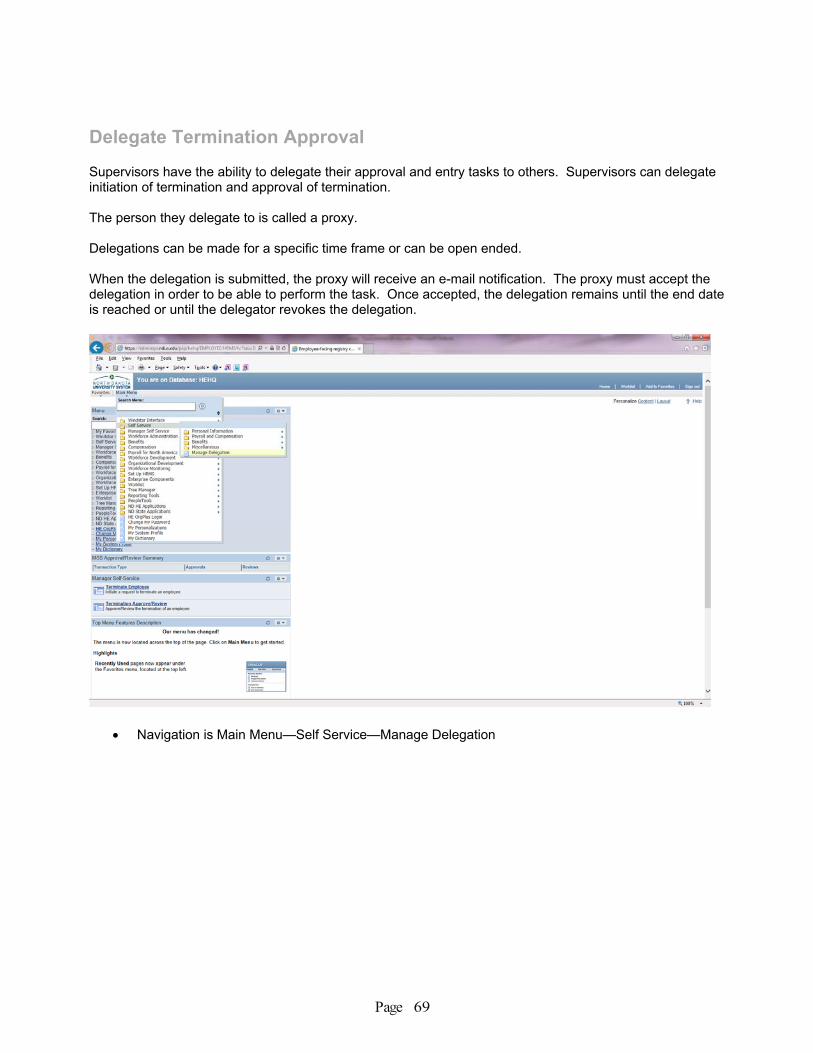
Delegate Termination Approval Supervisors have the ability to delegate their approval and entry tasks to others. Supervisors can delegate initiation of termination and approval of termination. The person they delegate to is called a proxy. Delegations can be made for a specific time frame or can be open ended. When the delegation is submitted, the proxy will receive an e-mail notification. The proxy must accept the delegation in order to be able to perform the task. Once accepted, the delegation remains until the end date is reached or until the delegator revokes the delegation.
Navigation is Main Menu—Self Service—Manage Delegation

Page 70
Click Create Delegation Request link
Enter From Date and To Date for the delegation dates. If open-ended, leave To Date field blank Click Next button
Click to Create Delegation Request

Page 71
Click the Termination Approve option if the proxy should be able to approve terminations that are
initiated Click the Termination Initiate option if the proxy should to be able to initiate a termination Click Next button

Page 72
Select the individual that will be a proxy Click Next button
Click Submit button

Page 73
Viewing/Editing Proxies Supervisors can view and edit who has been delegated as a proxy.
Navigation is Main Menu—Self Service—Manage Delegation

Page 74
Click Review My Proxies link
Supervisor may view, revoke or change proxy on this screen
Page 75
Combination Code Table
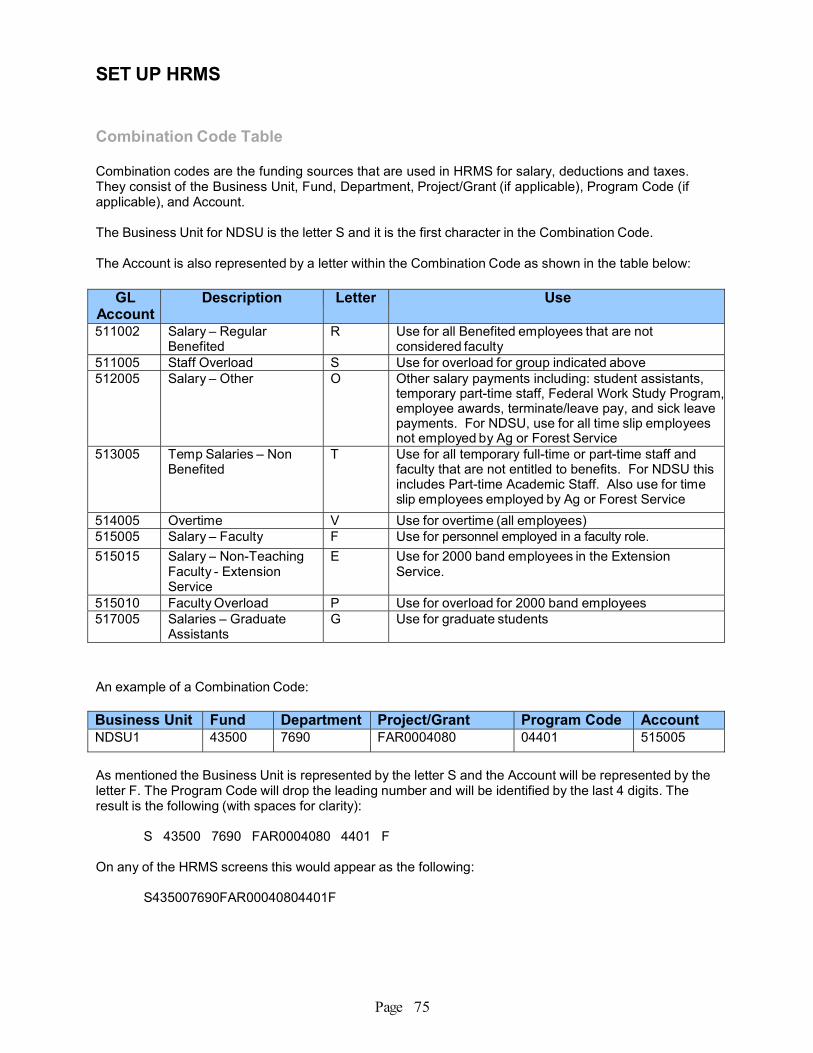
Combination codes are the funding sources that are used in HRMS for salary, deductions and taxes. They consist of the Business Unit, Fund, Department, Project/Grant (if applicable), Program Code (if applicable), and Account.
The Business Unit for NDSU is the letter S and it is the first character in the Combination Code.
The Account is also represented by a letter within the Combination Code as shown in the table below:
GL
Account Description Letter Use
511002 Salary – Regular Benefited
R Use for all Benefited employees that are not considered faculty
511005 Staff Overload S Use for overload for group indicated above 512005 Salary – Other O Other salary payments including: student assistants,
temporary part-time staff, Federal Work Study Program,employee awards, terminate/leave pay, and sick leave payments. For NDSU, use for all time slip employees not employed by Ag or Forest Service
513005 Temp Salaries – Non Benefited
T Use for all temporary full-time or part-time staff and faculty that are not entitled to benefits. For NDSU this includes Part-time Academic Staff. Also use for time slip employees employed by Ag or Forest Service
514005 Overtime V Use for overtime (all employees) 515005 Salary – Faculty F Use for personnel employed in a faculty role. 515015 Salary – Non-Teaching
Faculty - Extension Service
E Use for 2000 band employees in the Extension Service.
515010 Faculty Overload P Use for overload for 2000 band employees 517005 Salaries – Graduate
Assistants G Use for graduate students
An example of a Combination Code:
Business Unit Fund Department Project/Grant Program Code Account NDSU1 43500 7690 FAR0004080 04401 515005
As mentioned the Business Unit is represented by the letter S and the Account will be represented by the letter F. The Program Code will drop the leading number and will be identified by the last 4 digits. The result is the following (with spaces for clarity):
S 43500 7690 FAR0004080 4401 F
On any of the HRMS screens this would appear as the following:
S435007690FAR00040804401F
SET UP HRMS

Page 76
To see if a funding source is set up in the HRMS system you can look at the Combination Code Table. The Combination Code table is found at:
Set Up HRMS>Product Related>Commitment Accounting>Budget Information>Combination Code Table
The screen should look like this:
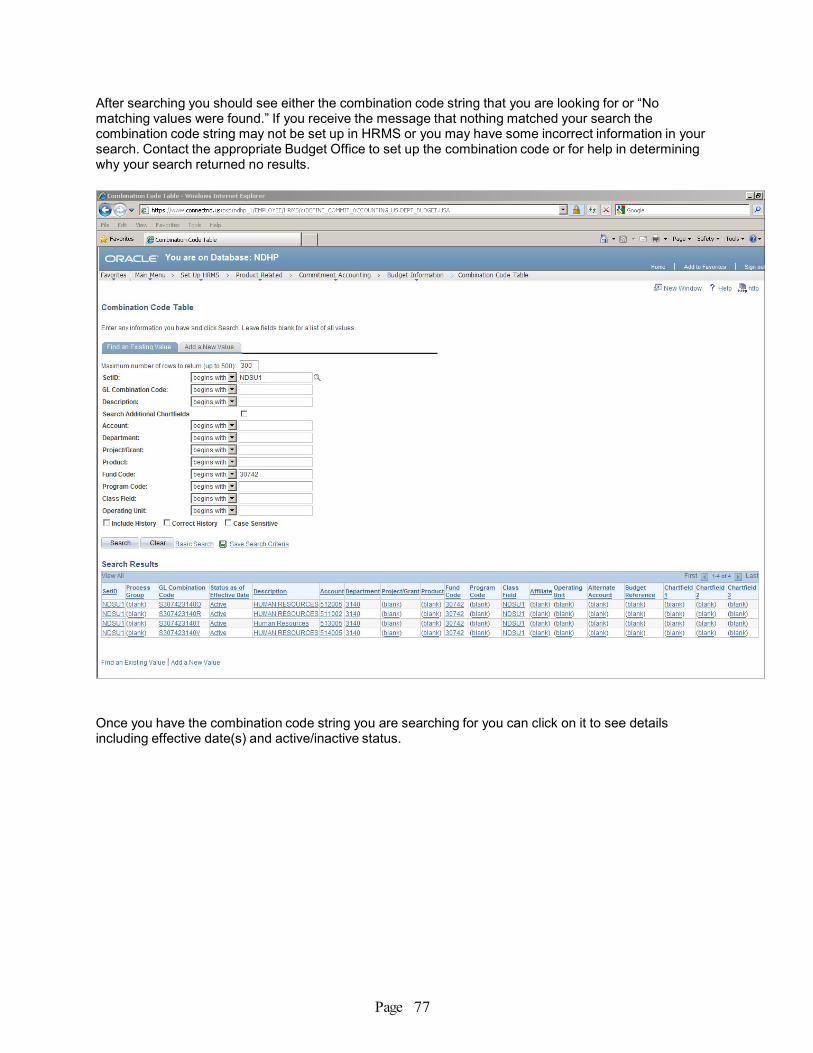
To search for a combination code, enter your information in the appropriate boxes and click on search. NDSU1 should always be entered in the SetID field when searching for a combination code. If you use the Account field in your search use the 6 digit number instead of the letter at the end of the combination code. If there is a program code in the combination code, use all 5 digits in the search.
Page 77
After searching you should see either the combination code string that you are looking for or “No matching values were found.” If you receive the message that nothing matched your search the combination code string may not be set up in HRMS or you may have some incorrect information in your search. Contact the appropriate Budget Office to set up the combination code or for help in determining why your search returned no results.
Once you have the combination code string you are searching for you can click on it to see details including effective date(s) and active/inactive status.
Page 78
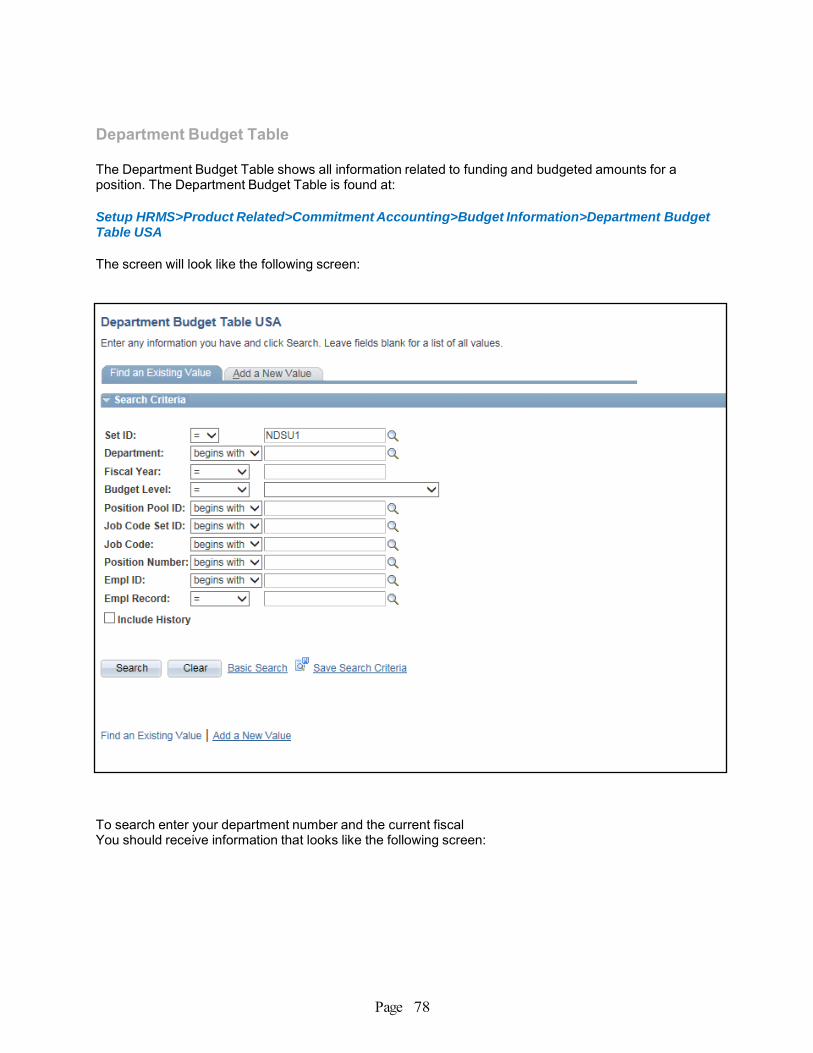
Department Budget Table The Department Budget Table shows all information related to funding and budgeted amounts for a position. The Department Budget Table is found at:
Setup HRMS>Product Related>Commitment Accounting>Budget Information>Department Budget Table USA
The screen will look like the following screen:
To search enter your department number and the current fiscal You should receive information that looks like the following screen:

Page 79
If you searched by your department you should be able to click on any of the positions to see the details for that position. If you searched by position number to begin with it should take you directly to the screen with the details for that position.
The details for the position are on the second tab titled “Dept Budget Earnings”. The circle at the top of the screen shot shows the department number this position is set up in. The red box on the screen shot shows the position number and title. The next red circle shows the most recent effective date for any changes to funding or budgeting for this position.
The information under the blue bar labeled “Earnings Distribution” is what you will want to look at for funding and budgeting purposes. The Combination Code field shows the Combination Code that is set up to be used on this position. There will either be a budgeted amount or a distribution percentage listed for each position. If there is more than one funding source you will need to select View All on the Earnings Distribution bar in order to see all of the funding sources.
Some employees may have more than one Department Budget Table set up for them. One Department Budget Table will be set up for the position, as indicated in the previous pages. The other Department Budget Table will be set up at an “Appointment” level.

Page 80
On the search page you can enter your department number, the current fiscal year and change the drop down for Budget Level to" Appointment". After clicking search you should see a list of all the Department Budget Tables for your department that are set up for specific employees. In the list that is returned you should see Empl ID and Empl Record instead of position numbers.

Page 81
On the Earnings tab the same information will appear with the exception of the position number. Instead of the position number and title the Empl ID, Empl Rcd# and Employee name will appear instead.
Empl ID Employee Name

Page 82
Funding Summary Report
Setup HRMS >Product Related>Commitment Accounting>Reports>Funding Summary USA The Funding Summary Report shows information related to funding and budgeted amounts for all positions in a department. The report can be used to proof funding sources and budgets that are currently set up to be used for employees. This report will show the same information as the Department Budget Table without having to go into each individual DBT. The Funding Summary Report is found at:
Setup Run Control ID When running the report you will need to use the following criteria: SetID: NDSU1 Department: home department number of position Fiscal Year: current fiscal year As Of Date: can be current or a specific date Funding Summary By: Position Level Report Option: Earnings
REPORTS

Page 83
Once the report has run the PDF will look like the example below:
As mentioned in the section about Department Budget Tables there are some DBTs set up by appointment level. The report may need to be run again using the Funding Summary By: Appointment Level rather than Position Level in order get a complete picture for the department. A Funding Summary Report Job Aid with more detailed instructions can be found on the Budget Office website under Resources and Job Aids.

Page 84
HE Pay Register 2 This report is your Payroll Register (Proof)
This report is available to departments to review their payroll, prior to the final calculation (during the time entry period). Department personnel are strongly encouraged to review a proof before the 6:00 p.m. deadline for time entry. Any discrepancies found after that time should be reported immediately to Payroll.
Payroll for North America>Payroll Processing USA>Pay Period Reports>HE Pay Register 2
Department personnel with DEPT_ADMIN access in HRMS will be able to view and/or print the HE Pay Register 2 (Proof) for their department:
Follow the navigation above to get to the run control page for this report. The run control page will look like this:
If you have accessed this page previously, please enter the Run Control ID you have created and click the search button.

Page 85
If you have never accessed this page before, you will need to click on the Add A New Value tab. The following page will appear:
Enter a Run Control ID of your choice. The recommended Run Control value to enter: HEPayRegister2. Click the Add button.
This report can be run back to January, 2005.

Page 86
The following screen appears:
Fill in and check on-cycle to see everyone in your department.
* Optional
Enter the Pay Run ID. This value is NDS followed by the ending date of the pay period (YYMMDD) for which you are requesting the Payroll Register. For Example: To access a payroll register for pay period ending December 31, 2005, you would enter the following: NDS051231. For the Payroll Register for pay period ending October 15, 2006, you would enter: NDS061015.
Click off the check box for All HR Unit. This will open up the next two boxes for your input.
Specify HR Unit: NDSU1 DeptID: Enter your department number Payroll Cycle: Click the ‘On Cycle’ button
∗ Multiple Pay Group Parameters: Used if you would like to limit the report to only being a certain pay
group. Company is ‘NDS’. Pay Group is either ‘NDB’ ‘NDC’ ‘NDN’. NDB – Salaried employees including 12 month benefitted, Grad students, and Part-Time Academic Staff. NDC – Less than 12 month benefitted faculty. NDN – Hourly Employees: Work on an hourly, timeslip basis. Sort Options: Primary Sort: ‘Pay Group’. Secondary Sort: ‘Employee Name’.

Page 87
If you were requesting the July 31, 2010 Payroll Register for department 3140, the screen would look like this:
The magnifying glasses next to each box can be used to search for appropriate values, if you do not know what they are. Only the left side of the screen needs to be completed.
Click Save.
Click Run.

Page 88
The following screen appears:
Verify the following: the Server Name is PSNT the HE Pay Register 2 box is checked Type is Web Format is PDF
Click OK

Page 89
The following screen appears:
Click on the Process Monitor hyperlink. The following screen appears:

Page 90
If Success does not appear immediately under the Run Status (located under the dark blue bar in the middle of the screen), Click on Refresh periodically until the Run Status is Success and Distribution Status is Posted. The screen will not update status, unless you click the Refresh button.
When Success and Posted appears, Click on the Details hyperlink, located to the right of the word Posted (immediately below the dark blue bar).

Page 91
The following screen appears:
Click on the View Log/Trace hyperlink.

Page 92
The following screen appears: You must have Adobe Acrobat on your computer to view this report. Click on the top file name that ends with a .PDF extension to view the report. A report will appear containing the data for your department for the selected pay period.
This report may be viewed on line or printed. Unless you need a printed copy, you do not need to print this report for future reference. This report will be available for you to recreate through this process any time in the future. In the future, a decision may be made to purge certain records after a specified number of years. If this decision is made, you will be notified as to the length of time these reports will be available.
After you have viewed or printed the report, click on the red X box in the top right corner of your screen. This closes the document and returns you to the Process Detail screen.
Click Return. This returns you to the Process Detail page.
Click Ok. This returns you to the Process Monitor page.
Click on the hyperlink at the bottom of the screen that says Go Back to HE Pay Register 2. This will return you to your starting screen.

Page 93
Empl Name
Empl ID
Empl Name
Empl ID
Empl Name
Empl ID
Empl Name
Empl ID

Page 94
Page 95
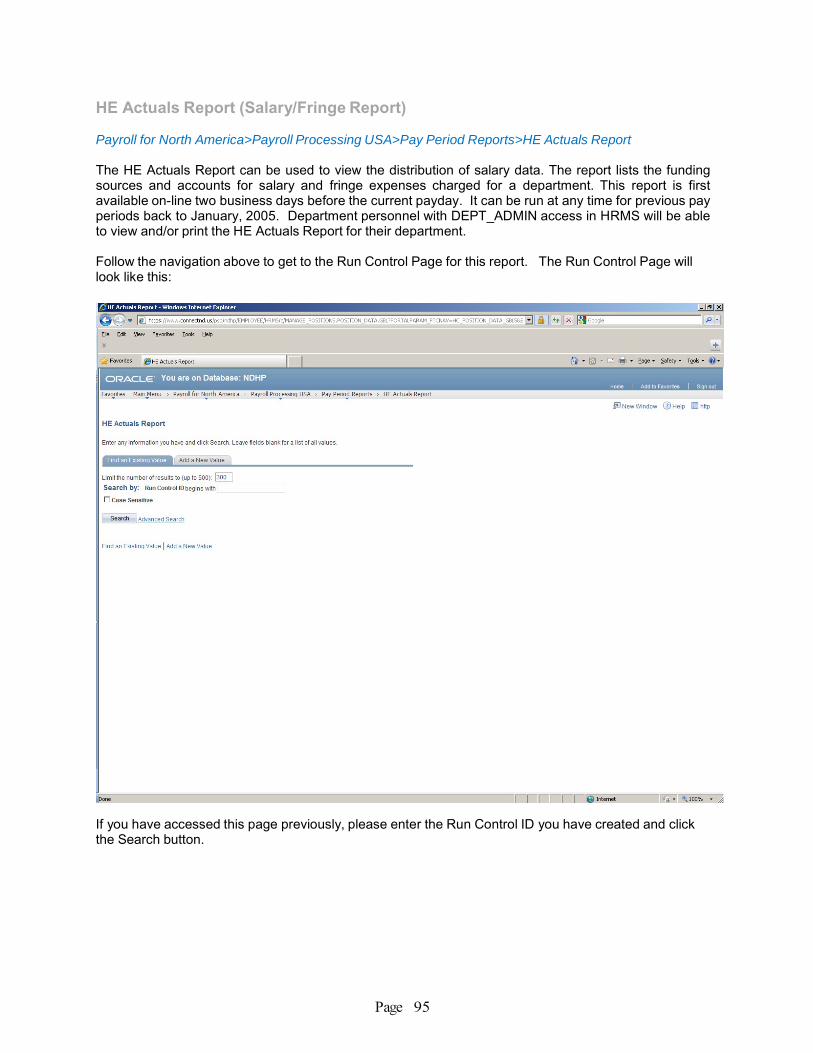
HE Actuals Report (Salary/Fringe Report) Payroll for North America>Payroll Processing USA>Pay Period Reports>HE Actuals Report The HE Actuals Report can be used to view the distribution of salary data. The report lists the funding sources and accounts for salary and fringe expenses charged for a department. This report is first available on-line two business days before the current payday. It can be run at any time for previous pay periods back to January, 2005. Department personnel with DEPT_ADMIN access in HRMS will be able to view and/or print the HE Actuals Report for their department.
Follow the navigation above to get to the Run Control Page for this report. The Run Control Page will look like this:
If you have accessed this page previously, please enter the Run Control ID you have created and click the Search button.

Page 96
If you have never accessed this page before, you will need to click on the Add a New Value tab. The following page will appear:
Enter a Run Control ID of your choice. Recommended Run Control value to enter: HEActuals. Click the Add button.
Page 97
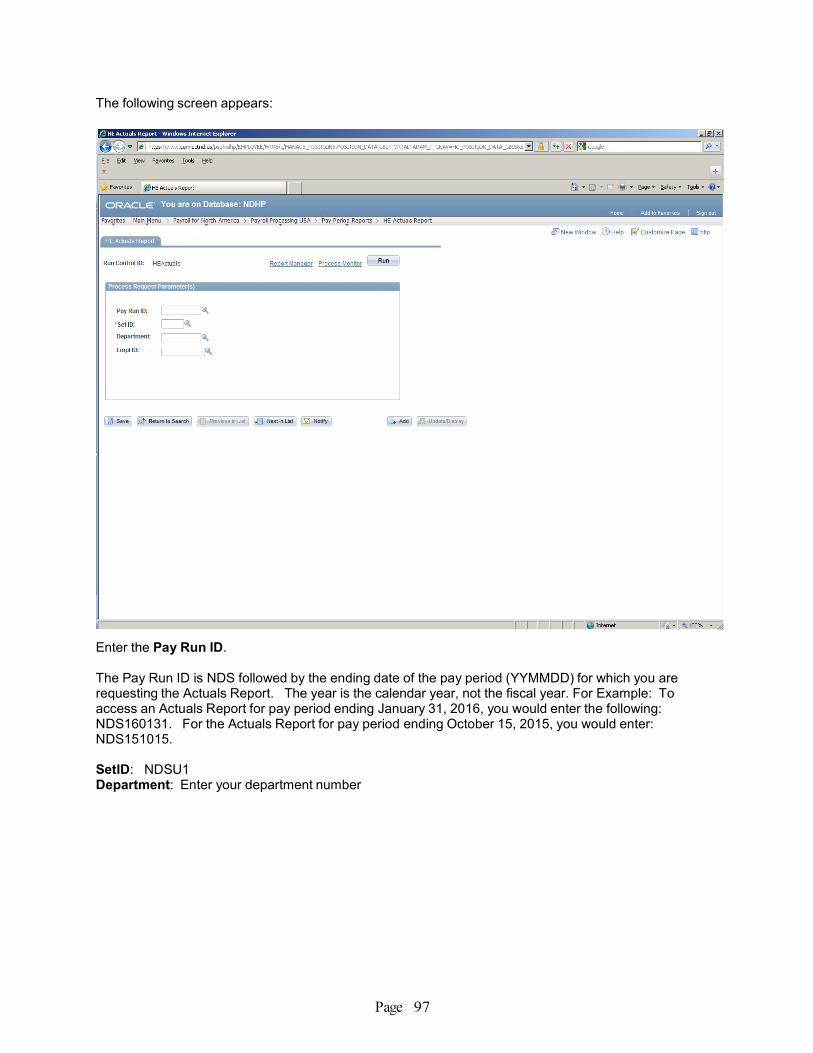
The following screen appears:
Enter the Pay Run ID.
The Pay Run ID is NDS followed by the ending date of the pay period (YYMMDD) for which you are requesting the Actuals Report. The year is the calendar year, not the fiscal year. For Example: To access an Actuals Report for pay period ending January 31, 2016, you would enter the following: NDS160131. For the Actuals Report for pay period ending October 15, 2015, you would enter: NDS151015.
SetID: NDSU1 Department: Enter your department number

Page 98
If you were requesting the July 31, 2010 Actuals Report for department 3140, the screen would look like this:
The magnifying glasses next to each box can be used to search for appropriate values.
Click Save.
Click Run.

Page 99
The following screen appears:
Verify the following: • The Server Name is PSNT • The HE Actuals Report box is checked • Type is Web • Format is PDF
Click OK.

Page 100
The following screen appears:
Click on the Process Monitor hyperlink. The following screen appears:
Page 101
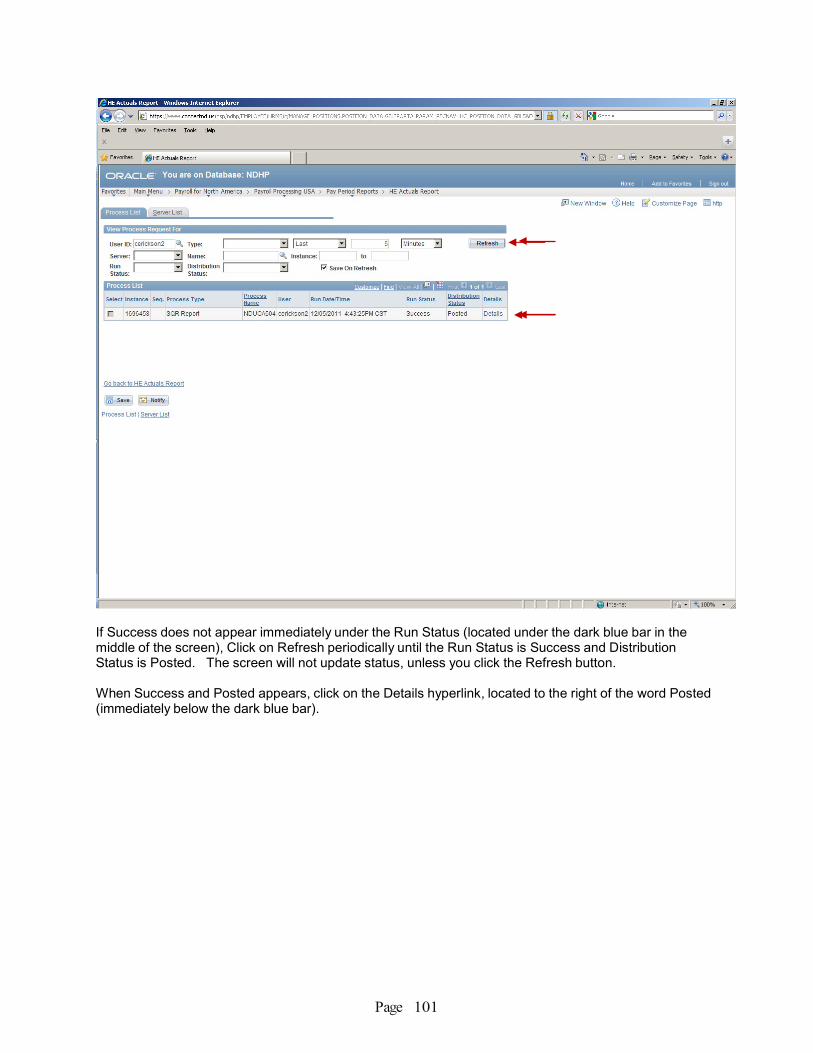
If Success does not appear immediately under the Run Status (located under the dark blue bar in the middle of the screen), Click on Refresh periodically until the Run Status is Success and Distribution Status is Posted. The screen will not update status, unless you click the Refresh button.
When Success and Posted appears, click on the Details hyperlink, located to the right of the word Posted (immediately below the dark blue bar).

Page 102
The following screen appears:
Click on the View Log/Trace hyperlink – located in the bottom right hand corner.

Page 103
The following screen appears:
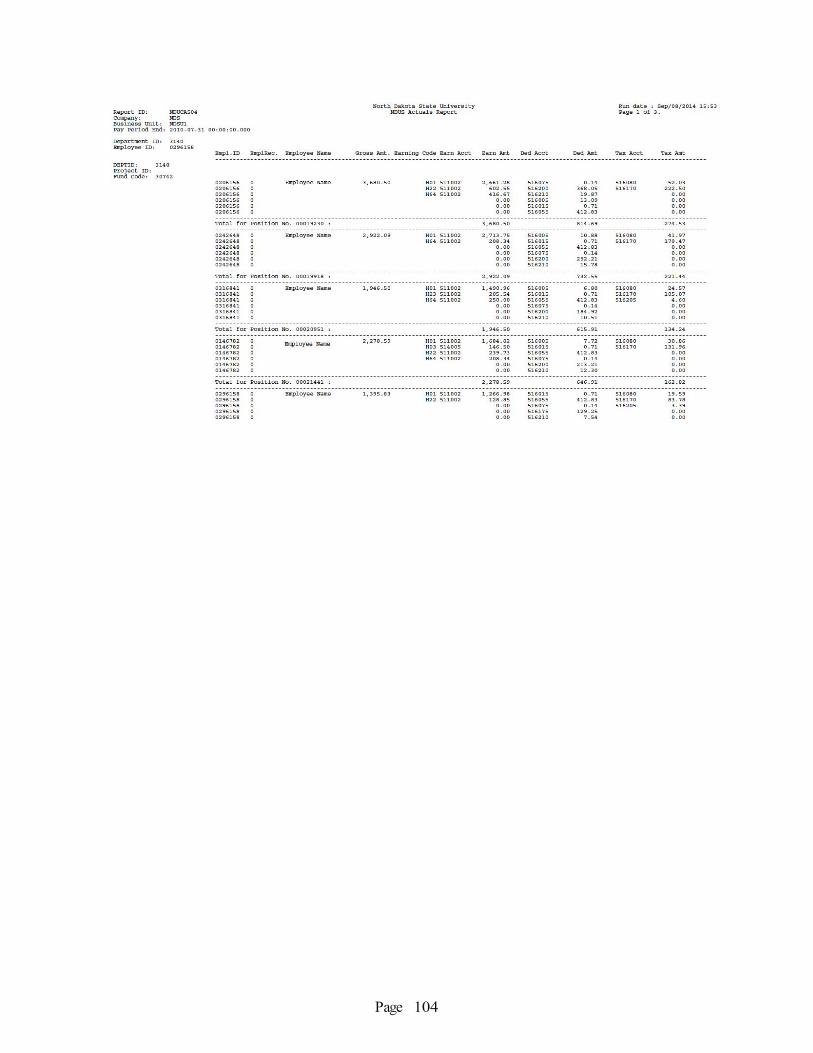
You must have Adobe Acrobat on your computer to view this report. Click on the middle file name that ends with a .PDF extension to view the report. A report will appear containing the data for your department for the selected pay period.
This report may be viewed on line or printed. Unless you need a printed copy, you do not need to print this report for future reference. This report will be available for you to recreate through this process any time in the future.
After you have viewed or printed the report, click on the red X box in the top right corner of your screen. This closes the document and returns you to the Process Detail screen.
Click Return. This returns you to the Process Details page.
Click Ok. This returns you to the Process Monitor page.
Click on the Go Back to HE Actuals Report hyperlink. This will return you to your starting screen. A HE Actuals Job Aid can also be found on the Budget Office website under Resources and Job Aids.
Page 104

Page 105
HE Leave Accrual Report (Department Leave Accrual Report)
Lists the leave earned, taken and balances for all individuals in the department. This report is available one day prior to payday and available until four days prior to the next payday. It can be run for any previous pay period back to January, 2005.
Benefits>Reports>Participation>HE Leave Accrual Report
Department personnel with DEPT_ADMIN access in HRMS will be able to view and/or print the Leave Accrual Report for their department.
Follow the navigation above to get to the Run Control Page for this report. The Run Control Page will look like this:
If you have accessed this page previously, please enter the Run Control ID you have created and click the Search button.

Page 106
If you have never accessed this page before, you will need to click on the Add A New Value tab. The following page will appear:
Enter a Run Control ID of your choice. Recommended Run Control value to enter: HELeaveAccrual.

Page 107
The page will look like this:
Language: English
Click off the checkbox for All HR Unit. This will open up the next two fields for you to enter:
Specify HR Unit: NDSU1 (Screenshot does not show the NDSU1, please make sure to include the 1 or it will error out.)
DeptID: Enter your department number
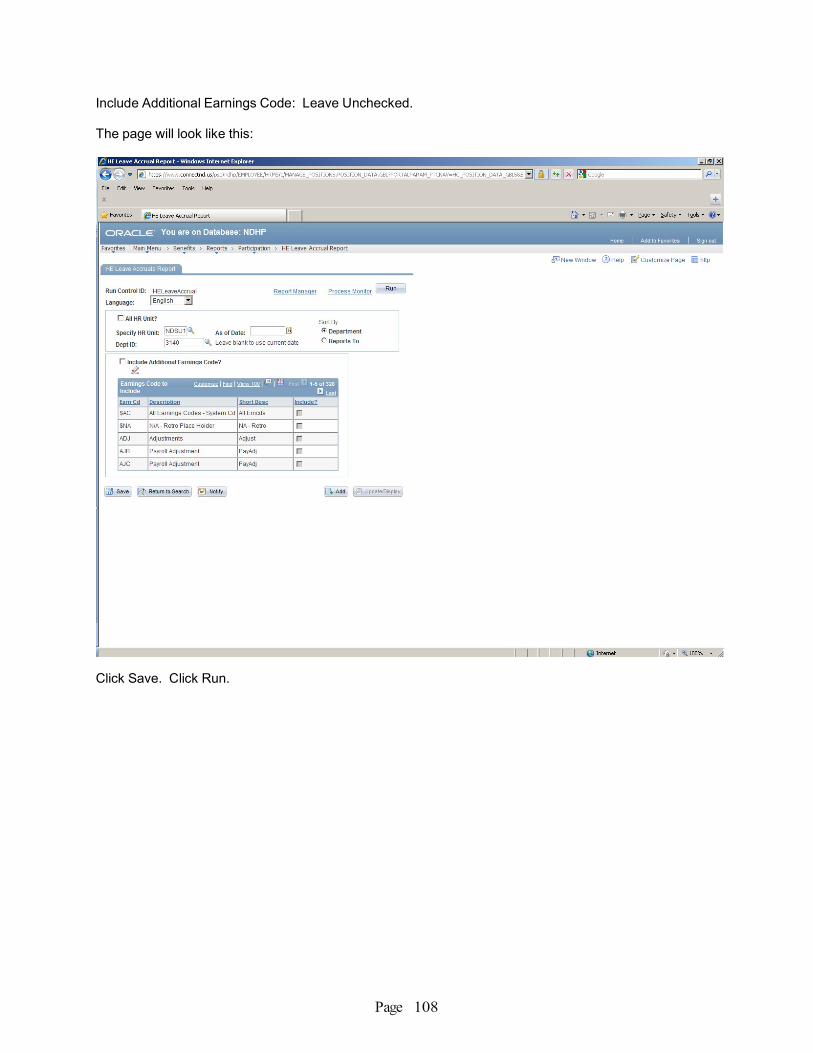
Page 108
Include Additional Earnings Code: Leave Unchecked.
The page will look like this:
Click Save. Click Run.

Page 109
The following screen will appear: Verify the following:
• The Server Name is PSNT, • The HE Leave Accruals Report box is checked, • Type is Web • Format is PDF.

Page 110
Click OK. The following screen appears: Click on Process Monitor hyperlink.

Page 111
The following screen appears: If Success does not appear immediately under the Run Status (located under the dark blue bar in the middle of the screen), Click on Refresh periodically until the Run Status is Success and Distribution Status is Posted. The screen will not update status, unless you click the Refresh button.
When Success and Posted appears, click on the Details hyperlink, located to the right of the word Posted (immediately below the dark blue bar).

Page 112
The following screen appears:
Click on the View Log/Trace hyperlink located at the bottom of the screen.
Page 113
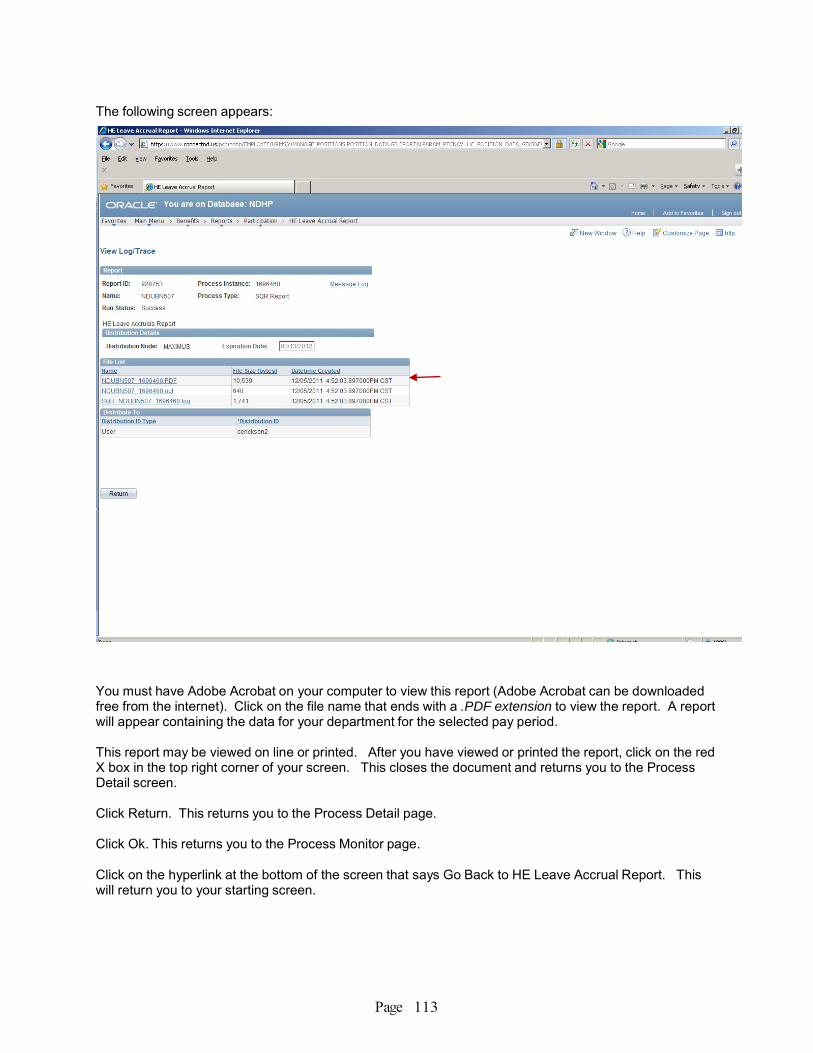
The following screen appears:
You must have Adobe Acrobat on your computer to view this report (Adobe Acrobat can be downloaded free from the internet). Click on the file name that ends with a .PDF extension to view the report. A report will appear containing the data for your department for the selected pay period.
This report may be viewed on line or printed. After you have viewed or printed the report, click on the red X box in the top right corner of your screen. This closes the document and returns you to the Process Detail screen.
Click Return. This returns you to the Process Detail page.
Click Ok. This returns you to the Process Monitor page.
Click on the hyperlink at the bottom of the screen that says Go Back to HE Leave Accrual Report. This will return you to your starting screen.

PeopleSoft Report ID: NDUBN507 LEAVE ACCRUALS Page No. 1 Run Date 09/16/2014 Run Time 15:34:38
Company: NDS North Dakota State University
Run Control BU: NDSU1
Run Control DeptId: 3140 Other Earnings Included:
Company: NDS North Dakota State University
DeptID: 3140 Human Resources/Payroll
Employee Employee Name/ Plan Benefit Last Date Beginning Hours Hours Hours Ending Take Prior Hourly Rate Balance Amount
ID/RCD# Ben SV&Cmp Snr Dt Type Plan Processed Balance Earned Taken Adj/Dontd Balance to Dec. 31
========= ================== ==== ======= ========== ============== ============== =========== ========== ============= =========== ============ ===============
0180619 Berger,Tina Marie 50 HSICK1 08/31/2014 Current PP 9.797 0.000 0.000 1.620
0 09/30/2010 09/30/2011 Jan 1/YTD 24.644 50.023 60.000 3.250‐ 11.42 17.67 201.79
5X HSKDEP Current PP 0.000 0.000
YTD 0.000 0.000
51 HVCST1 08/31/2014 Current PP 10.343 0.000 0.000 1.620
Jan 1/YTD 14.804 62.528 62.120 3.250‐ 11.96 17.67 211.33
8001861 Beug,Jena Ann 50 HSICK1 08/31/2014 Current PP 27.476 3.678 0.000 0.000
0 09/16/2013 09/16/2013 Jan 1/YTD 16.822 63.632 49.300 0.000 31.15 15.72 489.68
5X HSKDEP Current PP 0.000 0.000
YTD 0.000 0.000
51 HVCST1 08/31/2014 Current PP 58.776 3.678 0.000 0.000
Jan 1/YTD 12.322 63.632 13.500 0.000 62.45 26.50 15.72 981.71
5D HCOMP 08/31/2014 Current PP 1.500 10.200 0.000 0.000
Jan 1/YTD 0.600 11.700 0.600 0.000 11.70 15.72 183.92
0582910 Boyda,Sheila Kay 50 HSICK1 08/31/2014 Current PP 29.201 3.678 1.000 0.000
0 07/31/2006 07/31/2006 Jan 1/YTD 23.247 63.632 55.000 0.000 31.88 19.07 607.95
5X HSKDEP Current PP 1.000 0.000
YTD 32.000 0.000
51 HVCST1 08/31/2014 Current PP 196.380 5.517 0.500 0.000
Jan 1/YTD 155.448 95.449 49.500 0.000 201.40 19.07 3,840.70
5D HCOMP 08/31/2014 Current PP 0.250 0.000 0.000 0.000
Jan 1/YTD 7.350 6.000 13.100 0.000 19.07 4.77
Indicator for Balance Hours: T = Terminated, R = Retired Plan Type 5X (Dep Sick) hours taken are included in Plan Type 50 (Sick) current and YTD hours taken
Emplid Empl Name
Emplid Empl Name
Emplid Empl Name

Page 115
Gross and Fringe Report
Payroll for North America>Payroll Distribution>GL Interface Reports>Gross and Fringe
The Gross & Fringe Report can be used to view the distribution of salary data. The report is run to verify wages, deductions, and taxes paid to employees and the funding sources that were charged. Retroactive distributions will appear on the report during the pay period they were processed.
This report is available for the current pay period the day before payday. Previous pay periods are always available.
If you have accessed this page previously, please enter the Run Control ID you have created and click the Search button. If you have never accessed this page before, you will need to click on the Add A New Value tab.

Page 116
Enter a Run Control ID of your choice. Recommended Run Control value to enter: GrossFringe. Click the Add button. The following screen appears:
Language: English Fiscal Year: 2016 Accounting Period: The Fiscal year starts in July with Accounting Period 1 = July, 2 = August, etc. Uncheck: All Company and Paygroup Company: NDS Uncheck: All Department Set ID: NDSU1 Department: Enter your dept number Funding Sources: You can either select All Funding Sources , or type in a specific Combination Code that you want to see. Projects: You can either select All Projects, or type in a specific Project/Grant Report Options: Column Definition Code: HEID1, Detail Report Sort Options: Secondary Sort Sequence: (choose from drop down) Detail Report Sequence: (choose from drop down)
Click Save.

Page 117
Select Run.
Verify the following:
• The Server Name is PSNT • The Gross & Fringe Report box is checked • Type is Web • Format is PDF
Click OK.

Page 118
The following screen appears:
Click on the Process Monitor hyperlink.

Page 119
The following page appears:
If Success does not appear immediately under the Run Status (located under the dark blue bar in the middle of the screen), Click on Refresh periodically until the Run Status is Success and Distribution Status is Posted. The screen will not update status, unless you click the Refresh button.
When Success and Posted appears, click on the Details hyperlink, located to the right of the word Posted (immediately below the dark blue bar).
Click on the hyperlink at the bottom of the screen that says Go Back to Gross and Fringe Report. This will return you to your starting screen.

Page 120
The following screen appears: Click on the View Log/Trace hyperlink.
Page 121
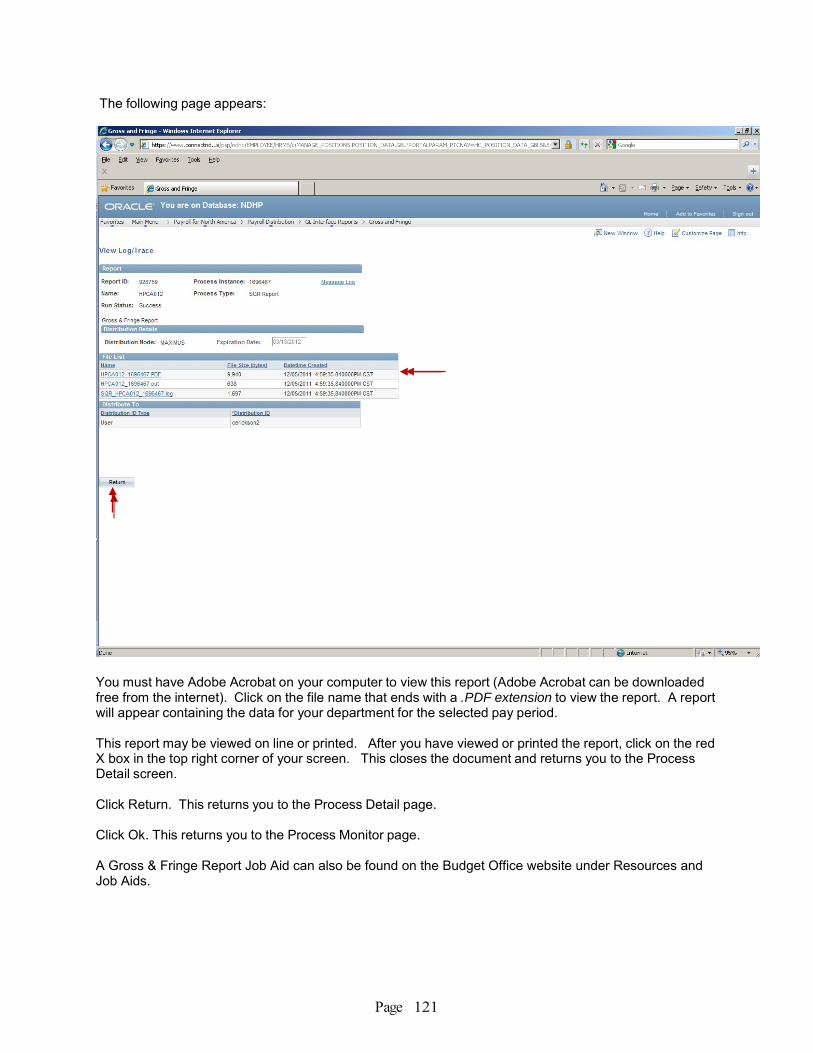
The following page appears:
You must have Adobe Acrobat on your computer to view this report (Adobe Acrobat can be downloaded free from the internet). Click on the file name that ends with a .PDF extension to view the report. A report will appear containing the data for your department for the selected pay period.
This report may be viewed on line or printed. After you have viewed or printed the report, click on the red X box in the top right corner of your screen. This closes the document and returns you to the Process Detail screen.
Click Return. This returns you to the Process Detail page.
Click Ok. This returns you to the Process Monitor page.
A Gross & Fringe Report Job Aid can also be found on the Budget Office website under Resources and Job Aids.

PeopleSoft Report ID: HPCA012 Gross & Fringe Detail ReportCompany NDS North Dakota State University Paygroup: NDB NDSU – Salaried
Run Date 10/21/2014 Run Time 14:27:17
Name Empl ID‐Rcd#
JobCode
Position# Check# Pool PayEndDt
Total Gross Total Fringe
Hlth/Life/EAP Retirement Wkfc Safety LT Disability SUT
FICA Taxes
Total
‐‐‐‐‐‐‐‐‐‐‐‐‐‐‐‐‐‐‐‐‐‐‐‐‐‐‐‐ ‐‐‐‐‐‐‐‐‐ ‐‐‐‐‐‐‐‐‐‐‐‐‐‐ ‐‐‐‐‐‐‐‐‐‐‐‐‐ ‐‐‐‐‐‐‐‐‐‐‐‐‐ ‐‐‐‐‐‐‐‐‐‐‐‐‐ ‐‐‐‐‐‐‐‐‐‐‐‐‐ ‐‐‐‐‐‐‐‐‐‐‐‐‐ ‐‐‐‐‐‐‐‐‐‐‐‐‐ ‐‐‐‐‐‐‐‐‐‐‐‐‐ ‐‐‐‐‐‐‐‐‐‐‐‐‐ ‐‐‐‐‐‐‐‐‐‐‐‐‐
Berger,Tina Marie 00022932 00980428 719.68 627.50 491.75 88.23 3.02 0.00
0.00 44.50 1347.18 0180619‐000 410514 2014‐08‐15
Berger,Tina Marie 00022932 00976447 191.41 520.10 491.75 23.46 0.80 0.00
0.00 4.09 711.51 0180619‐000 410514 2014‐07‐31
Beug,Jena Ann 00027364 00976448 1362.50 768.55 491.75 167.04 5.72 0.00
0.00 104.04 2131.05 8001861‐000 411021 2014‐07‐31
Beug,Jena Ann 00027364 00980429 1362.50 768.55 491.75 167.04 5.72 0.00
0.00 104.04 2131.05 8001861‐000 411021 2014‐08‐15
Boyda,Sheila Kay 00100072 00976449 1652.71 819.62 491.75 202.62 6.94 0.00
0.00 118.31 2472.33 0582910‐000 411006 2014‐07‐31
Boyda,Sheila Kay 00100072 00980430 1652.71 819.61 491.75 202.62 6.94 0.00
0.00 118.30 2472.32 0582910‐000 411006 2014‐08‐15
Buesgens,Michael Howard 00022946 00976450 1375.00 762.97 491.75 168.58 5.78 0.00
0.00 96.86 2137.97 8000928‐000 411015 2014‐07‐31
Buesgens,Michael Howard 00022946 00980431 1375.00 762.97 491.75 168.58 5.78 0.00
0.00 96.86 2137.97 8000928‐000 411015 2014‐08‐15
Erickson,Colette D 00020259 00976451 5014.54 1556.02 491.75 651.89 21.06 17.36
0.00 373.96 6570.56 0206156‐000 011512 2014‐07‐31
Erickson,Colette D 00020259 00980432 5014.54 1556.01 491.75 651.89 21.06 17.36
0.00 373.95 6570.55 0206156‐000 011512 2014‐08‐15
Garske‐Hermanson,Laura E 00022922 00976452 1647.96 819.55 491.75 202.04 6.92 0.00
0.00 118.84 2467.51 0341604‐000 410512 2014‐07‐31
Garske‐Hermanson,Laura E 00022922 00980433 1647.96 819.56 491.75 202.04 6.92 0.00
0.00 118.85 2467.52 0341604‐000 410512 2014‐08‐15
Gauthier,Christine Kay 00020951 00976453 1645.83 833.44 491.75 205.73 6.91 5.70
0.00 123.35 2479.27 7022320‐000 311034 2014‐07‐31
Empl Name
Emplid
Empl Name
Emplid
Empl Name
Emplid
Empl Name
Emplid
Empl Name
Emplid
Empl Name
Emplid
Empl Name 411015
Emplid
Empl Name 411015
Emplid
Empl Name
Emplid
Empl Name
Emplid
Empl Name 410512
Emplid
Empl Name 410512
Emplid
Empl Name 311034
Emplid
Page 123
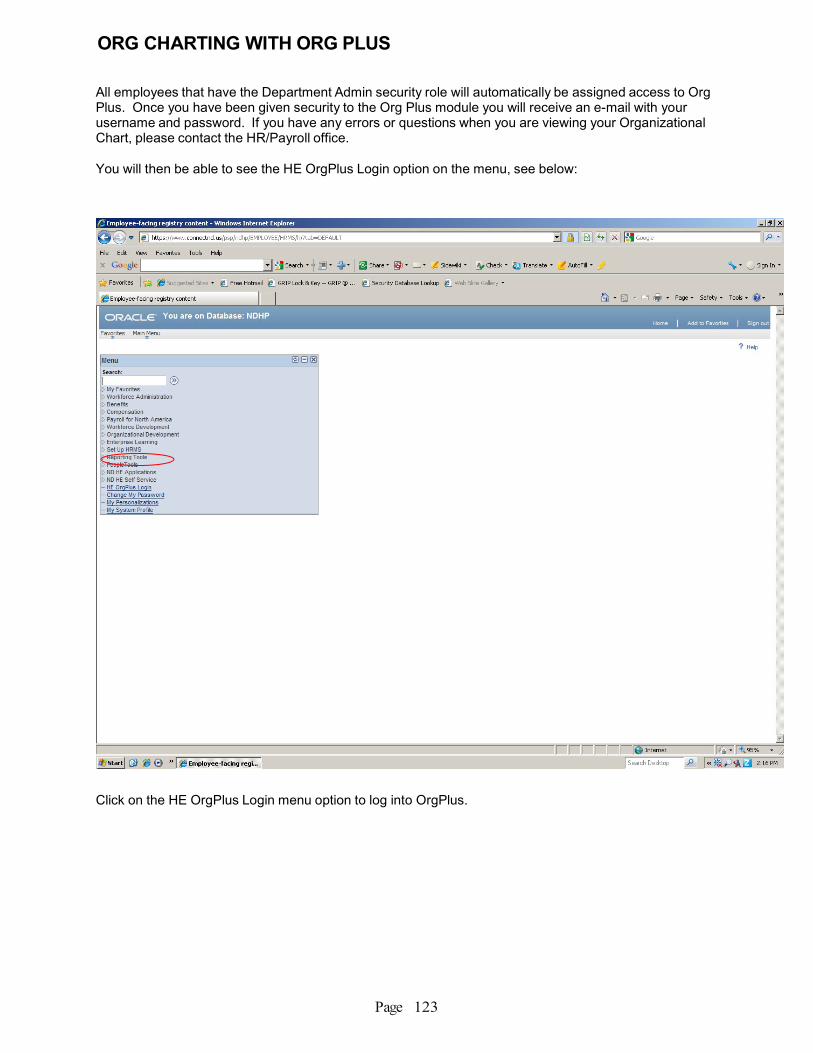
All employees that have the Department Admin security role will automatically be assigned access to Org Plus. Once you have been given security to the Org Plus module you will receive an e-mail with your username and password. If you have any errors or questions when you are viewing your Organizational Chart, please contact the HR/Payroll office.
You will then be able to see the HE OrgPlus Login option on the menu, see below:
Click on the HE OrgPlus Login menu option to log into OrgPlus.
ORG CHARTING WITH ORG PLUS

Page 124
The first time that you log into HE OrgPlus it will prompt you to change your password, after changing your password, you will see the screen below:

Page 125
Org Plus Enterprise allows for department org chart viewing for division, department or area, depending on your access.
Click on the Chart icon.

Page 126
To change your password at any time in the future, you will click on your name in the upper right corner it will drop down the Change Password option.
It will bring up the Organization Chart for your Department and two levels above the Supervisor of your Department.

Page 127
If you want to see the contact information of anyone on the Organizational Chart move your mouse over the hyperlink and it will display that information. See below:

Page 128
You can export the Org Chart to Excel, PDF format, or PowerPoint by clicking on the corresponding button:

Page 129
You can expand /collapse your view by clicking on the Expand/Collapse button:

Page 130
When you expand it gives you that employees’ information.

Page 131
The directory view allows for searching for a particular employee or a particular job title.

Page 132
It can give a detailed or overview of the employee information. If you leave the conditions blank, it will bring up everyone in alphabetical order.
Select the employee you want and then click on the chart button to go back to the chart view.

Page 133
It moves you back into the chart view, see below:

Page 134
You can perform a basic search by clicking on the basic button and typing in the criteria. For example, below I have typed in the title “Employment Assistant”, which brought up any positions that had Employment Assistant in the title.
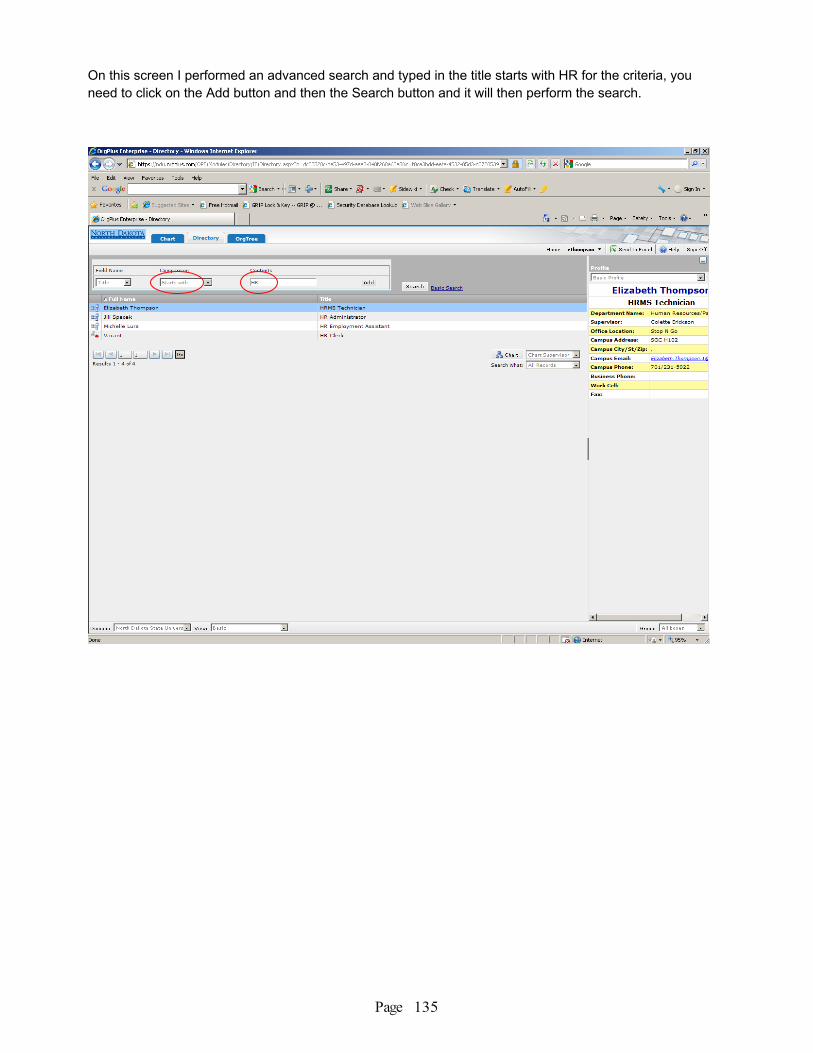
Page 135
On this screen I performed an advanced search and typed in the title starts with HR for the criteria, you need to click on the Add button and then the Search button and it will then perform the search.

Page 136
When you click on the OrgTree View it will display the same information in a tree with branches to expand.

Page 137
This is the expanded view that includes position number, job code, department name, and salary.
Salary Salary
Salary Salary Salary
Page 138
What form do I use for………
Use Form 100 when:
• Hiring a new employee
• Rehiring a termed employee
Use Form 101 when:
• Terminating an employee
• Putting an employee on leave
• Returning an employee from leave
• Making a pay rate change
• Making a title change
• Making a position change
• Transferring an employee to a position
• Changing an employee’s contract dates
Use Form 101 (page 2) when:
• Paying Summer School/Summer Salary
• Paying Overload for faculty or staff
• Paying Awards
• Paying an Interim Responsibility Increase
Timeslip when:
• Paying late timeslip hours
Fund Change Form when:
• Making a change to funding ONLY
Retro Form when:
• Making a change to funding retroactively
Leave Card when:
• Paying late leave slip hours
APPENDIX

Page 139
Sample Hiring Form 100

Page 140

Page 141
Sample Change Form 101

Page 142

Page 143
Sample Funding Change Form

Page 144
Sample Retroactive Distribution Form
Top Related
Copyright © 2022 FDOKUMEN

