


Bahasa
Halaman
Hukum


ADVIA® 2120i Hematology System
Operator Onsite Training Workbook


ADVIA® 2120i Hematology System T02006.012 Effective Date: 04/19/2021
Siemens Healthineers
ADVIA® 2120i Hematology System Operator
Onsite Training Workbook

ii ADVIA® 2120i Hematology System
© 2021 Siemens Healthineers Inc. All rights reserved.
This manual, and the software described in this manual, are copyrighted. No part of this may be copied, reproduced, translated or reduced to any electronic medium or machine-readable form without the prior written consent of Siemens Healthineers.
ADVIA, TESTpoint, OPTIpoint, SETpoint and TIMEPAC are trademarks of Siemens Healthcare Diagnostics Inc.
All other trademarks are the property of their respective owners.

ADVIA® 2120i Hematology System iii
Table of Contents
1: Welcome
2: System Overview
3: Starting Each Shift
4: Quality Control I
5: Sample Processing
6: How the System Works
7: Day 2 Review
8: Quality Control II
9: Methods
10: Scheduled Maintenance
11: Gains
12: Calibration
13: Troubleshooting
14: Multispecies (if applicable)
15: Additional Resources

iv ADVIA® 2120i Hematology System

Welcome
ADVIA® 2120i Hematology System 1-1
1 Welcome
Welcome to Training Siemens Healthineers Training would like to welcome you to basic operator training on the ADVIA 2120i Hematology System.
This course is designed to teach you the skills needed to operate and maintain the ADVIA 2120i Hematology System. Our staff welcomes the opportunity to present this training program to you.
Training Material This training workbook includes an agenda, learning goals, and practical exercises.

Welcome
1-2 ADVIA® 2120i Hematology System
Training Center Safety Information In this classroom, you will use materials and/or specimens that are potentially hazardous. To that end, we at Siemens Healthineers have requirements for using personal protective equipment use that we strongly urge you to follow.
• Eating, drinking, storing foods, applying cosmetics, or handling contact lenses is not permitted
• Laboratory coats are required at all times
• Gloves and safety glasses are required when:
o Handling calibrator and control materials, test specimens which originate from human blood and urine, or waste material produced by the instrument
o When performing any activity at the instrument while the instrument is in operation
• When gloves are removed, they must be placed in the biohazard container provided. Hands should be washed after gloves are removed
• After using any sharps, these items must be placed in the sharps disposal container provided
• Gloves and safety glasses are not required in the lecture area
• The lecture area may not be used to store or place reagents, calibrators, controls, waste material, or specimens derived from human blood or urine
• There is one sink in this classroom. It is not used for the disposal of any biohazard material. It may be used for hand washing
• Hands should be washed before exiting the classroom

Welcome
ADVIA® 2120i Hematology System 1-3
Course Objectives Upon completion of the class, you will be able to:
• Identify system hardware components and reagents
• Navigate through software menus
• Perform Starting each Shift
• Prepare and perform Quality Control processing
• Perform sample processing
• Describe how the system works
• Perform and record scheduled maintenance
• Identify the methods used on the system
• Perform a gains adjustment using the Gains Wizard
• Review the calibration process using the Calibration Wizard
• Perform troubleshooting of sample / system flags
Multispecies (if applicable)
• Create a User Defined Species
• Configure Test Dictionary
• Configure the Autosampler profile
• Identify the steps to use Playback
Welcome
1-4 ADVIA® 2120i Hematology System
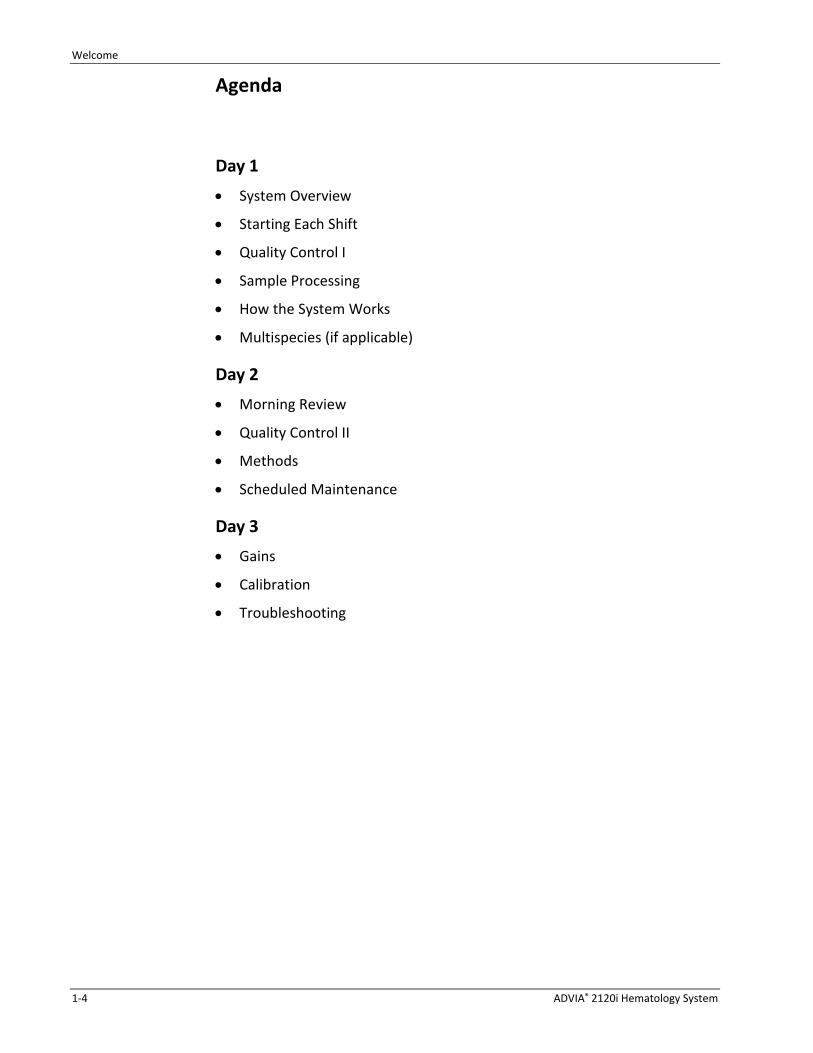
Agenda
Day 1 • System Overview
• Starting Each Shift
• Quality Control I
• Sample Processing
• How the System Works
• Multispecies (if applicable)
Day 2 • Morning Review
• Quality Control II
• Methods
• Scheduled Maintenance
Day 3 • Gains
• Calibration
• Troubleshooting
Welcome
ADVIA® 2120i Hematology System 1-5
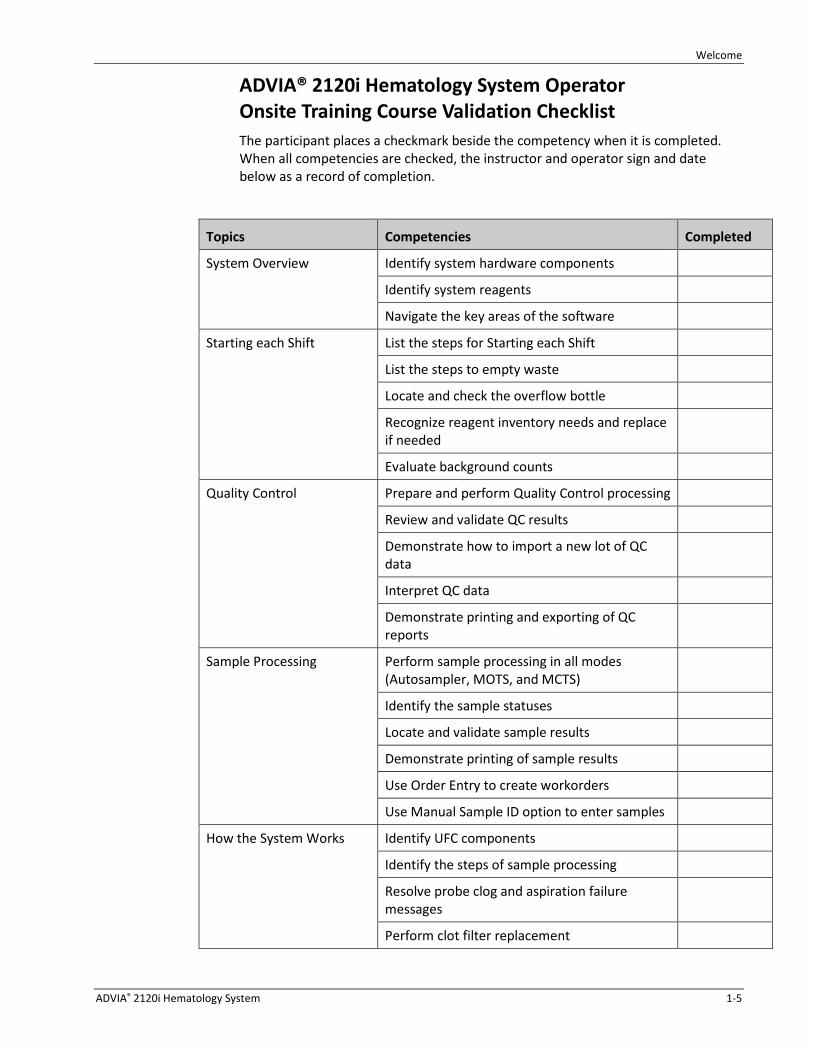
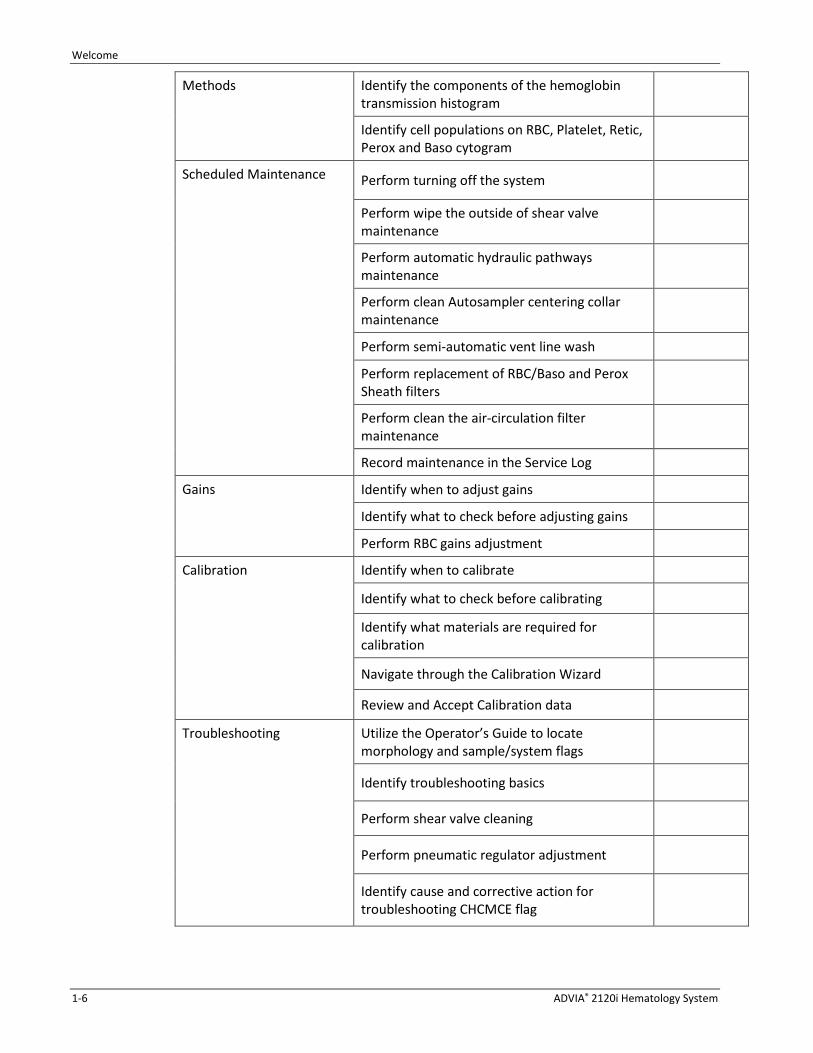
ADVIA® 2120i Hematology System Operator Onsite Training Course Validation Checklist The participant places a checkmark beside the competency when it is completed. When all competencies are checked, the instructor and operator sign and date below as a record of completion.
Topics Competencies Completed
System Overview Identify system hardware components
Identify system reagents
Navigate the key areas of the software
Starting each Shift List the steps for Starting each Shift
List the steps to empty waste
Locate and check the overflow bottle
Recognize reagent inventory needs and replace if needed
Evaluate background counts
Quality Control Prepare and perform Quality Control processing
Review and validate QC results
Demonstrate how to import a new lot of QC data
Interpret QC data
Demonstrate printing and exporting of QC reports
Sample Processing Perform sample processing in all modes (Autosampler, MOTS, and MCTS)
Identify the sample statuses
Locate and validate sample results
Demonstrate printing of sample results
Use Order Entry to create workorders
Use Manual Sample ID option to enter samples
How the System Works Identify UFC components
Identify the steps of sample processing
Resolve probe clog and aspiration failure messages
Perform clot filter replacement
Welcome
1-6 ADVIA® 2120i Hematology System
Methods Identify the components of the hemoglobin transmission histogram
Identify cell populations on RBC, Platelet, Retic, Perox and Baso cytogram
Scheduled Maintenance Perform turning off the system
Perform wipe the outside of shear valve maintenance
Perform automatic hydraulic pathways maintenance
Perform clean Autosampler centering collar maintenance
Perform semi-automatic vent line wash
Perform replacement of RBC/Baso and Perox Sheath filters
Perform clean the air-circulation filter maintenance
Record maintenance in the Service Log
Gains Identify when to adjust gains
Identify what to check before adjusting gains
Perform RBC gains adjustment
Calibration Identify when to calibrate
Identify what to check before calibrating
Identify what materials are required for calibration
Navigate through the Calibration Wizard
Review and Accept Calibration data
Troubleshooting Utilize the Operator’s Guide to locate morphology and sample/system flags
Identify troubleshooting basics
Perform shear valve cleaning
Perform pneumatic regulator adjustment
Identify cause and corrective action for troubleshooting CHCMCE flag

Welcome
ADVIA® 2120i Hematology System 1-7
Instructor: __________________________________________________
Participant: __________________________________________________
Date: __________________________________________________
What was most helpful to you during this program?
How can we improve this program to make it more meaningful to you?
Multispecies (if applicable)
Create a user defined species
Configure test dictionary
Configure the Autosampler profile
Identify the steps to use Playback

System Overview
ADVIA® 2120i Hematology System 2-1
2 System Overview

System Overview
2-2 ADVIA® 2120i Hematology System
System Overview
Resources • ADVIA 2120i Hematology System Hardware and Software Online Training Course
• ADVIA 2120/2120i Hematology Systems Operator’s Guide
• ADVIA 2120i Hematology System Quick Reference Guide
Objectives After completing this exercise, you will be able to:
• Identify system hardware components
• Identify system reagents
• Navigate key areas of the software

System Overview
ADVIA® 2120i Hematology System 2-3
Identify System Hardware Components Refer to the ADVIA 2120i Hematology System Quick Reference Guide and identify component accordingly.
1. Unified Fluids Circuit (UFC)
2. Waste Container
3. Laser Optical Assembly
4. Perox Optical Assembly
5. Autosampler
6. Overflow Bottle
7. Sheath/Rinse
8. Syringe Pump Assembly Left and Right
9. Touchpad
10. Manual Open-Tube Sampler (MOTS)
11. Manual Closed-Tube Sampler (MCTS)
12. Reagents
13. Hgb Optical Assembly
System Overview
2-4 ADVIA® 2120i Hematology System
Identify System Reagents 1. Which reagent is not on board the analyzer?
2. Which reagents are bundled together?
3. List the reagents on the right side of the instrument
4. List the reagents on the left side of the instrument.
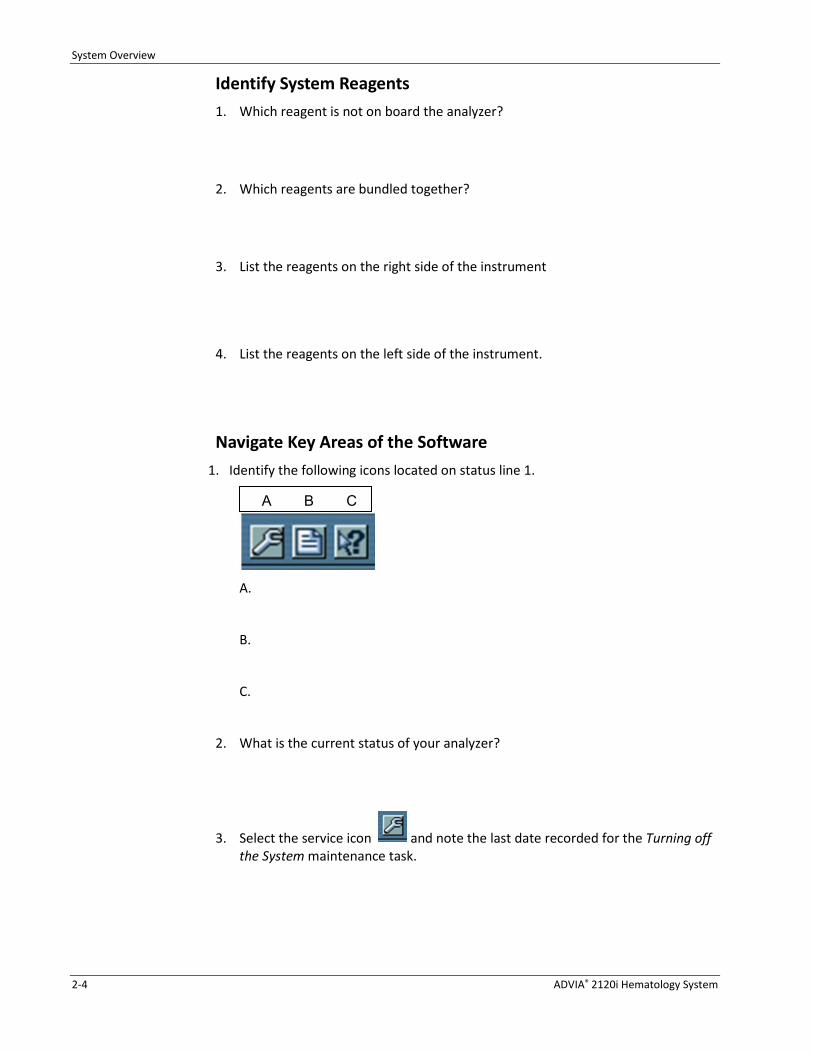
Navigate Key Areas of the Software 1. Identify the following icons located on status line 1.
A.
B.
C.
2. What is the current status of your analyzer?
3. Select the service icon and note the last date recorded for the Turning off the System maintenance task.
A B C

System Overview
ADVIA® 2120i Hematology System 2-5
4. Select Info > About. What is the software version listed for this analyzer?
5. In the Data Manager > Sample Control Panel, how many samples are pending?
6. Select Customize > Tools View > Routine Parameters. How do you return to the Sample Control Panel?
7. Go to Logs > Reagent log. What is the expiration date of the ADVIA Sheath/Rinse?

Starting Each Shift
ADVIA® 2120i Hematology System 3-1
3 Starting Each Shift

Starting Each Shift
3-2 ADVIA® 2120i Hematology System
Starting Each Shift
Resources • ADVIA 2120i Hematology System Quick Reference Guide
Objectives After completing this exercise, you will be able to:
• List the steps for Starting each Shift
• List the steps to empty waste
• Locate and check the overflow bottle
• Recognize reagent inventory needs and replace if needed
• Evaluate background counts

Starting Each Shift
ADVIA® 2120i Hematology System 3-3
Starting Each Shift Use the ADVIA 2120i Hematology System Quick Reference Guide to complete the following exercises.
Empty the Waste Container and Check the Overflow Bottle 1. Practice disconnecting the waste line, vacuum line, and level sensor from the
manual waste container and then reattach.
2. Verify the overflow bottle is empty.
Check the Status of Reagent Inventory: Replace Reagents if Needed 1. Are any reagents in need of replacement? If so, replace reagents.
2. What two reagents are NOT monitored on cycle by cycle basis?
Hint: From Startup screen, select the Help button. Click on “Check the Reagent Status.”
3. What reagent must be checked visually each start of shift?
Evaluate the Background Counts Navigate to Operations > Startup.
1. How can you verify background counts are in range?
2. How does the software display a background count that is out of range?
3. What is your first course of action if the background counts are out of range?
4. If the background counts are still out of range, what would be the next course of action? Now, perform that action.

Starting Each Shift
3-4 ADVIA® 2120i Hematology System

Quality Control I
ADVIA® 2120i Hematology System 4-1
4 Quality Control I

Quality Control I
4-2 ADVIA® 2120i Hematology System
Quality Control I
Resources • ADVIA 2120i Hematology System Quick Reference Guide
Objectives After completing this exercise, you will be able to:
• Prepare and perform Quality Control processing
• Review and validate QC results

Quality Control I
ADVIA® 2120i Hematology System 4-3
Prepare and Run QC Refer to the ADVIA 2120i Hematology System Quick Reference Guide and the control package insert to prepare the instrument and control material for processing.
1. Refer to the ADVIA TESTpoint™ package insert to complete the following statement. Controls are brought to __________ temperature and must be well __________ before they are run.
2. Which status must the instrument display before you can run controls?
3. Run the provided controls in all three modes.
Review and Validate QC Refer to ADVIA 2120i Hematology System Quick Reference Guide.
1. Select each control in the list and view the status of the parameters in the Test Panel.
2. Define the color coding in the Sample Control Panel.
a. Green:
b. Yellow:
c. Red:
3. What does an asterisk (*) in front of a QC control code indicate?
4. Select a control with an asterisk (*). What must be done to validate the control?
5. Which icon did you select to validate the control?

Quality Control I
4-4 ADVIA® 2120i Hematology System
6. How did the control change in the Sample Control Panel?
7. Print the report from Review/Edit screen for this control.

Sample Processing
ADVIA® 2120i Hematology System 5-1
5 Sample Processing

Sample Processing
5-2 ADVIA® 2120i Hematology System
Sample Processing
Resources • ADVIA 2120i Hematology System Quick Reference Guide
Objectives After completing this exercise, you will be able to:
• Perform sample processing in all three modes: Autosampler, Manual Open-tube sampler, and Manual Closed-tube Sampler
• Identify the sample statuses
• Locate and validate sample results
• Use Manual Sample ID option to enter samples
• Use Order Entry to create workorders
• Demonstrate printing of sample results

Sample Processing
ADVIA® 2120i Hematology System 5-3
Process Samples on the Autosampler, Manual Open-Tube Sampler, and Manual Closed-Tube Sampler 1. Process each of the barcoded samples at the workstation using the
Autosampler, MOTS, and MCTS.
Note: Your system has been configured to run CBC/Diff/Retic on all samples.
2. Process the non-barcoded tube in the MCTS mode.
Identify Sample Status Navigate to the Data Manager > Sample Control Panel
1. Which sample status now contains the barcoded sample results?
2. Open the unmatched folder. What did you find in the folder?
Review and Validate Sample Results Navigate to Data Manager > Sample Control Panel. Select Incomplete and scroll through each patient’s results.
1. Circle the icon that is used to validate sample results?
2. Select the validate button. What sample status now contains newly validated sample results? 3. How can the operator print the sample results for a patient in the Review/Edit screen?

Sample Processing
5-4 ADVIA® 2120i Hematology System
Order Entry and Manual Sample ID
1. Select Data Manager > Order Entry. Create a patient with a SID# and name and order a CBC/Diff for one of the non-barcoded samples at your workstation. Create a second workorder for the other non-barcoded tube provided.
2. Select Operations > Manual Sample ID. With patient data already entered in Order Entry, enter Sample ID into Manual Sample ID and process using the MOTS. Repeat process for the other created workorder.
3. Review and validate all processed samples.
4. Obtain printout of final patient reports.
5. Bring final reports to the table.

How the System Works
ADVIA® 2120i Hematology System 6-1
6 How the System Works
How the System Works
6-2 ADVIA® 2120i Hematology System
How the System Works
Resources • ADVIA® 2120i Hematology System How the System Works Online Training: The
Fluidics Process Video
• ADVIA 2120i Hematology System Quick Reference Guide
Objectives After completing this exercise, you will be able to:
• Identify UFC components
• Identify the steps of sample processing
• Resolve probe clog and aspiration failure messages
• Perform clot filter replacement

How the System Works
ADVIA® 2120i Hematology System 6-3
H GB
UFC
VAC
BASO
RBC
EQUI
L
SSV
VSC
VSC
RETIC
S45
16
6
8
75
18
17
433
4472
74
7331
2
47
65
102133
64
66
49
9
1122
2012
13
37 36 14
435
46
61
VENT PORTS
SSV VSCCFM
= sample shear valve = vacuum shuttle chamber = concentric flow module
COUPLERPLATE
FromRBC/BASO/CFM
RETICFrom
PEROX CFM
ToRBC/BASO/RETICsample syringe
ToPEROX
sample syringe
PERO
X
1
V A C U U M W A S T E
Unified Fluids Circuit (UFC)

How the System Works
6-4 ADVIA® 2120i Hematology System
Identify Shuttling Process
1. View The Fluidic Process Video and put the following sequence in the correct order:
shear valve turns to the dispense position
MCTS needle is rinsed
green Ready light stops flashing and MCTS needle retracts
sample reaches conductivity detector #1
reagents are dispensed
sample reaches conductivity detector #2
Ready light is green
sample is aspirated via MCTS
2. Aspirate a sample in the Manual Closed-tube sampler (MCTS) and observe the aspiration cycle.
a. Which of the chambers is shuttled to a flowcell via a syringe FIRST?
__________________________________________________________
b. What reaction chamber empties just before the perox chamber is shuttled to the flowcell via syringe?
__________________________________________________________
c. Which chamber is not shuttled to a flowcell via a syringe?
__________________________________________________________
d. How can you easily identify the Retic chamber?
__________________________________________________________

How the System Works
ADVIA® 2120i Hematology System 6-5
Troubleshoot Probe Clog / Aspiration Failure Messages
Status-line Message Errors:
Probe Clog
Conductivity detector 1 did not detect a sample within 20 seconds of aspiration.
Aspiration Failed - Probe Clog
Conductivity detector 2 did not detect a sample within the 20 seconds of aspiration.

How the System Works
6-6 ADVIA® 2120i Hematology System
Replace the Clot Filter 1. Analyzer Mode: Standby
2. Unscrew the filter tube fitting and tube assembly from the front of the selector valve.
3. Gently push the silicone sleeve to release the clot filter from the filter adapter fitting.
4. Visually check the filter adapter fitting and the input port of the selector assembly for any debris or small particles.
5. If you find some debris, use a piece of lens tissue moistened with water to remove it.
6. Wet the new clot filter with water and place it into the filter adapter fitting.
7. Orientation of the filter is not important.
8. Reconnect the filter adapter fitting to the selector valve. Finger tighten.
Important: Be very careful not to misthread the fitting. Misthreading could strip the valve which will prevent proper operation.
9. Press Standby to return analyzer to Ready to Run mode.
10. Run a sample and visually check for air bubbles in the sample line between the selector valve and the UFC block.
Selector valve
Filter tube fitting

How the System Works
ADVIA® 2120i Hematology System 6-7
Effects of Overtightening the Clot Filter
Normal Clot Filter Overtightened Clot Filter
Day 2 Review
ADVIA® 2120i Hematology System 7-1
7 Day 2 Review

Day 2 Review
7-2 ADVIA® 2120i Hematology System
Day 2 Review
Resources • ADVIA 2120i Hematology System Quick Reference Guide
Objectives Upon completion of this exercise you will be able to perform the following tasks:
• Perform Start of Shift
• Process Quality Control
• Process barcoded samples
• Use Manual Sample ID option to enter samples
• Use Order Entry to create workorders

Day 2 Review
ADVIA® 2120i Hematology System 7-3
Day 2 Review Exercise
1. Perform Start of Shift. Document any issues encountered and resolve.
2. After all issues are resolved, verify system performance by running QC using the MCTS.
3. Review and validate QC.
4. Process the barcoded samples at the workstation using the MCTS.
5. Select Data Manager > Order Entry. Create a patient with a SID# and name and order a CBC/Diff for one of the non-barcoded samples at your workstation. Create a second workorder for the other non-barcoded tube provided.
6. Select Operations > Manual Sample ID. With patient data already entered in Order Entry, enter Sample ID into Manual Sample ID and process using the MOTS. Repeat process for the other created workorder.
7. Review and validate all processed samples.
8. Obtain printout of final patient reports.
9. Bring final reports to the table.
Quality Control II
ADVIA® 2120i Hematology System 8-1
8 Quality Control II

Quality Control Il
8-2 ADVIA® 2120i Hematology System
Quality Control II
Resources • ADVIA 2120i Hematology System Quick Reference Guide
• ADVIA 2120/2120i Hematology Systems Operator’s Guide
Objectives After completing this exercise, you will be able to:
• Demonstrate how to import a new lot of QC data
• Interpret QC data
• Demonstrate printing and exporting of a QC report

Quality Control II
ADVIA® 2120i Hematology System 8-3
Importing New Lot QC 1. Select Customize > System Setup (or Analyzer Setup) > Tools Modify >
Control Dictionary.
2. Insert the mini CD into the computer. Note: It is possible to use the barcoded sheet that is enclosed in with each level of control and only import specific parameters. Scan the lot number barcode located in the upper right hand corner first, followed by the rest of the parameters. Proceed to Step 3.
3. Select Import
4. A list of controls appears. Select the first control to import by clicking on the control name, and then click OK.

Quality Control Il
8-4 ADVIA® 2120i Hematology System
5. If a control file already exists with this name (in this case, CDR Abnormal1), this window appears. Click on Create.
6. Enter a code name for the control. Refer to examples of code name below
Note: Code names can be up to 6 characters and must be unique from lot to lot.
7.
8. Select OK
A Code Name can be a combination of control level, lot
number and expiration date.
Examples of Code Names: JulLow JulN JulHi or 1045L,
2045N, 3045H

Quality Control II
ADVIA® 2120i Hematology System 8-5
9. Place a check mark next to Test Panel in order to see the colors on the Sample Control Panel.
10. Select OK.
11. A list of controls that still need to be imported appears. Select the next control level and repeat steps 4-9.
12. After all the controls are imported, click Cancel to end importing.
13. Select Exit button on the lower right hand side to exit Tools Modify.

Quality Control Il
8-6 ADVIA® 2120i Hematology System
Managing Quality Control Data 1. View the Normal QC for your current lot in the table format by selecting Data
Manager > QC. Circle the icon that will display QC in table format.
2. Circle the icon that allows operator to export QC data and print QC data.
Omit / Add a Comment to QC 1. In the Table Format, you have the ability to omit or disposition a QC result from
calculations. Navigate to Data Manager > QC. Select the normal QC and omit the last QC run by double-clicking on the date and time. Select Omit/Delete and select OK.
2. A comment can also be added to a QC in table format. Select an abnormal control and add a comment by typing comment in box and select OK.
Printing and Exporting QC Report 1. You would like to print the monthly statistics for the Normal control of your
current QC. Select the Printer Icon on the Toolbar. On the Print Selection screen select From and verify the current month is displayed. In the Selection: All Daily, select Daily Summary for Control. Select the Normal control and press OK.
2. After printing QC you would like to save or export the QC data to a USB. Place USB in drive and select Export to file.

Quality Control II
ADVIA® 2120i Hematology System 8-7

Methods
ADVIA® 2120i Hematology System 9-1
9 Methods

Methods
9-2 ADVIA® 2120i Hematology System
Methods
Resources • ADVIA 2120i Hematology System Quick Reference Guide
• ADVIA 2120/2120i Hematology Systems Operator’s Guide
Objectives After completing this exercise, you will be able to:
• Identify components of hemoglobin transmission histogram
• Identify cell populations on the RBC, platelet, retic, baso and perox cytogram

Methods
ADVIA® 2120i Hematology System 9-3
Hemoglobin Method Exercise
1. Hemoglobin reagent is part of which TIMEPAC®?
2. Identify the five parts of the hemoglobin transmission histogram.
___ Sample reading
___ Sheath/Rinse reading from previous cycle
___ Sheath/rinse Baseline reading
___ Draining and refilling with sample and HGB reagent
___ Draining and refilling with Sheath/Rinse

Methods
9-4 ADVIA® 2120i Hematology System
RBC Method Exercise
1. Label the RBC V/HC cytogram to indicate where the following cell types are located.
Microcytic Hyperchromic
Macrocytic Hypochromic
2. Which reagent encases the sample stream as it goes through the RBC flowcell? Where is this reagent located on the system?
3. Which optical assembly is used for the RBC method?

Methods
ADVIA® 2120i Hematology System 9-5
Platelet Method Exercise
1. Identify the different areas of the platelet cytogram.
___ Platelets
___ RBC ghosts
___ RBC fragments
___ Large Platelets
___ Red cells
2. Where is the reaction chamber located?
Methods
9-6 ADVIA® 2120i Hematology System
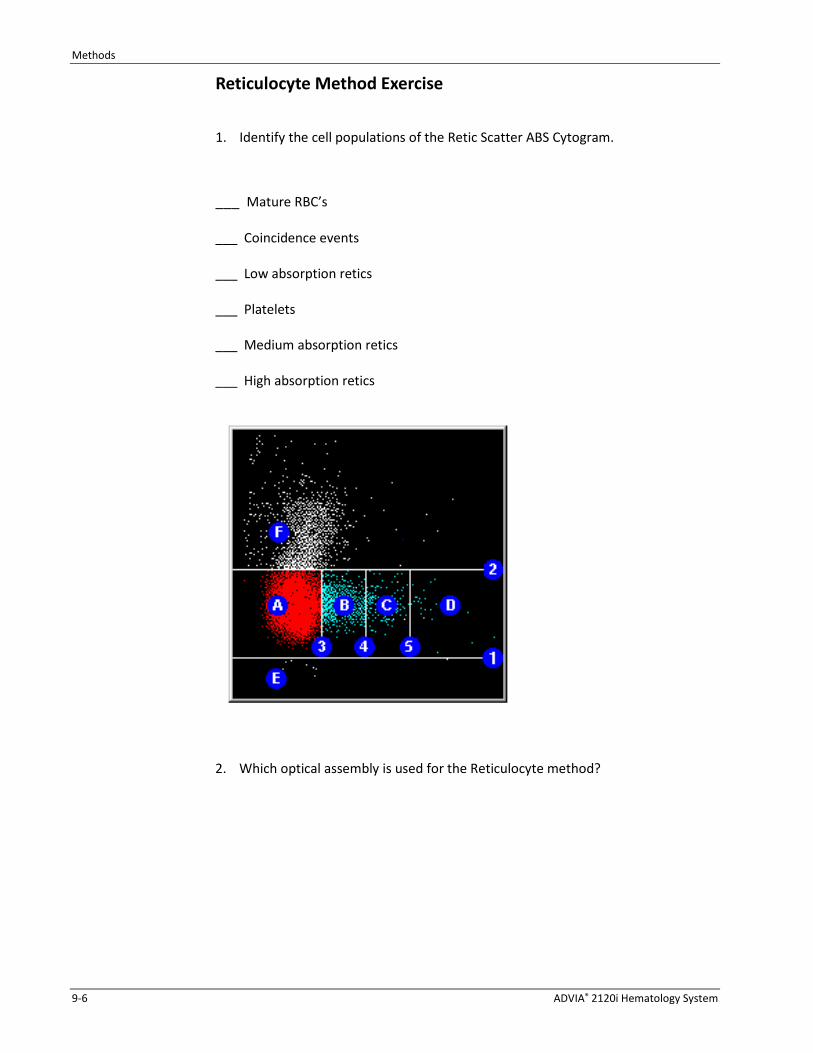
Reticulocyte Method Exercise
1. Identify the cell populations of the Retic Scatter ABS Cytogram.
___ Mature RBC’s ___ Coincidence events ___ Low absorption retics ___ Platelets ___ Medium absorption retics
___ High absorption retics
2. Which optical assembly is used for the Reticulocyte method?

Methods
ADVIA® 2120i Hematology System 9-7
Basophil / Lobularity Method Exercise
1. Label the areas of the Baso cytogram.
___ MN (Lymphocyte and Monocyte nuclei)
___ PMN (Neutrophil and Eosinophil nuclei)
___ Basophil
___ Baso Suspect
___ Blast nuclei
___ Saturation
___ Noise
2. The Baso reaction chamber is heated to ____ degrees Celsius.

Methods
9-8 ADVIA® 2120i Hematology System
Peroxidase Method Exercise
1. Identify the areas of the Perox cytogram.
___ Neutrophils
___ Eosinophils
___ Monocytes
___ Lymphocytes and Basophils
___ Large Unstained Cells (LUCs)
___ Platelet clumps
___ Noise
___ nRBC’s
2. The Perox reaction chamber is heated to ____ degrees Celsius.

Methods
ADVIA® 2120i Hematology System 9-9
Scheduled Maintenance
ADVIA® 2120i Hematology System 10-1
10 Scheduled Maintenance

Scheduled Maintenance
10-2 ADVIA® 2120i Hematology System
Scheduled Maintenance
Resources • ADVIA 2120i Hematology System Quick Reference Guide
Objectives After completing this exercise, you will be able to:
• Perform turning off the system
• Perform wipe the outside of shear valve maintenance
• Perform automatic hydraulic pathways maintenance
• Perform clean Autosampler centering collar maintenance
• Perform semi-automatic vent line wash
• Perform replacement of RBC/Baso and Perox Sheath filters
• Perform clean the air-circulation filter maintenance
• Record maintenance in the Service Log

Scheduled Maintenance
ADVIA® 2120i Hematology System 10-3
Scheduled Maintenance Use the ADVIA 2120i Hematology System Quick Reference Guide to perform the scheduled maintenance.
Weekly Maintenance
• Turn off the system
• Wipe the outside of shear valve
• Automatic Hydraulic Pathways Wash
• Inspect Autosampler Centering Collar, clean if necessary
Two Weeks Maintenance • Clean Autosampler Centering Collar
Monthly Maintenance • Semi-automatic Vent Line Wash
Two Months Maintenance • Replace RBC/Baso Sheath Filter and Perox Sheath Filter
Six Months Maintenance • Clean air-circulation filter
Important: In addition to these scheduled procedures, periodic inspections of the UFC pathways, vacuum shuttle, and reaction chambers are essential. If you find buildup or dirt in any of the lines or chambers, clean the line or chamber in question. Document Maintenance Performed in the Service Log
Use the ADVIA 2120i Hematology System Quick Reference Guide to document all scheduled maintenance performed.

Scheduled Maintenance
10-4 ADVIA® 2120i Hematology System

Gains
ADVIA® 2120i Hematology System 11-1
11 Gains

Gains
11-2 ADVIA® 2120i Hematology System
Gains
Resources • ADVIA 2120/2120i Hematology Systems Operator’s Guide
• ADVIA 2120i Hematology System Quick Reference Guide
Objectives After completing this exercise, you will be able to:
• Identify when to adjust gains.
• Identify what to check before adjusting gains.
• Perform RBC gains adjustment.

Gains
ADVIA® 2120i Hematology System 11-3
Identify When to Adjust Gains Gain adjustment is performed on an as-needed basis and in each of the following cases:
• On installation
• If there is a significant shift in control values after:
o Replacing a critical hydraulic or optical component
o Installing reagents with a different lot number
o When indicated by quality control data, or frequent false positive or false negative morphology flags
• When verifying that the optical system is functioning properly before calibration
Identify What to Check before Adjusting Gains Perform the following before adjusting gains:
1. Visually inspect the hydraulics during operation to ensure that they function properly.
2. Check pressure and vacuum readings at Analyzer Status tab of the Utilities menu.
3. Perform the weekly maintenance.
Scenario:
It has been 6 months since the last calibration was performed on the instrument. The regulatory agency College of American Pathologists (CAP) requires calibration of the hematology analyzer every 6 months. The operator needs to verify that the optical system is functioning properly and decides to perform the RBC Gains Adjustment.
The operator has already performed the following:
1. Performed reagent check.
2. Checked the vacuum and pressure readings.
3. Observed shuttling.
4. Performed the weekly maintenance.

Gains
11-4 ADVIA® 2120i Hematology System
Perform the RBC Gains Adjustment Using the Gains Wizard Analyzer Mode: Ready to Run
Material Required: ADVIA 120 / 2120 / 2120i OPTIpoint™
• Unopened stability: vial expiration date, when stored between 2-8°C
• Opened stability – one week, when stored between 2-8°C
• Allow OPTIpoint to reach room temperature
• Vortex vigorously for 30-60 seconds
1. Select Procedures > Adjust Gains > Gain Wizard
2. Enter password and select OK (if required).
3. Select RBC / RETIC. The number of aspirations will default to 3.
4. Select Next
5. Select Next
6. Scan the OPTIpoint package insert, beginning with the lot number. Select Import Barcode to populate fields.
7. Select Next
8. On the Run / Data Review screen, process 3 aspirations of OPTIpoint through the manual open-tube sampler (MOTS).
9. After all aspirations are complete evaluate data on Run/Data Review screen. A red check mark in the Apply column will display on each row of data included in the statistical analysis; to omit data, deselect the red checkmark.
Note: To run additional aspirations, select Run More and follow on screen instructions.
10. Select Next and review information on the Gain Acceptance screen. If status is Passed, select Accept Gains
11. Before final gain acceptance, a final verification is required. Select Ok and perform the required verification run.
Process 3 aspirations of OPTIpoint through the manual open-tube sampler (MOTS).
12. After all verification run aspirations are complete, review Verification Run: Run/Data Review data. A red check mark in the Apply column will display on each row of data included in the statistical analysis; to omit data, deselect the red checkmark.
13. For final acceptance, select Next
14. Review information on the Gain Acceptance screen. If status is Passed, select Finish

Gains
ADVIA® 2120i Hematology System 11-5
15. Select Gain Factors Log to view and print gain factors.
16. Select Exit to close.
17. Run QC as per laboratory policy.
Gain Acceptance Criteria
Number of Points Flatness Factor Range
RBC/Retic 3 n/a 20 - 255
Perox 8 - 25 ≤ 3.2 20 - 255
Baso 5 - 25 ≤ 2.5 20 - 255

Calibration
ADVIA® 2120i Hematology System 12-1
12 Calibration

Calibration
12-2 ADVIA® 2120i Hematology System
Calibration
Resources • ADVIA 2120i Hematology System Quick Reference Guide
• ADVIA 2120i Hematology System Calibration Online Training
Objectives After completing this exercise, you will be able to:
• Identify when to calibrate
• Identify what to check before calibrating
• Identify materials required for calibration
• Navigate through the Calibration Wizard
• Review and Accept calibration data

Calibration
ADVIA® 2120i Hematology System 12-3
Calibration Overview
When to calibrate
• On installation
• If there is a significant shift in control values after:
o Replacing a critical hydraulic or optical component
o Installing reagents with a different lot number
• Any time commercial control products and/or moving averages are out of range and you have verified that the out-of-control condition is not instrument related
• At periodic time intervals determined by laboratory regulations
What to check before calibrating
1. Verify that there is sufficient reagent for the calibration. Do not change the reagent lot number during the calibration.
2. Visually inspect the hydraulics during the operation to ensure that they function properly.
3. Check pressure and vacuum readings at the Analyzer Status tab of the Utilities menu.
4. Perform the weekly maintenance.
5. Verify that the optical system is functioning properly.
Note: Do not calibrate unless the gain and alignment of all the optics channels have been verified.
Materials required for calibration
1. ADVIA SETpoint™ Calibrator and/or 1 whole blood sample to calibrate all parameters except for the %RETIC.
2. Include 5 whole blood samples if you want to calibrate the %RETIC. %Retic calibration is only performed at laboratories using a manual counting method other than those recommended by NCCLS or ICSH, or laboratories using certain flow cytometric methods. These laboratories could observe a significant bias when comparing to the ADVIA 120/2120/2120i Hematology System.

Calibration
12-4 ADVIA® 2120i Hematology System
Calibration Wizard To access Calibration Wizard, go to ADVIA 2120i Calibration Online Training: Using the Calibration Wizard.
1. Which sampler type is selected by default in the Calibration Definition screen?
2. Review the Material Required screen.
a. List the two materials required for calibration when calibrating all parameters with Retic.
b. How do you prepare and handle your calibration materials?
3. Select Next to proceed to the Calibration Reference Data screen.
Review and Accept Calibration Data 1. Calibration Data Review screen
a. Why is it important to print the data before accepting calibration?
b. If a parameter failed, how are data points omitted?
c. What is the minimum number of data points required for Passed Status?
2. Select the back icon to Access the Calibration Acceptance screen. What is your calibration status?
Calibration
ADVIA® 2120i Hematology System 12-5
Locate and Print Calibration Factor Log
1. Go to your instrument and navigate to Calibration screen. Press Cal Factor to see current and previous Cal Factors.
2. After accepting the calibration, what should you run to verify system performance?

Troubleshooting
ADVIA® 2120i Hematology System 13-1
13 Troubleshooting

Troubleshooting
13-2 ADVIA® 2120i Hematology System
Troubleshooting
Resources • ADVIA 2120/2120i Hematology Systems Operator’s Guide
• ADVIA 2120i Hematology System Quick Reference Guide
Objectives After completing this exercise, you will be able to:
• Utilize the Operator’s Guide to locate morphology and sample/system flags
• Identify troubleshooting basics
• Perform shear valve cleaning
• Perform pneumatic regulator adjustment
• Identify cause and corrective action for troubleshooting CHCMCE flag

Troubleshooting
ADVIA® 2120i Hematology System 13-3
Troubleshooting Basics Isolate the Problem
• Observation: leaks, shuttling, bubbles, cytograms, and histograms
• Startup Screen: reagent and background counts
• Analyzer Status: pressures, vacuum, temperature, light source intensity
• Message Log: view past messages for repeated errors
• QC: what individual test parameters are out of range?
• Flags
o Sample/system flags are codes displayed in the Review/Edit tab and the Run Screen. These codes are associated with a specific test parameter marked by an asterisk. Isolated instances of flags are usually sample related. However, multiple occurrences, especially for consecutive samples, can indicate an analyzer problem.
o Morphology flags are plus signs (+) displayed in the Review/Edit tab and the Run Screen. These flags, one to three plus signs, alert the operator to possible cellular conditions that may require additional laboratory attention, such as preparing a slide for microscopic examination.
o System messages are displayed on the status lines on the PC monitor. Along with the messages, color-coded icons indicate the severity level of the message.
General Troubleshooting Steps 1. Verify the following
• Reagent volume
• Reagent delivery
• Reagent in the correct position and straw is submerged in reagent
• All fittings between reagent container and reagent diaphragm pump are connected
• Prime reagent lines and observe for air bubbles. Air bubbles present may indicate faulty reagent straw; replace straw
• Excessive bubbles in pathways may indicate a faulty reagent pump. Contact Siemens Service personnel
2. Verify Sheath Reagent (ADVIA 120 / 2120 / 2120i Sheath/Rinse or Perox Sheath) delivery by checking sheath filter is 90% full and free of air bubbles.
If bubbles are present, check filter for cracks or leaks in Luer fittings. Replace filter if needed taking care not to over-tighten Luer fitting.

Troubleshooting
13-4 ADVIA® 2120i Hematology System
System Flags Troubleshooting
Normal Flow Rates • Right side of UFC:
IFR Flags: BASOIFR, RBCIFR, RETICIFR
• Left side of UFC:
IFR Flag: PXIFR
• Top part of UFC:
IFR Flag: HGBIFR

Troubleshooting
ADVIA® 2120i Hematology System 13-5
Irregular Flow Rate Examples
Refer to the ADVIA® 2120i Hematology System Quick Reference Guide: System Flags Troubleshooting Chart for troubleshooting IFR flags.
Poor Sheath delivery
Poor sample delivery
Air in sample stream
Improper syringe plunger maintenance
Air in Hemoglobin reagent line

Troubleshooting
13-6 ADVIA® 2120i Hematology System
Clean the Shear Valve 1. Analyzer mode: Off
Important: Place paper towels directly under the shear valve to prevent fluid from dripping down into the analyzer.
2. Remove the knurled nut by turning counter-clockwise (1).
3. Remove the compression spring (2).
4. Remove the rotor (3).
5. Separate and remove shear face (4) by gently rotating front shear face.
Caution: Do not loosen or remove with sharp object
6. Place the front shear face in 6% sodium hypochlorite solution and soak ten
minutes. Rinse with DI water.
7. Rinse the rear shear face using a wash bottle filled with distilled water.
Caution: Do not use paper towel, gauze or cotton swabs on shear faces
8. Reassemble the shear valve with the faces wet. Verify the black line on the front face aligns with the black line and A on back face. Smaller loops are at 9 and 11 o’clock and the large loop is at 5 o’clock.
9. Install the rotor by installing the drive pin in the hole on the right side of the front face.
10. Replace the spring and knurled nut.
11. Hand tighten nut.
12. Turn analyzer power on and verify Background Counts.
13. Run a whole blood primer and QC as per laboratory policy.

Troubleshooting
ADVIA® 2120i Hematology System 13-7
Power Low Sample / System Flags LAS-PL (Laser Power Low)
o Laser Power Low flag is triggered if the laser light intensity in the RBC/Baso/Retic channel is less than 150
o Only replaced by a CSE from Siemens Healthineers o Call the CCC-TS if lamp intensity is 155 or less
HGB-PL (Hemoglobin Power Low)
o Hgb Power Low flag is triggered if the HGB baseline transmission is less than 2.5 or greater than 4.1
PX-PL (Perox Power Low Flag)
o Perox Power Low flag is triggered if the tungsten-halogen light intensity in the Perox channel is less than 90
Troubleshooting
13-8 ADVIA® 2120i Hematology System
Pressure and Vacuum Status-line Message errors • 40 PSI Out of Range
• 20 PSI Out of Range
• 5 PSI Out of Range
• Vacuum Out of Range
• UFC Vacuum Out of Range
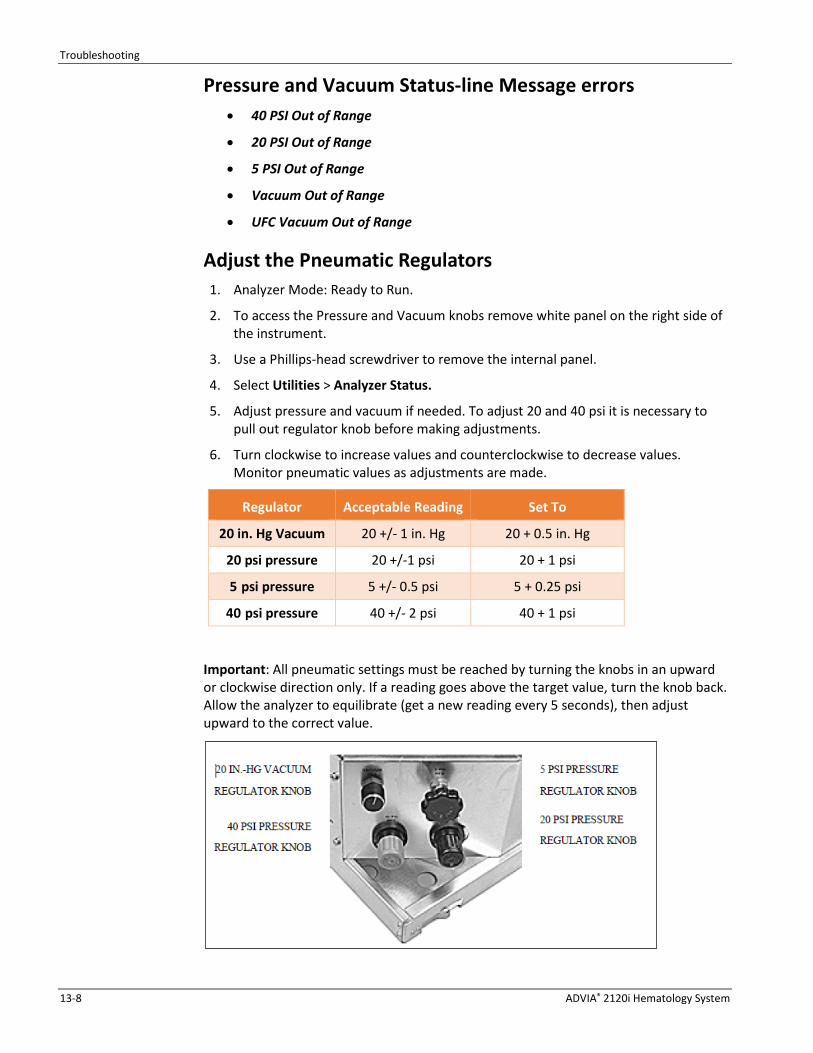
Adjust the Pneumatic Regulators 1. Analyzer Mode: Ready to Run.
2. To access the Pressure and Vacuum knobs remove white panel on the right side of the instrument.
3. Use a Phillips-head screwdriver to remove the internal panel.
4. Select Utilities > Analyzer Status.
5. Adjust pressure and vacuum if needed. To adjust 20 and 40 psi it is necessary to pull out regulator knob before making adjustments.
6. Turn clockwise to increase values and counterclockwise to decrease values. Monitor pneumatic values as adjustments are made.
Regulator Acceptable Reading Set To
20 in. Hg Vacuum 20 +/- 1 in. Hg 20 + 0.5 in. Hg
20 psi pressure 20 +/-1 psi 20 + 1 psi
5 psi pressure 5 +/- 0.5 psi 5 + 0.25 psi
40 psi pressure 40 +/- 2 psi 40 + 1 psi
Important: All pneumatic settings must be reached by turning the knobs in an upward or clockwise direction only. If a reading goes above the target value, turn the knob back. Allow the analyzer to equilibrate (get a new reading every 5 seconds), then adjust upward to the correct value.
Troubleshooting
ADVIA® 2120i Hematology System 13-9
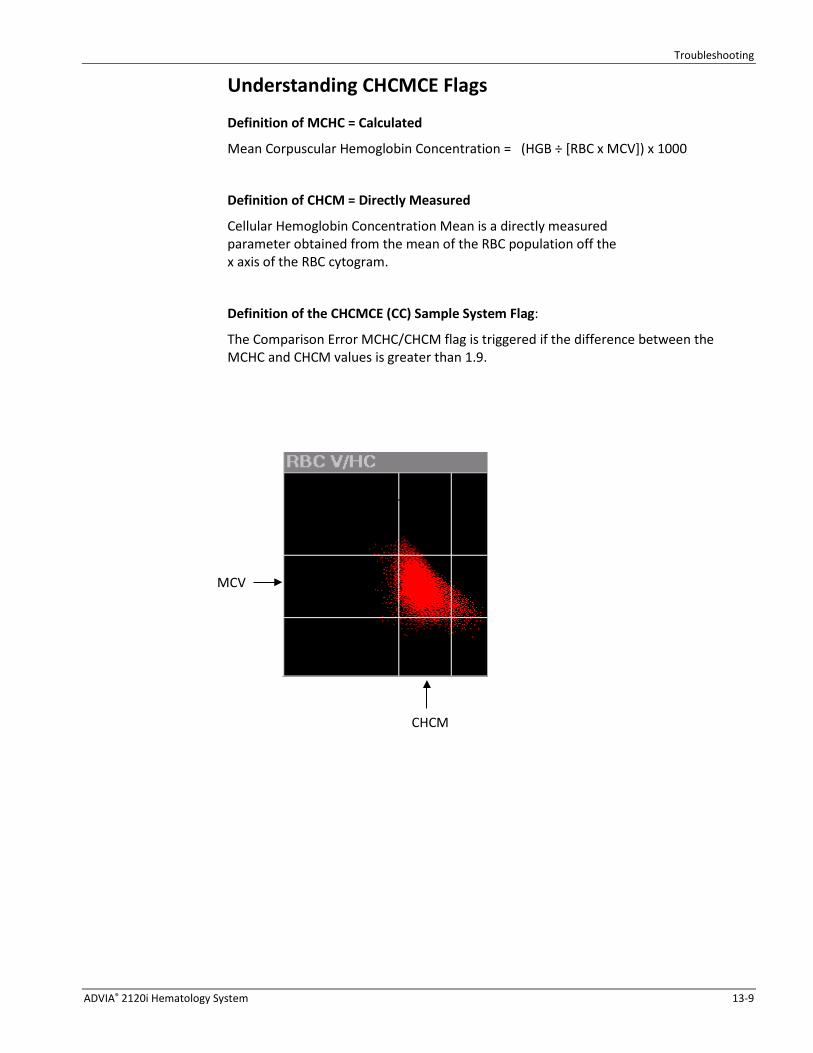
Understanding CHCMCE Flags
Definition of MCHC = Calculated
Mean Corpuscular Hemoglobin Concentration = (HGB ÷ [RBC x MCV]) x 1000
Definition of CHCM = Directly Measured
Cellular Hemoglobin Concentration Mean is a directly measured parameter obtained from the mean of the RBC population off the x axis of the RBC cytogram.
Definition of the CHCMCE (CC) Sample System Flag:
The Comparison Error MCHC/CHCM flag is triggered if the difference between the MCHC and CHCM values is greater than 1.9.
CHCM
MCV
Troubleshooting
13-10 ADVIA® 2120i Hematology System
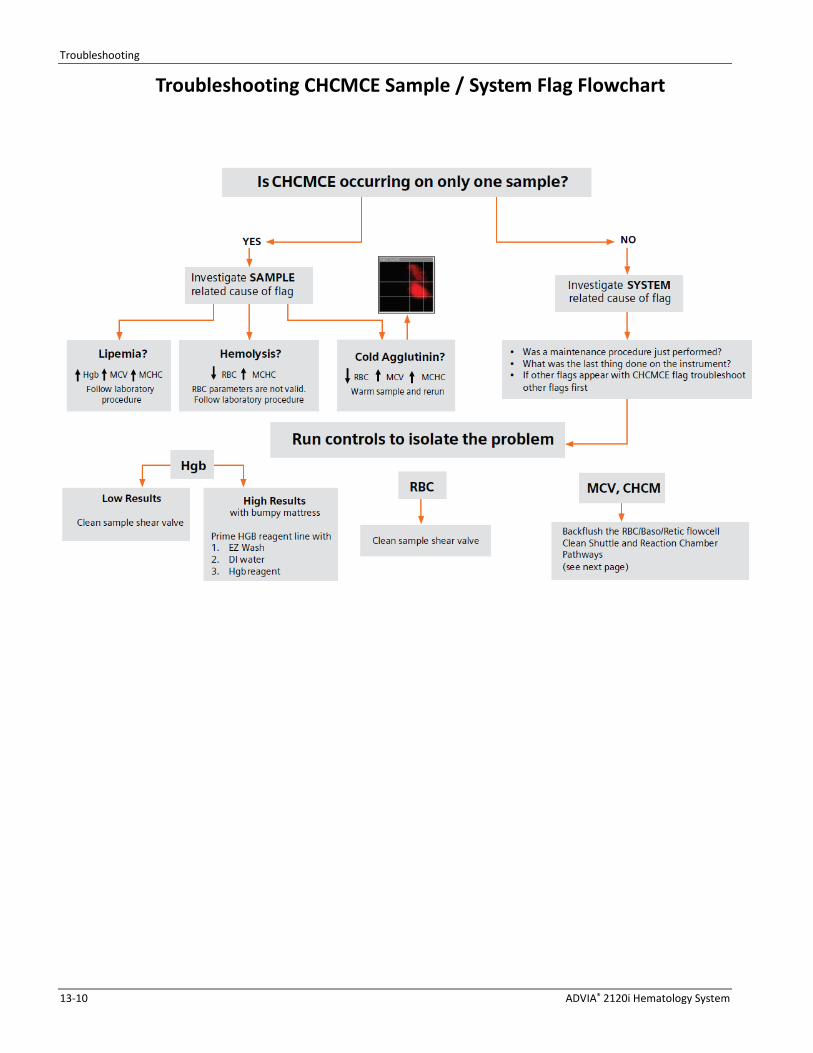
Troubleshooting CHCMCE Sample / System Flag Flowchart

Troubleshooting
ADVIA® 2120i Hematology System 13-11
Backflushing the RBC/Baso/Retic Flowcell 1. Select Utilities > Exerciser > Valves
2. Unscrew the white fitting of Valve 23
(upper middle valve above the RBC syringe).
Flowcell Cleaning Syringe
3. Attach the white fitting to a flowcell cleaning syringe filled with a 25% solution of 6% sodium hypochlorite and DI water.
4. Disconnect the sample tubing fitting from the top of the sample syringe and place into a beaker to catch the fluid.
5. Gently push the plunger on the syringe to flush the 25% solution through the flowcell.
6. Repeat with DI water.
7. Reattach the sample tubing fitting and Valve 23 white fitting. (continue on next page)
Valve 23 white fitting
sample tubing fitting
Troubleshooting
13-12 ADVIA® 2120i Hematology System
Clean the Shuttle Pathways and Reaction Chamber 1. Select Utilities > Exerciser > Valves
2. Unscrew the white fitting of Valve 23
3. Open V9 and then push the syringe to fill the RBC chamber with 25% solution of 6% sodium hypochlorite and DI water; open V10 to drain. 4. Close V9 and V10.
5. Repeat Step 3 and 4 with DI water.
6. Refill the syringe with the 25% solution.
7. To flush the RBC Vacuum Shuttle Chamber (VSC), open V20 and V22. Fill the chamber then empty the chamber by opening V21. Close V21. 8. Repeat step 7 with DI water.
9. Reattach the Valve 23 white fitting.
10. Select the Analyzer Status tab to exit Exerciser.
11. Perform one System Wash and run QC as per laboratory policy.

Multispecies
ADVIA® 2120i Hematology System 14-1
14 Multispecies

Multispecies
14-2 ADVIA® 2120i Hematology System
Multispecies
Resources • ADVIA 120/2120/2120i Hematology Systems Operator’s Guide
Objectives After completing this exercise, you will be able to:
• Create a User Defined Species
• Configure Test Dictionary
• Configure the Autosampler Profile
• Identify the steps to use Playback

Multispecies
ADVIA® 2120i Hematology System 14-3
Create a User Defined Species 1. Select Customize > System Setup > User Defined Species
2. Type the name of the new species in the Enter New User Defined Species Name box.
3. Select a Species to Associate from the drop-down menu.
4. Select the Associate button; the new species will display in the User Defined Species View list.
5. Select Save
6. Select Yes
Exercise:
Create the following User Defined Species: Fox. List the species used to associate the newly defined species.
_________________________________________________________________________
Configure Test Dictionary 1. Select Customize > System Setup > Tools Modify > Test Dictionary
2. Select Ranges from top of window; select type of range to be defined: Review, Report Rerun, Panic or Dilution
3. Select Species from Species Selection menu.
4. Enter Test in the Code field and press Enter on keyboard to advance to the next field.
5. Enter data in the corresponding. Press Enter to advance to next field.
6. Select OK to save new range values.
Note: If modifying existing range values, select a range value in the Range list box and select the Update button. Then modify the entered values and select OK.
7. Select Exit when finished entering new ranges for a species.
Exercise:
Practice configuring the Test Dictionary for the newly defined Fox species.
____________________________________________________________

Multispecies
14-4 ADVIA® 2120i Hematology System
Configure the Autosampler Profile 1. Select Customize > System Setup > Sample Identification
2. Select Autosampler Profile
3. Select Sample Type: Patient, Primer, or Control
4. Select Selectivity: CBC, CBC/Diff, CBC/Diff/Retic, CBC/Retic, or Retic
5. Select Species from dropdown list.
6. Select Save
7. Select OK
Exercise:
The Autosampler can be configured for default testing. Configure the Autosampler to run CBC/Diff for the newly created Fox species.
_________________________________________________________________________
Using the Playback Feature 1. Verify Raw Data File save option is active by selecting:
Customize > System Setup > System Options
2. Select Data Options; Raw Data On checkbox must be checked. Enter the path and directory in which you want to save the raw data.
3. Select Save followed by OK to save changes.
4. Open Playback window on desktop by simultaneously pressing CTRL + ESC on keyboard.
5. Select the Windows Start button and then select Playback.
6. At the Playback window, select the disk drive containing the raw data files (the C drive is set as default).
7. Double click the folder in the directory containing the raw data files (the default directory is raw data).
8. In the Select RD Files field, select a single file. If multiple files are desired hold CTRL while selecting files. Playback consecutive files by selecting the first file then press and hold Shift and select the last file.
9. Under Playback Options select desired Species, select the Stored radio button to use the species selected when the sample was originally run on the system; select the Select radio button to use a species type different from the original.
10. Under Playback Options Store Results, select Data Manager checkbox to process the sample results.
11. Select Playback Selected Files and a Run Screen will be displayed.

Multispecies
ADVIA® 2120i Hematology System 14-5
Exercise:
Access the desktop and open Playback. Locate a Fox sample and playback as a Cat. Which parameters will be affected?
Hint: Use the ADVIA 120/2120/2120i Hematology Systems Operator’s Guide:
Contents > Using Multispecies Features > Troubleshooting > Playback Incompatibilities
_______________________________________________________________________

Additional Resources
ADVIA® 2120i Hematology System 15-1
15 Additional Resources
Additional Resources
15-2 ADVIA® 2120i Hematology System
Additional Resources
Resources • ADVIA 2120 / 2120i Hematology Systems Operator’s Guide

Additional Resources
ADVIA® 2120i Hematology System 15-3
Clean the Shear Valve 1. Analyzer Mode: Off
Important: Place paper towels directly under the shear valve to prevent fluid from dripping down into the analyzer.
2. Remove the knurled nut by turning counter-clockwise (1).
3. Remove the compression spring (2).
4. Remove the rotor (3).
5. Separate and remove shear face (4) by gently rotating front shear face.
Caution: Do not loosen or remove with sharp object.
6. Place the front shear face in 6% sodium hypochlorite solution and soak ten
minutes. Rinse with DI water.
7. Rinse the rear shear face using a wash bottle filled with distilled water.
Caution: Do not use paper towel, gauze or cotton swabs on shear faces
8. Reassemble the shear valve with the faces wet. Verify the black line on the front face aligns with the black line and A on back face. Smaller loops are at 9 and 11 o’clock and the large loop is at 5 o’clock.
9. Install the rotor by installing the drive pin in the hole on the right side of the front face.
10. Replace the spring and knurled nut.
11. Hand tighten nut.
12. Turn analyzer power on and verify Background Counts
13. Run a whole blood primer and QC as per laboratory policy.

Additional Resources
15-4 ADVIA® 2120i Hematology System
Clean the Shear Valve Aspiration Pathways in the UFC
1. Analyzer Mode: Ready to Run
2. Select Utilities menu
3. Select Exerciser
4. Select the Syringe Pumps button.
5. If the arrow on the image of the valve under Selector Valve does not point to Open, select on the image until the arrow points to Open.
6. Select the Valves button on the left.
7. Select valves V1, V47, and V74 to open. Verify V72 and V73 are closed.
8. Hold a beaker of 6% sodium hypochlorite under the open-tube sample probe
until 5 mL is aspirated.
9. Repeat step 8 using 5 mL of DI water.
10. Close valve V74 and select V72 to open; verify V73 is closed.
11. Repeat steps 8 and 9.
12. Close V72 and select V73 to open.
13. Repeat steps 8 and 9.
14. Exit the Exerciser by selecting the Analyzer Status tab and verify system performance as per laboratory policy.

Additional Resources
ADVIA® 2120i Hematology System 15-5
RBC/Baso/Retic Flowcell Wash and Perox Flowcell Wash 1. Analyzer Mode: Ready to Run
2. Select Utilities > Hydraulic Functions > Flowcell Wash
3. In the Flowcell Options, select the desired flowcell.
4. To clean RBC/Baso/Retic flowcell, use 25% solution of 6% sodium hypochlorite and DI water.
To clean the Perox flowcell, use EZ Wash.
5. Hold tube under the open-tube sample probe.
Caution: Do not push the aspirate plate
6. Select Start to begin the flowcell wash.
7. Continue to hold the tube under the probe until you hear a beep and the wash block starts to move down (approximately 100 seconds).

Additional Resources
15-6 ADVIA® 2120i Hematology System
Inspect the Perox-Cap Vent Hole for Buildup, clean if necessary
1. Disconnect the overflow tube from the cap.
2. Remove the cap.
3. Inspect the inside of the vent cap and opening ensuring both are clean, dry and free of buildup.
4. If necessary, clean the cap and vent opening.
Use the drill bit included in the flowcell cleaning kit or a paper clip to clean blockages in the vent opening.
5. Replace the cap and reconnect the overflow tube.

Additional Resources
ADVIA® 2120i Hematology System 15-7
Top Related
Copyright © 2022 FDOKUMEN

