ZD410d Users Guide ( en) - Zebra Technologies
169
Link-OS 2 inch Desktop Printers Zebra ZD410 User’s Guide 212288-002 Rev. A
-
Upload
khangminh22 -
Category
Documents
-
view
0 -
download
0
Transcript of ZD410d Users Guide ( en) - Zebra Technologies

Link-OS 2 inch Desktop PrintersZebra ZD410
User’s Guide
212288-002 Rev. A

2
Copyright ZIH Corp. and/or its affiliates. All rights reserved. ZEBRA and the stylized Zebra head aretrademarks of ZIH Corp., registered in many jurisdictions worldwide. All other trademarks are the propertyof their respective owners.
Information in this document is subject to change without notice. The software described in this documentis furnished under a license agreement or nondisclosure agreement. The software may be used or copiedonly in accordance with the terms of those agreements.
For further information regarding legal and proprietary statements, please go to:
COPYRIGHTS: www.zebra.com/copyright WARRANTY: www.zebra.com/warranty END USER LICENSE AGREEMENT: www.zebra.com/eula SOFTWARE: www.zebra.com/linkoslegal
Terms of Use
Proprietary Statement
This manual contains proprietary information of Zebra Technologies Corporation and its subsidiaries(“Zebra Technologies”). It is intended solely for the information and use of parties operating andmaintaining the equipment described herein. Such proprietary information may not be used, reproduced,or disclosed to any other parties for any other purpose without the express, written permission of ZebraTechnologies.
Product Improvements
Continuous improvement of products is a policy of Zebra Technologies. All specifications and designs aresubject to change without notice.
Liability Disclaimer
Zebra Technologies takes steps to ensure that its published Engineering specifications and manuals arecorrect; however, errors do occur. Zebra Technologies reserves the right to correct any such errors anddisclaims liability resulting therefrom.
Limitation of Liability
In no event shall Zebra Technologies or anyone else involved in the creation, production, or delivery of theaccompanying product (including hardware and software) be liable for any damages whatsoever(including, without limitation, consequential damages including loss of business profits, businessinterruption, or loss of business information) arising out of the use of, the results of use of, or inability touse such product, even if Zebra Technologies has been advised of the possibility of such damages. Somejurisdictions do not allow the exclusion or limitation of incidental or consequential damages, so the abovelimitation or exclusion may not apply to you.
Publication DateAugust 2018

About
This guide is for integrators and operators of Zebra Link-OS ZD410 desktop printers. Use this guide toinstall, change configuration, operate, and physically support these printers.
Other Online resources are available to support this printer include:
• “How To” videos • ZD410 Desktop Printer Product page links for printer specifications• Printer accessory, supplies, parts, and software links• Various setup and configuration guides• Programmer’s manuals,• Printer Drivers (Windows, Apple, OPOS, etc.)• Printer Firmware• Printer Fonts• Utilities• Knowledge base and support contacts• Printer warranty and repair links
Use this link to get to your Online printer support resources:
• ZD410 Direct Thermal Printer —www.zebra.com/zd410d-info
3
About
Other Valuable Printer Resources
Zebra has a large suite of free and fee based software, Apps (applications), and other technical resourcesfor your Zebra Link-OS printer.
These are just some of the extensive software and resource areas available Online:
• Label Design software• Printer Management tools • Virtual Devices for legacy languages normally associated with other printer brands• Cloud based Enterprise printer management and printing• XML and PDF format file printing• Oracle and SAP support• Zebra Savanna ™ Data Intelligence platform - turns raw data from devices (IoT) and sensors into
actionable intelligence for your business• A suite of Link-OS Mobile Apps (applications for phones, tablets, etc.)• Link-OS software development kit (SDK)• Additional Operating Systems (OS) and Service platforms
See ZebraLink, Zebra Link-OS, and Zebra Savanna from this Online link: www.zebra.com/software
Zebra OneCare Printer Service and Support
For maximum productivity, we can help your business ensure its Zebra printers are Online and ready forbusiness. See the descriptions of the Zebra OneCare service and support options available for yourprinters Online at this link: www.zebra.com/zebraonecare
Using This Document and Its Internally Attached Files
This document is best used with Adobe Reader or Adobe DC. This user’s guide includes attached UserProgramming Example Files for sample printer operations.
Go to the Adobe Web site to load Adobe Reader (for free at the release time of this publication):www.adobe.com
4
About
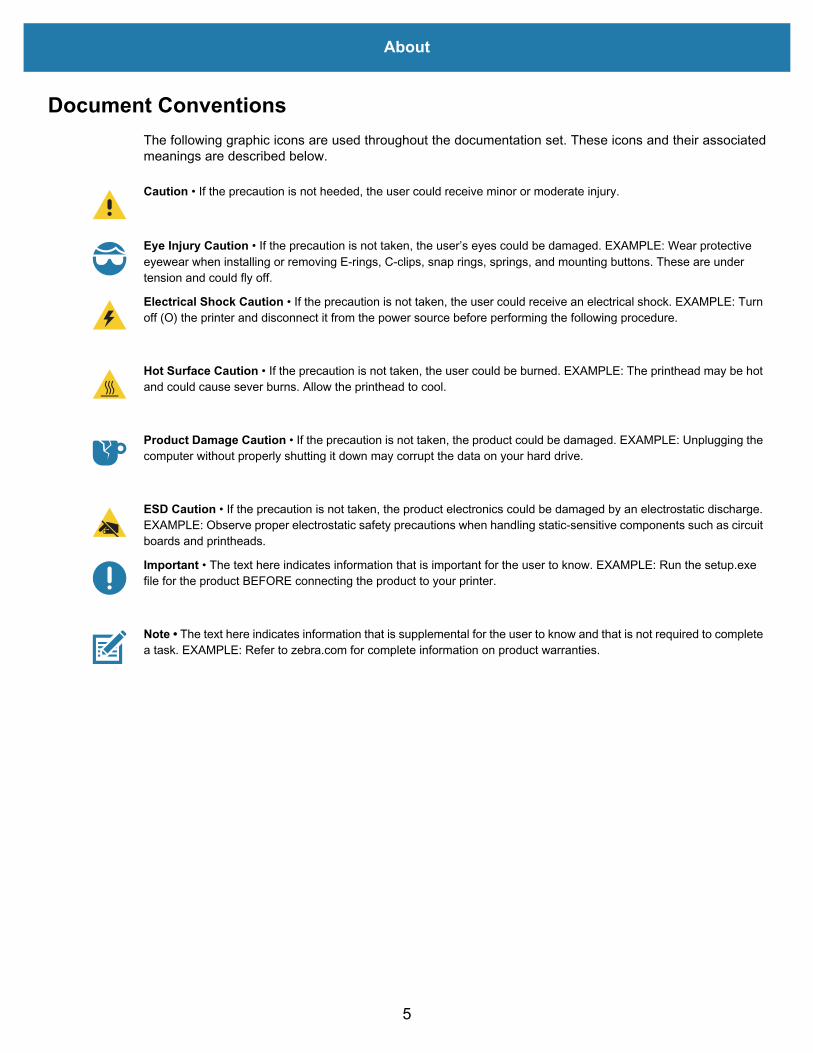
Document ConventionsThe following graphic icons are used throughout the documentation set. These icons and their associatedmeanings are described below.
Caution • If the precaution is not heeded, the user could receive minor or moderate injury.
Eye Injury Caution • If the precaution is not taken, the user’s eyes could be damaged. EXAMPLE: Wear protective eyewear when installing or removing E-rings, C-clips, snap rings, springs, and mounting buttons. These are under tension and could fly off.
Electrical Shock Caution • If the precaution is not taken, the user could receive an electrical shock. EXAMPLE: Turn off (O) the printer and disconnect it from the power source before performing the following procedure.
Hot Surface Caution • If the precaution is not taken, the user could be burned. EXAMPLE: The printhead may be hot and could cause sever burns. Allow the printhead to cool.
Product Damage Caution • If the precaution is not taken, the product could be damaged. EXAMPLE: Unplugging the computer without properly shutting it down may corrupt the data on your hard drive.
ESD Caution • If the precaution is not taken, the product electronics could be damaged by an electrostatic discharge. EXAMPLE: Observe proper electrostatic safety precautions when handling static-sensitive components such as circuit boards and printheads.
Important • The text here indicates information that is important for the user to know. EXAMPLE: Run the setup.exe file for the product BEFORE connecting the product to your printer.
Note • The text here indicates information that is supplemental for the user to know and that is not required to complete a task. EXAMPLE: Refer to zebra.com for complete information on product warranties.
5
Contents
Terms of Use . . . . . . . . . . . . . . . . . . . . . . . . . . . . . . . . . . . . . . . . . . . . . . . . . . . . . . . . .2Proprietary Statement . . . . . . . . . . . . . . . . . . . . . . . . . . . . . . . . . . . . . . . . . . . . . . .2Product Improvements . . . . . . . . . . . . . . . . . . . . . . . . . . . . . . . . . . . . . . . . . . . . . . .2Liability Disclaimer . . . . . . . . . . . . . . . . . . . . . . . . . . . . . . . . . . . . . . . . . . . . . . . . . .2Limitation of Liability . . . . . . . . . . . . . . . . . . . . . . . . . . . . . . . . . . . . . . . . . . . . . . . . .2
Publication Date . . . . . . . . . . . . . . . . . . . . . . . . . . . . . . . . . . . . . . . . . . . . . . . . . . . . . . .2
• About . . . . . . . . . . . . . . . . . . . . . . . . . . . . . . . . . . . . . . . . . . . . . . . . . . . . . . . . 3Other Valuable Printer Resources . . . . . . . . . . . . . . . . . . . . . . . . . . . . . . . . . . . . . .4Zebra OneCare Printer Service and Support . . . . . . . . . . . . . . . . . . . . . . . . . . . . . .4Using This Document and Its Internally Attached Files . . . . . . . . . . . . . . . . . . . . . .4
Document Conventions . . . . . . . . . . . . . . . . . . . . . . . . . . . . . . . . . . . . . . . . . . . . . . . . .5
• Contents . . . . . . . . . . . . . . . . . . . . . . . . . . . . . . . . . . . . . . . . . . . . . . . . . . . . . . 6• Introduction . . . . . . . . . . . . . . . . . . . . . . . . . . . . . . . . . . . . . . . . . . . . . . . . . . 11
ZD410 Direct Thermal Printers. . . . . . . . . . . . . . . . . . . . . . . . . . . . . . . . . . . . . . . . . . .11ZD410 Printer Features: . . . . . . . . . . . . . . . . . . . . . . . . . . . . . . . . . . . . . . . . . . . . .12ZD410 Printer Options:. . . . . . . . . . . . . . . . . . . . . . . . . . . . . . . . . . . . . . . . . . . . . .13
Zebra Label Printing Solution . . . . . . . . . . . . . . . . . . . . . . . . . . . . . . . . . . . . . . . . . . . .14Modes of Printing . . . . . . . . . . . . . . . . . . . . . . . . . . . . . . . . . . . . . . . . . . . . . . . . . .14
What’s in the Box? . . . . . . . . . . . . . . . . . . . . . . . . . . . . . . . . . . . . . . . . . . . . . . . . . . . .15Unpack and Inspect the Printer . . . . . . . . . . . . . . . . . . . . . . . . . . . . . . . . . . . . . . .16
Printer Features . . . . . . . . . . . . . . . . . . . . . . . . . . . . . . . . . . . . . . . . . . . . . . . . . . . . . .17Open the Printer . . . . . . . . . . . . . . . . . . . . . . . . . . . . . . . . . . . . . . . . . . . . . . . . . . .18Closing the printer . . . . . . . . . . . . . . . . . . . . . . . . . . . . . . . . . . . . . . . . . . . . . . . . .19Operator Controls . . . . . . . . . . . . . . . . . . . . . . . . . . . . . . . . . . . . . . . . . . . . . . . . . .22
Battery Indicators and Controls . . . . . . . . . . . . . . . . . . . . . . . . . . . . . . . . . . . . . . . . . .25Zebra Print Touch. . . . . . . . . . . . . . . . . . . . . . . . . . . . . . . . . . . . . . . . . . . . . . . . . . . . .26
• Install Hardware Options . . . . . . . . . . . . . . . . . . . . . . . . . . . . . . . . . . . . . . . 27Printer Connectivity Modules . . . . . . . . . . . . . . . . . . . . . . . . . . . . . . . . . . . . . . . . . . . .28
6
Contents
Print Media Handling Options. . . . . . . . . . . . . . . . . . . . . . . . . . . . . . . . . . . . . . . . . . . .32Installing the Label Dispenser . . . . . . . . . . . . . . . . . . . . . . . . . . . . . . . . . . . . . . . .33Installing the Cutter . . . . . . . . . . . . . . . . . . . . . . . . . . . . . . . . . . . . . . . . . . . . . . . .34Media Roll Core Size Adapters . . . . . . . . . . . . . . . . . . . . . . . . . . . . . . . . . . . . . . .35Installing the Attached Battery Base Options . . . . . . . . . . . . . . . . . . . . . . . . . . . . .37Installing the Battery into the Attached Battery Base . . . . . . . . . . . . . . . . . . . . . . .38
• Setup . . . . . . . . . . . . . . . . . . . . . . . . . . . . . . . . . . . . . . . . . . . . . . . . . . . . . . . . 39Printer Setup Overview . . . . . . . . . . . . . . . . . . . . . . . . . . . . . . . . . . . . . . . . . . . . .39
Select a Location for the Printer . . . . . . . . . . . . . . . . . . . . . . . . . . . . . . . . . . . . . . . . . .40Install Printer Options and Connectivity Modules . . . . . . . . . . . . . . . . . . . . . . . . . . . . .40Attaching Power . . . . . . . . . . . . . . . . . . . . . . . . . . . . . . . . . . . . . . . . . . . . . . . . . . . . . .41Getting Ready to Print . . . . . . . . . . . . . . . . . . . . . . . . . . . . . . . . . . . . . . . . . . . . . . . . .42
Preparing and Handling Media. . . . . . . . . . . . . . . . . . . . . . . . . . . . . . . . . . . . . . . .42Media Storage Tips . . . . . . . . . . . . . . . . . . . . . . . . . . . . . . . . . . . . . . . . . . . . . . . .42
Loading Roll Media. . . . . . . . . . . . . . . . . . . . . . . . . . . . . . . . . . . . . . . . . . . . . . . . . . . .43Setting Media Sensing by Media type . . . . . . . . . . . . . . . . . . . . . . . . . . . . . . . . . .43Using the Movable Sensor . . . . . . . . . . . . . . . . . . . . . . . . . . . . . . . . . . . . . . . . . . .47
Run a SmartCal Media Calibration . . . . . . . . . . . . . . . . . . . . . . . . . . . . . . . . . . . . . . . .50SmartCal Procedure. . . . . . . . . . . . . . . . . . . . . . . . . . . . . . . . . . . . . . . . . . . . . . . .50
Test Printing with the Configuration Report . . . . . . . . . . . . . . . . . . . . . . . . . . . . . . . . .51Detecting a Media Out Condition . . . . . . . . . . . . . . . . . . . . . . . . . . . . . . . . . . . . . . . . .52Connecting your Printer to a Computer . . . . . . . . . . . . . . . . . . . . . . . . . . . . . . . . . . . .53
Interface Cable Requirements . . . . . . . . . . . . . . . . . . . . . . . . . . . . . . . . . . . . . . . .53Wi-Fi and Bluetooth Classic Wireless Connectivity Option . . . . . . . . . . . . . . . . . . . . .57
• Setup for Windows OS . . . . . . . . . . . . . . . . . . . . . . . . . . . . . . . . . . . . . . . . . 58Windows to Printer Communication Setup (Overview). . . . . . . . . . . . . . . . . . . . . . . . .58Pre-install Windows® Printer Drivers . . . . . . . . . . . . . . . . . . . . . . . . . . . . . . . . . . . . . .59Setting Up the Wi-Fi Print Server Option . . . . . . . . . . . . . . . . . . . . . . . . . . . . . . . . . . .59Configure Using the ZebraNet Bridge’s Connectivity Wizard . . . . . . . . . . . . . . . . . . . .60
Using a Configuration Script. . . . . . . . . . . . . . . . . . . . . . . . . . . . . . . . . . . . . . . . . .66Bluetooth Option Configuration . . . . . . . . . . . . . . . . . . . . . . . . . . . . . . . . . . . . . . . . . .68
Connecting to a Windows XP® SP2 Master Device . . . . . . . . . . . . . . . . . . . . . . .70Connecting to a Windows Vista® SP2 or Windows 7® Master Device . . . . . . . . .71Connecting the Printer to a Windows 8 . . . . . . . . . . . . . . . . . . . . . . . . . . . . . . . . .74Connecting the Printer to a Windows 10 PC . . . . . . . . . . . . . . . . . . . . . . . . . . . . .75
After Your Printer is Connected . . . . . . . . . . . . . . . . . . . . . . . . . . . . . . . . . . . . . . . . . .78
• Print Operations . . . . . . . . . . . . . . . . . . . . . . . . . . . . . . . . . . . . . . . . . . . . . . . 80Thermal Printing . . . . . . . . . . . . . . . . . . . . . . . . . . . . . . . . . . . . . . . . . . . . . . . . . . . . . .80Determining Your Printer’s Configuration Settings . . . . . . . . . . . . . . . . . . . . . . . . . . . .80Replacing Supplies. . . . . . . . . . . . . . . . . . . . . . . . . . . . . . . . . . . . . . . . . . . . . . . . . . . .80Select a Print Mode . . . . . . . . . . . . . . . . . . . . . . . . . . . . . . . . . . . . . . . . . . . . . . . . . . .81
7

Contents
Adjusting the Print Quality . . . . . . . . . . . . . . . . . . . . . . . . . . . . . . . . . . . . . . . . . . . . . .81Operator Darkness Control. . . . . . . . . . . . . . . . . . . . . . . . . . . . . . . . . . . . . . . . . . . . . .82Printing on Fan-Fold Media . . . . . . . . . . . . . . . . . . . . . . . . . . . . . . . . . . . . . . . . . . . . .83Printing with Externally Mounted Roll Media . . . . . . . . . . . . . . . . . . . . . . . . . . . . . . . .85Using the Label Dispenser Option . . . . . . . . . . . . . . . . . . . . . . . . . . . . . . . . . . . . . . . .86Printing with the Attached Battery Base and Battery Option . . . . . . . . . . . . . . . . . . . .90Sending Files to the Printer . . . . . . . . . . . . . . . . . . . . . . . . . . . . . . . . . . . . . . . . . . . . .91Printer Fonts . . . . . . . . . . . . . . . . . . . . . . . . . . . . . . . . . . . . . . . . . . . . . . . . . . . . . . . . .91
Identifying Fonts in Your Printer . . . . . . . . . . . . . . . . . . . . . . . . . . . . . . . . . . . . . . .91Localizing the Printer with Code Pages . . . . . . . . . . . . . . . . . . . . . . . . . . . . . . . . .91Asian fonts and Other Large Font Sets . . . . . . . . . . . . . . . . . . . . . . . . . . . . . . . . .92Getting Asian Fonts . . . . . . . . . . . . . . . . . . . . . . . . . . . . . . . . . . . . . . . . . . . . . . . .92
EPL Line Mode - Direct Thermal Printers only . . . . . . . . . . . . . . . . . . . . . . . . . . . . . . .93Zebra® ZKDU — Printer Accessory . . . . . . . . . . . . . . . . . . . . . . . . . . . . . . . . . . . . . . .94ZBI 2.0 ™ — Zebra Basic Interpreter . . . . . . . . . . . . . . . . . . . . . . . . . . . . . . . . . . . . . .94Updating Printer Firmware . . . . . . . . . . . . . . . . . . . . . . . . . . . . . . . . . . . . . . . . . . . . . .95Setting the Power Failure Recovery Mode Jumper . . . . . . . . . . . . . . . . . . . . . . . . . . .96
• USB Host Port and Link-OS Usage Examples . . . . . . . . . . . . . . . . . . . . . . 97USB Host . . . . . . . . . . . . . . . . . . . . . . . . . . . . . . . . . . . . . . . . . . . . . . . . . . . . . . . . . . .97
Using USB Host for Firmware Updates . . . . . . . . . . . . . . . . . . . . . . . . . . . . . . . . .98USB Host and Printer Usage Examples . . . . . . . . . . . . . . . . . . . . . . . . . . . . . . . . . . . .99
Items Required for the USB Host Exercises . . . . . . . . . . . . . . . . . . . . . . . . . . . . .99Files for Completing the Exercises. . . . . . . . . . . . . . . . . . . . . . . . . . . . . . . . . . . . .99Exercise 1: Copy Files to a USB Flash Drive and Perform USB Mirror . . . . . . . .102
Using the USB Host Port and the NFC Capabilities . . . . . . . . . . . . . . . . . . . . . . . . . .104Exercise 2: Enter Data for a Stored File with a Smart Device and Print a Label .105
• Maintenance . . . . . . . . . . . . . . . . . . . . . . . . . . . . . . . . . . . . . . . . . . . . . . . . . 107Cleaning . . . . . . . . . . . . . . . . . . . . . . . . . . . . . . . . . . . . . . . . . . . . . . . . . . . . . . . . . . .107
Cleaning Supplies . . . . . . . . . . . . . . . . . . . . . . . . . . . . . . . . . . . . . . . . . . . . . . . .107Recommended Cleaning Schedule . . . . . . . . . . . . . . . . . . . . . . . . . . . . . . . . . . .108Cleaning the Printhead. . . . . . . . . . . . . . . . . . . . . . . . . . . . . . . . . . . . . . . . . . . . .110Media Path Cleaning . . . . . . . . . . . . . . . . . . . . . . . . . . . . . . . . . . . . . . . . . . . . . .111Cleaning the Cutter and Label Dispenser Options . . . . . . . . . . . . . . . . . . . . . . . .112Sensor Cleaning. . . . . . . . . . . . . . . . . . . . . . . . . . . . . . . . . . . . . . . . . . . . . . . . . .113Platen Cleaning and Replacement. . . . . . . . . . . . . . . . . . . . . . . . . . . . . . . . . . . .114
Other Printer Maintenance . . . . . . . . . . . . . . . . . . . . . . . . . . . . . . . . . . . . . . . . . . . . .117RTC Battery . . . . . . . . . . . . . . . . . . . . . . . . . . . . . . . . . . . . . . . . . . . . . . . . . . . . . . . .117Fuses . . . . . . . . . . . . . . . . . . . . . . . . . . . . . . . . . . . . . . . . . . . . . . . . . . . . . . . . . . . . .117Replacing the Printhead . . . . . . . . . . . . . . . . . . . . . . . . . . . . . . . . . . . . . . . . . . . . . . .118
8
Contents
• Troubleshooting . . . . . . . . . . . . . . . . . . . . . . . . . . . . . . . . . . . . . . . . . . . . . 122Resolving Alerts and Errors . . . . . . . . . . . . . . . . . . . . . . . . . . . . . . . . . . . . . . . . . . . .122
Alert: Printhead Open. . . . . . . . . . . . . . . . . . . . . . . . . . . . . . . . . . . . . . . . . . . . . .122Alert: Media Out . . . . . . . . . . . . . . . . . . . . . . . . . . . . . . . . . . . . . . . . . . . . . . . . . .123Alert: CUT ERROR. . . . . . . . . . . . . . . . . . . . . . . . . . . . . . . . . . . . . . . . . . . . . . . .124Alert: PRINTHEAD OVER TEMP . . . . . . . . . . . . . . . . . . . . . . . . . . . . . . . . . . . . .125Alert: PRINTHEAD SHUTDOWN . . . . . . . . . . . . . . . . . . . . . . . . . . . . . . . . . . . . .125Alert: PRINTHEAD UNDER TEMP . . . . . . . . . . . . . . . . . . . . . . . . . . . . . . . . . . .126Alert: OUT OF MEMORY . . . . . . . . . . . . . . . . . . . . . . . . . . . . . . . . . . . . . . . . . . .127
Resolving Print Issues . . . . . . . . . . . . . . . . . . . . . . . . . . . . . . . . . . . . . . . . . . . . . . . .128Issue: General Print Quality Issues . . . . . . . . . . . . . . . . . . . . . . . . . . . . . . . . . . .128Issue: No Print on the Label . . . . . . . . . . . . . . . . . . . . . . . . . . . . . . . . . . . . . . . . .129Issue: Labels Are Distorted in Size or Print Area Start Position Varies . . . . . . . .130
Communication Issues . . . . . . . . . . . . . . . . . . . . . . . . . . . . . . . . . . . . . . . . . . . . . . . .131Issue: Label Job Sent, No Data Transfer . . . . . . . . . . . . . . . . . . . . . . . . . . . . . . .131Issue: Label Job Sent, Skips Labels or Prints Bad Content . . . . . . . . . . . . . . . . .131Issue: Label Job Sent, Data Transfers, But No Print . . . . . . . . . . . . . . . . . . . . . .132
Miscellaneous Issues . . . . . . . . . . . . . . . . . . . . . . . . . . . . . . . . . . . . . . . . . . . . . . . . .133Issue: Settings are Lost or Ignored . . . . . . . . . . . . . . . . . . . . . . . . . . . . . . . . . . .133Issue: Non-continuous labels act as Continuous labels. . . . . . . . . . . . . . . . . . . .134Issue: Printer Locks-Up . . . . . . . . . . . . . . . . . . . . . . . . . . . . . . . . . . . . . . . . . . . .134Issue: Battery has a Red Indicator . . . . . . . . . . . . . . . . . . . . . . . . . . . . . . . . . . . .135
• Tools . . . . . . . . . . . . . . . . . . . . . . . . . . . . . . . . . . . . . . . . . . . . . . . . . . . . . . . 136Printer Diagnostics . . . . . . . . . . . . . . . . . . . . . . . . . . . . . . . . . . . . . . . . . . . . . . . . . . .137
Power-On Self Test . . . . . . . . . . . . . . . . . . . . . . . . . . . . . . . . . . . . . . . . . . . . . . .137SmartCal Media Calibration . . . . . . . . . . . . . . . . . . . . . . . . . . . . . . . . . . . . . . . . .137Configuration Report (CANCEL Self Test) . . . . . . . . . . . . . . . . . . . . . . . . . . . . . .138Printer Network (and Bluetooth) Configuration Report . . . . . . . . . . . . . . . . . . . . .139Print Quality Report (FEED self test) . . . . . . . . . . . . . . . . . . . . . . . . . . . . . . . . . .140Reset Printer Factory Defaults (PAUSE + FEED Self Test). . . . . . . . . . . . . . . . .143Reset Network Factory Defaults (PAUSE + CANCEL Self Test) . . . . . . . . . . . . .143Reset Button. . . . . . . . . . . . . . . . . . . . . . . . . . . . . . . . . . . . . . . . . . . . . . . . . . . . .144Communication Diagnostics Test . . . . . . . . . . . . . . . . . . . . . . . . . . . . . . . . . . . . .145Sensor Profile . . . . . . . . . . . . . . . . . . . . . . . . . . . . . . . . . . . . . . . . . . . . . . . . . . . .146
Advanced Mode . . . . . . . . . . . . . . . . . . . . . . . . . . . . . . . . . . . . . . . . . . . . . . . . . . . . .148Manual Media Calibration. . . . . . . . . . . . . . . . . . . . . . . . . . . . . . . . . . . . . . . . . . .148Manual Print Width Adjustment . . . . . . . . . . . . . . . . . . . . . . . . . . . . . . . . . . . . . .149Manual Print Darkness Adjustment . . . . . . . . . . . . . . . . . . . . . . . . . . . . . . . . . . .150
Factory Test Modes . . . . . . . . . . . . . . . . . . . . . . . . . . . . . . . . . . . . . . . . . . . . . . . . . .151
• Interface Connector Wiring . . . . . . . . . . . . . . . . . . . . . . . . . . . . . . . . . . . . . 152Universal Serial Bus (USB) Interface . . . . . . . . . . . . . . . . . . . . . . . . . . . . . . . . . . . . .152
9
Contents
Serial Port Interface . . . . . . . . . . . . . . . . . . . . . . . . . . . . . . . . . . . . . . . . . . . . . . . . . .153Connecting the Printer to a DTE Device . . . . . . . . . . . . . . . . . . . . . . . . . . . . . . .153Connecting the Printer to a DCE Device . . . . . . . . . . . . . . . . . . . . . . . . . . . . . . .154
• Dimensions . . . . . . . . . . . . . . . . . . . . . . . . . . . . . . . . . . . . . . . . . . . . . . . . . 155• Media . . . . . . . . . . . . . . . . . . . . . . . . . . . . . . . . . . . . . . . . . . . . . . . . . . . . . . . 159
Types of Thermal Media. . . . . . . . . . . . . . . . . . . . . . . . . . . . . . . . . . . . . . . . . . . . . . .160Determining Thermal Media Types . . . . . . . . . . . . . . . . . . . . . . . . . . . . . . . . . . .160
General Media and Print Specifications . . . . . . . . . . . . . . . . . . . . . . . . . . . . . . . . . . .161
• ZPL Configuration . . . . . . . . . . . . . . . . . . . . . . . . . . . . . . . . . . . . . . . . . . . . 163Managing the ZPL Printer Configuration . . . . . . . . . . . . . . . . . . . . . . . . . . . . . . . . . .164
ZPL Printer Configuration Format . . . . . . . . . . . . . . . . . . . . . . . . . . . . . . . . . . . .164Configuration Setting to Command Cross-reference . . . . . . . . . . . . . . . . . . . . . . . . .165Printer Memory Management and Related Status Reports . . . . . . . . . . . . . . . . . . . .168
ZPL Programming for Memory Management . . . . . . . . . . . . . . . . . . . . . . . . . . . .168
10
Introduction
This section introduces you to your new Zebra® ZD410 desktop thermal label printer. It describes whatyou get in your shipping box and provides an overview of printer features. It also includes procedures thatdescribe how to open and close the printer and report any problems.
This user’s guide provides all the information you need to operate your printer on a daily basis. Otherpublications are available to assist with service, network configuration and operation, printer utilities andapplications, software development kits, and more. All publications are available on the Zebra Web site.
Your printer, when connected to a host computer, functions as a complete system for printing labels, tags,tickets, wristbands, and receipts.
ZD410 Direct Thermal PrintersThe Zebra® ZD410 models are desktop label printers with the widest range of features and options.
• The 203 dpi (dots per inch print density) version printer provides direct thermal printing at speeds up to 152.4 mm/s (6 ips - inches per second).
• The 300 dpi version printer provides direct thermal printing at speeds up to 101.6 mm/s (4 ips).• Includes ZD410 Healthcare printer models with plastics that withstand common hospital cleaning
chemicals and a medical grade power supply.• These printers support ZPL ™ and EPL Zebra printer programming languages and a wide variety of
options.
11
Introduction
ZD410 Printer Features:
• High quality printing with a small footprint.• OpenAccess ™ design for simplified media loading.• Easy, field installable media handling options.• Supports media rolls:
• Up to 127 mm (5 inch) outer diameter (O.D.) media rolls and • 12.7 mm (0.5 inch) and 25.4 mm (1 inch) inner diameter (I.D.) roll cores and additional core sizes
with optional media core adapters.• Movable Sensor provides compatibility with the widest range of media types:
• Compatible with full or partial width black mark media.• Compatible with notched or slotted media.• Multi-center position transmissivity sensor for use with label gap/web media.
• Color-coded “touch points” for operator controls and media guides.• Enhanced user control panel featuring three buttons and five status indicators.• Universal Serial Bus (USB) Host Port that can be used for easy firmware updates.• Universal Serial Bus (USB) 2.0 interface• Modular Connectivity Slot for field installable Ethernet (802.3 RJ-45) or Serial interface options.• Backwards compatibility focused technology eases printer replacement:
• Drop in replacement of legacy Zebra desktop printers. The printer accepts both EPL and ZPL programming languages. The 203 dpi printer models also include support for Line Mode printing to support EPL1 legacy programming based printing applications.
• Supports Link-OS virtual devices to interpret non-Zebra printer programming languages.• On–the–fly OpenType and TrueType font scaling and import, Unicode, resident scalable font (Swiss
721 Latin 1 font), and a selection of resident bitmap fonts.• XML-Enabled printing—allows XML communications for barcode label printing, eliminating license fees
and print server hardware and lowering customization and programming costs.• Zebra ™ Global Printing Solution – supports Microsoft Windows keyboard encoding (and ANSI),
Unicode UTF-8 and UTF 16 (Unicode Transformation Formats), XML, ASCII (7 and 8 bit used by legacy programs and systems), basic single and double byte font encoding, JIS and Shift-JIS (Japanese International Standards), Hexadecimal encoding, and custom character mapping (DAT table creation, font linking, and character remapping).
• Factory installed network models support printer configuration via a setup utility running on mobile devices.• Use the printer’s optional Bluetooth Low Energy (LE) feature for short range communication to a
variety of mobile devices. Bluetooth LE works with Zebra mobile setup utility applications to assist in printer setup, perform media calibration, and maximize print quality.
• Zebra’s Print Touch (Near Field Communication - NFC) ‘tap’ to pair devices, access printer information, and access mobile applications.
• Zebra’s Link-OS - an open platform that connects operating systems for smart Zebra devices with powerful software Apps (applications), making the devices easy to integrate, manage and maintain from any location.
• 72 MB (64 MB E: memory) of user accessible flash memory for storing forms, fonts, and graphics. • Printhead maintenance reporting enabled and customizable by the user.• Easy tool-less replacement of printhead and platen (driver) roller.
12
Introduction
ZD410 Printer Options:
• Healthcare printer models• Healthcare wipe-able plastics for disinfecting and cleaning• IEC 60601-1 certified power supply
• Factory Installed Wired and Wireless options.The On-board Real Time Clock (RTC) is included as part of these factory installed options.• Bluetooth Low Energy (LE) wireless connectivity• Wi-Fi (802.11ac – includes a/b/g/n), Bluetooth Classic 4.X (3.X compatible), and Bluetooth Low
Energy (LE) wireless connectivity• Factory installed Internal Ethernet Print Server (LAN, RJ-45 connector) — supports 10Base-T,
100Base-TX and fast Ethernet 10/100 auto-switching networks for wired connectivity. • Field installable connectivity modules:
• Internal Ethernet Print Server (LAN, RJ-45 connector) — supports 10Base-T, 100Base-TX and fast Ethernet 10/100 auto-switching networks. (Does not add the RTC feature).
• Serial (RS-232 DB-9) Port.• Field installable media handling options:
• Label Dispenser (Peel-Off liner and present the label for the operator).• General purpose media cutter.
• Media Core Adapter kits for 38.1 mm (1.5 inch), 50.8 mm (2.0 inch), or 76.2 (3.0 inch) I.D. media cores.• Attached Battery Base with removable Battery.
• Attached Battery Base and Battery are sold separately.• The battery provides a constant regulated 24 VDC until the battery shutdown for recharging to
maintain print quality. This keeps print from changing as the battery discharges with use.• Includes a Shutdown Mode for shipping and storage.• Includes battery charge and status indicators built into the battery.
• Asian Language support with printer configuration options for the large Simplified and Traditional Chinese, Japanese, or Korean character sets. Printers sold in China have the Simplified Chinese SimSun font pre-installed.
• Zebra® ZBI 2.0 ™ (Zebra BASIC Interpreter) programming language. ZBI allows you to create custom printer operations that can automate processes, use peripherals (i.e. scanners, scales, keyboards, Zebra® ZKDU ™ , etc.) all without being attached to a PC or network.
13

Introduction
Zebra Label Printing SolutionThe printer is just one of three (3) parts of a printing solution. To print, you need a printer (ZD410),compatible direct thermal media, and software (driver, applications or programming) to tell the printer whatto do and print.
The media may be labels, tags, tickets, receipt paper, fan-fold stacks, tamper proof labels, etc.
The printer setup can not be completed without media installed. Ideally, your chosen media should be thesame media used for its intended operation. Starting with your chosen media will speed the setup anddeployment process.
Zebra assists you with label design and print with the free label and form design software:ZebraDesigner ™ for Windows PC operating systems.
Zebra provides a complete suite of free Link-OS software applications and drivers to configure printersettings, print labels and receipts, get printer status, import graphics and fonts, send programmingcommands, update firmware, and download files.
The Zebra web site or your reseller will be able to help you identify media for your desired use case.
Modes of Printing
You can operate this printer in many different modes and media configurations:
• Direct thermal printing (which uses heat sensitive media to print).• Standard Tear-Off mode allows you to tear off each label/receipt (or batch print a strip of labels) after it
is printed.• Label Dispense Mode: If an optional dispenser is installed, the backing material can be peeled away
from the label as it is printed. After this label is removed, the next one is printed.• Media Cutting: If an optional media cutter is installed, the printer can cut the label liner between labels,
receipt paper or tag stock.• Stand-alone: The printer can print without being connected to a computer using the printer’s auto
running label form feature (programming based) or by using a data input device connected to the printer’s serial port. This mode accommodates data input devices, such as scanners, weigh scales, a Zebra Keyboard Display Unit (ZKDU), etc.
• Shared network printing: Printers configured with an Ethernet (LAN) and Wi-Fi interface options include an internal print server.
14

Introduction
What’s in the Box?After unpacking, make sure you have all parts shown below. Follow the procedures for inspecting theprinter to familiarize yourself with printer parts so you can follow the instructions in this book.
Documentation and Software
USB CablePrinter
Power
SupplyPower Cord
varies by locale or region
Printer Documentation
15
Introduction
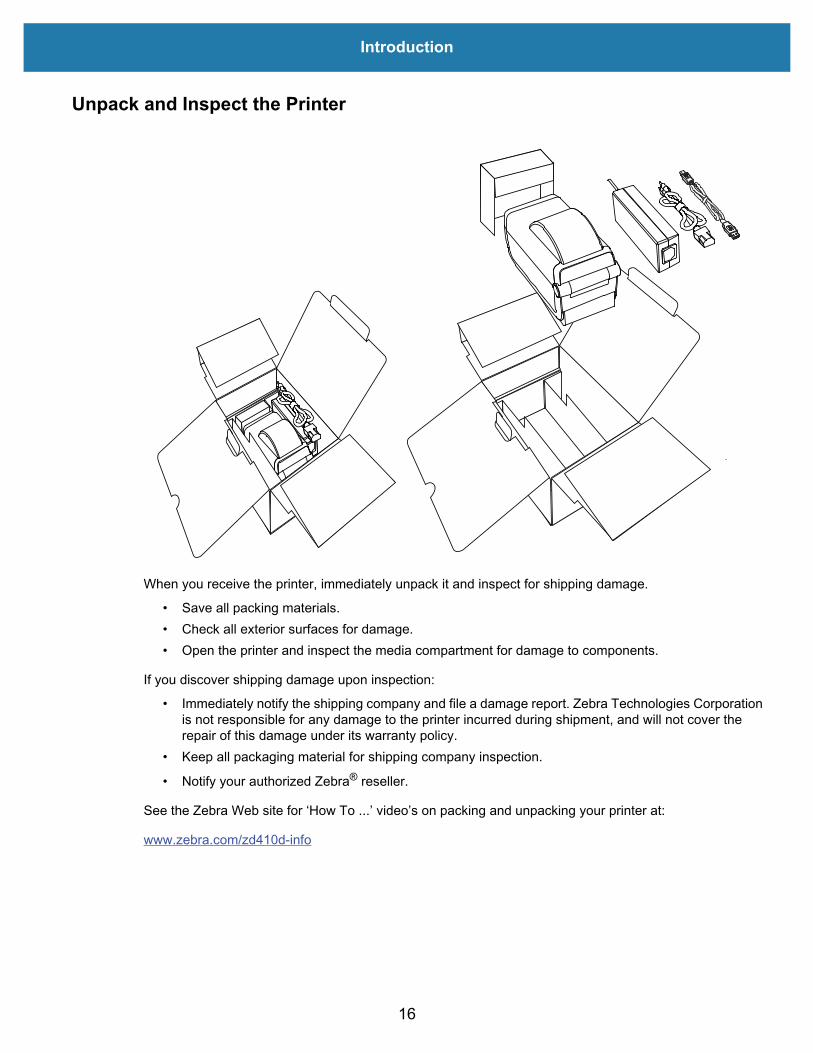
Unpack and Inspect the Printer
When you receive the printer, immediately unpack it and inspect for shipping damage.
• Save all packing materials.• Check all exterior surfaces for damage.• Open the printer and inspect the media compartment for damage to components.
If you discover shipping damage upon inspection:
• Immediately notify the shipping company and file a damage report. Zebra Technologies Corporation is not responsible for any damage to the printer incurred during shipment, and will not cover the repair of this damage under its warranty policy.
• Keep all packaging material for shipping company inspection.
• Notify your authorized Zebra® reseller.
See the Zebra Web site for ‘How To ...’ video’s on packing and unpacking your printer at:
www.zebra.com/zd410d-info
16
Introduction
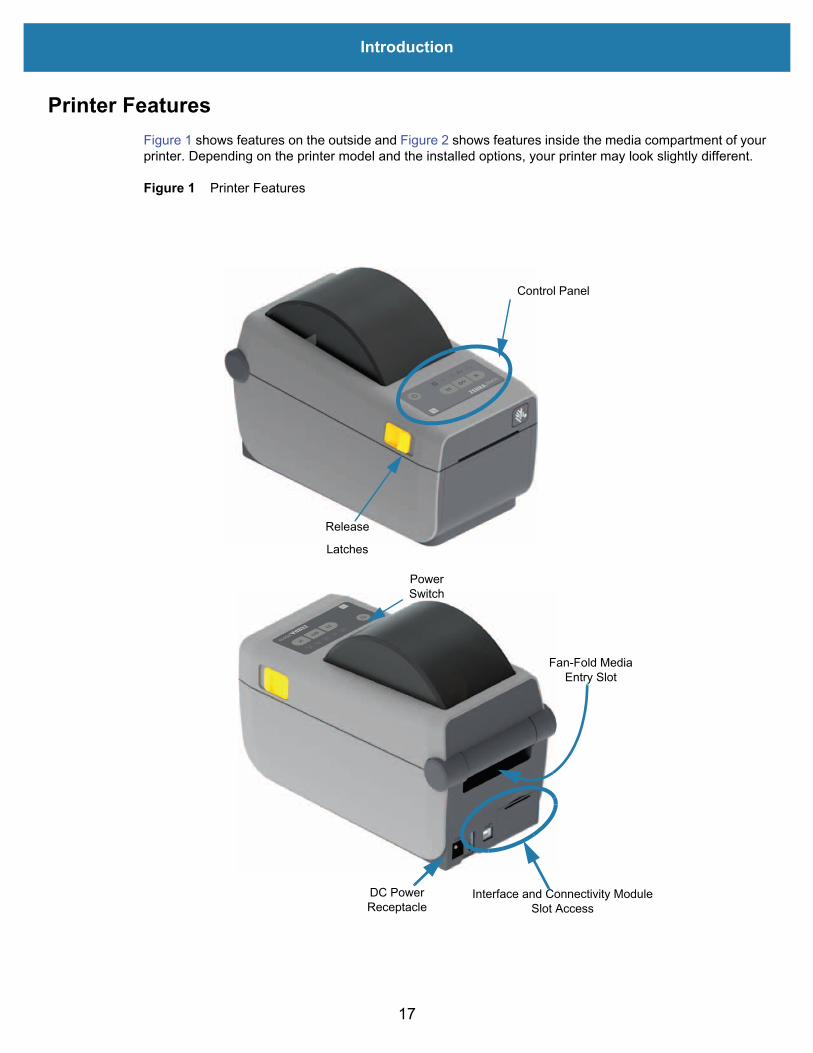
Printer FeaturesFigure 1 shows features on the outside and Figure 2 shows features inside the media compartment of yourprinter. Depending on the printer model and the installed options, your printer may look slightly different.
Figure 1 Printer Features
ZD410
Interface and Connectivity Module Slot Access
Control Panel
Release
Latches
DC PowerReceptacle
PowerSwitch
Fan-Fold Media Entry Slot
17
Introduction
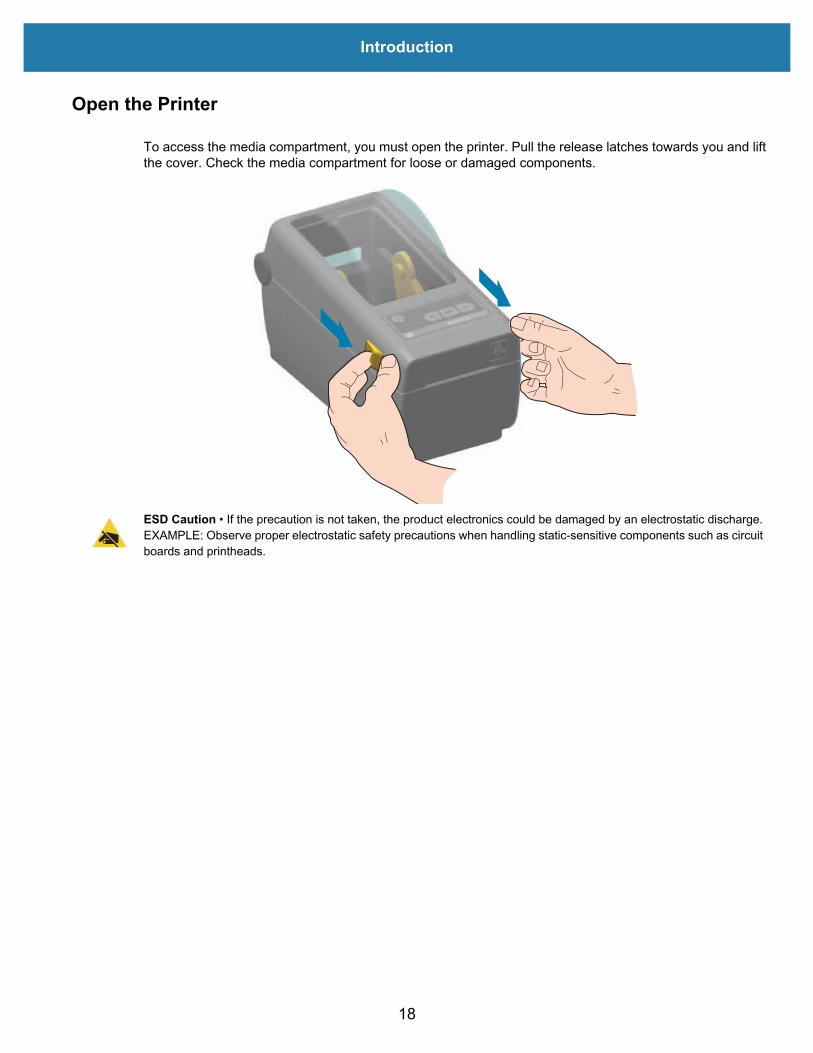
Open the Printer
To access the media compartment, you must open the printer. Pull the release latches towards you and liftthe cover. Check the media compartment for loose or damaged components.
ESD Caution • If the precaution is not taken, the product electronics could be damaged by an electrostatic discharge. EXAMPLE: Observe proper electrostatic safety precautions when handling static-sensitive components such as circuit boards and printheads.
18

Introduction
Closing the printer
Lower the top cover. Press down in the middle of the cover in front until the cover snaps closed.
Figure 2 Printer Features - Continued
19

Introduction
Printhead
Movable Sensor(Black Mark and Lower Web/Gap)
Media Guides
Head-Up Sensor(inside)
Upper Web (Gap)Array Sensor
Media Guide Stop Adjustment
Platen (Drive) Roller
Roll Holders
20
Introduction
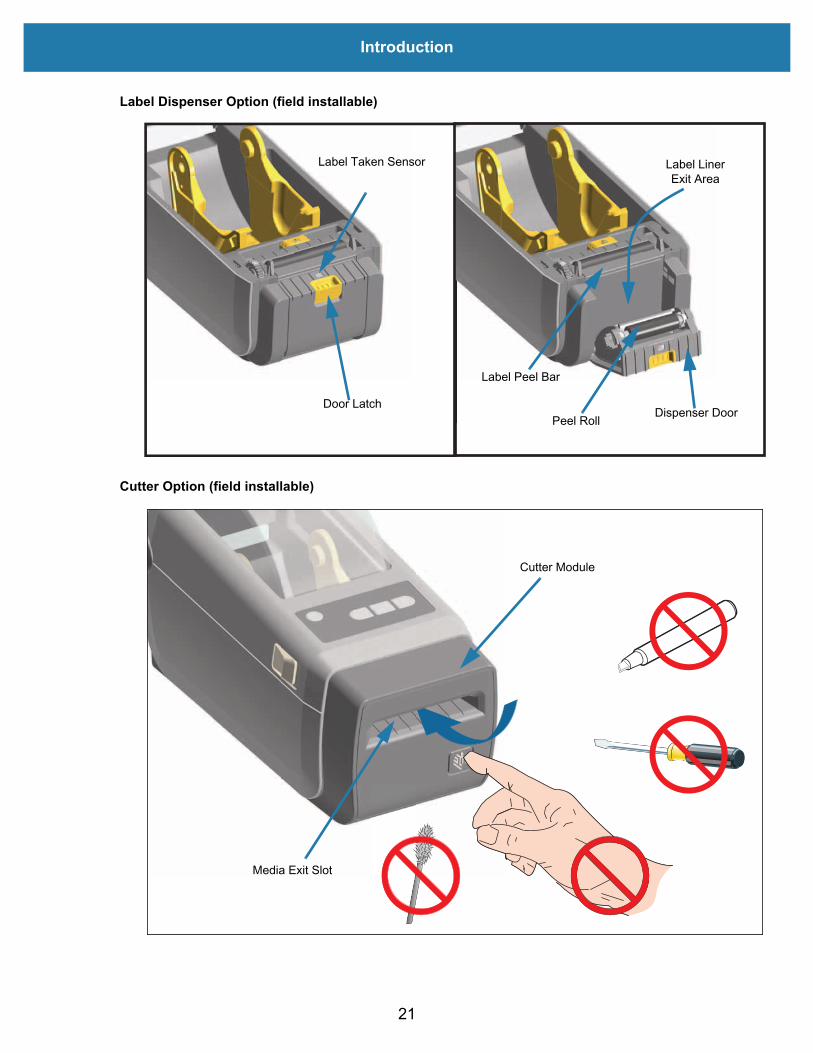
Label Dispenser Option (field installable)
Cutter Option (field installable)
Door Latch
Label Taken Sensor
Label Peel Bar
Peel Roll Dispenser Door
Label Liner Exit Area
Media Exit Slot
Cutter Module
21

Introduction
Operator Controls
The primary operator controls are found on the front of the printer. The indicators may be off (not lit), red,green, or yellow. The indicators can blink or remain on in a variety of patterns that denote various printeractivities or status. For more information on the indicator light patterns see Resolving Alerts and Errors).
1. Power Button — Turns power ON and OFF in the printer. It is also used to initiate low-power sleep and wake states.• Initial Power ON — Press the Power button until the printer’s indicator lights flash on. The
indicator lights will flash on and off in various combinations while the printer does self diagnostics, configuration checks, and integrate optional components which will take several seconds to complete.
The Status indicator will turn solid GREEN indicating the printer is ready for normal print operations.
• Sleep Mode — Pressing and releasing the button once will cause the printer to enter Sleep Mode. The printer will turn off after storing various configuration and status information in memory. All the indicators will be off except the Status Indicator will slowly change between On and Off to indicate Sleep Mode.
• Power OFF with Sleep Mode Delayed — Press and Hold the button for 4-9 seconds. The operator can start a batch print job and put the printer into the low power consumption state of Sleep mode — after the job has finished.
• Power OFF / Shutdown — Press and Hold the button for 4-9 seconds. The printer will turn OFF.
• Power Failure Recovery Mode — This printer feature is activated by a hardware jumper setting on one of the optional Printer Connectivity Modules installed in the printer. See Setting the Power Failure Recovery Mode Jumper.• The printer will automatically Power ON when plugged into an active (ON) AC power source. • Supports Sleep Mode and Power OFF with Sleep mode Delayed. • A Power OFF/Shutdown will reset the printer and then runs the Initial Power ON sequence.
Note • The Power Failure Recovery Mode is only available on printers with a Printer Connectivity Moduleinstalled in the printer.
Power Pause Feed(Advance)
Cancel
DataStatus Network
SuppliesPause
22

Introduction
2. Status Indicator — Primary status indicator for overall printer health and operational status. This indicator is also known as the Power indicator.• Green: Ready for print and data activity.• Green, Slowly Changing between ON and OFF: Printer is in Sleep Mode.• Red: Media out, media detection error, head (cover/printhead) open, cut error, printhead
authentication failure.• Amber: Printhead Over Temp (temperature), printhead element failure, out of memory while storing
content (formats, graphics, fonts, etc.), and interface power fault for USB Host or Serial ports.• Blinking Amber: Printhead Under Temp (temperature)• Blinking Red: Printhead Over Temp (temperature) — this status is coupled with blinking red Pause
indicator. Requires cooling and printer restart.
3. Pause Indicator — The printer is in Pause mode when the Pause indicator light is on. A label (print form) or all labels (print forms) in the print buffer’s queue can be canceled when the Pause indicator is on using the Cancel button. • Amber: The printer is paused. Print, label FEED (advance), and other label routines are suspended
until the pause state is removed by pressing the Pause button.• Blinking Red: Printhead Over Temp (temperature) — this status is coupled with blinking red Status
indicator. Requires cooling and printer restart.
4. Data Indicator — Indicates the status of data transfer activity.• Off: Data is not being transferred.• Green: A data communication operation has not finished, but is not actively being transferred.• Blinking Green: Data communications are in process.• Blinking Amber: Out of memory while storing content (formats, graphics, fonts, etc.).
5. Supplies Indicator — Indicates media (label, receipt, tags, etc.) status.• Red: There is a media out condition.
6. Network Indicator — Indicates network activity and status.• Amber: 10 base Ethernet (LAN) connection detected.• Green: 10/100 Ethernet (LAN) connection detected or when Wi-Fi (WLAN) has a strong signal and
is connected.• Red: when an Ethernet (LAN) or Wi-Fi (WLAN) fault occurs.• Blinking Red: during Wi-Fi (WLAN) association.• Blinking Amber: during Wi-Fi (WLAN) authentication.• Blinking Green: when Wi-Fi (WLAN) has completed, but has a weak signal.
23

Introduction
7. Cancel Button — Cancels print jobs. • Only functional when the printer is in the Pause state.• Pressing the Cancel button once causes the printer to cancel printing the next format in the print
buffer.• Pressing and holding the button for two seconds cancels printing of ALL pending formats.
8. FEED (Advance) Button — Advance a label (print form/format).• Feed One Label - Pressing (and releasing) the FEED button when the printer is not printing, causes
the printer to advance media one (1) blank form/format length (label, receipt, tag, ticket, etc.).• Advance Multiple Labels - Pressing and Holding the FEED button when the printer is not printing,
causes the printer to advance labels until released. It finishes advancing to the beginning position of the next label.
• Reprint Last Label (activated via a SGD command: ezpl.reprint_mode) - The intended purpose of this feature is to allow reprint of a failed media print. If the printer runs out of media (paper, labels, etc.), then the printer can re-print the last label (print form/format). The print buffer that stores the print image available for reprint is cleared when the printer gets turned off or is reset.
9. Pause Button — Pauses print and media movement actions.• Pressing the Pause button will stop print activities and place the printer into a ‘Pause’ state. The
printer will complete printing a label that is printing before it pauses.• The Pause indicator will display Amber (orange/yellow) to indicate the Pause state.• Pressing the Pause button while in Pause state will return the printer to normal operation. If printing
a multi label (form/format) job or another print job is waiting to print in the print queue, then the printer will resume printing.
24

Introduction
Battery Indicators and ControlsThe optional printer battery accessory has a simple, one button, 4 LED indicator light user interface tocontrol and display battery status and health. The battery acts as a UPS (uninterruptible power supply) forthe printer. For more information on using the battery with your printer and power saving modes (Sleep,Shutdown, etc.), see Printing with the Attached Battery Base and Battery Option.
Battery Control Button — The button helps you control the battery, both inside and outside of the printer.
• Battery On - Press and release• Wakes up (activates power) the battery from Sleep or Shutdown Modes. The battery health
and charge status are checked. The battery indicators all flash on and off together 3 times. The operator now has one (1) minute to turn the printer on before the battery reverts back to the previous Sleep or Shutdown Mode.
• Battery displays the battery level charge during the first ten (10) seconds after internal battery health checks are complete
• Shutdown Mode - Press and hold the button for 10-11 seconds and release. The battery begins shutdown and approximately 3 seconds later all of the battery LEDs will flash three (3) times to let you know the battery has shut down.
Battery Health Indicator — Displays the battery’s charging status and health of the battery.
• Green - Good health, charge complete and ready to operate.• Amber - Charging (printer is OFF).• Red - Battery has an internal error. Remove the battery and see the Troubleshooting. • Flashing Red - Charging error - over or under temperature, internal monitoring error, etc.
Battery Charge Level Indicator — Displays the battery’s charging status and health of the battery.
• Three (3) green bars on, no flashing - Battery is fully charged. (The battery will not start charging • Two (2) green bars on with the top bar flashing. Less than full charge.• One (1) green bar flash - Time to charge your battery!• No bars on - Battery needs charging, but the Battery Health Indicator flashes when the Battery
Control Button is pressed. The printer can not be turned on. • Amber - Charging.
Rear of Battery
Battery Control Button
Health IndicatorCharge Level Indicators (3)
Charge Level Indicators (3)
Health Indicator
25
Introduction
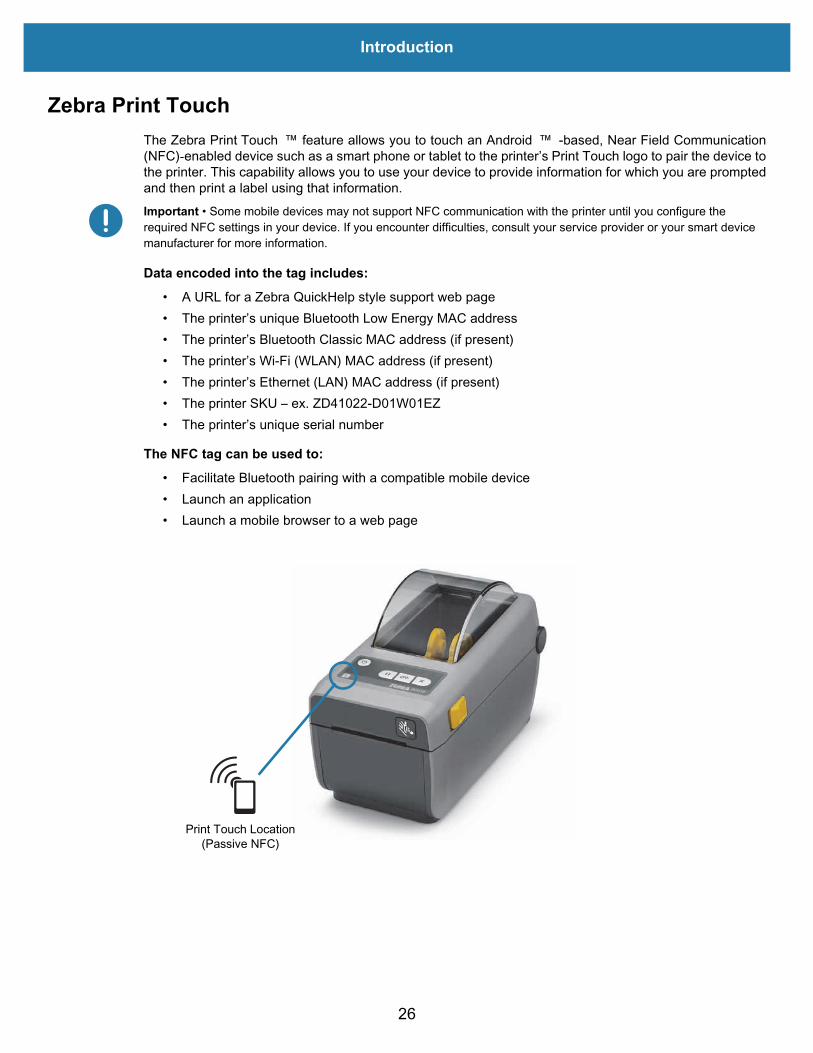
Zebra Print TouchThe Zebra Print Touch ™ feature allows you to touch an Android ™ -based, Near Field Communication(NFC)-enabled device such as a smart phone or tablet to the printer’s Print Touch logo to pair the device tothe printer. This capability allows you to use your device to provide information for which you are promptedand then print a label using that information. Important • Some mobile devices may not support NFC communication with the printer until you configure the required NFC settings in your device. If you encounter difficulties, consult your service provider or your smart device manufacturer for more information.
Data encoded into the tag includes:• A URL for a Zebra QuickHelp style support web page • The printer’s unique Bluetooth Low Energy MAC address• The printer’s Bluetooth Classic MAC address (if present)• The printer’s Wi-Fi (WLAN) MAC address (if present)• The printer’s Ethernet (LAN) MAC address (if present)• The printer SKU – ex. ZD41022-D01W01EZ• The printer’s unique serial number
The NFC tag can be used to:• Facilitate Bluetooth pairing with a compatible mobile device• Launch an application• Launch a mobile browser to a web page
Print Touch Location(Passive NFC)
26
Install Hardware Options
This section assists you installing common printer connectivity modules and media handling options.Important • To simplify and speed up the setup process, install all connectivity modules and media handling options before setting up and using your printer for the first time.
Important • It is strongly recommended that you update your printer’s firmware after the printer has completed the setup process. Many of these options have internal firmware that require an update to operate properly with the printer’s Main Logic Board’s installed firmware version.
Printer Connectivity Modules
The connectivity module’s access door must be removed (Accessing the Connectivity Module Slot) prior toinstalling the following options:
• Serial (RS-232 DB-9) Port - Installing the Serial Port Module• Internal Ethernet (LAN, RJ-45 connector) — supports 10Base-T, 100Base-TX and fast Ethernet
10/100 auto-switching networks - Installing the Internal Ethernet (LAN) Module
Media Handling Options
The printer’s standard bezel must be removed (Removing the Standard Bezel) prior to installing thefollowing options:
• Label Dispenser (Peel-Off Liner and Present Label for Operator) - Installing the Label Dispenser• General purpose media cutter - Installing the Cutter• Media Roll Adapters for 38.1 mm (1.5 inch), 50.8 mm (2.0 inch), or 76.2 (3.0 inch) I.D. media cores.
Power Base Options
The printer is supported with power base field upgrade kits for each the direct thermal and thermal transferversions of these printers.
• Attached Battery Base (battery pack sold separately)• Battery (battery power base sold separately)
27
Install Hardware Options
Printer Connectivity ModulesThe connectivity modules can be easily installed without tools.ESD Caution • If the precaution is not taken, the product electronics could be damaged by an electrostatic discharge. EXAMPLE: Observe proper electrostatic safety precautions when handling static-sensitive components such as circuit boards and printheads.
Update Printer Firmware to Finish Option InstallationsIt is recommended that you always update the printer’s firmware with the latest version for optimal printeroperation. For instructions on how to update printer firmware, see Updating Printer Firmware. This islocated on the Zebra Web site at:
http://www.zebra.com/support
Power Failure Recovery Mode Jumper (OFF by Default) All of the Printer Connectivity Modules have a Power Failure Recovery jumper. It is set to the OFF positionby default. With the jumper set to ON, the printer will automatically Power ON when plugged into an active(ON) AC power source (and not power off). See Operator Controls - Power Button - Power FailureRecovery Mode for power ON/OFF behaviors. See Setting the Power Failure Recovery Mode Jumper forinstructions on activating the mode.Note • The Power Failure Recovery Mode is only available on printers with a Printer Connectivity Module installed in your printer.
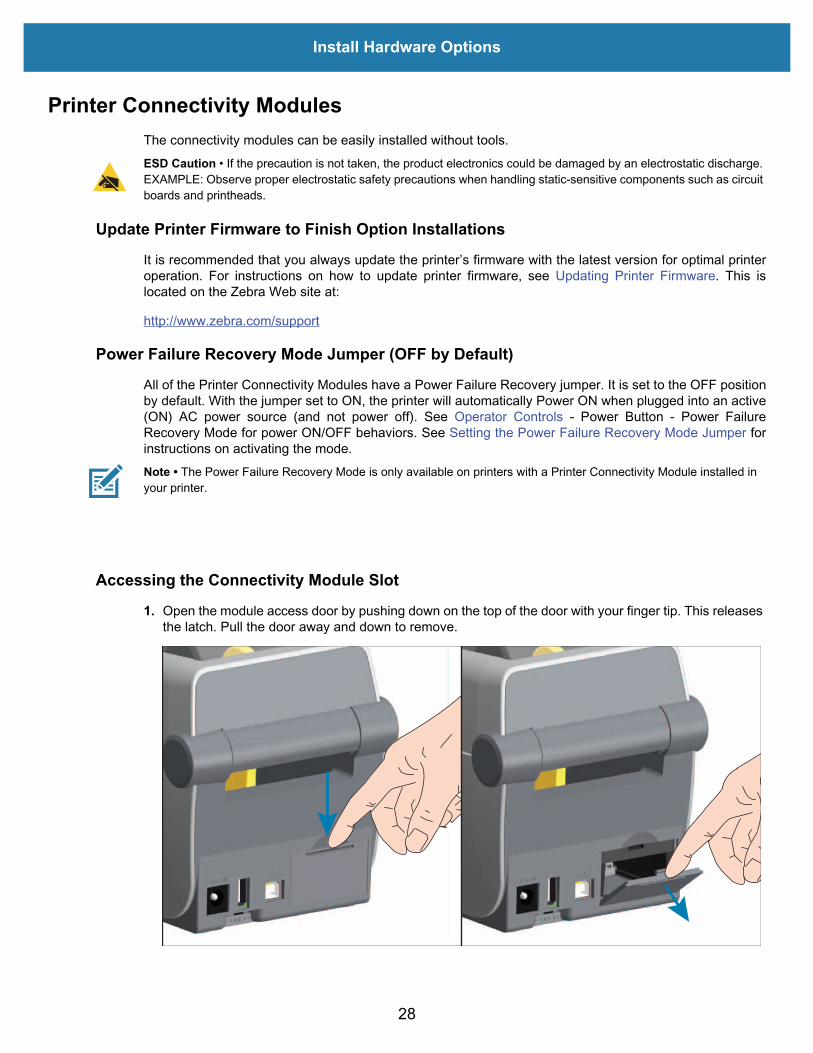
Accessing the Connectivity Module Slot1. Open the module access door by pushing down on the top of the door with your finger tip. This releases
the latch. Pull the door away and down to remove.
28

Install Hardware Options
Installing the Serial Port Module
1. With the module’s access door removed, slide the serial port module into the printer. Push the circuit card in slowly but firmly until the card is just past the inside lip of the access door.
2. Align the bottom of the serial port’s door cover to the bottom lip of the module access opening. Swing the door up and snap the cover closed.
Serial Port (RS-232)
29
Install Hardware Options
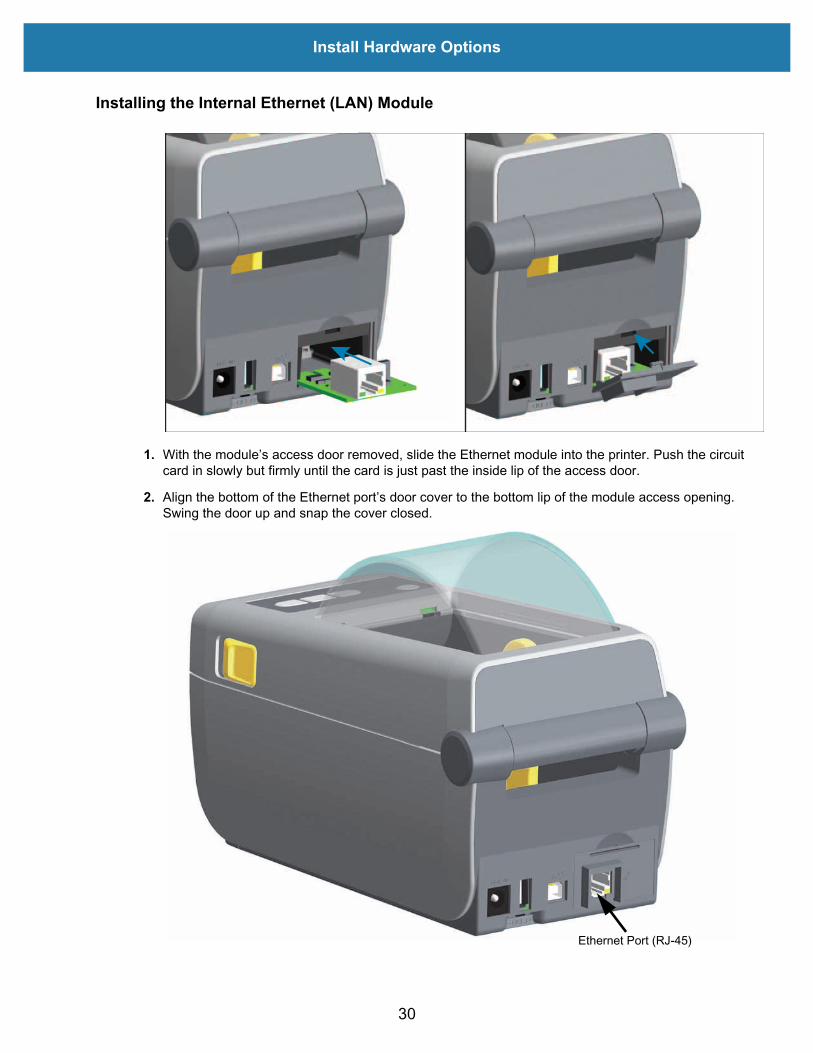
Installing the Internal Ethernet (LAN) Module
1. With the module’s access door removed, slide the Ethernet module into the printer. Push the circuit card in slowly but firmly until the card is just past the inside lip of the access door.
2. Align the bottom of the Ethernet port’s door cover to the bottom lip of the module access opening. Swing the door up and snap the cover closed.
Ethernet Port (RJ-45)
30

Install Hardware Options
Removing Printer Connectivity ModulesConnectivity modules can easily be removed for the purpose of reconfiguring a printer or repair. Youshould not remove and replace connectivity modules as a general practice.
1. Remove the interface cable (Ethernet or Serial).
2. Remove the module access door. Push down on the top of the door with your finger tip. This releases the latch. Pull the door away and down to remove.
3. Re-attach the interface cable to the connectivity module and secure the cable.
4. Gently pull on the interface cable that is secured to the connectivity module. Slowly pull the module out of the printer.
5. Install a different connectivity module or re-install the connectivity module’s access door. Align it to the bottom lip of the access opening and swing it up to snap and lock in place.
31
Install Hardware Options
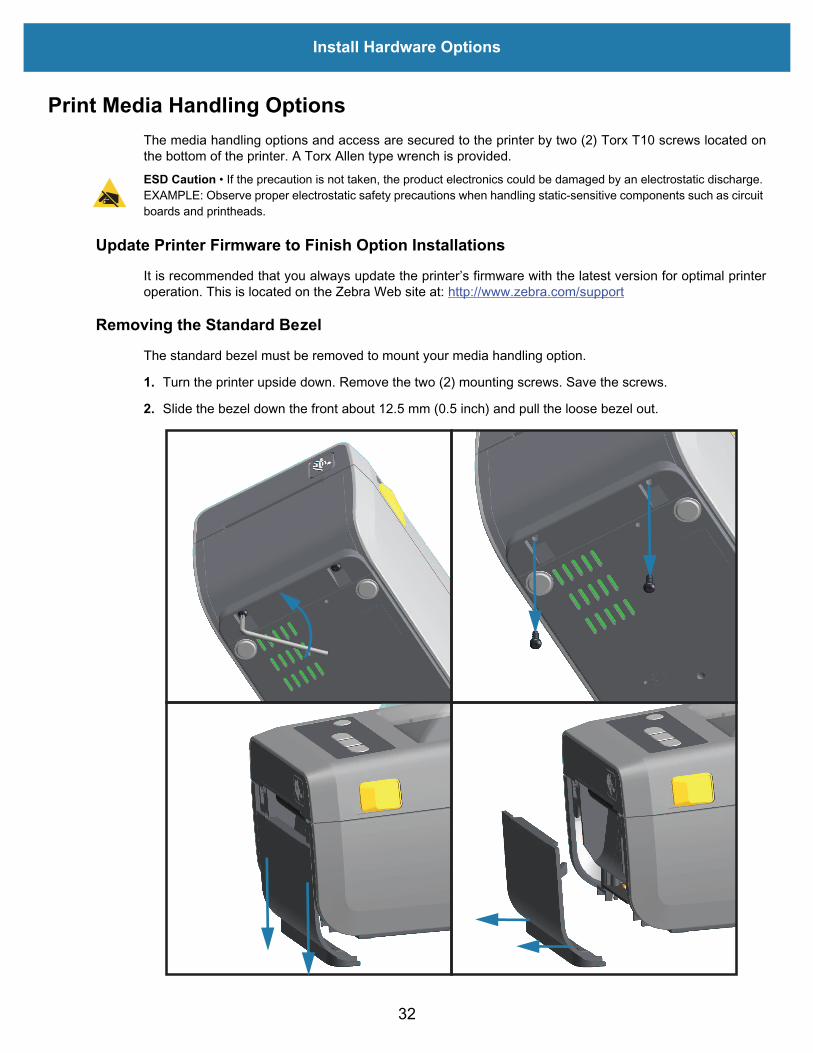
Print Media Handling OptionsThe media handling options and access are secured to the printer by two (2) Torx T10 screws located onthe bottom of the printer. A Torx Allen type wrench is provided.ESD Caution • If the precaution is not taken, the product electronics could be damaged by an electrostatic discharge. EXAMPLE: Observe proper electrostatic safety precautions when handling static-sensitive components such as circuit boards and printheads.
Update Printer Firmware to Finish Option InstallationsIt is recommended that you always update the printer’s firmware with the latest version for optimal printeroperation. This is located on the Zebra Web site at: http://www.zebra.com/support
Removing the Standard Bezel The standard bezel must be removed to mount your media handling option.
1. Turn the printer upside down. Remove the two (2) mounting screws. Save the screws.
2. Slide the bezel down the front about 12.5 mm (0.5 inch) and pull the loose bezel out.
32

Install Hardware Options
Installing the Label Dispenser
The standard bezel must be removed before the Label Dispenser can be installed.
1. Place the Label Dispenser module and printer right side up with the top of the module 12.5 mm (0.5 inch) below the bottom of the top cover. Center and push the module into the front of the printer and slide it up until it stops.
2. Turn the printer upside down and attach the module to the printer with the two screws.
33
Install Hardware Options
Installing the Cutter
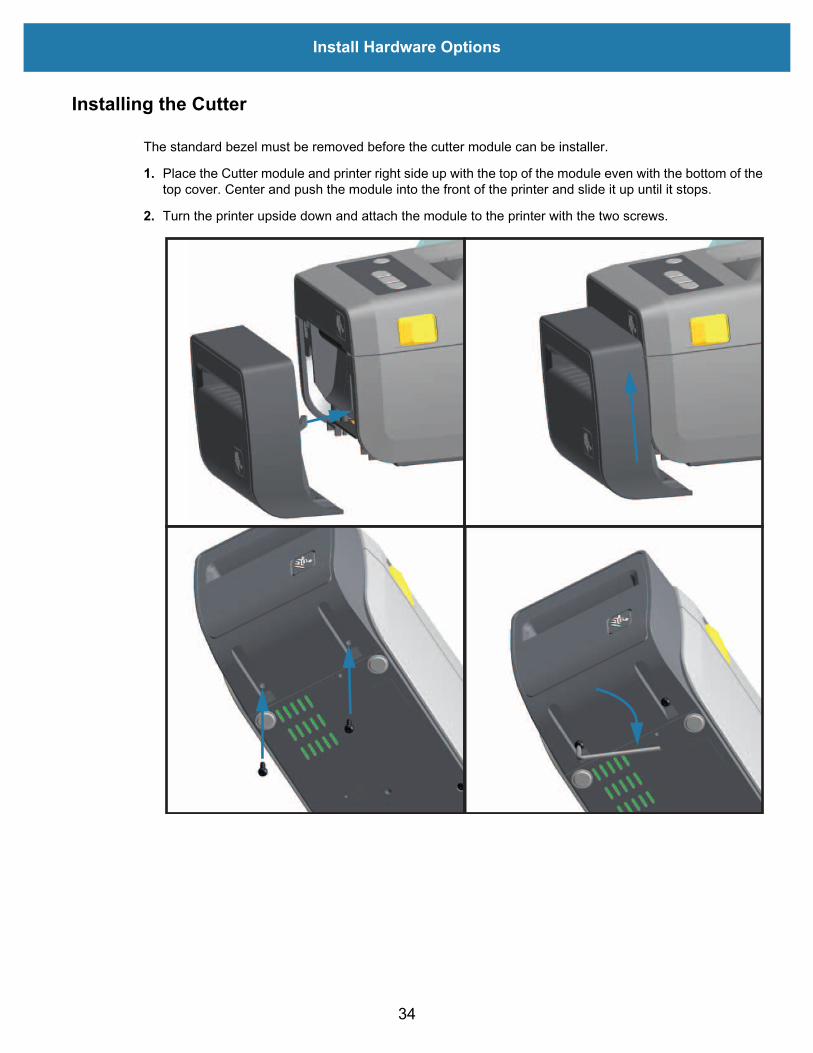
The standard bezel must be removed before the cutter module can be installer.
1. Place the Cutter module and printer right side up with the top of the module even with the bottom of the top cover. Center and push the module into the front of the printer and slide it up until it stops.
2. Turn the printer upside down and attach the module to the printer with the two screws.
34

Install Hardware Options
Media Roll Core Size Adapters
The media roll adapters kit includes three (3) pairs of media roll adapters. The kits are for 38.1 mm (1.5inch), 50.8 mm (2.0 inch), or 76.2 (3.0 inch) inner diameter (I.D.) media cores.
The adapters are intended to be permanently installed in the printer. They may be changed to supportother media roll sizes that require one of these adapter sizes. The adapters may wear out if they arechanged too much.
Removing the media adapters to print on standard roll cores may leave plastic pieces in the media rollholders side areas that rub against the roll. Push those attached pieces back into the side of the media rollholder.
Installing Media Roll Adapters1. Place one screw in the top adapter mounting hole of both of the roll holders. Start turning the screws
clockwise until the tip of the screw is just protruding through the inside of the roll holder. The screws are self-tapping.
2. Place the adapter on the inside of the roll holder. The large side of the adapter is on top. The smooth side (no ribs) faces the middle of the printer.
3. Align the adapter’s top screw hole to the protruding screw tip and pinch it tightly to the roll holder body. Tighten the screw until there is no gap between the adapter and roll holder. Do not tighten beyond this point. Over tightening will strip the thread.
4. Insert a screw in the bottom adapter mounting hole. Pinch the adapter tightly to the roll holder while tightening the screw. Tighten the screw until there is no gap between the adapter and roll holder. Do not tighten beyond this point. Over tightening will strip the thread.
5. Repeat step 1-4 for the other adapter and roll holder.
35
Install Hardware Options
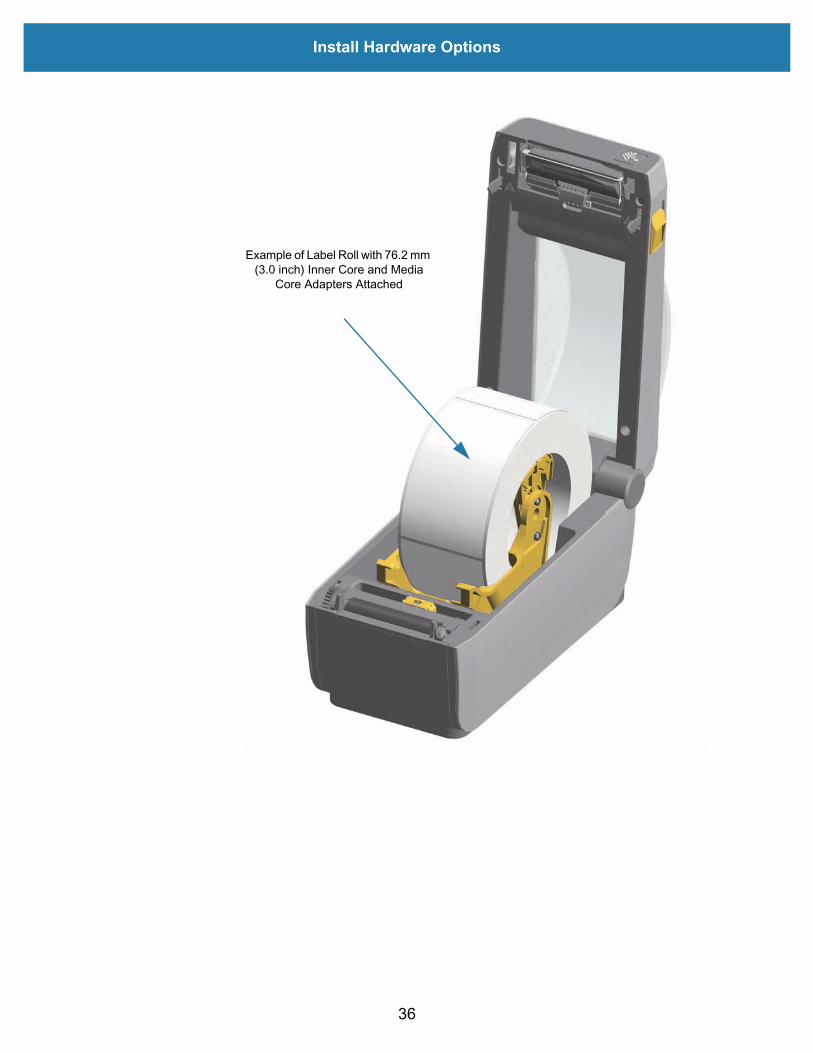
Example of Label Roll with 76.2 mm (3.0 inch) Inner Core and Media
Core Adapters Attached
36

Install Hardware Options
Installing the Attached Battery Base Options
The battery base is ready to attach to the printer. The base is installed using a Torx T10 wrench and themounting screws provided with the upgrade kit.
1. Remove any media rolls from the printer. Remove the original power supply cable from the back of the printer.
2. Turn the printer over and align the power base to the bottom of the printer with the printer power plug oriented toward the rear of the printer. The printer’s rubber feet align with recesses in the top of the power base.
3. Use the two (2) screws provided to attach the power base to the printer. Tighten the screws using the Torx wrench supplied in the kit.
37
Install Hardware Options
Installing the Battery into the Attached Battery Base
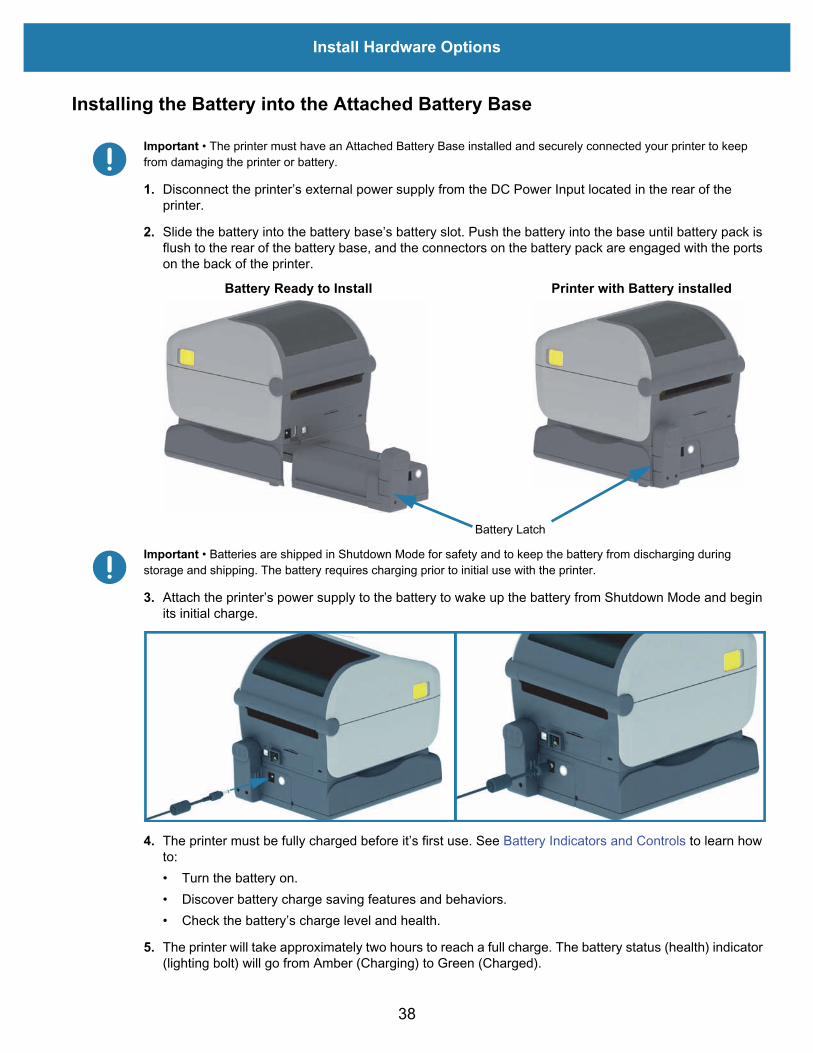
Important • The printer must have an Attached Battery Base installed and securely connected your printer to keep from damaging the printer or battery.
1. Disconnect the printer’s external power supply from the DC Power Input located in the rear of the printer.
2. Slide the battery into the battery base’s battery slot. Push the battery into the base until battery pack is flush to the rear of the battery base, and the connectors on the battery pack are engaged with the ports on the back of the printer.
Important • Batteries are shipped in Shutdown Mode for safety and to keep the battery from discharging during storage and shipping. The battery requires charging prior to initial use with the printer.
3. Attach the printer’s power supply to the battery to wake up the battery from Shutdown Mode and begin its initial charge.
4. The printer must be fully charged before it’s first use. See Battery Indicators and Controls to learn how to:• Turn the battery on. • Discover battery charge saving features and behaviors.• Check the battery’s charge level and health.
5. The printer will take approximately two hours to reach a full charge. The battery status (health) indicator (lighting bolt) will go from Amber (Charging) to Green (Charged).
Battery Ready to Install Printer with Battery installed
Battery Latch
38

Setup
This section assists you in setting up and operating your printer for the first time.
Printer Setup Overview
The setup process can be broken down into two (2) phases: hardware setup and host system(software/driver) setup. This section covers the physical hardware setup to print the first label.
• Install any printer hardware options first. See Install Hardware Options.• Place the printer in a safe location with access to power and where it can connect wired or
wirelessly to the printer to the host system.• Attach the printer and power supply to a grounded AC power source.• Select and prepare media for your printer.• Load the media.• Turn the printer ON. Calibrate the media with a SmartCal Media calibration.• Print a ‘Configuration Report’ to verify basic printer operation.• Turn the printer OFF.• Choose a method to communicate via a wired or wireless connection to your printer. Available wired
local connections are: • USB port• Optional Serial port• Optional Ethernet (LAN)
• Attach the printer cable to the network or host system (printer OFF).• Begin second phase of printer setup - Software based configuration for either wired or wireless
communication methods typically needed for operating systems like Microsoft Windows.
39

Setup
Select a Location for the PrinterThe printer and media need a clean safe area with moderate temperatures to have optimal printoperations.
Select a location for the printer that meets these conditions:
• Surface: The surface where the printer will be located must be solid, level, and of sufficient size and strength to hold the printer with media.
• Space: The area where the printer will be located must include enough space for opening the printer (media access and cleaning), and for printer access to connectivity and power cords. To allow for proper ventilation and cooling, leave open space on all sides of the printer.
• Important • Do not place any padding or cushioning material under or around the base of the printer because this restricts air flow and could cause the printer to overheat.Power: Put the printer close to an easily accessible power outlet.
• Data communication interfaces: Please ensure that cabling and Wi-Fi or Bluetooth radios do not exceed the maximum distance specified by the communication protocol standard or product data sheet for this printer. Radio signal strength can be reduced by physical barriers (objects, walls, etc.).
Data cables should not be routed with or near power cords or conduits, fluorescent lighting, transformers, microwave ovens, motors or other sources of electrical noise and interference. These interference sources may cause problems with communications, host system operation, and printer functionality.
• Operating conditions: Your printer is designed to function in a wide range of environments. Table 1 shows the temperature and relative humidity requirements for the printer.
Install Printer Options and Connectivity ModulesInstall the following printer options before proceeding with the printer’s setup.
• Serial (RS-232 DB-9) Port Module - Installing the Serial Port Module• Internal Ethernet (LAN) Module - Installing the Internal Ethernet (LAN) Module• Label Dispenser (Peel-Off Liner and Present Label for Operator) - Installing the Label Dispenser• General purpose media cutter - Installing the Cutter• Media Core Adapter kit for 38.1 mm (1.5 inch), 50.8 mm (2.0 inch), or 76.2 (3.0 inch) I.D. media cores.
Media Roll Core Size Adapters• Attached Battery Base - Installing the Attached Battery Base Options• Battery Pack - Installing the Battery into the Attached Battery Base
Table 1 Operational and Non-Operational Temperature and Humidity
Mode Temperature Relative HumidityOperational 32° to 104°F (0° to 40°C) 20 to 85% non-condensingNon-Operational -40° to 140°F (-40° to 60°C) 5 to 85% non-condensing
40
Setup
Attaching Power
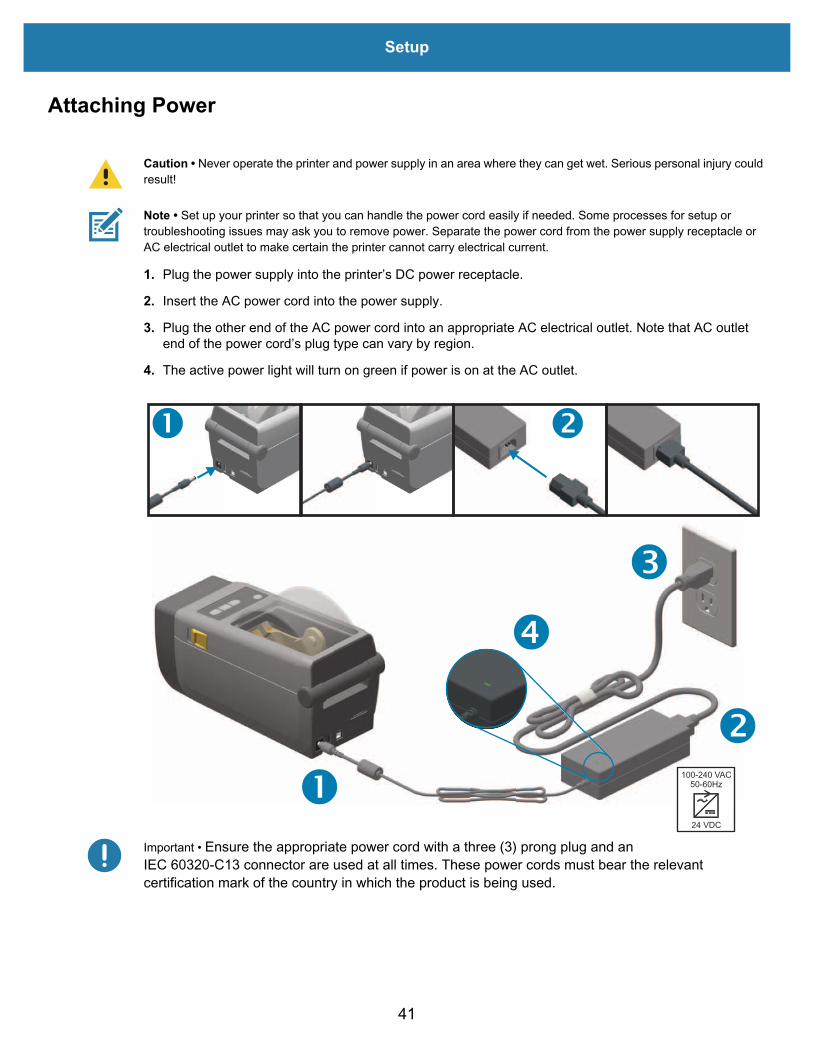
Caution • Never operate the printer and power supply in an area where they can get wet. Serious personal injury could result!
Note • Set up your printer so that you can handle the power cord easily if needed. Some processes for setup or troubleshooting issues may ask you to remove power. Separate the power cord from the power supply receptacle or AC electrical outlet to make certain the printer cannot carry electrical current.
1. Plug the power supply into the printer’s DC power receptacle.
2. Insert the AC power cord into the power supply.
3. Plug the other end of the AC power cord into an appropriate AC electrical outlet. Note that AC outlet end of the power cord’s plug type can vary by region.
4. The active power light will turn on green if power is on at the AC outlet.
Important • Ensure the appropriate power cord with a three (3) prong plug and an IEC 60320-C13 connector are used at all times. These power cords must bear the relevant certification mark of the country in which the product is being used.
41
Setup
Getting Ready to PrintThe printer setup cannot be completed without media. The media may be labels, tags, tickets, receiptpaper, fan-fold stacks, tamper proof labels, etc. Ideally, your chosen media should be the same mediaused for its normal intended operation. This will help you more easily identify any setup issues while usingthis guide. The printer does not come with media.
The Zebra web site or your reseller may be able to help you select the right media for your intendedprinting application.
Preparing and Handling Media
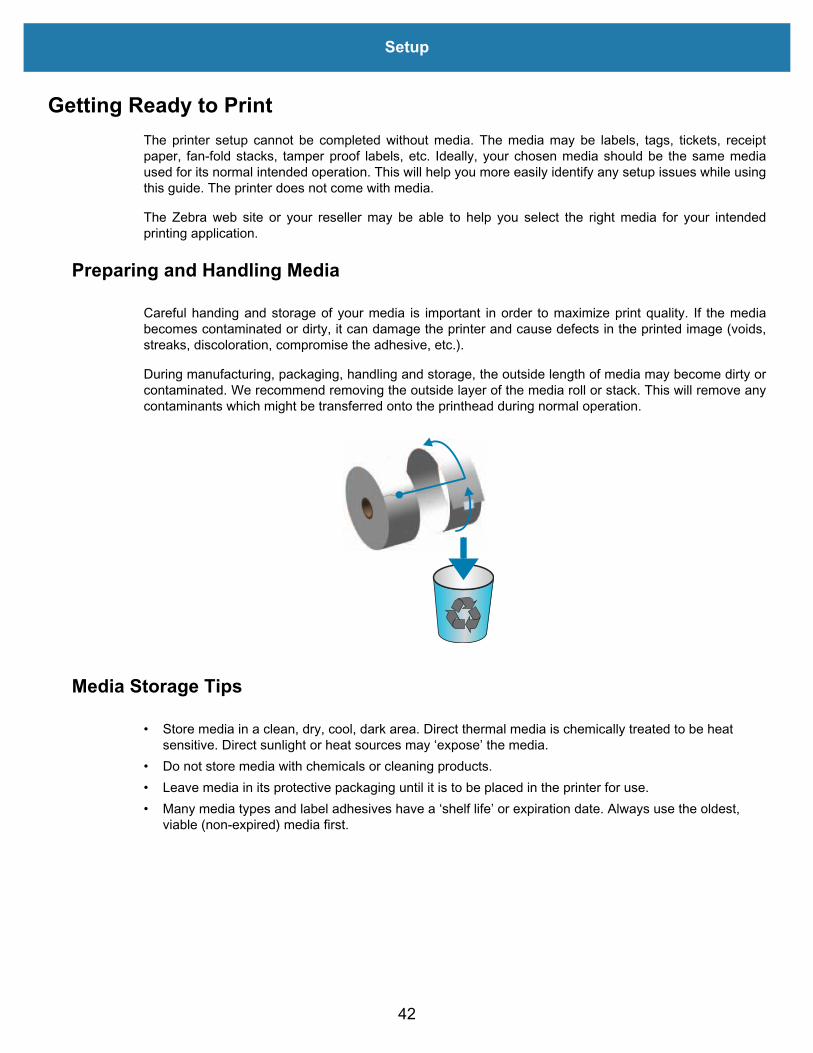
Careful handing and storage of your media is important in order to maximize print quality. If the mediabecomes contaminated or dirty, it can damage the printer and cause defects in the printed image (voids,streaks, discoloration, compromise the adhesive, etc.).
During manufacturing, packaging, handling and storage, the outside length of media may become dirty orcontaminated. We recommend removing the outside layer of the media roll or stack. This will remove anycontaminants which might be transferred onto the printhead during normal operation.
Media Storage Tips
• Store media in a clean, dry, cool, dark area. Direct thermal media is chemically treated to be heat sensitive. Direct sunlight or heat sources may ‘expose’ the media.
• Do not store media with chemicals or cleaning products.• Leave media in its protective packaging until it is to be placed in the printer for use. • Many media types and label adhesives have a ‘shelf life’ or expiration date. Always use the oldest,
viable (non-expired) media first.
42

Setup
Loading Roll MediaThe printer utilizes two (2) sensing methods to accommodate a wide range of media
• Center area transmissive sensing for continuous media and gap/web label media.• Full-width movable (reflective) sensing for print format (length) using black marks, black lines, notches
or holes).
Setting Media Sensing by Media type
• For web/gap media, the printer senses the differences between the label and the liner to determine the print format length.
• For continuous roll media, the printer only senses the media’s characteristics. The print format’s length is set by programming (driver or software) or the last stored form’s length.
• For black mark media, the printer senses the beginning of the mark and the distance to the start of the next black mark to measure the print format length.
• For other common media and setting variations, see one of the following:• Using the Label Dispenser Option after you have loaded media using this procedure.• See Printing on Fan-Fold Media
Instructions for media loading:
This procedure works for Tear-Off (standard bezel), Label Dispense and Media Cutting printer options.
1. Open the printer. Pull the release latch levers toward the front of the printer.
43

Setup
2. Open the media roll holders. Orient the media roll so that its printing surface will face up as it passes over the platen (drive) roller.Pull the media guides open with your free hand and place the media roll on the roll holders and release the guides. Verify the roll turns freely. The roll must not sit in the bottom of the media compartment.
44

Setup
3. Pull the media so that it extends out of the front of the printer.
4. Push the media under both of the media guides.
Under Media Guides
45

Setup
5. Flip the media up and align the movable media sensor for your media type. • For continuous roll receipt type media or label media without black marks or notches, align the
media to the default center position. • For black mark (black line, notches or holes) backed media, adjust the sensor position so the
sensor aligns to the center of the black mark. Avoid the center area of the media to only use black mark sensing for operation with black marks.
Movable Sensor
Off CenterBlack Mark Sensing Only
Default - Web (Gap) SensingStandard Operating Position
46

Setup
Using the Movable Sensor
The movable sensor is a dual function sensor. It provides transmissive (sees through media) and reflectivemedia sensing. The printer can use either sensing method, but not both at the same time.
The movable sensor has a center array of sensors. This provides adjustable transmissive web (gap)sensing to positions that match legacy Zebra® desktop printer sensor locations and positions in between.This also provides for use of some non-standard media variations or irregularly shaped media.
The movable sensor allows the printer to use media with black marks or notches (holes through themedia) on the back side of the media (or media liner). The sensor aligns to the middle of black marks ornotches not in the center of the media roll to avoid Web/Gap sensing array.
Adjusting the Movable Sensor for Black Marks or NotchesThe black mark sensing looks for non-reflective surfaces such as black marks, black lines, notches orholes on the back of the media which do not reflect the sensor’s near infrared light beam back to thesensor’s detector. The sensor light and its black mark detector are next to each other under the sensorcover.
Position the movable sensor’s alignment arrow to the middle of the black mark or notch in the underside ofthe media. Sensor alignment should be set as far as possible from the edge of media but where 100% ofthe sensor window is covered by the mark. When printing, the media can move from side to side ±1mm(due to media variations and edge damage due to handling). Notches cut into the side of the media canalso become damaged.
47
Setup
Adjusting the Movable Sensor for Web (Gap) Sensing
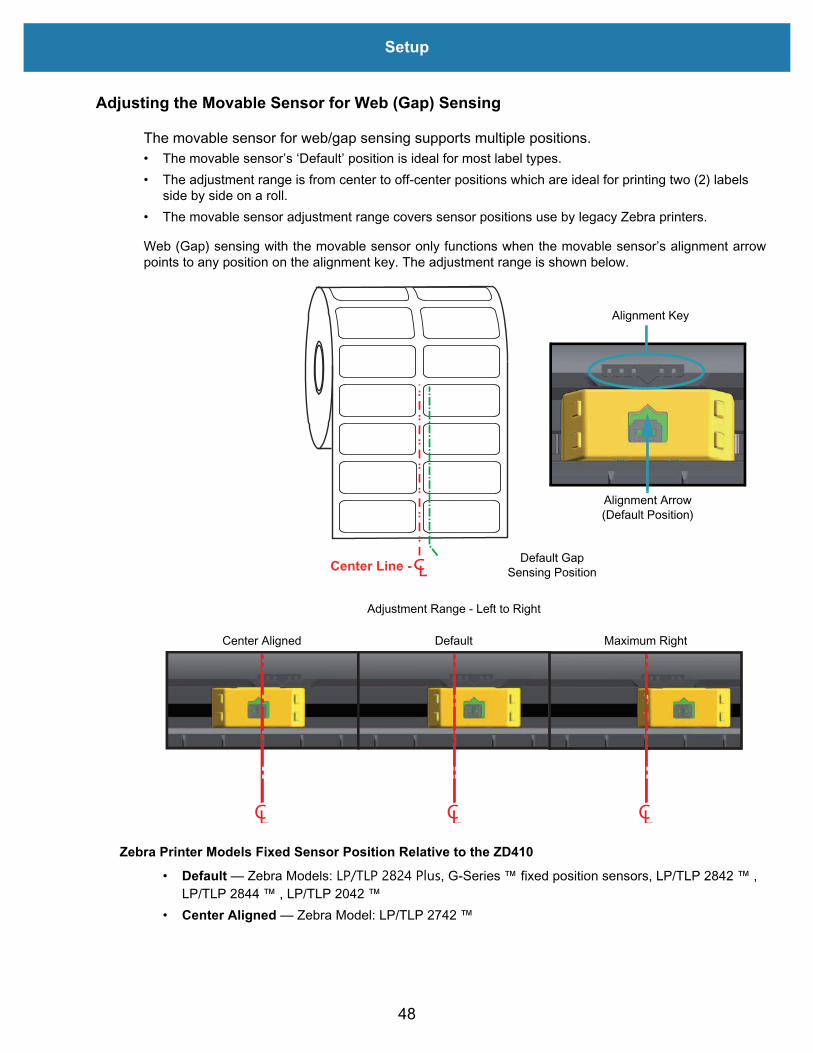
The movable sensor for web/gap sensing supports multiple positions.• The movable sensor’s ‘Default’ position is ideal for most label types. • The adjustment range is from center to off-center positions which are ideal for printing two (2) labels
side by side on a roll. • The movable sensor adjustment range covers sensor positions use by legacy Zebra printers.
Web (Gap) sensing with the movable sensor only functions when the movable sensor’s alignment arrowpoints to any position on the alignment key. The adjustment range is shown below.
Zebra Printer Models Fixed Sensor Position Relative to the ZD410• Default — Zebra Models: LP/TLP 2824 Plus, G-Series ™ fixed position sensors, LP/TLP 2842 ™ ,
LP/TLP 2844 ™ , LP/TLP 2042 ™• Center Aligned — Zebra Model: LP/TLP 2742 ™
CL
Default Gap Sensing PositionCenter Line -
Alignment Key
Alignment Arrow(Default Position)
CL CL CL
Adjustment Range - Left to Right
DefaultCenter Aligned Maximum Right
48
Setup
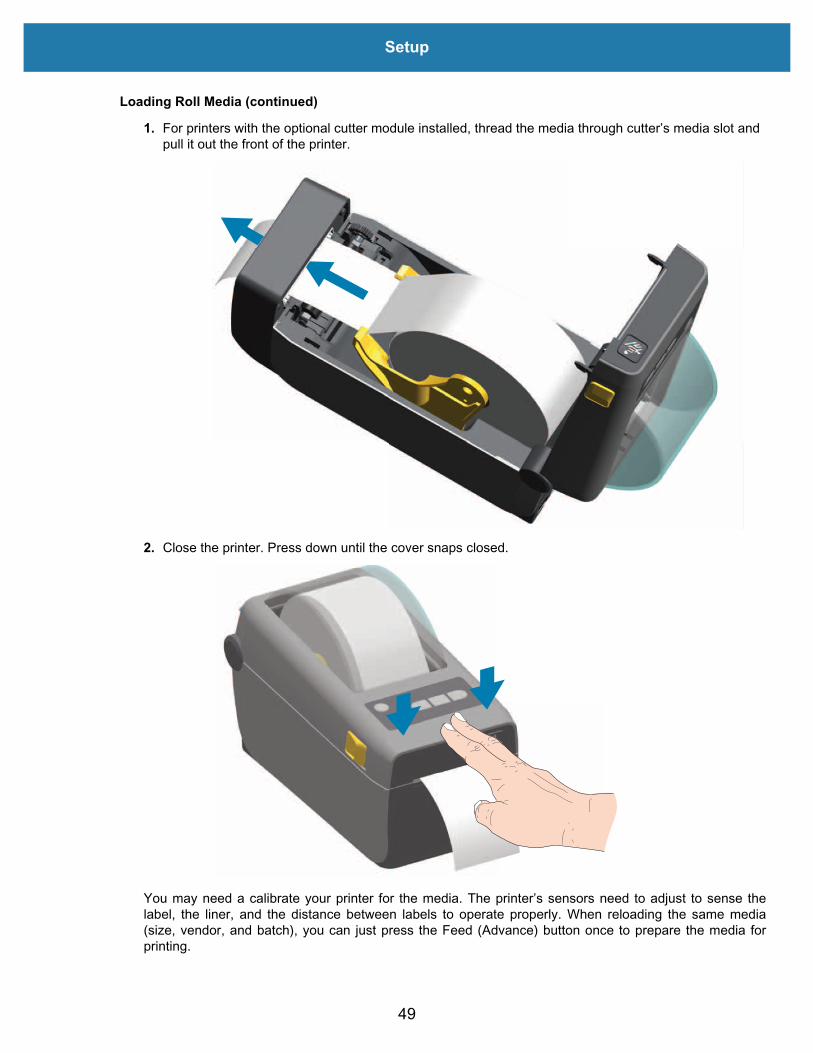
Loading Roll Media (continued)
1. For printers with the optional cutter module installed, thread the media through cutter’s media slot and pull it out the front of the printer.
2. Close the printer. Press down until the cover snaps closed.
You may need a calibrate your printer for the media. The printer’s sensors need to adjust to sense thelabel, the liner, and the distance between labels to operate properly. When reloading the same media(size, vendor, and batch), you can just press the Feed (Advance) button once to prepare the media forprinting.
49
Setup
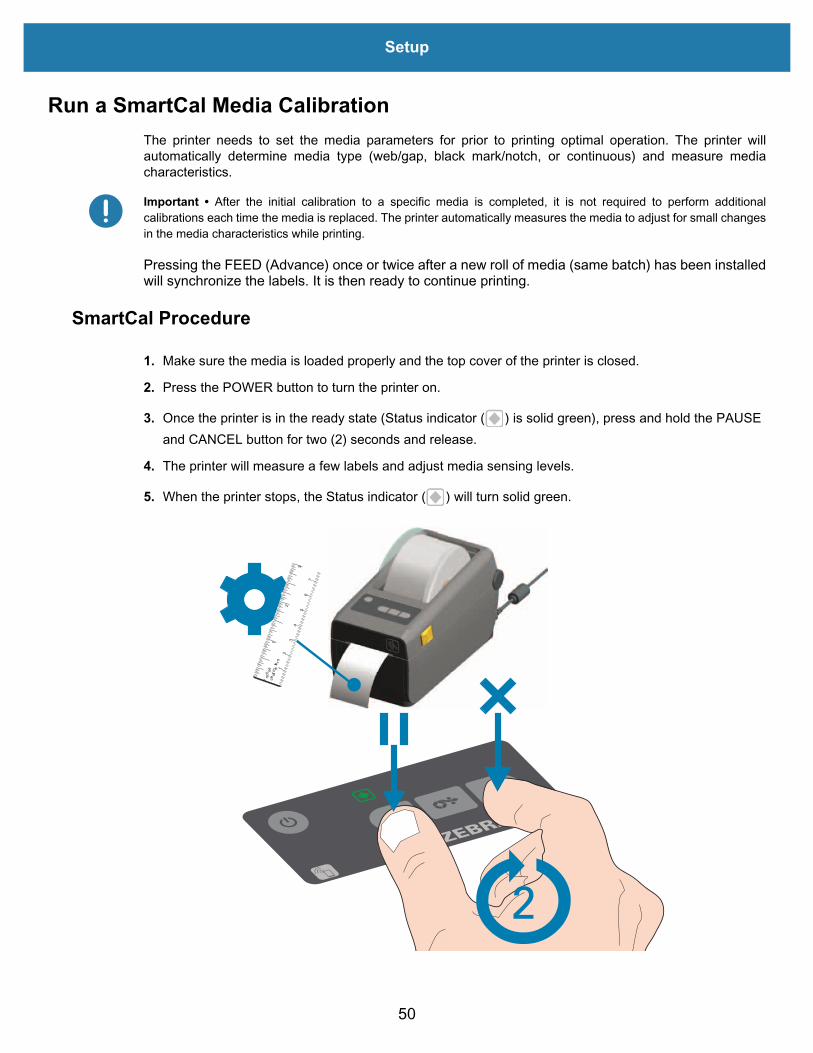
Run a SmartCal Media CalibrationThe printer needs to set the media parameters for prior to printing optimal operation. The printer willautomatically determine media type (web/gap, black mark/notch, or continuous) and measure mediacharacteristics.
Important • After the initial calibration to a specific media is completed, it is not required to perform additionalcalibrations each time the media is replaced. The printer automatically measures the media to adjust for small changesin the media characteristics while printing.
Pressing the FEED (Advance) once or twice after a new roll of media (same batch) has been installedwill synchronize the labels. It is then ready to continue printing.
SmartCal Procedure
1. Make sure the media is loaded properly and the top cover of the printer is closed.
2. Press the POWER button to turn the printer on.
3. Once the printer is in the ready state (Status indicator ( ) is solid green), press and hold the PAUSE and CANCEL button for two (2) seconds and release.
4. The printer will measure a few labels and adjust media sensing levels.
5. When the printer stops, the Status indicator ( ) will turn solid green.
1
2
3
12
34
56
7
centim e
te rs
i nches
2
50
Setup
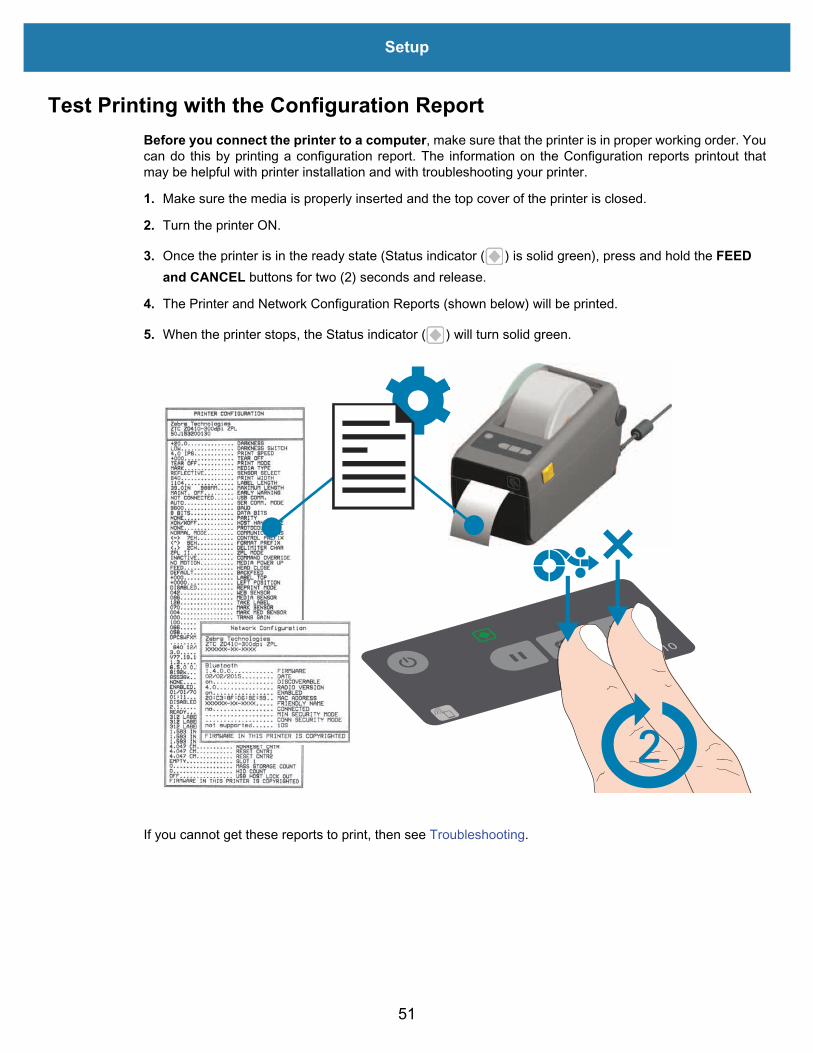
Test Printing with the Configuration ReportBefore you connect the printer to a computer, make sure that the printer is in proper working order. Youcan do this by printing a configuration report. The information on the Configuration reports printout thatmay be helpful with printer installation and with troubleshooting your printer.
1. Make sure the media is properly inserted and the top cover of the printer is closed.
2. Turn the printer ON.
3. Once the printer is in the ready state (Status indicator ( ) is solid green), press and hold the FEED and CANCEL buttons for two (2) seconds and release.
4. The Printer and Network Configuration Reports (shown below) will be printed.
5. When the printer stops, the Status indicator ( ) will turn solid green.
If you cannot get these reports to print, then see Troubleshooting.
2
51

Setup
Detecting a Media Out ConditionWhen you run out of media, your printer will report a ‘Media Out’ condition with the Status indicators. Thisis part of the normal media usage cycle.
When the printer detects that the media is out, the Status ( ) and Media ( ) indicator will turn solidred.
Recovering from a Media Out condition1. Open the printer.
2. Observe that the media is at the end or nearly at the end of the roll with a label missing from the liner. The printer stops before the adhesive or tape used to attach media to the roll core gets to the printhead.
3. Remove the remaining media and roll core.
4. Insert a new roll of media. See Loading Roll Media.• If you are installing more of the same media, just load the new media and press the FEED
(Advance) button once to resume printing.• If you are loading different media (size, vendor, or even batch is different), then reloading media
followed by a SmartCal is needed to ensure optimal operation. • Note that changing media size (length or width) usually requires you to change the programmed
media dimensions or the active label format in the printer.Important • Sometimes a label may be missing some where in the middle of your roll of labels (not at the end of media). This will also cause a ‘Media Out” condition. To recover, just pull the media past the missing label until the next label is over the platen roller. Close the printer. Press the FEED (Advance) button once. The printer will resynchronize the label position and will be ready to resume printing.
52

Setup
Connecting your Printer to a ComputerThe printer supports a variety of interface options and configurations. These include:
• Universal Serial Bus (USB 2.0) interface - Standard.• RS232 Serial - Field Upgrade Option for ZD420 printers.• Ethernet (LAN) - Field Upgrade Option for ZD420 printers.• Internal Wi-Fi (802.11ac) and Bluetooth Classic 4.1 (3.0 Compatible) - Factory Installed Option.
• WiFi models include Bluetooth Low Energy (low speed connection) for printer configuration using software running on an Android or iOS device.
Pre-install Windows® Printer Drivers Install the Zebra Setup Utilities (ZSU) before applying power to the printer connected to the PC. Theutility installs the Zebra Windows drivers first. The ZSU installation wizard will then prompt you turn on theprinter. Follow the instructions to complete your printer installation.
The Zebra Setup Utility is designed to assist you with installing your printer. The cabling and uniqueparameters for each of these physical printer communication interfaces is discussed in the following pagesto assist you with making configuration setup choices prior to and immediately following applying power.The Zebra Setup Utilities configuration wizards will instruct you to turn the printer’s power on at theappropriate time to complete the installation of your printer.
For more details on configuring network (Ethernet or Wi-Fi) and Bluetooth communication, see thefollowing guides:
• Wired and Wireless Print Server User Guide• Bluetooth Wireless Guide
Interface Cable Requirements
Data cables must be of fully shielded construction and fitted with metal or metalized connector shells.Shielded cables and connectors are required to prevent radiation and reception of electrical noise.
To minimize electrical noise pickup in the cable:
• Keep data cables as short as possible (1.83 m [6 foot] recommended).• Do not tightly bundle the data cables with power cords.• Do not tie the data cables to power wire conduits.
Important • This printer complies with FCC “Rules and Regulations,” Part 15, for Class B Equipment, using fully shielded data cables. Use of un-shielded cables may increase radiated emissions above the Class B limits.
53

Setup
USB InterfaceUniversal Serial Bus (version 2.0 compliant) provides a fast interface that is compatible with your existingPC hardware. USB’s “plug and play” design makes installation easy. Multiple printers can share a singleUSB port/hub.
When using a USB cable (not supplied with your printer), verify that the cable or cable packaging bears the“Certified USB ™ ” mark (see below) to guarantee USB 2.0 compliance..
USB Cable
USB
54
Setup
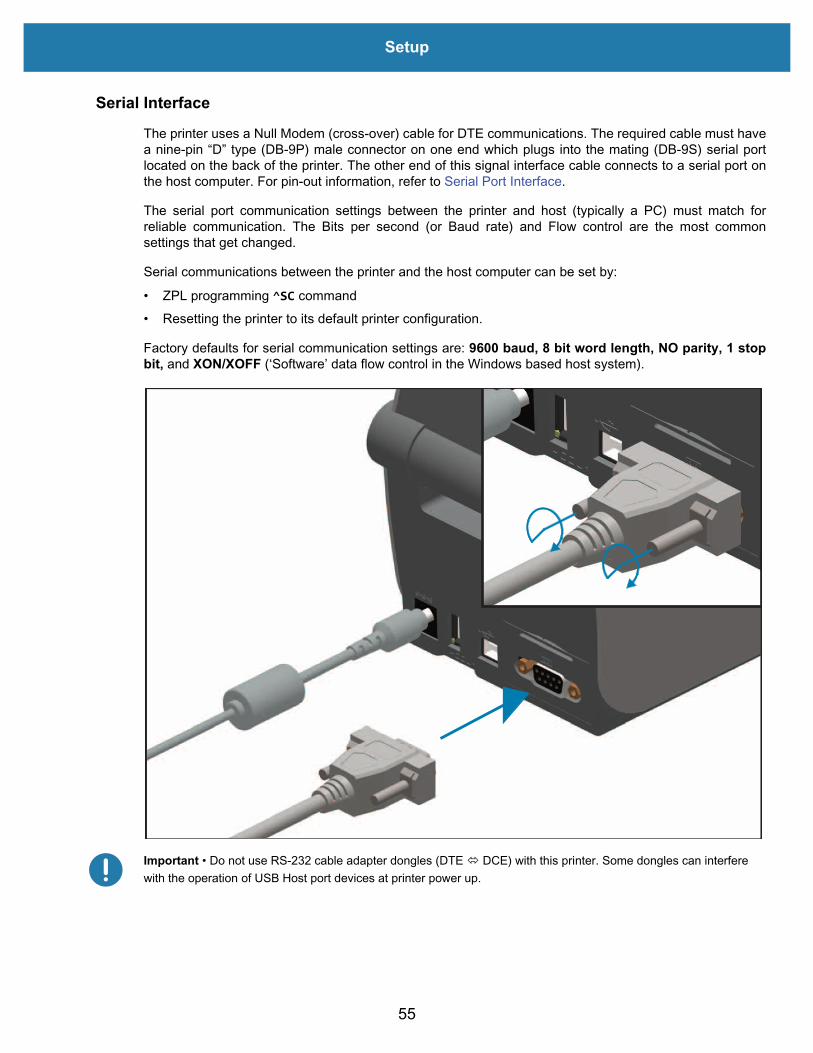
Serial InterfaceThe printer uses a Null Modem (cross-over) cable for DTE communications. The required cable must havea nine-pin “D” type (DB-9P) male connector on one end which plugs into the mating (DB-9S) serial portlocated on the back of the printer. The other end of this signal interface cable connects to a serial port onthe host computer. For pin-out information, refer to Serial Port Interface.
The serial port communication settings between the printer and host (typically a PC) must match forreliable communication. The Bits per second (or Baud rate) and Flow control are the most commonsettings that get changed.
Serial communications between the printer and the host computer can be set by:
• ZPL programming ^SC command• Resetting the printer to its default printer configuration.
Factory defaults for serial communication settings are: 9600 baud, 8 bit word length, NO parity, 1 stopbit, and XON/XOFF (‘Software’ data flow control in the Windows based host system).
Important • Do not use RS-232 cable adapter dongles (DTE DCE) with this printer. Some dongles can interfere with the operation of USB Host port devices at printer power up.
55
Setup
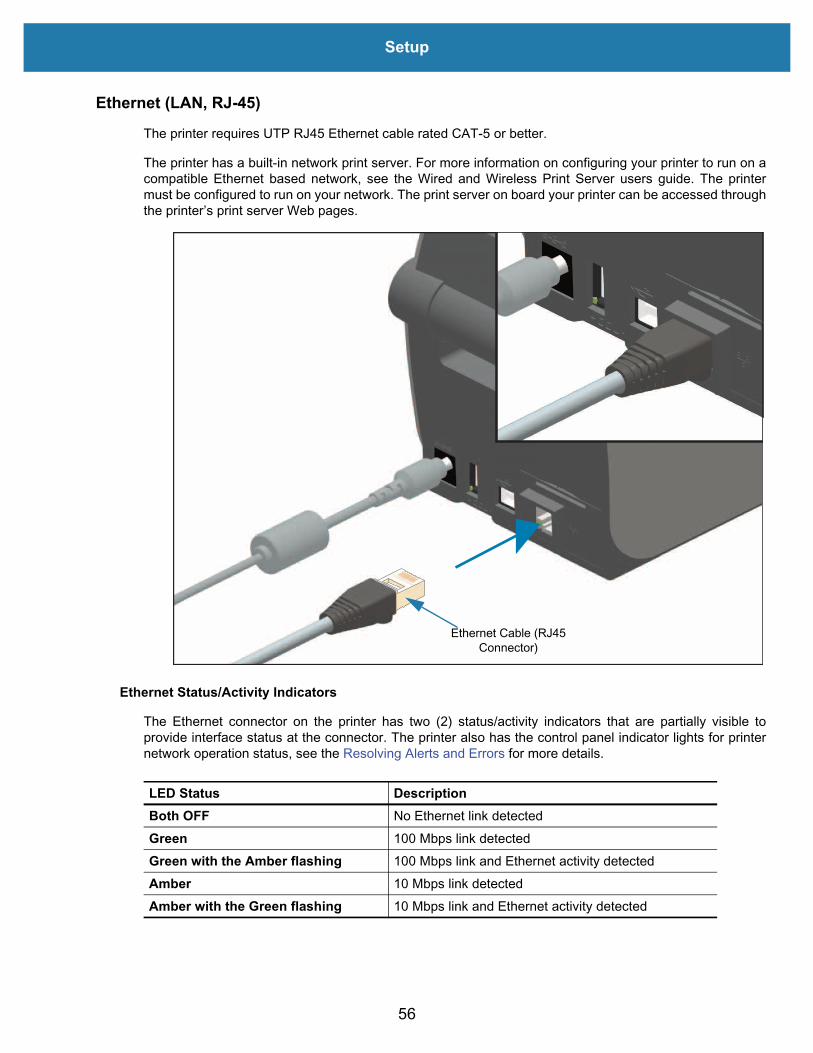
Ethernet (LAN, RJ-45)The printer requires UTP RJ45 Ethernet cable rated CAT-5 or better.
The printer has a built-in network print server. For more information on configuring your printer to run on acompatible Ethernet based network, see the Wired and Wireless Print Server users guide. The printermust be configured to run on your network. The print server on board your printer can be accessed throughthe printer’s print server Web pages.
Ethernet Status/Activity Indicators
The Ethernet connector on the printer has two (2) status/activity indicators that are partially visible toprovide interface status at the connector. The printer also has the control panel indicator lights for printernetwork operation status, see the Resolving Alerts and Errors for more details.
Ethernet Cable (RJ45 Connector)
LED Status DescriptionBoth OFF No Ethernet link detectedGreen 100 Mbps link detectedGreen with the Amber flashing 100 Mbps link and Ethernet activity detectedAmber 10 Mbps link detectedAmber with the Green flashing 10 Mbps link and Ethernet activity detected
56

Setup
Assigning an IP Address for Network Access
All devices on an Ethernet network (LAN and WLAN) require a network IP (Internet Protocol) address. Theprinter’s IP address is needed to access the printer for printing and printer configuration. The five differentways to assign an IP address are:
• DHCP (Dynamic Host Connection Protocol) - Default setting• Zebra Setup Utilities (includes the ZebraDesigner Windows printer driver)• Telnet• Mobile Apps• ZebraNet Bridge
DHCP for Personal Networks
The printer by default is set to operate on an Ethernet LAN or Wi-Fi network with DHCP. This setting isintended primarily for personal networks. The network automatically provides a new network IP addresseach time the printer is turned on. The Windows printer driver uses a Static IP address to connect to theprinter. The IP address set in the printer driver will need to be changed to access the printer if its assignedIP address has changed after the printer’s initial installation.
Managed Networks
Using the printer in a structured network (LAN or Wi-Fi) requires a network administrator to assign theprinter a Static IP address and other settings needed to operate on the network properly.
Print Server - Default User ID and Password
There are some features that require the default User ID and/or default password to access the printer’sprint server or if you have the Wi-Fi option in the printer. The Factory Default Values are shown below:
• User ID: admin • Password: 1234
Wi-Fi and Bluetooth Classic Wireless Connectivity OptionThis guide covers basic configuration of your Internal Wi-Fi Print Server and Bluetooth Classic 4.X wirelessconnectivity option.This manual only covers installing the Wi-Fi as part of the Wi-Fi and Bluetooth Classicwireless connectivity option in the Setting Up the Wi-Fi Print Server Option. See the Zebra Web site forWired and Wireless Print Server User Guide for more information on the printer’s Ethernet operation.
This manual only covers installing the Bluetooth as part of the Wi-Fi and Bluetooth Classic wirelessconnectivity option in the Bluetooth Option Configuration. See the Zebra Web site for Bluetooth WirelessGuide for more information on the printer’s Bluetooth operation.
Update Printer Firmware to Finish Option InstallationsIt is recommended that you always update the printer’s firmware with the latest version for optimal printerperformance . For instructions on how to update printer firmware, see Updating Printer Firmware. This islocated on the Zebra Web site at:
http://www.zebra.com/support
57

Setup for Windows OS
This section assists you in setting up and operating your printer for the first time.
Windows to Printer Communication Setup (Overview)For supported Windows Operating systems (most common) with a Local (wired) connection:
1. Download the Zebra Setup Utilities from the Zebra web site. • ZD410 Direct Thermal Printer — www.zebra.com/zd410d-info 2. ‘Run’ the Zebra Setup Utilities from your Download directory.3. Click on ‘Install New Printer’ and run the install wizard. 4. Select ‘Install Printer’.and select your printer’s model number from the list of ZDesigner printers.5. Select the port (USB or Serial) that you connected to the PC. Use these interfaces to assist Wizard
guided installation of networked or Bluetooth Classic (4.0). 6. Turn the printer ON and configure printer communications for your interface type.7. Use the Windows driver to print a ‘Test Print’ to verify operation with Windows.
58
Setup for Windows OS
Pre-install Windows® Printer Drivers Install the Zebra Setup Utilities (ZSU) before applying power to the printer connected to the PC(running a Zebra driver supported Windows operating system). The utility installs the Zebra Windowsdrivers first. The ZSU installation wizard will then prompt you to apply the printer power. Continue to followthe instructions to complete your printer installation.
The Zebra Setup Utility is designed to assist you setting up printer communication on a PC runningthe Windows operating system. The cabling and unique parameters for each of these physical printercommunication interfaces is discussed in the following pages to assist you with making configuration setupchoices prior to and immediately following applying power. The Zebra Setup Utilities configuration wizardswill instruct you to turn the printer’s power on at the appropriate time to complete the installation of yourprinter.
For more details on installing Ethernet (network) and Bluetooth interfaces:
• Wired and Wireless Print Servers User Guide• Bluetooth Wireless Guide
Setting Up the Wi-Fi Print Server OptionThis section covers basic configuration of your internal Wi-Fi Print Server option. For more detailedinformation, refer to the Wired and Wireless Print Servers User Guide.Note • The wireless radio option, which includes Wi-Fi, Bluetooth classic and Bluetooth low energy, is only available as a factory installed configuration.
You may configure your printer for wireless operation in the following ways. This basic guide covers onlythe first option, the Connectivity Wizard.
• Through the Connectivity Wizard, which writes a ZPL script for you. On the last screen of the utility, you may choose to send the command directly to your printer, or you may choose to save the ZPL script to a file. The saved ZPL file has several purposes:• The file can be sent to the printer through any available connection (serial, parallel, USB, or
wired print server).• The file can be resent to the printer after the network settings have been restored to factory
defaults.• The file can be sent to multiple printers that will use the same network settings.
• Through ZPL script that you write yourself. Use the ^WX command to set the basic parameters for security type. You can send the command through any available connection (serial, parallel, USB, or wired print server). Refer to the ZPL Programming Guide for more information on this option.
• Through Set/Get/Do (SGD) commands that you send to the printer. Begin with wlan.security to set the wireless security type. Depending on which security type that you select, other SGD commands will be necessary to specify other parameters. You can send the commands through any available connection (serial, parallel, USB, or wired print server). Refer to the ZPL Programming Guide for more information on this option.
59
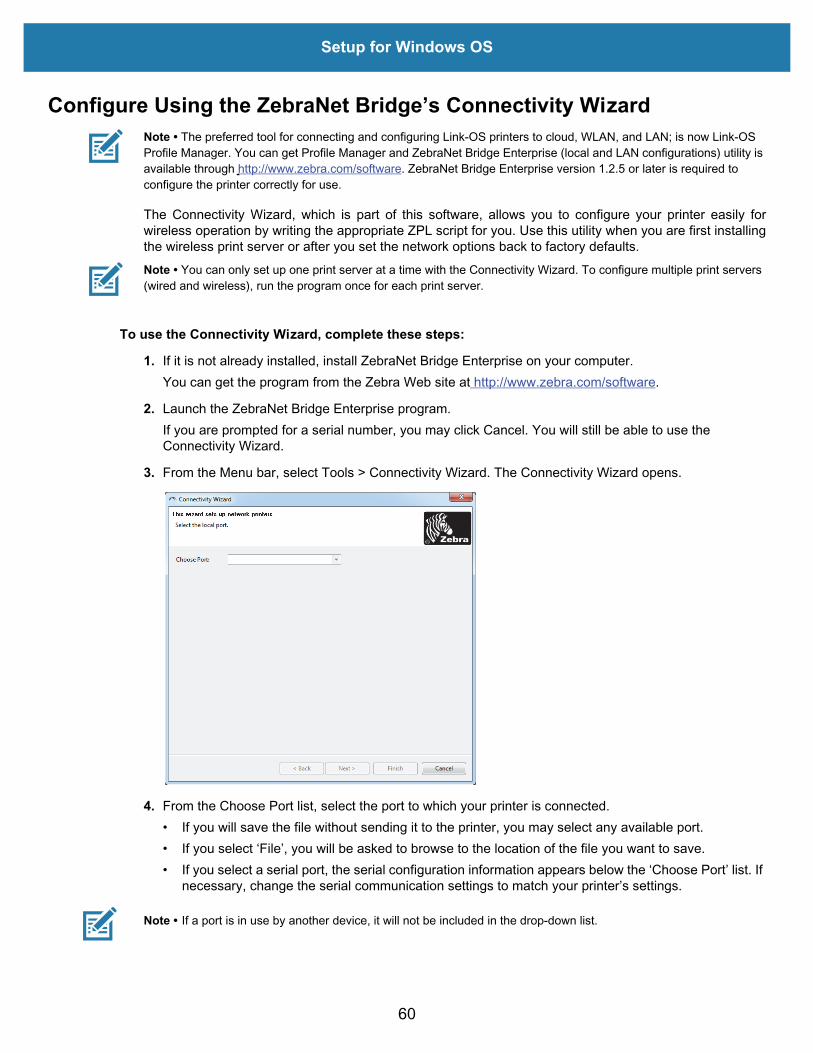
Setup for Windows OS
Configure Using the ZebraNet Bridge’s Connectivity WizardNote • The preferred tool for connecting and configuring Link-OS printers to cloud, WLAN, and LAN; is now Link-OS Profile Manager. You can get Profile Manager and ZebraNet Bridge Enterprise (local and LAN configurations) utility is available through http://www.zebra.com/software. ZebraNet Bridge Enterprise version 1.2.5 or later is required to configure the printer correctly for use.
The Connectivity Wizard, which is part of this software, allows you to configure your printer easily forwireless operation by writing the appropriate ZPL script for you. Use this utility when you are first installingthe wireless print server or after you set the network options back to factory defaults.Note • You can only set up one print server at a time with the Connectivity Wizard. To configure multiple print servers (wired and wireless), run the program once for each print server.
To use the Connectivity Wizard, complete these steps:
1. If it is not already installed, install ZebraNet Bridge Enterprise on your computer. You can get the program from the Zebra Web site at http://www.zebra.com/software.
2. Launch the ZebraNet Bridge Enterprise program.If you are prompted for a serial number, you may click Cancel. You will still be able to use the Connectivity Wizard.
3. From the Menu bar, select Tools > Connectivity Wizard. The Connectivity Wizard opens.
4. From the Choose Port list, select the port to which your printer is connected. • If you will save the file without sending it to the printer, you may select any available port.• If you select ‘File’, you will be asked to browse to the location of the file you want to save.• If you select a serial port, the serial configuration information appears below the ‘Choose Port’ list. If
necessary, change the serial communication settings to match your printer’s settings.
Note • If a port is in use by another device, it will not be included in the drop-down list.
60

Setup for Windows OS
5. Click Next.The wizard prompts for the print server device to configure.
6. Select Wireless and then click Next.The wizard prompts you for the type of printer you are using.
61
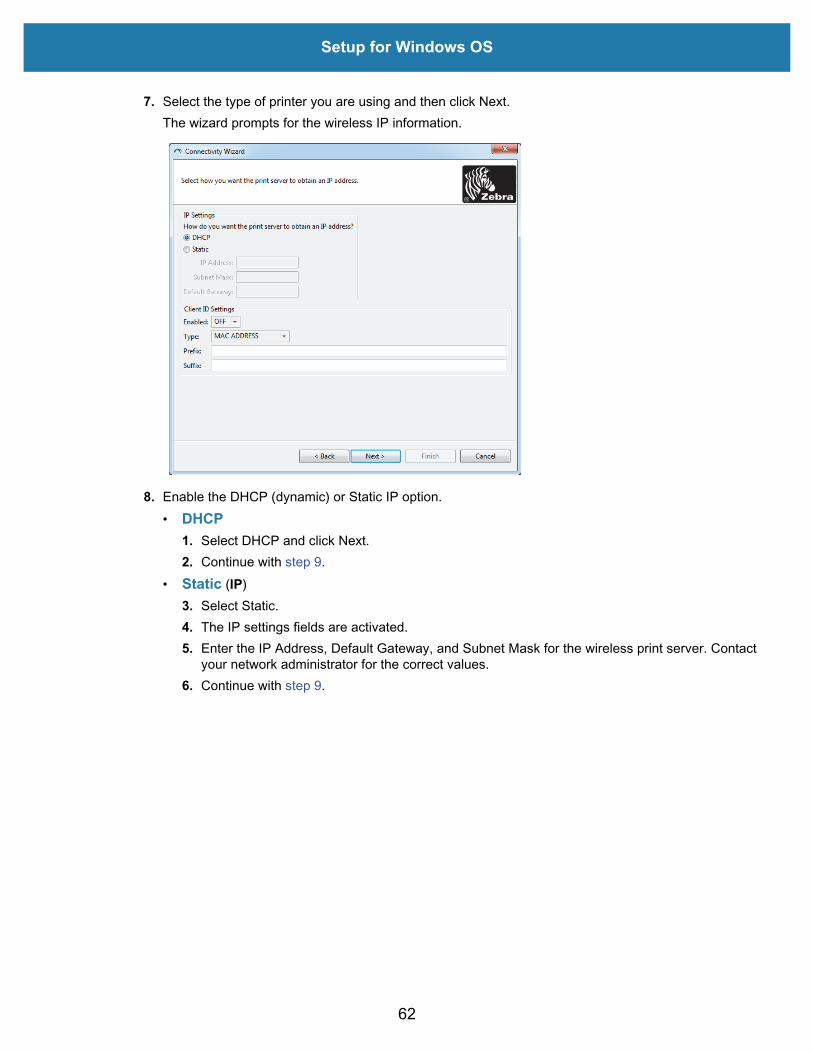
Setup for Windows OS
7. Select the type of printer you are using and then click Next.The wizard prompts for the wireless IP information.
8. Enable the DHCP (dynamic) or Static IP option.• DHCP
1. Select DHCP and click Next.2. Continue with step 9.
• Static (IP)3. Select Static.4. The IP settings fields are activated.5. Enter the IP Address, Default Gateway, and Subnet Mask for the wireless print server. Contact
your network administrator for the correct values.6. Continue with step 9.
62

Setup for Windows OS
9. Click Next.The Wireless Settings window opens.
63
Setup for Windows OS
10.Enter the ESSID.
Note • The ESSID and pass phrase, if used, must be set at your access point before completing these steps.
11.From the drop-down, select your Security Mode.• None (no security protocol selected) • WEP 40-Bit or WEP 128-Bit
In the WEP Options section of the window, enter the following values:• Authentication Type • WEP Index • Encryption Key Storage • WEP Keys Click Next and continue with step 12.
• EAP-TLS, EAP-TTLS, EAP-FAST, or WPA-EAP-TLS In the EAP section of the window, if necessary, enter the Optional Private Key.Click Next and continue with step 12.
• PEAP, LEAP, WPA-EAP-TTLS, WPA-PEAP, or WPA-LEAP In the General Security section of the window, enter the Security Username and Password.Click Next and continue with step 12.
• WPA-PSK In the WPA section of the window:1. Select the PSK Type.2. Enter the PSK Name.Click Next and continue with step 12
• WPA-EAP-FAST 3. In the General Security section of the window, enter the Security Username and Password.4. In the EAP section of the window, if necessary, enter the Optional Private Key.Click Next and continue with step 12.
• KERBEROS In the Kerberos Settings section of the window, enter the following values:• Kerberos User• Kerberos Password• Kerberos Realm• Kerberos KDC
Note • KERBEROS is not supported on Internal Wireless Plus print servers or radio cards.
Click Next and continue with step 12.
64
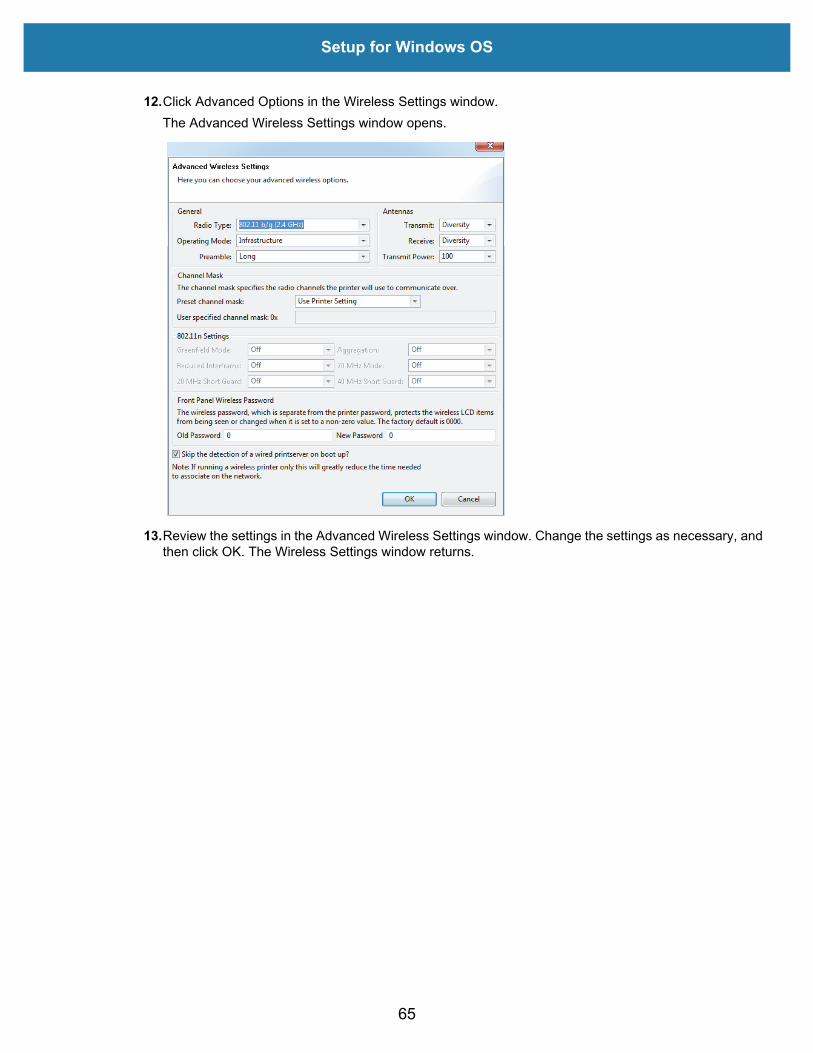
Setup for Windows OS
12.Click Advanced Options in the Wireless Settings window. step 12The Advanced Wireless Settings window opens.
13.Review the settings in the Advanced Wireless Settings window. Change the settings as necessary, and then click OK. The Wireless Settings window returns.
65
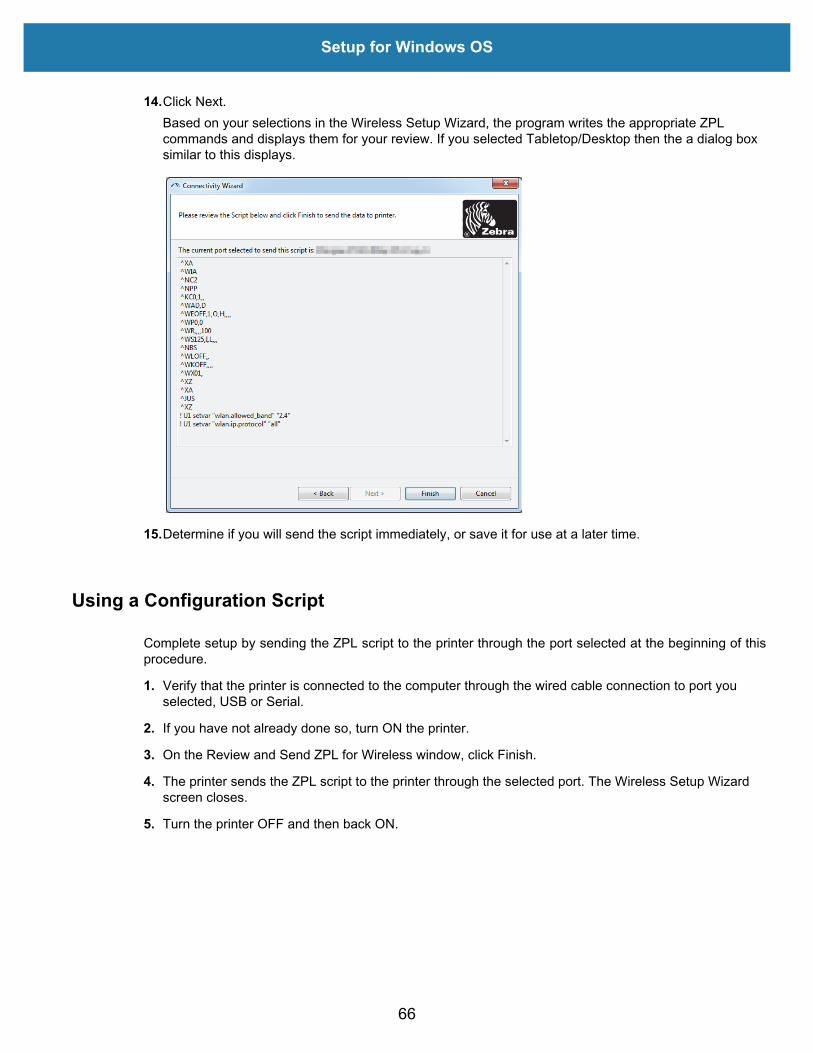
Setup for Windows OS
14.Click Next. Based on your selections in the Wireless Setup Wizard, the program writes the appropriate ZPL commands and displays them for your review. If you selected Tabletop/Desktop then the a dialog box similar to this displays.
15.Determine if you will send the script immediately, or save it for use at a later time.
Using a Configuration Script
Complete setup by sending the ZPL script to the printer through the port selected at the beginning of thisprocedure.
1. Verify that the printer is connected to the computer through the wired cable connection to port you selected, USB or Serial.
2. If you have not already done so, turn ON the printer.
3. On the Review and Send ZPL for Wireless window, click Finish.
4. The printer sends the ZPL script to the printer through the selected port. The Wireless Setup Wizard screen closes.
5. Turn the printer OFF and then back ON.
66
Setup for Windows OS
Saving a Configuration ScriptSave the ZPL script to a file for use later or for use with other printers.Note • You can send the ZPL script file to multiple printers that use the same configuration, or you can send the file to a printer that had the network settings restored to the factory defaults. This saves you from having to go through the Wireless Setup Wizard more than once.
1. On the ‘Review and Send ZPL for Wireless’ window, highlight the script, right-click, and select Copy.
2. Open a text editor, such as Notepad, and paste the script into the application.
3. Save the script.
4. In the Connectivity Wizard, click Cancel to exit without sending the script at this time.
5. If you have not already done so, turn ON the printer.
6. Send the ZPL file to the printer through the connection of your choice.
7. Observe the wireless status on the printer’s indicator lights, and confirm that you have set up your printer for wireless connectivity.
67

Setup for Windows OS
Bluetooth Option ConfigurationThe Zebra Setup Utilities provides a quick and easy way to configure a Bluetooth wireless connection withyour printer.
1. Double-click the Zebra Setup Utilities icon on your desktop.
2. Connect a USB cable from your printer to your computer.
3. On the first ZSU screen, highlight the printer displayed in the window and click on the Configure Printer Connectivity where shown.
4. Select ‘Bluetooth’ on the Connectivity Type screen and click on the Next button.
5. On the Bluetooth Settings screen, check “Enabled” to enable Bluetooth functionality.
6. In the Friendly Name text field, set the Bluetooth name of the device. This name appears during device discovery and the master device will label the printer with this name.
7. Set Discoverable to “On” or “Off” to set whether the device will appear when master devices are looking for new devices to pair with.
8. Set Authentication to “On.” (Note: This setting does not exist in Link-OS, but you need to turn on if you want to enter a PIN in ZSU. Actual authentication setting on the printer is set in the Security Mode on the Advanced Settings menu.)
68
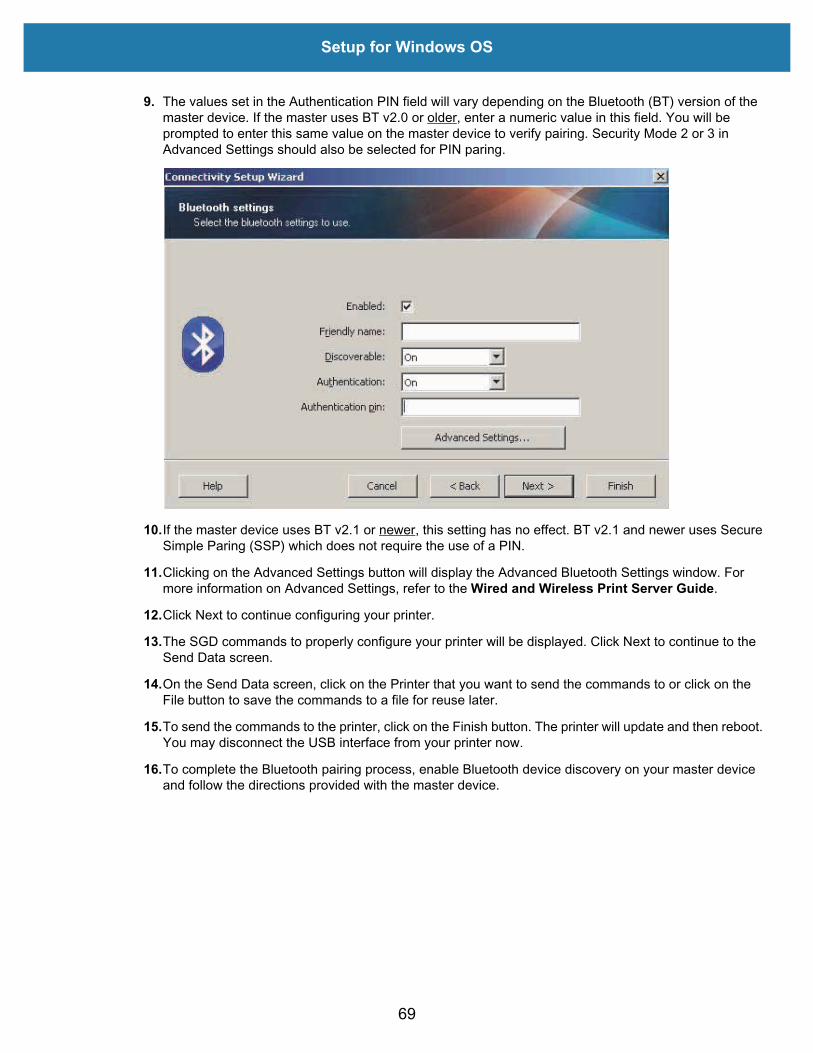
Setup for Windows OS
9. The values set in the Authentication PIN field will vary depending on the Bluetooth (BT) version of the master device. If the master uses BT v2.0 or older, enter a numeric value in this field. You will be prompted to enter this same value on the master device to verify pairing. Security Mode 2 or 3 in Advanced Settings should also be selected for PIN paring.
10.If the master device uses BT v2.1 or newer, this setting has no effect. BT v2.1 and newer uses Secure Simple Paring (SSP) which does not require the use of a PIN.
11.Clicking on the Advanced Settings button will display the Advanced Bluetooth Settings window. For more information on Advanced Settings, refer to the Wired and Wireless Print Server Guide.
12.Click Next to continue configuring your printer.
13.The SGD commands to properly configure your printer will be displayed. Click Next to continue to the Send Data screen.
14.On the Send Data screen, click on the Printer that you want to send the commands to or click on the File button to save the commands to a file for reuse later.
15.To send the commands to the printer, click on the Finish button. The printer will update and then reboot. You may disconnect the USB interface from your printer now.
16.To complete the Bluetooth pairing process, enable Bluetooth device discovery on your master device and follow the directions provided with the master device.
69

Setup for Windows OS
Connecting to a Windows XP® SP2 Master Device
This process covers the printer installation for Windows XP SP2 (or above)
1. From the Windows ‘Start’ menu, open the ‘Printers and Faxes’ window. Click on ‘Add Printer’ and a wizard will start. Click ‘Next’ when the “Welcome” window displays to continue.
2. Leave the ‘Local’ radio button with the ‘Automatic detect ...’ checkbox (checked) selected and click ‘Next’.
3. No printer should be found. If there is one or more new printers detected, then do not select any of those printers and click ‘Next’.
4. Select the ‘Create a new port’ radio button and select ‘Bluetooth Printer Port’ from the associated pull down menu.
5. From the new ‘Bluetooth Printer Port’ window, select your printer from the Bluetooth devices in the list. This may take several minutes. Click on the ‘Connect’ button.
6. The ‘Install Printer Software’ window will open. Select ‘ZDesigner’ as ‘Manufacture’ to select supported Zebra printer models, and then select your printer model in the ‘Printers’ selection. Click ‘Next’ to continue.
7. Select ‘Keep the existing drivers’ and click ‘Next’.
8. Name your printer and choose your default printer setting as desired. Click ‘Next’.
9. Answer ‘Yes’, you want to print a test page. Click ‘Next’ to continue.
10.Click ‘Finish’ on the ‘Completing the Add Printer Wizard’ window and the Bluetooth printer will complete installation and print a Windows test print page (a Windows logo at minimum).
70
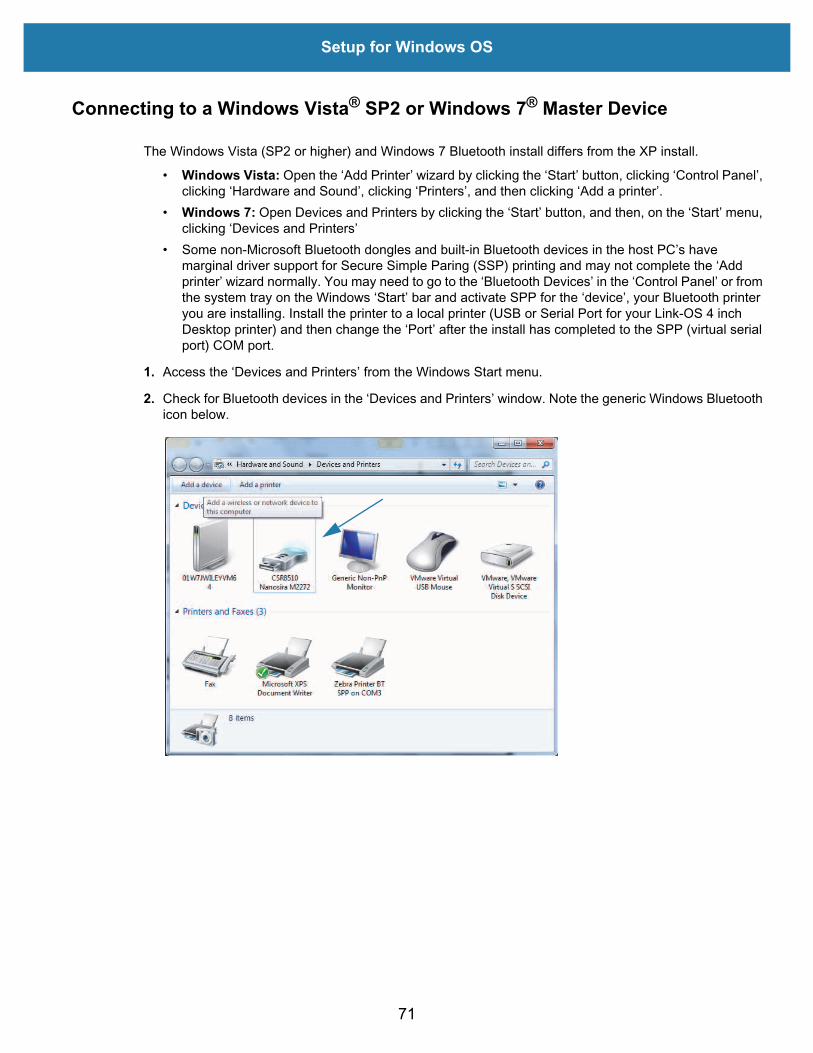
Setup for Windows OS
Connecting to a Windows Vista® SP2 or Windows 7® Master Device
The Windows Vista (SP2 or higher) and Windows 7 Bluetooth install differs from the XP install.
• Windows Vista: Open the ‘Add Printer’ wizard by clicking the ‘Start’ button, clicking ‘Control Panel’, clicking ‘Hardware and Sound’, clicking ‘Printers’, and then clicking ‘Add a printer’.
• Windows 7: Open Devices and Printers by clicking the ‘Start’ button, and then, on the ‘Start’ menu, clicking ‘Devices and Printers’
• Some non-Microsoft Bluetooth dongles and built-in Bluetooth devices in the host PC’s have marginal driver support for Secure Simple Paring (SSP) printing and may not complete the ‘Add printer’ wizard normally. You may need to go to the ‘Bluetooth Devices’ in the ‘Control Panel’ or from the system tray on the Windows ‘Start’ bar and activate SPP for the ‘device’, your Bluetooth printer you are installing. Install the printer to a local printer (USB or Serial Port for your Link-OS 4 inch Desktop printer) and then change the ‘Port’ after the install has completed to the SPP (virtual serial port) COM port.
1. Access the ‘Devices and Printers’ from the Windows Start menu.
2. Check for Bluetooth devices in the ‘Devices and Printers’ window. Note the generic Windows Bluetooth icon below.
71
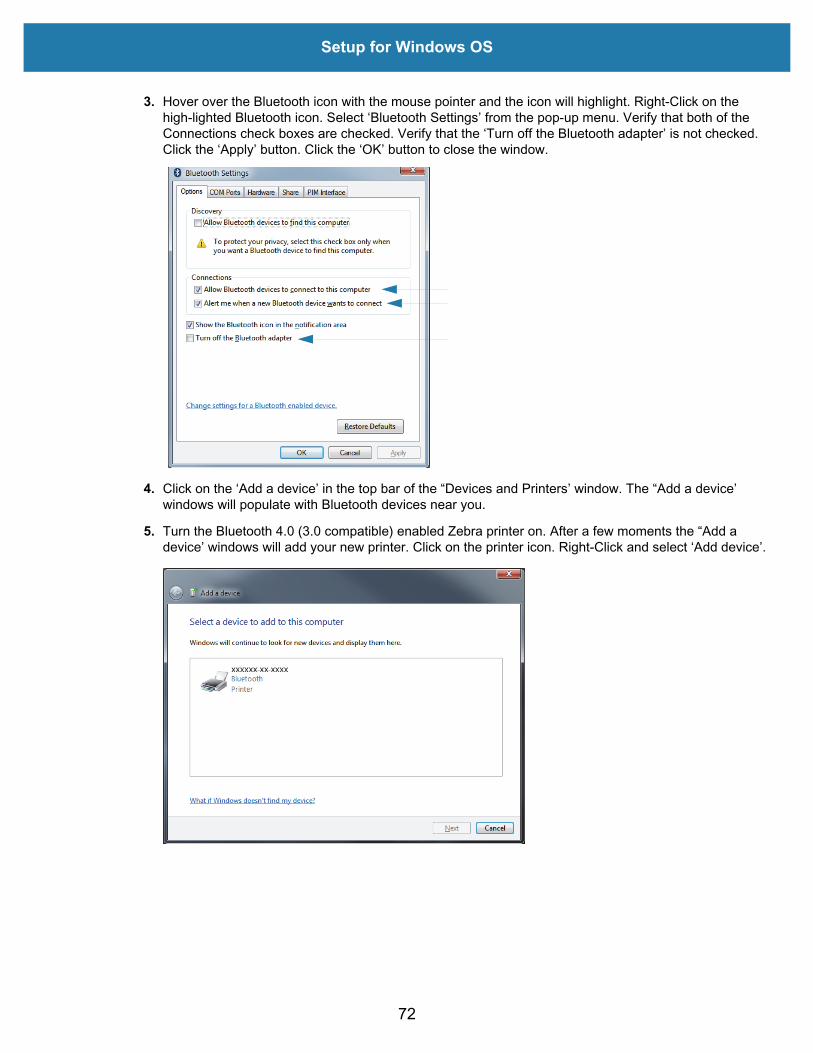
Setup for Windows OS
3. Hover over the Bluetooth icon with the mouse pointer and the icon will highlight. Right-Click on the high-lighted Bluetooth icon. Select ‘Bluetooth Settings’ from the pop-up menu. Verify that both of the Connections check boxes are checked. Verify that the ‘Turn off the Bluetooth adapter’ is not checked. Click the ‘Apply’ button. Click the ‘OK’ button to close the window.
4. Click on the ‘Add a device’ in the top bar of the “Devices and Printers’ window. The “Add a device’ windows will populate with Bluetooth devices near you.
5. Turn the Bluetooth 4.0 (3.0 compatible) enabled Zebra printer on. After a few moments the “Add a device’ windows will add your new printer. Click on the printer icon. Right-Click and select ‘Add device’.
72
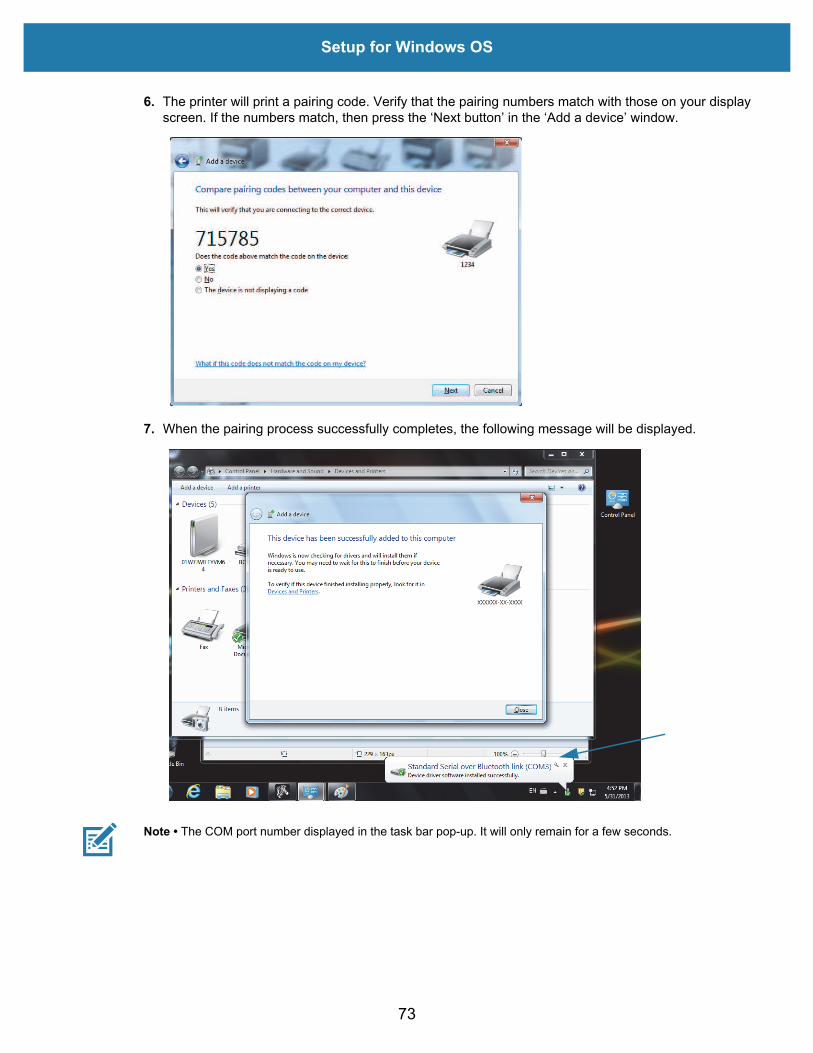
Setup for Windows OS
6. The printer will print a pairing code. Verify that the pairing numbers match with those on your display screen. If the numbers match, then press the ‘Next button’ in the ‘Add a device’ window.
7. When the pairing process successfully completes, the following message will be displayed.
Note • The COM port number displayed in the task bar pop-up. It will only remain for a few seconds.
73
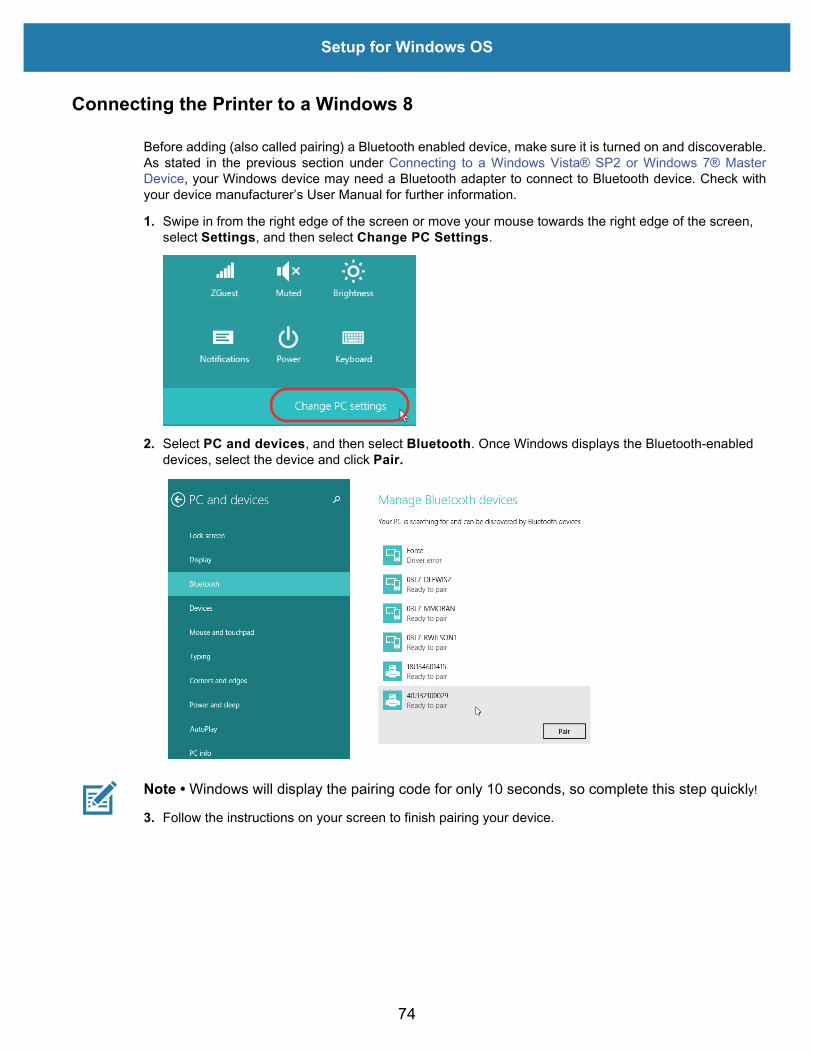
Setup for Windows OS
Connecting the Printer to a Windows 8
Before adding (also called pairing) a Bluetooth enabled device, make sure it is turned on and discoverable.As stated in the previous section under Connecting to a Windows Vista® SP2 or Windows 7® MasterDevice, your Windows device may need a Bluetooth adapter to connect to Bluetooth device. Check withyour device manufacturer’s User Manual for further information.
1. Swipe in from the right edge of the screen or move your mouse towards the right edge of the screen, select Settings, and then select Change PC Settings.
.
2. Select PC and devices, and then select Bluetooth. Once Windows displays the Bluetooth-enabled devices, select the device and click Pair.
Note • Windows will display the pairing code for only 10 seconds, so complete this step quickly!
3. Follow the instructions on your screen to finish pairing your device.
74

Setup for Windows OS
Connecting the Printer to a Windows 10 PC
Before adding (also called pairing) a Bluetooth enabled device, make sure it is turned on and discoverable.As stated in the previous section under “Installing the Printer on a Windows 7 PC,” your Windows devicemay need a Bluetooth adapter to connect to Bluetooth device. Check with your device manufacturer’s UserManual for further information.
1. Open the Windows Start Menu by clicking on the Windows Start ( )button and select Settings..
2. Click on the Devices category in the Settings window.
75

Setup for Windows OS
3. Click on Bluetooth. If your PC doesn’t have Bluetooth installed, the Bluetooth category will not be displayed in the list of device categories. The printer is identified by the serial number.
4. Click on the printer and then click on the ‘pairing’ button for the printer.
Printer Serial Number
76
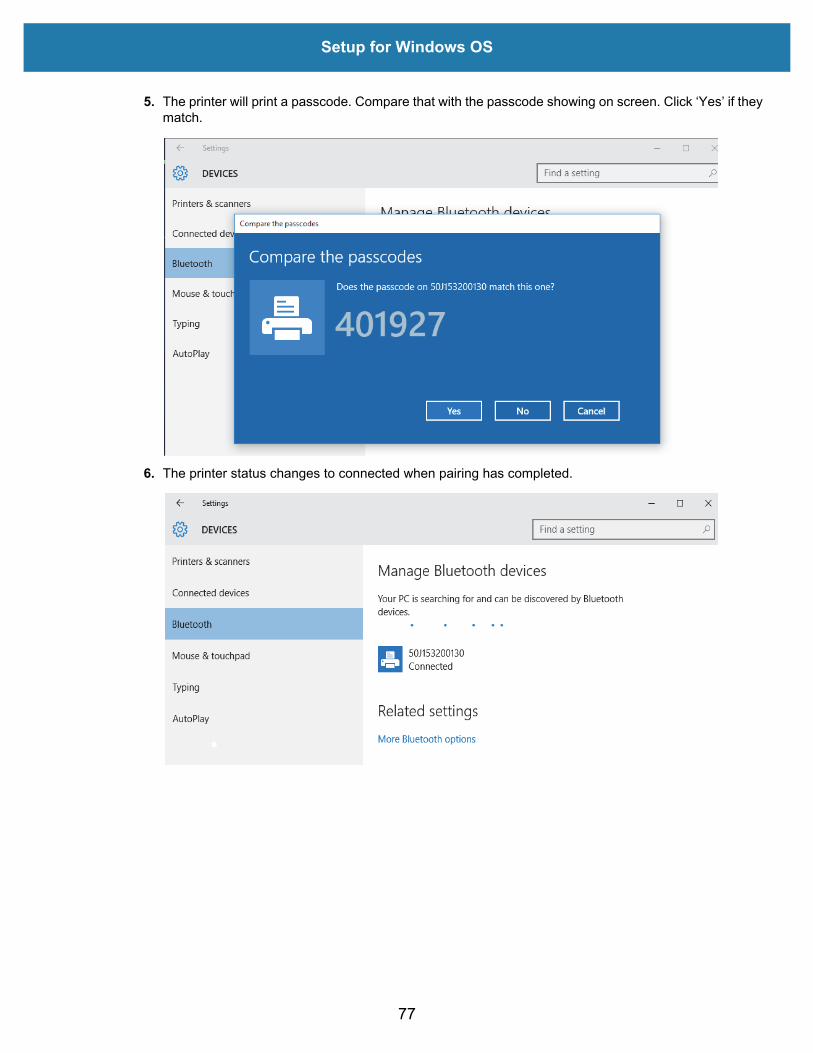
Setup for Windows OS
5. The printer will print a passcode. Compare that with the passcode showing on screen. Click ‘Yes’ if they match.
6. The printer status changes to connected when pairing has completed.
77

Setup for Windows OS
After Your Printer is ConnectedNow that you have basic communication to your printer, you may want to test printer communications andthen install other printer related applications, drivers or utilities.
Testing Communications by PrintingVerifying the print system’s operation is a relatively simple process. For Windows operating systems, usethe Zebra Setup Utility or the Windows ‘Printers and Faxes’ Control Panel to access and print a test label.For non-Windows operation systems, copy a basic ASCII text file with a single command (~WC) to print aconfiguration status label.
Test Printing with Zebra Setup Utility:
1. Open the Zebra Setup Utility.
2. Click on the newly installed printer’s icon to select the printer and activate the printer configuration buttons below it in the window.
3. Click the ‘Open Printer Tools’ button.
4. In the ‘Print’ tab window, click on the ‘Print configuration label’ line and click on the ‘Send’ button. The printer should print a configuration report.
Test Printing with Windows ‘Printer and Faxes’ menu:
1. Click on the Windows ‘Start’ menu button, to access the ‘Printers and Faxes’ menu or ‘Control Panel’ to access the ‘Printers and Faxes’ menu. Open the menu.
2. Select the newly installed printer’s icon to select the printer and right-click the mouse to access the printer ‘Properties’ menu.
3. From the printer’s ‘General’ tab window, click on the ‘Print Test Page’ button. The printer should print a Windows test print page.
Test Print with an Ethernet printer connected to a network
Test Print on an Ethernet printer connected to a network (LAN or WLAN) with a (MS-DOS) ‘CommandPrompt’ (or ‘Run’ from the Windows XP Start menu):
1. Create a text file with the following ASCII three characters: ~WC
2. Save the file as: TEST.ZPL (an arbitrary file name and extension name).
3. Read the IP address off the printer’s Configuration Report’s Network Status printout. On a system that is connected to the same LAN or WAN as the printer, type the following in the Web browser window’s address bar and enter: ftp (IP address). For IP address 123.45.67.01 it would be: ftp 123.45.67.01
4. Type the word ‘put’ followed by the file name and enter. For this ‘test print’ file, it would be:put TEST.ZPL
The printer should print a new Print Configuration Report.
78

Setup for Windows OS
Test Print with a Copied ZPL Command File for Non-Windows Operating Systems:
1. Create a text file with the following ASCII three characters: ~WC
2. Save the file as: TEST.ZPL (an arbitrary file name and extension name).
3. Copy the file to the printer. For DOS, a file sent to a printer connected to the system’s serial port would be as simple as:
COPY TEST.ZPL COM1
Other interface connection types and operating systems will have different command strings. See your operating system documentation for detailed instructions to copy to the appropriate printer interface for this test.
79

Print Operations
This section provides general information on media and print handling, font and language support, and thesetup of less common printer configurations.
Thermal PrintingThe ZD-Series printers use heat to expose direct thermal media or heat and pressure to melt and transfer‘ink’ to the media. Extra care should be taken to avoid touching the printhead which gets hot and issensitive to electrostatic discharges.Hot Surface Caution • The printhead becomes hot while printing. To protect from damaging the printhead and risk of personal injury, avoid touching the printhead. Only use the cleaning pen to perform printhead maintenance.
ESD Caution • The discharge of electrostatic energy that accumulates on the surface of the human body or other surfaces can damage or destroy the printhead and other electronic components used in this device. You must observe static-safe procedures when working with the printhead or the electronic components under the top cover.
Determining Your Printer’s Configuration SettingsThe ZD410 printer uses the configuration report to provide the printer settings. Operational status(darkness, speed, media type, etc.), installed printer options (network, interface settings, cutter, etc.) andprinter description information (serial number, model name, firmware version, etc.) are all included on theconfiguration report.
See Test Printing with the Configuration Report to print this label.
See Managing the ZPL Printer Configuration to help interpret the configuration report and the associatedprogramming command and command states it is identifying in the report.
Replacing SuppliesIf media (labels, receipt, tags, tickets, etc.) run out while printing, leave the printer power on while reloading(data loss results if you turn off the printer). After you load a new label, press the Feed button to restart.
80
Print Operations
Select a Print ModeUse a print mode that matches the media being used and the printer options available. The media path isthe same for roll and fanfold media.
To set the printer to use an available print mode:
• See the ZPL Programmer’s manual, ^MM command. See About section for information and support links for your specific printer model.
Print Modes• TEAR OFF -— This mode (default) can be used with any printer options and most media types. The
printer prints label formats as it receives them. The printer operator can tear off the printed labels any time after they print.
• PEEL — Label Dispenser Option only. The printer peels the label from the liner during printing and then pauses until the label is removed.
• CUTTER — Cutter Option only. The printer cuts between labels after each one is printed.
Adjusting the Print QualityPrint quality is affected by the heat (density) setting of the printhead, the print speed, and the media in use.Experiment with these settings to find the optimal mix for your application. Print quality can be configuredwith the Zebra Setup Utility’s ‘Configure Print Quality’ routine.
Note • Media manufacturers may have specific recommendations for speed settings for your printer andthe media. The recommended speed may be lower than your printer’s maximum speed setting!
The darkness (or density) setting can be controlled by:
• The Set Darkness (~SD) ZPL command (consult your ZPL Programming Guide).
• See the Manual Print Darkness Adjustment.• See the Operator Darkness Control.
If you find that the print speed needs to be adjusted, use:
• The Windows printer driver or application software such as ZebraDesigner ™ .• The Print Rate (^PR) command (consult your ZPL Programming Guide).
Use the printer’s ‘Print Quality Report’ (also known as the FEED Self Test) to print a range of labels thathelp you identify print DARKNESS and SPEED settings for optimizing general print and barcode quality.See the Print Quality Report (FEED self test) for details.
The printer’s media settings can be verified by printing a Printer Configuration label. See the Test Printingwith the Configuration Report for more details.
The maximum distance the automatic media type detection and sensing checks can be reduced using theZPL Maximum Label Length command (^ML). The minimum distance should be no less than two times thelongest label being printed. If the largest label being printed was a 2 by 6 inch label, then the maximumlabel (media) length detection distance can be reduced from the default distance of 39 inches down to 12inches.
Note • See About section for information and support links for your specific printer model.
81
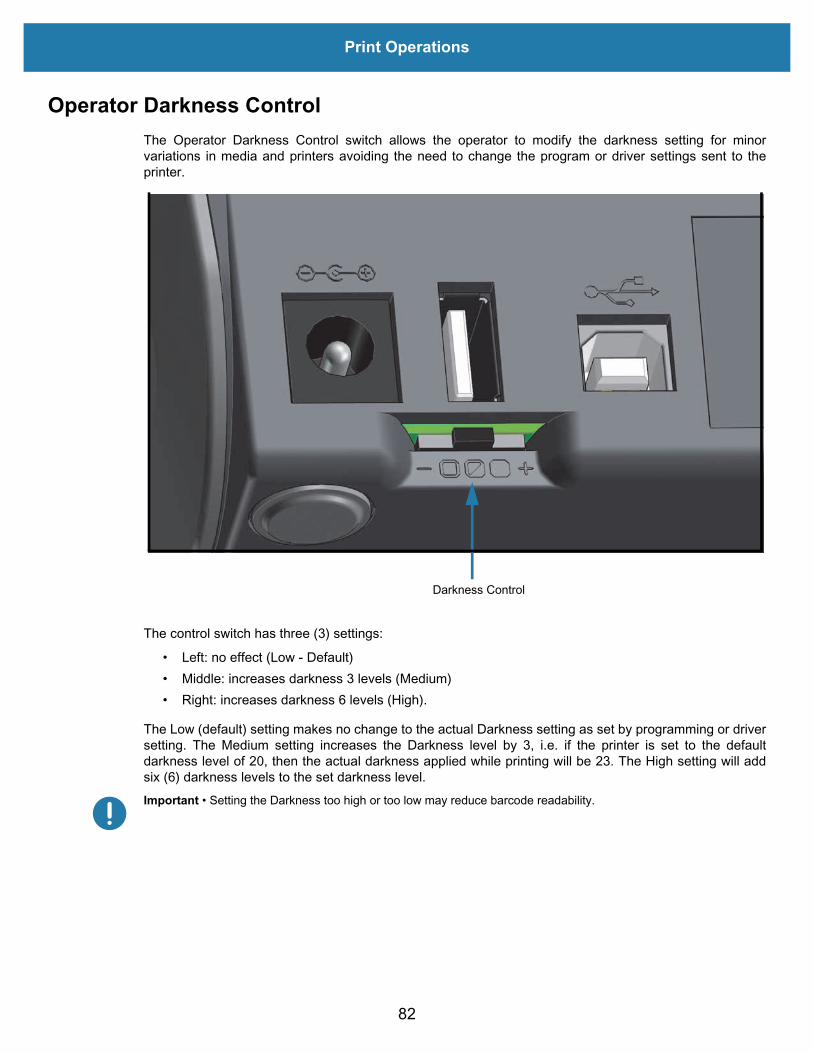
Print Operations
Operator Darkness ControlThe Operator Darkness Control switch allows the operator to modify the darkness setting for minorvariations in media and printers avoiding the need to change the program or driver settings sent to theprinter.
The control switch has three (3) settings:
• Left: no effect (Low - Default)• Middle: increases darkness 3 levels (Medium)• Right: increases darkness 6 levels (High).
The Low (default) setting makes no change to the actual Darkness setting as set by programming or driversetting. The Medium setting increases the Darkness level by 3, i.e. if the printer is set to the defaultdarkness level of 20, then the actual darkness applied while printing will be 23. The High setting will addsix (6) darkness levels to the set darkness level.Important • Setting the Darkness too high or too low may reduce barcode readability.
Darkness Control
82

Print Operations
Printing on Fan-Fold MediaPrinting on fan-fold media requires you to adjust the media guides stop position.
1. Open the top cover.
2. Adjust the media guide stop position with the gold thumb wheel. Use a piece of the fan-fold media to set the stop position. Rotate the wheel away from you to make the guides wider. Rotate the wheel toward you to make the media guides narrower.
Fan-FoldMedia Path
83

Print Operations
3. Insert the media through the slot at the rear of the printer and place the media between the media guide and roll holders.
4. Close the top cover.
After printing or feeding several labels: If the media does not track down the center (moves from side toside) or the sides of the media (liner, tag, paper, etc.) are frayed or damaged when exiting the printer, thenthe media guides may need further adjustment. If this does not correct the problem, then the media can berouted over the two roll holding pins on the media guide. An empty roll core of the same width as the stackof the fan-fold media can be placed between the roll holders to provide additional support for thin media.
84

Print Operations
Printing with Externally Mounted Roll MediaThe printer accommodates externally mounted roll media similar to the printer’s support of fan-fold media.The printer requires the media roll and stand combination to have a low initial inertia to pull the media offthe roll.
Zebra at this time does not offer an external roll media option for the ZD410 printer.
Externally Mounted Roll Media Considerations:• The media ideally should enter the printer directly behind the printer through the fan-fold media slot in
the rear of the printer. See Printing on Fan-Fold Media on page 83 for media loading. • Lower the print speed to decrease the chance of motor stalls. The roll typically has the highest inertia
when trying to start the roll moving. Larger media roll diameters require the printer to have more torque applied to get the roll moving.
• The media should move smoothly and freely. The media should not slip, skip, jerk, bind and then move, etc. when mounted on your media stand.
• The printer should not touch the media roll.• The printer should not slip or lift up off the operating surface.
85
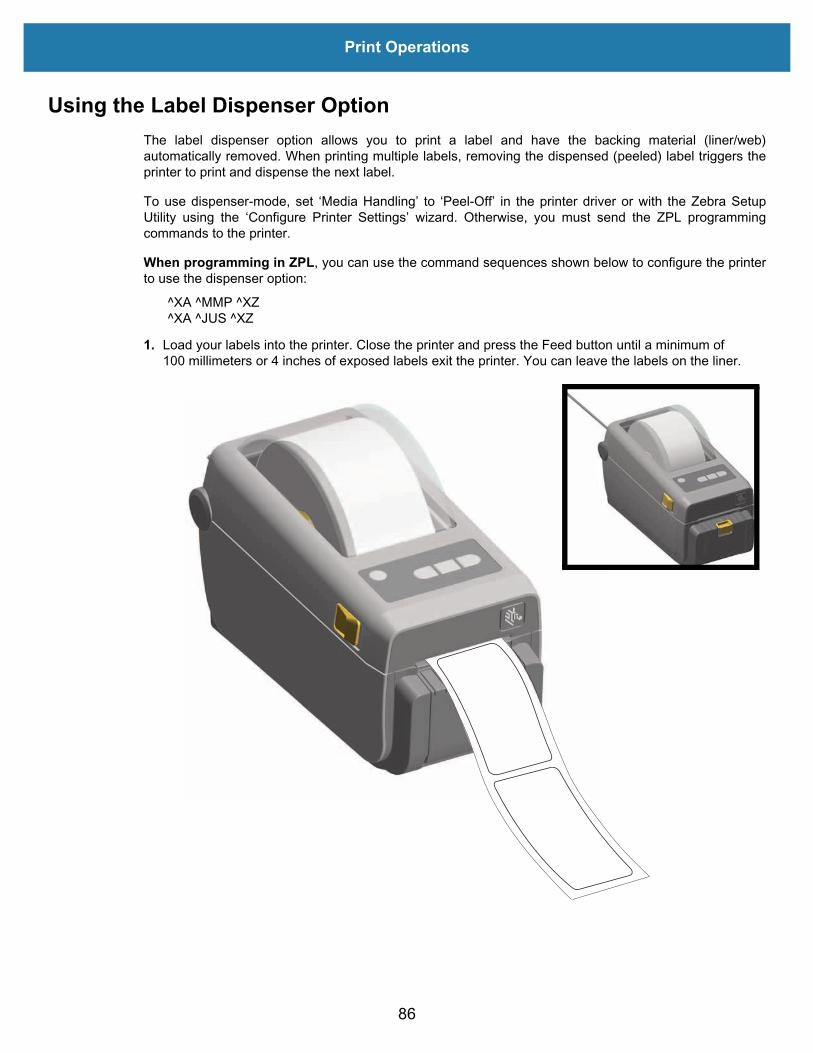
Print Operations
Using the Label Dispenser OptionThe label dispenser option allows you to print a label and have the backing material (liner/web)automatically removed. When printing multiple labels, removing the dispensed (peeled) label triggers theprinter to print and dispense the next label.
To use dispenser-mode, set ‘Media Handling’ to ‘Peel-Off’ in the printer driver or with the Zebra SetupUtility using the ‘Configure Printer Settings’ wizard. Otherwise, you must send the ZPL programmingcommands to the printer.
When programming in ZPL, you can use the command sequences shown below to configure the printerto use the dispenser option:
^XA ^MMP ^XZ^XA ^JUS ^XZ
1. Load your labels into the printer. Close the printer and press the Feed button until a minimum of 100 millimeters or 4 inches of exposed labels exit the printer. You can leave the labels on the liner.
86
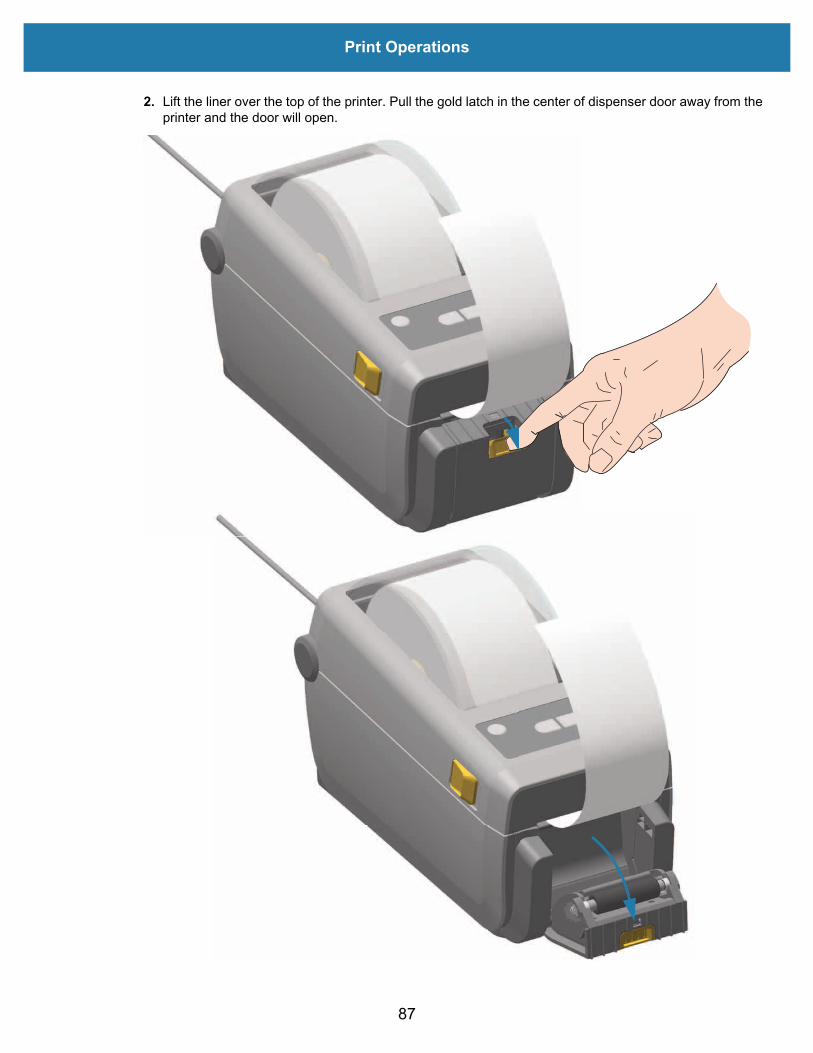
Print Operations
2. Lift the liner over the top of the printer. Pull the gold latch in the center of dispenser door away from the printer and the door will open.
87
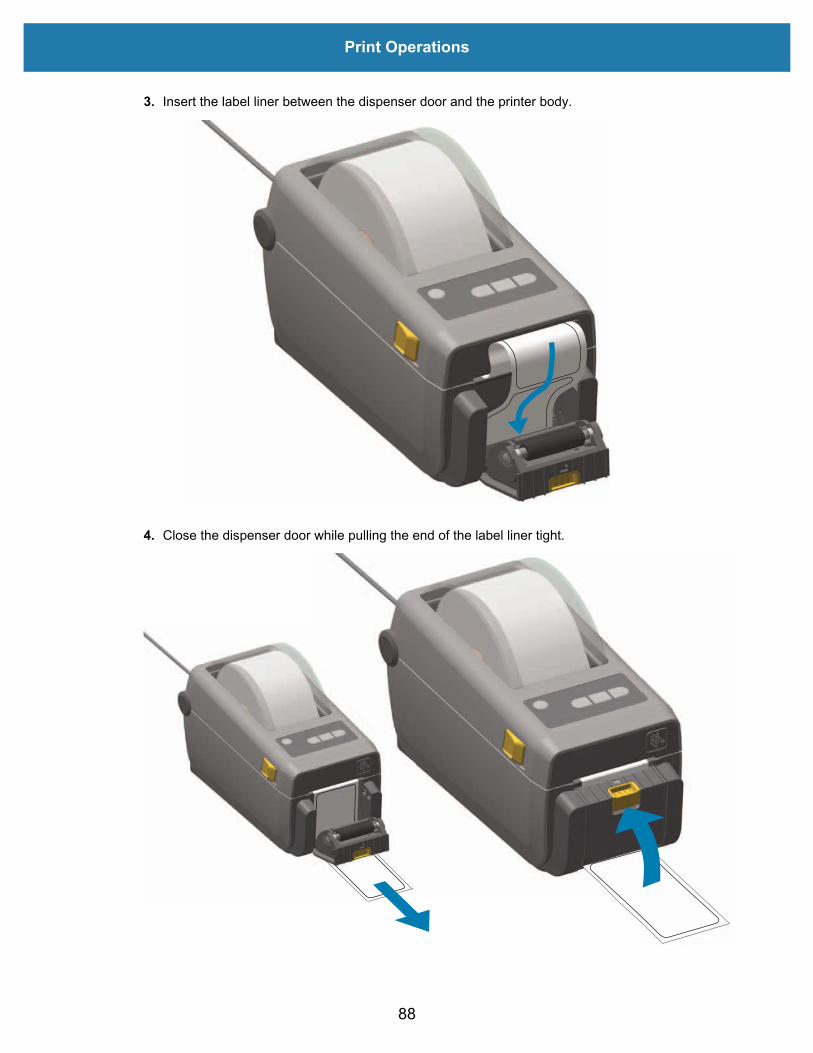
Print Operations
3. Insert the label liner between the dispenser door and the printer body.
4. Close the dispenser door while pulling the end of the label liner tight.
88
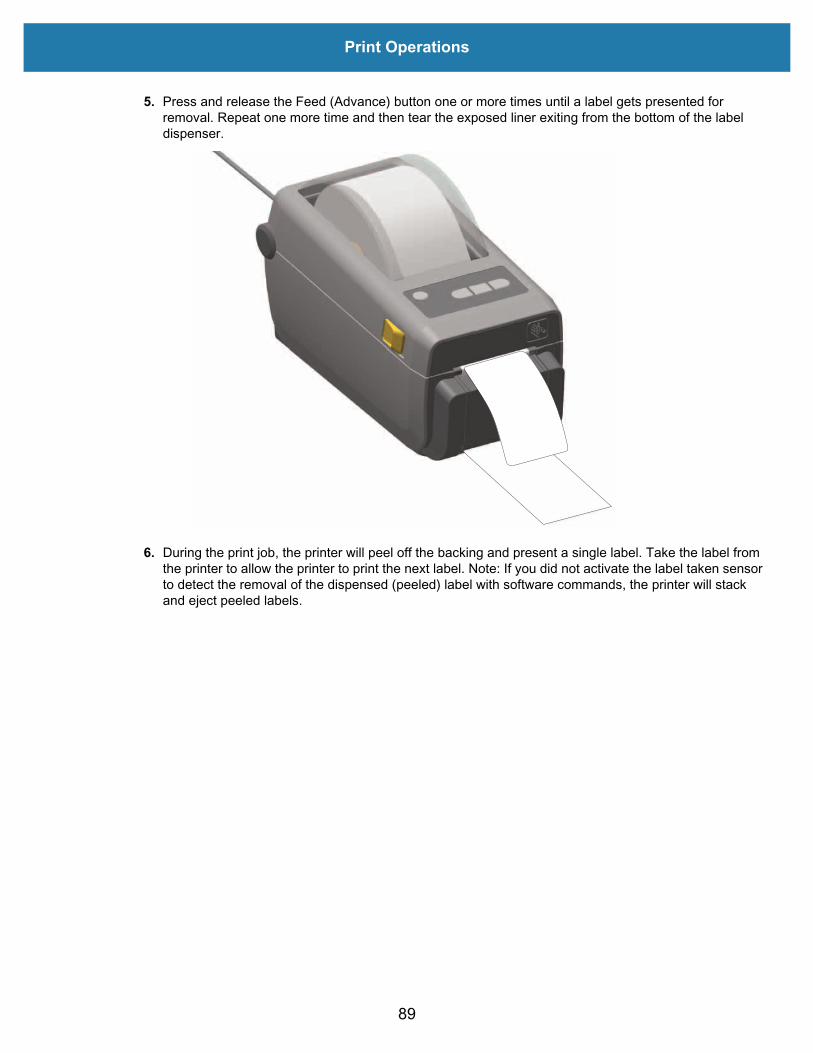
Print Operations
5. Press and release the Feed (Advance) button one or more times until a label gets presented for removal. Repeat one more time and then tear the exposed liner exiting from the bottom of the label dispenser.
6. During the print job, the printer will peel off the backing and present a single label. Take the label from the printer to allow the printer to print the next label. Note: If you did not activate the label taken sensor to detect the removal of the dispensed (peeled) label with software commands, the printer will stack and eject peeled labels.
89
Print Operations
Printing with the Attached Battery Base and Battery OptionPrinter operating procedures change slightly when using the battery. Power connections and power lossscenarios necessitate the differences in operation. The battery is designed to maximize battery life,maintain print quality, and have simple operation.
• Connecting the printer’s external power supply to the battery will wake up the battery. The battery determines if charging is needed.
• The battery will not start charging until the battery’s charge level is below 90% charge. This extends your battery’s life.
• Once charging has begun, the battery will charge to 100% capacity and then go into Sleep Mode. • The printer is receiving the external power passed through by the battery circuitry into the printer.
The battery does not charge while printing or moving media.• The battery uses very small amount of power during Sleep Mode to maximize the available charge
stored in the battery.• It takes about 2 hours to charge a fully discharged battery.
UPS Mode
The printer is receiving the external power passed through by the battery circuitry into the printer.
1. Press the Battery Control Button to ‘wake up’ the battery and check the battery has charge. After 60 seconds the battery “goes to sleep”.
2. The battery is in Sleep Mode awaiting the loss of external power to the battery (and attached printer).
The printer can be turned OFF and ON normally and does not require the battery be turned on to operate.
Battery Mode
The printer is powered by the battery only.
1. Press the Battery Control Button to ‘wake up’ the battery and check the battery has charge. After 60 seconds the battery “goes to sleep” if the printer has not been turned on yet.
2. Turn the printer ON.3. Use the printer normally. 4. Check the battery charge status at any time by pressing the Battery Control Button. 5. Change or charge your battery when the last battery charge level indicator is flashing. Your print
operation may be interrupted if the battery charge is used up and the printer turns off.
90
Print Operations
Sending Files to the PrinterGraphics, fonts and programming files can be sent to the printer from the Microsoft Windows operatingsystems by using the Link-OS Profile Manager, Zebra Setup Utilities (and driver), ZebraNet ™ Bridge orZebra® ZDownloader at www.zebra.com.
Printer FontsThe ZD410 printer supports your language and font requirements with a variety of internal fonts, on-boardfont scaling, international font sets and character code page support, Unicode support, and font download.
The printer’s font capabilities are programming language dependent. The ZPL ™ programming languageprovides advanced font mapping and scaling technology to support outline fonts (TrueType ™ orOpenType ™ ) and Unicode character mapping as well as basic bitmapped fonts and character codepages. The ZPL programming guide describes and documents the fonts, code pages, character access,listing fonts, and limitations for their respective printer programming languages. See the printerprogramming guides for information on Text, Fonts and Character support.
The printer includes utilities and application software that support font download into the printer for bothprinter programming languages.
Identifying Fonts in Your Printer
Fonts and memory are shared by the programming languages in the printer. Fonts can be loaded intovarious storage locations in the printer. ZPL programming can recognize EPL and ZPL fonts. EPLprogramming can only recognize EPL fonts. See the respective programmer guides for more informationon fonts and printer memory.
ZPL Fonts:
• To manage and download fonts for ZPL print operation, use the Zebra Setup utility or ZebraNet ™ Bridge.
• To display all of the fonts loaded in your printer, send the printer the ZPL command ^WD. See the ZPL Programmers Guide for details.• Bitmap fonts in the various printer memory areas are identified by the .FNT file extension in ZPL. • Scalable fonts are identified with the .TTF, .TTE or .OTF file extensions in ZPL. EPL does not
support these fonts.
Localizing the Printer with Code Pages
The ZD410 printer supports two sets of language, region and character sets for permanent fonts loadedinto the printer for each printer programming language, ZPL and EPL. The printer supports localizationwith common international character map code pages.
• For ZPL code page support, including Unicode, see the ^CI command in the ZPL programmer’s guide.
91

Print Operations
Asian fonts and Other Large Font Sets
Asian language ideographic and pictographic fonts have large character sets with thousands of charactersthat support single language code page. In order to support the large Asian character sets, the industryadopted a double-byte (67840 maximum) character system instead of the single-byte characters (256maximum) used by Latin based language characters to address large font sets. In order to addressmultiple languages with a single font set, Unicode was invented. A Unicode font supports one or morecode points (relate these to code page character maps) and is accessed in a standard method thatresolves character mapping conflicts. The ZPL programming language supports Unicode. Both of theprinter’s programming languages support the large pictographic double-byte character Asian font sets.
The number of fonts that can be downloaded is dependent upon the amount of available flash memory notalready in use and the size of the font to be downloaded.
Some Unicode fonts are large such as MS (Microsoft) Arial Unicode font (23 MB) available from Microsoftor the Andale font (22 MB) offered by Zebra. These large font sets typically support a large number oflanguages as well.
Getting Asian Fonts
Asian bitmap font sets are downloaded into the printer by the user or integrator. The ZPL fonts arepurchased separately from the printer. EPL Asian Fonts are available for free to download from the ZebraWeb site.
• Simplified and Traditional Chinese (The SimSun font is pre-loaded in printers sold in the Peoples Republic of China)
• Japanese — JIS and Shift-JIS mappings • Korean including Johab • Thai
92

Print Operations
EPL Line Mode - Direct Thermal Printers onlyYour direct thermal printer supports Line Mode printing. EPL Line Mode printing is designed to becommand compatible with EPL1 programming language used in early model LP2022 and LP2042 printers.The Zebra 2800 series direct thermal printers also included Line Mode printer language support. TheLink-OS 4 inch Desktop continues Zebra’s support of Line Mode.
Line mode printing is ideal for basic retail (point of sale - POS), shipping, inventory, work flow control, andgeneral labeling. EPL printers with Line Mode, are versatile and are capable of printing a wide range mediaand bar codes.
Line Mode printing only prints single lines the height of the largest element present in the line of text anddata - bar code, text, a logo or simple vertical lines. Line mode has many limitations due to the single lineof print: no fine element placement, no overlapping elements, and no horizontal (ladder) bar codes.
• Line Mode printer operation is entered by sending the printer the EPL OEPL1 command. See the EPL Programmers Guide (Page Mode) or the EPL Line Mode Programmers Guide.
• Line Mode printer operation is exited by sending the printer the escOEPL2 Line Mode command. See the EPL Line Mode Programmers Guide.
• With Line Mode active, ZPL and EPL (EPL2) Page Mode programming will be processed as Line Mode programming and data.
• With the default ZPL and EPL (EPL2) Page Mode active, Line Mode programming will be processed as ZPL and/or EPL programming and data.
• Verify printer programming modes by printing out a printer configuration.
93
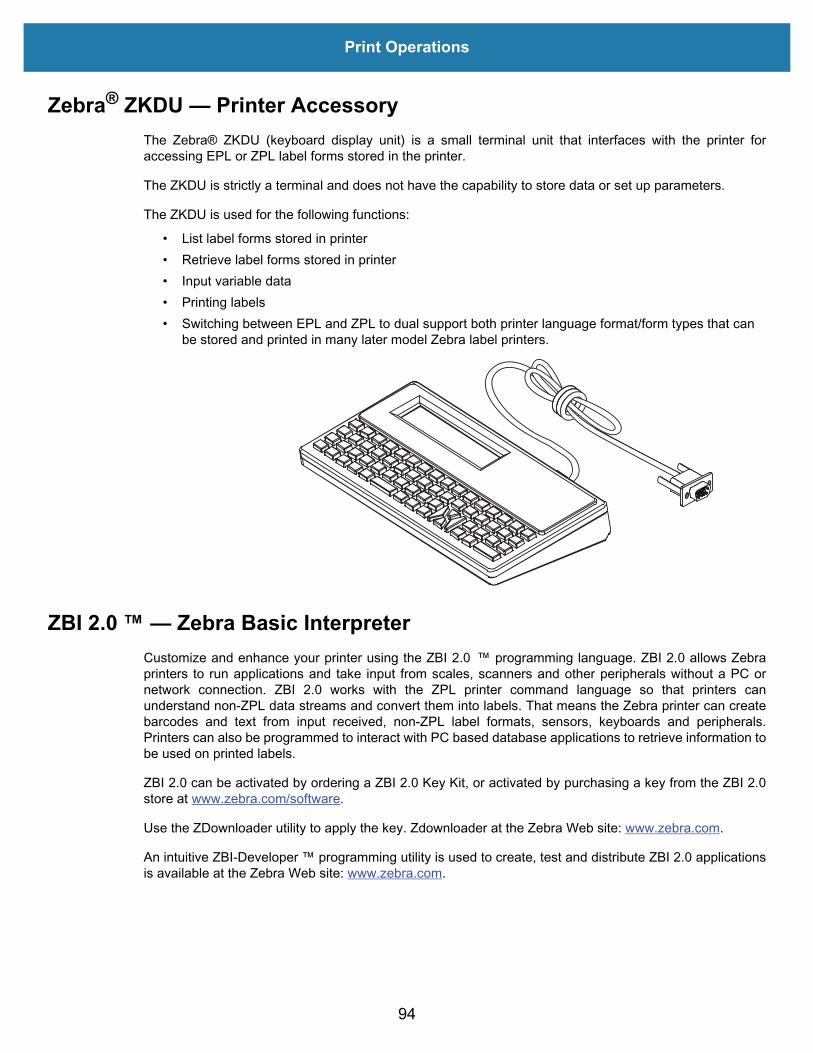
Print Operations
Zebra® ZKDU — Printer AccessoryThe Zebra® ZKDU (keyboard display unit) is a small terminal unit that interfaces with the printer foraccessing EPL or ZPL label forms stored in the printer.
The ZKDU is strictly a terminal and does not have the capability to store data or set up parameters.
The ZKDU is used for the following functions:
• List label forms stored in printer• Retrieve label forms stored in printer• Input variable data• Printing labels• Switching between EPL and ZPL to dual support both printer language format/form types that can
be stored and printed in many later model Zebra label printers.
ZBI 2.0 ™ — Zebra Basic Interpreter Customize and enhance your printer using the ZBI 2.0 ™ programming language. ZBI 2.0 allows Zebraprinters to run applications and take input from scales, scanners and other peripherals without a PC ornetwork connection. ZBI 2.0 works with the ZPL printer command language so that printers canunderstand non-ZPL data streams and convert them into labels. That means the Zebra printer can createbarcodes and text from input received, non-ZPL label formats, sensors, keyboards and peripherals.Printers can also be programmed to interact with PC based database applications to retrieve information tobe used on printed labels.
ZBI 2.0 can be activated by ordering a ZBI 2.0 Key Kit, or activated by purchasing a key from the ZBI 2.0store at www.zebra.com/software.
Use the ZDownloader utility to apply the key. Zdownloader at the Zebra Web site: www.zebra.com.
An intuitive ZBI-Developer ™ programming utility is used to create, test and distribute ZBI 2.0 applicationsis available at the Zebra Web site: www.zebra.com.
94
Print Operations
Updating Printer FirmwareThe printer’s firmware may need to be updated periodically to get new features, improvements, and printerupgrades for media handling and communications.
Use Zebra Setup Utilities (ZSU) to load new firmware.
1. Open ZSU.’ tab
2. Select your ZD410 printer.
3. Click on the ‘Open Printer Tools’ button and a ‘Tools’ window will open.
4. Click on the ‘Action’ tab.
5. Load the printer with media. See Loading Roll Media.
6. Click on the text line - ‘Send file’. The lower half of the window will present a filename and path with a Browse (...) button to select the latest firmware file you have downloaded from the Zebra Web site.
7. Observe the control panel and wait. If the firmware version is different than the version installed on the printer, the firmware will download to the printer. The data indicator will flash green while the firmware is downloading. The printer will restart with all indicators flashing. When the firmware update has completed, the STATUS indicator will display solid Green as the firmware is validated and installed. A printer Configuration Report is automatically printed and the firmware update has been completed.
95
Print Operations
Setting the Power Failure Recovery Mode JumperThe printer can be configured to re-start itself after a power failure, unattended, with Power FailureRecovery Mode.
Note • The Power Failure Recovery Mode is only available on printers with a Printer Connectivity Module installed in your printer.
The Printer Connectivity Modules have a Power Failure Recovery jumper set to OFF. With the jumper setto ON, the printer will automatically Power ON when plugged into an active (ON) AC power source (andnot power off).ESD Caution • The discharge of electrostatic energy that accumulates on the surface of the human body or other surfaces can damage or destroy the printhead or electronic components used in this device. You must observe static-safe procedures when working with the printhead or the electronic components.
Setting the Jumper
1. Disconnect the DC power plug and any interface connectors from the rear of the printer.
2. Remove the module access door and connectivity module. See Removing Printer Connectivity Modules for instructions for ZD410 printer models.
3. Move the AUTO (Power Failure Recovery Mode) jumper from the OFF position to the ON.
4. Reinstall the connectivity module and module access door. See Installing the Internal Ethernet (LAN) Module or Installing the Serial Port Module for ZD410 printer models.
Reconnect the printer DC power plug and interface cables to the printer.
96
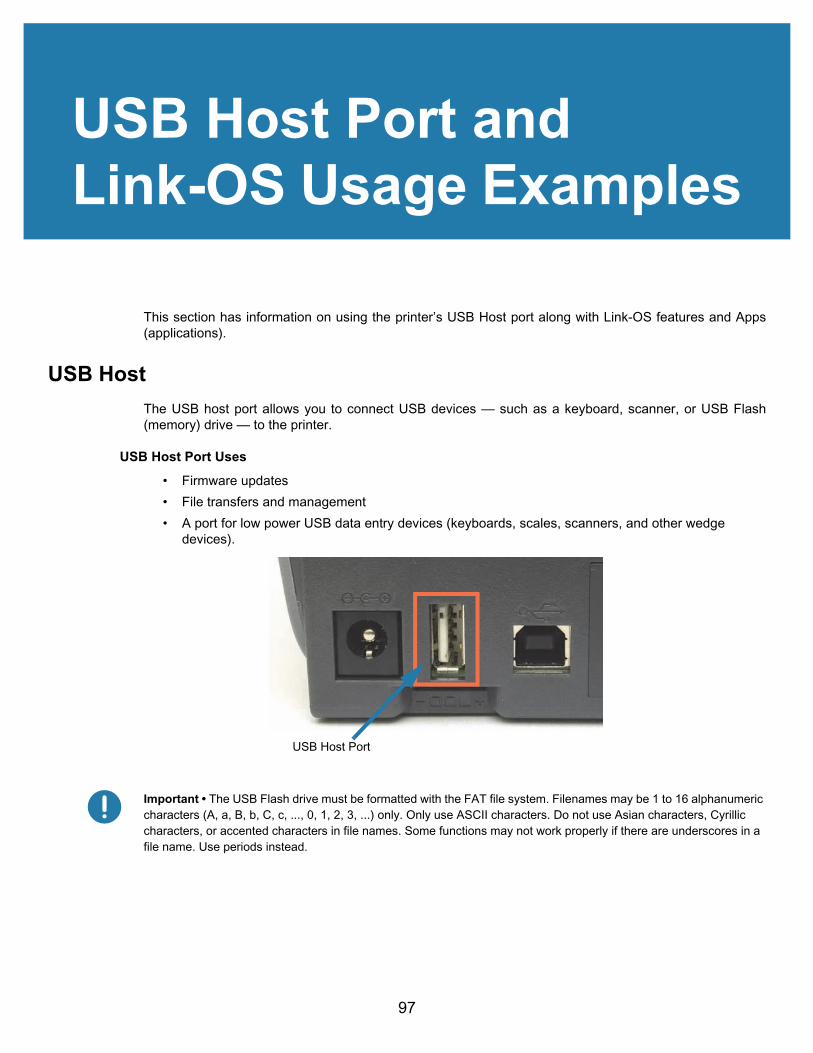
USB Host Port and Link-OS Usage Examples
This section has information on using the printer’s USB Host port along with Link-OS features and Apps(applications).
USB HostThe USB host port allows you to connect USB devices — such as a keyboard, scanner, or USB Flash(memory) drive — to the printer.
USB Host Port Uses• Firmware updates • File transfers and management• A port for low power USB data entry devices (keyboards, scales, scanners, and other wedge
devices).
Important • The USB Flash drive must be formatted with the FAT file system. Filenames may be 1 to 16 alphanumeric characters (A, a, B, b, C, c, ..., 0, 1, 2, 3, ...) only. Only use ASCII characters. Do not use Asian characters, Cyrillic characters, or accented characters in file names. Some functions may not work properly if there are underscores in a file name. Use periods instead.
USB Host Port
97

USB Host Port and Link-OS Usage Examples
Using USB Host for Firmware Updates
The USB host port allows you to connect an USB Flash drive to the printer to perform firmware updates.
This is an example of using the powerful printer management, Zebra Mirror functions. See the printer ZPLprogramming manual — Mirror and Set-Get-Do (SGD) usb.mirror commands operation.
Note • See About section for information and support links for your specific printer model.
Important • Supports USB Flash drives (or “thumb drive” or “memory stick”) up to 1 Terabyte (TB). The printer will not recognize drives larger than 1 TB.
Flash Drive Preparation and Firmware Update1. On your USB Flash Drive, create the following:
• a folder called Zebra• in that folder, create three sub-directories:
• appl • commands• files
2. In the /appl folder, place a copy of the latest firmware for your printer.
3. Load the printer with media. See Loading Roll Media.
4. Insert the USB Flash drive into the USB host port on your printer.
5. Observe the user interface and wait. If the firmware version on the USB Flash drive is different than the version installed on the printer, the firmware will download to the printer. The data indicator will flash green while the firmware is downloading. The printer will restart with all indicators flashing. When the firmware update has completed, the STATUS indicator will display solid Green as the firmware is validated and installed. A printer Configuration Report is automatically printed and the firmware update has been completed.
6. Remove the USB Flash drive from the printer.
98

USB Host Port and Link-OS Usage Examples
USB Host and Printer Usage ExamplesThe exercises in this section will teach you how to perform USB mirror (using an alternate firmware updateprocedure), how to transfer files to and from the printer, and how to provide information for which you areprompted and then print a label using that information.
Items Required for the USB Host Exercises
To perform the exercises in this document, you will need the following:
• USB Flash drive up to 1 Terabyte (TB). The printer will not recognize drives larger than 1 TB.• USB keyboard.• Various files referenced below (from files attached inside this PDF file)• Free Zebra Utilities app for your smart phone (search for Zebra Tech in the Google Play store).
Files for Completing the Exercises
Most of the actual files that you need to complete the exercises in these section are attached here in thePDF file. Copy these files to your computer before you begin the exercises. Where possible, the contentsof the files are shown. The contents of files that contain coded content, which cannot be viewed as text oras an image, are not included.
File 1: ZEBRA.BMP
File 2: SAMPLELABEL.TXT
This simple label format prints the Zebra logo and a line of text at the end of the mirroring exercise.
File 3: LOGO.ZPL
Uses the Zebra logo bitmap file.
^XA^FO100,75^XGE:zebra.bmp^FS^FO100,475^A0N,50,50^FDMirror from USB Completed^FS^XZ
99

USB Host Port and Link-OS Usage Examples
File 4: USBSTOREDFILE.ZPL
This label format prints an image and text. This file will be stored on the USB memory device at the rootlevel so that it can be printed.
File 5: VLS_BONKGRF.ZPL
File 6: VLS_EIFFEL.ZPL
CT~~CD,~CC^~CT~^XA~TA012~JSN^LT0^LH0,0^JMA^PR4,4~SD15^LRN^CI0^XZ~DG000.GRF,07680,024,,[image data]^XA^LS0^SL0^BY3,3,91^FT35,250^BCN,,Y,N^FC%,{,#^FD%d/%m/%Y^FS^FT608,325^XG000.GRF,1,1^FS^FT26,75^A0N,28,28^FH\^FDThis label was printed from a format stored^FS^FT26,125^A0N,28,28^FH\^FDon a USB Flash Memory drive. ^FS^BY3,3,90^FT33,425^BCN,,Y,N^FD>:Zebra Technologies^FS^PQ1,0,1,Y^XZ^XA^ID000.GRF^FS^XZ
100
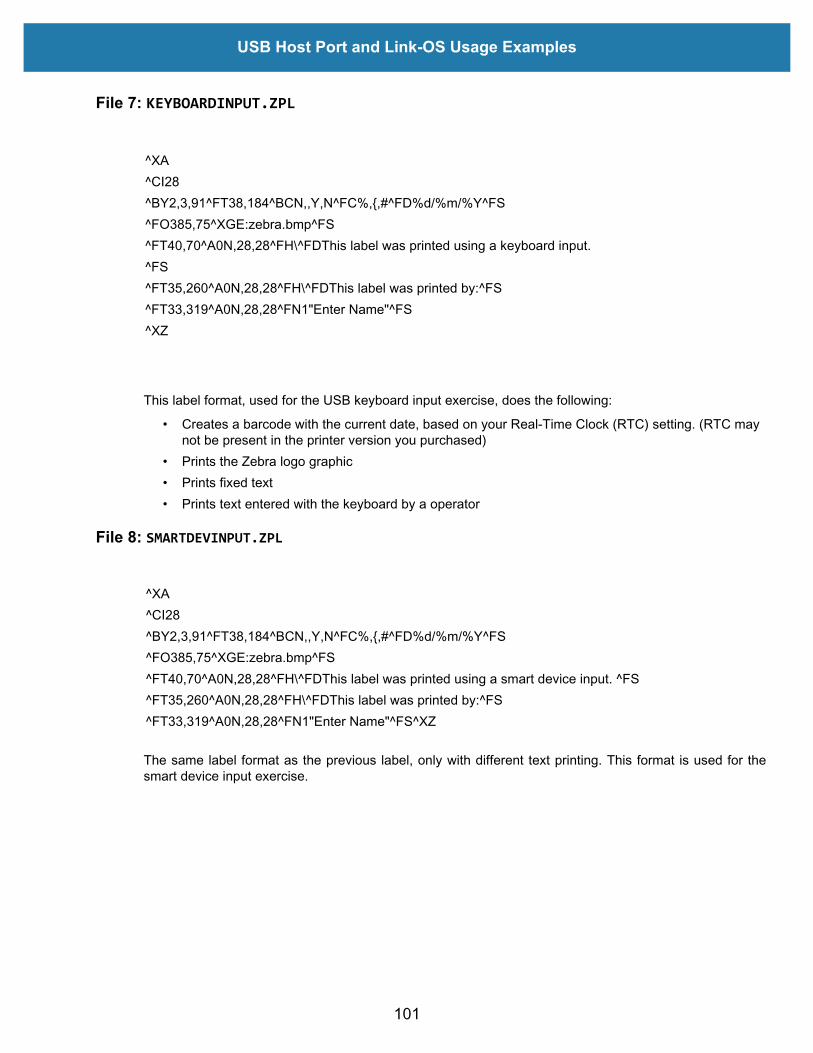
USB Host Port and Link-OS Usage Examples
File 7: KEYBOARDINPUT.ZPL
This label format, used for the USB keyboard input exercise, does the following:
• Creates a barcode with the current date, based on your Real-Time Clock (RTC) setting. (RTC may not be present in the printer version you purchased)
• Prints the Zebra logo graphic• Prints fixed text• Prints text entered with the keyboard by a operator
File 8: SMARTDEVINPUT.ZPL
The same label format as the previous label, only with different text printing. This format is used for thesmart device input exercise.
^XA^CI28^BY2,3,91^FT38,184^BCN,,Y,N^FC%,{,#^FD%d/%m/%Y^FS^FO385,75^XGE:zebra.bmp^FS^FT40,70^A0N,28,28^FH\^FDThis label was printed using a keyboard input.^FS^FT35,260^A0N,28,28^FH\^FDThis label was printed by:^FS^FT33,319^A0N,28,28^FN1"Enter Name"^FS^XZ
^XA^CI28^BY2,3,91^FT38,184^BCN,,Y,N^FC%,{,#^FD%d/%m/%Y^FS^FO385,75^XGE:zebra.bmp^FS^FT40,70^A0N,28,28^FH\^FDThis label was printed using a smart device input. ^FS^FT35,260^A0N,28,28^FH\^FDThis label was printed by:^FS^FT33,319^A0N,28,28^FN1"Enter Name"^FS^XZ
101
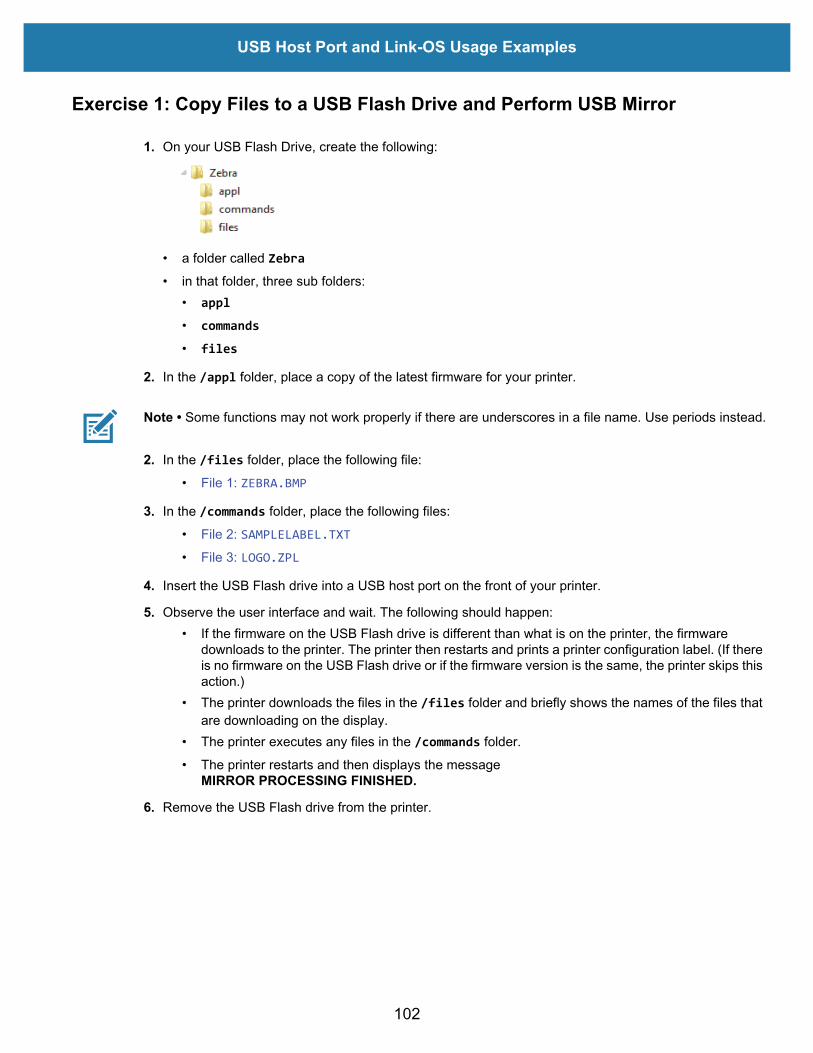
USB Host Port and Link-OS Usage Examples
Exercise 1: Copy Files to a USB Flash Drive and Perform USB Mirror
1. On your USB Flash Drive, create the following:
• a folder called Zebra • in that folder, three sub folders:
• appl • commands • files
2. In the /appl folder, place a copy of the latest firmware for your printer.
Note • Some functions may not work properly if there are underscores in a file name. Use periods instead.
2. In the /files folder, place the following file: • File 1: ZEBRA.BMP
3. In the /commands folder, place the following files: • File 2: SAMPLELABEL.TXT • File 3: LOGO.ZPL
4. Insert the USB Flash drive into a USB host port on the front of your printer.
5. Observe the user interface and wait. The following should happen:• If the firmware on the USB Flash drive is different than what is on the printer, the firmware
downloads to the printer. The printer then restarts and prints a printer configuration label. (If there is no firmware on the USB Flash drive or if the firmware version is the same, the printer skips this action.)
• The printer downloads the files in the /files folder and briefly shows the names of the files that are downloading on the display.
• The printer executes any files in the /commands folder.• The printer restarts and then displays the message
MIRROR PROCESSING FINISHED.
6. Remove the USB Flash drive from the printer.
102
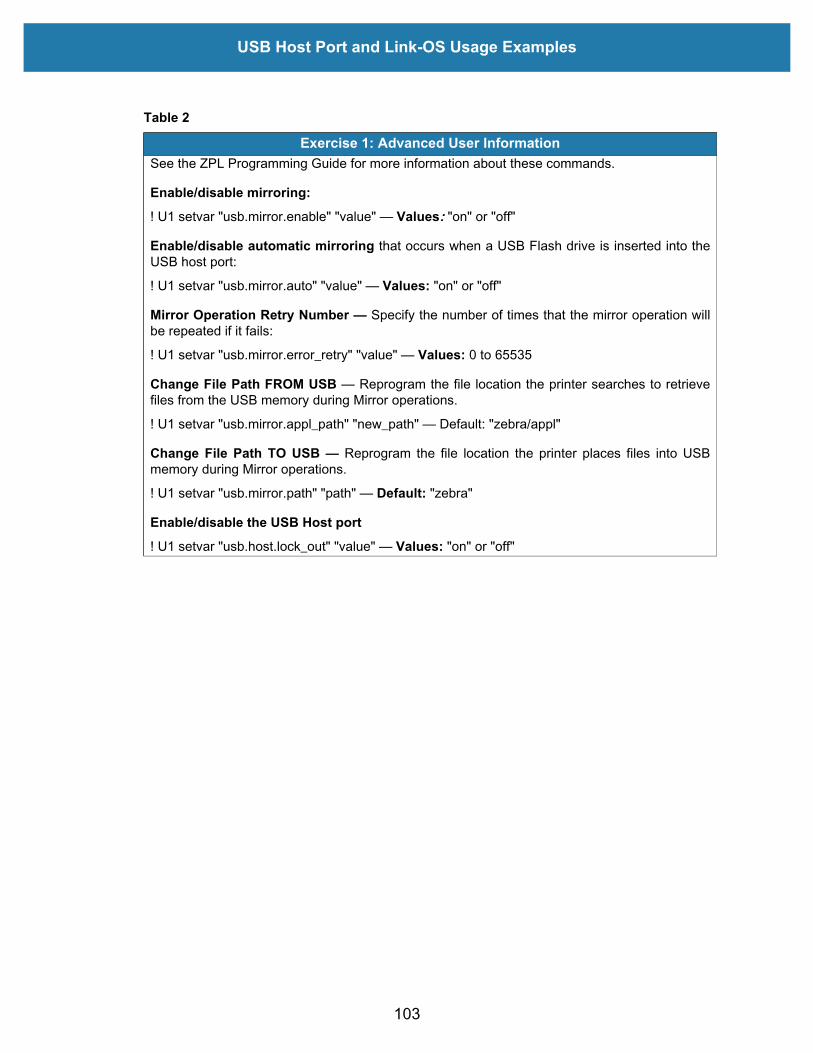
USB Host Port and Link-OS Usage Examples
Table 2
Exercise 1: Advanced User InformationSee the ZPL Programming Guide for more information about these commands.
Enable/disable mirroring:! U1 setvar "usb.mirror.enable" "value" — Values: "on" or "off"
Enable/disable automatic mirroring that occurs when a USB Flash drive is inserted into theUSB host port:
! U1 setvar "usb.mirror.auto" "value" — Values: "on" or "off"
Mirror Operation Retry Number — Specify the number of times that the mirror operation willbe repeated if it fails:
! U1 setvar "usb.mirror.error_retry" "value" — Values: 0 to 65535
Change File Path FROM USB — Reprogram the file location the printer searches to retrievefiles from the USB memory during Mirror operations.
! U1 setvar "usb.mirror.appl_path" "new_path" — Default: "zebra/appl"
Change File Path TO USB — Reprogram the file location the printer places files into USBmemory during Mirror operations.
! U1 setvar "usb.mirror.path" "path" — Default: "zebra"
Enable/disable the USB Host port! U1 setvar "usb.host.lock_out" "value" — Values: "on" or "off"
103
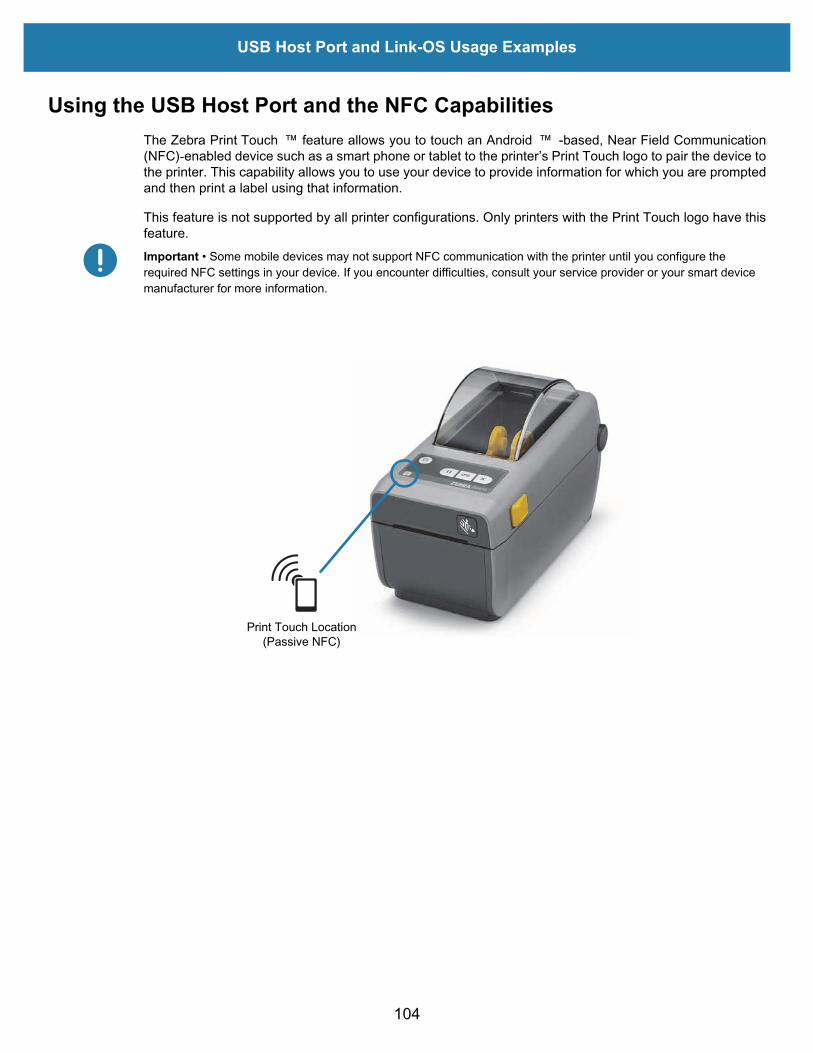
USB Host Port and Link-OS Usage Examples
Using the USB Host Port and the NFC CapabilitiesThe Zebra Print Touch ™ feature allows you to touch an Android ™ -based, Near Field Communication(NFC)-enabled device such as a smart phone or tablet to the printer’s Print Touch logo to pair the device tothe printer. This capability allows you to use your device to provide information for which you are promptedand then print a label using that information.
This feature is not supported by all printer configurations. Only printers with the Print Touch logo have thisfeature.Important • Some mobile devices may not support NFC communication with the printer until you configure the required NFC settings in your device. If you encounter difficulties, consult your service provider or your smart device manufacturer for more information.
Print Touch Location(Passive NFC)
104
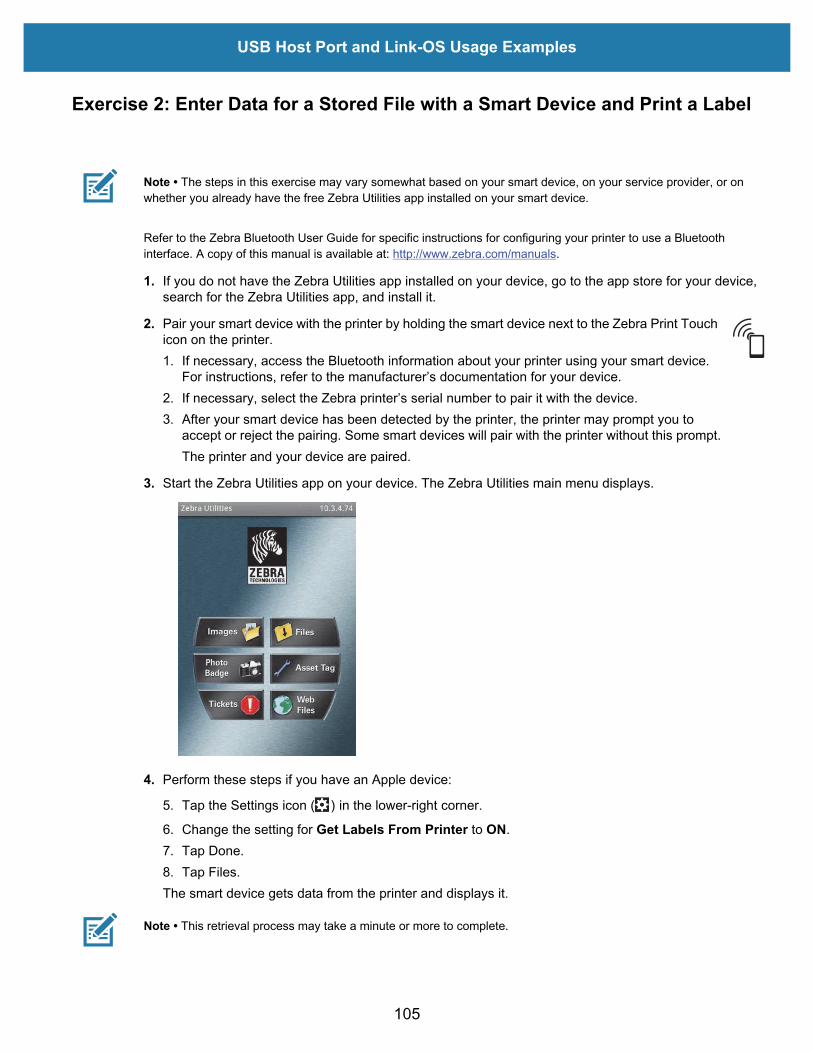
USB Host Port and Link-OS Usage Examples
Exercise 2: Enter Data for a Stored File with a Smart Device and Print a Label
Note • The steps in this exercise may vary somewhat based on your smart device, on your service provider, or on whether you already have the free Zebra Utilities app installed on your smart device.
Refer to the Zebra Bluetooth User Guide for specific instructions for configuring your printer to use a Bluetooth interface. A copy of this manual is available at: http://www.zebra.com/manuals.
1. If you do not have the Zebra Utilities app installed on your device, go to the app store for your device, search for the Zebra Utilities app, and install it.
2. Pair your smart device with the printer by holding the smart device next to the Zebra Print Touch icon on the printer. 1. If necessary, access the Bluetooth information about your printer using your smart device.
For instructions, refer to the manufacturer’s documentation for your device.2. If necessary, select the Zebra printer’s serial number to pair it with the device.3. After your smart device has been detected by the printer, the printer may prompt you to
accept or reject the pairing. Some smart devices will pair with the printer without this prompt.The printer and your device are paired.
3. Start the Zebra Utilities app on your device. The Zebra Utilities main menu displays.
4. Perform these steps if you have an Apple device:
5. Tap the Settings icon ( ) in the lower-right corner.
6. Change the setting for Get Labels From Printer to ON.7. Tap Done.8. Tap Files.The smart device gets data from the printer and displays it.
Note • This retrieval process may take a minute or more to complete.
105

USB Host Port and Link-OS Usage Examples
5. Scroll through the formats shown and select E:SMARTDEVINPUT.ZPL.Based on the ^FN field in the label format, the smart device prompts you for your name.
6. Enter your name at the prompt.
7. Change the quantity of labels to print, if desired.
8. Tap PRINT to print the label.
106

Maintenance
This section provides routine cleaning and maintenance procedures.
CleaningYour Zebra printer may require periodic maintenance to keep your printer functional and printing highquality labels, receipts, tags, etc.
Cleaning Supplies
The following printer cleaning supplies are recommended for use with your printer:
• Printhead Cleaning Pens for simple operator printhead cleaning• 99% pure Isopropyl Alcohol (Use a labeled dispenser. Never re-moisten cleaning materials used
to clean the printer).• Fiber-free Cleaning Swabs for media path, guides, and sensors and Cleaning Wipes for
media path and interior (for example Kimberly-Clark Kimwipes).• Can of Compressed Air.
Important • The cutter mechanism does not require maintenance cleaning. DO NOT clean the blade or mechanism. The blade has a special coating to resist adhesives and wear.
Important • Using too much alcohol can result in contamination of the electronic components requiring a much longer drying time before the printer will function properly.
Important • Do Not Use an air compressor in place of the can of compressed air. Air compressors have micro contaminants and particles the get into the air system and damage your printer.
Eye Injury Caution • Use eye protection to protect your eyes from flying particles and objects when using compressed air.
Get Zebra Supplies and Accessories for Cleaning Your PrinterGo to the Zebra Web site: www.zebra.com/accessories
107

Maintenance
Recommended Cleaning Schedule
PrintheadInterval: Clean the printhead after every 5 rolls printed.
Procedure: Cleaning the Printhead
Standard Platen (Drive) Roller Interval: As needed to improve print quality. Platen rollers can slip causing print image distortion and inworst case scenarios not move the media (labels, receipts, tags, etc.).
Procedure: See Platen Cleaning and Replacement.
Note • Standard platen rollers come in two colors, black (203 dpi) and gray (300 dpi).
Linerless Platen (Drive) RollerInterval: If there is observed build-up of particles on the platen roller, use this procedure. The linerlessplaten normally does not require cleaning. The adhesive side of the media picks up particles as you print.
If the linerless media is sticking and binding in the printer, the linerless platen normally needs to bereplaced. The silicon non-stick coating has been used up.
Important • Linerless platen rollers come in two colors, reddish-brown (203 dpi) and brown (300 dpi).
Important • Cleaning the roller with solutions or rubbing the delicate surface of this type of roller willpermanently damage or shorten the usable life of the linerless platen.
Important • The platen roller can accumulate adhesive on the outer edges of the roller. After using manyrolls of media, these ‘rings’ of adhesive can get dislodged when using the printer. These particle clumpscan then get transferred to other areas in the printer, most importantly, the printhead.
Procedure: To remove adhesive particles, use the adhesive side of a piece of linerless media to gentlypress and remove the particles from the plater roller. Use the Platen Cleaning and Replacement procedureto get better access for particle removal.
Media PathInterval: Clean as needed.
Method: Clean it thoroughly with fiber-free cleaning swabs and cloths moistened with 99% isopropylalcohol. Let alcohol evaporate completely.
Procedure: See Media Path Cleaning.
108
Maintenance
InteriorInterval: Clean the printer as needed.
Method: Use a soft cloth, brush or compressed air to wipe or blow dust and particles out of the printer.Use 99% isopropyl alcohol and a fiber-free cleaning cloth to dissolve contaminants like oils and grime.
ExteriorInterval: Clean as needed.
Method: Use a soft cloth, brush or compressed air to wipe or blow dust and particles out of the printer.The exterior of the printer can be cleaned using plain soap and water solutions to moisten the cloth. Onlyuse the minimum amount of cleaning solution to avoid getting solution in the printer or other areas. Do notclean connectors or interior of the printer with this method.
Healthcare Printer Models — The latest models now include Ultra-Violet (UV) and disinfectant-readyplastics for hospital and other similar environments. The user control’s are sealed so they can be cleanedwith the rest of the printer’s exterior. See the ‘Guide To Disinfecting and Cleaning Zebra® HealthcarePrinters’ on the Zebra Web site for the latest information on tested and approved cleaning materials, andcleaning methods.
Label Dispenser OptionInterval: As needed to improve label dispensing operations.
Procedure: See Label Dispenser Option cleaning.
Cutter OptionInterval: Not an operator serviceable component. Do Not Clean inside the cutter opening or blademechanism. You may use the Exterior cleaning to clean the cutter bezel (housing).
Method: Call a service technician.
Procedure: Not applicable.
Cut Warning • There are no operator serviceable parts in the cutter unit. Never remove the cutter cover (bezel). Never attempt to insert objects or fingers in to the cutter mechanism.
Important • The blade has a special coating to resist adhesives and wear. Cleaning it may ruin the blade.
Important • Using un-approved tools, cotton swabs, solvents (including alcohol), etc.; all may damage or shorten the cutter’s usable life or cause the cutter to bind.
109

Maintenance
Cleaning the Printhead
Always use a new cleaning pen on the printhead (an old pen carries contaminants from its previous usethat may damage the printhead).
When you load new media, you should clean the printhead for optimal print operations.
Hot Surface Caution • The printhead becomes hot while printing. To protect from damaging the printhead and risk of personal injury, avoid touching the printhead. Only use the cleaning pen to perform printhead maintenance.
ESD Caution • The discharge of electrostatic energy that accumulates on the surface of the human bodyor other surfaces can damage or destroy the printhead and other electronic components used in thisdevice. You must observe static-safe procedures when working with the printhead or the electroniccomponents under the top cover.When you load new media, you can also clean the printhead.
1. Rub the cleaning pen across the dark area of the printhead. Clean from the middle to the outside. This will move adhesive transferred from the edges of media to the outside of media path.
2. Wait one minute before closing the printer.
110

Maintenance
Media Path Cleaning
Use a cleaning swab and or a lint free cloth to remove debris, dust or crust that has built-up on the holders,guides and media path surfaces. Lightly moisten the swab or cloth with 99% solution medical-gradealcohol. For hard to clean areas, use extra alcohol on a cleaning swab to soak the debris to break up anyadhesive that may have accumulated on surfaces in the media compartment.
Do not clean the printhead, movable sensor, or platen as part of this process.
1. Wipe the inside areas (outlined in blue) of the media compartment.
2. Wipe the inside surfaces of the roll holders and the underside of the media guides with a swab.
3. Wipe the movable sensor slide channel (but not sensor). Move the sensor to get to all areas.
4. Wait one minute before closing the printer. Discard the cleaning swab after use.
Media Roll Holdersand Guides
111

Maintenance
Cleaning the Cutter and Label Dispenser Options
This is a continuation of cleaning the media path for either option if it is installed on your printer.
Cutter
The media path surfaces can be cleaned but not the internal cutter blades or mechanism.
1. Wipe the ridges and the plastic surfaces of the media entry (inside) and exit slot (outside) of the cutter. Clean inside the areas outlined in blue.
2. Repeat as necessary to remove any adhesive or contaminate residue after it dries.
Label Dispenser
1. Open the door and clean the peel bar, inner surfaces and ridges on the door.
2. Wipe the roller while rotating it. Discard the swab or cloth and clean again to remove residue.
3. Clean the sensor window. The window should be clear of streaks and residue.
Ridges
Pinch Roller
Peel Bar
Label Taken Sensor
112

Maintenance
Sensor Cleaning
Dust can accumulate on the media sensors. Do not use an air compressor to remove dust. Compressorsadd moisture, fine grit, and lubricant which can contaminate your printer.
1. Gently brush away dust or use a can of compressed air; if necessary, use a dry swab to brush away dust. If adhesives or other contaminants remain, use an alcohol moistened swab to break it up.
2. Use a dry swab to remove any residue that may be left from the first cleaning.
3. Repeat steps 1 and 2 as required until all residue and streaks are removed from the sensor..
Upper Array Sensor(Web/Gap)
Movable Sensor(Black Mark and Lower Web/Gap)
113

Maintenance
Platen Cleaning and Replacement
The platen (drive roller) normally does not require cleaning. Paper and liner dust can accumulate withoutaffecting print operations.
Contaminants on the platen roller can damage the printhead or cause the media to slip or stick whenprinting. Adhesive, dirt, general dust, oils and other contaminants should be cleaned immediately off theplaten.
Clean the platen (and media path) whenever the printer has significantly poorer performance, print qualityor media handling. The platen is the print surface and drive roller for your media. If sticking or jammingcontinues even after cleaning, you must replace the platen.
The platen can be cleaned with a fiber-free swab (such as a Texpad swab) or a lint free, clean, damp clothvery lightly moistened with medical grade alcohol (90% pure or better).
1. Open the cover (and dispenser door if the dispenser is installed). Remove media from platen area.
2. Pull the platen bearing latch release tabs on the right and left sides towards the front of the printer and rotate them up.
Platen Bearings Platen Bearings
114

Maintenance
3. Lift the platen out of the printer’s bottom frame.
4. Slide the gear and the two (2) bearings off the shaft of the platen roller.
Platen Bearings
115

Maintenance
5. Clean the platen with the alcohol moistened swab. Clean from the center out. Repeat this process until all of the roller surface has been cleaned. If there has been heavy adhesive build-up or label jam, repeat with a new swab to remove residual contaminants. Adhesives and oils, for example, may be thinned by the initial cleaning but not completely removed.
6. Discard the cleaning swabs after use - do not reuse.
7. Make sure the bearings and drive gear are on the shaft of the platen roller.
8. Align the platen with the gear to the left and lower it into the printer’s bottom frame.
9. Rotate the platen bearing latch release tabs down on the right and left sides towards the rear of the printer and snap them into place.
Allow the printer to dry for one minute before closing the dispenser door, media cover or loading labels.
116
Maintenance
Other Printer MaintenanceThere are no user level maintenance procedures beyond those detailed in this section. See theTroubleshooting for more information on diagnosing printer and print problems.
RTC BatteryThe Real Time Clock (RTC) is available with printers that have factory installed networking options and arepaired with Zebra Print Touch feature (which is identified by Print Touch logo on the front of the printer).
The clock’s battery is rated to provide approximately ten (10) years of service and is not user replaceable.See a Zebra authorized service technician to replace the battery. See the warranty for your printer for moredetails at the Zebra Web site:
www.zebra.com/warranty
Caution • The printer has a three volt lithium battery. You can discern a low or flat battery if the printer provides a consistently delayed date stamp. Battery replacement must be performed by a qualified service technician. Only use a Zebra approved replacement battery.
Important • Recycle batteries according to local your guidelines and regulations. Wrap the battery when disposing (or storing) to avoid a short circuit.
Caution • DO NOT short circuit the battery. Short circuiting the battery may result in heat generation, fire or bursting.
Caution • DO NOT heat, disassemble or dispose of battery in fire.
FusesThere are no replaceable fuses in these printers or power supplies.
117
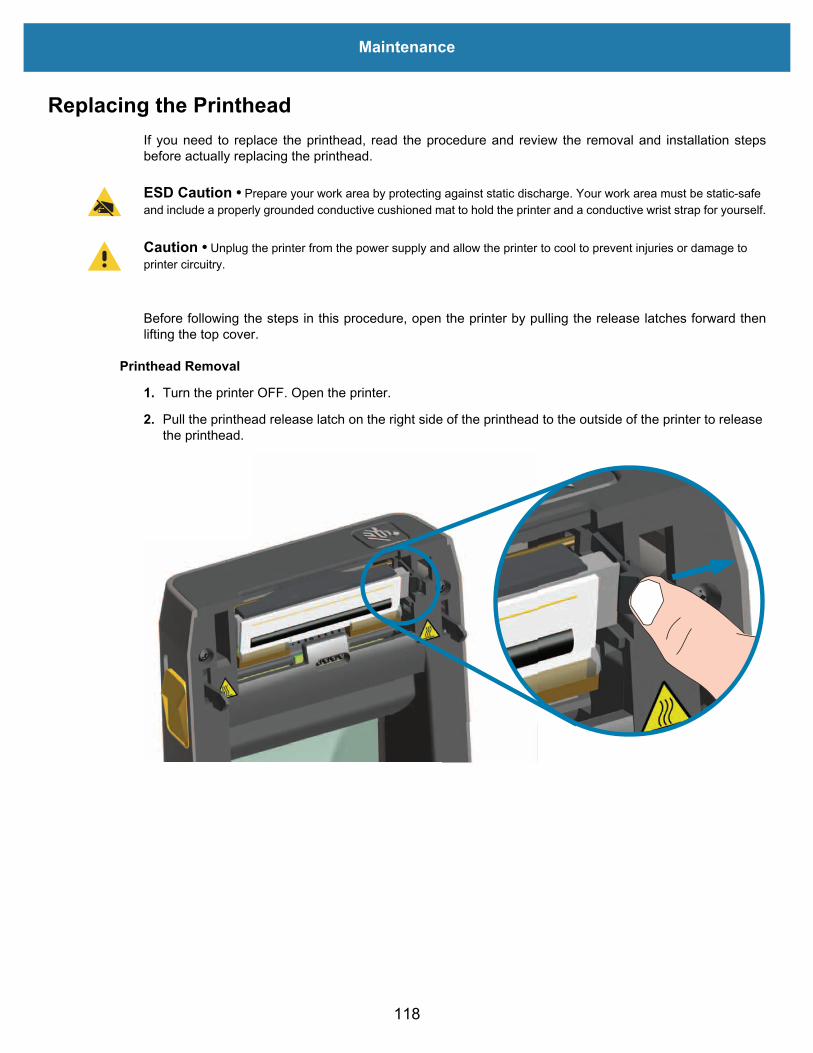
Maintenance
Replacing the PrintheadIf you need to replace the printhead, read the procedure and review the removal and installation stepsbefore actually replacing the printhead.
ESD Caution • Prepare your work area by protecting against static discharge. Your work area must be static-safe and include a properly grounded conductive cushioned mat to hold the printer and a conductive wrist strap for yourself.
Caution • Unplug the printer from the power supply and allow the printer to cool to prevent injuries or damage to printer circuitry.
Before following the steps in this procedure, open the printer by pulling the release latches forward thenlifting the top cover.
Printhead Removal
1. Turn the printer OFF. Open the printer.
2. Pull the printhead release latch on the right side of the printhead to the outside of the printer to release the printhead.
118

Maintenance
3. Swing the loose right side of the printhead out of the printer. Pull it to the right a little to get the left side of the printhead clear. Pull the printhead free to gain access to its attached cables.
4. Gently but firmly pull the two printhead cable bundle connectors off of the printhead.
Printhead Connectors
119

Maintenance
5. Gently but firmly pull the single black ground wire off the back side of the printhead.
120
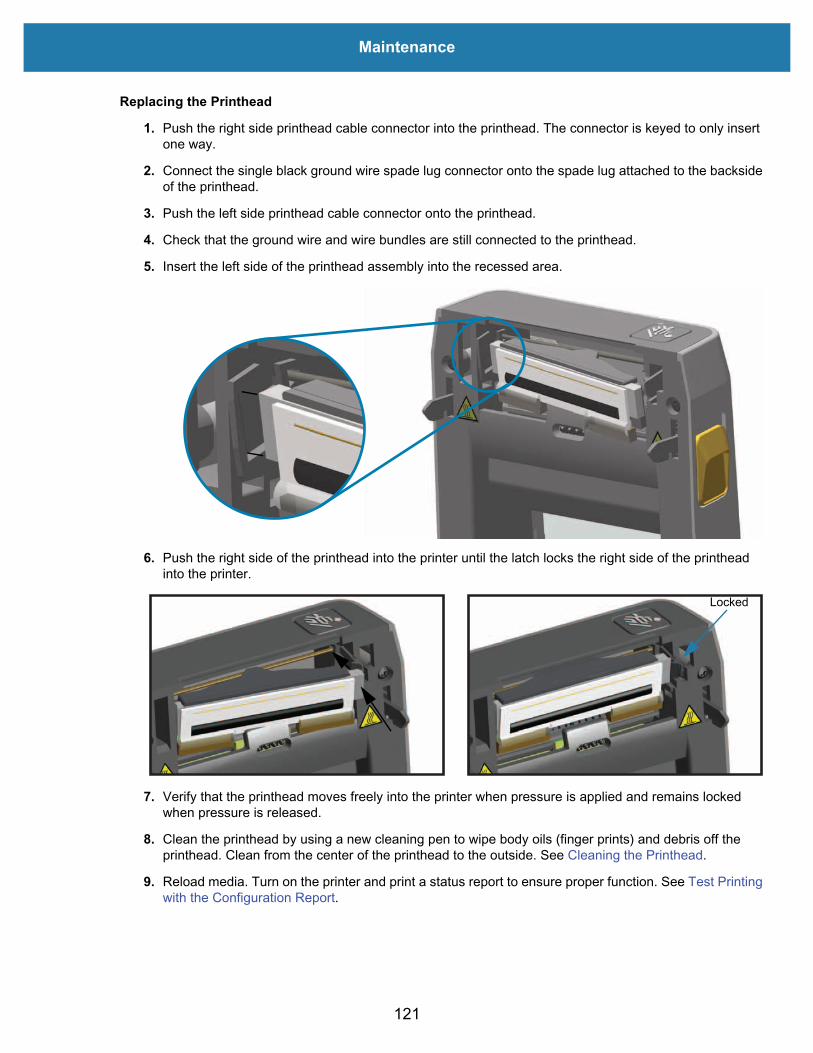
Maintenance
Replacing the Printhead
1. Push the right side printhead cable connector into the printhead. The connector is keyed to only insert one way.
2. Connect the single black ground wire spade lug connector onto the spade lug attached to the backside of the printhead.
3. Push the left side printhead cable connector onto the printhead.
4. Check that the ground wire and wire bundles are still connected to the printhead.
5. Insert the left side of the printhead assembly into the recessed area.
6. Push the right side of the printhead into the printer until the latch locks the right side of the printhead into the printer.
7. Verify that the printhead moves freely into the printer when pressure is applied and remains locked when pressure is released.
8. Clean the printhead by using a new cleaning pen to wipe body oils (finger prints) and debris off the printhead. Clean from the center of the printhead to the outside. See Cleaning the Printhead.
9. Reload media. Turn on the printer and print a status report to ensure proper function. See Test Printing with the Configuration Report.
Locked
121

Troubleshooting
This section provides troubleshooting procedures and information.
Resolving Alerts and Errors
Alert: Printhead Open
A print command or a FEED button has been pressed and the printer has detected that the printhead(cover) is not closed.
Possible Cause - 1The cover is open or has not been closed properly.
Resolution
Close the cover/printhead. Push down on the front top corners of the printer’s cover. You should normallyhear and feel the cover latches snap in place to lock the cover closed for printing.
See Closing the printer.
Possible Cause - 2The printer’s Head-Open switch needs service.
Resolution
Call a service technician.
122

Troubleshooting
Alert: Media Out
A print command, a FEED button has been pressed, or you are printing; and the printer can not detectmedia in the print path.
Possible Cause - 1There is no media (roll) in the printer.
Resolution
Load your chosen media in the printer and close the printer. You may need to press the FEED button onceor the PAUSE button the get the printer to resume your print operation. See Loading Roll Media.
Possible Cause - 2Open the printer: If there is a missing label on the roll between two labels at the end of a roll of labels, thenthis is the method used by the label roll manufacture to identify the end of the roll. See Detecting a MediaOut Condition.
Resolution
Replace the empty media roll and continue printing. Do not power the print off or you will loose your printjob. See Detecting a Media Out Condition.
Possible Cause - 3Misaligned media sensor.
Resolution
Check the position of the media sensor. See Using the Movable Sensor.
The printer may need to be calibrated for the media after the adjusting the sensor location. See Run aSmartCal Media Calibration.
Possible Cause - 4The printer is set for noncontinuous (labels or black mark) media, but continuous media is loaded.
Resolution
Check the position of the media sensor is in the center default location. See Using the Movable Sensor.
The printer may need to be calibrated for the media after the adjusting the sensor location. See Run aSmartCal Media Calibration.
123

Troubleshooting
Possible Cause - 5The media sensor is dirty.
Resolution
Clean the Upper Web (Gap) Sensor Array and the lower Movable Media sensors. See Sensor Cleaning.
Reload your media, adjust the Movable Media sensor’s position for your media, and recalibrate the printerfor the media. See Loading Roll Media and Run a SmartCal Media Calibration.
Possible Cause - 6The media sensing is not working. Possible data corruption of memory or faulty components.
Resolution
1 — Reload the printer’s firmware. See Updating Printer Firmware.
2 — If this does not fix this issue, call a service technician.
Alert: CUT ERROR
The cutter blade is bound and is not moving properly
Possible Cause - 1Media, adhesive, or external object has stopped the cutter blade from operating.
Resolution
1 — Turn the printer off by holding the power using the POWER button down for 5 seconds. Wait for theeprinter to shutdown completely. Turn the printer on.
2 — If the printer does not recover from this error, call a service technician. This is not a operatorserviceable item.
Cut Warning • There are no operator serviceable parts in the cutter unit. Never remove the cutter cover (bezel). Never attempt to insert objects or fingers in to the cutter mechanism.
Note • Using unapproved tools, cotton swabs, solvents (including alcohol), etc. all may damage or shorten the cutter’s usable life or cause the cutter to jam.
124
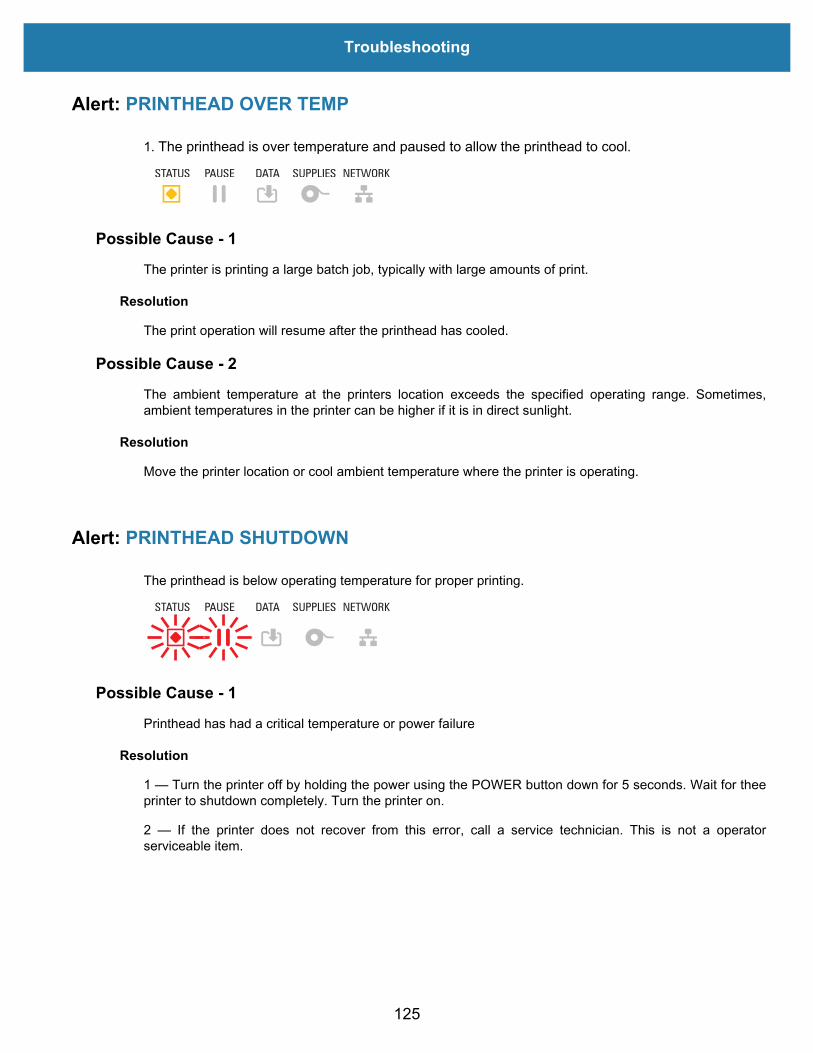
Troubleshooting
Alert: PRINTHEAD OVER TEMP
1. The printhead is over temperature and paused to allow the printhead to cool.
Possible Cause - 1The printer is printing a large batch job, typically with large amounts of print.
Resolution
The print operation will resume after the printhead has cooled.
Possible Cause - 2The ambient temperature at the printers location exceeds the specified operating range. Sometimes,ambient temperatures in the printer can be higher if it is in direct sunlight.
Resolution
Move the printer location or cool ambient temperature where the printer is operating.
Alert: PRINTHEAD SHUTDOWN
The printhead is below operating temperature for proper printing.
Possible Cause - 1Printhead has had a critical temperature or power failure
Resolution
1 — Turn the printer off by holding the power using the POWER button down for 5 seconds. Wait for theeprinter to shutdown completely. Turn the printer on.
2 — If the printer does not recover from this error, call a service technician. This is not a operatorserviceable item.
125
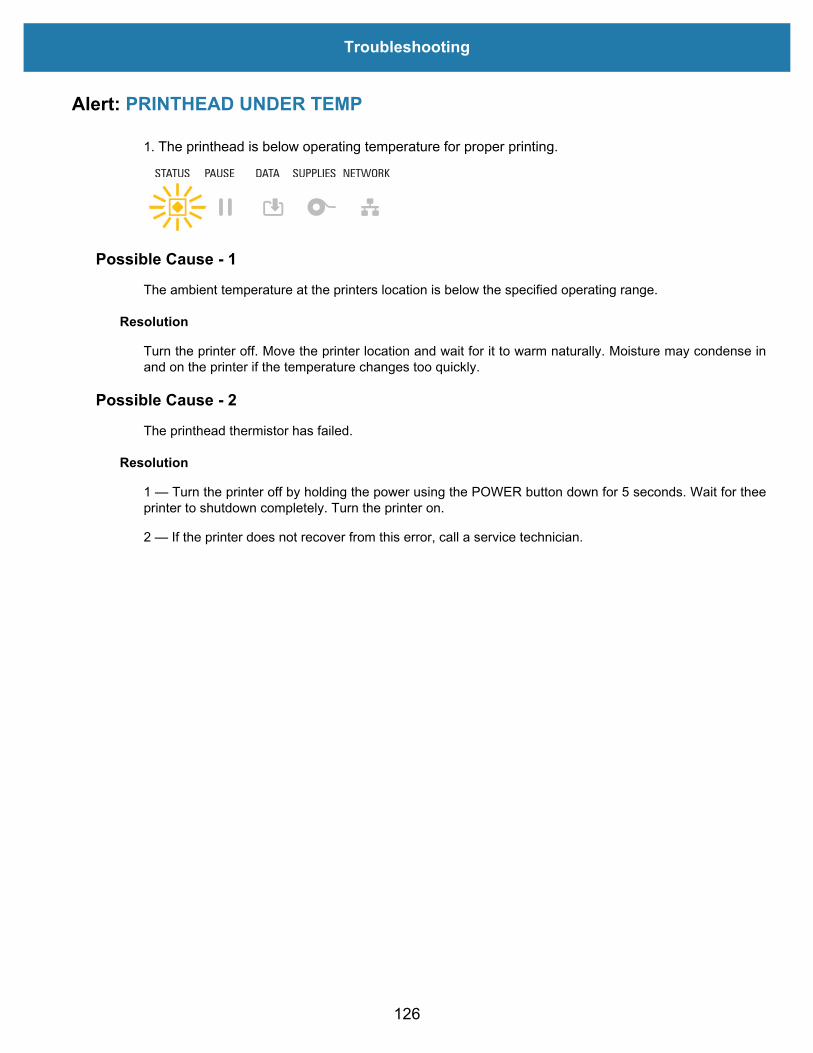
Troubleshooting
Alert: PRINTHEAD UNDER TEMP
1. The printhead is below operating temperature for proper printing.
Possible Cause - 1The ambient temperature at the printers location is below the specified operating range.
Resolution
Turn the printer off. Move the printer location and wait for it to warm naturally. Moisture may condense inand on the printer if the temperature changes too quickly.
Possible Cause - 2The printhead thermistor has failed.
Resolution
1 — Turn the printer off by holding the power using the POWER button down for 5 seconds. Wait for theeprinter to shutdown completely. Turn the printer on.
2 — If the printer does not recover from this error, call a service technician.
126
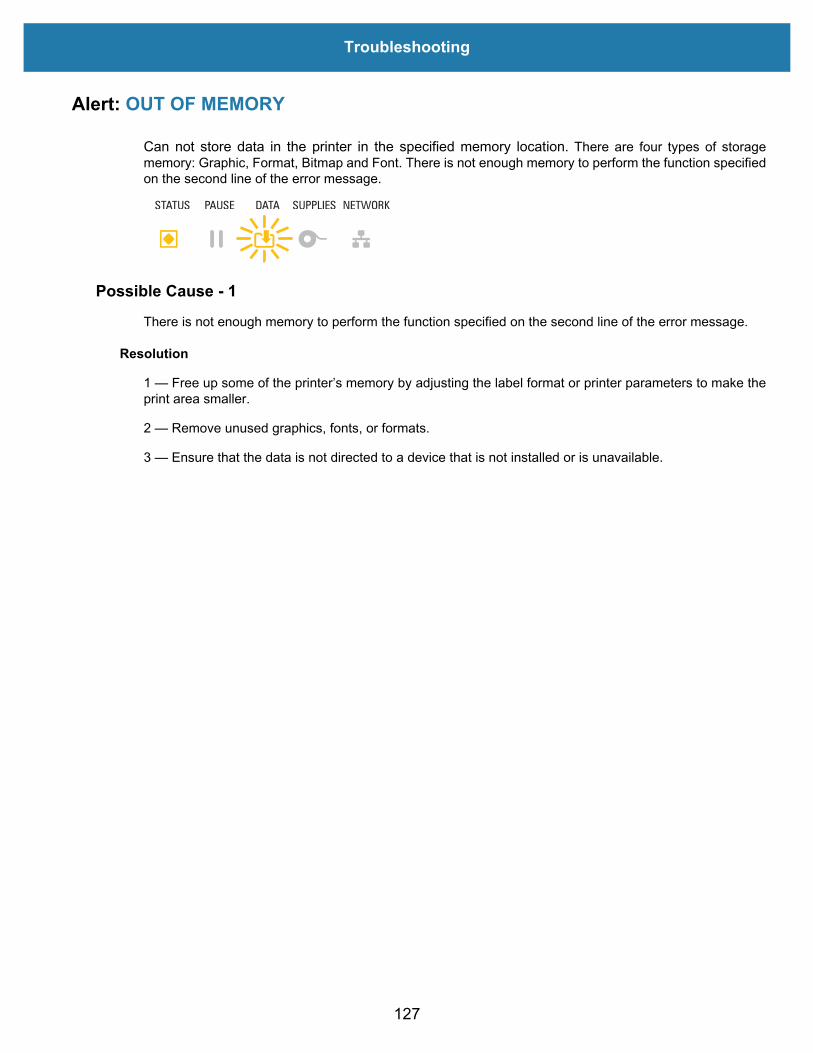
Troubleshooting
Alert: OUT OF MEMORY
Can not store data in the printer in the specified memory location. There are four types of storagememory: Graphic, Format, Bitmap and Font. There is not enough memory to perform the function specifiedon the second line of the error message.
Possible Cause - 1There is not enough memory to perform the function specified on the second line of the error message.
Resolution
1 — Free up some of the printer’s memory by adjusting the label format or printer parameters to make theprint area smaller.
2 — Remove unused graphics, fonts, or formats.
3 — Ensure that the data is not directed to a device that is not installed or is unavailable.
127
Troubleshooting
Resolving Print IssuesThis section helps you identify issues with printing or print quality, the possible causes, and therecommended solutions.
Issue: General Print Quality Issues
The printed image does not look right.
Possible Cause - 1The printer is set at an incorrect darkness level and/or print speed.
Resolution
Perform the Print Quality Report (FEED self test) to determine the ideal darkness and speed settings foryour application. Do not set print speeds above the manufacturer’s maximum rated speed for your media(print material).See Reset Printer Factory Defaults (PAUSE + FEED Self Test) and Adjusting the PrintQuality.
Possible Cause - 2The printhead is dirty.
Resolution
Clean the printhead. See Cleaning the Printhead.
Possible Cause - 3The platen roller is dirty or damaged.
Resolution
Clean or replace the platen. Platens can wear out or get damaged. See Platen Cleaning and Replacement.
Possible Cause - 4The printhead has worn out.
Resolution
Replace the printhead. The printhead can wear out and be damaged. See Replacing the Printhead.
Possible Cause - 5You may be using the wrong power supply.
Resolution
Verify you are using the power supply that came with this printer.
128
Troubleshooting
Issue: No Print on the Label
The printed image does not look right.
Possible Cause - 1The media may not be direct thermal media (and is thermal media, made for thermal transfer printers).
Resolution
See the test procedure, Determining Thermal Media Types.
Possible Cause - 2Media has been loaded incorrectly.
Resolution
The media printable surface must face up towards the printhead. See Getting Ready to Print followed byLoading Roll Media.
129

Troubleshooting
Issue: Labels Are Distorted in Size or Print Area Start Position Varies
Includes printed image that skips between labels (mis-registration).
Possible Cause - 1Media has been loaded incorrectly or the movable media sensor is not set properly.
Resolution
Verify that the sensor is set and positioned correctly for your media type and sensing location. SeeLoading Roll Media ,Setting Media Sensing by Media type, and Using the Movable Sensor.
Possible Cause - 2The media sensors are not calibrated for your media length, physical properties, or sensing type(gap/notch, continuous, or mark).
Resolution
See Run a SmartCal Media Calibration. or if it still skips labels try a Manual Media Calibration.
Possible Cause - 3The platen (drive) roller is slipping or damaged.
Resolution
Clean or replace the platen. Platens can wear out or get damaged. See Platen Cleaning and Replacement.
Possible Cause - 4The printer has communication issues with cables or communication settings.
Resolution
See Communication Issues.
130

Troubleshooting
Communication IssuesThis section identifies problems with communications, the possible causes, and the recommendedsolutions.
Issue: Label Job Sent, No Data Transfer
A label format was sent to the printer but was not recognized. The DATA light does not flash.
Possible CauseThe communication parameters are incorrect.
Resolution - 1
Check the printer driver or software communications settings (if applicable).
Resolution - 2
Serial Port Only - Check the printer’s handshake protocol and serial port settings. The setting used mustmatch the one being used by the host computer. See Serial Interface for the printer’s default serial portsettings.
Resolution - 3
The serial cable you are trying to use may not be a standard DTE or DCE type cable, is damaged, or is toolong per the RS-232 Serial ports specifications. See Serial Port Interface.
Issue: Label Job Sent, Skips Labels or Prints Bad Content
A label format was sent to the printer. Several labels print, then the printer skips, misplaces, misses, ordistorts the image on the label.
Possible CauseThe serial communication settings are incorrect.
Resolution - 1
Check the printer driver or software communications settings (if applicable). Ensure that the flow controlsettings and other serial port handshake setting match the host system.
131

Troubleshooting
Issue: Label Job Sent, Data Transfers, But No Print
A label format was sent to the printer but was not recognized. The DATA light flashes but no printingoccurs.
Possible Cause - 1The prefix and delimiter characters set in the printer do not match the ones in the label format.
Resolution
Verify the ZPL programmings prefix (COMMAND CHAR) and delimiter (DELIM./CHAR) characters.Configuration Setting to Command Cross-reference.
Possible Cause - 2Incorrect data is being sent to the printer.
Resolution
Check the communication settings on the computer. Ensure that they match the printer settings.
Possible Cause - 3Incorrect data is being sent to the printer.
Resolution
Check the label format. See the ZPL Programmer’s Manual for details on printer programming. For printerlinks to manuals, see the About section of this guide.
132

Troubleshooting
Miscellaneous IssuesThis section identifies miscellaneous issues with the printer, the possible causes, and the recommendedsolutions.
Issue: Settings are Lost or Ignored
Some parameters are set incorrectly.
Possible Cause - 1Printer settings were changed without saving them.
Resolution
The ZPL ^JU command was not used to save your configuration before turning the printer off. Cycle theprinter OFF and then back ON to verify settings have been saved.
Possible Cause - 2The label format/form commands or commands sent directly to the printer have syntax errors or have beenused incorrectly.
• A firmware command turned off the ability to change the parameter.• A firmware command changed the parameter back to default setting.
Resolution
See the ZPL programmer’s guide to verify command usage and syntax. See the About section for supportlinks. to view the programmer’ guide for your printer model.
Possible Cause - 3The prefix and delimiter characters set in the printer do not match the ones in the label format.
Resolution
Verify the ZPL programming settings of the Control, Command and Delimiter settings are correct for yoursystem software environment. Print a Configuration Report or use display’s Language Menu (if present) forthese three (3) menu items and compare it the commands in label format/form you are trying to print. SeeTest Printing with the Configuration Report and ZPL Configuration.
Possible Cause - 4The MLB (Main Logic Board) may be malfunctioning. Firmware is corrupted or the MLB needs service
Resolution
1 — Reset the printer to factory defaults. See use the Zebra Setup Utility and Open Printer Tools >Action > Load printer defaults.
2 — Reload printer firmware. See Updating Printer Firmware.
3 — If the printer does not recover from this error, call a service technician. This is not a user serviceableitem.
133

Troubleshooting
Issue: Non-continuous labels act as Continuous labels.
A non-continuous label format with matching media loaded in the printer, was sent to the printer but printslike it is continuous media.
Possible Cause - 1The printer was not calibrated for the media being used.
Possible Cause - 2The printer is configured for continuous media.
Resolution
Set the printer for the correct media type (gap/notch, continuous, or mark) and calibrate the printer usingRun a SmartCal Media Calibration, if necessary use Manual Media Calibration for hard to calibrate mediatypes.
Issue: Printer Locks-Up
All indicator lights are on and the printer locks up or the printer locks up while restarting.
Possible Cause - 1The printer memory has been corrupted by an unknown event.
Resolution - 1
1 — Reset the printer to factory defaults. See use the Zebra Setup Utility and Open Printer Tools >Action > Load printer defaults.
2 — Reload printer firmware. See Updating Printer Firmware..
3 — If the printer does not recover from this error, call a service technician. This is not a user serviceableitem.
134

Troubleshooting
Issue: Battery has a Red Indicator
Battery has a fault.
Possible Cause - 1The battery has reached its usable life or has a general component failure.
Possible Cause - 2Battery is too hot or too cold
Resolution
1 — Remove the battery from the printer and check charge status by charging the battery.
2 — Let the battery cool down or warm up to ambient temperature and recheck the battery charge.
3 — Replace the battery.
135

Tools
This section provides a variety of tools and utilities built into your printer. They are designed to assist youwith setup, configuration, and debugging (printer and command programming)
136

Tools
Printer DiagnosticsDiagnostic reports, calibration procedures, restoring factory defaults and other diagnostics provide specificinformation about the condition of the printer.Important • Use full-width media when performing self tests. If your media is not wide enough, the test labels may print on the platen (drive) roller.
Note • Diagnostic Testing Tips:
• When performing these self tests, do not send data to the printer from the host.If your media is shorter than the label to be printed, the test label continues on the next label.
• When canceling a self test prior to completion, always reset the printer by turning it OFF and then ON.
• If the printer is in dispense mode and the liner is being taken up by the applicator, the operator must manually remove the labels as they become available.
Each self test is enabled by pressing a specific user interface button or combination of buttons whileturning ON the printer power. Keep the button(s) pressed until the first indicator light turns off. The selectedself test automatically starts at the end of the Power-On Self Test.
Power-On Self Test
A Power-On Self Test (POST) is performed each time the printer power is turned ON. During this test, thecontrol panel indicators turn on and off to ensure proper operation. At the end of this self test, only theSTATUS indicator remains lit.
SmartCal Media Calibration
SmartCal is used to quickly calibrate the printer to the media currently loaded. During SmartCal, the printerwill automatically determine the media sensing type (gap, black line or notch) and then measure the lengthof the media.
To activate Smart Calibration, complete these steps:
1. Make sure media is properly loaded, the printer cover is closed, and printer power is ON.
2. Press and hold PAUSE + CANCEL buttons for two seconds.
3. The printer will FEED and measure several labels. When done, the printer will return to READY status.
If the printer should fail to recognize and correctly calibrate to the media, please refer to the Manual MediaCalibration procedure later in this section.
137
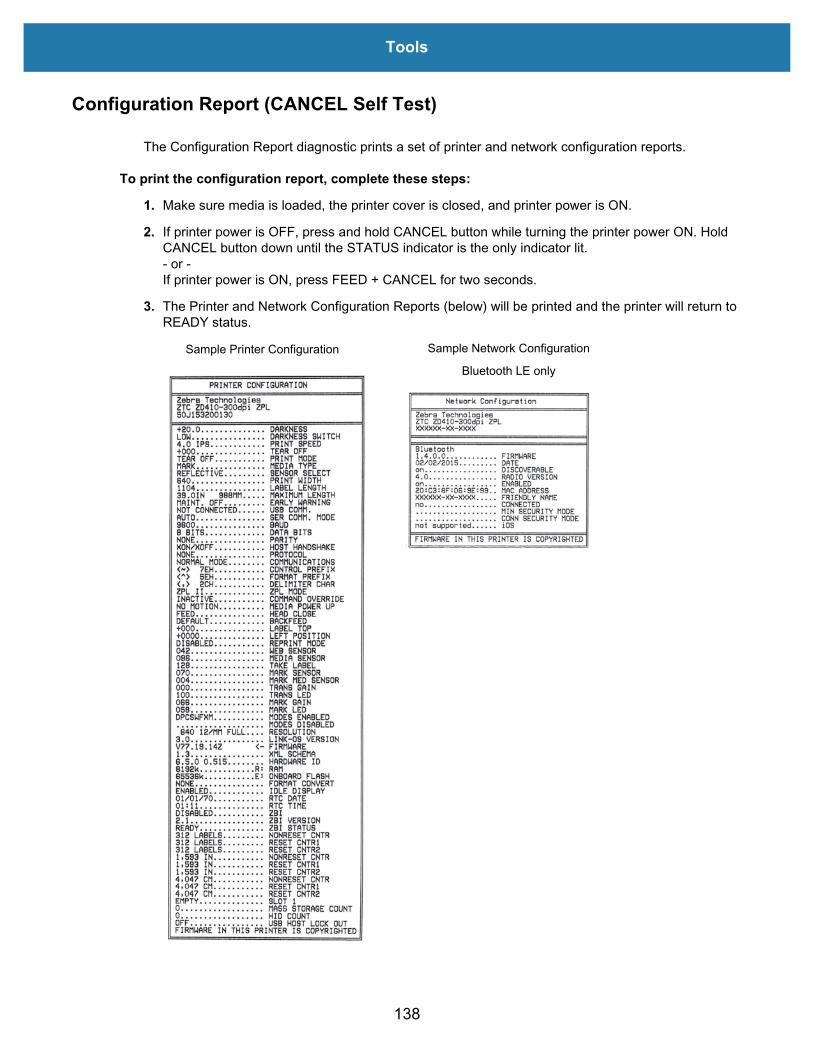
Tools
Configuration Report (CANCEL Self Test)
The Configuration Report diagnostic prints a set of printer and network configuration reports.
To print the configuration report, complete these steps:
1. Make sure media is loaded, the printer cover is closed, and printer power is ON.
2. If printer power is OFF, press and hold CANCEL button while turning the printer power ON. Hold CANCEL button down until the STATUS indicator is the only indicator lit.- or -If printer power is ON, press FEED + CANCEL for two seconds.
3. The Printer and Network Configuration Reports (below) will be printed and the printer will return to READY status.
Sample Printer Configuration Sample Network Configuration
Bluetooth LE only
138

Tools
Printer Network (and Bluetooth) Configuration Report
ZD-Series printers with Wired or Wireless connectivity options installed will print an additional printerconfiguration report. This information needed to establish and trouble shoot Ethernet (LAN and WLAN),Bluetooth 4.1 and Bluetooth LE network printing. The following printout is printed with the ZPL ~WLcommand.
iOS Bluetooth Support• iOS devices have Bluetooth Classic 4.X (with 3.0 compatibility) when the Wi-Fi and Bluetooth
Classic wireless connectivity option is installed in your printer and is noted as ‘supported’ on the bottom of the Bluetooth Configuration report.
• Some ZD series printers only have the Bluetooth LE (without Wi-Fi and classic Bluetooth). The iOS setting is noted on the bottom of the Bluetooth Configuration report as ‘not supported’ when the wireless connectivity option is not installed.
iOS Support Setting
139
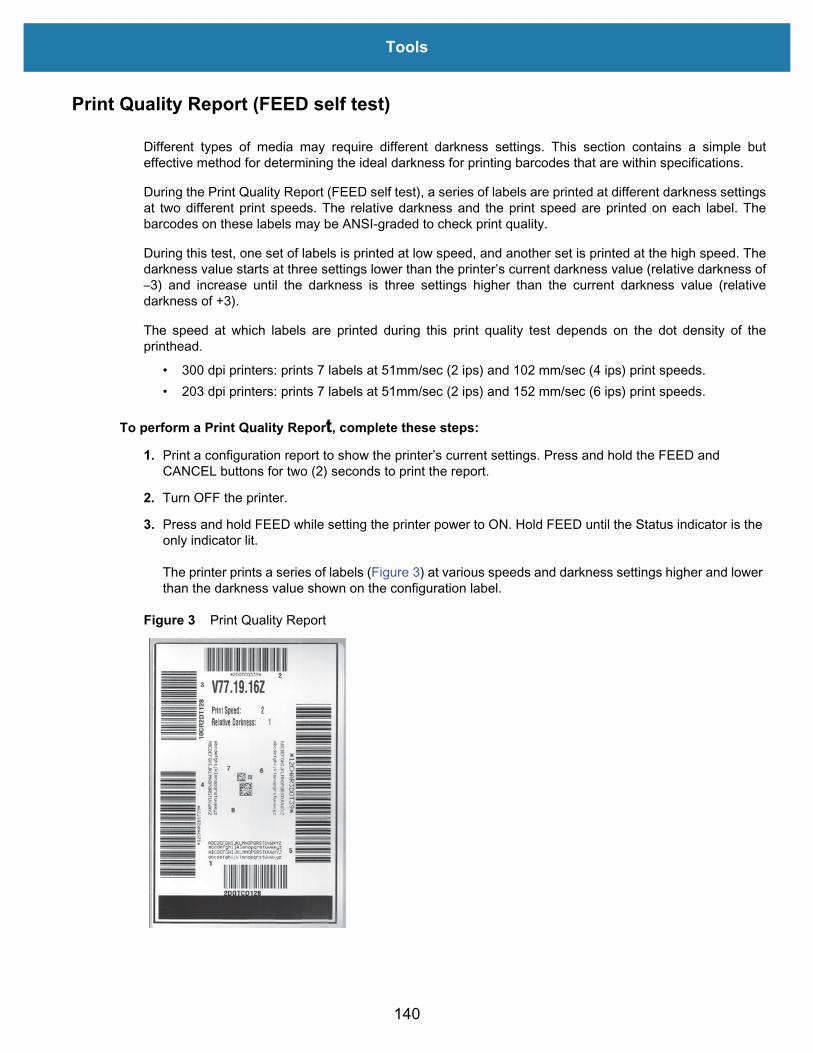
Tools
Print Quality Report (FEED self test)
Different types of media may require different darkness settings. This section contains a simple buteffective method for determining the ideal darkness for printing barcodes that are within specifications.
During the Print Quality Report (FEED self test), a series of labels are printed at different darkness settingsat two different print speeds. The relative darkness and the print speed are printed on each label. Thebarcodes on these labels may be ANSI-graded to check print quality.
During this test, one set of labels is printed at low speed, and another set is printed at the high speed. Thedarkness value starts at three settings lower than the printer’s current darkness value (relative darkness of–3) and increase until the darkness is three settings higher than the current darkness value (relativedarkness of +3).
The speed at which labels are printed during this print quality test depends on the dot density of theprinthead.
• 300 dpi printers: prints 7 labels at 51mm/sec (2 ips) and 102 mm/sec (4 ips) print speeds.• 203 dpi printers: prints 7 labels at 51mm/sec (2 ips) and 152 mm/sec (6 ips) print speeds.
To perform a Print Quality Report, complete these steps:
1. Print a configuration report to show the printer’s current settings. Press and hold the FEED and CANCEL buttons for two (2) seconds to print the report.
2. Turn OFF the printer.
3. Press and hold FEED while setting the printer power to ON. Hold FEED until the Status indicator is the only indicator lit.
The printer prints a series of labels (Figure 3) at various speeds and darkness settings higher and lower than the darkness value shown on the configuration label.
Figure 3 Print Quality Report
140
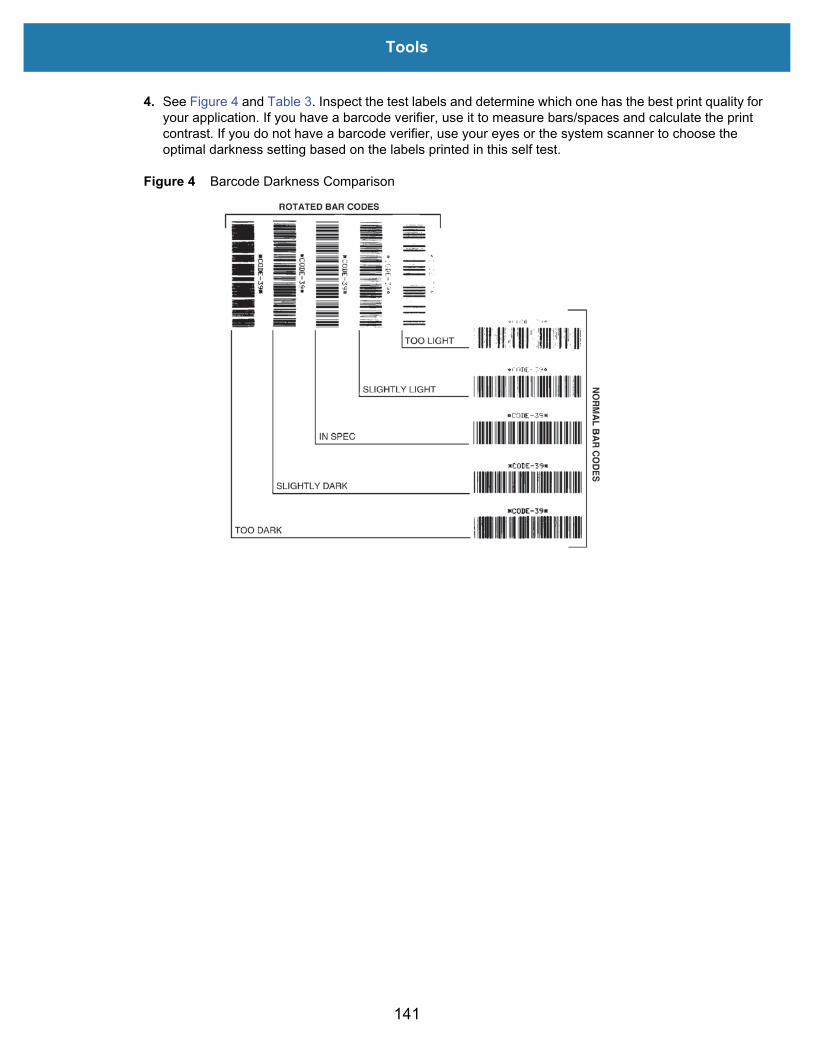
Tools
4. See Figure 4 and Table 3. Inspect the test labels and determine which one has the best print quality for your application. If you have a barcode verifier, use it to measure bars/spaces and calculate the print contrast. If you do not have a barcode verifier, use your eyes or the system scanner to choose the optimal darkness setting based on the labels printed in this self test.
Figure 4 Barcode Darkness Comparison
141

Tools
5. Note the relative darkness value and the print speed printed on the best test label.
6. Add or subtract the relative darkness value from the darkness value specified on the configuration label. The resulting numeric value is the best darkness value for that specific label and print speed combination.
7. If necessary, change the current darkness value to the darkness value on the best test label.
8. If necessary, change the current print speed to the speed value on the best test label.
Table 3 Visual Darkness Descriptions
Print Quality Description• Too dark • Labels that are too dark are fairly obvious. They may
be readable but not “in-spec.” • The normal barcode bars increase in size.• The openings in small alphanumeric characters may
appear filled in. • Rotated barcode have bars and spaces run together.
• Slightly dark • Slightly dark labels are not as obvious. • The normal barcode will be “in-spec.” • Small character alpha numerics will be bold and could
be slightly filled in. • The rotated barcode spaces are small when compared
to the “in-spec” code, possibly making the code unreadable.
• “In-spec” • The “in-spec” barcode can only be confirmed by a verifier, but it should exhibit the following visible characteristics.
• The normal barcode will have complete, even bars and clear, distinct spaces.
• The rotated barcode will have complete, even bars and clear, distinct spaces. Although it may not look as good as a slightly dark barcode, the barcode will be “in-spec.”
• In both normal and rotated styles, small alphanumeric characters look complete.
• Slightly light • Slightly light labels are, in some cases, preferred to slightly dark ones for “in-spec” barcodes.
• Both normal and rotated barcodes will be in spec, but small alphanumeric characters may not be complete.
• Too light • Labels that are too light are obvious. • Both normal and rotated barcodes have incomplete
bars and spaces. • Small alphanumeric characters are unreadable.
142
Tools
Reset Printer Factory Defaults (PAUSE + FEED Self Test)
This resets the printer configuration to the factory default values for the non-network printer settings.Perform a sensor calibration after this procedure. (See Manual Media Calibration.)
To perform a Reset Printer Factory Defaults procedure, complete these steps:
1. Turn OFF the printer.
2. Press and hold PAUSE + FEED while turning ON the printer.
3. Hold PAUSE + FEED until the STATUS indicator ( ) is the only indicator lit.
The printer configuration is reset to the factory default values. No labels print at the end of this action.
Note • The printer has a reset button under the printer, See the Reset Button.
Reset Network Factory Defaults (PAUSE + CANCEL Self Test)
This procedure resets the network configuration settings only to the factory default values.
To perform a Reset Network Factory Defaults procedure, complete these steps:
1. Turn OFF the printer.
2. Press and hold PAUSE + CANCEL while turning ON the printer.
3. Hold PAUSE + CANCEL until the STATUS indicator ( ) is the only indicator lit.
The printer’s network configuration is reset to the factory default values. No labels print at the end of this action.
143

Tools
Reset Button
In addition to the power on configurations described previously, the ZD-Series printer has a dedicatedreset button located on the bottom of the printer which can be pressed with a paperclip or similar smallobject.
Pressing the button has the following results based on the length of the button press:
0-1 second No action1-5 seconds Printer reset – Printer performs a factory reset and will automatically
print a configuration label (and network label if present)6-10 seconds Network reset – Printer drops connection to the network, and a
network factory default reset occurs. Upon completion of the reset, a configuration and network configuration label are automatically printed.
More than 10 seconds Exits the factory defaults function without resetting the printer or making changes
144

Tools
Communication Diagnostics Test
The communication diagnostics test is a troubleshooting tool for checking the connection between theprinter and the host computer. When the printer is in diagnostics mode, it prints all data received from thehost computer as straight ASCII characters with the hex values below the ASCII text. The printer prints allcharacters received, including control codes such as CR (carriage return). Figure 5 shows a typical testlabel from this test.
Note • The test label prints upside-down as it exits the printer.
Figure 5 Communications Diagnostics Test Label
To use communications diagnostics mode, complete these steps:
1. Ensure media is loaded and printer power is ON.
2. Set the print width equal to or less than the label width being used for the test.
3. Press and hold Pause + FEED for two seconds. When active, the STATUS indicator ( ) will alternate between green and yellow.The printer enters diagnostics mode and prints any data received from the host computer on a test label
4. Check the test label for error codes. For any errors, check that your communication parameters are correct. Errors show on the test label as follows:
• FE indicates a framing error.• OE indicates an overrun error.• PE indicates a parity error.• NE indicates noise.
5. Press and hold Pause + FEED for two seconds or turn the printer power off (O) and then back ON to exit this self test and return to normal operation.
145

Tools
Sensor Profile
Use the sensor profile image (which will extend across several labels or tags) to troubleshoot the followingsituations:
• The printer experiences difficulty in determining gaps (web) between labels.• The printer incorrectly identifies preprinted areas on a label as gaps (web).
With the printer in the Ready state, print a sensor profile in one of these ways:
Compare your results to the examples shown earlier in this section. If the sensitivity of the sensors must beadjusted, calibrate the printer (see Manual Media Calibration).
Using the buttons on the user interface
1. Turn OFF the printer.
2. Press and hold FEED + CANCEL while turning ON the printer.
3. Hold FEED + CANCEL until the STATUS indicator ( ) is the only indicator lit.
Using ZPL Send the ~JG command to the printer. See the Zebra Programming Guide for more information about this command.
146

Tools
Media Sensor Profile (Figures 5 and 6)
The line labeled MEDIA (1) on the sensor profile indicates the media sensor readings. The media sensorthreshold settings is indicated by WEB (2). The media out threshold is indicated by OUT (3).The upwardspikes (4) indicate gaps between labels (the web), the lines between the spikes (5) indicate where labelsare located, and the numbered line at the top (6) provides measurement in dots from the start of theprintout.
If you compare the sensor profile printout to a length of your media, the spikes should be the samedistance apart as the gaps on the media. If the distances are not the same, the printer may be havingdifficulty determining where the gaps are located.
Figure 6 Sensor Profile (Gap Media)
Figure 7 Sensor Profile (Black Mark Tag Media)
1
2
34
6
5 5
4
5
1
2
34
55
4
147
Tools
Advanced ModeAdvanced Mode is used to access several manual adjustment modes in the printer. Each manualadjustment mode is described in detail in the following sections.
To activate Advanced Mode, complete these steps:
1. Ensure media is loaded and printer power is ON.
2. Press PAUSE for two seconds, all indicators will flash yellow.
3. The STATUS indicator ( ) will show solid yellow, indicating the currently selected mode is: Manual Media Calibration.
4. Pressing FEED will sequentially cycle through all available modes.
5. Pressing PAUSE will activate the selected mode.
6. Pressing CANCEL will exit Advanced Mode.
Manual Media Calibration
While in Advanced Mode, pressing PAUSE while the Status indicator ( ) is illuminated yellow will startManual Media Calibration.
1. The MEDIA indicator ( ) will flash yellow then the Pause indicator ( ) will flash. Open the printer and verify the media sensor is in the center position for label gap (transmissive) sensing. Remove 3 inches or 80mm of labels from the liner. Place the label-less area of the liner over the platen (drive) roller with the leading edge of the first label under the media guides.
2. Close the printer and press PAUSE once. The MEDIA indicator ( ) will flash as the media liner is
measured. When complete, the Pause indicator ( ) will begin flashing.
3. Open the printer and reposition the media so that a label is located directly above the movable sensor. Close the printer.
4. Press PAUSE once. The printer will FEED and measure several labels. If the printer is able to determine the correct media type (gap, black mark or notch) and measure the media length, the printer will return to the READY state.
This advanced mode is typically used to calibrate the printer to media that is not correctly recognizedduring Smart Calibration. If your media uses black mark or notch sensing, ensure the media sensor is in tothe proper location to “see” the mark or notch. If your media is pre-printed, either on the front of the label oron the back of the liner, position the sensor so that it is in a position with minimal printing. You may need toperform Manual Media Calibration several times, moving the media sensor, until the printer completes thecalibration process and returns to the READY state.
148
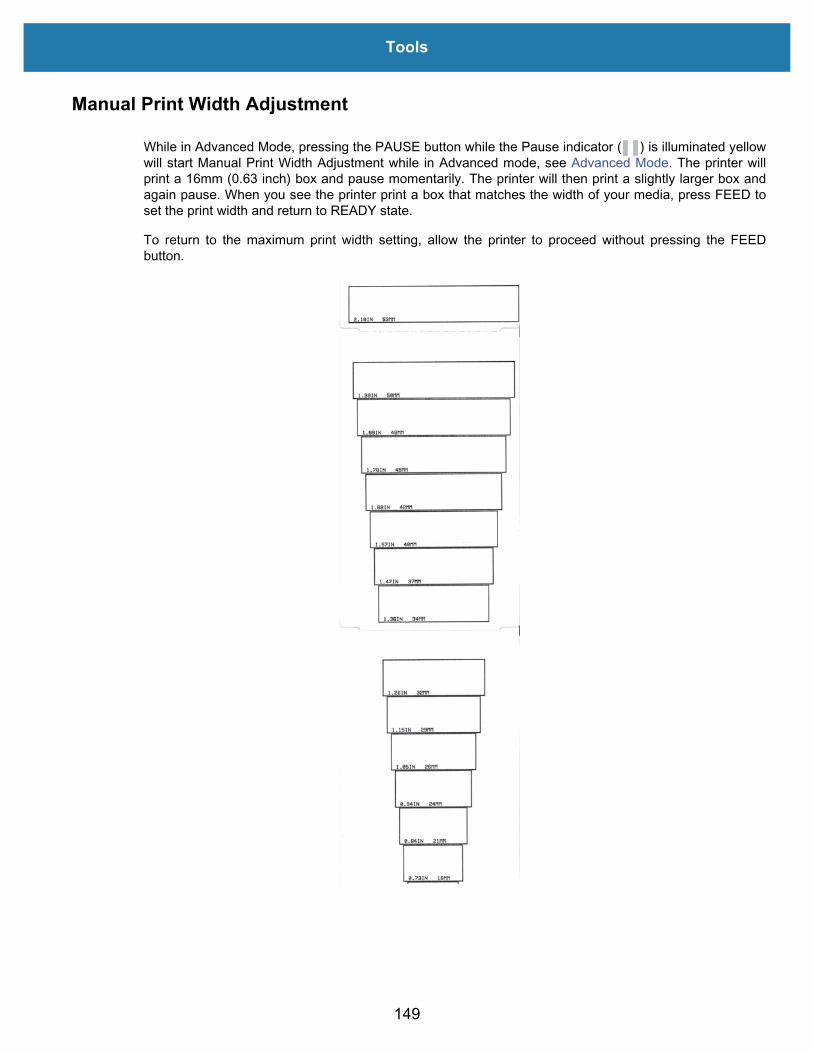
Tools
Manual Print Width Adjustment
While in Advanced Mode, pressing the PAUSE button while the Pause indicator ( ) is illuminated yellowwill start Manual Print Width Adjustment while in Advanced mode, see Advanced Mode. The printer willprint a 16mm (0.63 inch) box and pause momentarily. The printer will then print a slightly larger box andagain pause. When you see the printer print a box that matches the width of your media, press FEED toset the print width and return to READY state.
To return to the maximum print width setting, allow the printer to proceed without pressing the FEEDbutton.
149

Tools
Manual Print Darkness Adjustment
Pressing PAUSE while the DATA indicator( ) is illuminated yellow will start Manual Print DarknessAdjustment. The printer will print a test pattern showing the current darkness number and several barcodepatterns and then pause momentarily. The printer will then repeat the pattern with the next darkness level.When you see the printer print a pattern with solid even black lines, press FEED to set the darkness valueand return to the READY state.
150
Tools
Factory Test ModesThe printer includes print modes that are intended for factory test only.
Test mode 1
Initiated by holding PAUSE button while turning ON printer power. When activated, the printer will beginprinting various test patterns used to evaluate printer performance.
Test mode 2
Initiated by holding PAUSE + FEED + CANCEL button for two seconds while printer power is ON. Whenactivated, the printer will begin printing various test patterns used to evaluate printer performance.
Note • Both of these test modes will consume a considerable amount of media as the tests are performed.
You can exit either of these test modes by pressing and holding POWER button until the printer power isswitched OFF.
151
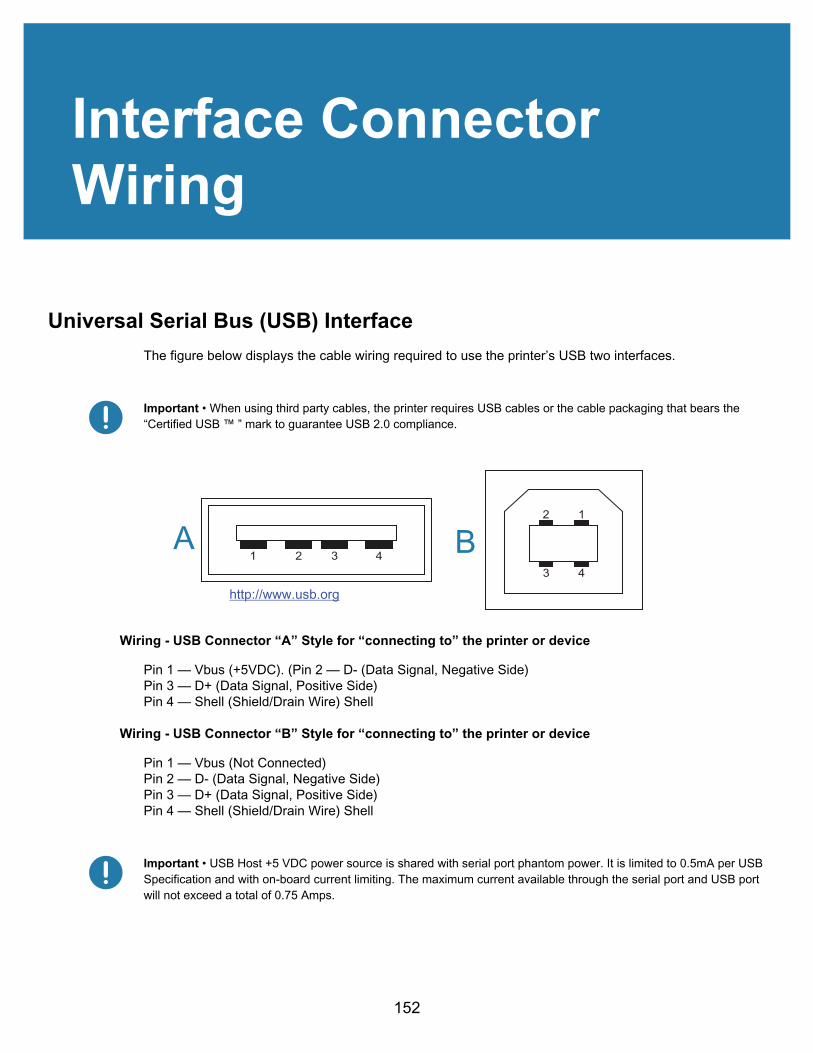
Interface Connector Wiring
Universal Serial Bus (USB) InterfaceThe figure below displays the cable wiring required to use the printer’s USB two interfaces.
Important • When using third party cables, the printer requires USB cables or the cable packaging that bears the “Certified USB ™ ” mark to guarantee USB 2.0 compliance.
Wiring - USB Connector “A” Style for “connecting to” the printer or device
Pin 1 — Vbus (+5VDC). (Pin 2 — D- (Data Signal, Negative Side)Pin 3 — D+ (Data Signal, Positive Side)Pin 4 — Shell (Shield/Drain Wire) Shell
Wiring - USB Connector “B” Style for “connecting to” the printer or device
Pin 1 — Vbus (Not Connected)Pin 2 — D- (Data Signal, Negative Side)Pin 3 — D+ (Data Signal, Positive Side)Pin 4 — Shell (Shield/Drain Wire) Shell
Important • USB Host +5 VDC power source is shared with serial port phantom power. It is limited to 0.5mA per USB Specification and with on-board current limiting. The maximum current available through the serial port and USB port will not exceed a total of 0.75 Amps.
http://www.usb.org
A B
152
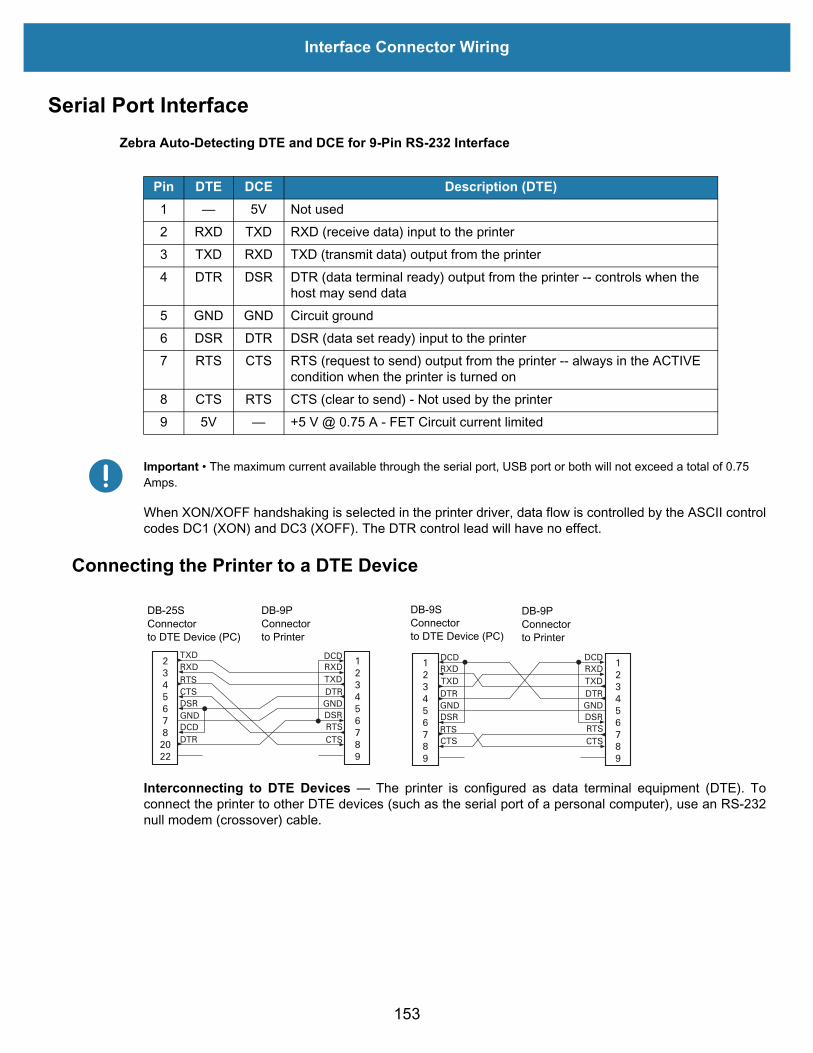
Interface Connector Wiring
Serial Port InterfaceZebra Auto-Detecting DTE and DCE for 9-Pin RS-232 Interface
Important • The maximum current available through the serial port, USB port or both will not exceed a total of 0.75 Amps.
When XON/XOFF handshaking is selected in the printer driver, data flow is controlled by the ASCII controlcodes DC1 (XON) and DC3 (XOFF). The DTR control lead will have no effect.
Connecting the Printer to a DTE Device
Interconnecting to DTE Devices — The printer is configured as data terminal equipment (DTE). Toconnect the printer to other DTE devices (such as the serial port of a personal computer), use an RS-232null modem (crossover) cable.
Pin DTE DCE Description (DTE)1 — 5V Not used2 RXD TXD RXD (receive data) input to the printer3 TXD RXD TXD (transmit data) output from the printer4 DTR DSR DTR (data terminal ready) output from the printer -- controls when the
host may send data5 GND GND Circuit ground6 DSR DTR DSR (data set ready) input to the printer7 RTS CTS RTS (request to send) output from the printer -- always in the ACTIVE
condition when the printer is turned on8 CTS RTS CTS (clear to send) - Not used by the printer9 5V — +5 V @ 0.75 A - FET Circuit current limited
DB-25S Connector to DTE Device (PC)
DB-9P Connectorto Printer
DB-9P Connectorto Printer
DB-9S Connector to DTE Device (PC)
153

Interface Connector Wiring
Connecting the Printer to a DCE Device
Interconnecting to DCE Devices — When the printer is connected via its RS-232 interface to datacommunication equipment (DCE) such as a modem, a STANDARD RS-232 (straight-through) interface cable must be used.
DB-9P Connectorto Printer
DB-9P Connectorto Printer
DB-25S Connector to DCE Device
DB-9S Connector to DCE Device
154

Dimensions
This section provides external printer dimensions.
Dimensions are in millimeters (mm)
155
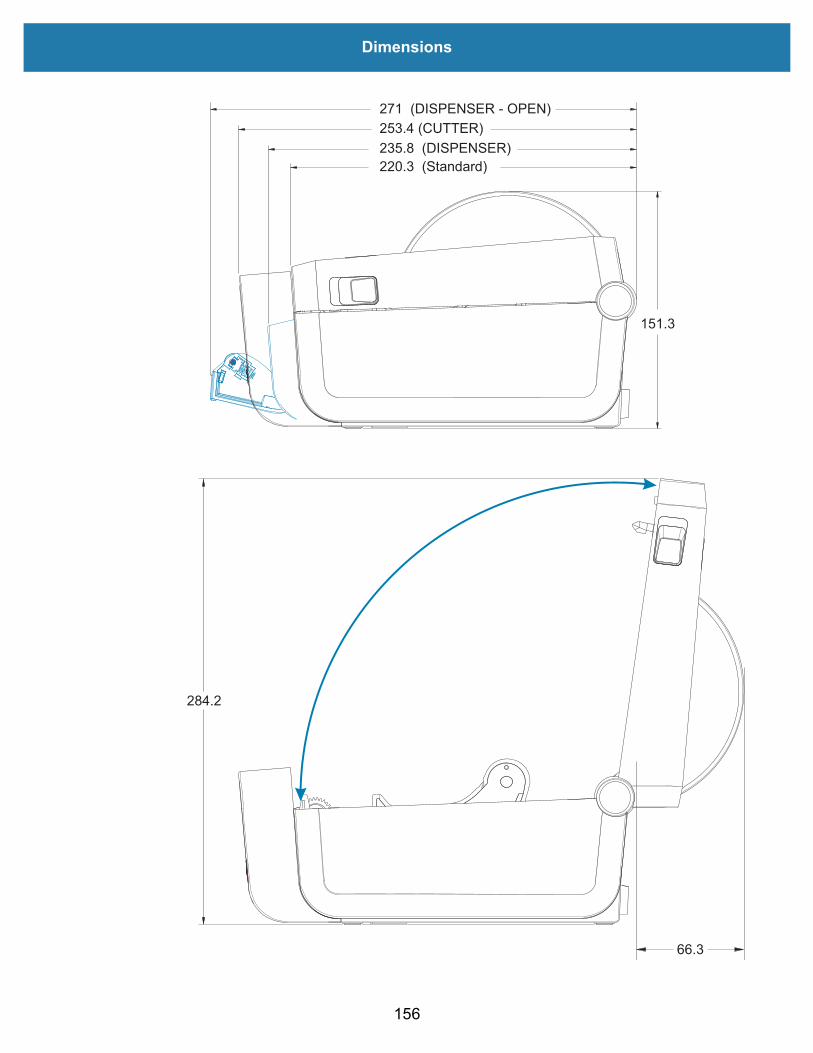
Dimensions
Dimensions are in millimeters (mm)
156
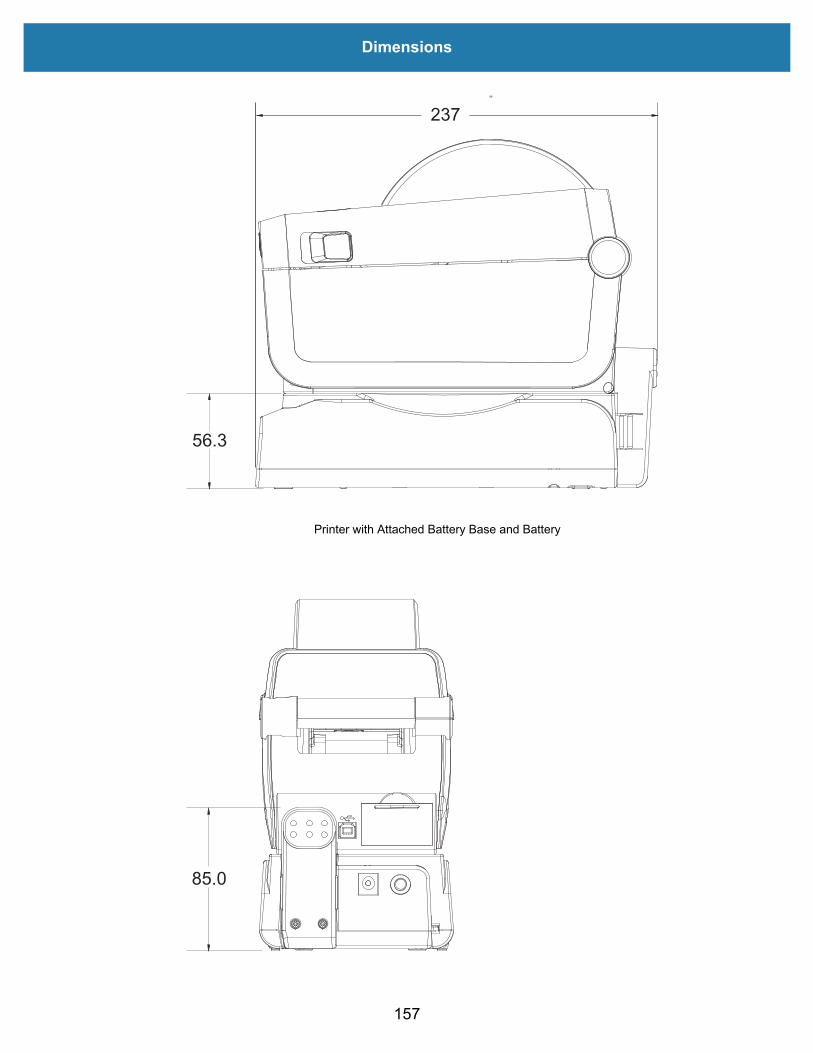
Dimensions
99
Dimensions are in millimeters (mm)
Printer with Attached Battery Base and Battery
157

Dimensions
Dimensions are in millimeters (mm)
Mounting Hole
Mounting Hole
Hardware Reset Access(Provide 20-25 mm hole in mounting plate or surface)
Use M3 thread forming screws with maximum hole depth of 5 mm into the printer body.
Note - Do not remove the rubber feet or the printer can overheat.
158

Media
This section provides a simple media overview for your printer.
159

Media
Types of Thermal Media
Important • Zebra strongly recommends the use of Zebra-brand supplies in order to ensure consistent high-quality printing. A wide range of paper, polypropylene, polyester, and vinyl stock has been specifically engineered to enhance the printing capabilities of the printer and to prevent premature printhead wear.
To purchase supplies, go to http://www.zebra.com/supplies.
• Your printer can use various types of media:• Standard media—Most standard (non-continuous) media uses an adhesive backing that sticks
individual labels or a continuous length of labels to a liner.• Continuous roll media—Most continuous roll media is direct thermal media (similar to FAX paper)
and is used for receipt or ticket style printing.• Tag stock—Tags are usually made from a heavy paper (up to 0.0075in./0.19mm thick). Tag stock
does not have adhesive or a liner, and it is typically perforated between tags.
For more information on basic media types, see Table 4.
The printer typically uses roll media, but you can use fan-fold or other continuous media too.
Determining Thermal Media Types
Thermal transfer media requires ribbon for printing while direct thermal media does not. To determine ifyou have direct thermal media used by your printer, perform a media scratch test.
To perform a media scratch test, complete these steps:1. Scratch the print surface of the media with a finger nail or pen cap. Press firmly and quickly while
dragging it across the media surface. Direct thermal media is chemically treated to print (expose) when heat is applied. This test method uses friction heat to expose the media.
2. Did a black mark appear on the media?
If a black mark... Then the media is...Appears on the media Direct thermal. No ribbon is required.Does not appear on the media Thermal transfer. A ribbon is required.
Not supported by this printer.
160

Media
General Media and Print Specifications• Media thickness:
• 0.08mm (0.003 inch) min – all requirements• 0.1905mm (0.0075 inch) max – all requirements
• Media width: • 60mm (2.36 inch) max• 15mm (0.585 inch) min
• Media length: • 990mm (39 inch) max • 6.35mm (0.25 inch) min – Tear Off or Label• 12.7mm(0.50 inch) min – Peel• 25.4mm (1.0 inch) min - Cutter
• Media Roll Outer Diameter (O.D.) max: 127mm• Media Roll Core Inner Diameter (I.D.):
• 12.7mm (0.5 inch) I.D. - Standard roll configuration• 25.4mm (1 inch) I.D. - Standard roll configuration• 38.1mm (1.5 inches) I.D. - with optional media roll adapter• 50.8mm (2.0 inches) I.D. - with optional media roll adapter• 76.2mm (3.0 inches) I.D. - with optional media roll adapter
• Print width: • 1 dot (ZPL) min.• 56mm (2.20 inches) max @ 203 dpi • 54mm (2.12 inches) max @ 300 dpi
• Dot pitch: • 203 dpi: 0.125mm (0.0049 inch)• 300 dpi: 0.085mm (0.0033 inch)
• Barcode modulus x-dim: • 203 dpi: 0.005-0.050 inch• 300 dpi: 0.00327 - 0.03267 inch
161
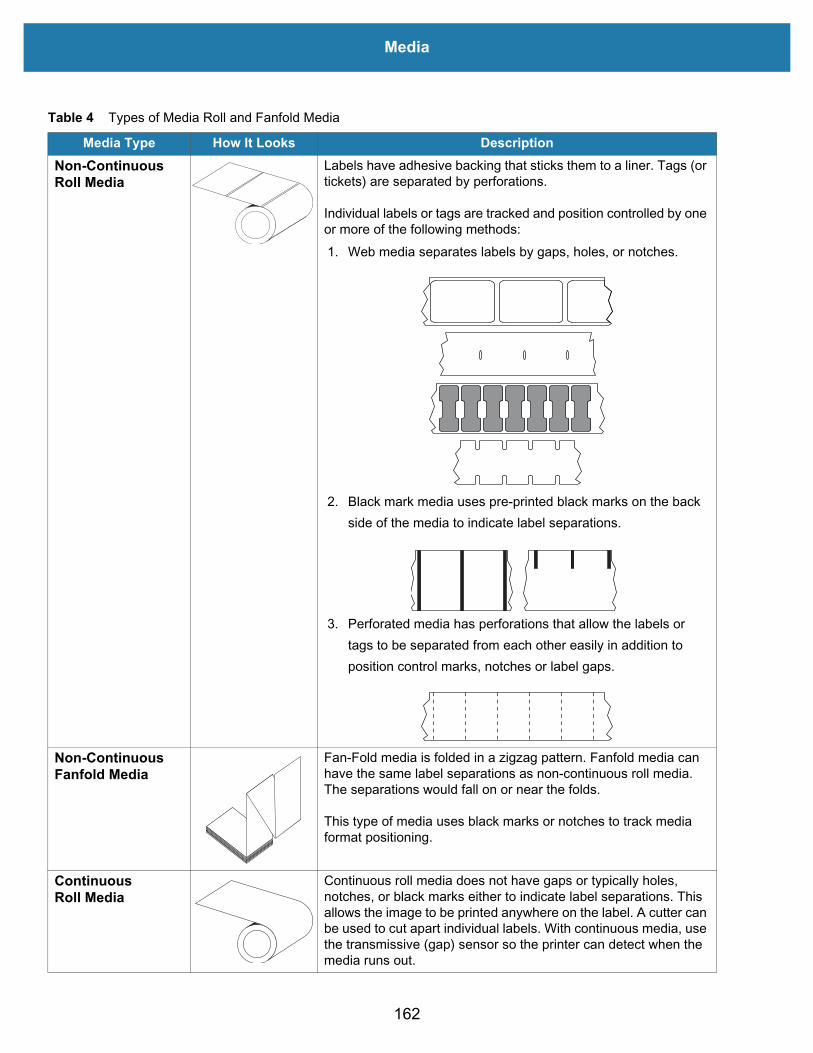
Media
Table 4 Types of Media Roll and Fanfold Media
Media Type How It Looks DescriptionNon-Continuous Roll Media
Labels have adhesive backing that sticks them to a liner. Tags (or tickets) are separated by perforations.
Individual labels or tags are tracked and position controlled by one or more of the following methods:1. Web media separates labels by gaps, holes, or notches.
2. Black mark media uses pre-printed black marks on the back side of the media to indicate label separations.
3. Perforated media has perforations that allow the labels or tags to be separated from each other easily in addition to position control marks, notches or label gaps.
Non-Continuous Fanfold Media
Fan-Fold media is folded in a zigzag pattern. Fanfold media can have the same label separations as non-continuous roll media. The separations would fall on or near the folds.
This type of media uses black marks or notches to track media format positioning.
Continuous Roll Media
Continuous roll media does not have gaps or typically holes, notches, or black marks either to indicate label separations. This allows the image to be printed anywhere on the label. A cutter can be used to cut apart individual labels. With continuous media, use the transmissive (gap) sensor so the printer can detect when the media runs out.
162

ZPL Configuration
This section provides an overview of managing printer configuration, the Configuring Status Printout, andPrinter Memory Printouts.
163

ZPL Configuration
Managing the ZPL Printer ConfigurationThe ZPL printer is designed to allow you to change printer settings dynamically for fast first label outprinting. Printer parameters that are persistent, will be retained for future formats to use. Those settings willremain in effect until they are changed by subsequent commands, the printer is reset, power is cycled, orwhen you restore a parameter that has a factory default by resetting the printer to factory defaults. TheZPL Configuration Update command (^JU) saves and restores printer configurations to initialize (orre-initialize) the printer with pre-configured settings.
• To keep settings after a power cycle or printer reset, a ^JUS can be sent to the printer to save all current persistent settings.
• The values are recalled with a ^JUR command to restore the last saved values to the printer.
ZPL stores all parameters at once with a single command mentioned above. The legacy EPL programminglanguage (supported by this printer) changes and saves individual commands immediately. Most printersettings are shared between ZPL and EPL. For example, changing the speed setting with EPL will alsochange the speed set for ZPL operations. The changed EPL setting will persist even after a power cycle orreset issued by either printer language.
A printer Configuration Report is available to assist the developer. The Configuration Report lists operatingparameters, sensor settings, and printer status. It can be accessed by using the procedure in Test Printingwith the Configuration Report. The Zebra Setup Utility and the ZebraDesigner ™ Windows driver also printthis report and other printer reports to help you manage your printer.
ZPL Printer Configuration Format
Managing more than one printer can be done by creating a printer configuration programming file to sendto one or more printers or ZebraNet ™ Bridge can be used to clone a printer’s setup. Figure 1 below showsthe basic structure of a ZPL programming configuration file.
See the ZPL programmer’s guide and the Configuration Setting to Command Cross-reference to create aprogramming file. The Zebra Setup Utility (ZSU) can be used to send programming files to the printer.Windows Notepad (text editor) can be used to create programing files.
Figure 8 Configuration Parameter Format Structure
164

ZPL Configuration
Configuration Setting to Command Cross-referenceThe Printer Configuration Report, shown below, provides a listing of a majority of the configurationssettings that can be set by ZPL command.
Figure 9 Configuration Report Printout
Sensor Settings used for
Service Purposes
165
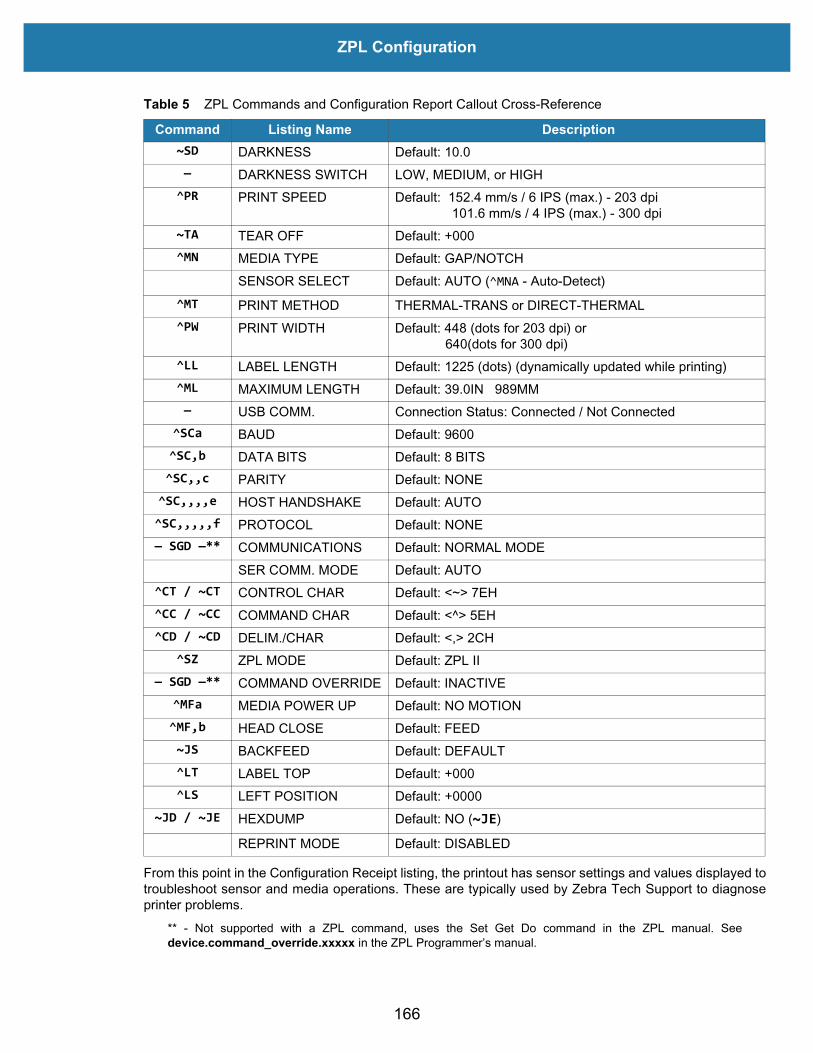
ZPL Configuration
From this point in the Configuration Receipt listing, the printout has sensor settings and values displayed totroubleshoot sensor and media operations. These are typically used by Zebra Tech Support to diagnoseprinter problems.
** - Not supported with a ZPL command, uses the Set Get Do command in the ZPL manual. Seedevice.command_override.xxxxx in the ZPL Programmer’s manual.
Table 5 ZPL Commands and Configuration Report Callout Cross-Reference
Command Listing Name Description~SD DARKNESS Default: 10.0 — DARKNESS SWITCH LOW, MEDIUM, or HIGH^PR PRINT SPEED Default: 152.4 mm/s / 6 IPS (max.) - 203 dpi
101.6 mm/s / 4 IPS (max.) - 300 dpi~TA TEAR OFF Default: +000^MN MEDIA TYPE Default: GAP/NOTCH
SENSOR SELECT Default: AUTO (^MNA - Auto-Detect)^MT PRINT METHOD THERMAL-TRANS or DIRECT-THERMAL^PW PRINT WIDTH Default: 448 (dots for 203 dpi) or
640(dots for 300 dpi)^LL LABEL LENGTH Default: 1225 (dots) (dynamically updated while printing)^ML MAXIMUM LENGTH Default: 39.0IN 989MM— USB COMM. Connection Status: Connected / Not Connected
^SCa BAUD Default: 9600 ^SC,b DATA BITS Default: 8 BITS^SC,,c PARITY Default: NONE^SC,,,,e HOST HANDSHAKE Default: AUTO^SC,,,,,f PROTOCOL Default: NONE— SGD —** COMMUNICATIONS Default: NORMAL MODE
SER COMM. MODE Default: AUTO^CT / ~CT CONTROL CHAR Default: <~> 7EH^CC / ~CC COMMAND CHAR Default: <^> 5EH^CD / ~CD DELIM./CHAR Default: <,> 2CH
^SZ ZPL MODE Default: ZPL II — SGD —** COMMAND OVERRIDE Default: INACTIVE
^MFa MEDIA POWER UP Default: NO MOTION^MF,b HEAD CLOSE Default: FEED~JS BACKFEED Default: DEFAULT^LT LABEL TOP Default: +000^LS LEFT POSITION Default: +0000
~JD / ~JE HEXDUMP Default: NO (~JE)
REPRINT MODE Default: DISABLED
166

ZPL Configuration
The configuration settings listed here resume after the TAKE LABEL sensor value. These listings containprinter features seldom changed from default or provide status information.
The printer has the ability to set a command or a group of commands once for all receipts (or labels) thatfollow. Those settings will remain in effect until they are changed by subsequent commands, the printer isreset, or you restore factory defaults.
Table 6 ZPL Commands and Configuration Receipt Callout Cross-Reference
Command Listing Name Description^MP MODES ENABLED Default: CWF (See ^MP Command)
MODES DISABLED Default: (nothing set)^JM RESOLUTION Default: 448 8/mm (203 dpi); 640 8/mm (300 dpi)— FIRMWARE Lists ZPL Firmware Version— XML SCHEMA 1.3— HARDWARE ID Lists Firmware Boot-block Version
LINK-OS VERSION— CONFIGURATION CUSTOMIZED (after first use)— RAM 2104k........ R:— ONBOARD FLASH 6144k.........E:
^MU FORMAT CONVERT NONE
RTC DATE Date Displayed
RTC TIME Time Displayed^JI / ~JI ZBI DISABLED (Requires key to enable)
— ZBI VERSION 2.1 (Displayed if installed)— ZBI STATUS READY
^JH^MA~RO
LAST CLEANED X,XXX INHEAD USAGE X,XXX INTOTAL USAGE X,XXX INRESET CNTR1 X,XXX INRESET CNTR2 X,XXX INNONRESET CNTR0 (1, 2) X,XXX INRESET CNTR1 X,XXX INRESET CNTR2 X,XXX INSLOT1 EMPTY / SERIAL / WIREDMASS STORAGE COUNT 0 HID COUNT 0 USB HOST LOCK OUT OFF /ON
— SERIAL NUMBER XXXXXXXXXXX^JH EARLY WARNING MAINT. OFF
167

ZPL Configuration
Printer Memory Management and Related Status ReportsTo help you manage printer resources, the printer supports a variety of format commands to managememory, transfer objects (between memory areas, import and export), object naming, and provide variousprinter operating status reports. They are very similar to the old DOS commands like DIR (directory listing)and DEL (delete file). The most common reports are also part of the Zebra Setup Utility andZebraDesigner ™ Windows driver.
It is recommended that a single command be processed within this type of format (form).A singlecommand is easily reused as a maintenance and development tool.
Many of the commands that transfer objects, manage and report on memory are control (~) commands.They do not need the be within a format (form). They will be processed immediately upon receipt by theprinter whether in a format (form) or not.
ZPL Programming for Memory Management
ZPL has various printer memory locations that are used to run the printer, assemble the print image, storeformats (forms), graphics, fonts and configuration settings.
• ZPL treats Formats (Forms), Fonts, and Graphics like files; and memory locations like disk drives in the DOS operating system environment: • Memory Object Naming: Up to sixteen (16) alphanumeric characters followed by a three (3)
alphanumeric character file extension, for example: 123456789ABCDEF.TTFLegacy ZPL printers with V60.13 firmware and earlier can only use the 8.3 file name format verses today’s 16.3 file name format.
• Allows moving objects between memory locations and deleting objects.• Supports DOS directory style file list reports as printouts or status to the host.• Allows use of ‘wild cards’ (*) in file access
168

ZPL Configuration
Important • Some factory installed ZPL fonts in your printer cannot be copied, cloned or restored to your printer by reloading or updating firmware. If these license restricted ZPL fonts are removed by an explicit ZPL object delete command, they must be repurchased and reinstalled via a font activation and installation utility. EPL fonts do not have this restriction.
Table 7 Object Management and Status Report Commands
Command Name Description^WD Print Directory
LabelPrints a list of objects and resident barcodes and fonts in all addressable memory locations
~WC Print Configuration Label
Prints a configuration Status Receipt (Label)Same as FEED Button mode one flash routine
^ID Object Delete Deletes objects from printer memory^TO Transfer Object Used to copy an object or group of objects from one
memory area to another.^CM Change Memory
Letter DesignationReassigns a letter designation to a printer memory area.
^JB Initialize Flash memory
Similar to formatting a disk - erases all objects from the specified memory locations B: or E:.
~JB Reset Optional Memory
Similar to formatting a disk - erases all objects from the B: memory (factory option).
~DY Download Objects Downloads and installs wide variety of printer usable programming objects: fonts (OpenType and TrueType), graphics, and other object data types.Recommendation: Use ZebraNet™ Bridge for downloading graphics and fonts in the printer.
~DG Download Graphic Downloads an ASCII Hex representation of a graphic image. This is used by ZebraDesigner ™ (label creation application) for graphics.
^FL Font Linking Appends secondary TrueType font or fonts to the primary TrueType font to add glyphs (characters).
^LF List Font Links Prints a list of the linked fonts^CW Font Identifier Assigns a single alphanumeric character as an alias to a
font stored in memory.
169