XMetaL Author Enterprise User's Guide (pdf)
233
-
Upload
khangminh22 -
Category
Documents
-
view
4 -
download
0
Transcript of XMetaL Author Enterprise User's Guide (pdf)


Contact Information:
Support:North America: +1 866 647 2003
Sales:North America: +1 866 793 1542
Office Locations:
XMetaL Sales & SupportSuite 3220
About JustSystems
JustSystems is a leading global software provider with three decadesof successful innovation in office productivity, information management,
666 Burrard StreetBox 207Vancouver, BC, CanadaV6C 2X8T: 604-602-9928and consumer and enterprise software. With over 2,500 customersToll-Free Sales: 1-866-793-1542worldwide and annual revenues over $110M, the company is continuing
a global expansion strategy that includes its enterprise software offering Tokushima Head Officecalled xfy, its XMetaL content lifecycle solutions, and its pioneering work Brains Park Kawauchi-choin the definition of the XBRL standard and commercialization of enabling Tokushima-city Tokushima 771-0189technologies. A Gartner “Cool Vendor” selection in 2008, JustSystems Japanis also a member of KMWorld’s 100 Companies that Matter in Knowledge T: 088 666 1000Management for 2008 and the 2007 EContent 100. XMetaL is a 2008 (+81 88 666 1000 from outside Japan)KMWorld Trend-Setting Product. Major strategic partnerships includeIBM, Oracle and EMC. For more information, please visithttp://www.justsystems.com.
Copyright JustSystems Canada, Inc. All rights reserved. XMetaL is aregistered trademark of JustSystems Canada, Inc. Other product namesmay be trademarks or registered trademarks of their respective owners.
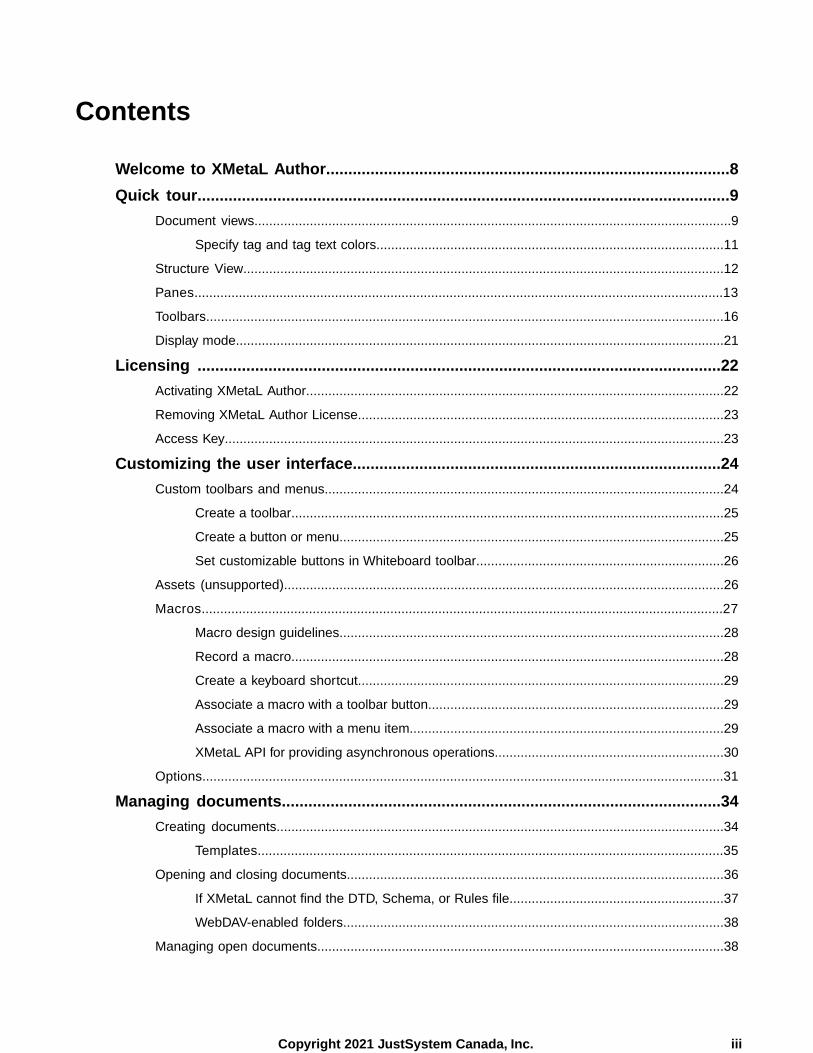
Contents
Welcome to XMetaL Author...........................................................................................8
Quick tour........................................................................................................................9
Document views.................................................................................................................................9
Specify tag and tag text colors..............................................................................................11
Structure View..................................................................................................................................12
Panes...............................................................................................................................................13
Toolbars............................................................................................................................................16
Display mode....................................................................................................................................21
Licensing ......................................................................................................................22
Activating XMetaL Author.................................................................................................................22
Removing XMetaL Author License...................................................................................................23
Access Key.......................................................................................................................................23
Customizing the user interface...................................................................................24
Custom toolbars and menus............................................................................................................24
Create a toolbar.....................................................................................................................25
Create a button or menu........................................................................................................25
Set customizable buttons in Whiteboard toolbar...................................................................26
Assets (unsupported).......................................................................................................................26
Macros.............................................................................................................................................27
Macro design guidelines........................................................................................................28
Record a macro.....................................................................................................................28
Create a keyboard shortcut...................................................................................................29
Associate a macro with a toolbar button................................................................................29
Associate a macro with a menu item.....................................................................................29
XMetaL API for providing asynchronous operations..............................................................30
Options.............................................................................................................................................31
Managing documents...................................................................................................34
Creating documents.........................................................................................................................34
Templates..............................................................................................................................35
Opening and closing documents......................................................................................................36
If XMetaL cannot find the DTD, Schema, or Rules file..........................................................37
WebDAV-enabled folders.......................................................................................................38
Managing open documents..............................................................................................................38
iiiCopyright 2021 JustSystem Canada, Inc.

Saving documents............................................................................................................................40
Character encoding..........................................................................................................................42
Creating well-formed XML documents.............................................................................................43
Defining an element..............................................................................................................43
Defining an attribute..............................................................................................................44
Inline attribute editor.........................................................................................................................45
Archiving linked documents..............................................................................................................46
Printing.............................................................................................................................................47
Working with a repository.................................................................................................................48
Editing documents........................................................................................................50
Selecting tags and text.....................................................................................................................50
Finding and replacing text................................................................................................................51
Search patterns.....................................................................................................................52
Finding and replacing elements.......................................................................................................53
Finding and replacing entities..........................................................................................................54
Checking your spelling.....................................................................................................................54
Using the spell checker.........................................................................................................55
Using the background spell checker......................................................................................59
Main word lists.......................................................................................................................61
User word lists.......................................................................................................................62
Language settings.................................................................................................................64
Checking a selected word's spelling and synonyms........................................................................64
Using the thesaurus.........................................................................................................................65
Thesaurus options ................................................................................................................66
Tracking your changes......................................................................................................................67
Cross-file Operations........................................................................................................................68
Finding and replacing across files.........................................................................................68
Spell checking across files....................................................................................................70
Replacing results across files................................................................................................71
Running cross-file operations................................................................................................72
Results pane.........................................................................................................................73
Text case assistant...........................................................................................................................78
Working with Markdown documents.................................................................................................79
Authoring structured content......................................................................................81
Validation and rules checking...........................................................................................................81
Validation using Schematron.................................................................................................82
XMetaL customizations....................................................................................................................84
XMetaL Author 16 User's Guideiv
Contents
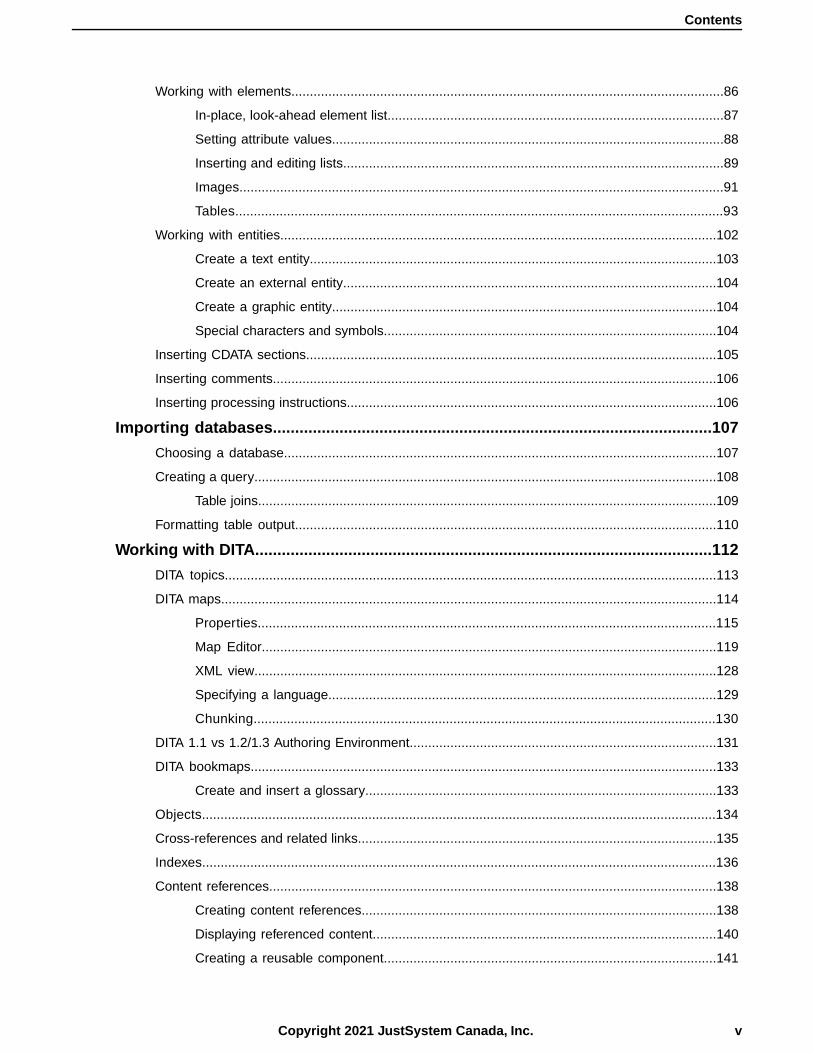
Working with elements.....................................................................................................................86
In-place, look-ahead element list...........................................................................................87
Setting attribute values..........................................................................................................88
Inserting and editing lists.......................................................................................................89
Images...................................................................................................................................91
Tables....................................................................................................................................93
Working with entities......................................................................................................................102
Create a text entity..............................................................................................................103
Create an external entity.....................................................................................................104
Create a graphic entity........................................................................................................104
Special characters and symbols..........................................................................................104
Inserting CDATA sections...............................................................................................................105
Inserting comments........................................................................................................................106
Inserting processing instructions....................................................................................................106
Importing databases...................................................................................................107
Choosing a database.....................................................................................................................107
Creating a query.............................................................................................................................108
Table joins............................................................................................................................109
Formatting table output..................................................................................................................110
Working with DITA.......................................................................................................112
DITA topics.....................................................................................................................................113
DITA maps......................................................................................................................................114
Properties............................................................................................................................115
Map Editor...........................................................................................................................119
XML view.............................................................................................................................128
Specifying a language.........................................................................................................129
Chunking.............................................................................................................................130
DITA 1.1 vs 1.2/1.3 Authoring Environment...................................................................................131
DITA bookmaps..............................................................................................................................133
Create and insert a glossary...............................................................................................133
Objects...........................................................................................................................................134
Cross-references and related links.................................................................................................135
Indexes...........................................................................................................................................136
Content references.........................................................................................................................138
Creating content references................................................................................................138
Displaying referenced content.............................................................................................140
Creating a reusable component..........................................................................................141
vCopyright 2021 JustSystem Canada, Inc.
Contents
Key references...............................................................................................................................141
Creating key definitions.......................................................................................................142
Creating key references.......................................................................................................143
Managing Key Spaces.........................................................................................................143
Ditaval references...........................................................................................................................146
Creating ditaval references..................................................................................................146
Relationship tables.........................................................................................................................147
Conditional text...............................................................................................................................148
Creating and modifying conditions in XMetaL.....................................................................148
Creating and modifying conditions in a text editor...............................................................149
Apply a condition.................................................................................................................150
Show conditional text in previews and output......................................................................150
Style conditional text............................................................................................................151
Publishing.......................................................................................................................................152
Deliverable types.................................................................................................................154
Extending the publishing framework....................................................................................158
Troubleshooting publishing issues.......................................................................................163
DITA specializations.......................................................................................................................164
Configure XMetaL...............................................................................................................165
Create a specialization template.........................................................................................166
Apply custom formatting......................................................................................................167
Deploy a specialized DITA customization............................................................................167
DITA options...................................................................................................................................167
Setting a filename prefix......................................................................................................170
DITA stylesheets ............................................................................................................................170
Subject schemes............................................................................................................................171
Applying or removing a subject scheme..............................................................................171
Managing subject schemes.................................................................................................172
Keyboard shortcuts....................................................................................................174
Quick navigation tool..................................................................................................179
Finding and executing XMetaL commands....................................................................................179
Viewing and customizing favorites.................................................................................................182
Application utilities..........................................................................................................................186
Document Ex commands...............................................................................................................187
3rd party viewers........................................................................................................191
Appendix A: XML basics............................................................................................192
Valid vs. well-formed documents....................................................................................................193
XMetaL Author 16 User's Guidevi
Contents
DTDs and Schemas.......................................................................................................................193
Document type declarations................................................................................................193
Elements........................................................................................................................................195
Attributes........................................................................................................................................195
Entities...........................................................................................................................................196
CDATA sections..............................................................................................................................198
Comments......................................................................................................................................198
Processing instructions..................................................................................................................198
Appendix B: W3C XML Inclusion (XInclude) Support..............................................199
Appendix C: Configuring XHTML, CHM and WebHelp output.................................201
Creating custom CSS files.............................................................................................................202
Headers and footers.......................................................................................................................202
Deliverable types and parameters..................................................................................................203
Save settings in an XHTML deliverable type..................................................................................203
Save settings in a CHM deliverable type........................................................................................205
Appendix D: Configuring PDF output.......................................................................207
Custom configuration framework....................................................................................................208
Page layouts...................................................................................................................................209
Attribute sets........................................................................................................................209
Page masters......................................................................................................................210
Headers and footers.......................................................................................................................210
Attribute sets........................................................................................................................210
Variables..............................................................................................................................211
XSL templates.....................................................................................................................212
Page body content.........................................................................................................................213
Notes..............................................................................................................................................215
Front matter....................................................................................................................................215
Fonts..............................................................................................................................................216
Appendix E: XMetaL Licensing Server.....................................................................217
Installing XMetaL Licensing Server................................................................................................217
Using XMetaL Licensing Server Admin..........................................................................................217
Glossary.......................................................................................................................219
Index.............................................................................................................................224
viiCopyright 2021 JustSystem Canada, Inc.
Contents

Welcome to XMetaL Author
XMetaL Author is a graphical editor for creating and editing structured documents. It provides a highlyconfigurable user interface and a powerful array of authoring tools.You can use XMetaL to create XMLdocuments in any language, regardless of your XML knowledge.
The user interface features multiple document views, customizable toolbars, and tear-off menus.The ResourceManager provides drag-and-drop management of text blocks, images, and other assets.
You can tailor XMetaL Author to fit your organization’s workflow and graphical standards throughcustomizations. A sample customization, Journalist, is provided as an example. Customizations determinehow your information is presented and much of the authoring functionality.
With support for DITA topics, maps, specializations and the DITA Open Toolkit, XMetaL Author continues itssupport for this industry standard. Assisted authoring features including enhanced menus, toolbars, dialogboxes, and styling and editing behaviors, let you create and publish DITA content out-of-the-box.
XMetaL also provides the flexibility for integrating with any source control system, database, repository, orcontent management system.
Other XMetaL publications
APIs and other programming features such as scripts, forms, controls, and macros are described in theXMetaL Programmer’s Guide. The XMetaL Customization Guide describes how to create and deploycustomizations. These publications are distributed with XMetaL Developer and are available for downloadfrom the JustSystems website at http://na.justsystems.com.
Feedback
Send your comments or questions about XMetaL documentation to [email protected].
Copyright
© 2021 JustSystems Canada, Inc. All rights reserved.
8Copyright 2021 JustSystem Canada, Inc.

Quick tour
The user interface provides access to all editing operations and allows you to create a custom environmentthat is tailored to your preferences.You can select a preferred view and choose panes and toolbars tofrequently used tasks.
Getting help
Context-sensitive Help is provided in all XMetaL Author dialogs.You can also access online Help and searchfor information through the Help menu.
When you are working in a DITA document, you can view the Help topic for the current element in the DITALanguage Reference through Help > Help on Current Element.
Sample files
Sample files are provided to demonstrate various aspects of XMetaL Author functionality. When a documentis open, you can view sample files through Help > Samples. A sample DITA map file is also provided.
Your working copies of the sample files are saved to the following location:%APPDATA%\SoftQuad\XMetaL\<version>\Samples.You can restore the sample files by deleting thisfolder and re-opening the sample files.
DITA references
The following DITA reference information is available through the Help menu:
• XMetaL Evaluation Guide. Covers basic information about creating DITA topics and maps as well asbackground information about structured authoring and the advantages of using DITA.
• DITA Language Reference. Describes the purpose of each DITA element and the rules associated withit. Includes usage examples.
• DITA Architectural Specification. The OASIS DITA specification. Describes DITA markup, processing,and specialization. Also provides background information on terminology and the DITA DTD/schema.
• DITA Open Toolkit User Guide. Describes the Java-based implementation of the OASIS DITA specification,including processing targets such as HTML and PDF.
Document viewsYou can choose a view for your document through the View menu or from the view buttons in the documentstatus bar. The view you select depends on how you want to work with your document.You can set viewoptions, including a default view through Tools > Options.
9Copyright 2021 JustSystem Canada, Inc.

Normal view
In Normal view, your documents appear similar to how they would appear in a word processor. Only thecontent of your document is visible; the underlying markup is not displayed. Formatting is determined by aCascading Style Sheet. Structured authoring commands are available from the menus, and rules checkingis active.
Tags On view
In Tags On view, both the content and markup (for example, element start and end tags) of your documentare visible. This view is useful for navigating the element hierarchy and positioning the insertion point.Formatting is determined by a Cascading Style Sheet. Structured authoring commands are available fromthe menus, and rules checking is active.
Here are some of the features available in Tags On view:
• You can select an entire element by clicking its start or end tag.
• You can collapse or expand tags through the right-click menu.
• You can view all set attributes by resting the pointer over a tag.
XMetaL Author 16 User's Guide10
Document views
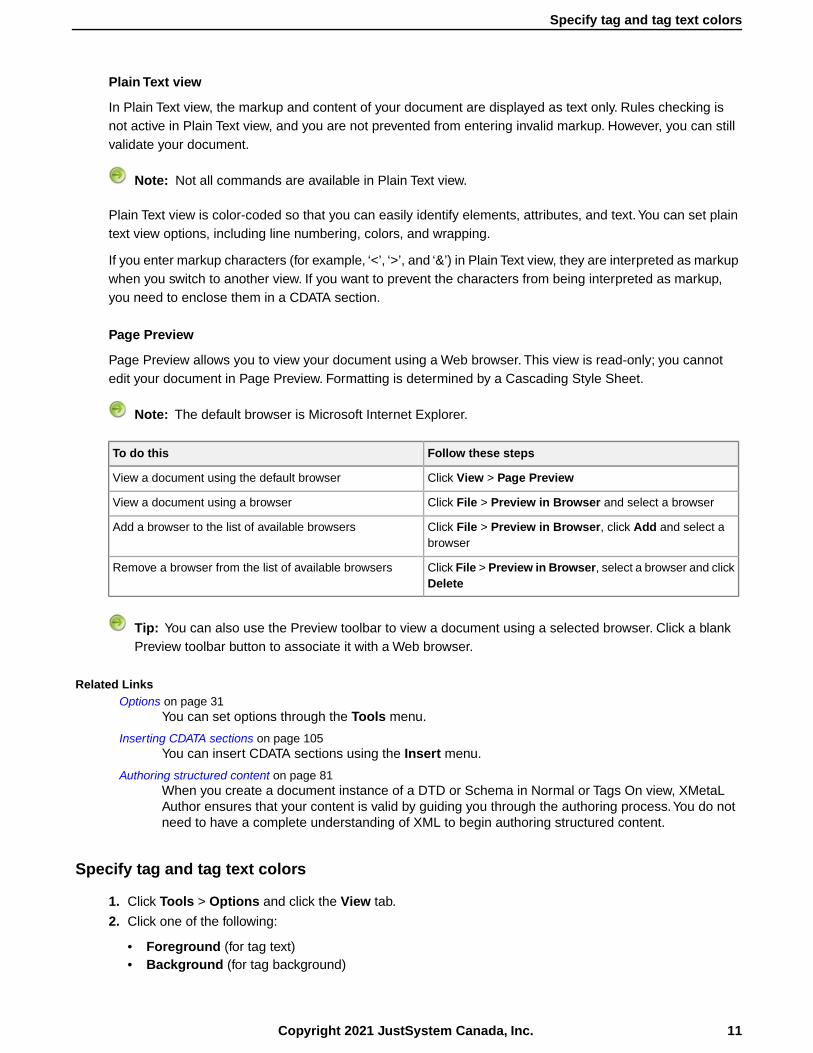
Plain Text view
In Plain Text view, the markup and content of your document are displayed as text only. Rules checking isnot active in Plain Text view, and you are not prevented from entering invalid markup. However, you can stillvalidate your document.
Note: Not all commands are available in Plain Text view.
Plain Text view is color-coded so that you can easily identify elements, attributes, and text.You can set plaintext view options, including line numbering, colors, and wrapping.
If you enter markup characters (for example, ‘<’, ‘>’, and ‘&’) in Plain Text view, they are interpreted as markupwhen you switch to another view. If you want to prevent the characters from being interpreted as markup,you need to enclose them in a CDATA section.
Page Preview
Page Preview allows you to view your document using a Web browser. This view is read-only; you cannotedit your document in Page Preview. Formatting is determined by a Cascading Style Sheet.
Note: The default browser is Microsoft Internet Explorer.
Follow these stepsTo do this
Click View > Page PreviewView a document using the default browser
Click File > Preview in Browser and select a browserView a document using a browser
Click File > Preview in Browser, click Add and select abrowser
Add a browser to the list of available browsers
Click File > Preview in Browser, select a browser and clickDelete
Remove a browser from the list of available browsers
Tip: You can also use the Preview toolbar to view a document using a selected browser. Click a blankPreview toolbar button to associate it with a Web browser.
Related LinksOptions on page 31
You can set options through the Tools menu.
Inserting CDATA sections on page 105You can insert CDATA sections using the Insert menu.
Authoring structured content on page 81When you create a document instance of a DTD or Schema in Normal or Tags On view, XMetaLAuthor ensures that your content is valid by guiding you through the authoring process.You do notneed to have a complete understanding of XML to begin authoring structured content.
Specify tag and tag text colors
1. Click Tools > Options and click the View tab.
2. Click one of the following:
• Foreground (for tag text)• Background (for tag background)
11Copyright 2021 JustSystem Canada, Inc.
Specify tag and tag text colors

3. Choose a color.
Tip: You can specify custom tag and text colors by creating a custom palette.
Structure ViewStructure View displays the overall structure or information hierarchy of the document.You can select StructureView from the View menu.
Structure View inherits the styles of the main document. It also has its own style sheet for each DTD orSchema that you use.
In Structure View, you can insert, cut, paste, copy, and drag-and-drop elements.
Related LinksCustomizing the user interface on page 24
You can customize the user interface to give you quick access to tasks and assets.You can makeyour changes available to all users or reserve them for your use only. Likewise, your changes canapply only to documents that use a specific DTD or Schema, or to all documents.
Options on page 31You can set options through the Tools menu.
XMetaL Author 16 User's Guide12
Structure View
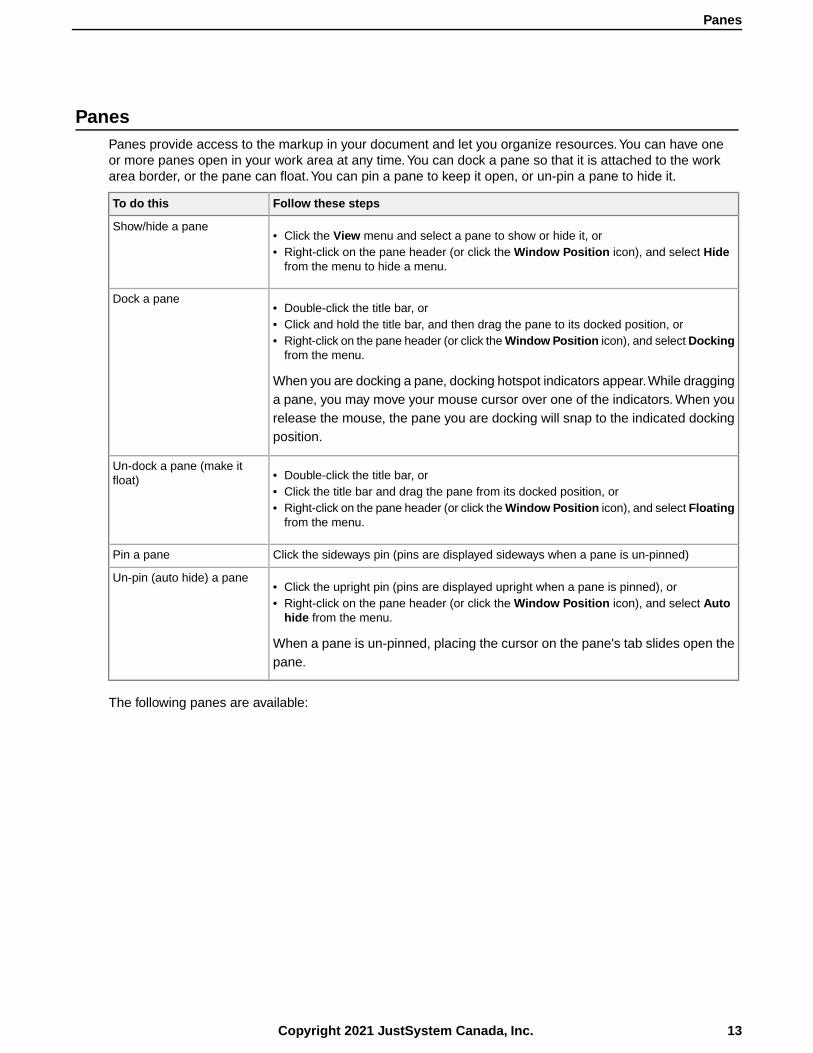
PanesPanes provide access to the markup in your document and let you organize resources.You can have oneor more panes open in your work area at any time.You can dock a pane so that it is attached to the workarea border, or the pane can float.You can pin a pane to keep it open, or un-pin a pane to hide it.
Follow these stepsTo do this
Show/hide a pane• Click the View menu and select a pane to show or hide it, or• Right-click on the pane header (or click the Window Position icon), and select Hide
from the menu to hide a menu.
Dock a pane• Double-click the title bar, or• Click and hold the title bar, and then drag the pane to its docked position, or• Right-click on the pane header (or click the Window Position icon), and select Docking
from the menu.
When you are docking a pane, docking hotspot indicators appear.While dragginga pane, you may move your mouse cursor over one of the indicators. When yourelease the mouse, the pane you are docking will snap to the indicated dockingposition.
Un-dock a pane (make itfloat) • Double-click the title bar, or
• Click the title bar and drag the pane from its docked position, or• Right-click on the pane header (or click the Window Position icon), and select Floating
from the menu.
Click the sideways pin (pins are displayed sideways when a pane is un-pinned)Pin a pane
Un-pin (auto hide) a pane• Click the upright pin (pins are displayed upright when a pane is pinned), or• Right-click on the pane header (or click the Window Position icon), and select Auto
hide from the menu.
When a pane is un-pinned, placing the cursor on the pane's tab slides open thepane.
The following panes are available:
13Copyright 2021 JustSystem Canada, Inc.
Panes
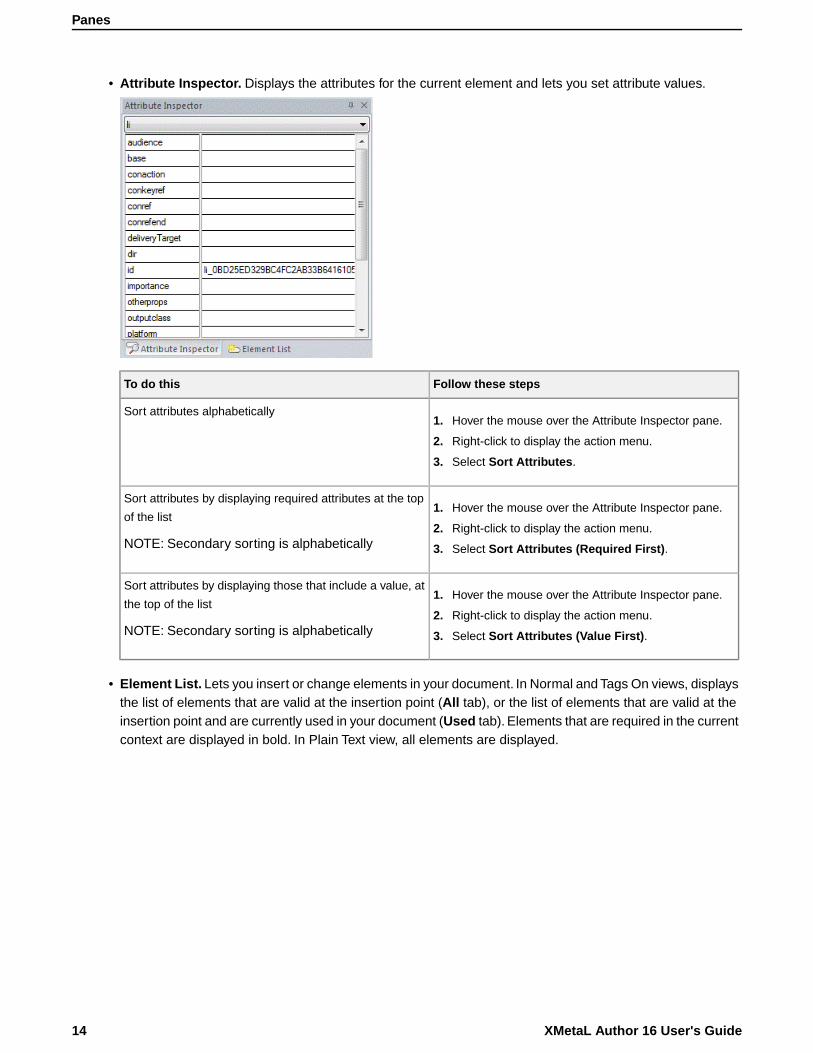
• Attribute Inspector. Displays the attributes for the current element and lets you set attribute values.
Follow these stepsTo do this
Sort attributes alphabetically1. Hover the mouse over the Attribute Inspector pane.
2. Right-click to display the action menu.
3. Select Sort Attributes.
Sort attributes by displaying required attributes at the top
of the list
NOTE: Secondary sorting is alphabetically
1. Hover the mouse over the Attribute Inspector pane.
2. Right-click to display the action menu.
3. Select Sort Attributes (Required First).
Sort attributes by displaying those that include a value, at
the top of the list
NOTE: Secondary sorting is alphabetically
1. Hover the mouse over the Attribute Inspector pane.
2. Right-click to display the action menu.
3. Select Sort Attributes (Value First).
• Element List. Lets you insert or change elements in your document. In Normal and Tags On views, displaysthe list of elements that are valid at the insertion point (All tab), or the list of elements that are valid at theinsertion point and are currently used in your document (Used tab). Elements that are required in the currentcontext are displayed in bold. In Plain Text view, all elements are displayed.
XMetaL Author 16 User's Guide14
Panes
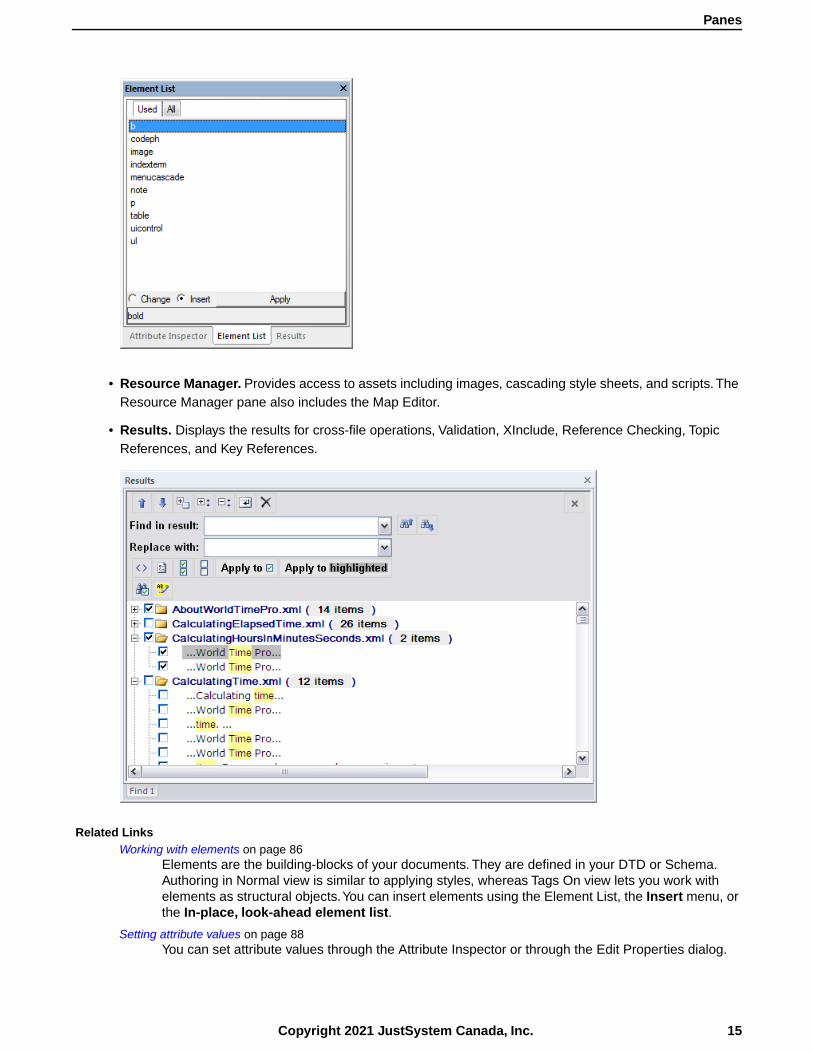
• Resource Manager. Provides access to assets including images, cascading style sheets, and scripts. TheResource Manager pane also includes the Map Editor.
• Results. Displays the results for cross-file operations, Validation, XInclude, Reference Checking, TopicReferences, and Key References.
Related LinksWorking with elements on page 86
Elements are the building-blocks of your documents. They are defined in your DTD or Schema.Authoring in Normal view is similar to applying styles, whereas Tags On view lets you work withelements as structural objects.You can insert elements using the Element List, the Insert menu, orthe In-place, look-ahead element list.
Setting attribute values on page 88You can set attribute values through the Attribute Inspector or through the Edit Properties dialog.
15Copyright 2021 JustSystem Canada, Inc.
Panes
Results pane on page 73The Results pane displays the results of cross-file operations, such as the Find in Files feature, anderror-reporting features, such as the Validation Log.
Assets (unsupported) on page 26You can organize frequently used objects as assets through the Resource Manager. Assets can besingle files, such as images, text, or markup blocks.You can drag and drop assets into your document.
Map Editor on page 119The Map Editor lets you perform map-specific functions and edit element and map editor properties.The Map Editor is included in the Resource Manager.
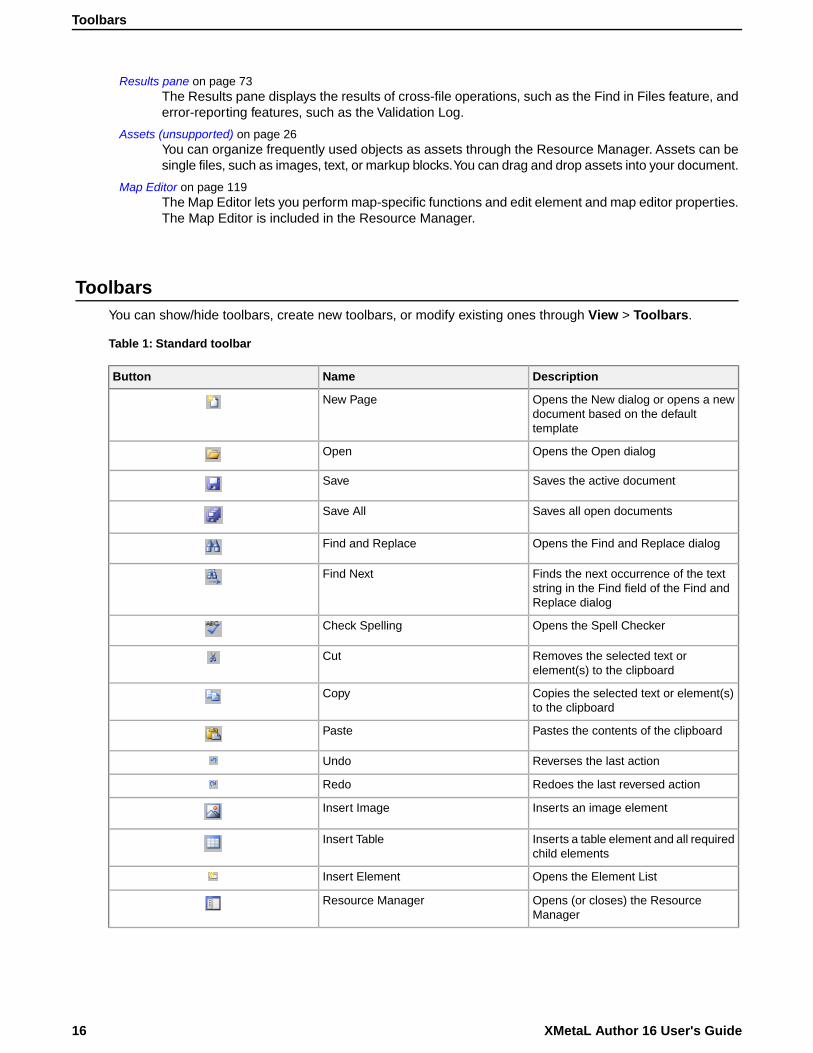
ToolbarsYou can show/hide toolbars, create new toolbars, or modify existing ones through View > Toolbars.
Table 1: Standard toolbar
DescriptionNameButton
Opens the New dialog or opens a newdocument based on the defaulttemplate
New Page
Opens the Open dialogOpen
Saves the active documentSave
Saves all open documentsSave All
Opens the Find and Replace dialogFind and Replace
Finds the next occurrence of the textstring in the Find field of the Find andReplace dialog
Find Next
Opens the Spell CheckerCheck Spelling
Removes the selected text orelement(s) to the clipboard
Cut
Copies the selected text or element(s)to the clipboard
Copy
Pastes the contents of the clipboardPaste
Reverses the last actionUndo
Redoes the last reversed actionRedo
Inserts an image elementInsert Image
Inserts a table element and all requiredchild elements
Insert Table
Opens the Element ListInsert Element
Opens (or closes) the ResourceManager
Resource Manager
XMetaL Author 16 User's Guide16
Toolbars
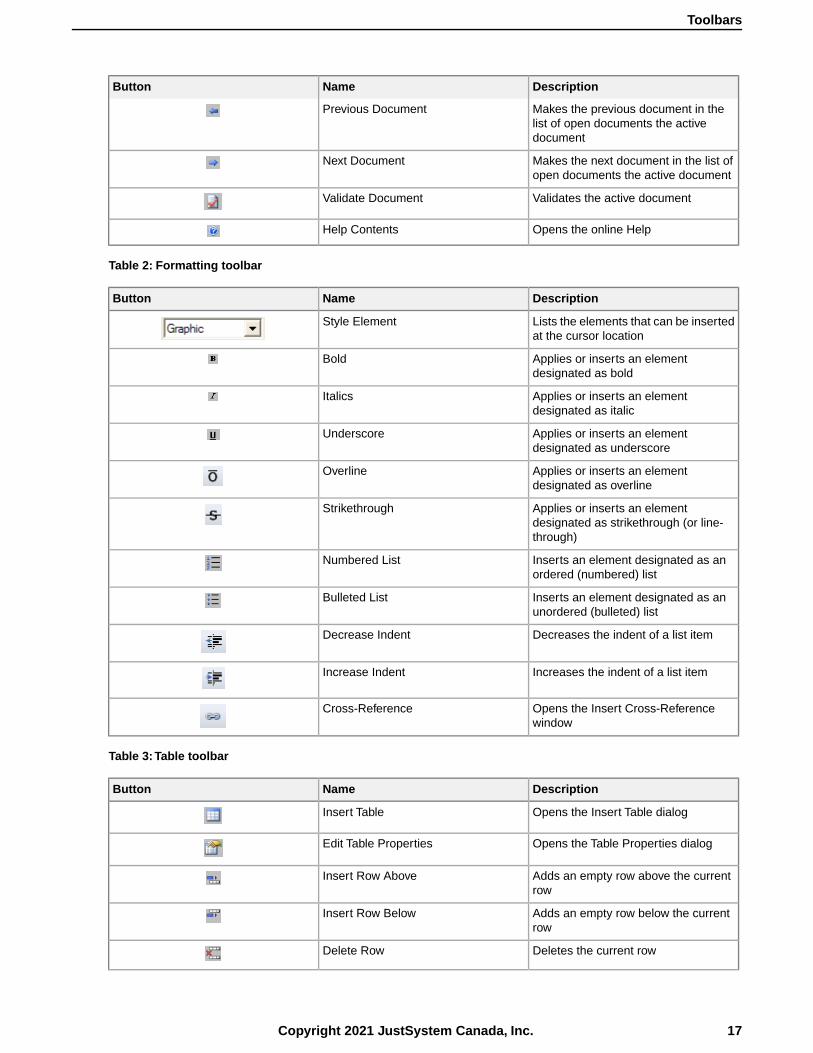
DescriptionNameButton
Makes the previous document in thelist of open documents the activedocument
Previous Document
Makes the next document in the list ofopen documents the active document
Next Document
Validates the active documentValidate Document
Opens the online HelpHelp Contents
Table 2: Formatting toolbar
DescriptionNameButton
Lists the elements that can be insertedat the cursor location
Style Element
Applies or inserts an elementdesignated as bold
Bold
Applies or inserts an elementdesignated as italic
Italics
Applies or inserts an elementdesignated as underscore
Underscore
Applies or inserts an elementdesignated as overline
Overline
Applies or inserts an elementdesignated as strikethrough (or line-through)
Strikethrough
Inserts an element designated as anordered (numbered) list
Numbered List
Inserts an element designated as anunordered (bulleted) list
Bulleted List
Decreases the indent of a list itemDecrease Indent
Increases the indent of a list itemIncrease Indent
Opens the Insert Cross-Referencewindow
Cross-Reference
Table 3:Table toolbar
DescriptionNameButton
Opens the Insert Table dialogInsert Table
Opens the Table Properties dialogEdit Table Properties
Adds an empty row above the currentrow
Insert Row Above
Adds an empty row below the currentrow
Insert Row Below
Deletes the current rowDelete Row
17Copyright 2021 JustSystem Canada, Inc.
Toolbars
DescriptionNameButton
Adds an empty column to the left of thecurrent column
Insert Column Left
Adds an empty column to the right ofthe current column
Insert Column Right
Deletes the current columnDelete Column
Moves the current row up one rowMove Row Up
Moves the current row down one rowMove Row Down
Moves the current column to the left byone column
Move Column Left
Moves the current column to the rightby one column
Move Column Right
Merges the current cell with the cell tothe right
Merge Cell Right
Merges the current cell with the cell tothe left
Merge Cell Left
Merges the current cell with the cellabove
Merge Cell Up
Merges the current cell with the cellbelow
Merge Cell Down
Splits the current cell into two cellshorizontally
Split Cell into Rows
Splits the current cell into two cellsvertically
Split Cell into Columns
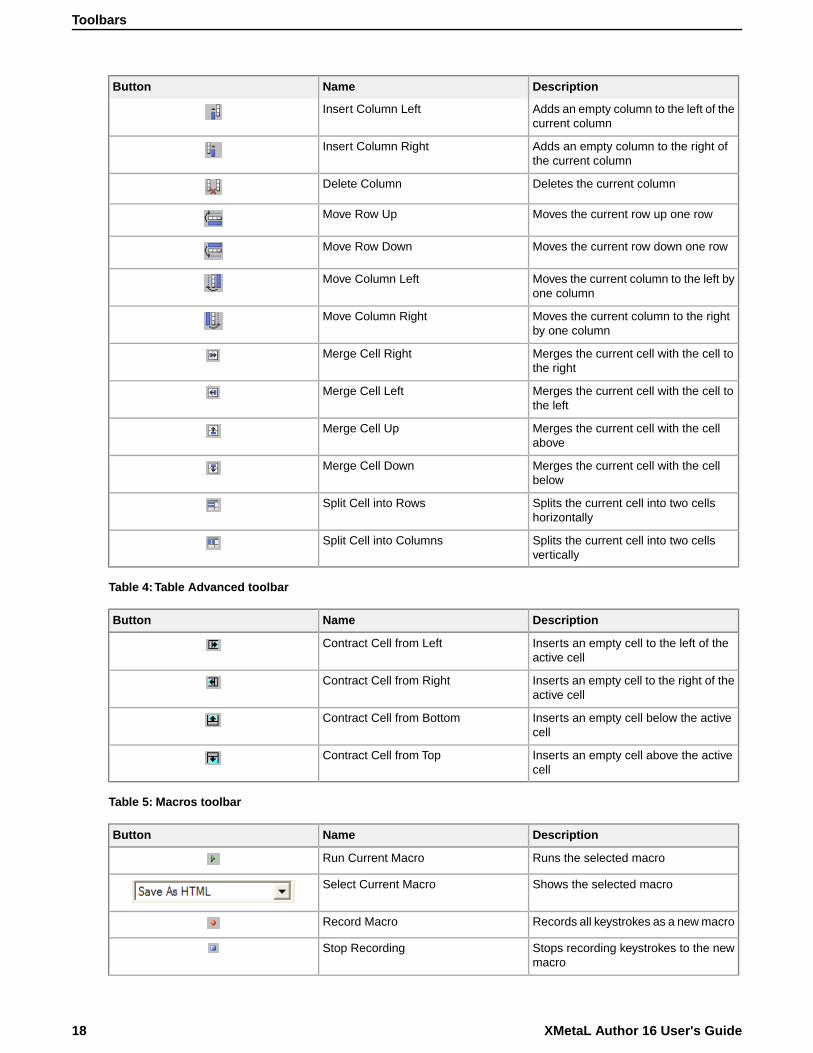
Table 4:Table Advanced toolbar
DescriptionNameButton
Inserts an empty cell to the left of theactive cell
Contract Cell from Left
Inserts an empty cell to the right of theactive cell
Contract Cell from Right
Inserts an empty cell below the activecell
Contract Cell from Bottom
Inserts an empty cell above the activecell
Contract Cell from Top
Table 5: Macros toolbar
DescriptionNameButton
Runs the selected macroRun Current Macro
Shows the selected macroSelect Current Macro
Records all keystrokes as a new macroRecord Macro
Stops recording keystrokes to the newmacro
Stop Recording
XMetaL Author 16 User's Guide18
Toolbars

DescriptionNameButton
Opens the Macros dialogMacros
Table 6: Reviewing toolbar
DescriptionNameButton
Turns change tracking on (off)Track Changes
Goes to and selects the previoustracked change
Previous Change
Goes to and selects the next trackedchange
Next Change
Accepts the current changeAccept Change
Rejects the current changeReject Change
Opens the Accept or Reject Changesdialog
Accept or Reject Changes
Shows the Revision Mark Options tabRevision Mark Options
Table 7: Repository toolbar
DescriptionNameButton
Displays repository contentsNew from Repository Template
Displays repository contentsOpen from Repository
Displays a search dialogExplore Repository
Displays repository contentsCheck In Document
Displays repository contentsCheck Out Document
Reverts to previously saved version ofthe document
Undo Checkout
Displays information about the currentdocument
Document Properties
Table 8: Views toolbar
DescriptionNameButton
Displays the active document in PlainText view
Plain Text
Displays the active document in TagsOn view
Tags On
Displays the active document in Normalview
Normal
Displays the active document in abrowser
Browse
Opens (closes) the Attribute InspectorAttribute Inspector
19Copyright 2021 JustSystem Canada, Inc.
Toolbars
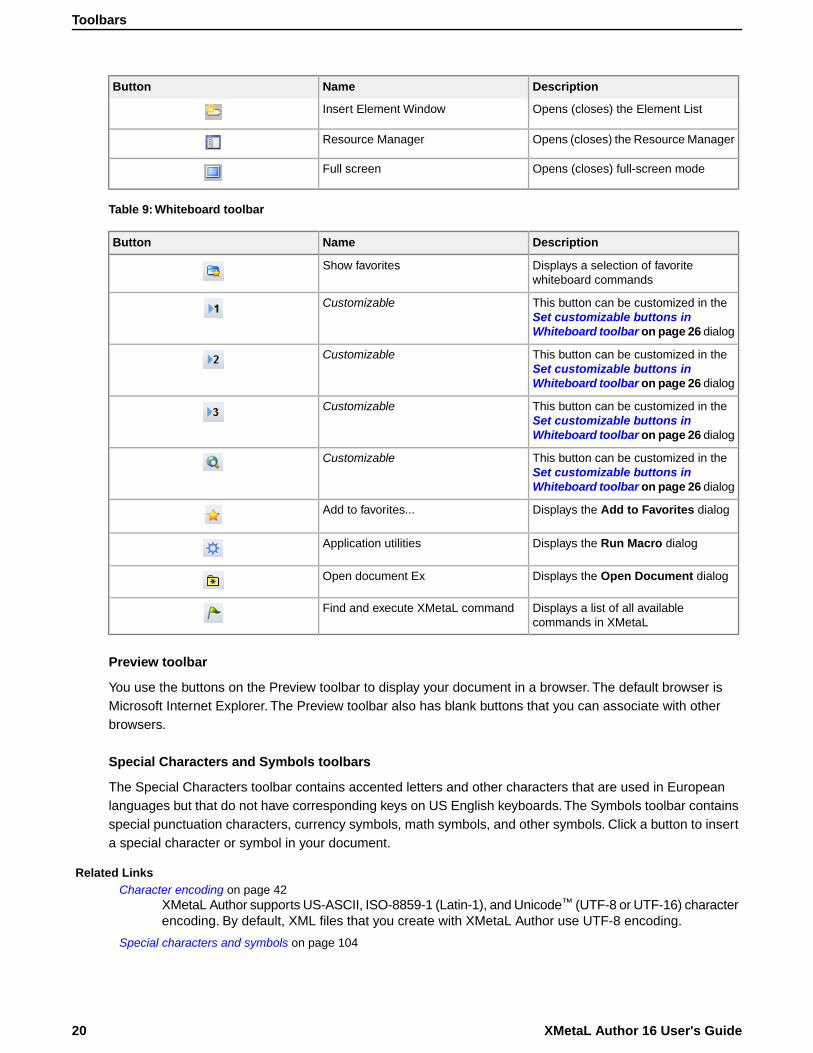
DescriptionNameButton
Opens (closes) the Element ListInsert Element Window
Opens (closes) the Resource ManagerResource Manager
Opens (closes) full-screen modeFull screen
Table 9: Whiteboard toolbar
DescriptionNameButton
Displays a selection of favoritewhiteboard commands
Show favorites
This button can be customized in theSet customizable buttons inWhiteboard toolbar on page 26 dialog
Customizable
This button can be customized in theSet customizable buttons inWhiteboard toolbar on page 26 dialog
Customizable
This button can be customized in theSet customizable buttons inWhiteboard toolbar on page 26 dialog
Customizable
This button can be customized in theSet customizable buttons inWhiteboard toolbar on page 26 dialog
Customizable
Displays the Add to Favorites dialogAdd to favorites...
Displays the Run Macro dialogApplication utilities
Displays the Open Document dialogOpen document Ex
Displays a list of all availablecommands in XMetaL
Find and execute XMetaL command
Preview toolbar
You use the buttons on the Preview toolbar to display your document in a browser. The default browser isMicrosoft Internet Explorer. The Preview toolbar also has blank buttons that you can associate with otherbrowsers.
Special Characters and Symbols toolbars
The Special Characters toolbar contains accented letters and other characters that are used in Europeanlanguages but that do not have corresponding keys on US English keyboards. The Symbols toolbar containsspecial punctuation characters, currency symbols, math symbols, and other symbols. Click a button to inserta special character or symbol in your document.
Related LinksCharacter encoding on page 42
XMetaL Author supports US-ASCII, ISO-8859-1 (Latin-1), and Unicode™ (UTF-8 or UTF-16) characterencoding. By default, XML files that you create with XMetaL Author use UTF-8 encoding.
Special characters and symbols on page 104
XMetaL Author 16 User's Guide20
Toolbars
You can use the Special Characters and Symbols toolbars, or the Insert Symbols menu (displayedby using the keyboard shortcut CTRL + Shift + S), to enter characters and symbols that do not havecorresponding keys on US English keyboards. If your document’s encoding supports it, the charactersand symbols themselves (not the character entities) are saved with your document.
Custom toolbars and menus on page 24You can create new toolbars and menus and customize existing ones.You can assign buttons andmenus to built-in commands or user-defined macros.
Display modeYou can choose how much space to allocate for displaying your documents.You can also choose to displayyour documents in a tabbed interface so that you can easily switch between open documents.
Follow these stepsTo do this
Click View > Full ScreenView a document in full-screen mode
In full-screen mode, the document display area expands to fill the screen, with only the menu bar visible.Youcan display other panes and views in full-screen mode.
21Copyright 2021 JustSystem Canada, Inc.
Display mode
Licensing
The licensing feature allows you to register and manage your XMetaL license.
You can view/edit your licensing information by clicking Help > Licensing.The following fields will be displayed:
• License Type - Displays the type of license; either Per-Seat, Concurrent, or Leased Concurrent.
• Licensee - Displays the name of the licensee.
• License Count - Displays the number of seats that apply to this license.
• Maintenance End - Displays the date when the maintenance contract for this license expires.
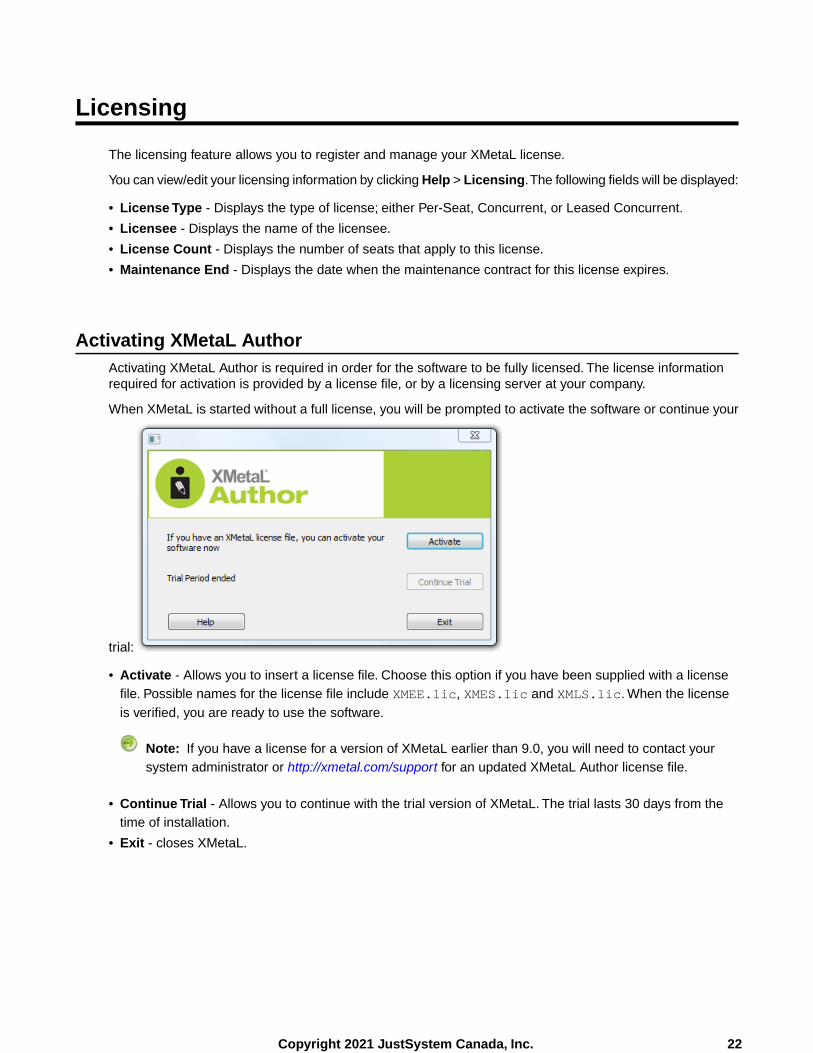
Activating XMetaL AuthorActivating XMetaL Author is required in order for the software to be fully licensed. The license informationrequired for activation is provided by a license file, or by a licensing server at your company.
When XMetaL is started without a full license, you will be prompted to activate the software or continue your
trial:
• Activate - Allows you to insert a license file. Choose this option if you have been supplied with a licensefile. Possible names for the license file include XMEE.lic, XMES.lic and XMLS.lic. When the licenseis verified, you are ready to use the software.
Note: If you have a license for a version of XMetaL earlier than 9.0, you will need to contact yoursystem administrator or http://xmetal.com/support for an updated XMetaL Author license file.
• Continue Trial - Allows you to continue with the trial version of XMetaL. The trial lasts 30 days from thetime of installation.
• Exit - closes XMetaL.
22Copyright 2021 JustSystem Canada, Inc.

Removing XMetaL Author LicenseRemoving XMetaL Author from a certain machine and will allow you to use the license on another machine.Concurrent licenses are automatically returned upon exit of XMetaL Author, leaving the local copy of XMetaLAuthor deactivated.
1. Click Help > Licensing
2. Click Remove License.
3. Click Ok when the confirmation window pops up.A dialog will appear asking you to activate the software; you may choose to activate or to exit the program.
Note: XMetaL Author will prompt you to save your work upon exit.
Access KeyAn access key, if required by your system administrator, allows you to use XMetaL Author in Concurrent orLeased Concurrent mode.
An access key may be required to receive a concurrent license. If you do not know the access key, contactyour system administrator.
23Copyright 2021 JustSystem Canada, Inc.
Removing XMetaL Author License

Customizing the user interface
You can customize the user interface to give you quick access to tasks and assets.You can make yourchanges available to all users or reserve them for your use only. Likewise, your changes can apply only todocuments that use a specific DTD or Schema, or to all documents.
Related LinksSpecify tag and tag text colors on page 11Spell checker options on page 56
You can specify Spell Checker options through Tools > Spell Checker.Your settings are appliedthe next time you open the spell checker.
Language settings on page 64You can choose a language for the current file or set it as the default language for the spell checkerand thesaurus.You can also add and remove languages.
Thesaurus options on page 66You can specify thesaurus options through Tools > Thesaurus.Your settings are applied the nexttime you open the thesaurus.
XMetaL customizations on page 84Formatting and authoring functionality are provided by an XMetaL customization. The basis for anXMetaL customization is the DTD or Schema. Journalist is provided as an example customization.For detailed information about creating and deploying customizations, see the XMetaL CustomizationGuide.
Options on page 31You can set options through the Tools menu.
Custom toolbars and menusYou can create new toolbars and menus and customize existing ones.You can assign buttons and menusto built-in commands or user-defined macros.
Follow these stepsTo do this
Perform the customization steps when no document is openCreate toolbars and menus for all DTDs and Schemas
Perform the customization steps when a document thatuses that DTD or Schema is the active document
Create toolbars and menus for a specific DTD or Schema
Toolbars are stored in the following files:
• Global toolbars for the current user only. %APPDATA%\SoftQuad\XMetaL\<version>\default.tbrcontains toolbars available to the current user for all documents being edited. Toolbars in this file takeprecedence over any toolbars of the same name in the above file.
• DTD-specific toolbars for all users. Toolbars available to all users for any document based on the DTDor Schema are contained beside the file location of the .dtd/.xsd OR in a fallback location under..\Author\Rules\<dtdname>.tbr.
• DTD-specific toolbars for current user only..%APPDATA%\SoftQuad\XMetaL\<version>\<dtdname>.tbr and a and per-user "gen" folder areacontain toolbars available to the current user for any document based on the DTD or Schema. Toolbars inthis file take precedence over any toolbars of the same name in the above file.
24Copyright 2021 JustSystem Canada, Inc.
Related LinksXMetaL customizations on page 84
Formatting and authoring functionality are provided by an XMetaL customization. The basis for anXMetaL customization is the DTD or Schema. Journalist is provided as an example customization.For detailed information about creating and deploying customizations, see the XMetaL CustomizationGuide.
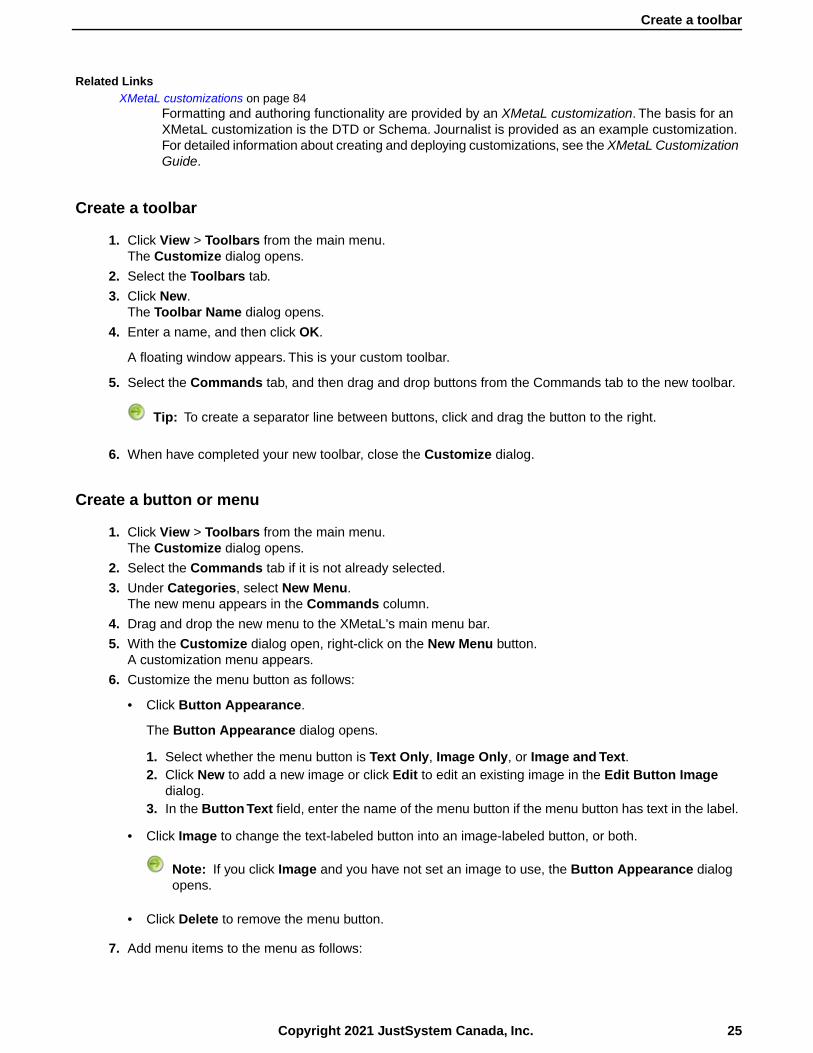
Create a toolbar
1. Click View > Toolbars from the main menu.The Customize dialog opens.
2. Select the Toolbars tab.
3. Click New.The Toolbar Name dialog opens.
4. Enter a name, and then click OK.
A floating window appears. This is your custom toolbar.
5. Select the Commands tab, and then drag and drop buttons from the Commands tab to the new toolbar.
Tip: To create a separator line between buttons, click and drag the button to the right.
6. When have completed your new toolbar, close the Customize dialog.
Create a button or menu
1. Click View > Toolbars from the main menu.The Customize dialog opens.
2. Select the Commands tab if it is not already selected.
3. Under Categories, select New Menu.The new menu appears in the Commands column.
4. Drag and drop the new menu to the XMetaL's main menu bar.
5. With the Customize dialog open, right-click on the New Menu button.A customization menu appears.
6. Customize the menu button as follows:
• Click Button Appearance.
The Button Appearance dialog opens.
1. Select whether the menu button is Text Only, Image Only, or Image and Text.2. Click New to add a new image or click Edit to edit an existing image in the Edit Button Image
dialog.3. In the Button Text field, enter the name of the menu button if the menu button has text in the label.
• Click Image to change the text-labeled button into an image-labeled button, or both.
Note: If you click Image and you have not set an image to use, the Button Appearance dialogopens.
• Click Delete to remove the menu button.
7. Add menu items to the menu as follows:
25Copyright 2021 JustSystem Canada, Inc.
Create a toolbar

Click Start Group.•• In the Customize dialog's Commands tab, select one of the categories other than New Menu.• From the list of all available commands in the right-side menu, drag and drop the commands you want
to include in the new menu.
8. When you are finished customizing your menu or button, close the Customize dialog.
Set customizable buttons in Whiteboard toolbar
The three customizable buttons ( , , , and ) in the Whiteboard toolbar can be customized foryour favorite macros, third-party applications, and documents. The default XMetaL installation containsexamples of using third party applications such as finding selected text on Google or WiKi, opening an imagein MS Paint and using free web services for translating selected text to and from different languages.
1. Press Shift and click one of the customizable buttons.The Customize favorites dialog opens.
2. Select the item you want to relate to one of the buttons.The selected function is displayed in the Title field.
3. Click the button to which you want to relate the function.The function is now set for the selected button.
4. Click Run Application to test the function in the Title field.
Assets (unsupported)You can organize frequently used objects as assets through the Resource Manager. Assets can be singlefiles, such as images, text, or markup blocks.You can drag and drop assets into your document.
Follow these stepsTo do this
In the Resource Manager, click the Assets tab. Right-clickthe My Assets folder, and select New Folder. Specify aname and asset type.
Create an asset folder
Click the Desktop tab, select a file, drag it onto the Assetstab, and drop it in an asset folder.
Add an asset to an asset folder
The Resource Manager contains the Assets tab and the Desktop tab.
The Assets tab contains the following folders:
• Customizable Asset Templates. A set of templates that can be used to create your own asset folders.An asset template is displayed when you click on a folder.
• Journalist DTD. A set of sample assets to be used with the Journalist DTD.
• My Assets. A folder for organizing your assets.
The Desktop tab gives you access to the files on your computer.
You can create your own asset folders to organize and categorize objects. When you create an asset folder,you must specify an asset type.You create an asset by dropping a file from your computer into an assetfolder.
The types of assets that you can create in My Assets are defined by asset templates, which are located in..\XMetaL <version>\Author\Asset Templates.You can add more templates to this folder, for
XMetaL Author 16 User's Guide26
Set customizable buttons in Whiteboard toolbar

example, by copying them from ..\XMetaL <version>\Author\Assets\Customizable AssetTemplates.
Note: You may need to customize some of these templates for your DTD or Schema.
Tip: You can drag and drop images, text, or markup blocks from your documents into asset folders.
Related LinksXMetaL customizations on page 84
Formatting and authoring functionality are provided by an XMetaL customization. The basis for anXMetaL customization is the DTD or Schema. Journalist is provided as an example customization.For detailed information about creating and deploying customizations, see the XMetaL CustomizationGuide.
Images on page 91You can insert images into your documents if your XMetaL customization recognizes elements inyour DTD or Schema as image elements, or if you are using DITA.
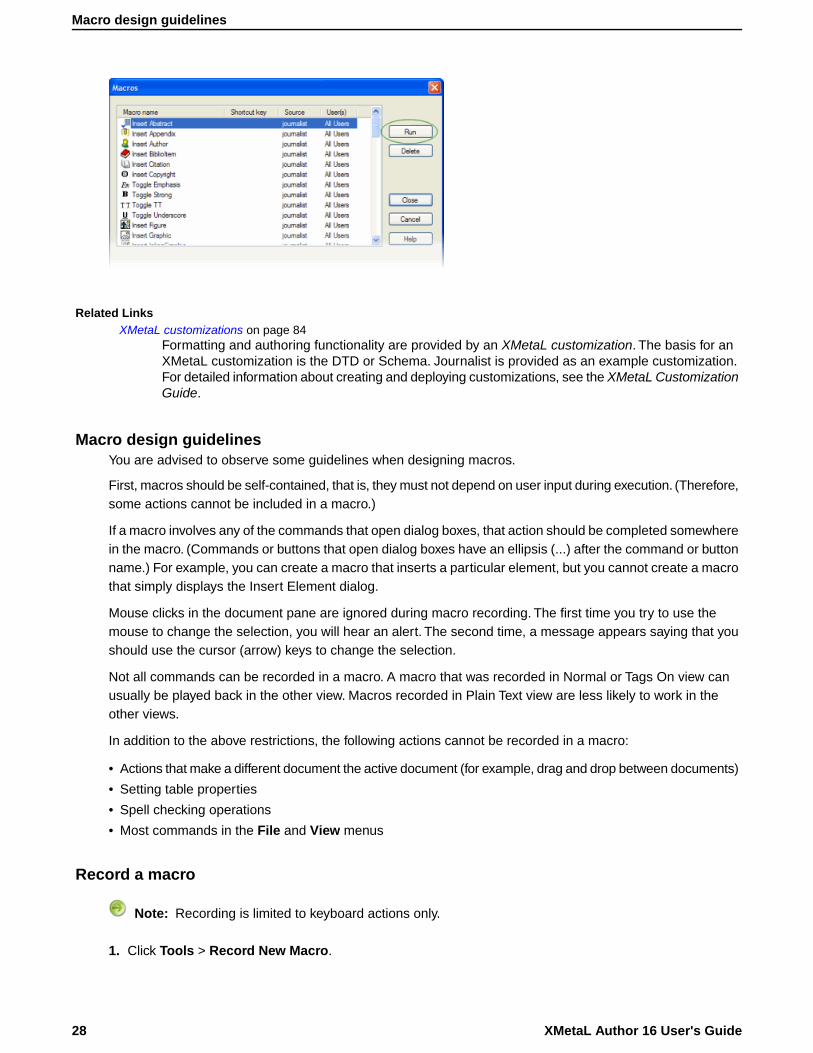
MacrosA macro is a sequence of operations that can be run as a unit. Macros can be associated with a shortcut key,toolbar button, or menu item.They are useful when you need to repeatedly execute a task that does not havea built-in shortcut key or command.
Follow these stepsTo do this
Click Tools > Macros. Then select a macro and click Run.Run a macro
Tip: You may want to create keyboard shortcuts for frequently used macros, or associate them withtoolbar buttons or menu items.
DTD-specific macros are available when you edit a document using the associated DTD or Schema; globalmacros are available to all documents and when no documents are open.
Macros are stored in the following files:
• Global macros for all users. ..\XMetaL <version>\Author\Macros\xmetal.mcr contains macrosavailable to all users for all documents. This is the default macro file.
• Global macros for the current user only. %APPDATA%\SoftQuad\XMetaL\<version>\xmetal.mcrcontains macros available to the current user for all documents being edited. Macros in this file takeprecedence over any macros of the same name in the above file.
• DTD-specific macros for all users. ..\XMetaL <version>\Author\Macros\<dtdname>.mcrcontains macros available to all users for any document based on the DTD or Schema.
• DTD-specific macros for current user only.%APPDATA%\SoftQuad\XMetaL\<version>\<dtdname>.mcr contains macros available to the currentuser for any document based on the DTD or Schema. Macros in this file take precedence over any macrosof the same name in the above file.
27Copyright 2021 JustSystem Canada, Inc.
Macros
Related LinksXMetaL customizations on page 84
Formatting and authoring functionality are provided by an XMetaL customization. The basis for anXMetaL customization is the DTD or Schema. Journalist is provided as an example customization.For detailed information about creating and deploying customizations, see the XMetaL CustomizationGuide.
Macro design guidelinesYou are advised to observe some guidelines when designing macros.
First, macros should be self-contained, that is, they must not depend on user input during execution. (Therefore,some actions cannot be included in a macro.)
If a macro involves any of the commands that open dialog boxes, that action should be completed somewherein the macro. (Commands or buttons that open dialog boxes have an ellipsis (...) after the command or buttonname.) For example, you can create a macro that inserts a particular element, but you cannot create a macrothat simply displays the Insert Element dialog.
Mouse clicks in the document pane are ignored during macro recording. The first time you try to use themouse to change the selection, you will hear an alert. The second time, a message appears saying that youshould use the cursor (arrow) keys to change the selection.
Not all commands can be recorded in a macro. A macro that was recorded in Normal or Tags On view canusually be played back in the other view. Macros recorded in Plain Text view are less likely to work in theother views.
In addition to the above restrictions, the following actions cannot be recorded in a macro:
• Actions that make a different document the active document (for example, drag and drop between documents)
• Setting table properties
• Spell checking operations
• Most commands in the File and View menus
Record a macro
Note: Recording is limited to keyboard actions only.
1. Click Tools > Record New Macro.
XMetaL Author 16 User's Guide28
Macro design guidelines
2. Perform the sequence of actions that you want the macro to execute.
3. Click Tools > Stop Recording.
4. Select an option from the Create this macro for list.
5. Type a name.
6. (Optional) Do any combination of the following:
• Specify a shortcut key combination to associate with the macro• Specify an image to associate with the macro
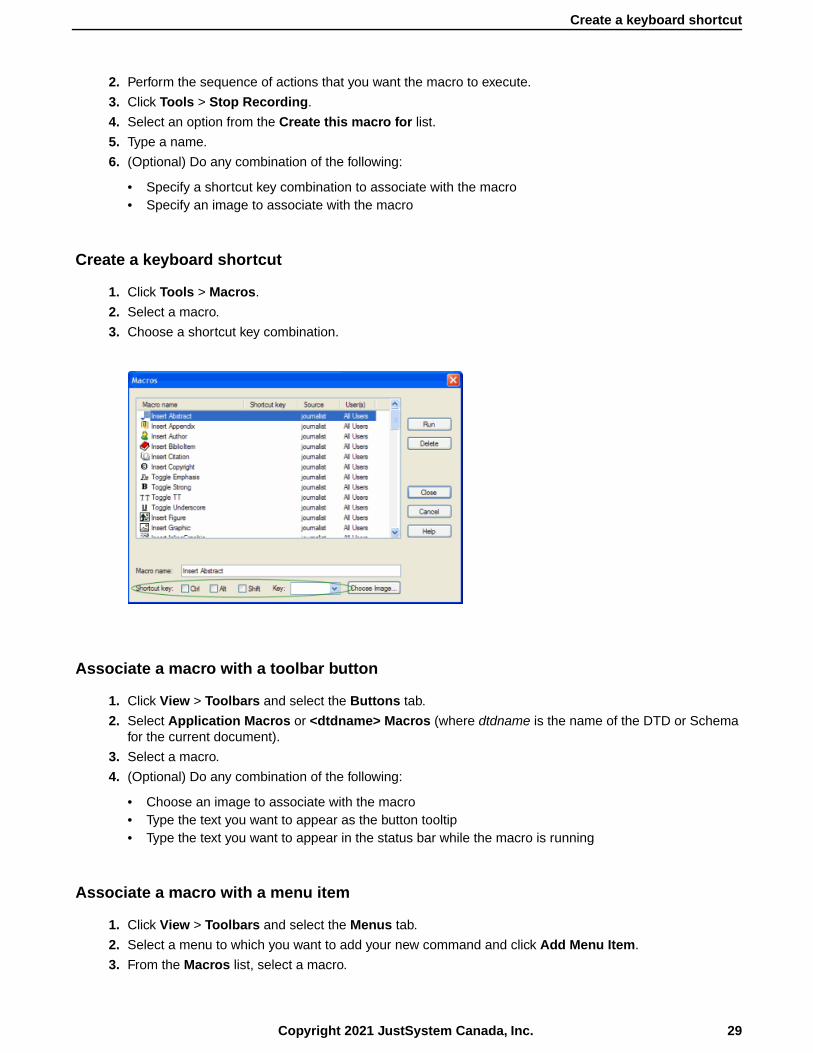
Create a keyboard shortcut
1. Click Tools > Macros.
2. Select a macro.
3. Choose a shortcut key combination.
Associate a macro with a toolbar button
1. Click View > Toolbars and select the Buttons tab.
2. Select Application Macros or <dtdname> Macros (where dtdname is the name of the DTD or Schemafor the current document).
3. Select a macro.
4. (Optional) Do any combination of the following:
• Choose an image to associate with the macro• Type the text you want to appear as the button tooltip• Type the text you want to appear in the status bar while the macro is running
Associate a macro with a menu item
1. Click View > Toolbars and select the Menus tab.
2. Select a menu to which you want to add your new command and click Add Menu Item.
3. From the Macros list, select a macro.
29Copyright 2021 JustSystem Canada, Inc.
Create a keyboard shortcut
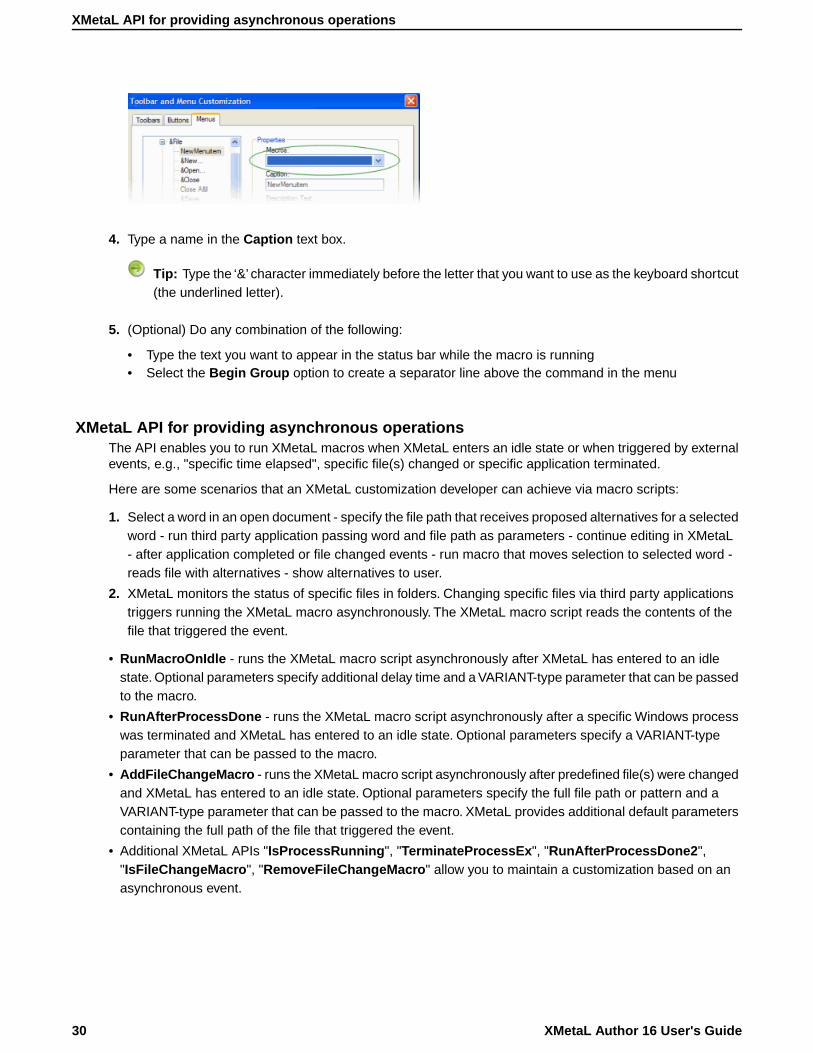
4. Type a name in the Caption text box.
Tip: Type the ‘&’ character immediately before the letter that you want to use as the keyboard shortcut(the underlined letter).
5. (Optional) Do any combination of the following:
• Type the text you want to appear in the status bar while the macro is running• Select the Begin Group option to create a separator line above the command in the menu
XMetaL API for providing asynchronous operationsThe API enables you to run XMetaL macros when XMetaL enters an idle state or when triggered by externalevents, e.g., "specific time elapsed", specific file(s) changed or specific application terminated.
Here are some scenarios that an XMetaL customization developer can achieve via macro scripts:
1. Select a word in an open document - specify the file path that receives proposed alternatives for a selectedword - run third party application passing word and file path as parameters - continue editing in XMetaL- after application completed or file changed events - run macro that moves selection to selected word -reads file with alternatives - show alternatives to user.
2. XMetaL monitors the status of specific files in folders. Changing specific files via third party applicationstriggers running the XMetaL macro asynchronously. The XMetaL macro script reads the contents of thefile that triggered the event.
• RunMacroOnIdle - runs the XMetaL macro script asynchronously after XMetaL has entered to an idlestate. Optional parameters specify additional delay time and a VARIANT-type parameter that can be passedto the macro.
• RunAfterProcessDone - runs the XMetaL macro script asynchronously after a specific Windows processwas terminated and XMetaL has entered to an idle state. Optional parameters specify a VARIANT-typeparameter that can be passed to the macro.
• AddFileChangeMacro - runs the XMetaL macro script asynchronously after predefined file(s) were changedand XMetaL has entered to an idle state. Optional parameters specify the full file path or pattern and aVARIANT-type parameter that can be passed to the macro. XMetaL provides additional default parameterscontaining the full path of the file that triggered the event.
• Additional XMetaL APIs "IsProcessRunning", "TerminateProcessEx", "RunAfterProcessDone2","IsFileChangeMacro", "RemoveFileChangeMacro" allow you to maintain a customization based on anasynchronous event.
XMetaL Author 16 User's Guide30
XMetaL API for providing asynchronous operations
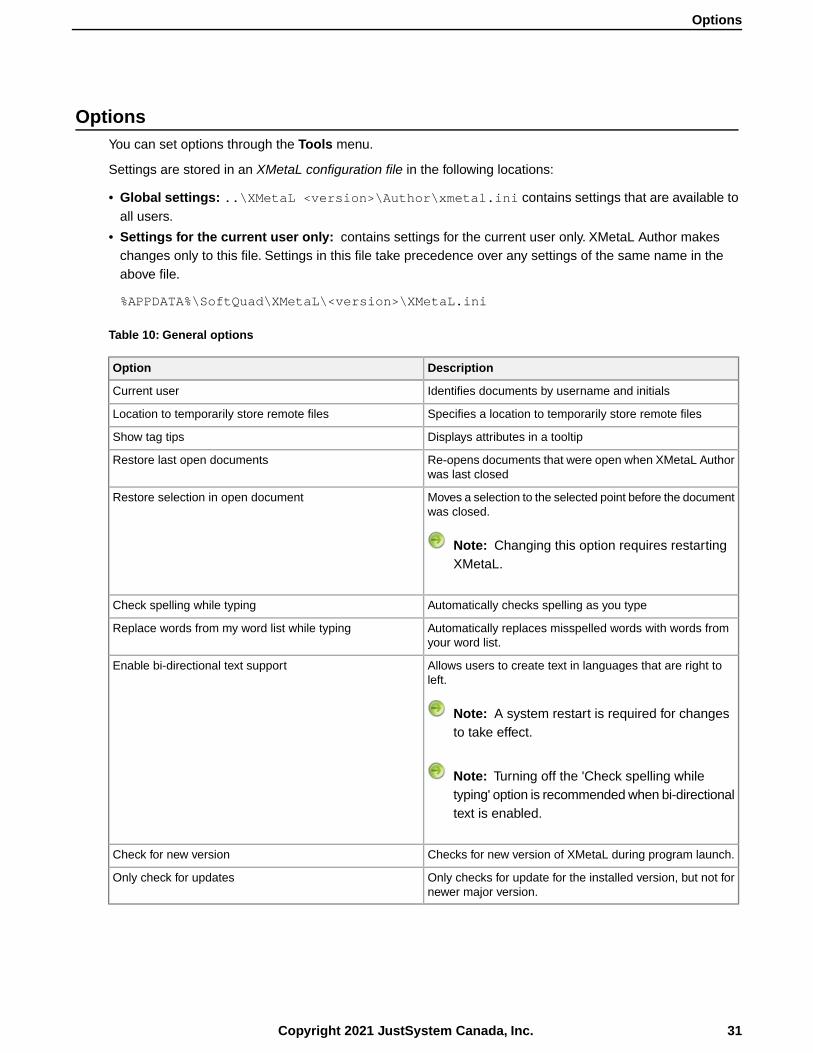
OptionsYou can set options through the Tools menu.
Settings are stored in an XMetaL configuration file in the following locations:
• Global settings: ..\XMetaL <version>\Author\xmetal.ini contains settings that are available toall users.
• Settings for the current user only: contains settings for the current user only. XMetaL Author makeschanges only to this file. Settings in this file take precedence over any settings of the same name in theabove file.
%APPDATA%\SoftQuad\XMetaL\<version>\XMetaL.ini
Table 10: General options
DescriptionOption
Identifies documents by username and initialsCurrent user
Specifies a location to temporarily store remote filesLocation to temporarily store remote files
Displays attributes in a tooltipShow tag tips
Re-opens documents that were open when XMetaL Authorwas last closed
Restore last open documents
Moves a selection to the selected point before the documentwas closed.
Restore selection in open document
Note: Changing this option requires restartingXMetaL.
Automatically checks spelling as you typeCheck spelling while typing
Automatically replaces misspelled words with words fromyour word list.
Replace words from my word list while typing
Allows users to create text in languages that are right toleft.
Enable bi-directional text support
Note: A system restart is required for changesto take effect.
Note: Turning off the 'Check spelling whiletyping' option is recommended when bi-directionaltext is enabled.
Checks for new version of XMetaL during program launch.Check for new version
Only checks for update for the installed version, but not fornewer major version.
Only check for updates
31Copyright 2021 JustSystem Canada, Inc.
Options
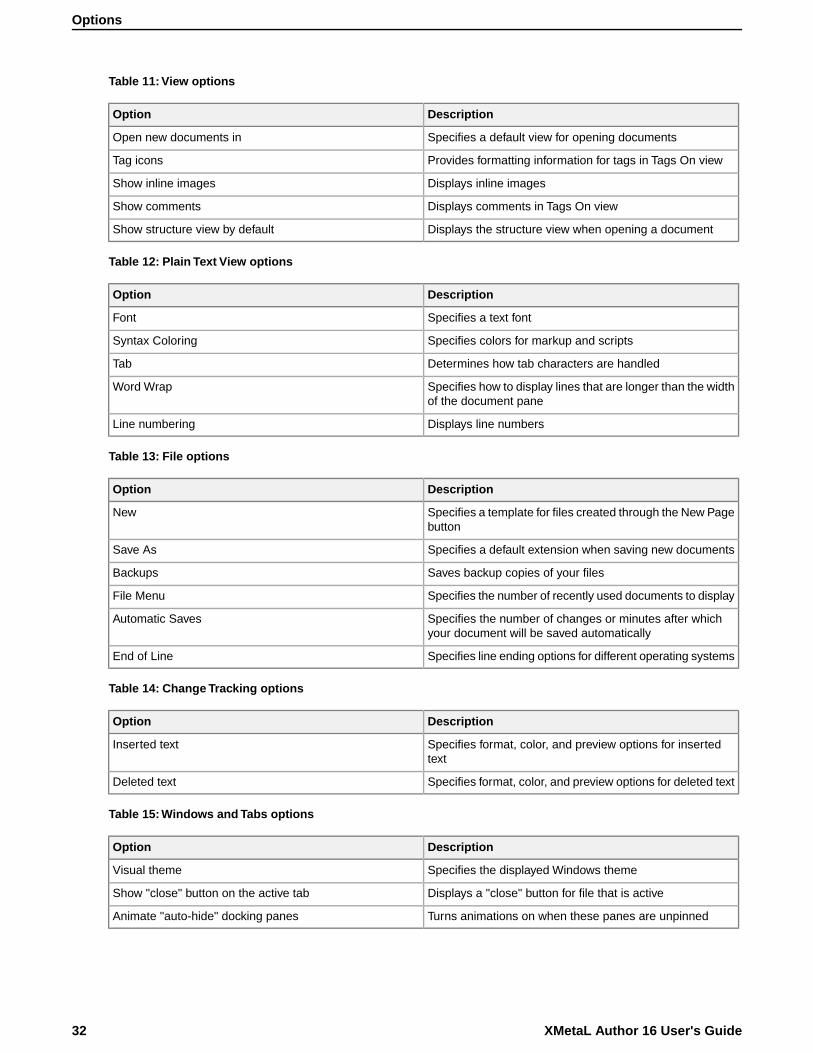
Table 11: View options
DescriptionOption
Specifies a default view for opening documentsOpen new documents in
Provides formatting information for tags in Tags On viewTag icons
Displays inline imagesShow inline images
Displays comments in Tags On viewShow comments
Displays the structure view when opening a documentShow structure view by default
Table 12: Plain Text View options
DescriptionOption
Specifies a text fontFont
Specifies colors for markup and scriptsSyntax Coloring
Determines how tab characters are handledTab
Specifies how to display lines that are longer than the widthof the document pane
Word Wrap
Displays line numbersLine numbering
Table 13: File options
DescriptionOption
Specifies a template for files created through the New Pagebutton
New
Specifies a default extension when saving new documentsSave As
Saves backup copies of your filesBackups
Specifies the number of recently used documents to displayFile Menu
Specifies the number of changes or minutes after whichyour document will be saved automatically
Automatic Saves
Specifies line ending options for different operating systemsEnd of Line
Table 14: Change Tracking options
DescriptionOption
Specifies format, color, and preview options for insertedtext
Inserted text
Specifies format, color, and preview options for deleted textDeleted text
Table 15: Windows and Tabs options
DescriptionOption
Specifies the displayed Windows themeVisual theme
Displays a "close" button for file that is activeShow "close" button on the active tab
Turns animations on when these panes are unpinnedAnimate "auto-hide" docking panes
XMetaL Author 16 User's Guide32
Options
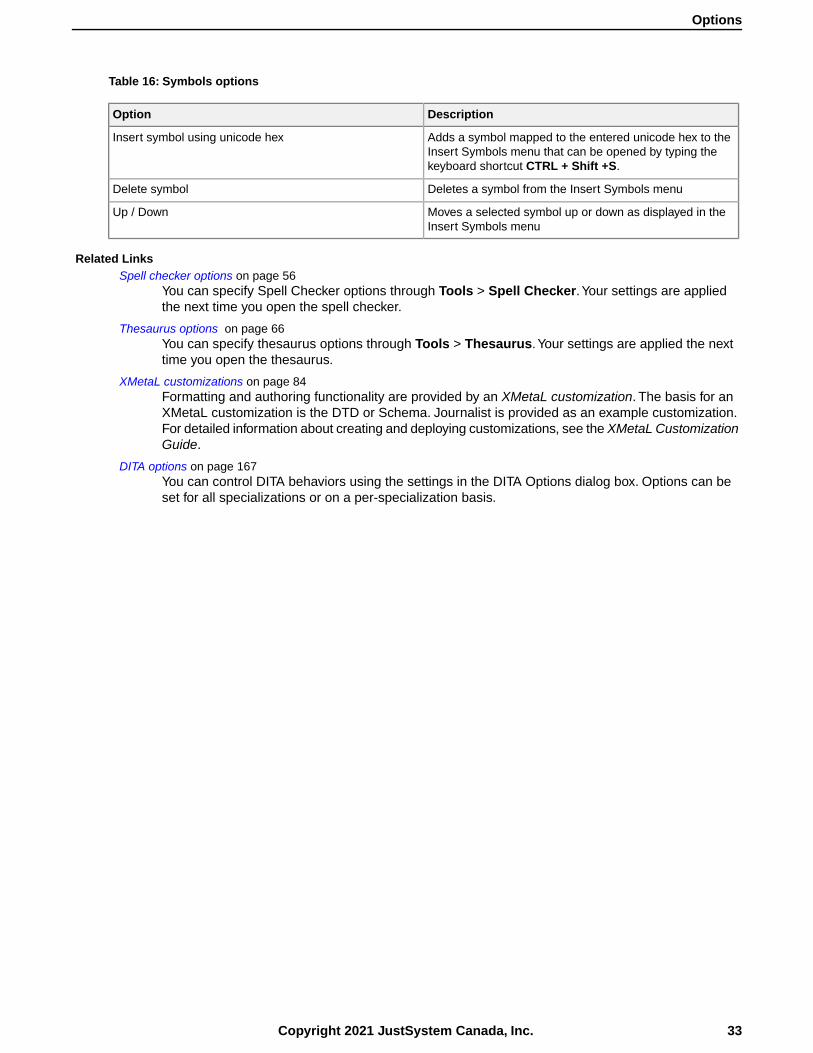
Table 16: Symbols options
DescriptionOption
Adds a symbol mapped to the entered unicode hex to theInsert Symbols menu that can be opened by typing thekeyboard shortcut CTRL + Shift +S.
Insert symbol using unicode hex
Deletes a symbol from the Insert Symbols menuDelete symbol
Moves a selected symbol up or down as displayed in theInsert Symbols menu
Up / Down
Related LinksSpell checker options on page 56
You can specify Spell Checker options through Tools > Spell Checker.Your settings are appliedthe next time you open the spell checker.
Thesaurus options on page 66You can specify thesaurus options through Tools > Thesaurus.Your settings are applied the nexttime you open the thesaurus.
XMetaL customizations on page 84Formatting and authoring functionality are provided by an XMetaL customization. The basis for anXMetaL customization is the DTD or Schema. Journalist is provided as an example customization.For detailed information about creating and deploying customizations, see the XMetaL CustomizationGuide.
DITA options on page 167You can control DITA behaviors using the settings in the DITA Options dialog box. Options can beset for all specializations or on a per-specialization basis.
33Copyright 2021 JustSystem Canada, Inc.
Options
Managing documents
This section contains information about managing documents such as creating, opening, printing and savingdocuments, creating well-formed XML documents, and working with a repository.
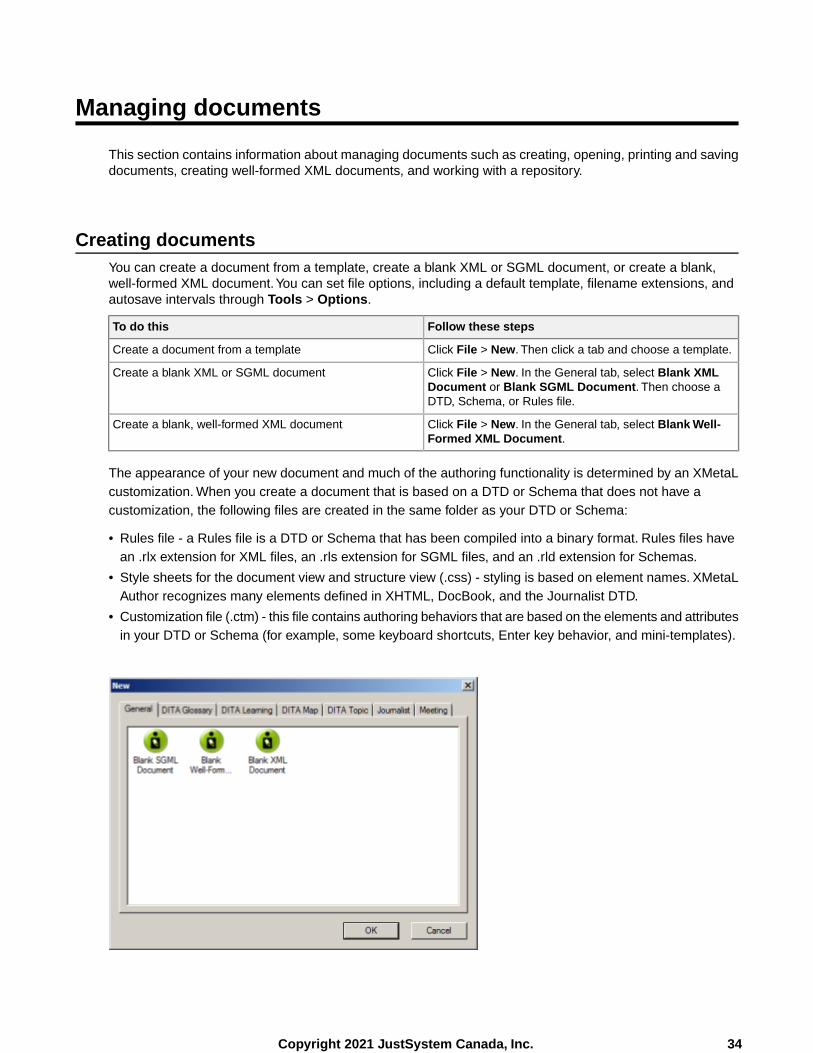
Creating documentsYou can create a document from a template, create a blank XML or SGML document, or create a blank,well-formed XML document.You can set file options, including a default template, filename extensions, andautosave intervals through Tools > Options.
Follow these stepsTo do this
Click File > New. Then click a tab and choose a template.Create a document from a template
Click File > New. In the General tab, select Blank XMLDocument or Blank SGML Document. Then choose aDTD, Schema, or Rules file.
Create a blank XML or SGML document
Click File > New. In the General tab, select Blank Well-Formed XML Document.
Create a blank, well-formed XML document
The appearance of your new document and much of the authoring functionality is determined by an XMetaLcustomization. When you create a document that is based on a DTD or Schema that does not have acustomization, the following files are created in the same folder as your DTD or Schema:
• Rules file - a Rules file is a DTD or Schema that has been compiled into a binary format. Rules files havean .rlx extension for XML files, an .rls extension for SGML files, and an .rld extension for Schemas.
• Style sheets for the document view and structure view (.css) - styling is based on element names. XMetaLAuthor recognizes many elements defined in XHTML, DocBook, and the Journalist DTD.
• Customization file (.ctm) - this file contains authoring behaviors that are based on the elements and attributesin your DTD or Schema (for example, some keyboard shortcuts, Enter key behavior, and mini-templates).
34Copyright 2021 JustSystem Canada, Inc.

Related LinksOptions on page 31
You can set options through the Tools menu.
XMetaL customizations on page 84Formatting and authoring functionality are provided by an XMetaL customization. The basis for anXMetaL customization is the DTD or Schema. Journalist is provided as an example customization.For detailed information about creating and deploying customizations, see the XMetaL CustomizationGuide.
TemplatesTemplates let you create new documents that use a particular DTD or Schema. They can also provide adocument outline and text that help you in the authoring process.
You should create at least one template for each DTD or Schema. In many cases, you can use the sametemplate to create either an XML or an SGML document. However, if your DTD was designed for SGMLdocuments, it may contain features that are not supported in XML.
Templates are stored in the following folder:..\XMetaL <version>\Author\Template.You can organizeyour templates in sub-folders. Sub-folders appear as tabs when you click File > New to create a new document.
Related LinksXMetaL customizations on page 84
Formatting and authoring functionality are provided by an XMetaL customization. The basis for anXMetaL customization is the DTD or Schema. Journalist is provided as an example customization.For detailed information about creating and deploying customizations, see the XMetaL CustomizationGuide.
Create a template
1. Click File > New and select the General tab.
2. Select Blank XML Document or Blank SGML Document and click Open.
3. Choose a DTD or Schema to associate with your template.
4. Add elements and content to the template as required.
5. Create a folder in the template folder and save the file (for example, ..\XMetaL<version>\Author\Template\New_products\Z-series.xml).
Tip: Give the file a descriptive name that reflects the template use or associated DTD.
Note: The file extension you assign to your template (.xml or .sgm) determines whether an XML orSGML file is created when the template is opened.
Related LinksWorking with elements on page 86
Elements are the building-blocks of your documents. They are defined in your DTD or Schema.Authoring in Normal view is similar to applying styles, whereas Tags On view lets you work withelements as structural objects.You can insert elements using the Element List, the Insert menu, orthe In-place, look-ahead element list.
Create a specialization template on page 166Once you have configured and re-started XMetaL, you can create a template so that authors cancreate new documents using your specialization.
35Copyright 2021 JustSystem Canada, Inc.
Templates
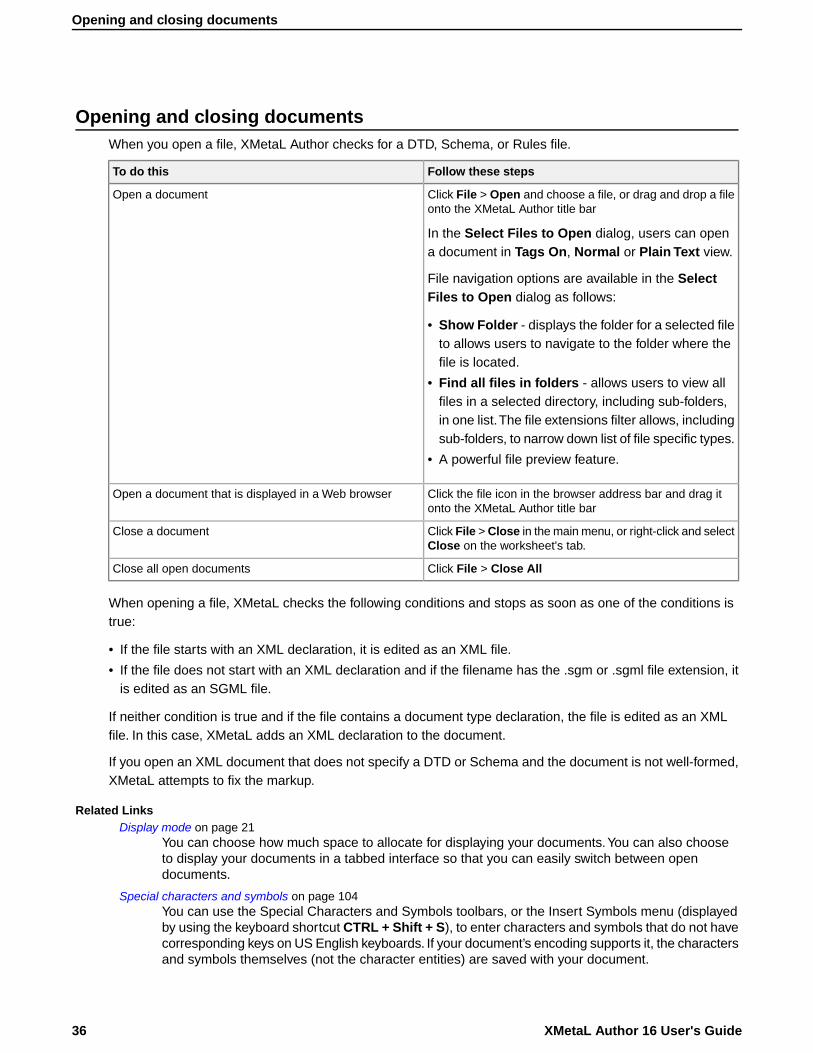
Opening and closing documentsWhen you open a file, XMetaL Author checks for a DTD, Schema, or Rules file.
Follow these stepsTo do this
Click File > Open and choose a file, or drag and drop a fileonto the XMetaL Author title bar
In the Select Files to Open dialog, users can opena document in Tags On, Normal or Plain Text view.
Open a document
File navigation options are available in the SelectFiles to Open dialog as follows:
• Show Folder - displays the folder for a selected fileto allows users to navigate to the folder where thefile is located.
• Find all files in folders - allows users to view allfiles in a selected directory, including sub-folders,in one list.The file extensions filter allows, includingsub-folders, to narrow down list of file specific types.
• A powerful file preview feature.
Click the file icon in the browser address bar and drag itonto the XMetaL Author title bar
Open a document that is displayed in a Web browser
Click File > Close in the main menu, or right-click and selectClose on the worksheet's tab.
Close a document
Click File > Close AllClose all open documents
When opening a file, XMetaL checks the following conditions and stops as soon as one of the conditions istrue:
• If the file starts with an XML declaration, it is edited as an XML file.
• If the file does not start with an XML declaration and if the filename has the .sgm or .sgml file extension, itis edited as an SGML file.
If neither condition is true and if the file contains a document type declaration, the file is edited as an XMLfile. In this case, XMetaL adds an XML declaration to the document.
If you open an XML document that does not specify a DTD or Schema and the document is not well-formed,XMetaL attempts to fix the markup.
Related LinksDisplay mode on page 21
You can choose how much space to allocate for displaying your documents.You can also chooseto display your documents in a tabbed interface so that you can easily switch between opendocuments.
Special characters and symbols on page 104You can use the Special Characters and Symbols toolbars, or the Insert Symbols menu (displayedby using the keyboard shortcut CTRL + Shift + S), to enter characters and symbols that do not havecorresponding keys on US English keyboards. If your document’s encoding supports it, the charactersand symbols themselves (not the character entities) are saved with your document.
XMetaL Author 16 User's Guide36
Opening and closing documents
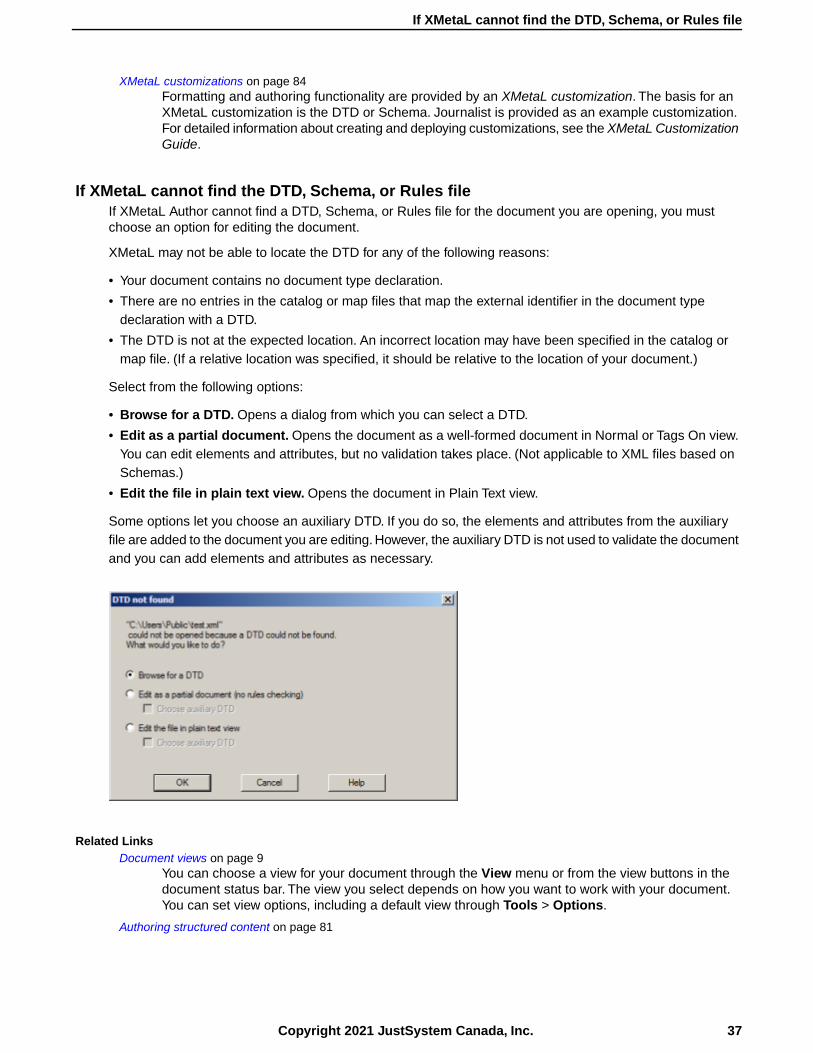
XMetaL customizations on page 84Formatting and authoring functionality are provided by an XMetaL customization. The basis for anXMetaL customization is the DTD or Schema. Journalist is provided as an example customization.For detailed information about creating and deploying customizations, see the XMetaL CustomizationGuide.
If XMetaL cannot find the DTD, Schema, or Rules fileIf XMetaL Author cannot find a DTD, Schema, or Rules file for the document you are opening, you mustchoose an option for editing the document.
XMetaL may not be able to locate the DTD for any of the following reasons:
• Your document contains no document type declaration.
• There are no entries in the catalog or map files that map the external identifier in the document typedeclaration with a DTD.
• The DTD is not at the expected location. An incorrect location may have been specified in the catalog ormap file. (If a relative location was specified, it should be relative to the location of your document.)
Select from the following options:
• Browse for a DTD. Opens a dialog from which you can select a DTD.
• Edit as a partial document. Opens the document as a well-formed document in Normal or Tags On view.You can edit elements and attributes, but no validation takes place. (Not applicable to XML files based onSchemas.)
• Edit the file in plain text view. Opens the document in Plain Text view.
Some options let you choose an auxiliary DTD. If you do so, the elements and attributes from the auxiliaryfile are added to the document you are editing. However, the auxiliary DTD is not used to validate the documentand you can add elements and attributes as necessary.
Related LinksDocument views on page 9
You can choose a view for your document through the View menu or from the view buttons in thedocument status bar. The view you select depends on how you want to work with your document.You can set view options, including a default view through Tools > Options.
Authoring structured content on page 81
37Copyright 2021 JustSystem Canada, Inc.
If XMetaL cannot find the DTD, Schema, or Rules file

When you create a document instance of a DTD or Schema in Normal or Tags On view, XMetaLAuthor ensures that your content is valid by guiding you through the authoring process.You do notneed to have a complete understanding of XML to begin authoring structured content.
WebDAV-enabled foldersTo open files in a WebDav-enabled folder, you must have permission. When you open a document in aWebDAV folder, it is locked for editing. Other users can open the file as read-only. Auxiliary files such as theDTD are left unlocked.
Customization files can be downloaded from a WebDAV server following the normal search rules. Catalogsare not downloaded from a WebDAV server; only your local system is searched according to the normalsearch behavior for catalogs.
Note: Microsoft Internet Information Server (IIS) Version 5.0 must be installed, and the folder containingthe target files must be Web Share enabled.
File caching
Files retrieved through WebDAV are stored in your Temp folder (usually ..\Documents andSettings\<username>\Local Settings\Temp). When you open a file from a WebDAV server, theURL to this folder is mapped and the cached file is used. If the file in the cache does not exist, the file isretrieved from the WebDAV folder and placed there. After the document is closed, all the cached items usedby the document are removed.
Related LinksXMetaL customizations on page 84
Formatting and authoring functionality are provided by an XMetaL customization. The basis for anXMetaL customization is the DTD or Schema. Journalist is provided as an example customization.For detailed information about creating and deploying customizations, see the XMetaL CustomizationGuide.
Managing open documentsDocuments are displayed in windows in the editing pane. XMetaL provides various ways of organizing andnavigating document windows, and navigating to documents outside XMetaL.
Moving between open documents
If you have more than one document open in XMetaL Author, you can move between the open documentsin the following ways:
• Click the appropriate file name on the Window menu
• Press Ctrl+Tab or Ctrl+Shift+Tab
• Click Next Document ( )/Previous Document ( ) on the Standard toolbar
• Click the "Active Files" downward arrow at the top-right corner of the editing pane and select the opendocument you want to view.
XMetaL Author 16 User's Guide38
WebDAV-enabled folders
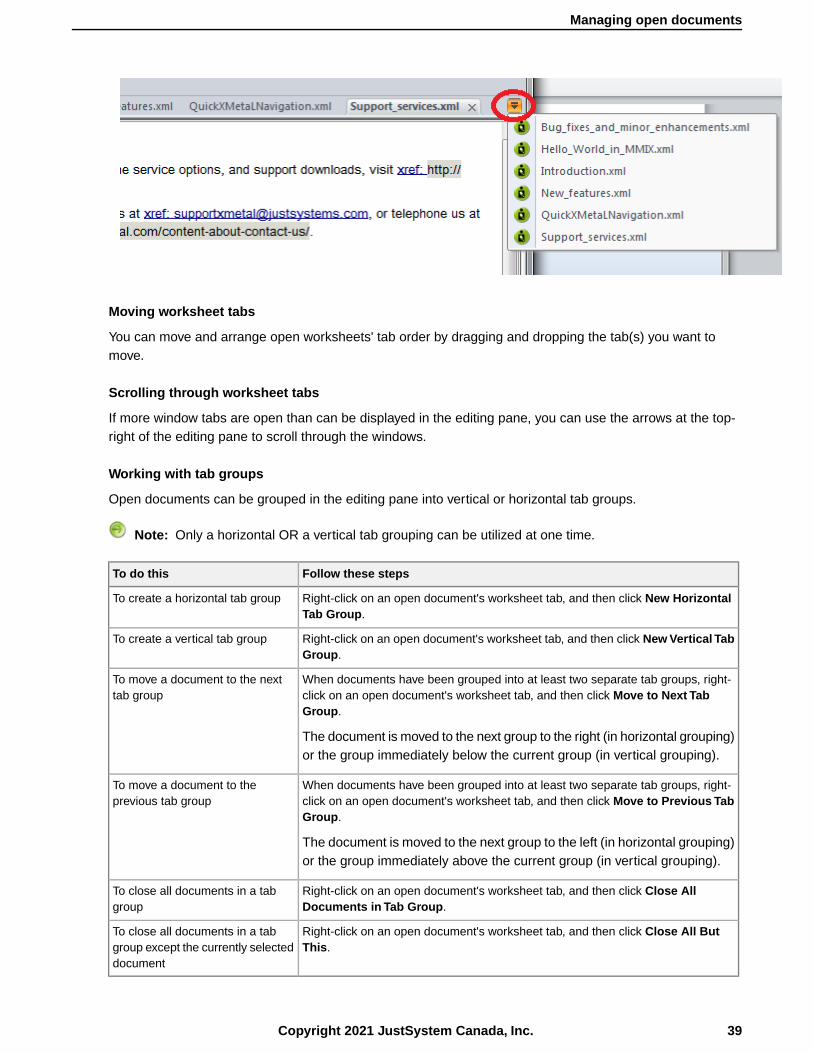
Moving worksheet tabs
You can move and arrange open worksheets' tab order by dragging and dropping the tab(s) you want tomove.
Scrolling through worksheet tabs
If more window tabs are open than can be displayed in the editing pane, you can use the arrows at the top-right of the editing pane to scroll through the windows.
Working with tab groups
Open documents can be grouped in the editing pane into vertical or horizontal tab groups.
Note: Only a horizontal OR a vertical tab grouping can be utilized at one time.
Follow these stepsTo do this
Right-click on an open document's worksheet tab, and then click New HorizontalTab Group.
To create a horizontal tab group
Right-click on an open document's worksheet tab, and then click New Vertical TabGroup.
To create a vertical tab group
When documents have been grouped into at least two separate tab groups, right-click on an open document's worksheet tab, and then click Move to Next TabGroup.
The document is moved to the next group to the right (in horizontal grouping)or the group immediately below the current group (in vertical grouping).
To move a document to the nexttab group
When documents have been grouped into at least two separate tab groups, right-click on an open document's worksheet tab, and then click Move to Previous TabGroup.
The document is moved to the next group to the left (in horizontal grouping)or the group immediately above the current group (in vertical grouping).
To move a document to theprevious tab group
Right-click on an open document's worksheet tab, and then click Close AllDocuments in Tab Group.
To close all documents in a tabgroup
Right-click on an open document's worksheet tab, and then click Close All ButThis.
To close all documents in a tabgroup except the currently selecteddocument
39Copyright 2021 JustSystem Canada, Inc.
Managing open documents
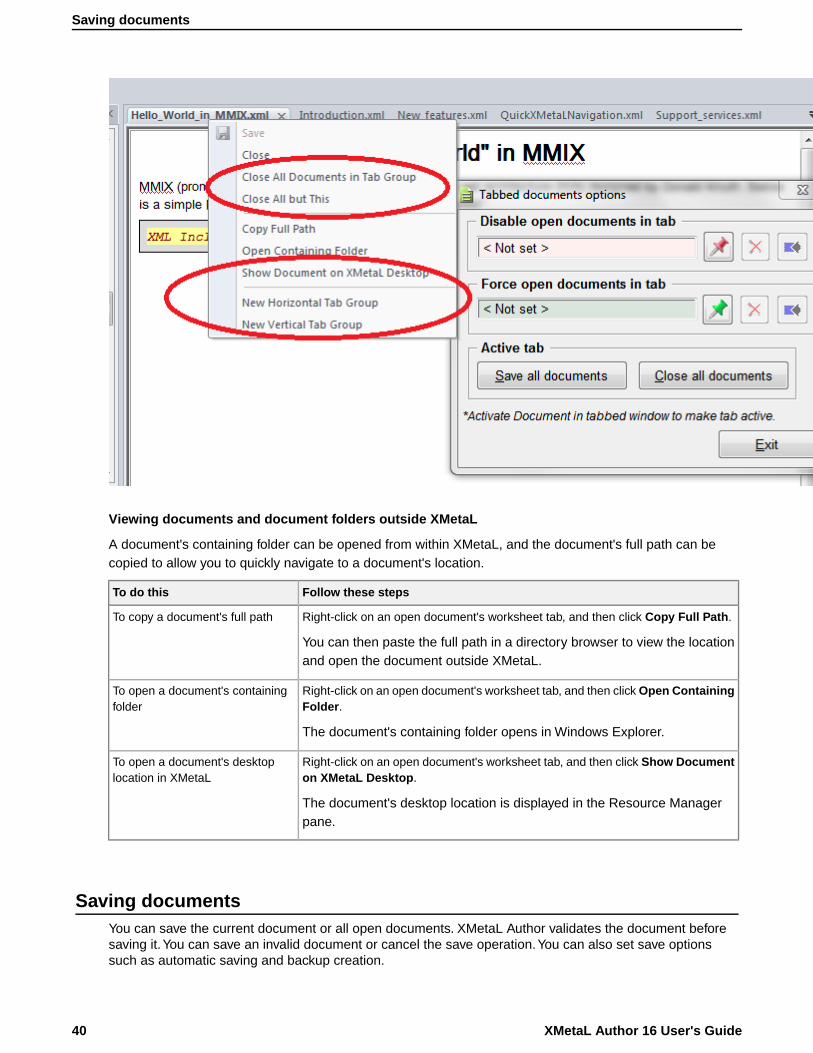
Viewing documents and document folders outside XMetaL
A document's containing folder can be opened from within XMetaL, and the document's full path can becopied to allow you to quickly navigate to a document's location.
Follow these stepsTo do this
Right-click on an open document's worksheet tab, and then click Copy Full Path.
You can then paste the full path in a directory browser to view the locationand open the document outside XMetaL.
To copy a document's full path
Right-click on an open document's worksheet tab, and then click Open ContainingFolder.
The document's containing folder opens in Windows Explorer.
To open a document's containingfolder
Right-click on an open document's worksheet tab, and then click Show Documenton XMetaL Desktop.
The document's desktop location is displayed in the Resource Managerpane.
To open a document's desktoplocation in XMetaL
Saving documentsYou can save the current document or all open documents. XMetaL Author validates the document beforesaving it.You can save an invalid document or cancel the save operation.You can also set save optionssuch as automatic saving and backup creation.
XMetaL Author 16 User's Guide40
Saving documents
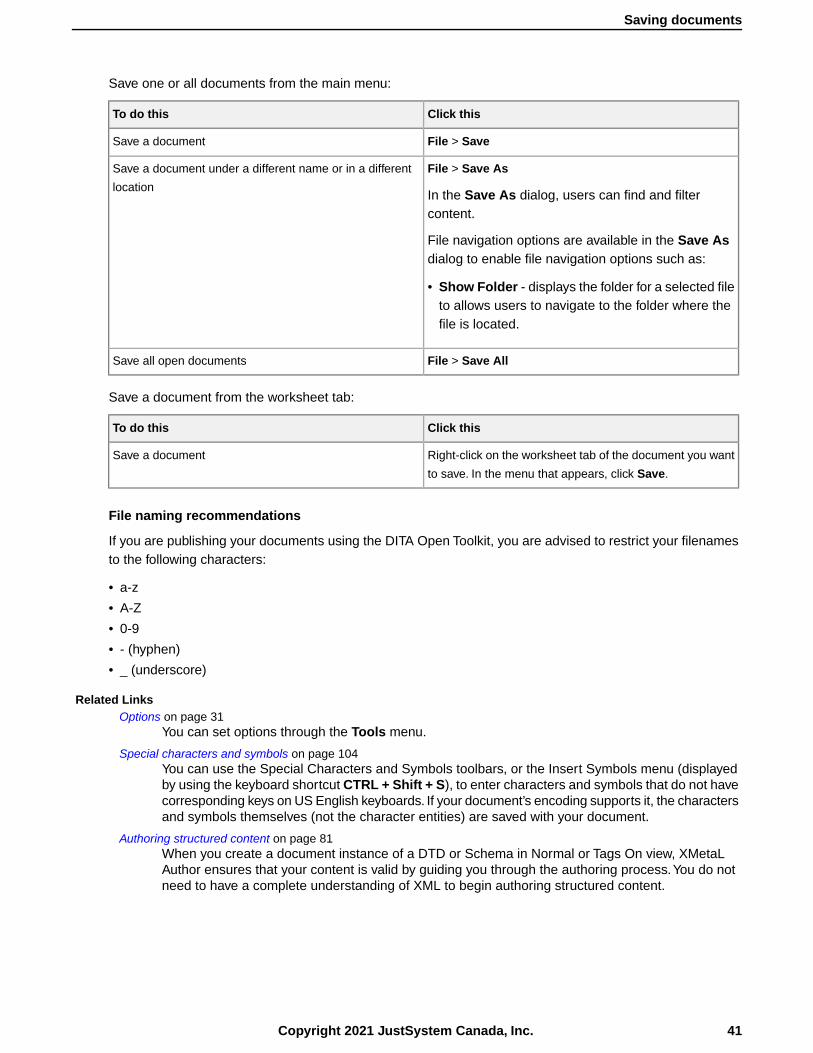
Save one or all documents from the main menu:
Click thisTo do this
File > SaveSave a document
File > Save As
In the Save As dialog, users can find and filtercontent.
Save a document under a different name or in a different
location
File navigation options are available in the Save Asdialog to enable file navigation options such as:
• Show Folder - displays the folder for a selected fileto allows users to navigate to the folder where thefile is located.
File > Save AllSave all open documents
Save a document from the worksheet tab:
Click thisTo do this
Right-click on the worksheet tab of the document you want
to save. In the menu that appears, click Save.
Save a document
File naming recommendations
If you are publishing your documents using the DITA Open Toolkit, you are advised to restrict your filenamesto the following characters:
• a-z
• A-Z
• 0-9
• - (hyphen)
• _ (underscore)
Related LinksOptions on page 31
You can set options through the Tools menu.
Special characters and symbols on page 104You can use the Special Characters and Symbols toolbars, or the Insert Symbols menu (displayedby using the keyboard shortcut CTRL + Shift + S), to enter characters and symbols that do not havecorresponding keys on US English keyboards. If your document’s encoding supports it, the charactersand symbols themselves (not the character entities) are saved with your document.
Authoring structured content on page 81When you create a document instance of a DTD or Schema in Normal or Tags On view, XMetaLAuthor ensures that your content is valid by guiding you through the authoring process.You do notneed to have a complete understanding of XML to begin authoring structured content.
41Copyright 2021 JustSystem Canada, Inc.
Saving documents
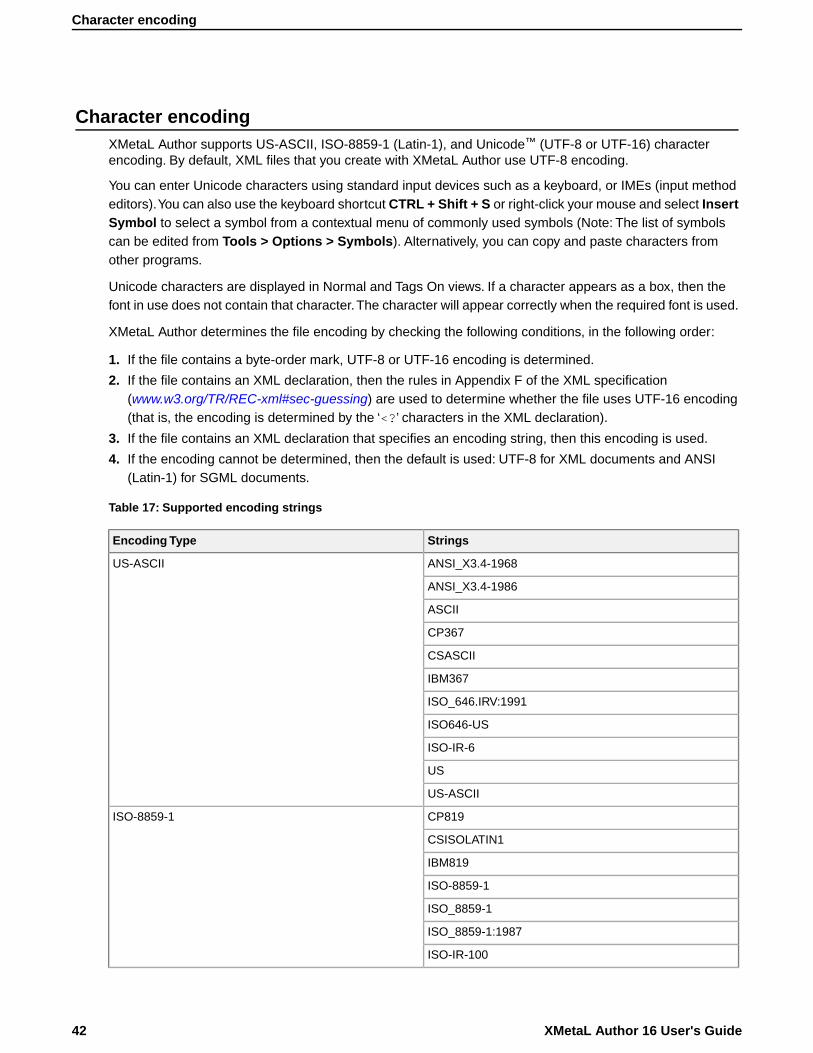
Character encodingXMetaL Author supports US-ASCII, ISO-8859-1 (Latin-1), and Unicode™ (UTF-8 or UTF-16) characterencoding. By default, XML files that you create with XMetaL Author use UTF-8 encoding.
You can enter Unicode characters using standard input devices such as a keyboard, or IMEs (input methodeditors).You can also use the keyboard shortcut CTRL + Shift + S or right-click your mouse and select InsertSymbol to select a symbol from a contextual menu of commonly used symbols (Note: The list of symbolscan be edited from Tools > Options > Symbols). Alternatively, you can copy and paste characters fromother programs.
Unicode characters are displayed in Normal and Tags On views. If a character appears as a box, then thefont in use does not contain that character.The character will appear correctly when the required font is used.
XMetaL Author determines the file encoding by checking the following conditions, in the following order:
1. If the file contains a byte-order mark, UTF-8 or UTF-16 encoding is determined.
2. If the file contains an XML declaration, then the rules in Appendix F of the XML specification(www.w3.org/TR/REC-xml#sec-guessing) are used to determine whether the file uses UTF-16 encoding(that is, the encoding is determined by the ‘<?’ characters in the XML declaration).
3. If the file contains an XML declaration that specifies an encoding string, then this encoding is used.
4. If the encoding cannot be determined, then the default is used: UTF-8 for XML documents and ANSI(Latin-1) for SGML documents.
Table 17: Supported encoding strings
StringsEncoding Type
ANSI_X3.4-1968US-ASCII
ANSI_X3.4-1986
ASCII
CP367
CSASCII
IBM367
ISO_646.IRV:1991
ISO646-US
ISO-IR-6
US
US-ASCII
CP819ISO-8859-1
CSISOLATIN1
IBM819
ISO-8859-1
ISO_8859-1
ISO_8859-1:1987
ISO-IR-100
XMetaL Author 16 User's Guide42
Character encoding

StringsEncoding Type
LATIN1
L1
UTF-8UTF-8
UTF-16UTF-16
Note: If the XML declaration contains an encoding string not listed in the above table, the file is openedin Plain Text view.
Related LinksSpecial characters and symbols on page 104
You can use the Special Characters and Symbols toolbars, or the Insert Symbols menu (displayedby using the keyboard shortcut CTRL + Shift + S), to enter characters and symbols that do not havecorresponding keys on US English keyboards. If your document’s encoding supports it, the charactersand symbols themselves (not the character entities) are saved with your document.
Creating well-formed XML documentsWhen you create a blank well-formed XML document, you must define elements and attributes before youcan create content. Because the document is not based on a DTD or Schema no rules checking or validationoccurs.
The Attribute Inspector and Element List display only the elements and attributes that you add to the document.
XMetaL Author inserts the following processing instruction in your well-formed document:
<?xm-well_formed path =""?>
Defining an element
1. In the Element List, double-click <Insert Element>.
2. Type a name.
3. Type a description.
The description will appear at the bottom of the Element List when the element is selected.
4. Choose an option:
43Copyright 2021 JustSystem Canada, Inc.
Creating well-formed XML documents
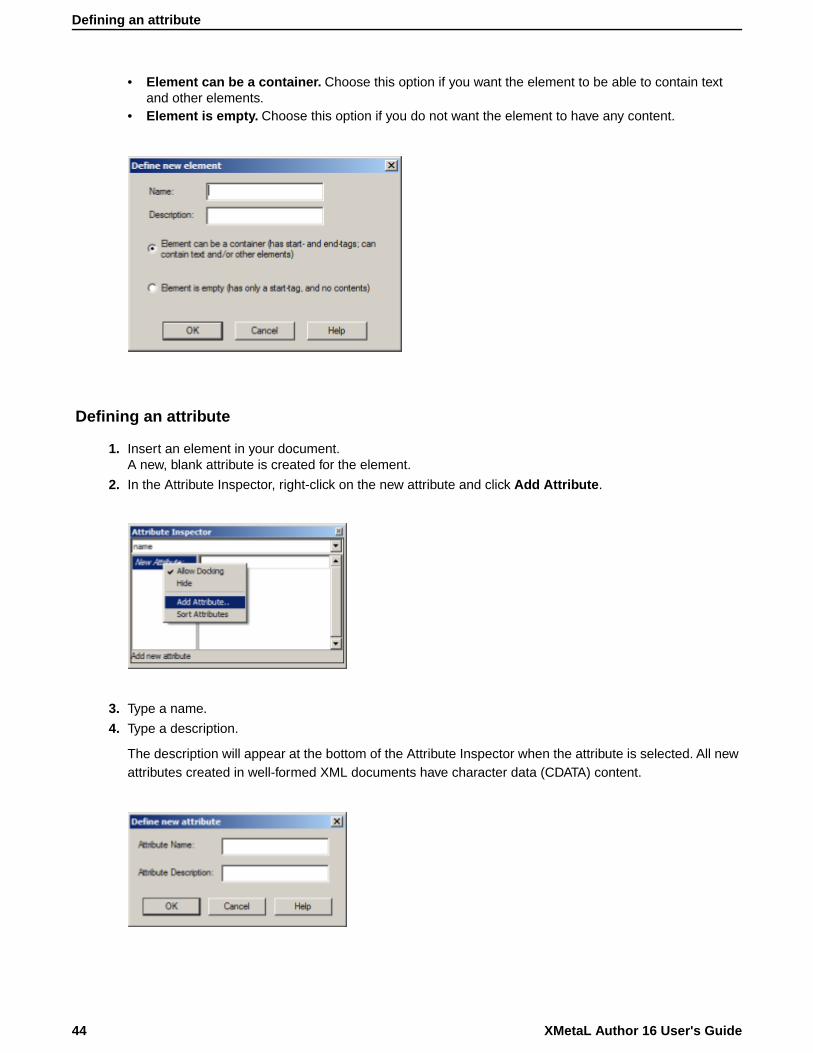
Element can be a container. Choose this option if you want the element to be able to contain textand other elements.
•
• Element is empty. Choose this option if you do not want the element to have any content.
Defining an attribute
1. Insert an element in your document.A new, blank attribute is created for the element.
2. In the Attribute Inspector, right-click on the new attribute and click Add Attribute.
3. Type a name.
4. Type a description.
The description will appear at the bottom of the Attribute Inspector when the attribute is selected. All newattributes created in well-formed XML documents have character data (CDATA) content.
XMetaL Author 16 User's Guide44
Defining an attribute
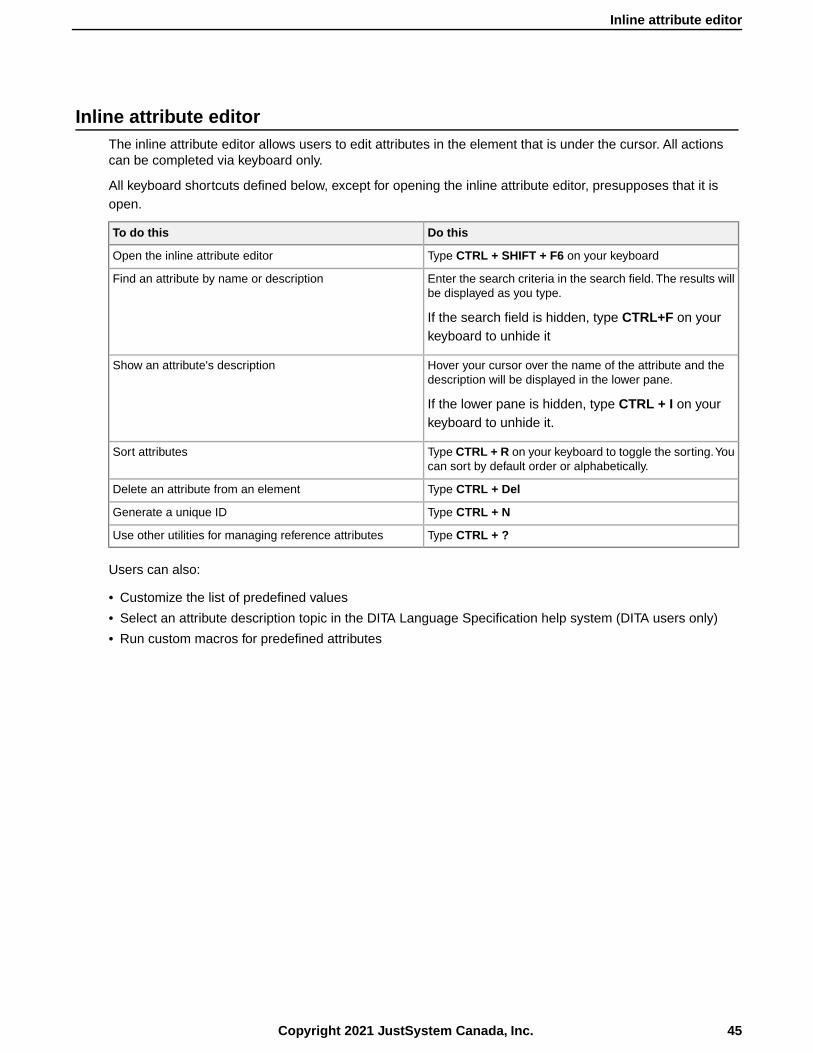
Inline attribute editorThe inline attribute editor allows users to edit attributes in the element that is under the cursor. All actionscan be completed via keyboard only.
All keyboard shortcuts defined below, except for opening the inline attribute editor, presupposes that it isopen.
Do thisTo do this
Type CTRL + SHIFT + F6 on your keyboardOpen the inline attribute editor
Enter the search criteria in the search field. The results willbe displayed as you type.
If the search field is hidden, type CTRL+F on yourkeyboard to unhide it
Find an attribute by name or description
Hover your cursor over the name of the attribute and thedescription will be displayed in the lower pane.
If the lower pane is hidden, type CTRL + I on yourkeyboard to unhide it.
Show an attribute's description
Type CTRL + R on your keyboard to toggle the sorting.Youcan sort by default order or alphabetically.
Sort attributes
Type CTRL + DelDelete an attribute from an element
Type CTRL + NGenerate a unique ID
Type CTRL + ?Use other utilities for managing reference attributes
Users can also:
• Customize the list of predefined values
• Select an attribute description topic in the DITA Language Specification help system (DITA users only)
• Run custom macros for predefined attributes
45Copyright 2021 JustSystem Canada, Inc.
Inline attribute editor

Archiving linked documentsThe tool for archiving linked documents creates a backup (zip) of files opened in XMetaL editor or files foundin XMetaL "Find in files" cross-files operations, including referenced content and images.
Linked documents are archived in the Archive Linked Documents dialog. To access this dialog, press CTRL+ ? and then find and select Archive linked documents in the dialog that appears.
Do thisTo do this
Click the Scope field and select the scope from the availableoptions.
Set the scope of the archive
Click the Find linked documents button.Find linked documents
Click the button. In the dialog that appears, selectthe attributes you want to add.
Set reference attributes
Note: The Ref. attributes checkbox must beselected to enable this function.
XMetaL Author 16 User's Guide46
Archiving linked documents

Do thisTo do this
Click the button to the right of the Input folder field.
Select a common folder for all archiving documents
Under archiving options, open the Content drop-downlist, and then select one of the available options.
Select the content included in the archive
Click the button to the right of the Show field.
Copy the list of paths to linked documents to the clipboard
After you have created the output successfully, click theSend [email application name] email button.
Send a created zip file via email as an attachment
When the paths for the found documents are shown, selectthe document you want to delete and press Delete on thekeyboard.
Remove files manually
In the Path starts with field, select a path from the availableoptions.
Set where the path will begin for the folder structure in thecreated archive
Enter the extension(s) in the File extensions field.Add only files with specific extensions to the archive (e.g.,find and archive images only)
In the Content field, select All files in input folder anddescendants.
Include all files in the subfolders of the archiving documentsin the archive
PrintingYou can print from any document view mode, including Page Preview.
47Copyright 2021 JustSystem Canada, Inc.
Printing

Follow these stepsTo do this
Click File > Print. Click Options to create headers andfooters.
Print a document
Right-click in the browser pane and choose Print.Print a document in Page Preview mode
Working with a repositoryXMetaL Connector is an integration layer that lets you access your repository through XMetaL Author dialogsand menus.
Note: Operation availability is determined by the adapter (a software driver for your repository). Referto your repository documentation for details.
Table 18: Common repository operations
NotesClick thisTo do this
When you open a topic or mapreference from a repository map,
Repository >Open fromRepository
Open a topic or map file
you have the option to view thefile or check it out for editing (ifenabled).
Select a template.When you addreferenced components (for
Repository >New from
Create a new repository file
example, images and links) to theRepositoryTemplate new file, you have access to
repository-specific operations(such as advanced search) if youradapter supports it.
Select a template.Repository >New Map from
Create a new repository map
RepositoryTemplate
Repository >Open
Open a document that you havechecked out
Checked-OutDocument
Repository >ExploreRepository
Explore a repository
You may check in a documentonly if it is currently open forediting.
Repository >Check InDocument
Check in a document
You may check out a documentonly if it is currently open for
Repository >Check OutDocument
Check out a document
viewing. When you check out adocument, the current view of thedocument is replaced with thelatest version of the document.
The document reverts to itsprevious version.
Repository >UndoCheckout
Undo checkout of a document
XMetaL Author 16 User's Guide48
Working with a repository

NotesClick thisTo do this
Repository >DocumentProperties
View document or map properties
You must set the URL for therepository before accessing files
Repository >RepositoryOptions
Set the URL for the defaultrepository
for the first time or if you switchrepositories.
Some repositories require thatyou log on before any repositoryoperations are allowed.
Repository >Log On toRepository
Log on to a repository
Repository >Log Off fromRepository
Log off from a repository
Note: When you open a DITA-based repository map file, you have the option of downloading all referencedcomponents (for example, reusable components).You may wish to do this in order to improve performance.
Adapter configuration file
Configuration files are located at ..\XMetaL x.x\Author\CRCL\configs. Each adapter instance musthave a configuration file.
Note: Only one configuration file can have the default attribute of the <AdapterInstance> elementset to true.
Related LinksToolbars on page 16
You can show/hide toolbars, create new toolbars, or modify existing ones through View > Toolbars.
49Copyright 2021 JustSystem Canada, Inc.
Working with a repository
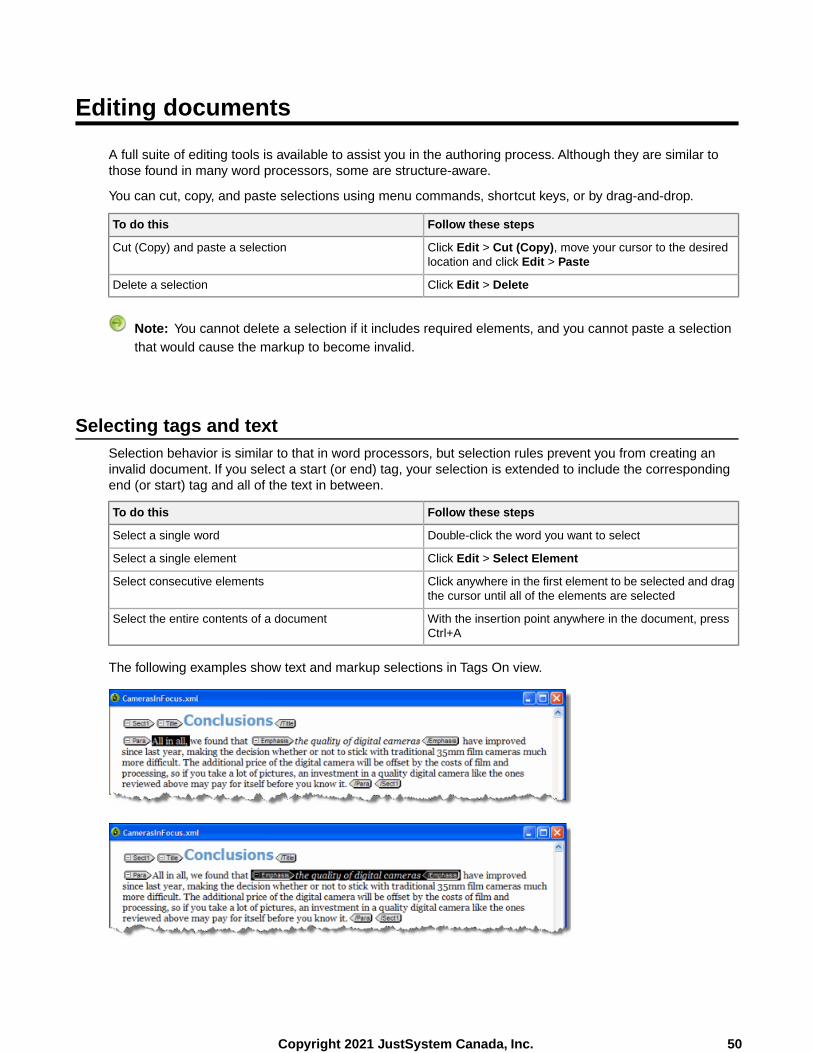
Editing documents
A full suite of editing tools is available to assist you in the authoring process. Although they are similar tothose found in many word processors, some are structure-aware.
You can cut, copy, and paste selections using menu commands, shortcut keys, or by drag-and-drop.
Follow these stepsTo do this
Click Edit > Cut (Copy), move your cursor to the desiredlocation and click Edit > Paste
Cut (Copy) and paste a selection
Click Edit > DeleteDelete a selection
Note: You cannot delete a selection if it includes required elements, and you cannot paste a selectionthat would cause the markup to become invalid.
Selecting tags and textSelection behavior is similar to that in word processors, but selection rules prevent you from creating aninvalid document. If you select a start (or end) tag, your selection is extended to include the correspondingend (or start) tag and all of the text in between.
Follow these stepsTo do this
Double-click the word you want to selectSelect a single word
Click Edit > Select ElementSelect a single element
Click anywhere in the first element to be selected and dragthe cursor until all of the elements are selected
Select consecutive elements
With the insertion point anywhere in the document, pressCtrl+A
Select the entire contents of a document
The following examples show text and markup selections in Tags On view.
50Copyright 2021 JustSystem Canada, Inc.
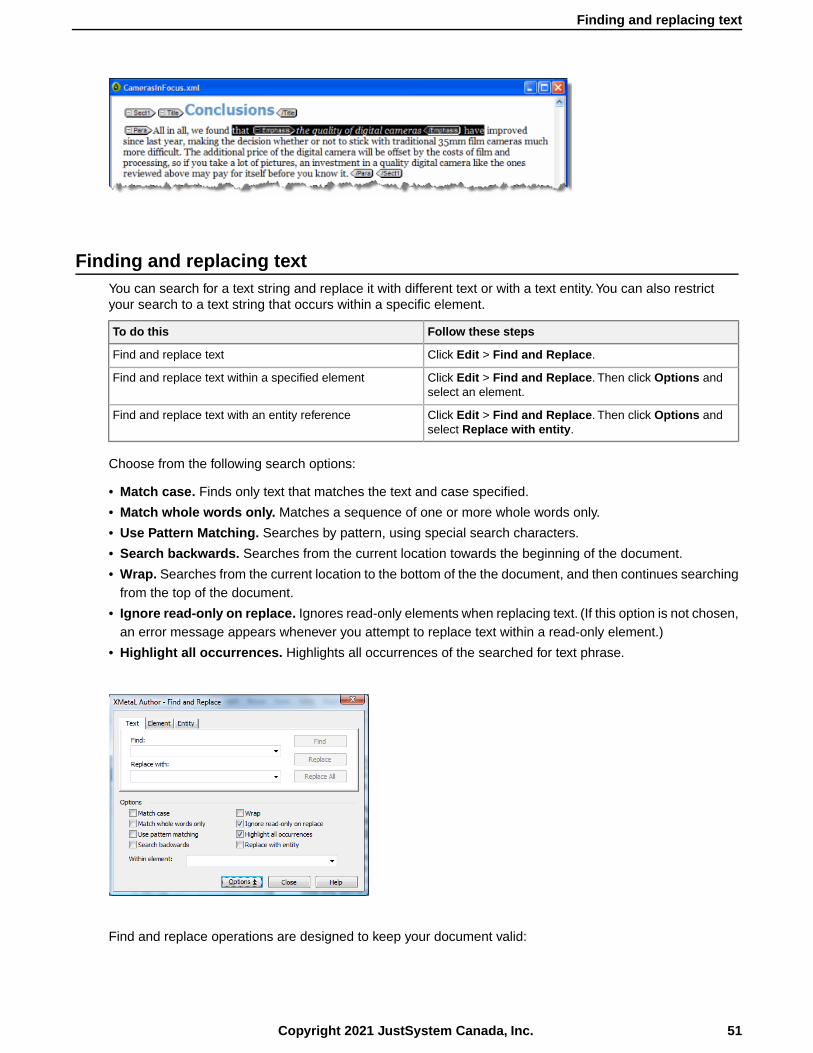
Finding and replacing textYou can search for a text string and replace it with different text or with a text entity.You can also restrictyour search to a text string that occurs within a specific element.
Follow these stepsTo do this
Click Edit > Find and Replace.Find and replace text
Click Edit > Find and Replace. Then click Options andselect an element.
Find and replace text within a specified element
Click Edit > Find and Replace. Then click Options andselect Replace with entity.
Find and replace text with an entity reference
Choose from the following search options:
• Match case. Finds only text that matches the text and case specified.
• Match whole words only. Matches a sequence of one or more whole words only.
• Use Pattern Matching. Searches by pattern, using special search characters.
• Search backwards. Searches from the current location towards the beginning of the document.
• Wrap. Searches from the current location to the bottom of the the document, and then continues searchingfrom the top of the document.
• Ignore read-only on replace. Ignores read-only elements when replacing text. (If this option is not chosen,an error message appears whenever you attempt to replace text within a read-only element.)
• Highlight all occurrences. Highlights all occurrences of the searched for text phrase.
Find and replace operations are designed to keep your document valid:
51Copyright 2021 JustSystem Canada, Inc.
Finding and replacing text

• Text searches do not find a match if part of the text is found in a separate element. For example, if you aresearching for ‘World Wide Web’ and ‘Web’ is in an <EMPH> element, no match is found.
• In Normal and Tags On views, element replacements that would invalidate the markup do not occur if ruleschecking is on.
Related LinksFinding and replacing across files on page 68
You can perform cross-file searches to find text or markup using simple text and pattern matchingall the way up to very advance XPath expressions.
Search patternsWhen you use pattern matching to find words, the characters in the Find box are interpreted as patterns.Thatis, the search text can contain special search characters that match a class of text strings, or markup constructs.If your search text does not contain any special characters, the text is searched for exactly as entered.
The following special characters can be used:
. *? + ^ $ [ ]
To search for any special character as ordinary text when Use Pattern Matching is selected, precede it witha backslash (\). For example, use ‘\.’ to match a period (.).
Table 19: Pattern summary
ExampleMatchesExpression
“abc” matches “abc”itselfordinary character
the element name<name or <name>
the entity name&name or &name;
“fo.d” matches “food”any single character.
“l*ama” matches “llama”0 or more occurrences of thecharacter x
x*
“b(an)*a” matches “banana”0 or more occurrences of the pattern(pattern)*
“be+n” matches “been”1 or more occurrences of thecharacter x
x+
“b(an)*a” matches “banana”1 or more occurrences of the pattern(pattern)+
XMetaL Author 16 User's Guide52
Search patterns
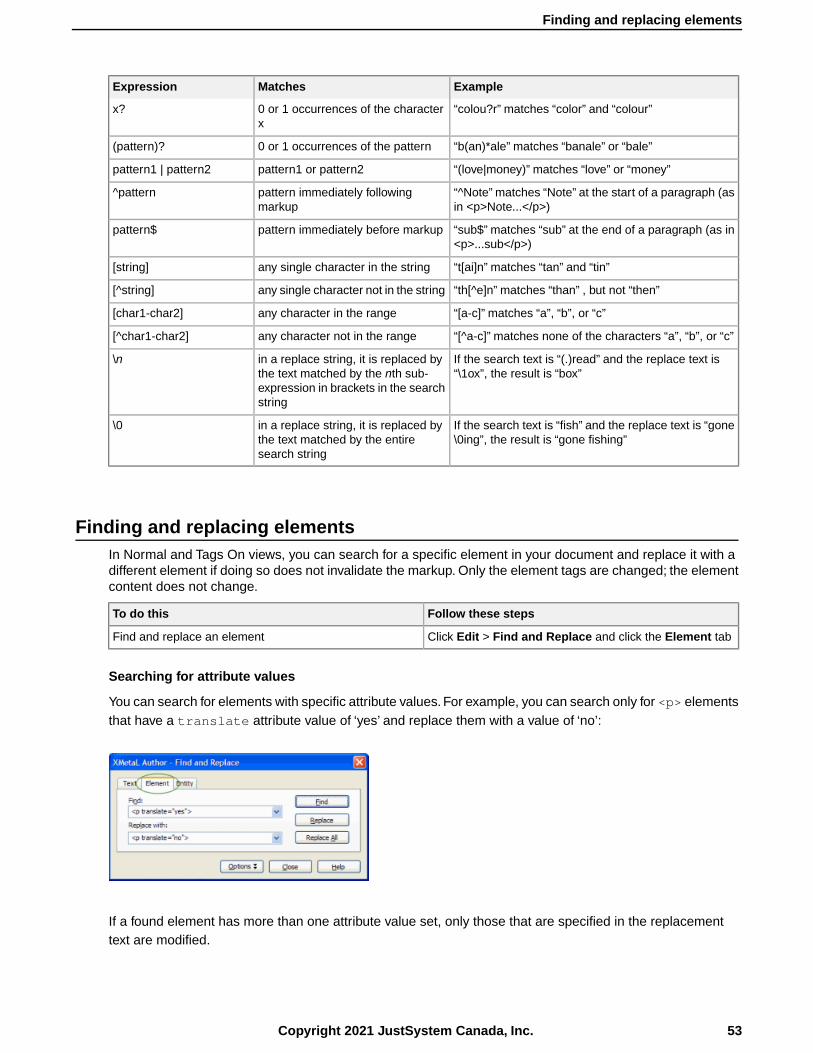
ExampleMatchesExpression
“colou?r” matches “color” and “colour”0 or 1 occurrences of the characterx
x?
“b(an)*ale” matches “banale” or “bale”0 or 1 occurrences of the pattern(pattern)?
“(love|money)” matches “love” or “money”pattern1 or pattern2pattern1 | pattern2
“^Note” matches “Note” at the start of a paragraph (asin <p>Note...</p>)
pattern immediately followingmarkup
^pattern
“sub$” matches “sub” at the end of a paragraph (as in<p>...sub</p>)
pattern immediately before markuppattern$
“t[ai]n” matches “tan” and “tin”any single character in the string[string]
“th[^e]n” matches “than” , but not “then”any single character not in the string[^string]
“[a-c]” matches “a”, “b”, or “c”any character in the range[char1-char2]
“[^a-c]” matches none of the characters “a”, “b”, or “c”any character not in the range[^char1-char2]
If the search text is “(.)read” and the replace text is“\1ox”, the result is “box”
in a replace string, it is replaced bythe text matched by the nth sub-expression in brackets in the searchstring
\n
If the search text is “fish” and the replace text is “gone\0ing”, the result is “gone fishing”
in a replace string, it is replaced bythe text matched by the entiresearch string
\0
Finding and replacing elementsIn Normal and Tags On views, you can search for a specific element in your document and replace it with adifferent element if doing so does not invalidate the markup. Only the element tags are changed; the elementcontent does not change.
Follow these stepsTo do this
Click Edit > Find and Replace and click the Element tabFind and replace an element
Searching for attribute values
You can search for elements with specific attribute values. For example, you can search only for <p> elementsthat have a translate attribute value of ‘yes’ and replace them with a value of ‘no’:
If a found element has more than one attribute value set, only those that are specified in the replacementtext are modified.
53Copyright 2021 JustSystem Canada, Inc.
Finding and replacing elements

Removing an attribute
If you need to remove an attribute, you have the following options:
• Delete the attribute value in the Attribute Inspector. If the value is currently set to an empty string, enter anew temporary value, press Enter, and then delete the value.
• Switch to Plain Text view and modify the source.
Finding and replacing entitiesIn Normal and Tags On views, you can search for an entity reference and replace it with a different entityreference or with text.
Follow these stepsTo do this
Click Edit > Find and Replace and click the Entity tab.Find and replace an entity reference
Click Edit > Find and Replace and click the Entity tab.From the options, choose Replace with text.
Find and replace an entity reference with text
For example, you can search for the product name entity &prodname; and replace it with the product nametext ‘Z9000’.
Checking your spellingYou can check your spelling using the spell checker or as you write by using background spellchecking.
The spell checker in XMetaL helps you eliminate spelling mistakes.The spell checker also includes tools thatcan help you customize the preferences to create the experience you want.You can spell check a documentall at once after finishing a document or you can use background spellchecking that uses wavy red lines toallow you to identify possible mistakes while you work.
Related LinksUsing the spell checker on page 55
You can check your spelling using the spell checker.
Using the background spell checker on page 59You can check your spelling as you write using background spell-checking.
XMetaL Author 16 User's Guide54
Finding and replacing entities
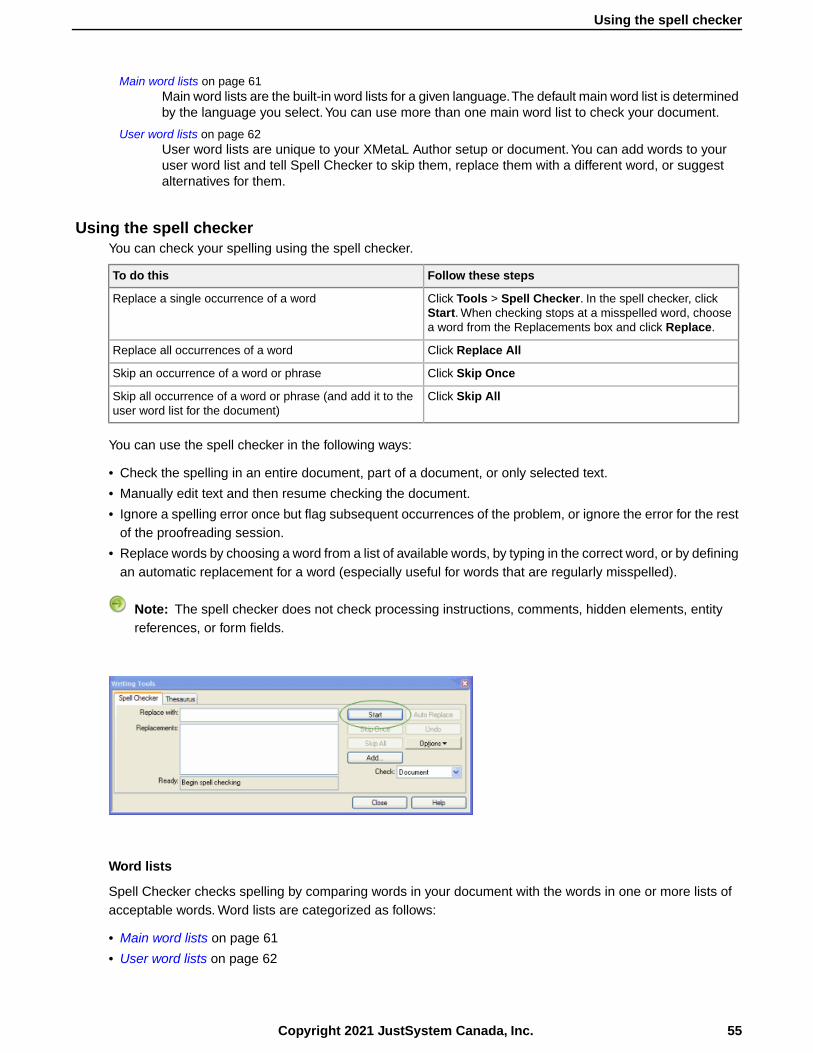
Main word lists on page 61Main word lists are the built-in word lists for a given language.The default main word list is determinedby the language you select.You can use more than one main word list to check your document.
User word lists on page 62User word lists are unique to your XMetaL Author setup or document.You can add words to youruser word list and tell Spell Checker to skip them, replace them with a different word, or suggestalternatives for them.
Using the spell checkerYou can check your spelling using the spell checker.
Follow these stepsTo do this
Click Tools > Spell Checker. In the spell checker, clickStart. When checking stops at a misspelled word, choosea word from the Replacements box and click Replace.
Replace a single occurrence of a word
Click Replace AllReplace all occurrences of a word
Click Skip OnceSkip an occurrence of a word or phrase
Click Skip AllSkip all occurrence of a word or phrase (and add it to theuser word list for the document)
You can use the spell checker in the following ways:
• Check the spelling in an entire document, part of a document, or only selected text.
• Manually edit text and then resume checking the document.
• Ignore a spelling error once but flag subsequent occurrences of the problem, or ignore the error for the restof the proofreading session.
• Replace words by choosing a word from a list of available words, by typing in the correct word, or by definingan automatic replacement for a word (especially useful for words that are regularly misspelled).
Note: The spell checker does not check processing instructions, comments, hidden elements, entityreferences, or form fields.
Word lists
Spell Checker checks spelling by comparing words in your document with the words in one or more lists ofacceptable words. Word lists are categorized as follows:
• Main word lists on page 61
• User word lists on page 62
55Copyright 2021 JustSystem Canada, Inc.
Using the spell checker
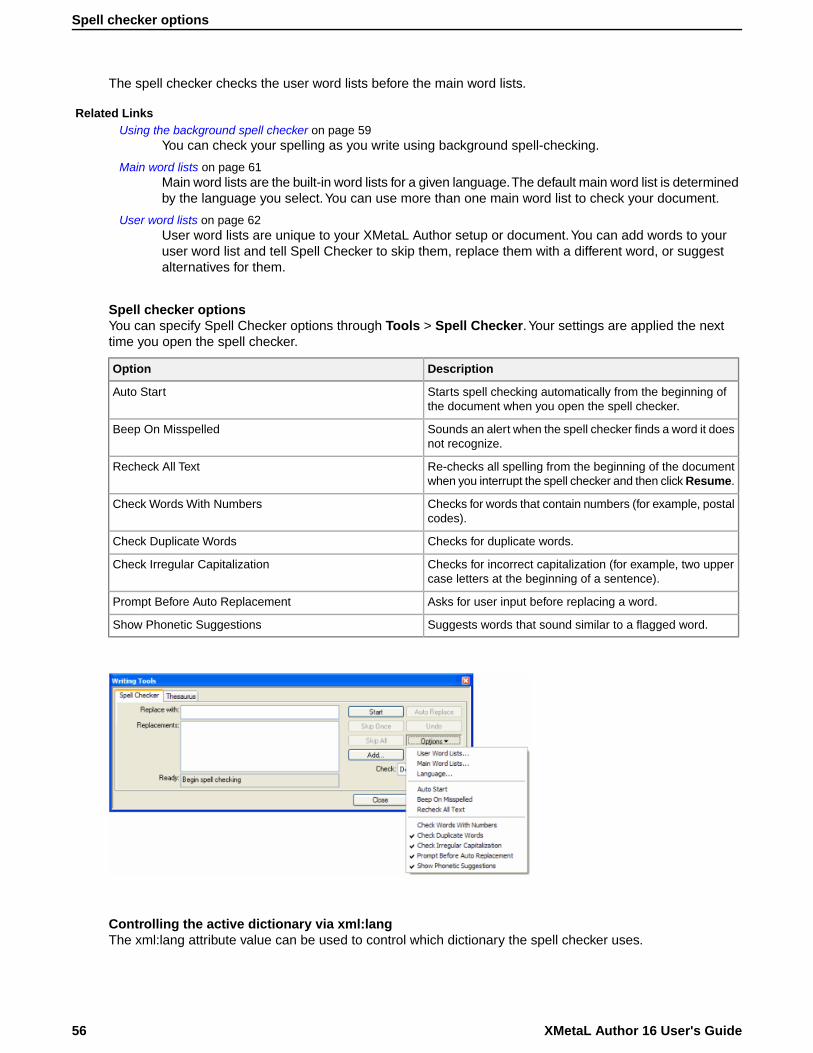
The spell checker checks the user word lists before the main word lists.
Related LinksUsing the background spell checker on page 59
You can check your spelling as you write using background spell-checking.
Main word lists on page 61Main word lists are the built-in word lists for a given language.The default main word list is determinedby the language you select.You can use more than one main word list to check your document.
User word lists on page 62User word lists are unique to your XMetaL Author setup or document.You can add words to youruser word list and tell Spell Checker to skip them, replace them with a different word, or suggestalternatives for them.
Spell checker optionsYou can specify Spell Checker options through Tools > Spell Checker.Your settings are applied the nexttime you open the spell checker.
DescriptionOption
Starts spell checking automatically from the beginning ofthe document when you open the spell checker.
Auto Start
Sounds an alert when the spell checker finds a word it doesnot recognize.
Beep On Misspelled
Re-checks all spelling from the beginning of the documentwhen you interrupt the spell checker and then click Resume.
Recheck All Text
Checks for words that contain numbers (for example, postalcodes).
Check Words With Numbers
Checks for duplicate words.Check Duplicate Words
Checks for incorrect capitalization (for example, two uppercase letters at the beginning of a sentence).
Check Irregular Capitalization
Asks for user input before replacing a word.Prompt Before Auto Replacement
Suggests words that sound similar to a flagged word.Show Phonetic Suggestions
Controlling the active dictionary via xml:langThe xml:lang attribute value can be used to control which dictionary the spell checker uses.
XMetaL Author 16 User's Guide56
Spell checker options

Whenever a spell checking action is in progress, the xml:lang attribute value will be inspected to determineif a different dictionary should be used instead of the default dictionary. The following table described INIvariables that correspond to a particular dictionary, setting the INI variable to the xml:lang value you wish tomap to that dictionary:
Table 20:Table of INI Variable Names, Default Values, Internal Codes, Standard Codes and Recommended Values
WT FilesRecommendedINI Value
ISO-639-2ISO-639-1WT LegacyInternalLanguage CodeDefault Value
WT INI VariableName
WT10LDAF.DLLaf;afrafrafAFWT_AFRIKAANS
WT10LDCA.DLLca;catcatcaCAWT_CATALAN
WT10LDCZ.DLLcs;ces;czeces, czecsCZWT_CZECH
Note: Bothcodes areconsideredsynonymsand shouldbe treatedequally.
WT10LDDK.DLLda;dandandaDKWT_DANISH
WT10LDNL.DLLnl;dut;nlddut, nldnlNLWT_DUTCH
Note: Bothcodes areconsideredsynonymsand shouldbe treatedequally.
WT10LDEN.DLLen;engengenENWT_ENGLISH
WT10LDFR.DLLfr;fra;frefra, frefrFRWT_FRENCH
Note: Bothcodes areconsideredsynonymsand shouldbe treatedequally.
WT10LDGA.DLLgl;glgglgglGAWT_GALICIAN
WT10LDDE.DLLde;deu;gerger, deudeDEWT_GERMAN
Note: Bothcodes areconsideredsynonymsand shouldbe treatedequally.
57Copyright 2021 JustSystem Canada, Inc.
Controlling the active dictionary via xml:lang
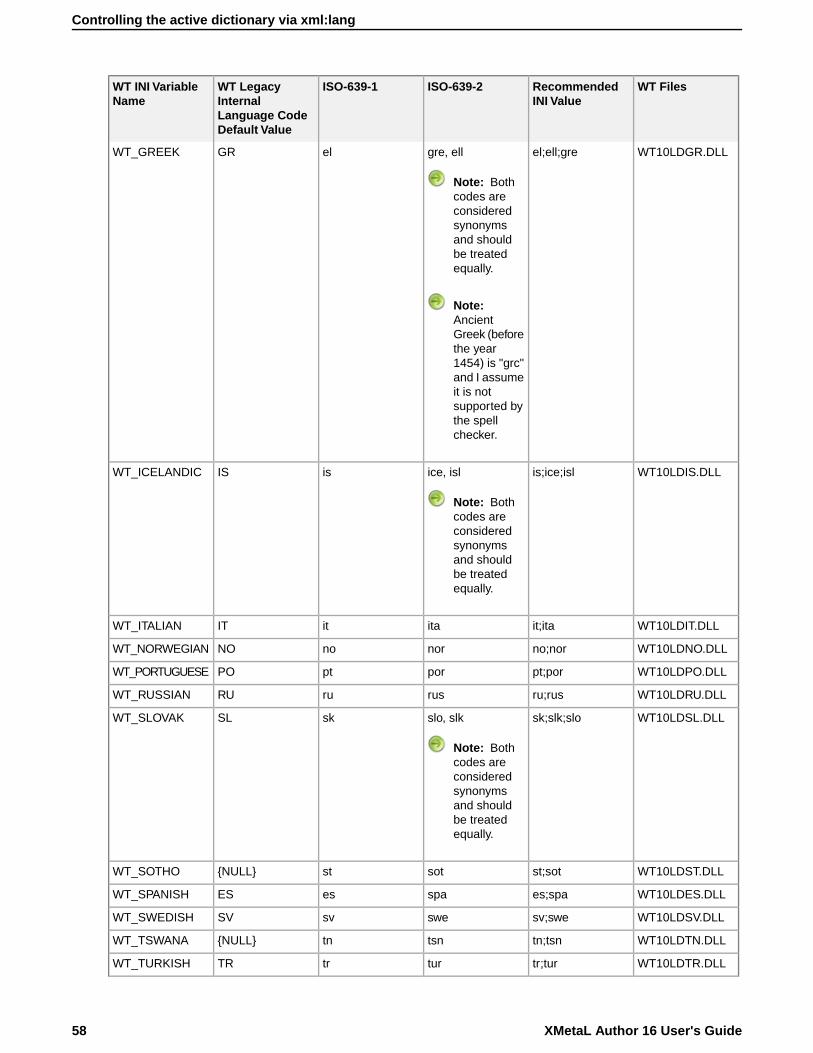
WT FilesRecommendedINI Value
ISO-639-2ISO-639-1WT LegacyInternalLanguage CodeDefault Value
WT INI VariableName
WT10LDGR.DLLel;ell;gregre, ellelGRWT_GREEK
Note: Bothcodes areconsideredsynonymsand shouldbe treatedequally.
Note:AncientGreek (beforethe year1454) is "grc"and I assumeit is notsupported bythe spellchecker.
WT10LDIS.DLLis;ice;islice, islisISWT_ICELANDIC
Note: Bothcodes areconsideredsynonymsand shouldbe treatedequally.
WT10LDIT.DLLit;itaitaitITWT_ITALIAN
WT10LDNO.DLLno;nornornoNOWT_NORWEGIAN
WT10LDPO.DLLpt;porporptPOWT_PORTUGUESE
WT10LDRU.DLLru;rusrusruRUWT_RUSSIAN
WT10LDSL.DLLsk;slk;sloslo, slkskSLWT_SLOVAK
Note: Bothcodes areconsideredsynonymsand shouldbe treatedequally.
WT10LDST.DLLst;sotsotst{NULL}WT_SOTHO
WT10LDES.DLLes;spaspaesESWT_SPANISH
WT10LDSV.DLLsv;sweswesvSVWT_SWEDISH
WT10LDTN.DLLtn;tsntsntn{NULL}WT_TSWANA
WT10LDTR.DLLtr;turturtrTRWT_TURKISH
XMetaL Author 16 User's Guide58
Controlling the active dictionary via xml:lang

WT FilesRecommendedINI Value
ISO-639-2ISO-639-1WT LegacyInternalLanguage CodeDefault Value
WT INI VariableName
WT10LDXH.DLLxh;xhoxhoxh{NULL}WT_XHOSA
WT10LDZU.DLLzu;zulzulzu{NULL}WT_ZULU
zxxzxx{NULL}WT_NOLANGUAGE
en-AU;eng-AUeng-AUen-auOZWT_ENGLISH_AUS
en-CA;eng-CAeng-CAen-caCEWT_ENGLISH_CAN
en-GB;eng-GBeng-GBen-gbUKWT_ENGLISH_UK
en-US;eng-USeng-USen-usUSWT_ENGLISH_US
fr-CA;fra-CA;fre-CA
fra-CA, fre-CAfr-caCFWT_FRENCH_CAN
fr-FR;fra-FR;fre-FR
fra-FR, fre-FRfr-frFRWT_FRENCH_NAT
WT10LDDE.DLLde-DE;deu-DE;ger-DE
deu-DE, ger-DEde-deDEWT_GERMAN_NAT
WT10LDDE.DLLde-CH;deu-CH;ger-CH
deu-CH, ger-CHde-chSDWT_GERMAN_SWI
WT10LDPO.DLLpt-BR;por-BRpor-BRpt-brBRWT_PORTUGUESE_BR
WT10LDPO.DLLpt-PT;por-PTpor-PTpt-ptPOWT_PORTUGUESE_PO
WT10LDES.DLLes-US;spa-USspa-USes-usEAWT_SPANISH_AMER
WT10LDES.DLLes-ES;spa-ESspa-ESes-esESWT_SPANISH_SPAIN
zxxzxx{NULL}WT_NODIALECT
Using the background spell checkerYou can check your spelling as you write using background spell-checking.
Background spell-checking displays red, wavy lines for any misspelled word to let you easily see and correctspelling mistakes.You can also choose to correct a word that is highlighted as misspelled. Background spell-checking also includes a feature that automatically replaces misspelled words as you type, using words fromthe user word lists and main word list (if only one match exists).
You can use background spell-checking in the following ways:
• View misspelled words as soon as you have typed them.
• Allow the background spell-checking feature to automatically correct words that are similar to words in themain or user word lists.
• Manually correct words that are similar to words in the main or user word lists.
Note: Background spell-checking is on by default.
Related LinksTurning on background spell-checking on page 60
Background spell-checking can be turned on or off. The change affects all documents.
Automatically correcting spelling on page 60
59Copyright 2021 JustSystem Canada, Inc.
Using the background spell checker

You can set up XMetaL to automatically correct misspelled words that are similar to words in themain word list or user word lists. This feature is triggered for an individual word only when thespacebar is pressed immediately after that word.
Manually correcting spelling on page 60You can manually correct misspelled words with words from the main word list and user word lists.
Turning on background spell-checkingBackground spell-checking can be turned on or off. The change affects all documents.
1. Click Tools > Options.
2. In the General pane, select the Check spelling while typing check box.
3. Click OK.The Options dialog box closes and changes are made to your settings.
Related LinksAutomatically correcting spelling on page 60
You can set up XMetaL to automatically correct misspelled words that are similar to words in themain word list or user word lists. This feature is triggered for an individual word only when thespacebar is pressed immediately after that word.
Manually correcting spelling on page 60You can manually correct misspelled words with words from the main word list and user word lists.
Automatically correcting spellingYou can set up XMetaL to automatically correct misspelled words that are similar to words in the main wordlist or user word lists. This feature is triggered for an individual word only when the spacebar is pressedimmediately after that word.
Note: Text in hyperlinks is not automatically corrected.
1. Click Tools > Options.
2. To automatically replace misspelled words, select the Replace words from my word list while typingcheck box.
3. Click OK.The Options dialog box closes and changes are made to your settings.
Related LinksTurning on background spell-checking on page 60
Background spell-checking can be turned on or off. The change affects all documents.
Manually correcting spelling on page 60You can manually correct misspelled words with words from the main word list and user word lists.
Main word lists on page 61Main word lists are the built-in word lists for a given language.The default main word list is determinedby the language you select.You can use more than one main word list to check your document.
User word lists on page 62User word lists are unique to your XMetaL Author setup or document.You can add words to youruser word list and tell Spell Checker to skip them, replace them with a different word, or suggestalternatives for them.
Manually correcting spellingYou can manually correct misspelled words with words from the main word list and user word lists.
1. Place your mouse cursor over a misspelled word that is highlighted and right-click your mouse.
XMetaL Author 16 User's Guide60
Turning on background spell-checking
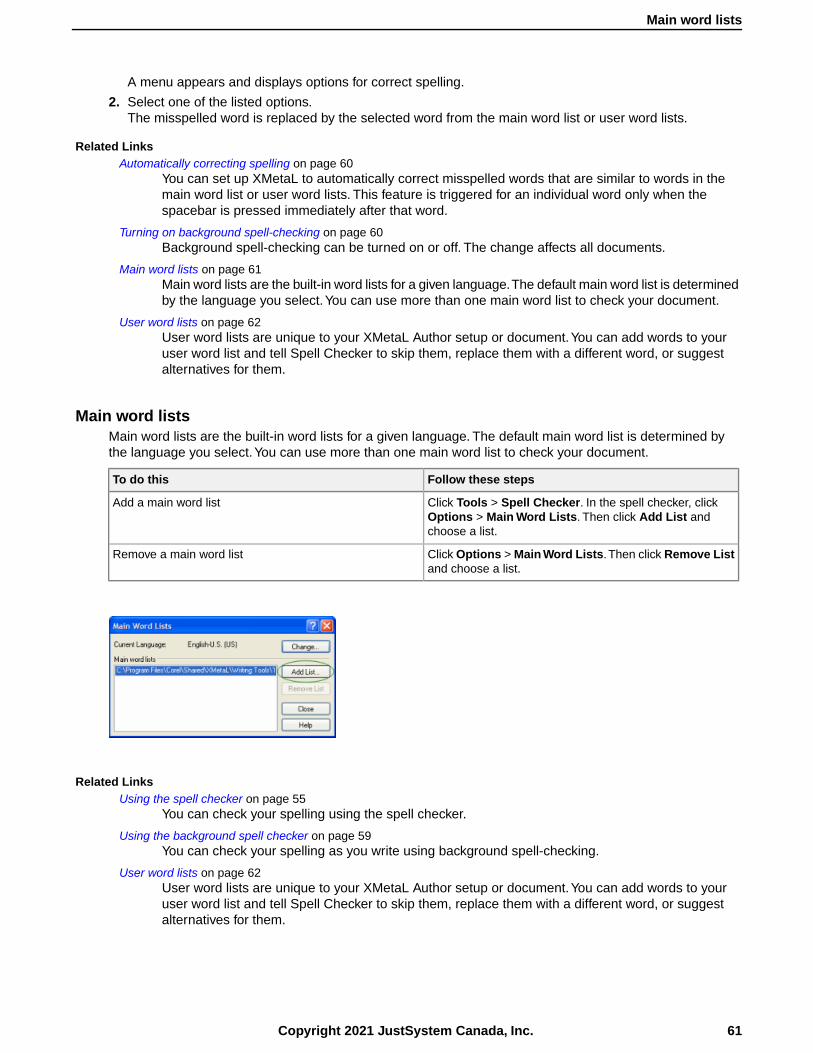
A menu appears and displays options for correct spelling.
2. Select one of the listed options.The misspelled word is replaced by the selected word from the main word list or user word lists.
Related LinksAutomatically correcting spelling on page 60
You can set up XMetaL to automatically correct misspelled words that are similar to words in themain word list or user word lists. This feature is triggered for an individual word only when thespacebar is pressed immediately after that word.
Turning on background spell-checking on page 60Background spell-checking can be turned on or off. The change affects all documents.
Main word lists on page 61Main word lists are the built-in word lists for a given language.The default main word list is determinedby the language you select.You can use more than one main word list to check your document.
User word lists on page 62User word lists are unique to your XMetaL Author setup or document.You can add words to youruser word list and tell Spell Checker to skip them, replace them with a different word, or suggestalternatives for them.
Main word listsMain word lists are the built-in word lists for a given language. The default main word list is determined bythe language you select.You can use more than one main word list to check your document.
Follow these stepsTo do this
Click Tools > Spell Checker. In the spell checker, clickOptions > Main Word Lists. Then click Add List andchoose a list.
Add a main word list
Click Options > Main Word Lists.Then click Remove Listand choose a list.
Remove a main word list
Related LinksUsing the spell checker on page 55
You can check your spelling using the spell checker.
Using the background spell checker on page 59You can check your spelling as you write using background spell-checking.
User word lists on page 62User word lists are unique to your XMetaL Author setup or document.You can add words to youruser word list and tell Spell Checker to skip them, replace them with a different word, or suggestalternatives for them.
61Copyright 2021 JustSystem Canada, Inc.
Main word lists
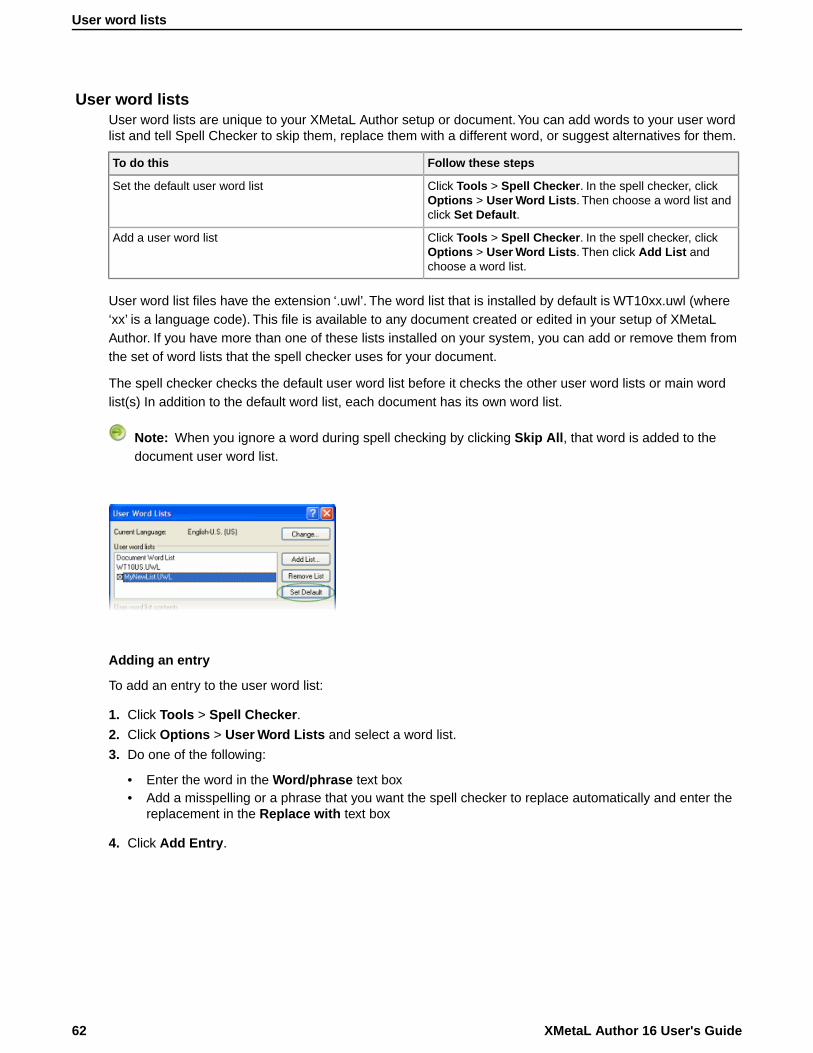
User word listsUser word lists are unique to your XMetaL Author setup or document.You can add words to your user wordlist and tell Spell Checker to skip them, replace them with a different word, or suggest alternatives for them.
Follow these stepsTo do this
Click Tools > Spell Checker. In the spell checker, clickOptions > User Word Lists. Then choose a word list andclick Set Default.
Set the default user word list
Click Tools > Spell Checker. In the spell checker, clickOptions > User Word Lists. Then click Add List andchoose a word list.
Add a user word list
User word list files have the extension ‘.uwl’. The word list that is installed by default is WT10xx.uwl (where‘xx’ is a language code). This file is available to any document created or edited in your setup of XMetaLAuthor. If you have more than one of these lists installed on your system, you can add or remove them fromthe set of word lists that the spell checker uses for your document.
The spell checker checks the default user word list before it checks the other user word lists or main wordlist(s) In addition to the default word list, each document has its own word list.
Note: When you ignore a word during spell checking by clicking Skip All, that word is added to thedocument user word list.
Adding an entry
To add an entry to the user word list:
1. Click Tools > Spell Checker.
2. Click Options > User Word Lists and select a word list.
3. Do one of the following:
• Enter the word in the Word/phrase text box• Add a misspelling or a phrase that you want the spell checker to replace automatically and enter the
replacement in the Replace with text box
4. Click Add Entry.
XMetaL Author 16 User's Guide62
User word lists
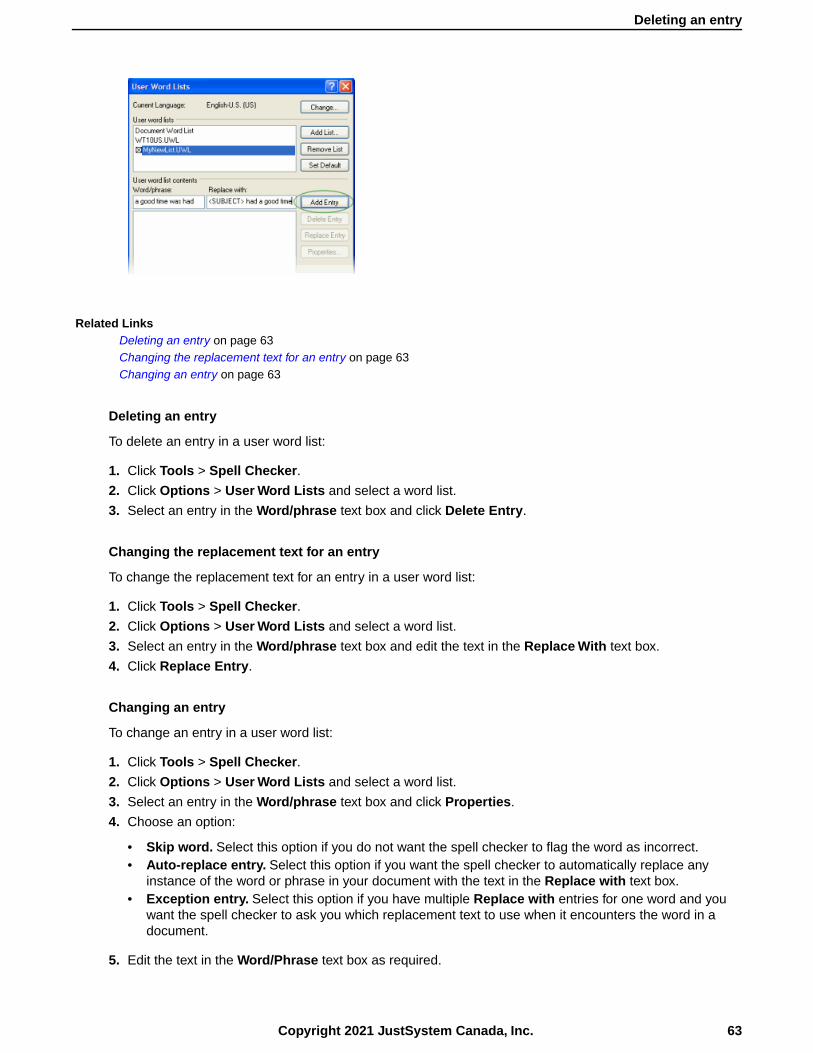
Related LinksDeleting an entry on page 63Changing the replacement text for an entry on page 63Changing an entry on page 63
Deleting an entry
To delete an entry in a user word list:
1. Click Tools > Spell Checker.
2. Click Options > User Word Lists and select a word list.
3. Select an entry in the Word/phrase text box and click Delete Entry.
Changing the replacement text for an entry
To change the replacement text for an entry in a user word list:
1. Click Tools > Spell Checker.
2. Click Options > User Word Lists and select a word list.
3. Select an entry in the Word/phrase text box and edit the text in the Replace With text box.
4. Click Replace Entry.
Changing an entry
To change an entry in a user word list:
1. Click Tools > Spell Checker.
2. Click Options > User Word Lists and select a word list.
3. Select an entry in the Word/phrase text box and click Properties.
4. Choose an option:
• Skip word. Select this option if you do not want the spell checker to flag the word as incorrect.• Auto-replace entry. Select this option if you want the spell checker to automatically replace any
instance of the word or phrase in your document with the text in the Replace with text box.• Exception entry. Select this option if you have multiple Replace with entries for one word and you
want the spell checker to ask you which replacement text to use when it encounters the word in adocument.
5. Edit the text in the Word/Phrase text box as required.
63Copyright 2021 JustSystem Canada, Inc.
Deleting an entry

This is the text that the spell checker finds (or ignores).
6. Edit the text in the Replace with text box as required.
If you want to enter more than one choice for replacement text (for Exception entry types), each choicemust be on a separate line in the Replace with text box.
Note: If the Auto-replace entry option is enabled, any text in the Replace with text box is ignored.
Language settingsYou can choose a language for the current file or set it as the default language for the spell checker andthesaurus.You can also add and remove languages.
Follow these stepsTo do this
Click Tools > Spell Checker. In Spell Checker, clickOptions > Language. Then enable the Save as defaultWriting Tools language option and choose a language.
Set the default language
Click Options > Language.Then click Add and type a two-letter code for the language you want to add (the code mustbe unique) and a description (the name of the language).
Add a language
Click Options > Language. Then select a language andclick Remove.
Remove a language
You can use the spell checker to format dates, time, currency symbols, and other text according to a languageconvention (for example, “12 avril 1996” for a French document).
Related LinksChecking your spelling on page 54
You can check your spelling using the spell checker or as you write by using backgroundspellchecking.
Using the thesaurus on page 65You can look up a word and display synonyms, antonyms, and other related information using thethesaurus.
Checking a selected word's spelling and synonymsThe word that is currently under the cursor can be checked with the hot key Ctrl + . (Ctrl + period).
The word is checked as follows:
XMetaL Author 16 User's Guide64
Language settings

• If the word is misspelled, correct words are proposed in the dialog that opens.
• If the word is spelled correctly, a list of synonyms, antonyms and groups of related words are displayed.
You can navigate forward and backward between the lists of proposed words. Every related word can haveits own list of related words, and it's possible to return back or move forward in the search chain.
Using the thesaurusYou can look up a word and display synonyms, antonyms, and other related information using the thesaurus.
Follow these stepsTo do this
Select a word in your document, click Tools > Thesaurus,and click Look Up. Expand the desired definition to display
Replace a word using the thesaurus
a list of synonyms and other words. Choose a word andclick Replace.
Look up a word in the thesaurus and expand the desireddefinition to display a list of synonyms and other words.Choose a word and click Insert.
Insert a word from the thesaurus
65Copyright 2021 JustSystem Canada, Inc.
Using the thesaurus

Thesaurus optionsYou can specify thesaurus options through Tools > Thesaurus.Your settings are applied the next time youopen the thesaurus.
DescriptionOption
Displays the thesaurus entry for the current word when thethesaurus is opened.
Auto look-up
Closes the thesaurus after you insert a word in yourdocument.
Auto close
Suggests alternate spellings if the word is spelled incorrectlyor not found in the thesaurus.
Spelling assist
Displays words that have the same or similar meaning asthe word being looked up.
Synonyms
Displays words that have an opposite meaning.Antonyms
Sets a language-specific data file for the thesaurus.Set data file
XMetaL Author 16 User's Guide66
Thesaurus options

Tracking your changesIn Normal and Tags On views, you can display changes as marked insertions or deletions. When changetracking is active, text that is inserted in a document appears in a distinctive color or formatting.You can hidetext that has been deleted, or you can display it in a distinctive color and with strikethrough formatting.
Follow these stepsTo do this
Click Tools > Track ChangesTurn on (off) track changes
Click Tools > Accept or Reject Changes. Then click Findprevious (Find next).
Scroll through changes
Click Tools > Accept or Reject Changes. Then clickAccept all (Reject all).
Accept (reject) all changes
Click Tools > Accept or Reject Changes. Then clickAccept (Reject).
Accept (reject) changes one at a time
The following types of changes can be tracked:
• Text inserted or pasted
• Text deleted or cut
• Text moved by drag-and-drop
Changes can be accepted or rejected on an individual or global basis. When marked changes are accepted,the changes are incorporated into the document and the revision marks are removed.When marked changesare rejected, the changes are removed, and the deleted text (if any) is restored to the document.
Note: When rules checking is active, changes that are necessary to make the document valid are notrejected.
Related LinksOptions on page 31
You can set options through the Tools menu.
67Copyright 2021 JustSystem Canada, Inc.
Tracking your changes

Cross-file OperationsYou can perform certain actions or operations, such as finding text or spell checking, across multiple files.
You can perform certain actions or operations, such as finding text or spell checking, across multiple files.You will have the option to choose from several different locations, including the DITA Maps currently open,all open documents, and the current document.
Finding and replacing across filesYou can perform cross-file searches to find text or markup using simple text and pattern matching all the wayup to very advance XPath expressions.
You can search for text, markup, and XPath expressions with the Find in Files feature. The results will bedisplayed in the Results pane. The results will be sorted alphabetically by filename.You can remove, select,highlight and replace results, as well as perform new searches on the results.
Double-clicking on a search result opens the containing document.
Find text across filesYou can search across files for text. The Find in Files dialog box can be opened from the editing pane orMap Editor. Results can be displayed on one of two pages, allowing you to keep the results of two searchesdisplayed at one time.
1. Click Edit > Find in Files.The Find in Files dialog box opens.
2. Enter the search string in the Text field.
3. Select the search location from the Look In drop-down list. Alternatively, click Browse to browse for thesearch location. The following options are available in the Look In drop-down list:
• All Open Documents - searches all documents (topic and map files) that are currently open• Current Document - searches the topic file you have currently open• [currently active map file] - searches all files in the currently active map file in the Map Editor (the name
of the map is displayed in the drop-down list)• Checked files in: Find [1 or 2] Results pane - searches the already checked files in the Find 1 or 2
Results pane (Note: This option is only available when initiating a search from the Find 1 or 2 Resultspane)
XMetaL Author 16 User's Guide68
Cross-file Operations
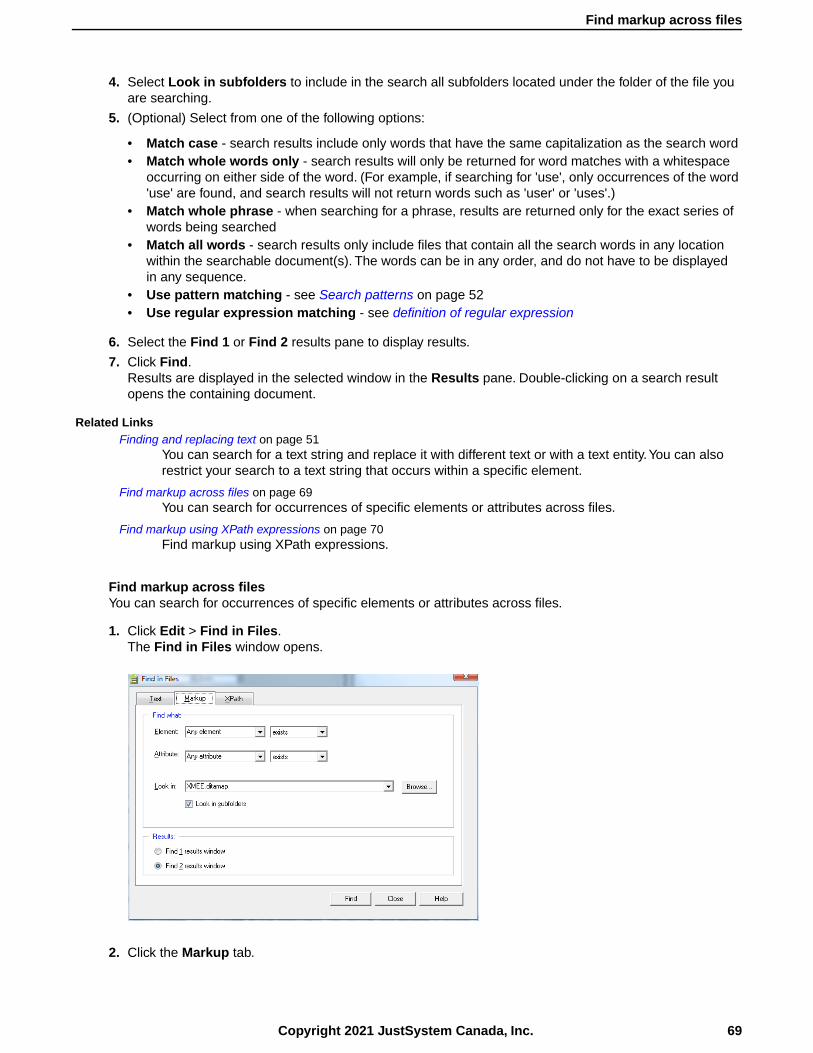
4. Select Look in subfolders to include in the search all subfolders located under the folder of the file youare searching.
5. (Optional) Select from one of the following options:
• Match case - search results include only words that have the same capitalization as the search word• Match whole words only - search results will only be returned for word matches with a whitespace
occurring on either side of the word. (For example, if searching for 'use', only occurrences of the word'use' are found, and search results will not return words such as 'user' or 'uses'.)
• Match whole phrase - when searching for a phrase, results are returned only for the exact series ofwords being searched
• Match all words - search results only include files that contain all the search words in any locationwithin the searchable document(s). The words can be in any order, and do not have to be displayedin any sequence.
• Use pattern matching - see Search patterns on page 52• Use regular expression matching - see definition of regular expression
6. Select the Find 1 or Find 2 results pane to display results.
7. Click Find.Results are displayed in the selected window in the Results pane. Double-clicking on a search resultopens the containing document.
Related LinksFinding and replacing text on page 51
You can search for a text string and replace it with different text or with a text entity.You can alsorestrict your search to a text string that occurs within a specific element.
Find markup across files on page 69You can search for occurrences of specific elements or attributes across files.
Find markup using XPath expressions on page 70Find markup using XPath expressions.
Find markup across filesYou can search for occurrences of specific elements or attributes across files.
1. Click Edit > Find in Files.The Find in Files window opens.
2. Click the Markup tab.
69Copyright 2021 JustSystem Canada, Inc.
Find markup across files
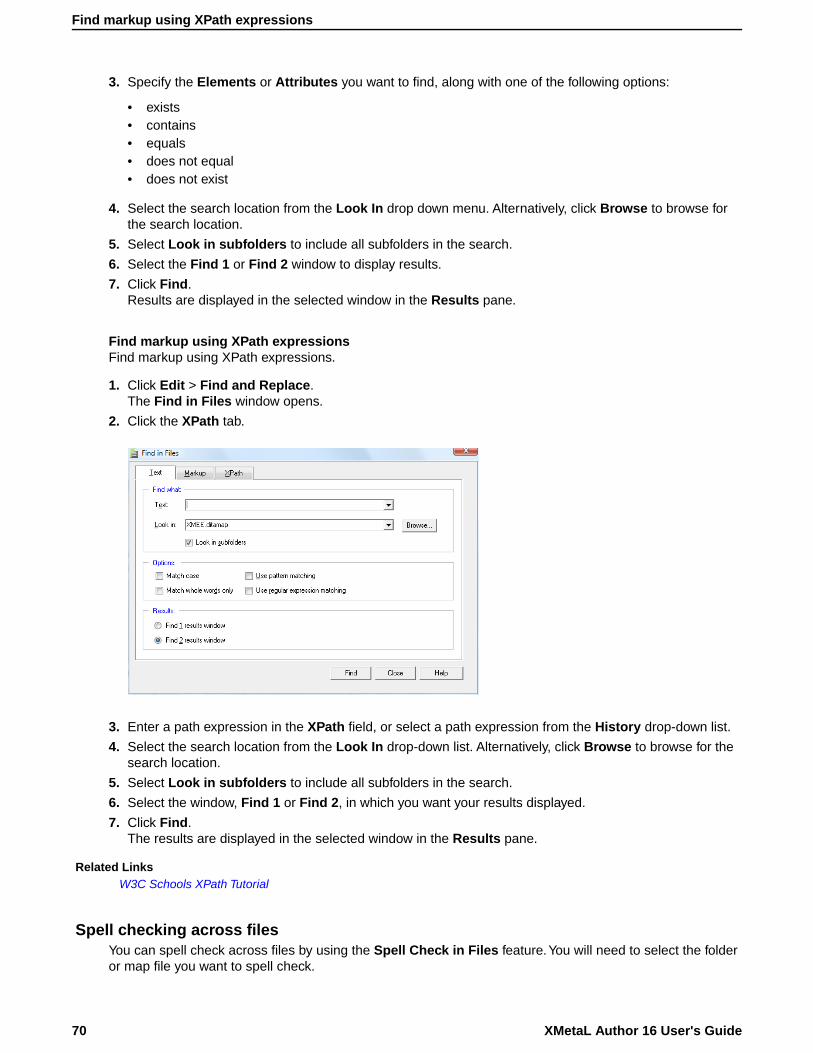
3. Specify the Elements or Attributes you want to find, along with one of the following options:
• exists• contains• equals• does not equal• does not exist
4. Select the search location from the Look In drop down menu. Alternatively, click Browse to browse forthe search location.
5. Select Look in subfolders to include all subfolders in the search.
6. Select the Find 1 or Find 2 window to display results.
7. Click Find.Results are displayed in the selected window in the Results pane.
Find markup using XPath expressionsFind markup using XPath expressions.
1. Click Edit > Find and Replace.The Find in Files window opens.
2. Click the XPath tab.
3. Enter a path expression in the XPath field, or select a path expression from the History drop-down list.
4. Select the search location from the Look In drop-down list. Alternatively, click Browse to browse for thesearch location.
5. Select Look in subfolders to include all subfolders in the search.
6. Select the window, Find 1 or Find 2, in which you want your results displayed.
7. Click Find.The results are displayed in the selected window in the Results pane.
Related LinksW3C Schools XPath Tutorial
Spell checking across filesYou can spell check across files by using the Spell Check in Files feature.You will need to select the folderor map file you want to spell check.
XMetaL Author 16 User's Guide70
Find markup using XPath expressions

To do this:
1. Click Tools > Spell Check in Files.
2. Enter the name of the folder or map file you want to spell check.3. Select the 'include subfolders' check box to spell check content in all subfolders.4. Select from any of the following output options:
• Show markup attributes - Displays markup attributes in the results• Show suggestions - Displays replacement options for correct spelling with the results. Tapping on a
replacement option inserts it in place of the original text• Fast spell check - The spell check does not load the DTD or XSD for each XML document being spell
checked.
NOTE: If your documents have DTD-inferred attributes such as xml:lang="fr-FR", you may get the wrongdictionary applied during the spell check when using Fast Spell Check.
5. Click Spell Check to perform the spell check across files.
Results are displayed in a tab in the Results pane.
Note: The Spell Check in Files feature will not differentiate between markup and text.
Replacing results across filesAfter you have performed a cross-file search or spell check, you can replace any or all of the results.
1. In the Results pane, select the check boxes of the results you want to replace, OR click the Check all
items button ( ) to select all results.
Note: You can click Uncheck all items ( ) to clear all check boxes.
2. In the Replace with: field, enter the replacement text or markup.
3. (optional) Click the Set Replacement Options button ( ) to set replacement options. For instructions,see Setting replacement options on page 72.
4. Click the Replace all checked items button ( ) to replace only the items you have checked,
OR click the Replace all highlighted items button ( )
71Copyright 2021 JustSystem Canada, Inc.
Replacing results across files

After you have replaced text or markup, you can click the New search in checked files button ( ), or pressF7, to perform a new search on the already searched files for which results are displayed in the current tabof the Results pane.
Setting replacement options
1. In the Results pane, click the Set replacement options button ( ).The Replace Options dialog appears.
2. In the General section, set the following:
• Open files - when a replacement is performed, the affected file is opened.When Open files is checked,you can perform undo operations for each open file to undo text replaced using the 'Replace with' feature.
• Track changes - all changes made by the replacement operation will be displayed• Make backup files - Create backup files. if you chose to make backup files, enter the default file extension
for the backup files.
3. In the Replace All Checked Options section, set the following parameters:
• Don't redo prior replacement even if checked - if an identical replacement operation has been performedon a checked field, it will not be repeated even if that file is again checked
• Uncheck items after replacement - the results that are checked will be unchecked after the replacementoperation has finished
4. In the Interpret-as-markup strictness section, select one of the following options:
• Full - checks the markup compatibility of the replacement value and the location into which it is insertedas well as its children
• Partial - checks the markup compatibility of the replacement value and the location into which it isinserted
• None - markup is not checked
5. Click OK.The new settings now apply to all future replace actions in the Results pane.
Running cross-file operationsThe Run Cross-File Operation feature allows you to run other cross-file operations that may have developedspecifically for your needs.
Follow these stepsTo do this
Click Tools > Run Cross-File OperationRun cross-file operation
The Run Cross-File Operation feature allows you to run the chosen cross-file operations:
• Accept All Changes - accepts all the changes tracked in the selected folder or given set of files• Detect Duplicate IDs - looks for duplicate attribute values for specific attribute type within each document• Validate References - validates all the cross references by asserting if the file is present or not; it will report
any broken links• Word Count - counts the words in each file and report the number of words in each file and the total number
of words
You can apply the cross-file operation to any of the following:
• All Open Documents - searches all documents (topic and map files) that are currently open
• Current Document - searches the topic file you have currently open
XMetaL Author 16 User's Guide72
Setting replacement options

• [currently active map file] - searches all files in the currently active map file in the Map Editor (the name ofthe map is displayed in the drop-down list)
• You can also click Browse to select a specific folder on which to run the cross-file operation. The cross-fileoperation will apply to all files in the folder (and subfolders, if the Include subfolders check box is selected).
Cross-file operationsCross-file operations provide searching, spell checking and other operations across multiple files in a folderor references from a ditamap.
Cross-file operations can be limited to a defined set of files. By default, xml, sgml, sgm, dita, and ditamap filetypes are selected.
To set cross-file operation preferences:
1. Select Tools > Options from the main menu.
The Options dialog box opens.
2. Under Cross-File Operations, select General to add or remove file types whose processing you want tolimit.
3. You can optionally choose to include or exclude attributes from the DTD.
Note: Selecting this check box causes cross-file operations to run slower.
4. Click OK to save changes.
Results paneThe Results pane displays the results of cross-file operations, such as the Find in Files feature, anderror-reporting features, such as the Validation Log.
Follow these stepsTo do this
Click View > Results > ValidationShow Validation log
Click View > Results > XIncludeShow XInclude link errors log
Click View > Results > Find 1Show Find 1 results
Click View > Results > Find 2Show Find 2 results
Click View > Results > Spell CheckingShow Spell Checking results
73Copyright 2021 JustSystem Canada, Inc.
Cross-file operations
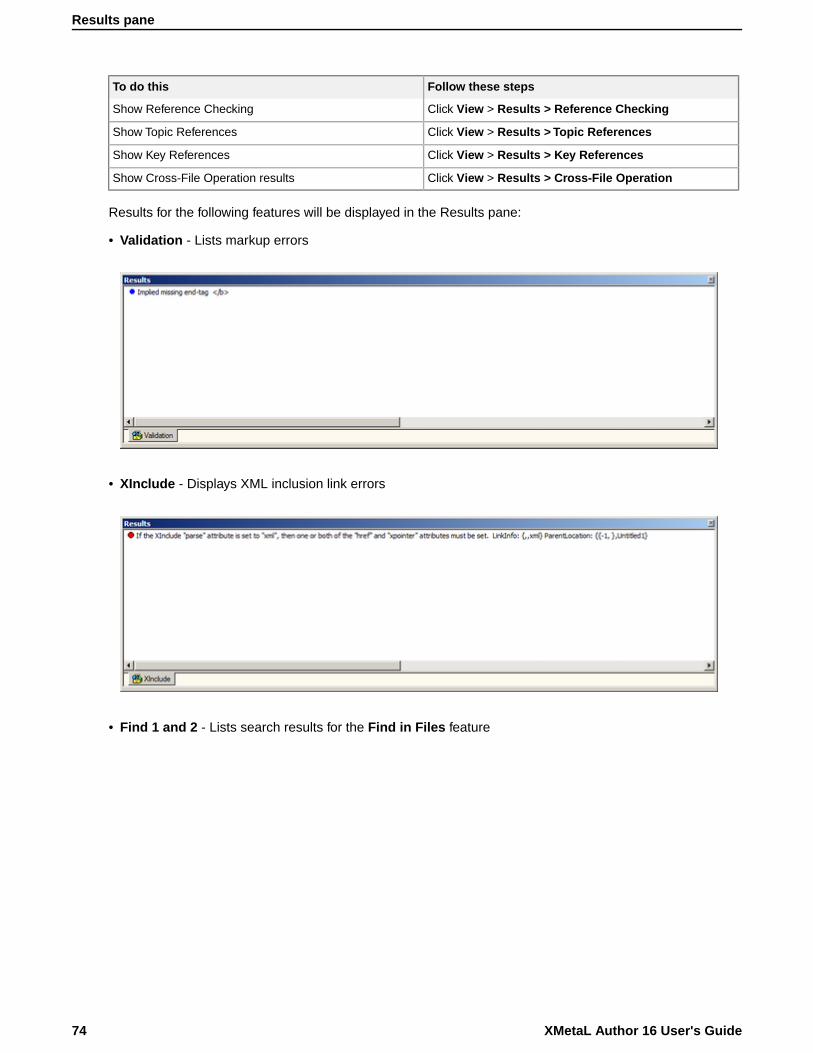
Follow these stepsTo do this
Click View > Results > Reference CheckingShow Reference Checking
Click View > Results > Topic ReferencesShow Topic References
Click View > Results > Key ReferencesShow Key References
Click View > Results > Cross-File OperationShow Cross-File Operation results
Results for the following features will be displayed in the Results pane:
• Validation - Lists markup errors
• XInclude - Displays XML inclusion link errors
• Find 1 and 2 - Lists search results for the Find in Files feature
XMetaL Author 16 User's Guide74
Results pane
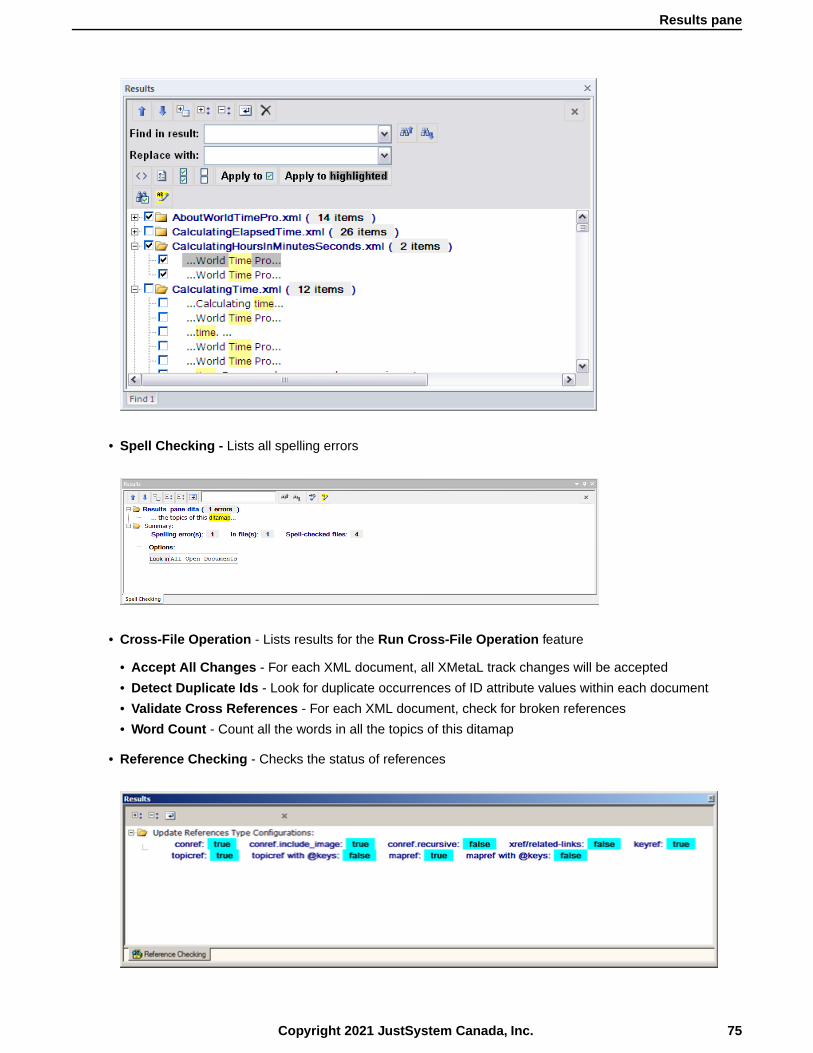
• Spell Checking - Lists all spelling errors
• Cross-File Operation - Lists results for the Run Cross-File Operation feature
• Accept All Changes - For each XML document, all XMetaL track changes will be accepted
• Detect Duplicate Ids - Look for duplicate occurrences of ID attribute values within each document
• Validate Cross References - For each XML document, check for broken references
• Word Count - Count all the words in all the topics of this ditamap
• Reference Checking - Checks the status of references
75Copyright 2021 JustSystem Canada, Inc.
Results pane
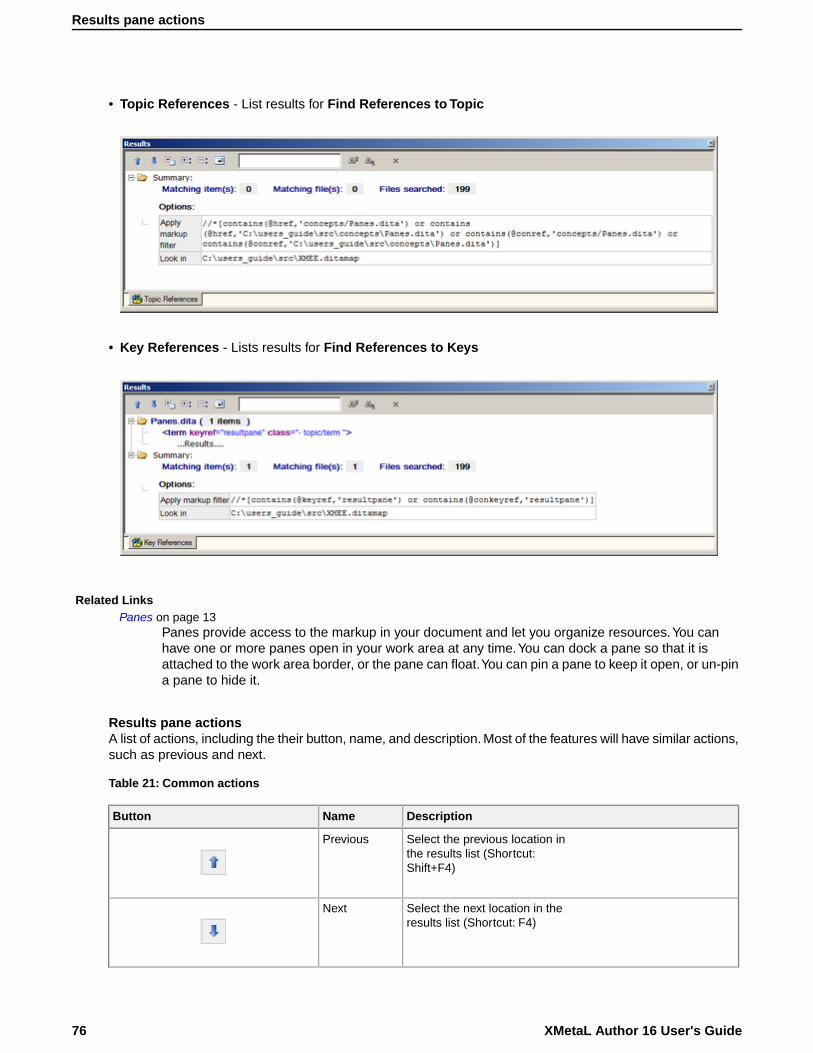
• Topic References - List results for Find References to Topic
• Key References - Lists results for Find References to Keys
Related LinksPanes on page 13
Panes provide access to the markup in your document and let you organize resources.You canhave one or more panes open in your work area at any time.You can dock a pane so that it isattached to the work area border, or the pane can float.You can pin a pane to keep it open, or un-pina pane to hide it.
Results pane actionsA list of actions, including the their button, name, and description. Most of the features will have similar actions,such as previous and next.
Table 21: Common actions
DescriptionNameButton
Select the previous location inthe results list (Shortcut:Shift+F4)
Previous
Select the next location in theresults list (Shortcut: F4)
Next
XMetaL Author 16 User's Guide76
Results pane actions
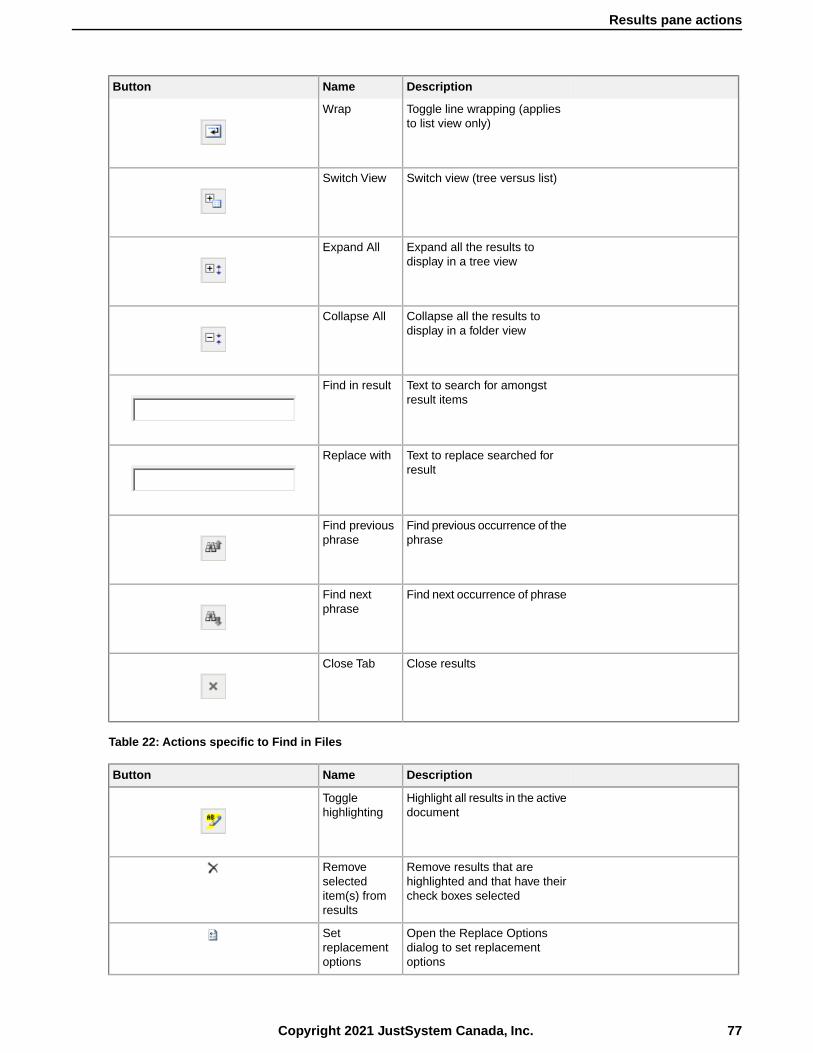
DescriptionNameButton
Toggle line wrapping (appliesto list view only)
Wrap
Switch view (tree versus list)Switch View
Expand all the results todisplay in a tree view
Expand All
Collapse all the results todisplay in a folder view
Collapse All
Text to search for amongstresult items
Find in result
Text to replace searched forresult
Replace with
Find previous occurrence of thephrase
Find previousphrase
Find next occurrence of phraseFind nextphrase
Close resultsClose Tab
Table 22: Actions specific to Find in Files
DescriptionNameButton
Highlight all results in the activedocument
Togglehighlighting
Remove results that arehighlighted and that have theircheck boxes selected
Removeselecteditem(s) fromresults
Open the Replace Optionsdialog to set replacementoptions
Setreplacementoptions
77Copyright 2021 JustSystem Canada, Inc.
Results pane actions
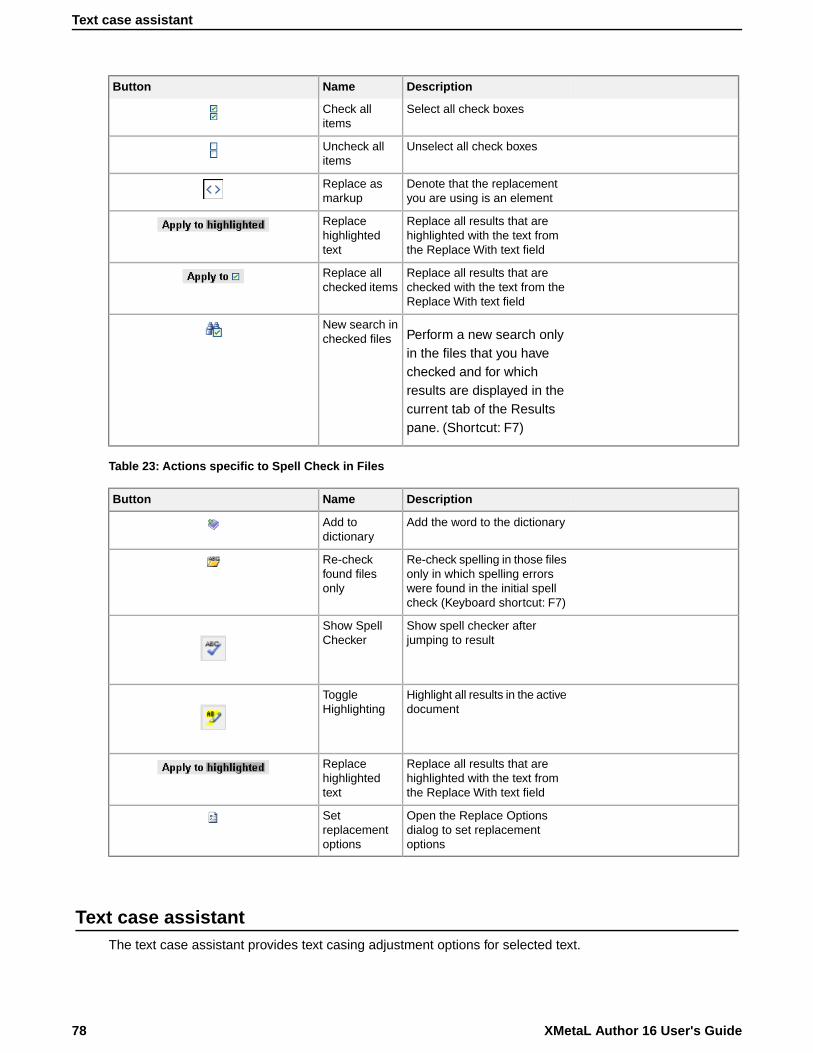
DescriptionNameButton
Select all check boxesCheck allitems
Unselect all check boxesUncheck allitems
Denote that the replacementyou are using is an element
Replace asmarkup
Replace all results that arehighlighted with the text fromthe Replace With text field
Replacehighlightedtext
Replace all results that arechecked with the text from theReplace With text field
Replace allchecked items
Perform a new search onlyin the files that you have
New search inchecked files
checked and for whichresults are displayed in thecurrent tab of the Resultspane. (Shortcut: F7)
Table 23: Actions specific to Spell Check in Files
DescriptionNameButton
Add the word to the dictionaryAdd todictionary
Re-check spelling in those filesonly in which spelling errors
Re-checkfound filesonly were found in the initial spell
check (Keyboard shortcut: F7)
Show spell checker afterjumping to result
Show SpellChecker
Highlight all results in the activedocument
ToggleHighlighting
Replace all results that arehighlighted with the text fromthe Replace With text field
Replacehighlightedtext
Open the Replace Optionsdialog to set replacementoptions
Setreplacementoptions
Text case assistantThe text case assistant provides text casing adjustment options for selected text.
XMetaL Author 16 User's Guide78
Text case assistant

To change text case, select the text for which you want to change the case, and then either click Ctrl + F3(by default) or right-click to open the context menu and select Text Case and one of the available options.The options are:
• Sentence case. - only the first letter of the sentence is in upper case when a full stop is included in theselection
• lowercase - all letters in the selection are displayed in lower case
• UPPER CASE - every letter in the selection is capitalized
• Capitalize Each Word - the first letter of every word in the selection is capitalized
• tOGGLE cASE - the case is inverted for each word in the selection
Note: The tOGGLE cASE option is only available in the right-click menu and not when using Ctrl + F3.
To set text case assistant preferences:
1. Select Tools > Options from the main menu.The Options dialog box opens.
2. UnderAssistants, selectText Case.
3. In the Display section,
• select Show in context menu to include the text case assistant in the right-click menu or select, or• select Show in Format toolbar to display the text assistant in the Formatting toolbar.
Note: For this change to take effect, a system restart is required.
4. The trigger is, by default, Ctrl + F3. This trigger key can be edited in the Trigger section by selecting akeyboard trigger from the list.
5. Click OK to save changes.
Working with Markdown documentsXMetaL supports the Markdown syntax and provides an easy to use split-screen editor.You can writedocuments in Markdown as well as convert documents into Markdown and convert Markdown documentsinto HTML and MS Word Document.
When editing a Markdown document, the editor has two panels. The Markdown syntax is highlighted in theeditor's left pane.GitHub Flavored Markdown (which is a strict superset of CommonMark) rules are used.Theright side is a web preview that is synchronized in real-time. For reference, see the remote-components topicin the Remote Lighting (LwDita) sample document in Help > Samples.
The Markdown document can be converted to HTML and MS Word Document.
79Copyright 2021 JustSystem Canada, Inc.
Working with Markdown documents
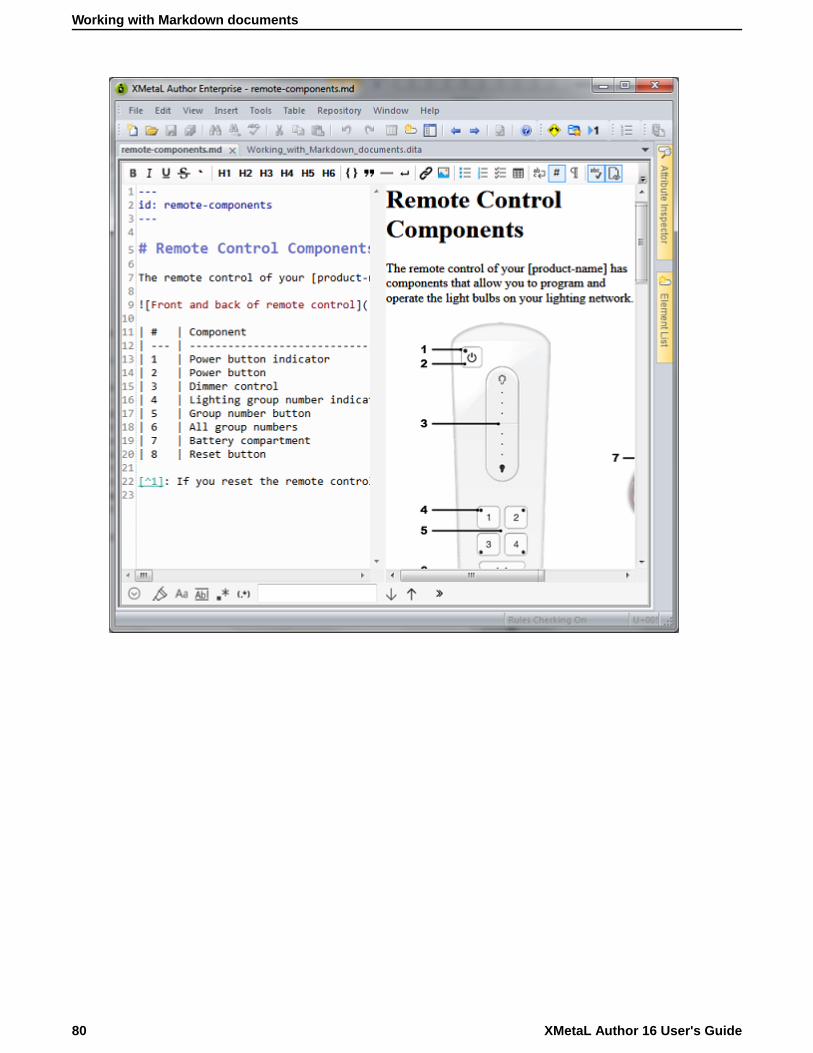
XMetaL Author 16 User's Guide80
Working with Markdown documents
Authoring structured content
When you create a document instance of a DTD or Schema in Normal or Tags On view, XMetaL Authorensures that your content is valid by guiding you through the authoring process.You do not need to have acomplete understanding of XML to begin authoring structured content.
Here are some of the ways in which XMetaL Author helps you create documents that conform to a DTD orSchema:
• The Element List displays only elements that are valid at the current element. Required elements aredisplayed in bold.
• The Attribute Inspector displays the attributes for the current element. Attributes that require a value aredisplayed in bold.
• Commands and menu items are unavailable if using them would result in an invalid document.
• You are prevented from typing text in the current location if the DTD or Schema does not allow it. If youtype at a location where text is not allowed, text is wrapped in the first valid paragraph element (if available).
• You are prevented from deleting an element if it is required by the DTD or Schema.
• You are prevented from inserting a CDATA section or other marked section that would result in an invaliddocument.
• You are prevented from pasting elements or text at an invalid location. The Smart Insert feature insertsthem at the next valid location in the document or the paste operation is not completed.
• You are prevented from dropping assets from the Resource Manager at an invalid location. The SmartInsert feature inserts them at the next valid location in the document or the paste operation is not completed.
• You are prevented from inserting elements at an invalid location. The Smart Insert feature inserts them atthe next valid location in the document.
• When working with change tracking, you cannot reject a change that is necessary to make the documentvalid.
• When using Find and Replace, you cannot make an element replacement that would make the documentinvalid.
• You are prevented from applying a condition on elements that are required by your DTD or Schema.
Related LinksAppendix A: XML basics on page 192
XML (Extensible Markup Language) is a recommendation of the World Wide Web Consortium (W3C).It is a language for describing the structure and content of a document. Authors use XML to “markup” their documents for a consuming application such as a Web browser or print formatting engine.XML is an application of SGML (Standard Generalized Markup Language). XML is more flexiblethan other markup languages such as HTML because it allows you to create your own markup.Thismakes it better suited to describing and processing complex information.
Validation and rules checkingValidation checks to see if the markup is correct and complete with reference to your DTD or Schema. Ruleschecking ensures that you do not break the required structure as you edit your document by allowing you toinsert only valid elements.
81Copyright 2021 JustSystem Canada, Inc.
Follow these stepsTo do this
Click Tools > Validate DocumentValidate a document
Validation occurs automatically when you save your document or when you switch from Plain Text view toNormal or Tags On view.You can validate an entire document, or you can select a selection of your documentto validate. Errors are displayed in the Validation Log.
Validation checks that the following conditions have been met:
• All elements, attributes, and entities used in the document have been declared.
• All required elements are present.
• All required attributes are present.
• All attributes are in the correct form.
• All ID attribute values are unique, and each IDREF attribute value matches an ID attribute value.
Rules checking is less stringent than validation in that it checks that no errors have been made, but does notcheck that the markup is complete. For example, rules checking does not check required elements, undeclaredentities, or missing ID values.
Rules checking occurs in Normal and Tags On views only.
Validation using SchematronThe Schematron differs in basic concept from other schema languages in that it not based on grammars buton finding tree patterns in the parsed document. This approach allows many kinds of structures to berepresented which are inconvenient and difficult in grammar-based schema languages.
NOTE: XMetaL now supports XSLT 2.0 for Schematron validation using Saxon-CE version 1.1. Saxon-CEimplements XSLT 2.0 at a minimum conformance level meaning it is a "Basic XSLT 2.0 Processor" as definedby the W3C XSLT 2.0 Specification.
To validate using the Schematron:
1. From the Tools menu, select Validate using Schematron (or hit CTRL + F9).
2. In the Schematron results pane, user the drop-down list to select a Schematron file to apply, and thenclick the Schematroll button to run the validatation.
3. You can also adjust the Schematron processing settings by going to the unified Options pane and clickingon the Tools > Schematron option.
For more information on Schematron validation, see http://schematron.com/.
Schematron OptionsYou can control options for global parameters, processing and debugging in the Tools > Schematronsectionof the Options dialog box.
Table 24: Global Parameters
DescriptionOption
Please refer to http://www.schematron.com for more details.Pass through non-Schematron elements
XMetaL Author 16 User's Guide82
Validation using Schematron

DescriptionOption
Add diagnostics to assertion results
Generate XPath values for SVRL @location attributes
Table 25: Schematron Processing
DescriptionOption
Please refer to http://www.schematron.com for more details.Run Document Schema Definition Languages (DSDL)
phase
Run Abstract Patterns expansion phase
Run custom SVRL to HTML results stylesheet
Table 26: Debugging Options
DescriptionOption
The debug version of Saxon-CE provides error and event
logging capabilities with a configurable logging threshold.
Use debug version of Saxon-CE
For definitions of the logging levels, seehttp://www.saxonica.com/ce/user-doc/1.1/html/coding/logging.html
Logging Level
The default logging level is set to SEVERE.
83Copyright 2021 JustSystem Canada, Inc.
Schematron Options
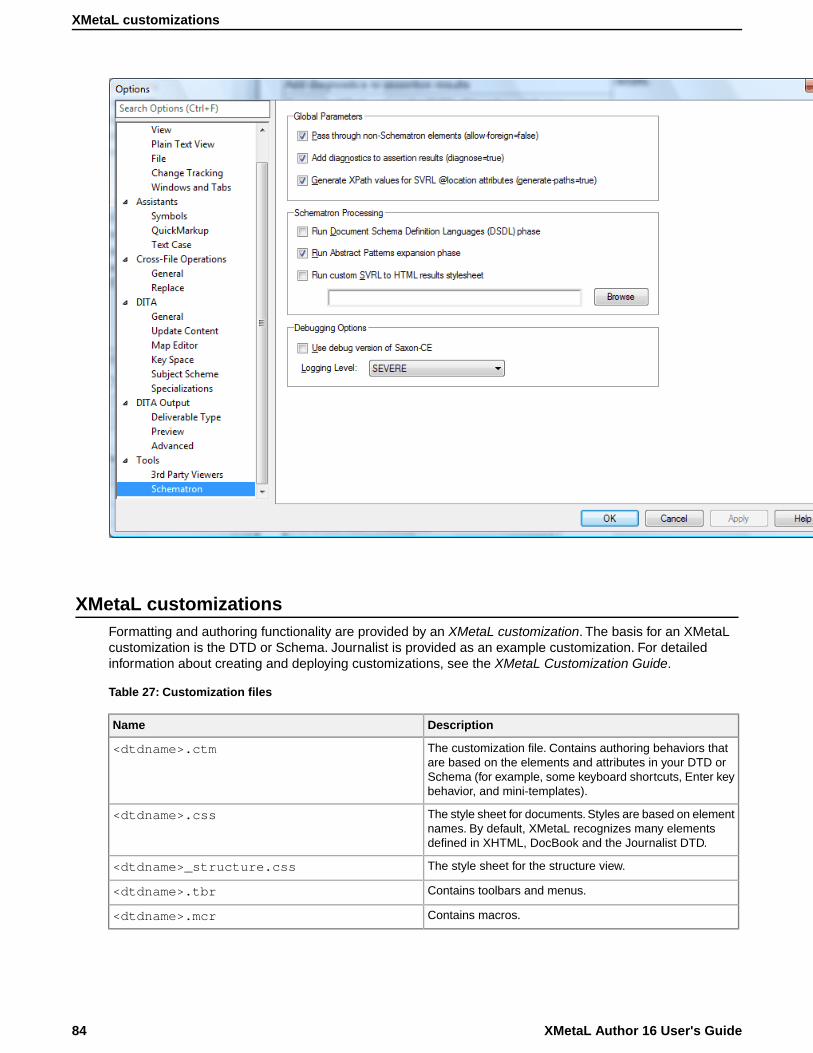
XMetaL customizationsFormatting and authoring functionality are provided by an XMetaL customization. The basis for an XMetaLcustomization is the DTD or Schema. Journalist is provided as an example customization. For detailedinformation about creating and deploying customizations, see the XMetaL Customization Guide.
Table 27: Customization files
DescriptionName
The customization file. Contains authoring behaviors thatare based on the elements and attributes in your DTD or
<dtdname>.ctm
Schema (for example, some keyboard shortcuts, Enter keybehavior, and mini-templates).
The style sheet for documents. Styles are based on elementnames. By default, XMetaL recognizes many elementsdefined in XHTML, DocBook and the Journalist DTD.
<dtdname>.css
The style sheet for the structure view.<dtdname>_structure.css
Contains toolbars and menus.<dtdname>.tbr
Contains macros.<dtdname>.mcr
XMetaL Author 16 User's Guide84
XMetaL customizations
When you open a document, XMetaL searches for customization files in the following locations, in the followingorder:
1. The same folder as the DTD or Schema
2. Your personal settings folder (usually %APPDATA%\SoftQuad\XMetaL\<version>\)
3. The XMetaL Author installation folder (usually ..\XMetaL <version>\Author\) and sub-folders
If the customization file or style sheets are not found, they are created in the same folder as the DTD orSchema.
When you work on a shared computer, you may want to save your customization files to your personal settingsfolder. Customization files that are saved in your personal settings folder are not deleted when you uninstallXMetaL Author.
Journalist customization
The Journalist customization is shipped with XMetaL Author to give you an introduction to authoring structureddocuments. This customization is designed to support the authoring of article-type documents. Templateshave been provided.
The Journalist customization is based on the following DTD:
..\XMetaL <version>\Author\Rules\journalist.dtd
Some of the formatting and behaviors in this customization include the following:
• A mini-template consisting of an Article Title, Section 1 Title, and paragraph. Special formatting is appliedto each.
• Type a title and press Enter. A paragraph element is inserted.
• If the selection or insertion point is inside a sequence of nested block elements, pressing Enter repeatedlymoves the insertion point up the hierarchy of nested elements.
• Follow the prompts in the replacement text that is displayed when you create an element.
• Clicking to the right of a table moves the insertion point outside of the table.This is particularly useful whenthe table is at the bottom of the document.
• If you are editing a <pre>-like element (one in which whitespace is preserved), press Enter to insert a linebreak, and Shift + Enter to close the element and start a new paragraph.
• To see the context of the current element, check the context bar to the left of the horizontal scrollbar.
• Followed-by elements are defined for some elements. For example, when your cursor is positioned beforethe end tag of an ordered list (</OrderedList>) and you press Enter, a <Para> element is inserted.
Related LinksCustom toolbars and menus on page 24
You can create new toolbars and menus and customize existing ones.You can assign buttons andmenus to built-in commands or user-defined macros.
Macros on page 27A macro is a sequence of operations that can be run as a unit. Macros can be associated with ashortcut key, toolbar button, or menu item. They are useful when you need to repeatedly execute atask that does not have a built-in shortcut key or command.
Options on page 31You can set options through the Tools menu.
Creating documents on page 34
85Copyright 2021 JustSystem Canada, Inc.
XMetaL customizations

You can create a document from a template, create a blank XML or SGML document, or create ablank, well-formed XML document.You can set file options, including a default template, filenameextensions, and autosave intervals through Tools > Options.
Images on page 91You can insert images into your documents if your XMetaL customization recognizes elements inyour DTD or Schema as image elements, or if you are using DITA.
Working with elementsElements are the building-blocks of your documents. They are defined in your DTD or Schema. Authoring inNormal view is similar to applying styles, whereas Tags On view lets you work with elements as structuralobjects.You can insert elements using the Element List, the Insert menu, or the In-place, look-aheadelement list.
Follow these stepsTo do this
In the Element List, click the Insert option, select an elementand click Apply or double-click an element
Insert an element or wrap a selection in an element
Click the Insert menu and select an elementInsert an element (DITA only)
Click Insert > Inline Element and select an element typeInsert an inline element (DITA only)
In the Element List, click the Change option, select anelement and click Apply
Change an element
Click Edit > Split Element or press EnterSplit an element
Click Edit > Join Element to PrecedingJoin two adjacent elements
Click Edit > Remove TagsRemove tags (Unwrap an element)
Some elements include a mini-template, which contains elements and prompt text that you can replace withyour own content. For example, the <OrderedList> element in the Journalist customization contains amini-template.
The current element refers to the element containing the insertion point or selection. If an entire element isselected, the current element is the parent of that element, not the selected element itself. In Normal andTags On views, the context of the current element (that is, its position in the element hierarchy) is displayedin the document status bar.
XMetaL Author 16 User's Guide86
Working with elements
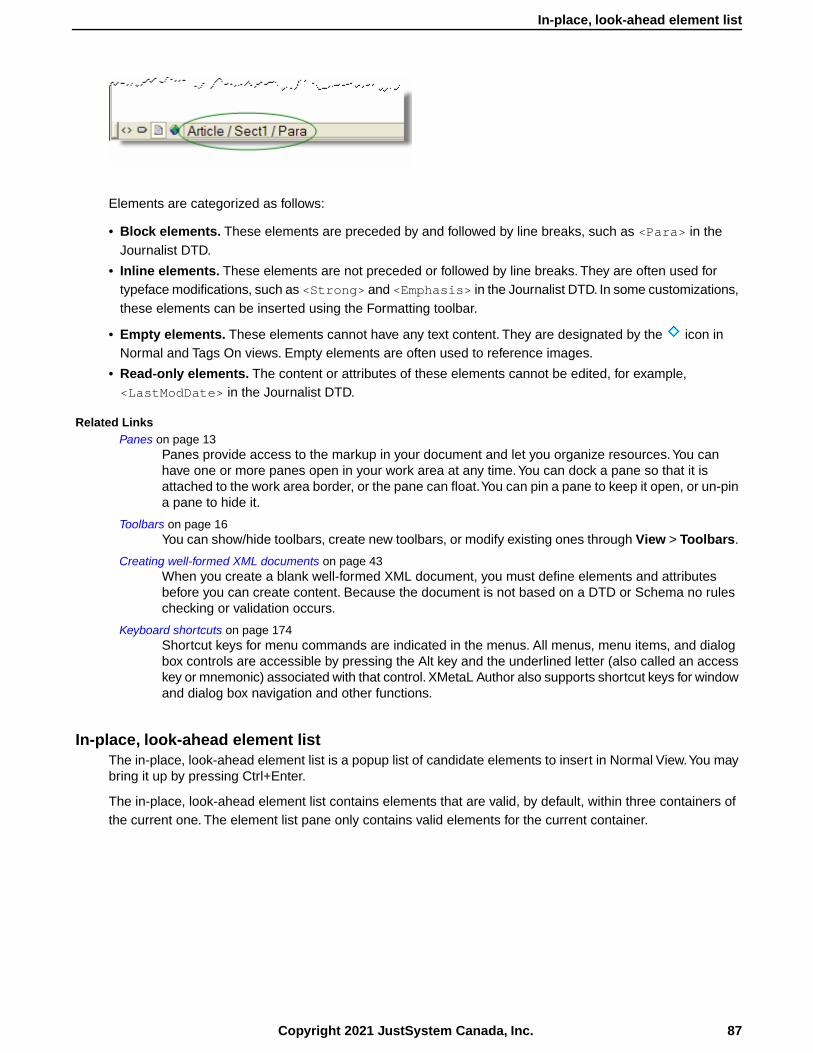
Elements are categorized as follows:
• Block elements. These elements are preceded by and followed by line breaks, such as <Para> in theJournalist DTD.
• Inline elements. These elements are not preceded or followed by line breaks. They are often used fortypeface modifications, such as <Strong> and <Emphasis> in the Journalist DTD. In some customizations,these elements can be inserted using the Formatting toolbar.
• Empty elements. These elements cannot have any text content. They are designated by the icon inNormal and Tags On views. Empty elements are often used to reference images.
• Read-only elements. The content or attributes of these elements cannot be edited, for example,<LastModDate> in the Journalist DTD.
Related LinksPanes on page 13
Panes provide access to the markup in your document and let you organize resources.You canhave one or more panes open in your work area at any time.You can dock a pane so that it isattached to the work area border, or the pane can float.You can pin a pane to keep it open, or un-pina pane to hide it.
Toolbars on page 16You can show/hide toolbars, create new toolbars, or modify existing ones through View > Toolbars.
Creating well-formed XML documents on page 43When you create a blank well-formed XML document, you must define elements and attributesbefore you can create content. Because the document is not based on a DTD or Schema no ruleschecking or validation occurs.
Keyboard shortcuts on page 174Shortcut keys for menu commands are indicated in the menus. All menus, menu items, and dialogbox controls are accessible by pressing the Alt key and the underlined letter (also called an accesskey or mnemonic) associated with that control. XMetaL Author also supports shortcut keys for windowand dialog box navigation and other functions.
In-place, look-ahead element listThe in-place, look-ahead element list is a popup list of candidate elements to insert in Normal View.You maybring it up by pressing Ctrl+Enter.
The in-place, look-ahead element list contains elements that are valid, by default, within three containers ofthe current one. The element list pane only contains valid elements for the current container.
87Copyright 2021 JustSystem Canada, Inc.
In-place, look-ahead element list

Editing the in-place, look-ahead element listThe display properties, insert actions, and keyboard combination for triggering the in-place, look-aheadelement list can be edited using the QuickMarkup Assistant Preferences window.
To edit the in-place, look-ahead element list:
1. Select Tools > Options from the main menu.
The Options dialog box opens.
2. Under Assistants, select QuickMarkup.
3. In the Display section, customize the following display properties of the list:
• Width - edit the width of the list
• Height - edit the height of the list
• Position - select whether the list appear above or below the cursor
• Depth - select the number of container levels of valid elements that are displayed
• Include table elements - include table-specific elements in the list
4. In the Insert Action section, select the action to be taken when inserting an element.
• Element-only - XMetaL inserts only the selected quick-insert element
• Using mini-template - XMetaL inserts the element using the mini-template defined in the customization(.ctm) file used to customize XMetaL for the DTD
• With required elements - XMetaL analyzes the DTD or XSD and, based on the selected quick-insertelement, inserts any additional elements that are required to make the document valid in that area ofinsertion
5. In the Trigger section, customize which CTRL+ keyboard combination opens the in-place, look-aheadelement list.
6. Click OK to save changes.
Setting attribute valuesYou can set attribute values through the Attribute Inspector or through the Edit Properties dialog.
Follow these stepsTo do this
In the Attribute Inspector, type or select an attribute valueSet an attribute value for an element
Click Edit > Element PropertiesSet an attribute value for an element (DITA only)
XMetaL Author 16 User's Guide88
Editing the in-place, look-ahead element list

The Attribute Inspector panel will, whenever possible, automatically suggest an attribute value if the sameattribute already has a value assigned elsewhere in the document on the same element type.This can greatlyspeed up the repetitive task of assigning the same value to the same attribute throughout the document.
Tip: You can select any ancestor of the current element from the list at the top of the Attribute Inspector.
Special characters in attribute values
The following characters must be escaped.
Escape sequenceCharacter
<<
>>
""
''
&&
Related LinksPanes on page 13
Panes provide access to the markup in your document and let you organize resources.You canhave one or more panes open in your work area at any time.You can dock a pane so that it isattached to the work area border, or the pane can float.You can pin a pane to keep it open, or un-pina pane to hide it.
Options on page 31You can set options through the Tools menu.
Displaying referenced content on page 140When you open a file, referenced content is displayed according to the refresh preferences youhave set in DITA options.You can also use the menus to refresh and show referenced content.
Inserting and editing listsYou can insert lists into your documents if your XMetaL customization recognizes elements in your DTD orSchema as list elements, or if you are using DITA.
Follow these stepsTo do this
Click (Numbered List) on the Formatting toolbarInsert a numbered list
Click (Bulleted List) on the Formatting toolbarInsert a bulleted list
Click Insert > List and select a list typeInsert a list (DITA only)
Position the cursor in a list and click Insert > List ItemInsert a list item (DITA only)
Select one or more paragraphs and click or Convert paragraphs to a list or change list type
Select one or more paragraphs, click Paragraph >Apply/Remove Bullets or Apply/Remove Numbering
Convert paragraphs to a list or change list type (DITAonly)
Position the cursor in a list item and click Paragraph > IncreaseList Indentation
Increase list indentation (DITA only)
Position the cursor in a list item and click Paragraph > DecreaseList Indentation
Decrease list indentation (DITA only)
89Copyright 2021 JustSystem Canada, Inc.
Inserting and editing lists

Follow these stepsTo do this
Position the cursor in a list item and click Paragraph > Split ListSplit a list (DITA only)
Table 28: Keyboard shortcuts
Follow these stepsTo do this
Position the cursor in a list item and press Enter (pressEnter twice if the contents are surrounded by a sub-elementsuch as a paragraph)
Insert a list item
Insert a list item and press TabInsert a list within a list
Select one or more list items and press TabConvert list items to a nested list
Select one or more list items and press Shift+TabConvert list items to paragraphs
Position the cursor in a list item and press TabDemote one or more items to a sub-list
Position the cursor in a list item and press Shift+TabPromote a sub-list up one level to its containing list
Position the cursor in a list item and press Enter twice (onceif you are already in an empty list item and three times ifthe list item contents are surrounded by a sub-element)
Terminate a list
Tip: You may find Tags On view preferable when working with lists.
If your DTD or Schema declares the HTML <UL> or <OL> elements, XMetaL Author recognizes them as listelements.Your DTD should also declare the <LI> (list item) element. The Journalist DTD declares the<ItemizedList> and <OrderedList> elements.
Definition lists consist of pairs of terms and definitions.You can use definition lists for any purpose that issuited to two-part lists. The <VariableList> element in the Journalist DTD is an example of a definitionlist:
<VariableList> <VarListEntry><Term>Term1</Term> <ListItem>Definition1</ListItem></VarListEntry> <VarListEntry> <Term>Term2</Term><ListItem>Definition2</ListItem> </VarListEntry></VariableList>
Sort a listYou can sort an entire list, or selected list items in a list.
1. (optional) If you only want to sort certain list items, highlight the items you want sorted in the list.
2. Click Edit > Sort.The Sort List dialog box opens.
3. If you selected list items to sort in step 1, select to sort either Selected Items or the Entire List.
4. In the Type field, select to sort by one of the following:
• Text - sorts columns in order, alphabetically and by numerical value• Number - sorts columns in order by number. Sorting pays only attention to numerical values, and entries
beginning with letters are not sorted and instead appear at the beginning or end of the range dependingon your sorting direction.
• Natural - sorts values in a natural order, numerically and alphabetically• Date - sorts values by date
5. Select either Ascending or Descending sorting direction.
XMetaL Author 16 User's Guide90
Sort a list

6. Click OK.The list is sorted.
ImagesYou can insert images into your documents if your XMetaL customization recognizes elements in your DTDor Schema as image elements, or if you are using DITA.
Follow these stepsTo do this
Click Insert > Image and select an image.
- OR -
Insert an image
Drag and drop an image (from within or outsideXMetaL) to where you want to place it. It will beautomatically placed in an image element.
File navigation options are available in the ChooseImage File dialog as follows:
• Show Folder - displays the folder for a selected fileto allows users to navigate to the folder where theimage is located.
• Find all files in folders - allows users to view allfiles in a selected directory, including sub-folders,in one list.The file extensions filter allows, includingsub-folders, to narrow down list of file specific types.
• A powerful file preview feature.
Click Insert > Figure with Title and select an imageInsert a figure with a title (DITA only)
Insert an image element using the Element List, then specifythe entity name as the value of the source attribute (orattribute that represents the image file)
Insert an image represented by an entity
Select an image and click Edit > Element PropertiesEdit image properties (DITA only)
If your DTD or Schema declares the HTML <IMG> element, XMetaL Author recognizes it as an image element.Your DTD should also declare the following attributes of the <IMG> element: SRC, ALT, HEIGHT, and WIDTH.The Journalist DTD declares the <Graphic> and <InlineGraphic> elements.
DITA images
DITA declares the <image> and <fig> elements. The <fig> element has <title> and <image> childelements.You can use this element to insert an image with a caption, for example:
<fig> <title>My summer getaway</title><image href="../images/LakeCharles.jpg" placement="break" width="300px"><!-- alternative text (if specified) is saved in the alt element --><alt>Lake Charles in summer</alt> </image></fig>
Table 29: Image properties
DescriptionAttribute/elementProperty
The relative path or URL to the image.hrefFile
91Copyright 2021 JustSystem Canada, Inc.
Images
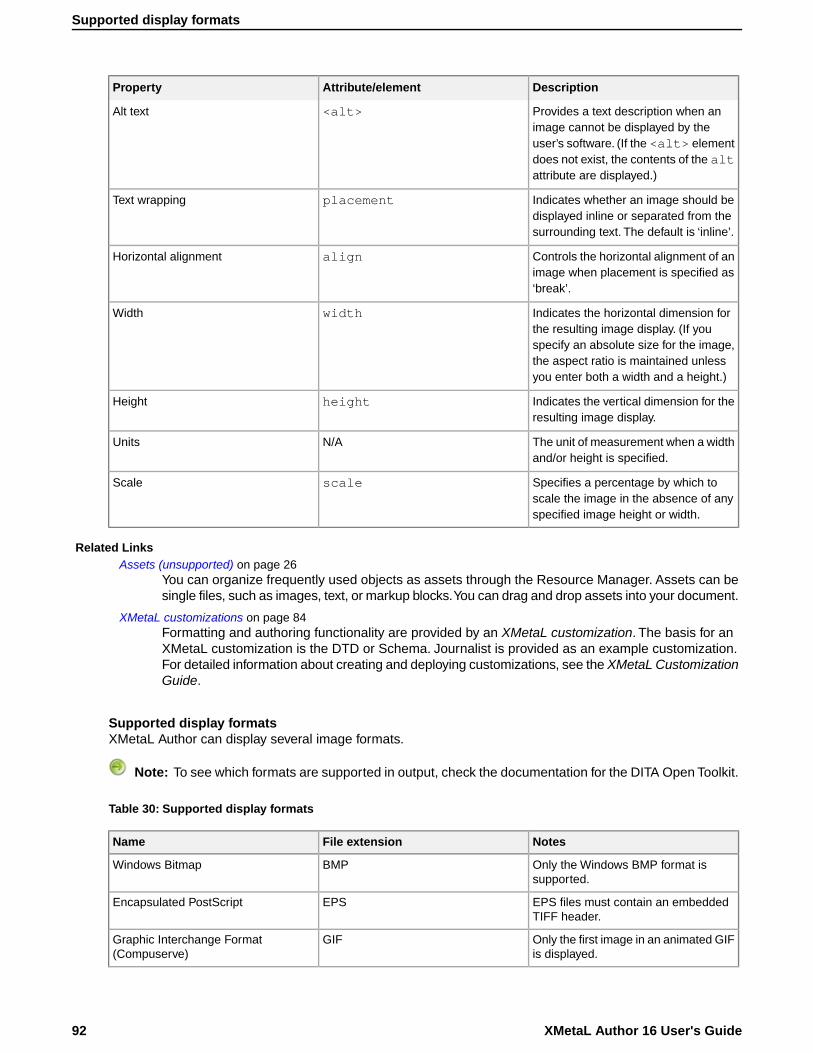
DescriptionAttribute/elementProperty
Provides a text description when animage cannot be displayed by the
<alt>Alt text
user’s software. (If the <alt> elementdoes not exist, the contents of the altattribute are displayed.)
Indicates whether an image should bedisplayed inline or separated from thesurrounding text. The default is ‘inline’.
placementText wrapping
Controls the horizontal alignment of animage when placement is specified as‘break’.
alignHorizontal alignment
Indicates the horizontal dimension forthe resulting image display. (If you
widthWidth
specify an absolute size for the image,the aspect ratio is maintained unlessyou enter both a width and a height.)
Indicates the vertical dimension for theresulting image display.
heightHeight
The unit of measurement when a widthand/or height is specified.
N/AUnits
Specifies a percentage by which toscale the image in the absence of anyspecified image height or width.
scaleScale
Related LinksAssets (unsupported) on page 26
You can organize frequently used objects as assets through the Resource Manager. Assets can besingle files, such as images, text, or markup blocks.You can drag and drop assets into your document.
XMetaL customizations on page 84Formatting and authoring functionality are provided by an XMetaL customization. The basis for anXMetaL customization is the DTD or Schema. Journalist is provided as an example customization.For detailed information about creating and deploying customizations, see the XMetaL CustomizationGuide.
Supported display formatsXMetaL Author can display several image formats.
Note: To see which formats are supported in output, check the documentation for the DITA Open Toolkit.
Table 30: Supported display formats
NotesFile extensionName
Only the Windows BMP format issupported.
BMPWindows Bitmap
EPS files must contain an embeddedTIFF header.
EPSEncapsulated PostScript
Only the first image in an animated GIFis displayed.
GIFGraphic Interchange Format(Compuserve)
XMetaL Author 16 User's Guide92
Supported display formats

NotesFile extensionName
JPG (or JPEG, JPE, JFIF, JIF)Joint Photographic Experts Group
ICOWindows Icon
WMF files must include a placeableheader.
WMFWindows Metafile
EMFEnhanced Metafile
PNGPortable Network Graphics
Only the first image in a file containingmultiple images is displayed.
TIF (or TIFF)Tagged Image File Format
PCXPC Paintbrush
TGATruevision Graphics Adapter or TARGA
Requires installation of an SVG viewer(for example, Adobe SVG Viewer).
SVGScalable Vector Graphics
Related LinksOptions on page 31
You can set options through the Tools menu.
TablesXMetaL Author supports the HTML and CALS table models. If your DTD or Schema uses either of thesemodels, you can use the Table menu to insert and edit tables.
Note: XMetaL Author does not support both table models in the same DTD or Schema.
Appropriately formatted content from other applications can be pasted or dragged and dropped into an XMetaLdocument as a table.
93Copyright 2021 JustSystem Canada, Inc.
Tables
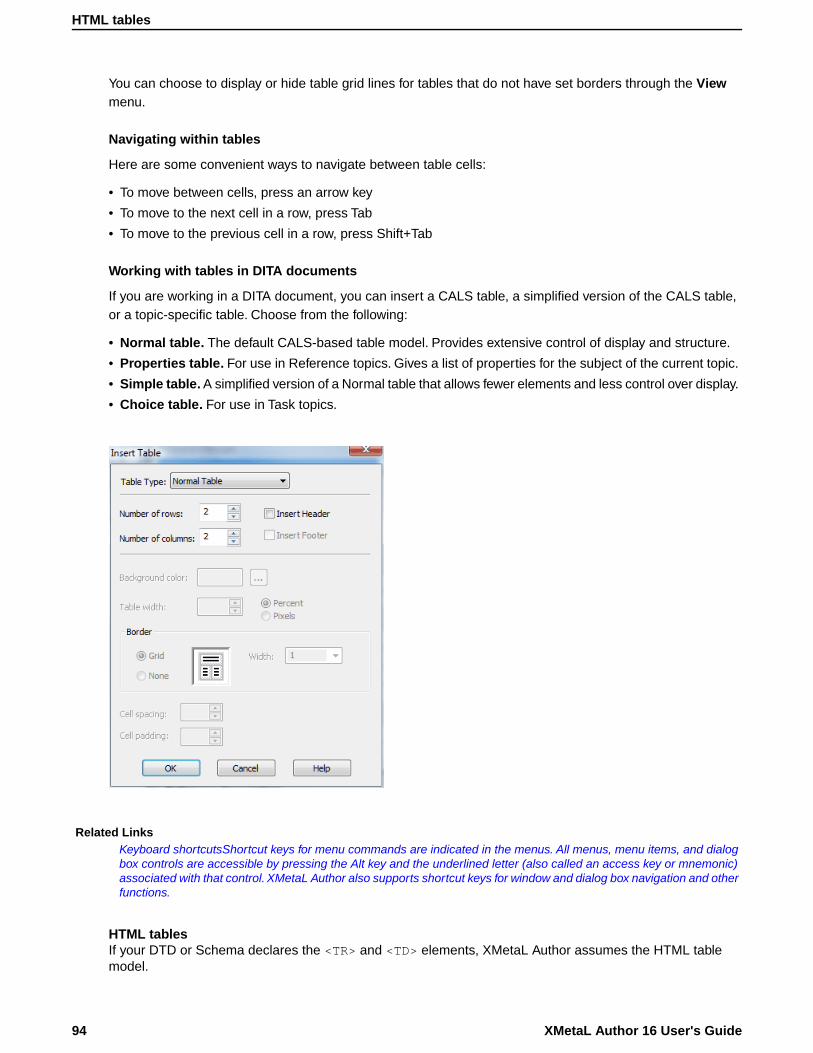
You can choose to display or hide table grid lines for tables that do not have set borders through the Viewmenu.
Navigating within tables
Here are some convenient ways to navigate between table cells:
• To move between cells, press an arrow key
• To move to the next cell in a row, press Tab
• To move to the previous cell in a row, press Shift+Tab
Working with tables in DITA documents
If you are working in a DITA document, you can insert a CALS table, a simplified version of the CALS table,or a topic-specific table. Choose from the following:
• Normal table. The default CALS-based table model. Provides extensive control of display and structure.
• Properties table. For use in Reference topics. Gives a list of properties for the subject of the current topic.
• Simple table. A simplified version of a Normal table that allows fewer elements and less control over display.
• Choice table. For use in Task topics.
Related LinksKeyboard shortcutsShortcut keys for menu commands are indicated in the menus. All menus, menu items, and dialogbox controls are accessible by pressing the Alt key and the underlined letter (also called an access key or mnemonic)associated with that control. XMetaL Author also supports shortcut keys for window and dialog box navigation and otherfunctions.
HTML tablesIf your DTD or Schema declares the <TR> and <TD> elements, XMetaL Author assumes the HTML tablemodel.
XMetaL Author 16 User's Guide94
HTML tables
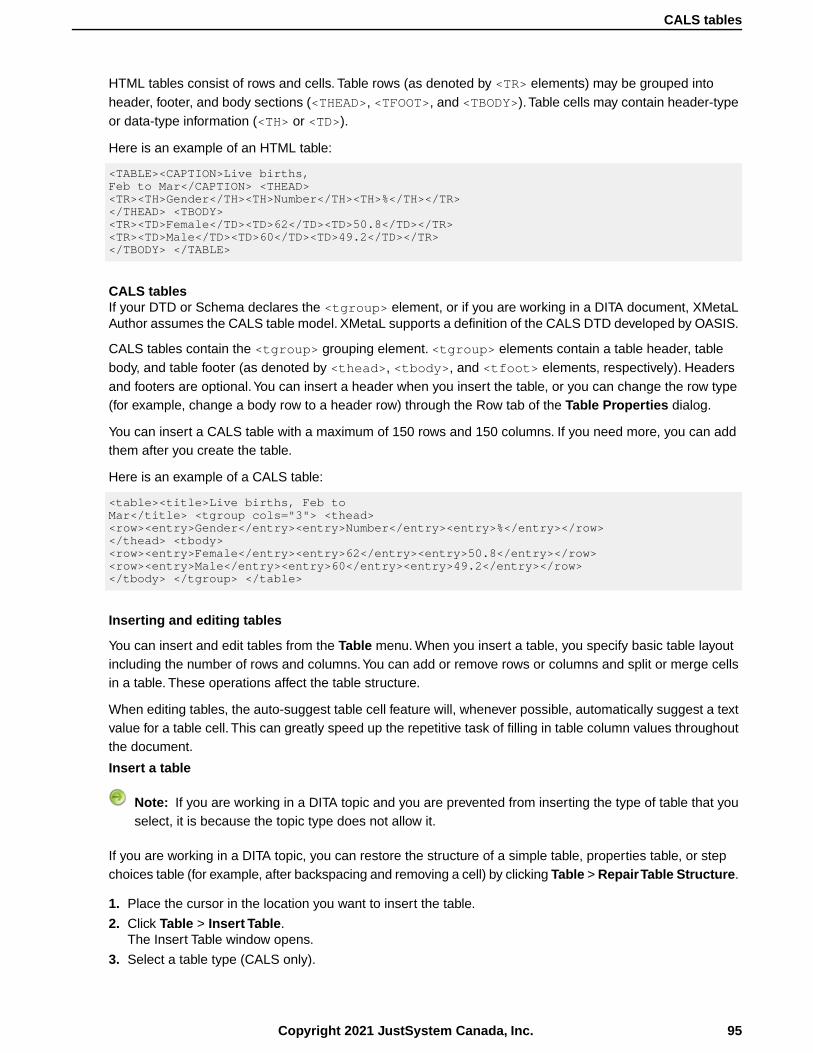
HTML tables consist of rows and cells. Table rows (as denoted by <TR> elements) may be grouped intoheader, footer, and body sections (<THEAD>, <TFOOT>, and <TBODY>). Table cells may contain header-typeor data-type information (<TH> or <TD>).
Here is an example of an HTML table:
<TABLE><CAPTION>Live births,Feb to Mar</CAPTION> <THEAD><TR><TH>Gender</TH><TH>Number</TH><TH>%</TH></TR></THEAD> <TBODY><TR><TD>Female</TD><TD>62</TD><TD>50.8</TD></TR><TR><TD>Male</TD><TD>60</TD><TD>49.2</TD></TR></TBODY> </TABLE>
CALS tablesIf your DTD or Schema declares the <tgroup> element, or if you are working in a DITA document, XMetaLAuthor assumes the CALS table model. XMetaL supports a definition of the CALS DTD developed by OASIS.
CALS tables contain the <tgroup> grouping element. <tgroup> elements contain a table header, tablebody, and table footer (as denoted by <thead>, <tbody>, and <tfoot> elements, respectively). Headersand footers are optional.You can insert a header when you insert the table, or you can change the row type(for example, change a body row to a header row) through the Row tab of the Table Properties dialog.
You can insert a CALS table with a maximum of 150 rows and 150 columns. If you need more, you can addthem after you create the table.
Here is an example of a CALS table:
<table><title>Live births, Feb toMar</title> <tgroup cols="3"> <thead><row><entry>Gender</entry><entry>Number</entry><entry>%</entry></row></thead> <tbody><row><entry>Female</entry><entry>62</entry><entry>50.8</entry></row><row><entry>Male</entry><entry>60</entry><entry>49.2</entry></row></tbody> </tgroup> </table>
Inserting and editing tables
You can insert and edit tables from the Table menu. When you insert a table, you specify basic table layoutincluding the number of rows and columns.You can add or remove rows or columns and split or merge cellsin a table. These operations affect the table structure.
When editing tables, the auto-suggest table cell feature will, whenever possible, automatically suggest a textvalue for a table cell. This can greatly speed up the repetitive task of filling in table column values throughoutthe document.
Insert a table
Note: If you are working in a DITA topic and you are prevented from inserting the type of table that youselect, it is because the topic type does not allow it.
If you are working in a DITA topic, you can restore the structure of a simple table, properties table, or stepchoices table (for example, after backspacing and removing a cell) by clicking Table > Repair Table Structure.
1. Place the cursor in the location you want to insert the table.
2. Click Table > Insert Table.The Insert Table window opens.
3. Select a table type (CALS only).
95Copyright 2021 JustSystem Canada, Inc.
CALS tables
4. Select the number of rows and columns in the table.
5. Click OK.The table is inserted into the selected location.
To add a caption:
Note: For HTML tables only
1. Place the cursor in the table.2. Click Table > Insert Caption
Insert a cell, row, or column
Insert a cell
You can add a cell by splitting an existing cell into two rows or columns.
1. Place the cursor in a table.2. Click Table > Split Cell Into Columns or Split Cell Into Rows
Insert a row
1. Place the cursor in a table.2. Click Table > Insert Rows or Columns
Note: To add a row to at the bottom of a table, you can also place the cursor in the last cell in a tableand press the Tab key.
Insert a column
1. Place the cursor in a table.2. Click Table > Insert Rows or Columns
Edit a cell, row, or column
Move a row or column
1. Place the cursor in a row or column.2. Click Table > Move Row or Column.
The Move Row or Column dialog opens.
3. Choose an option.4. Click Apply to apply the action and continue with more actions, or click OK to apply the action and close
the dialog.
Move a cell
You can move cells by cutting (or copying) and pasting them.
1. Select a block of cells.2. Click Edit > Cut (Copy).3. Place the cursor in the location you want to paste the cells.4. Click Edit > Paste.
XMetaL Author 16 User's Guide96
Insert a cell, row, or column

Tip: You can copy your selection by holding down the Ctrl key while you drag and drop the selectedblock of cells to its new location.
Note: You can use the cut (copy) and paste operations to re-position a selected block of table cells.However, the paste location must have the same configuration as the block of cells you are cutting. Ifyou are cutting and pasting between tables in different documents, both documents must use the sameDTD or Schema. Content in the target cell block is overwritten with the pasted content.
Merge cells
1. Place the cursor in a cell.2. Click Table > Merge cell.
The Merge Cell dialog opens.
3. Select a merge option.4. Click Apply to apply the action and continue with more actions, or click OK to apply the action and close
the dialog.
Contract a cell
If a cell spans two or more rows or columns, you can contract it to the proportions of the adjacent rows orcolumns.
1. Place the cursor in the cell that spans two or more rows or columns.2. On the Table Advanced toolbar, click one of the following options:
• Contract Cell from Left• Contract Cell from Right• Contract Cell from Bottom• Contract Cell from Top
3. The cell is split, and the border is aligned with adjacent borders.
Delete a cell, row, or column
Delete a cell
You can add a cell by merging it with another existing cell.
1. Place the cursor in a table.2. Click Table > Merge Cell.
Insert a row
Note: The row is deleted without a prompt.
1. Place the cursor in a table.2. Click Table > Delete Row.
Note: To add a row to at the bottom of a table, you can also place the cursor in the last cell in a tableand press the Tab key.
-OR-
97Copyright 2021 JustSystem Canada, Inc.
Delete a cell, row, or column
1. Select the entire row of a table.2. Press the Shift key and the Right Arrow key.
The row is highlighted blue.
3. Press the Delete key.
Delete multiple rows
1. Select the entire rows that you want to delete.2. Press the Shift key and the Right Arrow key.
The rows are highlighted blue.
3. Press the Delete key.
Delete a single column
Note: The column is deleted without a prompt.
1. Place the cursor in a table.2. Click Table > Delete Column
Copy a cellThe contents of a table cell can be quickly copied to other selected cells in the same table.
1. Beginning the cell from which you want to copy content, select all the cells which you want to include thesame content of that initial cell.
2. Select Table > Copy Cells.The content is copied to all selected cells.
Note: If any of the other cells contain content, it will be overwritten by the copied content.
Fill series of table cellsA cell with numerical content can be used to create a numerical series in a table. The content of the anchorcell that is being used to initiate the series must be a number (e.g., 123) or end in a number (e.g.,loremipsum123).The series proceeds left to right, top to bottom in the table.The series affects whole numbersonly so, for example, an initial value of 1.9 creates a series with values 1.9, 2.9, 3.9, and so on.
1. Enter the initial value in the anchor cell.
Note: The anchor cell must be the top left cell in the table.
2. Select the cell(s) for which you want to fill the numerical series, starting with the anchor cell.
Note: If any of the other cells contain text content, it will be overwritten by the series.
3. Select Table > Fill Series.
The series is displayed in selected cells in the table.Fill cell attributesCell attributes can be copied from an anchor cell to other cells in the table in one operation. The anchor cellis the cell in which you start a multi-cell selection.
1. Select the cell(s) for which you want to fill cell attributes, starting with the anchor cell.2. Select Table > Fill Cell Attributes.
The Select Table Cell Attributes dialog opens.
XMetaL Author 16 User's Guide98
Copy a cell
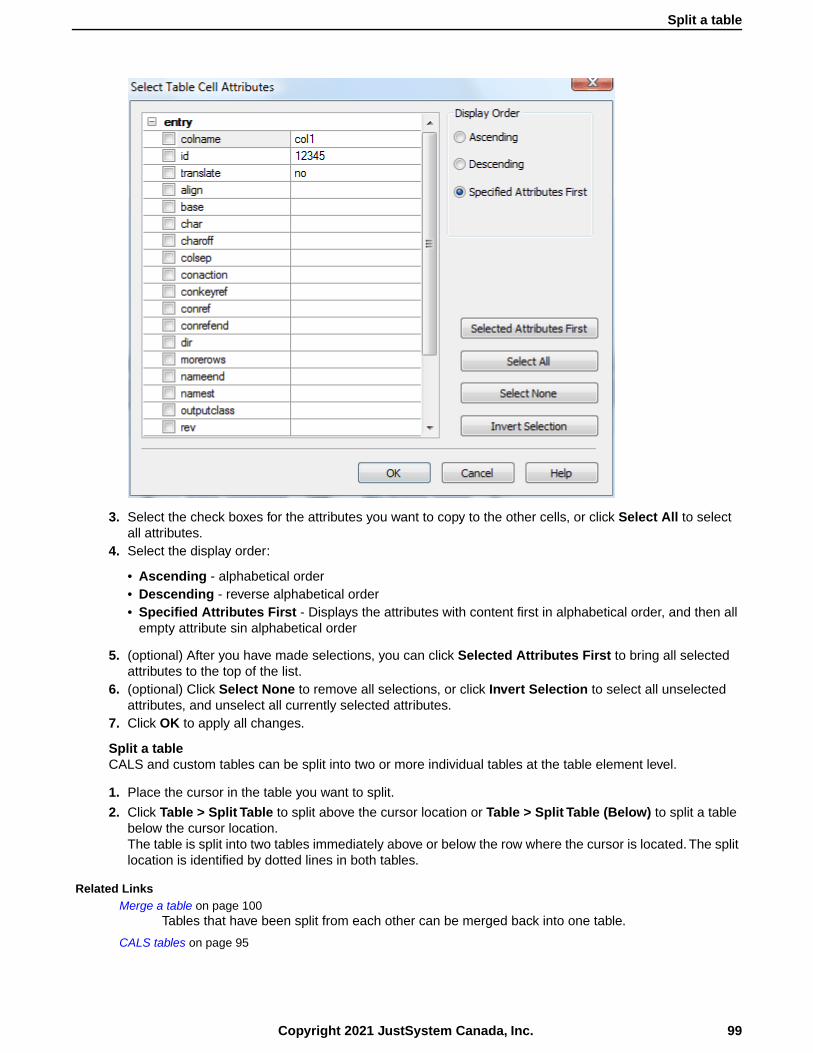
3. Select the check boxes for the attributes you want to copy to the other cells, or click Select All to selectall attributes.
4. Select the display order:
• Ascending - alphabetical order• Descending - reverse alphabetical order• Specified Attributes First - Displays the attributes with content first in alphabetical order, and then all
empty attribute sin alphabetical order
5. (optional) After you have made selections, you can click Selected Attributes First to bring all selectedattributes to the top of the list.
6. (optional) Click Select None to remove all selections, or click Invert Selection to select all unselectedattributes, and unselect all currently selected attributes.
7. Click OK to apply all changes.
Split a tableCALS and custom tables can be split into two or more individual tables at the table element level.
1. Place the cursor in the table you want to split.
2. Click Table > Split Table to split above the cursor location or Table > Split Table (Below) to split a tablebelow the cursor location.The table is split into two tables immediately above or below the row where the cursor is located. The splitlocation is identified by dotted lines in both tables.
Related LinksMerge a table on page 100
Tables that have been split from each other can be merged back into one table.
CALS tables on page 95
99Copyright 2021 JustSystem Canada, Inc.
Split a table
If your DTD or Schema declares the <tgroup> element, or if you are working in a DITA document,XMetaL Author assumes the CALS table model. XMetaL supports a definition of the CALS DTDdeveloped by OASIS.
Split a table groupCALS and custom tables can be split into two or more individual table group at the tgroup element level.
1. Place the cursor where you want to split the table (either above or below the cursor).
2. Click Table > Split Table Group to split above the cursor location or Table > Split Table Group (Below)to split a table below the cursor location.The table is split into two tables immediately above or below the row where the cursor is located. The splitlocation is identified by dotted lines in both tables.
Related LinksMerge a table on page 100
Tables that have been split from each other can be merged back into one table.
CALS tables on page 95If your DTD or Schema declares the <tgroup> element, or if you are working in a DITA document,XMetaL Author assumes the CALS table model. XMetaL supports a definition of the CALS DTDdeveloped by OASIS.
Merge a tableTables that have been split from each other can be merged back into one table.
1. Place the cursor in the table you want to merge.2. Click Table > Merge Table (Below) if the split is below the cursor location, or click Table > Merge Table
if the split is above the cursor location.
Related LinksSort a table on page 100
You can sort tables, or selected rows in a table. Sorting is available for HTML and CALS tables aswell as custom table models.
Sort a tableYou can sort tables, or selected rows in a table. Sorting is available for HTML and CALS tables as well ascustom table models.
1. (optional) If you only want to sort certain rows, highlight the rows you want sorted in the table.
2. Place the cursor in the table, and then select Table > Sort....The Sort dialog box opens.
3. (If you selected rows to sort in step 1) In the Scope section, select to sort either Selected Rows or theEntire Table.
4. Select the @colname check box to view the columns by the @colname tag. Otherwise, the columns willbe identified by number and text content.
5. In the Sort By section, select the sort type from the available options (as below), and then select eitherAscending or Descending and Case Sensitive or Case Insensitive.
Note: Although the attribute colname can be changed in the <entry> element in the table, the name of thecolumn is not changed and it is the same as specified in the <colspec> element. That name is used when@colname is checked in 'Sort Table'.
• Text - sorts columns in order, alphabetically and by numerical value• Number - sorts columns in order by number. Sorting pays only attention to numerical values, and entries
beginning with letters are not sorted and instead appear at the beginning or end of the range dependingon your sorting direction.
• Natural - sorts columns in a natural order, numerically and alphabetically
XMetaL Author 16 User's Guide100
Split a table group

• Microsoft® Excel Style - sorts columns in the same way that Excel sorts values alphanumerically• Date - sorts values by date
6. In the Then Sort By sections, select additional criteria.
Example: If you sorted by Number above, and you have identical number values in your table, you canuse a second sort that places the values into a hierarchy of your choosing.
7. Click OK.The table is sorted.
Enter a tab character in a table cellYou can insert a tab inside of an element in which whitespace is preserved (for example, the HTML <PRE>element) using a macro.
1. Switch to Plain Text view.
2. Click in a location where text is allowed.
3. Click Tools > Record New Macro.
4. Press Tab.
5. Click Tools > Stop Recording.
6. Complete the macro.
7. Switch back to Normal or Tags On view.
8. Position the cursor inside a table within a <PRE>-like element.
9. Run the macro.
Related LinksMacros on page 27
A macro is a sequence of operations that can be run as a unit. Macros can be associated with ashortcut key, toolbar button, or menu item. They are useful when you need to repeatedly execute atask that does not have a built-in shortcut key or command.
Inserting tables from other applicationsYou can copy content from other applications, such as spreadsheets and text editors, and paste it into yourdocument as a table.
Pasted selections are converted into a table if the following conditions are met:
• There are at least two lines in the selection
• Each line consists of items separated by tabs
• Each line has at least two items
• Each line has the same number of items
Formatting table propertiesYou can set formatting properties in the Table Properties dialog or the Attribute Inspector.You can also setsome formatting properties when you insert a table (HTML tables only).
Follow these stepsTo do this
Place the cursor anywhere inside a table, click Table >Table Properties, and select the Table tab
Format a table
Place the cursor in a column, click Table > TableProperties, and select the Column tab
Format a column
Place the cursor in a row, click Table > Table Properties,and select the Row tab
Format a row
101Copyright 2021 JustSystem Canada, Inc.
Enter a tab character in a table cell

Follow these stepsTo do this
Place the cursor in a cell, click Table > Table Properties,and select the Cell tab
Format a cell
Select cells within a column or row, click Table > TableProperties, and select the Selection tab
Format a selection
Note: The availability of properties depends on the table model in your DTD or Schema. Changing someof the properties may not yield visible changes to the tables.
In HTML tables, you can resize rows and columns from the Table Properties dialog box or by dragging therow and column boundaries. In CALS tables, only columns can be resized. CALS tables support absoluteand proportional column widths, or a mix of the two. Proportional values are expressed as a number followedby an asterisk (*).
Tip: You can change the width of a column without affecting the width of other columns in the table byholding down the Shift key while you drag the right edge of the column to the desired width.
Working with entitiesYou can create and manage entities through the Tools menu and insert entity references through the Insertmenu. When you create an entity, an entity declaration is added to your document’s internal subset. Entitiesare organized in entity sets.The list of entity sets contains all of the entities defined in the internal subset andthe DTD.
Follow these stepsTo do this
Click Tools > Text Entities, External Entities, or GraphicEntities. Then complete the required fields and click New.
Create an entity
Select an entity, make the required modifications, and clickChange.
Modify an entity
XMetaL Author 16 User's Guide102
Working with entities
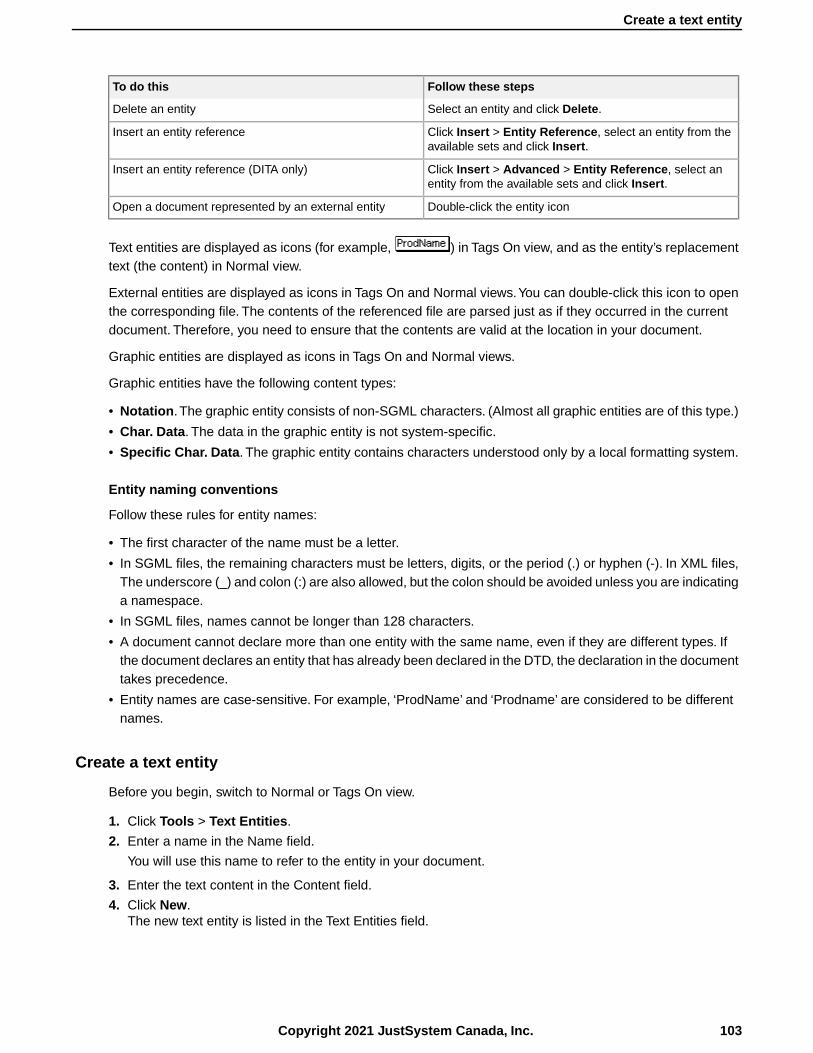
Follow these stepsTo do this
Select an entity and click Delete.Delete an entity
Click Insert > Entity Reference, select an entity from theavailable sets and click Insert.
Insert an entity reference
Click Insert > Advanced > Entity Reference, select anentity from the available sets and click Insert.
Insert an entity reference (DITA only)
Double-click the entity iconOpen a document represented by an external entity
Text entities are displayed as icons (for example, ) in Tags On view, and as the entity’s replacementtext (the content) in Normal view.
External entities are displayed as icons in Tags On and Normal views.You can double-click this icon to openthe corresponding file. The contents of the referenced file are parsed just as if they occurred in the currentdocument. Therefore, you need to ensure that the contents are valid at the location in your document.
Graphic entities are displayed as icons in Tags On and Normal views.
Graphic entities have the following content types:
• Notation.The graphic entity consists of non-SGML characters. (Almost all graphic entities are of this type.)
• Char. Data. The data in the graphic entity is not system-specific.
• Specific Char. Data. The graphic entity contains characters understood only by a local formatting system.
Entity naming conventions
Follow these rules for entity names:
• The first character of the name must be a letter.
• In SGML files, the remaining characters must be letters, digits, or the period (.) or hyphen (-). In XML files,The underscore (_) and colon (:) are also allowed, but the colon should be avoided unless you are indicatinga namespace.
• In SGML files, names cannot be longer than 128 characters.
• A document cannot declare more than one entity with the same name, even if they are different types. Ifthe document declares an entity that has already been declared in the DTD, the declaration in the documenttakes precedence.
• Entity names are case-sensitive. For example, ‘ProdName’ and ‘Prodname’ are considered to be differentnames.
Create a text entity
Before you begin, switch to Normal or Tags On view.
1. Click Tools > Text Entities.
2. Enter a name in the Name field.
You will use this name to refer to the entity in your document.
3. Enter the text content in the Content field.
4. Click New.The new text entity is listed in the Text Entities field.
103Copyright 2021 JustSystem Canada, Inc.
Create a text entity

Create an external entity
Before you begin, switch to Normal or Tags On view.
1. Click Tools > External Entities.
2. Enter a name in the Name field.
You will use this name to refer to the entity in your document.
3. Click Choose and select a file.
4. (Optional) Enter a public identifier in the Public Name field.
5. Click New.The new entity is listed in the File Entities field.
Create a graphic entity
Before you begin, switch to Normal or Tags On view.
Note: This procedure applies to SGML documents only. In order to declare a graphic entity, your DTDmust contain a corresponding NOTATION declaration.
1. Click Tools > Graphic Entities.
2. Enter a name.
You will use this name to refer to the entity in your document.
3. Click Choose and select a file.
4. Specify a content type and graphic format.
Graphic types correspond to NOTATION declarations in the DTD.
5. Click New.
Special characters and symbolsYou can use the Special Characters and Symbols toolbars, or the Insert Symbols menu (displayed by usingthe keyboard shortcut CTRL + Shift + S), to enter characters and symbols that do not have correspondingkeys on US English keyboards. If your document’s encoding supports it, the characters and symbols themselves(not the character entities) are saved with your document.
The character/entity conversion table (..\XMetaL <version>\Author\charentmap.xml) is used formapping entity references to characters.
XML files with Unicode encoding
When you open an XML file with Unicode encoding in Tags On and Normal views, the following rules apply,in the following order:
1. The entity references for the characters ‘<’, ‘>’, and ‘&’ are rendered as characters.
2. Other entity references are rendered as characters if they are included in the character/entity conversiontable, and if your operating system and version of XMetaL Author are capable of displaying the character.
When you save an XML file with Unicode encoding, the following rules apply, in the following order:
1. The characters ‘<’, ‘>’, and ‘&’ are converted to entity references.
2. If the document encoding allows it, other characters are saved as actual characters.
XMetaL Author 16 User's Guide104
Create an external entity
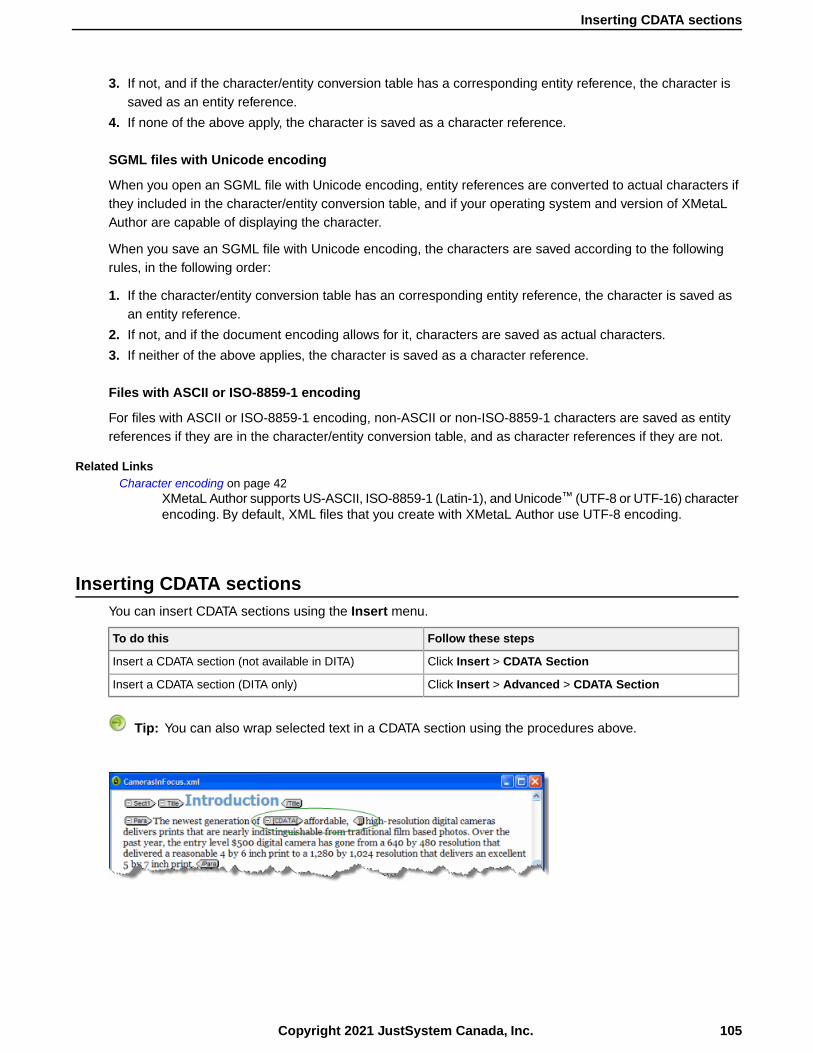
3. If not, and if the character/entity conversion table has a corresponding entity reference, the character issaved as an entity reference.
4. If none of the above apply, the character is saved as a character reference.
SGML files with Unicode encoding
When you open an SGML file with Unicode encoding, entity references are converted to actual characters ifthey included in the character/entity conversion table, and if your operating system and version of XMetaLAuthor are capable of displaying the character.
When you save an SGML file with Unicode encoding, the characters are saved according to the followingrules, in the following order:
1. If the character/entity conversion table has an corresponding entity reference, the character is saved asan entity reference.
2. If not, and if the document encoding allows for it, characters are saved as actual characters.
3. If neither of the above applies, the character is saved as a character reference.
Files with ASCII or ISO-8859-1 encoding
For files with ASCII or ISO-8859-1 encoding, non-ASCII or non-ISO-8859-1 characters are saved as entityreferences if they are in the character/entity conversion table, and as character references if they are not.
Related LinksCharacter encoding on page 42
XMetaL Author supports US-ASCII, ISO-8859-1 (Latin-1), and Unicode™ (UTF-8 or UTF-16) characterencoding. By default, XML files that you create with XMetaL Author use UTF-8 encoding.
Inserting CDATA sectionsYou can insert CDATA sections using the Insert menu.
Follow these stepsTo do this
Click Insert > CDATA SectionInsert a CDATA section (not available in DITA)
Click Insert > Advanced > CDATA SectionInsert a CDATA section (DITA only)
Tip: You can also wrap selected text in a CDATA section using the procedures above.
105Copyright 2021 JustSystem Canada, Inc.
Inserting CDATA sections
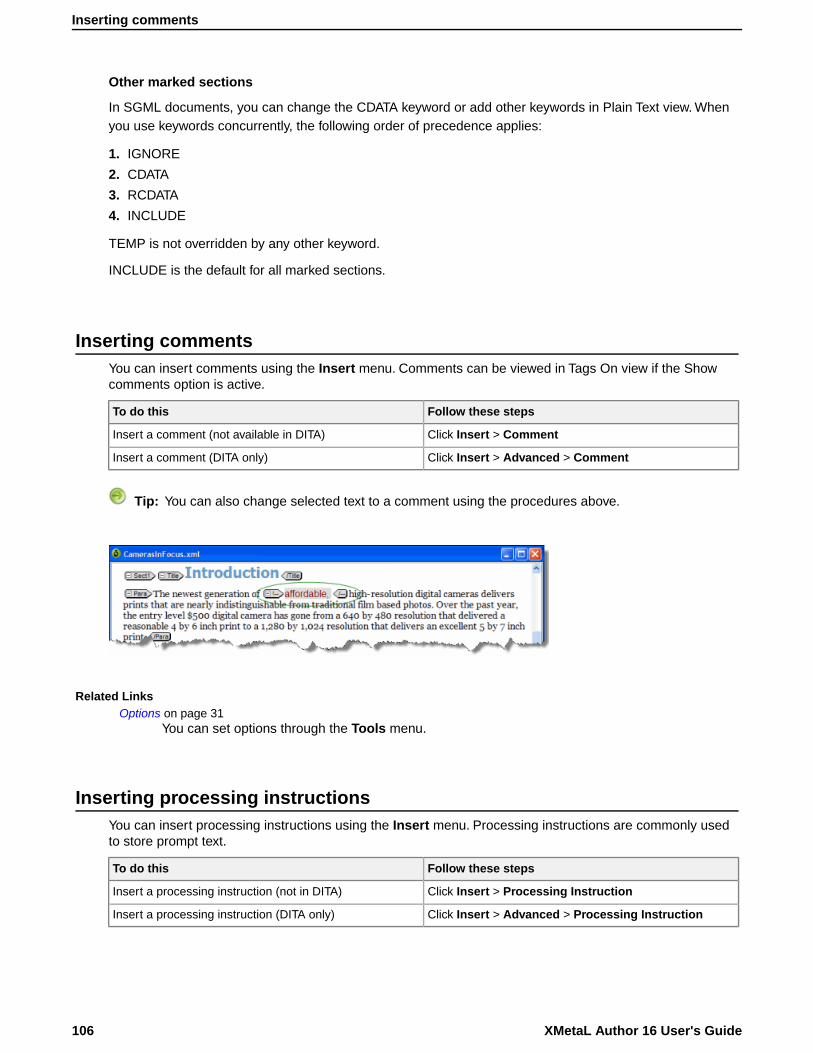
Other marked sections
In SGML documents, you can change the CDATA keyword or add other keywords in Plain Text view. Whenyou use keywords concurrently, the following order of precedence applies:
1. IGNORE
2. CDATA
3. RCDATA
4. INCLUDE
TEMP is not overridden by any other keyword.
INCLUDE is the default for all marked sections.
Inserting commentsYou can insert comments using the Insert menu. Comments can be viewed in Tags On view if the Showcomments option is active.
Follow these stepsTo do this
Click Insert > CommentInsert a comment (not available in DITA)
Click Insert > Advanced > CommentInsert a comment (DITA only)
Tip: You can also change selected text to a comment using the procedures above.
Related LinksOptions on page 31
You can set options through the Tools menu.
Inserting processing instructionsYou can insert processing instructions using the Insert menu. Processing instructions are commonly usedto store prompt text.
Follow these stepsTo do this
Click Insert > Processing InstructionInsert a processing instruction (not in DITA)
Click Insert > Advanced > Processing InstructionInsert a processing instruction (DITA only)
XMetaL Author 16 User's Guide106
Inserting comments

Importing databases
You can import the contents of a database or spreadsheet file into your structured document as a table.Whenyou import a database, you create an SQL query that allows you to import only the data you need and in theformat you want. When you import data, you apply elements and attributes that are used in your DTD orSchema.
Most customizations include a menu command or a toolbar button you can use to open the Import Databasedialog box. For example, the Journalist customization includes the following macros:
• Import Table
• Update Table
When you run the Import Table macro, the Import Database dialog box opens.This is the interface for selectingyour data, creating your query, and formatting output.
After you import data into your XMetaL Author document, you can update it (reload the data from the sourcedatabase) using the Update Table macro.
Related LinksMacros on page 27
A macro is a sequence of operations that can be run as a unit. Macros can be associated with ashortcut key, toolbar button, or menu item. They are useful when you need to repeatedly execute atask that does not have a built-in shortcut key or command.
Choosing a databaseThe source database can be a file, a folder, or a DSN (Data Source Name).You can choose a database fromthe Select Database dialog box.
107Copyright 2021 JustSystem Canada, Inc.
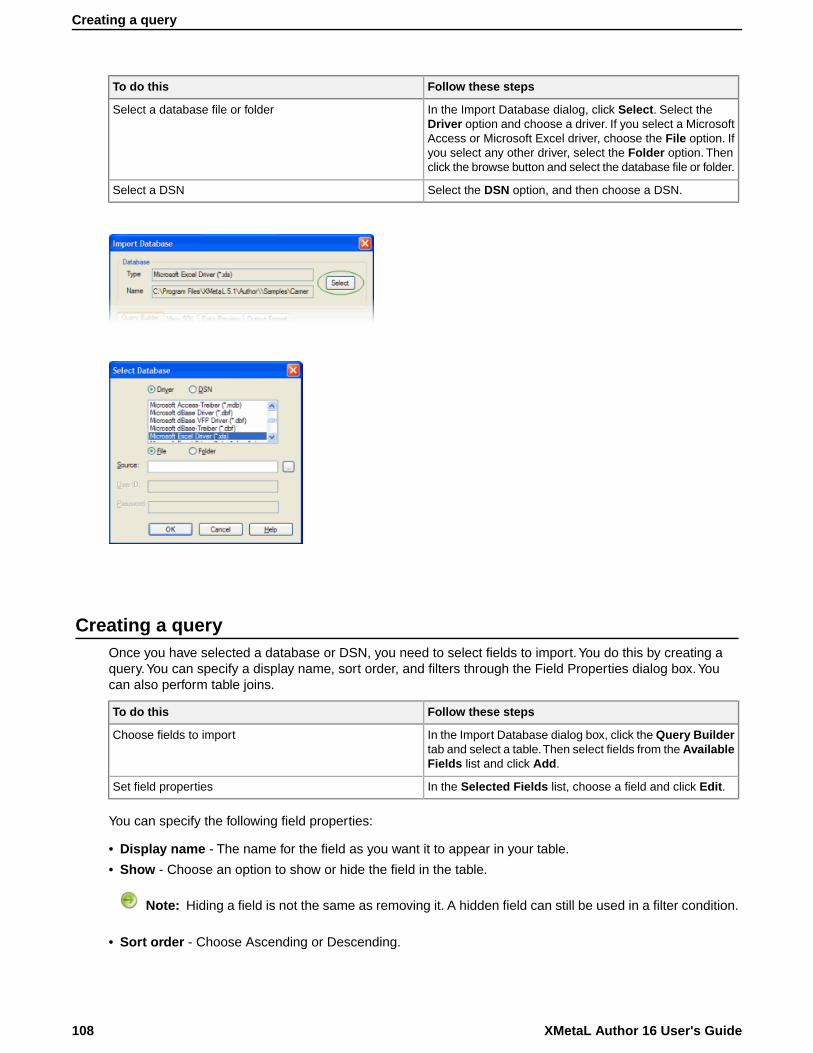
Follow these stepsTo do this
In the Import Database dialog, click Select. Select theDriver option and choose a driver. If you select a Microsoft
Select a database file or folder
Access or Microsoft Excel driver, choose the File option. Ifyou select any other driver, select the Folder option. Thenclick the browse button and select the database file or folder.
Select the DSN option, and then choose a DSN.Select a DSN
Creating a queryOnce you have selected a database or DSN, you need to select fields to import.You do this by creating aquery.You can specify a display name, sort order, and filters through the Field Properties dialog box.Youcan also perform table joins.
Follow these stepsTo do this
In the Import Database dialog box, click the Query Buildertab and select a table.Then select fields from the AvailableFields list and click Add.
Choose fields to import
In the Selected Fields list, choose a field and click Edit.Set field properties
You can specify the following field properties:
• Display name - The name for the field as you want it to appear in your table.
• Show - Choose an option to show or hide the field in the table.
Note: Hiding a field is not the same as removing it. A hidden field can still be used in a filter condition.
• Sort order - Choose Ascending or Descending.
XMetaL Author 16 User's Guide108
Creating a query
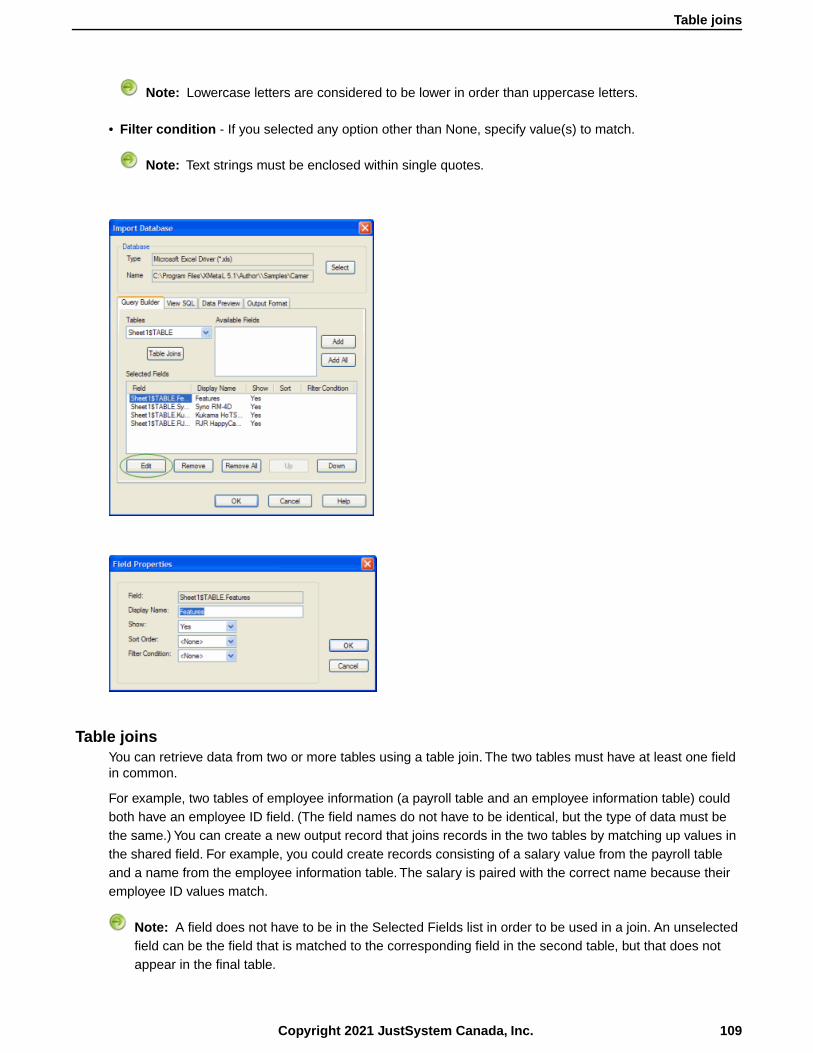
Note: Lowercase letters are considered to be lower in order than uppercase letters.
• Filter condition - If you selected any option other than None, specify value(s) to match.
Note: Text strings must be enclosed within single quotes.
Table joinsYou can retrieve data from two or more tables using a table join. The two tables must have at least one fieldin common.
For example, two tables of employee information (a payroll table and an employee information table) couldboth have an employee ID field. (The field names do not have to be identical, but the type of data must bethe same.) You can create a new output record that joins records in the two tables by matching up values inthe shared field. For example, you could create records consisting of a salary value from the payroll tableand a name from the employee information table. The salary is paired with the correct name because theiremployee ID values match.
Note: A field does not have to be in the Selected Fields list in order to be used in a join. An unselectedfield can be the field that is matched to the corresponding field in the second table, but that does notappear in the final table.
109Copyright 2021 JustSystem Canada, Inc.
Table joins
Creating a joined table query
To create a joined table query:
1. In the Import Database dialog box, click the Query Builder tab.
2. From the Table list box, select a table from the current database.
This is the primary table (the table to which you want to join a second table).
3. Click Table Joins.
4. From the Select Join Field list, choose the field that to use to join the data from the two tables.
This field must contain data common to both tables.
5. Choose the equivalent field from the Join Onto list.
6. Click Add.
Formatting table outputOnce you have defined your query, you need to determine the formatting for your table data in XMetaL Author.You apply elements and attributes that are used in your DTD or Schema.You can specify formatting throughthe Output Format tab in the Import Database dialog.
Options
Choose from the following options:
• The table model supported by your DTD.
• An orientation. Choose Vertical if you want the fields to be imported as columns (as in the original database)or Horizontal if you want the fields to be imported as rows.
• Headers. Choose Show to include the table header (the first row) in the output, or Hide to suppress it.
Output names
You can edit the element names in the Name to Use column. These are the element names that are usedwhen the data is written in your document.
Note: The elements must be declared in your DTD.
You can also specify a case for the element you are editing.
XMetaL Author 16 User's Guide110
Creating a joined table query

111Copyright 2021 JustSystem Canada, Inc.
Formatting table output
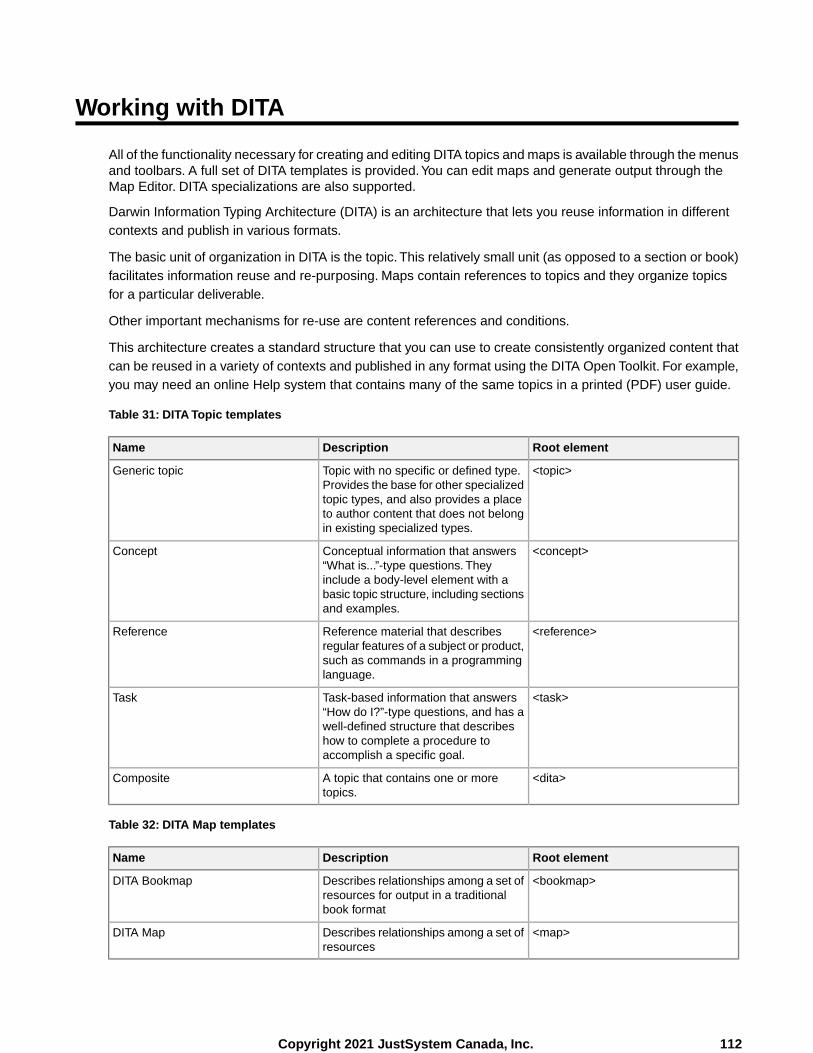
Working with DITA
All of the functionality necessary for creating and editing DITA topics and maps is available through the menusand toolbars. A full set of DITA templates is provided.You can edit maps and generate output through theMap Editor. DITA specializations are also supported.
Darwin Information Typing Architecture (DITA) is an architecture that lets you reuse information in differentcontexts and publish in various formats.
The basic unit of organization in DITA is the topic. This relatively small unit (as opposed to a section or book)facilitates information reuse and re-purposing. Maps contain references to topics and they organize topicsfor a particular deliverable.
Other important mechanisms for re-use are content references and conditions.
This architecture creates a standard structure that you can use to create consistently organized content thatcan be reused in a variety of contexts and published in any format using the DITA Open Toolkit. For example,you may need an online Help system that contains many of the same topics in a printed (PDF) user guide.
Table 31: DITA Topic templates
Root elementDescriptionName
<topic>Topic with no specific or defined type.Provides the base for other specialized
Generic topic
topic types, and also provides a placeto author content that does not belongin existing specialized types.
<concept>Conceptual information that answers“What is...”-type questions. They
Concept
include a body-level element with abasic topic structure, including sectionsand examples.
<reference>Reference material that describesregular features of a subject or product,
Reference
such as commands in a programminglanguage.
<task>Task-based information that answers“How do I?”-type questions, and has a
Task
well-defined structure that describeshow to complete a procedure toaccomplish a specific goal.
<dita>A topic that contains one or moretopics.
Composite
Table 32: DITA Map templates
Root elementDescriptionName
<bookmap>Describes relationships among a set ofresources for output in a traditionalbook format
DITA Bookmap
<map>Describes relationships among a set ofresources
DITA Map
112Copyright 2021 JustSystem Canada, Inc.
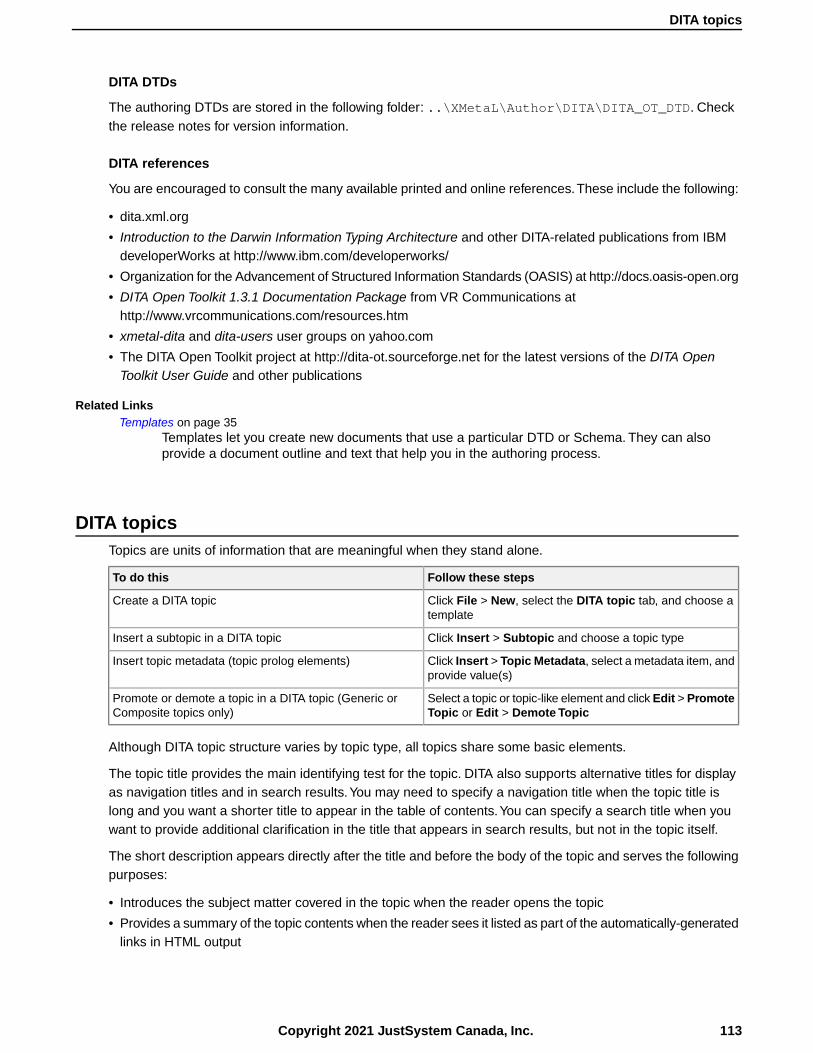
DITA DTDs
The authoring DTDs are stored in the following folder: ..\XMetaL\Author\DITA\DITA_OT_DTD. Checkthe release notes for version information.
DITA references
You are encouraged to consult the many available printed and online references.These include the following:
• dita.xml.org
• Introduction to the Darwin Information Typing Architecture and other DITA-related publications from IBMdeveloperWorks at http://www.ibm.com/developerworks/
• Organization for the Advancement of Structured Information Standards (OASIS) at http://docs.oasis-open.org
• DITA Open Toolkit 1.3.1 Documentation Package from VR Communications athttp://www.vrcommunications.com/resources.htm
• xmetal-dita and dita-users user groups on yahoo.com
• The DITA Open Toolkit project at http://dita-ot.sourceforge.net for the latest versions of the DITA OpenToolkit User Guide and other publications
Related LinksTemplates on page 35
Templates let you create new documents that use a particular DTD or Schema. They can alsoprovide a document outline and text that help you in the authoring process.
DITA topicsTopics are units of information that are meaningful when they stand alone.
Follow these stepsTo do this
Click File > New, select the DITA topic tab, and choose atemplate
Create a DITA topic
Click Insert > Subtopic and choose a topic typeInsert a subtopic in a DITA topic
Click Insert > Topic Metadata, select a metadata item, andprovide value(s)
Insert topic metadata (topic prolog elements)
Select a topic or topic-like element and click Edit > PromoteTopic or Edit > Demote Topic
Promote or demote a topic in a DITA topic (Generic orComposite topics only)
Although DITA topic structure varies by topic type, all topics share some basic elements.
The topic title provides the main identifying test for the topic. DITA also supports alternative titles for displayas navigation titles and in search results.You may need to specify a navigation title when the topic title islong and you want a shorter title to appear in the table of contents.You can specify a search title when youwant to provide additional clarification in the title that appears in search results, but not in the topic itself.
The short description appears directly after the title and before the body of the topic and serves the followingpurposes:
• Introduces the subject matter covered in the topic when the reader opens the topic
• Provides a summary of the topic contents when the reader sees it listed as part of the automatically-generatedlinks in HTML output
113Copyright 2021 JustSystem Canada, Inc.
DITA topics

Although the short description is not a required element, it is recommended that you include it.
You can specify the metadata that applies to the entire topic in the prolog. This includes index entries andkeywords that apply to the topic, as well as author and copyright data. Metadata also includes elements thatcontain more information about the topic, such as the product version.
The topic body contains the topic content. Each topic type has a unique body structure and each requiressome standard information. Concept and reference topics have the most flexibility in what elements you caninclude and where. For example, concept topics usually include sections, paragraphs, bulleted lists, andimages. Reference topics usually contain tables. By contrast, the task topic type is restrictive because it allowsonly one set of steps and prescribes an order in which you can use the elements. For example, you cannothave a result element before the steps. Topic body structure is designed to help you author information moreeasily and is intended to follow the logical flow of information.
Related LinksCreating documents on page 34
You can create a document from a template, create a blank XML or SGML document, or create ablank, well-formed XML document.You can set file options, including a default template, filenameextensions, and autosave intervals through Tools > Options.
Authoring structured content on page 81When you create a document instance of a DTD or Schema in Normal or Tags On view, XMetaLAuthor ensures that your content is valid by guiding you through the authoring process.You do notneed to have a complete understanding of XML to begin authoring structured content.
DITA mapsMaps contain topic references (<topicref> elements) and they organize topics for a specific deliverable.A DITA map template is provided.You can view and edit maps through the Map Editor or in XML view. DITAmaps are saved with the ‘.ditamap’ extension.
Follow these stepsTo do this
Click File > New, click the DITA Map tab, and select theDITA Map template. Then enter a title for the map (savedin the <title> element).
Create a DITA map
The structure of your map is used as the basis for a table of contents.You can control whether the topic islisted in the TOC by setting the ‘Include in TOC’ property (toc attribute) in the map.
Maps are one of the primary drivers of content re-use as they allow you to include the same source contentin multiple deliverables. For example, you can create a map file that organizes the topics for an online Helpsystem and another that uses many of the same topics as well as additional topics for a PDF file. In addition,you can nest maps within maps to create new grouping levels.
You can specify the relationships between parent and child topics in a map through the collection-typeattribute. This attribute is used by processors (such as the DITA Open Toolkit) to generate links betweentopics.
You can create non-hierarchical links or links between peer topics within a map with a relationship table(<reltable> element). The table is based on the topic types, with a column for each type. Relationshiptables make links in your map easy to maintain as they are stored within the map file itself. If the topic filename changes, you can open the map file and update all of the references to that file in a single location;
XMetaL Author 16 User's Guide114
DITA maps
you do not need to edit each file that links to that topic.This is especially useful when you are troubleshootinglinks.
Related LinksDocument views on page 9
You can choose a view for your document through the View menu or from the view buttons in thedocument status bar. The view you select depends on how you want to work with your document.You can set view options, including a default view through Tools > Options.
Panes on page 13Panes provide access to the markup in your document and let you organize resources.You canhave one or more panes open in your work area at any time.You can dock a pane so that it isattached to the work area border, or the pane can float.You can pin a pane to keep it open, or un-pina pane to hide it.
Creating documents on page 34You can create a document from a template, create a blank XML or SGML document, or create ablank, well-formed XML document.You can set file options, including a default template, filenameextensions, and autosave intervals through Tools > Options.
Authoring structured content on page 81When you create a document instance of a DTD or Schema in Normal or Tags On view, XMetaLAuthor ensures that your content is valid by guiding you through the authoring process.You do notneed to have a complete understanding of XML to begin authoring structured content.
PropertiesReferences in a DITA Map contain properties that can be viewed in the Properties dialog box.The Propertiesdialog box will allow you to change the markup of ditamap elements such as topicref, topichead, topicgroup,chapter, and part.To view the element's properties, select the element in the Map Editor and click the Element
Properties... icon ( ) at the top of the pane. Similar dialog boxes will appear when using the inserting orediting elements, including Topic Reference, File Reference, Web Link, and Map Reference.
General tab
The General Tab will allow you to edit the properties of the Topic Reference, including the topic path, the keydefinition, and the format of the Topic.
115Copyright 2021 JustSystem Canada, Inc.
Properties
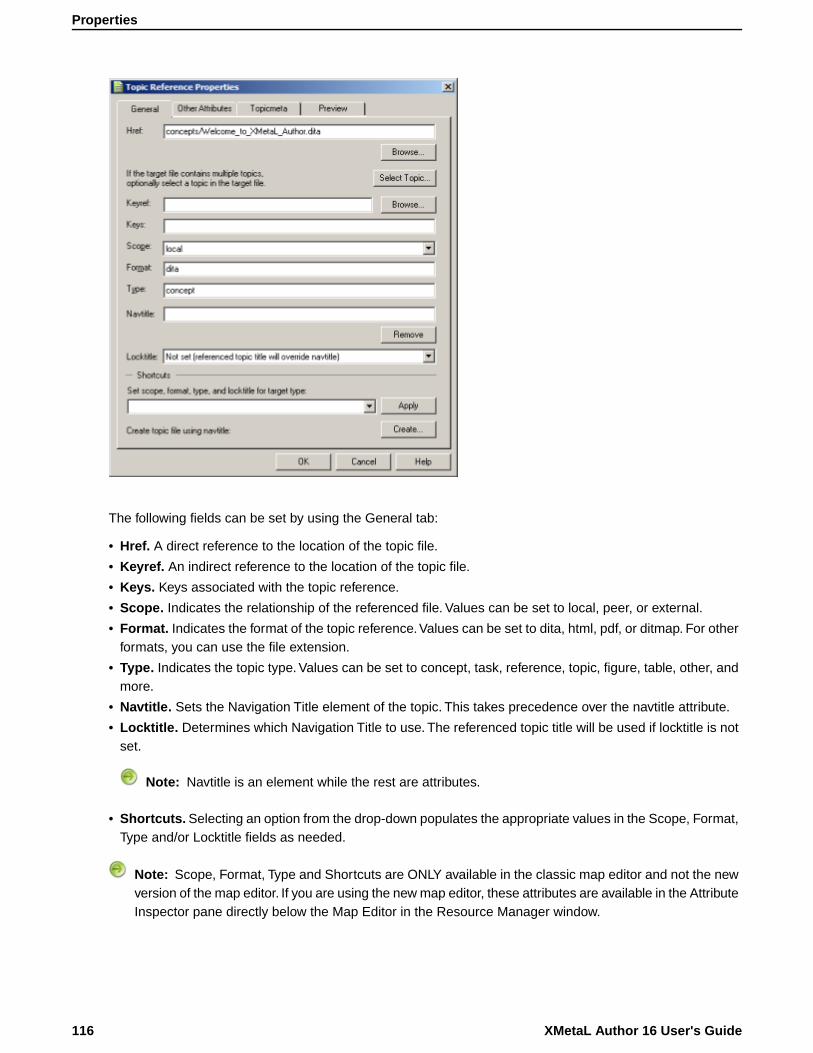
The following fields can be set by using the General tab:
• Href. A direct reference to the location of the topic file.
• Keyref. An indirect reference to the location of the topic file.
• Keys. Keys associated with the topic reference.
• Scope. Indicates the relationship of the referenced file. Values can be set to local, peer, or external.
• Format. Indicates the format of the topic reference.Values can be set to dita, html, pdf, or ditmap. For otherformats, you can use the file extension.
• Type. Indicates the topic type. Values can be set to concept, task, reference, topic, figure, table, other, andmore.
• Navtitle. Sets the Navigation Title element of the topic. This takes precedence over the navtitle attribute.
• Locktitle. Determines which Navigation Title to use. The referenced topic title will be used if locktitle is notset.
Note: Navtitle is an element while the rest are attributes.
• Shortcuts. Selecting an option from the drop-down populates the appropriate values in the Scope, Format,Type and/or Locktitle fields as needed.
Note: Scope, Format, Type and Shortcuts are ONLY available in the classic map editor and not the newversion of the map editor. If you are using the new map editor, these attributes are available in the AttributeInspector pane directly below the Map Editor in the Resource Manager window.
XMetaL Author 16 User's Guide116
Properties
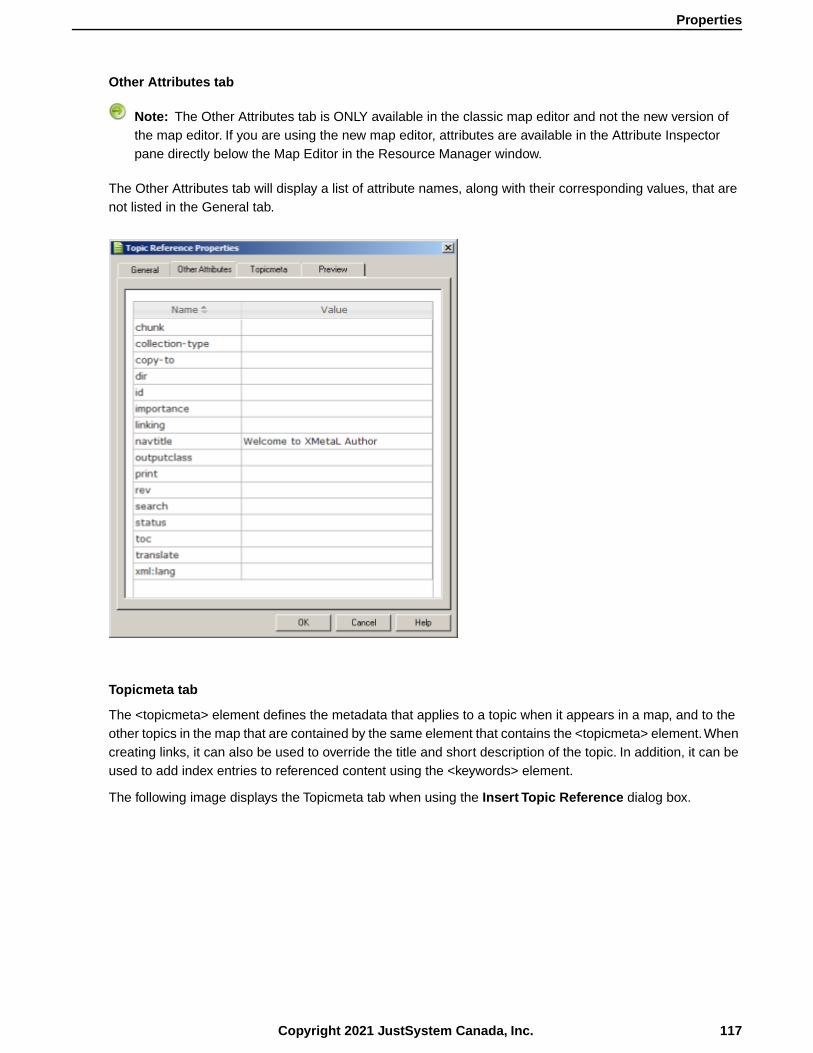
Other Attributes tab
Note: The Other Attributes tab is ONLY available in the classic map editor and not the new version ofthe map editor. If you are using the new map editor, attributes are available in the Attribute Inspectorpane directly below the Map Editor in the Resource Manager window.
The Other Attributes tab will display a list of attribute names, along with their corresponding values, that arenot listed in the General tab.
Topicmeta tab
The <topicmeta> element defines the metadata that applies to a topic when it appears in a map, and to theother topics in the map that are contained by the same element that contains the <topicmeta> element.Whencreating links, it can also be used to override the title and short description of the topic. In addition, it can beused to add index entries to referenced content using the <keywords> element.
The following image displays the Topicmeta tab when using the Insert Topic Reference dialog box.
117Copyright 2021 JustSystem Canada, Inc.
Properties
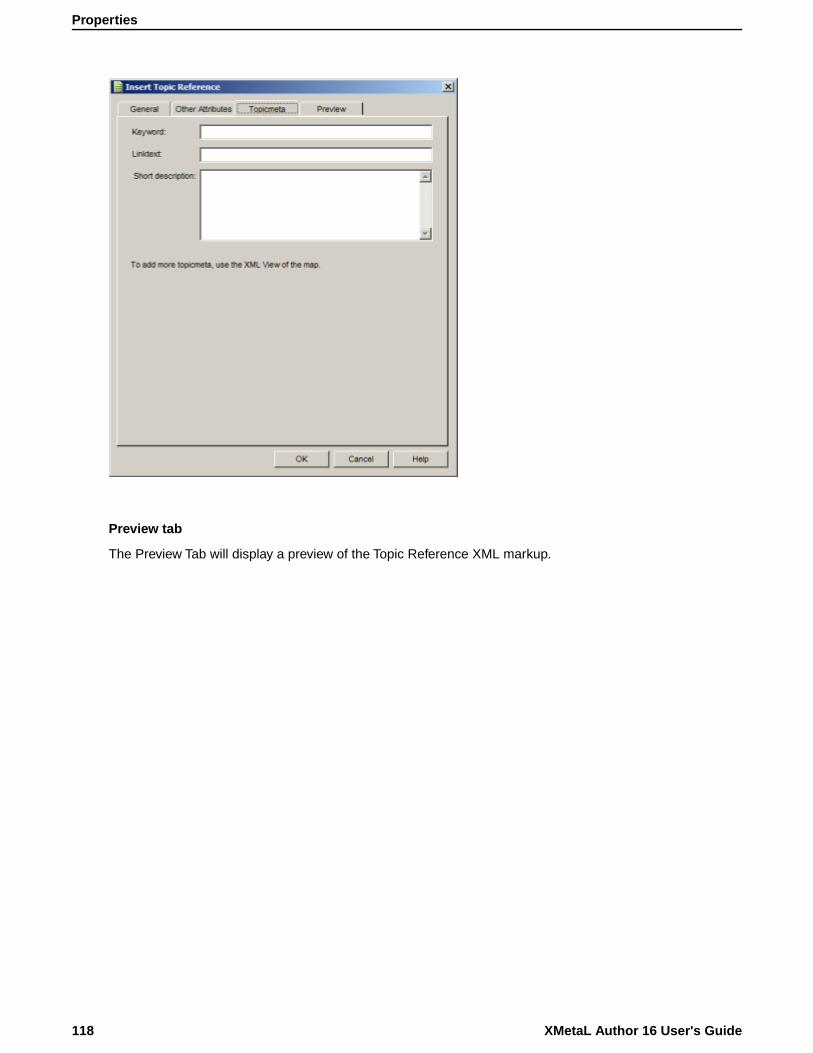
Preview tab
The Preview Tab will display a preview of the Topic Reference XML markup.
XMetaL Author 16 User's Guide118
Properties
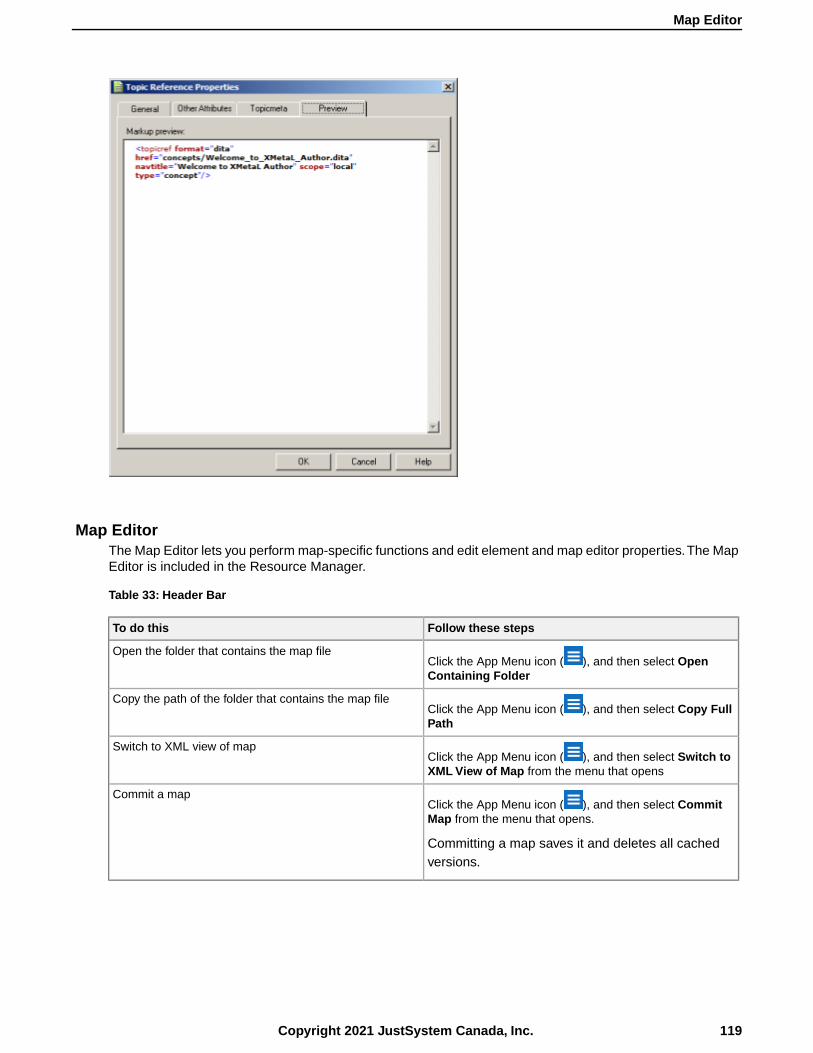
Map EditorThe Map Editor lets you perform map-specific functions and edit element and map editor properties.The MapEditor is included in the Resource Manager.
Table 33: Header Bar
Follow these stepsTo do this
Click the App Menu icon ( ), and then select OpenContaining Folder
Open the folder that contains the map file
Click the App Menu icon ( ), and then select Copy FullPath
Copy the path of the folder that contains the map file
Click the App Menu icon ( ), and then select Switch toXML View of Map from the menu that opens
Switch to XML view of map
Click the App Menu icon ( ), and then select CommitMap from the menu that opens.
Committing a map saves it and deletes all cachedversions.
Commit a map
119Copyright 2021 JustSystem Canada, Inc.
Map Editor
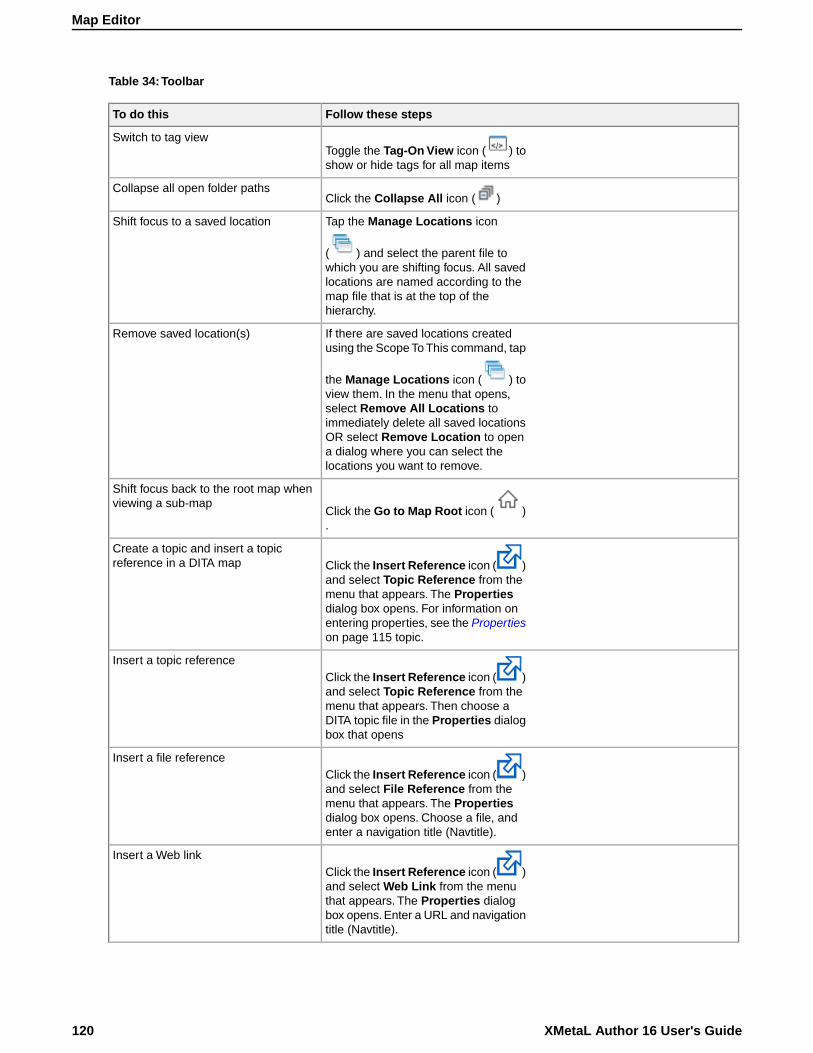
Table 34:Toolbar
Follow these stepsTo do this
Toggle the Tag-On View icon ( ) toshow or hide tags for all map items
Switch to tag view
Click the Collapse All icon ( )Collapse all open folder paths
Tap the Manage Locations icon
( ) and select the parent file to
Shift focus to a saved location
which you are shifting focus. All savedlocations are named according to themap file that is at the top of thehierarchy.
If there are saved locations createdusing the Scope To This command, tap
Remove saved location(s)
the Manage Locations icon ( ) toview them. In the menu that opens,select Remove All Locations toimmediately delete all saved locationsOR select Remove Location to opena dialog where you can select thelocations you want to remove.
Click the Go to Map Root icon ( ).
Shift focus back to the root map whenviewing a sub-map
Click the Insert Reference icon ( )and select Topic Reference from the
Create a topic and insert a topicreference in a DITA map
menu that appears. The Propertiesdialog box opens. For information onentering properties, see the Propertieson page 115 topic.
Click the Insert Reference icon ( )and select Topic Reference from the
Insert a topic reference
menu that appears. Then choose aDITA topic file in the Properties dialogbox that opens
Click the Insert Reference icon ( )and select File Reference from the
Insert a file reference
menu that appears. The Propertiesdialog box opens. Choose a file, andenter a navigation title (Navtitle).
Click the Insert Reference icon ( )and select Web Link from the menu
Insert a Web link
that appears. The Properties dialogbox opens. Enter a URL and navigationtitle (Navtitle).
XMetaL Author 16 User's Guide120
Map Editor
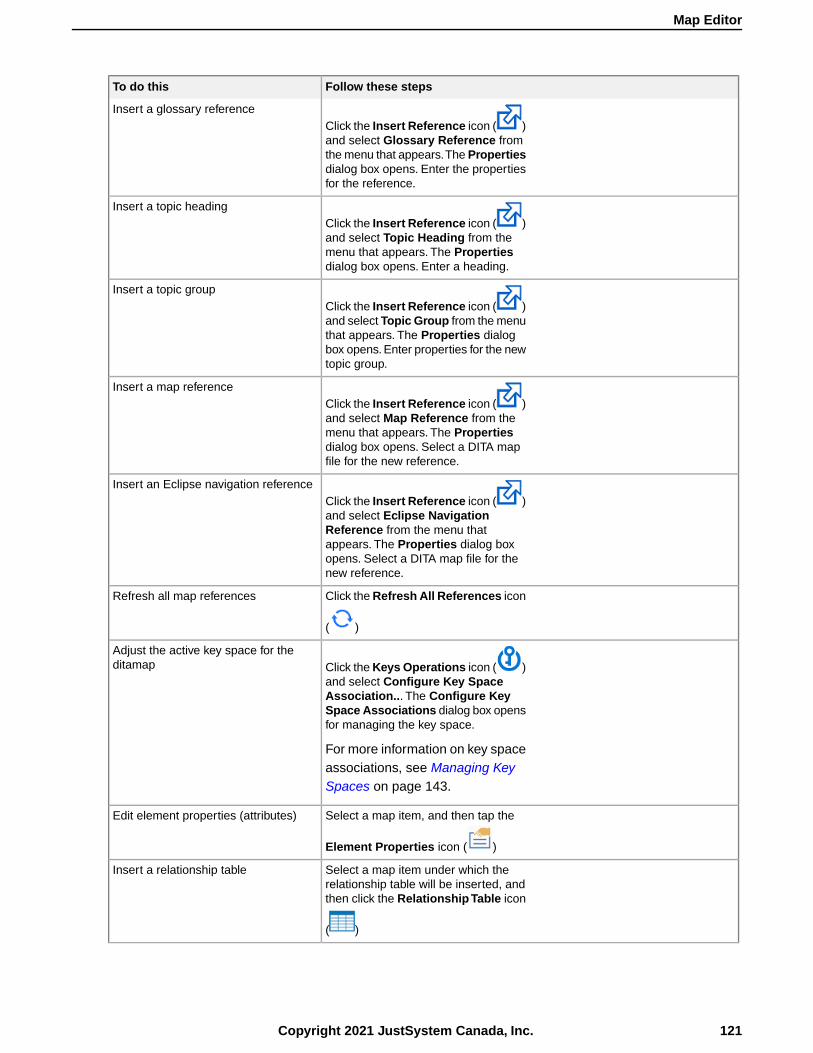
Follow these stepsTo do this
Click the Insert Reference icon ( )and select Glossary Reference from
Insert a glossary reference
the menu that appears.The Propertiesdialog box opens. Enter the propertiesfor the reference.
Click the Insert Reference icon ( )and select Topic Heading from the
Insert a topic heading
menu that appears. The Propertiesdialog box opens. Enter a heading.
Click the Insert Reference icon ( )and select Topic Group from the menu
Insert a topic group
that appears. The Properties dialogbox opens. Enter properties for the newtopic group.
Click the Insert Reference icon ( )and select Map Reference from the
Insert a map reference
menu that appears. The Propertiesdialog box opens. Select a DITA mapfile for the new reference.
Click the Insert Reference icon ( )and select Eclipse Navigation
Insert an Eclipse navigation reference
Reference from the menu thatappears. The Properties dialog boxopens. Select a DITA map file for thenew reference.
Click the Refresh All References icon
( )
Refresh all map references
Click the Keys Operations icon ( )and select Configure Key Space
Adjust the active key space for theditamap
Association... The Configure KeySpace Associations dialog box opensfor managing the key space.
For more information on key spaceassociations, see Managing KeySpaces on page 143.
Select a map item, and then tap the
Element Properties icon ( )
Edit element properties (attributes)
Select a map item under which therelationship table will be inserted, and
Insert a relationship table
then click the Relationship Table icon
( )
121Copyright 2021 JustSystem Canada, Inc.
Map Editor
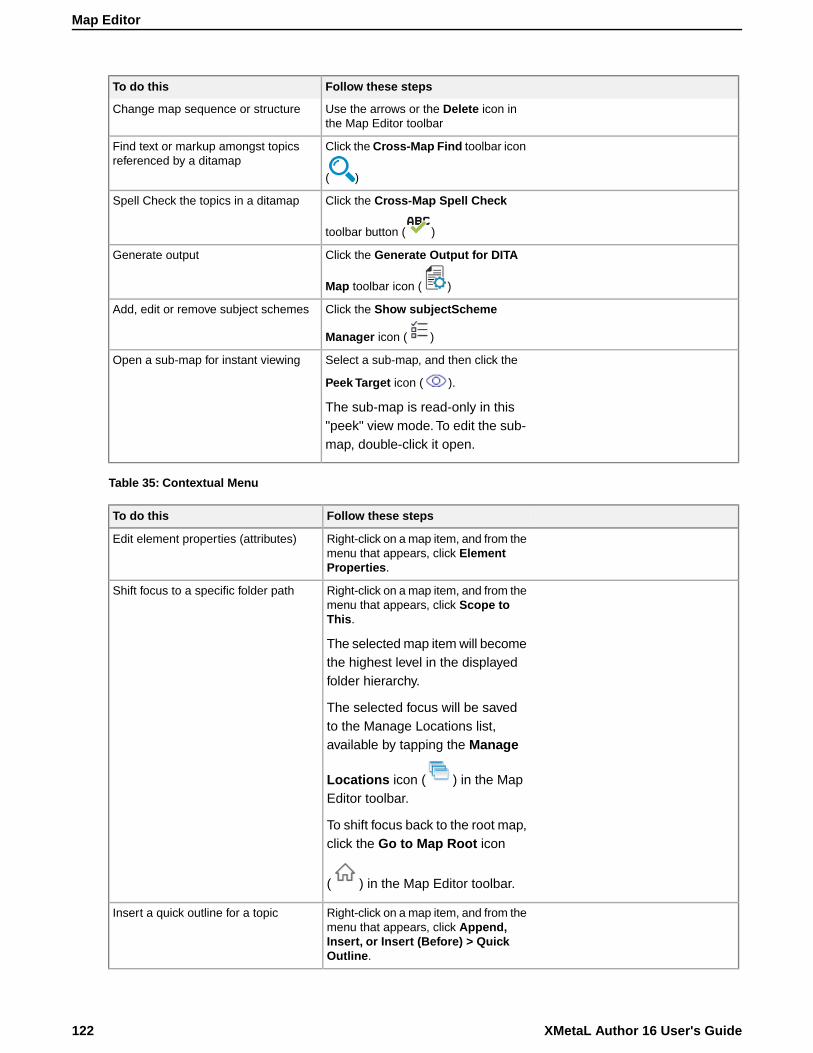
Follow these stepsTo do this
Use the arrows or the Delete icon inthe Map Editor toolbar
Change map sequence or structure
Click the Cross-Map Find toolbar icon
( )
Find text or markup amongst topicsreferenced by a ditamap
Click the Cross-Map Spell Check
toolbar button ( )
Spell Check the topics in a ditamap
Click the Generate Output for DITA
Map toolbar icon ( )
Generate output
Click the Show subjectScheme
Manager icon ( )
Add, edit or remove subject schemes
Select a sub-map, and then click the
Peek Target icon ( ).
The sub-map is read-only in this"peek" view mode. To edit the sub-map, double-click it open.
Open a sub-map for instant viewing
Table 35: Contextual Menu
Follow these stepsTo do this
Right-click on a map item, and from themenu that appears, click ElementProperties.
Edit element properties (attributes)
Right-click on a map item, and from themenu that appears, click Scope toThis.
The selected map item will becomethe highest level in the displayedfolder hierarchy.
Shift focus to a specific folder path
The selected focus will be savedto the Manage Locations list,available by tapping the Manage
Locations icon ( ) in the MapEditor toolbar.
To shift focus back to the root map,click the Go to Map Root icon
( ) in the Map Editor toolbar.
Right-click on a map item, and from themenu that appears, click Append,
Insert a quick outline for a topic
Insert, or Insert (Before) > QuickOutline.
XMetaL Author 16 User's Guide122
Map Editor
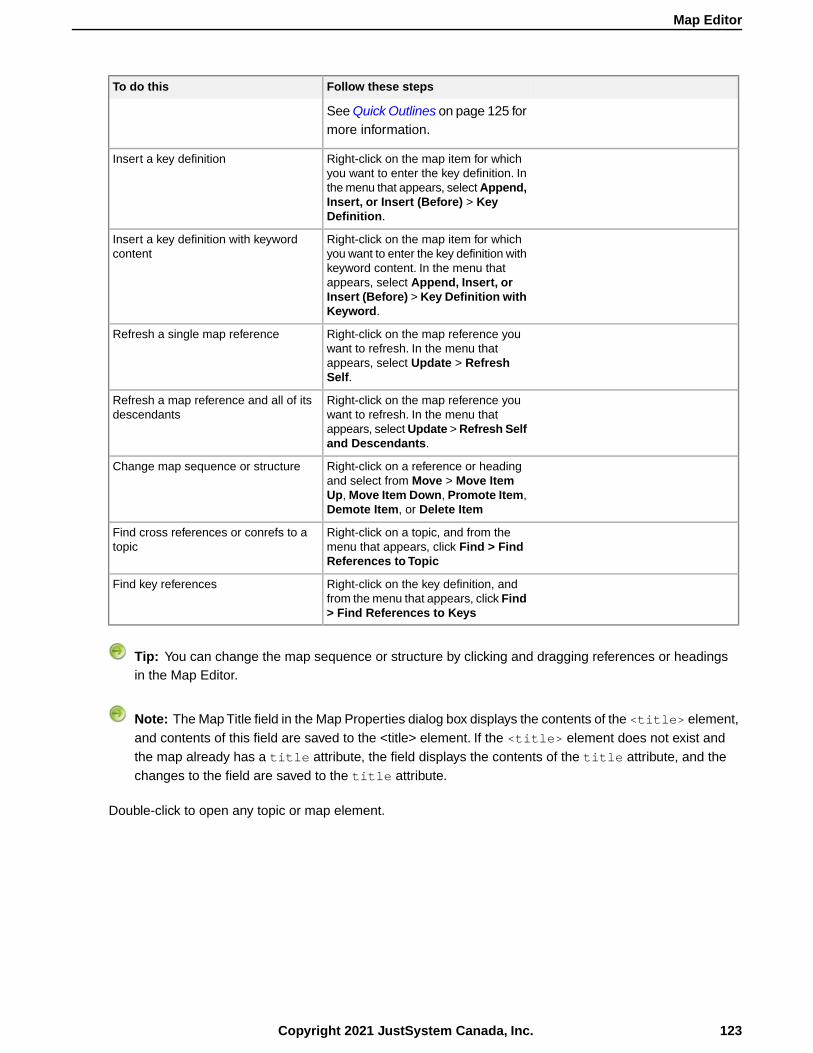
Follow these stepsTo do this
See Quick Outlines on page 125 formore information.
Right-click on the map item for whichyou want to enter the key definition. In
Insert a key definition
the menu that appears, select Append,Insert, or Insert (Before) > KeyDefinition.
Right-click on the map item for whichyou want to enter the key definition with
Insert a key definition with keywordcontent
keyword content. In the menu thatappears, select Append, Insert, orInsert (Before) > Key Definition withKeyword.
Right-click on the map reference youwant to refresh. In the menu that
Refresh a single map reference
appears, select Update > RefreshSelf.
Right-click on the map reference youwant to refresh. In the menu that
Refresh a map reference and all of itsdescendants
appears, select Update > Refresh Selfand Descendants.
Right-click on a reference or headingand select from Move > Move Item
Change map sequence or structure
Up, Move Item Down, Promote Item,Demote Item, or Delete Item
Right-click on a topic, and from themenu that appears, click Find > FindReferences to Topic
Find cross references or conrefs to atopic
Right-click on the key definition, andfrom the menu that appears, click Find> Find References to Keys
Find key references
Tip: You can change the map sequence or structure by clicking and dragging references or headingsin the Map Editor.
Note: The Map Title field in the Map Properties dialog box displays the contents of the <title> element,and contents of this field are saved to the <title> element. If the <title> element does not exist andthe map already has a title attribute, the field displays the contents of the title attribute, and thechanges to the field are saved to the title attribute.
Double-click to open any topic or map element.
123Copyright 2021 JustSystem Canada, Inc.
Map Editor
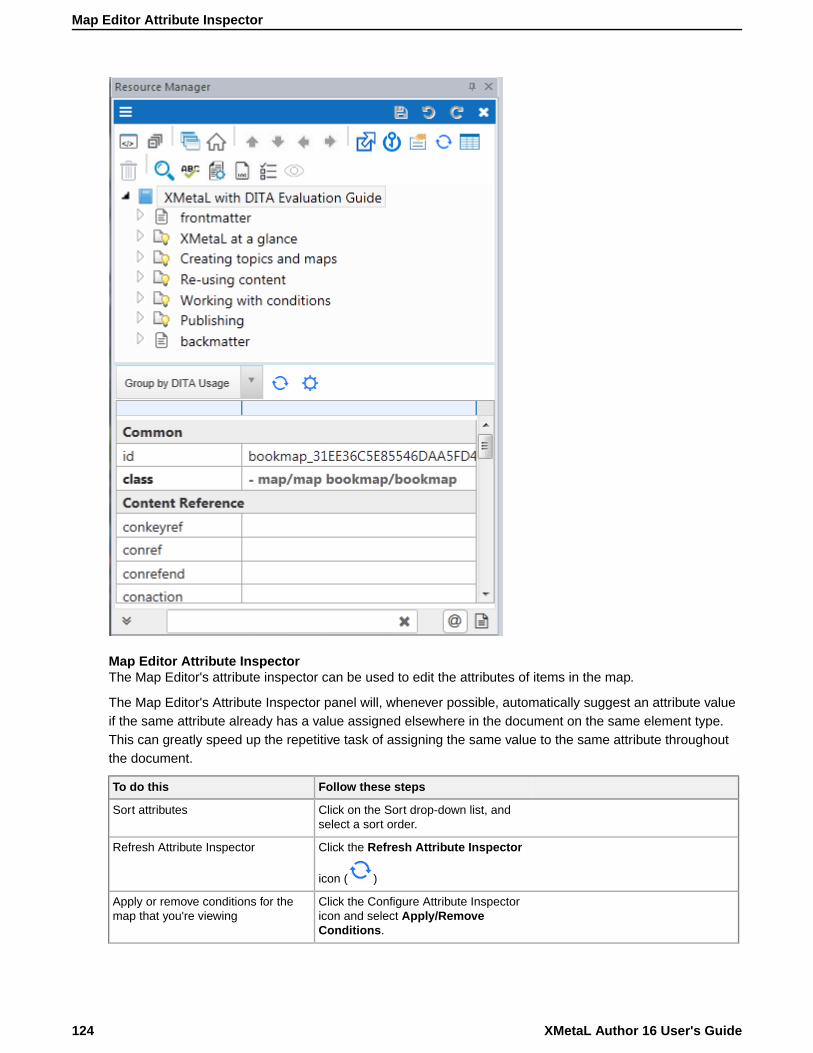
Map Editor Attribute InspectorThe Map Editor's attribute inspector can be used to edit the attributes of items in the map.
The Map Editor's Attribute Inspector panel will, whenever possible, automatically suggest an attribute valueif the same attribute already has a value assigned elsewhere in the document on the same element type.This can greatly speed up the repetitive task of assigning the same value to the same attribute throughoutthe document.
Follow these stepsTo do this
Click on the Sort drop-down list, andselect a sort order.
Sort attributes
Click the Refresh Attribute Inspector
icon ( )
Refresh Attribute Inspector
Click the Configure Attribute Inspectoricon and select Apply/RemoveConditions.
Apply or remove conditions for themap that you're viewing
XMetaL Author 16 User's Guide124
Map Editor Attribute Inspector

Follow these stepsTo do this
Click the Configure Attribute Inspectoricon. In the menu that appears, select
Classify a topic reference
NOTE: This sets referencedescription attributes for theselected map item
Classify Topic Reference and thereference description type you want touse.
See Setting attribute values on page 88for information.
Set a value for an attribute
Related LinksSetting attribute values on page 88
You can set attribute values through the Attribute Inspector or through the Edit Properties dialog.
Apply a condition on page 150You can apply conditions to the current element or selection, or any ancestor.
Map FilterThe DITA Map Editor's tree view can be filtered to show only those items that match a text phrase you haveprovided.This can aid in searching large maps quickly to locate a given topicref or similar item for modifications.
Table 36: Map Filter
Follow these stepsTo do this
Enter the filter criteria in the Map Filter field at the bottomof the Map Editor tab, and then press Enter.
The text you used to filter the map will be highlightedin the results.
Filter a DITA map
Quick OutlinesThe DITA Map Editor's Quick Outline feature can auto-generate topicref markup and stub topic files with titlesalready filled in.You can also re-use outlines by saving customized outlines and then loading at a later date.
Right-click on a map item, and from the menu that appears,click Append, Insert, or Insert (Before) > Quick Outline.
Insert a quick outline for a topic
125Copyright 2021 JustSystem Canada, Inc.
Map Filter
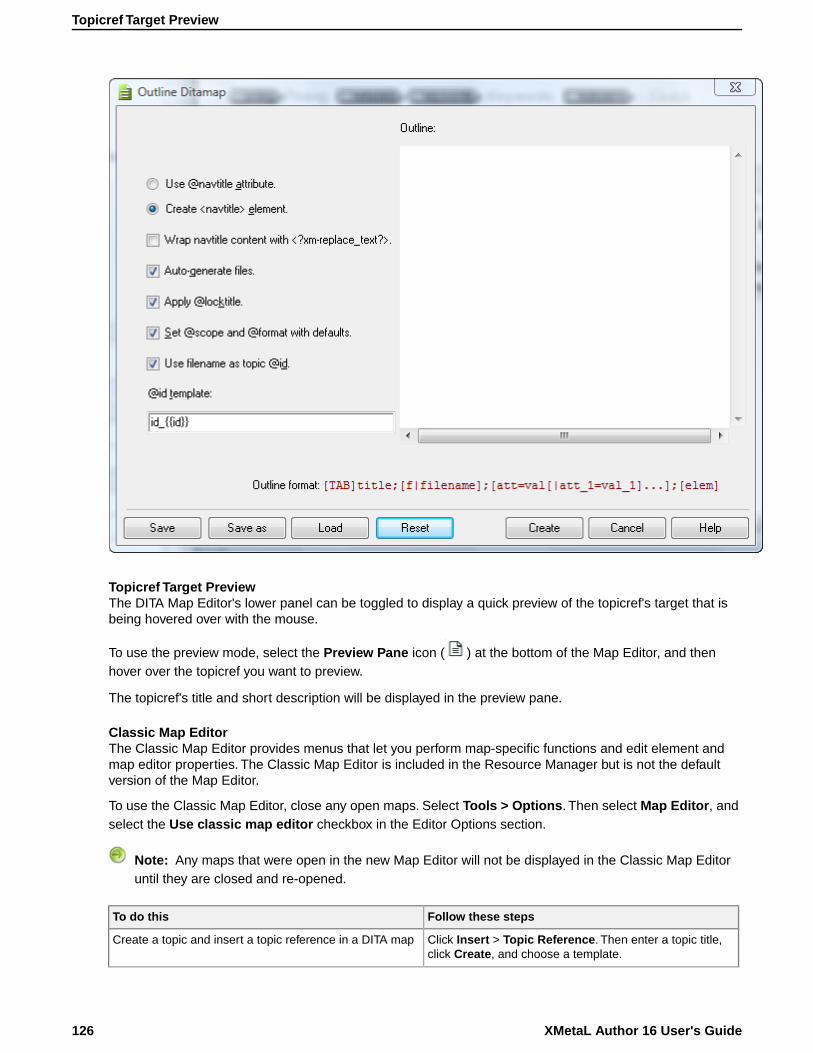
Topicref Target PreviewThe DITA Map Editor's lower panel can be toggled to display a quick preview of the topicref's target that isbeing hovered over with the mouse.
To use the preview mode, select the Preview Pane icon ( ) at the bottom of the Map Editor, and thenhover over the topicref you want to preview.
The topicref's title and short description will be displayed in the preview pane.
Classic Map EditorThe Classic Map Editor provides menus that let you perform map-specific functions and edit element andmap editor properties. The Classic Map Editor is included in the Resource Manager but is not the defaultversion of the Map Editor.
To use the Classic Map Editor, close any open maps. Select Tools > Options. Then select Map Editor, andselect the Use classic map editor checkbox in the Editor Options section.
Note: Any maps that were open in the new Map Editor will not be displayed in the Classic Map Editoruntil they are closed and re-opened.
Follow these stepsTo do this
Click Insert > Topic Reference. Then enter a topic title,click Create, and choose a template.
Create a topic and insert a topic reference in a DITA map
XMetaL Author 16 User's Guide126
Topicref Target Preview
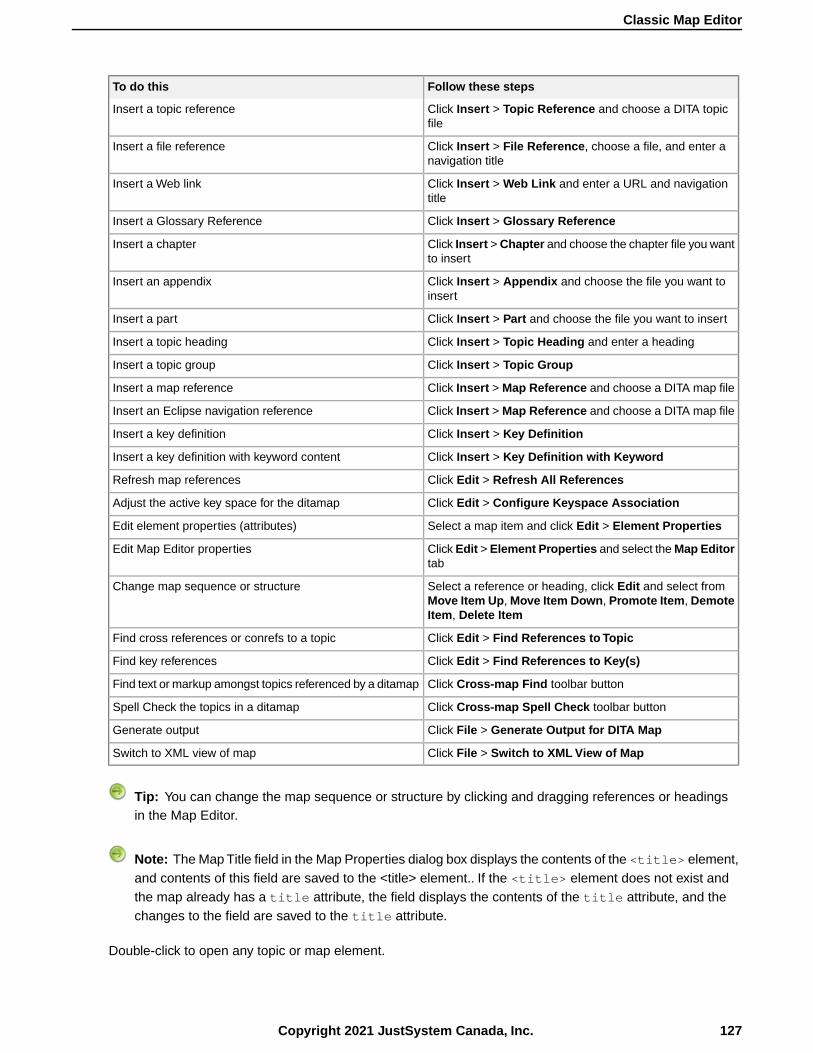
Follow these stepsTo do this
Click Insert > Topic Reference and choose a DITA topicfile
Insert a topic reference
Click Insert > File Reference, choose a file, and enter anavigation title
Insert a file reference
Click Insert > Web Link and enter a URL and navigationtitle
Insert a Web link
Click Insert > Glossary ReferenceInsert a Glossary Reference
Click Insert > Chapter and choose the chapter file you wantto insert
Insert a chapter
Click Insert > Appendix and choose the file you want toinsert
Insert an appendix
Click Insert > Part and choose the file you want to insertInsert a part
Click Insert > Topic Heading and enter a headingInsert a topic heading
Click Insert > Topic GroupInsert a topic group
Click Insert > Map Reference and choose a DITA map fileInsert a map reference
Click Insert > Map Reference and choose a DITA map fileInsert an Eclipse navigation reference
Click Insert > Key DefinitionInsert a key definition
Click Insert > Key Definition with KeywordInsert a key definition with keyword content
Click Edit > Refresh All ReferencesRefresh map references
Click Edit > Configure Keyspace AssociationAdjust the active key space for the ditamap
Select a map item and click Edit > Element PropertiesEdit element properties (attributes)
Click Edit > Element Properties and select the Map Editortab
Edit Map Editor properties
Select a reference or heading, click Edit and select fromMove Item Up, Move Item Down, Promote Item, DemoteItem, Delete Item
Change map sequence or structure
Click Edit > Find References to TopicFind cross references or conrefs to a topic
Click Edit > Find References to Key(s)Find key references
Click Cross-map Find toolbar buttonFind text or markup amongst topics referenced by a ditamap
Click Cross-map Spell Check toolbar buttonSpell Check the topics in a ditamap
Click File > Generate Output for DITA MapGenerate output
Click File > Switch to XML View of MapSwitch to XML view of map
Tip: You can change the map sequence or structure by clicking and dragging references or headingsin the Map Editor.
Note: The Map Title field in the Map Properties dialog box displays the contents of the <title> element,and contents of this field are saved to the <title> element.. If the <title> element does not exist andthe map already has a title attribute, the field displays the contents of the title attribute, and thechanges to the field are saved to the title attribute.
Double-click to open any topic or map element.
127Copyright 2021 JustSystem Canada, Inc.
Classic Map Editor

XML viewXML view is similar to Tags On view.You can perform additional map-related functions through the menus.
Follow these stepsTo do this
Click Table > Insert Relationship TableInsert a relationship table
Click File > Switch to Map EditorSwitch to Map Editor
Select an element and click Reuse > Open ReferencedFile
Open a map element
Note: When you open an invalid map, it appears in XML view.
Related LinksDocument views on page 9
XMetaL Author 16 User's Guide128
XML view
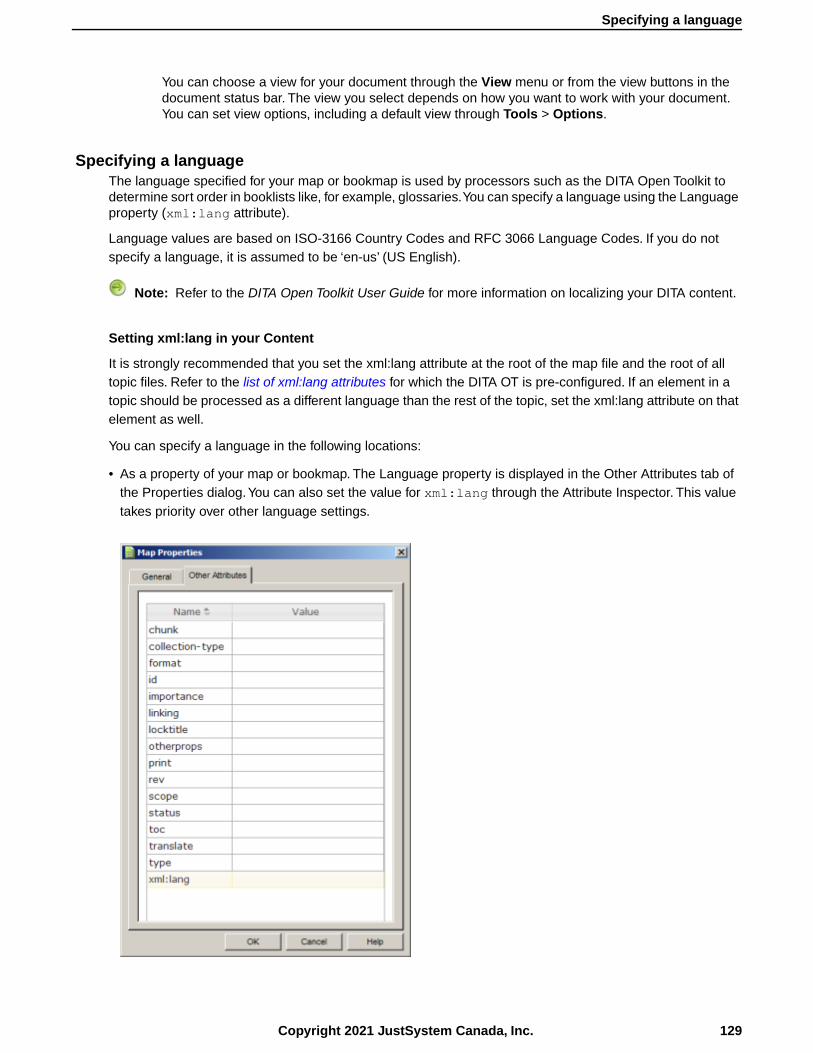
You can choose a view for your document through the View menu or from the view buttons in thedocument status bar. The view you select depends on how you want to work with your document.You can set view options, including a default view through Tools > Options.
Specifying a languageThe language specified for your map or bookmap is used by processors such as the DITA Open Toolkit todetermine sort order in booklists like, for example, glossaries.You can specify a language using the Languageproperty (xml:lang attribute).
Language values are based on ISO-3166 Country Codes and RFC 3066 Language Codes. If you do notspecify a language, it is assumed to be ‘en-us’ (US English).
Note: Refer to the DITA Open Toolkit User Guide for more information on localizing your DITA content.
Setting xml:lang in your Content
It is strongly recommended that you set the xml:lang attribute at the root of the map file and the root of alltopic files. Refer to the list of xml:lang attributes for which the DITA OT is pre-configured. If an element in atopic should be processed as a different language than the rest of the topic, set the xml:lang attribute on thatelement as well.
You can specify a language in the following locations:
• As a property of your map or bookmap. The Language property is displayed in the Other Attributes tab ofthe Properties dialog.You can also set the value for xml:lang through the Attribute Inspector. This valuetakes priority over other language settings.
129Copyright 2021 JustSystem Canada, Inc.
Specifying a language
• As a property of a component of a map or bookmap, such as a <glossarylist> element.The Languageproperty is displayed in the Other Attributes tab of the Properties dialog.
• As a global or local parameter.
Parameters when Generating Output from XMetaL
For Microsoft HTML Help (CHM) or JavaHelp output, add the following parameter to the Advanced tab of theEdit Deliverable Type dialog: ANT_PARAM_args.dita.locale = <locale code> For example, to sort in Spanish,use ANT_PARAM_args.dita.locale = es-es For HTML, WebHelp, and "XMetaL Enhanced PDF" output, youdo not need to add any parameters. Locale information will be picked up from your content.
Parameters when Generating Output Using a Standalone DITA OT
For generating Microsoft HTML Help (CHM) or JavaHelp output, set the following parameter:args.dita.locale= <locale code> For example, to sort in Spanish, this is args.dita.locale = es-es
Related LinksSetting attribute values on page 88
You can set attribute values through the Attribute Inspector or through the Edit Properties dialog.
Specifying parameters on page 161You can change the way you generate output, including the appearance of your output deliverable,by specifying parameters.You can specify parameters either by setting options in fields and checkboxes or by typing. Parameters can be global or local.Your settings are stored in the publishingconfiguration files.
Language tagging in HTML and XML
ChunkingBy default, the structure of the output from a DITA map reflects that which is represented in the Map Editoror XML view of the map, that is, topics (including composite topics) are saved as individual HTML files.However, you can specify different chunking behaviors.
Follow these stepsTo do this
In the Map Editor, select an element and click Edit >Element Properties.Then click the Special Attributes taband enter a value in the Chunk field.
Set chunking
Chunking refers to how the content you see in XMetaL is organized in files when you generate output froma DITA map.You can change the way content is chunked (divided or merged into new output documents)by setting the chunk attribute.The value of the chunk attribute consists of one or more space-delimited names.For more information about allowed values, see the DITA Architectural Specification.
Here are some example behaviors:
• You can split composite topics into several output files
• You can merge a group of topics into a single output file
• You can re-use a single topic from a composite topic and create output for that topic in a single file
• You can create a single navigation chunk (for example, a table of contents) within the contents of a map
XMetaL Author 16 User's Guide130
Chunking

Related LinksSetting attribute values on page 88
You can set attribute values through the Attribute Inspector or through the Edit Properties dialog.
DITA 1.1 vs 1.2/1.3 Authoring EnvironmentThe authoring environment is context sensitive; some menu commands, dialog boxes, and fields will bedifferent based on the DITA version in use. Elements pertaining to DITA 1.2/1.3 features will not appear ifthe default DITA version is set to DITA 1.1. The DITA version can be set by going to Tools > Options.
For example, the Insert Topic Reference dialog is different depending on the DITA version being used.When using DITA 1.1, the dialog box does not display any Key Reference properties or the TopicMeta tab.The following two images show the differences.
131Copyright 2021 JustSystem Canada, Inc.
DITA 1.1 vs 1.2/1.3 Authoring Environment

XMetaL Author 16 User's Guide132
DITA 1.1 vs 1.2/1.3 Authoring Environment
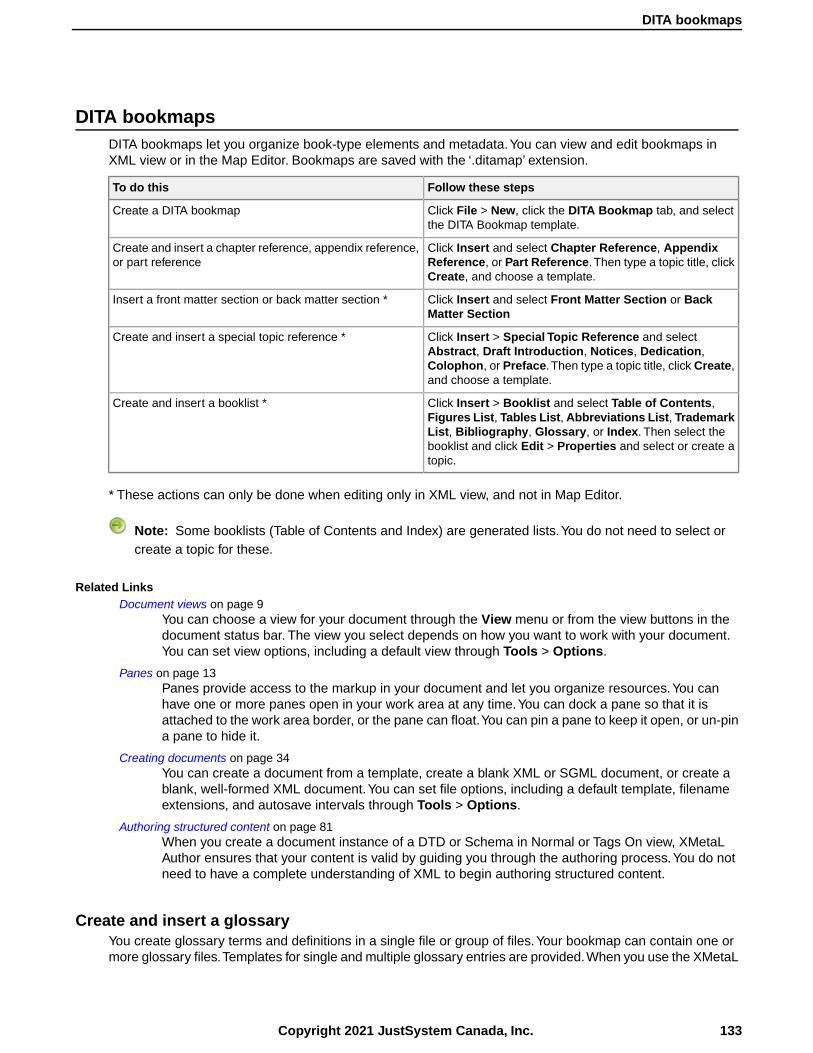
DITA bookmapsDITA bookmaps let you organize book-type elements and metadata.You can view and edit bookmaps inXML view or in the Map Editor. Bookmaps are saved with the ‘.ditamap’ extension.
Follow these stepsTo do this
Click File > New, click the DITA Bookmap tab, and selectthe DITA Bookmap template.
Create a DITA bookmap
Click Insert and select Chapter Reference, AppendixReference, or Part Reference.Then type a topic title, clickCreate, and choose a template.
Create and insert a chapter reference, appendix reference,or part reference
Click Insert and select Front Matter Section or BackMatter Section
Insert a front matter section or back matter section *
Click Insert > Special Topic Reference and selectAbstract, Draft Introduction, Notices, Dedication,
Create and insert a special topic reference *
Colophon, or Preface.Then type a topic title, click Create,and choose a template.
Click Insert > Booklist and select Table of Contents,Figures List, Tables List, Abbreviations List, Trademark
Create and insert a booklist *
List, Bibliography, Glossary, or Index. Then select thebooklist and click Edit > Properties and select or create atopic.
* These actions can only be done when editing only in XML view, and not in Map Editor.
Note: Some booklists (Table of Contents and Index) are generated lists.You do not need to select orcreate a topic for these.
Related LinksDocument views on page 9
You can choose a view for your document through the View menu or from the view buttons in thedocument status bar. The view you select depends on how you want to work with your document.You can set view options, including a default view through Tools > Options.
Panes on page 13Panes provide access to the markup in your document and let you organize resources.You canhave one or more panes open in your work area at any time.You can dock a pane so that it isattached to the work area border, or the pane can float.You can pin a pane to keep it open, or un-pina pane to hide it.
Creating documents on page 34You can create a document from a template, create a blank XML or SGML document, or create ablank, well-formed XML document.You can set file options, including a default template, filenameextensions, and autosave intervals through Tools > Options.
Authoring structured content on page 81When you create a document instance of a DTD or Schema in Normal or Tags On view, XMetaLAuthor ensures that your content is valid by guiding you through the authoring process.You do notneed to have a complete understanding of XML to begin authoring structured content.
Create and insert a glossaryYou create glossary terms and definitions in a single file or group of files.Your bookmap can contain one ormore glossary files.Templates for single and multiple glossary entries are provided.When you use the XMetaL
133Copyright 2021 JustSystem Canada, Inc.
DITA bookmaps
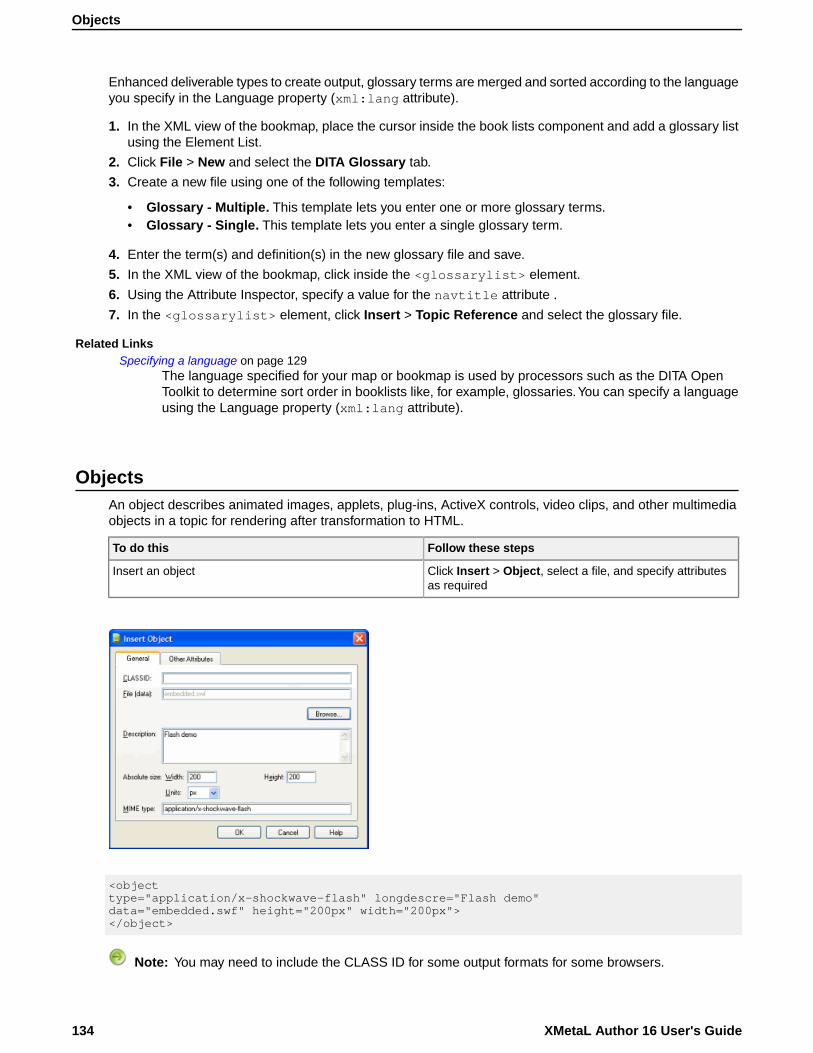
Enhanced deliverable types to create output, glossary terms are merged and sorted according to the languageyou specify in the Language property (xml:lang attribute).
1. In the XML view of the bookmap, place the cursor inside the book lists component and add a glossary listusing the Element List.
2. Click File > New and select the DITA Glossary tab.
3. Create a new file using one of the following templates:
• Glossary - Multiple. This template lets you enter one or more glossary terms.• Glossary - Single. This template lets you enter a single glossary term.
4. Enter the term(s) and definition(s) in the new glossary file and save.
5. In the XML view of the bookmap, click inside the <glossarylist> element.
6. Using the Attribute Inspector, specify a value for the navtitle attribute .
7. In the <glossarylist> element, click Insert > Topic Reference and select the glossary file.
Related LinksSpecifying a language on page 129
The language specified for your map or bookmap is used by processors such as the DITA OpenToolkit to determine sort order in booklists like, for example, glossaries.You can specify a languageusing the Language property (xml:lang attribute).
ObjectsAn object describes animated images, applets, plug-ins, ActiveX controls, video clips, and other multimediaobjects in a topic for rendering after transformation to HTML.
Follow these stepsTo do this
Click Insert > Object, select a file, and specify attributesas required
Insert an object
<objecttype="application/x-shockwave-flash" longdescre="Flash demo"data="embedded.swf" height="200px" width="200px"></object>
Note: You may need to include the CLASS ID for some output formats for some browsers.
XMetaL Author 16 User's Guide134
Objects

Note: Some file formats require browser plug-ins.
Cross-references and related linksCross-references and related links direct readers to additional information. This information can be a DITAtopic, a non-DITA file, or a Web page. If you insert a cross-reference or a related link to a DITA topic, XMetaLalso inserts the title of the topic you selected. This text is updated when you refresh references or when yougenerate output. Cross-references can be inserted in most places within a topic. Related links can be insertedonly at the end of topics.
Follow these stepsTo do this
Click Insert > Link and select a link typeInsert a cross-reference or related link
Click Edit > Refresh All ReferencesRefresh all references in a topic
Tip: You can insert a cross-reference to a section or other element within a topic by selecting an elementin the Insert Cross-Reference dialog box. (To view a list of target elements, click the Target ElementType list.)
Table 37: Link types
Default valueAttributeElementDescriptionName
the target elementhref<xref>Specify a location within thecurrent topic, another DITA
Cross-reference
the target keykeyreftopic, or a location withinanother DITA topic the type of the target element, e.g.,
fig, tabletype
ditaformat
localscope
the target elementhref<xref>Specify a file on your filesystem or content repository
File reference
the target keykeyref
file extension of the target file, e.g.,pdf
format
peerscope
the target elementhref<xref>Specify a URL or e-mailaddress
Web link
the target keykeyref
htmlformat
externalscope
the target elementhref<link>Specify a DITA topicRelated link to topic
the target keykeyref
the type of the target element, e.g.,fig, table
type
ditaformat
localscope
135Copyright 2021 JustSystem Canada, Inc.
Cross-references and related links

Default valueAttributeElementDescriptionName
the target elementhref<link>Specify a Web page or e-mail address
Related link to Webpage
the target keykeyref
htmlformat
externalscope
the target elementhref<link>Specify a file on your filesystem or content repository
Related link to File
the target keykeyref
file extension of the target file, e.g.,pdf
format
peerscope
The Insert Cross-Reference dialog box allows you to insert direct references or, when using DITA 1.2, key-based references. The following image is the Insert Cross-Reference dialog box when DITA 1.2 is used.
IndexesYou can create full-featured indexes for your documents by adding index markers to your topics. Index termscan contain simple terms consisting of one or more words, or terms that indicate a parent-child relationship(sub-entries).
Follow these stepsTo do this
Click Insert > Index Marker and type an index termInsert an index marker
Tip: You can add text to the Index Term field by selecting the words in your document first.
XMetaL Author 16 User's Guide136
Indexes
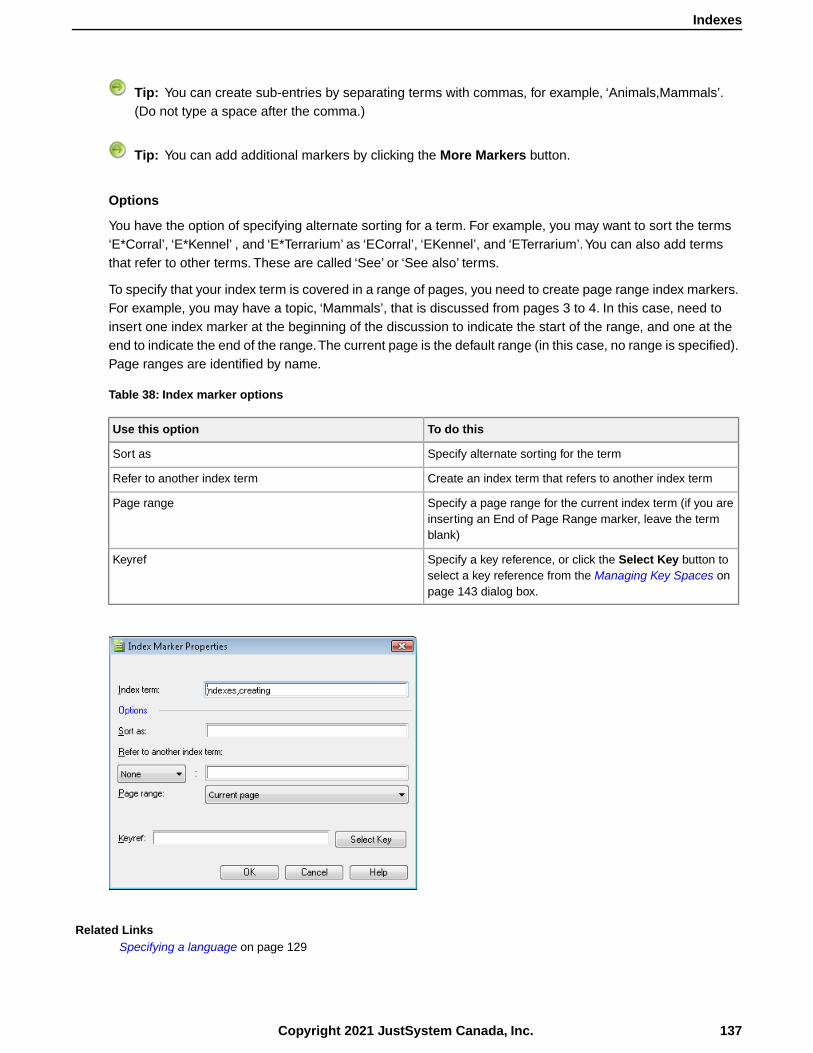
Tip: You can create sub-entries by separating terms with commas, for example, ‘Animals,Mammals’.(Do not type a space after the comma.)
Tip: You can add additional markers by clicking the More Markers button.
Options
You have the option of specifying alternate sorting for a term. For example, you may want to sort the terms‘E*Corral’, ‘E*Kennel’ , and ‘E*Terrarium’ as ‘ECorral’, ‘EKennel’, and ‘ETerrarium’.You can also add termsthat refer to other terms. These are called ‘See’ or ‘See also’ terms.
To specify that your index term is covered in a range of pages, you need to create page range index markers.For example, you may have a topic, ‘Mammals’, that is discussed from pages 3 to 4. In this case, need toinsert one index marker at the beginning of the discussion to indicate the start of the range, and one at theend to indicate the end of the range.The current page is the default range (in this case, no range is specified).Page ranges are identified by name.
Table 38: Index marker options
To do thisUse this option
Specify alternate sorting for the termSort as
Create an index term that refers to another index termRefer to another index term
Specify a page range for the current index term (if you areinserting an End of Page Range marker, leave the termblank)
Page range
Specify a key reference, or click the Select Key button toselect a key reference from the Managing Key Spaces onpage 143 dialog box.
Keyref
Related LinksSpecifying a language on page 129
137Copyright 2021 JustSystem Canada, Inc.
Indexes
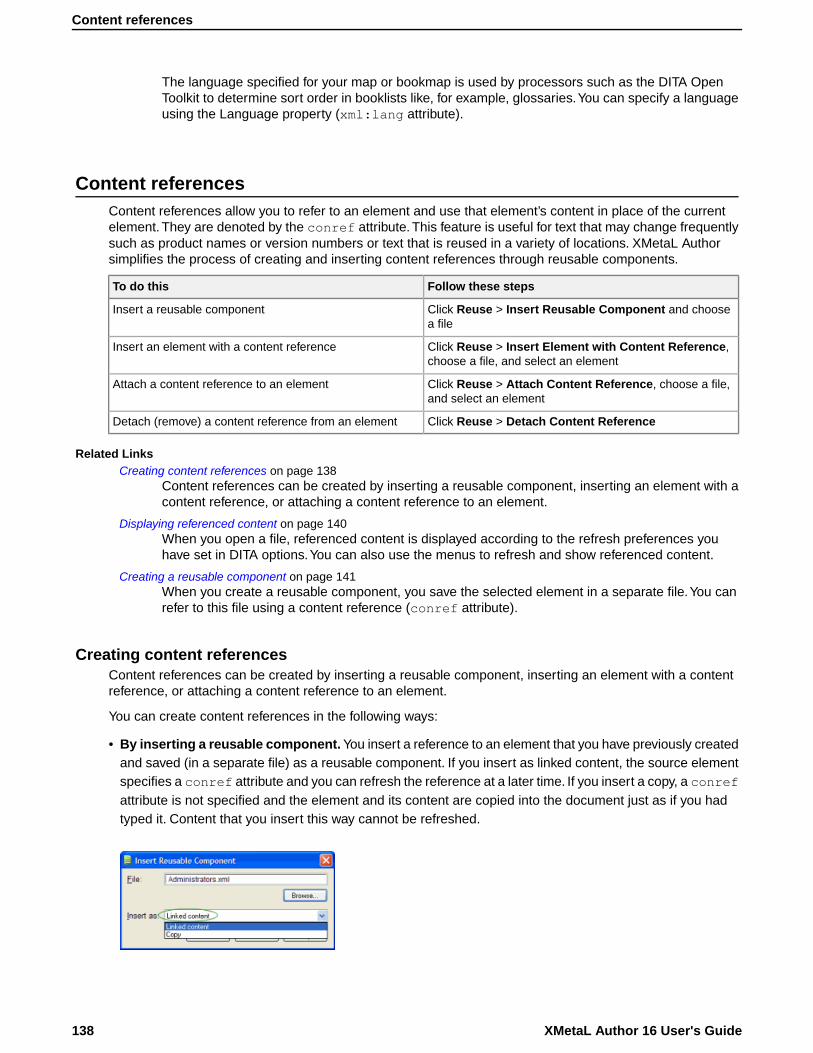
The language specified for your map or bookmap is used by processors such as the DITA OpenToolkit to determine sort order in booklists like, for example, glossaries.You can specify a languageusing the Language property (xml:lang attribute).
Content referencesContent references allow you to refer to an element and use that element’s content in place of the currentelement. They are denoted by the conref attribute. This feature is useful for text that may change frequentlysuch as product names or version numbers or text that is reused in a variety of locations. XMetaL Authorsimplifies the process of creating and inserting content references through reusable components.
Follow these stepsTo do this
Click Reuse > Insert Reusable Component and choosea file
Insert a reusable component
Click Reuse > Insert Element with Content Reference,choose a file, and select an element
Insert an element with a content reference
Click Reuse > Attach Content Reference, choose a file,and select an element
Attach a content reference to an element
Click Reuse > Detach Content ReferenceDetach (remove) a content reference from an element
Related LinksCreating content references on page 138
Content references can be created by inserting a reusable component, inserting an element with acontent reference, or attaching a content reference to an element.
Displaying referenced content on page 140When you open a file, referenced content is displayed according to the refresh preferences youhave set in DITA options.You can also use the menus to refresh and show referenced content.
Creating a reusable component on page 141When you create a reusable component, you save the selected element in a separate file.You canrefer to this file using a content reference (conref attribute).
Creating content referencesContent references can be created by inserting a reusable component, inserting an element with a contentreference, or attaching a content reference to an element.
You can create content references in the following ways:
• By inserting a reusable component. You insert a reference to an element that you have previously createdand saved (in a separate file) as a reusable component. If you insert as linked content, the source elementspecifies a conref attribute and you can refresh the reference at a later time. If you insert a copy, a conrefattribute is not specified and the element and its content are copied into the document just as if you hadtyped it. Content that you insert this way cannot be refreshed.
XMetaL Author 16 User's Guide138
Content references

• By inserting an element with a content reference. You can insert an element that specifies a conrefattribute. If the element you are inserting is not valid in the current content model, a generalized elementis inserted. For example, if you attempt to insert a <steps> element in a Reference topic, an <ol> (orderedlist) element is inserted.
• By attaching a content reference to an element. You can attach a conref attribute to an existing element.The referenced element must have an ID.
Content Reference Range
When you create a content reference, you can insert a range of content from the referenced topic.You cando this by:
1. Selecting to show Element IDs or Titles (for topics, sections, etc.).
2. Selecting an Element ID or a Title from the Start of Range column.
3. Checking End of Range.
4. Selecting an Element ID or a Title from the End of Range column.
The content from the range of Element IDs or Titles will then appear in the topic.
Requirements
Content references must conform to the following requirements:
• The target file specified must exist
• The target ID must exist in the target file
• The target document must be valid XML
• The target must be a different node than the source node, that is, it must not be a circular reference
• The target element and the referencing element must be of the same type or the target element must begeneralizable back to the source type
• The target domain set must be equal to or a subset of the source domain set
• The target element must be a descendent of a topic or a map
Example
The file About_user_accounts.dita has a <section> element with a conref attribute. This attributerefers to a <section> element that was saved as a reusable component in a separate file,administrators.xml. The reusable component file contains a root element, <ditacomponent>, that isa specialization of the <topic> element. The <ditacomponent> element contains a child <reusable-content> element that is a specialization of the <required-cleanup> element.
<!--the source file: About_user_accounts.dita --> <concept><title>About user accounts</title> <conbody> <p>Thereare two types of accounts: administrator and user. <!-- referenced contentis stored outside of the source element --> <sectionconref="administrators.xml#reusableconcept/administrators"> <!-- localcontent is stored in the file --> <title><?xm-replace_text_SectionTitle?></title> <p><?xm-replace_text_Paragraph?></p></section> ... </conbody> </concept>
<!-- the target file: administrators.xml --> <ditacomponentid="reusableconcept"> <reusable-content> <!-- the referencedcontent --> <section id="administrators"><title>Administrators</title> <p>Reviewer
139Copyright 2021 JustSystem Canada, Inc.
Creating content references
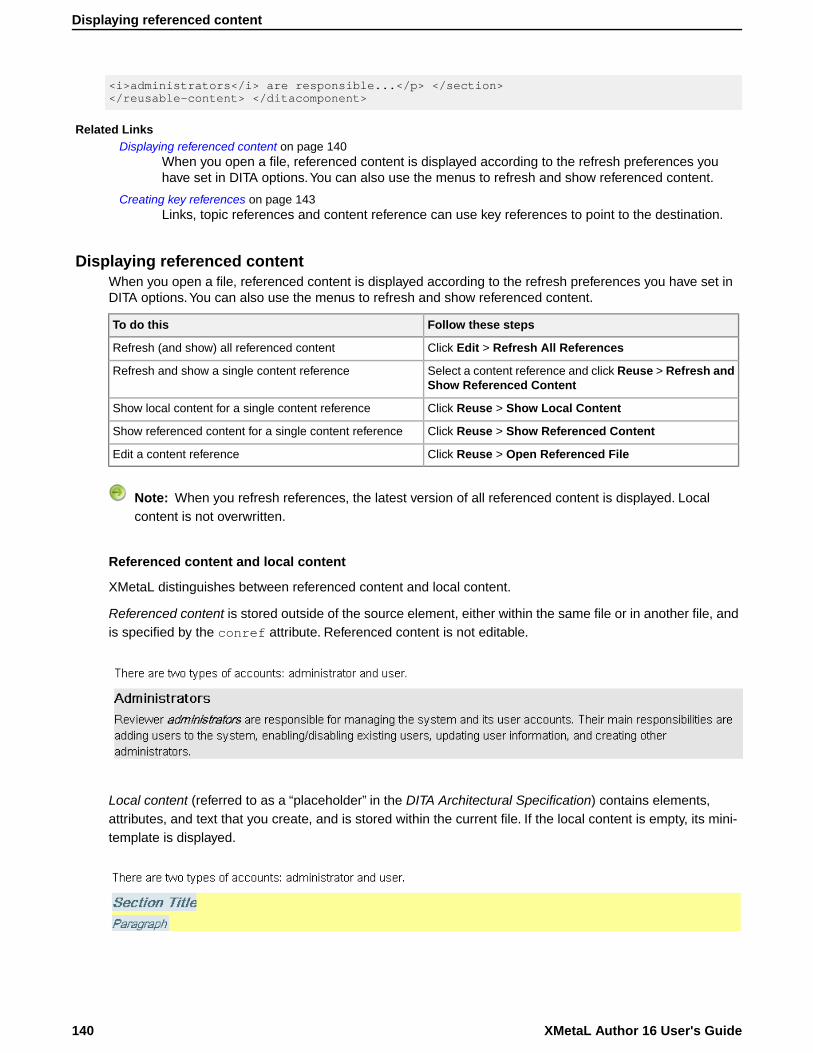
<i>administrators</i> are responsible...</p> </section></reusable-content> </ditacomponent>
Related LinksDisplaying referenced content on page 140
When you open a file, referenced content is displayed according to the refresh preferences youhave set in DITA options.You can also use the menus to refresh and show referenced content.
Creating key references on page 143Links, topic references and content reference can use key references to point to the destination.
Displaying referenced contentWhen you open a file, referenced content is displayed according to the refresh preferences you have set inDITA options.You can also use the menus to refresh and show referenced content.
Follow these stepsTo do this
Click Edit > Refresh All ReferencesRefresh (and show) all referenced content
Select a content reference and click Reuse > Refresh andShow Referenced Content
Refresh and show a single content reference
Click Reuse > Show Local ContentShow local content for a single content reference
Click Reuse > Show Referenced ContentShow referenced content for a single content reference
Click Reuse > Open Referenced FileEdit a content reference
Note: When you refresh references, the latest version of all referenced content is displayed. Localcontent is not overwritten.
Referenced content and local content
XMetaL distinguishes between referenced content and local content.
Referenced content is stored outside of the source element, either within the same file or in another file, andis specified by the conref attribute. Referenced content is not editable.
Local content (referred to as a “placeholder” in the DITA Architectural Specification) contains elements,attributes, and text that you create, and is stored within the current file. If the local content is empty, its mini-template is displayed.
XMetaL Author 16 User's Guide140
Displaying referenced content
Note:
• When you generate output, referenced content appears in place of local content.
• Find and replace, spell check, and track changes accept/reject functions operate on local content only.These operations may force local content to be displayed.
• To set the attribute values of any element that has a conref attribute, you must show local content.
• Only local content is checked for validity.
Related LinksDITA options on page 167
You can control DITA behaviors using the settings in the DITA Options dialog box. Options can beset for all specializations or on a per-specialization basis.
Setting attribute values on page 88You can set attribute values through the Attribute Inspector or through the Edit Properties dialog.
Creating a reusable componentWhen you create a reusable component, you save the selected element in a separate file.You can refer tothis file using a content reference (conref attribute).
1. Select the content you want to make into the reusable component.
Note: If you want to reference multiple elements, they must be contained within a single parentelement.
2. Click Reuse > Create Reusable Component.
3. Enter the following information:
• Component range - Select the current element or an ancestor.• Description - Type a description for the component.• If you want to replace the selected text with a reference to the component you are in the process of
creating, click Replace selected content with a reference to the new component. When you selectthis option, XMetaL creates a conref attribute on the current element and assigns a value to it. Thevalue contains the ID of the reusable component. The contents of the current element are replaced withthe element’s mini-template.
• If you want to replace the selected text as it appears throughout the document, click Find othercandidates. When you select this option, XMetaL searches for other matches after you have saved thereusable component. The results of the operation are displayed in the Results window.
4. Click Continue and save the component.
Key referencesKey references are an indirect addressing mechanism introduced in DITA 1.2. Keys are defined in the DITAmap. Topics can be given a symbolic name (keys attribute) that points to the path of the topic (href attribute).References can now point to the Topic by using a key reference to the symbolic name. The topic path onlyneeds to be updated once in the DITA map in which it is defined.
141Copyright 2021 JustSystem Canada, Inc.
Creating a reusable component
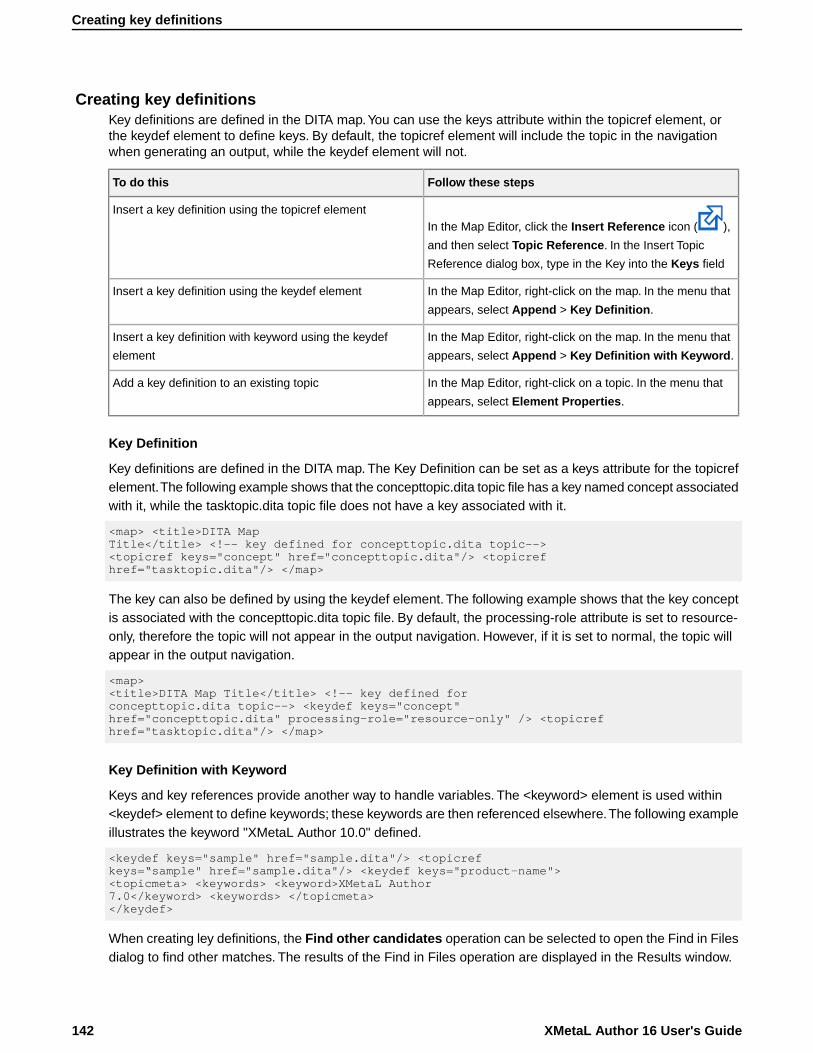
Creating key definitionsKey definitions are defined in the DITA map.You can use the keys attribute within the topicref element, orthe keydef element to define keys. By default, the topicref element will include the topic in the navigationwhen generating an output, while the keydef element will not.
Follow these stepsTo do this
In the Map Editor, click the Insert Reference icon ( ),
and then select Topic Reference. In the Insert Topic
Reference dialog box, type in the Key into the Keys field
Insert a key definition using the topicref element
In the Map Editor, right-click on the map. In the menu that
appears, select Append > Key Definition.
Insert a key definition using the keydef element
In the Map Editor, right-click on the map. In the menu that
appears, select Append > Key Definition with Keyword.
Insert a key definition with keyword using the keydef
element
In the Map Editor, right-click on a topic. In the menu that
appears, select Element Properties.
Add a key definition to an existing topic
Key Definition
Key definitions are defined in the DITA map. The Key Definition can be set as a keys attribute for the topicrefelement.The following example shows that the concepttopic.dita topic file has a key named concept associatedwith it, while the tasktopic.dita topic file does not have a key associated with it.
<map> <title>DITA MapTitle</title> <!-- key defined for concepttopic.dita topic--><topicref keys="concept" href="concepttopic.dita"/> <topicrefhref="tasktopic.dita"/> </map>
The key can also be defined by using the keydef element. The following example shows that the key conceptis associated with the concepttopic.dita topic file. By default, the processing-role attribute is set to resource-only, therefore the topic will not appear in the output navigation. However, if it is set to normal, the topic willappear in the output navigation.
<map><title>DITA Map Title</title> <!-- key defined forconcepttopic.dita topic--> <keydef keys="concept"href="concepttopic.dita" processing-role="resource-only" /> <topicrefhref="tasktopic.dita"/> </map>
Key Definition with Keyword
Keys and key references provide another way to handle variables. The <keyword> element is used within<keydef> element to define keywords; these keywords are then referenced elsewhere.The following exampleillustrates the keyword "XMetaL Author 10.0" defined.
<keydef keys="sample" href="sample.dita"/> <topicrefkeys=“sample" href="sample.dita"/> <keydef keys="product-name"><topicmeta> <keywords> <keyword>XMetaL Author7.0</keyword> <keywords> </topicmeta></keydef>
When creating ley definitions, the Find other candidates operation can be selected to open the Find in Filesdialog to find other matches. The results of the Find in Files operation are displayed in the Results window.
XMetaL Author 16 User's Guide142
Creating key definitions
To make use of a keyword, use a key reference to reference the key definition.The following example illustratesreferences pointing to the keys defined in the previous example.
<xref keyref="sample"/> <link keyref="sample"/><keyword keyref="product-name"/>
Creating key referencesLinks, topic references and content reference can use key references to point to the destination.
Follow these stepsTo do this
Click Reuse > Insert Element with Key-based Content
Reference
Insert Element with Key-based Content Reference
Click Reuse > Attach Key-Based Content ReferenceAttach Key-Based Content Reference
Click Reuse > Detach Key-Based Content ReferenceDetach Key-Based Content Reference
Click Reuse > Insert Element with KeyrefInsert Element with Keyref
You can create key references in the following ways:
• By inserting an element with a key-based content reference. You can insert an element that specifiesa conkeyref attribute. If the element you are inserting is not valid in the current content model, a generalizedelement is inserted. For example, if you attempt to insert a <steps> element in a Reference topic, an <ol>(ordered list) element is inserted.
• By attaching a content reference to an element. You can attach a conkeyref attribute to an existingelement. The referenced element must have an ID.
• By inserting links using keys. You can create links by using key references.
Related LinksCreating content references on page 138
Content references can be created by inserting a reusable component, inserting an element with acontent reference, or attaching a content reference to an element.
Managing Key SpacesA Key Space is the set of possible keys that is established by the hierarchy of the root map and its directlyaddressed, local scope descendant maps.You can manage key spaces by using the Keyspace Managerby going to Reuse > Show Keyspace Manager or by clicking the Keys Operations icon, and selectingShow Keyspace Manager, in the Map Editor.
Follow these stepsTo do this
In the Map Editor, click the Keys Operations icon andselect Configure Key Space Association... from the menu
Configure Keyspace Associations
From the main menu, click Reuse > Show KeyspaceManager and click on Add
Add Keyspace
In the Map Editor, click the Keys Operations icon andselect Configure Key Space Associations, and then clickon Attach
Attach Keyspace
143Copyright 2021 JustSystem Canada, Inc.
Creating key references
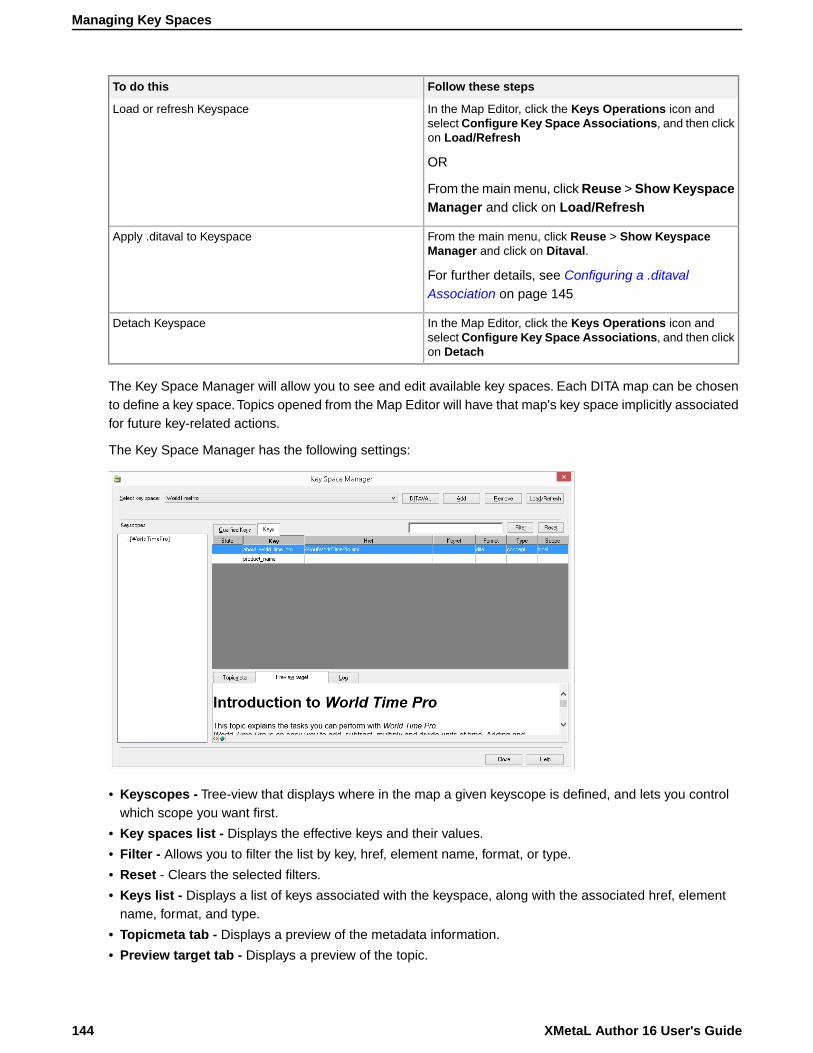
Follow these stepsTo do this
In the Map Editor, click the Keys Operations icon andselect Configure Key Space Associations, and then clickon Load/Refresh
OR
Load or refresh Keyspace
From the main menu, click Reuse > Show KeyspaceManager and click on Load/Refresh
From the main menu, click Reuse > Show KeyspaceManager and click on Ditaval.
For further details, see Configuring a .ditavalAssociation on page 145
Apply .ditaval to Keyspace
In the Map Editor, click the Keys Operations icon andselect Configure Key Space Associations, and then clickon Detach
Detach Keyspace
The Key Space Manager will allow you to see and edit available key spaces. Each DITA map can be chosento define a key space.Topics opened from the Map Editor will have that map's key space implicitly associatedfor future key-related actions.
The Key Space Manager has the following settings:
• Keyscopes - Tree-view that displays where in the map a given keyscope is defined, and lets you controlwhich scope you want first.
• Key spaces list - Displays the effective keys and their values.
• Filter - Allows you to filter the list by key, href, element name, format, or type.
• Reset - Clears the selected filters.
• Keys list - Displays a list of keys associated with the keyspace, along with the associated href, elementname, format, and type.
• Topicmeta tab - Displays a preview of the metadata information.
• Preview target tab - Displays a preview of the topic.
XMetaL Author 16 User's Guide144
Managing Key Spaces
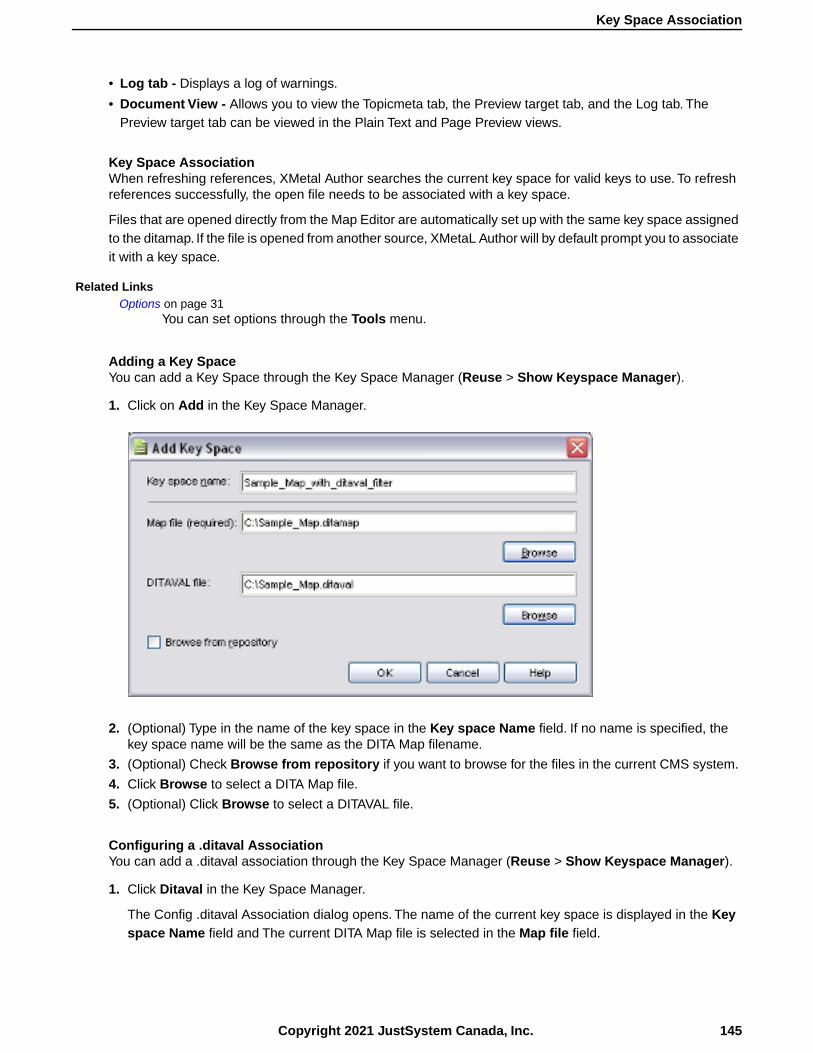
• Log tab - Displays a log of warnings.
• Document View - Allows you to view the Topicmeta tab, the Preview target tab, and the Log tab. ThePreview target tab can be viewed in the Plain Text and Page Preview views.
Key Space AssociationWhen refreshing references, XMetal Author searches the current key space for valid keys to use. To refreshreferences successfully, the open file needs to be associated with a key space.
Files that are opened directly from the Map Editor are automatically set up with the same key space assignedto the ditamap. If the file is opened from another source, XMetaL Author will by default prompt you to associateit with a key space.
Related LinksOptions on page 31
You can set options through the Tools menu.
Adding a Key SpaceYou can add a Key Space through the Key Space Manager (Reuse > Show Keyspace Manager).
1. Click on Add in the Key Space Manager.
2. (Optional) Type in the name of the key space in the Key space Name field. If no name is specified, thekey space name will be the same as the DITA Map filename.
3. (Optional) Check Browse from repository if you want to browse for the files in the current CMS system.
4. Click Browse to select a DITA Map file.
5. (Optional) Click Browse to select a DITAVAL file.
Configuring a .ditaval AssociationYou can add a .ditaval association through the Key Space Manager (Reuse > Show Keyspace Manager).
1. Click Ditaval in the Key Space Manager.
The Config .ditaval Association dialog opens. The name of the current key space is displayed in the Keyspace Name field and The current DITA Map file is selected in the Map file field.
145Copyright 2021 JustSystem Canada, Inc.
Key Space Association
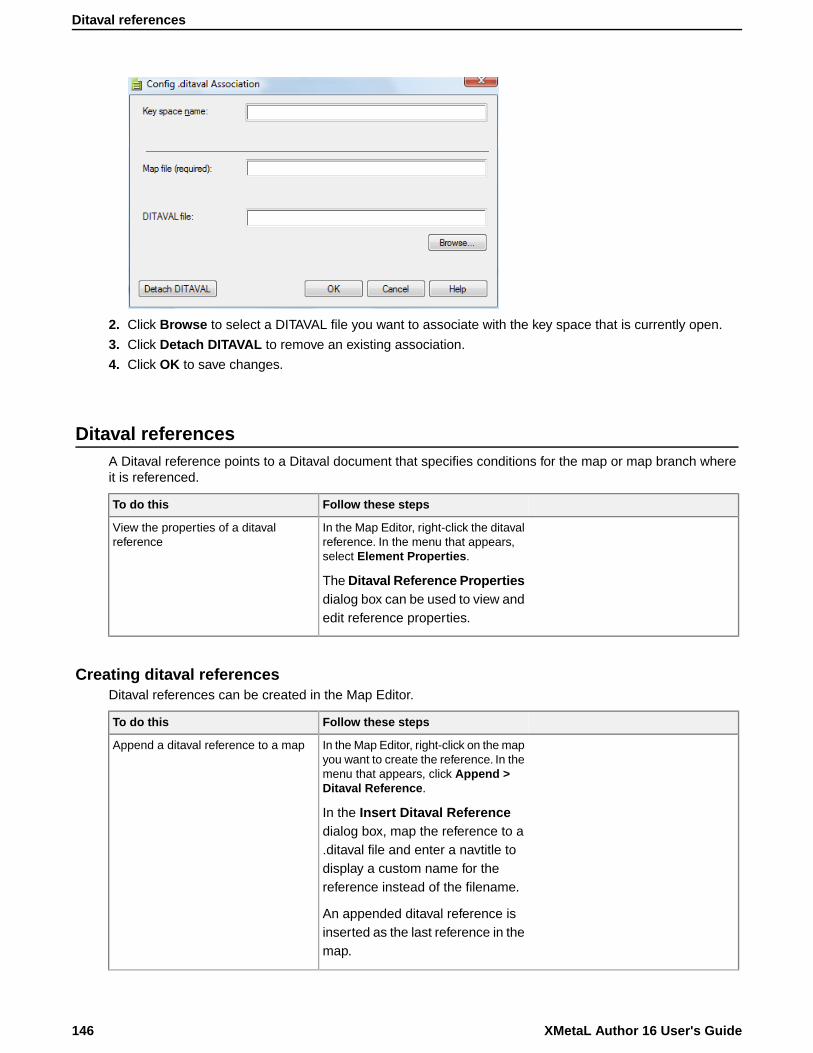
2. Click Browse to select a DITAVAL file you want to associate with the key space that is currently open.
3. Click Detach DITAVAL to remove an existing association.
4. Click OK to save changes.
Ditaval referencesA Ditaval reference points to a Ditaval document that specifies conditions for the map or map branch whereit is referenced.
Follow these stepsTo do this
In the Map Editor, right-click the ditavalreference. In the menu that appears,select Element Properties.
The Ditaval Reference Propertiesdialog box can be used to view andedit reference properties.
View the properties of a ditavalreference
Creating ditaval referencesDitaval references can be created in the Map Editor.
Follow these stepsTo do this
In the Map Editor, right-click on the mapyou want to create the reference. In the
Append a ditaval reference to a map
menu that appears, click Append >Ditaval Reference.
In the Insert Ditaval Referencedialog box, map the reference to a.ditaval file and enter a navtitle todisplay a custom name for thereference instead of the filename.
An appended ditaval reference isinserted as the last reference in themap.
XMetaL Author 16 User's Guide146
Ditaval references

Follow these stepsTo do this
In the Map Editor, right-click on alocation in the map where you want tocreate the reference.
In the menu that appears, clickInsert > Ditaval Reference if you
Insert a ditaval reference in a map ormap branch
want to place the reference belowthe current map item, or Insert >Ditaval Reference if you want toplace the reference above it.
In the Insert Ditaval Referencedialog box, map the reference to a.ditaval file and enter a navtitle todisplay a custom name for thereference instead of the filename.
Note: The navtitle and other attributes of ditaval references can be viewed and edited in the Map Editor'sAttribute Inspector.
Related LinksMap Editor Attribute Inspector on page 124
The Map Editor's attribute inspector can be used to edit the attributes of items in the map.
Relationship tablesRelationship tables (or reltables) indicate linking relationships between topics in a ditamap.
A relationship table defines the relationships in a grid-like structure, with rows in the table determining thelinks between topics.
Follow These StepsTo Do This
In the Map Editor, right-click on the ditamap. In the menuthat appears, select Append > Relationship Table.
The Insert Relationship Table dialog box allows youto set the columns and number of rows for yourrelationship table.
Append a relationship table to a ditamap
The produced relationship table is appended as thelast file in your ditamap collection.
TIP: It's recommended that you wait until you're mostly done with your content before producing a relationshiptable as you may be changing link names as you're creating your content.
147Copyright 2021 JustSystem Canada, Inc.
Relationship tables
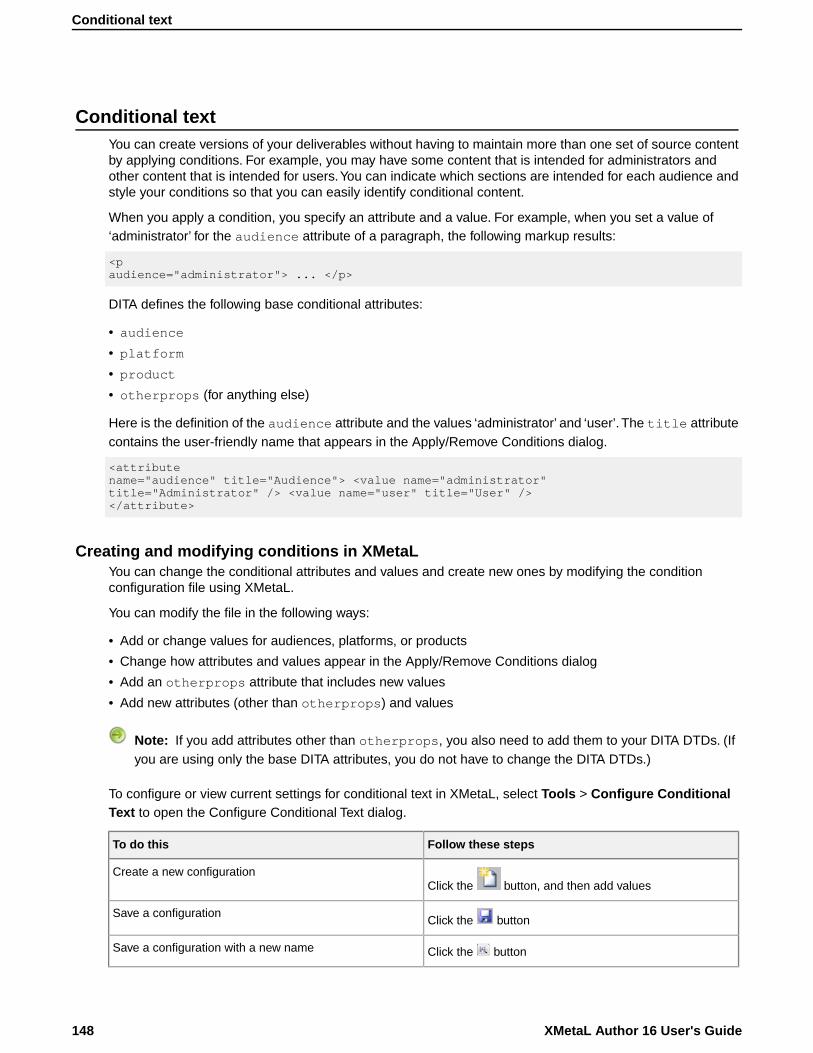
Conditional textYou can create versions of your deliverables without having to maintain more than one set of source contentby applying conditions. For example, you may have some content that is intended for administrators andother content that is intended for users.You can indicate which sections are intended for each audience andstyle your conditions so that you can easily identify conditional content.
When you apply a condition, you specify an attribute and a value. For example, when you set a value of‘administrator’ for the audience attribute of a paragraph, the following markup results:
<paudience="administrator"> ... </p>
DITA defines the following base conditional attributes:
• audience
• platform
• product
• otherprops (for anything else)
Here is the definition of the audience attribute and the values ‘administrator’ and ‘user’. The title attributecontains the user-friendly name that appears in the Apply/Remove Conditions dialog.
<attributename="audience" title="Audience"> <value name="administrator"title="Administrator" /> <value name="user" title="User" /></attribute>
Creating and modifying conditions in XMetaLYou can change the conditional attributes and values and create new ones by modifying the conditionconfiguration file using XMetaL.
You can modify the file in the following ways:
• Add or change values for audiences, platforms, or products
• Change how attributes and values appear in the Apply/Remove Conditions dialog
• Add an otherprops attribute that includes new values
• Add new attributes (other than otherprops) and values
Note: If you add attributes other than otherprops, you also need to add them to your DITA DTDs. (Ifyou are using only the base DITA attributes, you do not have to change the DITA DTDs.)
To configure or view current settings for conditional text in XMetaL, select Tools > Configure ConditionalText to open the Configure Conditional Text dialog.
Follow these stepsTo do this
Click the button, and then add valuesCreate a new configuration
Click the buttonSave a configuration
Click the buttonSave a configuration with a new name
XMetaL Author 16 User's Guide148
Conditional text
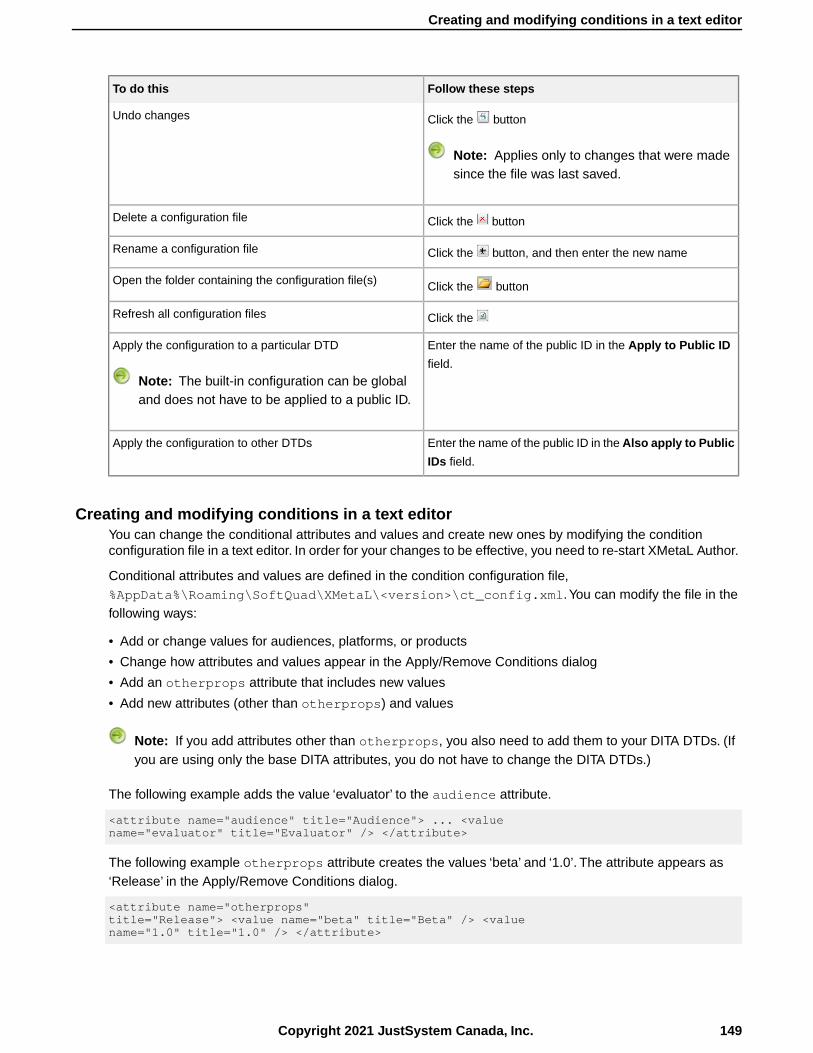
Follow these stepsTo do this
Click the buttonUndo changes
Note: Applies only to changes that were madesince the file was last saved.
Click the buttonDelete a configuration file
Click the button, and then enter the new nameRename a configuration file
Click the buttonOpen the folder containing the configuration file(s)
Click the Refresh all configuration files
Enter the name of the public ID in the Apply to Public ID
field.
Apply the configuration to a particular DTD
Note: The built-in configuration can be globaland does not have to be applied to a public ID.
Enter the name of the public ID in the Also apply to Public
IDs field.
Apply the configuration to other DTDs
Creating and modifying conditions in a text editorYou can change the conditional attributes and values and create new ones by modifying the conditionconfiguration file in a text editor. In order for your changes to be effective, you need to re-start XMetaL Author.
Conditional attributes and values are defined in the condition configuration file,%AppData%\Roaming\SoftQuad\XMetaL\<version>\ct_config.xml.You can modify the file in thefollowing ways:
• Add or change values for audiences, platforms, or products
• Change how attributes and values appear in the Apply/Remove Conditions dialog
• Add an otherprops attribute that includes new values
• Add new attributes (other than otherprops) and values
Note: If you add attributes other than otherprops, you also need to add them to your DITA DTDs. (Ifyou are using only the base DITA attributes, you do not have to change the DITA DTDs.)
The following example adds the value ‘evaluator’ to the audience attribute.
<attribute name="audience" title="Audience"> ... <valuename="evaluator" title="Evaluator" /> </attribute>
The following example otherprops attribute creates the values ‘beta’ and ‘1.0’. The attribute appears as‘Release’ in the Apply/Remove Conditions dialog.
<attribute name="otherprops"title="Release"> <value name="beta" title="Beta" /> <valuename="1.0" title="1.0" /> </attribute>
149Copyright 2021 JustSystem Canada, Inc.
Creating and modifying conditions in a text editor
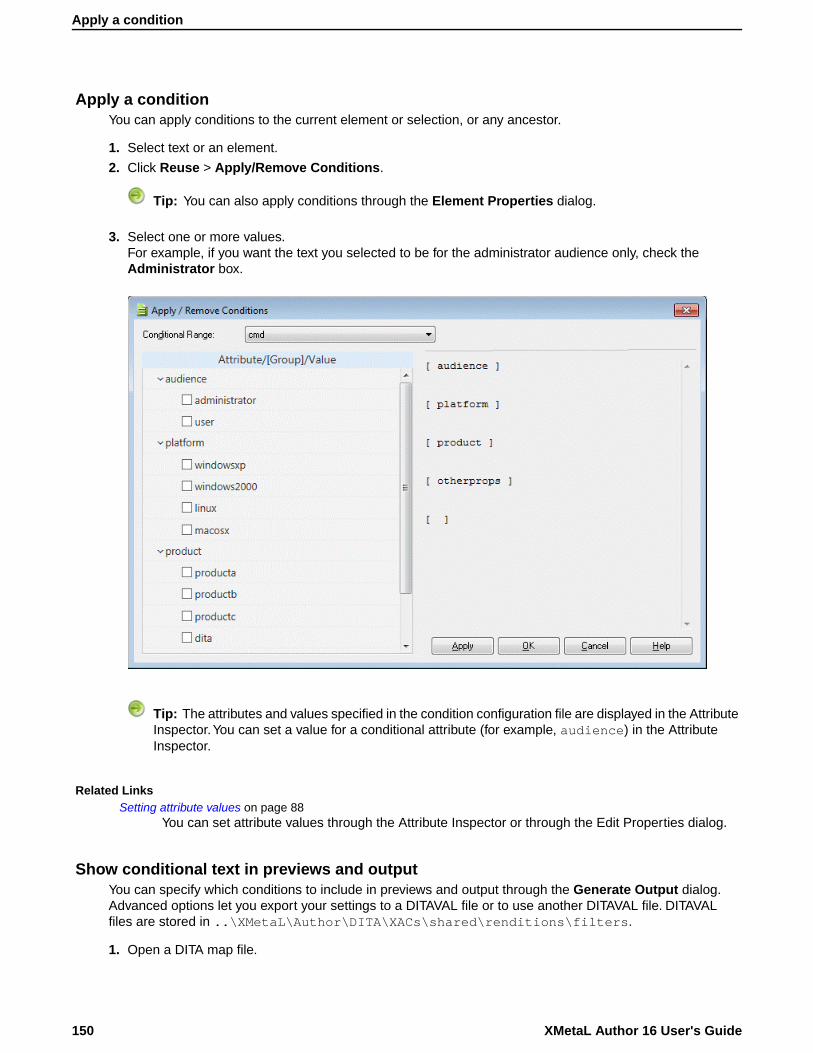
Apply a conditionYou can apply conditions to the current element or selection, or any ancestor.
1. Select text or an element.
2. Click Reuse > Apply/Remove Conditions.
Tip: You can also apply conditions through the Element Properties dialog.
3. Select one or more values.For example, if you want the text you selected to be for the administrator audience only, check theAdministrator box.
Tip: The attributes and values specified in the condition configuration file are displayed in the AttributeInspector.You can set a value for a conditional attribute (for example, audience) in the AttributeInspector.
Related LinksSetting attribute values on page 88
You can set attribute values through the Attribute Inspector or through the Edit Properties dialog.
Show conditional text in previews and outputYou can specify which conditions to include in previews and output through the Generate Output dialog.Advanced options let you export your settings to a DITAVAL file or to use another DITAVAL file. DITAVALfiles are stored in ..\XMetaL\Author\DITA\XACs\shared\renditions\filters.
1. Open a DITA map file.
XMetaL Author 16 User's Guide150
Apply a condition
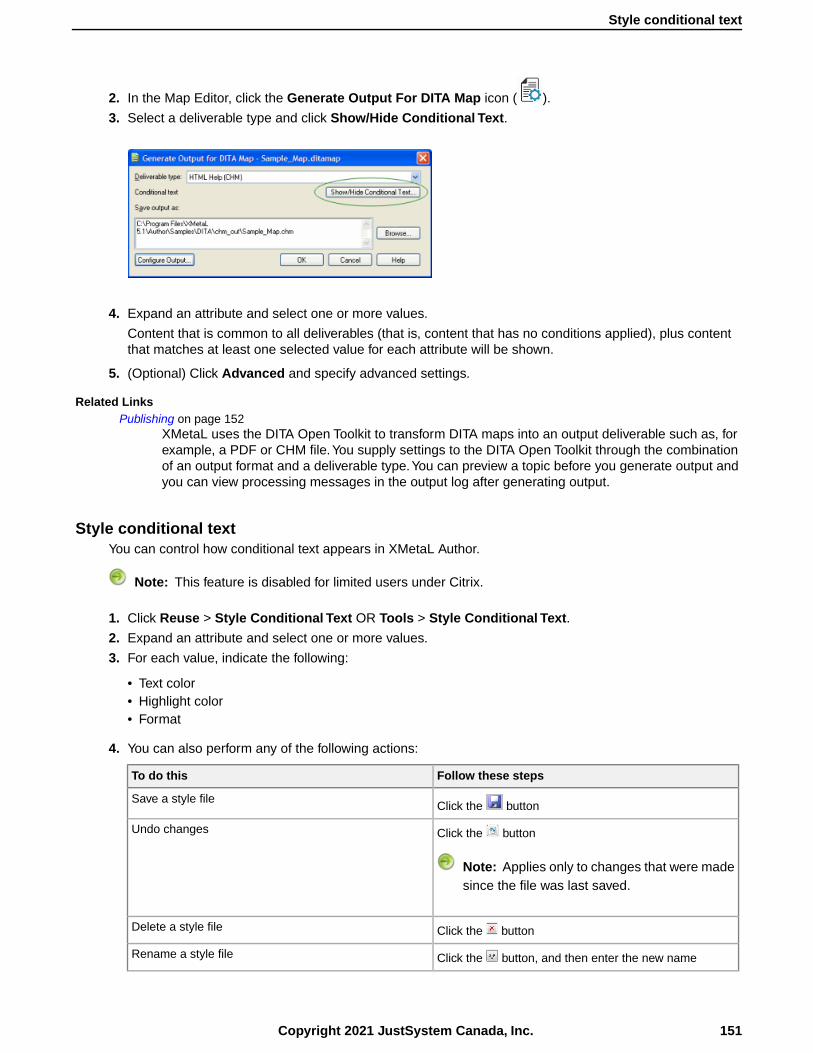
2. In the Map Editor, click the Generate Output For DITA Map icon ( ).
3. Select a deliverable type and click Show/Hide Conditional Text.
4. Expand an attribute and select one or more values.
Content that is common to all deliverables (that is, content that has no conditions applied), plus contentthat matches at least one selected value for each attribute will be shown.
5. (Optional) Click Advanced and specify advanced settings.
Related LinksPublishing on page 152
XMetaL uses the DITA Open Toolkit to transform DITA maps into an output deliverable such as, forexample, a PDF or CHM file.You supply settings to the DITA Open Toolkit through the combinationof an output format and a deliverable type.You can preview a topic before you generate output andyou can view processing messages in the output log after generating output.
Style conditional textYou can control how conditional text appears in XMetaL Author.
Note: This feature is disabled for limited users under Citrix.
1. Click Reuse > Style Conditional Text OR Tools > Style Conditional Text.
2. Expand an attribute and select one or more values.
3. For each value, indicate the following:
• Text color• Highlight color• Format
4. You can also perform any of the following actions:
Follow these stepsTo do this
Click the buttonSave a style file
Click the buttonUndo changes
Note: Applies only to changes that were madesince the file was last saved.
Click the buttonDelete a style file
Click the button, and then enter the new nameRename a style file
151Copyright 2021 JustSystem Canada, Inc.
Style conditional text
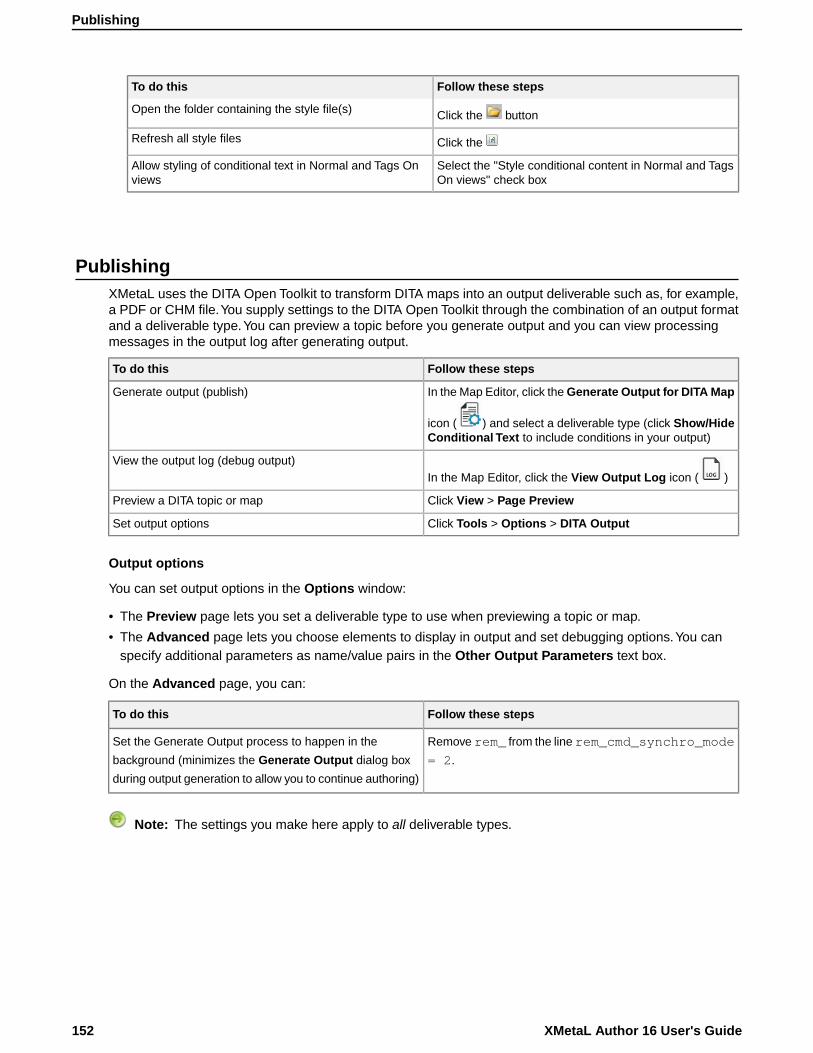
Follow these stepsTo do this
Click the buttonOpen the folder containing the style file(s)
Click the Refresh all style files
Select the "Style conditional content in Normal and TagsOn views" check box
Allow styling of conditional text in Normal and Tags Onviews
PublishingXMetaL uses the DITA Open Toolkit to transform DITA maps into an output deliverable such as, for example,a PDF or CHM file.You supply settings to the DITA Open Toolkit through the combination of an output formatand a deliverable type.You can preview a topic before you generate output and you can view processingmessages in the output log after generating output.
Follow these stepsTo do this
In the Map Editor, click the Generate Output for DITA Map
icon ( ) and select a deliverable type (click Show/HideConditional Text to include conditions in your output)
Generate output (publish)
In the Map Editor, click the View Output Log icon ( )View the output log (debug output)
Click View > Page PreviewPreview a DITA topic or map
Click Tools > Options > DITA OutputSet output options
Output options
You can set output options in the Options window:
• The Preview page lets you set a deliverable type to use when previewing a topic or map.
• The Advanced page lets you choose elements to display in output and set debugging options.You canspecify additional parameters as name/value pairs in the Other Output Parameters text box.
On the Advanced page, you can:
Follow these stepsTo do this
Remove rem_ from the line rem_cmd_synchro_mode
= 2.
Set the Generate Output process to happen in the
background (minimizes the Generate Output dialog box
during output generation to allow you to continue authoring)
Note: The settings you make here apply to all deliverable types.
XMetaL Author 16 User's Guide152
Publishing
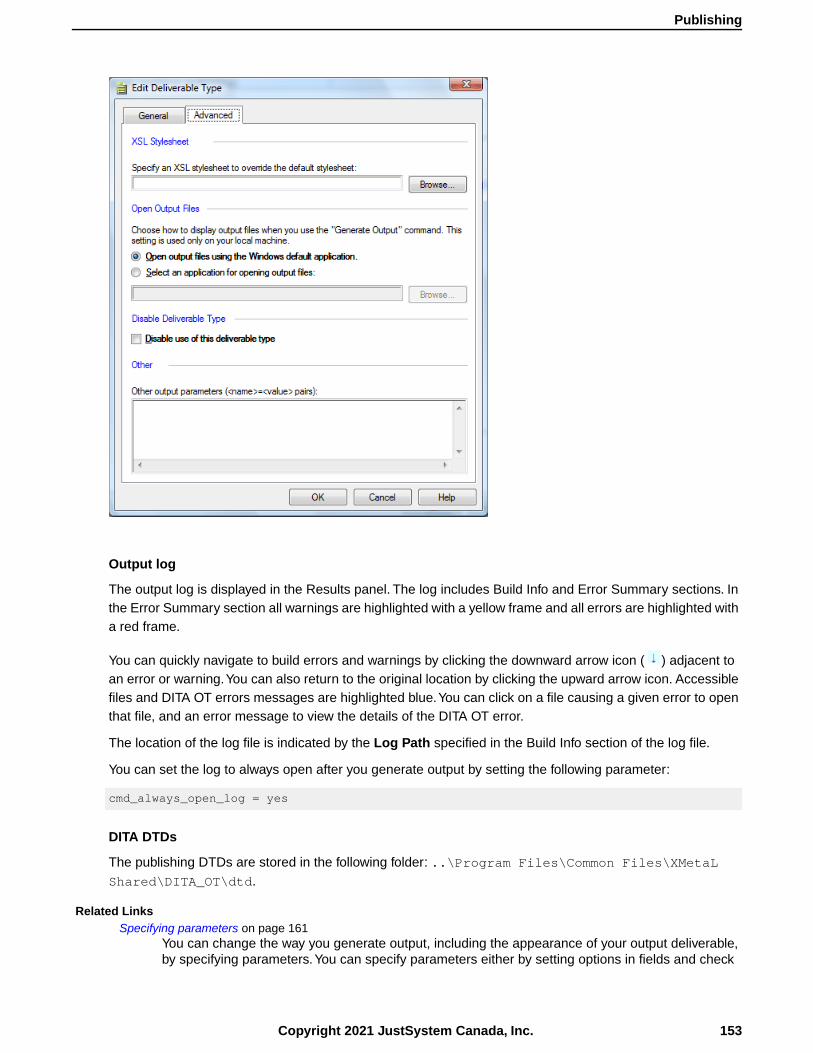
Output log
The output log is displayed in the Results panel. The log includes Build Info and Error Summary sections. Inthe Error Summary section all warnings are highlighted with a yellow frame and all errors are highlighted witha red frame.
You can quickly navigate to build errors and warnings by clicking the downward arrow icon ( ) adjacent toan error or warning.You can also return to the original location by clicking the upward arrow icon. Accessiblefiles and DITA OT errors messages are highlighted blue.You can click on a file causing a given error to openthat file, and an error message to view the details of the DITA OT error.
The location of the log file is indicated by the Log Path specified in the Build Info section of the log file.
You can set the log to always open after you generate output by setting the following parameter:
cmd_always_open_log = yes
DITA DTDs
The publishing DTDs are stored in the following folder: ..\Program Files\Common Files\XMetaLShared\DITA_OT\dtd.
Related LinksSpecifying parameters on page 161
You can change the way you generate output, including the appearance of your output deliverable,by specifying parameters.You can specify parameters either by setting options in fields and check
153Copyright 2021 JustSystem Canada, Inc.
Publishing

boxes or by typing. Parameters can be global or local.Your settings are stored in the publishingconfiguration files.
Displaying referenced content on page 140When you open a file, referenced content is displayed according to the refresh preferences youhave set in DITA options.You can also use the menus to refresh and show referenced content.
Appendix C: Configuring XHTML, CHM and WebHelp output on page 201You can use XMetaL to produce XHTML and Microsoft HTML Help (CHM) output using the DITAOpen Toolkit.
Appendix D: Configuring PDF output on page 207You can use XMetaL in conjunction with the DITA Open Toolkit to produce PDF output from yourDITA topics and maps. To produce PDF, XMetaL first transforms DITA-based content into an FOfile (XML with formatting objects) and then sends it to an FO processor, which renders it as PDF.
Deliverable typesA deliverable type specifies an output format and additional configuration settings. For example, you canapply your own CSS stylesheet to change the appearance of HTML output files. Several deliverable typesfor popular output formats are included out of the box.
Follow these stepsTo do this
Click Tools > Options > DITA Output,then click Add and select an outputformat
Create a deliverable type
Click Tools > Options > DITA Output,then select a deliverable type and clickEdit
Edit a deliverable type
Table 39: Deliverable types
DescriptionName
Enhanced PDF output using XEP.Includes improved pagination,
Book via RenderX
indexing, and table layouts. Alsoreferred to as the ‘Idiom plug-in’ or‘Idiom FO 1.1’ in the DITA OpenToolkit documentation. Uses theDITA OT ‘pdf2’ transtype.
Produces an XML file for each topicreference and a root XML file for themap, and the index
Eclipse Content
Produces an HTML file for each topicreference and a root XML file for themap, and the index
Eclipse Help
Produces a single EPUB file.Includes support for custom CSS filesand header/footer files.
EPUB (experimental)
Produces a single compiled MicrosoftHTML Help CHM file. Includes
HTML Help (CHM)
support for map and alias files forcontext-sensitive Help. RequiresMicrosoft HTML Help Workshop.
Includes support for custom CSS filesand header/footer files.
HTML2 (experimental)
XMetaL Author 16 User's Guide154
Deliverable types
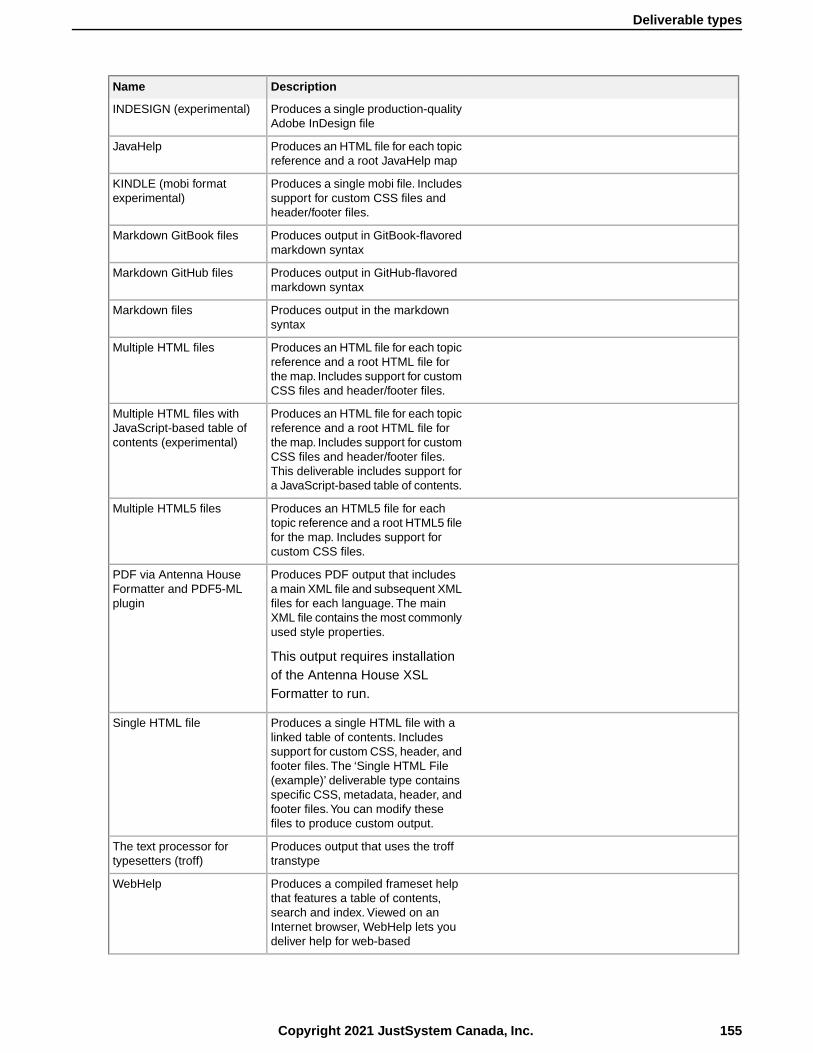
DescriptionName
Produces a single production-qualityAdobe InDesign file
INDESIGN (experimental)
Produces an HTML file for each topicreference and a root JavaHelp map
JavaHelp
Produces a single mobi file. Includessupport for custom CSS files andheader/footer files.
KINDLE (mobi formatexperimental)
Produces output in GitBook-flavoredmarkdown syntax
Markdown GitBook files
Produces output in GitHub-flavoredmarkdown syntax
Markdown GitHub files
Produces output in the markdownsyntax
Markdown files
Produces an HTML file for each topicreference and a root HTML file for
Multiple HTML files
the map. Includes support for customCSS files and header/footer files.
Produces an HTML file for each topicreference and a root HTML file for
Multiple HTML files withJavaScript-based table ofcontents (experimental) the map. Includes support for custom
CSS files and header/footer files.This deliverable includes support fora JavaScript-based table of contents.
Produces an HTML5 file for eachtopic reference and a root HTML5 file
Multiple HTML5 files
for the map. Includes support forcustom CSS files.
Produces PDF output that includesa main XML file and subsequent XML
PDF via Antenna HouseFormatter and PDF5-MLplugin files for each language. The main
XML file contains the most commonlyused style properties.
This output requires installationof the Antenna House XSLFormatter to run.
Produces a single HTML file with alinked table of contents. Includes
Single HTML file
support for custom CSS, header, andfooter files. The ‘Single HTML File(example)’ deliverable type containsspecific CSS, metadata, header, andfooter files.You can modify thesefiles to produce custom output.
Produces output that uses the trofftranstype
The text processor fortypesetters (troff)
Produces a compiled frameset helpthat features a table of contents,
WebHelp
search and index. Viewed on anInternet browser, WebHelp lets youdeliver help for web-based
155Copyright 2021 JustSystem Canada, Inc.
Deliverable types

DescriptionName
applications across multipleplatforms.
Produces production-quality printoutput using XEP and a fullyconfigurable set of parameters.
See XMetaL Enhanceddeliverable types on page 157 formore information.
XMetaL Enhanced PDF viaRenderX XEP
Produces production-quality printoutput using XEP and a fully
XMetaL Enhanced PDF viaRenderX XEP and AcrobatDistiller configurable set of parameters. Also
includes support for EPS graphics.Requires purchase and installationof Adobe Acrobat Distiller.
See XMetaL Enhanceddeliverable types on page 157 formore information.
Note: By default, some deliverable types are disabled. To view them, click Show disabled deliverabletypes in the DITA Output option windows.
Options
You can set options for a deliverable type through the Edit Deliverable Type dialog box:
• The General tab lets you specify an output folder.
• The Advanced tab lets you specify an XSL stylesheet, choose a viewer application, and enable/disable thedeliverable type.You can specify additional parameters as name/value pairs in the Other Output Parameterstext box.
Note: When you specify a stylesheet, you override one of the default transform (XSL) files in the DITAOpen Toolkit. Specifying a stylesheet has the effect of setting the ‘args’ parameter. For more information,refer to the DITA Open Toolkit User Guide. This option is recommended for advanced users who arefamiliar with the DITA Open Toolkit and XSL.
Other options are available, depending on the output format.
OptionsDeliverable type
Custom CSS stylesheet, header and footer files, extensionfor output files
Multiple HTML files, Single HTML file
Alias and map fileHTML Help (CHM)
Show/hide related links in outputXMetaL Enhanced PDF
XMetaL Author 16 User's Guide156
Deliverable types

Related LinksSpecifying parameters on page 161
You can change the way you generate output, including the appearance of your output deliverable,by specifying parameters.You can specify parameters either by setting options in fields and checkboxes or by typing. Parameters can be global or local.Your settings are stored in the publishingconfiguration files.
Show conditional text in previews and output on page 150You can specify which conditions to include in previews and output through the Generate Outputdialog. Advanced options let you export your settings to a DITAVAL file or to use another DITAVALfile. DITAVAL files are stored in..\XMetaL\Author\DITA\XACs\shared\renditions\filters.
Appendix C: Configuring XHTML, CHM and WebHelp output on page 201You can use XMetaL to produce XHTML and Microsoft HTML Help (CHM) output using the DITAOpen Toolkit.
XMetaL Enhanced deliverable typesYou can generate production-quality print output out of the box using the ‘XMetaL Enhanced PDF via RenderXXEP’ and ‘XMetaL Enhanced PDF via RenderX XEP and Acrobat Distiller’ deliverable types.You can customizethe output that you create with them through a fully configurable set of parameters.
These deliverable types work with the RenderX XEP print formatter that is included with XMetaL Author.Theyhave also been tested with Antenna House XSL Formatter. They are optimized to produce book-typedeliverables that include book lists such as a table of contents and index and book divisions such as partsand chapters.
157Copyright 2021 JustSystem Canada, Inc.
XMetaL Enhanced deliverable types
The XMetaL Enhanced deliverable types feature processing improvements over previous print deliverabletypes and the default toolkit ‘PDF2’ output. For example, the <booktitlealt> and <bookpartno> appearas the subtitle and part number on the title page. Page numbers appear for topics contained within frontmatter. By default, page numbers and the book title appear in the footer. Headers are separated by a horizontalline.
The appearance of the book deliverable features improved default margins. The first page of chapters, parts,and appendixes are space-efficient and feature an increased right margin to accommodate tables, definitionlists, and images. They do not include the wide left margin or mini-TOC in the default toolkit processing.Chapter headings are right-justified. Topic headings are not separated by a horizontal line.
Book output features improved typography, with a sans-serif font for titles, headers, and footers.<menucascade> elements use a greater-than (‘>’) symbol instead of the curved arrow used by the toolkit.
Icons for notes, tips, and other note-type elements have been improved and table rows now have a graybackground.
Other enhancements
Other enhancements to the DITA Open Toolkit processing include the following.
• Seamless integration into the authoring environment.You can preview and generate output directly fromthe authoring interface through menus and dialogs.
• Ease of configuration and troubleshooting. XMetaL includes a default set of deliverable types for the variousoutput formats supported by the toolkit.You can change and add new deliverable types and deploy themacross an organization.You can customize output by specifying parameters.
• Single HTML file output format.You can create a single HTML file that includes a table of contents. The‘Single HTML file (example)’ deliverable type demonstrates custom styling, and headers and footers.
• Glossary merging and sorting. Glossary entries are merged from multiple sources and sorted according tothe language specified.
• Technical support. Contact XMetaL Technical Support for assistance with configuring the DITA Open Toolkit.Support policies are available from the XMetaL website.
• Improved documentation. Detailed documentation on how to customize PDF, HTML, and CHM output isprovided.
Sample output
You can view an example of a book-type deliverable created using an XMetaL Enhanced deliverable typethrough Help > XMetaL with DITA Evaluation Guide.
Extending the publishing frameworkXMetaL Author, together with the DITA Open Toolkit, provides a flexible framework for publishing DITA maps.You can extend this framework by creating and modifying output formats and specifying parameters.
The publishing framework lets you publish documents in any of the standard formats, including PDF, CHM,and HTML. An output format specifies the file format of an output deliverable and, in the case of PDF, a printformatter. A print formatter is a third-party tool that renders XML content as PDF. Each output format specifiesa transformation type (transtype) that contains Java and XSL processing. Some transformation types arenative to the DITA Open Toolkit and some are supplied by XMetaL. Transformation types are specified in thepublishing configuration files.
XMetaL Author 16 User's Guide158
Extending the publishing framework
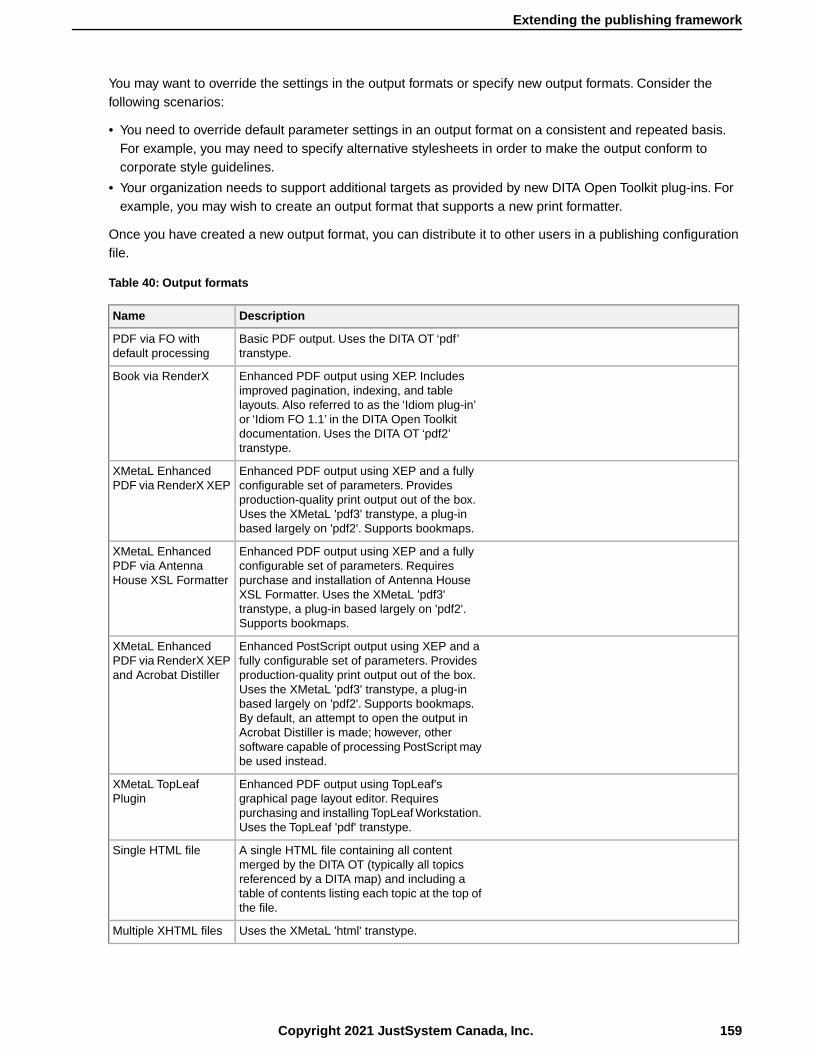
You may want to override the settings in the output formats or specify new output formats. Consider thefollowing scenarios:
• You need to override default parameter settings in an output format on a consistent and repeated basis.For example, you may need to specify alternative stylesheets in order to make the output conform tocorporate style guidelines.
• Your organization needs to support additional targets as provided by new DITA Open Toolkit plug-ins. Forexample, you may wish to create an output format that supports a new print formatter.
Once you have created a new output format, you can distribute it to other users in a publishing configurationfile.
Table 40: Output formats
DescriptionName
Basic PDF output. Uses the DITA OT ‘pdf’transtype.
PDF via FO withdefault processing
Enhanced PDF output using XEP. Includesimproved pagination, indexing, and table
Book via RenderX
layouts. Also referred to as the ‘Idiom plug-in’or ‘Idiom FO 1.1’ in the DITA Open Toolkitdocumentation. Uses the DITA OT ‘pdf2’transtype.
Enhanced PDF output using XEP and a fullyconfigurable set of parameters. Provides
XMetaL EnhancedPDF via RenderX XEP
production-quality print output out of the box.Uses the XMetaL 'pdf3' transtype, a plug-inbased largely on 'pdf2'. Supports bookmaps.
Enhanced PDF output using XEP and a fullyconfigurable set of parameters. Requires
XMetaL EnhancedPDF via AntennaHouse XSL Formatter purchase and installation of Antenna House
XSL Formatter. Uses the XMetaL 'pdf3'transtype, a plug-in based largely on 'pdf2'.Supports bookmaps.
Enhanced PostScript output using XEP and afully configurable set of parameters. Provides
XMetaL EnhancedPDF via RenderX XEPand Acrobat Distiller production-quality print output out of the box.
Uses the XMetaL 'pdf3' transtype, a plug-inbased largely on 'pdf2'. Supports bookmaps.By default, an attempt to open the output inAcrobat Distiller is made; however, othersoftware capable of processing PostScript maybe used instead.
Enhanced PDF output using TopLeaf'sgraphical page layout editor. Requires
XMetaL TopLeafPlugin
purchasing and installing TopLeaf Workstation.Uses the TopLeaf 'pdf' transtype.
A single HTML file containing all contentmerged by the DITA OT (typically all topics
Single HTML file
referenced by a DITA map) and including atable of contents listing each topic at the top ofthe file.
Uses the XMetaL 'html' transtype.Multiple XHTML files
159Copyright 2021 JustSystem Canada, Inc.
Extending the publishing framework
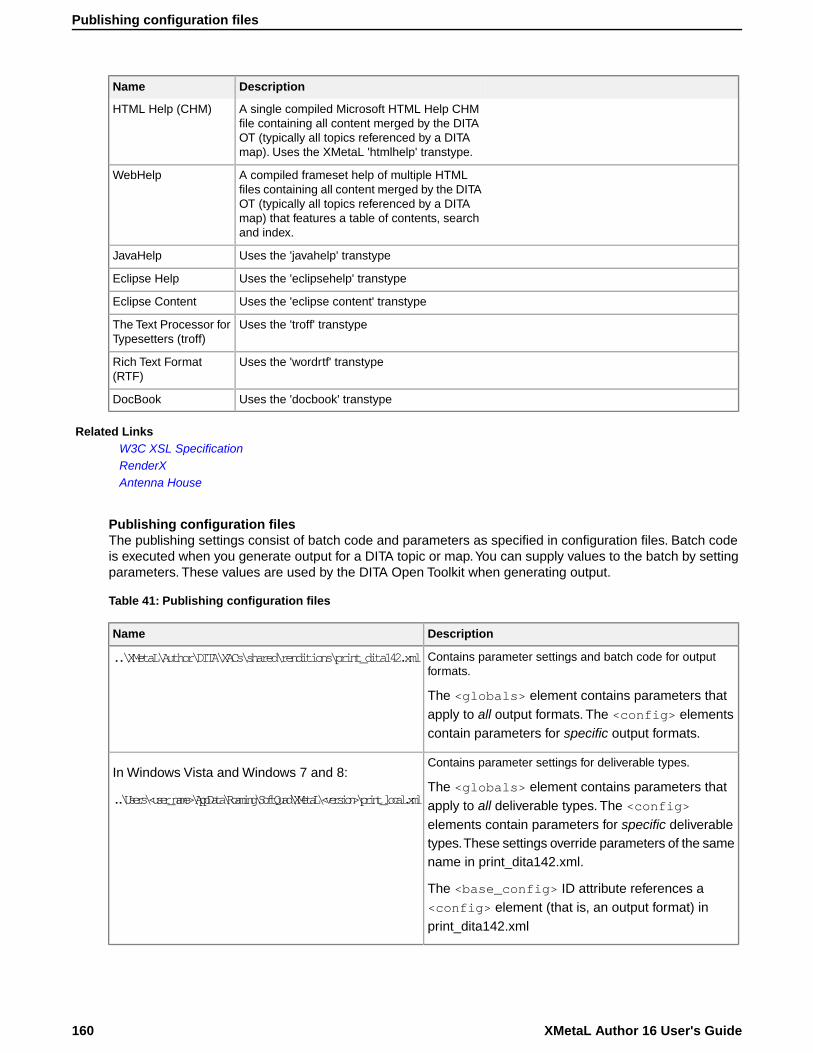
DescriptionName
A single compiled Microsoft HTML Help CHMfile containing all content merged by the DITA
HTML Help (CHM)
OT (typically all topics referenced by a DITAmap). Uses the XMetaL 'htmlhelp' transtype.
A compiled frameset help of multiple HTMLfiles containing all content merged by the DITA
WebHelp
OT (typically all topics referenced by a DITAmap) that features a table of contents, searchand index.
Uses the 'javahelp' transtypeJavaHelp
Uses the 'eclipsehelp' transtypeEclipse Help
Uses the 'eclipse content' transtypeEclipse Content
Uses the 'troff' transtypeThe Text Processor forTypesetters (troff)
Uses the 'wordrtf' transtypeRich Text Format(RTF)
Uses the 'docbook' transtypeDocBook
Related LinksW3C XSL SpecificationRenderXAntenna House
Publishing configuration filesThe publishing settings consist of batch code and parameters as specified in configuration files. Batch codeis executed when you generate output for a DITA topic or map.You can supply values to the batch by settingparameters. These values are used by the DITA Open Toolkit when generating output.
Table 41: Publishing configuration files
DescriptionName
Contains parameter settings and batch code for outputformats.
The <globals> element contains parameters thatapply to all output formats. The <config> elementscontain parameters for specific output formats.
..\XMetaL\Author\DITA\XACs\shared\renditions\print_dita142.xml
Contains parameter settings for deliverable types.
The <globals> element contains parameters thatapply to all deliverable types. The <config>
In Windows Vista and Windows 7 and 8:
..\Users\<user_name>\AppData\Roaming\SoftQuad\XMetaL\<version>\print_local.xml
elements contain parameters for specific deliverabletypes.These settings override parameters of the samename in print_dita142.xml.
The <base_config> ID attribute references a<config> element (that is, an output format) inprint_dita142.xml
XMetaL Author 16 User's Guide160
Publishing configuration files
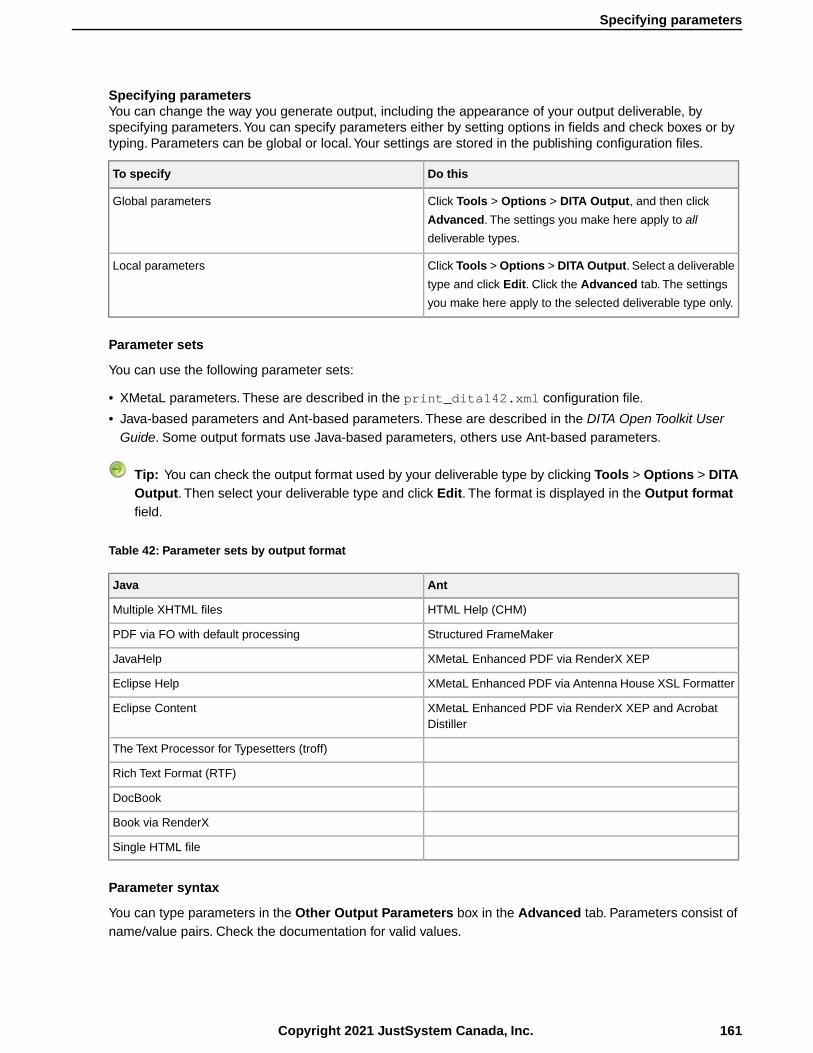
Specifying parametersYou can change the way you generate output, including the appearance of your output deliverable, byspecifying parameters.You can specify parameters either by setting options in fields and check boxes or bytyping. Parameters can be global or local.Your settings are stored in the publishing configuration files.
Do thisTo specify
Click Tools > Options > DITA Output, and then click
Advanced. The settings you make here apply to all
deliverable types.
Global parameters
Click Tools > Options > DITA Output. Select a deliverable
type and click Edit. Click the Advanced tab. The settings
you make here apply to the selected deliverable type only.
Local parameters
Parameter sets
You can use the following parameter sets:
• XMetaL parameters. These are described in the print_dita142.xml configuration file.
• Java-based parameters and Ant-based parameters. These are described in the DITA Open Toolkit UserGuide. Some output formats use Java-based parameters, others use Ant-based parameters.
Tip: You can check the output format used by your deliverable type by clicking Tools > Options > DITAOutput. Then select your deliverable type and click Edit. The format is displayed in the Output formatfield.
Table 42: Parameter sets by output format
AntJava
HTML Help (CHM)Multiple XHTML files
Structured FrameMakerPDF via FO with default processing
XMetaL Enhanced PDF via RenderX XEPJavaHelp
XMetaL Enhanced PDF via Antenna House XSL FormatterEclipse Help
XMetaL Enhanced PDF via RenderX XEP and AcrobatDistiller
Eclipse Content
The Text Processor for Typesetters (troff)
Rich Text Format (RTF)
DocBook
Book via RenderX
Single HTML file
Parameter syntax
You can type parameters in the Other Output Parameters box in the Advanced tab. Parameters consist ofname/value pairs. Check the documentation for valid values.
161Copyright 2021 JustSystem Canada, Inc.
Specifying parameters

For Java parameters, the format is as follows:
DSDK_PARAM_<parameter name> =<parameter value>
For Ant parameters, the format is as follows:
ANT_PARAM_<parameter name> = <parametervalue>
For example, to specify the ‘logdir’ parameter in the ‘Single HTML file’ output format, type the following:
DSDK_PARAM_logdir = html
To specify the same parameter in the ‘XMetaL Enhanced’ output format, type the following:
ANT_PARAM_args.logdir = html
Note: Ant parameters may contain more than one segment (denoted by the ‘.’ character).
Create an output formatYou can create a new output format by creating an XML configuration file and saving it in the same folder asprint_dita142.xml.You can distribute new configuration files in order to give all users access to the newoutput format.
1. Open print_dita142.xml in a text editor.
2. Create a new XML document that contains the following markup:
• An XML declaration• The print configuration DOCTYPE declaration:<!DOCTYPE print SYSTEM "print_config.dtd">• A single <print></print> root element• Optionally, a <globals></globals> element that contains settings that apply globally to all output
formats in the new configuration file. Refer to print_dita142.xml for an example.
3. Copy an existing <config> element from print_dita142.xml and paste it into the <print> elementin the new configuration file.
You may wish to choose a configuration that has settings similar to those you wish to use in the newconfiguration. For example, if your new configuration is based on HTML Help (CHM) output, copy andpaste the HTML Help configuration.
4. Type a unique ID for the new <config> element.
New deliverable types that you create for this output format will refer to this ID.
5. In the <config_title> element, type a unique title for the new configuration.
6. Add new parameters or change settings for existing parameters.
Parameters are specified in <instruction> elements.
7. Change the batch code as required and save the file in the same folder as print_dita142.xml.
You can now create a deliverable type that uses the new output format.
Related LinksModify an output format on page 163
To modify an output format, change the contents of print_dita142.xml, the publishingconfiguration file that contains parameters for output formats.
XMetaL Author 16 User's Guide162
Create an output format

Modify an output formatTo modify an output format, change the contents of print_dita142.xml, the publishing configuration filethat contains parameters for output formats.
1. go to ..\XMetaL\Author\DITA\XACs\shared\renditions and open print_dita142.xml in atext editor.
2. Scroll to the output format that you wish to modify.
Output formats are specified in <config> elements.
3. Add new parameters or change settings for existing parameters.
Parameters are specified in <instruction> elements.
Related LinksCreate an output format on page 162
You can create a new output format by creating an XML configuration file and saving it in the samefolder as print_dita142.xml.You can distribute new configuration files in order to give all usersaccess to the new output format.
Troubleshooting publishing issuesWhen you generate output, you may receive error messages in the output log, or output may fail.
If you cannot generate output, you can check and debug the log file. In the log, warnings are surrounded bya yellow box and errors and warnings are surrounded by a red or orange box.You can jump to the next orprevious warning or error by pressing Ctrl+Down Arrow or Ctrl+Up Arrow.
You can also refer to the DITA Open Toolkit User Guide and related online user forums. Issues related togenerating output are also described in the release notes.
Also check the following:
• If a file with the same name (for example, a CHM or PDF file) as the one you are currently generating isopen. Close the file and re-generate.
• If you are generating output from a DITA topic file that is saved with a ‘.dita’ extension, check to see thatyou have included the following parameter in your deliverable type: ‘DSDK_PARAM_ditaext = .dita’ (foroutput formats that use Java) or ‘ANT_PARAM_dita.extname=.dita’ (for output formats that use Ant) andre-generate.
• The contents of the topics and the map are valid.
• Ensure that all link elements such as <topicref> and <xref> point to a target that exists. (If you areworking with a specialized DITA document, check that you have assigned an ID to your specialized elementif it is the target of a reference.)
• If your CHM file is written to a computer other than your own (for example, a network drive), you may notbe able to view the contents. Copy the CHM file to your local drive.
File and folder naming rules
The DITA Open Toolkit has requirements for file and folder names. Problems with file and folder names maycause publishing to fail. Check the following:
• The file extensions of the topic references in your map are of one type; they must all be either ‘.xml’ or‘.dita’.
• Your map file has the extension ‘.ditamap’.
• All files are stored on the same drive letter.
163Copyright 2021 JustSystem Canada, Inc.
Modify an output format
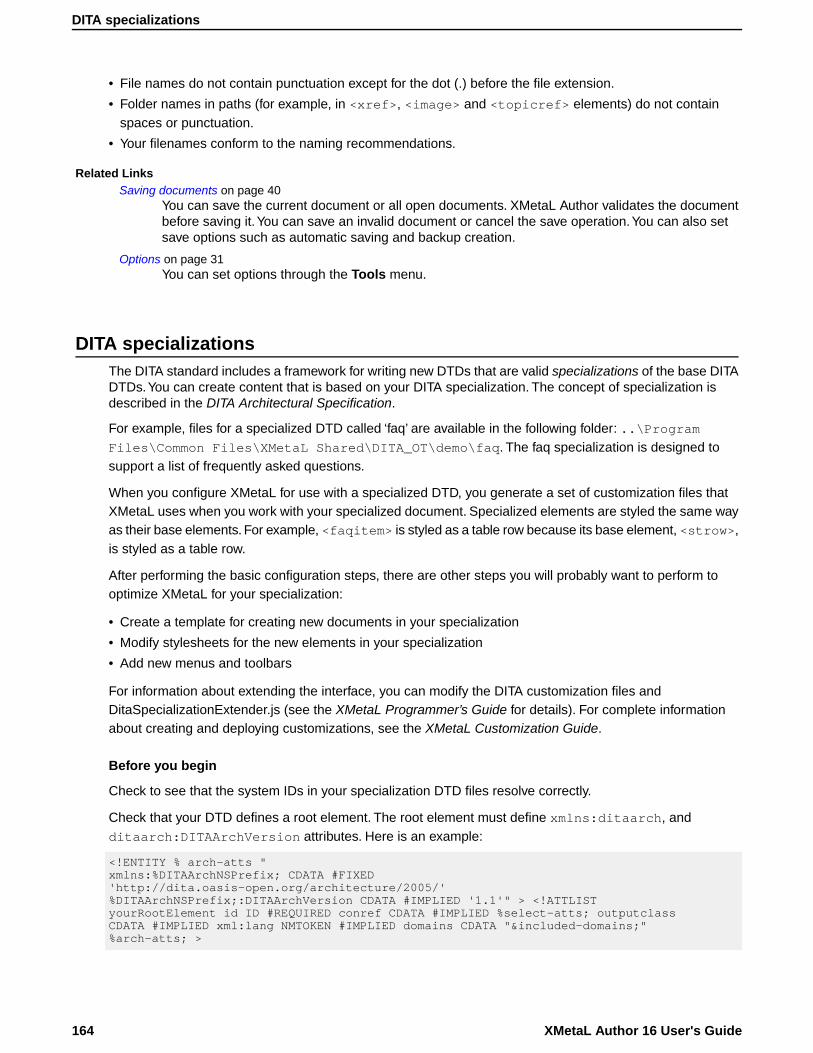
• File names do not contain punctuation except for the dot (.) before the file extension.
• Folder names in paths (for example, in <xref>, <image> and <topicref> elements) do not containspaces or punctuation.
• Your filenames conform to the naming recommendations.
Related LinksSaving documents on page 40
You can save the current document or all open documents. XMetaL Author validates the documentbefore saving it.You can save an invalid document or cancel the save operation.You can also setsave options such as automatic saving and backup creation.
Options on page 31You can set options through the Tools menu.
DITA specializationsThe DITA standard includes a framework for writing new DTDs that are valid specializations of the base DITADTDs.You can create content that is based on your DITA specialization. The concept of specialization isdescribed in the DITA Architectural Specification.
For example, files for a specialized DTD called ‘faq’ are available in the following folder: ..\ProgramFiles\Common Files\XMetaL Shared\DITA_OT\demo\faq. The faq specialization is designed tosupport a list of frequently asked questions.
When you configure XMetaL for use with a specialized DTD, you generate a set of customization files thatXMetaL uses when you work with your specialized document. Specialized elements are styled the same wayas their base elements. For example, <faqitem> is styled as a table row because its base element, <strow>,is styled as a table row.
After performing the basic configuration steps, there are other steps you will probably want to perform tooptimize XMetaL for your specialization:
• Create a template for creating new documents in your specialization
• Modify stylesheets for the new elements in your specialization
• Add new menus and toolbars
For information about extending the interface, you can modify the DITA customization files andDitaSpecializationExtender.js (see the XMetaL Programmer’s Guide for details). For complete informationabout creating and deploying customizations, see the XMetaL Customization Guide.
Before you begin
Check to see that the system IDs in your specialization DTD files resolve correctly.
Check that your DTD defines a root element. The root element must define xmlns:ditaarch, andditaarch:DITAArchVersion attributes. Here is an example:
<!ENTITY % arch-atts "xmlns:%DITAArchNSPrefix; CDATA #FIXED'http://dita.oasis-open.org/architecture/2005/'%DITAArchNSPrefix;:DITAArchVersion CDATA #IMPLIED '1.1'" > <!ATTLISTyourRootElement id ID #REQUIRED conref CDATA #IMPLIED %select-atts; outputclassCDATA #IMPLIED xml:lang NMTOKEN #IMPLIED domains CDATA "&included-domains;"%arch-atts; >
XMetaL Author 16 User's Guide164
DITA specializations

It is recommended that you create a folder for your specialization DTD files in the ..\ProgramFiles\Common Files\XMetaL Shared\DITA_OT folder for the following reasons:
• The DITA Open Toolkit requires access to the specialized dtd. This is provided by catalog entries addedto catalog-dita.xml and catalog-dita_template.xml. Since catalog files denote paths in a mannerrelative to the catalog file itself, it is easiest to formulate paths if the specialized DTD is nearby.
• Specializations must include topic.mod and similar stock DITA entities; relative paths for system IDs canbe formulated easily from demo specialization examples, which have relative path system IDs that resolveto the DITA_OT\dtd folder.
• For easy identification of specialization folders in the event of an un-install or re-install.
To take full advantage of the formatting and customization options, you should be familiar with the following:
• DITA specializations as described in the DITA Architectural Specification
• XMetaL customizations
• Document type declarations
• Catalog files
• CSS
• Forms
Related LinksDocument type declarations on page 193
Document type declarations associate XML documents with a DTD. They consist of an externalidentifier, an internal subset, or combination of the two.
Configure XMetaL
Note: The Select Specialized DITA DTD option is disabled for limited users under Citrix.
1. Create a folder for your specialization.For example: ..\Common Files\XMetaL Shared\DITA_OT\demo\faq.
2. Place your specialized DTD files in the specialization folder.
These include .dtd files and any modules.
Note: The system IDs in your specialization DTD must resolve correctly.
3. Start XMetaL.
4. Click Tools > Options, and go to DITA > Specializations.
5. Choose your specialized DITA DTD.
6. Choose the base document type that is most similar to the specialized document type (for example, Topic)and type the public ID for the specialized DTD. Do not include quotation marks.Here is an example of a public ID:
-//IBM//DTD DITA FAQ//EN
7. Click OK.XMetaL creates a customization folder for your specialization, for example,..\XMetaL\Author\DITA\XACs\1.2\faq_shell.
8. Close and re-start XMetaL.
9. If you want to create reusable components from your specialized topic, add an entity to the reusablecomponents entity file, ..\XMetaL\Author\DITA\DITA_OT_DTD\dcspecialized-typemods.ent.
165Copyright 2021 JustSystem Canada, Inc.
Configure XMetaL
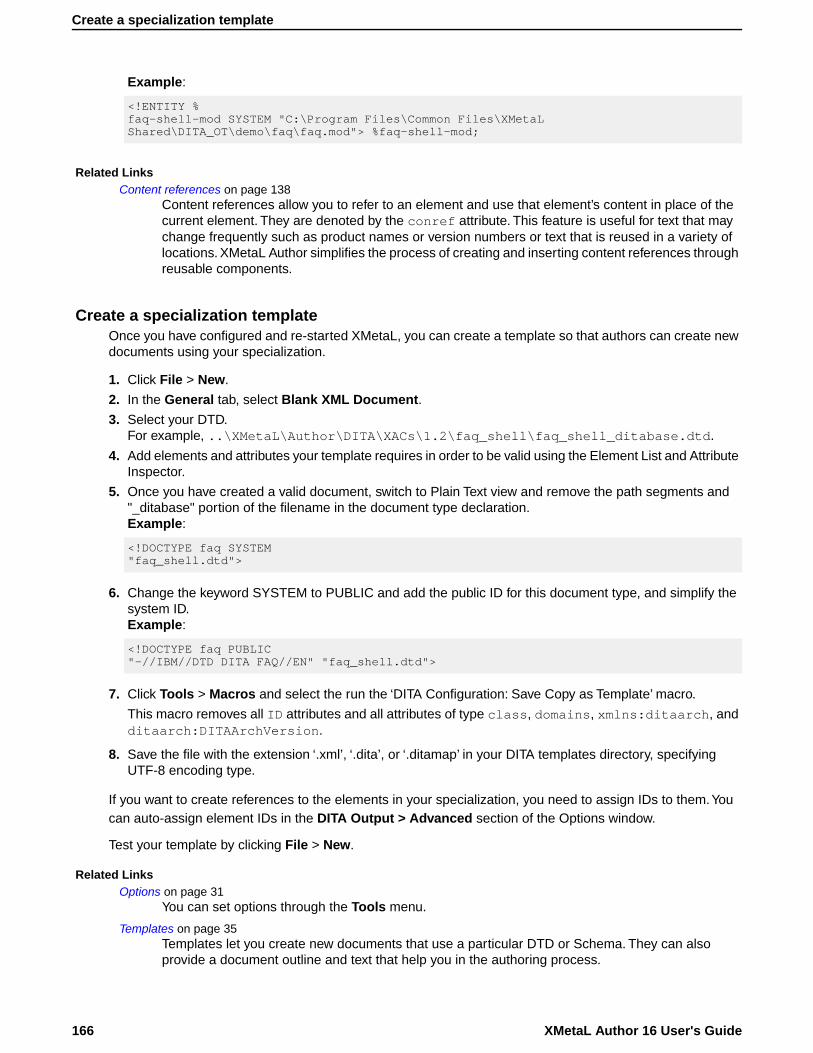
Example:
<!ENTITY %faq-shell-mod SYSTEM "C:\Program Files\Common Files\XMetaLShared\DITA_OT\demo\faq\faq.mod"> %faq-shell-mod;
Related LinksContent references on page 138
Content references allow you to refer to an element and use that element’s content in place of thecurrent element. They are denoted by the conref attribute. This feature is useful for text that maychange frequently such as product names or version numbers or text that is reused in a variety oflocations. XMetaL Author simplifies the process of creating and inserting content references throughreusable components.
Create a specialization templateOnce you have configured and re-started XMetaL, you can create a template so that authors can create newdocuments using your specialization.
1. Click File > New.
2. In the General tab, select Blank XML Document.
3. Select your DTD.For example, ..\XMetaL\Author\DITA\XACs\1.2\faq_shell\faq_shell_ditabase.dtd.
4. Add elements and attributes your template requires in order to be valid using the Element List and AttributeInspector.
5. Once you have created a valid document, switch to Plain Text view and remove the path segments and"_ditabase" portion of the filename in the document type declaration.Example:
<!DOCTYPE faq SYSTEM"faq_shell.dtd">
6. Change the keyword SYSTEM to PUBLIC and add the public ID for this document type, and simplify thesystem ID.Example:
<!DOCTYPE faq PUBLIC"-//IBM//DTD DITA FAQ//EN" "faq_shell.dtd">
7. Click Tools > Macros and select the run the ‘DITA Configuration: Save Copy as Template’ macro.
This macro removes all ID attributes and all attributes of type class, domains, xmlns:ditaarch, andditaarch:DITAArchVersion.
8. Save the file with the extension ‘.xml’, ‘.dita’, or ‘.ditamap’ in your DITA templates directory, specifyingUTF-8 encoding type.
If you want to create references to the elements in your specialization, you need to assign IDs to them.Youcan auto-assign element IDs in the DITA Output > Advanced section of the Options window.
Test your template by clicking File > New.
Related LinksOptions on page 31
You can set options through the Tools menu.
Templates on page 35Templates let you create new documents that use a particular DTD or Schema. They can alsoprovide a document outline and text that help you in the authoring process.
XMetaL Author 16 User's Guide166
Create a specialization template

Apply custom formattingYou can create custom formatting for DITA specializations.
1. Open the CSS stylesheet for your specialization (for example,..\XMetaL\Author\DITA\XACs\1.2\faq_shell\faq_shell_ditabase-specialized.css).
2. Add selectors and styles for your specialized elements.
Deploy a specialized DITA customizationYou can configure additional installations of XMetaL to use the same specialized DITA customization.
When you choose Tools > Options and go to DITA > Specializations, the currently configured DITA optionson page 167 is used to configure the specialized DITA DTD's authoring experience, and the files and folderscreated for that incorporate the version number. This means the files created during that process, and thefiles you need to distribute, will be different depending on that version.
Note: The files you need to copy from a configured machine are as follows, where "n.n" is equal to theDITA version (1.1, 1.2, etc) and where "nn" is that same version without the literal period (11, 12, etc).
1. Copy this entire folder <xmetal install path>\Author\DITA\XACs\n.n\<specialized DITA DTD's filename>.
2. Copy the reusable components file <xmetal installpath>\Author\DITA\DITA_n.n_DTD\dcspecialized-typemods.ent.
3. Copy the XAC catalog file <xmetal installpath>\Author\DITA\XACs\n.n\dita_xac_catalog_specialized.xml.
4. If you created one or more templates copy them to the same folder you saved them in inside <xmetalinstall path>\Author\Template.
5. Copy the rules catalog file <xmetal install path>\Author\Rules\ditann_specialized.soc.
Example where the DITA version was set to 1.2 and your specialized DTD's file name is"faq_shell":
1. Copy this entire folder <xmetal installpath>\Author\DITA\XACs\1.2\faq_shell.
2. Copy the reusable components file <xmetal installpath>\Author\DITA\DITA_1.2_DTD\dcspecialized-typemods.ent.
3. Copy the XAC catalog file <xmetal installpath>\Author\DITA\XACs\1.2\dita_xac_catalog_specialized.xml.
4. If you created one or more templates copy them to the same folder you saved them ininside <xmetal install path>\Author\Template.
5. Copy the rules catalog file <xmetal installpath>\Author\Rules\dita12_specialized.soc.
DITA optionsYou can control DITA behaviors using the settings in the DITA Options dialog box. Options can be set for allspecializations or on a per-specialization basis.
167Copyright 2021 JustSystem Canada, Inc.
Apply custom formatting
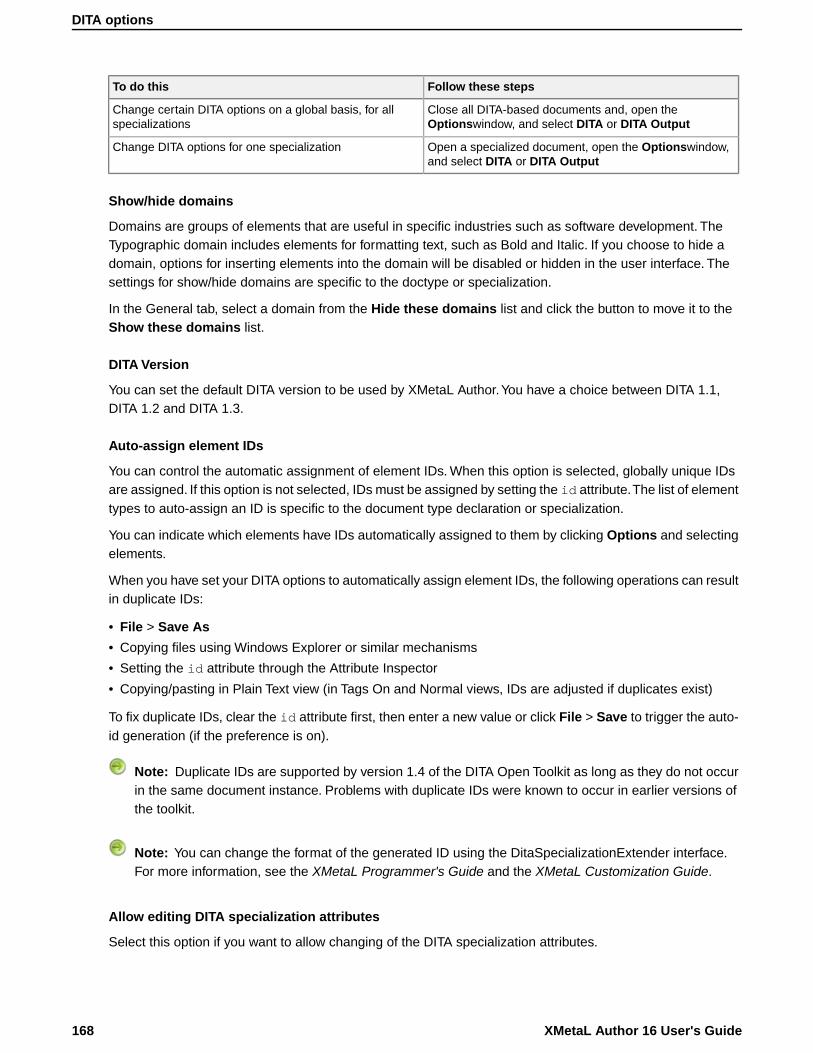
Follow these stepsTo do this
Close all DITA-based documents and, open theOptionswindow, and select DITA or DITA Output
Change certain DITA options on a global basis, for allspecializations
Open a specialized document, open the Optionswindow,and select DITA or DITA Output
Change DITA options for one specialization
Show/hide domains
Domains are groups of elements that are useful in specific industries such as software development. TheTypographic domain includes elements for formatting text, such as Bold and Italic. If you choose to hide adomain, options for inserting elements into the domain will be disabled or hidden in the user interface. Thesettings for show/hide domains are specific to the doctype or specialization.
In the General tab, select a domain from the Hide these domains list and click the button to move it to theShow these domains list.
DITA Version
You can set the default DITA version to be used by XMetaL Author.You have a choice between DITA 1.1,DITA 1.2 and DITA 1.3.
Auto-assign element IDs
You can control the automatic assignment of element IDs. When this option is selected, globally unique IDsare assigned. If this option is not selected, IDs must be assigned by setting the id attribute.The list of elementtypes to auto-assign an ID is specific to the document type declaration or specialization.
You can indicate which elements have IDs automatically assigned to them by clicking Options and selectingelements.
When you have set your DITA options to automatically assign element IDs, the following operations can resultin duplicate IDs:
• File > Save As
• Copying files using Windows Explorer or similar mechanisms
• Setting the id attribute through the Attribute Inspector
• Copying/pasting in Plain Text view (in Tags On and Normal views, IDs are adjusted if duplicates exist)
To fix duplicate IDs, clear the id attribute first, then enter a new value or click File > Save to trigger the auto-id generation (if the preference is on).
Note: Duplicate IDs are supported by version 1.4 of the DITA Open Toolkit as long as they do not occurin the same document instance. Problems with duplicate IDs were known to occur in earlier versions ofthe toolkit.
Note: You can change the format of the generated ID using the DitaSpecializationExtender interface.For more information, see the XMetaL Programmer's Guide and the XMetaL Customization Guide.
Allow editing DITA specialization attributes
Select this option if you want to allow changing of the DITA specialization attributes.
XMetaL Author 16 User's Guide168
DITA options
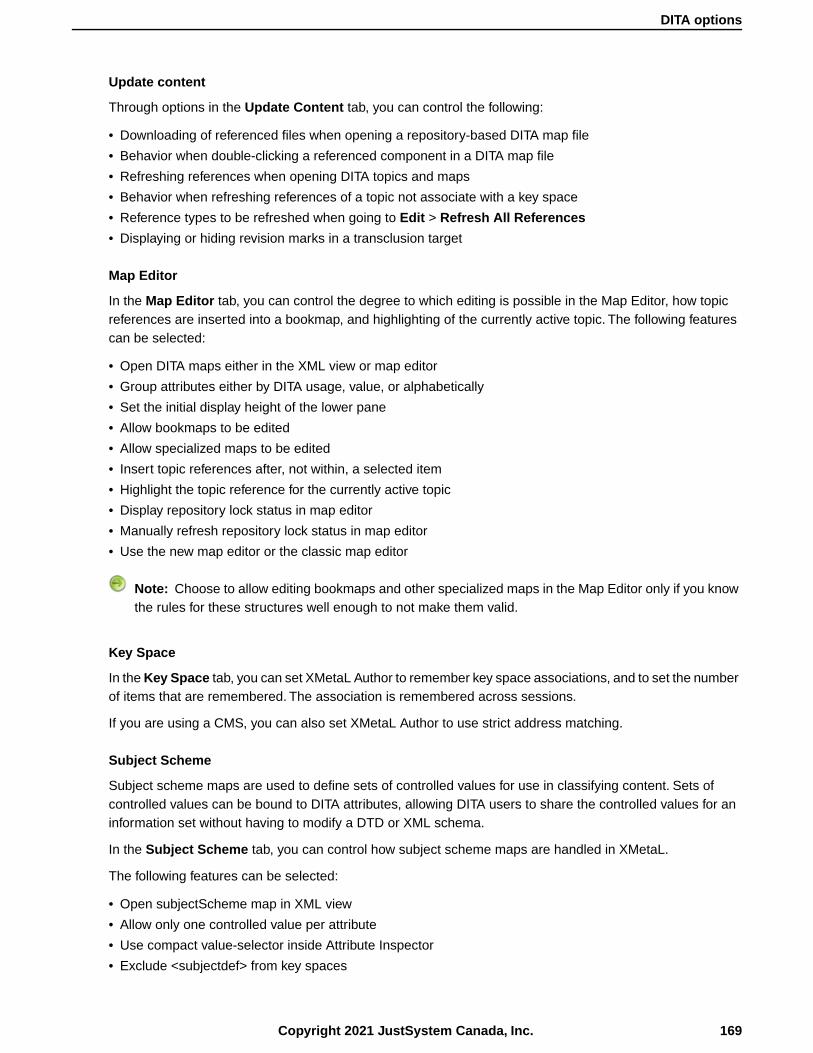
Update content
Through options in the Update Content tab, you can control the following:
• Downloading of referenced files when opening a repository-based DITA map file
• Behavior when double-clicking a referenced component in a DITA map file
• Refreshing references when opening DITA topics and maps
• Behavior when refreshing references of a topic not associate with a key space
• Reference types to be refreshed when going to Edit > Refresh All References
• Displaying or hiding revision marks in a transclusion target
Map Editor
In the Map Editor tab, you can control the degree to which editing is possible in the Map Editor, how topicreferences are inserted into a bookmap, and highlighting of the currently active topic. The following featurescan be selected:
• Open DITA maps either in the XML view or map editor
• Group attributes either by DITA usage, value, or alphabetically
• Set the initial display height of the lower pane
• Allow bookmaps to be edited
• Allow specialized maps to be edited
• Insert topic references after, not within, a selected item
• Highlight the topic reference for the currently active topic
• Display repository lock status in map editor
• Manually refresh repository lock status in map editor
• Use the new map editor or the classic map editor
Note: Choose to allow editing bookmaps and other specialized maps in the Map Editor only if you knowthe rules for these structures well enough to not make them valid.
Key Space
In the Key Space tab, you can set XMetaL Author to remember key space associations, and to set the numberof items that are remembered. The association is remembered across sessions.
If you are using a CMS, you can also set XMetaL Author to use strict address matching.
Subject Scheme
Subject scheme maps are used to define sets of controlled values for use in classifying content. Sets ofcontrolled values can be bound to DITA attributes, allowing DITA users to share the controlled values for aninformation set without having to modify a DTD or XML schema.
In the Subject Scheme tab, you can control how subject scheme maps are handled in XMetaL.
The following features can be selected:
• Open subjectScheme map in XML view
• Allow only one controlled value per attribute
• Use compact value-selector inside Attribute Inspector
• Exclude <subjectdef> from key spaces
169Copyright 2021 JustSystem Canada, Inc.
DITA options
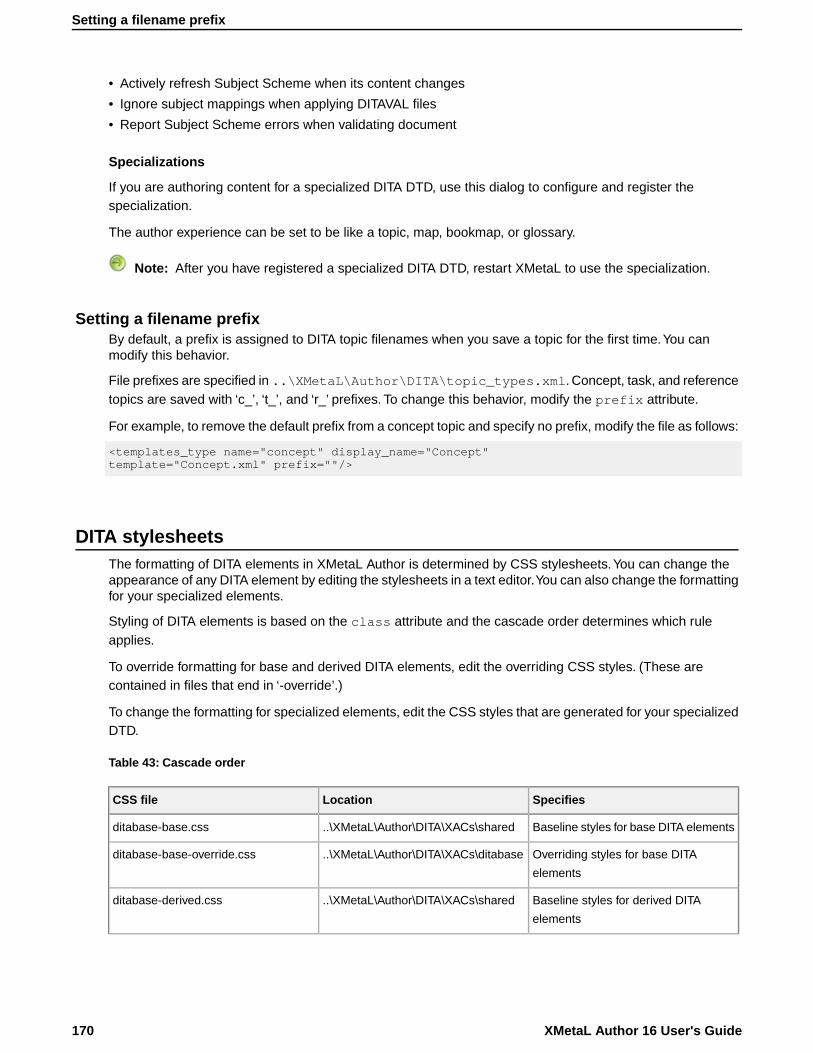
• Actively refresh Subject Scheme when its content changes
• Ignore subject mappings when applying DITAVAL files
• Report Subject Scheme errors when validating document
Specializations
If you are authoring content for a specialized DITA DTD, use this dialog to configure and register thespecialization.
The author experience can be set to be like a topic, map, bookmap, or glossary.
Note: After you have registered a specialized DITA DTD, restart XMetaL to use the specialization.
Setting a filename prefixBy default, a prefix is assigned to DITA topic filenames when you save a topic for the first time.You canmodify this behavior.
File prefixes are specified in ..\XMetaL\Author\DITA\topic_types.xml. Concept, task, and referencetopics are saved with ‘c_’, ‘t_’, and ‘r_’ prefixes. To change this behavior, modify the prefix attribute.
For example, to remove the default prefix from a concept topic and specify no prefix, modify the file as follows:
<templates_type name="concept" display_name="Concept"template="Concept.xml" prefix=""/>
DITA stylesheetsThe formatting of DITA elements in XMetaL Author is determined by CSS stylesheets.You can change theappearance of any DITA element by editing the stylesheets in a text editor.You can also change the formattingfor your specialized elements.
Styling of DITA elements is based on the class attribute and the cascade order determines which ruleapplies.
To override formatting for base and derived DITA elements, edit the overriding CSS styles. (These arecontained in files that end in ‘-override’.)
To change the formatting for specialized elements, edit the CSS styles that are generated for your specializedDTD.
Table 43: Cascade order
SpecifiesLocationCSS file
Baseline styles for base DITA elements..\XMetaL\Author\DITA\XACs\sharedditabase-base.css
Overriding styles for base DITA
elements
..\XMetaL\Author\DITA\XACs\ditabaseditabase-base-override.css
Baseline styles for derived DITA
elements
..\XMetaL\Author\DITA\XACs\sharedditabase-derived.css
XMetaL Author 16 User's Guide170
Setting a filename prefix
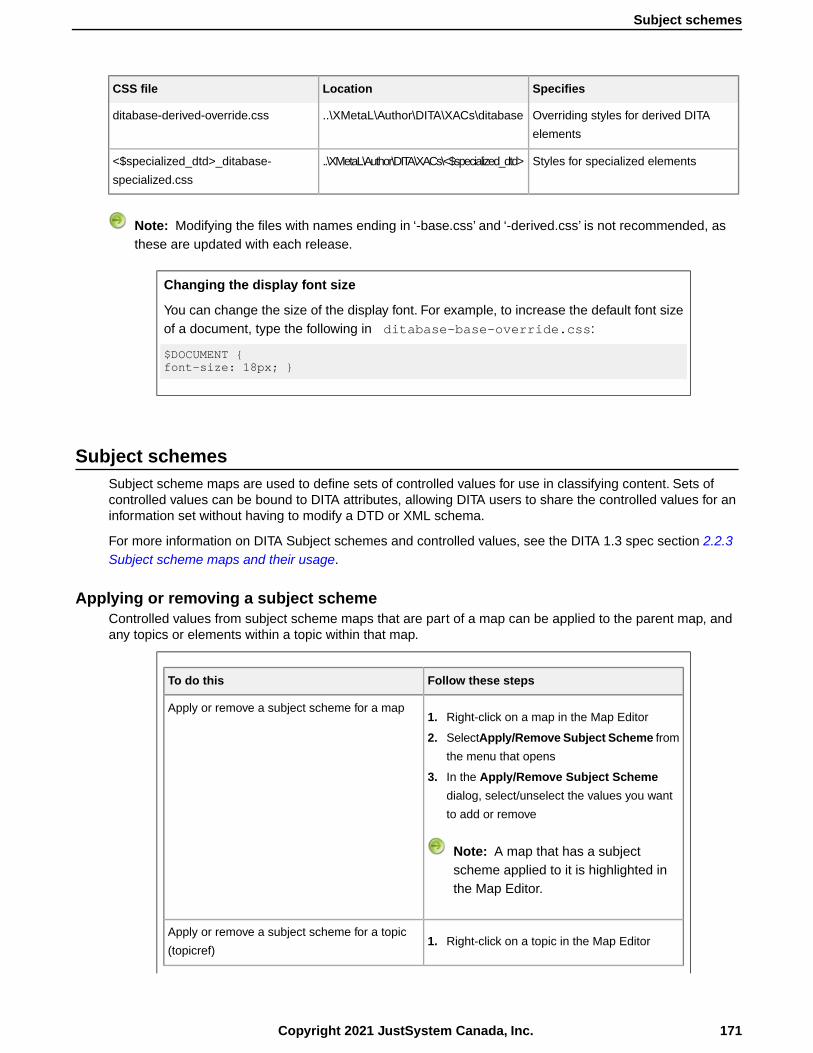
SpecifiesLocationCSS file
Overriding styles for derived DITA
elements
..\XMetaL\Author\DITA\XACs\ditabaseditabase-derived-override.css
Styles for specialized elements..\XMetaL\Author\DITA\XACs\<$specialized_dtd><$specialized_dtd>_ditabase-
specialized.css
Note: Modifying the files with names ending in ‘-base.css’ and ‘-derived.css’ is not recommended, asthese are updated with each release.
Changing the display font size
You can change the size of the display font. For example, to increase the default font sizeof a document, type the following in ditabase-base-override.css:
$DOCUMENT {font-size: 18px; }
Subject schemesSubject scheme maps are used to define sets of controlled values for use in classifying content. Sets ofcontrolled values can be bound to DITA attributes, allowing DITA users to share the controlled values for aninformation set without having to modify a DTD or XML schema.
For more information on DITA Subject schemes and controlled values, see the DITA 1.3 spec section 2.2.3Subject scheme maps and their usage.
Applying or removing a subject schemeControlled values from subject scheme maps that are part of a map can be applied to the parent map, andany topics or elements within a topic within that map.
Follow these stepsTo do this
Apply or remove a subject scheme for a map1. Right-click on a map in the Map Editor
2. SelectApply/Remove Subject Scheme from
the menu that opens
3. In the Apply/Remove Subject Scheme
dialog, select/unselect the values you want
to add or remove
Note: A map that has a subjectscheme applied to it is highlighted inthe Map Editor.
Apply or remove a subject scheme for a topic
(topicref)1. Right-click on a topic in the Map Editor
171Copyright 2021 JustSystem Canada, Inc.
Subject schemes

Follow these stepsTo do this
2. SelectApply/Remove Subject Scheme from
the menu that opens
3. In the Apply/Remove Subject Scheme
dialog, select/unselect the values you want
to add or remove
Note: A topic that has a subjectscheme applied to it is highlighted inthe Map Editor.
Apply or remove a subject scheme for an element
in a topic1. Open the topic to which you want to apply a
subject scheme
2. Place the cursor in the element to which you
want to apply the subject scheme
3. Open Reuse > Apply/Remove Subject
Scheme
4. In the Apply/Remove Subject Scheme
dialog, select/unselect the values you want
to add or remove
Note: An element that has a subjectscheme applied to it is highlighted.
Managing subject schemesYou can attach or detach subject scheme maps to/from active documents or DITA maps, inspect the use ofsubject schemes in opened documents, and view reference and definition pairings and subject definitionswithin scheme maps.
Perform these stepsTo do this
Add a subject scheme to the current edit session1. Open Reuse > Show Subject Scheme Manager.
2. Click Add.
3. Select the subject scheme map you want to add, and
then click Open.
The references and definitions for the opened mapwill be populated in the <subjectdef> and<enumerationref> windows.
Note: You can also remove a subject schememap from the current edit session as long as it isnot being used.
XMetaL Author 16 User's Guide172
Managing subject schemes

Perform these stepsTo do this
Attach (or detach) a subject scheme to the active document
or DITA map1. Open Reuse > Show Subject Scheme Manager.
2. Select a subject scheme map from the subjectScheme
dropdown list.
The references and definitions for the opened mapwill be populated in the <subjectdef> and<enumerationref> windows.
Note: If you need to add a subject scheme map,
see the instructions above.
3. Select Active Document or Active DITA Map from the
drop down list at the bottom left of the window.
4. Click Attach (or Detach).
Inspect opened documents to display context info
(keyspace, subjectScheme) attached to the document1. Click Inspect.
2. In the Inspect Opened Documents window, use the
up and down arrows to navigate through the open
documents.
View subject definitions1. Open a subject scheme map.
2. Place the cursor in a <subjectdef> element within an
<enumerationdef> element.
3. In the Attribute Inspector, click the ellipsis (...) button
for the keyref element.
173Copyright 2021 JustSystem Canada, Inc.
Managing subject schemes

Keyboard shortcuts
Shortcut keys for menu commands are indicated in the menus. All menus, menu items, and dialog box controlsare accessible by pressing the Alt key and the underlined letter (also called an access key or mnemonic)associated with that control. XMetaL Author also supports shortcut keys for window and dialog box navigationand other functions.
Note: If a keyboard shortcut listed here does not work in your document, check to see if the keystrokecombination has been assigned to a macro.
Table 44: Working with files
ShortcutAction
Ctrl+NCreate a new document from the default template
Ctrl+TCreate a new document by choosing a template
Ctrl+OOpen a document
Alt+F + number keyOpen a document from the recently-opened list
Ctrl+W OR Ctrl+F4Close a document
Note: You can also click the middle mousebutton to close a document.
Ctrl+SSave a document
Ctrl+QSave all documents
Ctrl+PPrint
Alt+F4Quit XMetaL Author
Ctrl+MPreview document in a browser
F1Display online help
F4Next Results Pane selection
Shift+F4Previous Results Pane selection
Ctrl+'View recently used and favorite documents
Ctrl+DView opened documents
Table 45: Editing documents
ShortcutAction
Ctrl+FFind and Replace
F3Find Next Forwards
Shift+F3Find Next Backwards
Ctrl+F3Find Selection Forwards
Ctrl+Shift+F3Find Selection Backwards
Ctrl+Z OR Alt+BackspaceUndo an action
174Copyright 2021 JustSystem Canada, Inc.
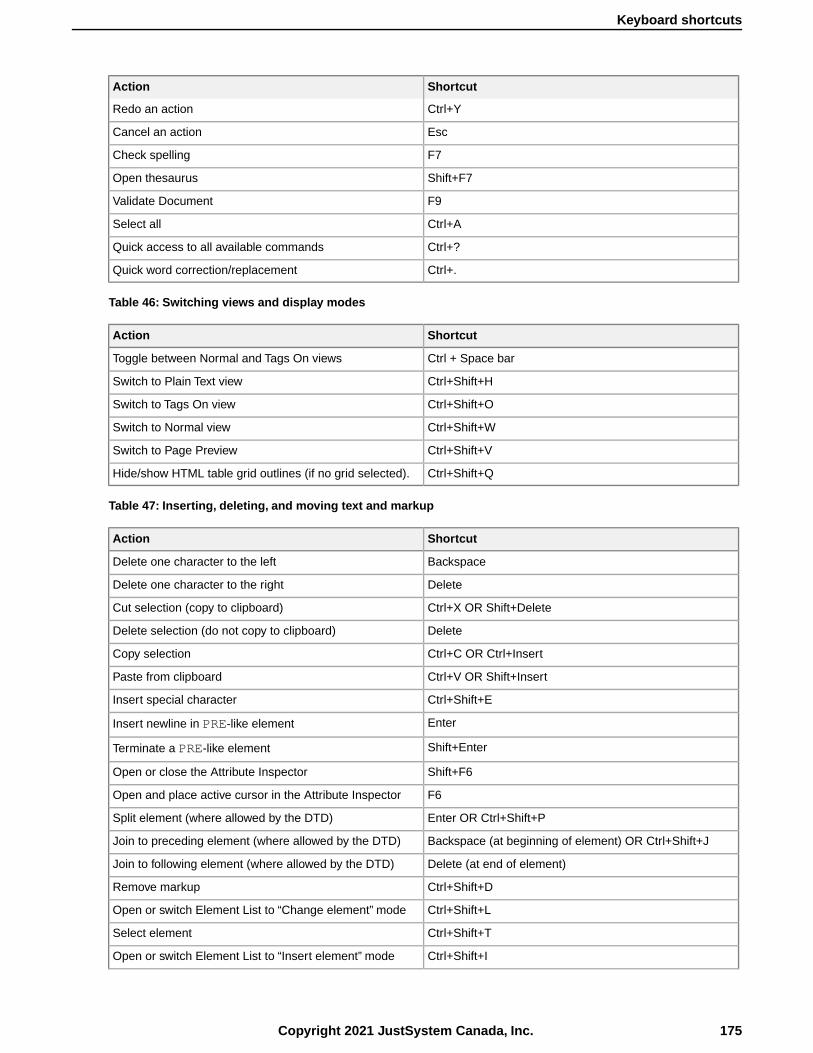
ShortcutAction
Ctrl+YRedo an action
EscCancel an action
F7Check spelling
Shift+F7Open thesaurus
F9Validate Document
Ctrl+ASelect all
Ctrl+?Quick access to all available commands
Ctrl+.Quick word correction/replacement
Table 46: Switching views and display modes
ShortcutAction
Ctrl + Space barToggle between Normal and Tags On views
Ctrl+Shift+HSwitch to Plain Text view
Ctrl+Shift+OSwitch to Tags On view
Ctrl+Shift+WSwitch to Normal view
Ctrl+Shift+VSwitch to Page Preview
Ctrl+Shift+QHide/show HTML table grid outlines (if no grid selected).
Table 47: Inserting, deleting, and moving text and markup
ShortcutAction
BackspaceDelete one character to the left
DeleteDelete one character to the right
Ctrl+X OR Shift+DeleteCut selection (copy to clipboard)
DeleteDelete selection (do not copy to clipboard)
Ctrl+C OR Ctrl+InsertCopy selection
Ctrl+V OR Shift+InsertPaste from clipboard
Ctrl+Shift+EInsert special character
EnterInsert newline in PRE-like element
Shift+EnterTerminate a PRE-like element
Shift+F6Open or close the Attribute Inspector
F6Open and place active cursor in the Attribute Inspector
Enter OR Ctrl+Shift+PSplit element (where allowed by the DTD)
Backspace (at beginning of element) OR Ctrl+Shift+JJoin to preceding element (where allowed by the DTD)
Delete (at end of element)Join to following element (where allowed by the DTD)
Ctrl+Shift+DRemove markup
Ctrl+Shift+LOpen or switch Element List to “Change element” mode
Ctrl+Shift+TSelect element
Ctrl+Shift+IOpen or switch Element List to “Insert element” mode
175Copyright 2021 JustSystem Canada, Inc.
Keyboard shortcuts
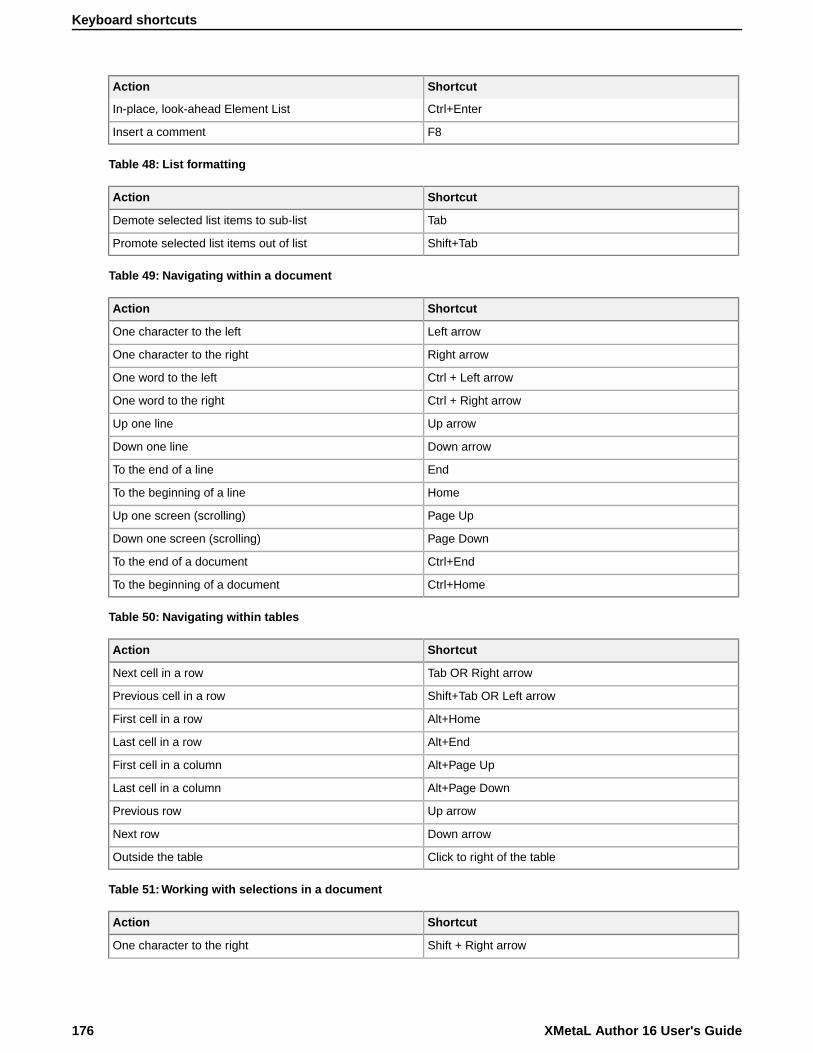
ShortcutAction
Ctrl+EnterIn-place, look-ahead Element List
F8Insert a comment
Table 48: List formatting
ShortcutAction
TabDemote selected list items to sub-list
Shift+TabPromote selected list items out of list
Table 49: Navigating within a document
ShortcutAction
Left arrowOne character to the left
Right arrowOne character to the right
Ctrl + Left arrowOne word to the left
Ctrl + Right arrowOne word to the right
Up arrowUp one line
Down arrowDown one line
EndTo the end of a line
HomeTo the beginning of a line
Page UpUp one screen (scrolling)
Page DownDown one screen (scrolling)
Ctrl+EndTo the end of a document
Ctrl+HomeTo the beginning of a document
Table 50: Navigating within tables
ShortcutAction
Tab OR Right arrowNext cell in a row
Shift+Tab OR Left arrowPrevious cell in a row
Alt+HomeFirst cell in a row
Alt+EndLast cell in a row
Alt+Page UpFirst cell in a column
Alt+Page DownLast cell in a column
Up arrowPrevious row
Down arrowNext row
Click to right of the tableOutside the table
Table 51: Working with selections in a document
ShortcutAction
Shift + Right arrowOne character to the right
XMetaL Author 16 User's Guide176
Keyboard shortcuts

ShortcutAction
Shift + Left arrowOne character to the left
Ctrl+Shift + Right arrowTo the end of a word
Ctrl+Shift + Left arrowTo the beginning of a word
Shift+EndTo the end of a line
Shift+HomeTo the beginning of a line
Shift + Down arrowOne line down
Shift + Up arrowOne line up
Ctrl+Shift+HomeTo the beginning of a document
Ctrl+Shift+TSelect the current element
Ctrl+ASelect the entire document
TabSelect the contents of the next cell in the table
Shift+TabSelect the contents of the preceding cell in the table
Table 52: Working with selections in a table
ShortcutAction
Shift + Right arrowExtend selected cell block by one cell to the right
Shift + Left arrowExtend selected cell block by one cell to the left
Shift + Down arrowExtend selected cell block by one cell down
Shift + Up arrowExtend selected cell block by one cell up
Table 53: Choosing menu commands
ShortcutAction
Shift+F10Show the shortcut (right mouse) menu
Alt + Space barShow the program icon menu (on the program title bar)
Down arrow, Up arrowSelect the next or previous command on the displayedmenu or sub-menu
Left arrow, Right arrowSelect the menu to the left or right; or, with a sub-menuvisible, switch between the main menu and the sub-menu
AltClose the visible menu and sub-menu at the same time
EscClose the visible menu; or, with a sub-menu visible, closethe sub-menu only
CTRL + Shift + SShow the Insert Symbol menu
CTRL + . (period)Show the Quick Writing Tools menu
Table 54: Moving between panes, documents, and dialogs
ShortcutAction
Hold Ctrl + Tab to open the dialog and press Tab again untilthe pane you want to activate is highlighted
Open a dialog to select where to move the active cursor
Alt+TabSwitch to the next active program
Alt+Shift+TabSwitch to the previous active program
177Copyright 2021 JustSystem Canada, Inc.
Keyboard shortcuts

ShortcutAction
Ctrl+F6Move the active cursor to the next document
Ctrl+Shift+F6 OR Ctrl+Shift+TabMove the active cursor to the previous document
Ctrl+EscShow the Windows Start menu
Ctrl+WClose the active document pane
Alt+F6Toggle between the active document and the most recentlyactive modeless dialog box
Alt+Shift+F6Cycle through the active document and any open modelessdialog boxes
Table 55: Navigating in a dialog
ShortcutAction
Ctrl+Tab OR Ctrl+Page DownSwitch to the next tab in a tabbed dialog
Ctrl+Shift+Tab OR Ctrl+Page UpSwitch to the previous tab in a tabbed dialog
TabMove to the next control
Shift+TabMove to the previous control
Alt + underlined letterMove to control
Arrow keysMove between options in the selected drop-down list box
Arrow keysMove between radio buttons in selected group
Space bar OR EnterPerform the action assigned to the selected button
Space barTurn selected check box on or off
Alt + underlined letterTurn any check box on or off
First letter in option nameMove to an option a selected drop-down list box
Alt + Down arrowOpen selected drop-down list box
EscClose selected drop-down list box
EnterPerform the action assigned to the default button in thedialog (if no other push button is selected)
Arrow keysSelect a folder in a folder list
F5Update the files visible in the Open or Save As dialog box
EscCancel the command and close the dialog
Table 56: Working with the Map Editor
ShortcutAction
Ctrl+N or CTRL+TCreate a new map by choosing a template
Enter or Double-clickOpen target-topic
Space barView scrolls down the open map in Map Editor
Down arrow, Up arrowSelect the next or previous topic in the map
Right arrowView hidden subtopics under the highlighted topic
Left arrowHide visible subtopics under the highlighted topic
XMetaL Author 16 User's Guide178
Keyboard shortcuts

Quick navigation tool
XMetaL exposes over 700 commands that you can run when you have documents and maps open. Most ofthese commands are exposed via menus, toolbars, macros, scripts, keyboard shortcuts, but finding thecommands can be difficult as it requires switching between keyboard and mouse, memorizing commands,toolbar images, macro names, etc.
Finding and executing XMetaL commands
Tapping the icon in the Whiteboard toolbar, or by entering the CTRL + ? on the keyboard, opens thedialog where you can find and execute all available XMetaL commands.
The following features will help users quickly navigate in XMetaL:
• A hot key for showing popup menu with commands titles and context sensitive search option.
• If commands are organized in groups - allowing filtering commands by groups (Active Document macrosgroup, Insert group, help group etc.)
• Showing commands descriptions when it is defined
• Search filtering options "word contains", "word start with", search in "titles and keywords" or "titles, keywordsand descriptions"
• Customer defined group of commands. Any command can be in one click added/deleted to/from "My groupof commands"
• Optional settings for sorting results
• Easy navigation between command groups and dialog controls (Up/Down/Enter keys and short cuts) -mouse is not required, easy run in full screen editor mode
• You can extend menu and groups content by dropping actions definition text files to predefined folder.Customer extensions define "title" - "descriptions" - "text or hex symbol - of paste content" - "showing inmenu priority" - "keywords for fast search". For example inserting mathml symbols, unicode symbols orfrequently used phrases.
• The Whiteboard toolbar provides easy access to your favorite and recently used documents, all XMetaLcommands, and application utilities.
The following commands, macros, documents and applications can be found:
• XMetaL main menu commands
• XMetaL default or customer commands surfaced via customization scripts
• Application level macros
• Active Document customization macros
• Toolbars commands
• XMetaL document templates
• Active DITA MAP menu and toolbars command
• Favorite and predefined XMetaL folders.You can mark a folder as a "favorite" in the XMetaL environment.Folder and subfolder content will be shown in a special file openEx dialog or selected on the XMetaL desktopexplorer
• Favorite and predefined XMetaL applications.
179Copyright 2021 JustSystem Canada, Inc.
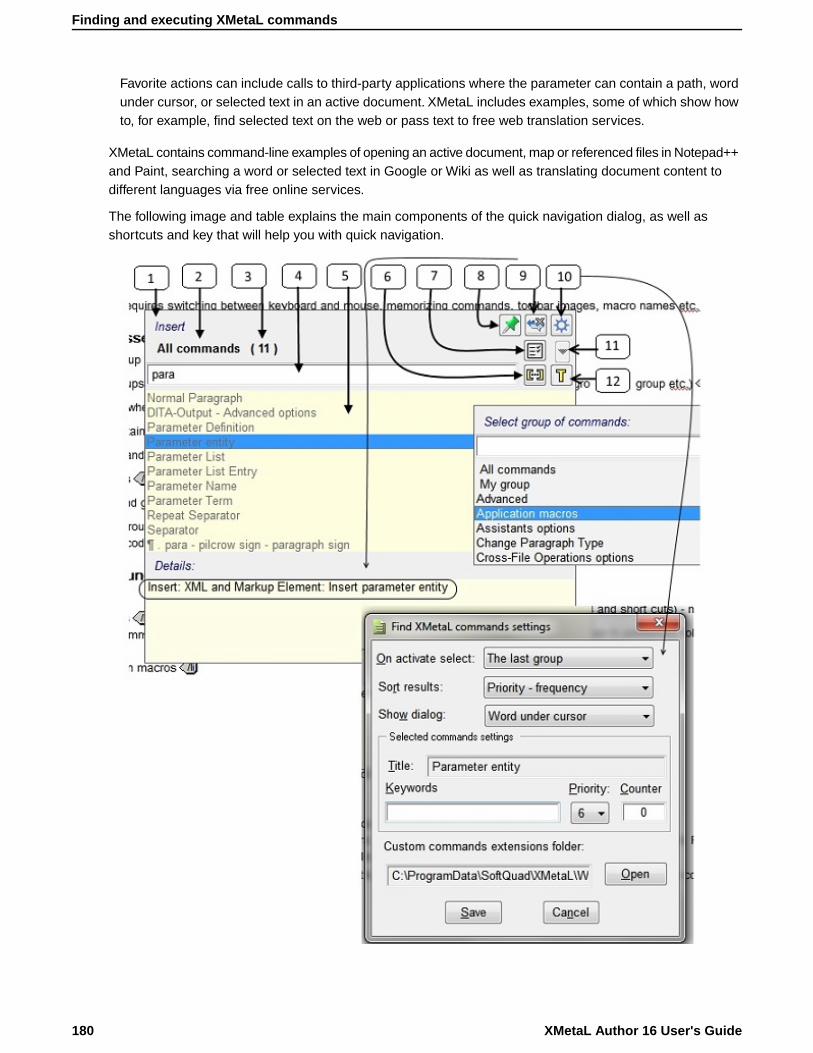
Favorite actions can include calls to third-party applications where the parameter can contain a path, wordunder cursor, or selected text in an active document. XMetaL includes examples, some of which show howto, for example, find selected text on the web or pass text to free web translation services.
XMetaL contains command-line examples of opening an active document, map or referenced files in Notepad++and Paint, searching a word or selected text in Google or Wiki as well as translating document content todifferent languages via free online services.
The following image and table explains the main components of the quick navigation dialog, as well asshortcuts and key that will help you with quick navigation.
XMetaL Author 16 User's Guide180
Finding and executing XMetaL commands
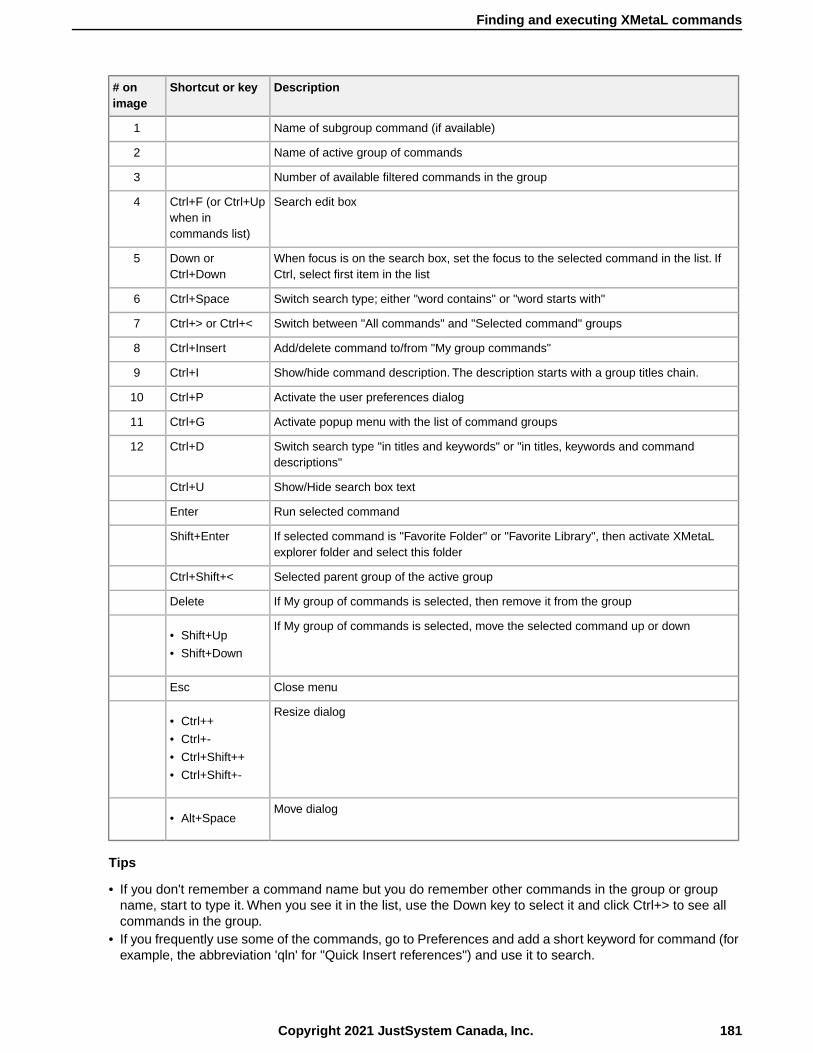
DescriptionShortcut or key# onimage
Name of subgroup command (if available)1
Name of active group of commands2
Number of available filtered commands in the group3
Search edit boxCtrl+F (or Ctrl+Upwhen incommands list)
4
When focus is on the search box, set the focus to the selected command in the list. IfCtrl, select first item in the list
Down orCtrl+Down
5
Switch search type; either "word contains" or "word starts with"Ctrl+Space6
Switch between "All commands" and "Selected command" groupsCtrl+> or Ctrl+<7
Add/delete command to/from "My group commands"Ctrl+Insert8
Show/hide command description. The description starts with a group titles chain.Ctrl+I9
Activate the user preferences dialogCtrl+P10
Activate popup menu with the list of command groupsCtrl+G11
Switch search type "in titles and keywords" or "in titles, keywords and commanddescriptions"
Ctrl+D12
Show/Hide search box textCtrl+U
Run selected commandEnter
If selected command is "Favorite Folder" or "Favorite Library", then activate XMetaLexplorer folder and select this folder
Shift+Enter
Selected parent group of the active groupCtrl+Shift+<
If My group of commands is selected, then remove it from the groupDelete
If My group of commands is selected, move the selected command up or down• Shift+Up
• Shift+Down
Close menuEsc
Resize dialog• Ctrl++
• Ctrl+-
• Ctrl+Shift++
• Ctrl+Shift+-
Move dialog• Alt+Space
Tips
• If you don't remember a command name but you do remember other commands in the group or groupname, start to type it. When you see it in the list, use the Down key to select it and click Ctrl+> to see allcommands in the group.
• If you frequently use some of the commands, go to Preferences and add a short keyword for command (forexample, the abbreviation 'qln' for "Quick Insert references") and use it to search.
181Copyright 2021 JustSystem Canada, Inc.
Finding and executing XMetaL commands

• If you frequently use some of the commands, go to Preferences and change the command priority (defaultis "6"), "1" is highest and the command will appear either close to the top or bottom of the list dependingon the set value.
• if you search for your favorite folder, type the "[" character in the search box (all folders contain them).• if you search for XMetaL predefined folders, enter the "#" character (all folders contain them).
Click thisTo do this
Add selected item to 'My Group'
Hide and show details
Open command settings
Show commands related to the selected item in the
command list
Show all available commands
Select to show only a group of commands
In the search, the entered word is contained in the name
of the action
In the search, the entered word is at the beginning of the
name of the action
Apply the search only to the title name of the action
Apply the search to both the title and the details of the action
Viewing and customizing favorites
Viewing and adding favorites
Tapping the icon in the Whiteboard toolbar or using the Ctrl+Shift+? hot key opens a dialog where youcan access favorite actions. In this dialog, you can apply your favorite and recently used actions in XMetaL.
XMetaL Author 16 User's Guide182
Viewing and customizing favorites

In the 'favorites' dialog, all actions are easy to find and run using hot-keys via context sensitive search andfiltering groups. All controls have tooltips containing the associated hot-keys.
Click thisTo do this
Hide or show the command line or full path
Hide or show the search field
Pin or unpin the dialog to stay open after performing the action
In the search, the entered word is contained in the name of the action
In the search, the entered word is at the beginning of the name of the action
Apply the search only to the title name of the action
Apply the search to both the title and the details of the action
183Copyright 2021 JustSystem Canada, Inc.
Viewing and customizing favorites
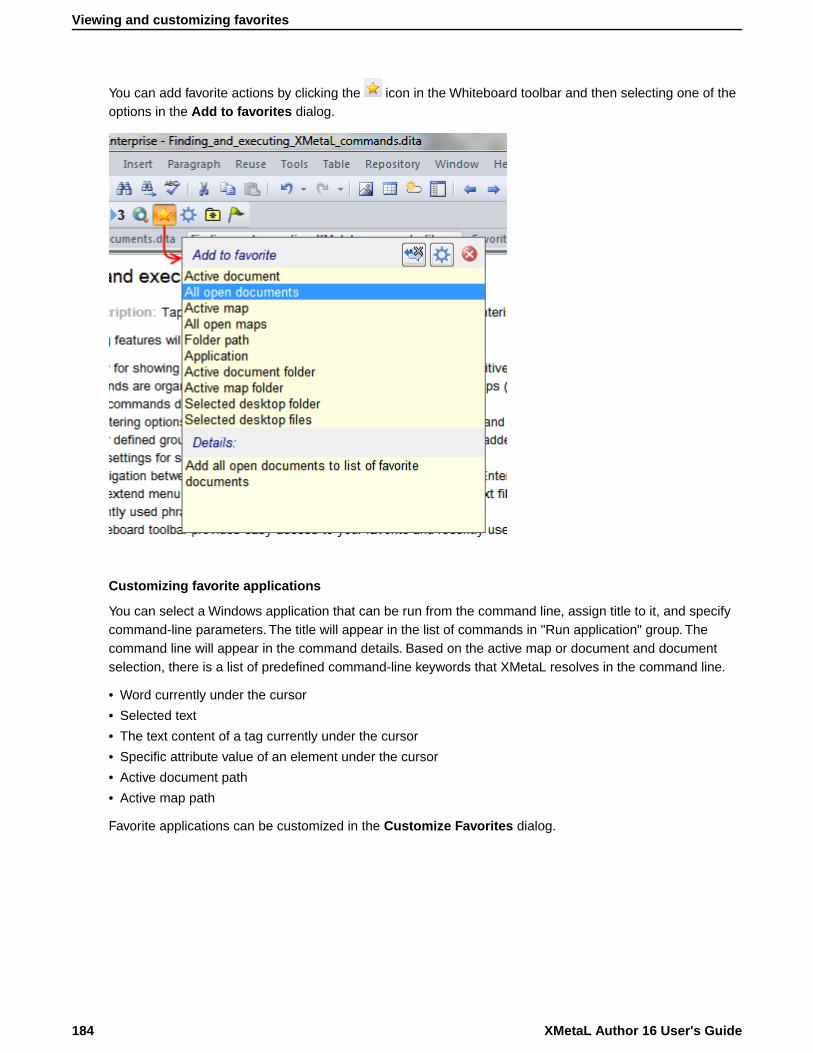
You can add favorite actions by clicking the icon in the Whiteboard toolbar and then selecting one of theoptions in the Add to favorites dialog.
Customizing favorite applications
You can select a Windows application that can be run from the command line, assign title to it, and specifycommand-line parameters. The title will appear in the list of commands in "Run application" group. Thecommand line will appear in the command details. Based on the active map or document and documentselection, there is a list of predefined command-line keywords that XMetaL resolves in the command line.
• Word currently under the cursor
• Selected text
• The text content of a tag currently under the cursor
• Specific attribute value of an element under the cursor
• Active document path
• Active map path
Favorite applications can be customized in the Customize Favorites dialog.
XMetaL Author 16 User's Guide184
Viewing and customizing favorites
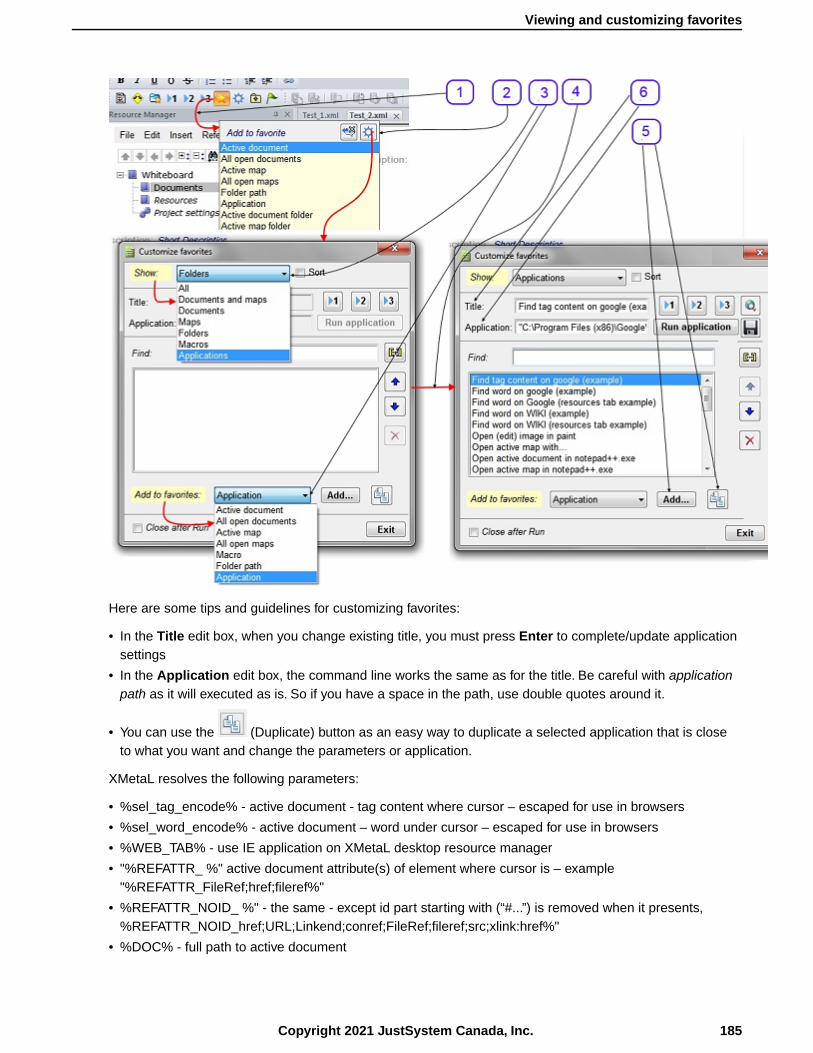
Here are some tips and guidelines for customizing favorites:
• In the Title edit box, when you change existing title, you must press Enter to complete/update applicationsettings
• In the Application edit box, the command line works the same as for the title. Be careful with applicationpath as it will executed as is. So if you have a space in the path, use double quotes around it.
• You can use the (Duplicate) button as an easy way to duplicate a selected application that is closeto what you want and change the parameters or application.
XMetaL resolves the following parameters:
• %sel_tag_encode% - active document - tag content where cursor – escaped for use in browsers
• %sel_word_encode% - active document – word under cursor – escaped for use in browsers
• %WEB_TAB% - use IE application on XMetaL desktop resource manager
• "%REFATTR_ %" active document attribute(s) of element where cursor is – example"%REFATTR_FileRef;href;fileref%"
• %REFATTR_NOID_ %" - the same - except id part starting with (“#...”) is removed when it presents,%REFATTR_NOID_href;URL;Linkend;conref;FileRef;fileref;src;xlink:href%"
• %DOC% - full path to active document
185Copyright 2021 JustSystem Canada, Inc.
Viewing and customizing favorites
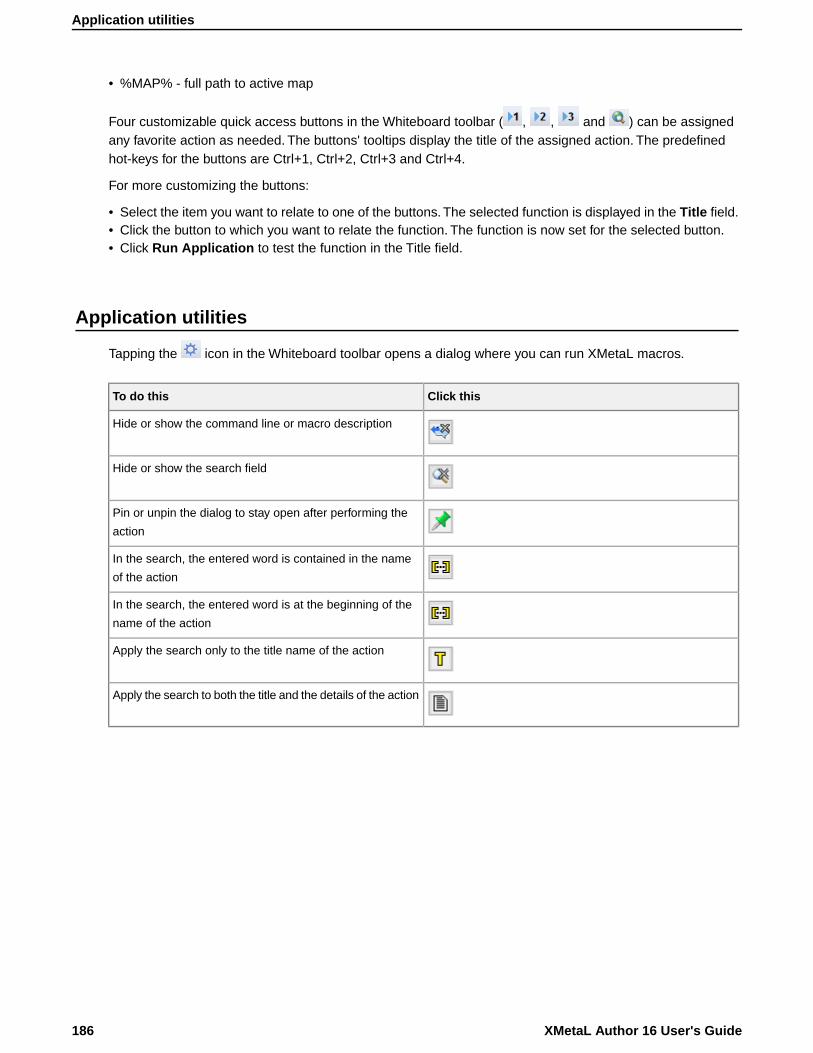
• %MAP% - full path to active map
Four customizable quick access buttons in the Whiteboard toolbar ( , , and ) can be assignedany favorite action as needed. The buttons' tooltips display the title of the assigned action. The predefinedhot-keys for the buttons are Ctrl+1, Ctrl+2, Ctrl+3 and Ctrl+4.
For more customizing the buttons:
• Select the item you want to relate to one of the buttons. The selected function is displayed in the Title field.• Click the button to which you want to relate the function. The function is now set for the selected button.• Click Run Application to test the function in the Title field.
Application utilities
Tapping the icon in the Whiteboard toolbar opens a dialog where you can run XMetaL macros.
Click thisTo do this
Hide or show the command line or macro description
Hide or show the search field
Pin or unpin the dialog to stay open after performing the
action
In the search, the entered word is contained in the name
of the action
In the search, the entered word is at the beginning of the
name of the action
Apply the search only to the title name of the action
Apply the search to both the title and the details of the action
XMetaL Author 16 User's Guide186
Application utilities
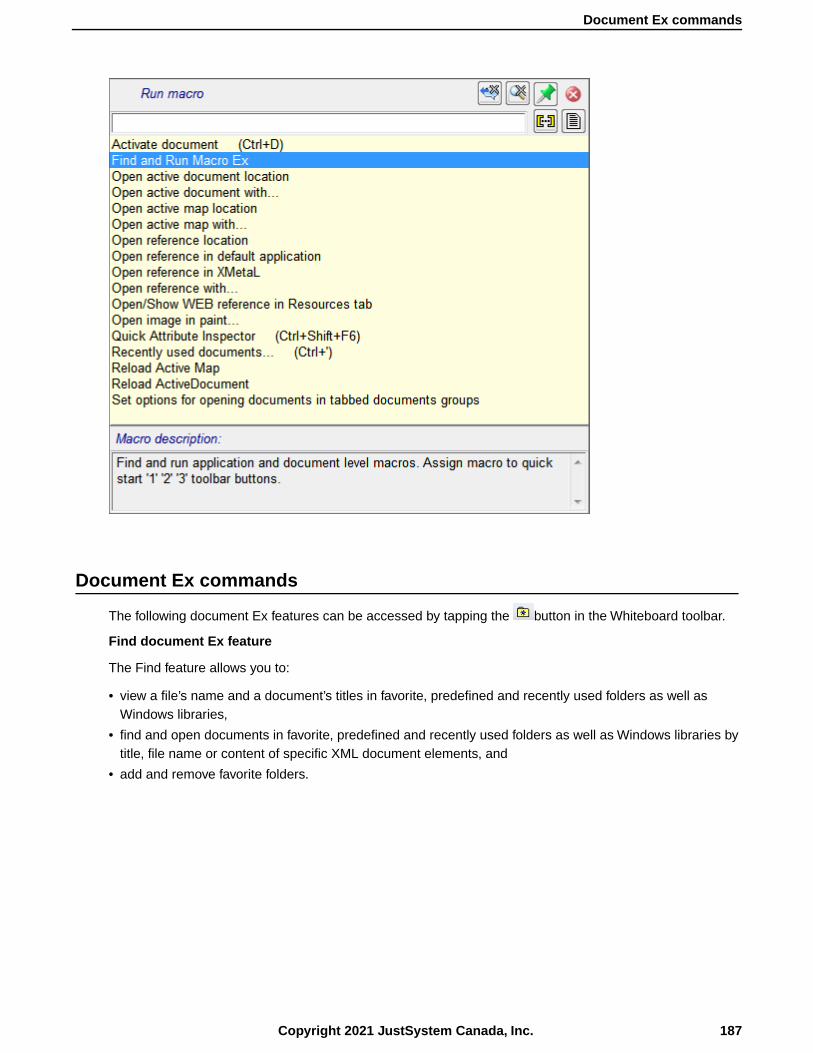
Document Ex commands
The following document Ex features can be accessed by tapping the button in the Whiteboard toolbar.
Find document Ex feature
The Find feature allows you to:
• view a file’s name and a document’s titles in favorite, predefined and recently used folders as well asWindows libraries,
• find and open documents in favorite, predefined and recently used folders as well as Windows libraries bytitle, file name or content of specific XML document elements, and
• add and remove favorite folders.
187Copyright 2021 JustSystem Canada, Inc.
Document Ex commands
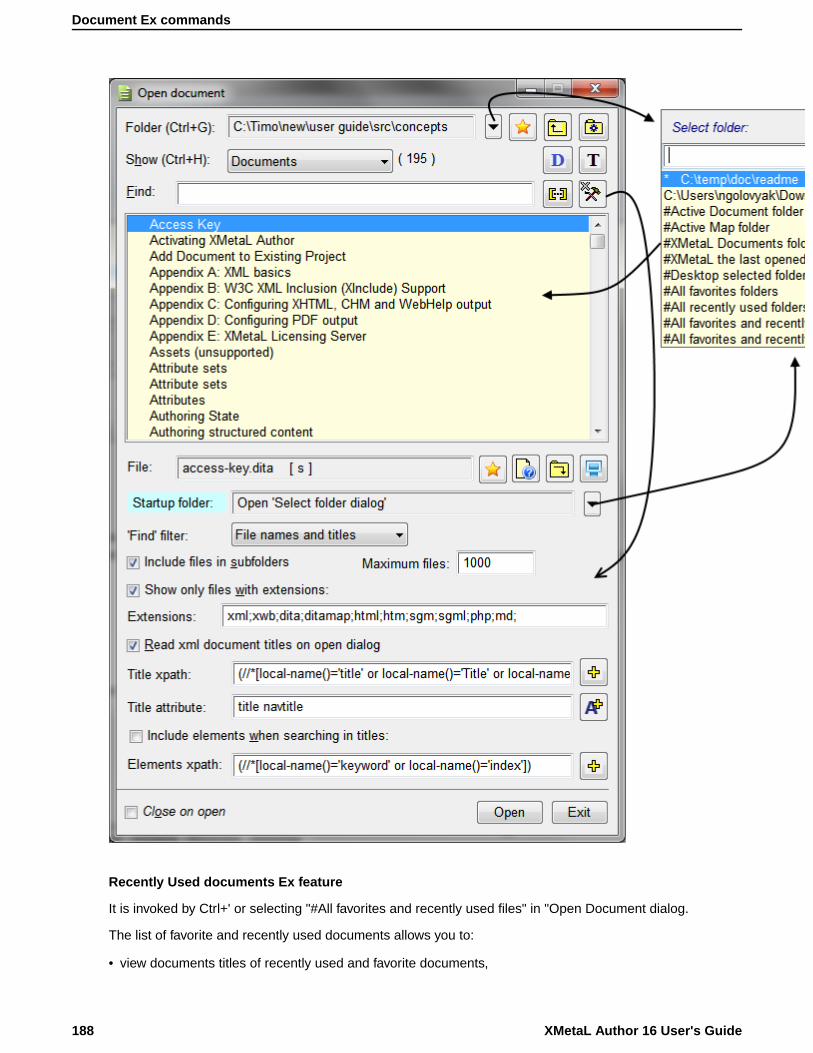
Recently Used documents Ex feature
It is invoked by Ctrl+' or selecting "#All favorites and recently used files" in "Open Document dialog.
The list of favorite and recently used documents allows you to:
• view documents titles of recently used and favorite documents,
XMetaL Author 16 User's Guide188
Document Ex commands
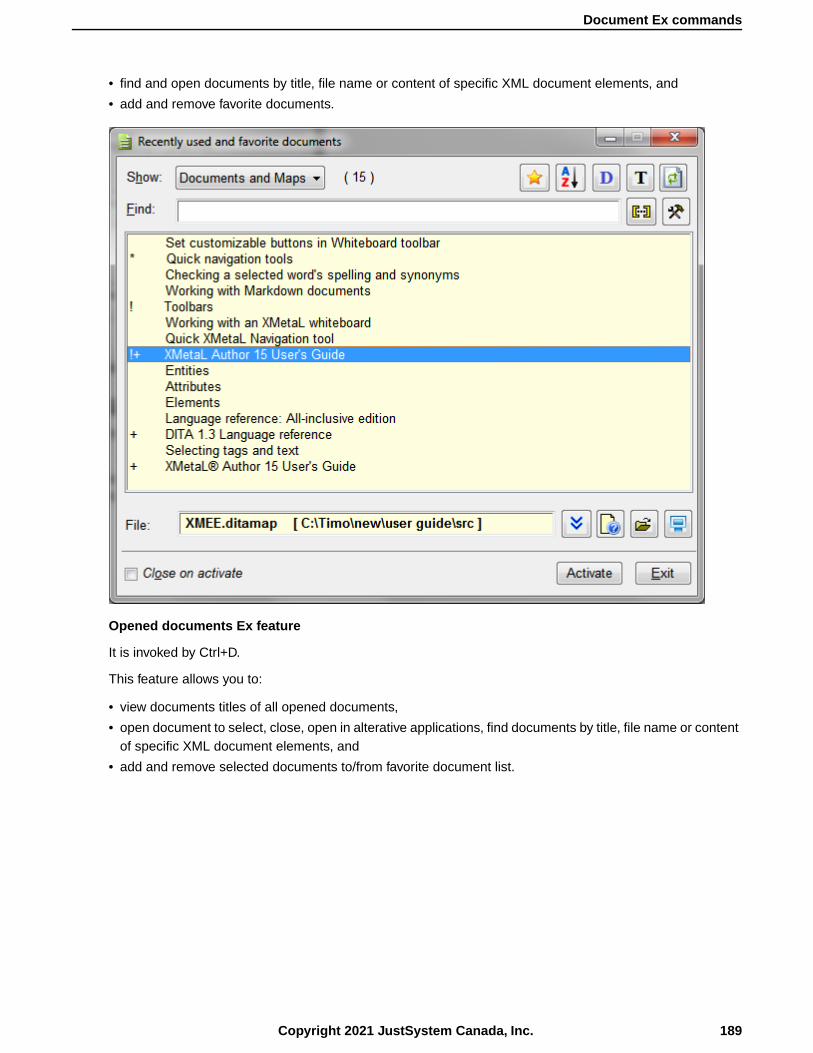
• find and open documents by title, file name or content of specific XML document elements, and
• add and remove favorite documents.
Opened documents Ex feature
It is invoked by Ctrl+D.
This feature allows you to:
• view documents titles of all opened documents,
• open document to select, close, open in alterative applications, find documents by title, file name or contentof specific XML document elements, and
• add and remove selected documents to/from favorite document list.
189Copyright 2021 JustSystem Canada, Inc.
Document Ex commands

XMetaL Author 16 User's Guide190
Document Ex commands

3rd party viewers
This option configures XMetaL to display media whose format requires third-party control for viewing. Elementtypes set up with Treat-As-Image designation will be so configured.
For more information, contact XMetaL Support by e-mail at [email protected] or by telephoneat one of the numbers listed at http://xmetal.com/content-about-contact-us/.
191Copyright 2021 JustSystem Canada, Inc.
Appendix A: XML basics
XML (Extensible Markup Language) is a recommendation of the World Wide Web Consortium (W3C). It is alanguage for describing the structure and content of a document. Authors use XML to “mark up” their documentsfor a consuming application such as a Web browser or print formatting engine. XML is an application of SGML(Standard Generalized Markup Language). XML is more flexible than other markup languages such as HTMLbecause it allows you to create your own markup. This makes it better suited to describing and processingcomplex information.
Separation of content and format
XML elements describe the role the information plays in a document, not how it is to be formatted. Consumingapplications such as Web browsers receive instructions from a style sheet on how to render the markup. XMLelements can also be transformed via XSLT (Extensible Stylesheet Language Transformations) into elementsthat are recognized by a consuming application. For example, an XML <title> element can be transformedinto the HTML <h1> element for rendering in a specific size and typeface.
XML declaration
All XML documents start with a processing instruction (the XML declaration) that indicates that the file is anXML file and which version of XML is used. Some XML declarations also specify a character encoding. Therecommended encoding for XML documents is UTF-8. Here is an example:
<?xml version="1.0"encoding="UTF-8"?>
References
You are encouraged to consult the many available printed and online references.These include the following:
• The Extensible Markup Language (XML) 1.0 (Fourth Edition) (a W3C Recommendation), available atwww.w3.org/TR/REC-xml
• The XML Handbook by Charles Goldfarb and Paul Prescod, at www.xmlhandbook.com
• The Annotated XML Specification by Tim Bray, at www.xml.com/axml/testaxml.htm
• XML-related publications, events, and software, from the World Wide Web Consortium web site atwww.w3.org/XML
• XML.com
• The SGML/XML Web Page (maintained by Robin Cover) at www.oasis-open.org/cover/sgml-xml.htmlprovides a reference database
• The XML Companion by Neil Bradley is recommended for beginners (see also www.bradley.co.uk)
• XML Specification Guide by Ian Graham and Liam Quin is a comprehensive reference book (see alsowww.wiley.com/compbooks/graham-quin)
• XML: The Annotated Specification by Bob DuCharme is recommended for advanced users
• The Project Cool Developer Zone at http://www.devx.com/projectcool/developer/ provides references onvarious technologies, including XML
• XML by Example by Benoit Marchal is recommended for intermediate-level Web developers
• XML Black Book by Natanya Pitts-Moultis and Cheryl Kirk is recommended for intermediate to advancedwebmasters and Web developers
• XML Pocket Reference by Robert Eckstein, a reference for XML, XSL, and XLL
192Copyright 2021 JustSystem Canada, Inc.

Valid vs. well-formed documentsAn XML document is well-formed if it is structurally correct according to the XML standard. It is valid if itconforms to a DTD or Schema. XML documents can be well-formed without being valid; however, all validXML documents are well-formed by definition. SGML documents must be valid and well-formed.
There are several aspects to well-formedness:
• The document must have only one top-level element that contains all other elements.
• All elements (with the exception of the top-level element) must be nested, that is, if an element’s start tagoccurs inside an element, then its end tag must occur inside the same element.
• An attribute name cannot occur twice in the same tag.
• All characters must be in the character set defined by the XML standard (that is, Unicode).
• Entities must not be defined recursively.
DTDs and SchemasDTDs and Schemas define the information that can be contained in a document and facilitate the exchangeof similarly defined information between systems. Although XML files can exist as well-formed, stand-alonedocuments, most are associated with either a document type definition (DTD) or an XML Schema. SGMLfiles must be associated with a DTD.
Document type definitions
Document type definitions contain declarations that describe document structure using a formal notation.They define the names of elements and attributes and the document hierarchy.
DTDs specify which elements can or must be contained in a document and their allowable sequence andcombinations. They are often separate files with the extension ‘.dtd’, but declarations can also be includedwholly within the XML or SGML document itself as part of the document type declaration.
A DTD can consist of one or many files. Some DTDs use parameter entities to “call in” blocks of declarationsthat exist in other files.
XML Schemas
XML Schemas are similar to DTDs in that they describe a document structure, but they are written in XML.They also provide flexibility in defining complex data types. Schemas are supported in XML only.
A Schema is always a separate file with the extension ‘.xsd’.
Document type declarationsDocument type declarations associate XML documents with a DTD. They consist of an external identifier, aninternal subset, or combination of the two.
Here is an example of a document type declaration:
<!DOCTYPE BOOKPUBLIC "-//XYZ Corporation//Book v1.0//EN" "book.dtd">
The document type name follows the DOCTYPE keyword (in this case, ‘BOOK’). By default, this is the top-level element in the DTD.
193Copyright 2021 JustSystem Canada, Inc.
Valid vs. well-formed documents
A document that refers to a DTD or Schema is referred to as a document instance.
External identifiersThe document type declaration can include an external identifier that specifies an external DTD file.
External identifiers consist of either of the following:
• The SYSTEM keyword followed by a system identifier
• The PUBLIC keyword followed by a public identifier followed by a system identifier
The system identifier can be a filename or URL and is generally the filename of the DTD (for example,‘book.dtd’). The public identifier is an arbitrary identifier that is agreed upon by the various organizations thatuse the DTD (for example, ‘-//XYZ Corporation//Book v1.0//EN’). If the external identifier starts with SYSTEM,there cannot be a public identifier.
Here are two document type declarations that refer to the same DTD:
<!DOCTYPE BOOK SYSTEM "book.dtd">
<!DOCTYPE BOOK PUBLIC "-//XYZ Corporation//Book v1.0//EN""book.dtd">
Another form of external identifier is available for SGML documents only, in which the PUBLIC keyword isfollowed by a public identifier, but no system identifier. Here is an example:
<!DOCTYPE BOOK PUBLIC "-//XYZ Corporation//Bookv1.0//EN">
Public identifiers can be mapped to system identifiers using a catalog file.
Internal subsetAn internal subset is an optional part of the document type declaration that contains additional declarations.
The internal subset follows the external identifier (if there is one) and is enclosed in square brackets. Hereis an example of an internal subset:
<!DOCTYPE Article SYSTEM"journalist.dtd" [ <!ENTITY Title "The History of the XYZ Corporation">... ]>
Declarations in the subset are read before declarations in the external DTD file; therefore, they override anyexternal declarations of the same name. Attribute list declarations specifying different attributes of the sameelement are combined, but if the same attribute is specified in both places, the specification in the internalsubset takes precedence.
A document type declaration can omit the external identifier. In this case, the document’s DTD is internal(contained completely in the internal subset). Here is an example:
<?xmlversion="1.0" standalone="yes"?> <!DOCTYPE Article [ <!Element Article(Title, Sect1+)> <!Element Title (#pcdata)> <!Element Sect1(Title,Para+)> <!Element Para (#pcdata)> <!Attlist Article Id ID#IMPLIED> ]> <Article> ... </Article>
XMetaL Author 16 User's Guide194
External identifiers
ElementsAn element is a markup construct that consists of tags and content. Tags are written using angle brackets(‘<’ and ‘>’) and contain element names. Elements are named according to their function in the document.For example, the <section> element describes a section. Elements can include attributes, text, or otherelements. The elements available in your document and the sequence in which they must appear is definedin a DTD or Schema.
Since documents are formatted differently by each rendering agent (for example, a browser), you may preferto think of elements as standing for parts of the document’s structure (for example, heading, paragraph, listitem) without thinking explicitly about how they are formatted.
In DTDs, an elements are defined using the ELEMENT keyword.The following sample defines topic, title,and para elements:
<!ENTITY % typemods "b|i|u|pre|tt"> <!ELEMENTtopic (title, para+) > <!ELEMENT title (#PCDATA) > <!ELEMENT para(#PCDATA|%typemods;)* >
Here is a corresponding document instance:
<!DOCTYPE topic SYSTEM "topic.dtd"> <topic><title>My sample topic</title> <para>The firstparagraph.</para> <para>The second paragraph.</para></topic>
In XML, element names are case-sensitive. The following samples represent different elements:
<Topic>...</Topic><topic>...</topic>
The following markup is illegal:
<Topic>...</topic>
Empty elements
Elements can also be defined as empty. These elements cannot have any text content. Here is a sampledefinition of an empty element in a DTD:
<!ELEMENT newpage EMPTY >
Empty elements appear differently in XML and SGML.
<!-- an emptyelement in XML --> <newpage/>
<!-- an emptyelement in SGML --> <newpage>
AttributesAttributes consist of name/value pairs that are used to provide more information about an element. Attributevalues are not part of an element’s content. The DTD or Schema specifies attribute names and allowedvalues.
195Copyright 2021 JustSystem Canada, Inc.
Elements
In DTDs, attributes are defined within attribute lists, which are declared using the ATTLIST keyword. In thefollowing example, an attribute list defines an audience attribute for the topic element:
<!ENTITY % typemods "b|i|u|pre|tt"> <!ELEMENT topic (title,para+) > <!ATTLIST topic audience CDATA #IMPLIED > <!ELEMENT title(#PCDATA) > <!ELEMENT para (#PCDATA|%typemods;)* >
Attribute names are separated from the element name by a space, and values are enclosed in quotationmarks. Here is a corresponding document instance:
<!DOCTYPE topic SYSTEM "topic.dtd"> <topicaudience="administrators"> <title>My sample topic</title><para>The first paragraph.</para> <para>The secondparagraph.</para> </topic>
In XML, attributes and their values are case-sensitive. The following samples represent different attributesand values:
version="beginner" Version="beginner"version="Beginner" Version="Beginner"
Data types and default values
Here are some commonly used attribute data types:
• CDATA describes a sequence of characters from the document character set and may include characterentities.
• ID/IDREF are identifiers. The value of an ID attribute is used to identify an element and must be unique.The value of an IDREF attribute must be the value of an ID attribute somewhere in the document.
• NUMBER tokens must contain at least one digit (0-9).
Attributes can also be defined as a name token group that restricts the possible values to a list.
Default values for attributes are defined by the default value parameter. Here are some commonly usedparameters:
• REQUIRED means that a value must be specified.
• IMPLIED means that specifying a value is optional.
• FIXED describes a fixed value for an attribute. The value cannot be modified.
EntitiesAn entity is a named body of data that you can refer to from within your document. An entity declarationnames the body of data and its replacement text or file reference. Entities are declared within the DTD oryour document’s internal subset.You can refer to the declaration from within your document using an entityreference. When the document is displayed in a rendering agent, the entity reference is replaced by the textor file that the entity represents. Entities are an important mechanism for supporting content reuse and datamanagement. In XML, entity names are case-sensitive.
Text entities
Text entities specify replacement text within the entity declaration itself. This type of entity is useful for“boilerplate” text or for terms that may change, such as product names or version numbers. For example, inthe following user manual, the name of the product is declared as ‘Z2000’ in the prodname entity. For
XMetaL Author 16 User's Guide196
Entities
subsequent model numbers, you need only change the replacement text to have the change reflectedthroughout the document.
<!DOCTYPE manualSYSTEM "manual.dtd" [ <!ENTITY prodname "Z2000"> ]> <manual><chapter> <title>Installing the &prodname;</title><p>The &prodname; is easy to install.</p> </chapter></manual>
External entities
External entities refer to text and markup that exists within an external file. In SGML, external entities includea system identifier or a public identifier or both. XML requires a system identifier, and a public identifier isoptional. Here are some examples:
<!ENTITY copyright SYSTEM "copyright.txt" --a copyright notice containing a block of text -->
<!ENTITY section SYSTEM "section.xml" -- asection containing text and markup -->
Graphic entities
Graphic entities are used to refer to image, video, sound, or other multimedia files. These entities are notparsed and they must specify a notation. Notations specify how the file is encoded. Here is an example ofan unparsed entity declaration and corresponding reference:
<!DOCTYPE chapter [ <!NOTATION JPEGSYSTEM "Joint Photographic Experts Group"> <!ENTITY dogpic SYSTEM"lassie.jpg" NDATA JPEG> ]> <chapter><title>Dogs</title> <img src="colliepic"/></chapter>
Character entities
Character entities are used to represent certain typographical characters, such as symbols and accentedletters, that are not normally found on US keyboards. For example, the character reference …represents an ellipsis (…). Numeric character entities do not have to be declared in XML documents becausethey are included in the XML specification.
Note: Named character entities, for example, …, must be declared in the DTD.
Parameter entities
Parameter entities are used to insert declarations. The internal subset can refer to an external DTD using aparameter entity reference. In the following example, ‘%journalist;’ causes the declarations in journalist.dtdto be parsed just as if they were included in the file.
<?xml version="1.0"?><!DOCTYPE Article [ <!ENTITY % journalist SYSTEM "journalist.dtd">%journalist; ]> <Article> ... </Article>
Many DTDs also use this mechanism to “call in” blocks of declarations. In the following DTD, ‘%topic-type;’causes the declarations in topic.mod to be parsed just as if they were included in the file.
<!ENTITY % topic-type PUBLIC "-//XYZCorp//ELEMENTS Topic//EN" "topic.mod"> %topic-type;
197Copyright 2021 JustSystem Canada, Inc.
Entities
Related LinksInternal subset on page 194
An internal subset is an optional part of the document type declaration that contains additionaldeclarations.
CDATA sectionsA CDATA (character data) section is a type of marked section that is used to prevent content from beinginterpreted as markup. A marked section is a markup construct that designates content for special processing.
For example, the following document includes an sample code that contains markup characters (‘<’ and ‘>’).In this case, you do not want these characters to be interpreted as markup, so you enclose them in a CDATAsection.
<?xml version="1.0" encoding="UTF-8"?> <technote><title>Audience attribute</title> <para>The audienceattribute describes the intended audience. It is defined for the TOPIC element.Here is an example: <![CDATA[<topic audience="administrators" />]]></para> </technote>
Note: SGML files can have several types of marked sections, but XML files can have only CDATAsections.
CommentsComments contain additional information about the text or markup. They are ignored during processing.Comments can contain text only.
The following sample XML document includes a sample comment.
<?xml version="1.0" encoding="UTF-8"?> <!--here is a comment in an XML document --> <topic> <title>Mysample topic</title> <para>The first paragraph.</para><para>The second paragraph.</para> </topic>
Comments in DTDs have a special syntax.
<!ELEMENT para(#PCDATA|%typemods;)* -- here is a comment in a DTD -->
Processing instructionsProcessing instructions contain instructions for applications.
The following processing instruction identifies the document as an XML 1.0 document that uses Unicodeencoding.
<?xml version="1.0"encoding="UTF-8"?>
XMetaL Author 16 User's Guide198
CDATA sections
Appendix B: W3C XML Inclusion (XInclude) Support
XInclude allows you to create larger XML documents from smaller documents without needing to manuallyduplicate content.
With XInclude, you can assemble multiple XML instances into a larger XML document through inclusion.Thisallows for easier editing using smaller files, improved distributed authoring, and reuse of content.
In XMetaL, XInclude support is turned off by default. For information on enabling XInclude, see the XMetaLDeveloper Customization Guide.
About W3C XInclude Support 1.0 (Second Edition)
W3C XInclude Support 1.0 (Second Edition) introduces a generic mechanism for merging XML documentsfor use by applications that need such a facility. The syntax leverages existing XML constructs - elements,attributes, and URI references. For more information on W3C XInclude Version 1.0 (Second Edition), go tohttp://www.w3.org/TR/xinclude/
XInclude Customization Features
Depending on your customization of XMetaL Author, you may be able to update, show, hide and/or openXIncluded target content.
• Updating XIncludes will import that target content and process it in accordance to the W3C XML Inclusionspecification. Any processing errors are listed within the XML Inclusion log pane. The target content'sphysical location can be either on the local file system or within your CMS (provided you have an XMetaLConnector).
• Showing XIncludes allows you to view the target content inline with the rest of your document.When includesare shown inline, they are in read-only but you are permitted to make selections and copy the content.
Note: Showing includes does not automatically update the includes if you have made changes to thetarget content.
• Hiding XIncludes allows you to edit the include element's attributes or fallback element.• Opening XIncludes opens the files that contain the target of an xinclude's link.
XML inclusion log
The XML inclusion log is a list of XML inclusion link errors. The XML inclusion log is displayed in the LinkErrors pane of the XMetaL Author user interface. Clicking on a link error displays the error in the main pane.
Limitations and Variations
The XML Inclusion support has the following limitations:
• For parse="xml", included target markup must be defined by the top-level source document's schema orDTD. Furthermore, appearance in Tags On/Normal view is determined by the top-level source document'scustomization (i.e., CSS and CTM settings).
• XPointer has the following limitations:
• The xptr-xpointer scheme is built on the XMetaL xpath capability and supports whatever XMetaL supportsfor xpath.
• The xptr-xpointer scheme does not support additional functionality described in 4.2 Additions to XPathTerms and Concepts of http://www.w3.org/TR/xptr-xpointer/.
199Copyright 2021 JustSystem Canada, Inc.
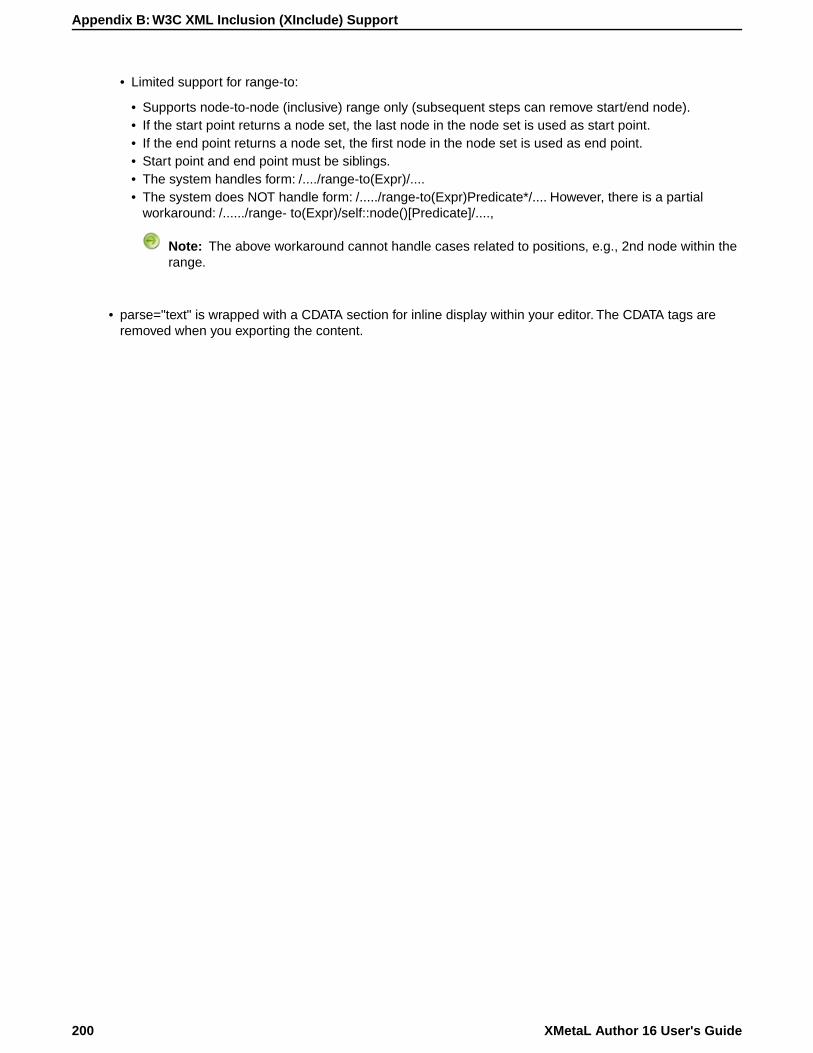
• Limited support for range-to:
• Supports node-to-node (inclusive) range only (subsequent steps can remove start/end node).• If the start point returns a node set, the last node in the node set is used as start point.• If the end point returns a node set, the first node in the node set is used as end point.• Start point and end point must be siblings.• The system handles form: /..../range-to(Expr)/....• The system does NOT handle form: /...../range-to(Expr)Predicate*/.... However, there is a partial
workaround: /....../range- to(Expr)/self::node()[Predicate]/....,
Note: The above workaround cannot handle cases related to positions, e.g., 2nd node within therange.
• parse="text" is wrapped with a CDATA section for inline display within your editor. The CDATA tags areremoved when you exporting the content.
XMetaL Author 16 User's Guide200
Appendix B: W3C XML Inclusion (XInclude) Support
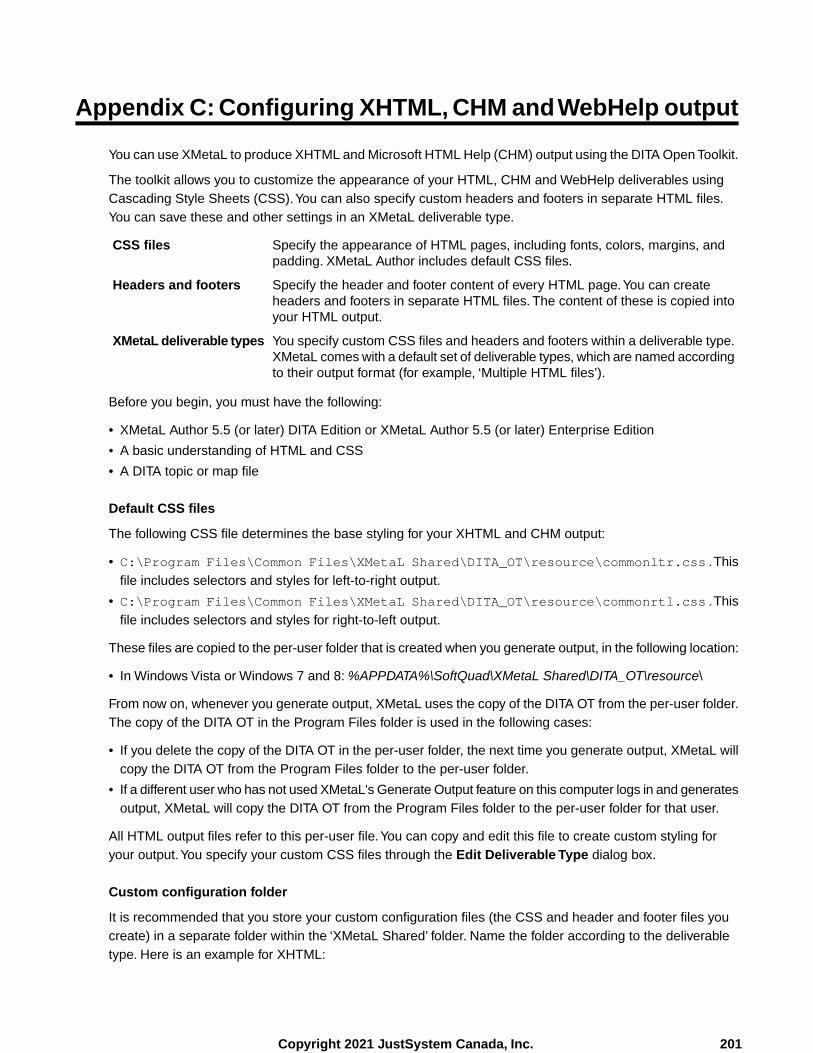
Appendix C: Configuring XHTML, CHM and WebHelp output
You can use XMetaL to produce XHTML and Microsoft HTML Help (CHM) output using the DITA Open Toolkit.
The toolkit allows you to customize the appearance of your HTML, CHM and WebHelp deliverables usingCascading Style Sheets (CSS).You can also specify custom headers and footers in separate HTML files.You can save these and other settings in an XMetaL deliverable type.
Specify the appearance of HTML pages, including fonts, colors, margins, andpadding. XMetaL Author includes default CSS files.
CSS files
Specify the header and footer content of every HTML page.You can createheaders and footers in separate HTML files. The content of these is copied intoyour HTML output.
Headers and footers
You specify custom CSS files and headers and footers within a deliverable type.XMetaL comes with a default set of deliverable types, which are named accordingto their output format (for example, ‘Multiple HTML files’).
XMetaL deliverable types
Before you begin, you must have the following:
• XMetaL Author 5.5 (or later) DITA Edition or XMetaL Author 5.5 (or later) Enterprise Edition
• A basic understanding of HTML and CSS
• A DITA topic or map file
Default CSS files
The following CSS file determines the base styling for your XHTML and CHM output:
• C:\Program Files\Common Files\XMetaL Shared\DITA_OT\resource\commonltr.css .Thisfile includes selectors and styles for left-to-right output.
• C:\Program Files\Common Files\XMetaL Shared\DITA_OT\resource\commonrtl.css .Thisfile includes selectors and styles for right-to-left output.
These files are copied to the per-user folder that is created when you generate output, in the following location:
• In Windows Vista or Windows 7 and 8: %APPDATA%\SoftQuad\XMetaL Shared\DITA_OT\resource\
From now on, whenever you generate output, XMetaL uses the copy of the DITA OT from the per-user folder.The copy of the DITA OT in the Program Files folder is used in the following cases:
• If you delete the copy of the DITA OT in the per-user folder, the next time you generate output, XMetaL willcopy the DITA OT from the Program Files folder to the per-user folder.
• If a different user who has not used XMetaL's Generate Output feature on this computer logs in and generatesoutput, XMetaL will copy the DITA OT from the Program Files folder to the per-user folder for that user.
All HTML output files refer to this per-user file.You can copy and edit this file to create custom styling foryour output.You specify your custom CSS files through the Edit Deliverable Type dialog box.
Custom configuration folder
It is recommended that you store your custom configuration files (the CSS and header and footer files youcreate) in a separate folder within the ‘XMetaL Shared’ folder. Name the folder according to the deliverabletype. Here is an example for XHTML:
201Copyright 2021 JustSystem Canada, Inc.
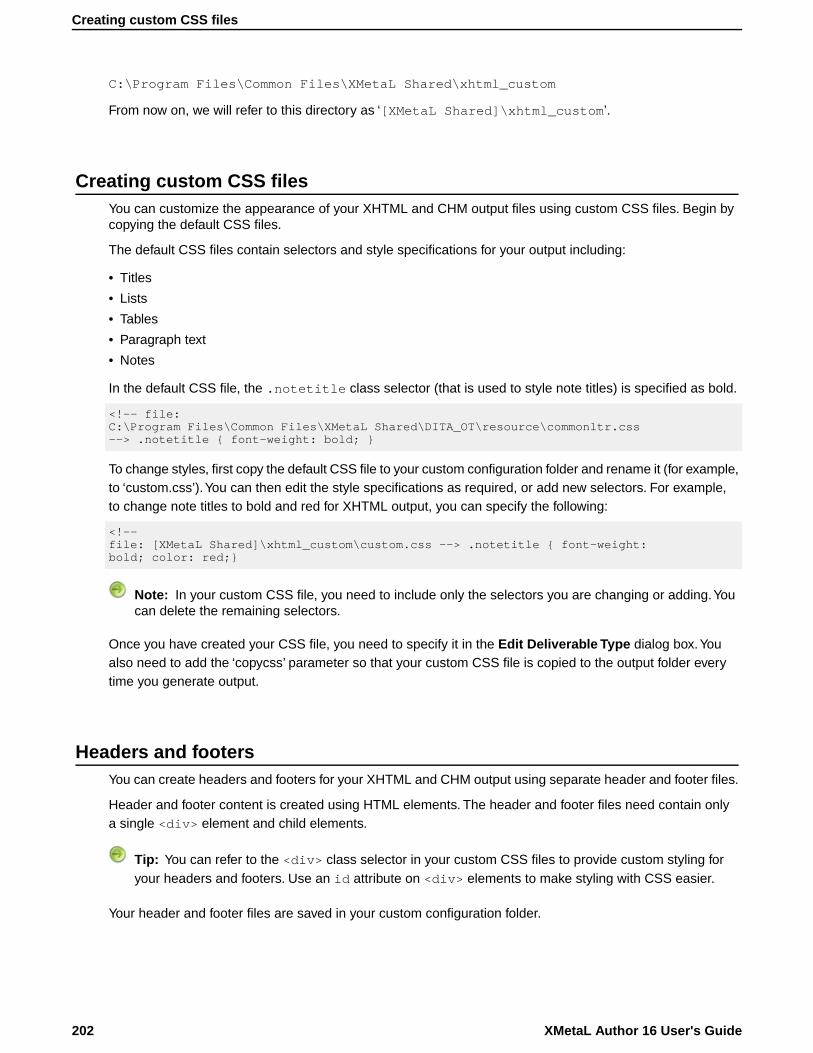
C:\Program Files\Common Files\XMetaL Shared\xhtml_custom
From now on, we will refer to this directory as ‘[XMetaL Shared]\xhtml_custom’.
Creating custom CSS filesYou can customize the appearance of your XHTML and CHM output files using custom CSS files. Begin bycopying the default CSS files.
The default CSS files contain selectors and style specifications for your output including:
• Titles
• Lists
• Tables
• Paragraph text
• Notes
In the default CSS file, the .notetitle class selector (that is used to style note titles) is specified as bold.
<!-- file:C:\Program Files\Common Files\XMetaL Shared\DITA_OT\resource\commonltr.css--> .notetitle { font-weight: bold; }
To change styles, first copy the default CSS file to your custom configuration folder and rename it (for example,to ‘custom.css’).You can then edit the style specifications as required, or add new selectors. For example,to change note titles to bold and red for XHTML output, you can specify the following:
<!--file: [XMetaL Shared]\xhtml_custom\custom.css --> .notetitle { font-weight:bold; color: red;}
Note: In your custom CSS file, you need to include only the selectors you are changing or adding.Youcan delete the remaining selectors.
Once you have created your CSS file, you need to specify it in the Edit Deliverable Type dialog box.Youalso need to add the ‘copycss’ parameter so that your custom CSS file is copied to the output folder everytime you generate output.
Headers and footersYou can create headers and footers for your XHTML and CHM output using separate header and footer files.
Header and footer content is created using HTML elements. The header and footer files need contain onlya single <div> element and child elements.
Tip: You can refer to the <div> class selector in your custom CSS files to provide custom styling foryour headers and footers. Use an id attribute on <div> elements to make styling with CSS easier.
Your header and footer files are saved in your custom configuration folder.
XMetaL Author 16 User's Guide202
Creating custom CSS files
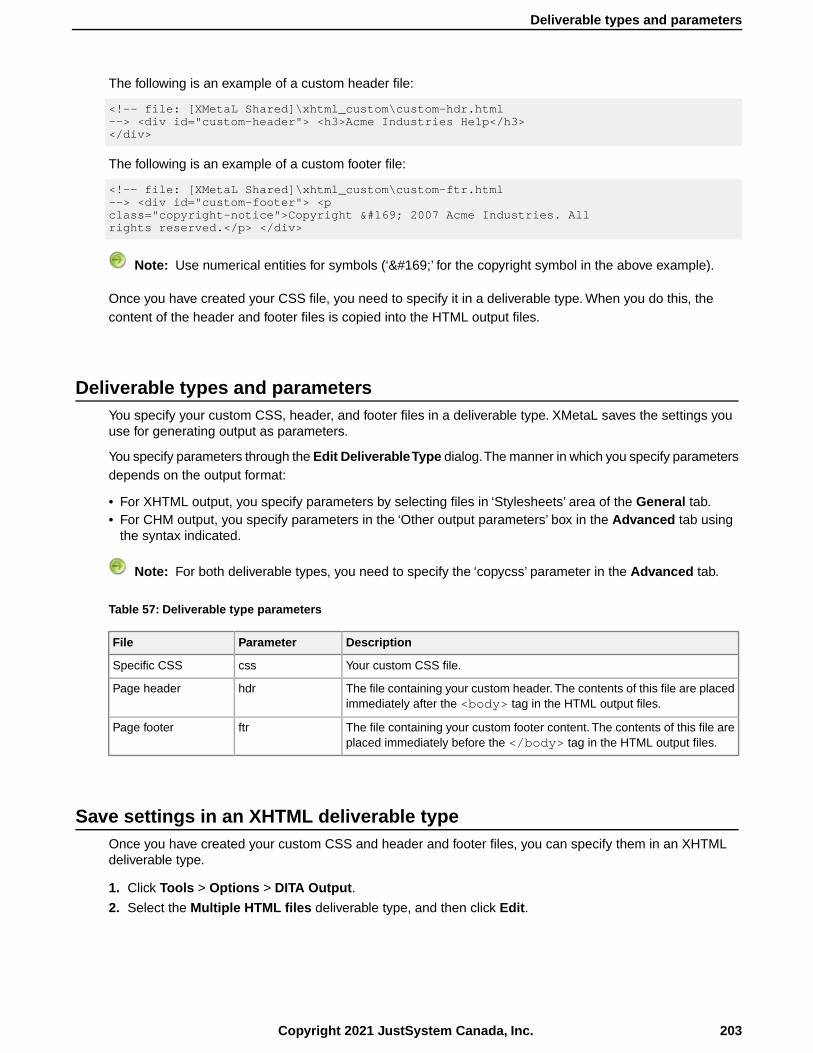
The following is an example of a custom header file:
<!-- file: [XMetaL Shared]\xhtml_custom\custom-hdr.html--> <div id="custom-header"> <h3>Acme Industries Help</h3></div>
The following is an example of a custom footer file:
<!-- file: [XMetaL Shared]\xhtml_custom\custom-ftr.html--> <div id="custom-footer"> <pclass="copyright-notice">Copyright © 2007 Acme Industries. Allrights reserved.</p> </div>
Note: Use numerical entities for symbols (‘©’ for the copyright symbol in the above example).
Once you have created your CSS file, you need to specify it in a deliverable type. When you do this, thecontent of the header and footer files is copied into the HTML output files.
Deliverable types and parametersYou specify your custom CSS, header, and footer files in a deliverable type. XMetaL saves the settings youuse for generating output as parameters.
You specify parameters through the Edit Deliverable Type dialog.The manner in which you specify parametersdepends on the output format:
• For XHTML output, you specify parameters by selecting files in ‘Stylesheets’ area of the General tab.• For CHM output, you specify parameters in the ‘Other output parameters’ box in the Advanced tab using
the syntax indicated.
Note: For both deliverable types, you need to specify the ‘copycss’ parameter in the Advanced tab.
Table 57: Deliverable type parameters
DescriptionParameterFile
Your custom CSS file.cssSpecific CSS
The file containing your custom header.The contents of this file are placedimmediately after the <body> tag in the HTML output files.
hdrPage header
The file containing your custom footer content. The contents of this file areplaced immediately before the </body> tag in the HTML output files.
ftrPage footer
Save settings in an XHTML deliverable typeOnce you have created your custom CSS and header and footer files, you can specify them in an XHTMLdeliverable type.
1. Click Tools > Options > DITA Output.
2. Select the Multiple HTML files deliverable type, and then click Edit.
203Copyright 2021 JustSystem Canada, Inc.
Deliverable types and parameters

3. In the General tab, specify the stylesheets for Specific CSS, Page header, and Page footer by clickingthe Browse button and browsing for the stylesheets.
4. Click the Advanced tab, and then enter the ‘copycss’ parameter in the Other output parameters box asspecified below.
Note: Parameters for this deliverable type use Java syntax.
XMetaL Author 16 User's Guide204
Save settings in an XHTML deliverable type
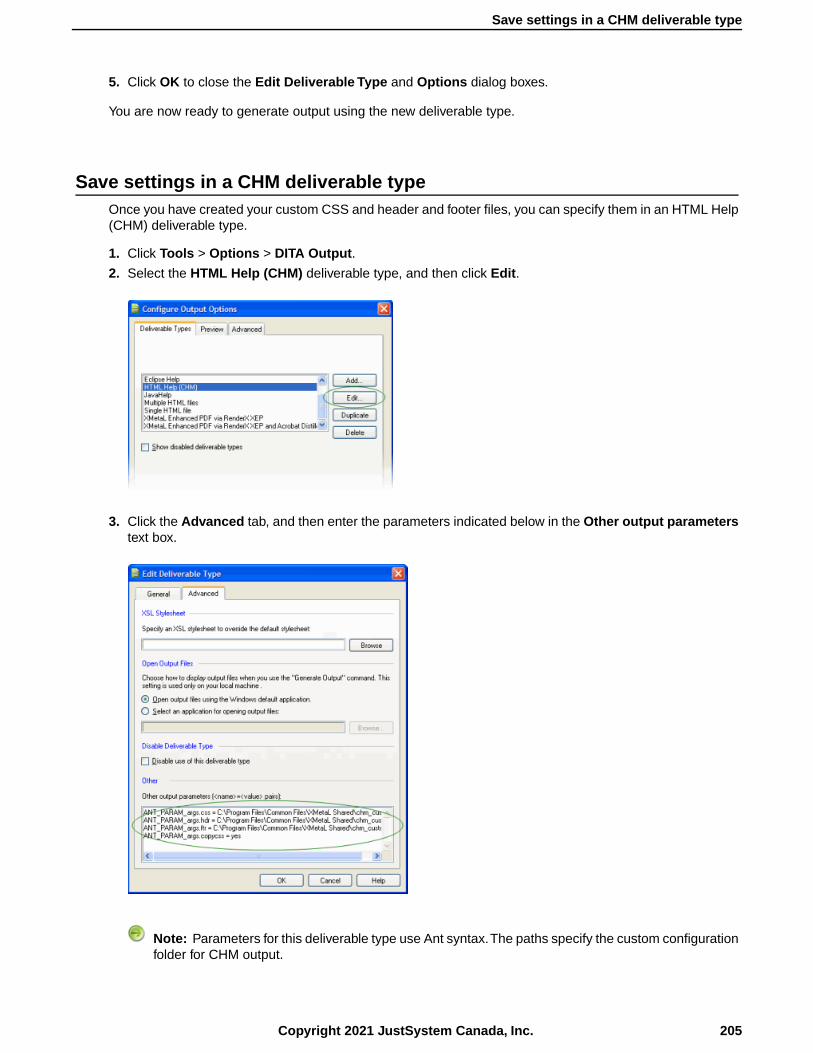
5. Click OK to close the Edit Deliverable Type and Options dialog boxes.
You are now ready to generate output using the new deliverable type.
Save settings in a CHM deliverable typeOnce you have created your custom CSS and header and footer files, you can specify them in an HTML Help(CHM) deliverable type.
1. Click Tools > Options > DITA Output.
2. Select the HTML Help (CHM) deliverable type, and then click Edit.
3. Click the Advanced tab, and then enter the parameters indicated below in the Other output parameterstext box.
Note: Parameters for this deliverable type use Ant syntax.The paths specify the custom configurationfolder for CHM output.
205Copyright 2021 JustSystem Canada, Inc.
Save settings in a CHM deliverable type
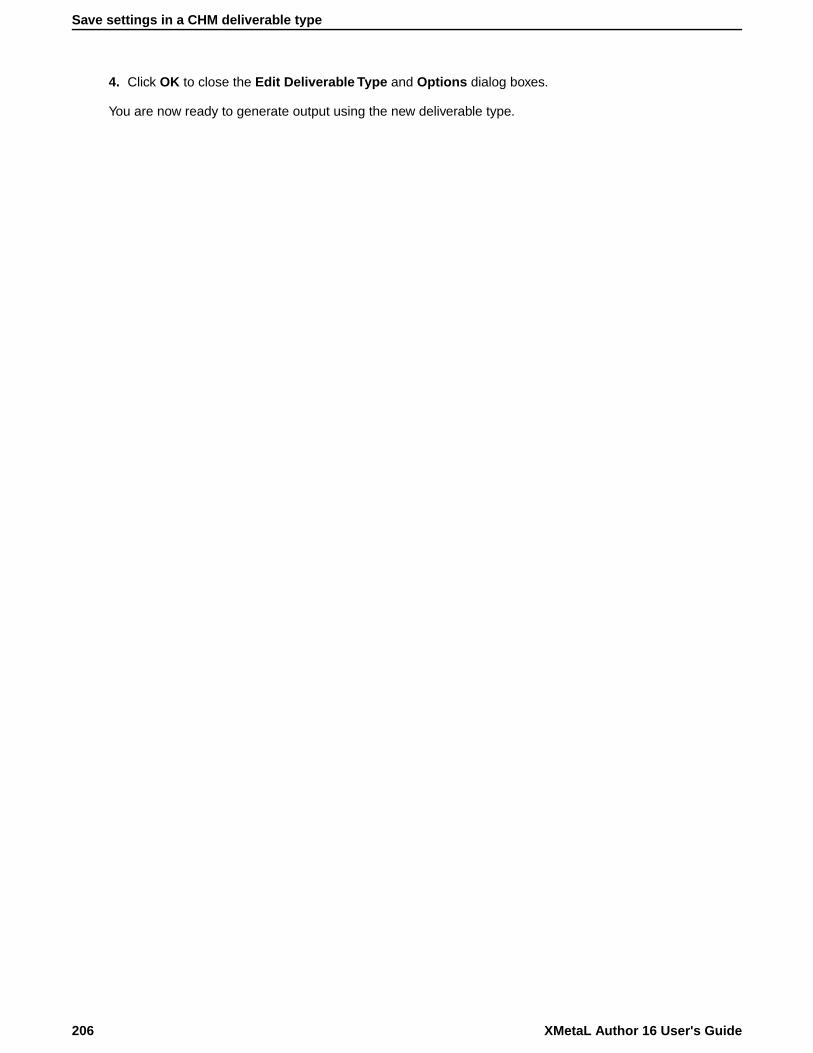
4. Click OK to close the Edit Deliverable Type and Options dialog boxes.
You are now ready to generate output using the new deliverable type.
XMetaL Author 16 User's Guide206
Save settings in a CHM deliverable type
Appendix D: Configuring PDF output
You can use XMetaL in conjunction with the DITA Open Toolkit to produce PDF output from your DITA topicsand maps. To produce PDF, XMetaL first transforms DITA-based content into an FO file (XML with formattingobjects) and then sends it to an FO processor, which renders it as PDF.
The toolkit allows you to customize your PDF output through a catalog-based custom configuration framework.No modification of the toolkit is necessary.
Custom configuration files determine the appearance of your PDF output, including:
• Page layouts
• Front matter
• Headers and footers
• Page body content
• Notes
• Fonts
Before you begin
Before you begin, you must have the following:
• An understanding of XML, XSLT, and XSL-FO
• A DITA topic or map file
• Document design specifications
• Font files (if you are using fonts that are not included in the Windows operating system)
Procedure overview
The process of making a custom configuration consists of adding configuration files to a customization directoryand making changes to the catalog file in that directory. The changes you make override the settings in thedefault catalog file. For more information, refer to README.txt in the customization folder.
The changes you make using the method described here affect the default toolkit processing, also referredto as the ‘Idiom plug-in’ or ‘Idiom FO 1.1’ in the DITA Open Toolkit documentation. This processing uses theDITA OT ‘pdf2’ transtype. Changes that you make to the default pdf2 processing affect all deliverable typesthat use the ‘Book via RenderX’ output format.
The XMetaL Enhanced output formats are a customization of the default toolkit processing. These outputformats use the XMetaL ‘pdf3’ transtype.You can make changes to them in the following ways:
• By modifying the XMetaL pdf3 transtype
• By setting parameters
If you choose to modify the XMetaL pdf3 transtype, you edit the files in the following folder:
...\SoftQuad\XMetaL\Shared\DITA_OT\plugins\com.xmetal.xmfo\Customization
Changes that you make to the default pdf3 processing using either method affect all deliverable types thatuse the ‘XMetaL Enhanced’ output formats.
207Copyright 2021 JustSystem Canada, Inc.
Custom configuration frameworkThe framework consists of a set of components that are stored in a custom configuration file or folder.
XMetaL stores the DITA OT in the following location:
• In Vista or Windows 7 and 8: %APPDATA%\SoftQuad\XMetaL\Shared\DITA_OT\plugins\com.xmetal.xmfo
From now on, we will refer to this copied folder as ‘[FO]’.
The set of files you create for your custom configuration must be located in the following folder:
...\SoftQuad\XMetaL\Shared\DITA_OT\plugins\com.xmetal.xmfo\Customization
From now on, we will refer to this folder as ‘[FO_CUSTOM]’.
Table 58: Configuration files
Custom configuration file/folderDefault file/folderComponent
[FO_CUSTOM]\catalog.xml[FO]\cfg\catalog.xmlCatalog file
[FO_CUSTOM]\fo\attrs\custom.xsl[FO]\cfg\fo\attrs\*.xslAttribute sets
[FO_CUSTOM]\common\artwork[FO]\cfg\common\artworkArtwork
[FO_CUSTOM]\fo\font-mappings.xml[FO]\cfg\fo\font-mappings.xmlFont mappings
[FO_CUSTOM]\fo\layout-masters.xml[FO]\cfg\fo\layout-masters.xmlPage layouts
[FO_CUSTOM]\fo\xsl\custom.xsl[FO]\xsl\fo\*.xslXSLT style sheets
[FO_CUSTOM]\common\vars\*.xml[FO]\cfg\common\vars\*.xmlVariables
[FO_CUSTOM]\common\index\*.xml[FO]\cfg\common\index\*.xmlIndex configurations
A custom configuration contains the following components:
The catalog file points to the other files in your custom configuration.Catalog file
Attribute sets contain formatting information such as fonts, colors, margins,padding, and borders. There are attribute sets for almost every DITA element.
Attribute sets
They are similar in concept to Cascading Style Sheets (CSS). Two excellentresources are http://www.dpawson.co.uk/xsl/sect3 as well as Mapping of elementsto the permitted properties
This folder includes images for your customization, such as those used in headersand footers. The accepted image formats are JPEG, GIF or PNG. PDF images
Artwork
can also be used. The default resolution is 120 dpi. Seehttp://www.renderx.com/reference.html#Graphic_Formats for more information.
Font files contain font mapping information.Fonts
Page layouts describe page characteristics such as dimensions, regions, andmargins.
Page layouts
XSLT style sheets contain templates that typically create formatting objects.Theyare frequently used in conjunction with variables.
XSLT style sheets
Variables define strings for use in headers, footers, and generated content.Variables
XMetaL Author 16 User's Guide208
Custom configuration framework

Index configurations control the display of the index, including sort order.Index configurations
Page layoutsPage layouts describe the design and order of pages in your document. They also define page regions andtheir size and placement.
The DITA Open Toolkit defines page layouts using the following mechanisms:
• Attribute sets
• Page masters
• XSL templates
Attribute setsThe DITA Open Toolkit uses attribute sets to control the display of regions within pages.
For example, the attribute set ‘topic.title’ specifies padding, margins and border styles for topic titles.
<!-- file: [FO]\cfg\fo\attrs\commons-attr.xsl--> <xsl:attribute-set name="topic.title"> <xsl:attributename="font-family">Sans</xsl:attribute> <xsl:attributename="border-bottom">3pt solid black</xsl:attribute> <xsl:attributename="margin-top">0pc</xsl:attribute> <xsl:attributename="margin-bottom">1.4pc</xsl:attribute> <xsl:attributename="font-size">18pt</xsl:attribute> <xsl:attributename="font-weight">bold</xsl:attribute> <xsl:attributename="padding-top">1.4pc</xsl:attribute> <xsl:attributename="keep-with-next.within-column">always</xsl:attribute></xsl:attribute-set>
Custom attribute set processing
You can change the default page layout in your custom configuration. For example, you may want to createa title page that reflects the graphic standards of your company. Title pages typically contain the documenttitle, product name, and corporate graphics. The following example adds a background image to the titlepage.
<!-- file:[FO_CUSTOM]\fo\attrs\custom.xsl --> <!-- overrides __frontmatterattribute set from [FO]\cfg\fo\attrs\front-matter-attr.xsl --><xsl:attribute-set name="__frontmatter"> <xsl:attributename="text-align">left</xsl:attribute> <xsl:attributename="color">#000</xsl:attribute> <xsl:attributename="background-image">url(Customization/OpenTopic/common/artwork/bg_image.jpg)</xsl:attribute><xsl:attribute name="background-repeat">no-repeat</xsl:attribute><xsl:attribute name="background-position">left top</xsl:attribute><xsl:attribute name="padding">30mm 0 0 0</xsl:attribute></xsl:attribute-set>
Note: The source file for the background image file must be located in the artwork folder for your customconfiguration. The (source) path is:
[FO_CUSTOM]\common\artwork
The path to the background image in the xsl:attribute is the relative path required by the DITAOpen Toolkit. This (destination) path is the path to the folder that is created during PDF processing:
[output directory]\pdf_out\Customization\OpenTopic\common\artwork
209Copyright 2021 JustSystem Canada, Inc.
Page layouts
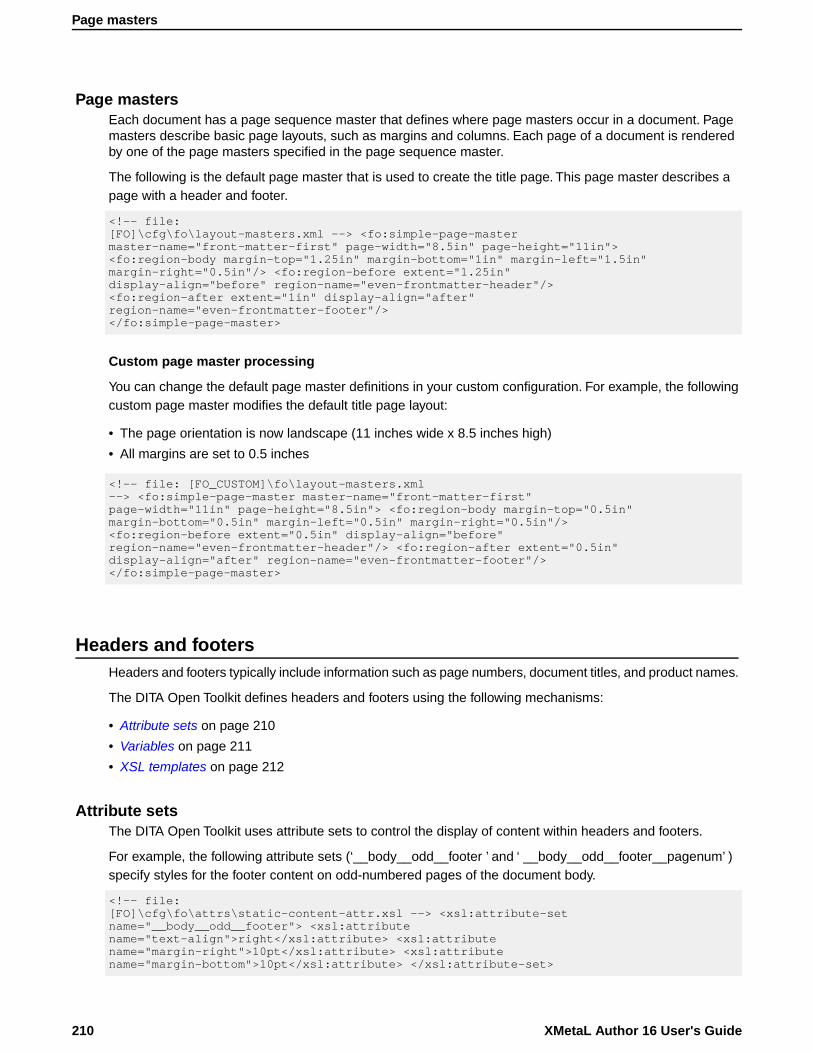
Page mastersEach document has a page sequence master that defines where page masters occur in a document. Pagemasters describe basic page layouts, such as margins and columns. Each page of a document is renderedby one of the page masters specified in the page sequence master.
The following is the default page master that is used to create the title page. This page master describes apage with a header and footer.
<!-- file:[FO]\cfg\fo\layout-masters.xml --> <fo:simple-page-mastermaster-name="front-matter-first" page-width="8.5in" page-height="11in"><fo:region-body margin-top="1.25in" margin-bottom="1in" margin-left="1.5in"margin-right="0.5in"/> <fo:region-before extent="1.25in"display-align="before" region-name="even-frontmatter-header"/><fo:region-after extent="1in" display-align="after"region-name="even-frontmatter-footer"/></fo:simple-page-master>
Custom page master processing
You can change the default page master definitions in your custom configuration. For example, the followingcustom page master modifies the default title page layout:
• The page orientation is now landscape (11 inches wide x 8.5 inches high)
• All margins are set to 0.5 inches
<!-- file: [FO_CUSTOM]\fo\layout-masters.xml--> <fo:simple-page-master master-name="front-matter-first"page-width="11in" page-height="8.5in"> <fo:region-body margin-top="0.5in"margin-bottom="0.5in" margin-left="0.5in" margin-right="0.5in"/><fo:region-before extent="0.5in" display-align="before"region-name="even-frontmatter-header"/> <fo:region-after extent="0.5in"display-align="after" region-name="even-frontmatter-footer"/></fo:simple-page-master>
Headers and footersHeaders and footers typically include information such as page numbers, document titles, and product names.
The DITA Open Toolkit defines headers and footers using the following mechanisms:
• Attribute sets on page 210
• Variables on page 211
• XSL templates on page 212
Attribute setsThe DITA Open Toolkit uses attribute sets to control the display of content within headers and footers.
For example, the following attribute sets (‘__body__odd__footer ’ and ‘ __body__odd__footer__pagenum’ )specify styles for the footer content on odd-numbered pages of the document body.
<!-- file:[FO]\cfg\fo\attrs\static-content-attr.xsl --> <xsl:attribute-setname="__body__odd__footer"> <xsl:attributename="text-align">right</xsl:attribute> <xsl:attributename="margin-right">10pt</xsl:attribute> <xsl:attributename="margin-bottom">10pt</xsl:attribute> </xsl:attribute-set>
XMetaL Author 16 User's Guide210
Page masters
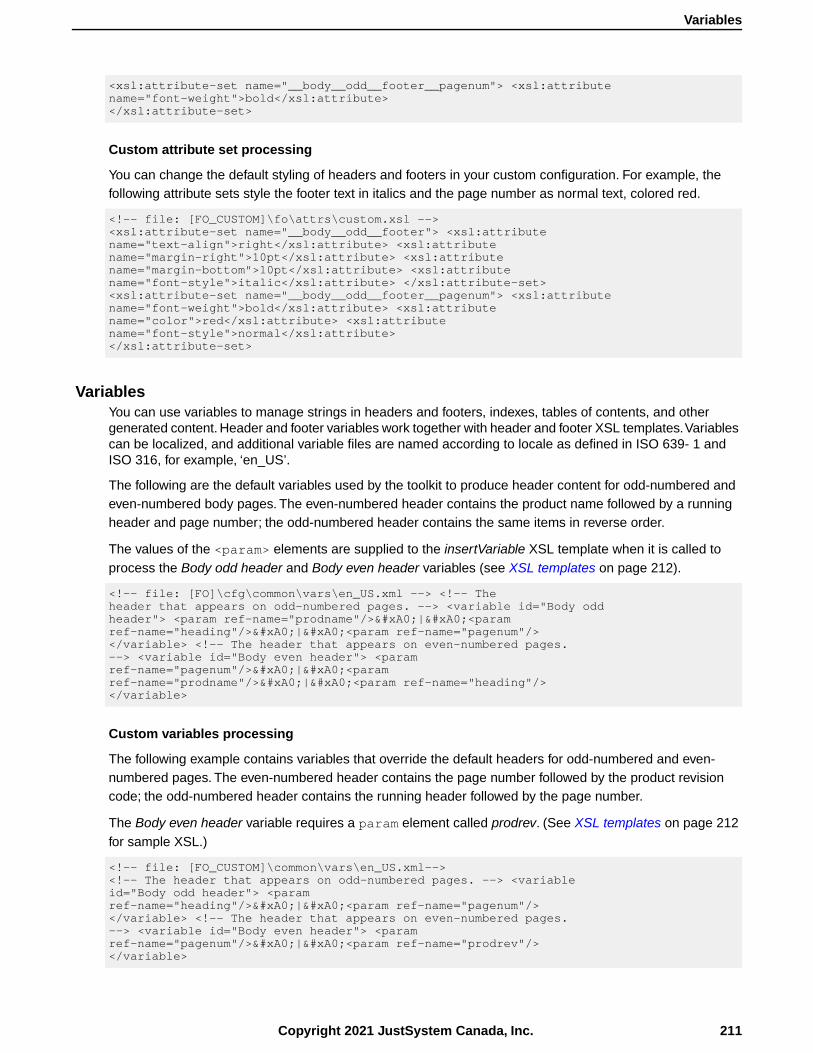
<xsl:attribute-set name="__body__odd__footer__pagenum"> <xsl:attributename="font-weight">bold</xsl:attribute></xsl:attribute-set>
Custom attribute set processing
You can change the default styling of headers and footers in your custom configuration. For example, thefollowing attribute sets style the footer text in italics and the page number as normal text, colored red.
<!-- file: [FO_CUSTOM]\fo\attrs\custom.xsl --><xsl:attribute-set name="__body__odd__footer"> <xsl:attributename="text-align">right</xsl:attribute> <xsl:attributename="margin-right">10pt</xsl:attribute> <xsl:attributename="margin-bottom">10pt</xsl:attribute> <xsl:attributename="font-style">italic</xsl:attribute> </xsl:attribute-set><xsl:attribute-set name="__body__odd__footer__pagenum"> <xsl:attributename="font-weight">bold</xsl:attribute> <xsl:attributename="color">red</xsl:attribute> <xsl:attributename="font-style">normal</xsl:attribute></xsl:attribute-set>
VariablesYou can use variables to manage strings in headers and footers, indexes, tables of contents, and othergenerated content. Header and footer variables work together with header and footer XSL templates.Variablescan be localized, and additional variable files are named according to locale as defined in ISO 639- 1 andISO 316, for example, ‘en_US’.
The following are the default variables used by the toolkit to produce header content for odd-numbered andeven-numbered body pages. The even-numbered header contains the product name followed by a runningheader and page number; the odd-numbered header contains the same items in reverse order.
The values of the <param> elements are supplied to the insertVariable XSL template when it is called toprocess the Body odd header and Body even header variables (see XSL templates on page 212).
<!-- file: [FO]\cfg\common\vars\en_US.xml --> <!-- Theheader that appears on odd-numbered pages. --> <variable id="Body oddheader"> <param ref-name="prodname"/> | <paramref-name="heading"/> | <param ref-name="pagenum"/></variable> <!-- The header that appears on even-numbered pages.--> <variable id="Body even header"> <paramref-name="pagenum"/> | <paramref-name="prodname"/> | <param ref-name="heading"/></variable>
Custom variables processing
The following example contains variables that override the default headers for odd-numbered and even-numbered pages. The even-numbered header contains the page number followed by the product revisioncode; the odd-numbered header contains the running header followed by the page number.
The Body even header variable requires a param element called prodrev. (See XSL templates on page 212for sample XSL.)
<!-- file: [FO_CUSTOM]\common\vars\en_US.xml--><!-- The header that appears on odd-numbered pages. --> <variableid="Body odd header"> <paramref-name="heading"/> | <param ref-name="pagenum"/></variable> <!-- The header that appears on even-numbered pages.--> <variable id="Body even header"> <paramref-name="pagenum"/> | <param ref-name="prodrev"/></variable>
211Copyright 2021 JustSystem Canada, Inc.
Variables
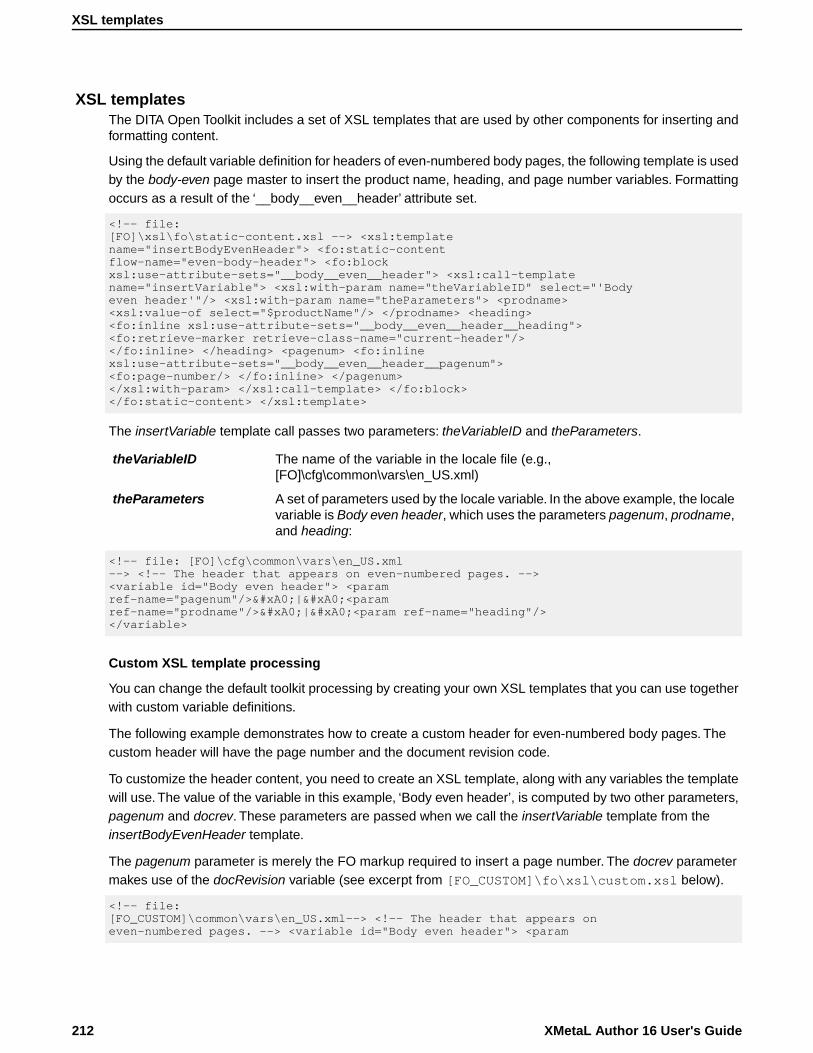
XSL templatesThe DITA Open Toolkit includes a set of XSL templates that are used by other components for inserting andformatting content.
Using the default variable definition for headers of even-numbered body pages, the following template is usedby the body-even page master to insert the product name, heading, and page number variables. Formattingoccurs as a result of the ‘__body__even__header’ attribute set.
<!-- file:[FO]\xsl\fo\static-content.xsl --> <xsl:templatename="insertBodyEvenHeader"> <fo:static-contentflow-name="even-body-header"> <fo:blockxsl:use-attribute-sets="__body__even__header"> <xsl:call-templatename="insertVariable"> <xsl:with-param name="theVariableID" select="'Bodyeven header'"/> <xsl:with-param name="theParameters"> <prodname><xsl:value-of select="$productName"/> </prodname> <heading><fo:inline xsl:use-attribute-sets="__body__even__header__heading"><fo:retrieve-marker retrieve-class-name="current-header"/></fo:inline> </heading> <pagenum> <fo:inlinexsl:use-attribute-sets="__body__even__header__pagenum"><fo:page-number/> </fo:inline> </pagenum></xsl:with-param> </xsl:call-template> </fo:block></fo:static-content> </xsl:template>
The insertVariable template call passes two parameters: theVariableID and theParameters.
The name of the variable in the locale file (e.g.,[FO]\cfg\common\vars\en_US.xml)
theVariableID
A set of parameters used by the locale variable. In the above example, the localevariable is Body even header, which uses the parameters pagenum, prodname,and heading:
theParameters
<!-- file: [FO]\cfg\common\vars\en_US.xml--> <!-- The header that appears on even-numbered pages. --><variable id="Body even header"> <paramref-name="pagenum"/> | <paramref-name="prodname"/> | <param ref-name="heading"/></variable>
Custom XSL template processing
You can change the default toolkit processing by creating your own XSL templates that you can use togetherwith custom variable definitions.
The following example demonstrates how to create a custom header for even-numbered body pages. Thecustom header will have the page number and the document revision code.
To customize the header content, you need to create an XSL template, along with any variables the templatewill use. The value of the variable in this example, ‘Body even header’, is computed by two other parameters,pagenum and docrev. These parameters are passed when we call the insertVariable template from theinsertBodyEvenHeader template.
The pagenum parameter is merely the FO markup required to insert a page number. The docrev parametermakes use of the docRevision variable (see excerpt from [FO_CUSTOM]\fo\xsl\custom.xsl below).
<!-- file:[FO_CUSTOM]\common\vars\en_US.xml--> <!-- The header that appears oneven-numbered pages. --> <variable id="Body even header"> <param
XMetaL Author 16 User's Guide212
XSL templates
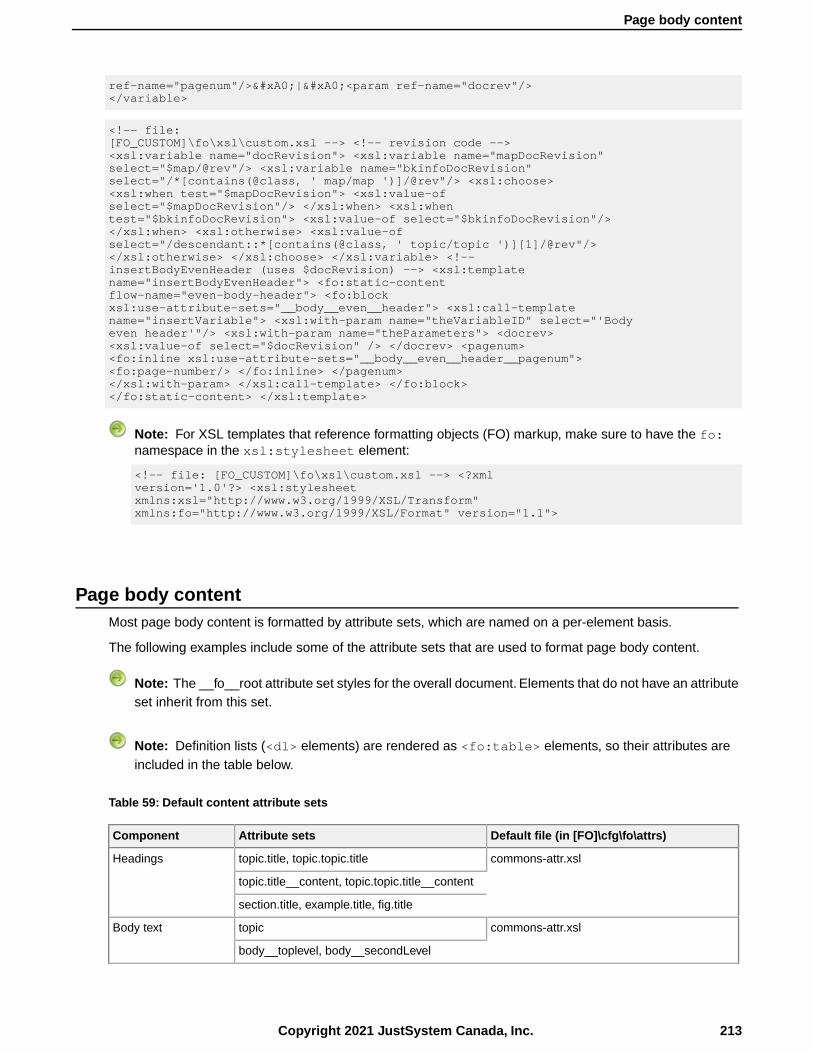
ref-name="pagenum"/> | <param ref-name="docrev"/></variable>
<!-- file:[FO_CUSTOM]\fo\xsl\custom.xsl --> <!-- revision code --><xsl:variable name="docRevision"> <xsl:variable name="mapDocRevision"select="$map/@rev"/> <xsl:variable name="bkinfoDocRevision"select="/*[contains(@class, ' map/map ')]/@rev"/> <xsl:choose><xsl:when test="$mapDocRevision"> <xsl:value-ofselect="$mapDocRevision"/> </xsl:when> <xsl:whentest="$bkinfoDocRevision"> <xsl:value-of select="$bkinfoDocRevision"/></xsl:when> <xsl:otherwise> <xsl:value-ofselect="/descendant::*[contains(@class, ' topic/topic ')][1]/@rev"/></xsl:otherwise> </xsl:choose> </xsl:variable> <!--insertBodyEvenHeader (uses $docRevision) --> <xsl:templatename="insertBodyEvenHeader"> <fo:static-contentflow-name="even-body-header"> <fo:blockxsl:use-attribute-sets="__body__even__header"> <xsl:call-templatename="insertVariable"> <xsl:with-param name="theVariableID" select="'Bodyeven header'"/> <xsl:with-param name="theParameters"> <docrev><xsl:value-of select="$docRevision" /> </docrev> <pagenum><fo:inline xsl:use-attribute-sets="__body__even__header__pagenum"><fo:page-number/> </fo:inline> </pagenum></xsl:with-param> </xsl:call-template> </fo:block></fo:static-content> </xsl:template>
Note: For XSL templates that reference formatting objects (FO) markup, make sure to have the fo:namespace in the xsl:stylesheet element:
<!-- file: [FO_CUSTOM]\fo\xsl\custom.xsl --> <?xmlversion='1.0'?> <xsl:stylesheetxmlns:xsl="http://www.w3.org/1999/XSL/Transform"xmlns:fo="http://www.w3.org/1999/XSL/Format" version="1.1">
Page body contentMost page body content is formatted by attribute sets, which are named on a per-element basis.
The following examples include some of the attribute sets that are used to format page body content.
Note: The __fo__root attribute set styles for the overall document. Elements that do not have an attributeset inherit from this set.
Note: Definition lists (<dl> elements) are rendered as <fo:table> elements, so their attributes areincluded in the table below.
Table 59: Default content attribute sets
Default file (in [FO]\cfg\fo\attrs)Attribute setsComponent
commons-attr.xsltopic.title, topic.topic.titleHeadings
topic.title__content, topic.topic.title__content
section.title, example.title, fig.title
commons-attr.xsltopicBody text
body__toplevel, body__secondLevel
213Copyright 2021 JustSystem Canada, Inc.
Page body content

Default file (in [FO]\cfg\fo\attrs)Attribute setsComponent
body
section
p
__fo__root
tables-attr.xsltable.titleTables
__tableframe__top, __tableframe__bottom
thead.row.entry, thead.row.entry__content
dl
dlentry.dt, dlentry.dt__content
dlentry.dd, dlentry.dd__content
commons-attr.xslnoteNotes
note__label
note__table
note__image__entry
lists-attr.xslul, ul.li, ul.li__label, ul.li__label__content, etc.Lists
ol, ol.li, ol.li__label, ol.li__label__content , etc.
steps-unordered, steps-unordered.step, etc.
steps, steps.step, steps.step__label, etc.
For example, the following excerpt from [FO]\cfg\fo\attrs\tables-attr.xsl shows the default styles for tableheadings:
<!-- file:[FO]\cfg\fo\attrs\tables-attr.xsl --> <xsl:attribute-setname="thead.row.entry"> <!--head cell--> <xsl:attributename="background-color">antiquewhite</xsl:attribute></xsl:attribute-set> <xsl:attribute-setname="thead.row.entry__content"> <!--head cell contents--><xsl:attribute name="margin">3pt 3pt 3pt 3pt</xsl:attribute><xsl:attribute name="font-weight">bold</xsl:attribute></xsl:attribute-set>
Custom processing
To customize styles:
1. Locate the relevant default attribute set (see the table above).
2. Copy the attribute set to [FO_CUSTOM]\fo\attrs\custom.xsl.
3. Modify / add attributes as required.
In the following example, the background color for table headers is set to black. Table heading text is alsocustomized.
<!-- file: [FO_CUSTOM]\fo\attrs\custom.xsl --><xsl:attribute-set name="thead.row.entry"> <!--head cell--><xsl:attribute name="background-color">black</xsl:attribute></xsl:attribute-set> <xsl:attribute-setname="thead.row.entry__content"> <!--head cell contents--><xsl:attribute name="color">white</xsl:attribute> <xsl:attributename="margin">3pt 3pt 3pt 3pt</xsl:attribute> <xsl:attribute
XMetaL Author 16 User's Guide214
Page body content

name="font-weight">bold</xsl:attribute></xsl:attribute-set>
NotesBy default, notes are preceded by text and an image, which are stored as variables. Variables are definedfor each note type.
Notes come in a variety of types:
• Regular notes
• Caution
• Attention
• Danger
The following example shows how the note of ‘type=note’ is rendered.
<!-- file: [FO]\cfg\common\vars\en_US.xml --> <variableid="Note">Note</variable> ... <variable id="note Note ImagePath">Configuration/OpenTopic/cfg/common/artwork/hand.gif</variable>
Custom processing
You can change how notes are rendered by specifying your own preceding text and image. The followingexample shows a note of ‘type=note’ with no preceding text and a custom image.
<!-- file:[FO_CUSTOM]\common\vars\en_US.xml --> <variable id="Note"><!-- noimage --></variable> ... <variable id="note Note ImagePath">Configuration/OpenTopic/cfg/common/artwork/corporate_note.gif</variable>
For further modification of notes, you can customize the placeNoteContent XSL template. The followingtemplate uses a custom attribute set.
<!-- file: [FO_CUSTOM]\common\vars\en_US.xml --><xsl:template name="placeNoteContent"> <fo:blockxsl:use-attribute-sets="note" id="{@id}"> <fo:inlinexsl:use-attribute-sets="note__label"> <xsl:choose> <xsl:whentest="@type='note' or not(@type)"> <fo:inlinexsl:use-attribute-sets="note__label__note"> <xsl:call-templatename="insertVariable"> <xsl:with-param name="theVariableID"select="'Note'"/> </xsl:call-template> </fo:inline></xsl:when> ... </xsl:choose> </fo:inline> ...</fo:block> </xsl:template>
Front matterFront matter consists of the pages at the front of a book that precede its main text, for example, the title page,copyright notice, dedication, and table of contents.You can create front matter content by setting the‘outputclass’ attribute value on a topic.
The following template applies to topics that have the outputclass attribute value of ‘frontmatter’.
<!-- file:[FO_CUSTOM\fo\xsl\custom.xsl --> <xsl:templatename="createFrontMatter"> <fo:page-sequencemaster-reference="front-matter"
215Copyright 2021 JustSystem Canada, Inc.
Notes

xsl:use-attribute-sets="__force__page__count"> ... <fo:flowflow-name="xsl-region-body"> <xsl:apply-templatesselect="//topic[@outputclass='frontmatter']" mode="frontmatter" /></fo:flow> </fo:page-sequence> </xsl:template>
You also need to add a custom template.
<!-- file:[FO_CUSTOM\fo\xsl\custom.xsl --> <xsl:templatematch="topic[@outputclass='frontmatter']"/> <xsl:template match="*"mode="frontmatter"> <xsl:apply-templates mode="frontmatter" /></xsl:template>
Now you can control how your front matter content is processed, and more importantly, use the toolkit templateswhere you want the default processing. For example, you might want to include images in your front matterusing the default placeImage template.
<!-- file: [FO_CUSTOM\fo\xsl\custom.xsl --> <xsl:templatematch="image" mode="frontmatter"> <fo:block> <xsl:call-templatename="placeImage" select="." mode="" ><!--switch to default mode --> <xsl:with-param name="imageAlign"select="@align" /> <xsl:with-param name="href" select="@href" /><xsl:with-param name="height" select="@height" /> <xsl:with-paramname="width" select="@width" /> </xsl:call-template> </fo:block></xsl:template>
FontsYou can set the font family and size by specifying parameter values.
Table 60: Parameters
DescriptionName
The base font size for the document. This is the font size that is usedby most body content (for example, paragraphs and lists). The value isset in points (pt).
xm.document.font-size
Sets the font body type for body text. Can be set to serif or sans-serif.xm.body.font.family
Sets the font type for titles. Can be set to serif or sans-serif.xm.title.font.family
Example
The base font size is set to 10 points, the body font is serif, and the title font is sans-serif.
<!-- file:[xmfo]\Customization\fo\attrs\custom.xsl --> <xsl:variablename="xm.document.font-size">10pt</xsl:variable> <xsl:variablename="xm.body.font-family">Serif</xsl:variable> <xsl:variablename="xm.title.font-family">Sans</xsl:variable>
XMetaL Author 16 User's Guide216
Fonts
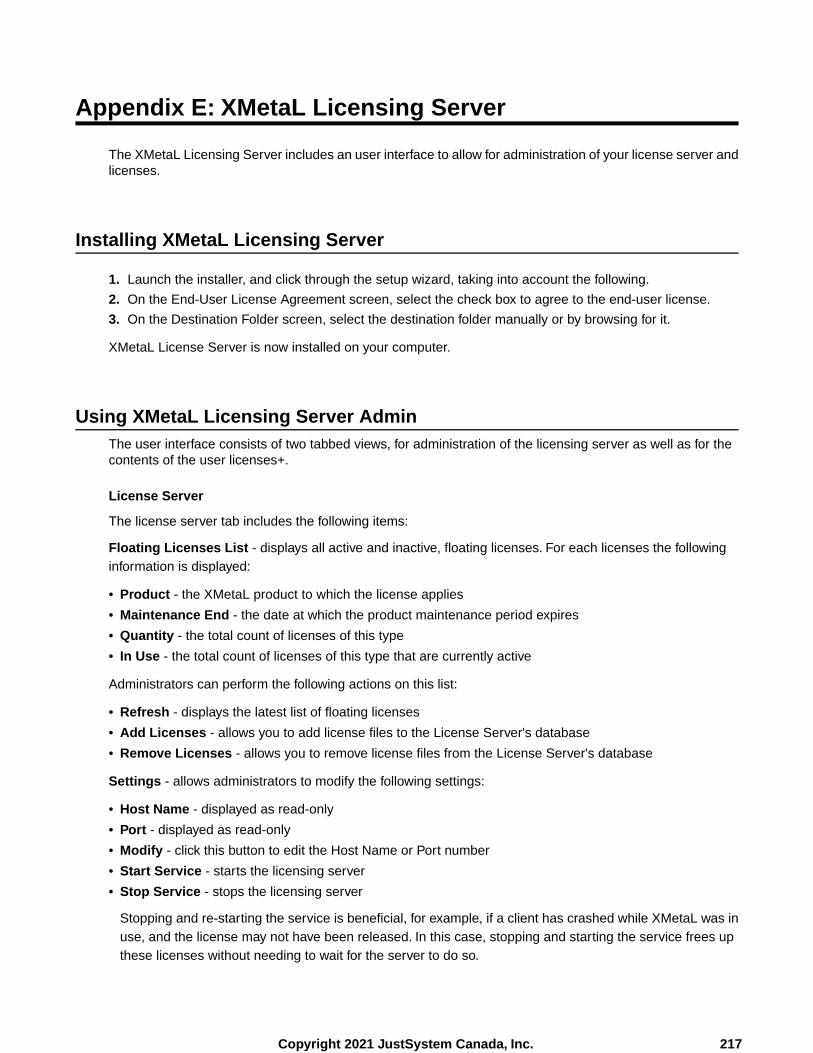
Appendix E: XMetaL Licensing Server
The XMetaL Licensing Server includes an user interface to allow for administration of your license server andlicenses.
Installing XMetaL Licensing Server
1. Launch the installer, and click through the setup wizard, taking into account the following.
2. On the End-User License Agreement screen, select the check box to agree to the end-user license.
3. On the Destination Folder screen, select the destination folder manually or by browsing for it.
XMetaL License Server is now installed on your computer.
Using XMetaL Licensing Server AdminThe user interface consists of two tabbed views, for administration of the licensing server as well as for thecontents of the user licenses+.
License Server
The license server tab includes the following items:
Floating Licenses List - displays all active and inactive, floating licenses. For each licenses the followinginformation is displayed:
• Product - the XMetaL product to which the license applies
• Maintenance End - the date at which the product maintenance period expires
• Quantity - the total count of licenses of this type
• In Use - the total count of licenses of this type that are currently active
Administrators can perform the following actions on this list:
• Refresh - displays the latest list of floating licenses
• Add Licenses - allows you to add license files to the License Server's database
• Remove Licenses - allows you to remove license files from the License Server's database
Settings - allows administrators to modify the following settings:
• Host Name - displayed as read-only
• Port - displayed as read-only
• Modify - click this button to edit the Host Name or Port number
• Start Service - starts the licensing server
• Stop Service - stops the licensing server
Stopping and re-starting the service is beneficial, for example, if a client has crashed while XMetaL was inuse, and the license may not have been released. In this case, stopping and starting the service frees upthese licenses without needing to wait for the server to do so.
217Copyright 2021 JustSystem Canada, Inc.
User License
This view displays the user license file contents. Administrators can perform the following actions:
• Save to File - saves the license file to a location of your choice
• Copy Server Address to Clipboard - copies the URL to the clipboard, to allow for sharing of the serveraddress
XMetaL Author 16 User's Guide218
Using XMetaL Licensing Server Admin
Glossary
A value that is associated with an element but is not part of the content of theelement.
attribute
An element whose content is preceded and followed by line breaks.block element
A program that communicates with Web servers and is used for retrieving anddisplaying documents from the World Wide Web or an intranet. Most browsers usea graphical interface to provide access to text, images, audio, and video.
browser
A widely used DTD for table markup, described in the U.S. Department of DefenseSGML standard MIL-M-28001B. XMetaL Author supports a definition of the CALSDTD developed by the OASIS consortium and described at www.oasis-open.org.
CALS table model
A way to specify document formatting that is supported by browsers. XMetaL usescascading style sheets to format the document pane in Normal and Tags On views.
cascading style sheet(CSS)
A cascading style sheet generally consists of one or more rules that define elementappearance. These style sheets are said to be cascading because several stylesheets can be applied to the same document. See www.w3.org for more information.
One or more files that map external identifiers for DTDs, rules files, or entities to afilename. Also called OASIS catalog files. For more information on catalog files,see OASIS Technical Resolution 9401:1997.
catalog files
Character data. A type of content in which any markup delimiters (such as ‘<’ and‘&’) that appear are treated as ordinary characters.
CDATA
A markup construct beginning with the characters ‘<![CDATA[’ and ending with‘]]>’, inside which all content is treated as character data.
CDATA section
The way in which the content you see in XMetaL is organized in files when yougenerate output from a DITA map.You can specify chunking behaviors, for example,that split composite topics into several output files.
chunking
An expression in a DTD that defines the content of a particular element.content model
The element containing the insertion point or selection. If an entire element isselected, the current element is the parent of that element, not the selected elementitself.
current element
A set of files that determines the formatting and authoring functionality in XMetaLAuthor. Customizations can be applied at the document level or at the applicationlevel.
customization
Specifies an output format and additional configuration settings that you supply tothe DITA Open Toolkit.
deliverable type
Document type declaration. A declaration that associates an XML or SGMLdocument with a DTD, and may contain additional markup declarations.
DOCTYPE declaration
The Document Object Model (DOM) is an abstract definition of an API (applicationprogram interface) for manipulating XML document structures. The DOM is a
Document ObjectModel (DOM)
Recommendation of the World Wide Web Consortium (W3C), developed andmaintained by the W3C DOM Working group. XMetaL follows the DOM Level 1Specification. The DOM was designed to represent XML structures, but canrepresent SGML structures (such as CALS tables) if they are also found in XML.
Document Type Definition. A set of definitions, written in a formal notation, thatdefines the structure and content of a document.
DTD
219Copyright 2021 JustSystem Canada, Inc.
The building blocks of XML and SGML documents. Elements are named accordingto their function in the document, for example, headings, lists, and paragraphs.
element
An element that cannot have any content.empty element
A named body of data that you can refer to from within a document.entity
A reference, using a specific syntax, to an entity. When the document is displayedin a browser or editor, the entity reference is replaced by the text or file that theentity represents.
entity reference
A type of entity that represents another file.external entity
A way of identifying an external file. External identifiers can appear in a documenttype declaration and in external entity declarations, where they identify the external
external identifier
file that the entity refers to. In SGML files, external identifiers can consist of a systemidentifier, a public identifier, or both. In XML files, external identifiers must containa system identifier, which may be preceded by a public identifier.
A file that associates external identifiers with filenames on the system.external identifiermap file
An element that is inserted following the occurrence of a specific element.Followed-by elements are configured in XMetaL Developer as part of thecustomization (.ctm) file.
followed-by element
A data-entry interface usually associated with specific elements in an XMetaLdocument. Forms are designed in the XMetaL Forms Toolkit (XFT) either as dialog
form
boxes that are launched from an XMetaL macro, or as content that appears as partof an element.
These can be text entities, external entities, or graphic entities.general entity
Text that is not part of the document content, but is generated by a display programand displayed at the beginning or end of an element’s content.
generated text
A type of general entity that represents an external multimedia file, for example, agraphic, video, or audio file.
graphic entity
Text that can be used to link to another document or another location in the samedocument. The viewer can display the linked document or location by clicking thetext.
hypertext
A unique identifier. The value of an ID attribute must not be used for any other IDattribute in the document.
ID
A reference to an ID. IDREF attribute values do not have to be unique; more thanone IDREF can refer to the same ID.
IDREF
An ActiveX control that is embedded in the Normal and Tags On document panesin XMetaL Author or XMetaL XMAX, and communicates with XMetaL Author or
in-place control
XMetaL XMAX so that changes in the control can modify the document, and viceversa.
An element that does not have a line break before or after its contents. They areoften used for typeface modifications.
inline element
An optional part of the document type declaration that may contain markupdeclarations.
internal subset
International Organization for Standardization.ISO
The character set for special or accented characters that is widely used in HTMLdocuments. This character set is also called ISO Latin 1. It includes charactersrequired for most western European languages.
ISO 8859-1 characterset
XMetaL Author 16 User's Guide220
Glossary
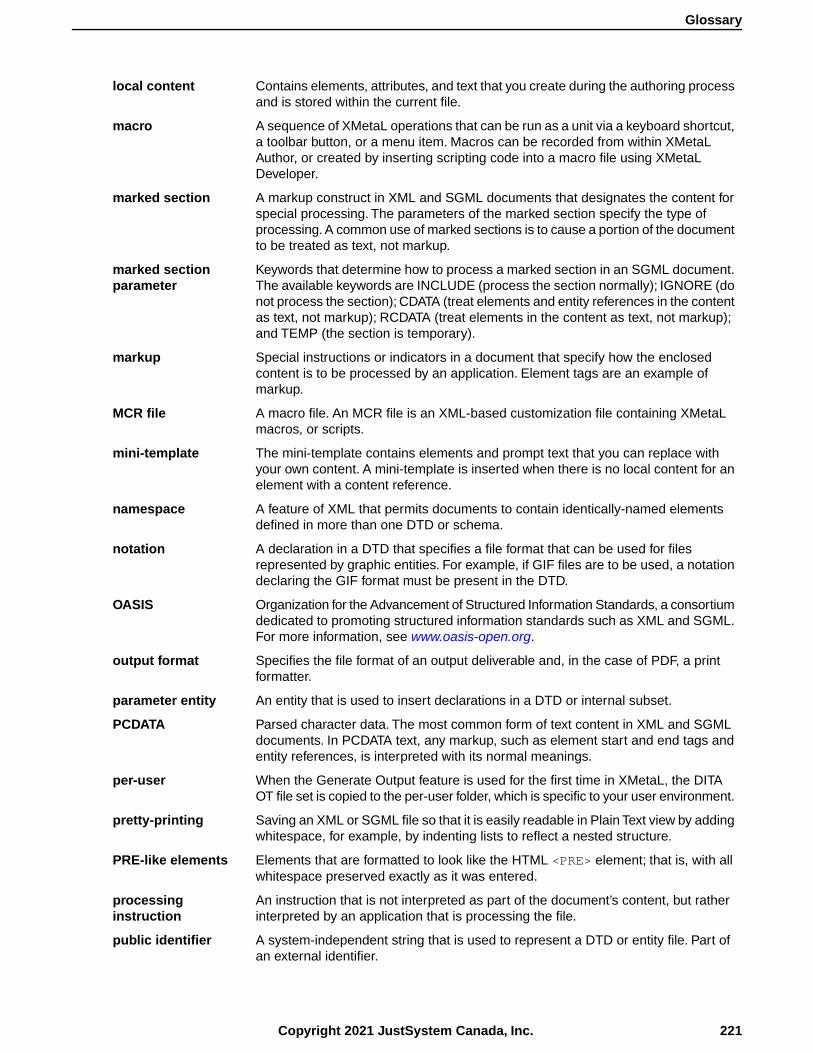
Contains elements, attributes, and text that you create during the authoring processand is stored within the current file.
local content
A sequence of XMetaL operations that can be run as a unit via a keyboard shortcut,a toolbar button, or a menu item. Macros can be recorded from within XMetaL
macro
Author, or created by inserting scripting code into a macro file using XMetaLDeveloper.
A markup construct in XML and SGML documents that designates the content forspecial processing. The parameters of the marked section specify the type of
marked section
processing. A common use of marked sections is to cause a portion of the documentto be treated as text, not markup.
Keywords that determine how to process a marked section in an SGML document.The available keywords are INCLUDE (process the section normally); IGNORE (do
marked sectionparameter
not process the section); CDATA (treat elements and entity references in the contentas text, not markup); RCDATA (treat elements in the content as text, not markup);and TEMP (the section is temporary).
Special instructions or indicators in a document that specify how the enclosedcontent is to be processed by an application. Element tags are an example ofmarkup.
markup
A macro file. An MCR file is an XML-based customization file containing XMetaLmacros, or scripts.
MCR file
The mini-template contains elements and prompt text that you can replace withyour own content. A mini-template is inserted when there is no local content for anelement with a content reference.
mini-template
A feature of XML that permits documents to contain identically-named elementsdefined in more than one DTD or schema.
namespace
A declaration in a DTD that specifies a file format that can be used for filesrepresented by graphic entities. For example, if GIF files are to be used, a notationdeclaring the GIF format must be present in the DTD.
notation
Organization for the Advancement of Structured Information Standards, a consortiumdedicated to promoting structured information standards such as XML and SGML.For more information, see www.oasis-open.org.
OASIS
Specifies the file format of an output deliverable and, in the case of PDF, a printformatter.
output format
An entity that is used to insert declarations in a DTD or internal subset.parameter entity
Parsed character data. The most common form of text content in XML and SGMLdocuments. In PCDATA text, any markup, such as element start and end tags andentity references, is interpreted with its normal meanings.
PCDATA
When the Generate Output feature is used for the first time in XMetaL, the DITAOT file set is copied to the per-user folder, which is specific to your user environment.
per-user
Saving an XML or SGML file so that it is easily readable in Plain Text view by addingwhitespace, for example, by indenting lists to reflect a nested structure.
pretty-printing
Elements that are formatted to look like the HTML <PRE> element; that is, with allwhitespace preserved exactly as it was entered.
PRE-like elements
An instruction that is not interpreted as part of the document’s content, but ratherinterpreted by an application that is processing the file.
processinginstruction
A system-independent string that is used to represent a DTD or entity file. Part ofan external identifier.
public identifier
221Copyright 2021 JustSystem Canada, Inc.
Glossary
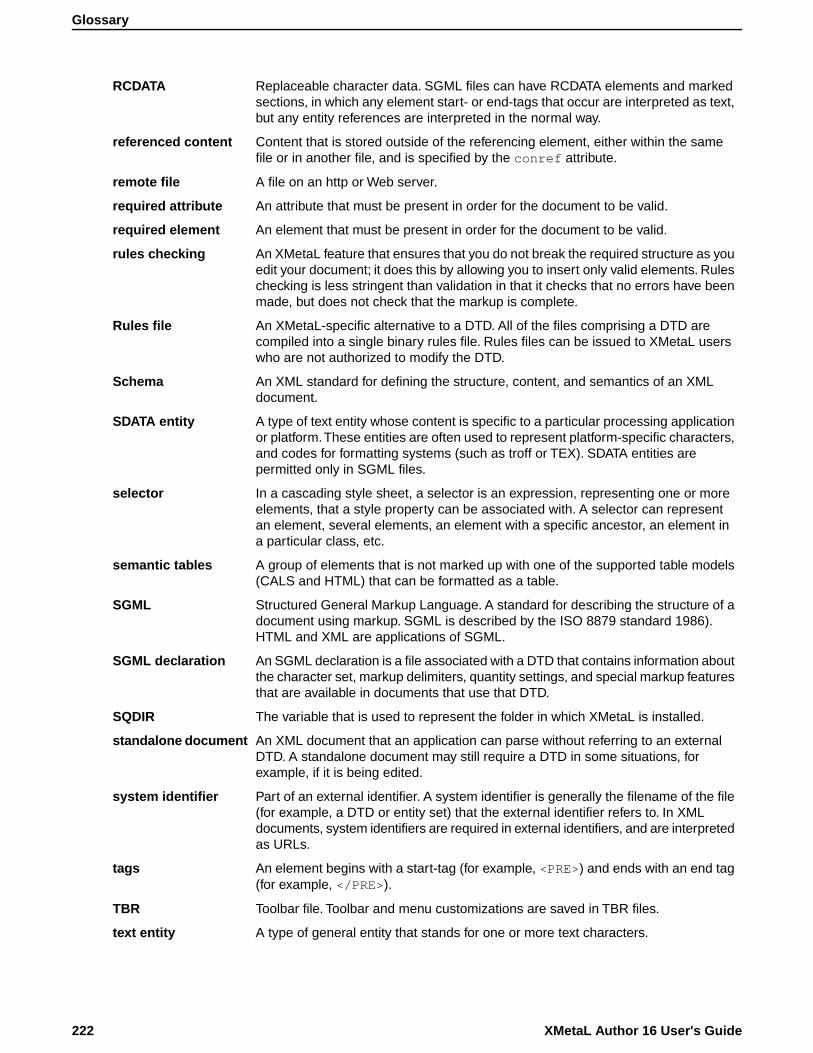
Replaceable character data. SGML files can have RCDATA elements and markedsections, in which any element start- or end-tags that occur are interpreted as text,but any entity references are interpreted in the normal way.
RCDATA
Content that is stored outside of the referencing element, either within the samefile or in another file, and is specified by the conref attribute.
referenced content
A file on an http or Web server.remote file
An attribute that must be present in order for the document to be valid.required attribute
An element that must be present in order for the document to be valid.required element
An XMetaL feature that ensures that you do not break the required structure as youedit your document; it does this by allowing you to insert only valid elements. Rules
rules checking
checking is less stringent than validation in that it checks that no errors have beenmade, but does not check that the markup is complete.
An XMetaL-specific alternative to a DTD. All of the files comprising a DTD arecompiled into a single binary rules file. Rules files can be issued to XMetaL userswho are not authorized to modify the DTD.
Rules file
An XML standard for defining the structure, content, and semantics of an XMLdocument.
Schema
A type of text entity whose content is specific to a particular processing applicationor platform.These entities are often used to represent platform-specific characters,
SDATA entity
and codes for formatting systems (such as troff or TEX). SDATA entities arepermitted only in SGML files.
In a cascading style sheet, a selector is an expression, representing one or moreelements, that a style property can be associated with. A selector can represent
selector
an element, several elements, an element with a specific ancestor, an element ina particular class, etc.
A group of elements that is not marked up with one of the supported table models(CALS and HTML) that can be formatted as a table.
semantic tables
Structured General Markup Language. A standard for describing the structure of adocument using markup. SGML is described by the ISO 8879 standard 1986).HTML and XML are applications of SGML.
SGML
An SGML declaration is a file associated with a DTD that contains information aboutthe character set, markup delimiters, quantity settings, and special markup featuresthat are available in documents that use that DTD.
SGML declaration
The variable that is used to represent the folder in which XMetaL is installed.SQDIR
An XML document that an application can parse without referring to an externalDTD. A standalone document may still require a DTD in some situations, forexample, if it is being edited.
standalone document
Part of an external identifier. A system identifier is generally the filename of the file(for example, a DTD or entity set) that the external identifier refers to. In XML
system identifier
documents, system identifiers are required in external identifiers, and are interpretedas URLs.
An element begins with a start-tag (for example, <PRE>) and ends with an end tag(for example, </PRE>).
tags
Toolbar file. Toolbar and menu customizations are saved in TBR files.TBR
A type of general entity that stands for one or more text characters.text entity
XMetaL Author 16 User's Guide222
Glossary

A standard for electronically encoding the characters of many of the scripts usedto write the world’s languages, as well as special symbols such as mathematical
Unicode
symbols. Unicode is the character encoding specified by XML. For more information,see www.unicode.org.
Uniform Resource Locator. A URL is the address of a file, written in a format thatcan be interpreted by a Web server.
URL
An XML or SGML document is valid if it conforms to the rules in the DTD or Schema.valid document
World Wide Web Consortium, an industry association for the development of WorldWide Web technologies. For more information, see www.w3.org.
W3C
World Wide Web Distributed Authoring and Versioning, the Internet EngineeringTask Force standard for collaborative authoring on the Web. WebDAV is a set of
WebDAV
extensions to the Hypertext Transfer Protocol (HTTP) and Secure Hypertext TransferProtocol (HTTPS) that facilitates collaborative editing and file management betweenusers located remotely from each other on the Internet.
An XML document that is structurally correct according to the XML standard.Thereare several aspects to well-formedness, the most important of which are: the
well-formeddocument
document must have only one top-level element, and all elements must be properlynested.
One or more space, tab, carriage return, or line feed characters, in any combination.whitespace
This is a generic term for the collection of Web servers and browsers. Usuallyabbreviated as WWW, or simply called ‘the Web’.
World Wide Web
Extensible Markup Language. An application of SGML that describes the structureand content of a document. Originally designed for displaying content over the
XML
Internet. XML is an initiative of the W3C. For more information, seewww.w3.org/XML.
A processing instruction that appears at the start of an XML document. Thisprocessing instruction indicates the XML version being used, and may specify thecharacter encoding and whether the document needs an external DTD.
XML declaration
Extensible Stylesheet Language: Transformations. A language for describing howto transform an XML document into another XML document.
XSLT
An element that redefines simple and complex types, groups, and attribute groupsfrom an external schema. For more information, seehttp://www.w3.org/TR/xmlschema-1#modify-schema
xs:redefine
223Copyright 2021 JustSystem Canada, Inc.
Glossary
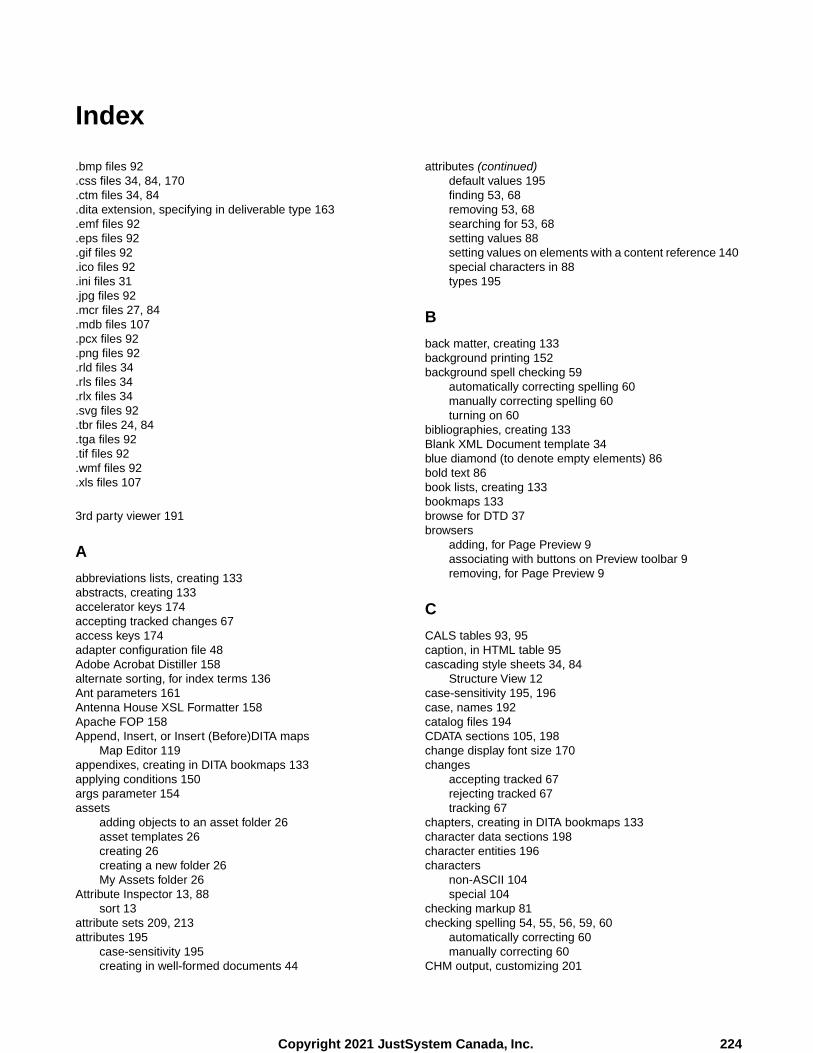
Index
.bmp files 92
.css files 34, 84, 170
.ctm files 34, 84
.dita extension, specifying in deliverable type 163
.emf files 92
.eps files 92
.gif files 92
.ico files 92
.ini files 31
.jpg files 92
.mcr files 27, 84
.mdb files 107
.pcx files 92
.png files 92
.rld files 34
.rls files 34
.rlx files 34
.svg files 92
.tbr files 24, 84
.tga files 92
.tif files 92
.wmf files 92
.xls files 107
3rd party viewer 191
A
abbreviations lists, creating 133abstracts, creating 133accelerator keys 174accepting tracked changes 67access keys 174adapter configuration file 48Adobe Acrobat Distiller 158alternate sorting, for index terms 136Ant parameters 161Antenna House XSL Formatter 158Apache FOP 158Append, Insert, or Insert (Before)DITA maps
Map Editor 119appendixes, creating in DITA bookmaps 133applying conditions 150args parameter 154assets
adding objects to an asset folder 26asset templates 26creating 26creating a new folder 26My Assets folder 26
Attribute Inspector 13, 88sort 13
attribute sets 209, 213attributes 195
case-sensitivity 195creating in well-formed documents 44
attributes (continued)default values 195finding 53, 68removing 53, 68searching for 53, 68setting values 88setting values on elements with a content reference 140special characters in 88types 195
B
back matter, creating 133background printing 152background spell checking 59
automatically correcting spelling 60manually correcting spelling 60turning on 60
bibliographies, creating 133Blank XML Document template 34blue diamond (to denote empty elements) 86bold text 86book lists, creating 133bookmaps 133browse for DTD 37browsers
adding, for Page Preview 9associating with buttons on Preview toolbar 9removing, for Page Preview 9
C
CALS tables 93, 95caption, in HTML table 95cascading style sheets 34, 84
Structure View 12case-sensitivity 195, 196case, names 192catalog files 194CDATA sections 105, 198change display font size 170changes
accepting tracked 67rejecting tracked 67tracking 67
chapters, creating in DITA bookmaps 133character data sections 198character entities 196characters
non-ASCII 104special 104
checking markup 81checking spelling 54, 55, 56, 59, 60
automatically correcting 60manually correcting 60
CHM output, customizing 201
224Copyright 2021 JustSystem Canada, Inc.
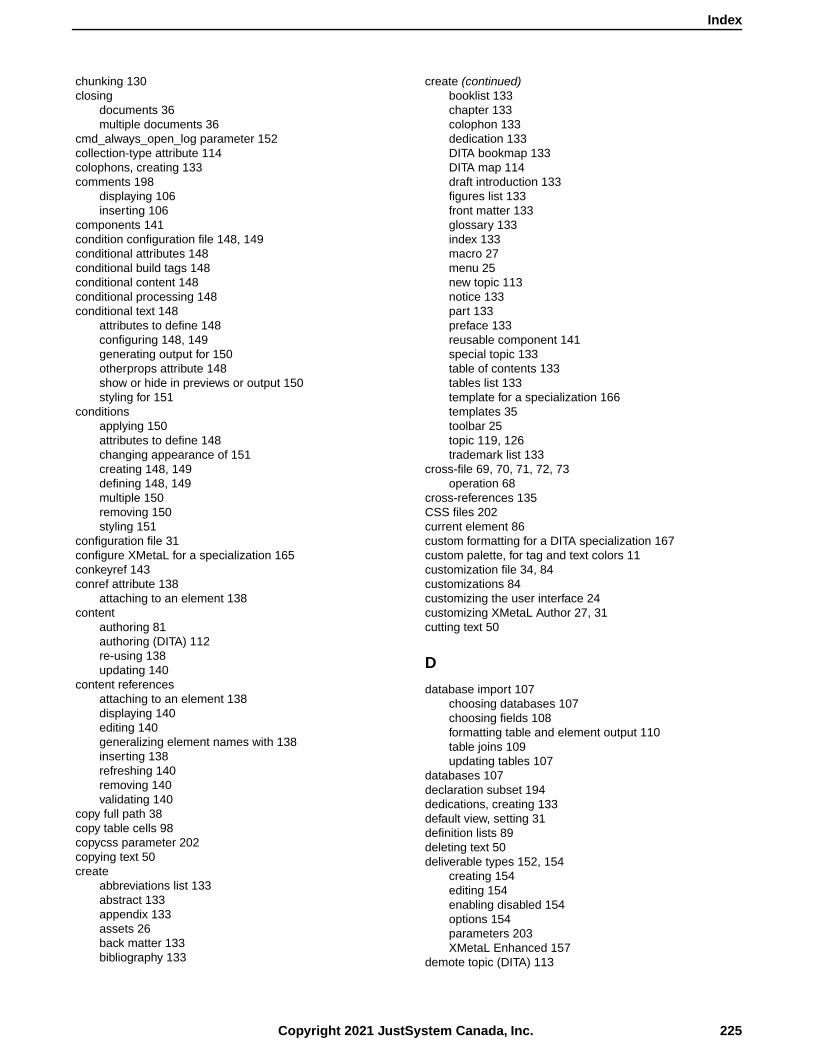
chunking 130closing
documents 36multiple documents 36
cmd_always_open_log parameter 152collection-type attribute 114colophons, creating 133comments 198
displaying 106inserting 106
components 141condition configuration file 148, 149conditional attributes 148conditional build tags 148conditional content 148conditional processing 148conditional text 148
attributes to define 148configuring 148, 149generating output for 150otherprops attribute 148show or hide in previews or output 150styling for 151
conditionsapplying 150attributes to define 148changing appearance of 151creating 148, 149defining 148, 149multiple 150removing 150styling 151
configuration file 31configure XMetaL for a specialization 165conkeyref 143conref attribute 138
attaching to an element 138content
authoring 81authoring (DITA) 112re-using 138updating 140
content referencesattaching to an element 138displaying 140editing 140generalizing element names with 138inserting 138refreshing 140removing 140validating 140
copy full path 38copy table cells 98copycss parameter 202copying text 50create
abbreviations list 133abstract 133appendix 133assets 26back matter 133bibliography 133
create (continued)booklist 133chapter 133colophon 133dedication 133DITA bookmap 133DITA map 114draft introduction 133figures list 133front matter 133glossary 133index 133macro 27menu 25new topic 113notice 133part 133preface 133reusable component 141special topic 133table of contents 133tables list 133template for a specialization 166templates 35toolbar 25topic 119, 126trademark list 133
cross-file 69, 70, 71, 72, 73operation 68
cross-references 135CSS files 202current element 86custom formatting for a DITA specialization 167custom palette, for tag and text colors 11customization file 34, 84customizations 84customizing the user interface 24customizing XMetaL Author 27, 31cutting text 50
D
database import 107choosing databases 107choosing fields 108formatting table and element output 110table joins 109updating tables 107
databases 107declaration subset 194dedications, creating 133default view, setting 31definition lists 89deleting text 50deliverable types 152, 154
creating 154editing 154enabling disabled 154options 154parameters 203XMetaL Enhanced 157
demote topic (DITA) 113
225Copyright 2021 JustSystem Canada, Inc.
Index
diamond (to denote empty elements) 86DITA 112
DTDs 112, 152formatting 170Help on Current Element 9metadata 113multimedia objects 134objects 134references 9sample map file 9specializations 164, 165, 166, 167, 170stylesheets 170subtopics 113tables 93topic metadata 113
DITA Architectural Specification 9DITA bookmaps 133
creating 133editing 119, 126, 133generated lists 133insert abbreviations list 133insert abstract 133insert appendix 133insert back matter 133insert bibliography 133insert booklist 133insert chapter 133insert colophon 133insert dedication 133insert draft introduction 133insert element 133insert figures list 133insert front matter 133insert glossary 133insert index 133insert notice 133insert part 133insert preface 133insert special topic 133insert table of contents 133insert tables list 133insert trademark list 133
DITA Configuration Save Copy as Template macro 166DITA Language Reference 9DITA maps 114, 119, 125, 126, 128
element 114collection-type attribute 114configuring TOC 114creating 114editing 119, 126generating output 152insert another map 119, 126insert Eclipse navigation reference 119, 126insert file reference 119, 126insert map reference 119, 126insert topic group 119, 126insert topic heading 119, 126insert topic reference 119, 126insert Web link 119, 126Map Editor 119, 126reference to non-DITA files 119, 126relationship tables 114, 128
DITA maps (continued)validity problems 128XML view 128
DITA Open Toolkittroubleshooting 163
DITA Open Toolkit User Guide 9DITA options 167DITA topics
opening through Map Editor 119, 126ditaval
creating 146definition 146reference 146
DITAVAL files 150ditaval reference 146DocBook 158docked panes 13docking indicator 13DOCTYPE 193
internal subset 194Document Ex 187document instance 193document publishing 152document status bar 9document type declaration 193document type name 193document views 9documents
closing 36creating 81linked 46moving between 38opening outside XMetaL 38saving 41
domains, hiding and showing 167download referenced components 48draft introductions, creating 133dragging-and-dropping text 50DSDK_PARAM_ditaext parameter 163DTDs 193
internal 194duplicate IDs 72duplicate IDs, fixing 167
E
Eclipse Content 158Eclipse Help 158Eclipse navigation reference 119, 126edit
deliverable type 154DITA bookmap 133DITA bookmaps 119, 126DITA maps 119, 126element properties 88
edit as partial document 37editing
accepting tracked changes 67rejecting tracked changes 67source 9text 50tracking changes 67
XMetaL Author 16 User's Guide226
Index
editing documents without a DTD 43editing options 37Element List 13, 86element properties 88element with keyref 143elements
block 86case-sensitivity 195changing 86creating in well-formed documents 43current 86empty 86, 195finding 53, 68inline 86inserting 86joining 86read-only 86removing tags 86replacing 53selecting 50splitting 86wrapping and unwrapping 86
empty elements 86, 195enlarging the document pane 21entities 102, 196
case-sensitivity 196external 102, 196for images and multimedia files 102, 196for special characters and symbols 196for text files 102, 196for XML or SGML files 102, 196graphic 102, 196naming conventions 102opening external 102opening external entities 36parameter 196text 102, 196
entity references 196finding 54replacing 54replacing text 51replacing with text 54
error checking 56extended publishing options
specifying parameters 160extended publishing options, specifying parameters 161external entities 102, 196
F
figures lists, creating 133file and folder naming rules 163file naming recommendations 41filename prefix, setting 170filenames 170files
closing 36creating a blank XML or SGML document 34creating a blank, well-formed XML document 34creating from a template 34creating new 34DTDs 193
files (continued)opening 36opening outside XMetaL 38printing 47saving 41Schemas 193
fill cell attributes 98filter maps 125filtered reuse 148find
across files 70in files 70
Find and Replace 51find in files 68find markup
across files 69finding
attribute values 53, 68elements 53, 68entity references 54text 51, 68text in an element 51using pattern matching 52
finding a word on Google 179finding a word on Wiki 179floating panes 13followed-by element 84font size, changing 170footers 202, 210
attribute sets 210Formatting toolbar 16, 86front matter, creating 133full-screen mode 21
G
generalizing element names 138generate output
chunking 130troubleshooting 163
glossariescreating 133, 134sorting 129, 134, 157
graphic entities 102, 196graphics 92
H
headers 202, 210attribute sets 210
HTML 154HTML Help 152, 154, 158HTML Help Workshop 154HTML tables 93, 95
I
identifierexternal 194public 194system 194
227Copyright 2021 JustSystem Canada, Inc.
Index
IDs 167changing format 167
images 91BMP files 92EMF files 92EPS files 92formats supported 92GIF files 92hiding 31ICO files 92inline 31inserting 91JPG files 92PCX files 92PNG files 92showing 31SVG files 92TGA files 92TIF files 92WMF files 92
importingdatabases 107Excel spreadsheets 107
Include in TOC property 114index markers 136
creating 136page ranges 136See and See also entries 136sorting 136sub-entries 136
indexes, creating 133, 136inline elements 86inline images, showing 31insert
abbreviations list into a DITA bookmap 133abstract into a DITA bookmap 133appendix into a DITA bookmap 133back matter into a DITA bookmap 133bibliography into a DITA bookmap 133booklist into a DITA bookmap 133chapter into a DITA bookmap 133colophon into a DITA bookmap 133content reference 138cross-reference 135dedication into a DITA bookmap 133definition list 89draft introduction into a DITA bookmap 133element into a DITA bookmap 133element with content reference 138elements 86figures list into a DITA bookmap 133file reference in a DITA map 119, 126front matter into a DITA bookmap 133glossary into a DITA bookmap 133index into a DITA bookmap 133index markers 136inline elements 86link 135list 89metadata in DITA topics 113notices into a DITA bookmap 133part into a DITA bookmap 133
insert (continued)preface into a DITA bookmap 133reference to a non-DITA file into a DITA map 119, 126related link 135relationship table 128reusable component 138special topic into a DITA bookmap 133subtopic 113table of contents into a DITA bookmap 133tables list into a DITA bookmap 133topic group into a DITA map 119, 126topic reference into a DITA map 119, 126trademark list into a DITA bookmap 133URL into a DITA map 119, 126Web link into a DITA map 119, 126XInclude 199
insertingCDATA sections 105comments 106marked sections 105processing instructions 106
inserting elements 86interface
document views 9introduction 9pane buttons 13panes 13
internal DTD 194internal subset 194ISO 8859-1 character set 42italic text 86
J
Java parameters 161JavaHelp 158Journalist customization 9, 84
K
keydefinition 141, 142keydef element 142keys 142reference 141
key spaceassociation 141, 143
key variables 141, 143key-based content reference 143keyboard shortcut, creating in menus 25keyboard shortcuts 174keyboard shortcuts (for lists) 89keys 141
L
language settings for spell checker and thesaurus 64language, specifying 129languages 61, 62, 64
setting a default 64Latin-1 character set 42
XMetaL Author 16 User's Guide228
Index

licensing 22link element 135linked documents
archiving 46links 135list items, inserting 89lists 89
bulleted 89converting paragraphs to 89converting to paragraphs 89converting types 89definition 89inserting 89nested lists 89numbered 89sorting 90
local content 88, 140log file 152
M
macro files 84macros 27
associate with a menu item 29associate with toolbar button 29create keyboard shortcut for 29design guidelines 28files 27inserting a tab in a table 101locations 27managing 27recording 28restrictions 28running 27
Macros toolbar 16main word lists 61
adding 61removing 61
Map Editor 119, 126Attribute Inspector 124previewing a topic 126Topicref Target Preview 126
map filter 125map references (insert in DITA map) 119, 126maps 114, 119, 126, 128marked sections 198
in SGML 105inserting 105order of precedence in SGML 105
marking revisions 67markup
display options 31source editing 9
menus, custom 24merging tables 100metadata 113metadata (in DITA topics) 113Microsoft Access databases, importing 107Microsoft Excel spreadsheets
importing 107pasting as tables 101
Microsoft HTML Help Workshop 154
Microsoft Internet Information Server (IIS) 38mini-template 86, 140mnemonic 174monospaced text (in DITA documents) 86moving between documents 38multimedia objects (in DITA topics 134multiple documents 21multiple panes 13multiple-file operations 73multiple-user settings 24, 27, 31, 84My Assets folder 26
N
names, case-sensitivity in XML 192naming rules, for files and folders 163nested lists 89new document 34non-ASCII characters 104Normal table 93Normal view 9notices, creating 133
O
objects (in DITA topics 134online Help 9Open 36open a DITA map element
in Map Editor 119, 126in XML view 128
open referenced file (in a DITA map) 119, 126, 128opening
documents 36external entities 36files in WebDAV-enabled folders 38templates 34
opening document foldersoutside XMetaL 38
opening documentsoutside XMetaL 38
options 167auto-saving 31backup 31default extension 31default template 31deliverable type 154DITA 167end-of-line 31File 31font 31General 31most recently used (MRU) list 31show/hide inline images 31syntax coloring 31tab 31tooltips 31View 31word wrap 31
otherprops attribute 148, 149outline view 12
229Copyright 2021 JustSystem Canada, Inc.
Index

output formats 158creating 162distributing 162modifying 163
output log 152, 163output options 152output parameters 161overriding formatting, in DITA specializations 170
P
page master 210Page Preview 9page ranges, for index terms 136panes
Attribute Inspector 13, 88behavior 13buttons 13docked 13Element List 13, 86floating 13options 13Resource Manager 13, 26Results 13rules for docking and floating 13
parameter entities 196parameters 161parts, creating in DITA bookmaps 133pasting text 50pattern matching 52PDF 152, 154, 158PDF output, customizing 207personal settings 24, 27, 31, 84phrases (in DITA documents) 86pin 13placeholder content 140Plain Text view 9prefaces, creating 133prefix, in filename 170preformatted text (in DITA documents) 86preview 152
set deliverable type for 152Preview toolbar 9, 16print formatters 158printing 47
headers and footers 47processing instructions 192, 198
inserting 106profiling 148promote topic (DITA) 113prompt text 86, 106, 140properties
editing 88, 119, 126Properties table 93public identifier 194PUBLIC keyword 194publishing 152
output options 152preview 152
publishing configuration files 160
Q
quick attribute inspector 45quick navigation 179quick navigation tool 179Quick Outlines
creating 125loading 125saving 125
quotes (in DITA documents) 86
R
raw code editing 9re-using content 138read-only elements 86Reference 115referenced content 140references 135refresh all references 135refresh references when opening a document 167rejecting tracked changes 67related links 135
insert 135relationship tables 114, 128removing conditions 150RenderX XEP 158Repair Table Structure 95replacing
elements 53entity references 54entity references with text 54text 51text with entity reference 51using pattern matching 52
repository 48repository adapter 48repository configuration file 48repository file
creating 48opening 48
repository integration layer 48Repository toolbar 16Resource Manager 13, 26Results 13results pane 73
actions 76buttons 76
reusable componentscreate 141displaying 140editing 140inserting 138refreshing 140removing 140validating 140
Reviewing toolbar 16revision marking 67revisions
accepting marked 67rejecting marked 67tracking 67
XMetaL Author 16 User's Guide230
Index

Rich Text Format 158RTF 158rules checking 81Rules file 34rules for pinning and un-pinning 13running
macros 27
S
sample files 9Save Copy as Template macro 166saving
documents 41multiple documents 41options 31validating before 41
Schemas 193Schematron
options 82validating 82
screen tips 31SDATA entities 192Search options 51search patterns 52searching 51
for attribute values 53, 68for elements 53, 68for entity references 54for text 51using pattern matching 52within an element 51
See and See also entries, for index terms 136separator line
in menus 25in toolbars 25
servicesmultiple-file operations 73
settingsmultiple users 24, 27, 31, 84personal 24, 27, 31, 84
SGML 192comments 198empty elements 86, 195entities 102processing instructions 198references 192source editing 9valid markup 193
short description 113shortcut keys 174showing inline images 31showing or hiding conditional text 150Simple table 93Smart Insert 81sorting, for glossary terms 129, 157sorting, for index terms 136source editing 9special characters 104Special Characters and Symbols toolbar 16special topics, creating 133specialization attributes 167
specializations 164specify XSL stylesheet 154spell check 71spell checker 55
languages 61options 56, 61, 62, 63word lists 55, 61, 62, 63
splitting cells into columns 96splitting cells into rows 96splitting table groups 100splitting tables 99SQL 107Standard toolbar 16Step choices table 93Structure View 12, 34style conditions 151style sheets 34, 84sub-entries, index terms 136Subject scheme 171
apply to DITA map 171managing 172
subscript (in DITA documents) 86subtopics (in DITA topics) 113superscript (in DITA documents) 86symbol characters 104symbols 31, 104system identifier 194SYSTEM keyword 194
T
tab grouphorizontal 38vertical 38
tabbed interface 21Table Advanced toolbar 16table caption (HTML table) 95table cells
contracting spanning 96copying a selection of 96entering tab character 101height (HTML) 101merging 96pasting a selection of 96splitting 96width 101
table grid lines 93table of contents (controlling display) 114Table Properties 101Table toolbar 16tables 93, 114
auto-suggest 95CALS 95
change body row to header row 95proportional column widths 101
captions 95cell properties 101column properties 101column/cell width 101contracting cells 96copy cells 98deleting cells 97
231Copyright 2021 JustSystem Canada, Inc.
Index
tables (continued)deleting columns 97deleting rows 97editing 95fill series 98from database 107header rows 95HTML 95inserting 95inserting caption (HTML table 95inserting cells 96inserting columns 96inserting rows 96merging 100merging cells 96moving rows and columns 95navigating in 93, 174pasting from other applications 101properties 101properties for a selection of cells 101repairing structure 95row properties 101row/cell height (HTML) 101sorting 100sorting rows 100splitting 99splitting cells 96splitting table groups 100XML model 110
tables lists, creating 133tables of contents, creating 133tag and text color, specifying 11tag-valid markup 81Tags On view 9tags-on view 119teletype text (in DITA documents) 86templates 34, 35text
finding 51finding in an element 51replacing 51replacing entity references 54replacing with entity 51
text casechanging 78
Text Case Assistant 78text entities 102, 196Text Processor for Typesetters 158thesaurus 65, 66
data file 66languages 66options 66
third-party viewer 191toc attribute 114toolbar files 84toolbars 16toolbars and menus 24
files 24locations 24
toolbars, custom 24tooltips 31topic headings (insert in DITA map) 119, 126
topic metadata 113topic metadata (in DITA topics) 113topic references 119, 126topic, properties 115topics
Inserting a quick outline 119opening through Map Editor 119, 126
topics, creating 113, 119, 126topics, promoting or demoting in DITA 113TopLeaf 158tracking changes 67trademark lists, creating 133transformation type 158transtype 158treat-as-image 191TROFF 154, 158troubleshooting 163
U
un-pin 13underlined text 86Unicode 42unpin 13unwrapping elements 86updating content when opening files 167updating references when opening files 167URLs 119, 126US-ASCII encoding 42user word lists 60, 62
adding 62default 62entries 62, 63
UTF-8, UTF-16 encodings 42
V
valid markup 193Validate Document 81validate references 72validating markup 81Validation Log 81variables 211versioning 148view results 73viewing properties 119, 126views 9views, setting a default 31
W
Web links 119, 126, 135WebDAV 38
file caching 38opening files 38
well-formed documents 43adding new attributes 44adding new elements 43
well-formed markup 193whiteboard 179windows 13
XMetaL Author 16 User's Guide232
Index
word count 72word lists 55
main 61user 60, 62, 63
worksheet tabmoving 38scrolling 38
wrapping elements 86
X
XHTML 158XHTML output, customizing 201XInclude attribute 199XIncludes
inserting 199XMetaL configuration file 31XMetaL Connector 48XMetaL Customization Guide 8XMetaL customizations 34, 84XMetaL Developer 8XMetaL Evaluation Guide 9
XMetaL Programmer's Guide 8XMetaL TopLeaf Plugin 158xmetal.ini 31XML 192
comments 198declaration 42, 192empty elements 86, 195entities 102, 196lang attribute 129processing instructions 198references 192separation of content and format 192source editing 9specification 192version 192well-formed markup 193
XML table model 110XPath
expression 70xref element 135XSL templates 212
233Copyright 2021 JustSystem Canada, Inc.
Index