


WordPress Theme Development Beginner's Guide - doc ...
252
www.it-ebooks.info
-
Upload
khangminh22 -
Category
Documents
-
view
3 -
download
0
Transcript of WordPress Theme Development Beginner's Guide - doc ...

WordPress Theme Development Beginner's Guide Third Edition
Learn how to design and build great WordPress themes
Rachel McCollin
Tessa Blakeley Silver
BIRMINGHAM - MUMBAI
www.it-ebooks.info

WordPress Theme Development Beginner's Guide Third Edition
Copyright © 2013 Packt Publishing
All rights reserved. No part of this book may be reproduced, stored in a retrieval system, or transmitted in any form or by any means, without the prior written permission of the publisher, except in the case of brief quotations embedded in critical articles or reviews.
Every effort has been made in the preparation of this book to ensure the accuracy of the information presented. However, the information contained in this book is sold without warranty, either express or implied. Neither the authors, nor Packt Publishing, and its dealers and distributors will be held liable for any damages caused or alleged to be caused directly or indirectly by this book.
Packt Publishing has endeavored to provide trademark information about all of the companies and products mentioned in this book by the appropriate use of capitals. However, Packt Publishing cannot guarantee the accuracy of this information.
First published: May 2008Second edition: November 2009Third edition: March 2013
Production Reference: 1130313
Published by Packt Publishing Ltd.Livery Place35 Livery StreetBirmingham B3 2PB, UK.
ISBN 978-1-84951-422-4
www.packtpub.com
Cover Image by Vinayak Chittar ([email protected])
www.it-ebooks.info

Credits
Authors
Rachel McCollin
Tessa Blakeley Silver
Reviewers
Srikanth AD
Steve Graham
Acquisition Editor
Kartikey Pandey
Lead Technical Editors
Ankita Shashi
Unnati Shah
Technical Editors
Worrell Lewis
Amit Ramadas
Project Coordinator
Michelle Quadros
Proofreader
Kevin McGowan
Indexer
Rekha Nair
Graphics
Valentina D'Silva
Production Coordinator
Conidon Miranda
Cover Work
Conidon Miranda
www.it-ebooks.info

About the Authors
Rachel McCollin is a web designer and developer specializing in WordPress development. She discovered WordPress when looking for a CMS that made the transition from static HTML relatively straightforward, and hasn't looked back since.
Rachel runs Compass Design, a web design agency based in Birmingham, England, but with clients across the UK and internationally. The agency was established in 2010 and quickly began specializing in building WordPress themes and sites, with a slant towards responsive themes. The agency now has a great team of designers and developers, including some WordPress specialists.
I've learned most of what I know about WordPress from the web design community. I'd like to thank all of the WordPress developers and designers who have inspired and taught me, in particular the organizing team for WordCampUK, without whom I never would have even thought of writing about WordPress. A number of friends and colleagues have provided support with my writing and have helped me develop my WordPress skills, as well as giving useful feedback for this book. They include Mark Wilkinson, Jon Hickman, Scott Evans, Tammie Lister, Nivi Morales, and Jonny Allbut. Rob Ashton at Emphasis has set me straight on grammar when I've needed it. Kartikey Pandey at Packt Publishing showed the confidence in my work to ask me to take on my second project for Packt Publishing—I'm grateful for this, and for his positivity and encouragement. Most importantly, my husband Pete has encouraged and supported me all along, and has spent many Saturdays entertaining our two boys, so that I could get on with the task of writing.
www.it-ebooks.info

Tessa Blakeley Silver's background is in print design and traditional illustration. She evolved over the years into web and multi-media development, where she focuses on usability and interface design. Prior to starting her consulting and development company, hyper3media (pronounced hyper-cube media) http://hyper3media.com, Tessa was the VP of Interactive Technologies at eHigherEducation, an online learning and technology company developing compelling multimedia simulations, interactions, and games that met online educational requirements like 508, AICC, and SCORM. She has also worked as a consultant and freelancer for J. Walter Thompson and The Diamond Trading Company (formerly known as DeBeers) and was a Design Specialist and Senior Associate for PricewaterhouseCoopers' East Region Marketing department. Tessa authors several design and web technology blogs. Joomla! Template Design is her first book.
www.it-ebooks.info

About the Reviewers
Srikanth is a web developer, passionate about developing and optimizing websites for better user experience, performance, and search engine visibility. He is particularly interested in adapting content management systems for developing structured and scalable websites.
Check out his portfolio at http://srikanth.me.
Steve Graham is a programmer turned web-developer with years of experience, building large-scale databases to run manufacturing control and international banking systems. His experience at the back-end of the IT industry has given him a keen understanding of the needs of the final users and it's this knowledge and expertise that he brings to his work with WordPress. As one half of the Internet Mentor team (www.internet-mentor.co.uk) his passion is developing themes that help to solve some of the most frustrating aspects of marketing online. Focusing on the key business objectives, his aim for all clients is to ensure that they derive measurable and sustainable direct results that drive business growth.
He spends much of his time working on theme development for niche areas. Rather than producing themes that are so generic that the only real reason they appeal to a market is the name of the theme or the type of background image, these themes are designed to provide real solutions and are created with a a knowledge and thorough understanding of the challenges their end users have to overcome.
Steve is also a passionate speaker and networking skills coach, who is able to bring a different perspective to the messages his clients are delivering in the online world. Relationship marketing is key to success in the 21st century and having an understanding of how effective both the on and off-line networks can be, is essential to the success of almost all businesses.
www.it-ebooks.info

www.PacktPub.com
Support files, eBooks, discount offers and moreYou might want to visit www.PacktPub.com for support files and downloads related to your book.
Did you know that Packt offers eBook versions of every book published, with PDF and ePub files available? You can upgrade to the eBook version at www.PacktPub.com and as a print book customer, you are entitled to a discount on the eBook copy. Get in touch with us at [email protected] for more details.
At www.PacktPub.com, you can also read a collection of free technical articles, sign up for a range of free newsletters and receive exclusive discounts and offers on Packt books and eBooks.
TM
http://PacktLib.PacktPub.com
Do you need instant solutions to your IT questions? PacktLib is Packt�s online digital book library. Here, you can access, read and search across Packt's entire library of books.
Why Subscribe? � Fully searchable across every book published by Packt
� Copy and paste, print and bookmark content
� On demand and accessible via web browser
Free Access for Packt account holdersIf you have an account with Packt at www.PacktPub.com, you can use this to access PacktLib today and view nine entirely free books. Simply use your login credentials for immediate access.
www.it-ebooks.info

Table of ContentsPreface 1
Chapter 1: Getting Started as a WordPress Theme Designer 7Overview of WordPress perks 8Does a WordPress site have to be a blog? 8Pick a theme or design of your own 9
Drawbacks of using an off-the-shelf theme 9What about premium themes and frameworks? 9
What exactly is a premium theme 10What is a framework theme 10
Core technology you should understand 12WordPress 12CSS 13HTML 13PHP 13Other helpful technologies 14
Tools of the trade 14HTML editor 14Graphics editor 15Web browser 15
Basics of a WordPress theme 16The template hierarchy 17The Loop 17Template tags and API hooks 17
Our development strategies 18Fonts and typefaces 18
A CSS strategy – font sizing with ems 19
www.it-ebooks.info

Table of Contents
[ ii ]
A CSS strategy – working with a CSS framework 20960 20Blueprint 21Layoutcore 21
Setting up your WordPress sandbox 23Using WAMP 24Using MAMP 24Choosing a hosting provider 24Rolling out WordPress 25
Summary 25
Chapter 2: Preparing a Design for Our WordPress Theme 27Getting ready to design 28
Designing in the browser 28Starting our design 29
Planning and sketching our design 31Time for action – planning our design 31Creating your design – from the sketch to the screen 32Time for action – creating our static HTML file 32
The semantic body 32Time for action – adding in basic HTML structure 33Time for action – adding in the semantic structure 33
Attaching our CSS stylesheet 36Time for action – creating and including a style.css shell into your index.php page 36
Prepping for responsiveness – viewport and apple-mobile meta tags 36Time for action – adding in the viewport and apple-mobile meta tags 37
Adding in content 37Starting with the text 38
Time for action – adding sample text to our semantic sections 38Styling our fonts 41
Styling font families 41
Time for Action – assigning your font families 41Styling font sizes 42
Time for action – sizing your fonts 43Time for action – handling search engine bots/screen reader text 45
Setting up our layout with CSS 46Time for action – referencing our layout core to set up our positions 47Time for Action: Adding our media queries 48
Setting up the desktop view 49Time for action – standard settings 49Time for action – checking in on larger desktops 51Time for action – making sure smaller screens are handled 51
Setting up the tablet view 52
www.it-ebooks.info

Table of Contents
[ iii ]
Time for action – adjusting the standard layout for tablets 53Setting up the small screen view 54
Time for action – setting up our small screen layout 55Adding design treatments 57Time for action – setting up our graphic treatments in the stylesheet 57Adding graphics and background images 60
Setting up our background images in our stylesheet 61Time for action – adding background images to our design 61Time for action – adding background image styling to the media queries 63Don't forget the favicon and touch icon 67
Adding a favicon 67Time for action – adding the favicon you just created 67
Touch icons 68Time for action – adding a touch icon 69Summary 70
Chapter 3: Coding it Up 71WordPress theme basics 71
The Template hierarchy 72Why the Template hierarchy works the way it does 76
The WordPress theme API 76Setting up your WordPress workflow 78
Building your WordPress theme template files 79Starting with a blank slate 79
Creating a new theme directory 79
Time for action – setting up our theme directory 80Including WordPress content 82
Time for action – getting your CSS styles to show up 83Understanding WordPress template tags and hooks 84
Looping it! – The WordPress Loop 86The Loop in a nutshell – how it works 86
Time for action – creating a basic Loop 87Time for action – adding content 90Time for action – adding metadata, the timestamp, and author template tags 91
Keeping up-to-date with WordPress 93
Adding to the Loop 93Time for action – displaying the number of comments 93Time for action – adding in autogenerated classes 95
One last look – our full loop 97
Breaking the code up into template files 98Including everyone 98Creating a header file 98
www.it-ebooks.info

Table of Contents
[ iv ]
Time for action – creating the header.php file 99Separating out our sidebar 101
Time for action – creating the sidebar.php file 101Finishing off with the footer 102
Time for action – creating the footer.php template file 103Time for action – don't forget the plugin hooks 104
Creating a template file for static pages 105Time for action – creating a custom page.php template file 106Summary 108
Chapter 4: Advanced Theme Features 109Site settings 110Time for action – configuring your site settings 110Time for action – adding the site title and description to your theme 111Pretty permalinks 112Time for action – setting up pretty permalinks 113
Permalinks – a quick guide 115Menus 115
Registering navigation menus 116Time for action – registering a navigation menu 116Time for action – adding menus to our theme's header.php file 117
Setting up our menu 119Defining our Reading settings 119
Time for action – defining Reading settings 119Creating a menu 120
Time for action – creating a new WordPress menu 121Adding pages and other content to our menu 122
Time for action – adding pages to a menu 122Time for action – adding a custom link to the menu 123Time for action – adding a category link to the menu 124
The WordPress Menus admin – the possibilities 126
Widgets 128Registering sidebars or widget areas 129
Time for action – registering sidebars in functions.php 130Time for action – adding widget areas to sidebar.php 132Time for action –adding widget areas to footer.php 134
Widget areas – not just for the sidebar and footer 135
Adding widgets in the Widgets admin screen 136What widgets will we need 136
Time for action – adding sidebar widgets 137Time for action – adding footer widgets 138Featured images 142
www.it-ebooks.info

Table of Contents
[ v ]
Time for action – adding featured images to our theme 142Time for action – adding featured images to the site 143Time for action – displaying featured images differently in different template files 148Parent and child themes 150Summary 153
Chapter 5: Debugging and Validation 155Debugging and validation workflow 155Browser tools for debugging 156
Firefox 156The Web Developer toolbar 156Firebug 157
Google Chrome 158Safari 159
Validation 159Validating HTML 160
Time for action – validating your HTML 160Time for action – finding and fixing errors 162Time for action – fixing our code 163
Validating CSS 164Time for action – using the W3C's CSS validator 164Testing on multiple browsers and platforms 166
Which browsers to support 166Approaches to browser support 166
Graceful degradation 166Progressive enhancement 167
Troubleshooting basics 167PHP template tags 168CSS quick fixes 169
Fixing CSS across browsers 169Common browser problems 169Adding an IE-specific stylesheet 171
Time for action – setting up an alternative IE stylesheet 171Checking your work in Internet Explorer 172Time for action – testing our theme with BrowserLab 172Testing on mobile devices 174Summary 174
Chapter 6: Your Theme in Action 175The WordPress Theme Review guidelines 175The theme preview screenshot 176Time for action – snagging a thumbnail of your theme 177
www.it-ebooks.info

Table of Contents
[ vi ]
Packaging your theme up 178Tidying up your theme 178
Time for action – tidying up your theme 178Describing your theme in the stylesheet 179
Time for action – describing your theme 179Your theme's license 180
Time for action – adding license information to our theme 180Zipping up your theme 181Time for action – zipping up your theme 181One last test 182Time for action – testing the theme 182Summary 185
Chapter 7: Tips and tricks 187Adding more template files to your theme 187
A search.php file for search results 188Time for action – creating a search.php template file 190
Creating a custom page template 194Time for action – creating a custom page template 195Time for action – assigning a custom page template to a page in our site 196Working with conditional tags 198
Conditional tags' syntax 198Incorporating conditional tags in our theme 199Using conditional tags to hide the home page's title 200
Time for action – using CSS to hide our home page's title 201Time for action – using a conditional tag to hide our home page's title 204
The Theme Customizer 206Time for action - adding the Theme Customizer to our theme 208Time for action – adding some more options to the Theme Customizer 210Time for action – ensuring Theme Customizer changes are carried through to the CSS 212
Theme Customizer – the possibilities 214
Search engine optimization 214SEO checklist 215Clean, valid, standards-compliant code 215Semantic HTML5 215Making your theme run faster 216Search-engine optimized permalinks 217Optimizing images and links with alt and title attributes 217
www.it-ebooks.info

Table of Contents
[ vii ]
Time for action – optimizing a logo for SEO 218Using optimized meta tags – page titles and descriptions 219
Time for action – optimizing our theme's page meta tags 220Summary 223
Pop Quiz Answers 225Chapter 2, Preparing a Design for Our WordPress Theme 225Chapter 3, Coding it Up 225Chapter 4, Advanced Theme Features 226Chapter 6, Your Theme in Action 226
Index 227
www.it-ebooks.info

PrefaceWordPress has evolved significantly since the last edition of this book. It's now recognized as much more than a blogging platform, and is the Content Management System (CMS) powering 22 percent of the world's websites.
You may have used WordPress to build a site or two, perhaps using themes you've downloaded from the WordPress theme repository, bought from a theme vendor, or come with a theme framework. But if you want more control over your themes, you're going to have to build you own.
These are the cornerstones of WordPress. Without them, WordPress sites just wouldn't work. In this book, you'll learn how to take a design you create using static HTML and CSS and turn that into a great WordPress theme. You'll create the template files your theme needs and add extra functionality such as widgets and featured image support. We'll also cover how to validate and debug your theme and how to release it to other developers.
By the end of this book you'll have built a fully functional WordPress theme and you'll have the skills you need to build more, either for yourself or your clients.
What this book coversChapter 1, Getting Started as a WordPress Theme Designer, gives an introduction to the world of WordPress theme building. It covers the basics of how themes work, theme coding strategies using HTML and CSS, and setting up your theme design process.
Chapter 2, Preparing a Design for our WordPress Theme, takes you through the process of creating a design for your theme, including wireframing, creating your design concepts, and designing responsively in the browser.
Chapter 3, Coding it Up, is when you'll start to build an actual theme by taking your HTML from Chapter 3 and inserting that into theme template files along with the PHP needed to make your theme work.
www.it-ebooks.info

Preface
[ 2 ]
Chapter 4, Advanced Theme Features, covers additional features you can add to your theme. These include site settings, reading settings, permalinks, featured image support, and widgets.
Chapter 5, Debugging and Validation, shows you how to check for any bugs in your code and test that your site meets the W3C requirements for validity. We'll also look at browser testing and troubleshooting.
Chapter 6, Your Theme in Action, is all about shipping your theme to other WordPress users and developers. You'll learn how to use the WordPress theme repository to make your themes publicly available and the steps you need to take to package up a theme.
Chapter 7, Tips & Tricks, will help you take your WordPress theme development skills further. You'll learn how to add some more advanced features to your theme, including additional template files, conditional tags to display different content according to context, how to give your theme's users access to the theme customizer, and how to optimize your theme for SEO.
Who this book is forThis book is aimed at web designers and developers with some experience of using WordPress and of coding using HTML and CSS. It assumes you are familiar with the WordPress interface and know how to manage a site and add content via that interface. You should also have experience of writing HTML and CSS. The ability to write PHP is not needed but the book does include some PHP code so you will learn something about this along the way.
ConventionsIn this book, you will find several headings appearing frequently.
To give clear instructions of how to complete a procedure or task, we use:
Time for action – heading1. Action 1
2. Action 2
3. Action 3
Instructions often need some extra explanation so that they make sense, so they are followed with:
www.it-ebooks.info

Preface
[ 3 ]
What just happened?This heading explains the working of tasks or instructions that you have just completed.
You will also find some other learning aids in the book, including:
Pop quiz – headingThese are short multiple choice questions intended to help you test your own understanding.
Have a go hero – headingThese set practical challenges and give you ideas for experimenting with what you have learned.
You will also find a number of styles of text that distinguish between different kinds of information. Here are some examples of these styles, and an explanation of their meaning.
Code words in text are shown as follows: "The Loop won't work unless you close it, so below your closing </article> tag, add the following:".
A block of code is set as follows:
<?php endwhile; ?><?php else : ?> <h2 class="center">Not Found</h2> <p class="center">Sorry, but you are looking for something that isn't here.</p> <?php get_search_form(); ?><?php endif; ?>
When we wish to draw your attention to a particular part of a code block, the relevant lines or items are set in bold:
/* Text meant only for screen readers */.screen-text{ position: absolute; left: -5000em;}
New terms and important words are shown in bold. Words that you see on the screen, in menus or dialog boxes for example, appear in the text like this: "Click on Publish to save your post.".
www.it-ebooks.info

Preface
[ 4 ]
Warnings or important notes appear in a box like this.
Tips and tricks appear like this.
Reader feedbackFeedback from our readers is always welcome. Let us know what you think about this book—what you liked or may have disliked. Reader feedback is important for us to develop titles that you really get the most out of.
To send us general feedback, simply send an e-mail to [email protected], and mention the book title through the subject of your message.
If there is a topic that you have expertise in and you are interested in either writing or contributing to a book, see our author guide on www.packtpub.com/authors.
Customer supportNow that you are the proud owner of a Packt book, we have a number of things to help you to get the most from your purchase.
Downloading the example codeYou can download the example code files for all Packt books you have purchased from your account at http://www.packtpub.com. If you purchased this book elsewhere, you can visit http://www.packtpub.com/support and register to have the files e-mailed directly to you.
ErrataAlthough we have taken every care to ensure the accuracy of our content, mistakes do happen. If you find a mistake in one of our books—maybe a mistake in the text or the code—we would be grateful if you would report this to us. By doing so, you can save other readers from frustration and help us improve subsequent versions of this book. If you find any errata, please report them by visiting http://www.packtpub.com/support, selecting your book, clicking on the errata submission form link, and entering the details of your errata. Once your errata are verified, your submission will be accepted and the errata will be uploaded to our website, or added to any list of existing errata, under the Errata section of that title.
www.it-ebooks.info

Preface
[ 5 ]
PiracyPiracy of copyright material on the Internet is an ongoing problem across all media. At Packt, we take the protection of our copyright and licenses very seriously. If you come across any illegal copies of our works, in any form, on the Internet, please provide us with the location address or website name immediately so that we can pursue a remedy.
Please contact us at [email protected] with a link to the suspected pirated material.
We appreciate your help in protecting our authors, and our ability to bring you valuable content.
QuestionsYou can contact us at [email protected] if you are having a problem with any aspect of the book, and we will do our best to address it.
www.it-ebooks.info
1Getting Started as a WordPress
Theme Designer
Welcome to WordPress 3.2 Theme Design! This book is intended to take you through the process of creating sophisticated professional themes for the WordPressweb publishing platform. Since its inception, WordPress has evolved way beyond mere blogging capabilities and has many standard features that are expandable with content types, plugins, and widgets, which make it comparable to a full Content Management System (CMS).
In this chapter and upcoming chapters, we'll walk through:
� The perks of using WordPress and basics of how a theme works
� The core technology you should understand and tools you should use to develop your theme
� The essential elements you need to consider when planning your theme design
� An overview of theme development strategies
� Starting with semantic HTML5 markup
� An overview of typography for the web
� Using a CSS layout framework
� Sizing typography with ems
� Using "object-oriented CSS" techniques for graphic treatments
� Setting up your WordPress theme design process
This chapter is mostly the background and overview of the key concepts you'll need to understand once it's "time for action" in the following chapters. Let's get started.
www.it-ebooks.info

Getting Started as a WordPress Theme Designer
[ 8 ]
Overview of WordPress perksAs you're interested in generating custom themes for WordPress, you'll be very happy to know (especially all you web standards evangelists) that WordPress really does separate content from design.
You may already know from painful experience that many content management and blog systems end up publishing their content prewrapped in (sometimes large) chunks of layout HTML, peppered with all sorts of predetermined selector id and class names.
You usually have to do a fair amount of sleuthing to figure out what these IDs and classes are so that you can create custom CSS rules for them. This is very time consuming.
The good news is, WordPress publishes only two things:
� The site's textual content—the text you enter into the post and the page administration panels
� Supplemental site content such as widgets, banners, and menus, wrapped in div tags, li tags, or nav tags depending on how the theme is coded
WordPress can also include classes which let you add styling based on a variety of circumstances. Most of those classes are controlled directly by the template tags (which we'll get into later).
That's it! You decide how everything published via WordPress is styled and displayed.
The culmination of all those styling and display decisions, along with WordPress template tags that pull your site's content into your design, are what your WordPress theme consists of.
Does a WordPress site have to be a blog ?The answer to this question is—no. WordPress has been capable of managing static pages and subpages since Version 1.5. Static pages are different from blog posts in that they aren't constrained by the chronology of posts. This means that you can manage a wide variety of content with pages and their subpages.
WordPress also has a great community of developers supporting it with an ever-growing library of plugins. Using plugins, you can expand the capabilities of your server-installed WordPress site to include infinite possibilities such as event calendars, image galleries, sidebar widgets, and even shopping carts. For just about anything you can think of, you can probably find a WordPress plugin to help you out.
By considering how you want to manage content via WordPress, what kind of additional plugins you might employ, and how your theme displays all that content, you can easily create a site that is completely unique and original in concept as well as design.
www.it-ebooks.info

Chapter 1
[ 9 ]
Pick a theme or design of your ownIt's a good idea to approach theme design from two angles:
� Simplicity: Sometimes it suits the client and/or the site to go as barebones as possible. In that case, it's quick and easy to use a very basic, already built theme and modify it.
� Unique and beautiful: Occasionally, the site's theme needs to be created from scratch so that everything displayed caters to the specific kind of content the site offers. This ensures that the site is something eye-catching, which no one else will have. This is often the best route when custom branding is a priority or you just want to show off your design skills.
There are many benefits to using or tweaking off-the-shelf themes. First, you save a lot of time getting your site up with a nice theme design. Second, you don't need to know as much about CSS, HTML, or PHP. This means that with a little web surfing, you can have your WordPress site up and running with a stylish look in no time at all.
Drawbacks of using an off-the-shelf themeUsing an off-the-shelf theme is a great way to get started with WordPress. It means you can build your first WordPress site with a coding experience, or with experience of writing code but not of building themes. You can also work with an existing theme to create your own, either editing the theme directly or by using a child theme (which we'll come to later).
But if you need to build a bespoke site, using an off-the-shelf theme will have its drawbacks and may not save you as much time as you would hope for.
Perhaps your site needs a special third-party plugin for a specific type of content; it might not look quite right without a lot of tweaking. And while we're discussing tweaking, every CSS designer is different and sets up their theme's template files and stylesheets accordingly. While it makes perfect sense to them, it can be confusing and time consuming to work through.
Working with an off-the-shelf theme starts off feeling like the simplest approach, but as you delve deeper into the code, you may find yourself making more and more changes until you reach the point where it would have been easier to start form scratch.
Before making use of an existing theme, check if it really has everything you'll need for your project with minimal tweaking. And check its license—it should be GPL, like WordPress itself.
What about premium themes and frameworks?If you've done any research on the internet, you will have come across a host of WordPress frameworks and premium themes (which can often be used as frameworks).
www.it-ebooks.info

Getting Started as a WordPress Theme Designer
[ 10 ]
What exactly is a premium themeFirst off, a premium theme is simply a nicely (sometimes an amazingly) designed WordPress theme that often also has many, really cool features. The author may have taken the time to include a host of JavaScript enhancements, like a rotating header slideshow, "Ajaxified" comment forms and endless "widgetized" areas, as well as additional custom areas in the administration panel where you can easily manage and update all the custom enhancements.
Secondly (and more importantly), a premium theme is one that the developer wants you to pay for because they took the time to code up that design and include all those nice enhancements. Hence the "premium" on the theme.
Be careful with customizing premium themes
While premium theme designers often offer many ways to easily customize their theme (a perk of choosing their theme over others), the images, CSS, and JavaScripts of the theme are not required to fall under the WordPress GPL license (we'll learn all about this in Chapter 6,Your Theme in Action). The authors may require you to leave their name, link, or other copyright/attribution information somewhere within the theme. Essentially, read the seller's license information to understand what you have the right to change and use common sense. Don't steal other people's design work to pass off as your own. Really, it's just not nice.
What is a framework themeFrameworks are in many ways similar to premium themes, but the focus of the framework is not so much to be a "theme" all by itself but to be more of a "starter kit" that strips the need for understanding the WordPress'Theme API out of the design process and usually also adds great additional features and functionality. Most frameworks work on the assumption that you'll create a child theme of your own for the look and feel you want. Because frameworks do offer designers a "quick start" as well as extra features, similar to premium themes, some frameworks require purchasing or licensing for each site you use them on. There are also some very good open source frameworks that are free to download and use.
Frameworks are particularly useful to designers who are short on time, very good with CSS, and don't want to deal with the learning curve of having to understand the WordPress template page hierarchy, template tags, and plugin API hooks.
What are child themes?
We'll learn later in Chapter 4, Advanced Theme Features, of this book that you can actually create a child theme off any theme, be it a framework theme, a premium theme, or your best friend's WordPress theme experiment.
www.it-ebooks.info

Chapter 1
[ 11 ]
The whole point of this book is to introduce you to these concepts and introduce you to the basics of WordPress theme features so that you can create elegant comprehensive themes from scratch. You can then see how getting a little creative will enable you to develop any kind of site you can imagine with WordPress.
You'll also be able to better take advantage of a theme framework, as you'll understand what the framework is accomplishing for you "under the hood", and you would also be able to better customize the framework if you need to.
For many frameworks, there is still some amount of learning curve to getting up and running with them. But less of it will deal directly with futzing with PHP code to get WordPress to do what you want.
We'd encourage you to take a look at development with a framework and compare it to development from scratch. Having the skills this book provides you with under your belt will only help, even if you choose to go with a framework to save time.
Popular theme frameworks to choose from
More and more frameworks show up every day, and each framework tries to address and handle slightly different needs. As a bonus, some frameworks add options into the WordPress administration panel that allow the end user to add and remove features to/from the child theme they've selected.
The right framework for you will depend on your development style and the needs of your site, but some popular frameworks are listed next.
Themes that offer a lot of child themes which you can customize yourself:
� Thematic (http://themeshaper.com/thematic/)
� Hybrid (http://themehybrid.com/)
Premium frameworks with additional features are as follows:
� Carrington (http://carringtontheme.com/) � Thesis (http://diythemes.com/)
These frameworks may appear complex at first, but offer a range of rich features for developing themes and, especially if you understand the essentials of creating WordPress themes (as you will after reading this book), can really aid you in speeding up your theme development.
Again, there are many theme frameworks available. A quick Google search for "WordPress Theme Frameworks" will turn up quite a range to choose from.
www.it-ebooks.info

Getting Started as a WordPress Theme Designer
[ 12 ]
Core technology you should understandThis book is geared towards visual designers (with no server-side scripting or programming experience) who are used to working with the common industry standard tools such as Photoshop and Dreamweaver or other popular graphic, HTML, and text editors.
Regardless of your web development skillset or level, you'll be walked through clear, step-by-step instructions. But there are many web development skills and WordPress know-how that you'll need to be familiar with to gain maximum benefit from this book.
WordPressMost importantly, you should be at least somewhat familiar with the most current stable version of WordPress. You should understand how to add content to the WordPress system and how its posts, categories, and pages work. If available in the theme you're using, you should be aware of how to set up a custom menu (the WordPress default Twenty Ten theme will allow you to play with custom menus). Understanding the basics of installing and using plugins will also be helpful (though we will cover that to some extent in the later chapters of the book as well).
Even if you'll be working with a more technical WordPress administrator, you should have an overview of what the WordPress site that you're designing entails, and what (if any) additional plugins or widgets will be needed for the project. If your site does require additional plugins and widgets, you'll want to have them handy and/or installed in your WordPress development installation (or sandbox—a place to test and play without messing up a live site). This will ensure that your design will cover all the various types of content that the site intends to provide. We'll cover the basics of setting up your sandbox in just a minute in this chapter.
What version of WordPress does this book use?
This book focuses on WordPress 3.4.2. While this book's case study is developed using Version 3.4.2, any newer version of WordPress should have the same core capabilities, meaning you can develop themes for it using these techniques. Bug fixes and new features for each new version of WordPress are documented at http://wordpress.org. If you are new to WordPress, then it's worth reading WordPress 3 Complete, April Hodge Silver, Packt Publishing.
www.it-ebooks.info

Chapter 1
[ 13 ]
CSSWe'll be giving detailed explanations of the CSS rules and properties used in this book, especially the CSS3 rules and how to use progressive enhancement to support browsers that don't support CSS3. We'll also let you in on the "how and why" behind creating our style sheets. You should know a bit about what CSS is, and the basics of setting up a cascading stylesheet and including it within an HTML page. You'll find that the more comfortable you are with CSS markup and how to use it effectively with HTML, the better will be your WordPress theme-creating experience.
HTMLYou don't need to have every markup tag in the XHTML or HTML5 standard memorized. If you really want, you can still switch to the Design view in your HTML editor to drop in those markup tags that you keep forgetting. However, the more HTML and HTML5 basics you understand, the more comfortable you'll be working in the Code view of your HTML editor or with a plaintext editor. The more you work directly with the markup, the quicker you'll be able to create well-built themes that are quick loading, semantic, expand easily to accommodate new features, and are search engine friendly.
PHPYou definitely don't have to be a PHP programmer to get through this book, but be aware that WordPress uses liberal doses of PHP to work its magic. A lot of this PHP code will be directly visible in your theme's various template files. PHP code is needed to make your theme work with your WordPress installation, as well as make individual template files work with your theme.
If you at least understand how basic PHP syntax is structured, you'll be much less likely to make mistakes while retyping or copying and pasting code snippets of PHP and WordPress template tags into your theme's template files. You'll be able to more easily recognize the difference between your template files, XHTML, and PHP snippets, so that you don't accidentally delete or overwrite anything crucial.
If you get more comfortable with PHP, you'll have the ability to change variables and call new functions or even create new functions on your own, again infinitely expanding the possibilities of your WordPress site.
www.it-ebooks.info

Getting Started as a WordPress Theme Designer
[ 14 ]
Other helpful technologiesIf your project will be incorporating any other special technologies such as JavaScript, AJAX, or Flash content, the more you know and understand how these scripting languages and technologies work, the better it is for your theme-making experience (again http://www.w3schools.com/ is a great place to start).
The more web technologies you have a general understanding of, the more likely you'll be able to intuitively make a more flexible theme that will be able to handle anything you may need to incorporate into your site in the future. You don't need to be an expert in all of them to build a WordPress theme though.
Tools of the tradeSkills are one thing, but the better your tools are, and the more command you have over those tools, the better your skills can be put to use. Just ask any carpenter, golfer, or app programmer about the sheer importance of their favorite "tools of the trade", you're likely to get quite an earful.
In order to get started in the next chapter, you'll need the following tools to help you out:
HTML editorYou'll need a good HTML editor. Text editors which a lot of web developers trust include:
� Dreamweaver (http://www.adobe.com/products/dreamweaver/)
� Coda for Mac (http://www.panic.com/coda/)
� TextWrangler (http://www.barebones. com/products/textwrangler/)
� HTML-kit (http://www.htmlkit.com/)
An HTML or text editor that includes the following features will work just great:
� View line numbers: Can help you find specific lines in a theme file, to help you identify any problems
� View syntax colors: Helps you identify where you're working in PHP, HTML, CSS, and where the code is working
� View nonprinting characters: Helps you see hard returns, spaces, tabs, and other special characters that you may or may not want in your code
� Text wrapping: Lets you wrap text, so you don't have to scroll horizontally to edit a long line of code
www.it-ebooks.info

Chapter 1
[ 15 ]
� Load files with FTP or local directories: Lets you work on remote files (or upload local files to a remote server) from your code editor
Free open source HTML editors
Free, open source text editors include: � Nvu (http://www.net2.com/nvu/) � KompoZer (http://kompozer.net/) � Bluefish (http://bluefish.openoffice.nl)
Graphics editorThe next piece of software you'll need is a graphics editor. While you can find plenty of CSS-only WordPress themes out there (and CSS3 gives you much more opportunity to create graphic effects with code), chances are that you'll want to expand on your design a little more and add nice visual enhancements.
The most popular graphics programs are Photoshop (or its lighter cousin, Photoshop Elements) and Fireworks, both from Adobe (http://www.adobe.com/products/).
If you're looking for a free, open source graphics program, you could try one of the following:
� GIMP (http://gimp.org/)
� Inkscape (http://inkscape.org).
Web browserFinally, you'll need a web browser. Many developers use Firefox, available at http://mozilla.com/firefox/. It includes some advanced developer tools which are useful for debugging and delving into your code. If you're getting started though, you might find Google Chrome easier to use at first. It's fast and standards-compliant and available at https://www.google.com/intl/en/chrome/browser/.
You'll also need to use other web browsers to test your theme on, as it will need to be compatible with the latest versions of the main browsers. Browsers you should be testing on include:
� Firefox
� Chrome
� Safari for Mac
� Opera
www.it-ebooks.info

Getting Started as a WordPress Theme Designer
[ 16 ]
� Internet Explorer (Version 7 or 8 upwards)
It's unlikely that you'll have access to all of these browsers on your machine—Internet Explorer only runs on Windows and Safari only runs on a Mac, for example. To test them, you can use the AdobeBrowser lab tool, available at http://browserlab.adobe.com.
Basics of a WordPress themeAccording to the WordPress codex a WordPress theme is:
A collection of files that work together to produce a graphical interface with an underlying unifying design for a weblog.
Themes are comprised of a collection of template files and web collateral such as images, CSS stylesheets, and JavaScript.
The next diagram illustrates how the WordPress theme works with the WordPress system: core installation, theme files, plugin files, and MySQL database, to serve up a complete HTML page to the browser:
We'll go over the specifics and code examples of each part of a WordPress theme in detail in Chapter 3, Coding it Up, but here are the basics to get you started:
www.it-ebooks.info

Chapter 1
[ 17 ]
The template hierarchyThe most important part of a WordPress theme to start realizing now is the template hierarchy. A WordPress theme is comprised of many file types including template pages. Template pages have a structure or hierarchy to them. That means, if one template file is not present, then the WordPress system will call up the next level template file. This allows developers to create themes that are fantastically detailed, which take full advantage of all of the hierarchy's available template files, and yet make the setup unbelievably simple. It's also possible to have a fully functioning WordPress theme that consists of no more than an index.php file and a stylesheet.
You can see the template hierarchy in detail at http://codex.wordpress.org/Template_Hierarchy.
The LoopWithin most template pages in the hierarchy (not necessarily all of them), we'll be adding a piece of code called "the Loop". The Loop is an essential part of your WordPress theme. It displays your posts in chronological order and lets you define custom display properties with various WordPress template tags wrapped in HTML markup.
Template tags and API hooksLooking within a template page's "Loop", you'll find some interesting bits of code wrapped in PHP tags. The code isn't pure PHP, most of them are WordPress-specific tags and functions such as template tags, which only work within a WordPress system. Most tags and functions can have various parameters passed through them.
Not all WordPress tags and functions go inside the Loop. If you were to poke around the header.php file included in the default Twenty Ten theme, you'll find several tags that work outside the Loop. Specifically in the header.php template page (as well as the footer.php and sidebar.php template pages), you'll also find several WordPress-specific functions that are part of the Plugin API and Script API.
Again, no need to worry about the specifics of these now. We'll be covering all these terms in detail with examples in Chapter 3, Coding it Up, plus the Appendix will have a complete Quick Reference Cheat Sheet for you to quickly look up all of these specifics.
www.it-ebooks.info

Getting Started as a WordPress Theme Designer
[ 18 ]
Our development strategiesThe approach of this book is going to take you through the unique and beautiful route (or unique and awesome, whatever your design aesthetics call for) with the idea that once you know how to create a theme from scratch, you'll be better at understanding what to look for in other WordPress themes, premium themes, and frameworks. You'll then be able to assess when it really is better or easier to use an already built theme versus building up something of your own from scratch.
Chapter 2, Preparing a Design for Our WordPress Theme will cover creating an HTML5-and CSS3-based, design "mock-up" that will work across all browsers as well as be responsive and mobile ready. In Chapter 3, Coding it Up, we'll take that working HTML/CSS code and break it down into template pages injected with template tags and essentially "WordPress-ize" it into a fully functional theme. In Chapter 4, Advanced Theme Features and beyond, we'll learn how to add some great advanced features as well as properly validate and package our theme to share it with the world. Don't let the "Beginner" series this title is under fool you. By the end of this book you'll probably be ready to create your own polished, professional themes for clients or even premium themes.
Fonts and typefacesThe Cufon JavaScript technique, but for now, let's get some basic typography under our belts.
When envisioning the theme's typography, think about the type of information the site will (or might) hold, and what's expected along with what's in vogue right now. Try to think in terms of headers, secondary fonts, block-quotes, specialty text (for code), and paragraph page text.
You can use any fonts you want as long as you think there's a really good chance that others will have the same font on their computers. Here is a list of the basic fonts that work well on the screen:
� Fonts designed for viewing on screen:
� Georgia (serif)
� Verdana (sans serif)
� Fonts available on most Macs and/or PCs:
� Arial
� Helvetica
� Times New Roman
www.it-ebooks.info

Chapter 1
[ 19 ]
� Fonts commonly used for code:
� Monaco
� Consolas
A CSS strategy – font sizing with emsIt is possible to set text in one of five different units – keywords, points, pixels, percentages, and ems. These work in the following way:
� Keywords include xx-small, x-small, small, medium, large, x-large, and xx-large. The medium option is the same as the default font size set by the browser, and the others are set in relation to this, for example, the x-small keyword equates to 9 pixels on desktop browsers in their default setting. Keywords are limited, with only seven choices, and they are imprecise as it's impossible to know if the user has changed the browser's default size or if different browsers are using a different default size. It's therefore not a good idea to use keywords.
� Points will be familiar to you if you use a word processing or desktop publishing program, and they are related to the size of text on the printed page. Their only real application in websites is for a separate print stylesheet—they generally aren't used in screen stylesheets.
� Pixels are probably the most commonly used, and relate to the pixels on the screen. They provide fine control over exact dimensions but because the font size for each element (for example, headings) has to be set separately, you have to edit each one if you want to make the font sizes larger or smaller across the site.
� Percentages change the text size in relation to the size set by the browser (a bit like keywords), but give much finer control. You can also use them to set the size of text in an element relative to the size it would normally inherit from elements higher in the html structure. For example, if you set the <body> element to have a font size of 16 pixels, and the <h1> tag to have a font size of 120 percent, its size will be 120 percent of 16 pixels, which is 19.2 pixels.
� Ems are also relative, and work in exactly the same way as percentages, so 1.2em is the equivalent of 120 percent. Some developers find that the smaller numbers are easier to work with. They're also useful when styling layout relative to text size. For example, in the Carborelli's call to action box, the padding is in ems, so it would be based on the size of the text in that element. If we used percentages for that padding, the browser would use a percentage of the width or height of the call to action's containing element instead.
Because ems and percentages are relative values, they have two major advantages over pixels:
www.it-ebooks.info

Getting Started as a WordPress Theme Designer
[ 20 ]
� If you set the site's base text size at 14 pixels, for example, using the <body> element, and set other elements with different font sizes using ems, then at a later date decide to make the text size larger, all you need to do is change the size for the <body> element and this will have a knock-on effect on all other elements or selectors that have been set in ems or pixels. This also means that you can adjust the text size for all parts of the site on mobile devices using one change – to the font size of the <body> element.
� As ems are relative, they adjust when the user changes their text size settings in their browser, for example if he or she is visually impaired or short-sighted. Pixel values won't do this so well. This makes ems much better for accessibility.
You could use either, but ems are more commonly used as they're simpler to work with.
A CSS strategy – working with a CSS frameworkAs we're about to learn, there are lots of CSS frameworks to choose from. Regardless of which one you end up with, this is where a lot of time-saving "magic" can start to happen for you and your design process. By using a CSS framework, you can quickly set up layout positioning for your mock-up. Let's take a quick tour of the top two CSS framework systems available.
960960 grid is probably the most popular CSS framework out there because of the fact that 960 can be divided by a lot of numbers, giving you a great deal of flexibility for your layout.
You can find it at http://960.gs/.
www.it-ebooks.info

Chapter 1
[ 21 ]
BlueprintBlueprint includes typography, form starters, and other plugins to choose from. It's based on a grid of 24 columns that are 30-pixel wide, with a 10-pixel margin, and the default is 950-pixels wide. You can find out all about it at: http://www.blueprintcss.org.
LayoutcoreThe tutorial in this book usesthe layout core framework developed by me.
Layoutcore is very simple. It uses object-oriented CSS, meaning that, instead of assigning styling to specific elements in your markup, you add classes defined in layoutcore which are designed to style whichever elements they're applied to. For example, these will control floats, widths, backgrounds, and fonts.
To learn more about object-oriented CSS, see http://coding.smashingmagazine.com/2011/12/12/an-introduction-to-object-oriented-css-oocss/.
www.it-ebooks.info

Getting Started as a WordPress Theme Designer
[ 22 ]
Here's an example of a layout using layoutcore:
...<div id="container"><div class="left eighth margin-right"></div><div class="left eighth margin-right"></div><div class="left quarter"></div>
<div class="right half"><div class="push"></div><div class="right third"></div><div class="left two-thirds"></div></div><div class="push"></div></div><!--//#container-->…
This markup would create a layout similar to the following screenshot:
A quick overview of the layoutcore CSS is as follows:
� It has several vertical lists and horizontal "grid list" options that can be applied to ul and ol lists, which turn them into horizontal lists that wrap from 2 up, to 8 up.
� It also makes the suckerfish method for drop-down menus a breeze (we'll break down the CSS for this in detail in Chapter 4, Advanced Theme Features). You simply assign the.sfTabclass for horizontal menus or .sfList for vertical menus. Using the vertical .sfList class, you can also assign the classes.dropRight or .dropLeft to determine on which side the drop-down menus appear or just assign .currentLevel if you want to have a vertical drop-down menu that automatically shows what section you're active in.
www.it-ebooks.info

Chapter 1
[ 23 ]
� It also accommodates some very basic @media queries that appropriately size the #container and footer element's width property and turn off the .left and .right float properties to get the layout's basic responsiveness set up and ready to roll.
� As with any other framework you use (or just plain stylesheet you create), the layout-core.css file uses the Eric-Meyers reset so that the layout and style rules you set up look as consistent as possible across all browsers.
� Last, for good measure, it accommodates some very common mime-type assignment images and social networking icons.
More CSS frameworks
There are tons of great frameworks out there, each one taking in different approaches or end solutions into account.
You may find one that works better for you than the ones mentioned here. For some examples, see http://speckyboy.com/2011/11/17/15-responsive-css-frameworks-worth-considering/
To find out more about it and download a 10k minified version, visit my CSS site http://csscheatsheet.net/layout-core (you get the unminified version with this chapter's code pack so you can look through it in detail).
Multiple class styles assigned to the same HTML object tag?
Hopefully, this is not a totally new CSS concept for you, but as you can see by the description of CSS frameworks and my quick layout-core.css examples given previously, you can have as many classes as you want assigned to an HTML object tag. Simply separate the class names with a blank space and they'll affect your HTML object in the order that you assign them. Keep in mind that the rules of cascading apply, so if your second CSS rule has properties in it that match the first, the first rule properties will be overwritten by the second. We'll delve even further into using this technique later on in this chapter and there are more suggestions for this trick in Chapter 7, Tips and Tricks.
Setting up your WordPress sandboxIf you have a version of WordPress running that you can play with, great. If you don't, it's a good idea to have a locally running installation. Installing and running a small web server on your local machine or laptop has become very easy with the release of WAMP (Windows, Apache, MySQL, and PHP) and MAMP (Mac, Apache, MySQL, and PHP). A local server offers you several conveniences compared to working with WordPress installed on a hosting provider.
www.it-ebooks.info

Getting Started as a WordPress Theme Designer
[ 24 ]
Using WAMPWAMP stands for Windows, Apache, MySQL, and PHP, and it lets you run a local web server on a Windows machine. To download it, go to http://www.wampserver.com.
The installation wizard includes instructions which will help you set up WAMP correctly for your system—make sure you follow them!
Using MAMPSimilar to WAMP, MAMP stands for (you guessed it!) Mac, Apache, MySQL, and PHP. Mac users will head on over to http://mamp.info and download the free version of the server.
Once you download and unpack the ZIP and launch the .dmg file, it's a pretty straightforward process for copying the MAMP folder to your Applications folder and launching the app.
Again, like WAMP, MAMP from the start page offers you an easy way to launch phpMyAdmin. phpMyAdmin will allow you to easily create a database and a database user account, which is required for installing WordPress.
Choosing a hosting providerIf you want to work remotely, or to publish your site to the web, you'll need hosting. There are hundreds of hosting providers out there so finding the right one can be tricky – the important thing is that they provide support for WordPress.
Your hosting will need to include Apache, MySQL, and PHP in order for WordPress to operate. It's also a big help if you have access to CPanel and phpMyAdmin.
Many hosting providers offer Fantastico or Softaculous for one-click installs, which can speed up the installation process and be useful for WordPress beginners. But be sure that this gives you the latest version of WordPress—if not, upgrade immediately after installing. It's important to use the latest version of WordPress to avoid any security problems. If you want maximum control over your WordPress installation, it's best to install it yourself.
For details of WordPress hosting requirements, see http://wordpress.org/hosting/
www.it-ebooks.info

Chapter 1
[ 25 ]
Rolling out WordPressYou'll be pleased to know that WordPress is easy to install. Once you have a MySQL database set up with a username and password, you simply unzip the latest WordPress version and copy it to your site's root folder and then run the installation by navigating to http://localhost/wp-admin/install.php, or for a remote installation, to http://example.com/wp-admin/install.php, where example.com is your domain name.
WordPress in 5 minutes (or less)
For a complete overview of installing WordPress, take a look at the WordPress 5-minute installation guide from the Codex: http://codex.wordpress.org/Installing_WordPressAgain. Also, the book we mentioned earlier, WordPress 3.0 Complete, April Hodge Silver,Packt Publishing will walk you through a WordPress installation, step by step.
SummaryTo get going on your WordPress theme design, you'll want to understand how the WordPress blog system works, and have your head wrapped around the basics of the WordPress project you're ready to embark on. If you'll be working with a more technical WordPress administrator and/or PHP developer, make sure your development installation or sandbox will have the same WordPress plugins that the final site needs to have. You'll want to have all the recommended tools installed and ready to use, as well as brush up on those web skills, especially XHTML and CSS. Get ready to embark on designing a great theme for one of the most popular, open source blog systems available for the Web today.
www.it-ebooks.info

2Preparing a Design for Our
WordPress Theme
The purpose of this chapter is to help you create a working HTML5- and CSS3-based template mockup, with an eye towards having it end up being a WordPress theme. This theme will be responsive, meaning it will display content optimally on mobile devices as well as desktop browsers. All the while, we'll be staying compliant with W3C standards and following good usability practices. Our hope for this chapter is that even you design pros may discover interesting tidbits that will help you in your WordPress theme design creation.
WordPress theme design is essentially web design so, throughout the chapter, we'll be focusing a bit more on thinking about semantics, standards, and usability first. We'll then focus on what we want to design (keeping in mind it will end up in WordPress) using the most simple, straightforward means possible: pencil and paper, HTML, and CSS, and last, our graphic editor/drawing programs. This approach will give us a more flexible, yet solid HTML and CSS structure.
While you might find this approach a little strange at first, it's by no means set in stone as the only right way to design a theme. Simply read through the chapter and, even if you already have a polished, Photoshop-designed mockup, go ahead and try to set up your HTML and CSS using the steps laid out in this chapter. You may find it helps your process.
www.it-ebooks.info

Preparing a Design for Our WordPress Theme
[ 28 ]
In this chapter, we're going to take a look at implementing the following strategies we learned in Chapter 1, Getting Started as a WordPress Theme Designer by:
� Building out our layout based on semantic content
� Adding in our content, fonts, and sizing
� Setting up our layout using our CSS layout framework
� Adding in our graphic elements using CSS3 and our object-oriented approach to CSS (which we'll explain when we come to it)
By the end of this chapter, we'll have a working HTML5- and CSS3-based template "comp" or "mockup" of our WordPress theme design, ready to be broken down, coded up, and assembled into a fully functional WordPress theme.
Already got a design? Not a designer at all?
That's fine! This chapter covers basic, web design best practices, with an eye towards ending up with a unique and custom WordPress theme. It contains time honored and tested methods for approaching compliant, accessible, and responsive HTML and CSS creation. If you're a total HTML and CSS design wizard, you can skim this chapter for any new tips and tricks that might be of use to you and then move on to Chapter 3, Coding it Up. If you're not a designer at all and you just need to convert an existing HTML/CSS template into WordPress, we'd still recommend you skim this chapter, as it may help you better understand some of the HTML markup and CSS in your template. You can then move on to Chapter 3, Coding it Up to learn how to code working HTML and CSS templates and mockups into WordPress.
Getting ready to designDesign Comp is an abbreviation used in design and print. It refers to a preliminary design or sketch as "comp", as in "comprehensive artwork" or "composite". It is also known as "mockup", "sample artwork", or "dummy artwork". We'll be creating one of these in this chapter to then use to create our WordPress theme in Chapter 4, Advanced Theme Features.
You may already have a design process similar to the one detailed next; if so, just skim the next section and skip down to the next main heading.
Designing in the browserHistorically, most web designers have used Photoshop or another graphics program to create a static design for a site and then either develop the site themselves or pass this to a developer to create the code.
www.it-ebooks.info

Chapter 2
[ 29 ]
This approach reflected the fact that web design had its background in print design, which makes good use of this sort of process. It gives you a nice static mockup that you can give to a client for approval.
But this approach isn't so effective anymore. Now that our sites need to look good on a variety of devices, a single static design won't apply to every screen size. Does this mean we have to prepare a full design for every conceivable screen size?
Of course not. The approach we're moving towards is replacing designing in a graphics program with designing in the browser.
The way you approach this will depend on your own preferences and the needs of your project, but a process which works for a lot of designers is:
1. Generate design concepts and ideas for the site using a mood board or similar technique, so you know what styling and graphics you'll be using.
2. Prepare some wireframes for the site's layout at different screen widths. These can be a rough sketch on paper or use a wireframing tool.
3. Create a static mockup of the design in the browser, using the layouts defined in your wireframes and the graphical treatments in your mood board. This gives you a working prototype of your design which is much more effective for demonstrating to clients how their site will actually work for users on different devices.
4. Turn that static design into a WordPress theme, using the HTML and CSS you've used for your mockup and adding WordPress goodness to it.
This is the process we'll be using in this chapter, which will take us up to step 3 of the process. In Chapter 4, Advanced Theme Features, we'll move on to the final step, turning our mockup into a WordPress theme.
Of course, you may already have a fully worked-up static design which you've been given by a designer, which doesn't mean you can't follow this chapter. Just skip to the Creating your design – from the sketch to the screen section and instead of using wireframes and a mood board to decide how to code your design, use the design you've been given.
Starting our designAs mentioned, for the third edition of this title, we're going to stick with the magazine site. The difference is, it's been almost four years since the original design was created (eons in internet years) and it's time for an update that reflects today's newest web standards, design aesthetics, and practices.
But the design of the magazine needs a "post 2010" update. This time around, we need something a little less "Martha Stewart" and a little more "Wired".
www.it-ebooks.info

Preparing a Design for Our WordPress Theme
[ 30 ]
For those of you who haven't seen the previous version, here's a look at what the previous edition's design looked like:
And here's what our final, responsive HTML5- and CSS3-based design will look like:
www.it-ebooks.info

Chapter 2
[ 31 ]
Planning and sketching our designThe first step is to plan our design and layout.
Before doing this, you'll need to think about the requirements of the site and of your client, if you have one. If you're designing a theme for release to other users, consider how they're likely to use it.
Imagine you are someone who has come to the site for the information it contains. What do you think the user will actually do? What kind of goals might they have for coming to your site? How hard or easy will it be for them to attain those goals? How hard or easy do you want it to be for them to attain those goals?
Are you adhering to standard usability conventions? Web standards and conventions are more than what's laid out in a lengthy W3C document. A lot of them are just adhering to what we, as web users, expect. For example, if text has underlines in it and/or is a different color, we expect that text to be a link. If something looks like a button, we expect clicking on it to do something, like process the comment form we just filled out or add an item to our cart.
It's perfectly fine to get creative and break away from the norm and not use all the web conventions. But be sure to let your viewers know up front what to expect, especially as most of us are simply expecting a web page to act like a web page.
Time for action – planning our designIf you don't already have a full-blown design, you'll need to create some graphics as a starting point and some wireframes too. You can do this as follows:
1. Using your preferred graphics program, create some design elements and concepts, such as buttons, color schemes, logos, backgrounds, or whatever else your site needs. Our design elements are all included in the design that we've seen in the previous figure.
2. Either on paper or by using a wireframing tool, create some wireframes for the screen widths you're targeting with your responsive design. We'll do ours on paper for now. You may need to prepare wireframes for more than one area of the site, for example for sections of the site that have a different sidebar or no sidebar at all.
3. Now revisit the considerations for your design and your site's users. Make any adjustments to your wireframes that you need to.
What just happened?You've created your design. It may not be what you're used to, but you'll find it will include everything you need to create your mockup in the browser. Obviously we've just skimmed this process—depending on the needs of your site, this may have taken you a very long time.
www.it-ebooks.info

Preparing a Design for Our WordPress Theme
[ 32 ]
Clean it up?
This might seem to defeat the purpose of rapid design—comping, but if you're working within a large design team, you may need to take an hour or so to clean your sketch up into a nicer line drawing. This may help other developers on your team to understand your WordPress theme idea more clearly.
Creating your design – from the sketch to the screenWe're now ready to open our HTML editor and start producing our design mockup. We'll work through the layout in HTML and CSS using our sketch and then the final visual elements will be created in an image editor at the end.
Time for action – creating our static HTML fileWe'll need a single HTML file for this design, so let's create it and start setting it up:
1. Open your HTML or text editor and create a new, fresh index.html file.
2. Add the following to the very first line in the document:
<!DOCTYPE html>
3. Save your index.html file.
What just happened?We created a new HTML file to contain our mockup and added the DOCTYPE declaration to it.
You must always specify DOCTYPE in all HTML documents, so that the browser knows what type of document to expect. If you're familiar with the different DOCTYPE declarations for HTML 4.0, or XHTML Strict, or Transitional, you probably remember it being a fairly lengthy line of code. The great news is that with HTML5, things just got a whole lot simpler.
Don't forget, even though it's such a simple declaration, you still need the basic DOCTYPE declaration when using HTML5.
The semantic bodyAfter our DOCTYPE, we can add the other essential requirements of an HTML file, the html tags, head tags, title tags, and body tags.
www.it-ebooks.info

Chapter 2
[ 33 ]
Time for action – adding in basic HTML structureThe next step is to give our HTML file some basic structure:
1. Immediately below the DOCTYPE declaration, add in the basic HTML markup structure required for any web page to work:
<html dir="ltr" lang="en-US"><head><meta charset="UTF-8" /> <title> </title></head>
<body>
</body></html>
2. Save your index.html file.
Downloading the example code
You can download the example code files for all Packt books you have purchased from your account at http://www.packtpub.com. If you purchased this book elsewhere, you can visit http://www.packtpub.com/support and register to have the files e-mailed directly to you.
What just happened?Our page now has the core HTML structure that all site pages need. It has defining html tags, head tags where meta and other defining and included information are placed, and most importantly, body tags. HTML body tags are where everything that's seen on a web page goes.
Now we'll add some more elements for our theme's content.
Time for action – adding in the semantic structureThe markup for our mockup now needs to go between those body tags we created.
1. Between your <body> tags in index.html, add the code for a very basic semantic overview of your theme:
<div id="container"><!--layout container--><header>
www.it-ebooks.info

Preparing a Design for Our WordPress Theme
[ 34 ]
<em>Header:</em> background image and text elements for header will go inside this div.</header><!--//header-->
<!-- Begin #container2 this holds the content and sidebars--><div id="container2">
<!-- Begin first section holds the left content columns--><section><!-- Begin content --><article><em>Main Content:</em> Post content will go here inside this div.</article></section>
<!-- Second section holds the right columns--><section><!-- #left sidebar --><aside class="sidebar1"><em>Left Side Bar:</em> Will contain WordPress content related links</aside><!--//.sidebar1 -->
<!-- #right sidebar --><aside class="sidebar2"><em>Right Side Bar:</em> This will include additional ads, or non-content relevant items.</aside><!--//.sidebar2--></section>
</div><!--//#container2-->
<nav id="mainNav"><em>Top Nav:</em> For reading through straight text, it's best to have links at bottom (css will place it up top, for visual ease of use)</nav><!--//mainNav-->
</div><!--//container-->
<footer><em>Footer:</em> Useful information and quick links for CSS design users who've had to scroll to the bottom plus site information and copyright will go here
</footer>
2. Save your index.html file.
www.it-ebooks.info

Chapter 2
[ 35 ]
What just happened?We added some semantic markup to our HTML file to give us an idea of what will be going where. Note that the actual text won't be the same in our final theme, this is just to give us some direction as we complete our design.
So, what does this page look like if we open it in a browser?
As you can see, it's very simple right now, but it's a start.
If a search engine bot or someone using a text-only/text-to-speech browser or mobile device arrived and viewed our site, the following is the order they'd see things in:
� Header: Because it's good to know whose stuff you're looking at
� Main content: Get right to the point of what you're looking for
� Left column content: Under the main content, we should have the next most interesting items features list, category (sometimes referred to as columns links), and archives (sometimes called "Past Issues" links)
� Right column content: It is the secondary information such as advertisements and non-content related items
� Top page navigation: Even though in the design this will be on the top, we've coded it at the bottom in text-only viewing with an anchor link to it for easy access
� Footer information: If this was a page of real content, it's nice to see whose site we're on again, especially if we've been scrolling or reading down for some time
www.it-ebooks.info

Preparing a Design for Our WordPress Theme
[ 36 ]
Attaching our CSS stylesheetSo, now that we have an HTML file set up, the next step is to create a stylesheet for our CSS.
Here's a quick refresher on how to apply the following CSS selectors (if these seem unfamiliar or new to you, you may want to check out the resources in Chapter 1, Getting Started as a WordPress Theme Designer and brush up on your CSS skills):
� HTML object tags (header, paragraph, list items, div tags, and so on) can just be listed as a CSS selector for example, div{...} p{...}.
� ID names that are attributes and should only be used once on a page, have a "#" hash mark in front of their CSS selector for example, #container{...} #sidebar{...}.
� Class names are attributes that can be applied multiple times on a page and combined with other classes, have a period (.) in front of the selector's name for example, .floatLeft{...}.
Time for action – creating and including a style.css shell into your index.php page
Let's create our stylesheet:
1. In your text editor, create a new file and name it style.css. Make sure it's in the same directory as your index.php file.
2. Open your index.html file, and inside the <head> tags, just under the <title> tags, add the following link to your style.css file:
<link rel="stylesheet" type="text/css" media="all" href="style.css" />
What just happened?We created a new stylesheet called style.css and attached it to our index.html file with a line of code inside the <head> section of our HTML file.
For now our stylesheet is still empty, but we'll change that shortly.
Prepping for responsiveness – viewport and apple-mobile meta tagsOur theme is going to be responsive—its layout will adapt to the width of the device it's being viewed on. In order for this to work, and for mobile devices to display the site at the correct width, we need to add some more code to our <head> section in our index.html file.
www.it-ebooks.info

Chapter 2
[ 37 ]
Time for action – adding in the viewport and apple-mobile meta tags
Adding the tags is very simple.
1. In your index.html head tags, place the following meta tags:
<meta name="viewport" content="width=device-width"><meta name="apple-mobile-web-app-capable" content="yes"><meta name="apple-mobile-web-app-status-bar-style" content="black">
What just happened?We added three meta tags to our file to ensure the theme behaves as it should on mobile devices. Let's have a look at each:
� The viewport meta tag is a Webkit requirement and not (yet) a W3C standard. The width property controls the viewport. As we'll be styling our layout based on the screen size, we'll want this set to device-width.
� By setting the apple-mobile-web-app-capable meta tag to yes, the site will run in full screen mode (when selected by the users), meaning it will bump the address bar up out of the screen view once the page has loaded. Even though this meta tag has the word apple in it, it actually affects all Webkit-based browsers, so even Android devices should benefit from this tag.
� On iOS devices the apple-mobile-web-app-status-bar-style specifies the status bar settings. This setting changes the color of the bar and then moves it out of the way or allows it to stay up at the top. If we set it to default it will stay its normal "iOS gradient-gray", but move up out of the way. We've changed to black (the only color you're allowed to change it to).
� If we were to change it to black-translucent it would stay permanently over the top of the HTML content and be slightly transparent. If your users need access to the status bar while browsing the site, you might want to consider making this setting black-translucent.
Adding in contentWe're now ready to add some text-based content. Even if you're designing a very visual theme, text is the most common element of a site, so you should be prepared to put a fair amount of thought into how it will be displayed.
www.it-ebooks.info

Preparing a Design for Our WordPress Theme
[ 38 ]
Starting with the textWe'll start by adding some dummy text to our site. As we go along, we'll create elements for that content to go into, which will use up-to-date, semantic HTML5 elements.
Time for action – adding sample text to our semantic sectionsIf you're adding dummy text, you can either use lorem ipsum text (you can access examples of it at http://www.lipsum.com), or you could add some more descriptive text (an example of which you can find at http://notloremipsum.com). The second approach often helps when building sites for clients as it helps them see what sort of content will go where. For our purpose we'll just use lorem ipsum.
1. Still in index.html, delete any HTML you may have already added in between the body tags.
2. Add your semantic elements with their content. A section of the code used in our mockup is shown next (to save space here we've only included a sample, but you can download the full code pack for this chapter from the book's pages on the Packt website):
<div id="container"><!--container goes here--><header> <hgroup class="screen-text"> <h1>OpenSource</h2> <h2>Online Magazine</h2> <p><em>Using Open Source for work and play</em></p> </hgroup> <div id="date">Current Month and Year</div></header><!--//header-->
<!-- Begin #container2 this holds the content and sidebars--><div id="container2">
<!-- Begin #container3 keeps the left col and body positioned--><section class=""><h2 class="thisMonth">This Month</h2>
<!-- Begin #content --><article class="post"><h2><a href="#">Really Long Article Title Name The More Text The Better Cause You Never Know</a></h2><em>Main Content:</em> Post content will go here inside this div.<p>by Author Name for <a href="#">Column Type</a></p>
www.it-ebooks.info

Chapter 2
[ 39 ]
<div class="entry-content"><!--//post--><p>Lorem ipsum dolor sit amet, consectetuer adipiscing elit. Sed a eros nec orci volutpat vestibulum. Ut pellentesque sagittis metus. In euismod tellus id ante. Ut lectus. Nunc adipiscing. Praesent luctus, massa quis vulputate rhoncus, justo turpis mollis dolor, nec blandit nisl mauris et pede.</p><p>Lorem ipsum dolor sit amet, consectetuer adipiscing elit. Sed a eros nec orci volutpat vestibulum. Ut pellentesque sagittis metus.</p>
<p><a href="#">Read the rest of this entry »</a></p></div><!--//.entry-content-->
3. Save your index.html file.
What just happened?We added some semantic elements to our site, with content.
Let's look at some of the elements we've included:
� A #container div to contain our page content—useful for styling
� The header element—containing the site title and description, inside an hgroup tag with a .screen-text class so we can make it invisible to browsers with CSS turned on
� A #container2 div to hold the post or page content and sidebars
� A section to contain all of the post or page content
� An article element with a .post class—it mirrors the class WordPress will eventually assign to this element, as we'll see in Chapter 4, Advanced Theme Features
� An h2 element for the title of the post
� A p element with author information
� A div with the .entry-content class to hold the post content itself—this also mirrors the class WordPress will assign once we set that up
� More p elements to contain the content itself, these will eventually be automatically populated by WordPress from the site's database but for now we're using dummy text
www.it-ebooks.info

Preparing a Design for Our WordPress Theme
[ 40 ]
The trick: Start with a lot of text
Use a lot of sample text. It's tempting to create a nice mockup that's got clean, little, two-word headers, followed by trim and tight, one or two-sentence paragraphs (which are also easier to handle if you did the entire mockup in Photoshop, right?).
In this optimally minimalist sample, the design looks beautiful. However, the client then dumps all their content into WordPress and your theme, which includes long, boring, two-sentence headlines and reams of unscannable text. Your beautiful theme design now seems dumpy and all of a sudden the client isn't so happy, and they are full of suggestions they want you to incorporate in order to compensate for their text-heavy site.
Just design for lots of text upfront. If the site ends up having less text than what's in your mockup, that's perfectly fine; less text will always look better. Getting lots of it to look good after the fact is what's hard.
Now let's see what our page looks like when viewed in the browser:
www.it-ebooks.info

Chapter 2
[ 41 ]
You can see it has a basic structure in place, but it now needs some styling. After all, this isn't 1992!
Styling our fontsSo, now we're going to add some styling for our text, starting with the fonts, or font families used to display it.
Styling font familiesBy assigning font families to our CSS rules, we can set up backup font choices. This means if someone doesn't have our preferred font, then they'll probably have the backup we specify, and if they don't have that? Well, at the very least we can rely on their browser's built-in "generic" assigned font. Just specify serif, sans-serif, or mono-space.
When specifying font families, it's a good idea to include one or more of the fonts which are both commonly held on PCs, Macs, and mobile devices, and which look good on screen (as against on paper). Fonts designed for screens include Verdana and Georgia, and other fonts commonly available on your users' systems will be Arial and Times New Roman.
Our headers will be Helvetica with Arial as a fallback, and the body content of our text will be Trebuchet with Helvetica and then Verdana as a fallback.
Time for Action – assigning your font familiesLet's add some font families to our stylesheet:
1. In your style.css file, under the TYPOGRAPHY comment, add the following code:
/*------------------TYPOGRAPHY -------------------*//*Set font stacks hereAssign default colors only. Otherwise color is handled at BOTTOM of sheet.*/
body {font-family: 'Trebuchet MS', Helvetica, Arial, Verdana, sans-serif;}
h1, h3, h5{ font-family: Helvetica, Arial, sans-serif;
}
www.it-ebooks.info

Preparing a Design for Our WordPress Theme
[ 42 ]
h2, h4, h6{ font-family: 'Helvetica Neue', Helvetica, 'Arial Condensed', Arial, sans-serif;
}a {
font-family: Helvetica, Arial, sans-serif; }pre, code{
font-family: Courier, monospace;}
2. Save your stylesheet.
What just happened?We set the font families that our theme will use, including:
� The default font for the body element, which will apply to anything we don't specify an alternative font family for, because of CSS inheritance
� Font families for our headings and links
� Finally, a font family for pre and code element, in other words for the display of code in our theme
@font-face techniquesYou'll be pleased to know we can take advantage of a much wider world of typography than just what's hopefully installed on other people's computers. Using @font-face and other techniques, you can serve up fonts of your choice to your site's users. We'll go over these techniques in detail in Chapter 7, Tips and Tricks.
Warning: Most fonts are licensed! You must not violate the terms and licensing of fonts. As most were expecting to be used with print, many have licenses which will be violated if you use them on the web with the @font-face, Cufon (or sIFR) techniques. Your best bet is to use open source fonts. A great repository is http://www.fontsquirrel.com/. We'll also be using Google's new font repository: http://www.google.com/webfonts.
The next step is to specify sizing for our fonts.
Styling font sizesWe have our font families in place, but we need to tell browsers at what size to display the text in our theme.
www.it-ebooks.info

Chapter 2
[ 43 ]
Time for action – sizing your fontsLet's add some styling for font sizes to the CSS declarations we've set up for our font families.
1. In style.css, edit the font styling so it reads as follows:
/*------------------TYPOGRAPHY -------------------*//*Set font stacks hereAssign default colors only. Otherwise color is handled at BOTTOM of sheet.*/
body{ font-family: 'Trebuchet MS', Helvetica, Arial, Verdana, sans-serif; font-size: 0.9em; color: #333;}h1, h2, h3, h4, h5, h6 { font-weight: 100; margin: 20px 0 10px 0;}h1, h3, h5{ font-family: Helvetica, Arial, sans-serif; line-height: 120%; color: #666;}h2, h4, h6{ font-family: 'Helvetica Neue', Helvetica, 'Arial Condensed', Arial, sans-serif; line-height: 110%; color: #999;}a { font-family: Helvetica, Arial, sans-serif; font-size: 100%; color: #666; font-weight: 100; text-decoration: none;}
pre, code{ font-family: Courier, monospace; font-size: 100%; margin-bottom:10px;}
www.it-ebooks.info

Preparing a Design for Our WordPress Theme
[ 44 ]
2. Now add some more specific height styling for some other elements. Add the following code below the code you've just added:
h1 { font-size: 280%;
font-weight: 600;}h2 {
font-size: 220%; border-bottom: 1px solid #ccc; padding-bottom: 10px;}h3 {
font-size: 180%;}h4{
font-size: 200%; color: #999}h5{
font-size: 115%;}h6{
font-size: 100%;}p {
line-height: 150%; margin-bottom: 170%;
}
3. Save your stylesheet.
What just happened?We added some additional styling for font sizing. You'll notice that we've also included some styling for margins as well, to give our text some extra space where it's needed.
As you can see, in the previous code examples, the only em size we used was in the body rule. The rest of our header, paragraph, and other typography-based rules rely on increasing or decreasing the font size based on percentages. 90% = 0.9em and so 90% would size down the font a tad, while 280% sizes the font up considerably. Now, if our client asks to just "bump down" (or up) the size on everything "a little" all we have to do is change the main em size in the body rule. Everything else will size up or down, relatively, based on the percentage we assigned it. Easy!
www.it-ebooks.info

Chapter 2
[ 45 ]
We then moved on to using percentages to help us with the line-height property and also made sure our a href links stand out with a different font-family, yet still have the familiar underline appear on :hover.
Using ems and percentages in this way is also far better for accessibility than using pixels, as it means that, if a user has set their browser to resize text, this will be applied across our theme, and not be overridden by any pixel-based text styling.
The final stage in styling our text is to deal with text we want to hide from browsers with CSS turned on, while making them visible to screen readers and search engine bots.
Time for action – handling search engine bots/screen reader text
You'll note in the HTML5 markup, we have several headers and hgroups assigned a class called .screen-text. This is the text that users viewing the styled site in a browser won't see, but makes things clear for text screen readers and may have some SEO benefits. Let's add the styling for it:
1. In the TYPOGRAPHY section of your stylesheet, add the following:
/* Text meant only for screen readers */.screen-text{
position: absolute; left: -5000em;
}
2. Save your style.css file.
What just happened?We added some property settings to move any text that has the .screen-text class assigned to it, 5000em units to the left. Assuming most people have a screen that's smaller than 5000ems, this will be hidden from view.
www.it-ebooks.info

Preparing a Design for Our WordPress Theme
[ 46 ]
Let's take a look at our basic text styling so far. The following image shows our mockup starting to take shape:
If you don't like how your text looks here, then a bunch of graphics, columns, and layout adjustments won't help! Take your time getting the text to look nice and read well now. You'll have less edits and tweaks to make later.
Setting up our layout with CSSNow that we've got our initial typography set up, let's start making this stuff look like our sketch! First up, we'll add a call to the layout-core stylesheet to give our theme some basic layout styling.
www.it-ebooks.info

Chapter 2
[ 47 ]
Time for action – referencing our layout core to set up our positions
Let's make sure our stylesheet references the layout core:
1. At the very top of your stylesheet, add the following code:
/* ---------------------------------------------------|NOTE: This style sheet leverages: layout-core.css. | ---------------------------------------------------*/@import url(layout-core.css);
2. Make sure you have a copy of layout-core.css in the same directory as your style.css and index.html files. You can find a copy in the code bundle for this chapter.
3. Save your stylesheet.
What just happened?We added the @import directive to call an external stylesheet, meaning we can make use of the layout styling already set up in layout-core.css and won't have to add it all in manually.
Layoutcore uses a few classes to help us achieve our layout. To use them, you'll simply assign whether a div, section, article, or aside tag should float, left or right and then assign an additional class of full, half, two-thirds, three-quarters, third, or quarter to set the width of that HTML element. We'll come to this later in this chapter.
CSS Resets
Of course, you might be building your own stylesheet from scratch and won't want to include layout-core.css. If so, it's a good idea to include a CSS Reset at the beginning of your stylesheet. This resets any browser-specific CSS so we can start with a clean sheet regardless of what browser the user is viewing our site in.
Our layout-core.css file includes a reset, so if you're importing that, you don't need to add another one.
For more on CSS Resets, and an example of a great one to use, see http://meyerweb.com/eric/tools/css/reset/.
www.it-ebooks.info

Preparing a Design for Our WordPress Theme
[ 48 ]
Now that we have our @import directive set up, we'll move on to add some media queries to make our theme responsive.
Media queries sit at the end of a stylesheet and they specify the styling to apply depending on the width of the screen the site's being viewed on. For much more on building responsive themes and leveraging media queries, see WordPress Mobile Web Development: Beginner's Guide, Rachel McCollin, Packt Publishing.
Time for Action: Adding our media queriesThe following steps will allow you to add your media queries:
1. Below your typography section in your style.css stylesheet (or at the bottom of the stylesheet if you have other code below your typography section), add the following media queries:
@media (min-width: 1220px) {
}@media (max-width: 1024px) {
}
@media (min-width: 480px) and (max-width: 800px) {
}@media (max-width: 480px) {
}@media only screen and (min-width: 320px) and (max-width: 480px) {
}
2. Save your stylesheet.
What just happened?We added some media queries to target the screen sizes most commonly used. Let's have a look at how they work:
� @media (min-width: 1220px) targets very large screens
� @media (max-width: 1024px) targets small desktop screens and larger tablet screens
www.it-ebooks.info

Chapter 2
[ 49 ]
� @media (min-width: 480px) and (max-width: 800px) target small tablet screens or larger tablet screens in portrait
� @media (max-width: 480px) targets small screens including phones in landscape
� @media only screen and (min-width: 320px) and (max-width: 480px) target phones in portrait
These media queries work for the vast majority of devices available at the time of writing. But as more and more devices are released with different screen widths, you may find these media queries don't continue to target the devices you expect them to. When working on your theme, you may find it helps to tweak these media queries so they target widths at which the design needs to be altered for it to look good, rather than focusing on specific devices.
Setting up the desktop viewWe'll first start with our desktop browser view. We'll use layout-core.css to help us set our columns up.
Time for action – standard settingsNow we'll set up the default styling for the desktop view:
1. Below the typography section in your stylesheet and above the media queries, add the layout styling, shown as follows:
/*------------------ STANDARD STYLING -------------------*/header{ height: 110px;}
#mainNav{ position:absolute; top: 110px; width: 100%;}#mainNav li a{ display: block; padding: 10px 15px 13px 15px; line-height: 100%; -size: 120%;
www.it-ebooks.info

Preparing a Design for Our WordPress Theme
[ 50 ]
border: none; color: #036;}#across{ margin: 0; width:100%;}/*for a stretched bottom only*/
h2.thisMonth{ font-size: 260%;}.content{ margin-top: 250px;}.sidebar{ margin-top: 150px;}.sidebar div{ margin-top: 30px; padding-bottom: 10px;}.sidebar h2{ margin-left:20px;}
2. Save your stylesheet.
What just happened?We added styling for our layout on standard desktop screens. We don't need to examine all of the CSS in detail but some points to note are as follows:
� Our #mainNav navigation element has been positioned absolute so it could be brought up to the top of our layout
� We added some sizing for our .thisMonth h2 title
� Our #across div is for larger desktops stretched all the way out to the full width of the screen
� We added margins and padding for our .content and .sidebar divs, in particular margin-top to push them down (this is because we'll be adding in a background image here in a bit)
www.it-ebooks.info

Chapter 2
[ 51 ]
Time for action – checking in on larger desktopsWe've styled our standard, default view, but we'll also want to handle larger desktop browsers. Let's add some CSS to our first media query, to widen the #mainNav nav element out to match our #container div if we detect a larger screen:
1. Inside your first media query, add the following code:
@media (min-width: 1220px) { #mainNav{ position:absolute; top: 110px; width: 1100px; }}
2. Save your stylesheet.
What just happened?Our layout-core.css stylesheet sets our div widths as percentages, so they'll expand to whatever size the #container div is set to. It also sets the #container div to 1100 pixels. Our #mainNav nav will now match and not extend over the #container div on larger screens.
Time for action – making sure smaller screens are handledWhen our layout-core.css file snaps the #container div in on smaller screens to 950 pixels, we'll want #mainNav to match that as well:
1. In the next media query, add the following code:
@media (max-width: 1024px) { /*for netbook/tablet screens*/ #mainNav{ position:absolute; top: 110px; width: 950px;}}
2. Save your stylesheet.
www.it-ebooks.info

Preparing a Design for Our WordPress Theme
[ 52 ]
What just happened?Our #mainNav will now snap in to the width of our #container div if the media query for 1024px or less is called. Let's see how it looks on the relevant size screen:
Setting up the tablet viewWe're now ready to focus on our tablet and media player views. There are lots of devices out there in this range. The following two media queries help catch the majority of these devices.
www.it-ebooks.info

Chapter 2
[ 53 ]
Time for action – adjusting the standard layout for tabletsWe'll start with devices that range from 480 pixels wide up to 800 pixels. This range includes the iPad when it's held in portrait orientation:
1. Add the following code to your media query:
@media (min-width: 480px) and (max-width: 800px) { header{ height: 100px; } #mainNav{ top:100px; width: 300px; } #mainNav li{ float:none; clear:both; } #container2{ background-position: 70% -90px; } .home article.post h2{ font-size: 150%; margin-bottom: 10px; } .home article.post .entry-content,article.post .entry-meta, article.post a.more{ display:none; } .content.left.two-thirds, .sidebar.right.third{ float:none; clear:both; margin: 0 auto; width:98%; } .sidebar div{ width: 30%; margin: 1.2%; float:left; } .home .content.left.two-thirds{ margin-top:180px; }}
2. Save your stylesheet.
www.it-ebooks.info

Preparing a Design for Our WordPress Theme
[ 54 ]
What just happened?We added some styling to adjust the layout on tablet devices. Specifically:
� We removed the "tab" floats of our #mainNav list items li and set them to list vertically
� We changed some of the font sizes of our titles
� We hid our article content, only displaying the titles
� We turned off our .sidebar element's right float
� We set each div in the .sidebar to float: left of each other, creating a three-up box spread under our main article headlines
The end result looks like the following screenshot:
Setting up the small screen viewWe're now ready to set our small screen view up, which will target smartphones and other smaller devices in portrait orientation.
www.it-ebooks.info

Chapter 2
[ 55 ]
Time for action – setting up our small screen layoutHere our media query will be a little different, only applying to screens (the other queries will affect print layout as well).
1. In your final media query add the following CSS rules and changes:
@media only screen and (min-width: 320px) and (max-width: 480px) { header{ height: 70px; } #mainNav{ top:70px; width: 220px; } #mainNav li{ float:none; clear:both; } #mainNav li a{ font-size: 100%; padding: 10px } .home article.post h2{ font-size: 120%; margin-bottom: 10px; padding-left: 50px; } .home article.post .entry-content,article.post .entry-meta, article.post a.more{ display:none; } .home article.post a.comments{ position:absolute; margin-top: -55px; } .content.left.two-thirds{ margin-top:150px; } .soc { text-indent: -5000em; }}
2. Save your stylesheet.
www.it-ebooks.info

Preparing a Design for Our WordPress Theme
[ 56 ]
What just happened?We've added some styling to improve the layout on small screens. In particular:
� We shortened up our header even more and tightened up the width of our #mainNav
� We reduced font sizes in our #mainNav and titles
� We reduced the margin-top of our .content div
The most notable thing that happens is actually handled by default in our layout-core.css. All left and right floats are turned off, cleared on both sides, and all percentage widths are set to 100%. This makes every div laid out in our phone view push edge to edge. The result looks like the following screenshot:
www.it-ebooks.info

Chapter 2
[ 57 ]
Adding design treatmentsFinally! Now we have our mockup's responsive layout set up. Let's polish it off.
We'll be using CSS3 techniques, even in IE
We'll be taking advantage of many CSS3 techniques in our design, most notably, simple gradients, rounded corners, and box shadows. Trouble is, IE7 and 8 don't really support any of those CSS3 features yet.
Not to worry, there's a wonderful library called CSS3PIE which we'll be using to create polyfill fallbacks for IE 7 and 8.
The most recent (as of this writing) version is included in this chapter's code files but you can also go and pick up the most recent version of the library from http://css3pie.com/.
We'll talk about how to properly implement it for our mockup as well as how to get it working in our WordPress theme in Chapter 3, Coding it Up.
Time for action – setting up our graphic treatments in the stylesheet
Now we need to set up a section in our stylesheet for design treatment rules.
1. The first step is to upload our graphics files. Create a folder called images inside the folder containing your other files. Upload your image files to it.
2. In style.css, below the STANDARD STYLING section, but above our media queries, add in our color scheme for background colors:
/*------------------REUSABLE GRAPHIC TREATMENTS -------------------*//*main background colorscheme*/.bg-main{ background-color: #222;}.bg-secondary{ background-color: #666;}.bg-tertiary{ background-color: #999;}.bg-light1{ background-color: #eee;}
www.it-ebooks.info

Preparing a Design for Our WordPress Theme
[ 58 ]
.bg-light2{ background-color: #ddd;}.bg-dark1{ background-color: #000;}.bg-dark2{ background-color: #444;}
3. Next, add some gradient schemes below. You'll need to include the browser-prefixed versions of the CSS as well—we've left it out here to save space.
.grd-vt-main{ background: linear-gradient(top, #333, #000);}.grd-vt-secondary{ background: linear-gradient(top, #555, #222);}.grd-vt-tertiary{ background: linear-gradient(top, #ddd, #999);}
4. Beneath this, add some rules for handling borders:
/*borders*/.bdr{ border: 1px solid;} /*apply thickness*/.bdr-2px{ border: 2px solid;} /*pick a side*/.bdr-top{ border-left:none; border-right: none; border-bottom: none;}.bdr-left{ border-top:none; border-right: none; border-bottom: none;}
www.it-ebooks.info

Chapter 2
[ 59 ]
.bdr-right{ border-left:none; border-top: none; border-bottom: none;}.bdr-bottom{ border-left:none; border-right: none; border-top: none;} /*leverage selectors for border colors -be sure to apply your rules in this order*/.bg-main.bdr{ border-color: #aaa;}.bg-secondary.bdr{ border-color: #999;}.bg-tertiary.bdr{ border-color: #eee;}
5. Next, set up the rounded corners. As with gradients, we've omitted the browser-prefixed code to save space, but you'll find it in the code files of this chapter.
/*rounded corners*/.rnd border-radius: 5px;} /*only two corners*/.rnd-top{border-radius: 5px 5px 0 0;}.rnd-left{border-radius: 5px 0 0 5px;}.rnd-right{border-radius: 0 5px 5px 0;}.rnd-bottom{border-radius: 0 0 5px 5px;}
www.it-ebooks.info
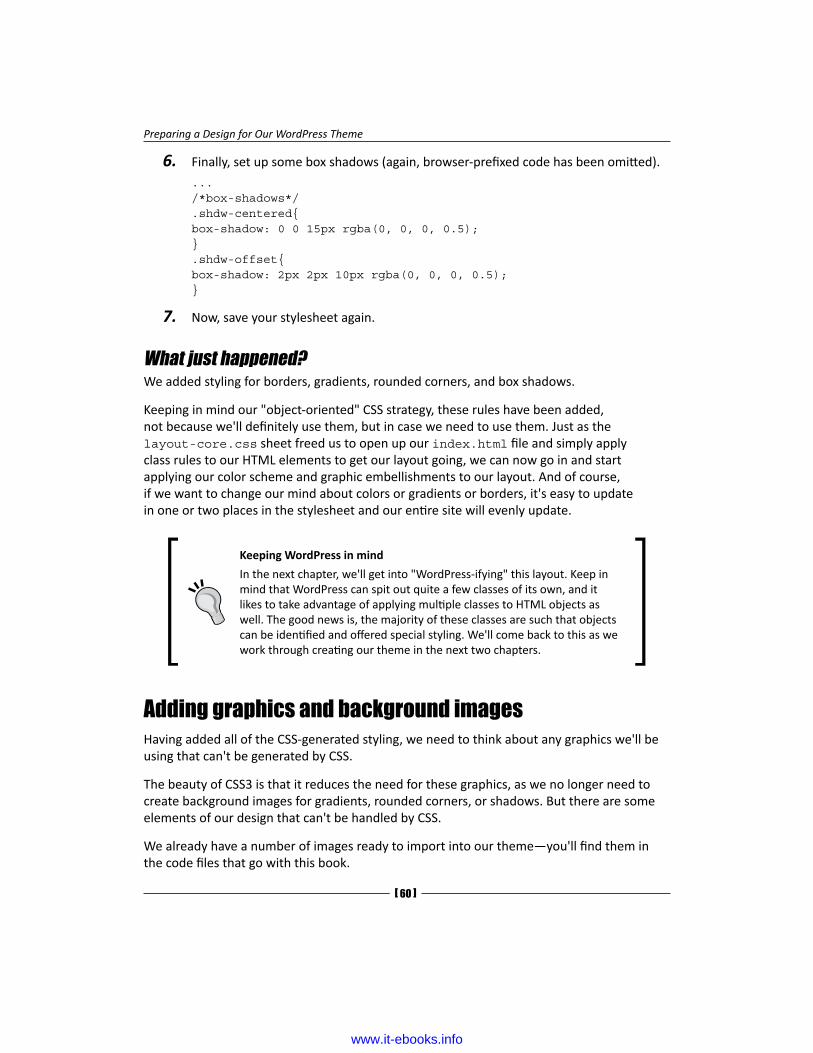
Preparing a Design for Our WordPress Theme
[ 60 ]
6. Finally, set up some box shadows (again, browser-prefixed code has been omitted).
.../*box-shadows*/.shdw-centered{box-shadow: 0 0 15px rgba(0, 0, 0, 0.5);}.shdw-offset{box-shadow: 2px 2px 10px rgba(0, 0, 0, 0.5);}
7. Now, save your stylesheet again.
What just happened?We added styling for borders, gradients, rounded corners, and box shadows.
Keeping in mind our "object-oriented" CSS strategy, these rules have been added, not because we'll definitely use them, but in case we need to use them. Just as the layout-core.css sheet freed us to open up our index.html file and simply apply class rules to our HTML elements to get our layout going, we can now go in and start applying our color scheme and graphic embellishments to our layout. And of course, if we want to change our mind about colors or gradients or borders, it's easy to update in one or two places in the stylesheet and our entire site will evenly update.
Keeping WordPress in mind
In the next chapter, we'll get into "WordPress-ifying" this layout. Keep in mind that WordPress can spit out quite a few classes of its own, and it likes to take advantage of applying multiple classes to HTML objects as well. The good news is, the majority of these classes are such that objects can be identified and offered special styling. We'll come back to this as we work through creating our theme in the next two chapters.
Adding graphics and background imagesHaving added all of the CSS-generated styling, we need to think about any graphics we'll be using that can't be generated by CSS.
The beauty of CSS3 is that it reduces the need for these graphics, as we no longer need to create background images for gradients, rounded corners, or shadows. But there are some elements of our design that can't be handled by CSS.
We already have a number of images ready to import into our theme—you'll find them in the code files that go with this book.
www.it-ebooks.info

Chapter 2
[ 61 ]
Our theme makes extensive use of background images to avoid any problems with inline images conflicting with any other content that our theme's users may add in future. You may prefer to use inline images in your markup, which has the advantage of being better for accessibility and SEO but the disadvantage that if a future user of your theme edits the template files, he or she may accidentally delete images that are required for the design. Our images are for design only and not part of the content, so we're using background images.
Setting up our background images in our stylesheetWe've exported our logos to one single image. Using the background-position property we'll be displaying the different sized logos depending on which screen size triggers our media query.
Wellstyled has an excellent tutorial on how to use a single image technique (also referred to as "CSS sprites") to handle image background rollovers with CSS: http://wellstyled.com/css-nopreload-rollovers.html.
You can also check out CSS Tricks, and their article CSS Sprites: What They Are, Why They're Cool, and How To Use Them at http://css- tricks.com/css-sprites/.
Remember: To see the full and final CSS mockup style.css and index.html page, please refer to the code download section in the preface.
Time for action – adding background images to our designThe images we've created need to be added to our stylesheet as background images.
1. In your stylesheet, edit the STANDARD STYLING section to add background images and colors, with the following code. Best practice is to add each declaration within the description blocks you've already set up. You can see the final code in the code files of this chapter.
header{ background: url(images/osmag-logos.png) no-repeat 0 0;}#mainNav li a:hover{ color:#088fff;}#across{ border-top: 2px solid #444; background: #000}#container{
www.it-ebooks.info

Preparing a Design for Our WordPress Theme
[ 62 ]
background: url(images/osmag-container-bg.png) no-repeat 50% -30px;}#container2{ background: url(images/osmag-earth.jpg) no-repeat 50% 0;}h2.thisMonth{ color: #fff;}h2.pastIssues{ color:#222;}article h2{ background: url(images/pngs/highlight-border.png) repeat-x 0 bottom;}.comments{ background: url(images/pngs/comments-icon.png) no-repeat 0 0; }
2. Now add the following new section below your STANDARD STYLING section:
/*------------------REUSABLE GRAPHIC TREATMENTS -------------------*//*reusable image backgrounds*/.img-quote-light{ background: url(images/pngs/r-quotes-light.png) no-repeat -10px -7px; text-indent: 55px;}.img-quote-dark{ background-image: url(images/pngs/r-quotes-dark.png); background-repeat: no-repeat; background-position: -10px -7px; text-indent: 55px;}.img-bottom-shadow{ background: url(images/pngs/bot-r-shadow.png) no-repeat 50% bottom;}.img-top-shadow{ background: url(images/pngs/top-r-shadow.png) no-repeat 50% 0;}.img-line-hz{ background: url(images/pngs/highlight-border.png) repeat-x left bottom;}
3. Save your style.css file.
www.it-ebooks.info

Chapter 2
[ 63 ]
What just happened?We added CSS for backgrounds and colors into our stylesheet. As you'll notice, we made a lot of use of no-repeat to ensure our background images didn't repeat, and used positioning of background images to place them in our design.
Now let's add any changes needed for those backgrounds to our media queries.
Time for action – adding background image styling to the media queries
We'll need to edit the two media queries for the two smallest screen sizes.
1. Inside the media query targeted at small tablets and phones in landscape—@media (min-width: 480px) and (max-width: 800px)—add the following code. Again, you'll find you can add it to your existing declarations.
header{ height: 100px; background-position: 0 -220px;}#mainNav{ top:100px;}#mainNav li{ background: url(images/pngs/highlight-border.png) repeat-x 0 bottom;}#container2{ background-position: 70% -90px;}
2. Next, in the media query targeting small screens—@media only screen and (min-width: 320px) and (max-width: 480px)—add the following code:
header{ height: 70px; background-position: 0 -425px;}#mainNav{top:70px; }#mainNav li{background: url(images/pngs/highlight-border.png) repeat-x 0 bottom;}#mainNav li a{padding: 10px}
www.it-ebooks.info

Preparing a Design for Our WordPress Theme
[ 64 ]
3. Finally, save your stylesheet.
What just happened?We loaded our graphics into our STANDARD STYLING rules and then moved on to each media query, modifying the height, background-position and other visual properties as needed along the way. Most notably, we changed our header height and, using the CSS sprite technique, our logo loaded up with the different sized logo as our screen dimension changed.
Our final desktop layout now looks like the following screenshot:
www.it-ebooks.info

Chapter 2
[ 65 ]
Our final portrait tablet layout now looks like this:
www.it-ebooks.info

Preparing a Design for Our WordPress Theme
[ 66 ]
And last, our final phone layout now looks like this:
www.it-ebooks.info

Chapter 2
[ 67 ]
Don't forget the favicon and touch iconYou certainly don't need a favicon or touch icon, but it does add a finishing touch. Let's work through the steps to do it.
Adding a faviconFavicons are those little 16px x 16px icons that appear next to the URL in the address bar of a web browser. They also show up on the tabs (if you're using a tabbed browser), in your bookmarks, as well as on shortcuts on your desktop or other folders in Windows XP and Vista.
The easiest (and quickest) way to create a favicon is to take your site's logo, or key graphic (in this case, the "O" in opensource), and size it down to 16px x 16 px; then save it as an .ico file.
For advice on creating a favicon, see the page on the WordPress codex at http://codex.wordpress.org/Creating_a_Favicon.
Time for action – adding the favicon you just createdHaving created a favicon, we need to upload it to our theme.
1. Once you have your favicon.ico, place the file in the same folder as your stylesheet and index.html file.
2. Open index.html and add this code inside the <head> section:
<link rel="shortcut icon" href="favicon.ico" type="image/x-icon" />
What just happened?We added a favicon, uploaded it to the correct place, and added a line of code in our index.html file referencing it.
If you refresh your browser you'll see it in your navigation bar.
www.it-ebooks.info

Preparing a Design for Our WordPress Theme
[ 68 ]
Can't see your favicon?
Be sure to name your file favicon.ico correctly! It won't work if it's not named favicon.ico.
You may also find that you need to clear your cache and reload several times before you see your new favicon. Be sure to actually clear your cache through your browser's preference panel. The keyboard shortcut Shift + F2(Refresh) sometimes only clears the web page cache. Some browsers cache favicons in a separate directory.
Have a go hero – making your favicon high-resolutionA little known fact about the .ico format is that it can contain multiple versions of itself at different color depths and resolutions. This is how your operating system is able to display those "smooth icons" that seem to be the right resolution no matter how large or small they're displayed. You may have noticed that some favicons, if saved as shortcuts to your desktop, look great and others look jaggy and terrible. The ones that look great take advantage of this feature.
The three main sizes that Windows will display a favicon in are: 16 x 16, 32 x 32, and 48 x 48. Sometimes favicons go all the way up to 128 x 128. It's up to you; just remember, the more resolutions, color depths, and transparencies you add, the larger your favicon file is and longer it will take to load.
You'd basically use the same steps listed previously to create your favicon, just starting with 48 px x 48 px, then save it (so as to not overwrite your original file) down to 32 x 32 and last 16 x 16. It helps to save each icon initially in PNG format, especially if you want the background to be transparent.
To find out more about favicons and generate your own, visit http://www.favicon.co.uk.
Touch iconsSince we just took the time to add a great, multi-resolution favicon, we might as well go all out and add in a nice touch icon. Touch icons are used by iOS and Android devices with versions higher than 2.1.0. While you can technically just create one higher resolution image (for example, 114 x 114) the other devices will size it down, but then why waste bandwidth time loading in a larger image if you don't have to? It's better to create the three required sizes.
www.it-ebooks.info

Chapter 2
[ 69 ]
Time for action – adding a touch iconOnce you have a touch icon (which you should have saved as .png or a set of them), you'll need to add them to your theme.
1. Upload your touch icon to the same folder as your index.html file.
2. In index.html, add the following code inside the <head> section:
<link rel="apple-touch-icon" sizes="57x57" href="/apple-touch-icon-57x57.png"/><link rel="apple-touch-icon" sizes="72x72" href="/apple-touch-icon-72x72.png"/><link rel="apple-touch-icon" sizes="114x114" href="/apple-touch-icon-114x114.png"/>
3. Save your index.html file.
What just happened?We added a few lines of code to fetch our touch icon to index.php. You'll notice that we included three file sizes:
� The 57 x 57 pixel icon is what older iOS devices and Android devices will load in
� The 114 x 114 pixel icon is for high-resolution Retina displays
� The 72 x 72 pixel icon is for iPads
The icons become available when you save pages as web clips to the home screen like so:
www.it-ebooks.info

Preparing a Design for Our WordPress Theme
[ 70 ]
Pop quiz – questions about theme designQ1. What things should you take into consideration when planning your theme?
1. What type of site or blog your theme will be for?
2. How many layouts or "views" your theme will have?
3. What plugins or widgets will it support?
4. All of the above.
Q2. What does sketching your theme design accomplish?
1. It helps you add CSS classes to layout elements.
2. It helps you see what colors you will be using in your design.
3. It helps you write better code.
4. It helps you see your design quickly and start considering usability and content.
Q3. How much sample text should you start with?
1. Lots – it helps you see what your design will look like when lots of content is added.
2. As little as possible – to avoid distraction from the design.
SummaryYou have now learned the key theme design considerations to make when planning a WordPress theme. We've walked through the basics of creating a functional mockup of our theme design in the browser, with the following features:
� Use of HTML5 semantic elements
� CSS3 for gradients, shadows, and so on, to save on loading images
� Font styling and sizing
� A color scheme
� Some graphic image treatments using background images
� A favicon and touch icon
Now that we can see and even get a sense of the user experience of our mockup, the next step is coding it up into a fully working WordPress theme, which is the topic of our next chapter.
www.it-ebooks.info

3Coding it Up
As we have our HTML and CSS in place, the next step is to turn it into a working WordPress theme. This involves copying our code into WordPress template files and adding some special code, which WordPress uses to display content. This is what we'll do in this chapter.
In this chapter, you'll learn how to:
� Turn your HTML files into PHP files for WordPress
� Split your PHP into a number of template files, which split the code up into manageable chunks WordPress can work with
� Use the correct template files to display different kinds of content
� Incorporate WordPress-specific PHP code, such as template tags and API hooks, into the theme's template pages to create our functional theme
When we're done with this chapter, we'll be ready to move on to adding more advanced features to our theme in the next chapter!
WordPress theme basicsTo get started, you should already have an installation of WordPress to work with. If you don't, please return to Chapter 1, Getting Started as a WordPress Theme Designer, to read up on the best solution for setting up a sandbox installation of WordPress that you can build your themes in.
www.it-ebooks.info

Coding it Up
[ 72 ]
By now you've gotten the point that a WordPress theme essentially contains the HTML and CSS that hold and style your WordPress content. WordPress themes are put together by leveraging the WordPress Template hierarchy and the theme API (Application, Programming Interface). The theme API is basically just WordPress-specific PHP code, which enables us to create and customize the loop as well as leverage various template tags and hooks in our theme.
The Template hierarchyWe've discussed the fact that a WordPress theme is comprised of many file types including template pages. Template pages have a structure or hierarchy to them. That means if one template page type is not present, then the WordPress system will call up the next available template page type.
This allows developers to create themes that are fantastically detailed and take full advantage of all of the WordPress hierarchy's available template page types. It is also possible to have a fully functioning WordPress theme that consists of nothing more than a single index.php file, but it's not necessarily good practice!
In addition to these template files, themes of course also include image files, CSS stylesheets, custom template pages, and PHP code files. Essentially, you can have many different default page templates in your WordPress theme, not including your style.css sheet or include template files. You can have way more template pages than that, if you take advantage of WordPress' capability for individual custom post, page, category, and tag templates.
An include is a template file, which is called from the main files (such as index.php)—in other words, they are included in a page using an include template tag. Examples of includes are header.php, sidebar.php, footer.php, and searchform.php. We'll work on these later in this chapter.
Your theme does need to have the appropriate WordPress PHP code placed into it in order for the content that is entered into the Administration panel to materialize on your site. To help you organize and maintain that special WordPress PHP code, it helps if your theme is broken down into some of these various template files, which make your theme easier to maintain with less confusion.
www.it-ebooks.info

Chapter 3
[ 73 ]
The following screenshot illustrates how a theme's template files contribute to the final rendered page that a user sees in the browser:
The next list contains the general template hierarchy rules. As we've mentioned, the absolute simplest theme you can have must contain an index.php page. If no other specific template pages exist, then index.php is the default.
www.it-ebooks.info

Coding it Up
[ 74 ]
You can then begin expanding your theme by adding the following files:
For static pages:
� page.php trumps index.php when looking at a static page
� home.php trumps index.php and page.php when the main blog post listing is viewed
� front-page.php trumps index.php and home.php when the front page is being viewed, whether that's a static page or the blog post listing
� A custom template page-slug or page-ID page, such as page-about.php, when selected through the page's Administration panel, trumps index.php and page.php
For individual posts and attachments:
� single.php trumps index.php when an individual post or attachment is viewed.
� single-post_type.php trumps single.php when used with a custom post type. For example, if you were using a post type of product, you would set up a template file called single-product.php for viewing individual product details. This can be useful if you want to display different metadata or have a different layout for custom post types.
� single-attachment.php trumps single.php when an attachment is viewed. In turn, attachment.php trumps single-attachment.php
� A custom MIME_type page trumps attachment.php when attachments of a given MIME_type are viewed. For example you could use image.php or video.php for displaying each of these types of attachment.
For archives which list posts or search results:
� archive.php trumps index.php when a category, tag, date, or author listing is viewed.
� search.php trumps index.php when the results from a search are viewed.
� category.php trumps archive.php when a category listing is viewed.
� taxonomy.php trumps archive.php when a taxonomy listing is viewed.
� A custom category-ID page trumps category.php. To set up a category listing page you can either use the category ID (which would give you a category-12.php filename, for example), or you can use the category's slug (which would give you an example filename of category-featured.php).
� tag.php trumps archive.php when a tag listing is viewed.
� A custom tag-tagname page, such as tag-reviews.php, trumps tag.php.
www.it-ebooks.info

Chapter 3
[ 75 ]
� author.php trumps archive.php when a list of posts by an author is viewed.
� date.php trumps archive.php when a list of posts for a given date is viewed.
And finally, when the server can't find the page or post:
� 404.php trumps everything else when the URL address finds no existing content. You can use this to display some custom content for 404 pages, such as an error message and search box.
Pages, posts, attachments, and custom post types are the different kinds of content that you create in WordPress:
A page is a static page which isn't included in listings. For example, you might have a static About page, or if your site isn't a blog, a static Home page. You can tell WordPress whether to display a static Home page or a list of posts—we'll come to that later in this chapter.
A post is a blog post or news article. Depending on the kind of site you're developing, you might use these for most of your content or you might not use them at all.
An attachment is a file you upload via the WordPress Media admin screen. WordPress uses attachment pages to display media such as images, pdf files, and videos.
A custom post type is a different kind of post from your blog or news posts. For example, if you're developing a site for a business wanting to showcase its products, you might create a products custom post type. These wouldn't show up in the blog, but would have their own listings pages. We'll look at how to set these up in Chapter 4, Advanced Theme Features.
www.it-ebooks.info

Coding it Up
[ 76 ]
Why the Template hierarchy works the way it doesIn a nutshell, WordPress does this for powerful flexibility. If your theme design is simple and straightforward enough (that is, you're sure you want all your loops, posts, and pages to look and work exactly the same), as mentioned, you can technically just dump everything into a single index.php file that contains all the code for the header, footer, sidebar, and plugin elements!
However, as your own theme developing skills progress (and as you'll see with the theme we build in this book), you'll find that breaking the theme apart into individual template files helps you take advantage of the features that WordPress has to offer, which lets you design more robust sites that can easily accommodate many different types of content, layouts, widgets, and plugins.
If all this talk of template files and hierarchies is making your head swim, don't worry! We'll start by creating a simple theme using index.php, and then move on to creating more template files as needed.
The WordPress theme APIA WordPress site uses PHP code and a MySQL database to keep content, design, and functionality completely separate from each other, enabling us to easily upgrade and enhance them.
To refresh ourselves, the WordPress system works as pictured in the following diagram, which we first saw in Chapter 1, Getting Started as a WordPress Theme Designer:
www.it-ebooks.info

Chapter 3
[ 77 ]
Each file in a WordPress theme contains template tags, which allow us to call in different aspects of our content, such as the title, the post, the author, and so on. On a traditional blog page, we will probably place template tags inside what's called the loop—this code will retrieve all the posts associated with the page's call (say, the ten most recent posts if the user is on the blog listing page, or all the posts in a specific category if a category listing is being displayed).
Below is a graphic, which demonstrates how the WordPress Loop works with template tags.
www.it-ebooks.info

Coding it Up
[ 78 ]
Setting up your WordPress workflowYour workflow will pretty much look like the following:
You'll be editing CSS and HTML in your HTML editor. After each edit, you'll hit Save, then use Alt + Tab, or the dock, or taskbar to switch over to your browser window. You'll then hit Refresh and check the results. Depending on where you are in this process, you might also have two or more browser windows or tabs open with your WordPress theme view and others, with the key WordPress Administration screens that you'll be using.
Whether you're using Dreamweaver or a robust text editor, such as Coda, TextWrangler, or HTML-Kit, all of these let you use FTP to access and update files from within the program if they're stored on a remote server. Be sure to use this built-in FTP feature. It will let you edit and save to the actual theme's template files and stylesheet, without having to stop and copy to your working directory or upload your file with a standalone FTP client.
Be sure to save regularly and make backups!
Backups are sometimes more important than just saving. They enable you to roll back to a previously stable version of your theme design, should you find yourself in a position where your HTML and CSS has stopped playing nice. Rather than continuing to mess with your code wondering where you broke it, it's sometimes much more cost effective to roll back to your last good stopping point and try again. You can set your preferences in some editors, such as HTML-Kit, to autosave backups for you in a directory of your choice. However, you know best when you're at a good "Hey, this is great!" spot. When you get to these points, get in the habit of using the Save a Copy feature to make backups. Your future-messing-self will love you for it.
www.it-ebooks.info
Chapter 3
[ 79 ]
Building your WordPress theme template filesOK! We're ready to start. Open your HTML editor program and set it up to display your FTP or local working directory in a files panel, giving you access to your WordPress installation files. Also, have a couple of browser windows open with your WordPress home page loaded into one, as well as the WordPress Administration panel available in another.
Starting with a blank slateThe approach we'll use here includes the following steps (we'll go over each step in detail):
1. Create a new, empty theme directory (but don't delete the default theme—leave that safely where it is).
2. Upload your mockup's image directory as well as your index.html and style.css mockup files to the directory.
3. Add some commented-out code to your stylesheet for WordPress to work with.
4. Rename your index.html file to index.php.
5. Add the WordPress template tag PHP code, specifically the blog_info tag and the loop, to your design so that your stylesheet styles and some WordPress content shows up.
6. Once your theme's WordPress content is loading in and your HTML and CSS still work and look correctly, then you can pull it apart into your theme's corresponding template files, such as header.php, footer.php, sidebar.php and so on.
7. Once your theme design is separated out into logical template files, you can begin finalizing any special display requirements your theme has, such as a different home page layout, internal page layouts, and extra features using template tags and API hooks, so your theme works with plugins. That will be a job for a later chapter.
The other advantage to this approach is that if any part of your theme starts to break, you can narrow it down to WordPress PHP code that wasn't copied into its own template file correctly. You'll always have your backup files to return to if anything goes wrong.
Creating a new theme directoryTo get started, we'll create a copy of the existing default theme. We'll be using a development installation of WordPress 3.4.2 on a remote server, and using TextWrangler with its inbuilt FTP capability to edit the code. If you prefer, you can work on a local installation of WordPress.
www.it-ebooks.info

Coding it Up
[ 80 ]
Time for action – setting up our theme directoryThe first step is to create a directory to contain our theme.
1. Create a new directory that has a completely unique name that best suits your project. This needs to go in the wp-content/themes/ directory. You can see the theme folders for our theme in the illustration below, which is taken from the FTP client FileZilla.
We've given the theme directory a name of opensourcemagazine_ch3, as we'll be saving a version of the theme for each chapter to capture our progress. We'll also add the chapter number to the Theme Name in the stylesheet and save it into the code packs so you can work along and see the progress of the theme as you move through the book. This also helps us see in the WordPress Theme Manager screen what theme to select to work on. You'll just name your theme whatever you'd like it to appear as in the Theme Manager screen.
2. Copy your HTML/CSS mockup files and the image directory into this new directory.
3. Rename your index.html file as index.php. Again, because WordPress template files follow the template hierarchy, that hierarchy looks first for all sorts of other template page types, but will always settle for the index.php page if none of the others exist. Leaving the page as .html, or attempting to name it anything else at this point, will result in your template not working correctly.
www.it-ebooks.info

Chapter 3
[ 81 ]
4. Open the style.css file and add the following at the very top, above any other code:
/*Theme Name: Open Source Online Magazine chapter 3Theme URI: http://rachelmccollin.co.uk/opensourcemagazineAuthor: Tessa Blakeley Silver / Rachel McCollinAuthor URI:Description: Theme to accompany WordPress 3.4 Theme Development Beginners GuideVersion: Tags: */
The details of what you add will be different for your theme—you'll need to replace our theme name, URI, author, and description with your own and add more information as relevant.
5. Save your stylesheet.
6. Now, in WordPress, go to Appearance | Themes. There, you'll be able to select and Activate the new theme you just created. (Note that our theme doesn't have a thumbnail image, which would be displayed in the Administration panel Dashboard, as we haven't created one.)
www.it-ebooks.info

Coding it Up
[ 82 ]
What just happened?We created a new theme folder and uploaded our code to it.
By making sure the properly formatted WordPress information was at the top of the stylesheet, we were able to see the new folder and files we created as a theme in the Administration panel's Theme Manager and select it.
Including WordPress contentWhen you point your browser to your WordPress installation, you should see your mockup's unstyled HTML as shown in the following screenshot:
www.it-ebooks.info

Chapter 3
[ 83 ]
The next step is to attach the stylesheet to the index.php page so that WordPress reads your styles.
To get the index.php page to read your style.css page, we need to find the call to the stylesheet in the index.php file. This will take one of the following two forms:
<link rel="stylesheet" href="[stylesheet name]">
or
<style>@import "[stylesheet name]"</style>
Time for action – getting your CSS styles to show upThe first of the two options discussed previously is better practice, and is what we're using in our stylesheet.
1. First, find the call to the stylesheet—in our theme it's as follows:
<link media="all" rel="stylesheet" type="text/css" href="style.css" />
As you can see, we've also specified a few extra parameters for our stylesheet.
2. Replace the href attribute with following WordPress template tag: bloginfo('stylesheet_url') like so:
<link media="all" rel="stylesheet" type="text/css" href="<?php bloginfo('stylesheet_url'); ?>" />
www.it-ebooks.info

Coding it Up
[ 84 ]
What just happened?Congratulations! That's your first bit of WordPress code! It's a template tag called bloginfo() that can actually be passed several parameters, as we'll discover throughout this book. You should now see your styled mockup, when you point your browser at your WordPress installation:
Understanding WordPress template tags and hooksIn the upcoming sections, we'll run into many more template tags and a few API hooks that will help our template play well with plugins. Let's go over the basics of template tags and hooks.
www.it-ebooks.info

Chapter 3
[ 85 ]
Template tagsTemplate tags are most commonly used in templates to help you retrieve, and most importantly display information from your WordPress CMS into your theme design. If you delve more deeply into WordPress development, you'll find that most template tags have a similar function in the WordPress system. The difference between the template tag and its corresponding function is that template tags have a return built in to them so they'll automatically display the WordPress content. The function will not display the content unless you specifically use a PHP echo or print command. For example, the template tag which reads:
<? php the_author_meta( 'name' );?>
would have the same result as the following function:
<? php echo get_author_meta( 'name' );?>
WordPress functions can also prove useful for when you don't want content to display right away, say for special scripts that you write in your template's function.php file, which we'll get into in the next chapter or if you start developing custom plugins to add extra functionality to WordPress.
Some template tags can also be used to include or call in other template files, as we'll see later in this chapter.
The bloginfo() template tag is a typical example of a tag that can be passed a parameter. In the previous section, we passed it the stylesheet_url parameter, to make sure we targeted our style.css page, but in other parts of our template we may wish to pass that template tag the name parameter or the version parameter. It's up to you where and how you might want to use a template tag. For a list of parameters of this tag, see http://codex.wordpress.org/Function_Reference/bloginfo.
HooksHooks are part of the plugin API and are mostly used by WordPress plugin developers to access and manipulate WordPress CMS data, then serve it up or activate at certain points in the theme, for that theme's use. Your theme does need some preparation in order to work with most plugins.
Hooks include action hooks, which are used for adding content or functions, and filter hooks, which are used to manipulate the way data is output. You don't need to worry about the difference between these for now.
www.it-ebooks.info

Coding it Up
[ 86 ]
The most important hook we'll work with is the wp_head() hook. This allows plugins to activate and write information in your WordPress theme's header files, such as CSS links to any special CSS the plugin might need or JavaScript files the plugin might use to enhance your site. We'll take a look at a few other hooks later in this book that will enhance our theme and make sure it's plugin-ready.
Looping it! – The WordPress LoopAfter the bloginfo template tag, the next (and probably the most important) bit of WordPress code to add to our theme is the Loop. The Loop is an essential part of your WordPress theme. It displays your posts in chronological order and lets you define custom display properties with various WordPress template tags and queries wrapped in your HTML markup.
The Loop in a nutshell – how it worksThe following illustration shows how the Loop is constructed, and how it pulls in posts from the WordPress database to construct the post content of a site:
www.it-ebooks.info

Chapter 3
[ 87 ]
Really get to know the Loop
The Loop is one of those core pieces of WordPress PHP code you should brush up on. Understanding how the Loop works in WordPress is incredibly helpful in letting you achieve any special requirements or effects of a custom professional template. To find out more about The Loop, its uses in the main index file and other template files, and how to customize it, check out the following links on the WordPress codex:
http://codex.wordpress.org/The_Loop_in_Action
http://codex.wordpress.org/The_Loop
Time for action – creating a basic LoopWe'll start by placing the following loop code into the widest column under the This Month header, overwriting the sample content. This code is the Loop at its most basic. As we'll see, it will need some tweaking later on to be in line with our theme design.
1. Find the code for the first sample article in the mockup:
<article class="post"> <h2><a href="#">Really Long Article Title Name The More Text The Better Cause You Never Know</a></h2> <p class="entry-meta">by Author Name for <a href="#">Column Type</a></p> <div class="entry-content"><!--//post--> <p>Lorem ipsum dolor sit amet, consectetuer adipiscing elit. Sed a eros nec orci volutpat vestibulum. Ut pellentesque sagittis metus. In euismod tellus id ante.</p> <blockquote class="left margin-right third bg-dark2 img- quote-dark bdr rnd rnd-right shdw-centered">Lorem ipsum dolor sit amet, consectetuer adipiscing elit.</blockquote> <p>Lorem ipsum dolor sit amet, consectetuer adipiscing elit. Sed a eros nec orci volutpat vestibulum. Ut pellentesque sagittis metus. In euismod tellus id ante.</p> </div><!--//.entry-content--> <p class="left"><a class="more" href="#">Read more »</a></p> <p class="right"><a class="comments-count" href="#">150</a></p> <div class="push"></div></article>
In our mockup, this code appears more than once; so, we start by deleting all but the first example of it.
www.it-ebooks.info

Coding it Up
[ 88 ]
2. Now, working with the code you've left in and above the opening <article> tag, add the code to start the Loop:
<?php if (have_posts()) :?> <?php while (have_posts()) : the_post();?>
Next, add the code to display the title of the post in place of our old static heading:
<h2 class=""><a href="<?php the_permalink() ?>" rel="bookmark" title="Permanent Link to <?php the_title_attribute(); ?>"><?php the_title();?></a></h2>
3. Add the code which will display the content for the article. This goes inside <div class="entry-content">, and replaces any static text (paragraphs and blockquotes) we had in there before:
<?php the_content();?>
4. Under the content, where we have a Read more link, replace the existing code with:
<p class="left"><a class="more" href="<?php the_permalink() ?>">Read more »</a></p>
5. The Loop won't work unless you close it, so below your closing </article> tag, add the following:
<?php endwhile; ?><?php else : ?> <h2 class="center">Not Found</h2> <p class="center">Sorry, but you are looking for something that isn't here.</p> <?php get_search_form(); ?><?php endif; ?>
6. Now save your index.php file, open your site in your browser and refresh the screen.
What just happened?You've just completed a major step towards developing your WordPress theme, namely allowing WordPress to display posts on a page. Well done! Let's work through the code:
<?php if (have_posts()) :?> <?php while (have_posts()) : the_post();?> <article class="post"> <h2>a href="<?php the_permalink() ?>" rel="bookmark" title="Permanent Link to <?php the_title_attribute(); ?>"><?php the_title();?></a></h2>
www.it-ebooks.info

Chapter 3
[ 89 ]
<p class="entry-meta">by Author Name for <a href="#">Column Type</a></p> <div class="entry-content"><!--//post--> <?php the_content();?> </div><!--//.entry-content--> <p class="left"><a class="more" href="<?php the_permalink() ?>">Read more »</a></p> <p class="right"><a class="comments-count" href="#">150</a></p> <div class="push"></div> </article><?php endwhile; ?><?php else : ?> <h2 class="center">Not Found</h2> <p class="center">Sorry, but you are looking for something that isn't here.</p> <?php get_search_form(); ?><?php endif; ?>
� The first two lines open the Loop by checking if there are posts to display, and then if that is the case, start to work with the first post.
� The code we added to the <h2> tag displays the post title using <?php the_title();?> and creates a link using the tag <?php the_permalink() ?>. This means that when users click on the title, they'll be taken to a page displaying that post on its own—the permalink is the url for that post.
� Inside our entry-content div, we used <?php the_content;?> to display the content of the post.
� Our Read more link uses <?php the_permalink() ?> to link to the full post.
� We stopped displaying posts with the code <?php endwhile; ?>.
� Before ending the Loop completely, we added some text to display if no posts were found, along with a search form, called using the tag get_search_form.
� Finally, we closed the Loop with <?php endif; ?>.
You must include the code to close the Loop, or it won't display anything. The Loop has to have the following lines in the appropriate places to work:
<?php if (have_posts()) :?>
<?php while (have_posts()) : the_post();?>
<?php endwhile; ?>
<?php endif; ?>
www.it-ebooks.info

Coding it Up
[ 90 ]
Time for action – adding contentWe've added the code for the Loop to display content in our site, but it doesn't actually have any content to display yet!
1. In the WordPress admin, clik on Add New in the Posts menu.
2. Copy in the text from the first post in our original HTML file.
3. Click on Publish to save your post.
4. Repeat steps 1-3 for the other posts in our mockup.
What just happened?We added some content to display on the front page of our site. So, does WordPress display our posts when we refresh the screen? You bet it does!
www.it-ebooks.info

Chapter 3
[ 91 ]
Time for action – adding metadata, the timestamp, and author template tags
In our mockup, we have included some metadata—information about each post being displayed. Specifically, we've included the author's name and the column the article is featured in. In WordPress, what a magazine editor might call a column is referred to as a category. To add these, we do the following:
Inside the Loop below the <h2> tag, add the following in place of the existing <p> tag and its contents:
<p class="entry-meta">by <?php the_author_meta('first_name'); ?> <?php the_author_meta('last_name'); ?> in <?php the_category(", ") ?></p>
Save index.php and refresh your browser.
What just happened?We added two template tags to display metadata about the post:
� <?php the_author_meta('first_name'); ?> displays the author's first name and, unsurprisingly, <?php the_author_meta('last_name'); ?> displays the author's last name
� <?php the_category(", ") ?> displays a list of categories assigned to the post, with a comma in between each listing
www.it-ebooks.info
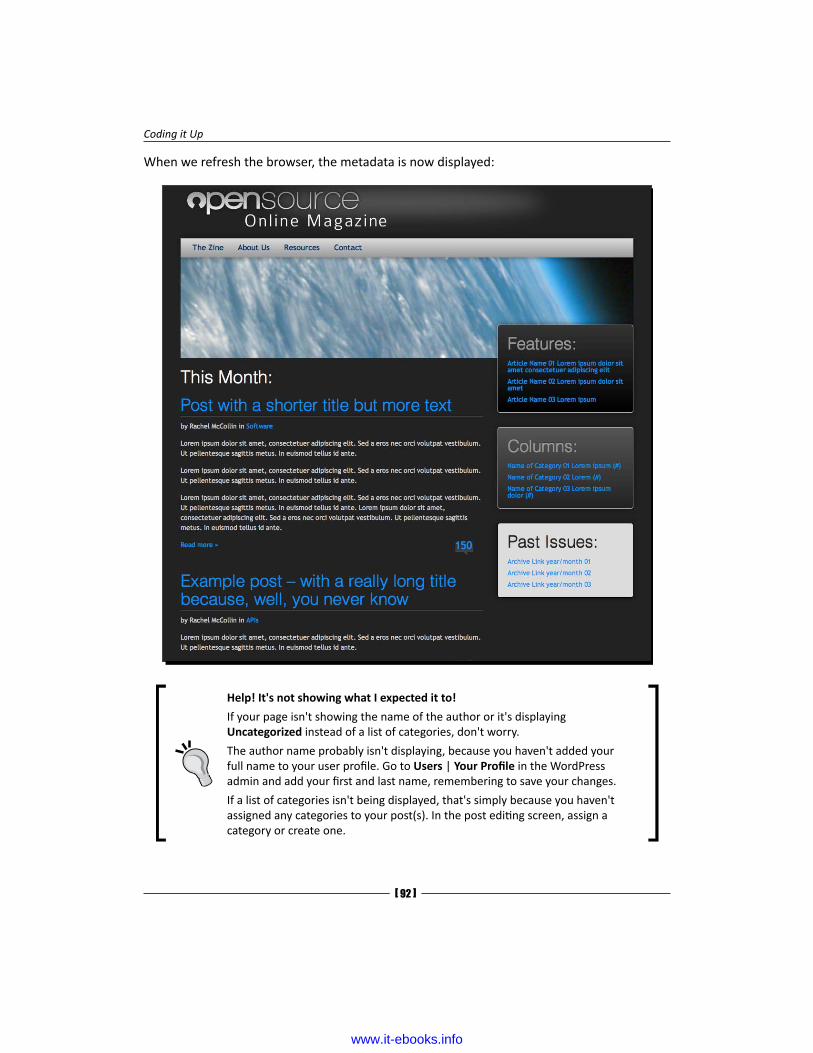
Coding it Up
[ 92 ]
When we refresh the browser, the metadata is now displayed:
Help! It's not showing what I expected it to!
If your page isn't showing the name of the author or it's displaying Uncategorized instead of a list of categories, don't worry.
The author name probably isn't displaying, because you haven't added your full name to your user profile. Go to Users | Your Profile in the WordPress admin and add your first and last name, remembering to save your changes.
If a list of categories isn't being displayed, that's simply because you haven't assigned any categories to your post(s). In the post editing screen, assign a category or create one.
www.it-ebooks.info

Chapter 3
[ 93 ]
Keeping up-to-date with WordPress In older versions of WordPress you could use the_author_firstname and the_author_lastname template tags. While those tags still work in version 3.4.2, they have been deprecated and the the_author_meta template tag has been introduced.
This meta tag offers more flexibility than the previous template tags, by allowing the theme to take advantage of all the user registration information with a single tag, as well as any additional information a custom plugin may add to the user registration database table. For a list of parameters you can send to this template tag, see https://codex.wordpress.org/Function_Reference/the_author_meta.
Adding to the LoopBecause this is the web and not a paper magazine, there are WordPress features we should take advantage of. We want to take advantage of having people's comments and ideas on the article to help keep it fresh. So, we'll show how many comments have been added to the post.
For now, we'll just display the number of comments for the post instead of displaying all of those comments. In the next chapter, we'll edit the single.php file to display comments when a user is viewing the individual post. For the time being, we'll show how many comments there are and include a link, so that if the user clicks on the number of comments, he or she is taken to the post's individual page.
Time for action – displaying the number of commentsSo let's do it!
1. Find the code that reads:
<p class="right"><a class="comments-count" href="#">850</a></p>
2. Replace it with:
<p class='right'><a class='comments-count' href='<?php the_permalink() ?>'><?php comments_number('0', '1', '%') ?></a></p>
3. Save index.php and refresh your browser.
What just happened?We added the comments_number tag to display a count of the comments for each post, and used <?php the_permalink(); ?> to add a link to the individual post, when the user clicks on the number of comments.
www.it-ebooks.info

Coding it Up
[ 94 ]
The result now looks like this:
Even though we had most of these text elements handled in our mockup, we're now seeing what's available via the WordPress template tags. Using these tags means, we can pull in content automatically from the database, making full use of WordPress' CMS capabilities.
www.it-ebooks.info

Chapter 3
[ 95 ]
Beyond the Loop: WP_Query and template tags
Once you get to rummaging around in your loop (or loops, if you create custom ones for other template pages), you'll quickly see that the default theme's template tags are a bit limiting. There are thousands of custom template tags you can call and reference within the Loop (and outside of it) to display the WordPress content. In Chapter 4, Advanced Theme Features, we'll customize our theme with advanced features using the WP Query function. Chapter 6, Your Theme in Action, will have a template tag and WP_Query reference and you can also check out the following links to find out what template tags are available:
http://codex.wordpress.org/Template_Tags
http://codex.wordpress.org/Function_Reference/WP_Query
The final touch to our loop is to add some automatically generated classes, which will help us if we want to use different styling for different areas of the site at a later stage. This also applies to parts of the page outside the Loop.
Time for action – adding in autogenerated classesTo add in some WordPress classes, make the following changes to index.php:
1. Edit the <body> tag to remove any existing classes, and add a new template tag so it reads:
<body <?php body_class($class); ?>>
2. Edit the <article> tag in your Loop, again removing any existing classes, so it reads:
<article <?php post_class(); ?> id="post-<?php the_ID(); ?>">
3. Still in the Loop, find the <h2> tag that displays the post title and add class="post-title" to it so it reads:
<h2 class="post-title"><a href="<?php the_permalink(); ?>" rel="bookmark" title="Permanent Link to <?php the_title_attribute(); ?>"><?php the_title(); ?></a></h2>
4. Finally, save your file and make any adjustments to your CSS; you might have to to apply it to the new classes instead of any old ones you were using. For example, if you've used a class for styling your <body> tag, you may need to apply that styling to the <body> tag itself, or to body.home if it just applies to the home page. As we'll see in a moment, WordPress now automatically adds a class of home to the home page's <body> tag.
www.it-ebooks.info

Coding it Up
[ 96 ]
What just happened?We added some functions to automatically give our content classes based on what the content is and where it's being displayed.
� <?php body_class($class); ?> will give the <body> tag of each page a set of classes according to what kind of content is being viewed. For example:
� home when the home page is being displayed
� blog when the main blog listing is being displayed (which may or may not be the home page)
� single-post when a single post is being displayed
� category-slug when a category listing for the category with a given slug is being displayed.
There are many more classes WordPress will automatically append using this function. For a full list, see http://codex.wordpress.org/Function_Reference/body_class.
� We also used <?php post_class(); ?> to append the post class to our <article> tag plus an id of the post ID. This lets us style each type of post differently if we want to, as well as styling individual posts using the ID. Depending on how the post is being viewed, classes it might add include:
� post when a post is being displayed
� attachment when an attachment is being displayed
� category-ID and category-name mean we can style posts from different categories differently – useful in a site where you want to color-code different categories, for example.
� sticky for posts which have been designated as "sticky", sticking to the front page of the blog or the top of the blog listing
There are more classes which WordPress will append here. For a full list see http://codex.wordpress.org/Function_Reference/post_class.
� Finally, we added class="post-title" to each post title listing. This will help us to style the post titles in a specific way should we want to override or add to the styling for the <h2> tag.
www.it-ebooks.info

Chapter 3
[ 97 ]
One last look – our full loopWe now have come up with a main loop that looks something like the following:
<?php if (have_posts()) :?> <?php while (have_posts()) : the_post();?>
<article <?php post_class(); ?> id="post-<?php the_ID(); ?>"> <h2 class="post-title"><a href="<?php the_permalink(); ?>" rel="bookmark" title="Permanent Link to <?php the_title_attribute(); ?>"><?php the_title();?></a></h2> <p class="entry-meta">by <?php the_author_meta('first_name'); ?> <?php the_author_meta('last_name'); ?> in <?php the_category(", "); ?></p>
<div class="entry-content"><!--//post--> <?php the_content();?> </div><!--//.entry-content-->
<p class="left"><a class="more" href="<?php the_permalink(); ?>">Read more »</a></p> <p class="right"><a class="comments-count" href="<?php the_permalink(); ?>"><?php comments_number("0", "1", '%'); ?></a></p> <div class="push"></div> </article><?php endwhile; ?><?php else : ?> <h2 class="center">Not Found</h2> <p class="center">Sorry, but you are looking for something that isn't here.</p> <?php get_search_form(); ?><?php endif; ?>
By now, you can see that by leveraging WordPress' template tags and functions, we can easily move on to including other WordPress content and features into our HTML mockup, making it a fully functional and dynamic theme. We'll move on to doing more of that in Chapter 4, Advanced Theme Features, but first we have to break our index.php file into its component parts.
www.it-ebooks.info

Coding it Up
[ 98 ]
Breaking the code up into template filesNow that we've got the Loop working in our theme, it's time to start breaking the theme down into template files, which will help us make sure edits flow consistently across all of the various aspects of the theme.
A good rule of thumb for separating markup and code into its own template file is:
� First and foremost, avoid duplicate markup and code
� Secondly, you'll be able to create template files to address any unique markup and code that should only appear in special circumstances, like on a home page, but nowhere else
The most common template files we'll look at first are the header.php, footer.php, and sidebar.php template files. Each of these template files will be used in various types of pages on the site.
The header should be the same for a post or an archive as for a static page. The footer should remain consistent across all types of content on the site. If we update or change the header or footer, we'll want that change to appear everywhere it's used and not have to edit two or three different template files. The same goes for the sidebar—we may want it on several types of pages, or not. This is easy to manage if it's contained in its own file, and included where needed into other template files which control different content types.
Including everyoneThese three template files (mentioned in the previous section) are so common that they have their own include template tags in WordPress, namely get_header, get_sidebar, get_footer. The tags are used like so in your template file:
� <?php get_header(); ?>—to call the header.php file
� <?php get_sidebar(); ?>—to call the sidebar.php file
� <?php get_footer (); ?>—to call (yes, you've guessed it) the footer.php file
Let's start by creating the header.php file and adding the tag to include that in our index.php file.
Creating a header fileThe header is more than just the beginning of the HTML5 file and the specific <head> tag. It includes the opening <body> tag and everything that is in the header of the theme's design—what is often referred to as the banner.
www.it-ebooks.info

Chapter 3
[ 99 ]
Time for action – creating the header.php fileTo start, we create header.php as follows:
1. Create a file called header.php in your theme directory.
2. Open up your index.php file and cut everything from DOCTYPE at the very top of the file down to the end of the <header> tag or the main <nav> tag, depending on the structure of your markup. For our theme, the code we need to cut is as follows:
<html lang="en" class='no-js'><head><meta http-equiv="Content-Type" content="text/html; charset=utf-8">
<!--for mobile ready--> <meta name="viewport" content="width=device-width, initial- scale=1.0, user-scalable=0, minimum-scale=1.0, maximum- scale=1.0"><meta name="apple-mobile-web-app-capable" content="yes"><meta name="apple-mobile-web-app-status-bar-style" content="black">
<link rel="apple-touch-icon" sizes="57x57" href="images/pngs/apple-touch-icon-57x57.png"/><link rel="apple-touch-icon" sizes="72x72" href="images/pngs/apple-touch-icon-72x72.png"/><link rel="apple-touch-icon" sizes="114x114" href="images/pngs/apple-touch-icon-114x114.png"/>
<meta name="description" content="Description of content that contains top keyword phrases"></meta><meta name="keywords" content="Key words and phrases, comma separated, not directly used in content - Google ignores this tag but used in other engines as a fall back"></meta>
<title>Open Source Online Magazine</title>
<!--//style sheets--><link media="all" rel="stylesheet" type="text/css" href="<?php bloginfo('stylesheet_url'); ?>" />
<!--//javascripts--><script src="js/modernizr.custom.20796.js"></script>
www.it-ebooks.info

Coding it Up
[ 100 ]
<!--[if lt IE 9]> <script src="http://html5shim.googlecode.com/svn/trunk/html5.js"></script> <link media="all" rel="stylesheet" type="text/css" href="css/style-ie.css" /><![endif]-->
</head><body <?php body_class($class); ?>><div id="container"><header class=""><hgroup class="screen-reader-text"> <h1>OpenSource</h1> <h2>Online Magazine</h2>
<p><em>Using Open Source for work and play</em></p> </hgroup></header>
<nav id="mainNav" class="grd-vt-tertiary shdw-centered"> <h2 class="screen-reader-text">Main Navigation:</h2> <ul class="sfTab"> <li class="current_page_item"><a href="#">The Zine</a></li> <li><a href="#">About Us</a></li> <li><a href="#">Resources</a></li> <li><a href="#">Contact</a></li></ul></nav><!--//top_navlist-->
3. Paste that into your header.php file, and in your index.php file include the header back in with the get_header include template tag at the very beginning of the file:
<?php get_header(); ?>
4. Save both the header.php and index.php files and refresh your browser. Your page should look exactly the same.
What just happened?We cut the <head> section of the index.php file as well as the header of our site design, and pasted that into a new header.php file.
We then added an include to make sure that index.php still displays the content of header.php: <?php get_header(); ?>.
www.it-ebooks.info
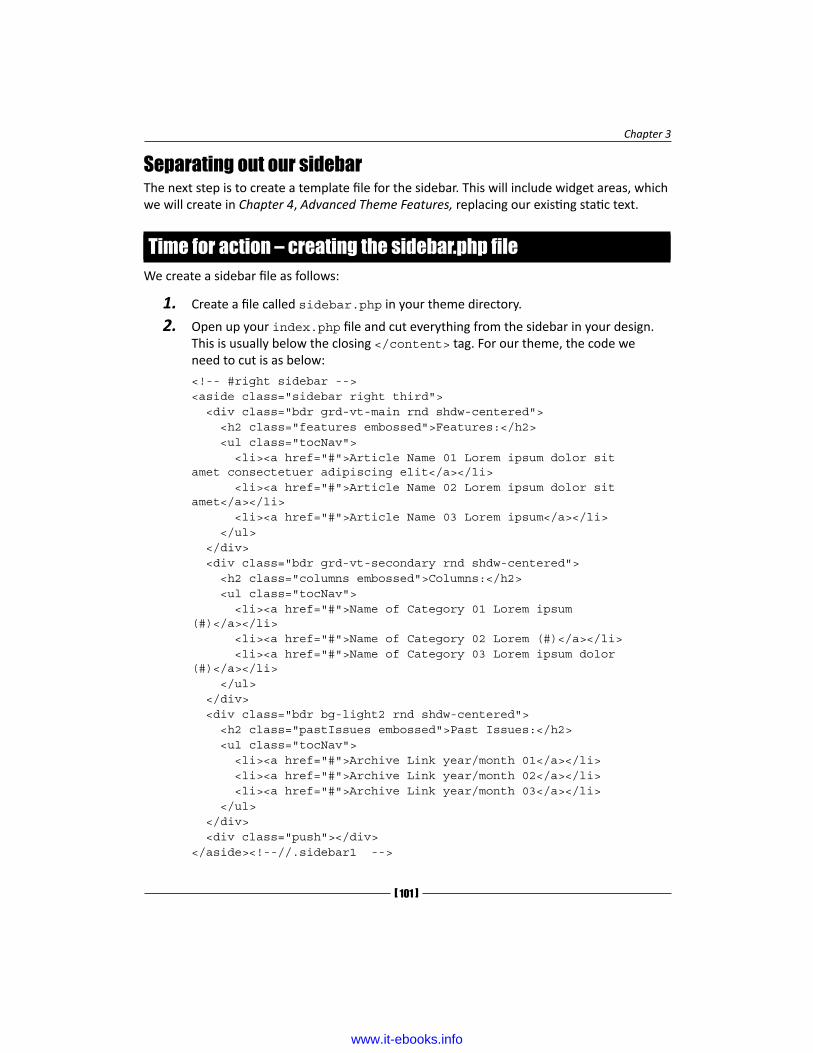
Chapter 3
[ 101 ]
Separating out our sidebarThe next step is to create a template file for the sidebar. This will include widget areas, which we will create in Chapter 4, Advanced Theme Features, replacing our existing static text.
Time for action – creating the sidebar.php fileWe create a sidebar file as follows:
1. Create a file called sidebar.php in your theme directory.
2. Open up your index.php file and cut everything from the sidebar in your design. This is usually below the closing </content> tag. For our theme, the code we need to cut is as below:
<!-- #right sidebar --><aside class="sidebar right third"> <div class="bdr grd-vt-main rnd shdw-centered"> <h2 class="features embossed">Features:</h2> <ul class="tocNav"> <li><a href="#">Article Name 01 Lorem ipsum dolor sit amet consectetuer adipiscing elit</a></li> <li><a href="#">Article Name 02 Lorem ipsum dolor sit amet</a></li> <li><a href="#">Article Name 03 Lorem ipsum</a></li> </ul> </div> <div class="bdr grd-vt-secondary rnd shdw-centered"> <h2 class="columns embossed">Columns:</h2> <ul class="tocNav"> <li><a href="#">Name of Category 01 Lorem ipsum (#)</a></li> <li><a href="#">Name of Category 02 Lorem (#)</a></li> <li><a href="#">Name of Category 03 Lorem ipsum dolor (#)</a></li> </ul> </div> <div class="bdr bg-light2 rnd shdw-centered"> <h2 class="pastIssues embossed">Past Issues:</h2> <ul class="tocNav"> <li><a href="#">Archive Link year/month 01</a></li> <li><a href="#">Archive Link year/month 02</a></li> <li><a href="#">Archive Link year/month 03</a></li> </ul> </div> <div class="push"></div></aside><!--//.sidebar1 -->
www.it-ebooks.info

Coding it Up
[ 102 ]
The previous code doesn't include any widget areas and still consists of static markup—don't worry, we'll change all this in Chapter 4, Advanced Theme Features, and make our sidebars much more jazzy.
3. Paste that into your sidebar.php file, and in your index.php file, include the sidebar back in with the get_sidebar include template tag at the very beginning of the file:
<?php get_sidebar(); ?>
4. Save both the sidebar.php and index.php files and refresh your browser. Again, your page won't have changed.
Warning!
The code you paste into your sidebar.php file should contain only the code required to display the sidebar and nothing else. Don't copy any additional code between the closing </aside> tag and the opening <footer> tag, as the template files don't have a sidebar and so they don't include the sidebar.php file.
What just happened?We created a sidebar.php template file to hold the code for our sidebar, moved the code for the sidebar into it, and then included it in index.php with the get_sidebar include template tag.
We'll finish off by repeating this process for our footer.
Finishing off with the footerThe final element of our theme, which we need to give its own file, is the footer. Footers these days are often much more than just a copyright notice and designer credit. Lots of sites make use of fat footers, which display much more information and list content from elsewhere in the site. You may have noticed that our design for Open Source Magazine includes one of these fat footers.
To create our fat footer, we'll add widget areas to our footer as well as our sidebar, but not just yet. First we need to create our footer.php file—we'll move on to adding the widgets in Chapter 4, Advanced Theme Features.
www.it-ebooks.info
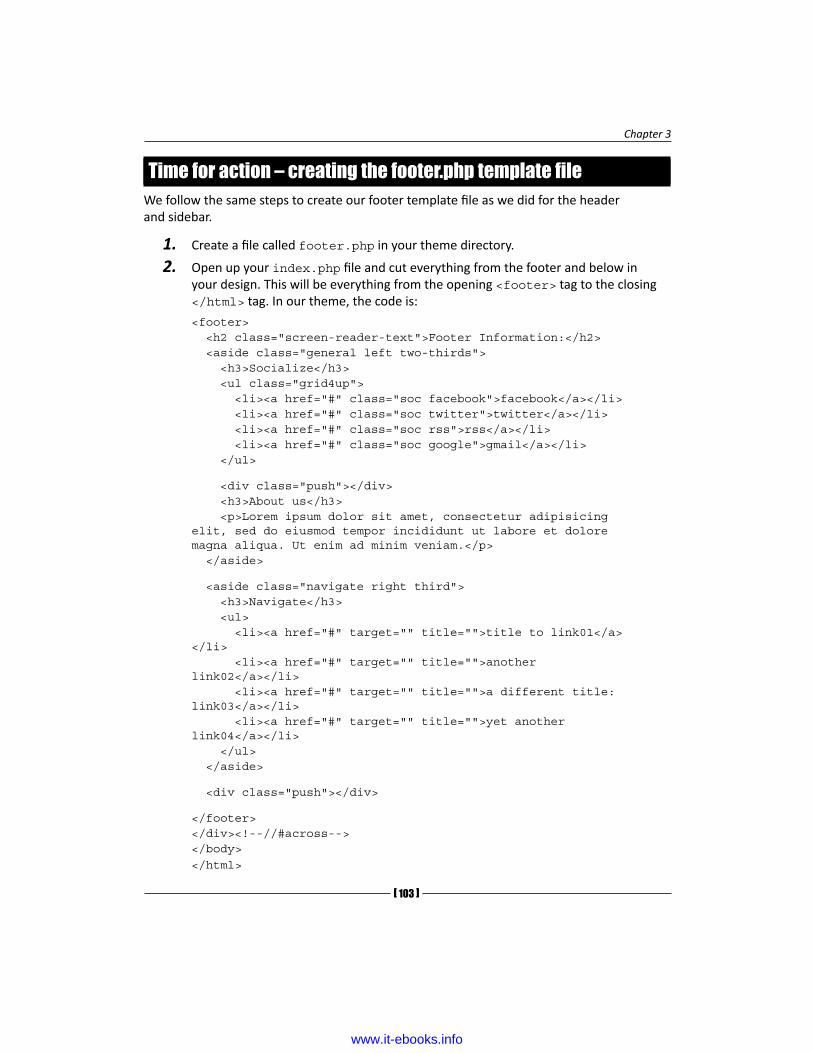
Chapter 3
[ 103 ]
Time for action – creating the footer.php template fileWe follow the same steps to create our footer template file as we did for the header and sidebar.
1. Create a file called footer.php in your theme directory.
2. Open up your index.php file and cut everything from the footer and below in your design. This will be everything from the opening <footer> tag to the closing </html> tag. In our theme, the code is:
<footer> <h2 class="screen-reader-text">Footer Information:</h2> <aside class="general left two-thirds"> <h3>Socialize</h3> <ul class="grid4up"> <li><a href="#" class="soc facebook">facebook</a></li> <li><a href="#" class="soc twitter">twitter</a></li> <li><a href="#" class="soc rss">rss</a></li> <li><a href="#" class="soc google">gmail</a></li> </ul>
<div class="push"></div> <h3>About us</h3> <p>Lorem ipsum dolor sit amet, consectetur adipisicing elit, sed do eiusmod tempor incididunt ut labore et dolore magna aliqua. Ut enim ad minim veniam.</p> </aside>
<aside class="navigate right third"> <h3>Navigate</h3> <ul> <li><a href="#" target="" title="">title to link01</a> </li> <li><a href="#" target="" title="">another link02</a></li> <li><a href="#" target="" title="">a different title: link03</a></li> <li><a href="#" target="" title="">yet another link04</a></li> </ul> </aside>
<div class="push"></div>
</footer></div><!--//#across--></body></html>
www.it-ebooks.info
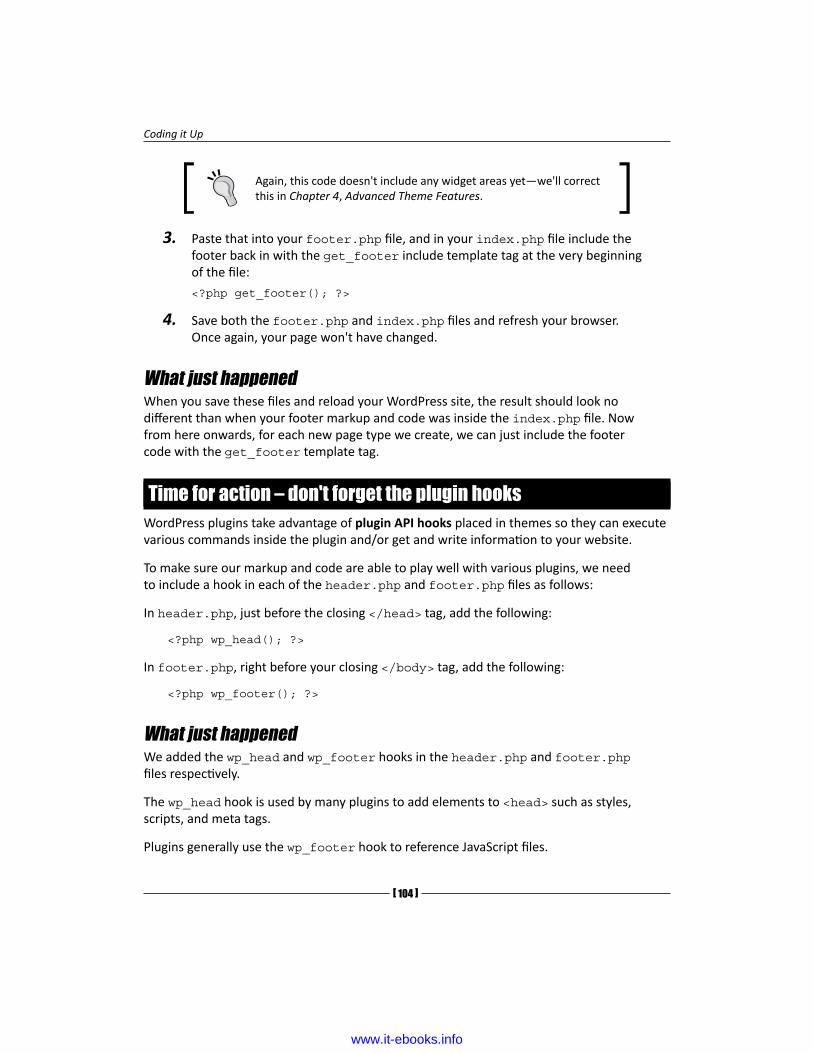
Coding it Up
[ 104 ]
Again, this code doesn't include any widget areas yet—we'll correct this in Chapter 4, Advanced Theme Features.
3. Paste that into your footer.php file, and in your index.php file include the footer back in with the get_footer include template tag at the very beginning of the file:
<?php get_footer(); ?>
4. Save both the footer.php and index.php files and refresh your browser. Once again, your page won't have changed.
What just happenedWhen you save these files and reload your WordPress site, the result should look no different than when your footer markup and code was inside the index.php file. Now from here onwards, for each new page type we create, we can just include the footer code with the get_footer template tag.
Time for action – don't forget the plugin hooksWordPress plugins take advantage of plugin API hooks placed in themes so they can execute various commands inside the plugin and/or get and write information to your website.
To make sure our markup and code are able to play well with various plugins, we need to include a hook in each of the header.php and footer.php files as follows:
In header.php, just before the closing </head> tag, add the following:
<?php wp_head(); ?>
In footer.php, right before your closing </body> tag, add the following:
<?php wp_footer(); ?>
What just happenedWe added the wp_head and wp_footer hooks in the header.php and footer.php files respectively.
The wp_head hook is used by many plugins to add elements to <head> such as styles, scripts, and meta tags.
Plugins generally use the wp_footer hook to reference JavaScript files.
www.it-ebooks.info

Chapter 3
[ 105 ]
Creating a template file for static pagesAs we've mentioned, WordPress makes use of a variety of content types including pages, posts, and attachments. You can create specific template files to display each of these.
The most commonly used template file in addition to index.php is probably page.php, which is used to display static pages. This is because you'll often find that a static page doesn't need to display all of the information shown in a single post or archive listing, such as metadata or comments.
Let's have a look at how one of our static pages looks right now, using index.php:
Currently, it's displaying the text This Month: plus a comment count, a Read more link, and the author metadata. We want to remove those.
So the final step we'll take in this chapter is to create a page.php file based on our index.php file, which WordPress will use to display all static pages correctly.
www.it-ebooks.info
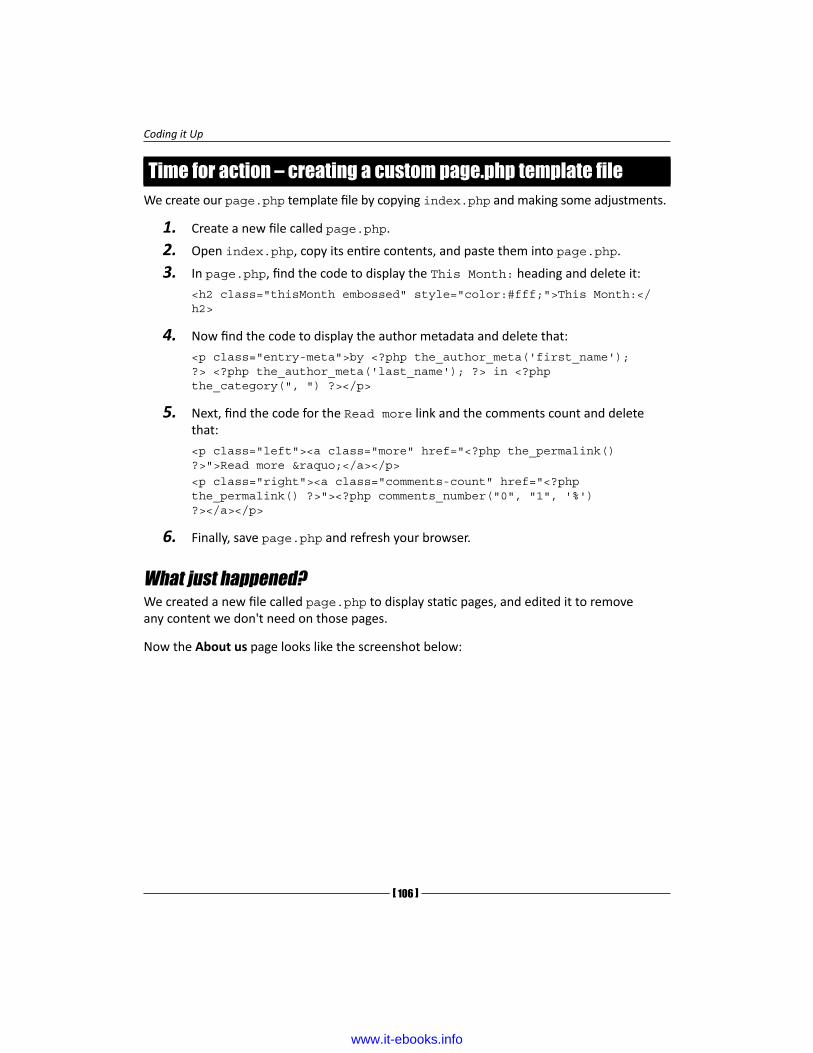
Coding it Up
[ 106 ]
Time for action – creating a custom page.php template fileWe create our page.php template file by copying index.php and making some adjustments.
1. Create a new file called page.php.
2. Open index.php, copy its entire contents, and paste them into page.php.
3. In page.php, find the code to display the This Month: heading and delete it:
<h2 class="thisMonth embossed" style="color:#fff;">This Month:</h2>
4. Now find the code to display the author metadata and delete that:
<p class="entry-meta">by <?php the_author_meta('first_name'); ?> <?php the_author_meta('last_name'); ?> in <?php the_category(", ") ?></p>
5. Next, find the code for the Read more link and the comments count and delete that:
<p class="left"><a class="more" href="<?php the_permalink() ?>">Read more »</a></p><p class="right"><a class="comments-count" href="<?php the_permalink() ?>"><?php comments_number("0", "1", '%') ?></a></p>
6. Finally, save page.php and refresh your browser.
What just happened?We created a new file called page.php to display static pages, and edited it to remove any content we don't need on those pages.
Now the About us page looks like the screenshot below:
www.it-ebooks.info

Chapter 3
[ 107 ]
Much better—the metadata has gone, as well as the Read more link, the comments count, and the confusing heading.
In Chapter 4, Advanced Theme Features, we'll look at doing more with page templates, for example, creating a template that doesn't display a sidebar.
www.it-ebooks.info

Coding it Up
[ 108 ]
Pop Quiz – questions about WordPress theme structureQ1. According to the WordPress hierarchy, which of the following is true and which is false?
1. page.php trumps index.php when viewing a static page
2. archive.php trumps category.php when viewing a category archive
3. single.php trumps index.php when viewing a static page
Q2. What does the header.php file contain?
1. The <head> tag and its contents
2. The <header> tag and its contents, taken from the theme design
3. Everything from the opening DOCTYPE to the end of the <header> tag
Q3. Which files normally include widgets?
1. footer.php
2. sidebar.php
3. header.php
SummaryWe've now got a working theme for Open Source Online Magazine. Great Job!
It's probably clear that you can take advantage of all sorts of custom WordPress template hierarchy pages and template tags to endlessly continue to tweak your theme, in order to display custom information and layouts for all types of different scenarios.
How much customization your theme requires depends entirely on what you want to use it for. If you know exactly how it's going to be used and you'll be the administrator controlling it, you can save time by covering the most obvious page displays the site will need to get it rolling, and occasionally create new template files should the need arise. If you intend to release the theme to the public, the more customized page views you cover, the better. You never know how someone will want to apply your theme to their site.
You've now learnt how to set up your development environment and an HTML editor for a smooth workflow. You also have a theme design that uses semantic, SEO-friendly HTML5 and CSS3 with fallbacks for IE7 and 8, which has been broken down into WordPress template pages for flexibility in your layouts. Believe it or not, we're not quite done!
In the next chapter, we'll continue working with our new theme and add additional features to it, such as widget areas and an improved menu, as well as learning ways to allow users to tweak the theme without delving into code. Let's get started!
www.it-ebooks.info
4Advanced Theme Features
So, you now have a working WordPress theme, but your job isn't done yet. For the theme to support a fully functioning site, it'll need a few more things added to it.
In this chapter you'll learn how to add more to your theme so you (or anyone else who downloads the theme) can use it to set up a great website. We'll look at using site settings to give our site a name and description, configuring the Reading settings and permalinks, adding featured images, and setting up widget areas.
So let's get started!
www.it-ebooks.info

Advanced Theme Features
[ 110 ]
Site settingsNow that you have your theme installed and powering the Open Source Magazine site, you need to make a few changes to the theme settings. You access these via Settings | General.
Time for action – configuring your site settingsOnce you are in the Settings screen, make the following changes:
1. Site Title: Change this to Open Source Magazine.
2. Tagline: Change this to Using Open Source for work and play.
3. TimeZone: Change this to the city nearest to you or to your readership, to ensure that any time metadata for your posts works correctly.
4. Click on the Save Changes button.
www.it-ebooks.info

Chapter 4
[ 111 ]
What just happened?You edited your site's settings so it now has the correct title and description, and the time settings are correct for you or your readership. At the moment this won't make any difference to your site as the theme isn't displaying the site title or the tagline (sometimes known as the description). Let's fix that.
Time for action – adding the site title and description to your theme
To add the site title and description, do the following:
1. Open the header.php file that you created in the previous chapter.
2. Find the following code:
<hgroup class="screen-reader-text"> <h1>OpenSource</h1> <h2>Online Magazine</h2> <p><em>Using Open Source for work and play</em></p></hgroup>
3. Replace it with the following:
<hgroup class="screen-reader-text"> <h1 id="site-title"> <a href="<?php bloginfo('url'); ?>" title="<?php bloginfo('name'); ?>"><?php bloginfo('name'); ?></a> </h1> <h2 id="site-description"><?php bloginfo( 'description' ); ?></h2></hgroup>
4. Save your file.
What just happened?We added some PHP code to tell WordPress to insert our site's title and description in place of the static code that was there before. Let's have a closer look at the code:
� First we have an <h1> element with a #site-title ID. This ID will help us to style the title if we need to.
� Inside the <h1> tag is a link with the href attribute of <?php bloginfo( 'url' ); ?> which WordPress uses to fetch the site's URL. This link also has a title attribute of <?php bloginfo('name'); ?>, which is the site title.
www.it-ebooks.info

Advanced Theme Features
[ 112 ]
� Inside the link is the site title itself, displayed using <?php bloginfo('name'); ?>.
� After the <h1> element is an <h2> element displaying the site description (or tagline), using <?php bloginfo( 'description' ); ?>. This element has an ID of #site-description so we can target it for styling if we need to.
These changes won't make any difference to our site as it's displayed in the browser, because the contents of the <hgroup> element are hidden offscreen. But it does change the underlying code. Let's have a look at what WordPress generates as the source code in our header now:
<hgroup class="screen-reader-text"> <h1 id="site-title"> <a href="http://rachelmccollin.co.uk/opensourcemagazine" title="Open Source Magazine">Open Source Magazine</a></h1> <h2 id="site-description">Using Open Source for work and play</h2></hgroup>
As you can see, it's using the bloginfo tag to provide browsers (and users, if you set your CSS up that way) with information on the site. Having added this code to your header.php file, if we need to change the site title or description in future we just do this in the Settings screen and don't need to touch the code. And if you or anyone else uses your theme for another site, this will work out of the box.
For more on the bloginfo tag and ways you can use it in your themes, see http://codex.wordpress.org/Function_Reference/bloginfo.
Pretty permalinksThe next thing to configure is our permalinks. Permalinks are the unique URLs that a browser uses to display a given page in our site. At the moment our site uses the default style of permalinks, which means they look something like this:
http://rachelmccollin.co.uk/opensourcemagazine/?p=7
That ?p=7 at the end of the URL isn't very helpful for two main reasons:
� User-friendliness: The URL tells users nothing about the content of the page or post being viewed and isn't very easy to remember.
� SEO: Search engines use URLs for information when indexing sites. That URL won't help search engines to determine what the page is about.
Luckily, WordPress makes it easy to improve our permalinks.
www.it-ebooks.info

Chapter 4
[ 113 ]
Time for action – setting up pretty permalinksSetting up permalinks is simple and you do it in the WordPress admin.
1. Go to Settings | Permalinks to view the screen shown in the following screenshot:
www.it-ebooks.info
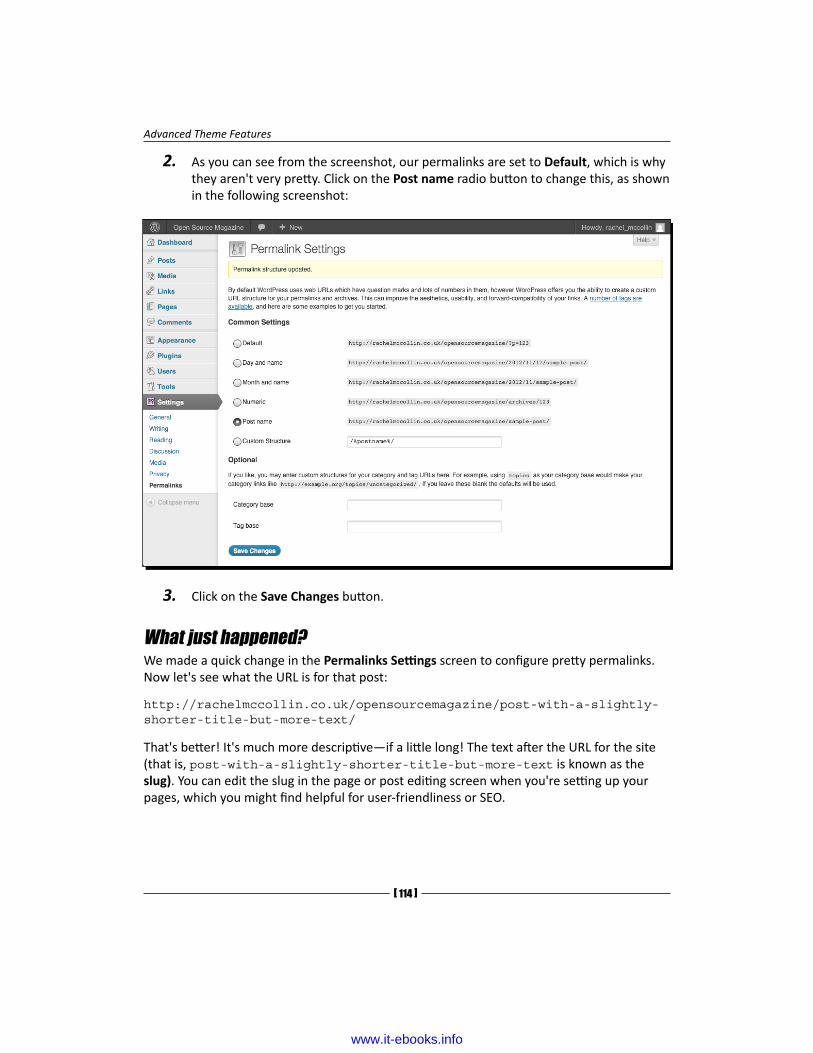
Advanced Theme Features
[ 114 ]
2. As you can see from the screenshot, our permalinks are set to Default, which is why they aren't very pretty. Click on the Post name radio button to change this, as shown in the following screenshot:
3. Click on the Save Changes button.
What just happened?We made a quick change in the Permalinks Settings screen to configure pretty permalinks. Now let's see what the URL is for that post:
http://rachelmccollin.co.uk/opensourcemagazine/post-with-a-slightly-shorter-title-but-more-text/
That's better! It's much more descriptive—if a little long! The text after the URL for the site (that is, post-with-a-slightly-shorter-title-but-more-text is known as the slug). You can edit the slug in the page or post editing screen when you're setting up your pages, which you might find helpful for user-friendliness or SEO.
www.it-ebooks.info

Chapter 4
[ 115 ]
To find out how to change the slug, and therefore the URL, of individual pages and posts, see http://codex.wordpress.org/Pages#Changing_the_URL_of_Your_Pages.
Permalinks – a quick guideYou may have noticed that when you clicked on the Post name radio button on the Permalinks screen, the text /%postname%/ appeared in the Custom structure field below it. This is the tag which WordPress uses to generate the URL based on the post name. Other tags are:
� %year% – the year the post was published using four digits, for example 2013.
� %monthnum% – the numerical month the post was published, for example 05.
� %day% – the day of the month the post was published, for example 28.
� %hour% – the hour the post was published, using the 24-hour clock, for example 15.
� %minute% – the minute of the hour the post was published, for example 43.
� %second% – the second of the minute the post was published, for example 57.
� %post_id% – the unique ID of the post, for example 7.
� %postname% – the post name, using the slug which is automatically generated from the post name or which you can edit manually.
� %category% – the slug for the category, which is either generated based on the category name or which you specify when setting up the category. For example, WordPress would give the slug new-products to a category called New Products.
� %author% – the author name, for example Rachel McCollin would become rachel-mccollin.
Occasionally permalink settings may not work right out of the box, as it depends on your server configuration. In some cases, you may have to change the file permissions for the .htaccess file at the root of your site. For more on this, see http://codex.wordpress.org/Using_Permalinks.
MenusThe next step is to get our menus working correctly. Since Version 3.0, WordPress provides a great interface for creating and configuring menus using the Menus admin screen, which means, once you've added some PHP to set this up in your theme, you don't need to touch your code if you need to edit the navigation menu.
www.it-ebooks.info

Advanced Theme Features
[ 116 ]
Registering navigation menusIn order for any menus added in the WordPress admin to show up on your site, you'll need to create those menus by registering them. This refers to the code you add to your functions file to create the menu. You'll then add some code to header.php to display the menu in the correct place.
Time for action – registering a navigation menuLet's start by registering the menu. This involves creating a new file called functions.php.
1. Create a new blank file in your theme directory and name it functions.php.
2. At the beginning of the file, type the following:
<?phpfunction register_my_menus() { register_nav_menus( array( 'header-menu' => __( 'Header Menu' ) ) ); }add_action( 'init', 'register_my_menus' );?>
3. Save the file.
What just happened?We created a new file called functions.php and added a function to it to register a menu. The functions.php file is a special file which is used to store extra functions which the theme needs in order to work. This will be PHP code that isn't included in WordPress itself and isn't in your theme files, but is used by them.
Let's have a look at each line of the function we added:
� <?php starts running PHP, this line must be the very first line of your file with no spaces before it.
� function register_my_menus() { defines a new function with the name register_my_menus.
� register_nav_menus( uses a WordPress function called register_nav_menus to tell WordPress that this is what we're doing here.
� array( 'header-menu' => __( 'Header Menu' ) ) is an array with a list of menus that you're setting up. We're just setting up one menu here, the name WordPress uses for it will be header-menu and the name shown in the menus admin screen will be Header Menu.
www.it-ebooks.info

Chapter 4
[ 117 ]
� ); closes our array.
� } closes our function.
� add_action( 'init', 'register_my_menus' ); makes things happen. Any actions using init will be run after WordPress has finished loading but before any content is sent to the browser. Here, we're telling WordPress to run the register_my_menus function as part of the init action which it will always run.
� ?> stops the PHP. This must be the final line of the functions.php file with no spacing or empty lines afterwards.
Well done! You just defined your first function. Now let's add the code to our header.php file to make the menu appear.
Time for action – adding menus to our theme's header.php fileThe next step involves inserting a line of code into your header.php file.
1. Open the header.php file and find the following code:
<nav id="mainNav" class="grd-vt-tertiary shdw-centered"> <h2 class="screen-reader-text">Main Navigation:</h2> <ul class="sfTab"> <li class="current_page_item"><a href="#">The Zine</a></li> <li><a href="#">About Us</a></li> <li><a href="#">Resources</a></li> <li><a href="#">Contact</a></li></ul></nav><!--//top_navlist-->
2. Replace that code with the following:
<nav id="mainNav" class="grd-vt-tertiary shdw-centered"> <h2 class="screen-reader-text">Main Navigation:</h2> <?php wp_nav_menu( array( 'theme_location' => 'header-menu', 'container_class' => 'sfTab' ) ); ?></nav><!--//top_navlist-->
3. Save the file and view the site in your browser to see what happens.
www.it-ebooks.info

Advanced Theme Features
[ 118 ]
What just happened?We added the wp_nav_menu tag to our header file to display the menu we'd registered in the correct place. Let's have a closer look:
� wp_nav_menu is the tag which calls and displays a navigation menu.
� The first parameter we set is 'theme_location' => 'header-menu'. This tells WordPress which menu to display – the header-menu we defined in functions.php earlier.
� The second parameter we set is 'container_class' => 'sfTab'. This adds a containing <div> with the class .sfTab to the menu, which replaces the <ul class="sfTab"> code we had originally.
Now let's have a look at our site with its new menu:
www.it-ebooks.info

Chapter 4
[ 119 ]
The menu is there but it isn't displaying what we want it to. If you don't set up your own menu, WordPress just displays all the pages on the site in the order they were added (much as it used to with the wp_page_menu tag before Version 3.0). Our site just includes an About page which we set up in Chapter 3, Coding it Up. So we need to add some more pages and set up our menu.
Setting up our menuTo finish our menu, we need to do three things:
� Create some new pages, a custom link, and a category which the menu will link to
� Define our Reading settings so WordPress knows which page our blog listings are on
� Add a menu linking to the pages in the WordPress Menus screen
Setting up the new pages and category is simple so we won't show you how to do that (if you're stuck, look at http://codex.wordpress.org/Pages and http://codex.wordpress.org/Posts_Categories_Screen). We'll move straight on to configuring our Reading settings and then creating our menu. So let's do it!
Defining our Reading settingsThe first step is to ensure the site's Reading settings are set up correctly so that we can add the content we need to our menu.
Time for action – defining Reading settingsWordPress gives you the option of having a blog listing on your home page or using a static page instead. A blog listing is great for a magazine site like ours but on a business website, for example, you might want to have a static page. In fact it's becoming more and more common for WordPress sites to be set up with static front pages now.
www.it-ebooks.info

Advanced Theme Features
[ 120 ]
1. Go to Settings | Reading to access the Reading Settings screen:
2. As you can see, the site is set to the default—the front page displays all your latest posts. This is what we want, so we don't need to make any changes here.
3. Below this, you'll see that there are options to change the number of posts displayed and whether a full post or an extract is displayed. We'll keep the number of posts at 10 but tell WordPress to display a summary instead of each full post on the front page.
4. To do this, click on the radio button next to Summary.
5. Click on the Save Changes button, switch to your site, and refresh your browser.
What just happened?We edited our Reading settings in line with the site's design. If we wanted to use a static page as our home page, we would click on the Static Page radio button and then choose the static page we wanted to display as our home page.
Creating a menuThe next step is to set up our menu in the Menus admin screen.
www.it-ebooks.info

Chapter 4
[ 121 ]
Time for action – creating a new WordPress menuAs we have the correct code in place in our theme file, we can set up our menu in the Menus admin screen.
1. Open the Menus screen by going to Appearance | Menus to see the Menus admin screen as shown in the following screenshot:
2. At the moment, there isn't a menu defined. To add one, type the name of your menu in the Menu Name field at the top-right side. For our site, let's call the menu main-menu.
3. Click on the Save Menu button. You will see a message telling you that the menu has been successfully created and you'll see its name in a tab above the Menu Name field. Good job!
4. In the Theme Locations box, select your menu from the select field (make sure you've followed step 3 and saved your menu first or it won't appear in the select field).
5. Click on the Save button in the Theme Locations box.
www.it-ebooks.info

Advanced Theme Features
[ 122 ]
What just happened?We created a new menu and saved it. Now let's add some links to it.
Adding pages and other content to our menuYou can add all sorts of content to your menus including pages, posts, categories, and custom links. Let's start by adding some static pages.
Time for action – adding pages to a menuNow to add some links to our menu.
1. Click on the checkboxes next to each of the pages listed in the Pages box and then click on Add to Menu.
2. You will see your pages listed in your new menu. To get them in the right order, simply drag them up and down in the list until you're happy.
3. The Menus admin screen will now look like the following screenshot:
www.it-ebooks.info

Chapter 4
[ 123 ]
What just happened?We added some static pages to our menu. Most sites will include some static pages so it's something you'll find yourself doing a lot. The next step is to add a custom link to our home page, which we're calling The Zine.
Time for action – adding a custom link to the menuWordPress lets you add custom links – which could be to a specific post in our site, to an external site, or to any link within our site. We'll use a custom link to add a link to the home page and call it The Zine.
1. In the Custom Links box, type the URL of the site in the URL field. In our case it's http://rachelmccollin.co.uk/opensourcemagazine (or whatever URL you're using for your site).
2. In the Label field, type the label you want WordPress to use for your link. It could be Home or in our case, we'll type The Zine.
3. Click on the Add to Menu button. The custom link will appear in the menu on the right-hand side.
4. Finally, drag the link up to the top of the menu so it's listed first and click on the Save Menu button.
What just happened?We added a custom link, saved it to our menu, and moved it to the correct position.
In this case, it was necessary to use a custom link because the front page displays blog posts (which you set up in the Reading Settings page earlier). If the front page was a static page, you would simply add that page to your menu.
www.it-ebooks.info

Advanced Theme Features
[ 124 ]
Here's how the Menus admin screen looks now:
The final step in creating our menu is to add a link to the Resources category.
Time for action – adding a category link to the menuAlong with pages and custom links, you can use the navigation screen to provide links to categories you define for your content. Let's do it!
1. Now our pages are in place, but not our Resources category. To add that, click on the checkbox next to Resources in the Categories box and click on the Add to Menu button.
2. Move the Resources link within the menu until everything is in the right order:
www.it-ebooks.info

Chapter 4
[ 125 ]
Can't see the Resources category?
If you can't see one of your categories in the Menus screen, that's because you haven't assigned it to any posts yet. WordPress doesn't let you add empty categories to your menu as that wouldn't be very helpful to users. Simply assign that category to one of your posts and it will show up in the Menus screen, and if you need to leave the Menus screen to do this, make sure you save your menu first.
3. Click on the Save Menu button to save your menu.
Important!
WordPress doesn't save any changes to your menu until you click on the Save Menu button. So don't forget!
www.it-ebooks.info

Advanced Theme Features
[ 126 ]
What just happened?We created a new WordPress menu in the Menus admin screen, told WordPress to display it in our theme and added some links to it.
The WordPress Menus screen gives us even more functionality than we've used here. Let's have a look at some of the possibilities.
The WordPress Menus admin – the possibilitiesWordPress lets you set up your menus in a variety of ways and with a lot of flexibility. You can add any links you like, call them whatever you want, and structure your menu however you need.
Firstly, you can add different types of links to your menu:
� Pages: You can add as many static pages as you want to the menu in whatever order.
� Categories: As we've seen, you can add links to one or more categories to a menu. If you want to add tags as well you can do this—if the list of tags isn't visible, click on the Screen Options tab at the top of the Menus screen and then click on the checkbox next to Tags. Your tags will appear and you can add them to the menu.
� Custom taxonomies: If you've defined any custom taxonomies for your site, you can link to these in your menu.
� Custom post types: It's possible to add links to custom post types to your menu, if you have those set up in your site.
� Custom links: You can add any custom link to your menu and give it whatever name you want. For example, you could link to an external site or to a specific post in your site.
Once you've added your links, you can give them a custom navigation label, which doesn't have to be the name of the page or post linked to. So if you wanted to link to a post with a long name you could use an abbreviated label in the navigation menu. You do this by clicking on the arrow next to the label's name in your menu and typing text into the Navigation Label field:
www.it-ebooks.info

Chapter 4
[ 127 ]
As well as this, you can change the structure of your menu by adding second level links, which will be output as a <ul> tag inside your top level <li> tag. You do this by dragging the link to the right underneath the link you want it to appear below. This is great for drop-down menus in larger sites. The following screenshot shows how this looks in the Menus admin screen:
www.it-ebooks.info

Advanced Theme Features
[ 128 ]
And here's the effect in our theme:
As you can see it doesn't quite work in this theme as we haven't added any styling for second level navigation links, but a bit of CSS would soon fix that. We'll undo this and make the menu all one level again to fit with our design.
WidgetsIf you've ever set up a WordPress site, maybe using the default theme or one you downloaded from the theme repository, chances are that you've used widgets. Widgets are areas in a site or theme which can be set up via the WordPress admin, meaning site owners can add their own content without having to write a line of code.
The most common place to include widgets are in the sidebar and footer, but you could use them anywhere in your theme. For example, a widget area below the content gives you somewhere to display content listings, some share buttons or a call to action button beneath every single post.
www.it-ebooks.info

Chapter 4
[ 129 ]
WordPress comes with a number of widgets preinstalled and you can add more with plugins. Some of the preinstalled widgets are:
� Archives – a list of posts by the date they were published.
� Recent posts – list the latest posts from your blog.
� Text – add some text or HTML (for example, you could use this to code a call to action button or add an image you've uploaded via the Media screen).
� Categories – a list of the categories in your blog. If the user clicks one they'll see a list of all posts in that category.
� Custom menu – a widget enabling you to place a custom menu in a widget area. For example, if you wanted to list your "small print" pages in the footer, you could create a menu listing them and then use this widget to display that menu in a footer widget area.
� Tag cloud – a tag cloud showing the categories posts have been published to, with the most popular categories shown in larger text.
There are plenty more. To see them all, just take a look at the Widgets admin screen in WordPress.
But before we can add any widgets to our site we need to add widget areas to our theme, these will hold the individual widgets. This is similar to adding menus and has two stages:
� In functions.php, register our sidebars, or widget areas
� In the relevant template files or includes, add the code to display the appropriate widget area
So let's start by registering our sidebars in functions.php.
Registering sidebars or widget areasFor your theme to display any widget areas you must first register them in your theme's functions file, in much the same way as we did earlier for the menu. You can register as many as you need and then add the code to display them in the appropriate place in your theme.
www.it-ebooks.info

Advanced Theme Features
[ 130 ]
Time for action – registering sidebars in functions.phpThis step involves adding some more functions below your menu's function in the theme functions file:
1. Open functions.php.
2. Above the closing ?> tag, add the following:
function osmag_widgets_init() { register_sidebar (array( 'name' => __('Sidebar','osmag'), 'id' => "sidebar-widget-area", 'before_widget' => '<li id="%1$s" class="widget %2$s">', 'after_widget' => '</li>', 'before_title' => '<h2 class="widgettitle">', 'after_title' => '</h2>' ) ); register_sidebar (array( 'name' => __('Left Footer','osmag'), 'id' => "footer-left-widget-area", 'before_widget' => '<li id="%1$s" class="widget %2$s">', 'after_widget' => '</li>', 'before_title' => '<h2 class="widgettitle">', 'after_title' => '</h2>' ) ); register_sidebar (array( 'name' => __('Right Footer','osmag'), 'id' => "footer-right-widget-area", 'before_widget' => '<li id="%1$s" class="widget %2$s">', 'after_widget' => '</li>', 'before_title' => '<h2 class="widgettitle">', 'after_title' => '</h2>' ) );}add_action('init', 'osmag_widgets_init');
3. Save your functions.php file.
www.it-ebooks.info

Chapter 4
[ 131 ]
What just happened?We added the functions to register sidebars for our theme's footer and sidebar. Let's have a look at what we did.
Firstly, the sidebars we registered:
� One widget area in the sidebar – it's the area most commonly used by themes for widgets. We called it sidebar but you don't have to, you could call it whatever you like.
� Two widget areas in the footer – this gives you the option to add two areas of content in the footer using widgets.
Now let's take a look at the code we used to register each widget area:
� The opening line function osmag_widgets_init defines a new function for our theme based on widgets_init
� The first sidebar is registered with the function register_sidebar and an array of parameters
� The parameters for the first sidebar are:
� Name: __('Sidebar','osmag') defines the sidebar name. It won't work without osmag which echoes the function osmag_widgets_init.
� ID: sidebar-widget-area is the unique ID for the widget area which we'll use shortly to add it to a template file. It's also used to give the widget area an ID which you can use for styling.
� HTML before each widget within the widget area: <li id="%1$s" class="widget %2$s">, which opens a <li> tag and gives it an ID and class related to the widget name.
� HTML after each widget: </li> closes the list item.
� HTML before the title of each widget: <h2 class="widgettitle">, which opens an <h2> tag to display the title and gives it a class for styling.
� HTML after each widget title: </h2> closes the <h2> element.
� The two footer sidebars are set up in the same way, with only the name and ID needing to change
� Finally, the last line beginning add_action adds an action based on our function to the init action which WordPress always runs on starting up
www.it-ebooks.info
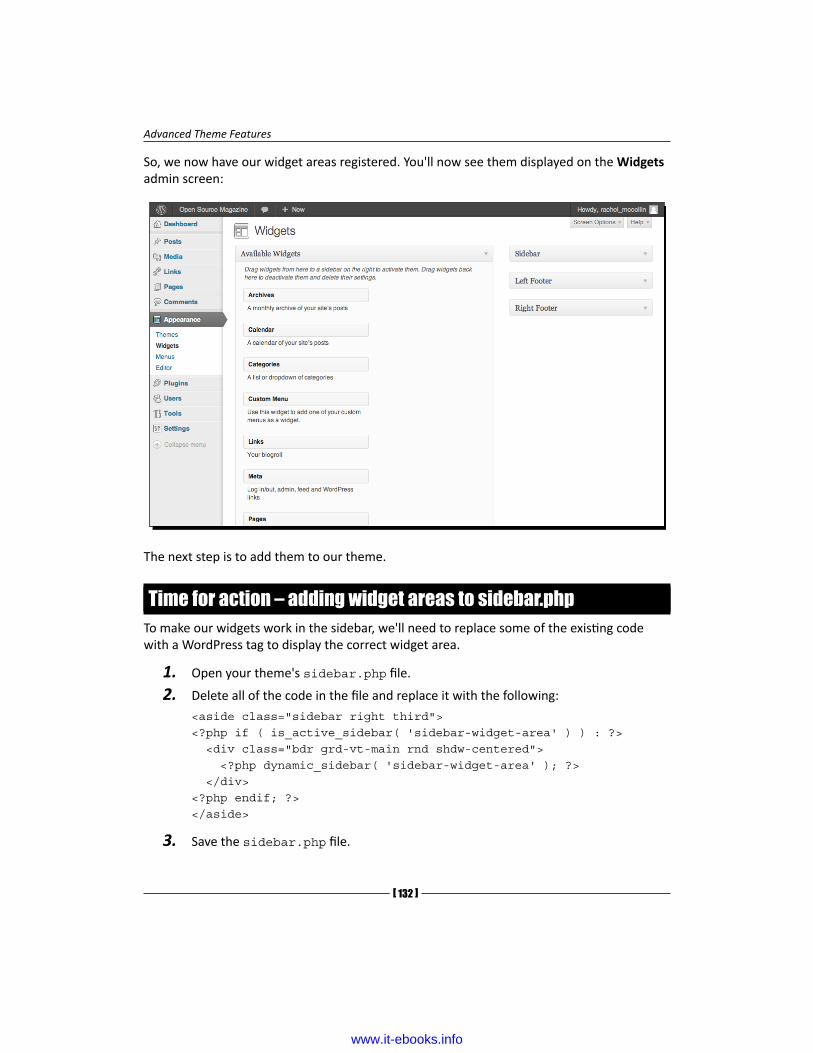
Advanced Theme Features
[ 132 ]
So, we now have our widget areas registered. You'll now see them displayed on the Widgets admin screen:
The next step is to add them to our theme.
Time for action – adding widget areas to sidebar.phpTo make our widgets work in the sidebar, we'll need to replace some of the existing code with a WordPress tag to display the correct widget area.
1. Open your theme's sidebar.php file.
2. Delete all of the code in the file and replace it with the following:
<aside class="sidebar right third"><?php if ( is_active_sidebar( 'sidebar-widget-area' ) ) : ?> <div class="bdr grd-vt-main rnd shdw-centered"> <?php dynamic_sidebar( 'sidebar-widget-area' ); ?> </div><?php endif; ?></aside>
3. Save the sidebar.php file.
www.it-ebooks.info

Chapter 4
[ 133 ]
What just happened?We added a widget area to our sidebar. Let's have a look at the code in detail:
� Firstly, the <aside> element to contain our sidebar—which is the same as in our static mockup
� The next line checks if there are any widgets in the widget area with the ID of sidebar-widget-area
� If that's the case, it displays the contents of the widget area, using the dynamic_sidebar tag with the ID of our sidebar
� It then closes all the relevant tags
Now let's see what the site looks like in the browser:
At the moment the sidebar is empty because we haven't added any widgets. We'll do that in a moment but first let's add widget areas to our footer.
www.it-ebooks.info

Advanced Theme Features
[ 134 ]
Time for action –adding widget areas to footer.phpWe've added one widget area to the sidebar, now we're going to add two to the footer.
1. Open your theme's footer.php file.
2. Find the following code (the content of our first <aside> element):
<h3>Socialize</h3> <ul class="grid4up"> <li><a href="#" class="soc facebook">facebook</a></li> <li><a href="#" class="soc twitter">twitter</a></li> <li><a href="#" class="soc rss">rss</a></li> <li><a href="#" class="soc google">gmail</a></li> </ul> <div class="push"></div> <h3>About us</h3> <p>Lorem ipsum dolor sit amet, consectetur adipisicing elit, sed do eiusmod tempor incididunt ut labore et dolore magna aliqua. Ut enim ad minim veniam.</p>
3. Copy that code somewhere safe, we'll be using it again shortly.
4. Delete the code and replace with the following:
<?php if ( is_active_sidebar( 'footer-left-widget-area' ) ) : ?> <?php dynamic_sidebar( 'footer-left-widget-area' ); ?><?php endif; ?>
5. Now find the following code (it's inside the second <aside> element, you don't need to save this):
<h3>Navigate</h3><ul> <li><a href="#" target="" title="">title to link01</a> </li> <li><a href="#" target="" title="">another link02</a></li> <li><a href="#" target="" title="">a different title: link03</a></li> <li><a href="#" target="" title="">yet another link04</a></li></ul>
6. Delete that code and replace it with the following:
<?php if ( is_active_sidebar( 'footer-right-widget-area' ) ) : ?> <?php dynamic_sidebar( 'footer-right-widget-area' ); ?><?php endif; ?>
7. Save your footer.php file.
www.it-ebooks.info

Chapter 4
[ 135 ]
What just happened?We added two footer areas to our footer. The code works in exactly the same way as the code we used for the sidebar widget area.
If you check your site now you'll see that nothing is displayed in the footer, in fact the footer has completely disappeared. That will soon change when we add some widgets.
Widget areas – not just for the sidebar and footerIf you wanted to, you could register more widget areas for use elsewhere in the theme, for example:
� Above the header – useful if you want to use a widget to add some important text above the site content or add a login widget here.
� Above the content – sometimes you might want to include a menu or some text above the content of all your pages and posts, without having to manually add it to every post.
� Below the content – useful for messages you want users to read after the content, lists of links for users to click after reading a post, call to action buttons, or social sharing widgets.
� A secondary sidebar – a second widget area in the sidebar. It may seem superfluous to have two widget areas in one place but it can be useful, for example when you want to add a styling element between the two widget areas, you want to position or style them differently or anything else that you can think of. I developed a site once where I used CSS to position the primary widget area across the width of the page above the content and the secondary sidebar – this was done without having to edit the PHP, simply with CSS positioning, widths, and margins.
� More footer widget areas – our theme just uses two, but some themes use three or four footer widget areas side by side, or two or three side by side and another underneath them for the colophon—the small print such as site credits and copyright.
� Custom widget areas – you might want to register a widget area which will only be used in one of your template files, or in a custom include file only called in certain circumstances. This is more advanced territory!
www.it-ebooks.info

Advanced Theme Features
[ 136 ]
Adding widgets in the Widgets admin screenWidgets are fun! They let you add all sorts of custom content to your site without having to touch a line of code. If you're going to have people who can't code working on your site, they're a great way for them to add extra content to the site, and they're even better if you're going to release your theme to other WordPress users—people who don't understand PHP can add custom content in your widget areas using the preinstalled widgets and by adding to these by using plugins.
The possibilities from using widgets and plugins are huge!
Setting up widgets is something you've probably done before and it's very easy to do. Let's add some widgets to replicate the static code we had in our mockup before we turned it into a WordPress theme.
What widgets will we needThe mockup included one widget area in the sidebar and two in the footer. The sidebar widget area contained three widgets, listing different kinds of content. So which widgets will do that job for us?
� Our first sidebar widget lists the three latest blog posts. We can add that using the Latest Posts widget, which comes preinstalled with WordPress.
� The second sidebar widget lists three categories. Again, WordPress has a preinstalled widget for that – the Categories widget.
� The third sidebar widget lists archives by month – the preinstalled Archives widget will handle that.
� Our first footer widget is for social sharing and some information about the magazine – it lists a set of links to the Open Source Magazine's presence on different social media platforms. We can add that with the Text widget, which lets us add some HTML.
� Our second footer widget is a list of internal links to static pages. We can use the Custom Menu widget to achieve that, along with a new custom menu.
Great! That means we don't have to install any plugins, and can use the widgets already at our disposal to display all the content and links we need.
Setting each of these up is pretty straightforward, so we won't go into too much detail here, but let's just look at the steps involved.
www.it-ebooks.info

Chapter 4
[ 137 ]
Time for action – adding sidebar widgetsWe add sidebar widgets in the Widgets admin screen, which you access via Appearance | Widgets.
1. Drag the Recent Posts widget (in the list of available widgets on the left) to the sidebar widget area on the right.
2. Give it a title of Features: and type 3 in the Number of posts to show field.
3. Click on Save to save the widget.
4. Drag the Categories widget to the sidebar widget area and give it a title of Columns:. Click on Save to save it.
5. Drag the Archives widget to the sidebar widget area and give it a title of Past Issues:. Click on Save to save it.
What just happened?We added three widgets to our sidebar. Now let's see how they look in the live site:
www.it-ebooks.info

Advanced Theme Features
[ 138 ]
You'll notice that the styling is a little bit off:
� There's a bullet point before each of our headings. That's because WordPress automatically puts each widget inside a <li> tag. We can easily fix that with some CSS to tell browsers to display lists in the sidebar differently:
aside li { list-style-type: none;}
� You'll also notice that all of the sidebar widgets are displayed in one box with the same styling, rather than in three separate boxes like our mockup. That's because the mockup uses three separate <aside> elements while we've used just one. There are three ways we could fix this:
� Add three separate widget areas to our sidebar (instead of one widget area with three widgets), each in an <aside> with the appropriate styling—not best practice as it's adding lots of extra HTML just to achieve styling
� Apply the styling we set for the mockup to the new classes WordPress has given to our widgets inside the widget area
� A better approach is to use the same classes and IDs that WordPress uses when we're creating our mockup, that way the design will work perfectly with no tweaks
We won't worry about that too much now as the site still looks fine, but if you want to tinker with the CSS, go ahead!
Time for action – adding footer widgetsNow we have our sidebar widgets in place, let's add the footer widgets. We'll need to set up a custom menu first, so that we can display it using the Custom Menu widget for the Navigate: footer area from our mockup.
1. Now switch to the Menus screen, by going to Appearance | Menus. Add a new menu using the same method we used previously to create our navigation menu, starting by clicking on the + tab next to the tab for our existing menu. We'll call this menu Footer Links.
2. Add the relevant pages to the new menu and save it. You'll see from the following screenshot that we've added some more static pages to the site for use in this menu:
www.it-ebooks.info

Chapter 4
[ 139 ]
3. Save the menu and switch to the Widgets page by going to Appearance | Widgets.
4. First, set up the text widget. Drag the Text widget over to the Left Footer widget area.
5. In the text box, copy the HTML you saved earlier form the old footer:
<h3>Socialize</h3> <ul class="grid4up"> <li><a href="#" class="soc facebook">facebook</a></li> <li><a href="#" class="soc twitter">twitter</a></li> <li><a href="#" class="soc rss">rss</a></li> <li><a href="#" class="soc google">gmail</a></li> </ul><div class="push"></div><h3>About us</h3> <p>Lorem ipsum dolor sit amet, consectetur adipisicing elit, sed do eiusmod tempor incididunt ut labore et dolore magna aliqua. Ut enim ad minim veniam.</p>
6. Drag the Custom Menu widget to the Right Footer widget area.
www.it-ebooks.info

Advanced Theme Features
[ 140 ]
7. In the drop-down menu, select the menu you've just added. In our case, the Footer Links menu, as shown in the following screenshot:
8. Save the widget.
What just happened?We added five new widgets to our widget areas, to display the content we need. We also set up a new menu and copied some HTML that was used in our mockup for a text widget.
So, how do our widgets look? Switch to your browser and refresh the screen to check.
www.it-ebooks.info

Chapter 4
[ 141 ]
The footers look exactly as they should—no tweaks necessary. Well done!
www.it-ebooks.info

Advanced Theme Features
[ 142 ]
Featured imagesIf you've built a site before using the default Twenty Eleven theme, you may have used its featured image functionality.
Featured images are images which you add to a page or post outside the content of the post or page itself, as opposed to an image, which you would add into the flow of the content. WordPress can then display your featured images however you want, for example on an archive page it can display a small version of the featured image for each post above or next to its excerpt.
Featured images were introduced with WordPress Version 2.9, before that many developers created a special custom field, but it wasn't an ideal workaround. Featured images are a feature of WordPress that make theme builders and site owners' lives easier.
So let's add them to our theme.
Time for action – adding featured images to our themeFor our theme to display featured images, we need to follow two steps – adding a new function for featured image support to functions.php, and then add some code to display the featured images to our template files.
1. Open your theme's functions.php file.
2. Above the closing ?> PHP tag, add the following code:
add_theme_support( 'post-thumbnails' );
3. Save your functions.php file.
4. Open your theme's index.php file.
5. In the loop, insert a line break between the opening of <div class="entry-content"> and above the PHP call for the content itself.
6. Add the following code:
<?php if ( has_post_thumbnail() ) { the_post_thumbnail('large');} ?>
7. Save the file.
8. Now open your theme's page.php file and repeat step 2 to step 4.
www.it-ebooks.info

Chapter 4
[ 143 ]
What just happened?We added the code needed to display featured images for each post and page. Let's look at that code in detail:
� First, it checks if the post or page has a thumbnail (or featured image) assigned to it
� If so, it displays the image using the large size
Now let's add some featured images to our site and see how they look.
Time for action – adding featured images to the siteAdding featured images is done in the admin screen for each page or post.
1. Open the editing screen for a post or page, as shown in the following screenshot:
2. On the right-hand side, below the Categories box, is the box for uploading featured images.
www.it-ebooks.info

Advanced Theme Features
[ 144 ]
Can't see a featured images box?
If you can't see the box for uploading featured images, it's because you don't have the functionality in your theme. Your theme's functions.php file must have the code we added previously in order for this box to show up.
3. Click on Set featured image to open the featured images pop up:
4. Upload your image as you would for any other image.
5. Once you've uploaded the image, don't click on the Insert into Post button, instead, click on Use as featured image.
6. Click on the Save all changes button to return to the post editing screen.
www.it-ebooks.info

Chapter 4
[ 145 ]
7. To close the featured images pop up, click on the small X sign in the upper-right corner.
8. Click on the Update button to save the changes to your post or page.
9. You will now see your featured image displayed in the editing screen:
10. Repeat steps 3 to step 8 for some more posts and pages.
www.it-ebooks.info
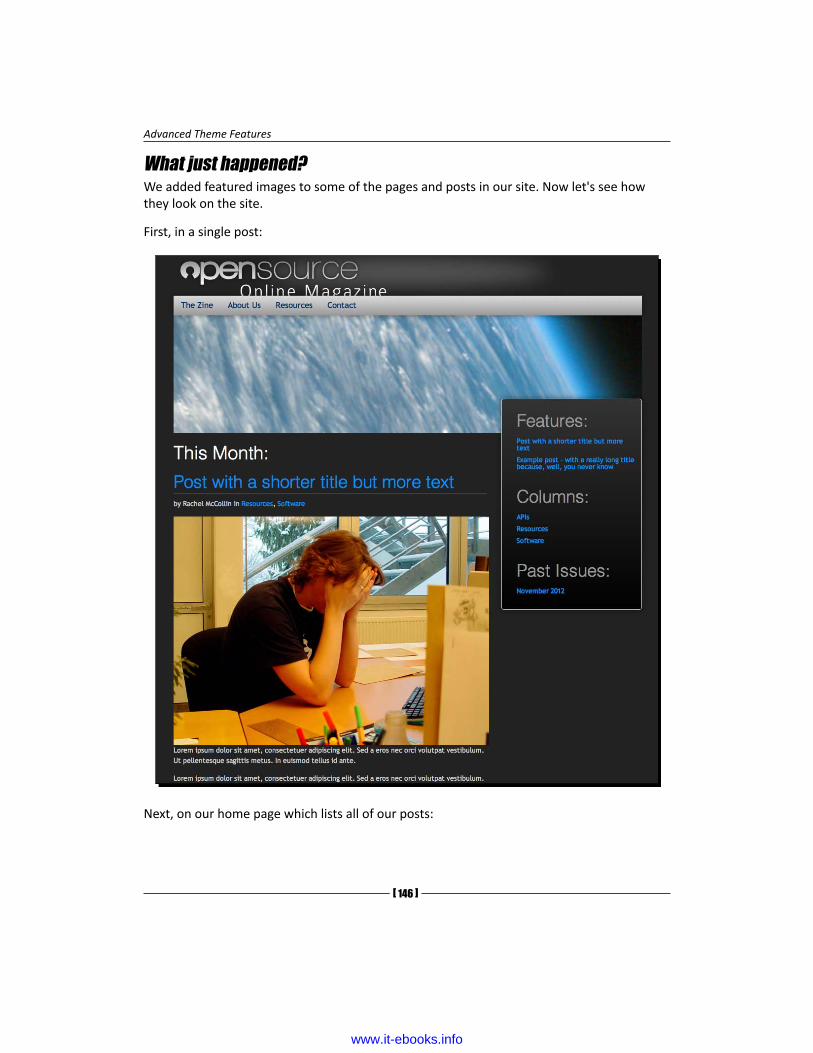
Advanced Theme Features
[ 146 ]
What just happened?We added featured images to some of the pages and posts in our site. Now let's see how they look on the site.
First, in a single post:
Next, on our home page which lists all of our posts:
www.it-ebooks.info

Chapter 4
[ 147 ]
The image on the single post looks great and fits well into our layout. But the images on the home page are a bit large. Luckily, WordPress makes it easy for us to change that. We can set up a new template file just for single posts, and then edit our index.php file so it displays smaller featured images. This means when any archive listings are using index.php, they will display the smaller image.
www.it-ebooks.info

Advanced Theme Features
[ 148 ]
There is an alternative way to do this. We could set up an archive.php file for displaying all our archive listings, and leave index.php as it is. Or we could use both single.php and archive.php, for even greater control. As you get more advanced with your WordPress theme development, you'll find that there's often more than one way to solve a problem, and that the best one may be simply the one that works best for you.
Time for action – displaying featured images differently in different template files
To do this, we'll need to create a new file called single.php, and edit the index.php file as well.
1. Make a copy of your theme's index.php file and call it single.php. Save it to your theme directory.
2. Open index.php and find the code you added for displaying featured images:
<?php if ( has_post_thumbnail() ) { the_post_thumbnail('large');} ?>
3. Edit that code so it reads:
<?php if ( has_post_thumbnail() ) { the_post_thumbnail('medium');} ?>
4. Save the index.php file.
What just happened?We created a new file called single.php. The reason we copied index.php for this and not page.php is that we want single posts to include post metadata. You may remember that in Chapter 3, Coding it Up, we deleted the code to display that metadata, which was why we set up the page.php file in the first place.
We then edited the index.php file so that any pages on your site using that file to display content will display a smaller image.
Let's see how our home page looks now:
www.it-ebooks.info

Chapter 4
[ 149 ]
It needs a bit of styling, maybe floating the text to the left of the image for example, but it's already much better—the images aren't so dominant and we can see more content.
www.it-ebooks.info

Advanced Theme Features
[ 150 ]
Featured image sizes
When we upload an image to the media gallery, either directly into the gallery or into a post or page, WordPress saves the uploaded image plus up to three versions of it:
The thumbnail, a version of the photo which is cropped to a square, whose default size is 150 px x 150 px.
The medium size, with a default maximum size of 300 px x 300 px. This size doesn't involve cropping so if the image isn't square, then one side will be less than 300 px.
The large size, with a default maximum of 640 px x 640 px, again not cropped.
WordPress will only save each of these images if the original image is large enough. so if, for example, we load an image 500 px x 400 px, it will save the original image plus the thumbnail and medium sizes but not the large size. It's a good idea to upload images which are the same size as the large size in your theme, to save on server space, but sometimes it may be necessary to upload a wider image and use it in full size, for example for a full width banner.
If the featured image sizes don't fit in your design, you can always change them via the Settings | Media screen.
Parent and child themesThis topic doesn't apply to the Open Source Online Magazine but it's worth explaining as it's a really useful feature of WordPress theme development.
Say you've been working with the Open Source Online Magazine theme or another one you've developed yourself or downloaded. You decide you want to build a second theme or site with a similar layout and design, or with the content structured in a similar way, but you don't want to start again from scratch.
You could just edit the theme you've already got to create a brand new one. But if your changes aren't huge, it may be better to build a child theme.
A child theme is a theme which is associated with another theme, called the parent theme. It takes most of its styling and content from the parent theme but has a few things which are different say, for example the archive listings are displayed differently. To do this, you would set up a child theme with its own stylesheet (all child themes need a stylesheet as we'll see shortly), and an archive.php file. It wouldn't need any other files—not even an index.php file, as it would take that from the parent theme.
www.it-ebooks.info

Chapter 4
[ 151 ]
To tell WordPress that a theme is the child of another theme, you have to add some text to the very top of its stylesheet—the style.css file:
/*Theme Name: My child themeTheme URI: http://example.com/Description: Child theme for the Open Source Magazine theme Author: Your name hereAuthor URI: http://example.com/about/Template: opensourcemagazineVersion: 1.0*/
Some notes on this text:
� It's commented out, browsers won't read it but WordPress will
� The theme must have a name and a template, the other information is optional
� The template is the parent theme – here you need to enter the directory your parent theme is in, in your themes directory (not its name)
Below this commented out code, you add a call to the parent theme's stylesheet:
@import url("../opensourcemagazine /style.css");
After this, you add any styling that's specific to the child theme. You don't need to repeat any styling that's in the parent theme.
When activating your theme in the WordPress theme's admin screen, you simply activate the child theme—WordPress does the rest for you.
Child themes are a great way to build up your own bank of great WordPress themes with less effort than it takes to develop them all from scratch. For more on child themes see http://codex.wordpress.org/Child_Themes.
www.it-ebooks.info

Advanced Theme Features
[ 152 ]
Pop Quiz – understanding advanced theme featuresQ1. What are pretty permalinks?
1. Images in a theme's design which make the site look pretty.
2. User-friendly URLs which use post titles instead of numerical IDs.
3. URLs which are better for SEO.
Q2. Where might you add a widget area to your themes?
1. In the sidebar.php file.
2. In the footer.php file.
3. In the header.php file.
4. All of the above.
Q3. What steps do you need to take to add a menu to a theme?
1. Register the menu in the functions.php file, add it to the correct place in the theme (normally in header.php) and set it up in the Menus admin screen.
2. Register a widget area and then add that to the header.php file.
3. Add the wp_nav_menu() code to header.php then set up the menu using the Menus admin screen.
4. Code the links directly into the header.php file.
Q4. I'm building a child theme. My parent theme and child theme both have an index.php and a style.css file. My parent theme has an archive.php file and my child theme has a page.php file. When I visit a category listing on my site, which template file will be used to display it?
1. index.php from the parent theme.
2. index.php from the child theme.
3. archive.php from the parent theme.
4. page.php from the child theme.
www.it-ebooks.info

Chapter 4
[ 153 ]
SummaryIn this chapter, we took our theme building skills to the next level, and added some more advanced functionality to our theme.
Specifically, we covered:
� Site settings, including the site title and description, and the code needed to display these in our theme
� Setting up "pretty" permalinks to make your site more user-friendly and improve search engine rankings
� Adding menus to our theme and configuring them in the Menus admin screen
� Registering multiple widget areas and adding widgets to them
� Adding featured image functionality to our theme and customizing where and how images are displayed
� Child themes – understanding how they work and their benefits
We now have a great theme in place, which reflects our original design and incorporates some advanced theme features. The next step is to test that it validates and is free of bugs, which we'll do in the next chapter.
www.it-ebooks.info

5Debugging and Validation
In this chapter, we'll cover the advantages of debugging and validating your theme. We'll learn about validation and the validation services available online, and use them to validate our theme. Then we'll cover browser compatibility—a look at some of the most common reasons why markup and CSS don't always work how you expect them to, especially in Internet Explorer (IE), and the various ways to remedy the problems.
As you work further and develop your own WordPress themes, you'll find that things will be much smoother if you debug and validate at each step of your theme development process, using a process we'll cover in detail in this chapter.
Depending on how your theme fares when validated and tested, you may not need to follow all of the steps here, but you may find them useful at a later date.
So let's get on with it.
Debugging and validation workflowIt's a good idea to adopt a consistent workflow when it comes to testing your code, which could look something like the following:
� Add some code
� Check if the page looks good in a modern browser
� Validate
� Check it in IE and other browsers you're using
www.it-ebooks.info

Debugging and Validation
[ 156 ]
� Make any necessary changes
� Validate again, if necessary
� Add the next bit of code
� Repeat, as necessary, until your theme is complete
So, having added your code, the first step is to validate and debug it. Let's look at some browser tools you'll use to help you do this, and then have a look at validation.
Browser tools for debuggingBefore you start debugging your code, it's helpful to get to know the tools that come with your browser to help you with this. Let's look at what's available.
FirefoxFirefox has traditionally been the web developer's browser of choice because of the great developer tools it offers. However, in the last year or so, more developers are using Chrome as that also has developer tools, as well as the benefit of being slightly more reliable in terms of rendering code.
Let's look at some of Firefox's developer tools.
The Web Developer toolbarThis extension adds a toolbar to the Firefox browser. You can download it from http://chrispederick.com/work/web-developer/.
The toolbar lets you link directly to the W3C's HTML5 and CSS validation tools. It also lets you toggle and view your CSS output in various ways, and lets you view and manipulate a myriad of information your page is outputting on-the-fly.
The following screenshot shows some of the options available with the Web Developer toolbar:
www.it-ebooks.info

Chapter 5
[ 157 ]
FirebugA more robust tool is the Firebug extension for Firefox, available at http://www.getfirebug.com/.
Firebug includes features for reviewing HTML, CSS, and the Document Object Model (DOM). Also, the latest version of Firebug lets you make edits on-the-fly to easily experiment with different fixes before committing them to your actual document.
The Document Object Model, or DOM, defines the structure of the markup in your HTML pages. For more, see http://www.w3.org/TR/DOM-Level-2-Core/introduction.html.
www.it-ebooks.info

Debugging and Validation
[ 158 ]
The following screenshot shows how Firebug displays source code:
There's also a Firebug Lite version for Internet Explorer, Safari, and Opera available at http://www.getfirebug.com/. Once you have Firebug installed in your browser, you can turn it off and on by hitting F12 or going to View | Firebug.
Google ChromeGoogle Chrome also includes developer tools, which come bundled with Chrome—you don't need to download any extensions. You can find out about them at https://developers.google.com/chrome-developer-tools/docs/overview.
To access the developer tools, click on View | Developer. This presents you with a list of three types of tools:
� View Source, which gives you a full-screen view of the source code in a new tab
� Developer Tools, which displays the source code alongside the open page, using a number of panels to display different items, such as elements, resources, and sources
� JavaScript Console, which displays the JavaScript console, enabling you to see how JavaScript is operating and debug it
The screenshot shows the Elements pane as seen using the Developer Tools option, with the header element in the page highlighted.
www.it-ebooks.info
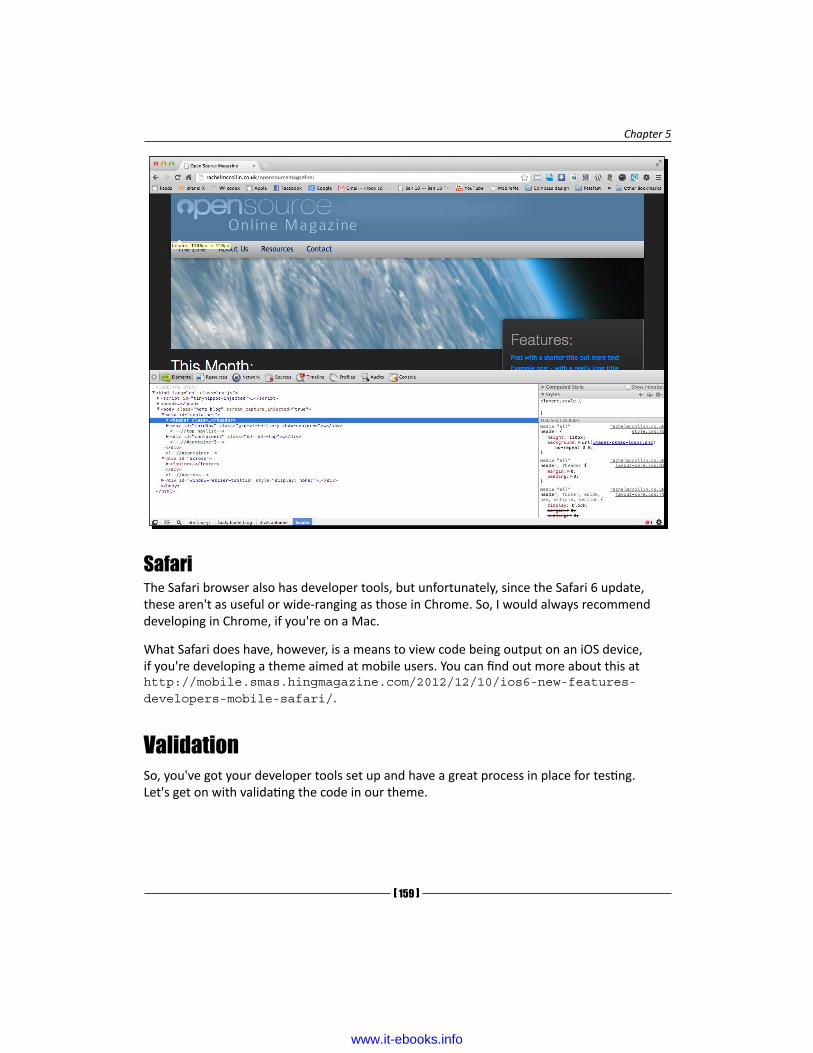
Chapter 5
[ 159 ]
SafariThe Safari browser also has developer tools, but unfortunately, since the Safari 6 update, these aren't as useful or wide-ranging as those in Chrome. So, I would always recommend developing in Chrome, if you're on a Mac.
What Safari does have, however, is a means to view code being output on an iOS device, if you're developing a theme aimed at mobile users. You can find out more about this at http://mobile.smas.hingmagazine.com/2012/12/10/ios6-new-features-developers-mobile-safari/.
ValidationSo, you've got your developer tools set up and have a great process in place for testing. Let's get on with validating the code in our theme.
www.it-ebooks.info

Debugging and Validation
[ 160 ]
Validating HTMLThe first step is to validate your markup. You do this using the W3C's validation service at http://validator.w3.org/.
Time for action – validating your HTMLLet's see how validation works. The process for validating your code is different, depending on whether you're working locally or remotely. First, the process for working remotely:
1. Go to http://validator.w3.org/.
2. Type in the URL of the site running your theme—in the case of my site, it's http://rachelmccollin.co.uk/opensourcemagazine/.
3. Click on the Check button.
Next, the process if you're working locally:
1. Save a static HTML file with the markup that WordPress outputs from your theme. To do this, in your browser, click on Save Page As and save as an HTML file.
2. Go to http://validator.w3.org/.
3. Click on the Validate by File Upload tab.
4. Upload your file.
5. Click on the Check button.
What just happened?You used the W3C validation service to check the code in your theme.
Let's see what the results are:
www.it-ebooks.info

Chapter 5
[ 161 ]
As you can see from the previous screenshot, there are some problems at the moment. To find out what they are, let's scroll down the page:
There are three instances of the same error relating to a category tag.
www.it-ebooks.info

Debugging and Validation
[ 162 ]
Time for action – finding and fixing errorsThe next step is to find the error, so that we can fix it.
1. Open the page you've just validated in your browser.
2. Using your browser's developer tools, display the page source. I'm working in Chrome, so I'll navigate to View | Developer | View Source.
3. Look for the line numbers where the errors are—lines 61 and 78, as shown in the previous screenshot. Here they are as displayed in Chrome. I've highlighted line number 61 and you can also see line number 78:
4. The code on line number 61 is as follows (I've taken out the links to save space):
<p class="entry-meta">by Rachel McCollin in <a href="" title="View all posts in Resources" rel="category tag">Resources</a>, <a href=" " title="View all posts in Software" rel="category tag">Software</a></p>
5. Looking at the code, identify which template file it's being generated by. In this case, the relevant lines are inside <div class="content">, so I know they're in the main template file and not in one of the include files, such as sidebar.php or footer.php. Both lines 61 and 78 are displaying metadata and are enclosed in a <p class="entry-meta"> tag.
www.it-ebooks.info

Chapter 5
[ 163 ]
6. Now, open the relevant template file and find the PHP which generates that markup. In the case of this page, the template file is index.php. The PHP generating those two lines is inside the loop, which is shown below:
<p class="entry-meta">by <?php the_author_meta('first_name'); ?> <?php the_author_meta('last_name'); ?> in <?php the_category(", ") ?></p>
What just happened?We opened the page we checked with the validator, identified the code causing the problem, and then found the PHP generating that code in the template file.
Sniffing out PHP from the HTML it generates in this way may seem a bit daunting at first, but the trick is to find HTML elements which form major areas of the site, such as <div class="content">. Then you can identify the HTML tags immediately surrounding the offending markup and trace that back to the PHP in the template file. If in doubt, always make a backup before you make any changes.
Time for action – fixing our codeThe next step is to fix the code we've identified as the cause for the problem.
1. The code causing the problem is the link which reads:
<a href="" title="View all posts in Resources" rel="category tag">Resources</a>
2. This is being generated by the the_category() template tag.
3. The best way to find out what this tag does is to check out its Codex page at http://codex.wordpress.org/Function_Reference/the_category and its source code in the category-template.php file, which is a part of the core WordPress installation (you can see this at http://core.trac.wordpress.org/browser/tags/3.5.1/wp-includes/category-template.php—it's daunting, so be warned!).
4. Through my investigations I've discovered that this markup is generated by WordPress and not by my theme. I, therefore, have two options, either I can live with it, or I can delete that template tag.
5. In this case, let's delete the tag to get the theme to validate. Select the following code in your index.php file and delete it:
in <?php the_category(", ") ?>
6. Save your index.php file and repeat the validation process at http://validator.w3.org/.
www.it-ebooks.info

Debugging and Validation
[ 164 ]
What just happened?Having identified the offending code, we found out how it was being generated and removed it. If the code is generated by your theme's markup rather than by WordPress, you may find that you can change it instead of deleting it.
If you ever come across problems like this which are thrown up by WordPress, you can always go to the WordPress trac site at http://core.trac.wordpress.org to see if a ticket has been raised about it, or you can submit one yourself. In this case, there is a ticket at http://core.trac.wordpress.org/ticket/17632.
Now let's see what the validator makes of our page:
Validating CSSNow that we have valid HTML5 markup, we can move on to checking the CSS.
Time for action – using the W3C's CSS validatorLet's use the W3C's CSS validator service to check that. Again, the process for validating our code is different, depending on whether you're working locally or remotely. First, the process for working remotely:
www.it-ebooks.info

Chapter 5
[ 165 ]
1. Go to http://jigsaw.w3.org/css-validator/.
2. Type in the URL of the site running your theme—in the case of my site, it's http://rachelmccollin.co.uk/opensourcemagazine/.
3. Click on the Check button.
Next, the process if you're working locally:
1. Save a static HTML file with the markup that WordPress outputs from your theme. To do this, in your browser, click on Save Page As and save as an HTML file.
2. Go to http://jigsaw.w3.org/css-validator/.
3. Click on the Validate by File Upload tab.
4. Upload your file.
5. Click on the Check button.
What just happened?Here you'll want to see another screen with a green bar that says Congratulations! No Error Found.
However, for our theme, we won't get this screen! We're using several new CSS3 properties, that haven't made it officially into the specification, yet browsers are implementing them by adding their own, specific browser prefixes. This means our rounded corner and gradient properties fail, as shown in the following screenshot:
www.it-ebooks.info

Debugging and Validation
[ 166 ]
You'll simply need to be aware of which CSS3 properties you're using, and if you don't get the green bar, the validator will display the offending error and again offer suggestions on how to fix it. The CSS validator will also show you the line the offending code is on. This is handy, as your stylesheet is not affected by WordPress output, so you can go directly to the line in your stylesheet file and make the suggested fix.
Testing on multiple browsers and platformsNo doubt you'll have a browser that you prefer to develop in, which is likely to be a modern, standards-compliant browser, such as Chrome, Firefox, or perhaps Safari. But you'll need to ensure that your themes work just as well in other browsers too. By debugging throughout your development process, you'll reduce the number of browser compatibility problems and spend less time at the end hacking your code, or putting in place fixes aimed at one browser (normally IE).
Which browsers to supportYou'll need to decide which browsers your theme will support and which versions of them. This will depend on what you're developing your theme for—is it for a client or for release to the public? The browsers supported by most developers at the time of writing are:
� Google Chrome
� Firefox
� Safari for Mac
� Opera
� Internet Explorer version 7 onwards (or sometimes 8 onwards).
Very few themes now support IE6, and this is the right approach. Microsoft themselves want us to stop supporting IE6, as you can discover at http://www.ie6countdown.com.
Approaches to browser supportThere are two approaches to ensuring cross-browser compatibility—progressive enhancement and graceful degradation. Let's take a quick look at the difference between these.
Graceful degradationGraceful degradation is the process web developers have traditionally used. It involves developing in a modern browser and then putting in place fixes for anything that doesn't work in older browsers, such as IE6 and IE7.
www.it-ebooks.info

Chapter 5
[ 167 ]
This approach feels easier to start with, as it makes the initial development more straightforward, but can mean a lot of extra work at the end of the process, and a lot of extra code to get things working in older browsers.
Progressive enhancementProgressive enhancement is the opposite of graceful degradation. It involves developing in a way which is cross-browser compatible, so that your layout and basic styling works across all of the browsers you're supporting, and then adding extras for those browsers that support it, such as CSS3 styling. The extras you add aren't essential to the site, so it won't matter if users on older browsers can't see them.
This method can be much more efficient and result in tidier code, but for many developers, it entails a shift in thinking.
Whichever approach you adopt, I would recommend one very important thing—don't save your browser testing till the end of your development process. Keep checking as you go along, and then you can make small adjustments or fixes instead of having to do a lot of extra work at the end.
Troubleshooting basicsSuffice to say, it will usually be obvious when something is wrong with your WordPress theme. The most common reasons for things being off are:
� CSS rules that use incorrect syntax or conflict with other rules
� Mis-named, mis-targeted, or inappropriately-sized images
� Markup text or PHP code that affects or breaks the Document Object Model (DOM) due to being inappropriately placed or having syntax errors in it
� WordPress PHP code or template tags and hooks that are copied over incorrectly, producing PHP error displays in your template rather than content
The second point is pretty obvious when it happens. You see no images, or worse, you might get those little ugly "x'd" boxes in IE if they're called directly from the WordPress posts or pages. Fortunately, the solution is also obvious: you have to go in and make sure your images are named and referenced correctly inside any img tags in your markup or background-image declarations in your stylesheet.
For images that are not appearing correctly because they were mis-sized, you can go back to your image editor, fix them, and then re-export them, or you might be able to make adjustments in your stylesheet to display a height and/or width that is more appropriate to the image you designed.
www.it-ebooks.info

Debugging and Validation
[ 168 ]
For the latter two points, one of the best ways to debug syntax errors that cause visual "wonks" is not to have syntax errors in the first place.
This is why, in your workflow, you should be constantly checking for validation.
Let's have a look at some of the most common causes of problems with code.
PHP template tagsThe next issue you'll most commonly run into is mistakes and typos that are created by copying and pasting your WordPress template tags and other PHP code incorrectly. The most common result you'll get from invalid PHP syntax is a Fatal Error. Fortunately, PHP does a decent job of trying to let you know in which file and line of code in the file the offending syntax lives.
If you get a Fatal Error in your template, your best bet is to open the filename that is listed and go to the line in your editor. Once there, search for missing <?php ?> tags. Your template tags should also be followed with parentheses, followed by a semicolon, such as ();. If the template tag has parameters passed in it, make sure each parameter is surrounded by single quote marks, for example, template_tag_name( 'parameter name', 'next_parameter' );.
Be aware of proper PHP notation
The proper way to notate PHP is as mentioned earlier, with a <?php at the beginning and a ?> at the end. The server will look for the beginning <?php tag and start processing the PHP. Some developers use PHP shorthand—starting with just a <? (no php added). This is risky as not all servers support it, so stick with <?php in your opening tags.
The following screenshot shows the results of a PHP error, with reference to the line number in the file generating the problem:
As you can see, this is a simple typo - the have_posts() template tag has been mis-typed. This tag appears at the beginning of the loop, so it should be easy to find and fix.
www.it-ebooks.info

Chapter 5
[ 169 ]
CSS quick fixesFinally, your CSS file might get fairly big, fairly quickly. It's easy to forget you already made a rule and/or just accidentally created another rule with the same name. It's all about cascading, so whatever comes last overwrites what came first.
The biggest cause of problems is duplicating selectors with different properties set. Beware of duplicating in this way, and if you do need to, ensure that the rule you want to be used by the browser is after any rule with duplicated selectors in your stylesheet.
For example, you may have the following rule for all of your headings:
h1, h2, h3, h4, h5, h6 { color: #333;}
And then, elsewhere in your stylesheet, you have a separate rule for h3 headings, which you want to be a different color:
h3 { color: #000;}
For the second rule to be implemented by the browser, you must put it lower down in the stylesheet than the first, so that it can override it.
Again, validating your markup and CSS as you're developing will alert you to syntax errors, deprecated properties, and duplicate rules that could compound and cause issues in your stylesheet down the line.
Fixing CSS across browsersIf you've been following our debug and validate method described in the chapter, then for all intents and purposes, your layout should look pretty spot-on between both the browsers.
Common browser problemsIn the vast majority of cases, it will be IE that doesn't render your CSS correctly. Common issues include:
www.it-ebooks.info

Debugging and Validation
[ 170 ]
� Box model problems: IE can calculate the size of block elements differently from other browsers. In most browsers, the total space taken up by an element is the sum of its width and height plus the width and height of its margins and padding. However, IE6, 7, and 8 will sometimes calculate the space taken up by an element differently, including its padding in the width defined by the width property, and so deducting this from the total space taken up by the element, as you can see in the following diagram:
� The hasLayout model: In IE6 and 7, hasLayout is a property that must be assigned to elements for them to be rendered correctly. In some cases, you'll need to add extra styling to trigger hasLayout in IE.
� Float problems: IE6 and 7 sometimes drop elements which should be floated next to each other, due to the way their width is calculated.
� List spacing problems: IE6 will sometimes add white space between list items—a pain if you're styling lists as boxes next to each other for navigation.
� The peekaboo bug: In IE6 and 7, this bug causes floated elements to disappear seemingly at random.
� The guillotine bug: This bug makes elements, floated next to each other, change height when the user hovers their mouse over one of them.
Fortunately, there is a fix (or often more than one fix) for each of these bugs. For a comprehensive guide to the bugs and how to fix them, refer to The CSS Detective by Denise R. Jacobs, published by New Riders (http://cssdetectiveguide.com).
www.it-ebooks.info

Chapter 5
[ 171 ]
Adding an IE-specific stylesheetIf IE is causing you problems which you can't fix by making tweaks to your main stylesheet, then it's time for some hacks.
The neatest way to do this is to create two stylesheets for your theme—one for general browser use and one for IE browsers, and let each browser call them in.
This isn't as bad as it seems. The bulk of your CSS can stay in your main CSS file; you'll then call in the following specific IE stylesheet code, which will load additionally only if the browser is IE.
In the IE stylesheet, you'll duplicate the rules and correct the properties that were not looking correct in IE. Because this stylesheet will load in underneath your main stylesheet, any duplicated rules will overwrite the original rules in your first stylesheet.
Time for action – setting up an alternative IE stylesheetLet's set up an IE stylesheet.
1. In your header.php template file, add the following code after your full stylesheet call:
<!--[if IE]> <link rel='stylesheet" type='text/css" href="ie-fix.css" media='screen, projection" /> <![endif]-->
2. Save the header.php file.
3. Now create a new stylesheet called ie-fix.css and save it to your theme's directory (that is, the same folder your stylesheet is in). This is where any IE-specific CSS will go.
What just happened?We created a new IE-only stylesheet, and added a conditional tag in the header.php file to call it only when the theme is being run in IE.
The <!--[if IE]> and <![endif]--> tags are essential. The first one checks if the page is being viewed in IE, and the second ends the conditional tag, ensuring that all code after it is run by all browsers.
www.it-ebooks.info

Debugging and Validation
[ 172 ]
Checking your work in Internet ExplorerIf you're not running Windows, or you are but aren't running all of the versions of IE you need to test for, you have a couple of options for testing your theme in IE:
� On a Mac, use Boot Camp (http://support.apple.com/kb/HT1461?viewlocale=en_US&locale=en_US) or Parallels (http://www.parallels.com/products/desktop/) to run Windows alongside OS X.
� On any machine, use a browser emulator, such as Adobe BrowserLab (https://browserlab.adobe.com) to emulate browsers which you aren't running, including IE.
Time for action – testing our theme with BrowserLabLet's test our site in IE using Adobe BrowserLab.
1. Go to https://browserlab.adobe.com.
2. You'll need to sign in with an Adobe user ID, so if you don't have one, create one and then sign in.
3. Select the browsers you want to test for in the dropdown list.
4. Type in the URL of the page you want to test and hit Return.
5. Your page will be displayed as it renders in the browser you've selected.
What just happened?We tested our theme using BrowserLab. Here's how it looks in IE9:
www.it-ebooks.info

Chapter 5
[ 173 ]
As you can see, there are some issues with the sidebar, as it uses a gradient for its background—IE isn't picking that up. This means that we need to adjust the background-color property for that element (or the relevant class) in our IE-only stylesheet to fix the problem.
www.it-ebooks.info

Debugging and Validation
[ 174 ]
Testing on mobile devicesTesting your themes on small screens and different devices brings a new set of challenges. Again, you have a few options:
� Test on the devices themselves. This is an expensive option given the range of devices out there, but it can be helpful to test on one iOS and one Android device if possible.
� Resize your browser window to see how your layout appears when the screen is resized. This will give you a good indication of how your responsive layout behaves across screen widths.
� Use a mobile browser emulator, such as the excellent versions for Opera Mobile at http://www.opera.com/developer/tools/mobile/ and Opera Mini at http://www.opera.com/developer/tools/mini/.
The book, WordPress Mobile Development Beginner's Guide by Rachel McCollin, published by Packt Publishing, gives you a full guide to making your theme mobile and testing across a variety of mobile browsers and devices. Find out more at http://www.packtpub.com/wordpress-mobile-web-development-beginners-guide/book.
SummaryIn this chapter, we reviewed the basic process of debugging and validating your theme. We learnt about:
� Using a thorough validation and debugging process during development
� Using browser tools to help with debugging
� Using the W3C validator to validate HTML and CSS
� Ensuring our PHP has the correct syntax
� Testing across browsers and fixing problems in Internet Explorer
Next, it's time to package up the theme and send it to our client!
www.it-ebooks.info
6Your Theme in Action
Now that we've got our theme designed, styled, and looking great, we just have one last thing to do. It's time to share your theme with your client, friends, and/or the rest of the WordPress community. This is the whole point of creating a theme in WordPress; your designs are separate from the WordPress CMS content and therefore easily shareable. This means that anyone can create a WordPress theme, and anybody else can install that theme in their WordPress installation.
In this chapter, you'll learn how to check your theme against the WordPress Theme Review guidelines, set it up so its stylesheet and license are correct, compress your theme as a ZIP file, and run some test installations before uploading it.
The WordPress Theme Review guidelinesBefore any theme can be published to the WordPress theme repository at http://wordpress.org/extend/themes/, it has to conform to the WordPress Theme Review guidelines. These include the following:
� Code quality: Make sure your code is up to date.
� Presentation versus functionality: Themes are for presentation, not functionality.
� Theme features: Your theme should support implementation of core WordPress features.
� Template tags and hooks: Make sure your theme implements template tags and hooks properly.
� WordPress-generated CSS classes: Make sure you use WordPress-generated CSS classes.
www.it-ebooks.info

Your Theme in Action
[ 176 ]
� Theme template files: Theme template files should be used properly.
� Security and privacy: The theme shouldn't present any issues with security and privacy.
� Licensing: A GPL-compatible license is required.
� Theme name: The theme name must be appropriate.
� Credit links: Credit links should be used and should be appropriate.
� Theme unit tests: Your theme must pass these tests.
� Theme obsolescence: Your theme should be kept current on an ongoing basis, keeping up-to-date with WordPress updates.
There are a lot of hoops you have to jump through, as you can see, but none of them are too tough. For more details, see the codex page on Theme Review at http://codex.wordpress.org/Theme_Review, and the Theme Review team site at http://make.wordpress.org/themes/.
In this chapter, you'll learn about the specifics of some of these criteria so you can share your theme.
You can find a copy of these at http://codex.wordpress.org/Theme_Review.
In this chapter, we'll take a look at WordPress' licensing requirements. We'll also spend some time properly naming our theme and crediting it, as well as creating a screenshot for our theme, and giving it a run through WordPress' Theme Unit Test criteria using the following:
http://codex.wordpress.org/Theme_Unit_Test
Let's get started packaging our theme up.
The theme preview screenshotBefore we begin wrapping up our theme package, we'll need one more asset—the theme's preview thumbnail.
www.it-ebooks.info

Chapter 6
[ 177 ]
Time for action – snagging a thumbnail of your themeLet's create a screenshot for our theme.
1. Using whatever screen capture software you have on your system, take a screenshot of a site running your theme.
2. Save the file and open it in an image editor.
3. Crop the image and resize it so that it's 600px wide x 450px high.
4. Save the image as screenshot.png—it must have this name or it won't work.
5. Copy the new screenshot.png file to your theme directory.
What just happened?We created a screenshot of our theme and saved it in the format used by WordPress.
Now, when I view the theme in the Themes admin screen, the following screenshot is displayed:
For more on theme screenshots, see http://codex.wordpress.org/Theme_Development#Screenshot.
www.it-ebooks.info

Your Theme in Action
[ 178 ]
Packaging your theme upTo make sure your template is ready to go public, you'll need to run through the following steps before packaging it up:
� Removing any unnecessary files and code
� Checking the stylesheet to ensure its information text is accurate
� Creating a README.TXT file to package with the theme
� Zipping the theme into a ZIP file and testing it using the Unit Test specs
Let's work through each of these steps in turn.
Tidying up your themeBefore you can do anything else, you need to ensure your theme is tidy.
Time for action – tidying up your themeLet's tidy up the theme directory and code files. Perform the following steps for the same:
1. Open the theme directory in your file manager. Make a backup of your theme just in case.
2. Check there aren't any files in your theme folder that aren't used by the theme. If so, remove them.
3. Open your code files in turn and check them. If you've commented out any code, remove that. Check that you haven't unnecessarily duplicated code, such as stylesheet declarations.
4. Review your code. Is it clear and easy to work with? Is it laid out well so other users could see what's happening and how your files are structured? See the WordPress coding standards at http://codex.wordpress.org/WordPress_Coding_Standards.
5. Now save all of the files you've edited.
What just happened?You tidied up your files and your code. You should now have a theme which is well coded and meets the WordPress coding standards. Well done!
www.it-ebooks.info

Chapter 6
[ 179 ]
Describing your theme in the stylesheetThe next step is to ensure that your stylesheet has all of the information users of your theme will need. In Chapter 3, Coding It Up, we added text at the top of the stylesheet inside comments to tell WordPress the name of the theme and provide more information. Now let's add to that.
The opening lines of the stylesheet are commented out and contain the following information about your theme:
� Theme Name: The full name of your theme.
� Theme URI: Where the theme can be downloaded from.
� Description: A quick description of what the theme looks like, any specific purpose it's best suited for, and/or any other theme it's based on or inspired by.
� Author: Your name as the theme's author goes here.
� Author URI: A URL to a page, where people can find out more about you.
� Version: The version number—1.0 if it's a new theme. Each time you edit the theme, change this by adding a 0.1 increment for small changes or going up to the next whole number for major changes.
� Tags: A list of tags applying to your theme, which will help people searching for themes with certain characteristics.
You can also add license information—this won't be displayed on the Themes admin page, but will be visible to anyone who opens your stylesheet. This can take the form of the full license information or a short description of the license (for example, GPL).
Time for action – describing your themeNow it's time to describe our theme.
1. Open the style.css file.
2. At the top of the file, edit the existing information so that it reads something like the following:
/*Theme Name: Open Source Online Magazine chapter 6Theme URI: http://rachelmccollin.co.uk/opensourcemagazineDescription: Theme to accompany WordPress 3.4 Theme Development Beginners Guide Chapter 6Author: Tessa Blakeley Silver / Rachel McCollinAuthor URI: http://rachelmccollin.co.uk/Version: 1.0Tags: Black, blue, dark, responsive, magazine*/
3. Save your style.css file.
www.it-ebooks.info

Your Theme in Action
[ 180 ]
What just happened?You added the information users need to understand what your theme is, who developed it, and what attributes it has (using the tags). Now, when you refresh the Themes admin screen, the new information is displayed:
Your theme's licenseThe requirement for the theme repository is that themes are derivative works of the WordPress code base and, therefore, should be released with a standard GPL license that does not conflict with the WordPress GPL license. If you're not familiar with the GNU/GPL license, you can learn more about it here: http://www.gnu.org/copyleft/gpl.html
Again, if you're hoping to get into the WordPress theme repository, this is the license that you must use for your theme. You'll want to refer to the WordPress theme review guidelines for more information. The link for the same is http://codex.wordpress.org/Theme_Review#Licensing.
Time for action – adding license information to our themeLet's add some licensing information to our theme.
1. Open your theme's stylesheet.
www.it-ebooks.info

Chapter 6
[ 181 ]
2. Under the information you just added, and again inside comments, add the following:
License: GNU General Public License v2.0License URI: http://www.gnu.org/licenses/gpl-2.0.html
3. Save the file.
What just happened?We added license information to our theme. This makes it clear that the theme is released under the GPL so it will meet the WordPress theme repository criteria.
Zipping up your themeNow the theme is ready to go, we just need to compress it for upload to wordpress.org. To do this, we'll need to create a .zip file, but the way you do this will be different depending on what platform you're using—Windows or Mac.
Time for action – zipping up your themeLet's zip our theme up. First, the process for doing this on a Mac:
1. In Finder, select your theme's folder.
2. Right-click or command + click on it and select Compress from the shortcut menu.
3. A zip file will automatically be created for you.
The method for doing this will vary on Windows depending on what version of Windows you're using. Firstly, for Windows Vista:
1. In File Manager, select your theme's folder.
2. Right-click or Ctrl + click on it and select Send to from the shortcut menu.
3. Select Compressed (zipped) folder.
4. A zip file will automatically be created for you.
If you're using an earlier version of Windows, you'll have to use compression software on your PC to do this. For details of free compression software for Windows, see http://www.top5freeware.com/top-5-free-file-compression-software. The most popular compression software is WinZip, which isn't free, but you can download a free trial at http://www.winzip.com/index.htm.
www.it-ebooks.info

Your Theme in Action
[ 182 ]
What just happened?We made a .zip file with a compressed version of our theme contained in it. This file can now be sent to other users or developers or uploaded to the WordPress theme directory at http://wordpress.org/extend/themes/upload/.
One last testYou're now ready to test the package. This involves unzipping and uploading the theme to a WordPress installation, which mirrors a live environment where it will be used.
Ideally, you'll want to install your theme on a web server installation, preferably the one where the theme is going to be used (if it's a custom design for a single client), or under the circumstances you feel your theme's users are most likely to use (for example, if you're going to post your theme for download on the WordPress theme repository, then test your theme on an installation of WordPress on a shared hosting environment which most people use).
Don't assume that the ZIP file you made is going to unzip or unpack properly (files have been known to be corrupt).
Time for action – testing the themeLet's install our theme in a site and test it. Perform the following steps:
1. Open a clean WordPress installation.
2. Go to the Themes screen by clicking on Appearance.
3. Click on the Install Themes tab.
4. At the top of the screen, click on Upload as shown in the following screenshot:
www.it-ebooks.info

Chapter 6
[ 183 ]
5. Click on the Choose File button and select your ZIP file.
6. Your file will upload to WordPress. Click on Activate.
7. Now test the theme, checking that it displays properly in the site and that all of the functions you expect are available. You may have to amend the Permalinks and Reading settings to do this—for a recap on how to do this, see Chapter 4, Advanced Theme Features.
What just happened?You uploaded your theme to a fresh WordPress installation and tested it. Hopefully, it's all working ok—well done!
www.it-ebooks.info

Your Theme in Action
[ 184 ]
Have a go hero – using the WordPress Theme Unit TestYou've already learned about the Theme Review guidelines earlier in this chapter, but if you want to submit your theme to the theme repository, you'll also need to make sure it passes the Theme Unit Test.
As part of the theme review, the Theme Review Team will run tests on your theme, known as the Theme Unit Test (http://codex.wordpress.org/Theme_Unit_Test). You can do this yourself for your own theme to test it. To do so, you follow a few steps:
1. Download an XML file from https://wpcom-themes.svn.automattic.com/demo/theme-unit-test-data.xml to your theme.
2. Import some text data by navigating to Tools | Import.
3. In the wp-config.php file in your WordPress installation, set WP_DEBUG to true, using the instructions at http://codex.wordpress.org/WP_DEBUG.
4. Install some specific plugins and follow the testing process. You can find the full instructions at http://make.wordpress.org/themes/about/how-to-join-wptrt/.
Try doing this for your theme—it helps to know if your theme will pass before you submit it, and is a useful way to learn about the standards required for themes listed on the WordPress website.
Pop Quiz - questions on packaging up your themeQ1. What license should a WordPress theme have to be accepted to the theme repository?
1. GPL
2. Creative Commons
3. Split license
Q2. Where do you place information that will be displayed in your theme's listing on the Themes admin screen?
1. In functions.php
2. In the <head> tag of header.php
3. In a separate file of its own
4. In style.css
www.it-ebooks.info

Chapter 6
[ 185 ]
Q3. What type of file should you upload to the WordPress theme submission page?
1. A PHP file
2. A ZIP file
3. A README.TXT file
Q4. What is the Theme Unit Test?
1. Specifications for the files your theme should include
2. A list of template tags your theme has to use
3. Guidelines on theme templates
4. A process for testing if your theme meets the Theme Review guidelines
SummaryIn this chapter, you've learned how to package your theme up, so that other WordPress users and developers can make use of it. You've also learned the following:
� How to check your theme against the WordPress Theme Review guidelines
� How to create a screenshot.png file for your theme
� How to provide appropriate information in your stylesheet for users of the theme
� How to compress your theme so that it can be uploaded to the WordPress theme repository or sent to other users
� How to run some final tests on your theme
Congratulations, you now know about getting a WordPress theme design off that coffee shop napkin and into the real world! In the next chapter, we'll get down into the real-world nitty-gritty of getting things done quickly with some slick tips and tricks for your WordPress theme development.
www.it-ebooks.info

7Tips and tricks
You now have a great working WordPress theme, which uses valid, standards-compliant code and is fit for release to the public. Congratulations!
In this chapter we'll look at some added extras, some additional bells and whistles you can use to make your theme just that bit better.
You'll learn how to create and make use of additional template files to add extra flexibility and functionality to your theme, as well as how to use conditional tags to display different content in different parts of your site. You'll also learn how to make use of the Theme Customizer and optimize your site for SEO.
You can create perfectly good, workable WordPress themes without any of these extras, but you'll find that you can take your WordPress themes much further with these techniques.
So let's get going!
Adding more template files to your themeIn Chapter 3, Coding it Up, we looked at the template files you need for a basic WordPress theme, and we spent some time creating them. We also learned about includes, files which you call from your main template files, such as header.php.
www.it-ebooks.info
Tips and tricks
[ 188 ]
So far we've created the following template files for our theme:
� Template files:
� index.php
� page.php
� Includes:
� header.php
� sidebar.php
� footer.php
� The functions file:
� functions.php
� The stylesheet:
� style.css
But let's say our site needed to display posts from a specific category differently from the rest of the site, or we needed the home page to work differently, or maybe we wanted to have more control over how search results or 404 pages were displayed.
With template files, we can do all that.
A search.php file for search resultsWordPress handles search results pretty well already. Let's see what's displayed in our theme if we try to search for example post (Note that we've now added a Search widget to the right-hand side footer widget area to make this possible):
www.it-ebooks.info

Chapter 7
[ 189 ]
As you can see, it' s using our index.php template file, so the heading reads This Month:. We'd rather make it more obvious that these are search results.
www.it-ebooks.info

Tips and tricks
[ 190 ]
Now let's see what happens if we search for something that can't be found:
Again, the heading isn't great. Our theme gives the user a message telling them what's happened (which is coded into index.php as we'll see), but we could beef that up a bit, for example by adding a list of the most recent posts.
Time for action – creating a search.php template fileLet's create our search.php file and add some code to get it working in the way we'd like it to:
1. In your theme folder, make a copy of index.php and call it search.php.
www.it-ebooks.info

Chapter 7
[ 191 ]
2. Find the following code near the top of the file:
<h2 class="thisMonth embossed" style="color:#fff;">This Month:</h2>
3. Edit the contents of the h2 element so the line of code now reads:
<h2 class="thisMonth embossed" style="color:#fff;">Search results:</h2>
4. Find the loop. This will begin with:
<?php if (have_posts()) :?> <?php while (have_posts()) : the_post();?>
5. The first section of the loop displays any posts found by the search, leave this as it is. The second section of the loop specifies what happens if no search results are found. It's in the following lines of code:
<?php else : ?> <h2 class="center">Not Found</h2> <p class="center">Sorry, but you are looking for something that isn't here.</p> <?php get_search_form(); ?><?php endif; ?>
6. Underneath the line that reads <?php get_search_form(); ?> and before <?php endif; ?>, add the following lines of code:
<h3>Latest articles:</h3><?php $query = new WP_Query( array ( 'post_type' => 'post', 'post_count' => '5' ) ); while ( $query->have_posts() ) : $query->the_post(); ?> <ul> <li> <a href="<?php the_permalink(); ?>"> <?php the_title(); ?> </a> </li> </ul><?php endwhile; ?>
7. Save your search.php file and try searching for something which isn't included in the site.
www.it-ebooks.info

Tips and tricks
[ 192 ]
What just happened?We created a new template file called search.php, which will be used to display the results of a site search. We then edited the heading to make it clearer, and added some code to display the latest posts if the search had no results.
We actually did something pretty advanced, we added a second loop inside our original loop.
Let's have a look at the code we added after the search form:
� The function $query = new WP_Query() runs a new query on the database, based on the WordPress WP_Query function, which is the function you should use when running a loop inside the main loop.
� We gave WP_Query the following parameters:
� 'post_type' => 'post' – this ensures that the query will only look for posts, not for any other kind of content.
� 'post_count' => '5' – this tells WordPress how many posts to show. Five, in this case.
� We then output the title of each post with the php the_title() tag which we've already used higher up in the loop to display post titles. We wrapped this in a link inside a list item. The link uses the_permalink() to link to the blog post whose title is displayed. This is very similar to the main loop.
� Finally, we added endwhile() to stop this loop. This doesn't replace the endwhile() at the end of our main loop, which is higher up in the file.
For more on WP_Query and how to use it to create multiple loops, see http://codex.wordpress.org/Class_Reference/WP_Query.
www.it-ebooks.info
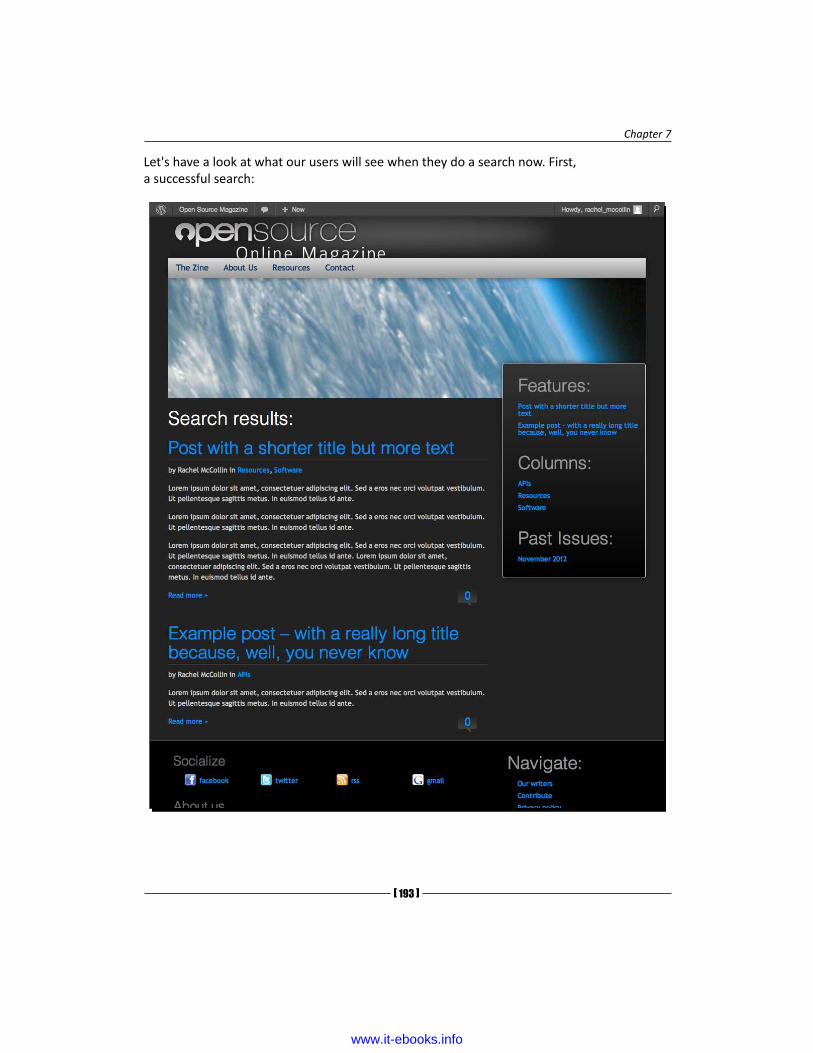
Chapter 7
[ 193 ]
Let's have a look at what our users will see when they do a search now. First, a successful search:
www.it-ebooks.info

Tips and tricks
[ 194 ]
Next, an unsuccessful search:
So that's how we set up a template file for search results. Our search page is only displaying two posts because that's all we have on our site. If there were more than five, it would just display the five most recent.
Now let's set one up to display some pages differently.
Creating a custom page templateIn many themes, all pages will need the same basic layout and content, with the same sidebars and footer and the same styling. But sometimes you may need some pages to look different.
For example, you might want to use different sidebars in different pages, or you might want a different layout. Here we'll look at the second of those two options.
www.it-ebooks.info
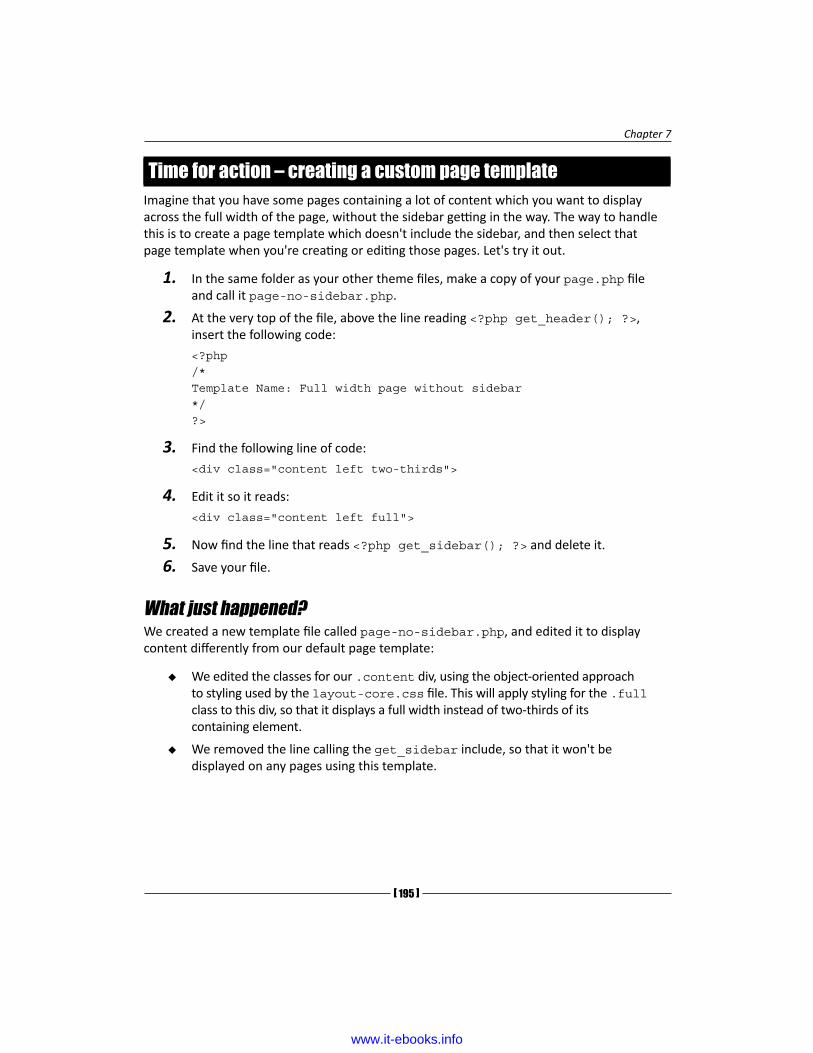
Chapter 7
[ 195 ]
Time for action – creating a custom page templateImagine that you have some pages containing a lot of content which you want to display across the full width of the page, without the sidebar getting in the way. The way to handle this is to create a page template which doesn't include the sidebar, and then select that page template when you're creating or editing those pages. Let's try it out.
1. In the same folder as your other theme files, make a copy of your page.php file and call it page-no-sidebar.php.
2. At the very top of the file, above the line reading <?php get_header(); ?>, insert the following code:
<?php/*Template Name: Full width page without sidebar*/?>
3. Find the following line of code:
<div class="content left two-thirds">
4. Edit it so it reads:
<div class="content left full">
5. Now find the line that reads <?php get_sidebar(); ?> and delete it.
6. Save your file.
What just happened?We created a new template file called page-no-sidebar.php, and edited it to display content differently from our default page template:
� We edited the classes for our .content div, using the object-oriented approach to styling used by the layout-core.css file. This will apply styling for the .full class to this div, so that it displays a full width instead of two-thirds of its containing element.
� We removed the line calling the get_sidebar include, so that it won't be displayed on any pages using this template.
www.it-ebooks.info

Tips and tricks
[ 196 ]
The lines we added at the top are essential for WordPress to pick up on our page template and make it available in the WordPress admin. Page editors will see a drop-down list of page templates available, and the name we defined in the template is what they'll see in that list, as shown in the following screenshot:
As you can see, in the Page Attributes box to the right-hand side, a new select box has appeared called Template. Our new page template is listed in that select box, along with Default Template, which is page.php.
Now we can try it out by assigning this template to a page and seeing how it looks.
Time for action – assigning a custom page template to a page in our site
It's very simple to make a page in our site use our new page template.
1. In the WordPress admin, open the editing screen for one of your pages. Here we'll use the About Us page.
2. In the Page Attributes box, select the template called Full width page without sidebar.
3. Click on the Update button to save changes to the page.
4. Now visit the page to see how it looks.
www.it-ebooks.info

Chapter 7
[ 197 ]
What just happened?We edited one of our pages so it uses the page template we just set up. This is how it now looks in the browser:
The page is displayed without a sidebar, and the content stretches to the full width of the page. Good job!
Have a go hero – styling the custom page templateYou may remember that in Chapter 3, Coding it Up, we added the body_class() template tag to the <body> tag in our theme's header.php file, using the following code:
<body <?php body_class($class); ?>>
This tag automatically assigns classes to the <body> tag depending on what type of content is being displayed and the template file being used. The great news is that you can use it to target our new page template.
www.it-ebooks.info

Tips and tricks
[ 198 ]
Try doing this with your theme, using the .page-template-page-no-sidebar-php class, which will be assigned to the <body> tag for any pages using this template.
For example, you could try:
� Changing the color or size of the page title, using the .page-template-page-no-sidebar-php h2.page-title selector
� Hiding some content on this page only, using the display:none declaration (although it's much better to delete the content from the template file as then the content won't be output in the first place)
� Moving the sidebar to the left-hand side instead of removing it altogether— using layout styling for the sidebar and the content
� Adding an additional background image (or a different one) to those pages
There are plenty of possibilities!
For more on creating custom page templates, see http://codex.wordpress.org/Pages#Creating_Your_Own_Page_Templates.
Working with conditional tagsAlong with using page templates to display different content in different parts of your site, you can also use conditional tags. These are bits of PHP that tell WordPress to check if something is the case and, if so, run some code or, if not, to either run a different piece of code or to do nothing at all.
We'll scrape the surface of conditional tags here as it's a huge subject that you can do a great deal with, but it can get very complicated.
First, let's have a quick look at what conditional tags should look like.
Conditional tags' syntaxThe basic syntax for conditional tags is as follows:
<?php if ( [condition] ) { // code to output when condition is met} ?>
www.it-ebooks.info

Chapter 7
[ 199 ]
If the condition isn't met, WordPress would just skip the contents of the conditional tag and go straight on to the next bit of code. We'll create an example of this shortly.
You can also check when a condition is not true, using an exclamation mark:
<?php if ( ![condition] ) { // code to output when condition is not met} ?>
Or you can use else to add an alternative action if the condition is not met:
<?php if ( [condition] ) { // code to output when condition is met} else { // code to output when condition is not met}?>
These are the three basic ways of using conditional tags.
Incorporating conditional tags in our themeCan you think of any examples where we've already used conditional tags in this book? For a start, there's our loop, which we've used in all of our template files. When looking for posts to output, WordPress checks if there are any posts to display, and displays them if this is the case; if not, it does nothing.
The code in the loop which does this is shown as follows:
<?php if ( have_posts() ) : ?> // code to display our post titles and content<?php else : ?> /// code to output if there are no posts<?php endif; ?>
www.it-ebooks.info

Tips and tricks
[ 200 ]
You may have noticed that this code is slightly different from what you've already seen in the loop, which uses while (have_posts). An if statement checks if there are posts, but a while statement just tells WordPress to do something while there are posts to display, and isn't used for checking conditions.
The else statement and its contents are optional, but it helps to have something there just in case WordPress can't find anything to display. In our search.php template, as you'll remember, we added some code to output a list of recent posts inside that else statement, so that it's only displayed if the search finds no results:
<?php if ( have_posts() ) : ?> // code to output posts if the search is successful<?php else : ?> <h2 class="center">Not Found</h2> <p class="center">Sorry, but you are looking for something that isn't here.</p> <?php get_search_form(); ?> <h3>Latest articles:</h3> <?php $query = new WP_Query( array ( 'post_type' => 'post', 'post_count' => '5' ) ); while ( $query->have_posts() ) : $query->the_post(); ?> <ul> <li><a href="<?php the_permalink() ?>"><?php the_title(); ?></a></li> </ul> <?php endwhile; ?><?php endif; ?>
This means you've already been working with conditional tags and you didn't even know it! Now let's work on another example of using conditional tags – hiding the page title on the home page.
Using conditional tags to hide the home page's titleLet's imagine that we're working on a site which needs a static page as the home page instead of the blog listing we're using for Open Source Magazine. If we created a site like this we'd probably want to call our home page Home. But would users need to see that Home title on the home page? Not really, as they know it's the home page.
Let's try a really easy way to do this using CSS first, before moving on to using a conditional tag.
www.it-ebooks.info

Chapter 7
[ 201 ]
Time for action – using CSS to hide our home page's titleBefore we can hide our home page title, we'll need to change the settings on our site so it displays a static page as the home page.
1. In the WordPress admin, go to the Reading screen via the Settings menu:
www.it-ebooks.info

Tips and tricks
[ 202 ]
2. Change the Front page displays settings so that your site displays the About us page as the home page:
3. Click on Save Changes to save your settings.
4. Switch to your browser and visit the home page of your site. It's now changed:
www.it-ebooks.info

Chapter 7
[ 203 ]
5. Now open your theme's style.css stylesheet.
6. Above the media queries in your stylesheet add the following:
/* hide home page title */.home h2.post-title { display: none;}
7. Save style.css and switch to your browser. Refresh the home page screen.
What just happened?We changed our Reading settings to display a static home page, and then we added some CSS to hide the home page title on that page:
� .home targets the home page only, the .home class is generated by body_class() which we used earlier
� h2.post-title targets the h2 element in the loop, which displays the post title of any posts found (in this case actually a page, but that's not important)
� display: none tells the browser not to display the content we've targeted
So now what does our home page look like?
www.it-ebooks.info

Tips and tricks
[ 204 ]
The title isn't there anymore! What's left would need some styling as the margin between our image and our content is a bit small, but the CSS has done what we set out to achieve.
Now let's look at the HTML that WordPress generates on the home page. This is just a snippet of the full page HTML showing the elements affected by what we've just done:
<div class="content left full"> <article class="post-16 page type-page status-publish hentry" id="post-16"> <h2 class="post-title"><a href="http://rachelmccollin.co.uk/opensourcemagazine/" rel="bookmark" title="Permanent Link to About Us">About Us</a></h2> <div class="entry-content"><!--//post--> <p>Lorem ipsum...
The title is still output in the markup—it's the line beginning <h2 class="post-title">. This means that anyone viewing our site without CSS, either because they've turned it off or they're using assistive technology such as a screen reader will still see or hear that title.
We want to remove the title altogether, so we use a conditional tag instead.
Time for action – using a conditional tag to hide our home page's title
Now we'll use a conditional tag to completely remove the home page title.
1. Open your style.css file and remove the styling you just added to hide the home page title. Check your home page in the browser, it should be displaying the title again.
2. Open the page-no-sidebar.php file, which is the template file our About Us page uses.
3. Find the following code:
<h2 class="post-title"><a href="<?php the_permalink() ?>" rel="bookmark" title="Permanent Link to <?php the_title_attribute(); ?>"><?php the_title();?></a></h2>
4. Add a conditional tag around it so it reads:
<?php if ( !is_front_page () ) { ?> <h2 class="post-title"><a href="<?php the_permalink() ?>" rel="bookmark" title="Permanent Link to <?php the_title_attribute(); ?>"><?php the_title();?></a></h2> <?php } ?>
www.it-ebooks.info

Chapter 7
[ 205 ]
5. Save your template file.
6. Now repeat this process for the page.php template file and save that.
7. Switch to your browser and refresh the home page.
What just happened?We added a conditional tag to tell WordPress to not output the post title on the site's front page. Let's have a look at that code:
� <?php if ( !is_front_page () ) { ?> checks if the user is not on the front page (by inserting an exclamation mark). The } ?> at the end is important as the braces will contain the code to output if the condition is met, and ?> closes PHP so that the next line of HTML can be read by the browser.
� The next line is unchanged, it's the output of our h2 element and its contents.
� Finally, <?php } ?> tells the browser we're using PHP again. We use the closing brace (}) to end the code that's output if the condition in our conditional tag is met, and then uses ?> to close PHP again.
When you refresh your home page again you'll see that the title isn't displayed. It looks exactly the same as the previous screenshot which was the result of using CSS to hide the title.
But the difference is in the code. Let's see the HTML that WordPress outputs for our home page now:
<article class="post-16 page type-page status-publish hentry" id="post-16"> <div class="entry-content"><!--//post--> <p>Lorem ipsum...
The h2 element and its contents have gone completely. Much better!
Before moving on to the next section, we'll just take a moment to restore our Reading settings to the way they were, so that the blog page is shown as the home page instead of a static page. Don't undo the changes you've made to your template files though. If you should ever change the Reading settings back in the future, or someone else who needs a static home page should use your theme, this conditional tag will be useful.
www.it-ebooks.info

Tips and tricks
[ 206 ]
Have a go hero – other ways of showing conditional contentCan you think of any other ways of hiding the title in our home page?
Yes, you could use a template file. You could either set up a custom page template for use on the home page, or (even better) create a front-page.php file which WordPress will automatically use to display home page content. In your new template file, you'd remove the h2 element and its contents altogether. We've used the conditional tag to create a whole new template file just to remove one line of code seems a bit disproportionate.
Can you think of any other uses for conditional tags? Try to identify how you might use them in other places in your theme, and give it a go.
For a full list of the conditional tags available and how to use them, see http://codex.wordpress.org/Conditional_Tags.
The Theme CustomizerYou could quite happily stop where you are and you'd have a great theme. It's structured well, it makes use of the bloginfo tag to display site information, it has a menu and some cool widgets, as well as using template files and conditional tags to display the right content in the right place.
But if your theme is going to be used by other people, you can add more options to help make their lives easier. By activating the Theme Customizer, you can let users tweak settings such as colors and fonts or add content to be displayed in the theme. These are great features if you're going to release your theme to the public, but can also be useful for client sites.
The Theme Customizer was introduced with WordPress 3.4. The Theme Customizer for the default Twenty Eleven theme looks like the following screenshot:
www.it-ebooks.info

Chapter 7
[ 207 ]
To give your theme users access to the Theme Customizer you need to add some code to your functions.php file, and then you need to add the relevant code for each option you want to provide them with. We'll start by adding Theme Customizer functionality to our theme.
www.it-ebooks.info

Tips and tricks
[ 208 ]
Time for action - adding the Theme Customizer to our themeTo do this, we need to add some code to our functions.php file.
1. Open your theme's functions.php file.
2. Before the closing ?> tag, add the following:
function add_theme_customizer( $wp_customize ) { } add_action( 'customize_register', ' add_theme_customizer');
3. Save the functions.php file.
4. To view the Theme Customizer, go to Appearance | Themes, and then in the links below your theme, click on Customize.
What just happened?We added a new function to add Theme Customizer capability to our theme. Let's have a look at that function:
� First we define our function, add_theme_customizer. You can give this any name you want, the name we've used makes it easy to see what the function does.
� The space between the braces is where all the code will go to add specific options to our Theme Customizer.
� After closing the braces, we add an action. This will run the code inside our add_theme_customizer function when WordPress runs the customize_register function, which is a default function.
www.it-ebooks.info

Chapter 7
[ 209 ]
Now we can view the Theme Customizer for our theme. As we haven't defined any additional functions, it currently includes the default options provided by WordPress:
We can see the default customizations added by WordPress:
� Site Title & Tagline: Here we can change the site's name and description
� Navigation: Change the menu used in the main navigation area
� Static Front Page: Change the Reading settings if you want the front page to display a static page instead of the latest posts
We can add more options to the Theme Customizer, so let's do it.
www.it-ebooks.info

Tips and tricks
[ 210 ]
Time for action – adding some more options to the Theme Customizer
WordPress provides some default options in the Theme Customizer, and we can also add our own. Let's add the option for users to tweak the color of links.
1. In functions.php, add the following code between the curly braces in the function you just defined:
// SETTINGS $wp_customize->add_setting( 'content_link_color', array( 'default' => '#088fff', 'transport' => 'refresh', ) );// CONTROLS $wp_customize->add_control( new WP_Customize_Color_Control( $wp_customize, 'content_link_color', array( 'label' => 'Content Link Color', 'section' => 'colors', ) ) );
2. Save your functions.php file.
What just happened?We added a function to enable users to change the link colors in their site using the Theme Customizer. This is the most complex piece of PHP code we've added yet so let's have a look at how it works:
� Firstly, it defines the settings which are available in our Theme Customizer, using the WordPress $wp_customize->add_setting function:
� content_link_color is the ID of our setting
� the default value is #088fff, which is the link color coded into our theme's stylesheet
� 'transport' => 'refresh' tells WordPress to display any changes users may make in the Theme Customizer as they are making them
www.it-ebooks.info

Chapter 7
[ 211 ]
� Next, it specifies the control which users will use to edit the setting, using the new WP_Customize_Color_Control function:
� content_link_color is the ID for our setting that tells WordPress that this control will amend that setting
� The label value is what WordPress will display in the Theme Customizer screen
� section is the section within that screen in which WordPress will place our control, in this case, colors
Let's see what our Theme Customizer looks like now:
Any changes the user makes won't actually have any effect yet, because we haven't told WordPress to alter the CSS based on their modifications.
www.it-ebooks.info

Tips and tricks
[ 212 ]
Time for action – ensuring Theme Customizer changes are carried through to the CSS
To ensure any changes made by users actually take effect, we need to add another function telling WordPress to alter the CSS.
1. In your functions.php file, below the functions you've just added, add the following lines:
function theme_customize_css() { ?> <style type="text/css"> a { color:<?php echo get_theme_mod( 'content_link_color' ); ?>; } </style> <?php }add_action( 'wp_head', 'theme_customize_css');
2. Save your functions.php file.
What just happened?We added a final function which tells WordPress to amend CSS based on any changes the user makes in the Theme Customizer screen. In detail, the code is as follows:
� We start with the theme_customize_css() function which defines our function's name.
� Inside the function's settings, we set styling using <style type="text/css"> which is inline CSS to be inserted in our page's <head> section:
� The styling uses echo get_theme_mod( 'content_link_color' ). What this does is fetch the value of content_link_color (the setting we defined earlier) and echoes it, which means it outputs it.
� Finally, after closing the HTML tags and PHP braces, we define an action: add_action( 'wp_head', 'theme_customize_css'). This defines an action to be run with the wp_head hook, which means WordPress will use it whenever it encounters wp_head in our page's <head> section. You may remember we added that to our theme in the Finishing off with the footer section in Chapter 3, Coding It Up. The action runs our function theme_customize_css, at this point. What this will then do is output the HTML into the <head> section of each page, generating inline CSS.
Now when our users amend the link color, it will show up on the Theme Customizer screen:
www.it-ebooks.info

Chapter 7
[ 213 ]
If they then save changes by clicking on the Save button, the changes will be reflected in the live site, as shown in the following screenshot:
www.it-ebooks.info

Tips and tricks
[ 214 ]
Before continuing, we'll use the Theme Customizer to change the color back to the default CSS as it fits with our design.
Theme Customizer – the possibilitiesWe've just added one option to the Theme Customizer—of course you could add more. Possibilities include:
� changing any of the colors
� tweaking the layout
� adding content in specific areas of the site
� uploading images
The great thing about using the Theme Customizer is that users can see the effect of their changes before saving, which means they'll be less likely to break the site than if they tried to hack your theme files.
For more on the Theme Customizer, see http://codex.wordpress.org/Theme_Customization_API.
Have a go hero – adding a theme options screenAlong with activating the Theme Customizer, you could also create a theme options screen which lets users configure a wider range of options in your theme. This involves using functions to create admin screens and menu items, as well as getting to grips with the WordPress Settings API.
Try creating a theme options screen for your theme. You can find out how to do it at http://codex.wordpress.org/Creating_Options_Pages.
Search engine optimizationWordPress is great for SEO. It lets you add meta tags to your pages which will help search engines to index them properly, it makes it easy for you to add information to your images to help search engines to find them, and with the use of plugins, you can do even more.
As SEO is so important to most site owners, we're going to spend some time looking at SEO and how you can develop themes that enhance SEO for the owners of any sites using them.
www.it-ebooks.info

Chapter 7
[ 215 ]
SEO checklistThere are a few basic checks you can make to ensure your theme is SEO-friendly. Many of them have other benefits too, such as making the site more accessible or faster.
The main things you should be doing in your themes include:
� Using clean, valid, standards-compliant code
� Using semantic elements which will help search engines (and browsers) understand how the content is organized
� Ensuring your theme isn't sluggish
� Configuring pretty permalinks which make use of search keywords
� Optimizing images with alt and title attributes
� Using optimized meta tags: title and description
Of course, in addition to these it's important for a site's content to be SEO-friendly but we won't deal with that here as it's not related to the theme itself.
Let's have a look at each of those in turn.
Clean, valid, standards-compliant codeA theme which is well coded will have immediate SEO benefits, as well and speed and usability benefits too. Search engines will find it easier to index well-coded sites and will be less likely to blacklist them. In addition, by using semantic elements you can give search engines some pointers as to how your theme's content is structured, for example by using elements such as header, article, aside, and footer correctly.
We covered validation in detail in Chapter 5, Debugging and Validation, and ran our site through the W3C validator. If you haven't gone through that process, it's a good idea to do so, especially if you're going to be releasing your theme to the public.
Semantic HTML5You'll remember from Chapter 3, Coding it Up, that we coded our theme using HTML5. This latest version of HTML gives us some new semantic elements to work with that make more sense of our files. The elements we used included:
� header – the site header, which you may have coded in the past as <div ID="header">.
� article – the element containing each of our posts.
www.it-ebooks.info

Tips and tricks
[ 216 ]
� aside – it contains sidebars. An aside is anything that is separate from the main content and sits outside the flow of the page.
� footer – the site footer. You can also use this for a footer within any other element, for example an article's footer might contain some metadata about the article.
These elements tell search engines more about the structure of a page than the div tags we may have used in the past, which have no semantic meaning at all.
For more information on HTML5 and how to implement it, see the excellent HTML5 Doctor website at http://html5doctor.com. For an overview of how HTML5 and WordPress fit together, see http://rachelmccollin.co.uk/blog/wordpress-and-html5/.
Making your theme run fasterThis isn't really so much about themes as it is about the sites they're used on, but there are some tips for faster sites that can also be applied to themes.
Some tips for making your theme lean and fast, so it doesn't slow down the sites it's installed in include:
� Keep your code tidy – only use what's necessary and delete anything that's not being used.
� Avoid duplication in your code – for example, when using CSS for styling. A lot of themes will include the same styling for multiple elements or classes, repeating the same declarations over and over. Our object-oriented approach means we only have to add each bit of styling once and then use classes to apply it to our theme.
� Avoid inline JavaScript and CSS – store them in external files such as style.css and then call them from your template files.
Occasionally inline CSS and scripts may be unavoidable, such as when we added styling earlier using the Theme Customizer. This was because we needed to attach it to the get_option() function, which we can't run in a stylesheet.
� Call stylesheets at the top of each page (in header.php) and scripts at the bottom (in footer.php) where possible.
� Minimize HTTP requests by using only the images you need. For example, by using CSS3 for gradients and rounded corners we avoided a large number of HTTP requests for images that older themes would have made to achieve these effects.
www.it-ebooks.info

Chapter 7
[ 217 ]
Once you have your theme installed on a site, there's more you can do to make the site itself faster, for example:
� Use a caching plugin such as WP Supercache (available at http://wordpress.org/extend/plugins/wp-super-cache/) to cache your site. The way this works is by generating static HTML from the PHP generated by WordPress. This HTML is then stored on the server with your site and displayed when a user accesses the site. This is much faster than running all the PHP every time.
� Minify your code with a plugin such as WP Minify (http://wordpress.org/extend/plugins/wp-minify/), which compresses the code in your site to make it run faster.
Search-engine optimized permalinksIn Chapter 4, Advanced Theme Features we looked at how to configure so-called "pretty" permalinks, and how to edit the slug for each page and post to give us more control over those permalinks. A slug is a unique identifier for a page or post which appears at the end of its URL, so the page http://rachelmccollin.co.uk/opensourcemagazine/contact/ has the slug contact. When editing your slugs, you will help search engine rankings if you ensure those slugs include some of your search keywords, in other words, the words or phrases people are likely to use when looking for sites like yours.
Identifying the best search engine keywords to target can be a mammoth task, especially for sites where being found by search engines is crucial and there's a lot of competition. To learn how to do this, check out WordPress 3 Search Engine Optimization, Michael David, Packt Publishing, and the article on the subject at http://www.packtpub.com/article/customizing-wordpress-settings-seo.
Optimizing images and links with alt and title attributesThis is a topic more for site owners than for theme builders, as they will be uploading more images and adding more links to their site. However, it does have its place in theme building.
Our theme includes images as background images which can't have alt or title attributes assigned to them. But let's imagine your theme included a logo as part of the HTML markup. How would you optimize that image for SEO?
www.it-ebooks.info

Tips and tricks
[ 218 ]
Time for action – optimizing a logo for SEOHere we'll add a linked image to our site header and optimize it for SEO. We don't need to check the visual impact on the theme, as it will break the design—after all, this is just an example.
1. Open your theme's header.php file.
2. Inside the <header> element, and above the <hgroup> element, insert the following code:
<a href="<?php bloginfo('url'); ?>" title="<?php bloginfo('name'); ?>"> <img src="<?php bloginfo('stylesheet_directory')?>/images/osmag-logos.png" alt="<?php bloginfo('name')?> - logo" title="Logo - click for home page"/></a>
3. Save your header.php file.
4. Switch to the browser and check the code generated by WordPress.
What just happened?We added an image inside a link, and optimized both for SEO. Let's look at each.
First the link, which has the following attributes:
� href="<?php bloginfo('url'); ?>" – this ensures that the link is directed to the site's home page, using the bloginfo template tag we first encountered in Chapter 3, Coding it Up.
� title="<?php bloginfo('name'); ?>" – the link has a title which corresponds to the site name, again using bloginfo. This tells browsers, search engines, and screen readers more about the link.
Now the image. Its attributes are:
� src="<?php bloginfo('stylesheet_directory')?>/images/osmag-logos.png" – the image is contained in the images directory within our theme directory.
� alt="<?php bloginfo('name')?> - logo" – the alt attribute is what a screen reader would read out to a user, so it needs to be descriptive. As well as adding the name of the site we've added a note that it's the logo.
� title="Logo - click for home page" – the title gives users some helpful information about how to use this link.
www.it-ebooks.info

Chapter 7
[ 219 ]
Using bloginfo like this means you can code these attributes into your theme without worrying about what will be generated by different sites using the theme—WordPress will fetch the correct information for you.
When managing images and links in a site, you don't have to worry about writing the code. WordPress handles attributes via its links and media upload interfaces. That's a relief!
Let's see the code generated by WordPress for that image and its link:
<a href="http://rachelmccollin.co.uk/opensourcemagazine" title="Open Source Magazine"> <img src="http://rachelmccollin.co.uk/opensourcemagazine/wp-content/themes/opensourcemagazine_ch7/images/osmag-logos.png" alt="Open Source Magazine - logo" title="Logo - click for home page"/></a>
As you can see, the HTML which WordPress generates includes useful information for search engines and screen readers.
Before moving on, we'll quickly delete the code we added here, as it breaks our site's design. You might want to keep it in your theme if you're including a logo in your markup instead of as a background image. If you wanted to, you could make this an image your theme's users could upload via the Theme Customizer.
Using optimized meta tags – page titles and descriptionsAlong with using alt and title attributes for our images and links, we can also use meta tags for each page to tell search engines what the page is about. These are very important for SEO, as they are the text that's displayed when Google (for example) displays your site on a search results page. Along with influencing the likelihood that your site will be found, they also influence the chances of a user clicking that link in the search results page and visiting your site.
www.it-ebooks.info

Tips and tricks
[ 220 ]
For example, here's the listing Google displays when it finds the small business websites page in my agency site, http:compass-design.co.uk in a search:
The underlined text in purple is the title of this page, while the black text below the link is its description. In this case it's been optimized using a plugin called SEO by Yoast (http://wordpress.org/extend/plugins/wordpress-seo/). We won't go into that here as it's a task for site owners, not theme builders. The blue text at the bottom is the business address—something which Google has in its database because Compass Design is registered with Google Places.
As a theme builder you can optimize these meta tags for your theme users—great if users don't want to use a plugin or don't know how.
Time for action – optimizing our theme's page meta tagsThe meta tags go in the <head> section of each page, which in a WordPress theme is in header.php.
1. Open your theme's header.php file.
2. Find the following code and delete it:
<meta name="description" content="Description of content that contains top keyword phrases"/><meta name="keywords" content="Key words and phrases, comma separated, not directly used in content - google ignores this tag but used in other engines as a fall back"/><title>Open Source Online Magazine</title>
3. Add an optimized title meta tag. In the space where you've just deleted the existing code, add the following:
<title><?php wp_title('|','true','right'); ?><?php bloginfo('name'); ?></title>
www.it-ebooks.info

Chapter 7
[ 221 ]
4. Now, below that, add the code for the description:
<meta name="description" content="<?php bloginfo('description'); ?>" >
5. Save your header.php file and switch to your browser. Visit the page for one of your blog posts and take a look at the title displayed.
What just happened?We added some meta tags to our theme, specifically the title tag and a description meta tag. Let's check the code we used:
Our title tag includes two elements:
� Firstly, the name of the current post or page that is output using wp_title('|','true','right'):
� wp_title is the WordPress template tag which displays the title of the current post or page
� The first parameter '|' displays a separator
� The second parameter, 'true' tells WordPress to display (or echo, in PHP terms) the page title, rather than just fetching it for later use
� The third parameter tells WordPress where to display the separator—to the right of the page title
� Next, we use bloginfo('name') to display the site name—it's that handy bloginfo tag again.
Our description meta tag uses the content attribute to display the site description using bloginfo('description').
Why no meta tag for keywords?
We haven't included a meta tag for keywords as Google no longer uses keywords when generating search results. This is because keywords were so widely abused in the past that they became unreliable. If you wanted to use keywords (for example, if you're optimizing for a search engine that does still use keywords), the best approach is to use a plugin.
www.it-ebooks.info

Tips and tricks
[ 222 ]
So let's have a look at our post, as viewed in the Safari browser:
You can see our title displayed by the browser. However, you can't see the description. To check that, let's look at the code generated for this page:
<title>Post with a shorter title but more text | Open Source Magazine</title><meta name="description" content="Using Open Source for work and play" >
As you can see, our description is there too. Well done!
www.it-ebooks.info

Chapter 7
[ 223 ]
SummaryIn this chapter, we learned some extra tips and tricks to make your themes even better. We learned about:
� Template files – creating them and using them to display different content in different parts of your site. We created a custom page template for pages needing full width content and no sidebar.
� Conditional tags – we looked at how to use them to display different content or hide content when certain conditions are met. We used a conditional tag to hide the page title on the home page.
� Theme Customizer – we added this functionality to our theme and gave users the option of tweaking some colors.
� SEO – we worked through an SEO checklist for theme building and optimized our theme's images, links, and meta tags for SEO.
You're now at the end of this book and have worked through the process of creating your first WordPress theme from scratch, congratulations! You've learned how to:
� Design a theme and prepare wireframes and mockups
� Write the HTML and CSS for your theme
� Convert your HTML to PHP and split that into template files
� Add template tags, menus, widgets, and more
� Debug and validate your theme
� Package your theme up for users
� Enhance your theme with advanced features
You now have an all-singing, all-dancing theme which goes beyond the basics and will enable you (and other users) to create great websites.
Being able to build WordPress themes is a core skill without which you can't really achieve very much with the platform. You now have the skills you need to design and develop great themes for your own or your client sites or for release to other WordPress users.
Now all that's left is for you to put what you've learned into practice on some more themes and enjoy being a theme developer. Good luck!
www.it-ebooks.info

Pop Quiz Answers
Chapter 2, Preparing a Design for Our WordPress Theme
Pop quiz – questions about theme design
Q1 4. All of the above.
Q2 4. It helps you see your design quickly and start considering usability and content.
Q3 1. Lots—it helps you see what your design will look like when lots of content is added.
Chapter 3, Coding it UpPop quiz – questions about WordPress theme structure
Q1 1. Only the first statement is true—page.php trumps index.php when viewing a static page. When viewing a category archive, it's category.php that trumps archive.php (not the other way round). single.php trumps index.php when viewing an individual post or attachment—it isn't used for viewing static pages.
Q2 3. The header.php file contains everything from the opening the DOCTYPE declaration to the end of the header in the design, which is generally the end of the <header> tag (or the end of the main <nav> tag).
www.it-ebooks.info
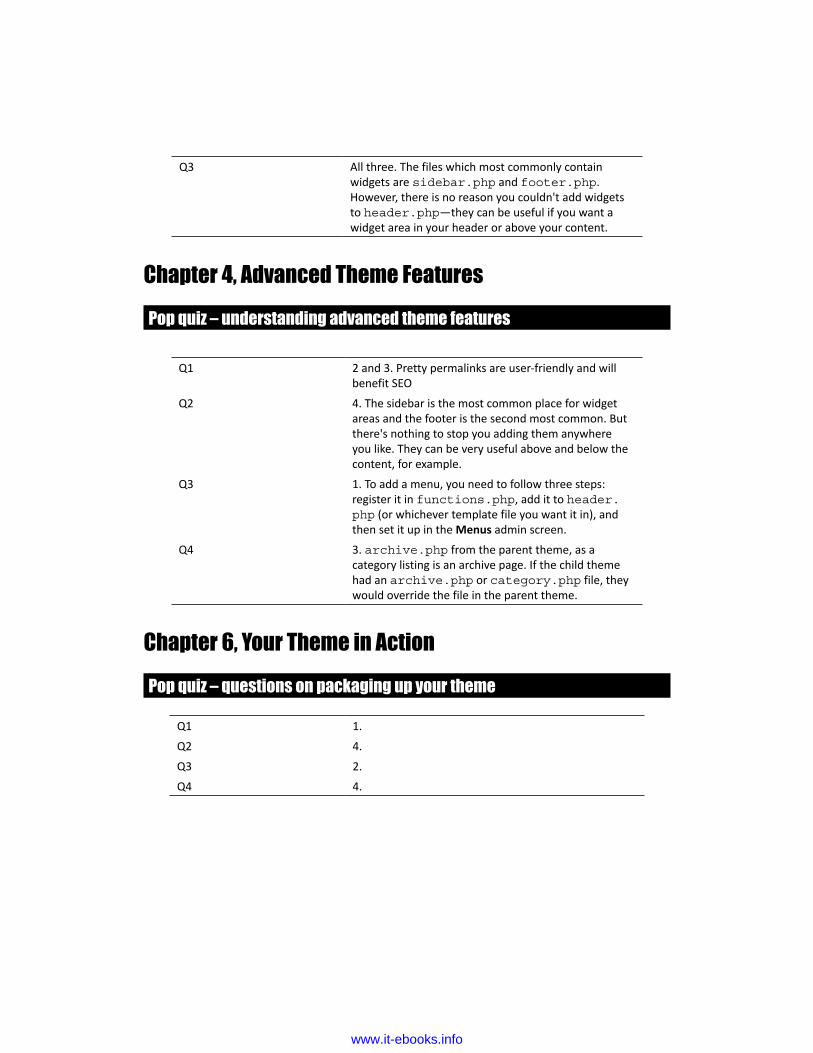
Q3 All three. The files which most commonly contain widgets are sidebar.php and footer.php. However, there is no reason you couldn't add widgets to header.php—they can be useful if you want a widget area in your header or above your content.
Chapter 4, Advanced Theme FeaturesPop quiz – understanding advanced theme features
Q1 2 and 3. Pretty permalinks are user-friendly and will benefit SEO
Q2 4. The sidebar is the most common place for widget areas and the footer is the second most common. But there's nothing to stop you adding them anywhere you like. They can be very useful above and below the content, for example.
Q3 1. To add a menu, you need to follow three steps: register it in functions.php, add it to header.php (or whichever template file you want it in), and then set it up in the Menus admin screen.
Q4 3. archive.php from the parent theme, as a category listing is an archive page. If the child theme had an archive.php or category.php file, they would override the file in the parent theme.
Chapter 6, Your Theme in ActionPop quiz – questions on packaging up your theme
Q1 1.
Q2 4.
Q3 2.
Q4 4.
www.it-ebooks.info

IndexSymbols960grid 20.ico format 68
AAbout us page 106Adobe 15Alt + Tab 78Appearance | Menus 138apple-mobile meta tags
adding 37attachment 75
Bbackground-color property 173background images
about 60adding, to images 61-63adding, to media queries 63-66setting up 61
banner 98bloginfo() template tag 85Bluefish 15blueprint 21browser support
about 166approaches 166
CCarrington 11categories 126child theme 150child themes 10Coda for Mac 14code, breaking into template files
footer 102header file, creating 98sidebar, separating 101steps 98template file , creating 105
conditional tagsincorporating, in theme 199syntax 198Theme Customizer 206using, for home page title hiding 200-206working with 198
contentadding 37sample text, adding 38-41text, adding 38
CSS 13CSS framework
960 grid 20blueprint 21layout core 21-23working with 20
www.it-ebooks.info

[ 228 ]
CSS issuesbox model problem 170Float problems 170guillotine bug 170hasLayout model 170IE-specific stylesheet, adding 171List spacing problems 170vpeekaboo bug 170
CSS stylesheetattaching 36creating 36
CSS validationusing 164-166
Cufon JavaScript 18custom page template
about 194assigning, to page 196, 197creating 195, 196styling 197
custom post links 126custom post type 75custom taxonomies 126
Ddebugging browser tools
Firefox 156Google Chrome 158Safari 159
designcreating 32layout 31planning 31starting with 29, 30
Design Comp 28designing
about 28in browser 28, 29
design treatmentsadding 57graphic treatments, setting up 57-60
desktop viewlarger desktops 51setting up 49smaller screens 51standard settings 49, 50
Document Object Model. See DOMDOM 157Dreamweaver 14dynamic_sidebar tag 133
EEms
about 19advantages 19
FFatal Error 168fat footers 102favicon
adding 67, 68high-resolution 68
featured imagesabout 142adding, to site 143-148adding, to theme 142, 143displaying, in different files 148-150
featured images sizes 150
FireFoxabout 156Firebug 157, 158Web Developer toolbar 156
font@font-face techniques 42font families, assigning 41, 42font families, styling 41search engine bots, handling 45, 46sizing 42, 44styling 41
fonts 18footer.php template file
creating 103, 104framework theme 10, 11
Gget_option() function 216GIMP 15Google Chrome 158
www.it-ebooks.info

[ 229 ]
Graphics editorGIMP 15Inkscape 15
Hhave_posts() template tag 168header file
header.php file, creating 99, 100hooks
about 85action hooks 85filter hooks 85
HTML 13HTML editor
Coda for Mac 14Dreamweaver 14features 14, 15HTML-kit 14TextWrangler 14
HTML-kit 14HTML object tags 36HTML validation
error, finding 162, 163error, fixing 162-164steps 160, 161
Hybrid 11
IIE-specific stylesheet
adding 171setting up 171
index.php file 148Inkscape 15Internet Explorer (IE) 155
Kkeywords 19KompoZer 15
Llayout core
about 21overview 22referencing 47
using 21layout-core.css file 23loop 77lorem ipsum text 38
MMac, Apache, MySQL, and PHP. See MAMPMAMP
about 23using 24
media queriesabout 48adding 48, 49
menuabout 115category link, adding 124, 126custom link, adding 123navigation menu, registering 116pages, adding 122, 123setting, requirements 119WordPress Menus admin 126-128
Menus admin screen 124menu setup
new WordPress menu, creating 121Reading settings, defining 119, 120requirements 119
mobile devices testing 174
Nnavigation menu
adding, to theme’s header.php file 117-119Nvu 15
Oopen source HTML editors
Bluefish 15KompoZer 15Nvu 15
Opera Mini 174Opera Mobile 174
Ppage 75, 126Parallels 172
www.it-ebooks.info

[ 230 ]
parent theme 150percentages 19permalinks
about 112features 112setting up 113, 114tags 115
PHP 13phpMyAdmin 24pixels 19Plugin API 17plugin API hooks 104points 19post 75premium themes
about 10customizing 10
RRead more link 105Recent Posts widget 137
SSafari 159sandbox 12Script API 17search.php file
about 188-190search.php template file, creating 190-194
semantic bodyabout 32basic HTML structure 33semantic structure, adding 33-35
SEOabout 214benefits 215checklists 215logo, optimizing 218, 219optimized meta tags, using 219optimized permalinks 217semantic HTML5 215theme’s page meta tags, optimizing 220-222theme speed, increasing 216
SEO by Yoast 220Settings | Media screen 150Shift + F2 68sidebar
sidebar.php file, creating 101, 102site settings
about 110configuring 110description, adding to theme 111, 112site title, adding 111, 112
slug 114small screen view
setting up 54, 56static HTML file
creating 32static pages
custom page.php template file, creating 106, 107
template file, creating for 105
Ttablet view
setting up 52standard layout, adjusting 53, 54
template files 188template hierarchy 17
about 72-75working 76
template pages 17template tags 8text setting
Ems 19keywords 19percentages 19pixels 19points 19
TextWrangler 14the Loop 17Thematic 11theme
testing 182, 183Theme Unit Test, using 184zipping 181
www.it-ebooks.info

[ 231 ]
Theme Customizerabout 206, 207adding, to theme 208, 209changes, incorporating 212, 214options, adding 210possibilities 214theme option screen, adding 214
theme designoff-the-shelf theme, drawbacks 9selecting 9
Theme Locations box 121theme packup
presteps 178theme packup, steps
license information, adding 180theme description, in stylesheet 179, 180tidying 178
theme preview screenshotcreating 177
theme testingBrowserLab, using 172, 173in IE 172
Theme Unit Test 184Thesis 11The Zine 123thumbnail 150tools
about 14Graphics editor 15HTML editor 14, 15web browser 15
touch iconsabout 68adding 69
troubleshootingbasics 167CSS quick fixes 169PHP template tags 168
UUpdate button 145
Vviewport
adding 37
WWAMP
about 23using 24
widgetsabout 128adding, in Widgets admin screen 136archives 129areas, registering 129categories 129custom menu 129recent posts 129tag cloud 129text 129
widgets, adding in Widgets admin screenfooter widgets, adding 138-141requirements 136sidebar widgets, adding 137, 138
Widgets admin screenwidgets, adding 136
widget areasabout 102adding, to footer.php 134, 135adding, to sidebars.php 132, 133registering 129, 135sidebars, registering in functions.php 130-132
Windows, Apache, MySQL, and PHP. See WAMPWordPress
about 7, 12as a blog 8overview 8
WordPress Loopabout 86adding 93auto-generated classes, adding 95, 96basic loop, creating 87-89comment count, displaying 93-95content, adding 90metadata, adding 91template tags, adding 91, 92version, updating 93viewing 97working 86, 87
www.it-ebooks.info

[ 232 ]
WordPress sandboxhosting provider, selecting 24rolling out 25setting up 23WAMP, using 24
WordPress themeAPI 76API hooks 17basics 71defining 16review guidelines 175, 176template files, building 79template hierarchy 17, 72template tags 17the Loop 17workflow, setting up 78
WordPress theme template filesbuilding, steps 79CSS styles 83hooks 85new theme directory, creating 79template tags 85theme directory, setting up 80, 81WordPress content, including 82, 83WordPress Loop 86
workflowdebugging 155validation 155
wp_head hook 104WP Minify 217WP Supercache 217
www.it-ebooks.info

Thank you for buying
WordPress Theme Development – Beginners’ Guide
About Packt PublishingPackt, pronounced 'packed', published its first book "Mastering phpMyAdmin for Effective MySQL Management" in April 2004 and subsequently continued to specialize in publishing highly focused books on specific technologies and solutions.
Our books and publications share the experiences of your fellow IT professionals in adapting and customizing today's systems, applications, and frameworks. Our solution based books give you the knowledge and power to customize the software and technologies you're using to get the job done. Packt books are more specific and less general than the IT books you have seen in the past. Our unique business model allows us to bring you more focused information, giving you more of what you need to know, and less of what you don't.
Packt is a modern, yet unique publishing company, which focuses on producing quality, cutting-edge books for communities of developers, administrators, and newbies alike. For more information, please visit our website: www.packtpub.com.
About Packt Open SourceIn 2010, Packt launched two new brands, Packt Open Source and Packt Enterprise, in order to continue its focus on specialization. This book is part of the Packt Open Source brand, home to books published on software built around Open Source licences, and offering information to anybody from advanced developers to budding web designers. The Open Source brand also runs Packt's Open Source Royalty Scheme, by which Packt gives a royalty to each Open Source project about whose software a book is sold.
Writing for PacktWe welcome all inquiries from people who are interested in authoring. Book proposals should be sent to [email protected]. If your book idea is still at an early stage and you would like to discuss it first before writing a formal book proposal, contact us; one of our commissioning editors will get in touch with you.
We're not just looking for published authors; if you have strong technical skills but no writing experience, our experienced editors can help you develop a writing career, or simply get some additional reward for your expertise.
www.it-ebooks.info

WordPress Theme DesignISBN: 978-1-847193-09-4 Paperback: 224 pages
A complete guide to creating professional WordPress themes
1. Take control of the look and feel of your WordPress site
2. Simple, clear tutorial to creating Unique and Beautiful themes
3. Expert guidance with practical step-by-step instructions for theme design
WordPress 2.8 Theme DesignISBN: 978-1-849510-08-0 Paperback: 292 pages
Create flexible, powerful, and professional themes for your WordPress blogs and websites
1. Take control of the look and feel of your WordPress site by creating fully functional unique themes that cover the latest WordPress features
2. Add interactivity to your themes using Flash and AJAX techniques
3. Expert guidance with practical step-by-step instructions for custom theme design
Please check www.PacktPub.com for information on our titles
www.it-ebooks.info

WordPress 3.0 jQueryISBN: 978-1-849511-74-2 Paperback: 316 pages
Enhance your WordPress website with the captivating effects of jQuery
1. Enhance the usability and increase visual interest in your WordPress 3.0 site with easy-to-implement jQuery techniques
2. Create advanced animations, use the UI plugin to your advantage within WordPress, and create custom jQuery plugins for your site
3. Turn your jQuery plugins into WordPress plugins and share with the world
WordPress 3 CompleteISBN: 978-1-849514-10-1 Paperback: 344 pages
Create your own complete website or blog from scratch with WordPress
1. Learn everything you need for creating your own feature-rich website or blog from scratch
2. Clear and practical explanations of all aspects of WordPress
3. In-depth coverage of installation, themes, plugins, and syndication
4. Explore WordPress as a fully functional content management system
Please check www.PacktPub.com for information on our titles
www.it-ebooks.info