Aptana Studio Beginner's Guide - Fussilatbd
298
www.it-ebooks.info
-
Upload
khangminh22 -
Category
Documents
-
view
0 -
download
0
Transcript of Aptana Studio Beginner's Guide - Fussilatbd

Aptana Studio Beginner's Guide
Develop web applications effectively with the Aptana Studio 3 IDE
Thomas Deuling
BIRMINGHAM - MUMBAI
www.it-ebooks.info

Aptana Studio Beginner's Guide
Copyright © 2013 Packt Publishing
All rights reserved. No part of this book may be reproduced, stored in a retrieval system, or transmitted in any form or by any means, without the prior written permission of the publisher, except in the case of brief quotations embedded in critical articles or reviews.
Every effort has been made in the preparation of this book to ensure the accuracy of the information presented. However, the information contained in this book is sold without warranty, either express or implied. Neither the author, nor Packt Publishing, and its dealers and distributors will be held liable for any damages caused or alleged to be caused directly or indirectly by this book.
Packt Publishing has endeavored to provide trademark information about all of the companies and products mentioned in this book by the appropriate use of capitals. However, Packt Publishing cannot guarantee the accuracy of this information.
First published: January 2013
Production Reference: 1180113
Published by Packt Publishing Ltd. Livery Place 35 Livery Street Birmingham B3 2PB, UK.
ISBN 978-1-84951-824-6
www.packtpub.com
Cover Image by Junaid Shah ([email protected])
www.it-ebooks.info

Credits
Author
Thomas Deuling
Reviewers
Gabriel Buckley
Zeeshan Choudhary
Rohit P. Khare
Daniel Rosca
Scott M. Spear
Acquisition Editor
Usha Iyer
Lead Technical Editor
Susmita Panda
Technical Editors
Kirti Pujari
Nitee Shetty
Copy Editors
Brandt D'Mello
Insiya Morbiwala
Aditya Nair
Alfida Paiva
Laxmi Subramanian
Ruta Waghmare
Project Coordinator
Leena Purkait
Proofreaders
Elinor Perry-Smith
Lindsey Thomas
Indexer
Monica Ajmera Mehta
Production Coordinator
Conidon Miranda
Cover Work
Conidon Miranda
www.it-ebooks.info

About the Author
Thomas Deuling is a web applications developer with over 5 years experience in developing large web applications with open source technologies. He started by programming small web applications and websites for different agencies. Currently, he is self employed and has just founded his own company called coding.ms (www.coding.ms). He has managed many large web projects in the past, even developing a whole ERP/CRM system for a large international company. In short, Thomas lives web development.
He is also the author of a German book, Warenwirtschaft und Webapplikationen auf Basis von OpenLaszlo, VDM Publishing, which deals with enterprise resource planning and web applications based on OpenLaszlo.
Firstly, the Appcelerator team deserves much of my gratitude for their time and effort, especially Ingo Muschenetz. I would like to thank Packt Publishing for giving me the opportunity to write this book, and for the immeasurable support provided to me throughout this project. Last but most definitely not least, I would like to thank my family for their on-going encouragement and understanding.
www.it-ebooks.info

About the Reviewers
Rohit P. Khare has around 10 years experience in programming. He specializes in .NET technology, but also has a passion for PHP and Ruby on Rails. For most open-source projects, he uses Aptana Studio as the preferred IDE.
He is working as a Tech Lead in a company where he handles the web applications division. Prior to this, he worked with different companies specializing in the retail domain, and he has also worked as a software consultant with a few key government organizations.
Scott M. Spear owns and operates Webmasters by Design LLC, a web design and development business. He has earned his Bachelor of Science degree in Computer Management Information Systems and a Masters degree in Business Administration, and has over a decade of web-design, development, and hosting experience. He has experience in a variety of fields, including specialization in dynamic website design and development using technologies such as PHP, MySQL, CSS, Ajax, jQuery, and ZendFramework. Additionally, he had experience working with Photoshop, Dreamweaver, WordPress, and Joomla!.
I would like to thank my wife for being there to help me succeed through all of my challenges and opportunities. She is my best friend, my biggest supporter, and the love of my life. Thank you, Heather!
www.it-ebooks.info

www.PacktPub.com
Support files, eBooks, discount offers and moreYou might want to visit www.PacktPub.com for support files and downloads related to your book.
Did you know that Packt offers eBook versions of every book published, with PDF and ePub files available? You can upgrade to the eBook version at www.PacktPub.com and as a print book customer, you are entitled to a discount on the eBook copy. Get in touch with us at [email protected] for more details.
At www.PacktPub.com, you can also read a collection of free technical articles, sign up for a range of free newsletters and receive exclusive discounts and offers on Packt books and eBooks.
TM
http://PacktLib.PacktPub.com
Do you need instant solutions to your IT questions? PacktLib is Packt's online digital book library. Here, you can access, read and search across Packt's entire library of books.
Why Subscribe? � Fully searchable across every book published by Packt
� Copy and paste, print and bookmark content
� On demand and accessible via web browser
Free Access for Packt account holdersIf you have an account with Packt at www.PacktPub.com, you can use this to access PacktLib today and view nine entirely free books. Simply use your login credentials for immediate access.
www.it-ebooks.info

Table of ContentsPreface 1
Chapter 1: Getting Started 7System requirements 7Downloading and installing Aptana Studio 8Time for action – downloading and installing Aptana Studio on Linux 8Time for action – downloading and installing Aptana Studio on Windows 10Time for action – downloading and installing Aptana Studio on Mac 14
How to increase memory for Java 15Time for action – increasing Java memory 16Upgrading the system 17How to install third-party plugins 20Time for action – installing a third-party plugin 21Uninstalling Aptana 26Summary 27
Chapter 2: Basics and How to Use Perspectives and Views 29Time for action – changing the color theme 30Time for action – configuring the tab behavior 31Definitions 32
Navigation 33Toolbar 33Perspectives 35Perspective menu 36Editors 38Views 38Statusbar 39
Customizing perspectives 41Creating a customized perspective 44Arrange perspective views 44
www.it-ebooks.info

Table of Contents
[ ii ]
Time for action – arranging views 45Time for action – adding new views 46
Customizing selection menus 47Time for action – customizing the View selection menus 48Time for action – customizing the new submenu 49
Command Groups Availability 50Time for action – adding and removing command groups availability 50
Toolbar visibility 51Time for action – customizing the toolbar 51
Menu visibility 52Time for action – customizing the menu 52
Saving a perspective 52Time for action – saving a perspective 52
Perspective preferences 53Deleting a perspective 53
Time for action – deleting a perspective 54Marking a default perspective 54
Time for action – marking a default perspective 55The most frequently used views 55
App Explorer view 56Project explorer view 57Properties view 58Outline view 59
Searching and replacing 60Search dialog 60Search view 62Search preferences 63Replacing matches 64
Customizing Aptana Studio 3 65Summary 66
Chapter 3: Working with Workspaces and Projects 67Workspace 68
Current workspace 69Creating workspaces 69
Time for action – creating a new workspace 69Importing and exporting preferences 70
Time for action – exporting Aptana Studio preferences 70Time for action – importing Aptana Studio preferences 71
Switching between different workspaces 72
www.it-ebooks.info

Table of Contents
[ iii ]
Time for action – switching to another workspace 73Deleting unnecessary workspaces 74
Time for action – deleting a workspace 74Workspace preferences 75
Time for action – prompting the selection of a workspace on startup 75Working with projects 76
Project nature 76Creating a new project 77
Time for action – using the Promote to Project function 80Importing an existing project 81
Time for action – importing an existing folder as a new project 81Time for action – importing existing projects into the workspace 83
Deleting an existing project 85Time for action – deleting a project 85
Changing a project's nature 85Time for action – changing a project's nature 86
Closing or opening a project 87Time for action – closing a project 87Time for action – excluding a project from the index 88
Creating a new file in a project 88Time for action – creating a new project file 88Summary 90
Chapter 4: Debugging JavaScript 91The Debug perspective 91
Installing the JavaScript debugger 92Time for action – installing Aptana Debugger for Firefox 92Configuring the debugger 93Time for action – creating a debug configuration 94Debugging JavaScript 96Time for action – debugging JavaScript 96Console view 98Time for action – working with the Console view 99Using breakpoints 101Time for action – adding a breakpoint 102Time for action – disabling a breakpoint 103Time for action – setting a hit count on a breakpoint 104Time for action – inspecting variables at a breakpoint and changing their values 105Studio AJAX monitor 106Time for action – uninstalling the Aptana Debugger Extension 107
www.it-ebooks.info

Table of Contents
[ iv ]
Uninstalling the debugger 107Time for action – uninstalling the Aptana Debugger Extension 108Summary 109
Chapter 5: Code Documentation and Content Assist 111ScriptDoc 112
JavaScript file comment 114JavaScript property comment 115
JavaScript function comment 115Time for action – displaying a function comment 116The Content Assist feature 117Time for action – using the Content Assist feature 117
Browser capabilities 118Time for action – changing the user agents used by the Content Assist feature 119Summary 121
Chapter 6: Inspecting Code with Firebug 123What is Firebug 124Time for action – installing Firebug 124Time for action – enabling and configuring Firebug 126Inspecting HTML code 127Time for action – inspecting HTML code 127Time for action – using the mouse selector for editing HTML 129Inspecting the CSS code 131Time for action – editing the CSS code by using the HTML module 131Time for action – editing the CSS code by using the CSS module 132Using the Firebug console 133Time for action – using the Firebug console 133Profiling code performance 135Time for action – profiling code performance by using console.time() 135Time for action – profiling code performance by using console.profile() 137Summary 140
Chapter 7: Using JavaScript Libraries 141Requirements for including a JavaScript library 141Using jQuery 142Time for action – installing the jQuery bundle 143Time for action – integrating jQuery 144Using Dojo Toolkit 146Time for action – integrating the Dojo Toolkit 146Using ExtJS 149Time for action – integrating ExtJS 149Summary 152
www.it-ebooks.info

Table of Contents
[ v ]
Chapter 8: Remotely Working with FTP 153The Remote view 154Time for action – creating an FTP connection 154Time for action – modifying an FTP connection 156
Deleting an FTP connection 157Using the Web Deployment Wizard 157
Time for action – connecting a project with a remote server 158Using the Connection Manager 163
Time for action – opening the Connection Manager and creating a new connection 163
Modifying an existing connection within the Connection Manager 166Deleting an existing connection within the Connection Manager 166Exporting and importing FTP settings 166
Time for action – exporting FTP settings 167Time for action – importing FTP settings 168Summary 170
Chapter 9: Collaborative Work with SVN and Git 171Working with SVN 172Time for action – adding an SVN Repository 174
Checking out an SVN Repository 175Time for action – checking out an SVN Repository 176
File states 178Committing an SVN Repository 179
Time for action – updating and committing an SVN Repository 180Updating an SVN Repository 181
Time for action – using the SVN history and comparing files 182Working with Git 188Time for action – cloning a remote Git Repository 188
Creating a Git Repository 190Time for action – creating a new local Git Repository for a new or existing project 190Time for action – working with a new local Git Repository 192
Pulling and pushing Git remote projects 195Time for action – pulling and pushing Git remote projects 195Summary 197
Chapter 10: PHP Projects 199Creating and configuring PHP projects 200Time for action – creating a PHP project 200Configuring a PHP project 202Time for action – configuring a PHP project 202
www.it-ebooks.info

Table of Contents
[ vi ]
Using PHPDoc within PHP Projects 206Using the predefined PHPDoc Comments 206Time for action – using PHPDoc Comments from the PHP Bundle 207Aptana Studio's PHP Bundle PHPDoc Comment snippets 209Using PHP libraries 210Time for action – using external libraries 212Configuring project-specific libraries 215Time for action – configuring project-specific libraries 215Using and configuring the code formatter 217Time for action – using and configuring the PHP code formatter 218Summary 225
Chapter 11: Optimizing Work and Increasing Collaboration 227Creating a syntax highlight theme 228Time for action – creating a syntax highlight theme 228Sharing or restoring your configurations 230Time for action – importing and exporting syntax highlight themes 232Time for action – importing and exporting code formatter profiles 234Sharing Aptana Studio preferences 236Working with bookmarks 237Time for action – setting a bookmark 237
The bookmark view 239Time for action – configuring the bookmark view 239SVN commit comment templates 242Time for action – creating SVN commit comment templates 242Working with tasks 244Time for action – configuring the tasks and managing the task tags 244Creating tasks 246Time for action – creating a task over the line numbers 246Time for action – creating a task using a comment 248Summary 250
Chapter 12: Troubleshooting 251What to do when problems occur 251
Systems help 252Do you have a problem? 253Which version of Aptana Studio have you installed 253
Time for action – displaying installation details 253Running the diagnostic test 257Viewing and clearing the logfile 258
Time for action – viewing and clearing the logfile 259
www.it-ebooks.info

Table of Contents
[ vii ]
Forums 260Reporting a bug 261Time for action – reporting a bug 261Fixing a moved workspace directory 264Time for action – changing the workspace directory in config.ini 264Summary 265
Pop Quiz Answers 267Chapter 1, Getting Started 267Chapter 2, Basics and How to Use Perspectives and Views 267Chapter 3, Working with Workspaces and Projects 268Chapter 4, Debugging JavaScript 268Chapter 5, Code Documentation and Content Assist 268Chapter 6, Inspecting Code with Firebug 269Chapter 7, Using JavaScript Libraries 269Chapter 8, Remotely Working with FTP 269Chapter 9, Collaborative Work with SVN and Git 270Chapter 10, PHP Projects 270Chapter 11, Optimizing Work and Increasing Collaboration 271Chapter 12, Troubleshooting 271
Index 273
www.it-ebooks.info

PrefaceAptana Studio is a powerful open source integrated development environment (IDE) that specializes in building web applications. Aptana Studio has been around since 2008. It provides language support for HTML, CSS, JavaScript, Ruby, Rails, PHP, Python, and many others, by using plugins. Since Version 3.0.4, the developer team of Aptana Studio has integrated the latest HTML5 and CSS3 specifications. This allows the capabilities of most modern browsers to be utilized for the development of Aptana Studio. The latest Version has been downloaded more than 6 million times.
Aptana Studio ships with other tasks, such as FTP and Git integration, JavaScript libraries, and JavaScript debugging. Furthermore, the Aptana Jaxer web server is included, which specializes in working with AJAX applications and websites.
Aptana Studio builds on the Java platform Eclipse, therefore it is a cross platform software and works on common operating systems, such as Linux, Mac OS-X, and Windows.
What is Eclipse SDK?
The Eclipse software development kit (SDK) is an open source project that is completely written in Java and was started by the IBM company in 2001.
It is possible to install Aptana either as an Eclipse plugin or as a standalone version because Aptana Studio builds on Eclipse. Experienced users who have already worked with the Eclipse IDE can integrate the Eclipse plugin in their existing Eclipse installation. Users with less experience can install the standalone version as it works without having an Eclipse installation.
But why is Aptana Studio perfect for web development?
Aptana Studio allows you to develop and test your entire web application using a single environment.
www.it-ebooks.info

Preface
[ 2 ]
Some of the great core features of Aptana Studio are as follows:
� Code Assist for HTML, CSS, JavaScript, and so on. It also supports the latest HTML5 and CSS3 specifications and includes information about the level of support in major web browsers.
� JavaScript Debugger integration.
� FTP, SFTP, and FTPS integration provides you with the possibility to develop remotely.
� Git integration enables you to manage your projects with Git source code control.
Let's go and take a look at how easy web development can be with Aptana Studio.
What this book coversChapter 1, Getting Started, shows you how to get a fully operational Aptana Studio version on your system, how to carry out system updates, or integrate new plugins. By the end of this chapter, your version of Aptana Studio should be fully operational for work.
Chapter 2, Basics and How to Use Perspectives and Views, talks about the basic functionality of Aptana Studio, and learning how to use perspectives and views. By the end of the chapter, you should be able to modify the appearance of Aptana Studio to optimize it as per your your needs.
Chapter 3, Working with Workspaces and Projects, is all about creating and configuring your source codes in projects, and grouping these projects together in useful workspaces.
Chapter 4, Debugging JavaScript, teaches you how to debug your JavaScript applications and how to find errors as fast as possible.
Chapter 5, Code Documentation and Content Assisst, shows you how to document your code in the best way, so that each development team member understands the functionality and the Aptana Studio builders are able to read out more information from your source code.
Chapter 6, Inspecting Code with Firebug, looks at how you can inspect your source code and helps you to understand why your web application looks and behaves as it does.
Chapter 7, Using JavaScript Libraries, provides a detailed guide to integrating JavaScript libraries such as jQuery or Dojo toolkit into your project.
Chapter 8, Remotely Working with FTP, guides you on how to remotely work with FTP on your web server.
www.it-ebooks.info

Preface
[ 3 ]
Chapter 9, Collaborative Work with SVN and Git, helps you to discover how you can use Aptana Studio with Subversion or GitHub, to develop large projects with your development team.
Chapter 10, PHP Projects, teaches you how to create and configure PHP projects to develop backends for your web applications.
Chapter 11, Optimizing Work and Increasing Collaboration, looks at the various possibilities of optimizing your workflow.
Chapter 12, Troubleshooting, discusses the most common issues that developers face when developing with Aptana Studio.
What you need for this bookAll the chapters in this book have been tried and tested on the following software setup:
� Ubuntu/Debian/LinuxMint Linux with 3.0.x Kernel and Gnome3.2
� Aptana Studio 3.0.6 (from where we begin this book and work progressively through the versions up to Aptana Studio 3.3.1)
So, you need nothing more than your workstation with an Internet connection to download your Aptana Studio installation package and for deploying your web application, or remotely work via FTP, SVN, or Git.
If you're using an Apple or Windows operating system, don't be afraid. The whole system looks the same on different operating systems, but only the GUI elements may differ a little between operating systems.
Who this book is forThis book is a perfect beginners' guide for both, Aptana Studio beginners and experienced web developers.
If you are already a bit familiar with Aptana Studio or the Eclipse IDE, this book will help you to learn more about how Aptana Studio can optimize your daily work on large web applications and projects.
All in all, this book a complete guide to configuring the whole development environment to get the best out of your work.
www.it-ebooks.info

Preface
[ 4 ]
ConventionsIn this book, you will find a number of styles of text that distinguish between different kinds of information. Here are some examples of these styles, and an explanation of their meaning.
Code words in text are shown as follows: "We can include other contexts through the use of the include directive."
A block of code is set as follows:
function someLoopWithinAFunction(loopEnd) { var someResult = 0; for(var i=0 ; i<loopEnd ; i++) { someResult += i; aptana.log("i: " +i); // Add a breakpoint here } return someResults)
Any command-line input or output is written as follows:
sudo rm -r /opt/Aptana\ Studio\3
New terms and important words are shown in bold. Words that you see on the screen, in menus or dialog boxes for example, appear in the text like this: "clicking the Next button moves you to the next screen".
Warnings or important notes appear in a box like this.
Tips and tricks appear like this.
Reader feedbackFeedback from our readers is always welcome. Let us know what you think about this book—what you liked or may have disliked. Reader feedback is important for us to develop titles that you really get the most out of.
To send us general feedback, simply send an e-mail to [email protected], and mention the book title through the subject of your message.
If there is a topic that you have expertise in and you are interested in either writing or contributing to a book, see our author guide on www.packtpub.com/authors.
www.it-ebooks.info

Preface
[ 5 ]
Customer supportNow that you are the proud owner of a Packt book, we have a number of things to help you to get the most from your purchase.
Downloading the example codeYou can download the example code files for all Packt books you have purchased from your account at http://www.packtpub.com. If you purchased this book elsewhere, you can visit http://www.packtpub.com/support and register to have the files e-mailed directly to you.
ErrataAlthough we have taken every care to ensure the accuracy of our content, mistakes do happen. If you find a mistake in one of our books—maybe a mistake in the text or the code—we would be grateful if you would report this to us. By doing so, you can save other readers from frustration and help us improve subsequent versions of this book. If you find any errata, please report them by visiting http://www.packtpub.com/support, selecting your book, clicking on the errata submission form link, and entering the details of your errata. Once your errata are verified, your submission will be accepted and the errata will be uploaded to our website, or added to any list of existing errata, under the Errata section of that title.
PiracyPiracy of copyright material on the Internet is an ongoing problem across all media. At Packt, we take the protection of our copyright and licenses very seriously. If you come across any illegal copies of our works, in any form, on the Internet, please provide us with the location address or website name immediately so that we can pursue a remedy.
Please contact us at [email protected] with a link to the suspected pirated material.
We appreciate your help in protecting our authors, and our ability to bring you valuable content.
QuestionsYou can contact us at [email protected] if you are having a problem with any aspect of the book, and we will do our best to address it.
www.it-ebooks.info

1Getting Started
Aptana Studio 3 builds on the well-known Java IDE, Eclipse; this means that it's possible to install Aptana Studio as an Eclipse plugin or as a standalone version. In this beginner's guide, we will use the standalone version as it is much easier to install and works right away.
In this chapter we will cover:
� System requirements
� Where to get Aptana Studio
� Installing Aptana Studio on your system
� How to increase memory for Java
� Keeping Aptana Studio up-to-date
� Installing third party plugins
� Uninstalling Aptana Studio
System requirementsAptana Studio supports both 32-bit and 64-bit architecture for the following common operating systems:
� Linux: x86 architecture, GTK windowing system
� Mac OS: OS X/Intel architecture, OS X 10.5 or later
� Windows: x86 architecture
www.it-ebooks.info

Getting Started
[ 8 ]
Minimum requirements:
� Linux: 1 GB RAM, Pentium 4-level processor
� Mac OS: 1 GB RAM, G5 or Intel-based machine
� Windows: 1 GB RAM, Pentium 4-level processor
For larger projects and workspaces, better hardware is recommended.
Aptana Studio requires you to have Sun/Oracle Java Runtime Environment JRE 1.5.x on your Mac OS-X or Linux system (note that OpenJDK is not yet supported). Windows Installer includes a compatible version of Java.
Downloading and installing Aptana StudioFirst of all, we have to download the current version of Aptana Studio. This section will teach you how to do this.
Downloading the example code
You can download the example code files for all Packt books you have purchased from your account at http://www.packtpub.com . If you purchased this book elsewhere, you can visit http://www.packtpub.com/support and register to have the files e-mailed directly to you.
Time for action – downloading and installing Aptana Studio on Linux
1. In order to download the current version of Aptana Studio, navigate to the Aptana home page at http://www.aptana.com/products/studio3/download.
2. Simply select your system environment on the website and download the Aptana Studio package to your ~/Downloads folder. You can also do this quickly by using wget on the command line (just replace *version* by your used version), as follows:
wget http://download.aptana.com/studio3/standalone/*version*/linux/Aptana_Studio_3_Setup_Linux_x86_64_*version*.zip -P ~/Downloads
www.it-ebooks.info

Chapter 1
[ 9 ]
3. After downloading the Aptana Studio package, we only need to extract it. For this, we use the unzip command, which also redirects the extracted files to the /opt folder.
sudo unzip ./Aptana_Studio_3_Setup_Linux_x86_64_*version*.zip -d /opt/
Why install Aptana in the /opt - folder?
The /opt folder is reserved for all software and add-on packages that are not part of the default installation of your operating system. Under Linux Mint, for example, Adobe Reader, Google Chrome, and some other packages are normally found here.
4. We just have to create a symbolic link so that we can start Aptana Studio without typing the complete path on the command line.
sudo ln -s /opt/Aptana\ Studio\ 3/AptanaStudio3 /usr/bin/AptanaStudio3
5. Finally, you have to change the owner and/or group of your installation files; this will allow Aptana Studio to modify its files and carry out updates.
sudo chown thomas:thomas ./Aptana\ Studio\ 3 -R
6. Now, you can start Aptana Studio just by executing the following instruction on the command line:
AptanaStudio3
What just happened?We installed Aptana Studio on a Linux-based operating system.
Installing Aptana Studio on Windows is much easier; you just have to follow the Windows Installer.
www.it-ebooks.info

Getting Started
[ 10 ]
Time for action – downloading and installing Aptana Studio on Windows
1. In order to download the current version of Aptana Studio, navigate to the Aptana homepage at http://www.aptana.com/products/studio3/download.
2. Simply select your system environment on the website and download the Aptana Studio package to your workstation.
3. Double-click the downloaded .exe file in order to start the installation process.
4. Now, you have to follow the installation instructions; click on Next.
5. Click on the I Agree button to accept the terms of agreement.
www.it-ebooks.info

Chapter 1
[ 11 ]
6. Select a folder for Aptana Studio to be installed in.
www.it-ebooks.info

Getting Started
[ 12 ]
7. Now, select a Start menu folder.
8. Last but not least, select the file extensions to be associated with Aptana Studio.
www.it-ebooks.info

Chapter 1
[ 13 ]
9. Now, click on the Install button in order to start the installation.
10. After the installation process is over, just click on the Close button to finish the installation.
What just happened?We just installed Aptana Studio on a machine running a Windows operating system.
www.it-ebooks.info

Getting Started
[ 14 ]
Time for action – downloading and installing Aptana Studio on Mac
1. In order to download the current version of Aptana Studio, navigate to the Aptana homepage at http://www.aptana.com/products/studio3/download.
2. Simply select your system environment on the website and download the Aptana Studio package to your workstation.
3. Double-click the downloaded .dmg file in order to extract the installation files.
4. After that, you just have to drag Aptana Studio into your Applications folder.
5. And that's it!
What just happened?We installed Aptana Studio on a Mac operating system.
After the first start, Aptana Studio looks like the following screenshot:
www.it-ebooks.info

Chapter 1
[ 15 ]
How to increase memory for JavaBecause Aptana Studio is based on Java, ensure that you allow Java to allocate the required amount of memory. In the default configuration of Aptana Studio, memory parameters are adjusted for common large projects and workspaces. Aptana Studio comes with two parameters for handling this memory usage:
� The -Xms parameter defines how much memory Aptana Studio should allocate at the start
� The -Xmx parameter defines the maximum amount of memory that Aptana Studio is allowed to be allocated (Java heap memory)
But sometimes, when you have many large projects, for example, you may get better performance by increasing the maximum heap memory.
www.it-ebooks.info

Getting Started
[ 16 ]
How do you display currently used memory?
In order to see your current memory usage, you must enable the Heap Status indicator. For this, navigate to Window | Preferences and select General entry within the left-hand tree. There you will find a checkbox, Show heap status, to the right; select it, and click on Apply. Now a memory display appears at the bottom-right corner of the main window. There's also a trash button available, which can run the garbage collector that is able to deallocate memory that is no longer required.
Time for action – increasing Java memory1. In order to increase the memory, you have to edit the AptanaStudio3.ini file,
which is contained in the installation folder. You can do this simply by using a plain-text editor and adjusting the memory parameter.
nano /opt/Aptana\ Studio\ 3/AptanaStudio3.ini
In our case, because we use a Linux system, the .ini file looks like this:
--launcher.XXMaxPermSize
256m
--launcher.defaultAction
openFile
-vmargs
-Xms40m
-Xmx512m
-Declipse.p2.unsignedPolicy=allow
-Declipse.log.size.max=10000
-Declipse.log.backup.max=5
-Djava.awt.headless=true
Here you are able to adjust the Xms and Xmx values and change them to the number of megabytes you require.
2. Finally, Aptana Studio needs to restart for the changes to take effect.
www.it-ebooks.info

Chapter 1
[ 17 ]
What just happened?We increased the memory for Java so that Aptana Studio is able to work with large projects and workspaces.
Upgrading the systemIt is highly recommended that we keep the system up-to-date. Aptana Studio will most likely contain some small bugs that need to be fixed so that you can work as effectively as possible without errors or possible loss of data.
Have you found a possible bug?
If you think you've found a bug, help the Aptana developer team to fix it as fast as possible and report it at http://jira.appcelerator.org/browse/APSTUD. There, you can also find out whether the bug that you have found has already been tracked by the developer team. You can report a bug from within Aptana Studio too. We will take a look at this in Chapter 12, Troubleshooting.
It's also nice to see how, after an update, there are always new and useful functions available. Personally, I always use the update site to download the latest beta releases. If you prefer to work with a more stable version, it is better to use the Aptana Studio 3 release update site. All in all, there are three update types available:
� Stable releases: These are are the most tested. They are the same as those downloaded from the Aptana website.
� Beta releases: These have been somewhat tested and are still in preparation for release.
� Nightly updates: These come straight from the developer's server. This is the first place where the latest features and fixed bugs can be found. These versions probably contain progressive bugs. Use at your own risk!
What is an update site?
An update site is a simple HTTP link that contains all related data for updating Aptana Studio and installing and updating plugins.
Now that we are running Aptana Studio for the first time, we want to check if there are any updates available. For this, we just navigate to Help | Check for Updates in the main menu.
www.it-ebooks.info

Getting Started
[ 18 ]
If you get the the following message, maybe your system user has opened Aptana Studio without the permission to change Aptana Studio files:
Ensure that the user that starts Aptana Studio has the required permissions to be able to update the Aptana Studio files! The following command, which we have already seen in this chapter, adjusts the required permissions:
sudo chown thomas:thomas /opt/Aptana\ Studio\ 3 -R
If the user has the required permission, Aptana Studio checks all of the available update sites that have been enabled, contacts them, and checks whether any updates are available.
If no updates are available on any of your enabled update sites, Aptana Studio shows you the message No updates were found.
However, if there are updates available, a window appears in which all of the updates that you can install are displayed.
www.it-ebooks.info

Chapter 1
[ 19 ]
Just select the packages that you want to update and click on Next. Click on the Next button on the confirmation site too. Finally, confirm I accept the terms of the license agreements and let the update start by clicking on Finish.
Now, Aptana Studio connects to all relevant update sites and downloads the current packages and installs them. After completing this process, Aptana Studio asks you whether you want to apply the changes or you want to restart Aptana Studio. Here, I would highly recommend always choosing to restart Aptana. Unfortunately, it takes a moment for Aptana to restart, but you can be sure that all the libraries will have been loaded successfully.
www.it-ebooks.info

Getting Started
[ 20 ]
After this restart, you have finished your first Aptana Studio update.
How do you determine the installed version of Aptana Studio?
To determine the installed version of Aptana Studio, just navigate to Help | About Aptana Studio 3. If you also need to know the version of your plugins and any more information, just click on Installation Details.
But during the daily project work, we generally don't have the time to think about updates. Therefore, Aptana Studio provides you with an update reminder.
The update reminder checks, by default, after every Aptana Studio start up, whether there are some updates available or not. If there's an update, a pop up that looks like this appears at the bottom-right corner of the main window:
If you want to install the updates, just click within the window and the update manager comes up; it shows you the available updates.
Reminder options
You can also change the handling of the automatic updates by clicking on Reminder options within the Updates Available notice. You will be redirected to the preferences with the Automatic Updates area already selected. Here you're able to select at what time Aptana Studio should check for updates and how Aptana Studio should handle the download and update.
How to install third-party pluginsIf you want to use Aptana Studio with other programming languages, which Aptana Studio naturally supports, you have to install a third-party plugin. The plugin system, which is provided by Eclipse, is a very sophisticated technology and makes it very easy to install additional plugins and keep them up-to-date. As an example of plugin installation, we will install the Subversion plugin from Tigris, which we will see in a later chapter.
www.it-ebooks.info

Chapter 1
[ 21 ]
Time for action – installing a third-party plugin1. Before we can start the installation of the Subversion plugin, we have to check for
Aptana Studio updates and install them. It's highly recommended that this be done before every plugin installation.
2. If your system is up-to-date, open the Available Software window that you will find under Help | Install New Software....
3. Here you have to add the URL from the update site from where the plugin should be installed.
4. But, from where can you get the required update site URL for your plugin?
Most plugin developers usually provide this update site URL on their website. Sometimes, they also provide an additional package for a manual installation. But it's recommended that you install the plugin with the update manager, because the manager checks the required dependencies and prevents installation if the dependencies are not met.
www.it-ebooks.info

Getting Started
[ 22 ]
5. So, just surf quickly to the Tigris Subclipse website, http://subclipse.tigris.org, and determine the URL of the required update site, which is currently available at http://subclipse.tigris.org/update_1.6.x.
6. Now, we go back to Aptana Studio and click on the Add... button in order to add the new location for our plugin.
7. For the Name, just enter a label such as Subclipse 1.6.x. But don't forget to add the version number of the plugin. It's possible for you to have to add more and more update sites over time for the same plugin. And if there is a new major version of the Subclipse plugin, there will also be a new update site location that you'll have to add. So, prevent confusion between similar plugins, and always specify a name that identifies your update site clearly. You could even use the URL directly as the label.
Installing or updating from an archive
Often, you are unable to find an update site for the plugin you currently need, but you find a .jar or a .zip file of the plugin instead. No problem! Just download it and click on Archive... instead of filling in a location link, select your local file, and install it.
8. Finally, you have to add the URL in the Location field and click on OK.
Update site
Always make sure that you have a current update site. Most plugin developers have several update sites for each major version of their plugins.
www.it-ebooks.info

Chapter 1
[ 23 ]
Now you have to wait for a short moment until the table is refreshed. After that, you should see an entry named Subclipse, which you can expand. Expand the Subclipse node and select the packages that we need for our purposes. In the following screenshot, you will see the packages that we need to select for our Subclipse plugin:
www.it-ebooks.info

Getting Started
[ 24 ]
9. Click on the Next button, and Aptana Studio will check whether all dependencies are satisfied, which should be the case.
10. As you can see in the preceding screenshot, all dependencies are satisfied. So, we can click on Next for the second time, and before the installation starts, you only need to confirm the terms and conditions.
www.it-ebooks.info

Chapter 1
[ 25 ]
11. The moment you click Finish, Aptana Studio connects to the update site, downloads the required packages, and installs them.
12. The moment Aptana Studio finishes installing the plugin, a dialog appears and recommends that you restart Aptana Studio. We recommend this too; therefore, you should click on Restart Now.
13. After Aptana Studio starts up again, the plugin asks you if you want to send the Subclipse team anonymous usage statistics.
14. I think it's generally ok to support the developers with anonymous data because they also make it possible for us to use a lot of great plugins and software for free. In addition, we help them with our statistics to optimize the plugin and help to integrate users' new requirements.
15. Therefore, we click on OK.
If you want to change your decision later, you can do this under Window | Preferences. There, you'll have to navigate to Team | SVN | Usage Reporting.
www.it-ebooks.info
Getting Started
[ 26 ]
What just happened?We just installed our first third-party plugin.
After the successful installation, you will find SVN Repositiory Exploring under Window | Open Perspective | Other…. You are now able to add some repository locations and check them out here. We will do this in detail in Chapter 9, Collaborative Work with SVN and Git.
Keeping your plugins up-to-date
It's also necessary to check frequently whether there are updates available for your installed plugins. So, be sure to select the required update sites in the Aptana Studio update manager.
Uninstalling AptanaUninstalling Aptana Studio on Linux is very easy. Just remove the Aptana Studio directory from within the opt folder:
sudo rm -r /opt/Aptana\ Studio\ 3
After deleting the Aptana Studio software folder, you can remove the symbolic link, which is now useless:
sudo rm /usr/bin/AptanaStudio3
But that's not all. During installation, Aptana Studio creates more data than you see at the first glance. There will be folders for your workspaces. The default folder for the workspace is located in your home directory, ~/Aptana Studio 3 Workspace. When you have your projects and source codes backed up, you can just delete it.
Furthermore, there is a folder for the Aptana rubles that is also created during installation. This folder contains your customized and downloaded rubles.
What is an Aptana ruble?
Ruble is short for Ruby bundle and is a runtime environment that allows the extensibility of Aptana Studio's editors by using Ruby. Rubles are compatible with TextMate bundles, so you should be able to convert them easily to Aptana rubles.
www.it-ebooks.info

Chapter 1
[ 27 ]
To uninstall Aptana under Windows, just use the uninstaller within the All Programs menu. Because this is so easy—just like uninstalling most other software—we don't want to cover it here.
Mac OS-X users just have to drag the Aptana folder from the Program folder into the trash.
Note that there could also be separate folders for the ruble and workspaces, on Mac OS-X and Windows. Don't forget to remove them too, if you no longer need them.
Pop quiz – test your installation knowledgeQ1. On which software framework is Aptana Studio 3 based?
1. Circular
2. Eclipse
3. Square
Q2. In which Aptana file are you able to adjust the memory parameter?
1. AptanaStudio3.ini
2. AptanaStudio3.pdf
3. AptanaStudio3.conf
Q3. What are the names of the parameters used to adjust the memory settings?
1. Xls and Xml
2. Xtc and Xol
3. Xms and Xmx
SummaryIn this chapter we have looked at the requirements for installing the Aptana Studio IDE. After this, we installed Aptana Studio, checked for any updates available, and installed these updates. We learned how to increase the memory for the IDE and installed the Subversion plugin for use in a later chapter. Finally, we saw how to uninstall Aptana Studio when we don't need it anymore.
Now you are ready to configure your installation of Aptana Studio and learn more about perspectives and views.
www.it-ebooks.info

2Basics and How to Use
Perspectives and Views
After we are familiar with installing and updating Aptana, and also integrating additional plugins within Aptana Studio, we will have a look at the main features of the IDE.
In this chapter we will cover:
� Defining some components
� Customizing perspectives
� Creating, saving, and deleting perspectives
� Customizing submenus
� Customizing the menu and the toolbar
� Having a look at some of the most frequently used views, such as the App Explorer, Project Explorer, and Outline views
� Searching and replacing within files
� Customizing Aptana Studio
All in all, after reading this chapter you will know the most important things about perspectives, where you will find the different menus, and the most frequently used views.
www.it-ebooks.info

Basics and How to Use Perspectives and Views
[ 30 ]
Time for action – changing the color themeI have always heard from different Aptana Studio users that when they tried the IDE for the first time they did not like the dark color and syntax highlight theme, which is selected by default in a fresh installation of Aptana. Those guys prefer the traditional syntax-highlight with a white background and so on. No problem, let's change the theme back to the classic Eclipse theme with a few easy steps.
1. Navigate to Window | Preferences and select the tree item Themes under the Aptana Studio entry.
2. Select your preferred theme within the selectbox.
3. After you've chosen a theme that you find pleasant, you have the ability to justify some colors and change the fonts for the editor. Just take your time and play around a bit with the different setting possibilities.
www.it-ebooks.info

Chapter 2
[ 31 ]
What just happened?We have changed the theme, so Aptana has now assumed the desired appearance.
Save your theme
Before you start to personalize your own theme, press the + button to the right of the theme's name in order to create a copy of it. Finally, when you've finished your customizations, better save your theme by exporting it. You will now be able to share it with your team members or restore it after a reinstallation of Aptana.
Time for action – configuring the tab behaviorThe Tab key is one of the most frequently used keys for a developer, and the preferred configuration is very different for each developer. In the following steps, you will see how you can adjust tab preferences in Aptana Studio:
1. Navigate to Window | Preferences and select the Text Editors tree item under the General entry.
2. In the Display tab width field you can change the number of spaces used for the Tab key's width.
3. Additionally, you can check the Insert spaces for tabs checkbox so that the Tab key now inserts the preferred number of spaces instead of a single Tab character.
What just happened?We have changed the tab behavior, so Aptana Studio now processes the pressing of the Tab key as you prefer it.
www.it-ebooks.info

Basics and How to Use Perspectives and Views
[ 32 ]
DefinitionsFirst of all, we will define a few terms so that you are well acquainted with the components we are talking about. The terms are explained in relation to the following screenshot.
� Navigation: If we talk about the Navigation bar, we mean the main menu at the top of the Aptana Studio window.
� Toolbar: The toolbar is the button line directly under the Navigation bar and it provides a selected number of the most frequently used actions.
� Perspective menu: The Perspective menu is placed on the right-hand side of the toolbar and allows you to switch between different perspectives.
� Perspective: The perspective refers to a collection of views, editors, and preferences that are optimized for a special kind of development activity.
� Editor: An editor is a space where you can edit and save files.
� View: A view is an area within a perspective where you can do something. Aptana Studio provides many different views that can be collected to customize perspectives.
� Statusbar: The Statusbar is located at the bottom of the Aptana Studio window and primarily provides information.
www.it-ebooks.info
Chapter 2
[ 33 ]
NavigationThe Navigation bar is a menu element, as you know from many other software programs. The only thing we want to point out is that the items contained in the Navigation bar change by switching the perspective. How you can influence which menu item appears in which perspective, will be discussed in the Customizing perspectives recipe.
The Navigation bar is, in addition, dependent on the current focus. For example, if an Editor view has the focus, the Navigation bar is extended by a menu element named Source.
ToolbarThe toolbar provides, as just mentioned, a selected number of action buttons. All related buttons are together taken as a group, which can be easily moved via drag-and-drop, and the visibility of each button can also be controlled by the Customize Perspective... option.
This functionality enables you to create a complete dependent toolbar for each of your perspectives, where only the buttons required in the context are integrated.
An additional feature of this toolbar is that you can place your button groups in more than one row. This is very useful if your system display isn't so large that all your required buttons can be arranged in only one row.
Did you know?
This kind of a toolbar, where the buttons are grouped and you can add and move various items, is called a Coolbar.
In the following table, you will find a small excerpt from the structure of the available toolbar buttons and their functionality. A full list is available by going to Window | Customize Perspective... on the Tool Bar Structure tab. You should also have a look at this section if you don't find a needed toolbar button in your current perspective. How you can customize your perspective and hence the toolbar, we will discuss later in this chapter in the Customizing perspectives recipe.
So, in the Icon column you see the toolbar button we are talking about. The Group column shows you the group the button belongs to. Finally, the Description column gives you a short note about what the button is able to do.
Icon Group Description
File The New toolbar button allows you to create projects, folders, files, and so on.
www.it-ebooks.info

Basics and How to Use Perspectives and Views
[ 34 ]
Icon Group Description
File The Save toolbar button saves the currently opened file.
File The Save All toolbar button saves all open files.
File The Print toolbar button lets you print the currently opened file.
Aptana The Toggle to show or hide Outline view toolbar button shows and hides the Outline view.
Aptana The Toggle to show or hide App Explorer view toolbar button shows and hides the App Explorer view.
Aptana The Aptana Studio Start Page toolbar button opens the Aptana Studio start page, which shows you the latest news from Aptana.
Aptana The Show Preview Editor toolbar button opens a preview of the currently opened file.
Aptana The Open Terminal toolbar button opens a new Terminal view.
Aptana The Themes toolbar button provides, on the small triangle, a menu to switch to the currently used theme, or opens the theme preferences window by clicking on the color button.
Launch The Open URL... toolbar button allows you to open a file by entering a URL.
Launch The Toggle breakpoint on selected line toolbar button sets or unsets a breakpoint at the currently selected line.
Launch The Debug toolbar button allows you to debug your current application.
Launch The Run toolbar button allows you to run your current application.
Launch The External Tools toolbar button allows you to run external tools.
Search The Search toolbar button opens the search window. The small triangle allows you to navigate directly to a special search tab within the search window.
Editors Presentation
The Mark Occurrences toolbar button marks all similar selections in the currently used file.
Editors Presentation
The Toggle Block Selection Mode toolbar button enables and disables the block selection mode, which allows you to select a block of characters.
www.it-ebooks.info

Chapter 2
[ 35 ]
Icon Group Description
Editors Presentation
The Show Whitespace Characters toolbar button allows you to display characters, such as a white space or a tab.
Navigate The Next Annotation toolbar button jumps forward to the next configured annotation.
Navigate The Previous Annotation toolbar button jumps backward to the previous configured annotation.
Navigate The Last Edit Location toolbar button jumps back to the last file that you have edited.
Navigate The Back toolbar button jumps back to the last file that has the focus.
Navigate The Forward toolbar button jumps forward to the file that has the focus.
PerspectivesA perspective is a collection of views, editors, and preferences that are optimized for a special activity or development process. A perspective can be easily adapted to your needs.
But why define different perspectives?
Because of the development of different programming languages, you need different views and editors. It is also possible to define a view for a specific project, for example, a project that often uses a terminal for shell actions should be contained in a Terminal view by default.
Use perspectives for working on different displays
If you're working with a notebook, but also often with an additional display, it is possible that you're often working between different display resolutions. So, there is a possible use case to define a perspective for each display resolution.
How you can change perspectives with the help of the Perspective menu is something we will cover in the following section. But there are more possibilities if you go to Window | Navigation. Besides the functions to open, close, and change, there are options to reset, save, and customize a perspective.
If you have moved views by dragging-and-dropping, opening, or closing new views, or just resized view areas, the perspective will no longer look like the one that you have defined in the past. Therefore, you can reset a perspective to the one that you had saved. All positions, views, and so on will be restored.
www.it-ebooks.info

Basics and How to Use Perspectives and Views
[ 36 ]
For example, if you add a new view to your perspective and save it, Aptana Studio displays the new view each time this perspective is opened. In addition, you can also save a copy of a perspective with a new name so it is possible to make very similar but still different perspectives.
Finally, there is an option to customize your perspective. This is a very powerful feature that we will discuss later in detail.
Available shortcuts in a perspective
If you are not sure which shortcut you can use within a perspective, just press Ctrl + Shift + L to see a full list of the currently available key bindings.
Perspective menuThe Perspective menu allows you to open, close, and switch between different perspectives.
The first left button opens a new perspective. In order to open a new perspective you can click on it, and it drops down a small menu with a few perspectives and finally an entry named Other.... You are now able to open a listed perspective directly, or open a perspective that you use less frequently by using the Other... button.
Customize the perspectives menu
One of the various customization possibilities is to select the perspective entries that should be displayed in this menu. How you can select your most frequently used perspectives and let them appear in this menu is something you will learn later in this chapter, when we're starting to create our own perspectives.
Just select one entry and click on OK and Aptana Studio will display all views, editors, and preferences that the perspective defines.
www.it-ebooks.info

Chapter 2
[ 37 ]
To the right of the Open Perspective button will be listed all open perspectives. You can switch to the opened perspectives by simply clicking on this perspective button.
Switch perspective shortcut
In order to switch quickly between perspectives, you can use the shortcut Ctrl + F8 to switch the perspectives forward and Ctrl + Shift + F8 to switch the perspectives backward.
If there isn't enough display space to list all open perspectives side by side, it appears as a small button with two arrows to the right of it. This button will provide you with a drop-down menu to select the currently used perspective from all open perspectives. But you can also customize the menu with a right-click, and disable the text label by clicking on the Show Text entry, to save more space and prevent the drop-down menu to occupy space.
More perspective functions
The Perspective menu represents only a quick menu. In order to open or close a perspective, you can also navigate to Window | Open Perspective or Window | Close Perspective.
If you use Aptana with an environment with less performance, it would be better to have fewer perspectives open at the same time. Close the perspectives that are currently not in use.
www.it-ebooks.info

Basics and How to Use Perspectives and Views
[ 38 ]
EditorsAptana Studio provides a lot of different editors that are specialized for their programming language. So, for example, the XML and HTML editor provides an adapted syntax highlight and the option to expand or collapse the nodes of the currently opened file.
A few of the best supported editors are as follows:
� JavaScript Development
� Ruby Development
� Rails Development
� PHP Development
� HTML Development
� CSS Development
Jump to line
With the shortcut key Ctrl + L, you're able to open the Go To line dialog. Just open the dialog, enter a line number, and press the Enter button, and the editor cursor jumps to the entered line number.
A full list of the provided editors and their supported features can be found on the Aptana Studio website at https://wiki.appcelerator.org/display/tis/Editor+Feature+Matrix.
ViewsViews are small containers that contain some grouped functionality from Aptana Studio or from an integrated plugin of Aptana Studio. The base functionality of each view is the same. A view can be opened by navigating to Window | Show View. Let's have look at the Outline view, which is a very simple view, in detail.
www.it-ebooks.info

Chapter 2
[ 39 ]
Every view is a container with a tab on the left-hand side, which contains the icon of the View menu, followed by the label (in our case Outline), and finally a Close button that removes a view from the perspective. But the tab of the view has additional features. You can drag-and-drop it to move the View to another area of the perspective (top, right, bottom, or left). If you double-click on it, the View will be maximized to the full size of the Aptana Studio window. If there is more than one view in the same area, the View tabs are strung together.
On the top-right corner of a view you will find some more functionalities. There is an additional maximize button at the extreme right, which has the same functionality as the double-click on the tab. With the second button from the right, you can minimize a view so you have more space for some other views such as the editors. The other buttons differ from view to view. These buttons control the appearance and functionality of each view.
Help tooltips
If you don't know which button has which functionality, just hold the mouse over the button and a little tooltip appears with a description of its function.
While working with Aptana Studio, only one view can be active at any given time. This means the active view is the View that has the focus to receive keyboard actions and so on.
At the end of this chapter, we will show you some of the most frequently used views with their most useful features.
Shortcut to switch between views
If you want to switch between different views or open a new view, just press Alt + Shift + Q to display a list of all the views that are accessible as shortcuts. In this list, you can use the up and down keys to select the needed view, or just press the last key of the shortcut.
StatusbarFinally, there is the Statusbar, which primarily serves information. Here, there are messages placed by different views and some features such as the heap status, which displays the memory usage that we had activated in the first chapter. But there is another very useful feature, called Fast view bar. It looks like the following screenshot:
www.it-ebooks.info

Basics and How to Use Perspectives and Views
[ 40 ]
Where is the Fast view bar?
If you didn't find this bar in your Statusbar, it may be deactivated. Just navigate to Window | Preferences and select the Perspectives tree item under the General entry and deselect the Hide empty fast view bar checkbox within the Fast Views section.
The Fast view bar is a small view selection button, followed by an icon list that contains all selected views for the fast view action. This is very useful for views in which we sometimes have just a quick action to do. If a fast view is open, and you click somewhere outside of the View, the fast view hides automatically.
But also file dependent features such as the command menu and the file information, which are only visible when the Editor view has the focus. It displays information such as if the file is writable and in which column and line the cursor currently is.
www.it-ebooks.info

Chapter 2
[ 41 ]
Customizing perspectivesAptana Studio allows you to customize your used perspectives in very high detail. You have various settings and compilation options to collect all needed functions and actions at their ideal location of the IDE.
The window that allows you to do most of the settings to customize a perspective can be found by navigating to Window | Customize Perspective.... The Customize Perspective... window is grouped into four tabs in which we can customize the toolbar, navigation, command groups, and shortcuts.
The first tab is for the Tool Bar Visibility option. Here you can select the buttons that should be visible for each button group.
www.it-ebooks.info

Basics and How to Use Perspectives and Views
[ 42 ]
The second tab is for the Menu Visibility option. Here you can also just select the functionality that you need within the navigation of your perspective.
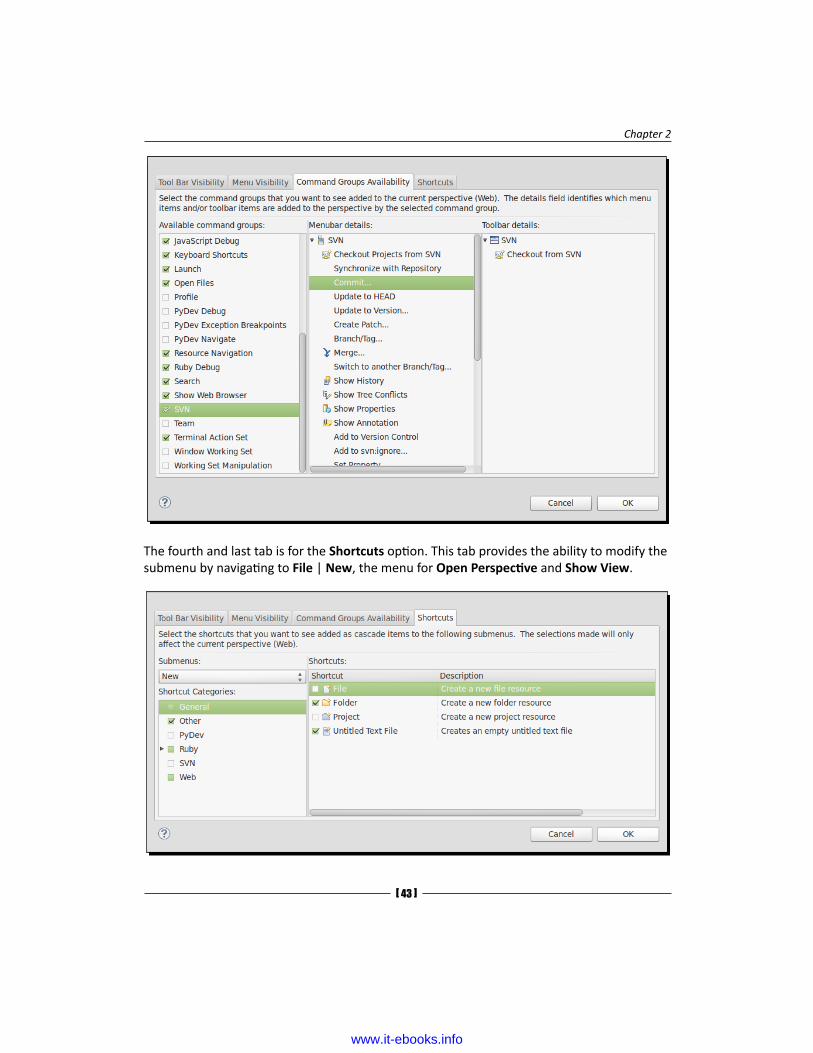
The third tab is for the Command Groups Availability option. In this tab you are able to add a command group to your perspective. For example, if you want to add some actions such as commit or update from the SVN plugin to the toolbar or navigation, you have to select the SVN entry in the Available command groups option of this tab. Now you are able to select SVN functionality within the toolbar and menu tab.
www.it-ebooks.info
Chapter 2
[ 43 ]
The fourth and last tab is for the Shortcuts option. This tab provides the ability to modify the submenu by navigating to File | New, the menu for Open Perspective and Show View.
www.it-ebooks.info

Basics and How to Use Perspectives and Views
[ 44 ]
Creating a customized perspectiveNow we want to create our own customized perspective. Therefore, we will first create a copy of a perspective that is most similar to our target customized perspective. This is quickly done. For example, just activate the Web perspective , navigate to Window | Save Perspective As..., and save the perspective with a different name. So, we take the same name and suffix it with the word customized.
After we have pressed the OK button, Aptana creates a complete copy of the current activated perspective, which we can now start to customize.
Arrange perspective viewsStarting from the Web perspective option of a new workspace, we will at first arrange the needed views. Therefore, we activate the Samples view by clicking on this tab. The View gets the focus and the Close button will be visible. Now, hide the Samples view from your perspective by clicking the Close button to the right of the tab.
Further, close all the other views that you didn't need, in the same way.
So now, after we just removed all unnecessary views, we have enough space for the really necessary views and we can rearrange these remaining views in a useful structure.
www.it-ebooks.info

Chapter 2
[ 45 ]
Time for action – arranging viewsMoving a view to another area of the Perspective can be done in different ways. The easiest and fastest way is to do it simply via dragging-and-dropping.
1. Move the mouse over the tab of a view and begin a drag action by pressing the left mouse button and holding it.
2. While you are dragging the View in different areas of the Aptana Studio window, pay attention to the mouse cursor. The cursor will be changed to an arrow, in the region where the View is attached, when you drop the View at the current position.
3. Release the left mouse button in order to drop the View on the current position.
Another option to move a view is to do it with the help of the context menu.
1. Make a right-click on the tab and the context menu appears.
2. Go to Move | View to move just the tab to a new area.
3. If you want to move the complete tab group at once, go to Move | Tab Group.
4. After selecting the Action view or Tab Group view, the cursor changes to the icon that helps you to place the View.
5. If the cursor shows you the icon that lets you know that the View will be attached in the target area, just click the mouse to finalize the move action.
What just happened?Now we have all views placed in the areas where we need them.
Finally, if we missed some additional views, we can complement our perspective with more views.
www.it-ebooks.info

Basics and How to Use Perspectives and Views
[ 46 ]
Time for action – adding new viewsTo add a new view to our perspective is very easy; just use the following steps:
1. Navigate to Window | Show View.
2. If the required view isn't contained in the menu, just click on Other... and you get a selection window with all the available views, grouped by the module or the plugin.
3. Just select the required view and accept it by clicking on OK.
4. The selection window is closed automatically and the new view appears in a random area of your perspective.
5. Now, you just have to move the View to the required area of your perspective.
What just happened?After you have finished the rearrangement of your required views, your perspective might look something like the following screenshot:
www.it-ebooks.info

Chapter 2
[ 47 ]
Customizing selection menusNow, after we have collected the required views for our perspective, we will think about views we only used occasionally. Therefore, we can access these views also in a quick way. We are able to customize the selection of the Fast view menu, which, as you remember, is located to the left of the Statusbar, and also in the selection in the Show view menu under the Window navigation entry.
www.it-ebooks.info

Basics and How to Use Perspectives and Views
[ 48 ]
Time for action – customizing the View selection menusIn the first step, we want to customize the View selection menus.
1. Navigate to Window | Customize Perspective... and select the Shortcuts tab.
2. In the top left of this tab you will find a checkbox that allows you to select the submenu for customization. We select the Show View entry and take a look at the rest of the tab's content.
3. On the left-hand side, we see the shortcut categories. If you select a category on the left, the content area will display all available view entries in this category.
4. Now you have to navigate through the categories and select or deselect the required views. At this point, we want to deselect the Outline and App Explorer views because, as you will remember, Aptana Studio provides these two views with their own toolbar buttons. Therefore, activate the category General and deactivate the entry Outline. Further, activate the category Studio and deactivate the entry App Explorer.
5. If you're ready, accept the changes by clicking on OK and take a look at the result.
What just happened?Now we have filled the Fast view and Show view menus with all the necessary view items.
In the same way, we are able to customize the Perspective menu.
1. Navigate again to the Shortcuts tab and select the submenu Open Perspective.
2. Here there are no categories available, so we select just the most frequently used perspectives, for example, SVN Repository Exploring, Web, and Web customized. The result might look something like the following screenshot:
www.it-ebooks.info

Chapter 2
[ 49 ]
After these steps, we have filled the Perspective menu with all the frequently used perspective items.
Time for action – customizing the new submenuThe last submenu we can customize is the new submenu that you will find by navigating to File | New, or by clicking the small triangle on the right of the New toolbar button.
1. Navigate once again to the Shortcuts tab and select the submenu New.
2. If, for example, I didn't work on the Ruby and Rails projects, I deselect the entries Rails Project in the category Other and Ruby Project in the category Ruby.
3. Instead of the two removed ones, I select the PHP project entry in the category Web.
What just happened?We've now created a shortcut to the most frequently used project types, to access these quickly.
www.it-ebooks.info

Basics and How to Use Perspectives and Views
[ 50 ]
Command Groups AvailabilityWithin the Command Groups Availability tab, which is the third tab within the Customize Perspective window, you can select the command groups that you want to see added to your perspective.
Command groups provide commands of menu items, toolbar buttons, and key bindings. Making a command group unavailable in a perspective removes these methods of executing commands. After you have made a command group available, you're able to adjust in detail which function should be available and in what context.
Time for action – adding and removing command groups availability
We will now add the SVN plugin to the command group because we want to use it in a later chapter.
1. Navigate to Window | Customize Perspective... and select the Command Groups Availability tab.
2. Select the SVN entry on the left in the Available Command Groups column, and the Menubar details and Toolbar details columns will be filled with the related commands.
3. Other unnecessary entries such as the Ruby Debug entry, which you may not require, could be deselected.
www.it-ebooks.info

Chapter 2
[ 51 ]
4. After you have accepted your changes by clicking on OK, the window is closed automatically and your Perspective toolbar and menu is refreshing.
What just happened?Finally, if you take a closer look at the toolbar and the menu, you will see that there are already new SVN entries added. We will now see how you can customize them.
Toolbar visibilityNow we want to customize the toolbar visibility. This means we can select the available functions that our toolbar provides.
Time for action – customizing the toolbar1. Navigate again to Window | Customize Perspective... and switch to the Tool
Bar Visibility tab.
Disabled entries
The gray colored entries within the Tool Bar Visibility and Menu Visibility tabs are disabled because their command group is unavailable. Just switch to the Command Groups Availability tab and activate the required group.
2. Here you will find all available toolbar buttons and the option to enable and disable them by using the checkboxes. As the default setting, most of the toolbar buttons are already selected. But, because we want to reduce the size of the toolbar, we deselect the toolbar button of the Checkout from SVN option. Therefore, we search the SVN tab and remove the complete entry because there is only the Checkout from SVN contained.
www.it-ebooks.info

Basics and How to Use Perspectives and Views
[ 52 ]
What just happened?After these steps, you have a toolbar with an exquisite selection of toolbar buttons.
Menu visibilityNow we will customize menu visibility. This means we can select the available functions that our navigation bar provides.
Time for action – customizing the menu1. Navigate again to Window | Customize Perspective... and switch to the Menu
Visibility tab.
2. Here you will find all available menu entries and also the option to enable and disable them, by using the checkboxes. Like the Tool Bar Visibility option, the menu visibility also has the default setting that all entries nearby are already selected. But in the case of the menu, it is ok—we can leave this unchanged.
3. If you have deselected some entries, you can navigate to the related menu point and you will see that the entries are gone.
Saving a perspectiveAfter you have spent some time customizing Aptana Studio by creating some perspectives, there is an important thing to add.
Don't forget to save the perspective after all of your changes. If you forget it, Aptana Studio will lose all these changes after closing the IDE!
Time for action – saving a perspectiveIn order to save your perspective, just use the following steps:
1. Navigate to Window | Save Perspective As... and select the perspective to be saved.
2. If you want to save an existing perspective, confirm the saving action by clicking on Yes.
www.it-ebooks.info

Chapter 2
[ 53 ]
Now, all the changes in your personalized perspective are saved. If you're now moving some views or changing something else, after performing a reset your perspective will look and behave like the saved one.
Perspective preferencesBut there is more. If you navigate to Window | Preferences and within the tree go to General | Perspectives, you can configure more perspective behaviors.
As an example, you can decide whether new perspectives will open in the same window or in a new one, and so on. We will let this setting be unchanged and take a look at the other possibilities in this window.
Deleting a perspectiveIn this section, we will see how to delete a perspective.
www.it-ebooks.info

Basics and How to Use Perspectives and Views
[ 54 ]
Time for action – deleting a perspectiveIf you want to delete some unused perspectives, just use the following steps:
1. Navigate again to Window | Preferences, and within the tree go to General | Perspectives.
2. Here you will find a complete list of the available perspectives. Now you can select a no-longer-needed perspective, and remove it by clicking on the Delete button.
We've deleted an unused perspective; and it is completely removed from Aptana Studio and doesn't appear anywhere anymore.
Marking a default perspectiveAfter we have created our own perspective, which we want to use frequently, we should mark this perspective as our default.
www.it-ebooks.info

Chapter 2
[ 55 ]
Time for action – marking a default perspective1. Navigate again to Window | Preferences, and within the tree go to General |
Perspectives.
2. Here you will find a complete list of the available perspectives. Now you can select the derived perspective and mark it as default by clicking on the Make Default button.
What just happened?We've marked our own created perspective as Aptana Studio's default perspective.
The most frequently used viewsIn the following section, we will have a look at few of the most frequently used views in the Aptana Studio.
www.it-ebooks.info

Basics and How to Use Perspectives and Views
[ 56 ]
App Explorer viewThe App Explorer view helps you by working with files in your projects. In the head of this view you can select the project to work within, followed by a little file search that is linked with the system search. So if you search by using this search field, the search view will display the results.
In the View menu, which you can open by clicking on the small triangle button, Aptana Studio provides you with the functionality Link with editor. This is a nice feature that always selects the same file in the App Explorer view as you select within the editor.
But you can customize more within this view by clicking on the Customize View... tab. The dialog for customization of the View menu consists of two tabs. First there is the Filters tab. The Filters tab allows you, as the name implies, to filter the listed files in the View menu.
Because we often work with hidden files, such as .htaccess files, we deactivate the .* resources entry, which hides all resources that begin with ..
www.it-ebooks.info

Chapter 2
[ 57 ]
Furthermore, there is the Content tab, which allows you to display content from extensions.
But, like in most other views, in this view there are also view-specific buttons available. There are, starting from the left, a button available that collapses all open elements. This is followed by a deployment button, about which we will be talking in a later chapter. Finally, the command menu that provides some other functions; but we haven't talked about this yet.
Project explorer viewThe Project Explorer view is similar to the App Explorer view. The difference is that the Project Explorer view is across all projects and therefore we just talk about the additional functionalities.
The Customize view dialog has some more available extensions in the Content tab.
Other differences are the view-specific buttons. Here, the Link with editor function gets its own button. Additionally, there are buttons for Synchronize, Upload, and Download, which are necessary for the remote working.
www.it-ebooks.info
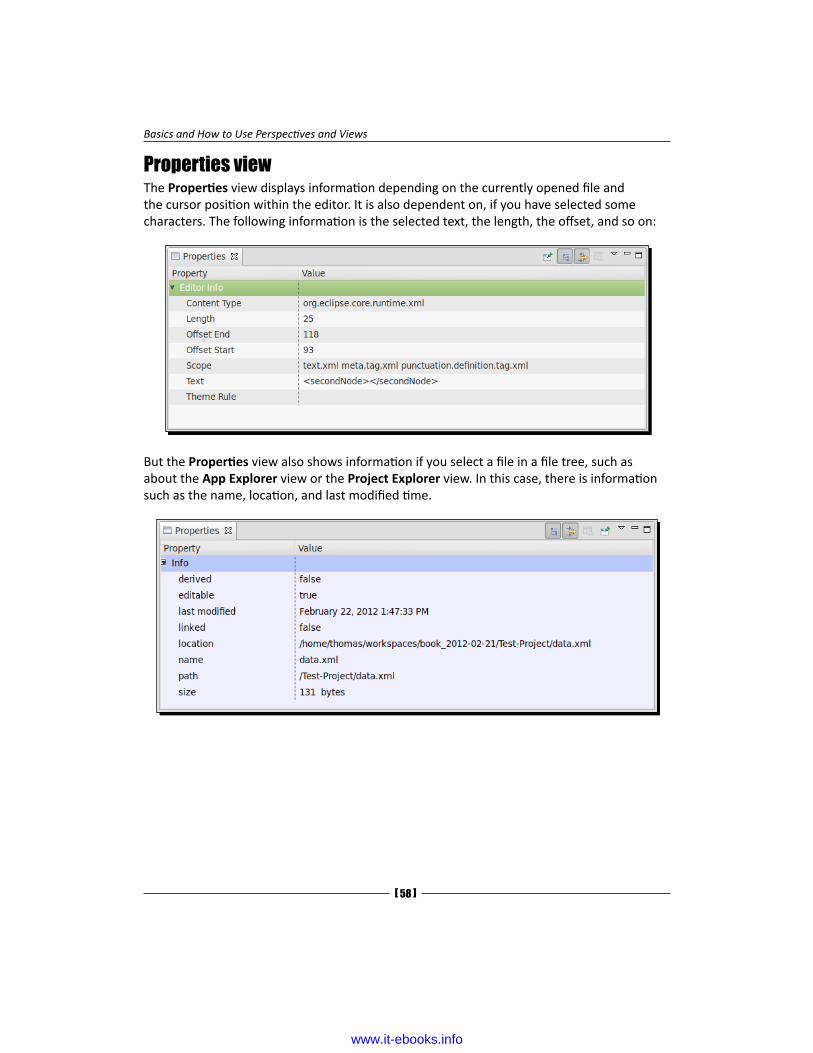
Basics and How to Use Perspectives and Views
[ 58 ]
Properties viewThe Properties view displays information depending on the currently opened file and the cursor position within the editor. It is also dependent on, if you have selected some characters. The following information is the selected text, the length, the offset, and so on:
But the Properties view also shows information if you select a file in a file tree, such as about the App Explorer view or the Project Explorer view. In this case, there is information such as the name, location, and last modified time.
www.it-ebooks.info

Chapter 2
[ 59 ]
Outline viewThe Outline view displays a hierarchical grouping of the elements of your code in the currently opened and focused file. The contained elements depend on the file type of the related file. So, if the related file is a markup file such as an HTML or a XML file, the Outline view will display the structure of their nodes.
In this case, the Outline view allows you to expand and collapse the nodes of the file. There is also a filter function that allows you to search a node, and if you select a node by a double-click on the Outline view, the editor jumps to the related line.
The Outline view for HTML file provides, in addition, a button that allows you to display text nodes within the structure.
www.it-ebooks.info

Basics and How to Use Perspectives and Views
[ 60 ]
If you open a script file such as a JavaScript or PHP file, the Outline view displays the contained variables, functions, classes, and so on. The amount of varied information that the Outline view can display is too large to talk about.
But there are a few functionalities of every file type available. The A-Z button sorts all elements on the level in an alphabetical order. In the View menu, which you can open by clicking on the small triangle button, you're also able to expand or collapse all elements.
The Outline view is therefore one of the most helpful views for navigating quickly through large files.
Searching and replacingThe Search tool in Aptana Studio is a powerful tool and consists of a search dialog where you configure and start a search, and a search view where the search results are listed. Additionally, there is a function to replace matched items and a preferences section for the search.
Search dialogThe Search dialog box can be opened by using the Search menu entry or clicking on the Search toolbar button. But depending on the current active view, it is sometimes also accessible by the shortcut Ctrl + F.
www.it-ebooks.info

Chapter 2
[ 61 ]
The dialog essentially contains three parts. At first, there is the search pattern, in other words, the characters to be searched. Here you have the option of searching case sensitive or case insensitive. But the search pattern could also be a regular expression, which makes the search more powerful.
Further, you can define a filename pattern that decides in which files Aptana Studio should search. This is very useful, so, for example, if you already know that the relevant search pattern can be in a PHP file, you use *.php as the file name pattern.
Finally the scope, which can limit the number of files examined. The default setting for this value is the Workspace scope. This means, if you start a search with the scope Workspace, Aptana Studio will look for the pattern in all files and all projects in the Workspace. This could, under some circumstances, be very many files. Therefore, it is better to limit the scope from the start, for example, by selecting a resource. That's very quickly done. Before you open the search dialog, navigate to your App Explorer or Project Explorer view and select a folder where you want to search. Now open the search dialog and select in the Scope section the entry Selected resources and you're ready to search in a limited scope.
www.it-ebooks.info

Basics and How to Use Perspectives and Views
[ 62 ]
Search viewThe Search view is closely linked with the search dialog, which we have just described. After you have started a search and fired it up, the Search view will be visible and will list all the matched files.
After our example search for the first pattern within the scope Workspace, we have received the following search result:
If the View menu setting Show as Tree is selected, the list structure is built up like a file tree and can accordingly expand and collapse. After each file entry is the count of the matches listed. If you expand a file node, you will get a list with the lines where the matches were found. So when you double-click on a search result line, the editor opens the file on the relevant line.
The Search view provides a list of different view specific buttons, which extends the search with useful features.
Starting from the left, there are the Show Next Match button and the Show Previous Match button, which are very useful if you search for a special match of the search result.
Quick access to the next and previous match
Use the shortcut Crtl + . for switching quickly forward to the next match, or Crtl + , for switching backward.
The Remove Selected Matches (Delete) button and Remove All Matches button allow you to remove matches from the list. The Remove Selected Matches (Delete) button removes just a single match, and the Remove All Matches button removes all matches.
The Expand All button and the Collapse All button are only visible if you display the search result as a tree, and they allow you to expand or collapse all entries.
www.it-ebooks.info

Chapter 2
[ 63 ]
The Run the Current Search Again (F5) button allows you to start the same search again. This is useful if you have already changed matches so that these ones can be omitted by a new search.
The Cancel Current Search button cancels a search in case you have run a search in a large number of files and the search seems to be taking ages.
The last button we will see is Show Previous Searches, which is extended with a small triangle that provides a list with the last searches.
Search preferencesJust like most of the other main features of Aptana Studio, the Search view has a section within the Preferences tab. In order to make some changes, navigate to Window | Preferences and select the node General | Search in the tree.
Here you will find, among other things, the option Reuse editors to show matches. This option controls whether Aptana Studio opens its own editor for each selected file, or always re-uses the same editor.
When you activate this option it can sometimes be useful, for example, when you navigate through the search results with the Show Next match or Show Previous match function. So you don't get a dedicated editor for each opened file, which must also be closed every time.
But on the other hand, if you open a file for every search, take a look at the file, and want to look in an additional file, it would be better if Aptana Studio takes a new editor instead of the same, where you can look or work further.
www.it-ebooks.info

Basics and How to Use Perspectives and Views
[ 64 ]
Replacing matchesIf you want to replace some character patterns within your project, you can do this with the help of the Search function too.
Search the pattern as just described, with the difference that you press the Replace... button instead of the Search button in the Search dialog. Our search example for the pattern firstDataNode starts and it appears in another dialog for the replacement.
In the header of the dialog, you get the information how many matches in how many files were found. In the Replace field you will recover your search pattern, followed by the field where you have to enter the replacement, which could also be a regular expression if the search pattern was also a regular expression.
Finally, you can take a look at a preview before you replace something in a lot of files. This is useful when you don't know if your pattern may contain unwanted matches.
If you don't need a preview, just replace all occurrences by clicking on OK.
www.it-ebooks.info

Chapter 2
[ 65 ]
Customizing Aptana Studio 3In the following steps we want to customize our installation of Aptana Studio, so that you're getting a surface to work where you feel comfortable.
Have a go hero – configuring Aptana StudioYour first task is to go into your installation of Aptana Studio and try to create your own perspective. Go on and personalize it as you prefer and arrange the contained views as you need.
Lastly, don't forget to save your changes; otherwise, after you restart Aptana Studio, all your changes will be lost.
Pop quiz – testing your newly acquired Workspace knowledgeQ1. What is a toolbar called where the buttons are grouped and you can add and move various items?
1. Toolbar
2. Foolbar
3. Coolbar
Q2. In which menu can you switch between perspectives?
1. Main menu
2. Perspective menu
3. Context menu
Q3. How can you get a description of unknown buttons?
1. You hold the mouse over the button and wait for the tooltip
2. You just press on it and look at what happens
3. You right-click it and get some information about it
Q4. Which elements can be grouped in perspectives?
1. Views, navigations, and toolbars
2. Views, editors, and preferences
3. Editors, Windows, and Statusbars
www.it-ebooks.info

Basics and How to Use Perspectives and Views
[ 66 ]
Q5. Why can't you select the gray-colored entries within the toolbar and menu visibility tab?
1. Because the required command group is unavailable
2. Because the feature isn't installed
3. Because you don't have the required authorizations
Q6. Why should you save your perspective after making some changes?
1. Because the changes are immediately lost
2. Because the changes are lost after an operating system restart
3. Because the changes are lost after an Aptana Studio restart
Q7. Which feature lets you take fast actions within views?
1. Fast view menu
2. Fast food menu
3. Fast tree menu
Q8. How can you speed up your search?
1. By using a smaller scope
2. By reducing the search pattern length
3. By taking an easier search pattern
SummaryAfter reading this chapter you should be able to customize Aptana and your perspectives with all you need. In addition, you should be able to create your own customized perspective with all you need.
You should know how to work with views and how you search and replace some character patterns within your workspace or a smaller scope.
In the next chapter, you will get started with creating your first workspace and project, and learn how to work with them.
www.it-ebooks.info

3Working with Workspaces
and Projects
Now that we have familiarized ourselves with the basic structure and main features of Aptana Studio, let us proceed with the two most important functions, namely the workspaces and projects.
Workspaces and projects allow you to split and group all of your projects and working files into logical and user friendly units, often making work much more effective. Let's start directly and see what workspaces are and what they are good for.
Subjects that we'll cover throughout the course of this chapter will include:
� What workspaces are and what they are good for � Creating and deleting workspaces � How to switch between different workspaces � Importing and exporting Aptana Studio preferences � Which project natures are available within Aptana Studio � Creating individual projects � Common ways of importing projects � Deleting unnecessary projects � Changing project natures � Reasons for closing and opening projects � Improving performance while working with large projects � Creating new files within projects
www.it-ebooks.info

Working with Workspaces and Projects
[ 68 ]
WorkspaceA workspace allows you to group many projects and source codes together that may have some relation to one another. The workspace also contains a set of preferences, such as the configured theme, shortcut settings, and code formatting configuration. Be aware of the size of your workspace; it should not be too large, otherwise the performance of the system may suffer. How many and how large the projects are that your Aptana Studio can handle depends on your system's memory and the configured memory settings of Aptana Studio.
Higher performance
If you notice that your system's performance is decreasing with the growth of your projects, you should maybe divide your workspace into multiple, separate workspaces or close some projects that are currently not in use. The method of closing a project will be explained later in this chapter.
For developers, there are different ways in which workspaces are operated. Some work with a single workspace in which they manage all projects. In this case, they often have to close unneeded projects or increase their memory in order to maintain good performance.
Other developers, in turn, work with a lot of different workspaces and further use it as an opportunity for grouping.
But why should you group projects into different workspaces?
There are many reasons why. Let's say you code in different programming languages. For example, you work intermittently on different projects for one or more clients. Client group 1 is developing projects based on Zend framework/PHP, and client group 2 is developing projects based on OpenLaszlo/Flash. Here we keep all the projects in the ZendFramework/PHP category in one workspace and all the other projects in the OpenLaszlo/Flash category in another workspace. If you need to know how you solved a particular problem in an analogous project, you can find that out quickly. As I currently work on a freelance basis, I myself use different workspaces that are grouped according to individual clients. This means that I often have to change my work environment. For some clients, I help them on site, while for other clients I work from my own office.
We have worked together with many clients on different projects but those projects had completely different methods from one another. Here it is very useful for creating a single workspace for each client. If you begin a new section of work for a different client, you can simply change the workspace, and everything will be available as you left it.
www.it-ebooks.info

Chapter 3
[ 69 ]
Current workspaceIf you regularly work in different workspaces, you may find yourself asking: which workspace am I in at the moment? or where is the current workspace located on my local filesystem? How do I locate the current workspace?
1. Navigate to File | Switch Workspace... | Other....
2. Here you will find the path to the current active workspace in the Workspace field.
3. Press Cancel to close this window.
Creating workspacesNow we want to start working with projects. First, we have to define a workspace.
Time for action – creating a new workspace1. Navigate to File | Switch Workspace | Other....
2. The window asks us to select a folder where we want to store our new workspace. So because I'm a supporter of using many small workspaces instead of a single, large one, I first create a folder named workspaces within my home directory.
3. The first workspace should contain my own projects, therefore I give them the name tdeuling and append the date of creation.
www.it-ebooks.info

Working with Workspaces and Projects
[ 70 ]
4. Within the Copy Settings tab, you can select which settings should be copied to the new workspace. Workspace Layout will copy all opened views, their sizes, and selected perspectives to the new workspace. Working Sets will copy all user-defined working sets to the new workspace.
5. By clicking on OK, Aptana Studio automatically saves the opened workspace and closes it. Thereafter, Aptana Studio starts up with the newly created workspace automatically.
What just happened?We have just created an additional workspace where you can locate some projects, maybe for a special kind of programming language or for grouping client projects.
Importing and exporting preferencesOn closer observation, we notice that all the settings are lost. This can be pretty annoying, especially if you have made a lot of personalizations and have to create a new workspace. In order to avoid having to set your preferences every time you create a new workspace, Aptana Studio provides the option of importing and exporting settings.
Time for action – exporting Aptana Studio preferences1. Navigate to File | Export....
2. Select the Preferences entry under the General entry in the window and click on Next.
3. Select the preferences that should be exported. We want to export all the settings, therefore we'll select the Export all checkbox.
www.it-ebooks.info

Chapter 3
[ 71 ]
4. The filename must end with the suffix .epf (eclipse preferences file) so that it's possible to select the file and import the preferences back later.
5. Click on the Finish button to complete the export.
What just happened?Now we have saved all the preferences to a local file. If you create a new workspace or set up a new installation of Aptana Studio now, you will be able to restore all your preferences.
But how can you import your saved preferences back? Take a look at how easy it is.
Time for action – importing Aptana Studio preferences1. Navigate to File | Import....
2. Select the entry General | Preferences on the window and click on Next.
www.it-ebooks.info
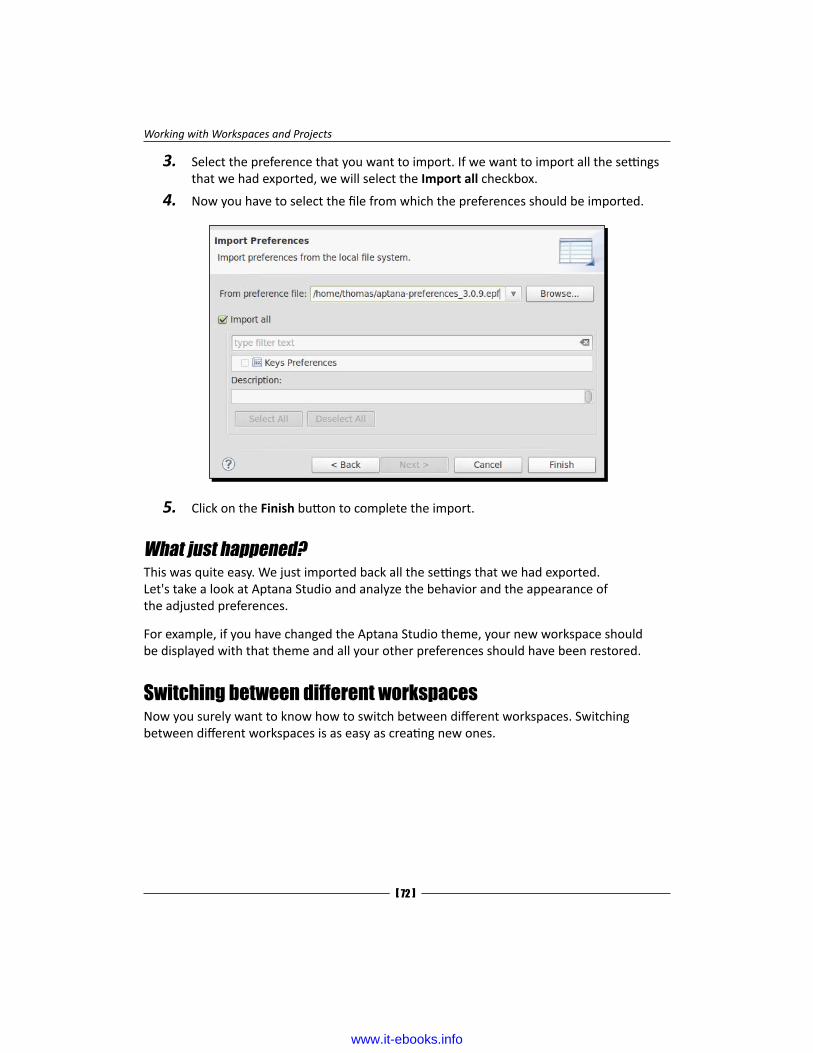
Working with Workspaces and Projects
[ 72 ]
3. Select the preference that you want to import. If we want to import all the settings that we had exported, we will select the Import all checkbox.
4. Now you have to select the file from which the preferences should be imported.
5. Click on the Finish button to complete the import.
What just happened?This was quite easy. We just imported back all the settings that we had exported. Let's take a look at Aptana Studio and analyze the behavior and the appearance of the adjusted preferences.
For example, if you have changed the Aptana Studio theme, your new workspace should be displayed with that theme and all your other preferences should have been restored.
Switching between different workspacesNow you surely want to know how to switch between different workspaces. Switching between different workspaces is as easy as creating new ones.
www.it-ebooks.info

Chapter 3
[ 73 ]
Time for action – switching to another workspace1. Navigate to File | Switch Workspace... and select the required workspace from
the list.
2. If your required workspace is not in the list, just click on Other....
3. Finally select the workspace directory, and click on OK to finish the selection.
4. While creating a new workspace, Aptana Studio automatically saves the currently opened workspace and closes it. Thereafter, Aptana Studio starts up with the newly selected workspace automatically.
www.it-ebooks.info

Working with Workspaces and Projects
[ 74 ]
What just happened?You have just switched your workspace, projects, and preferences to another one—just by a single selection. Easy, isn't it?
Deleting unnecessary workspacesDeleting an existing workspace is very simple. You just have to delete the workspace directory on your filesystem.
You have to switch into another workspace before you delete a workspace. If you don't do this, Aptana Studio will try to start up by using the deleted workspace and crash on not finding them. The result is that Aptana Studio will not start anymore. If this happens, refer to Chapter 12, Troubleshooting, in order to fix it.
Time for action – deleting a workspace1. Open Aptana Studio and make sure that there are no projects or files contained
in the workspace that you want to delete, which you will need again sometime in the future.
2. Switch to another workspace, like we have learned earlier in this chapter.
3. Navigate within your preferred file browser to your workspace and delete the directory.
What just happened?You have deleted a workspace that is no longer necessary from your system.
Remove the workspace from the recent workspaces list as well
In order to remove the deleted workspace from the recent workspaces list, which is the list that you will find under File | Workspaces, navigate to Window | Preferences and select the Workspaces tree item from the Startup and Shutdown option under the General tab. Just select your deleted workspace from the list and click on Remove.
www.it-ebooks.info

Chapter 3
[ 75 ]
Workspace preferencesAptana Studio provides a lot of preferences for adjusting the workspace according to your need. You will find all these settings by navigating to Window | Preferences. In this section, you have to select General | Workspace within the left tree. Because Aptana Studio provides so many preferences, we are not able to examine all this. Just take the time and have a closer look at the available preferences. I have mentioned as an example a useful setting that adjusts Aptana Studio so that it will ask you to choose a workspace every time Aptana Studio starts up.
Time for action – prompting the selection of a workspace on startup
If you are working with a lot of workspaces, it's sometimes a bit annoying when Aptana Studio starts up with the wrong workspace instead of the one you need.
So you have to wait until the Aptana Studio startup is finished, after which you can change the workspace, then you must wait until Aptana Studio closes down again. After that, Aptana Studio will start up with the required workspace. This takes a lot of time and is annoying every time.
But luckily you can teach Aptana Studio to ask you for the required workspace to be loaded before every start up. This is quickly done by performing the following steps:
1. Navigate to Window | Preferences and select the General | Startup and Shutdown | Workspaces tree item.
2. Now select the Refresh workspace on startup checkbox.
3. Apply the changes and close the Preferences window by clicking on OK.
What just happened?We changed the startup preferences, so Aptana Studio asks you which workspace you want to work in/on before every start up. This setting will save you a lot of time if you want/need to switch multiple times between different workspaces.
www.it-ebooks.info

Working with Workspaces and Projects
[ 76 ]
Pop quiz – testing your newly acquired Projects knowledgeQ1. What should a file end with to be a preferences export file?
1. .epf
2. .pef
3. .ini
Q2. What do you have to do before deleting a workspace?
1. Open the workspace that you want to delete.
2. Close the workspace that you want to delete.
3. Close all perspectives of the current workspace.
Working with projectsA project in Aptana Studio is like a group of source code files that together belong to a web application, website, or something similar.
But before we start to create our first project, let's take a look at the project nature that Aptana Studio provides.
Project natureThe project nature allows us to specify the nature of our project. By assigning a nature to your project, you can enable additional functionalities for it.
Project nature helps to identify the kind of source code that is present inside your files. The project nature affects many things, mainly the code assistant.
It primarily comes down to how the projects are indexed; well, some project types are actually a combination of several others, as you can see in the following table. So, in fact, you can have any file type within your projects, but the project nature defines how different files are evaluated in certain projects. Now, in the following table you will find a file type that is indexed with a particular nature:
Type/
NatureCSS HTML JavaScript Ruby ERB PHP
Web x x x
Ruby x x x x x
www.it-ebooks.info

Chapter 3
[ 77 ]
Type/
NatureCSS HTML JavaScript Ruby ERB PHP
Rails x x x x x
PHP x x x x
As shown in the previous table, a PHP-natured project has been tailored for PHP development, a Rails-natured project for Rails development, a Ruby-natured project for Ruby development, and a Web-natured project for web development, with techniques such as HTML, CSS, and JavaScript.
If you're using the Project Explorer view, you can identify the primary nature of a project on the small icon, which extends the project folder, as shown in the following screenshot:
Creating a new projectNow we want to create our first project within our workspace. Aptana Studio provides us with different ways to do this. The fastest way to do this is by using the toolbar. Just click on the small triangle to the left of the new button. It appears as a small menu, where we can directly select the project type for our new project.
www.it-ebooks.info

Working with Workspaces and Projects
[ 78 ]
Shortcut
In order to create a new project much faster, you can use the keyboard shortcut Shift + Alt + N. It directly provides a selection menu, similar to the new menu, and you can select the required project type by using the arrow keys.
So from the various ways of selecting a project type, we will select Web Project for this example.
An alternative way to open this project creation selection is to navigate to File | New. But the list of displayed project entries is not a full list of all the available projects. If you select the Project... item, you will receive a window with all the project types.
Now we have the option of jumping to the next step by clicking on Next >, where we can select a template for our new project.
www.it-ebooks.info

Chapter 3
[ 79 ]
After choosing a project template, we will proceed to the next step, where we have to define a project name and choose its location on our disk.
Ok, here we go. The name of the project should clearly describe what the project contains. Therefore, my web projects in the www folder are always named as per the domain name. The location is by default a folder in the current workspace and bears the same name as the project name.
Custom location
Sometimes it is useful to locate the project file in a location other than the workspace. For example, you may have a local, Apache web server running that always provides the current version of your project in your www folder. No problem; just change the location to a folder outside your workspace, and your project will still be associated with your workspace.
www.it-ebooks.info

Working with Workspaces and Projects
[ 80 ]
File synchronization
As a default setting, Aptana Studio automatically refreshes or syncs files in your workspace when a modification happens from outside of Aptana Studio. If you want to disable this behavior, just navigate to Preferences | General | Workspace and deselect the Refresh button on the access checkbox.
For another example of how you can create a project, we will take a look at the Promote to Project functionality. This function allows you to take a folder from your filesystem and convert it into a new project.
Time for action – using the Promote to Project function1. First of all, navigate to the Project Explorer view.
2. Now expand the filesystem node and navigate to the folder, which should be a project.
3. Right-click on the folder and select the Promote to Project...option.
4. Just enter a name for the new project and select the nature associated with the project.
5. Finally, click on Finish to complete the creation.
www.it-ebooks.info

Chapter 3
[ 81 ]
What just happened?Now we have converted a simple folder into a project by using the Promote to Project... function. You will see the project in your workspace henceforth, but the files are still located within their filesystem location.
Importing an existing projectIf you want to change over from another IDE to Aptana Studio, or have to develop an existing project that you will get from another developer or project, which is still integrated within another workspace, you have the option of importing them as a project.
There are two common ways to import projects into Aptana Studio:
� Importing an existing folder as a new project
� Importing existing projects into a workspace
Now we will take a look at these two functions.
Time for action – importing an existing folder as a new project1. Navigate to File | Import....
2. Select General | Existing Folder as New Project and click on Next.
3. Select the folder where the project is located. Use the Browse... button, navigate to the source code folder, and click on OK.
www.it-ebooks.info

Working with Workspaces and Projects
[ 82 ]
4. Now enter a name for the new project in the Project name field.
5. Select the Project Type of your project.
6. Finally, complete the import by clicking on Finish.
What just happened?We have now created a new project with an existing base of source code. You will find the new project within your Project Explorer or App Explorer view.
www.it-ebooks.info

Chapter 3
[ 83 ]
But what was happening in the background? The source code folder is still located in the same location. Aptana Studio has just added a hidden file named .project to the root of the source code folder and connected the project with your workspace.
However, also the import of an existing project is done quickly. So you could for example, have one and the same project integrated in different workspaces.
Time for action – importing existing projects into the workspace1. Navigate to File | Import....
2. Select General | Existing Projects into Workspace and click on Next.
3. Select the location from where you want to import the project. This could be a directory or an archive file, but the method of selection is the same. We want to do it with the option Select root directory and select the source by using the Browse... button.
www.it-ebooks.info

Working with Workspaces and Projects
[ 84 ]
4. Now you will be able to successively select several projects and collect them within the list.
5. After we have selected all the required projects, we have to decide if the project source code should be copied into our workspace or the project should still remain at the current location.
6. If we want, we can add our projects to a working set.
7. Finally, you have to finish the import process by clicking on Finish.
What just happened?Currently we have imported several projects in our workspace at once. If we take a look into the Project Explorer view, we'll see that all the selected projects have been successfully imported.
www.it-ebooks.info

Chapter 3
[ 85 ]
Deleting an existing projectSometimes it may so happen that you have a project that is no longer necessary. So let's take a look at how we can delete a project.
Time for action – deleting a project1. Navigate to the Project Explorer view.
2. Right-click on the project that you want to delete and select the Delete option.
3. A dialog box appears asking you if you want to delete the files in the filesystem as well. If you don't check the checkbox, Aptana will just remove the project from your workspace.
4. Finally if you're sure to want to delete the project, click on OK.
What just happened?You have deleted a project from your workspace, and depending on your decision to delete the file on your filesystem, the source code is also deleted.
Changing a project's natureIf you want to change or add an associated nature with a project, maybe because you have created a project as a web project and now you want to add some additional PHP code into it, just refer to the following Time for action – changing a project's nature section.
www.it-ebooks.info

Working with Workspaces and Projects
[ 86 ]
Time for action – changing a project's nature1. First of all, navigate to the Project Explorer view and right-click on the project
on which you want to change the nature.
2. In the project context menu, click on Properties and select Project Natures on the left-hand side of the dialog box.
3. Select the nature that is most appropriate to your project.
4. If you select more than one nature, you will be able to set a nature as the primary nature by clicking on the Make Primary button of the relevant nature.
5. Finally click OK. In order for the change of nature to be applied immediately, just click Yes in the appearing dialog, and Aptana will reopen your project.
What just happened?After Aptana Studio reopens your currently changed project, the nature of the project is assumed and the project provides the respective additional functionalities.
www.it-ebooks.info

Chapter 3
[ 87 ]
Closing or opening a projectIf your workspace is growing with more and more projects, your Aptana Studio performance may slow down more and more because the system parser, such as the error or style checker, gets more and more to do. So it is best practice to close projects that are currently not necessary.
When a project is closed within your workspace, it can no longer be changed. The resources of a closed project are no longer visible in the workspace, but they are still on the filesystem. So if a project is closed, it requires less memory in Aptana Studio. You can also improve the build time by closing a project because closed projects are not examined during builds.
Improve the startup duration
If you close your projects after your work is done and before you close down Aptana Studio, the effect is that the next startup will be much faster when you start up Aptana Studio with opened projects.
So let's take a look at how we can close and reopen a project in the Project Explorer view.
Time for action – closing a project1. Navigate to the Project Explorer view.
2. Right-click on the project that you want to close and select Close project.
That's it; you have now closed the project, and the icon of the project root node has switched to the icon of a closed folder.
As an inversed functionality, you can also click on the Close Unrelated Projects entry within the project context menu, which closes all projects in your workspace that have no relation to the selected one.
If you want to reopen a project, you can do so in the same way. Just right-click on the project that you want to reopen and select Open Project.
Improving performance while working with large projects and also working with a large number of projects is often problematic, but if you are working with very large projects, it will be even more problematic. If your projects are too large, your Aptana Studio could become very sluggish.
Now we will take a look at how we can improve performance by working with large projects.
The solution to this is to exclude the large project from the index.
www.it-ebooks.info

Working with Workspaces and Projects
[ 88 ]
Time for action – excluding a project from the index1. Open the Project Explorer or App Explorer view.
2. Select the project for which you need to improve the performance.
3. Right-click on it and select Indexing | Exclude from Index.
By selecting the Exclude from Index option, you have marked the project, so Aptana Studio can exclude the contained files from indexing and help improve performance.
A second possibility to improve your performance is to disable the Build Automatically option. This is easier than the previous option of excluding a project from the index.
1. Navigate to the menu Project | Build Automatically.
2. Deselect the menu entry.
Now, we have disabled the Build Automatically option. This means that the build is no longer triggered on the project when you save a file in it.
Creating a new file in a projectNow, after we have created some projects in different project natures, it's time to create some new source code files in our project.
Time for action – creating a new project file1. Navigate to the App Explorer or the Project Explorer view, and select the project
where you would like to add the file.
2. Right-click on the project and select New | File to open the New File window.
3. If you want to create a new file by template, an alternative way to do this is to select New From Template | The programming language | The Template file.
4. Within the New File window, specify the parent folder in the textbox at the top of the screen.
www.it-ebooks.info

Chapter 3
[ 89 ]
5. Enter the name of the new file into the File name field. Be sure not to forget to add a proper extension, for example, .html, .css, or .js.
6. Finally, just click on the Finish button to complete the creation.
What just happened?After this process, the file will be created and added to the selected location of your project. In addition, Aptana Studio will open the new file in the associated editor so that you can directly begin to code.
www.it-ebooks.info

Working with Workspaces and Projects
[ 90 ]
Have a go hero – create your own workspace with at least two different projects
After reading the chapter, your task is to create your own workspace on your system. If you're done, start to create some projects with different project natures. By the end of it, you must have at least one web project and one PHP project. When the projects are created, go forward and create some appropriate files in the web project (HTML, CSS, JavaScript files) and PHP project (PHP files).
Additionally, you can try out the Promote to Project function in order to create a project from an existing source code folder in your filesystem.
Pop quizQ1. How can you improve performance if you're using many projects within your workspace?
1. Open all the available projects.
2. Delete all the unnecessary projects.
3. Close all the unnecessary projects.
Q2. How can you improve performance if you're using some large projects within your workspace?
1. Include folders or the complete project into the index.
2. Exclude large projects or folders from the index.
3. Delete all files within the largest project that you do not need anymore.
SummaryAfter completing this chapter, you should be familiar with the different workspaces and projects.
You should be able to create workspaces and switch between them. You should know how to export and import Aptana Studio preferences so that you are able to restore them after creating new workspaces.
In addition, you should be able to create projects and adjust their nature to your needs. Furthermore, you should know how to improve the performance of your workspace.
All in all, we could say that, we are ready to start with the next chapter and to learn how to debug JavaScript projects within Aptana Studio.
www.it-ebooks.info

4Debugging JavaScript
Now, when we have created our own workspaces and projects, we can begin to work with Aptana Studio. Surely you have already created your own project with some files for your web application or website.
So, in this chapter we will take a look at the following:
� Installing the Aptana Studio Debugger Extension
� Working with the debug console
� Working with breakpoints
� Monitoring AJAX requests
� Uninstalling the Debugger Extension
The Debug perspectiveBefore we can start to debug our application, the first thing we have to do is to switch to the Debug perspective under Window | Open Perspective | Debug. The Debug perspective contains several useful views such as the Console view, the Debug view, the Breakpoints view, and so on, which are perfect for JavaScript debugging.
But first, let's start with installing the Debugger Extension, which is absolutely necessary for debugging.
www.it-ebooks.info

Debugging JavaScript
[ 92 ]
Installing the JavaScript debuggerIn order to debug some JavaScript code with Aptana Studio, we need to install the required extensions for our browser. The Debugger Extension is currently only available for Firefox and Internet Explorer.
We want to install the Debugger Extension for the Firefox browser.
Time for action – installing Aptana Debugger for Firefox1. Start up your Firefox browser. If you don't have Firefox already installed, do it now.
2. Install the Aptana Debugger Extension for Firefox. You will find it at http://firefox.aptana.com/update/aptanadebugger.xpi. By clicking on this link, Firefox automatically starts the installation. Only your confirmation and a Firefox restart is necessary.
3. After installing the extension, navigate to Firefox | Add-ons and take a look at the requirements of your version of Aptana Debugger.
www.it-ebooks.info

Chapter 4
[ 93 ]
4. In our case the Aptana Debugger 1.7.2 requires Firebug 1.2 to 1.8. Now navigate to www.getfirebug.com and install the required Firebug extension dependent on your currently installed Firefox version. We navigate to the website at https://getfirebug.com/releases/firebug/1.8/ and install the highest required Firebug version 1.8.
Already a newer version of Firebug installed?
If you already have a newer version of Firebug installed, you need to uninstall it and install one of the required versions. This might be unintended, because the newer versions of Firebug provide many nice features. In this case, you might install a second (older) version of Firefox that you're only using for Aptana Studio debugging.
5. After you have both the extensions installed, restart Firefox to complete the installation.
What just happened?You have just prepared your Firefox browser for debugging your Aptana Studio projects with it. In detail, this means you have integrated the Aptana Debugger Extension and the required Firebug extension.
It is absolutely recommended that the Firebug extension is compatible with the Aptana Debugger Extension.
Configuring the debuggerAptana Studio provides you with the option to configure many different debug configurations. For example, if you have a local installation of different Firefox or Internet Explorer versions, you could create a debug configuration for each of these browsers, so that you can start to debug your code in any of these browsers just by a single-click on the toolbar.
www.it-ebooks.info

Debugging JavaScript
[ 94 ]
Time for action – creating a debug configuration1. In order to create a debugging configuration, we click on the small triangle on the
right-hand side of the Debug toolbar button to drop-down the Debug menu and select the entry Debug Configurations….
2. Click on the New launch configuration button (a white paper symbol) at the top-left of the configuration window.
3. After Studio has inserted a configuration entry below the Web Browser node within the left-hand side tree, enter the name for the debug configuration into the Name field at the top-right. We enter, for example, the name Firefox - Internal Server.
4. Choose a browser within the Main tab in which our debugging function should run. We enter the path to our Firefox, for example, /usr/bin/firefox.
www.it-ebooks.info

Chapter 4
[ 95 ]
5. Further, we want to start the debugger on the current page; therefore we select the Use current page option in the Start Action section.
6. We select the Use built-in Web server entry because our first simple debug configuration should use the internal web server.
7. Afterwards, just click on Apply in order to save the first settings of the configuration.
8. Further we want that our debug configuration should appear under the Debug menu within the toolbar. Therefore, we select the Common tab and the Debug entry within the Display in favorites menu list.
9. Finally, click on Apply to save the changes, and afterwards click on Close to finish the creation.
www.it-ebooks.info

Debugging JavaScript
[ 96 ]
What just happened?We have created a debug configuration, which furthermore can be directly selected over the toolbar. When you select this configuration, Aptana Studio opens the related browser and starts the debugging.
Debugging JavaScriptAfter we have created the required configuration for JavaScript debugging, let's go forward and take a look at how we can debug a JavaScript file.
Time for action – debugging JavaScript1. At first, click on the Debug toolbar button in order to debug the file that is
currently open.
2. If you haven't already installed the Debugger Extension, you get the following message:
3. In this case, just click on Yes and Aptana Studio will install it directly in the background. After the quick and successful installation you receive a corresponding message where you click on OK and you can continue.
www.it-ebooks.info

Chapter 4
[ 97 ]
Maybe you have to restart Firefox after the Debugger Extension installation, if Firefox was running during the installation. When Firefox was running during the installation, and you continue without a restart, you get a Socket connection error error message. Please try shutting down and restarting your web browser, and then run Debug again.
4. Now, the next time when Firefox starts, you get the Another program on your computer would like to modify Firefox with the following add-on: message. Here we have to select Allow this installation and click on Continue.
5. In order to complete the installation of the Aptana Debugger Extension of Firefox, you have to restart Firefox again.
6. Finally the debug process should run your script in a simple browser.
www.it-ebooks.info

Debugging JavaScript
[ 98 ]
What just happened?We have debugged our first JavaScript code. But we currently see nothing spectacular during this process—everything behaves as usual.
This happens because we haven't set a breakpoint or any other debugging action. But because this is what we really want to do, let's take a look at the options which the debugger provides us with to debug our code.
Before we go forward, we have to stop the current debugging process. Therefore we click the Terminate view button, which is displayed as a red square and you will find it in the Debug view and the Console view. Alternatively, you can also just close the browser window in which the debugging process runs.
Console viewThe Console view allows you to print some log entries while your program processes. You can print values, types, and many more directly while processing occurs.
For example, the following action prints just a simple message in the Console view:
// Just print a stringaptana.log('something to print');
// Print a string with some variableaptana.log('this is the value: ' + variable);
The output of both these actions looks like the following:
something to printthis is the value: helloWorld
An additional method of the Console view is the trace method. The trace method will print a complete backtrace in the Console view, so that you can quickly locate the position of a problem.
aptana.trace(someVariable);
www.it-ebooks.info

Chapter 4
[ 99 ]
Time for action – working with the Console view1. Prepare an HTML file with the following JavaScript code:
<script type="text/javascript"> function someLoopWithinAFunction(loopEnd) { try { var someResult = 0; for(var i=1 ; i<=loopEnd ; i++) { // Logging some variable value aptana.log(someResult + "+" + i); someResult += i; } // Logging a simple variable by using backtrace aptana.trace("Backtrace a variable: " + someResult); // Logging an exception by using backtrace throw new Error("Some error happens"); } catch(exception) { // Execute some backtrace aptana.trace(exception); } return someResult; } var result = someLoopWithinAFunction(5); // The finishing result aptana.log("The result is: " + result);</script>
2. Switch to the Debug perspective.
3. Start the debug process by clicking on the Debug toolbar button.
4. A Firefox window automatically opens and executes our JavaScript code.
5. Now the Console view contains all logging values and backtraces.
www.it-ebooks.info

Debugging JavaScript
[ 100 ]
What just happened?We have just executed some JavaScript code that contains one aptana.log and two different aptana.trace. The Console view displays all logged values now.
In the first five rows, we see the result of the aptana.log, which was called within the loop. These five entries log only the calculation.
Next is the first backtrace with a simple variable. This is a very useful feature. As you can see, the value of the variable is printed followed by the complete backtrace of the program process. You can see all the functions that were successively called and listed in the Console view. In this case each function call is displayed with the filename and the related line number, so that you can find their positions quickly. In addition, you're also able to perform a double-click on this filename, and the editor automatically jumps to the function.
The second backtrace shows you how to combine the backtrace with an exception, so that you always get enough information if a problem occurs.
Finally, just a warning if you're working often with aptana.log and aptana.trace. One of the most often occurring errors is, a forgotten aptana.log() or aptana.trace() call within your JavaScript code. Within the normal debugging process, it isn't always noticeable—but if you execute your JavaScript code directly within a browser (without a debug console), you will get a Aptana is not defined error message.
www.it-ebooks.info

Chapter 4
[ 101 ]
That is correct, because the libraries by Aptana Studio are no longer included. So in order to optimize your code and prevent this error, you can wrap the Aptana functions into a separate function that checks if Aptana's libraries are available. This could look something like the following code:
<script type="text/javascript"> function myLog(value) { if(typeof aptana != "undefined") { aptana.log(value); } } function myTrace(value) { if(typeof aptana != "undefined") { aptana.trace(value); } } var logValue = new Date(); myLog(logValue); myTrace(logValue);</script>
Using breakpointsThe Breakpoints view gives you an overview about all breakpoints you have set within your current workspace. In the following screenshot, you can see the Breakpoints view, with a breakpoint on line 11 of the code:
But, what is a breakpoint and why should you set it?
A breakpoint is an exact position within your source code where the debugger should stop the execution. For example, if you have a loop of actions in your code, but something goes wrong somewhere within the code (maybe with your variables; they get bad values or invalid types). In this case you are able to set a breakpoint within your loop, and take a precise look at all variable values and see how they change in each cycle.
www.it-ebooks.info
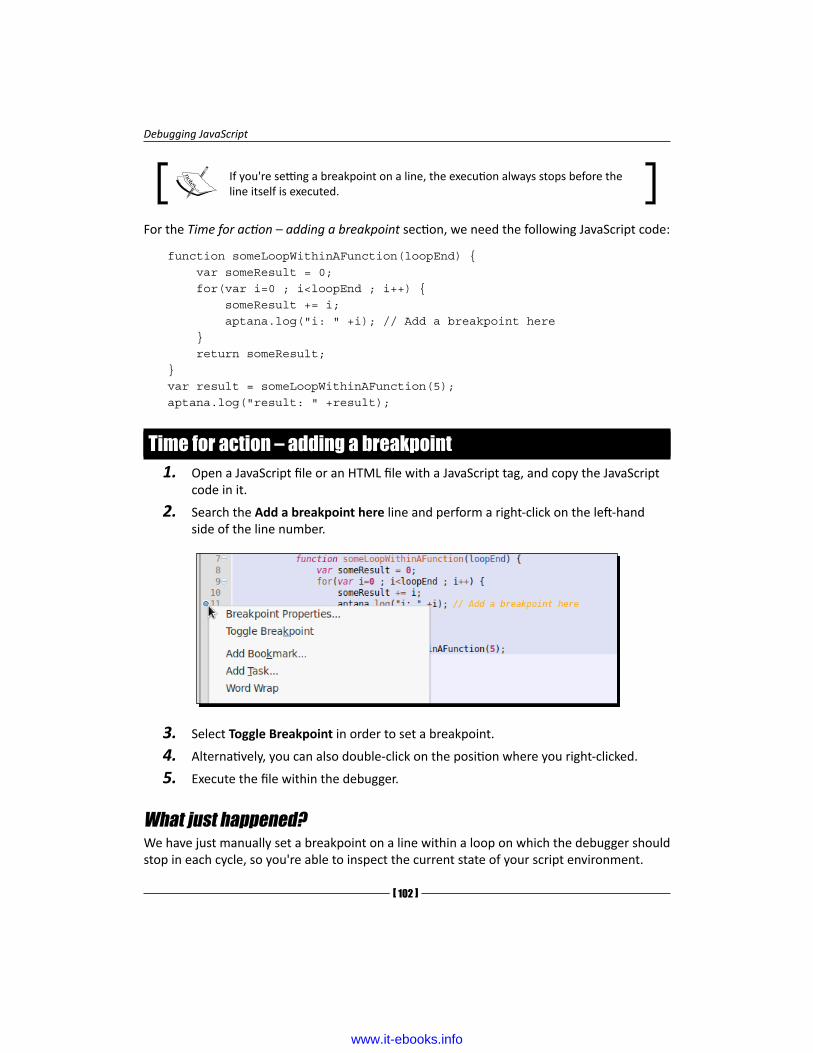
Debugging JavaScript
[ 102 ]
If you're setting a breakpoint on a line, the execution always stops before the line itself is executed.
For the Time for action – adding a breakpoint section, we need the following JavaScript code:
function someLoopWithinAFunction(loopEnd) { var someResult = 0; for(var i=0 ; i<loopEnd ; i++) { someResult += i; aptana.log("i: " +i); // Add a breakpoint here } return someResult;}var result = someLoopWithinAFunction(5);aptana.log("result: " +result);
Time for action – adding a breakpoint1. Open a JavaScript file or an HTML file with a JavaScript tag, and copy the JavaScript
code in it.
2. Search the Add a breakpoint here line and perform a right-click on the left-hand side of the line number.
3. Select Toggle Breakpoint in order to set a breakpoint.
4. Alternatively, you can also double-click on the position where you right-clicked.
5. Execute the file within the debugger.
What just happened?We have just manually set a breakpoint on a line within a loop on which the debugger should stop in each cycle, so you're able to inspect the current state of your script environment.
www.it-ebooks.info

Chapter 4
[ 103 ]
Resume a breakpoint
If you want to resume a breakpoint, you can do this simply by pressing F8.
If you take a look into the Console view, you see the following output:
i: 0i: 1i: 2i: 3i: 4result: 10
As you can see, the debugger prints the current value of the i variable in each cycle of the loop, and also the result of the calculation at the end.
The debugger stops only at breakpoints that are placed on lines that have executable source code. If you set a breakpoint on an empty line, the debugger will ignore it.
If you have placed several breakpoints in your script, and you don't need some of them in the actual execution of the script, you have the option to disable your breakpoints.
Time for action – disabling a breakpoint1. Open the Breakpoints view and search the unnecessary breakpoints.
2. Deselect the checkbox on the left-hand side of the breakpoint entry.
3. Alternatively, you can search the breakpoint line within the editor.
4. Right-click on the blue breakpoint beside the line number.
5. Select Breakpoints properties… and deselect the Enabled checkbox.
6. Finally, click on OK.
What just happened?You have deactivated a breakpoint by using the Breakpoints view and selecting the Breakpoints properties... beside the editor's line numbers.
Identify disabled breakpoints
To identify disabled and enabled breakpoints in the whole IDE is very easy. Disabled breakpoints are always displayed with a white point, and enabled breakpoints always with a blue point.
www.it-ebooks.info

Debugging JavaScript
[ 104 ]
Time for action – setting a hit count on a breakpoint1. Search the line of our currently placed breakpoint.
2. Right-click on the blue breakpoint on the left-hand side of the related line number.
3. Select the Breakpoints properties… entry.
4. Select the Hit Count checkbox and enter the number 3.
5. Execute the file within the debugger.
What just happened?Now we adjusted our breakpoint, so that it's not stopped just at the third time it's reached.
This is very useful, if you already know that the problem within your loop happens for the first time in the third cycle. Now the debugger also stops just within the cycle where you want to search for the problem.
Identify breakpoints with a hit count or a condition
By working with the Breakpoints view and within the editor, you can always identify a breakpoint with a hit count or a condition through the small question mark on the left-hand side of the point.
If you want to search for errors, the Variables view is very useful. The Variables view displays all variables with their values, and the type in which the variable was defined and the actual type which the variable has within the current scope of the breakpoint. In order to select the columns that are displayed, you can navigate to View Menu to Layout | Show columns.
The Variables view only displays information when a breakpoint stops your JavaScript.
www.it-ebooks.info

Chapter 4
[ 105 ]
Time for action – inspecting variables at a breakpoint and changing their values
1. Execute the last debugged JavaScript code, with the placed Hit Count breakpoint.
2. When the script stops at the breakpoint, open the Variables view in Aptana Studio.
3. Take a look at the list of variables and check if they are correct.
4. Perform a double-click on the value of the loopEnd variable and change the value from 5 to 7.
5. Press Enter to take the new value.
6. After that press F8 to resume the debug process.
What just happened?Now you have inspected the current variables on a breakpoint and changed the loopEnd variable to a new value. By finishing the script the Console view should have the following output:
i: 0i: 1i: 2i: 3i: 4i: 5i: 6result: 21
As you can see, the script assumes the new variable value directly and now executes seven cycles.
www.it-ebooks.info

Debugging JavaScript
[ 106 ]
Studio AJAX monitorIf you're developing an application, which sends a lot of AJAX requests during the whole execution time, it's often necessary to know what kind of data is returned. For this, Aptana Studio provides the Studio AJAX Monitor, in which you're able to track all AJAX requests and their responses.
The Studio AJAX Monitor consists of three parts. First, there is the overview about all requests. Here you can see which URL is requested by which method, and at what time.
The other two parts are each a part of the request information and the response information. Both are separated in a Headers area and a Body area where you can inspect the AJAX request in detail.
For the Time for action – installing the Debugger Extension section, we need a small script like the following one:
function testXHR() { var xmlhttp = new XMLHttpRequest(); xmlhttp.open("GET", "debug_ajax.html", true); xmlhttp.setRequestHeader("variable", "value"); xmlhttp.onreadystatechange = function() { if (xmlhttp.readyState==4) { aptana.log("responseText: "+xmlhttp.responseText); } } try { xmlhttp.send("Debug AJAX"); } catch(exc) { dump("XMLHttpRequest exception: " + exc); }}testXHR();
www.it-ebooks.info

Chapter 4
[ 107 ]
Time for action – uninstalling the Aptana Debugger Extension1. Open a JavaScript file or an HTML file with a JavaScript tag and place the JavaScript
code within it.
2. Execute the debugging and open the Studio AJAX Monitor view.
3. Now the browser executes an AJAX request, and we are able to inspect them within the Studio AJAX Monitor view.
4. Take a look at the listed AJAX request within the view.
What just happened?You have fired a simple AJAX request and the request is directly listed in the Studio AJAX Monitor view. Here you are able to inspect the request, at what moment it starts, what kind of headers are sent, and which data is in the response.
Uninstalling the debuggerMaybe you want to uninstall Aptana Studio or whatever, and you want to uninstall the Aptana Debugger too.
Let's take a look at how to uninstall the Aptana Firefox Extension.
www.it-ebooks.info

Debugging JavaScript
[ 108 ]
Time for action – uninstalling the Aptana Debugger Extension1. Open Firefox and navigate to Tools | Add-Ons.
2. Select the Extensions section.
3. Select the Aptana Debugger Extension and click on Remove.
4. Finally restart Firefox.
What just happened?We have just removed the Aptana Debugger Extension from your Firefox. Now the extension is no longer available.
Have a go hero – selecting a JavaScript file which you didn't code yourself and inspect the functionality by using the debugger
Now your task is to go forward and select a JavaScript file, which is coded by another developer. Integrate it to a simple HTML wrapper file and try to inspect the functionality. Use the Breakpoints and the Log functions in order to learn how the script works.
Pop quizQ1. Which function you have to call, if you want to print a backtrace within your Console view?
1. The aptana.log() function.
2. The aptana.print() function.
3. The aptana.trace() function.
Q2. Why is it necessary to remove all Aptana functions when your application goes into public use?
1. Because all users of your application received your debug messages.
2. Because all users of your application received error messages, as the Aptana object isn't available in a non-debugger use case.
3. It's not necessary to remove the Aptana functions. The script works fine with or without it.
www.it-ebooks.info

Chapter 4
[ 109 ]
Q3. Why don't you place a breakpoint within an empty line?
1. Because the debugger stops the debugging in this line.
2. Because the debugger ignores the breakpoint and the script will continue.
3. There's no reason. Placing a breakpoint on an empty line works fine.
Q4. Which color has a disabled breakpoint?
1. Disabled breakpoints are red.
2. Disabled breakpoints are blue.
3. Disabled breakpoints are white.
SummaryBy the end of this chapter, you should be able to debug your JavaScript code. This means, you should know how to set and remove breakpoints, and also how to find available breakpoints.
If a breakpoint stops the execution within your code, you should know how you are able to inspect the variables in the current state of your application.
Now we're ready to start up with the next chapter, where we'll take a look at how we can document our JavaScript files and projects.
www.it-ebooks.info

5Code Documentation and
Content Assist
Documenting your code is very important. Everyone knows that when they get the task of extending or changing the script of another developer, before they can start with their work, they have to understand the process of the script and must understand the thinking of the developer. When the source code from other developers is well documented, it will be much easier to do this.
But sometimes it also happens that you have to work on a script that you had developed yourself, but this was quite some time ago so you don't remember the functionality in detail anymore.
Therefore, it is recommended that you always document your scripts (files, classes, properties, methods, and functions), ideally during the development stage. At this stage, you have the most knowledge about the functionality. For this reason, Aptana Studio understands ScriptDoc and uses it with the Content Assist feature.
In this chapter we will take a look at the following:
� What is ScriptDoc and which tags it provides
� Creating general documentation comments
� Using the Content mentation comment snippets and using it with the Content Assist feature
www.it-ebooks.info

ScriptDocScriptDoc is a tool that extracts all documentation from JavaScript files and provides this information to Aptana Studio so that it can generate the content for the Content Assist feature. ScriptDoc automatically scans your projects for ScriptDoc documentation blocks and uses the Content Assist feature to display information tooltips. For example, as soon as you create a ScriptDoc comment for a function, the Content Assist feature knows your new function and displays the information to you if you're using the function somewhere within your project.
But what should such a comment really look like?
A ScriptDoc comment starts with /** and ends as a normal multiline comment, with */. Between this start and end, you can insert some tags that describe your documentation comment.
The following table gives you a small overview of the available tags that you can use in order to document your code:
Tag Definition and examples Applies to
@alias Defines an ID for a class or function.
Example: * @alias aliasName
Any
@author Defines the description of a class.
Example: * @author Thomas Deuling [email protected]
Any
@classDescription Defines the description of a class.
Example: * @classDescription Description ...
Function
@constructor Defines that a function is the constructor of a class.
Example: * @constructor
Function
@deprecated Defines that a function or property is deprecated.
Example: * @deprecated
Function and property
@example Defines an example.
Example: * @example Example code
Any
@exception Defines an exception thrown by a function.
Example: * @exception {TestException} ThrowDescription
Function
@id Allows you to link functions or properties documentation to an external ScriptDoc file.
Example: /** @id */
Any
www.it-ebooks.info

Tag Definition and examples Applies to
@inherits Defines that a function inherits from another function.
Example: * @inherits functionNameA, functionNameB
Function
@internal Defines that a function or property should not be visible for the Content Assist feature.
Example: * @internal
Function and property
@memberOf Defines that a function is a member of a class.
Example: * @memberOf className
Function and property
@method Defines that a function is a method of a class.
Example: * @method
Function
@namespace Defines a namespace for a file.
Example: * @namespace coding.ms
File
@param Defines a parameter of a function.
Example: * @param {String} paramName Description
Function
@private Defines that a function or property is private.
Example: * @private
Function and property
@projectDescription Defines a description for a file. It must be the first tag in the first documentation block.
Example: * @projectDescription Description-text ...
File
@property Defines a property of a class.
Example: * @poperty {Array} Array for ...
File
@return Defines the type and description of the return value.
Example: * @return {Object} Return description
Function
@see Links to a related class or function.
Example link to a function: * @see #functionName
Example link to a class: * @see className
Example link to a method: * @see className#methodName
Any
www.it-ebooks.info

Tag Definition and examples Applies to
@since Defines in which version the subject was created.
Example: * @since 1.0
File, Function, and Property
@type Defines the data type of a property.
Example: * @type {Object} Object description
Property
@version Defines the version of a file or class.
Example: * @version 1.1
Any
These ScriptDoc tags give you a good base to document your code, in such a way that nearly all other developers will understand what your script is good for.
In the following section we will take a look at what comments for files, functions, and properties look like.
JavaScript file commentAt first, we will take a look at the comment for a file. The comment for a file should contain the @projectDescription and @author tags, which describe what kind of source is in the file and who has written it. Further, there could be a @namespace, @since, and @version tag so that everybody knows in which namespace the code is reachable and since which version the file exists and what's the current version of the file.
The @property tags are also helpful, which should be added for each notable property.
Following is a common file comment:
/** * @projectDescription File description * * @author Thomas Deuling [email protected] * @namespace coding.ms * @version 1.1 * @since 1.0 * * @property {String} */
Don't forget, the file comment with the @projectDescription tag must be the first documentation block within the first line in your JavaScript file.
www.it-ebooks.info

JavaScript property commentNext is the property comment, which describes a property of a class. So, if you're writing a class that contains some properties, you should document them with a description that describes the destination of it. If the property is a private property of the class, you should use the @private tag. But the @since and @type tags are also useful and help everyone know how long the class had this property and what type it has.
Here's a common property comment:
/** * Property description * @type {Object} * @private * @since 1.0 */
JavaScript function commentNow, at last, the function comment.
It can be used for a function or a method. If the function is a method, the comment contains the @method tag. Additionally, there could be a @constructor tag, which defines that the method is the constructor of the class. But in every case the comment should contain the @author and @since tags so that it's clear who has written that function and for which version of your application. Further, you should create a @param tag for each function parameter. These @param tags contain the type of the parameter, the variable name, and a description of the use case. And finally the @return tag (if any are available) that describes what kind of data is returned by the function.
And, at last, an example of a common function comment:
/** * Function description * * @param {String} paramName Description * @return {Object} Return description * @author Thomas Deuling [email protected] * @since 1.0 */
www.it-ebooks.info

Time for action – displaying a function commentNow let's take a look at how to display these function comments.
1. Create a JavaScript file with the following content:
/** * This function does something * * @param {String} aStringParam String for... * @return {Object} Return the result object * @author Thomas Deuling [email protected] * @since 1.0 */function doSomething(aStringParam) { // ...do something return new Object();}doSomething();
2. Save the file.
3. Hover the mouse on the function call.
What just happened?We have just created a function with a ScriptDoc conform comment. By hovering over a function call of this function, as in line 16 of the following screenshot, Aptana Studio displays a tooltip with information about the ScriptDoc comment:
www.it-ebooks.info

Where is the information tooltip?
If the information tooltip doesn't appear on hovering over the function call, just navigate to Window | Preferences and go to Aptana Studio | Content Assist. In this area, you have to select the Show information on hover option.
The Content Assist featureThe Content Assist feature provides you with information about properties, methods, and functions. The related information is displayed, as we have seen in the Time for action – displaying a function comment section, in the form of a tooltip. When the information within the tooltip is larger than the available tooltip space, just press F2 while the cursor is on the function or object, and the tooltip will be sticky so you're able to scroll within.
Time for action – using the Content Assist featureThe Content Assist feature will automatically pop up and provide you a context menu, where you get an overview of objects, functions, and so on that are available in the current scope.
1. Open the JavaScript file following the steps mentioned in the Time for action – displaying a function comment section.
2. Place the cursor on any location within the file.
3. Begin to type a function or object name. For example, we want to use the document object and therefore we press the letter D.
4. Now the Content Assist feature provides you a context menu, which lists all available objects and functions that are starting with the letter "d".
Trigger the Content Assist feature manually
In case you need the Content Assist feature and it doesn't appear automatically, you can trigger it manually by using the shortcut Ctrl + Space bar.
5. Use the up and down arrow keys in order to select the required entry, or type more letters to get a more precise result list. We selected the document object.
6. If you selected the required entry or there's only one entry left to be selected, just insert the required code by pressing the Tab key.
7. After the document object is inserted and you type the dot in order to call a method from the document object, the Content Assist feature reappears and this time it provides you with all the available methods of the object.
www.it-ebooks.info

What just happened?We have used the Content Assist feature to complete our required statement, even if we don't know in detail which properties are available on the related object. The following screenshot shows you the Content Assist feature related to the Time for action – using the Content Assist section.
Browser capabilitiesBut the Content Assist feature can do much more. If you have to develop your code for different browser, which you know has very different functionalities, you need to know which feature is provided by which browser. If you do not, it initiates many developing mistakes just because you didn't know that a particular browser doesn't understand a feature.
For this problem, Aptana Studio provides an additional useful feature. If you start to write a statement of a browser-provided object, such as the document object, the Code Assist provides you a list of available features. But if you take a closer look, you will see a lot of browser icons on the right-hand side of each entry. Each icon indicates whether the related browser understands the feature or not. When the icon is full-colored, it indicates that the browser supports the feature; otherwise the icon is grayed-out and the browser doesn't support the feature. If there is no information available, the Content Assist feature assumes the property to be available.
www.it-ebooks.info

Time for action – changing the user agents used by the Content Assist feature
1. Navigate to Window | Preferences.
2. Select the Content Assist entry under the Aptana Studio tab in the left-hand side tree.
3. Select at the top-right the type of the project in which you will set the provided user agents.
4. Select, in our case, the Web entry.
5. Check your required browser and accept the selection by clicking on OK. We select the Chrome, Firefox, and Internet Explorer.
What just happened?We selected the browser that our project has to support. In order to test the current selection of browser, just open a JavaScript file and type document. Take a look at the Content Assist feature; now it should display only the icons of selected browsers in the list.
Another nice feature is that you can use the Content Assist feature with your own code. If you want to use the Content Assist feature with your own code, you have to document your objects, methods, and functions.
You can also optimize the process of documenting your code by creating snippets for each comment. These snippets are easy to insert by using the Content Assist feature.
www.it-ebooks.info

Have a go hero – documenting a project that contains JavaScript codeNow, by yourself, select a small JavaScript project that is currently under construction, and add documentation for all objects, methods, functions, and properties. When you're done, check out how well the Content Assist feature delivers you information about your own code.
Pop quizQ1. How must a documentation comment block start so that the ScriptDoc parser is able to parse it?
1. /**
2. /*
3. //
Q2. Where must the file comment with the @projectDescription tag be located in a JavaScript file?
1. The file comment with the @projectDescription tag must be the last documentation block in your JavaScript file.
2. The file comment with the @projectDescription tag must be the first documentation block in the first line of your JavaScript file.
3. It does not matter where it is.
Q3. What action is necessary to display a function comment?
1. Hovering the mouse above a function call.
2. Clicking on a function call.
3. Right-clicking on a function call.
Q4. Which shortcut makes the information tooltip sticky so that you're able to read the complete information, in case it does not fit within the tooltip?
1. F2
2. Ctrl + S
3. F1
Q5. Which shortcut triggers the Content Assist feature?
1. Ctrl + Alt + Delete
2. Ctrl + F2
3. Ctrl + Space bar
www.it-ebooks.info

SummaryBy the end of this chapter, you should be able to document your JavaScript code so that it's conformed to ScriptDoc. In addition, you should know in detail how to document your JavaScript code so that every developer is able to understand your scripts and their functionality.
Now we go forward and take a look at how we can work with HTML and CSS, and inspect them.
www.it-ebooks.info

6Inspecting Code with Firebug
This chapter shows you how to inspect your code. Aptana Studio itself does not provide features for inspecting code but nearly every browser provides one or more good tools for doing this. In this chapter, we will look at how you can do this with the Firefox extension, Firebug.
In this chapter we will take a look in detail at the following:
� What is Firebug
� Inspecting the source of a website
� Inspecting and editing HTML code
� Inspecting and editing CSS code
� Using the Firebug console
� Profiling code performance
www.it-ebooks.info

Inspecting Code with Firebug
[ 124 ]
What is FirebugFirebug is one of the most popular extensions for Firefox and helps you to inspect and debug websites. It was downloaded more than 3 million times and is rated with 5 stars on the addons.mozilla.org website. The addons.mozilla.org website has a great collection of extensions, and here you can get almost any Firefox extension.
Firebug is constantly being developed and contains many useful features such as the following:
� A Console module where Firebug lists errors, warnings, and traces from JavaScript, CSS, and so on.
� An HTML module where you can inspect and edit the HTML code of the currently displayed website.
� A CSS module where you can inspect and edit the CSS code of the currently displayed website.
� A Script module where you can inspect and debug the JavaScript code of the currently displayed website.
� A DOM module where you can inspect and change the Document Object Model, abbreviated as DOM, from the currently displayed website.
� A Network module where you can monitor all network activities and inspect their requests and responses.
You can download Firebug at http://getfirebug.com/, where you will always find the actual version and much useful stuff such as documentation or community support.
Time for action – installing FirebugBefore we can start, we need to install Firebug.
1. Start Firefox and navigate to http://getfirebug.com, and then click on Install and after that on Download; or navigate directly to https://addons.mozilla.org/en-US/firefox/addon/firebug/.
2. Click on +Add to Firefox.
www.it-ebooks.info

Chapter 6
[ 125 ]
3. Confirm the installation by clicking on Install.
4. Finally, restart Firefox.
What just happened?We have just installed the Firebug extension into our Firefox. After a successful installation you will find the Firebug menu at the top-right of your Firefox window.
Now we can start to explore our websites and web applications.
As you can see in the previous image, the Firefox icon is currently grayed out. This means that Firebug is currently disabled. You can click on this icon in order to open and activate Firebug. As an alternative and faster way to do this, you can just press F12.
In case Firebug is active, the icon is displayed as colored.
www.it-ebooks.info

Inspecting Code with Firebug
[ 126 ]
Time for action – enabling and configuring FirebugSo, let's start working with Firebug and see how to enable and disable the main modules of Firebug.
1. Open Firefox and surf to any website.
2. Press F12 to open Firebug.
3. Firebug opens by default at the bottom of Firefox and provides you with a main menu in the form of the Firebug symbol on the left-hand side. In the top-center of Firebug, you will find a tab bar that allows you to switch between Firebug's main modules.
4. Each module tab, when activated, has in addition its own menu where you can activate some specific settings (have a look at the small triangle on the right-hand side of the tab label).
5. You must also know that the Console, Script, and Net modules can be enabled and disabled for performance reasons. If the label of this tab is gray, the module is currently disabled; and if the label is black, it is enabled. All three modules can be enabled and disabled by their respective menus. Try it yourself!
Disable unnecessary Firebug modules
Unfortunately, Firebug is a little bit of a memory eater. If you've enabled all Firebug modules, and perhaps even have many Firefox tabs open, Firefox will quickly use several hundred MB of memory. So better disable all Firebug features that you currently don't require.
www.it-ebooks.info

Chapter 6
[ 127 ]
What just happened?We have opened the Firebug on any website and had a look at the possibilities for configuring Firebug and its tabs. In addition, we now know how we can enable and disable Firebug modules.
Firebug in a separate window
In order to open Firebug in its own window, just use the shortcut Ctrl + F12
Inspecting HTML codeThe first module that we want to view in detail is the HTML tab. It's not the first in the row of Firebug tabs, but it gives us a good start to working with Firebug.
In the first step, we will inspect the HTML code of a website and try to select a particular HTML tag.
Time for action – inspecting HTML code1. Open Firefox and navigate to any website, such as google.com.
2. Press F12 in order to open Firebug.
3. Select the HTML tab.
4. In the bottom-left, you will find the complete HTML code of the currently loaded site.
5. Here, you are able to navigate through the HTML tree by expanding nodes by clicking on the small plus icons.
www.it-ebooks.info
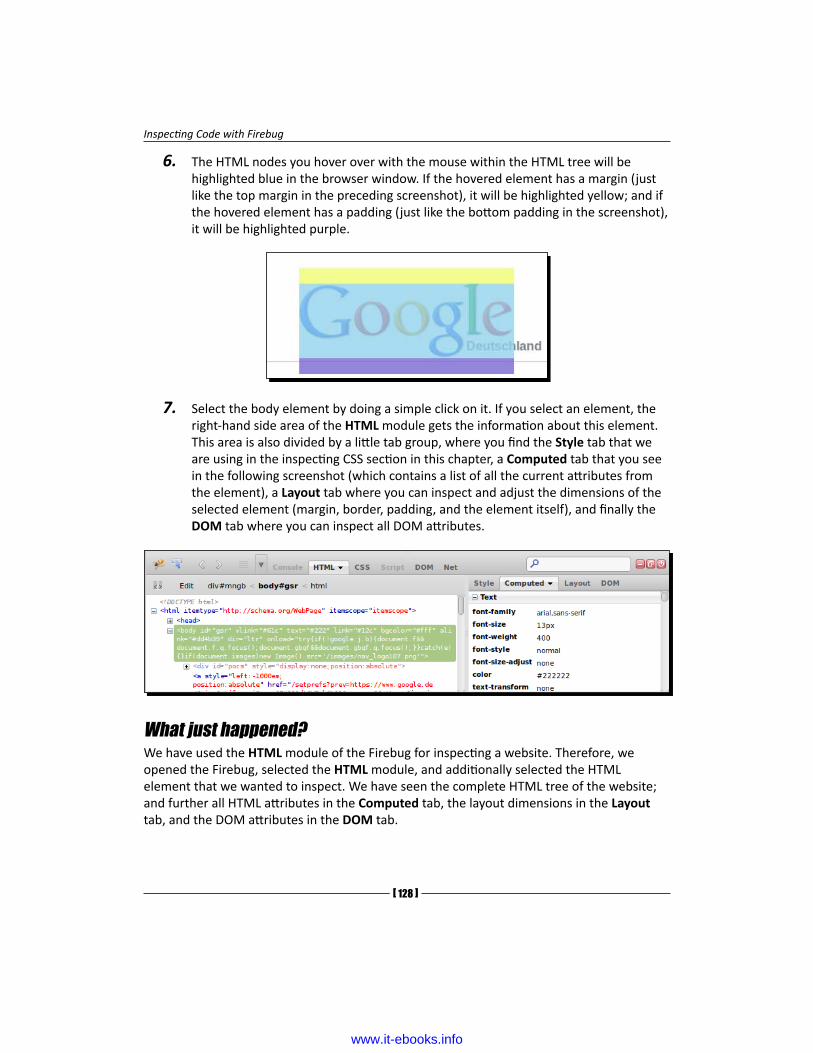
Inspecting Code with Firebug
[ 128 ]
6. The HTML nodes you hover over with the mouse within the HTML tree will be highlighted blue in the browser window. If the hovered element has a margin (just like the top margin in the preceding screenshot), it will be highlighted yellow; and if the hovered element has a padding (just like the bottom padding in the screenshot), it will be highlighted purple.
7. Select the body element by doing a simple click on it. If you select an element, the right-hand side area of the HTML module gets the information about this element. This area is also divided by a little tab group, where you find the Style tab that we are using in the inspecting CSS section in this chapter, a Computed tab that you see in the following screenshot (which contains a list of all the current attributes from the element), a Layout tab where you can inspect and adjust the dimensions of the selected element (margin, border, padding, and the element itself), and finally the DOM tab where you can inspect all DOM attributes.
What just happened?We have used the HTML module of the Firebug for inspecting a website. Therefore, we opened the Firebug, selected the HTML module, and additionally selected the HTML element that we wanted to inspect. We have seen the complete HTML tree of the website; and further all HTML attributes in the Computed tab, the layout dimensions in the Layout tab, and the DOM attributes in the DOM tab.
www.it-ebooks.info

Chapter 6
[ 129 ]
Why so some attributes in the HTML view sometimes blink in yellow?
If you're inspecting some JavaScript-driven website and there are attributes in the current scope of the viewed HTML code, which just at that moment is manipulated by JavaScript, Firebug lets these attributes blink in yellow.
Now we want to go forward and take a look at how we can edit or delete some HTML code by using Firebug.
Time for action – using the mouse selector for editing HTML1. We will start at the same position where the previous Time for action section ended.
So, open Firefox, navigate to any website, and press F12 in order to open Firebug.
2. Now, if you're searching a special element within the website, you can also use the mouse selector. This is a small button in the form of a blue rectangle with a mouse inside, on the right-hand side of the Firebug main menu. Just activate the button and move the mouse over the website in order to find the element you want to inspect. Once clicked, the element will be selected in Firebug and the mouse selector button gets disabled.
3. When you have selected an element, you have the option to right-click for opening a context-sensitive context menu. In this context menu, Firebug provides you with several actions for the selected HTML element. You can attach new attributes, edit the element node, delete the complete node, or perform other actions.
www.it-ebooks.info

Inspecting Code with Firebug
[ 130 ]
4. At this point we use the mouse-selector for selecting the country name to the right of the Google logo. After this, we perform a right-click on the selected div node and click on the Edit HTML button.
5. Now we are able to edit the complete HTML node with all the other nodes inside. For a little test, we change the CSS attribute's color to red. By changing the HTML code, Firebug refreshes the website in real time, so you'll get any results of your changes directly.
6. If you have made all your changes, just press the Edit button in the top-left to finish the editing.
What just happened?We have selected a special element from a website and changed it. We have seen how Firebug shows us the changes in real time in the current website.
In the same way, as we currently edit the HTML code, you are also able to delete nodes or just quickly add a single attribute.
A frequent workflow is therefore to select an HTML node and edit it, and after editing just copying the HTML node by right-clicking on it. The copied HTML node, which is now contained in the clipboard, can simply be pasted into your source file.
www.it-ebooks.info

Chapter 6
[ 131 ]
Inspecting the CSS codeFor inspecting and editing the CSS code, Firebug mainly provides two methods. In the first, there is the Style tab of the HTML module. Here you can inspect and adjust the CSS code of the currently selected HTML element. On the other hand, you can just use the CSS module. In the CSS module, you are able to inspect and edit the CSS code directly within the structure of the single CSS file.
At this point, we will take a look at both variants of working with CSS.
Time for action – editing the CSS code by using the HTML module1. We start again just as we did in the previous Time for action section. So, open
Firefox, navigate to any website (we use the Google site again), and press F12 in order to open Firebug in the HTML module.
2. Select the country name in the right of the Google logo by right clicking on it.
3. Now Firebug displays all the information about the current HTML element. We select the Style tab and take a look at the CSS information in detail.
4. As we can see in the Style tab, the element gets an instruction to change the font size by three times. You can see in detail which property of the element comes from where. You can also see in each element block where it has been inherited from; and in each selector section, in which file and line number the selector is defined. So, from the lower side to the upper side the instructions will get overwritten.
www.it-ebooks.info
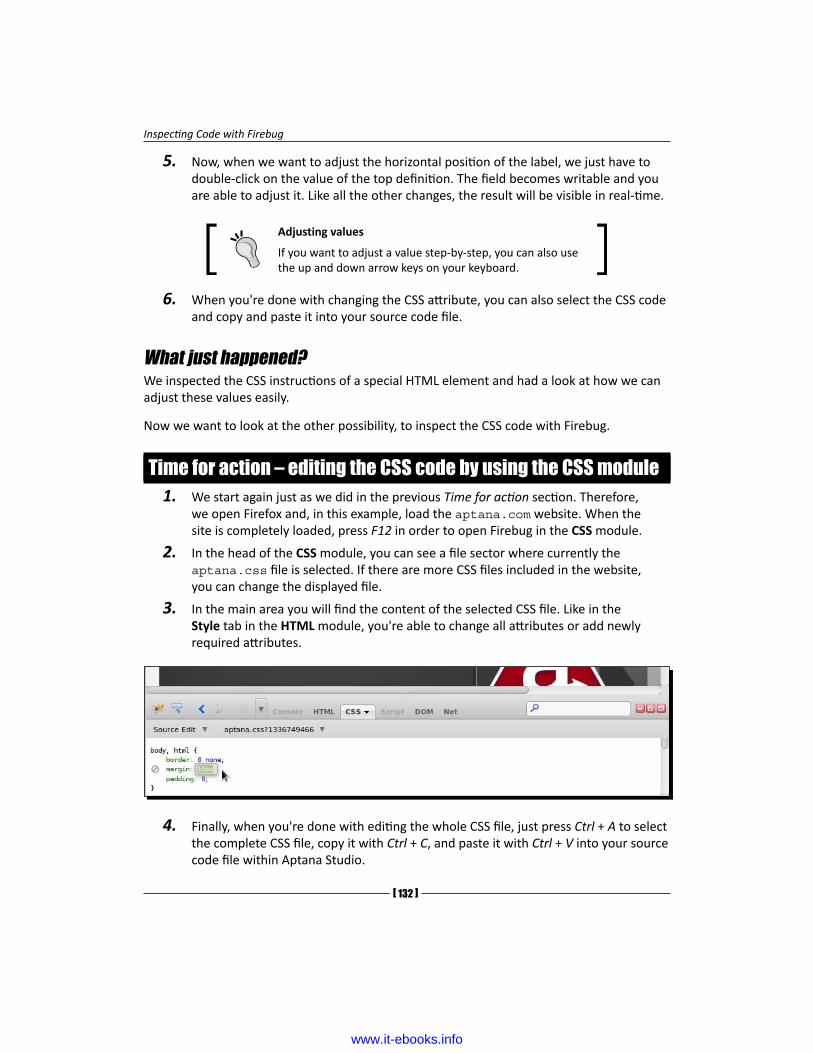
Inspecting Code with Firebug
[ 132 ]
5. Now, when we want to adjust the horizontal position of the label, we just have to double-click on the value of the top definition. The field becomes writable and you are able to adjust it. Like all the other changes, the result will be visible in real-time.
Adjusting values
If you want to adjust a value step-by-step, you can also use the up and down arrow keys on your keyboard.
6. When you're done with changing the CSS attribute, you can also select the CSS code and copy and paste it into your source code file.
What just happened?We inspected the CSS instructions of a special HTML element and had a look at how we can adjust these values easily.
Now we want to look at the other possibility, to inspect the CSS code with Firebug.
Time for action – editing the CSS code by using the CSS module1. We start again just as we did in the previous Time for action section. Therefore,
we open Firefox and, in this example, load the aptana.com website. When the site is completely loaded, press F12 in order to open Firebug in the CSS module.
2. In the head of the CSS module, you can see a file sector where currently the aptana.css file is selected. If there are more CSS files included in the website, you can change the displayed file.
3. In the main area you will find the content of the selected CSS file. Like in the Style tab in the HTML module, you're able to change all attributes or add newly required attributes.
4. Finally, when you're done with editing the whole CSS file, just press Ctrl + A to select the complete CSS file, copy it with Ctrl + C, and paste it with Ctrl + V into your source code file within Aptana Studio.
www.it-ebooks.info
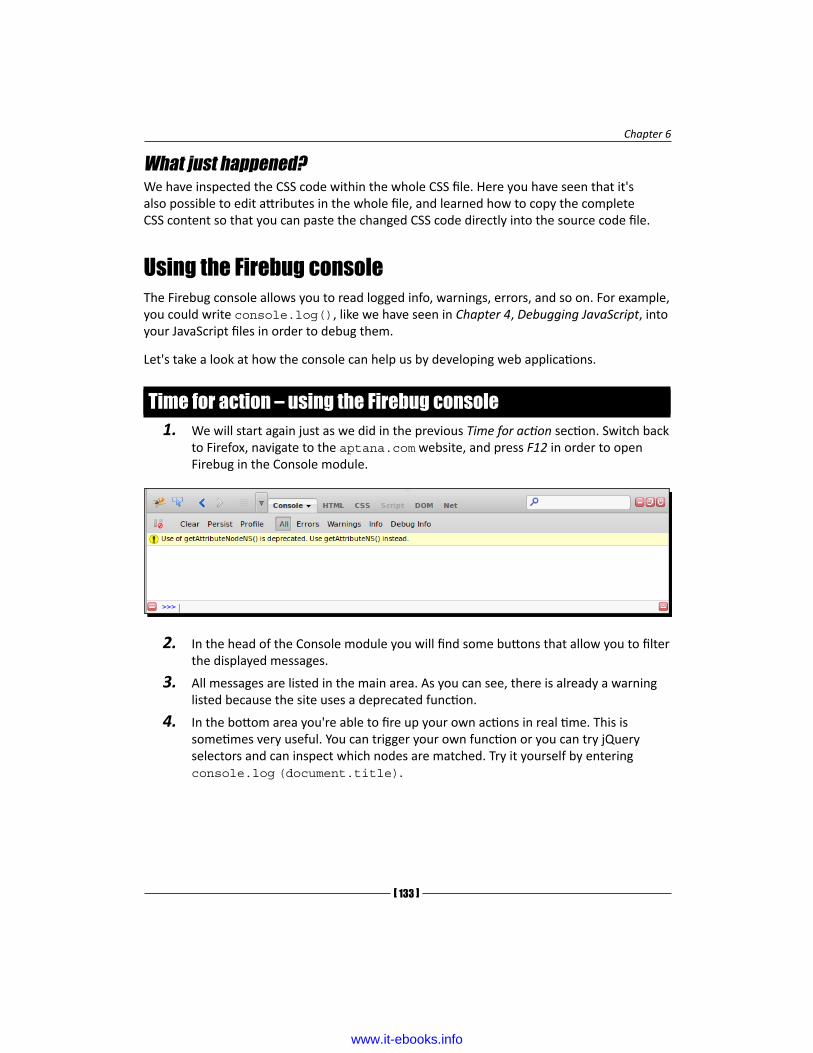
Chapter 6
[ 133 ]
What just happened?We have inspected the CSS code within the whole CSS file. Here you have seen that it's also possible to edit attributes in the whole file, and learned how to copy the complete CSS content so that you can paste the changed CSS code directly into the source code file.
Using the Firebug consoleThe Firebug console allows you to read logged info, warnings, errors, and so on. For example, you could write console.log(), like we have seen in Chapter 4, Debugging JavaScript, into your JavaScript files in order to debug them.
Let's take a look at how the console can help us by developing web applications.
Time for action – using the Firebug console1. We will start again just as we did in the previous Time for action section. Switch back
to Firefox, navigate to the aptana.com website, and press F12 in order to open Firebug in the Console module.
2. In the head of the Console module you will find some buttons that allow you to filter the displayed messages.
3. All messages are listed in the main area. As you can see, there is already a warning listed because the site uses a deprecated function.
4. In the bottom area you're able to fire up your own actions in real time. This is sometimes very useful. You can trigger your own function or you can try jQuery selectors and can inspect which nodes are matched. Try it yourself by entering console.log (document.title).
www.it-ebooks.info

Inspecting Code with Firebug
[ 134 ]
Enter multiline commands
If you need to enter a multiline—no problem. Just press the red triangle icon at the right of the command line, and the command line moves to the right into a multiline command line. Now you're also able to paste complete script lines at once into Firebug and execute them.
5. Another nice feature is that the Console module provides a history of your commands. You can display the previous actions by clicking on the red list icon at the left of the command line. Additionally, you can use the up and down arrow keys, if the command line has the focus, to navigate through the previous history entries.
6. You can also write your own messages, errors, warnings, or just a debug message in the Console module. Firebug therefore provides four methods on the console object, shown as follows:
� console.log(object[, object, …])
� console.error(object[, object, …])
� console.warning(object[, object, …])
� console.debug(object[, object, …])
7. The last feature that we want to envisage here is the completion proposal (attention, this feature is only available by using the single line command line). If you write in the single line command line and you type doc, the Console will suggest an object or function you could have meant to type. If there is more than one successful suggestion, you are able to use the up and down arrow keys on your keyboard to select the one you need. If your required object or function is implied, just press the Tab key to select it.
Did you know?
The Console module is also able to calculate. If you're currently creating a layout, and you have to calculate properties or dimensions, you don't have to start your systems calculator. Just use the Firebug console.
www.it-ebooks.info
Chapter 6
[ 135 ]
What just happened?We have examined the main functionalities of the Console module. Now you should know how you can filter the output and fire up JavaScript commands at runtime.
Profiling code performanceWhile developing goes forward and your web application gets larger and larger, the performance might slow down more and more. This results from the increasing amount of JavaScript code that must be executed by the browser.
This is the best moment to think about optimizing your code. Therefore, you have to profile many parts of your source code in order to find out which functions or code blocks are the largest performance eaters.
Firebug provides you with some useful functionalities that you can use to localize these performance eaters.
A simple way to find out how good the performance of a single code block or function is to wrap it into a time and timeEnd function. How we do this exactly will be discussed in the following section.
Time for action – profiling code performance by using console.time()
In this section, we will discuss the steps for profiling code performance by using the console.time() function.
1. First, we need some JavaScript code which we can profile. For this simple example we just use a small function (with some actions that require a little bit of time), like the following code:
<script type="text/javascript"> function loop() { var sum =0; for(var i=0 ; i<1000 ; i++) { sum += i*Math.random(); } return sum; }</script>
www.it-ebooks.info

Inspecting Code with Firebug
[ 136 ]
2. We embed this function into an HTML file.
3. When we now want to determine the execution time, we have to wrap the function call into two console functions. The first is for registering the start time and will be set by console.time('unique_identifier'). Pay attention to the first parameter; this must be a unique identifier for each profiling.
4. After that, we call the function which we will profile.
5. Finally, we have to register that our time measurement is done. Therefore, we have to call the second function, which requires the same unique identifier as the first function console.timeEnd('unique_identifier'). After all, our code should look something like the following code:
<script type="text/javascript"> function loop() { var sum =0; for(var i=0 ; i<1000 ; i++) { sum += i*Math.random(); } return sum; } console.time('timer1'); console.log('loop: ', loop()); console.timeEnd('timer1');</script>
6. Now, we open our HTML file within Firefox and open Firebug by pressing F12, and open the Console module.
7. Maybe we have to enable the Console. If so, we have to reload our site by pressing F5.
8. Finally, we take a look at the Console output and see that the execution of our block has taken 4 milliseconds.
What just happened?We have wrapped our function call into the functions console.time() and console.timeEnd() in order to determine the exact execution time for our function. It is important that both the wrapper functions get the same unique parameter, which the Console needs to identify the timer.
www.it-ebooks.info

Chapter 6
[ 137 ]
Another way to get more information about your application and where the most performance got lost is to profile some code block or function with the console.profile function.
Let's take a look at it in the following section.
Time for action – profiling code performance by using console.profile()
In this section, we will discuss the steps for profiling code performance by using the console.profile() function.
1. We grab the HTML file from the previous Time for action section and extend the JavaScript code.
2. First, we move the Math.random function call into a separate function named getRandom. We do this in order to create more function calls within our loop function.
3. The console.time and console.timeEnd functions are no longer required; but don't delete these rows. The console.profile function works in a similar way.
4. So, we change the console.time function into a console.profile function. The unique identifier is still required, because you're able to run more profiles at the same time.
5. This step helps to Change the console.timeEnd function into a console.profileEnd function—and that's it. After all these steps, your code should look something like the following:
<script type="text/javascript"> function loop() { var sum =0; for(var i=0 ; i<100 ; i++) { sum += i*getRandom(); } return sum; } function getRandom() { return Math.random(); } console.profile('timer1'); console.log('loop: ', loop()); console.profileEnd('timer1');</script>
6. Now we will load our HTML file within Firefox and open Firebug by pressing F12 and selecting the Console module.
www.it-ebooks.info

Inspecting Code with Firebug
[ 138 ]
7. Maybe we have to enable the Console. If so, we have to reload our site by pressing F5.
8. Finally, we take a look at the Console output and see that our profiling code block has used 533 milliseconds and 101 function calls.
What just happened?We have wrapped our function call into the console.profile() and console.profileEnd() functions. During the execution, the Console logs every function call between the profile() and profileEnd() functions and generates a complete profiling table where you can see which functions were called at which time, and how long they took.
Manually starting the profiling
You can also start a profiling process manually. If you take a look at the top buttons within the Console module, you will find a button called Profile. If you press it the first time, it will start a profiling process just like the console.profile() function. If you press it a second time, the profiling process stops and you get the profiling result in the Console output.
Have a go hero – inspecting a website in detailNow your task is to select a website and open it within Firefox. Open the Firebug and start inspecting this website in detail. Have a look at how the HTML and CSS codes are structured. Also throw a closer look at how the individual CSS classes override the other CSS classes.
Play around with the different values and customize them in order to understand what they do. After you have explored the HTML code structure and CSS styles, take a look at the JavaScript codes within the site. Enable the profiling and examine which functions are called and so on.
www.it-ebooks.info

Chapter 6
[ 139 ]
Pop quizQ1. Which keyboard shortcut opens Firebug?
1. F7
2. F12
3. F13
Q2. Why is it better to disable unnecessary Firebug modules?
1. It ensures good performance
2. It doesn't matter
3. It's better to enable all the modules
Q3. When you inspect an HTML file and hover over some HTML elements, what does the yellow and purple color mean in the highlighted elements?
1. There are no yellow or purple highlight colors
2. These colors display the distance to other elements
3. The yellow highlight displays the margin of an element and the purple highlight displays the padding of an element
Q4. When will the change be visible after you have changed it within Firebug?
1. After you have reloaded the page
2. The change is immediately visible
3. After you have saved your changes
Q5. Why did you make the console.time() and console.timeEnd() functions and the console.profile() and console.profileEnd() functions the first parameter and unique identifier?
1. If you start multiple time or profile processes, Firebug needs them to identify which process has to stop when
2. It's just a label and is not required
3. There's no parameter in these functions
www.it-ebooks.info

Inspecting Code with Firebug
[ 140 ]
SummaryAfter reading this chapter, you should be able to inspect websites and web applications by using Firebug. In addition, you should know in detail how you can edit HTML elements, change their CSS attributes, and examine JavaScript code.
Now we want to go forward, and in the next chapter examine how we can work with JavaScript libraries and how we can integrate them in our project.
www.it-ebooks.info

7Using JavaScript Libraries
While developing a web application, nearly every developer uses their own or another public JavaScript framework or library, because no one wants to do all the required script coding again and again. The wheel does not have any time to be reinvented!
Another pro is, of course, that popular JavaScript frameworks such as Dojo Toolkit, jQuery, or ExtJS are already proofed across browsers , making their use more attractive.
Therefore, we want to easily integrate libraries from other developers or use our own existing libraries.
In this chapter we will cover the requirements for including JavaScript libraries:
� Using jQuery
� Using Dojo Toolkit
� Using ExtJS
Requirements for including a JavaScript libraryIn order to make Aptana Studio work with the JavaScript library, some requirements must be met so that this library can provide information to the Aptana Studio Content Assist.
www.it-ebooks.info

Using JavaScript Libraries
[ 142 ]
The library you want to integrate must have either of the following:
� A JSCA 1.0 specification file. You can read more about it on https://wiki.appcelerator.org/display/tis/JSCA+1.0+Specification.
� Script comments can also be read using the ScriptDoc specifications, as we have already described in a previous chapter.
� A Virtual Studio Documentation (VSDoc) for JavaScript.
Using an Aptana Studio 2.X Code Assist XML file
You can also use an Aptana Studio 2.X Code Assist XML file. In such a case, you just have to rename the file extension to .sdocml.
A further requirement is that the project must have one of the following types:
� Web
� PHP
� Python
� Ruby
� Rails
The reason that we need one of these project types is that (as discussed in Chapter 3, Working with Workspaces and Projects) each one of them is able to access and add different features to a project.
In Chapter 3, Working with Workspaces and Projects, you can read about how to create a project in one of these types, or how to change the type of project.
Using jQueryjQuery is one of the most popular JavaScript libraries. jQuery is a free and very extensive library that provides many comfortable functions for DOM manipulation and navigation.
As the name suggests, it started as a JavaScript query library and today provides a huge number of plugins and even a complete UI package.
You can get it from the jQuery website at http://docs.jquery.com/Downloading_jQuery.
Before we start to integrate jQuery, we can also install the additional jQuery bundle. This does not take long and only needs to be installed once. After installation, the Content Assist provides us with additional useful jQuery snippets and commands.
www.it-ebooks.info

Chapter 7
[ 143 ]
Time for action – installing the jQuery bundleTo install the jQuery bundle, follow these steps:
1. In the menu, navigate to Commands | Bundle Development | Install Bundle.
2. Select the jQuery entry and click on OK.
3. Now, Aptana Studio pulls the jQuery ruble from github and integrates it into the system.
Cloning the Git Repository failed?
If you receive an error such as fatal: Unable to look up github.com, just check your DNS setting and make sure that the github domain is correctly resolved.
www.it-ebooks.info

Using JavaScript Libraries
[ 144 ]
What just happened?We have just installed the jQuery bundle directly from the Aptana Git Repository. Aptana Studio has integrated it automatically into the system so that you receive many further jQuery specific Content Assist entries. From now on, you will find a jQuery entry within the Commands menu, which contains the jQuery bundle with all their snippets and some commands.
Now that we have installed the jQuery bundle, we will go on and integrate the jQuery library.
Time for action – integrating jQueryIn this section, we will see how to integrate jQuery. To do this, refer to the following steps:
1. Create a new web project named Using JavaScript Libraries - jQuery.
2. Download the jQuery source and save it under jquery-release-1.7.2-src.
www.it-ebooks.info

Chapter 7
[ 145 ]
3. Create a folder named jquery-vsdoc-*version* (replace *version* with your jQuery version), in our case jquery-vsdoc-1.7.2.
4. Now we have to download the relevant VSDoc file. You can download this from the website at http://appendto.com/community/jquery-vsdoc. Now just select your version and click on the VSDOC link, in our case on jQuery 1.7.2 VSDOC, and save the file into the jquery-vsdoc-1.7.2 directory.
5. Finally, you must drag the VSDOC file into your Project folder, otherwise the Content Assist will not provide you with the information from the VSDOC file.
Why does Content Assist not work? If Content Assist did not provide any jQuery functions or some other functions, maybe you have not integrated the VSDoc file via drag-and-drop into your project. As a quick solution, you could just drag-and-drop the file into another project and then back to the current project.
What just happened?We have integrated the jQuery VSDoc file into our web project. From now on, the Content Assist will provide us with all of the available jQuery functions from the current scope.
So if, for example, you type $(d) and place the cursor behind the d variable, you can then trigger the Content Assist by pressing Ctrl + Space bar; the Content Assist will then give you some suggestions.
www.it-ebooks.info

Using JavaScript Libraries
[ 146 ]
You could then place the cursor, for example, behind a $(document) entry, and trigger the Content Assist once more. Now the Content Assist will also provide you with all available jQuery functions.
Easy, isn't it? No more searching within the documentation because you didn't know which functions were available or how they should have been written—now you can just navigate through the list of all functions and properties and select the required one.
Using Dojo ToolkitDojo Toolkit is a solid JavaScript toolkit that provides many home-made components, plugins, and widgets. All of them are internationalized and, as the Dojo team says, unbeatable. It has already been thoroughly tested in all major browsers and is appropriate for programming a variety of applications, from large web applications to mobile applications.
You can get it from the Dojo Toolkit website at http://dojotoolkit.org/download/.
Time for action – integrating the Dojo ToolkitThe following steps show how to integrate the Dojo Toolkit:
1. Create a new web project named Using JavaScript Libraries - Dojo.
2. Download the Dojo Toolkit source and extract it into a folder, for example, dojo-release-1.7.2-src.
3. Copy the folder that contains the Dojo Toolkit source into your Project folder.
4. Create a folder named dojo-sdocml-*version* (replace *version* with your Dojo Toolkit version), in our case dojo-sdocml-1.7.2.
www.it-ebooks.info
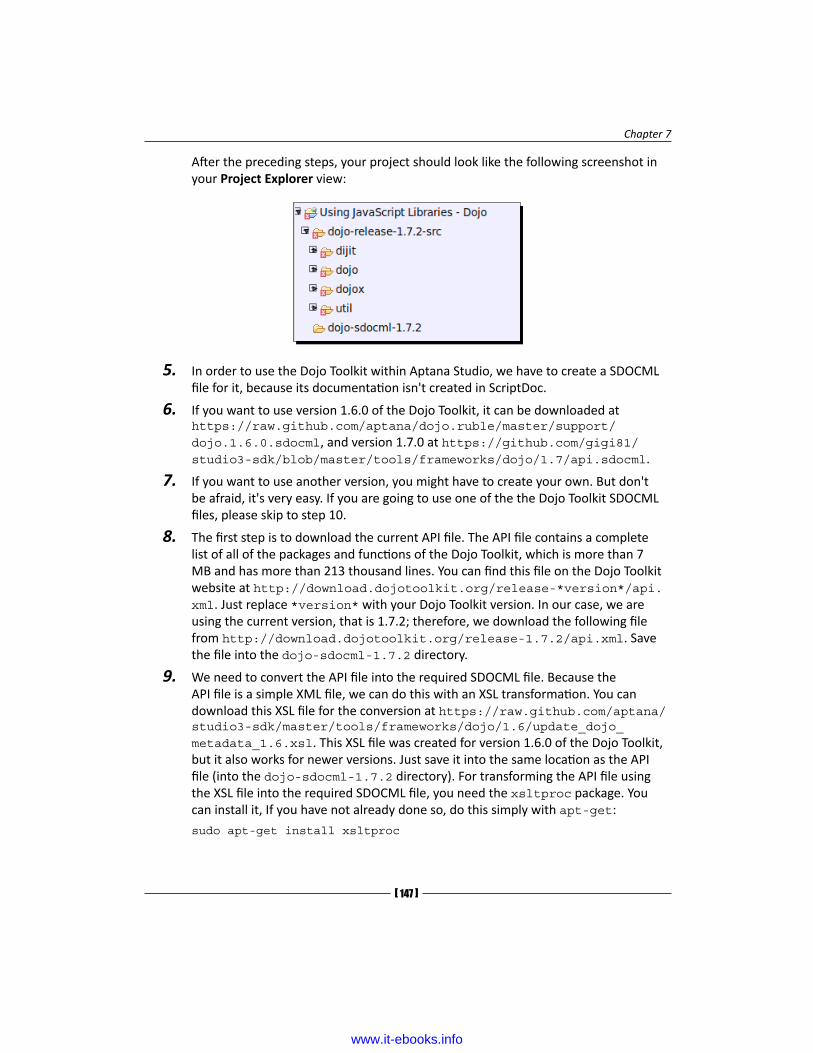
Chapter 7
[ 147 ]
After the preceding steps, your project should look like the following screenshot in your Project Explorer view:
5. In order to use the Dojo Toolkit within Aptana Studio, we have to create a SDOCML file for it, because its documentation isn't created in ScriptDoc.
6. If you want to use version 1.6.0 of the Dojo Toolkit, it can be downloaded at https://raw.github.com/aptana/dojo.ruble/master/support/dojo.1.6.0.sdocml, and version 1.7.0 at https://github.com/gigi81/studio3-sdk/blob/master/tools/frameworks/dojo/1.7/api.sdocml.
7. If you want to use another version, you might have to create your own. But don't be afraid, it's very easy. If you are going to use one of the the Dojo Toolkit SDOCML files, please skip to step 10.
8. The first step is to download the current API file. The API file contains a complete list of all of the packages and functions of the Dojo Toolkit, which is more than 7 MB and has more than 213 thousand lines. You can find this file on the Dojo Toolkit website at http://download.dojotoolkit.org/release-*version*/api.xml. Just replace *version* with your Dojo Toolkit version. In our case, we are using the current version, that is 1.7.2; therefore, we download the following file from http://download.dojotoolkit.org/release-1.7.2/api.xml. Save the file into the dojo-sdocml-1.7.2 directory.
9. We need to convert the API file into the required SDOCML file. Because the API file is a simple XML file, we can do this with an XSL transformation. You can download this XSL file for the conversion at https://raw.github.com/aptana/studio3-sdk/master/tools/frameworks/dojo/1.6/update_dojo_metadata_1.6.xsl. This XSL file was created for version 1.6.0 of the Dojo Toolkit, but it also works for newer versions. Just save it into the same location as the API file (into the dojo-sdocml-1.7.2 directory). For transforming the API file using the XSL file into the required SDOCML file, you need the xsltproc package. You can install it, If you have not already done so, do this simply with apt-get:
sudo apt-get install xsltproc
www.it-ebooks.info

Using JavaScript Libraries
[ 148 ]
If you're using a Windows operating system, just navigate to the http://xmlsoft.org/XSLT/downloads.html website. Here you will find a link to the windows port (by Igor Zlatkovic) of this library. After installing the package, you can create the SDOCML file using the following simple shell action:
xsltproc update_dojo_metadata_1.6.xsl api.xml > api.sdocml
10. Finally, you just have to drag the downloaded or created SDOCML file somewhere into your project. We drag this file into the dojo-sdocml-1.7.2 directory.
After all these steps, your project may look something like this:
What just happened?We have just integrated the Dojo Toolkit source into one of our projects. Furthermore, we created a Dojo Toolkit SDOCML file that provides the Content Assist with the necessary information so that it can provide us with all the available features in the current scope.
Let's do a simple check. Create a JavaScript file within our Dojo project. Open the file, type in dojo, and trigger the Content Assist by pressing Ctrl + Space bar. The Content Assist will suggest the dojo object to you along with other options that begin with the same letters. In the right-hand side column, you can see from which file the Content Assist gets the information for this object.
www.it-ebooks.info

Chapter 7
[ 149 ]
Now, let's go forward and type in dojo. The Content Assist will list all available methods from the dojo object. When we specify our input further, for example, dojo.q, the Content Assist updates its list and removes all entries that no longer match.
This time the object that the method belongs to is displayed in the right-hand side column. To the right-hand side of the list is a tooltip that displays the documentation of this method.
Using ExtJSExtJS is a JavaScript framework, just like Dojo Toolkit, that provides many rich, modern UI widgets. ExtJS was a collection of function extensions from the Yahoo User Interface (YUI) library that, in time, became more and more popular. Through increasing complexity and popularity, it developed into an independent library called ExtJS.
You can get it from the Sencha website at http://www.sencha.com/products/extjs/download/.
Time for action – integrating ExtJSThe following steps are required to integrate ExtJS:
1. Create a new web project named Using JavaScript Libraries - ExtJS.
2. Download the ExtJS package. In our case, we will choose the ext-4.1.0-gpl.zip package.
3. Extract the ExtJS package into your Project folder.
4. Create a folder named extjs-sdocml-4.1.0 (replace *version* with your ExtJS version), in our case extjs-sdocml-4.1.0.
www.it-ebooks.info

Using JavaScript Libraries
[ 150 ]
After the preceding steps, your project should look like the following screenshot:
5. Refresh your project by right-clicking on the project name in the Project Explorer folder and click on Refresh. Now, Aptana Studio will index the new files and read the required information for the Content Assist. This may take a moment because ExtJS has a lot of files.
6. Now we have to get the required ScriptDoc file. If you want to use version 3.3.0 of ExtJS, you can find the file at https://raw.github.com/aptana/sencha.ruble/master/support/ext-js-3.3.0.sdocml. If you want to use version 4.0 or 4.1 (as in our example), you can download the ScriptDoc file from the web blog at http://www.thekuroko.com/aptana-sdocml-code-hinting-support/. John Crosby has written a tool that uses Adobe AIR and jsduck to create the necessary ScriptDoc file. At this point, we can thank John for his work. We download the required file and drag it into the sdocml directory.
What just happened?We have integrated ExtJS into one of our own projects. It is done in the same way as jQuery and Dojo Toolkit. Again, it is very important that the file is dragged into the project, otherwise the Content Assist will not provide any information contained within the ScriptDoc file.
You will be able to test it in a similar way to the way we tested it in the jQuery and Dojo Toolkit case.
www.it-ebooks.info

Chapter 7
[ 151 ]
Have a go hero – integrating a JavaScript library into a current project of your own
Now your task is to select a current project of yours that uses one of the libraries we have dealt with in this chapter. Take a look at how this library is currently integrated and adjust its integration in such a way that you can use the Content Assist for further development.
When you're done, try out the code completion and see whether all of the library features are provided.
Pop quizQ1. Which requirements must be met in order to use the JavaScript library with the Content Assist?
1. The Library API must be available in XML or JSON format
2. None, the Content Assist reads directly from your source code files
3. The Library must be documented in ScriptDoc format, in Virtual Studio Documentation (VSDoc) for JavaScript, or must have a JSCA 1.0 specification file
Q2. Can you use the Aptana Studio 2.X Code Assist XML file with Aptana Studio 3?
1. Yes, just rename the XML file extension to the SDOCML file extension
2. No, there is no way to use them in Aptana Studio 3
3. Yes, but it must be converted with an XSLT conversion
Q3. What is absolutely necessary to get the Content Assist to work with your libraries?
1. The ScriptDoc file must be copied and pasted into your project
2. The ScriptDoc file must be dragged into your project
3. Nothing
Q4. What does the jQuery bundle provide?
1. The complete jQuery Content Assist information to enable all Content Assist functionalities
2. Only jQuery snippets and some commands
3. jQuery itself—a separate copy of the jQuery library is not required anymore
www.it-ebooks.info

Using JavaScript Libraries
[ 152 ]
SummaryAfter reading this chapter, you should be able to integrate several JavaScript libraries into your projects so that the Content Assist provides all the necessary information to work much more effectively. In addition, you should know in detail what is required for integration other than what has been dealt within this chapter—JavaScript libraries.
In the next chapter we will learn how to work on a remote server with FTP.
www.it-ebooks.info

8Remotely Working with FTP
A large number of websites and web applications are located on a remote web server, somewhere in a computer center or some similar platform far away. This is sometimes a bit problematic because while developing a website or a web application on a remote server, you have to upload every changed file manually. In such a cases the working process is very long, programming some changes in your code, switching to the third-party FTP software, trying to remember which files you have just edited, selecting them, and then finally uploading them can be very annoying. When these files are uploaded you will be able to test the results of the changes in your developing project. Thus, there are many steps for every small change in your website or web application.
But there is a much easier way with Aptana Studio for developing a project on a remote web server. Aptana Studio allows you to work in a remote way with your project. This is much easier than to work with the third-party FTP software. You do not have to remember which files you have changed, you just have to make changes in your file and save it, that's it! Aptana Studio realizes that you have changed a file and uses the sync functionality to upload your changes. All of this happens automatically.
Let's try it out!
www.it-ebooks.info

Remotely Working with FTP
[ 154 ]
In this chapter we will cover:
� Using the Remote view for creating, modifying, and deleting FTP connections
� Using the Web Deployment Wizard
� Using the Connection Manager window for creating, modifying, and deleting connections
� Exporting and importing FTP settings
The Remote viewThe first thing we need to take a look at is the Remote view. The Remote view is for managing the FTP connections and it therefore provides a complete list of all currently available FTP connections. We will see how you can open this view, how you will be able to create new FTP connections, and modify and delete the existing connections.
In order to open the Remote view, just navigate to Window | Show view... and select the Remote entry. Now, the Remote view should appear on the left of Aptana Studio, grouped besides the Project Explorer and the App Explorer views, as seen in the following screenshot:
Time for action – creating an FTP connection1. Open the Remote view.
2. Click on the small world icon located in the upper-right corner of the Remote view.
3. First enter a name for the new FTP connection. Ideally choose a name that contains the IP or the Hostname.
4. Then you have to select the protocol that should be used for the connection. Just select FTP, SFTP, or FTPS. We will choose FTP for our example.
5. Further, you must enter the Host, Username, and Password for the connection.
6. After you have entered the account data, you can use the Test button in order to test the entered access data immediately.
www.it-ebooks.info
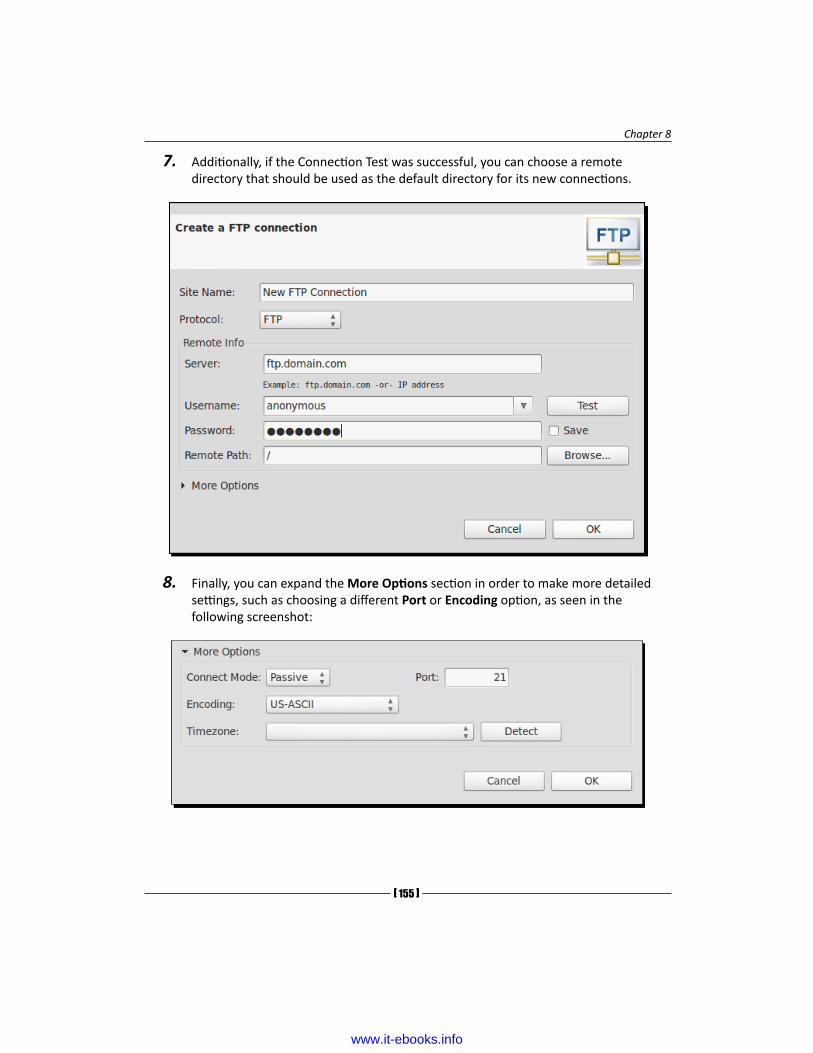
Chapter 8
[ 155 ]
7. Additionally, if the Connection Test was successful, you can choose a remote directory that should be used as the default directory for its new connections.
8. Finally, you can expand the More Options section in order to make more detailed settings, such as choosing a different Port or Encoding option, as seen in the following screenshot:
www.it-ebooks.info

Remotely Working with FTP
[ 156 ]
9. After saving the new FTP connection by clicking on OK, the new connection appears in the Remote view connection list, as seen in the following screenshot:
What just happened?We have created a single new FTP connection by using the Remote view. Now we are able to use this FTP connection within the Connection Manager window, or directly from a project in order to connect them with a remote server.
Time for action – modifying an FTP connection1. Open the Remote view.
2. Select the FTP connection within the connection list that you want to modify.
3. Right-click on it and select the Properties entry.
4. Now, a window appears wherein you can modify the connection data.
5. Finally, confirm the changes by clicking on OK.
The following dialog box will appear where we can edit our connection settings:
www.it-ebooks.info

Chapter 8
[ 157 ]
What just happened?We have modified an existing FTP connection (a connection that may have a new password) and confirmed the new connection data. From now on, the connection uses the current modified account data.
Deleting an FTP connectionAn FTP connection can be deleted very quickly. Just open the Remote view and select the FTP connection within the connection list that you want to delete. Now right-click on this entry and select the Delete entry.
Aptana Studio asks you if you're sure you want to delete this connection. If you are sure, just confirm the deletion by clicking on OK. The following screenshot shows how we can delete an FTP connection:
From now on, this deleted connection isn't available anymore within Aptana Studio.
As you are now familiar with managing FTP connections using the Remote view, we will go ahead and take a look at how we can connect these FTP connections with local projects or local directories. For this, we will use the Web Deployment Wizard.
Using the Web Deployment WizardThe Web Deployment Wizard helps you to connect to a local project with a remote server using an FTP connection. Let's see how easy it is in the next few steps.
www.it-ebooks.info

Remotely Working with FTP
[ 158 ]
Time for action – connecting a project with a remote server1. At first, we create a small project that we want to use for our example. We do it as
usual and afterwards you can select the project root within the Project Explorer or open it within the App Explorer. In this example, we open the project within the App Explorer.
2. Now we have to start the Web Development Wizard. This wizard is located behind the package symbol at the top of the App Explorer (the Project Explorer has this symbol in the same place). We can open this wizard just by clicking on the package symbol and selecting the Run Web Development Wizard... entry as shown in the following screenshot:
3. In the first step of the Web Development Wizard, you have to select a deployment provider. Because we want to connect our project with FTP, we select the FTP/SFTP/FTPS option for our example, as seen in the following screenshot:
www.it-ebooks.info

Chapter 8
[ 159 ]
4. After that, you have to enter your FTP connection data. The first step thereby is to enter a name for your connection. This name should be related to the website or the web application so that you are able to identify the connection easily.
5. The selection of the protocol is an important step. Depending on this selection, the further number and types of fields will be changed automatically. The possible options are FTP, SFTP, and FTPS. Just select the required protocol. We want to set up a simple FTP account, therefore we select just FTP.
6. In this step we enter the server host, Username, and Password for the FTP connection. After you have entered this data, you will be able to use another nice Aptana Studio feature – a connection Test button. Click on this button and Aptana Studio tries to connect to the web server that you have just specified. In case Aptana Studio is able to connect to the web server, you will get an appropriate message; if not, you receive an error message from the internal FTP client. A success message is seen in the following screenshot:
www.it-ebooks.info

Remotely Working with FTP
[ 160 ]
7. If you have entered the correct connection data and the connection test was successful, you will now be able to select a directory on the remote web server that is used as the root directory for your source code, as shown in the following screenshot:
8. Further, there's a More Options sections where you can adjust some more special actions, such as the used Port or Encoding.
9. The final configuration within this window is the sync setting. This option is available at this stage if you're creating an FTP connection related to a project. Here you can set the behavior of the synchronization. Once you have activated the synchronization, you get the settings seen in the following screenshot:
www.it-ebooks.info

Chapter 8
[ 161 ]
These sync settings are shown in the following screenshot:
Why is the sync setting so important?
The sync setting is very important. What if you are working with different developers on the same remote project and some developer changed a file that you have already downloaded as a local copy? No problem, you don't need to think about it, Aptana Studio uses the sync function in order to identify differences.
10. By finishing the Web Deployment Wizard, Aptana Studio automatically starts the first synchronization. Here you have to initially select which files should be synchronized. The following screenshot shows the synchronization window:
www.it-ebooks.info

Remotely Working with FTP
[ 162 ]
Skip the .project file
Before you start the synchronization, check the Skip checkbox from the .project file, because you just need this file in your local Aptana Studio project.
11. A click on the Synchronize button starts the synchronization. After it is done, your remote project contains the current source code, and you can close the synchronization window.
What just happened?We have created a PHP project and connected it with a remote web server. After that, we synchronized it with one another.
We are now able to work with the remote files within our local project. If you now modify a file and then save it, Aptana Studio automatically starts the synchronization and uploads the modified file.
You will also be able to start the synchronization manually, as shown in the following screenshot:
Take a quick look at the Publish menu within the App Explorer view too.
www.it-ebooks.info

Chapter 8
[ 163 ]
Using the Connection ManagerThe Connection Manager window allows you to configure connections between a local container and a remote site or another local container.
The difference between the remote view and the Connection Manager window is that you're defining just the FTP connections in the remote view, whereas in the Connection Manager window you're managing the combination of an FTP connection and some local projects or directories.
So, you're able to create a single FTP connection to a web server and use this within many different connections and local projects or directories.
Time for action – opening the Connection Manager and creating a new connection
1. Navigate to the Project Explorer.
2. Select a Project and expand it.
3. You should see the Connections node as the last node in the project, as shown in the following screenshot:
www.it-ebooks.info

Remotely Working with FTP
[ 164 ]
4. But what to do if you didn't see this Connection node? No problem, in this case the connection node is just invisible. In order to activate the connection node, click on the View menu and select the Customize View... entry. Within the Available Customizations window, you have to switch to the Content tab and activate the Site Connections check box as seen in the following screenshot:
5. If you see the Connections section within your project, right-click on it and select the Connection Manager... entry, as seen in the following screenshot:
www.it-ebooks.info

Chapter 8
[ 165 ]
6. Now in order to create a new connection, we're clicking on the green plus symbol (+) at the bottom of the left-hand side, below the list. The Connection Manager window creates a new entry within the Connections list and selects them automatically, so that we can enter the connection data immediately.
7. You have to enter an appropriate name for the new connection in the Name text field located at the top of the view.
8. In the next step you have to select a local source. This could be an already existing Aptana Studio project, or also a directory on your local drive. You will be able to select it with the Browse... button. Go on and select your source.
9. Finally you have to select the destination for the connection. Here you can select an FTP connection to a remote server that you have already created. You can also create a new FTP connection by clicking on New..., or just a local project directory on your local drive.
What just happened?In the first step, we just opened the Connection Manager window. In some cases the Connection Manager node is invisible, so we must take a look at how we can make it visible. Anyway, you must have seen the Connection Manager node on your screen.
After that, we created a new connection within the Connection Manager window. This means we have connected a local project with some other project, which may also be located on a remote system as seen in the following screenshot:
www.it-ebooks.info

Remotely Working with FTP
[ 166 ]
Modifying an existing connection within the Connection ManagerFirst of all, open the Connection Manager window if it is not already opened. Select the connection you want to modify within the connection list. By selecting the connection, Connection Manager fills in the connection data into the right form fields. Now you're able to change their values and apply the changes by clicking on the Apply button.
Now, we have just selected an existing connection within the Connection Manager window and modified the values of the connection. After we adjusted the values, we saved them by clicking on the Apply button.
Deleting an existing connection within the Connection ManagerFirst of all, open the Connection Manager window if not already opened. Select the connection that you want to delete within the connection list. Now click on the red symbol located at the end of the connection list. After that, Aptana Studio asks you if you're sure you want to delete this connection. If you are, just click on OK to finish the deletion.
Now, we have just deleted an existing connection from the Connection Manager window. This connection will now no longer be available in Aptana Studio.
Exporting and importing FTP settingsAptana Studio allows you to export your created connections and import them again in the future. This is a very useful feature. You may create a backup from your connections and restore them if you're setting up a new installation of Aptana Studio. But it's also useful for companies or development teams that have a recurring amount of connections. They can create this current connections in only one Aptana Studio installation and export them into an export file. After that, they will be able to import these connections easily in all the other Aptana Studio installations.
www.it-ebooks.info

Chapter 8
[ 167 ]
Time for action – exporting FTP settings1. In order to export your current FTP settings, navigate to File | Export... within the
main menu.
2. Expand the Aptana Studio entry in the window, select the Connection Settings entry as shown in the following screenshot, and click on the Next button:
3. Select a file to which you want to export your connection settings. If you want to create a new file, just select the path and enter your own filename.
www.it-ebooks.info
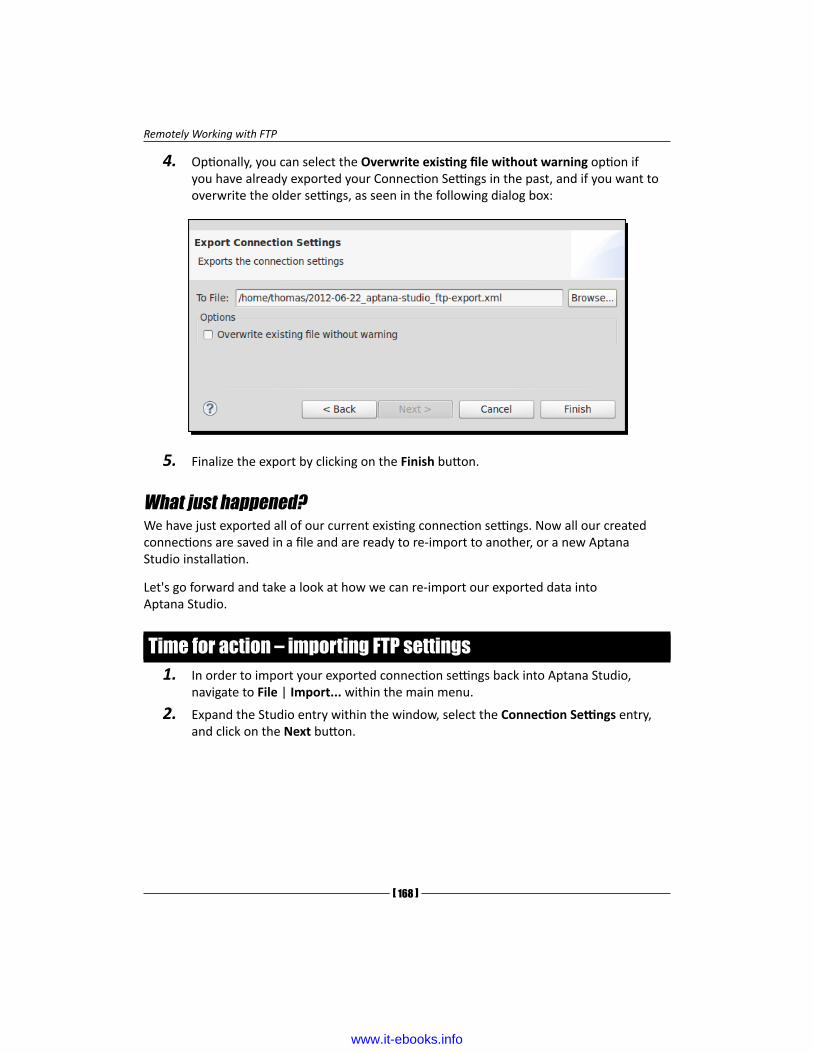
Remotely Working with FTP
[ 168 ]
4. Optionally, you can select the Overwrite existing file without warning option if you have already exported your Connection Settings in the past, and if you want to overwrite the older settings, as seen in the following dialog box:
5. Finalize the export by clicking on the Finish button.
What just happened?We have just exported all of our current existing connection settings. Now all our created connections are saved in a file and are ready to re-import to another, or a new Aptana Studio installation.
Let's go forward and take a look at how we can re-import our exported data into Aptana Studio.
Time for action – importing FTP settings1. In order to import your exported connection settings back into Aptana Studio,
navigate to File | Import... within the main menu.
2. Expand the Studio entry within the window, select the Connection Settings entry, and click on the Next button.
www.it-ebooks.info

Chapter 8
[ 169 ]
3. In the following view you are able to decide between an import from another workspace or a file, which you may have exported in the past. We will choose the File option and click on the Browse... button in order to select our export file as seen in the following screenshot:
4. Lastly, we finalize the import process where we have selected our file to import, by clicking on the Finish button.
What just happened?We have just imported back our exported connection settings into Aptana Studio. Now all the connections from our export file should be restored and ready to use in Aptana Studio.
That's easy, isn't it?
Have a go hero – connecting a remote project with a local projectNow your task is to select an existing remote project, which you usually use when working with a third-party FTP software. Create a new Aptana Studio project for it with the necessary project type. Afterwards, connect this project with the remote web server by configuring an FTP connection or by using the Web Deployment Wizard.
Further, make an export from your created connections so that you're able to restore them in the future when you might create a new Aptana Studio installation.
www.it-ebooks.info
Remotely Working with FTP
[ 170 ]
Pop quizQ1. Which connections protocols are provided by Aptana Studio?
1. Just FTP.
2. FTP and SFTP.
3. FTP, SFTP, and FTPS.
Q2. How do you create an FTP connection so that the sync option is available automatically?
1. When you're creating an FTP connection related to a project.
2. When you're creating an FTP connection within the Remote view.
3. In both creation ways you have the sync option available automatically.
Q3. Where can you switch the visibility of the Site Connection node within your project in the Project Explorer view?
1. Just in the System Preferences tab under Window | Preferences.
2. In the Project Explorer view under Customize View....
3. This node is always visible and cannot be made invisible.
SummaryBy the end of this chapter, you should be able to manage your FTP connections by using the Connection Manager window. This means you know how you can create, modify, and delete connections. Additionally, you should know in detail how you can connect a project with a remote web server and how you can configure the automatic synchronization. We have also seen how the FTP connection in Aptana Studio works fine with our small project; but if you're developing larger projects where a complete developer team is working, it's a better use case to work with a version control, such as SVN or Git.
In the next chapter, we will learn how we can work with a SVN repositiory and a Git repository.
www.it-ebooks.info
9Collaborative Work with SVN and Git
Collaborative work is an important topic at present. Many large projects are now being developed in a collaborative way. But this was not always easy for the developer. When many developers are working together on large projects, each developer must have a well-known area of work, and each developer must make sure that he doesn't interfere with the work of the other developers.
Without tools such as SVN or Git, large projects like jQuery or Linux Mint could not be possible. The developers of all these projects are distributed all over the world and they often work in different time zones and have different ways of working, but in the end all the parts are merged into one great project in SVN or Git.
So, SVN and Git are a great enrichment for all developers and essential for the fast progress of large web projects.
Let's take a look at how easy it is to work with SVN and Git in Aptana Studio.
In this chapter we will cover the following topics:
� What views does the SVN perspective provide
� Checking out an SVN Repository
� Identifying files in different states within the Project Explorer
� Updating and committing an SVN project
� How to read the SVN history, compare versions, and restore an older version
www.it-ebooks.info

Collaborative Work with SVN and Git
[ 172 ]
� Cloning a Git repository in order to receive a project
� Working with a local Git repository
� How to stage, unstage, revert, and commit within Git Repositories
� Pushing and pulling remote Git Repositories
Working with SVNAt first we will take a look at the SVN perspective. We have already examined how to install the SVN plugin in Chapter 2, Basics and How to Use Perspectives and Views. If you haven't installed it yet, switch back to Chapter 2 and install it.
The SVN perspective provides a group of views that help us to work with a Subversion server. You can open this perspective by using the Perspective menu in the top-right of the Aptana Studio window.
The important and most frequently used views related to SVN, which we will take a look at, are the SVN Repositories view, the Team | History view, and the SVN | Console view. These views are categorized as the views selection into the SVN and Team folder, as shown in the following screenshot:
The SVN Repositories view allows you to add new repositories and manage all available repositories. Additionally, you have the option to create new tags or branches of the Repository. These views belong to the SVN views, as shown in the following screenshot:
www.it-ebooks.info

Chapter 9
[ 173 ]
The History view allows you to get an overview about the project and revisions history. This view is used by SVN and Git projects; for this reason the view is stored in the Team views group. The History view can be opened by the menu under Window | Show View | History. Here you can see all the revisions with their comments and data creation. Furthermore, you can get a view into all revisions of a file and you also have, the ability to compare all revisions. The following screenshot shows the History view:
Within the SVN Console view, you will find the output from all the SVN actions that are executed by Aptana Studio. Therefore, if you have an SVN conflict or something else, you can take a look at this Console view's output and you might locate the problem a bit faster. The SVN Console view was automatically integrated in the Aptana Studio Console, while the SVN plugin was installed. So if you need the SVN Console view, just open the general Console view from Window | Show view | Console. If the Console view is open, just use the View menu to select the Console type, which in this case is the SVN Console entry.
The following screenshot shows the Console view and how you can select SVN Console:
However, before we can start work with SVN, we have to add the related SVN Repository.
www.it-ebooks.info

Collaborative Work with SVN and Git
[ 174 ]
Time for action – adding an SVN Repository1. Open the SVN perspective by using the Perspective menu in the top-right corner of
the Aptana Studio window.
2. Now, you should see the SVN Repositories view on the left-hand side of the Aptana Studio window. If it does not open automatically, open it by selecting the view from the navigation Window | Show view | SVN Repositories.
3. In order to add a new SVN Repository, click on the small SVN icon with the plus sign at the top of the SVN Repositories view.
4. You will now have to enter the address of the Subversion server in the pop up that appears, for example, svn://219.199.99.99/svn_codeSnippets.
5. After you have clicked on the Finish button, Aptana Studio tries to reach the Subversion server in order to complete the process of adding a new Repository.
6. If the Subversion server was reached and the SVN Repository is password protected, you will have to enter the access data for reading the SVN data.
www.it-ebooks.info

Chapter 9
[ 175 ]
7. If you don't have the required access data available currently, you can abort the process and Aptana Studio will ask you whether you want to keep the location. If you click on NO, the newly added SVN Repository will be deleted, but if you click on YES, the location will remain. This allows you to retrieve the required access data later, enter them, and begin to work with the SVN Repository.
8. Regardless of whether you keep the location or enter the required access data, the new SVN Repository will be listed in the SVN Repository view.
What just happened?We have added a new SVN Repository into Aptana Studio. The new Repository is now listed in our SVN Repositories view and we can check this out from there, or create new tags or branches.
Checking out an SVN RepositoryAfter we have seen how to add a new SVN Repository to Aptana Studio, we also want to know how we can check this Repository in order to work with the contained source code.
You can do this, like many other things are done in Aptana Studio, in different ways. We will take a look at how we can do this directly from the SVN Repositories view, because every time we add a new Repository to Aptana Studio, we will also want to check it and use it as a project.
www.it-ebooks.info

Collaborative Work with SVN and Git
[ 176 ]
Time for action – checking out an SVN Repository1. Open the SVN Repositories view.
2. Expand the SVN Repository that you wish to check out. We do this because we want to check out the trunk directory from the Repository, not the tags and branches directory.
3. Now, right-click on the trunk directory and select the Check Out... entry.
4. Aptana Studio will now read the properties of the SVN Repository directly from the Subversion server. When all the required properties are received, the following window will appear on your screen:
5. First of all, we select the Check out as a project in the workspace option and enter the name of the new SVN project.
6. After this, we select the revision that we want to check out. This is usually the head revision. This means that you want to check out the last committed one—called the head revision. But you can check out any revision number you want from the past. If this is so, just deselect the Check out HEAD revision checkbox and enter the number of the revision that you want to check out.
www.it-ebooks.info
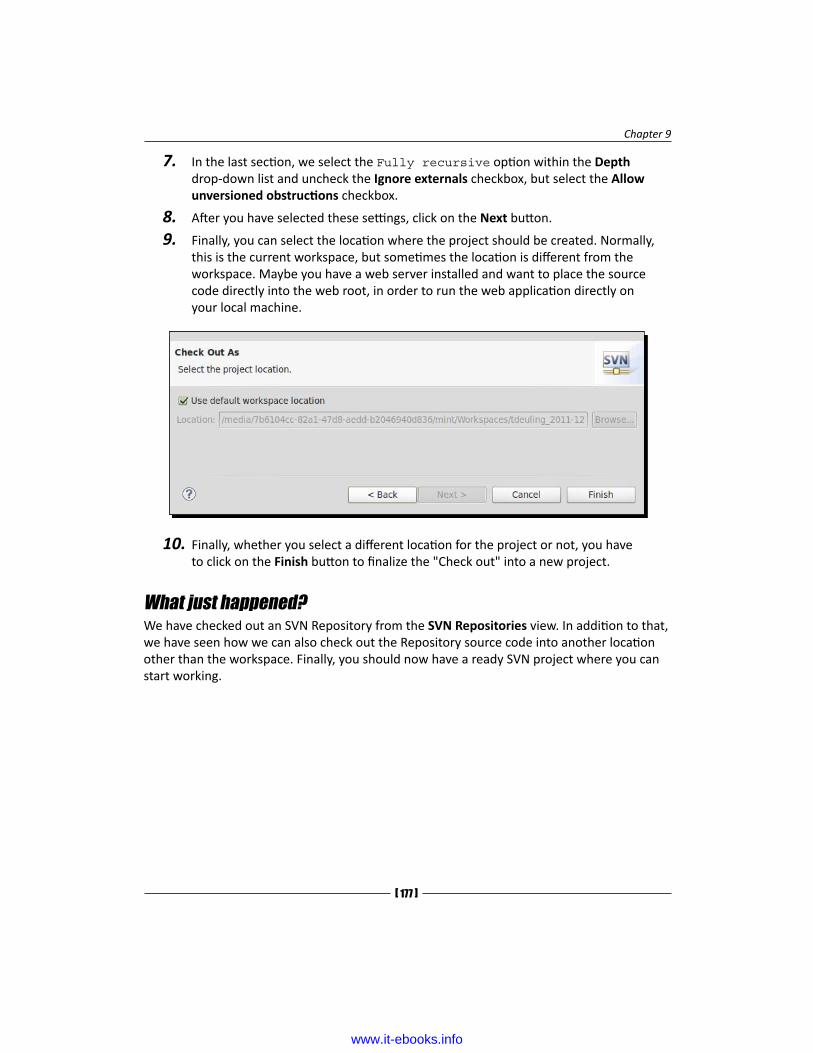
Chapter 9
[ 177 ]
7. In the last section, we select the Fully recursive option within the Depth drop-down list and uncheck the Ignore externals checkbox, but select the Allow unversioned obstructions checkbox.
8. After you have selected these settings, click on the Next button.
9. Finally, you can select the location where the project should be created. Normally, this is the current workspace, but sometimes the location is different from the workspace. Maybe you have a web server installed and want to place the source code directly into the web root, in order to run the web application directly on your local machine.
10. Finally, whether you select a different location for the project or not, you have to click on the Finish button to finalize the "Check out" into a new project.
What just happened?We have checked out an SVN Repository from the SVN Repositories view. In addition to that, we have seen how we can also check out the Repository source code into another location other than the workspace. Finally, you should now have a ready SVN project where you can start working.
www.it-ebooks.info

Collaborative Work with SVN and Git
[ 178 ]
File statesIf you're now changing some lines within a source code file, the Project Explorer view and the App Explorer view change the files' icon, so that you see a small white star on the black background. This means the file has changed since the last commit/update.
There are some more small icons, which give you information about the related files and directories. Let's take a closer look at the Label Decorations tab as shown in the following screenshot:
Now, we will discuss the symbols in the order shown in the previous screenshot:
� The small rising arrow shows you that the file or directory is an external one.
� The small yellow cylinder shows you that the file or directory is already under version control.
www.it-ebooks.info

Chapter 9
[ 179 ]
� The red X shows you that this file or directory is marked for deletion. The next time you commit your changes, the file will be deleted.
� The small blue cylinder shows you that the file or directory is switched. These are files or directories that belong to a different working copy other than their local parent directory.
� The small blue plus symbol shows you that this already versioned file or directory needs to be added to the repository. These could be files or directories you may have renamed or moved to a different directory.
� The small cornered square shows you that these files have a conflict with the repository.
� The small white star on the black background shows you that these files or directories have been changed since the last commit.
� If the file's or directory's icon has no small symbol, it means the file is ignored by the SVN Repository.
� The small white hook on the black background shows you that this file or directory is locked.
� The small red stop sign shows you that this file or directory is read-only.
� The small yellow cylinder shows you that this file or directory is already under version control and unchanged since the last commit.
� The small question mark shows you that this new file or directory isn't currently under version control.
If you didn't find your icons in this list, or your icons look different, no problem. Just navigate to Window | Preferences and select the Label Decorations entry under Team | SVN within the tree. Here you will find all of the icons which are used.
Committing an SVN RepositoryIf you have finished extending your web application with some new features, you can now commit these changes so that the changes are stored in the Repository, and other developers can also update their working copies and get the new features.
But how can you simply commit the changed files?
Unlike a Git Repository, SVN allows you to commit changes in a tree from the Repository. By using Git, you can only commit changes in the complete Repository at once. But for now, we want to commit our SVN Repository changes, therefore just follow the steps mentioned in the following Time for action – updating and committing an SVN Repository section.
www.it-ebooks.info

Collaborative Work with SVN and Git
[ 180 ]
Time for action – updating and committing an SVN Repository1. The first step, before performing a commit, is to perform an update on your
working copy. Therefore, we will start by doing this, Aptana Studio reads all new revisions from the Subversion server and merges them with your local working copy. In order to do this update, right-click on your project root and select Team | Update to HEAD.
2. When your working copy is up to date, navigate to the App Explorer view or the Project Explorer view and right-click on the files or directories that you want to commit, and then select the Commit... entry in the Team option.
3. If you select a few directories or the whole project, the Commit window lists only those files within the selection that have changed since the last commit. So, you are able to select just the files and directories that you want to commit. Compose the selected files and directories as you need, and enter a comment in the top of the window.
Why do you have to enter a comment while committing a change?
Because, by committing the SVN Repository, it automatically saves the date, time, and your username; with this data the revision history stores information about who has changed which file at what time. In addition to that comes the commenting part. The comment should describe what kind of changes were made and what is their purpose.
www.it-ebooks.info
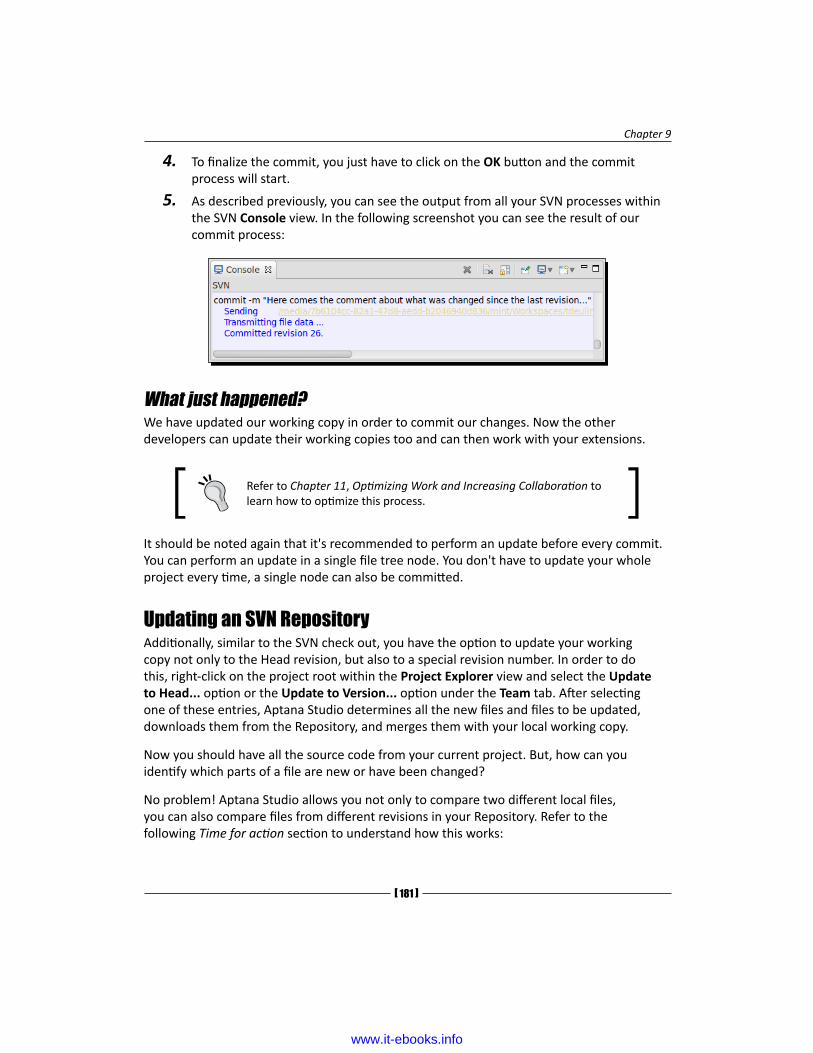
Chapter 9
[ 181 ]
4. To finalize the commit, you just have to click on the OK button and the commit process will start.
5. As described previously, you can see the output from all your SVN processes within the SVN Console view. In the following screenshot you can see the result of our commit process:
What just happened?We have updated our working copy in order to commit our changes. Now the other developers can update their working copies too and can then work with your extensions.
Refer to Chapter 11, Optimizing Work and Increasing Collaboration to learn how to optimize this process.
It should be noted again that it's recommended to perform an update before every commit. You can perform an update in a single file tree node. You don't have to update your whole project every time, a single node can also be committed.
Updating an SVN RepositoryAdditionally, similar to the SVN check out, you have the option to update your working copy not only to the Head revision, but also to a special revision number. In order to do this, right-click on the project root within the Project Explorer view and select the Update to Head... option or the Update to Version... option under the Team tab. After selecting one of these entries, Aptana Studio determines all the new files and files to be updated, downloads them from the Repository, and merges them with your local working copy.
Now you should have all the source code from your current project. But, how can you identify which parts of a file are new or have been changed?
No problem! Aptana Studio allows you not only to compare two different local files, you can also compare files from different revisions in your Repository. Refer to the following Time for action section to understand how this works:
www.it-ebooks.info

Collaborative Work with SVN and Git
[ 182 ]
Time for action – using the SVN history and comparing files1. First we will view the SVN history of a single file. You can do this on a whole
directory or project also; for now we will do it on a single file, but the procedure is the same. Navigate to your SVN project in the App Explorer or Project Explorer view.
2. Select the file or directory that you want to inspect, right-click on it and select the Show History entry in the Team tab.
3. In the SVN History view (as shown in the previous screenshot), at the top you have a list of all the revisions, and the location where the selected file was changed and committed. In our case, the file was initially committed first in revision 8, and updated in revision 25 and 26. Additionally, you can see the date of the revision and the name of the user who had committed it. The last column is the Comment column, where you find more information about what was changed in the commit.
The list on the bottom area of the SVN History view depends on the selected revision in the top area and shows you which files are affected in the current selected scope of the History view.
4. If you double-click on a single file in the bottom list, Aptana Studio loads the file in the selected revision from the Subversion server, and opens it in the related editor. In the head of the editor, you can see the number of opened revisions suffixed to the filename as shown in the following screenshot:
The file opens in read-only mode only because it is an already committed file.
www.it-ebooks.info

Chapter 9
[ 183 ]
5. Now you know how to inspect an older version of a file from your SVN project, but it is also interesting to know what parts in the file have changed between the different versions.
For this purpose, you can use the Compare... function. Select the file you want to compare in the bottom area, right-click on it, and select the Compare... entry.
6. The window, as shown in the following screenshot, allows you to select the two files that you want to compare. We already selected the first one by right-clicking on it. This file is automatically entered in the Compare from field. The Compare to field is automatically entered by Aptana Studio. Here, Aptana Studio just counts down one number. But, in our case (as shown in the previous screenshot) there is a revision 25. In this case, since there was no revision 25, Aptana Studio selected the revision 8 for comparing, because it was the last checked one since revision 25.
7. After choosing the two file revisions that you want to compare, just click on OK in order to load the Compare view.
www.it-ebooks.info
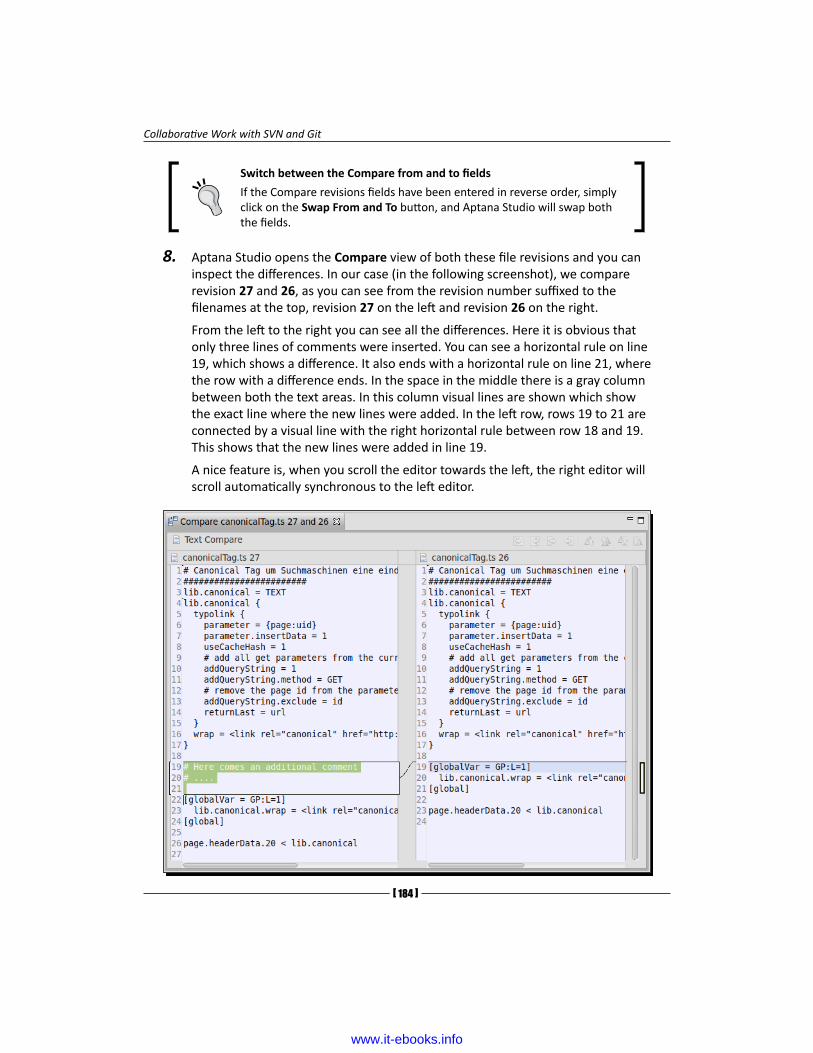
Collaborative Work with SVN and Git
[ 184 ]
Switch between the Compare from and to fields
If the Compare revisions fields have been entered in reverse order, simply click on the Swap From and To button, and Aptana Studio will swap both the fields.
8. Aptana Studio opens the Compare view of both these file revisions and you can inspect the differences. In our case (in the following screenshot), we compare revision 27 and 26, as you can see from the revision number suffixed to the filenames at the top, revision 27 on the left and revision 26 on the right.
From the left to the right you can see all the differences. Here it is obvious that only three lines of comments were inserted. You can see a horizontal rule on line 19, which shows a difference. It also ends with a horizontal rule on line 21, where the row with a difference ends. In the space in the middle there is a gray column between both the text areas. In this column visual lines are shown which show the exact line where the new lines were added. In the left row, rows 19 to 21 are connected by a visual line with the right horizontal rule between row 18 and 19. This shows that the new lines were added in line 19.
A nice feature is, when you scroll the editor towards the left, the right editor will scroll automatically synchronous to the left editor.
www.it-ebooks.info
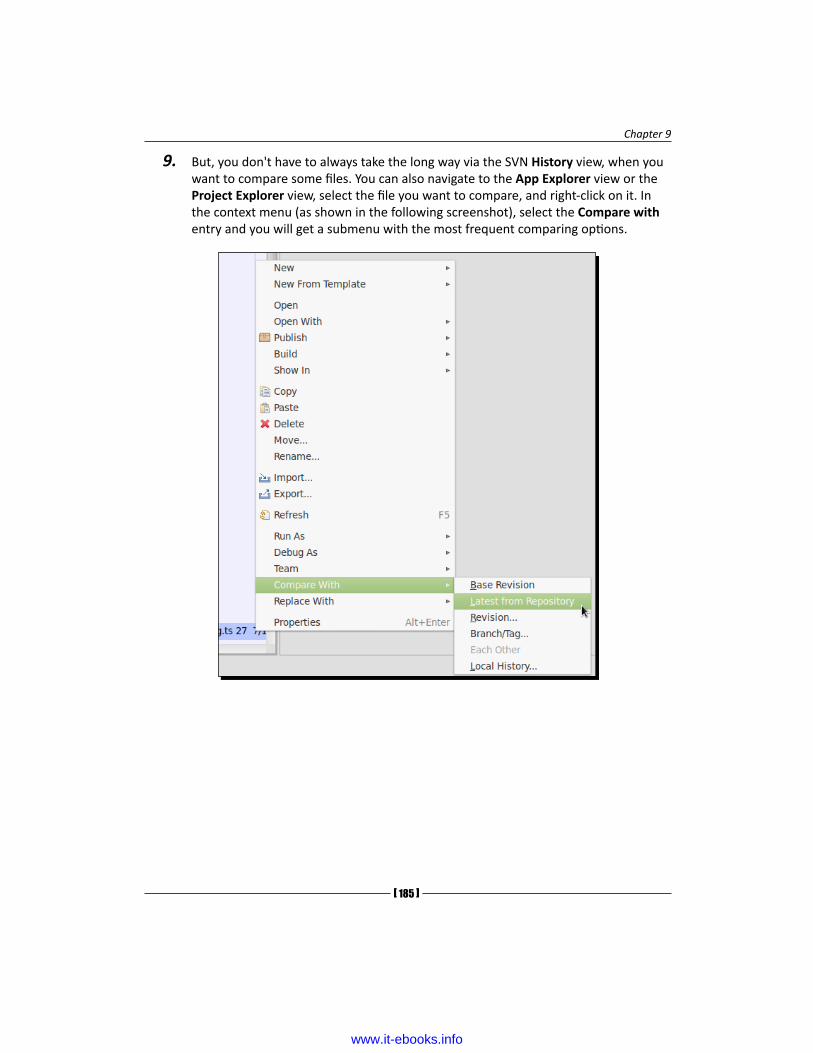
Chapter 9
[ 185 ]
9. But, you don't have to always take the long way via the SVN History view, when you want to compare some files. You can also navigate to the App Explorer view or the Project Explorer view, select the file you want to compare, and right-click on it. In the context menu (as shown in the following screenshot), select the Compare with entry and you will get a submenu with the most frequent comparing options.
www.it-ebooks.info

Collaborative Work with SVN and Git
[ 186 ]
If you want to compare two files that are both not in a subversion or maybe even in different projects, just select both of them by holding the Ctrl key within the Project Explorer view, right-click on one of the files, and select the Each other entry in the Compare With option. The Compare view of a compare will look similar to the following screenshot:
What just happened?We have seen how easy it is to inspect what parts of a file have changed in the previous revisions by using the SVN History view. Starting with listing all available revisions of a file, we also discussed how to compare each of these revisions with each other. Comparing different files that maybe from other projects was also discussed in this section.
Have a go hero – checking out an SVN Repository and working with itNow, your task is to add an SVN Repository to the Aptana Studio Repository view and then check it out directly into a project. After you have created your SVN project, go forward and work within it. Change some files and commit the changes. When you have committed some files, take a look into the SVN History view and see how the changes are displayed. Finally, choose one file from the SVN History view and compare it with the one from the Head Revision.
www.it-ebooks.info

Chapter 9
[ 187 ]
Pop quiz – testing your newly acquired SVN knowledgeQ1. What is recommended to be done before every commit?
1. Checking out a fresh working copy
2. Performing an update
3. Performing a clean-up
Q2. How can you identify the subversion state of your files within your project?
1. Right-click on the file, select the Properties entry, and then select the Subversion section in the opening window.
2. The files didn't have different states.
3. You can identify the state of the file by the small symbol on the icon of the file.
Q3. What should be done when you are working on your project and you notice that the performed changes are not what you want, and you want to restore the original state again?
1. Delete the complete working copy and check them out again.
2. Try to undo all the changes by using the Ctrl + Z shortcut.
3. Select the related files and directories and revert the changes by using the context menu in the Project Explorer view.
Q4. What should be done to compare two files from two different projects?
1. You have to select both the files within the Project Explorer view, right-click on one of the files, and select the Each other entry under the Compare With option.
2. Select the first file within the Project Explorer view, open it, and drop the second file within the same editor.
3. You have to select both the files within the Project Explorer view and drag-and-drop these files into the editors area.
www.it-ebooks.info

Collaborative Work with SVN and Git
[ 188 ]
Working with GitJust like SVN, Git is a version control and source code management system, and was initially developed by Linus Torvalds. The difference between SVN and Git is that Git is a distributed version control and SVN is a centralized version control.
Aptana Studio is shipped with a built-in support for Git source control. However, if you are using a Linux-based operating system, you have to install the Git package manually. You can use the following command to do this:
apt-get install git
If you are using a Windows-based operating system, you don't need to install any additional components. Aptana Studio is pre-packaged with portable Git and so you can start using Git with Aptana Studio immediately.
Cloning a Git Repository and creating a new project with this clone can be done in different ways. At this point, we will take a look at the fastest way to do this.
What is happening?
Like the SVN Processes, the Git Processes are also executed on the console. Therefore, there will be some output found after each action, with one small difference; that Git uses the Aptana Studio system console.
Time for action – cloning a remote Git Repository1. Navigate to the App Explorer view or the Project Explorer view. Right-click on the
background of the view and select the Import... entry from the context menu.
2. On the window that has opened (as shown in the following screenshot), expand the Git folder. Select the Git Repository as New Project entry and click on Next.
www.it-ebooks.info

Chapter 9
[ 189 ]
3. Now we have to determine the URI of the Git Repository that we wish to clone. For this example, we will choose the Less Css project with the following URI:
https://github.com/cloudhead/less.js.git
4. Next, select the Destination directory for the project in which the cloned files should be stored.
5. Finally, you can complete the process by clicking on the Finish button.
www.it-ebooks.info

Collaborative Work with SVN and Git
[ 190 ]
What just happened?We have cloned a Git Repository and created a new Aptana Studio project in the same process, in which the source code is copied. We can now extend this project. The following screenshot shows you the Project Explorer view, where you can find your Git project:
Sometimes, there are some files that should not be added to the Repository. In this instance, you can add these files to an ignore list similar to the SVN. Just select the related file, right-click on it, and select the Add to .gitignore entry under the Team entry. If it is the first file that was added to the ignore list, the Git Repository gets an additional .gitignore file in the same directory as the ignored file of the project.
Creating a Git RepositoryCreating a Git Repository is quick and easy to do. Refer to the following Time for action section to find out how to do this.
Time for action – creating a new local Git Repository for a new or existing project
1. First, create a project if you want to create a local Git Repository for a new project.
2. Now, navigate to your project within the Project Explorer view, right-click on it, and then select the Share Project... entry in the Team tab.
www.it-ebooks.info

Chapter 9
[ 191 ]
3. In the window that opens, as shown in the following screenshot, you have to select the type of repository that you want to use. Select Aptana Git and click on Next.
4. Configure the new Git repository. Aptana Studio creates the required infrastructure and saves them within the .git directory.
Select your project entry within the list, click on Create... and that's it. Aptana Studio creates the local repository and deactivates the Create... button, as the project is now a Git repository project.
5. Finally, you can close the window by clicking on the Finish button.
What just happened?We have created a new project (just in case the project was previously not available) and integrated these projects into a new Git Repository. Now, let's do a bit of work on managing our source code versions within our new Git repository.
www.it-ebooks.info

Collaborative Work with SVN and Git
[ 192 ]
Time for action – working with a new local Git Repository1. Navigate to the App Explorer view and create a new file, for example, create one
with the name hello.php and write some PHP code in it. Now our Git project and the new file will look like the following screenshot:
2. The small question mark on the file icon shows you that this new file isn't currently under version control. In order to mark this file for the next commit, right-click on the new file and select the Stage entry. After this, the small question mark should change to a green plus sign.
3. Now you have created a new file, written some code into it, and marked this file for the next commit.
4. In order to commit the new file into the local Repository, right-click on the file and select the Commit... entry.
www.it-ebooks.info

Chapter 9
[ 193 ]
5. The Commit window, similar to the previous screenshot, comes with four areas. At the top you will find the content from the currently selected file. At the bottom-left, you will find all the unstaged files; this includes all the files that you didn't want to commit. In the bottom-right, you will find all the staged files, also the files that you want to commit. Finally, at the bottom in the middle, you will find an area for a comment for the commit. Fill in a short comment about what you have done in the changed files and click on Commit.
6. After Git has finished performing the commit, the area on the bottom-right with the staged files will be cleared. Now you can close the window by clicking on the Close button.
7. Now that we have checked our first file into the Git repository, we can go forward and add some new lines within our file. After that, we can save these changes and take a closer look at the App Explorer view (as shown in the following screenshot). We will see that there is an * symbol included between the file icon and the filename. This shows that this file is "dirty" (this means that this file has changed since the last commit).
www.it-ebooks.info

Collaborative Work with SVN and Git
[ 194 ]
8. After you have extended your web application and you are satisfied with the result, you may want to commit these changes. You can perform this in a similar way. First you have to stage the files that you want to commit and then click on the Commit... button.
At the top of the commit window (as shown in the following screenshot), where the currently selected committed file is displayed, you can now see what has changed since the last commit.
Green rows are rows that have been added, and red rows are rows that have been removed.
The left column where the line numbers are located has been duplicated. The left-hand side line contains the line numbers from the previous committed file, the right-hand side one contains the new line numbers from the current version of the file.
9. In order to complete the commit process, click on the Commit button and then click on the Close button.
10. If you have made some changes that you wish to undo, no problem. Right-click on the related file and select the Revert... entry. Now, Aptana Studio will restore the file to the last committed one.
If the Revert... entry is grayed out, you may have already staged the file you want to revert. Just select the Unstage... entry first and then revert your changes.
www.it-ebooks.info

Chapter 9
[ 195 ]
What just happened?We have worked with our local Git Repository project. In short, we have created new files, filled them with code, and committed the first version into the Git Repository. After that, we have extended our files and committed these changes too. Additionally, we have seen what should be done if you want to undo the changes that you've made.
Pulling and pushing Git remote projectsIf you've finished working with the extension of your local clone for a project, or if you want to merge your local clone with a remote one in order to get new extensions, you will come to the point where you need to use the Push and Pull functionality.
Firstly, we need to know what Push and Pull functions mean?
A Push function sends all the changes from a local Git Repository to a remote one and merges them on the remote side, whereas a Pull function pulls all the changes from a remote Git Repository and merges them with the local one.
Time for action – pulling and pushing Git remote projects1. Navigate to the project that you want to push, within the Project Explorer view.
2. Ensure that all the files that you want to push are already committed to the local Git Repository, otherwise you might get the message Everything up-to-date.
3. Right-click on the project root and select the Push... entry in the Team tab.
4. If an authorization for the remote Git Repository is required, you will see the following window where you can enter your username and password:
www.it-ebooks.info

Collaborative Work with SVN and Git
[ 196 ]
5. After the Push process is complete, logging from the Git Repository within the Console view can be seen, as shown in the following screenshot:
6. The Pull process is also easy and can be done quickly. Navigate to the project that you want to merge by pulling a remote Git Repository, within the Project Explorer view. Right-click on it and then select Team | Pull....
7. In the background, Aptana Studio loads the remote Repository and merges it with your local Repository.
After this process has completed and providing that no conflicts happen, the console shows you a list of all the files that are new or have changed, as shown in the following screenshot:
What just happened?We have seen how easy it is to push and pull remote Git Repositories. After pulling a remote Repository, all the new and changed files from the remote side were merged with your local Repository. While pushing your local Repository, you merged your local extensions with the remote Repository so that other developers can pull these new features.
Have a go hero – checking out a Git RepositoryNow your task is to create your own remote Git Repository (maybe by a service like GitHub or something similar), and clone it within Aptana Studio into a local project. If the project is ready, begin to work within it and create source code files, stage them, and commit the progress in your work.
www.it-ebooks.info

Chapter 9
[ 197 ]
Pop quiz– testing your newly acquired Git knowledgeQ1. What's the difference between a Git version control and an SVN version control?
1. There are no differences. Both contain the same logic just in different implementations.
2. Git is a distributed version control and SVN is a centralized version control.
3. Git is a centralized version control and SVN is a distributed version control.
Q2. What can you do with the files that are not inserted into the Git Repository?
1. Simply delete them from your project.
2. Rename the file so that the filename begins with a point.
3. Add these files to the .gitignore file.
SummaryBy the end of this chapter, you should be familiar with SVN and Git Repositories. By working with SVN Repositories you should know, in detail, how to add a new Repository and, how to check out the Repository into a project. After adding and checking out, you should know how to work with the SVN project. This means that you have to know how to commit your local changes, update your local working copy, and know how to use the SVN history for your work.
While working with Git, you have not only seen how to clone a remote Git Repository and work with it within a local project, but also how to create your own local Git Repository. Within your local Git Repository, we had a look at the commit process and how to stage, unstage, and revert files. Finally, we had a look at how to push and pull a Git Repository.
In the next chapter, we will learn how to work in an optimal way with PHP within Aptana Studio.
www.it-ebooks.info

10PHP Projects
PHP is a scripting language for developing websites and web applications. PHP (which stands for Personal Home Page) is used to compile the source code on the server side the moment the script is called from the client and send the result to the browser.
PHP is used for small to large websites and web applications. Large frameworks, content management systems, and Webshops (ZendFramework, Symphony, XT-Commerce, WordPress, and many more) are all developed using PHP. Although PHP is also very useful for JavaScript AJAX web applications that need to send, receive, and persist data through a web server.
In this chapter, you will take a closer look at PHP and how you can develop PHP easily with Aptana Studio 3.
In this chapter you will cover:
� Creating and configuring PHP projects
� Configuring existing projects as PHP projects
� Working with external PHP libraries and including them
� Using PHPDoc to document projects
� Using and configuring the PHP code formatter
www.it-ebooks.info

PHP Projects
[ 200 ]
Creating and configuring PHP projectsEditing single PHP files is very easy. If you have to edit one or more PHP files, you can just drag-and-drop the files into Aptana Studio 3 Editor. Aptana Studio opens the file automatically in the PHP Editor; this provides syntax highlight, code completion, and much more, allowing you to begin editing them straight away. However, you will only know the full power of Aptana Studio PHP Editor when you edit your PHP files as a PHP-natured, Aptana Studio 3 project.
Time for action – creating a PHP projectA PHP project can be quickly created by following the next few steps:
1. Select the menu entry from File | New (or just press the shortcut key Alt + Shift + N) and then select PHP Project.
2. In the opening window, which can be seen in the following screenshot, enter the Project name and select the location where the project source code should be stored:
3. After that, you have to choose the compatibility of your PHP project. This means you'll choose the PHP version that will finally be used for your web application. When Aptana Studio knows the related PHP version of your project, it is able to adjust the syntax highlighting, code assist, and error detection (as a result of parsing the PHP files). For example, if you select PHP 4 as the version and have PHP 5 code, you will see error markers in your code for the PHP 5 content. The Content Assist feature will not work for namespaces and such, and also, you will not get the suggested Content Assist feature for classes, functions, and constants as they are only defined in the PHP 5 API. So identify the requirements for your web applications and select the PHP version you need.
4. Finally, you have to click the Finish button.
www.it-ebooks.info

Chapter 10
[ 201 ]
5. Alternatively, if you want to work with an existing source code base, you can navigate to the Project Explorer view and search for the source code directory within the Local Filesystem node.
6. If you have located the source code directory, right-click on this directory and select the entry Promote to Project..., as shown in the following screenshot:
7. You have to select the project type with this alternative method, therefore select the Project Type entry as PHP-Primary. As the secondary Project Type you can choose Web, as an example, but make sure that the PHP entry is marked as primary, as shown in the following screenshot:
www.it-ebooks.info

PHP Projects
[ 202 ]
Project nature
When you'll take a look at the projects within Project Explorer, you may see on some project icons in the top-right corner, a small symbol that will show you the primary nature (or named type) of these projects. A blue P shows you that this is a PHP-natured project.
8. Using both these methods, you should finally receive a PHP project which you'll use as a base for the rest of this chapter.
What just happened?You have just created a PHP-natured project. This project provides you with the specific functions for developing PHP web applications. This means that you also have the ability to select the used version of PHP and therefore adjust some functionalities, such as the syntax highlighting, code assist, and error detection (as a result of parsing the PHP files).
You have also seen that you're able to combine the nature of your PHP project with a web project, this will allow you to specialize the Aptana Studio project to meet the requirements of your project.
Configuring a PHP projectBut what do you have to do when you have an existing project that you want to configure for PHP development? No problem, you can configure each project as you need. The next Time for action section will show you how you can adjust your PHP project.
Time for action – configuring a PHP projectFor this section, you'll start with a project that doesn't already have a nature assigned to it. Now we will configure this project as a PHP project by using the following steps:
1. Navigate to the Project Explorer view, right-click on the project that you want to configure and select the Properties entry.
2. Within the Properties window which will appear, you can configure some PHP-relevant properties that you wish to look at. To the left of the window, you will find a list of property pages. You will find the content of each property page in the larger right-hand side of the window area, as shown in the following screenshot:
www.it-ebooks.info

Chapter 10
[ 203 ]
3. You can start scrolling down from the top page-by-page, starting from the Builders page. You will find the Builders for your project on this page. If you'll add the web project nature here, the Studio Unified Builder option will appear in the list. For a selected PHP project nature, the PHP builder is added to this list, so you don't have to select these entries by hand. This happens automatically if you select or deselect a project nature. The Builders page is shown in the following screenshot:
www.it-ebooks.info

PHP Projects
[ 204 ]
4. The next relevant section is the Formatter page. Here you will take a look at how you can select a custom formatter. Also, later in this chapter, we will look at how you can create your own formatter. In the first step to selecting your own formatter, you have to set the Enable project specific settings checkbox. After this happens, the fields shown in the Formatter page in the following screenshot lose their read-only state, and you will then be able to select a formatter profile:
5. The PHP Buildpath page allows you to include libraries from another project in your workspace or even from an external directory. Examples of how you can use this feature will be seen later in this chapter. The PHP Buildpath page is covered in the following screenshot:
www.it-ebooks.info

Chapter 10
[ 205 ]
6. The PHP Development section allows you to change the compatibility of your project. Just choose the required PHP version. This means that, as you learned in the previous Time for action section, you need to choose the PHP version that will finally be used for your web application. When Aptana Studio knows the related PHP version of your project, it is able to adjust the syntax highlighting, code assist, and error detection (as a result of parsing the PHP files). The PHP Development section can be seen in the following screenshot:
7. The next and last relevant section is the Project Natures section. This section allows you to change the nature of a project. Just check the checkbox of the natures that your project should support. By selecting a nature and pressing the Make Primary button, you can switch the primary nature of your project. As you wish to develop a web application, you'll need to choose PHP as the primary and Web as the additional nature. The Project Natures section can be seen in the following screenshot:
www.it-ebooks.info

PHP Projects
[ 206 ]
What just happened?You have chosen an existing project that didn't have a project nature assigned, with the aim of configuring it for PHP Development. In this Time for action section, you have seen where the Project Builders are selected, where you can select a project-specific code formatter, and how you can include additional libraries or even an external directory, from your workspace. In addition to this, you also learned how to change the project nature or the required PHP version.
Using PHPDoc within PHP ProjectsPHPDoc is the short name for the phpDocumentor which is a tool for the automatic generation of project documentations. You can get information on the phpDocumentor and much more on it's website, http://www.phpdoc.org/.
PHPDoc provides you with a convention of structure and fixed attributes, with which you can create source code comments for files, classes, functions, and attributes. These specified attributes from the comments help define the information (such as types and descriptions)in the source code files, in a standardized way and are optimized for a further processing.
But why is the usage of PHPDoc so important?
Firstly, every developer should know that to document the source code itself is very important. If you have to extend a code from another developer, it's sometimes not so easy to understand why the developer has coded certain parts in his code. But it may also happen that you have to extend your own code, which you had coded in the past, and you don't remember why you have done some things the way you did. At least at this moment you know it, and it is thus considered good practice to document the code.
But that's not all. If you always use a well-formed and valid PHPDoc style, you can get much more out of your code. For example, you're able to automatically create a complete HTML documentation page with the phpDocumentor. However, the important point for us at this moment is that Aptana Studio reads out our PHPDoc comments and feeds the information into Content Assist.
With this ability, you can to create an auto completion for all your classes, constants, and functions while you are writing it.
Using the predefined PHPDoc CommentsAptana Studio 3 comes with a few predefined PHPDoc Comments, which can be included from the PHP Bundle snippets. These can be used in the same way as we mentioned earlier in this chapter, with the help of the Content Assist feature. The short Time for action section that follows will cover this in more detail.
www.it-ebooks.info

Chapter 10
[ 207 ]
Time for action – using PHPDoc Comments from the PHP Bundle1. Open a PHP file from a PHP-natured project.
2. Place the cursor on an empty line from where you want to code a function or method.
3. Type the chars doc and trigger the Content Assist feature by pressing Ctrl + Space bar. You should get results similar to the ones shown in the following screenshot:
4. The Content Assist feature then suggests all snippets with the trigger that begins with doc, and you're able to select the required snippet from the list.
5. You can select the Function entry and insert it by pressing Enter.
www.it-ebooks.info

PHP Projects
[ 208 ]
6. As you can see in the previous screenshot, the Content Assist feature inserts a complete function body introduced by the PHPDoc Function Comment. After the snippet is inserted, the function name is displayed within a border (as you can see in the preceding screenshot). This shows you that this name can be edited directly, simply begin to enter the name of your new function. If you're ready, you can use the Tab key to jump to the next position where the snippet allows you to adjust it. So if this is the case, you can jump to each parameter, namely the function description in the comment, the return value, the author name, and finally into the function body step-by- step, where you can immediately begin to code the function itself. Your final code should now look similar to the following screenshot:
7. After you have saved your file, place your cursor a few lines below the new function and begin to type the function name. As you can see, the Content Assist feature has already indexed the function and now provides you with the ability to insert it easily.
8. You can read a lot of information from the suggested rows of the Content Assist feature. First, there is an icon that shows you the type of suggestion. Types could be functions, classes, snippets, and so on. Also, the location where the suggestion is located is in squared brackets. In our case, the suggestion is local; this means it is in the same file. In other cases, the filename would be displayed where the suggestion is contained. If the suggestion is a PHP-API entry, it also displays which PHP version it is available with. The last column is reserved for the snippet entries where the trigger name is displayed.
www.it-ebooks.info

Chapter 10
[ 209 ]
What just happened?You have inserted a PHPDoc conform Function Comment that was provided by the PHP Bundle snippets. The snippets quickly allow us to fill in the required information in the prestructured comment.
Aptana Studio's PHP Bundle PHPDoc Comment snippetsAptana Studio's standard PHP Bundle provides us with some snippets for the most commonly used PHPDoc Comments. However, as we have already mentioned, you're also able to extend the snippets and create some new PHPDoc Comments that are much more specialized to your needs.
Here is a complete list of predefined PHPDoc Comments and their trigger keywords:
Trigger Title
doc_c Class
doc_v Class Variable
doc_d Constant Definition
doc_f Function
doc_s Function Signature
doc_h Header
doc_i Interface
However, it must be said that in very dynamic PHP code, the Content Assist feature doesn't always have an easy job. In some cases, it may not be possible to determine the type of variable and so the Content Assist feature isn't able to provide correct suggestions for it. In this instance you will need to support the Content Assist feature and declare the type with a small PHPDoc Comment. In the following screenshot, you will see a brief example of this:
Now you can go ahead and take a look at how to include and use external libraries within PHP projects.
www.it-ebooks.info

PHP Projects
[ 210 ]
Using PHP librariesMost large PHP projects come with active additional external libraries. Often these libraries are not located within the PHP project itself. For example, you could place ZendFramework directly within your project, but you could also place it within the PHP-API directory or somewhere else.
But, you may wonder, what's the difference between these two processes?
If you have your ZendFramework located within your project, the Content Assist feature of this project automatically knows all PHPDoc-tagged elements. If this is the case, the build process of the project might slow down and the project size is increased drastically. The first time after the inclusion of the ZendFramework libraries, Aptana Studio will index all ZendFramework files and evaluate the contained PHPDocs. Then, every time Aptana Studio triggers the build process of this project, it will also check the timestamps of all ZendFramework files for possible changes.
If you locate the ZendFramework outside your project, you must integrate it as a library into your project. Otherwise, Aptana Studio will not be able to provide you with the Content Assist feature of the ZendFramework information. In this instance, Aptana Studio will only index all the files of ZendFramework while creating the Aptana Studio library. After that, only when Aptana Studio starts up will it check the timestamps of each file in order to identify the changed files that have to be reindexed. If you want to integrate a library that you use in most of your projects, you have the additional advantage of only having to include the library once. After inclusion, Aptana Studio provides the library with every PHP-natured project.
In both cases, the Content Assist feature learns all the available classes, constants, and functions that are contained within your library and uses them for inspection.
You have to remember that all libraries that you want to include as part of the goal that the Content Assist feature needs to work with, must be equipped with PHPDoc Comments.
In the case of Aptana Studio's Content Assist feature, the PHPDoc Comments were determined and used to provide the developer with more information and code suggestions of the available environment at the time of developing.
www.it-ebooks.info

Chapter 10
[ 211 ]
PHP-API files are supported by default with the Content Assist feature. While you have chosen a PHP compatibility version (by creating or configuring your project), you have adjusted the Content Assist feature so that it only suggests the classes, functions, and documentation entries that are equal with the PHP version.
For example, if you used a PHP-API function, such as substr, and didn't remember what parameter number has what functionality. No problem, simply hover the mouse cursor above the function call within the PHP editor and it appears as a tool tip that contains the PHP Documentation of this function, as seen in the following screenshot:.
Here you will get all the information that you need such as, what parameter requires what kind of variable type, what parameters are optional, and much more.
Too much information!
If the PHP Documentation is too large and it does not fit in the tool tip, just press the F2 key in order to make the tool tip sticky. Now you're able to scroll within the tool tip and read it in a relaxed manner.
www.it-ebooks.info

PHP Projects
[ 212 ]
Time for action – using external librariesNow you will take a look at how you can add external libraries to your PHP project so that your Content Assist feature knows all the available classes, constants, and functions from these additional libraries.
1. First of all, you have to add a new user library. So you will need to open Preferences under Window | Preferences and navigate within the tree to Aptana Studio | Editors | PHP | Libraries. The Libraries dialog box is shown in the following screenshot:
2. After that, click on the New user library button in order to open the creation window seen in the following screenshot:
www.it-ebooks.info

Chapter 10
[ 213 ]
3. Here you have to enter a name for your user library. You will use ZendFramework, so you will need to enter the name of this library, which is extended by the version number.
4. Then you will need to select at least one or more directories where your libraries are located. When you've selected all the required libraries, click on OK to complete this step, as seen in the following screenshot:
5. Now, your new library should be listed within the libraries list. Be sure that all the libraries that you want to use within the PHP projects have the related checkbox enabled by default, as seen in the following screenshot:
www.it-ebooks.info

PHP Projects
[ 214 ]
What happens internally when you add a new PHP library
When you add a new library, Aptana Studio will index all the included files. While indexing, it remembers the timestamp for each file, so it can check if a file has been changed with every startup. If changed files were detected during start up, Aptana Studio will reindex these files. So you can be sure that you are always getting the newest information from the Content Assist feature.
6. Finally, click on Apply and then on OK to complete the library creation and wait for it to complete the indexing of the library. The progress is shown in a dialog box, as seen in the following screenshot:
What just happened?You have integrated a PHP library such as ZendFramework into Aptana Studio. After you have added the library within the preferences, the library will be used in all PHP-natured projects by default.
Now when you are developing in a PHP project, the Content Assist feature will provide you with the available classes, constants, and functions from this library.
Let's perform a quick test of the Content Assist feature. Open a PHP file within a PHP-natured project and begin to enter the chars Zend, as shown in the following screenshot:
www.it-ebooks.info

Chapter 10
[ 215 ]
As you can see, Aptana Studio identifies that you want to create an instance of a class and therefore provides you with only those classes that begin with Zend.
Alternatively, if you can't remember what kind of parameters are available in a function of your library, just hover the mouse cursor above a function call, and a tool tip appears with the PHPDoc Comment within it. If the PHPDoc Comment is of good quality, all your questions will be answered quickly. The following screenshot shows such an example:
Configuring project-specific librariesNow that you know how you can provide libraries to all PHP projects, the following question still remains; what should you do if you don't need or want a library within a PHP project? It may so happen that you have a PHP project that isn't using ZendFramework. In that case, the information provided by the Content Assist feature about the ZendFramework could disturb you while you are searching for the Content Assist information that you really need.
Additionally, this project could be a Flow3 project, but this is the only Flow3 project that you are developing and therefore you don't want the Content Assist information of Flow3 in each PHP project. This is not a problem as you can overwrite the libraries in each project.
Time for action – configuring project-specific librariesLet's take a look at how easy it is to configure project-specific libraries using the following steps:
1. Navigate to the the PHP project in the Project Explorer view that you want to adjust the used libraries in. Right-click on it and select the Properties entry.
2. In the opening window, select the PHP Buildpath section. In this section, you will find three tabs that will allow you to adjust the used libraries.
www.it-ebooks.info

PHP Projects
[ 216 ]
3. The Workspace tab allows you to add libraries to your project that are already contained in another project in your workspace. Just click on the Add... button and select a PHP project within the popup. This tab is shown in the following screenshot:
Default selection within the Workspace tab
By default, you will find the PHP project within the list on the Workspace tab itself. This is the reason for the project Content Assist feature already knowing its own classes, constants, and functions.
4. The External Directories tab allows you to add libraries that are located in external directories somewhere on your disk. Just click on the Add... button and select a directory from the popup. This tab is shown in the following screenshot:
www.it-ebooks.info
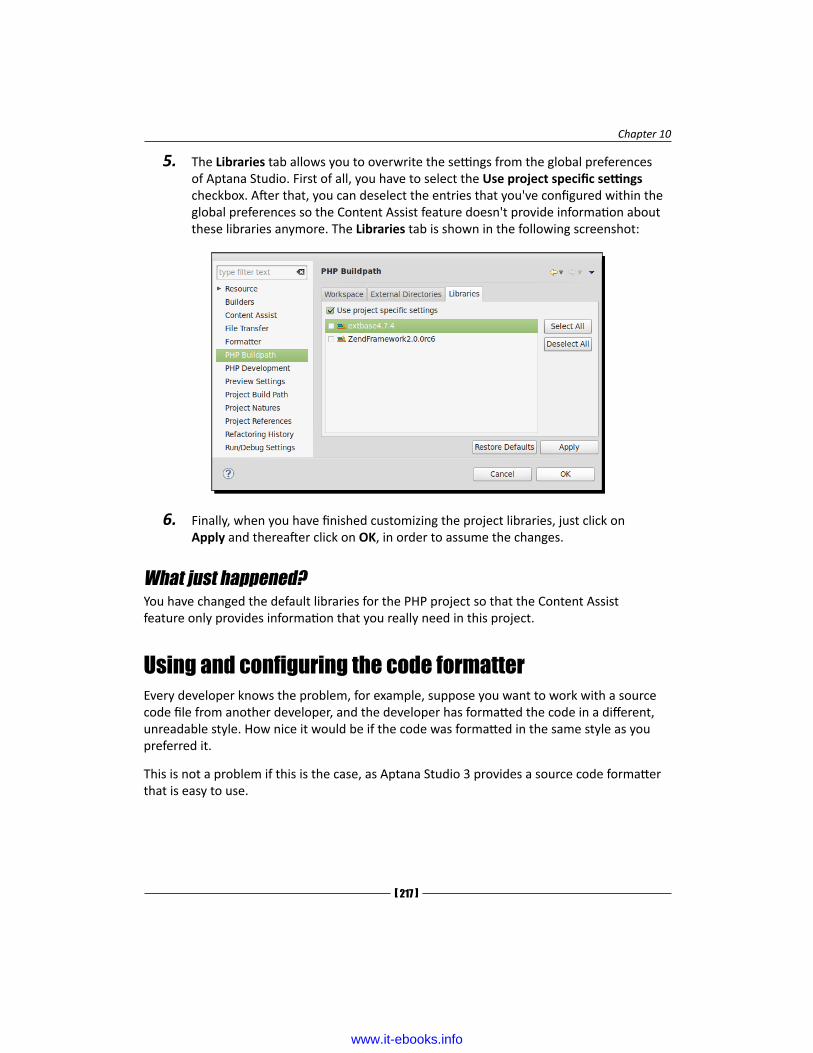
Chapter 10
[ 217 ]
5. The Libraries tab allows you to overwrite the settings from the global preferences of Aptana Studio. First of all, you have to select the Use project specific settings checkbox. After that, you can deselect the entries that you've configured within the global preferences so the Content Assist feature doesn't provide information about these libraries anymore. The Libraries tab is shown in the following screenshot:
6. Finally, when you have finished customizing the project libraries, just click on Apply and thereafter click on OK, in order to assume the changes.
What just happened?You have changed the default libraries for the PHP project so that the Content Assist feature only provides information that you really need in this project.
Using and configuring the code formatterEvery developer knows the problem, for example, suppose you want to work with a source code file from another developer, and the developer has formatted the code in a different, unreadable style. How nice it would be if the code was formatted in the same style as you preferred it.
This is not a problem if this is the case, as Aptana Studio 3 provides a source code formatter that is easy to use.
www.it-ebooks.info
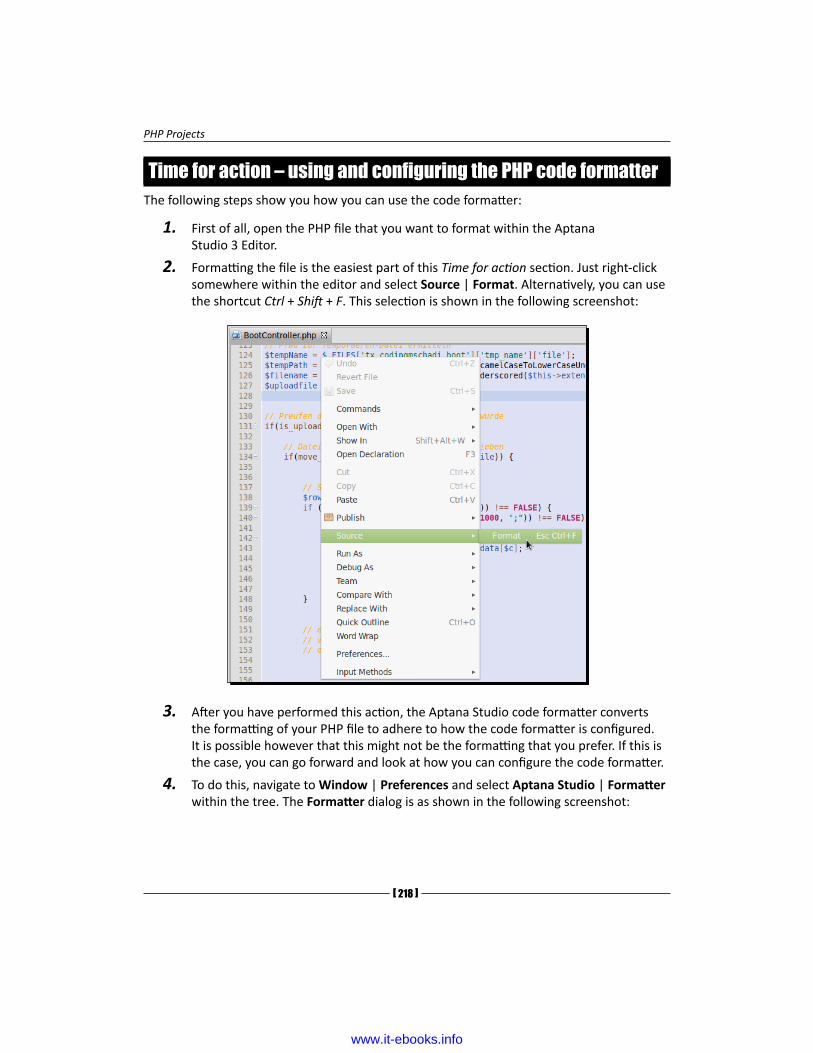
PHP Projects
[ 218 ]
Time for action – using and configuring the PHP code formatterThe following steps show you how you can use the code formatter:
1. First of all, open the PHP file that you want to format within the Aptana Studio 3 Editor.
2. Formatting the file is the easiest part of this Time for action section. Just right-click somewhere within the editor and select Source | Format. Alternatively, you can use the shortcut Ctrl + Shift + F. This selection is shown in the following screenshot:
3. After you have performed this action, the Aptana Studio code formatter converts the formatting of your PHP file to adhere to how the code formatter is configured. It is possible however that this might not be the formatting that you prefer. If this is the case, you can go forward and look at how you can configure the code formatter.
4. To do this, navigate to Window | Preferences and select Aptana Studio | Formatter within the tree. The Formatter dialog is as shown in the following screenshot:
www.it-ebooks.info

Chapter 10
[ 219 ]
5. In the top-right corner, you can create a new profile for the formatter. If you don't have a profile already, click on the green plus (+) button in order to create your own profile. This is recommended, because you can then switch back to the default one.
6. Enter a name for your new profile and select the profile from which your new profile should be initialized. You will need to choose the Default Profile option, as shown in the following screenshot, because its the only one you have:
www.it-ebooks.info

PHP Projects
[ 220 ]
Using code formatter profiles
If you're working for different developer teams or maybe different clients, it might happen that these developer teams or clients have different formatting conventions. The profiles allow you to create for each of them a dedicated formatter configuration. Information on how you can combine the different projects with the required formatter profiles has already been covered in this chapter.
7. Click on the OK button in order to create the new profile.
8. You will begin to customize your new profile where your old one was saved. Select your new profile from the top of the window, then select the PHP entry within the list, and start the editing function by clicking on the pencil button.
9. The Formatter edit window is grouped in different tabs, where you are able to adjust many settings on the left and immediately see the preview on the right. The first tab contains the options for New Lines. Here you can set a position where the formatter should insert a new line. This tab is shown in the following screenshot:
10. In the second tab, Indentation, you can adjust the kind of indentation for your source code. Here you have the option to inherit the tab policy from the general settings or to overwrite them. This tab is shown in the following screenshot:
www.it-ebooks.info

Chapter 10
[ 221 ]
11. The third tab, Blank Lines, allows you to adjust the behavior of blank lines within classes and functions. This tab is shown in the following screenshot:
www.it-ebooks.info

PHP Projects
[ 222 ]
12. The fourth tab, Braces, contains the behavior of braces. Here you can select the different lines in which different braces should appear. This tab is shown in the following screenshot:
13. The Spaces tab provides you with more than 20 options to customize the behavior of spaces. These space settings are grouped in the Parentheses, Punctuation Elements, and Operators areas. With each of these settings, you're able to select the amount of spaces before and after occurrences. This tab is shown in the following screenshot:
www.it-ebooks.info

Chapter 10
[ 223 ]
14. The sixth tab, Comments, provides settings for comment behavior. Here you're able format the comments within your source code. This tab is shown in the following screenshot:
15. The last tab, Off/On Tags, customizes the behavior of the off/on tags. The @formatter:off and @formatter:on tags can be used as PHPDoc functions. So, with these tags you're able to mark a section where the formatter shouldn't format your source code. If you want to use these tags, just enable the functionality and use the entered tags to enable and disable the formatter from your source code. This tab is shown in the following screenshot:
16. Finally, you just have to confirm the changes by clicking on the OK button.
www.it-ebooks.info

PHP Projects
[ 224 ]
Importing and exporting formatter settings
If you have finished configuring the code formatter, you may want to save these settings in order to restore them sometime, or you might want to distribute these conventions within your developing team so that every developer formats his code in the same style. For this purpose, you can use the import and export function within the formatter configuration section.
What just happened?You have created your own formatter profile and adjusted the formatter to adhere to your requirements. You also had a look at the rich possibilities which are available to customize them, to ensure that you receive the style of source code that you require in order to make them easier to read.
Now you can format each file that you have to work with, your own as well as other developers. But that's not all. As you may have gathered, you can apply this action to other programming languages. Aptana Studio currently allows you to format CSS, HTML, JavaScript, JSON, PHP, Ruby/ERB, and XML files.
That's easy and very useful, isn't it?
Have a go hero – configuring your own PHP projectNow your task is to select your own PHP-based project that is currently located somewhere on your disk. Search for it over the Project Explorer and promote it to a project. Go ahead and configure this new project for optimal development with PHP.
You should adjust the PHP version, include required libraries, and equip your source code with valid PHPDoc Comments.
Further more, you should create your own code formatter profile, which helps you to format your source code. Save it in your profile, do not overwrite the existing one. When you've created it, format a PHP file that has a different format and see the result.
Pop quizQ1. Why are project natures so important to a PHP project?
1. The project nature adds additional features to the projects that have a specialization for them.
2. The nature isn't important for projects.
3. The nature is a reminder of the kind of editor that should be used for each file that is located within the project.
www.it-ebooks.info

Chapter 10
[ 225 ]
Q2. With what languages can the code formatter work?
1. The code formatter works only with PHP files.
2. The code formatter works with all XML-based files, such as HTML and XML.
3. The code formatter works currently with CSS, HTML, JavaScript, JSON, PHP, Ruby/ERB, and XML.
Q3. What do you do when you have a source code section that should not be formatted by the code formatter?
1. Cut that section before formatting, and paste it back after formatting.
2. You have to wrap the section within a PHP Comment.
3. You have to use both the @formatter:on and @formatter:off keywords.
Q4. What criteria must be met so that user libraries can be used by the Content Assist feature?
1. The classes, constants, and functions must be equipped with JavaDoc Comments.
2. The classes, constants, and functions must be equipped with PHPDoc Comments.
3. The classes, constants, and functions need to be named clearly.
Q5. Why does the Content Assist feature provide all project-own classes, constants, and functions by default?
1. Within the project properties, the project in the PHP Buildpath section is included by default.
2. The project doesn't know its project-own classes, constants, and functions.
3. The project only knows the project-own classes, constants, and functions that have no PHPDoc Comment.
SummaryBy the end of this chapter, you should be able to create and manage your own PHP projects within Aptana Studio. In addition to this, you should also know how to use all the PHP-specific features to get the full power out of your PHP-natured project.
You have also seen how you can select your used PHP version and how you can extend your code with PHPDoc Comments so that it is readable for the Content Assist feature and you were able to create some PHP Documentation from it. You have also seen how to configure the code formatter and use it. In addition, you have seen, how you can include external libraries, such as ZendFramework, so that the Content Assist feature can provide you with information about the libraries.
www.it-ebooks.info

11Optimizing Work and
Increasing Collaboration
Aptana Studio can optimize your collaborative work within your development team in more ways than you might think. As you already know, Aptana Studio is much more than just a source code editor. In this chapter, we will not only take a look at how we can improve our own work, but also the effectiveness of the whole development team.
In this chapter we will cover:
� Customizing the syntax highlight and sharing the created theme
� Importing and exporting settings for sharing it with other developers
� Importing and exporting a code formatter profile
� Organizing the work with Bookmarks
� Organizing the work with Tasks
� Working with the Task view
� Using tasks within source code comments
www.it-ebooks.info
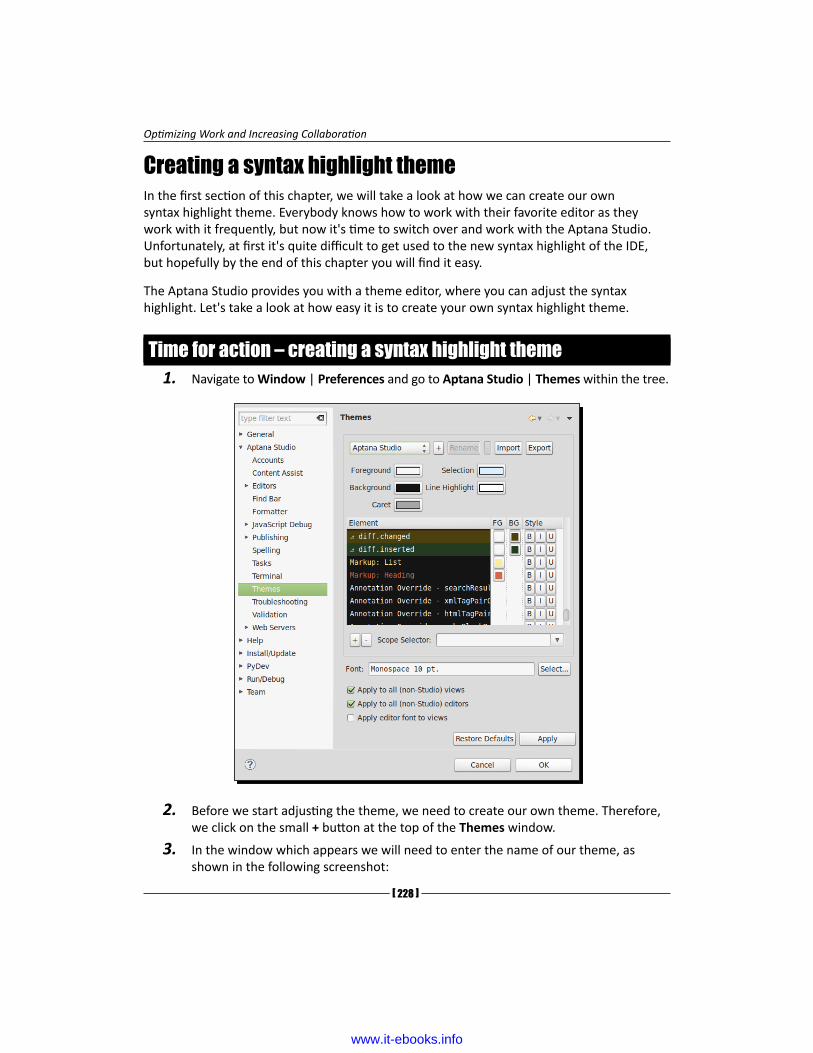
Optimizing Work and Increasing Collaboration
[ 228 ]
Creating a syntax highlight themeIn the first section of this chapter, we will take a look at how we can create our own syntax highlight theme. Everybody knows how to work with their favorite editor as they work with it frequently, but now it's time to switch over and work with the Aptana Studio.Unfortunately, at first it's quite difficult to get used to the new syntax highlight of the IDE, but hopefully by the end of this chapter you will find it easy.
The Aptana Studio provides you with a theme editor, where you can adjust the syntax highlight. Let's take a look at how easy it is to create your own syntax highlight theme.
Time for action – creating a syntax highlight theme1. Navigate to Window | Preferences and go to Aptana Studio | Themes within the tree.
2. Before we start adjusting the theme, we need to create our own theme. Therefore, we click on the small + button at the top of the Themes window.
3. In the window which appears we will need to enter the name of our theme, as shown in the following screenshot:
www.it-ebooks.info
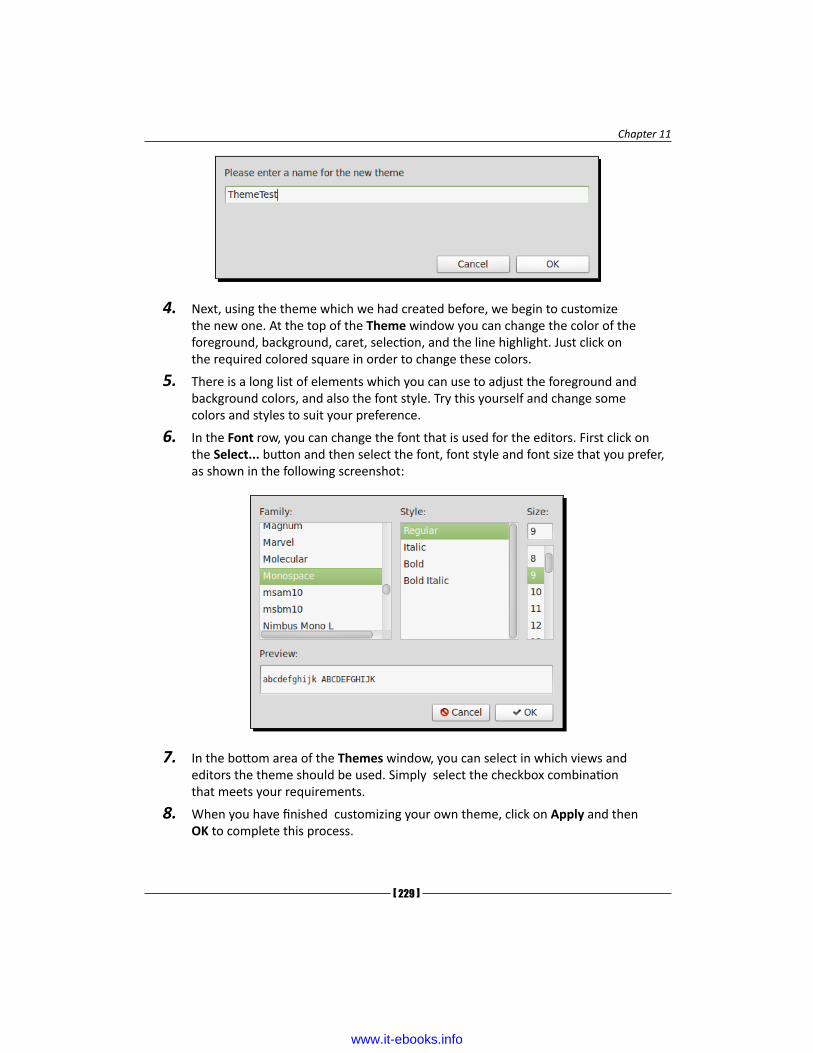
Chapter 11
[ 229 ]
4. Next, using the theme which we had created before, we begin to customize the new one. At the top of the Theme window you can change the color of the foreground, background, caret, selection, and the line highlight. Just click on the required colored square in order to change these colors.
5. There is a long list of elements which you can use to adjust the foreground and background colors, and also the font style. Try this yourself and change some colors and styles to suit your preference.
6. In the Font row, you can change the font that is used for the editors. First click on the Select... button and then select the font, font style and font size that you prefer, as shown in the following screenshot:
7. In the bottom area of the Themes window, you can select in which views and editors the theme should be used. Simply select the checkbox combination that meets your requirements.
8. When you have finished customizing your own theme, click on Apply and then OK to complete this process.
www.it-ebooks.info

Optimizing Work and Increasing Collaboration
[ 230 ]
What just happened?We have just created our own theme. In short, we have seen where we can create our own theme and how easy it is to customize it. In addition to this, we can also select where our theme should be used.
Sharing or restoring your configurationsAs you already know, configuring the Aptana Studio can be a very long process. You may have already adjusted a lot of settings and there are nevertheless a lot of settings that you can still adjust. Thankfully you don't have to select all these settings twice, as the Aptana Studio comes with a lot of import and export features. If you have to reinstall a new instance of Aptana Studio or set up a new instance, you can easily import all your settings without you have to reconfigure them all again.
This feature is much more useful, for development teams, especially in the beginning of the project when the project leader elaborates a basic configuration. This task should be done with a handful of senior or lead developers, but not too many (if the group is too large the process may unnecessarily take a long time). The important points for elaborating the basic configuration are as follows:
� Base configuration: We start with the base configuration. We have already covered this basic configuration in Chapter 3, Working with Workspaces and Projects. There we had examined the behavior, in which, when we had created a new workspace, all of our settings were lost. We do however, also need this functionality when we are setting up a completely new instance of Aptana Studio. As you may remember, we found this import/export feature by going to File | Import and navigating to General | Preferences within the tree. More information about performing an import or export can be found in the Importing and exporting preferences section of Chapter 3, Working with Workspaces and Projects. Among the many general settings, there are also settings such as the Bookmarks view configuration, Key Preferences, Tasks view configuration, and so on.
� Connection settings: The export of the connection settings, as we already learned in Chapter 8, Remotely Working with FTP, contains all configured connections from the Connection Manager. If the development team works frequently with the connections to different servers, it's very useful to create an export file which contains all of the required connections. After importing the connections, the user might have to just change the username for each connection, and enter their password (Note that no passwords are exported by the Connection settings export). As you may remember, this import/export feature can be found by going to File | Import and by navigating to Aptana Studio | Connection Settings within the tree. More information about performing an import or export can be found in the Importing and exporting FTP settings section of Chapter 8, Remotely Working with FTP.
www.it-ebooks.info

Chapter 11
[ 231 ]
� Syntax highlight: The team should work together to create a syntax highlight configuration for the most frequently used programming languages. This gives you the advantage when a team member needs help from another team member. The ones helping are able to orient themselves faster within the source code of the other. They quickly recognize all important keywords and code structures. We have already covered the topic of creating and configuring a syntax highlight theme in this chapter. We have also seen how to change a theme in the Time for action – changing the color theme section in the Customizing Aptana Studio 3 section of Chapter 2, Basics and How to Use Perspectives and Views. We will look at how you can import and export themes in the next few pages of this chapter but in the meantime we will complete this listing.
� Code formatting: For the same reason stated earlier, the team should format all their project source code in the same way. Therefore, they should work together to configure a code formatter profile that every developer must use. One bonus for doing this is that every developer can read the code faster when he has to read it on another team member's workstation, and it will also save a lot time and stress when they don't have to format each file before they can work with it. In Chapter 10, PHP Projects, in the Using and configuring the code formatter section, we have already seen how we can create some profiles. How we can import and export these profiles will be seen later in this chapter.
These were the important points for importing and exporting a lot of settings from Aptana Studio. Importing and exporting the base configuration and the connection settings has already been seen in the previous chapters. However, importing and exporting syntax highlight themes and code formatting profiles is something we will take a look at in the next section.
If you have already created your own syntax highlight theme, you will now surely want to know how to export it and restore it at a later point in time. So, let's take a look at this.
www.it-ebooks.info

Optimizing Work and Increasing Collaboration
[ 232 ]
Time for action – importing and exporting syntax highlight themes
1. Navigate to Window | Preferences and go to Aptana Studio | Themes within the tree.
2. On the top-right corner of your Themes window, you will find the Export button. Firstly, we want to export our current theme, and then import it back afterwards. Therefore, we will need to select the theme that we want to export and then click on the Export button.
3. In the window that opens, we will have to select the location where we want to save our theme file. Just select your preferred directory and enter a name for the theme. This theme file contains the theme information in an XML structure and must end with .tmTheme, as seen in the following screenshot:
www.it-ebooks.info

Chapter 11
[ 233 ]
4. After you have chosen a filename and directory, just click on the Save button in order to complete the export process.
5. Now we will try to import the profile file back from the location we had exported it to. Here, we will start again with the themes settings section from step 1.
6. On the top-right corner of the Themes page, you will find the Import button to the left of the Export button—click on it.
7. The opening window allows you to select a theme file from your file system. Navigate to the directory where you saved the exported theme and select it, as shown in the following screenshot:
8. Finally, click on the Open button in order to complete the import process.
9. Now the created theme is available in Aptana Studio.
www.it-ebooks.info

Optimizing Work and Increasing Collaboration
[ 234 ]
What just happened?We just navigated into the preferences and exported an existing syntax highlight theme to our local file system. Then we went back to the preferences and imported the theme back into Aptana Studio. With this process you can restore your syntax highlight theme to other Aptana Studio instances, or share it with other developer's code formatter profiles.
In Chapter 10, PHP Projects, we have seen how we can create our own code formatting profile. However, like the syntax highlight themes, it's best practice to export these code formatting profiles in order to create a backup of these settings or to share it with other developers. It's just as easy as importing and exporting syntax highlight themes. Let's try it!
Time for action – importing and exporting code formatter profiles
1. Navigate to Window | Preferences and go to Aptana Studio | Formatter within the tree, as seen in the following screenshot:
2. On the top-right corner of the Themes page, you will find the Export button. In this view the Import and Export buttons are displayed with a blue icon. At first, we want to export our current theme, and might want to import it back in later. Therefore, we select the profile that we want to export and then click on the Export button.
www.it-ebooks.info

Chapter 11
[ 235 ]
3. In the window which appears, we have to select the location where we want to save our profile file. Just select your preferred directory and enter a name for the profile. This profile file contains the formatter information in an XML structure and must end with the .xml extension, as shown in the following screenshot:
4. After you have chosen a filename and directory, just click on the Save button in order to complete the export process.
5. Now we will try to import the profile file back from the same location which we had exported it to. Here we start again with the formatter settings section from step 1.
6. On the top-right corner, you will find the Import button to the left of the Export button—click on it.
7. The window which appears allows you to select a profile file from your file system. Navigate to the directory where you have just saved the exported profile, and select it as shown in the following screenshot:
8. Finally, click on the Open button in order to complete the import process.
9. Now the imported profile is available in Aptana Studio.
www.it-ebooks.info

Optimizing Work and Increasing Collaboration
[ 236 ]
What just happened?We have just navigated through the preferences and exported an existing code formatter profile to our local filesystem. After that, we went back to the preferences and imported the profile back into Aptana Studio. Using this process, you can restore your code formatter profile to other Aptana Studio instances, or share it with other developers.
Sharing Aptana Studio preferencesIn the previous section, we have seen how you can export a lot of the settings and preferences of Aptana Studio. If your team now starts the developing process and has to configure the Aptana Studio workspace of each of their workstations, they can save a lot of time by simply importing the settings. When new developers join your team, they can be up and running with a fully configured Aptana Studio version in a few minutes without having to do endless amounts of configuration.
Here's the process again in a few steps:
1. Create your first Aptana Studio instance and configure it completely to the needs of your upcoming project.
2. Export all settings and share them with other team members.
3. Each team member now installs the current version of Aptana Studio on their workstation and imports the shared settings.
The sharing of the team's settings, templates, and much more could be handled over an integrated source control, such as SVN. The team leader simply creates a new repository and defines the team members who can work on files and then commit it. This small circle can now extend the team's settings and template base to other team members , who can just check out each new project convention from the SVN and use it immediately. A further advantage of using version control is the history of the development of the configuration and template usage.
An additional solution of sharing a fully configured instance of the Aptana Studio is to make a complete copy of this basic installation of the Aptana Studio. One disadvantage of this process is that you have to create a basic installation for each operating system. Although, another advantage is that the team members will already have the required plugins installed. After installing a copy of the basic installation, the developer just has to perform an update of the IDE.
www.it-ebooks.info

Chapter 11
[ 237 ]
Ideas and discussion
If you have some ideas about optimizing Aptana Studio or you want to discuss some of our examined topics, just visit our page at http://www.coding.ms/aptana-studio-3/.
Working with bookmarksIf you're working on different source code parts and therefore have to frequently jump between different source code files, it can save a lot of time if you use bookmarks to mark the currently used source code areas. Luckily Aptana Studio provides you with the ability to do this. You can place a bookmark simply on a line of any source code file without changing its content. Aptana Studio then remembers all bookmarks within your project.
Using bookmarks in libraries
If you're using external libraries and you have to often look up functionalities within other files, it is worth using bookmarks in order to jump quickly and easily to the required places. The only requirement for this is that the external libraries must be within an Aptana Studio project.
Time for action – setting a bookmark1. Open the source code file within the editor, where you want to set a new bookmark.
2. Right-click on the left margin of the line number in which you want to place the bookmark and select the Add Bookmark... entry, as shown in the following screenshot:
www.it-ebooks.info

Optimizing Work and Increasing Collaboration
[ 238 ]
3. Within the window which appears you're able to enter the bookmark name. If you're trying to set a bookmark on a line where some code is already contained, Aptana Studio will prefill this code into the name field. Please note that you don't have to use this prefilled name, you can name your bookmark anything you wish to in the following dialog box:
4. Finally, click on OK in order to complete setting the new bookmark.
What just happened?We have just set a new bookmark into a line of a file where you might have to jump frequently to view or change something. It is easy to recognize which line has a bookmark by the small blue bookmark label on the left of the line number, as seen in the following screenshot:
However, by completing this process and setting one bookmark this doesn't tell us how we can then jump to it. To enable us to do this Aptana Studio provides us a bookmark view. Let's take a look and see how to work with this view.
www.it-ebooks.info

Chapter 11
[ 239 ]
The bookmark viewThe bookmark view is a list that contains all of the available bookmarks in your currently opened project. You can open this view by navigating to Window | Show view | Bookmarks. The Bookmarks view is shown in the following screenshot:
If you want to jump to a bookmark from the list, simply double-click on the related bookmark and the Aptana Studio opens the bookmarked file within the editor. It then places the cursor on the line where the bookmark is located.
Unfortunately, over time, your list of bookmarks can become quite untidy and you may need to clean up or filter the bookmark view. We will now see how this can be done. For the next Time for action section, we will give ourselves the task of filtering all of the available ZendFramework bookmarks.
Time for action – configuring the bookmark view1. Open the bookmark view.
2. Click on the View menu and select the Configure Content... entry.
3. Before you can start to create and use your own filter, you have to deselect the Show all items checkbox, seen in the following screenshot:
www.it-ebooks.info

Optimizing Work and Increasing Collaboration
[ 240 ]
4. Now you can create a new configuration. Just click on the New button in order to create a new filter.
5. After you have clicked on the New button, within the left-hand side list, appears a new configuration entry with the name New Configuration. We will now have to configure this new entry so that we can use it. These actions can be seen in the following screenshot:
6. We will now rename this entry with a more descriptive name than "New Configuration". To do this, simply click on the Rename button and then enter a name, for example, ZendFramework. The following dialog, as seen in the following screenshot, can be used for renaming:
www.it-ebooks.info

Chapter 11
[ 241 ]
7. Next, we can select the scope in which the filter will work. For this simple example, we leave the scope on any element.
8. Finally, we can enter some text that should or should not be contained within the bookmark's name. For this example, enter ZF as the short name of ZendFramework and select contains within the Text select box.
9. Finally, we can finish the configuration by clicking on OK.
What just happened?We have just created a filter for the bookmark view. Now, the View menu provides us with a new entry named Show. This small sub menu contains all of the available filters and gives us the ability to filter the bookmark view quickly.
As a quick test, we will create two bookmarks. The first contains the keyword ZF and the second will contain some other keywords. After this, just play a bit with the ZendFramework entry from the Show submenu. As you will see, the list will display and hide the entry without the ZF keyword. These actions are shown in the following screenshot:
Collect the displayed list columns
If you are unable to see some of the information on the bookmarks, or if there are list columns you don't need, use the Configure Columns… entry within the View menu to customize the columns that you require.
If you work a lot with bookmarks and you already have a lot of bookmarks and filters, and you don't want to change the filter every time—no problem, just go ahead and create an additional bookmarks view over the current bookmarks view menu. You can equip your new bookmark view with any name of your choice that describes the configured list inside.
www.it-ebooks.info

Optimizing Work and Increasing Collaboration
[ 242 ]
SVN commit comment templatesIf you're working a lot with SVN-based projects, it often occurs that you have to commit your current source codes. As discussed previously, it's always recommended that you provide your commits with detailed comments about what you have done. Hence, when you often make similar changes, it's a good idea to create a template for these comments.
Many development teams also use the post-commit hook of the SVN Repository in order to further process the committed data in additional ways. Therefore, it could be advantageous that every team member writes his comments in the same style and structure so that automatic processing is possible.
In order to make this easier, you can create templates for your SVN comments.
Time for action – creating SVN commit comment templates1. Navigate to Window | Preferences.
2. Go to Team | SVN | Comment Templates within the tree. Here you will find the complete list of the available comment templates, as seen in the following screenshot:
www.it-ebooks.info

Chapter 11
[ 243 ]
3. Click on the New... button on the right-hand side of the list in order to create a new template.
4. Here you can enter the complete text of your new comment, as seen in the following screenshot:
5. Finally, click on the OK button to save your new comment.
What just happened?You have just created a comment template for the SVN-commit process. If you're now performing an SVN commit, and the SVN plugin requires you to enter a comment, you have the possibility to choose one of your comment templates, as shown in the following screenshot:
After selecting the necessary template, you can adjust or extend the template text and finish your commit.
www.it-ebooks.info

Optimizing Work and Increasing Collaboration
[ 244 ]
Working with tasksWhile developing a web application, it may often be the case that you are working with sections that are not currently of high importance or are not completely coded, and you want to finish this part at a later time. Unfortunately, as your project gets larger and larger, that you may forget these sections within your source code, leaving holes in your code. What is the best solution to allow your to remember these positions?
How great would it be if there was a self-organizing to-do list that contains points such as to-dos and fix-mes, and the entries may also have different priorities. For this reason, the Aptana Studio provides you a Task view. This view helps you to remember all of the positions where you have to do or fix something. All entries within the list are automatically added while coding on your project. Aptana Studio understands by default the @TODO and the @FIXME tags, used for tagging task entries.
The tags that Aptana Studio generally understands can be configured within the preferences. Let's take a look at how this works.
Time for action – configuring the tasks and managing the task tags
1. First navigate to Window | Preferences and go to Aptana Studio | Tasks. The Tasks window is shown in the following screenshot:
www.it-ebooks.info

Chapter 11
[ 245 ]
2. In this preference window, we firstly need to make a decision whether we want to use case-sensitive or case-insensitive task tags, via the Case sensitive task tags checkbox, located near the bottom of the window. Based on this decision, we either select the case-sensitive task tags or we don't. It is often a good choice to use case-sensitive task tags because if you write a comment where the tag name is contained in the comment text, the comment will be marked as a task.
3. The list above the checkbox allows us to get an overview of the currently available task tags. On the left, we see the tag name itself; and on the right, the related priority of each tag. In order to edit an entry, select the entry you want to change and click the Edit... button.
4. Within the edit window, you can change the tag name or priority of the task. After you have adjusted the task tag to fit with your requirements, click on OK to save your changes, as shown in the following screenshot:
5. Now we can add a new task tag by clicking on the New... button in order to open the creation window. This window has the same structure as the edit window. You only need to enter the tag name and the required priority of your new task tag, and that's it. At this point you can create a task tag named OPTIMIZE for source code parts that function well, but they might need to be optimized at a later date. An example of this task creation is shown in the following screenshot:
6. Now click on Apply and then on the OK button to complete the configuration of the tasks.
www.it-ebooks.info
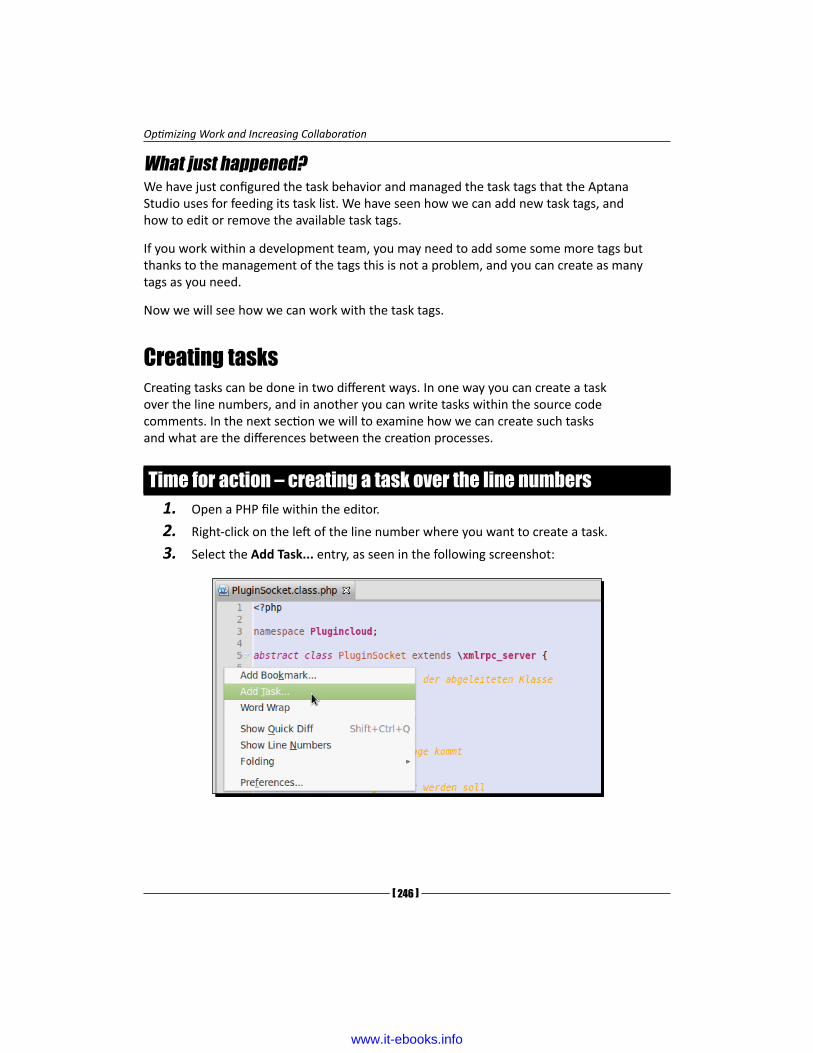
Optimizing Work and Increasing Collaboration
[ 246 ]
What just happened?We have just configured the task behavior and managed the task tags that the Aptana Studio uses for feeding its task list. We have seen how we can add new task tags, and how to edit or remove the available task tags.
If you work within a development team, you may need to add some some more tags but thanks to the management of the tags this is not a problem, and you can create as many tags as you need.
Now we will see how we can work with the task tags.
Creating tasksCreating tasks can be done in two different ways. In one way you can create a task over the line numbers, and in another you can write tasks within the source code comments. In the next section we will to examine how we can create such tasks and what are the differences between the creation processes.
Time for action – creating a task over the line numbers1. Open a PHP file within the editor.
2. Right-click on the left of the line number where you want to create a task.
3. Select the Add Task... entry, as seen in the following screenshot:
www.it-ebooks.info

Chapter 11
[ 247 ]
4. In the window which appears, the most important bits of information are already filled in. You just need to enter a description of the new task. Although, you must make sure that the description contains the task tag so that the task list is able to filter these tasks too. This is shown in the following screenshot:
5. Finally, click the OK button and that's it.
What just happened?We have just created our first task with help of line numbers. The task view should immediately list them. In addition to this, you can also identify a line with a linked task on by the small task icon, as you can see in the following screenshot:
As we have already mentioned, there is a second way to create a task; we'll take a look at this now.
www.it-ebooks.info

Optimizing Work and Increasing Collaboration
[ 248 ]
Time for action – creating a task using a comment1. Open a PHP file within the editor.
2. Search for the line where you want to place the task.
3. Now, begin to enter a PHPDoc conform comment. This comment should contain the PHPDoc attribute @TODO, followed by the task description text.
4. After saving your file, the task should appear within the task list.
What just happened?We have just created a task with the help of a PHPDoc comment. After saving the file that contains the new task, the task list will include the new task.
Where are my tasks?
What if you have created your task as described here, but they don't appear within the task list? Make sure that your project has a nature type, otherwise the build process won't read out the task comments.
But, you surely may wonder, which method should I prefer? Well, it turns out that the comment-based method of creating tasks has more advantages. Firstly, the Tasks can be shared with Git and SVN; and secondly, if the comments are PHPDoc conform, you will also be to fill in these tasks into your PHPDoc documentation. The latter method of creating tasks is perhaps better for a single developer who doesn't want to equip his/her code with all the things that he/she still has to create.
www.it-ebooks.info

Chapter 11
[ 249 ]
Tasks within developer teams
When working on large projects, it's very advantageous when all team members have marked their tasks, bugs, and optimizations with the related tags. When all occurrences are marked accordingly, the project leader is can easily gain a rough overview of how many points are left to solve without getting in contact with each developer.
Have a go hero – try out what you have learnedYour task now is to create your own syntax highlight theme with the highlight that you prefer.
After that, export all of your Aptana Studio settings, themes, code formatter, and so on, so that you can restore them later. After you have finished exporting your data, try to import the files back in.
Finally, when you've tried out the import and export features, make yourself familiar with the bookmarks and tasks. To do this, open one of your projects and navigate through the contained files and then place a bookmark on the lines which you use often. If you find a line which is incomplete or requires optimization, place a task on that line.
Pop quizQ1. Where can you export the themes and the code formatter?
1. The Preferences window within the Aptana Studio entry.
2. The Export button in the File window.
3. These settings can't be exported.
Q2. What is the difference between the two ways that we have learned of creating tasks?
1. Comment-based tasks are located within the related file, the other within the project itself.
2. Comment-based tasks are located within the project itself, the other within the related file.
3. There is no difference.
Q3. What task tags are predefined by Aptana Studio?
1. OPTIMIZE and TODO.
2. TODO and FIXME.
3. FIXME and OPTIMIZE.
www.it-ebooks.info

Optimizing Work and Increasing Collaboration
[ 250 ]
SummaryBy the end of this chapter, you should be able to create and manage your own syntax highlight themes. Additionally, you should be able to import and export the most important settings and configurations of the Aptana Studio. You should also be able to manage and optimize your work by using bookmarks and tasks.
Aptana Studio can however do much more than what we have covered here. For example, you could extend the available bundles, templates, and snippets or create new ones, as you need within your project. Further more, there is the possibility of sharing them within your development team, like the Aptana Studio team does.
When your project environment has reached such a point, the bundle keeps learning with your increasing project. Integrate all the frequently used code structures into snippets, then create file templates with the base structure of your project where all headers and footers are already contained, extend the menu functionality of the bundle so that all developers are able to use the bundle features over the menu (writing their own commands that they will be executing directly from the editor), and much more.
In the next and last chapter, we will take a look at what we have to do when errors occur.
www.it-ebooks.info

12Troubleshooting
At times we may encounter problems while working with Aptana Studio. These problems often depend on the operating system used, the Aptana Studio plugins, or the Aptana Studio configuration. It's important to know how to get the required information out of Aptana Studio in order to solve your problems. But the possible problems could be very varied.
For this reason, we can't solve all these possible problems easily or in the same way. Furthermore, it might happen that you find a completely new problem or bug within Aptana Studio. Therefore, we will take a look at a few of the most frequently occurring problems, and what you can to do to solve these problems. We will also discuss the procedure that you will need to follow to solve those problems with Aptana Studio that you're not able to solve by yourself.
So, in this chapter we will cover the following:
� What to do when problems occur
� How to configure the system error level
� Where can you find the logfiles content
� Where you can get additional support
� How to report a bug ticket
What to do when problems occurFirst of all, we will see where you can find some additional information or help in case you have some questions or need some help.
www.it-ebooks.info

Troubleshooting
[ 252 ]
Systems helpIf you have any questions about the main features of Aptana Studio, first take a look at the Help Contents menu. You will find it by going to Help | Help Contents. The window that appears provides you with a tree of the help content on the left, and the help content is displayed on the right.
� The Content tree contains the Workbench User Guide option, which has help topics about the base functionality of Aptana Studio in general. These help topics are provided by the eclipse framework, which is located under the hood. Another important entry is the Studio User Guide option. Here you will find specific help for the functionalities that are provided by Aptana Studio. Additionally, there could be more entries related to the system plugins which are installed.
www.it-ebooks.info

Chapter 12
[ 253 ]
Do you have a problem?Say you have got to a point where you have some problems with Aptana Studio. As you have already read, you can try and solve these problems by writing a forum post or creating a bug ticket. But stop!
Before you go ahead and post something on the forums or report a bug, you should try to solve the problem by yourself.
A possible process of solving your problems could be performing a system update. Maybe your problem results from a bug in Aptana Studio or an integrated plugin. After a system update, the whole IDE should work with the newest source—maybe your problem was related to an older version and is now solved. How to run a system update has already been discussed in Chapter 1, Getting Started.
If the problem still remains, you should start a search for the problem. Have a look—is there an error message? Could you describe your problem in words? Take all this information and feed it into your preferred search engine. This search will surely give you some tips on how to solve your problem.
If your problem still remains and the search gives you no effective results, try providing your search with the version and system information from Aptana Studio. We will now see how to get this information out of Aptana Studio.
Which version of Aptana Studio have you installedIn order to make your problem search more exact, it will be a good idea to provide your search with your Aptana Studio version and other details related to your problem.
Time for action – displaying installation detailsIn the next few steps, you will see how to retrieve a good deal of information about your installation:
1. Navigate to Help | About Aptana Studio 3.
www.it-ebooks.info

Troubleshooting
[ 254 ]
2. The resulting window does not provide much information. It will simply provide you with the used Version/build number and some general information about Aptana Studio.
3. You can however get more information from this area. The icon button in the left-bottom corner provides you filtered information about the plugins that you have integrated. So, if you have some problems with a plugin and you need to know which version you're using, navigate to this area and you will find the details that you need.
4. But that's not all, if you click on the Installation Details button (see previous screenshot). Click on it, and you will get an overview of the installation details of Aptana Studio.
www.it-ebooks.info
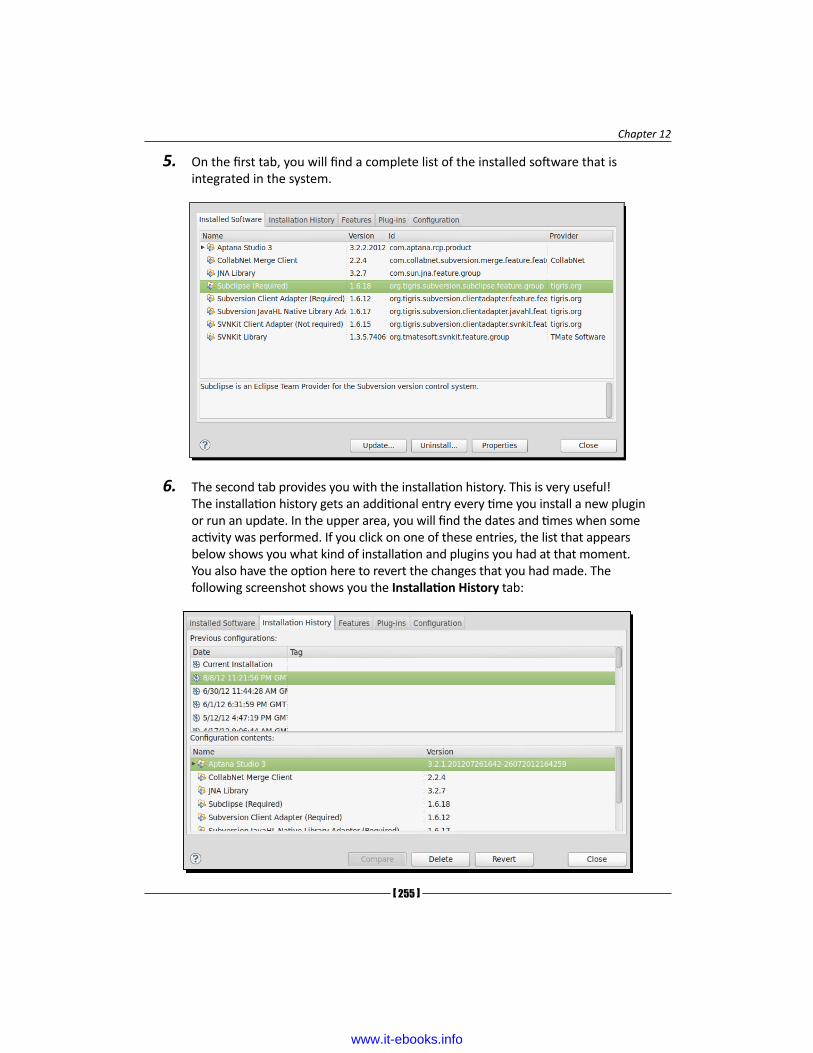
Chapter 12
[ 255 ]
5. On the first tab, you will find a complete list of the installed software that is integrated in the system.
6. The second tab provides you with the installation history. This is very useful! The installation history gets an additional entry every time you install a new plugin or run an update. In the upper area, you will find the dates and times when some activity was performed. If you click on one of these entries, the list that appears below shows you what kind of installation and plugins you had at that moment. You also have the option here to revert the changes that you had made. The following screenshot shows you the Installation History tab:
www.it-ebooks.info

Troubleshooting
[ 256 ]
7. The next tab is the Features tab, gives you an overview of the installed features. The Features tab shows all of the installed plugins.
8. Next, there is the Plug-ins tab. The plugins are the smallest installable software components.
www.it-ebooks.info

Chapter 12
[ 257 ]
9. The last tab is the Configuration tab. In this tab, you will find information on the whole configuration of Aptana Studio. This information is very useful for the Appcelerator team when you have to report a bug.
Running the diagnostic testThe diagnostic test simply provides a few pieces of information on the system that are useful for us when debugging an issue. It doesn't do anything more than that currently, but this information is often very useful.
In order to run the diagnostic test, complete the following steps:
1. Navigate to Help | Aptana | Run Diagnostic Test....
www.it-ebooks.info

Troubleshooting
[ 258 ]
2. That's it! In the window which appears, you can see the most important information about your installation of Aptana Studio.
We just created our own output of the diagnostic test.
Your diagnostic test result looks like the following screenshot:
Here, you can copy the result directly into your clipboard in order to paste it wherever you need. Maybe on a forum or bug ticket.
Viewing and clearing the logfileAptana Studio has a logfile where all warnings and errors are logged while its starting up and running the IDE. Sometimes, it's very useful to read the logfile if you have problems with Aptana Studio.
This will allow you (with the help of the logged warnings and errors) to identify the source of your problems.
www.it-ebooks.info
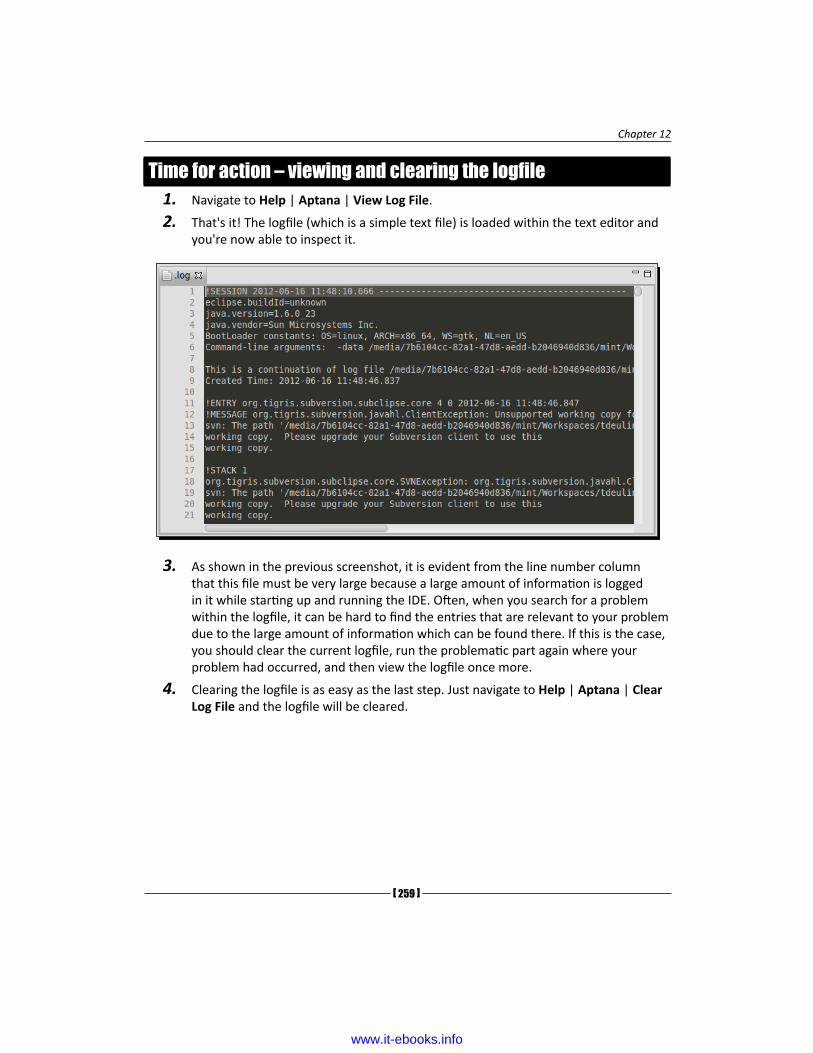
Chapter 12
[ 259 ]
Time for action – viewing and clearing the logfile1. Navigate to Help | Aptana | View Log File.
2. That's it! The logfile (which is a simple text file) is loaded within the text editor and you're now able to inspect it.
3. As shown in the previous screenshot, it is evident from the line number column that this file must be very large because a large amount of information is logged in it while starting up and running the IDE. Often, when you search for a problem within the logfile, it can be hard to find the entries that are relevant to your problem due to the large amount of information which can be found there. If this is the case, you should clear the current logfile, run the problematic part again where your problem had occurred, and then view the logfile once more.
4. Clearing the logfile is as easy as the last step. Just navigate to Help | Aptana | Clear Log File and the logfile will be cleared.
www.it-ebooks.info

Troubleshooting
[ 260 ]
What just happened?We just took a look into the logfile. The logfile is generally very large and therefore it's not so easy to read out the relevant information. Aptana Studio 3 provides a functionality to clear the logfile, something which we also looked at.
If the logfile doesn't contain the information you need, navigate to Window | Preferences and select the Troubleshooting entry under Aptana Studio. Here, you can select what kind of errors and warnings should be logged into the logfile.
ForumsIf your problem still persists and you couldn't find a solution by searching on the Internet, your next step could be a post within a forum.
www.it-ebooks.info

Chapter 12
[ 261 ]
If you need some help from the Aptana community, you should refer to the following website:
http://aptana.com/support
Here, you will find an overview of the different support possibilities. In this case, we want to get in contact with other Aptana Studio users in order to exchange information about your problem. Aptana has its own discussion forum named Tender app, which can be found on its website, but the team has decided to move the forum to stackoverflow.com. StackOverflow has a very large community of knowledgeable individuals, and they often respond much quicker than the Appcelerator team.
At StackOverflow you can create a new question and give it the tag aptana. The tag aptana allows StackOverflow to inform all the users that have subscribed to Aptana-tagged questions, and also to categorize the question with other Aptana Studio questions.
Don't forget to mention your Aptana Studio Version in your post and other problem-related information.
Good luck with the posting and discussion with the other Aptana Studio users and some Appcelerator team members, who are often available there to help.
Reporting a bugWhile you're fighting with a problem and you think you've found a possible bug, if this is so, go on and report it to the Appcelerator team. After the bug is tracked, the team will try to inspect and solve this problem as soon as possible.
Before you create a new bug ticket it is worth having a look at the currently tracked issues. Maybe there's already a ticket for your problem. Simply navigate to http://jira.appcelerator.org in your preferred browser and use the Issue Tracker option to go through the current issues.
You didn't find your problem? No? Then you will need to report a bug.
Time for action – reporting a bugLet's take a look at how we can report a bug.
1. Navigate to Help | Aptana | Submit a ticket... to open the window for reporting a bug.
www.it-ebooks.info

Troubleshooting
[ 262 ]
2. Before you start to fill in the details of your bug, we need to log in to the JIRA bug tracker. If you don't have an account, just click on Sign up... and the registration form will open in your default browser. Follow the required steps to complete your account registration.
3. After you are logged into JIRA, you can fill in the ticket information. We start with the first selection. The Type field is already selected correctly, as we want to submit a possible bug. Then select the Severity field, following which you will find a short description of each option:
� Blocker: The issue is blocking our project
� Major: Crash or incorrect behavior issue that may have a workaround
� Minor: Crash or incorrect behavior that does not have a reasonable workaround
� Trivial: Functions correctly, but appearance/functionality needs improvement
� None: Default
www.it-ebooks.info

Chapter 12
[ 263 ]
4. The Summary field is like an e-mail's subject field, keep its content brief but clear.
5. This is the most important step. In the Steps to Reproduce field, you will need to describe very clearly what the Appcelerator team must do to enforce the malfunction. Mention this in the step-by-step procedure—every bit of information can help solve this problem.
6. Within the Actual Result field, you have to describe what's the result of the action. If it's too difficult to describe the behavior, feel free to attach an additional screenshot that will help in understanding the problem.
7. After that, within the Expected Result field, describe what you think should be the correct behavior after this action.
8. Next, check the two Logs to attach checkboxes. This information helps the Appcelerator team a lot for reproducing and solving the problem. Neither of these documents contain any sensitive data. You have already seen in this chapter the data that is contained, in detail.
9. Finally, click on the OK button in order to complete the process of reporting a bug ticket.
What just happened?We just navigated to the bug reporting window, logged into JIRA, and began filling out a bug ticket. Here, we have to describe the problem as clearly as we can and submitted it to the JIRA Bug tracker.
The Appcelerator team will now find the new ticket within the Bug tracker, read it, and then decide how this ticket should be handled.
With your JIRA account, you can log in to the Bug tracker and find out where your problem is in the solving process. The Bug tracker is available at http://jira.appcelerator.org/.
Here, you can identify the current status of the ticket and read the existing comments of the solution process. You're also able to give more information to support the team.
If you're at this point, it's time to say: Thanks for all your support in making Aptana Studio much better and more stable!
If you have an idea for a new feature or improvement for Aptana Studio, that's great! Feel free to use the ticket functionality and send the idea to the Appcelerator team. Just select the type of improvement or feature, and describe your idea as accurately as possible.
www.it-ebooks.info

Troubleshooting
[ 264 ]
Attention: Please do not spam the Appcelerator team with questions and problems which you could solve yourself! First try the solution tips provided in this chapter.
Fixing a moved workspace directoryWhen you're working with a lot of different workspaces, it is possible that you may start Aptana Studio but the workspace directory of your last used workspace isn't available any more. This is not good!, If you haven't configured Aptana Studio in a way that makes it ask you about which workspace you want to use at every start up, Aptana Studio won't start up and will throw the following message:
Could not launch the product because the specified workspace cannot be created. The specified workspace directory is either invalid or read-only.
In the following Time for action section, we will discuss how to fix this problem.
Time for action – changing the workspace directory in config.ini1. Use your system file browser and navigate to your Aptana Studio installation
directory.
2. In the installation directory, select the config.ini file that is located within the configuration directory and open it in an editor.
3. Look for the row that starts with osgi.instance.area.default. This row contains the path to the currently used workspace.
4. Adjust the path so that Aptana Studio can find a valid workspace.
5. Finally, save the file and start Aptana Studio.
What just happened?You just changed the workspace path directly within the config.ini file. After that, Aptana Studio will be able to find a valid workspace.
Have a go hero – collecting information about Aptana StudioNow your task is to identify what version of Aptana Studio you have installed, and what features and plugins are integrated in that Version.
After we know our current environment, we will take a look at the logfile and try to clear it.
Finally, try to run a diagnostic test.
www.it-ebooks.info

Chapter 12
[ 265 ]
Pop quizQ1. What to should you if you have a problem with Aptana Studio?
1. First of all, report a bug about your problem.
2. Before you do anything else, try to reinstall Aptana Studio.
3. First of all, try to help yourself. Search on the Internet, and if you don't find a solution try searching for help within a forum.
SummaryBy the end of this chapter, you should know what to do when a problem with Aptana Studio 3 occurs. We have seen the procedure for solving problems that occur in Aptana Studio, starting with identifying what environment is currently available, executing a diagnostic test, to reading through the logfile.
www.it-ebooks.info

Pop Quiz Answers
Chapter 1, Getting StartedPop quiz – test your installation knowledge
Q1 2
Q2 1
Q3 3
Chapter 2, Basics and How to Use Perspectives and ViewsPop quiz
Q1 3
Q2 2
Q3 1
Q4 2
Q5 1
Q6 3
Q7 1
Q8 1
www.it-ebooks.info

Pop Quiz Answers
[ 268 ]
Chapter 3, Working with Workspaces and ProjectsPop quiz – testing your newly acquired Workspace knowledge
Q1 1
Q2 2
Pop quiz – testing your newly acquired Projects knowledge
Q1 3
Q2 2
Chapter 4, Debugging JavaScriptPop quiz
Q1 3
Q2 2
Q3 2
Q4 3
Chapter 5, Code Documentation and Content AssistPop quiz
Q1 1
Q2 2
Q3 1
Q4 1
Q5 3
www.it-ebooks.info

Pop Quiz Answers
[ 269 ]
Chapter 6, Inspecting Code with FirebugPop quiz
Q1 2
Q2 1
Q3 3
Q4 2
Q5 2
Chapter 7, Using JavaScript LibrariesPop quiz
Q1 3
Q2 1
Q3 2
Q4 2
Chapter 8, Remotely Working with FTPPop quiz
Q1 3
Q2 1
Q3 2
www.it-ebooks.info

Pop Quiz Answers
[ 270 ]
Chapter 9, Collaborative Work with SVN and GitPop quiz – testing your newly acquired SVN knowledge
Q1 2
Q2 1 and 3
Q3 3
Q4 1
Pop quiz – testing your newly acquired Git knowledge
Q1 2
Q2 3
Chapter 10, PHP ProjectsPop quiz
Q1 1
Q2 3
Q3 3
Q4 2
Q5 1
www.it-ebooks.info

Pop Quiz Answers
[ 271 ]
Chapter 11, Optimizing Work and Increasing CollaborationPop quiz
Q1 1
Q2 1
Q3 2
Chapter 12, TroubleshootingPop quiz
Q1 3
www.it-ebooks.info

IndexSymbols@alias tag 112@author tag 112-115@classDescription tag 112@constructor tag 112, 115@deprecated tag 112@example tag 112@exception tag 112@FIXME tag 244@id tag 112@inherits tag 113@internal tag 113@memberOf tag 113@method tag 113@namespace tag 113, 114@param tag 113, 115@private tag 113, 115@projectDescription tag 113, 114@property tag 113, 114@return tag 113, 115@see tag 113@since tag 113-115@TODO tag 244@type tag 114, 115@version tag 114-Xms parameter 15-Xmx parameter 15
AActual Result field 263addons.mozilla.org website 124
Allow unversioned obstructions checkbox 177App Explorer tab 154App Explorer view 56, 57, 178Apply button 166Aptana Debugger
for Firefox, installing 92, 93Aptana Debugger Extension
uninstalling 107, 108Aptana Firefox Extension
uninstalling 107Aptana homepage
URL 14Aptana is not defined error message 100Aptana Ruble 26Aptana Studio
-Xms parameter 15-Xmx parameter 15about 7base configuration 230bookmarks 237collaborative work, optimizing 227configuring 65, 230current used memory, displaying 16downloading, on Linux 8downloading, on Mac 14downloading, on Windows 10Git 188help 252installation details, displaying 253-257installing, on Linux 9installing, on Mac 14installing, on Windows 10-13issues, solving 253
www.it-ebooks.info

[ 274 ]
Java memory, increasing 15, 16memory usage, handling 15on Linux, uninstalling 26, 27search tool 60syntax highlight themes, creating 228system requisites 7, 8system, upgrading 17-19
Aptana Studio 3color theme, customizing 30, 31customizing 65update types 17
Aptana Studio, configurationbase configuration 230code, formatting 231connection settings 230syntax highlight 231
Aptana Studio preferencesexporting 70, 71importing 71, 72sharing 236
Aptana Studio Start Page toolbar button 34Available command groups option 42
BBack toolbar button 35bookmarks
about 237setting, steps for 237, 238view 239view, configuring 239, 240
breakpointsabout 101adding 102disabled breakpoint, identifying 103disabled breakpoint, identifying with
condition 104disabled breakpoint, identifying with hit
count 104disabling 103hit count, setting 104, 105resuming 103variables, inspecting 105variables, values changing 105
Browse... button 81, 83, 165, 169bug
reporting, steps for 262, 263
Build Automatically option 88Builders page 203
CCancel Current Search button 63Case sensitive task tags checkbox 245code
documenting 111code formatter
about 217configuring 219-223using 218, 219
code formatter profilesabout 234exporting 234, 235importing 235
code performanceprofiling 135profiling, console.profile() used 137profiling, console.time() used 135, 136
collaborative work 171Collapse All button 62command groups availability
about 50adding 50removing 51
Command Groups Availability option 42, 50Commit... button 194Commit... entry 192condition
breakpoints, identifying with 104config.ini
workspace directory, changing 264Configuration tab 257Connection Manager
about 163new connection, creating 163-165used, for deleting exisiting connection 166used, for modifying exisiting connection 166
Connection Manager... entry 164console module 124console.profile()
used, for profiling code performance 137, 138console.profileEnd() function 138console.time()
used, for profiling code performance 135, 136
www.it-ebooks.info

[ 275 ]
console viewabout 98working with 99, 101
Content Assist featureabout 117browser capabilities 118user agents, changing 119using 117
Content tree 252Copy Settings tab 70cose button 13CSS code
editing, CSS module used 132editing, HTML module used 131, 132
CSS moduleabout 124used, for editing CSS code 132
Customize Perspective... option 33
Ddebugger
configuring 93debug configuration, creating 94, 95
Debug perspective 91Debug toolbar button 34, 99Default Profile option 219diagnostic test
running 257, 258doc_c trigger keyword 209doc_d trigger keyword 209doc_f trigger keyword 209doc_h trigger keyword 209doc_i trigger keyword 209doc_s trigger keyword 209doc_v trigger keyword 209dojo object 149Dojo Toolkit
about 146integrating, steps for 146-148website, URL 146
DOM module 124downloading, Aptana Studio
on Linux 8on Mac 14on Windows 10
EEdit... button 245editors 32, 38Enable project specific settings checkbox 204Expand All button 62Expected Result field 263Export button 232, 233External Directories tab 216External Tools toolbar button 34ExtJS
about 149integrating, steps for 149, 150
FFast view bar 39file comment, JavaScript 114Finish button 168, 200Firebug
about 124downloading, URL for 124enabling, steps for 126features 124installing, steps for 124
Firebug consoleabout 133using 133, 134
FirefoxAptana Debugger, installing 92, 93
Formatter edit window 220Formatter page 204forums
clearing 261Forward toolbar button 35FTP connection
creating 154, 155deleting 157modifying 156
FTP settingsexporting, steps for 167importing, steps for 168
FTP/SFTP/FTPS option 158function comment, JavaScript
about 115displaying 116
Function entry 207
www.it-ebooks.info

[ 276 ]
GGit
new local Git repository, working with 192-194remote Git repository, cloning 188, 189remote projects, pulling 195, 196remote projects, pushing 195, 196repository, checking 196repository, creating for existing
project 190, 191repository, creating for new project 190, 191working with 188
Git repositorychecking 196
HHelp Contents menu 252History view 173hit count
breakpoints, identifying with 104on breakpoint, setting 104
HTML codeediting, mouse selector used 129, 130inspecting, steps for 127, 128
HTML moduleabout 124used, for editing CSS code 131, 132
II Agree button 10Ignore externals checkbox 177index
project, excluding from 88information tooltip 117install button 13installing, Aptana Studio
on Linux 8, 9on Mac 14on Windows 10-13
issuessolving 253
JJava memory
increasing 16
JavaScriptdebugging 96, 97file comment 114function comment 115property comment 115
JavaScript debuggerinstalling 92
JavaScript libraryDojo Toolkit 146ExtJS 149integrating, into current project 151jQuery 142requisites 141, 142
JavaScript library, requisitesJSCA 1.0 specification file 142Virtual Studio Documentation (VSDoc) 142
JIRA account 263jQuery
about 142bundle, installing 143, 144integrating 144, 145website, URL 142
JSCA 1.0 specification file 142
LLast Edit Location toolbar button 35Libraries tab 217Link with editor function 56, 57Linux
Aptana Studio, downloading 8Aptana Studio, installing 9
Local Filesystem node 201logfile
clearing 259viewing 259
Logs to attach checkboxes 263
MMac
Aptana Studio, downloading 14Aptana Studio, installing 14
Make Primary button 86, 205Mark Occurrences toolbar button 34matches
replacing 64
www.it-ebooks.info
[ 277 ]
menu visibilityabout 52menu, customizing 52
mouse selectorusing, for editing HTML 129, 130
multiline commands 134
Nnavigation bar 32, 33network module 124New button 240New... button 243New launch configuration button 94New toolbar button 33, 49New user library button 212Next Annotation toolbar button 35Next button 24, 167, 168
OOK button 220Open button 235Open Perspective button 37Open Terminal toolbar button 34Open URL... toolbar button 34Other... button 36outline view 59, 60Overwrite existing file without warning
option 168
PPersonal Home Page. See PHPperspective
about 32-36customizing 41-43customizing perspective, creating 44default perspective, marking 55deleting 54new views, adding 46preferences 53saving 52, 53shortcuts 36views, arranging 44, 45
perspective menu 32, 36PHP 199
PHP-API files 211PHP Buildpath page 204PHP Buildpath section 215PHP Bundle
PHPDoc Comments, using 207PHP code formatter. See code formatterPHP Development section 205PHPDoc
URL 206usage, importance 206using, within PHP project 206
PHPDoc Commentsdoc_c trigger keyword 209doc_d trigger keyword 209doc_f trigger keyword 209doc_h trigger keyword 209doc_i trigger keyword 209doc_s trigger keyword 209doc_v trigger keyword 209using 206using, from PHP Bundle 207, 208
PHPDoc Comment snippets 209PHP Libraries
about 210, 211external libraries, using 212-214
PHP projectabout 200configuring 202-205, 224creating 200-202PHPDoc, using 206
Plug-ins tab 256pop quiz
answers 267-271preferences, Aptana Studio
sharing 236Previous Annotation toolbar button 35Print toolbar button 34Profile 138project
about 76closing 87deleting 85excluding, from index 88existing folder, importing as new project 81, 82existing project, deleting 85existing project, importing 81
www.it-ebooks.info

[ 278 ]
existing project, importing into workspace 83, 84
nature 76, 77nature, changing 86new project, creating 77-80new project file, creating 88, 89opening 87project function, using 80promote function, using 80workspace creating, with multiple projects 90
Project Explorer tab 154Project Explorer view 57, 77project function 80Project name field 82Project Natures section 205project-specific libraries
configuring 215-217promote function 80properties view 58property comment, JavaScript 115Pull function 195Push function 195
RRefresh button 80reminder options 20remote project
connecting, with local project 169remote server
project, connecting with 158-162Remote view
about 154FTP connection, creating 154, 155FTP connection, deleting 157FTP connection, modifying 156
Remove All Matches button 62Remove Selected Matches (Delete) button 62Ruble. See Aptana RubleRun the Current Search Again (F5) button 63Run toolbar button 34
SSave All toolbar button 34Save toolbar button 34
ScriptDoc@alias tag 112@author tag 112@classDescription tag 112@constructor tag 112@deprecated tag 112@example tag 112@exception tag 112@id tag 112@inherits tag 113@internal tag 113@memberOf tag 113@method tag 113@namespace tag 113@param tag 113@private tag 113@projectDescription tag 113@property tag 113@return tag 113@see tag 113@since tag 113@type tag 114@version tag 114about 112tags 114
ScriptDoc fileURL, for downloading 150
script module 124search dialog box 60, 61Search function 64search preferences 63search tool 60Search toolbar button 34search view 62selection menus
customizing 47new submenu, customizing 49view selection menus, customizing 48
Severity field 262Show Next Match button 62Show Preview Editor toolbar button 34Show Text entry 37Show Whitespace Characters toolbar button 35Spaces tab 222StackOverflow 261start menu 12
www.it-ebooks.info

[ 279 ]
statusbar 32, 39, 40Steps to Reproduce field 263Studio AJAX monitor 106Studio Unified Builder option 203Studio User Guide option 252Subclipse plugin 23SVN
file states 178, 179repository, adding 174, 175repository, checking 175, 177working with 172, 173
SVN commit comment templatesabout 242creating, steps for 242, 243
SVN Console view 173SVN history
using 182, 183SVN repository
checking 175-177, 186committing 179-181files, comparing 184-186SVN history, using 182, 183updating 180, 181
Swap From and To button 184Synchronize button 162sync setting 161syntax highlight themes
creating 228creating, steps for 228, 229exporting 232, 233importing 232
systems help 252
Ttab key 31tags, ScriptDoc. See ScriptDoctasks
about 244, 248configuring 244, 245creating, comment used 248creating, over line numbers 246, 247creating, ways for 246
Terminate view button 98Test button 159Themes toolbar button 34
Theme window 229third-party plugins
installing 21- 26Tigris Subclipse website
URL 22timeEnd function 135time function 135Toggle Block Selection Mode toolbar
button 34Toggle breakpoint on selected line toolbar
button 34Toggle to show or hide App Explorer view
toolbar button 34Toggle to show or hide Outline view toolbar
button 34toolbar 32- 35Tool Bar Structure tab 33toolbar visibility
about 51customizing 51
Tool Bar Visibility option 41Type field 262
Uupdate site 17Update to Head... option 181Update to Version... option 181Use current page option 95
Vvariables
at breakpoint, inspecting 105at breakpoint, values changing 105
views 32, 38, 39view selection menus
customizing 48Virtual Studio Documentation (VSDoc) 142
WWeb Deployment Wizard
about 157project, connecting with remote
server 158-162Web perspective option 44
www.it-ebooks.info

[ 280 ]
WindowsAptana Studio, downloading 10Aptana Studio, installing 10-13
Workbench User Guide option 252workspace
about 68another workspace, switching to 72, 73Aptana Studio preferences, exporting 70, 71Aptana Studio preferences, importing 71, 72creating 69creating, steps for 69, 70creating, with multiple projects 90current workspace 69deleting 74existing workspace, deleting 74preferences 75preferences, importing 70selection, on startup 75
workspace directoryin config.ini, changing 264
Workspace tab 216
YYahoo User Interface (YUI) library 149
ZZendFramework 210ZF keyword 241
www.it-ebooks.info

Thank you for buying
Aptana Studio Beginner's Guide
About Packt PublishingPackt, pronounced 'packed', published its first book "Mastering phpMyAdmin for Effective MySQL Management" in April 2004 and subsequently continued to specialize in publishing highly focused books on specific technologies and solutions.
Our books and publications share the experiences of your fellow IT professionals in adapting and customizing today's systems, applications, and frameworks. Our solution based books give you the knowledge and power to customize the software and technologies you're using to get the job done. Packt books are more specific and less general than the IT books you have seen in the past. Our unique business model allows us to bring you more focused information, giving you more of what you need to know, and less of what you don't.
Packt is a modern, yet unique publishing company, which focuses on producing quality, cutting-edge books for communities of developers, administrators, and newbies alike. For more information, please visit our website: www.packtpub.com.
About Packt Open SourceIn 2010, Packt launched two new brands, Packt Open Source and Packt Enterprise, in order to continue its focus on specialization. This book is part of the Packt Open Source brand, home to books published on software built around Open Source licences, and offering information to anybody from advanced developers to budding web designers. The Open Source brand also runs Packt's Open Source Royalty Scheme, by which Packt gives a royalty to each Open Source project about whose software a book is sold.
Writing for PacktWe welcome all inquiries from people who are interested in authoring. Book proposals should be sent to [email protected]. If your book idea is still at an early stage and you would like to discuss it first before writing a formal book proposal, contact us; one of our commissioning editors will get in touch with you.
We're not just looking for published authors; if you have strong technical skills but no writing experience, our experienced editors can help you develop a writing career, or simply get some additional reward for your expertise.
www.it-ebooks.info

Java EE 6 Development with NetBeans 7ISBN: 978-1-84951-270-1 Paperback: 392 pages
Develop professional enterprise Java EE applications quickly and easily with this popular IDE
1. Use features of the popular NetBeans IDE to accelerate development of Java EE applications
2. Develop JavaServer Pages (JSPs) to display both static and dynamic content in a web browser
3. Learn development with the popular PrimeFaces JSF 2.0 component library
PHP Application Development with NetBeans: Beginner's GuideISBN: 978-1-84951-580-1 Paperback: 302 pages
Boost your PHP development skills with this step-by-step practical guide
1. Clear step-by-step instructions with lots of practical examples
2. Develop cutting-edge PHP applications like never before with the help of this popular IDE, through quick and simple techniques
3. Experience exciting features of PHP application development with real-life PHP projects
Please check www.PacktPub.com for information on our titles
www.it-ebooks.info

NetBeans Platform 6.9 Developer's GuideISBN: 978-1-84951-176-6 Paperback: 288 pages
Creating professional desktop rich-client Swing applications using the world's only modular Swing application framework
1. Create large, scalable, modular Swing applications from scratch
2. Master a broad range of topics essential to have in your desktop application development toolkit, right from conceptualization to distribution
3. Pursue an easy-to-follow sequential and tutorial approach that builds to a complete Swing application
NetBeans IDE 7 CookbookISBN: 978-1-84951-250-3 Paperback: 308 pages
Over 70 highly focused practical recipes to maximize your output with NetBeans
1. Covers the full spectrum of features offered by the NetBeans IDE
2. Discover ready-to-implement solutions for developing desktop and web applications
3. Learn how to deploy, debug, and test your software using NetBeans IDE
Please check www.PacktPub.com for information on our titles
www.it-ebooks.info