Editors Welcome Welcome to the second issue of “Stay Safe ...
Upload
khangminh22Category
view
4download
0
www.flairltd.co.uk
Welcome to
Introduction PackFashion & Luxury Division
Join us on social media:
@flairrecruitmentltd @flairltd@flair_recruitment
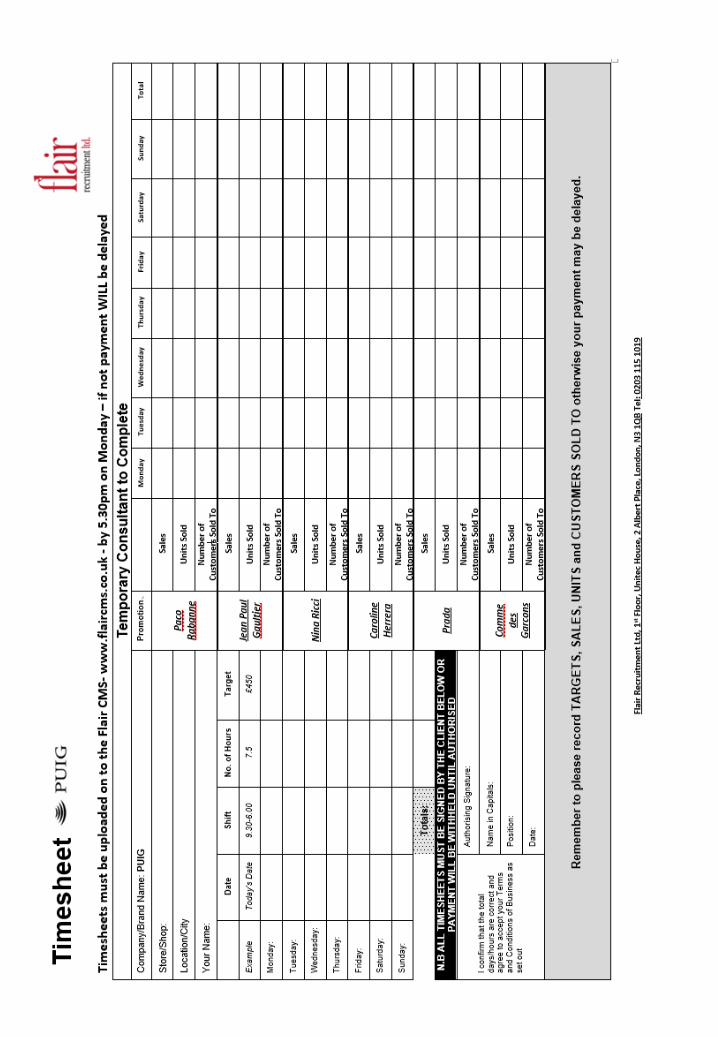
Please read and save this information and print out the timesheet
for instore bookings. Further timesheets can be found on our website
www.flairltd.co.uk
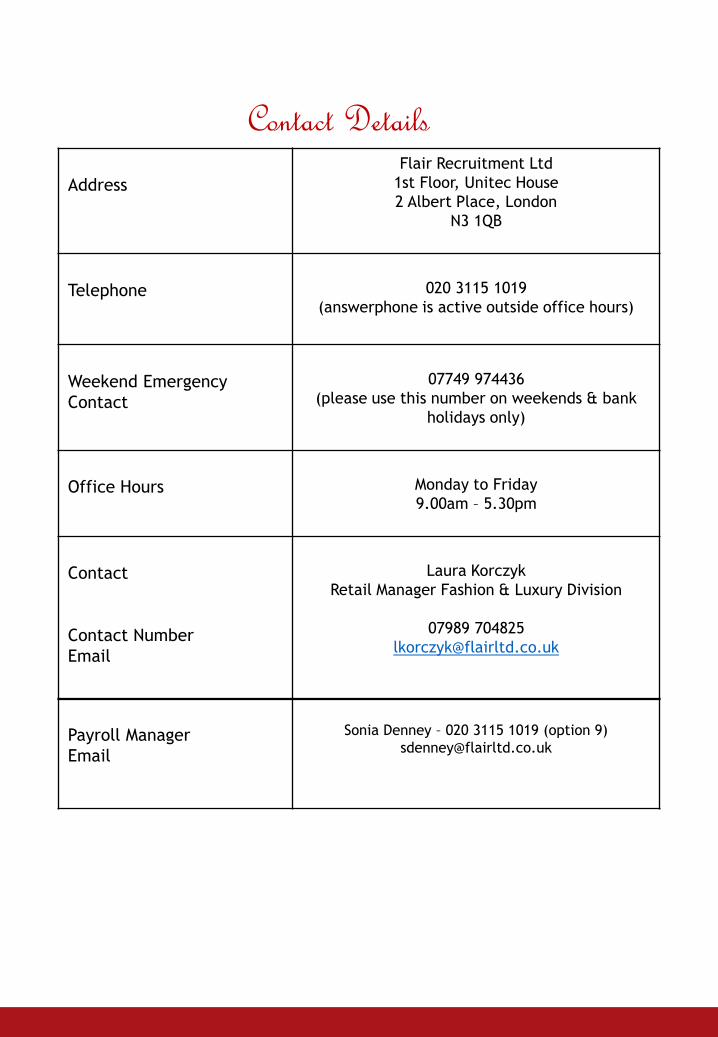
Contact Details
Address
Flair Recruitment Ltd
1st Floor, Unitec House
2 Albert Place, London
N3 1QB
Telephone 020 3115 1019
(answerphone is active outside office hours)
Weekend Emergency
Contact
07749 974436
(please use this number on weekends & bank
holidays only)
Office Hours Monday to Friday
9.00am – 5.30pm
Contact
Contact Number
Laura Korczyk
Retail Manager Fashion & Luxury Division
07989 704825
Payroll Manager
Sonia Denney – 020 3115 1019 (option 9)
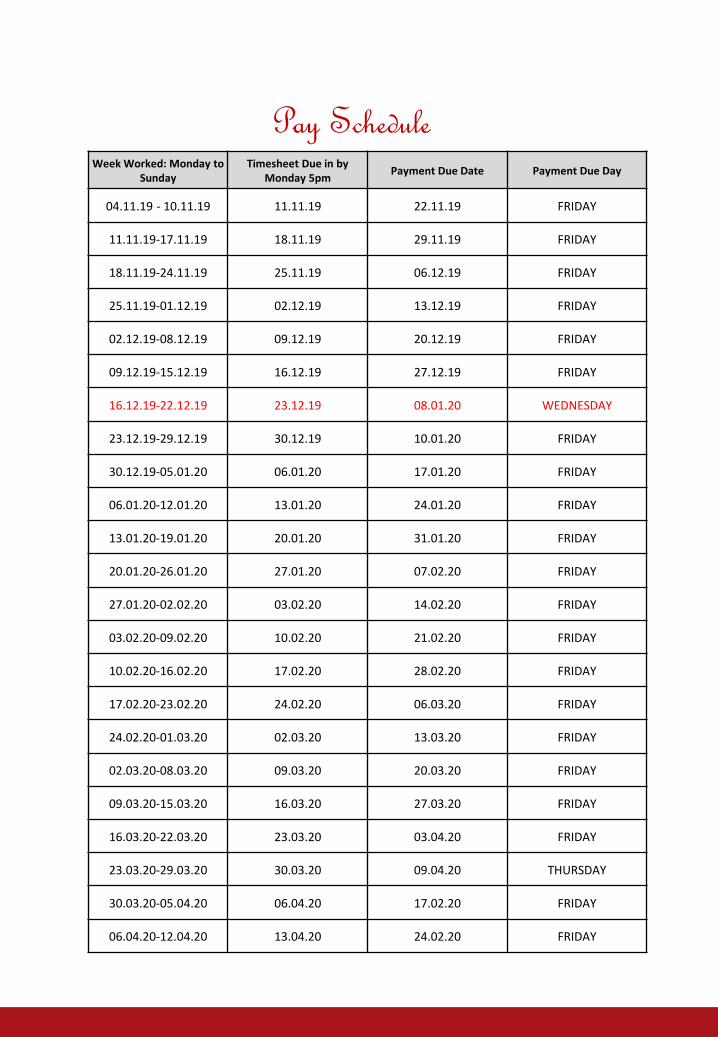
Pay ScheduleWeek Worked: Monday to
Sunday Timesheet Due in by
Monday 5pmPayment Due Date Payment Due Day
04.11.19 - 10.11.19 11.11.19 22.11.19 FRIDAY
11.11.19-17.11.19 18.11.19 29.11.19 FRIDAY
18.11.19-24.11.19 25.11.19 06.12.19 FRIDAY
25.11.19-01.12.19 02.12.19 13.12.19 FRIDAY
02.12.19-08.12.19 09.12.19 20.12.19 FRIDAY
09.12.19-15.12.19 16.12.19 27.12.19 FRIDAY
16.12.19-22.12.19 23.12.19 08.01.20 WEDNESDAY
23.12.19-29.12.19 30.12.19 10.01.20 FRIDAY
30.12.19-05.01.20 06.01.20 17.01.20 FRIDAY
06.01.20-12.01.20 13.01.20 24.01.20 FRIDAY
13.01.20-19.01.20 20.01.20 31.01.20 FRIDAY
20.01.20-26.01.20 27.01.20 07.02.20 FRIDAY
27.01.20-02.02.20 03.02.20 14.02.20 FRIDAY
03.02.20-09.02.20 10.02.20 21.02.20 FRIDAY
10.02.20-16.02.20 17.02.20 28.02.20 FRIDAY
17.02.20-23.02.20 24.02.20 06.03.20 FRIDAY
24.02.20-01.03.20 02.03.20 13.03.20 FRIDAY
02.03.20-08.03.20 09.03.20 20.03.20 FRIDAY
09.03.20-15.03.20 16.03.20 27.03.20 FRIDAY
16.03.20-22.03.20 23.03.20 03.04.20 FRIDAY
23.03.20-29.03.20 30.03.20 09.04.20 THURSDAY
30.03.20-05.04.20 06.04.20 17.02.20 FRIDAY
06.04.20-12.04.20 13.04.20 24.02.20 FRIDAY
Work Place Pensions
From October 2012 UK employers and employees got together and
started saving for retirement. Known as auto enrolment, this is a new
savings plan that both Flair Recruitment Ltd and you, will save in to.
So who will join?
The Government introduced auto enrolment as a way of encouraging
the UK working population to save towards their retirement.
Gradually, auto enrolment will be available to everybody. At present it
is available to you only if you:
Are not already in a qualifying pension scheme
Are aged 22 or over and under State Pension Age
Earn more than £192 gross in the week you are assessed
PAYE (Pay As You Earn)
Work (or usually work) in the UK
If for some reason you qualify, but choose not to join, then you can
opt out.
Who will be looking after my Pension?
Flair Recruitment LTD have chosen NOW: Pensions as the pension
provider NOW: Pensions will be in touch with more information once
you commence employment.
You can find out more about auto enrolment by visiting:
www.direct.gov.uk/workplacepension
You can find out more about NOW: Pensions by visiting:
www.nowpensions.com

£££ Earn Extra Cash £££
Refer a Friend – London
If you have a friend or know someone that is passionate
about the beauty industry and are looking to start
immediately, refer them to Flair and you could earn
yourself £10 for every successful registered consultant.
Please contact Sharon Gold for further information
Monies will be paid in your weekly salary once the candidate has successfully
registered with Flair Recruitment and worked for us for one month.
Refer a Friend

www.flaircms.co.uk
Flair Consultant CMS User Manual
Table of Contents
1. Introduction
2. Register
3. Log In
4. Welcome Menu
5. View Bookings
5.1 Attach Timesheet
5.2 Preview Timesheet
5.3 Update Timesheet
5.4 Delete Timesheet
5.5 Edit Shift Details
6. My Availability
7. Change Password
8. Sign Out
9. Support
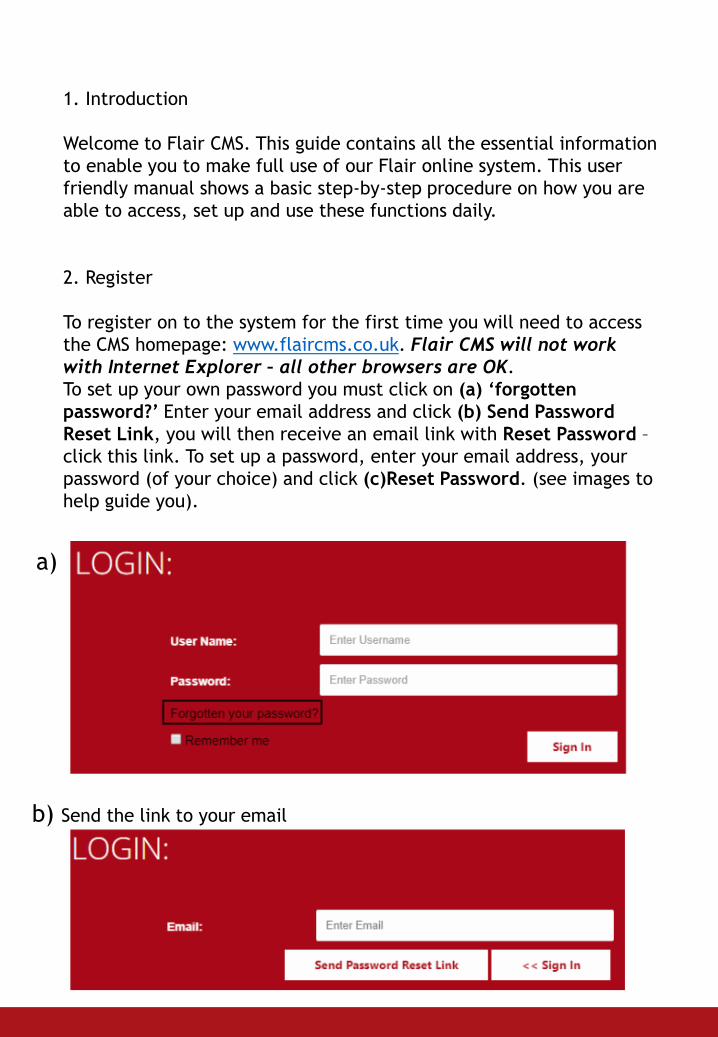
1. Introduction
Welcome to Flair CMS. This guide contains all the essential information
to enable you to make full use of our Flair online system. This user
friendly manual shows a basic step-by-step procedure on how you are
able to access, set up and use these functions daily.
2. Register
To register on to the system for the first time you will need to access
the CMS homepage: www.flaircms.co.uk. Flair CMS will not work
with Internet Explorer – all other browsers are OK.
To set up your own password you must click on (a) ‘forgotten
password?’ Enter your email address and click (b) Send Password
Reset Link, you will then receive an email link with Reset Password –
click this link. To set up a password, enter your email address, your
password (of your choice) and click (c)Reset Password. (see images to
help guide you).
a)
b) Send the link to your email
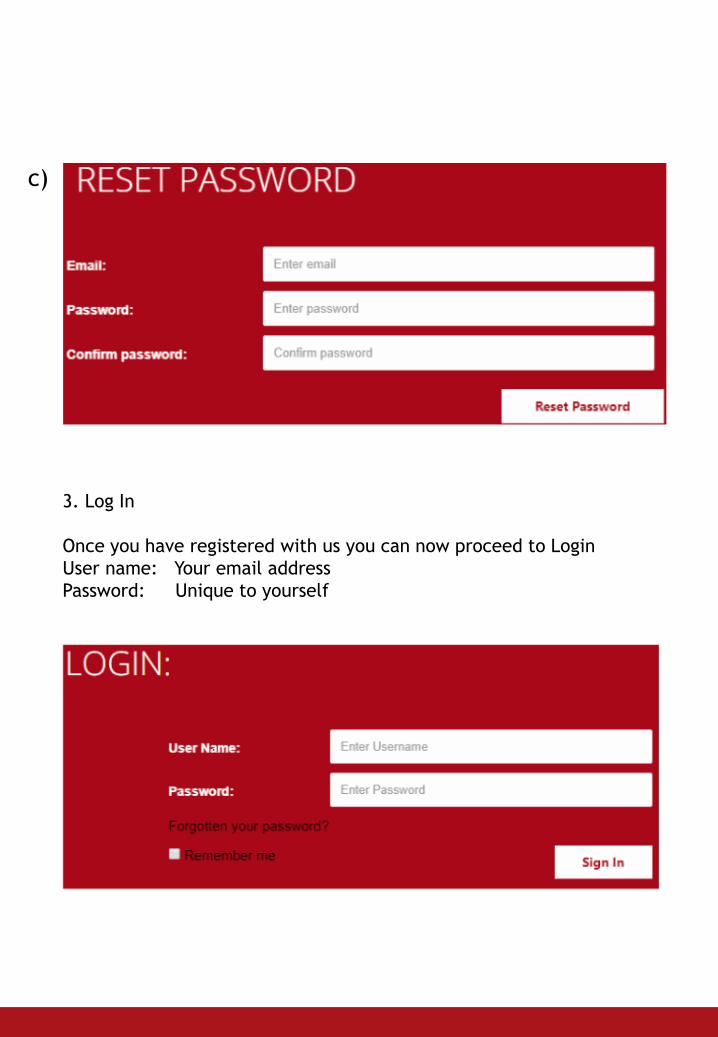
c)
3. Log In
Once you have registered with us you can now proceed to Login
User name: Your email address
Password: Unique to yourself
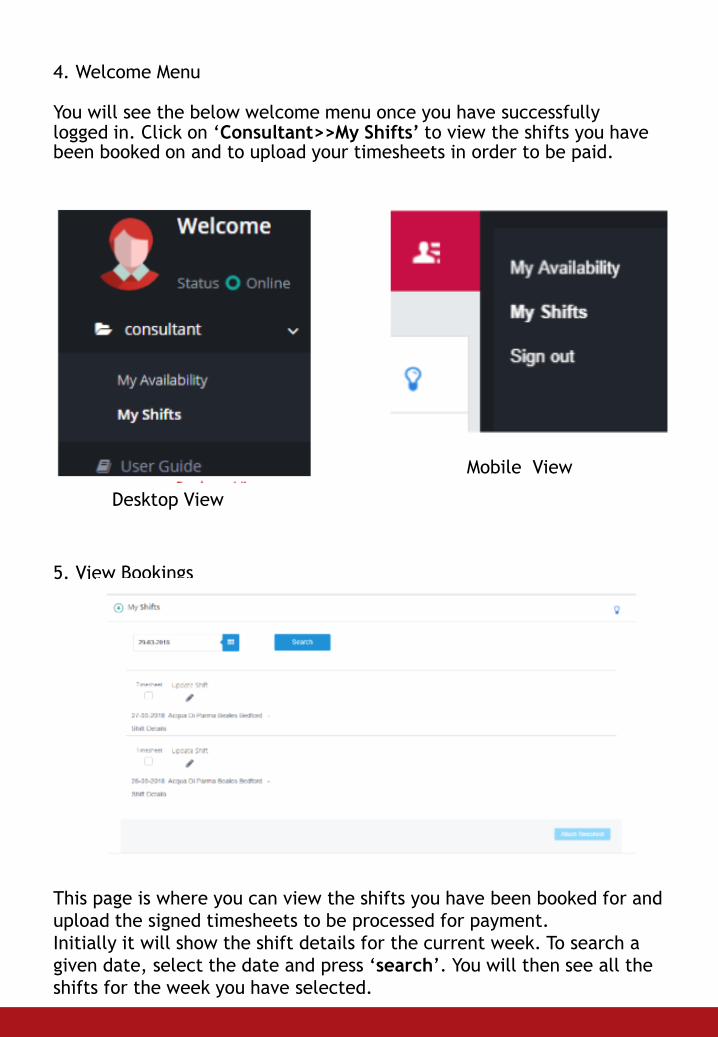
4. Welcome Menu
You will see the below welcome menu once you have successfully logged in. Click on ‘Consultant>>My Shifts’ to view the shifts you have been booked on and to upload your timesheets in order to be paid.
Desktop View
Mobile View
5. View Bookings
This page is where you can view the shifts you have been booked for and
upload the signed timesheets to be processed for payment.
Initially it will show the shift details for the current week. To search a
given date, select the date and press ‘search’. You will then see all the
shifts for the week you have selected.
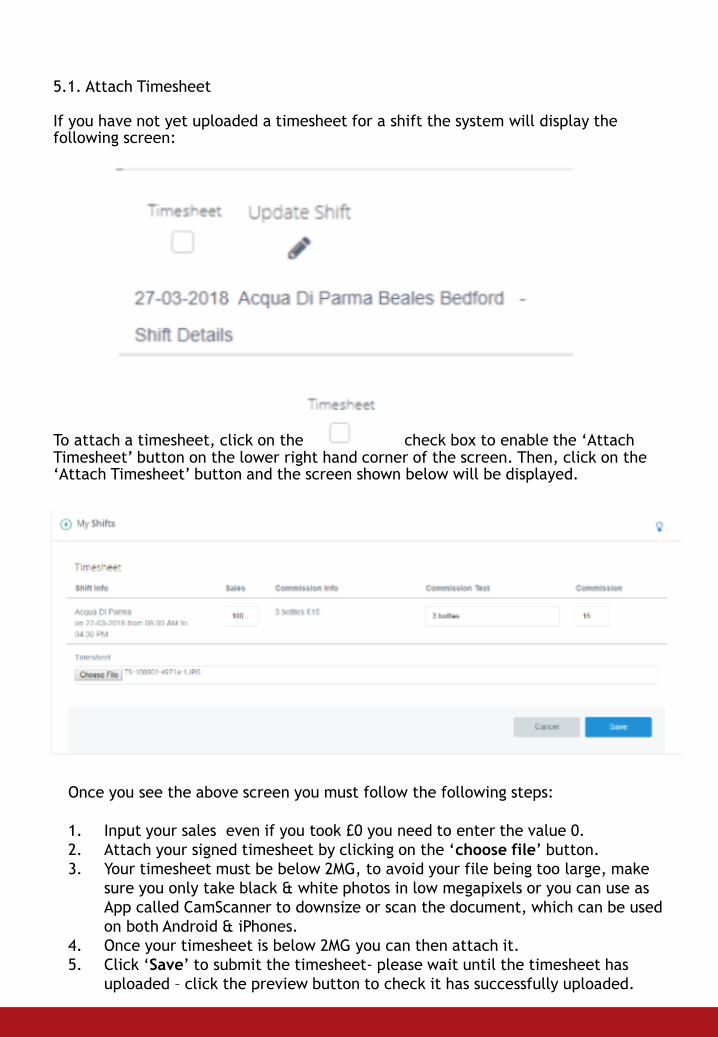
5.1. Attach Timesheet
If you have not yet uploaded a timesheet for a shift the system will display the following screen:
To attach a timesheet, click on the check box to enable the ‘Attach Timesheet’ button on the lower right hand corner of the screen. Then, click on the ‘Attach Timesheet’ button and the screen shown below will be displayed.
Once you see the above screen you must follow the following steps:
1. Input your sales even if you took £0 you need to enter the value 0.
2. Attach your signed timesheet by clicking on the ‘choose file’ button.
3. Your timesheet must be below 2MG, to avoid your file being too large, make
sure you only take black & white photos in low megapixels or you can use as
App called CamScanner to downsize or scan the document, which can be used
on both Android & iPhones.
4. Once your timesheet is below 2MG you can then attach it.
5. Click ‘Save’ to submit the timesheet- please wait until the timesheet has
uploaded – click the preview button to check it has successfully uploaded.
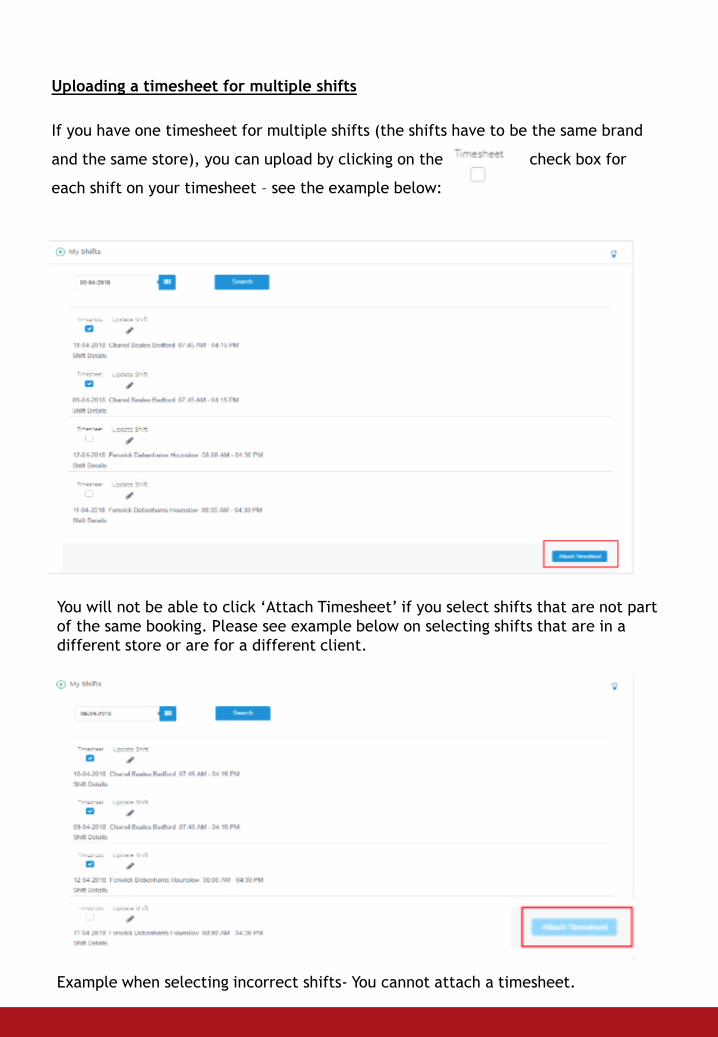
Uploading a timesheet for multiple shifts
If you have one timesheet for multiple shifts (the shifts have to be the same brand
and the same store), you can upload by clicking on the check box for
each shift on your timesheet – see the example below:
You will not be able to click ‘Attach Timesheet’ if you select shifts that are not part
of the same booking. Please see example below on selecting shifts that are in a
different store or are for a different client.
Example when selecting incorrect shifts- You cannot attach a timesheet.
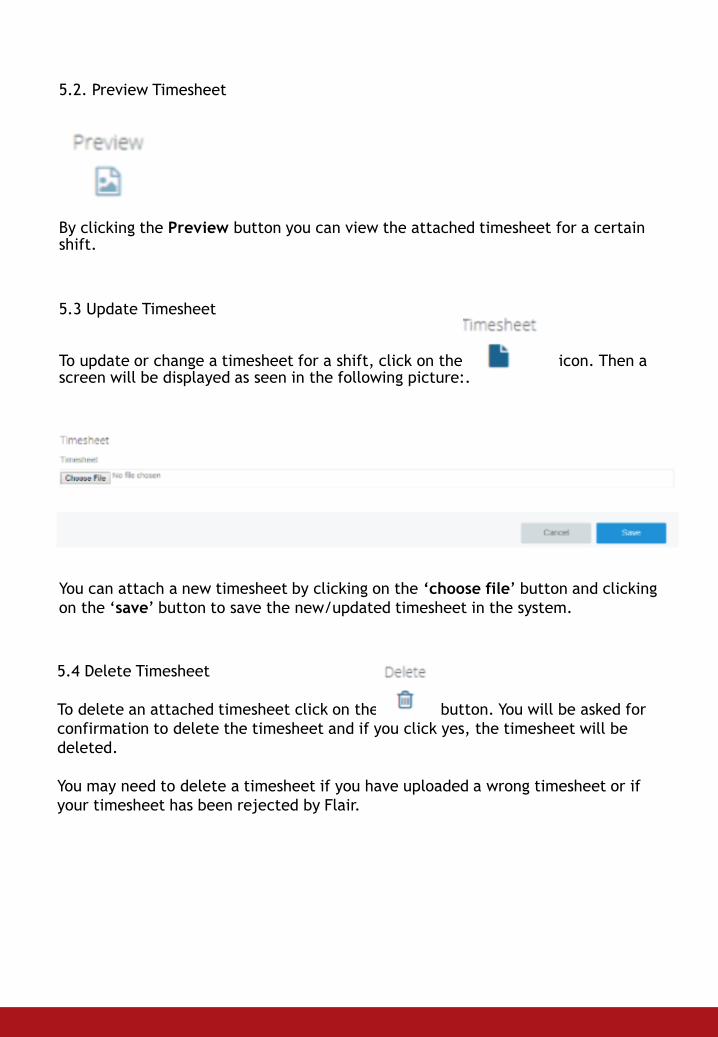
5.2. Preview Timesheet
By clicking the Preview button you can view the attached timesheet for a certain shift.
5.3 Update Timesheet
To update or change a timesheet for a shift, click on the icon. Then a screen will be displayed as seen in the following picture:.
You can attach a new timesheet by clicking on the ‘choose file’ button and clicking
on the ‘save’ button to save the new/updated timesheet in the system.
5.4 Delete Timesheet
To delete an attached timesheet click on the button. You will be asked for
confirmation to delete the timesheet and if you click yes, the timesheet will be
deleted.
You may need to delete a timesheet if you have uploaded a wrong timesheet or if
your timesheet has been rejected by Flair.
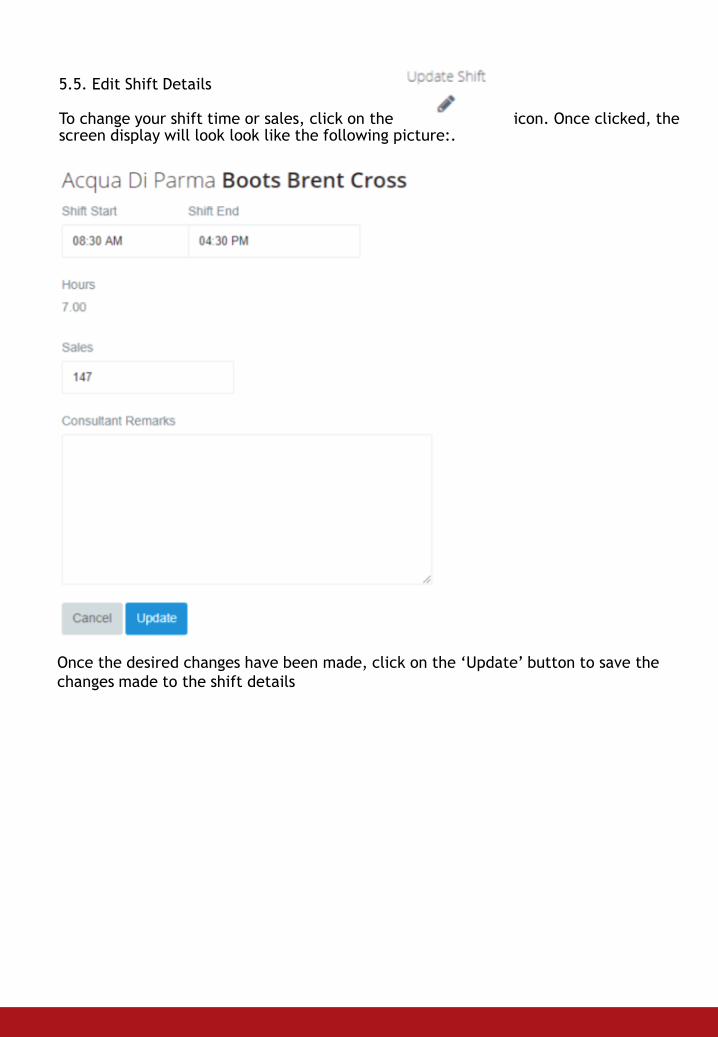
5.5. Edit Shift Details
To change your shift time or sales, click on the icon. Once clicked, the screen display will look look like the following picture:.
Once the desired changes have been made, click on the ‘Update’ button to save the
changes made to the shift details
6. My Availability
This area is being worked on, until it is finished, please call your relevant Area
Manager to give them your availability.
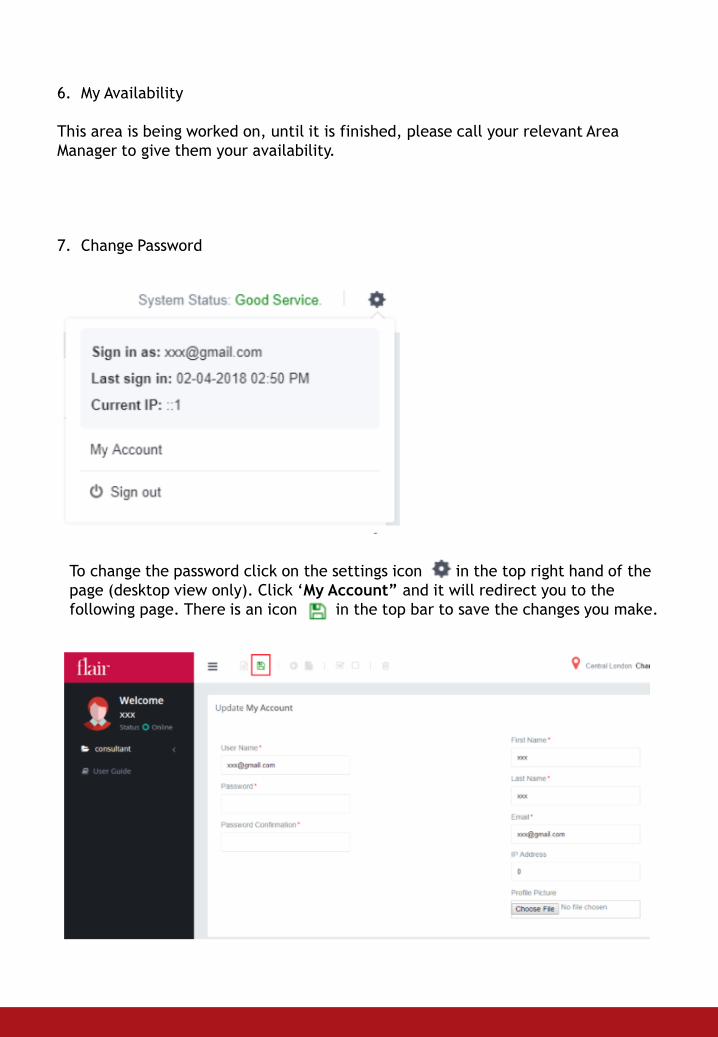
7. Change Password
To change the password click on the settings icon in the top right hand of the
page (desktop view only). Click ‘My Account” and it will redirect you to the
following page. There is an icon in the top bar to save the changes you make.

8. Sign Out
Sign out sing the following icon (setting ). Click Sign Out to log out.
9. Support
If you experience any issues accessing the system, please contact your Flair Account
manager or email our support team at [email protected]
Copyright © 2022 FDOKUMEN