WE OF DA TING C EB TE R ES S CENTR ECHNO SALAA RE ...
148
Dip UN loma in CT NIVERS CO n Com T 0510 SITY O OMPUT puting 05: WE OF DA TING C and In EB TE R ES S CENTR nforma ECHNO SALAA RE ation Te OLOGI AM echnol IES ogy
-
Upload
khangminh22 -
Category
Documents
-
view
1 -
download
0
Transcript of WE OF DA TING C EB TE R ES S CENTR ECHNO SALAA RE ...

Dip
UN
loma in
CT
NIVERS
CO
n Com
T 0510
SITY O
OMPUT
puting
05: WE
OF DA
TING C
and In
EB TE
R ES S
CENTR
nforma
ECHNO
SALAA
RE
ation Te
OLOGI
AM
echnol
IES
ogy

PAGE 2 WEB TECHNOLOGIES MANUAL
University of Dar es Salaam Computing Centre. One stop Centre for your ICT Solutions. www.ucc.co.tz. 022 2410645
© 2016 University of Dar es Salaam Computing Centre
University Road P.O Box 35062 Dar es Salaam Tanzania Tel: +255 (022) 2410645 Fax: +255 (022) 2410690 Email: [email protected] Internet: http://www.ucc.co.tz All trademarks acknowledged. E&OE.
© University of Dar es Salaam Computing Centre. No part of this document may be copied without written permission from University of Dar es Salaam Computing Centre unless produced under the terms of a courseware site license agreement with University of Dar es Salaam Computing Centre.
While all reasonable precautions have been taken in the preparation of this document, including both technical and non-technical proofing. University of Dar es Salaam Computing Centre and all staff assume no responsibility for any errors or omissions. No warranties are made, expressed or implied with regard to these notes. University of Dar es Salaam Computing Centre shall not be responsible for any direct, incidental or consequential damages arising from the use of any material contained in this document. If you find any errors in these training modules, please inform University of Dar es Salaam Computing Centre. Whilst every effort is made to eradicate typing or technical mistakes, we apologise for any errors you may detect. University of Dar es Salaam Computing Centre manuals are updated on a regular basis, so your feedback is both valued by us and will help us to maintain the highest possible standards.

PAGE 3 WEB TECHNOLOGIES MANUAL
University of Dar es Salaam Computing Centre. One stop Centre for your ICT Solutions. www.ucc.co.tz. 022 2410645
Introduction .............................................................................................................. 7
COURSE DESCRIPTION .......................................................................................................................... 7 COURSE OBJECTIVES ............................................................................................................................ 7 DELIVERY METHODOLOGY ..................................................................................................................... 7
Chapter 1: BASIC HTML .......................................................................................... 8
1.1 INTRODUCTION TO HTML ................................................................................................................. 8 1.1.1 Basic HTML Document .......................................................................................................... 8 1.1.2 HTML Document Structure .................................................................................................... 9 1.1.3 Basic HTML Tags ................................................................................................................. 10 1.1.4 HTML Text Formatting ......................................................................................................... 15 1.1.5 HTML Links .......................................................................................................................... 17 1.1.6 HTML Tables ........................................................................................................................ 18 1.1.7 HTML Lists ........................................................................................................................... 20
1.2 HTML FORMS ............................................................................................................................. 21 1.2.1 Text Input Controls ............................................................................................................... 22 1.2.2 Checkbox Control ................................................................................................................. 25 1.2.3 Radio Button Control ............................................................................................................ 25 1.2.4 Select Box Control ............................................................................................................... 26 1.2.5 File Upload Box .................................................................................................................... 27 1.2.6 Button Controls .................................................................................................................... 27 1.2.7 Hidden Form Controls .......................................................................................................... 28
1.3 HTML IMAGES .............................................................................................................................. 29 1.4 HTML BACKGROUNDS & COLORS .................................................................................................. 31
1.4.1 Html Background with Colors ............................................................................................... 32 1.4.2 Html Background with Images ............................................................................................. 33 1.4.3 HTML Colors ........................................................................................................................ 34
EXERCISES ......................................................................................................................................... 36
Chapter 2. ADVANCED HTML ............................................................................... 37
2.1 THE HTML HEADER ELEMENTS ..................................................................................................... 37 2.1.1 The HTML <title> Tag .......................................................................................................... 37 2.1.2 The HTML <meta> Tag ........................................................................................................ 37 2.1.3 The HTML <base> Tag ........................................................................................................ 38 2.1.4 The HTML <style> Tag ........................................................................................................ 38 2.1.5 The HTML <script> Tag ....................................................................................................... 39 2.1.6 The <noscript> Tag .............................................................................................................. 39
2.2. HTML FRAMES .......................................................................................................................... 40 2.2.1 Disadvantages of Frames .................................................................................................... 40 2.2.2 Creating Frames .................................................................................................................. 40 2.2.3 Frame's name and target attributes ..................................................................................... 43
2.3 HTML – IFRAMES ....................................................................................................................... 44 2.4 HTML 4.0 EVENT ATTRIBUTES ....................................................................................................... 46
2.4.1 Window Events .................................................................................................................... 46 2.4.2 Form Element Events ........................................................................................................... 46 2.4.3 Keyboard Events .................................................................................................................. 46 2.4.4 Mouse Events ...................................................................................................................... 46
EXERCISES ......................................................................................................................................... 47
Chapter 3. BASIC CSS ........................................................................................... 48
3.1 INTRODUCTION TO CSS ................................................................................................................. 48 3.1.1 Cascading Order .................................................................................................................. 48
3.2 CSS SYNTAX ................................................................................................................................ 48 3.2.1 The class Selector ................................................................................................................ 49 3.2.2 The id Selector ..................................................................................................................... 50 3.2.3 CSS Comments ................................................................................................................... 50
3.3 HOW TO INSERT A STYLE SHEET .................................................................................................... 51 3.3.1 External Style Sheet ............................................................................................................. 51 3.3.2 Internal Style Sheet .............................................................................................................. 51

PAGE 4 WEB TECHNOLOGIES MANUAL
University of Dar es Salaam Computing Centre. One stop Centre for your ICT Solutions. www.ucc.co.tz. 022 2410645
3.3.3 Inline Styles .......................................................................................................................... 52 3.3.4 Multiple Style Sheets ............................................................................................................ 52
3.4 CSS BACKGROUND ....................................................................................................................... 53 3.5 CSS TEXT .................................................................................................................................... 53
3.5.1 CSS Font Property description ............................................................................................ 53 3.5.2 CSS font-family Property description ................................................................................... 54 3.5.3 CSS font-style Property description ..................................................................................... 55
3.6 CSS LIST ...................................................................................................................................... 55 3.6.1 CSS List Properties .............................................................................................................. 55 3.6.2 CSS list-style-type Property description ............................................................................... 56
3.7 CSS TABLE PROPERTIES ................................................................................................................ 56 3.7.1 CSS border-collapse Property ............................................................................................. 56 3.7.2 CSS border-spacing Property .............................................................................................. 57 3.7.3 CSS table-layout Property ................................................................................................... 57
EXERCISES ......................................................................................................................................... 58
Chapter 4. BASIC JAVASCRIPT ............................................................................ 59
4.1 INTRODUCTION TO JAVASCRIPT ...................................................................................................... 59 4.1.1 Getting started with JavaScript ............................................................................................ 59
4.2 JAVASCRIPT DOCUMENT STRUCTURE ............................................................................................. 60 4.2.1 Where to Put the JavaScript ................................................................................................ 60 4.2.2 Using an External JavaScript ............................................................................................... 61 4.2.3 JavaScript Statements ......................................................................................................... 61
4.3 JAVASCRIPT COMMENTS ................................................................................................................ 62 4.3.1 JavaScript Multi-Line Comments ......................................................................................... 62 4.3.2 Using Comments to Prevent Execution ............................................................................... 63 4.3.3 Using Comments at the End of a Line ................................................................................. 63
4.4 JAVASCRIPT VARIABLES ................................................................................................................ 63 4.4.1 Declaring (Creating) JavaScript Variables ........................................................................... 64
4.5 JAVASCRIPT ARITHMETIC ............................................................................................................... 65 4.5.1 JavaScript Arithmetic Operators .......................................................................................... 65 4.5.2 JavaScript Assignment Operators ....................................................................................... 65
4.6 JAVASCRIPT COMPARISON AND LOGICAL OPERATORS .................................................................... 66 4.6.1 Comparison Operators ......................................................................................................... 66 4.6.1 Logical Operators ................................................................................................................. 67 4.6.2 Conditional Operator ............................................................................................................ 67
4.7 CONDITIONAL STATEMENTS ........................................................................................................... 67 4.7.1 If Statement .......................................................................................................................... 67 4.7.2 If...else Statement ................................................................................................................ 68 4.7.3 If...else if...else Statement .................................................................................................... 69 4.7.4 The JavaScript Switch Statement ........................................................................................ 70
4.8 JAVASCRIPT FUNCTIONS ................................................................................................................ 70 4.8.1 How to Define a Function ..................................................................................................... 71 4.8.2 JavaScript For Loop ............................................................................................................. 72 4.8.3 JavaScript While Loop ......................................................................................................... 73 4.8.4 The do...while Loop .............................................................................................................. 74 4.8.5 JavaScript break and continue Statements ......................................................................... 74 4.8.6 JavaScript For...In Statement .............................................................................................. 75
4.9 JAVASCRIPT EVENTS ..................................................................................................................... 76 4.9.1 onload and onUnload ........................................................................................................... 77 4.9.2 onFocus, onBlur and onChange .......................................................................................... 77 4.9.3 onSubmit .............................................................................................................................. 77 4.9.4 onMouseOver and onMouseOut .......................................................................................... 77
EXERCISES ......................................................................................................................................... 77
Chapter 5. WEB LAYOUT AND DHTML ................................................................ 79
5.1 WEB LAYOUTS ............................................................................................................................... 79 5.1.1 Web Layout - Using Tables .................................................................................................. 79 5.1.2 Multiple Columns Layout - Using Tables ............................................................................. 80 5.1.3 Web Layouts - Using DIV, SPAN ......................................................................................... 81

PAGE 5 WEB TECHNOLOGIES MANUAL
University of Dar es Salaam Computing Centre. One stop Centre for your ICT Solutions. www.ucc.co.tz. 022 2410645
5.2 INTRODUCTION TO DHTML ............................................................................................................ 82 5.3 DHTML CSS POSITIONING (CSS-P) ............................................................................................. 82
5.3.1 Position ................................................................................................................................ 83 5.3.2 Visibility ................................................................................................................................ 83 5.3.3 Filters.................................................................................................................................... 84 5.3.4 Background .......................................................................................................................... 85
5.4 DHTML DOCUMENT OBJECT MODEL .............................................................................................. 85 5.5 DHTML EVENT HANDLERS ............................................................................................................ 85 EXERCISES ......................................................................................................................................... 86
Chapter 6. BASIC PHP SCRIPTS ........................................................................... 88
6.1 BASIC PHP SYNTAX ...................................................................................................................... 88 6.2 COMMENTS IN PHP ....................................................................................................................... 88 6.3 VARIABLES IN PHP ........................................................................................................................ 89
6.3.1 Variable Naming Rules ........................................................................................................ 89 6.4 STRINGS IN PHP ........................................................................................................................... 89
6.4.1 The Concatenation Operator ............................................................................................... 90 6.4.2 Using the strlen() function .................................................................................................... 90 6.4.3 Using the strpos() function ................................................................................................... 91
6.5 PHP OPERATORS .......................................................................................................................... 91 6.6 CONDITIONAL STATEMENTS ........................................................................................................... 92
6.6.1 The If...Else Statement ......................................................................................................... 92 6.6.2 The ElseIf Statement ............................................................................................................ 93 6.6.3 The Switch Statement .......................................................................................................... 93
6.7 ARRAY .......................................................................................................................................... 94 6.7.1 Numeric Arrays .................................................................................................................... 95 6.7.2 Associative Arrays ................................................................................................................ 95 6.7.3 Multidimensional Arrays ....................................................................................................... 96
6.8 LOOPING ....................................................................................................................................... 97 6.8.1 The while Statement ............................................................................................................ 97 6.8.2 The do...while Statement ..................................................................................................... 97 6.8.3 The for Statement ................................................................................................................ 98 6.8.4 The foreach Statement......................................................................................................... 99
6.9 PHP FUNCTIONS ........................................................................................................................... 99 6.9.1 Create a PHP Function ........................................................................................................ 99 6.9.2 Use a PHP Function ........................................................................................................... 100 6.9.3 PHP Functions - Adding parameters ................................................................................. 100
Chapter 7. DEVELOPING INTERACTIVE LAYERS WITH MACROMEDIA ......... 102
6.1 UNDERSTANDING LAYERS ............................................................................................................ 102 6.2 WORKING WITH LAYERS IN FLASH 8 .............................................................................................. 103 6.3 WORKING WITH ADVANCED LAYERS OPTIONS ............................................................................... 103 6.4 REORGANIZING THE LAYERS WITH FLASH 8 ................................................................................... 105 6.5 LAYER TYPES .............................................................................................................................. 105 6.6 CREATING FLASH ANIMATION WITH FLASH 8 .................................................................................. 107
6.6.1 Making the Animation ......................................................................................................... 107 6.7 CREATING ROLLOVER IMAGES WITH DREAMWEAVER ...................................................................... 107
Chapter 8: DRUPAL CORE BASICS .................................................................... 111
8.1 DRUPAL INSTALLATION ................................................................................................................. 111 8.1.1 Technical requirements for installing Drupal ...................................................................... 111 8.1.2 Download the Drupal codebase ......................................................................................... 111 8.1.3 Installation through the web interface ................................................................................ 112
8.2 NODES ........................................................................................................................................ 118 8.2.1 Creating nodes ................................................................................................................... 118 8.2.2 Editing nodes and managing revisions .............................................................................. 121 8.2.3 Other node settings ............................................................................................................ 123 8.2.4 View modes for nodes ........................................................................................................ 123 8.2.5 Node types and node administration ................................................................................. 123

PAGE 6 WEB TECHNOLOGIES MANUAL
University of Dar es Salaam Computing Centre. One stop Centre for your ICT Solutions. www.ucc.co.tz. 022 2410645
8.2.6 Node comments ................................................................................................................. 126 8.3 USERS AND PERMISSIONS ............................................................................................................ 129
8.3.1 Adding and managing users .............................................................................................. 129 8.3.2 Permissions and roles ........................................................................................................ 132 8.3.3 Other user account settings ............................................................................................... 135
8.4 REGIONS AND BLOCKS ................................................................................................................. 136 8.4.1 Block settings ..................................................................................................................... 140 8.4.2 Adding blocks ..................................................................................................................... 141 8.4.3 Complements and alternatives to blocks ........................................................................... 142
8.5 MENUS ........................................................................................................................................ 142 8.5.1 Displaying menus ............................................................................................................... 142 8.5.2 Creating and editing menu links ......................................................................................... 143 8.5.3 Creating menu links for nodes ........................................................................................... 145
8.6 OTHER BASIC DRUPAL CORE SETTINGS ......................................................................................... 145 8.6.1 Administration aids ............................................................................................................. 145 8.6.2 Text formats ....................................................................................................................... 146 8.6.3 Other settings ..................................................................................................................... 146
References ............................................................................................................ 148

PAGE 7 WEB TECHNOLOGIES MANUAL
University of Dar es Salaam Computing Centre. One stop Centre for your ICT Solutions. www.ucc.co.tz. 022 2410645
Introduction
Course Description The course introduces students to the concepts and techniques of designing and constructing web pages. It will teach students about basic standards that apply, explore design issues and examine client –side and server- side scripting technologies.
Course Objectives At the end of the course students should be able to:
1. Understand the fundamental of the World Wide Web, HTML and web browsers
2. Understand the structure of web documents from a technical perspective
3. Design and construct web pages using techniques such as Cascading Style Sheets (CSS), JavaScript, PHP and DHTML
4. Describe the concepts applied in designing dynamic websites
5. Design dynamic websites using the Concept of DHTML and PHP scripts
6. Design and Manage websites using various HTML editors
Delivery Methodology The course will be delivered in form of lecturers, Tutorials in the classroom and in the Computer lab accordingly. Exercise with real life nature will be provided during and at the end of the class. The manual is also designed such that one can follow the course at own time and pace.

PAGE 8 WEB TECHNOLOGIES MANUAL
University of Dar es Salaam Computing Centre. One stop Centre for your ICT Solutions. www.ucc.co.tz. 022 2410645
Chapter 1: BASIC HTML
1.1 Introduction to HTML Hyper Text Mark-up Language (HTML) is a vital component in the world of Web page designing and development. The HTML language specifies how a web page should be displayed in a browser. HTML stands for Hypertext Markup Language, and it is the most widely used language to write Web Pages. Hypertext refers to the way in which Web pages (HTML documents) are linked together. Thus, the link available on a webpage is called Hypertext. As its name suggests, HTML is a Markup Language which means you use HTML to simply "mark-up" a text document with tags that tell a Web browser how to structure it to display. Using HTML tags and elements, you can:
Control the appearance of the page and the content Publish online documents and retrieve online information using the links inserted in
the HTML document Create online forms, which can be used to collect information about the user, conduct
transactions and so on Insert objects like audio clips, video clips.
The HTML document forms the source code of a web page. When viewed in the editor, the document is a series of tags and elements that specify how the page is to be displayed. The browser reads the .htm/ .html file and displays the page according to the specified instructions. The HTML document is displayed in a browser. What is a browser? A browser is an application that reads the HTML source code and displays the page as instructed. To create the source document, an HTML editor is required. Example of HTML editor is Microsoft FrontPage (is a tool that can be used to create, design and edit Web pages. We can also add text, images, tables and other HTML elements to the page. We can also use Notepad to create the HTML document. In order to view the document in a browser you have to save the document with a .htm /.html extension.HTML commands are called Tags. Tags are used to control the content and appearance of the HTML document. The opening tag is a <>,the closing tag is represented as </>. HTML tags are not case sensitive. For example, the following HTML syntax will display the message" my first HTML document” <html> <head> <title>welcome to HTML</title></head> <body><h2>my first HTML document</h2></body> </html>
1.1.1 Basic HTML Document
In its simplest form, following is an example of an HTML document:

PAGE 9
<!DOCT<html> <head><title>T</head><body><h1>Th<p>Doc</body></html>
If you atest.htmFirefox
As menthe conmost oftag</ht Above eTag <!DOCT<html>
<head>
<title>
<body>
<h1> <p>
1.1.2 H A typica
9 WEB TE
University o
TYPE html>
> This is docu>
> his is a headcument con>
>
are runningml. Finally etc. It must
ntioned earlntent. Thesef the tags hml> and <b
example of
TYPE...>
>
>
HTML Do
al HTML do
CHNOLOG
of Dar es Salaam
>
ment title</
ding</h1> tent goes h
g Windowsopen it usint show the f
ier, HTML ie tags are ave their co
body> tag h
HTML docuDescThis tThis comp<head<bodyThis tHTMLThe <documThis ttags lThis tThis t
cument S
ocument will
GIES MANU
m Computing C
title>
here.....</p>
, start Noteng a web bfollowing ou
is a markupenclosed worrespondinhas its closi
ument usesription tag defines tag enclos
prises of d>...</heady>...</body>tag represeL tags like <<title> tag isment title. tag represeike <h1>, <tag represetag represe
Structure
l have the fo
UAL
Centre. One st022 2410645
>
epad, type browser likeutput:
p language within angleng closing tang tag </bo
s the followi
the documeses the cdocument
> and doc> tags. nts the doc
<title>, <links used insid
nts the doc<div>, <p> ents the heants a parag
e
ollowing str
top Centre for y
the text ae Internet E
and makese braces <Tags. For ex
ody> tag etc
ng tags:
ent type andomplete H
header cument bo
ument's heak> etc. e the <head
ument's bodetc. ding.
graph.
ructure:
your ICT Soluti
bove, savexplorer or G
s use of varTag Name>xample, <htc.
d HTML verHTML docu
which is dy which
ader which
d> tag to m
dy which ke
tions. www.uc
e it as testGoogle Chr
rious tags to>. Except fetml> has its
rsion. ument and
represenis represe
can keep o
ention the
eeps other H
c.co.tz.
.htm or rome, or
o format ew tags, s closing
mainly ted by nted by
other
HTML

PAGE 10 WEB TECHNOLOGIES MANUAL
University of Dar es Salaam Computing Centre. One stop Centre for your ICT Solutions. www.ucc.co.tz. 022 2410645
We have just said that HTML tags are not case sensitive: <B> means the same as <b>. If you want to follow the latest web standards, you should always use lowercase tags. The World Wide Web Consortium (W3C) recommends lowercase tags in their HTML 4 recommendation, and XHTML (the next generation HTML) demands lowercase tags An HTML document has three basic structures as shown below:
The HTML section: Every HTML document must begin with an opening HTML tag and end with a closing HTML tag <HTML>……</HTML>.The HTML tags tells the browser that the content between these two tags is an HTML document.
The Header Section: The Header section begins with a <HEAD> tag and is closed with a </HEAD> tag. This section contains the title that is displayed in the navigation bar of the web page. The title itself is enclosed within the TITLE tag, which begins with a <TITLE>tag and is closed with a </TITLE>
The BODY section: This comes after the HEAD section. The BODY section contains the text, images, link that you want to display in your Web page. The BODY section begins with a <BODY> tag and ends with a </BODY>.
1.1.3 Basic HTML Tags The most important tags in HTML are tags that define headings, paragraphs and line breaks Heading Tags
Any document starts with a heading. You can use different sizes for your headings. HTML has six levels of headings, which use the elements <h1>, <h2>, <h3>, <h4>, <h5>, and <h6>. While displaying any heading, browser adds one line before and one line after that heading. Example <!DOCTYPE html> <html> <head> <title>Heading Example</title> </head> <body> <h1>This is heading 1</h1> <h2>This is heading 2</h2> <h3>This is heading 3</h3> </body> </html>
Document declaration tag
<html> <head> Document header related tags </head> <body> Document body related tags </body> </html>

PAGE 1
This wil
Paragra
The <ptext shoexampl Examp<!DOCT<html> <head><title>P</head><body><p>Her<p>Her<p>Her</body></html> This wiHere is aHere is aHere is a
Line Br
Whenevis an exthere isThe <brspace, forwardExamp <!DOCT<html> <head><title>L</head><body><p>HelYou delThanksMahnaz</body></html>
11 WEB TE
University o
ll produce th
aph Tag
> tag offersould go in e:
ple TYPE html>
> Paragraph E>
> re is a first pre is a secore is a third >
>
ill producea first paragra second paa third parag
reak Tag
ver you usexample of a
s nothing to r /> tag hasolder brow
d slash charple
TYPE html>
> Line Break E>
> lo<br /> livered your
s<br /> z</p> >
>
ECHNOLO
of Dar es Salaam
he following
s a way to sbetween an
>
Example</tit
paragraph ond paragraparagraph
the followraph of text. ragraph of te
graph of text.
e the <br />an empty ego in betwe
s a space bewsers will hracter and ju
>
Example</ti
r assignmen
GIES MAN
m Computing C
g result
structure yon opening <
tle>
of text.</p> ph of text.<of text.</p>
wing result:
ext.
element, aelement, wheen them. etween the have troublust use <br>
tle>
nt on time.<
UAL
Centre. One st022 2410645
our text into<p> and a
</p> >
anything follhere you do
characterse rendering> it is not va
<br />
top Centre for y
o different pclosing </p
owing it stao not need
br and theg the line alid in XHTM
your ICT Soluti
aragraphs. p> tag as s
arts from theopening an
forward slabreak, whiML.
tions. www.uc
Each paragshown below
e next line. nd closing
ash. If you ole if you m
c.co.tz.
graph of w in the
This tag tags, as
omit this miss the

PAGE 12 WEB TECHNOLOGIES MANUAL
University of Dar es Salaam Computing Centre. One stop Centre for your ICT Solutions. www.ucc.co.tz. 022 2410645
This will produce the following result: Hello You delivered your assignment on time. Thanks Mahnaz
Horizontal Lines
Horizontal lines are used to visually break-up sections of a document. The <hr> tag creates a line from the current position in the document to the right margin and breaks the line accordingly. For example, you may want to give a line between two paragraphs as in the given example below: <!DOCTYPE html> <html> <head> <title>Horizontal Line Example</title> </head> <body> <p>This is paragraph one and should be on top</p> <hr /> <p>This is paragraph two and should be at bottom</p> </body> </html> This will produce the following result: This is paragraph one and should be on top This is paragraph two and should be at bottom Again <hr /> tag is an example of the empty element, where you do not need opening and closing tags, as there is nothing to go in between them. The <hr /> element has a space between the characters hr and the forward slash. If you omit this space, older browsers will have trouble rendering the horizontal line, while if you miss the forward slash character and just use <hr> it is not valid in XHTML Preserve Formatting
Sometimes, you want your text to follow the exact format of how it is written in the HTML document. In these cases, you can use the preformatted tag <pre>. Any text between the opening <pre> tag and the closing </pre> tag will preserve the formatting of the source document. Example <!DOCTYPE html> <html> <head> <title>Preserve Formatting Example</title> </head> <body> <pre>

PAGE 13 WEB TECHNOLOGIES MANUAL
University of Dar es Salaam Computing Centre. One stop Centre for your ICT Solutions. www.ucc.co.tz. 022 2410645
function testFunction( strText ){ alert (strText) } </pre> </body> </html> This will produce the following result: function testFunction( strText ){ alert (strText) } Try using the same code without keeping it inside <pre>...</pre> tags
Comments in HTML
The comment tag is used to insert a comment in the HTML source code. A comment will be ignored by the browser. You can use comments to explain your code, which can help you when you edit the sou-rce code at a later date. <!-- This is a comment -->
Note that you need an exclamation point after the opening bracket, but not before the closing bracket HTML ELEMENTS
An HTML element is defined by a starting tag. If the element contains other content, it ends with a closing tag, where the element name is preceded by a forward slash as shown below with few tags:
Start Tag Content End Tag <p> This is paragraph content. </p> <h1> This is heading content. </h1> <div> This is division content. </div> <br />
So here <p>....</p> is an HTML element, <h1>...</h1> is another HTML element. There are some HTML elements which don't need to be closed, such as <img.../>, <hr /> and <br /> elements. These are known as void elements.
HTML documents consist of a tree of these elements and they specify how HTML documents should be built, and what kind of content should be placed in what part of an HTML document.
HTML Tag vs. Element
An HTML element is defined by a starting tag. If the element contains other content, it ends with a closing tag. For example, <p> is starting tag of a paragraph and </p> is closing tag of the same paragraph but <p>This is paragraph</p> is a paragraph element. Nested HTML Elements
It is very much allowed to keep one HTML element inside another HTML element:

PAGE 14 WEB TECHNOLOGIES MANUAL
University of Dar es Salaam Computing Centre. One stop Centre for your ICT Solutions. www.ucc.co.tz. 022 2410645
Example <!DOCTYPE html> <html> <head> <title>Nested Elements Example</title> </head> <body> <h1>This is <i>italic</i> heading</h1> <p>This is <u>underlined</u> paragraph</p> </body> </html> This will display the following result:
This is italic heading This is underlined paragraph HTML ATTRIBUTES
We have seen few HTML tags and their usage like heading tags <h1>, <h2>, paragraph tag <p> and other tags. We used them so far in their simplest form, but most of the HTML tags can also have attributes, which are extra bits of information.
An attribute is used to define the characteristics of an HTML element and is placed inside the element's opening tag. All attributes are made up of two parts: a name and a value:
The name is the property you want to set. For example, the paragraph <p> element in the example carries an attribute whose name is align, which you can use to indicate the alignment of paragraph on the page.
The value is what you want the value of the property to be set and always put within quotations. The below example shows three possible values of align attribute: left, center and right.
Attribute names and attribute values are case-insensitive. However, the World Wide Web Consortium (W3C) recommends lowercase attributes/attribute values in their HTML 4 recommendation. Example
<!DOCTYPE html> <html> <head> <title>Align Attribute Example</title> </head> <body> <p align="left">This is left aligned</p> <p align="center">This is center aligned</p> <p align="right">This is right aligned</p> </body> </html> This will display the following result: This is left aligned This is center aligned This is right aligned

PAGE 15 WEB TECHNOLOGIES MANUAL
University of Dar es Salaam Computing Centre. One stop Centre for your ICT Solutions. www.ucc.co.tz. 022 2410645
<h1> defines the start of a heading. <h1 align="center"> has additional information about the alignment. <body> defines the body of an HTML document. <body bgcolor="yellow"> has additional information about the background color. Attribute values should always be enclosed in quotes. Double style quotes are the most common, but single style quotes are also allowed. In some rare situations, like when the attribute value itself contains quotes, it is necessary to use single quotes: name='John "ShotGun" Nelson'
1.1.4 HTML Text Formatting
HTML defines a lot of elements for formatting output, like bold or italic text.
Text Formatting Tags
Tag Description <b> Defines bold text
<big> Defines big text
<em> Defines emphasized text
<i> Defines italic text
<small> Defines small text
<strong> Defines strong text
<sub> Defines subscripted text
<sup> Defines superscripted text
<ins> Defines inserted text
<del> Defines deleted text
<s> Deprecated. Use <del> instead
<strike> Deprecated. Use <del> instead
<u> Deprecated. Use styles instead
"Computer Output" Tags
Tag Description
<code> Defines computer code text
<kbd> Defines keyboard text
<samp> Defines sample computer code
<tt> Defines teletype text
<var> Defines a variable
<pre> Defines preformatted text
<listing> Deprecated. Use <pre> instead
<plaintext> Deprecated. Use <pre> instead
<xmp> Deprecated. Use <pre> instead
Citations, Quotations, and Definition Tags
Tag Description <abbr> Defines an abbreviation
<acronym> Defines an acronym
<address> Defines an address element

PAGE 16 WEB TECHNOLOGIES MANUAL
University of Dar es Salaam Computing Centre. One stop Centre for your ICT Solutions. www.ucc.co.tz. 022 2410645
<bdo> Defines the text direction
<blockquote> Defines a long quotation
<q> Defines a short quotation
<cite> Defines a citation
<dfn> Defines a definition term
How to View HTML Source
A web is made up of source code. To find out, click the VIEW option in your browser's toolbar and select SOURCE or PAGE SOURCE. This will open a window that shows you the HTML code of the page.
Character Entities
Some characters have a special meaning in HTML, like the less than sign (<) that defines the start of an HTML tag. If we want the browser to actually display these characters we must insert character entities in the HTML source.
A character entity has three parts: an ampersand (&), an entity name or a # and an entity number, and finally a semicolon (;).
To display a less than sign in an HTML document we must write: < or <
The advantage of using a name instead of a number is that a name is easier to remember. The disadvantage is that not all browsers support the newest entity names, while the support for entity numbers is very good in almost all browsers. Note that the entities are case sensitive.
Non-breaking Space
The most common character entity in HTML is the non-breaking space. Normally HTML will truncate spaces in your text. If you write 10 spaces in your text HTML will remove 9 of them. To add spaces to your text, use the character entity.
The Most Common Character Entities:
Result Description Entity Name Entity Number non-breaking space  
< less than < <
> greater than > >
& ampersand & &
" quotation mark " "
' apostrophe ' (does not work in IE) '
Some Other Commonly Used Character Entities:
Result Description Entity Name Entity Number
¢ cent ¢ ¢
£ pound £ £
¥ yen ¥ ¥
€ euro € €
§ section § §
© copyright © ©
® registered trademark ® ®
× multiplication × ×
÷ division ÷ ÷

PAGE 17 WEB TECHNOLOGIES MANUAL
University of Dar es Salaam Computing Centre. One stop Centre for your ICT Solutions. www.ucc.co.tz. 022 2410645
1.1.5 HTML Links The main power of HTML is the ability to support hyperlinks. A hyperlink, or a link for short, is a connection to another document or file (graphic,audio,video )or even to another section of the same document. We can provide links to:
A specific section of the same document Another document Other files-image,audio, Another location or server
To create a hyperlink, we need to specify two components 1. The full address or URL of the file to be linked 2. The hotspot that will provide the link. The hotspot may be a line of text or even an
image
HTML uses the <a> (anchor) tag to create a link to another document.
An anchor can point to any resource on the Web: an HTML page, an image, a sound file, a movie, etc.
The syntax of creating an anchor:
<a href="url">Text to be displayed</a>
The <a> tag is used to create an anchor to link from, the href attribute is used to address the document to link to, and the words between the open and close of the anchor tag will be displayed as a hyperlink.
This anchor defines a link to University Computing Centre:
<a href="http://www.ucc.co.tz/">Visit University Computing Centre!</a>
The Target Attribute
With the target attribute, you can define where the linked document will be opened. The line below will open the document in a new browser window: <a href="http://www. ucc.co.tz/" target="_blank"> Visit University Computing Centre!</a>
The Anchor Tag and the Name Attribute
The name attribute is used to create a named anchor. When using named anchors we can create links that can jump directly into a specific section on a page, instead of letting the user scroll around to find what he/she is looking for. Below is the syntax of a named anchor: <a name="label">Text to be displayed</a>
The name attribute is used to create a named anchor. The name of the anchor can be any text you care to use. The line below defines a named anchor: <a name="tips">Useful Tips Section</a>
You should notice that a named anchor is not displayed in a special way.

PAGE 18 WEB TECHNOLOGIES MANUAL
University of Dar es Salaam Computing Centre. One stop Centre for your ICT Solutions. www.ucc.co.tz. 022 2410645
To link directly to the "tips" section, add a # sign and the name of the anchor to the end of a URL, like this: <a href="http://www. ucc.co.tz/html_links.asp#tips"> Jump to the Useful Tips Section</a>
A hyperlink to the Useful Tips Section from WITHIN the file "html_links.asp" will look like this: <a href="#tips">Jump to the Useful Tips Section</a>
Creating an e-mail Link
If you want users to send an email, you can include a feature within the web page that allows them to send the email from browser. All you have to do is insert the mailto value in the link tag. <a href=“mailto:[email protected]”>
1.1.6 HTML Tables
With HTML you can create tables.
Tables
Tables are defined with the <table> tag. A table is divided into rows (with the <tr> tag), and each row is divided into data cells (with the <td> tag). The letters td stands for "table data," which is the content of a data cell. A data cell can contain text, images, lists, paragraphs, forms, horizontal rules, tables, etc. <table border="1"> <tr> <td>row 1, cell 1</td> <td>row 1, cell 2</td> </tr> <tr> <td>row 2, cell 1</td> <td>row 2, cell 2</td> </tr> </table>
How it looks in a browser:
row 1, cell 1 row 1, cell 2
row 2, cell 1 row 2, cell 2
Tables and the Border Attribute
If you do not specify a border attribute the table will be displayed without any borders. Sometimes this can be useful, but most of the time, you want the borders to show. To display a table with borders, you will have to use the border attribute: <table border="1"> <tr> <td>Row 1, cell 1</td>

PAGE 19 WEB TECHNOLOGIES MANUAL
University of Dar es Salaam Computing Centre. One stop Centre for your ICT Solutions. www.ucc.co.tz. 022 2410645
<td>Row 1, cell 2</td> </tr> </table>
Headings in a Table
Headings in a table are defined with the <th> tag. <table border="1"> <tr> <th>Heading</th> <th>Another Heading</th> </tr> <tr> <td>row 1, cell 1</td> <td>row 1, cell 2</td> </tr> <tr> <td>row 2, cell 1</td> <td>row 2, cell 2</td> </tr> </table>
How it looks in a browser:
Heading Another Heading
row 1, cell 1 row 1, cell 2
row 2, cell 1 row 2, cell 2
Empty Cells in a Table
Table cells with no content are not displayed very well in most browsers. <table border="1"> <tr> <td>row 1, cell 1</td> <td>row 1, cell 2</td> </tr> <tr> <td>row 2, cell 1</td> <td></td> </tr> </table>
How it looks in a browser:
row 1, cell 1 row 1, cell 2
row 2, cell 1
Note that the borders around the empty table cell are missing (NB! Mozilla Firefox displays the border). To avoid this, add a non-breaking space ( ) to empty data cells, to make the borders visible: <table border="1">

PAGE 20 WEB TECHNOLOGIES MANUAL
University of Dar es Salaam Computing Centre. One stop Centre for your ICT Solutions. www.ucc.co.tz. 022 2410645
<tr> <td>row 1, cell 1</td> <td>row 1, cell 2</td> </tr> <tr> <td>row 2, cell 1</td> <td> </td> </tr> </table>
How it looks in a browser:
row 1, cell 1 row 1, cell 2
row 2, cell 1
Table Tags
Tag Description
<table> Defines a table
<th> Defines a table header
<tr> Defines a table row
<td> Defines a table cell
<caption> Defines a table caption
<colgroup> Defines groups of table columns
<col> Defines the attribute values for one or more columns in a table
<thead> Defines a table head
<tbody> Defines a table body
<tfoot> Defines a table footer
1.1.7 HTML Lists
Lists are used to group data logically. They can be added to the html document to group related information together. HTML supports ordered, unordered and definition lists.
Unordered Lists
An unordered list is a list of items. The list items are marked with bullets (typically small black circles). An unordered list starts with the <ul> tag. Each list item starts with the <li> tag. <ul> <li>Coffee</li> <li>Milk</li> </ul>
Here is how it looks in a browser:
Coffee Milk
Inside a list item you can put paragraphs, line breaks, images, links, other lists, etc.
Ordered Lists
An ordered list is also a list of items. The list items are marked with numbers.

PAGE 21 WEB TECHNOLOGIES MANUAL
University of Dar es Salaam Computing Centre. One stop Centre for your ICT Solutions. www.ucc.co.tz. 022 2410645
An ordered list starts with the <ol> tag. Each list item starts with the <li> tag. <ol> <li>Coffee</li> <li>Milk</li> </ol>
Here is how it looks in a browser:
1. Coffee 2. Milk
Inside a list item you can put paragraphs, line breaks, images, links, other lists, etc.
Definition Lists
A definition list is not a list of items. This is a list of terms and explanation of the terms. A definition list starts with the <dl> tag. Each definition-list term starts with the <dt> tag. Each definition-list definition starts with the <dd> tag. <dl> <dt>Coffee</dt> <dd>Black hot drink</dd> <dt>Milk</dt> <dd>White cold drink</dd> </dl>
Here is how it looks in a browser: Coffee
Black hot drink Milk
White cold drink
Inside a definition-list definition (the <dd> tag) you can put paragraphs, line breaks, images, links, other lists, etc.
1.2 HTML FORMS A form is a section of an HTML document that contains special elements called as controls.
Controls are used to accept input from the user and provide some interaction.The data that is entered by the user can be validated by the client-side scripts and then submitted to the server for further processing.
Uses of forms are collecting names, addresses, telephone numbers, e-mail address and other information to register users for a service or event; gathering information for the purchase of an item; collecting feedback about a Web site and providing a search tool for the web site.
A form will take input from the site visitor and then will post it to a back-end application such as CGI, ASP Script or PHP script etc. The back-end application will perform required processing on the passed data based on defined business logic inside the application.
PAGE 22 WEB TECHNOLOGIES MANUAL
University of Dar es Salaam Computing Centre. One stop Centre for your ICT Solutions. www.ucc.co.tz. 022 2410645
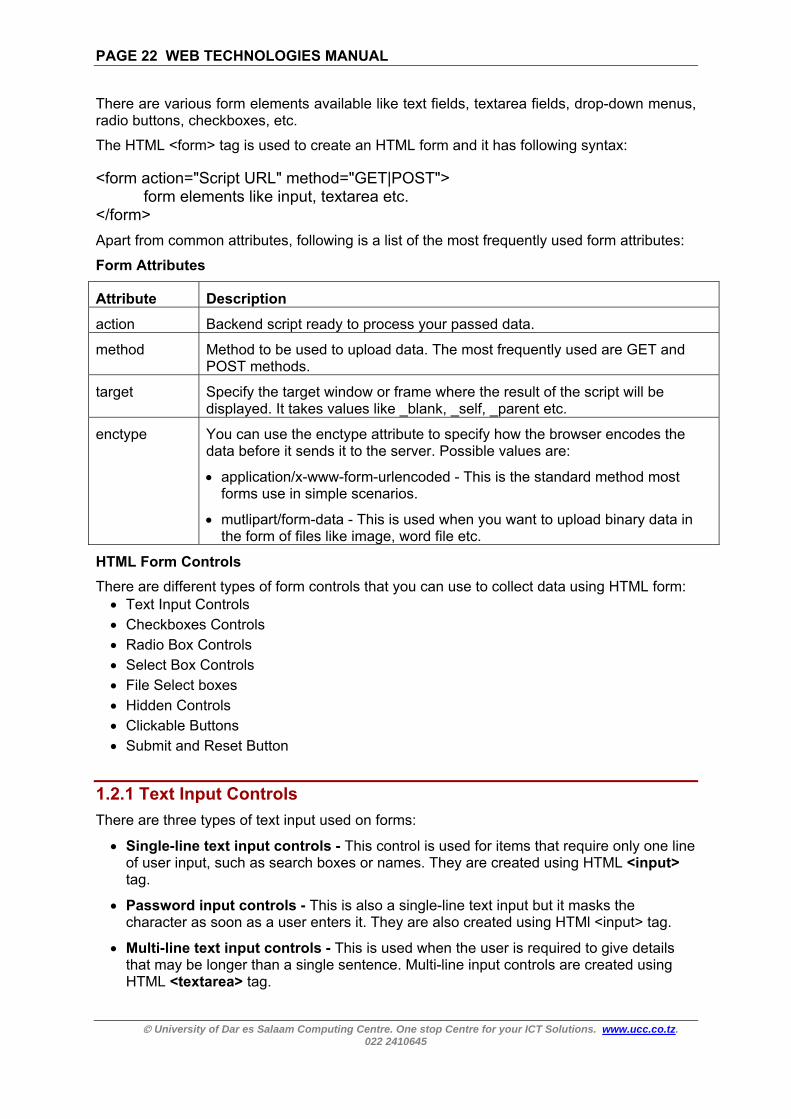
There are various form elements available like text fields, textarea fields, drop-down menus, radio buttons, checkboxes, etc.
The HTML <form> tag is used to create an HTML form and it has following syntax: <form action="Script URL" method="GET|POST">
form elements like input, textarea etc. </form>
Apart from common attributes, following is a list of the most frequently used form attributes:
Form Attributes
Attribute Description
action Backend script ready to process your passed data.
method Method to be used to upload data. The most frequently used are GET and POST methods.
target Specify the target window or frame where the result of the script will be displayed. It takes values like _blank, _self, _parent etc.
enctype You can use the enctype attribute to specify how the browser encodes the data before it sends it to the server. Possible values are:
application/x-www-form-urlencoded - This is the standard method most forms use in simple scenarios.
mutlipart/form-data - This is used when you want to upload binary data in the form of files like image, word file etc.
HTML Form Controls
There are different types of form controls that you can use to collect data using HTML form: Text Input Controls Checkboxes Controls Radio Box Controls Select Box Controls File Select boxes Hidden Controls Clickable Buttons Submit and Reset Button
1.2.1 Text Input Controls
There are three types of text input used on forms:
Single-line text input controls - This control is used for items that require only one line of user input, such as search boxes or names. They are created using HTML <input> tag.
Password input controls - This is also a single-line text input but it masks the character as soon as a user enters it. They are also created using HTMl <input> tag.
Multi-line text input controls - This is used when the user is required to give details that may be longer than a single sentence. Multi-line input controls are created using HTML <textarea> tag.

PAGE 2
Single-
This coor name
ExampHere is <!DOC<html><head><title>T</head<body><form >First na<br>
</form></body></html> This wil
First na
Last nam
Followin
Attribu
type
name
value
size
maxlen
Passwo
This is aThey ar
Examp
Here is <!DOCT<html>
23 WEB TE
University o
-line text in
ntrol is usedes. They ar
ple a basic exa
CTYPE htm> > Text Input d> > >
ame: <input
Last name:> >
>
ll produce th
me:
me:
ng is the lis
te D
It
Ur
T
A
gth At
ord Input c
also a singlre also crea
ple
a basic exa
TYPE html>
ECHNOLO
of Dar es Salaam
nput contro
d for items re created u
ample of a s
ml>
Control</ti
type="text"
: <input type
he following
t of attribute
Description
ndicates thtotext.
Used to giverecognized
This can be
Allows to sp
Allows to spthe text box
controls
e-line text iated using H
ample of a s
>
GIES MAN
m Computing C
ols
that requireusing HTML
single-line t
itle>
" name="firs
e="text" nam
g result:
es for <inpu
n
e type of in
e a name toand get the
used to pro
pecify the w
pecify the mx.
nput but it mHTML <inpu
single-line p
UAL
Centre. One st022 2410645
e only one liL <input> tag
text input us
st_name" />
me="last_na
ut> tag for c
put control
o the controe value.
ovide an ini
width of the t
maximum nu
masks the cut> tag but t
password in
top Centre for y
ine of user ig.
sed to take
>
ame" />
creating text
and for text
ol which is s
tial value in
text-input co
umber of ch
character astype attribut
nput used to
your ICT Soluti
input, such
first name a
t field.
t input contr
ent to the s
nside the co
ontrol in term
aracters a u
s soon as ate is set to p
o take user
tions. www.uc
as search b
and last nam
rol it will be
server to be
ontrol.
ms of chara
user can en
a user enterpassword.
password:
c.co.tz.
boxes
me:
set
acters.
nter into
s it.
PAGE 2
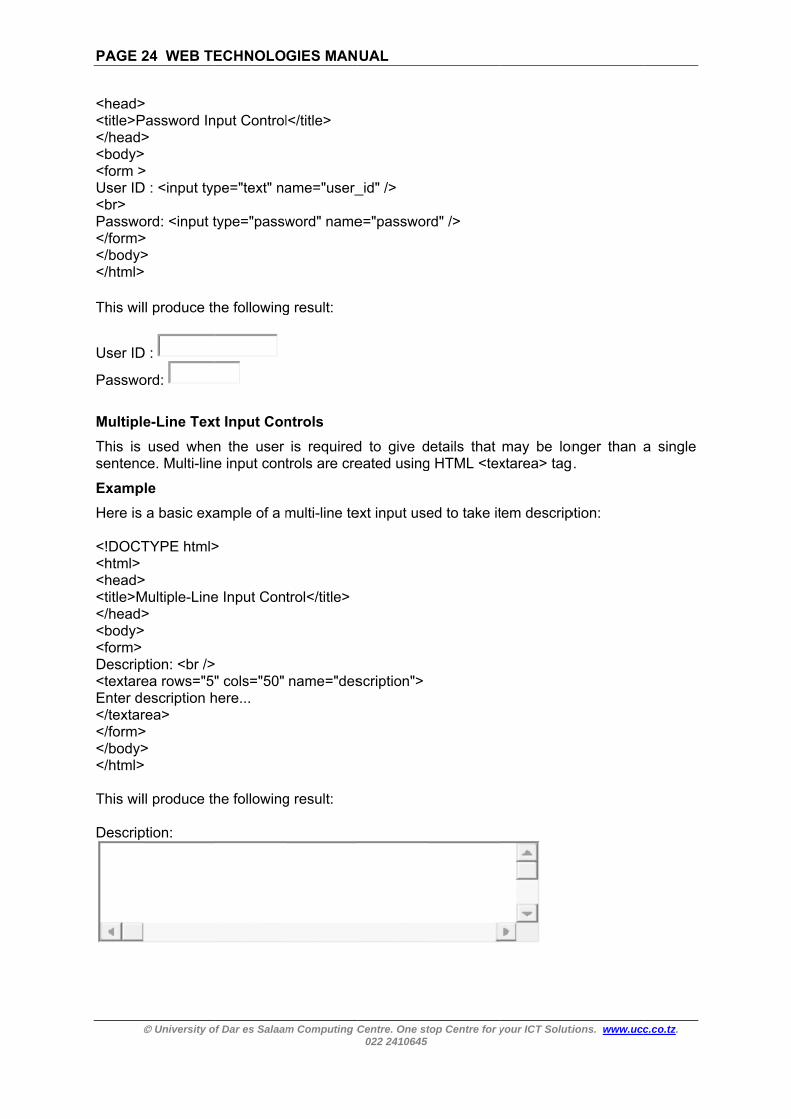
<head><title>P</head><body><form >User ID<br> Passwo</form></body></html>
This wil
User ID
Passwo
Multipl
This is sentenc
Examp
Here is <!DOCT<html> <head><title>M</head><body><form> Descrip<textareEnter d</textar</form></body></html> This wil Descrip
24 WEB TE
University o
> Password In>
> > D : <input typ
ord: <input t> >
>
ll produce th
D :
ord:
e-Line Tex
used whence. Multi-line
ple
a basic exa
TYPE html>
> Multiple-Line>
>
ption: <br />ea rows="5escription hrea> > >
>
ll produce th
ption:
ECHNOLO
of Dar es Salaam
nput Control
pe="text" na
type="passw
he following
xt Input Con
n the user e input cont
ample of a m
>
e Input Con
> " cols="50"
here...
he following
GIES MAN
m Computing C
l</title>
ame="user_
word" name
g result:
ntrols
is requiredtrols are cre
multi-line te
trol</title>
name="des
g result:
UAL
Centre. One st022 2410645
_id" />
e="passwor
d to give deated using
ext input use
scription">
top Centre for y
rd" />
etails that g HTML <tex
ed to take it
your ICT Soluti
may be lonxtarea> tag
tem descrip
tions. www.uc
nger than .
ption:
c.co.tz.
a single

PAGE 2
Followin
Attribuname
rows cols
1.2.2 C
Checkbcreated
Examp
Here is <!DOCT<html> <head><title>C</head><body><form> <input t<input t</form></body></html> This wil
M
Followin
Attribu
type
name
value
checked
1.2.3 R
Radio bThey ar
Examp
Here is
<!DOCT<html>
25 WEB TE
University o
ng is the lis
te DUreInIn
Checkbox
boxes are usd using HTM
ple
an exampleTYPE html>
> Checkbox C>
>
type="checktype="check> >
>
ll produce th
Maths
ng is the lis
te D
Inse
Ure
T
d S
Radio Bu
buttons are re also crea
ple
example H
TYPE html>
ECHNOLO
of Dar es Salaam
t of attribute
DescriptionUsed to givecognized andicates thendicates the
x Control
sed when mML <input> t
e HTML cod>
Control</title
kbox" namekbox" name
he following
Physics
t of attribute
Description
ndicates theet to checkb
Used to giveecognized a
The value th
Set to check
tton Con
used whenated using H
HTML code f
>
GIES MAN
m Computing C
es for <texta
ve a name and get the e number ofe number of
l
more than otag but type
de for a form
e>
e="maths" ve="physics"
g result:
es for <chec
e type of inpbox.
e a name to and get the
at will be us
ked if you wa
trol
out of manHTML <inpu
for a form w
UAL
Centre. One st022 2410645
area> tag.
to the convalue.
f rows of texf columns o
one option ise attribute is
m with two
value="on">value="on"
ckbox> tag
put control a
the controlvalue.
sed if the ch
ant to selec
ny options, jut> tag but t
with two rad
top Centre for y
ntrol which
xt area boxof text area b
s required tos set to che
checkboxes
> Maths "> Physics
.
and for chec
which is se
heckbox is
ct it by defau
just one opttype attribut
io buttons:
your ICT Soluti
is sent to
. box
o be selecteckbox.
s:
ckbox input
ent to the se
selected.
ult.
tion is requte is set to r
tions. www.uc
o the serve
ed. They ar
t control it w
erver to be
ired to be sradio.
c.co.tz.
er to be
re also
will be
selected.

PAGE 2
<head><title>R</head><body><form> <input t<input t</form></body></html>This wil
The attr
1.2.4 S
A selecthe form
Examp
Here is
<!DOCT<html> <head><title>S</head><body><form> <select <option<option</select</form></body></html>This wil
Followin
Attribu
name
size
multiple Followin
Attribu
26 WEB TE
University o
> Radio Box C>
>
type="radiotype="radio> >
> ll produce th
Maths
ributes for r
Select Bo
ct box, also m of drop do
ple
example H
TYPE html>
> Select Box C>
> name="dro
n value="Man value="Pht>
> >
> ll produce th
ng is the lis
te D
Ure
T
e If
ng is the lis
te D
ECHNOLO
of Dar es Salaam
Control</title
" name="su" name="su
he following
Physics
radio button
ox Contro
called dropown list, fro
HTML code f
>
Control</title
opdown"> aths" selecteysics">Phy
he following
t of importa
Description
Used to givecognized a
This can be
f set to "mul
t of importa
Description
GIES MAN
m Computing C
e>
ubject" valueubject" value
g result:
s
n is similar to
ol
p down box m where a
for a form w
e>
ed>Maths</sics</option
g result:
ant attributes
ve a name and get the
used to pre
ltiple" then a
ant attributes
n
UAL
Centre. One st022 2410645
e="maths">e="physics"
o those of c
which provuser can se
with one dro
/option> n>
s of <select
to the convalue.
esent a scro
allows a us
s of <option
top Centre for y
> Maths "> Physics
checkbox
ides option elect one or
op down box
t> tag:
ntrol which
olling list box
er to select
n> tag:
your ICT Soluti
to list downr more optio
x
is sent to
x.
multiple ite
tions. www.uc
n various opons.
o the serve
ems from th
c.co.tz.
ptions in
er to be
e menu.

PAGE 27 WEB TECHNOLOGIES MANUAL
University of Dar es Salaam Computing Centre. One stop Centre for your ICT Solutions. www.ucc.co.tz. 022 2410645
value The value that will be used if an option in the selectbox is selected.
selected Specifies that this option should be the initially selected value when the page loads.
label An alternative way of labeling options
1.2.5 File Upload Box
If you want to allow a user to upload a file to your web site, you will need to use a file upload box, also known as a file select box. This is also created using the <input> element but type attribute is set to file.
Example Here is example HTML code for a form with one file upload box: <!DOCTYPE html> <html> <head> <title>File Upload Box</title> </head> <body> <form> <input type="file" name="fileupload" accept="image/*" /> </form> </body> </html> This will produce the following result:
Following is the list of important attributes of file upload box:
Attribute Description
name Used to give a name to the control which is sent to the server to be recognized and get the value.
accept Specifies the types of files that the server accepts.
accept Specifies the types of files that the server accepts.
1.2.6 Button Controls
There are various ways in HTML to create clickable buttons. You can also create a clickable button using <input> tag by setting its type attribute to button. The type attribute can take the following values:
Type Description submit This creates a button that automatically submits a form. reset This creates a button that automatically resets form controls to their initial
values. button This creates a button that is used to trigger a client-side script when the user
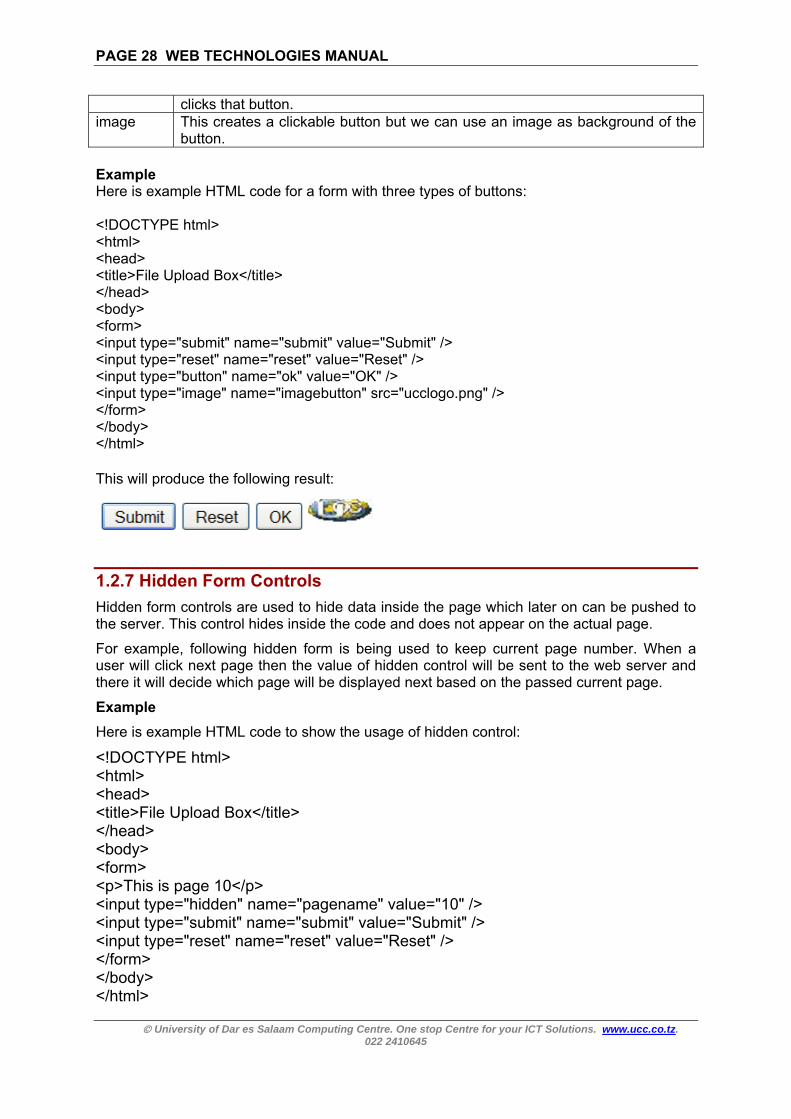
PAGE 28 WEB TECHNOLOGIES MANUAL
University of Dar es Salaam Computing Centre. One stop Centre for your ICT Solutions. www.ucc.co.tz. 022 2410645
clicks that button. image This creates a clickable button but we can use an image as background of the
button. Example Here is example HTML code for a form with three types of buttons: <!DOCTYPE html> <html> <head> <title>File Upload Box</title> </head> <body> <form> <input type="submit" name="submit" value="Submit" /> <input type="reset" name="reset" value="Reset" /> <input type="button" name="ok" value="OK" /> <input type="image" name="imagebutton" src="ucclogo.png" /> </form> </body> </html> This will produce the following result:
1.2.7 Hidden Form Controls
Hidden form controls are used to hide data inside the page which later on can be pushed to the server. This control hides inside the code and does not appear on the actual page.
For example, following hidden form is being used to keep current page number. When a user will click next page then the value of hidden control will be sent to the web server and there it will decide which page will be displayed next based on the passed current page.
Example
Here is example HTML code to show the usage of hidden control:
<!DOCTYPE html> <html> <head> <title>File Upload Box</title> </head> <body> <form> <p>This is page 10</p> <input type="hidden" name="pagename" value="10" /> <input type="submit" name="submit" value="Submit" /> <input type="reset" name="reset" value="Reset" /> </form> </body> </html>

PAGE 2
This wil This is
1.3 H
Imagesway on web pa
Insert I
You casyntax t
<img s
The <imhas no
Examp
To try fsame d
<!DOC<html><head><title>U</head<body><p>Sim<img s</body</html> This wil Simple
You cancorrect The alt image c
29 WEB TE
University o
ll produce th
page 10
HTML Im
s are very imyour web pges.
mage
n insert anto use this t
rc="Image
mg> tag is aclosing tag
ple
following exirectory:
CTYPE htm> > Using Imagd> > mple Imagerc="ucclog
y> >
ll produce th
Image Inse
n use PNG,image file n
attribute is cannot be d
ECHNOLO
of Dar es Salaam
he following
mages
mportant to page. This s
ny image intag.
e URL" ... a
an empty ta.
xample, let's
ml>
ge in Webp
e Insert</pgo.jpg" alt=
he following
ert
, JPEG or Gname in src
a mandatodisplayed.
GIES MAN
m Computing C
g result:
beautify assection will
your web
attributes-li
ag, which m
s keep our
page</title
p> ="Test Imag
g result:
GIF image fc attribute. I
ory attribute
UAL
Centre. One st022 2410645
s well as to take you th
page by u
st/>
means that,
HTML file t
>
ge" />
file based omage name
which spec
top Centre for y
depict manrough simp
sing <img>
it can conta
test.htm and
n your come is always
cifies an alte
your ICT Soluti
ny complex ple steps to
> tag. Follo
ain only list
d image file
fort but makcase sensi
ernate text f
tions. www.uc
concepts inuse images
owing is the
t of attribute
e ucclogo.jp
ke sure youtive.
for an imag
c.co.tz.
n simple s in your
e simple
es and it
pg in the
u specify
ge, if the

PAGE 3
Set ImaUsuallyour homwill kee ExampAssumi<!DOC<html><head><title>U</head<body><p>Sim<img s</body</html>
Set Ima
You caattributepercent
Examp
<!DOC<html><head><title>S</head<body><p>Set<img s</body</html> This wilSetting
Set Ima
By defapixels u
Examp
<!DOC
30 WEB TE
University o
age Locatioy we keep ame directoryep our image
ple ng our imag
CTYPE htm> > Using Imagd> > mple Imagerc="image
y> >
age Width/
an set images. You catage of its a
ple
CTYPE htm> > Set Image d> > tting imagerc="test.pn
y> >
ll produce thimage widt
age Border
ault, image using borde
ple
CTYPE htm
ECHNOLO
of Dar es Salaam
on all the imagy and create ucclogo.jp
ge location ml>
ge in Webp
e Insert</ps/ucclogo.
Height
ge width anan specify actual size.
ml>
Width and
e width andng" alt="Te
he followingth and heigh
r
will have a r attribute. A
ml>
GIES MAN
m Computing C
ges in a septe a subdirepg.
is "images/
page</title
p> jpg " alt="T
d height bawidth and
d Height</t
d height</pest Image"
g result: ht
border aroA thickness
UAL
Centre. One st022 2410645
parate direcectory imag
/ucclogo.jpg
>
Test Image
ased on yoheight of
itle>
p> width="15
ound it, you s of 0 means
top Centre for y
ctory. So leges inside
g", try the fo
e" />
our requiremthe image
50" height=
can specifs, no borde
your ICT Soluti
t's keep HTthe home d
ollowing exa
ment using in terms
="100"/>
y border thr around the
tions. www.uc
TML file tesdirectory w
ample:
width andof either p
ickness in te picture.
c.co.tz.
st.htm in here we
d height pixels or
terms of

PAGE 31 WEB TECHNOLOGIES MANUAL
University of Dar es Salaam Computing Centre. One stop Centre for your ICT Solutions. www.ucc.co.tz. 022 2410645
<html> <head> <title>Set Image Border</title> </head> <body> <p>Setting image Border</p> <img src="test.png" alt="Test Image" border="3"/> </body> </html> This will produce the following result: Setting image Border
Set Image Alignment
By default, image will align at the left side of the page, but you can use align attribute to set it in the center or right.
Example
<!DOCTYPE html> <html> <head> <title>Set Image Alignment</title> </head> <body> <p>Setting image Alignment</p> <img src="test.png" alt="Test Image" border="3" align="right"/> </body> </html> This will produce the following result: Setting image Alignment
1.4 HTML Backgrounds & Colors
By default, your webpage background is white in color. You may not like it, but no worries. HTML provides you following two good ways to decorate your webpage background.
Html Background with Colors
Html Background with Images
Now let's see both the approaches one by one using appropriate examples.

PAGE 32 WEB TECHNOLOGIES MANUAL
University of Dar es Salaam Computing Centre. One stop Centre for your ICT Solutions. www.ucc.co.tz. 022 2410645
1.4.1 Html Background with Colors
The bgcolor attribute is used to control the background of an HTML element, specifically page body and table backgrounds. Following is the syntax to use bgcolor attribute with any HTML tag.
<tagname bgcolor="color_value"...> This color_value can be given in any of the following formats: <!-- Format 1 - Use color name --> <table bgcolor="lime" > <!-- Format 2 - Use hex value --> <table bgcolor="#f1f1f1" > <!-- Format 3 - Use color value in RGB terms --> <table bgcolor="rgb(0,0,120)" > Example Here are the examples to set background of an HTML tag: <!DOCTYPE html> <html> <head> <title>HTML Background Colors</title> </head> <body> <!-- Format 1 - Use color name --> <table bgcolor="yellow" width="100%"> <tr><td> This background is yellow </td></tr> </table> <!-- Format 2 - Use hex value --> <table bgcolor="#6666FF" width="100%"> <tr><td> This background is sky blue </td></tr> </table> <!-- Format 3 - Use color value in RGB terms --> <table bgcolor="rgb(255,0,255)" width="100%"> <tr><td> This background is green </td></tr> </table> </body> </html>

PAGE 33 WEB TECHNOLOGIES MANUAL
University of Dar es Salaam Computing Centre. One stop Centre for your ICT Solutions. www.ucc.co.tz. 022 2410645
1.4.2 Html Background with Images
The background attribute can also be used to control the background of an HTML element, specifically page body and table backgrounds. You can specify an image to set background of your HTML page or table. Following is the syntax to use background attribute with any HTML tag.
Note: The background attribute is deprecated and it is recommended to use Style Sheet for background setting.
<tagname background="Image URL"...>
The most frequently used image formats are JPEG, GIF and PNG images.
Here are the examples to set background images of a table. <!DOCTYPE html> <html> <head> <title>HTML Background Images</title> </head> <body> <!-- Set table background --> <table background="/images/html.gif" width="100%" height="100"> <tr><td> This background is filled up with HTML image. </td></tr> </table> </body> </html> Patterned & Transparent Backgrounds You might have seen many pattern or transparent backgrounds on various websites. This simply can be achieved by using patterned image or transparent image in the background.
It is suggested that while creating patterns or transparent GIF or PNG images, use the smallest dimensions possible even as small as 1x1 to avoid slow loading.
Here are the examples to set background pattern of a table: <!DOCTYPE html> <html> <head> <title>HTML Background Images</title> </head> <body> <!-- Set a table background using pattern --> <table background="/images/pattern1.gif" width="100%" height="100"> <tr><td> This background is filled up with a pattern image. </td></tr> </table> <!-- Another example on table background using pattern --> <table background="/images/pattern2.gif" width="100%" height="100">

PAGE 34 WEB TECHNOLOGIES MANUAL
University of Dar es Salaam Computing Centre. One stop Centre for your ICT Solutions. www.ucc.co.tz. 022 2410645
<tr><td> This background is filled up with a pattern image. </td></tr> </table> </body> </html>
1.4.3 HTML Colors
Colors are very important to give a good look and feel to your website. You can specify colors on page level using <body> tag or you can set colors for individual tags using bgcolor attribute.
The <body> tag has following attributes which can be used to set different colors:
bgcolor - sets a color for the background of the page.
text - sets a color for the body text.
alink - sets a color for active links or selected links.
link - sets a color for linked text.
vlink - sets a color for visited links - that is, for linked text that you have already clicked on.
HTML Color Coding Methods
There are following three different methods to set colors in your web page:
Color names - You can specify color names directly like green, blue or red.
Hex codes - A six-digit code representing the amount of red, green, and blue that makes up the color.
Color decimal or percentage values - This value is specified using the rgb() property.
Now we will see these coloring schemes one by one.
HTML Colors - Color Names
You can specify direct a color name to set text or background color. W3C has listed 16 basic color names that will validate with an HTML validator but there are over 200 different color names supported by major browsers. Here is the list of W3C Standard 16 Colors names and it is recommended to use them.
Black Gray Silver White Yellow Lime Aqua Fuchsia Red Green Blue Purple Maroon Olive Navy Teal Example Here are the examples to set background of an HTML tag by color name: <!DOCTYPE html> <html> <head> <title>HTML Colors by Name</title>

PAGE 35 WEB TECHNOLOGIES MANUAL
University of Dar es Salaam Computing Centre. One stop Centre for your ICT Solutions. www.ucc.co.tz. 022 2410645
</head> <body text="blue" bgcolor="green"> <p>Use different color names for for body and table and see the result.</p> <table bgcolor="black"> <tr> <td> <font color="white">This text will appear white on black background.</font> </td> </tr> </table> </body> </html> HTML Colors - Hex Codes
A hexadecimal is a 6 digit representation of a color. The first two digits(RR) represent a red value, the next two are a green value(GG), and the last are the blue value(BB).
A hexadecimal value can be taken from any graphics software like Adobe Photoshop, Paintshop Pro or MS Paint.
Each hexadecimal code will be preceded by a pound or hash sign #. Following is a list of few colors using hexadecimal notation.
Example Here are the examples to set background of an HTML tag by color code in hexadecimal: <!DOCTYPE html> <html> <head> <title>HTML Colors by Hex</title> </head> <body text="#0000FF" bgcolor="#00FF00"> <p>Use different color hexa for body and table and see the result.</p> <table bgcolor="#000000"> <tr> <td> <font color="#FFFFFF">This text will appear white on black background.</font> </td> </tr> </table> </body> </html> HTML Colors - RGB Values
This color value is specified using the rgb( ) property. This property takes three values, one each for red, green, and blue. The value can be an integer between 0 and 255 or a percentage.
Note: All the browsers does not support rgb() property of color so it is recommended not to use it.
Following is a list to show few colors using RGB values.

PAGE 36 WEB TECHNOLOGIES MANUAL
University of Dar es Salaam Computing Centre. One stop Centre for your ICT Solutions. www.ucc.co.tz. 022 2410645
Example Here are the examples to set background of an HTML tag by color code using rgb() values: <!DOCTYPE html> <html> <head> <title>HTML Colors by RGB code</title> </head> <body text="rgb(0,0,255)" bgcolor="rgb(0,255,0)"> <p>Use different color code for for body and table and see the result.</p> <table bgcolor="rgb(0,0,0)"> <tr> <td> <font color="rgb(255,255,255)">This text will appear white on black background.</font> </td> </tr> </table> </body> </html>
Example of colors in different coding
Color Name Color HEX Color RGB
Black #000000 rgb(0,0,0)
Red #FF0000 rgb(255,0,0)
Green #00FF00 rgb(0,255,0)
Blue #0000FF rgb(0,0,255)
Yellow #FFFF00 rgb(255,255,0)
Cyan #00FFFF rgb(0,255,255)
Purple #FF00FF rgb(255,0,255)
Grey #C0C0C0 rgb(192,192,192)
White #FFFFFF rgb(255,255,255)
Exercises 1. What is the function of the attribute in HTML tag 2. Provide the difference between HTML tag and HTML element 3. Why is it not safe to use upper case character in HTML tag? 4. Why is not recommended to use RGB values to present colors in the websites?

PAGE 37 WEB TECHNOLOGIES MANUAL
University of Dar es Salaam Computing Centre. One stop Centre for your ICT Solutions. www.ucc.co.tz. 022 2410645
Chapter 2. ADVANCED HTML
2.1 The HTML Header Elements The head element contains general information. The <head> tag is a container of various important tags like <title>, <meta>, <link>, <base>, <style>, <script>, and <noscript> tags. The elements inside the head element should not be displayed by a browser.
2.1.1 The HTML <title> Tag The HTML <title> tag is used for specifying the title of the HTML document. Following is an example to give a title to an HTML document: <!DOCTYPE html> <html> <head> <title>HTML Title Tag Example</title> </head> <body> <p>Hello, World!</p> </body> </html>
2.1.2 The HTML <meta> Tag
The HTML <meta> tag is used to provide metadata about the HTML document which includes information about page expiry, page author, list of keywords, page description etc.
Following are few of the important usages of <meta> tag inside an HTML document: <!DOCTYPE html> <html> <head> <title>HTML Meta Tag Example</title> <!-- Provide list of keywords --> <meta name="keywords" content="C, C++, Java, PHP, Perl, Python"> <!-- Provide description of the page --> <meta name="description" content="Simply Easy Learning by Tutorials Point"> <!-- Author information --> <meta name="author" content="Tutorials Point"> <!-- Page content type --> <meta http-equiv="content-type" content="text/html; charset=UTF-8"> <!-- Page refreshing delay --> <meta http-equiv="refresh" content="30"> <!-- Page expiry --> <meta http-equiv="expires" content="Wed, 21 June 2006 14:25:27 GMT"> <!-- Tag to tell robots not to index the content of a page --> <meta name="robots" content="noindex, nofollow"> </head> <body> <p>Hello, World!</p> </body> </html>

PAGE 38 WEB TECHNOLOGIES MANUAL
University of Dar es Salaam Computing Centre. One stop Centre for your ICT Solutions. www.ucc.co.tz. 022 2410645
2.1.3 The HTML <base> Tag
The HTML <base> tag is used for specifying the base URL for all relative URLs in a page, which means all the other URLs will be concatenated into base URL while locating for the given item.
For example, all the given pages and images will be searched after prefixing the given URLs with base URL http://www.tutorial.com/ directory:
<!DOCTYPE html> <html> <head> <title>HTML Base Tag Example</title> <base href="http://www.tutorial.com/" /> </head> <body> <img src="/images/logo.png" alt="Logo Image"/> <a href="/html/index.htm" title="HTML Tutorial"/>HTML Tutorial</a> </body> </html> <!DOCTYPE html> <html> <head> <title>HTML link Tag Example</title> <base href="http://www.tutorial.com/" /> <link rel="stylesheet" type="text/css" href="/css/style.css"> </head> <body> <p>Hello, World!</p> </body> </html>
2.1.4 The HTML <style> Tag The HTML <style> tag is used to specify style sheet for the current HTML document. Following is an example to define few style sheet rules inside <style> tag: <!DOCTYPE html> <html> <head> <title>HTML style Tag Example</title> <base href="http://www.tutorial.com/" /> <style type="text/css"> .myclass{ background-color: #aaa; padding: 10px; } </style> </head> <body> <p class="myclass">Hello, World!</p> </body> </html>

PAGE 39 WEB TECHNOLOGIES MANUAL
University of Dar es Salaam Computing Centre. One stop Centre for your ICT Solutions. www.ucc.co.tz. 022 2410645
2.1.5 The HTML <script> Tag
The HTML <script> tag is used to include either external script file or to define internal script for the HTML document. Following is an example where we are using JavaScript to define a simple JavaScript function:
<!DOCTYPE html> <html> <head> <title>HTML script Tag Example</title> <base href="http://www.tutorial.com/" /> <script type="text/JavaScript"> function Hello(){ alert("Hello, World"); } </script> </head> <body> <input type="button" onclick="Hello();" name="ok" value="OK" /> </body> </html> How to Handle Older Browsers
A browser that does not recognize the <script> tag at all, will display the <script> tag's content as text on the page. To prevent the browser from doing this, you should hide the script in comment tags. An old browser (that does not recognize the <script> tag) will ignore the comment and it will not write the tag's content on the page, while a new browser will understand that the script should be executed, even if it is surrounded by comment tags.
Example
JavaScript: <script type="text/javascript"> <!-- document.write("Hello World!") //--> </script>
VBScript: <script type="text/vbscript"> <!-- document.write("Hello World!") '--> </script>
2.1.6 The <noscript> Tag
In addition to hiding the script inside a comment, you can also add a <noscript> tag.
The <noscript> tag is used to define an alternate text if a script is NOT executed. This tag is used for browsers that recognize the <script> tag, but do not support the script inside, so these browsers will display the text inside the <noscript> tag instead. However, if a browser supports the script inside the <script> tag it will ignore the <noscript> tag.
PAGE 40 WEB TECHNOLOGIES MANUAL
University of Dar es Salaam Computing Centre. One stop Centre for your ICT Solutions. www.ucc.co.tz. 022 2410645
Example JavaScript: <script type="text/javascript"> <!-- document.write("Hello World!") //--> </script> <noscript>Your browser does not support JavaScript!</noscript>
VBScript: <script type="text/vbscript"> <!-- document.write("Hello World!") '--> </script> <noscript>Your browser does not support VBScript!</noscript>
2.2. HTML FRAMES
HTML frames are used to divide your browser window into multiple sections where each section can load a separate HTML document. A collection of frames in the browser window is known as a frameset. The window is divided into frames in a similar way the tables are organized: into rows and columns.
2.2.1 Disadvantages of Frames
There are few drawbacks with using frames, so it's never recommended to use frames in your webpages:
Some smaller devices cannot cope with frames often because their screen is not big enough to be divided up.
Sometimes your page will be displayed differently on different computers due to different screen resolution.
The browser's back button might not work as the user hopes.
There are still few browsers that do not support frame technology.
2.2.2 Creating Frames
To use frames on a page we use <frameset> tag instead of <body> tag. The <frameset> tag defines, how to divide the window into frames. The rows attribute of <frameset> tag defines horizontal frames and cols attribute defines vertical frames. Each frame is indicated by <frame> tag and it defines which HTML document shall open into the frame.
Example
Following is the example to create three horizontal frames: <!DOCTYPE html> <html> <head> <title>HTML Frames</title> </head> <frameset rows=”10%,80%,10%”>

PAGE 4
<frame <frame <frame <nofram<body>Your br</body></nofram</frame</html>This wil
ExampLet’s pchange <!DOCT<html> <head><title>H</head><frames<frame <frame <frame <nofram<body>Your br</body></nofram</frame</html> This wil
If a use<nofram
So you<framesunderstelemen
41 WEB TE
University o
name=”topname=”maname=”bot
mes> > rowser does> mes>
eset> > ll produce th
ple ut the abo
ed their widt
TYPE html>
> HTML Frame> set cols=”25name=”leftname=”cenname=”righ
mes> > rowser does> mes>
eset> >
ll produce th
er is using mes> eleme
u must plaset> elemetand <framt which is c
ECHNOLO
of Dar es Salaam
p” src=”/htmain” src=”/htttom” src=”/
s not suppo
he following
ove examplh. This will
>
es</title>
5%,50%,25t” src=”/htmnter” src=”/hht” src=”/htm
s not suppo
he following
any old bent should b
ace a <bont is suppo
meset> elemcontained in
GIES MAN
m Computing C
l/top_frameml/main_fra/html/bottom
ort frames.
g result:
le as followcreate all th
5%”> l/top_framehtml/main_fml/bottom_f
ort frames.
g result:
rowser or abe displayed
dy> elemeosed to replment then a <noframe
UAL
Centre. One st022 2410645
e.htm” /> ame.htm” />m_frame.htm
ws, here whe three fra
e.htm” /> frame.htm” /frame.htm”
any browsed to the use
ent inside lace the <bit should es> elemen
top Centre for y
> m” />
we replacedmes vertica
/> />
er, which der.
the <nofrabody> elemeunderstandnt.
your ICT Soluti
d rows attrally:
does not su
ames> element, but if a what is i
tions. www.uc
ribute by c
upport fram
ment becaa browser dinside the
c.co.tz.
cols and
mes then
use the does not
<body>

PAGE 42 WEB TECHNOLOGIES MANUAL
University of Dar es Salaam Computing Centre. One stop Centre for your ICT Solutions. www.ucc.co.tz. 022 2410645
You can put some nice message for your user having old browsers. For example, “Sorry!! your browser does not support frames” as shown in the above example. The <frameset> Tag Attributes Following are important attributes of the <frameset> tag:
Attribute Description
cols Specifies how many columns are contained in the frameset and the size of each column. You can specify the width of each column in one of the four ways:
Absolute values in pixels. For example, to create three vertical frames, use cols=”100, 500,100”.
A percentage of the browser window. For example, to create three vertical frames, use cols=”10%, 80%,10%”.
Using a wildcard symbol. For example, to create three vertical frames, use cols=”10%, *,10%”. In this case wildcard takes remainder of the window.
As relative widths of the browser window. For example, to create three vertical frames, use cols=”3*,2*,1*”. This is an alternative to percentages. You can use relative widths of the browser window. Here the window is divided into sixths: the first column takes up half of the window, the second takes one third, and the third takes one sixth.
rows This attribute works just like the cols attribute and takes the same values, but it is used to specify the rows in the frameset. For example, to create two horizontal frames, use rows=”10%, 90%”. You can specify the height of each row in the same way as explained above for columns.
border This attribute specifies the width of the border of each frame in pixels. For example, border=”5”. A value of zero means no border.
frameborder This attribute specifies whether a three-dimensional border should be displayed between frames. This attribute takes value either 1 (yes) or 0 (no). For example frameborder=”0” specifies no border.
framespacing This attribute specifies the amount of space between frames in a frameset. This can take any integer value. For example framespacing=”10” means there should be 10 pixels spacing between each frames.
The <frame> Tag Attributes
Following are the important attributes of <frame> tag:
Attribute Description
src This attribute is used to give the file name that should be loaded in the frame. Its value can be any URL. For example, src=”/html/top_frame.htm” will load an HTML file available in html directory.
name This attribute allows you to give a name to a frame. It is used to indicate which frame a document should be loaded into. This is especially important when you want to create links in one frame that load pages into an another frame, in which case the second frame needs a name to identify itself as the target of the link.

PAGE 43 WEB TECHNOLOGIES MANUAL
University of Dar es Salaam Computing Centre. One stop Centre for your ICT Solutions. www.ucc.co.tz. 022 2410645
Attribute Description
frameborder This attribute specifies whether or not the borders of that frame are shown; it overrides the value given in the frameborder attribute on the <frameset> tag if one is given, and this can take values either 1 (yes) or 0 (no).
marginwidth This attribute allows you to specify the width of the space between the left and right of the frame’s borders and the frame’s content. The value is given in pixels. For example marginwidth=”10”.
marginheight This attribute allows you to specify the height of the space between the top and bottom of the frame’s borders and its contents. The value is given in pixels. For example marginheight=”10”.
noresize By default, you can resize any frame by clicking and dragging on the borders of a frame. The noresize attribute prevents a user from being able to resize the frame. For example noresize=”noresize”.
scrolling This attribute controls the appearance of the scrollbars that appear on the frame. This takes values either “yes”, “no” or “auto”. For example scrolling=”no” means it should not have scroll bars.
longdesc This attribute allows you to provide a link to another page containing a long description of the contents of the frame. For example longdesc=”framedescription.htm”
2.2.3 Frame's name and target attributes
One of the most popular uses of frames is to place navigation bars in one frame and then load main pages into a separate frame.
Let's see following example where a test.htm file has following code:
<!DOCTYPE html> <html> <head> <title>HTML Target Frames</title> </head> <frameset cols="200, *"> <frame src="/html/menu.htm" name="menu_page" /> <frame src="/html/main.htm" name="main_page" /> <noframes> <body> Your browser does not support frames. </body> </noframes> </frameset> </html> Here, we have created two columns to fill with two frames. The first frame is 200 pixels wide and will contain the navigation menu bar implemented by menu.htm file. The second column fills in remaining space and will contain the main part of the page and it is implemented by main.htm file. For all the three links available in menu bar, we have mentioned target frame as main_page, so whenever you click any of the links in menu bar, available link will open in main page. Following is the content of menu.htm file

PAGE 4
<!DOCT<html> <body b<a href=<br /><<a href=<br /><<a href=</body></html> Followin<!DOCT<html> <body b<h3>Th<p>So </body></html> When w
Now yoattribute
Option
_self
_blank
_parent
_top
targetfra
2.3 H
You carelated tag defseparat
The src
Examp
Followin
44 WEB TE
University o
TYPE html>
bgcolor="#4="http://wwwbr /> ="http://wwwbr /> ="http://new>
>
ng is the coTYPE html>
bgcolor="#bhis is main pnow click a>
>
we load test
ou can try e can also t
D
L
L
t Lf
L
ame L
HTML –
n define anto <frames
fines a rectte documen
c attribute is
ple
ng is the ex
ECHNOLO
of Dar es Salaam
>
4a7d49"> w.google.co
w.microsoft
ws.bbc.co.u
ontent of ma>
b5dcb3"> page and cony link and
t.htm file, it
to click lintake one of
Description
Loads the p
Loads a pag
Loads the pframeset is
Loads the p
Loads the p
IFRAME
n inline framset> tag, instangular regnt, including
s used to sp
xample to sh
GIES MAN
m Computing C
om" target=
t.com" targe
k" target="m
ain.htm file:
ontent from see the res
t produces f
ks availablthe followin
n
page into the
ge into a ne
page into thethe main br
page into the
page into a
ES
me with HTMstead, it cangion within scrollbars
pecify the U
how how to
UAL
Centre. One st022 2410645
="main_page
et="main_pa
main_page"
any link wisult.</p>
following re
le in the leng values:
e current fra
ew browser
e parent wirowser wind
e browser w
named targ
ML tag <ifran appear anthe documand border
URL of the d
use the <if
top Centre for y
e">Google<
age">Micro
">BBC New
ll be display
esult:
eft panel an
ame.
window.op
ndow, whicdow.
window, rep
getframe.
ame>. The nywhere in
ment in whics.
document th
frame>:
your ICT Soluti
</a>
soft</a>
ws</a>
yed here.</
nd see the
ening a new
h in the cas
placing any
<iframe> tayour documch the brow
hat occupies
tions. www.uc
/h3>
e result. Th
w window.
se of a sing
current fram
ag is not soment. The <wser can d
s the inline
c.co.tz.
e target
le
mes.
omehow <iframe> isplay a
frame.

PAGE 45 WEB TECHNOLOGIES MANUAL
University of Dar es Salaam Computing Centre. One stop Centre for your ICT Solutions. www.ucc.co.tz. 022 2410645
<!DOCTYPE html> <html> <head> <title>HTML Iframes</title> </head> <body> <p>Document content goes here...</p> <iframe src="/html/menu.htm" width="555" height="200"> Sorry your browser does not support inline frames. </iframe> <p>Document content also go here...</p> </body> </html> This will produce the following result: Document content goes here... Document content can also go here...
The <Iframe> Tag Attributes
Most of the attributes of the <iframe> tag, including name, class, frameborder, id, longdesc, marginheight, marginwidth, name, scrolling, style, and title behave exactly like the corresponding attributes for the <frame> tag.
Attribute Description
src This attribute is used to give the file name that should be loaded in the frame. Its value can be any URL. For example src="/html/top_frame.htm" will load an HTML file available in html directory.
name This attribute allows you to give a name to a frame. It is used to indicate which frame a document should be loaded into. This is especially important when you want to create links in one frame that load pages into an another frame, in which case the second frame needs a name to identify itself as the target of the link.
frameborder This attribute specifies whether or not the borders of that frame are shown; it overrides the value given in the frameborder attribute on the <frameset> tag if one is given, and this can take values either 1 (yes) or 0 (no).
marginwidth This attribute allows you to specify the width of the space between the left and right of the frame's borders and the frame's content. The value is given in pixels. For example marginwidth="10".
marginheight This attribute allows you to specify the height of the space between the top and bottom of the frame's borders and its contents. The value is given in pixels. For example marginheight="10".
noresize By default, you can resize any frame by clicking and dragging on the borders of a frame. The noresize attribute prevents a user from being able to resize the frame. For example noresize="noresize".
scrolling This attribute controls the appearance of the scrollbars that appear on the frame. This takes values either "yes", "no" or "auto". For example scrolling="no" means it should not have scroll bars.
longdesc This attribute allows you to provide a link to another page containing a long description of the contents of the frame. For example

PAGE 46 WEB TECHNOLOGIES MANUAL
University of Dar es Salaam Computing Centre. One stop Centre for your ICT Solutions. www.ucc.co.tz. 022 2410645
longdesc="framedescription.htm"
2.4 HTML 4.0 Event Attributes New to HTML 4.0 is the ability to let HTML events trigger actions in the browser, like starting a JavaScript when a user clicks on an HTML element. Below is a list of attributes that can be inserted into HTML tags to define event actions
2.4.1 Window Events Only valid in body and frameset elements Attribute Value Description
onload script Script to be run when a document loads
onunload script Script to be run when a document unloads
2.4.2 Form Element Events Only valid in form elements. Attribute Value Description
onchange script Script to be run when the element changes
onsubmit script Script to be run when the form is submitted
onreset script Script to be run when the form is reset
onselect script Script to be run when the element is selected
onblur script Script to be run when the element loses focus
onfocus script Script to be run when the element gets focus
2.4.3 Keyboard Events Not valid in base, bdo, br, frame, frameset, head, html, iframe, meta, param, script, style, and title elements. Attribute Value Description
onkeydown script What to do when key is pressed
onkeypress script What to do when key is pressed and released
onkeyup script What to do when key is released
2.4.4 Mouse Events Not valid in base, bdo, br, frame, frameset, head, html, iframe, meta, param, script, style, title elements. Attribute Value Description
onclick script What to do on a mouse click
ondblclick script What to do on a mouse double-click
onmousedown script What to do when mouse button is pressed
onmousemove script What to do when mouse pointer moves
onmouseout script What to do when mouse pointer moves out of an element
onmouseover script What to do when mouse pointer moves over an element
onmouseup script What to do when mouse button is released

PAGE 47 WEB TECHNOLOGIES MANUAL
University of Dar es Salaam Computing Centre. One stop Centre for your ICT Solutions. www.ucc.co.tz. 022 2410645
Exercises
1. The <head> tag is a container of various important tags mention them
2. Explain in details the function of HTML <meta> Tag in html document
3. List down the drawbacks of frames
4. Differentiate between frames and iframes
5. List events that are valid only in body and frameset elements

PAGE 48 WEB TECHNOLOGIES MANUAL
University of Dar es Salaam Computing Centre. One stop Centre for your ICT Solutions. www.ucc.co.tz. 022 2410645
Chapter 3. BASIC CSS
3.1 Introduction to CSS
With HTML 4.0 all formatting can be moved out of the HTML document and into a separate style sheet.
Cascading Style Sheets (CSS) describe how documents are presented on screens. It provides easy and effective alternatives to specify various attributes for the HTML tags. Using CSS, you can specify a number of style properties for a given HTML element. Each property has a name and a value, separated by a colon (:). Each property declaration is separated by a semi-colon (;).
You can use CSS in three ways in your HTML document:
External Style Sheet: Define style sheet rules in a separate .css file and then include that file in your HTML document using HTML <link> tag.
Internal Style Sheet: Define style sheet rules in header section of the HTML document using <style> tag.
Inline Style Sheet: Define style sheet rules directly along-with the HTML elements using style attribute.
3.1.1 Cascading Order What style will be used when there is more than one style specified for an HTML element? Generally speaking we can say that all the styles will "cascade" into a new "virtual" style sheet by the following rules, where number four has the highest priority:
1. Browser default 2. External style sheet 3. Internal style sheet (inside the <head> tag) 4. Inline style (inside an HTML element)
So, an inline style (inside an HTML element) has the highest priority, which means that it will override a style declared inside the <head> tag, in an external style sheet, or in a browser (a default value).
3.2 CSS Syntax The CSS syntax is made up of three parts: a selector, a property and a value: selector {property: value} The selector is normally the HTML element/tag you wish to define, the property is the attribute you wish to change, and each property can take a value. The property and value are separated by a colon, and surrounded by curly braces: body {color: black} Note: If the value is multiple words, put quotes around the value:

PAGE 49 WEB TECHNOLOGIES MANUAL
University of Dar es Salaam Computing Centre. One stop Centre for your ICT Solutions. www.ucc.co.tz. 022 2410645
p {font-family: "sans serif"} Note: If you wish to specify more than one property, you must separate each property with a semicolon. The example below shows how to define a center aligned paragraph, with a red text color: p {text-align:center;color:red} To make the style definitions more readable, you can describe one property on each line, like this: p { text-align: center; color: black; font-family: arial } You can group selectors. Separate each selector with a comma. In the example below we have grouped all the header elements. All header elements will be displayed in green text color: h1,h2,h3,h4,h5,h6 { color: green }
3.2.1 The class Selector
With the class selector you can define different styles for the same type of HTML element.
Say that you would like to have two types of paragraphs in your document: one right-aligned paragraph, and one center-aligned paragraph. Here is how you can do it with styles:
p.right {text-align: right} p.center {text-align: center}
You have to use the class attribute in your HTML document:
<p class="right"> This paragraph will be right-aligned. </p> <p class="center"> This paragraph will be center-aligned. </p>
Note: To apply more than one class per given element, the syntax is:
<p class="center bold"> This is a paragraph. </p>

PAGE 5
The par
You canelemenclass="
.center
In the cthat bot
<h1 claThis he</h1> <p clasThis pa</p>
Do NOT
You can
The sty"text":
input[ty
3.2.2 TYou cadefinedThe sty"green" #green The sty p#para1{ text-aligcolor: re}
Do N
3.2.3 CCommeat a latand end/* This ip
50 WEB TE
University o
ragraph abo
n also omit ts that hacenter" will
{text-align:
code below th elements
ss="center"eading will b
s="center">aragraph wil
T start a cla
n also apply
yle rule belo
ype="text"] {
The id Sean also defd as a #. yle rule be":
{color: gree
yle rule belo
1
gn: center; ed
NOT start an
CSS Coments are useter date. A ds with "*/", is a comme
ECHNOLO
of Dar es Salaam
ove will be s
the tag namave a certa
be center-a
center}
both the hs will follow
"> be center-al
> l also be ce
ass name w
y styles to H
ow will matc
{background
elector fine styles
elow will m
en}
ow will matc
n ID name w
mments ed to explaicomment wlike this:
ent */
GIES MAN
m Computing C
styled by th
me in the seain class. aligned:
1 element athe rules in
igned
enter-aligne
with a numbe
HTML eleme
ch all input
d-color: blue
for HTML
match the e
h the p elem
with a numb
in your codewill be igno
UAL
Centre. One st022 2410645
he class "ce
elector to deIn the exa
and the p e the ".cente
ed.
er! It will no
ents with pa
t elements t
e}
elements
element th
ment that ha
ber! It will n
e, and mayred by brow
top Centre for y
nter" AND t
efine a styleample belo
element haver" selector:
t work in Mo
articular attr
that have a
with the id
hat has an
as an id wit
ot work in M
y help you wwsers. A C
your ICT Soluti
the class "b
e that will beow, all HTM
ve class="c
ozilla/Firefo
ributes.
a type attrib
d selector.
id attribut
h a value of
Mozilla/Firef
when you edSS comme
tions. www.uc
bold".
e used by aML elemen
center". This
ox.
bute with a
The id sel
te with a v
of "para1":
fox.
dit the sourent begins w
c.co.tz.
all HTML nts with
s means
value of
ector is
value of
rce code with "/*",

PAGE 5
{ text-alig/* This icolor: bfont-fam}
3.3 H When athree w
3.3.1 Ex
An extestyle shmust lin
<head><link rehref="m</head>
The broaccordi
An extetags. Yfile is sh
hr {colop {margbody {b
Do N20 px" iMozilla/
3.3.2 In
An intedefine i
<head><style tyhr {colop {margbody {b</style></head>
The bro
51 WEB TE
University o
gn: center; is another c
black; mily: arial
How to I
a browser rways of inse
xternal Sty
ernal style sheet, you cank to the sty
> el="styleshemystyle.css">
owser will reng to it.
ernal style sour style shhown below
or: sienna} gin-left: 20pbackground-
NOT leave sinstead of "/Firefox or N
nternal Styl
ernal style snternal style
> ype="text/c
or: sienna} gin-left: 20pbackground-> >
owser will no
ECHNOLO
of Dar es Salaam
comment */
nsert a
reads a stylrting a style
yle Sheet
sheet is idean change tyle sheet us
et" type="te" />
ead the styl
sheet can bheet should
w:
x} -image: url(
spaces betwmargin-left:Netscape.
le Sheet
sheet shoules in the he
css">
x} -image: url(
ow read the
GIES MAN
m Computing C
Style S
le sheet, it e sheet:
eal when ththe look of
sing the <lin
ext/css"
e definitions
e written in d be saved
("images/ba
ween the pr 20px" it wi
ld be used ead section
("images/ba
e style defin
UAL
Centre. One st022 2410645
Sheet
will format
he style is aan entire W
nk> tag. The
s from the f
any text edwith a .css
ack40.gif")}
roperty valull only work
when a siby using th
ack40.gif")}
nitions, and
top Centre for y
the docum
applied to mWeb site by e <link> tag
file mystyle.
ditor. The fis extension
e and the uk properly in
ingle documhe <style> ta
format the
your ICT Soluti
ment accord
many pageschanging ogoes inside
.css, and fo
le should n. An examp
units! If you IE6 but it w
ment has aag, like this
document a
tions. www.uc
ing to it. Th
s. With an one file. Eae the head
ormat the do
ot contain aple of a sty
use "margiwill not work
a unique sty:
according to
c.co.tz.
here are
external ch page section:
ocument
any html le sheet
n-left: k in
yle. You
o it.

PAGE 52 WEB TECHNOLOGIES MANUAL
University of Dar es Salaam Computing Centre. One stop Centre for your ICT Solutions. www.ucc.co.tz. 022 2410645
Note: A browser normally ignores unknown tags. This means that an old browser that does not support styles, will ignore the <style> tag, but the content of the <style> tag will be displayed on the page. It is possible to prevent an old browser from displaying the content by hiding it in the HTML comment element:
<head> <style type="text/css"> <!-- hr {color: sienna} p {margin-left: 20px} body {background-image: url("images/back40.gif")} --> </style> </head>
3.3.3 Inline Styles
An inline style loses many of the advantages of style sheets by mixing content with presentation. Use this method sparingly, such as when a style is to be applied to a single occurrence of an element.
To use inline styles you use the style attribute in the relevant tag. The style attribute can contain any CSS property. The example shows how to change the color and the left margin of a paragraph:
<p style=”color: sienna; margin-left: 20px”> This is a paragraph </p>
3.3.4 Multiple Style Sheets If some properties have been set for the same selector in different style sheets, the values will be inherited from the more specific style sheet. For example, an external style sheet has these properties for the h3 selector: h3 { color: red; text-align: left; font-size: 8pt } And an internal style sheet has these properties for the h3 selector: h3 { text-align: right; font-size: 20pt } If the page with the internal style sheet also links to the external style sheet the properties for h3 will be:

PAGE 53 WEB TECHNOLOGIES MANUAL
University of Dar es Salaam Computing Centre. One stop Centre for your ICT Solutions. www.ucc.co.tz. 022 2410645
color: red; text-align: right; font-size: 20pt The color is inherited from the external style sheet and the text-alignment and the font-size is replaced by the internal style sheet.
3.4 CSS Background The CSS background properties define the background effects of an element. The background property is a shorthand property for setting all background properties in one declaration. Example body { background: #FF0000 }
body { background: url(stars.gif) no-repeat top }
body { background: #00FF00 url(stars.gif) no-repeat fixed top }
Possible Values Value Description background-color background-image background-repeat background-attachment background-position
You can declare from one to five background properties in this declaration
Default value: Not defined
3.5 CSS Text The CSS text properties define the appearance of text
3.5.1 CSS Font Property description
The font property is, with exception of some system fonts, a shorthand property for setting all of the properties for a font in one declaration.
Note: This property also has a sixth value: "line-height", which sets the space between lines.
Example p { font: 12px arial

PAGE 54 WEB TECHNOLOGIES MANUAL
University of Dar es Salaam Computing Centre. One stop Centre for your ICT Solutions. www.ucc.co.tz. 022 2410645
}
p { font: italic small-caps bold 12px arial }
p { font: oblique small-caps 900 12px/14px arial }
p { font: menu }
Possible Values Value Description font-style font-variant font-weight font-size/line-height font-family
Sets the properties for a font. The line-height value sets the space between lines. The value can be a number, a %, or a font size.
Default value: Browser dependent
caption Defines the font that are used by captioned controls (like buttons, drop-downs, etc.)
icon Defines the fonts that are used by icon labels menu Defines the fonts that are used by dropdown menus message-box Defines the fonts that are used by dialog boxes small-caption status-bar Defines the fonts that are used by window status bars
3.5.2 CSS font-family Property description
The font-family property is a prioritized list of font family names and/or generic family names for an element. The browser will use the first value it recognizes.
There are two types of font-family values:
family-name: The name of a font-family, like "times", "courier", "arial", etc. generic-family: The name of a generic-family, like "serif", "sans-serif", "cursive",
"fantasy", "monospace".
Note: Separate each value with a comma, and always offer a generic-family name as the last alternative.
Note: If a family-name contains white-space, it should be quoted. Single quotes must be used when using the "style" attribute in HTML.
Example

PAGE 55 WEB TECHNOLOGIES MANUAL
University of Dar es Salaam Computing Centre. One stop Centre for your ICT Solutions. www.ucc.co.tz. 022 2410645
body { font-family: courier, serif }
p { font-family: arial, "lucida console", sans-serif }
<p style="font-family: arial, 'lucida console', sans-serif">
Possible Values Value Description family-name generic-family
A prioritized list of font family names and/or generic family names for an element.
Default value: Browser dependent
3.5.3 CSS font-style Property description
The font-style property sets the style of a font.
Example body { font-style: italic }
Possible Values Value Description normal Default. The browser displays a normal font italic The browser displays an italic font oblique The browser displays an oblique font
3.6 CSS List The CSS list properties allow you to place the list-item marker, change between different list-item markers, or set an image as the list-item marker.
3.6.1 CSS List Properties
The CSS list properties allow you to place the list-item marker, change between different list-item markers, or set an image as the list-item marker.
Browser support: IE: Internet Explorer, F: Firefox, N: Netscape.
The list-style property is a shorthand property for setting all the properties for a list in one declaration.
Example ul { list-style: disc outside

PAGE 56 WEB TECHNOLOGIES MANUAL
University of Dar es Salaam Computing Centre. One stop Centre for your ICT Solutions. www.ucc.co.tz. 022 2410645
}
ol { list-style: decimal inside }
Possible Values Value Description list-style-type list-style-position list-style-image
Sets the properties for a list.
Default value: Not defined
3.6.2 CSS list-style-type Property description
The list-style-type sets the type of the list-item marker.
Note: Some browsers only support the "disc" value.
Example ul { list-style-type: disc }
Possible Values Value Description none No marker disc Default. The marker is a filled circle circle The marker is a circle square The marker is a square decimal The marker is a number decimal-leading-zero The marker is a number padded by initial zeros (01, 02, 03, etc.)lower-roman The marker is lower-roman (i, ii, iii, iv, v, etc.) upper-roman The marker is upper-roman (I, II, III, IV, V, etc.) lower-alpha The marker is lower-alpha (a, b, c, d, e, etc.) upper-alpha The marker is upper-alpha (A, B, C, D, E, etc.) lower-greek The marker is lower-greek (alpha, beta, gamma, etc.) lower-latin The marker is lower-latin (a, b, c, d, e, etc.) upper-latin The marker is upper-latin (A, B, C, D, E, etc.)
3.7 CSS table properties The CSS table properties allow you to set the layout of a table.
3.7.1 CSS border-collapse Property
The border-collapse property sets whether the table borders are collapsed into a single border or detached as in standard HTML.
Example

PAGE 57 WEB TECHNOLOGIES MANUAL
University of Dar es Salaam Computing Centre. One stop Centre for your ICT Solutions. www.ucc.co.tz. 022 2410645
table { border-collapse: separate }
Possible Values Value Description separate Borders are detached collapse Default. Borders are collapsed into a single border when possible
3.7.2 CSS border-spacing Property
The border-spacing property sets the distance between the borders of adjacent cells (only for the "separated borders" model).
Example table { border-spacing: 10px }
Possible Values Value Description length length Defines the distance in px, cm, etc. If one length parameter is specified, it
defines the horizontal and vertical spacing. If two length parameters are specified, the first sets the horizontal spacing and the second sets the vertical spacing. Lengths may not be negative
3.7.3 CSS table-layout Property
The tableLayout property sets the algorithm used to display the table cells, rows, and columns
Fixed table layout:
The fixed table layout allows the browser to lay out the table faster than the automatic table layout
In a fixed table layout, the horizontal layout only depends on the table's width, the width of the columns, and not the content of the cells
By using fixed table layout, the user agent can begin to display the table once the entire first row has been received
Automatic table layout:
In an automatic table layout, the column width is set by the widest unbreakable content in the column cells
This algorithm is sometimes slow since it needs to access all the content in the table before determining the final layout
Example

PAGE 58 WEB TECHNOLOGIES MANUAL
University of Dar es Salaam Computing Centre. One stop Centre for your ICT Solutions. www.ucc.co.tz. 022 2410645
table { table-layout: fixed }
Possible Values Value Description automatic Default. Column width is set by cell content fixed Column width is set by table width and the width of the columns
Exercises 1a. What are the three different ways a style sheet can be incorporated into a web page?
b. What would be the advantage of using <link> instead of <style>?
c. What are the different components of this line from a style sheet? What are they called? p {font-family: courier;}

PAGE 59 WEB TECHNOLOGIES MANUAL
University of Dar es Salaam Computing Centre. One stop Centre for your ICT Solutions. www.ucc.co.tz. 022 2410645
Chapter 4. BASIC JAVASCRIPT
4.1 Introduction to JavaScript JavaScript is used in millions of Web pages to improve the design, validate forms, detect browsers, create cookies, and much more.
JavaScript is the most popular scripting language on the internet, and works in all major browsers, such as Internet Explorer, Mozilla, Firefox, Netscape, and Opera.
You can keep JavaScript code in a separate file and then include it wherever it's needed, or you can define functionality inside HTML document itself.
4.1.1 Getting started with JavaScript The HTML <script> tag is used to insert a JavaScript into an HTML page.
How to Put a JavaScript Into an HTML Page <html> <body> <script type="text/javascript"> document.write("Hello World!"); </script> </body> </html>
The code above will produce this output on an HTML page:
Hello World!
Example Explained To insert a JavaScript into an HTML page, we use the <script> tag. Inside the <script> tag we use the "type=" attribute to define the scripting language. So, the <script type="text/javascript"> and </script> tells where the JavaScript starts and ends: <html> <body> <script type="text/javascript"> ... </script> </body> </html>
The word document.write is a standard JavaScript command for writing output to a page.
By entering the document.write command between the <script> and </script> tags, the browser will recognize it as a JavaScript command and execute the code line. In this case the browser will write Hello World! to the page: <html> <body> <script type="text/javascript"> document.write("Hello World!");

PAGE 60 WEB TECHNOLOGIES MANUAL
University of Dar es Salaam Computing Centre. One stop Centre for your ICT Solutions. www.ucc.co.tz. 022 2410645
</script> </body> </html
HTML Comments to Handle Simple Browsers Browsers that do not support JavaScript will display JavaScript as page content. To prevent them from doing this, and as a part of the JavaScript standard, the HTML comment tag can be used to "hide" the JavaScript. Just add an HTML comment tag <!-- before the first JavaScript statement, and a --> (end of comment) after the last JavaScript statement. <html> <body> <script type="text/javascript"> <!-- document.write("Hello World!"); //--> </script> </body> </html>
The two forward slashes at the end of comment line (//) is the JavaScript comment symbol. This prevents JavaScript from executing the --> tag.
4.2 JavaScript Document Structure JavaScripts in the body section will be executed WHILE the page loads. JavaScripts in the head section will be executed when CALLED.
4.2.1 Where to Put the JavaScript
JavaScript’s in a page will be executed immediately while the page loads into the browser. This is not always what we want. Sometimes we want to execute a script when a page loads, other times when a user triggers an event.
Scripts in the head section: Scripts to be executed when they are called, or when an event is triggered, go in the head section. When you place a script in the head section, you will ensure that the script is loaded before anyone uses it.
<html> <head> <script type="text/javascript"> .... </script> </head>
Scripts in the body section: Scripts to be executed when the page loads go in the body section. When you place a script in the body section it generates the content of the page.
<html> <head> </head> <body>

PAGE 61 WEB TECHNOLOGIES MANUAL
University of Dar es Salaam Computing Centre. One stop Centre for your ICT Solutions. www.ucc.co.tz. 022 2410645
<script type="text/javascript"> .... </script> </body>
Scripts in both the body and the head section: You can place an unlimited number of scripts in your document, so you can have scripts in both the body and the head section.
<html> <head> <script type="text/javascript"> .... </script> </head> <body> <script type="text/javascript"> .... </script> </body>
4.2.2 Using an External JavaScript
Sometimes you might want to run the same JavaScript on several pages, without having to write the same script on every page.
To simplify this, you can write a JavaScript in an external file. Save the external JavaScript file with a .js file extension.
Note: The external script cannot contain the <script> tag!
To use the external script, point to the .js file in the "src" attribute of the <script> tag:
<html> <head> <script src="xxx.js"></script> </head> <body> </body> </html>
Note: Remember to place the script exactly where you normally would write the script!
4.2.3 JavaScript Statements JavaScript is a sequence of statements to be executed by the browser.
A JavaScript statements is a command to the browser. The purpose of the command is to tell the browser what to do.
This JavaScript statement tells the browser to write "Hello Dolly" to the web page:
document.write("Hello Dolly");

PAGE 62 WEB TECHNOLOGIES MANUAL
University of Dar es Salaam Computing Centre. One stop Centre for your ICT Solutions. www.ucc.co.tz. 022 2410645
It is normal to add a semicolon at the end of each executable statement. Most people think this is a good programming practice, and most often you will see this in JavaScript examples on the web.
The semicolon is optional (according to the JavaScript standard), and the browser is supposed to interpret the end of the line as the end of the statement. Because of this you will often see examples without the semicolon at the end.
Note: Using semicolons makes it possible to write multiple statements on one line.
JavaScript Code JavaScript code (or just JavaScript) is a sequence of JavaScript statements. Each statement is executed by the browser in the sequence they are written. This example will write a header and two paragraphs to a web page: <script type="text/javascript"> document.write("<h1>This is a header</h1>"); document.write("<p>This is a paragraph</p>"); document.write("<p>This is another paragraph</p>"); </script>
JavaScript Blocks JavaScript statements can be grouped together in blocks. Blocks start with a left curly bracket {, and ends with a right curly bracket}. The purpose of a block is to make the sequence of statements execute together. This next example will write a header and two paragraphs to a web page: <script type="text/javascript"> { document.write("<h1>This is a header</h1>"); document.write("<p>This is a paragraph</p>"); document.write("<p>This is another paragraph</p>"); } </script>
4.3 JavaScript Comments JavaScript comments can be used to make the code more readable. Comments can be added to explain the JavaScript, or to make it more readable. Single line comments start with //. This example uses single line comments to explain the code:
<script type="text/javascript"> // This will write a header: document.write("<h1>This is a header</h1>"); // This will write two paragraphs: document.write("<p>This is a paragraph</p>"); document.write("<p>This is another paragraph</p>"); </script>
4.3.1 JavaScript Multi-Line Comments
Multi line comments start with /* and end with */.

PAGE 63 WEB TECHNOLOGIES MANUAL
University of Dar es Salaam Computing Centre. One stop Centre for your ICT Solutions. www.ucc.co.tz. 022 2410645
This example uses a multi line comment to explain the code:
<script type="text/javascript"> /* The code below will write one header and two paragraphs */ document.write("<h1>This is a header</h1>"); document.write("<p>This is a paragraph</p>"); document.write("<p>This is another paragraph</p>"); </script>
4.3.2 Using Comments to Prevent Execution In this example the comment is used to prevent the execution of a single code line: <script type="text/javascript"> document.write("<h1>This is a header</h1>"); document.write("<p>This is a paragraph</p>"); //document.write("<p>This is another paragraph</p>"); </script>
In this example the comments is used to prevent the execution of multiple code lines: <script type="text/javascript"> /* document.write("<h1>This is a header</h1>"); document.write("<p>This is a paragraph</p>"); document.write("<p>This is another paragraph</p>"); */ </script>
4.3.3 Using Comments at the End of a Line In this example the comment is placed at the end of a line: <script type="text/javascript"> document.write("Hello"); // This will write "Hello" document.write("Dolly"); // This will write "Dolly" </script>
4.4 JavaScript Variables JavaScript variables are used to hold values or expressions. A variable can have a short name, like x, or a more describing name like length. A JavaScript variable can also hold a text value like in carname="Volvo". Rules for JavaScript variable names:
Variable names are case sensitive (y and Y are two different variables) Variable names must begin with a letter or the underscore character
NOTE: Because JavaScript is case-sensitive, variable names are case-sensitive.

PAGE 64 WEB TECHNOLOGIES MANUAL
University of Dar es Salaam Computing Centre. One stop Centre for your ICT Solutions. www.ucc.co.tz. 022 2410645
Example A variable's value can change during the execution of a script. You can refer to a variable by its name to display or change its value.
4.4.1 Declaring (Creating) JavaScript Variables
Creating variables in JavaScript is most often referred to as "declaring" variables.
You can declare JavaScript variables with the var statement: var x; var carname;
After the declaration shown above, the variables have no values, but you can assign values to the variables while you declare them:
var x=5; var carname="Volvo";
Note: When you assign a text value to a variable, you use quotes around the value.
Assigning Values to JavaScript Variables You assign values to JavaScript variables with assignment statements: x=5; carname="Volvo";
The variable name is on the left side of the = sign, and the value you want to assign to the variable is on the right. After the execution of the statements above, the variable x will hold the value 5, and carname will hold the value Volvo.
Assigning Values to Undeclared JavaScript Variables If you assign values to variables that has not yet been declared, the variables will automatically be declared. These statements: x=5; carname="Volvo";
have the same effect as: var x=5; var carname="Volvo";
Redeclaring JavaScript Variables If you redeclare a JavaScript variable, it will not lose its original value. var x=5; var x;
After the execution of the statements above, the variable x will still have the value of 5. The value of x is not reset (or cleared) when you redeclare it.

PAGE 65 WEB TECHNOLOGIES MANUAL
University of Dar es Salaam Computing Centre. One stop Centre for your ICT Solutions. www.ucc.co.tz. 022 2410645
4.5 JavaScript Arithmetic As with algebra, you can do arithmetic with JavaScript variables: y=x-5; z=y+5;
JavaScript Operators The operator = is used to assign values. The operator + is used to add values.
The assignment operator = is used to assign values to JavaScript variables. The arithmetic operator + is used to add values together. y=5; z=2; x=y+z;
The value of x, after the execution of the statements above is 7.
4.5.1 JavaScript Arithmetic Operators
Arithmetic operators are used to perform arithmetic between variables and/or values.
Given that y=5, the table below explains the arithmetic operators:
Operator Description Example Result + Addition x=y+2 x=7 - Subtraction x=y-2 x=3 * Multiplication x=y*2 x=10 / Division x=y/2 x=2.5 % Modulus (division remainder) x=y%2 x=1 ++ Increment x=++y x=6 -- Decrement x=--y x=4
4.5.2 JavaScript Assignment Operators
Assignment operators are used to assign values to JavaScript variables.
Given that x=10 and y=5, the table below explains the assignment operators:
Operator Example Same As Result = x=y x=5 += x+=y x=x+y x=15 -= x-=y x=x-y x=5 *= x*=y x=x*y x=50 /= x/=y x=x/y x=2 %= x%=y x=x%y x=0
The + Operator Used on Strings The + operator can also be used to add string variables or text values together. To add two or more string variables together, use the + operator. txt1="What a very";

PAGE 66 WEB TECHNOLOGIES MANUAL
University of Dar es Salaam Computing Centre. One stop Centre for your ICT Solutions. www.ucc.co.tz. 022 2410645
txt2="nice day"; txt3=txt1+txt2;
After the execution of the statements above, the variable txt3 contains "What a verynice day". To add a space between the two strings, insert a space into one of the strings: txt1="What a very "; txt2="nice day"; txt3=txt1+txt2;
or insert a space into the expression: txt1="What a very"; txt2="nice day"; txt3=txt1+" "+txt2;
After the execution of the statements above, the variable txt3 contains: "What a very nice day"
Adding Strings and Numbers Look at these examples: x=5+5; document.write(x); x="5"+"5"; document.write(x); x=5+"5"; document.write(x); x="5"+5; document.write(x);
The rule is: If you add a number and a string the result will be a string
4.6 JavaScript Comparison and Logical Operators Comparison and Logical operators are used to test for true or false.
4.6.1 Comparison Operators
Comparison operators are used in logical statements to determine equality or difference between variables or values.
Given that x=5, the table below explains the comparison operators:
Operator Description Example == is equal to x==8 is false === is exactly equal to (value and type) x==5 is true
x==="5" is false != is not equal x!=8 is true > is greater than x>8 is false < is less than x<8 is true >= is greater than or equal to x>=8 is false <= is less than or equal to x<=8 is true

PAGE 67 WEB TECHNOLOGIES MANUAL
University of Dar es Salaam Computing Centre. One stop Centre for your ICT Solutions. www.ucc.co.tz. 022 2410645
How Can it be Used Comparison operators can be used in conditional statements to compare values and take action depending on the result: if (age<18) document.write("Too young");
4.6.1 Logical Operators
Logical operators are used in determine the logic between variables or values.
Given that x=6 and y=3, the table below explains the logical operators:
Operator Description Example && and (x < 10 && y > 1) is true || or (x==5 || y==5) is false ! not !(x==y) is true
4.6.2 Conditional Operator
JavaScript also contains a conditional operator that assigns a value to a variable based on some condition.
Syntax variablename=(condition)?value1:value2
Example greeting=(visitor=="PRES")?"Dear President ":"Dear ";
If the variable visitor has the value of "PRES", then the variable greeting will be assigned the value "Dear President” else it will be assigned "Dear".
4.7 Conditional Statements Conditional statements in JavaScript are used to perform different actions based on different conditions.
Very often when you write code, you want to perform different actions for different decisions. You can use conditional statements in your code to do this.
In JavaScript we have the following conditional statements:
if statement - use this statement if you want to execute some code only if a specified condition is true
if...else statement - use this statement if you want to execute some code if the condition is true and another code if the condition is false
if...else if....else statement - use this statement if you want to select one of many blocks of code to be executed
switch statement - use this statement if you want to select one of many blocks of code to be executed
4.7.1 If Statement You should use the if statement if you want to execute some code only if a specified condition is true.

PAGE 68 WEB TECHNOLOGIES MANUAL
University of Dar es Salaam Computing Centre. One stop Centre for your ICT Solutions. www.ucc.co.tz. 022 2410645
Syntax if (condition) { code to be executed if condition is true }
Note that if is written in lowercase letters. Using uppercase letters (IF) will generate a JavaScript error!
Example 1 <script type="text/javascript"> //Write a "Good morning" greeting if //the time is less than 10 var d=new Date(); var time=d.getHours(); if (time<10) { document.write("<b>Good morning</b>"); } </script>
Example 2 <script type="text/javascript"> //Write "Lunch-time!" if the time is 11 var d=new Date(); var time=d.getHours(); if (time==11) { document.write("<b>Lunch-time!</b>"); } </script>
Note: When comparing variables you must always use two equals signs next to each other (==)! Notice that there is no ..else.. in this syntax. You just tell the code to execute some code only if the specified condition is true.
4.7.2 If...else Statement
If you want to execute some code if a condition is true and another code if the condition is not true, use the if....else statement.
Syntax if (condition) { code to be executed if condition is true } else { code to be executed if condition is not true }
Example <script type="text/javascript">

PAGE 69 WEB TECHNOLOGIES MANUAL
University of Dar es Salaam Computing Centre. One stop Centre for your ICT Solutions. www.ucc.co.tz. 022 2410645
//If the time is less than 10, //you will get a "Good morning" greeting. //Otherwise you will get a "Good day" greeting. var d = new Date(); var time = d.getHours(); if (time < 10) { document.write("Good morning!"); } else { document.write("Good day!"); } </script>
4.7.3 If...else if...else Statement
You should use the if....else if...else statement if you want to select one of many sets of lines to execute.
Syntax if (condition1) { code to be executed if condition1 is true } else if (condition2) { code to be executed if condition2 is true } else { code to be executed if condition1 and condition2 are not true }
Example <script type="text/javascript"> var d = new Date() var time = d.getHours() if (time<10) { document.write("<b>Good morning</b>"); } else if (time>10 && time<16) { document.write("<b>Good day</b>"); } else { document.write("<b>Hello World!</b>"); } </script>

PAGE 70 WEB TECHNOLOGIES MANUAL
University of Dar es Salaam Computing Centre. One stop Centre for your ICT Solutions. www.ucc.co.tz. 022 2410645
4.7.4 The JavaScript Switch Statement
Conditional statements in JavaScript are used to perform different actions based on different conditions.
You should use the switch statement if you want to select one of many blocks of code to be executed.
Syntax switch(n) { case 1: execute code block 1 break; case 2: execute code block 2 break; default: code to be executed if n is different from case 1 and 2 }
This is how it works: First we have a single expression n (most often a variable), that is evaluated once. The value of the expression is then compared with the values for each case in the structure. If there is a match, the block of code associated with that case is executed. Use break to prevent the code from running into the next case automatically.
Example <script type="text/javascript"> //You will receive a different greeting based //on what day it is. Note that Sunday=0, //Monday=1, Tuesday=2, etc. var d=new Date(); theDay=d.getDay(); switch (theDay) { case 5: document.write("Finally Friday"); break; case 6: document.write("Super Saturday"); break; case 0: document.write("Sleepy Sunday"); break; default: document.write("I'm looking forward to this weekend!"); } </script>
4.8 JavaScript Functions A function is a reusable code-block that will be executed by an event, or when the function is called.

PAGE 71 WEB TECHNOLOGIES MANUAL
University of Dar es Salaam Computing Centre. One stop Centre for your ICT Solutions. www.ucc.co.tz. 022 2410645
To keep the browser from executing a script when the page loads, you can put your script into a function.
A function contains code that will be executed by an event or by a call to that function.
You may call a function from anywhere within the page (or even from other pages if the function is embedded in an external .js file).
Functions can be defined both in the <head> and in the <body> section of a document. However, to assure that the function is read/loaded by the browser before it is called, it could be wise to put it in the <head> section.
Example <html> <head> <script type="text/javascript"> function displaymessage() { alert("Hello World!"); } </script> </head> <body> <form> <input type="button" value="Click me!" onclick="displaymessage()" > </form> </body> </html>
If the line: alert("Hello world!!") in the example above had not been put within a function, it would have been executed as soon as the line was loaded. Now, the script is not executed before the user hits the button. We have added an onClick event to the button that will execute the function displaymessage() when the button is clicked.
4.8.1 How to Define a Function
The syntax for creating a function is:
function functionname(var1,var2,...,varX) { some code }
var1, var2, etc are variables or values passed into the function. The { and the } defines the start and end of the function.
Note: A function with no parameters must include the parentheses () after the function name:
function functionname() { some code }
Note: Do not forget about the importance of capitals in JavaScript! The word function must be written in lowercase letters, otherwise a JavaScript error occurs! Also note that you must call a function with the exact same capitals as in the function name.
The return Statement The return statement is used to specify the value that is returned from the function.

PAGE 72 WEB TECHNOLOGIES MANUAL
University of Dar es Salaam Computing Centre. One stop Centre for your ICT Solutions. www.ucc.co.tz. 022 2410645
So, functions that are going to return a value must use the return statement.
Example The function below should return the product of two numbers (a and b): function prod(a,b) { x=a*b; return x; }
When you call the function above, you must pass along two parameters: product=prod(2,3);
The returned value from the prod() function is 6, and it will be stored in the variable called product.
The Lifetime of JavaScript Variables When you declare a variable within a function, the variable can only be accessed within that function. When you exit the function, the variable is destroyed. These variables are called local variables. You can have local variables with the same name in different functions, because each is recognized only by the function in which it is declared. If you declare a variable outside a function, all the functions on your page can access it. The lifetime of these variables starts when they are declared, and ends when the page is closed.
4.8.2 JavaScript For Loop
Loops in JavaScript are used to execute the same block of code a specified number of times or while a specified condition is true.
Very often when you write code, you want the same block of code to run over and over again in a row. Instead of adding several almost equal lines in a script we can use loops to perform a task like this.
In JavaScript there are two different kind of loops:
for - loops through a block of code a specified number of times
while - loops through a block of code while a specified condition is true
The for Loop The for loop is used when you know in advance how many times the script should run. Syntax for (var=startvalue;var<=endvalue;var=var+increment) { code to be executed }
Example Explanation: The example below defines a loop that starts with i=0. The loop will continue to run as long as i is less than, or equal to 10. i will increase by 1 each time the loop runs.
Note: The increment parameter could also be negative, and the <= could be any comparing statement.
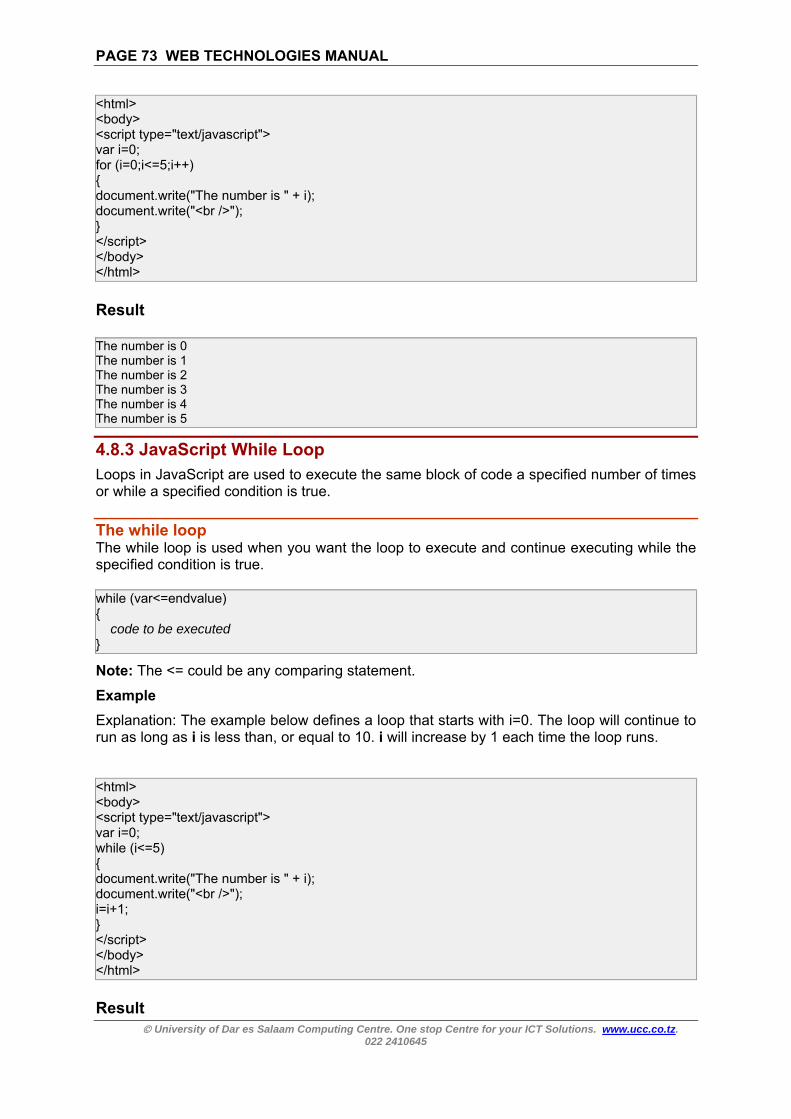
PAGE 73 WEB TECHNOLOGIES MANUAL
University of Dar es Salaam Computing Centre. One stop Centre for your ICT Solutions. www.ucc.co.tz. 022 2410645
<html> <body> <script type="text/javascript"> var i=0; for (i=0;i<=5;i++) { document.write("The number is " + i); document.write("<br />"); } </script> </body> </html>
Result
The number is 0 The number is 1 The number is 2 The number is 3 The number is 4 The number is 5
4.8.3 JavaScript While Loop Loops in JavaScript are used to execute the same block of code a specified number of times or while a specified condition is true.
The while loop The while loop is used when you want the loop to execute and continue executing while the specified condition is true. while (var<=endvalue) { code to be executed }
Note: The <= could be any comparing statement.
Example
Explanation: The example below defines a loop that starts with i=0. The loop will continue to run as long as i is less than, or equal to 10. i will increase by 1 each time the loop runs.
<html> <body> <script type="text/javascript"> var i=0; while (i<=5) { document.write("The number is " + i); document.write("<br />"); i=i+1; } </script> </body> </html>
Result

PAGE 74 WEB TECHNOLOGIES MANUAL
University of Dar es Salaam Computing Centre. One stop Centre for your ICT Solutions. www.ucc.co.tz. 022 2410645
The number is 0 The number is 1 The number is 2 The number is 3 The number is 4 The number is 5
4.8.4 The do...while Loop
The do...while loop is a variant of the while loop. This loop will always execute a block of code ONCE, and then it will repeat the loop as long as the specified condition is true. This loop will always be executed at least once, even if the condition is false, because the code is executed before the condition is tested.
do { code to be executed } while (var<=endvalue);
Example
<html> <body> <script type="text/javascript"> var i=0; do { document.write("The number is " + i); document.write("<br />"); i=i+1; } while (i<0); </script> </body> </html>
Result
The number is 0
4.8.5 JavaScript break and continue Statements
There are two special statements that can be used inside loops: break and continue.
Break The break command will break the loop and continue executing the code that follows after the loop (if any). Example <html> <body> <script type="text/javascript"> var i=0; for (i=0;i<=10;i++) { if (i==3)

PAGE 75 WEB TECHNOLOGIES MANUAL
University of Dar es Salaam Computing Centre. One stop Centre for your ICT Solutions. www.ucc.co.tz. 022 2410645
{ break; } document.write("The number is " + i); document.write("<br />"); } </script> </body> </html>
Result
The number is 0 The number is 1 The number is 2
Continue The continue command will break the current loop and continue with the next value.
Example
<html> <body> <script type="text/javascript"> var i=0 for (i=0;i<=5;i++) { if (i==3) { continue; } document.write("The number is " + i); document.write("<br />"); } </script> </body> </html>
Result
The number is 0 The number is 1 The number is 2 The number is 4 The number is 5
4.8.6 JavaScript For...In Statement The for...in statement is used to loop (iterate) through the elements of an array or through the properties of an object.
JavaScript For...In Statement The for...in statement is used to loop (iterate) through the elements of an array or through the properties of an object. The code in the body of the for ... in loop is executed once for each element/property.

PAGE 76 WEB TECHNOLOGIES MANUAL
University of Dar es Salaam Computing Centre. One stop Centre for your ICT Solutions. www.ucc.co.tz. 022 2410645
Syntax
for (variable in object) { code to be executed }
The variable argument can be a named variable, an array element, or a property of an object.
Example Using for...in to loop through an array: <html> <body> <script type="text/javascript"> var x; var mycars = new Array(); mycars[0] = "Saab"; mycars[1] = "Volvo"; mycars[2] = "BMW"; for (x in mycars) { document.write(mycars[x] + "<br />"); } </script> </body> </html>
4.9 JavaScript Events Events are actions that can be detected by JavaScript.
By using JavaScript, we have the ability to create dynamic web pages. Events are actions that can be detected by JavaScript.
Every element on a web page has certain events which can trigger JavaScript functions. For example, we can use the onClick event of a button element to indicate that a function will run when a user clicks on the button. We define the events in the HTML tags.
Examples of events:
A mouse click
A web page or an image loading
Mousing over a hot spot on the web page
Selecting an input box in an HTML form
Submitting an HTML form
A keystroke
Note: Events are normally used in combination with functions, and the function will not be executed before the event occurs!

PAGE 77 WEB TECHNOLOGIES MANUAL
University of Dar es Salaam Computing Centre. One stop Centre for your ICT Solutions. www.ucc.co.tz. 022 2410645
4.9.1 onload and onUnload
The onload and onUnload events are triggered when the user enters or leaves the page.
The onload event is often used to check the visitor's browser type and browser version, and load the proper version of the web page based on the information.
Both the onload and onUnload events are also often used to deal with cookies that should be set when a user enters or leaves a page. For example, you could have a popup asking for the user's name upon his first arrival to your page. The name is then stored in a cookie. Next time the visitor arrives at your page, you could have another popup saying something like: "Welcome John Doe!".
4.9.2 onFocus, onBlur and onChange
The onFocus, onBlur and onChange events are often used in combination with validation of form fields.
Below is an example of how to use the onChange event. The checkEmail() function will be called whenever the user changes the content of the field:
<input type="text" size="30" id="email" onchange="checkEmail()">
4.9.3 onSubmit
The onSubmit event is used to validate ALL form fields before submitting it.
Below is an example of how to use the onSubmit event. The checkForm() function will be called when the user clicks the submit button in the form. If the field values are not accepted, the submit should be cancelled. The function checkForm() returns either true or false. If it returns true the form will be submitted, otherwise the submit will be cancelled:
<form method="post" action="xxx.htm" onsubmit="return checkForm()">
4.9.4 onMouseOver and onMouseOut
onMouseOver and onMouseOut are often used to create "animated" buttons.
Below is an example of an onMouseOver event. An alert box appears when an onMouseOver event is detected:
<a href="http://www.w3schools.com" onmouseover="alert('An onMouseOver event');return false"> <img src="w3schools.gif" width="100" height="30"> </a>
Exercises 1. Examine the following piece of JavaScript code: <script type="text/javascript"> <!-- // commence script hiding document.write("This is text written with JavaScript"); // end script hiding --> </script>

PAGE 78 WEB TECHNOLOGIES MANUAL
University of Dar es Salaam Computing Centre. One stop Centre for your ICT Solutions. www.ucc.co.tz. 022 2410645
Answer the following:
a. where can this code be placed in a document? b. the <script> element and its type attribute c. the comment code present - differentiate between the HTML and JavaScript versions d. Why do we include comments? e. discuss the <noscript> element - where it is used, and why it is used f. the function write - what does it do, and how is it called
2. What does the following code yield in a browser? <html> <body> <script type="text/javascript"> var i=0 for (i=0;i<=5;i++) { if (i!=3) { continue; } document.write("The number is " + i); document.write("<br />"); } </script> </body> </html>

PAGE 79 WEB TECHNOLOGIES MANUAL
University of Dar es Salaam Computing Centre. One stop Centre for your ICT Solutions. www.ucc.co.tz. 022 2410645
Chapter 5. WEB LAYOUT AND DHTML
5.1 Web Layouts A webpage layout is very important to give better look to your website. It takes considerable time to design a website's layout with great look and feel. Now days, all modern websites are using CSS and JavaScript based framework to come up with responsive and dynamic websites but you can create a good layout using simple HTML tables or division tags in combination with other formatting tags. This chapter will give you few examples on how to create a simple but working layout for your webpage using pure HTML and its attributes.
5.1.1 Web Layout - Using Tables The simplest and most popular way of creating layouts is using HTML <table> tag. These tables are arranged in columns and rows, so you can utilize these rows and columns in whatever way you like. Example For example, the following HTML layout example is achieved using a table with 3 rows and 2 columns but the header and footer column spans both columns using the colspan attribute: <!DOCTYPE html> <html> <head> <title>HTML Layout using Tables</title> </head> <body> <table width="100%" border="0"> <tr> <td colspan="2" bgcolor="#b5dcb3"> <h1>This is Web Page Main title</h1> </td> </tr> <tr valign="top"> <td bgcolor="#aaa" width="50"> <b>Main Menu</b><br /> HTML<br /> PHP<br /> PERL... </td> <td bgcolor="#eee" width="100" height="200"> Technical and Managerial Tutorials </td> </tr> <tr> <td colspan="2" bgcolor="#b5dcb3"> <center> Copyright © 2014. All Rights Reserved. </center> </td> </tr> </table> </body>

PAGE 8
</html>This wil
5.1.2 MYou cancontentused to ExampHere is <!DOCT<html> <head><title>T</head><body><table w<tr valig<td bgc<b>MaiHTML<PHP<bPERL..</td> <td bgcTechnic</td> <td bgc<b>RigHTML<PHP<bPERL..</td> </tr> <table></body></html> This wil
80 WEB TE
University o
> ll produce th
Multiple Con design yot in middle c
o put adverti
ple an example
TYPE html>
> Three Colum>
> width="100%gn="top"> color="#aaain Menu</b
<br /> r /> .
color="#b5dcal and Man
color="#aaaht Menu</b
<br /> r /> .
> >
>
ll produce th
ECHNOLO
of Dar es Salaam
he following
olumns Laour webpagecolumn andisement or s
e to create
>
mn HTML La
%" border=
" width="20><br />
cb3" heightnagerial Tut
" width="20b><br />
he
Copyri
GIES MAN
m Computing C
g result:
ayout - Use to put you
d you can ussome other
three colum
ayout</title>
"0">
0%">
t="200" widttorials
0%">
ight © 2014
UAL
Centre. One st022 2410645
sing Tableur web contse left columr stuff.
mn layout:
>
th="60%">
4. All Rights R
top Centre for y
es tent in multimn to use m
Reserved.
your ICT Soluti
ple pages. menu and r
tions. www.uc
You can keright column
c.co.tz.
eep your n can be

PAGE 8
5.1.3 W
The <dHTML <
Althougdesigne
ExampHere wachieve <!DOCT<html> <head><title>H</head><body><div sty<div sty<h1>Th</div> <div sty<div><bHTML<PHP<bPERL..</div> <div sty<p>Tec</div> <div sty<div><bHTML<PHP<bPERL..</div> <div sty<centerCopyrigh</cente</div> </div> </body></html>
81 WEB TE
University o
Web Layou
div> elemen<span> elem
gh we can ed as a layo
ple e will try to
ed using <ta
TYPE html>
> HTML Layou>
> yle="width:1yle="backgrhis is Web P
yle="backgrb>Main Men
<br /> r /> .
yle="backgrchnical and
yle="backgrb>Right Me
<br /> r /> .
yle="backgrr> t © 2014. All R
er>
> >
ECHNOLO
of Dar es Salaam
uts - Using
nt is a blocment is use
achieve prout tool. Tab
achieve saable> tag in
>
uts using DI
100%"> round-color:Page Main t
round-color:nu</b></div
round-color:Manageria
round-color:enu</b></div
round-color:
Rights Reserv
GIES MAN
m Computing C
g DIV, SPA
ck level eleed for group
retty nice lables are mo
ame result uprevious e
IV, SPAN</
:#b5dcb3; wtitle</h1>
:#aaa; heighv>
:#eee; heighl Tutorials</
:#aaa; heighv>
:#b5dcb3;cl
ved.
UAL
Centre. One st022 2410645
AN
ement useding elemen
ayouts withore suited to
using <div>xample.
/title>
width:100%"
ht:200px;wi
ht:200px;wi/p>
ht:200px;wi
lear:both">
top Centre for y
for groupits at an inlin
h HTML tabo presenting
> tag along
">
idth:100px;f
idth:350px;f
idth:100px;f
your ICT Soluti
ng HTML ene level.
bles, but tag tabular da
with CSS, w
float:left;">
float:left;">
float:right;">
tions. www.uc
elements w
ables werenata.
whatever y
>
c.co.tz.
while the
n't really
ou have

PAGE 8
This wil
5.2 InDHTML
DHTML
To mos
With DHbrowse
The Do
DOM st
The HT
The HTand ma
JavaSc
Allows y
DHTML Netscape
Note: PcreatesA Web
5.3 DCSS is
82 WEB TE
University o
ll produce th
ntroducL is the art o
L is a combi
st people DH
HTML a Wer window.
ocument O
tands for th
TML DOM is
TML DOM danipulate HT
cript
you to write
Technologie 4.x
JSS (JavaScSheets) (allocontrol how HTML elemedisplayed) Layers (allowcontrol elempositioning a
Problems ws its own propage may l
DHTML Cused to sty
ECHNOLO
of Dar es Salaam
he following
ction to of making H
ination of te
HTML mean
eb develope
Object Mo
e Documen
s the Docum
defines a stTML objects
e code to co
ies in Netsc
cript Style ows you to different ents will be
ws you to ment and visibility)
with codingoprietary feook great in
CSS Poyle HTML el
Copyri
GIES MAN
m Computing C
g result:
DHTMLHTML pages
echnologies
ns a combin
er can cont
odel (DOM
nt Object Mo
ment Object
andard set s.
ontrol all HT
cape 4.x andCross-Brow
)
CS CS
coHTdis
CSyoupo
Jav
DHTML teatures and n one brows
ositioninements.
ight © 2014
UAL
Centre. One st022 2410645
L s dynamic!
s used to cre
nation of HT
trol how to d
)
odel.
t Model for
of objects f
TML elemen
d Internet Exwser DHTML
SS1 SS2 (allows yntrol how diff
TML elementsplayed) SS Positioninu to control esitioning andvaScript
echnologiestechnology
ser and hor
ng (CSS
4. All Rights R
top Centre for y
eate dynam
TML, Style S
display and
HTML.
for HTML, a
nts.
xplorer 4.x In
you to fferent ts will be
ng (allows element d visibility)
s WILL occy that is not rrible in ano
S-P)
Reserved.
your ICT Soluti
mic and inter
Sheets and
d position H
and a stand
nternet Explor
Visuato apptext a
Dynato conpositi
cur as longsupported ther.
tions. www.uc
ractive Web
d JavaScript
HTML eleme
dard way to
rer 4.x
al Filters (alloply visual eff
and graphicsamic CSS (alntrol elemenioning and vi
g as each by other br
c.co.tz.
b sites.
t.
ents in a
o access
ow you fects to ) lows you t isibility)
browser rowsers.
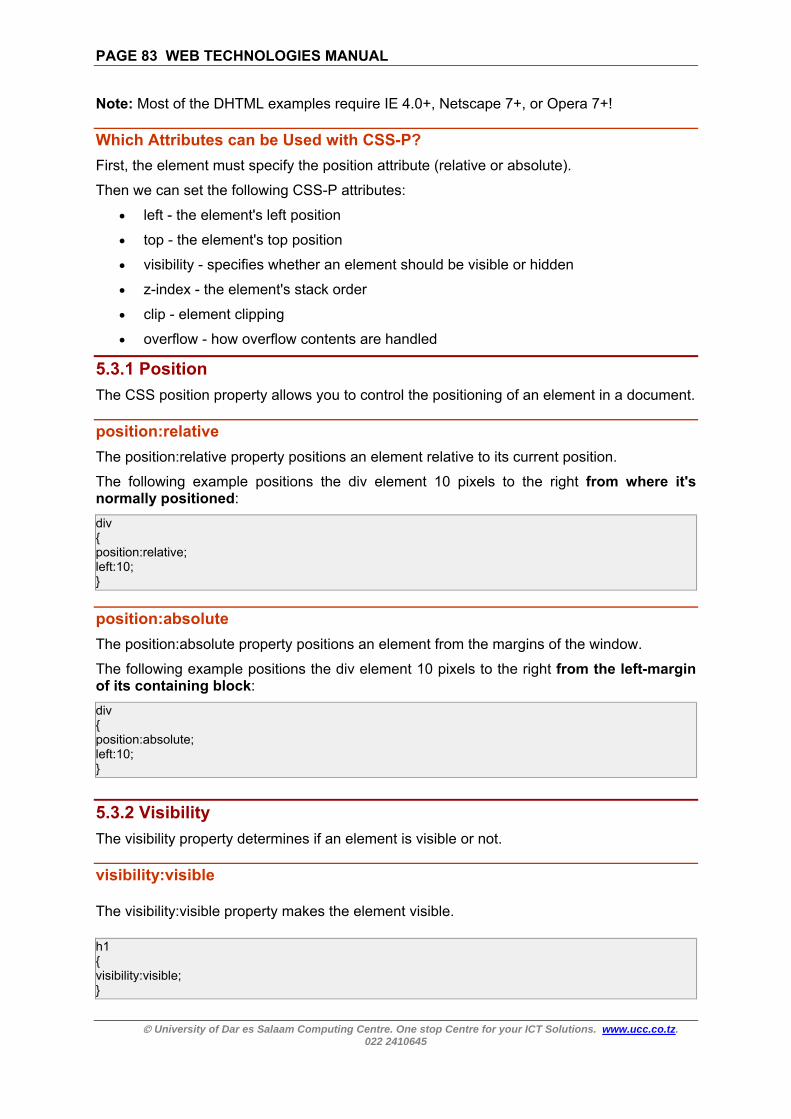
PAGE 83 WEB TECHNOLOGIES MANUAL
University of Dar es Salaam Computing Centre. One stop Centre for your ICT Solutions. www.ucc.co.tz. 022 2410645
Note: Most of the DHTML examples require IE 4.0+, Netscape 7+, or Opera 7+!
Which Attributes can be Used with CSS-P?
First, the element must specify the position attribute (relative or absolute).
Then we can set the following CSS-P attributes:
left - the element's left position
top - the element's top position
visibility - specifies whether an element should be visible or hidden
z-index - the element's stack order
clip - element clipping
overflow - how overflow contents are handled
5.3.1 Position
The CSS position property allows you to control the positioning of an element in a document.
position:relative
The position:relative property positions an element relative to its current position.
The following example positions the div element 10 pixels to the right from where it's normally positioned:
div { position:relative; left:10; }
position:absolute
The position:absolute property positions an element from the margins of the window.
The following example positions the div element 10 pixels to the right from the left-margin of its containing block:
div { position:absolute; left:10; }
5.3.2 Visibility
The visibility property determines if an element is visible or not.
visibility:visible
The visibility:visible property makes the element visible.
h1 { visibility:visible; }

PAGE 84 WEB TECHNOLOGIES MANUAL
University of Dar es Salaam Computing Centre. One stop Centre for your ICT Solutions. www.ucc.co.tz. 022 2410645
visibility:hidden
The visibility:hidden property makes the element invisible.
h1 { visibility:hidden; }
Z-index
The z-index property is used to place an element "behind" another element. Default z-index is 0. The higher number the higher priority. z-index: -1 has lower priority.
h1 { z-index:1; } h2 { z-index:2; }
In the example above, if the h1 and h2 elements are positioned on top of each other, the h2 element will be positioned on top of the h1 element.
5.3.3 Filters
The filter property allows you to add more style effects to your text and images.
h1 { width:100%; filter:glow; }
Note: Always specify the width of the element if you want to use the filter property.
The example above produces this output:
Header
Different Filters
Note: Some of the Filter properties will not work unless the background-color property is set to transparent!
Property Argument Description Examplealpha opacity
finishopacity style startx starty finishx finishy
Allows you to set the opacity of the element filter:alpha(opacity=20, finishopacity=100, style=1, startx=0, starty=0, finishx=140, finishy=270)
blur add direction strength
Makes the element blur filter:blur(add=true, direction=90, strength=6);
chroma color Makes the specified color transparent filter:chroma(color=#ff0000) fliph none Flips the element horizontally filter:fliph; flipv none Flips the element vertically filter:flipv; glow color Makes the element glow filter:glow(color=#ff0000, strength=5);

PAGE 85 WEB TECHNOLOGIES MANUAL
University of Dar es Salaam Computing Centre. One stop Centre for your ICT Solutions. www.ucc.co.tz. 022 2410645
strength gray none Renders the element in black and white filter:gray; invert none Renders the element in its reverse color and
brightness values filter:invert;
mask color Renders the element with the specified background color, and transparent foreground color
filter:mask(color=#ff0000);
shadow color direction
Renders the element with a shadow filter:shadow(color=#ff0000, direction=90);
dropshadow color offx offy positive
Renders the element with a dropshadow filter:dropshadow(color=#ff0000, offx=5, offy=5, positive=true);
wave add freq lightstrength phase strength
Renders the element like a wave filter:wave(add=true, freq=1, lightstrength=3, phase=0, strength=5)
xray none Renders the element in black and white with reverse color and brightness values
filter:xray;
5.3.4 Background
The background property allows you to select your own background.
background-attachment:scroll
The background scrolls along with the rest of the page.
background-attachment:fixed
The background does not move when the rest of the page scrolls.
5.4 DHTML Document Object Model The Document Object Model gives us access to every element in a document.
How to access an element?
The element must have an id attribute defined and a scripting language is needed. JavaScript is the most browser compatible scripting language, so we use JavaScript.
<html> <body> <h1 id="header">My header</h1> <script type="text/javascript"> document.getElementById('header').style.color="red"; </script> </body> </html>
The script changes the color of the header element.
5.5 DHTML Event Handlers With an event handler you can do something with an element when an event occurs.
With an event handler you can do something with an element when an event occurs: when the user clicks an element, when the page loads, when a form is submitted, etc.
<h1 onclick="style.color='red'">Click on this text</h1>
The example above defines a header that turns red when a user clicks on it.

PAGE 86 WEB TECHNOLOGIES MANUAL
University of Dar es Salaam Computing Centre. One stop Centre for your ICT Solutions. www.ucc.co.tz. 022 2410645
You can also add a script in the head section of the page and then call the function from the event handler:
<html> <head> <script type="text/javascript"> function changecolor() { document.getElementById('header').style.color="red"; } </script> </head> <body> <h1 id="header" onclick="changecolor()"> Click on this text</h1> </body> </html>
HTML 4.0 Event Handlers Event Occurs when...onabort a user aborts page loading onblur a user leaves an object onchange a user changes the value of an object onclick a user clicks on an object ondblclick a user double-clicks on an object onfocus a user makes an object active onkeydown a keyboard key is on its way down onkeypress a keyboard key is pressed onkeyup a keyboard key is released
onload a page is finished loading. Note: In Netscape this event occurs during the loading of a page!
onmousedown a user presses a mouse-button onmousemove a cursor moves on an object onmouseover a cursor moves over an object onmouseout a cursor moves off an object onmouseup a user releases a mouse-button onreset a user resets a form onselect a user selects content on a page onsubmit a user submits a form onunload a user closes a page
Exercises
1. Examine the following code and write its output <html> <head> <style> h1.ex1 { position:relative; left:20px; } h1.ex2 {

PAGE 87 WEB TECHNOLOGIES MANUAL
University of Dar es Salaam Computing Centre. One stop Centre for your ICT Solutions. www.ucc.co.tz. 022 2410645
position:relative; left:-20px; } </style> </head> <body> <h1>Normal Heading</h1> <h1 class="ex1">Heading +20</h1> <h1 class="ex2">Heading -20</h1> <p> Relative positioning moves an element relative to its original position. </p> <p> "left:20" adds 20 pixels to the element's LEFT position. </p> <p> "left:-20" subtracts 20 pixels from the element's LEFT position. </p> </body> </html>
2. Describe the event(s) in the following code. Write messages displayed as a result of such event(s) <html> <head> <script type="text/javascript"> function mymessage() { alert("This message was triggered from the onunload event"); } </script> </head> <body onunload="mymessage()"> <p>An alert box will display a message when you close this document!</p> </body> </html>

PAGE 88 WEB TECHNOLOGIES MANUAL
University of Dar es Salaam Computing Centre. One stop Centre for your ICT Solutions. www.ucc.co.tz. 022 2410645
Chapter 6. BASIC PHP SCRIPTS PHP is a powerful server-side scripting language for creating dynamic and interactive websites.
PHP is the widely-used, free, and efficient alternative to competitors such as Microsoft's ASP. PHP is perfectly suited for Web development and can be embedded directly into the HTML code.
The PHP syntax is very similar to Perl and C. PHP is often used together with Apache (web server) on various operating systems. It also supports ISAPI and can be used with Microsoft's IIS on Windows
PHP code is executed on the server, and the plain HTML result is sent to the browser.
6.1 Basic PHP Syntax
A PHP scripting block always starts with <?php and ends with ?>. A PHP scripting block can be placed anywhere in the document.
On servers with shorthand support enabled you can start a scripting block with <? and end with ?>.
For maximum compatibility, we recommend that you use the standard form (<?php) rather than the shorthand form.
<?php ?>
A PHP file normally contains HTML tags, just like an HTML file, and some PHP scripting code.
Below, we have an example of a simple PHP script which sends the text "Hello World" to the browser:
<html> <body> <?php echo "Hello World"; ?> </body> </html>
Each code line in PHP must end with a semicolon. The semicolon is a separator and is used to distinguish one set of instructions from another.
There are two basic statements to output text with PHP: echo and print. In the example above we have used the echo statement to output the text "Hello World".
Note: The file must have the .php extension. If the file has a .html extension, the PHP code will not be executed.
6.2 Comments in PHP In PHP, we use // to make a single-line comment or /* and */ to make a large comment block. <html> <body> <?php //This is a comment /* This is a comment

PAGE 89 WEB TECHNOLOGIES MANUAL
University of Dar es Salaam Computing Centre. One stop Centre for your ICT Solutions. www.ucc.co.tz. 022 2410645
block */ ?> </body> </html>
Variables are used for storing values, such as numbers, strings or function results, so that they can be used many times in a script.
6.3 Variables in PHP
Variables are used for storing a values, like text strings, numbers or arrays.
When a variable is set it can be used over and over again in your script
All variables in PHP start with a $ sign symbol.
The correct way of setting a variable in PHP:
$var_name = value;
New PHP programmers often forget the $ sign at the beginning of the variable. In that case it will not work.
Let's try creating a variable with a string, and a variable with a number:
<?php $txt = "Hello World!"; $number = 16; ?>
In PHP a variable does not need to be declared before being set.
In the example above, you see that you do not have to tell PHP which data type the variable is.
PHP automatically converts the variable to the correct data type, depending on how they are set.
In a strongly typed programming language, you have to declare (define) the type and name of the variable before using it.
In PHP the variable is declared automatically when you use it.
6.3.1 Variable Naming Rules
A variable name must start with a letter or an underscore "_"
A variable name can only contain alpha-numeric characters and underscores (a-z, A-Z, 0-9, and _ )
A variable name should not contain spaces. If a variable name is more than one word, it should be separated with underscore ($my_string), or with capitalization ($myString)
6.4 Strings in PHP
String variables are used for values that contain character strings.

PAGE 90 WEB TECHNOLOGIES MANUAL
University of Dar es Salaam Computing Centre. One stop Centre for your ICT Solutions. www.ucc.co.tz. 022 2410645
In this section we are going to look at some of the most common functions and operators used to manipulate strings in PHP.
After we create a string we can manipulate it. A string can be used directly in a function or it can be stored in a variable.
Below, the PHP script assigns the string "Hello World" to a string variable called $txt:
<?php $txt="Hello World"; echo $txt; ?>
The output of the code above will be:
Hello World
Now, lets try to use some different functions and operators to manipulate our string.
6.4.1 The Concatenation Operator
There is only one string operator in PHP.
The concatenation operator (.) is used to put two string values together.
To concatenate two variables together, use the dot (.) operator:
<?php $txt1="Hello World"; $txt2="1234"; echo $txt1 . " " . $txt2; ?>
The output of the code above will be:
Hello World 1234
If we look at the code above you see that we used the concatenation operator two times. This is because we had to insert a third string.
Between the two string variables we added a string with a single character, an empty space, to separate the two variables.
6.4.2 Using the strlen() function
The strlen() function is used to find the length of a string.
Let's find the length of our string "Hello world!":
<?php echo strlen("Hello world!"); ?>
The output of the code above will be:
12
The length of a string is often used in loops or other functions, when it is important to know when the string ends. (i.e. in a loop, we would want to stop the loop after the last character in the string)

PAGE 91 WEB TECHNOLOGIES MANUAL
University of Dar es Salaam Computing Centre. One stop Centre for your ICT Solutions. www.ucc.co.tz. 022 2410645
6.4.3 Using the strpos() function
The strpos() function is used to search for a string or character within a string.
If a match is found in the string, this function will return the position of the first match. If no match is found, it will return FALSE.
Let's see if we can find the string "world" in our string:
<?php echo strpos("Hello world!","world"); ?>
The output of the code above will be:
6
As you see the position of the string "world" in our string is position 6. The reason that it is 6, and not 7, is that the first position in the string is 0, and not 1.
6.5 PHP Operators
This section lists the different operators used in PHP.
Arithmetic Operators Operator Description Example Result + Addition x=2
x+2 4
- Subtraction x=2 5-x
3
* Multiplication x=4 x*5
20
/ Division 15/5 5/2
3 2.5
% Modulus (division remainder) 5%2 10%8 10%2
1 2 0
++ Increment x=5 x++
x=6
-- Decrement x=5 x--
x=4
Assignment Operators Operator Example Is The Same As = x=y x=y += x+=y x=x+y -= x-=y x=x-y *= x*=y x=x*y /= x/=y x=x/y .= x.=y x=x.y %= x%=y x=x%y
Comparison Operators Operator Description Example == is equal to 5==8 returns false != is not equal 5!=8 returns true

PAGE 92 WEB TECHNOLOGIES MANUAL
University of Dar es Salaam Computing Centre. One stop Centre for your ICT Solutions. www.ucc.co.tz. 022 2410645
> is greater than 5>8 returns false < is less than 5<8 returns true >= is greater than or equal to 5>=8 returns false <= is less than or equal to 5<=8 returns true
Logical Operators Operator Description Example && and x=6
y=3 (x < 10 && y > 1) returns true
|| or x=6 y=3 (x==5 || y==5) returns false
! not x=6 y=3 !(x==y) returns true
6.6 Conditional Statements
Very often when you write code, you want to perform different actions for different decisions.
You can use conditional statements in your code to do this.
if...else statement - use this statement if you want to execute a set of code when a condition is true and another if the condition is not true
elseif statement - is used with the if...else statement to execute a set of code if one of several condition are true
6.6.1 The If...Else Statement
If you want to execute some code if a condition is true and another code if a condition is false, use the if....else statement.
Syntax if (condition) code to be executed if condition is true; else code to be executed if condition is false; Example
The following example will output "Have a nice weekend!" if the current day is Friday, otherwise it will output "Have a nice day!":
<html> <body> <?php $d=date("D"); if ($d=="Fri") echo "Have a nice weekend!"; else echo "Have a nice day!"; ?> </body> </html>

PAGE 93 WEB TECHNOLOGIES MANUAL
University of Dar es Salaam Computing Centre. One stop Centre for your ICT Solutions. www.ucc.co.tz. 022 2410645
If more than one line should be executed if a condition is true/false, the lines should be enclosed within curly braces:
<html> <body> <?php $d=date("D"); if ($d=="Fri") { echo "Hello!<br />"; echo "Have a nice weekend!"; echo "See you on Monday!"; } ?> </body> </html> 6.6.2 The ElseIf Statement
If you want to execute some code if one of several conditions are true use the elseif statement
Syntax if (condition) code to be executed if condition is true; elseif (condition) code to be executed if condition is true; else code to be executed if condition is false;Example
The following example will output "Have a nice weekend!" if the current day is Friday, and "Have a nice Sunday!" if the current day is Sunday. Otherwise it will output "Have a nice day!":
<html> <body> <?php $d=date("D"); if ($d=="Fri") echo "Have a nice weekend!"; elseif ($d=="Sun") echo "Have a nice Sunday!"; else echo "Have a nice day!"; ?> </body> </html>
The Switch statement in PHP is used to perform one of several different actions based on one of several different conditions.
6.6.3 The Switch Statement
If you want to select one of many blocks of code to be executed, use the Switch statement.
The switch statement is used to avoid long blocks of if..elseif..else code.

PAGE 94 WEB TECHNOLOGIES MANUAL
University of Dar es Salaam Computing Centre. One stop Centre for your ICT Solutions. www.ucc.co.tz. 022 2410645
Syntax switch (expression) { case label1: code to be executed if expression = label1; break; case label2: code to be executed if expression = label2; break; default: code to be executed if expression is different from both label1 and label2; } Example
This is how it works:
A single expression (most often a variable) is evaluated once
The value of the expression is compared with the values for each case in the structure
If there is a match, the code associated with that case is executed
After a code is executed, break is used to stop the code from running into the next case
The default statement is used if none of the cases are true <html> <body> <?php switch ($x) { case 1: echo "Number 1"; break; case 2: echo "Number 2"; break; case 3: echo "Number 3"; break; default: echo "No number between 1 and 3"; } ?> </body> </html>
An array can store one or more values in a single variable name.
6.7 Array
When working with PHP, sooner or later, you might want to create many similar variables.
Instead of having many similar variables, you can store the data as elements in an array.

PAGE 95 WEB TECHNOLOGIES MANUAL
University of Dar es Salaam Computing Centre. One stop Centre for your ICT Solutions. www.ucc.co.tz. 022 2410645
Each element in the array has its own ID so that it can be easily accessed.
There are three different kind of arrays:
Numeric array - An array with a numeric ID key Associative array - An array where each ID key is associated with a value Multidimensional array - An array containing one or more arrays
6.7.1 Numeric Arrays
A numeric array stores each element with a numeric ID key.
There are different ways to create a numeric array.
Example 1
In this example the ID key is automatically assigned:
$names = array("Peter","Quagmire","Joe"); Example 2
In this example we assign the ID key manually:
$names[0] = "Peter"; $names[1] = "Quagmire"; $names[2] = "Joe";
The ID keys can be used in a script:
<?php $names[0] = "Peter"; $names[1] = "Quagmire"; $names[2] = "Joe"; echo $names[1] . " and " . $names[2] . " are ". $names[0] . "'s neighbors"; ?>
The code above will output:
Quagmire and Joe are Peter's neighbors 6.7.2 Associative Arrays
An associative array, each ID key is associated with a value.
When storing data about specific named values, a numerical array is not always the best way to do it.
With associative arrays we can use the values as keys and assign values to them.
Example 1
In this example we use an array to assign ages to the different persons:
$ages = array("Peter"=>32, "Quagmire"=>30, "Joe"=>34); Example 2
This example is the same as example 1, but shows a different way of creating the array:
$ages['Peter'] = "32"; $ages['Quagmire'] = "30"; $ages['Joe'] = "34";
The ID keys can be used in a script:

PAGE 96 WEB TECHNOLOGIES MANUAL
University of Dar es Salaam Computing Centre. One stop Centre for your ICT Solutions. www.ucc.co.tz. 022 2410645
<?php $ages['Peter'] = "32"; $ages['Quagmire'] = "30"; $ages['Joe'] = "34"; echo "Peter is " . $ages['Peter'] . " years old."; ?>
The code above will output:
Peter is 32 years old. 6.7.3 Multidimensional Arrays
In a multidimensional array, each element in the main array can also be an array. And each element in the sub-array can be an array, and so on.
Example
In this example we create a multidimensional array, with automatically assigned ID keys:
$families = array ( "Griffin"=>array ( "Peter", "Lois", "Megan" ), "Quagmire"=>array ( "Glenn" ), "Brown"=>array ( "Cleveland", "Loretta", "Junior" ) ); The array above would look like this if written to the output: Array ( [Griffin] => Array ( [0] => Peter [1] => Lois [2] => Megan ) [Quagmire] => Array ( [0] => Glenn ) [Brown] => Array ( [0] => Cleveland [1] => Loretta

PAGE 97 WEB TECHNOLOGIES MANUAL
University of Dar es Salaam Computing Centre. One stop Centre for your ICT Solutions. www.ucc.co.tz. 022 2410645
[2] => Junior ) ) Example 2
Lets try displaying a single value from the array above:
echo "Is " . $families['Griffin'][2] . " a part of the Griffin family?";
The code above will output:
Is Megan a part of the Griffin family? 6.8 Looping
Very often when you write code, you want the same block of code to run a number of times. You can use looping statements in your code to perform this.
In PHP we have the following looping statements:
while - loops through a block of code if and as long as a specified condition is true do...while - loops through a block of code once, and then repeats the loop as long as
a special condition is true for - loops through a block of code a specified number of times foreach - loops through a block of code for each element in an array
6.8.1 The while Statement
The while statement will execute a block of code if and as long as a condition is true.
Syntax while (condition) code to be executed; Example
The following example demonstrates a loop that will continue to run as long as the variable i is less than, or equal to 5. i will increase by 1 each time the loop runs:
<html> <body> <?php $i=1; while($i<=5) { echo "The number is " . $i . "<br />"; $i++; } ?> </body> </html> 6.8.2 The do...while Statement
The do...while statement will execute a block of code at least once - it then will repeat the loop as long as a condition is true.
Syntax do

PAGE 98 WEB TECHNOLOGIES MANUAL
University of Dar es Salaam Computing Centre. One stop Centre for your ICT Solutions. www.ucc.co.tz. 022 2410645
{ code to be executed; } while (condition); Example
The following example will increment the value of i at least once, and it will continue incrementing the variable i as long as it has a value of less than 5:
<html> <body> <?php $i=0; do { $i++; echo "The number is " . $i . "<br />"; } while ($i<5); ?> </body> </html> 6.8.3 The for Statement
The for statement is the most advanced of the loops in PHP.
In it's simplest form, the for statement is used when you know how many times you want to execute a statement or a list of statements.
Syntax for (init; cond; incr) { code to be executed; }
Parameters:
init: Is mostly used to set a counter, but can be any code to be executed once at the beginning of the loop statement.
cond: Is evaluated at beginning of each loop iteration. If the condition evaluates to TRUE, the loop continues and the code executes. If it evaluates to FALSE, the execution of the loop ends.
incr: Is mostly used to increment a counter, but can be any code to be executed at the end of each loop.
Note: Each of the parameters can be empty or have multiple expressions separated by commas.
cond: All expressions separated by a comma are evaluated but the result is taken from the last part. This parameter being empty means the loop should be run indefinitely. This is useful when using a conditional break statement inside the loop for ending the loop.
Example The following example prints the text "Hello World!" five times: <html> <body> <?php

PAGE 99 WEB TECHNOLOGIES MANUAL
University of Dar es Salaam Computing Centre. One stop Centre for your ICT Solutions. www.ucc.co.tz. 022 2410645
for ($i=1; $i<=5; $i++) { echo "Hello World!<br />"; } ?> </body> </html> 6.8.4 The foreach Statement
The foreach statement is used to loop through arrays.
For every loop, the value of the current array element is assigned to $value (and the array pointer is moved by one) - so on the next loop, you'll be looking at the next element.
Syntax foreach (array as value) { code to be executed; } Example
The following example demonstrates a loop that will print the values of the given array:
<html> <body> <?php $arr=array("one", "two", "three"); foreach ($arr as $value) { echo "Value: " . $value . "<br />"; } ?> </body> </html> 6.9 PHP Functions
The real power of PHP comes from its functions.
In PHP - there are more than 700 built-in functions available.
6.9.1 Create a PHP Function
A function is a block of code that can be executed whenever we need it. Creating PHP functions:
All functions start with the word "function()" Name the function - It should be possible to understand what the function does by its
name. The name can start with a letter or underscore (not a number) Add a "{" - The function code starts after the opening curly brace Insert the function code Add a "}" - The function is finished by a closing curly brace
Example A simple function that writes my name when it is called: <html> <body>

PAGE 100 WEB TECHNOLOGIES MANUAL
University of Dar es Salaam Computing Centre. One stop Centre for your ICT Solutions. www.ucc.co.tz. 022 2410645
<?php function writeMyName() { echo "Kai Jim Refsnes"; } writeMyName(); ?> </body> </html>
6.9.2 Use a PHP Function
Now we will use the function in a PHP script:
<html> <body> <?php function writeMyName() { echo "Kai Jim Refsnes"; } echo "Hello world!<br />"; echo "My name is "; writeMyName(); echo ".<br />That's right, "; writeMyName(); echo " is my name."; ?> </body> </html>
The output of the code above will be:
Hello world! My name is Kai Jim Refsnes. That's right, Kai Jim Refsnes is my name.
6.9.3 PHP Functions - Adding parameters
Our first function (writeMyName()) is a very simple function. It only writes a static string.
To add more functionality to a function, we can add parameters. A parameter is just like a variable.
You may have noticed the parentheses after the function name, like: writeMyName(). The parameters are specified inside the parentheses.
Example 1
The following example will write different first names, but the same last name:
<html> <body> <?php function writeMyName($fname) { echo $fname . " Refsnes.<br />";

PAGE 101 WEB TECHNOLOGIES MANUAL
University of Dar es Salaam Computing Centre. One stop Centre for your ICT Solutions. www.ucc.co.tz. 022 2410645
} echo "My name is "; writeMyName("Kai Jim"); echo "My name is "; writeMyName("Hege"); echo "My name is "; writeMyName("Stale"); ?> </body> </html> The output of the code above will be: My name is Kai Jim Refsnes. My name is Hege Refsnes. My name is Stale Refsnes. Example 2
The following function has two parameters:
<html> <body> <?php function writeMyName($fname,$punctuation) { echo $fname . " Refsnes" . $punctuation . "<br />"; } echo "My name is "; writeMyName("Kai Jim","."); echo "My name is "; writeMyName("Hege","!"); echo "My name is "; writeMyName("Ståle","..."); ?> </body> </html>
The output of the code above will be:
My name is Kai Jim Refsnes. My name is Hege Refsnes! My name is Ståle Refsnes...

PAGE 102 WEB TECHNOLOGIES MANUAL
University of Dar es Salaam Computing Centre. One stop Centre for your ICT Solutions. www.ucc.co.tz. 022 2410645
Chapter 7: DEVELOPING INTERACTIVE LAYERS WITH MACROMEDIA
6.1 Understanding Layers Everybody has seen sometimes how the sketchers of cartoons work. And all we've seen how they place a semitransparent leaf with drawings on others and the superposition of all composes the final drawing. Why do they not draw everything on a same leaf? Why do they work with several levels and several drawings if they are going to finish all together?
The reasons are many, and these levels that use the sketchers, are equivalent to the Layers, which Flash uses. Each layer is, therefore, a level in which we can draw, to insert sounds, texts etc with INDEPENDENCE from the rest of layers. It is necessary to take into account that all the layers share the same Timeline and therefore, its different frames will be reproduced simultaneously.
Let's clarify this with an example:
Let's suppose that we have 2 layers. In one layer, the frames from the 1 to the 10 contain the drawing of soccer goal. In the other layer, the frames from the 1 to the 5 contain the drawing of a goalkeeper (they are empty from 5 and further).
Then, this movie will initially display (during the time that lasts the first 5 frames) the goal with the goalkeeper, to show afterward (during the frames from the 5 to the 10) the goal without goalkeeper.
In such a way the goal is independent from the goalkeeper, and we can handle these objects freely, since they do not interfere among themselves.
Another reason to separate the objects in layers is that Flash makes us place each different animation in a layer. Otherwise, all the objects that are in this layer will compose the animation. If we want that an object doesn't form part of an animation, we'll have to delete it from the layer in which this animation is produced.
To proceed further with the example of the goalkeeper, it’s easy if we want to create a motion of the goalkeeper towards a side, but if the goal were in the same layer that the goalkeeper, then BOTH objects would move towards this side, with which it would be impossible to have only the goalkeeper, moved. The solution is to separate the objects in 2 layers, since we've already done.
In addition, the layers have other utilities, they allow us to order our movie rationally, and they help us in the editing drawings (avoiding that they "are based" on only one, or blocking the rest of layers so that we can only select the layer that is of interest).

PAGE 1
6.2 WThe stimagehow to
Insert Insertilayers will be
Add Gdiscus
Erase
Chang
Layer propecomme
Here yhide it.
6.3 W
103 WEB T
University o
Workingtandard View. Let's see fo
o use them.
Layers ing layers (in the folloseen).
Guide Layerssed in detail
Layer : E
ge Name: To
Propertiesrties of the ented and so
you can chan.
Working
TECHNOLO
of Dar es Salaam
g with Law of a layeor what the d
: As its nain the presewing point th
r : Inser the following
Erase the sel
o change Na
: If we doulayer we've ome more of
nge different
g with A
OGIES MAN
m Computing C
ayers iner is the onedifferent butt
ame indicateent scene. he different
rt a kind of g point.
ected layer.
ame: of a lay
ble click theclicked. We'f lesser impo
t options abo
dvance
NUAL
Centre. One st022 2410645
n Flash e that showtons are use
es, it is useIt inserts ntypes from l
guide layer
yer, it is enou
e icon , ll be able to
ortance.
out the layer,
ed Layer
top Centre for y
8 ws the
d and
ed for ormal ayers
. It is
ugh to double
we'll be abmodify all th
, like its nam
rs Optio
your ICT Soluti
e click the cu
ble to acceshe options th
me or color. Y
ons
tions. www.uc
urrent name.
ss a panel what we've pre
You can also
c.co.tz.
with the eviously
o lock or

PAGE 1
ShowIt is veto accorres
Blockuntil uthe prthe ico
To bloand wblockieven t
Showas if twe'll b
Every simila
Let's s
In theobservthis oFILLEwill be
Therewhich"blockthe coto see
In adddistingeach activa
104 WEB T
University o
w /Hide Layery helpful w
ctivate the sponding lay
k Layersunblocking trevious poinon "Block L
ock a layer want to mang a layer to select the
w/Hide layethey were cbe able to d
y layer can br manner.
see how the
e first imagve that a bption isn't a
ED square ine completed
e appears a indicates th
k layers", wholumn "Showe the fillings
dition, the guish them layer. In th
ated or not:
TECHNOLO
of Dar es Salaam
yers : Thwhen we haview of ayer in the p
: It blocksthem. In ordnt, clicking ayers".
is very useake sure th
we'll be abem, so we'l
rs as outlincomposed oistinguish a
be also activ
ese activate
e the curreblack point aactivated; tn the columd and not on
a cross locahat this layehich symbow layers as until we de
color of thbetter. The
his exampl
OGIES MAN
m Computing C
his button aave many laa concrete oint (or in th
s the editionder to block on the poin
eful when what we donble to work l edit the de
nes : Thonly by borall of them e
vated or de
ed and deac
ent layer doappears in the same h
mn "Show laynly its outlin
ated under er isn't visib
olizes that ths outlines". Teactivate thi
he outlines e color of te you can
NUAL
Centre. One st022 2410645
allows us toayers and w
layer (or he cross) th
n of all the or to unblont or icon "L
we have sevn't modify " with the s
esired objec
his button srders. Facineasily and to
eactivated b
ctivated opti
oesn't havethe column
happens to yers as out
nes.
the columble on the sthe layer is bThe layer isis option.
will be difthe outline
see the o
top Centre for y
o show andwe want only
to hide it)hat is under
layers, so wock a concreLock" locat
veral object"without waecurity of n
ct with great
show / hide ng numerouo see in wha
y using the
ions are sho
e any of thn "Show Lathe button
lines", whic
n "Show Ltage. It appblocked. Ans shown in t
fferent for will coincid
object depe
your ICT Soluti
d hide all lay to see one) it is enothe icon "S
we'll not beete layer, wed in the cu
ts together anting" somnot modifyinter easiness
the contenus set of obat layer eac
above men
own.
e buttons aayers”. This
"Block laych symbolize
ayers" in thears a lock d the fill dothis way and
each layerde with the ending on t
tions. www.uc
ayers of the e of them. Iough to cliShow/Hide l
e able to edwe'll proceed
urrent layer
in differentme of themng its objecs.
nts of all thebjects in thch of them i
ntioned butt
activated, ws point meayers". Therees that the
he second k under the coes NOT apd we'll not b
r, so that wcolor indic
the outline
c.co.tz.
movie. n order ick the ayers"
dit them d like in r under
t layers m. After cts, not
e layers is way, s.
ton in a
we can ans that e are a objects
image, column
ppear in be able
we can ated in option

PAGE 1
6.4 R
We'veobjecthave r
As it hwith oshare seen a
But wmovielayer.
Pay att
The gbecausupon timageis enomove the de
We'll sbehindwhethe
In ordemove aand the
6.5 L
There a
Normadescribobjects
GuideanimatBecau(straig
In thiscontenthem cthe seline. Wlayer when animatnext utrack fwouldn
105 WEB T
University o
Reorgan
e dedicatedt over anothrealized tha
has been aothers. The
the same tat the same
what object e. The objec
tention to the
oalkeeper ase the layethe layer "Go. If we want
ough to clickand drag it usired positio
see how the d those of theer its layer is
r to move and drag it en pasted in
Layer Ty
are many typ
al Layersbed in the prs, sounds, ac
e Layerstions of objese its missioht, curve, etc
s image went of 2 layercontains theecond conta
We have definas Guide L
making thtion (this weunit) it will for the blue bn't be seen in
TECHNOLO
of Dar es Salaam
nizing th
a whole uher one in aat if we work
already com first and mtimeline ande time in the
is over thects that will
e previous ex
appears in frer "Goalkeeoal", so it cato change th
k the layer tupwards or dn.
objects are e selected la
s above or be
a frame froup to the la
n the destiny
ypes
pes of layers
: These arrevious pointctions, and o
: These arcts moveme
on is to reprec).
e can see rs. The first
e blue ball ains the curvned the secoLayer, so the moveme'll see it inbe used asball. Its contn the movie.
OGIES MAN
m Computing C
he Laye
nit to how ta movie, hok with differe
mmented, thmain featurd therefore,e movie as s
e others? Tappear ahe
xample:
ront of the geper" is locn be seen inhis distributiothat we wandownwards o
placed aheaayer accordinelow this one
om a layer ayer where y layer.
, as you can
re the layerss. They are u
others
re layers font and its on
esent the traj
the t of and ved ond hat ent
n a s a ent
NUAL
Centre. One st022 2410645
ers with
to place obow to grouprent layers,
he different re is the Ti, the objectsuperposed
The criterionead of all th
goal, cated n the on, it nt to or to
ad or ng to e.
to another we want to
n see in the g
s of Flash bused most c
or special only aim is to sectory of an
top Centre for y
Flash 8
bjects, we ap them andall this isn't
layers havmeline, all s of all framd ones upon
n is given be others wil
one, it is eo stick it. T
general prope
by default, aommonly an
or specific cset the trajecanimated ob
your ICT Soluti
8
already kno many othevery helpfu
ve many feathe layers
mes from alln others.
by the Layell be those t
enough to sThe frame c
erties of a lay
nd they havd for almost
content. Thectory that thisbject, its con
tions. www.uc
own how to er things. Bul.
atures in coof a samel the layers
ers positionthat are on
select the fcan also be
yer:
ve all the proeverything:
ey are useds object mustent usually
c.co.tz.
get an But we'll
ommon e scene will be
n in the the top
frame to e Copied
operties to place
d in the st follow. is a line

PAGE 106 WEB TECHNOLOGIES MANUAL
University of Dar es Salaam Computing Centre. One stop Centre for your ICT Solutions. www.ucc.co.tz. 022 2410645
It is important to remember that the content of the Guide Layers will not be seen in the final movie. Its effect will cause that the blue ball moves from one end of the line to the other following that way. That's a beautiful effect.
Guided Layers : When we define a layer as a guide layer, it is necessary to define also a guided layer. This is a layer that will be affected by the guide defined in the guide Layer.
If we didn't define a guided layer, the guide layer will have not any effect and though it will not be seen in the movie (being a guide layer) it will not cause any effect in the other layers. In the previous image, the blue ball might have to be found in a Guided layer; otherwise it'll not follow the way set by the guide layer.
The guide layers and the guided layers are related to each other in an evident way. A series of guided layers correspond to every guide layer.
On associating a guide layer with a guided layer, a change on the guide layer icon will indicate that the job correctly done.
In the image we can see an example of a guide layer and guided layers associated correctly.
The use of the Guide Layers and its utilities we'll see in detail in the unit of Motion Animations
Mask Layers : These layers can be seen as groups that keep the unmasked layers off. The use of these layers is something that needs high concentration. It is enough to mention that these layers are placed "above" the layers, which they mask, and allow us to see only the part of the layer that cover up the objects located in the mask layer (they act like filters). Similar to the guide layers, the existing objects in this type of layers are not seen either in the final movie. Only the objects from their masked layer corresponding to the "covered" ones we'll be seen.
Masked Layers : These layers work jointly with the masked Layers. The mask layers and the masked layers must be associated to be involved correctly.
Its objects are visible in the final movie, but only when some object of the Mask layer is on the top of them.
Let's see the operation of these layers on an example.
In this example, the blue rectangles are part of a Masked Layer and therefore they will be seen in the final movie (but only ones covered by the mask layer). The red oval is located in the Mask layer and it will not be seen in the movie, but only what "covers" it will be seen. Thus the masks are displayed in the following way.

PAGE 1
6.6 COne of allows cLet's suseem aFlash.
6.6.1 M
At firsof momovemdraw tmomepositiowe se
Now, thmomencreate a
6.7 C
Layers HTML eone lay
107 WEB T
University o
Creatingthe main c
creating aniuppose youa task that w
Making th
t glance, it ments makment. Nevethe globe a
ent when iton (actually
ee now, mos
he durationnts when thean animatio
Creating
area speciaelements ayer over an
TECHNOLO
of Dar es Salaam
g Flash aharacteristiimations in want to cr
will take lon
he Anima
seems logickes the movertheless, wat the initialt touches ty you can cst part of the
n of each e globe is a
on of movem
g rollove
al kind of Hnd to show
nother. One
OGIES MAN
m Computing C
animatics of Flashan effective
reate an anng hours, bu
ation
cal to draw vement mor
with Flash it instance (athe ground reate this fe work (dra
movementat the top ament betwee
er imag
TML elemew them dynae or more L
NUAL
Centre. One st022 2410645
ion withh 8 is its sime and quick imation in wut not really
the globe are real: the t is sufficienabove all), and then
frame by mwing object
t is determand at the ben those tw
es with
ents, which amically usLayers can
top Centre for y
h Flash mplicity; the
way. which a gloy. Let's see
at each mommore draw
nt to createsecondly, wthe globe
aking a copts) is alread
mined by sbottom, andwo frames.
Dream
can be useing JavaScbe made
your ICT Soluti
8 straightforw
obe goes upe how easy
ment, so thawn instants,
only 3 framwe will drawwill come
py of the firdy done.
etting the finally Flas
weaver
ed as a concript. We cavisible dyna
tions. www.uc
wardness in
p and downis to handl
at growing nthe more r
mes: firstly w the globeback to its
rst one). So
time betwsh is pointe
r
ntainer to hoan stack moamically, b
c.co.tz.
n its use
n. It may e it with
number realistic we will
e at the s initial o far as
een the ed out to
old other ore than y hiding

PAGE 1
others. JavaSc The disthis secwhen thImage1
When wwill be and onlwill com
6.7.1 C First letcase I hthe buttusing, Istate anImagesthis.
6.7.2 P
Openthe Linto tNow conteSelecPropeselecThis defauvisiblloade
Note doon the layers. the layeto sit on
6.7.3
108 WEB T
University o
But using cript
sadvantage ction we arehe mouse is, Image 2 a
we mouse ohidden alonly Layer3 w
me up again
Creating ro
t us create have designtons, open nsert>Internd the seco
s are in the
Placing La
n Insert>LayLayer1. Mothe column2
you canent inside ct the laerties Insct Overflowmakes this
ult layer e while t
ed.
own the posame posit(Note: Due
ers at somen the first la
Changing
TECHNOLO
of Dar es Salaam
Macromed
with layerse going to us rolled oveand three la
over on theng with its c
will appear wn. To achiev
ollover Im
2 Images, wned 4 buttoa new pag
ractive Imagond one for first column
ayers
yer and plaove the lay2 of the tabn write t
the Layeayer in tspector aw as 'visibls first layer
and makthe page
sition of thetion, so tha to the over
ewhere elseyers positio
g the Laye
OGIES MAN
m Computing C
dia Dreamw
s is, they cause multipler in an Imagyers: Layer
e Image1, thcontent. Likwith its conve this Follo
ages:
we can usens; 2 for the in Dream
ges>Rollovethe down s
n of the tab
ce yer le. he er. he nd e'. as
kes is
e Layer (56t they will sr lapping of
e, write dowon)
r properti
NUAL
Centre. One st022 2410645
weaver youor
an be viewe layers stacge. In this cr1, Layer2 a
he second kewise for ttent. When
ow the steps
e Macromede up state
mweaver, crer Image. Bstate. Now
ble as show
66px and 16sit over thef layers the
wn the text a
es
top Centre for y
u can do a
ed only witcked over acase study and Layer3.
layer will ahe Image 3 we mouse
s and enjoy
dia Fireworkand 2 for theate a 2X1
Browse anddo it for then in this ex
63px). Insee first layer.
text may nand then cha
your ICT Soluti
all this with
h 4.0 and aanother, andI have take
ppear while3, Layer1 ane out from t!
ks to createhe down sta table. Nowselect the
e next Imagample. Now
rt the seco Now inserot be clear.ange the po
tions. www.uc
hout even
above browd make it vn 2 rollover
e Layer1 & nd 2 will behe Images
e the imageate. After dew Insert the
first one foge, so that w it should
nd and thirrt the text o. So, you caosition of th
c.co.tz.
knowing coding.
wsers. In iewable, r images
Layer 3 e hidden Layer 1
s, in our esigning images
or the up both the look like
rd layers on those an place he layers

PAGE 1
6.7.4 A
Now goingThen see tDreamwhich
bYou wLayerNow a. Seb. Sec. SeThis adisapyou m
Follow tLayer2 the Layover the
109 WEB T
University o
Adding Be
select the to add theOpen Wind
the Events mweaver foh we did in
button and sewill get this brs.
do elect Layerlect Layer2 elect Layeraction will mpear and to
move your mo
the step 4 band click o
yer1 and Lae Image1.
TECHNOLO
of Dar es Salaam
ehaviors
Image1 whe dynamic Ldow > Behav
and actionsor the Rollo
the step1.
elect "Show-box to 'Show
the r1 than clicand click on3 and clic
make the Layo show the ouse over th
by selectingon 'Hide' theayer2 to dis
OGIES MAN
m Computing C
SelInspLayto cyouLaybe h
here we arLayer effectsvior. You cas created bover ImageClick on th
-hide Layersw or Hide" th
followingck on 'Hiden 'Show' thenk on 'Hideyer1 and 3 tLayer2 while Image1.
g Image2. Ten, c. Selecsappear an
NUAL
Centre. One st022 2410645
ect Windopector, withyer2 and Laclose for bou can see tyer2 and Lahidden whil
re s.
an by es he
". e
g;e' n,e'.to e
You can aby Dreamthe new ohide Note herelike. For euse onClicblack, inveselect othfoot of thechoose wcheck is nchoosing tsee all the
Then, a. Sect Layer3 a
nd to show
top Centre for y
ow>Layers. h all the thrayer3 and Ifoth of them.he OverFlo
ayer3. This ele the page
also see the nmweaver in t
nMouseOveLayers
e, You can uexample instck. To do thierted arrow er events, ielist there is
which browsenext to 4 andthe browser
e Events in a
elect Layer1and click on
the Layer2
your ICT Soluti
You will ree layer def the eye is. In the prow is selecteenables theis loaded.
new JavaScrhe Behaviorr and onMou
as
use other evead of onMos you need tnext to the e OnClick, Da category wers to suppd higher bro4 or higher ylist)
then click 'Show'. Th while you
tions. www.uc
get the etails. Seles open clickperties Inspted as hiddee Layer2 an
ript events crs InspectoruseOut with s a
vents also aouseOver yoto click on thevent. Use
Down etc.,. which allows port, make sowsers. (Onlyyou will be a
on 'Hide'; bhis action w
move your
c.co.tz.
Layer ct the
k on it pector en for d 3 to
reated . Here Show-ctions.
as you ou can he tiny this to At the you to
sure a y after able to
b. Select will make r mouse

PAGE 1
6.7.5
Now LayeImagat so
and cLayeLayeNow
a. b. Sc. Se
This acmove yonMou
Repeat showing
110 WEB T
University o
Bringing d
as a final r1 when ye (Or when
omewhere
click on thers". You wirs. do the follo
Select LaSelect Layelect Layer3
ction will mayour mousseOut.
step 5 withg all the Eve
TECHNOLO
of Dar es Salaam
default lay
step, you you move yn you mouson that pa
e buttonll get this b
owing;
ayer1 thayer2 and 3 and click o
ake the Layse out of t
h Image2 alents for bot
OGIES MAN
m Computing C
yer again:
need to bryour mouse away from
age). Select
n and selecox to 'Show
an click click on
on 'Hide'.
er2 and Laythe Image1
so. Now yoth Image1 &
NUAL
Centre. One st022 2410645
:
ring back tse out of tm the imagt the Imag
ct "Show-hiw or Hide" t
on 'Sho'Hide' the
yer3 to disa1. Also do
ou should g& Image2.
top Centre for y
the the ges e1
de the
ow' en,
appear and o not forge
et the Beha
your ICT Soluti
to show thet to chan
avior Inspec
tions. www.uc
e Layer1 wnge the Ev
ctor like tha
c.co.tz.
while you vents to
t Image,

PAGE 111 WEB TECHNOLOGIES MANUAL
University of Dar es Salaam Computing Centre. One stop Centre for your ICT Solutions. www.ucc.co.tz. 022 2410645
Chapter 8: DRUPAL CORE BASICS
Drupal is a program, or a web application, used to manage content on a website. It is distributed with a license usually called open source.
8.1 Drupal Installation
8.1.1 Technical requirements for installing Drupal
Drupal is written in PHP and uses a database to store much of the information being handled on your site. The most common platform for running Drupal is a so-called LAMP stack – Linux, Apache, MySQL, PHP – but Drupal will run on any platform that can run PHP and has a database usable by Drupal. You can, for example, run Drupal on Windows or Mac platforms.
Drupal 7 runs all database queries through an abstraction layer, PHP Data Objects (PDO), which theoretically allows Drupal to run on a wide variety of databases. To work in practice, though, you need drivers to manage the interpretation necessary between Drupal and PDO. This limits your options of databases to use, but the most common databases already have drivers ready to use with Drupal. Drupal supports MySQL (and compatible databases, such as MySQLi and MariaDB), PostgreSQL, SQLite, MS SQL, Oracle databases and the non-relational database MongoDB.
A clean install of Drupal 7 requires PHP to use about 32 MB of memory, but a full website will most likely require much more. The exact memory requirements depends on how a site is set up (and optimized), but a Drupal developer with the php memory limit setting at 128 MB will rarely need to care about the site's memory.
You install Drupal by the following steps:
1. Dowload Drupal and put it on a server. 2. Make two adjustments to Drupal's file system (or make sure that Drupal can do them
for you). 3. Provide Drupal with the login information for your database. 4. Set a few basic settings for your site, such as information for the first user account.
These steps are described in more detail below.
8.1.2 Download the Drupal codebase
You will find the latest version of Drupal at drupal.org. There is a big green button get started with Drupal, providing you with some easy-to-use links to get started. There is also a link directly to Drupal core on the site's front page.
The downloaded file package is either a zip or a tar.gz archive, depending on which download link you use. Regardless of its format, the archive should be extracted with a suitable tool and its content should be moved to the web folder on your server.
Drupal won't care if you place all the files in a sub folder of your server's web folder or directly in the web root. The only thing affected is the path used for accessing your site.

PAGE 112 WEB TECHNOLOGIES MANUAL
University of Dar es Salaam Computing Centre. One stop Centre for your ICT Solutions. www.ucc.co.tz. 022 2410645
If you're using a web hosting service, you will probably need an ftp client to upload files. A good and free ftp client is FileZilla. You will need ftp login information, provided by your web hosting service.
Before the actual installation can start, you will (on most servers) need to make two adjustments to the file system. This ensures Drupal is able to write files to two places. The required steps are:
1. In Drupal's root folder there is a subfolder sites, containing a subfolder default. Within it is a file named default.settings.php. You should copy this and give the resulting file the name settings.php (placed in the same folder). Note that the file should be copied, and not renamed. Drupal requires the original file as well.
2. In the same folder (sites/default), you should create a subfolder named files. 3. The file and folder you have created should both be writable for Drupal, meaning that
they should be writable for your server. These are the only places Drupal requires write access (except for a temporary folder that should be outside the web folder and usually are inherited from your server settings without you having to even think about it).
If you're using an ftp client, you can change the write access for files and folders by right-clicking on them and choosing any option similar to properties or file attributes. How the settings appear depends on your ftp client, but you should be able to find a setting for group write access. Check that option.
Depending on how your server is set up, Drupal may be able to make these changes itself during the installation process. If you find this step confusing, skip it and try installing Drupal anyway. Drupal will let you know if some requirements are unmet, and provide suggestion to how to get things working.
8.1.3 Installation through the web interface
When the file structure is in place, you do the actual Drupal installation by visiting your soon-to-be website. The server will find Drupal's index.php file and if no database environment is available, Drupal will run the installation wizard. The steps in the wizard are:
1. Select an installation profile. Drupal core contains the Standard and Minimal profiles. (See figure A1.2) The standard profile contains a number of commonly used settings, while the minimal profile is as bare as it gets. There are a number of other installation profiles available at drupal.org, for example for building news sites or project management sites. The examples in this manual all build on the standard profile.

PAGE 1
2.
113 WEB T
University o
Figure A1.profile. Oth
Choose lanprofile) havoffer alternbuilding yo
Figure A1languages
TECHNOLO
of Dar es Salaam
2: Professiers tend to
nguage. Byve downloadatives on thur site, as w
.3: By addeven during
OGIES MAN
m Computing C
ional Drupalike the sta
default onded additionhis screen. well as durin
ding more g the install
NUAL
Centre. One st022 2410645
al developeandard profi
ly English inal languag(See figureng the insta
languagesation.
top Centre for y
ers tend tole.
is availablege packs, D
A1.3) You allation.
s you can
your ICT Soluti
o like the m
, but if youDrupal will re
can add ne
use Drup
tions. www.uc
minimal ins
(or the insecognize thew languag
pal in non
c.co.tz.
stallation
stallation hem and es while
-English

PAGE 114 WEB TECHNOLOGIES MANUAL
University of Dar es Salaam Computing Centre. One stop Centre for your ICT Solutions. www.ucc.co.tz. 022 2410645
3. When language settings are complete, Drupal will check that all requirements are met, such as the file and folder described in the previous section are writable. If anything is wrong, and Drupal can't fix it by itself, you will get an error message along with notes about how to fix the problem.
4. Database configuration. This includes selecting the type of database and entering information necessary to access the database, database name, username and any password. (See figure A1.4) If you use a web hosting service only providing you with a single database, you may separate different installations by using a table prefix. This is short text added before all database tables created by Drupal (such as site1_ or site2_).

PAGE 1
115 WEB T
University o
Figure A1.4
TECHNOLO
of Dar es Salaam
4: Drupal ne
OGIES MAN
m Computing C
eeds databa
NUAL
Centre. One st022 2410645
ase login in
top Centre for y
formation to
your ICT Soluti
o work prop
tions. www.uc
perly.
c.co.tz.

PAGE 116 WEB TECHNOLOGIES MANUAL
University of Dar es Salaam Computing Centre. One stop Centre for your ICT Solutions. www.ucc.co.tz. 022 2410645
5. When the database settings have been entered, Drupal will run the actual installation. This means that Drupal will be busy for a minute or so and displaying the different steps in the installation process as entertainment.
6. Configure site. When the installation is complete, you will be asked for basic site information, such as site name and time zone settings. (See figure A1.5) You should also enter information for the first user account on the site. This account will be granted all permissions on the site and should only be used during development and system updates. (It should not be used as a personal account used to post content to the site.)

PAGE 1
117 WEB T
University o
Figure A1.information
TECHNOLO
of Dar es Salaam
.5: The lan for user ac
OGIES MAN
m Computing C
st step is ccount 1.
NUAL
Centre. One st022 2410645
entering
top Centre for y
some basi
your ICT Soluti
c site info
tions. www.uc
ormation, in
c.co.tz.
ncluding

PAGE 1
7.
8.2 N
A node press resuch asusers.
As a Drbuild thfeatures
In Drupnode isimportaintercha
8.2.1 C
On the three linpage, aadminis1.2)
118 WEB T
University o
When all tYou can no
Figure A1.6
Nodes
is a piece oelease. Cos images, v
rupal develohe informatis of nodes.
pal 7, the tes still widelyant to knowangeably if
Creating
first page ynks to add nand one rstrative ove
TECHNOLO
of Dar es Salaam
hese settinow start the
6: A new Dr
of content ontent you dvideos, or
oper, one ofion structur
erm node hay used by
w and recognot otherwi
nodes
you see asnew contenight in therlay, allowin
OGIES MAN
m Computing C
gs are madfun of expe
rupal websit
on a Drupaldon't usuallycontainers
f the most ire on a we
as almost cmany modugnize. In thse stated.
an adminisnt – one in te middle ong you to c
NUAL
Centre. One st022 2410645
de, your inerimenting w
te, fresh fro
l site. It cany read as sto collect
mportant thebsite. This
completely bules (pluginhis manual
strator on athe sidebar,of the pagecreate eithe
top Centre for y
stallation iswith Drupal!
om the insta
n be an infoseparate wpages with
hings you w chapter ex
been replacns) and in d, the terms
a new Drup, another in e. (See figer an Article
your ICT Soluti
s complete.!
allation proc
rmation pageb pages c restricted
ill learn is hxplains how
ced with codocumentats node and
al site, therthe shortcu
gure 1.1) Te or a Basic
tions. www.uc
. (See figur
cess
ge, a blog pcan also beaccess for
how to use nw to use th
ontent. But ttion. This m
d content a
re are no leuts at the toThey all oc page. (Se
c.co.tz.
re A1.6)
post or a e nodes, r certain
nodes to he basic
the term makes it are used
ess than op of the pen the
ee figure

PAGE 1
Figure your firs
Articlesnames The forget a nuor savin
Figure 1
Below i
119 WEB T
University o
1.1: A Drupst node!
s and Basic will give yoms used foumber of fieng the piece
1.2: By defa
s a descript
TECHNOLO
of Dar es Salaam
pal standard
pages are ou a form usor Articles aelds where e of content
ault, nodes
tion for the
OGIES MAN
m Computing C
d installatio
two node tysed to buildnd Basic payou can inpt. (See figur
– content –
fields availa
NUAL
Centre. One st022 2410645
on without a
ypes or typd a content ages are difput informatre 1.3)
– come in tw
able in the A
top Centre for y
any content
es of conteof that typefferent, but tion, and yo
wo flavors: A
Article node
your ICT Soluti
t – click add
nt. Clickinge. This is ca
they work tou have but
Articles and
e form.
tions. www.uc
dd content to
g on any of alled the nodthe same wttons for pre
d Basic page
c.co.tz.
o create
the type de form.
way. You eviewing
es.

PAGE 1
120 WEB T
University o
Title: This page on thbrowser's tTags: This used to catwhile you wseparate thnodes with Edit summacan write alisted, as a summary isBody: This Text formaHTML marallowed, whImage: Thisthe article. the image impaired, aAt the bottoand some oFinally, thetakes you t
TECHNOLO
of Dar es Salaam
is the headhe websiteop bar). is an oppo
tegorize thewrite, but yhem with cothe same k
ary/hide sua summaryso-called t
s written, Drfield is uset: Usually tkup. The shich is impos gives youUploaded iisn't loade
as well as foom of the noother thingsere are buto a new we
OGIES MAN
m Computing C
line for the(it will als
ortunity to ae content. Dou can alsoommas. Kekeyword. mmary: Wh
y of the arteaser. The rupal will crd for the mahe body fieettings in th
ortant from au the opportmages can
ed (this is ior search enode form, ths. tons to sav
eb page tha
NUAL
Centre. One st022 2410645
e article, andso be used
assign your Drupal will o provide n
eywords are
hen clickingticle. Summlink hide su
reate one froain text of th
eld only conhe text forma security ptunity to upln by default important fngine robotshere are a n
ve or previt shows the
top Centre for y
d will be shd for the H
article one suggest an
new ones. Ie usually di
g edit summmaries are ummary hidom the first he article.
ntains plain mat field depoint of viewload an imabe provide
for screen s). number of s
ew the artie article you
your ICT Soluti
hown at theHTML title s
or more key matchingf you want splayed as
mary, you geoften usedes the box part of the
text, but it ecide which w. age to be did with alt tereaders us
settings for
icle. Clickinu just create
tions. www.uc
e top of the shown in t
eywords, wg existing ket several kes links to lis
et a box wh when articagain. If nobody.
can interprmarkup sh
isplayed aloexts – text ssed by the
menus, com
ng the saveed.
c.co.tz.
article's the web
hich are eywords
eywords, sts of all
here you cles are o explicit
et some hould be
ong with shown if visually
mments,
e button
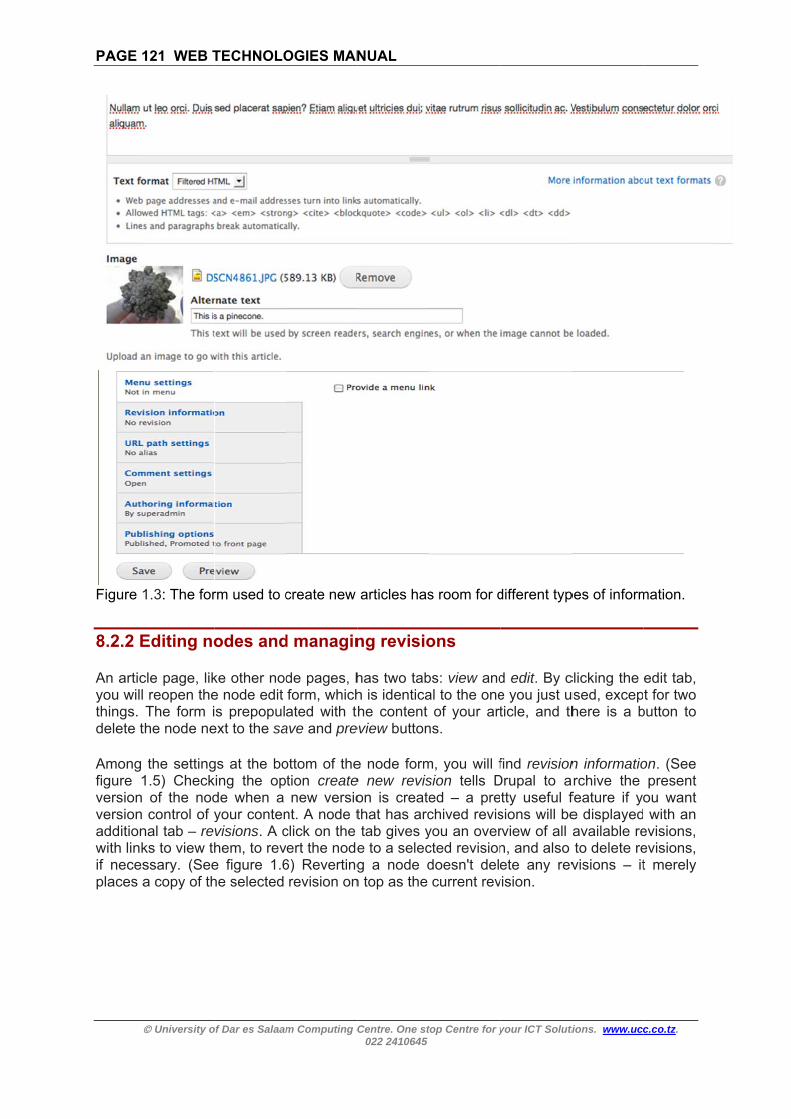
PAGE 1
Figure 1
8.2.2 E
An articyou willthings. delete t
Among figure 1version version additionwith linkif necesplaces a
121 WEB T
University o
1.3: The for
Editing no
cle page, lik reopen theThe form i
the node ne
the setting1.5) Check of the nod control of ynal tab – reks to view thssary. (Seea copy of th
TECHNOLO
of Dar es Salaam
rm used to c
odes and
ke other node node edit s prepopul
ext to the sa
gs at the boking the opde when a your contenvisions. A chem, to reve figure 1.6he selected
OGIES MAN
m Computing C
create new
d managin
de pages, hform, whichated with th
ave and pre
ottom of thetion createnew versio
nt. A node tclick on the vert the node6) Revertingrevision on
NUAL
Centre. One st022 2410645
articles has
ng revisio
has two tabh is identicahe content
eview button
e node forme new revison is createthat has arctab gives y
e to a selecg a node d
n top as the
top Centre for y
s room for d
ons
bs: view andal to the one
of your artns.
m, you will fsion tells Ded – a prechived revisyou an overcted revisiondoesn't delecurrent rev
your ICT Soluti
different typ
d edit. By ce you just uticle, and th
find revisionDrupal to atty useful f
sions will berview of all an, and also ete any rev
vision.
tions. www.uc
pes of inform
clicking the used, excephere is a b
n informatioarchive the feature if yoe displayedavailable reto delete revisions – it
c.co.tz.
mation.
edit tab, t for two
button to
on. (See present
ou want with an
evisions, evisions, t merely

PAGE 1
Figure 1
Figure messag
As a ruediting text formaccoun
122 WEB T
University o
1.5: Drupal
1.6: The tages for the r
le, links anda node is omats is onlyt 1 (the adm
TECHNOLO
of Dar es Salaam
has built-in
ab revisionsrevisions.
d settings aonly displayy displayed ministrator a
OGIES MAN
m Computing C
n functionali
s shows al
are only visied for usersif you are a
account), yo
NUAL
Centre. One st022 2410645
ty for node
ll previous
ible if you as who are aallowed to sou will usua
top Centre for y
revisions.
versions o
are allowed allowed to eswitch formlly see all s
your ICT Soluti
f a node, a
to use themedit it. The oats. When ettings, for
tions. www.uc
along with
m. Thus, theoption for clogged in wbetter or fo
c.co.tz.
any log
e tab for changing with user or worse.

PAGE 123 WEB TECHNOLOGIES MANUAL
University of Dar es Salaam Computing Centre. One stop Centre for your ICT Solutions. www.ucc.co.tz. 022 2410645
8.2.3 Other node settings
Apart from revision information, the bottom of the node form also usually contains five other tabs with settings.
Menu settings: This gives you the chance to add a menu item linking to the node. URL path settings: This allows you to give the node a URL path in parallel to the path
used internally by Drupal. The internal path for nodes is always in the form 'node/NN', where NN is a unique ID number for the node.
Comment settings: This allows you to turn commenting on or off on each node. If the node already has comments, you can choose to hide them.
Authoring information: This shows which user account was used to create the node, and when it was created. Both fields can be changed if necessary.
Publishing options: This gives you three settings controlling how and where the node should be displayed on the site.
Published: By default, only administrators may view unpublished content, while published content is accessible for anyone.
Promoted to front page: With this option checked, the node will be included in the list that is used by default as Drupal's home page. (Most larger sites have customized home pages on which this option is hidden.)
Sticky at top of lists: This option makes the node show up above other nodes on the front page, as well as above some other lists.
8.2.4 View modes for nodes
When visiting the page for a node, you will usually see all of its content. When the node is listed on the front page, only parts of it are displayed. With articles, the body is replaced by a summary, and any images are displayed in a smaller format. This represents two view modes for nodes: full node and teaser.
Nodes may be configured to be displayed in different ways in each display mode.
8.2.5 Node types and node administration
Articles and basic pages are two different node types – two different templates used to create and manage the nodes. These differences are reflected in certain ways. For example:
There are separate links for creating each node type. Each node type has room for different sets of information. You may set separate permissions for which users may create, edit and delete each
node type. Each node type may have different default settings for comment handling, publishing
options, menu links, and more. More details can be found below.
Default settings for node types
In the administration toolbar – the black list at the top of the page in a standard Drupal installation – there is an item called Structure. It leads to a page with some of the most interesting settings when building a Drupal site – such as Content Types. Clicking this link leads to an overview of all node types available on the website, along with links to manage each content type. Above the list, there is also a link to create new content types. (See figure 1.7)

PAGE 1
Figure provide
The linkfields inmost ba
124 WEB T
University o
1.7: The ae an overvie
ks named Mn the node, asic propert
Name: Thissuggests adatabase.
Descriptionwhen you c
Submissionthe title of tthe label tothe node pr
Publishing publishing editing conexception o
Display setwho create
Comment sor not comstraight list
Menu settinthis type, adefault.
TECHNOLO
of Dar es Salaam
administratioew of all nod
Manage Fiedelete link
ties for a no
s is the naa machine
n: This text click add co
n form settinthe node ty
o 'name' mareview setti
options: Tstates. This
ntent. Changof revisionin
ttings: Thisd the node
settings: Thmmenting is
or in a tree
ngs: These and whethe
OGIES MAN
m Computing C
on link strude types on
elds and Mais used to d
ode type (se
ame of thename whi
is shown inntent.
ngs: This giype – for exkes more sngs, and fo
This is uses includes tging these
ng, which is
gives you and when.
his allows a s allowed be structure.
options dicer nodes s
NUAL
Centre. One st022 2410645
ucture: conyour websi
anage Displdelete the nee figure 1.8
e node typech is used
n some lists
ives you thexample, if yosense than 'or providing
ed to chanthe option settings wireturned to
the opport
number ofby default,
ctate which hould be p
top Centre for y
ntent types ite.
lay are usednode type. T8). These p
e. Based od to identif
s of node ty
e opportunitou have a n'title'. Therethe node fo
nge the deto create nll not affect
o default eve
tunity to sh
f settings foand wheth
menus shoplaced unde
your ICT Soluti
in the adm
d for managThe edit linroperties ar
n its plain-fy the node
ypes, such a
ty to changenode type foe are also oorm with hel
efault settinew revisiont any existiery time a n
how or hide
r commentser commen
ould be ableer a particu
tions. www.uc
ministration
ging and disk is used tore:
-text name,e type in
as the list p
e the label for contactsptions for clp text.
ngs for thens by defaung nodes (
node is edite
e informatio
s, such as nts are liste
e to link to nular menu
c.co.tz.
toolbar
splaying o set the
, Drupal Drupal's
provided
used for s, setting changing
e nodes' ult when (with the ed).
on about
whether ed as a
nodes of item by

PAGE 1
Figure revision
Node a
Nodes you area webs
125 WEB T
University o
1.8: It is poning.
administrat
may be scae looking forite, along w
Filters to lipublishing oLinks to seeOptions founpublishin
TECHNOLO
of Dar es Salaam
ossible to se
tion
attered all or. The admi
with some us
mit the nodoptions. e, edit, andor performng, or deleti
OGIES MAN
m Computing C
et a numbe
over a Drupnistration toseful tools (
de list to o
delete eacing mass ng several
NUAL
Centre. One st022 2410645
er of default
pal site; it isoolbar's Con(see figure 1
nly selecte
ch node. updates
nodes at on
top Centre for y
t settings pe
s not alwayntent option1.9) includin
d content t
on nodes nce.
your ICT Soluti
er content t
ys easy to fn provides ang:
types or no
- for exa
tions. www.uc
type, such
find the exaa list of all n
odes, with s
ample, pu
c.co.tz.
as node
act node odes on
selected
blishing,

PAGE 1
Figure updates
Larger accordialternat
8.2.6 N
When tmay poturn thedefault
Adminis
Commenot nod
126 WEB T
University o
1.9: The as on nodes.
Drupal siteng to worktive adminis
Node com
the Commeost commene comment setting for e
strators can
Each commcomment, publishing/On the conpublished between vpublishing,
ents are simdes.
TECHNOLO
of Dar es Salaam
administrati.
s usually hakflows relevstration pag
mments
ent module nts to node
settings oneach node t
n manage co
ment has aincluding
unpublishinntent overvcomments
viewing pubunpublishin
milar to node
OGIES MAN
m Computing C
on page to
ave customant to that e for conten
is enabled,s. (See figun and off fotype.
omments in
n edit link, g chang
ng the commview page t
on the weblished andng and dele
es in their s
NUAL
Centre. One st022 2410645
o manage
m tailored adsite. The V
nt, with mor
, which is thure 1.10) Aor each nod
n two differe
allowing aging posment. (See fthere is a Cebsite. Therd unpublisheting comme
structure, bu
top Centre for y
content ha
dministratioViews Bulk re options a
he case forAs previousde, and it is
ent ways:
dministratosting infofigure 1.11)Comments re are alsohed commeents. (See f
ut from a te
your ICT Soluti
as tools for
on pages thOperations
and greater
r a standardly mentiones also poss
rs to edit thormation tab that le
o subtabs aents. Each figure 1.12 a
echnical poi
tions. www.uc
r performin
hat manages module oflexibility.
d installatioed, it is possible to cha
he content and o
eads to a liavailable to
list has tand 1.13)
nt of view,
c.co.tz.
ng mass
content offers an
n, users ssible to ange the
of each ptionally
ist of all o switch ools for
they are

PAGE 1
Figure 1
127 WEB T
University o
1.10: Nodes
TECHNOLO
of Dar es Salaam
s may have
OGIES MAN
m Computing C
e comments
NUAL
Centre. One st022 2410645
s, and comm
top Centre for y
ments may b
your ICT Soluti
be ordered
tions. www.uc
in a tree st
c.co.tz.
ructure.

PAGE 1
Figure 1
128 WEB T
University o
1.11: Admin
TECHNOLO
of Dar es Salaam
nistrators ca
OGIES MAN
m Computing C
an, if neces
NUAL
Centre. One st022 2410645
sary, edit e
top Centre for y
ach individu
your ICT Soluti
ual commen
tions. www.uc
nt.
c.co.tz.

PAGE 1
Figure comme
Figure comme
8.3 U
Next to even bedivide ton your
8.3.1 A
The adregistercontentand ma
129 WEB T
University o
1.12: The aents at once
1.13: The ents.
Users an
content, use more imphem into grr website.
Adding an
dministrationred on yourt list. Thereass updating
TECHNOLO
of Dar es Salaam
administratie.
list of unp
nd perm
sers are proportant tharoups, and d
nd manag
n toolbar's r website. (Se are links tg accounts.
OGIES MAN
m Computing C
on list for p
ublished co
missions
obably the n content. decide the t
ging user
people linSee figure 2to view and
NUAL
Centre. One st022 2410645
published c
omments h
s
most imporThis sectiothings that
rs
nk provides2.1) The lis
d edit each
top Centre for y
comments h
has tools si
rtant compoon will showeach group
s you withst of users s
account, a
your ICT Soluti
has tools to
imilar to th
onent of a ww you how p of users w
a list of shares mannd there ar
tions. www.uc
o unpublish
he list of pu
website; theto manage
will be allow
all user any features re tools for
c.co.tz.
several
ublished
ey might e users, ed to do
accounts with the
r filtering

PAGE 1
Figure tools fo
On top adding (See fig
130 WEB T
University o
02.1: The lr mass upd
of the list new accou
gure 2.2) Be
Username:unique. Current paaddress or E-mail addfor this is username aPassword/cmisspellingencrypted benter a shoyou from usStatus: UseRoles: Thisdetails.) Alllog in. Picture (ontheir accouAdministratadministratthe overlayLocale settuser. Notify user e-mail to th
TECHNOLO
of Dar es Salaam
list of user ates.
is a link aunts is veryelow is a de
This is the
assword (onpassword, ress: Like tthat the e-are forgotteconfirm pags. Note thabefore theyort or simpsing it. er accountss shows or sl users auto
nly on editinnt. tive overlaytive overlay y. tings (only o
of new acche new us
OGIES MAN
m Computing C
accounts c
dd user, ussimilar to
escription of
e user's nam
nly when eyou must u
the usernam-mail addreen. assword: Tat Drupal cay are storedle password
s that are blosets which omatically h
ng): This allo
y (only on efor selecte
on editing):
count (only er with the
NUAL
Centre. One st022 2410645
contains sh
sed to addthe form yof the setting
me on the w
editing yourusually give me, the e-mess should
This is theannot show d and Drupard, you will
ocked cannpermission
have the ro
ows users
editing): Thised users, dis
: This settin
on creatione account in
top Centre for y
hortcuts to e
new accouou get whe
gs in the form
website, use
r own accoyour curren
mail addressbe availab
e user's pathe current
al has no wget a warn
not be used n roles the ule of authen
to upload a
s setting msplaying the
ng is used t
n): This optinformation.
your ICT Soluti
edit each a
unts to the n editing ams.
ed when log
ount): To cnt passwords must be uble to use i
assword, rt password.way of decrning, but Dr
for logging user has. (Snticated us
an image an
akes it pose administra
to change t
ion makes DThis is the
tions. www.uc
account, as
e site. The n existing a
gging in. It
change youd. unique. Theif the pass
repeated to. All passworypting themrupal won't
in. See next seser as soon
nd associat
ssible to disation pages
the time zo
Drupal sende only time
c.co.tz.
well as
form for account.
must be
r e-mail
e reason sword or
o avoid ords are
m. If you prevent
ction for as they
te it with
able the s without
ne for a
d out an e Drupal

PAGE 1
131 WEB T
University o
sends out arather than
TECHNOLO
of Dar es Salaam
a password their existin
OGIES MAN
m Computing C
d – if users ng passwor
NUAL
Centre. One st022 2410645
lose their prd.
top Centre for y
passwords,
your ICT Soluti
they will ge
tions. www.uc
et a one-tim
c.co.tz.
me login,

PAGE 132 WEB TECHNOLOGIES MANUAL
University of Dar es Salaam Computing Centre. One stop Centre for your ICT Solutions. www.ucc.co.tz. 022 2410645
Figure 2.2: The page used to edit user accounts contains a number of settings, such as which permissions/roles the user has.
Best practice dictates that you should not use the first user account as a personal account. The first user account bypasses all access controls in Drupal, and should be available to pass on to new site managers.
8.3.2 Permissions and roles
The first account created on a Drupal site, user 1, has permission to do everything on the site, but what about other users?
To see which permissions different types of users have – and to change these settings – you use the tab Permissions under the People link in the toolbar. The resulting page contains a long list of permissions, and there is one column for each permission role on your site – anonymous users, authenticated users and administrators. (See figure 2.3)
By checking or unchecking the different permissions, it is possible to do things like give authenticated users permission to create articles or allow anonymous users to search the site. The permissions are grouped by the module that is responsible for them, and the more modules that are installed, the more permissions are sure to turn up.

PAGE 1
Figure 2
133 WEB T
University o
2.3: The pe
TECHNOLO
of Dar es Salaam
ermissions li
OGIES MAN
m Computing C
ist contains
NUAL
Centre. One st022 2410645
a large ma
top Centre for y
atrix of settin
your ICT Soluti
ngs.
tions. www.ucc.co.tz.

PAGE 1
The Roavailablthree inEach neset perm
Assigniyou wan
Figure 2
134 WEB T
University o
oles tab, vile on the w
ncluded in aew role willmissions fo
ng roles to nt to chang
2.4: You ma
TECHNOLO
of Dar es Salaam
isible on thwebsite. (Seea standard be represer each role
users is doe, or you ca
ay add more
OGIES MAN
m Computing C
he permisse figure 2.4installation
ented by a nindependen
one in one oan make ma
e permissio
NUAL
Centre. One st022 2410645
ions list, s4) If your sit, which is vnew columnnt of the oth
of two waysass updates
on roles in th
top Centre for y
hows you te needs movery likely, n in the perhers. (See f
s – you cans from the u
he roles list
your ICT Soluti
a list of aore permissthis is the p
rmissions migure 2.5) Q
either edit user list.
t.
tions. www.uc
ll permissiosion levels tplace to ad
matrix, and yQuick and s
each user
c.co.tz.
on roles than the
dd more. you may lick!
account

PAGE 1
Figure 2
If a useall these
The pepermissit is coavoids
8.3.3 O
Selectinblock odevelop
135 WEB T
University o
2.5: Each n
er has moree roles. The
rmissions msion is moremmon to whaving to go
Other use
ng the Conon the Conper should k
AdministratpermissionRegistratiocreated - foand accounPersonalizasignature thchanges he
TECHNOLO
of Dar es Salaam
ew role can
e than one re rule is tha
matrix is one or less sewait until a o through th
er accoun
nfiguration lnfiguration Pknow. The m
tor role: Thes matrix. n and cancor example,nts should bation – signhat will be aer signature
OGIES MAN
m Computing C
n have sepa
role, which t roles deci
e of the buelf-explanato
project is he whole lis
nt setting
ink from thPage will smost import
e role set h
cellation: Th, if visitors sbe treated wnatures: If sadded to ale, signatures
NUAL
Centre. One st022 2410645
arate permis
is quite posde what yo
siest settingory. Since nnearly finis
st more time
gs
e toolbar ashow you atant are des
ere will aut
his setting dshould be a
when an accignatures al their comms on existin
top Centre for y
ssion settin
ssible, she u can do, n
gs pages innew moduleshed beforees than is n
and then Aca few morescribed belo
omatically h
determines allowed to scount is can
are enabled,ments (but
ng comment
your ICT Soluti
gs.
will get perot what you
n Drupal, bues often adde setting allecessary.
ccount Sette user settiow.
have all per
how new asign up, andncelled. , users will not to otherts are also a
tions. www.uc
rmissions bu can't.
ut fortunated new perml permissio
tings in theings that a
rmissions s
accounts shd also how
be allowed r content). affected.
c.co.tz.
ased on
ely, each missions, ns. This
e People a Drupal
et in the
hould be content
to set a If a user

PAGE 136 WEB TECHNOLOGIES MANUAL
University of Dar es Salaam Computing Centre. One stop Centre for your ICT Solutions. www.ucc.co.tz. 022 2410645
E-mails: This setting contains a number of e-mail templates that are used when users register, if they lose their passwords, and in some other cases. Note that there are some token replacement patterns available for dynamic replacements, such as [user:name] and [user:one-time-login-url].
8.4 Regions and blocks
When you visit a node page in Drupal – or any other page – Drupal pulls out the content corresponding to the current URL and formats it to make it possible for a web browser to display. On the URL node/1, for example, Drupal displays the content for the node with ID 1. But it is not just the content of node one that is displayed; there may also be elements like menus, search forms, related content, latest comments on the site, and much more.
Both the main content and the other elements are displayed as blocks, placed in one of the regions of the website. These blocks can be moved around, and there are basic, as well as more sophisticated, ways of adding new blocks to your website.

PAGE 1
Figure regionsin your
You caselect Swhere ta list ofmove ba block'
137 WEB T
University o
3.1: Blockss link on thecurrent the
n reach a liStructure athey are plaf blocks und
blocks to a n's sorting ar
TECHNOLO
of Dar es Salaam
s are placede administrame.
ist of all avand then Bl
aced – whicder the subnew region rrow and dr
OGIES MAN
m Computing C
d in one of ation page f
ailable blococks. (See
ch could, forbheading Diby using theragging it to
NUAL
Centre. One st022 2410645
the regionsfor blocks g
cks on the s figure 3.2)r example, isabled, mee select list
o another re
top Centre for y
s of the wegives an ove
site by usin) The blockbe Sidebar
eaning they of region ngion's subh
your ICT Soluti
ebsite. The erview of th
g the adminks are grour first or Condon't showames, or by
header.
tions. www.uc
Demonstrahe regions a
nistration touped by thentent. There
w up at all. Yy simply clic
c.co.tz.
ate block available
oolbar to e region e is also You can cking on

PAGE 138 WEB TECHNOLOGIES MANUAL
University of Dar es Salaam Computing Centre. One stop Centre for your ICT Solutions. www.ucc.co.tz. 022 2410645
Above the list of blocks is the link Demonstrate block regions. It leads to a page where all regions are printed clearly on an empty site template, making it easy to get an overview of the available regions. (See figure 3.1) Don't miss the Exit block region demonstration link to return to the block list.

PAGE 1
Figure grouped
139 WEB T
University o
3.2: The add by the reg
TECHNOLO
of Dar es Salaam
dministratiogions in whi
OGIES MAN
m Computing C
on page forch they are
NUAL
Centre. One st022 2410645
r blocks she placed.
top Centre for y
ows all the
your ICT Soluti
e blocks ava
tions. www.uc
ailable on t
c.co.tz.
the site,

PAGE 140 WEB TECHNOLOGIES MANUAL
University of Dar es Salaam Computing Centre. One stop Centre for your ICT Solutions. www.ucc.co.tz. 022 2410645
8.4.1 Block settings
In the block list, there is a configure link available for each block. Each link leads to a page where you may change the settings for the block (see figure 3.3).
Block title: This can be used for overriding the title of the block as it is shown to users. To hide the title, enter <none>.
Region settings: This is an alternative way of moving the block between regions, similar to the select lists in the block overview list.
Visibility settings: These settings provide some basic options for determining when the block should be visible or not:
Pages: This allows for showing or hiding the block based on the URL of the viewed page. You may use * as a wildcard to replace the entire URL or just parts of it. Any pattern will be compared with both the internal paths ('node/1') and URL aliases ('information/about-us').
Content types: This can be used to show the block only when selected node types are viewed.
Roles: This can be used to show the block only to users with the selected roles.
Users: Enabling this setting allows users to determine if the block should be visible or not. (These blocks then become available on each user’s account edit page.)
Apart from these settings, every block also has its own particular settings. The block for most recent comments, for example, has settings for how many comments should be displayed.

PAGE 1
Figure 3context
8.4.2 A
Many mwhich lemost baabove t
141 WEB T
University o
3.3: Every b the block s
Adding b
modules proet you, as asic blocks,the block lis
TECHNOLO
of Dar es Salaam
block has itshould be sh
locks
ovide the ban adminis, though, yost. This lead
OGIES MAN
m Computing C
s own settinhown or hid
lock list witstrator, creaou only needds to a page
NUAL
Centre. One st022 2410645
ngs - for exdden.
th new blocate new blod the Block
e where you
top Centre for y
xample, som
cks, and thocks throughk module itsu can create
your ICT Soluti
me settings
ere are alsh configuraelf and the
e a block wi
tions. www.uc
determine
so a lot of mation. To cre
add block lth static co
c.co.tz.
in which
modules eate the link right ntent.

PAGE 142 WEB TECHNOLOGIES MANUAL
University of Dar es Salaam Computing Centre. One stop Centre for your ICT Solutions. www.ucc.co.tz. 022 2410645
8.4.3 Complements and alternatives to blocks
Block management can quickly become a mess on large and complex Drupal sites. In response to this problem, a number of modules have been created. Here are the two most important to know:
Context: Among other things, this module helps set visibility rules for blocks in a more flexible way.
Panels and Page manager (part of Chaos tools suite): These modules replace the regular block system with panel panes. Compared to blocks, these panes make it far easier to access and use contextual information.
These modules provide more functionality by complementing or replacing the block system. Discussion on Context module, Panels and Page manager are beyond the coverage of this manual.
8.5 Menus
By default, content on a Drupal site is not automatically placed in any particular structure. When creating a node, you don't choose where on the site it should be. You create it, and then other parts of Drupal can make it appear as a subpage to a particular menu item, in a list in a particular section, or as a part of another structure.
The most direct way of bringing structure to your Drupal site is to use menus. These are links collected in a tree structure.
8.5.1 Displaying menus
A standard installation of Drupal has four initial menus: main menu, management, navigation and user menu. More menus can be added via Drupal's interface, and you can also choose where and how they should be displayed.
There are, in principle, two ways of displaying menus:
Each menu on the site has its own block, which can be placed in a region just like any block.
The theme on the site can (but does not always) have two places where menus are displayed in a special format – main links and secondary links. In a standard Drupal installation, the main links are displayed as large white tabs against the blue header, while the secondary links are displayed as discrete links in the upper-right corner of the site.
Which menus should be used for main links and secondary links can be changed at the toolbar's Structure link, in the Menu and Settings tabs.
The display of main links and secondary links only hold one level of menu links. Submenu items are not shown. It is possible to use secondary links to display subitems of the primary menu by configuring them to fetch links from the same menu. The Menu block module provides further possibilities to display selected levels and parts of a menu.

PAGE 1
8.5.2 C
As with found bthe men
Figure 4
At the tdifferenstandar
The pagways (s
143 WEB T
University o
Creating
many otheby going to tnus availab
List links: Tto do whenEdit menu:(not the linkAdd link: Th
4.1: The me
top of the lisnce betweenrd installatio
ge listing msee figure 4
You may cSubmenu itYou may ewon't be dpages they
TECHNOLO
of Dar es Salaam
and editi
er administrathe toolbar le on your s
This gives y managing This allowks it containhis leads to
enu overvie
st of menusn menus thon) is that yo
menu links a.2):
change the tems are cr
enable or diisplayed in
y lead to are
OGIES MAN
m Computing C
ng menu
ation tasks,and selecti
site. (See fig
you a list of a menu.
ws you to chns). You mao a page for
w can be fo
s is an Addhat you creaour custom
allows you to
menu strureated by insable a me the menu
e not affecte
NUAL
Centre. One st022 2410645
links
, there is anng first Strugure 4.1) E
all items in
hange the ay also dele
adding ano
ound in Stru
d menu link ate yourself menus can
o manage t
ucture by cndenting a menu item wit, and any
ed. top Centre for y
n overview fucture and tach menu p
n this menu,
name and ete any menother link in
ucture, Men
used for adf and thosen be deleted
the content
licking andmenu item. th the checchild items
your ICT Soluti
for managinthen Menuspresents thr
, and is usu
descriptionnus you hav
the menu.
us.
dding furthee provided bd.
of the men
dragging t
ckbox enabls will also b
tions. www.uc
ng menus. Is, and it disree options.
ually what y
n of the meve created ySee details
er menus. Tby modules
nu in a few
the sorting
led. Disablebe hidden.
c.co.tz.
t can be plays all .
you want
nu itself yourself. s below.
The only s (or the
different
arrows.
ed items But the

PAGE 1
Figure 4
Right ato the cinforma
144 WEB T
University o
You may eone used foEach item by other mdisabled in
4.2: Each m
bove the liscurrently vieation:
Menu link tPath: This recommend('http://examthe site witwith any URDescriptionEnabled: TShow as exloaded andParent linkany. This olist.
TECHNOLO
of Dar es Salaam
edit each meor creating managed b
modules are the menu l
menu has a
st of menu ewed menu
itle: This is is the URL ded to usmple.com/nthout breakRL aliases. n: This is a this correspxpanded: If
d displayed,: This settin
option can b
OGIES MAN
m Computing C
enu item usnew items. by Drupal's
managed ink list.
list of all lin
items there. The form
the clickablthe menu le the inteode/1'), sin
king links. It
tooltip that ionds to thef this optioneven if the
ng dictates wbe replaced
NUAL
Centre. One st022 2410645
sing the edi Menu modby their res
nks included
e is an Add for creating
le text that wink leads to
ernal path nce using int also make
is usually she enabled sen is checked user has nwhich menu
d by manua
top Centre for y
it link. This
dule also haspective mo
d in that me
item link, wg or editing
will be dispo. When cre
('node/1') nternal pathes it possib
hown whenetting in thed, all child
navigated tou link this it
al click-and-
your ICT Soluti
leads to a
as a delete odule settin
nu.
which is usemenu item
layed to useeating menu
rather thahs makes itble for Drup
hovering oe menu itemitems of thi another pa
tem should -drag sorting
tions. www.uc
page simila
link. Links ngs, but can
ed to add nms has the f
ers. u links, it is an absolutet possible tpal to repla
over the mem list.
is menu linart of the mebe placed g in the me
c.co.tz.
ar to the
defined n still be
ew links following
strongly e paths to move
ace links
nu item.
k will be enu. under, if enu item

PAGE 1
Menu li
8.5.3 C
A quickon nodenumberitem co
Figure 4
By defasettingsform, as
8.6 O
This seknow.
8.6.1 A
There awith the
145 WEB T
University o
Weight: Thparent, withby manual
nks don't ha
Creating
k and easy e edit pager of new optnfigurations
4.3: You ca
ault, articles on each ns well as de
Other ba
ection collec
Administr
are a numbee purpose o
TECHNOLO
of Dar es Salaam
his setting h lower weiclick-and-d
ave to lead
menu lin
alternative es, under Mtions becoms described
an create me
es and basnode type default setting
asic Dru
cts some m
ration aid
er of shortcof making sit
OGIES MAN
m Computing C
determinesight numberag sorting
to pages o
ks for no
when creatMenu settingme available
in the prev
enu links to
ic pages mdetermininggs for the p
upal cor
iscellaneou
ds
cuts and niftte administr
NUAL
Centre. One st022 2410645
s the sortinrs floating tin the menu
n your Drup
odes
ting menu lgs. If the Pe (see figurevious section
o nodes righ
may only bg which meparent item.
re settin
us administr
fty tools enaration easie
top Centre for y
ng order foto the top. Tu item list.
pal site. The
inks is to usProvide a me 4.3). All sn.
ht from the n
e placed innus should
ngs
rative settin
abled in a ser. They are
your ICT Soluti
r menu iteThis option
ey can point
se the menmenu link op
ettings are
node's edit f
n the Mainbe availab
ngs a Drupa
standard Drue summarize
tions. www.uc
ms with th can be ov
t to any val
nu options aption is chesimilar to th
form.
n menu. Thble in the n
al develope
rupal installaed below.
c.co.tz.
he same erridden
id URL.
available ecked, a he menu
here are ode edit
r should
ation, all

PAGE 146 WEB TECHNOLOGIES MANUAL
University of Dar es Salaam Computing Centre. One stop Centre for your ICT Solutions. www.ucc.co.tz. 022 2410645
The black toolbar at the top on Drupal pages is provided by the Toolbar module. It contains links to the top-level items in the menu management.
The administrative overlay, the frame that appears when clicking on administration links, is provided by the Overlay module. One of its points is to make it easier to find the page you were on when starting your administration.
The Contextual links module adds a number of links in drop-down menus at various elements on your Drupal site. The menu is accessed by clicking on the gear icon that appears when hovering over elements that have contextual links – such as blocks.
The Dashboard module makes it easier to build a collection of blocks on one single administration page (found under the dashboard link in the toolbar).
The gray list just below the black toolbar is provided by the Shortcut module, which also provides links (marked with plus signs) to add default shortcuts. The latter are used to add links to the former, which is a handy way to always have your most-visited administration pages one click away. It is possible to create different sets of shortcuts. From the toolbar, select Configuration, Shortcuts. Users with relevant permissions may select which shortcut sets to use on a separate tab on their user pages. Note that while shortcuts remind us of menus, they are technically separated.
The modules Administration menu and Admin are popular complements to Drupal's built-in tools for administrators. They both provide alternative, and in some aspects more user-friendly, administration menus.
8.6.2 Text formats
In Drupal, all text that may contain markup is handled by one of the website's text formats. These are rules determining how the text should be processed before being displayed. The text formats have three main purposes:
Security: The text formats make sure that any malicious code or script, entered by malicious users, doesn't have malicious effects on the site or its visitors.
Sanitation: The inputted text is processed to make sure that any markup is clean and follows common standards. This is one of the reasons for Drupal being naturally search-engine friendly (as well as friendly towards screen readers).
Comfort: Text formats may also be used to convert certain expressions to HTML. In Drupal core, this is used to automatically create things like line breaks and links from URLs, but it could also be used for allowing the same type of markup as is used on Wikipedia, for example.
Each text format consists of one or more filters. The formats and most filters can be managed using the toolbar Configuration, Text formats.
Even if Drupal processes all formatted text, the original text is never changed, which is an important rule for how to treat user input. Since the original potentially malicious input is stored in the database, it is important to keep in mind that user-provided text should always be sanitized.
8.6.3 Other settings
This last section of the Drupal core basics chapter contains some loosely related items you may find useful.

PAGE 147 WEB TECHNOLOGIES MANUAL
University of Dar es Salaam Computing Centre. One stop Centre for your ICT Solutions. www.ucc.co.tz. 022 2410645
The page you use as your site's home page can be set from the toolbar Configuration, Site information. The default setting is "node," which provides a list of teasers of nodes marked with promote to front page.
Drupal depends on a number of scheduled activities being carried out on a regular basis – for example, allowing indexing of new content for searches. If your server has native cron functions, you can turn off Drupal's backup functionality for scheduled activities at the toolbar Configuration, Cron. On the same page, you can also trigger cron activities manually - for example, to make new content immediately searchable.
If things start behaving weirdly while you're building your Drupal site, it is wise to empty Drupal's cache. This processed data is temporarily stored to speed up the website. If this doesn't help, check the error logs for interesting messages. You can clear the cache using the toolbar Configuration, Performance. The most interesting log messages are available at Reports, Recent log messages.
When performing system updates on your site, you should put it in maintenance mode to make sure that site visitors aren't accessing the database while it is being updated. This setting is on the toolbar at Configuration, Maintenance mode.

PAGE 148 WEB TECHNOLOGIES MANUAL
University of Dar es Salaam Computing Centre. One stop Centre for your ICT Solutions. www.ucc.co.tz. 022 2410645
References 1. Anderson, R “The Long and Winding Road to Web-Based Apps”. Network Computing 19
March 2001: 79-84
2. Deitel, H:, et al., Internet & World Wide Web How to Program. Upper Saddle River, NJ: Prentice Hall, 2004
3. Chun, Russel. Macromedia Flash Advanced. US.: Peachpit Press, 2001
4. Bleyle, J., et al., Macromedia Flash MX 2004 Actionscript Reference Guide. http://download.macromedia.com/pub/documentation/en/flash/mx2004/fl_actionscript_reference.pdf, San Francisco, CA: Macromedia, Inc.,2003.
5. Curtis, H. Flash Web Design: The art of Motion Graphics. U.S:. New Riders Publishing, 2000.
6. Boumphrey, F., et al., Beginning XHTML. U.S.: Wrox Press Ltd, 2000. 7. Floyd, M. “Generating Style Sheets Dynamically.” Webtechniques January 2001:C2 8. “DHTML and CSS (For the World Wide Web),” Second Edition, Cranford Teague,
Peachpit Press, 2001, ISBN 0-201-73084-7 9. “The Web Wizard’s Guide to Web Design,” James G. Lengel, Addison Wesley, 2001,
ISBN: 0-201-74562-3 10. Drupal site, https://www.drupal.org/