WASHING MACHINE DRUM TYPE - Icecat
43
WASHING MACHINE DRUM TYPE WASHING MACHINE (DRUM) CONTENTS SERVICE Manual REPAIR GUIDE The model code is on the next page. 1. Safety Instructions 2. Features and Specifications 3. Disassembly and Reassembly 4. Troubleshooting 5. Wiring Diagram 6. Reference WW10T754DBH WW90T684DLH WW90T654DLH WW90T986DSH WW90T534DAW
-
Upload
khangminh22 -
Category
Documents
-
view
0 -
download
0
Transcript of WASHING MACHINE DRUM TYPE - Icecat

WASHING MACHINEDRUM TYPE
WASHING MACHINE (DRUM) CONTENTS
SERVICE ManualR E PA I R G U I D E
The model code is on the next page.
1. Safety Instructions
2. FeaturesandSpecifications
3. Disassembly and Reassembly
4. Troubleshooting
5. Wiring Diagram
6. Reference
WW10T754DBH
WW90T684DLH
WW90T654DLH
WW90T986DSH WW90T534DAW

MODEL CODE
WW1*T****** WW7*T****** WW8*T****** WW9*T******WW10T4040CH WW70T4020CE WW80T4020CE WW80T754ABH WW90T4020CE WW90T734DBTWW10T4040CN WW70T4020CH WW80T4020CX WW80T754ABT WW90T4020EE WW90T734DBXWW10T534DAN WW70T4020CW WW80T4020EE WW80T754DBH WW90T4020EH WW90T734DWHWW10T534DAT WW70T4020CX WW80T4020EH WW80T754DBT WW90T4040CE WW90T754ABHWW10T534DAW WW70T4020EE WW80T4040CE WW80T754DWH WW90T4041CE WW90T754ABTWW10T534DTW WW70T4020EW WW80T4040EE WW80T756ABH WW90T4041CX WW90T754DBHWW10T554DAN WW70T4040CE WW80T4040EH WW80T756AWT WW90T4042CE WW90T754DBNWW10T554DAT WW70T4040CN WW80T4041EE WW80T854ABH WW90T4540AE WW90T754DBTWW10T554DAW WW70T4040CW WW80T4042CE WW80T854ABT WW90T4540AX WW90T754DBXWW10T554DAX WW70T4040EE WW80T4042EW WW80T854DBH WW90T4540TE WW90T754DWHWW10T554DTW WW70T4042CE WW80T4520TE WW80T854DBT WW90T4540TH WW90T854ABHWW10T604CLH WW70T4042CX WW80T4540AE WW80T854DBX WW90T4543AE WW90T854ABTWW10T604DHH WW70T4042EW WW80T4540AX WW80T854DWT WW90T4543TE WW90T854DBHWW10T634AHH WW70T4540TE WW80T4540TE WW80T934ASH WW90T534AAW WW90T854DBTWW10T634CLH WW70T4543AE WW80T4541TE WW80T936ASH WW90T534ATW WW90T854DBXWW10T634DLE WW70T4543TE WW80T4543AE WW80T936DSH WW90T534DAE WW90T934ASHWW10T634DLH WW70T534AAE WW80T4543TE WW80T954ASE WW90T534DAN WW90T936ASHWW10T634DLN WW70T534ATW WW80T534AAE WW80T954ASH WW90T534DAT WW90T936DSHWW10T634DLX WW70T534DTW WW80T534AAW WW80T956ASE WW90T534DAW WW90T936DSXWW10T654ALE WW70T552DAE WW80T534AAX WW80TA026AE WW90T534DAX WW90T954ASHWW10T654ALH WW70T552DAT WW80T534ATW WW80TA026AH WW90T534DTT WW90T954ASXWW10T654CLH WW70T552DAW WW80T534DAE WW80TA026AT WW90T534DTW WW90T954DSHWW10T654CLX WW70T552DAX WW80T534DAN WW80TA026AX WW90T554AAE WW90T956ASEWW10T654DLE WW70T552DTW WW80T534DAT WW80TA026TE WW90T554AAT WW90T956DSHWW10T654DLH WW70T554ATT WW80T534DAW WW80TA026TH WW90T554AAW WW90T956DSXWW10T654DLN WW70T554DAE WW80T534DAX WW80TA026TT WW90T554ATE WW90T984CSHWW10T654DLX WW70T554DAN WW80T534DTT WW80TA046AE WW90T554ATT WW90T986ASEWW10T684DHE WW70T554DAT WW80T534DTW WW80TA046AH WW90T554CAT WW90T986ASHWW10T684DLE WW70T554DAW WW80T552DAW WW80TA046AN WW90T554CAW WW90T986DSHWW10T684DLH WW70T554DAX WW80T554AAE WW80TA046AT WW90T554CAX WW90T986DSXWW10T684DLN WW70T554DTT WW80T554AAT WW80TA046AX WW90T554DAE WW90TA026AEWW10T734AWH WW70T554DTW WW80T554AAW WW80TA046TE WW90T554DAN WW90TA026TEWW10T734CBH WW70TA026AE WW80T554AAX WW80TA046TH WW90T554DAT WW90TA046AEWW10T734CBX WW70TA026AH WW80T554ATT WW80TA046TT WW90T554DAW WW90TA046AHWW10T734DBH WW70TA026AT WW80T554ATW WW80TA047AT WW90T554DAX WW90TA046ANWW10T734DBX WW70TA026AX WW80T554DAE WW80TA047TT WW90T554DTT WW90TA046ATWW10T734DWH WW70TA026TE WW80T554DAN WW80TA049AE WW90T554DTW WW90TA046AXWW10T754ABT WW70TA026TH WW80T554DAT WW80TA049AH WW90T604CLE WW90TA046TEWW10T754CBH WW70TA026TT WW80T554DAW WW80TA049TE WW90T604CLN WW90TA046THWW10T754CBX WW70TA046AE WW80T554DAX WW80TA049TH WW90T606CHE WW90TA046TTWW10T754DBH WW70TA046AH WW80T554DTE WW81T4042EW WW90T606CLE WW90TA047AEWW10T754DBN WW70TA046AN WW80T554DTT WW81T4543AE WW90T634CLE WW90TA047AXWW10T754DBX WW70TA046AX WW80T554DTW WW81T554AAW WW90T634DHE WW90TA049AEWW10TA046AE WW70TA046TE WW80T604CLE WW81T684AHH WW90T634DHH WW90TA049THWW10TA046AN WW70TA046TH WW80T634ALE WW81T854ABT WW90T634DLE WW91T4543AEWW10TP34DSG WW70TA046TT WW80T634ALH WW81T956ASH WW90T634DLH WW91T956ASEWW10TP34DSX WW70TA049AE WW80T634CLH WW81TA049AE WW90T634DLN WW91T986ASHWW10TP54DSX WW70TA049AH WW80T634CLE WW81TA049AH WW90T636AHH WW91TA049AEWW11T604DLE WW70TA049AX WW80T634DHE WW81TA049TE WW90T636ALH WW91TA049THWW11T754DBH WW70TA049TE WW80T634DLE WW81TA049TH WW90T654ALH WW92T656CLEWW11TA046AH WW70TA049TH WW80T634DLH WW82T4041EH WW90T654DHE WW92T736CBTWW13T734CBH WW71T4042CE WW80T636ALH WW83T554AAW WW90T654DLE WW94T756CBTWW14T654CLE WW71T4543AE WW80T636CLH WW83T554CAW WW90T654DLH WW95T534CAE
WW71TA049AE WW80T654ALE WW83TA047AH WW90T654DLN WW95T654DLHWW71TA049TE WW80T654ALX WW84T734CBT WW90T654DLX WW95T754DBHWW71TA049TH WW80T654DHE WW84T954ASH WW90T656AHE WW95T956ASEWW7ET4543AE WW80T654DLE WW85T504DAE WW90T656ALE WW95T984DSHWW7ET4543AX WW80T654DLH WW85T554DAW WW90T684ALE WW95TA047AEWW7QT4543AE WW80T656ALE WW85T654DLH WW90T684DHE WW9ET4543AEWW7TT4042EH WW80T684ALE WW85T754DBH WW90T684DLE WW9GT684ALEWW7XTA049AH WW80T684ALH WW85T954DSH WW90T684DLH WW9GT754AWH
WW80T684DHE WW85T984DSH WW90T684DLN WW9TT4543THWW80T684DLE WW85TA047AE WW90T734AWH WW9XT654ALHWW80T684DLH WW8ET4543AE WW90T734DBHWW80T684DLN WW8ET554AAWWW80T734ABH WW8ET754ABHWW80T734AWH WW8GT654ALHWW80T734DBH WW8TT554AAEWW80T734DBT WW8TT754AWH
WW80T734DWH WW8XT854AWHWW80T736ABH WW8XT956ASH
WW95T534DAXWW90T4040CX
WW90T4040CT
CONTENTS
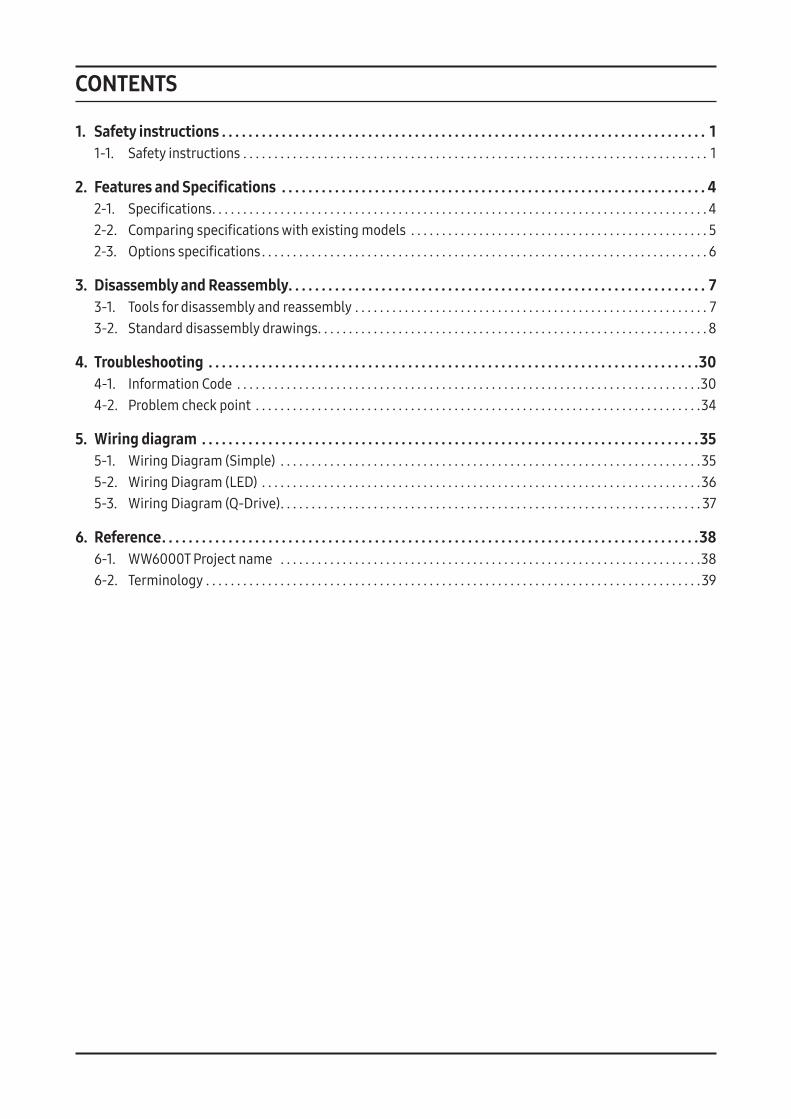
1. Safety instructions . . . . . . . . . . . . . . . . . . . . . . . . . . . . . . . . . . . . . . . . . . . . . . . . . . . . . . . . . . . . . . . . . . . . . . . . . 11-1. Safety instructions . . . . . . . . . . . . . . . . . . . . . . . . . . . . . . . . . . . . . . . . . . . . . . . . . . . . . . . . . . . . . . . . . . . . . . . . . . . 1
2. FeaturesandSpecifications . . . . . . . . . . . . . . . . . . . . . . . . . . . . . . . . . . . . . . . . . . . . . . . . . . . . . . . . . . . . . . . . 42-1. Specifications . . . . . . . . . . . . . . . . . . . . . . . . . . . . . . . . . . . . . . . . . . . . . . . . . . . . . . . . . . . . . . . . . . . . . . . . . . . . . . . . 42-2. Comparingspecificationswithexistingmodels . . . . . . . . . . . . . . . . . . . . . . . . . . . . . . . . . . . . . . . . . . . . . . . . 52-3. Optionsspecifications . . . . . . . . . . . . . . . . . . . . . . . . . . . . . . . . . . . . . . . . . . . . . . . . . . . . . . . . . . . . . . . . . . . . . . . . 6
3. Disassembly and Reassembly . . . . . . . . . . . . . . . . . . . . . . . . . . . . . . . . . . . . . . . . . . . . . . . . . . . . . . . . . . . . . . . 73-1. Toolsfordisassemblyandreassembly . . . . . . . . . . . . . . . . . . . . . . . . . . . . . . . . . . . . . . . . . . . . . . . . . . . . . . . . . 73-2. Standarddisassemblydrawings . . . . . . . . . . . . . . . . . . . . . . . . . . . . . . . . . . . . . . . . . . . . . . . . . . . . . . . . . . . . . . . 8
4. Troubleshooting . . . . . . . . . . . . . . . . . . . . . . . . . . . . . . . . . . . . . . . . . . . . . . . . . . . . . . . . . . . . . . . . . . . . . . . . . .304-1. InformationCode . . . . . . . . . . . . . . . . . . . . . . . . . . . . . . . . . . . . . . . . . . . . . . . . . . . . . . . . . . . . . . . . . . . . . . . . . . .304-2. Problemcheckpoint . . . . . . . . . . . . . . . . . . . . . . . . . . . . . . . . . . . . . . . . . . . . . . . . . . . . . . . . . . . . . . . . . . . . . . . .34
5. Wiring diagram . . . . . . . . . . . . . . . . . . . . . . . . . . . . . . . . . . . . . . . . . . . . . . . . . . . . . . . . . . . . . . . . . . . . . . . . . . . 355-1. WiringDiagram(Simple) . . . . . . . . . . . . . . . . . . . . . . . . . . . . . . . . . . . . . . . . . . . . . . . . . . . . . . . . . . . . . . . . . . . .355-2. WiringDiagram(LED) . . . . . . . . . . . . . . . . . . . . . . . . . . . . . . . . . . . . . . . . . . . . . . . . . . . . . . . . . . . . . . . . . . . . . . .365-3. WiringDiagram(Q-Drive) . . . . . . . . . . . . . . . . . . . . . . . . . . . . . . . . . . . . . . . . . . . . . . . . . . . . . . . . . . . . . . . . . . . . 37
6. Reference . . . . . . . . . . . . . . . . . . . . . . . . . . . . . . . . . . . . . . . . . . . . . . . . . . . . . . . . . . . . . . . . . . . . . . . . . . . . . . . . .386-1. WW6000T Project name . . . . . . . . . . . . . . . . . . . . . . . . . . . . . . . . . . . . . . . . . . . . . . . . . . . . . . . . . . . . . . . . . . . .386-2. Terminology . . . . . . . . . . . . . . . . . . . . . . . . . . . . . . . . . . . . . . . . . . . . . . . . . . . . . . . . . . . . . . . . . . . . . . . . . . . . . . . . 39

Safety Instructions _ 1
1. SAFETY INSTRUCTIONS
1-1. SAFETY INSTRUCTIONS► Makesuretoobservethefollowinginstructionstooperatetheproductcorrectlyandsafelyandpreventpossibleaccidentsand
hazardswhileservicing.► Twotypesofsafetysymbols,WarningandCaution,areusedinthesafetyinstructions.
WARNINGHazardsorunsafepracticesthatmayresultinseverepersonalinjuryordeath.
CAUTIONHazardsorunsafepracticesthatmayresultinminorpersonalinjuryorpropertydamage.
► Followingtherepairbyanon-authorisedserviceprovider,self-repairornon-professionalrepairoftheproduct,Samsungisnotliableforanydamagetotheproduct,anyinjuryoranyotherproductsafetyissuecausedbyanyattempttorepairtheproductwhichdoesnotcarefullyfollowtheserepairandmaintenanceinstructions.AnydamagetotheproductcausedbyanattempttorepairtheproductbyanypersonotherthanaSamsungcertifiedserviceproviderwillnotbecoveredbythewarranty.
WARNING BEFORE SERVICING
• (Whenservicingelectricalpartsorharnesses)Makesuretodisconnectthepowerplugbeforeservicing.4 Failingtodosomayresultinariskofelectricshock.
• Adviseconsumersnottoconnectseveralappliancestoasinglepoweroutletatthesametime.4 Thereisariskoffireduetooverheating.
• Whenremovingthepowercord,makesuretoholdthepowerplugwhenpullingtheplugfromtheoutlet.4 Failingtodosomaydamagetheplugorpoweroutletandresultinfireorelectricshock.
• Whenthewashingmachineisnotbeingused,makesuretodisconnectthepowerplugfromthepoweroutlet.4 Failingtodosomayresultinresultinaccidentaloperationofthewashingmachine.
• Donotplaceorusegasoline,thinners,alcohol,orotherflammableorexplosivesubstancesnearthewashingmachine.4 Thereisariskofexplosionandfirecausedfromelectricsparks.

2 _ Safety Instructions
WARNING WHILE SERVICING
• Checkifthepowerplugandoutletaredamaged,flattened,cutorotherwisedegraded.4 Iffaulty,replaceitimmediately.
Failingtodosomayresultinelectricshockorfire.
• Completelyremoveanydustorforeignmaterialfromthehousing,wiringandconnectionparts.4 Thiswillpreventariskoffireduetotrackingandshortsinadvance.
• Whenconnectingwires,makesuretoconnectthemusingtherelevantconnectorsandcheckthattheyareproperlyconnected.4 Donotusetapeinsteadoftheconnectors,itmaycausefireduetotracking.
• MakesuretodischargethePBApowerterminalsbeforestartingtheservice.4 Failingtodosomayresultinahighvoltageelectricshock.
• Whenreplacingtheheater,makesuretofastenthenutafterensuringthatitisinsertedintothebracket-heater.4 Ifnotinsertedintothebracket-heater,ittouchesthedrumandcausesnoiseandelectricleakage.
• Donotrepairthewashingmachinewithoutsafetygloves.4 It can cause injury.
WARNING AFTER SERVICING
• Checkthewiring.4 Ensurethatthewiringcannotbedamagedbyanysharpedgesormovingparts.
• Checkforanywaterleakage.4 Performatestrunforthewashingmachineusingthestandardcourseandcheckwhetherthereisanywaterleakage
throughthefloorsectionorthepipes.
• Adviseconsumersnottorepairorserviceanypartofthewashingmachinethemselves.4 Thismayresultinpersonalinjuryandshortentheproductlifetime.
Safety Instructions _ 3
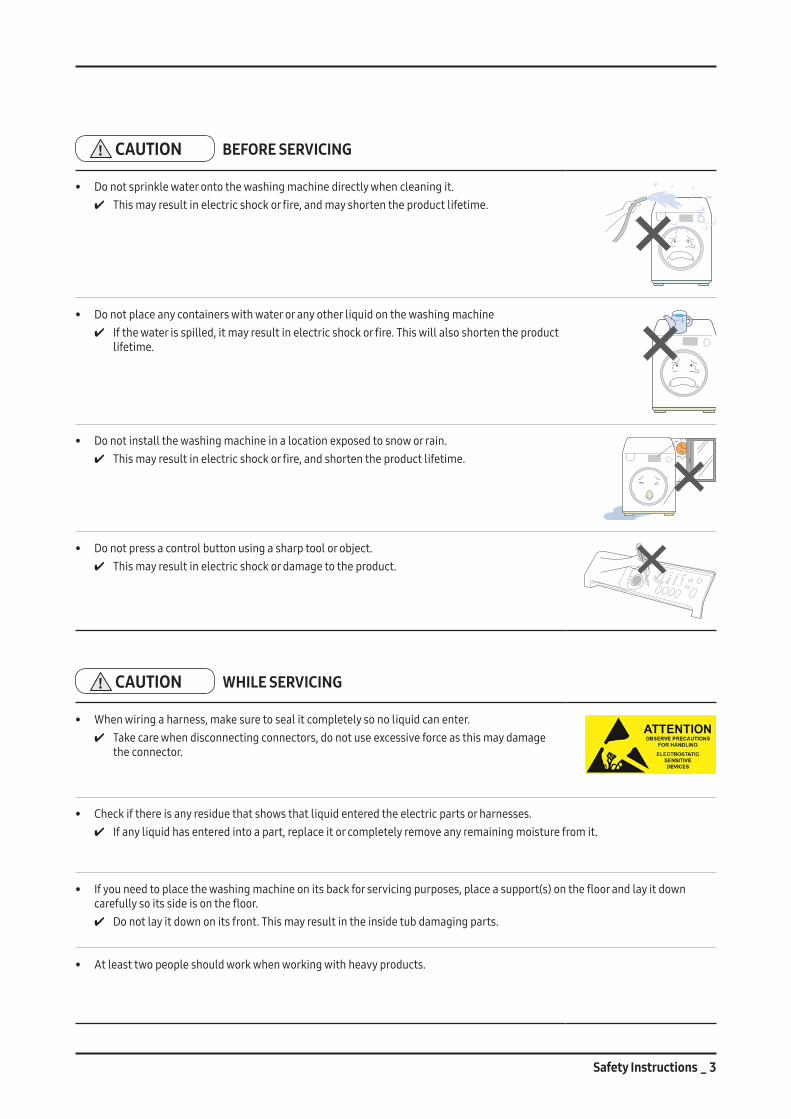
CAUTION BEFORE SERVICING
• Donotsprinklewaterontothewashingmachinedirectlywhencleaningit.4 Thismayresultinelectricshockorfire,andmayshortentheproductlifetime.
• Donotplaceanycontainerswithwateroranyotherliquidonthewashingmachine4 Ifthewaterisspilled,itmayresultinelectricshockorfire.Thiswillalsoshortentheproduct
lifetime.
• Donotinstallthewashingmachineinalocationexposedtosnoworrain.4 Thismayresultinelectricshockorfire,andshortentheproductlifetime.
• Donotpressacontrolbuttonusingasharptoolorobject.4 Thismayresultinelectricshockordamagetotheproduct.
CAUTION WHILE SERVICING
• Whenwiringaharness,makesuretosealitcompletelysonoliquidcanenter.4 Takecarewhendisconnectingconnectors,donotuseexcessiveforceasthismaydamage
theconnector.
• Checkifthereisanyresiduethatshowsthatliquidenteredtheelectricpartsorharnesses.4 Ifanyliquidhasenteredintoapart,replaceitorcompletelyremoveanyremainingmoisturefromit.
• Ifyouneedtoplacethewashingmachineonitsbackforservicingpurposes,placeasupport(s)onthefloorandlayitdowncarefullysoitssideisonthefloor.4 Donotlayitdownonitsfront.Thismayresultintheinsidetubdamagingparts.
• Atleasttwopeopleshouldworkwhenworkingwithheavyproducts.

FeaturesandSpecifications_4
2. FEATURES AND SPECIFICATIONS
2-1. SPECIFICATIONSMODEL WW90T654DLH WW10T754DBH WW90T986DSH WW90T684DLH WW90T534DAW WW90T4540AX
Modelname Frontloadingwashingmachine
Dimensions(mm) 600x850x550 600x850x600 600x850x600 600x850x550 600x850x550 600x850x550
Water pressure 50kPa-800kPa
Netweight(kg) 70 74 75 70 68 68
Washandspincapacity 9 10.5 9 9 9 9
Powerconsumption
Washing220V 150W
240V 150W
Washingandheating
220V 2000W
240V 2400W
Spin 220V~ 240V 600W 600W 700W 600W 600W 600W
PUMPING 30W
Spinrevolutions 1400 1400 1600 1400 1400 1400
- pleasevisitSamsungofficialwebsitetoreceivemostup-to-dateinformationaboutsoftwareandproductmaintenance.
Model WW90T654DLH WW10T754DBH WW90T986DSH WW90T684DLH WW90T534DAW WW90T4540AX
Width(A) 600mm
Height-Overall(B) 850mm
Depth(C) 550mm 600mm 600mm 550mm 550mm 550mm
Depthwithdooropen90°(D) 1110mm 1160mm 1160mm 1110mm 1110mm 1110mm
A
B
CD

5_FeaturesandSpecifications
2-2. COMPARING SPECIFICATIONS WITH EXISTING MODELS
Model name WW90T654DLH WW10T754DBH WW90T986DSH WW90T684DLH WW90T534DAW WW90T4540AX WW6500K
Image
Capacity 9 10.5 9 9 9 9 9
Main Spec
Drum Volume 63 70.5 65.9 63 63 63 63
MaxRPM 1400 1400 1600 1400 1400 1400 1400
Motor DIT DIT DIT DIT DIT DIT BLDC
Water Supply Coldonly Coldonly Coldonly Coldonly Coldonly Coldonly Coldonly
Drainage Pump Pump Pump Pump Pump Pump Pump
USP
ECO BUBBLE ● ● ● ● ● X ●
AddWash ● ● ● ● X ● ●
Steam ● ● ● ● ● ● ●
AOW/AD X/X X/X ●/● ●/X ●/X X/X X/X
BubbleSoak ● ● ● ● ● X ●
Super Speed ● ● ● ● X X ●
Wifi ● ● ● ● ● X ●
Q-DRIVE X 2nd ● X X X X
Design
DOOR Good Tint Door (Better)
Tint Door (Best) Good Basic Basic Crystal
gloss
Drum EssentialDiamond Swirl+ Swirl+ Essential
DiamondEssentialDiamond
EssentialDiamond Diamond
DISPLAY Simple Simple Simple Simple Simple LED LED
Dimension 600x850x550 600x850x600 600x850x600 600x850x550 600x850x550 600x850x550 600x850x550

FeaturesandSpecifications_6
2-3. OPTIONS SPECIFICATIONS
NO Unit Part Code Figure Description Qty
1 BoltSpanner DC60-40146A ToremovetheshippingboltsToadjustthelevelingleg
1
2 Assy Hose WaterDC97-17845A(Cold)DC97-17845B(Hot)
Tosetupwatersupply. Coldonly1, Cold+Hot2(★)
3Hose Water(Aqua-Stop)
DC67-00675A Tosetupwatersupply. 1(★)
4 ManualUsers DC68-03649A~Z Toexplaintheproductoperationandinstallation 1
5 CapFixer DC67-00307A Tocovertheholes 3
6 Hose Hanger DC67-00357A Tosecurethedrainhose. 1
7 GuideLiquid DC61-03510A Touseliquiddetergent. 1(★)
Note• (H)issuppliedforspecificmodelsonlyamongthosewithoutwatersupplyhoses.• Customercanpurchaseadditionalwatersupplyanddrainhosesfromaservicecenter.• Forbuilt-inmodels,thespanner,watersupplyanddrainhosesarenotsupplied.Boththewatersupplyanddrainhosesare
suppliedduringtheinstallation.
Disassembly and Reassembly _ 7
3. DISASSEMBLY AND REASSEMBLY
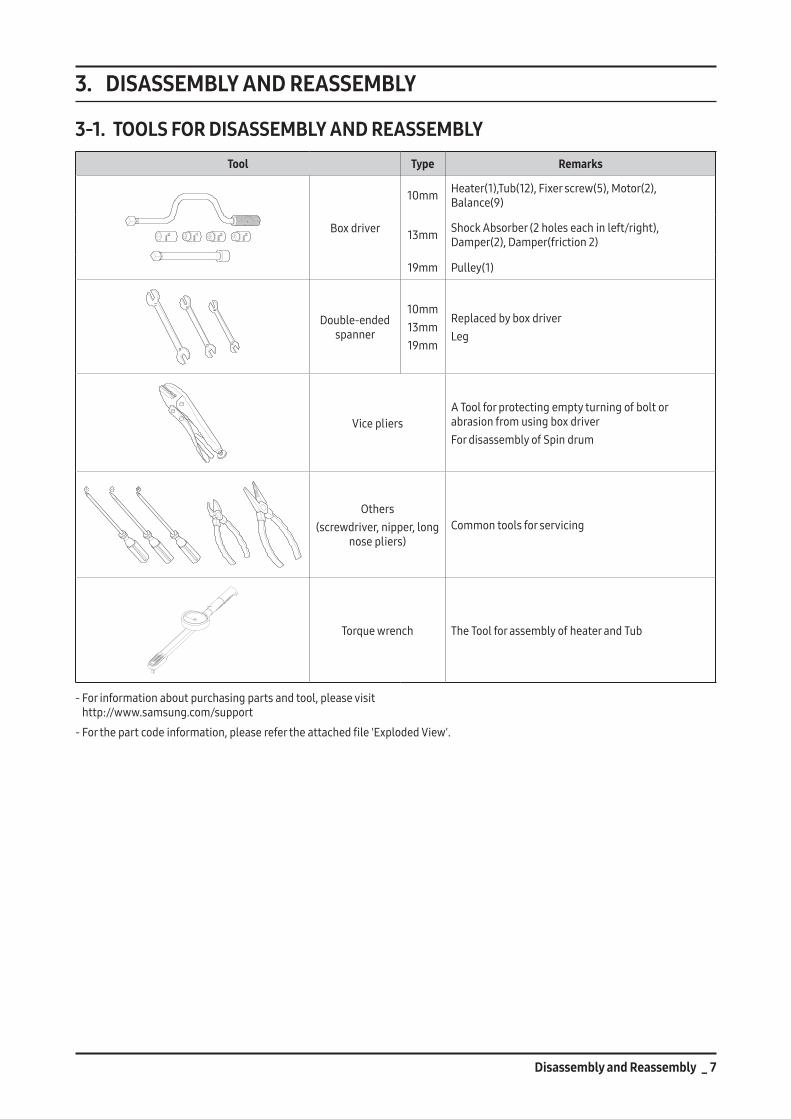
3-1. TOOLS FOR DISASSEMBLY AND REASSEMBLY Tool Type Remarks
Boxdriver
10mm Heater(1),Tub(12),Fixerscrew(5),Motor(2),Balance(9)
13mm ShockAbsorber(2holeseachinleft/right),Damper(2),Damper(friction2)
19mm Pulley(1)
Double-endedspanner
10mm13mm19mm
ReplacedbyboxdriverLeg
VicepliersAToolforprotectingemptyturningofboltorabrasionfromusingboxdriverFordisassemblyofSpindrum
Others(screwdriver,nipper,long
nosepliers)Commontoolsforservicing
Torquewrench TheToolforassemblyofheaterandTub
-Forinformationaboutpurchasingpartsandtool,pleasevisit http://www.samsung.com/support
-Forthepartcodeinformation,pleaserefertheattachedfile'ExplodedView'.

8 _ Disassembly and Reassembly
3-2. STANDARD DISASSEMBLY DRAWINGS► Thisisastandarddisassemblydiagramandmaydifferfromtheactualproduct.
Usethismaterialasareferencewhendisassemblingandreassemblingtheproduct.
Disassembly
Part Figure Description
Assy Cover Top
1. Remove2screwsholdingtheCoverTopatthebackoftheunitusing(+)screwdriver.
BACK FRONT
2. RemovetheCoverTopbyliftingitupafterpullingitbackabout15mm.
Assy Drawer
1. OpentheDrawerbyhand
2. Whileholdingdownthereleaseleverinsidethedrawer(redbox),slideopenthedrawer.
3. PulluptheCapRinsetoremoveit.

Disassembly and Reassembly _ 9
Reassembly
Part Figure Description
Assy Drawer
1. FittheholeandpresstheCapRinsesothatitcanbeassembled.
2. MakesuretofittherailwhenreassemblingtheAssydrawer.
3. Putthedrawerintherightdirection.

10 _ Disassembly and Reassembly
Disassembly
Part Figure Description
Assy Drawer (Auto Dispense)
1. PulltoopentheDrawerbyhand.
2. Whileholdingdownthereleaseleverinsidethedrawer(redbox),slideopenthedrawer.
3. DisassembletheCoverDrawerbyhand.
4. PulluptheCapRinsetoremoveit.
Disassembly and Reassembly _ 11
Reassembly
Part Figure Description
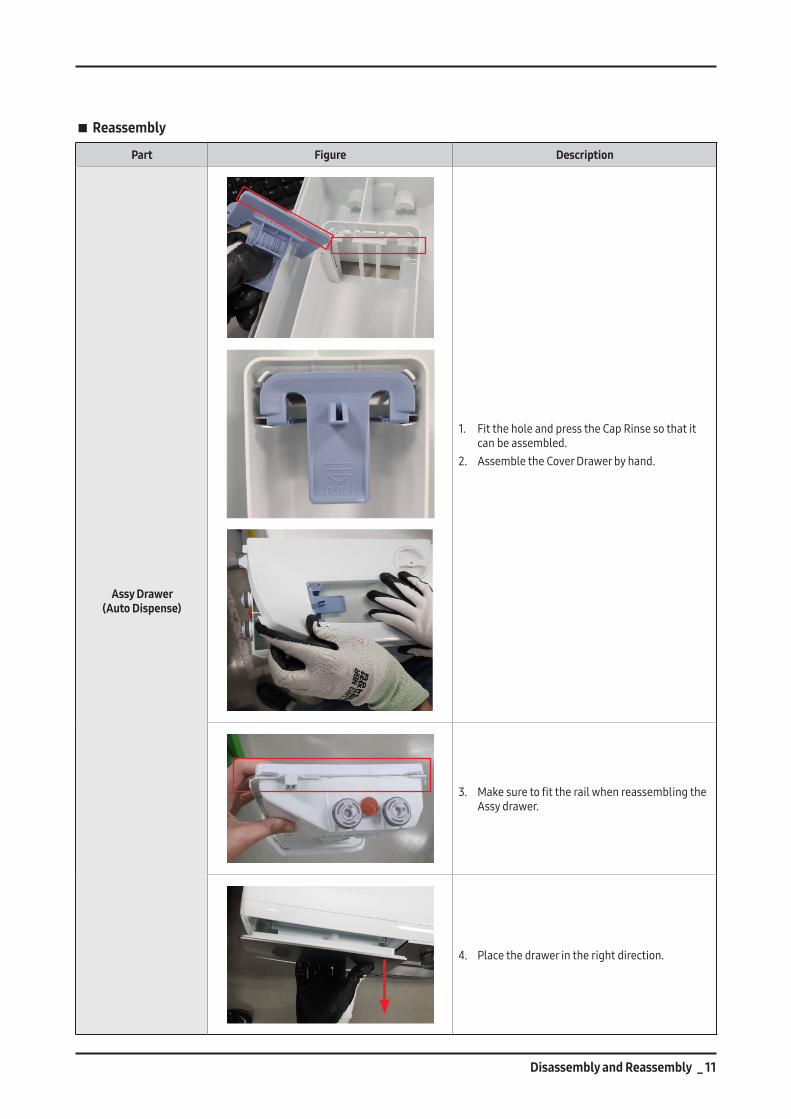
Assy Drawer (Auto Dispense)
1. FittheholeandpresstheCapRinsesothatitcanbeassembled.
2. AssembletheCoverDrawerbyhand.
3. MakesuretofittherailwhenreassemblingtheAssydrawer.
4. Placethedrawerintherightdirection.

12 _ Disassembly and Reassembly
Disassembly
Part Figure Description
Assy Panel Control (Simple)
-Beforeyoustart,disassembleAssyCoverTop,AssyDrawer.1. Remove2screwsholdingthedrawerandpanel
using(+)screwdriver.
2. RemovethescrewsatthetopoftheASSY-PANELCONTROLusing(+)screwdriver.(3ea)
3. Grabthepanelandslightlypushthehousingdrawertoremovethehookandpullthepanelupwardstodisassemblewithbody
Becarefulnottobreakthehook.
4. HoldtheASSY-PANELCONTROLwhilepullingitupwardsanddisassembletheterminaltoremoveit.Pressthehookwhileremovingtheterminal.
Disassembly and Reassembly _ 13
Reassembly
Part Figure Description
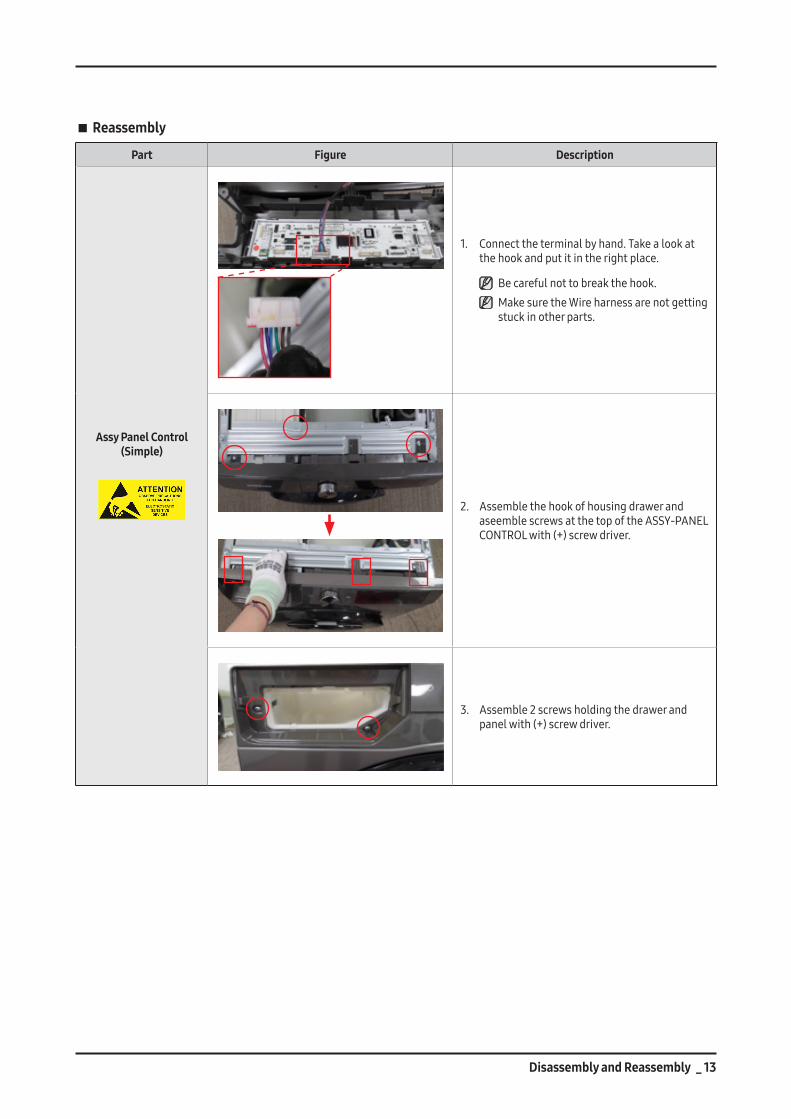
Assy Panel Control (Simple)
1. Connecttheterminalbyhand.Takealookatthehookandputitintherightplace.
Becarefulnottobreakthehook. MakesuretheWireharnessarenotgettingstuckinotherparts.
2. AssemblethehookofhousingdrawerandaseemblescrewsatthetopoftheASSY-PANELCONTROLwith(+)screwdriver.
3. Assemble2screwsholdingthedrawerandpanelwith(+)screwdriver.

14 _ Disassembly and Reassembly
Disassembly
Part Figure Description
Assy Panel Control (LED)
-Beforeyoustart,disassembleAssyCoverTop,AssyDrawer.1. Remove2screwsholdingthedrawerandpanel
using(+)screwdriver.
2. RemovethescrewsatthetopoftheASSY-PANELCONTROLusing(+)screwdriver.(3ea)
3. Grabthepanelandslightlypushthehousingdrawertoremovethehookandpullthepanelupwardstodisassemblewithbody.
Becarefulnottobreakthehook.
4. HoldtheASSY-PANELCONTROLwhilepullingitupwardsanddisassembletheterminaltoremoveit.Pressthehookwhileremovingtheterminal.
Disassembly and Reassembly _ 15
Reassembly
Part Figure Description
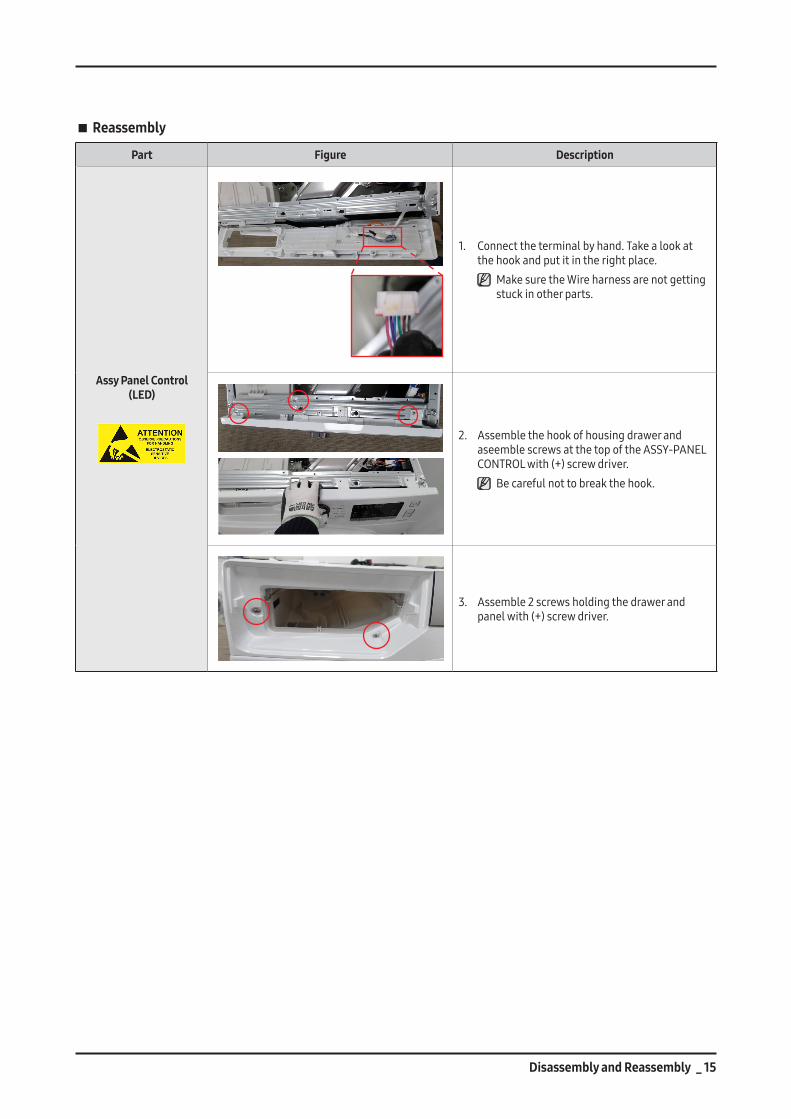
Assy Panel Control (LED)
1. Connecttheterminalbyhand.Takealookatthehookandputitintherightplace. MakesuretheWireharnessarenotgettingstuckinotherparts.
2. AssemblethehookofhousingdrawerandaseemblescrewsatthetopoftheASSY-PANELCONTROLwith(+)screwdriver. Becarefulnottobreakthehook.
3. Assemble2screwsholdingthedrawerandpanelwith(+)screwdriver.

16 _ Disassembly and Reassembly
Disassembly
Part Figure Description
Assy Housing-Drawer
Beforeyoustart,disassembleAssyCoverTop,AssyPanelControl.1. Remove4screwstodisassembleframeplate-
upusing(+)screwdriver.
2. RemovetheBand-ring.(2ea)
Becarefulnottobreakthehose.
Disassembly and Reassembly _ 17
Part Figure Description
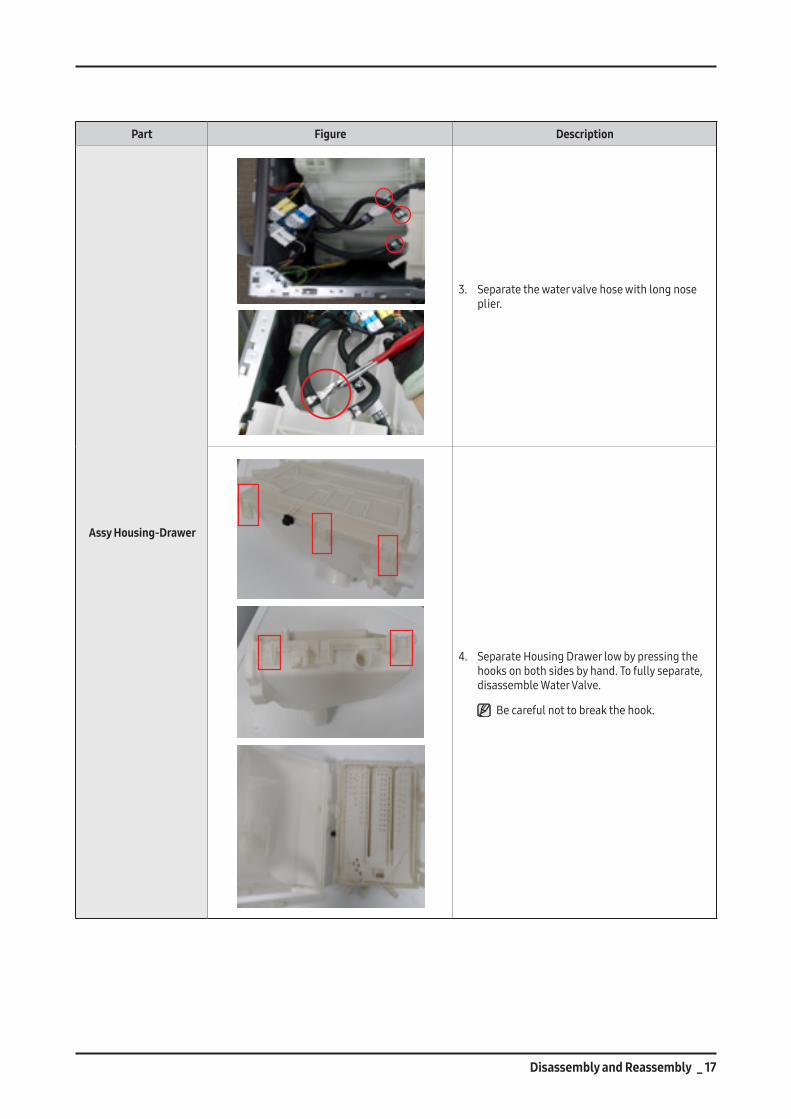
Assy Housing-Drawer
3. Separatethewatervalvehosewithlongnoseplier.
4. SeparateHousingDrawerlowbypressingthehooksonbothsidesbyhand.Tofullyseparate,disassembleWaterValve.
Becarefulnottobreakthehook.
18 _ Disassembly and Reassembly
Part Figure Description
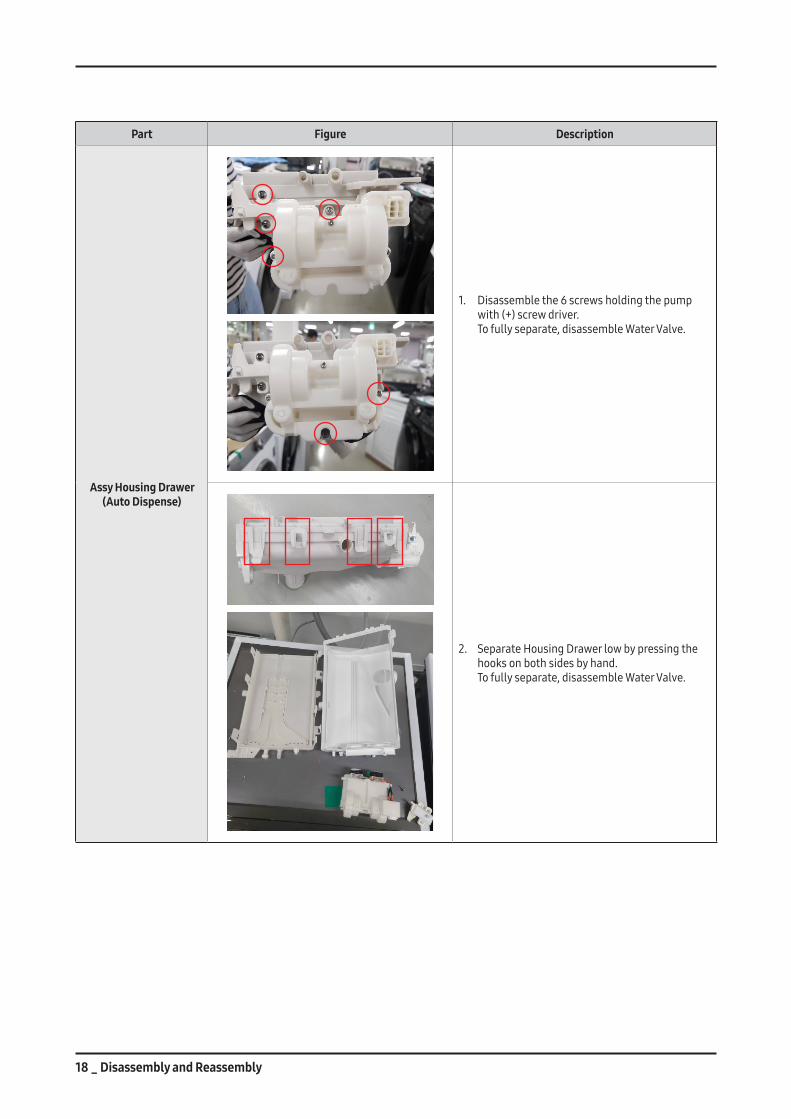
Assy Housing Drawer (Auto Dispense)
1. Disassemblethe6screwsholdingthepumpwith(+)screwdriver. Tofullyseparate,disassembleWaterValve.
2. SeparateHousingDrawerlowbypressingthehooksonbothsidesbyhand. Tofullyseparate,disassembleWaterValve.

Disassembly and Reassembly _ 19
Part Figure Description
Assy Housing Drawer (Auto Dispense)
1. AssembletheHousingDrawerlowbypressingthehooksonbothsidesbyhand.
2. Assemblethe6screwsholdingthepumpwith(+)screwdriver.

20 _ Disassembly and Reassembly
Reassembly
Part Figure Description
Assy Housing-Drawer
1. AssembletheHousingDrawerlowbypressingthehooksonbothsidesbyhand.
Becarefulnottobreakthehose.
2. Assemblethewatervalvehosewithlongnoseplier.
Becarefulnottobreakthehook. Makesuretoinsertthehosesandassembletheclamp,bandringscorrectly.There’rerisksofleakageorpoorperformancewhenit’smisassembled.

Disassembly and Reassembly _ 21
Part Figure Description
Assy Housing-Drawer
3. AssembletheBandrings.(2ea) Makesuretoinsertthehosesandassembletheclamp,bandringscorrectly.There’rerisksofleakageorpoorperformancewhenit’smisassembled.
4. Remove4screwstodisassembleframeplate-upusing(+)screwdriver.

22 _ Disassembly and Reassembly
Disassembly
Part Figure Description
Frame Front
Beforeyoustart,disassembleAssyCoverTop,AssyPanelControl.
Becarefulnottotearupthediaphragm.
1. Usinglongnosepliers,pickuponeoftheringsonWire-Diaphragmwhichconnectthespringandthewireends.Then,separatetheWire-DiaphragmfromtheFRAME-FRONTandDisconnecttheDiaphragm.
2. Remove2screwsholdingtheDOOR-LOCKswitchwith(+)screwdriver.
3. Disassembletheterminal(theblueboxisterminallocation)bypressingthebluecirclepartandremove2screwsholdingtheFrameFrontwith(+)screwdriver.
4. Pressthecircledplacetoopenupthecoverfilter.
5. Remove3screwsholdingthebottomoftheFRAME-FRONTwith(+)screwdriver.

Disassembly and Reassembly _ 23
Part Figure Description
Frame Front
6. Removecoverfilterbyhand.
7. PressthehooktoremoveGuidecoverfilterusing(-)screwdriver.
Becarefulnottobreakthehook.
8. PulltheGuidefiltertowardsyou.
9. LiftFramefrontuptodisassemble.
Cover-Back
Unfasten6(Dependingonthemodel,therecanbe4screws)screwsthatholdthecoverbackinplacewith(+)screwdriver. Removethebackcoverbyslidingitup. (Whenassembling,slidethebackcoverdown.)

24 _ Disassembly and Reassembly
Disassembly
Part Figure Description
Assy Door
Beforeyoustart,disassembleAssyCoverTop,AssyPanelControlandFrameFront.
1. Removethewirebydisassemblingthe3hooksusinglongnoseplier.
2. Disassembletheterminalandremovetheholdersusinglongnosepliers.
3. Remove2screwsholdingtheAssydoor.Removethedoorbyslightlyliftingthedoor.

Disassembly and Reassembly _ 25
Reassembly
Part Figure Description
Assy Door
BACK SIDE FRONT SIDE
1. Puttheterminalthroughthebiggestholeandassemble3hooksasshowninthepictures.
2. AssemblethedoorwithFrameFrontbyfittingthetwohooksandassemble2screwsholdingtheAssydoorwith(+)screwdriver.
3. Assemble3hooksusinghand.
4. Assembletheterminalandtheholders.
MakesuretheWireharnessarenotgettingstuckinotherparts.
26 _ Disassembly and Reassembly
Disassembly
Part Figure Description
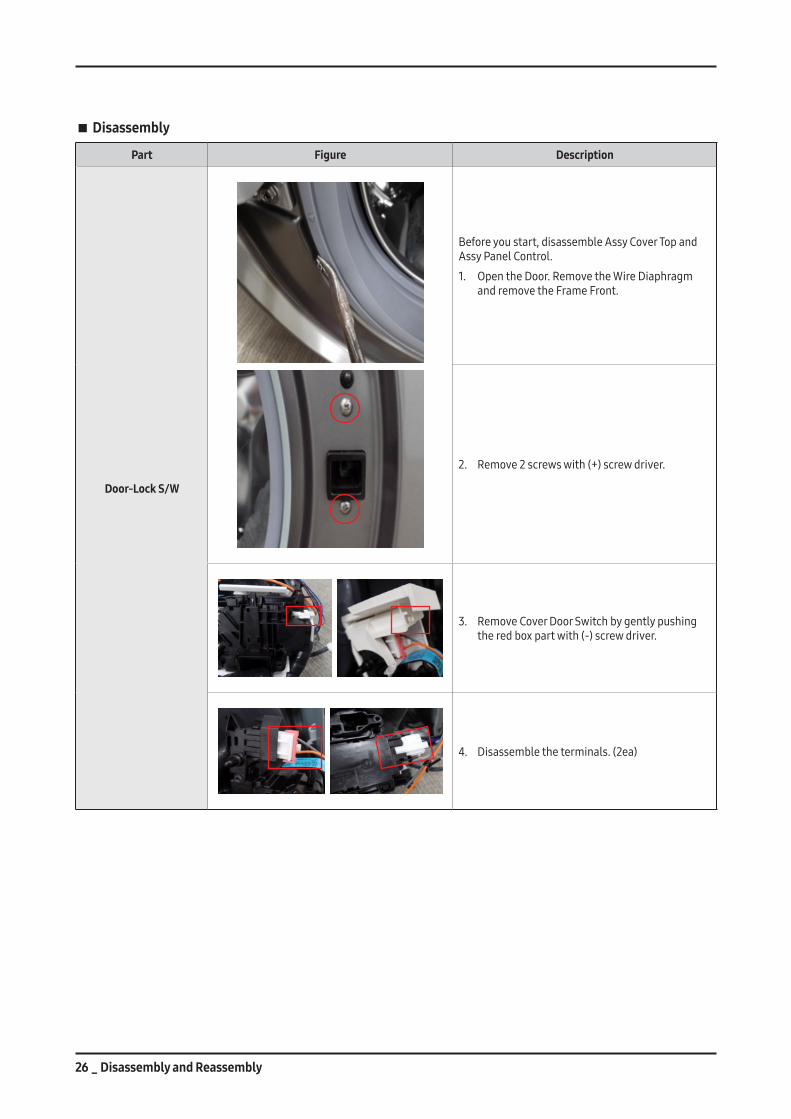
Door-Lock S/W
Beforeyoustart,disassembleAssyCoverTopandAssyPanelControl.
1. OpentheDoor.RemovetheWireDiaphragmandremovetheFrameFront.
2. Remove2screwswith(+)screwdriver.
3. RemoveCoverDoorSwitchbygentlypushingtheredboxpartwith(-)screwdriver.
4. Disassembletheterminals.(2ea)
Disassembly and Reassembly _ 27
Reassembly
Part Figure Description
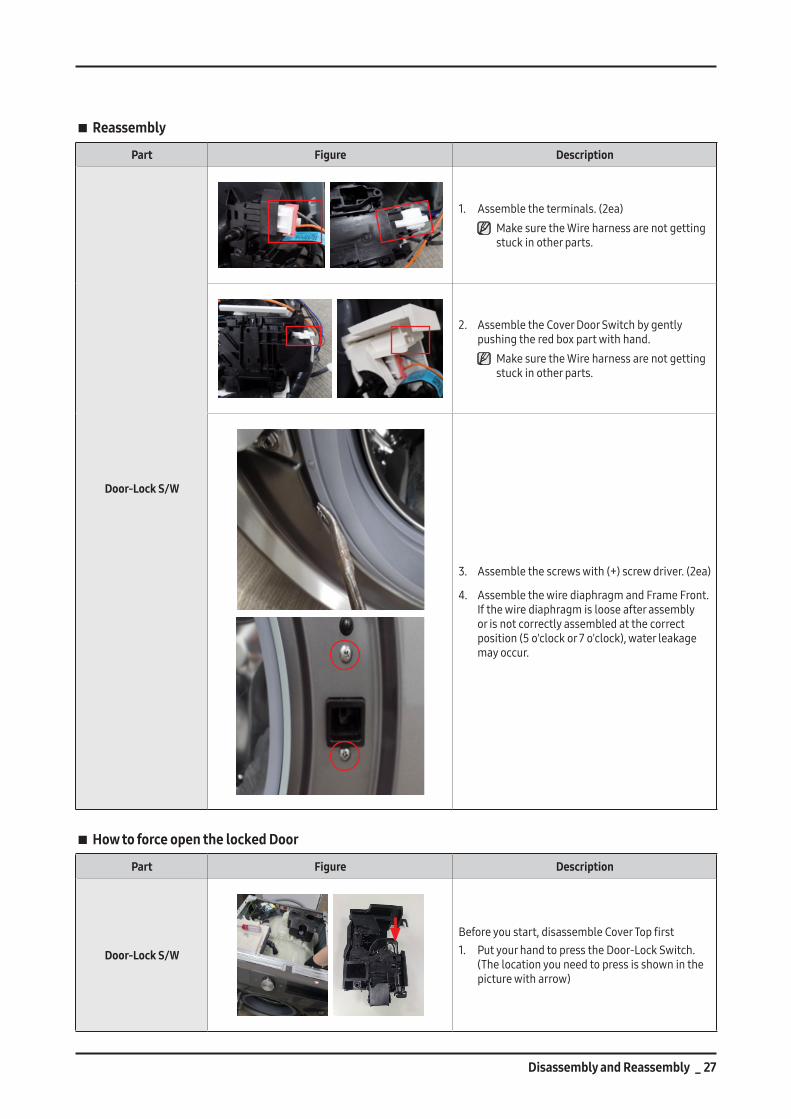
Door-Lock S/W
1. Assembletheterminals.(2ea) MakesuretheWireharnessarenotgettingstuckinotherparts.
2. AssembletheCoverDoorSwitchbygentlypushingtheredboxpartwithhand. MakesuretheWireharnessarenotgettingstuckinotherparts.
3. Assemblethescrewswith(+)screwdriver.(2ea)
4. AssemblethewirediaphragmandFrameFront. Ifthewirediaphragmislooseafterassemblyorisnotcorrectlyassembledatthecorrectposition(5o'clockor7o'clock),waterleakagemay occur.
How to force open the locked Door
Part Figure Description
Door-Lock S/W
Beforeyoustart,disassembleCoverTopfirst1. PutyourhandtopresstheDoor-LockSwitch.
(Thelocationyouneedtopressisshowninthepicturewitharrow)

28 _ Disassembly and Reassembly
Disassembly
Part Figure Description
Diaphragm
Beforeyoustart,removecovertop,AssyDrawer,AssyPanelControlandFrameFront.
1. Removehoseandclampwithlongnoseplier,andunfastenthescrewwith(+)screwdriver.
2. Pulldiaphragmtowardsyou.
Becarefulnottoripdiaphragm.

Disassembly and Reassembly _ 29
Reassembly
Part Figure Description
Diaphragm
1. AssembletheDiaphragmwithtubbyhand.Diaphragmandtubhastrianglepartmakesuretofitthemcorrectly.
2. Assemblehoseandclampwithlongnoseplier,andfastenthescrewwith(+)screwdriver.

30 _ Troubleshooting
4. TROUBLESHOOTING
4-1. INFORMATION CODE► When an abnormal condition occurs, melody sounds and displays Info. code indications as shown in the following Info. codes
are shown until the status has cleared.
No. Information Type Information Code Causes Corrective Actions
1 WaterLevel 1C
- Thepartofthehosewherethewaterlevelsensorislocatedisdamaged(punctured).
- Thehoseiscloggedwithforeignmaterial.- Thehoseisfolded.- Toomuchlubricanthasbeenappliedtotheinsertion
partoftheairhose.- Hoseengagementerror(disengaged)- Partfault(Faultyinternalsoldering)- Thewaterlevelsensorterminalisdisengaged.- MainPBAfault
•Waterlevelsensorfault.•Thewaterlevelsensorterminalisdisengaged.
•Thepartofthehosewherethewaterlevelsensorfolded.
•MainPCBfault.
2 Motor
3C
- ThePBAconnectorterminalisnotconnected.- Themotorspinnetisnotengaged.- Themotor’sinternalcoilisdamaged(short-circuited
orcut)- Foreignmaterial(ascrew)hasenteredthemotor.
•Washingmotorfault.•CheckWashingmotorconnector.•Washingmotorrotor/statorfault.•MainPCBfault.
3C1 - Motoroverloadedduetotoomuchlaundry(Non
sensing)- PBAfault
3C2 - ThemotordrivingerrorfromthePBAisweak:Unstablerelayoperation,etc.
3C3 - TheIPMterminalofthemainPBAisnotconnected.- TheDDmotorcoverisoutofplace.
3C4 - ThePCBhousingterminalisnotconnected.- PBAfault- DDmotorfault
3 WaterSupply4C
- Foreignmaterialisenteringthewatersupplyvalve.- Thewatersupplyvalveterminalisnotconnected.
(Wiredisconnected)- Thewarmwaterandrinseconnectorsarewrongly
connectedtoeachother.- ThisoccursifthePCBterminalfromthedrainhoseto
thedetergentdrawerisnotconnected.Checkwhetherthetransparenthoseisfoldedortorn.
- ThisoccursWaterpressureisweak,acertaintimedelay.
- ThisoccursWaterValvebyfreezinginwinterseason.
•Watersupplyvalvefault.•MainPCBfault.•Freezingbywinterseason.
4C2 - Thewatertemperatureissensedashigherthan50˚CintheWoolorLingeriecourses -
4 Drain 5C
- Thepumpmotorimpellerisdamagedinternally.- Thewrongvoltage(220V→110V)issuppliedtothe
parts.- Partfault- Thisoccursduetofreezinginthewinterseason.- Thedrainhoseisclogged.(Injectionerror,foreign
material)- Cloggedwithforeignmaterial.- Thewaterpumpterminalisnotconnected:rubber
band,bills,cotton,hairpins,coins.
•Drainpumpfault.•Freezingbywinterseason.•Checkinsideforeignmaterialofdrainpump.•MainPCBfault.

Troubleshooting _ 31
No. Information Type Information Code Causes Corrective Actions
5 Communication AC
- ThesignalsbetweenthesubandmainPBAsarenotsensedbecauseofacommunicationserror.
- ChecktheconnectorconnectionsbetweenthesubandmainPBAscarefully.→Checkforincorrectorlooseconnections,etc.
- RemovethesubPBAC/Panelandcheckforanyfaultysoldering.
•MainPCBandSubPCBSignalDetectionfault.•MainPCBandSubPCBwireconnectionfault.
6SWITCH
(Mainrelay)BC2
- AbuttonotherthanthePowerbuttoniscontinuallypressed(formorethan30seconds).
- Deformationofaninternalplasticinjectionpart.- AscrewforassemblingthesubPBAistightenedtoo
much.
•WhenpressedPowerbutton.•Whenpressedbuttonexceptforpowerbutton.•MainPCBrelayfault.
7 COOLING CC
- Whenthetemperatureofthewaterisgreaterthanorequalto55℃,thiscodeappearswhenthemachinedoesnotdrain.(reason:Itisunsafeforhotwatertodrainasmayburniftouched).
- Temperaturesensorfault,orincorrectuse.
•Washingtemperaturesensorcheck.•DescriptionPLAccident
prevention.
8 DOOR
dC
- Aswitchcontacterrorbecauseofadeformationofthedoorhook.
- Whenthedoorispulledbyforce.- Thisoccursinthehotwashesbecausethedooris
pushedduetoapressuredifferencefrominternaltemperaturechanges.
- S/WcontactfaultbecauseofLIDTC“L”transformation.•Doorlockswitchfault.•Drainpumpfault.•Dryductfanmotorfault.•MainPCBfault.dC1
- Thedoorlockswitchterminalisconnectedincorrectly.- Thedoorlockswitchterminalisbroken.- ThisoccursduetoLowinsualtionofthewiringassy- MainPCBfault
dC2- ThisoccursifthePowerswitchisturnedon/off
continuallyandtoomuchheatisgenerated(Thiserrorisdifficulttobereproduced.)
9 HEATER
HC - Thewashingheaterisshort-circuitedorhasawiredisconnected.
- Thewashingheaterinthetubhasanerror.(Contacterror,temperaturesensorfault)
- Ifthewaterlevelsensoroperateswithoutwaterbecausewaterisfrozenorforanyotherreasonandthetemperaturesensorengagedatthebottomtopreventoverheatingforthewashingheaterdetectsatemperatureof100to150˚C,thewashingmachineturnstheinputpoweroff.
•Heaterfault.•Redtemperaturesensoratthecenterofthedryheater.•Steamfunctionfault.•Freezingbywinterseason.
HC1
HC2
- Thiserroroccurswhentheredtemperaturesensoratthecenterofthedryheateroperates(atatemperaturehigherthan145˚C) :Correctiveaction–Pressthebuttonatthecenterlightly.
Thewashingmachinewilloperatenormally.Alternatively,replacethetemperaturesensorifthetemperaturesensingisunstablebecauseoffunctionaldegradation.

32 _ Troubleshooting
No. Information Type Information Code Causes Corrective Actions
10 WaterLeakageLCLC1
- Heaterengagementfault.(outofplace)- Theairhoseisoutofplaceandwaterleakageoccurs
duringthespincycle.- Thetubbackatthesafetyboltsfixingpartisbroken.- Waterleakageoccursatthefrontwithfoaming
becauseoftoomuchdetergent.- Waterleakageoccursbecausetheconnectinghoseto
thedetergentdrawerisconnectedincorrectly.- Thedrainpumpfiltercoverisengagedincorrectly.- Waterleakageoccursatthedrainhose.- Theductcondensingholdingscrewsareworn.- Thenozzle-diaphragmisengagedintheopposite
directionortherubberpackagingisomitted.- Waterleakageoccursbecausethescrewsthat
holdthetubbackandfrontinplacearefastenedincorrectly.
- Theleakagesensorisfaulty.
•CheckWaterLeakage.•DVCASEforeignmaterialoccurs.•Leakageoftheproductinsidethehoseandpartsmoldedproblem.
11 OVER FLOW OCOF
- Waterissuppliedcontinuallybecausethewaterleveldetectiondoesnotwork.
- Becausethedrainhoseiscloggedandthereisaninjectionerror(atanarrowsection),thewaterleveldetectiondoesnotworkandwaterissuppliedcontinually.
- Waterissuppliedcontinuallybecauseoffreezingorbecausethereisforeignmaterialinthewatersupplyvalve.
- Thismayoccurwhenthesensorisfaultyorthepressuretubeisblockedordamaged.
•Waterlevelsensorfault.•Freezingbywinterseason.
12Temperature
Sensor
TC1
- Thewashingheaterinthetubhasanerror. (Contacterror,temperaturesensorfault)
- Theconnectorisconnectedincorrectlyorisdisconnected.
- Ifthewaterlevelsensoroperateswithoutwaterbecausethewaterisfrozenorforanyotherreasonandthetemperaturesensorengagedatthebottomtopreventoverheatingforthewashingheaterdetectsatemperatureof100to150˚C,thewashingmachineturnstheinputpoweroff.
•Washingtemperaturesensorcheck.•Drytemperaturesensorcheck•Drycondensingtemperaturesensorcheck.•ProblemscausedbythemainPCBfault.•Problemscausedbythefreezinginwinter.
TC2
- Thetemperaturesensorfortheductassyfanhousingisfaulty.(Asensorfaultsuchasaninternalshort-circuitorwiredisconnection)
- Theconnectorisoutofplaceorhasacontacterror.
TC3
- Thisoccurswhentheductcondensingtemperaturesensor is open.
- Thisoccurswhentheductcondensingtemperaturesensorhasawiredisconnectedorisshort-circuited.
13 UNBALANCE UB- Aslaundrycausesthiserror,checkthelaundry.- Findthereasonfortheunbalanceandsolveitas
directedintheusermanual.•Thisoccursbylaundry.

Troubleshooting _ 33
No. Information Type Information Code Causes Corrective Actions
14 PowerUC(9C)
- Powerconditionfault.- Thisoccurswhenunderorovervoltageissupplied.- Extensionleadorplugadapterisbeingused.- MainPBAfault(sometimes)
•Checkthepowersupply, polarityandvoltage.•Selectahotwashordrycycle(wdonly),measurethevoltagesuppliedduringheating.(Aerroroccurswhenundervoltageisdetected.)*Safetyensuresafeworkingpracticesobservedwhentestingliveappliance.
•Checkifasocketoutletadaptorisbeingused.•MainPCBfault(sometimes)
15 Mems PBA 8C - ErrordetectedintheMemsPBAordataerrordetected.
•Checkthewireconnections. Replaceifnecessary.
1.Checkthewireconnections.2.ReplacetheMemsPBA.3.MainPBAwireconnectionerrororPBA’ssilvernanopartmalfunction. Replaceifnecessary.
16 AddDoor
DDC
- AswitchcontacterrorbecauseofdamagetotheAddDoorswitch.
- Whentheadddoorispulledbyforce.- Thisoccursinthehotwashbecausetheadddooris
pushedduetoapressuredifferencefrominternaltemperaturechanges.
- S/WcontactfaultbecauseofLIDTC“L”transformation.
•Adddooropen/closeswitchfault.•MainPCBfault.
DC3
- TheAddDoorlockswitchterminalisconnectedincorrectly.
- TheAddDoorlockswitchterminalisbroken.- ThisoccursduetoLowinsualtionofthewiringassy.- MainPCBfault.
•Adddoorlockswitchfault.•MainPCBfault.
17Detergent
DrawerMotor6C
- Autodetergentdispensemotorconstrain- Autodetergentdispensemotorwiring- Autodetergentdispensemotornotoperate
•Checkmotoroperationbypressingthelaundrywhenyouenterautodetergentdispenser.•IfnotoperationchangeASSY
PUMP DRAIN.
18 Auto Dispense
6C1 - Theinputarrestofthedetergentmotorissensed.
Checkthewireandifnecessaryreplaceit.
1.CheckWireconnection2.ReplaceAssyPump
6C2 - Thenon-operationofthedetergentmotorissensed.
6C3 - Theinputarrestofthefabricsoftenermotorissensed.
6C4 - Thenon-operationofthefabricsoftenermotorissensed.
6C5 - Themotormotionperceptionsensorfault
6C6 - Thedetergentlevelperceptionsensorfault
6C7 - Thefabricsoftenerlevelperceptionsensorfault

34 _ Troubleshooting
PROBLEM SOLUTION
Thewashingmachinewon’tstart.
•Makesurethewashingmachineispluggedin.•Makesurethedoorisproperlyclosed.•Makesurethewatertapisopen.•TapStartorPressStart/Pausebuttonagain.
Watersupplyisinsufficient,ornowaterissupplied.
•Openthewatertapfully.•Makesurethewatersupplyhoseisnotfrozen.•Makesurethewatersupplyhoseisnotkinkedorclogged.•Cleanthefilteronthewatersupplyhose.
Thewashingmachinevibratesbadly,ormakesnoise.
•Makesurethewashingmachineisinstalledonalevelfloor.Ifthefloorisnotlevel,usethelevelingfeettoadjustthelevel.•Makesurethattheshippingboltsareremoved.•Makesurethewashingmachineisnottouchinganyotherobject.•Makesurethelaundryloadisbalanced.
Thewashingmachinedoesnotdrainand/orspin.
•Makesurethedrainhoseisstraightenedallthewaytothedrainsystem.•Makesurethedebrisfilterisnotclogged.
Thedoorwon’topen.
•PresstheStart/Pausebuttontostopthewashingmachine.•Thedoorstayslockedaslongasthewashingmachineisstillhotinsideafteraheatingoperation.•Itmaytakeseveralsecondstodisengagethedoorlockmechanism.
ButtonCheck •bCoccurs.ReferthebCtroubleshooting.
CanIopentheAddDoor at any time?
•TheAddDoorcanbeopenedonlywhentheindicatorappears. However,itdoesnotopeninthefollowingcases:-Whenthewatertemperatureisabove55degorthedryingprocessisrunning,whenthedrumisrotating,atanypointontheECOdrumcleancycle.-IfyousettheChildLockforsafetyreasons.-Whenthedrumwashordrumdryingcycleisrunningthatdoesnotinvolveadditionallaundry.
4-2. PROBLEM CHECK POINT

Wiring Diagram _ 35
5. WIRING DIAGRAM
5-1. WIRING DIAGRAM (SIMPLE)► ThisDocumentcannotbeusedwithoutSamsung’sauthorization.
n REFERENCE INFORMATION
BLK BLACK
BLU BLUE
GRN GREEN
GRY GRAY
NTR NATURAL
ORG ORANGE
PNK PINK
RED RED
SKYBLU SKYBLUE
VIO VIOLET
WHT WHITE
YEL YELLOW

36 _ Wiring Diagram
5-2. WIRING DIAGRAM (LED)► ThisDocumentcannotbeusedwithoutSamsung’sauthorization.
n REFERENCE INFORMATION
BLK BLACK
BLU BLUE
GRN GREEN
GRY GRAY
NTR NATURAL
ORG ORANGE
PNK PINK
RED RED
SKYBLU SKYBLUE
VIO VIOLET
WHT WHITE
YEL YELLOW

Wiring Diagram _ 37
5-3. WIRING DIAGRAM (Q-DRIVE)► ThisDocumentcannotbeusedwithoutSamsung’sauthorization.
n REFERENCE INFORMATION
BLK BLACK
BLU BLUE
GRN GREEN
GRY GRAY
NTR NATURAL
ORG ORANGE
PNK PINK
RED RED
SKYBLU SKYBLUE
VIO VIOLET
WHT WHITE
YEL YELLOW
38 _ Reference
6. REFERENCE
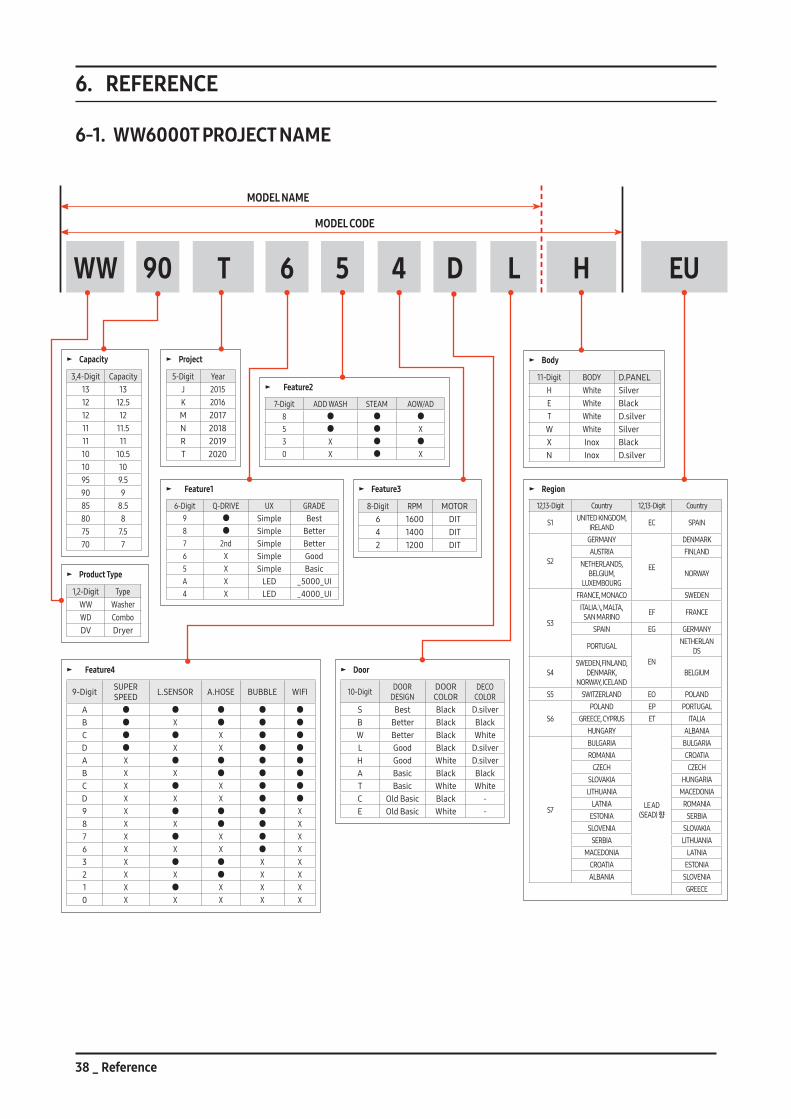
6-1. WW6000T PROJECT NAME
► Door
10-Digit DOOR DESIGN
DOOR COLOR
DECO COLOR
S Best Black D.silverB Better Black BlackW Better Black WhiteL Good Black D.silverH Good White D.silverA Basic Black BlackT Basic White WhiteC OldBasic Black -E OldBasic White -
► Region
12,13-Digit Country 12,13-Digit Country
S1 UNITEDKINGDOM,IRELAND EC SPAIN
S2
GERMANY
EE
DENMARKAUSTRIA FINLAND
NETHERLANDS,BELGIUM,
LUXEMBOURGNORWAY
S3
FRANCE,MONACO SWEDENITALIA.\,MALTA,
SAN MARINO EF FRANCE
SPAIN EG GERMANY
PORTUGAL
EN
NETHERLAN DS
S4SWEDEN,FINLAND,
DENMARK,NORWAY,ICELAND
BELGIUM
S5 SWITZERLAND EO POLAND
S6POLAND EP PORTUGAL
GREECE,CYPRUS ET ITALIAHUNGARY
LE AD (SEAD)향
ALBANIA
S7
BULGARIA BULGARIAROMANIA CROATIA
CZECH CZECHSLOVAKIA HUNGARIA
LITHUANIA MACEDONIALATNIA ROMANIA
ESTONIA SERBIASLOVENIA SLOVAKIA
SERBIA LITHUANIAMACEDONIA LATNIA
CROATIA ESTONIAALBANIA SLOVENIA
GREECE
MODEL NAME
► Product Type
1,2-Digit TypeWW WasherWD ComboDV Dryer
MODEL CODE
90 L WW
► Capacity
3,4-Digit Capacity13 1312 12.512 1211 11.511 1110 10.510 1095 9.590 985 8.580 875 7.570 7
6 5
► Feature4
9-Digit SUPER SPEED L.SENSOR A.HOSE BUBBLE WIFI
A ● ● ● ● ●
B ● X ● ● ●
C ● ● X ● ●
D ● X X ● ●
A X ● ● ● ●
B X X ● ● ●
C X ● X ● ●
D X X X ● ●
9 X ● ● ● X8 X X ● ● X7 X ● X ● X6 X X X ● X3 X ● ● X X2 X X ● X X1 X ● X X X0 X X X X X
► Feature2
7-Digit ADD WASH STEAM AOW/AD8 ● ● ●
5 ● ● X3 X ● ●
0 X ● X
► Feature1
6-Digit Q-DRIVE UX GRADE9 ● Simple Best8 ● Simple Better7 2nd Simple Better6 X Simple Good5 X Simple BasicA X LED _5000_UI4 X LED _4000_UI
4 D
► Body
11-Digit BODY D.PANELH White SilverE White BlackT White D.silver
W White SilverX Inox BlackN Inox D.silver
► Feature3
8-Digit RPM MOTOR6 1600 DIT4 1400 DIT2 1200 DIT
H
► Project
5-Digit YearJ 2015K 2016M 2017N 2018R 2019T 2020
T EU

Reference _ 39
6-2. TERMINOLOGY
1. Drain Pump Thepumpthatdrainsthewaterfromthewashingmachinegeneratedwhilethewashingmachineisrunning
2. Heater Theheaterislocatedonthetubinsidethewashingmachine.Itheatsthewatertoincreasewashefficiency.
3.DoorLockSwitch Detectswhetherthedoorofthewashingmachineisopenorclosedifthedoorisopenwhilethewashingmachineisrunningthecycleistemporarystopped.
ThisServiceManualisapropertyofSamsungElectronicsCo.,Ltd.AnyunauthorizeduseofManualcanbepunishedunderapplicableInternationaland/ordomesticlaw.
© 2020 Samsung Electronics Co.,Ltd. All rights reserved.Printed in Korea
GSPN (GLOBAL SERVICE PARTNER NETWORK)
Area Web Site
Europe,CIS,Mideast&Africa gspn1.samsungcsportal.com
Asia gspn2.samsungcsportal.com
North&LatinAmerica gspn3.samsungcsportal.com
China china.samsungportal.com