VSX-821-K - Pioneer (HK)
148
AUDIO/VIDEO MULTI-CHANNEL RECEIVER RECEPTOR AUDIO-VIDEO MULTICANAL VSX-821-K Operating Instructions Manual de instrucciones
-
Upload
khangminh22 -
Category
Documents
-
view
3 -
download
0
Transcript of VSX-821-K - Pioneer (HK)
AUDIO/VIDEO MULTI-CHANNEL RECEIVER
RECEPTOR AUDIO-VIDEO MULTICANAL
VSX-821-K
Operating Instructions
Manual de instrucciones
VSX-821_FLXCN_En.book 1 ページ 2011年3月30日 水曜日 午後12時38分
2En
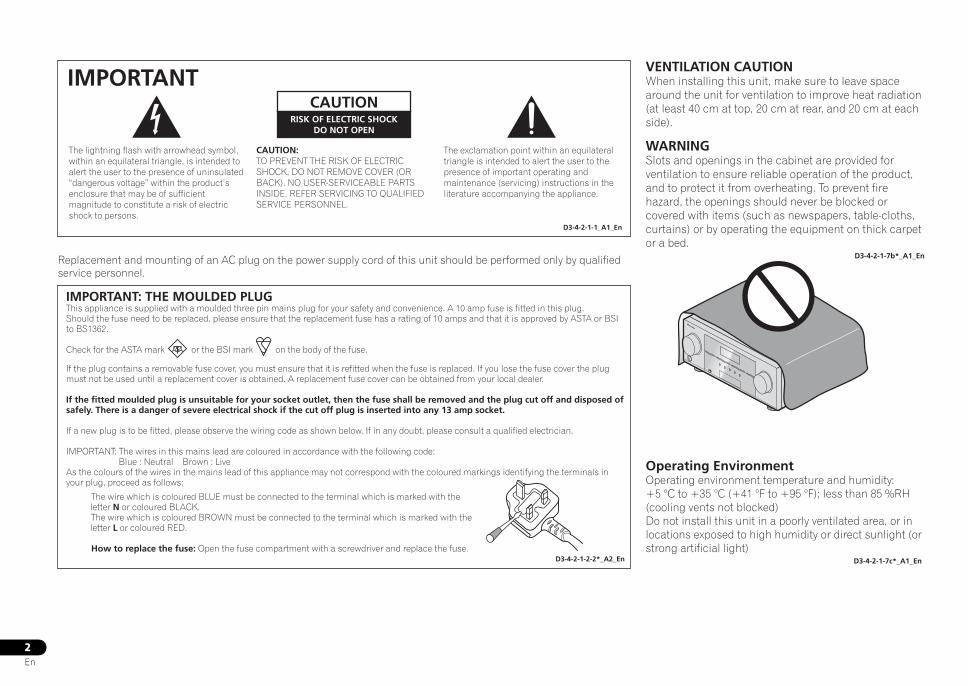
The exclamation point within an equilateral triangle is intended to alert the user to the presence of important operating and maintenance (servicing) instructions in the literature accompanying the appliance.
The lightning flash with arrowhead symbol, within an equilateral triangle, is intended to alert the user to the presence of uninsulated “dangerous voltage” within the product’s enclosure that may be of sufficient magnitude to constitute a risk of electric shock to persons.
CAUTION:TO PREVENT THE RISK OF ELECTRIC SHOCK, DO NOT REMOVE COVER (OR BACK). NO USER-SERVICEABLE PARTS INSIDE. REFER SERVICING TO QUALIFIED SERVICE PERSONNEL.
CAUTIONRISK OF ELECTRIC SHOCK
DO NOT OPEN
IMPORTANT
D3-4-2-1-1_A1_En
D3-4-2-1-2-2*_A2_En
Replacement and mounting of an AC plug on the power supply cord of this unit should be performed only by qualified service personnel.
IMPORTANT: THE MOULDED PLUGThis appliance is supplied with a moulded three pin mains plug for your safety and convenience. A 10 amp fuse is fitted in this plug. Should the fuse need to be replaced, please ensure that the replacement fuse has a rating of 10 amps and that it is approved by ASTA or BSI to BS1362.
Check for the ASTA mark or the BSI mark on the body of the fuse.
If the plug contains a removable fuse cover, you must ensure that it is refitted when the fuse is replaced. If you lose the fuse cover the plug must not be used until a replacement cover is obtained. A replacement fuse cover can be obtained from your local dealer.
If the fitted moulded plug is unsuitable for your socket outlet, then the fuse shall be removed and the plug cut off and disposed of safely. There is a danger of severe electrical shock if the cut off plug is inserted into any 13 amp socket.
If a new plug is to be fitted, please observe the wiring code as shown below. If in any doubt, please consult a qualified electrician.
IMPORTANT: The wires in this mains lead are coloured in accordance with the following code: Blue : Neutral Brown : LiveAs the colours of the wires in the mains lead of this appliance may not correspond with the coloured markings identifying the terminals in your plug, proceed as follows;
The wire which is coloured BLUE must be connected to the terminal which is marked with the letter N or coloured BLACK.The wire which is coloured BROWN must be connected to the terminal which is marked with the letter L or coloured RED.
How to replace the fuse: Open the fuse compartment with a screwdriver and replace the fuse.
VENTILATION CAUTIONWhen installing this unit, make sure to leave space around the unit for ventilation to improve heat radiation (at least 40 cm at top, 20 cm at rear, and 20 cm at each side).
WARNINGSlots and openings in the cabinet are provided for ventilation to ensure reliable operation of the product, and to protect it from overheating. To prevent fire hazard, the openings should never be blocked or covered with items (such as newspapers, table-cloths, curtains) or by operating the equipment on thick carpet or a bed.
D3-4-2-1-7b*_A1_En
Operating EnvironmentOperating environment temperature and humidity:+5 °C to +35 °C (+41 °F to +95 °F); less than 85 %RH (cooling vents not blocked)Do not install this unit in a poorly ventilated area, or in locations exposed to high humidity or direct sunlight (or strong artificial light)
D3-4-2-1-7c*_A1_En
VSX-821_FLXCN_En.book 2 ページ 2011年3月30日 水曜日 午後12時38分

EnglishEspañol
3En
If the AC plug of this unit does not match the AC outlet you want to use, the plug must be removed and appropriate one fitted. Replacement and mounting of an AC plug on the power supply cord of this unit should be performed only by qualified service personnel. If connected to an AC outlet, the cut-off plug can cause severe electrical shock. Make sure it is properly disposed of after removal.The equipment should be disconnected by removing the mains plug from the wall socket when left unused for a long period of time (for example, when on vacation).
D3-4-2-2-1a_A1_En
CAUTIONThe STANDBY/ON switch on this unit will not completely shut off all power from the AC outlet. Since the power cord serves as the main disconnect device for the unit, you will need to unplug it from the AC outlet to shut down all power. Therefore, make sure the unit has been installed so that the power cord can be easily unplugged from the AC outlet in case of an accident. To avoid fire hazard, the power cord should also be unplugged from the AC outlet when left unused for a long period of time (for example, when on vacation).
D3-4-2-2-2a*_A1_En
This product is for general household purposes. Any failure due to use for other than household purposes (such as long-term use for business purposes in a restaurant or use in a car or ship) and which requires repair will be charged for even during the warranty period.
K041_A1_En
WARNINGTo prevent a fire hazard, do not place any naked flame sources (such as a lighted candle) on the equipment.
D3-4-2-1-7a_A1_En
WARNINGThis equipment is not waterproof. To prevent a fire or shock hazard, do not place any container filled with liquid near this equipment (such as a vase or flower pot) or expose it to dripping, splashing, rain or moisture.
D3-4-2-1-3_A1_En
WARNINGBefore plugging in for the first time, read the following section carefully.The voltage of the available power supply differs according to country or region. Be sure that the power supply voltage of the area where this unit will be used meets the required voltage (e.g., 230 V or 120 V) written on the rear panel.
D3-4-2-1-4*_A1_En
Voltage selectorYou can find the voltage selector switch on the rear panel of multi-voltage models.The factory setting for the voltage selector is 220-240 V. Please set it to the correct voltage for your country or region.• Saudi Arabia operates on 127 V and 220 V mains voltage. Please set to the correct voltage before using.• For Taiwan, please set to 110-127 V before using.• For Mexico, please set to 110-127V before using.
Before changing the voltage, disconnect the AC power cord. Use a medium size screwdriver to change the voltage selector switch.
D3-4-2-1-5*_A1_En
Medium size screwdriver
For Taiwan exclusivelyTaiwanese two pin flat-bladed plug
These symbols are only valid in the European Union.
K058c_A1_En
(Symbol examples for batteries)
Pb
VSX-821_FLXCN_En.book 3 ページ 2011年3月30日 水曜日 午後12時38分
4En
Thank you for buying this Pioneer product. Please read through these operating instructions so you will know how to operate your model properly. After you have finished reading the instructions, put them away in a safe place for future reference.
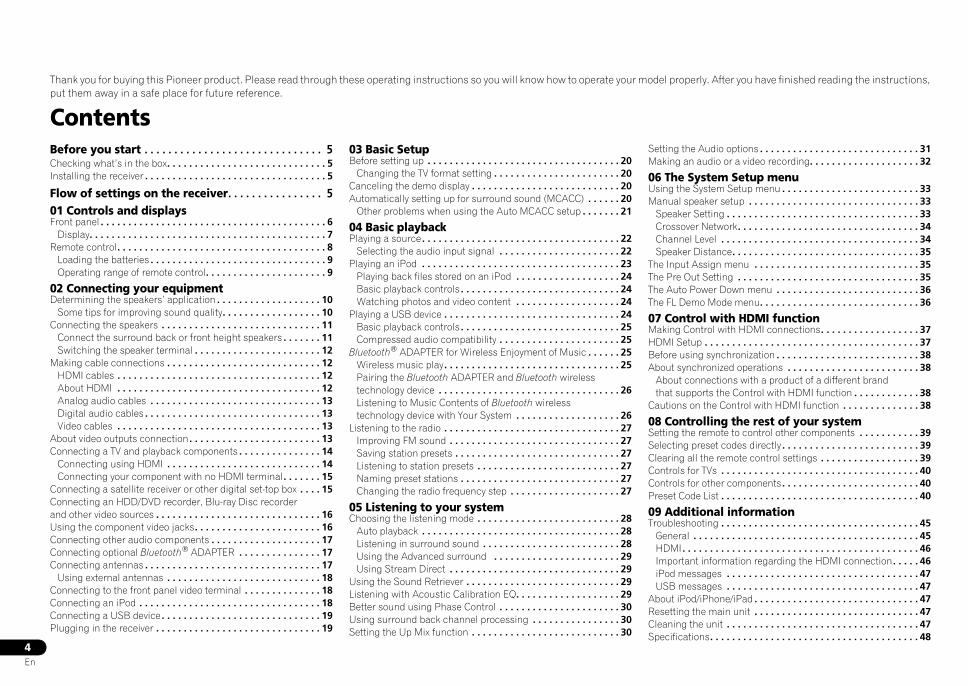
ContentsBefore you start . . . . . . . . . . . . . . . . . . . . . . . . . . . . . . 5Checking what’s in the box. . . . . . . . . . . . . . . . . . . . . . . . . . . . . 5Installing the receiver . . . . . . . . . . . . . . . . . . . . . . . . . . . . . . . . . 5
Flow of settings on the receiver. . . . . . . . . . . . . . . . 501 Controls and displaysFront panel . . . . . . . . . . . . . . . . . . . . . . . . . . . . . . . . . . . . . . . . . 6
Display. . . . . . . . . . . . . . . . . . . . . . . . . . . . . . . . . . . . . . . . . . . 7Remote control. . . . . . . . . . . . . . . . . . . . . . . . . . . . . . . . . . . . . . 8
Loading the batteries . . . . . . . . . . . . . . . . . . . . . . . . . . . . . . . . 9Operating range of remote control. . . . . . . . . . . . . . . . . . . . . . 9
02 Connecting your equipmentDetermining the speakers’ application . . . . . . . . . . . . . . . . . . . 10
Some tips for improving sound quality. . . . . . . . . . . . . . . . . . 10Connecting the speakers . . . . . . . . . . . . . . . . . . . . . . . . . . . . . 11
Connect the surround back or front height speakers . . . . . . . 11Switching the speaker terminal . . . . . . . . . . . . . . . . . . . . . . . 12
Making cable connections . . . . . . . . . . . . . . . . . . . . . . . . . . . . 12HDMI cables . . . . . . . . . . . . . . . . . . . . . . . . . . . . . . . . . . . . . 12About HDMI . . . . . . . . . . . . . . . . . . . . . . . . . . . . . . . . . . . . . 12Analog audio cables . . . . . . . . . . . . . . . . . . . . . . . . . . . . . . . 13Digital audio cables . . . . . . . . . . . . . . . . . . . . . . . . . . . . . . . . 13Video cables . . . . . . . . . . . . . . . . . . . . . . . . . . . . . . . . . . . . . 13
About video outputs connection . . . . . . . . . . . . . . . . . . . . . . . . 13Connecting a TV and playback components . . . . . . . . . . . . . . . 14
Connecting using HDMI . . . . . . . . . . . . . . . . . . . . . . . . . . . . 14Connecting your component with no HDMI terminal. . . . . . . 15
Connecting a satellite receiver or other digital set-top box . . . . 15Connecting an HDD/DVD recorder, Blu-ray Disc recorder and other video sources . . . . . . . . . . . . . . . . . . . . . . . . . . . . . . 16Using the component video jacks. . . . . . . . . . . . . . . . . . . . . . . 16Connecting other audio components . . . . . . . . . . . . . . . . . . . . 17Connecting optional Bluetooth® ADAPTER . . . . . . . . . . . . . . . 17Connecting antennas . . . . . . . . . . . . . . . . . . . . . . . . . . . . . . . . 17
Using external antennas . . . . . . . . . . . . . . . . . . . . . . . . . . . . 18Connecting to the front panel video terminal . . . . . . . . . . . . . . 18Connecting an iPod . . . . . . . . . . . . . . . . . . . . . . . . . . . . . . . . . 18Connecting a USB device . . . . . . . . . . . . . . . . . . . . . . . . . . . . . 19Plugging in the receiver . . . . . . . . . . . . . . . . . . . . . . . . . . . . . . 19
03 Basic SetupBefore setting up . . . . . . . . . . . . . . . . . . . . . . . . . . . . . . . . . . . 20
Changing the TV format setting . . . . . . . . . . . . . . . . . . . . . . . 20Canceling the demo display . . . . . . . . . . . . . . . . . . . . . . . . . . . 20Automatically setting up for surround sound (MCACC) . . . . . . 20
Other problems when using the Auto MCACC setup . . . . . . . 21
04 Basic playbackPlaying a source . . . . . . . . . . . . . . . . . . . . . . . . . . . . . . . . . . . . 22
Selecting the audio input signal . . . . . . . . . . . . . . . . . . . . . . 22Playing an iPod . . . . . . . . . . . . . . . . . . . . . . . . . . . . . . . . . . . . 23
Playing back files stored on an iPod . . . . . . . . . . . . . . . . . . . 24Basic playback controls . . . . . . . . . . . . . . . . . . . . . . . . . . . . . 24Watching photos and video content . . . . . . . . . . . . . . . . . . . 24
Playing a USB device . . . . . . . . . . . . . . . . . . . . . . . . . . . . . . . . 24Basic playback controls . . . . . . . . . . . . . . . . . . . . . . . . . . . . . 25Compressed audio compatibility . . . . . . . . . . . . . . . . . . . . . . 25
Bluetooth® ADAPTER for Wireless Enjoyment of Music . . . . . . 25Wireless music play. . . . . . . . . . . . . . . . . . . . . . . . . . . . . . . . 25Pairing the Bluetooth ADAPTER and Bluetooth wireless technology device . . . . . . . . . . . . . . . . . . . . . . . . . . . . . . . . . 26Listening to Music Contents of Bluetooth wireless technology device with Your System . . . . . . . . . . . . . . . . . . . 26
Listening to the radio . . . . . . . . . . . . . . . . . . . . . . . . . . . . . . . . 27Improving FM sound . . . . . . . . . . . . . . . . . . . . . . . . . . . . . . . 27Saving station presets . . . . . . . . . . . . . . . . . . . . . . . . . . . . . . 27Listening to station presets . . . . . . . . . . . . . . . . . . . . . . . . . . 27Naming preset stations . . . . . . . . . . . . . . . . . . . . . . . . . . . . . 27Changing the radio frequency step . . . . . . . . . . . . . . . . . . . . 27
05 Listening to your systemChoosing the listening mode . . . . . . . . . . . . . . . . . . . . . . . . . . 28
Auto playback . . . . . . . . . . . . . . . . . . . . . . . . . . . . . . . . . . . . 28Listening in surround sound . . . . . . . . . . . . . . . . . . . . . . . . . 28Using the Advanced surround . . . . . . . . . . . . . . . . . . . . . . . 29Using Stream Direct . . . . . . . . . . . . . . . . . . . . . . . . . . . . . . . 29
Using the Sound Retriever . . . . . . . . . . . . . . . . . . . . . . . . . . . . 29Listening with Acoustic Calibration EQ. . . . . . . . . . . . . . . . . . . 29Better sound using Phase Control . . . . . . . . . . . . . . . . . . . . . . 30Using surround back channel processing . . . . . . . . . . . . . . . . 30Setting the Up Mix function . . . . . . . . . . . . . . . . . . . . . . . . . . . 30
Setting the Audio options . . . . . . . . . . . . . . . . . . . . . . . . . . . . . 31Making an audio or a video recording. . . . . . . . . . . . . . . . . . . . 32
06 The System Setup menuUsing the System Setup menu . . . . . . . . . . . . . . . . . . . . . . . . . 33Manual speaker setup . . . . . . . . . . . . . . . . . . . . . . . . . . . . . . . 33
Speaker Setting . . . . . . . . . . . . . . . . . . . . . . . . . . . . . . . . . . . 33Crossover Network. . . . . . . . . . . . . . . . . . . . . . . . . . . . . . . . . 34Channel Level . . . . . . . . . . . . . . . . . . . . . . . . . . . . . . . . . . . . 34Speaker Distance. . . . . . . . . . . . . . . . . . . . . . . . . . . . . . . . . . 35
The Input Assign menu . . . . . . . . . . . . . . . . . . . . . . . . . . . . . . 35The Pre Out Setting . . . . . . . . . . . . . . . . . . . . . . . . . . . . . . . . . 35The Auto Power Down menu . . . . . . . . . . . . . . . . . . . . . . . . . . 36The FL Demo Mode menu. . . . . . . . . . . . . . . . . . . . . . . . . . . . . 36
07 Control with HDMI functionMaking Control with HDMI connections. . . . . . . . . . . . . . . . . . 37HDMI Setup . . . . . . . . . . . . . . . . . . . . . . . . . . . . . . . . . . . . . . . 37Before using synchronization . . . . . . . . . . . . . . . . . . . . . . . . . . 38About synchronized operations . . . . . . . . . . . . . . . . . . . . . . . . 38
About connections with a product of a different brand that supports the Control with HDMI function . . . . . . . . . . . . 38
Cautions on the Control with HDMI function . . . . . . . . . . . . . . 38
08 Controlling the rest of your systemSetting the remote to control other components . . . . . . . . . . . 39Selecting preset codes directly . . . . . . . . . . . . . . . . . . . . . . . . . 39Clearing all the remote control settings . . . . . . . . . . . . . . . . . . 39Controls for TVs . . . . . . . . . . . . . . . . . . . . . . . . . . . . . . . . . . . . 40Controls for other components . . . . . . . . . . . . . . . . . . . . . . . . . 40Preset Code List . . . . . . . . . . . . . . . . . . . . . . . . . . . . . . . . . . . . 40
09 Additional informationTroubleshooting . . . . . . . . . . . . . . . . . . . . . . . . . . . . . . . . . . . . 45
General . . . . . . . . . . . . . . . . . . . . . . . . . . . . . . . . . . . . . . . . . 45HDMI . . . . . . . . . . . . . . . . . . . . . . . . . . . . . . . . . . . . . . . . . . . 46Important information regarding the HDMI connection . . . . . 46iPod messages . . . . . . . . . . . . . . . . . . . . . . . . . . . . . . . . . . . 47USB messages . . . . . . . . . . . . . . . . . . . . . . . . . . . . . . . . . . . 47
About iPod/iPhone/iPad . . . . . . . . . . . . . . . . . . . . . . . . . . . . . . 47Resetting the main unit . . . . . . . . . . . . . . . . . . . . . . . . . . . . . . 47Cleaning the unit . . . . . . . . . . . . . . . . . . . . . . . . . . . . . . . . . . . 47Specifications. . . . . . . . . . . . . . . . . . . . . . . . . . . . . . . . . . . . . . 48
VSX-821_FLXCN_En.book 4 ページ 2011年3月30日 水曜日 午後12時38分
EnglishEspañol
5En
Before you startChecking what’s in the boxPlease check that you’ve received the following supplied accessories:
• Setup microphone• Remote control• AAA size IEC R03 dry cell batteries (to confirm system
operation) x2• AM loop antenna• FM wire antenna• iPod cable• Power cord• These operating instructions
Installing the receiver• When installing this unit, make sure to put it on a level and
stable surface. Don’t install it on the following places:– on a color TV (the screen may distort)– near a cassette deck (or close to a device that gives off a magnetic field). This may interfere with the sound.– in direct sunlight– in damp or wet areas– in extremely hot or cold areas– in places where there is vibration or other movement– in places that are very dusty– in places that have hot fumes or oils (such as a kitchen)
Flow of settings on the receiverThe unit is a full-fledged AV receiver equipped with an abundance of functions and terminals. It can be used easily after following the procedure below to make the connections and settings.The colors of the steps indicate the following:
Required setting item
Setting to be made as necessary
1 Connecting the speakersWhere you place the speakers will have a big effect on the sound.
• Determining the speakers’ application (page 10)• Connecting the speakers (page 11)• Switching the speaker terminal (page 12)
2 Connecting the componentsFor surround sound, you’ll want to hook up using a digital connection from the Blu-ray Disc/DVD player to the receiver.
• About video outputs connection (page 13)• Connecting a TV and playback components (page 14)• Connecting antennas (page 17)• Plugging in the receiver (page 19)
3 Power OnMake sure you’ve set the video input on your TV to this receiver. Check the manual that came with the TV if you don’t know how to do this.
4 Making the initial settings according to the region and environment in which you live
• Changing the TV format setting (page 20)• Changing the radio frequency step (page 27)
5 The Pre Out Setting (page 35)(When connecting the front height speakers.)The Input Assign menu (page 35)(When using connections other than the recommended connections.)Using the Audio Return Channel function (page 37)(When the connected TV supports the HDMI Audio Return Channel function.)
6 Use the on-screen automatic MCACC setup to set up your system
• Automatically setting up for surround sound (MCACC) (page 20)
7 Playing a source (page 22)• Selecting the audio input signal (page 22)• Playing an iPod (page 23)• Playing a USB device (page 24)• Choosing the listening mode (page 28)
8 Adjusting the sound as desired• Using the Sound Retriever (page 29)• Better sound using Phase Control (page 30)• Listening with Acoustic Calibration EQ (page 29)• Using surround back channel processing (page 30)• Setting the Up Mix function (page 30)• Setting the Audio options (page 31)• Manual speaker setup (page 33)
9 Making maximum use of the remote control• Setting the remote to control other components (page 39)
VSX-821_FLXCN_En.book 5 ページ 2011年3月30日 水曜日 午後12時38分

Controls and displays01
6En
01
Chapter 1:Controls and displays
Front panel
1 INPUT SELECTOR dialSelects an input source (page 22).
2 IndicatorsMCACC – Lights when Acoustic Calibration EQ (page 29) is on (Acoustic Calibration EQ is automatically set to on after the Auto MCACC setup (page 20)).
HDMI – Blinks when connecting an HDMI-equipped component; lights when the component is connected (page 14).
iPod iPhone iPad – Lights when an iPod/iPhone/iPad is connected and iPod USB input is selected (page 18).
3 Receiver control buttonsSPEAKERS – See Switching the speaker terminal on page 12.
DIMMER – Dims or brightens the display. The brightness can be controlled in four steps.
DISPLAY – Switches the display of this unit. The listening mode, sound volume, Pre Out setting or input name can be checked by selecting an input source.
• The Pre Out setting may or may not be displayed, depending on the input source you have selected.
4 Character displaySee Display on page 7.
5 Tuner control buttonsBAND – Switches between AM, FM ST (stereo) and FM MONO radio bands (page 27).
TUNER EDIT – Use with TUNE/, PRESET/ and ENTER to memorize and name stations for recall (page 27).
TUNE / – Used to find radio frequencies (page 27).
PRESET/ – Use to select preset radio stations (page 27).
6 Remote sensorReceives the signals from the remote control (see Operating range of remote control on page 9).
7 MASTER VOLUME dial
8 STANDBY/ON
9 PHONES jackUse to connect headphones. When the headphones are connected, there is no sound output from the speakers. The listening mode when the sound is heard from the headphone can be selected only from PHONES SURR, STEREO or STEREO ALC mode (S.R AIR mode can be also selected with ADAPTER input).
10 Listening mode buttonsAUTO SURROUND/STREAM DIRECT – Switches between Auto surround mode (page 28) and Stream Direct playback (page 29).
ALC/STANDARD SURR – Press for standard decoding and to switch between the modes of 2 Pro Logic II, 2 Pro Logic IIx, 2 Pro Logic IIz and NEO:6, and the Auto level control stereo mode (page 28).
ADVANCED SURROUND – Switches between the various surround modes (page 29).
STEREO – Press to select stereo playback (page 28).
AUDIO/ VIDEO MULTI-CHANNEL RECEIVER
MASTERVOLUME
STANDBY/ON
INPUTSELECTOR
MCACCSETUP MIC L AUDIO R VIDEO
VIDEO 2 INPUT
iPodiPhone
iPadUSB
5V 2.1 A
iPod iPhone iPadDIRECT CONTROLSTEREO
ADVANCEDSURROUND
ALC/STANDARD SURR
AUTO SURROUND/STREAM DIRECT
PHONES
SPEAKERS DIMMER DISPLAY BAND TUNER EDIT TUNE PRESET ENTER
iPod iPhone iPadHDMIMCACC
VSX-821
1 4 5
8 9 10 11 12 13 14
2 23 6 7
15 16 17 18 19 17
22 23 24 25 25 2726
20
21
VSX-821_FLXCN_En.book 6 ページ 2011年3月30日 水曜日 午後12時38分
EnglishEspañol
Controls and displays 0101
7En
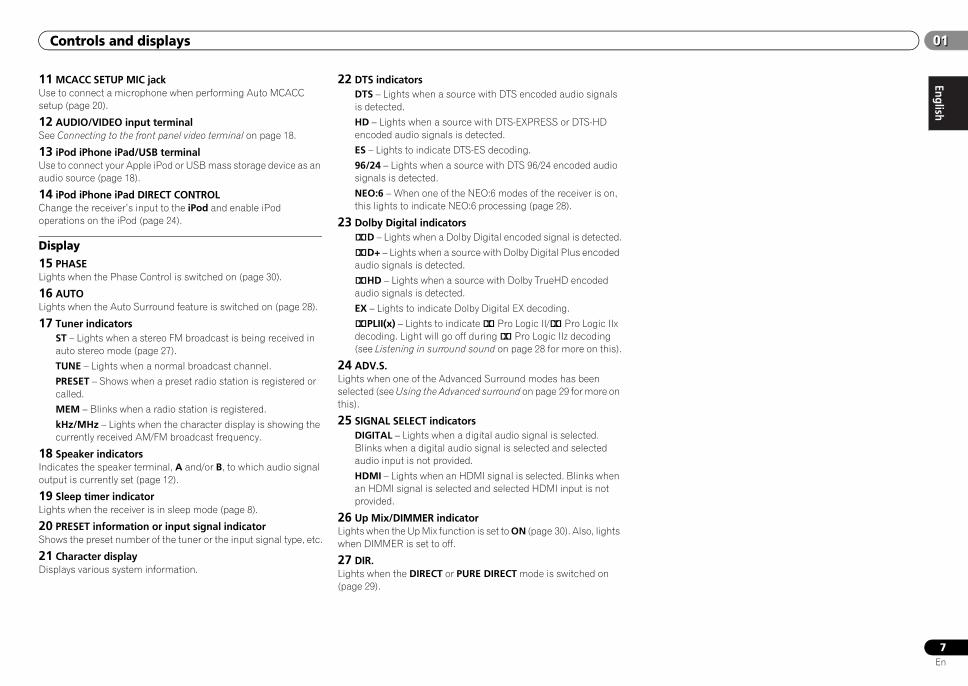
11 MCACC SETUP MIC jackUse to connect a microphone when performing Auto MCACC setup (page 20).
12 AUDIO/VIDEO input terminalSee Connecting to the front panel video terminal on page 18.
13 iPod iPhone iPad/USB terminalUse to connect your Apple iPod or USB mass storage device as an audio source (page 18).
14 iPod iPhone iPad DIRECT CONTROLChange the receiver’s input to the iPod and enable iPod operations on the iPod (page 24).
Display15 PHASELights when the Phase Control is switched on (page 30).
16 AUTOLights when the Auto Surround feature is switched on (page 28).
17 Tuner indicatorsST – Lights when a stereo FM broadcast is being received in auto stereo mode (page 27).
TUNE – Lights when a normal broadcast channel.
PRESET – Shows when a preset radio station is registered or called.
MEM – Blinks when a radio station is registered.
kHz/MHz – Lights when the character display is showing the currently received AM/FM broadcast frequency.
18 Speaker indicatorsIndicates the speaker terminal, A and/or B, to which audio signal output is currently set (page 12).
19 Sleep timer indicatorLights when the receiver is in sleep mode (page 8).
20 PRESET information or input signal indicatorShows the preset number of the tuner or the input signal type, etc.
21 Character display Displays various system information.
22 DTS indicatorsDTS – Lights when a source with DTS encoded audio signals is detected.
HD – Lights when a source with DTS-EXPRESS or DTS-HD encoded audio signals is detected.
ES – Lights to indicate DTS-ES decoding.
96/24 – Lights when a source with DTS 96/24 encoded audio signals is detected.
NEO:6 – When one of the NEO:6 modes of the receiver is on, this lights to indicate NEO:6 processing (page 28).
23 Dolby Digital indicators2D – Lights when a Dolby Digital encoded signal is detected.
2D+ – Lights when a source with Dolby Digital Plus encoded audio signals is detected.
2HD – Lights when a source with Dolby TrueHD encoded audio signals is detected.
EX – Lights to indicate Dolby Digital EX decoding.
2PLII(x) – Lights to indicate 2 Pro Logic II/2 Pro Logic IIx decoding. Light will go off during 2 Pro Logic IIz decoding (see Listening in surround sound on page 28 for more on this).
24 ADV.S.Lights when one of the Advanced Surround modes has been selected (see Using the Advanced surround on page 29 for more on this).
25 SIGNAL SELECT indicatorsDIGITAL – Lights when a digital audio signal is selected. Blinks when a digital audio signal is selected and selected audio input is not provided.
HDMI – Lights when an HDMI signal is selected. Blinks when an HDMI signal is selected and selected HDMI input is not provided.
26 Up Mix/DIMMER indicatorLights when the Up Mix function is set to ON (page 30). Also, lights when DIMMER is set to off.
27 DIR.Lights when the DIRECT or PURE DIRECT mode is switched on (page 29).
VSX-821_FLXCN_En.book 7 ページ 2011年3月30日 水曜日 午後12時38分
Controls and displays01
8En
01
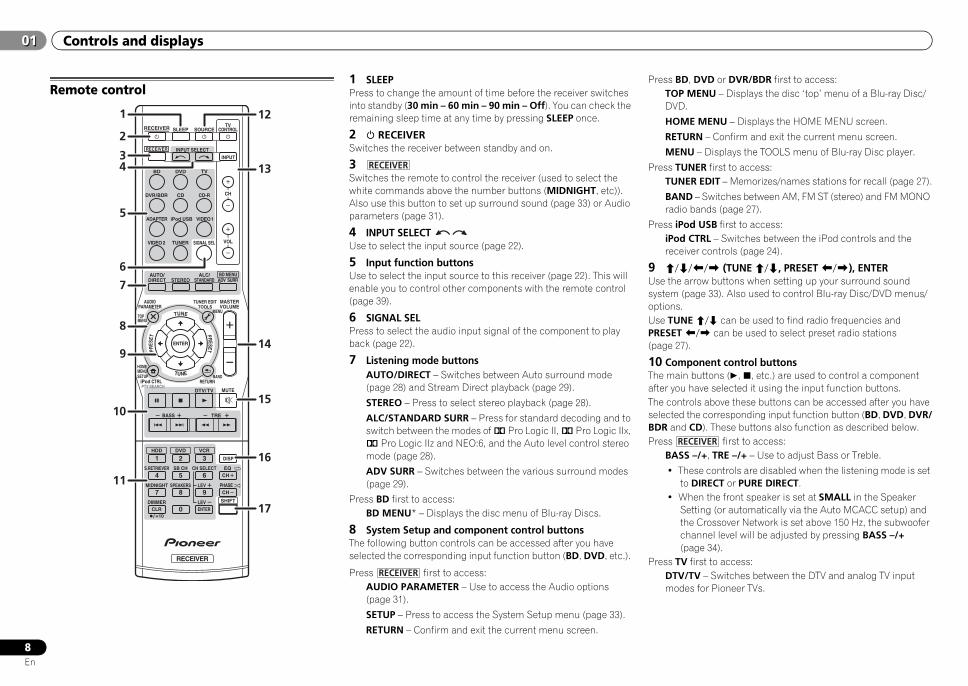
Remote control1 SLEEPPress to change the amount of time before the receiver switches into standby (30 min – 60 min – 90 min – Off). You can check the remaining sleep time at any time by pressing SLEEP once.
2 RECEIVERSwitches the receiver between standby and on.
3Switches the remote to control the receiver (used to select the white commands above the number buttons (MIDNIGHT, etc)). Also use this button to set up surround sound (page 33) or Audio parameters (page 31).
4 INPUT SELECT Use to select the input source (page 22).
5 Input function buttonsUse to select the input source to this receiver (page 22). This will enable you to control other components with the remote control (page 39).
6 SIGNAL SELPress to select the audio input signal of the component to play back (page 22).
7 Listening mode buttonsAUTO/DIRECT – Switches between Auto surround mode (page 28) and Stream Direct playback (page 29).
STEREO – Press to select stereo playback (page 28).
ALC/STANDARD SURR – Press for standard decoding and to switch between the modes of 2 Pro Logic II, 2 Pro Logic IIx, 2 Pro Logic IIz and NEO:6, and the Auto level control stereo mode (page 28).
ADV SURR – Switches between the various surround modes (page 29).
Press BD first to access:BD MENU* – Displays the disc menu of Blu-ray Discs.
8 System Setup and component control buttonsThe following button controls can be accessed after you have selected the corresponding input function button (BD, DVD, etc.).
Press first to access:AUDIO PARAMETER – Use to access the Audio options (page 31).
SETUP – Press to access the System Setup menu (page 33).
RETURN – Confirm and exit the current menu screen.
Press BD, DVD or DVR/BDR first to access:TOP MENU – Displays the disc ‘top’ menu of a Blu-ray Disc/DVD.
HOME MENU – Displays the HOME MENU screen.
RETURN – Confirm and exit the current menu screen.
MENU – Displays the TOOLS menu of Blu-ray Disc player.
Press TUNER first to access:TUNER EDIT – Memorizes/names stations for recall (page 27).
BAND – Switches between AM, FM ST (stereo) and FM MONO radio bands (page 27).
Press iPod USB first to access:iPod CTRL – Switches between the iPod controls and the receiver controls (page 24).
9 /// (TUNE/, PRESET/), ENTERUse the arrow buttons when setting up your surround sound system (page 33). Also used to control Blu-ray Disc/DVD menus/options.Use TUNE/ can be used to find radio frequencies and PRESET/ can be used to select preset radio stations (page 27).
10 Component control buttonsThe main buttons (, , etc.) are used to control a component after you have selected it using the input function buttons.The controls above these buttons can be accessed after you have selected the corresponding input function button (BD, DVD, DVR/BDR and CD). These buttons also function as described below.Press first to access:
BASS –/+, TRE –/+ – Use to adjust Bass or Treble.
• These controls are disabled when the listening mode is set to DIRECT or PURE DIRECT.
• When the front speaker is set at SMALL in the Speaker Setting (or automatically via the Auto MCACC setup) and the Crossover Network is set above 150 Hz, the subwoofer channel level will be adjusted by pressing BASS –/+ (page 34).
Press TV first to access:DTV/TV – Switches between the DTV and analog TV input modes for Pioneer TVs.
BD DVD
INPUT SELECT
SOURCESLEEPTV
CONTROL
DIMMER
TV
INPUT
1
4
7MIDNIGHT
S.RETRIEVER
HDD
CH
RECEIVER
DVR/BDR CD CD-R
ADAPTER iPod USB VIDEO 1
VIDEO 2 SIGNAL SELTUNER
BD MENU
ENTER
ALC/STANDARD ADV SURRSTEREO
AUTO/DIRECT
VOL
+10
2
5
8SPEAKERS LEV
LEV
SB CH
DISP
CLR
EQ
PHASE
DVD
3
6
9
0 ENTER
CH
CH
CH SELECT
VCR
SHIFT
MUTE
RETURN
AUDIOPARAMETER
TUNER EDITTOOLS
MASTERVOLUME
iPod CTRLPTY SEARCH
BAND
MENU
HOMEMENUSETUP
DTV/ TV
/
TREBASS
TOPMENU
RECEIVER
TUNE
TUNE
PRESETPRES
ETRECEIVER
1
2
12
13
14
15
16
34
5
6
7
8
9
10
11
17
RECEIVER
RECEIVER
RECEIVER
VSX-821_FLXCN_En.book 8 ページ 2011年3月30日 水曜日 午後12時38分
EnglishEspañol
Controls and displays 0101
9En
11 Number buttons and other component controlsUse the number buttons to directly select a radio frequency (page 27) or the tracks on a CD, etc. There are other buttons that can be accessed after is pressed. (For example MIDNIGHT, etc.)
HDD*, DVD*, VCR* – These buttons switch between the hard disk, DVD and VCR controls for HDD/DVD/VCR recorders.
S.RETRIEVER – Press to restore CD quality sound to compressed audio sources (page 29).
SB CH – Press to select ON, AUTO or OFF the surround back channel (page 30).
CH SELECT – Press repeatedly to select a channel, then use LEV +/– to adjust the level (page 34).
LEV +/– – Use to adjust the channel level.
EQ – Press to switch on/off Acoustic Calibration EQ setting (page 29).
MIDNIGHT – Switches to Midnight or Loudness listening (page 31).
SPEAKERS – See Switching the speaker terminal on page 12.
PHASE – Press to switch on/off Phase Control (page 30).
DIMMER – Dims or brightens the display. The brightness can be controlled in four steps.
12 SOURCEPress to turn on/off other components connected to the receiver (page 40).
13 TV CONTROL buttonsThese buttons are dedicated to control the TV assigned to the TV button. Thus if you only have one TV to hook up to this system assign it to the TV button (page 40).
– Use to turn on/off the power of the TV.
INPUT – Use to select the TV input signal.
CH +/– – Use to select channels.
VOL +/– – Use to adjust the volume on your TV.
14 MASTER VOLUME +/–Use to set the listening volume.
15 MUTEMutes/unmutes the sound.
16 DISPSwitches the display of this unit. The listening mode, sound volume, Pre Out setting or input name can be checked by selecting an input source.
• The Pre Out setting may or may not be displayed, depending on the input source you have selected.
17 SHIFTPress to access the ‘boxed’ commands (above the buttons) on the remote. These buttons are marked with an asterisk (*) in this section.
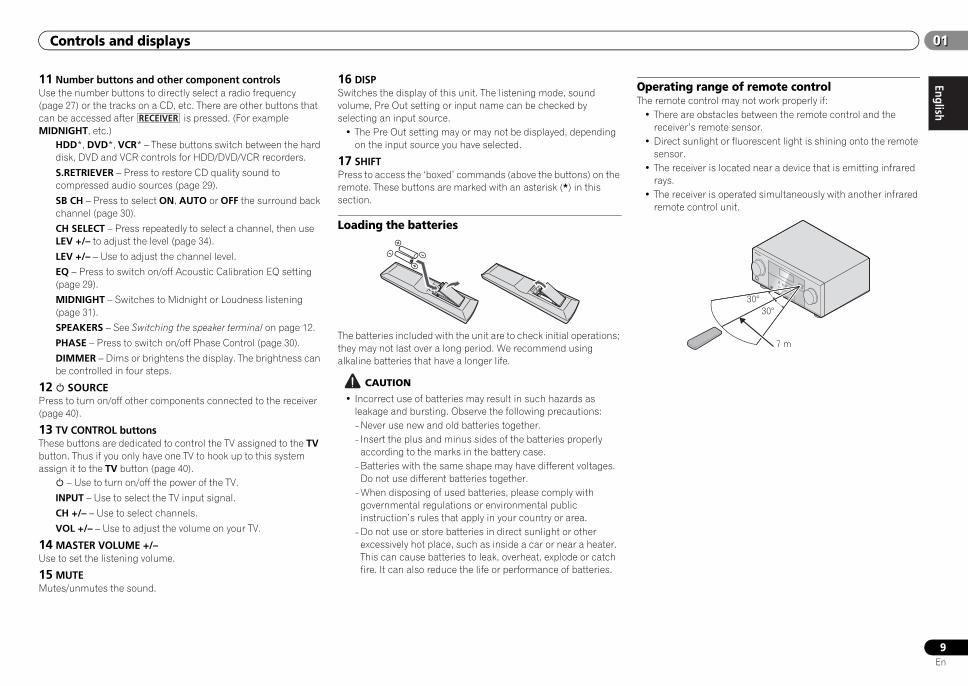
Loading the batteries
The batteries included with the unit are to check initial operations; they may not last over a long period. We recommend using alkaline batteries that have a longer life.
CAUTION
• Incorrect use of batteries may result in such hazards as leakage and bursting. Observe the following precautions:-Never use new and old batteries together.- Insert the plus and minus sides of the batteries properly
according to the marks in the battery case.-Batteries with the same shape may have different voltages.
Do not use different batteries together.-When disposing of used batteries, please comply with
governmental regulations or environmental public instruction’s rules that apply in your country or area.
-Do not use or store batteries in direct sunlight or other excessively hot place, such as inside a car or near a heater. This can cause batteries to leak, overheat, explode or catch fire. It can also reduce the life or performance of batteries.
Operating range of remote controlThe remote control may not work properly if:
• There are obstacles between the remote control and the receiver’s remote sensor.
• Direct sunlight or fluorescent light is shining onto the remote sensor.
• The receiver is located near a device that is emitting infrared rays.
• The receiver is operated simultaneously with another infrared remote control unit.
RECEIVER
30°
7 m
30°
VSX-821_FLXCN_En.book 9 ページ 2011年3月30日 水曜日 午後12時38分

Connecting your equipment02
10En
02
Chapter 2:Connecting your equipment
Determining the speakers’ applicationBy connecting the left and right front speakers (L/R), the center speaker (C), the left and right surround speakers (SL/SR), the left and right surround back speakers (SBL/SBR) (or the left and right front height speakers (FHL/FHR)), and the subwoofer (SW), a surround sound system up to 7.1 channel can be enjoyed.The 5.1 channel surround system is the most commonly-used in home theaters. To achieve the best possible surround sound, install your speakers as shown below.
Important• To connect the surround back or front height speakers, an
additional amplifier is required. Connect the additional amplifier to the PRE OUT SURR BACK/FRONT HEIGHT outputs of this unit and connect the surround back or front height speakers to the additional amplifier (see Connect the surround back or front height speakers on page 11).
Another way, you can use the speakers connected to the B speaker terminals to listen to stereo playback in another room. See Switching the speaker terminal on page 12 for the listening options with this setup.
Some tips for improving sound qualityWhere you put your speakers in the room has a big effect on the quality of the sound. The following guidelines should help you to get the best sound from your system.
• It is best to angle the speakers towards the listening position. The angle depends on the size of the room. Use less of an angle for bigger rooms.
• Refer to the chart below for placement of speakers you intend to connect.
-Place the surround speakers at 120º from the center. If you, (1) use the surround back speaker, and, (2) don’t use the front height speakers, we recommend placing the surround speaker right beside you.
- If you intend to connect only one surround back speakers, place it directly behind you.
- If the surround speakers cannot be set directly to the side of the listening position with a 7.1-channel system, the surround effect can be enhanced by turning off the Up Mix function (see Setting the Up Mix function on page 30).
• For the best stereo effect, place the front speakers 2 m to 3 m apart, at equal distance from the TV.
• If you’re using a center speaker, place the front speakers at a wider angle. If not, place them at a narrower angle.
• Place the center speaker above or below the TV so that the sound of the center channel is localized at the TV screen. Also, make sure the center speaker does not cross the line formed by the leading edge of the front left and right speakers.
• Surround and surround back speakers should be positioned 60 cm to 90 cm higher than your ears and titled slight downward. Make sure the speakers don’t face each other. For DVD-Audio, the speakers should be more directly behind the listener than for home theater playback.
• Try not to place the surround speakers farther away from the listening position than the front and center speakers. Doing so can weaken the surround sound effect.
• Place the left and right front height speakers at least one meter directly above the left and right front speakers.
• If you’re going to place speakers around your CRT TV, use shielded speakers or place the speakers at a sufficient distance from your CRT TV.
• The subwoofer can be placed on the floor. Ideally, the other speakers should be at about ear-level when you’re listening to them. Putting the speakers on the floor (except the subwoofer), or mounting them very high on a wall is not recommended.
• When not connecting a subwoofer, connect speakers with low frequency reproduction capabilities to the front channel. (The subwoofer’s low frequency component is played from the front speakers, so the speakers could be damaged.)
• After connecting, be sure to conduct the Auto MCACC (speaker environment setting) procedure. See Automatically setting up for surround sound (MCACC) on page 20.
SL
L
SWC
R R
SR
SL
L
SWC
SR
SB
5.1 channel surround system:
6.1 channel surround (Surround back) system:
C
SL
L
FHL
FHR
SW
R
SRSL
L
SWC
R
SR
SBL
SBR
7.1 channel surround (Surround back) system:
7.1 channel surround (Front height) system:
LR
Main zone
Speaker B
L
SWC
FHL
SL
SBL SBRSB
SR
R
FHR
30 30
60
120 120
VSX-821_FLXCN_En.book 10 ページ 2011年3月30日 水曜日 午後12時38分
EnglishEspañol
Connecting your equipment 0202
11En
CAUTION• Make sure that all speakers are securely installed. This not only improves sound quality, but also
reduces the risk of damage or injury resulting from speakers being knocked over or falling in the event of external shocks such as earthquakes.
Connecting the speakersThe receiver will work with just two stereo speakers (the front speakers in the diagram) but using at least three speakers is recommended, and a complete setup is best for surround sound. Make sure you connect the speaker on the right to the right (R) terminal and the speaker on the left to the left (L) terminal. Also make sure the positive and negative (+/–) terminals on the receiver match those on the speakers.You can use speakers with a normal impedance between 6 Ω and 16 Ω.
Important• Note that only the front speakers are set to a value between 12 Ω and 16 Ω if you select SPAB in
Switching the speaker terminal on page 12. Be sure to complete all connections before connecting this unit to the AC power source.
CAUTION• These speaker terminals carry HAZARDOUS LIVE voltage. To prevent the risk of electric shock
when connecting or disconnecting the speaker cables, disconnect the power cord before touching any uninsulated parts.
• Make sure that all the bare speaker wire is twisted together and inserted fully into the speaker terminal. If any of the bare speaker wire touches the back panel it may cause the power to cut off as a safety measure.
Connect the surround back or front height speakersConnect the PRE OUT SURR BACK/FRONT HEIGHT outputs of the unit and additional amplifier to add a surround back or front height speaker.The Pre Out setting must be set if the above connections are performed. Select SURR.BACK if the surround back speaker is connected and HEIGHT if the front height speaker is connected (If neither the surround back speaker nor the front height speaker is connected, either setting will suffice) (see The Pre Out Setting on page 35).
• You can use the additional amplifier on the surround back channel pre-outs for a single speaker as well. In this case plug the amplifier into the left (L (Single)) terminal only.
Bare wire connections
1 Twist exposed wire strands together.
2 Loosen terminal and insert exposed wire.
3 Tighten terminal.
1 2 3
10 mm
HDMI
VIDEO
COMPONENT VIDEO
DVR/BDR L
R
R
L
Y PB PR
COAXIAL
AUDIO
PRE OUT SPEAKERS
ANTENNA
OPTICAL
ASSIGNABLE
ASSIGNABLE
ASSIGNABLE
OUT
A
DVR/BDR
OUT
CD-R/TAPESURR BACK/FRONT HEIGHT
L
R
PRE OUT(Single)
IN
(CD)
1
SUBWOOFER
IN IN
CD
MONITOROUT
TV/SATIN
BDIN
OUT IN DVD IN
IN
TV/SAT BD
IN
DVD
(DVD)IN 1
MONITOROUT
(DVR/BDR)
IN 2
DVR/BDR IN DVD IN BD IN VIDEO 1 IN
(TV/SAT)
IN1
(CD-R/TAPE)
IN2
FMUNBAL75
(OUTPUT 5 V 0.1 A MAX)
ADAPTER PORT
AM LOOPFRONT
R LCENTER SURROUND
R L R LB
LINE LEVELINPUT
ANALOGR L
AUDIO IN SPEAKER R SPEAKER L
Center
Surround right
Front right
Surround back or front height channel amplifier
Front leftSubwoofer
Right Left
Speaker B
Surround left
Right Left
Surround back or front height speakers
VSX-821_FLXCN_En.book 11 ページ 2011年3月30日 水曜日 午後12時38分
Connecting your equipment02
12En
02
Switching the speaker terminalThree speaker system settings are possible using the SPEAKERS button.
Use the SPEAKERS button on the front panel to select a speaker terminal setting.
Press repeatedly to choose a speaker terminal option:• SPA – Sound is output from the speakers connected to the
A-speaker terminals and PRE OUT SURR BACK/FRONT HEIGHT (multichannel playback is possible).
• SPB – Sound is output from the two speakers connected to the B-speaker terminals (only stereo playback is possible).
• SPAB – Sound is output from the A-speaker terminals, the two speakers in the B-speaker terminals, and the subwoofer. Multichannel sources are downmixed only when the STEREO or STEREO ALC mode is selected for stereo output from A- and B-speaker terminals.
• SP – No sound is output from the speakers.
Note• The subwoofer output depends on the settings you made in
Speaker Setting on page 33. However, if SPB is selected above, no sound is heard from the subwoofer (the LFE channel is not downmixed).
• You can use speakers with a normal impedance between 6 Ω and 16 Ω. However, be aware that only the front speakers are set to a value between 12 Ω and 16 Ω when you select SPAB.
• All speaker terminals are switched off when headphones are connected.
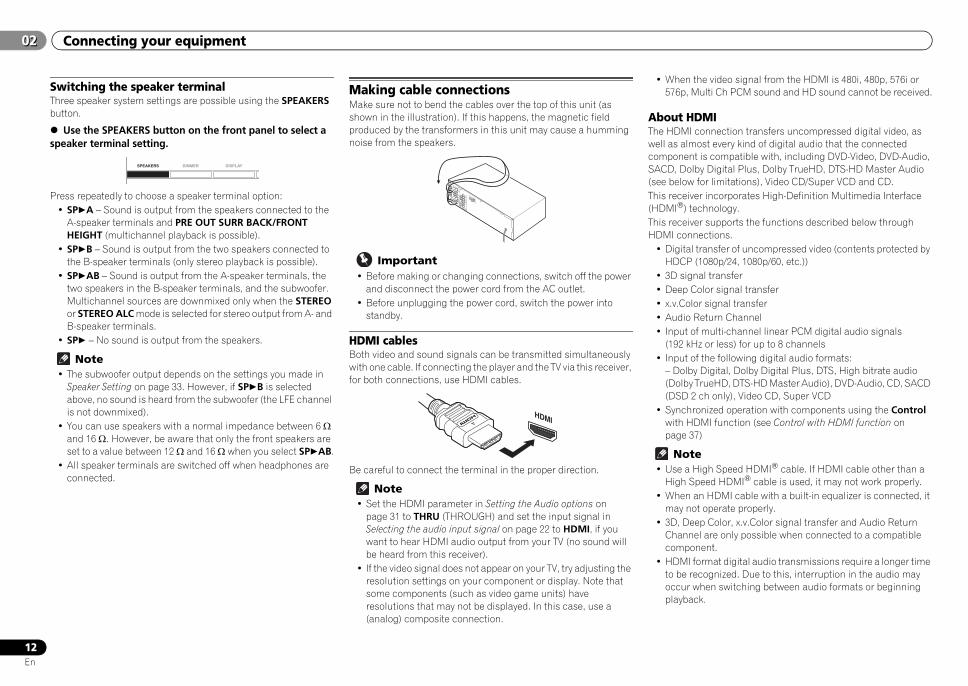
Making cable connectionsMake sure not to bend the cables over the top of this unit (as shown in the illustration). If this happens, the magnetic field produced by the transformers in this unit may cause a humming noise from the speakers.
Important• Before making or changing connections, switch off the power
and disconnect the power cord from the AC outlet.• Before unplugging the power cord, switch the power into
standby.
HDMI cablesBoth video and sound signals can be transmitted simultaneously with one cable. If connecting the player and the TV via this receiver, for both connections, use HDMI cables.
Be careful to connect the terminal in the proper direction.
Note• Set the HDMI parameter in Setting the Audio options on
page 31 to THRU (THROUGH) and set the input signal in Selecting the audio input signal on page 22 to HDMI, if you want to hear HDMI audio output from your TV (no sound will be heard from this receiver).
• If the video signal does not appear on your TV, try adjusting the resolution settings on your component or display. Note that some components (such as video game units) have resolutions that may not be displayed. In this case, use a (analog) composite connection.
• When the video signal from the HDMI is 480i, 480p, 576i or 576p, Multi Ch PCM sound and HD sound cannot be received.
About HDMIThe HDMI connection transfers uncompressed digital video, as well as almost every kind of digital audio that the connected component is compatible with, including DVD-Video, DVD-Audio, SACD, Dolby Digital Plus, Dolby TrueHD, DTS-HD Master Audio (see below for limitations), Video CD/Super VCD and CD.This receiver incorporates High-Definition Multimedia Interface (HDMI®) technology.This receiver supports the functions described below through HDMI connections.
• Digital transfer of uncompressed video (contents protected by HDCP (1080p/24, 1080p/60, etc.))
• 3D signal transfer• Deep Color signal transfer• x.v.Color signal transfer• Audio Return Channel• Input of multi-channel linear PCM digital audio signals
(192 kHz or less) for up to 8 channels• Input of the following digital audio formats:
– Dolby Digital, Dolby Digital Plus, DTS, High bitrate audio (Dolby TrueHD, DTS-HD Master Audio), DVD-Audio, CD, SACD (DSD 2 ch only), Video CD, Super VCD
• Synchronized operation with components using the Control with HDMI function (see Control with HDMI function on page 37)
Note• Use a High Speed HDMI® cable. If HDMI cable other than a
High Speed HDMI® cable is used, it may not work properly.• When an HDMI cable with a built-in equalizer is connected, it
may not operate properly.• 3D, Deep Color, x.v.Color signal transfer and Audio Return
Channel are only possible when connected to a compatible component.
• HDMI format digital audio transmissions require a longer time to be recognized. Due to this, interruption in the audio may occur when switching between audio formats or beginning playback.
SPEAKERS DIMMER DISPLAY
HDMI
VSX-821_FLXCN_En.book 12 ページ 2011年3月30日 水曜日 午後12時38分
EnglishEspañol
Connecting your equipment 0202
13En
• Turning on/off the device connected to this unit’s HDMI OUT terminal during playback, or disconnecting/connecting the HDMI cable during playback, may cause noise or interrupted audio.
HDMI, the HDMI Logo and High-Definition Multimedia Interface are trademarks or registered trademarks of HDMI Licensing, LLC in the United States and other countries.
“x.v.Color” and are trademarks of Sony Corporation.
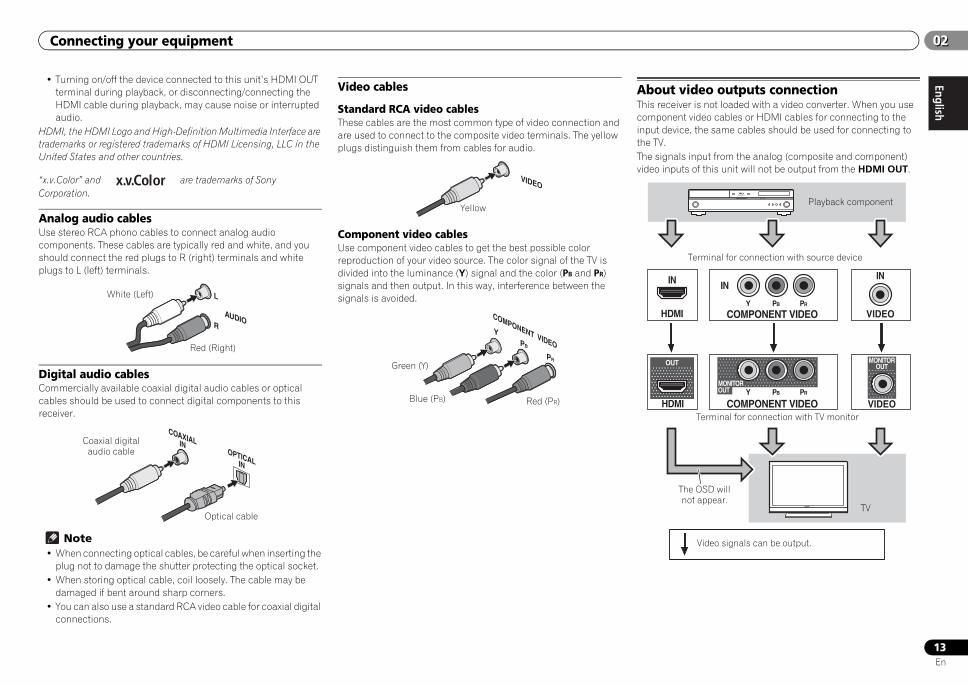
Analog audio cablesUse stereo RCA phono cables to connect analog audio components. These cables are typically red and white, and you should connect the red plugs to R (right) terminals and white plugs to L (left) terminals.
Digital audio cablesCommercially available coaxial digital audio cables or optical cables should be used to connect digital components to this receiver.
Note• When connecting optical cables, be careful when inserting the
plug not to damage the shutter protecting the optical socket.• When storing optical cable, coil loosely. The cable may be
damaged if bent around sharp corners.• You can also use a standard RCA video cable for coaxial digital
connections.
Video cables
Standard RCA video cablesThese cables are the most common type of video connection and are used to connect to the composite video terminals. The yellow plugs distinguish them from cables for audio.
Component video cablesUse component video cables to get the best possible color reproduction of your video source. The color signal of the TV is divided into the luminance (Y) signal and the color (PB and PR) signals and then output. In this way, interference between the signals is avoided.
About video outputs connectionThis receiver is not loaded with a video converter. When you use component video cables or HDMI cables for connecting to the input device, the same cables should be used for connecting to the TV.The signals input from the analog (composite and component) video inputs of this unit will not be output from the HDMI OUT.
L
RAUDIO
White (Left)
Red (Right)
COAXIALINOPTICALIN
Coaxial digital audio cable
Optical cable
VIDEO
Yellow
YPB
PR
COMPONENT VIDEO
Green (Y)
Red (PR)Blue (PB)
VIDEO
VIDEO
ININ IN
HDMI
COMPONENT VIDEO
MONITOROUT Y PB PR
MONITOROUT
COMPONENT VIDEOY PB PR
HDMI
OUT
Terminal for connection with source device
Terminal for connection with TV monitor
Playback component
TV
The OSD will not appear.
Video signals can be output.
VSX-821_FLXCN_En.book 13 ページ 2011年3月30日 水曜日 午後12時38分
Connecting your equipment02
14En
02
Connecting a TV and playback components
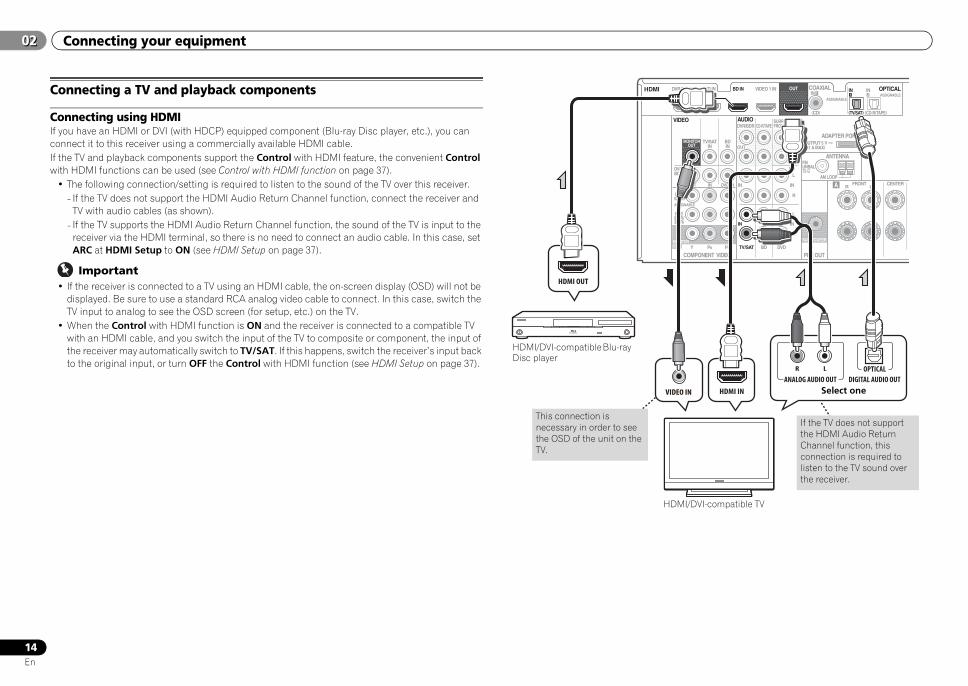
Connecting using HDMIIf you have an HDMI or DVI (with HDCP) equipped component (Blu-ray Disc player, etc.), you can connect it to this receiver using a commercially available HDMI cable.If the TV and playback components support the Control with HDMI feature, the convenient Control with HDMI functions can be used (see Control with HDMI function on page 37).
• The following connection/setting is required to listen to the sound of the TV over this receiver.- If the TV does not support the HDMI Audio Return Channel function, connect the receiver and
TV with audio cables (as shown).- If the TV supports the HDMI Audio Return Channel function, the sound of the TV is input to the
receiver via the HDMI terminal, so there is no need to connect an audio cable. In this case, set ARC at HDMI Setup to ON (see HDMI Setup on page 37).
Important• If the receiver is connected to a TV using an HDMI cable, the on-screen display (OSD) will not be
displayed. Be sure to use a standard RCA analog video cable to connect. In this case, switch the TV input to analog to see the OSD screen (for setup, etc.) on the TV.
• When the Control with HDMI function is ON and the receiver is connected to a compatible TV with an HDMI cable, and you switch the input of the TV to composite or component, the input of the receiver may automatically switch to TV/SAT. If this happens, switch the receiver’s input back to the original input, or turn OFF the Control with HDMI function (see HDMI Setup on page 37).
MONITOROUT
HDMI
VIDEO
COMPONENT VIDEO
DVR/BDR L
R
R
L
Y PB PR
COAXIAL
AUDIO
PRE OUT
ANTENNA
OPTICAL
ASSIGNABLE
ASSIGNABLE
ASSIGNABLE
OUT
A
DVR/BDR
OUT
CD-R/TAPESURR BACK/FRONT HEIGHT
L
R
PRE OUT(Single)
IN
(CD)
1
SUBWOOFER
IN IN
CD
MONITOROUT
TV/SATIN
BDIN
OUT IN DVD IN
IN
TV/SAT BD
IN
DVD
(DVD)IN 1
MONITOROUT
(DVR/BDR)
IN 2
DVR/BDR IN DVD IN BD IN VIDEO 1 IN
(TV/SAT)
IN1
(CD-R/TAPE)
IN2
FMUNBAL75
(OUTPUT 5 V 0.1 A MAX)
ADAPTER PORT
AM LOOPFRONT
R LCENTER
VIDEO IN HDMI IN
HDMI OUT
R L
DIGITAL AUDIO OUTANALOG AUDIO OUTOPTICAL
Select one
HDMI/DVI-compatible TV
HDMI/DVI-compatible Blu-ray Disc player
If the TV does not support the HDMI Audio Return Channel function, this connection is required to listen to the TV sound over the receiver.
This connection is necessary in order to see the OSD of the unit on the TV.
VSX-821_FLXCN_En.book 14 ページ 2011年3月30日 水曜日 午後12時38分

EnglishEspañol
Connecting your equipment 0202
15En
Connecting your component with no HDMI terminalThis diagram shows connections of a TV and DVD player (or other playback component) with no HDMI terminal to the receiver.
• If both TV and player has a component video jacks, you can connect these too. See Using the component video jacks on page 16 for more on this.
Note• In order to listen to the audio from the DVD player that is connected to this receiver using an optical
cable or a coaxial cable, first, switch to the DVD input, then press SIGNAL SEL to choose the audio signal O2 (OPTICAL2) or C1 (COAXIAL1) (see Selecting the audio input signal on page 22).
Connecting a satellite receiver or other digital set-top boxSatellite and cable receivers, and terrestrial digital TV tuners are all examples of so-called ‘set-top boxes’.
• If the set-top box or video component also has an HDMI or a component video output, you can connect this too. See Connecting using HDMI on page 14 or Using the component video jacks on page 16 for more on this.
Note• In order to listen to the audio from the source component that is connected to this receiver using
a coaxial cable, first, switch to the TV/SAT, then press SIGNAL SEL to choose the audio signal C1 (COAXIAL1) (see Selecting the audio input signal on page 22).
HDMI
VIDEO
COMPONENT VIDEO
DVR/BDR L
R
R
L
Y PB PR
COAXIAL
AUDIO
PRE OUT
ANTENNA
OPTICAL
ASSIGNABLE
ASSIGNABLE
ASSIGNABLE
OUT
A
DVR/BDR
OUT
CD-R/TAPESURR BACK/FRONT HEIGHT
L
R
PRE OUT(Single)
IN
(CD)
1
SUBWOOFER
IN IN
CD
MONITOROUT
TV/SATIN
BDIN
OUT IN DVD IN
IN
TV/SAT BD
IN
DVD
(DVD)IN 1
MONITOROUT
(DVR/BDR)
IN 2
DVR/BDR IN DVD IN BD IN VIDEO 1 IN
(TV/SAT)
IN1
(CD-R/TAPE)
IN2
FMUNBAL75
(OUTPUT 5 V 0.1 A MAX)
ADAPTER PORT
AM LOOPFRONT
R LCENTER
R L
DIGITAL AUDIO OUT ANALOG AUDIO OUTOPTICAL
R L
DIGITAL AUDIO OUTANALOG AUDIO OUTOPTICAL COAXIAL
VIDEO IN VIDEO OUT
Select one
TV DVD player
Select one
This connection is required in order to listen to the sound of the TV over the receiver.
HDMI
VIDEO
COMPONENT VIDEO
DVR/BDR L
R
R
L
Y PB PR
COAXIAL
AUDIO
PRE OUT
ANTENNA
OPTICAL
ASSIGNABLE
ASSIGNABLE
ASSIGNABLE
OUT
A
DVR/BDR
OUT
CD-R/TAPESURR BACK/FRONT HEIGHT
L
R
PRE OUT(Single)
IN
(CD)
1
SUBWOOFER
IN IN
CD
MONITOROUT
TV/SATIN
BDIN
OUT IN DVD IN
IN
TV/SAT BD
IN
DVD
(DVD)IN 1
MONITOROUT
(DVR/BDR)
IN 2
DVR/BDR IN DVD IN BD IN VIDEO 1 IN
(TV/SAT)
IN1
(CD-R/TAPE)
IN2
FMUNBAL75
(OUTPUT 5 V 0.1 A MAX)
ADAPTER PORT
AM LOOPFRONT
R LCENTER
R L
DIGITAL AUDIO OUTANALOG AUDIO OUTOPTICALCOAXIAL
VIDEO OUT Select one
Set-top box, etc.
VSX-821_FLXCN_En.book 15 ページ 2011年3月30日 水曜日 午後12時38分

Connecting your equipment02
16En
02
Connecting an HDD/DVD recorder, Blu-ray Disc recorder and other video sourcesThis receiver has audio/video inputs and outputs suitable for connecting analog or digital video recorders, including HDD/DVD recorders and Blu-ray Disc recorders.
• Only the signals that are input to the VIDEO IN terminal can be output from the VIDEO OUT terminal.
• Audio signals that are input through the digital terminal will not be output from the analog terminal.
Note• In order to listen to the audio from the source component that is connected to this receiver using
an optical cable, first, switch to the DVR/BDR input, then press SIGNAL SEL to choose the audio signal O2 (OPTICAL2) (see Selecting the audio input signal on page 22).
Using the component video jacksComponent video should deliver superior picture quality when compared to composite video. A further advantage (if your source and TV are both compatible) is progressive-scan video, which delivers a very stable, flicker-free picture. See the manuals that came with your TV and source component to check whether they are compatible with progressive-scan video.
• For the audio connection, refer to Connecting your component with no HDMI terminal on page 15.
Important• If you connect any source component to the receiver using a component video input, you must
also have your TV connected to this receiver’s COMPONENT VIDEO MONITOR OUT jacks.• If necessary, assign the component video inputs to the input source you’ve connected. This only
needs to be done if you didn’t connect according to the following defaults: -COMPONENT VIDEO IN 1: DVD-COMPONENT VIDEO IN 2: DVR/BDR
See The Input Assign menu on page 35 for more on this.
HDMI
VIDEO
COMPONENT VIDEO
DVR/BDR L
R
R
L
Y PB PR
COAXIAL
AUDIO
PRE OUT
ANTENNA
OPTICAL
ASSIGNABLE
ASSIGNABLE
ASSIGNABLE
OUT
A
DVR/BDR
OUT
CD-R/TAPESURR BACK/FRONT HEIGHT
L
R
PRE OUT(Single)
IN
(CD)
1
SUBWOOFER
IN IN
CD
MONITOROUT
TV/SATIN
BDIN
OUT IN DVD IN
IN
TV/SAT BD
IN
DVD
(DVD)IN 1
MONITOROUT
(DVR/BDR)
IN 2
DVR/BDR IN DVD IN BD IN VIDEO 1 IN
(TV/SAT)
IN1
(CD-R/TAPE)
IN2
FMUNBAL75
(OUTPUT 5 V 0.1 A MAX)
ADAPTER PORT
AM LOOPFRONT
R LCENTER
R L
DIGITAL AUDIO OUTANALOG AUDIO OUTR L
ANALOG AUDIO IN
OPTICAL
VIDEO IN VIDEO OUT Select one
HDD/DVD recorder, Blu-ray Disc recorder, etc.
COMPONENT VIDEO
DVR/BDR L
R
R
L
Y PB PR
PRE OUT
ANTENNA
ASSIGNABLE
A
OUT
L
R
PRE OUT(Single)
SUBWOOFER
IN IN
CD
MONITOROUT
TV/SATIN
BDIN
OUT IN DVD IN
IN
TV/SAT BD
IN
DVD
(DVD)IN 1
MONITOROUT
(DVR/BDR)
IN 2
FMUNBAL75
(OUTPUT 5 V 0.1 A MAX)
ADAPTER PORT
AM LOOPFRONT
R LCENTER
YPBPR
COMPONENT VIDEO IN
YPBPR
COMPONENT VIDEO OUT
DVD playerTV
VSX-821_FLXCN_En.book 16 ページ 2011年3月30日 水曜日 午後12時38分
EnglishEspañol
Connecting your equipment 0202
17En
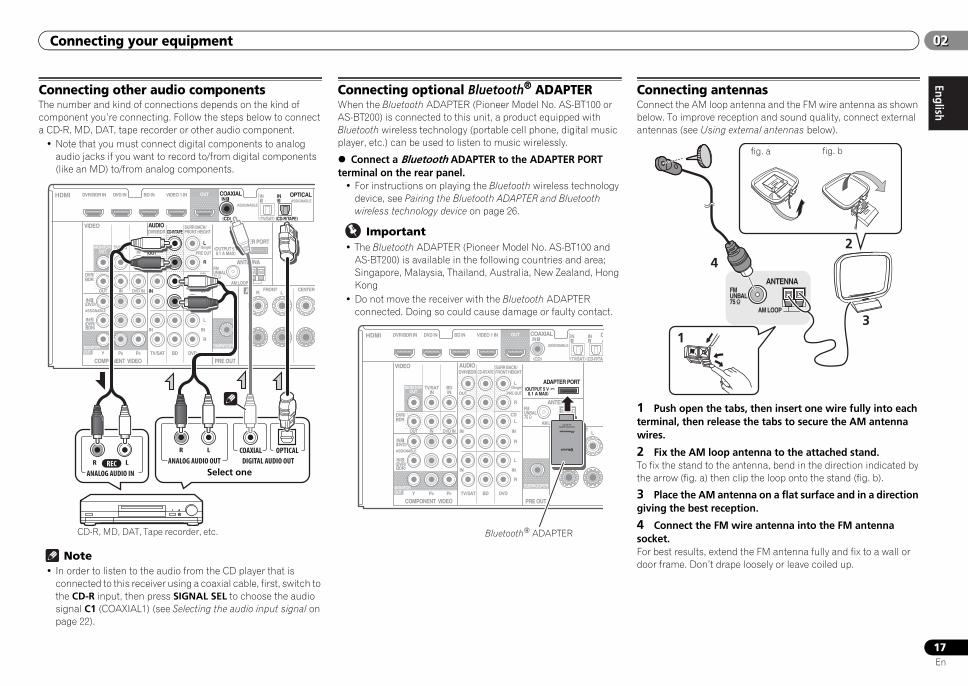
Connecting other audio componentsThe number and kind of connections depends on the kind of component you’re connecting. Follow the steps below to connect a CD-R, MD, DAT, tape recorder or other audio component.
• Note that you must connect digital components to analog audio jacks if you want to record to/from digital components (like an MD) to/from analog components.
Note• In order to listen to the audio from the CD player that is
connected to this receiver using a coaxial cable, first, switch to the CD-R input, then press SIGNAL SEL to choose the audio signal C1 (COAXIAL1) (see Selecting the audio input signal on page 22).
Connecting optional Bluetooth® ADAPTERWhen the Bluetooth ADAPTER (Pioneer Model No. AS-BT100 or AS-BT200) is connected to this unit, a product equipped with Bluetooth wireless technology (portable cell phone, digital music player, etc.) can be used to listen to music wirelessly.
Connect a Bluetooth ADAPTER to the ADAPTER PORT terminal on the rear panel.
• For instructions on playing the Bluetooth wireless technology device, see Pairing the Bluetooth ADAPTER and Bluetooth wireless technology device on page 26.
Important• The Bluetooth ADAPTER (Pioneer Model No. AS-BT100 and
AS-BT200) is available in the following countries and area;Singapore, Malaysia, Thailand, Australia, New Zealand, Hong Kong
• Do not move the receiver with the Bluetooth ADAPTER connected. Doing so could cause damage or faulty contact.
Connecting antennasConnect the AM loop antenna and the FM wire antenna as shown below. To improve reception and sound quality, connect external antennas (see Using external antennas below).
1 Push open the tabs, then insert one wire fully into each terminal, then release the tabs to secure the AM antenna wires.
2 Fix the AM loop antenna to the attached stand.To fix the stand to the antenna, bend in the direction indicated by the arrow (fig. a) then clip the loop onto the stand (fig. b).
3 Place the AM antenna on a flat surface and in a direction giving the best reception.
4 Connect the FM wire antenna into the FM antenna socket.For best results, extend the FM antenna fully and fix to a wall or door frame. Don’t drape loosely or leave coiled up.
HDMI
VIDEO
COMPONENT VIDEO
DVR/BDR L
R
R
L
Y PB PR
COAXIAL
AUDIO
PRE OUT
ANTENNA
OPTICAL
ASSIGNABLE
ASSIGNABLE
ASSIGNABLE
OUT
A
DVR/BDR
OUT
CD-R/TAPESURR BACK/FRONT HEIGHT
L
R
PRE OUT(Single)
IN
(CD)
1
SUBWOOFER
IN IN
CD
MONITOROUT
TV/SATIN
BDIN
OUT IN DVD IN
IN
TV/SAT BD
IN
DVD
(DVD)IN 1
MONITOROUT
(DVR/BDR)
IN 2
DVR/BDR IN DVD IN BD IN VIDEO 1 IN
(TV/SAT)
IN1
(CD-R/TAPE)
IN2
FMUNBAL75
(OUTPUT 5 V 0.1 A MAX)
ADAPTER PORT
AM LOOPFRONT
R LCENTER
REC
R L
DIGITAL AUDIO OUTANALOG AUDIO OUTR L
ANALOG AUDIO IN
OPTICALCOAXIAL
Select one
CD-R, MD, DAT, Tape recorder, etc.
HDMI
VIDEO
COMPONENT VIDEO
DVR/BDR L
R
R
L
Y PB PR
COAXIAL
AUDIO
PRE OUT
ANTENNA
O
ASSIGNABLE
ASSIGNABLE
A
OUT
A
DVR/BDR
OUT
CD-R/TAPESURR BACK/FRONT HEIGHT
L
R
PRE OUT(Single)
IN
(CD)
1
SUBWOOFER
IN IN
CD
MONITOROUT
TV/SATIN
BDIN
OUT IN DVD IN
IN
TV/SAT BD
IN
DVD
(DVD)IN 1
MONITOROUT
(DVR/BDR)
IN 2
DVR/BDR IN DVD IN BD IN VIDEO 1 IN
(TV/SAT)
IN1
(CD-R/TAP
IN2
FMUNBAL75
(OUTPUT 5 V 0.1 A MAX)
ADAPTER PORT
AM LOOPFRONT
R L
Bluetooth® ADAPTER
ANTENNAFMUNBAL75
AM LOOP
2
13
4
fig. a fig. b
VSX-821_FLXCN_En.book 17 ページ 2011年3月30日 水曜日 午後12時38分
Connecting your equipment02
18En
02
Using external antennas
To improve FM receptionConnect an external FM antenna as shown below.
To improve AM receptionConnect a 5 m to 6 m length of vinyl-coated wire to the AM antenna terminal without disconnecting the supplied AM loop antenna.For the best possible reception, suspend horizontally outdoors.
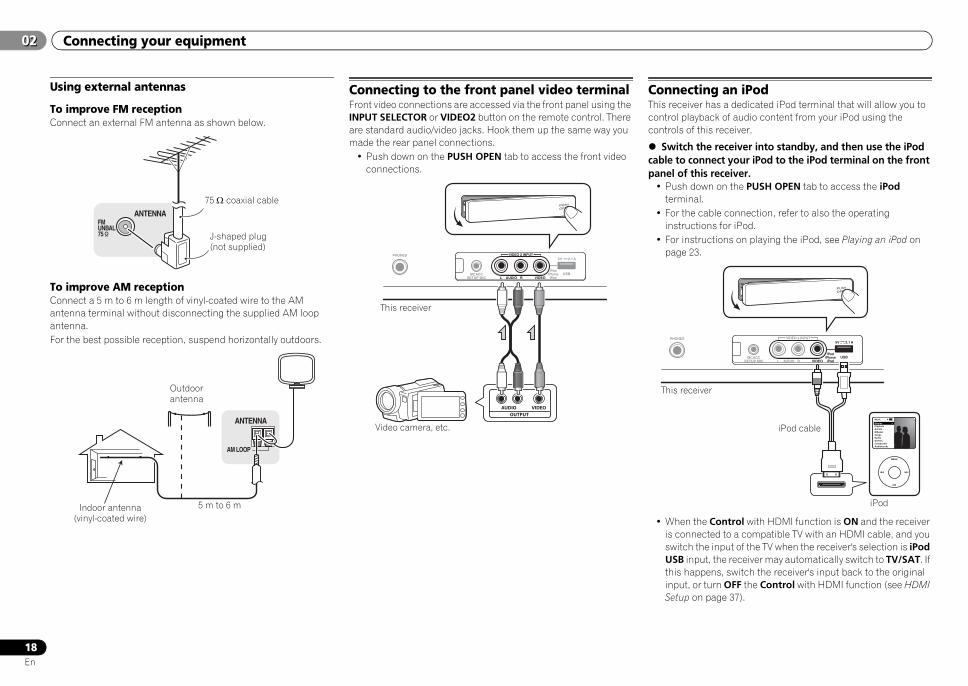
Connecting to the front panel video terminalFront video connections are accessed via the front panel using the INPUT SELECTOR or VIDEO2 button on the remote control. There are standard audio/video jacks. Hook them up the same way you made the rear panel connections.
• Push down on the PUSH OPEN tab to access the front video connections.
Connecting an iPodThis receiver has a dedicated iPod terminal that will allow you to control playback of audio content from your iPod using the controls of this receiver.
Switch the receiver into standby, and then use the iPod cable to connect your iPod to the iPod terminal on the front panel of this receiver.
• Push down on the PUSH OPEN tab to access the iPod terminal.
• For the cable connection, refer to also the operating instructions for iPod.
• For instructions on playing the iPod, see Playing an iPod on page 23.
• When the Control with HDMI function is ON and the receiver is connected to a compatible TV with an HDMI cable, and you switch the input of the TV when the receiver's selection is iPod USB input, the receiver may automatically switch to TV/SAT. If this happens, switch the receiver's input back to the original input, or turn OFF the Control with HDMI function (see HDMI Setup on page 37).
ANTENNAFMUNBAL75 J-shaped plug
(not supplied)
75 Ω coaxial cable
ANTENNA
AM LOOP
Outdoor antenna
5 m to 6 mIndoor antenna (vinyl-coated wire)
CONTROL ON / OFF
AUDIO VIDEOOUTPUT
MCACCSETUP MIC L AUDIO R VIDEO
VIDEO 2 INPUT
iPodiPhone
iPadUSB
5V 2.1 APHONES
This receiver
Video camera, etc.
MCACCSETUP MIC L AUDIO R VIDEO
VIDEO 2 INPUT
iPodiPhone
iPadUSB
5V 2.1 APHONES
MENU
Music
Genius >PlaylistsArtistsAlbumsSongsRadioGenresComposersAudiobooks
CONTROL ON / OFF
iPod
iPod cable
This receiver
VSX-821_FLXCN_En.book 18 ページ 2011年3月30日 水曜日 午後12時38分
EnglishEspañol
Connecting your equipment 0202
19En
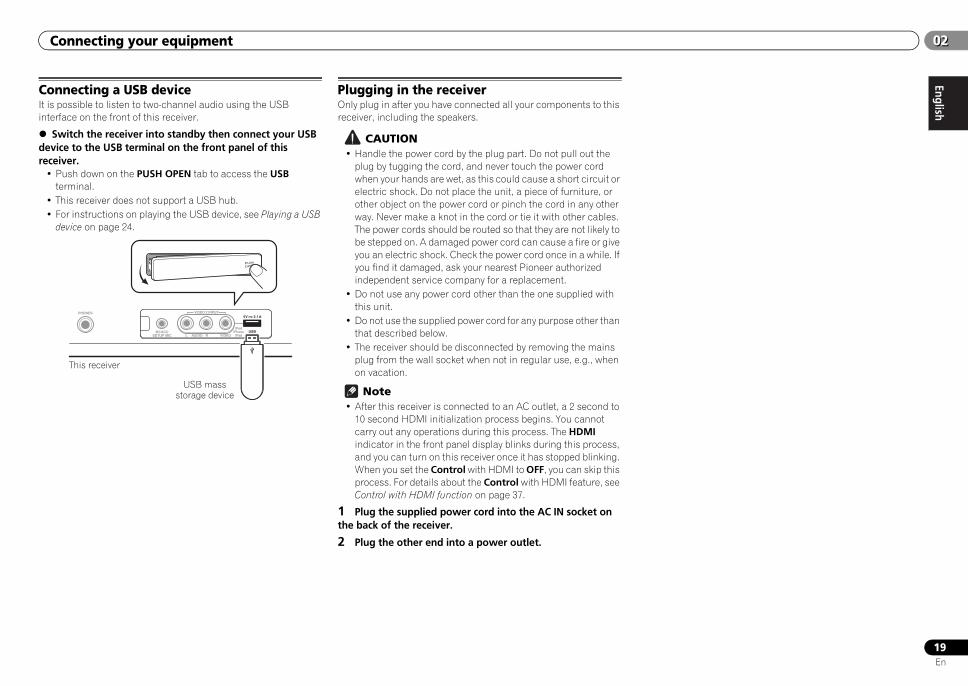
Connecting a USB deviceIt is possible to listen to two-channel audio using the USB interface on the front of this receiver.
Switch the receiver into standby then connect your USB device to the USB terminal on the front panel of this receiver.
• Push down on the PUSH OPEN tab to access the USB terminal.
• This receiver does not support a USB hub.• For instructions on playing the USB device, see Playing a USB
device on page 24.
Plugging in the receiverOnly plug in after you have connected all your components to this receiver, including the speakers.
CAUTION• Handle the power cord by the plug part. Do not pull out the
plug by tugging the cord, and never touch the power cord when your hands are wet, as this could cause a short circuit or electric shock. Do not place the unit, a piece of furniture, or other object on the power cord or pinch the cord in any other way. Never make a knot in the cord or tie it with other cables. The power cords should be routed so that they are not likely to be stepped on. A damaged power cord can cause a fire or give you an electric shock. Check the power cord once in a while. If you find it damaged, ask your nearest Pioneer authorized independent service company for a replacement.
• Do not use any power cord other than the one supplied with this unit.
• Do not use the supplied power cord for any purpose other than that described below.
• The receiver should be disconnected by removing the mains plug from the wall socket when not in regular use, e.g., when on vacation.
Note• After this receiver is connected to an AC outlet, a 2 second to
10 second HDMI initialization process begins. You cannot carry out any operations during this process. The HDMI indicator in the front panel display blinks during this process, and you can turn on this receiver once it has stopped blinking. When you set the Control with HDMI to OFF, you can skip this process. For details about the Control with HDMI feature, see Control with HDMI function on page 37.
1 Plug the supplied power cord into the AC IN socket on the back of the receiver.
2 Plug the other end into a power outlet.
MCACCSETUP MIC L AUDIO R VIDEO
VIDEO 2 INPUT
iPodiPhone
iPadUSB
5V 2.1 APHONES
CONTROL ON / OFF
USB mass storage device
This receiver
VSX-821_FLXCN_En.book 19 ページ 2011年3月30日 水曜日 午後12時38分

Basic Setup03
20En
03
Chapter 3:Basic Setup
Before setting upThis receiver allows you to adjust the system setup, and operate iPod/USB devices for playback, using the on-screen display (OSD) that is shown on the TV screen.
• The OSD will not appear if you have connected using the HDMI output to your TV. Use composite or component connections for system setup.
First, follow the procedure below to make sure that the OSD screen is displayed.
1 Switch on the receiver and your TV.
2 Switch the TV input to the input that connects this receiver to the TV through the corresponding composite or component cable.For example, if you connected this receiver to the VIDEO jacks on your TV, make sure that the VIDEO input is now selected.
3 Press on the remote control, then press the SETUP button.The System Setup menu of the OSD screen will be displayed on the TV. If nothing appears on the screen, try to change the TV format setting on the receiver (see below).
Changing the TV format settingIf the OSD screen is not displayed correctly, it may be that the TV system is set incorrectly for your country or region.
1 Switch the receiver into standby.
2 While holding down the TUNE button, press and hold the STANDBY/ON button for about two seconds.The display shows the new setting (PAL or NTSC).
Canceling the demo displayThe display on the front panel shows various information (demo displays) when the receiver is not operating.You can turn off the demo display. For details, see The FL Demo Mode menu on page 36.
• The demo mode is canceled automatically when the Auto MCACC setup is performed (see below).
Automatically setting up for surround sound (MCACC)The Auto Multi-Channel Acoustic Calibration (MCACC) setup measures the acoustic characteristics of your listening area, taking into account ambient noise, speaker size and distance, and tests for both channel delay and channel level. After you have set up the microphone provided with your system, the receiver uses the information from a series of test tones to optimize the speaker settings and equalization for your particular room.
CAUTION• The test tones used in the Auto MCACC setup are output at
high volume.
Important• The OSD will not appear if you have connected using the HDMI
output to your TV. Use composite or component connections for system setup.
• The Auto MCACC setup will overwrite any existing speaker settings you’ve made.
• Before using the Auto MCACC setup, the iPod USB input should not be selected as an input source.
• If you connected either the surround back speaker or the front height speaker, make sure that the Pre Out setting is correctly set before performing the Auto MCACC setup (see page 35). (Here is an explanation using the OSD screen for a surround back speaker connection.)
1 Switch on the receiver and your TV.
2 Switch the TV input to the input that connects this receiver to the TV through the corresponding composite or component cable.
3 Connect the microphone to the MCACC SETUP MIC jack on the front panel.Make sure there are no obstacles between the speakers and the microphone.
If you have a tripod, use it to place the microphone so that it’s about ear level at your normal listening position. Otherwise, place the microphone at ear level using a table or a chair.
4 Press on the remote control, then press the SETUP button.The System Setup menu appears on your TV. Use /// and ENTER on the remote control to navigate through the screens and select menu items. Press RETURN to exit the current menu.
• Press SETUP at any time to exit the System Setup menu. If you cancel the Auto MCACC setup at any time, the receiver automatically exits and no settings will be made.
• The screensaver automatically starts after three minutes of inactivity.
5 Select ‘Auto MCACC’ from the System Setup menu, then press ENTER.
• MIC IN blinks when the microphone is not connected to MCACC SETUP MIC jack.
RECEIVER
BD DVD
INPUT SELECT
SOURCESLEEPTV
CONTROL
TV
INPUT
RECEIVER
RECEIVERENTER
MUTE
RETURN
PARAMETER TOOLS VOLUME
iPod CTRLPTY SEARCH
BAND
MENU
HOMEMENUSETUP
DTV/ TV
TOPMENU
TUNE
TUNE
PRESETPRES
ET
MCACCSETUP MIC L AUDIO R VIDEO
VIDEO 2 INPUT
iPodiPhone
iPadUSB
5V 2.1 APHONES
CONTROL ON / OFF
Tripod
Microphone
RECEIVER
System Setup
1.Auto MCACC2.Manual SP Setup3.Input Assign4.Pre Out Setting5.HDMI Setup6.Auto Power Down7.FL Demo Mode
Return
VSX-821_FLXCN_En.book 20 ページ 2011年3月30日 水曜日 午後12時38分
EnglishEspañol
Basic Setup 0303
21En
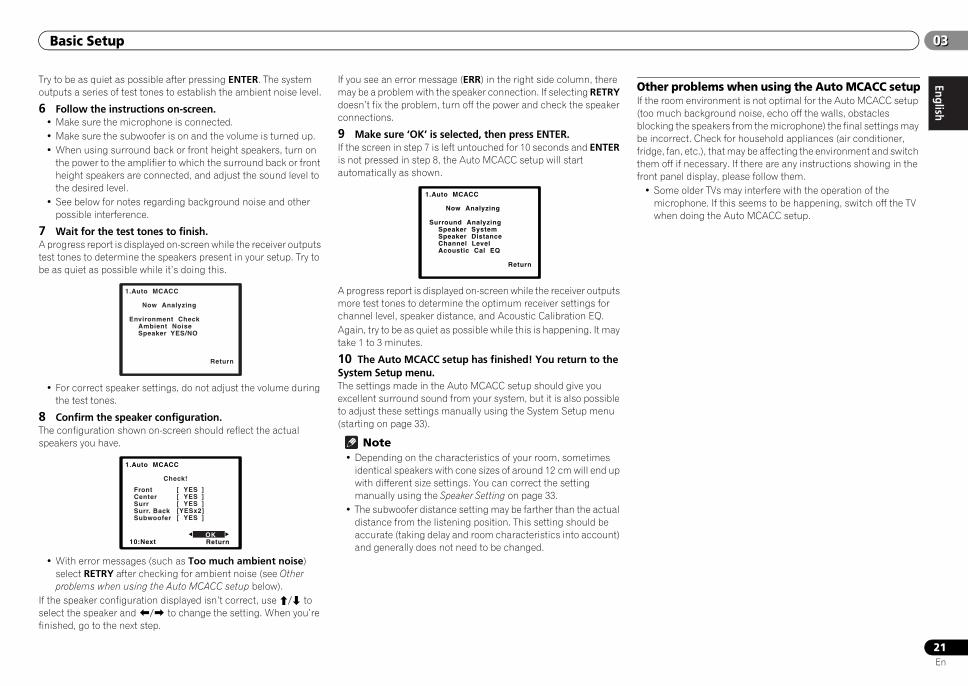
Try to be as quiet as possible after pressing ENTER. The system outputs a series of test tones to establish the ambient noise level.
6 Follow the instructions on-screen.• Make sure the microphone is connected.• Make sure the subwoofer is on and the volume is turned up.• When using surround back or front height speakers, turn on
the power to the amplifier to which the surround back or front height speakers are connected, and adjust the sound level to the desired level.
• See below for notes regarding background noise and other possible interference.
7 Wait for the test tones to finish.A progress report is displayed on-screen while the receiver outputs test tones to determine the speakers present in your setup. Try to be as quiet as possible while it’s doing this.
• For correct speaker settings, do not adjust the volume during the test tones.
8 Confirm the speaker configuration.The configuration shown on-screen should reflect the actual speakers you have.
• With error messages (such as Too much ambient noise) select RETRY after checking for ambient noise (see Other problems when using the Auto MCACC setup below).
If the speaker configuration displayed isn’t correct, use / to select the speaker and / to change the setting. When you’re finished, go to the next step.
If you see an error message (ERR) in the right side column, there may be a problem with the speaker connection. If selecting RETRY doesn’t fix the problem, turn off the power and check the speaker connections.
9 Make sure ‘OK’ is selected, then press ENTER.If the screen in step 7 is left untouched for 10 seconds and ENTER is not pressed in step 8, the Auto MCACC setup will start automatically as shown.
A progress report is displayed on-screen while the receiver outputs more test tones to determine the optimum receiver settings for channel level, speaker distance, and Acoustic Calibration EQ.Again, try to be as quiet as possible while this is happening. It may take 1 to 3 minutes.
10 The Auto MCACC setup has finished! You return to the System Setup menu.The settings made in the Auto MCACC setup should give you excellent surround sound from your system, but it is also possible to adjust these settings manually using the System Setup menu (starting on page 33).
Note• Depending on the characteristics of your room, sometimes
identical speakers with cone sizes of around 12 cm will end up with different size settings. You can correct the setting manually using the Speaker Setting on page 33.
• The subwoofer distance setting may be farther than the actual distance from the listening position. This setting should be accurate (taking delay and room characteristics into account) and generally does not need to be changed.
Other problems when using the Auto MCACC setupIf the room environment is not optimal for the Auto MCACC setup (too much background noise, echo off the walls, obstacles blocking the speakers from the microphone) the final settings may be incorrect. Check for household appliances (air conditioner, fridge, fan, etc.), that may be affecting the environment and switch them off if necessary. If there are any instructions showing in the front panel display, please follow them.
• Some older TVs may interfere with the operation of the microphone. If this seems to be happening, switch off the TV when doing the Auto MCACC setup.
1.Auto MCACC
Now Analyzing
Environment Check Ambient Noise Speaker YES/NO
Return
1.Auto MCACC
Check!
OK Return 10:Next
Front CenterSurrSurr. BackSubwoofer
[ YES ][ YES ][ YES ][YESx2][ YES ]
1.Auto MCACC
Now Analyzing
Surround Analyzing Speaker System Speaker Distance Channel Level Acoustic Cal EQ
Return
VSX-821_FLXCN_En.book 21 ページ 2011年3月30日 水曜日 午後12時38分
Basic playback04
22En
04
Chapter 4:Basic playback
Playing a sourceHere are the basic instructions for playing a source (such as a DVD disc) with your home theater system.
1 Switch on your system components and receiver.Start by switching on the playback component (for example a DVD player), your TV and subwoofer (if you have one), then the receiver (press RECEIVER).
• Make sure the setup microphone is disconnected.
2 Switch the TV input to the input that connects this receiver.For example, if you connected this receiver to the VIDEO jacks on your TV, make sure that the VIDEO input is now selected.
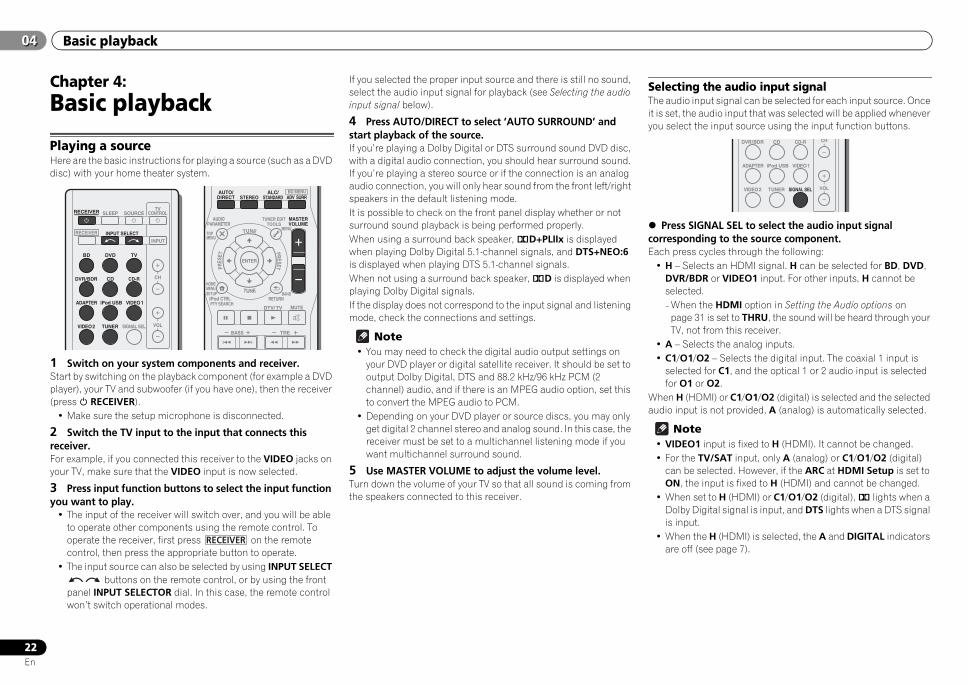
3 Press input function buttons to select the input function you want to play.
• The input of the receiver will switch over, and you will be able to operate other components using the remote control. To operate the receiver, first press on the remote control, then press the appropriate button to operate.
• The input source can also be selected by using INPUT SELECT buttons on the remote control, or by using the front
panel INPUT SELECTOR dial. In this case, the remote control won’t switch operational modes.
If you selected the proper input source and there is still no sound, select the audio input signal for playback (see Selecting the audio input signal below).
4 Press AUTO/DIRECT to select ‘AUTO SURROUND’ and start playback of the source.If you’re playing a Dolby Digital or DTS surround sound DVD disc, with a digital audio connection, you should hear surround sound. If you’re playing a stereo source or if the connection is an analog audio connection, you will only hear sound from the front left/right speakers in the default listening mode.It is possible to check on the front panel display whether or not surround sound playback is being performed properly.When using a surround back speaker, 2D+PLIIx is displayed when playing Dolby Digital 5.1-channel signals, and DTS+NEO:6 is displayed when playing DTS 5.1-channel signals.When not using a surround back speaker, 2D is displayed when playing Dolby Digital signals.If the display does not correspond to the input signal and listening mode, check the connections and settings.
Note• You may need to check the digital audio output settings on
your DVD player or digital satellite receiver. It should be set to output Dolby Digital, DTS and 88.2 kHz/96 kHz PCM (2 channel) audio, and if there is an MPEG audio option, set this to convert the MPEG audio to PCM.
• Depending on your DVD player or source discs, you may only get digital 2 channel stereo and analog sound. In this case, the receiver must be set to a multichannel listening mode if you want multichannel surround sound.
5 Use MASTER VOLUME to adjust the volume level.Turn down the volume of your TV so that all sound is coming from the speakers connected to this receiver.
Selecting the audio input signalThe audio input signal can be selected for each input source. Once it is set, the audio input that was selected will be applied whenever you select the input source using the input function buttons.
Press SIGNAL SEL to select the audio input signal corresponding to the source component. Each press cycles through the following:
• H – Selects an HDMI signal. H can be selected for BD, DVD, DVR/BDR or VIDEO1 input. For other inputs, H cannot be selected.-When the HDMI option in Setting the Audio options on
page 31 is set to THRU, the sound will be heard through your TV, not from this receiver.
• A – Selects the analog inputs. • C1/O1/O2 – Selects the digital input. The coaxial 1 input is
selected for C1, and the optical 1 or 2 audio input is selected for O1 or O2.
When H (HDMI) or C1/O1/O2 (digital) is selected and the selected audio input is not provided, A (analog) is automatically selected.
Note• VIDEO1 input is fixed to H (HDMI). It cannot be changed.• For the TV/SAT input, only A (analog) or C1/O1/O2 (digital)
can be selected. However, if the ARC at HDMI Setup is set to ON, the input is fixed to H (HDMI) and cannot be changed.
• When set to H (HDMI) or C1/O1/O2 (digital), 2 lights when a Dolby Digital signal is input, and DTS lights when a DTS signal is input.
• When the H (HDMI) is selected, the A and DIGITAL indicators are off (see page 7).
BD DVD
INPUT SELECT
SOURCESLEEPTV
CONTROL
TV
INPUT
DVR/BDR CD CD-R
ADAPTER iPod USB VIDEO 1
VIDEO 2 SIGNAL SELTUNER
RECEIVER
CH
VOL
RECEIVER
ENTER
ADV SURRAUTO/
DIRECT
MUTE
RETURN
AUDIOPARAMETER
TUNER EDITTOOLS
MASTERVOLUME
iPod CTRLPTY SEARCH
BAND
MENU
HOMEMENUSETUP
DTV/ TV
TREBASS
TOPMENU
TUNE
TUNE
PRESETPRES
ET
BD MENUALC/STANDARDSTEREO
RECEIVER
DVR/BDR CD CD-R
ADAPTER iPod USB VIDEO 1
VIDEO 2 SIGNAL SELTUNER
CH
VOL
VSX-821_FLXCN_En.book 22 ページ 2011年3月30日 水曜日 午後12時38分
EnglishEspañol
Basic playback 0404
23En
• When digital input (optical or coaxial) is selected, this receiver can only play back Dolby Digital, PCM (32 kHz to 96 kHz) and DTS (including DTS 96 kHz/24 bit) digital signal formats. The compatible signals via the HDMI terminals are: Dolby Digital, DTS, SACD (DSD 2 ch only), PCM (32 kHz to 192 kHz sampling frequencies), Dolby TrueHD, Dolby Digital Plus, DTS-EXPRESS, DTS-HD Master Audio and DVD Audio (including 192 kHz). With other digital signal formats, set to A (analog).
• You may get digital noise when a LD or CD player compatible with DTS is playing an analog signal. To prevent noise, make the proper digital connections (page 13) and set the signal input to C1/O1/O2 (digital).
• Some DVD players don’t output DTS signals. For more details, refer to the instruction manual supplied with your DVD player.
Playing an iPodThis receiver has a dedicated iPod terminal that will allow you to control playback of audio content from your iPod using the controls of this receiver.
Important• Pioneer cannot under any circumstances accept
responsibility for any direct or indirect loss arising from any inconvenience or loss of recorded material resulting from the iPod failure.
Note• This receiver is compatible with the audio and the video of the
iPod nano, iPod (fifth generation), iPod classic, iPod touch and iPhone (only supports iPod (fifth generation) and iPod nano (first and second generation) audio playback) (iPod shuffle not supported). However, that some of the functions may be restricted for some models.
• This receiver has been developed and tested for the software version of iPod/iPhone/iPad indicated on the website of Pioneer (http://pioneer.jp/homeav/support/ios/ao/).
• Installing software versions other than indicated on the website of Pioneer to your iPod/iPhone/iPad may result in incompatibility with this receiver.
• iPod and iPhone are licensed for reproduction of non-copyrighted materials or materials the user is legally permitted to reproduce.
• Features such as the equalizer cannot be controlled using this receiver, and we recommend switching the equalizer off before connecting.
1 Switch on the receiver and your TV.See Connecting an iPod on page 18.
2 Switch the TV input to the input that connects this receiver to the TV through the corresponding composite or component cable.
3 Press iPod USB on the remote control to switch the receiver to the iPod USB input.The front panel display shows Loading while the receiver verifies the connection and retrieves data from the iPod.
4 Use TOP MENU to display iPod Top menu.When the display shows Top Menu you’re ready to play music from the iPod.
Tip• In order to enjoy the picture and/or sound from devices connected to each terminal, select the input by doing the following.
MONITOROUT
HDMI
VIDEO
COMPONENT VIDEO
DVR/BDR
L
R
R
L
Y PB PR
COAXIAL
AUDIO
ANTENNA
OPTICAL
ASSIGNABLE
ASSIGNABLE
ASSIGNABLE
OUT
DVR/BDR
OUT
CD-R/TAPESURR BACK/FRONT HEIGHT
L
R
PRE OUT(Single)
IN
(CD)
1
IN IN
CD
MONITOROUT
TV/SATIN
BDIN
OUT IN DVD IN
IN
TV/SAT BD
IN
DVD
(DVD)IN 1
(DVR/BDR)
IN 2
DVR/BDR IN DVD IN BD IN VIDEO 1 IN
(TV/SAT)
IN1
(CD-R/TAPE)
IN2
FMUNBAL75
(OUTPUT 5 V 0.1A MAX)
ADAPTER PORT
AM LOOP
DVD BD
CD
CD-R
ADAPTER
TUNER
TV
DVR/BDR
TV BD
DVR/BDR DVD
DVR/BDR
DVD
CD-R CDDVR/BDR
BD DVDTV
VIDEO
1. 1.
1.
O2
A
2.
SIGNAL SEL
SIGNAL SEL
O1
2.SIGNAL SEL
C1
2.SIGNAL SEL
Audio
Other than CD input
Audio
Audio
Audio
Video/Audio (HDMI)
Video
Video
Other than TV/SAT input
Other than CD-R input
(CD input) (TV/SAT input)
(CD-R input)
Reassignable (page 35)
VSX-821_FLXCN_En.book 23 ページ 2011年3月30日 水曜日 午後12時38分
Basic playback04
24En
04
• If after pressing iPod the display shows NO DEVICE, try switching off the receiver and reconnecting the iPod to the receiver.
• The controls of your iPod will be inoperable when connected to this receiver.
Playing back files stored on an iPodTo navigate songs on your iPod, you can take advantage of the OSD of your TV connected to this receiver. You can also control all operations for music in the front panel display of this receiver.
• Note that non-roman characters in the title are displayed as ‘*’.
• This feature is not available for photos or video clips on your iPod.
Finding what you want to playWhen your iPod is connected to this receiver, you can browse songs stored on your iPod by playlist, artist, album name, song name, genre or composer, similar to using your iPod directly.
1 Use / to select a category, then press ENTER to browse that category.
• To return to the previous level any time, press RETURN.
2 Use / to browse the selected category (e.g., albums).• Use / to move to previous/next levels.
3 Continue browsing until you arrive at what you want to play, then press to start playback.
Tip• If you’re in the song category, you can also press ENTER to
start playback.• You can play all of the songs in a particular category by
selecting the All item at the top of each category list. For example, you can play all the songs by a particular artist.
Basic playback controlsThis receiver’s remote control buttons can be used for basic playback of files stored on an iPod.
• Press iPod USB to switch the remote control to the iPod/USB operation mode.
• During Audiobook playback, press / to switch the playback speed: Faster Normal Slower
Watching photos and video contentTo view photos or video on your iPod, since video control is not possible using this receiver, you must use the main controls of your iPod instead.
Important• To play photos or video on your iPod, you must connect the
composite MONITOR OUT jack and TV.• iPod photos and video content can be viewed only when the
iPod is connected to the iPod VIDEO input on the front panel.• This feature can only be used with an iPod having video output.
1 Press iPod CTRL to switch to the iPod controls for photo and video playback.The receiver controls will be unavailable while you are watching iPod videos or browsing photos.
2 Press iPod CTRL again to switch back to the receiver controls when you’re done.
Tip• Change the receiver’s input to the iPod in one action by
pressing iPod iPhone iPad DIRECT CONTROL on the front panel to enable iPod operations on the iPod.
Playing a USB deviceIt is possible to listen to two-channel audio using the USB interface on the front of this receiver.
Important• Pioneer cannot guarantee compatibility (operation and/or bus
power) with all USB mass storage devices and assumes no responsibility for any loss of data that may occur when connected to this receiver.
Note• This includes playback of WMA/MP3/MPEG-4 AAC files
(except files with copy-protection or restricted playback).• Compatible USB devices include external magnetic hard
drives, portable flash memory (particularly keydrives) and digital audio players (MP3 players) of format FAT16/32. It is not possible to connect this receiver to a personal computer for USB playback.
• With large amounts of data, it may take longer for the receiver to read the contents of a USB device.
• If the file selected cannot be played back, this receiver automatically skips to the next file playable.
• When the file currently being played back has no title assigned to it, the file name is displayed in the OSD instead; when neither the album name nor the artist name is present, the row is displayed as a blank space.
• Note that non-roman characters in the playlist are displayed as ‘*’.
• Make sure the receiver is in standby when disconnecting the USB device.
1 Switch on the receiver and your TV.See Connecting a USB device on page 19.
2 Switch the TV input to the input that connects this receiver to the TV through the corresponding composite or component cable.
3 Press iPod USB on the remote control to switch the receiver to the iPod USB input.Loading appears in the OSD as this receiver starts recognizing the USB device connected. After the recognition, a playback screen appears in the OSD and playback starts automatically.
ENTER
ADV SURRAUTO/
DIRECT
RETURN
AUDIOPARAMETER
TUNER EDITTOOLS
MASTERVOLUME
iPod CTRLPTY SEARCH
BAND
MENU
HOMEMENUSETUP
TOPMENU
TUNE
TUNE
PRESETPRES
ET
BD MENU
DIMMER
1
4
7MIDNIGHT
S.RETRIEVER
2
5
8SPEAKERS LEV
LEV
SB CH
DISP
EQ
PHASE
3
6
9
0
CH
CH
CH SELECT
MUTEDTV/ TV
TREBASS
SHIFT
HDD DVD VCR
ALC/STANDARDSTEREO
VSX-821_FLXCN_En.book 24 ページ 2011年3月30日 水曜日 午後12時38分
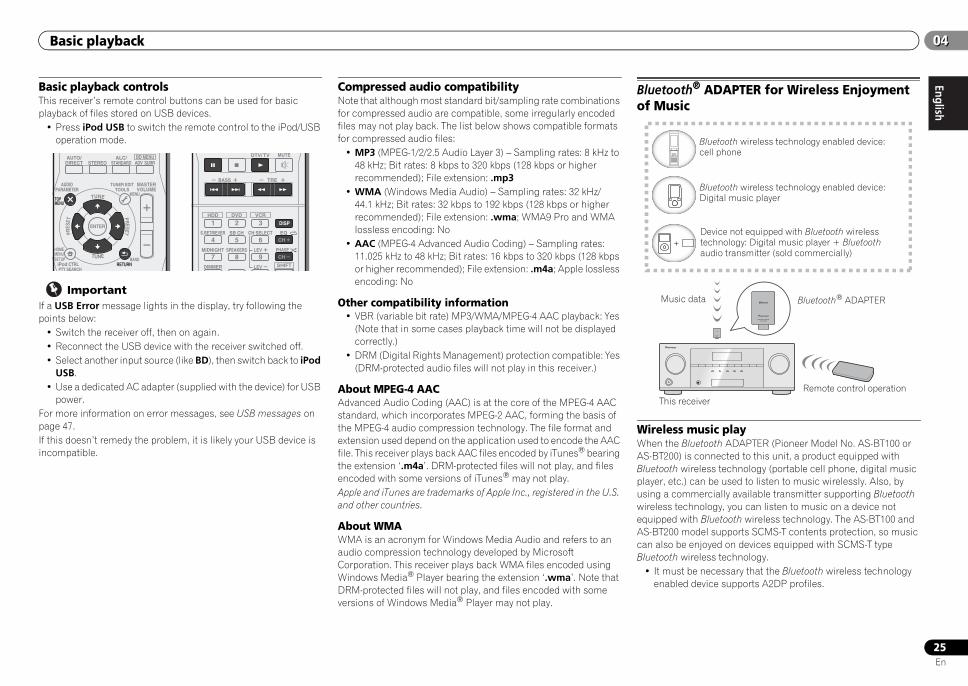
EnglishEspañol
Basic playback 0404
25En
Basic playback controlsThis receiver’s remote control buttons can be used for basic playback of files stored on USB devices.
• Press iPod USB to switch the remote control to the iPod/USB operation mode.
ImportantIf a USB Error message lights in the display, try following the points below:
• Switch the receiver off, then on again.• Reconnect the USB device with the receiver switched off.• Select another input source (like BD), then switch back to iPod
USB.• Use a dedicated AC adapter (supplied with the device) for USB
power.For more information on error messages, see USB messages on page 47.If this doesn’t remedy the problem, it is likely your USB device is incompatible.
Compressed audio compatibilityNote that although most standard bit/sampling rate combinations for compressed audio are compatible, some irregularly encoded files may not play back. The list below shows compatible formats for compressed audio files:
• MP3 (MPEG-1/2/2.5 Audio Layer 3) – Sampling rates: 8 kHz to 48 kHz; Bit rates: 8 kbps to 320 kbps (128 kbps or higher recommended); File extension: .mp3
• WMA (Windows Media Audio) – Sampling rates: 32 kHz/44.1 kHz; Bit rates: 32 kbps to 192 kbps (128 kbps or higher recommended); File extension: .wma; WMA9 Pro and WMA lossless encoding: No
• AAC (MPEG-4 Advanced Audio Coding) – Sampling rates: 11.025 kHz to 48 kHz; Bit rates: 16 kbps to 320 kbps (128 kbps or higher recommended); File extension: .m4a; Apple lossless encoding: No
Other compatibility information• VBR (variable bit rate) MP3/WMA/MPEG-4 AAC playback: Yes
(Note that in some cases playback time will not be displayed correctly.)
• DRM (Digital Rights Management) protection compatible: Yes (DRM-protected audio files will not play in this receiver.)
About MPEG-4 AACAdvanced Audio Coding (AAC) is at the core of the MPEG-4 AAC standard, which incorporates MPEG-2 AAC, forming the basis of the MPEG-4 audio compression technology. The file format and extension used depend on the application used to encode the AAC file. This receiver plays back AAC files encoded by iTunes® bearing the extension ‘.m4a’. DRM-protected files will not play, and files encoded with some versions of iTunes® may not play.Apple and iTunes are trademarks of Apple Inc., registered in the U.S. and other countries.
About WMAWMA is an acronym for Windows Media Audio and refers to an audio compression technology developed by Microsoft Corporation. This receiver plays back WMA files encoded using Windows Media® Player bearing the extension ‘.wma’. Note that DRM-protected files will not play, and files encoded with some versions of Windows Media® Player may not play.
Bluetooth® ADAPTER for Wireless Enjoyment of Music
Wireless music playWhen the Bluetooth ADAPTER (Pioneer Model No. AS-BT100 or AS-BT200) is connected to this unit, a product equipped with Bluetooth wireless technology (portable cell phone, digital music player, etc.) can be used to listen to music wirelessly. Also, by using a commercially available transmitter supporting Bluetooth wireless technology, you can listen to music on a device not equipped with Bluetooth wireless technology. The AS-BT100 and AS-BT200 model supports SCMS-T contents protection, so music can also be enjoyed on devices equipped with SCMS-T type Bluetooth wireless technology.
• It must be necessary that the Bluetooth wireless technology enabled device supports A2DP profiles.
ENTER
ADV SURRAUTO/
DIRECT
MUTE
RETURN
AUDIOPARAMETER
TUNER EDITTOOLS
MASTERVOLUME
iPod CTRLPTY SEARCH
BAND
MENU
HOMEMENUSETUP
DTV/TV
TOPMENU
TUNE
TUNE
PRESETPRES
ET
BD MENU
DIMMER
1
4
7MIDNIGHT
S.RETRIEVER
2
5
8SPEAKERS LEV
LEV
SB CH
DISP
EQ
PHASE
3
6
9
0
CH
CH
CH SELECT
MUTEDTV/ TV
TREBASS
SHIFT
HDD DVD VCR
ALC/STANDARDSTEREO
Bluetooth wireless technology enabled device: cell phone
Bluetooth wireless technology enabled device: Digital music player
Device not equipped with Bluetooth wireless technology: Digital music player + Bluetooth audio transmitter (sold commercially)
Music data
Remote control operation
Bluetooth® ADAPTER
This receiver
VSX-821_FLXCN_En.book 25 ページ 2011年3月30日 水曜日 午後12時38分
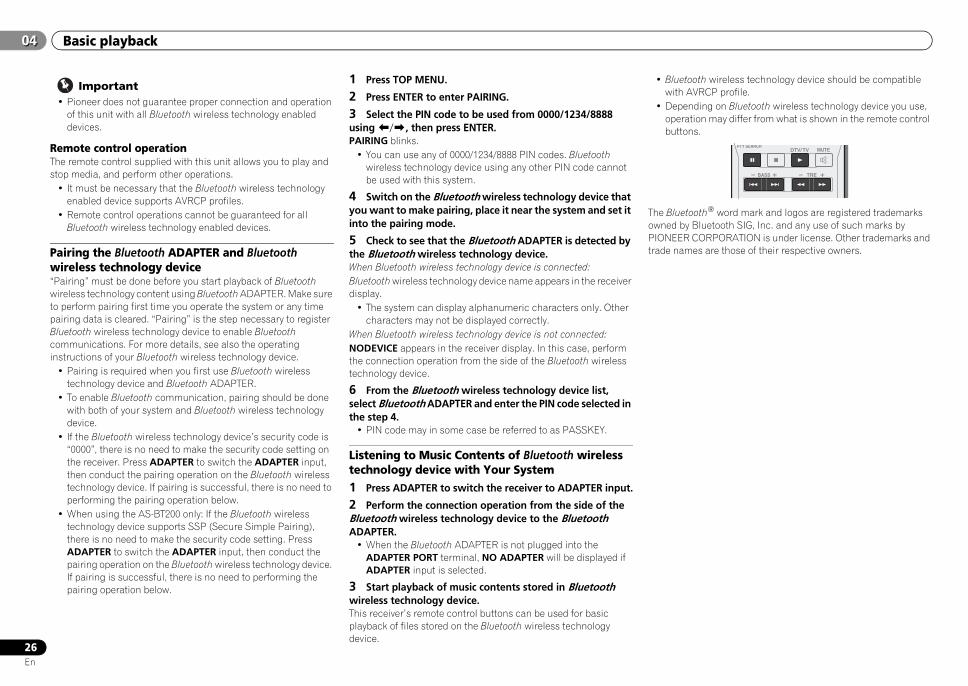
Basic playback04
26En
04
Important• Pioneer does not guarantee proper connection and operation
of this unit with all Bluetooth wireless technology enabled devices.
Remote control operationThe remote control supplied with this unit allows you to play and stop media, and perform other operations.
• It must be necessary that the Bluetooth wireless technology enabled device supports AVRCP profiles.
• Remote control operations cannot be guaranteed for all Bluetooth wireless technology enabled devices.
Pairing the Bluetooth ADAPTER and Bluetooth wireless technology device“Pairing” must be done before you start playback of Bluetooth wireless technology content using Bluetooth ADAPTER. Make sure to perform pairing first time you operate the system or any time pairing data is cleared. “Pairing” is the step necessary to register Bluetooth wireless technology device to enable Bluetooth communications. For more details, see also the operating instructions of your Bluetooth wireless technology device.
• Pairing is required when you first use Bluetooth wireless technology device and Bluetooth ADAPTER.
• To enable Bluetooth communication, pairing should be done with both of your system and Bluetooth wireless technology device.
• If the Bluetooth wireless technology device’s security code is “0000”, there is no need to make the security code setting on the receiver. Press ADAPTER to switch the ADAPTER input, then conduct the pairing operation on the Bluetooth wireless technology device. If pairing is successful, there is no need to performing the pairing operation below.
• When using the AS-BT200 only: If the Bluetooth wireless technology device supports SSP (Secure Simple Pairing), there is no need to make the security code setting. Press ADAPTER to switch the ADAPTER input, then conduct the pairing operation on the Bluetooth wireless technology device. If pairing is successful, there is no need to performing the pairing operation below.
1 Press TOP MENU.
2 Press ENTER to enter PAIRING.
3 Select the PIN code to be used from 0000/1234/8888 using /, then press ENTER.PAIRING blinks.
• You can use any of 0000/1234/8888 PIN codes. Bluetooth wireless technology device using any other PIN code cannot be used with this system.
4 Switch on the Bluetooth wireless technology device that you want to make pairing, place it near the system and set it into the pairing mode.
5 Check to see that the Bluetooth ADAPTER is detected by the Bluetooth wireless technology device.When Bluetooth wireless technology device is connected:Bluetooth wireless technology device name appears in the receiver display.
• The system can display alphanumeric characters only. Other characters may not be displayed correctly.
When Bluetooth wireless technology device is not connected:NODEVICE appears in the receiver display. In this case, perform the connection operation from the side of the Bluetooth wireless technology device.
6 From the Bluetooth wireless technology device list, select Bluetooth ADAPTER and enter the PIN code selected in the step 4.
• PIN code may in some case be referred to as PASSKEY.
Listening to Music Contents of Bluetooth wireless technology device with Your System1 Press ADAPTER to switch the receiver to ADAPTER input.
2 Perform the connection operation from the side of the Bluetooth wireless technology device to the Bluetooth ADAPTER.
• When the Bluetooth ADAPTER is not plugged into the ADAPTER PORT terminal, NO ADAPTER will be displayed if ADAPTER input is selected.
3 Start playback of music contents stored in Bluetooth wireless technology device.This receiver’s remote control buttons can be used for basic playback of files stored on the Bluetooth wireless technology device.
• Bluetooth wireless technology device should be compatible with AVRCP profile.
• Depending on Bluetooth wireless technology device you use, operation may differ from what is shown in the remote control buttons.
The Bluetooth® word mark and logos are registered trademarks owned by Bluetooth SIG, Inc. and any use of such marks by PIONEER CORPORATION is under license. Other trademarks and trade names are those of their respective owners.
MUTEPTY SEARCH
DTV/ TV
TREBASS
VSX-821_FLXCN_En.book 26 ページ 2011年3月30日 水曜日 午後12時38分
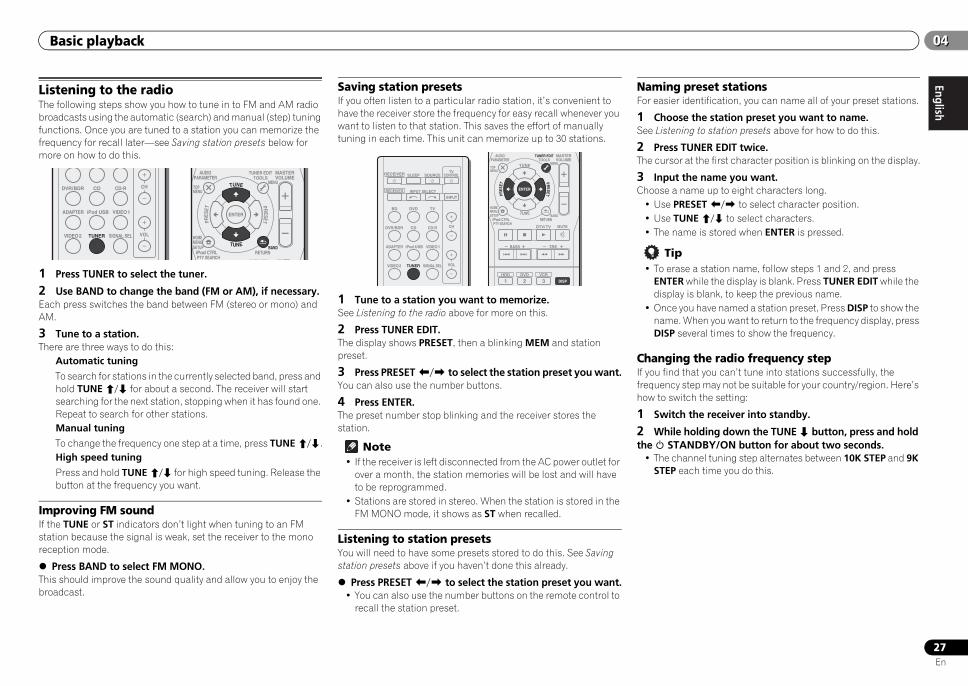
EnglishEspañol
Basic playback 0404
27En
Listening to the radioThe following steps show you how to tune in to FM and AM radio broadcasts using the automatic (search) and manual (step) tuning functions. Once you are tuned to a station you can memorize the frequency for recall later—see Saving station presets below for more on how to do this.
1 Press TUNER to select the tuner.
2 Use BAND to change the band (FM or AM), if necessary.Each press switches the band between FM (stereo or mono) and AM.
3 Tune to a station.There are three ways to do this:
Automatic tuning
To search for stations in the currently selected band, press and hold TUNE/ for about a second. The receiver will start searching for the next station, stopping when it has found one. Repeat to search for other stations.Manual tuning
To change the frequency one step at a time, press TUNE/.High speed tuning
Press and hold TUNE/ for high speed tuning. Release the button at the frequency you want.
Improving FM soundIf the TUNE or ST indicators don’t light when tuning to an FM station because the signal is weak, set the receiver to the mono reception mode.
Press BAND to select FM MONO.This should improve the sound quality and allow you to enjoy the broadcast.
Saving station presetsIf you often listen to a particular radio station, it’s convenient to have the receiver store the frequency for easy recall whenever you want to listen to that station. This saves the effort of manually tuning in each time. This unit can memorize up to 30 stations.
1 Tune to a station you want to memorize.See Listening to the radio above for more on this.
2 Press TUNER EDIT.The display shows PRESET, then a blinking MEM and station preset.
3 Press PRESET/ to select the station preset you want.You can also use the number buttons.
4 Press ENTER.The preset number stop blinking and the receiver stores the station.
Note• If the receiver is left disconnected from the AC power outlet for
over a month, the station memories will be lost and will have to be reprogrammed.
• Stations are stored in stereo. When the station is stored in the FM MONO mode, it shows as ST when recalled.
Listening to station presetsYou will need to have some presets stored to do this. See Saving station presets above if you haven’t done this already.
Press PRESET/ to select the station preset you want.• You can also use the number buttons on the remote control to
recall the station preset.
Naming preset stationsFor easier identification, you can name all of your preset stations.
1 Choose the station preset you want to name.See Listening to station presets above for how to do this.
2 Press TUNER EDIT twice.The cursor at the first character position is blinking on the display.
3 Input the name you want.Choose a name up to eight characters long.
• Use PRESET/ to select character position.• Use TUNE/ to select characters.• The name is stored when ENTER is pressed.
Tip• To erase a station name, follow steps 1 and 2, and press
ENTER while the display is blank. Press TUNER EDIT while the display is blank, to keep the previous name.
• Once you have named a station preset, Press DISP to show the name. When you want to return to the frequency display, press DISP several times to show the frequency.
Changing the radio frequency stepIf you find that you can’t tune into stations successfully, the frequency step may not be suitable for your country/region. Here’s how to switch the setting:
1 Switch the receiver into standby.
2 While holding down the TUNE button, press and hold the STANDBY/ON button for about two seconds.
• The channel tuning step alternates between 10K STEP and 9K STEP each time you do this.
DVR/BDR CD CD-R
ADAPTER iPod USB VIDEO 1
VIDEO 2 SIGNAL SELTUNER
CH
VOL
ENTER
MUTE
RETURN
AUDIOPARAMETER
TUNER EDITTOOLS
MASTERVOLUME
iPod CTRLPTY SEARCH
BAND
MENU
HOMEMENUSETUP
DTV/TV
TOPMENU
TUNE
TUNE
PRESETPRES
ET BD DVD
INPUT SELECT
SOURCESLEEPTV
CONTROL
TV
INPUT
DVR/BDR CD CD-R
ADAPTER iPod USB VIDEO 1
VIDEO 2 SIGNAL SELTUNER
RECEIVER
CH
VOL
RECEIVER
1
ENTER
2 DISP3
MUTE
RETURN
AUDIOPARAMETER
TUNER EDITTOOLS
MASTERVOLUME
iPod CTRLPTY SEARCH
BAND
MENU
HOMEMENUSETUP
DTV/ TV
TREBASS
TOPMENU
TUNE
TUNE
PRESETPRES
ET
HDD DVD VCR
VSX-821_FLXCN_En.book 27 ページ 2011年3月30日 水曜日 午後12時38分
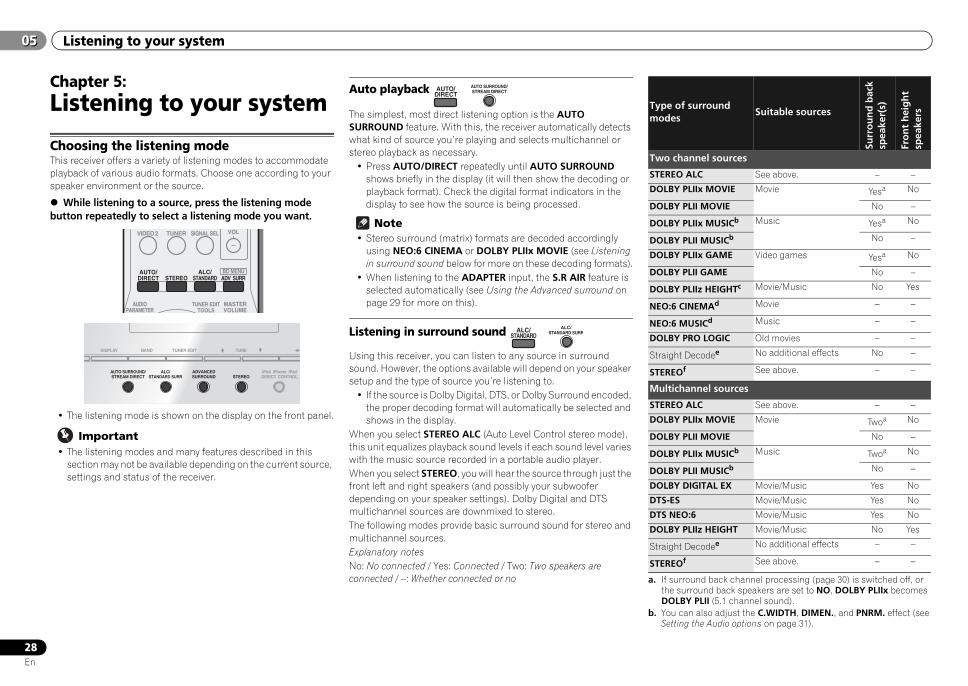
Listening to your system05
28En
05
Chapter 5:Listening to your system
Choosing the listening modeThis receiver offers a variety of listening modes to accommodate playback of various audio formats. Choose one according to your speaker environment or the source.
While listening to a source, press the listening mode button repeatedly to select a listening mode you want.
• The listening mode is shown on the display on the front panel.
Important• The listening modes and many features described in this
section may not be available depending on the current source, settings and status of the receiver.
Auto playback
The simplest, most direct listening option is the AUTO SURROUND feature. With this, the receiver automatically detects what kind of source you’re playing and selects multichannel or stereo playback as necessary.
• Press AUTO/DIRECT repeatedly until AUTO SURROUND shows briefly in the display (it will then show the decoding or playback format). Check the digital format indicators in the display to see how the source is being processed.
Note• Stereo surround (matrix) formats are decoded accordingly
using NEO:6 CINEMA or DOLBY PLIIx MOVIE (see Listening in surround sound below for more on these decoding formats).
• When listening to the ADAPTER input, the S.R AIR feature is selected automatically (see Using the Advanced surround on page 29 for more on this).
Listening in surround sound
Using this receiver, you can listen to any source in surround sound. However, the options available will depend on your speaker setup and the type of source you’re listening to.
• If the source is Dolby Digital, DTS, or Dolby Surround encoded, the proper decoding format will automatically be selected and shows in the display.
When you select STEREO ALC (Auto Level Control stereo mode), this unit equalizes playback sound levels if each sound level varies with the music source recorded in a portable audio player.When you select STEREO, you will hear the source through just the front left and right speakers (and possibly your subwoofer depending on your speaker settings). Dolby Digital and DTS multichannel sources are downmixed to stereo.The following modes provide basic surround sound for stereo and multichannel sources.Explanatory notesNo: No connected / Yes: Connected / Two: Two speakers are connected / –: Whether connected or no a. If surround back channel processing (page 30) is switched off, or
the surround back speakers are set to NO, DOLBY PLIIx becomes DOLBY PLII (5.1 channel sound).
b. You can also adjust the C.WIDTH, DIMEN., and PNRM. effect (see Setting the Audio options on page 31).
VIDEO 2 SIGNAL SELTUNER
ADV SURRAUTO/
DIRECT
VOL
AUDIOPARAMETER
TUNER EDITTOOLS
MASTERVOLUME
BD MENUALC/STANDARDSTEREO
iPod iPhone iPadDIRECT CONTROLSTEREO
ADVANCEDSURROUND
DISPLAY BAND TUNER EDIT TUNE
ALC/STANDARD SURR
AUTO SURROUND/STREAM DIRECT
AUTO/DIRECT
AUTO SURROUND/STREAM DIRECT
ALC/STANDARD
ALC/STANDARD SURR
Type of surround modes
Suitable sources
Surr
ou
nd
bac
k sp
eake
r(s)
Fro
nt
hei
gh
t sp
eake
rs
Two channel sources
STEREO ALC See above. – –
DOLBY PLIIx MOVIE Movie Yesa No
DOLBY PLII MOVIE No –
DOLBY PLIIx MUSICb Music Yesa No
DOLBY PLII MUSICb No –
DOLBY PLIIx GAME Video games Yesa No
DOLBY PLII GAME No –
DOLBY PLIIz HEIGHTc Movie/Music No Yes
NEO:6 CINEMAd Movie – –
NEO:6 MUSICd Music – –
DOLBY PRO LOGIC Old movies – –
Straight Decodee No additional effects No –
STEREOf See above. – –
Multichannel sources
STEREO ALC See above. – –
DOLBY PLIIx MOVIE Movie Twoa No
DOLBY PLII MOVIE No –
DOLBY PLIIx MUSICb Music Twoa No
DOLBY PLII MUSICb No –
DOLBY DIGITAL EX Movie/Music Yes No
DTS-ES Movie/Music Yes No
DTS NEO:6 Movie/Music Yes No
DOLBY PLIIz HEIGHT Movie/Music No Yes
Straight Decodee No additional effects – –
STEREOf See above. – –
VSX-821_FLXCN_En.book 28 ページ 2011年3月30日 水曜日 午後12時38分
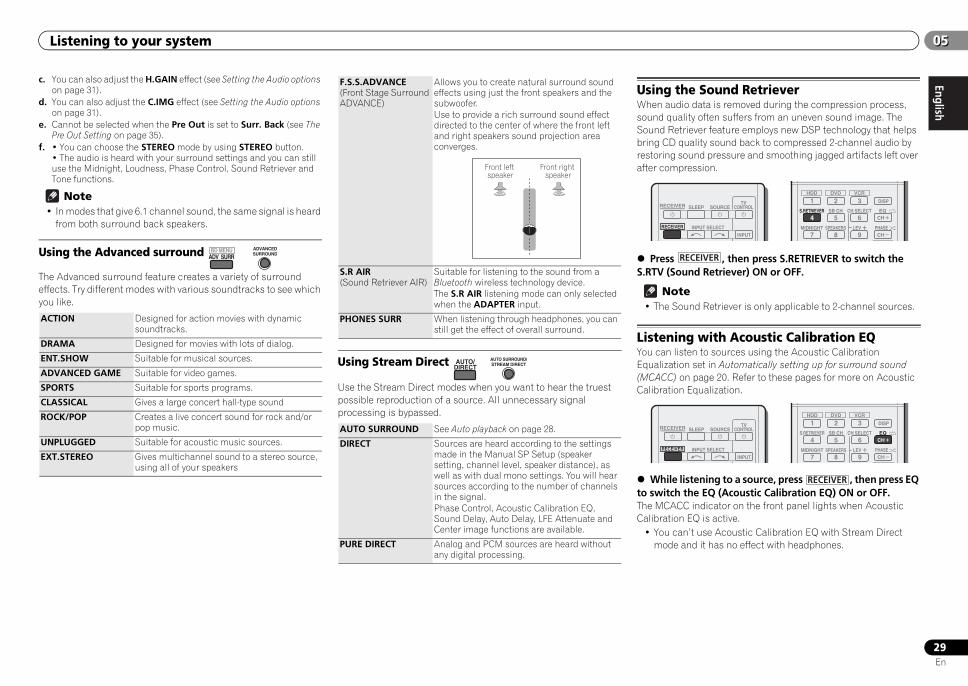
EnglishEspañol
Listening to your system 0505
29En
c. You can also adjust the H.GAIN effect (see Setting the Audio options on page 31).
d. You can also adjust the C.IMG effect (see Setting the Audio options on page 31).
e. Cannot be selected when the Pre Out is set to Surr. Back (see The Pre Out Setting on page 35).
f. • You can choose the STEREO mode by using STEREO button.• The audio is heard with your surround settings and you can still use the Midnight, Loudness, Phase Control, Sound Retriever and Tone functions.
Note• In modes that give 6.1 channel sound, the same signal is heard
from both surround back speakers.
Using the Advanced surround
The Advanced surround feature creates a variety of surround effects. Try different modes with various soundtracks to see which you like.
Using Stream Direct
Use the Stream Direct modes when you want to hear the truest possible reproduction of a source. All unnecessary signal processing is bypassed.
Using the Sound RetrieverWhen audio data is removed during the compression process, sound quality often suffers from an uneven sound image. The Sound Retriever feature employs new DSP technology that helps bring CD quality sound back to compressed 2-channel audio by restoring sound pressure and smoothing jagged artifacts left over after compression.
Press , then press S.RETRIEVER to switch the S.RTV (Sound Retriever) ON or OFF.
Note• The Sound Retriever is only applicable to 2-channel sources.
Listening with Acoustic Calibration EQYou can listen to sources using the Acoustic Calibration Equalization set in Automatically setting up for surround sound (MCACC) on page 20. Refer to these pages for more on Acoustic Calibration Equalization.
While listening to a source, press , then press EQ to switch the EQ (Acoustic Calibration EQ) ON or OFF.The MCACC indicator on the front panel lights when Acoustic Calibration EQ is active.
• You can’t use Acoustic Calibration EQ with Stream Direct mode and it has no effect with headphones.
ACTION Designed for action movies with dynamic soundtracks.
DRAMA Designed for movies with lots of dialog.
ENT.SHOW Suitable for musical sources.
ADVANCED GAME Suitable for video games.
SPORTS Suitable for sports programs.
CLASSICAL Gives a large concert hall-type sound
ROCK/POP Creates a live concert sound for rock and/or pop music.
UNPLUGGED Suitable for acoustic music sources.
EXT.STEREO Gives multichannel sound to a stereo source, using all of your speakers
BD MENUADV SURR
ADVANCEDSURROUND
F.S.S.ADVANCE (Front Stage Surround ADVANCE)
Allows you to create natural surround sound effects using just the front speakers and the subwoofer.Use to provide a rich surround sound effect directed to the center of where the front left and right speakers sound projection area converges.
S.R AIR (Sound Retriever AIR)
Suitable for listening to the sound from a Bluetooth wireless technology device.The S.R AIR listening mode can only selected when the ADAPTER input.
PHONES SURR When listening through headphones, you can still get the effect of overall surround.
AUTO SURROUND See Auto playback on page 28.
DIRECT Sources are heard according to the settings made in the Manual SP Setup (speaker setting, channel level, speaker distance), as well as with dual mono settings. You will hear sources according to the number of channels in the signal.Phase Control, Acoustic Calibration EQ, Sound Delay, Auto Delay, LFE Attenuate and Center image functions are available.
PURE DIRECT Analog and PCM sources are heard without any digital processing.
Front left speaker
Front right speaker
AUTO/DIRECT
AUTO SURROUND/STREAM DIRECT
INPUT SELECT
SOURCESLEEPTV
CONTROL
INPUT
RECEIVER
RECEIVER
1
4
7MIDNIGHT
S.RETRIEVER
2
5
8SPEAKERS LEV
SB CH
DISP
EQ
PHASE
3
6
9
CH
CH
CH SELECT
S
HDD DVD VCR
RECEIVER
INPUT SELECT
SOURCESLEEPTV
CONTROL
INPUT
RECEIVER
RECEIVER
1
4
7MIDNIGHT
S.RETRIEVER
2
5
8SPEAKERS LEV
SB CH
DISP
EQ
PHASE
3
6
9
CH
CH
CH SELECT
S
HDD DVD VCR
RECEIVER
VSX-821_FLXCN_En.book 29 ページ 2011年3月30日 水曜日 午後12時38分

Listening to your system05
30En
05
Better sound using Phase ControlThis receiver’s Phase Control feature uses phase correction measures to make sure your sound source arrives at the listening position in phase, preventing unwanted distortion and/or coloring of the sound.Phase Control technology provides coherent sound reproduction through the use of phase matching for an optimal sound image at your listening position. The default setting is on and we recommend leaving Phase Control switched on for all sound sources.
Press , then press PHASE to switch the P.CTL (Phase Control) ON or OFF.
Note• Phase matching is a very important factor in achieving proper
sound reproduction. If two waveforms are ‘in phase’, they crest and trough together, resulting in increased amplitude, clarity and presence of the sound signal. If a crest of a wave meets a trough, then the sound will be ‘out of phase’ and an unreliable sound image will be produced.
• If your subwoofer has a phase control switch, set it to the plus (+) sign (or 0°). However, the effect you can actually feel when Phase Control is set to ON on this receiver depends on the type of your subwoofer. Set your subwoofer to maximize the effect. It is also recommended you try changing the orientation or the place of your subwoofer.
• Set the built-in lowpass filter switch of your subwoofer to OFF. If this cannot be done on your subwoofer, set the cutoff frequency to a higher value.
• If the speaker distance is not properly set, you may not have a maximized Phase Control effect.
• The Phase Control mode cannot be set to ON in the following cases:-When the PURE DIRECT mode is switched on.-When the headphones are connected.
Using surround back channel processingYou can have the receiver automatically use 6.1 or 7.1 decoding for 6.1 encoded sources (for example, Dolby Digital EX or DTS-ES), or you can choose to always use 6.1 or 7.1 decoding (for example, with 5.1 encoded material). With 5.1 encoded sources, a surround back channel will be generated, but the material may sound better in the 5.1 format for which it was originally encoded (in which case, you can simply switch surround back channel processing off).
• With a 7.1-channel surround system, audio signals that have undergone matrix decoding processing through surround back channel processing to which the Up Mix function is added are output from the surround back speakers.
Press , then press SB CH repeatedly to cycle the surround back channel options.Each press cycles through the options as follows:
• SB ON – Matrix decoding processing for generating the surround back component from the surround component is turned on.
• SB AUTO – Matrix decoding processing for generating the surround back component from the surround component is switched automatically. Matrix decoding processing is only performed when surround back channel signals are detected in the input signals.
• SB OFF – Matrix decoding processing for generating the surround back component from the surround component is turned off.
Setting the Up Mix functionIn a 7.1-channel surround system with surround speakers placed directly at the sides of the listening position, the surround sound of 5.1-channel sources is heard from the side. The Up Mix function mixes the sound of the surround speakers with the surround back speakers so that the surround sound is heard from diagonally to the rear as it should be.
• Using the Up Mix function is effective when the speakers in the 7.1-channel surround system are set up as recommended in the example on page 10.
• Depending on the positions of the speakers and the sound source, in some cases it may not be possible to achieve good results. In this case, set the setting to OFF.
1 Switch the receiver into standby.
2 While holding down PRESET on the front panel, and hold the STANDBY/ON for about two seconds.UP MIX: OFF appears and the Up Mix function turns off. If you want to turn this function on, perform steps 1 and 2 again.
• When set to ON, the (Up Mix) indicator on the front panel lights.
Note• Set to ON regardless of this setting when playing DTS-HD
signals.• May automatically be set to OFF even when set to ON,
depending on the input signal and listening mode.
INPUT SELECT
SOURCESLEEPTV
CONTROL
INPUT
RECEIVER
RECEIVER
1
4
7MIDNIGHT
S.RETRIEVER
2
5
8SPEAKERS LEV
SB CH
DISP
EQ
PHASE
3
6
9
CH
CH
CH SELECT
HDD DVD VCR
RECEIVERINPUT SELECT
SOURCESLEEPTV
CONTROL
INPUT
RECEIVER
RECEIVER
1
4
7MIDNIGHT
S.RETRIEVER
2
5
8SPEAKERS LEV
SB CH
DISP
EQ
PHASE
3
6
9
CH
CH
CH SELECT
HDD DVD VCR
RECEIVER
CSWL R
SL SR
SBL SBR SBL SBR
CSWL R
SL SR
UP MIX OFF UP MIX ON
VSX-821_FLXCN_En.book 30 ページ 2011年3月30日 水曜日 午後12時38分
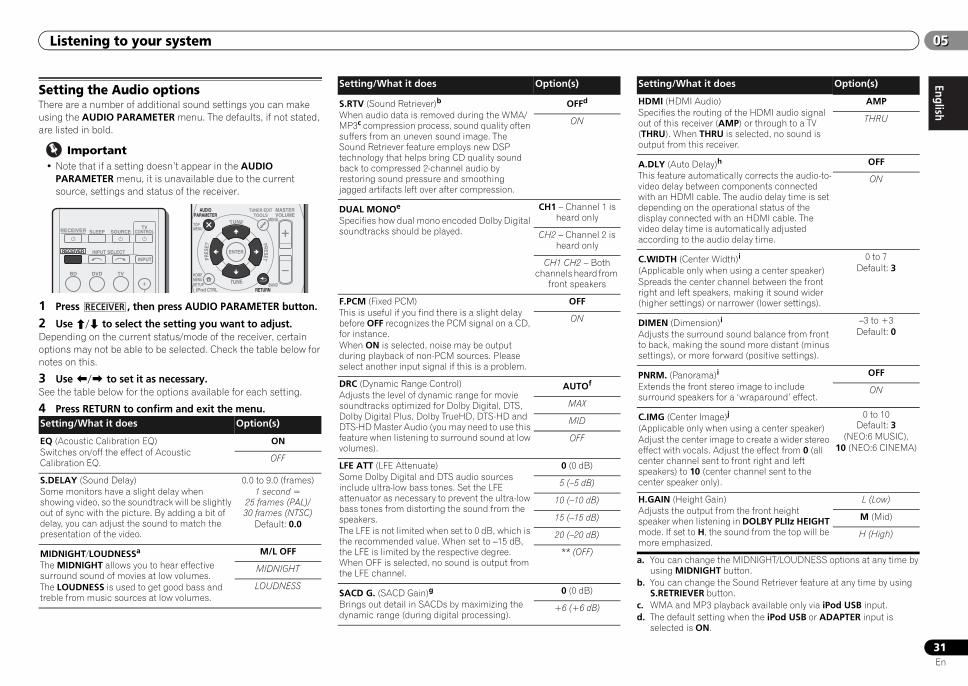
EnglishEspañol
Listening to your system 0505
31En
Setting the Audio optionsThere are a number of additional sound settings you can make using the AUDIO PARAMETER menu. The defaults, if not stated, are listed in bold.
Important• Note that if a setting doesn’t appear in the AUDIO
PARAMETER menu, it is unavailable due to the current source, settings and status of the receiver.
1 Press , then press AUDIO PARAMETER button.
2 Use / to select the setting you want to adjust.Depending on the current status/mode of the receiver, certain options may not be able to be selected. Check the table below for notes on this.
3 Use / to set it as necessary.See the table below for the options available for each setting.
4 Press RETURN to confirm and exit the menu.
a. You can change the MIDNIGHT/LOUDNESS options at any time by using MIDNIGHT button.
b. You can change the Sound Retriever feature at any time by using S.RETRIEVER button.
c. WMA and MP3 playback available only via iPod USB input.d. The default setting when the iPod USB or ADAPTER input is
selected is ON.
Setting/What it does Option(s)
EQ (Acoustic Calibration EQ)Switches on/off the effect of Acoustic Calibration EQ.
ON
OFF
S.DELAY (Sound Delay)Some monitors have a slight delay when showing video, so the soundtrack will be slightly out of sync with the picture. By adding a bit of delay, you can adjust the sound to match the presentation of the video.
0.0 to 9.0 (frames)1 second =
25 frames (PAL)/30 frames (NTSC)
Default: 0.0
MIDNIGHT/LOUDNESSa
The MIDNIGHT allows you to hear effective surround sound of movies at low volumes.The LOUDNESS is used to get good bass and treble from music sources at low volumes.
M/L OFF
MIDNIGHT
LOUDNESS
BD DVD
INPUT SELECT
SOURCESLEEPTV
CONTROL
TV
INPUT
RECEIVER
RECEIVER ENTER
RETURN
AUDIOPARAMETER
TUNER EDITTOOLS
MASTERVOLUME
iPod CTRLC GO
BAND
MENU
HOMEMENUSETUP
TOPMENU
TUNE
TUNE
PRESETPRES
ET
RECEIVER
S.RTV (Sound Retriever)b
When audio data is removed during the WMA/MP3c compression process, sound quality often suffers from an uneven sound image. The Sound Retriever feature employs new DSP technology that helps bring CD quality sound back to compressed 2-channel audio by restoring sound pressure and smoothing jagged artifacts left over after compression.
OFFd
ON
DUAL MONOe
Specifies how dual mono encoded Dolby Digital soundtracks should be played.
CH1 – Channel 1 is heard only
CH2 – Channel 2 is heard only
CH1 CH2 – Both channels heard from
front speakers
F.PCM (Fixed PCM)This is useful if you find there is a slight delay before OFF recognizes the PCM signal on a CD, for instance.When ON is selected, noise may be output during playback of non-PCM sources. Please select another input signal if this is a problem.
OFF
ON
DRC (Dynamic Range Control)Adjusts the level of dynamic range for movie soundtracks optimized for Dolby Digital, DTS, Dolby Digital Plus, Dolby TrueHD, DTS-HD and DTS-HD Master Audio (you may need to use this feature when listening to surround sound at low volumes).
AUTOf
MAX
MID
OFF
LFE ATT (LFE Attenuate)Some Dolby Digital and DTS audio sources include ultra-low bass tones. Set the LFE attenuator as necessary to prevent the ultra-low bass tones from distorting the sound from the speakers.The LFE is not limited when set to 0 dB, which is the recommended value. When set to –15 dB, the LFE is limited by the respective degree. When OFF is selected, no sound is output from the LFE channel.
0 (0 dB)
5 (–5 dB)
10 (–10 dB)
15 (–15 dB)
20 (–20 dB)
** (OFF)
SACD G. (SACD Gain)g
Brings out detail in SACDs by maximizing the dynamic range (during digital processing).
0 (0 dB)
+6 (+6 dB)
Setting/What it does Option(s)
HDMI (HDMI Audio)Specifies the routing of the HDMI audio signal out of this receiver (AMP) or through to a TV (THRU). When THRU is selected, no sound is output from this receiver.
AMP
THRU
A.DLY (Auto Delay)h
This feature automatically corrects the audio-to-video delay between components connected with an HDMI cable. The audio delay time is set depending on the operational status of the display connected with an HDMI cable. The video delay time is automatically adjusted according to the audio delay time.
OFF
ON
C.WIDTH (Center Width)i
(Applicable only when using a center speaker)Spreads the center channel between the front right and left speakers, making it sound wider (higher settings) or narrower (lower settings).
0 to 7Default: 3
DIMEN (Dimension)i
Adjusts the surround sound balance from front to back, making the sound more distant (minus settings), or more forward (positive settings).
–3 to +3Default: 0
PNRM. (Panorama)i
Extends the front stereo image to include surround speakers for a ‘wraparound’ effect.
OFF
ON
C.IMG (Center Image)j
(Applicable only when using a center speaker)Adjust the center image to create a wider stereo effect with vocals. Adjust the effect from 0 (all center channel sent to front right and left speakers) to 10 (center channel sent to the center speaker only).
0 to 10 Default: 3
(NEO:6 MUSIC),10 (NEO:6 CINEMA)
H.GAIN (Height Gain)Adjusts the output from the front height speaker when listening in DOLBY PLIIz HEIGHT mode. If set to H, the sound from the top will be more emphasized.
L (Low)
M (Mid)
H (High)
Setting/What it does Option(s)
VSX-821_FLXCN_En.book 31 ページ 2011年3月30日 水曜日 午後12時38分
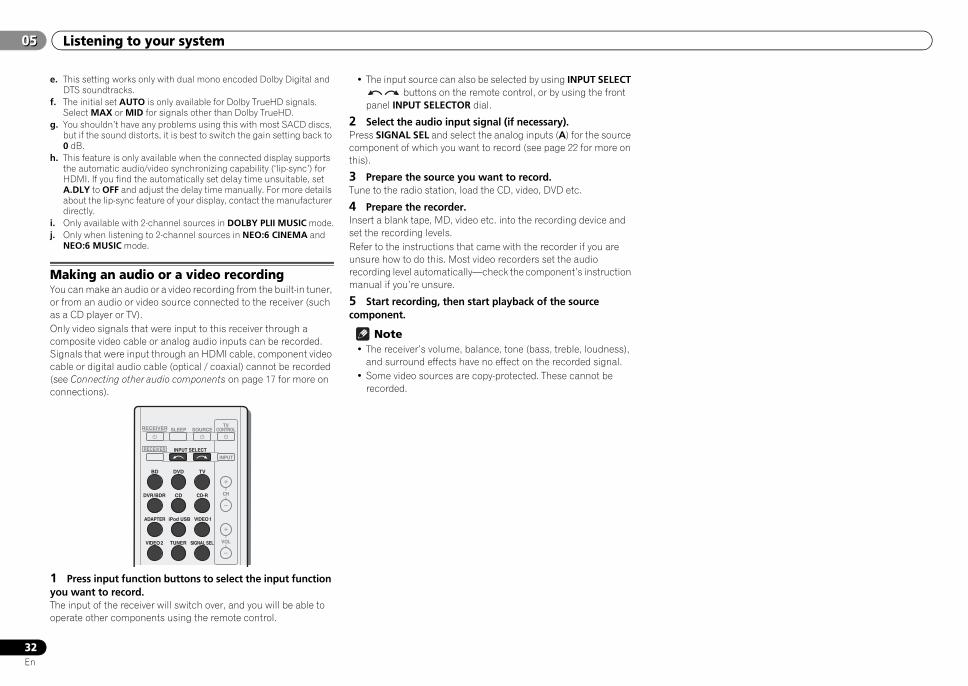
Listening to your system05
32En
05
e. This setting works only with dual mono encoded Dolby Digital and DTS soundtracks.
f. The initial set AUTO is only available for Dolby TrueHD signals. Select MAX or MID for signals other than Dolby TrueHD.
g. You shouldn’t have any problems using this with most SACD discs, but if the sound distorts, it is best to switch the gain setting back to 0 dB.
h. This feature is only available when the connected display supports the automatic audio/video synchronizing capability (‘lip-sync’) for HDMI. If you find the automatically set delay time unsuitable, set A.DLY to OFF and adjust the delay time manually. For more details about the lip-sync feature of your display, contact the manufacturer directly.
i. Only available with 2-channel sources in DOLBY PLII MUSIC mode.j. Only when listening to 2-channel sources in NEO:6 CINEMA and
NEO:6 MUSIC mode.
Making an audio or a video recordingYou can make an audio or a video recording from the built-in tuner, or from an audio or video source connected to the receiver (such as a CD player or TV). Only video signals that were input to this receiver through a composite video cable or analog audio inputs can be recorded. Signals that were input through an HDMI cable, component video cable or digital audio cable (optical / coaxial) cannot be recorded (see Connecting other audio components on page 17 for more on connections).
1 Press input function buttons to select the input function you want to record.The input of the receiver will switch over, and you will be able to operate other components using the remote control.
• The input source can also be selected by using INPUT SELECT buttons on the remote control, or by using the front
panel INPUT SELECTOR dial.
2 Select the audio input signal (if necessary).Press SIGNAL SEL and select the analog inputs (A) for the source component of which you want to record (see page 22 for more on this).
3 Prepare the source you want to record.Tune to the radio station, load the CD, video, DVD etc.
4 Prepare the recorder.Insert a blank tape, MD, video etc. into the recording device and set the recording levels.Refer to the instructions that came with the recorder if you are unsure how to do this. Most video recorders set the audio recording level automatically—check the component’s instruction manual if you’re unsure.
5 Start recording, then start playback of the source component.
Note• The receiver’s volume, balance, tone (bass, treble, loudness),
and surround effects have no effect on the recorded signal.• Some video sources are copy-protected. These cannot be
recorded.
BD DVD
INPUT SELECT
SOURCESLEEPTV
CONTROL
TV
INPUT
DVR/BDR CD CD-R
ADAPTER iPod USB VIDEO 1
VIDEO 2 SIGNAL SELTUNER
RECEIVER
CH
VOL
RECEIVER
VSX-821_FLXCN_En.book 32 ページ 2011年3月30日 水曜日 午後12時38分

EnglishEspañol
The System Setup menu 0606
33En
Chapter 6:The System Setup menu
Using the System Setup menuThe following section shows you how to make detailed settings to specify how you’re using the receiver, and also explains how to fine-tune individual speaker system settings to your liking.
Important• The OSD will not appear if you have connected using the HDMI
output to your TV. Use component or composite connections for system setup.
• If headphones are connected to the receiver, disconnect them.• You can’t use the System Setup menu when the iPod USB
input is selected.
1 Switch on the receiver and your TV.Press RECEIVER to switch on.
2 Switch the TV input to the input that connects this receiver to the TV through the corresponding composite or component cable.
3 Press , then press SETUP.The System Setup menu appears on your TV. Use /// and ENTER on the remote control to navigate through the screens and select menu items. Press RETURN to confirm and exit the current menu.
• Press SETUP at any time to exit the System Setup menu.
4 Select the setting you want to adjust.
• Auto MCACC – This is a quick and effective automatic surround setup (see Automatically setting up for surround sound (MCACC) on page 20).
• Manual SP Setup-Speaker Setting – Specify the size and number of speakers
you’ve connected (see below).-Crossover Network – Specify which frequencies will be sent
to the subwoofer (page 34).-Channel Level – Adjust the overall balance of your speaker
system (page 34).-Speaker Distance – Specify the distance of your speakers
from the listening position (page 35).• Input Assign – Specify what you’ve connected to the
component video inputs (see The Input Assign menu on page 35).
• Pre Out Setting – Specify how to use the PRE OUT SURR BACK/FRONT HEIGHT outputs (see The Pre Out Setting on page 35).
• HDMI Setup – Sets synchronized operations when connected to a device/TV that supports the Control with HDMI function (see HDMI Setup on page 37).
• Auto Power Down – Sets to automatically turn off the power when the receiver has not operated for several hours (see The Auto Power Down menu on page 36).
• FL Demo Mode – Sets the demo display on the front panel display (see The FL Demo Mode menu on page 36).
Manual speaker setupThis receiver allows you to make detailed settings to optimize the surround sound performance. You only need to make these settings once (unless you change the placement of your current speaker system or add new speakers).These settings are designed to fine-tune your system, but if you’re satisfied with the settings made in Automatically setting up for surround sound (MCACC) on page 20, it isn’t necessary to make all of these settings.
CAUTION• The test tones used in the System Setup are output at high
volume.
Important• Depending on the Pre Out Setting, there will be differences in
the speaker items that can be adjusted. The OSD display for these operating instructions is an example of when the Pre Out Setting is set to Surr. Back.
Speaker SettingUse this setting to specify your speaker configuration (size, number of speakers). It is a good idea to make sure that the settings made in Automatically setting up for surround sound (MCACC) on page 20 are correct.
1 Select ‘Manual SP Setup’ from the System Setup menu.
2 Select ‘Speaker Setting’ from the Manual SP Setup menu.
3 Choose the set of speakers that you want to set then select a speaker size.Use / to select the size (and number) of each of the following speakers:
• Front – Select LARGE if your front speakers reproduce bass frequencies effectively, or if you didn’t connect a subwoofer. Select SMALL to send the bass frequencies to the subwoofer.
BD DVD
INPUT SELECT
SOURCESLEEPTV
CONTROL
TV
INPUT
RECEIVER
RECEIVERENTER
MUTE
RETURN
PARAMETER TOOLS VOLUME
iPod CTRLPTY SEARCH
BAND
MENU
HOMEMENUSETUP
DTV/ TV
TOPMENU
TUNE
TUNE
PRESETPRES
ET
RECEIVER
System Setup
1.Auto MCACC2.Manual SP Setup3.Input Assign4.Pre Out Setting5.HDMI Setup6.Auto Power Down7.FL Demo Mode
Return
2.Manual SP Setup
Return
a.Speaker Settingb.Crossover Networkc.Channel Leveld.Speaker Distance
2a.Speaker Setting
Front CenterSurrSurr. BackSubwoofer:
Return
[ SMALL ][ SMALL ][ NO ] YES
SMALL
VSX-821_FLXCN_En.book 33 ページ 2011年3月30日 水曜日 午後12時38分
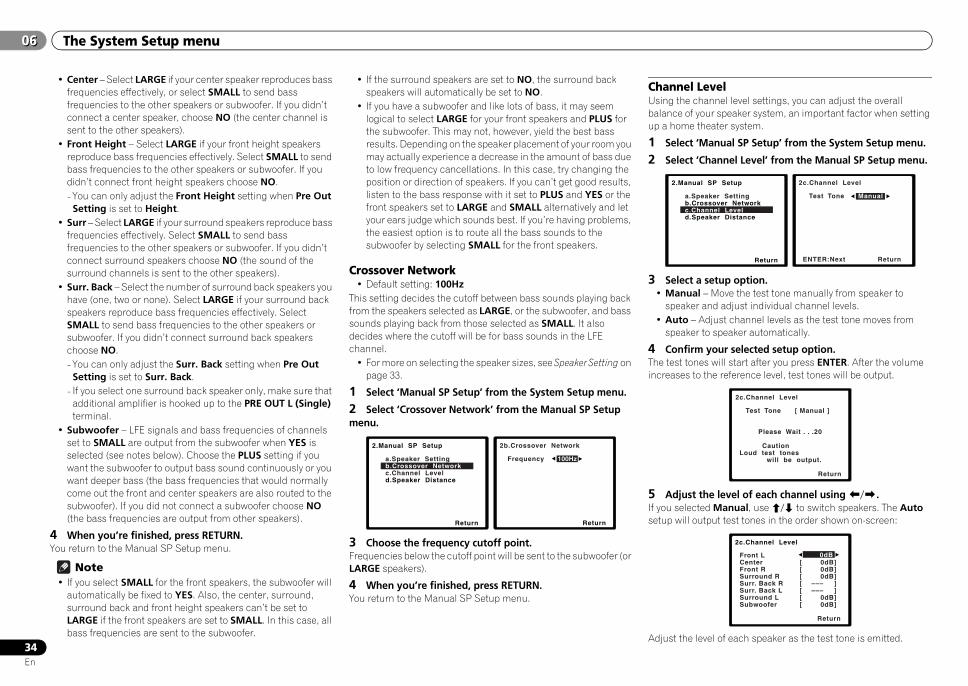
The System Setup menu06
34En
06
• Center – Select LARGE if your center speaker reproduces bass frequencies effectively, or select SMALL to send bass frequencies to the other speakers or subwoofer. If you didn’t connect a center speaker, choose NO (the center channel is sent to the other speakers).
• Front Height – Select LARGE if your front height speakers reproduce bass frequencies effectively. Select SMALL to send bass frequencies to the other speakers or subwoofer. If you didn’t connect front height speakers choose NO.- You can only adjust the Front Height setting when Pre Out
Setting is set to Height.• Surr – Select LARGE if your surround speakers reproduce bass
frequencies effectively. Select SMALL to send bass frequencies to the other speakers or subwoofer. If you didn’t connect surround speakers choose NO (the sound of the surround channels is sent to the other speakers).
• Surr. Back – Select the number of surround back speakers you have (one, two or none). Select LARGE if your surround back speakers reproduce bass frequencies effectively. Select SMALL to send bass frequencies to the other speakers or subwoofer. If you didn’t connect surround back speakers choose NO.- You can only adjust the Surr. Back setting when Pre Out
Setting is set to Surr. Back.- If you select one surround back speaker only, make sure that
additional amplifier is hooked up to the PRE OUT L (Single) terminal.
• Subwoofer – LFE signals and bass frequencies of channels set to SMALL are output from the subwoofer when YES is selected (see notes below). Choose the PLUS setting if you want the subwoofer to output bass sound continuously or you want deeper bass (the bass frequencies that would normally come out the front and center speakers are also routed to the subwoofer). If you did not connect a subwoofer choose NO (the bass frequencies are output from other speakers).
4 When you’re finished, press RETURN.You return to the Manual SP Setup menu.
Note• If you select SMALL for the front speakers, the subwoofer will
automatically be fixed to YES. Also, the center, surround, surround back and front height speakers can’t be set to LARGE if the front speakers are set to SMALL. In this case, all bass frequencies are sent to the subwoofer.
• If the surround speakers are set to NO, the surround back speakers will automatically be set to NO.
• If you have a subwoofer and like lots of bass, it may seem logical to select LARGE for your front speakers and PLUS for the subwoofer. This may not, however, yield the best bass results. Depending on the speaker placement of your room you may actually experience a decrease in the amount of bass due to low frequency cancellations. In this case, try changing the position or direction of speakers. If you can’t get good results, listen to the bass response with it set to PLUS and YES or the front speakers set to LARGE and SMALL alternatively and let your ears judge which sounds best. If you’re having problems, the easiest option is to route all the bass sounds to the subwoofer by selecting SMALL for the front speakers.
Crossover Network• Default setting: 100Hz
This setting decides the cutoff between bass sounds playing back from the speakers selected as LARGE, or the subwoofer, and bass sounds playing back from those selected as SMALL. It also decides where the cutoff will be for bass sounds in the LFE channel.
• For more on selecting the speaker sizes, see Speaker Setting on page 33.
1 Select ‘Manual SP Setup’ from the System Setup menu.
2 Select ‘Crossover Network’ from the Manual SP Setup menu.
3 Choose the frequency cutoff point.Frequencies below the cutoff point will be sent to the subwoofer (or LARGE speakers).
4 When you’re finished, press RETURN.You return to the Manual SP Setup menu.
Channel LevelUsing the channel level settings, you can adjust the overall balance of your speaker system, an important factor when setting up a home theater system.
1 Select ‘Manual SP Setup’ from the System Setup menu.
2 Select ‘Channel Level’ from the Manual SP Setup menu.
3 Select a setup option.• Manual – Move the test tone manually from speaker to
speaker and adjust individual channel levels.• Auto – Adjust channel levels as the test tone moves from
speaker to speaker automatically.
4 Confirm your selected setup option.The test tones will start after you press ENTER. After the volume increases to the reference level, test tones will be output.
5 Adjust the level of each channel using /.If you selected Manual, use / to switch speakers. The Auto setup will output test tones in the order shown on-screen:
Adjust the level of each speaker as the test tone is emitted.
2.Manual SP Setup
Return
a.Speaker Settingb.Crossover Networkc.Channel Leveld.Speaker Distance
2b.Crossover Network
Return
Frequency 100Hz
2.Manual SP Setup
Return
a.Speaker Settingb.Crossover Networkc.Channel Leveld.Speaker Distance
2c.Channel Level
Test Tone Manual
ENTER:NextReturn
2c.Channel Level
Test Tone [ Manual ]
Please Wait . . .20 Caution Loud test tones will be output.
Return
2c.Channel Level
Front L CenterFront RSurround RSurr. Back RSurr. Back LSurround LSubwoofer
Return
[ 0dB][ 0dB][ 0dB][ ––– ][ ––– ][ 0dB][ 0dB]
0dB
VSX-821_FLXCN_En.book 34 ページ 2011年3月30日 水曜日 午後12時38分
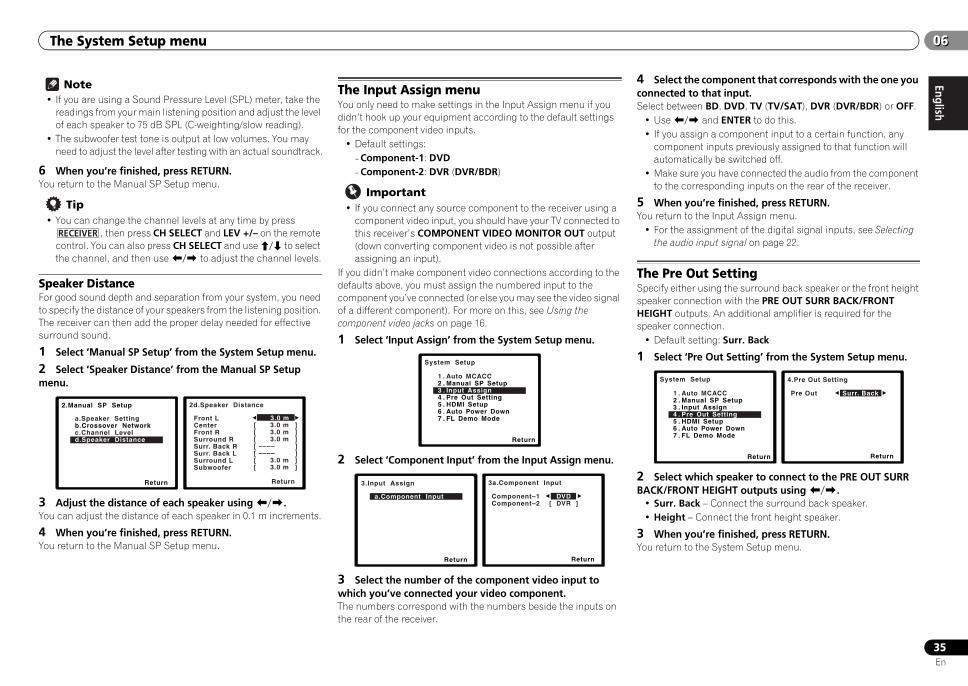
EnglishEspañol
The System Setup menu 0606
35En
Note• If you are using a Sound Pressure Level (SPL) meter, take the
readings from your main listening position and adjust the level of each speaker to 75 dB SPL (C-weighting/slow reading).
• The subwoofer test tone is output at low volumes. You may need to adjust the level after testing with an actual soundtrack.
6 When you’re finished, press RETURN.You return to the Manual SP Setup menu.
Tip• You can change the channel levels at any time by press
, then press CH SELECT and LEV +/– on the remote control. You can also press CH SELECT and use / to select the channel, and then use / to adjust the channel levels.
Speaker DistanceFor good sound depth and separation from your system, you need to specify the distance of your speakers from the listening position. The receiver can then add the proper delay needed for effective surround sound.
1 Select ‘Manual SP Setup’ from the System Setup menu.
2 Select ‘Speaker Distance’ from the Manual SP Setup menu.
3 Adjust the distance of each speaker using /.You can adjust the distance of each speaker in 0.1 m increments.
4 When you’re finished, press RETURN.You return to the Manual SP Setup menu.
The Input Assign menuYou only need to make settings in the Input Assign menu if you didn’t hook up your equipment according to the default settings for the component video inputs.
• Default settings:-Component-1: DVD-Component-2: DVR (DVR/BDR)
Important• If you connect any source component to the receiver using a
component video input, you should have your TV connected to this receiver’s COMPONENT VIDEO MONITOR OUT output (down converting component video is not possible after assigning an input).
If you didn’t make component video connections according to the defaults above, you must assign the numbered input to the component you’ve connected (or else you may see the video signal of a different component). For more on this, see Using the component video jacks on page 16.
1 Select ‘Input Assign’ from the System Setup menu.
2 Select ‘Component Input’ from the Input Assign menu.
3 Select the number of the component video input to which you’ve connected your video component.The numbers correspond with the numbers beside the inputs on the rear of the receiver.
4 Select the component that corresponds with the one you connected to that input.Select between BD, DVD, TV (TV/SAT), DVR (DVR/BDR) or OFF.
• Use / and ENTER to do this.• If you assign a component input to a certain function, any
component inputs previously assigned to that function will automatically be switched off.
• Make sure you have connected the audio from the component to the corresponding inputs on the rear of the receiver.
5 When you’re finished, press RETURN.You return to the Input Assign menu.
• For the assignment of the digital signal inputs, see Selecting the audio input signal on page 22.
The Pre Out SettingSpecify either using the surround back speaker or the front height speaker connection with the PRE OUT SURR BACK/FRONT HEIGHT outputs. An additional amplifier is required for the speaker connection.
• Default setting: Surr. Back
1 Select ‘Pre Out Setting’ from the System Setup menu.
2 Select which speaker to connect to the PRE OUT SURR BACK/FRONT HEIGHT outputs using /.
• Surr. Back – Connect the surround back speaker.• Height – Connect the front height speaker.
3 When you’re finished, press RETURN.You return to the System Setup menu.
RECEIVER
2.Manual SP Setup
Return
a.Speaker Settingb.Crossover Networkc.Channel Leveld.Speaker Distance
2d.Speaker Distance
Front L CenterFront RSurround RSurr. Back RSurr. Back LSurround LSubwoofer
Return
3.0 m [ 3.0 m ][ 3.0 m ][ 3.0 m ][ –––– ][ –––– ][ 3.0 m ][ 3.0 m ]
System Setup
1 . Auto MCACC2 . Manual SP Setup3 . Input Assign4 . Pre Out Setting5 . HDMI Setup6 . Auto Power Down7 . FL Demo Mode
Return
3.Input Assign
Return
a.Component Input
3a.Component Input
Return
Component–1 DVD Component–2 [ DVR ]
System Setup
1 . Auto MCACC2 . Manual SP Setup3 . Input Assign4 . Pre Out Setting5 . HDMI Setup6 . Auto Power Down7 . FL Demo Mode
Return
4.Pre Out Setting
Return
Pre Out Surr. Back
VSX-821_FLXCN_En.book 35 ページ 2011年3月30日 水曜日 午後12時38分
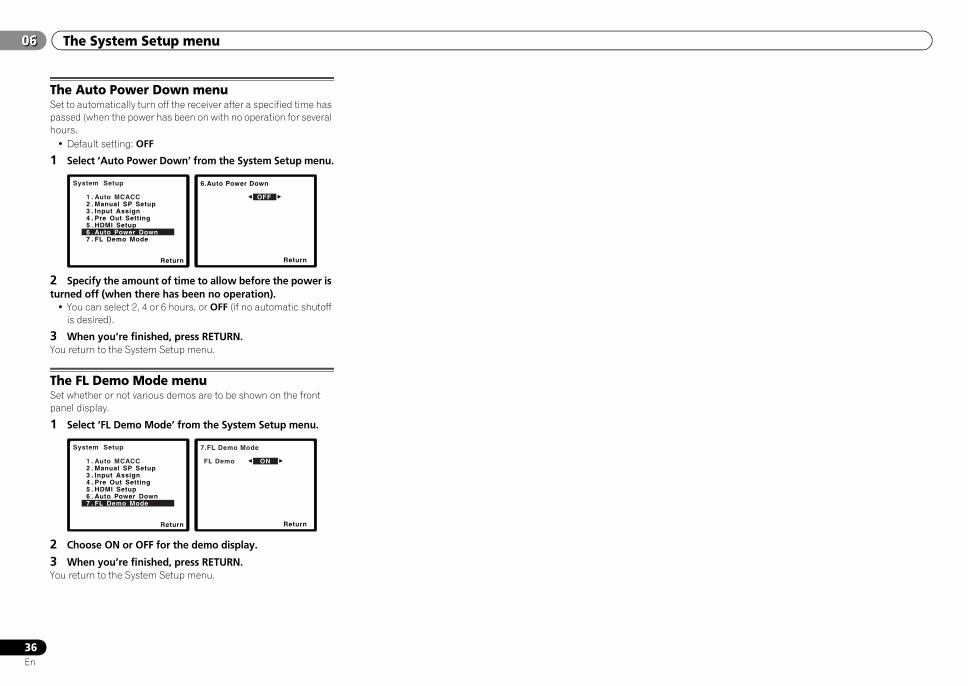
The System Setup menu06
36En
06
The Auto Power Down menuSet to automatically turn off the receiver after a specified time has passed (when the power has been on with no operation for several hours.
• Default setting: OFF
1 Select ‘Auto Power Down’ from the System Setup menu.
2 Specify the amount of time to allow before the power is turned off (when there has been no operation).
• You can select 2, 4 or 6 hours, or OFF (if no automatic shutoff is desired).
3 When you’re finished, press RETURN.You return to the System Setup menu.
The FL Demo Mode menuSet whether or not various demos are to be shown on the front panel display.
1 Select ‘FL Demo Mode’ from the System Setup menu.
2 Choose ON or OFF for the demo display.
3 When you’re finished, press RETURN.You return to the System Setup menu.
System Setup
1 . Auto MCACC2 . Manual SP Setup3 . Input Assign4 . Pre Out Setting5 . HDMI Setup6 . Auto Power Down7 . FL Demo Mode
Return
6.Auto Power Down
Return
OFF
System Setup
1 . Auto MCACC2 . Manual SP Setup3 . Input Assign4 . Pre Out Setting5 . HDMI Setup6 . Auto Power Down7 . FL Demo Mode
Return
7.FL Demo Mode
Return
FL Demo ON
VSX-821_FLXCN_En.book 36 ページ 2011年3月30日 水曜日 午後12時38分

EnglishEspañol
Control with HDMI function 0707
37En
Chapter 7:Control with HDMI functionSynchronized operations below with a Control with HDMI-compatible Pioneer TV or Blu-ray Disc player or with a component of another make that supports the Control with HDMI functions are possible when the component is connected to the receiver using an HDMI cable.
• Synchronized amp modeThe receiver’s volume can be set and the sound can be muted using the TV’s remote control.
• Power synchronization with TV• Automatic switching of inputs
The receiver’s input switches over automatically when the TV’s input is changed or a Control with HDMI-compatible component is played.
Important• With Pioneer devices, the Control with HDMI functions are
referred to as “KURO LINK”.• You cannot use this function with components that do not
support Control with HDMI.• We only guarantee this receiver will work with Pioneer made
Control with HDMI-compatible components and components of other makes that support the Control with HDMI function. However, we do not guarantee that all synchronized operations will work with components of other makes that support the Control with HDMI function.
• Use a High Speed HDMI® cable when you want to use the Control with HDMI function. The Control with HDMI function may not work properly if a different type of HDMI cable is used.
• For details about concrete operations, settings, etc., refer to also the operating instructions for each component.
Making Control with HDMI connectionsYou can use synchronized operation for a connected TV and up to four other components.
• Be sure to connect the TV’s audio cable to the audio input of this unit. When the TV and receiver are connected by HDMI connections, if the TV supports the HDMI Audio Return Channel function, the sound of the TV is input to the receiver via the HDMI terminal, so there is no need to connect an audio cable. In this case, set ARC at HDMI Setup to ON (see HDMI Setup below).
For details, see Connecting using HDMI on page 14.
Important• When connecting this system or changing connections, be
sure to switch the power off and disconnect the power cord from the wall socket.After completing all connections, connect the power cords to the wall socket.
• After this receiver is connected to an AC outlet, a 2 second to 10 second HDMI initialization process begins. You cannot carry out any operations during initialization. The HDMI indicator on the display unit blinks during initialization, and you can turn this receiver on once it has stopped blinking.
• To get the most out of this function, we recommend that you connect your HDMI component not to a TV but rather directly to the HDMI terminal on this receiver.
• While the receiver is equipped with four HDMI inputs, the Control with HDMI function can only be used with up to three DVD or Blu-ray Disc players or up to three DVD or Blu-ray Disc recorders.
HDMI SetupYou must adjust the settings of this receiver as well as the connected Control with HDMI-compatible components in order to make use of the Control with HDMI function. For more information see the operating instructions for each component.
1 Switch on the receiver and your TV.Press RECEIVER to switch on.
2 Switch the TV input to the input that connects this receiver to the TV through the corresponding composite or component cable.
3 Press , then press SETUP.The System Setup menu appears on your TV. Use /// and ENTER on the remote control to navigate through the screens and select menu items. Press RETURN to confirm and exit the current menu.
• Press SETUP at any time to exit the System Setup menu.
4 Select ‘HDMI Setup’ from the System Setup menu.
5 Select the ‘Control’ setting you want.Choose whether to set this unit’s Control with HDMI function ON or OFF. You will need to set it to ON to use the Control with HDMI function.When using a component that does not support the Control with HDMI function, set this to OFF.
• ON – Enables the Control with HDMI function. When this unit’s power is turned off and you have a supported source begin playback while using the Control with HDMI function, the audio and video outputs from the HDMI connection are output from the TV.
• OFF – The Control with HDMI is disabled. Synchronized operations cannot be used. When this unit’s power is turned off, audio and video of sources connected via HDMI are not output.
RECEIVER
System Setup
1 . Auto MCACC2 . Manual SP Setup3 . Input Assign4 . Pre Out Setting5 . HDMI Setup6 . Auto Power Down7 . FL Demo Mode
Return
5.HDMI Setup
Return
Control ON ARC [ OFF ]
VSX-821_FLXCN_En.book 37 ページ 2011年3月30日 水曜日 午後12時38分
Control with HDMI function07
38En
07
6 Select the ‘ARC’ setting you want.When a TV supporting the HDMI Audio Return Channel function is connected to the receiver, the sound of the TV can be input via the HDMI terminal.
• ON – The TV’s sound is input via the HDMI terminal. This can only be selected when Control is set to ON.
• OFF – The TV’s sound is input from the audio input terminals other than HDMI inputs.
7 When you’re finished, press RETURN.You return to the System Setup menu.
Before using synchronizationOnce you have finished all connections and settings, you must:
1 Put all components into standby mode.
2 Turn the power on for all components, with the power for the TV being turned on last.
3 Choose the HDMI input to which the TV is connected to this receiver, and see if video output from connected components displays properly on the screen or not.
4 Check whether the components connected to all HDMI inputs are properly displayed.
About synchronized operationsThe Control with HDMI-compatible component connected to the receiver operates in sync as described below.
• Synchronized amp mode- From the menu screen of the Control with HDMI-compatible
TV, set audio to be played through this receiver, and the receiver will switch to the synchronized amp mode.
-When in the synchronized amp mode, the synchronized amp mode is canceled when the receiver’s power is turned off. To turn the synchronized amp mode back on, set audio to be played through the receiver from the TV’s menu screen, etc. This receiver will power up and switch to the synchronized amp mode.
-When in the synchronized amp mode, the synchronized amp mode is canceled if an operation that produces sound from the TV is performed from the TV’s menu screen, etc.
-When the synchronized amp mode is canceled, the receiver’s power turns off if you were viewing an HDMI input or a TV program on the TV.
• Power synchronization with TV-When the TV’s power is set to standby, the receiver’s power is
also set to standby. (Only when the input for a component connected to the receiver by HDMI connection is selected or when watching the TV.)
• Automatic switching of inputs- The receiver’s input switches automatically when the
Control with HDMI-compatible component is played.- The receiver’s input switches automatically when the TV’s
input is switched.- The synchronized amp mode remains in effect even if the
receiver’s input is switched to a component other than one connected by HDMI.
About connections with a product of a different brand that supports the Control with HDMI functionThe synchronized operations below can be used when the receiver’s Control with HDMI function is connected to a TV of a brand other than Pioneer that supports the Control with HDMI function. (Depending on the TV, however, some of the Control with HDMI functions may not work.)
• When the TV’s power is set to standby, the receiver’s power is also set to standby. (Only when the input for a component connected to the receiver by HDMI connection is selected or when watching the TV.)
• The sound of TV programs or an external input connected to the TV can also be output from the speakers connected to the receiver. (If the TV does not support the HDMI Audio Return Channel function, this requires connection of an optical digital cable, etc., in addition to the HDMI cable.)
The synchronized operations below can be used when the receiver’s Control with HDMI function is connected to a player or recorder of a brand other than Pioneer that supports the Control with HDMI function.
• When playback starts on the player or recorder, the receiver’s input switches to the HDMI input to which that component is connected.
See the Pioneer website for the latest information on the models of non-Pioneer brands and products that support the Control with HDMI function.
Cautions on the Control with HDMI function• Connect the TV and components (Blu-ray Disc player, etc.)
directly to this receiver. Interrupting a direct connection with other amps or an AV converter (such as an HDMI switch) can cause operational errors.
• When the receiver’s Control is turned ON, even if the receiver’s power is in the standby mode, it is possible to output the audio and video signals from a player via HDMI to the TV without producing sound from the receiver, but only when a Control with HDMI-compatible component (Blu-ray Disc player, etc.) and compatible TV are connected. In this case, the receiver’s power turns on and the power and HDMI indicators light.
VSX-821_FLXCN_En.book 38 ページ 2011年3月30日 水曜日 午後12時38分
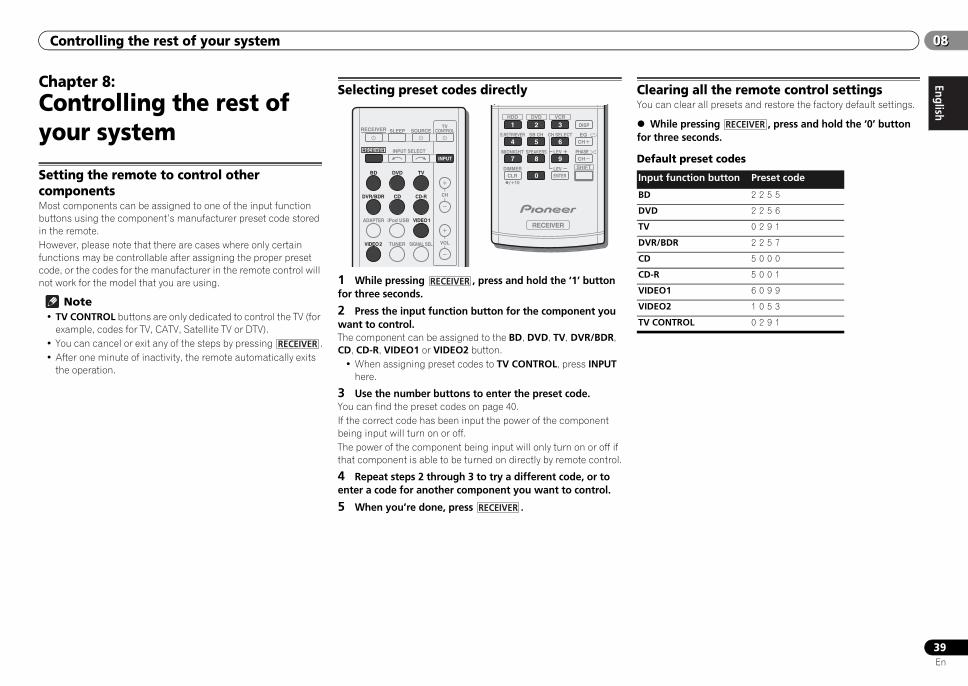
EnglishEspañol
Controlling the rest of your system 0808
39En
Chapter 8:Controlling the rest of your system
Setting the remote to control other componentsMost components can be assigned to one of the input function buttons using the component’s manufacturer preset code stored in the remote.However, please note that there are cases where only certain functions may be controllable after assigning the proper preset code, or the codes for the manufacturer in the remote control will not work for the model that you are using.
Note• TV CONTROL buttons are only dedicated to control the TV (for
example, codes for TV, CATV, Satellite TV or DTV).• You can cancel or exit any of the steps by pressing .• After one minute of inactivity, the remote automatically exits
the operation.
Selecting preset codes directly
1 While pressing , press and hold the ‘1’ button for three seconds.
2 Press the input function button for the component you want to control.The component can be assigned to the BD, DVD, TV, DVR/BDR, CD, CD-R, VIDEO1 or VIDEO2 button.
• When assigning preset codes to TV CONTROL, press INPUT here.
3 Use the number buttons to enter the preset code.You can find the preset codes on page 40.If the correct code has been input the power of the component being input will turn on or off. The power of the component being input will only turn on or off if that component is able to be turned on directly by remote control.
4 Repeat steps 2 through 3 to try a different code, or to enter a code for another component you want to control.
5 When you’re done, press .
Clearing all the remote control settingsYou can clear all presets and restore the factory default settings.
While pressing , press and hold the ‘0’ button for three seconds.
Default preset codes
RECEIVER
BD DVD
INPUT SELECT
SOURCESLEEPTV
CONTROL
TV
INPUT
DVR/BDR CD CD-R
ADAPTER iPod USB VIDEO 1
VIDEO 2 SIGNAL SELTUNER
RECEIVER
CH
VOL
RECEIVER
RECEIVER
DIMMER
1
4
7MIDNIGHT
S.RETRIEVER
+10
2
5
8SPEAKERS LEV
LEV
SB CH
DISP
CLR
EQ
PHASE
3
6
9
0 ENTER
CH
CH
CH SELECT
/
SHIFT
HDD DVD VCR
RECEIVER
RECEIVER
Input function button Preset code
BD 2 2 5 5
DVD 2 2 5 6
TV 0 2 9 1
DVR/BDR 2 2 5 7
CD 5 0 0 0
CD-R 5 0 0 1
VIDEO1 6 0 9 9
VIDEO2 1 0 5 3
TV CONTROL 0 2 9 1
RECEIVER
VSX-821_FLXCN_En.book 39 ページ 2011年3月30日 水曜日 午後12時38分
Controlling the rest of your system08
40En
08
Controls for TVsThis remote control can control components after entering the proper codes or teaching the receiver the commands (see Controlling the rest of your system on page 39 for more on this). Use the input function buttons to select the component.
• The TV CONTROL buttons on the remote control are dedicated to control the TV assigned to the TV CONTROL INPUT button.
Controls for other componentsThis remote control can control these components (BD, DVD, CD, DVR (BDR), VCR, CD-R) after entering the proper codes or teaching the receiver the commands (see Controlling the rest of your system on page 39 for more on this). Use the input function buttons to select the component.
Preset Code ListYou should have no problem controlling a component if you find the manufacturer in this list, but please note that there are cases where codes for the manufacturer in the list will not work for the model that you are using. There are also cases where only certain functions may be controllable after assigning the proper preset code.
Important• We do not guarantee the operations of all the manufacturers
and devices listed. Operation may not be possible even if a preset code is entered.
Button(s) Function
TV DTV
Sate
llite
/C
able
TV
TV CONTROL
Switches the DTV on or off. – –
Switches the TV or CATV between standby and on.
–
TV CONTROL INPUT
Switches the TV input. (Not possible with all models.)
– –
TV CONTROL CH +/–
Selects channels.
TV CONTROL VOL +/–
Adjust the TV volume.
SOURCE Press to switch the component assigned to the TV button on or off.
DTV/TV Switches between the DTV and analog TV input modes for Pioneer TVs.
–
TOP MENU Switches TEXT ON/OFF for TVs. – –
HOME MENU Use as the GUIDE button for navigating.
RETURN Use to select closed captioning with DTV.
– –
Number buttons
Use to select a specific TV channel.
ENTER Use to enter a channel.
MENU Press to display the DTV menu. – –
Select the menu screen. –
////ENTER
Press to select or adjust and navigate items on the menu screen.
CH +/– Selects channels.
Button(s) Function
For Blu-ray Disc player, DVD player, CD player, DVR (BDR), VCR, CD-R
SOURCE Press to switch the component between standby and on.
Press to return to the start of the current track. Repeated presses skips to the start of previous tracks.
Press to advance to the start of the next track. Repeated presses skips to the start of following tracks.
Pause playback or recording.
Start playback.
Hold down for fast forward playback.
Hold down for fast reverse playback.
Stops playback (on some models, pressing this when the disc is already stopped will cause the disc tray to open).
Number buttons Use to enter a title/chapter/track number.
DISP Press to display information.
TOP MENU Displays the disc ‘top’ menu of a BD/DVD player.
MENU Displays menus for the current BD/DVD or DVR you are using.
////ENTER/RETURN
Navigates BD/DVD menu/options.
HOME MENU Displays the HOME MENU.
CH +/– Selects channels. (DVR/VCR only)
For HDD/DVD/VCR recorder
HDD (SHIFT + 1) Switches to the hard disk controls.
DVD (SHIFT + 2) Switches to the DVD controls.
VCR (SHIFT + 3) Switches to the VCR controls.
TVPioneer 0291
example:
CategoryPreset codeManufacturer
VSX-821_FLXCN_En.book 40 ページ 2011年3月30日 水曜日 午後12時38分
EnglishEspañol
Controlling the rest of your system 0808
41En
TV Pioneer 0291, 0113, 0295, 0296A.R. Systems 0155 Acme 0141 Acura 0142, 0154 ADC 0140 Admiral 0138, 0139, 0140, 0145,
0146 Adyson 0141, 0228, 0229 Agashi 0228, 0229 Agazi 0140 Aiko 0141, 0142, 0154, 0155, 0228,
0229 Aim 0155 Aiwa 0199 Akai 0142, 0143, 0149, 0152, 0154,
0155, 0228, 0229 Akiba 0143, 0155 Akura 0140, 0143, 0154, 0155 Alaron 0228 Alba 0125, 0141, 0142, 0143, 0147,
0150, 0152, 0154, 0155, 0190, 0193, 0203, 0228
Alcyon 0132 Allorgan 0229 Allstar 0149, 0155 AMOi 0224 Amplivision 0125, 0141, 0156, 0229 Amstrad 0140, 0142, 0143, 0154,
0155 Anam 0142 Anglo 0142, 0154 Anitech 0132, 0140, 0142, 0154,
0155 Ansonic 0125, 0133, 0142, 0144,
0154, 0155 Arcam 0228, 0229 Arcam Delta 0141 Aristona 0149, 0152, 0155 Arthur Martin 0156 ASA 0138, 0146 Asberg 0132, 0149, 0155 Astra 0142 Asuka 0140, 0141, 0143, 0228, 0229 Atlantic 0141, 0149, 0152, 0155,
0228 Atori 0142, 0154 Auchan 0156 Audiosonic 0125, 0141, 0142, 0143,
0149, 0152, 0155, 0229 AudioTon 0125, 0141, 0229 Ausind 0132 Autovox 0132, 0138, 0140, 0141,
0229 Awa 0228, 0229 Baird 0229 Bang & Olufsen 0138, 0230 Basic Line 0142, 0143, 0149, 0154,
0155, 0229 Bastide 0141, 0229 Baur 0152, 0155 Bazin 0229 Beko 0125, 0150, 0155, 0175 Benq 0219 Beon 0149, 0152, 0155 Best 0125 Bestar 0125, 0149, 0155 Binatone 0141, 0229 Blue Sky 0143, 0155 Blue Star 0151
Boots 0141, 0229 BPL 0151, 0155 Brandt 0148, 0153, 0157, 0159 Brinkmann 0155 Brionvega 0138, 0149, 0152, 0155 Britannia 0141, 0228, 0229 Bruns 0138 BTC 0143 Bush 0142, 0143, 0145, 0147, 0149,
0151, 0152, 0154, 0155, 0180, 0193, 0229
Capsonic 0140 Carena 0155 Carrefour 0147 Cascade 0142, 0154, 0155 Casio 0221 Cathay 0149, 0152, 0155 CCE 0229 Centurion 0149, 0152, 0155 Century 0138 CGE 0125, 0132 Cimline 0142, 0154 City 0142, 0154 Clarivox 0152 Clatronic 0125, 0132, 0140, 0141,
0142, 0143, 0149, 0150, 0154, 0155, 0229
CMS 0228 CMS Hightec 0229 Concorde 0142, 0154 Condor 0125, 0141, 0149, 0150,
0154, 0155, 0228 Contec 0141, 0142, 0147, 0154, 0228 Continental Edison 0148 Cosmel 0142, 0154 Crosley 0132, 0138 Crown 0125, 0132, 0142, 0149, 0150,
0152, 0154, 0155 CS Electronics 0141, 0143, 0228 CTC Clatronic 0144 Cybertron 0143 Daewoo 0128, 0141, 0142, 0149,
0154, 0155, 0169, 0179, 0206, 0228, 0229
Dainichi 0143, 0228 Dansai 0140, 0149, 0152, 0155, 0228,
0229 Dantax 0125, 0152 Dawa 0155 Daytron 0142, 0154 De Graaf 0145 Decca 0141, 0149, 0152, 0155, 0229 Denver 0213, 0218 Desmet 0149, 0152, 0155 Diamant 0155 Diamond 0228 Dixi 0142, 0149, 0152, 0154, 0155,
0229 DTS 0142, 0154 Dual 0141, 0155, 0229 Dual-Tec 0141, 0142 Dumont 0138, 0141, 0144, 0229 Dux 0152 Dynatron 0149, 0152, 0155 Elbe 0125, 0133, 0155, 0229 Elcit 0138 Electa 0151 ELECTRO TECH 0142 Elin 0141, 0149, 0152, 0154, 0155,
0228 Elite 0143, 0149, 0155
Elman 0144 Elta 0142, 0154, 0228 Emerson 0125, 0138, 0155 Epson 0216 Erres 0149, 0152, 0155 ESC 0229 Etron 0142 Eurofeel 0229, 0140 Euroline 0152 Euroman 0125, 0140, 0141, 0149,
0155, 0228, 0229 Europhon 0141, 0144, 0149, 0155,
0228, 0229 Expert 0156 Exquisit 0155 Fenner 0142, 0154 Ferguson 0148, 0152, 0153, 0157 Fidelity 0141, 0145, 0155, 0228 Filsai 0229 Finlandia 0145 Finlux 0132, 0138, 0141, 0144, 0149,
0152, 0155, 0229 Firstline 0141, 0142, 0149, 0154,
0155, 0228, 0229 Fisher 0125, 0138, 0141, 0147, 0150,
0229 Flint 0149, 0155 Formenti 0132, 0138, 0139, 0141,
0152, 0228 Formenti/Phoenix 0228 Fortress 0138, 0139 Fraba 0125, 0155 Friac 0125 Frontech 0140, 0142, 0145, 0146,
0154, 0229 Fujitsu 0229 Fujitsu General 0229 Funai 0140 Galaxi 0155, 0150 Galaxis 0125, 0155 GBC 0142, 0147, 0154 Geant Casino 0156 GEC 0141, 0146, 0149, 0152, 0155,
0229 Geloso 0142, 0145, 0154 General Technic 0142, 0154 Genexxa 0143, 0146, 0149, 0155 Giant 0229 GoldHand 0228 Goldline 0155 Goldstar 0125, 0141, 0142, 0145,
0149, 0152, 0154, 0155, 0228, 0229 Goodmans 0140, 0142, 0147, 0149,
0152, 0154, 0155, 0222, 0229 Gorenje 0125, 0150 GPM 0143 Graetz 0146 Granada 0132, 0141, 0145, 0147,
0149, 0152, 0155, 0156, 0229 Grandin 0142, 0143, 0151, 0152 Gronic 0229 Grundig 0124, 0125, 0132, 0155,
0162 Halifax 0140, 0141, 0228, 0229 Hampton 0141, 0228, 0229 Hanseatic 0125, 0133, 0141, 0142,
0147, 0149, 0152, 0154, 0155, 0229 Hantarex 0142, 0154, 0155 Hantor 0155 Harwood 0154, 0155
HCM 0140, 0141, 0142, 0151, 0154, 0155, 0229
Hema 0154, 0229 Higashi 0228 HiLine 0155 Hinari 0142, 0143, 0147, 0149, 0152,
0154, 0155 Hisawa 0143, 0151, 0156 Hitachi 0137, 0141, 0145, 0146,
0147, 0155, 0191, 0226, 0229 Hornyphon 0149, 0155 Hoshai 0143 Huanyu 0141, 0228 Hygashi 0141, 0228, 0229 Hyper 0141, 0142, 0154, 0228, 0229 Hypson 0140, 0141, 0149, 0151,
0152, 0155, 0156, 0229 Iberia 0155 ICE 0140, 0141, 0142, 0143, 0149,
0154, 0155, 0228, 0229 ICeS 0228 Imperial 0125, 0132, 0146, 0149,
0150, 0155 Indiana 0149, 0152, 0155 Ingelen 0146 Ingersol 0142, 0154 Inno Hit 0132, 0141, 0142, 0143,
0149, 0152, 0154, 0155, 0229 Innovation 0140, 0142 Interactive 0125 Interbuy 0142, 0154 Interfunk 0125, 0138, 0146, 0149,
0152, 0155 International 0228 Intervision 0125, 0140, 0141, 0144,
0155, 0229 Irradio 0132, 0142, 0143, 0149, 0152,
0154, 0155 Isukai 0143, 0155 ITC 0141, 0229 ITS 0143, 0149, 0151, 0155, 0228 ITT 0142, 0146 ITV 0142, 0152, 0155 JVC 0134, 0135, 0147, 0149, 0192 Kaisui 0141, 0142, 0143, 0151, 0154,
0155, 0228, 0229 Kamosonic 0141 Kamp 0141, 0228 Kapsch 0146 Karcher 0125, 0141, 0142, 0152,
0155 Kawasho 0228 Kendo 0125, 0144, 0145, 0155 KIC 0229 Kingsley 0141, 0228 Kneissel 0125, 0133, 0155 Kolster 0149, 0155 Konka 0143 Korpel 0149, 0152, 0155 Korting 0125, 0138 Kosmos 0155 Koyoda 0142 KTV 0141, 0229 Kyoto 0228, 0229 Lasat 0125 Lenco 0142, 0154 Lenoir 0141, 0142, 0154 Leyco 0140, 0149, 0152, 0155 LG 0125, 0136, 0141, 0142, 0145,
0149, 0152, 0154, 0155, 0186, 0189, 0196, 0220, 0228, 0229
LG/GoldStar 0129 Liesenk 0152 Liesenkotter 0155 Life 0140, 0142 Lifetec 0140, 0142, 0154, 0155 Lloyds 0154 Loewe 0125, 0133, 0155, 0166, 0167 Loewe Opta 0138, 0149, 0152 Luma 0145, 0152, 0154, 0155 Lumatron 0145, 0149, 0152, 0155,
0229 Lux May 0149 Luxor 0141, 0145, 0229 M Electronic 0141, 0142, 0146,
0148, 0149, 0152 Magnadyne 0138, 0144, 0152 Magnafon 0132, 0141, 0144, 0228 Magnum 0140, 0142 Mandor 0140 Manesth 0140, 0141, 0149, 0152,
0155, 0229 Marantz 0149, 0152, 0155 Marelli 0138 Mark 0149, 0152, 0154, 0155, 0228,
0229 Masuda 0229 Matsui 0141, 0142, 0145, 0147,
0149, 0152, 0154, 0155, 0229 Mediator 0149, 0152, 0155 Medion 0140, 0142, 0155 M-Electronic 0154, 0155, 0228,
0229 Melvox 0156 Memorex 0142, 0154 Memphis 0142, 0154 Mercury 0154, 0155 Metz 0138, 0299, 0300, 0301, 0302 Micromaxx 0140, 0142 Microstar 0140, 0142 Minerva 0132 Minoka 0149, 0155 Mitsubishi 0138, 0147, 0149, 0155,
0200 Mivar 0125, 0132, 0133, 0141, 0228,
0229 Motion 0132 MTC 0125, 0228 Multi System 0152 Multitech 0125, 0141, 0142, 0144,
0145, 0147, 0152, 0154, 0155, 0228, 0229
Murphy 0141, 0228 Naonis 0145 NEC 0147, 0229 Neckermann 0125, 0138, 0141,
0145, 0149, 0150, 0152, 0155, 0229 NEI 0149, 0152, 0155 Neufunk 0154, 0155 New Tech 0142, 0149, 0154, 0155,
0229 New World 0143 Nicamagic 0141, 0228 Nikkai 0140, 0141, 0143, 0149, 0152,
0154, 0155, 0228, 0229 Nobliko 0132, 0141, 0144, 0228 Nokia 0146 Nordic 0229 Nordmende 0138, 0146, 0148, 0149 Nordvision 0152 Novatronic 0155 Oceanic 0146, 0156
Okano 0125, 0150, 0155 ONCEAS 0141 Opera 0155 Orbit 0149, 0155 Orion 0142, 0149, 0152, 0154, 0155,
0194 Orline 0155 Osaki 0140, 0141, 0143, 0155, 0229 Oso 0143 Otto Versand 0139, 0141, 0147,
0149, 0151, 0152, 0155, 0229 Pael 0141, 0228 Palladium 0125, 0141, 0150, 0155,
0229 Palsonic 0229 Panama 0140, 0141, 0142, 0154,
0155, 0228, 0229 Panasonic 0123, 0146, 0155, 0158,
0164, 0214, 0217 Panavision 0155 Pathe Cinema 0125, 0133, 0141,
0156, 0228 Pausa 0142, 0154 Perdio 0155, 0228 Perfekt 0155 Philco 0125, 0132, 0138, 0155 Philharmonic 0141, 0229 Philips 0115, 0117, 0138, 0141, 0149,
0152, 0155, 0160, 0163, 0165, 0170, 0171, 0173, 0174, 0182, 0183, 0195, 0196, 0202, 0205, 0212, 0215
Phoenix 0125, 0138, 0149, 0152, 0155, 0228
Phonola 0138, 0149, 0152, 0155, 0228
Plantron 0140, 0149, 0154, 0155 Playsonic 0229 Poppy 0142, 0154 Prandoni-Prince 0132, 0145 Precision 0141, 0229 Prima 0142, 0146, 0154 Profex 0142, 0154 Profi-Tronic 0149, 0155 Proline 0149, 0155 Prosonic 0125, 0141, 0152, 0155,
0228, 0229, 0232 Protech 0140, 0141, 0142, 0144,
0149, 0152, 0229 Provision 0152, 0155 Pye 0149, 0152, 0155, 0198 Pymi 0142, 0154 Quandra Vision 0156 Quelle 0140, 0141, 0149, 0152, 0155,
0229 Questa 0147 Radialva 0155 Radio Shack 0155 Radiola 0149, 0152, 0155, 0229 Radiomarelli 0138, 0155 Radiotone 0125, 0149, 0154, 0155 Rank 0147 Recor 0155 Redstar 0155 Reflex 0155 Revox 0125, 0149, 0152, 0155 Rex 0140, 0145, 0146 RFT 0125, 0133, 0138 Rhapsody 0228 R-Line 0149, 0152, 0155 Roadstar 0140, 0142, 0143, 0154 Robotron 0138
Rowa 0228, 0229 Royal Lux 0125 RTF 0138 Saba 0138, 0146, 0148, 0153, 0157,
0159 Saisho 0140, 0141, 0142, 0154, 0229 Salora 0145, 0146 Sambers 0132, 0144 Samsung 0119, 0120, 0125, 0140,
0141, 0142, 0149, 0150, 0152, 0154, 0155, 0177, 0178, 0181, 0204, 0208, 0228, 0229
Sandra 0141, 0228, 0229 Sansui 0149, 0155 Sanyo 0125, 0133, 0141, 0147, 0154,
0187, 0228, 0229 SBR 0152, 0155 SCHAUB LORENTZ 0146 Schneider 0141, 0143, 0149, 0152,
0155, 0190, 0229 SEG 0140, 0141, 0144, 0147, 0152,
0154, 0155, 0190, 0228, 0229 SEI 0155 SEI-Sinudyne 0138, 0144, 0146 Seleco 0145, 0146, 0147 Sencora 0142, 0154 Sentra 0154 Serino 0228 Sharp 0130, 0131, 0139, 0147, 0184,
0207 Siarem 0138, 0144, 0155 Sierra 0149, 0155 Siesta 0125 Silva 0228 Silver 0147 Singer 0138, 0144, 0156 Sinudyne 0138, 0144, 0152, 0155 Skantic 0146 Solavox 0146 Sonitron 0125, 0229 Sonoko 0140, 0141, 0142, 0149,
0152, 0154, 0155, 0229Sonolor 0146, 0156 Sontec 0125, 0149, 0152, 0155 Sony 0116, 0118, 0142, 0147, 0161,
0168, 0172, 0185, 0188, 0197, 0201, 0211, 0225, 0227
Sound & Vision 0143, 0144 Soundwave 0149, 0152, 0155 Standard 0141, 0142, 0143, 0149,
0154, 0155, 0229 Starlight 0152 Starlite 0154, 0155 Stenway 0151 Stern 0145, 0146 Strato 0154, 0155 Stylandia 0229 Sunkai 0142 Sunstar 0154, 0155 Sunwood 0142, 0149, 0154, 0155 Superla 0141, 0228, 0229 SuperTech 0154, 0155, 0228 Supra 0142, 0154 Susumu 0143 Sutron 0142, 0154 Sydney 0141, 0228, 0229 Sysline 0152 Sytong 0228 Tandy 0139, 0141, 0143, 0146, 0229 Tashiko 0144, 0145, 0147, 0228,
0229
VSX-821_FLXCN_En.book 41 ページ 2011年3月30日 水曜日 午後12時38分
Controlling the rest of your system08
42En
08
Tatung 0141, 0149, 0152, 0155, 0229 TCM 0140, 0142 Teac 0155, 0229 Tec 0141, 0142, 0154, 0229 TEDELEX 0229 Teleavia 0148 Telecor 0155, 0229 Telefunken 0148, 0149, 0155, 0157 Telegazi 0155 Telemeister 0155 Telesonic 0155 Telestar 0155 Teletech 0142, 0152, 0154, 0155 Teleton 0141, 0229 Televideon 0228 Televiso 0156 Tensai 0142, 0143, 0149, 0154, 0155,
0229 Tesmet 0149 Tevion 0140, 0142 Texet 0141, 0154, 0228, 0229 Thomson 0121, 0122, 0141, 0148,
0149, 0153, 0155, 0157, 0159, 0210 Thorn 0152, 0155 Tokai 0149, 0155, 0229 Tokyo 0141, 0228 Tomashi 0151 Toshiba 0126, 0127, 0147, 0176,
0209, 0229 Towada 0146, 0229 Trakton 0229 Trans Continens 0155, 0229 Transtec 0228 Trident 0229 Triumph 0155 Vestel 0145, 0146, 0149, 0150, 0152,
0155, 0229 Vexa 0142, 0152, 0154, 0155 Victor 0147, 0149 VIDEOLOGIC 0228 Videologique 0141, 0143, 0228,
0229 VideoSystem 0149, 0155 Videotechnic 0228, 0229 Viewsonic 0223 Visiola 0141, 0228 Vision 0149, 0155, 0229 Vortec 0149, 0152, 0155 Voxson 0132, 0138, 0145, 0146,
0149, 0155 Waltham 0141, 0155, 0229 Watson 0149, 0152, 0155 Watt Radio 0141, 0144, 0228 Wega 0138, 0147, 0155 Wegavox 0154 Weltblick 0149, 0152, 0155, 0229 White Westinghouse 0141, 0144,
0152, 0155, 0228 Xrypton 0155 Yamishi 0155, 0229 Yokan 0155 Yoko 0125, 0140, 0141, 0142, 0143,
0149, 0152, 0154, 0155, 0228, 0229 Yorx 0143 Zanussi 0145, 0229
DVDIf operations are not possible using the preset codes below, you may be able to conduct operations with the preset codes for the BD, DVR (BDR, HDR).Pioneer 2256, 2014AEG 2188 Aiwa 2149 Akai 2096 Akura 2186 Alba 2122, 2133, 2143 Amitech 2188 AMW 2189 Awa 2189 Bang & Olufsen 2191 Bellagio 2189 Best Buy 2185 Brainwave 2188 Brandt 2112, 2139 Bush 2122, 2143, 2177, 2184 Cambridge Audio 2180 CAT 2182, 2183 Centrum 2183 CGV 2180, 2188 Cinetec 2189 Clatronic 2184 Coby 2190 Conia 2177 Continental Edison 2189 Crown 2188 C-Tech 2181 CyberHome 2103, 2132 Daenyx 2189 Daewoo 2130, 2154, 2188, 2189 Daewoo International 2189 Dalton 2187 Dansai 2179, 2188 Daytek 2105, 2128, 2189 Dayton 2189 DEC 2184 Decca 2188 Denon 2161, 2163 Denver 2164, 2184, 2186, 2190Denzel 2178 Diamond 2180, 2181 DK Digital 2129 Dmtech 2095 Dual 2178 DVX 2181 Easy Home 2185 Eclipse 2180 Electrohome 2188 Elin 2188 Elta 2142, 2188 Enzer 2178 Finlux 2180, 2188 Gericom 2145 Global Solutions 2181 Global Sphere 2181 Goodmans 2122, 2165, 2184 Graetz 2178 Grundig 2148 Grunkel 2188 H&B 2184 Haaz 2180, 2181 HiMAX 2185 Hitachi 2110, 2178, 2185 Innovation 2097
JVC 2119, 2136, 2152 Kansai 2190 Kennex 2188 Kenwood 2146 KeyPlug 2188 Kiiro 2188 Kingavon 2184 Kiss 2178 Koda 2184 KXD 2185 Lawson 2181 Lecson 2179 Lenco 2184, 2188 LG 2111, 2115, 2135, 2138, 2160,
2171 Life 2097 Lifetec 2097 Limit 2181 Loewe 2151 LogicLab 2181 Magnavox 2184 Majestic 2190 Marantz 2157 Marquant 2188 Matsui 2139 Mecotek 2188 Medion 2097 MiCO 2180 Micromaxx 2097 Microstar 2097 Minoka 2188 Mizuda 2184, 2185 Monyka 2178 Mustek 2101 Mx Onda 2180 Naiko 2188 Neufunk 2178 Nevir 2188 NU-TEC 2177 Onkyo 2167 Optim 2179 Optimus 2099 Orava 2184 Orbit 2189 Orion 2156 P&B 2184 Pacific 2181 Panasonic 2113, 2114, 2121, 2127,
2131, 2170 Philips 2100, 2106, 2117, 2118, 2126,
2134, 2157 Pointer 2188 Portland 2188 Powerpoint 2189 Prosonic 2190 Provision 2184 Raite 2178 RedStar 2186, 2188, 2190 Reoc 2181 Roadstar 2116, 2184 Ronin 2189 Rowa 2177 Rownsonic 2183 Saba 2112, 2139 Sabaki 2181 Saivod 2188 Samsung 2110, 2137, 2158, 2173,
2176 Sansui 2180, 2181, 2188 Sanyo 2140, 2166 ScanMagic 2101
Schaub Lorenz 2188 Schneider 2095 Scientific Labs 2181 Scott 2120, 2187 SEG 2116, 2178, 2181, 2189 Sharp 2097, 2141, 2174 Sigmatek 2185 Silva 2186 Singer 2180, 2181 Skymaster 2153, 2181 Skyworth 2186 Slim Art 2188 SM Electronic 2181 Sony 2104, 2108, 2123, 2124, 2125,
2150, 2175 Soundmaster 2181 Soundmax 2181 Spectra 2189 Standard 2181 Star Cluster 2181 Starmedia 2184 Sunkai 2188 Supervision 2181 Synn 2181 Tatung 2130, 2188 TCM 2097 Teac 2162, 2177, 2181 Tec 2186 Technika 2188 Telefunken 2183 Tensai 2188 Tevion 2097, 2181, 2187 Thomson 2098, 2112, 2155, 2159 Tokai 2178, 2186 Toshiba 2102, 2156, 2168, 2169,
2172 TRANScontinents 2189 Trio 2188 TruVision 2185 Wharfedale 2180, 2181 Xbox 2098 Xlogic 2181, 2188 XMS 2188 Yamada 2189 Yamaha 2106 Yamakawa 2178, 2189 Yukai 2101, 2147
BDIf operations are not possible using the preset codes below, you may be able to conduct operations with the preset codes for the DVD, DVR (BDR, HDR).Pioneer 2255, 2192, 2281Denon 2310, 2311, 2312 Hitachi 2307, 2308, 2309 JVC 2290, 2291, 2293, 2294, 2295,
2296LG 2286, 2287 Marantz 2302, 2303 Mitsubishi 2300, 2301 Onkyo 2289 Panasonic 2277, 2278, 2279Philips 2280 Samsung 2282 Sharp 2304, 2305, 2306 Sony 2283, 2284, 2285, 2292 Toshiba 2288, 2262 Yamaha 2297, 2298, 2299
DVR (BDR, HDR)If operations are not possible using the preset codes below, you may be able to conduct operations with the preset codes for the DVD, BD.Pioneer 2257, 2193, 2258, 2259,
2260, 2261, 2264, 2265, 2266, 2270Panasonic 2263, 2269 Sharp 2267, 2275 Sony 2268, 2271, 2272, 2273, 2276 Toshiba 2274
VCR Pioneer 1053, 1108Adyson 1050 Aiwa 1033, 1034, 1035 Akai 1034 Akiba 1040, 1050 Akura 1034, 1040, 1050 Alba 1035, 1036, 1037, 1040, 1050,
1051 Ambassador 1037 Amstrad 1033, 1050, 1051 Anitech 1040, 1050 ASA 1038, 1039 Asuka 1033, 1038, 1039, 1040, 1050 Audiosonic 1051 Baird 1033, 1034, 1036, 1051 Bang & Olufsen 1052 Basic Line 1035, 1036, 1037, 1040,
1050, 1051 Baur 1039 Bestar 1036, 1037, 1051 Black Panther Line 1036, 1051 Blaupunkt 1039 Bondstec 1037, 1050 Bush 1035, 1036, 1040, 1050, 1051 Cathay 1051 Catron 1037 CGE 1033, 1034 Cimline 1035, 1040, 1050 Clatronic 1037, 1050 Condor 1036, 1037, 1051
Crown 1036, 1037, 1040, 1050, 1051 Daewoo 1036, 1037, 1051 Dansai 1040, 1050, 1051 Dantax 1035 Daytron 1036, 1051 De Graaf 1039 Decca 1033, 1034, 1039 Denko 1050 Dual 1034, 1051, 1060Dumont 1033, 1039 Elbe 1051 Elcatech 1050 Elsay 1050 Elta 1040, 1050, 1051 Emerson 1050 ESC 1036, 1051 Etzuko 1040, 1050 Ferguson 1034 Fidelity 1033, 1050 Finlandia 1039 Finlux 1033, 1034, 1039 Firstline 1035, 1038, 1040, 1050 Flint 1035 Formenti/Phoenix 1039 Frontech 1037 Fujitsu 1033 Funai 1033 Galaxy 1033 GBC 1037, 1040 GEC 1039 Geloso 1040 General 1037 General Technic 1035 GoldHand 1040, 1050 Goldstar 1033, 1048 Goodmans 1033, 1036, 1037, 1038,
1040, 1050, 1051 Graetz 1034 Granada 1039 Grandin 1033, 1036, 1037, 1038,
1040, 1050, 1051 Grundig 1039, 1040 Hanseatic 1038, 1039, 1051 Harwood 1050 HCM 1040, 1050 Hinari 1035, 1040, 1050, 1051 Hisawa 1035 Hitachi 1033, 1034, 1039, 1045Hypson 1035, 1040, 1050, 1051Impego 1037 Imperial 1033 Inno Hit 1036, 1037, 1039, 1040,
1050, 1051 Innovation 1035 Interbuy 1038, 1050 Interfunk 1039 Intervision 1033, 1051 Irradio 1038, 1040, 1050 ITT 1034 ITV 1036, 1038, 1051 JVC 1034, 1046 Kaisui 1040, 1050 Karcher 1039 Kendo 1035, 1036, 1037, 1050 Korpel 1040, 1050 Kyoto 1050 Lenco 1036 Leyco 1040, 1050 LG 1033, 1038, 1049 Lifetec 1035 Loewe Opta 1038, 1039
Logik 1040, 1050 Lumatron 1036, 1051 Luxor 1050 M Electronic 1033 Manesth 1040, 1050 Marantz 1039 Mark 1051 Matsui 1035, 1038 Matsushita 1033, 1039 Mediator 1039 Medion 1035 Memorex 1033, 1038 Memphis 1040, 1050 Micromaxx 1035 Microstar 1035 Migros 1033 Multitech 1033, 1037, 1039, 1040,
1050 Murphy 1033 NEC 1034 Neckermann 1034, 1039 NEI 1039 Nesco 1040, 1050 Nikkai 1037, 1050, 1051 Nokia 1034, 1051 Nordmende 1034 Oceanic 1033, 1034 Okano 1035, 1050, 1051 Orion 1035 Orson 1033 Osaki 1033, 1038, 1040, 1050 Otto Versand 1039 Palladium 1034, 1038, 1040, 1050 Panasonic 1043 Pathe Marconi 1034 Perdio 1033 Philco 1050 Philips 1039, 1045, 1052 Phonola 1039 Portland 1036, 1037, 1051 Prinz 1033 Profex 1040 Proline 1033 Prosonic 1035, 1051 Pye 1039 Quelle 1033, 1039 Radialva 1050 Radiola 1039 Rex 1034 RFT 1037, 1039, 1050 Roadstar 1036, 1038, 1040, 1050,
1051 Royal 1050 Saba 1034 Saisho 1035, 1040 Samsung 1041 Samurai 1037, 1050 Sansui 1034 Saville 1051 SBR 1039 Schaub Lorenz 1033, 1034 Schneider 1033, 1035, 1036, 1037,
1038, 1039, 1040, 1050, 1051SEG 1040, 1050, 1051 SEI-Sinudyne 1039 Seleco 1034 Sentra 1037, 1050 Sentron 1040, 1050 Sharp 1042 Shintom 1040, 1050 Shivaki 1038
VSX-821_FLXCN_En.book 42 ページ 2011年3月30日 水曜日 午後12時38分
EnglishEspañol
Controlling the rest of your system 0808
43En
Siemens 1038 Silva 1038 Silver 1051 Sinudyne 1039 Solavox 1037 Sonneclair 1050 Sonoko 1036, 1051 Sontec 1038 Sony 1044 Standard 1036, 1051 Stern 1051 Sunkai 1035 Sunstar 1033 Suntronic 1033 Sunwood 1040, 1050 Symphonic 1050 Taisho 1035 Tandberg 1051 Tashiko 1033 Tatung 1033, 1034, 1039 TCM 1035 Teac 1051 Tec 1037, 1050, 1051 Teleavia 1034 Telefunken 1034 Teletech 1050, 1051 Tenosal 1040, 1050 Tensai 1033, 1038, 1040, 1050 Tevion 1035 Thomson 1034, 1048 Thorn 1034 Tokai 1038, 1040, 1050 Tonsai 1040 Toshiba 1034, 1039, 1047 Towada 1040, 1050 Towika 1040, 1050 TVA 1037 Uher 1038 Ultravox 1051 United Quick Star 1036, 1051Universum 1033, 1038, 1039 Videon 1035 Weltblick 1038 Yamishi 1040, 1050 Yokan 1040, 1050 Yoko 1037, 1038, 1040, 1050
Satellite Set Top BoxPioneer 6220, 6219, 6204@sat 6251 @Sky 6238 ABsat 6180 Acoustic Solutions 6217 ADB 6174 Akai 6214 Akura 6228 Alba 6176, 6200, 6180, 6217 Allsat 6214 Alltech 6180 Allvision 6252, 6238, 6199 Amitronica 6180 Ampere 6256, 6261 Amstrad 6202, 6243, 6256, 6261,
6236, 6180 Anglo 6180 Ankaro 6180 Ansonic 6245 Anttron 6200 Apollo 6176 Apro 6232 Arcon 6192
Arcus 6193 Armstrong 6214 Arnion 6251 ASA 6230 Asat 6214 ASCI 6213, 6238 ASLF 6180 AssCom 6220 Astra 6255, 6180 Astratec 6268, 6269 Astrell 6202 Astro 6177, 6236, 6255, 6200, 6246,
6215, 6222, 6243 Atlanta 6245 Atsat 6251 AtSky 6238 Audioline 6232 Audioton 6200 Austar 6174 Avalon 6261 Axil 6244, 6186, 6245 Axis 6267 Axitronic 6228 B.net 6232 B@ytronic 6230, 6199 Balmet 6186 Beko 6176 Belson 6245 Big Sat 6186 Black Diamond 6217 Blaupunkt 6177 Blue Sky 6180 Boca 6256, 6180, 6252, 6185, 6257,
6237, 6187, 6188 Bodner & Mann 6194 Boshmann 6244, 6247 Boston 6227 Brainwave 6232, 6231 British Sky Broadcasting 6210 Broco 6180 BskyB 6210 BT 6195 Bubu Sat 6180 Bush 6254, 6217, 6264, 6228, 6190,
6232, 6268, 6201, 6265, 6182 Cambridge 6236 Canal Digital 6220 Canal Satellite 6220, 6219, 6278,
6277 Canal+ 6220, 6277 CGV 6244, 6183 Cherokee 6194 Chess 6213, 6180, 6238, 6228 CityCom 6229, 6255, 6179, 6192,
6241, 6252 Clark 6200 Classic 6232 Clatronic 6244 Clayton 6228 Clemens Kamphus 6261 Cobra 6261 Colombia 6256 Columbia 6256 Comag 6256, 6252, 6185, 6199,
6244, 6257, 6237, 6189, 6187, 6188 Comsat 6244 Condor 6255, 6253 Connexions 6261 Conrad 6256, 6236, 6207, 6255 Coship 6186, 6232 Crown 6217
Cryptovision 6176 CS 6247 Cyfrowy Polsat 6220 Cyrus 6214 D-box 6275 Daewoo 6267, 6180, 6195, 6268,
6182 Dantax 6228 Deltasat 6192 Denver 6245 Digatron 6231 Digenius 6229, 6226 Digiality 6255, 6238 Digifusion 6268, 6269 Digihome 6217, 6265, 6218 DigiLogic 6217 DigiQuest 6251, 6186, 6247 DigiSat 6252 Digisky 6186 Digital 6187 Digital Vision 6269 DigitalBox 6222, 6247 Dijam 6195 DirecTV 6263 Discovery 6194 Distratel 6202, 6250 DMT 6192 DNT 6214, 6261 Doro 6232 Dual 6252 Durabrand 6217, 6218 Echolink 6185 Echostar 6220, 6233, 6261, 6176,
6180, 6181, 6239 Edision 6247 Einhell 6256, 6236, 6180 Elap 6180, 6244, 6183 Elbe 6245 Elless 6230 Elsat 6180 Elta 6214 eMTech 6196 Energy Sistem 6247 Engel 6180, 6227 EP Sat 6176 Eurieult 6202 Eurocrypt 6176 EuroLine 6227 Europa 6236, 6255 Europhon 6256, 6229, 6255 Eurosat 6189 Eurosky 6256, 6213, 6229, 6236,
6255, 6230 Eurostar 6255, 6179 Eutelsat 6180 Eutra 6230 Evesham 6218 Exator 6200 Fagor 6203 Fenner 6180 Ferguson 6176, 6264, 6268, 6269 Fidelity 6236 Finlandia 6176 Finlux 6176, 6207, 6228 FinnSat 6230 Flair Mate 6180 Fly Com 6186 FMD 6213, 6244, 6186 Freecom 6236 FTEmaximal 6180, 6189
Fuba 6177, 6229, 6261, 6207, 6226, 6196
Galaxis 6220, 6267 Gardiner 6179 Garnet 6192 GbSAT 6196 Gecco 6246, 6199 General Satellite 6241 Globo 6230, 6227, 6238, 6199, 6257 GOD Digital 6214 Gold Box 6220, 6219 Gold Vision 6247 Golden Interstar 6250 Goodmans 6176, 6254, 6217, 6264,
6271, 6218, 6201, 6190 Gran Prix 6230 Granada 6176 Grandin 6228 Grocos 6239, 6186 Grundig 6220, 6177, 6217, 6264,
6232, 6218, 6201, 6190 Haensel & Gretel 6256 Haier 6245 Hama 6183 Hanseatic 6215, 6222 Hauppauge 6231, 6232 HB 6196 Heliocom 6255 Helium 6255 Hiro 6189 Hirschmann 6267, 6177, 6229,
6261, 6236, 6207, 6255, 6230, 6252, 6199, 6189
Hitachi 6176, 6217, 6218 HNE 6256 Hornet 6251 Houston 6261 Humax 6241, 6268, 6242 Huth 6256, 6255, 6192, 6193 Hyundai 6192 ID Digital 6241 ILLUSION sat 6247 Imperial 6222, 6216, 6223, 6238,
6232 Ingelen 6213, 6261 Inno Hit 6228 International 6256 Interstar 6196 Intervision 6255 Inves 6268 iotronic 6244 ITT Nokia 6176, 6207 Jaeger 6238 K-SAT 6180 Kamm 6180 Kaon 6251 KaTelco 6267 Kathrein 6177, 6214, 6213, 6262,
6200, 6180, 6179, 6272, 6183 Kendo 6252 Kenwood 6220 Key West 6256 Kiton 6213 KR 6200 Kreiling 6213, 6194, 6228 Kreiselmeyer 6177 Kyostar 6200 L&S Electronic 6256, 6238 Labgear 6195 LaSAT 6177, 6256, 6229, 6255, 6230 Leiko 6228
Lemon 6238 Lenco 6255, 6180 Lenson 6236 LG 6192 Lifesat 6256, 6229, 6180 Listo 6228 Lodos 6217 Logik 6217 Logix 6192 Lorenzen 6256, 6229, 6255, 6226,
6231, 6257, 6237 Luxor 6236, 6207, 6265 M Electronic 6179 Manata 6256, 6180 Manhattan 6176, 6251 Marantz 6214 Maspro 6177, 6180 Matsui 6177, 6217, 6271, 6228,
6268, 6269 Max 6255 Maximum 6192, 6238 Mediabox 6220, 6219 Mediacom 6198 MediaSat 6220, 6219, 6236, 6278,
6277 Medion 6256, 6229, 6180, 6230,
6192, 6252, 6238, 6199, 6228 Medison 6180 Mega 6214 MegaSat 6189 Metronic 6256, 6200, 6180, 6179,
6202, 6250, 6238, 6244 Metz 6177 Micro 6236, 6255, 6200, 6180, 6231 Micro Elektronic 6180 Micro Technology 6180 Micromaxx 6229 Microstar 6229, 6192, 6226 Microtec 6180 Mitsubishi 6176 Morgan’s 6214, 6256, 6180, 6252,
6199 Multibroadcast 6174 Multichoice 6174 Myryad 6214 Mysat 6180 MySky 6212, 6211 NEOTION 6238 Netsat 6263 Neuhaus 6236, 6255, 6180 Neuling 6256, 6252, 6257, 6188 Neusat 6180 Neveling 6226 Newton 6261 NextWave 6193 Nichimen 6254 Nikko 6214, 6180 Noda Electronic 6202 Nokia 6220, 6176, 6207, 6206 Nordmende 6176 Octagon 6200 OctalTV 6231 Onn 6217, 6218 Opentel 6252, 6199 Optex 6213, 6180, 6250, 6244, 6203,
6228 Orbis 6252, 6238, 6199 Orbitech 6213, 6236, 6215, 6222,
6216, 6223 P/Sat 6252
Pace 6220, 6214, 6176, 6181, 6273, 6212, 6211
Pacific 6217 Packard Bell 6267 Palcom 6229, 6226, 6239 Palladium 6261, 6236 Palsat 6236 Panasonic 6176, 6178 Panda 6177, 6176, 6255 Pansat 6191 Pass 6183 Patriot 6256 peeKTon 6186, 6245 Philips 6220, 6177, 6214, 6275, 6219,
6277, 6268, 6232, 6179, 6200, 6176, 6263
Phoenix 6245 Phonotrend 6233 Pilotime 6278 Pino 6238 Pixx 6191 Planet 6261 PMB 6180, 6203 Polytron 6261 Portland 6195 Preisner 6256, 6261, 6243, 6185 Premier 6219 Primacom 6267 Pro Basic 6220, 6184 Proline 6217 Promax 6176 Proscan 6234 Quelle 6229, 6255 Radiola 6214 Radix 6261, 6243 Rainbow 6200 RCA 6234 Rebox 6196 Regal 6227 RFT 6214 Roadstar 6220, 6180 Rollmaster 6244 Rover 6180 Rownsonic 6183 SAB 6227, 6251 Saba 6255, 6230, 6202, 6184 Sabre 6176 Sagem 6275, 6258, 6277 Saivod 6245 Salora 6252 Samsung 6220, 6198, 6197, 6273,
6253 Sanyo 6228 SAT 6236 Sat Control 6251 Sat Partner 6236, 6200 Sat Team 6180 SAT+ 6239 Satcom 6255 Satec 6180 Satelco 6252 Satplus 6222 SatyCon 6247 Schaecke 6200 Schaub Lorenz 6196, 6245 Schneider 6198, 6227 Schwaiger 6267, 6256, 6262, 6255,
6230, 6202, 6192, 6238, 6199, 6186, 6257, 6247, 6232, 6187, 6188
Scientific Atlanta 6209 SCS 6229, 6230
Sedea Electronique 6256, 6213, 6198, 6250, 6228
Seemann 6261 SEG 6213, 6192, 6227, 6217, 6228 Septimo 6202 Serd 6199 Servimat 6203 ServiSat 6180, 6227 Shark 6247 Sharp 6265, 6218 Siemens 6177, 6261, 6238 Sigmatek 6245 Silva 6229 SilverCrest 6187 Skantin 6180 SKR 6180 SKT 6256 SKY 6263, 6210, 6212, 6211 SKY Italia 6220, 6212 Sky XL 6227, 6199 Skymaster 6233, 6180, 6192, 6238,
6239, 6183, 6203, 6184 Skymax 6214, 6244 Skypex 6230 Skyplus 6230, 6252, 6238, 6199 SkySat 6213, 6236, 6255, 6180 Skyvision 6238 SL 6256, 6229, 6230, 6231, 6257, 6232 SM Electronic 6233, 6180, 6239 Smart 6256, 6261, 6180, 6243, 6252,
6246, 6244, 6257, 6247 SmartVision 6186 Sony 6235, 6220, 6219, 6176 SR 6256 Star Sat 6196 Starland 6180 Starlite 6214 Stream 6212 Stream System 6251 Strong 6220, 6228, 6256, 6200, 6180,
6245, 6217, 6239 Sumin 6199 Sunny 6251 Sunsat 6180 Sunstar 6174, 6256 SuperMax 6193 Supratech 6244 Systec 6238 Tantec 6176 Targa 6191 Tatung 6176 TBoston 6227, 6245 Tecatel 6233 Technical 6228 Technika 6217, 6232, 6218 TechniSat 6213, 6261, 6176, 6236,
6215, 6222, 6216, 6223 Technomate 6250 Technosat 6193 Technosonic 6254, 6232 Technotrend 6232 Technowelt 6256, 6255 Techwood 6213, 6217, 6228, 6218 Telasat 6255 TELE System 6261, 6227, 6239,
6203 Teleciel 6200 Teleka 6261, 6236, 6255, 6200 Telesat 6255 Telestar 6213, 6236, 6215, 6222,
6216, 6223, 6227, 6238, 6228, 6232
VSX-821_FLXCN_En.book 43 ページ 2011年3月30日 水曜日 午後12時38分
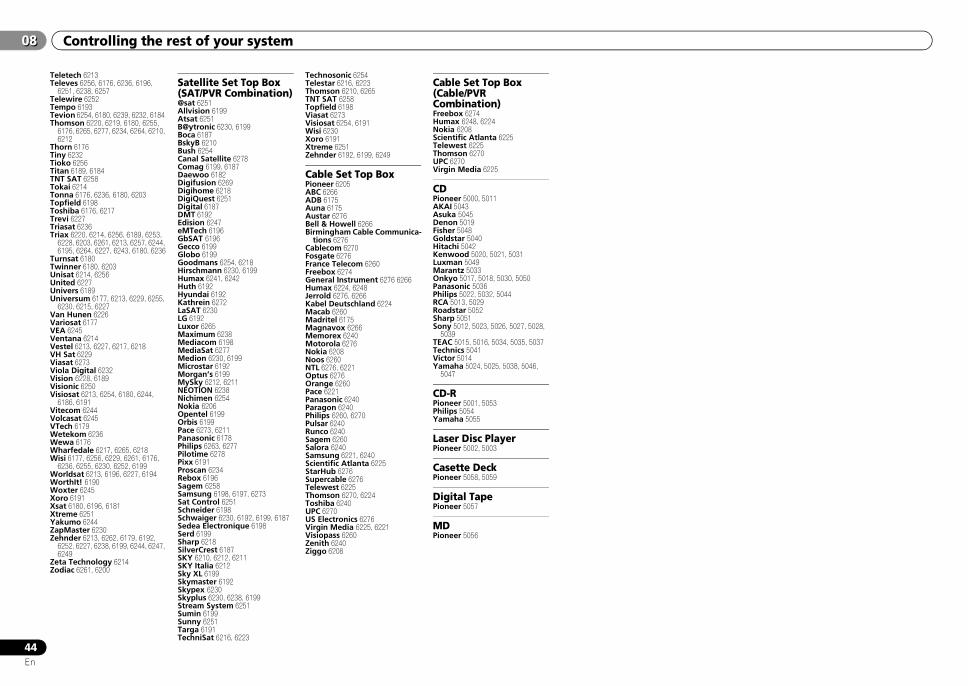
Controlling the rest of your system08
44En
08
Teletech 6213 Televes 6256, 6176, 6236, 6196,
6251, 6238, 6257 Telewire 6252 Tempo 6193 Tevion 6254, 6180, 6239, 6232, 6184 Thomson 6220, 6219, 6180, 6255,
6176, 6265, 6277, 6234, 6264, 6210, 6212
Thorn 6176 Tiny 6232 Tioko 6256 Titan 6189, 6184 TNT SAT 6258 Tokai 6214 Tonna 6176, 6236, 6180, 6203 Topfield 6198 Toshiba 6176, 6217 Trevi 6227 Triasat 6236 Triax 6220, 6214, 6256, 6189, 6253,
6228, 6203, 6261, 6213, 6257, 6244, 6195, 6264, 6227, 6243, 6180, 6236
Turnsat 6180 Twinner 6180, 6203 Unisat 6214, 6256 United 6227 Univers 6189 Universum 6177, 6213, 6229, 6255,
6230, 6215, 6227 Van Hunen 6226 Variosat 6177 VEA 6245 Ventana 6214 Vestel 6213, 6227, 6217, 6218 VH Sat 6229 Viasat 6273 Viola Digital 6232 Vision 6228, 6189 Visionic 6250 Visiosat 6213, 6254, 6180, 6244,
6186, 6191 Vitecom 6244 Volcasat 6245 VTech 6179 Wetekom 6236 Wewa 6176 Wharfedale 6217, 6265, 6218 Wisi 6177, 6256, 6229, 6261, 6176,
6236, 6255, 6230, 6252, 6199 Worldsat 6213, 6196, 6227, 6194 WorthIt! 6190 Woxter 6245 Xoro 6191 Xsat 6180, 6196, 6181 Xtreme 6251 Yakumo 6244 ZapMaster 6230 Zehnder 6213, 6262, 6179, 6192,
6252, 6227, 6238, 6199, 6244, 6247, 6249
Zeta Technology 6214 Zodiac 6261, 6200
Satellite Set Top Box (SAT/PVR Combination)@sat 6251 Allvision 6199 Atsat 6251 B@ytronic 6230, 6199 Boca 6187 BskyB 6210 Bush 6254 Canal Satellite 6278 Comag 6199, 6187 Daewoo 6182 Digifusion 6269 Digihome 6218 DigiQuest 6251 Digital 6187 DMT 6192 Edision 6247 eMTech 6196 GbSAT 6196 Gecco 6199 Globo 6199 Goodmans 6254, 6218 Hirschmann 6230, 6199 Humax 6241, 6242 Huth 6192 Hyundai 6192 Kathrein 6272 LaSAT 6230 LG 6192 Luxor 6265 Maximum 6238 Mediacom 6198 MediaSat 6277 Medion 6230, 6199 Microstar 6192 Morgan’s 6199 MySky 6212, 6211 NEOTION 6238 Nichimen 6254 Nokia 6206 Opentel 6199 Orbis 6199 Pace 6273, 6211 Panasonic 6178 Philips 6263, 6277 Pilotime 6278 Pixx 6191 Proscan 6234 Rebox 6196 Sagem 6258 Samsung 6198, 6197, 6273 Sat Control 6251 Schneider 6198 Schwaiger 6230, 6192, 6199, 6187Sedea Electronique 6198 Serd 6199 Sharp 6218 SilverCrest 6187 SKY 6210, 6212, 6211SKY Italia 6212 Sky XL 6199 Skymaster 6192 Skypex 6230 Skyplus 6230, 6238, 6199 Stream System 6251 Sumin 6199 Sunny 6251 Targa 6191 TechniSat 6216, 6223
Technosonic 6254 Telestar 6216, 6223 Thomson 6210, 6265 TNT SAT 6258 Topfield 6198 Viasat 6273 Visiosat 6254, 6191 Wisi 6230 Xoro 6191 Xtreme 6251 Zehnder 6192, 6199, 6249
Cable Set Top BoxPioneer 6205 ABC 6266 ADB 6175 Auna 6175 Austar 6276 Bell & Howell 6266 Birmingham Cable Communica-
tions 6276 Cablecom 6270 Fosgate 6276 France Telecom 6260 Freebox 6274 General Instrument 6276 6266 Humax 6224, 6248 Jerrold 6276, 6266 Kabel Deutschland 6224 Macab 6260 Madritel 6175 Magnavox 6266 Memorex 6240 Motorola 6276 Nokia 6208 Noos 6260 NTL 6276, 6221 Optus 6276 Orange 6260 Pace 6221 Panasonic 6240 Paragon 6240 Philips 6260, 6270 Pulsar 6240 Runco 6240 Sagem 6260 Salora 6240 Samsung 6221, 6240 Scientific Atlanta 6225 StarHub 6276 Supercable 6276 Telewest 6225 Thomson 6270, 6224 Toshiba 6240 UPC 6270 US Electronics 6276 Virgin Media 6225, 6221 Visiopass 6260 Zenith 6240 Ziggo 6208
Cable Set Top Box (Cable/PVR Combination) Freebox 6274 Humax 6248, 6224 Nokia 6208 Scientific Atlanta 6225 Telewest 6225 Thomson 6270 UPC 6270 Virgin Media 6225
CDPioneer 5000, 5011 AKAI 5043 Asuka 5045 Denon 5019 Fisher 5048 Goldstar 5040 Hitachi 5042 Kenwood 5020, 5021, 5031 Luxman 5049 Marantz 5033 Onkyo 5017, 5018, 5030, 5050 Panasonic 5036 Philips 5022, 5032, 5044 RCA 5013, 5029 Roadstar 5052 Sharp 5051 Sony 5012, 5023, 5026, 5027, 5028,
5039TEAC 5015, 5016, 5034, 5035, 5037 Technics 5041 Victor 5014 Yamaha 5024, 5025, 5038, 5046,
5047
CD-RPioneer 5001, 5053Philips 5054Yamaha 5055
Laser Disc PlayerPioneer 5002, 5003
Casette DeckPioneer 5058, 5059
Digital TapePioneer 5057
MDPioneer 5056
VSX-821_FLXCN_En.book 44 ページ 2011年3月30日 水曜日 午後12時38分

EnglishEspañol
Additional information 0909
45En
Chapter 9:Additional information
TroubleshootingIncorrect operations are often mistaken for trouble and malfunctions. If you think that there is something wrong with this component, check the points below. Take a look at the other components and electrical appliances being used, because sometimes the problem may lie there. If the trouble isn’t sorted out even after going through the checks below, ask your nearest Pioneer authorized independent service company to carry out repair work.
• If the unit does not operate normally due to external effects such as static electricity disconnect the power plug from the outlet and insert again to return to normal operating conditions.
GeneralThe power does not turn on.Disconnect the power plug from the outlet, and insert again.Make sure there are no loose strands of speaker wire touching the
rear panel. This could cause the receiver to shut off automatically.
The receiver suddenly switches off.When the Auto Power Down function is working, the power will
automatically turn off if the receiver has not operated for several hours. Check the setting for the Auto Power Down function (see The Auto Power Down menu on page 36).
After about a minute (you won’t be able to switch the unit on during this time), switch the receiver back on. If the message persists, call a Pioneer authorized independent service company.
The power suddenly turns on or off, or the input suddenly changes (When the Control with HDMI is ON).This happens because of the synchronized operation due to the
Control with HDMI function. If synchronized operations are not needed, set the Control with HDMI to OFF (see HDMI Setup on page 37).
OVERHEAT shows in the display and the power turns off.The temperature within the unit has exceeded the allowable value.
Try moving the unit for better ventilation (see page 2).Lower the volume level.
TEMP shows in the display and the volume level drops.The temperature within the unit has exceeded the allowable value.
Try moving the unit for better ventilation (see page 2).Lower the volume level.
No sound is output when an input function is selected.Use MASTER VOLUME to turn up the volume.Press MUTE on the remote control to turn muting off.Press SPEAKERS to select the proper speaker set (see Switching the
speaker terminal on page 12).Set the SIGNAL SEL to H (HDMI), C1/O1/O2 (digital) or A (analog)
according to the type of connections made (refer to page 22).Make sure the component is connected correctly (refer to
Connecting your equipment on page 10).Check the audio output settings of the source component.Refer to the instruction manual supplied with the source
component.
No image is output when an input function is selected.Make sure the component is connected correctly (refer to
Connecting your equipment on page 10).Use the same type of video cables for the source component and TV
to connect to this receiver (see About video outputs connection on page 13).
Check The Input Assign menu on page 35 to make sure you’re assigned the correct input.
The video input selected on the TV monitor is incorrect. Refer to the instruction manual supplied with the TV.
No sound from subwoofer.Make sure the subwoofer is switched on.If the subwoofer has a volume knob, make sure it’s turned up.The Dolby Digital or DTS source you are listening to may not have
an LFE channel.Switch the subwoofer setting in Speaker Setting on page 33 to YES
or PLUS.Switch the LFE ATT (LFE Attenuate) on page 31 to LFEATT 0 or
LFEATT 5.
No sound from surround or center speakers.Connect the speakers properly (refer to page 11).Refer to Speaker Setting on page 33 to check the speaker settings.Refer to Channel Level on page 34 to check the speaker levels.
The Phase Control feature doesn’t seem to have an audible effect.If applicable, check that the lowpass filter switch on your subwoofer
is off, or the lowpass cutoff is set to the highest frequency setting. If there is a PHASE setting on your subwoofer, set it to 0º (or depending on the subwoofer, the setting where you think it has the best overall effect on the sound).
Make sure the speaker distance setting is correct for all speakers (see Speaker Distance on page 35).
Considerable noise in radio broadcasts.Connect the antenna (page 17) and adjust the position for best
reception.Route any loose cables away from the antenna terminals and wires.Fully extend the FM wire antenna, position for best reception, and
secure to a wall (or connect an outdoor FM antenna).Connect an additional internal or external AM antenna (page 18).Turn off equipment causing interference or move it away from the
receiver (or move antennas farther away from equipment causing noise).
Broadcast stations cannot be selected automatically.Connect an outdoor antenna (refer to page 18).
Noise during playback of a cassette deck.Move the cassette deck away from your receiver, until the noise
disappears.
No sound is output or a noise is output when software with DTS is played back.Make sure the player’s settings are correct and/or the DTS signal
out is on. Refer to the instruction manual supplied with the DVD player.
There seems to be a time lag between the speakers and the output of the subwoofer.See Automatically setting up for surround sound (MCACC) on
page 20 to set up your system again using MCACC (this will automatically compensate for a delay in the subwoofer output).
After using the Auto MCACC setup, the speaker size setting (LARGE or SMALL) is incorrect.Low-frequency noise could have been caused by an air conditioner
or motor. Switch off all appliances in the room and rerun the Auto MCACC setup.
Can’t operate the remote control.Replace the batteries (refer to page 9).Operate within 7 m, 30º of the remote sensor (refer to page 9).Remove the obstacle or operate from another position.Avoid exposing the remote sensor on the front panel to direct light.
VSX-821_FLXCN_En.book 45 ページ 2011年3月30日 水曜日 午後12時38分
Additional information09
46En
09
The display is dark or off.Press DIMMER on the remote control repeatedly to return to the
default.
The front panel display switches over for no apparent reason to various different displays.This happens because the demo display is in operation. To turn off
the demo display, press any button to go back to the original display, or set the FL Demo Mode to OFF (see The FL Demo Mode menu on page 36).
The receiver doesn’t recognize iPod touch/iPhone.Try the following.
1. Simultaneously keep pressing the sleep button and home button on the iPod touch or iPhone for over 10 seconds to restart.2. Turn on the receiver.3. Connect the iPod touch/iPhone to the receiver.
The Bluetooth wireless technology device cannot be connected or operated. Sound from the Bluetooth wireless technology device is not emitted or the sound is interrupted.Check that no object that emits electromagnetic waves in the
2.4 GHz band (microwave oven, wireless LAN device or Bluetooth wireless technology apparatus) is near the unit. If such an object is near the unit, set the unit far from it. Or, stop using the object emitting the electromagnetic waves.
Check that the Bluetooth wireless technology device is not too far from the unit and that obstructions are not set between the Bluetooth wireless technology device and the unit. Set the Bluetooth wireless technology device and the unit so that the distance between them is less than about 10 m and no obstructions exist between them.
Check that the Bluetooth ADAPTER and the ADAPTER PORT terminal of the unit are correctly connected.
The Bluetooth wireless technology device may not be set to the communication mode supporting the Bluetooth wireless technology. Check the setting of the Bluetooth wireless technology device.
Check that pairing is correct. The pairing setting was deleted from this unit or the Bluetooth wireless technology device. Reset the pairing.
Check that the profile is correct. Use a Bluetooth wireless technology device that supports A2DP profile and AVRCP profile.
HDMINo picture or sound.If the problem still persists when connecting your HDMI component
directly to your monitor, please consult the component or monitor manual or contact the manufacturer for support.
No picture.Video signals that are input from the analog video terminal will not
output from the HDMI terminal. Signals that are input from the HDMI terminal will not output from the analog video terminal. Be consistent with the type of cable between input and output.
Depending in the output settings of the source component, it may be outputting a video format that can’t be displayed. Change the output settings of the source, or connect using the component or composite jacks.
This receiver is HDCP-compatible. Check that the components you are connecting are also HDCP-compatible. If they are not, please connect them using the component or composite video jacks.
Depending on the connected source component, it’s possible that it will not work with this receiver (even if it is HDCP-compatible). In this case, connect using the component or composite video jacks between source and receiver.
If video images do not appear on your TV, try adjusting the resolution, Deep Color or other setting for your component.
To output signals in Deep Color, use an HDMI cable (High Speed HDMI® Cable) to connect this receiver to a component or TV with the Deep Color feature.
The OSD screen (System Setup menu or the menu screen for the iPod/USB) isn’t displayed.The OSD will not appear if you have connected using the HDMI
output to your TV. Use component or composite connections when setting up the system.
No sound, or sound suddenly ceases.Check that the Audio Parameter setting is set to HDMI AMP/THRU
(refer to page 31).If the component is a DVI device, use a separate connection for the
audio.HDMI format digital audio transmissions require a longer time to be
recognized. Due to this, interruption in the audio may occur when switching between audio formats or beginning playback.
Turning on/off the device connected to this unit’s HDMI OUT terminal during playback, or disconnecting/connecting the HDMI cable during playback, may cause noise or interrupted audio.
Synchronized operation not possible using Control with HDMI function.Check the HDMI connections.The cable may be damaged.Select ON for the Control with HDMI setting (see HDMI Setup on
page 37).Turn the TV’s power on before turning on this receiver’s power.Set the TV side Control with HDMI setting to on (see TV’s operating
instructions).
Important information regarding the HDMI connectionThere are cases where you may not be able to route HDMI signals through this receiver (this depends on the HDMI equipped component you are connecting-check with the manufacturer for HDMI compatibility information).If you aren’t receiving HDMI signals properly through this receiver (from your component), please try the following configuration when connecting up.
ConfigurationConnect your HDMI-equipped component directly to the display using an HDMI cable. Then use the most convenient connection (digital is recommended) for sending audio to the receiver. See the operating instructions for more on audio connections. Set the display volume to minimum when using this configuration.
Note• Depending on the component, audio output may be limited to
the number of channels available from the connected display unit (for example audio output is reduced to 2 channels for a monitor with stereo audio limitations).
• If you want to switch the input source, you’ll have to switch functions on both the receiver and your display unit.
• Since the sound is muted on the display when using the HDMI connection, you must adjust the volume on the display every time you switch input sources.
VSX-821_FLXCN_En.book 46 ページ 2011年3月30日 水曜日 午後12時38分
EnglishEspañol
Additional information 0909
47En
iPod messages‘iPod/USB Error 1 (I/U ERR1)’,‘iPod/USB Error 3 (I/U ERR3)’Switch off the receiver and reconnect the iPod to the receiver. If this
doesn’t seem to work, try resetting your iPod.‘iPod/USB Error 2 (I/U ERR2)’Switch off the receiver and reconnect the iPod to the receiver. If this
doesn’t seem to work, try resetting your iPod.An iPod not supported by this receiver is connected. Connect the
iPod supported by this receiver (see page 23).
‘No Track’When there are no tracks in the category selected on the iPod.
Select a different category.
USB messages‘iPod/USB Error 1 (I/U ERR1)’There is a problem with the signal path from the USB to the
receiver. Switch off the receiver and reconnect the USB to the receiver.
‘iPod/USB Error 3 (I/U ERR3)’When there is no response from the USB. Switch off the receiver
and reconnect the USB to the receiver.
‘iPod/USB Error 4 (I/U ERR4)’The power requirements of the USB device are too high for this
receiver. Switch off the receiver and reconnect the USB to the receiver.
About iPod/iPhone/iPad
“Made for iPod,” “Made for iPhone” and “Made for iPad” mean that an electronic accessory has been designed to connect specifically to iPod, iPhone, or iPad, respectively, and has been certified by the developer to meet Apple performance standards. Apple is not responsible for the operation of this device or its compliance with safety and regulatory standards. Please note that the use of this accessory with iPod, iPhone, or iPad may affect wireless performance.Apple, iPad, iPhone, iPod, iPod shuffle, iPod nano, iPod classic, iPod touch and iTunes are trademarks of Apple Inc., registered in the U.S. and other countries.
Resetting the main unitUse this procedure to reset all the receiver’s settings to the factory default. Use the front panel controls to do this.
1 Switch the receiver into standby.
2 While holding down BAND, press and hold STANDBY/ON for about two seconds.
3 When you see RESET? appear in the display, press AUTO SURROUND/STREAM DIRECT.OK? shows in the display.
4 Press ALC/STANDARD SURR to confirm.OK appears in the display to indicate that the receiver has been reset to the factory default settings.
Important• If the Control with HDMI function is set to ON, you may not be
able to reset the unit. In this case, reset either by turning OFF the Control with HDMI function, or by putting the unit into standby mode by turning off the power of all the connected devices, and resetting after the HDMI indicator on the front panel turns off.
Cleaning the unit• Use a polishing cloth or dry cloth to wipe off dust and dirt.• When the surface is dirty, wipe with a soft cloth dipped in
some neutral cleanser diluted five or six times with water, and wrung out well, and then wipe again with a dry cloth. Do not use furniture wax or cleansers.
• Never use thinners, benzine, insecticide sprays or other chemicals on or near this unit, since these will corrode the surface.
VSX-821_FLXCN_En.book 47 ページ 2011年3月30日 水曜日 午後12時38分
Additional information09
48En
09
Specifications
Audio sectionFTC power output . . . . . . . . . . . . . . . . . . . . . . . . . . . . 65 W + 65 W
(STEREO, 20 Hz to 20 kHz, 8 Ω, 0.2 %)Rated power output (Front, Center, Surround)
. . . . . . . . . . . . . . . . . . . . . . . 125 W per channel (1 kHz, 6 Ω, 1 %)Maximum power output (Front, Center, Surround)
. . . . . . . . . . . . . . . . . . . . . . 150 W per channel (1 kHz, 6 Ω, 10 %)Total Harmonic Distortion
. . . . . . . . . . . . . . . . . . . . 0.06 % (20 Hz to 20 kHz, 8 Ω, 50 W/ch)Guaranteed speaker impedance
FRONT : A, B . . . . . . . . . . . . . . . . . . . . . . . . . . . . . . . . . 6 Ω to 16 ΩFRONT : A+B . . . . . . . . . . . . . . . . . . . . . . . . . . . . . . . 12 Ω to 16 ΩSURROUND, CENTER . . . . . . . . . . . . . . . . . . . . . . . . . 6 Ω to 16 Ω
Input (Sensitivity/Impedance)LINE . . . . . . . . . . . . . . . . . . . . . . . . . . . . . . . . . . . . . 200 mV/47 kΩ
Output (Level/Impedance)REC . . . . . . . . . . . . . . . . . . . . . . . . . . . . . . . . . . . . . 200 mV/2.2 kΩ
Signal-to-Noise Ratio (IHF, short circuited, A network)LINE . . . . . . . . . . . . . . . . . . . . . . . . . . . . . . . . . . . . . . . . . . . . 98 dB
Video sectionSignal level
Composite . . . . . . . . . . . . . . . . . . . . . . . . . . . . . . . . . 1 Vp-p (75 Ω)Component Video . . . . . . . . . . . . . . . . . . . . . . . . Y: 1.0 Vp-p (75 Ω)
PB, PR: 0.7 Vp-p (75 Ω)Corresponding maximum resolution
Component Video . . . . . . . . . . . . . . . . . . . . . . . . . . 1080p (1125p)
Tuner sectionFrequency Range (FM). . . . . . . . . . . . . . . . . . 87.5 MHz to 108 MHzAntenna Input (FM) . . . . . . . . . . . . . . . . . . . . . . . .75 Ω unbalancedFrequency Range (AM)
9 kHz step . . . . . . . . . . . . . . . . . . . . . . . . . . . 531 kHz to 1602 kHz10 kHz step . . . . . . . . . . . . . . . . . . . . . . . . . . 530 kHz to 1700 kHz
Antenna (AM) . . . . . . . . . . . . . . . . . . . . . . . . . . . . . . . .Loop antenna
Digital In/Out sectionHDMI terminal . . . . . . . . . . . . . . . . . . . . . . . . . . . . . . Type A (19-pin)HDMI output type. . . . . . . . . . . . . . . . . . . . . . . . . . . . . . 5 V, 100 mAUSB terminal . . . . . . . . . . . . . . . . . . . . USB2.0 Full Speed (Type A)iPod terminal . . . . . . . . . . . . . . . . . . . USB, and Video (Composite)ADAPTER PORT terminal . . . . . . . . . . . . . . . . . . . . . . . 5 V, 100 mA
MiscellaneousPower Requirements
. . . . . . . . . . . . . . .AC 110 V to 127 V/220 V to 240 V, 50 Hz/60 HzPower Consumption. . . . . . . . . . . . . . . . . . . . . . . . . . . . . . . . . 415 W
In standby . . . . . . . . . . . . . . . . . . . . . . . . . . . . . . . . . . . . . . 0.45 W(Control with HDMI function: OFF)
Dimensions . . . . . . . . . 435 mm (W) x 168 mm (H) x 362.5 mm (D)Weight (without package) . . . . . . . . . . . . . . . . . . . . . . . . . . . . 9.2 kg
Furnished PartsMicrophone (for Auto MCACC setup). . . . . . . . . . . . . . . . . . . . . . . 1Remote control . . . . . . . . . . . . . . . . . . . . . . . . . . . . . . . . . . . . . . . . 1Dry cell batteries (AAA size IEC R03) . . . . . . . . . . . . . . . . . . . . . . . 2AM loop antenna . . . . . . . . . . . . . . . . . . . . . . . . . . . . . . . . . . . . . . . 1FM wire antenna. . . . . . . . . . . . . . . . . . . . . . . . . . . . . . . . . . . . . . . . 1iPod cable . . . . . . . . . . . . . . . . . . . . . . . . . . . . . . . . . . . . . . . . . . . . . 1Power cordThese operating instructions
Note• The specifications are applicable when the power supply is 230
V.• Specifications and the design are subject to possible
modifications without notice, due to improvements.
© 2011 PIONEER CORPORATION. All rights reserved.
Manufactured under license from Dolby Laboratories. “Dolby”, “Pro Logic”, “Surround EX”, and the double-D symbol are trademarks of Dolby Laboratories.
Manufactured under license under U.S. Patent #’s: 5,451,942; 5,956,674; 5,974,380; 5,978,762; 6,226,616; 6,487,535; 7,212,872; 7,333,929; 7,392,195; 7,272,567 & other U.S. and worldwide patents issued & pending. DTS and the Symbol are registered trademarks, & DTS-HD, DTS-HD Master Audio, and the DTS logos are trademarks of DTS, Inc. Product includes software. © DTS, Inc. All Rights Reserved.
VSX-821_FLXCN_En.book 48 ページ 2011年3月30日 水曜日 午後12時38分
EnglishEspañol
Additional information 0909
49En
VSX-821_FLXCN_En.book 49 ページ 2011年3月30日 水曜日 午後12時38分

2Zhtw
D3-4-2-1-1_A1_Zhtw
D3-4-2-1-3_A1_Zhtw
D3-4-2-1-4*_A1_Zhtw
D3-4-2-1-7a_A1_Zhtw
D3-4-2-1-7b*_A1_Zhtw
D3-4-2-1-7c*_A1_Zhtw
VSX-821_FLXCN_zhtw.book Page 2 Monday, March 28, 2011 2:55 PM

EnglishEspañol
3Zhtw
D3-4-2-1-5*_A1_Zhtw
K056_A1_Zhtw
D3-4-2-2-1a_A1_Zhtw
STANDBY/ON
D3-4-2-2-2a*_A1_Zhtw
K041_A1_Zhtw
K058c_A1_ZhtwPb
VSX-821_FLXCN_zhtw.book Page 3 Monday, March 28, 2011 2:55 PM
4Zhtw
感謝您購買本先鋒產品。 請徹底閱讀此份操作手冊,以便知道如何正確操作您的機器。 手冊閱讀完後,請妥善保管以供未來參考之用。
目錄使用前 . . . . . . . . . . . . . . . . . . . . . . . . . . . . . . . . . . . . 5清點包裝內容物 . . . . . . . . . . . . . . . . . . . . . . . . . . . . . . . . . . . . . 5安裝接收器. . . . . . . . . . . . . . . . . . . . . . . . . . . . . . . . . . . . . . . . . 5
接收器的設定流程 . . . . . . . . . . . . . . . . . . . . . . . . . . . 501 控制與顯示前面板 . . . . . . . . . . . . . . . . . . . . . . . . . . . . . . . . . . . . . . . . . . . . 6顯示 . . . . . . . . . . . . . . . . . . . . . . . . . . . . . . . . . . . . . . . . . . . . . 7遙控器 . . . . . . . . . . . . . . . . . . . . . . . . . . . . . . . . . . . . . . . . . . . . 8裝入電池 . . . . . . . . . . . . . . . . . . . . . . . . . . . . . . . . . . . . . . . . . 9遙控器的操作範圍 . . . . . . . . . . . . . . . . . . . . . . . . . . . . . . . . . . 9
02 連接您的設備決定揚聲器的應用 . . . . . . . . . . . . . . . . . . . . . . . . . . . . . . . . . . 10一些改善音質的要訣 . . . . . . . . . . . . . . . . . . . . . . . . . . . . . . . 10連接揚聲器. . . . . . . . . . . . . . . . . . . . . . . . . . . . . . . . . . . . . . . . 11連接後環繞或前側高音揚聲器 . . . . . . . . . . . . . . . . . . . . . . . . 11切換揚聲器端子 . . . . . . . . . . . . . . . . . . . . . . . . . . . . . . . . . . . 12連接線 . . . . . . . . . . . . . . . . . . . . . . . . . . . . . . . . . . . . . . . . . . . 12
HDMI連接線. . . . . . . . . . . . . . . . . . . . . . . . . . . . . . . . . . . . . 12關於 HDMI . . . . . . . . . . . . . . . . . . . . . . . . . . . . . . . . . . . . . . 12類比音訊線 . . . . . . . . . . . . . . . . . . . . . . . . . . . . . . . . . . . . . . 13數位音訊線 . . . . . . . . . . . . . . . . . . . . . . . . . . . . . . . . . . . . . . 13視訊線 . . . . . . . . . . . . . . . . . . . . . . . . . . . . . . . . . . . . . . . . . . 13關於連接視訊輸出 . . . . . . . . . . . . . . . . . . . . . . . . . . . . . . . . . . 13連接電視機及播放設備. . . . . . . . . . . . . . . . . . . . . . . . . . . . . . . 14使用 HDMI 連接 . . . . . . . . . . . . . . . . . . . . . . . . . . . . . . . . . . 14連接沒有 HDMI端子的設備 . . . . . . . . . . . . . . . . . . . . . . . . . 15連接衛星接收器或其他數位機上盒. . . . . . . . . . . . . . . . . . . . . . 15連接硬碟(HDD) /DVD錄影機、Blu-ray Disc錄影機及其他視訊來源 . . . . . . . . . . . . . . . . . . . . 16使用色差視訊插孔 . . . . . . . . . . . . . . . . . . . . . . . . . . . . . . . . . . 16連接其他音訊設備 . . . . . . . . . . . . . . . . . . . . . . . . . . . . . . . . . . 17連接選用的 Bluetooth® ADAPTER . . . . . . . . . . . . . . . . . . . . . 17連接天線 . . . . . . . . . . . . . . . . . . . . . . . . . . . . . . . . . . . . . . . . . 17使用外部天線 . . . . . . . . . . . . . . . . . . . . . . . . . . . . . . . . . . . . 18連接至前面板視訊端子. . . . . . . . . . . . . . . . . . . . . . . . . . . . . . . 18連接 iPod . . . . . . . . . . . . . . . . . . . . . . . . . . . . . . . . . . . . . . . . . 18連接 USB裝置 . . . . . . . . . . . . . . . . . . . . . . . . . . . . . . . . . . . . . 19插上接收器電源 . . . . . . . . . . . . . . . . . . . . . . . . . . . . . . . . . . . . 19
03 基本設定設定前 . . . . . . . . . . . . . . . . . . . . . . . . . . . . . . . . . . . . . . . . . . . 20切換電視機格式設定值 . . . . . . . . . . . . . . . . . . . . . . . . . . . . . 20取消示範顯示 . . . . . . . . . . . . . . . . . . . . . . . . . . . . . . . . . . . . . . 20環繞音效的自動設定(MCACC). . . . . . . . . . . . . . . . . . . . . . 20自動 MCACC設定使用時的其他問題 . . . . . . . . . . . . . . . . . . 21
04 基本播放功能播放來源 . . . . . . . . . . . . . . . . . . . . . . . . . . . . . . . . . . . . . . . . . 22選擇音訊輸入訊號 . . . . . . . . . . . . . . . . . . . . . . . . . . . . . . . . . 22播放 iPod . . . . . . . . . . . . . . . . . . . . . . . . . . . . . . . . . . . . . . . . . 23播放儲存在 iPod上的檔案. . . . . . . . . . . . . . . . . . . . . . . . . . . 24基本播放控制. . . . . . . . . . . . . . . . . . . . . . . . . . . . . . . . . . . . . 24觀賞相片與視訊內容 . . . . . . . . . . . . . . . . . . . . . . . . . . . . . . . 24播放 USB裝置 . . . . . . . . . . . . . . . . . . . . . . . . . . . . . . . . . . . . . 24基本播放控制. . . . . . . . . . . . . . . . . . . . . . . . . . . . . . . . . . . . . 25壓縮音訊之相容性 . . . . . . . . . . . . . . . . . . . . . . . . . . . . . . . . . 25享受無線音樂的 Bluetooth® ADAPTER . . . . . . . . . . . . . . . . . . 25無線音樂播放. . . . . . . . . . . . . . . . . . . . . . . . . . . . . . . . . . . . . 25用來配對 Bluetooth ADAPTER及 Bluetooth無線技術裝置. . . . . . . . . . . . . . . . . . . . . . . . . . . . . . . . . . . . . 26聆聽與您系統搭配的 Bluetooth無線技術裝置音樂內容 . . . . 26收聽收音機 . . . . . . . . . . . . . . . . . . . . . . . . . . . . . . . . . . . . . . . . 27改善 FM音質. . . . . . . . . . . . . . . . . . . . . . . . . . . . . . . . . . . . . 27儲存預設電台. . . . . . . . . . . . . . . . . . . . . . . . . . . . . . . . . . . . . 27收聽預設電台. . . . . . . . . . . . . . . . . . . . . . . . . . . . . . . . . . . . . 27命名預設電台. . . . . . . . . . . . . . . . . . . . . . . . . . . . . . . . . . . . . 27切換無線電頻率間隔 . . . . . . . . . . . . . . . . . . . . . . . . . . . . . . . 27
05 聆聽您的系統選擇聆聽模式 . . . . . . . . . . . . . . . . . . . . . . . . . . . . . . . . . . . . . . 28自動播放 . . . . . . . . . . . . . . . . . . . . . . . . . . . . . . . . . . . . . . . . 28使用環繞音效聆聽 . . . . . . . . . . . . . . . . . . . . . . . . . . . . . . . . 28使用先進環繞聲 . . . . . . . . . . . . . . . . . . . . . . . . . . . . . . . . . . 29使用直流 . . . . . . . . . . . . . . . . . . . . . . . . . . . . . . . . . . . . . . . . 29使用聲音修正器功能 . . . . . . . . . . . . . . . . . . . . . . . . . . . . . . . . 29使用音場補正等化功能聆聽 . . . . . . . . . . . . . . . . . . . . . . . . . . . 29使用相位控制獲得更佳音效 . . . . . . . . . . . . . . . . . . . . . . . . . . . 30使用後環繞聲道處理模式 . . . . . . . . . . . . . . . . . . . . . . . . . . . . . 30設定 Up Mix功能. . . . . . . . . . . . . . . . . . . . . . . . . . . . . . . . . . . 30設定音訊選項 . . . . . . . . . . . . . . . . . . . . . . . . . . . . . . . . . . . . . . 31錄音或錄影 . . . . . . . . . . . . . . . . . . . . . . . . . . . . . . . . . . . . . . . . 32
06 系統設定選單使用系統設定選單 . . . . . . . . . . . . . . . . . . . . . . . . . . . . . . . . . . 33手動揚聲器設定 . . . . . . . . . . . . . . . . . . . . . . . . . . . . . . . . . . . . 33揚聲器設定 . . . . . . . . . . . . . . . . . . . . . . . . . . . . . . . . . . . . . . 33分頻器 . . . . . . . . . . . . . . . . . . . . . . . . . . . . . . . . . . . . . . . . . . 34聲道位準 . . . . . . . . . . . . . . . . . . . . . . . . . . . . . . . . . . . . . . . . 34揚聲器距離 . . . . . . . . . . . . . . . . . . . . . . . . . . . . . . . . . . . . . . 35輸入指定選單 . . . . . . . . . . . . . . . . . . . . . . . . . . . . . . . . . . . . . . 35Pre Out設定 . . . . . . . . . . . . . . . . . . . . . . . . . . . . . . . . . . . . . . 36自動電源關閉選單 . . . . . . . . . . . . . . . . . . . . . . . . . . . . . . . . . . 36FL示範模式選單 . . . . . . . . . . . . . . . . . . . . . . . . . . . . . . . . . . . . 36
07 HDMI控制功能完成 HDMI控制連接 . . . . . . . . . . . . . . . . . . . . . . . . . . . . . . . . 37HDMI設定 . . . . . . . . . . . . . . . . . . . . . . . . . . . . . . . . . . . . . . . . 37使用同步化之前 . . . . . . . . . . . . . . . . . . . . . . . . . . . . . . . . . . . . 38關於同步操作 . . . . . . . . . . . . . . . . . . . . . . . . . . . . . . . . . . . . . . 38關於與支援 HDMI控制功能的不同品牌產品連接 . . . . . . . . . 38
HDMI控制功能的注意事項 . . . . . . . . . . . . . . . . . . . . . . . . . . . 38
08 控制您系統的其他設備設定遙控器控制其他設備 . . . . . . . . . . . . . . . . . . . . . . . . . . . . . 39直接選取預設代碼 . . . . . . . . . . . . . . . . . . . . . . . . . . . . . . . . . . 39刪除所有的遙控器預設代碼 . . . . . . . . . . . . . . . . . . . . . . . . . . . 39電視機控制功能 . . . . . . . . . . . . . . . . . . . . . . . . . . . . . . . . . . . . 40其他設備控制功能 . . . . . . . . . . . . . . . . . . . . . . . . . . . . . . . . . . 40預設代碼清單 . . . . . . . . . . . . . . . . . . . . . . . . . . . . . . . . . . . . . . 40
09 其他資訊疑難排解 . . . . . . . . . . . . . . . . . . . . . . . . . . . . . . . . . . . . . . . . . 45一般 . . . . . . . . . . . . . . . . . . . . . . . . . . . . . . . . . . . . . . . . . . . . 45HDMI . . . . . . . . . . . . . . . . . . . . . . . . . . . . . . . . . . . . . . . . . . 46關於 HDMI連接線的重要資訊. . . . . . . . . . . . . . . . . . . . . . . . 46iPod訊息. . . . . . . . . . . . . . . . . . . . . . . . . . . . . . . . . . . . . . . . 47USB訊息 . . . . . . . . . . . . . . . . . . . . . . . . . . . . . . . . . . . . . . . . 47關於 iPod/iPhone/iPad. . . . . . . . . . . . . . . . . . . . . . . . . . . . . . . 47重新設定主機 . . . . . . . . . . . . . . . . . . . . . . . . . . . . . . . . . . . . . . 47清潔主機 . . . . . . . . . . . . . . . . . . . . . . . . . . . . . . . . . . . . . . . . . 47規格 . . . . . . . . . . . . . . . . . . . . . . . . . . . . . . . . . . . . . . . . . . . . . 48
VSX-821_FLXCN_zhtw.book Page 4 Monday, March 28, 2011 2:55 PM
EnglishEspañol
5Zhtw
使用前
清點包裝內容物請清點是否收到以下隨附配件:
•設定麥克風•遙控器• AAA/IEC R03乾電池(以確保系統運作) x2• AM環型天線• FM線型天線• iPod連接線•電源線•本操作手冊
安裝接收器•在安裝本機時,請確實將其安放在水平且平穩的表面上。
切勿安裝在以下地方: - 彩色電視機上(畫面可能失真) - 卡式錄音座附近(或靠近會產生磁場的設備)。 這會對聲音造成干擾。 - 陽光直射的地方 - 濕氣重或潮濕的地方 - 極熱或極冷的場所 - 有振動或其他動作的場所 - 灰塵多的場所 - 有熱霧或油氣的場所(如廚房)
接收器的設定流程本機是配備多種功能和端子的全方位影音接收器。 依下列程序連接和設定後,就可以輕易使用。步驟的顏色指示下列事項:
需設定項目
視需要設定
1 連接揚聲器揚聲器的位置對音效產生極大的影響。
•決定揚聲器的應用(第 10頁)•連接揚聲器(第 11頁)•切換揚聲器端子(第 12頁)
2 連接設備要產生環繞音效,需將 Blu-ray Disc播放機/ DVD播放器利用數位接線連接至接收器上。
•關於連接視訊輸出(第 13頁)•連接電視機及播放設備(第 14頁)•連接天線(第 17頁)•插上接收器電源(第 19頁)
3 開啟電源確定已設定好電視機的視訊輸入。 若不知如何設定,請參閱電視機隨附手冊。
4 請根據您居住的地區及環境進行初始設定•切換電視機格式設定值(第 20頁)•切換無線電頻率間隔(第 27頁)
5 Pre Out設定(第 36頁)(連接前側高音揚聲器時。)
輸入指定選單(第 35頁)(使用建議的連接方式以外的連接方式時。)
使用音訊返回通道功能(第 37頁)(連接的電視支援 HDMI音訊返回通道功能時。)
6 使用螢幕自動MCACC設定以設定您的系統•環繞音效的自動設定(MCACC)(第 20頁)
7 播放來源(第 22頁)•選擇音訊輸入訊號(第 22頁)•播放 iPod(第 23頁)•播放 USB裝置(第 24頁)•選擇聆聽模式(第 28頁)
8 調整所需要的聲音•使用聲音修正器功能(第 29頁)•使用相位控制獲得更佳音效(第 30頁)•使用音場補正等化功能聆聽(第 29頁)•使用後環繞聲道處理模式(第 30頁)•設定 Up Mix功能(第 30頁)•設定音訊選項(第 31頁)•手動揚聲器設定(第 33頁)
9 充分運用遙控器•設定遙控器控制其他設備(第 39頁)
VSX-821_FLXCN_zhtw.book Page 5 Monday, March 28, 2011 2:55 PM
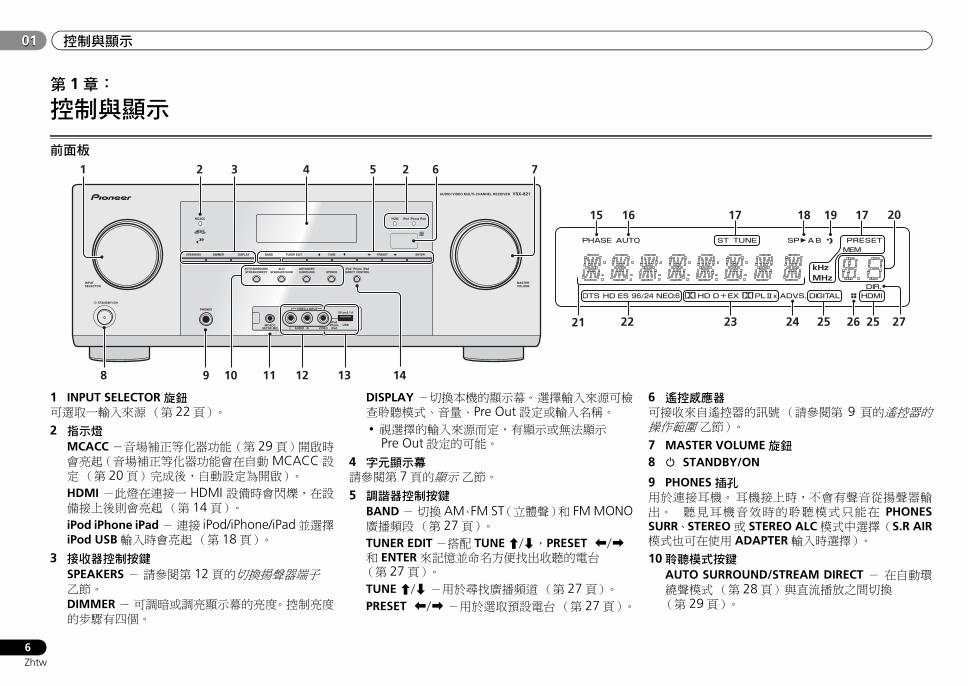
控制與顯示01
6Zhtw
01
第 1章:
控制與顯示
前面板
1 INPUT SELECTOR旋鈕可選取一輸入來源(第 22頁)。2 指示燈
MCACC-音場補正等化器功能(第 29頁)開啟時會亮起(音場補正等化器功能會在自動 MCACC設定(第 20頁)完成後,自動設定為開啟)。HDMI -此燈在連接一 HDMI 設備時會閃爍,在設備接上後則會亮起(第 14頁)。iPod iPhone iPad - 連接 iPod/iPhone/iPad並選擇iPod USB輸入時會亮起(第 18頁)。
3 接收器控制按鍵
SPEAKERS - 請參閱第 12頁的切換揚聲器端子乙節。
DIMMER - 可調暗或調亮顯示幕的亮度。 控制亮度的步驟有四個。
DISPLAY -切換本機的顯示幕。 選擇輸入來源可檢查聆聽模式、音量、Pre Out設定或輸入名稱。• 視選擇的輸入來源而定,有顯示或無法顯示
Pre Out設定的可能。4 字元顯示幕請參閱第 7頁的顯示 乙節。5 調諧器控制按鍵
BAND - 切換 AM、FM ST(立體聲)和 FM MONO廣播頻段(第 27頁)。TUNER EDIT-搭配 TUNE/,PRESET /和 ENTER來記憶並命名方便找出收聽的電台(第 27頁)。TUNE / -用於尋找廣播頻道(第 27頁)。PRESET /-用於選取預設電台(第 27頁)。
6 遙控感應器可接收來自遙控器的訊號(請參閱第 9 頁的遙控器的操作範圍 乙節)。7 MASTER VOLUME旋鈕8 STANDBY/ON
9 PHONES插孔用於連接耳機。 耳機接上時,不會有聲音從揚聲器輸出。 聽見耳機音效時的聆聽模式只能在 PHONESSURR、STEREO或 STEREO ALC模式中選擇(S.R AIR模式也可在使用 ADAPTER輸入時選擇)。
10聆聽模式按鍵AUTO SURROUND/STREAM DIRECT - 在自動環繞聲模式(第 28頁)與直流播放之間切換(第 29頁)。
AUDIO/ VIDEO MULTI-CHANNEL RECEIVER
MASTERVOLUME
STANDBY/ON
INPUTSELECTOR
MCACCSETUP MIC L AUDIO R VIDEO
VIDEO 2 INPUT
iPodiPhone
iPadUSB
5V 2.1 A
iPod iPhone iPadDIRECT CONTROLSTEREO
ADVANCEDSURROUND
ALC/STANDARD SURR
AUTO SURROUND/STREAM DIRECT
PHONES
SPEAKERS DIMMER DISPLAY BAND TUNER EDIT TUNE PRESET ENTER
iPod iPhone iPadHDMIMCACC
VSX-821
1 4 5
8 9 10 11 12 13 14
2 23 6 7
15 16 17 18 19 17
22 23 24 25 25 2726
20
21
VSX-821_FLXCN_zhtw.book Page 6 Monday, March 28, 2011 2:55 PM

EnglishEspañol
控制與顯示 0101
7Zhtw
ALC/STANDARD SURR - 按下可進行標準解碼,並能在2 Pro Logic II、2 Pro Logic IIx、2 Pro Logic IIz和 NEO:6模式,以及自動音量控制立體聲模式(第 28頁)間切換。ADVANCED SURROUND-可於各種環繞模式中進行切換(第 29頁)。STEREO - 按下可選擇立體聲播放(第 28頁)。
11 MCACC SETUP MIC插孔用於在執行自動 MCACC設定時連接麥克風(第 20頁)。12 AUDIO/VIDEO輸入端子請參閱第 18頁的連接至前面板視訊端子 乙節。13 iPod iPhone iPad/USB端子用於連接音訊來源如Apple iPod或USB大量儲存裝置(第 18頁)。14 iPod iPhone iPad DIRECT CONTROL變更 iPod的接收器輸入,並啟用 iPod(第 24頁)上的 iPod操作。
顯示
15 PHASE相位控制開啟時會亮起(第 30頁)。16 AUTO自動環繞聲功能開啟時會亮起(第 28頁)。17調諧器指示燈
ST - 以自動立體聲模式接收立體聲FM廣播時會亮起(第 27頁)。TUNE - 調頻至正常廣播頻道時亮起。PRESET -在註冊或呼叫預設廣播電台時顯示。MEM-在註冊廣播電台時閃爍。kHz/MHz - 字元顯示幕顯示目前接收的AM/FM廣播頻率時亮起。
18揚聲器指示燈表示目前設定的音訊訊號輸出揚聲器端子、A及/或 B(第 12頁)。
19睡眠定時器指示燈接收器進入睡眠模式時會亮起(第 8頁)。20 PRESET資訊或輸入訊號指示燈顯示調諧器的預設號碼或輸入訊號類型等。
21字元顯示幕顯示各種系統資訊。
22 DTS指示燈DTS - 偵測到有 DTS編碼音訊訊號的來源時會亮起。
HD-偵測到含DTS-EXPRESS或DTS-HD解碼音訊訊號時會亮起。
ES-亮起表示 DTS-ES解碼中。96/24-偵測到含 DTS 96/24解碼音訊訊號時會亮起。
NEO:6-當接收器其中一種 Neo:6模式啟用,亮起表示正在進行 Neo:6處理(第 28頁)。
23 Dolby Digital指示燈2 D - 偵測到 Dolby Digital編碼訊號時會亮起。2D+-偵測到含 Dolby Digital Plus解碼音訊訊號時會亮起。
2 HD-偵測到含 Dolby TrueHD解碼音訊訊號時會亮起。
EX-亮起表示 Dolby Digital EX解碼中。2PLII(x)-亮起表示2 Pro Logic II / 2 Pro Logic IIx解碼。 在2 Pro Logic IIz 解碼期間指示燈會熄滅(有關詳細資料請參閱第 28 頁的使用環繞音效聆聽 乙節)。
24 ADV.S.已選取其中一種先進環繞聲模式時會亮起(詳情請參閱第 29頁的使用先進環繞聲 乙節)。25 SIGNAL SELECT指示燈
DIGITAL -選取數位音訊訊號時會亮起。 選擇數位音訊訊號且未選擇音訊輸入時會閃爍。
HDMI-選取 HDMI訊號時會亮起。 選擇 HDMI訊號且未選擇 HDMI輸入時會閃爍。
26 Up Mix/DIMMER指示燈Up Mix 功能設為 ON(第 30 頁)。 此外,DIMMER設為關閉時也會亮起。
27 DIR.此燈在 DIRECT或 PURE DIRECT模式啟用時會亮起(第 29頁)。
VSX-821_FLXCN_zhtw.book Page 7 Monday, March 28, 2011 2:55 PM
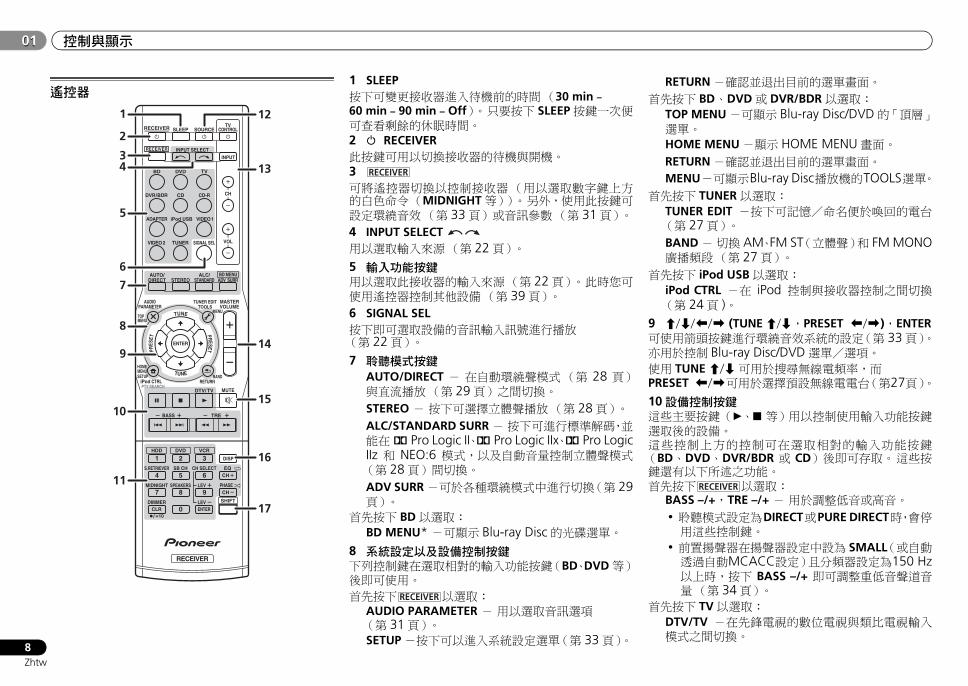
控制與顯示01
8Zhtw
01
遙控器1 SLEEP按下可變更接收器進入待機前的時間(30 min – 60 min – 90 min – Off)。 只要按下 SLEEP按鍵一次便可查看剩餘的休眠時間。
2 RECEIVER此按鍵可用以切換接收器的待機與開機。
3可將遙控器切換以控制接收器(用以選取數字鍵上方的白色命令(MIDNIGHT等))。 另外,使用此按鍵可設定環繞音效(第 33頁)或音訊參數(第 31頁)。4 INPUT SELECT 用以選取輸入來源(第 22頁)。5 輸入功能按鍵用以選取此接收器的輸入來源(第 22頁)。 此時您可使用遙控器控制其他設備(第 39頁)。6 SIGNAL SEL按下即可選取設備的音訊輸入訊號進行播放(第 22頁)。7 聆聽模式按鍵
AUTO/DIRECT - 在自動環繞聲模式(第 28 頁)與直流播放(第 29頁)之間切換。STEREO - 按下可選擇立體聲播放(第 28頁)。ALC/STANDARD SURR - 按下可進行標準解碼,並能在2 Pro Logic II、2 Pro Logic IIx、2 Pro LogicIIz 和 NEO:6 模式,以及自動音量控制立體聲模式(第 28頁)間切換。ADV SURR-可於各種環繞模式中進行切換(第 29頁)。
首先按下 BD以選取:BD MENU* -可顯示 Blu-ray Disc的光碟選單。
8 系統設定以及設備控制按鍵下列控制鍵在選取相對的輸入功能按鍵(BD、DVD等)後即可使用。 首先按下 以選取:
AUDIO PARAMETER - 用以選取音訊選項(第 31頁)。SETUP-按下可以進入系統設定選單(第 33頁)。
RETURN-確認並退出目前的選單畫面。首先按下 BD、DVD或 DVR/BDR以選取:
TOP MENU-可顯示 Blu-ray Disc/DVD的「頂層」選單。
HOME MENU-顯示 HOME MENU畫面。RETURN-確認並退出目前的選單畫面。MENU-可顯示Blu-ray Disc播放機的TOOLS選單。
首先按下 TUNER以選取:TUNER EDIT -按下可記憶/命名便於喚回的電台(第 27頁)。BAND - 切換 AM、FM ST(立體聲)和 FM MONO廣播頻段(第 27頁)。
首先按下 iPod USB以選取:iPod CTRL -在 iPod 控制與接收器控制之間切換(第 24頁 )。
9 /// (TUNE/,PRESET /),ENTER可使用箭頭按鍵進行環繞音效系統的設定(第 33頁)。亦用於控制 Blu-ray Disc/DVD選單/選項。使用 TUNE /可用於搜尋無線電頻率,而PRESET /可用於選擇預設無線電電台(第27頁)。10設備控制按鍵這些主要按鍵(、 等)用以控制使用輸入功能按鍵選取後的設備。這些控制上方的控制可在選取相對的輸入功能按鍵(BD、DVD、DVR/BDR 或 CD)後即可存取。 這些按鍵還有以下所述之功能。首先按下 以選取:
BASS –/+,TRE –/+ - 用於調整低音或高音。• 聆聽模式設定為DIRECT或PURE DIRECT時,會停用這些控制鍵。
• 前置揚聲器在揚聲器設定中設為 SMALL(或自動透過自動MCACC設定)且分頻器設定為150 Hz以上時,按下 BASS –/+ 即可調整重低音聲道音量(第 34頁)。
首先按下 TV以選取:DTV/TV -在先鋒電視的數位電視與類比電視輸入模式之間切換。
BD DVD
INPUT SELECT
SOURCESLEEPTV
CONTROL
DIMMER
TV
INPUT
1
4
7MIDNIGHT
S.RETRIEVER
HDD
CH
RECEIVER
DVR/BDR CD CD-R
ADAPTER iPod USB VIDEO 1
VIDEO 2 SIGNAL SELTUNER
BD MENU
ENTER
ALC/STANDARD ADV SURRSTEREO
AUTO/DIRECT
VOL
+10
2
5
8SPEAKERS LEV
LEV
SB CH
DISP
CLR
EQ
PHASE
DVD
3
6
9
0 ENTER
CH
CH
CH SELECT
VCR
SHIFT
MUTE
RETURN
AUDIOPARAMETER
TUNER EDITTOOLS
MASTERVOLUME
iPod CTRLPTY SEARCH
BAND
MENU
HOMEMENUSETUP
DTV/ TV
/
TREBASS
TOPMENU
RECEIVER
TUNE
TUNE
PRESETPRES
ETRECEIVER
1
2
12
13
14
15
16
34
5
6
7
8
9
10
11
17
RECEIVER
RECEIVER
RECEIVER
VSX-821_FLXCN_zhtw.book Page 8 Monday, March 28, 2011 2:55 PM
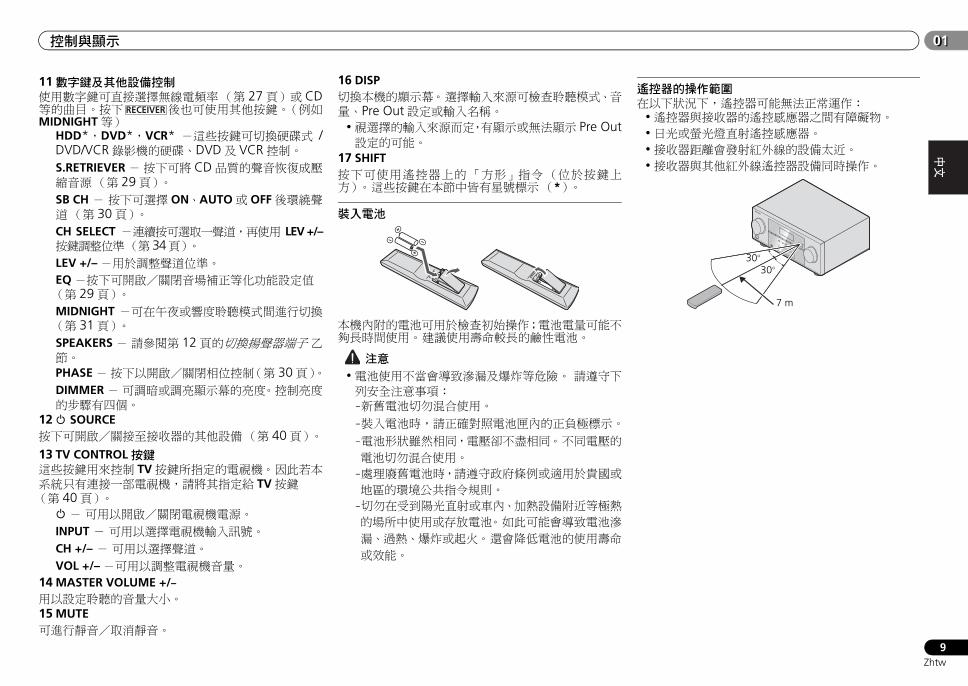
EnglishEspañol
控制與顯示 0101
9Zhtw
11數字鍵及其他設備控制使用數字鍵可直接選擇無線電頻率(第 27頁)或 CD等的曲目。按下 後也可使用其他按鍵。(例如MIDNIGHT等)
HDD*,DVD*,VCR* -這些按鍵可切換硬碟式 /DVD/VCR錄影機的硬碟、DVD及 VCR控制。S.RETRIEVER - 按下可將 CD 品質的聲音恢復成壓縮音源(第 29頁)。SB CH - 按下可選擇 ON、AUTO或 OFF後環繞聲道(第 30頁)。CH SELECT -連續按可選取一聲道,再使用 LEV +/–按鍵調整位準(第 34頁)。LEV +/–-用於調整聲道位準。EQ-按下可開啟/關閉音場補正等化功能設定值(第 29頁)。MIDNIGHT -可在午夜或響度聆聽模式間進行切換(第 31頁)。SPEAKERS - 請參閱第 12頁的切換揚聲器端子 乙節。
PHASE - 按下以開啟/關閉相位控制(第 30頁)。DIMMER - 可調暗或調亮顯示幕的亮度。 控制亮度的步驟有四個。
12 SOURCE按下可開啟/關接至接收器的其他設備(第 40頁)。13 TV CONTROL按鍵這些按鍵用來控制 TV按鍵所指定的電視機。 因此若本系統只有連接一部電視機,請將其指定給 TV按鍵(第 40頁)。
- 可用以開啟/關閉電視機電源。INPUT - 可用以選擇電視機輸入訊號。CH +/– - 可用以選擇聲道。VOL +/–-可用以調整電視機音量。
14 MASTER VOLUME +/–
用以設定聆聽的音量大小。
15 MUTE可進行靜音/取消靜音。
16 DISP切換本機的顯示幕。 選擇輸入來源可檢查聆聽模式、音量、Pre Out設定或輸入名稱。
•視選擇的輸入來源而定,有顯示或無法顯示 Pre Out設定的可能。
17 SHIFT按下可使用遙控器上的「方形」指令(位於按鍵上方)。 這些按鍵在本節中皆有星號標示(*)。
裝入電池
本機內附的電池可用於檢查初始操作;電池電量可能不夠長時間使用。 建議使用壽命較長的鹼性電池。
注意•電池使用不當會導致滲漏及爆炸等危險。 請遵守下列安全注意事項:-新舊電池切勿混合使用。-裝入電池時,請正確對照電池匣內的正負極標示。-電池形狀雖然相同,電壓卻不盡相同。 不同電壓的電池切勿混合使用。
-處理廢舊電池時,請遵守政府條例或適用於貴國或地區的環境公共指令規則。
-切勿在受到陽光直射或車內、加熱設備附近等極熱的場所中使用或存放電池。 如此可能會導致電池滲漏、過熱、爆炸或起火。 還會降低電池的使用壽命或效能。
遙控器的操作範圍在以下狀況下,遙控器可能無法正常運作:
•遙控器與接收器的遙控感應器之間有障礙物。•日光或螢光燈直射遙控感應器。•接收器距離會發射紅外線的設備太近。•接收器與其他紅外線遙控器設備同時操作。
RECEIVER
30°
7 m
30°
VSX-821_FLXCN_zhtw.book Page 9 Monday, March 28, 2011 2:55 PM
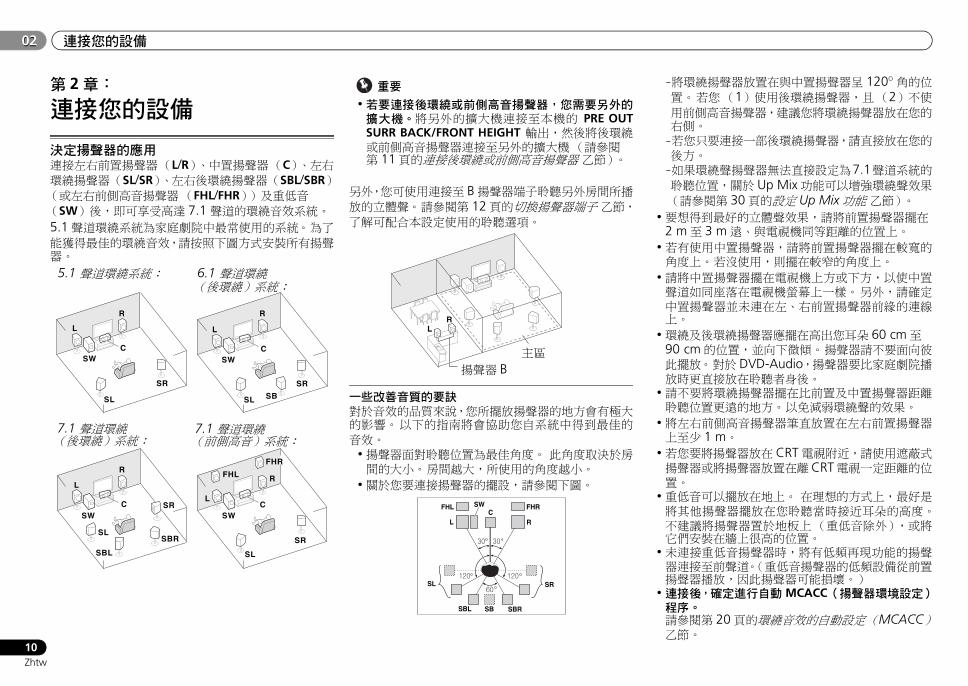
連接您的設備02
10Zhtw
02
第 2章:
連接您的設備
決定揚聲器的應用連接左右前置揚聲器(L/R)、中置揚聲器(C)、左右環繞揚聲器(SL/SR)、左右後環繞揚聲器(SBL/SBR)(或左右前側高音揚聲器(FHL/FHR))及重低音(SW)後,即可享受高達 7.1 聲道的環繞音效系統。5.1聲道環繞系統為家庭劇院中最常使用的系統。 為了能獲得最佳的環繞音效,請按照下圖方式安裝所有揚聲器。
重要
•若要連接後環繞或前側高音揚聲器,您需要另外的擴大機。將另外的擴大機連接至本機的 PRE OUTSURR BACK/FRONT HEIGHT 輸出,然後將後環繞或前側高音揚聲器連接至另外的擴大機(請參閱第 11頁的連接後環繞或前側高音揚聲器 乙節)。
另外,您可使用連接至 B揚聲器端子聆聽另外房間所播放的立體聲。 請參閱第 12頁的切換揚聲器端子 乙節,了解可配合本設定使用的聆聽選項。
一些改善音質的要訣對於音效的品質來說,您所擺放揚聲器的地方會有極大的影響。 以下的指南將會協助您自系統中得到最佳的音效。
•揚聲器面對聆聽位置為最佳角度。 此角度取決於房間的大小。 房間越大,所使用的角度越小。
•關於您要連接揚聲器的擺設,請參閱下圖。
-將環繞揚聲器放置在與中置揚聲器呈 120º角的位置。 若您(1)使用後環繞揚聲器,且(2)不使用前側高音揚聲器,建議您將環繞揚聲器放在您的右側。-若您只要連接一部後環繞揚聲器,請直接放在您的後方。-如果環繞聲揚聲器無法直接設定為7.1聲道系統的聆聽位置,關於 Up Mix功能可以增強環繞聲效果(請參閱第 30頁的設定 Up Mix功能 乙節)。
•要想得到最好的立體聲效果,請將前置揚聲器擺在2 m至 3 m遠、與電視機同等距離的位置上。
•若有使用中置揚聲器,請將前置揚聲器擺在較寬的角度上。 若沒使用,則擺在較窄的角度上。
•請將中置揚聲器擺在電視機上方或下方,以使中置聲道如同座落在電視機螢幕上一樣。 另外,請確定中置揚聲器並未連在左、右前置揚聲器前緣的連線上。
•環繞及後環繞揚聲器應擺在高出您耳朵 60 cm至90 cm的位置,並向下微傾。 揚聲器請不要面向彼此擺放。 對於 DVD-Audio,揚聲器要比家庭劇院播放時更直接放在聆聽者身後。
•請不要將環繞揚聲器擺在比前置及中置揚聲器距離聆聽位置更遠的地方。 以免減弱環繞聲的效果。
•將左右前側高音揚聲器筆直放置在左右前置揚聲器上至少 1 m。
•若您要將揚聲器放在 CRT電視附近,請使用遮蔽式揚聲器或將揚聲器放置在離CRT電視一定距離的位置。
•重低音可以擺放在地上。 在理想的方式上,最好是將其他揚聲器擺放在您聆聽當時接近耳朵的高度。不建議將揚聲器置於地板上(重低音除外),或將它們安裝在牆上很高的位置。
•未連接重低音揚聲器時,將有低頻再現功能的揚聲器連接至前聲道。(重低音揚聲器的低頻設備從前置揚聲器播放,因此揚聲器可能損壞。)
•連接後,確定進行自動 MCACC(揚聲器環境設定)程序。請參閱第 20頁的環繞音效的自動設定(MCACC)乙節。
SL
L
SWC
R R
SR
SL
L
SWC
SR
SB
5.1 聲道環繞系統: 6.1 聲道環繞 (後環繞)系統:
C
SL
L
FHL
FHR
SW
R
SRSL
L
SWC
R
SR
SBL
SBR
7.1聲道環繞 (後環繞)系統:
7.1 聲道環繞 (前側高音)系統:
LR
主區
揚聲器 B
L
SWC
FHL
SL
SBL SBRSB
SR
R
FHR
30 30
60
120 120
VSX-821_FLXCN_zhtw.book Page 10 Monday, March 28, 2011 2:55 PM

EnglishEspañol
連接您的設備 0202
11Zhtw
注意•請確定所有揚聲器均已牢牢安裝。 這不僅有助於改善音質,更可減少因地震等外力導致揚聲器翻倒或掉落而造成損壞或使人受傷的危險。
連接揚聲器本接收器僅需兩只立體聲揚聲器就可運作(如圖中的前置揚聲器),但建議請至少使用三只揚聲器,再加上完整的設定方式為環繞音效最好的組合。 請確實將右置的揚聲器接至右側(R)端子,左置的揚聲器接至左側(L)端子。 另請將本接收器的正、負(+/–)端對應至揚聲器上相符的端子。您可用正常阻抗在 6 Ω和 16 Ω之間的揚聲器。
重要
•請注意,只有在第 12頁的切換揚聲器端子 選擇 SPAB時,才會將前置揚聲器設定為 12 Ω和 16 Ω之間的值。
將裝置接上 AC 電源前,請務必完成所有的接線工作。
注意•這些揚聲器端子均帶有危險電壓。為避免在連接或脫離揚聲器線時發生電擊危險,在觸摸任何未絕緣部分之前,請先將電源線插頭拔離。
•請確定所有裸露的揚聲器導線都已纏繞在一起,並完全插入揚聲器端子中。 若有任何裸露的揚聲器金屬線接觸到背面面板,則可能導致電源切斷以策安全。
連接後環繞或前側高音揚聲器連接本機的 PRE OUT SURR BACK/FRONT HEIGHT輸出和另外的擴大機以增加後環繞或前側高音揚聲器。若已完成以上連接,則必須進行 Pre Out 設定。 若已連接後環繞揚聲器,請選擇SURR.BACK,而若已連接前側高音揚聲器,請選擇 HEIGHT(若未連接後環繞揚聲器,也未連接前側高音揚聲器,則兩項設定皆無法作用)(請參閱第 36 頁的 PreOut設定 乙節)。
•您也可以在後環繞聲道前置輸出上連接另外的擴大機供單體揚聲器使用。 此時,僅將擴大機入左聲道(L (Single))端子。
裸露金屬線之連接方式
1 將裸露的導線捲繞在一起。
2 鬆開端子,插入裸露的導線。
3 旋緊端子。
1 2 3
10 mm
HDMI
VIDEO
COMPONENT VIDEO
DVR/BDR L
R
R
L
Y PB PR
COAXIAL
AUDIO
PRE OUT SPEAKERS
ANTENNA
OPTICAL
ASSIGNABLE
ASSIGNABLE
ASSIGNABLE
OUT
A
DVR/BDR
OUT
CD-R/TAPESURR BACK/FRONT HEIGHT
L
R
PRE OUT(Single)
IN
(CD)
1
SUBWOOFER
IN IN
CD
MONITOROUT
TV/SATIN
BDIN
OUT IN DVD IN
IN
TV/SAT BD
IN
DVD
(DVD)IN 1
MONITOROUT
(DVR/BDR)
IN 2
DVR/BDR IN DVD IN BD IN VIDEO 1 IN
(TV/SAT)
IN1
(CD-R/TAPE)
IN2
FMUNBAL75
(OUTPUT 5 V 0.1 A MAX)
ADAPTER PORT
AM LOOPFRONT
R LCENTER SURROUND
R L R LB
LINE LEVELINPUT
ANALOGR L
AUDIO IN SPEAKER R SPEAKER L
中置
右環繞
右前置
後環繞或前側高音聲道擴大機
左前置重低音
右聲道 左聲道
揚聲器 B
左環繞
右聲道 左聲道
後環繞或前側高音揚聲器
VSX-821_FLXCN_zhtw.book Page 11 Monday, March 28, 2011 2:55 PM
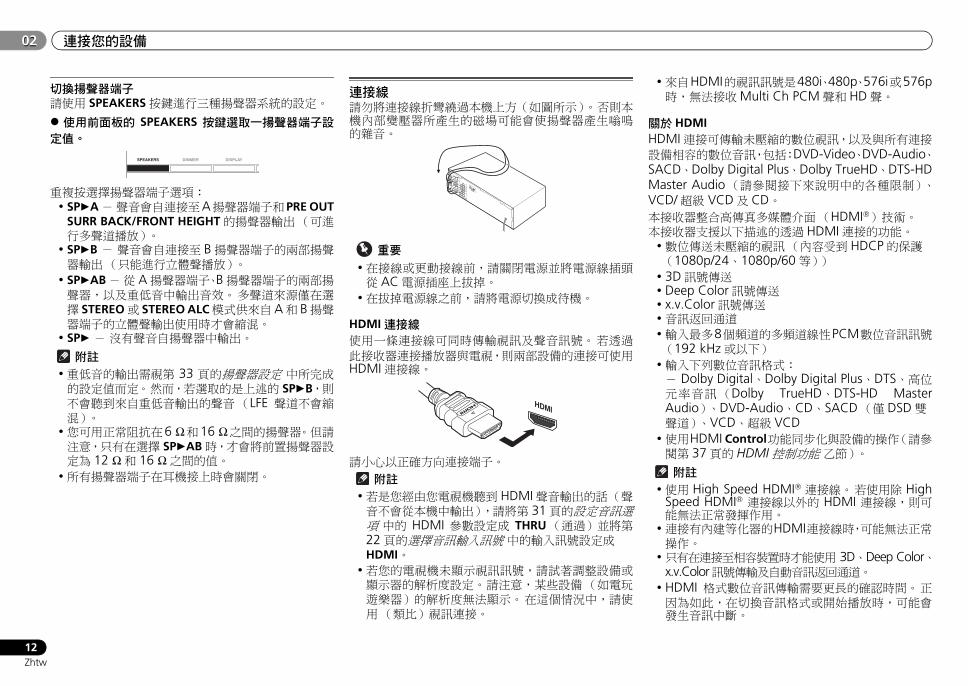
連接您的設備02
12Zhtw
02
切換揚聲器端子請使用 SPEAKERS按鍵進行三種揚聲器系統的設定。
使用前面板的 SPEAKERS 按鍵選取一揚聲器端子設定值。
重複按選擇揚聲器端子選項:• SPA - 聲音會自連接至A揚聲器端子和PRE OUT
SURR BACK/FRONT HEIGHT的揚聲器輸出(可進行多聲道播放)。
• SPB - 聲音會自連接至 B揚聲器端子的兩部揚聲器輸出(只能進行立體聲播放)。
• SPAB - 從 A揚聲器端子、B揚聲器端子的兩部揚聲器,以及重低音中輸出音效。 多聲道來源僅在選擇 STEREO或 STEREO ALC模式供來自A和 B揚聲器端子的立體聲輸出使用時才會縮混。
• SP - 沒有聲音自揚聲器中輸出。 附註
•重低音的輸出需視第 33 頁的揚聲器設定 中所完成的設定值而定。 然而,若選取的是上述的 SPB,則不會聽到來自重低音輸出的聲音(LFE 聲道不會縮混)。
•您可用正常阻抗在6 Ω和16 Ω之間的揚聲器。 但請注意,只有在選擇 SPAB時,才會將前置揚聲器設定為 12 Ω和 16 Ω之間的值。
•所有揚聲器端子在耳機接上時會關閉。
連接線請勿將連接線折彎繞過本機上方(如圖所示)。 否則本機內部變壓器所產生的磁場可能會使揚聲器產生嗡鳴的雜音。
重要
•在接線或更動接線前,請關閉電源並將電源線插頭從 AC電源插座上拔掉。
•在拔掉電源線之前,請將電源切換成待機。
HDMI連接線使用一條連接線可同時傳輸視訊及聲音訊號。 若透過此接收器連接播放器與電視,則兩部設備的連接可使用HDMI連接線。
請小心以正確方向連接端子。
附註•若是您經由您電視機聽到 HDMI聲音輸出的話(聲音不會從本機中輸出),請將第 31頁的設定音訊選項 中的 HDMI 參數設定成 THRU(通過)並將第22頁的選擇音訊輸入訊號 中的輸入訊號設定成HDMI。
•若您的電視機未顯示視訊訊號,請試著調整設備或顯示器的解析度設定。 請注意,某些設備(如電玩遊樂器)的解析度無法顯示。 在這個情況中,請使用(類比)視訊連接。
•來自HDMI的視訊訊號是480i、480p、576i或576p時,無法接收Multi Ch PCM聲和 HD聲。
關於 HDMIHDMI連接可傳輸未壓縮的數位視訊,以及與所有連接設備相容的數位音訊,包括:DVD-Video、DVD-Audio、SACD、Dolby Digital Plus、Dolby TrueHD、DTS-HDMaster Audio(請參閱接下來說明中的各種限制)、VCD/超級 VCD及 CD。本接收器整合高傳真多媒體介面(HDMI®)技術。本接收器支援以下描述的透過 HDMI連接的功能。
•數位傳送未壓縮的視訊(內容受到 HDCP的保護(1080p/24、1080p/60等))
• 3D訊號傳送• Deep Color訊號傳送• x.v.Color訊號傳送•音訊返回通道•輸入最多8個頻道的多頻道線性PCM數位音訊訊號(192 kHz或以下)
•輸入下列數位音訊格式:- Dolby Digital、Dolby Digital Plus、DTS、高位元率音訊(Dolby TrueHD、DTS-HD MasterAudio)、DVD-Audio、CD、SACD(僅 DSD雙聲道)、VCD、超級 VCD
•使用HDMI Control功能同步化與設備的操作(請參閱第 37頁的 HDMI控制功能 乙節)。 附註
•使用 High Speed HDMI® 連接線。 若使用除 HighSpeed HDMI® 連接線以外的 HDMI 連接線,則可能無法正常發揮作用。
•連接有內建等化器的HDMI連接線時,可能無法正常操作。
•只有在連接至相容裝置時才能使用 3D、Deep Color、x.v.Color訊號傳輸及自動音訊返回通道。
• HDMI 格式數位音訊傳輸需要更長的確認時間。 正因為如此,在切換音訊格式或開始播放時,可能會發生音訊中斷。
SPEAKERS DIMMER DISPLAY
HDMI
VSX-821_FLXCN_zhtw.book Page 12 Monday, March 28, 2011 2:55 PM
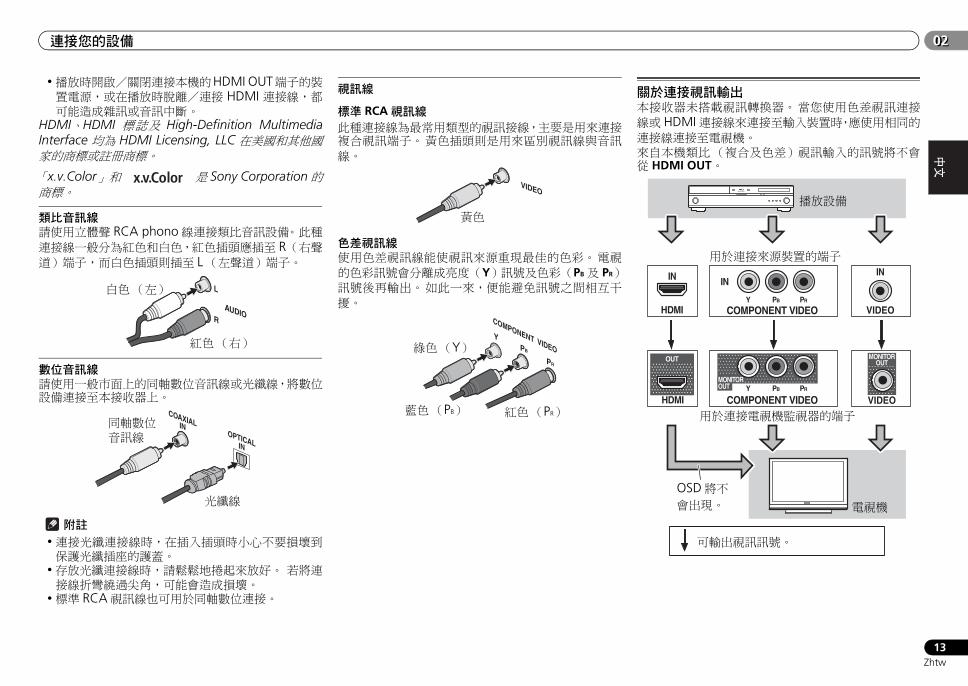
EnglishEspañol
連接您的設備 0202
13Zhtw
•播放時開啟/關閉連接本機的HDMI OUT端子的裝置電源,或在播放時脫離/連接 HDMI 連接線,都可能造成雜訊或音訊中斷。
HDMI、HDMI 標誌及 High-Definition MultimediaInterface 均為 HDMI Licensing, LLC 在美國和其他國家的商標或註冊商標。
「x.v.Color」 和 是 Sony Corporation的商標。
類比音訊線請使用立體聲 RCA phono線連接類比音訊設備。 此種連接線一般分為紅色和白色,紅色插頭應插至 R(右聲道)端子,而白色插頭則插至 L(左聲道)端子。
數位音訊線請使用一般市面上的同軸數位音訊線或光纖線,將數位設備連接至本接收器上。
附註•連接光纖連接線時,在插入插頭時小心不要損壞到保護光纖插座的護蓋。
•存放光纖連接線時,請鬆鬆地捲起來放好。 若將連接線折彎繞過尖角,可能會造成損壞。
•標準 RCA視訊線也可用於同軸數位連接。
視訊線
標準 RCA視訊線此種連接線為最常用類型的視訊接線,主要是用來連接複合視訊端子。 黃色插頭則是用來區別視訊線與音訊線。
色差視訊線使用色差視訊線能使視訊來源重現最佳的色彩。 電視的色彩訊號會分離成亮度(Y)訊號及色彩(PB及 PR)訊號後再輸出。 如此一來,便能避免訊號之間相互干擾。
關於連接視訊輸出本接收器未搭載視訊轉換器。 當您使用色差視訊連接線或 HDMI連接線來連接至輸入裝置時,應使用相同的連接線連接至電視機。來自本機類比(複合及色差)視訊輸入的訊號將不會從 HDMI OUT。
L
RAUDIO
白色(左)
紅色(右)
COAXIALINOPTICALIN
同軸數位音訊線
光纖線
VIDEO
黃色
YPB
PR
COMPONENT VIDEO綠色(Y)
紅色(PR)藍色(PB)
VIDEO
VIDEO
ININ IN
HDMI
COMPONENT VIDEO
MONITOROUT Y PB PR
MONITOROUT
COMPONENT VIDEOY PB PR
HDMI
OUT
用於連接來源裝置的端子
用於連接電視機監視器的端子
播放設備
電視機
OSD將不會出現。
可輸出視訊訊號。
VSX-821_FLXCN_zhtw.book Page 13 Monday, March 28, 2011 2:55 PM
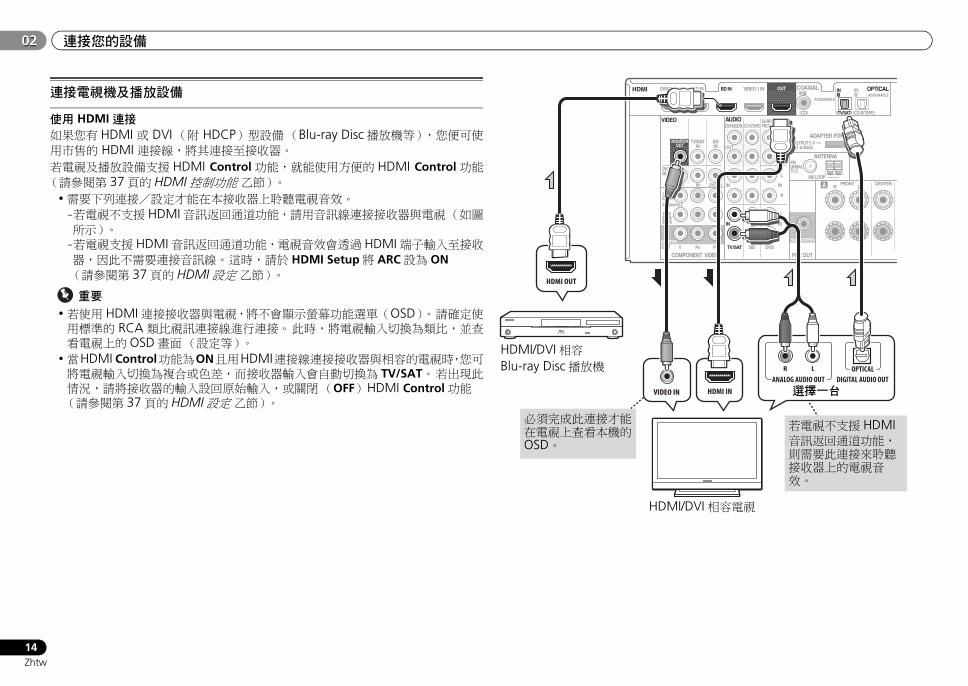
連接您的設備02
14Zhtw
02
連接電視機及播放設備
使用 HDMI 連接如果您有 HDMI 或 DVI(附 HDCP)型設備(Blu-ray Disc播放機等),您便可使用市售的 HDMI 連接線,將其連接至接收器。若電視及播放設備支援 HDMI Control功能,就能使用方便的 HDMI Control功能(請參閱第 37頁的 HDMI控制功能 乙節)。
•需要下列連接/設定才能在本接收器上聆聽電視音效。-若電視不支援 HDMI音訊返回通道功能,請用音訊線連接接收器與電視(如圖所示)。-若電視支援 HDMI音訊返回通道功能,電視音效會透過 HDMI端子輸入至接收器,因此不需要連接音訊線。 這時,請於 HDMI Setup將 ARC設為 ON(請參閱第 37頁的 HDMI設定 乙節)。
重要
•若使用 HDMI連接接收器與電視,將不會顯示螢幕功能選單(OSD)。 請確定使用標準的 RCA類比視訊連接線進行連接。 此時,將電視輸入切換為類比,並查看電視上的 OSD畫面(設定等)。
•當HDMI Control功能為ON且用HDMI連接線連接接收器與相容的電視時,您可將電視輸入切換為複合或色差,而接收器輸入會自動切換為 TV/SAT。 若出現此情況,請將接收器的輸入設回原始輸入,或關閉(OFF) HDMI Control功能(請參閱第 37頁的 HDMI設定 乙節)。
MONITOROUT
HDMI
VIDEO
COMPONENT VIDEO
DVR/BDR L
R
R
L
Y PB PR
COAXIAL
AUDIO
PRE OUT
ANTENNA
OPTICAL
ASSIGNABLE
ASSIGNABLE
ASSIGNABLE
OUT
A
DVR/BDR
OUT
CD-R/TAPESURR BACK/FRONT HEIGHT
L
R
PRE OUT(Single)
IN
(CD)
1
SUBWOOFER
IN IN
CD
MONITOROUT
TV/SATIN
BDIN
OUT IN DVD IN
IN
TV/SAT BD
IN
DVD
(DVD)IN 1
MONITOROUT
(DVR/BDR)
IN 2
DVR/BDR IN DVD IN BD IN VIDEO 1 IN
(TV/SAT)
IN1
(CD-R/TAPE)
IN2
FMUNBAL75
(OUTPUT 5 V 0.1 A MAX)
ADAPTER PORT
AM LOOPFRONT
R LCENTER
VIDEO IN HDMI IN
HDMI OUT
R L
DIGITAL AUDIO OUTANALOG AUDIO OUTOPTICAL
選擇一台
HDMI/DVI相容電視
HDMI/DVI相容Blu-ray Disc播放機
若電視不支援 HDMI音訊返回通道功能,則需要此連接來聆聽接收器上的電視音效。
必須完成此連接才能在電視上查看本機的OSD。
VSX-821_FLXCN_zhtw.book Page 14 Monday, March 28, 2011 2:55 PM

EnglishEspañol
連接您的設備 0202
15Zhtw
連接沒有 HDMI端子的設備本圖顯示沒有 HDMI端子的電視與 DVD播放器(或其他播放設備)和接收器的連接方式。
•若電視及播放器都有色差視訊插孔,您也可以連接該端子。 詳情請參閱第16頁的使用色差視訊插孔 乙節。
附註•若要聆聽使用光纖或同軸纜線連接此接收器的DVD播放器音訊,請先切換至DVD輸入,然後按 SIGNAL SEL以選擇音訊訊號 O2 (OPTICAL2)或 C1 (COAXIAL1)(請參閱第 22頁的選擇音訊輸入訊號 乙節)。
連接衛星接收器或其他數位機上盒衛星、有線接收器及地面數位電視調諧器,均稱為「機上盒」設備。
•若機上盒或視訊設備也有 HDMI或色差視訊輸出,您也可連接此端子。 詳情請參閱第 14頁的使用 HDMI 連接 或第 16頁的使用色差視訊插孔 乙節。
附註•若要聆聽使用同軸纜線連接此接收器的來源裝置音訊,請先切換至 TV/SAT,然後按 SIGNAL SEL以選擇音訊訊號 C1 (COAXIAL1)(請參閱第 22頁的選擇音訊輸入訊號 乙節)。
HDMI
VIDEO
COMPONENT VIDEO
DVR/BDR L
R
R
L
Y PB PR
COAXIAL
AUDIO
PRE OUT
ANTENNA
OPTICAL
ASSIGNABLE
ASSIGNABLE
ASSIGNABLE
OUT
A
DVR/BDR
OUT
CD-R/TAPESURR BACK/FRONT HEIGHT
L
R
PRE OUT(Single)
IN
(CD)
1
SUBWOOFER
IN IN
CD
MONITOROUT
TV/SATIN
BDIN
OUT IN DVD IN
IN
TV/SAT BD
IN
DVD
(DVD)IN 1
MONITOROUT
(DVR/BDR)
IN 2
DVR/BDR IN DVD IN BD IN VIDEO 1 IN
(TV/SAT)
IN1
(CD-R/TAPE)
IN2
FMUNBAL75
(OUTPUT 5 V 0.1 A MAX)
ADAPTER PORT
AM LOOPFRONT
R LCENTER
R L
DIGITAL AUDIO OUT ANALOG AUDIO OUTOPTICAL
R L
DIGITAL AUDIO OUTANALOG AUDIO OUTOPTICAL COAXIAL
VIDEO IN VIDEO OUT
選擇一台
電視機 DVD播放器
選擇一台
若要透過接收器收聽電視機的聲音,需要此連接。
HDMI
VIDEO
COMPONENT VIDEO
DVR/BDR L
R
R
L
Y PB PR
COAXIAL
AUDIO
PRE OUT
ANTENNA
OPTICAL
ASSIGNABLE
ASSIGNABLE
ASSIGNABLE
OUT
A
DVR/BDR
OUT
CD-R/TAPESURR BACK/FRONT HEIGHT
L
R
PRE OUT(Single)
IN
(CD)
1
SUBWOOFER
IN IN
CD
MONITOROUT
TV/SATIN
BDIN
OUT IN DVD IN
IN
TV/SAT BD
IN
DVD
(DVD)IN 1
MONITOROUT
(DVR/BDR)
IN 2
DVR/BDR IN DVD IN BD IN VIDEO 1 IN
(TV/SAT)
IN1
(CD-R/TAPE)
IN2
FMUNBAL75
(OUTPUT 5 V 0.1 A MAX)
ADAPTER PORT
AM LOOPFRONT
R LCENTER
R L
DIGITAL AUDIO OUTANALOG AUDIO OUTOPTICALCOAXIAL
VIDEO OUT 選擇一台
機上盒等
VSX-821_FLXCN_zhtw.book Page 15 Monday, March 28, 2011 2:55 PM

連接您的設備02
16Zhtw
02
連接硬碟(HDD) /DVD錄影機、Blu-ray Disc錄影機及其他視訊來源本接收器有音訊/視訊輸入及輸出,可適合連接類比或數位錄影機,包括硬碟式 /DVD錄影機及 Blu-ray Disc錄影機等。
•只有輸入至 VIDEO IN端子的訊號可從 VIDEO OUT端子輸出。•透過數位端子輸入的音訊訊號將不會從類比端子輸出。
附註•若要聆聽使用光纖纜線連接此接收器的來源裝置音訊,請先切換至 DVR/BDR輸入,然後按 SIGNAL SEL以選擇音訊訊號 O2 (OPTICAL2)(請參閱第 22頁的選擇音訊輸入訊號 乙節)。
使用色差視訊插孔色差視訊相較於複合視訊,應可帶來更為優異的畫質。 另一項優勢(若來源及電視機均相容)則是循序掃描視訊,它可帶來極為穩定、毫無跳動的畫面。 請參閱電視機及來源設備隨附手冊,進一步了解它們是否與循序掃描相容。
•有關音訊連接的詳細資料,請參閱第 15頁的連接沒有 HDMI端子的設備 乙節。
重要
•使用色差視訊輸入將任何一種來源設備連接至本接收器時,需將電視機一併接至本接收器的 COMPONENT VIDEO MONITOR OUT插孔上。
•必要時,請配合所連接的輸入來源指定色差視訊輸入。 只有在未依以下預設值連接時,才需如此做: -COMPONENT VIDEO IN 1: DVD-COMPONENT VIDEO IN 2: DVR/BDR詳情請參閱第 35頁的輸入指定選單 乙節。
HDMI
VIDEO
COMPONENT VIDEO
DVR/BDR L
R
R
L
Y PB PR
COAXIAL
AUDIO
PRE OUT
ANTENNA
OPTICAL
ASSIGNABLE
ASSIGNABLE
ASSIGNABLE
OUT
A
DVR/BDR
OUT
CD-R/TAPESURR BACK/FRONT HEIGHT
L
R
PRE OUT(Single)
IN
(CD)
1
SUBWOOFER
IN IN
CD
MONITOROUT
TV/SATIN
BDIN
OUT IN DVD IN
IN
TV/SAT BD
IN
DVD
(DVD)IN 1
MONITOROUT
(DVR/BDR)
IN 2
DVR/BDR IN DVD IN BD IN VIDEO 1 IN
(TV/SAT)
IN1
(CD-R/TAPE)
IN2
FMUNBAL75
(OUTPUT 5 V 0.1 A MAX)
ADAPTER PORT
AM LOOPFRONT
R LCENTER
R L
DIGITAL AUDIO OUTANALOG AUDIO OUTR L
ANALOG AUDIO IN
OPTICAL
VIDEO IN VIDEO OUT 選擇一台
硬碟式 /DVD錄影機、Blu-ray Disc錄影機等
COMPONENT VIDEO
DVR/BDR L
R
R
L
Y PB PR
PRE OUT
ANTENNA
ASSIGNABLE
A
OUT
L
R
PRE OUT(Single)
SUBWOOFER
IN IN
CD
MONITOROUT
TV/SATIN
BDIN
OUT IN DVD IN
IN
TV/SAT BD
IN
DVD
(DVD)IN 1
MONITOROUT
(DVR/BDR)
IN 2
FMUNBAL75
(OUTPUT 5 V 0.1 A MAX)
ADAPTER PORT
AM LOOPFRONT
R LCENTER
YPBPR
COMPONENT VIDEO IN
YPBPR
COMPONENT VIDEO OUT
DVD播放器電視機
VSX-821_FLXCN_zhtw.book Page 16 Monday, March 28, 2011 2:55 PM

EnglishEspañol
連接您的設備 0202
17Zhtw
連接其他音訊設備接線的數量及種類需視連接的設備類型而定。 請按照以下步驟連接 CD-R、MD、DAT、卡式錄音機或其他音訊設備。
•請注意,若想在數位設備(如 MD)與類比設備之間來回錄製,則必須將數位設備連接至類比音訊插孔上。
附註•若要聆聽使用同軸纜線連接此接收器的 CD 播放器音訊,請先切換至 CD-R輸入,然後按 SIGNAL SEL以選擇音訊訊號 C1 (COAXIAL1)(請參閱第 22頁的選擇音訊輸入訊號 乙節)。
連接選用的 Bluetooth® ADAPTERBluetooth ADAPTER(先鋒型號 AS-BT100或AS-BT200)連接本機時,搭載 Bluetooth無線技術的產品(行動電話、數位音樂播放器等)就能以無線的方式聆聽音樂。
將 Bluetooth ADAPTER連接至後面板上的ADAPTER PORT端子。
•關於播放 Bluetooth無線技術裝置的指示,請參閱第 26頁的用來配對 Bluetooth ADAPTER及Bluetooth無線技術裝置 乙節。
重要
•下列國家及地區中可使用 Bluetooth ADAPTER(先鋒型號 AS-BT100及 AS-BT200);新加坡、馬來西亞、泰國、澳大利亞、紐西蘭、香港、臺灣
•請勿移動連接Bluetooth ADAPTER的接收器。 這麼做可能會造成受損或接觸不良。
連接天線請依下圖方式連接 AM 環型天線及 FM 線型天線。 要改善接收效果及聲音品質,可連接外部天線(請參閱以下的使用外部天線乙節)。
1 按開固定片,然後將每條導線插入各個端子,接著放開固定片將 AM天線固定。
2 將 AM環型天線固定在附送腳架上。將腳架固定到天線上,請依箭頭指示方向折彎(圖 a),再將環圈夾到腳架上(圖 b)。
3 將 AM天線置於平坦的表面上,並面向能提供最佳接收效果的方向。
4 將 FM線型天線連接至 FM天線插座。為了能獲得最佳的接收效果,請將 FM天線完全展開並固定到牆上或門框上。 切勿將線鬆弛地垂掛或捲起。
HDMI
VIDEO
COMPONENT VIDEO
DVR/BDR L
R
R
L
Y PB PR
COAXIAL
AUDIO
PRE OUT
ANTENNA
OPTICAL
ASSIGNABLE
ASSIGNABLE
ASSIGNABLE
OUT
A
DVR/BDR
OUT
CD-R/TAPESURR BACK/FRONT HEIGHT
L
R
PRE OUT(Single)
IN
(CD)
1
SUBWOOFER
IN IN
CD
MONITOROUT
TV/SATIN
BDIN
OUT IN DVD IN
IN
TV/SAT BD
IN
DVD
(DVD)IN 1
MONITOROUT
(DVR/BDR)
IN 2
DVR/BDR IN DVD IN BD IN VIDEO 1 IN
(TV/SAT)
IN1
(CD-R/TAPE)
IN2
FMUNBAL75
(OUTPUT 5 V 0.1 A MAX)
ADAPTER PORT
AM LOOPFRONT
R LCENTER
REC
R L
DIGITAL AUDIO OUTANALOG AUDIO OUTR L
ANALOG AUDIO IN
OPTICALCOAXIAL
選擇一台
CD-R,MD,DAT,卡式錄音機等
HDMI
VIDEO
COMPONENT VIDEO
DVR/BDR L
R
R
L
Y PB PR
COAXIAL
AUDIO
PRE OUT
ANTENNA
O
ASSIGNABLE
ASSIGNABLE
A
OUT
A
DVR/BDR
OUT
CD-R/TAPESURR BACK/FRONT HEIGHT
L
R
PRE OUT(Single)
IN
(CD)
1
SUBWOOFER
IN IN
CD
MONITOROUT
TV/SATIN
BDIN
OUT IN DVD IN
IN
TV/SAT BD
IN
DVD
(DVD)IN 1
MONITOROUT
(DVR/BDR)
IN 2
DVR/BDR IN DVD IN BD IN VIDEO 1 IN
(TV/SAT)
IN1
(CD-R/TAP
IN2
FMUNBAL75
(OUTPUT 5 V 0.1 A MAX)
ADAPTER PORT
AM LOOPFRONT
R L
Bluetooth® ADAPTER
ANTENNAFMUNBAL75
AM LOOP
2
13
4
圖 a 圖 b
VSX-821_FLXCN_zhtw.book Page 17 Monday, March 28, 2011 2:55 PM
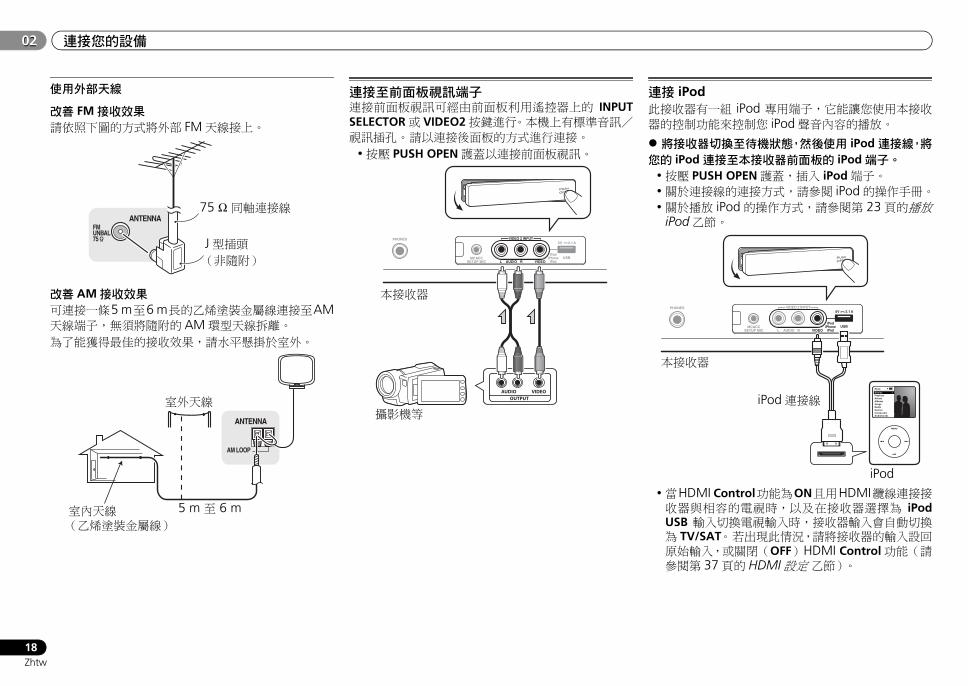
連接您的設備02
18Zhtw
02
使用外部天線
改善 FM接收效果請依照下圖的方式將外部 FM天線接上。
改善 AM接收效果可連接一條5 m至6 m長的乙烯塗裝金屬線連接至AM天線端子,無須將隨附的 AM環型天線拆離。為了能獲得最佳的接收效果,請水平懸掛於室外。
連接至前面板視訊端子連接前面板視訊可經由前面板利用遙控器上的 INPUTSELECTOR或 VIDEO2按鍵進行。 本機上有標準音訊/視訊插孔。 請以連接後面板的方式進行連接。
•按壓 PUSH OPEN護蓋以連接前面板視訊。
連接 iPod此接收器有一組 iPod 專用端子,它能讓您使用本接收器的控制功能來控制您 iPod聲音內容的播放。
將接收器切換至待機狀態,然後使用 iPod連接線,將您的 iPod連接至本接收器前面板的 iPod端子。
•按壓 PUSH OPEN護蓋,插入 iPod端子。•關於連接線的連接方式,請參閱 iPod的操作手冊。•關於播放 iPod的操作方式,請參閱第 23頁的播放
iPod乙節。
•當HDMI Control功能為ON且用HDMI纜線連接接收器與相容的電視時,以及在接收器選擇為 iPodUSB 輸入切換電視輸入時,接收器輸入會自動切換為 TV/SAT。 若出現此情況,請將接收器的輸入設回原始輸入,或關閉(OFF)HDMI Control功能(請參閱第 37頁的 HDMI設定 乙節)。
ANTENNAFMUNBAL75 J型插頭
(非隨附)
75 Ω 同軸連接線
ANTENNA
AM LOOP
室外天線
5 m 至 6 m室內天線(乙烯塗裝金屬線)
CONTROL ON / OFF
AUDIO VIDEOOUTPUT
MCACCSETUP MIC L AUDIO R VIDEO
VIDEO 2 INPUT
iPodiPhone
iPadUSB
5V 2.1 APHONES
本接收器
攝影機等
MCACCSETUP MIC L AUDIO R VIDEO
VIDEO 2 INPUT
iPodiPhone
iPadUSB
5V 2.1 APHONES
MENU
Music
Genius >PlaylistsArtistsAlbumsSongsRadioGenresComposersAudiobooks
CONTROL ON / OFF
iPod
iPod連接線
本接收器
VSX-821_FLXCN_zhtw.book Page 18 Monday, March 28, 2011 2:55 PM

EnglishEspañol
連接您的設備 0202
19Zhtw
連接 USB裝置您可利用本接收器前面板的 USB介面,聆聽雙聲道音訊。
將接收器切換至待機狀態,然後將您的USB裝置連接至本接收器前面板的 USB端子。
•按壓 PUSH OPEN護蓋,插入 USB端子。•本接收器不支援 USB集線器。•關於播放USB裝置的操作方式,請參閱第24頁的播放 USB裝置 乙節。
插上接收器電源只有在將所有設備連接至本接收器(包括揚聲器)時,才能插入接收器。
注意•手拿電源線時請握住插頭部分。 切勿拖著線將插頭拔出,並不可在您手濕的時候觸摸電線,因為這樣會造成短路或受到電擊。 請勿將本機、傢俱或其他物體放在電源線上或有任何擠壓到電線的情形發生。 絕不可將線打結或與其他連接線纏繞在一起。電源線在佈置上不可會有腳踩到的情形。 破損的電源線會引起火災或讓您遭受電擊。 請每隔一段時間檢查一次電源線。 若您發現到有破損,請洽最近的先鋒授權服務公司尋求更換。
•請勿使用不是本機隨附的其他電源線。•請勿將電源線用於非下列所述之範圍。•不常使用時(例如,休假時),本機應把主電源插頭從牆上插座拔掉將電源切斷。
附註•連接此接收器至AC電源插座後,開始二秒至十秒的
HDMI 初始化程序。 在此程序期間無法執行任何操作。 在此程序期間,前面板顯示幕的 HDMI指示燈閃爍,您可以在它一停止閃爍時即開啟此接收器的電源。 將 HDMI Control設定為 OFF時,您可略過此程序。 有關 HDMI Control 功能的詳情,請參閱第 37頁的 HDMI控制功能 乙節。
1 將隨附的電源線插入接收器背面的 AC IN 插座內。
2 將另一端插入電源輸出插座內。
MCACCSETUP MIC L AUDIO R VIDEO
VIDEO 2 INPUT
iPodiPhone
iPadUSB
5V 2.1 APHONES
CONTROL ON / OFF
USB大量儲存裝置
本接收器
VSX-821_FLXCN_zhtw.book Page 19 Monday, March 28, 2011 2:55 PM

基本設定03
20Zhtw
03
第 3章:
基本設定
設定前您可利用此接收器調整系統設定,以及使用電視畫面上的螢幕功能選單(OSD)操作 iPod/USB裝置進行播放。
•如果您已使用 HDMI 輸出連接至您的電視機,則OSD 將不會出現。 使用複合或色差接線方式以設定系統。
首先請依以下程序,確定已顯示 OSD畫面。
1 打開接收器及電視機。
2 切換電視輸入為透過對應複合或色差連接線連接此接收器與電視的輸入。例如,若是您將本接收器接至電視機的 VIDEO 插孔,則請確定現在所選取的輸入是 VIDEO。
3 按下遙控器上的 ,然後按下 SETUP按鍵。OSD畫面的 System Setup選單會顯示在電視上。 若畫面上未顯示任何動靜,請嘗試變更接收器上的電視格式設定(請參閱下文)。
切換電視機格式設定值若 OSD 未能正確顯示,則可能是電視系統的設定不適用於所在國家或地區。
1 將接收器切換成待機。
2 在按住 TUNE 按鍵時,同時按住 STANDBY/ON按鍵約兩秒鐘。此時顯示幕會顯示新的設定值(PAL或 NTSC)。
取消示範顯示不使用接收器時,前面板上的顯示幕會顯示各種資訊(示範顯示)。您可以關閉示範顯示。 詳情請參閱第 36 頁的 FL 示範模式選單 乙節。
•執行自動MCACC設定(請參閱下文)時,將自動取消示範模式。
環繞音效的自動設定(MCACC)多聲道自動音場補正(MCACC)設定功能可測量聆聽區域內的音場特性、考量周遭環境的雜訊、揚聲器尺寸和間距,並同時測試聲道延遲及聲道位準等條件。 在您完成系統隨附麥克風的設定後,接收器便可利用一連串測試音所測得的資訊,完成最佳的揚聲器設定及所在房間的等化處理。
注意•自動 MCACC設定功能所使用的測試音均以高音量輸出。
重要
•如果您已使用 HDMI 輸出連接至您的電視機,則OSD 將不會出現。 使用複合或色差接線方式以設定系統。
•自動 MCACC設定功能會將目前所有已完成的揚聲器設定值重新設定。
•使用自動MCACC設定之前,不應選擇 iPod USB輸入作為輸入來源。
•若您連接後環繞揚聲器或前側高音揚聲器,請確定在執行自動MCACC設定前已正確完成 Pre Out設定(請參閱第 36 頁)。(此處為使用 OSD 畫面進行後環繞揚聲器連接的說明。)
1 打開接收器及電視機。
2 切換電視輸入為透過對應複合或色差連接線連接此接收器與電視的輸入。
3 將麥克風連接至前面板的MCACC SETUP MIC插孔。請確定揚聲器與麥克風之間無任何阻擋物。
若有三腳架,請用它放置麥克風,將其調整在正常聆聽位置下的耳朵高度。 不然,可利用桌子或椅子將麥克風置於耳朵的高度。
4 按下遙控器上的 ,然後按下 SETUP按鍵。電視上會出現 System Setup 選單。 使用 ///按鍵及 ENTER 導覽所有畫面及選擇選單項目。 按下RETURN即可退出目前選單。
•可隨時按下SETUP按鍵退出System Setup選單。 一旦取消自動 MCACC設定後,接收器將自動退出,不儲存任何設定。
•螢幕保護程式在系統閒置三分鐘後會自動啟動。
5 從 System Setup選單中選取「Auto MCACC」,然後按下 ENTER。
•麥克風未連接至MCACC SETUP MIC插孔時,MIC IN會閃爍。
RECEIVER
BD DVD
INPUT SELECT
SOURCESLEEPTV
CONTROL
TV
INPUT
RECEIVER
RECEIVERENTER
MUTE
RETURN
PARAMETER TOOLS VOLUME
iPod CTRLPTY SEARCH
BAND
MENU
HOMEMENUSETUP
DTV/ TV
TOPMENU
TUNE
TUNE
PRESETPRES
ET
MCACCSETUP MIC L AUDIO R VIDEO
VIDEO 2 INPUT
iPodiPhone
iPadUSB
5V 2.1 APHONES
CONTROL ON / OFF
三腳架
麥克風
RECEIVER
System Setup
1.Auto MCACC2.Manual SP Setup3.Input Assign4.Pre Out Setting5.HDMI Setup6.Auto Power Down7.FL Demo Mode
Return
VSX-821_FLXCN_zhtw.book Page 20 Monday, March 28, 2011 2:55 PM
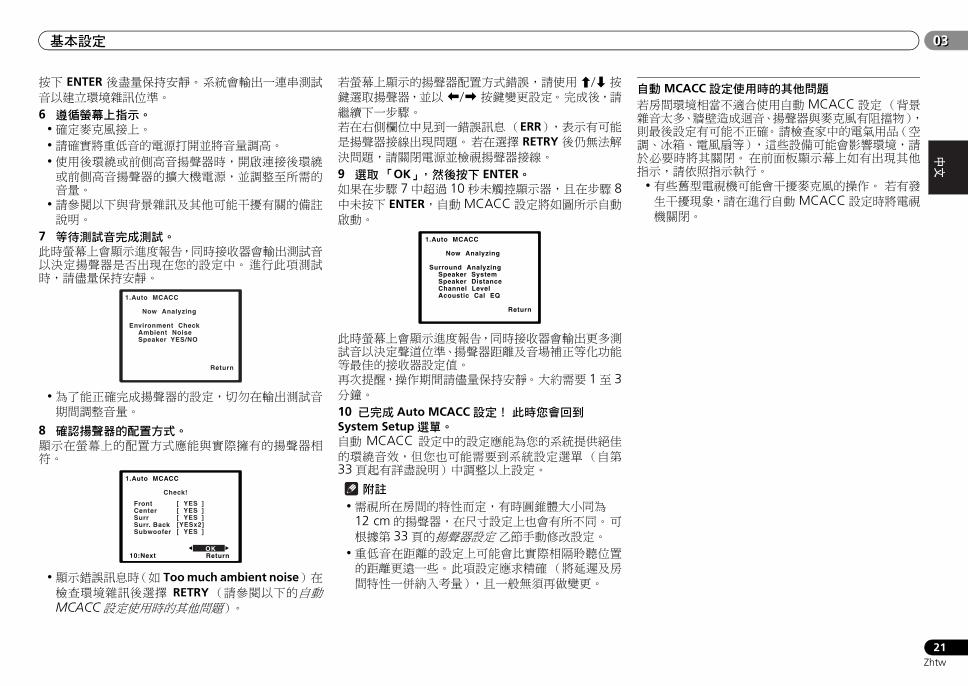
EnglishEspañol
基本設定 0303
21Zhtw
按下 ENTER 後盡量保持安靜。 系統會輸出一連串測試音以建立環境雜訊位準。
6 遵循螢幕上指示。•確定麥克風接上。•請確實將重低音的電源打開並將音量調高。•使用後環繞或前側高音揚聲器時,開啟連接後環繞或前側高音揚聲器的擴大機電源,並調整至所需的音量。
•請參閱以下與背景雜訊及其他可能干擾有關的備註說明。
7 等待測試音完成測試。此時螢幕上會顯示進度報告,同時接收器會輸出測試音以決定揚聲器是否出現在您的設定中。 進行此項測試時,請儘量保持安靜。
•為了能正確完成揚聲器的設定,切勿在輸出測試音期間調整音量。
8 確認揚聲器的配置方式。顯示在螢幕上的配置方式應能與實際擁有的揚聲器相符。
•顯示錯誤訊息時(如 Too much ambient noise) 在檢查環境雜訊後選擇 RETRY(請參閱以下的自動MCACC設定使用時的其他問題)。
若螢幕上顯示的揚聲器配置方式錯誤,請使用/按鍵選取揚聲器,並以/按鍵變更設定。 完成後,請繼續下一步驟。若在右側欄位中見到一錯誤訊息(ERR),表示有可能是揚聲器接線出現問題。 若在選擇 RETRY後仍無法解決問題,請關閉電源並檢視揚聲器接線。
9 選取「OK」,然後按下 ENTER。如果在步驟 7中超過 10秒未觸控顯示器,且在步驟 8中未按下 ENTER,自動MCACC設定將如圖所示自動啟動。
此時螢幕上會顯示進度報告,同時接收器會輸出更多測試音以決定聲道位準、揚聲器距離及音場補正等化功能等最佳的接收器設定值。再次提醒,操作期間請儘量保持安靜。 大約需要 1至 3分鐘。
10 已完成 Auto MCACC設定! 此時您會回到System Setup選單。自動 MCACC 設定中的設定應能為您的系統提供絕佳的環繞音效,但您也可能需要到系統設定選單(自第33頁起有詳盡說明)中調整以上設定。
附註•需視所在房間的特性而定,有時圓錐體大小同為
12 cm的揚聲器,在尺寸設定上也會有所不同。 可根據第 33頁的揚聲器設定 乙節手動修改設定。
•重低音在距離的設定上可能會比實際相隔聆聽位置的距離更遠一些。 此項設定應求精確(將延遲及房間特性一併納入考量),且一般無須再做變更。
自動 MCACC設定使用時的其他問題若房間環境相當不適合使用自動 MCACC設定(背景雜音太多、牆壁造成迴音、揚聲器與麥克風有阻擋物),則最後設定有可能不正確。 請檢查家中的電氣用品(空調、冰箱、電風扇等),這些設備可能會影響環境,請於必要時將其關閉。 在前面板顯示幕上如有出現其他指示,請依照指示執行。
•有些舊型電視機可能會干擾麥克風的操作。 若有發生干擾現象,請在進行自動 MCACC設定時將電視機關閉。
1.Auto MCACC
Now Analyzing
Environment Check Ambient Noise Speaker YES/NO
Return
1.Auto MCACC
Check!
OK Return 10:Next
Front CenterSurrSurr. BackSubwoofer
[ YES ][ YES ][ YES ][YESx2][ YES ]
1.Auto MCACC
Now Analyzing
Surround Analyzing Speaker System Speaker Distance Channel Level Acoustic Cal EQ
Return
VSX-821_FLXCN_zhtw.book Page 21 Monday, March 28, 2011 2:55 PM
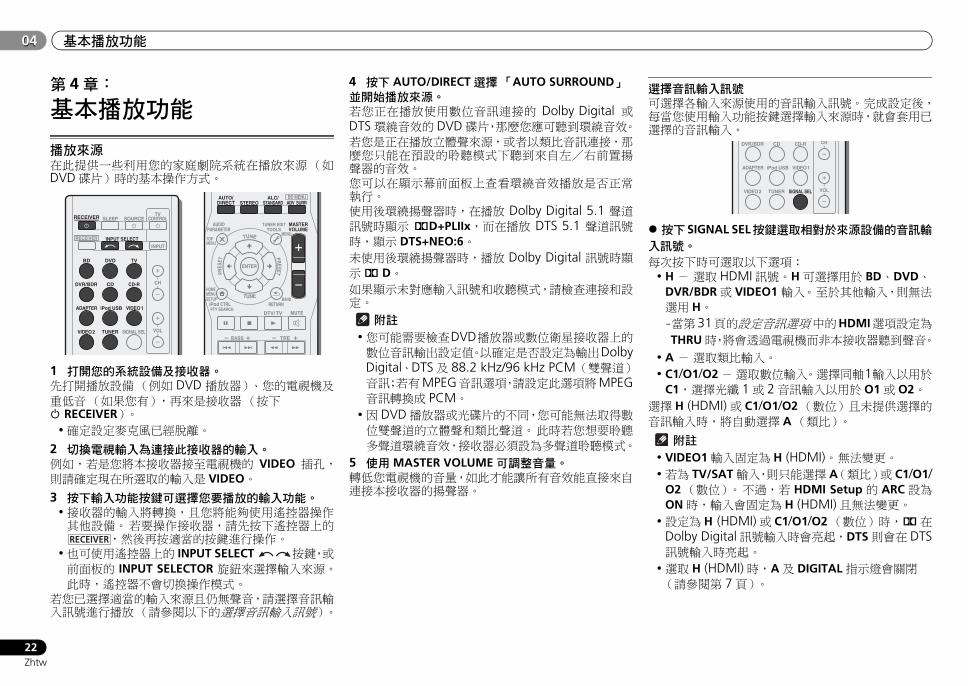
基本播放功能04
22Zhtw
04
第 4章:
基本播放功能
播放來源在此提供一些利用您的家庭劇院系統在播放來源(如DVD碟片)時的基本操作方式。
1 打開您的系統設備及接收器。先打開播放設備(例如 DVD播放器)、您的電視機及重低音(如果您有),再來是接收器(按下 RECEIVER)。
•確定設定麥克風已經脫離。
2 切換電視輸入為連接此接收器的輸入。例如,若是您將本接收器接至電視機的 VIDEO 插孔,則請確定現在所選取的輸入是 VIDEO。
3 按下輸入功能按鍵可選擇您要播放的輸入功能。•接收器的輸入將轉換,且您將能夠使用遙控器操作其他設備。 若要操作接收器,請先按下遙控器上的
,然後再按適當的按鍵進行操作。•也可使用遙控器上的 INPUT SELECT 按鍵,或
前面板的 INPUT SELECTOR 旋鈕來選擇輸入來源。此時,遙控器不會切換操作模式。
若您已選擇適當的輸入來源且仍無聲音,請選擇音訊輸入訊號進行播放(請參閱以下的選擇音訊輸入訊號)。
4 按下 AUTO/DIRECT選擇「AUTO SURROUND」並開始播放來源。若您正在播放使用數位音訊連接的 Dolby Digital 或DTS環繞音效的 DVD碟片,那麼您應可聽到環繞音效。若您是正在播放立體聲來源,或者以類比音訊連接,那麼您只能在預設的聆聽模式下聽到來自左/右前置揚聲器的音效。您可以在顯示幕前面板上查看環繞音效播放是否正常執行。使用後環繞揚聲器時,在播放 Dolby Digital 5.1 聲道訊號時顯示 2D+PLIIx,而在播放 DTS 5.1 聲道訊號時,顯示 DTS+NEO:6。未使用後環繞揚聲器時,播放 Dolby Digital 訊號時顯示2 D。如果顯示未對應輸入訊號和收聽模式,請檢查連接和設定。
附註•您可能需要檢查DVD播放器或數位衛星接收器上的數位音訊輸出設定值。以確定是否設定為輸出DolbyDigital、DTS及 88.2 kHz/96 kHz PCM(雙聲道)音訊;若有MPEG音訊選項,請設定此選項將MPEG音訊轉換成 PCM。
•因 DVD播放器或光碟片的不同,您可能無法取得數位雙聲道的立體聲和類比聲道。 此時若您想要聆聽多聲道環繞音效,接收器必須設為多聲道聆聽模式。
5 使用MASTER VOLUME可調整音量。轉低您電視機的音量,如此才能讓所有音效能直接來自連接本接收器的揚聲器。
選擇音訊輸入訊號可選擇各輸入來源使用的音訊輸入訊號。 完成設定後,每當您使用輸入功能按鍵選擇輸入來源時,就會套用已選擇的音訊輸入。
按下SIGNAL SEL按鍵選取相對於來源設備的音訊輸入訊號。 每次按下時可選取以下選項:
• H - 選取 HDMI訊號。H可選擇用於 BD、DVD、DVR/BDR或 VIDEO1 輸入。 至於其他輸入,則無法選用 H。-當第31頁的設定音訊選項 中的HDMI選項設定為THRU時,將會透過電視機而非本接收器聽到聲音。
• A - 選取類比輸入。 • C1/O1/O2 - 選取數位輸入。 選擇同軸1輸入以用於
C1,選擇光纖 1或 2音訊輸入以用於 O1或 O2。選擇 H (HDMI)或 C1/O1/O2(數位)且未提供選擇的音訊輸入時,將自動選擇 A(類比)。
附註• VIDEO1輸入固定為 H (HDMI)。 無法變更。•若為 TV/SAT輸入,則只能選擇 A(類比)或 C1/O1/
O2(數位)。 不過,若 HDMI Setup的 ARC設為ON時,輸入會固定為 H (HDMI)且無法變更。
•設定為 H (HDMI)或 C1/O1/O2(數位)時,2在
Dolby Digital訊號輸入時會亮起,DTS則會在 DTS訊號輸入時亮起。
•選取 H (HDMI)時,A及 DIGITAL指示燈會關閉(請參閱第 7頁)。
BD DVD
INPUT SELECT
SOURCESLEEPTV
CONTROL
TV
INPUT
DVR/BDR CD CD-R
ADAPTER iPod USB VIDEO 1
VIDEO 2 SIGNAL SELTUNER
RECEIVER
CH
VOL
RECEIVER
ENTER
ADV SURRAUTO/
DIRECT
MUTE
RETURN
AUDIOPARAMETER
TUNER EDITTOOLS
MASTERVOLUME
iPod CTRLPTY SEARCH
BAND
MENU
HOMEMENUSETUP
DTV/ TV
TREBASS
TOPMENU
TUNE
TUNE
PRESETPRES
ET
BD MENUALC/STANDARDSTEREO
RECEIVER
DVR/BDR CD CD-R
ADAPTER iPod USB VIDEO 1
VIDEO 2 SIGNAL SELTUNER
CH
VOL
VSX-821_FLXCN_zhtw.book Page 22 Monday, March 28, 2011 2:55 PM
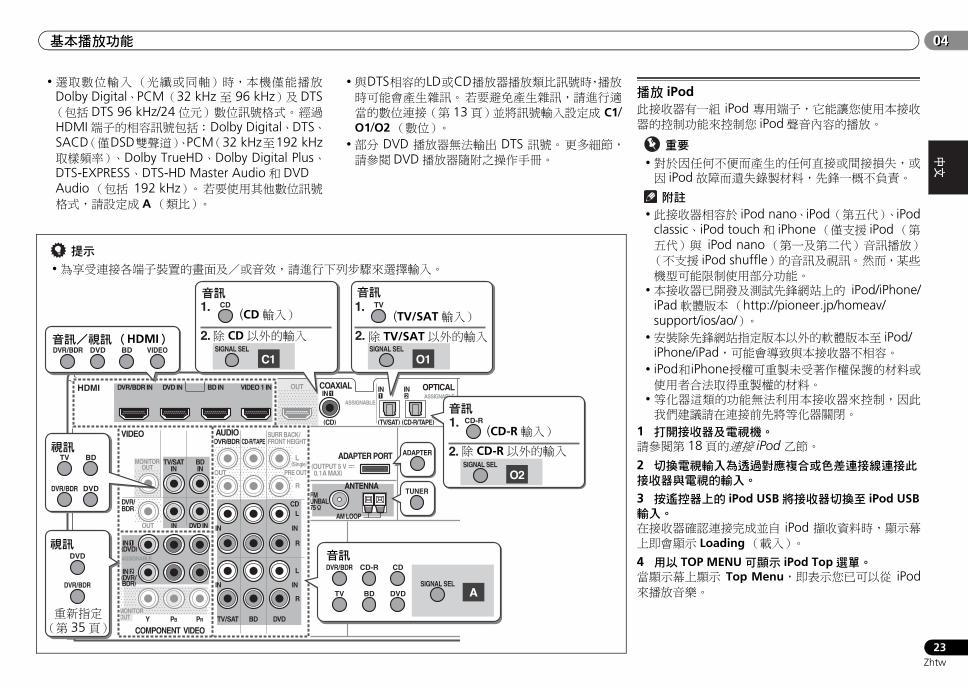
EnglishEspañol
基本播放功能 0404
23Zhtw
•選取數位輸入(光纖或同軸)時,本機僅能播放Dolby Digital、PCM(32 kHz 至 96 kHz)及 DTS(包括 DTS 96 kHz/24位元)數位訊號格式。 經過HDMI端子的相容訊號包括: Dolby Digital、DTS、SACD(僅DSD雙聲道)、PCM(32 kHz至192 kHz取樣頻率)、Dolby TrueHD、Dolby Digital Plus、DTS-EXPRESS、DTS-HD Master Audio和 DVDAudio(包括 192 kHz)。 若要使用其他數位訊號格式,請設定成 A(類比)。
•與DTS相容的LD或CD播放器播放類比訊號時,播放時可能會產生雜訊。 若要避免產生雜訊,請進行適當的數位連接(第 13頁)並將訊號輸入設定成 C1/O1/O2(數位)。
•部分 DVD 播放器無法輸出 DTS 訊號。 更多細節,請參閱 DVD播放器隨附之操作手冊。
播放 iPod此接收器有一組 iPod 專用端子,它能讓您使用本接收器的控制功能來控制您 iPod聲音內容的播放。
重要
•對於因任何不便而產生的任何直接或間接損失,或因 iPod故障而遺失錄製材料,先鋒一概不負責。
附註•此接收器相容於 iPod nano、iPod(第五代)、iPod
classic、iPod touch和 iPhone(僅支援 iPod(第五代)與 iPod nano(第一及第二代)音訊播放)(不支援 iPod shuffle)的音訊及視訊。 然而,某些機型可能限制使用部分功能。
•本接收器已開發及測試先鋒網站上的 iPod/iPhone/iPad軟體版本(http://pioneer.jp/homeav/support/ios/ao/)。
•安裝除先鋒網站指定版本以外的軟體版本至 iPod/iPhone/iPad,可能會導致與本接收器不相容。
• iPod和iPhone授權可重製未受著作權保護的材料或使用者合法取得重製權的材料。
•等化器這類的功能無法利用本接收器來控制,因此我們建議請在連接前先將等化器關閉。
1 打開接收器及電視機。請參閱第 18頁的連接 iPod 乙節。
2 切換電視輸入為透過對應複合或色差連接線連接此接收器與電視的輸入。
3 按遙控器上的 iPod USB將接收器切換至 iPod USB輸入。在接收器確認連接完成並自 iPod 擷收資料時,顯示幕上即會顯示 Loading(載入)。
4 用以 TOP MENU可顯示 iPod Top選單。當顯示幕上顯示 Top Menu,即表示您已可以從 iPod來播放音樂。
提示
•為享受連接各端子裝置的畫面及/或音效,請進行下列步驟來選擇輸入。
MONITOROUT
HDMI
VIDEO
COMPONENT VIDEO
DVR/BDR
L
R
R
L
Y PB PR
COAXIAL
AUDIO
ANTENNA
OPTICAL
ASSIGNABLE
ASSIGNABLE
ASSIGNABLE
OUT
DVR/BDR
OUT
CD-R/TAPESURR BACK/FRONT HEIGHT
L
R
PRE OUT(Single)
IN
(CD)
1
IN IN
CD
MONITOROUT
TV/SATIN
BDIN
OUT IN DVD IN
IN
TV/SAT BD
IN
DVD
(DVD)IN 1
(DVR/BDR)
IN 2
DVR/BDR IN DVD IN BD IN VIDEO 1 IN
(TV/SAT)
IN1
(CD-R/TAPE)
IN2
FMUNBAL75
(OUTPUT 5 V 0.1A MAX)
ADAPTER PORT
AM LOOP
DVD BD
CD
CD-R
ADAPTER
TUNER
TV
DVR/BDR
TV BD
DVR/BDR DVD
DVR/BDR
DVD
CD-R CDDVR/BDR
BD DVDTV
VIDEO
1. 1.
1.
O2
A
2.
SIGNAL SEL
SIGNAL SEL
O1
2.SIGNAL SEL
C1
2.SIGNAL SEL
音訊
除 CD以外的輸入
音訊
音訊
音訊
音訊/視訊(HDMI)
視訊
視訊
除 TV/SAT以外的輸入
除 CD-R以外的輸入
(CD輸入) (TV/SAT輸入)
(CD-R輸入)
重新指定(第 35頁)
VSX-821_FLXCN_zhtw.book Page 23 Monday, March 28, 2011 2:55 PM

基本播放功能04
24Zhtw
04
•若是在按下 iPod後,顯示幕上卻顯示 NO DEVICE,則請嘗試將接收器關機並重新將 iPod連接至接收器上。
•與本接收器連接時,iPod的控制功能無法作用。
播放儲存在 iPod上的檔案您可以使用與接收器連接的電視機上的 OSD 來瀏覽您iPod 上的歌曲。 您也可以控制此接收器前面板顯示器中的所有音樂操作作業。
•注意,標題中非羅馬字元會顯示為「*」。•此功能無法在您 iPod上的相片或視訊片段上使用。
搜索您要播放的內容將您的 iPod 連接到此接收器時,您便可以依照播放清單、演出者姓名、專輯名稱、歌名、類型或作曲者等等分類方式來瀏覽 iPod 上儲存的歌曲,就好像您直接在使用 iPod一樣。1 使用/以選取一項,然後按下 ENTER來瀏覽該項內容。
•要回到上一層,請按 RETURN。
2 使用/以瀏覽所選項目的內容(例如專輯)。•使用 /以移至上/下一層。
3 繼續瀏覽,直到您找到想要播放的內容,然後按下 開始播放。
提示
•若是您目前在歌曲項目中,那麼您也可以按下ENTER 來開始播放。
•您可以選取每種項目清單最上方的 All 物件來播放所有在特定項目的歌曲。 例如,您可播放由特定演唱人所演唱的所有歌曲。
基本播放控制此接收器的遙控器按鍵可用於儲存在 iPod 中檔案的基本播放。
•按 iPod USB將遙控器切換至 iPod/USB操作模式。
•播放有聲書時,請按下/按鍵來切換播放速度:較快正常較慢
觀賞相片與視訊內容若要觀賞您 iPod 上的相片或視訊,由於無法使用此接收器來控制視訊,因此您必須使用 iPod 的控制功能來控制。
重要
•若要播放您 iPod上的相片或視訊,您必須連接複合MONITOR OUT插孔和電視機。
•只有在 iPod連接至前面板的 iPod VIDEO輸入時,才能檢視 iPod的相片和視訊內容。
•本功能僅能搭配有視訊輸出功能的 iPod使用。
1 請按下 iPod CTRL來切換相片與視訊播放的 iPod控制功能。在您觀賞 iPod 視訊或瀏覽相片時,將無法使用此接收器的控制功能。
2 在您觀賞完畢時可再按一次 iPod CTRL來切換回接收器控制功能。
提示
•按下前面板上的 iPod iPhone iPad DIRECT CONTROL來變更接收器的輸入為 iPod,以啟用iPod上的 iPod操作。
播放 USB裝置您可利用本接收器前面板的 USB 介面,聆聽雙聲道音訊。
重要
•先鋒概不保證所有 USB大量儲存裝置的相容性(操作及/或匯流排電源),以及承擔在連接至本接收器時可能造成資料遺失的相關責任。
附註•此項包含WMA/MP3/MPEG-4 AAC檔案的播放(除防拷或受限檔案的播放外)。
•相容的USB裝置包括FAT16/32格式的磁碟機、可攜式快閃記憶體(特殊隨身碟)及數位音訊播放器(MP3 播放器)。本接收器不能連接至個人電腦進行 USB播放。
•對於大量的資料,接收器可能需要較長的時間讀取USB裝置的內容。
•若無法播放選擇的檔案,此接收器便會自動跳到下一個可以播放的檔案。
•當目前正在播放的檔案沒有被指定標題時,便會在OSD中顯示檔案名稱;若沒有專輯名稱與演唱人姓名資料時,該列便會顯示為空白。
•注意,播放清單中非羅馬字元會顯示為「*」。•要拆離 USB裝置時,請確定接收器為待機狀態。
1 打開接收器及電視機。請參閱第 19頁的連接 USB裝置 乙節。
2 切換電視輸入為透過對應複合或色差連接線連接此接收器與電視的輸入。
3 按遙控器上的 iPod USB將接收器切換至 iPod USB輸入。當接收器開始辨識連接的 USB裝置時,OSD中便會出現 Loading。 辨識完成後,OSD 中便會出現一個播放畫面並自動開始播放。
ENTER
ADV SURRAUTO/
DIRECT
RETURN
AUDIOPARAMETER
TUNER EDITTOOLS
MASTERVOLUME
iPod CTRLPTY SEARCH
BAND
MENU
HOMEMENUSETUP
TOPMENU
TUNE
TUNE
PRESETPRES
ET
BD MENU
DIMMER
1
4
7MIDNIGHT
S.RETRIEVER
2
5
8SPEAKERS LEV
LEV
SB CH
DISP
EQ
PHASE
3
6
9
0
CH
CH
CH SELECT
MUTEDTV/ TV
TREBASS
SHIFT
HDD DVD VCR
ALC/STANDARDSTEREO
VSX-821_FLXCN_zhtw.book Page 24 Monday, March 28, 2011 2:55 PM

EnglishEspañol
基本播放功能 0404
25Zhtw
基本播放控制此接收器的遙控器按鍵可用於儲存在 USB 隨身碟中檔案的基本播放。
•按 iPod USB將遙控器切換至 iPod/USB操作模式。
重要
若顯示幕中的 USB Error錯誤訊息燈亮起,請嘗試從下列各點進行了解:
•將接收器關閉後再開啟。•在接收器關機時重新接上 USB裝置。•選取其他輸入來源(如BD),然後切回至 iPod USB。•使用專用的AC電源變壓器(隨裝置附上)提供USB電源。
如需有關錯誤訊息的詳細資訊,請參閱第 47頁的 USB訊息 乙節。若仍無法解決問題,則有可能是 USB裝置不相容。
壓縮音訊之相容性請注意,雖然大多數壓縮音訊的標準位元率/取樣率組合均能相容,但也有些不規則的編碼檔案會無法播放。
以下僅列出屬於相容格式的壓縮音訊檔案:• MP3 (MPEG-1/2/2.5 Audio Layer 3) -取樣率:
8 kHz 至 48 kHz;位元率: 8 kbps 至 320 kbps(建議 128 kbps 以上);副檔名: .mp3
• WMA (Windows Media Audio)-取樣率:32 kHz/44.1 kHz;位元率: 32 kbps 至 192 kbps(建議 128 kbps 以上);副檔名: .wma;WMA9 Pro及WMA無失真編碼: 否
• AAC (MPEG-4 Advanced Audio Coding) -取樣率: 11.025 kHz 至 48 kHz;位元率: 16 kbps 至320 kbps(建議 128 kbps 以上);副檔名: .m4a;Apple無失真編碼: 否
其他相容性資訊• VBR(可變位元率)MP3/WMA/MPEG-4 AAC播放:可 (請注意,有時播放時間會無法正確顯示。)
• DRM(數位版權管理)保護相容性:可(不能在本接收器上播放受 DRM 保護的音訊檔案。)
關於MPEG-4 AACAdvanced Audio Coding (AAC)是MPEG-4 AAC標準的核心,主要採用MPEG-2 AAC規格,為構成MPEG-4音訊壓縮技術的基礎。 所使用的檔案格式及副檔名需視進行 AAC檔案編碼的應用程式而定。 本機能播 iTunes® 編碼為「.m4a」。 副檔名的 AAC 檔案;DRM保護檔案不能播放,同時某些版本的 iTunes®所編碼的檔案也可能無法播放。Apple及 iTunes均是 Apple Inc.於美國及其他國家註冊的商標。
關於WMAWMA 是 Windows Media Audio 的首字母縮寫,是指由 Microsoft Corporation 所研發的一種音壓縮技術。 本機可播放利用Windows Media® Player編碼為「.wma」副檔名的 WMA 檔案。 請注意,DRM 保護檔案不能播放,同時某些版本的 Windows Media®
Player所編碼的檔案也可能無法播放。
享受無線音樂的 Bluetooth® ADAPTER
無線音樂播放Bluetooth ADAPTER(先鋒型號 AS-BT100或AS-BT200)連接本機時,搭載 Bluetooth無線技術的產品(行動電話、數位音樂播放器等)就能以無線的方式聆聽音樂。 此外,使用支援 Bluetooth無線技術的市售發射器,您即可聆聽未搭載 Bluetooth無線技術裝置上的音樂。 AS-BT100和 AS-BT200機型支援 SCMS-T內容保護,因此也可在搭載 SCMS-T 類型 Bluetooth 無線技術的裝置上享受音樂。
•採用Bluetooth無線技術的裝置必須支援A2DP設定檔。
ENTER
ADV SURRAUTO/
DIRECT
MUTE
RETURN
AUDIOPARAMETER
TUNER EDITTOOLS
MASTERVOLUME
iPod CTRLPTY SEARCH
BAND
MENU
HOMEMENUSETUP
DTV/TV
TOPMENU
TUNE
TUNE
PRESETPRES
ET
BD MENU
DIMMER
1
4
7MIDNIGHT
S.RETRIEVER
2
5
8SPEAKERS LEV
LEV
SB CH
DISP
EQ
PHASE
3
6
9
0
CH
CH
CH SELECT
MUTEDTV/ TV
TREBASS
SHIFT
HDD DVD VCR
ALC/STANDARDSTEREO
採用 Bluetooth無線技術裝置:行動電話
採用 Bluetooth無線技術裝置:數位音訊播放器
未配備 Bluetooth無線技術的裝置: 數位音樂播放器 + Bluetooth音訊發射器(另售)
音樂資料
遙控器操作
Bluetooth® ADAPTER
本接收器
VSX-821_FLXCN_zhtw.book Page 25 Monday, March 28, 2011 2:55 PM

基本播放功能04
26Zhtw
04
重要
•先鋒不保證本機與所有採用 Bluetooth 無線技術裝置的搭配連接與操作正常。
遙控器操作您可利用本機隨附的遙控器播放及停止媒體,並執行其他操作。
•採用Bluetooth無線技術的裝置必須支援AVRCP設定檔。
•無法保證所有採用 Bluetooth 無線技術裝置的遙控操作。
用來配對 Bluetooth ADAPTER及 Bluetooth無線技術裝置在您使用 Bluetooth ADAPTER開始播放 Bluetooth無線技術內容前,必須完成「配對」。 請確定在首次操作系統或清除時間配對資料時執行配對。「配對」是登錄Bluetooth無線技術裝置以啟用 Bluetooth通訊的必要步驟。 有關詳細資料,請參閱 Bluetooth無線技術裝置的操作手冊。
•當您首次使用Bluetooth無線技術裝置及BluetoothADAPTER時,必須進行配對。
•若要啟用 Bluetooth通訊,必須完成您的系統與Bluetooth無線技術裝置的配對。
•若Bluetooth無線技術裝置的安全代碼為「0000」,則不需要在接收器上設定安全代碼。 按下ADAPTER可切換 ADAPTER 輸入,接著於 Bluetooth 無線技術裝置上進行配對操作。 若配對成功,則不需要執行以下配對操作。
•僅使用AS-BT200時: 若Bluetooth無線技術裝置支援 SSP(安全簡易配對)功能,則不需要設定安全代碼。 按下 ADAPTER 可切換 ADAPTER 輸入,接著於 Bluetooth無線技術裝置上進行配對操作。 若配對成功,則不需要執行以下配對操作。
1 按下 TOP MENU按鍵。
2 按下 ENTER以進入 PAIRING。
3 使用/從 0000/1234/8888中選擇要使用的PIN碼,然後按下 ENTER。PAIRING閃爍。
•您可使用任一 0000/1234/8888 PIN碼。 使用其他PIN 碼的 Bluetooth 無線技術裝置無法搭配此系統使用。
4 開啟您要配對的 Bluetooth無線技術裝置,放置在系統附近並設定為配對模式。
5 查看 Bluetooth無線技術裝置是否已偵測到Bluetooth ADAPTER。連接 Bluetooth無線技術裝置時:Bluetooth 無線技術裝置名稱會出現在接收器顯示幕上。
•系統只會顯示英數字元。其他字元可能無法正確顯示。
未連接 Bluetooth無線技術裝置時:接收器顯示幕中會出現 NODEVICE。此時請由Bluetooth無線技術裝置端執行連接操作。
6 在 Bluetooth無線技術裝置清單中,選擇Bluetooth ADAPTER並輸入步驟 4中選擇的 PIN碼。
•在某些情況下 PIN碼稱為 PASSKEY。
聆聽與您系統搭配的 Bluetooth無線技術裝置音樂內容
1 請按下 ADAPTER來切換接收器為 ADAPTER輸入。
2 從 Bluetooth無線技術裝置端執行與 Bluetooth ADAPTER的連接操作。
• Bluetooth ADAPTER 未插入 ADAPTER PORT端子時,若選擇 ADAPTER輸入就會顯示 NO ADAPTER。
3 開始播放儲存在 Bluetooth無線技術裝置中的音樂內容。此接收器的遙控器按鍵可用於儲存在Bluetooth無線技術裝置中檔案的基本播放。
• Bluetooth 無線技術裝置必須與 AVRCP 設定檔相容。
•視您使用的Bluetooth無線技術裝置而定,操作可能會與遙控器按鍵中顯示的內容不同。
Bluetooth®字標和商標為 Bluetooth SIG, Inc. 所有,先鋒公司使用這些標誌皆需獲得授權。 其他商標和商品名稱分屬其各自的擁有者所有。
MUTEPTY SEARCH
DTV/ TV
TREBASS
VSX-821_FLXCN_zhtw.book Page 26 Monday, March 28, 2011 2:55 PM

EnglishEspañol
基本播放功能 0404
27Zhtw
收聽收音機以下步驟為說明如何利用自動(搜索)及手動(間隔)調諧功能調選 FM 及 AM 廣播節目的方法。 在完成選台後,可記憶頻率便於叫出收聽 — 更多關於此項操作的說明,請參閱以下的儲存預設電台 乙節。
1 按下 TUNER以選取調諧器。
2 如有必要,使用 BAND按鍵切換波段(FM或AM)。每次按下可切換 FM(立體聲或單聲道)及 AM兩者之間的波段。
3 調選電台。共有三種調選方式:自動調諧
要在目前所選的波段中搜索電台,請按住TUNE /按鍵大約一秒鐘。 接收器便會往下一個電台開始搜索,直至搜索到電台為止。 要搜索其他電台,請重複上述步驟。手動調諧
要逐步變更頻率,請按下 TUNE/按鍵。高速調諧
持續按住 TUNE/按鍵可進行高速調諧。 搜索到所需頻率時請放開按鍵。
改善 FM音質若在調選到一FM電台時因訊號微弱而導致TUNE或ST指示燈未亮,請將接收器切換至單聲道接收模式。
按下 BAND以選取 FM MONO。如此應可有效改善音質,進而享受廣播的樂趣。
儲存預設電台若經常固定收聽一個電台,最方便的方式是讓接收器將頻率儲存起來,日後隨時想聽節目時就可叫出來收聽。如此便無須每次手動微調。 本機最多可記憶30個電台。
1 調至想要記憶的電台。詳情請參閱上文的收聽收音機 乙節。
2 按下 TUNER EDIT按鍵。顯示幕顯示 PRESET,然後閃爍MEM和預設電台。
3 按下 PRESET /選取所要的預設電台。您也可以利用數字鍵。
4 按下 ENTER按鍵。在按下後,預設數字會停止閃爍,同時接收器會儲存電台。
附註•如果接收器超過一個月未接上 AC 電源,則電台記憶將會消失,您必須重新編排。
•電台會以立體聲儲存。 以 FM MONO模式儲存電台後,在喚回時會顯示為 ST。
收聽預設電台必須已儲存一些電台才可進行此項操作。 若尚未儲存,則請參閱上文的儲存預設電台 乙節。
按下 PRESET /選取所要的預設電台。•預設電台亦可使用遙控器的數字鍵叫出收聽。
命名預設電台為了能更容易識別,您可以將所有預設電台命名。
1 選擇要命名的預設電台。請參閱上文的收聽預設電台 乙節以便進行連接。
2 按兩下 TUNER EDIT按鍵。第一個字元位置上的游標在顯示幕上閃爍。
3 輸入想要的名稱。選擇最多八個字元長度的名稱。
•可用 PRESET /以選擇字元位置。•可用 TUNE /以選擇字元。•按下 ENTER時會儲存名稱。
提示
•若要刪除電台名稱,請依照步驟 1和 2,然後在顯示幕空白時按下 ENTER。 在顯示幕空白時按下 TUNEREDIT以保留之前的名稱。
•將預設電台命名後,請按 DISP以顯示名稱。 要返回頻率顯示時,按數次 DISP以顯示頻率。
切換無線電頻率間隔若發現無法成功調選到電台,則表示該頻率間隔不適用於所在的國家/地區。 以下為切換設定值的方式:
1 將接收器切換成待機。
2 在按住 TUNE 按鍵時,同時按住 STANDBY/ON按鍵約兩秒鐘。
•每次操作時,可輪流切換 10K STEP與 9K STEP的聲道調諧間隔。
DVR/BDR CD CD-R
ADAPTER iPod USB VIDEO 1
VIDEO 2 SIGNAL SELTUNER
CH
VOL
ENTER
MUTE
RETURN
AUDIOPARAMETER
TUNER EDITTOOLS
MASTERVOLUME
iPod CTRLPTY SEARCH
BAND
MENU
HOMEMENUSETUP
DTV/TV
TOPMENU
TUNE
TUNE
PRESETPRES
ET
BD DVD
INPUT SELECT
SOURCESLEEPTV
CONTROL
TV
INPUT
DVR/BDR CD CD-R
ADAPTER iPod USB VIDEO 1
VIDEO 2 SIGNAL SELTUNER
RECEIVER
CH
VOL
RECEIVER
1
ENTER
2 DISP3
MUTE
RETURN
AUDIOPARAMETER
TUNER EDITTOOLS
MASTERVOLUME
iPod CTRLPTY SEARCH
BAND
MENU
HOMEMENUSETUP
DTV/ TV
TREBASS
TOPMENU
TUNE
TUNE
PRESETPRES
ET
HDD DVD VCR
VSX-821_FLXCN_zhtw.book Page 27 Monday, March 28, 2011 2:55 PM
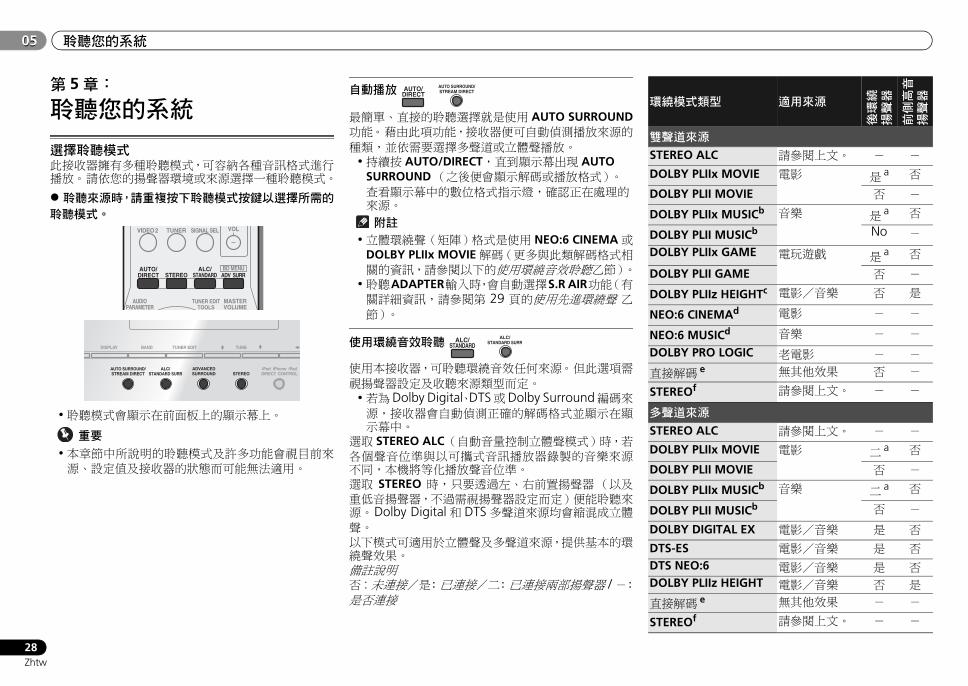
聆聽您的系統05
28Zhtw
05
第 5章:
聆聽您的系統
選擇聆聽模式此接收器擁有多種聆聽模式,可容納各種音訊格式進行播放。 請依您的揚聲器環境或來源選擇一種聆聽模式。
聆聽來源時,請重複按下聆聽模式按鍵以選擇所需的聆聽模式。
•聆聽模式會顯示在前面板上的顯示幕上。
重要
•本章節中所說明的聆聽模式及許多功能會視目前來源、設定值及接收器的狀態而可能無法適用。
自動播放
最簡單、直接的聆聽選擇就是使用 AUTO SURROUND功能。 藉由此項功能,接收器便可自動偵測播放來源的種類,並依需要選擇多聲道或立體聲播放。
•持續按 AUTO/DIRECT,直到顯示幕出現 AUTO SURROUND(之後便會顯示解碼或播放格式)。 查看顯示幕中的數位格式指示燈,確認正在處理的來源。
附註•立體環繞聲(矩陣)格式是使用 NEO:6 CINEMA或
DOLBY PLIIx MOVIE解碼(更多與此類解碼格式相關的資訊,請參閱以下的使用環繞音效聆聽乙節)。
•聆聽ADAPTER輸入時,會自動選擇S.R AIR功能(有關詳細資訊,請參閱第 29 頁的使用先進環繞聲 乙節)。
使用環繞音效聆聽
使用本接收器,可聆聽環繞音效任何來源。 但此選項需視揚聲器設定及收聽來源類型而定。
•若為Dolby Digital、DTS或Dolby Surround編碼來源,接收器會自動偵測正確的解碼格式並顯示在顯示幕中。
選取 STEREO ALC(自動音量控制立體聲模式)時,若各個聲音位準與以可攜式音訊播放器錄製的音樂來源不同,本機將等化播放聲音位準。選取 STEREO 時,只要透過左、右前置揚聲器(以及重低音揚聲器,不過需視揚聲器設定而定)便能聆聽來源。 Dolby Digital和 DTS多聲道來源均會縮混成立體聲。以下模式可適用於立體聲及多聲道來源,提供基本的環繞聲效果。備註說明否 : 未連接/是: 已連接/二: 已連接兩部揚聲器 / -:是否連接
VIDEO 2 SIGNAL SELTUNER
ADV SURRAUTO/
DIRECT
VOL
AUDIOPARAMETER
TUNER EDITTOOLS
MASTERVOLUME
BD MENUALC/STANDARDSTEREO
iPod iPhone iPadDIRECT CONTROLSTEREO
ADVANCEDSURROUND
DISPLAY BAND TUNER EDIT TUNE
ALC/STANDARD SURR
AUTO SURROUND/STREAM DIRECT
AUTO/DIRECT
AUTO SURROUND/STREAM DIRECT
ALC/STANDARD
ALC/STANDARD SURR
環繞模式類型 適用來源
後環繞
揚聲器
前側高音
揚聲器
雙聲道來源
STEREO ALC 請參閱上文。 - -
DOLBY PLIIx MOVIE 電影 是 a 否
DOLBY PLII MOVIE 否 -
DOLBY PLIIx MUSICb 音樂 是 a 否
DOLBY PLII MUSICb No -
DOLBY PLIIx GAME 電玩遊戲 是 a 否
DOLBY PLII GAME 否 -
DOLBY PLIIz HEIGHTc 電影/音樂 否 是
NEO:6 CINEMAd 電影 - -
NEO:6 MUSICd 音樂 - -
DOLBY PRO LOGIC 老電影 - -
直接解碼 e 無其他效果 否 -
STEREOf 請參閱上文。 - -
多聲道來源
STEREO ALC 請參閱上文。 - -
DOLBY PLIIx MOVIE 電影 二 a 否
DOLBY PLII MOVIE 否 -
DOLBY PLIIx MUSICb 音樂 二 a 否
DOLBY PLII MUSICb 否 -
DOLBY DIGITAL EX 電影/音樂 是 否
DTS-ES 電影/音樂 是 否
DTS NEO:6 電影/音樂 是 否
DOLBY PLIIz HEIGHT 電影/音樂 否 是
直接解碼 e 無其他效果 - -
STEREOf 請參閱上文。 - -
VSX-821_FLXCN_zhtw.book Page 28 Monday, March 28, 2011 2:55 PM
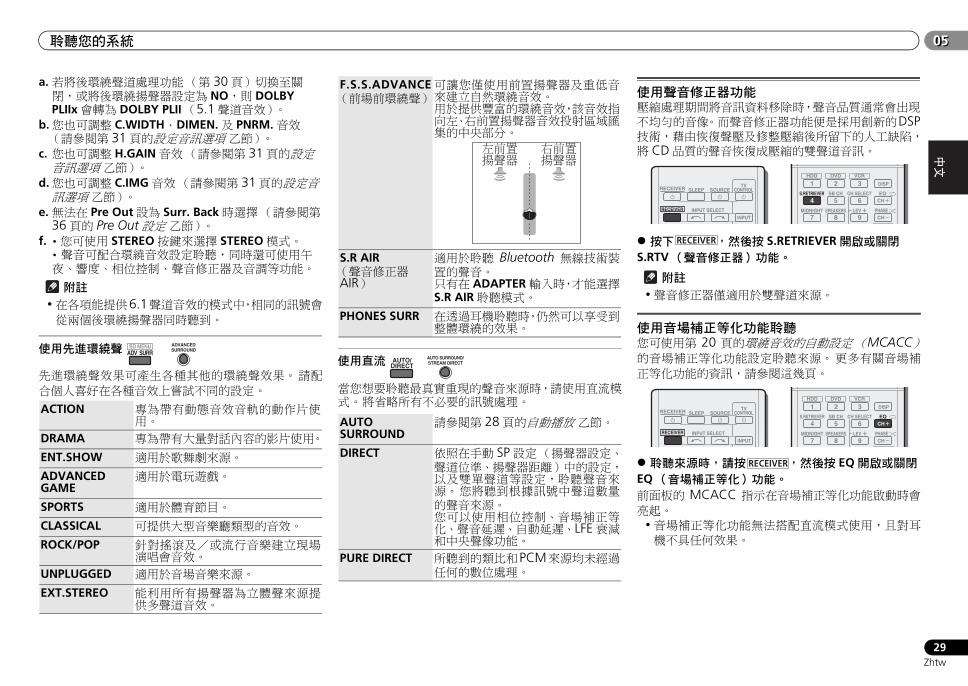
EnglishEspañol
聆聽您的系統 0505
29Zhtw
a.若將後環繞聲道處理功能(第 30頁)切換至關閉,或將後環繞揚聲器設定為 NO,則 DOLBY PLIIx會轉為 DOLBY PLII(5.1聲道音效)。
b.您也可調整 C.WIDTH、DIMEN.及 PNRM.音效(請參閱第 31頁的設定音訊選項 乙節)。
c. 您也可調整 H.GAIN音效(請參閱第 31頁的設定音訊選項 乙節)。
d.您也可調整 C.IMG音效(請參閱第 31頁的設定音訊選項 乙節)。
e.無法在 Pre Out設為 Surr. Back時選擇(請參閱第36頁的 Pre Out設定 乙節)。
f. •您可使用 STEREO按鍵來選擇 STEREO模式。• 聲音可配合環繞音效設定聆聽,同時還可使用午夜、響度、相位控制、聲音修正器及音調等功能。
附註•在各項能提供6.1聲道音效的模式中,相同的訊號會從兩個後環繞揚聲器同時聽到。
使用先進環繞聲
先進環繞聲效果可產生各種其他的環繞聲效果。 請配合個人喜好在各種音效上嘗試不同的設定。
使用直流
當您想要聆聽最真實重現的聲音來源時,請使用直流模式。 將省略所有不必要的訊號處理。
使用聲音修正器功能壓縮處理期間將音訊資料移除時,聲音品質通常會出現不均勻的音像。 而聲音修正器功能便是採用創新的DSP技術,藉由恢復聲壓及修整壓縮後所留下的人工缺陷,將 CD品質的聲音恢復成壓縮的雙聲道音訊。
按下 ,然後按 S.RETRIEVER開啟或關閉S.RTV(聲音修正器)功能。
附註•聲音修正器僅適用於雙聲道來源。
使用音場補正等化功能聆聽您可使用第 20 頁的環繞音效的自動設定(MCACC)的音場補正等化功能設定聆聽來源。 更多有關音場補正等化功能的資訊,請參閱這幾頁。
聆聽來源時,請按 ,然後按 EQ開啟或關閉EQ(音場補正等化)功能。前面板的 MCACC 指示在音場補正等化功能啟動時會亮起。
•音場補正等化功能無法搭配直流模式使用,且對耳機不具任何效果。
ACTION 專為帶有動態音效音軌的動作片使用。
DRAMA 專為帶有大量對話內容的影片使用。
ENT.SHOW 適用於歌舞劇來源。
ADVANCED GAME
適用於電玩遊戲。
SPORTS 適用於體育節目。
CLASSICAL 可提供大型音樂廳類型的音效。
ROCK/POP 針對搖滾及/或流行音樂建立現場演唱會音效。
UNPLUGGED 適用於音場音樂來源。
EXT.STEREO 能利用所有揚聲器為立體聲來源提供多聲道音效。
BD MENUADV SURR
ADVANCEDSURROUND
F.S.S.ADVANCE(前場前環繞聲)
可讓您僅使用前置揚聲器及重低音來建立自然環繞音效。用於提供豐富的環繞音效,該音效指向左、右前置揚聲器音效投射區域匯集的中央部分。
S.R AIR(聲音修正器AIR)
適用於聆聽 Bluetooth 無線技術裝置的聲音。只有在 ADAPTER輸入時,才能選擇S.R AIR聆聽模式。
PHONES SURR 在透過耳機聆聽時,仍然可以享受到整體環繞的效果。
AUTO SURROUND
請參閱第 28頁的自動播放 乙節。
DIRECT 依照在手動 SP設定(揚聲器設定、聲道位準、揚聲器距離)中的設定,以及雙單聲道等設定,聆聽聲音來源。 您將聽到根據訊號中聲道數量的聲音來源。您可以使用相位控制、音場補正等化、聲音延遲、自動延遲、LFE衰減和中央聲像功能。
PURE DIRECT 所聽到的類比和PCM來源均未經過任何的數位處理。
左前置揚聲器
右前置揚聲器
AUTO/DIRECT
AUTO SURROUND/STREAM DIRECT
INPUT SELECT
SOURCESLEEPTV
CONTROL
INPUT
RECEIVER
RECEIVER
1
4
7MIDNIGHT
S.RETRIEVER
2
5
8SPEAKERS LEV
SB CH
DISP
EQ
PHASE
3
6
9
CH
CH
CH SELECT
S
HDD DVD VCR
RECEIVER
INPUT SELECT
SOURCESLEEPTV
CONTROL
INPUT
RECEIVER
RECEIVER
1
4
7MIDNIGHT
S.RETRIEVER
2
5
8SPEAKERS LEV
SB CH
DISP
EQ
PHASE
3
6
9
CH
CH
CH SELECT
S
HDD DVD VCR
RECEIVER
VSX-821_FLXCN_zhtw.book Page 29 Monday, March 28, 2011 2:55 PM
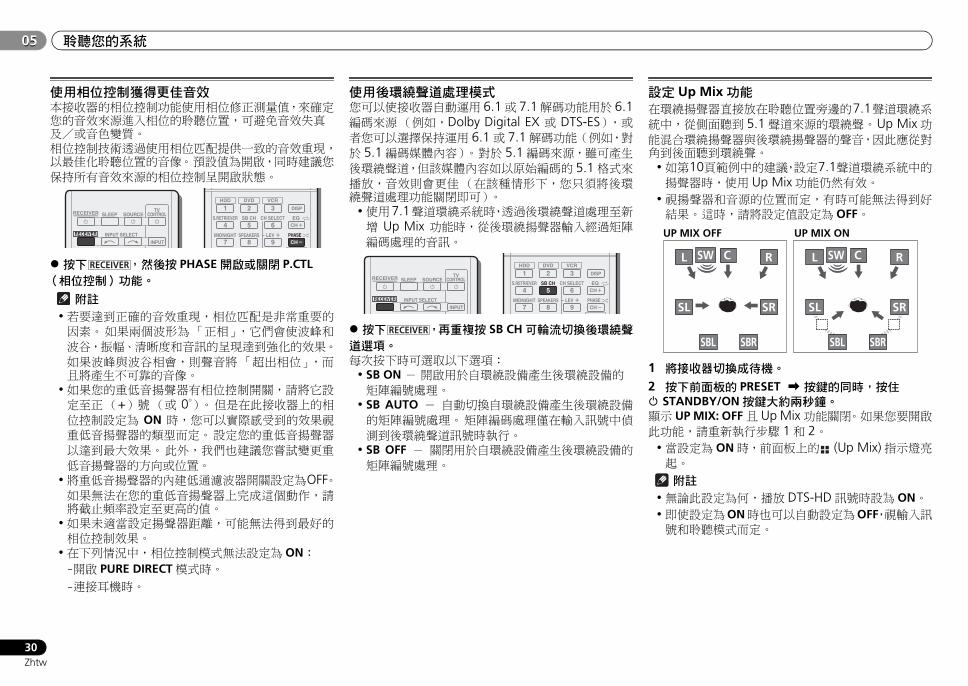
聆聽您的系統05
30Zhtw
05
使用相位控制獲得更佳音效本接收器的相位控制功能使用相位修正測量值,來確定您的音效來源進入相位的聆聽位置,可避免音效失真及/或音色變質。相位控制技術透過使用相位匹配提供一致的音效重現,以最佳化聆聽位置的音像。 預設值為開啟,同時建議您保持所有音效來源的相位控制呈開啟狀態。
按下 ,然後按 PHASE開啟或關閉 P.CTL(相位控制)功能。
附註•若要達到正確的音效重現,相位匹配是非常重要的因素。 如果兩個波形為「正相」,它們會使波峰和波谷,振幅、清晰度和音訊的呈現達到強化的效果。
如果波峰與波谷相會,則聲音將「超出相位」,而且將產生不可靠的音像。
•如果您的重低音揚聲器有相位控制開關,請將它設定至正(+)號(或 0°)。 但是在此接收器上的相位控制設定為 ON 時,您可以實際感受到的效果視重低音揚聲器的類型而定。 設定您的重低音揚聲器以達到最大效果。 此外,我們也建議您嘗試變更重低音揚聲器的方向或位置。
•將重低音揚聲器的內建低通濾波器開關設定為OFF。如果無法在您的重低音揚聲器上完成這個動作,請將截止頻率設定至更高的值。
•如果未適當設定揚聲器距離,可能無法得到最好的相位控制效果。
•在下列情況中,相位控制模式無法設定為 ON:-開啟 PURE DIRECT模式時。-連接耳機時。
使用後環繞聲道處理模式您可以使接收器自動運用 6.1或 7.1解碼功能用於 6.1編碼來源(例如,Dolby Digital EX 或 DTS-ES),或者您可以選擇保持運用 6.1或 7.1解碼功能(例如,對於 5.1編碼媒體內容)。 對於 5.1編碼來源,雖可產生後環繞聲道,但該媒體內容如以原始編碼的 5.1格式來播放,音效則會更佳(在該種情形下,您只須將後環繞聲道處理功能關閉即可)。
•使用7.1聲道環繞系統時,透過後環繞聲道處理至新增 Up Mix 功能時,從後環繞揚聲器輸入經過矩陣編碼處理的音訊。
按下 ,再重複按 SB CH可輪流切換後環繞聲道選項。每次按下時可選取以下選項:
• SB ON - 開啟用於自環繞設備產生後環繞設備的矩陣編號處理。
• SB AUTO - 自動切換自環繞設備產生後環繞設備的矩陣編號處理。 矩陣編碼處理僅在輸入訊號中偵測到後環繞聲道訊號時執行。
• SB OFF - 關閉用於自環繞設備產生後環繞設備的矩陣編號處理。
設定 Up Mix功能在環繞揚聲器直接放在聆聽位置旁邊的7.1聲道環繞系統中,從側面聽到 5.1聲道來源的環繞聲。 Up Mix功能混合環繞揚聲器與後環繞揚聲器的聲音,因此應從對角到後面聽到環繞聲。
•如第10頁範例中的建議,設定7.1聲道環繞系統中的揚聲器時,使用 Up Mix功能仍然有效。
•視揚聲器和音源的位置而定,有時可能無法得到好結果。 這時,請將設定值設定為 OFF。
1 將接收器切換成待機。
2 按下前面板的 PRESET 按鍵的同時,按住 STANDBY/ON按鍵大約兩秒鐘。顯示 UP MIX: OFF且 Up Mix功能關閉。 如果您要開啟此功能,請重新執行步驟 1和 2。
•當設定為 ON時,前面板上的 (Up Mix)指示燈亮起。
附註•無論此設定為何,播放 DTS-HD訊號時設為 ON。•即使設定為ON時也可以自動設定為OFF,視輸入訊號和聆聽模式而定。
INPUT SELECT
SOURCESLEEPTV
CONTROL
INPUT
RECEIVER
RECEIVER
1
4
7MIDNIGHT
S.RETRIEVER
2
5
8SPEAKERS LEV
SB CH
DISP
EQ
PHASE
3
6
9
CH
CH
CH SELECT
S
HDD DVD VCR
RECEIVER
INPUT SELECT
SOURCESLEEPTV
CONTROL
INPUT
RECEIVER
RECEIVER
1
4
7MIDNIGHT
S.RETRIEVER
2
5
8SPEAKERS LEV
SB CH
DISP
EQ
PHASE
3
6
9
CH
CH
CH SELECT
HDD DVD VCR
RECEIVER
CSWL R
SL SR
SBL SBR SBL SBR
CSWL R
SL SR
UP MIX OFF UP MIX ON
VSX-821_FLXCN_zhtw.book Page 30 Monday, March 28, 2011 2:55 PM
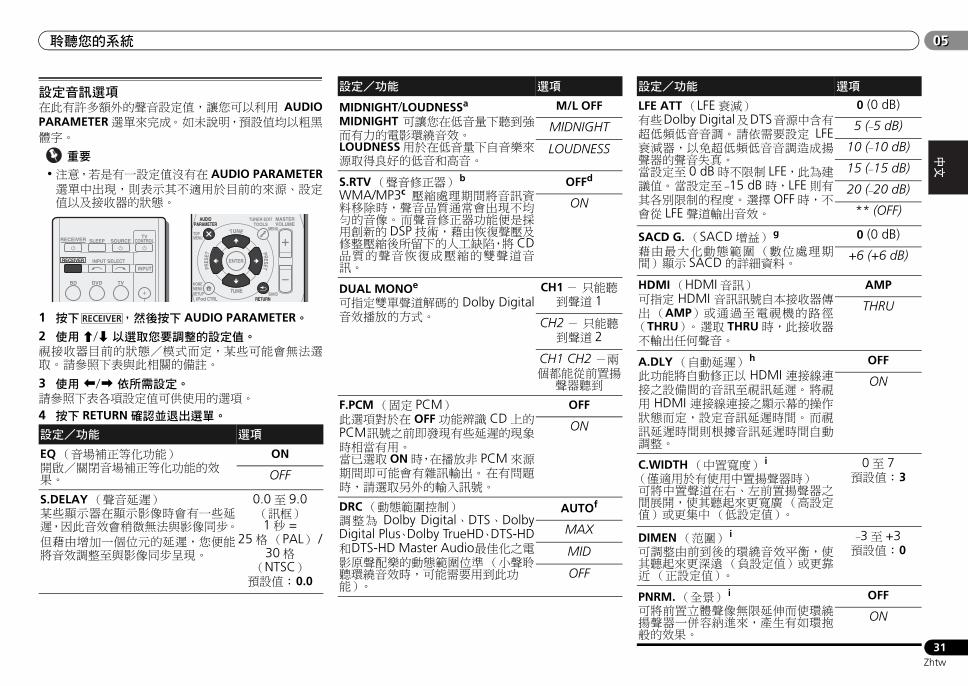
EnglishEspañol
聆聽您的系統 0505
31Zhtw
設定音訊選項在此有許多額外的聲音設定值,讓您可以利用 AUDIOPARAMETER選單來完成。 如未說明,預設值均以粗黑體字。
重要
•注意,若是有一設定值沒有在 AUDIO PARAMETER選單中出現,則表示其不適用於目前的來源、設定值以及接收器的狀態。
1 按下 ,然後按下 AUDIO PARAMETER。
2 使用/ 以選取您要調整的設定值。視接收器目前的狀態/模式而定,某些可能會無法選取。 請參照下表與此相關的備註。
3 使用/ 依所需設定。請參照下表各項設定值可供使用的選項。
4 按下 RETURN確認並退出選單。
設定/功能 選項
EQ(音場補正等化功能)開啟/關閉音場補正等化功能的效果。
ON
OFF
S.DELAY(聲音延遲)某些顯示器在顯示影像時會有一些延遲,因此音效會稍微無法與影像同步。
但藉由增加一個位元的延遲,您便能將音效調整至與影像同步呈現。
0.0至 9.0(訊框)1秒 =
25格(PAL) /30格
(NTSC)預設值: 0.0
BD DVD
INPUT SELECT
SOURCESLEEPTV
CONTROL
TV
INPUT
RECEIVER
RECEIVER ENTER
RETURN
AUDIOPARAMETER
TUNER EDITTOOLS
MASTERVOLUME
iPod CTRLC GO
BAND
MENU
HOMEMENUSETUP
TOPMENU
TUNE
TUNE
PRESETPRES
ET
RECEIVER
MIDNIGHT/LOUDNESSa
MIDNIGHT 可讓您在低音量下聽到強而有力的電影環繞音效。LOUDNESS用於在低音量下自音樂來源取得良好的低音和高音。
M/L OFF
MIDNIGHT
LOUDNESS
S.RTV(聲音修正器) b
WMA/MP3c 壓縮處理期間將音訊資料移除時,聲音品質通常會出現不均勻的音像。 而聲音修正器功能便是採用創新的 DSP技術,藉由恢復聲壓及修整壓縮後所留下的人工缺陷,將 CD品質的聲音恢復成壓縮的雙聲道音訊。
OFFd
ON
DUAL MONOe
可指定雙單聲道解碼的 Dolby Digital音效播放的方式。
CH1- 只能聽到聲道 1
CH2- 只能聽到聲道 2
CH1 CH2 -兩個都能從前置揚聲器聽到
F.PCM(固定 PCM)此選項對於在 OFF功能辨識 CD上的PCM訊號之前即發現有些延遲的現象時相當有用。當已選取 ON時,在播放非 PCM來源期間即可能會有雜訊輸出。 在有問題時,請選取另外的輸入訊號。
OFF
ON
DRC(動態範圍控制)調整為 Dolby Digital、DTS、DolbyDigital Plus、Dolby TrueHD、DTS-HD和DTS-HD Master Audio最佳化之電影原聲配樂的動態範圍位準(小聲聆聽環繞音效時,可能需要用到此功能)。
AUTOf
MAX
MID
OFF
設定/功能 選項
LFE ATT(LFE衰減)有些Dolby Digital及DTS音源中含有超低頻低音音調。 請依需要設定 LFE衰減器,以免超低頻低音音調造成揚聲器的聲音失真。當設定至 0 dB時不限制 LFE,此為建議值。 當設定至 –15 dB時,LFE則有其各別限制的程度。 選擇 OFF時,不會從 LFE聲道輸出音效。
0 (0 dB)
5 (–5 dB)
10 (–10 dB)
15 (–15 dB)
20 (–20 dB)
** (OFF)
SACD G.(SACD增益) g
藉由最大化動態範圍(數位處理期間)顯示 SACD的詳細資料。
0 (0 dB)
+6 (+6 dB)
HDMI(HDMI音訊)可指定 HDMI 音訊訊號自本接收器傳出(AMP)或通過至電視機的路徑(THRU)。 選取 THRU時,此接收器不輸出任何聲音。
AMP
THRU
A.DLY(自動延遲) h
此功能將自動修正以 HDMI 連接線連接之設備間的音訊至視訊延遲。 將視用 HDMI 連接線連接之顯示幕的操作狀態而定,設定音訊延遲時間。 而視訊延遲時間則根據音訊延遲時間自動調整。
OFF
ON
C.WIDTH(中置寬度) i
(僅適用於有使用中置揚聲器時)可將中置聲道在右、左前置揚聲器之間展開,使其聽起來更寬廣(高設定值)或更集中(低設定值)。
0至 7預設值: 3
DIMEN(范圍) i
可調整由前到後的環繞音效平衡,使其聽起來更深遠(負設定值)或更靠近(正設定值)。
–3至 +3預設值: 0
PNRM.(全景) i
可將前置立體聲像無限延伸而使環繞揚聲器一併容納進來,產生有如環抱般的效果。
OFF
ON
設定/功能 選項
VSX-821_FLXCN_zhtw.book Page 31 Monday, March 28, 2011 2:55 PM
聆聽您的系統05
32Zhtw
05
a.您可使用MIDNIGHT按鍵隨時變更MIDNIGHT/LOUDNESS選項。
b.您可使用 S.RETRIEVER按鍵隨時變更聲音修正器功能。
c. WMA和MP3僅能透過 iPod USB輸入來播放。d.選擇 iPod USB或 ADAPTER輸入時的預設設定為
ON。e.此設定僅可用於以雙單聲道解碼的 Dolby Digital以及 DTS音軌。
f. 初始設定 AUTO僅適用於 Dolby TrueHD訊號。 若非 Dolby TrueHD訊號,請選擇MAX或MID。
g.以多數 SACD碟片使用此設定應該是沒有問題,但若音效失真,最好將增益設定切換回 0 dB。
h.只有當已連接的顯示幕支援 HDMI的自動音訊/視訊同步功能(「唇形同步分析」「lip-sync」)時,才可以使用此功能。 若發現自動設定的延遲時間不適合,請將 A.DLY設定至 OFF,並手動調整延遲時間。 如需更多有關顯示幕之唇形同步分析「lip-sync」功能的詳細資訊,請直接洽詢製造商。
i. 僅適用於 DOLBY PLII MUSIC模式下的雙聲道來源。
j. 僅限聆聽 NEO:6 CINEMA與 NEO:6 MUSIC模式的雙聲道來源時。
錄音或錄影您可經由內建調諧器或連接至本接收器的音訊或視訊來源,進行錄音或錄影(如 CD播放器或電視機)。 只有透過複合視訊連接線或類比音訊輸入進行輸入至此接收器的視訊訊號才能錄製。 透過 HDMI 纜線、色差視訊纜線或數位音訊纜線(光纖/同軸)輸入的訊號無法錄製(有關連接的詳細資料請參閱第 17頁的連接其他音訊設備 乙節)。
1 按下輸入功能按鍵可選擇您要錄製的輸入功能。接收器的輸入將轉換,且您將能夠使用遙控器操作其他設備。
•也可使用遙控器上的 INPUT SELECT 按鍵,或
前面板的 INPUT SELECTOR旋鈕來選擇輸入來源。
2 選擇音訊輸入訊號(如有必要)。若要錄製來源設備,請按下 SIGNAL SEL鍵並選擇類比輸入(A)(有關詳細資料請參閱第 22頁)。
3 準備好要錄製的來源。請調選電台、置入 CD、錄影帶、DVD等。
4 準備好錄製設備。將空白的錄音帶、MD、錄影帶等置入錄製設備並設定錄製音量。若不確定如何進行,請參閱錄製設備隨附操作手冊。 多數錄影機均會自動設定錄製音量 — 若不確定,請參閱設備操作手冊。
5 開始錄製,然後開始播放來源設備。
附註•接收器的音量、平衡、音調(低音、高音、響度)及環繞音效不會對錄製訊號造成影響。
•有些視訊來源為防拷。 無法錄製這些視訊。
C.IMG(中央聲像) j
(僅適用於有使用中置揚聲器時)可調整中央聲像,為歌聲製造出更寬廣的立體聲效果。 效果調整可從 0(所有中置聲道均送至右、左前置揚聲器)至 10(中置聲道僅送至中置揚聲器)。
0至 10預設值: 3
(NEO:6 MUSIC),10 (NEO:6 CINEMA)
H.GAIN(高音增益)以DOLBY PLIIz HEIGHT模式聆聽時,調整前側高音揚聲器的輸出。 若設為H,則來自上方的聲音將更為強調。
L (Low)
M (Mid)
H (High)
設定/功能 選項
BD DVD
INPUT SELECT
SOURCESLEEPTV
CONTROL
TV
INPUT
DVR/BDR CD CD-R
ADAPTER iPod USB VIDEO 1
VIDEO 2 SIGNAL SELTUNER
RECEIVER
CH
VOL
RECEIVER
VSX-821_FLXCN_zhtw.book Page 32 Monday, March 28, 2011 2:55 PM
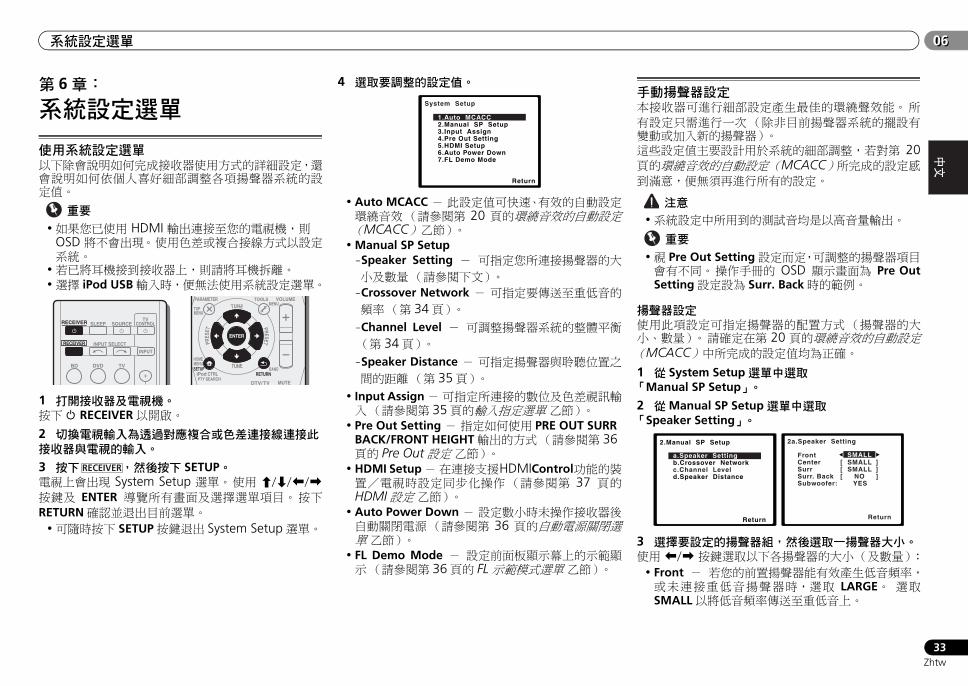
EnglishEspañol
系統設定選單 0606
33Zhtw
第 6章:
系統設定選單
使用系統設定選單以下除會說明如何完成接收器使用方式的詳細設定,還會說明如何依個人喜好細部調整各項揚聲器系統的設定值。
重要
•如果您已使用 HDMI 輸出連接至您的電視機,則OSD 將不會出現。 使用色差或複合接線方式以設定系統。
•若已將耳機接到接收器上,則請將耳機拆離。•選擇 iPod USB輸入時,便無法使用系統設定選單。
1 打開接收器及電視機。按下 RECEIVER以開啟。
2 切換電視輸入為透過對應複合或色差連接線連接此接收器與電視的輸入。
3 按下 ,然後按下 SETUP。電視上會出現 System Setup 選單。 使用 ///按鍵及 ENTER 導覽所有畫面及選擇選單項目。 按下RETURN確認並退出目前選單。
•可隨時按下 SETUP按鍵退出 System Setup選單。
4 選取要調整的設定值。
• Auto MCACC - 此設定值可快速、有效的自動設定環繞音效(請參閱第 20 頁的環繞音效的自動設定(MCACC) 乙節)。
• Manual SP Setup-Speaker Setting - 可指定您所連接揚聲器的大小及數量(請參閱下文)。
-Crossover Network - 可指定要傳送至重低音的頻率(第 34頁)。-Channel Level - 可調整揚聲器系統的整體平衡(第 34頁)。-Speaker Distance - 可指定揚聲器與聆聽位置之間的距離(第 35頁)。
• Input Assign - 可指定所連接的數位及色差視訊輸入(請參閱第 35頁的輸入指定選單 乙節)。
• Pre Out Setting - 指定如何使用 PRE OUT SURR BACK/FRONT HEIGHT輸出的方式(請參閱第 36頁的 Pre Out設定 乙節)。
• HDMI Setup - 在連接支援HDMIControl功能的裝置/電視時設定同步化操作(請參閱第 37 頁的HDMI設定 乙節)。
• Auto Power Down - 設定數小時未操作接收器後自動關閉電源(請參閱第 36 頁的自動電源關閉選單 乙節)。
• FL Demo Mode - 設定前面板顯示幕上的示範顯示(請參閱第 36頁的 FL示範模式選單 乙節)。
手動揚聲器設定本接收器可進行細部設定產生最佳的環繞聲效能。 所有設定只需進行一次(除非目前揚聲器系統的擺設有變動或加入新的揚聲器)。這些設定值主要設計用於系統的細部調整,若對第 20頁的環繞音效的自動設定(MCACC)所完成的設定感到滿意,便無須再進行所有的設定。
注意•系統設定中所用到的測試音均是以高音量輸出。
重要
•視 Pre Out Setting設定而定,可調整的揚聲器項目會有不同。 操作手冊的 OSD 顯示畫面為 Pre OutSetting設定設為 Surr. Back時的範例。
揚聲器設定使用此項設定可指定揚聲器的配置方式(揚聲器的大小、數量)。 請確定在第 20 頁的環繞音效的自動設定(MCACC)中所完成的設定值均為正確。
1 從 System Setup選單中選取「Manual SP Setup」。
2 從Manual SP Setup選單中選取「Speaker Setting」。
3 選擇要設定的揚聲器組,然後選取一揚聲器大小。使用/按鍵選取以下各揚聲器的大小(及數量):
• Front - 若您的前置揚聲器能有效產生低音頻率,或未連接重低音揚聲器時,選取 LARGE。 選取SMALL以將低音頻率傳送至重低音上。
BD DVD
INPUT SELECT
SOURCESLEEPTV
CONTROL
TV
INPUT
RECEIVER
RECEIVERENTER
MUTE
RETURN
PARAMETER TOOLS VOLUME
iPod CTRLPTY SEARCH
BAND
MENU
HOMEMENUSETUP
DTV/ TV
TOPMENU
TUNE
TUNE
PRESETPRES
ET
RECEIVER
System Setup
1.Auto MCACC2.Manual SP Setup3.Input Assign4.Pre Out Setting5.HDMI Setup6.Auto Power Down7.FL Demo Mode
Return
2.Manual SP Setup
Return
a.Speaker Settingb.Crossover Networkc.Channel Leveld.Speaker Distance
2a.Speaker Setting
Front CenterSurrSurr. BackSubwoofer:
Return
[ SMALL ][ SMALL ][ NO ] YES
SMALL
VSX-821_FLXCN_zhtw.book Page 33 Monday, March 28, 2011 2:55 PM
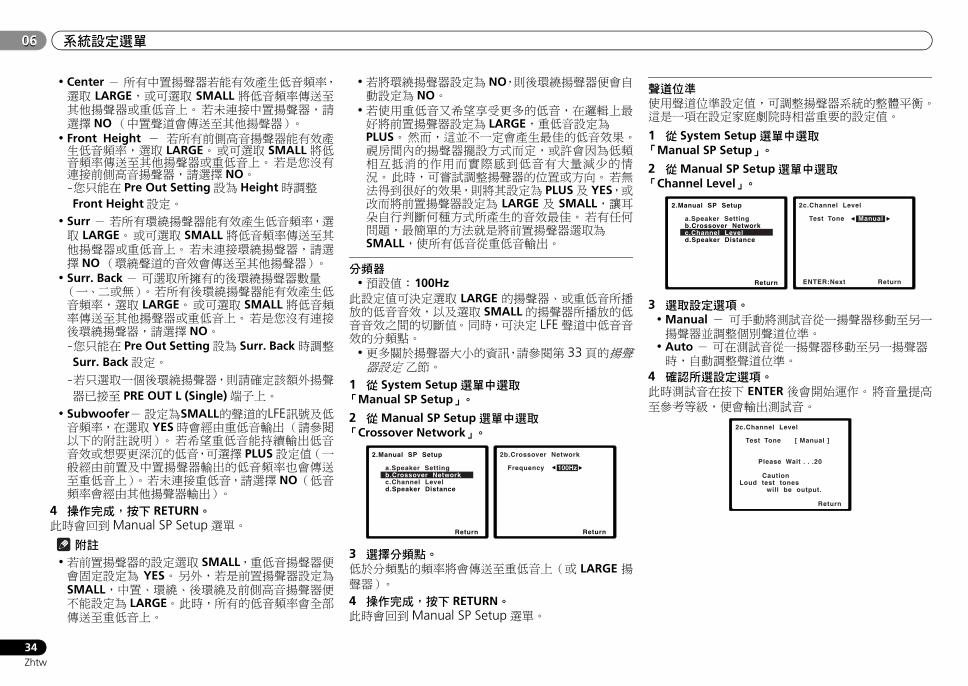
系統設定選單06
34Zhtw
06
• Center - 所有中置揚聲器若能有效產生低音頻率,選取 LARGE,或可選取 SMALL 將低音頻率傳送至其他揚聲器或重低音上。 若未連接中置揚聲器,請選擇 NO(中置聲道會傳送至其他揚聲器)。
• Front Height - 若所有前側高音揚聲器能有效產生低音頻率,選取 LARGE。 或可選取 SMALL將低音頻率傳送至其他揚聲器或重低音上。 若是您沒有連接前側高音揚聲器,請選擇 NO。-您只能在 Pre Out Setting設為 Height時調整Front Height設定。
• Surr - 若所有環繞揚聲器能有效產生低音頻率,選取 LARGE。 或可選取 SMALL將低音頻率傳送至其他揚聲器或重低音上。 若未連接環繞揚聲器,請選擇 NO(環繞聲道的音效會傳送至其他揚聲器)。
• Surr. Back- 可選取所擁有的後環繞揚聲器數量(一、二或無)。 若所有後環繞揚聲器能有效產生低音頻率,選取 LARGE。 或可選取 SMALL將低音頻率傳送至其他揚聲器或重低音上。 若是您沒有連接後環繞揚聲器,請選擇 NO。-您只能在 Pre Out Setting設為 Surr. Back時調整Surr. Back設定。-若只選取一個後環繞揚聲器,則請確定該額外揚聲器已接至 PRE OUT L (Single)端子上。
• Subwoofer- 設定為SMALL的聲道的LFE訊號及低音頻率,在選取 YES時會經由重低音輸出(請參閱以下的附註說明)。 若希望重低音能持續輸出低音音效或想要更深沉的低音,可選擇 PLUS設定值(一般經由前置及中置揚聲器輸出的低音頻率也會傳送至重低音上)。 若未連接重低音,請選擇 NO(低音頻率會經由其他揚聲器輸出)。
4 操作完成,按下 RETURN。此時會回到Manual SP Setup選單。
附註•若前置揚聲器的設定選取 SMALL,重低音揚聲器便會固定設定為 YES。 另外,若是前置揚聲器設定為SMALL,中置、環繞、後環繞及前側高音揚聲器便不能設定為 LARGE。 此時,所有的低音頻率會全部傳送至重低音上。
•若將環繞揚聲器設定為 NO,則後環繞揚聲器便會自動設定為 NO。
•若使用重低音又希望享受更多的低音,在邏輯上最好將前置揚聲器設定為 LARGE,重低音設定為PLUS。 然而,這並不一定會產生最佳的低音效果。視房間內的揚聲器擺設方式而定,或許會因為低頻相互抵消的作用而實際感到低音有大量減少的情況。 此時,可嘗試調整揚聲器的位置或方向。 若無法得到很好的效果,則將其設定為 PLUS及 YES,或改而將前置揚聲器設定為 LARGE 及 SMALL,讓耳朵自行判斷何種方式所產生的音效最佳。 若有任何問題,最簡單的方法就是將前置揚聲器選取為SMALL,使所有低音從重低音輸出。
分頻器•預設值: 100Hz此設定值可決定選取 LARGE 的揚聲器、或重低音所播放的低音音效,以及選取 SMALL的揚聲器所播放的低音音效之間的切斷值。 同時,可決定 LFE聲道中低音音效的分頻點。
•更多關於揚聲器大小的資訊,請參閱第 33頁的揚聲器設定 乙節。
1 從 System Setup選單中選取「Manual SP Setup」。
2 從Manual SP Setup選單中選取「Crossover Network」。
3 選擇分頻點。低於分頻點的頻率將會傳送至重低音上(或 LARGE 揚聲器)。
4 操作完成,按下 RETURN。此時會回到Manual SP Setup選單。
聲道位準使用聲道位準設定值,可調整揚聲器系統的整體平衡。這是一項在設定家庭劇院時相當重要的設定值。
1 從 System Setup選單中選取「Manual SP Setup」。
2 從Manual SP Setup選單中選取「Channel Level」。
3 選取設定選項。• Manual - 可手動將測試音從一揚聲器移動至另一揚聲器並調整個別聲道位準。
• Auto - 可在測試音從一揚聲器移動至另一揚聲器時,自動調整聲道位準。
4 確認所選設定選項。此時測試音在按下 ENTER後會開始運作。 將音量提高至參考等級,便會輸出測試音。
2.Manual SP Setup
Return
a.Speaker Settingb.Crossover Networkc.Channel Leveld.Speaker Distance
2b.Crossover Network
Return
Frequency 100Hz
2.Manual SP Setup
Return
a.Speaker Settingb.Crossover Networkc.Channel Leveld.Speaker Distance
2c.Channel Level
Test Tone Manual
ENTER:NextReturn
2c.Channel Level
Test Tone [ Manual ]
Please Wait . . .20 Caution Loud test tones will be output.
Return
VSX-821_FLXCN_zhtw.book Page 34 Monday, March 28, 2011 2:55 PM
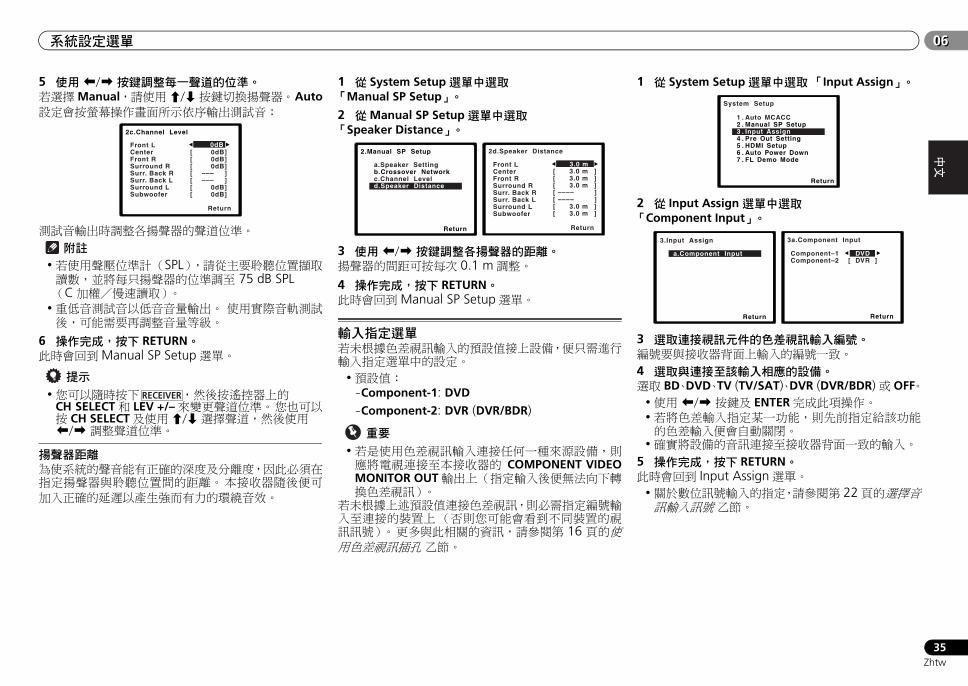
EnglishEspañol
系統設定選單 0606
35Zhtw
5 使用/按鍵調整每一聲道的位準。若選擇Manual,請使用/按鍵切換揚聲器。 Auto設定會按螢幕操作畫面所示依序輸出測試音:
測試音輸出時調整各揚聲器的聲道位準。
附註•若使用聲壓位準計(SPL),請從主要聆聽位置擷取讀數,並將每只揚聲器的位準調至 75 dB SPL(C加權/慢速讀取)。
•重低音測試音以低音音量輸出。 使用實際音軌測試後,可能需要再調整音量等級。
6 操作完成,按下 RETURN。此時會回到Manual SP Setup選單。
提示
•您可以隨時按下 ,然後按遙控器上的CH SELECT和 LEV +/–來變更聲道位準。 您也可以按 CH SELECT及使用/選擇聲道,然後使用/調整聲道位準。
揚聲器距離為使系統的聲音能有正確的深度及分離度,因此必須在指定揚聲器與聆聽位置間的距離。 本接收器隨後便可加入正確的延遲以產生強而有力的環繞音效。
1 從 System Setup選單中選取「Manual SP Setup」。
2 從Manual SP Setup選單中選取「Speaker Distance」。
3 使用/按鍵調整各揚聲器的距離。揚聲器的間距可按每次 0.1 m調整。
4 操作完成,按下 RETURN。此時會回到Manual SP Setup選單。
輸入指定選單若未根據色差視訊輸入的預設值接上設備,便只需進行輸入指定選單中的設定。
•預設值:-Component-1: DVD
-Component-2: DVR (DVR/BDR)
重要
•若是使用色差視訊輸入連接任何一種來源設備,則應將電視連接至本接收器的 COMPONENT VIDEOMONITOR OUT輸出上(指定輸入後便無法向下轉換色差視訊)。
若未根據上述預設值連接色差視訊,則必需指定編號輸入至連接的裝置上(否則您可能會看到不同裝置的視訊訊號)。 更多與此相關的資訊,請參閱第 16 頁的使用色差視訊插孔 乙節。
1 從 System Setup選單中選取「Input Assign」。
2 從 Input Assign選單中選取「Component Input」。
3 選取連接視訊元件的色差視訊輸入編號。編號要與接收器背面上輸入的編號一致。
4 選取與連接至該輸入相應的設備。選取 BD、DVD、TV (TV/SAT)、DVR (DVR/BDR)或 OFF。
•使用/按鍵及 ENTER完成此項操作。•若將色差輸入指定某一功能,則先前指定給該功能的色差輸入便會自動關閉。
•確實將設備的音訊連接至接收器背面一致的輸入。5 操作完成,按下 RETURN。此時會回到 Input Assign選單。
•關於數位訊號輸入的指定,請參閱第 22頁的選擇音訊輸入訊號 乙節。
2c.Channel Level
Front L CenterFront RSurround RSurr. Back RSurr. Back LSurround LSubwoofer
Return
[ 0dB][ 0dB][ 0dB][ ––– ][ ––– ][ 0dB][ 0dB]
0dB
RECEIVER
2.Manual SP Setup
Return
a.Speaker Settingb.Crossover Networkc.Channel Leveld.Speaker Distance
2d.Speaker Distance
Front L CenterFront RSurround RSurr. Back RSurr. Back LSurround LSubwoofer
Return
3.0 m [ 3.0 m ][ 3.0 m ][ 3.0 m ][ –––– ][ –––– ][ 3.0 m ][ 3.0 m ]
System Setup
1 . Auto MCACC2 . Manual SP Setup3 . Input Assign4 . Pre Out Setting5 . HDMI Setup6 . Auto Power Down7 . FL Demo Mode
Return
3.Input Assign
Return
a.Component Input
3a.Component Input
Return
Component–1 DVD Component–2 [ DVR ]
VSX-821_FLXCN_zhtw.book Page 35 Monday, March 28, 2011 2:55 PM
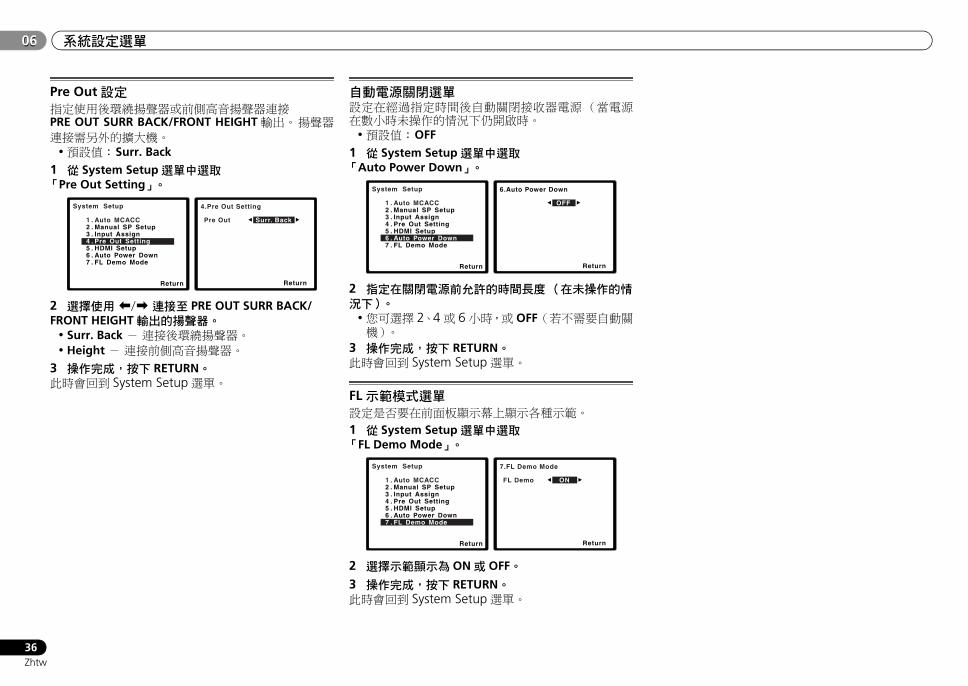
系統設定選單06
36Zhtw
06
Pre Out設定指定使用後環繞揚聲器或前側高音揚聲器連接PRE OUT SURR BACK/FRONT HEIGHT輸出。 揚聲器連接需另外的擴大機。
•預設值: Surr. Back
1 從 System Setup選單中選取「Pre Out Setting」。
2 選擇使用/連接至 PRE OUT SURR BACK/FRONT HEIGHT輸出的揚聲器。
• Surr. Back - 連接後環繞揚聲器。• Height - 連接前側高音揚聲器。
3 操作完成,按下 RETURN。此時會回到 System Setup選單。
自動電源關閉選單設定在經過指定時間後自動關閉接收器電源(當電源在數小時未操作的情況下仍開啟時。
•預設值: OFF
1 從 System Setup選單中選取「Auto Power Down」。
2 指定在關閉電源前允許的時間長度(在未操作的情況下)。
•您可選擇 2、4或 6小時,或 OFF(若不需要自動關機)。
3 操作完成,按下 RETURN。此時會回到 System Setup選單。
FL示範模式選單設定是否要在前面板顯示幕上顯示各種示範。
1 從 System Setup選單中選取「FL Demo Mode」。
2 選擇示範顯示為 ON或 OFF。
3 操作完成,按下 RETURN。此時會回到 System Setup選單。
System Setup
1 . Auto MCACC2 . Manual SP Setup3 . Input Assign4 . Pre Out Setting5 . HDMI Setup6 . Auto Power Down7 . FL Demo Mode
Return
4.Pre Out Setting
Return
Pre Out Surr. Back
System Setup
1 . Auto MCACC2 . Manual SP Setup3 . Input Assign4 . Pre Out Setting5 . HDMI Setup6 . Auto Power Down7 . FL Demo Mode
Return
6.Auto Power Down
Return
OFF
System Setup
1 . Auto MCACC2 . Manual SP Setup3 . Input Assign4 . Pre Out Setting5 . HDMI Setup6 . Auto Power Down7 . FL Demo Mode
Return
7.FL Demo Mode
Return
FL Demo ON
VSX-821_FLXCN_zhtw.book Page 36 Monday, March 28, 2011 2:55 PM
EnglishEspañol
HDMI控制功能 0707
37Zhtw
第 7章:
HDMI控制功能設備使用 HDMI連接線連接接收器時,可與 HDMI Control相容的先鋒電視或 Blu-ray Disc播放機或者與其他可支援 HDMI Control功能的設備進行以下同步化操作。
•同步放大模式使用電視機的遙控器可以設定接收器的音量,以及將聲音靜音。
•與電視的電源同步化•自動切換輸入電視輸入變更或播放 HDMI Control相容設備時,將自動切換接收器的輸入。
重要
•使用先鋒裝置時,HDMI Control功能又稱做「KURO LINK」。
•您無法使用此功能搭配不支援 HDMI Control 的設備。
•我們僅保證本接收器可以搭配先鋒製 HDMIControl相容設備,以及他支援 HDMI Control功能的其他設備機型使用。 不過我們不保證所有同步操作可以與其他支援 HDMI Control 功能的設備機型搭配使用。
•想要使用HDMI Control功能時,請使用High SpeedHDMI® 連接線。 如果使用不同類型的 HDMI 連接線,則 HDMI Control功能可能無法正常作用。
•如需有關具體操作、設定等的詳細資料,請參閱每個設備的操作手冊。
完成 HDMI控制連接您可將同步操作用於連接的電視和最多四個其他設備。
•確定將電視機的音訊線連接至本機的音訊輸入。 當以 HDMI 連接線連接電視與接收器時,若電視支援HDMI 音訊返回通道功能,電視音效會透過 HDMI端子輸入至接收器,因此不需要連接音訊纜線。 這時,請於 HDMI Setup將 ARC設為 ON(請參閱以下的 HDMI設定 乙節)。
詳情請參閱第 14頁的使用 HDMI 連接乙節。
重要
•連接此系統或變更連接時,確定關閉電源並從牆上電源插座上拔下電源線。完成所有連接後,將電源線連接至牆上電源插座。
•連接此接收器至AC電源插座後,開始2秒至10秒的HDMI 初始化程序。 初始化時無法嘗試任何操作。初始化時,顯示器上的 HDMI 指示燈閃爍,您可以在它一停止閃爍時即開啟此接收器的電源。
•為了充分運用這個功能,我們建議您不要將HDMI設備直接連接至電視機,而是直接連接至此接收器的HDMI端子。
•接收器配備四個 HDMI輸入時,HDMI Control功能只能搭配最多三台 DVD或 Blu-ray Disc播放機,或最多三台 DVD或 Blu-ray Disc錄影機使用。
HDMI設定若要使用 HDMI Control功能,您必須調整此接收器與HDMI Control相容連接設備的設定值。 如需更多資訊,請參閱每個設備的操作手冊。
1 打開接收器及電視機。按下 RECEIVER以開啟。2 切換電視輸入為透過對應複合或色差連接線連接此接收器與電視的輸入。
3 按下 ,然後按下 SETUP。電視上會出現 System Setup 選單。 使用 ///按鍵及 ENTER 導覽所有畫面及選擇選單項目。 按下RETURN確認並退出目前選單。
•可隨時按下 SETUP按鍵退出 System Setup選單。
4 從 System Setup選單中選取「HDMI Setup」。
5 選取您想要的「Control」設定值。選擇將本機的 HDMI Control功能設定為 ON或 OFF。您必須將它設定為 ON才能使用 HDMI Control功能。使用不支援 HDMI Control功能的設備時,請將此設定為 OFF。
• ON - 啟用HDMI Control功能。 本機電源關閉且您在使用 HDMI Control功能期間開始播放支援的來源時,電視輸出 HDMI連接的音訊和視訊。
• OFF- 停用HDMI Control控制。 無法使用同步化操作。 本機電源關閉時,無法輸出透過 HDMI連接的音訊和視訊來源。
RECEIVER
System Setup
1 . Auto MCACC2 . Manual SP Setup3 . Input Assign4 . Pre Out Setting5 . HDMI Setup6 . Auto Power Down7 . FL Demo Mode
Return
5.HDMI Setup
Return
Control ON ARC [ OFF ]
VSX-821_FLXCN_zhtw.book Page 37 Monday, March 28, 2011 2:55 PM

HDMI控制功能07
38Zhtw
07
6 選取您想要的「ARC」設定值。當支援 HDMI音訊返回通道功能的電視連接接收器時,電視音效可透過 HDMI端子輸入。
• ON - 電視音效透過 HDMI端子輸入。 只能在Control設為 ON時選擇。
• OFF - 電視音效從HDMI輸入以外的音訊輸入端子輸入。
7 操作完成,按下 RETURN。此時會回到 System Setup選單。
使用同步化之前完成所有連接和設定時,您必須:
1 將所有設備切換成待機模式。
2 開啟所有設備的電源,而電視的電源最後再開。
3 選擇用於連接電視機至此接收器的 HDMI輸入,並查看連接設備的視訊輸出是否正確顯示在畫面上。
4 檢查是否正確顯示連接至所有 HDMI輸入的設備。
關於同步操作HDMI Control相容設備連接至接收器的同步操作如下說明。
•同步放大模式-在 HDMI Control相容電視的選單畫面中,將音訊設為可在此接收器播放,而接收器便會切換至同步放大模式。
-在同步化放大模式中,當接收器電源關閉時,取消同步化放大模式。 若要開啟同步放大模式,請由電視選單畫面中將音訊設為透過接收器播放。此接收器將開啟電源並切換至同步放大模式。
-在同步放大模式中,如果從電視機的選單畫面執行從電視產生聲音的操作,則取消同步放大模式。
-取消同步放大模式時,如果您在電視上觀看 HDMI輸入或電視節目,則接收器電源會關閉。
•與電視的電源同步化-電視的電源設為待機時,接收器電源也會設定為待機。(僅在選擇以 HDMI連接至接收器的設備輸入或觀看電視時。)
•自動切換輸入-使用 HDMI Control相容設備播放時,自動切換接收器的輸出。
-切換電視輸入時,自動切換接收器的輸入。-即使接收器的輸入切換到 HDMI連接以外的設備,接收器的同步放大模式仍然有效。
關於與支援 HDMI控制功能的不同品牌產品連接接收器的 HDMI Control 功能連接至先鋒以外的支援HDMI Control功能的品牌電視機時,可使用以下的同步操作。(視電視機而定,有些 HDMI Control功能可能無法作用。)
•電視的電源設為待機時,接收器電源也會設定為待機。(僅在選擇以 HDMI 連接至接收器的設備輸入或觀看電視時。)
•電視節目或連接至電視的外部輸入的聲音也可以從與接收器連接的揚聲器輸出。 (若電視不支援HDMI音訊返回通道功能,就需要除 HDMI 纜線以外的光纖數位纜線等連接。)
接收器的 HDMI Control 功能連接至先鋒以外的支援HDMI Control功能的品牌播放器或錄影機時,可使用以下的同步操作。
•播放器或錄影機開始播放時,接收器的輸入切換至連接該設備的 HDMI輸入。
如需有關支援HDMI Control功能的非先鋒品牌與產品機型的最新資訊,請參閱先鋒網站。
HDMI控制功能的注意事項•直接連接電視及裝置(Blu-ray Disc播放機等)至本接收器。 中斷與其他擴大機或 AV 轉換器(例如HDMI開關)的直接連接會導致操作錯誤。
•當本接收器的 Control功能ON時,即使接收器的電源在待機模式,仍可透過 HDMI 從播放機輸出音訊和視訊至電視,接收器無需產生聲音,但僅限於連接 HDMI Control 相容設備(Blu-ray Disc 播放機等)和相容電視時。 在此情況中,接收器的電源開啟,且 HDMI指示燈亮起。
VSX-821_FLXCN_zhtw.book Page 38 Monday, March 28, 2011 2:55 PM
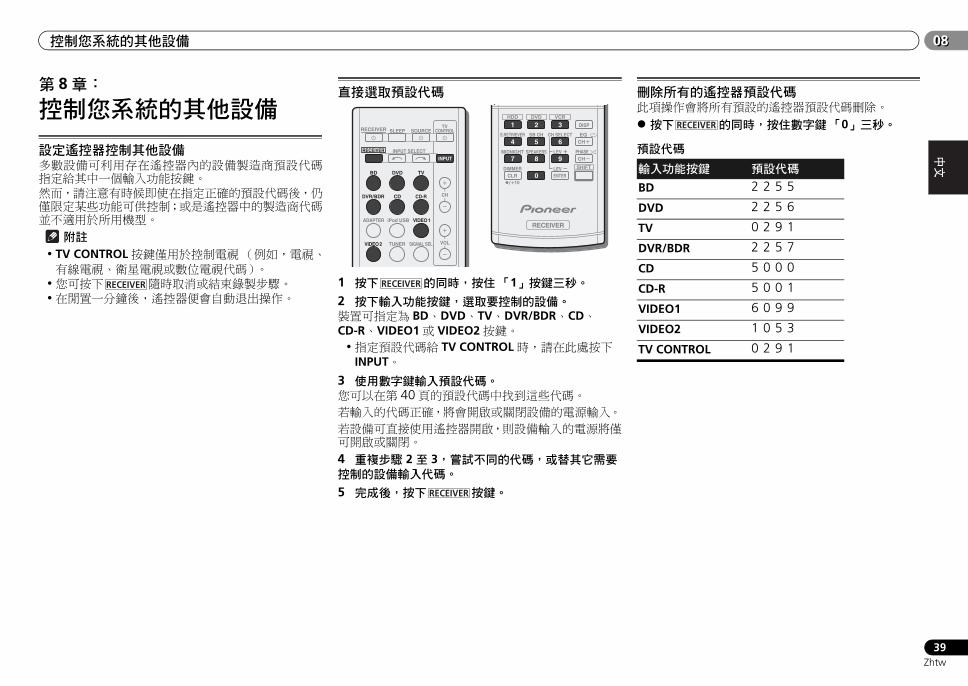
EnglishEspañol
控制您系統的其他設備 0808
39Zhtw
第 8章:
控制您系統的其他設備
設定遙控器控制其他設備多數設備可利用存在遙控器內的設備製造商預設代碼指定給其中一個輸入功能按鍵。然而,請注意有時候即使在指定正確的預設代碼後,仍僅限定某些功能可供控制;或是遙控器中的製造商代碼並不適用於所用機型。
附註• TV CONTROL按鍵僅用於控制電視(例如,電視、有線電視、衛星電視或數位電視代碼)。
•您可按下 隨時取消或結束錄製步驟。•在閒置一分鐘後,遙控器便會自動退出操作。
直接選取預設代碼
1 按下 的同時,按住「1」按鍵三秒。
2 按下輸入功能按鍵,選取要控制的設備。裝置可指定為 BD、DVD、TV、DVR/BDR、CD、CD-R、VIDEO1或 VIDEO2按鍵。
•指定預設代碼給 TV CONTROL時,請在此處按下INPUT。
3 使用數字鍵輸入預設代碼。您可以在第 40頁的預設代碼中找到這些代碼。若輸入的代碼正確,將會開啟或關閉設備的電源輸入。 若設備可直接使用遙控器開啟,則設備輸入的電源將僅可開啟或關閉。
4 重複步驟 2 至 3,嘗試不同的代碼,或替其它需要控制的設備輸入代碼。
5 完成後,按下 按鍵。
刪除所有的遙控器預設代碼此項操作會將所有預設的遙控器預設代碼刪除。
按下 的同時,按住數字鍵「0」三秒。
預設代碼
RECEIVER
BD DVD
INPUT SELECT
SOURCESLEEPTV
CONTROL
TV
INPUT
DVR/BDR CD CD-R
ADAPTER iPod USB VIDEO 1
VIDEO 2 SIGNAL SELTUNER
RECEIVER
CH
VOL
RECEIVER
RECEIVER
DIMMER
1
4
7MIDNIGHT
S.RETRIEVER
+10
2
5
8SPEAKERS LEV
LEV
SB CH
DISP
CLR
EQ
PHASE
3
6
9
0 ENTER
CH
CH
CH SELECT
/
SHIFT
HDD DVD VCR
RECEIVER
RECEIVER
輸入功能按鍵 預設代碼
BD 2 2 5 5
DVD 2 2 5 6
TV 0 2 9 1
DVR/BDR 2 2 5 7
CD 5 0 0 0
CD-R 5 0 0 1
VIDEO1 6 0 9 9
VIDEO2 1 0 5 3
TV CONTROL 0 2 9 1
RECEIVER
VSX-821_FLXCN_zhtw.book Page 39 Monday, March 28, 2011 2:55 PM
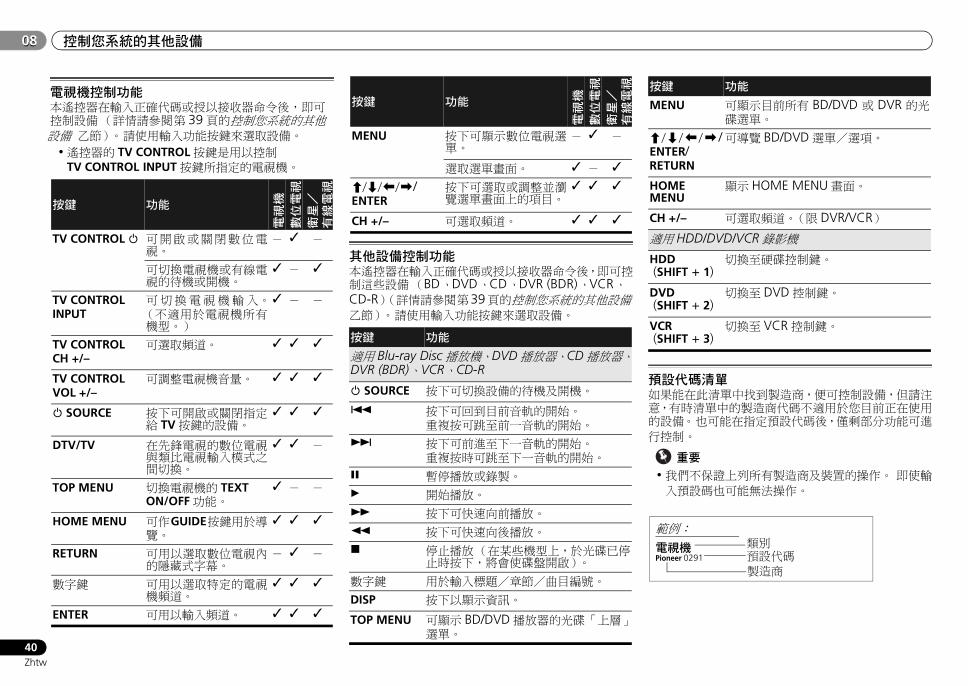
控制您系統的其他設備08
40Zhtw
08
電視機控制功能本遙控器在輸入正確代碼或授以接收器命令後,即可控制設備(詳情請參閱 第 39頁的控制您系統的其他設備 乙節)。 請使用輸入功能按鍵來選取設備。
•遙控器的 TV CONTROL按鍵是用以控制TV CONTROL INPUT按鍵所指定的電視機。
其他設備控制功能本遙控器在輸入正確代碼或授以接收器命令後,即可控制這些設備(BD、DVD、CD、DVR (BDR)、VCR、CD-R)(詳情請參閱 第39頁的控制您系統的其他設備乙節)。 請使用輸入功能按鍵來選取設備。
預設代碼清單如果能在此清單中找到製造商,便可控制設備,但請注意,有時清單中的製造商代碼不適用於您目前正在使用的設備。 也可能在指定預設代碼後,僅剩部分功能可進行控制。
重要
•我們不保證上列所有製造商及裝置的操作。 即使輸入預設碼也可能無法操作。
按鍵 功能
電視機
數位電視
衛星/
有線電視
TV CONTROL 可開啟或關閉數位電視。
- -
可切換電視機或有線電視的待機或開機。
-
TV CONTROL INPUT
可切換電視機輸入。(不適用於電視機所有機型。)
- -
TV CONTROL CH +/–
可選取頻道。
TV CONTROL VOL +/–
可調整電視機音量。
SOURCE 按下可開啟或關閉指定給 TV按鍵的設備。
DTV/TV 在先鋒電視的數位電視與類比電視輸入模式之間切換。
-
TOP MENU 切換電視機的 TEXT ON/OFF功能。
- -
HOME MENU 可作GUIDE按鍵用於導覽。
RETURN 可用以選取數位電視內的隱藏式字幕。
- -
數字鍵 可用以選取特定的電視機頻道。
ENTER 可用以輸入頻道。
MENU 按下可顯示數位電視選單。
- -
選取選單畫面。 -
////ENTER
按下可選取或調整並瀏覽選單畫面上的項目。
CH +/– 可選取頻道。
按鍵 功能
適用 Blu-ray Disc播放機、DVD播放器、CD播放器、DVR (BDR)、VCR、CD-R
SOURCE 按下可切換設備的待機及開機。
按下可回到目前音軌的開始。 重複按可跳至前一音軌的開始。
按下可前進至下一音軌的開始。 重複按時可跳至下一音軌的開始。
暫停播放或錄製。
開始播放。
按下可快速向前播放。
按下可快速向後播放。
停止播放(在某些機型上,於光碟已停止時按下,將會使碟盤開啟)。
數字鍵 用於輸入標題/章節/曲目編號。
DISP 按下以顯示資訊。
TOP MENU 可顯示 BD/DVD播放器的光碟「上層」選單。
按鍵 功能
電視機
數位電視
衛星/
有線電視
MENU 可顯示目前所有 BD/DVD 或 DVR 的光碟選單。
////ENTER/RETURN
可導覽 BD/DVD選單/選項。
HOME MENU
顯示 HOME MENU畫面。
CH +/– 可選取頻道。(限 DVR/VCR)
適用 HDD/DVD/VCR錄影機
HDD (SHIFT + 1)
切換至硬碟控制鍵。
DVD (SHIFT + 2)
切換至 DVD控制鍵。
VCR (SHIFT + 3)
切換至 VCR控制鍵。
按鍵 功能
電視機Pioneer 0291
範例:類別預設代碼
製造商
VSX-821_FLXCN_zhtw.book Page 40 Monday, March 28, 2011 2:55 PM
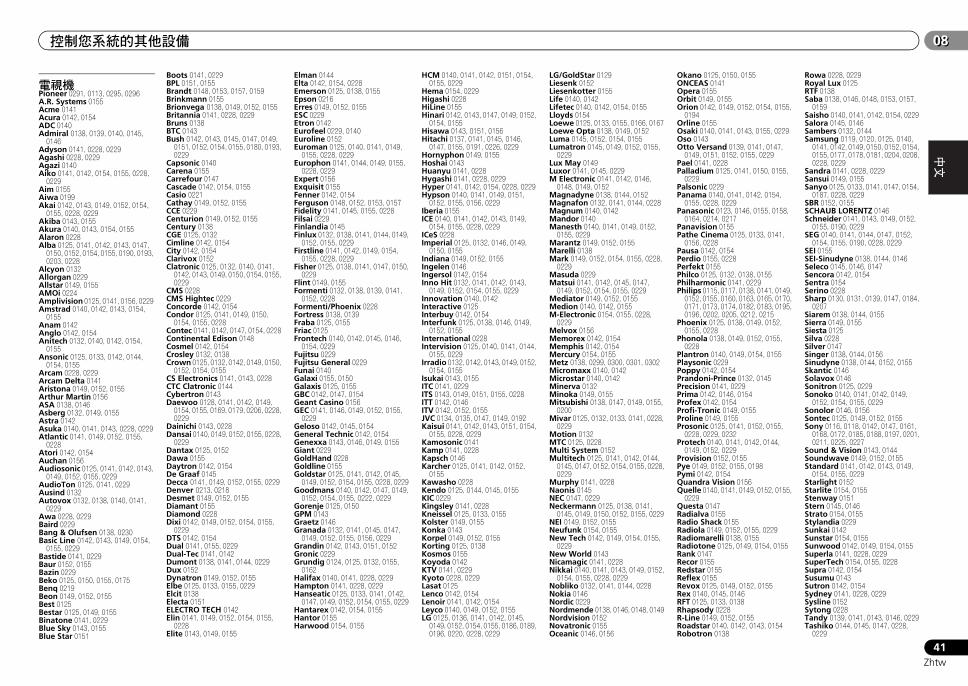
EnglishEspañol
控制您系統的其他設備 0808
41Zhtw
電視機Pioneer 0291, 0113, 0295, 0296A.R. Systems 0155 Acme 0141 Acura 0142, 0154 ADC 0140 Admiral 0138, 0139, 0140, 0145,
0146 Adyson 0141, 0228, 0229 Agashi 0228, 0229 Agazi 0140 Aiko 0141, 0142, 0154, 0155, 0228,
0229 Aim 0155 Aiwa 0199 Akai 0142, 0143, 0149, 0152, 0154,
0155, 0228, 0229 Akiba 0143, 0155 Akura 0140, 0143, 0154, 0155 Alaron 0228 Alba 0125, 0141, 0142, 0143, 0147,
0150, 0152, 0154, 0155, 0190, 0193, 0203, 0228
Alcyon 0132 Allorgan 0229 Allstar 0149, 0155 AMOi 0224 Amplivision 0125, 0141, 0156, 0229 Amstrad 0140, 0142, 0143, 0154,
0155 Anam 0142 Anglo 0142, 0154 Anitech 0132, 0140, 0142, 0154,
0155 Ansonic 0125, 0133, 0142, 0144,
0154, 0155 Arcam 0228, 0229 Arcam Delta 0141 Aristona 0149, 0152, 0155 Arthur Martin 0156 ASA 0138, 0146 Asberg 0132, 0149, 0155 Astra 0142 Asuka 0140, 0141, 0143, 0228, 0229 Atlantic 0141, 0149, 0152, 0155,
0228 Atori 0142, 0154 Auchan 0156 Audiosonic 0125, 0141, 0142, 0143,
0149, 0152, 0155, 0229 AudioTon 0125, 0141, 0229 Ausind 0132 Autovox 0132, 0138, 0140, 0141,
0229 Awa 0228, 0229 Baird 0229 Bang & Olufsen 0138, 0230 Basic Line 0142, 0143, 0149, 0154,
0155, 0229 Bastide 0141, 0229 Baur 0152, 0155 Bazin 0229 Beko 0125, 0150, 0155, 0175 Benq 0219 Beon 0149, 0152, 0155 Best 0125 Bestar 0125, 0149, 0155 Binatone 0141, 0229 Blue Sky 0143, 0155 Blue Star 0151
Boots 0141, 0229 BPL 0151, 0155 Brandt 0148, 0153, 0157, 0159 Brinkmann 0155 Brionvega 0138, 0149, 0152, 0155 Britannia 0141, 0228, 0229 Bruns 0138 BTC 0143 Bush 0142, 0143, 0145, 0147, 0149,
0151, 0152, 0154, 0155, 0180, 0193, 0229
Capsonic 0140 Carena 0155 Carrefour 0147 Cascade 0142, 0154, 0155 Casio 0221 Cathay 0149, 0152, 0155 CCE 0229 Centurion 0149, 0152, 0155 Century 0138 CGE 0125, 0132 Cimline 0142, 0154 City 0142, 0154 Clarivox 0152 Clatronic 0125, 0132, 0140, 0141,
0142, 0143, 0149, 0150, 0154, 0155, 0229
CMS 0228 CMS Hightec 0229 Concorde 0142, 0154 Condor 0125, 0141, 0149, 0150,
0154, 0155, 0228 Contec 0141, 0142, 0147, 0154, 0228 Continental Edison 0148 Cosmel 0142, 0154 Crosley 0132, 0138 Crown 0125, 0132, 0142, 0149, 0150,
0152, 0154, 0155 CS Electronics 0141, 0143, 0228 CTC Clatronic 0144 Cybertron 0143 Daewoo 0128, 0141, 0142, 0149,
0154, 0155, 0169, 0179, 0206, 0228, 0229
Dainichi 0143, 0228 Dansai 0140, 0149, 0152, 0155, 0228,
0229 Dantax 0125, 0152 Dawa 0155 Daytron 0142, 0154 De Graaf 0145 Decca 0141, 0149, 0152, 0155, 0229 Denver 0213, 0218 Desmet 0149, 0152, 0155 Diamant 0155 Diamond 0228 Dixi 0142, 0149, 0152, 0154, 0155,
0229 DTS 0142, 0154 Dual 0141, 0155, 0229 Dual-Tec 0141, 0142 Dumont 0138, 0141, 0144, 0229 Dux 0152 Dynatron 0149, 0152, 0155 Elbe 0125, 0133, 0155, 0229 Elcit 0138 Electa 0151 ELECTRO TECH 0142 Elin 0141, 0149, 0152, 0154, 0155,
0228 Elite 0143, 0149, 0155
Elman 0144 Elta 0142, 0154, 0228 Emerson 0125, 0138, 0155 Epson 0216 Erres 0149, 0152, 0155 ESC 0229 Etron 0142 Eurofeel 0229, 0140 Euroline 0152 Euroman 0125, 0140, 0141, 0149,
0155, 0228, 0229 Europhon 0141, 0144, 0149, 0155,
0228, 0229 Expert 0156 Exquisit 0155 Fenner 0142, 0154 Ferguson 0148, 0152, 0153, 0157 Fidelity 0141, 0145, 0155, 0228 Filsai 0229 Finlandia 0145 Finlux 0132, 0138, 0141, 0144, 0149,
0152, 0155, 0229 Firstline 0141, 0142, 0149, 0154,
0155, 0228, 0229 Fisher 0125, 0138, 0141, 0147, 0150,
0229 Flint 0149, 0155 Formenti 0132, 0138, 0139, 0141,
0152, 0228 Formenti/Phoenix 0228 Fortress 0138, 0139 Fraba 0125, 0155 Friac 0125 Frontech 0140, 0142, 0145, 0146,
0154, 0229 Fujitsu 0229 Fujitsu General 0229 Funai 0140 Galaxi 0155, 0150 Galaxis 0125, 0155 GBC 0142, 0147, 0154 Geant Casino 0156 GEC 0141, 0146, 0149, 0152, 0155,
0229 Geloso 0142, 0145, 0154 General Technic 0142, 0154 Genexxa 0143, 0146, 0149, 0155 Giant 0229 GoldHand 0228 Goldline 0155 Goldstar 0125, 0141, 0142, 0145,
0149, 0152, 0154, 0155, 0228, 0229 Goodmans 0140, 0142, 0147, 0149,
0152, 0154, 0155, 0222, 0229 Gorenje 0125, 0150 GPM 0143 Graetz 0146 Granada 0132, 0141, 0145, 0147,
0149, 0152, 0155, 0156, 0229 Grandin 0142, 0143, 0151, 0152 Gronic 0229 Grundig 0124, 0125, 0132, 0155,
0162 Halifax 0140, 0141, 0228, 0229 Hampton 0141, 0228, 0229 Hanseatic 0125, 0133, 0141, 0142,
0147, 0149, 0152, 0154, 0155, 0229 Hantarex 0142, 0154, 0155 Hantor 0155 Harwood 0154, 0155
HCM 0140, 0141, 0142, 0151, 0154, 0155, 0229
Hema 0154, 0229 Higashi 0228 HiLine 0155 Hinari 0142, 0143, 0147, 0149, 0152,
0154, 0155 Hisawa 0143, 0151, 0156 Hitachi 0137, 0141, 0145, 0146,
0147, 0155, 0191, 0226, 0229 Hornyphon 0149, 0155 Hoshai 0143 Huanyu 0141, 0228 Hygashi 0141, 0228, 0229 Hyper 0141, 0142, 0154, 0228, 0229 Hypson 0140, 0141, 0149, 0151,
0152, 0155, 0156, 0229 Iberia 0155 ICE 0140, 0141, 0142, 0143, 0149,
0154, 0155, 0228, 0229 ICeS 0228 Imperial 0125, 0132, 0146, 0149,
0150, 0155 Indiana 0149, 0152, 0155 Ingelen 0146 Ingersol 0142, 0154 Inno Hit 0132, 0141, 0142, 0143,
0149, 0152, 0154, 0155, 0229 Innovation 0140, 0142 Interactive 0125 Interbuy 0142, 0154 Interfunk 0125, 0138, 0146, 0149,
0152, 0155 International 0228 Intervision 0125, 0140, 0141, 0144,
0155, 0229 Irradio 0132, 0142, 0143, 0149, 0152,
0154, 0155 Isukai 0143, 0155 ITC 0141, 0229 ITS 0143, 0149, 0151, 0155, 0228 ITT 0142, 0146 ITV 0142, 0152, 0155 JVC 0134, 0135, 0147, 0149, 0192 Kaisui 0141, 0142, 0143, 0151, 0154,
0155, 0228, 0229 Kamosonic 0141 Kamp 0141, 0228 Kapsch 0146 Karcher 0125, 0141, 0142, 0152,
0155 Kawasho 0228 Kendo 0125, 0144, 0145, 0155 KIC 0229 Kingsley 0141, 0228 Kneissel 0125, 0133, 0155 Kolster 0149, 0155 Konka 0143 Korpel 0149, 0152, 0155 Korting 0125, 0138 Kosmos 0155 Koyoda 0142 KTV 0141, 0229 Kyoto 0228, 0229 Lasat 0125 Lenco 0142, 0154 Lenoir 0141, 0142, 0154 Leyco 0140, 0149, 0152, 0155 LG 0125, 0136, 0141, 0142, 0145,
0149, 0152, 0154, 0155, 0186, 0189, 0196, 0220, 0228, 0229
LG/GoldStar 0129 Liesenk 0152 Liesenkotter 0155 Life 0140, 0142 Lifetec 0140, 0142, 0154, 0155 Lloyds 0154 Loewe 0125, 0133, 0155, 0166, 0167 Loewe Opta 0138, 0149, 0152 Luma 0145, 0152, 0154, 0155 Lumatron 0145, 0149, 0152, 0155,
0229 Lux May 0149 Luxor 0141, 0145, 0229 M Electronic 0141, 0142, 0146,
0148, 0149, 0152 Magnadyne 0138, 0144, 0152 Magnafon 0132, 0141, 0144, 0228 Magnum 0140, 0142 Mandor 0140 Manesth 0140, 0141, 0149, 0152,
0155, 0229 Marantz 0149, 0152, 0155 Marelli 0138 Mark 0149, 0152, 0154, 0155, 0228,
0229 Masuda 0229 Matsui 0141, 0142, 0145, 0147,
0149, 0152, 0154, 0155, 0229 Mediator 0149, 0152, 0155 Medion 0140, 0142, 0155 M-Electronic 0154, 0155, 0228,
0229 Melvox 0156 Memorex 0142, 0154 Memphis 0142, 0154 Mercury 0154, 0155 Metz 0138, 0299, 0300, 0301, 0302 Micromaxx 0140, 0142 Microstar 0140, 0142 Minerva 0132 Minoka 0149, 0155 Mitsubishi 0138, 0147, 0149, 0155,
0200 Mivar 0125, 0132, 0133, 0141, 0228,
0229 Motion 0132 MTC 0125, 0228 Multi System 0152 Multitech 0125, 0141, 0142, 0144,
0145, 0147, 0152, 0154, 0155, 0228, 0229
Murphy 0141, 0228 Naonis 0145 NEC 0147, 0229 Neckermann 0125, 0138, 0141,
0145, 0149, 0150, 0152, 0155, 0229 NEI 0149, 0152, 0155 Neufunk 0154, 0155 New Tech 0142, 0149, 0154, 0155,
0229 New World 0143 Nicamagic 0141, 0228 Nikkai 0140, 0141, 0143, 0149, 0152,
0154, 0155, 0228, 0229 Nobliko 0132, 0141, 0144, 0228 Nokia 0146 Nordic 0229 Nordmende 0138, 0146, 0148, 0149 Nordvision 0152 Novatronic 0155 Oceanic 0146, 0156
Okano 0125, 0150, 0155 ONCEAS 0141 Opera 0155 Orbit 0149, 0155 Orion 0142, 0149, 0152, 0154, 0155,
0194 Orline 0155 Osaki 0140, 0141, 0143, 0155, 0229 Oso 0143 Otto Versand 0139, 0141, 0147,
0149, 0151, 0152, 0155, 0229 Pael 0141, 0228 Palladium 0125, 0141, 0150, 0155,
0229 Palsonic 0229 Panama 0140, 0141, 0142, 0154,
0155, 0228, 0229 Panasonic 0123, 0146, 0155, 0158,
0164, 0214, 0217 Panavision 0155 Pathe Cinema 0125, 0133, 0141,
0156, 0228 Pausa 0142, 0154 Perdio 0155, 0228 Perfekt 0155 Philco 0125, 0132, 0138, 0155 Philharmonic 0141, 0229 Philips 0115, 0117, 0138, 0141, 0149,
0152, 0155, 0160, 0163, 0165, 0170, 0171, 0173, 0174, 0182, 0183, 0195, 0196, 0202, 0205, 0212, 0215
Phoenix 0125, 0138, 0149, 0152, 0155, 0228
Phonola 0138, 0149, 0152, 0155, 0228
Plantron 0140, 0149, 0154, 0155 Playsonic 0229 Poppy 0142, 0154 Prandoni-Prince 0132, 0145 Precision 0141, 0229 Prima 0142, 0146, 0154 Profex 0142, 0154 Profi-Tronic 0149, 0155 Proline 0149, 0155 Prosonic 0125, 0141, 0152, 0155,
0228, 0229, 0232 Protech 0140, 0141, 0142, 0144,
0149, 0152, 0229 Provision 0152, 0155 Pye 0149, 0152, 0155, 0198 Pymi 0142, 0154 Quandra Vision 0156 Quelle 0140, 0141, 0149, 0152, 0155,
0229 Questa 0147 Radialva 0155 Radio Shack 0155 Radiola 0149, 0152, 0155, 0229 Radiomarelli 0138, 0155 Radiotone 0125, 0149, 0154, 0155 Rank 0147 Recor 0155 Redstar 0155 Reflex 0155 Revox 0125, 0149, 0152, 0155 Rex 0140, 0145, 0146 RFT 0125, 0133, 0138 Rhapsody 0228 R-Line 0149, 0152, 0155 Roadstar 0140, 0142, 0143, 0154 Robotron 0138
Rowa 0228, 0229 Royal Lux 0125 RTF 0138 Saba 0138, 0146, 0148, 0153, 0157,
0159 Saisho 0140, 0141, 0142, 0154, 0229 Salora 0145, 0146 Sambers 0132, 0144 Samsung 0119, 0120, 0125, 0140,
0141, 0142, 0149, 0150, 0152, 0154, 0155, 0177, 0178, 0181, 0204, 0208, 0228, 0229
Sandra 0141, 0228, 0229 Sansui 0149, 0155 Sanyo 0125, 0133, 0141, 0147, 0154,
0187, 0228, 0229 SBR 0152, 0155 SCHAUB LORENTZ 0146 Schneider 0141, 0143, 0149, 0152,
0155, 0190, 0229 SEG 0140, 0141, 0144, 0147, 0152,
0154, 0155, 0190, 0228, 0229 SEI 0155 SEI-Sinudyne 0138, 0144, 0146 Seleco 0145, 0146, 0147 Sencora 0142, 0154 Sentra 0154 Serino 0228 Sharp 0130, 0131, 0139, 0147, 0184,
0207 Siarem 0138, 0144, 0155 Sierra 0149, 0155 Siesta 0125 Silva 0228 Silver 0147 Singer 0138, 0144, 0156 Sinudyne 0138, 0144, 0152, 0155 Skantic 0146 Solavox 0146 Sonitron 0125, 0229 Sonoko 0140, 0141, 0142, 0149,
0152, 0154, 0155, 0229Sonolor 0146, 0156 Sontec 0125, 0149, 0152, 0155 Sony 0116, 0118, 0142, 0147, 0161,
0168, 0172, 0185, 0188, 0197, 0201, 0211, 0225, 0227
Sound & Vision 0143, 0144 Soundwave 0149, 0152, 0155 Standard 0141, 0142, 0143, 0149,
0154, 0155, 0229 Starlight 0152 Starlite 0154, 0155 Stenway 0151 Stern 0145, 0146 Strato 0154, 0155 Stylandia 0229 Sunkai 0142 Sunstar 0154, 0155 Sunwood 0142, 0149, 0154, 0155 Superla 0141, 0228, 0229 SuperTech 0154, 0155, 0228 Supra 0142, 0154 Susumu 0143 Sutron 0142, 0154 Sydney 0141, 0228, 0229 Sysline 0152 Sytong 0228 Tandy 0139, 0141, 0143, 0146, 0229 Tashiko 0144, 0145, 0147, 0228,
0229
VSX-821_FLXCN_zhtw.book Page 41 Monday, March 28, 2011 2:55 PM
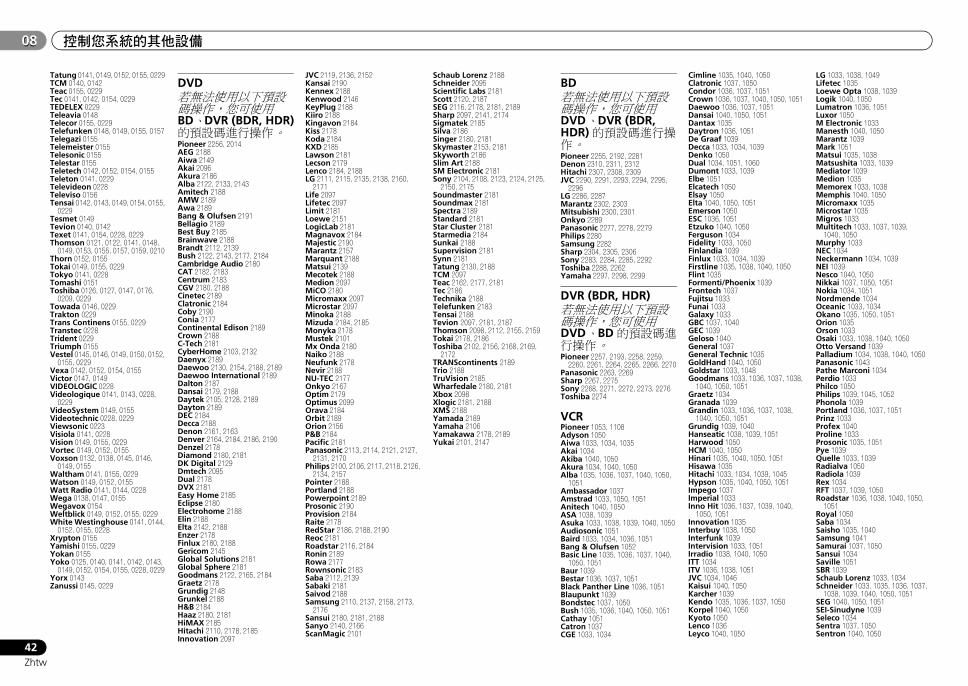
控制您系統的其他設備08
42Zhtw
08
Tatung 0141, 0149, 0152, 0155, 0229 TCM 0140, 0142 Teac 0155, 0229 Tec 0141, 0142, 0154, 0229 TEDELEX 0229 Teleavia 0148 Telecor 0155, 0229 Telefunken 0148, 0149, 0155, 0157 Telegazi 0155 Telemeister 0155 Telesonic 0155 Telestar 0155 Teletech 0142, 0152, 0154, 0155 Teleton 0141, 0229 Televideon 0228 Televiso 0156 Tensai 0142, 0143, 0149, 0154, 0155,
0229 Tesmet 0149 Tevion 0140, 0142 Texet 0141, 0154, 0228, 0229 Thomson 0121, 0122, 0141, 0148,
0149, 0153, 0155, 0157, 0159, 0210 Thorn 0152, 0155 Tokai 0149, 0155, 0229 Tokyo 0141, 0228 Tomashi 0151 Toshiba 0126, 0127, 0147, 0176,
0209, 0229 Towada 0146, 0229 Trakton 0229 Trans Continens 0155, 0229 Transtec 0228 Trident 0229 Triumph 0155 Vestel 0145, 0146, 0149, 0150, 0152,
0155, 0229 Vexa 0142, 0152, 0154, 0155 Victor 0147, 0149 VIDEOLOGIC 0228 Videologique 0141, 0143, 0228,
0229 VideoSystem 0149, 0155 Videotechnic 0228, 0229 Viewsonic 0223 Visiola 0141, 0228 Vision 0149, 0155, 0229 Vortec 0149, 0152, 0155 Voxson 0132, 0138, 0145, 0146,
0149, 0155 Waltham 0141, 0155, 0229 Watson 0149, 0152, 0155 Watt Radio 0141, 0144, 0228 Wega 0138, 0147, 0155 Wegavox 0154 Weltblick 0149, 0152, 0155, 0229 White Westinghouse 0141, 0144,
0152, 0155, 0228 Xrypton 0155 Yamishi 0155, 0229 Yokan 0155 Yoko 0125, 0140, 0141, 0142, 0143,
0149, 0152, 0154, 0155, 0228, 0229 Yorx 0143 Zanussi 0145, 0229
DVD若無法使用以下預設碼操作,您可使用BD、DVR (BDR, HDR)的預設碼進行操作。Pioneer 2256, 2014AEG 2188 Aiwa 2149 Akai 2096 Akura 2186 Alba 2122, 2133, 2143 Amitech 2188 AMW 2189 Awa 2189 Bang & Olufsen 2191 Bellagio 2189 Best Buy 2185 Brainwave 2188 Brandt 2112, 2139 Bush 2122, 2143, 2177, 2184 Cambridge Audio 2180 CAT 2182, 2183 Centrum 2183 CGV 2180, 2188 Cinetec 2189 Clatronic 2184 Coby 2190 Conia 2177 Continental Edison 2189 Crown 2188 C-Tech 2181 CyberHome 2103, 2132 Daenyx 2189 Daewoo 2130, 2154, 2188, 2189 Daewoo International 2189 Dalton 2187 Dansai 2179, 2188 Daytek 2105, 2128, 2189 Dayton 2189 DEC 2184 Decca 2188 Denon 2161, 2163 Denver 2164, 2184, 2186, 2190Denzel 2178 Diamond 2180, 2181 DK Digital 2129 Dmtech 2095 Dual 2178 DVX 2181 Easy Home 2185 Eclipse 2180 Electrohome 2188 Elin 2188 Elta 2142, 2188 Enzer 2178 Finlux 2180, 2188 Gericom 2145 Global Solutions 2181 Global Sphere 2181 Goodmans 2122, 2165, 2184 Graetz 2178 Grundig 2148 Grunkel 2188 H&B 2184 Haaz 2180, 2181 HiMAX 2185 Hitachi 2110, 2178, 2185 Innovation 2097
JVC 2119, 2136, 2152 Kansai 2190 Kennex 2188 Kenwood 2146 KeyPlug 2188 Kiiro 2188 Kingavon 2184 Kiss 2178 Koda 2184 KXD 2185 Lawson 2181 Lecson 2179 Lenco 2184, 2188 LG 2111, 2115, 2135, 2138, 2160,
2171 Life 2097 Lifetec 2097 Limit 2181 Loewe 2151 LogicLab 2181 Magnavox 2184 Majestic 2190 Marantz 2157 Marquant 2188 Matsui 2139 Mecotek 2188 Medion 2097 MiCO 2180 Micromaxx 2097 Microstar 2097 Minoka 2188 Mizuda 2184, 2185 Monyka 2178 Mustek 2101 Mx Onda 2180 Naiko 2188 Neufunk 2178 Nevir 2188 NU-TEC 2177 Onkyo 2167 Optim 2179 Optimus 2099 Orava 2184 Orbit 2189 Orion 2156 P&B 2184 Pacific 2181 Panasonic 2113, 2114, 2121, 2127,
2131, 2170 Philips 2100, 2106, 2117, 2118, 2126,
2134, 2157 Pointer 2188 Portland 2188 Powerpoint 2189 Prosonic 2190 Provision 2184 Raite 2178 RedStar 2186, 2188, 2190 Reoc 2181 Roadstar 2116, 2184 Ronin 2189 Rowa 2177 Rownsonic 2183 Saba 2112, 2139 Sabaki 2181 Saivod 2188 Samsung 2110, 2137, 2158, 2173,
2176 Sansui 2180, 2181, 2188 Sanyo 2140, 2166 ScanMagic 2101
Schaub Lorenz 2188 Schneider 2095 Scientific Labs 2181 Scott 2120, 2187 SEG 2116, 2178, 2181, 2189 Sharp 2097, 2141, 2174 Sigmatek 2185 Silva 2186 Singer 2180, 2181 Skymaster 2153, 2181 Skyworth 2186 Slim Art 2188 SM Electronic 2181 Sony 2104, 2108, 2123, 2124, 2125,
2150, 2175 Soundmaster 2181 Soundmax 2181 Spectra 2189 Standard 2181 Star Cluster 2181 Starmedia 2184 Sunkai 2188 Supervision 2181 Synn 2181 Tatung 2130, 2188 TCM 2097 Teac 2162, 2177, 2181 Tec 2186 Technika 2188 Telefunken 2183 Tensai 2188 Tevion 2097, 2181, 2187 Thomson 2098, 2112, 2155, 2159 Tokai 2178, 2186 Toshiba 2102, 2156, 2168, 2169,
2172 TRANScontinents 2189 Trio 2188 TruVision 2185 Wharfedale 2180, 2181 Xbox 2098 Xlogic 2181, 2188 XMS 2188 Yamada 2189 Yamaha 2106 Yamakawa 2178, 2189 Yukai 2101, 2147
BD若無法使用以下預設碼操作,您可使用DVD、DVR (BDR, HDR)的預設碼進行操作。Pioneer 2255, 2192, 2281Denon 2310, 2311, 2312 Hitachi 2307, 2308, 2309 JVC 2290, 2291, 2293, 2294, 2295,
2296LG 2286, 2287 Marantz 2302, 2303 Mitsubishi 2300, 2301 Onkyo 2289 Panasonic 2277, 2278, 2279Philips 2280 Samsung 2282 Sharp 2304, 2305, 2306 Sony 2283, 2284, 2285, 2292 Toshiba 2288, 2262 Yamaha 2297, 2298, 2299
DVR (BDR, HDR)若無法使用以下預設碼操作,您可使用DVD、BD的預設碼進行操作。Pioneer 2257, 2193, 2258, 2259,
2260, 2261, 2264, 2265, 2266, 2270Panasonic 2263, 2269 Sharp 2267, 2275 Sony 2268, 2271, 2272, 2273, 2276 Toshiba 2274
VCR Pioneer 1053, 1108Adyson 1050 Aiwa 1033, 1034, 1035 Akai 1034 Akiba 1040, 1050 Akura 1034, 1040, 1050 Alba 1035, 1036, 1037, 1040, 1050,
1051 Ambassador 1037 Amstrad 1033, 1050, 1051 Anitech 1040, 1050 ASA 1038, 1039 Asuka 1033, 1038, 1039, 1040, 1050 Audiosonic 1051 Baird 1033, 1034, 1036, 1051 Bang & Olufsen 1052 Basic Line 1035, 1036, 1037, 1040,
1050, 1051 Baur 1039 Bestar 1036, 1037, 1051 Black Panther Line 1036, 1051 Blaupunkt 1039 Bondstec 1037, 1050 Bush 1035, 1036, 1040, 1050, 1051 Cathay 1051 Catron 1037 CGE 1033, 1034
Cimline 1035, 1040, 1050 Clatronic 1037, 1050 Condor 1036, 1037, 1051 Crown 1036, 1037, 1040, 1050, 1051 Daewoo 1036, 1037, 1051 Dansai 1040, 1050, 1051 Dantax 1035 Daytron 1036, 1051 De Graaf 1039 Decca 1033, 1034, 1039 Denko 1050 Dual 1034, 1051, 1060Dumont 1033, 1039 Elbe 1051 Elcatech 1050 Elsay 1050 Elta 1040, 1050, 1051 Emerson 1050 ESC 1036, 1051 Etzuko 1040, 1050 Ferguson 1034 Fidelity 1033, 1050 Finlandia 1039 Finlux 1033, 1034, 1039 Firstline 1035, 1038, 1040, 1050 Flint 1035 Formenti/Phoenix 1039 Frontech 1037 Fujitsu 1033 Funai 1033 Galaxy 1033 GBC 1037, 1040 GEC 1039 Geloso 1040 General 1037 General Technic 1035 GoldHand 1040, 1050 Goldstar 1033, 1048 Goodmans 1033, 1036, 1037, 1038,
1040, 1050, 1051 Graetz 1034 Granada 1039 Grandin 1033, 1036, 1037, 1038,
1040, 1050, 1051 Grundig 1039, 1040 Hanseatic 1038, 1039, 1051 Harwood 1050 HCM 1040, 1050 Hinari 1035, 1040, 1050, 1051 Hisawa 1035 Hitachi 1033, 1034, 1039, 1045Hypson 1035, 1040, 1050, 1051Impego 1037 Imperial 1033 Inno Hit 1036, 1037, 1039, 1040,
1050, 1051 Innovation 1035 Interbuy 1038, 1050 Interfunk 1039 Intervision 1033, 1051 Irradio 1038, 1040, 1050 ITT 1034 ITV 1036, 1038, 1051 JVC 1034, 1046 Kaisui 1040, 1050 Karcher 1039 Kendo 1035, 1036, 1037, 1050 Korpel 1040, 1050 Kyoto 1050 Lenco 1036 Leyco 1040, 1050
LG 1033, 1038, 1049 Lifetec 1035 Loewe Opta 1038, 1039 Logik 1040, 1050 Lumatron 1036, 1051 Luxor 1050 M Electronic 1033 Manesth 1040, 1050 Marantz 1039 Mark 1051 Matsui 1035, 1038 Matsushita 1033, 1039 Mediator 1039 Medion 1035 Memorex 1033, 1038 Memphis 1040, 1050 Micromaxx 1035 Microstar 1035 Migros 1033 Multitech 1033, 1037, 1039,
1040, 1050 Murphy 1033 NEC 1034 Neckermann 1034, 1039 NEI 1039 Nesco 1040, 1050 Nikkai 1037, 1050, 1051 Nokia 1034, 1051 Nordmende 1034 Oceanic 1033, 1034 Okano 1035, 1050, 1051 Orion 1035 Orson 1033 Osaki 1033, 1038, 1040, 1050 Otto Versand 1039 Palladium 1034, 1038, 1040, 1050 Panasonic 1043 Pathe Marconi 1034 Perdio 1033 Philco 1050 Philips 1039, 1045, 1052 Phonola 1039 Portland 1036, 1037, 1051 Prinz 1033 Profex 1040 Proline 1033 Prosonic 1035, 1051 Pye 1039 Quelle 1033, 1039 Radialva 1050 Radiola 1039 Rex 1034 RFT 1037, 1039, 1050 Roadstar 1036, 1038, 1040, 1050,
1051 Royal 1050 Saba 1034 Saisho 1035, 1040 Samsung 1041 Samurai 1037, 1050 Sansui 1034 Saville 1051 SBR 1039 Schaub Lorenz 1033, 1034 Schneider 1033, 1035, 1036, 1037,
1038, 1039, 1040, 1050, 1051SEG 1040, 1050, 1051 SEI-Sinudyne 1039 Seleco 1034 Sentra 1037, 1050 Sentron 1040, 1050
VSX-821_FLXCN_zhtw.book Page 42 Monday, March 28, 2011 2:55 PM
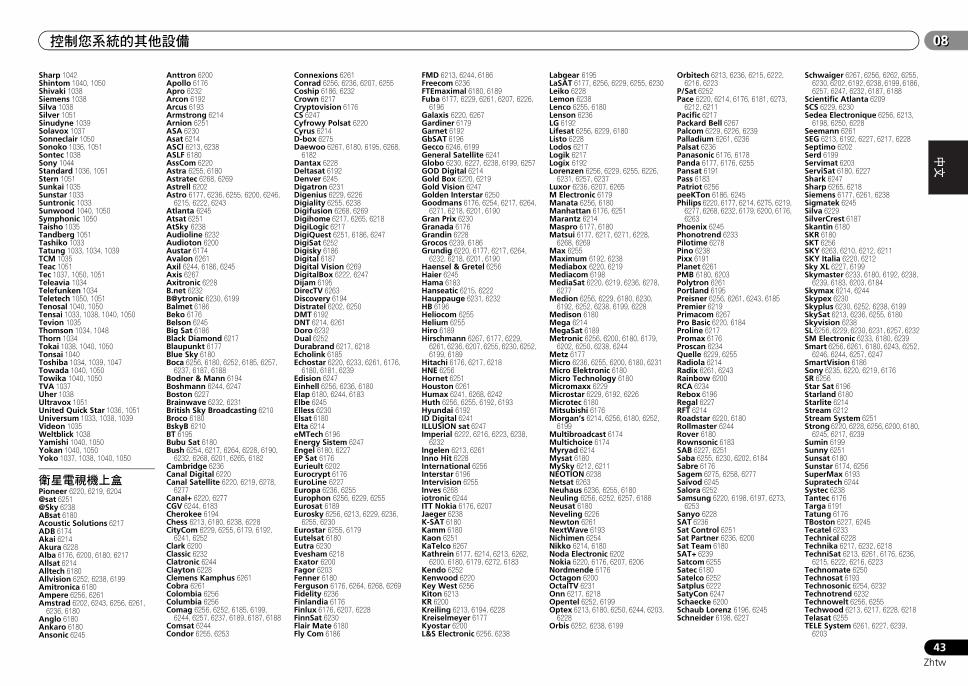
EnglishEspañol
控制您系統的其他設備 0808
43Zhtw
Sharp 1042 Shintom 1040, 1050 Shivaki 1038 Siemens 1038 Silva 1038 Silver 1051 Sinudyne 1039 Solavox 1037 Sonneclair 1050 Sonoko 1036, 1051 Sontec 1038 Sony 1044 Standard 1036, 1051 Stern 1051 Sunkai 1035 Sunstar 1033 Suntronic 1033 Sunwood 1040, 1050 Symphonic 1050 Taisho 1035 Tandberg 1051 Tashiko 1033 Tatung 1033, 1034, 1039 TCM 1035 Teac 1051 Tec 1037, 1050, 1051 Teleavia 1034 Telefunken 1034 Teletech 1050, 1051 Tenosal 1040, 1050 Tensai 1033, 1038, 1040, 1050 Tevion 1035 Thomson 1034, 1048 Thorn 1034 Tokai 1038, 1040, 1050 Tonsai 1040 Toshiba 1034, 1039, 1047 Towada 1040, 1050 Towika 1040, 1050 TVA 1037 Uher 1038 Ultravox 1051 United Quick Star 1036, 1051Universum 1033, 1038, 1039 Videon 1035 Weltblick 1038 Yamishi 1040, 1050 Yokan 1040, 1050 Yoko 1037, 1038, 1040, 1050
衛星電視機上盒Pioneer 6220, 6219, 6204@sat 6251 @Sky 6238 ABsat 6180 Acoustic Solutions 6217 ADB 6174 Akai 6214 Akura 6228 Alba 6176, 6200, 6180, 6217 Allsat 6214 Alltech 6180 Allvision 6252, 6238, 6199 Amitronica 6180 Ampere 6256, 6261 Amstrad 6202, 6243, 6256, 6261,
6236, 6180 Anglo 6180 Ankaro 6180 Ansonic 6245
Anttron 6200 Apollo 6176 Apro 6232 Arcon 6192 Arcus 6193 Armstrong 6214 Arnion 6251 ASA 6230 Asat 6214 ASCI 6213, 6238 ASLF 6180 AssCom 6220 Astra 6255, 6180 Astratec 6268, 6269 Astrell 6202 Astro 6177, 6236, 6255, 6200, 6246,
6215, 6222, 6243 Atlanta 6245 Atsat 6251 AtSky 6238 Audioline 6232 Audioton 6200 Austar 6174 Avalon 6261 Axil 6244, 6186, 6245 Axis 6267 Axitronic 6228 B.net 6232 B@ytronic 6230, 6199 Balmet 6186 Beko 6176 Belson 6245 Big Sat 6186 Black Diamond 6217 Blaupunkt 6177 Blue Sky 6180 Boca 6256, 6180, 6252, 6185, 6257,
6237, 6187, 6188 Bodner & Mann 6194 Boshmann 6244, 6247 Boston 6227 Brainwave 6232, 6231 British Sky Broadcasting 6210 Broco 6180 BskyB 6210 BT 6195 Bubu Sat 6180 Bush 6254, 6217, 6264, 6228, 6190,
6232, 6268, 6201, 6265, 6182 Cambridge 6236 Canal Digital 6220 Canal Satellite 6220, 6219, 6278,
6277 Canal+ 6220, 6277 CGV 6244, 6183 Cherokee 6194 Chess 6213, 6180, 6238, 6228 CityCom 6229, 6255, 6179, 6192,
6241, 6252 Clark 6200 Classic 6232 Clatronic 6244 Clayton 6228 Clemens Kamphus 6261 Cobra 6261 Colombia 6256 Columbia 6256 Comag 6256, 6252, 6185, 6199,
6244, 6257, 6237, 6189, 6187, 6188 Comsat 6244 Condor 6255, 6253
Connexions 6261 Conrad 6256, 6236, 6207, 6255 Coship 6186, 6232 Crown 6217 Cryptovision 6176 CS 6247 Cyfrowy Polsat 6220 Cyrus 6214 D-box 6275 Daewoo 6267, 6180, 6195, 6268,
6182 Dantax 6228 Deltasat 6192 Denver 6245 Digatron 6231 Digenius 6229, 6226 Digiality 6255, 6238 Digifusion 6268, 6269 Digihome 6217, 6265, 6218 DigiLogic 6217 DigiQuest 6251, 6186, 6247 DigiSat 6252 Digisky 6186 Digital 6187 Digital Vision 6269 DigitalBox 6222, 6247 Dijam 6195 DirecTV 6263 Discovery 6194 Distratel 6202, 6250 DMT 6192 DNT 6214, 6261 Doro 6232 Dual 6252 Durabrand 6217, 6218 Echolink 6185 Echostar 6220, 6233, 6261, 6176,
6180, 6181, 6239 Edision 6247 Einhell 6256, 6236, 6180 Elap 6180, 6244, 6183 Elbe 6245 Elless 6230 Elsat 6180 Elta 6214 eMTech 6196 Energy Sistem 6247 Engel 6180, 6227 EP Sat 6176 Eurieult 6202 Eurocrypt 6176 EuroLine 6227 Europa 6236, 6255 Europhon 6256, 6229, 6255 Eurosat 6189 Eurosky 6256, 6213, 6229, 6236,
6255, 6230 Eurostar 6255, 6179 Eutelsat 6180 Eutra 6230 Evesham 6218 Exator 6200 Fagor 6203 Fenner 6180 Ferguson 6176, 6264, 6268, 6269 Fidelity 6236 Finlandia 6176 Finlux 6176, 6207, 6228 FinnSat 6230 Flair Mate 6180 Fly Com 6186
FMD 6213, 6244, 6186 Freecom 6236 FTEmaximal 6180, 6189 Fuba 6177, 6229, 6261, 6207, 6226,
6196 Galaxis 6220, 6267 Gardiner 6179 Garnet 6192 GbSAT 6196 Gecco 6246, 6199 General Satellite 6241 Globo 6230, 6227, 6238, 6199, 6257 GOD Digital 6214 Gold Box 6220, 6219 Gold Vision 6247 Golden Interstar 6250 Goodmans 6176, 6254, 6217, 6264,
6271, 6218, 6201, 6190 Gran Prix 6230 Granada 6176 Grandin 6228 Grocos 6239, 6186 Grundig 6220, 6177, 6217, 6264,
6232, 6218, 6201, 6190 Haensel & Gretel 6256 Haier 6245 Hama 6183 Hanseatic 6215, 6222 Hauppauge 6231, 6232 HB 6196 Heliocom 6255 Helium 6255 Hiro 6189 Hirschmann 6267, 6177, 6229,
6261, 6236, 6207, 6255, 6230, 6252, 6199, 6189
Hitachi 6176, 6217, 6218 HNE 6256 Hornet 6251 Houston 6261 Humax 6241, 6268, 6242 Huth 6256, 6255, 6192, 6193 Hyundai 6192 ID Digital 6241 ILLUSION sat 6247 Imperial 6222, 6216, 6223, 6238,
6232 Ingelen 6213, 6261 Inno Hit 6228 International 6256 Interstar 6196 Intervision 6255 Inves 6268 iotronic 6244 ITT Nokia 6176, 6207 Jaeger 6238 K-SAT 6180 Kamm 6180 Kaon 6251 KaTelco 6267 Kathrein 6177, 6214, 6213, 6262,
6200, 6180, 6179, 6272, 6183 Kendo 6252 Kenwood 6220 Key West 6256 Kiton 6213 KR 6200 Kreiling 6213, 6194, 6228 Kreiselmeyer 6177 Kyostar 6200 L&S Electronic 6256, 6238
Labgear 6195 LaSAT 6177, 6256, 6229, 6255, 6230 Leiko 6228 Lemon 6238 Lenco 6255, 6180 Lenson 6236 LG 6192 Lifesat 6256, 6229, 6180 Listo 6228 Lodos 6217 Logik 6217 Logix 6192 Lorenzen 6256, 6229, 6255, 6226,
6231, 6257, 6237 Luxor 6236, 6207, 6265 M Electronic 6179 Manata 6256, 6180 Manhattan 6176, 6251 Marantz 6214 Maspro 6177, 6180 Matsui 6177, 6217, 6271, 6228,
6268, 6269 Max 6255 Maximum 6192, 6238 Mediabox 6220, 6219 Mediacom 6198 MediaSat 6220, 6219, 6236, 6278,
6277 Medion 6256, 6229, 6180, 6230,
6192, 6252, 6238, 6199, 6228 Medison 6180 Mega 6214 MegaSat 6189 Metronic 6256, 6200, 6180, 6179,
6202, 6250, 6238, 6244 Metz 6177 Micro 6236, 6255, 6200, 6180, 6231 Micro Elektronic 6180 Micro Technology 6180 Micromaxx 6229 Microstar 6229, 6192, 6226 Microtec 6180 Mitsubishi 6176 Morgan’s 6214, 6256, 6180, 6252,
6199 Multibroadcast 6174 Multichoice 6174 Myryad 6214 Mysat 6180 MySky 6212, 6211 NEOTION 6238 Netsat 6263 Neuhaus 6236, 6255, 6180 Neuling 6256, 6252, 6257, 6188 Neusat 6180 Neveling 6226 Newton 6261 NextWave 6193 Nichimen 6254 Nikko 6214, 6180 Noda Electronic 6202 Nokia 6220, 6176, 6207, 6206 Nordmende 6176 Octagon 6200 OctalTV 6231 Onn 6217, 6218 Opentel 6252, 6199 Optex 6213, 6180, 6250, 6244, 6203,
6228 Orbis 6252, 6238, 6199
Orbitech 6213, 6236, 6215, 6222, 6216, 6223
P/Sat 6252 Pace 6220, 6214, 6176, 6181, 6273,
6212, 6211 Pacific 6217 Packard Bell 6267 Palcom 6229, 6226, 6239 Palladium 6261, 6236 Palsat 6236 Panasonic 6176, 6178 Panda 6177, 6176, 6255 Pansat 6191 Pass 6183 Patriot 6256 peeKTon 6186, 6245 Philips 6220, 6177, 6214, 6275, 6219,
6277, 6268, 6232, 6179, 6200, 6176, 6263
Phoenix 6245 Phonotrend 6233 Pilotime 6278 Pino 6238 Pixx 6191 Planet 6261 PMB 6180, 6203 Polytron 6261 Portland 6195 Preisner 6256, 6261, 6243, 6185 Premier 6219 Primacom 6267 Pro Basic 6220, 6184 Proline 6217 Promax 6176 Proscan 6234 Quelle 6229, 6255 Radiola 6214 Radix 6261, 6243 Rainbow 6200 RCA 6234 Rebox 6196 Regal 6227 RFT 6214 Roadstar 6220, 6180 Rollmaster 6244 Rover 6180 Rownsonic 6183 SAB 6227, 6251 Saba 6255, 6230, 6202, 6184 Sabre 6176 Sagem 6275, 6258, 6277 Saivod 6245 Salora 6252 Samsung 6220, 6198, 6197, 6273,
6253 Sanyo 6228 SAT 6236 Sat Control 6251 Sat Partner 6236, 6200 Sat Team 6180 SAT+ 6239 Satcom 6255 Satec 6180 Satelco 6252 Satplus 6222 SatyCon 6247 Schaecke 6200 Schaub Lorenz 6196, 6245 Schneider 6198, 6227
Schwaiger 6267, 6256, 6262, 6255, 6230, 6202, 6192, 6238, 6199, 6186, 6257, 6247, 6232, 6187, 6188
Scientific Atlanta 6209 SCS 6229, 6230 Sedea Electronique 6256, 6213,
6198, 6250, 6228 Seemann 6261 SEG 6213, 6192, 6227, 6217, 6228 Septimo 6202 Serd 6199 Servimat 6203 ServiSat 6180, 6227 Shark 6247 Sharp 6265, 6218 Siemens 6177, 6261, 6238 Sigmatek 6245 Silva 6229 SilverCrest 6187 Skantin 6180 SKR 6180 SKT 6256 SKY 6263, 6210, 6212, 6211 SKY Italia 6220, 6212 Sky XL 6227, 6199 Skymaster 6233, 6180, 6192, 6238,
6239, 6183, 6203, 6184 Skymax 6214, 6244 Skypex 6230 Skyplus 6230, 6252, 6238, 6199 SkySat 6213, 6236, 6255, 6180 Skyvision 6238 SL 6256, 6229, 6230, 6231, 6257, 6232 SM Electronic 6233, 6180, 6239 Smart 6256, 6261, 6180, 6243, 6252,
6246, 6244, 6257, 6247 SmartVision 6186 Sony 6235, 6220, 6219, 6176 SR 6256 Star Sat 6196 Starland 6180 Starlite 6214 Stream 6212 Stream System 6251 Strong 6220, 6228, 6256, 6200, 6180,
6245, 6217, 6239 Sumin 6199 Sunny 6251 Sunsat 6180 Sunstar 6174, 6256 SuperMax 6193 Supratech 6244 Systec 6238 Tantec 6176 Targa 6191 Tatung 6176 TBoston 6227, 6245 Tecatel 6233 Technical 6228 Technika 6217, 6232, 6218 TechniSat 6213, 6261, 6176, 6236,
6215, 6222, 6216, 6223 Technomate 6250 Technosat 6193 Technosonic 6254, 6232 Technotrend 6232 Technowelt 6256, 6255 Techwood 6213, 6217, 6228, 6218 Telasat 6255 TELE System 6261, 6227, 6239,
6203
VSX-821_FLXCN_zhtw.book Page 43 Monday, March 28, 2011 2:55 PM
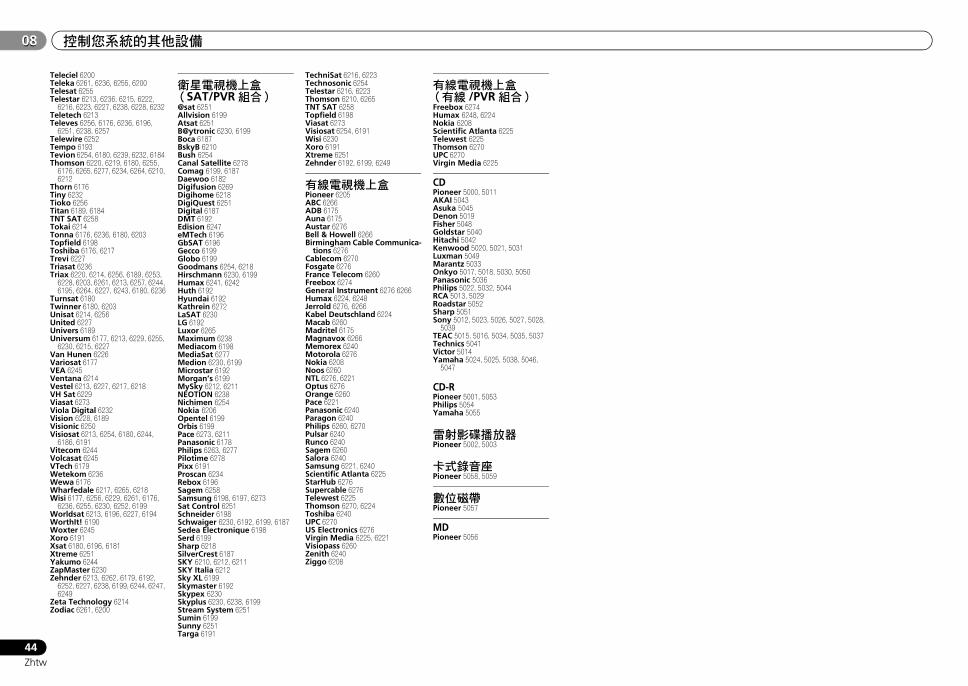
控制您系統的其他設備08
44Zhtw
08
Teleciel 6200 Teleka 6261, 6236, 6255, 6200 Telesat 6255 Telestar 6213, 6236, 6215, 6222,
6216, 6223, 6227, 6238, 6228, 6232 Teletech 6213 Televes 6256, 6176, 6236, 6196,
6251, 6238, 6257 Telewire 6252 Tempo 6193 Tevion 6254, 6180, 6239, 6232, 6184 Thomson 6220, 6219, 6180, 6255,
6176, 6265, 6277, 6234, 6264, 6210, 6212
Thorn 6176 Tiny 6232 Tioko 6256 Titan 6189, 6184 TNT SAT 6258 Tokai 6214 Tonna 6176, 6236, 6180, 6203 Topfield 6198 Toshiba 6176, 6217 Trevi 6227 Triasat 6236 Triax 6220, 6214, 6256, 6189, 6253,
6228, 6203, 6261, 6213, 6257, 6244, 6195, 6264, 6227, 6243, 6180, 6236
Turnsat 6180 Twinner 6180, 6203 Unisat 6214, 6256 United 6227 Univers 6189 Universum 6177, 6213, 6229, 6255,
6230, 6215, 6227 Van Hunen 6226 Variosat 6177 VEA 6245 Ventana 6214 Vestel 6213, 6227, 6217, 6218 VH Sat 6229 Viasat 6273 Viola Digital 6232 Vision 6228, 6189 Visionic 6250 Visiosat 6213, 6254, 6180, 6244,
6186, 6191 Vitecom 6244 Volcasat 6245 VTech 6179 Wetekom 6236 Wewa 6176 Wharfedale 6217, 6265, 6218 Wisi 6177, 6256, 6229, 6261, 6176,
6236, 6255, 6230, 6252, 6199 Worldsat 6213, 6196, 6227, 6194 WorthIt! 6190 Woxter 6245 Xoro 6191 Xsat 6180, 6196, 6181 Xtreme 6251 Yakumo 6244 ZapMaster 6230 Zehnder 6213, 6262, 6179, 6192,
6252, 6227, 6238, 6199, 6244, 6247, 6249
Zeta Technology 6214 Zodiac 6261, 6200
衛星電視機上盒(SAT/PVR組合)@sat 6251 Allvision 6199 Atsat 6251 B@ytronic 6230, 6199 Boca 6187 BskyB 6210 Bush 6254 Canal Satellite 6278 Comag 6199, 6187 Daewoo 6182 Digifusion 6269 Digihome 6218 DigiQuest 6251 Digital 6187 DMT 6192 Edision 6247 eMTech 6196 GbSAT 6196 Gecco 6199 Globo 6199 Goodmans 6254, 6218 Hirschmann 6230, 6199 Humax 6241, 6242 Huth 6192 Hyundai 6192 Kathrein 6272 LaSAT 6230 LG 6192 Luxor 6265 Maximum 6238 Mediacom 6198 MediaSat 6277 Medion 6230, 6199 Microstar 6192 Morgan’s 6199 MySky 6212, 6211 NEOTION 6238 Nichimen 6254 Nokia 6206 Opentel 6199 Orbis 6199 Pace 6273, 6211 Panasonic 6178 Philips 6263, 6277 Pilotime 6278 Pixx 6191 Proscan 6234 Rebox 6196 Sagem 6258 Samsung 6198, 6197, 6273 Sat Control 6251 Schneider 6198 Schwaiger 6230, 6192, 6199, 6187Sedea Electronique 6198 Serd 6199 Sharp 6218 SilverCrest 6187 SKY 6210, 6212, 6211SKY Italia 6212 Sky XL 6199 Skymaster 6192 Skypex 6230 Skyplus 6230, 6238, 6199 Stream System 6251 Sumin 6199 Sunny 6251 Targa 6191
TechniSat 6216, 6223 Technosonic 6254 Telestar 6216, 6223 Thomson 6210, 6265 TNT SAT 6258 Topfield 6198 Viasat 6273 Visiosat 6254, 6191 Wisi 6230 Xoro 6191 Xtreme 6251 Zehnder 6192, 6199, 6249
有線電視機上盒Pioneer 6205 ABC 6266 ADB 6175 Auna 6175 Austar 6276 Bell & Howell 6266 Birmingham Cable Communica-
tions 6276 Cablecom 6270 Fosgate 6276 France Telecom 6260 Freebox 6274 General Instrument 6276 6266 Humax 6224, 6248 Jerrold 6276, 6266 Kabel Deutschland 6224 Macab 6260 Madritel 6175 Magnavox 6266 Memorex 6240 Motorola 6276 Nokia 6208 Noos 6260 NTL 6276, 6221 Optus 6276 Orange 6260 Pace 6221 Panasonic 6240 Paragon 6240 Philips 6260, 6270 Pulsar 6240 Runco 6240 Sagem 6260 Salora 6240 Samsung 6221, 6240 Scientific Atlanta 6225 StarHub 6276 Supercable 6276 Telewest 6225 Thomson 6270, 6224 Toshiba 6240 UPC 6270 US Electronics 6276 Virgin Media 6225, 6221 Visiopass 6260 Zenith 6240 Ziggo 6208
有線電視機上盒(有線 /PVR組合) Freebox 6274 Humax 6248, 6224 Nokia 6208 Scientific Atlanta 6225 Telewest 6225 Thomson 6270 UPC 6270 Virgin Media 6225
CDPioneer 5000, 5011 AKAI 5043 Asuka 5045 Denon 5019 Fisher 5048 Goldstar 5040 Hitachi 5042 Kenwood 5020, 5021, 5031 Luxman 5049 Marantz 5033 Onkyo 5017, 5018, 5030, 5050 Panasonic 5036 Philips 5022, 5032, 5044 RCA 5013, 5029 Roadstar 5052 Sharp 5051 Sony 5012, 5023, 5026, 5027, 5028,
5039TEAC 5015, 5016, 5034, 5035, 5037 Technics 5041 Victor 5014 Yamaha 5024, 5025, 5038, 5046,
5047
CD-RPioneer 5001, 5053Philips 5054Yamaha 5055
雷射影碟播放器Pioneer 5002, 5003
卡式錄音座Pioneer 5058, 5059
數位磁帶Pioneer 5057
MDPioneer 5056
VSX-821_FLXCN_zhtw.book Page 44 Monday, March 28, 2011 2:55 PM
EnglishEspañol
其他資訊 0909
45Zhtw
第 9章:
其他資訊
疑難排解錯誤的操作經常被誤以為故障及功能異常。 若認為設備出現問題,可按以下要點進行檢查。 請留意所使用的其他設備及電氣用品,有時便是問題所在。 若按照以下要點檢查後仍無法找出問題,請洽當地先鋒所授權的獨立服務公司進行維修。
•若本機是因為靜電等外力導致無法正常操作,請拔掉插座上的電源插頭再重新插回,以回復正常的操作狀態。
一般
電源無法打開。將電源插頭從插座上拔掉,然後再插上。確定沒有鬆脫的揚聲器線碰觸到後面板。 否則會造成接收器自動關機。
接收器突然關機。啟用自動關閉電源功能時,若已數小時未操作接收器,接收器電源將自動關閉。 檢查自動關閉電源功能的設定(請參閱第 36頁的自動電源關閉選單 乙節)。
大約一分鐘後(請勿在這段時間內開機),將接收器重新開機。 若訊息仍在,請洽先鋒所授權的獨立服務公司。
電源突然開啟或關閉,或輸入突然變(HDMI Control為 ON時)。此現象是因為HDMI Control功能進行同步操作的緣故。 若不需要同步操作,請將 HDMI Control設為OFF(請參閱第 37頁的 HDMI設定 乙節)。
顯示幕中顯示 OVERHEAT,且電源關閉。本機內的溫度已超過允許值。 請試著將本機移至通風良好的地方(請參閱第 2頁)。
降低音量。
顯示幕中顯示 TEMP,且音量降低。本機內的溫度已超過允許值。 請試著將本機移至通風良好的地方(請參閱第 2頁)。
降低音量。選取一輸入功能時沒有聲音傳出。使用MASTER VOLUME調高音量。按下遙控器上的MUTE按鍵將靜音功能關閉。按下 SPEAKERS選取正確的揚聲器設定(請參閱第
12頁的切換揚聲器端子 乙節)。根據所用接線類型將SIGNAL SEL設定為H (HDMI)、
C1/O1/O2(數位)或 A(類比)(請參閱第 22頁)。
請確定設備連接正確(請參閱第 10頁的連接您的設備 乙節)。
檢查來源設備的音訊輸出設定。請參閱來源設備隨附操作手冊。選取輸入功能時沒有影像輸出。請確定設備連接正確(請參閱第 10頁的連接您的設備 乙節)。
請使用適用於來源設備與電視的相同類型視訊連接線,以連接此接收器(請參閱第 13頁的關於連接視訊輸出 乙節)。
檢查第 35頁的輸入指定選單,確定指定的是正確的輸入。
電視機選取的視訊輸入錯誤。 請參閱電視機隨附的操作手冊。
重低音沒有聲音。確定重低音已開啟。若重低音有音量調整鈕,請確定已有調高。所聆聽的Dolby Digital或DTS來源可能不含 LFE聲道。
在第33頁的揚聲器設定 中將重低音設定切換為YES或 PLUS。
在第 31頁上將 LFE ATT(LFE衰減)切換為LFEATT 0或 LFEATT 5。
環繞或中置揚聲器沒有聲音。正確連接揚聲器(請參閱第 11頁)。請參閱第 33頁的揚聲器設定 乙節,檢查揚聲器設定。
請參閱第 34頁的聲道位準 乙節,檢查揚聲器音壓。
相位控制功能似乎沒有提供音效。若適用的話,請檢查重低音的低通濾波器開關是否關閉,或低通分頻點是否設定為最高頻率。 若重低音有設定 PHASE,將其設定為 0º(或視重低音而定,從您認為有最佳整體音效的角度進行設定)。
確定已正確設定所有揚聲器的揚聲器距離(請參閱第 35頁的揚聲器距離 乙節)。
廣播節目中有明顯雜音。接上天線(第 17頁)並調整至最佳接收的方位。將鬆散的連接線排放在遠離天線端子及導線的地方。
將 FM線型天線完全展開,調整最佳接收的方位,並固定於牆上(或接上室外 FM天線)。
連接另一條內部或外部 AM天線(第 18頁)。關閉造成干擾的設備或將其移離接收器(或將天線移離產生雜訊的設備遠一些)。
無法自動選台。連接室外天線(請參閱第 18頁)。卡式錄音座播放期間有雜音。將卡式錄音座移離接收器,直到雜音消失。播放含有 DTS的軟體時,沒有聲音輸出或有雜音。確定播放器的設定值正確及/或 DTS訊號輸出已開啟。 請參閱 DVD播放器隨附操作手冊。
揚聲器與重低音的輸出之間似乎有時間延遲。請參閱第 20頁的環繞音效的自動設定(MCACC)乙節,再次利用MCACC來設定您的系統(這樣可以自動補償存在於重低音輸出中的延遲)。
在使用自動 MCACC設定後,揚聲器的大小設定值(LARGE或 SMALL)出現錯誤。低頻雜訊可能是來自空調或馬達。 請關閉房內的所有電氣設備再回到自動 MCACC設定。
遙控器無法操作。更換電池(請參閱第 9頁)。請在遙控感應器的 7 m、30º 範圍內操作(請參閱第 9頁)。
移除阻擋物或從其他位置操作。避免陽光直接照射到前面板上的遙控感應器。
VSX-821_FLXCN_zhtw.book Page 45 Monday, March 28, 2011 2:55 PM

其他資訊09
46Zhtw
09
顯示幕黑暗或關閉。連續按遙控器的 DIMMER回復預設值。 前面板顯示幕不知什麼原因便切換為各種不同的顯示幕。這是因為正在使用示範顯示功能。 若要關閉示範顯示功能,按下任意按鍵即可返回原始顯示幕,或將FL Demo Mode設為 OFF(請參閱第 36頁的 FL示範模式選單 乙節)。
接收器未識別 iPod touch/iPhone。試著使用下列方式。
1. 同時按下 iPod touch或 iPhone上的關機按鍵與Home按鍵 10秒以上即可重新啟動。2. 開啟接收器。3. 將 iPod touch/iPhone連接接收器。
無法連接或操作 Bluetooth無線技術裝置。 Bluetooth無線技術裝置的聲音未輸出或聲音中斷。檢查是否有物體在本機附近於 2.4 GHz頻帶中發射電磁波(微波爐、無線 LAN裝置或 Bluetooth無線技術設備)。 若此類物體接近本機,請將本機遠離該物體。 否則,請停止使用發射電磁波的物體。
檢查 Bluetooth無線技術裝置是否離本機太遠,且Bluetooth無線技術裝置與本機間沒有阻礙物。 讓Bluetooth無線技術裝置與本機間的距離短於約10 m,且兩者之間沒有阻礙物。
檢查Bluetooth ADAPTER與本機的ADAPTER PORT端子是否正確連接。
Bluetooth無線技術裝置可能未設為支援 Bluetooth無線技術的通訊模式。 檢查 Bluetooth無線技術裝置的設定。
檢查配對是否正確。 本機或 Bluetooth無線技術裝置的配對設定已遭刪除。 重設配對。
檢查設定檔是否正確。 請使用支援 A2DP設定檔及AVRCP設定檔的 Bluetooth無線技術裝置。
HDMI
無畫面或音效。若直接將 HDMI 設備連接至顯示器後仍然出現此問題,請查閱設備或監視器手冊,或聯絡製造商以獲得支援。
無畫面。從類比視訊端子輸入的視訊訊號將不會從 HDMI端子輸出。 從 HDMI端子輸入的訊號將不會從類比視訊端子輸出。 輸入與輸出的連接線類型請維持一致。
視來源設備的輸出設定而異,該設備可能是輸出無法顯示的視訊格式。 變更來源的輸出設定,或使用色差或複合插孔連接。
本機為HDCP相容。 確認所連接的設備亦是HDCP相容。 若不是,則請利用色差或複合視訊插孔將這些設備接上。
視接上的來源設備而定,有可能對本接收器並不適用(即使是 HDCP相容)。 此時,請使用色差或複合視訊插孔將來源及接收器連接上。
若您的電視機上未出現視訊影像,請嘗試調整解析度、Deep Color或設備的其他設定。
若要在Deep Color中輸出訊 .號,請使用HDMI連接線(High Speed HDMI®連接線)將接收器連接至提供 Deep Color功能的設備或電視機。
未顯示 OSD畫面(System Setup選單或 iPod/USB的選單畫面)如果您已使用 HDMI 輸出連接至您的電視機,則
OSD 將不會出現。 設定系統時,使用色差或複合接線方式。
無音效,或音效突然中止。確定音訊選項是設定為 HDMI AMP/THRU(請參閱第 31頁)。
若設備是 DVI裝置,則請將音訊連接至另外的端子上。
HDMI格式數位音訊傳輸需要更長的確認時間。 正因為如此,在切換音訊格式或開始播放時,可能會發生音訊中斷。
播放時開啟/關閉連接本機的 HDMI OUT端子的裝置電源,或在播放時脫離/連接 HDMI連接線,都可能造成雜訊或音訊中斷。
無法使用 HDMI的控制功能進行同步化操作。檢查 HDMI的連接情形。連接線可能損壞。選擇ON用於HDMI設定的 Control功能第 37頁的
HDMI設定。開啟本接收器的電源之前,請先開啟電視機的電源。
將電視端的 HDMI控制設定設為開啟(請參閱電視的操作手冊)。
關於 HDMI連接線的重要資訊以下為您可能無法透過本接收器傳送HDMI訊號的範例(此取決於您連接的HDMI設備 -關於HDMI相容資訊,請洽詢設備製造商)。若無法透過本接收器從您的設備正確接收 HDMI訊號,請在連接時嘗試使用以下配置方式。
配置使用 HDMI 連接線直接將 HDMI 設備接上顯示器。 然後最便利的連接方式(建議使用數位連接)來傳送音訊至接收器。 關於音訊連接的更多資訊,請參閱操作說明。 使用此配置時,請將顯示裝置的音量設定為最小。
附註•視設備而定,音訊輸出可能會受到連接顯示裝置可用聲道數的限制(例如,如使用有立體聲音訊限制的監視器,音訊輸出將減至雙聲道)。
•若要切換輸入來源,您必須切換接收器與顯示裝置上的功能。
•使用 HDMI連接線時,由於顯示裝置的聲音會關閉,因此您必須在每次切換輸入來源時調整顯示器的音量。
VSX-821_FLXCN_zhtw.book Page 46 Monday, March 28, 2011 2:55 PM
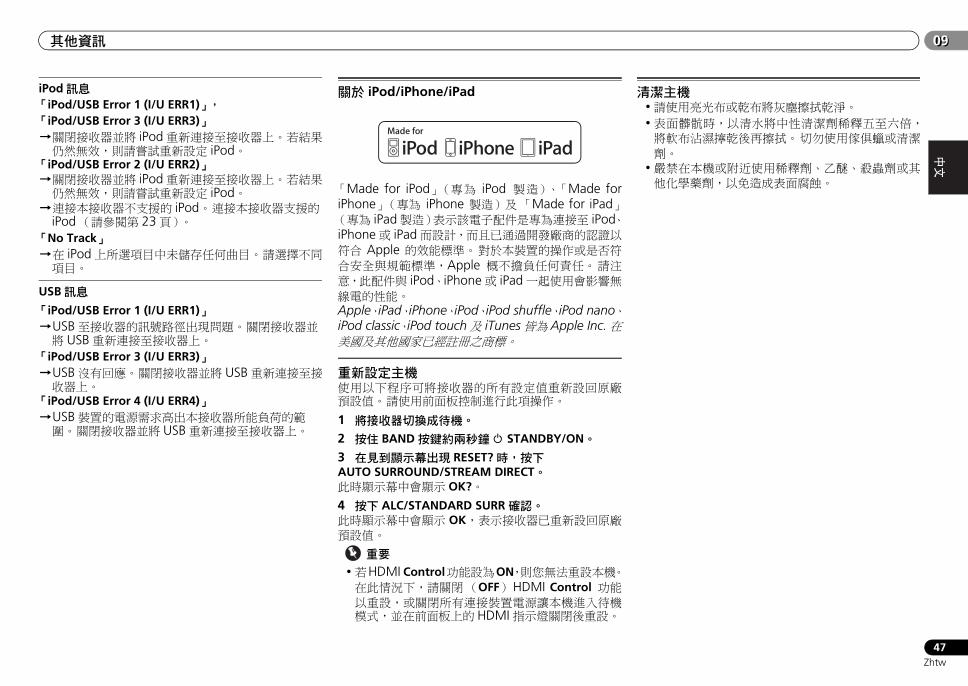
EnglishEspañol
其他資訊 0909
47Zhtw
iPod訊息「iPod/USB Error 1 (I/U ERR1)」,「iPod/USB Error 3 (I/U ERR3)」關閉接收器並將 iPod重新連接至接收器上。 若結果仍然無效,則請嘗試重新設定 iPod。
「iPod/USB Error 2 (I/U ERR2)」關閉接收器並將 iPod重新連接至接收器上。 若結果仍然無效,則請嘗試重新設定 iPod。
連接本接收器不支援的 iPod。 連接本接收器支援的iPod(請參閱第 23頁)。
「No Track」在 iPod上所選項目中未儲存任何曲目。 請選擇不同項目。
USB訊息
「iPod/USB Error 1 (I/U ERR1)」USB至接收器的訊號路徑出現問題。 關閉接收器並將 USB重新連接至接收器上。
「iPod/USB Error 3 (I/U ERR3)」USB沒有回應。 關閉接收器並將 USB重新連接至接收器上。
「iPod/USB Error 4 (I/U ERR4)」USB裝置的電源需求高出本接收器所能負荷的範圍。 關閉接收器並將 USB重新連接至接收器上。
關於 iPod/iPhone/iPad
「Made for iPod」(專為 iPod 製造)、「Made foriPhone」(專為 iPhone 製造)及「Made for iPad」(專為 iPad製造)表示該電子配件是專為連接至 iPod、iPhone或 iPad而設計,而且已通過開發廠商的認證以符合 Apple 的效能標準。 對於本裝置的操作或是否符合安全與規範標準,Apple 概不擔負任何責任。 請注意,此配件與 iPod、iPhone或 iPad一起使用會影響無線電的性能。Apple、iPad、iPhone、iPod、iPod shuffle、iPod nano、iPod classic、iPod touch及 iTunes皆為 Apple Inc.在美國及其他國家已經註冊之商標。
重新設定主機使用以下程序可將接收器的所有設定值重新設回原廠預設值。 請使用前面板控制進行此項操作。
1 將接收器切換成待機。
2 按住 BAND按鍵約兩秒鐘 STANDBY/ON。
3 在見到顯示幕出現 RESET?時,按下AUTO SURROUND/STREAM DIRECT。此時顯示幕中會顯示 OK?。
4 按下 ALC/STANDARD SURR確認。此時顯示幕中會顯示 OK,表示接收器已重新設回原廠預設值。
重要
•若HDMI Control功能設為ON,則您無法重設本機。在此情況下,請關閉(OFF) HDMI Control 功能以重設,或關閉所有連接裝置電源讓本機進入待機模式,並在前面板上的 HDMI指示燈關閉後重設。
清潔主機•請使用亮光布或乾布將灰塵擦拭乾淨。•表面髒骯時,以清水將中性清潔劑稀釋五至六倍,將軟布沾濕擰乾後再擦拭。 切勿使用傢俱蠟或清潔劑。
•嚴禁在本機或附近使用稀釋劑、乙醚、殺蟲劑或其他化學藥劑,以免造成表面腐蝕。
VSX-821_FLXCN_zhtw.book Page 47 Monday, March 28, 2011 2:55 PM
其他資訊09
48Zhtw
09
規格
音訊部分FTC功率輸出 . . . . . . . . . . . . . . . . . . 65 W + 65 W
(立體聲,20 Hz至 20 kHz,8 Ω,0.2 %)額定功率輸出(前置、中置和環繞)
. . . . . . . . . 每聲道 125 W(1 kHz,6 Ω,1 %)最大功率輸出(前置、中置和環繞)
. . . . . . . . 每聲道 150 W(1 kHz,6 Ω,10 %)總諧波失真
. . . . 0.06 %(20 Hz至 20 kHz,8 Ω,50 W /ch)保證揚聲器阻抗前置: A,B. . . . . . . . . . . . . . . . . . . .6 Ω至 16 Ω前置: A+B . . . . . . . . . . . . . . . . . . .12 Ω至 16 Ω環繞,中置 . . . . . . . . . . . . . . . . . . . .6 Ω至 16 Ω輸入(靈敏度/阻抗)
LINE . . . . . . . . . . . . . . . . . . . . . . 200 mV/47 kΩ輸出(位準/阻抗)
REC . . . . . . . . . . . . . . . . . . . . . 200 mV/2.2 kΩ訊噪比(IHF、短路、A型網路)
LINE . . . . . . . . . . . . . . . . . . . . . . . . . . . . . 98 dB
視訊部分訊號位準複合 . . . . . . . . . . . . . . . . . . . . . . . 1 Vp-p (75 Ω)色差視訊 . . . . . . . . . . . . . . . .Y:1.0 Vp-p (75 Ω)
PB,PR:0.7 Vp-p (75 Ω)對應最大解析度色差視訊 . . . . . . . . . . . . . . . . . . . 1080p (1125p)
調諧器部分頻率範圍(FM). . . . . . . . . 87.5 MHz 至 108 MHz天線輸入(FM). . . . . . . . . . . . . . . . . 75 Ω 非平衡頻率範圍(AM)
9 kHz間隔 . . . . . . . . . . . . 531 kHz 至 1602 kHz10 kHz間隔 . . . . . . . . . . . 530 kHz 至 1700 kHz天線(AM) . . . . . . . . . . . . . . . . . . . . . 環型天線
數位輸入/輸出部分HDMI 端子 . . . . . . . . . . . . . . . . . .Type A(19針)HDMI輸出類型. . . . . . . . . . . . . . . . . 5 V,100 mAUSB端子 . . . . . . . . . . . . . . . USB2.0全速(A型)iPod端子 . . . . . . . . . . . . . . . . USB和視訊(複合)ADAPTER PORT端子 . . . . . . . . . . . . 5 V,100 mA
其他資訊電源需求 . . . AC 110 V至 127 V/220 V至 240 V,
50 Hz/60 Hz消耗功率 . . . . . . . . . . . . . . . . . . . . . . . . . . 415 W待機時 . . . . . . . . . . . . . . . . . . . . . . . . . . .0.45 W
(HDMI Control功能:關閉)尺寸. . . . . . . . 435 mm(寬) x 168 mm(高) x
362.5 mm(深)重量(不含包裝). . . . . . . . . . . . . . . . . . . . 9.2 kg
隨附配件麥克風(自動 MCACC設定專用). . . . . . . . . . . . 1遙控器 . . . . . . . . . . . . . . . . . . . . . . . . . . . . . . . 1乾電池(AAA/IEC R03). . . . . . . . . . . . . . . . . . . 2AM環型天線 . . . . . . . . . . . . . . . . . . . . . . . . . . . 1FM線型天線. . . . . . . . . . . . . . . . . . . . . . . . . . . . 1iPod連接線 . . . . . . . . . . . . . . . . . . . . . . . . . . . . 1電源線本操作手冊
附註•規格僅在電源為 230 V時才適用。•如因改良以致規格及設計有所變更,恕不另行通知。
© 2011 日本先鋒公司。 版權所有。
©
VSX-821_FLXCN_zhtw.book Page 48 Monday, March 28, 2011 2:55 PM
EnglishEspañol
其他資訊 0909
49Zhtw
VSX-821_FLXCN_zhtw.book Page 49 Monday, March 28, 2011 2:55 PM
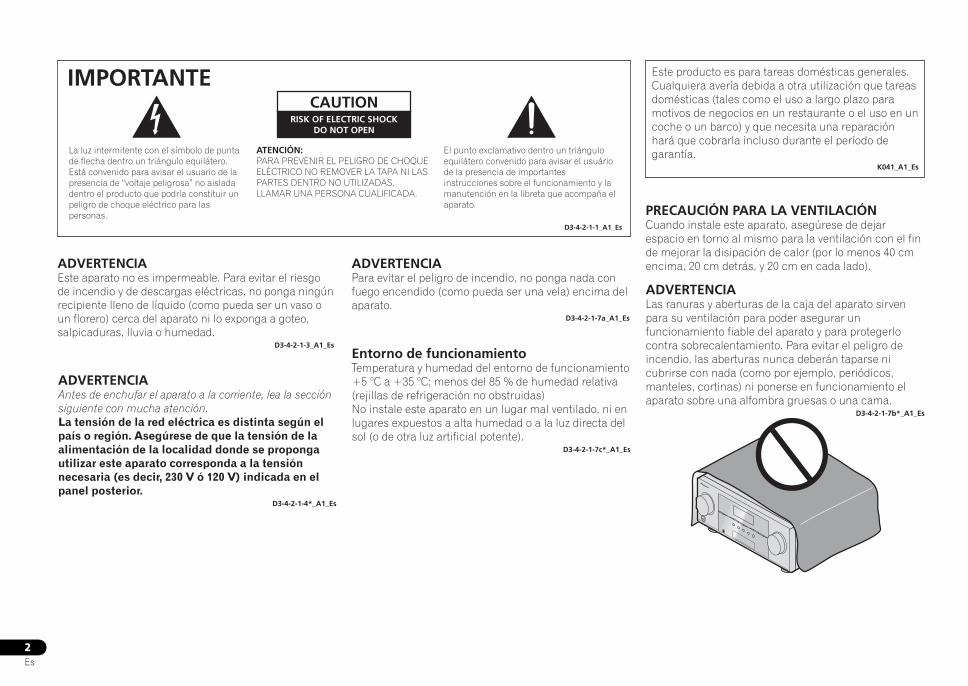
2Es
El punto exclamativo dentro un triángulo equilátero convenido para avisar el usuário de la presencia de importantes instrucciones sobre el funcionamiento y la manutención en la libreta que acompaña el aparato.
La luz intermitente con el símbolo de punta de flecha dentro un triángulo equilátero. Está convenido para avisar el usuario de la presencia de “voltaje peligrosa” no aislada dentro el producto que podría constituir un peligro de choque eléctrico para las personas.
ATENCIÓN:PARA PREVENIR EL PELIGRO DE CHOQUE ELÉCTRICO NO REMOVER LA TAPA NI LAS PARTES DENTRO NO UTILIZADAS, LLAMAR UNA PERSONA CUALIFICADA.
CAUTIONRISK OF ELECTRIC SHOCK
DO NOT OPEN
IMPORTANTE
D3-4-2-1-1_A1_Es
PRECAUCIÓN PARA LA VENTILACIÓNCuando instale este aparato, asegúrese de dejar espacio en torno al mismo para la ventilación con el fin de mejorar la disipación de calor (por lo menos 40 cm encima, 20 cm detrás, y 20 cm en cada lado).
ADVERTENCIALas ranuras y aberturas de la caja del aparato sirven para su ventilación para poder asegurar un funcionamiento fiable del aparato y para protegerlo contra sobrecalentamiento. Para evitar el peligro de incendio, las aberturas nunca deberán taparse ni cubrirse con nada (como por ejemplo, periódicos, manteles, cortinas) ni ponerse en funcionamiento el aparato sobre una alfombra gruesas o una cama.
D3-4-2-1-7b*_A1_Es
Entorno de funcionamientoTemperatura y humedad del entorno de funcionamiento+5 °C a +35 °C; menos del 85 % de humedad relativa (rejillas de refrigeración no obstruidas)No instale este aparato en un lugar mal ventilado, ni en lugares expuestos a alta humedad o a la luz directa del sol (o de otra luz artificial potente).
D3-4-2-1-7c*_A1_Es
ADVERTENCIAPara evitar el peligro de incendio, no ponga nada con fuego encendido (como pueda ser una vela) encima del aparato.
D3-4-2-1-7a_A1_Es
ADVERTENCIAEste aparato no es impermeable. Para evitar el riesgo de incendio y de descargas eléctricas, no ponga ningún recipiente lleno de líquido (como pueda ser un vaso o un florero) cerca del aparato ni lo exponga a goteo, salpicaduras, lluvia o humedad.
D3-4-2-1-3_A1_Es
ADVERTENCIAAntes de enchufar el aparato a la corriente, lea la sección siguiente con mucha atención.La tensión de la red eléctrica es distinta según el país o región. Asegúrese de que la tensión de la alimentación de la localidad donde se proponga utilizar este aparato corresponda a la tensión necesaria (es decir, 230 V ó 120 V) indicada en el panel posterior.
D3-4-2-1-4*_A1_Es
Este producto es para tareas domésticas generales. Cualquiera avería debida a otra utilización que tareas domésticas (tales como el uso a largo plazo para motivos de negocios en un restaurante o el uso en un coche o un barco) y que necesita una reparación hará que cobrarla incluso durante el período de garantía.
K041_A1_Es
VSX-821_FLXCN_Es.book 2 ページ 2011年3月23日 水曜日 午前11時33分
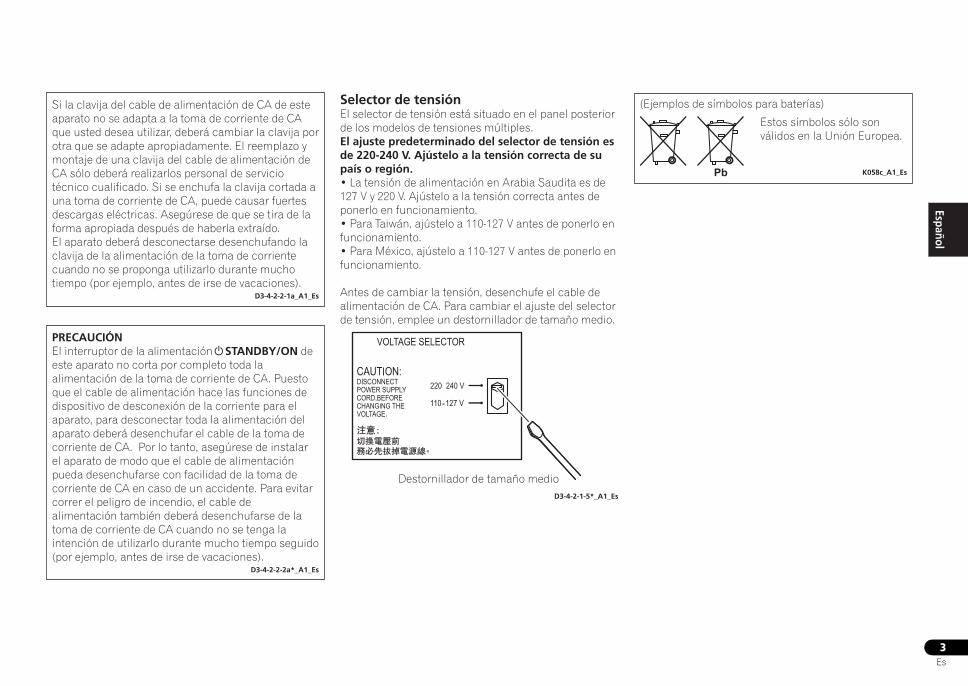
EnglishEspañol
3Es
Si la clavija del cable de alimentación de CA de este aparato no se adapta a la toma de corriente de CA que usted desea utilizar, deberá cambiar la clavija por otra que se adapte apropiadamente. El reemplazo y montaje de una clavija del cable de alimentación de CA sólo deberá realizarlos personal de servicio técnico cualificado. Si se enchufa la clavija cortada a una toma de corriente de CA, puede causar fuertes descargas eléctricas. Asegúrese de que se tira de la forma apropiada después de haberla extraído.El aparato deberá desconectarse desenchufando la clavija de la alimentación de la toma de corriente cuando no se proponga utilizarlo durante mucho tiempo (por ejemplo, antes de irse de vacaciones).
D3-4-2-2-1a_A1_Es
PRECAUCIÓNEl interruptor de la alimentación STANDBY/ON de este aparato no corta por completo toda la alimentación de la toma de corriente de CA. Puesto que el cable de alimentación hace las funciones de dispositivo de desconexión de la corriente para el aparato, para desconectar toda la alimentación del aparato deberá desenchufar el cable de la toma de corriente de CA. Por lo tanto, asegúrese de instalar el aparato de modo que el cable de alimentación pueda desenchufarse con facilidad de la toma de corriente de CA en caso de un accidente. Para evitar correr el peligro de incendio, el cable de alimentación también deberá desenchufarse de la toma de corriente de CA cuando no se tenga la intención de utilizarlo durante mucho tiempo seguido (por ejemplo, antes de irse de vacaciones).
D3-4-2-2-2a*_A1_Es
Selector de tensiónEl selector de tensión está situado en el panel posterior de los modelos de tensiones múltiples.El ajuste predeterminado del selector de tensión es de 220-240 V. Ajústelo a la tensión correcta de su país o región.• La tensión de alimentación en Arabia Saudita es de 127 V y 220 V. Ajústelo a la tensión correcta antes de ponerlo en funcionamiento.• Para Taiwán, ajústelo a 110-127 V antes de ponerlo en funcionamiento.• Para México, ajústelo a 110-127 V antes de ponerlo en funcionamiento.
Antes de cambiar la tensión, desenchufe el cable de alimentación de CA. Para cambiar el ajuste del selector de tensión, emplee un destornillador de tamaño medio.
Destornillador de tamaño medioD3-4-2-1-5*_A1_Es
Estos símbolos sólo son válidos en la Unión Europea.
K058c_A1_Es
(Ejemplos de símbolos para baterías)
Pb
VSX-821_FLXCN_Es.book 3 ページ 2011年3月23日 水曜日 午前11時33分
4Es
Enhorabuena por la adquisición de este producto Pioneer. Lea completamente este manual de instrucciones para aprender a operar correctamente el aparato. Después de haber terminado la lectura de las instrucciones, guarde el manual en un lugar seguro para poderlo consultar en el futuro.
ÍndiceAntes de comenzar. . . . . . . . . . . . . . . . . . . . . . . . . . . . 5Comprobación del contenido de la caja . . . . . . . . . . . . . . . . . . . 5Instalación del receptor . . . . . . . . . . . . . . . . . . . . . . . . . . . . . . . 5
Organigrama de ajustes del receptor . . . . . . . . . . . 501 Controles e indicadoresPanel frontal. . . . . . . . . . . . . . . . . . . . . . . . . . . . . . . . . . . . . . . . 6
Pantalla . . . . . . . . . . . . . . . . . . . . . . . . . . . . . . . . . . . . . . . . . . 7Mando a distancia . . . . . . . . . . . . . . . . . . . . . . . . . . . . . . . . . . . 8
Colocación de las pilas . . . . . . . . . . . . . . . . . . . . . . . . . . . . . . 9Alcance operativo del mando a distancia . . . . . . . . . . . . . . . . 9
02 Conexión del equipoDeterminación de la aplicación de los altavoces . . . . . . . . . . . 10
Algunos consejos para mejorar la calidad del sonido . . . . . . 10Conexión de los altavoces . . . . . . . . . . . . . . . . . . . . . . . . . . . . 11
Conexión de los altavoces traseros de sonido envolvente o de los altavoces delanteros con efectos de altura. . . . . . . . . . . . 11Activación del terminal de altavoces . . . . . . . . . . . . . . . . . . . 12
Conexiones de los cables . . . . . . . . . . . . . . . . . . . . . . . . . . . . . 12Cables HDMI . . . . . . . . . . . . . . . . . . . . . . . . . . . . . . . . . . . . . 12Acerca de HDMI . . . . . . . . . . . . . . . . . . . . . . . . . . . . . . . . . . 12Cables de audio analógico. . . . . . . . . . . . . . . . . . . . . . . . . . . 13Cables de audio digital . . . . . . . . . . . . . . . . . . . . . . . . . . . . . 13Cables de vídeo . . . . . . . . . . . . . . . . . . . . . . . . . . . . . . . . . . . 13
Acerca de la conexión de salidas de vídeo . . . . . . . . . . . . . . . . 13Conexión de componentes de reproducción y de un TV . . . . . . 14
Conexión mediante HDMI . . . . . . . . . . . . . . . . . . . . . . . . . . . 14Conexión de un componente sin terminal HDMI . . . . . . . . . . 15
Conexión de un receptor de satélite u otro módulo de conexión digital . . . . . . . . . . . . . . . . . . . . . . . . . . . . . . . . . . . . . . . . . . . . 15Conexión de una grabadora HDD/DVD, una grabadora Blu-ray Disc y otras fuentes de vídeo . . . . . . . . . . . . . . . . . . . . 16Uso de conectores de vídeo de componentes. . . . . . . . . . . . . . 16Conexión de otros componentes de audio . . . . . . . . . . . . . . . . 17Conexión del ADAPTADOR Bluetooth® opcional . . . . . . . . . . . 17Conexión de antenas . . . . . . . . . . . . . . . . . . . . . . . . . . . . . . . . 17
Uso de antenas exteriores . . . . . . . . . . . . . . . . . . . . . . . . . . . 18Conexión al terminal de vídeo del panel frontal . . . . . . . . . . . . 18Conexión de un iPod . . . . . . . . . . . . . . . . . . . . . . . . . . . . . . . . 18Conexión de un dispositivo USB. . . . . . . . . . . . . . . . . . . . . . . . 19Conexión del receptor. . . . . . . . . . . . . . . . . . . . . . . . . . . . . . . . 19
03 Configuración básicaAntes de llevar a cabo la configuración . . . . . . . . . . . . . . . . . . 20
Cambio del ajuste del formato de TV . . . . . . . . . . . . . . . . . . . 20Cancelación de la pantalla demo . . . . . . . . . . . . . . . . . . . . . . . 20Configuración automática para sonido envolvente (MCACC) . . . . . . . . . . . . . . . . . . . . . . . . . . . . . . . . . . . . . . . . . 20
Otros problemas al utilizar la configuración automática MCACC . . . . . . . . . . . . . . . . . . . . . . . . . . . . . . . . . . . . . . . . . 21
04 Reproducción básicaReproducción de una fuente . . . . . . . . . . . . . . . . . . . . . . . . . . 22
Selección de la señal de entrada de audio . . . . . . . . . . . . . . . 22Reproducción de un iPod . . . . . . . . . . . . . . . . . . . . . . . . . . . . . 23
Reproducción de archivos guardados en un iPod . . . . . . . . . 24Controles de reproducción básica . . . . . . . . . . . . . . . . . . . . . 24Visionado de fotos y vídeos . . . . . . . . . . . . . . . . . . . . . . . . . . 24
Reproducción de un aparato USB . . . . . . . . . . . . . . . . . . . . . . 24Controles de reproducción básica . . . . . . . . . . . . . . . . . . . . . 25Compatibilidad de sonido comprimido . . . . . . . . . . . . . . . . . 25
Bluetooth® ADAPTER para el disfrute inalámbrico de la música . . . . . . . . . . . . . . . . . . . . . . . . . . . . . . . . . . . . . . . . . . . 25
Reproducción inalámbrica de música . . . . . . . . . . . . . . . . . . 25Cómo emparejar el Bluetooth ADAPTER y el aparato de tecnología inalámbrica Bluetooth . . . . . . . . . . . . . . . . . . . . . 26Escucha de contenidos musicales de un dispositivo con tecnología inalámbrica Bluetooth con su sistema . . . . . . . . . 26
Recepción de radio. . . . . . . . . . . . . . . . . . . . . . . . . . . . . . . . . . 27Mejora del sonido de FM . . . . . . . . . . . . . . . . . . . . . . . . . . . . 27Presintonización de emisoras . . . . . . . . . . . . . . . . . . . . . . . . 27Cómo sintonizar emisoras memorizadas . . . . . . . . . . . . . . . . 27Asignación de nombres a las emisoras . . . . . . . . . . . . . . . . . 27Cambio del paso de radiofrecuencia . . . . . . . . . . . . . . . . . . . 27
05 Escuchar su sistemaElección del modo de escucha . . . . . . . . . . . . . . . . . . . . . . . . . 28
Reproducción automática . . . . . . . . . . . . . . . . . . . . . . . . . . 28Reproducción con sonido envolvente . . . . . . . . . . . . . . . . . . 28Uso de Advanced surround . . . . . . . . . . . . . . . . . . . . . . . . . 29Uso de Stream Direct . . . . . . . . . . . . . . . . . . . . . . . . . . . . . . 29
Uso de Sound Retriever . . . . . . . . . . . . . . . . . . . . . . . . . . . . . . 29Reproducción con el ecualizador de calibración acústica . . . . 29Sonido mejorado con Phase Control . . . . . . . . . . . . . . . . . . . . 30Uso del procesamiento del canal envolvente trasero . . . . . . . . 30Ajuste de la función Up Mix . . . . . . . . . . . . . . . . . . . . . . . . . . . 30Ajuste de las opciones de Audio. . . . . . . . . . . . . . . . . . . . . . . . 31
Cómo hacer una grabación de audio o vídeo . . . . . . . . . . . . . . 32
06 El menú System SetupUso del menú System Setup . . . . . . . . . . . . . . . . . . . . . . . . . . 33Configuración manual de los altavoces . . . . . . . . . . . . . . . . . . 33
Ajuste de los altavoces . . . . . . . . . . . . . . . . . . . . . . . . . . . . . 33Red divisora de frecuencias . . . . . . . . . . . . . . . . . . . . . . . . . . 34Nivel de canales. . . . . . . . . . . . . . . . . . . . . . . . . . . . . . . . . . . 34Distancia de los altavoces . . . . . . . . . . . . . . . . . . . . . . . . . . . 35
El menú Input Assign . . . . . . . . . . . . . . . . . . . . . . . . . . . . . . . . 35La configuración Pre Out . . . . . . . . . . . . . . . . . . . . . . . . . . . . . 36El menú Auto Power Down. . . . . . . . . . . . . . . . . . . . . . . . . . . . 36El menú FL Demo Mode . . . . . . . . . . . . . . . . . . . . . . . . . . . . . . 36
07 Función de Control con HDMIConexiones de Control con HDMI. . . . . . . . . . . . . . . . . . . . . . . 37HDMI Setup . . . . . . . . . . . . . . . . . . . . . . . . . . . . . . . . . . . . . . . 37Antes de usar la sincronización . . . . . . . . . . . . . . . . . . . . . . . . 38Acerca del funcionamiento sincronizado . . . . . . . . . . . . . . . . . 38
Acerca de las conexiones con un producto de una marca diferente que soporte la función de Control con HDMI . . . . . 38
Advertencias para la función de Control con HDMI . . . . . . . . . 38
08 Control de otros componentes del sistemaUso del mando a distancia para controlar otros componentes . . . . . . . . . . . . . . . . . . . . . . . . . . . . . . . . . . . . . . 39Selección directa de códigos de preajuste . . . . . . . . . . . . . . . . 39Borrado de todos los ajustes del mando a distancia. . . . . . . . . 39Controles para televisores . . . . . . . . . . . . . . . . . . . . . . . . . . . . 40Controles para otros componentes. . . . . . . . . . . . . . . . . . . . . . 40Lista de códigos de preajuste . . . . . . . . . . . . . . . . . . . . . . . . . . 40
09 Información adicionalSolución de problemas. . . . . . . . . . . . . . . . . . . . . . . . . . . . . . . 45
General . . . . . . . . . . . . . . . . . . . . . . . . . . . . . . . . . . . . . . . . . 45HDMI . . . . . . . . . . . . . . . . . . . . . . . . . . . . . . . . . . . . . . . . . . . 46Información importante relativa a la conexión HDMI . . . . . . . 46Mensajes de iPod . . . . . . . . . . . . . . . . . . . . . . . . . . . . . . . . . 47Mensajes USB . . . . . . . . . . . . . . . . . . . . . . . . . . . . . . . . . . . . 47
Acerca de iPod/iPhone/iPad. . . . . . . . . . . . . . . . . . . . . . . . . . . 47Restablecimiento de los ajustes por defecto del equipo . . . . . . 47Limpieza del equipo . . . . . . . . . . . . . . . . . . . . . . . . . . . . . . . . . 47Especificaciones . . . . . . . . . . . . . . . . . . . . . . . . . . . . . . . . . . . 48
VSX-821_FLXCN_Es.book 4 ページ 2011年3月23日 水曜日 午前11時33分

EnglishEspañol
5Es
Antes de comenzarComprobación del contenido de la cajaCompruebe que ha recibido todos los accesorios siguientes:
• Micrófono de configuración• Mando a distancia• Pilas secas AAA, IEC R03 (para confirmar el funcionamiento
del sistema) x 2• Antena de cuadro de AM• Antena de hilos de FM• Cable iPod• Cable de alimentación• Este manual de instrucciones
Instalación del receptor• Cuando instale el equipo, asegúrese de colocarlo sobre una
superficie nivelada y estable. No lo instale en los lugares siguientes:– sobre un televisor en color (la imagen podría distorsionarse en la pantalla)– cerca de una platina de casete (o cerca de dispositivos que generen campos magnéticos). Esto podría interferir con el sonido.– bajo la luz directa del sol– en lugares húmedos o mojados– en lugares extremadamente calurosos o fríos– en lugares que sean objeto de vibraciones u otros movimientos– en lugares donde haya mucho polvo– en lugares donde haya vapores o aceites calientes (p. ej., en una cocina)
Organigrama de ajustes del receptorEste equipo es un receptor AV completo equipado con numerosas funciones y terminales. Se puede usar fácilmente tras seguir el procedimiento indicado a continuación para la realización de las conexiones y ajustes.Los colores de los pasos indican lo siguiente:
Elemento de ajuste necesario
Ajuste que debe realizarse si es necesario
1 Conexión de los altavocesEl lugar donde coloque los altavoces tendrá un efecto importante en el sonido.
• Determinación de la aplicación de los altavoces (página 10)• Conexión de los altavoces (página 11)• Activación del terminal de altavoces (página 12)
2 Conexión de los componentesPara disfrutar del sonido envolvente, utilice una conexión digital entre el reproductor de Blu-ray Disc/DVD y el receptor.
• Acerca de la conexión de salidas de vídeo (página 13)• Conexión de componentes de reproducción y de un TV
(página 14)• Conexión de antenas (página 17)• Conexión del receptor (página 19)
3 EncendidoAsegúrese de seleccionar este receptor como entrada de vídeo en el televisor. Si no sabe cómo hacerlo, consulte el manual suministrado con el televisor.
4 Ajustes iniciales según la región y el ambiente en los que usted vive
• Cambio del ajuste del formato de TV (página 20)• Cambio del paso de radiofrecuencia (página 27)
5 La configuración Pre Out (página 36)(Cuando conecte los altavoces delanteros con efectos de altura.)El menú Input Assign (página 35)(Cuando se usan otras conexiones que no son las recomendadas.)Uso de la función Audio Return Channel (página 37)(Cuando el televisor soporta la función HDMI Audio Return Channel.)
6 Utilice la configuración automática de MCACC en pantalla para configurar su sistema
• Configuración automática para sonido envolvente (MCACC) (página 20)
7 Reproducción de una fuente (página 22)• Selección de la señal de entrada de audio (página 22)• Reproducción de un iPod (página 23)• Reproducción de un aparato USB (página 24)• Elección del modo de escucha (página 28)
8 Ajuste personalizado del sonido• Uso de Sound Retriever (página 29)• Sonido mejorado con Phase Control (página 30)• Reproducción con el ecualizador de calibración acústica
(página 29)• Uso del procesamiento del canal envolvente trasero
(página 30)• Ajuste de la función Up Mix (página 30)• Ajuste de las opciones de Audio (página 31)• Configuración manual de los altavoces (página 33)
9 Máximo provecho del mando a distancia• Uso del mando a distancia para controlar otros
componentes (página 39)
VSX-821_FLXCN_Es.book 5 ページ 2011年3月23日 水曜日 午前11時33分

01
6Es
01 Capítulo 1:Controles e indicadores
Panel frontal
1 Dial INPUT SELECTORSelecciona una fuente de entrada (página 22).
2 IndicadoresMCACC – Se ilumina cuando la ecualización (EC) de calibración acústica (página 29) está activada (EC de calibración acústica se activa automáticamente después de realizar la configuración Auto MCACC (página 20)).
HDMI – Parpadea cuando se conecta un componente equipado con HDMI; se ilumina cuando el componente está conectado (página 14).
iPod iPhone iPad – Se ilumina cuando se conecta un iPod/iPhone/iPad y se selecciona la entrada iPod USB (página 18).
3 Botones de control del receptorSPEAKERS – Consulte Activación del terminal de altavoces en la página 12.
DIMMER – Para reducir o incrementar la luminosidad de la pantalla. Se pueden seleccionar cuatro niveles de luminosidad.
DISPLAY – Cambia la pantalla de esta unidad. Puede comprobar el modo de escucha, el volumen del sonido, la configuración Pre Out o el nombre de la entrada seleccionando una fuente de entrada.
• La configuración Pre Out se mostrará o no dependiendo de la fuente de entrada seleccionada.
4 Pantalla de visualización de caracteresConsulte Pantalla en la página 7.
5 Botones de control del sintonizadorBAND – Cambia entre las sintonías AM, FM ST (estéreo) y FM MONO (página 27).
TUNER EDIT – Utilice este botón junto con TUNE /, PRESET/ y ENTER para memorizar emisoras y asignarles nombres (página 27).
TUNE / – Se utilizan para buscar frecuencias de radio (página 27).
PRESET/ – Utilícelo para seleccionar presintonías (página 27).
6 Sensor del mando a distanciaRecibe las señales del mando a distancia (consulte Alcance operativo del mando a distancia en la página 9).
7 Dial MASTER VOLUME
8 STANDBY/ON
9 Conector PHONESUtilícelo para conectar un par de auriculares. Cuando se conecta un par de auriculares, los altavoces no emiten sonido. El modo de escucha cuando se oye el sonido desde el auricular sólo puede seleccionarse desde el modo PHONES SURR, STEREO o STEREO ALC (el modo S.R AIR también puede seleccionarse con la entrada ADAPTER).
10 Botones de modo de escuchaAUTO SURROUND/STREAM DIRECT – Alterna entre el modo Auto surround (consulte la página 28) y la reproducción Stream Direct (página 29).
ALC/STANDARD SURR – Púlselo para una descodificación estándar y para cambiar entre los modos de 2 Pro Logic II, 2 Pro Logic IIx, 2 Pro Logic IIz y NEO:6, y el modo estéreo de control de nivel Auto (página 28).
ADVANCED SURROUND – Alterna entre los diversos modos envolventes (página 29).
STEREO – Púlselo para seleccionar la reproducción estéreo (página 28).
11 Conector MCACC SETUP MICUtilícelo para conectar un micrófono cuando lleve a cabo la configuración de Auto MCACC (página 20).
AUDIO/ VIDEO MULTI-CHANNEL RECEIVER
MASTERVOLUME
STANDBY/ON
INPUTSELECTOR
MCACCSETUP MIC L AUDIO R VIDEO
VIDEO 2 INPUT
iPodiPhone
iPadUSB
5V 2.1 A
iPod iPhone iPadDIRECT CONTROLSTEREO
ADVANCEDSURROUND
ALC/STANDARD SURR
AUTO SURROUND/STREAM DIRECT
PHONES
SPEAKERS DIMMER DISPLAY BAND TUNER EDIT TUNE PRESET ENTER
iPod iPhone iPadHDMIMCACC
VSX-821
1 4 5
8 9 10 11 12 13 14
2 23 6 7
15 16 17 18 19 17
22 23 24 25 25 2726
20
21
VSX-821_FLXCN_Es.book 6 ページ 2011年3月23日 水曜日 午前11時33分

EnglishEspañol
0101
7Es
12 Terminal de entrada AUDIO/VIDEOConsulte Conexión al terminal de vídeo del panel frontal en la página 18.
13 Terminal de iPod iPhone iPad/USBUtilícelo para conectar su iPod de Apple o dispositivo de almacenamiento masivo USB como fuente de sonido (página 18).
14 iPod iPhone iPad DIRECT CONTROLCambie la entrada del receptor al iPod y habilite las operaciones del iPod en el iPod (página 24).
Pantalla15 PHASESe ilumina cuando se enciende Phase Control (página 30).
16 AUTOSe ilumina cuando la función Auto Surround está activada (página 28).
17 Indicadores del sintonizadorST – Se ilumina durante la recepción de una emisión FM en modo autoestéreo (página 27).
TUNE – Se enciende con un canal normal de radiodifusión.
PRESET – Muestra cuándo una presintonía se ha registrado o recuperado.
MEM – Parpadea cuando se registra una emisora de radio.
kHz/MHz – Se ilumina cuando la pantalla de caracteres muestra la frecuencia de radiodifusión AM/FM que recibe actualmente.
18 Indicadores de altavocesIndica el terminal de altavoz, A y/o B, en el que la salida de señal de audio está ajustada actualmente (página 12).
19 Indicador del temporizador de modo de esperaSe ilumina cuando el receptor se encuentra en modo de desconexión automática (página 8).
20 Información de presintonía o indicador de señal de entradaMuestra el número de presintonía del sintonizador o el tipo de señal de entrada, etc.
21 Pantalla de visualización de caracteres Muestra diversos datos del sistema.
22 Indicadores de DTSDTS – Se ilumina cuando se detecta una fuente con señales de audio codificadas en DTS.
HD – Se ilumina cuando se detecta una fuente con señales de sonido codificadas en DTS-EXPRESS o DTS-HD.
ES – Se ilumina para indicar la descodificación DTS-ES.
96/24 – Se ilumina cuando se detecta una fuente con señales de audio codificadas en DTS 96/24.
NEO:6 – Cuando uno de los modos NEO:6 del receptor está activo, este indicador se ilumina para indicar el procesamiento de NEO:6 (página 28).
23 Indicadores Dolby Digital2D – Se ilumina cuando se detecta una señal codificada en Dolby Digital.
2D+ – Se ilumina cuando se detecta una fuente con señales de sonido codificadas en Dolby Digital Plus.
2HD – Se ilumina cuando se detecta una fuente con señales de sonido codificadas en Dolby TrueHD.
EX – Se ilumina para indicar la descodificación Dolby Digital EX.
2PLII(x) – Se ilumina para indicar la descodificación 2 Pro Logic II/2 Pro Logic IIx. Se apagará durante la descodificación 2 Pro Logic IIz (Reproducción con sonido envolvente en la página 28 para obtener más información).
24 ADV.S.Se ilumina cuando se selecciona uno de los modos Advanced Surround (consulte Uso de Advanced surround en la página 29 para obtener más información).
25 Indicadores del SIGNAL SELECTDIGITAL – Se ilumina cuando se selecciona una señal de sonido digital. Parpadea cuando se ha seleccionado una señal de audio y la entrada de audio seleccionada no está disponible.
HDMI – Se ilumina cuando se selecciona una señal HDMI. Parpadea cuando se ha seleccionado una señal HDMI y la entrada HDMI seleccionada no está disponible.
26 Indicador de Up Mix/DIMERSe ilumina cuando la función Up Mix se ajusta a ON (consulte la página 30). También se ilumina cuando se desactiva DIMMER.
27 DIR.Se ilumina cuando se activa el modo DIRECT o PURE DIRECT (página 29).
VSX-821_FLXCN_Es.book 7 ページ 2011年3月23日 水曜日 午前11時33分
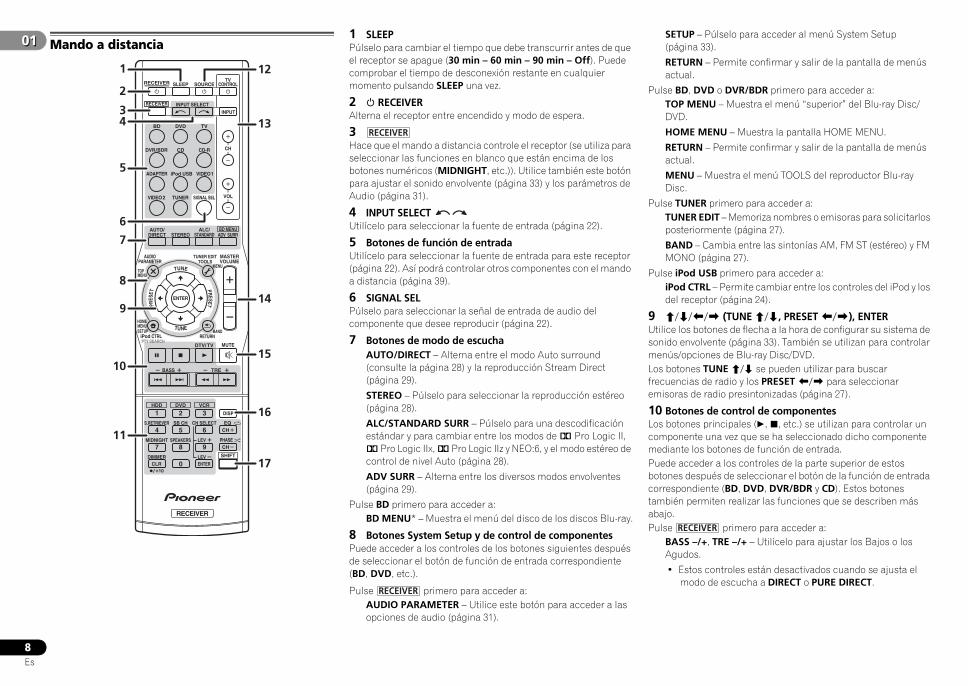
01
8Es
01 Mando a distancia1 SLEEPPúlselo para cambiar el tiempo que debe transcurrir antes de que el receptor se apague (30 min – 60 min – 90 min – Off). Puede comprobar el tiempo de desconexión restante en cualquier momento pulsando SLEEP una vez.
2 RECEIVERAlterna el receptor entre encendido y modo de espera.
3Hace que el mando a distancia controle el receptor (se utiliza para seleccionar las funciones en blanco que están encima de los botones numéricos (MIDNIGHT, etc.)). Utilice también este botón para ajustar el sonido envolvente (página 33) y los parámetros de Audio (página 31).
4 INPUT SELECT Utilícelo para seleccionar la fuente de entrada (página 22).
5 Botones de función de entradaUtilícelo para seleccionar la fuente de entrada para este receptor (página 22). Así podrá controlar otros componentes con el mando a distancia (página 39).
6 SIGNAL SELPúlselo para seleccionar la señal de entrada de audio del componente que desee reproducir (página 22).
7 Botones de modo de escuchaAUTO/DIRECT – Alterna entre el modo Auto surround (consulte la página 28) y la reproducción Stream Direct (página 29).
STEREO – Púlselo para seleccionar la reproducción estéreo (página 28).
ALC/STANDARD SURR – Púlselo para una descodificación estándar y para cambiar entre los modos de 2 Pro Logic II, 2 Pro Logic IIx, 2 Pro Logic IIz y NEO:6, y el modo estéreo de control de nivel Auto (página 28).
ADV SURR – Alterna entre los diversos modos envolventes (página 29).
Pulse BD primero para acceder a:BD MENU* – Muestra el menú del disco de los discos Blu-ray.
8 Botones System Setup y de control de componentesPuede acceder a los controles de los botones siguientes después de seleccionar el botón de función de entrada correspondiente (BD, DVD, etc.).
Pulse primero para acceder a:AUDIO PARAMETER – Utilice este botón para acceder a las opciones de audio (página 31).
SETUP – Púlselo para acceder al menú System Setup (página 33).
RETURN – Permite confirmar y salir de la pantalla de menús actual.
Pulse BD, DVD o DVR/BDR primero para acceder a:TOP MENU – Muestra el menú “superior” del Blu-ray Disc/DVD.
HOME MENU – Muestra la pantalla HOME MENU.
RETURN – Permite confirmar y salir de la pantalla de menús actual.
MENU – Muestra el menú TOOLS del reproductor Blu-ray Disc.
Pulse TUNER primero para acceder a:TUNER EDIT – Memoriza nombres o emisoras para solicitarlos posteriormente (página 27).
BAND – Cambia entre las sintonías AM, FM ST (estéreo) y FM MONO (página 27).
Pulse iPod USB primero para acceder a:iPod CTRL – Permite cambiar entre los controles del iPod y los del receptor (página 24).
9 /// (TUNE/, PRESET/), ENTERUtilice los botones de flecha a la hora de configurar su sistema de sonido envolvente (página 33). También se utilizan para controlar menús/opciones de Blu-ray Disc/DVD.Los botones TUNE / se pueden utilizar para buscar frecuencias de radio y los PRESET/ para seleccionar emisoras de radio presintonizadas (página 27).
10 Botones de control de componentesLos botones principales (, , etc.) se utilizan para controlar un componente una vez que se ha seleccionado dicho componente mediante los botones de función de entrada.Puede acceder a los controles de la parte superior de estos botones después de seleccionar el botón de la función de entrada correspondiente (BD, DVD, DVR/BDR y CD). Estos botones también permiten realizar las funciones que se describen más abajo.Pulse primero para acceder a:
BASS –/+, TRE –/+ – Utilícelo para ajustar los Bajos o los Agudos.
• Estos controles están desactivados cuando se ajusta el modo de escucha a DIRECT o PURE DIRECT.
BD DVD
INPUT SELECT
SOURCESLEEPTV
CONTROL
DIMMER
TV
INPUT
1
4
7MIDNIGHT
S.RETRIEVER
HDD
CH
RECEIVER
DVR/BDR CD CD-R
ADAPTER iPod USB VIDEO 1
VIDEO 2 SIGNAL SELTUNER
BD MENU
ENTER
ALC/STANDARD ADV SURRSTEREO
AUTO/DIRECT
VOL
+10
2
5
8SPEAKERS LEV
LEV
SB CH
DISP
CLR
EQ
PHASE
DVD
3
6
9
0 ENTER
CH
CH
CH SELECT
VCR
SHIFT
MUTE
RETURN
AUDIOPARAMETER
TUNER EDITTOOLS
MASTERVOLUME
iPod CTRLPTY SEARCH
BAND
MENU
HOMEMENUSETUP
DTV/ TV
/
TREBASS
TOPMENU
RECEIVER
TUNE
TUNE
PRESETPRES
ET
RECEIVER
1
2
12
13
14
15
16
34
5
6
7
8
9
10
11
17
RECEIVER
RECEIVER
RECEIVER
VSX-821_FLXCN_Es.book 8 ページ 2011年3月23日 水曜日 午前11時33分

EnglishEspañol
0101
9Es
• Cuando el altavoz delantero se ha ajustado a SMALL en la Configuración de altavoces (o bien automáticamente a través de la configuración automática MCACC) y la Red de cruce se ajusta por encima de 150 Hz, el nivel del canal del subwoofer se ajustará pulsando BASS –/+ (página 34).
Pulse TV primero para acceder a:DTV/TV – Alterna entre los modos de entrada de DTV y de TV analógica para los televisores Pioneer.
11 Botones numéricos y otros controles de componentesUtilice los botones numéricos para seleccionar directamente una frecuencia de radio (página 27) o las pistas de un CD, etc. Se puede acceder a otros botones después de pulsar . (Por ejemplo MIDNIGHT, etc.)
HDD*, DVD*, VCR* – Estos botones alternan entre los controles del disco duro, el DVD y el vídeo para las grabadoras HDD/DVD/VCR.
S.RETRIEVER – Púlselo para restaurar el sonido con calidad de CD a fuentes de audio comprimidas (página 29).
SB CH – Púlselo para seleccionar ON, AUTO o OFF para el canal trasero de sonido envolvente (página 30).
CH SELECT – Pulse este botón repetidamente para seleccionar un canal; luego, utilice LEV +/– para ajustar el nivel (página 34).
LEV +/– – Utilícelos para ajustar el nivel de canal.
EQ – Púlselo para activar/desactivar el ajuste Ecualización de calibración acústica (página 29).
MIDNIGHT – Alterna entre la audición Midnight o Loudness (página 31).
SPEAKERS – Consulte Activación del terminal de altavoces en la página 12.
PHASE – Pulse este botón para activar/desactivar el control de fase (página 30).
DIMMER – Para reducir o incrementar la luminosidad de la pantalla. Se pueden seleccionar cuatro niveles de luminosidad.
12 SOURCEPúlselo para activar o desactivar otros componentes conectados al receptor (página 40).
13 Botones TV CONTROLEstos botones se utilizan exclusivamente para controlar el televisor asignado al botón TV. Por lo tanto, si sólo va a conectar un televisor al sistema, asígnelo al botón TV (página 40).
– Úselo para apagar y encender el televisor.
INPUT – Utilícelo para seleccionar la señal de entrada del televisor.
CH +/– – Utilice estos botones para seleccionar canales.
VOL +/– – Utilice estos botones para ajustar el volumen del televisor.
14 MASTER VOLUME +/–Utilice estos botones para ajustar el nivel de volumen.
15 MUTESilencia/restablece el sonido.
16 DISPActiva la pantalla de esta unidad. Puede comprobar el modo de escucha, el volumen del sonido, la configuración Pre Out o el nombre de la entrada seleccionando una fuente de entrada.
• La configuración Pre Out se mostrará o no dependiendo de la fuente de entrada seleccionada.
17 SHIFTPúlselo para acceder a los comandos “enmarcados” (encima de los botones) del mando a distancia. En esta sección, estos botones se indican con un asterisco (*).
Colocación de las pilas
Las pilas suministradas con este equipo le permitirán comprobar las operaciones iniciales, pero no durarán mucho tiempo. Se recomienda utilizar pilas alcalinas de larga duración.
PRECAUCIÓN
• El uso incorrecto de las pilas puede provocar situaciones peligrosas tales como fugas y explosiones. Tenga en cuenta las siguientes precauciones:-Nunca utilice pilas nuevas y usadas al mismo tiempo.- Instale las pilas correctamente, haciendo coincidir los polos
positivo y negativo de las mismas con las marcas de polaridad impresas en el compartimiento de las pilas.
-Aunque distintas pilas tengan la misma forma, pueden tener tensiones diferentes. No mezcle pilas de distinto tipo.
-Cuando se deshaga de las pilas usadas, asegúrese de respetar las disposiciones gubernamentales o las normas de las instituciones medioambientales públicas que rigen en su país o región.
-No use ni guarde pilas en lugares expuestos a la luz solar directa o en lugares con un calor excesivo, como el interior de un coche o cerca de un calefactor. Esto puede provocar fugas en las pilas, sobrecalentamiento, explosiones o incendios. También puede reducir la vida o el rendimiento de las mismas.
Alcance operativo del mando a distanciaEl mando a distancia puede que no funcione correctamente si:
• Hay obstáculos entre el mando a distancia y el sensor del mando a distancia del receptor.
• El sensor del mando a distancia está expuesto a la luz directa del sol o a una luz fluorescente.
• El receptor está instalado cerca de un dispositivo que emite rayos infrarrojos.
• Se utiliza simultáneamente otro mando a distancia por infrarrojos para controlar el receptor.
RECEIVER
30°
7 m
30°
VSX-821_FLXCN_Es.book 9 ページ 2011年3月23日 水曜日 午前11時33分
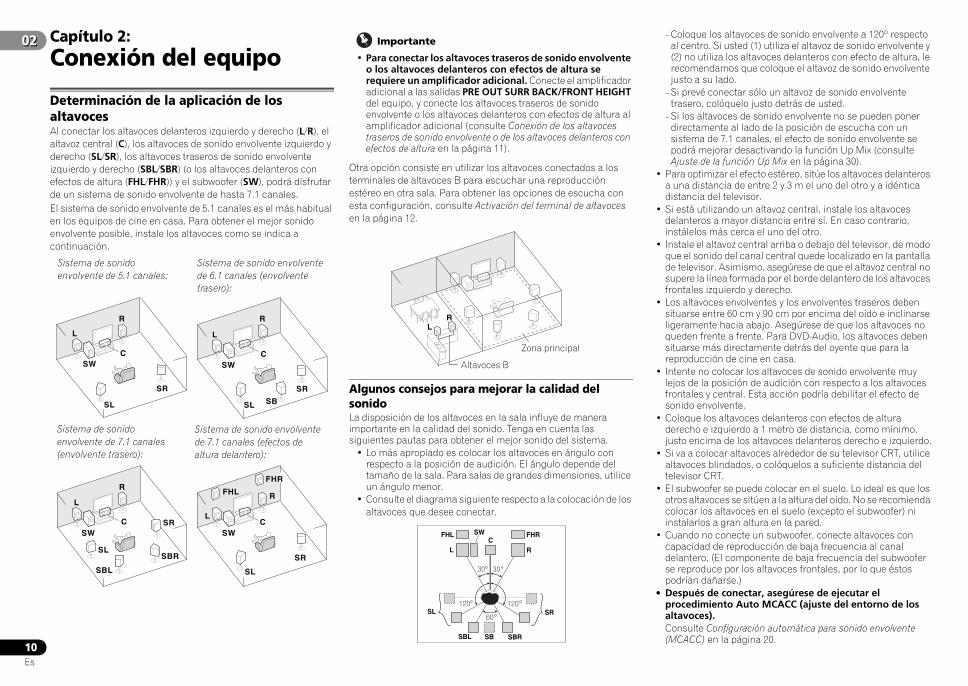
02
10Es
02 Capítulo 2:Conexión del equipo
Determinación de la aplicación de los altavocesAl conectar los altavoces delanteros izquierdo y derecho (L/R), el altavoz central (C), los altavoces de sonido envolvente izquierdo y derecho (SL/SR), los altavoces traseros de sonido envolvente izquierdo y derecho (SBL/SBR) (o los altavoces delanteros con efectos de altura (FHL/FHR)) y el subwoofer (SW), podrá disfrutar de un sistema de sonido envolvente de hasta 7.1 canales.El sistema de sonido envolvente de 5.1 canales es el más habitual en los equipos de cine en casa. Para obtener el mejor sonido envolvente posible, instale los altavoces como se indica a continuación.
Importante
• Para conectar los altavoces traseros de sonido envolvente o los altavoces delanteros con efectos de altura se requiere un amplificador adicional. Conecte el amplificador adicional a las salidas PRE OUT SURR BACK/FRONT HEIGHT del equipo, y conecte los altavoces traseros de sonido envolvente o los altavoces delanteros con efectos de altura al amplificador adicional (consulte Conexión de los altavoces traseros de sonido envolvente o de los altavoces delanteros con efectos de altura en la página 11).
Otra opción consiste en utilizar los altavoces conectados a los terminales de altavoces B para escuchar una reproducción estéreo en otra sala. Para obtener las opciones de escucha con esta configuración, consulte Activación del terminal de altavoces en la página 12.
Algunos consejos para mejorar la calidad del sonidoLa disposición de los altavoces en la sala influye de manera importante en la calidad del sonido. Tenga en cuenta las siguientes pautas para obtener el mejor sonido del sistema.
• Lo más apropiado es colocar los altavoces en ángulo con respecto a la posición de audición. El ángulo depende del tamaño de la sala. Para salas de grandes dimensiones, utilice un ángulo menor.
• Consulte el diagrama siguiente respecto a la colocación de los altavoces que desee conectar.
-Coloque los altavoces de sonido envolvente a 120º respecto al centro. Si usted (1) utiliza el altavoz de sonido envolvente y (2) no utiliza los altavoces delanteros con efecto de altura, le recomendamos que coloque el altavoz de sonido envolvente justo a su lado.
-Si prevé conectar sólo un altavoz de sonido envolvente trasero, colóquelo justo detrás de usted.
-Si los altavoces de sonido envolvente no se pueden poner directamente al lado de la posición de escucha con un sistema de 7.1 canales, el efecto de sonido envolvente se podrá mejorar desactivando la función Up Mix (consulte Ajuste de la función Up Mix en la página 30).
• Para optimizar el efecto estéreo, sitúe los altavoces delanteros a una distancia de entre 2 y 3 m el uno del otro y a idéntica distancia del televisor.
• Si está utilizando un altavoz central, instale los altavoces delanteros a mayor distancia entre sí. En caso contrario, instálelos más cerca el uno del otro.
• Instale el altavoz central arriba o debajo del televisor, de modo que el sonido del canal central quede localizado en la pantalla de televisor. Asimismo, asegúrese de que el altavoz central no supere la línea formada por el borde delantero de los altavoces frontales izquierdo y derecho.
• Los altavoces envolventes y los envolventes traseros deben situarse entre 60 cm y 90 cm por encima del oído e inclinarse ligeramente hacia abajo. Asegúrese de que los altavoces no queden frente a frente. Para DVD-Audio, los altavoces deben situarse más directamente detrás del oyente que para la reproducción de cine en casa.
• Intente no colocar los altavoces de sonido envolvente muy lejos de la posición de audición con respecto a los altavoces frontales y central. Esta acción podría debilitar el efecto de sonido envolvente.
• Coloque los altavoces delanteros con efectos de altura derecho e izquierdo a 1 metro de distancia, como mínimo, justo encima de los altavoces delanteros derecho e izquierdo.
• Si va a colocar altavoces alrededor de su televisor CRT, utilice altavoces blindados, o colóquelos a suficiente distancia del televisor CRT.
• El subwoofer se puede colocar en el suelo. Lo ideal es que los otros altavoces se sitúen a la altura del oído. No se recomienda colocar los altavoces en el suelo (excepto el subwoofer) ni instalarlos a gran altura en la pared.
• Cuando no conecte un subwoofer, conecte altavoces con capacidad de reproducción de baja frecuencia al canal delantero. (El componente de baja frecuencia del subwoofer se reproduce por los altavoces frontales, por lo que éstos podrían dañarse.)
• Después de conectar, asegúrese de ejecutar el procedimiento Auto MCACC (ajuste del entorno de los altavoces). Consulte Configuración automática para sonido envolvente (MCACC) en la página 20.
SL
L
SWC
R R
SR
SL
L
SWC
SR
SB
Sistema de sonido envolvente de 5.1 canales:
Sistema de sonido envolvente de 6.1 canales (envolvente trasero):
C
SL
L
FHL
FHR
SW
R
SRSL
L
SWC
R
SR
SBL
SBR
Sistema de sonido envolvente de 7.1 canales (envolvente trasero):
Sistema de sonido envolvente de 7.1 canales (efectos de altura delantero):
LR
Zona principal
Altavoces B
L
SWC
FHL
SL
SBL SBRSB
SR
R
FHR
30 30
60
120 120
VSX-821_FLXCN_Es.book 10 ページ 2011年3月23日 水曜日 午前11時33分
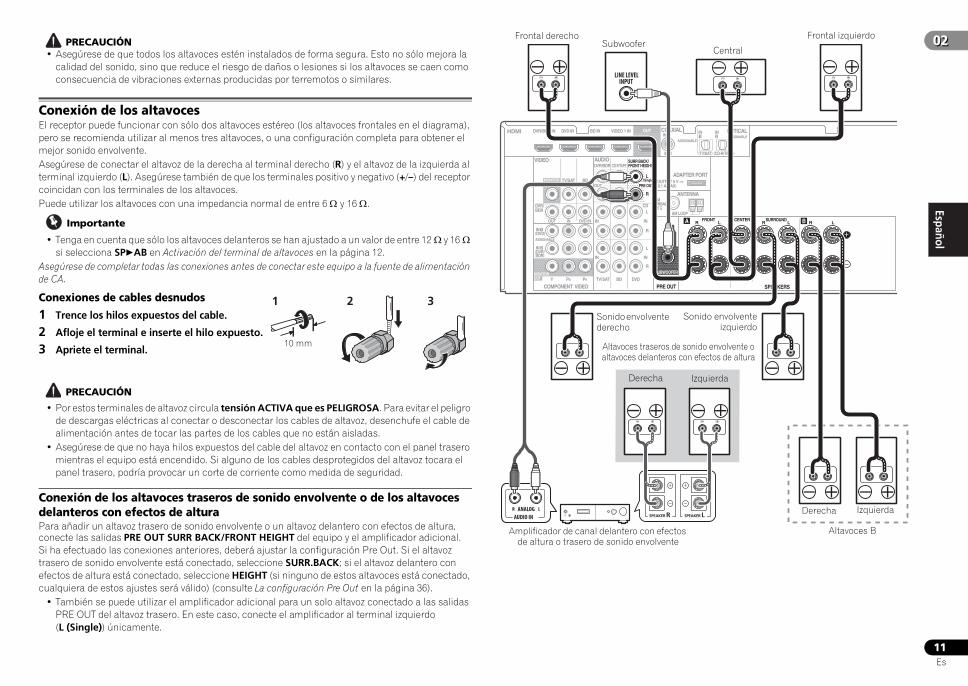
EnglishEspañol
0202
11Es
PRECAUCIÓN• Asegúrese de que todos los altavoces estén instalados de forma segura. Esto no sólo mejora la
calidad del sonido, sino que reduce el riesgo de daños o lesiones si los altavoces se caen como consecuencia de vibraciones externas producidas por terremotos o similares.
Conexión de los altavocesEl receptor puede funcionar con sólo dos altavoces estéreo (los altavoces frontales en el diagrama), pero se recomienda utilizar al menos tres altavoces, o una configuración completa para obtener el mejor sonido envolvente. Asegúrese de conectar el altavoz de la derecha al terminal derecho (R) y el altavoz de la izquierda al terminal izquierdo (L). Asegúrese también de que los terminales positivo y negativo (+/–) del receptor coincidan con los terminales de los altavoces.Puede utilizar los altavoces con una impedancia normal de entre 6 y 16 .
Importante
• Tenga en cuenta que sólo los altavoces delanteros se han ajustado a un valor de entre 12 y 16 si selecciona SPAB en Activación del terminal de altavoces en la página 12.
Asegúrese de completar todas las conexiones antes de conectar este equipo a la fuente de alimentación de CA.
PRECAUCIÓN
• Por estos terminales de altavoz circula tensión ACTIVA que es PELIGROSA. Para evitar el peligro de descargas eléctricas al conectar o desconectar los cables de altavoz, desenchufe el cable de alimentación antes de tocar las partes de los cables que no están aisladas.
• Asegúrese de que no haya hilos expuestos del cable del altavoz en contacto con el panel trasero mientras el equipo está encendido. Si alguno de los cables desprotegidos del altavoz tocara el panel trasero, podría provocar un corte de corriente como medida de seguridad.
Conexión de los altavoces traseros de sonido envolvente o de los altavoces delanteros con efectos de alturaPara añadir un altavoz trasero de sonido envolvente o un altavoz delantero con efectos de altura, conecte las salidas PRE OUT SURR BACK/FRONT HEIGHT del equipo y el amplificador adicional.Si ha efectuado las conexiones anteriores, deberá ajustar la configuración Pre Out. Si el altavoz trasero de sonido envolvente está conectado, seleccione SURR.BACK; si el altavoz delantero con efectos de altura está conectado, seleccione HEIGHT (si ninguno de estos altavoces está conectado, cualquiera de estos ajustes será válido) (consulte La configuración Pre Out en la página 36).
• También se puede utilizar el amplificador adicional para un solo altavoz conectado a las salidas PRE OUT del altavoz trasero. En este caso, conecte el amplificador al terminal izquierdo (L (Single)) únicamente.
Conexiones de cables desnudos
1 Trence los hilos expuestos del cable.
2 Afloje el terminal e inserte el hilo expuesto.
3 Apriete el terminal.
1 2 3
10 mm
HDMI
VIDEO
COMPONENT VIDEO
DVR/BDR L
R
R
L
Y PB PR
COAXIAL
AUDIO
PRE OUT SPEAKERS
ANTENNA
OPTICAL
ASSIGNABLE
ASSIGNABLE
ASSIGNABLE
OUT
A
DVR/BDR
OUT
CD-R/TAPESURR BACK/FRONT HEIGHT
L
R
PRE OUT(Single)
IN
(CD)
1
SUBWOOFER
IN IN
CD
MONITOROUT
TV/SATIN
BDIN
OUT IN DVD IN
IN
TV/SAT BD
IN
DVD
(DVD)IN 1
MONITOROUT
(DVR/BDR)
IN 2
DVR/BDR IN DVD IN BD IN VIDEO 1 IN
(TV/SAT)
IN1
(CD-R/TAPE)
IN2
FMUNBAL75
(OUTPUT 5 V 0.1 A MAX)
ADAPTER PORT
AM LOOPFRONT
R LCENTER SURROUND
R L R LB
LINE LEVELINPUT
ANALOGR L
AUDIO IN SPEAKER R SPEAKER L
Central
Sonido envolvente derecho
Frontal derecho
Amplificador de canal delantero con efectos de altura o trasero de sonido envolvente
Frontal izquierdoSubwoofer
Derecha Izquierda
Altavoces B
Sonido envolventeizquierdo
Derecha Izquierda
Altavoces traseros de sonido envolvente o altavoces delanteros con efectos de altura
VSX-821_FLXCN_Es.book 11 ページ 2011年3月23日 水曜日 午前11時33分
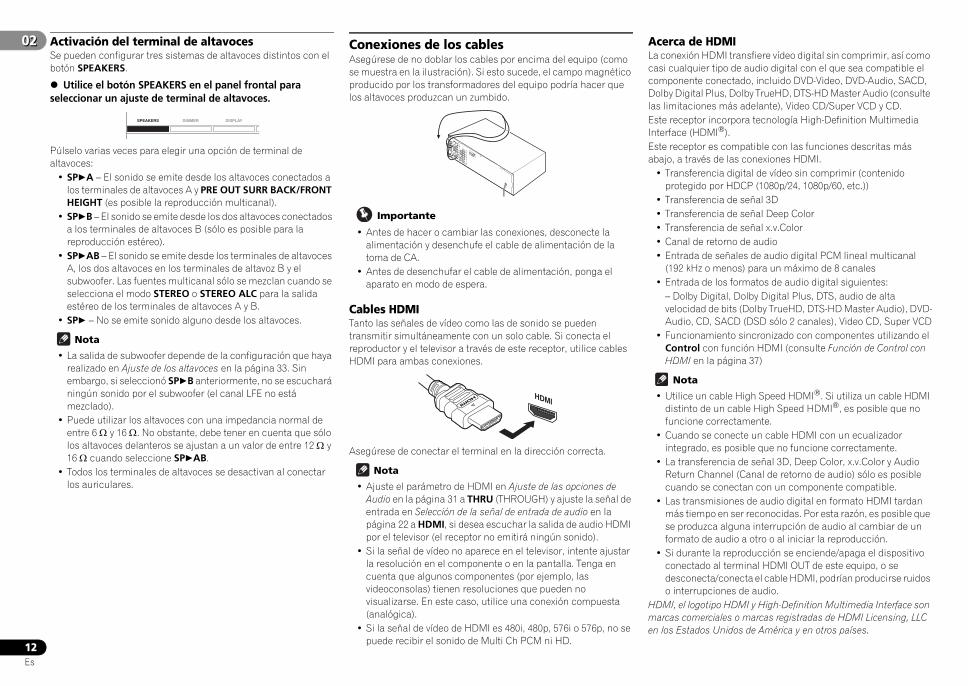
02
12Es
02 Activación del terminal de altavocesSe pueden configurar tres sistemas de altavoces distintos con el botón SPEAKERS.
Utilice el botón SPEAKERS en el panel frontal para seleccionar un ajuste de terminal de altavoces.
Púlselo varias veces para elegir una opción de terminal de altavoces:
• SPA – El sonido se emite desde los altavoces conectados a los terminales de altavoces A y PRE OUT SURR BACK/FRONT HEIGHT (es posible la reproducción multicanal).
• SPB – El sonido se emite desde los dos altavoces conectados a los terminales de altavoces B (sólo es posible para la reproducción estéreo).
• SPAB – El sonido se emite desde los terminales de altavoces A, los dos altavoces en los terminales de altavoz B y el subwoofer. Las fuentes multicanal sólo se mezclan cuando se selecciona el modo STEREO o STEREO ALC para la salida estéreo de los terminales de altavoces A y B.
• SP – No se emite sonido alguno desde los altavoces.
Nota
• La salida de subwoofer depende de la configuración que haya realizado en Ajuste de los altavoces en la página 33. Sin embargo, si seleccionó SPB anteriormente, no se escuchará ningún sonido por el subwoofer (el canal LFE no está mezclado).
• Puede utilizar los altavoces con una impedancia normal de entre 6 y 16 . No obstante, debe tener en cuenta que sólo los altavoces delanteros se ajustan a un valor de entre 12 y 16 cuando seleccione SPAB.
• Todos los terminales de altavoces se desactivan al conectar los auriculares.
Conexiones de los cablesAsegúrese de no doblar los cables por encima del equipo (como se muestra en la ilustración). Si esto sucede, el campo magnético producido por los transformadores del equipo podría hacer que los altavoces produzcan un zumbido.
Importante
• Antes de hacer o cambiar las conexiones, desconecte la alimentación y desenchufe el cable de alimentación de la toma de CA.
• Antes de desenchufar el cable de alimentación, ponga el aparato en modo de espera.
Cables HDMITanto las señales de vídeo como las de sonido se pueden transmitir simultáneamente con un solo cable. Si conecta el reproductor y el televisor a través de este receptor, utilice cables HDMI para ambas conexiones.
Asegúrese de conectar el terminal en la dirección correcta.
Nota
• Ajuste el parámetro de HDMI en Ajuste de las opciones de Audio en la página 31 a THRU (THROUGH) y ajuste la señal de entrada en Selección de la señal de entrada de audio en la página 22 a HDMI, si desea escuchar la salida de audio HDMI por el televisor (el receptor no emitirá ningún sonido).
• Si la señal de vídeo no aparece en el televisor, intente ajustar la resolución en el componente o en la pantalla. Tenga en cuenta que algunos componentes (por ejemplo, las videoconsolas) tienen resoluciones que pueden no visualizarse. En este caso, utilice una conexión compuesta (analógica).
• Si la señal de vídeo de HDMI es 480i, 480p, 576i o 576p, no se puede recibir el sonido de Multi Ch PCM ni HD.
Acerca de HDMILa conexión HDMI transfiere vídeo digital sin comprimir, así como casi cualquier tipo de audio digital con el que sea compatible el componente conectado, incluido DVD-Video, DVD-Audio, SACD, Dolby Digital Plus, Dolby TrueHD, DTS-HD Master Audio (consulte las limitaciones más adelante), Video CD/Super VCD y CD.Este receptor incorpora tecnología High-Definition Multimedia Interface (HDMI®).Este receptor es compatible con las funciones descritas más abajo, a través de las conexiones HDMI.
• Transferencia digital de vídeo sin comprimir (contenido protegido por HDCP (1080p/24, 1080p/60, etc.))
• Transferencia de señal 3D• Transferencia de señal Deep Color• Transferencia de señal x.v.Color• Canal de retorno de audio• Entrada de señales de audio digital PCM lineal multicanal
(192 kHz o menos) para un máximo de 8 canales• Entrada de los formatos de audio digital siguientes:
– Dolby Digital, Dolby Digital Plus, DTS, audio de alta velocidad de bits (Dolby TrueHD, DTS-HD Master Audio), DVD-Audio, CD, SACD (DSD sólo 2 canales), Video CD, Super VCD
• Funcionamiento sincronizado con componentes utilizando el Control con función HDMI (consulte Función de Control con HDMI en la página 37)
Nota
• Utilice un cable High Speed HDMI®. Si utiliza un cable HDMI distinto de un cable High Speed HDMI®, es posible que no funcione correctamente.
• Cuando se conecte un cable HDMI con un ecualizador integrado, es posible que no funcione correctamente.
• La transferencia de señal 3D, Deep Color, x.v.Color y Audio Return Channel (Canal de retorno de audio) sólo es posible cuando se conectan con un componente compatible.
• Las transmisiones de audio digital en formato HDMI tardan más tiempo en ser reconocidas. Por esta razón, es posible que se produzca alguna interrupción de audio al cambiar de un formato de audio a otro o al iniciar la reproducción.
• Si durante la reproducción se enciende/apaga el dispositivo conectado al terminal HDMI OUT de este equipo, o se desconecta/conecta el cable HDMI, podrían producirse ruidos o interrupciones de audio.
HDMI, el logotipo HDMI y High-Definition Multimedia Interface son marcas comerciales o marcas registradas de HDMI Licensing, LLC en los Estados Unidos de América y en otros países.
SPEAKERS DIMMER DISPLAY
HDMI
VSX-821_FLXCN_Es.book 12 ページ 2011年3月23日 水曜日 午前11時33分

EnglishEspañol
0202
13Es
“x.v.Color” y son marcas de fábrica de Sony Corporation.
Cables de audio analógicoUtilice cables fonográficos RCA estéreo para conectar componentes de audio analógico. Estos cables generalmente tienen una clavija roja y otra blanca; conecte las clavijas rojas a los terminales R (derechos) y las clavijas blancas a los terminales L (izquierdos).
Cables de audio digitalUtilice cables de audio digital coaxiales o cables ópticos (disponibles en comercios) para conectar componentes digitales a este receptor.
Nota
• Al realizar las conexiones con cables ópticos, tenga cuidado de no dañar la lengüeta protectora del conector óptico mientras inserta la clavija.
• Al guardar un cable óptico, no lo enrolle demasiado. El cable podría dañarse si lo dobla excesivamente.
• También puede utilizar un cable de vídeo RCA estándar para las conexiones digitales coaxiales.
Cables de vídeo
Cables de vídeo RCA estándarEstos cables son el tipo de conexión de vídeo más común y deben utilizarse para las conexiones a los terminales de vídeo compuesto. Los conectores amarillos los distinguen de los cables de audio.
Cables de vídeo de componentesUse cables de vídeo de componentes para obtener la mejor reproducción de color posible de su fuente de vídeo. La señal de color del televisor se divide en la señal de luminancia (Y) y las señales de color (PB y PR) y, a continuación, es generada. De este modo, se evitan interferencias entre las señales.
Acerca de la conexión de salidas de vídeoEste receptor no incorpora un conversor de vídeo. Si utiliza cables de vídeo de componentes o cables HDMI para conectar el equipo al dispositivo de entrada, utilice los mismos cables para conectar el equipo al televisor.La entrada de señales de las entradas de vídeo analógico (de componentes y compuesto) de esta unidad no saldrán de HDMI OUT.
L
RAUDIO
Blanco(Izquierdo)
Rojo (Derecho)
COAXIALINOPTICALIN
Cable coaxial de audio digital
Cable óptico
VIDEO
Amarillo
YPB
PR
COMPONENT VIDEO
Verde (Y)
Rojo (PR)Azul (PB)
VIDEO
VIDEO
ININ IN
HDMI
COMPONENT VIDEO
MONITOROUT Y PB PR
MONITOROUT
COMPONENT VIDEOY PB PR
HDMI
OUT
Terminal para conectar con la fuente
Terminal para conectar con el monitor de TV
Componente de reproducción
TV
La información en pantalla (OSD) no
se mostrará.
Se puede dar salida a señales de vídeo.
VSX-821_FLXCN_Es.book 13 ページ 2011年3月23日 水曜日 午前11時33分
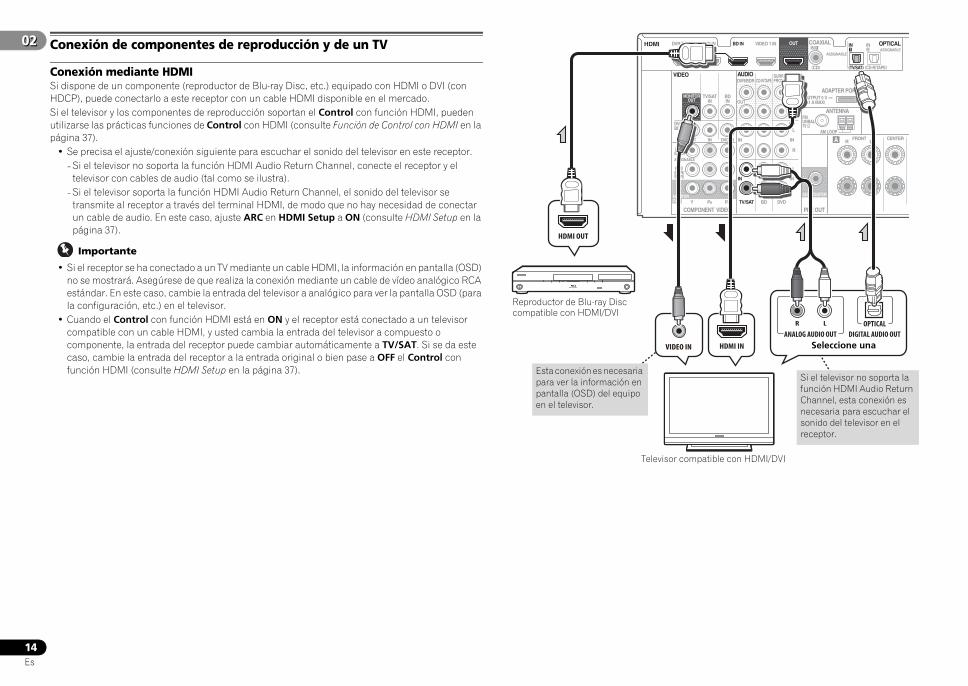
02
14Es
02 Conexión de componentes de reproducción y de un TV
Conexión mediante HDMISi dispone de un componente (reproductor de Blu-ray Disc, etc.) equipado con HDMI o DVI (con HDCP), puede conectarlo a este receptor con un cable HDMI disponible en el mercado.Si el televisor y los componentes de reproducción soportan el Control con función HDMI, pueden utilizarse las prácticas funciones de Control con HDMI (consulte Función de Control con HDMI en la página 37).
• Se precisa el ajuste/conexión siguiente para escuchar el sonido del televisor en este receptor.- Si el televisor no soporta la función HDMI Audio Return Channel, conecte el receptor y el
televisor con cables de audio (tal como se ilustra).-Si el televisor soporta la función HDMI Audio Return Channel, el sonido del televisor se
transmite al receptor a través del terminal HDMI, de modo que no hay necesidad de conectar un cable de audio. En este caso, ajuste ARC en HDMI Setup a ON (consulte HDMI Setup en la página 37).
Importante
• Si el receptor se ha conectado a un TV mediante un cable HDMI, la información en pantalla (OSD) no se mostrará. Asegúrese de que realiza la conexión mediante un cable de vídeo analógico RCA estándar. En este caso, cambie la entrada del televisor a analógico para ver la pantalla OSD (para la configuración, etc.) en el televisor.
• Cuando el Control con función HDMI está en ON y el receptor está conectado a un televisor compatible con un cable HDMI, y usted cambia la entrada del televisor a compuesto o componente, la entrada del receptor puede cambiar automáticamente a TV/SAT. Si se da este caso, cambie la entrada del receptor a la entrada original o bien pase a OFF el Control con función HDMI (consulte HDMI Setup en la página 37).
MONITOROUT
HDMI
VIDEO
COMPONENT VIDEO
DVR/BDR L
R
R
L
Y PB PR
COAXIAL
AUDIO
PRE OUT
ANTENNA
OPTICAL
ASSIGNABLE
ASSIGNABLE
ASSIGNABLE
OUT
A
DVR/BDR
OUT
CD-R/TAPESURR BACK/FRONT HEIGHT
L
R
PRE OUT(Single)
IN
(CD)
1
SUBWOOFER
IN IN
CD
MONITOROUT
TV/SATIN
BDIN
OUT IN DVD IN
IN
TV/SAT BD
IN
DVD
(DVD)IN 1
MONITOROUT
(DVR/BDR)
IN 2
DVR/BDR IN DVD IN BD IN VIDEO 1 IN
(TV/SAT)
IN1
(CD-R/TAPE)
IN2
FMUNBAL75
(OUTPUT 5 V 0.1 A MAX)
ADAPTER PORT
AM LOOPFRONT
R LCENTER
VIDEO IN HDMI IN
HDMI OUT
R L
DIGITAL AUDIO OUTANALOG AUDIO OUTOPTICAL
Seleccione una
Televisor compatible con HDMI/DVI
Reproductor de Blu-ray Disc compatible con HDMI/DVI
Si el televisor no soporta la función HDMI Audio Return Channel, esta conexión es necesaria para escuchar el sonido del televisor en el receptor.
Esta conexión es necesaria para ver la información en pantalla (OSD) del equipo en el televisor.
VSX-821_FLXCN_Es.book 14 ページ 2011年3月23日 水曜日 午前11時33分
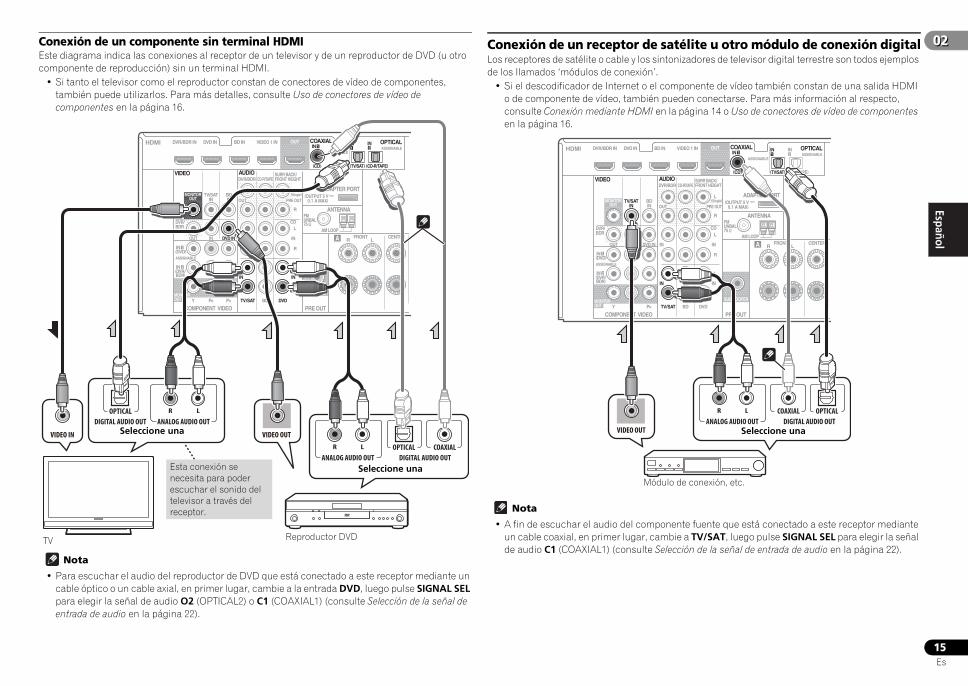
EnglishEspañol
0202
15Es
Conexión de un componente sin terminal HDMIEste diagrama indica las conexiones al receptor de un televisor y de un reproductor de DVD (u otro componente de reproducción) sin un terminal HDMI.
• Si tanto el televisor como el reproductor constan de conectores de vídeo de componentes, también puede utilizarlos. Para más detalles, consulte Uso de conectores de vídeo de componentes en la página 16.
Nota
• Para escuchar el audio del reproductor de DVD que está conectado a este receptor mediante un cable óptico o un cable axial, en primer lugar, cambie a la entrada DVD, luego pulse SIGNAL SEL para elegir la señal de audio O2 (OPTICAL2) o C1 (COAXIAL1) (consulte Selección de la señal de entrada de audio en la página 22).
Conexión de un receptor de satélite u otro módulo de conexión digitalLos receptores de satélite o cable y los sintonizadores de televisor digital terrestre son todos ejemplos de los llamados ‘módulos de conexión’.
• Si el descodificador de Internet o el componente de vídeo también constan de una salida HDMI o de componente de vídeo, también pueden conectarse. Para más información al respecto, consulte Conexión mediante HDMI en la página 14 o Uso de conectores de vídeo de componentes en la página 16.
Nota
• A fin de escuchar el audio del componente fuente que está conectado a este receptor mediante un cable coaxial, en primer lugar, cambie a TV/SAT, luego pulse SIGNAL SEL para elegir la señal de audio C1 (COAXIAL1) (consulte Selección de la señal de entrada de audio en la página 22).
HDMI
VIDEO
COMPONENT VIDEO
DVR/BDR L
R
R
L
Y PB PR
COAXIAL
AUDIO
PRE OUT
ANTENNA
OPTICAL
ASSIGNABLE
ASSIGNABLE
ASSIGNABLE
OUT
A
DVR/BDR
OUT
CD-R/TAPESURR BACK/FRONT HEIGHT
L
R
PRE OUT(Single)
IN
(CD)
1
SUBWOOFER
IN IN
CD
MONITOROUT
TV/SATIN
BDIN
OUT IN DVD IN
IN
TV/SAT BD
IN
DVD
(DVD)IN 1
MONITOROUT
(DVR/BDR)
IN 2
DVR/BDR IN DVD IN BD IN VIDEO 1 IN
(TV/SAT)
IN1
(CD-R/TAPE)
IN2
FMUNBAL75
(OUTPUT 5 V 0.1 A MAX)
ADAPTER PORT
AM LOOPFRONT
R LCENTER
R L
DIGITAL AUDIO OUT ANALOG AUDIO OUTOPTICAL
R L
DIGITAL AUDIO OUTANALOG AUDIO OUTOPTICAL COAXIAL
VIDEO IN VIDEO OUT
Seleccione una
TV Reproductor DVD
Seleccione una
Esta conexión se necesita para poder escuchar el sonido del televisor a través del receptor.
HDMI
VIDEO
COMPONENT VIDEO
DVR/BDR L
R
R
L
Y PB PR
COAXIAL
AUDIO
PRE OUT
ANTENNA
OPTICAL
ASSIGNABLE
ASSIGNABLE
ASSIGNABLE
OUT
A
DVR/BDR
OUT
CD-R/TAPESURR BACK/FRONT HEIGHT
L
R
PRE OUT(Single)
IN
(CD)
1
SUBWOOFER
IN IN
CD
MONITOROUT
TV/SATIN
BDIN
OUT IN DVD IN
IN
TV/SAT BD
IN
DVD
(DVD)IN 1
MONITOROUT
(DVR/BDR)
IN 2
DVR/BDR IN DVD IN BD IN VIDEO 1 IN
(TV/SAT)
IN1
(CD-R/TAPE)
IN2
FMUNBAL75
(OUTPUT 5 V 0.1 A MAX)
ADAPTER PORT
AM LOOPFRONT
R LCENTER
R L
DIGITAL AUDIO OUTANALOG AUDIO OUTOPTICALCOAXIAL
VIDEO OUT Seleccione una
Módulo de conexión, etc.
VSX-821_FLXCN_Es.book 15 ページ 2011年3月23日 水曜日 午前11時33分
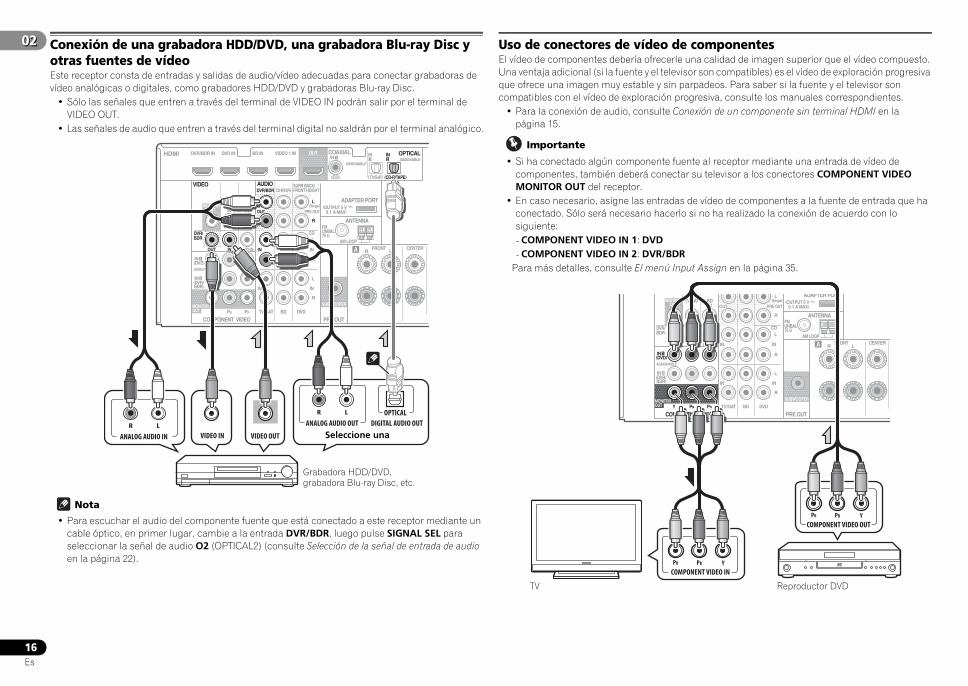
02
16Es
02 Conexión de una grabadora HDD/DVD, una grabadora Blu-ray Disc y otras fuentes de vídeoEste receptor consta de entradas y salidas de audio/vídeo adecuadas para conectar grabadoras de vídeo analógicas o digitales, como grabadores HDD/DVD y grabadoras Blu-ray Disc.
• Sólo las señales que entren a través del terminal de VIDEO IN podrán salir por el terminal de VIDEO OUT.
• Las señales de audio que entren a través del terminal digital no saldrán por el terminal analógico.
Nota
• Para escuchar el audio del componente fuente que está conectado a este receptor mediante un cable óptico, en primer lugar, cambie a la entrada DVR/BDR, luego pulse SIGNAL SEL para seleccionar la señal de audio O2 (OPTICAL2) (consulte Selección de la señal de entrada de audio en la página 22).
Uso de conectores de vídeo de componentesEl vídeo de componentes debería ofrecerle una calidad de imagen superior que el vídeo compuesto. Una ventaja adicional (si la fuente y el televisor son compatibles) es el vídeo de exploración progresiva que ofrece una imagen muy estable y sin parpadeos. Para saber si la fuente y el televisor son compatibles con el vídeo de exploración progresiva, consulte los manuales correspondientes.
• Para la conexión de audio, consulte Conexión de un componente sin terminal HDMI en la página 15.
Importante
• Si ha conectado algún componente fuente al receptor mediante una entrada de vídeo de componentes, también deberá conectar su televisor a los conectores COMPONENT VIDEO MONITOR OUT del receptor.
• En caso necesario, asigne las entradas de vídeo de componentes a la fuente de entrada que ha conectado. Sólo será necesario hacerlo si no ha realizado la conexión de acuerdo con lo siguiente: -COMPONENT VIDEO IN 1: DVD-COMPONENT VIDEO IN 2: DVR/BDR
Para más detalles, consulte El menú Input Assign en la página 35.
HDMI
VIDEO
COMPONENT VIDEO
DVR/BDR L
R
R
L
Y PB PR
COAXIAL
AUDIO
PRE OUT
ANTENNA
OPTICAL
ASSIGNABLE
ASSIGNABLE
ASSIGNABLE
OUT
A
DVR/BDR
OUT
CD-R/TAPESURR BACK/FRONT HEIGHT
L
R
PRE OUT(Single)
IN
(CD)
1
SUBWOOFER
IN IN
CD
MONITOROUT
TV/SATIN
BDIN
OUT IN DVD IN
IN
TV/SAT BD
IN
DVD
(DVD)IN 1
MONITOROUT
(DVR/BDR)
IN 2
DVR/BDR IN DVD IN BD IN VIDEO 1 IN
(TV/SAT)
IN1
(CD-R/TAPE)
IN2
FMUNBAL75
(OUTPUT 5 V 0.1 A MAX)
ADAPTER PORT
AM LOOPFRONT
R LCENTER
R L
DIGITAL AUDIO OUTANALOG AUDIO OUTR L
ANALOG AUDIO IN
OPTICAL
VIDEO IN VIDEO OUT Seleccione una
Grabadora HDD/DVD, grabadora Blu-ray Disc, etc.
COMPONENT VIDEO
DVR/BDR L
R
R
L
Y PB PR
PRE OUT
ANTENNA
ASSIGNABLE
A
OUT
L
R
PRE OUT(Single)
SUBWOOFER
IN IN
CD
MONITOROUT
TV/SATIN
BDIN
OUT IN DVD IN
IN
TV/SAT BD
IN
DVD
(DVD)IN 1
MONITOROUT
(DVR/BDR)
IN 2
FMUNBAL75
(OUTPUT 5 V 0.1 A MAX)
ADAPTER PORT
AM LOOPFRONT
R LCENTER
YPBPR
COMPONENT VIDEO IN
YPBPR
COMPONENT VIDEO OUT
Reproductor DVDTV
VSX-821_FLXCN_Es.book 16 ページ 2011年3月23日 水曜日 午前11時33分
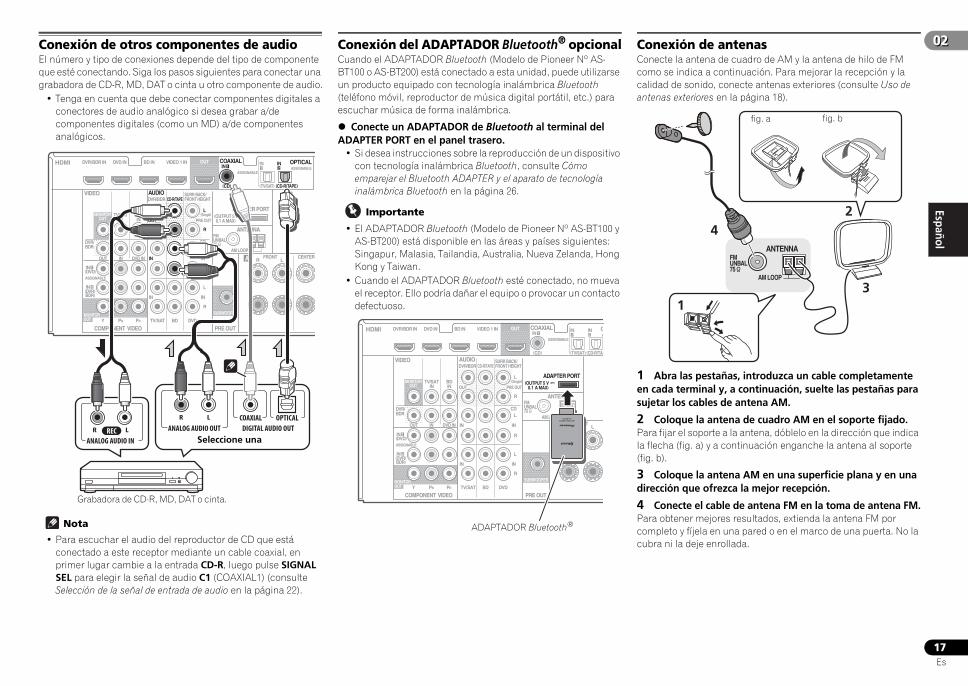
EnglishEspañol
0202
17Es
Conexión de otros componentes de audioEl número y tipo de conexiones depende del tipo de componente que esté conectando. Siga los pasos siguientes para conectar una grabadora de CD-R, MD, DAT o cinta u otro componente de audio.
• Tenga en cuenta que debe conectar componentes digitales a conectores de audio analógico si desea grabar a/de componentes digitales (como un MD) a/de componentes analógicos.
Nota
• Para escuchar el audio del reproductor de CD que está conectado a este receptor mediante un cable coaxial, en primer lugar cambie a la entrada CD-R, luego pulse SIGNAL SEL para elegir la señal de audio C1 (COAXIAL1) (consulte Selección de la señal de entrada de audio en la página 22).
Conexión del ADAPTADOR Bluetooth® opcionalCuando el ADAPTADOR Bluetooth (Modelo de Pioneer Nº AS-BT100 o AS-BT200) está conectado a esta unidad, puede utilizarse un producto equipado con tecnología inalámbrica Bluetooth (teléfono móvil, reproductor de música digital portátil, etc.) para escuchar música de forma inalámbrica.
Conecte un ADAPTADOR de Bluetooth al terminal del ADAPTER PORT en el panel trasero.
• Si desea instrucciones sobre la reproducción de un dispositivo con tecnología inalámbrica Bluetooth, consulte Cómo emparejar el Bluetooth ADAPTER y el aparato de tecnología inalámbrica Bluetooth en la página 26.
Importante
• El ADAPTADOR Bluetooth (Modelo de Pioneer Nº AS-BT100 y AS-BT200) está disponible en las áreas y países siguientes: Singapur, Malasia, Tailandia, Australia, Nueva Zelanda, Hong Kong y Taiwan.
• Cuando el ADAPTADOR Bluetooth esté conectado, no mueva el receptor. Ello podría dañar el equipo o provocar un contacto defectuoso.
Conexión de antenasConecte la antena de cuadro de AM y la antena de hilo de FM como se indica a continuación. Para mejorar la recepción y la calidad de sonido, conecte antenas exteriores (consulte Uso de antenas exteriores en la página 18).
1 Abra las pestañas, introduzca un cable completamente en cada terminal y, a continuación, suelte las pestañas para sujetar los cables de antena AM.
2 Coloque la antena de cuadro AM en el soporte fijado.Para fijar el soporte a la antena, dóblelo en la dirección que indica la flecha (fig. a) y a continuación enganche la antena al soporte (fig. b).
3 Coloque la antena AM en una superficie plana y en una dirección que ofrezca la mejor recepción.
4 Conecte el cable de antena FM en la toma de antena FM.Para obtener mejores resultados, extienda la antena FM por completo y fíjela en una pared o en el marco de una puerta. No la cubra ni la deje enrollada.
HDMI
VIDEO
COMPONENT VIDEO
DVR/BDR L
R
R
L
Y PB PR
COAXIAL
AUDIO
PRE OUT
ANTENNA
OPTICAL
ASSIGNABLE
ASSIGNABLE
ASSIGNABLE
OUT
A
DVR/BDR
OUT
CD-R/TAPESURR BACK/FRONT HEIGHT
L
R
PRE OUT(Single)
IN
(CD)
1
SUBWOOFER
IN IN
CD
MONITOROUT
TV/SATIN
BDIN
OUT IN DVD IN
IN
TV/SAT BD
IN
DVD
(DVD)IN 1
MONITOROUT
(DVR/BDR)
IN 2
DVR/BDR IN DVD IN BD IN VIDEO 1 IN
(TV/SAT)
IN1
(CD-R/TAPE)
IN2
FMUNBAL75
(OUTPUT 5 V 0.1 A MAX)
ADAPTER PORT
AM LOOPFRONT
R LCENTER
REC
R L
DIGITAL AUDIO OUTANALOG AUDIO OUTR L
ANALOG AUDIO IN
OPTICALCOAXIAL
Seleccione una
Grabadora de CD-R, MD, DAT o cinta.
HDMI
VIDEO
COMPONENT VIDEO
DVR/BDR L
R
R
L
Y PB PR
COAXIAL
AUDIO
PRE OUT
ANTENNA
O
ASSIGNABLE
ASSIGNABLE
A
OUT
A
DVR/BDR
OUT
CD-R/TAPESURR BACK/FRONT HEIGHT
L
R
PRE OUT(Single)
IN
(CD)
1
SUBWOOFER
IN IN
CD
MONITOROUT
TV/SATIN
BDIN
OUT IN DVD IN
IN
TV/SAT BD
IN
DVD
(DVD)IN 1
MONITOROUT
(DVR/BDR)
IN 2
DVR/BDR IN DVD IN BD IN VIDEO 1 IN
(TV/SAT)
IN1
(CD-R/TAP
IN2
FMUNBAL75
(OUTPUT 5 V 0.1 A MAX)
ADAPTER PORT
AM LOOPFRONT
R L
ADAPTADOR Bluetooth®
ANTENNAFMUNBAL75
AM LOOP
2
13
4
fig. a fig. b
VSX-821_FLXCN_Es.book 17 ページ 2011年3月23日 水曜日 午前11時33分
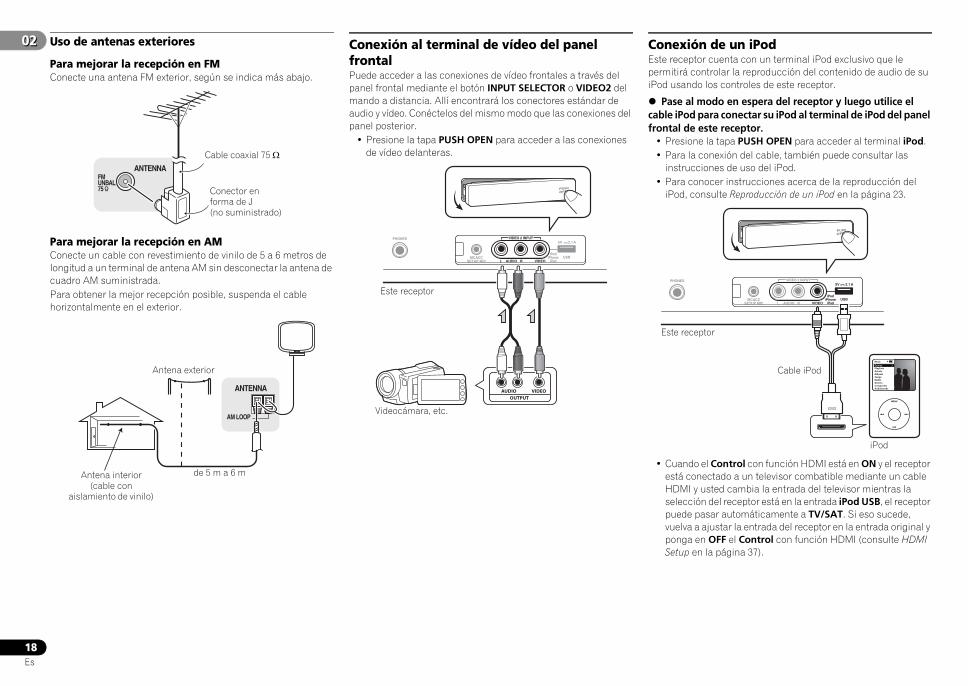
02
18Es
02 Uso de antenas exteriores
Para mejorar la recepción en FMConecte una antena FM exterior, según se indica más abajo.
Para mejorar la recepción en AMConecte un cable con revestimiento de vinilo de 5 a 6 metros de longitud a un terminal de antena AM sin desconectar la antena de cuadro AM suministrada.Para obtener la mejor recepción posible, suspenda el cable horizontalmente en el exterior.
Conexión al terminal de vídeo del panel frontalPuede acceder a las conexiones de vídeo frontales a través del panel frontal mediante el botón INPUT SELECTOR o VIDEO2 del mando a distancia. Allí encontrará los conectores estándar de audio y vídeo. Conéctelos del mismo modo que las conexiones del panel posterior.
• Presione la tapa PUSH OPEN para acceder a las conexiones de vídeo delanteras.
Conexión de un iPodEste receptor cuenta con un terminal iPod exclusivo que le permitirá controlar la reproducción del contenido de audio de su iPod usando los controles de este receptor.
Pase al modo en espera del receptor y luego utilice el cable iPod para conectar su iPod al terminal de iPod del panel frontal de este receptor.
• Presione la tapa PUSH OPEN para acceder al terminal iPod.• Para la conexión del cable, también puede consultar las
instrucciones de uso del iPod.• Para conocer instrucciones acerca de la reproducción del
iPod, consulte Reproducción de un iPod en la página 23.
• Cuando el Control con función HDMI está en ON y el receptor está conectado a un televisor combatible mediante un cable HDMI y usted cambia la entrada del televisor mientras la selección del receptor está en la entrada iPod USB, el receptor puede pasar automáticamente a TV/SAT. Si eso sucede, vuelva a ajustar la entrada del receptor en la entrada original y ponga en OFF el Control con función HDMI (consulte HDMI Setup en la página 37).
ANTENNAFMUNBAL75 Conector en
forma de J (no suministrado)
Cable coaxial 75
ANTENNA
AM LOOP
Antena exterior
de 5 m a 6 mAntena interior (cable con
aislamiento de vinilo)
CONTROL ON / OFF
AUDIO VIDEOOUTPUT
MCACCSETUP MIC L AUDIO R VIDEO
VIDEO 2 INPUT
iPodiPhone
iPadUSB
5V 2.1 APHONES
Este receptor
Videocámara, etc.
MCACCSETUP MIC L AUDIO R VIDEO
VIDEO 2 INPUT
iPodiPhone
iPadUSB
5V 2.1 APHONES
MENU
Music
Genius >PlaylistsArtistsAlbumsSongsRadioGenresComposersAudiobooks
CONTROL ON / OFF
iPod
Cable iPod
Este receptor
VSX-821_FLXCN_Es.book 18 ページ 2011年3月23日 水曜日 午前11時33分

EnglishEspañol
0202
19Es
Conexión de un dispositivo USBEs posible escuchar audio de dos canales utilizando la interfaz USB de la parte delantera de este receptor.
Ponga el receptor en espera y luego conecte su aparato USB al terminal USB del panel frontal de este receptor.
• Presione la tapa PUSH OPEN para acceder al terminal USB.• Este receptor no es compatible con un concentrador USB.• Para conocer instrucciones acerca de la reproducción del
aparato USB, consulte Reproducción de un aparato USB en la página 24.
Conexión del receptorEnchufe el receptor a la red sólo después de haber conectado al mismo todos los componentes, incluidos los altavoces.
PRECAUCIÓN
• Sujete el cable de alimentación por la parte del enchufe. No desconecte la clavija tirando del cable; nunca toque el cable de alimentación con las manos mojadas, ya que esto puede causar cortocircuitos o descargas eléctricas. No coloque el equipo, un mueble ni ningún objeto encima del cable de alimentación. No dañe el cable de alimentación. No anude el cable ni lo ate a otros cables. Los cables de alimentación deben ser tendidos de manera tal que la probabilidad de que alguien los pise sea mínima. Un cable de alimentación dañado puede causar incendios y descargas eléctricas. Revise el cable de alimentación cada cierto tiempo. Si encuentra que está dañado, pida un cable de recambio al representante autorizado de Pioneer más cercano.
• No utilice ningún cable de alimentación que no sea el suministrado con esta unidad.
• No utilice el cable de alimentación suministrado para ninguna finalidad distinta a la descrita a continuación.
• Cuando no utilice el receptor de forma continuada (por ejemplo, durante las vacaciones), desenchúfelo de la toma de corriente.
Nota
• Después de conectar este receptor a una toma de CA empieza un proceso de inicialización de HDMI que dura de 2 a 10 segundos. Durante este proceso no puede hacer ninguna operación. El indicador HDMI de la pantalla del panel frontal parpadea durante este proceso, y usted puede encender este receptor una vez que el indicador deje de parpadear. Cuando ajuste el Control con HDMI en OFF, puede pasar por alto este proceso. Para conocer más detalles sobre el Control con función HDMI, véase Función de Control con HDMI en la página 37.
1 Enchufe el cable de alimentación a la toma AC IN de la parte posterior del receptor.
2 Enchufe el otro extremo a la toma de corriente.
MCACCSETUP MIC L AUDIO R VIDEO
VIDEO 2 INPUT
iPodiPhone
iPadUSB
5V 2.1 APHONES
CONTROL ON / OFF
Dispositivo de almacenamiento
masivo USB
Este receptor
VSX-821_FLXCN_Es.book 19 ページ 2011年3月23日 水曜日 午前11時33分
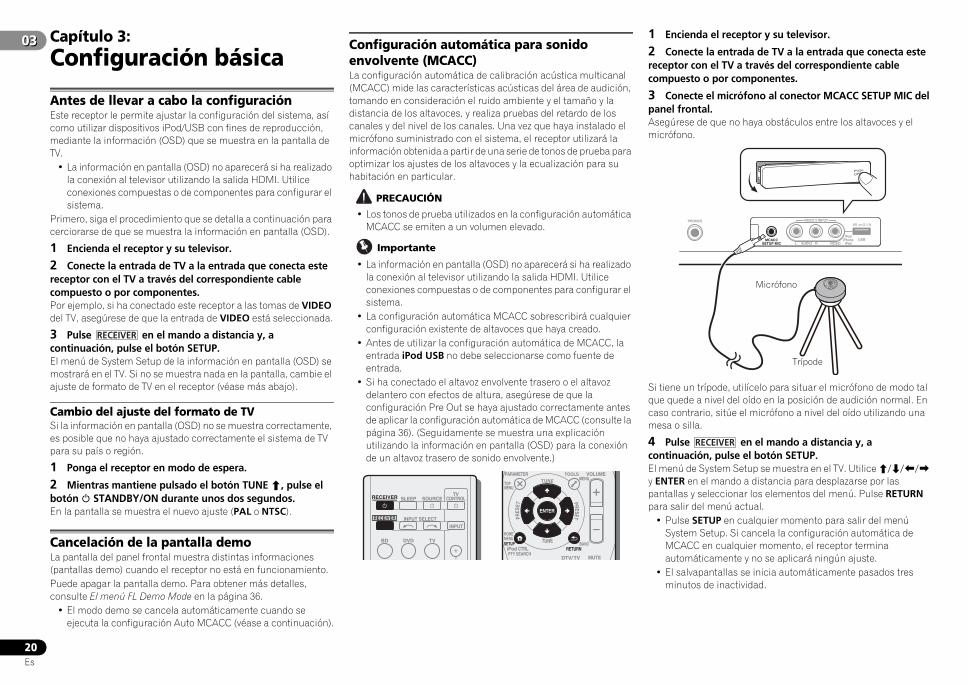
03
20Es
03 Capítulo 3:Configuración básica
Antes de llevar a cabo la configuraciónEste receptor le permite ajustar la configuración del sistema, así como utilizar dispositivos iPod/USB con fines de reproducción, mediante la información (OSD) que se muestra en la pantalla de TV.
• La información en pantalla (OSD) no aparecerá si ha realizado la conexión al televisor utilizando la salida HDMI. Utilice conexiones compuestas o de componentes para configurar el sistema.
Primero, siga el procedimiento que se detalla a continuación para cerciorarse de que se muestra la información en pantalla (OSD).
1 Encienda el receptor y su televisor.
2 Conecte la entrada de TV a la entrada que conecta este receptor con el TV a través del correspondiente cable compuesto o por componentes.Por ejemplo, si ha conectado este receptor a las tomas de VIDEO del TV, asegúrese de que la entrada de VIDEO está seleccionada.
3 Pulse en el mando a distancia y, a continuación, pulse el botón SETUP.El menú de System Setup de la información en pantalla (OSD) se mostrará en el TV. Si no se muestra nada en la pantalla, cambie el ajuste de formato de TV en el receptor (véase más abajo).
Cambio del ajuste del formato de TVSi la información en pantalla (OSD) no se muestra correctamente, es posible que no haya ajustado correctamente el sistema de TV para su país o región.
1 Ponga el receptor en modo de espera.
2 Mientras mantiene pulsado el botón TUNE , pulse el botón STANDBY/ON durante unos dos segundos.En la pantalla se muestra el nuevo ajuste (PAL o NTSC).
Cancelación de la pantalla demoLa pantalla del panel frontal muestra distintas informaciones (pantallas demo) cuando el receptor no está en funcionamiento.Puede apagar la pantalla demo. Para obtener más detalles, consulte El menú FL Demo Mode en la página 36.
• El modo demo se cancela automáticamente cuando se ejecuta la configuración Auto MCACC (véase a continuación).
Configuración automática para sonido envolvente (MCACC)La configuración automática de calibración acústica multicanal (MCACC) mide las características acústicas del área de audición, tomando en consideración el ruido ambiente y el tamaño y la distancia de los altavoces, y realiza pruebas del retardo de los canales y del nivel de los canales. Una vez que haya instalado el micrófono suministrado con el sistema, el receptor utilizará la información obtenida a partir de una serie de tonos de prueba para optimizar los ajustes de los altavoces y la ecualización para su habitación en particular.
PRECAUCIÓN
• Los tonos de prueba utilizados en la configuración automática MCACC se emiten a un volumen elevado.
Importante
• La información en pantalla (OSD) no aparecerá si ha realizado la conexión al televisor utilizando la salida HDMI. Utilice conexiones compuestas o de componentes para configurar el sistema.
• La configuración automática MCACC sobrescribirá cualquier configuración existente de altavoces que haya creado.
• Antes de utilizar la configuración automática de MCACC, la entrada iPod USB no debe seleccionarse como fuente de entrada.
• Si ha conectado el altavoz envolvente trasero o el altavoz delantero con efectos de altura, asegúrese de que la configuración Pre Out se haya ajustado correctamente antes de aplicar la configuración automática de MCACC (consulte la página 36). (Seguidamente se muestra una explicación utilizando la información en pantalla (OSD) para la conexión de un altavoz trasero de sonido envolvente.)
1 Encienda el receptor y su televisor.
2 Conecte la entrada de TV a la entrada que conecta este receptor con el TV a través del correspondiente cable compuesto o por componentes.
3 Conecte el micrófono al conector MCACC SETUP MIC del panel frontal.Asegúrese de que no haya obstáculos entre los altavoces y el micrófono.
Si tiene un trípode, utilícelo para situar el micrófono de modo tal que quede a nivel del oído en la posición de audición normal. En caso contrario, sitúe el micrófono a nivel del oído utilizando una mesa o silla.
4 Pulse en el mando a distancia y, a continuación, pulse el botón SETUP.El menú de System Setup se muestra en el TV. Utilice /// y ENTER en el mando a distancia para desplazarse por las pantallas y seleccionar los elementos del menú. Pulse RETURN para salir del menú actual.
• Pulse SETUP en cualquier momento para salir del menú System Setup. Si cancela la configuración automática de MCACC en cualquier momento, el receptor termina automáticamente y no se aplicará ningún ajuste.
• El salvapantallas se inicia automáticamente pasados tres minutos de inactividad.
RECEIVER
BD DVD
INPUT SELECT
SOURCESLEEPTV
CONTROL
TV
INPUT
RECEIVER
RECEIVERENTER
MUTE
RETURN
PARAMETER TOOLS VOLUME
iPod CTRLPTY SEARCH
BAND
MENU
HOMEMENUSETUP
DTV/ TV
TOPMENU
TUNE
TUNE
PRESETPRES
ET
MCACCSETUP MIC L AUDIO R VIDEO
VIDEO 2 INPUT
iPodiPhone
iPadUSB
5V 2.1 APHONES
CONTROL ON / OFF
Trípode
Micrófono
RECEIVER
VSX-821_FLXCN_Es.book 20 ページ 2011年3月23日 水曜日 午前11時33分
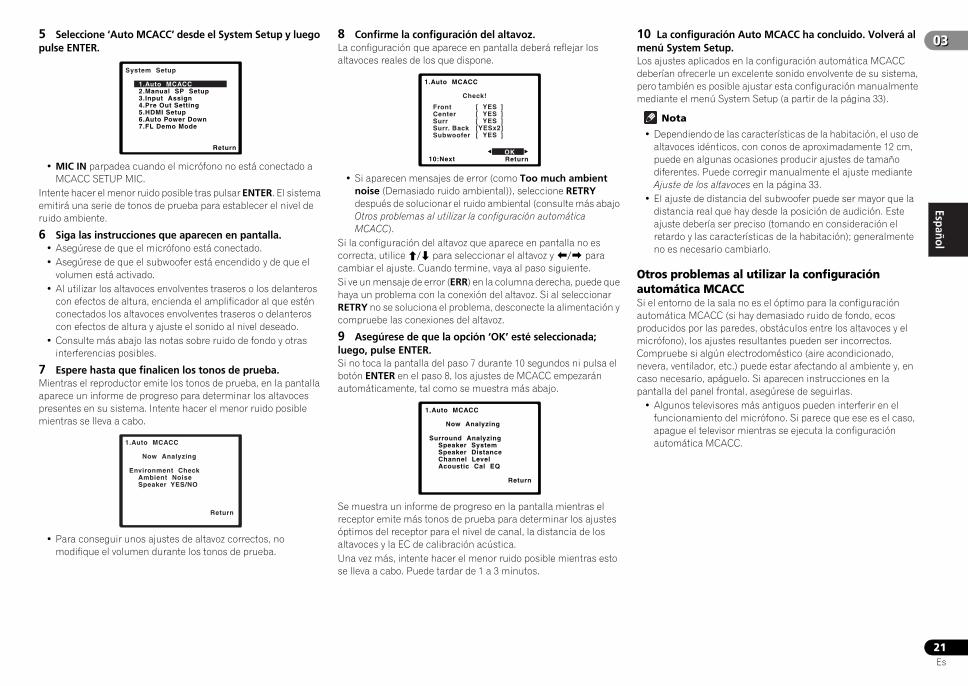
EnglishEspañol
0303
21Es
5 Seleccione ‘Auto MCACC’ desde el System Setup y luego pulse ENTER.
• MIC IN parpadea cuando el micrófono no está conectado a MCACC SETUP MIC.
Intente hacer el menor ruido posible tras pulsar ENTER. El sistema emitirá una serie de tonos de prueba para establecer el nivel de ruido ambiente.
6 Siga las instrucciones que aparecen en pantalla.• Asegúrese de que el micrófono está conectado.• Asegúrese de que el subwoofer está encendido y de que el
volumen está activado.• Al utilizar los altavoces envolventes traseros o los delanteros
con efectos de altura, encienda el amplificador al que estén conectados los altavoces envolventes traseros o delanteros con efectos de altura y ajuste el sonido al nivel deseado.
• Consulte más abajo las notas sobre ruido de fondo y otras interferencias posibles.
7 Espere hasta que finalicen los tonos de prueba.Mientras el reproductor emite los tonos de prueba, en la pantalla aparece un informe de progreso para determinar los altavoces presentes en su sistema. Intente hacer el menor ruido posible mientras se lleva a cabo.
• Para conseguir unos ajustes de altavoz correctos, no modifique el volumen durante los tonos de prueba.
8 Confirme la configuración del altavoz.La configuración que aparece en pantalla deberá reflejar los altavoces reales de los que dispone.
• Si aparecen mensajes de error (como Too much ambient noise (Demasiado ruido ambiental)), seleccione RETRY después de solucionar el ruido ambiental (consulte más abajo Otros problemas al utilizar la configuración automática MCACC).
Si la configuración del altavoz que aparece en pantalla no es correcta, utilice / para seleccionar el altavoz y / para cambiar el ajuste. Cuando termine, vaya al paso siguiente.Si ve un mensaje de error (ERR) en la columna derecha, puede que haya un problema con la conexión del altavoz. Si al seleccionar RETRY no se soluciona el problema, desconecte la alimentación y compruebe las conexiones del altavoz.
9 Asegúrese de que la opción ‘OK’ esté seleccionada; luego, pulse ENTER.Si no toca la pantalla del paso 7 durante 10 segundos ni pulsa el botón ENTER en el paso 8, los ajustes de MCACC empezarán automáticamente, tal como se muestra más abajo.
Se muestra un informe de progreso en la pantalla mientras el receptor emite más tonos de prueba para determinar los ajustes óptimos del receptor para el nivel de canal, la distancia de los altavoces y la EC de calibración acústica.Una vez más, intente hacer el menor ruido posible mientras esto se lleva a cabo. Puede tardar de 1 a 3 minutos.
10 La configuración Auto MCACC ha concluido. Volverá al menú System Setup.Los ajustes aplicados en la configuración automática MCACC deberían ofrecerle un excelente sonido envolvente de su sistema, pero también es posible ajustar esta configuración manualmente mediante el menú System Setup (a partir de la página 33).
Nota
• Dependiendo de las características de la habitación, el uso de altavoces idénticos, con conos de aproximadamente 12 cm, puede en algunas ocasiones producir ajustes de tamaño diferentes. Puede corregir manualmente el ajuste mediante Ajuste de los altavoces en la página 33.
• El ajuste de distancia del subwoofer puede ser mayor que la distancia real que hay desde la posición de audición. Este ajuste debería ser preciso (tomando en consideración el retardo y las características de la habitación); generalmente no es necesario cambiarlo.
Otros problemas al utilizar la configuración automática MCACCSi el entorno de la sala no es el óptimo para la configuración automática MCACC (si hay demasiado ruido de fondo, ecos producidos por las paredes, obstáculos entre los altavoces y el micrófono), los ajustes resultantes pueden ser incorrectos. Compruebe si algún electrodoméstico (aire acondicionado, nevera, ventilador, etc.) puede estar afectando al ambiente y, en caso necesario, apáguelo. Si aparecen instrucciones en la pantalla del panel frontal, asegúrese de seguirlas.
• Algunos televisores más antiguos pueden interferir en el funcionamiento del micrófono. Si parece que ese es el caso, apague el televisor mientras se ejecuta la configuración automática MCACC.
System Setup
1.Auto MCACC2.Manual SP Setup3.Input Assign4.Pre Out Setting5.HDMI Setup6.Auto Power Down7.FL Demo Mode
Return
1.Auto MCACC
Now Analyzing
Environment Check Ambient Noise Speaker YES/NO
Return
1.Auto MCACC
Check!
OK Return 10:Next
Front CenterSurrSurr. BackSubwoofer
[ YES ][ YES ][ YES ][YESx2][ YES ]
1.Auto MCACC
Now Analyzing
Surround Analyzing Speaker System Speaker Distance Channel Level Acoustic Cal EQ
Return
VSX-821_FLXCN_Es.book 21 ページ 2011年3月23日 水曜日 午前11時33分
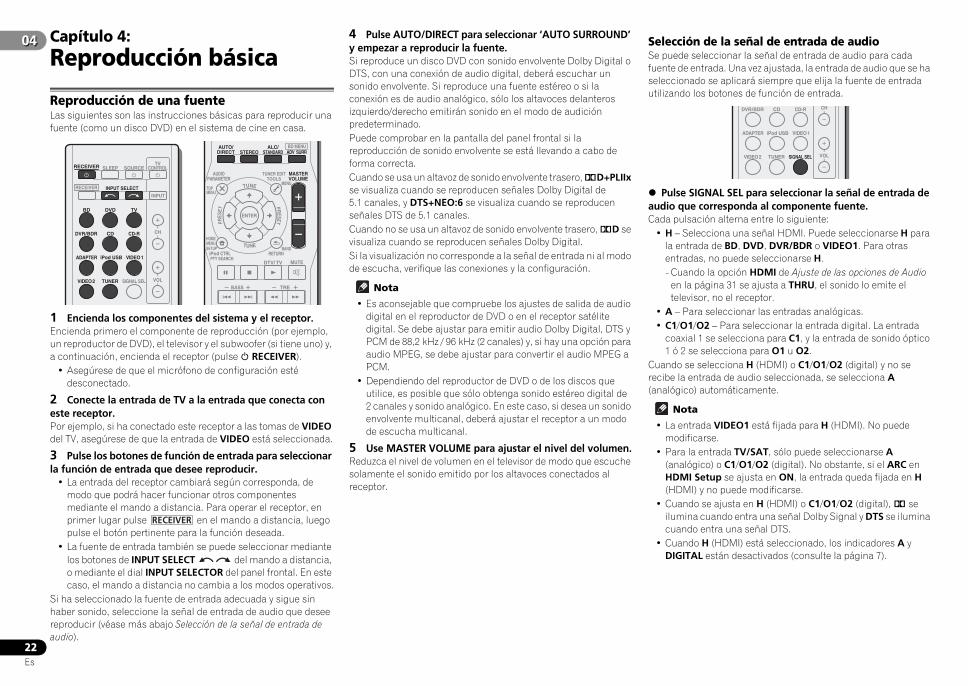
04
22Es
04 Capítulo 4:Reproducción básica
Reproducción de una fuenteLas siguientes son las instrucciones básicas para reproducir una fuente (como un disco DVD) en el sistema de cine en casa.
1 Encienda los componentes del sistema y el receptor.Encienda primero el componente de reproducción (por ejemplo, un reproductor de DVD), el televisor y el subwoofer (si tiene uno) y, a continuación, encienda el receptor (pulse RECEIVER).
• Asegúrese de que el micrófono de configuración esté desconectado.
2 Conecte la entrada de TV a la entrada que conecta con este receptor.Por ejemplo, si ha conectado este receptor a las tomas de VIDEO del TV, asegúrese de que la entrada de VIDEO está seleccionada.
3 Pulse los botones de función de entrada para seleccionar la función de entrada que desee reproducir.
• La entrada del receptor cambiará según corresponda, de modo que podrá hacer funcionar otros componentes mediante el mando a distancia. Para operar el receptor, en primer lugar pulse en el mando a distancia, luego pulse el botón pertinente para la función deseada.
• La fuente de entrada también se puede seleccionar mediante los botones de INPUT SELECT del mando a distancia, o mediante el dial INPUT SELECTOR del panel frontal. En este caso, el mando a distancia no cambia a los modos operativos.
Si ha seleccionado la fuente de entrada adecuada y sigue sin haber sonido, seleccione la señal de entrada de audio que desee reproducir (véase más abajo Selección de la señal de entrada de audio).
4 Pulse AUTO/DIRECT para seleccionar ‘AUTO SURROUND’ y empezar a reproducir la fuente.Si reproduce un disco DVD con sonido envolvente Dolby Digital o DTS, con una conexión de audio digital, deberá escuchar un sonido envolvente. Si reproduce una fuente estéreo o si la conexión es de audio analógico, sólo los altavoces delanteros izquierdo/derecho emitirán sonido en el modo de audición predeterminado.Puede comprobar en la pantalla del panel frontal si la reproducción de sonido envolvente se está llevando a cabo de forma correcta.Cuando se usa un altavoz de sonido envolvente trasero, 2D+PLIIx se visualiza cuando se reproducen señales Dolby Digital de 5.1 canales, y DTS+NEO:6 se visualiza cuando se reproducen señales DTS de 5.1 canales.Cuando no se usa un altavoz de sonido envolvente trasero, 2D se visualiza cuando se reproducen señales Dolby Digital.Si la visualización no corresponde a la señal de entrada ni al modo de escucha, verifique las conexiones y la configuración.
Nota
• Es aconsejable que compruebe los ajustes de salida de audio digital en el reproductor de DVD o en el receptor satélite digital. Se debe ajustar para emitir audio Dolby Digital, DTS y PCM de 88,2 kHz / 96 kHz (2 canales) y, si hay una opción para audio MPEG, se debe ajustar para convertir el audio MPEG a PCM.
• Dependiendo del reproductor de DVD o de los discos que utilice, es posible que sólo obtenga sonido estéreo digital de 2 canales y sonido analógico. En este caso, si desea un sonido envolvente multicanal, deberá ajustar el receptor a un modo de escucha multicanal.
5 Use MASTER VOLUME para ajustar el nivel del volumen.Reduzca el nivel de volumen en el televisor de modo que escuche solamente el sonido emitido por los altavoces conectados al receptor.
Selección de la señal de entrada de audioSe puede seleccionar la señal de entrada de audio para cada fuente de entrada. Una vez ajustada, la entrada de audio que se ha seleccionado se aplicará siempre que elija la fuente de entrada utilizando los botones de función de entrada.
Pulse SIGNAL SEL para seleccionar la señal de entrada de audio que corresponda al componente fuente. Cada pulsación alterna entre lo siguiente:
• H – Selecciona una señal HDMI. Puede seleccionarse H para la entrada de BD, DVD, DVR/BDR o VIDEO1. Para otras entradas, no puede seleccionarse H.-Cuando la opción HDMI de Ajuste de las opciones de Audio
en la página 31 se ajusta a THRU, el sonido lo emite el televisor, no el receptor.
• A – Para seleccionar las entradas analógicas. • C1/O1/O2 – Para seleccionar la entrada digital. La entrada
coaxial 1 se selecciona para C1, y la entrada de sonido óptico 1 ó 2 se selecciona para O1 u O2.
Cuando se selecciona H (HDMI) o C1/O1/O2 (digital) y no se recibe la entrada de audio seleccionada, se selecciona A (analógico) automáticamente.
Nota
• La entrada VIDEO1 está fijada para H (HDMI). No puede modificarse.
• Para la entrada TV/SAT, sólo puede seleccionarse A (analógico) o C1/O1/O2 (digital). No obstante, si el ARC en HDMI Setup se ajusta en ON, la entrada queda fijada en H (HDMI) y no puede modificarse.
• Cuando se ajusta en H (HDMI) o C1/O1/O2 (digital), 2 se ilumina cuando entra una señal Dolby Signal y DTS se ilumina cuando entra una señal DTS.
• Cuando H (HDMI) está seleccionado, los indicadores A y DIGITAL están desactivados (consulte la página 7).
BD DVD
INPUT SELECT
SOURCESLEEPTV
CONTROL
TV
INPUT
DVR/BDR CD CD-R
ADAPTER iPod USB VIDEO 1
VIDEO 2 SIGNAL SELTUNER
RECEIVER
CH
VOL
RECEIVER
ENTER
ADV SURRAUTO/
DIRECT
MUTE
RETURN
AUDIOPARAMETER
TUNER EDITTOOLS
MASTERVOLUME
iPod CTRLPTY SEARCH
BAND
MENU
HOMEMENUSETUP
DTV/ TV
TREBASS
TOPMENU
TUNE
TUNE
PRESETPRES
ET
BD MENUALC/STANDARDSTEREO
RECEIVER
DVR/BDR CD CD-R
ADAPTER iPod USB VIDEO 1
VIDEO 2 SIGNAL SELTUNER
CH
VOL
VSX-821_FLXCN_Es.book 22 ページ 2011年3月23日 水曜日 午前11時33分
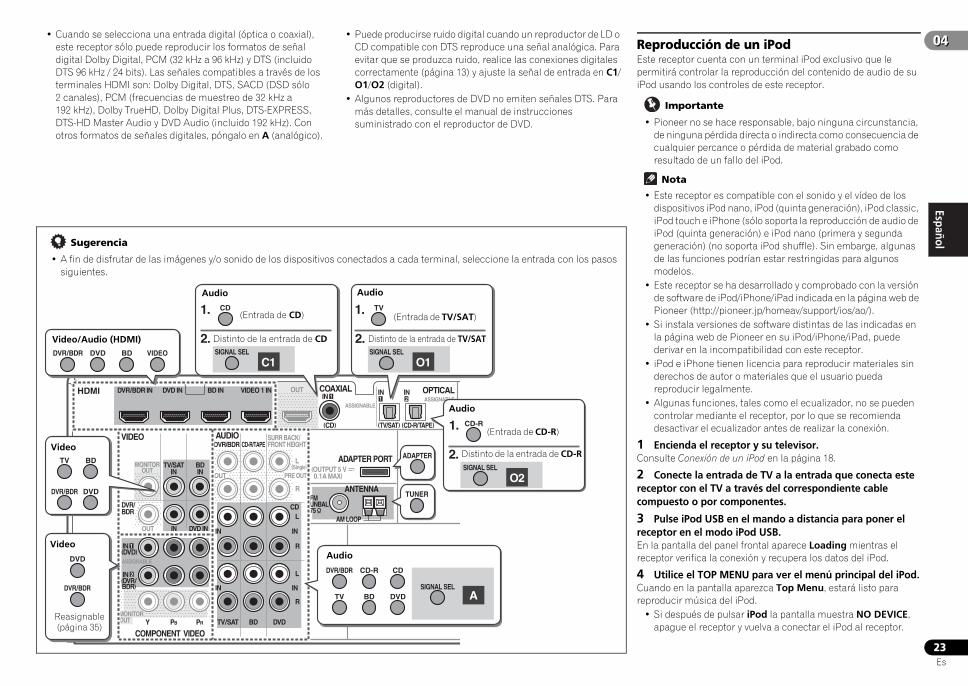
EnglishEspañol
0404
23Es
• Cuando se selecciona una entrada digital (óptica o coaxial), este receptor sólo puede reproducir los formatos de señal digital Dolby Digital, PCM (32 kHz a 96 kHz) y DTS (incluido DTS 96 kHz / 24 bits). Las señales compatibles a través de los terminales HDMI son: Dolby Digital, DTS, SACD (DSD sólo 2 canales), PCM (frecuencias de muestreo de 32 kHz a 192 kHz), Dolby TrueHD, Dolby Digital Plus, DTS-EXPRESS, DTS-HD Master Audio y DVD Audio (incluido 192 kHz). Con otros formatos de señales digitales, póngalo en A (analógico).
• Puede producirse ruido digital cuando un reproductor de LD o CD compatible con DTS reproduce una señal analógica. Para evitar que se produzca ruido, realice las conexiones digitales correctamente (página 13) y ajuste la señal de entrada en C1/O1/O2 (digital).
• Algunos reproductores de DVD no emiten señales DTS. Para más detalles, consulte el manual de instrucciones suministrado con el reproductor de DVD.
Reproducción de un iPodEste receptor cuenta con un terminal iPod exclusivo que le permitirá controlar la reproducción del contenido de audio de su iPod usando los controles de este receptor.
Importante
• Pioneer no se hace responsable, bajo ninguna circunstancia, de ninguna pérdida directa o indirecta como consecuencia de cualquier percance o pérdida de material grabado como resultado de un fallo del iPod.
Nota
• Este receptor es compatible con el sonido y el vídeo de los dispositivos iPod nano, iPod (quinta generación), iPod classic, iPod touch e iPhone (sólo soporta la reproducción de audio de iPod (quinta generación) e iPod nano (primera y segunda generación) (no soporta iPod shuffle). Sin embarge, algunas de las funciones podrían estar restringidas para algunos modelos.
• Este receptor se ha desarrollado y comprobado con la versión de software de iPod/iPhone/iPad indicada en la página web de Pioneer (http://pioneer.jp/homeav/support/ios/ao/).
• Si instala versiones de software distintas de las indicadas en la página web de Pioneer en su iPod/iPhone/iPad, puede derivar en la incompatibilidad con este receptor.
• iPod e iPhone tienen licencia para reproducir materiales sin derechos de autor o materiales que el usuario pueda reproducir legalmente.
• Algunas funciones, tales como el ecualizador, no se pueden controlar mediante el receptor, por lo que se recomienda desactivar el ecualizador antes de realizar la conexión.
1 Encienda el receptor y su televisor.Consulte Conexión de un iPod en la página 18.
2 Conecte la entrada de TV a la entrada que conecta este receptor con el TV a través del correspondiente cable compuesto o por componentes.
3 Pulse iPod USB en el mando a distancia para poner el receptor en el modo iPod USB.En la pantalla del panel frontal aparece Loading mientras el receptor verifica la conexión y recupera los datos del iPod.
4 Utilice el TOP MENU para ver el menú principal del iPod.Cuando en la pantalla aparezca Top Menu, estará listo para reproducir música del iPod.
• Si después de pulsar iPod la pantalla muestra NO DEVICE, apague el receptor y vuelva a conectar el iPod al receptor.
Sugerencia
• A fin de disfrutar de las imágenes y/o sonido de los dispositivos conectados a cada terminal, seleccione la entrada con los pasos siguientes.
MONITOROUT
HDMI
VIDEO
COMPONENT VIDEO
DVR/BDR
L
R
R
L
Y PB PR
COAXIAL
AUDIO
ANTENNA
OPTICAL
ASSIGNABLE
ASSIGNABLE
ASSIGNABLE
OUT
DVR/BDR
OUT
CD-R/TAPESURR BACK/FRONT HEIGHT
L
R
PRE OUT(Single)
IN
(CD)
1
IN IN
CD
MONITOROUT
TV/SATIN
BDIN
OUT IN DVD IN
IN
TV/SAT BD
IN
DVD
(DVD)IN 1
(DVR/BDR)
IN 2
DVR/BDR IN DVD IN BD IN VIDEO 1 IN
(TV/SAT)
IN1
(CD-R/TAPE)
IN2
FMUNBAL75
(OUTPUT 5 V 0.1A MAX)
ADAPTER PORT
AM LOOP
DVD BD
CD
CD-R
ADAPTER
TUNER
TV
DVR/BDR
TV BD
DVR/BDR DVD
DVR/BDR
DVD
CD-R CDDVR/BDR
BD DVDTV
VIDEO
1. 1.
1.
O2
A
2.
SIGNAL SEL
SIGNAL SEL
O1
2.SIGNAL SEL
C1
2.SIGNAL SEL
Audio
Distinto de la entrada de CD
Audio
Audio
Audio
Video/Audio (HDMI)
Video
Video
Distinto de la entrada de TV/SAT
Distinto de la entrada de CD-R
(Entrada de CD) (Entrada de TV/SAT)
(Entrada de CD-R)
Reasignable (página 35)
VSX-821_FLXCN_Es.book 23 ページ 2011年3月23日 水曜日 午前11時33分
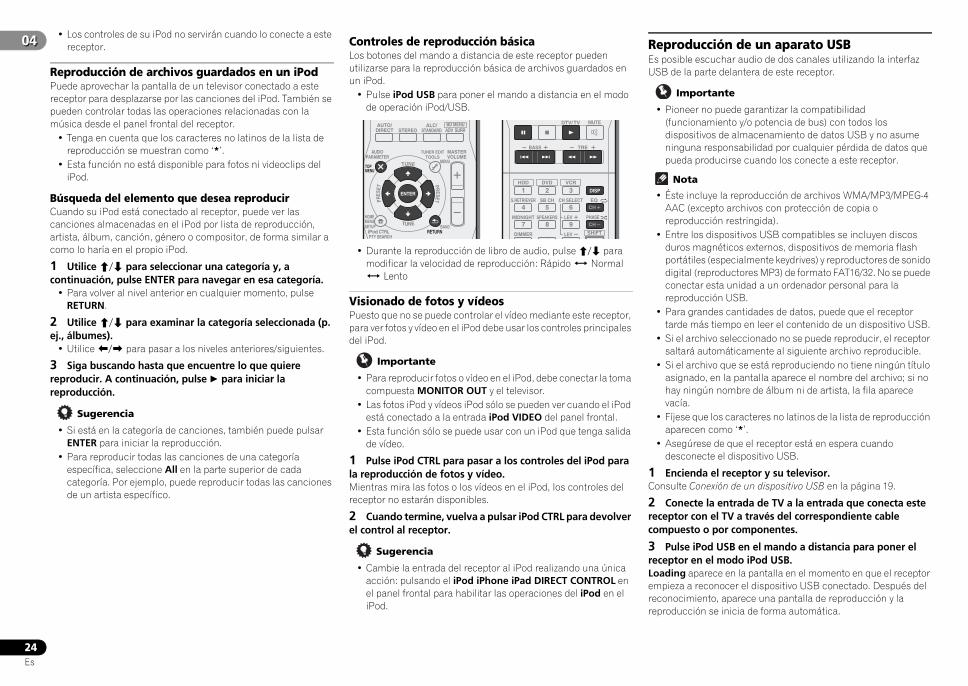
04
24Es
04 • Los controles de su iPod no servirán cuando lo conecte a este receptor.
Reproducción de archivos guardados en un iPodPuede aprovechar la pantalla de un televisor conectado a este receptor para desplazarse por las canciones del iPod. También se pueden controlar todas las operaciones relacionadas con la música desde el panel frontal del receptor.
• Tenga en cuenta que los caracteres no latinos de la lista de reproducción se muestran como ‘*’.
• Esta función no está disponible para fotos ni videoclips del iPod.
Búsqueda del elemento que desea reproducirCuando su iPod está conectado al receptor, puede ver las canciones almacenadas en el iPod por lista de reproducción, artista, álbum, canción, género o compositor, de forma similar a como lo haría en el propio iPod.
1 Utilice / para seleccionar una categoría y, a continuación, pulse ENTER para navegar en esa categoría.
• Para volver al nivel anterior en cualquier momento, pulse RETURN.
2 Utilice / para examinar la categoría seleccionada (p. ej., álbumes).
• Utilice / para pasar a los niveles anteriores/siguientes.
3 Siga buscando hasta que encuentre lo que quiere reproducir. A continuación, pulse para iniciar la reproducción.
Sugerencia
• Si está en la categoría de canciones, también puede pulsar ENTER para iniciar la reproducción.
• Para reproducir todas las canciones de una categoría específica, seleccione All en la parte superior de cada categoría. Por ejemplo, puede reproducir todas las canciones de un artista específico.
Controles de reproducción básicaLos botones del mando a distancia de este receptor pueden utilizarse para la reproducción básica de archivos guardados en un iPod.
• Pulse iPod USB para poner el mando a distancia en el modo de operación iPod/USB.
• Durante la reproducción de libro de audio, pulse / para modificar la velocidad de reproducción: Rápido Normal Lento
Visionado de fotos y vídeosPuesto que no se puede controlar el vídeo mediante este receptor, para ver fotos y vídeo en el iPod debe usar los controles principales del iPod.
Importante
• Para reproducir fotos o vídeo en el iPod, debe conectar la toma compuesta MONITOR OUT y el televisor.
• Las fotos iPod y vídeos iPod sólo se pueden ver cuando el iPod está conectado a la entrada iPod VIDEO del panel frontal.
• Esta función sólo se puede usar con un iPod que tenga salida de vídeo.
1 Pulse iPod CTRL para pasar a los controles del iPod para la reproducción de fotos y vídeo.Mientras mira las fotos o los vídeos en el iPod, los controles del receptor no estarán disponibles.
2 Cuando termine, vuelva a pulsar iPod CTRL para devolver el control al receptor.
Sugerencia
• Cambie la entrada del receptor al iPod realizando una única acción: pulsando el iPod iPhone iPad DIRECT CONTROL en el panel frontal para habilitar las operaciones del iPod en el iPod.
Reproducción de un aparato USBEs posible escuchar audio de dos canales utilizando la interfaz USB de la parte delantera de este receptor.
Importante
• Pioneer no puede garantizar la compatibilidad (funcionamiento y/o potencia de bus) con todos los dispositivos de almacenamiento de datos USB y no asume ninguna responsabilidad por cualquier pérdida de datos que pueda producirse cuando los conecte a este receptor.
Nota
• Éste incluye la reproducción de archivos WMA/MP3/MPEG-4 AAC (excepto archivos con protección de copia o reproducción restringida).
• Entre los dispositivos USB compatibles se incluyen discos duros magnéticos externos, dispositivos de memoria flash portátiles (especialmente keydrives) y reproductores de sonido digital (reproductores MP3) de formato FAT16/32. No se puede conectar esta unidad a un ordenador personal para la reproducción USB.
• Para grandes cantidades de datos, puede que el receptor tarde más tiempo en leer el contenido de un dispositivo USB.
• Si el archivo seleccionado no se puede reproducir, el receptor saltará automáticamente al siguiente archivo reproducible.
• Si el archivo que se está reproduciendo no tiene ningún título asignado, en la pantalla aparece el nombre del archivo; si no hay ningún nombre de álbum ni de artista, la fila aparece vacía.
• Fíjese que los caracteres no latinos de la lista de reproducción aparecen como ‘*’.
• Asegúrese de que el receptor está en espera cuando desconecte el dispositivo USB.
1 Encienda el receptor y su televisor.Consulte Conexión de un dispositivo USB en la página 19.
2 Conecte la entrada de TV a la entrada que conecta este receptor con el TV a través del correspondiente cable compuesto o por componentes.
3 Pulse iPod USB en el mando a distancia para poner el receptor en el modo iPod USB.Loading aparece en la pantalla en el momento en que el receptor empieza a reconocer el dispositivo USB conectado. Después del reconocimiento, aparece una pantalla de reproducción y la reproducción se inicia de forma automática.
ENTER
ADV SURRAUTO/
DIRECT
RETURN
AUDIOPARAMETER
TUNER EDITTOOLS
MASTERVOLUME
iPod CTRLPTY SEARCH
BAND
MENU
HOMEMENUSETUP
TOPMENU
TUNE
TUNE
PRESETPRES
ET
BD MENU
DIMMER
1
4
7MIDNIGHT
S.RETRIEVER
2
5
8SPEAKERS LEV
LEV
SB CH
DISP
EQ
PHASE
3
6
9
0
CH
CH
CH SELECT
MUTEDTV/ TV
TREBASS
SHIFT
HDD DVD VCR
ALC/STANDARDSTEREO
VSX-821_FLXCN_Es.book 24 ページ 2011年3月23日 水曜日 午前11時33分
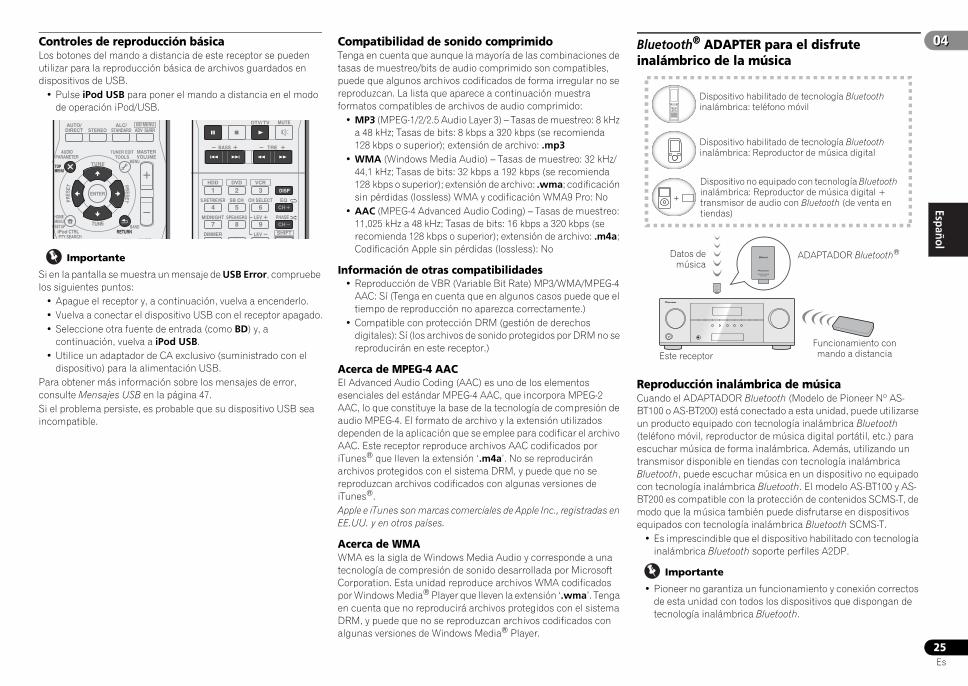
EnglishEspañol
0404
25Es
Controles de reproducción básicaLos botones del mando a distancia de este receptor se pueden utilizar para la reproducción básica de archivos guardados en dispositivos de USB.
• Pulse iPod USB para poner el mando a distancia en el modo de operación iPod/USB.
Importante
Si en la pantalla se muestra un mensaje de USB Error, compruebe los siguientes puntos:
• Apague el receptor y, a continuación, vuelva a encenderlo.• Vuelva a conectar el dispositivo USB con el receptor apagado.• Seleccione otra fuente de entrada (como BD) y, a
continuación, vuelva a iPod USB.• Utilice un adaptador de CA exclusivo (suministrado con el
dispositivo) para la alimentación USB.Para obtener más información sobre los mensajes de error, consulte Mensajes USB en la página 47.Si el problema persiste, es probable que su dispositivo USB sea incompatible.
Compatibilidad de sonido comprimidoTenga en cuenta que aunque la mayoría de las combinaciones de tasas de muestreo/bits de audio comprimido son compatibles, puede que algunos archivos codificados de forma irregular no se reproduzcan. La lista que aparece a continuación muestra formatos compatibles de archivos de audio comprimido:
• MP3 (MPEG-1/2/2.5 Audio Layer 3) – Tasas de muestreo: 8 kHz a 48 kHz; Tasas de bits: 8 kbps a 320 kbps (se recomienda 128 kbps o superior); extensión de archivo: .mp3
• WMA (Windows Media Audio) – Tasas de muestreo: 32 kHz/44,1 kHz; Tasas de bits: 32 kbps a 192 kbps (se recomienda 128 kbps o superior); extensión de archivo: .wma; codificación sin pérdidas (lossless) WMA y codificación WMA9 Pro: No
• AAC (MPEG-4 Advanced Audio Coding) – Tasas de muestreo: 11,025 kHz a 48 kHz; Tasas de bits: 16 kbps a 320 kbps (se recomienda 128 kbps o superior); extensión de archivo: .m4a; Codificación Apple sin pérdidas (lossless): No
Información de otras compatibilidades• Reproducción de VBR (Variable Bit Rate) MP3/WMA/MPEG-4
AAC: Sí (Tenga en cuenta que en algunos casos puede que el tiempo de reproducción no aparezca correctamente.)
• Compatible con protección DRM (gestión de derechos digitales): Sí (los archivos de sonido protegidos por DRM no se reproducirán en este receptor.)
Acerca de MPEG-4 AACEl Advanced Audio Coding (AAC) es uno de los elementos esenciales del estándar MPEG-4 AAC, que incorpora MPEG-2 AAC, lo que constituye la base de la tecnología de compresión de audio MPEG-4. El formato de archivo y la extensión utilizados dependen de la aplicación que se emplee para codificar el archivo AAC. Este receptor reproduce archivos AAC codificados por iTunes® que lleven la extensión ‘.m4a’. No se reproducirán archivos protegidos con el sistema DRM, y puede que no se reproduzcan archivos codificados con algunas versiones de iTunes®.Apple e iTunes son marcas comerciales de Apple Inc., registradas en EE.UU. y en otros países.
Acerca de WMAWMA es la sigla de Windows Media Audio y corresponde a una tecnología de compresión de sonido desarrollada por Microsoft Corporation. Esta unidad reproduce archivos WMA codificados por Windows Media® Player que lleven la extensión ‘.wma’. Tenga en cuenta que no reproducirá archivos protegidos con el sistema DRM, y puede que no se reproduzcan archivos codificados con algunas versiones de Windows Media® Player.
Bluetooth® ADAPTER para el disfrute inalámbrico de la música
Reproducción inalámbrica de músicaCuando el ADAPTADOR Bluetooth (Modelo de Pioneer Nº AS-BT100 o AS-BT200) está conectado a esta unidad, puede utilizarse un producto equipado con tecnología inalámbrica Bluetooth (teléfono móvil, reproductor de música digital portátil, etc.) para escuchar música de forma inalámbrica. Además, utilizando un transmisor disponible en tiendas con tecnología inalámbrica Bluetooth, puede escuchar música en un dispositivo no equipado con tecnología inalámbrica Bluetooth. El modelo AS-BT100 y AS-BT200 es compatible con la protección de contenidos SCMS-T, de modo que la música también puede disfrutarse en dispositivos equipados con tecnología inalámbrica Bluetooth SCMS-T.
• Es imprescindible que el dispositivo habilitado con tecnología inalámbrica Bluetooth soporte perfiles A2DP.
Importante
• Pioneer no garantiza un funcionamiento y conexión correctos de esta unidad con todos los dispositivos que dispongan de tecnología inalámbrica Bluetooth.
ENTER
ADV SURRAUTO/
DIRECT
MUTE
RETURN
AUDIOPARAMETER
TUNER EDITTOOLS
MASTERVOLUME
iPod CTRLPTY SEARCH
BAND
MENU
HOMEMENUSETUP
DTV/TV
TOPMENU
TUNE
TUNE
PRESETPRES
ET
BD MENU
DIMMER
1
4
7MIDNIGHT
S.RETRIEVER
2
5
8SPEAKERS LEV
LEV
SB CH
DISP
EQ
PHASE
3
6
9
0
CH
CH
CH SELECT
MUTEDTV/ TV
TREBASS
SHIFT
HDD DVD VCR
ALC/STANDARDSTEREO
Dispositivo habilitado de tecnología Bluetooth inalámbrica: teléfono móvil
Dispositivo habilitado de tecnología Bluetooth inalámbrica: Reproductor de música digital
Dispositivo no equipado con tecnología Bluetooth inalámbrica: Reproductor de música digital + transmisor de audio con Bluetooth (de venta en tiendas)
Datos demúsica
Funcionamiento con mando a distancia
ADAPTADOR Bluetooth®
Este receptor
VSX-821_FLXCN_Es.book 25 ページ 2011年3月23日 水曜日 午前11時33分
04
26Es
04 Funcionamiento con mando a distanciaEl mando a distancia suministrado con este equipo le permite reproducir y parar diversos medios, además de realizar otras operaciones.
• Es imprescindible que el dispositivo habilitado con tecnología inalámbrica Bluetooth soporte perfiles AVRCP.
• No pueden garantizarse las operaciones con mando a distancia para todos los dispositivos con tecnología inalámbrica Bluetooth.
Cómo emparejar el Bluetooth ADAPTER y el aparato de tecnología inalámbrica Bluetooth“Debe emparejarlos” antes de que comience la reproducción del contenido de la tecnología inalámbrica Bluetooth utilizando el ADAPTADOR Bluetooth. Asegúrese de realizar el emparejamiento la primera vez que opere con el sistema o cada vez que se eliminen los datos de emparejamiento. “El emparejamiento” es el paso necesario para registrar el aparato con tecnología inalámbrica Bluetooth para permitir las comunicaciones mediante Bluetooth. Para más información, consulte las instrucciones de funcionamiento de su dispositivo con tecnología inalámbrica Bluetooth.
• Se requiere el emparejamiento la primera vez que se utiliza el dispositivo de tecnología inalámbrica Bluetooth y el ADAPTADOR Bluetooth.
• Para permitir la comunicación mediante Bluetooth, el emparejamiento debe realizarse tanto con su sistema como con el dispositivo de tecnología inalámbrica Bluetooth.
• Si el código de seguridad del dispositivo con tecnología inalámbrica Bluetooth es “0000”, no es necesario aplicar la configuración del código de seguridad en el receptor. Pulse ADAPTER para cambiar la entrada del ADAPTER, luego realice la operación de enlace en el dispositivo con tecnología inalámbrica Bluetooth. Si el enlace tiene éxito, no es necesario realizar la siguiente operación de enlace.
• Cuando sólo use el AS-BT200: Si el dispositivo con tecnología inalámbrica Bluetooth soporta SSP (Secure Simple Pairing), no es necesario aplicar la configuración del código de seguridad. Pulse ADAPTER para cambiar la entrada del ADAPTER, luego realice la operación de enlace en el dispositivo con tecnología inalámbrica Bluetooth. Si el enlace tiene éxito, no es necesario realizar la siguiente operación de enlace.
1 Pulse TOP MENU.
2 Pulse ENTER para introducir PAIRING.
3 Seleccione el código PIN que vaya a utilizar de entre 0000/1234/8888 utilizando / y, a continuación, pulse ENTER.PAIRING parpadea.
• También puede utilizar cualquiera de los códigos PIN 0000/1234/8888. Los dispositivos con tecnología inalámbrica Bluetooth que utilizan cualquier otro código PIN no pueden utilizarse con este sistema.
4 Encienda el dispositivo con tecnología inalámbrica Bluetooth que quiera emparejar, colóquelo cerca del sistema y ajústelo al modo de emparejamiento.
5 Compruebe que el ADAPTADOR Bluetooth haya sido detectado por el dispositivo con tecnología inalámbrica Bluetooth.Cuando esté conectado el dispositivo con tecnología inalámbrica Bluetooth:El nombre del dispositivo habilitado con tecnología inalámbrica Bluetooth se mostrará en la pantalla del receptor.
• El sistema sólo puede mostrar caracteres alfanuméricos. Los otros caracteres no se mostrarán correctamente.
Cuando no esté conectado el dispositivo con tecnología inalámbrica Bluetooth:Aparecerá NODEVICE en la pantalla del receptor. En este caso, lleve a cabo la operación de conexión desde el dispositivo con tecnología inalámbrica Bluetooth.
6 Desde la lista de dispositivos con tecnología inalámbrica Bluetooth, seleccione ADAPTADOR Bluetooth e introduzca el código PIN seleccionado en el paso 4.
• En algunos casos, puede que se haga referencia al código PIN como PASSKEY.
Escucha de contenidos musicales de un dispositivo con tecnología inalámbrica Bluetooth con su sistema1 Pulse ADAPTER para cambiar el receptor a la entrada del ADAPTER.
2 Lleve a cabo la operación de conexión desde el dispositivo provisto de tecnología inalámbrica Bluetooth hacia el ADAPTADOR Bluetooth.
• Si el ADAPTADOR Bluetooth no está conectado al ADAPTER PORT, aparecerá NO ADAPTER si el modo de entrada seleccionado es ADAPTER.
3 Comience la reproducción de contenidos musicales almacenados en el dispositivo con tecnología inalámbrica Bluetooth.Los botones del mando a distancia de este receptor se pueden utilizar para la reproducción básica de archivos guardados en el dispositivo de tecnología inalámbrica Bluetooth.
• El dispositivo con tecnología inalámbrica Bluetooth deberá ser compatible con el perfil AVRCP.
• Según el dispositivo de tecnología inalámbrica Bluetooth que utilice, el funcionamiento puede ser distinto de lo que se indica en los botones del mando a distancia.
La marca literal y los logotipos Bluetooth® son marcas registradas propiedad de Bluetooth SIG, Inc., y cualquier uso de dichas marcas por PIONEER CORPORATION se hace bajo licencia. Otras marcas y nombres comerciales son propiedad de sus respectivos propietarios.
MUTEPTY SEARCH
DTV/ TV
TREBASS
VSX-821_FLXCN_Es.book 26 ページ 2011年3月23日 水曜日 午前11時33分
EnglishEspañol
0404
27Es
Recepción de radioEl siguiente procedimiento describe cómo sintonizar emisiones de radio de FM o AM utilizando las funciones de sintonización automática (búsqueda) y sintonización manual (por pasos). Una vez que haya sintonizado una emisora, podrá memorizar la frecuencia para recuperarla más tarde; para más detalles, consulte más abajo Presintonización de emisoras.
1 Pulse TUNER para seleccionar el sintonizador.
2 Si es necesario, utilice BAND para cambiar la banda (FM o AM).Cada pulsación cambia la banda entre FM (estéreo o monoaural) y AM.
3 Sintonice una emisora.Hay tres formas de hacerlo:
Sintonización automática
Para buscar emisoras en la banda actualmente seleccionada, pulse TUNE/ durante aproximadamente un segundo. El receptor comenzará a buscar la siguiente emisora disponible y se detendrá cuando localice una. Repita la operación para buscar otras emisoras.Sintonización manual
Para cambiar la frecuencia un intervalo cada vez, pulse TUNE/.Sintonización rápida
Pulse y mantenga pulsado TUNE/ para que la operación de sintonización se realice a alta velocidad. Suelte el botón en la frecuencia que desea sintonizar.
Mejora del sonido de FMSi los indicadores TUNE o ST no se iluminan al sintonizar una emisora FM porque la señal es débil, ajuste el receptor al modo de recepción mono.
Pulse BAND para seleccionar FM MONO.Esto debería mejorar la calidad del sonido y permitirle disfrutar de la emisión.
Presintonización de emisorasSi escucha una emisora de radio en particular a menudo, puede ser conveniente almacenar la frecuencia de la emisora en el receptor para luego recuperarla fácilmente cada vez que desee escuchar dicha emisora. Esto le evitará tener que sintonizar manualmente la emisora cada vez que desee escucharla. Esta unidad puede memorizar hasta 30 emisoras.
1 Sintonice la emisora que desea memorizar.Para más detalles, consulte Recepción de radio más arriba.
2 Pulse TUNER EDIT.La pantalla muestra PRESET, luego MEM parpadeante y una presintonía.
3 Pulse PRESET/ para seleccionar la presintonía deseada.También se pueden usar los botones numéricos.
4 Pulse ENTER.El número presintonizado deja de parpadear y el receptor guarda la emisora.
Nota
• Si el receptor permanece desconectado de la toma de corriente alterna durante un mes aproximadamente, se perderán las memorias de emisoras y deberán volver a programarse.
• Las estaciones se guardan en estéreo. Cuando la estación se guarda en el modo FM MONO, al recuperarla se muestra como ST.
Cómo sintonizar emisoras memorizadasPara poder utilizar esta función, primero deberá presintonizar algunas emisoras. Consulte Presintonización de emisoras más arriba si aún no lo ha hecho.
Pulse PRESET/ para seleccionar la presintonía deseada.
• También puede utilizar los botones numéricos del mando a distancia para seleccionar la emisora presintonizada.
Asignación de nombres a las emisorasPara una identificación más fácil, puede poner nombre a sus presintonías.
1 Elija la emisora presintonizada a la que desea asignar un nombre.Consulte Cómo sintonizar emisoras memorizadas más arriba para aprender cómo hacerlo.
2 Pulse TUNER EDIT dos veces.El cursor parpadea en la posición del primer carácter, en la pantalla.
3 Introduzca el nombre que desea asignar a esta emisora.Elija un nombre de hasta ocho caracteres.
• Utilice PRESET/ para seleccionar la posición del carácter.
• Utilice TUNE/ para seleccionar los caracteres.• El nombre se almacena cuando se pulsa ENTER.
Sugerencia
• Para borrar el nombre de una emisora, siga los pasos 1 y 2, y pulse ENTER mientras la pantalla está en blanco. Pulse TUNER EDIT mientras la pantalla está en blanco, para mantener el nombre anterior.
• Una vez asignado el nombre a una presintonía, pulse DISP para ver el nombre. Cuando quiera volver a la pantalla de frecuencia, pulse DISP varias veces para mostrar la frecuencia.
Cambio del paso de radiofrecuenciaSi tiene dificultades para sintonizar correctamente las emisoras, es posible que el paso de frecuencia no corresponda a su país/zona. Así es cómo se cambia la configuración:
1 Ponga el receptor en modo de espera.
2 Mientras mantiene pulsado el botón TUNE , pulse el botón STANDBY/ON durante unos dos segundos.
• El paso de sintonización de canal alterna entre 10K STEP y 9K STEP cada vez que ejecute esta acción.
DVR/BDR CD CD-R
ADAPTER iPod USB VIDEO 1
VIDEO 2 SIGNAL SELTUNER
CH
VOL
ENTER
MUTE
RETURN
AUDIOPARAMETER
TUNER EDITTOOLS
MASTERVOLUME
iPod CTRLPTY SEARCH
BAND
MENU
HOMEMENUSETUP
DTV/TV
TOPMENU
TUNE
TUNE
PRESETPRES
ET
BD DVD
INPUT SELECT
SOURCESLEEPTV
CONTROL
TV
INPUT
DVR/BDR CD CD-R
ADAPTER iPod USB VIDEO 1
VIDEO 2 SIGNAL SELTUNER
RECEIVER
CH
VOL
RECEIVER
1
ENTER
2 DISP3
MUTE
RETURN
AUDIOPARAMETER
TUNER EDITTOOLS
MASTERVOLUME
iPod CTRLPTY SEARCH
BAND
MENU
HOMEMENUSETUP
DTV/ TV
TREBASS
TOPMENU
TUNE
TUNE
PRESETPRES
ET
HDD DVD VCR
VSX-821_FLXCN_Es.book 27 ページ 2011年3月23日 水曜日 午前11時33分
05
28Es
05 Capítulo 5:Escuchar su sistema
Elección del modo de escuchaEste receptor ofrece varios modos de escucha para adaptarse a la reproducción de distintos formatos de audio. Elija uno según su entorno de altavoces o la fuente.
Mientras escuche una fuente, pulse el botón de modo de escucha varias veces para seleccionar el modo de escucha que desee.
• El modo de escucha aparece en la pantalla del panel frontal.
Importante
• Los modos de escucha y muchas funciones descritas en esta sección pueden no estar disponibles dependiendo de la fuente actual, los ajustes y el estado del receptor.
Reproducción automática
La opción de escucha más simple y directa es la función AUTO SURROUND. Con esta función, el receptor detecta automáticamente el tipo de fuente que se está reproduciendo y selecciona el modo apropiado para dicha fuente: reproducción multicanal o estéreo.
• Pulse este botón AUTO/DIRECT repetidamente hasta que AUTO SURROUND se muestre brevemente en la pantalla (a continuación mostrará el formato de descodificación o reproducción). Compruebe los indicadores de formato digital en la pantalla para ver cómo se está procesando la fuente.
Nota
• Los formatos de sonido envolvente estéreo (matriz) se descodifican con NEO:6 CINEMA o DOLBY PLIIx MOVIE (para más detalles sobre estos formatos de descodificación, consulte más abajo Reproducción con sonido envolvente).
• Mientras escuche la entrada ADAPTER, la función S.R AIR se selecciona automáticamente (para más detalles sobre estos formatos de descodificación, consulte Uso de Advanced surround en la página 29).
Reproducción con sonido envolvente
Este receptor permite escuchar cualquier fuente en modo de sonido envolvente. Sin embargo, las opciones disponibles dependerán de la configuración de los altavoces y del tipo de fuente que esté escuchando.
• Si la fuente es Dolby Digital, DTS o Dolby Surround codificado, el formato de descodificación apropiado será seleccionado automáticamente y se visualizará en la pantalla.
Cuando selecciona STEREO ALC (modo estéreo Auto Level Control), esta unidad ecualiza los niveles de sonido de reproducción si cada uno de los niveles de sonido varía con la fuente de música grabada en un reproductor de audio portátil.Cuando seleccione STEREO, escuchará la fuente solamente a través de los altavoces delanteros izquierdo y derecho (y posiblemente a través del subwoofer, dependiendo de la configuración de los altavoces). Las fuentes multicanal Dolby Digital y DTS se mezclan a estéreo.Los siguientes modos ofrecen sonido envolvente básico para fuentes estéreo y multicanal.Notas explicativasNo: No conectado / Sí: Conectado / Dos: Hay dos altavoces conectados / – : Tanto si está conectado como si no
a. Si el procesamiento de canal trasero envolvente (página 30) está desactivado, o los altavoces traseros envolventes están ajustados a NO, DOLBY PLIIx se convierte en DOLBY PLII (sonido de 5.1 canales).
b. Puede ajustar los efectos de C.WIDTH, DIMEN., y PNRM. (consulte Ajuste de las opciones de Audio en la página 31).
c. También puede ajustar el efecto H.GAIN (consulte Ajuste de las opciones de Audio en la página 31).
VIDEO 2 SIGNAL SELTUNER
ADV SURRAUTO/
DIRECT
VOL
AUDIOPARAMETER
TUNER EDITTOOLS
MASTERVOLUME
BD MENUALC/STANDARDSTEREO
iPod iPhone iPadDIRECT CONTROLSTEREO
ADVANCEDSURROUND
DISPLAY BAND TUNER EDIT TUNE
ALC/STANDARD SURR
AUTO SURROUND/STREAM DIRECT
AUTO/DIRECT
AUTO SURROUND/STREAM DIRECT
ALC/STANDARD
ALC/STANDARD SURR
Tipo de modos envolventes
Fuentes adecuadas
Alt
avo
ces
de
son
ido
en
volv
ente
tra
sero
Alt
avo
ces
del
ante
ros
con
efe
cto
s d
e al
tura
Fuentes de dos canales
STEREO ALC Consulte más arriba. – –
DOLBY PLIIx MOVIE Película Sía No
DOLBY PLII MOVIE No –
DOLBY PLIIx MUSICb Música Sía No
DOLBY PLII MUSICb No –
DOLBY PLIIx GAME Videojuegos Sía No
DOLBY PLII GAME No –
DOLBY PLIIz HEIGHTc Película/Música No Sí
NEO:6 CINEMAd Película – –
NEO:6 MUSICd Música – –
DOLBY PRO LOGIC Películas antiguas – –
Descodificación directae Sin efectos adicionales No –
STEREOf Consulte más arriba. – –
Fuentes multicanal
STEREO ALC Consulte más arriba. – –
DOLBY PLIIx MOVIE Película Dosa No
DOLBY PLII MOVIE No –
DOLBY PLIIx MUSICb Música Dosa No
DOLBY PLII MUSICb No –
DOLBY DIGITAL EX Película/Música Sí No
DTS-ES Película/Música Sí No
DTS NEO:6 Película/Música Sí No
DOLBY PLIIz HEIGHT Película/Música No Sí
Descodificación directae Sin efectos adicionales – –
STEREOf Consulte más arriba. – –
VSX-821_FLXCN_Es.book 28 ページ 2011年3月23日 水曜日 午前11時33分
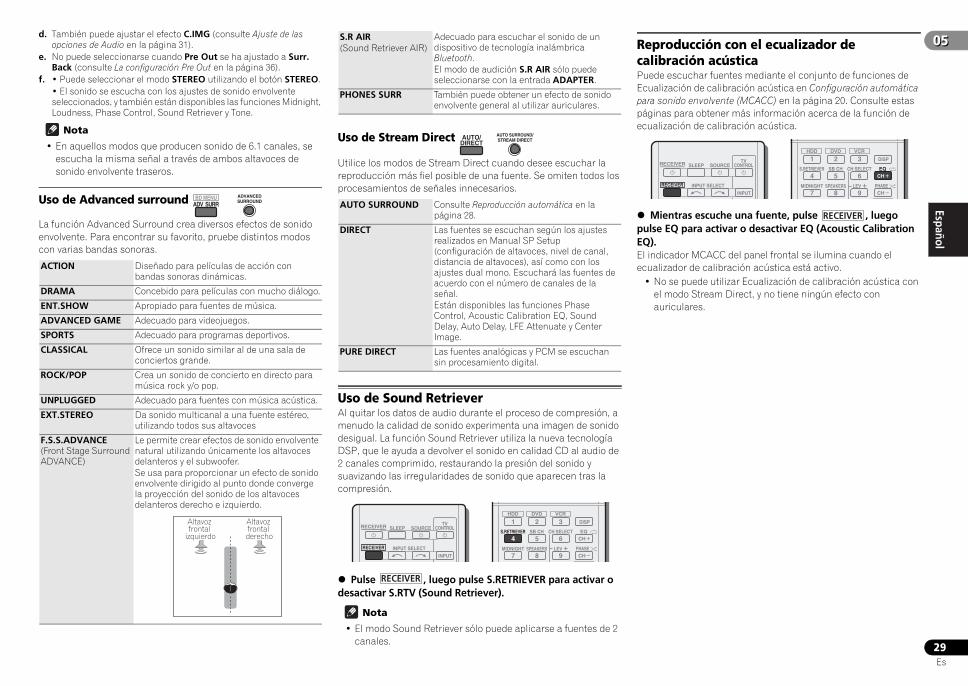
EnglishEspañol
0505
29Es
d. También puede ajustar el efecto C.IMG (consulte Ajuste de las opciones de Audio en la página 31).
e. No puede seleccionarse cuando Pre Out se ha ajustado a Surr. Back (consulte La configuración Pre Out en la página 36).
f. • Puede seleccionar el modo STEREO utilizando el botón STEREO.• El sonido se escucha con los ajustes de sonido envolvente seleccionados, y también están disponibles las funciones Midnight, Loudness, Phase Control, Sound Retriever y Tone.
Nota
• En aquellos modos que producen sonido de 6.1 canales, se escucha la misma señal a través de ambos altavoces de sonido envolvente traseros.
Uso de Advanced surround
La función Advanced Surround crea diversos efectos de sonido envolvente. Para encontrar su favorito, pruebe distintos modos con varias bandas sonoras.
Uso de Stream Direct
Utilice los modos de Stream Direct cuando desee escuchar la reproducción más fiel posible de una fuente. Se omiten todos los procesamientos de señales innecesarios.
Uso de Sound RetrieverAl quitar los datos de audio durante el proceso de compresión, a menudo la calidad de sonido experimenta una imagen de sonido desigual. La función Sound Retriever utiliza la nueva tecnología DSP, que le ayuda a devolver el sonido en calidad CD al audio de 2 canales comprimido, restaurando la presión del sonido y suavizando las irregularidades de sonido que aparecen tras la compresión.
Pulse , luego pulse S.RETRIEVER para activar o desactivar S.RTV (Sound Retriever).
Nota
• El modo Sound Retriever sólo puede aplicarse a fuentes de 2 canales.
Reproducción con el ecualizador de calibración acústicaPuede escuchar fuentes mediante el conjunto de funciones de Ecualización de calibración acústica en Configuración automática para sonido envolvente (MCACC) en la página 20. Consulte estas páginas para obtener más información acerca de la función de ecualización de calibración acústica.
Mientras escuche una fuente, pulse , luego pulse EQ para activar o desactivar EQ (Acoustic Calibration EQ).El indicador MCACC del panel frontal se ilumina cuando el ecualizador de calibración acústica está activo.
• No se puede utilizar Ecualización de calibración acústica con el modo Stream Direct, y no tiene ningún efecto con auriculares.
ACTION Diseñado para películas de acción con bandas sonoras dinámicas.
DRAMA Concebido para películas con mucho diálogo.
ENT.SHOW Apropiado para fuentes de música.
ADVANCED GAME Adecuado para videojuegos.
SPORTS Adecuado para programas deportivos.
CLASSICAL Ofrece un sonido similar al de una sala de conciertos grande.
ROCK/POP Crea un sonido de concierto en directo para música rock y/o pop.
UNPLUGGED Adecuado para fuentes con música acústica.
EXT.STEREO Da sonido multicanal a una fuente estéreo, utilizando todos sus altavoces
F.S.S.ADVANCE (Front Stage Surround ADVANCE)
Le permite crear efectos de sonido envolvente natural utilizando únicamente los altavoces delanteros y el subwoofer.Se usa para proporcionar un efecto de sonido envolvente dirigido al punto donde converge la proyección del sonido de los altavoces delanteros derecho e izquierdo.
BD MENUADV SURR
ADVANCEDSURROUND
Altavoz frontal
izquierdo
Altavoz frontal derecho
S.R AIR (Sound Retriever AIR)
Adecuado para escuchar el sonido de un dispositivo de tecnología inalámbrica Bluetooth.El modo de audición S.R AIR sólo puede seleccionarse con la entrada ADAPTER.
PHONES SURR También puede obtener un efecto de sonido envolvente general al utilizar auriculares.
AUTO SURROUND Consulte Reproducción automática en la página 28.
DIRECT Las fuentes se escuchan según los ajustes realizados en Manual SP Setup (configuración de altavoces, nivel de canal, distancia de altavoces), así como con los ajustes dual mono. Escuchará las fuentes de acuerdo con el número de canales de la señal.Están disponibles las funciones Phase Control, Acoustic Calibration EQ, Sound Delay, Auto Delay, LFE Attenuate y Center Image.
PURE DIRECT Las fuentes analógicas y PCM se escuchan sin procesamiento digital.
AUTO/DIRECT
AUTO SURROUND/STREAM DIRECT
INPUT SELECT
SOURCESLEEPTV
CONTROL
INPUT
RECEIVER
RECEIVER
1
4
7MIDNIGHT
S.RETRIEVER
2
5
8SPEAKERS LEV
SB CH
DISP
EQ
PHASE
3
6
9
CH
CH
CH SELECT
S
HDD DVD VCR
RECEIVER
INPUT SELECT
SOURCESLEEPTV
CONTROL
INPUT
RECEIVER
RECEIVER
1
4
7MIDNIGHT
S.RETRIEVER
2
5
8SPEAKERS LEV
SB CH
DISP
EQ
PHASE
3
6
9
CH
CH
CH SELECT
HDD DVD VCR
RECEIVER
VSX-821_FLXCN_Es.book 29 ページ 2011年3月23日 水曜日 午前11時33分
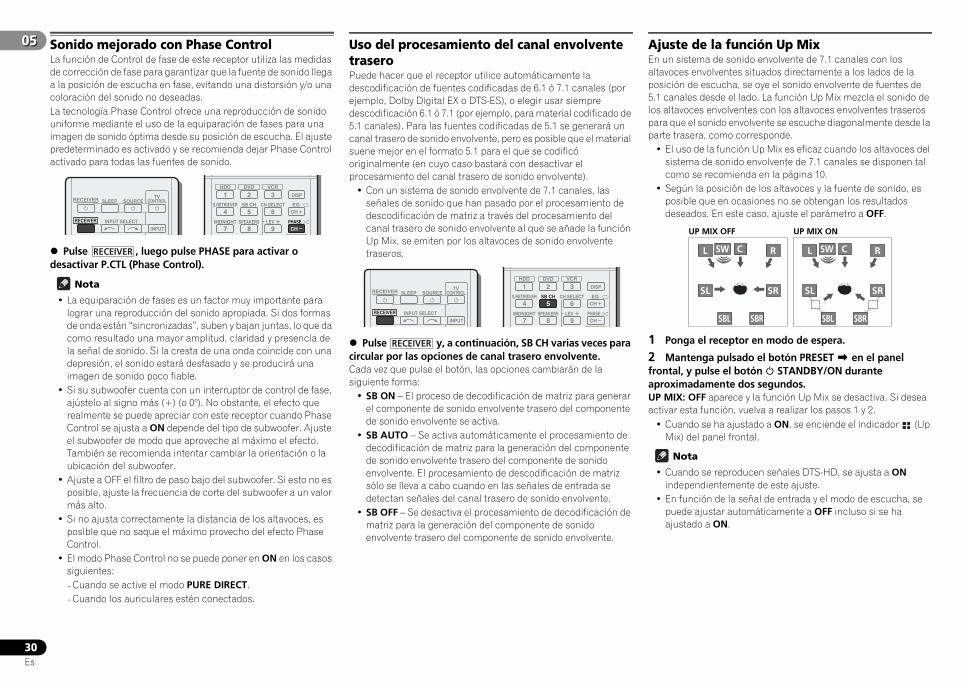
05
30Es
05 Sonido mejorado con Phase ControlLa función de Control de fase de este receptor utiliza las medidas de corrección de fase para garantizar que la fuente de sonido llega a la posición de escucha en fase, evitando una distorsión y/o una coloración del sonido no deseadas.La tecnología Phase Control ofrece una reproducción de sonido uniforme mediante el uso de la equiparación de fases para una imagen de sonido óptima desde su posición de escucha. El ajuste predeterminado es activado y se recomienda dejar Phase Control activado para todas las fuentes de sonido.
Pulse , luego pulse PHASE para activar o desactivar P.CTL (Phase Control).
Nota
• La equiparación de fases es un factor muy importante para lograr una reproducción del sonido apropiada. Si dos formas de onda están “sincronizadas”, suben y bajan juntas, lo que da como resultado una mayor amplitud, claridad y presencia de la señal de sonido. Si la cresta de una onda coincide con una depresión, el sonido estará desfasado y se producirá una imagen de sonido poco fiable.
• Si su subwoofer cuenta con un interruptor de control de fase, ajústelo al signo más (+) (o 0°). No obstante, el efecto que realmente se puede apreciar con este receptor cuando Phase Control se ajusta a ON depende del tipo de subwoofer. Ajuste el subwoofer de modo que aproveche al máximo el efecto. También se recomienda intentar cambiar la orientación o la ubicación del subwoofer.
• Ajuste a OFF el filtro de paso bajo del subwoofer. Si esto no es posible, ajuste la frecuencia de corte del subwoofer a un valor más alto.
• Si no ajusta correctamente la distancia de los altavoces, es posible que no saque el máximo provecho del efecto Phase Control.
• El modo Phase Control no se puede poner en ON en los casos siguientes:-Cuando se active el modo PURE DIRECT.-Cuando los auriculares estén conectados.
Uso del procesamiento del canal envolvente traseroPuede hacer que el receptor utilice automáticamente la descodificación de fuentes codificadas de 6.1 ó 7.1 canales (por ejemplo, Dolby Digital EX o DTS-ES), o elegir usar siempre descodificación 6.1 ó 7.1 (por ejemplo, para material codificado de 5.1 canales). Para las fuentes codificadas de 5.1 se generará un canal trasero de sonido envolvente, pero es posible que el material suene mejor en el formato 5.1 para el que se codificó originalmente (en cuyo caso bastará con desactivar el procesamiento del canal trasero de sonido envolvente).
• Con un sistema de sonido envolvente de 7.1 canales, las señales de sonido que han pasado por el procesamiento de descodificación de matriz a través del procesamiento del canal trasero de sonido envolvente al que se añade la función Up Mix, se emiten por los altavoces de sonido envolvente traseros.
Pulse y, a continuación, SB CH varias veces para circular por las opciones de canal trasero envolvente.Cada vez que pulse el botón, las opciones cambiarán de la siguiente forma:
• SB ON – El proceso de decodificación de matriz para generar el componente de sonido envolvente trasero del componente de sonido envolvente se activa.
• SB AUTO – Se activa automáticamente el procesamiento de decodificación de matriz para la generación del componente de sonido envolvente trasero del componente de sonido envolvente. El procesamiento de descodificación de matriz sólo se lleva a cabo cuando en las señales de entrada se detectan señales del canal trasero de sonido envolvente.
• SB OFF – Se desactiva el procesamiento de decodificación de matriz para la generación del componente de sonido envolvente trasero del componente de sonido envolvente.
Ajuste de la función Up MixEn un sistema de sonido envolvente de 7.1 canales con los altavoces envolventes situados directamente a los lados de la posición de escucha, se oye el sonido envolvente de fuentes de 5.1 canales desde el lado. La función Up Mix mezcla el sonido de los altavoces envolventes con los altavoces envolventes traseros para que el sonido envolvente se escuche diagonalmente desde la parte trasera, como corresponde.
• El uso de la función Up Mix es eficaz cuando los altavoces del sistema de sonido envolvente de 7.1 canales se disponen tal como se recomienda en la página 10.
• Según la posición de los altavoces y la fuente de sonido, es posible que en ocasiones no se obtengan los resultados deseados. En este caso, ajuste el parámetro a OFF.
1 Ponga el receptor en modo de espera.
2 Mantenga pulsado el botón PRESET en el panel frontal, y pulse el botón STANDBY/ON durante aproximadamente dos segundos.UP MIX: OFF aparece y la función Up Mix se desactiva. Si desea activar esta función, vuelva a realizar los pasos 1 y 2.
• Cuando se ha ajustado a ON, se enciende el indicador (Up Mix) del panel frontal.
Nota
• Cuando se reproducen señales DTS-HD, se ajusta a ON independientemente de este ajuste.
• En función de la señal de entrada y el modo de escucha, se puede ajustar automáticamente a OFF incluso si se ha ajustado a ON.
INPUT SELECT
SOURCESLEEPTV
CONTROL
INPUT
RECEIVER
RECEIVER
1
4
7MIDNIGHT
S.RETRIEVER
2
5
8SPEAKERS LEV
SB CH
DISP
EQ
PHASE
3
6
9
CH
CH
CH SELECT
HDD DVD VCR
RECEIVER
INPUT SELECT
SOURCESLEEPTV
CONTROL
INPUT
RECEIVER
RECEIVER
1
4
7MIDNIGHT
S.RETRIEVER
2
5
8SPEAKERS LEV
SB CH
DISP
EQ
PHASE
3
6
9
CH
CH
CH SELECT
S
HDD DVD VCR
RECEIVER
CSWL R
SL SR
SBL SBR SBL SBR
CSWL R
SL SR
UP MIX OFF UP MIX ON
VSX-821_FLXCN_Es.book 30 ページ 2011年3月23日 水曜日 午前11時33分

EnglishEspañol
0505
31Es
Ajuste de las opciones de AudioExisten varios ajustes de sonido adicionales que puede realizar a través del menú AUDIO PARAMETER. Los valores predeterminados, si no se indican, aparecen en negrita.
Importante
• Tenga en cuenta que si un ajuste no aparece en el menú AUDIO PARAMETER, no está disponible debido a la fuente, los ajustes y el estado actuales del receptor.
1 Pulse y luego pulse botón AUDIO PARAMETER.
2 Utilice / para seleccionar el ajuste que desea modificar.Según el estado/modo del receptor, es posible que algunas opciones no estén disponibles. En la siguiente tabla se facilitan algunas observaciones al respecto.
3 Utilice / para realizar el ajuste necesario.Consulte la tabla siguiente para conocer las opciones disponibles de cada ajuste.
4 Pulse RETURN para confirmar la selección y salir del menú.
a. Puede cambiar las opciones MIDNIGHT/LOUDNESS en cualquier momento con el botón MIDNIGHT.
b. Puede modificar la función Sound Retriever en cualquier momento con el botón S.RETRIEVER.
Ajuste/Qué hace Opciones
EQ (Ecualizador de calibración acústica)Activa/desactiva el efecto de la Ecualización de calibración acústica.
ON
OFF
S.DELAY (Retardo de sonido)Algunos monitores muestran la imagen con un leve retardo, lo que afecta a la sincronización entre la imagen y el sonido. Si introduce un pequeño retardo, puede conseguir que el sonido coincida con la presentación del vídeo.
0,0 a 9,0 (cuadros)1 segundo = 25 cuadros (PAL)/
30 cuadros (NTSC)Predeterminado: 0.0
MIDNIGHT/LOUDNESSa
MIDNIGHT le permite escuchar un sonido envolvente eficaz con películas a bajo volumen.LOUDNESS se utiliza para conseguir un buen nivel de bajos y agudos con música a bajo volumen.
M/L OFF
MIDNIGHT
LOUDNESS
BD DVD
INPUT SELECT
SOURCESLEEPTV
CONTROL
TV
INPUT
RECEIVER
RECEIVER ENTER
RETURN
AUDIOPARAMETER
TUNER EDITTOOLS
MASTERVOLUME
iPod CTRLC GO
BAND
MENU
HOMEMENUSETUP
TOPMENU
TUNE
TUNE
PRESETPRES
ET
RECEIVER
S.RTV (Recuperador de sonido)b
Al quitar los datos de sonido durante el proceso de compresión WMA/MP3,c a menudo la calidad de sonido experimenta una imagen de sonido desigual. La función Sound Retriever utiliza la nueva tecnología DSP, que le ayuda a devolver el sonido en calidad CD al audio de 2 canales comprimido, restaurando la presión del sonido y suavizando las irregularidades de sonido que aparecen tras la compresión.
OFFd
ON
DUAL MONOe
Especifica cómo deben reproducirse las pistas de sonido monoaurales duales codificadas en Dolby Digital.
CH1 – Sólo se escucha el canal 1
CH2 – Sólo se escucha el canal 2
CH1 CH2 – Se escuchan ambos canales por los
altavoces frontales
F.PCM (Fixed PCM)Esto resulta útil si observa que se produce un ligero retardo antes de que OFF reconozca la señal PCM en un CD, por ejemplo.Cuando se selecciona ON, puede que se emita sonido durante la reproducción de fuentes que no sean PCM. Seleccione otra señal de entrada si esto constituye un problema.
OFF
ON
DRC (Control de margen dinámico)Ajusta el nivel del margen dinámico para pistas de sonido optimizadas para Dolby Digital, DTS, Dolby Digital Plus, Dolby TrueHD, DTS-HD y DTS-HD Master Audio (es posible que tenga que utilizar esta función al escuchar sonido envolvente con el volumen bajo).
AUTOf
MAX
MID
OFF
LFE ATT (Atenuación de LFE)Algunas fuentes de audio Dolby Digital y DTS incluyen tonos graves ultrabajos. Ajuste el atenuador LFE según sea necesario para evitar que los tonos graves ultrabajos distorsionen el sonido de los altavoces.El LFE no queda limitado al ajustarlo a 0 dB, que es el valor recomendado. Cuando se ajusta a –15 dB, el LFE queda limitado por el grado respectivo. Cuando se selecciona OFF, no sale sonido por el canal de LFE.
0 (0 dB)
5 (–5 dB)
10 (–10 dB)
15 (–15 dB)
20 (–20 dB)
** (OFF)
SACD G. (Ganancia SACD)g
Realza el detalle de los SACD maximizando la gama dinámica (durante el proceso digital).
0 (0 dB)
+6 (+6 dB)
Ajuste/Qué hace Opciones
HDMI (Audio HDMI)Especifica la dirección de la señal de audio HDMI que emite este receptor (AMP) o pasa por él hasta llegar a un televisor (THRU). Cuando se selecciona THRU, el receptor no emite ningún sonido.
AMP
THRU
A.DLY (Retardo automático)h
Esta función corrige automáticamente el retardo de sonido a vídeo entre componentes conectados con un cable HDMI. El tiempo de retardo de sonido se ajusta en función del estado operativo de la pantalla conectada con un cable HDMI. El tiempo de retardo de vídeo se ajusta automáticamente según el tiempo de retardo de audio.
OFF
ON
C.WIDTH (Amplitud central)i
(sólo aplicable al utilizar un altavoz central)Extiende el canal central entre los altavoces frontales derecho e izquierdo, haciendo que el sonido sea más amplio (ajustes más altos) o más estrecho (ajustes más bajos).
0 a 7Predeterminado: 3
DIMEN (Dimensiones)i
Ajusta el balance de sonido envolvente desde el frente hasta la parte posterior, haciendo que el sonido sea más distante (ajustes negativos) o más hacia delante (ajustes positivos).
–3 a +3Predeterminado: 0
PNRM. (Panorama)i
Extiende la imagen de estéreo frontal para incluir los altavoces estéreos, a fin de obtener un efecto “envolvente”.
OFF
ON
C.IMG (Imagen central)j
(sólo aplicable al utilizar un altavoz central)Ajusta la imagen central para crear un efecto estéreo más amplio con voces. Ajusta el efecto de 0 (todos los canales centrales se envían a los altavoces central, derecho e izquierdo) a 10 (el canal central se envía únicamente al altavoz central).
0 a 10 Predeterminado: 3
(NEO:6 MUSIC),10 (NEO:6 CINEMA)
H.GAIN (Ganancia efectos de altura)Ajusta la salida desde el altavoz delantero con efectos de altura cuando la escucha se realiza en el modo DOLBY PLIIz HEIGHT. Si se ajusta a H, el sonido procedente de la parte superior será más intenso.
L (Bajo)
M (Medio)
H (Alto)
Ajuste/Qué hace Opciones
VSX-821_FLXCN_Es.book 31 ページ 2011年3月23日 水曜日 午前11時33分
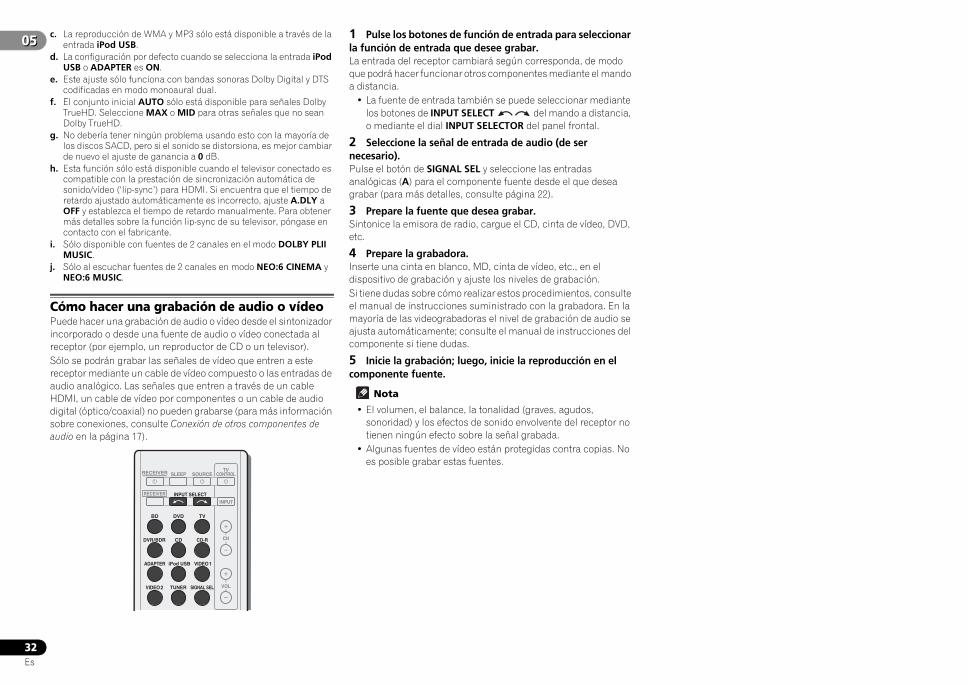
05
32Es
05 c. La reproducción de WMA y MP3 sólo está disponible a través de la entrada iPod USB.
d. La configuración por defecto cuando se selecciona la entrada iPod USB o ADAPTER es ON.
e. Este ajuste sólo funciona con bandas sonoras Dolby Digital y DTS codificadas en modo monoaural dual.
f. El conjunto inicial AUTO sólo está disponible para señales Dolby TrueHD. Seleccione MAX o MID para otras señales que no sean Dolby TrueHD.
g. No debería tener ningún problema usando esto con la mayoría de los discos SACD, pero si el sonido se distorsiona, es mejor cambiar de nuevo el ajuste de ganancia a 0 dB.
h. Esta función sólo está disponible cuando el televisor conectado es compatible con la prestación de sincronización automática de sonido/vídeo (‘lip-sync’) para HDMI. Si encuentra que el tiempo de retardo ajustado automáticamente es incorrecto, ajuste A.DLY a OFF y establezca el tiempo de retardo manualmente. Para obtener más detalles sobre la función lip-sync de su televisor, póngase en contacto con el fabricante.
i. Sólo disponible con fuentes de 2 canales en el modo DOLBY PLII MUSIC.
j. Sólo al escuchar fuentes de 2 canales en modo NEO:6 CINEMA y NEO:6 MUSIC.
Cómo hacer una grabación de audio o vídeoPuede hacer una grabación de audio o vídeo desde el sintonizador incorporado o desde una fuente de audio o vídeo conectada al receptor (por ejemplo, un reproductor de CD o un televisor). Sólo se podrán grabar las señales de vídeo que entren a este receptor mediante un cable de vídeo compuesto o las entradas de audio analógico. Las señales que entren a través de un cable HDMI, un cable de vídeo por componentes o un cable de audio digital (óptico/coaxial) no pueden grabarse (para más información sobre conexiones, consulte Conexión de otros componentes de audio en la página 17).
1 Pulse los botones de función de entrada para seleccionar la función de entrada que desee grabar.La entrada del receptor cambiará según corresponda, de modo que podrá hacer funcionar otros componentes mediante el mando a distancia.
• La fuente de entrada también se puede seleccionar mediante los botones de INPUT SELECT del mando a distancia, o mediante el dial INPUT SELECTOR del panel frontal.
2 Seleccione la señal de entrada de audio (de ser necesario).Pulse el botón de SIGNAL SEL y seleccione las entradas analógicas (A) para el componente fuente desde el que desea grabar (para más detalles, consulte página 22).
3 Prepare la fuente que desea grabar.Sintonice la emisora de radio, cargue el CD, cinta de vídeo, DVD, etc.
4 Prepare la grabadora.Inserte una cinta en blanco, MD, cinta de vídeo, etc., en el dispositivo de grabación y ajuste los niveles de grabación.Si tiene dudas sobre cómo realizar estos procedimientos, consulte el manual de instrucciones suministrado con la grabadora. En la mayoría de las videograbadoras el nivel de grabación de audio se ajusta automáticamente; consulte el manual de instrucciones del componente si tiene dudas.
5 Inicie la grabación; luego, inicie la reproducción en el componente fuente.
Nota
• El volumen, el balance, la tonalidad (graves, agudos, sonoridad) y los efectos de sonido envolvente del receptor no tienen ningún efecto sobre la señal grabada.
• Algunas fuentes de vídeo están protegidas contra copias. No es posible grabar estas fuentes.
BD DVD
INPUT SELECT
SOURCESLEEPTV
CONTROL
TV
INPUT
DVR/BDR CD CD-R
ADAPTER iPod USB VIDEO 1
VIDEO 2 SIGNAL SELTUNER
RECEIVER
CH
VOL
RECEIVER
VSX-821_FLXCN_Es.book 32 ページ 2011年3月23日 水曜日 午前11時33分

EnglishEspañol
0606
33Es
Capítulo 6:El menú System Setup
Uso del menú System SetupEn la siguiente sección se explica de qué modo realizar ajustes detallados para especificar cómo se está usando el receptor, y cómo adaptar un sistema de altavoces específico a sus preferencias.
Importante
• La información en pantalla (OSD) no aparecerá si ha realizado la conexión al televisor utilizando la salida HDMI. Para la instalación del sistema, utilice las conexiones de vídeo de componentes o de vídeo compuesto.
• Si tiene unos auriculares conectados al receptor, desconéctelos.
• No se puede utilizar el menú System Setup si la entrada iPod USB está seleccionada.
1 Encienda el receptor y su televisor.Pulse RECEIVER para encender el amplificador y el televisor.
2 Conecte la entrada de TV a la entrada que conecta este receptor con el TV a través del correspondiente cable compuesto o por componentes.
3 Pulse y luego pulse SETUP.El menú de System Setup se muestra en el TV. Utilice /// y ENTER en el mando a distancia para desplazarse por las pantallas y seleccionar los elementos del menú. Pulse RETURN para confirmar las opciones seleccionadas y salir del menú actual.
• Pulse SETUP en cualquier momento para salir del menú System Setup.
4 Seleccione la opción que desea ajustar.
• Auto MCACC – Con esta opción, el sonido envolvente se configura automáticamente, de manera rápida y efectiva (consulte Configuración automática para sonido envolvente (MCACC) en la página 20).
• Manual SP Setup-Speaker Setting – Especifica el tamaño y el número de
altavoces conectados (vea más abajo).-Crossover Network – Para especificar qué frecuencias se
enviarán al subwoofer (página 34).-Channel Level – Ajusta el balance general del sistema de
altavoces (página 34).-Speaker Distance – Especifica la distancia de los altavoces
respecto de la posición de audición (página 35).• Input Assign – Especifique qué ha conectado a las entradas
de vídeo de componentes (consulte El menú Input Assign en la página 35).
• Pre Out Setting – Especifica cómo se usan las salidas PRE OUT SURR BACK/FRONT HEIGHT (consulte La configuración Pre Out en la página 36).
• HDMI Setup – Ajusta operaciones sincronizadas cuando está conectado a un dispositivo/televisor que soporta el Control con función HDMI (consulte HDMI Setup en la página 37).
• Auto Power Down – Ajuste para apagar automáticamente el aparato cuando el receptor no ha funcionado durante varias horas (consulte El menú Auto Power Down en la página 36).
• FL Demo Mode – Ajusta la pantalla demo en la pantalla del panel frontal (consulte El menú FL Demo Mode en la página 36).
Configuración manual de los altavocesEste receptor permite hacer ajustes detallados para optimizar el sonido envolvente. Sólo es necesario realizar estos ajustes una vez (a menos que se cambie la ubicación del sistema de altavoces o se agreguen nuevos altavoces).Estos ajustes son para el ajuste de precisión del sistema, pero si se siente satisfecho con los ajustes realizados en Configuración automática para sonido envolvente (MCACC) en la página 20, no será necesario que realice todos estos ajustes.
PRECAUCIÓN
• Los tonos de prueba utilizados en System Setup se emiten a un volumen alto.
Importante
• Según la Configuración Pre Out Setting, habrá diferencias en las características de los altavoces, que podrán ajustarse. La pantalla OSD para estas instrucciones operativas constituye un ejemplo del ajuste de Pre Out Setting a Surr. Back.
Ajuste de los altavocesSeleccione esta opción para especificar la configuración de sus altavoces (tamaño, número de altavoces). Le recomendamos asegurarse de que los ajustes realizados en Configuración automática para sonido envolvente (MCACC) en la página 20 son correctos.
1 Seleccione ‘Manual SP Setup’ desde el menú System Setup.
2 Seleccione ‘Speaker Setting’ desde el menú Manual SP Setup.
3 Seleccione el conjunto de altavoces que desea ajustar y, a continuación, seleccione el tamaño de altavoz.Utilice / para seleccionar el tamaño (y número) de cada uno de los siguientes altavoces:
• Front – Seleccione LARGE si los altavoces delanteros reproducen las frecuencias bajas de manera efectiva, o si no ha conectado un subwoofer. Seleccione SMALL para enviar las frecuencias bajas al subwoofer.
BD DVD
INPUT SELECT
SOURCESLEEPTV
CONTROL
TV
INPUT
RECEIVER
RECEIVERENTER
MUTE
RETURN
PARAMETER TOOLS VOLUME
iPod CTRLPTY SEARCH
BAND
MENU
HOMEMENUSETUP
DTV/ TV
TOPMENU
TUNE
TUNE
PRESETPRES
ET
RECEIVER
System Setup
1.Auto MCACC2.Manual SP Setup3.Input Assign4.Pre Out Setting5.HDMI Setup6.Auto Power Down7.FL Demo Mode
Return
2.Manual SP Setup
Return
a.Speaker Settingb.Crossover Networkc.Channel Leveld.Speaker Distance
2a.Speaker Setting
Front CenterSurrSurr. BackSubwoofer:
Return
[ SMALL ][ SMALL ][ NO ] YES
SMALL
VSX-821_FLXCN_Es.book 33 ページ 2011年3月23日 水曜日 午前11時33分

06
34Es
06 • Center – Seleccione LARGE si el altavoz central reproduce las frecuencias bajas de manera efectiva; seleccione SMALL para enviar las frecuencias bajas a otros altavoces o al subwoofer. Si no ha conectado un altavoz central, seleccione NO (el canal central se transmite a los demás altavoces).
• Front Height – Seleccione LARGE si los altavoces delanteros con efectos de altura reproducen las frecuencias bajas de manera efectiva. Seleccione SMALL para enviar las frecuencias bajas a los otros altavoces o al subwoofer. Si no ha conectado altavoces delanteros con efectos de altura, seleccione NO.- Sólo puede ajustar la configuración Front Height cuando
Pre Out Setting se ha ajustado a Height.• Surr – Seleccione LARGE si sus altavoces de sonido
envolvente traseros reproducen las frecuencias bajas de manera efectiva. Seleccione SMALL para enviar las frecuencias bajas a los otros altavoces o al subwoofer. Si no ha conectado altavoces de sonido envolvente, seleccione NO (el sonido de los canales de sonido envolvente se deriva a los otros altavoces).
• Surr. Back – Seleccione el número de altavoces de sonido envolvente traseros de los que dispone (uno, dos o ninguno). Seleccione LARGE si los altavoces traseros de sonido envolvente reproducen frecuencias de graves de forma eficaz. Seleccione SMALL para enviar las frecuencias bajas a los otros altavoces o al subwoofer. Si no ha conectado altavoces envolventes traseros, seleccione NO.- Sólo puede ajustar la configuración Surr. Back cuando Pre
Out Setting se ha ajustado a Surr. Back.- Si sólo selecciona un altavoz trasero de sonido envolvente,
asegúrese de que el amplificador adicional esté conectado al terminal PRE OUT L (Single).
• Subwoofer – Las señales LFE y las frecuencias bajas de canales ajustados en SMALL son emitidas desde el subwoofer cuando se selecciona la opción YES (véanse las notas siguientes). Seleccione la opción PLUS si desea que el subwoofer emita graves de forma continua o si desea graves más profundos (en este caso, las frecuencias bajas que normalmente son emitidas desde los altavoces delanteros y el altavoz central también son dirigidas al subwoofer). Si no ha conectado un subwoofer, seleccione NO (las frecuencias bajas son emitidas desde otros altavoces).
4 Cuando termine, pulse RETURN.Volverá al menú Manual SP Setup.
Nota
• Si selecciona SMALL para los altavoces delanteros, el subwoofer se ajustará automáticamente a YES. Además, los altavoces central, envolvente, trasero de sonido envolvente y delantero con efecto de altura no pueden ajustarse a LARGE si los altavoces delanteros están ajustados en SMALL. En este caso, todas las frecuencias bajas son enviadas al subwoofer.
• Si los altavoces envolventes están ajustados a NO, los altavoces envolventes traseros se ajustarán automáticamente a NO.
• Si tiene un subwoofer y desea obtener un sonido rico en graves, puede parecer lógico seleccionar la opción LARGE para los altavoces delanteros y PLUS para el subwoofer. Sin embargo, esta combinación puede que no proporcione los mejores resultados. Dependiendo de la ubicación de los altavoces en la habitación, estos ajustes pueden producir una disminución de la cantidad de graves debido a cancelaciones de las frecuencias bajas. Si esto sucediera, intente cambiar la posición o la dirección de los altavoces. Si no obtiene los resultados que desea, escuche la respuesta de graves con los ajustes PLUS y YES o con los altavoces delanteros ajustados en LARGE y SMALL, y permita que sus oídos determinen qué combinación suena mejor. Si tiene problemas, la mejor forma de resolverlos es dirigir todos los sonidos graves al subwoofer seleccionando SMALL para los altavoces delanteros.
Red divisora de frecuencias• Ajuste por defecto: 100Hz
Esta opción determina el corte entre los sonidos graves reproducidos desde los altavoces seleccionados como LARGE, o el subwoofer, y los sonidos graves reproducidos desde los altavoces seleccionados como SMALL. También determina el punto de corte de los sonidos graves en el canal LFE.
• Para obtener más información sobre cómo seleccionar tamaños de altavoces, consulte Ajuste de los altavoces en la página 33.
1 Seleccione ‘Manual SP Setup’ desde el menú System Setup.
2 Seleccione ‘Crossover Network’ desde el menú Manual SP Setup.
3 Seleccione el punto de corte de frecuencia.Las frecuencias que se encuentren por debajo del punto de corte serán enviadas al subwoofer (o a los altavoces LARGE).
4 Cuando termine, pulse RETURN.Volverá al menú Manual SP Setup.
Nivel de canalesLas opciones de nivel de canales le permiten ajustar el equilibrio general de su sistema de altavoces, un factor importante al configurar un sistema de cine en casa.
1 Seleccione ‘Manual SP Setup’ desde el menú System Setup.
2 Seleccione ‘Channel Level’ desde el menú Manual SP Setup.
3 Seleccione una opción de configuración.• Manual – Para mover el tono de prueba manualmente de
altavoz en altavoz y ajustar los niveles de canales individuales.• Auto – Para ajustar automáticamente los niveles de los
canales a medida que el tono de prueba se desplaza de un altavoz a otro.
2.Manual SP Setup
Return
a.Speaker Settingb.Crossover Networkc.Channel Leveld.Speaker Distance
2b.Crossover Network
Return
Frequency 100Hz
2.Manual SP Setup
Return
a.Speaker Settingb.Crossover Networkc.Channel Leveld.Speaker Distance
2c.Channel Level
Test Tone Manual
ENTER:NextReturn
VSX-821_FLXCN_Es.book 34 ページ 2011年3月23日 水曜日 午前11時33分
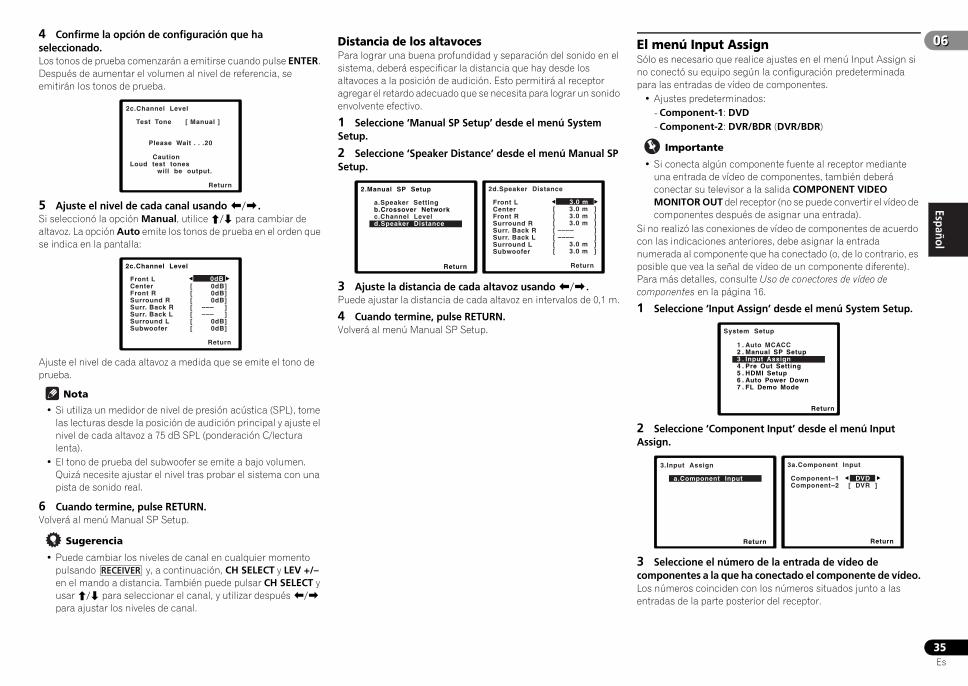
EnglishEspañol
0606
35Es
4 Confirme la opción de configuración que ha seleccionado.Los tonos de prueba comenzarán a emitirse cuando pulse ENTER. Después de aumentar el volumen al nivel de referencia, se emitirán los tonos de prueba.
5 Ajuste el nivel de cada canal usando /.Si seleccionó la opción Manual, utilice / para cambiar de altavoz. La opción Auto emite los tonos de prueba en el orden que se indica en la pantalla:
Ajuste el nivel de cada altavoz a medida que se emite el tono de prueba.
Nota
• Si utiliza un medidor de nivel de presión acústica (SPL), tome las lecturas desde la posición de audición principal y ajuste el nivel de cada altavoz a 75 dB SPL (ponderación C/lectura lenta).
• El tono de prueba del subwoofer se emite a bajo volumen. Quizá necesite ajustar el nivel tras probar el sistema con una pista de sonido real.
6 Cuando termine, pulse RETURN.Volverá al menú Manual SP Setup.
Sugerencia
• Puede cambiar los niveles de canal en cualquier momento pulsando y, a continuación, CH SELECT y LEV +/– en el mando a distancia. También puede pulsar CH SELECT y usar / para seleccionar el canal, y utilizar después / para ajustar los niveles de canal.
Distancia de los altavocesPara lograr una buena profundidad y separación del sonido en el sistema, deberá especificar la distancia que hay desde los altavoces a la posición de audición. Esto permitirá al receptor agregar el retardo adecuado que se necesita para lograr un sonido envolvente efectivo.
1 Seleccione ‘Manual SP Setup’ desde el menú System Setup.
2 Seleccione ‘Speaker Distance’ desde el menú Manual SP Setup.
3 Ajuste la distancia de cada altavoz usando /.Puede ajustar la distancia de cada altavoz en intervalos de 0,1 m.
4 Cuando termine, pulse RETURN.Volverá al menú Manual SP Setup.
El menú Input AssignSólo es necesario que realice ajustes en el menú Input Assign si no conectó su equipo según la configuración predeterminada para las entradas de vídeo de componentes.
• Ajustes predeterminados:-Component-1: DVD-Component-2: DVR/BDR (DVR/BDR)
Importante
• Si conecta algún componente fuente al receptor mediante una entrada de vídeo de componentes, también deberá conectar su televisor a la salida COMPONENT VIDEO MONITOR OUT del receptor (no se puede convertir el vídeo de componentes después de asignar una entrada).
Si no realizó las conexiones de vídeo de componentes de acuerdo con las indicaciones anteriores, debe asignar la entrada numerada al componente que ha conectado (o, de lo contrario, es posible que vea la señal de vídeo de un componente diferente). Para más detalles, consulte Uso de conectores de vídeo de componentes en la página 16.
1 Seleccione ‘Input Assign’ desde el menú System Setup.
2 Seleccione ‘Component Input’ desde el menú Input Assign.
3 Seleccione el número de la entrada de vídeo de componentes a la que ha conectado el componente de vídeo.Los números coinciden con los números situados junto a las entradas de la parte posterior del receptor.
2c.Channel Level
Test Tone [ Manual ]
Please Wait . . .20 Caution Loud test tones will be output.
Return
2c.Channel Level
Front L CenterFront RSurround RSurr. Back RSurr. Back LSurround LSubwoofer
Return
[ 0dB][ 0dB][ 0dB][ ––– ][ ––– ][ 0dB][ 0dB]
0dB
RECEIVER
2.Manual SP Setup
Return
a.Speaker Settingb.Crossover Networkc.Channel Leveld.Speaker Distance
2d.Speaker Distance
Front L CenterFront RSurround RSurr. Back RSurr. Back LSurround LSubwoofer
Return
3.0 m [ 3.0 m ][ 3.0 m ][ 3.0 m ][ –––– ][ –––– ][ 3.0 m ][ 3.0 m ]
System Setup
1 . Auto MCACC2 . Manual SP Setup3 . Input Assign4 . Pre Out Setting5 . HDMI Setup6 . Auto Power Down7 . FL Demo Mode
Return
3.Input Assign
Return
a.Component Input
3a.Component Input
Return
Component–1 DVD Component–2 [ DVR ]
VSX-821_FLXCN_Es.book 35 ページ 2011年3月23日 水曜日 午前11時33分

06
36Es
06 4 Seleccione el componente que se corresponda con el que ha conectado en dicha entrada.Seleccione entre BD, DVD, TV (TV/SAT), DVR/BDR (DVR/BDR) o OFF.
• Para hacerlo utilice / y ENTER.• Si se asigna una entrada de componente a cierta función,
cualquier entrada de componente asignada previamente a dicha función quedará automáticamente desactivada.
• Asegúrese de que ha conectado el audio del componente a las entradas correspondientes de la parte posterior del receptor.
5 Cuando termine, pulse RETURN.Volverá al menú Input Assign.
• Para la asignación de las entradas de señal digital, consulte Selección de la señal de entrada de audio en la página 22.
La configuración Pre OutEspecifíquela usando la conexión del altavoz trasero de sonido envolvente o del altavoz delantero con efectos de altura con las salidas PRE OUT SURR BACK/FRONT HEIGHT. Para la conexión del altavoz se precisa un amplificador adicional.
• Ajuste por defecto: Surr. Back
1 Seleccione ‘Pre Out Setting’ desde el menú System Setup.
2 Seleccione mediante / qué altavoz desea conectar a las salidas PRE OUT SURR BACK/FRONT HEIGHT.
• Surr. Back – Conecte el altavoz trasero de sonido envolvente.• Height – Conecte el altavoz delantero con efectos de altura.
3 Cuando termine, pulse RETURN.Volverá al menú System Setup.
El menú Auto Power DownEstá ajustado para apagar automáticamente el receptor una vez transcurrido un tiempo determinado (cuando la alimentación ha estado activa sin funcionamiento durante varias horas).
• Ajuste por defecto: OFF
1 Seleccione ‘Auto Power Down’ desde el menú System Setup.
2 Especifique el tiempo que debe pasar antes de que se apague la alimentación (cuando no ha habido funcionamiento).
• Puede seleccionar 2, 4 ó 6 horas, o bien OFF (si no desea que funcione el apagado automático).
3 Cuando termine, pulse RETURN.Volverá al menú System Setup.
El menú FL Demo ModeDefine si deben aparecer o no varias demos en la pantalla del panel frontal.
1 Seleccione ‘FL Demo Mode’ desde el menú System Setup.
2 Elija ON u OFF para la pantalla de demo.
3 Cuando termine, pulse RETURN.Volverá al menú System Setup.
System Setup
1 . Auto MCACC2 . Manual SP Setup3 . Input Assign4 . Pre Out Setting5 . HDMI Setup6 . Auto Power Down7 . FL Demo Mode
Return
4.Pre Out Setting
Return
Pre Out Surr. Back
System Setup
1 . Auto MCACC2 . Manual SP Setup3 . Input Assign4 . Pre Out Setting5 . HDMI Setup6 . Auto Power Down7 . FL Demo Mode
Return
6.Auto Power Down
Return
OFF
System Setup
1 . Auto MCACC2 . Manual SP Setup3 . Input Assign4 . Pre Out Setting5 . HDMI Setup6 . Auto Power Down7 . FL Demo Mode
Return
7.FL Demo Mode
Return
FL Demo ON
VSX-821_FLXCN_Es.book 36 ページ 2011年3月23日 水曜日 午前11時33分
EnglishEspañol
0707
37Es
Capítulo 7:Función de Control con HDMILas operaciones sincronizadas siguientes con un televisor o con un reproductor de Blu-ray Disc de Pioneer compatibles con Control con HDMI, o con un componente de otra marca que soporte las funciones de Control con HDMI son posibles cuando el componente se conecta al receptor con un cable HDMI.
• Modo de amplificador sincronizadoEl volumen del receptor se puede ajustar y el sonido se puede silenciar usando el mando a distancia del televisor.
• Sincronización de alimentación con televisor• Cambio automático de entradas
La entrada del receptor cambia automáticamente cuando se cambia la entrada del televisor o bien se reproduce un componente compatible con Control con HDMI.
Importante
• Con los dispositivos de Pioneer, las funciones de Control con HDMI se denominan “KURO LINK”.
• No puede utilizar esta función con componentes que no soporten el Control con HDMI.
• Sólo garantizamos que este receptor funcionará con componentes compatibles con Control con HDMI fabricados por Pioneer y los componentes de otras marcas que soporten el Control con función HDMI. No obstante, no garantizamos que todas las operaciones sincronizadas funcionen con componentes de otras marcas que soporten el Control con función HDMI.
• Utilice un cable High Speed HDMI® cuando quiera usar la función de Control con HDMI. La función de Control con HDMI puede no funcionar bien si se utiliza un cable HDMI de tipo diferente.
• Para conocer detalles de las operaciones y ajustes concretos, etc., consulte el manual de instrucciones de cada componente.
Conexiones de Control con HDMIPuede utilizar el funcionamiento sincronizado para un televisor conectado y hasta cuatro componentes más.
• Asegúrese de conectar el cable de audio del televisor a la entrada de audio de esta unidad. Cuando el televisor y el receptor están conectados mediante conexiones HDMI, si el televisor soporta la función HDMI Audio Return Channel, el sonido del televisor entra en el receptor a través del terminal HDMI, de modo que no es necesario conectar un cable de audio. En este caso, ajuste ARC en HDMI Setup a ON (consulte más abajo HDMI Setup).
Para obtener más detalles, consulte Conexión mediante HDMI en la página 14.
Importante
• Antes de conectar este sistema o de cambiar las conexiones, asegúrese de apagar el interruptor de alimentación y de desconectar el cable de alimentación de la toma de corriente de la pared. Después de haber finalizado la conexiones, conecte el cable de alimentación al tomacorriente de la red.
• Después de conectar este receptor a una toma de CA empieza un proceso de inicialización de HDMI que dura de 2 a 10 segundos. Durante la inicialización no puede hacer ninguna operación. El indicador HDMI de la pantalla parpadea durante la inicialización, y usted podrá encender este receptor una vez que el indicador deje de parpadear.
• Para sacar el máximo provecho de esta función, le recomendamos que conecte su componente HDMI no a un televisor sino directamente al terminal HDMI de este receptor.
• Aunque el receptor está provisto de cuatro entradas HDMI, el Control con función HDMI sólo puede utilizarse con hasta tres reproductores de DVD o Blu-ray Disc o hasta tres grabadoras de DVD o Blu-ray Disc.
HDMI SetupPara usar la función de Control con HDMI deberá establecer los ajustes de este receptor y de los componentes conectados compatibles con el Control con HDMI. Para más información, consulte las instrucciones de funcionamiento de cada componente.
1 Encienda el receptor y su televisor.Pulse RECEIVER para encender el amplificador y el televisor.
2 Conecte la entrada de TV a la entrada que conecta este receptor con el TV a través del correspondiente cable compuesto o por componentes.
3 Pulse y luego pulse SETUP.El menú de System Setup se muestra en el TV. Utilice /// y ENTER en el mando a distancia para desplazarse por las pantallas y seleccionar los elementos del menú. Pulse RETURN para confirmar las opciones seleccionadas y salir del menú actual.
• Pulse SETUP en cualquier momento para salir del menú System Setup.
4 Seleccione ‘HDMI Setup’ desde el menú System Setup.
5 Seleccione la opción ‘Control’ que quiera.Elija si va a poner la función de Control con HDMI de esta unidad en ON o en OFF. Tendrá que ponerla en ON para usar la función de Control con HDMI.Cuando use un componente que no sea compatible con la función de Control con HDMI, ponga esto en OFF.
• ON – Activa la función de Control con HDMI. Cuando se apaga la alimentación de la unidad y se está reproduciendo una fuente soportada usando la función Control con HDMI, la salida de audio y vídeo de la conexión HDMI se emiten desde el televisor.
• OFF – El Control con HDMI se desactiva. No pueden realizarse operaciones sincronizadas. Cuando la alimentación de esta unidad está desconectada no sale el audio ni el vídeo de las fuentes conectadas mediante HDMI.
RECEIVER
System Setup
1 . Auto MCACC2 . Manual SP Setup3 . Input Assign4 . Pre Out Setting5 . HDMI Setup6 . Auto Power Down7 . FL Demo Mode
Return
5.HDMI Setup
Return
Control ON ARC [ OFF ]
VSX-821_FLXCN_Es.book 37 ページ 2011年3月23日 水曜日 午前11時33分
07
38Es
07 6 Seleccione la opción ‘ARC’ que quiera.Cuando se conecta con el receptor un televisor que soporta la función HDMI Audio Return Channel, el sonido del televisor puede entrar a través del terminal HDMI.
• ON – El sonido del televisor entra a través del terminal HDMI. Esta opción sólo puede seleccionarse cuando Control se ha ajustado en ON.
• OFF – El sonido del televisor entra desde terminales de entrada de audio distintos de las entradas HDMI.
7 Cuando termine, pulse RETURN.Volverá al menú System Setup.
Antes de usar la sincronizaciónUna vez que haya realizado todas las conexiones y ajustes, deberá:
1 Poner todos los componentes en el modo en espera.
2 Active la alimentación de todos los componentes, activando en último lugar la alimentación del televisor.
3 Elija la entrada HDMI a la que el televisor está conectado a este receptor, y verifique si la salida de vídeo del componente conectado se muestra correctamente en la pantalla o no.
4 Compruebe si la reproducción de los componentes conectados a todas las entradas HDMI puede verse correctamente.
Acerca del funcionamiento sincronizadoEl componente compatible con el Control con HDMI conectado al receptor funciona de manera sincronizada, como se describe a continuación.
• Modo de amplificador sincronizado-Desde la pantalla de menú del televisor compatible con el
Control con HDMI, ajuste el volumen que se reproducirá a través de este receptor, y el receptor accederá al modo de amplificador sincronizado.
-En el modo de amplificador sincronizado, este modo se cancelará cuando se desconecte la alimentación del receptor. Para volver a activar el modo de amplificador sincronizado, ajuste el audio para reproducirlo a través del receptor desde la pantalla de menú del televisor, etc. Este receptor se activará y pasará al modo de amplificador sincronizado.
-En el modo de amplificador sincronizado, éste se cancela si se realiza en la pantalla menú del televisor una operación que produce sonido desde el televisor, etc.
-Cuando se cancele el modo de amplificador sincronizado, la alimentación del receptor se desconectará si usted está viendo una entrada HDMI o un programa de televisión en el televisor.
• Sincronización de alimentación con televisor-Cuando la alimentación del televisor se pone en espera, la
del receptor también se pone en espera. (Sólo cuando se selecciona la entrada para un componente conectado al receptor mediante la conexión HDMI o cuando se ve la televisión.)
• Cambio automático de entradas- La entrada del receptor cambia automáticamente cuando se
reproduce el componente compatible con el Control con HDMI.
- La entrada del receptor se activa automáticamente cuando se activa la entrada del televisor.
- El modo de amplificador sincronizado permanece vigente aunque la entrada del receptor se cambie a un componente diferente del conectado mediante HDMI.
Acerca de las conexiones con un producto de una marca diferente que soporte la función de Control con HDMIEl funcionamiento sincronizado siguiente puede usarse cuando la función de Control con HDMI del receptor esté conectada a un televisor de una marca distinta de Pioneer que soporte la función de Control con HDMI. (No obstante, en función del televisor, es posible que algunas funciones de Control con HDMI no funcionen.)
• Cuando la alimentación del televisor se pone en espera, la del receptor también se pone en espera. (Sólo cuando se selecciona la entrada para un componente conectado al receptor mediante la conexión HDMI o cuando se ve la televisión.)
• El sonido de los programas de televisión o de una entrada externa conectada al televisor también pueden salir por los altavoces conectados al receptor. (Si el televisor no soporta la función HDMI Audio Return Channel, precisará la conexión de un cable óptico digital, etc., además del cable HDMI.)
Las operaciones sincronizadas siguientes pueden utilizarse cuando el Control con función HDMI del receptor se conecta a un reproductor o una grabadora de una marca distinta a Pioneer que soporte el Control con función HDMI.
• Cuando empieza la reproducción en el reproductor o grabadora, la entrada del receptor cambia a la entrada HDMI a la que está conectado ese componente.
Consulte la página web de Pioneer para conocer la información más reciente sobre los modelos de marcas y productos distintos de Pioneer que soportan la función de Control con HDMI.
Advertencias para la función de Control con HDMI
• Conecte el televisor y los componentes (reproductor de Blu-ray Disc, etc.) directamente a este receptor. La interrupción de una conexión directa con otros amplificadores o con un conversor de AV (como un interruptor HDMI) puede provocar fallos de funcionamiento.
• Cuando el Control del receptor esté ON, incluso si la alimentación del receptor está en espera, es posible transmitir las señales de audio y vídeo desde un reproductor a través de HDMI hasta el televisor sin producir sonido desde el receptor, pero sólo cuando estén conectados un componente compatible con el Control con HDMI (reproductor de Blu-ray Disc, etc.) y un televisor compatible. En este caso, la alimentación del receptor se conecta y los indicadores de alimentación y HDMI se encienden.
VSX-821_FLXCN_Es.book 38 ページ 2011年3月23日 水曜日 午前11時33分
EnglishEspañol
0808
39Es
Capítulo 8:Control de otros componentes del sistema
Uso del mando a distancia para controlar otros componentesLa mayoría de componentes pueden asignarse a uno de los botones de función de entrada mediante el código predeterminado del fabricante del componente almacenado en el mando a distancia.Sin embargo, tenga presente que en algunos casos sólo será posible controlar ciertas funciones después de asignar el código de preajuste correspondiente, o de lo contrario los códigos del fabricante almacenados en el mando a distancia no funcionarán para el modelo que se está utilizando.
Nota
• Los botones TV CONTROL sólo sirven para controlar el televisor (por ejemplo, códigos para TV, CATV, TV por satélite o DTV).
• Puede cancelar o salir de cualquier paso pulsando y manteniendo pulsado .
• Después de un minuto de inactividad, el mando a distancia cancelará automáticamente la operación.
Selección directa de códigos de preajuste
1 Mientras mantiene pulsado el botón , pulse el botón ‘1’ durante 3 segundos.
2 Pulse el botón de función de entrada para el componente que desea controlar.El componente puede asignarse al botón BD, DVD, TV, DVR/BDR, CD, CD-R, VIDEO1 o VIDEO2.
• Cuando se asignen códigos de preajuste a TV CONTROL, pulse aquí INPUT.
3 Utilice los botones numéricos para introducir el código de preajuste.Encontrará los códigos de preajuste en la página 40.Si se introduce el código correcto, el componente correspondiente se enciende o apaga. El componente cuyo código se está introduciendo sólo se encenderá o apagará si puede ser encendido directamente con el mando a distancia.
4 Repita los pasos 2 a 3 para probar con otro código, o para introducir un código para otro componente.
5 Cuando haya terminado, pulse .
Borrado de todos los ajustes del mando a distanciaPuede borrar todos los ajustes y restaurar los ajustes de fábrica.
Mientras mantiene pulsado el botón , pulse el botón ‘0’ durante 3 segundos.
Códigos de preajuste predeterminados
RECEIVER
BD DVD
INPUT SELECT
SOURCESLEEPTV
CONTROL
TV
INPUT
DVR/BDR CD CD-R
ADAPTER iPod USB VIDEO 1
VIDEO 2 SIGNAL SELTUNER
RECEIVER
CH
VOL
RECEIVER
RECEIVER
DIMMER
1
4
7MIDNIGHT
S.RETRIEVER
+10
2
5
8SPEAKERS LEV
LEV
SB CH
DISP
CLR
EQ
PHASE
3
6
9
0 ENTER
CH
CH
CH SELECT
/
SHIFT
HDD DVD VCR
RECEIVER
RECEIVER
Botón de función de entrada
Código de preajuste
BD 2 2 5 5
DVD 2 2 5 6
TV 0 2 9 1
DVR/BDR 2 2 5 7
CD 5 0 0 0
CD-R 5 0 0 1
VIDEO1 6 0 9 9
VIDEO2 1 0 5 3
TV CONTROL 0 2 9 1
RECEIVER
VSX-821_FLXCN_Es.book 39 ページ 2011年3月23日 水曜日 午前11時33分

08
40Es
08 Controles para televisoresEste mando a distancia puede controlar componentes una vez que se han introducido los códigos apropiados o después de programar comandos en el receptor (para más detalles, consulte Control de otros componentes del sistema en la página 39). Utilice los botones de función de entrada para seleccionar el componente.
• Los botones TV CONTROL del mando a distancia se utilizan exclusivamente para controlar el televisor asignado al botón TV CONTROL INPUT.
Controles para otros componentesEste mando a distancia puede controlar componentes (BD, DVD, CD, DVR (BDR), VCR, CD-R) una vez que se han introducido los códigos apropiados o después de programar comandos en el receptor (para más detalles, consulte Control de otros componentes del sistema en la página 39). Utilice los botones de función de entrada para seleccionar el componente.
Lista de códigos de preajusteNo debería tener problemas para controlar un componente cuyo fabricante figure en la lista, pero tenga en cuenta que hay casos en los que los códigos del fabricante no funcionan con el modelo que está usando. También hay casos en los que la asignación del código predeterminado correcto sólo permite controlar algunas funciones.
Importante
• No garantizamos el funcionamiento de todos los fabricantes y dispositivos relacionados. La operación puede no ser posible incluso si se introduce un código de preajuste.
Botón(es) Función
TV DTV
TV s
atél
ite/
TV p
or
cab
le
TV CONTROL
Enciende y apaga la televisión digital. – –
Alterna el estado del televisor o la televisión por cable entre el modo de espera y encendido.
–
TV CONTROL INPUT
Para cambiar la entrada de TV. (No funciona con todos los modelos.)
– –
TV CONTROL CH +/–
Para seleccionar canales.
TV CONTROL VOL +/–
Para ajustar el nivel de volumen del televisor.
SOURCE Púlselo para cambiar el componente asignado al botón TV de encendido o apagado.
DTV/TV Alterna entre los modos de entrada de DTV y de TV analógica para los televisores Pioneer.
–
TOP MENU Cambia TEXT ON/OFF para televisores.
– –
HOME MENU Utilícelo como botón GUIDE para navegar.
RETURN Úselo para seleccionar los subtítulos ocultos en el DTV.
– –
Botones numéricos
Utilícelos para seleccionar un canal de TV específico.
ENTER Utilícelo para introducir un canal.
MENU Púlselo para acceder al menú DTV. – –
Para seleccionar la pantalla de menú. –
////ENTER
Pulse este botón para seleccionar o ajustar elementos en la pantalla de menú, o para desplazarse.
CH +/– Para seleccionar canales.
Botón(es) Función
Para reproductor de Blu-ray Disc, reproductor de DVD, reproductor de CD, DVR (BDR), VCR, CD-R.
SOURCE Pulse este botón para encender y apagar (modo de espera) el componente.
Pulse este botón para retroceder al principio de la pista actual. Púlselo repetidamente para retroceder al principio de pistas anteriores.
Pulse este botón para avanzar al principio de la pista siguiente. Púlselo repetidamente para avanzar al principio de las pistas subsiguientes.
Para hacer una pausa en la reproducción o grabación.
Para iniciar la reproducción.
Manténgalo pulsado para reproducción rápida en dirección de avance.
Manténgalo pulsado para reproducción rápida en dirección de retroceso.
Para detener la reproducción (en algunos modelos, la pulsación de este botón cuando el disco ya está detenido causará la apertura de la bandeja portadisco).
Botones numéricos
Úselos para introducir un número de título, capítulo o pista.
DISPLAY Púlselo para ver la información.
TOP MENU Muestra el menú “superior” del reproductor de BD/DVD.
MENU Muestra los menús del BD/DVD o DVR que está utilizando.
////ENTER/RETURN
Para navegar por los menús/opciones de BD/DVD.
HOME MENU Muestra la pantalla HOME MENU.
CH +/– Para seleccionar canales. (sólo DVR/reproductor de vídeo)
Para grabadora HDD/DVD/VCR.
HDD (SHIFT + 1) Cambia a los controles de disco duro.
DVD (SHIFT + 2) Cambia a los controles de DVD.
VCR (SHIFT + 3) Cambia a los controles de VCR.
Botón(es) Función
TVPioneer 0291
ejemplo:
CategoríaCódigo de preajusteFabricante
VSX-821_FLXCN_Es.book 40 ページ 2011年3月23日 水曜日 午前11時33分
EnglishEspañol
0808
41Es
TV Pioneer 0291, 0113, 0295, 0296A.R. Systems 0155 Acme 0141 Acura 0142, 0154 ADC 0140 Admiral 0138, 0139, 0140, 0145,
0146 Adyson 0141, 0228, 0229 Agashi 0228, 0229 Agazi 0140 Aiko 0141, 0142, 0154, 0155, 0228,
0229 Aim 0155 Aiwa 0199 Akai 0142, 0143, 0149, 0152, 0154,
0155, 0228, 0229 Akiba 0143, 0155 Akura 0140, 0143, 0154, 0155 Alaron 0228 Alba 0125, 0141, 0142, 0143, 0147,
0150, 0152, 0154, 0155, 0190, 0193, 0203, 0228
Alcyon 0132 Allorgan 0229 Allstar 0149, 0155 AMOi 0224 Amplivision 0125, 0141, 0156, 0229 Amstrad 0140, 0142, 0143, 0154,
0155 Anam 0142 Anglo 0142, 0154 Anitech 0132, 0140, 0142, 0154,
0155 Ansonic 0125, 0133, 0142, 0144,
0154, 0155 Arcam 0228, 0229 Arcam Delta 0141 Aristona 0149, 0152, 0155 Arthur Martin 0156 ASA 0138, 0146 Asberg 0132, 0149, 0155 Astra 0142 Asuka 0140, 0141, 0143, 0228, 0229 Atlantic 0141, 0149, 0152, 0155,
0228 Atori 0142, 0154 Auchan 0156 Audiosonic 0125, 0141, 0142, 0143,
0149, 0152, 0155, 0229 AudioTon 0125, 0141, 0229 Ausind 0132 Autovox 0132, 0138, 0140, 0141,
0229 Awa 0228, 0229 Baird 0229 Bang & Olufsen 0138, 0230 Basic Line 0142, 0143, 0149, 0154,
0155, 0229 Bastide 0141, 0229 Baur 0152, 0155 Bazin 0229 Beko 0125, 0150, 0155, 0175 Benq 0219 Beon 0149, 0152, 0155 Best 0125 Bestar 0125, 0149, 0155 Binatone 0141, 0229 Blue Sky 0143, 0155 Blue Star 0151 Boots 0141, 0229 BPL 0151, 0155 Brandt 0148, 0153, 0157, 0159 Brinkmann 0155 Brionvega 0138, 0149, 0152, 0155 Britannia 0141, 0228, 0229
Bruns 0138 BTC 0143 Bush 0142, 0143, 0145, 0147, 0149,
0151, 0152, 0154, 0155, 0180, 0193, 0229
Capsonic 0140 Carena 0155 Carrefour 0147 Cascade 0142, 0154, 0155 Casio 0221 Cathay 0149, 0152, 0155 CCE 0229 Centurion 0149, 0152, 0155 Century 0138 CGE 0125, 0132 Cimline 0142, 0154 City 0142, 0154 Clarivox 0152 Clatronic 0125, 0132, 0140, 0141,
0142, 0143, 0149, 0150, 0154, 0155, 0229
CMS 0228 CMS Hightec 0229 Concorde 0142, 0154 Condor 0125, 0141, 0149, 0150,
0154, 0155, 0228 Contec 0141, 0142, 0147, 0154, 0228 Continental Edison 0148 Cosmel 0142, 0154 Crosley 0132, 0138 Crown 0125, 0132, 0142, 0149, 0150,
0152, 0154, 0155 CS Electronics 0141, 0143, 0228 CTC Clatronic 0144 Cybertron 0143 Daewoo 0128, 0141, 0142, 0149,
0154, 0155, 0169, 0179, 0206, 0228, 0229
Dainichi 0143, 0228 Dansai 0140, 0149, 0152, 0155, 0228,
0229 Dantax 0125, 0152 Dawa 0155 Daytron 0142, 0154 De Graaf 0145 Decca 0141, 0149, 0152, 0155, 0229 Denver 0213, 0218 Desmet 0149, 0152, 0155 Diamant 0155 Diamond 0228 Dixi 0142, 0149, 0152, 0154, 0155,
0229 DTS 0142, 0154 Dual 0141, 0155, 0229 Dual-Tec 0141, 0142 Dumont 0138, 0141, 0144, 0229 Dux 0152 Dynatron 0149, 0152, 0155 Elbe 0125, 0133, 0155, 0229 Elcit 0138 Electa 0151 ELECTRO TECH 0142 Elin 0141, 0149, 0152, 0154, 0155,
0228 Elite 0143, 0149, 0155 Elman 0144 Elta 0142, 0154, 0228 Emerson 0125, 0138, 0155 Epson 0216 Erres 0149, 0152, 0155 ESC 0229 Etron 0142 Eurofeel 0229, 0140 Euroline 0152 Euroman 0125, 0140, 0141, 0149,
0155, 0228, 0229
Europhon 0141, 0144, 0149, 0155, 0228, 0229
Expert 0156 Exquisit 0155 Fenner 0142, 0154 Ferguson 0148, 0152, 0153, 0157 Fidelity 0141, 0145, 0155, 0228 Filsai 0229 Finlandia 0145 Finlux 0132, 0138, 0141, 0144, 0149,
0152, 0155, 0229 Firstline 0141, 0142, 0149, 0154,
0155, 0228, 0229 Fisher 0125, 0138, 0141, 0147, 0150,
0229 Flint 0149, 0155 Formenti 0132, 0138, 0139, 0141,
0152, 0228 Formenti/Phoenix 0228 Fortress 0138, 0139 Fraba 0125, 0155 Friac 0125 Frontech 0140, 0142, 0145, 0146,
0154, 0229 Fujitsu 0229 Fujitsu General 0229 Funai 0140 Galaxi 0155, 0150 Galaxis 0125, 0155 GBC 0142, 0147, 0154 Geant Casino 0156 GEC 0141, 0146, 0149, 0152, 0155,
0229 Geloso 0142, 0145, 0154 General Technic 0142, 0154 Genexxa 0143, 0146, 0149, 0155 Giant 0229 GoldHand 0228 Goldline 0155 Goldstar 0125, 0141, 0142, 0145,
0149, 0152, 0154, 0155, 0228, 0229 Goodmans 0140, 0142, 0147, 0149,
0152, 0154, 0155, 0222, 0229 Gorenje 0125, 0150 GPM 0143 Graetz 0146 Granada 0132, 0141, 0145, 0147,
0149, 0152, 0155, 0156, 0229 Grandin 0142, 0143, 0151, 0152 Gronic 0229 Grundig 0124, 0125, 0132, 0155,
0162 Halifax 0140, 0141, 0228, 0229 Hampton 0141, 0228, 0229 Hanseatic 0125, 0133, 0141, 0142,
0147, 0149, 0152, 0154, 0155, 0229 Hantarex 0142, 0154, 0155 Hantor 0155 Harwood 0154, 0155 HCM 0140, 0141, 0142, 0151, 0154,
0155, 0229 Hema 0154, 0229 Higashi 0228 HiLine 0155 Hinari 0142, 0143, 0147, 0149, 0152,
0154, 0155 Hisawa 0143, 0151, 0156 Hitachi 0137, 0141, 0145, 0146,
0147, 0155, 0191, 0226, 0229 Hornyphon 0149, 0155 Hoshai 0143 Huanyu 0141, 0228 Hygashi 0141, 0228, 0229 Hyper 0141, 0142, 0154, 0228, 0229 Hypson 0140, 0141, 0149, 0151,
0152, 0155, 0156, 0229 Iberia 0155
ICE 0140, 0141, 0142, 0143, 0149, 0154, 0155, 0228, 0229
ICeS 0228 Imperial 0125, 0132, 0146, 0149,
0150, 0155 Indiana 0149, 0152, 0155 Ingelen 0146 Ingersol 0142, 0154 Inno Hit 0132, 0141, 0142, 0143,
0149, 0152, 0154, 0155, 0229 Innovation 0140, 0142 Interactive 0125 Interbuy 0142, 0154 Interfunk 0125, 0138, 0146, 0149,
0152, 0155 International 0228 Intervision 0125, 0140, 0141, 0144,
0155, 0229 Irradio 0132, 0142, 0143, 0149, 0152,
0154, 0155 Isukai 0143, 0155 ITC 0141, 0229 ITS 0143, 0149, 0151, 0155, 0228 ITT 0142, 0146 ITV 0142, 0152, 0155 JVC 0134, 0135, 0147, 0149, 0192 Kaisui 0141, 0142, 0143, 0151, 0154,
0155, 0228, 0229 Kamosonic 0141 Kamp 0141, 0228 Kapsch 0146 Karcher 0125, 0141, 0142, 0152,
0155 Kawasho 0228 Kendo 0125, 0144, 0145, 0155 KIC 0229 Kingsley 0141, 0228 Kneissel 0125, 0133, 0155 Kolster 0149, 0155 Konka 0143 Korpel 0149, 0152, 0155 Korting 0125, 0138 Kosmos 0155 Koyoda 0142 KTV 0141, 0229 Kyoto 0228, 0229 Lasat 0125 Lenco 0142, 0154 Lenoir 0141, 0142, 0154 Leyco 0140, 0149, 0152, 0155 LG 0125, 0136, 0141, 0142, 0145,
0149, 0152, 0154, 0155, 0186, 0189, 0196, 0220, 0228, 0229
LG/GoldStar 0129 Liesenk 0152 Liesenkotter 0155 Life 0140, 0142 Lifetec 0140, 0142, 0154, 0155 Lloyds 0154 Loewe 0125, 0133, 0155, 0166, 0167 Loewe Opta 0138, 0149, 0152 Luma 0145, 0152, 0154, 0155 Lumatron 0145, 0149, 0152, 0155,
0229 Lux May 0149 Luxor 0141, 0145, 0229 M Electronic 0141, 0142, 0146,
0148, 0149, 0152 Magnadyne 0138, 0144, 0152 Magnafon 0132, 0141, 0144, 0228 Magnum 0140, 0142 Mandor 0140 Manesth 0140, 0141, 0149, 0152,
0155, 0229 Marantz 0149, 0152, 0155 Marelli 0138
Mark 0149, 0152, 0154, 0155, 0228, 0229
Masuda 0229 Matsui 0141, 0142, 0145, 0147,
0149, 0152, 0154, 0155, 0229 Mediator 0149, 0152, 0155 Medion 0140, 0142, 0155 M-Electronic 0154, 0155, 0228,
0229 Melvox 0156 Memorex 0142, 0154 Memphis 0142, 0154 Mercury 0154, 0155 Metz 0138, 0299, 0300, 0301, 0302 Micromaxx 0140, 0142 Microstar 0140, 0142 Minerva 0132 Minoka 0149, 0155 Mitsubishi 0138, 0147, 0149, 0155,
0200 Mivar 0125, 0132, 0133, 0141, 0228,
0229 Motion 0132 MTC 0125, 0228 Multi System 0152 Multitech 0125, 0141, 0142, 0144,
0145, 0147, 0152, 0154, 0155, 0228, 0229
Murphy 0141, 0228 Naonis 0145 NEC 0147, 0229 Neckermann 0125, 0138, 0141,
0145, 0149, 0150, 0152, 0155, 0229 NEI 0149, 0152, 0155 Neufunk 0154, 0155 New Tech 0142, 0149, 0154, 0155,
0229 New World 0143 Nicamagic 0141, 0228 Nikkai 0140, 0141, 0143, 0149, 0152,
0154, 0155, 0228, 0229 Nobliko 0132, 0141, 0144, 0228 Nokia 0146 Nordic 0229 Nordmende 0138, 0146, 0148, 0149 Nordvision 0152 Novatronic 0155 Oceanic 0146, 0156 Okano 0125, 0150, 0155 ONCEAS 0141 Opera 0155 Orbit 0149, 0155 Orion 0142, 0149, 0152, 0154, 0155,
0194 Orline 0155 Osaki 0140, 0141, 0143, 0155, 0229 Oso 0143 Otto Versand 0139, 0141, 0147,
0149, 0151, 0152, 0155, 0229 Pael 0141, 0228 Palladium 0125, 0141, 0150, 0155,
0229 Palsonic 0229 Panama 0140, 0141, 0142, 0154,
0155, 0228, 0229 Panasonic 0123, 0146, 0155, 0158,
0164, 0214, 0217 Panavision 0155 Pathe Cinema 0125, 0133, 0141,
0156, 0228 Pausa 0142, 0154 Perdio 0155, 0228 Perfekt 0155 Philco 0125, 0132, 0138, 0155 Philharmonic 0141, 0229 Philips 0115, 0117, 0138, 0141, 0149,
0152, 0155, 0160, 0163, 0165, 0170,
0171, 0173, 0174, 0182, 0183, 0195, 0196, 0202, 0205, 0212, 0215
Phoenix 0125, 0138, 0149, 0152, 0155, 0228
Phonola 0138, 0149, 0152, 0155, 0228
Plantron 0140, 0149, 0154, 0155 Playsonic 0229 Poppy 0142, 0154 Prandoni-Prince 0132, 0145 Precision 0141, 0229 Prima 0142, 0146, 0154 Profex 0142, 0154 Profi-Tronic 0149, 0155 Proline 0149, 0155 Prosonic 0125, 0141, 0152, 0155,
0228, 0229, 0232 Protech 0140, 0141, 0142, 0144,
0149, 0152, 0229 Provision 0152, 0155 Pye 0149, 0152, 0155, 0198 Pymi 0142, 0154 Quandra Vision 0156 Quelle 0140, 0141, 0149, 0152, 0155,
0229 Questa 0147 Radialva 0155 Radio Shack 0155 Radiola 0149, 0152, 0155, 0229 Radiomarelli 0138, 0155 Radiotone 0125, 0149, 0154, 0155 Rank 0147 Recor 0155 Redstar 0155 Reflex 0155 Revox 0125, 0149, 0152, 0155 Rex 0140, 0145, 0146 RFT 0125, 0133, 0138 Rhapsody 0228 R-Line 0149, 0152, 0155 Roadstar 0140, 0142, 0143, 0154 Robotron 0138 Rowa 0228, 0229 Royal Lux 0125 RTF 0138 Saba 0138, 0146, 0148, 0153, 0157,
0159 Saisho 0140, 0141, 0142, 0154, 0229 Salora 0145, 0146 Sambers 0132, 0144 Samsung 0119, 0120, 0125, 0140,
0141, 0142, 0149, 0150, 0152, 0154, 0155, 0177, 0178, 0181, 0204, 0208, 0228, 0229
Sandra 0141, 0228, 0229 Sansui 0149, 0155 Sanyo 0125, 0133, 0141, 0147, 0154,
0187, 0228, 0229 SBR 0152, 0155 SCHAUB LORENTZ 0146 Schneider 0141, 0143, 0149, 0152,
0155, 0190, 0229 SEG 0140, 0141, 0144, 0147, 0152,
0154, 0155, 0190, 0228, 0229 SEI 0155 SEI-Sinudyne 0138, 0144, 0146 Seleco 0145, 0146, 0147 Sencora 0142, 0154 Sentra 0154 Serino 0228 Sharp 0130, 0131, 0139, 0147, 0184,
0207 Siarem 0138, 0144, 0155 Sierra 0149, 0155 Siesta 0125 Silva 0228 Silver 0147
Singer 0138, 0144, 0156 Sinudyne 0138, 0144, 0152, 0155 Skantic 0146 Solavox 0146 Sonitron 0125, 0229 Sonoko 0140, 0141, 0142, 0149,
0152, 0154, 0155, 0229Sonolor 0146, 0156 Sontec 0125, 0149, 0152, 0155 Sony 0116, 0118, 0142, 0147, 0161,
0168, 0172, 0185, 0188, 0197, 0201, 0211, 0225, 0227
Sound & Vision 0143, 0144 Soundwave 0149, 0152, 0155 Standard 0141, 0142, 0143, 0149,
0154, 0155, 0229 Starlight 0152 Starlite 0154, 0155 Stenway 0151 Stern 0145, 0146 Strato 0154, 0155 Stylandia 0229 Sunkai 0142 Sunstar 0154, 0155 Sunwood 0142, 0149, 0154, 0155 Superla 0141, 0228, 0229 SuperTech 0154, 0155, 0228 Supra 0142, 0154 Susumu 0143 Sutron 0142, 0154 Sydney 0141, 0228, 0229 Sysline 0152 Sytong 0228 Tandy 0139, 0141, 0143, 0146, 0229 Tashiko 0144, 0145, 0147, 0228,
0229 Tatung 0141, 0149, 0152, 0155, 0229 TCM 0140, 0142 Teac 0155, 0229 Tec 0141, 0142, 0154, 0229 TEDELEX 0229 Teleavia 0148 Telecor 0155, 0229 Telefunken 0148, 0149, 0155, 0157 Telegazi 0155 Telemeister 0155 Telesonic 0155 Telestar 0155 Teletech 0142, 0152, 0154, 0155 Teleton 0141, 0229 Televideon 0228 Televiso 0156 Tensai 0142, 0143, 0149, 0154, 0155,
0229 Tesmet 0149 Tevion 0140, 0142 Texet 0141, 0154, 0228, 0229 Thomson 0121, 0122, 0141, 0148,
0149, 0153, 0155, 0157, 0159, 0210 Thorn 0152, 0155 Tokai 0149, 0155, 0229 Tokyo 0141, 0228 Tomashi 0151 Toshiba 0126, 0127, 0147, 0176,
0209, 0229 Towada 0146, 0229 Trakton 0229 Trans Continens 0155, 0229 Transtec 0228 Trident 0229 Triumph 0155 Vestel 0145, 0146, 0149, 0150, 0152,
0155, 0229 Vexa 0142, 0152, 0154, 0155 Victor 0147, 0149 VIDEOLOGIC 0228
VSX-821_FLXCN_Es.book 41 ページ 2011年3月23日 水曜日 午前11時33分
08
42Es
08Videologique 0141, 0143, 0228,
0229 VideoSystem 0149, 0155 Videotechnic 0228, 0229 Viewsonic 0223 Visiola 0141, 0228 Vision 0149, 0155, 0229 Vortec 0149, 0152, 0155 Voxson 0132, 0138, 0145, 0146,
0149, 0155 Waltham 0141, 0155, 0229 Watson 0149, 0152, 0155 Watt Radio 0141, 0144, 0228 Wega 0138, 0147, 0155 Wegavox 0154 Weltblick 0149, 0152, 0155, 0229 White Westinghouse 0141, 0144,
0152, 0155, 0228 Xrypton 0155 Yamishi 0155, 0229 Yokan 0155 Yoko 0125, 0140, 0141, 0142, 0143,
0149, 0152, 0154, 0155, 0228, 0229 Yorx 0143 Zanussi 0145, 0229
DVDSi los códigos preseleccionados que se indican a continuación no funcionan, intente realizar operaciones con los códigos preseleccionados para el BD, DVR (BDR, HDR).Pioneer 2256, 2014AEG 2188 Aiwa 2149 Akai 2096 Akura 2186 Alba 2122, 2133, 2143 Amitech 2188 AMW 2189 Awa 2189 Bang & Olufsen 2191 Bellagio 2189 Best Buy 2185 Brainwave 2188 Brandt 2112, 2139 Bush 2122, 2143, 2177, 2184 Cambridge Audio 2180 CAT 2182, 2183 Centrum 2183 CGV 2180, 2188 Cinetec 2189 Clatronic 2184 Coby 2190 Conia 2177 Continental Edison 2189 Crown 2188 C-Tech 2181 CyberHome 2103, 2132 Daenyx 2189 Daewoo 2130, 2154, 2188, 2189 Daewoo International 2189 Dalton 2187 Dansai 2179, 2188 Daytek 2105, 2128, 2189 Dayton 2189 DEC 2184 Decca 2188 Denon 2161, 2163 Denver 2164, 2184, 2186, 2190Denzel 2178 Diamond 2180, 2181 DK Digital 2129 Dmtech 2095 Dual 2178
DVX 2181 Easy Home 2185 Eclipse 2180 Electrohome 2188 Elin 2188 Elta 2142, 2188 Enzer 2178 Finlux 2180, 2188 Gericom 2145 Global Solutions 2181 Global Sphere 2181 Goodmans 2122, 2165, 2184 Graetz 2178 Grundig 2148 Grunkel 2188 H&B 2184 Haaz 2180, 2181 HiMAX 2185 Hitachi 2110, 2178, 2185 Innovation 2097 JVC 2119, 2136, 2152 Kansai 2190 Kennex 2188 Kenwood 2146 KeyPlug 2188 Kiiro 2188 Kingavon 2184 Kiss 2178 Koda 2184 KXD 2185 Lawson 2181 Lecson 2179 Lenco 2184, 2188 LG 2111, 2115, 2135, 2138, 2160,
2171 Life 2097 Lifetec 2097 Limit 2181 Loewe 2151 LogicLab 2181 Magnavox 2184 Majestic 2190 Marantz 2157 Marquant 2188 Matsui 2139 Mecotek 2188 Medion 2097 MiCO 2180 Micromaxx 2097 Microstar 2097 Minoka 2188 Mizuda 2184, 2185 Monyka 2178 Mustek 2101 Mx Onda 2180 Naiko 2188 Neufunk 2178 Nevir 2188 NU-TEC 2177 Onkyo 2167 Optim 2179 Optimus 2099 Orava 2184 Orbit 2189 Orion 2156 P&B 2184 Pacific 2181 Panasonic 2113, 2114, 2121, 2127,
2131, 2170 Philips 2100, 2106, 2117, 2118, 2126,
2134, 2157 Pointer 2188 Portland 2188 Powerpoint 2189 Prosonic 2190 Provision 2184 Raite 2178
RedStar 2186, 2188, 2190 Reoc 2181 Roadstar 2116, 2184 Ronin 2189 Rowa 2177 Rownsonic 2183 Saba 2112, 2139 Sabaki 2181 Saivod 2188 Samsung 2110, 2137, 2158, 2173,
2176 Sansui 2180, 2181, 2188 Sanyo 2140, 2166 ScanMagic 2101 Schaub Lorenz 2188 Schneider 2095 Scientific Labs 2181 Scott 2120, 2187 SEG 2116, 2178, 2181, 2189 Sharp 2097, 2141, 2174 Sigmatek 2185 Silva 2186 Singer 2180, 2181 Skymaster 2153, 2181 Skyworth 2186 Slim Art 2188 SM Electronic 2181 Sony 2104, 2108, 2123, 2124, 2125,
2150, 2175 Soundmaster 2181 Soundmax 2181 Spectra 2189 Standard 2181 Star Cluster 2181 Starmedia 2184 Sunkai 2188 Supervision 2181 Synn 2181 Tatung 2130, 2188 TCM 2097 Teac 2162, 2177, 2181 Tec 2186 Technika 2188 Telefunken 2183 Tensai 2188 Tevion 2097, 2181, 2187 Thomson 2098, 2112, 2155, 2159 Tokai 2178, 2186 Toshiba 2102, 2156, 2168, 2169,
2172 TRANScontinents 2189 Trio 2188 TruVision 2185 Wharfedale 2180, 2181 Xbox 2098 Xlogic 2181, 2188 XMS 2188 Yamada 2189 Yamaha 2106 Yamakawa 2178, 2189 Yukai 2101, 2147
BDSi los códigos preseleccionados que se indican a continuación no funcionan, intente realizar operaciones con los códigos preseleccionados para el DVD, DVR (BDR, HDR).Pioneer 2255, 2192, 2281Denon 2310, 2311, 2312 Hitachi 2307, 2308, 2309 JVC 2290, 2291, 2293, 2294, 2295,
2296LG 2286, 2287 Marantz 2302, 2303 Mitsubishi 2300, 2301 Onkyo 2289 Panasonic 2277, 2278, 2279Philips 2280 Samsung 2282 Sharp 2304, 2305, 2306 Sony 2283, 2284, 2285, 2292 Toshiba 2288, 2262 Yamaha 2297, 2298, 2299
DVR (BDR, HDR)Si los códigos preseleccionados que se indican a continuación no funcionan, intente realizar operaciones con los códigos preseleccionados para el DVD, BD.Pioneer 2257, 2193, 2258, 2259,
2260, 2261, 2264, 2265, 2266, 2270Panasonic 2263, 2269 Sharp 2267, 2275 Sony 2268, 2271, 2272, 2273, 2276 Toshiba 2274
VCR Pioneer 1053, 1108Adyson 1050 Aiwa 1033, 1034, 1035 Akai 1034 Akiba 1040, 1050 Akura 1034, 1040, 1050 Alba 1035, 1036, 1037, 1040, 1050,
1051 Ambassador 1037 Amstrad 1033, 1050, 1051 Anitech 1040, 1050 ASA 1038, 1039 Asuka 1033, 1038, 1039, 1040, 1050 Audiosonic 1051 Baird 1033, 1034, 1036, 1051 Bang & Olufsen 1052 Basic Line 1035, 1036, 1037, 1040,
1050, 1051 Baur 1039 Bestar 1036, 1037, 1051 Black Panther Line 1036, 1051 Blaupunkt 1039 Bondstec 1037, 1050 Bush 1035, 1036, 1040, 1050, 1051 Cathay 1051 Catron 1037 CGE 1033, 1034 Cimline 1035, 1040, 1050 Clatronic 1037, 1050 Condor 1036, 1037, 1051 Crown 1036, 1037, 1040, 1050, 1051 Daewoo 1036, 1037, 1051 Dansai 1040, 1050, 1051 Dantax 1035 Daytron 1036, 1051
De Graaf 1039 Decca 1033, 1034, 1039 Denko 1050 Dual 1034, 1051, 1060Dumont 1033, 1039 Elbe 1051 Elcatech 1050 Elsay 1050 Elta 1040, 1050, 1051 Emerson 1050 ESC 1036, 1051 Etzuko 1040, 1050 Ferguson 1034 Fidelity 1033, 1050 Finlandia 1039 Finlux 1033, 1034, 1039 Firstline 1035, 1038, 1040, 1050 Flint 1035 Formenti/Phoenix 1039 Frontech 1037 Fujitsu 1033 Funai 1033 Galaxy 1033 GBC 1037, 1040 GEC 1039 Geloso 1040 General 1037 General Technic 1035 GoldHand 1040, 1050 Goldstar 1033, 1048 Goodmans 1033, 1036, 1037, 1038,
1040, 1050, 1051 Graetz 1034 Granada 1039 Grandin 1033, 1036, 1037, 1038,
1040, 1050, 1051 Grundig 1039, 1040 Hanseatic 1038, 1039, 1051 Harwood 1050 HCM 1040, 1050 Hinari 1035, 1040, 1050, 1051 Hisawa 1035 Hitachi 1033, 1034, 1039, 1045Hypson 1035, 1040, 1050, 1051Impego 1037 Imperial 1033 Inno Hit 1036, 1037, 1039, 1040,
1050, 1051 Innovation 1035 Interbuy 1038, 1050 Interfunk 1039 Intervision 1033, 1051 Irradio 1038, 1040, 1050 ITT 1034 ITV 1036, 1038, 1051 JVC 1034, 1046 Kaisui 1040, 1050 Karcher 1039 Kendo 1035, 1036, 1037, 1050 Korpel 1040, 1050 Kyoto 1050 Lenco 1036 Leyco 1040, 1050 LG 1033, 1038, 1049 Lifetec 1035 Loewe Opta 1038, 1039 Logik 1040, 1050 Lumatron 1036, 1051 Luxor 1050 M Electronic 1033 Manesth 1040, 1050 Marantz 1039 Mark 1051 Matsui 1035, 1038 Matsushita 1033, 1039 Mediator 1039 Medion 1035
Memorex 1033, 1038 Memphis 1040, 1050 Micromaxx 1035 Microstar 1035 Migros 1033 Multitech 1033, 1037, 1039, 1040,
1050 Murphy 1033 NEC 1034 Neckermann 1034, 1039 NEI 1039 Nesco 1040, 1050 Nikkai 1037, 1050, 1051 Nokia 1034, 1051 Nordmende 1034 Oceanic 1033, 1034 Okano 1035, 1050, 1051 Orion 1035 Orson 1033 Osaki 1033, 1038, 1040, 1050 Otto Versand 1039 Palladium 1034, 1038, 1040, 1050 Panasonic 1043 Pathe Marconi 1034 Perdio 1033 Philco 1050 Philips 1039, 1045, 1052 Phonola 1039 Portland 1036, 1037, 1051 Prinz 1033 Profex 1040 Proline 1033 Prosonic 1035, 1051 Pye 1039 Quelle 1033, 1039 Radialva 1050 Radiola 1039 Rex 1034 RFT 1037, 1039, 1050 Roadstar 1036, 1038, 1040, 1050,
1051 Royal 1050 Saba 1034 Saisho 1035, 1040 Samsung 1041 Samurai 1037, 1050 Sansui 1034 Saville 1051 SBR 1039 Schaub Lorenz 1033, 1034 Schneider 1033, 1035, 1036, 1037,
1038, 1039, 1040, 1050, 1051SEG 1040, 1050, 1051 SEI-Sinudyne 1039 Seleco 1034 Sentra 1037, 1050 Sentron 1040, 1050 Sharp 1042 Shintom 1040, 1050 Shivaki 1038 Siemens 1038 Silva 1038 Silver 1051 Sinudyne 1039 Solavox 1037 Sonneclair 1050 Sonoko 1036, 1051 Sontec 1038 Sony 1044 Standard 1036, 1051 Stern 1051 Sunkai 1035 Sunstar 1033 Suntronic 1033 Sunwood 1040, 1050 Symphonic 1050 Taisho 1035
Tandberg 1051 Tashiko 1033 Tatung 1033, 1034, 1039 TCM 1035 Teac 1051 Tec 1037, 1050, 1051 Teleavia 1034 Telefunken 1034 Teletech 1050, 1051 Tenosal 1040, 1050 Tensai 1033, 1038, 1040, 1050 Tevion 1035 Thomson 1034, 1048 Thorn 1034 Tokai 1038, 1040, 1050 Tonsai 1040 Toshiba 1034, 1039, 1047 Towada 1040, 1050 Towika 1040, 1050 TVA 1037 Uher 1038 Ultravox 1051 United Quick Star 1036, 1051Universum 1033, 1038, 1039 Videon 1035 Weltblick 1038 Yamishi 1040, 1050 Yokan 1040, 1050 Yoko 1037, 1038, 1040, 1050
Receptor de satélitePioneer 6220, 6219, 6204@sat 6251 @Sky 6238 ABsat 6180 Acoustic Solutions 6217 ADB 6174 Akai 6214 Akura 6228 Alba 6176, 6200, 6180, 6217 Allsat 6214 Alltech 6180 Allvision 6252, 6238, 6199 Amitronica 6180 Ampere 6256, 6261 Amstrad 6202, 6243, 6256, 6261,
6236, 6180 Anglo 6180 Ankaro 6180 Ansonic 6245 Anttron 6200 Apollo 6176 Apro 6232 Arcon 6192 Arcus 6193 Armstrong 6214 Arnion 6251 ASA 6230 Asat 6214 ASCI 6213, 6238 ASLF 6180 AssCom 6220 Astra 6255, 6180 Astratec 6268, 6269 Astrell 6202 Astro 6177, 6236, 6255, 6200, 6246,
6215, 6222, 6243 Atlanta 6245 Atsat 6251 AtSky 6238 Audioline 6232 Audioton 6200 Austar 6174 Avalon 6261 Axil 6244, 6186, 6245 Axis 6267
VSX-821_FLXCN_Es.book 42 ページ 2011年3月23日 水曜日 午前11時33分

EnglishEspañol
0808
43Es
Axitronic 6228 B.net 6232 B@ytronic 6230, 6199 Balmet 6186 Beko 6176 Belson 6245 Big Sat 6186 Black Diamond 6217 Blaupunkt 6177 Blue Sky 6180 Boca 6256, 6180, 6252, 6185, 6257,
6237, 6187, 6188 Bodner & Mann 6194 Boshmann 6244, 6247 Boston 6227 Brainwave 6232, 6231 British Sky Broadcasting 6210 Broco 6180 BskyB 6210 BT 6195 Bubu Sat 6180 Bush 6254, 6217, 6264, 6228, 6190,
6232, 6268, 6201, 6265, 6182 Cambridge 6236 Canal Digital 6220 Canal Satellite 6220, 6219, 6278,
6277 Canal+ 6220, 6277 CGV 6244, 6183 Cherokee 6194 Chess 6213, 6180, 6238, 6228 CityCom 6229, 6255, 6179, 6192,
6241, 6252 Clark 6200 Classic 6232 Clatronic 6244 Clayton 6228 Clemens Kamphus 6261 Cobra 6261 Colombia 6256 Columbia 6256 Comag 6256, 6252, 6185, 6199,
6244, 6257, 6237, 6189, 6187, 6188 Comsat 6244 Condor 6255, 6253 Connexions 6261 Conrad 6256, 6236, 6207, 6255 Coship 6186, 6232 Crown 6217 Cryptovision 6176 CS 6247 Cyfrowy Polsat 6220 Cyrus 6214 D-box 6275 Daewoo 6267, 6180, 6195, 6268,
6182 Dantax 6228 Deltasat 6192 Denver 6245 Digatron 6231 Digenius 6229, 6226 Digiality 6255, 6238 Digifusion 6268, 6269 Digihome 6217, 6265, 6218 DigiLogic 6217 DigiQuest 6251, 6186, 6247 DigiSat 6252 Digisky 6186 Digital 6187 Digital Vision 6269 DigitalBox 6222, 6247 Dijam 6195 DirecTV 6263 Discovery 6194 Distratel 6202, 6250 DMT 6192 DNT 6214, 6261
Doro 6232 Dual 6252 Durabrand 6217, 6218 Echolink 6185 Echostar 6220, 6233, 6261, 6176,
6180, 6181, 6239 Edision 6247 Einhell 6256, 6236, 6180 Elap 6180, 6244, 6183 Elbe 6245 Elless 6230 Elsat 6180 Elta 6214 eMTech 6196 Energy Sistem 6247 Engel 6180, 6227 EP Sat 6176 Eurieult 6202 Eurocrypt 6176 EuroLine 6227 Europa 6236, 6255 Europhon 6256, 6229, 6255 Eurosat 6189 Eurosky 6256, 6213, 6229, 6236,
6255, 6230 Eurostar 6255, 6179 Eutelsat 6180 Eutra 6230 Evesham 6218 Exator 6200 Fagor 6203 Fenner 6180 Ferguson 6176, 6264, 6268, 6269 Fidelity 6236 Finlandia 6176 Finlux 6176, 6207, 6228 FinnSat 6230 Flair Mate 6180 Fly Com 6186 FMD 6213, 6244, 6186 Freecom 6236 FTEmaximal 6180, 6189 Fuba 6177, 6229, 6261, 6207, 6226,
6196 Galaxis 6220, 6267 Gardiner 6179 Garnet 6192 GbSAT 6196 Gecco 6246, 6199 General Satellite 6241 Globo 6230, 6227, 6238, 6199, 6257 GOD Digital 6214 Gold Box 6220, 6219 Gold Vision 6247 Golden Interstar 6250 Goodmans 6176, 6254, 6217, 6264,
6271, 6218, 6201, 6190 Gran Prix 6230 Granada 6176 Grandin 6228 Grocos 6239, 6186 Grundig 6220, 6177, 6217, 6264,
6232, 6218, 6201, 6190 Haensel & Gretel 6256 Haier 6245 Hama 6183 Hanseatic 6215, 6222 Hauppauge 6231, 6232 HB 6196 Heliocom 6255 Helium 6255 Hiro 6189 Hirschmann 6267, 6177, 6229,
6261, 6236, 6207, 6255, 6230, 6252, 6199, 6189
Hitachi 6176, 6217, 6218 HNE 6256
Hornet 6251 Houston 6261 Humax 6241, 6268, 6242 Huth 6256, 6255, 6192, 6193 Hyundai 6192 ID Digital 6241 ILLUSION sat 6247 Imperial 6222, 6216, 6223, 6238,
6232 Ingelen 6213, 6261 Inno Hit 6228 International 6256 Interstar 6196 Intervision 6255 Inves 6268 iotronic 6244 ITT Nokia 6176, 6207 Jaeger 6238 K-SAT 6180 Kamm 6180 Kaon 6251 KaTelco 6267 Kathrein 6177, 6214, 6213, 6262,
6200, 6180, 6179, 6272, 6183 Kendo 6252 Kenwood 6220 Key West 6256 Kiton 6213 KR 6200 Kreiling 6213, 6194, 6228 Kreiselmeyer 6177 Kyostar 6200 L&S Electronic 6256, 6238 Labgear 6195 LaSAT 6177, 6256, 6229, 6255, 6230 Leiko 6228 Lemon 6238 Lenco 6255, 6180 Lenson 6236 LG 6192 Lifesat 6256, 6229, 6180 Listo 6228 Lodos 6217 Logik 6217 Logix 6192 Lorenzen 6256, 6229, 6255, 6226,
6231, 6257, 6237 Luxor 6236, 6207, 6265 M Electronic 6179 Manata 6256, 6180 Manhattan 6176, 6251 Marantz 6214 Maspro 6177, 6180 Matsui 6177, 6217, 6271, 6228,
6268, 6269 Max 6255 Maximum 6192, 6238 Mediabox 6220, 6219 Mediacom 6198 MediaSat 6220, 6219, 6236, 6278,
6277 Medion 6256, 6229, 6180, 6230,
6192, 6252, 6238, 6199, 6228 Medison 6180 Mega 6214 MegaSat 6189 Metronic 6256, 6200, 6180, 6179,
6202, 6250, 6238, 6244 Metz 6177 Micro 6236, 6255, 6200, 6180, 6231 Micro Elektronic 6180 Micro Technology 6180 Micromaxx 6229 Microstar 6229, 6192, 6226 Microtec 6180 Mitsubishi 6176
Morgan’s 6214, 6256, 6180, 6252, 6199
Multibroadcast 6174 Multichoice 6174 Myryad 6214 Mysat 6180 MySky 6212, 6211 NEOTION 6238 Netsat 6263 Neuhaus 6236, 6255, 6180 Neuling 6256, 6252, 6257, 6188 Neusat 6180 Neveling 6226 Newton 6261 NextWave 6193 Nichimen 6254 Nikko 6214, 6180 Noda Electronic 6202 Nokia 6220, 6176, 6207, 6206 Nordmende 6176 Octagon 6200 OctalTV 6231 Onn 6217, 6218 Opentel 6252, 6199 Optex 6213, 6180, 6250, 6244, 6203,
6228 Orbis 6252, 6238, 6199 Orbitech 6213, 6236, 6215, 6222,
6216, 6223 P/Sat 6252 Pace 6220, 6214, 6176, 6181, 6273,
6212, 6211 Pacific 6217 Packard Bell 6267 Palcom 6229, 6226, 6239 Palladium 6261, 6236 Palsat 6236 Panasonic 6176, 6178 Panda 6177, 6176, 6255 Pansat 6191 Pass 6183 Patriot 6256 peeKTon 6186, 6245 Philips 6220, 6177, 6214, 6275, 6219,
6277, 6268, 6232, 6179, 6200, 6176, 6263
Phoenix 6245 Phonotrend 6233 Pilotime 6278 Pino 6238 Pixx 6191 Planet 6261 PMB 6180, 6203 Polytron 6261 Portland 6195 Preisner 6256, 6261, 6243, 6185 Premier 6219 Primacom 6267 Pro Basic 6220, 6184 Proline 6217 Promax 6176 Proscan 6234 Quelle 6229, 6255 Radiola 6214 Radix 6261, 6243 Rainbow 6200 RCA 6234 Rebox 6196 Regal 6227 RFT 6214 Roadstar 6220, 6180 Rollmaster 6244 Rover 6180 Rownsonic 6183 SAB 6227, 6251 Saba 6255, 6230, 6202, 6184 Sabre 6176
Sagem 6275, 6258, 6277 Saivod 6245 Salora 6252 Samsung 6220, 6198, 6197, 6273,
6253 Sanyo 6228 SAT 6236 Sat Control 6251 Sat Partner 6236, 6200 Sat Team 6180 SAT+ 6239 Satcom 6255 Satec 6180 Satelco 6252 Satplus 6222 SatyCon 6247 Schaecke 6200 Schaub Lorenz 6196, 6245 Schneider 6198, 6227 Schwaiger 6267, 6256, 6262, 6255,
6230, 6202, 6192, 6238, 6199, 6186, 6257, 6247, 6232, 6187, 6188
Scientific Atlanta 6209 SCS 6229, 6230 Sedea Electronique 6256, 6213,
6198, 6250, 6228 Seemann 6261 SEG 6213, 6192, 6227, 6217, 6228 Septimo 6202 Serd 6199 Servimat 6203 ServiSat 6180, 6227 Shark 6247 Sharp 6265, 6218 Siemens 6177, 6261, 6238 Sigmatek 6245 Silva 6229 SilverCrest 6187 Skantin 6180 SKR 6180 SKT 6256 SKY 6263, 6210, 6212, 6211 SKY Italia 6220, 6212 Sky XL 6227, 6199 Skymaster 6233, 6180, 6192, 6238,
6239, 6183, 6203, 6184 Skymax 6214, 6244 Skypex 6230 Skyplus 6230, 6252, 6238, 6199 SkySat 6213, 6236, 6255, 6180 Skyvision 6238 SL 6256, 6229, 6230, 6231, 6257, 6232 SM Electronic 6233, 6180, 6239 Smart 6256, 6261, 6180, 6243, 6252,
6246, 6244, 6257, 6247 SmartVision 6186 Sony 6235, 6220, 6219, 6176 SR 6256 Star Sat 6196 Starland 6180 Starlite 6214 Stream 6212 Stream System 6251 Strong 6220, 6228, 6256, 6200, 6180,
6245, 6217, 6239 Sumin 6199 Sunny 6251 Sunsat 6180 Sunstar 6174, 6256 SuperMax 6193 Supratech 6244 Systec 6238 Tantec 6176 Targa 6191 Tatung 6176 TBoston 6227, 6245 Tecatel 6233
Technical 6228 Technika 6217, 6232, 6218 TechniSat 6213, 6261, 6176, 6236,
6215, 6222, 6216, 6223 Technomate 6250 Technosat 6193 Technosonic 6254, 6232 Technotrend 6232 Technowelt 6256, 6255 Techwood 6213, 6217, 6228, 6218 Telasat 6255 TELE System 6261, 6227, 6239,
6203 Teleciel 6200 Teleka 6261, 6236, 6255, 6200 Telesat 6255 Telestar 6213, 6236, 6215, 6222,
6216, 6223, 6227, 6238, 6228, 6232 Teletech 6213 Televes 6256, 6176, 6236, 6196,
6251, 6238, 6257 Telewire 6252 Tempo 6193 Tevion 6254, 6180, 6239, 6232, 6184 Thomson 6220, 6219, 6180, 6255,
6176, 6265, 6277, 6234, 6264, 6210, 6212
Thorn 6176 Tiny 6232 Tioko 6256 Titan 6189, 6184 TNT SAT 6258 Tokai 6214 Tonna 6176, 6236, 6180, 6203 Topfield 6198 Toshiba 6176, 6217 Trevi 6227 Triasat 6236 Triax 6220, 6214, 6256, 6189, 6253,
6228, 6203, 6261, 6213, 6257, 6244, 6195, 6264, 6227, 6243, 6180, 6236
Turnsat 6180 Twinner 6180, 6203 Unisat 6214, 6256 United 6227 Univers 6189 Universum 6177, 6213, 6229, 6255,
6230, 6215, 6227 Van Hunen 6226 Variosat 6177 VEA 6245 Ventana 6214 Vestel 6213, 6227, 6217, 6218 VH Sat 6229 Viasat 6273 Viola Digital 6232 Vision 6228, 6189 Visionic 6250 Visiosat 6213, 6254, 6180, 6244,
6186, 6191 Vitecom 6244 Volcasat 6245 VTech 6179 Wetekom 6236 Wewa 6176 Wharfedale 6217, 6265, 6218 Wisi 6177, 6256, 6229, 6261, 6176,
6236, 6255, 6230, 6252, 6199 Worldsat 6213, 6196, 6227, 6194 WorthIt! 6190 Woxter 6245 Xoro 6191 Xsat 6180, 6196, 6181 Xtreme 6251 Yakumo 6244 ZapMaster 6230
Zehnder 6213, 6262, 6179, 6192, 6252, 6227, 6238, 6199, 6244, 6247, 6249
Zeta Technology 6214 Zodiac 6261, 6200
VSX-821_FLXCN_Es.book 43 ページ 2011年3月23日 水曜日 午前11時33分
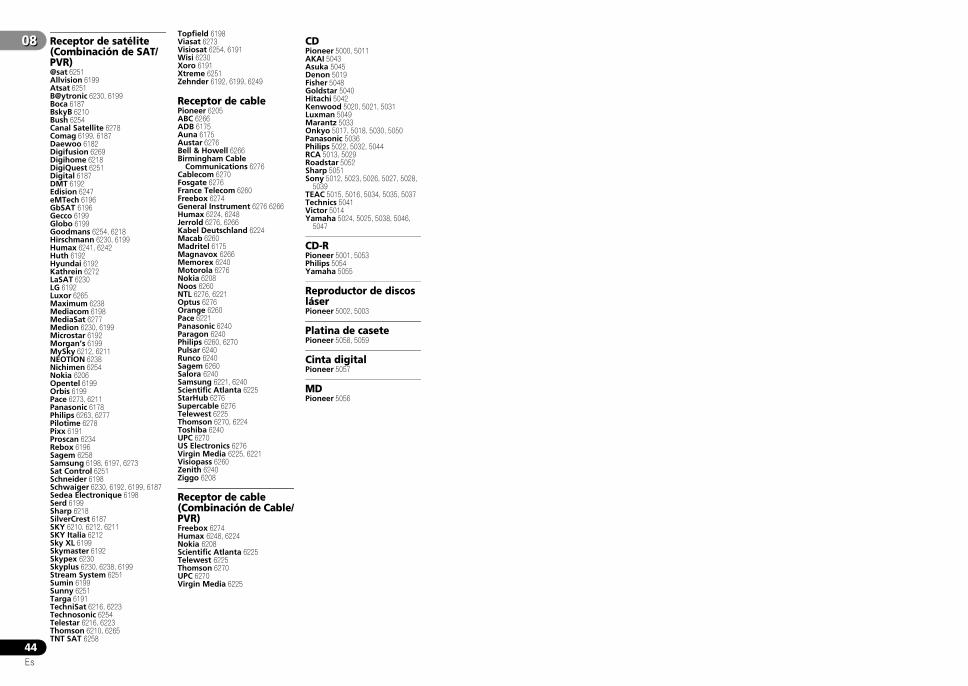
08
44Es
08 Receptor de satélite (Combinación de SAT/PVR)@sat 6251 Allvision 6199 Atsat 6251 B@ytronic 6230, 6199 Boca 6187 BskyB 6210 Bush 6254 Canal Satellite 6278 Comag 6199, 6187 Daewoo 6182 Digifusion 6269 Digihome 6218 DigiQuest 6251 Digital 6187 DMT 6192 Edision 6247 eMTech 6196 GbSAT 6196 Gecco 6199 Globo 6199 Goodmans 6254, 6218 Hirschmann 6230, 6199 Humax 6241, 6242 Huth 6192 Hyundai 6192 Kathrein 6272 LaSAT 6230 LG 6192 Luxor 6265 Maximum 6238 Mediacom 6198 MediaSat 6277 Medion 6230, 6199 Microstar 6192 Morgan’s 6199 MySky 6212, 6211 NEOTION 6238 Nichimen 6254 Nokia 6206 Opentel 6199 Orbis 6199 Pace 6273, 6211 Panasonic 6178 Philips 6263, 6277 Pilotime 6278 Pixx 6191 Proscan 6234 Rebox 6196 Sagem 6258 Samsung 6198, 6197, 6273 Sat Control 6251 Schneider 6198 Schwaiger 6230, 6192, 6199, 6187Sedea Electronique 6198 Serd 6199 Sharp 6218 SilverCrest 6187 SKY 6210, 6212, 6211SKY Italia 6212 Sky XL 6199 Skymaster 6192 Skypex 6230 Skyplus 6230, 6238, 6199 Stream System 6251 Sumin 6199 Sunny 6251 Targa 6191 TechniSat 6216, 6223 Technosonic 6254 Telestar 6216, 6223 Thomson 6210, 6265 TNT SAT 6258
Topfield 6198 Viasat 6273 Visiosat 6254, 6191 Wisi 6230 Xoro 6191 Xtreme 6251 Zehnder 6192, 6199, 6249
Receptor de cablePioneer 6205 ABC 6266 ADB 6175 Auna 6175 Austar 6276 Bell & Howell 6266 Birmingham Cable
Communications 6276 Cablecom 6270 Fosgate 6276 France Telecom 6260 Freebox 6274 General Instrument 6276 6266 Humax 6224, 6248 Jerrold 6276, 6266 Kabel Deutschland 6224 Macab 6260 Madritel 6175 Magnavox 6266 Memorex 6240 Motorola 6276 Nokia 6208 Noos 6260 NTL 6276, 6221 Optus 6276 Orange 6260 Pace 6221 Panasonic 6240 Paragon 6240 Philips 6260, 6270 Pulsar 6240 Runco 6240 Sagem 6260 Salora 6240 Samsung 6221, 6240 Scientific Atlanta 6225 StarHub 6276 Supercable 6276 Telewest 6225 Thomson 6270, 6224 Toshiba 6240 UPC 6270 US Electronics 6276 Virgin Media 6225, 6221 Visiopass 6260 Zenith 6240 Ziggo 6208
Receptor de cable (Combinación de Cable/PVR) Freebox 6274 Humax 6248, 6224 Nokia 6208 Scientific Atlanta 6225 Telewest 6225 Thomson 6270 UPC 6270 Virgin Media 6225
CDPioneer 5000, 5011 AKAI 5043 Asuka 5045 Denon 5019 Fisher 5048 Goldstar 5040 Hitachi 5042 Kenwood 5020, 5021, 5031 Luxman 5049 Marantz 5033 Onkyo 5017, 5018, 5030, 5050 Panasonic 5036 Philips 5022, 5032, 5044 RCA 5013, 5029 Roadstar 5052 Sharp 5051 Sony 5012, 5023, 5026, 5027, 5028,
5039TEAC 5015, 5016, 5034, 5035, 5037 Technics 5041 Victor 5014 Yamaha 5024, 5025, 5038, 5046,
5047
CD-RPioneer 5001, 5053Philips 5054Yamaha 5055
Reproductor de discos láserPioneer 5002, 5003
Platina de casetePioneer 5058, 5059
Cinta digitalPioneer 5057
MDPioneer 5056
VSX-821_FLXCN_Es.book 44 ページ 2011年3月23日 水曜日 午前11時33分

EnglishEspañol
0909
45Es
Capítulo 9:Información adicional
Solución de problemasUn manejo incorrecto a menudo puede confundirse con problemas o un mal funcionamiento. Si cree que este componente tiene algún problema, compruebe los puntos siguientes. Eche un vistazo a los otros componentes y aparatos electrónicos que se están utilizando, ya que en ocasiones el problema puede residir ahí. Si no puede solucionar el problema después de realizar las comprobaciones que se indican a continuación, diríjase al centro de servicio técnico Pioneer autorizado más cercano para que lleve a cabo las reparaciones necesarias.
• Si el equipo no funciona de forma normal debido a interferencias externas tales como electricidad estática, desconecte la clavija de alimentación de la toma de corriente y luego vuelva a conectarla para restablecer las condiciones normales de funcionamiento.
GeneralEl equipo no se enciende.Desconecte la clavija de alimentación de la toma de corriente y
luego vuelva a conectarla.Asegúrese de que no hay hilos sueltos del cable de los altavoces
tocando el panel posterior. Esto puede provocar que el receptor se cierre automáticamente.
El receptor se apaga de repente.Cuando la función Auto Power Down está activa, la alimentación se
apagará automáticamente si el receptor no ha funcionado durante varias horas. Compruebe la configuración de la función Auto Power Down (consulte El menú Auto Power Down en la página 36).
Después de un minuto aproximadamente (no deberá encender la unidad durante este tiempo), vuelva a encender el receptor. Si el mensaje persiste, llame a una empresa de servicio técnico independiente autorizada por Pioneer.
La alimentación se activa o desactiva de repente, o cambia la entrada de manera inesperada (Cuando el Control con HDMI está en ON).Esto sucede con motivo del funcionamiento sincronizado, debido al
Control con función HDMI. Si no se precisa el funcionamiento sincronizado, ajuste el Control con HDMI a OFF (consulte HDMI Setup en la página 37).
OVERHEAT aparece en la pantalla y se apaga la alimentación.La temperatura en el interior de la unidad ha superado el valor
permisible. Pruebe a mover la unidad para que se ventile mejor (véase la página 2).
Baje el nivel de volumen.
Aparece TEMP en la pantalla y cae el nivel de volumen.La temperatura en el interior de la unidad ha superado el valor
permisible. Pruebe a mover la unidad para que se ventile mejor (véase la página 2).
Baje el nivel de volumen.
No hay emisión de sonido cuando se selecciona una función de entrada.Utilice MASTER VOLUME para subir el volumen.Pulse MUTE en el mando a distancia para desactivar la
silenciación.Pulse SPEAKERS para seleccionar el juego de altavoces apropiado
(consulte Activación del terminal de altavoces en la página 12).Ajuste el SIGNAL SEL a H (HDMI), C1/O1/O2 (digital) o A
(analógico) según el tipo de conexiones realizadas (consulte la página 22).
Asegúrese de que ha conectado correctamente el componente (consulte Conexión del equipo en la página 10).
Compruebe la configuración de salida de audio del componente de origen.
Consulte el manual de instrucciones facilitado con el componente fuente.
No se emite ninguna imagen cuando se selecciona una función de entrada.Asegúrese de que ha conectado correctamente el componente
(consulte Conexión del equipo en la página 10).Utilice el mismo tipo de cables de vídeo para el componente fuente
y el TV para conectar este receptor (consulte Acerca de la conexión de salidas de vídeo en la página 13).
Consulte la sección El menú Input Assign en la página 35 para asegurarse de que ha asignado la entrada correcta.
Se ha seleccionado una entrada de vídeo incorrecta en el monitor de TV. Consulte el manual de instrucciones suministrado con el televisor.
El subwoofer no emite sonido.Asegúrese de que el subwoofer está conectado.Si el subwoofer dispone de un mando de volumen, asegúrese de
que está ajustado de forma adecuada.Es posible que la fuente Dolby Digital o DTS que escucha no tenga
un canal LFE.Cambie la configuración de subwoofer en Ajuste de los altavoces en
la página 33 a YES o PLUS.Cambie el LFE ATT (LFE Attenuate) de la página 31 a LFEATT 0 o
LFEATT 5.
No se emite ningún sonido por los altavoces central o de sonido envolvente.Conecte los altavoces de forma adecuada (consulte la página 11).Consulte Ajuste de los altavoces en la página 33 para comprobar los
ajustes de los altavoces.Consulte Nivel de canales en la página 34 para comprobar los
niveles de los altavoces.
La función Phase Control no parece tener un efecto audible.Si procede, compruebe que el interruptor del filtro de paso bajo de
su subwoofer está apagado o que el corte se ha definido en el ajuste de frecuencia más alto. Si hay una opción PHASE en el subwoofer, ajústela en 0º (o según el subwoofer, en el ajuste que piense que tiene el mejor efecto general sobre el sonido).
Asegúrese de que el ajuste de distancia del altavoz es correcto para todos los altavoces (consulte Distancia de los altavoces en la página 35).
Las emisiones de radio contienen una cantidad considerable de ruido.Conecte la antena (página 17) y ajuste la posición para obtener la
mejor recepción.Aleje los cables sueltos de los hilos y terminales de la antena.Extienda al máximo la antena de cable FM, oriéntela correctamente
y fíjela a una pared (o conecte una antena FM exterior).Conecte una antena de AM interior o exterior adicional (página 18).Apague el equipo que provoca interferencias o aléjelo del receptor
(o sitúe las antenas más lejos del equipo que está provocando ruidos).
No es posible seleccionar emisoras de radiodifusión automáticamente.Conecte una antena exterior (consulte la página 18).
Se escucha ruido durante la reproducción de una platina de casete.Aleje la platina de casete del receptor hasta que el ruido
desaparezca.
Cuando se reproduce software con DTS, no se emite ningún sonido ni ningún ruido.Asegúrese de que los ajustes en el reproductor sean correctos y/o
que la salida de señal DTS esté activada. Consulte el manual de instrucciones suministrado con el reproductor de DVD.
Parece haber un retardo de tiempo entre los altavoces y la salida del subwoofer.Consulte Configuración automática para sonido envolvente (MCACC)
en la página 20 para configurar el sistema de nuevo utilizando MCACC (esto compensará automáticamente un retardo en la salida del subwoofer).
Después de utilizar la configuración automática MCACC, el ajuste de tamaño de altavoz (LARGE o SMALL) es incorrecto.El ruido de baja frecuencia puede estar provocado por un aparato
de aire acondicionado o un motor. Apague todos los aparatos en la habitación y vuelva a ejecutar configuración automática MCACC.
El mando a distancia no funciona.Sustituya las pilas (consulte la página 9).Utilícelo en un rango de 7 m, 30º del sensor remoto (consulte la
página 9).Retire el obstáculo o utilice el mando a distancia desde otra
posición.Evite exponer el sensor de mando a distancia del panel frontal a luz
directa.
VSX-821_FLXCN_Es.book 45 ページ 2011年3月23日 水曜日 午前11時33分
09
46Es
09 La pantalla se ve oscura o está apagada.Para regresar al valor por defecto, pulse repetidamente DIMMER en
el mando a distancia.
La pantalla del panel frontal cambia sin motivo aparente a varias pantallas distintas.Esto sucede porque la pantalla demo está en funcionamiento. Para
apagar la pantalla demo, pulse cualquier botón a fin de volver a la pantalla original, o bien ajuste el FL Demo Mode en OFF (consulte El menú FL Demo Mode en la página 36).
El receptor no reconoce iPod touch/iPhone.Intente lo siguiente.
1. Mantenga pulsados simultáneamente el botón Sleep y el botón Home en el iPod touch o el iPhone durante más de 10 segundos para reiniciarlo.2. Active el receptor.3. Conecte el iPod touch/iPhone al receptor.
El dispositivo de tecnología inalámbrica Bluetooth no puede conectarse ni manejarse. El dispositivo de tecnología inalámbrica Bluetooth no emite sonido o el sonido se interrumpe.Compruebe que no haya ningún objeto que emita ondas
electromagnéticas en la banda de 2,4 GHz (horno microondas, dispositivo inalámbrico LAN o un aparato de tecnología inalámbrica Bluetooth) cerca de la unidad. Si dicho objeto está cerca de la unidad, configure la unidad lejos de él. O deje de utilizar el objeto que emite ondas electromagnéticas.
Compruebe que el dispositivo de tecnología inalámbrica Bluetooth no está demasiado lejos de la unidad y que no hay obstáculos entre el dispositivo de tecnología inalámbrica Bluetooth y la unidad. Ajuste el dispositivo de tecnología inalámbrica Bluetooth y la unidad, de modo que la distancia entre ambos sea inferior a 10 m y no exista ningún obstáculo entre ellos.
Compruebe que el ADAPTADOR Bluetooth y el ADAPTER PORT de la unidad estén correctamente conectados.
Puede que el dispositivo de tecnología inalámbrica Bluetooth no esté ajustado en el modo de comunicación compatible con la tecnología inalámbrica Bluetooth. Compruebe la configuración del dispositivo de tecnología inalámbrica Bluetooth.
Compruebe que el emparejamiento se haya realizado correctamente. La configuración del emparejamiento se ha borrado de esta unidad o del dispositivo de tecnología inalámbrica Bluetooth. Reinicie el emparejamiento.
Compruebe que el perfil sea correcto. Utilice un dispositivo de tecnología inalámbrica Bluetooth que sea compatible con los perfiles A2DP y AVRCP.
HDMINo hay imagen ni sonido.Si el problema todavía persiste cuando conecte su componente
HDMI directamente al monitor, consulte el manual del componente o del monitor, o bien póngase en contacto con el fabricante para obtener asistencia.
No hay imagen.Las señales de vídeo procedentes del terminal de vídeo analógico
no saldrán por el terminal HDMI. Las señales de vídeo procedentes del terminal HDMI no saldrán por el terminal de vídeo analógico. Utilice el mismo tipo de cable para las conexiones de entrada y de salida.
Dependiendo de la configuración de salida del componente de origen, es posible que esté reproduciendo un formato de vídeo que no puede visualizarse. Modifique la configuración de salida de la fuente o realice la conexión mediante las tomas de componentes o compuestas.
Este receptor es compatible con HDCP. Compruebe que los componentes que está conectando también sean compatibles con HDCP. Si no lo son, conéctelos mediante las tomas de vídeo de componentes o compuestas.
Según el componente fuente conectado, es posible que no funcione con este receptor (aunque sea compatible con HDCP). Si es el caso, use las tomas de vídeo de componentes o compuestas para la conexión entre la fuente y el receptor.
Si no aparecen imágenes de vídeo en su TV, pruebe a ajustar la resolución, Deep Color u otros ajustes de su componente.
Para emitir señales en Deep Color, use un cable HDMI (cable High Speed HDMI®) para conectar este receptor a un componente o televisor con función Deep Color.
La información en pantalla (OSD) (menú del System Setup o la pantalla de menús para el iPod/USB) no se muestra.La información en pantalla (OSD) no aparecerá si ha realizado la
conexión al televisor utilizando la salida HDMI. Al configurar el sistema, utilice conexiones de componentes o compuestas.
No hay sonido o éste se detiene de repente.Compruebe que Audio Parameter esté ajustado a HDMI AMP/
THRU (consulte la página 31).Si el componente es un dispositivo DVI, utilice una conexión
distinta para el sonido.Las transmisiones de audio digital en formato HDMI tardan más
tiempo en ser reconocidas. Por esta razón, es posible que se produzca alguna interrupción de audio al cambiar de un formato de audio a otro o al iniciar la reproducción.
Si durante la reproducción se enciende/apaga el dispositivo conectado al terminal HDMI OUT de este equipo, o se desconecta/conecta el cable HDMI, podrían producirse ruidos o interrupciones de audio.
No es posible un funcionamiento sincronizado utilizando la función de Control con HDMI.Compruebe las conexiones HDMI.El cable puede estar dañado.Seleccione ON para el ajuste de Control con HDMI, consulte HDMI
Setup en la página 37.Conecte la alimentación del televisor antes de conectar la
alimentación del receptor.Ajuste a ON el Control con HDMI del lado del televisor (consulte las
instrucciones de funcionamiento del TV).
Información importante relativa a la conexión HDMIHabrá casos en los que no podrá encaminar señales HDMI a través de este receptor (depende del componente que está conectando; consulte al fabricante si es compatible con HDMI).Si no está recibiendo señales HDMI correctamente a través de este receptor (desde su componente), realice la siguiente configuración.
ConfiguraciónConecte el componente compatible con HDMI directamente a la pantalla mediante un cable HDMI. Después utilice la conexión más adecuada (se recomienda una conexión digital) para enviar audio al receptor. Para obtener más información sobre las conexiones de audio, consulte las instrucciones de uso. Al utilizar esta configuración, ponga el volumen de la pantalla al mínimo.
Nota
• Dependiendo del componente, la salida de audio puede limitarse al número de canales disponibles de la unidad de visualización conectada (por ejemplo, la salida de audio se reduce a 2 canales para un monitor con limitaciones de audio estéreo).
• Si desea cambiar la fuente de entrada, deberá cambiar las funciones tanto en el receptor como en la unidad de pantalla.
• Puesto que el sonido se anula en la pantalla al utilizar la conexión HDMI, deberá ajustar el volumen en la pantalla cada vez que cambie las fuentes de entrada.
VSX-821_FLXCN_Es.book 46 ページ 2011年3月23日 水曜日 午前11時33分
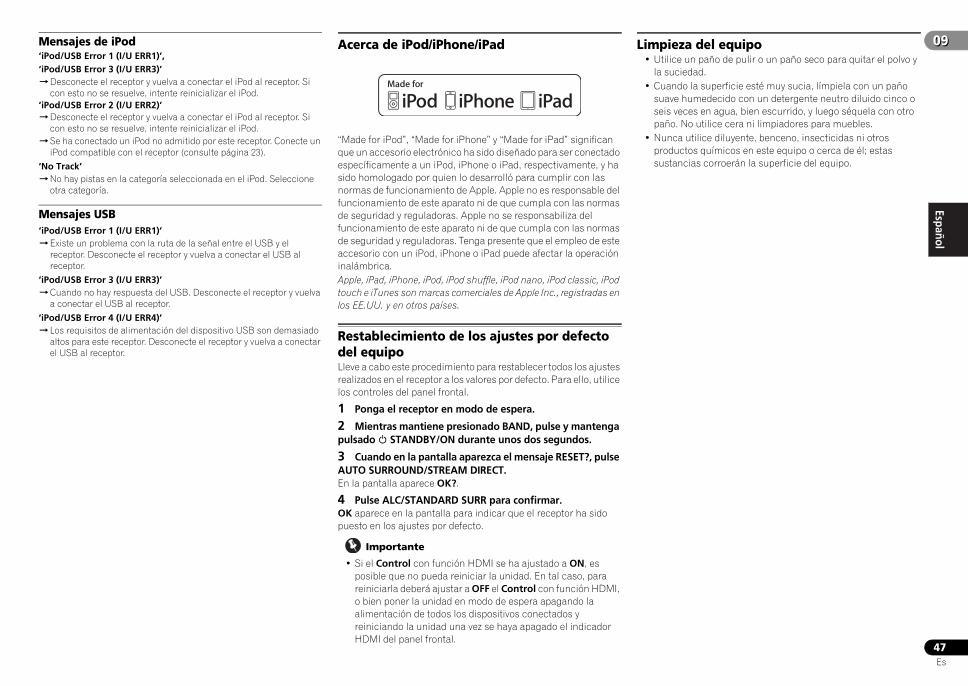
EnglishEspañol
0909
47Es
Mensajes de iPod‘iPod/USB Error 1 (I/U ERR1)’,‘iPod/USB Error 3 (I/U ERR3)’Desconecte el receptor y vuelva a conectar el iPod al receptor. Si
con esto no se resuelve, intente reinicializar el iPod.‘iPod/USB Error 2 (I/U ERR2)’Desconecte el receptor y vuelva a conectar el iPod al receptor. Si
con esto no se resuelve, intente reinicializar el iPod.Se ha conectado un iPod no admitido por este receptor. Conecte un
iPod compatible con el receptor (consulte página 23).
‘No Track’No hay pistas en la categoría seleccionada en el iPod. Seleccione
otra categoría.
Mensajes USB‘iPod/USB Error 1 (I/U ERR1)’Existe un problema con la ruta de la señal entre el USB y el
receptor. Desconecte el receptor y vuelva a conectar el USB al receptor.
‘iPod/USB Error 3 (I/U ERR3)’Cuando no hay respuesta del USB. Desconecte el receptor y vuelva
a conectar el USB al receptor.
‘iPod/USB Error 4 (I/U ERR4)’Los requisitos de alimentación del dispositivo USB son demasiado
altos para este receptor. Desconecte el receptor y vuelva a conectar el USB al receptor.
Acerca de iPod/iPhone/iPad
“Made for iPod”, “Made for iPhone” y “Made for iPad” significan que un accesorio electrónico ha sido diseñado para ser conectado específicamente a un iPod, iPhone o iPad, respectivamente, y ha sido homologado por quien lo desarrolló para cumplir con las normas de funcionamiento de Apple. Apple no es responsable del funcionamiento de este aparato ni de que cumpla con las normas de seguridad y reguladoras. Apple no se responsabiliza del funcionamiento de este aparato ni de que cumpla con las normas de seguridad y reguladoras. Tenga presente que el empleo de este accesorio con un iPod, iPhone o iPad puede afectar la operación inalámbrica.Apple, iPad, iPhone, iPod, iPod shuffle, iPod nano, iPod classic, iPod touch e iTunes son marcas comerciales de Apple Inc., registradas en los EE.UU. y en otros países.
Restablecimiento de los ajustes por defecto del equipoLleve a cabo este procedimiento para restablecer todos los ajustes realizados en el receptor a los valores por defecto. Para ello, utilice los controles del panel frontal.
1 Ponga el receptor en modo de espera.
2 Mientras mantiene presionado BAND, pulse y mantenga pulsado STANDBY/ON durante unos dos segundos.
3 Cuando en la pantalla aparezca el mensaje RESET?, pulse AUTO SURROUND/STREAM DIRECT.En la pantalla aparece OK?.
4 Pulse ALC/STANDARD SURR para confirmar.OK aparece en la pantalla para indicar que el receptor ha sido puesto en los ajustes por defecto.
Importante
• Si el Control con función HDMI se ha ajustado a ON, es posible que no pueda reiniciar la unidad. En tal caso, para reiniciarla deberá ajustar a OFF el Control con función HDMI, o bien poner la unidad en modo de espera apagando la alimentación de todos los dispositivos conectados y reiniciando la unidad una vez se haya apagado el indicador HDMI del panel frontal.
Limpieza del equipo• Utilice un paño de pulir o un paño seco para quitar el polvo y
la suciedad.• Cuando la superficie esté muy sucia, límpiela con un paño
suave humedecido con un detergente neutro diluido cinco o seis veces en agua, bien escurrido, y luego séquela con otro paño. No utilice cera ni limpiadores para muebles.
• Nunca utilice diluyente, benceno, insecticidas ni otros productos químicos en este equipo o cerca de él; estas sustancias corroerán la superficie del equipo.
VSX-821_FLXCN_Es.book 47 ページ 2011年3月23日 水曜日 午前11時33分
09
48Es
09 Especificaciones
Sección de audioPotencia de salida FTC . . . . . . . . . . . . . . . . . . . . . . . . 65 W + 65 W
(ESTÉREO, de 20 Hz a 20 kHz, 8 , 0,2 %)Potencia nominal de salida (frontal, central, sonido envolvente)
. . . . . . . . . . . . . . . . . . . . . . . . . 125 W por canal (1 kHz, 6 , 1 %)Máxima potencia de salida (frontal, central, sonido envolvente)
. . . . . . . . . . . . . . . . . . . . . . . . 150 W por canal (1 kHz, 6 , 10 %)Distorsión armónica total
. . . . . . . . . . . . . . . . . . . . . 0,06 % (20 Hz a 20 kHz, 8 , 50 W/ch)Impedancia de altavoces garantizada
FRONT: A, B . . . . . . . . . . . . . . . . . . . . . . . . . . . . . . . de 6 a 16 FRONT: A+B. . . . . . . . . . . . . . . . . . . . . . . . . . . . . . de 12 a 16 SURROUND, CENTER . . . . . . . . . . . . . . . . . . . . . . . de 6 a 16
Entrada (sensibilidad/impedancia)LINE . . . . . . . . . . . . . . . . . . . . . . . . . . . . . . . . . . . . . 200 mV/47 k
Salida (nivel/impedancia)REC . . . . . . . . . . . . . . . . . . . . . . . . . . . . . . . . . . . . 200 mV/2,2 k
Cociente señal/ruido (IHF, cortocircuito, red A)LINE . . . . . . . . . . . . . . . . . . . . . . . . . . . . . . . . . . . . . . . . . . . . 98 dB
Sección de vídeoNivel de señal
Compuesto . . . . . . . . . . . . . . . . . . . . . . . . . . . . . . . . 1 Vp-p (75 )Vídeo de componentes . . . . . . . . . . . . . . . . . . . Y: 1,0 Vp-p (75 )
PB, PR: 0,7 Vp-p (75 )Resolución máxima correspondiente
Vídeo de componentes . . . . . . . . . . . . . . . . . . . . . 1080p (1125p)
Sección del sintonizadorIntervalo de frecuencia (FM) . . . . . . . . . . . de 87,5 MHz a 108 MHzEntrada de antena (FM) . . . . . . . . . . . . . . . . . . . . . . 75 asimétricaGama de frecuencias (AM)
Paso de 9 kHz . . . . . . . . . . . . . . . . . . . . . . . . 531 kHz a 1602 kHzPaso de 10 kHz . . . . . . . . . . . . . . . . . . . . . . . 530 kHz a 1700 kHz
Antena (AM) . . . . . . . . . . . . . . . . . . . . . . . . . . . . . Antena de cuadro
Sección de entrada/salida digitalTerminal HDMI . . . . . . . . . . . . . . . . . . . . . . . . . . Tipo A (19 clavijas)Tipo de salida HDMI. . . . . . . . . . . . . . . . . . . . . . . . . . . . 5 V, 100 mATerminal USB . . . . . . . . . . . . . . . . . . . . USB2.0 Full Speed (Tipo A)Terminal de iPod . . . . . . . . . . . . . . . . . . .USB y vídeo (Compuesto)Terminal de ADAPTER PORT . . . . . . . . . . . . . . . . . . . . 5 V, 100 mA
OtrosRequisitos de potencia
. . . . . . . . . . . . . . . . CA 110 V a 127 V/220 V a 240 V, 50 Hz/60 HzConsumo. . . . . . . . . . . . . . . . . . . . . . . . . . . . . . . . . . . . . . . . . . 415 W
En modo de espera. . . . . . . . . . . . . . . . . . . . . . . . . . . . . . . 0,45 W(Función de Control con HDMI OFF)
Dimensiones . . . . . . . 435 mm (An) x 168 mm (Al) x 362,5 mm (Pr)Peso (sin embalaje) . . . . . . . . . . . . . . . . . . . . . . . . . . . . . . . . . 9,2 kg
Accesorios suministradosMicrófono (para la configuración Auto MCACC) . . . . . . . . . . . . . 1Mando a distancia . . . . . . . . . . . . . . . . . . . . . . . . . . . . . . . . . . . . . . 1Pilas secas (tamaño AAA IEC R03). . . . . . . . . . . . . . . . . . . . . . . . . 2Antena de cuadro de AM. . . . . . . . . . . . . . . . . . . . . . . . . . . . . . . . . 1Antena de hilo de FM . . . . . . . . . . . . . . . . . . . . . . . . . . . . . . . . . . . . 1Cable iPod . . . . . . . . . . . . . . . . . . . . . . . . . . . . . . . . . . . . . . . . . . . . . 1Cable de alimentaciónEste manual de instrucciones
Nota
• Las especificaciones son aplicables cuando la alimentación es de 230 V.
• Con el propósito de introducir mejoras, el diseño y las especificaciones del producto están sujetos a posibles modificaciones sin previo aviso.
© 2011 PIONEER CORPORATION. Todos los derechos reservados.
Fabricado bajo licencia de Dolby Laboratories. “Dolby”, “Pro Logic”, “Surround EX” y el símbolo de la doble D son marcas comerciales de Dolby Laboratories.
Fabricado bajo licencia con patentes de los EE.UU. números: 5,451,942; 5,956,674; 5,974,380; 5,978,762; 6,226,616; 6,487,535; 7,212,872; 7,333,929; 7,392,195; 7,272,567 y otras patentes de los EE.UU. y el resto del mundo emitidas y pendientes. DTS y el símbolo son marcas registradas, y DTS-HD, DTS-HD Master Audio y los logotipos DTS son marcas de fábrica de DTS, Inc. El producto incluye software. © DTS, Inc. Todos los derechos reservados.
VSX-821_FLXCN_Es.book 48 ページ 2011年3月23日 水曜日 午前11時33分

EnglishEspañol
0909
49Es
VSX-821_FLXCN_Es.book 49 ページ 2011年3月23日 水曜日 午前11時33分

09
50Es
09
09_additional_info.fm 50 ページ 2011年3月30日 水曜日 午後1時47分

EnglishEspañol
0909
51Es
09_additional_info.fm 51 ページ 2011年3月30日 水曜日 午後1時47分

<5707-00000-501-0S>Printed in China
© 2011 PIONEER CORPORATION.All rights reserved.
PIONEER CORPORATION1-1, Shin-ogura, Saiwai-ku, Kawasaki-shi, Kanagawa 212-0031, JapanPIONEER ELECTRONICS (USA) INC.P.O. BOX 1540, Long Beach, California 90801-1540, U.S.A. TEL: (800) 421-1404
PIONEER ELECTRONICS OF CANADA, INC.340 Ferrier Street, Unit 2, Markham, Ontario L3R 2Z5, Canada TEL: 1-877-283-5901, 905-479-4411
PIONEER EUROPE NVHaven 1087, Keetberglaan 1, B-9120 Melsele, Belgium TEL: 03/570.05.11
PIONEER ELECTRONICS ASIACENTRE PTE. LTD.253 Alexandra Road, #04-01, Singapore 159936 TEL: 65-6472-7555
PIONEER ELECTRONICS AUSTRALIA PTY. LTD.5 Arco Lane, Heatherton, Victoria, 3202, Australia, TEL: (03) 9586-6300
PIONEER ELECTRONICS DE MEXICO S.A. DE C.V.Blvd.Manuel Avila Camacho 138 10 piso Col.Lomas de Chapultepec, Mexico, D.F. 11000 TEL: 55-9178-4270K002_B3_En
VSX-821_FLXCN_En.book 50 ページ 2011年3月30日 水曜日 午後12時38分