VR423CAT VR623CAT - Philips
56
VR423CAT VR623CAT Video Cassette Recorder Owner’s Manual
-
Upload
khangminh22 -
Category
Documents
-
view
0 -
download
0
Transcript of VR423CAT VR623CAT - Philips

VR423CATVR623CAT
Video Cassette Recorder
Owner’s Manual

Once your PHILIPS purchase is registered, you’re eligible to receive all the privileges of owning aPHILIPS product. So complete and return the Warranty Registration Card enclosed with yourpurchase at once. And take advantage of these important benefits.
Return your Warranty Registration card today toensure you receive all the benefits you’re entitled to.
For Customer UseEnter below the Serial No.which is located on the rear ofthe cabinet. Retain this infor-mation for future reference.Model No.________________Serial No. ________________
Congratulations on your purchase, andwelcome to the “family!”
Dear PHILIPS product owner:Thank you for your confidence in PHILIPS. You’ve selected one ofthe best-built, best-backed products available today. And we’ll doeverything in our power to keep you happy with your purchasefor many years to come. As a member of the PHILIPS “family,” you’re entitled to protectionby one of the most comprehensive warranties and outstanding ser-vice networks in the industry.What’s more, your purchase guarantees you’ll receive all the infor-mation and special offers for which you qualify, plus easy access toaccessories from our convenient home shopping network.And most importantly you can count on our uncompromisingcommitment to your total satisfaction.All of this is our way of saying welcome-and thanks for investing ina PHILIPS product.
Sincerely,
Robert Minkhorst President and Chief Executive Officer
P.S. Remember, to get the most from your PHILIPSproduct, you must return your WarrantyRegistration Card within 10 days. So please mailit to us right now!
Know thesesafetysymbols
This “bolt of lightning” indi-cates uninsulated material
within your unit may cause anelectrical shock. For the safetyof everyone in your household,please do not remove productcovering.
The “exclamation point”calls attention to featuresfor which you should read
the enclosed literature closelyto prevent operating and main-tenance problems.WARNING: TO PREVENTFIRE OR SHOCK HAZARD,DO NOT EXPOSE THISEQUIPMENT TO RAIN ORMOISTURE.CAUTION: To prevent elec-tric shock, match wide blade ofplug to wide slot, fully insert.ATTENTION: Pour éviter leschoc électriques, introduire lalame la plus large de la fichedans la borne correspondantede la prise et pousser jusqu’aufond.
CAUTIONRISK OF ELECTRIC SHOCK
DO NOT OPEN
CAUTION: TO REDUCE THE RISK OF ELECTRIC SHOCK, DO NOTREMOVE COVER (OR BACK). NO USER-SERVICEABLE PARTS
INSIDE. REFER SERVICING TO QUALIFIED SERVICE PERSONNEL.
RE
GI S
TR
A T I O N N E E DE
DW
ITH
IN10DAYS Hurry
!
WarrantyVerificationRegistering your product within10 days confirms your right to max-imum protection under theterms and conditions of yourPHILIPS warranty.
OwnerConfirmationYour completed WarrantyRegistration Card serves asverification of ownership in theevent of product theft or loss.
ModelRegistrationReturning your WarrantyRegistration Card right away guaran-tees you’ll receive all the informa-tion and special offers which youqualify for as the owner of yourmodel.
Visit our World Wide Web Site at http://www.philips.com
t
s

Introduction 3
Features• Automatic Channel Setup• Automatic Clock Setting with Time Zone• Automatic Head Cleaner• Automatic Operation Features• Automatic Tracking Adjustment• Blue Background• Daylight-Savings Time• Display Panel• Front Panel Menu Access• Hi-Fi Stereo Sound System (VR623CAT only)• High Quality (HQ) System• MTS (Multi-Channel Television Sound) System
(VR623CAT only)
• 19 micron head• On-Screen Displays in English or Spanish• One-Touch Recording• Real-Time Counter• Remote Control with glow-in-the-dark buttons
and the capability to operate a TV, Cable Box, andDirect Broadcast System
• Repeat Play• S-VHS Quasi Play Back (SQPB)• Special Effects Playback: Forward and Reverse
Searching; Still; Slow Motion• Time Search• Timer Recording
Safety PrecautionsWarning: To prevent fire or shock hazard, do not exposethis equipment to rain or moisture.Federal Communications Commission Warning: Any unau-thorized changes or modifications to this equipment voidthe user’s authority to operate it.
This VCR has a High Quality (HQ) system and is compatible withexisting Video Home System (VHS) equipment.Philips Consumer Electronics recommends you use only video cas-sette tapes that have the mark. The use of other tapes mayresult in poor picture quality and excessive deposits on the videoheads, which may not be covered by the warranty if damage occurs.The 19 micron head provides a better picture when you view tapesrecorded in slow speed (SLP).
Note to the Cable TV System Installer: This reminder callsthe Cable TV system installer’s attention to Article 820-40 of theNational Electrical Code, which provides guidelines for propergrounding – in particular, specifying that the cable ground shall beconnected to the grounding system of the building, as close to thepoint of cable entry as possible.
Declaration of ConformityModel Number: VR423CAT/VR623CATTrade Name: PhilipsResponsible Party: Philips Consumer Electronics
P.O. Box 14810Knoxville, TN 37914-1810(865) 521-4316
As an ENERGY STAR® Partner, Philips Consumer Electronicshas determined that this product meets the ENERGY STAR®
guidelines for energy efficiency. ENERGY STAR® is a U.S. registeredmark.Using products with the ENERGY STAR® label can save energy. Savingenergy reduces air pollution and lowers utility bills.
Copyright 2001 Philips Consumer Electronics. All rights reserved.
Welcome to your VCR owner’s manual.This manual describes the VR423CAT and the VR623CAT. The VR423CAT is a monaural (single soundsource) system, while the VR623CAT is a stereo system. Otherwise, the two models are exactly the same. Inthis manual, the VR623CAT is illustrated. (The VR423CAT has single AUDIO IN/OUT jacks. Otherwise, theVR423CAT looks exactly like the VR623CAT.)This manual has seven sections: Setting Up Your VCR; Description of Controls; Basic Operations; Recording;Playing; Additional Features; and Information You May Need. The instructions explain all of the VCR’s features,which are listed below. You cannot hurt your VCR by trying the features! So read on – and relax.
• This manual, your new product, andthe packaging contain materialsthat can be recycled and reused.Specialized companies can recycleyour product to increase theamount of reusable materials andto minimize the amount that needsto be properly disposed.Your product uses batteries thatshould not be thrown away whendepleted but should be disposed ofas small chemical waste.Please find out about the local regu-lations on disposal of your old prod-uct, batteries, manual, and packag-ing whenever you replace existingequipment.
Helpful Hint

4 Table of ContentsSetting Up Your VCRIntroduction . . . . . . . . . . . . . . . . . . . . . . . . . . . . . . . . . . . . . . . . . . . . . . . . . . . . . . . . . .3Table of Contents . . . . . . . . . . . . . . . . . . . . . . . . . . . . . . . . . . . . . . . . . . . . . . . . . . . . . .4Before Using Your VCR . . . . . . . . . . . . . . . . . . . . . . . . . . . . . . . . . . . . . . . . . . . . . . . . .5Hookups without a Cable Box/Direct Broadcast System . . . . . . . . . . . . . . . . . . . . . . .6-7Hookups with a Cable Box/Direct Broadcast System . . . . . . . . . . . . . . . . . . . . . . . . .8-9Hookups with a Stereo TV . . . . . . . . . . . . . . . . . . . . . . . . . . . . . . . . . . . . . . . . . . . . . .10Turning on Your VCR . . . . . . . . . . . . . . . . . . . . . . . . . . . . . . . . . . . . . . . . . . . . . . . . . .11Automatic Channel Setup . . . . . . . . . . . . . . . . . . . . . . . . . . . . . . . . . . . . . . . . . . . .12-14Setting the Clock . . . . . . . . . . . . . . . . . . . . . . . . . . . . . . . . . . . . . . . . . . . . . . . . . . .15-18Daylight-Savings Time . . . . . . . . . . . . . . . . . . . . . . . . . . . . . . . . . . . . . . . . . . . . . . . . . .19Language Selection . . . . . . . . . . . . . . . . . . . . . . . . . . . . . . . . . . . . . . . . . . . . . . . . . . . .20Setting the Remote to Operate a TV . . . . . . . . . . . . . . . . . . . . . . . . . . . . . . . . . . . . . .21Setting the Remote to Operate a Cable Box/Direct Broadcast System . . . . . . . . . . . . .22
Description of ControlsRemote Control Buttons . . . . . . . . . . . . . . . . . . . . . . . . . . . . . . . . . . . . . . . . . . . . .23-24On-Screen Status Displays . . . . . . . . . . . . . . . . . . . . . . . . . . . . . . . . . . . . . . . . . . . . . .25VCR Display Panel . . . . . . . . . . . . . . . . . . . . . . . . . . . . . . . . . . . . . . . . . . . . . . . . . . . .26Front Panel . . . . . . . . . . . . . . . . . . . . . . . . . . . . . . . . . . . . . . . . . . . . . . . . . . . . . . . . . .27Rear Panel . . . . . . . . . . . . . . . . . . . . . . . . . . . . . . . . . . . . . . . . . . . . . . . . . . . . . . . . . . .28
Basic OperationsPlaying . . . . . . . . . . . . . . . . . . . . . . . . . . . . . . . . . . . . . . . . . . . . . . . . . . . . . . . . . . . . . .29Recording . . . . . . . . . . . . . . . . . . . . . . . . . . . . . . . . . . . . . . . . . . . . . . . . . . . . . . . . . . .30
RecordingRecording One Channel/Watching Another . . . . . . . . . . . . . . . . . . . . . . . . . . . . . . . . .31One-Touch Recording . . . . . . . . . . . . . . . . . . . . . . . . . . . . . . . . . . . . . . . . . . . . . . . . .32Timer Recording . . . . . . . . . . . . . . . . . . . . . . . . . . . . . . . . . . . . . . . . . . . . . . . . . . .33-36Rerecording (Tape Duplication) . . . . . . . . . . . . . . . . . . . . . . . . . . . . . . . . . . . . . . . . . .37
PlayingRepeat Play . . . . . . . . . . . . . . . . . . . . . . . . . . . . . . . . . . . . . . . . . . . . . . . . . . . . . . . . . .38Real-Time Counter Memory . . . . . . . . . . . . . . . . . . . . . . . . . . . . . . . . . . . . . . . . . . . . .39Time Search . . . . . . . . . . . . . . . . . . . . . . . . . . . . . . . . . . . . . . . . . . . . . . . . . . . . . . . . .40Special Effects Playback . . . . . . . . . . . . . . . . . . . . . . . . . . . . . . . . . . . . . . . . . . . . . . . . .41Automatic Operation Features . . . . . . . . . . . . . . . . . . . . . . . . . . . . . . . . . . . . . . . . . . .42
Additional Features Multi-Channel Television Sound System (VR623CAT only) . . . . . . . . . . . . . . . . . . .43-44Hi-Fi Stereo Sound System (VR623CAT only) . . . . . . . . . . . . . . . . . . . . . . . . . . . . . . .45Blue Background . . . . . . . . . . . . . . . . . . . . . . . . . . . . . . . . . . . . . . . . . . . . . . . . . . . . . .46
Information You May NeedGlossary . . . . . . . . . . . . . . . . . . . . . . . . . . . . . . . . . . . . . . . . . . . . . . . . . . . . . . . . . . . .47Helpful Hints . . . . . . . . . . . . . . . . . . . . . . . . . . . . . . . . . . . . . . . . . . . . . . . . . . . . . .48-49Limited Warranty . . . . . . . . . . . . . . . . . . . . . . . . . . . . . . . . . . . . . . . . . . . . . . . . . . .50-51Specifications . . . . . . . . . . . . . . . . . . . . . . . . . . . . . . . . . . . . . . . . . . . . . . . . . . . . . . . . .52Index . . . . . . . . . . . . . . . . . . . . . . . . . . . . . . . . . . . . . . . . . . . . . . . . . . . . . . . . . . . . . . .53Accessories . . . . . . . . . . . . . . . . . . . . . . . . . . . . . . . . . . . . . . . . . . . . . . . . . . . . . . . . . .56

● Use only tapes with the mark.● Remove any light adhesive stick-on notes from the video cassette
tape before putting the tape in the VCR. Removable labels can jamthe VCR.
● This VCR requires periodic maintenance to maintain its excellentperformance. This VCR has an Automatic Head Cleaner.However, the video heads will require replacement eventually.Only an authorized service center should perform this service.
Before Using Your VCR 5
Putting Batteries in the Remote Control
1Remove the battery compartment lid on the bottom of theremote control by pressing the tab, then lifting the lid.
2Place two AA batteries inside the battery compartment withtheir + and – ends aligned as indicated.
3Replace the battery compartment lid.
Using the Remote Control● Point the remote control at the VCR, then press the VCR button
before using the remote control to operate the VCR.● Point the remote control at the TV, then press the TV button
before using the remote control to operate the TV.● Point the remote control at the Cable Box or Direct Broadcast
System (DBS), then press the CBL/DBS button before using theremote control to operate the Cable Box or DBS.
VCR maintenance
Video cassette tapes have record tabs to ensure that recordings arenot accidentally erased.
1To prevent recording, break off the tab with a screwdriver.
2To allow recording, cover the hole with cellophane tape.
Recording Prevention
1
2
1
2
3Battery Safety● Battery Usage CAUTION - To prevent battery leakage that may
result in bodily injury or damage to the unit:Install ALL batteries correctly, with the + and - markings on thebattery aligned as indicated on the unit;Do not mix batteries, for example, old with new or carbon withalkaline; andRemove batteries when the unit will not be used for a long time.
Removing the Plastic Cover from the Front Panel● A thin plastic cover may protect the front panel of your VCR.
Before using the VCR, lift a corner of the plastic, then peel it off.

AUDIO ANTIN
OUTVIDEO
L
R
OUT INCH3 CH4
OUT IN
OR
AUDIO ANTIN
OUTVIDEO
L
R
OUT INCH3 CH4
OUT IN
OR
6 Hookups without a Cable Box/Direct Broadcast SystemThe basic VCR/TV connection – antenna/cable to VCR to TV – is shown below. If you have aCable Box or a Direct Broadcast System, please see pages eight-nine. If you have a StereoTV, please see page 10. After you hook up the VCR, go to page 11 to turn on the VCR.(The VR623CAT is illustrated here. The VR423CAT has single AUDIO IN/OUT jacks.)
ANTENNA INJack
(on back ofTV)Cable
(75 ohm)
Back of VCR
AntennaIndoor/Outdoor
(300 ohm)
1Disconnect the antenna or cable from your TV.
2Connect the antenna or cable to the ANT(enna) IN Jack of your VCR.
Cable(75 ohm)
AntennaIndoor/Outdoor
(300 ohm)

AUDIO ANTIN
OUTVIDEO
L
R
OUT INCH3 CH4
OUT IN
AUDIO ANTIN
OUTVIDEO
L
R
OUT INCH3 CH4
OUT IN
CH 4or
CH 3
CH3 / CH4Switch
CH3 CH4
AUDIO ANTIN
OUTVIDEO
L
R
OUT INCH3 CH4
OUT IN
AUDIO ANTIN
OUTVIDEO
L
R
OUT INCH3 CH4
OUT IN 75 ANT /
CABLE
75 ANT /CABLE
supplied black RF coaxial cable
3Connect the supplied black RF coaxial cable to the OUT Jack on the back ofthe VCR and to the ANTENNA IN Jack on the TV. (You may use either a snap-ontype (supplied) or screw-on type of coaxial cable, whichever you prefer.)
5Set the CH3/CH4 switch on the back of the VCR to CH3 or CH4, whicheverchannel is not used or least used in your area. Set the TV to the same channel. Forexample, when playing a tape, if the CH3/CH4 switch is set to CH3, the TV should be onchannel 03.
Hookups without a Cable Box/Direct Broadcast System (cont’d) 7
ANTENNA IN Jack(on back of TV)example only
4Plug in the power cords of the TV and the VCR.
6You are ready to turn on the VCR. Please go to page 11 before turning onthe VCR.

8 Hookups with a Cable Box/Direct Broadcast SystemThere are two ways to connect your Cable Box/DBS to the VCR. With this connection:● You may view any channel.● You must select channels at the Cable Box/DBS. You can not change channels at the VCR.● You may not view a channel other than the one you are recording.● You may not program channels at the VCR.● You can only program a timer recording for one channel at a time. Set the TV and the VCR to the Cable Box/DBS
output channel (channel 03 or 04). Set the CH3/CH4 switch on the back of the VCR to the same channel. Set yourCable Box/DBS to the channel you want to record. When you enter the channel you want to record in a timerrecording, select channel 03 or 04 (the Cable Box/DBS output channel). (This is step 5 on page 34.) Leave the CableBox/DBS on for a timer recording.
AUDIO ANTIN
OUTVIDEO
L
R
OUT INCH3 CH4
OUT IN
OUTIN
75 ANT /CABLE
TV’sANTENNA
IN Jack
Cable Box/DBS VCR
Recording/Viewing Any Channel
Connections
1With the VCR on and in VCR position (the VCR light will appear on the display panel),set the VCR to the Cable Box/DBS output channel (03 or 04).
2Set the TV to the same channel to which you set the VCR. Set the CH3/CH4switch on the back of the VCR to the same channel.
3Select the channel you want to view/record at the Cable Box/DBS.
1Connect a Cable signal to the IN Jack on the Cable Box/DBS.
2Use the supplied black RF coaxial cable to connect the OUT Jack on the Cable Box/DBSto the ANT(enna) IN Jack on the VCR.
3Use a second RF coaxial cable (not supplied) to connect the OUT Jack on the VCR tothe TV’s ANTENNA IN Jack.
1 2
3CableSignal RF coaxial
cable
RF coaxialcable

Hookups with a Cable Box/Direct Broadcast System (cont’d) 9
AUDIO ANTIN
OUTVIDEO
L
R
OUT INCH3 CH4
OUT IN
INOUT
75 ANT /CABLE
With this connection:● You may watch one channel while recording another.● You may not record scrambled channels.
Recording One Channel/Watching Another
1Put the Cable Box/DBS on the same channel as the VCR’s CH3/CH4switch. Set the TV to the Cable Box/DBS output channel (03 or 04).Then, with the VCR in VCR position (the VCR light will appear on thedisplay panel), use the CH(annel) o/p buttons to select thechannel you want to record at the VCR. Start the recording.
2Press the VCR/TV button once to put the VCR in TV position.(The VCR light will disappear.)
3Select the channel you want to watch at the Cable Box/DBS.
4To return to the channel you are recording, set the Cable Box/DBS tothe same channel as the VCR’s CH3/CH4 switch. Press the VCR/TVbutton so that the VCR is in VCR position again. The VCR light willappear on the display panel. The channel you are recording will appearon the TV screen. Press the STOP/p button to stop recording.
TV’s ANTENNAIN Jack
Cable Box/DBS
VCR
• When you play a tape, make surethe Cable Box/DBS is set to thesame channel as the CH3/CH4switch on the VCR. Set the TV tothe Cable Box/DBS output channel(03 or 04).
Helpful Hint
1Connect a Cable signal to the VCR’s ANT(enna) IN Jack.
2Use the supplied black RF coaxial cable to connect the OUT Jack on theVCR to the IN Jack on the Cable Box/DBS.
3Use a second RF coaxial cable (not supplied) to connect the OUT Jackon the Cable Box/DBS to the ANTENNA IN Jack on the TV.
12
3Connections
CableSignal
RF coaxial cable RF coaxial cable
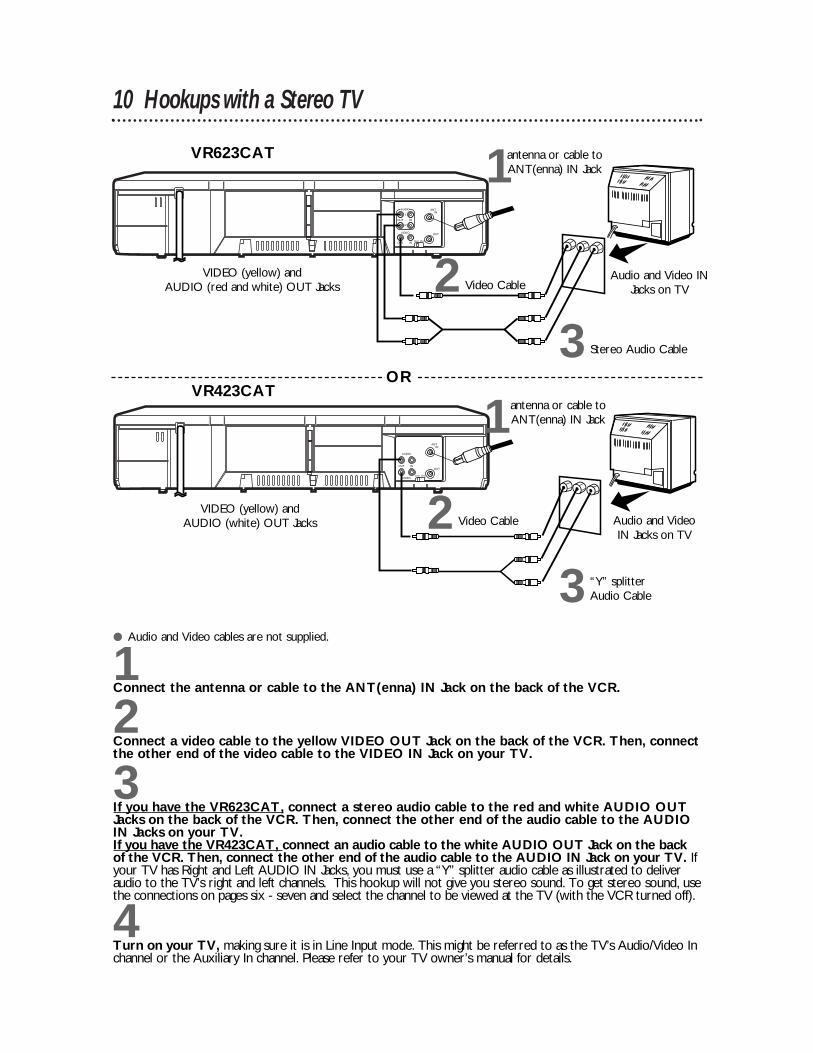
10 Hookups with a Stereo TV
● Audio and Video cables are not supplied.
1Connect the antenna or cable to the ANT(enna) IN Jack on the back of the VCR.
2Connect a video cable to the yellow VIDEO OUT Jack on the back of the VCR. Then, connectthe other end of the video cable to the VIDEO IN Jack on your TV.
3If you have the VR623CAT, connect a stereo audio cable to the red and white AUDIO OUTJacks on the back of the VCR. Then, connect the other end of the audio cable to the AUDIOIN Jacks on your TV.If you have the VR423CAT, connect an audio cable to the white AUDIO OUT Jack on the backof the VCR. Then, connect the other end of the audio cable to the AUDIO IN Jack on your TV. Ifyour TV has Right and Left AUDIO IN Jacks, you must use a “Y” splitter audio cable as illustrated to deliveraudio to the TV’s right and left channels. This hookup will not give you stereo sound. To get stereo sound, usethe connections on pages six - seven and select the channel to be viewed at the TV (with the VCR turned off).
4Turn on your TV, making sure it is in Line Input mode. This might be referred to as the TV’s Audio/Video Inchannel or the Auxiliary In channel. Please refer to your TV owner’s manual for details.
AUDIO ANTIN
OUTVIDEO
L
R
OUT INCH3 CH4
OUT IN
Video Cable
Stereo Audio Cable
VIDEO (yellow) and AUDIO (red and white) OUT Jacks
Audio and Video INJacks on TV2
3
AUDIO
ANTIN
OUT
VIDEO
OUT IN
CH3 CH4
Video Cable
“Y” splitterAudio Cable
VIDEO (yellow) andAUDIO (white) OUT Jacks Audio and Video
IN Jacks on TV
1
2
3
VR423CATOR
1antenna or cable toANT(enna) IN Jack
VR623CAT
antenna or cable toANT(enna) IN Jack

1Press the VCR button, then press the POWER button.The VCR light and the PWR. (power) light will appear on the VCRdisplay panel.
2Turn on the TV. Set it to the same channel as theCH3/CH4 switch on the back of the VCR. The display shownbelow will appear on the TV screen. (If the display does notappear, check your hookups, then follow the steps on page 12 toset up channels and page 20 to select a language.)
3Within 60 seconds, press the PLAY/o button or theSTOP/p button to select English or Spanish on-screendisplays and menus.
4Press the MENU button. The display shown below will appear.
SELECT op
→ ENGLISH ONESPAÑOL
MAKE SELECTION ORPUSH MENU TO CONTINUE
Turning on Your VCR 11
5Within 60 seconds, press the CH(annel) o button tobegin automatic channel programming. AUTO CH PRO-GRAMMING IN PROCESS PLEASE WAIT will appear on thescreen. The VCR will memorize all available channels. The channelnumbers will appear on the display panel as the VCR scans chan-nels. When all channels are memorized, CHANNELS ARE SET willappear on the screen briefly, then TV programming will appear.Now, when you press the CH(annel) o/p buttons, you’ll onlyscan through channels that you receive. You can still select otherchannels using the Number buttons.
• To skip this feature and play a tapeimmediately, insert a tape with itsrecord tab removed. Or, to skip step3, press the MENU button. All on-screen displays will be in English. Toskip step 5, press the STOP/p but-ton. Channels will not be pro-grammed, and CHANNELS NOTSET will appear on the screen.
• When you turn on the VCR againlater, you may see a messageregarding AUTO CLOCK. Details areon pages 15-18.
• If you try to program channelswhen there is no antenna or cableconnected to the VCR, programmingwill appear to take place, but even-tually a NO TV SIGNALS messagewill appear. Connect an antenna orcable to the VCR’s ANT(enna) INJack and press the CH(annel) obutton again. You may need to fol-low the steps on page 12.
• You may need to repeat the stepson this page if a power failureoccurs.
Helpful Hints
Before turning on your VCR, make sure batteries are in the remotecontrol and you have connected the VCR and TV correctly.● You can not program channels if you are using a Cable Box or a
Direct Broadcast System.● If you are not using a Cable Box/DBS, the clock may set itself
automatically after you connect the antenna/Cable signal to theVCR and plug in the power cord. The time will appear on thedisplay panel.
2 Turn on the TV.
CONNECT ANTENNA OR CABLETO VCR
THEN . . .PUSH CH UP KEY
OR . . .FOR PLAY ONLY – PUSH STOP
1
3
4
5
POWEREJECT
VCR/TV SPEED TIME SEARCH
SLOWENTER
1 2 3
4 5 6
7 8 9
0
CH. VOL.
MEMORY ALT.CH
REW
PLAY
F.FWD
REC/OTR
PAUSE/STILL
STOP
MUTE
VCR CBL/DBSTV
MENU STATUS/EXIT CLEAR

12 Automatic Channel Setup
2Press the MENU button.
SELECT op CHOOSE B
→ PROGRAMVCR SET UPTUNER SET UPSET CLOCK
TO END PUSH EXIT
• You can not enter the TUNER SETUP menu when you are in LineInput mode (channel 001 or 002).When you select channel 001 or002, AV REAR or AV FRONT willappear on the TV screen briefly.
• You can not program channels ifyou are using a Cable Box or DBS.
• If you have an antenna, channels 2-69 will be available. If you have acable connection, channels 1-125will be available.
• You may need to repeat the stepson this page if a power failureoccurs.
Helpful Hints
Although your VCR may automatically memorize the channels youreceive when you turn it on for the first time, this function letsyou set up the channels again.
3Press the PLAY/o button or the STOP/p button to selectTUNER SET UP, then press the F.FWD/B button.
SELECT op CHOOSE B
→ AUTO PROGRAMMINGADD/DELETE CHCH MEMORY REVIEWTV STEREO ON2ND AUDIO
TO END PUSH EXIT
4Press the PLAY/o button or the STOP/p button to selectAUTO PROGRAMMING, then press the F.FWD/B but-ton. The VCR distinguishes between TV channels and cable chan-nels, and the VCR will memorize all the channels you receive. Thechannel numbers will appear on the VCR display panel duringchannel setup.
5Wait for a few minutes while the VCR sets up the chan-nels. When this is complete, CHANNELS ARE SET will appear onthe screen. Then the programming of the lowest channel numberplaced in the VCR’s memory will appear on the screen. Nowwhen you press the CH(annel) o/p buttons, you will scan onlythrough channels you receive. You may still select non-memorizedchannels by pressing the Number buttons.
2
3-41Press the VCR button.
1
POWEREJECT
VCR/TV SPEED TIME SEARCH
SLOWENTER
1 2 3
4 5 6
7 8 9
0
CH. VOL.
MEMORY ALT.CH
REW
PLAY
F.FWD
REC/OTR
PAUSE/STILL
STOP
MUTE
VCR CBL/DBSTV
MENU STATUS/EXIT CLEAR
VR623CAT only
AUTO CH PROGRAMMINGIN PROCESS
PLEASE WAIT
START FINISH

Automatic Channel Setup (cont’d) 13
2Press the MENU button.
SELECT op ADD/DELETE B
124 DELETED125 DELETED
1 → DELETED2 ADDED3 ADDED
TO END PUSH EXIT
3Press the PLAY/o button or the STOP/p button to selectTUNER SET UP, then press the F.FWD/B button.
4Press the PLAY/o button or the STOP/p button to selectADD/DELETE CH, then press the F.FWD/B button.
5Press the PLAY/o button or the STOP/p button until thechannel number you want to add or delete appears besidethe arrow.
SELECT op ADD/DELETE B
16 DELETED17 ADDED18 → ADDED19 ADDED20 ADDED
TO END PUSH EXIT
6Press the F.FWD/B button to select ADDED or DELET-ED. Repeat steps 5 and 6 until you have added or deleted all thechannels you wanted to add or delete.
7Press the STATUS/EXIT button.
2
3-67
1Press the VCR button.
1
POWEREJECT
VCR/TV SPEED TIME SEARCH
SLOWENTER
1 2 3
4 5 6
7 8 9
0
CH. VOL.
MEMORY ALT.CH
REW
PLAY
F.FWD
REC/OTR
PAUSE/STILL
STOP
MUTE
VCR CBL/DBSTV
MENU STATUS/EXIT CLEAR
NOTE: If you have an antenna, channel numbers 2-69 will appear onthe ADD/DELETE CH menu. If you have a cable connection, channels1-125 will be available.
Adding/Deleting ChannelsIf your channel lineup changes, you may want to add newly avail-able channels or remove channels that are no longer available inyour area. Channels that you add to the VCR’s memory can beselected by pressing the CH(annel) o/p buttons. To add or delete channels from the VCR’s memory, follow thesesteps.

14 Automatic Channel Setup (cont’d)Reviewing Memorized Channels
4Press the PLAY/o button or the STOP/p button to selectCH MEMORY REVIEW, then press the F.FWD/B button.A list of programmed channels will appear on the screen.● If all the programmed channels don’t fit on the screen, press
the F.FWD/B button to see the remaining channels. Thenpress the REW(ind)/s button to return to the first screen ofchannels.
● If you do not press any buttons within 10 seconds, you willeither go to the next screen of channels or you will return tothe previous menu.
5Press the STATUS/EXIT button once or twice to exit.
2Press the MENU button.
SELECT op CHOOSE B
→ PROGRAMVCR SET UPTUNER SET UPSET CLOCK
TO END PUSH EXIT
3Press the PLAY/o button or the STOP/p button to selectTUNER SET UP, then press the F.FWD/B button.
SELECT op CHOOSE B
→ AUTO PROGRAMMINGADD/DELETE CHCH MEMORY REVIEWTV STEREO ON2ND AUDIO
TO END PUSH EXIT
2
3-451Press the VCR button.
1
POWEREJECT
VCR/TV SPEED TIME SEARCH
SLOWENTER
1 2 3
4 5 6
7 8 9
0
CH. VOL.
MEMORY ALT.CH
REW
PLAY
F.FWD
REC/OTR
PAUSE/STILL
STOP
MUTE
VCR CBL/DBSTV
MENU STATUS/EXIT CLEAR
VR623CAT only

Setting the Clock 15
2Press the MENU button.
There are two ways to set the clock. With manual clock setting,you tell the VCR the current time. With automatic clock setting,the VCR gets the current time from your local PBS station. Itkeeps track of the time by constantly referring to the time broad-casted by your PBS station.If you are using a Cable Box or Direct Broadcast System,you must set the clock manually.Follow the instructions under either manual clock setting (below)or automatic clock setting (page 17) to set the VCR’s clock.Before you begin, make sure:● The VCR is hooked up and turned on, and channels are pro-
grammed into the VCR’s memory (see pages six-12). ● The VCR is in VCR position. The VCR light will appear on the
display panel. If it does not, press the VCR/TV button once.
Do each step within 60 seconds of the previous step.
3Press the PLAY/o button or the STOP/p button to selectSET CLOCK, then press the F.FWD/B button.
SET CLOCK→AUTO CLOCK [ON]
SET MANUAL CLOCKDAYLIGHT SVG TIME [ON]SET TIME ZONE
(AUTO)
TO CONTINUE PUSH MENUSELECT op CHOOSE BTO END PUSH EXIT
• To display the time on the TVscreen, press the STATUS/EXIT but-ton. Details are on page 25.
• Power failures may erase the clocksetting. If this happens, reset theclock.
• Until the clock is set, - : - - mayappear on the VCR display panel.
Helpful Hints
Manual Clock Setting
4Press the PLAY/o button or the STOP/p button to selectSET MANUAL CLOCK, then press the F.FWD/B button.
TIME – – : – – DATE – – / – – / – –
TO END PUSH EXIT
1Press the VCR button.
SELECT op CHOOSE B
→ PROGRAMVCR SET UPTUNER SET UPSET CLOCK
TO END PUSH EXIT
2
3-4
1
POWEREJECT
VCR/TV SPEED TIME SEARCH
SLOWENTER
1 2 3
4 5 6
7 8 9
0
CH. VOL.
MEMORY ALT.CH
REW
PLAY
F.FWD
REC/OTR
PAUSE/STILL
STOP
MUTE
VCR CBL/DBSTV
MENU STATUS/EXIT CLEAR
Instructions continue on page 16.

TIME 02 :15 PMMONTH – – / – – /– –
TO CORRECT PUSH CLEARTO END PUSH EXIT
TIME 02 :15 PMDATE 07/ 01 / 01
SUN.
TO CORRECT PUSH CLEARTO END PUSH EXIT
5Press two Number buttons for the hour(s) and twoNumber buttons for the minute(s). Then press 1 for AMor 2 for PM. For example, for 2:15 PM, press 02, 15, 2.● Enter a 0 before a single-digit number.● Entries that do not match the VCR’s calendar or clock will
cause a question mark (?) to appear on the screen.● To make corrections, press the CLEAR button until the space
for the number you want to correct is flashing. Then enter thecorrect number.
6Press two Number buttons for the month, two Numberbuttons for the day, and two Number buttons for theyear. For example, for July 1, 2001, press 07, 01, 01. The day ofthe week will appear automatically.
7Press the STATUS/EXIT button to start the clock. Thescreen will return to the program you were watching. The timewill appear on the VCR display panel.
16 Setting the Clock (cont’d)
5-6
7POWER
EJECT
VCR/TV SPEED TIME SEARCH
SLOWENTER
1 2 3
4 5 6
7 8 9
0
CH. VOL.
MEMORY ALT.CH
REW
PLAY
F.FWD
REC/OTR
PAUSE/STILL
STOP
MUTE
VCR CBL/DBSTV
MENU STATUS/EXIT CLEAR

Setting the Clock (cont’d) 17
4● If you want the VCR to locate a local PBS station from
which to take the time, press the PLAY/o button or theSTOP/p button to select SET PBS CH. AUTO. Thenpress the F.FWD/B button. When the current time appearson the screen, you’re finished. Press the STATUS/EXIT button. Or, you may be prompted to turn off the VCR. Turn off theVCR power, and leave it off for several minutes. When the cur-rent time appears on the VCR display panel, the clock is set. Youmay turn on the VCR again.
● If you want to tell the VCR the PBS station from whichto take the time, press the PLAY/o button or theSTOP/p button to select SET PBS CH. MANUAL. Pressthe F.FWD/B button, then use the Number buttons toenter the channel number of the desired PBS station.When the current time appears on the screen, you’re finished.Press the STATUS/EXIT button.NOTE: CANNOT FIND PBS CLOCK DATA may flash on the screen.Press the PLAY/o button or the STOP/p button to choose SELECTNEW PBS CH., then press the F.FWD/B button. Use the Numberbuttons to enter the channel number of another PBS station. Or, press the PLAY/o button or the STOP/p button to select SETPBS CH. AUTO. Press the F.FWD/B button. You will be prompted toturn off the VCR. Turn off the VCR power, and leave it off for severalminutes. When the current time appears on the VCR display panel,the clock is set. You may turn on the VCR again.
• If you enter an incorrect PBS channelnumber at step 4, press the CLEARbutton to erase the incorrect channel,then enter the correct channel number.
• If you have an antenna, you mayselect channels 2-69 at step 4. If youhave a cable connection, you mayselect channels 1-125.
• The VCR can not set its clock auto-matically if it doesn’t receive a chan-nel that carries a time signal. Set theclock manually.
• If only a few channels in your areacarry time signals, setting the clockautomatically may take several min-utes. If nothing happens after youwait several minutes, set the clockmanually.
• You cannot select AUTO CLOCK atstep 3 during tape playback.
Helpful Hints
1Press the VCR button, then press the MENU button.
2Press the PLAY/o button or the STOP/p button to selectSET CLOCK, then press the F.FWD/B button.
3If OFF appears to the right of AUTO CLOCK, press theF.FWD/B button to select ON. Then, press the MENUbutton. Or, if ON appears to the right of AUTO CLOCK,press the MENU button. Go to step 4.
Automatic Clock Setting
SELECT op CHOOSE B
→ PROGRAMVCR SET UPTUNER SET UPSET CLOCK
TO END PUSH EXIT
1
32-44
AUTO CLOCK
AUTO CLOCK USESPBS CHANNEL DATA
→SET PBS CH. AUTOSET PBS CH. MANUAL
SELECT op CHOOSE BTO END PUSH EXIT
POWEREJECT
VCR/TV SPEED TIME SEARCH
SLOWENTER
1 2 3
4 5 6
7 8 9
0
CH. VOL.
MEMORY ALT.CH
REW
PLAY
F.FWD
REC/OTR
PAUSE/STILL
STOP
MUTE
VCR CBL/DBSTV
MENU STATUS/EXIT CLEAR

18 Setting the Clock (cont’d)Time ZoneWhen using the AUTO CLOCK function, you can specify yourtime zone. That way, the VCR will update the clock according toyour time zone.
1Press the VCR button, then press the MENU button.
2Press the PLAY/o button or the STOP/p button to selectSET CLOCK, then press the F.FWD/B button.
SET CLOCK→AUTO CLOCK [ON]
SET MANUAL CLOCKDAYLIGHT SVG TIME [ON]SET TIME ZONE
(AUTO)
TO CONTINUE PUSH MENUSELECT op CHOOSE BTO END PUSH EXIT
3Press the PLAY/o button or the STOP/p button to selectSET TIME ZONE, then press the F.FWD/B button.
SELECT op CHOOSE B
→ AUTO ONATLANTICEASTERNCENTRALMOUNTAINPACIFICALASKAHAWAII
TO END PUSH EXIT
4Press the PLAY/o button or the STOP/p button to selectyour time zone. ON will appear beside your choice.
5Press the STATUS/EXIT button.
SELECT op CHOOSE B
→ PROGRAMVCR SET UPTUNER SET UPSET CLOCK
TO END PUSH EXIT
2-45
1
SELECT op CHOOSE B
AUTOATLANTIC
→ EASTERN ONCENTRALMOUNTAINPACIFICALASKAHAWAII
TO END PUSH EXIT
POWEREJECT
VCR/TV SPEED TIME SEARCH
SLOWENTER
1 2 3
4 5 6
7 8 9
0
CH. VOL.
MEMORY ALT.CH
REW
PLAY
F.FWD
REC/OTR
PAUSE/STILL
STOP
MUTE
VCR CBL/DBSTV
MENU STATUS/EXIT CLEAR
• SET TIME ZONE will not appear inthe menu if AUTO CLOCK is set toOFF.
• You may need to turn off the VCR forseveral minutes to enable the VCR toset its clock for your time zone.
Helpful Hints

2Press the MENU button.
3Press the PLAY/o button or the STOP/p button to selectSET CLOCK, then press the F.FWD/B button.
5Press the STATUS/EXIT button.
SET CLOCK→AUTO CLOCK [ON]
SET MANUAL CLOCKDAYLIGHT SVG TIME [ON]SET TIME ZONE
(AUTO)
TO CONTINUE PUSH MENUSELECT op CHOOSE BTO END PUSH EXIT
SELECT op CHOOSE B
→ PROGRAMVCR SET UPTUNER SET UPSET CLOCK
TO END PUSH EXIT
Daylight-Savings Time 19You may program the VCR so its clock will automatically moveforward one hour in April and turn back one hour in October.Daylight-Savings Time is ON when you receive your VCR. TurnDaylight-Savings Time ON or OFF by following the steps below.Before you begin:● Make sure you have set the clock. Details are on pages 15-18.
4Press the PLAY/o button or the STOP/p button to selectDAYLIGHT SVG TIME. Then, press the F.FWD/B buttonso that OFF (or ON) appears beside DAYLIGHT SVGTIME.
2
3-45
1Press the VCR button.
1
POWEREJECT
VCR/TV SPEED TIME SEARCH
SLOWENTER
1 2 3
4 5 6
7 8 9
0
CH. VOL.
MEMORY ALT.CH
REW
PLAY
F.FWD
REC/OTR
PAUSE/STILL
STOP
MUTE
VCR CBL/DBSTV
MENU STATUS/EXIT CLEAR
SET CLOCKAUTO CLOCK [ON]SET MANUAL CLOCK
→DAYLIGHT SVG TIME [ON]SET TIME ZONE
(AUTO)
TO CONTINUE PUSH MENUSELECT op CHOOSE BTO END PUSH EXIT

20 Language Selection
2Press the MENU button.
Follow the steps below to change the language of the on-screendisplays and menus.
3Press the PLAY/o button or the STOP/p button to selectVCR SET UP, then press the F.FWD/B button.
4Press the PLAY/o button or the STOP/p button to selectLANGUAGE, then press the F.FWD/B button.
5Press the PLAY/o button or the STOP/p button to selectEnglish or Spanish on-screen displays and menus.
6Press the STATUS/EXIT button.
SELECT op CHOOSE B
→ PROGRAMVCR SET UPTUNER SET UPSET CLOCK
TO END PUSH EXIT
SELECT op CHOOSE B
→ REPEAT PLAY OFFON SCREEN MODEAUDIO OUTLANGUAGEBLUE BACKGROUND ON
TO END PUSH EXIT
• If you accidentally select Spanishand need English:
1. Press the VCR button.2. Press the MENU button.3. Press the PLAY/o button or the
STOP/p button to select PREPAREEL VCR, then press the F.FWD/Bbutton.
4. Press the PLAY/o button or theSTOP/p button to select LENGUA-JE, then press the F.FWD/B button.
5. Press the PLAY/o button or theSTOP/p button to select ENGLISH.
6. Press the STATUS/EXIT button.
Helpful Hint
SELECT op
→ ENGLISH ONESPAÑOL
MAKE SELECTION ORTO END PUSH EXIT
2
3-561Press the VCR button.
1
POWEREJECT
VCR/TV SPEED TIME SEARCH
SLOWENTER
1 2 3
4 5 6
7 8 9
0
CH. VOL.
MEMORY ALT.CH
REW
PLAY
F.FWD
REC/OTR
PAUSE/STILL
STOP
MUTE
VCR CBL/DBSTV
MENU STATUS/EXIT CLEAR
VR623CAT only

Setting the Remote to Operate a TV 21
• The remote control may only operatesome features of your TV. For exam-ple, the remote control may turn onthe TV power, but it may not changechannels at the TV.
• If you can not change the channels atthe TV using the Number buttons,press the ENTER button after youpress the Number buttons. It maychange channels at the TV.
• When you replace the batteries inthe remote control, you may need toprogram the remote control again.
• Remember to point the remote con-trol toward the TV during steps 1-6.
Helpful Hints
4Within 30 seconds, press the TV button.
3Press the MUTE button.
5Within 30 seconds, press the Number buttons to enterthe two-digit code for your TV brand. For example, if youhave a Zenith TV, press Number buttons 0, 6.
Your VCR remote control may operate your TV. If the remotecontrol doesn’t operate your TV now, follow the steps below.
1Point the remote control at your TV and press the TVbutton. Then, press the POWER button. If your TV turnson or off, try the other TV buttons (see pages 23-24). If your TVdoesn’t turn on or off, or if the other buttons don’t work, go tostep 2.
2Find the brand of your TV on the list below, and remem-ber the two-digit number beside it.
6Repeat step 1. If the remote control works your TV, you’re fin-ished. If the remote control still doesn’t work your TV, repeatsteps 3-5, using a different code for your brand (if available).
There is no guarantee that theremote will work your TV.
EMERSON . . . . . . . . . . . . . .14FISHER . . . . . . . . . . . . . . . . .11GE . . . . . . . . . . . . . . . . . . . .10GOLDSTAR . . . . . . . . . . . . .04HITACHI . . . . . . . . . . . . . . . .12JVC . . . . . . . . . . . . . . . . . . . .05MAGNAVOX . . . . . . .01, 02, 03MARANTZ . . . . . . . . . . . . . .13MITSUBISHI . . . . . . . . . . . . .13MONTGOMERY WARD . . . .14PANASONIC . . . . . . . . . . . . .07PANASONIC-GAOO . . . . . . .07
PHILCO . . . . . . . . . . . . . . . .14PHILIPS . . . . . . . . . . . . . . . .01PHILIPS MAGNAVOX. .01, 02, 03QUASAR . . . . . . . . . . . . . . . .07RCA . . . . . . . . . . . . . . . . . . .10SAMSUNG . . . . . . . . . . . . . .17SANYO . . . . . . . . . . . . . . . . .11SEARS . . . . . . . . . . . . . .08, 11SHARP . . . . . . . . . . . . . . . . .16SONY . . . . . . . . . . . . . . . . . .09TOSHIBA . . . . . . . . . . . . . . .08ZENITH . . . . . . . . . . . . . .06, 15
TV CODES
2 Find yourTV code.
3
5POWER
EJECT
VCR/TV SPEED TIME SEARCH
SLOWENTER
1 2 3
4 5 6
7 8 9
0
CH. VOL.
MEMORY ALT.CH
REW
PLAY
F.FWD
REC/OTR
PAUSE/STILL
STOP
MUTE
VCR CBL/DBSTV
MENU STATUS/EXIT CLEAR
1&6
4

• The remote control may only operatesome features of your Cable Box/DBS.For example, the remote control mayturn off the Cable Box/DBS power,but it may not change channels at theCable Box/DBS.
• If you can not change the channelsat the Cable Box by using theNumber buttons, press the ENTERbutton after you press the Numberbuttons. It may change channels atthe Cable Box.
• When you replace the batteries inthe remote control, you may have toprogram the remote control again.
• Remember to point the remote con-trol toward the Cable Box/DBS dur-ing steps 1-6.
• Some Cable Boxes can only beturned on at the Cable Box.
Helpful Hints
22 Setting the Remote to Operate a Cable Box/Direct Broadcast System
4Within 30 seconds, press the CBL/DBS button.
3Press the MUTE button.
5Within 30 seconds, press the Number buttons to enter thetwo-digit code for your Cable Box or DBS. For example, if youhave a Zenith Cable Box, press Number buttons 0,7.
Your VCR remote control may operate your Cable Box or DirectBroadcast System (DBS). If the remote control doesn’t operateyour Cable Box or DBS now, follow the steps below.
1Turn on the Cable Box/DBS. Then, point the remote con-trol at your Cable Box/DBS and press the CBL/DBS button.Then, press the POWER button. If your Cable Box/DBS turnsoff, try the other Cable Box/DBS buttons (see pages 23-24). If yourCable Box/DBS doesn’t turn off, or if the other buttons don’t work,go to step 2.
2Find the brand of your Cable Box or DBS on the listsbelow and remember the two-digit number beside it.
6Repeat step 1. If the remote control works your Cable Box orDBS, you’re finished. If the remote control still doesn’t work yourCable Box or DBS, repeat steps 3-5, using a different code foryour brand, if available.
There is no guaranteethat the remote will work your
Cable Box or DBS.
2 Find yourcode.
CABLE BOX CODES
DIRECT BROADCAST SYSTEM CODES
ARCHER..01, 05, 06, 44CABLETENNA.....01, 44CABLEVIEW........04, 30, 42, 44, 52CENTURY..................44CITIZEN...............04, 30, 42, 44, 52CURTIS................08, 09DIAMOND............01, 44EAGLE...........26, 40, 62EASTERN/REGENCY...................................28GC BRAND..........04, 30, 42, 44, 52GEMINI/JASCO..........04GENERAL ELECTRIC.............................01, 57GENERAL INSTRUMENT.....01, 02, 03, 04, 34, 83HAMLIN....14, 15, 28, 41JERROLD.......01, 02, 03, 04, 34, 83
MAGNAVOX...........94,95
MAGNAVOX..............26MATSUSHITA.......................16, 17, 97MOVIETIME.........42, 44NOVAVISION........08, 09NSC/NEC...................40OAK......................11, 46OAK SIGMA.........11, 46PANASONIC..16, 17, 97PHILIPS.........07, 23, 50PIONEER.............05, 06PULSAR.........04, 30, 42, 44, 52QUEST.................05, 06RCA................16, 17, 97REALISTIC.................44RECOTON.................44REGAL.....14, 15, 28, 41REMBRANDT.........................01, 42, 44
RCA.........................97
SAMSUNG.............05, 06, 40, 42SCIENTIFIC ATLANTA...............................08, 09SIGNAL........................26SL MARX.........06, 40, 42, 44, 52SPRUCER........16, 17, 97STANDARD COMPONENTS...............................42, 44STARGATE......04, 06, 30, 40, 42, 44, 52TELEVIEW.......06, 40, 42TOCOM......01, 33, 34, 42UNIKA....................01, 44UNIVERSAL.....42, 44, 52VIDEOWAY......07, 23, 50VIEWSTAR......26, 40, 62ZENITH............07, 23, 50
SONY.......................98
1&6
3
5
4
POWEREJECT
VCR/TV SPEED TIME SEARCH
SLOWENTER
1 2 3
4 5 6
7 8 9
0
CH. VOL.
MEMORY ALT.CH
REW
PLAY
F.FWD
REC/OTR
PAUSE/STILL
STOP
MUTE
VCR CBL/DBSTV
MENU STATUS/EXIT CLEAR

Remote Control Buttons 23
POWEREJECT
VCR/TV SPEED TIME SEARCH
SLOWENTER
1 2 3
4 5 6
7 8 9
0
CH. VOL.
MEMORY ALT.CH
REW
PLAY
F.FWD
REC/OTR
PAUSE/STILL
STOP
MUTE
VCR CBL/DBSTV
MENU STATUS/EXIT CLEAR
SPEED ButtonPress to select the recording speed (SP or SLP). Details are on
pages 35 and 47.
REC(ord)/OTR ButtonPress once to start a recording. Details are on page 30. Or, press
repeatedly to start a One-Touch Recording. Details are on page 32.
MEMORY ButtonPress to memorize the tape position at which you set the
real-time counter to 0:00:00. Details are on page 39.
VCR ButtonPress to operate the VCR with the remote control.
POWER ButtonPress to turn on or off the VCR, TV, Cable Box, or Direct Broadcast
System. (You must first press the VCR, TV, or CBL/DBS button.)
MENU ButtonPress to access the VCR menu or some TV menus.
Number ButtonsPress to select channels at the VCR, TV, Cable Box, or Direct Broadcast
System; use to set up VCR features (such as the clock).Cable Users ●
At the VCR, enter channel numbers as a two-digit number for the quickestresults. For example, to select channel 6, press 0,6. If you only press the
Number 6 button, channel 6 will be selected after a brief delay. (Therealso may be a brief delay when you select channels 10, 11, and 12.) If you
want to select channels 100 and above, enter channel numbers as a three-digit number. For example, to select channel 117, press 1, 1, 7.
Antenna Users ●
Enter channel numbers as a two-digit number for the quickest results. Youmay only select channels 2-69. For example, to select channel 5, press 0,5.
If you only press the Number 5 button, channel 5 will be selected after abrief delay.
PLAY/o ButtonPress to play a tape; press to release Slow, Search, or Still mode and return
to normal playback. Details are on page 41. Press to select an item in theVCR’s menu or some TV menus.
• Press the VCR button before pressing VCR feature buttons; press the TV button before pressing TV feature buttons;press the CBL/DBS button before pressing Cable Box/Direct Broadcast System feature buttons.
• Buttons that are shaded in the picture will glow for some time after exposure to direct light.• Buttons with a shaded description may also operate features of your TV, Cable Box, or Direct Broadcast System.
Helpful Hints
EJECT ButtonPress to eject the tape.
VOL(ume) o/p ButtonsPress to adjust the volume of your TV.
MUTE ButtonPress to eliminate the sound at your TV. Press again to restore the volume.If you mute the volume, pressing the VOL(ume) o button also will restore
the volume.
PAUSE/STILL ButtonWhile recording, press to temporarily stop the recording (pause). Press asecond time to resume normal recording. Details are on page 30. You can
not pause a One-Touch Recording. During playback, press to freeze thepicture (still). Press again to resume playback. Details are on page 41.
SLOW ButtonDuring tape playback, press to view the picture in slow motion.Press again to resume normal playback. Details are on page 41.

24 Remote Control Buttons (cont’d)CLEAR Button
Press to erase incorrect data when programming VCR functions.Also, press to reset the real-time counter. Details are on page 39.
VCR/TV ButtonPress to select VCR or TV position.
VCR Position ●Use to watch a tape, to watch a program while recording it, or to
watch a TV broadcast using the CH(annel) o/p or Number buttonsto change channels at the VCR. If the VCR light appears on the dis-
play panel of the VCR, it is in VCR position.TV Position ●
Use to watch TV (changing channels at the TV) or to watch one pro-gram while recording another. Details are on page 31. If the VCR light
doesn’t appear on the display panel of the VCR, it is in TV position.
POWEREJECT
VCR/TV SPEED TIME SEARCH
SLOWENTER
1 2 3
4 5 6
7 8 9
0
CH. VOL.
MEMORY ALT.CH
REW
PLAY
F.FWD
REC/OTR
PAUSE/STILL
STOP
MUTE
VCR CBL/DBSTV
MENU STATUS/EXIT CLEARREW(ind)/{ ButtonWhen tape playback is stopped, press to rewind the tape at high speed.
During playback, press to rewind the tape while the picture stays on thescreen. Details are on page 41. Press to return to a previous VCR menu.
Or, press to adjust the controls in some TV menus.
STATUS/EXIT ButtonPress to access or remove the VCR’s on-screen status display. Detailsare on page 25. Press to exit on-screen menus. Or, press the TV but-ton, then press the STATUS/EXIT button to access or remove some
TV displays or menus.
STOP/p ButtonPress to stop the tape. Press to select an item in the VCR menu. Or,
press when in TV mode to select an item in some TV menus.CH(annel) o/p Buttons
Press to change channels at the VCR, TV, Cable Box, or DirectBroadcast System.
• Press the VCR button before pressing VCR feature buttons; press the TV button before pressing TV feature buttons;press the CBL/DBS button before pressing Cable Box/Direct Broadcast System feature buttons.
• Buttons that are shaded in the picture will glow for some time after exposure to direct light.• Buttons with a shaded description may also operate features of your TV, Cable Box, or Direct Broadcast System.
Helpful Hints
ALT. CH (Alternate Channel) ButtonPress while in TV position to return to the TV channel you were
viewing immediately before switching to your current channel. (If youpress the ALT. CH button while in VCR position, the TV will change
to the channel you last selected before choosing channel 3 or 4 touse the VCR. However, the TV channel will not be clear, because you
are in VCR position.)
F.FWD(Fast Forward)/B ButtonWhen playback is stopped, press to fast forward the tape at high
speed. During playback, press to fast forward the tape while the pic-ture stays on the screen. Details are on page 41. Or, use to adjust the
controls in some TV menus.
TV ButtonPress to operate the TV. Details are on page 21.
CBL/DBS ButtonPress to operate the Cable Box or Direct Broadcast System.
Details are on page 22.
TIME SEARCH ButtonPress to fast forward or rewind the tape a specific length of time.
Details are on page 40.
ENTER ButtonPress after pressing the Number buttons to select a channel at the TV
or the Cable Box. Details are on pages 21-22.

SELECT op CHOOSE B
→ STATUS [ON]COUNTER ONLY [OFF]
TO END PUSH EXIT
On-Screen Status Displays 25
• You may not access a status displaywhen viewing a still picture, duringslow motion playback, or during asearch.
• A status display may not be avail-able when you are watching TV ifBLUE BACKGROUND is OFF.Details are on page 46.
Helpful Hint
1Press the VCR button, then press the MENU button.
A status display will appear when you press the STATUS/EXIT but-ton or certain function buttons. The contents of the status displaywill vary. To choose the status display mode, follow the steps below.If you select STATUS ON, then select COUNTER ONLYON:● Whenever you press the STOP/p button or the PLAY/o button,
the status display will appear for five seconds. After five seconds,only the counter will remain on the screen. You must press theSTATUS/EXIT button to remove it. Portions of the status displayalso may appear when you press other function buttons.
If you select STATUS ON, then select COUNTER ONLYOFF:● Whenever you press the STOP/p button or the PLAY/o button,
the status display will appear for five seconds. Portions of the sta-tus display also may appear when you press other function but-tons.
If you select STATUS OFF:● The status display will not appear when you press function but-
tons. You must press the STATUS/EXIT button to see the statusdisplay.
2Press the PLAY/o button or the STOP/p button to selectVCR SET UP, then press the F.FWD/B button.
3Press the PLAY/o button or the STOP/p button to selectON SCREEN MODE, then press the F.FWD/B button.
5If you set STATUS to OFF, go to step 6. If you set STA-TUS to ON, press the PLAY/o button or the STOP/p
button to select COUNTER ONLY, then press theF.FWD/B button so that OFF (or ON) appears beside it.
6Press the STATUS/EXIT button.
4Press the PLAY/o button or the STOP/p button to selectSTATUS, then press the F.FWD/B button so that OFF(or ON) appears beside STATUS.
Status Display(example only)
Current statusof tape Time
MTS BroadcastAvailable(VR623CAT only)
Counter,CounterMemory
TapeSpeed
STOP 12:00 AMTV STEREO CH10
STEREO2ND AUD
SLP M 1:23:45 HIFI
Channel
Audio Out Mode(VR623CAT only)
Receiving andRecording Mode(VR623CAT only)

26 VCR Display Panel
Cassette CompartmentInsert a tape here.
VCR LightThis light appears when theVCR is in VCR position. Thislight does not appear when theVCR is in TV position.Details are on pages 24 and 27.
REC(ord) LightThis light appears during a record-ing. It flashes when a recording ispaused.
Cassette-Inside LightThis light appears when a tape isin the VCR.
PWR.(power) LightThis light appears when thepower is on.
STOP/EJECT
RECORD
MENUSTATUS/EXIT
F.FWD
PAUSE
REW
CHANNELVCR/TV
PLAY
VIDEO
VIDEO CASSETTE RECORDER
L AUDIO R
POWER
Timer LightThis light glows when the VCRis off for a timer recording, dur-ing a timer recording, or duringa One-Touch Recording. Itflashes if the power is off for atimer recording, but no tape isin the VCR. It flashes when alltimer recordings are finished.
Clock DisplayThe current timeappears here when theclock is set. If the clockis not set, -:-- will appearhere. PM will appear onthe display, but AM willnot.
VR623CAT

Front Panel 27
POWER ButtonPress to turn the VCR power on and off.
PLAY ButtonPress to play a tape. Press to releaseSlow, Search, or Still mode and return toplayback. Details are on page 41. Press toselect an item in the VCR menu.
REW(ind) ButtonWhen playback is stopped, press to rewind the tape athigh speed. During playback, press to rewind the tapewhile the picture stays on the screen. Details are onpage 41. Press to return to a previous VCR menu.
F.FWD (Fast Forward) ButtonWhen playback is stopped, press to fast forward the tape at highspeed. During tape playback, press to fast forward the tape whilethe picture stays on the screen. Details are on page 41. Press toselect an item in the VCR menu or to change the setting of amenu item.
STOP/EJECT
RECORD
MENUSTATUS/EXIT
F.FWD
PAUSE
REW
CHANNELVCR/TV
PLAY
VIDEO
VIDEO CASSETTE RECORDER
L AUDIO R
POWER
Remote SensorReceives a signal from yourremote control so you can oper-ate your VCR from a distance.
VIDEO In JackConnect a video cablecoming from the videoout jack of a camcorder,another VCR, or anaudio-visual source (laserdisc player, digital videodisc player, etc.) here.Details are on page 37.
PAUSE ButtonWhile recording, press to pause the recording.Press again to resume recording. Details are onpage 30. You can not pause a One-TouchRecording. During tape playback, press to freezethe picture. Press again to resume playback.Details are on page 41.
VCR/TV ButtonPress to select VCR or TV position.● VCR Position
Use to watch a tape, to watch a programwhile recording it, or to watch a TV pro-gram (changing channels at the VCR).When the VCR light appears on the dis-play panel, the VCR is in VCR position.
● TV PositionUse to watch TV (changing channels atthe TV) or to watch one program whilerecording another. When the VCR lightdoes not appear on the display panel, theVCR is in TV position.
RECORD ButtonPress once to start a recording. Pressrepeatedly to start a One-Touch Recording.Details are on page 32.
CHANNEL (p/o) ButtonsPress to change channels at the VCR.Or, press to adjust the tracking of atape during normal playback or slowmotion playback. Also, press to removevertical jitter in a Still picture.
STOP/EJECT ButtonPress once to stop the tape. When playbackis stopped, press to eject the tape. Press toselect an item in the VCR menu.
AUDIO In JacksConnect audio cables com-ing from the audio out jacksof a camcorder, anotherVCR, or an audio sourcehere. Details are on page 37.The VR623CAT is shown here.The VR423CAT has only oneAUDIO In jack.
VR623CAT
MENU ButtonPress to access the VCR menu.
STATUS/EXIT ButtonPress to access or remove the on-screen status display.Details are on page 25. Press to exit on-screen menus.

AUDIO ANTIN
OUTVIDEO
L
R
OUT INCH3 CH4
OUT IN
28 Rear Panel
AUDIO IN Jack(s)Connect audio cables coming from the AUDIO OUT Jacks of a camcorder, anoth-er VCR, or an audio source here. Details are on page 37. If you connect other equip-ment to the AUDIO and VIDEO IN jacks on the back of the VCR, select channel 001(AV REAR) at the VCR. This allows you to view or hear the materials playing on theother equipment. The VR623CAT is shown here. The VR423CAT has only one AUDIO IN jack.
VIDEO IN JackConnect a video cable coming from theVIDEO OUT Jack of a camcorder,another VCR, or an audio-visual source(laser disc player, digital video disc play-er, etc.) here. Details are on page 37.If you connect other equipment to theAUDIO and VIDEO IN jacks on theback of the VCR, select channel 001 (AVREAR) at the VCR. This allows you toview or hear the materials playing onthe other equipment.
ANT(enna) IN JackConnect your antenna or cablehere. Details are on pages six-10.
CH3/CH4 SwitchSet to channel 3 or 4to use your TV withyour VCR. Details areon pages six-nine.
OUT JackUse the supplied black RFcoaxial cable to connectthis jack to the ANTEN-NA IN Jack on your TV,Cable Box, or DirectBroadcast System. Detailsare on pages six-nine.
VIDEO OUT JackConnect a video cable going to the VIDEOIN Jack of a camcorder, another VCR, oran audio-visual system (monitor, laser discplayer, video disc player, etc.) here. Detailsare on pages 37 and 43.
AC Power CordConnect to a standardAC outlet to supplypower to the VCR.
AUDIO OUT Jack(s)Connect audio cables going to the AUDIO IN Jacks of a camcorder, anotherVCR, or an audio system here. Details are on pages 37 and 43.The VR623CAT is shown here. The VR423CAT has only one AUDIO OUT jack.

Playing 29
• If the tape you want to play isalready in the VCR, make sure theVCR power is on and the VCR is inVCR position. (The VCR light willappear on the display panel. If itdoes not, press the VCR/TV buttononce.) Press the VCR button, thenpress the PLAY/o button.
• Other playback options and featuresare on pages 38-45.
• If REPEAT PLAY is ON, playback willbegin automatically when you inserta tape, even when the record tab isintact. (However, playback will notbegin if the VCR power is off and atimer recording is set.)
Helpful Hints
Read and follow the steps below to play a tape.
1Turn on the TV and set it to channel 3 or 4, whicheverchannel the CH3/CH4 switch on the back of the VCR is set to.
2Insert a tape in the VCR. The PWR., VCR, and Cassette-Insidelights will appear on the display panel. If the tape’s record tab ismissing, playback will start automatically.
6Press the EJECT button to remove the tape.
3If playback does not start automatically, press the VCRbutton, then press the PLAY/o button.
4Press the STOP/p button to stop playback.
5Press the REW(ind)/{ button to rewind the tape.
1 Turn on the TV.
2 Insert a tape in the VCR.
6
345
POWEREJECT
VCR/TV SPEED TIME SEARCH
SLOWENTER
1 2 3
4 5 6
7 8 9
0
CH. VOL.
MEMORY ALT.CH
REW
PLAY
F.FWD
REC/OTR
PAUSE/STILL
STOP
MUTE
VCR CBL/DBSTV
MENU STATUS/EXIT CLEAR
S-VHS Quasi Play Back (SQPB)This unit has a SQPB function that allows you to view a tape yourecorded in S-VHS format. An S-VHS format tape will play thesame as a normal format tape. This unit automatically detectswhether the tape is in S-VHS format or in normal format.When you play an S-VHS tape on this unit, you can not get thehigh resolution that would be available on an S-VHS VCR. Noiselines (black and white streaks) may appear on the picture.

Read and follow the steps below to record a television program.
1Turn on the TV and set it to channel 3 or 4, whicheverchannel the CH3/CH4 switch on the back of the VCR is set to.
30 Recording
2Insert a tape with its record tab intact in the VCR.
4If the VCR light appears on the display panel, go to step 5. If theVCR light does not appear, press the VCR/TV buttononce.
• If you press the REC(ord)/OTR buttonwhen a tape is not in the VCR, NOCASSETTE will flash on the screen.
• If you press the REC(ord)/OTR buttonwhile a tape without a record tab isin the VCR, the VCR will eject thetape and PROTECTED CASSETTECANNOT RECORD will flash on thescreen.
• Other recording options are on pages31-37.
• You can change the tape speed during a recording, but some distortion will appear on the tape.
• The VCR will record in a preset volume.
Helpful Hints
5Press the SPEED button until the desired tape speedappears briefly on the screen. (Details about tape speed are onpage 35.)
6Use the CH(annel) o/p buttons or the Number buttonsto select the channel to be recorded.
7Press the REC(ord)/OTR button once to start recording.The REC(ord) light will appear on the VCR display panel.
8To pause the recording, press the PAUSE/STILL buttononce. The REC(ord) light will flash. To resume recording,press the REC(ord)/OTR button or press thePAUSE/STILL button again. The REC(ord) light will come onagain.
9To stop recording, press the STOP/p button.
1 Turn on the TV.
2 Insert a tape in the VCR.
7
4
68
5
9
3Press the VCR button.
3
POWEREJECT
VCR/TV SPEED TIME SEARCH
SLOWENTER
1 2 3
4 5 6
7 8 9
0
CH. VOL.
MEMORY ALT.CH
REW
PLAY
F.FWD
REC/OTR
PAUSE/STILL
STOP
MUTE
VCR CBL/DBSTV
MENU STATUS/EXIT CLEAR

2Press the REC(ord)/OTR button to start a recording ofthe current channel. (See page 30.) The REC(ord) light willappear on the VCR display panel.
Recording One Channel/Watching Another 31
• If your VCR remote control does notoperate your TV, see page 21 fordetails.
• If you use a Cable Box or DirectBroadcast System, you may not beable to watch one channel whilerecording another. See pages eight-nine for details.
Helpful Hints
3Press the VCR/TV button to put the VCR in TV position.The VCR light will disappear from the VCR’s display panel.
7Press the VCR/TV button to put the VCR in VCR posi-tion. The VCR light will appear on the display panel. The channelbeing recorded will appear on the TV screen.
8Press the STOP/p button to stop the recording.
1Press the VCR button.
6Press the VCR button.
4Press the TV button, then press the CH(annel) o/p orNumber buttons to select the channel you want to watchat the TV. (If the VCR remote control doesn’t operate your TV,use the TV remote control to select the channel.)
5To return to the channel being recorded, press the TVbutton, then use the Number buttons to select channel 03or 04 at the TV (whichever channel the CH3/CH4 switch onthe back of the VCR is set to).(If the VCR remote control doesn’t operate your TV, use the TVremote control to select channel 03 or 04.)
3&7
28
1&6
4-5POWER
EJECT
VCR/TV SPEED TIME SEARCH
SLOWENTER
1 2 3
4 5 6
7 8 9
0
CH. VOL.
MEMORY ALT.CH
REW
PLAY
F.FWD
REC/OTR
PAUSE/STILL
STOP
MUTE
VCR CBL/DBSTV
MENU STATUS/EXIT CLEAR

32 One-Touch Recording
1Press the VCR button, then press the CH(annel) o/p but-tons or the Number buttons to select the channel youwant to record.
OTR (0:30)CH12
2Press the REC(ord)/OTR button repeatedly until thedesired recording length (30 minutes to eight hours)appears on the screen. Recording will begin immediately. TheREC(ord) light and the Timer light will appear on the displaypanel.
The One-Touch Recording (OTR) feature allows you to set animmediate timed recording 30 minutes to eight hours long. Beforeyou begin:● Set up the channels at the VCR. Details are on page 12.● Select a recording speed (SP, SLP) with the SPEED button.
Details are on page 35.● Put a tape in the VCR. Make sure the tape’s record tab is intact
and the tape is long enough to record the program(s).● Place the VCR in VCR position. (The VCR light will appear on
the display panel. If it does not, press the VCR/TV button once.)
3To stop an OTR before recording is finished, press theSTOP/p button or the POWER button.To cancel the OTR but continue recording, press theREC(ord)/OTR button repeatedly until REC appears in the upperleft corner of the TV screen. (STATUS must be ON. See page 25for details.) The REC(ord) light will remain on the display panel ofthe VCR, but the Timer light will disappear.
• To check the time remaining for anOTR that is in progress, press theSTATUS/EXIT button.
• To change the recording length whilean OTR is in progress, press theREC(ord)/OTR button until the desiredlength appears on the screen.
• If you begin an OTR when anotherrecording is paused, the OTR willbegin.
• You can not pause an OTR.• If the preset time for a timer record-
ing comes up during an OTR, theOTR has priority. A message willremind you when the timer recordingwas scheduled to begin. You may letthe OTR continue; the timer recordingwill not take place. Or, stop the OTRand turn off the VCR immediately.The timer recording will take place ifyou turn off the VCR before the timerrecording’s scheduled start time.
Helpful Hints
1 2
3POWEREJECT
VCR/TV SPEED TIME SEARCH
SLOWENTER
1 2 3
4 5 6
7 8 9
0
CH. VOL.
MEMORY ALT.CH
REW
PLAY
F.FWD
REC/OTR
PAUSE/STILL
STOP
MUTE
VCR CBL/DBSTV
MENU STATUS/EXIT CLEAR

DAILY PROGRAM (MON-FRI)PROGRAM -1 2 3 4 5 6 7 8-
SELECT PROGRAM NUMBERTO END PUSH EXIT
Timer Recording 33Follow the steps below to program your VCR to record TV pro-grams while you’re away from home. The VCR will turn itself on,record, and turn itself off automatically. Before you begin:● Set up the channels at the VCR. Details are on page 12.● Set the clock. Details are on pages 15-17.● Put a tape in the VCR. Make sure the tape’s record tab is intact
and the tape is long enough to record the program(s).● Put the VCR in VCR position. The VCR light will appear on the
display panel. If it does not, press the VCR/TV button once.
Do each step within 60 seconds of the previous step.
1Press the VCR button, then press the MENU button.
SELECT op CHOOSE B
→ PROGRAMVCR SET UPTUNER SET UPSET CLOCK
TO END PUSH EXIT
2Press the PLAY/o button or the STOP/p button to selectPROGRAM, then press the F.FWD/B button.
SELECT op CHOOSE B
→ ONCEDAILYWEEKLYPROGRAM REVIEW
TO END PUSH EXIT
3Press the PLAY/o button or the STOP/p button to selecta ONCE, DAILY, or WEEKLY recording. Then, press theF.FWD/B button.● ONCE: The VCR will record a TV program on any day you
choose, up to 12 months away.● DAILY: The VCR will record the same channel every day from
Monday to Friday – starting at the same time and recording forthe same length of time.
● WEEKLY: The VCR will record the same channel on the sameday, at the same time, and for the same length of time everyweek.
DailyRecording(example)
• If you need to make a correctionwhile programming a timer record-ing, press the CLEAR button untilthe cursor is flashing on the itemyou want to change. Then enter thecorrect information.
Helpful Hint
1
2-3POWER
EJECT
VCR/TV SPEED TIME SEARCH
SLOWENTER
1 2 3
4 5 6
7 8 9
0
CH. VOL.
MEMORY ALT.CH
REW
PLAY
F.FWD
REC/OTR
PAUSE/STILL
STOP
MUTE
VCR CBL/DBSTV
MENU STATUS/EXIT CLEAR
Instructions continue on page 34.

ONE TIME PROGRAMPROGRAM 1CHANNEL 10TIME ON – – : – –
TO CORRECT PUSH CLEARTO END PUSH EXIT
6Press two Number buttons for the hour you want therecording to begin. Press two Number buttons for theminute you want the recording to begin. Press 1 for AMor 2 for PM. For example, for 9:30 PM, press 09, 30, 2.
ONE TIME PROGRAMPROGRAM 1CHANNEL 10TIME ON 09:30 PMTIME OFF – – : – –
TO CORRECT PUSH CLEARTO END PUSH EXIT
34 Timer Recording (cont’d)
4Use the Number buttons (1 - 8) to select a slot in whichto store the timer recording. There are eight slots. Numbersfor open slots will flash on the screen.NOTE: If you enter a number for a slot that has already been used tostore a timer recording, PREVIOUSLY SET PROGRAM will appear on thescreen briefly. Information about the program in that slot will appear onthe screen. If this happens, press the STATUS/EXIT button, then selectanother number.
5Use the Number buttons to enter the channel you wantto record.● Cable Users, enter channel numbers as a two-digit number for
the quickest results. For example, to select channel 6, press0,6. If you only press the Number 6 button, channel 6 will beselected after a brief delay. There also may be a brief delay whenyou select channels 10, 11, and 12. If you want to select chan-nels 100 and above, enter channel numbers as a three-digitnumber. For example, to select channel 117, press 1, 1, 7.Antenna Users, enter channel numbers as a two-digit numberfor the quickest results. For example, to select channel 5, press0,5. If you only press the Number 5 button, channel 5 will beselected after a brief delay.
● If you are recording from line input, press 0,0 to select AVREAR.
● If you are using a Cable Box/DBS, select the Cable Box/DBSoutput channel (03 or 04). Set the Cable Box/DBS to the chan-nel you want to record. Leave the Cable Box/DBS on for thetimer recording. See page eight for details.
7Follow the instructions in step 6 to enter the recording’sstop time. (AM or PM will be set automatically.)
4-7POWER
EJECT
VCR/TV SPEED TIME SEARCH
SLOWENTER
1 2 3
4 5 6
7 8 9
0
CH. VOL.
MEMORY ALT.CH
REW
PLAY
F.FWD
REC/OTR
PAUSE/STILL
STOP
MUTE
VCR CBL/DBSTV
MENU STATUS/EXIT CLEAR
• Entries that do not match the VCR’sclock or calendar will cause a ques-tion mark to appear on the screen.
• If you are recording from line input,connect the audio and video cablesto the AUDIO IN and VIDEO INjacks on the back of the VCR.(Please see illustration on page 37.)
Helpful Hints

ONE TIME PROGRAMPROGRAM 1CHANNEL 10TIME ON 09:30 PMTIME OFF 11:00 PMREC SPEED SLP
SP=1 SLP=2
TO CORRECT PUSH CLEARTO END PUSH EXIT
Timer Recording (cont’d) 35
8Press the Number 1 button to record in SP speed or theNumber 2 button to record in SLP speed. (See the chartbelow.) You cannot use the SPEED button at this time.
9Press two Number buttons for the month and twoNumber buttons for the day you want to record the pro-gram. For example, for July 10, 2001, press 07, 10. The day ofthe week and the year will appear automatically. (You cannot pro-gram the VCR to record more than one year in advance.)
ONE TIME PROGRAMPROGRAM 1CHANNEL 10TIME ON 09:30 PMTIME OFF 11:00 PMREC SPEED SLPSTART DATE 07/10/01
TUE.TO CORRECT PUSH CLEARTO END PUSH EXIT
10Press the STATUS/EXIT button. PROGRAM WAS COM-PLETED / PLEASE TURN OFF VCR FOR TIMER RECORDINGwill appear on the screen briefly. (If PROGRAM NOT COMPLET-ED appears, try again from step 1.)
11Press the POWER button to turn off the VCR power. TheTimer light will appear on the display panel. The Timer light willflash if there is no tape in the VCR.If the timer recording will take place several hours or days fromnow, you may use the VCR until time for the recording. Turn off theVCR a few minutes before the recording starts. If you forget to turnoff the VCR, PLEASE TURN OFF VCR FOR TIMER RECORDINGflashes on your TV screen two minutes before a timer recordingstarts. Press the CLEAR button to remove the message.
Cassette type / Playback TimeTape Speed T160 T120 T60SP (standard play) 2 hrs.
2 hrs. 1 hr.40 mins.LP (long play) 5 hrs.
4 hrs. 2 hrs.(playback only) 20 mins.SLP (super long play)
8 hrs. 6 hrs. 3 hrs.
Tape SpeedsThis chart shows the recording/playback time forthree types of video cassettes (T160, T120, andT60). There are three playback speeds: SP, LP, andSLP. When recording, you can change the tapespeed (SP or SLP) using the SPEED button. Youcannot record in LP speed. You can play a tapeonly in the speed in which you recorded it.
Turn off the VCRfor the recording.
Insert a tape inthe VCR.
Leave the CableBox/DBS on
(if applicable).
89
10 11POWER
EJECT
VCR/TV SPEED TIME SEARCH
SLOWENTER
1 2 3
4 5 6
7 8 9
0
CH. VOL.
MEMORY ALT.CH
REW
PLAY
F.FWD
REC/OTR
PAUSE/STILL
STOP
MUTE
VCR CBL/DBSTV
MENU STATUS/EXIT CLEAR

36 Timer Recording (cont’d)
6Repeat steps 1 - 4 to make sure you have cleared the cor-rect timer recording.
• CLASH may flash on the screen whenyou finish setting a timer recording. Thismeans that the timer recording you justprogrammed and another timer record-ing overlap. The current timer recordingwill not take place. You may choose tocancel the overlapping timer recording.
• To stop a started timer recording, pressthe STOP/EJECT button on the VCR.
• If the power fails for more than oneminute, programmed timer recordingswill be lost. If this occurs, repeat thesteps on pages 11 and 15 before reset-ting the timer recordings.
• If the preset time for a timer recordingcomes up during an OTR, the OTR haspriority. A message will remind youwhen the timer recording was scheduledto begin. You may let the OTR continue;the timer recording will not take place.Or, stop the OTR and turn off the VCRimmediately. The timer recording willtake place if you turn off the VCRbefore the timer recording’s scheduledstart time.
See page 48 for more hints.
Helpful Hints
1With the VCR on and in VCR position (the VCR light will appearon the display panel), press the VCR button, then press theMENU button.
Checking or Cancelling Timer Recordings
2Press the PLAY/o button or the STOP/p button to selectPROGRAM, then press the F.FWD/B button.
3Press the PLAY/o button or the STOP/p button to selectPROGRAM REVIEW, then press the F.FWD/B button.The timer recording information for the program in the lowestnumbered slot will appear on the screen. If no timer recordingsare set, nothing will happen when you press the F.FWD/B button.
4Press the F.FWD/B button repeatedly to review all pro-grammed timer recordings. If you don’t press the F.FWD/B
button within 10 seconds, the VCR will automatically display infor-mation about the next programmed timer recording. This willcontinue until all timer recordings have been displayed. Then themenu will disappear.
5To cancel the timer recording displayed, press theCLEAR button. Either the display will disappear or informationabout other timer recordings will appear. If you do not press anyother buttons, the display will disappear after all timer recordingshave been displayed.
1
2-45POWER
EJECT
VCR/TV SPEED TIME SEARCH
SLOWENTER
1 2 3
4 5 6
7 8 9
0
CH. VOL.
MEMORY ALT.CH
REW
PLAY
F.FWD
REC/OTR
PAUSE/STILL
STOP
MUTE
VCR CBL/DBSTV
MENU STATUS/EXIT CLEAR

1Make the connections shown above.
Rerecording (Tape Duplication) 37
3VCR 2 will record your tape. Insert a blank tape in VCR 2.The VCR must be in VCR position. (The VCR light will appear onthe display panel. If it does not, press the VCR/TV button once.)
4Turn on the TV and set it to channel 03 or 04, whicheverchannel the CH3/CH4 switch on VCR 2 is set to.
5Point the remote control at VCR 2. Press the VCR but-ton, then press Number buttons 0, 0, 1 or 0, 0, 2. (SeeHelpful Hints at right.)
6Press the SPEED button to select SP or SLP at VCR 2.
7Press the PLAY button on VCR 1 and the RECORD but-ton on VCR 2 at the same time.To stop recording, press the STOP/EJECT button on VCR 1, thenpress the STOP/EJECT button on VCR 2.
2VCR 1 will play your tape. Put a prerecorded tape in VCR 1.
• If you use the AUDIO and VIDEO INJacks on the back of VCR 2, pressNumber buttons 0, 0, 1. AV REARwill appear on the TV screen. (BLUEBACKGROUND should be ON.Details are on page 46.)
• If you use the AUDIO and VIDEO InJacks on the front of VCR 2, pressNumber buttons 0, 0, 2. AV FRONTwill appear on the TV screen. (BLUEBACKGROUND should be ON.Details are on page 46.)
• Unauthorized recording of copyright-ed television programs, video tapes,or other materials may infringe onthe rights of copyright owners andviolate copyright laws.
• If a program has copyright protection,it may not record clearly.
• The VCR in the figure above is theVR623CAT. If you have theVR423CAT, use a single-plug audiocable to connect the AUDIO OUTjack on VCR 1 to the AUDIO IN jackon VCR 2.
Helpful Hints
● Audio and Video cables are not supplied.
AUDIO ANTIN
OUTVIDEO
L
R
OUT INCH3 CH4
OUT IN
AUDIO ANTIN
OUTVIDEO
L
R
OUT INCH3 CH4
OUT IN
VCR 1Playing VCR VCR 2 - Recording VCR
1. Audio cables from AUDIO OUT Jacksof VCR 1 to AUDIO IN Jacks of VCR 2
2. Video cable from VIDEO OUT Jackof VCR 1 to VIDEO IN Jack of VCR 2
3. RF coaxial cablefrom the OUT jack of
VCR 2 to the TV’sANTENNA IN Jack
The instructions on this page show you how to copy tapes. The illustration uses two VR623CAT VCRs. DifferentVCRs may operate differently. To duplicate a tape, make the connections shown, then follow steps 1-7.

38 Repeat PlayFollow the steps below to make the VCR play a tape over andover.
2Press the MENU button.
3Press the PLAY/o button or the STOP/p button to selectVCR SET UP, then press the F.FWD/B button.
5Press the F.FWD/B button so that ON appears besideREPEAT PLAY.
6Press the STATUS/EXIT button. Now, when a tape has fin-ished playing, the VCR will rewind it and start playback again. • To cancel Repeat Play, follow steps
1-4 above. At step 5, press theF.FWD/B button so that OFFappears beside REPEAT PLAY. Pressthe STATUS/EXIT button.
• The real-time counter memory doesnot function during Repeat Play.
Helpful Hints
SELECT op CHOOSE B
→ PROGRAMVCR SET UPTUNER SET UPSET CLOCK
TO END PUSH EXIT
SELECT op CHOOSE B
→ REPEAT PLAY OFFON SCREEN MODEAUDIO OUTLANGUAGEBLUE BACKGROUND ON
TO END PUSH EXIT
4Press the PLAY/o button or the STOP/p button to selectREPEAT PLAY.
3-5
2
61Press the VCR button.
1
POWEREJECT
VCR/TV SPEED TIME SEARCH
SLOWENTER
1 2 3
4 5 6
7 8 9
0
CH. VOL.
MEMORY ALT.CH
REW
PLAY
F.FWD
REC/OTR
PAUSE/STILL
STOP
MUTE
VCR CBL/DBSTV
MENU STATUS/EXIT CLEAR
VR623CAT only
SELECT op CHOOSE B
→ REPEAT PLAY ONON SCREEN MODEAUDIO OUTLANGUAGEBLUE BACKGROUND ON
TO END PUSH EXIT
VR623CAT only

• The MEMORY button does notfunction if REPEAT PLAY is ON.Details are on page 38.
• To erase a real-time counter memo-ry, press the MEMORY button untilthe M disappears from the screen.
• You may only set the real-timecounter to zero at one location at atime. If you set the real-timecounter to zero at a second loca-tion, the previous real-time counterto zero setting will be erased.
Helpful Hints
Follow the steps below to reset the real-time counter to zero at atape location you want to refer to later.
2Play, fast forward, or rewind a tape to the location thatyou would like to refer to later. Press the STOP/p buttonto stop the tape.
1Press the VCR button.
3Press the STATUS/EXIT button to see the status display.
4While the status display is on the screen, press theCLEAR button to reset the real-time counter to zero.
5While the real-time counter is on the screen, press theMEMORY button so that M appears beside the counter.
6To go to a tape location where you set the real-timecounter to zero, press the REW(ind)/{ button or theF.FWD/B button when playback is stopped.When the tape reaches the point at which you set the counter tozero, the tape will stop.Press the PLAY/o button to watch the tape.
Real-Time Counter Memory 39
2
3 4
65
1
POWEREJECT
VCR/TV SPEED TIME SEARCH
SLOWENTER
1 2 3
4 5 6
7 8 9
0
CH. VOL.
MEMORY ALT.CH
REW
PLAY
F.FWD
REC/OTR
PAUSE/STILL
STOP
MUTE
VCR CBL/DBSTV
MENU STATUS/EXIT CLEAR
STOP 1:08PMTV STEREO CH10
STEREO
SLP 1 : 23 : 45 HIFI
STOP 1:08 PMTV STEREO CH10
STEREO
SLP 0 : 00 : 00 HIFI
STOP 1:08 PMTV STEREO CH10
STEREO
SLP M 0 : 00 : 00 HIFI
VR623CAT only
VR623CAT only
VR623CAT only

40 Time SearchFollow the steps below to program the VCR to search forward orbackward on a tape a specific length of time. There must be a tapein the VCR.
2Press the TIME SEARCH button.
3Within 10 seconds, use the Number buttons to enter thedesired length of time you want to skip forward or back-ward. For example, for 1 hour, 25 minutes, press Number but-tons 1, 2, 5. Or, for five minutes, press Number buttons 0, 0, 5.
4Within 10 seconds, press the F.FWD/B button or theREW(ind)/{ button. The VCR will skip over the specifiedlength of time, then begin playback.
• If you want to search for more than59 minutes, you must enter thelength of time in hours and minutes.For example, to search forward 70minutes, press 1,1,0 at step 3.
• You can not do a Time Search whilerecording.
• To remove the Time Search display,press the TIME SEARCH buttonagain.
• To cancel a Time Search that is inprogress, press the STOP/p button.
Helpful Hints
TIME SEARCH0:00
ENTER SEARCH TIME 4
1Press the VCR button.
POWEREJECT
VCR/TV SPEED TIME SEARCH
SLOWENTER
1 2 3
4 5 6
7 8 9
0
CH. VOL.
MEMORY ALT.CH
REW
PLAY
F.FWD
REC/OTR
PAUSE/STILL
STOP
MUTE
VCR CBL/DBSTV
MENU STATUS/EXIT CLEAR
2
3
1

Special Effects Playback 41Forward and Reverse Searching (SP/LP/SLP)
1During tape playback, press and release the F.FWD/B but-ton or the REW(ind)/{ button. A fast forward or reverse pic-ture search will begin.
2To return to playback, press the PLAY/o button.
Super High Speed Searching (LP/SLP)
1During tape playback, press the F.FWD/B button or theREW(ind)/{ button, then press again. The VCR will nowsearch in super high speed. Press the F.FWD/B button or theREW(ind)/{ button repeatedly to switch between regular searchingand super high speed searching.
2To return to normal playback, press the PLAY/o button.
Viewing a Still Picture
1During tape playback, press the PAUSE/STILL button. A stillpicture will appear on the screen.
2To release the still picture and return to playback, press thePLAY/o button or press the PAUSE/STILL button again.
Viewing a Slow Motion Picture
1During tape playback, press the SLOW button. The tape willplay in slow motion.
2To release Slow mode and return to normal playback, pressthe PLAY/o button or press the SLOW button again.
• Slow and Still modes will automatical-ly switch to Stop mode after five min-utes to protect the VCR and the tapefrom damage.
• SP/LP/SLP means this feature willwork with tapes recorded in StandardPlay, Long Play, or Super Long Play.
• LP/SLP means this feature will workwith tapes recorded in Long Play orSuper Long Play. For details abouttape speed, see pages 35 and 47.
Helpful Hints
POWEREJECT
VCR/TV SPEED TIME SEARCH
SLOWENTER
1 2 3
4 5 6
7 8 9
0
CH. VOL.
MEMORY ALT.CH
REW
PLAY
F.FWD
REC/OTR
PAUSE/STILL
STOP
MUTE
VCR CBL/DBSTV
MENU STATUS/EXIT CLEAR

42 Automatic Operation FeaturesThe following playback features will always operate.
Automatic PlaybackWhen you put a tape in the VCR, the power will come on auto-matically. If the tape’s record tab is missing, playback will begin.If a timer recording is set, the power will not come on automati-cally when you insert a tape with the record tab intact. If a timer recording is set and the VCR power is off, the VCR willeject the tape if the record tab is missing.
Automatic Rewind, Eject, OffWhen you play, fast forward, or record a tape to its end, the VCRwill rewind the tape, stop, eject the tape, then turn itself off. If the real-time counter memory is set, the VCR will only rewindthe tape to the point at which the counter is set to zero, thenstop. The VCR will not eject the tape automatically or shut itselfoff.
Tape EjectYou can eject a tape with the VCR power on or off (but the VCRpower cord must be plugged in). If a timer recording is set, youcan eject a tape only with the power on. Make sure you insert atape and turn off the VCR power for the timer recording.
Automatic Tracking AdjustmentThe VCR adjusts tracking automatically to give you the best possi-ble picture quality. With some recordings, however, you may get abetter picture using the manual tracking controls (see below).
Manual TrackingTo manually adjust the tracking during playback and slow motionplayback, press the CHANNEL o/p buttons on the VCR. (TheCH(annel) o/p buttons on the remote control will not adjusttracking.)Tracking will return to Automatic Tracking Adjustment when youpress the STOP/p button or insert a tape.You cannot manually adjust the tracking of a Still picture.However, you may press the CHANNEL o/p buttons on theVCR to remove vertical jitter in a Still picture.
BeforeTrackingAdjustment
AfterTrackingAdjustment

Multi-Channel Television Sound System (VR623CAT only) 43
To record and play back programs broadcast in stereo, even if you have aSingle Speaker TV, just use one of the connections shown, then follow thesteps on pages 44-45.
Your VCR can play recordings broadcast in Hi-Fi (high fidelity) stereo, which produces a crisp, clear soundfrom two sources. Your VCR also can play tapes recorded in a second audio (usually, that means yourprogram is recorded in a second language). Of course, your VCR will play tapes recorded in monaural(single-source) sound as well.Your VCR also will record in Hi-Fi stereo or in second audio, so when you play back that tape on theVCR, it will be in stereo or second audio. If you play back the tape on a VCR that can’t play back tapes instereo or second audio, the VCR will automatically play the tape in monaural sound.Read the directions on this page to familiarize yourself with your VCR’s stereo and second audio setups.Then follow the directions on page 44 to record in stereo or second audio and the directions on page 45to play back tapes recorded in Hi-Fi stereo.
The indication 2ND AUD or TVSTEREO that appears on this sideof the status display tells you ifyour VCR is receiving a secondaudio or stereo broadcast.Although a program may bebroadcast in both stereo and second audio, you cannot record inboth stereo and second audio atthe same time.
The indication 2ND AUD orSTEREO that appears on thisside of the status display tellsyou if the program you’rewatching is available in secondaudio or stereo. This indicationis not available during tapeplayback. Even though a program isavailable in stereo or secondaudio, you still must programthe VCR to receive or recordthe program. Follow the direc-tions on page 44.
STOP 12:00 AMTV STEREO CH 02
STEREO2ND AUD
SLP 1:23:45 HIFI
AUDIO ANTIN
OUTVIDEO
L
R
OUT INCH3 CH4
OUT IN
Stereo Amplifier or Receiver
MonitorTV
Single Speaker TV
Stereo Speaker TV
OR
RMonaural Sound
L
OR
Audio cables fromAUDIO OUT Jacks ofVCR to AUDIO IN Jacksof Stereo Amplifier orReceiver
Video cable from VIDEO OUT Jack of VCRto VIDEO IN Jack of monitor TV
RF coaxial cable (supplied) from VCR’sOUT Jack to TV’s ANTENNA IN Jack
Understanding On-Screen DisplaysWhen you receive a signal from a channel you’re watching, portions of the on-screen display shown belowwill appear when you press the STATUS/EXIT button on the remote control.

6
44 Multi-Channel Television Sound System (VR623CAT only) (cont’d)
1Press the VCR button, then press the MENU button.
2Press the PLAY/o button or the STOP/p button to selectTUNER SET UP, then press the F.FWD/B button.
3Press the PLAY/o button or the STOP/p button to selectTV STEREO or 2ND AUDIO. Then, press the F.FWD/B
button. ON will appear to the right of your selection.
4Press the STATUS/EXIT button.
5To record, select the channel to be recorded using theCH(annel) o/p buttons.
6Press the REC(ord)/OTR button to start recording.
SELECT op CHOOSE B
→ AUTO PROGRAMMINGADD/DELETE CHCH MEMORY REVIEWTV STEREO ON2ND AUDIO
TO END PUSH EXIT
• You can only receive and record instereo or second audio programsthat are broadcast in stereo or sec-ond audio. You can only play instereo or second audio tapes thatwere recorded in stereo or secondaudio. Please see page 43 to deter-mine if the program you want towatch/record is being broadcast instereo or second audio.
• If you select second audio whensecond audio is not available, theVCR will record normal audio.
Helpful Hints
1
2-34
5
POWEREJECT
VCR/TV SPEED TIME SEARCH
SLOWENTER
1 2 3
4 5 6
7 8 9
0
CH. VOL.
MEMORY ALT.CH
REW
PLAY
F.FWD
REC/OTR
PAUSE/STILL
STOP
MUTE
VCR CBL/DBSTV
MENU STATUS/EXIT CLEAR
SELECT op CHOOSE B
→ PROGRAMVCR SET UPTUNER SET UPSET CLOCK
TO END PUSH EXIT

POWEREJECT
VCR/TV SPEED TIME SEARCH
SLOWENTER
1 2 3
4 5 6
7 8 9
0
CH. VOL.
MEMORY ALT.CH
REW
PLAY
F.FWD
REC/OTR
PAUSE/STILL
STOP
MUTE
VCR CBL/DBSTV
MENU STATUS/EXIT CLEAR
Hi-Fi Stereo Sound System (VR623CAT only) 45
1Press the VCR button, then press the MENU button.
2Press the PLAY/o button or the STOP/p button to selectVCR SET UP, then press the F.FWD/B button.
3Press the PLAY/o button or the STOP/p button to selectAUDIO OUT, then press the F.FWD/B button.
Multi-Channel Television Sound system broadcasts are automati-cally recorded in Hi-Fi stereo sound. To play in Hi-Fi stereo thetapes recorded in Hi-Fi stereo, however, you’ll need to followsteps 1-5.
SELECT op
→ HIFI ONMONO
TO END PUSH EXIT
SELECT op CHOOSE B
→ REPEAT PLAY OFFON SCREEN MODEAUDIO OUTLANGUAGEBLUE BACKGROUND ON
TO END PUSH EXIT
• All programs are automaticallyrecorded in both Hi-Fi stereo soundand in monaural sound.
• The audio level of a tape recordedin Hi-Fi stereo will differ from theaudio level of a tape not recordedin Hi-Fi stereo.
• Normally, HIFI should be selectedfrom the AUDIO OUT menu forplayback with Hi-Fi sound. But, youcan change the selection to MONOif you want monaural audio play-back. To do this, follow steps 1-3.At step 4, press the PLAY/o buttonor the STOP/p button to selectMONO. Press the STATUS/EXITbutton. HIFI will disappear from thestatus display during TV viewing.
• If you play non-Hi-Fi tapes while theVCR is set to HIFI, the tape will playin monaural sound.Please see additional noteson page 49.
Helpful Hints
1
2-45
4Press the PLAY/o button or the STOP/p button to selectHIFI. ON will appear to the right of HIFI on the screen.
5Press the STATUS/EXIT button.
SELECT op
→ HIFI ONMONO
TO END PUSH EXIT

1Press the VCR button.
2Press the MENU button.
3Press the PLAY/o button or the STOP/p button to selectVCR SET UP, then press the F.FWD/B button.
4Press the PLAY/o button or the STOP/p button to selectBLUE BACKGROUND. Then, press the F.FWD/B buttonrepeatedly so that OFF (or ON) appears beside BLUEBACKGROUND.
46 Blue BackgroundIf you want the TV screen to be solid blue when a weak signal isreceived, set BLUE BACKGROUND to ON. The screen will beblue and the sound will be muted.Or, if you want to receive the weak signal, set BLUE BACK-GROUND to OFF. When you select a channel that is receiving aweak signal, you will see the static in the TV programming. Thechannel number will not appear on the screen when you select aweak channel. You may not be able to access the status display oradjust the TV volume at this time. To set BLUE BACKGROUND to ON or OFF, follow these steps.
5Press the STATUS/EXIT button.
SELECT op CHOOSE B
→ PROGRAMVCR SET UPTUNER SET UPSET CLOCK
TO END PUSH EXIT
SELECT op CHOOSE B
→ REPEAT PLAY OFFON SCREEN MODEAUDIO OUTLANGUAGEBLUE BACKGROUND ON
TO END PUSH EXIT
2
3-45
1
POWEREJECT
VCR/TV SPEED TIME SEARCH
SLOWENTER
1 2 3
4 5 6
7 8 9
0
CH. VOL.
MEMORY ALT.CH
REW
PLAY
F.FWD
REC/OTR
PAUSE/STILL
STOP
MUTE
VCR CBL/DBSTV
MENU STATUS/EXIT CLEAR
VR623CAT only
SELECT op CHOOSE B
REPEAT PLAY OFFON SCREEN MODEAUDIO OUTLANGUAGE
→ BLUE BACKGROUND ON
TO END PUSH EXIT
VR623CAT only

Glossary 47AUDIO IN/OUT Jacks: jacks located on the front and back ofthe VCR which are used to record audio from another source (IN)or to send audio to another system (OUT).The VR423CAT has a single AUDIO IN jack on the front and backof the VCR. It has a single AUDIO OUT jack on the back of theVCR. The VR623CAT has Right and Left AUDIO IN jacks on thefront and back of the VCR. It has Right and Left AUDIO OUT jackson the back of the VCR.
Automatic Channel Setup: process in which the VCR memo-rizes all available channels. Then, when you press the CH(annel)o/p buttons, you only scan through channels you receive.
Bands: settings that allow you to tune channels.• Antenna – VHF (very high frequency; channels 2-13) and UHF
(ultra high frequency; channels 14-69).• Cable – all standard channels can be received without a Cable
Box.
Cable Box/DBS Output Channel: 03 or 04.
Dubbing: copying a tape using a second VCR.
Frame: a still picture.
HQ: high quality; a feature in the VCR circuitry which providesenhanced picture detail.
Line Input: The channel to which you set your VCR during dub-bing. If you use the AUDIO and VIDEO In jacks on the front of theVCR, select channel 002 (AV FRONT). If you use the AUDIO andVIDEO IN jacks on the back of the VCR, select 001 (AV REAR). If you accidentally enter Line Input mode, press the CH(annel) o/p
buttons or use the Number buttons to select another channel.
OTR: One-Touch Recording; a timed recording that starts immedi-ately and records for 30 minutes to eight hours.
Remote Control: the small electronic unit that came with yourVCR; allows you to operate your VCR from a distance. You maybe able to operate your TV, Cable Box, or Direct BroadcastSystem with the remote control.
RF coaxial cable: The black cable supplied with your VCR. Use itto connect your VCR to your TV (or Cable Box or DBS). The sup-plied cable is a snap-on type. However, you may use a screw-ontype if you prefer.
Special Effects: forward and reverse searching; a still picture; slowmotion playback.
Tape Speeds: how fast the tape travels during a recording or play-back.• SP (standard play) – fastest tape speed (recording time for a
T120 tape is approximately two hours); best picture quality.• LP (long play) – average tape speed; playback only.• SLP (super long play) – slowest tape speed (recording time for a
T120 tape is approximately six hours).
VCR: video cassette recorder.
VIDEO IN/OUT Jacks: jacks located on the front and back of theVCR which are used to record video from another source (IN) orto send video to another system (OUT).

If you are having problems with your product, check this list of problems and possible solutions before request-ing service. You may be able to solve the problem yourself.If you need to call a customer service representative, please know the model number and serial number ofyour product before you call. This information is on the back of the product. Also, please take a moment toidentify the problem you are having, and be prepared to explain this to the representative. If you believe therepresentative will need to help you with operations, please stay near the product. Our representatives will behappy to assist you.
No power• Connect the power plug to an AC (alternating current) outlet completely.• Make sure the power is on.Power Failure• The VCR may lose timer recordings and the clock and channel settings if the power fails for more than one
minute. Follow the steps on page 11 to set up your language and channels again. See pages 15-18 to resetyour clock. See pages 33-36 to reprogram your timer recordings.
The VCR will not record a TV program.• Check the connections between the VCR, TV, antenna/cable, and Cable Box/Direct Broadcast System (if
applicable). Details are on pages six-10.• Make sure the tape has a record tab. Details are on page five.• Check the TV/VCR position. Details are on page 27.• Check the CH3/CH4 switch. Details are on pages six-nine.The VCR will not perform a timer recording.• Set the recording start and stop times correctly. Details are on pages 33-36.• Make sure a tape is in the VCR and the tape has a record tab. Details are on page five. If, after programming a
timer recording, you turn off the VCR power without putting a tape in the VCR, the Timer light will blink.• If the record tab on a tape is missing, the VCR will eject the tape. The Timer light will blink.• Make sure the VCR power is off.• Set the clock. Details are on pages 15-18.• The VCR may not perform or continue a timer recording if a power interruption of more than one minute
occurs.• If you have a Cable Box/Direct Broadcast System, you will program timer recordings differently. Details are
on page eight.• Finish programming a timer recording at least five minutes before the recording is set to begin.• 12 p.m. is noon; 12 a.m. is midnight.There is no playback picture or the playback picture is noisy or contains streaks.• Make sure the TV is on the same channel as the CH3/CH4 switch on the back of the VCR.• Make sure the VCR is in VCR position. (The VCR light will appear on the display panel. If it does not, press
the VCR/TV button once.)• Adjust channel 03 or 04 at the TV.• Adjust the tracking. Details are on page 42.• TVs that are too close to the VCR can cause interference during tape playback. Move the VCR away from
the TV.The remote control will not work the VCR. • Press the VCR button, then try the other VCR feature buttons.• Make sure the VCR light appears on the display panel. If it does not, press the VCR/TV button once.• Aim the remote control directly at the VCR’s remote sensor. Details are on page 27.• Remove all obstacles between the remote control and the VCR.• Inspect and/or replace the batteries in the remote control. Details are on page five.The Number buttons won’t work for channels above 69.• Enter channel numbers as a two-digit number. If you want to select channels 100 and above, enter channel
numbers as a three-digit number. If you are using an antenna (not a cable signal), you may only select chan-nels 2-69. Details are on page 23.
You can not watch TV programs normally.• Put the VCR in TV position, then change channels at the TV. (Press the VCR/TV button so that the VCR light
disappears from the display panel.) Details are on page 27.• Check the connections between the VCR, TV, antenna/cable, and Cable Box/Direct Broadcast System (if
applicable). Details are on pages six-10.
48 Helpful Hints

You can not insert a tape in the VCR.• Insert the tape, window side up, with the record tab facing you.• Make sure a tape isn’t already in the VCR by pressing the STOP/EJECT button on the VCR.• Gently push on the center of the tape when putting it in the VCR. Never force the tape into the VCR.• If a timer recording is programmed and the VCR power is off, you can not insert a tape without a record
tab.You can not remove the tape from the VCR.• Connect the power plug to a power outlet completely.• You have set a timer recording. Turn on the VCR power, then eject the tape. Be sure to insert a tape and
turn off the power for your timer recording.• Unplug the VCR power cord for five minutes. Then, plug in the power cord again, then press the POWER
button on the VCR. If the tape does not eject, press the STOP/EJECT button on the VCR three to fivetimes. If the tape still does not eject, you may need to have an authorized servicer remove the tape.
VCR ejects the tape when you press the REC(ord)/OTR button or when you turn off the VCRpower for a timer recording.• Make sure the tape has a record tab. Details are on page five.Poor reception• You may need to tune your TV again.The motor (cylinder) rotates even when the VCR is in Stop mode.• To enable the quick play mechanism, the cylinder will rotate for about five minutes. This is normal. The quick
play mechanism allows the tape mechanism to switch from Stop mode to Play mode in one second.Direct Broadcast System Hookups• Watching one TV channel while recording another may not be possible if you have a DBS hookup. You may
have to set your TV to channel 03 or 04, then make your channel selections at the DBS. Details are on pagenine.
• If you use audio and video cables to connect your DBS, VCR, and TV, you may have to put your VCR in LineInput mode (channel 001 or 002).
Line Input mode• If you accidentally enter Line Input mode (AV FRONT or AV REAR will appear on your TV screen briefly),
press the CH(annel) o/p buttons or use the Number buttons to select another channel.Hi-Fi Stereo Sound (VR623CAT only)• During playback, Hi-Fi audio may temporarily revert to normal audio when you adjust tracking. This is nor-
mal.• When connecting the VCR to a stereo TV, you will only get stereo sound if you use audio cables to connect
the AUDIO OUT jacks on the VCR to the AUDIO IN jacks on your TV, and if the TV is in Line (Auxiliary)Input mode.
• When you connect the AUDIO OUT jacks on the VCR to the AUDIO IN jacks on your TV, the stereo lighton the TV might not glow. But, as long as the VCR’s on-screen status display indicates you are receiving astereo signal, you are receiving a stereo signal. This is normal. Details are on page 43.
• Only tapes recorded in Hi-Fi audio will play in Hi-Fi audio. Tapes recorded in normal audio will play inmonaural (single-source or single-channel) audio.
Cleaning the Video Heads• Your VCR automatically cleans the video heads each time you insert a tape. However, the heads may
become dirty. If so, use a commercially-available head cleaner or have an authorized servicer clean the videoheads. Eventually, the heads may need to be replaced.
The playback picture is too dim, too bright, or fluctuates in brightness.• Some programs may be broadcast with copyright protection technology in order to protect the rights of
copyright owners. This technology is used on programs that are recorded on video tapes or Digital VideoDiscs (DVDs), as well as some programs broadcast by antenna/cable/satellite television channels. Programsbroadcast with copyright protection technology may not record clearly. Likewise, if you play a tape that is arecording of a copyright protected program, the picture may not be clear. Tapes of copyright protected pro-grams may have a picture that is dark or dim, or the brightness of the picture may fluctuate. Therefore, youshould avoid recording or playing copies of copyright protected programs. This VCR incorporates copyright protection technology that is protected by method claims of certain U.S.patents and other intellectual property rights owned by Macrovision Corporation and other rights owners.Use of this copyright protection technology must be authorized by Macrovision Corporation and is intendedfor home and other limited viewing uses only, unless otherwise authorized by Macrovision Corporation.Reverse engineering or disassembly is prohibited.
Helpful Hints (cont’d) 49

50 Limited WarrantyVIDEO CASSETTE RECORDER or PLAYER
90 days Free Exchange / 91 days–One Year Reduced-Cost Exchange
WHO IS COVERED?You must have proof of the date of purchase to exchangeyour product. A sales receipt or other document showingthe date that you purchased the product is considered suchproof.
WHAT IS COVERED?Warranty coverage begins the day you buy your product. For90 days thereafter, you may exchange the defective productfor a new product at the store from which it was purchasedor through Philips. This exchange is made at no cost to you. From 91 days to one year from the date of purchase, you mustfollow the exchange procedures set out on the next page.For an exchange during this warranty period you must pay$29.95 (plus your local sales tax) for a new or renewedproduct. This reduced-cost exchange ends one year after thedate of purchase. The replacement product is covered only for the warrantyperiod of the original product. When the warranty on theoriginal product expires, the warranty on all replaced prod-ucts also expires.
WHAT IS EXCLUDED?Your warranty does not cover:• labor charges for installation or setup of the product,
adjustment of customer controls on the product, andinstallation or repair of antenna systems outside of theproduct.
• product repair and/or part replacement because of mis-use, accident, unauthorized repair or other cause notwithin the control of Philips Consumer Electronics.
• reception problems caused by signal conditions or cableor antenna systems outside the product.
• a product that requires modification or adaptation toenable it to operate in any country other than the coun-try for which it was designed, manufactured, approvedand/or authorized, or repair of products damaged bythese modifications.
• incidental or consequential damages resulting from theproduct. (Some states do not allow the exclusion of inci-dental or consequential damages, so the above exclusionmay not apply to you. This includes, but is not limited to,prerecorded material, whether copyrighted or not copy-righted.)
• damage caused by the use of non-VHS tapes or tapesthat have not been tested and labeled for use in two,four, six, and eight hour VHS recorders.
• a product that is used for commercial or institutionalpurposes (including but not limited to rental purposes).
WHERE IS EXCHANGE AVAILABLE?Warranty exchange is available in all countries where theproduct is officially distributed by Philips ConsumerElectronics. In countries where Philips Consumer Electronicsdoes not distribute the product, the local Philips service
organization will attempt to exchange the product, althoughthere may be a delay if the appropriate product is not readilyavailable.
MAKE SURE YOU KEEP...Please keep your sales receipt or other document showingproof of date of purchase. Attach it to the owner’s manualand keep both nearby. Also keep the original box and pack-ing material in case you need to return your product.
BEFORE EXCHANGING THE PRODUCT...Please check your owner’s manual before exchanging theproduct. Adjustments of the controls discussed there maysave you time and money.
TO EXCHANGE YOUR PRODUCT IN THE U.S.A., PUERTO RICO, OR U.S. VIRGIN ISLANDS...Follow the instructions stated previously in the “What isCovered” section, or refer to the exchange instructions onthe next page.In the U.S.A., Puerto Rico, and U.S. Virgin Islands, all impliedwarranties, including implied warranties of merchantabilityand fitness for a particular purpose, are limited in duration tothe duration of this express warranty. Because some statesdo not allow limitations on how long an implied warrantymay last, this limitation may not apply to you.
TO EXCHANGE A PRODUCT IN CANADA...Please contact Philips at:
1-800-661-6162 (French Speaking)1-800-363-7278 (English Speaking)
In Canada, this warranty is given in lieu of all other war-ranties. No other warranties are expressed or implied,including any implied warranties of merchantability or fitnessfor a particular purpose. Philips is not liable under any cir-cumstances for any direct, indirect, special, incidental, orconsequential damages, howsoever incurred, even if notifiedof the possibility of such damages.
TO GET OUT-OF-WARRANTY EXCHANGE...In the U.S.A., Puerto Rico, or U.S. Virgin Islands, contactPhilips Service Solutions Group at 1-800-531-0039 to obtainthe cost of out-of-warranty exchange.
REMEMBER...Please record below the model and serial numbers found onthe product. Also, please fill out and mail your warranty reg-istration card promptly. It will be easier for us to notify youif necessary.MODEL #__________________________________SERIAL #__________________________________
This warranty gives you specific legal rights. You may have otherrights which vary from state to state.
Philips Service Solutions Group, P.O. Box 2976, Longview, Texas 75606, (903) 242-4800EL6466E003 /10-00

Limited Warranty (cont’d) 51
If your product is defective, you may be able to exchange it at the store from which it was purchased. Most stores display a Return Policy. If not, ask the manager or sales associate how many days you have to exchangea product with them. After the store’s return period has expired, you may exchange the product with Philips if youhave your original sales receipt.To exchange your product with Philips (per the warranty conditions stated previously), remember:• If you exchange the product within 90 days of the original purchase, there is no cost to you. • If you exchange the product more than 90 days after but less than one year after the day of original purchase,
your cost will be $29.95 plus your local sales tax. If sales tax is missing or incorrect, your order will be delayed,and you will be contacted.
• After 12 months from the day of original purchase, contact Philips Service Solutions Group at 1-800-531-0039for information regarding out-of-warranty exchange.
• If you do not have your original sales receipt, or if you have any questions, call Philips Service Solutions Group at1-800-531-0039.
To obtain a replacement product from Philips:1. Complete the Exchange Form below.2. Pack the product and its accessories (remote control, rf coaxial cable, owner’s manual, and car battery cord, if
applicable) in the original box or a suitable alternative. You will receive replacement accessories with yourreplacement product. For packing details, call 1-800-531-0039.
3. Put the completed Exchange Form, a copy of the original sales receipt, and the proper payment in an envelope.Do not staple or clip these items together. Label the envelope “Return Documents Enclosed.” Place this enve-lope in the box with the product.
4. Seal the box with packing tape and return the product via United Parcel Service (UPS), insured and freight pre-paid, to:
Philips Recovery CenterRojas 612420 Mercantile AvenueEl Paso, TX 79928ATTENTION: VCR EXCHANGE
A replacement will be sent to you via UPS within 48 business hours of Philips’ receipt of the product.
EXCHANGE INSTRUCTIONS
EXCHANGE FORM
Your Address (street address to which replacement should be delivered, no P.O. boxes allowed):Name:Street Address: Apt. #:City: State: Zip Code:Phone (day): Phone (night):
Payment Amount: $29.95 + Sales Tax = Total
Method of Payment: (Check one. Please, no cash or CODs.)_____ Check or money order Check/Money order number
Account number Expiration date_____ American Express ___________________________ _______________ Visa ___________________________ _______________ Novus/Discover ___________________________ _______________ Mastercard ___________________________ __________
Signature: _____________________________________________________________Detailed reason for return, use additional paper if necessary: ____________________________________________________________________________________________________________________________________________Model Number Serial Number
Remember, the return box should include the following:• The product, • Completed Exchange Form and sales receipt,
• Accessories supplied with the product, and• Payment, if applicable.

52 SpecificationsVideo HeadsFour heads – Hi-Fi (VR623CAT)Four heads (VR423CAT)
Video SignalEIA standards; NTSC color
AntennaVHF/UHF – 75 ohm external antenna terminal
VHF Output SignalChannel 03 or 04 (switchable)75 ohms unbalanced
Power Requirement120V AC; 60Hz
Power Consumption14W (VR623CAT)12W (VR423CAT)
Operating Temperature41°F (5°C) to 104°F (40°C)
Relative Humidity10% to 80%
Weight5.3 Ibs. (2.4 kg.)
Dimensions15-3/4” (W) x 3-5/8” (H) x 8-1/2” (D)(400mm x 92mm x 216mm)
Tuner Broadcast ChannelsVHF 2-13, UHF 14-69
Cable TV Channels1-125
NOTE: Designs and specifications are subject to change without notice.

ac power cord.................................28accessories .......................................56alt.ch button.....................................24ant(enna) in jack ...................6-10, 28audio in/out jacks....................10, 27,
.............................28, 37, 43, 47automatic
playback .......................................42rewind, eject, off........................42
batteries ..............................................5blue background..............................46
cassette compartment ...................26cassette-inside light ........................26cbl/dbs button......................5, 22, 24ch(annel) o/p buttons ..............24ch3/ch4 switch ........................6-9, 28channel
adding ...........................................13deleting ........................................13reviewing .....................................14selection ......................................23setup.......................................11-14o/p buttons ......................27, 42
clear button...............................24, 39clock display.....................................26clock setting ...............................15-18connections ..................................6-10contents, table of ..............................4controls
remote ...................................23-24vcr ...........................................26-28
copyright protection...............37, 49counter only mode.........................25
daylight-savings time.......................19display panel .....................................26duplication ........................................37
eject button......................................23ejecting a tape..................................49enter button........................21-22, 24
f.fwd/B button ..................24, 27, 41front panel ........................................27
glossary..............................................47
head cleaner ...........................3, 5, 49helpful hints................................48-49hi-fi stereo sound system .............45hookups
with cable box/dbs ..................8-9with stereo tv.............................10without cable box/dbs ............6-7
language selection....................11, 20line input mode .................12, 37, 47long play .....................................35, 47lp ................................................35, 47
memory button ........................23, 39menu button .............................23, 27mute button .....................................23
number buttons ..............................23
on-screen status displays ..............25one-touch recording ......................32out jack .....................................6-9, 28
pause button ....................................27pause/still button...............23, 30, 41play/K button..............23, 27, 29, 41playing................................................29power
button....................................23, 27cord ..............................................28
pwr.(power) light............................26
real-time counter............................39rear panel .........................................28rec/otr button ...................23, 30, 32rec(ord) light....................................26record button....................27, 30, 32recording
basic..............................................30one channel/watching another.......................31prevention .....................................5timer.......................................33-36
remote controlbuttons...................................23-24sensor...........................................27using................................................5
repeat play........................................38rerecording ......................................37rew(ind)/s button ...........24, 27, 41rf coaxial cable ...6-9, 37, 43, 47, 56
safety precautions .............................3searching ...........................................41second audio broadcast
receiving ...........................43-44recording..........................43-44
sensor (remote) ..............................27slow
button ..........................................23motion..........................................41
slp ................................................35, 47smart clock.......................................17sp ................................................35, 47
speed button....................................23sqpb .................................................29standard play.............................35, 47status display....................................25status/exit button..............24, 25, 27stereo broadcast
receiving ................................43-44recording ...............................43-44
stereo hookups................................43stereo TV hookups ........................10still picture........................................41stop/L button..................................24stop/eject button ............................27super high speed searching ..........41super long play .........................35, 47
table of contents ...............................4tape
duplication...................................37eject ................................23, 27, 42speed .....................................35, 47
time search button..................24, 40time setting ................................15-18timer
light ...............................................26recording
cancelling................................36checking..................................36setting ...............................33-35
tracking..............................................42tv
button...............................5, 21, 24controls......................5, 21, 23-24hookups ...................................6-10position .................................24, 27
vcrbutton......................................5, 23light ...............................................26position .................................24, 27
vcr/tv button.............................24, 27video in/out jacks.............10, 27, 28,
.................................. 37, 43, 47vol(ume) o/p buttons.................23
warranty......................................50-51
Index 53


IB8277E001Printed In China
0VMN02649 / H79L0UD * * * * *
SUPPLIED ACCESSORIES
OPTIONAL ACCESSORIES
The following items are supplied with your VCR; theyare provided to help you use or set up your VCR.
The following additional items are not provided with yourVCR, but they are designed for use with your new VCR.To order these optional accessories, contact us at:
Philips Parts & Accessories Marketing Department401 East Old Andrew Johnson Highway
P.O. Box 555Jefferson City, TN 37760
1-800-851-8885.
VHS Cassette Rewinder#M61117
Three Cassette Storage Cases (plastic)Fits VHS and Beta cassettes
#M61104Six High-grade, VHS, T-120 Cassettes
#MHG1206
Stereo Audio and Video Cables (6 feet)#M61106 (gold connectors)
#M61105 (color-coded connectors)
RF Coaxial Cable, 75 ohm
4835 323 27011Remote Control 4835 218 37309
Two AA Batteries 4835 138 17012
This owner’s manual is made of recyclable materials. Remember to recycle!
As an ENERGY STAR® Partner, Philips Consumer Electronicshas determined that this product meets the ENERGY STAR® guidelines for energy efficiency. ENERGY STAR® is a U.S. registered mark.
Monaural Audio and Video Cables (6 feet)Color-coded for easy connection
#M61103