
Voice Client - Zebra Technologies
178
Voice Client Version 9.x Workforce Connect Administrator Guide For Cisco CUCM MN-003590-15EN Rev A
-
Upload
khangminh22 -
Category
Documents
-
view
2 -
download
0
Transcript of Voice Client - Zebra Technologies

Voice ClientVersion 9.x
Workforce Connect
Administrator GuideFor Cisco CUCM
MN-003590-15EN Rev A

Copyright
ZEBRA and the stylized Zebra head are trademarks of Zebra Technologies Corporation, registered in manyjurisdictions worldwide. All other trademarks are the property of their respective owners. ©2022 ZebraTechnologies Corporation and/or its affiliates. All rights reserved.
Information in this document is subject to change without notice. The software described in this documentis furnished under a license agreement or nondisclosure agreement. The software may be used or copiedonly in accordance with the terms of those agreements.
For further information regarding legal and proprietary statements, please go to:
SOFTWARE: zebra.com/linkoslegal.COPYRIGHTS: zebra.com/copyright.WARRANTY: zebra.com/warranty.END USER LICENSE AGREEMENT: zebra.com/eula.
Terms of Use
Proprietary Statement
This manual contains proprietary information of Zebra Technologies Corporation and its subsidiaries(“Zebra Technologies”). It is intended solely for the information and use of parties operating andmaintaining the equipment described herein. Such proprietary information may not be used, reproduced,or disclosed to any other parties for any other purpose without the express, written permission of ZebraTechnologies.
Product Improvements
Continuous improvement of products is a policy of Zebra Technologies. All specifications and designs aresubject to change without notice.
Liability Disclaimer
Zebra Technologies takes steps to ensure that its published Engineering specifications and manuals arecorrect; however, errors do occur. Zebra Technologies reserves the right to correct any such errors anddisclaims liability resulting therefrom.
Limitation of Liability
In no event shall Zebra Technologies or anyone else involved in the creation, production, or delivery of theaccompanying product (including hardware and software) be liable for any damages whatsoever (including,without limitation, consequential damages including loss of business profits, business interruption, or lossof business information) arising out of the use of, the results of use of, or inability to use such product, evenif Zebra Technologies has been advised of the possibility of such damages. Some jurisdictions do not allowthe exclusion or limitation of incidental or consequential damages, so the above limitation or exclusion maynot apply to you.

Contents
Revision History...............................................................................................................................................11
About This Guide............................................................................................................................................12
PBX Integration Statement..................................................................................................................13
Notational Conventions........................................................................................................................ 13
Service Information................................................................................................................................13
Configuring Basic CUCM.............................................................................................................................. 14
Creating SIP Security Profile...............................................................................................................14
Creating an End User in Basic CUCM............................................................................................. 15
Creating Phone Endpoint in Basic CUCM.......................................................................................17
Assigning Directory Number to Endpoint in Basic CUCM......................................................... 19
Configuring Premium CUCM....................................................................................................................... 20
Creating an End User in Premium CUCM..................................................................................... 20
Creating a Phone Endpoint in Premium CUCM...........................................................................22
Assigning Directory Number to Endpoint in Premium CUCM.................................................. 24
Configuring the Client...................................................................................................................................25
Determine Deployment Readiness..................................................................................................25
Connect Android Wireless Device to Network............................................................................ 25
Install WFC Voice..................................................................................................................................25
Download and Install Board Support Package (BSP) Operating System.......................26
Installing the WFC Voice APK...................................................................................................26
3

Contents
Creating a Shortcut for WFC Voice......................................................................................... 27
Opening WFC Voice............................................................................................................................ 27
Activate WFC Voice............................................................................................................................. 27
Activating Manually.......................................................................................................................28
Activate with an MDM................................................................................................................. 29
Activating with a USB Tether.................................................................................................... 30
Update License...............................................................................................................................31
Configure WFC Voice...........................................................................................................................31
Configuring with WFC Voice GUI..............................................................................................31
Configure Using an MDM........................................................................................................... 34
Configuring with a USB Tether.................................................................................................35
Configuring with WFC Profile Manager.................................................................................. 35
Dynamic Configuration................................................................................................................................. 36
Dynamic Configuration Overview.....................................................................................................36
General Device Use Cases................................................................................................................36
Device Start-Up......................................................................................................................................37
Device Identification............................................................................................................................. 37
Profile Configuration.............................................................................................................................37
Connection Attributes.................................................................................................................. 37
Enable Using Dynamic Configuration............................................................................................. 38
Enabling Dynamic Configuration.............................................................................................. 38
wfcvariable.xml File.......................................................................................................................38
XML File Location......................................................................................................................... 40
DHCP Option 150..........................................................................................................................40
Configuration Resynchronization......................................................................................................40
Dynamic Configuration Start-Up - Server Side..............................................................................41
Dynamic Configuration Start-Up - Client Side.............................................................................. 42
XML File Examples............................................................................................................................... 43
Testing Remote Dynamic Configuration........................................................................................ 45
Settings............................................................................................................................................................ 47
Accessing Settings................................................................................................................................47
4

Contents
Exit, Reload, or Sign Out.....................................................................................................................47
Exiting WFC Voice........................................................................................................................ 47
Reloading WFC Voice..................................................................................................................47
Signing Out of WFC Voice.........................................................................................................48
Profile Settings.......................................................................................................................................48
Creating a Profile.......................................................................................................................... 48
Changing a Profile Name........................................................................................................... 49
Setting the Shared Profiles URI................................................................................................ 49
Load New Profile...........................................................................................................................49
Save Current Profile.....................................................................................................................50
Edit a Profile Using XML.............................................................................................................50
Connection Parameters...................................................................................................................... 50
Configuring Multiple PBX Types.............................................................................................. 50
Color Theme............................................................................................................................................51
Choosing a Theme.......................................................................................................................52
Audio Settings....................................................................................................................................... 52
Accessing Audio Settings...........................................................................................................52
Audio Codecs Priorities...............................................................................................................53
Jitter Buffer..................................................................................................................................... 54
RTP Parameters............................................................................................................................. 54
Audio Enhancements...................................................................................................................56
UI Settings...............................................................................................................................................57
Accessing UI Settings.................................................................................................................. 57
Configuration File Sections........................................................................................................ 58
Headless Mode..............................................................................................................................59
Background Logo..........................................................................................................................59
Graphical User Interface Design Tool.................................................................................... 60
Home Screen Buttons.................................................................................................................. 61
In-Call Buttons................................................................................................................................62
Buttons Settings............................................................................................................................ 62
Icons.................................................................................................................................................. 87
Button Color................................................................................................................................... 89
Global Button Color Settings.....................................................................................................90
Resetting Colors to Default.........................................................................................................91
5

Contents
Restoring Buttons...........................................................................................................................91
Call Settings.............................................................................................................................................91
Accessing Call Settings................................................................................................................91
Setting the Call Waiting Volume............................................................................................... 91
Setting the Call Waiting Interval............................................................................................... 92
Ringer OFF In Charger................................................................................................................92
Speaker mode............................................................................................................................... 92
Speaker on Table......................................................................................................................... 93
Call Accept Style...........................................................................................................................93
Setting Auto Answer Mode........................................................................................................95
Incoming Call Voice Announcer...............................................................................................95
Incoming Call Full Screen...........................................................................................................95
Voice Command............................................................................................................................96
Voice Command Confirmation..................................................................................................96
No Audio Cutoff.............................................................................................................................97
Audio Prompt File......................................................................................................................... 97
MOH Enabled.................................................................................................................................98
MOH File..........................................................................................................................................98
BLE PTT Button............................................................................................................................. 99
Paging Extension...........................................................................................................................99
Ringtones............................................................................................................................................... 100
Accessing Ringtone Settings................................................................................................... 100
Line Ringtones............................................................................................................................. 100
Miscellaneous Settings....................................................................................................................... 101
Accessing Miscellaneous Settings.......................................................................................... 101
Sign Out in Charger.....................................................................................................................101
Flexible TLS...................................................................................................................................102
WiFi Preferred...............................................................................................................................102
Help URL........................................................................................................................................ 103
Settings Password....................................................................................................................... 103
Additional Profile URI................................................................................................................. 104
Show Extension Name............................................................................................................... 104
Contacts URL................................................................................................................................ 105
Sync Contacts...............................................................................................................................105
6

Contents
Screen Orientation...................................................................................................................... 106
Show Only Voice Contact.........................................................................................................106
Disable Favorites......................................................................................................................... 107
Disable the Contact Scrolling...................................................................................................107
Hide the Dashboard Footer..................................................................................................... 108
Logging........................................................................................................................................................... 110
Accessing Logging Settings..............................................................................................................110
Logging Level........................................................................................................................................ 110
Setting Logging Level................................................................................................................. 110
Logging Types........................................................................................................................................111
Setting Logging to File................................................................................................................ 111
Setting SIPCLF Logging............................................................................................................... 111
Log Files..................................................................................................................................................112
Workforce Connect Logs........................................................................................................... 112
Fusion Logs.................................................................................................................................... 112
Collecting LogCat with RxLogger.................................................................................................... 112
Enabling RXLogger...................................................................................................................... 112
Debug Log Markers............................................................................................................................. 113
Adding a Log Marker for Debugging......................................................................................113
Configure the Log Marker..........................................................................................................113
Enable Fusion Logs............................................................................................................................. 113
Enabling Fusion Logs In Android 6.1 or 7.1.2........................................................................113
Enabling Fusion Logs In Android 8.1...................................................................................... 114
Capturing the Logs.............................................................................................................................. 114
Using the Client............................................................................................................................................ 115
Home Screen Dashboard.................................................................................................................. 115
In-Call Dashboard................................................................................................................................. 116
Signal Quality......................................................................................................................................... 117
Initiate a Call.......................................................................................................................................... 118
Voice Commands......................................................................................................................... 118
Receive a Call................................................................................................................................119
7

Contents
Ending a Call................................................................................................................................ 120
Adding a Call................................................................................................................................ 120
Using Call Hold and Resume....................................................................................................121
Call Park and Unpark(Premium Feature).............................................................................. 122
Call Park Directed....................................................................................................................... 123
Dashboard of Parked Calls (Premium Feature)...................................................................123
Voicemail................................................................................................................................................123
Retrieving Voicemail Messages.............................................................................................. 124
Message Waiting Indicator (MWI).......................................................................................... 124
Message Retrieval....................................................................................................................... 124
Contacts..................................................................................................................................................124
Using Contacts............................................................................................................................. 125
Contact Presence Indicators.................................................................................................... 126
Favorites................................................................................................................................................. 127
Using Favorites.............................................................................................................................127
Call History............................................................................................................................................ 128
Viewing Recent Calls................................................................................................................. 128
Dialing from Call History........................................................................................................... 129
Deleting Call History...................................................................................................................129
Advanced Calling Features.............................................................................................................. 129
Multiple Lines(Premium Feature).............................................................................................129
Transfer (attended, semi-attended)........................................................................................ 130
Ad hoc Conference(Premium Feature)..................................................................................130
Call Forward (All, Busy / No Answer, Disable).....................................................................130
Miscellaneous Features...................................................................................................................... 131
Setting Ringtone............................................................................................................................131
Using Reload..................................................................................................................................131
Using Sign Out.............................................................................................................................. 131
Using Speed Dial Numbers....................................................................................................... 131
Using Do Not Disturb(Premium Feature).............................................................................. 132
Using Suspend Mode.................................................................................................................132
Using the Directory Feature..................................................................................................... 132
Using the List Button..................................................................................................................132
Using the Home Button.............................................................................................................132
8

Contents
Call Pickup..................................................................................................................................... 132
Adjusting the Ring Volume....................................................................................................... 133
Unique Ringtone per Line Appearance(Premium Feature).............................................. 133
Unique Ringtone per Contact (Premium Feature).............................................................. 133
Distinctive Ringing....................................................................................................................... 133
Vibrate or Ring Tone.................................................................................................................. 134
Start Application........................................................................................................................... 134
Log Markers...................................................................................................................................134
Caller ID.......................................................................................................................................... 134
Hold Recall.....................................................................................................................................134
On-hook Dialing........................................................................................................................... 134
Profile Manager Features..................................................................................................................134
Adding a Department.................................................................................................................135
Changing a Department............................................................................................................ 135
Load Contacts...............................................................................................................................135
Button Actions.............................................................................................................................................. 136
XML Tags.......................................................................................................................................................139
XML Example - Profile.................................................................................................................................156
XML Example - Dashboard......................................................................................................................... 158
XML Example - Call Buttons....................................................................................................................... 161
Directory Button Configuration..................................................................................................................163
Creating the Directory Button..........................................................................................................163
Using the Directory Button...............................................................................................................163
Proxy Server Configuration........................................................................................................................ 164
9

Contents
Configuring a Proxy Server.............................................................................................................. 164
Unsupported Features.................................................................................................................................166
Network Ports and Protocols..................................................................................................................... 167
Services Configuration................................................................................................................................ 168
Configuring Extension Mobility........................................................................................................168
Disabling Extension Mobility............................................................................................................ 168
IP Phone Services URL (SURL)........................................................................................................169
Installing IIS Web Services....................................................................................................... 169
Create IP Phone Services XML Files..................................................................................... 170
Enabling the Cisco IP Phone Service.....................................................................................174
Using IP Phone Services in WFC Voice................................................................................175
Hunt Groups.................................................................................................................................................. 176
Configuring Hunt Groups.................................................................................................................. 176
Joining a Hunt Group......................................................................................................................... 177
Leaving a Hunt Group........................................................................................................................ 177
10

Revision HistoryRevision History
Changes to the original guide are listed below:
Change Date Description
-01 Rev A 5/2019 Initial release.
-02 Rev A 5/2019 Fix to initial release of the guide.
-03 Rev A 7/2019 Updates to custom ringtone and audio prompt file formats. Update to HomeScreen Dashboard section. Add EC30 screenshots.
-04EN Rev A 12/2019 Updates to WFC Voice screenshots, Contacts section, and Loggingchapter.
-05EN Rev A 3/2020 Update the Voice Commands section in Using the Client chapter.
-06EN Rev A 3/2020 Add OPUS to codecs priority and update to call transfer instructions.
-07EN Rev A 6/2020 Updates to Using the Client > Profile Manager section. Update sectionsrelated to the three-line menu.
-08EN Rev A 7/2020 Update to Voice Commands and new Sign Out feature added.
-09EN Rev A 11/2020 Changes to WFC Voice licensing information.
-10EN Rev A 3/2021 Updates for release of WFC Voice 9.0.20307.
-11EN Rev A 6/20/21 Added BlueParrot support.
-12EN Rev A 10/18/21 Added Emergency Dialer, Prevent Full Screen for Incoming Calls, updatedlicensing information, and language support.
-13EN Rev A 12/14/21 Added information about the screen orientation setting.
-14EN Rev A 3/2022 ET5X support. Choosing a theme and option to show only WFC Voicecontacts in the app added to settings. Incoming calls display as notificationswhen WFC Voice is in the background.
-15EN Rev A 6/2022 Updated voicemail message, configuration to disable favorites and scrolling of contacts, hiding dashboard footer, handling one time Google prompt message after adding the contacts, and keeping the WFC Voice Signed in after rebooting the device.
11

About This GuideAbout This Guide
This manual describes how to install, configure and use Zebra Workforce Connect Voice Client (WFCVoice) on a Cisco CUCM network.
Devices running Android 11 must use WFC Voice version 9.0.2103xx or later.
WARNING: The WFC Voice supports the use of both secure protocols, such as HTTPS andcleartext network traffic, such as cleartext HTTP. Zebra strongly recommends customers usesecure protocols such as HTTPS to access their data. Zebra always uses the secure protocolHTTPS to communicate with the WFC Extension Manager or the WFC Provisioning Manager. Ifcustomers elect to use cleartext network traffic, the customer assumes the risk of exposing dataon the network.
IMPORTANT: For some devices, a Mobility DNA Enterprise license is required to use WFC Voice.Please contact your administrator or Zebra Support for more information.
NOTE: Screens, icons, and options may differ on each device. Those in this guide are samplesand can differ from actual screens.
WFC Voice Client 9.x for Android supports the following languages:
• Czech
• Dutch
• English
• French (Canada)
• French (France)
• German
• Italian
• Hungarian
• Polish
• Russian
• Slovak
• Spanish (Spain)
• Swedish
12

About This Guide
PBX Integration StatementCisco CUCM configuration references contained within this document is based on Cisco CUCM version 8.6and above.
Generally Cisco configuration elements are maintained in subsequent releases, however this cannot beguaranteed. The reader is advised to consult Cisco CUCM configuration guide for releases above 8.6 anduse in conjunction with this documentation.
NOTE: WFC Voice requires a minimum Cisco CUCM version of 8.6.
Notational ConventionsThe conventions are used in this document:
• Bold text is used to highlight the following:
• Dialog box, window and screen names
• Drop-down list and list box names
• Check box and radio button names
• Icons on a screen
• Key names on a keypad
• Button names on a screen.
• Bullets (•) indicate:
• Action items
• Lists of alternatives
• Lists of required steps that are not necessarily sequential.
• Sequential lists (e.g., those that describe step-by-step procedures) appear as numbered lists.
Service InformationIf you have a problem with your equipment, contact Zebra Global Customer Support for your region.Contact information is available at: www.zebra.com/support.
When contacting support, please have the following information available:
• Serial number of the unit
• Model number or product name
• Software type and version number.
Zebra responds to calls by email, telephone or fax within the time limits set forth in support agreements.
If your problem cannot be solved by Zebra Customer Support, you may need to return your equipment forservicing and will be given specific directions. Zebra is not responsible for any damages incurred duringshipment if the approved shipping container is not used. Shipping the units improperly can possibly voidthe warranty.
If you purchased your Zebra business product from a Zebra business partner, contact that business partnerfor support.
13

Configuring Basic CUCMConfiguring Basic CUCM
This section contains general instructions to configure the Basic CUCM PBX.
Basic CUCM allows configuration of one phone line with a maximum of two calls per line. For moreinformation on features available in Basic CUCM, see Using the Client on page 115.
1. Create SIP Security Profile.
2. Create End User.
3. Create Phone Endpoint.
4. Assign DN to Endpoint.
Creating SIP Security ProfileTo create an optional SIP security profile with digest authentication:
If digest authentication is not required, skip to .
1. Select System > Security > Phone Security Profile.
2. Scroll to the bottom of the list and select Third-party SIP Device Basic - Standard SIP Non-SecureProfile.
14

Configuring Basic CUCM
3. Select Copy.
4. Change the name of the profile to Third-party SIP Device Basic - Digest Required.
5. Select the checkbox next to Enable Digest Authentication to enable.
6. Select Save.
Creating an End User in Basic CUCMTo create an End User:
1. Select User Management > End User.
Figure 1 User Management Menu
2. Select Add New.
15

Configuring Basic CUCM
3. Enter the following:
• User ID
• Password
• Confirm Password
• PIN
• Confirm PIN
• Last Name
• First Name
• Telephone Number
• Department
• User Locale
• Digest Credentials
• Confirm Digest Credentials.
4. Scroll to the bottom of the screen.
5. Select Save.
16

Configuring Basic CUCM
Creating Phone Endpoint in Basic CUCMTo map the End User to the Phone Endpoint:
1. Select Device > Phone.
2. Select Add New.
17

Configuring Basic CUCM
3. Select Phone Type Third Party SIP (Basic).
4. For Device Information, complete fields as needed.
5. For Protocol Specific Information, enter information from Creating SIP Security Profile on page 14.
6. Select Save.
18

Configuring Basic CUCM
7. Select Apply Config.
Assigning Directory Number to Endpoint in Basic CUCMTo assign a new Directory Number (DN) to an endpoint:
1. Select Add a new DN.
2. For Directory Number Information, complete fields as needed.
3. For Directory Number Settings, complete fields as needed.
4. Scroll to the bottom of the screen.
5. Select Save.
19
Configuring Premium CUCMConfiguring Premium CUCM
This section contains general instructions to configure the Premium CUCM PBX.
1. Create End User.
2. Create Phone Endpoint.
3. Assign DN to Endpoint.
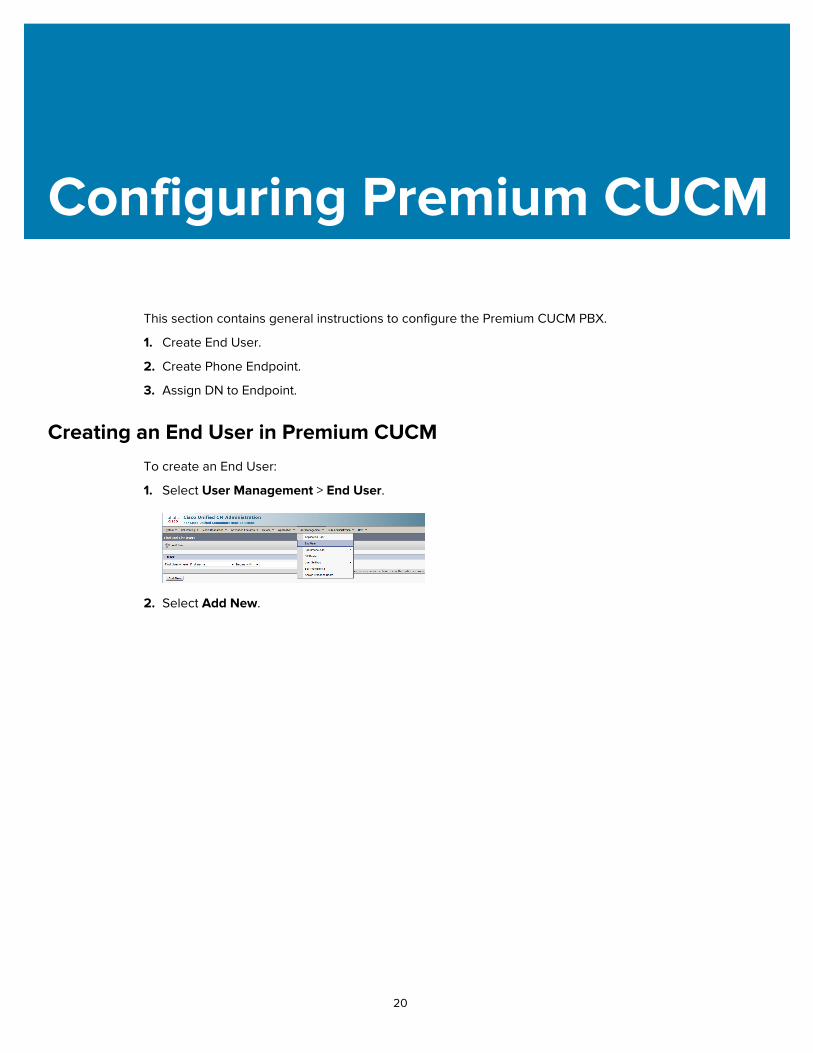
Creating an End User in Premium CUCMTo create an End User:
1. Select User Management > End User.
2. Select Add New.
20

Configuring Premium CUCM
3. Enter the following:
• User ID
• Password
• Confirm Password
• PIN
• Confirm PIN
• Last Name
• First Name
• Telephone Number
• Department
• User Locale.
4. Scroll to the bottom of the screen.
5. Select Save.
21

Configuring Premium CUCM
Creating a Phone Endpoint in Premium CUCMTo map the End User to the Phone Endpoint:
1. Select Device > Phone.
2. Select Add New.
22

Configuring Premium CUCM
3. Select Phone Type 8865.
4. For Device Information, complete fields as needed.
5. For Protocol Specific Information, complete fields as needed.
6. Select Save.
23

Configuring Premium CUCM
7. Select Apply Config.
Assigning Directory Number to Endpoint in Premium CUCMTo assign a new Directory Number (DN) to an endpoint:
1. Select Add a new DN.
2. For Directory Number Information, complete fields as needed.
3. For Directory Number Settings, complete fields as needed.
4. Scroll to the bottom of the screen.
5. Select Save.
24

Configuring the ClientConfiguring the Client
Learn how to install, activate and configure the Zebra Workforce Connect Voice Client (WFC Voice).
Determine Deployment ReadinessAssess the suitability of your Wireless Local Area Network (WLAN) for voice traffic, using the Best PracticesGuide: Deploying VoWLAN Over Aruba Wireless Networks, Deploying VoWLAN Over Cisco WirelessNetworks or Deploying VoWLAN Over WiNG5 Wireless Networks.
WARNING: If your WLAN is not suitable for voice traffic, WFC Voice will perform on a best effortbasis. Contact the Zebra Software Support Desk for more information.
Connect Android Wireless Device to NetworkConnect the Android wireless device to the network.
Use the Android wireless settings on your device to connect to a network. See device instructions for moreinformation. If you need assistance, contact Zebra Support.
Zebra WFC Voice for Android includes support for the following device types:
• Enterprise Mobile devices
• Consumer Smartphone devices (evaluation only)
Install WFC VoiceThis section describes the methods for installing WFC Voice.
NOTE: When upgrading from WFC Voice version 8.2.x to version 9.x, download and install thenew APK as described below. During activation, make sure to use your WFC Voice version 9.xactivation key(s).
When upgrading to WFC Voice version 9.0.20306 or later from an earlier version, contact yourZebra administrator.
There are two ways to install WFC Voice:
• USB tether or web server - This section describes using a USB tether or web server to manually installthe WFC Voice Android Package Kit (APK).
• Mobile Device Manager (MDM) - For information on installing the WFC Voice Client APK using an MDM,refer to the Workforce Connect Voice Client Configuration Guide for Mobile Device Managers.
25

Configuring the Client
Download and Install Board Support Package (BSP) Operating System
For instructions please refer to the Zebra support at www.zebra.com/support and login using yourpartner login for latest BSP and integration instructions. If you need assistance, contact Zebra Support atwww.zebra.com/support.
Installing the WFC Voice APK
Download the APK from the Zebra Licensing End User Portal.
1. From a web browser, go to the Zebra Licensing End User Portal.
To access the Zebra Licensing End User Portal, follow the instructions in the Software Entitlement emailfrom Zebra. Portal access requires registration at Zebra.com and authorization as a portal user by ZebraSupport.
2. From the Zebra Licensing End User Portal, download the latest WFC Voice APK file.
Installing the APK Manually
Install the APK manually using a USB tether or from a web server.
1. Save the APK file to the root directory of the target device using one of the following methods:
• USB tether
• Web server download (if your network supports this option)
2. On the Android device, go to the Apps list and open the file browser.
3. Navigate to the APK file.
4. Run and install the APK file.
5. Check that WFC Voice is available on the Apps Screen.
6. After the user opens the WFC Voice application, the user needs to grant the following permissions :
a. Record Audio
b. Access Photos and Media
c. Read Contacts
d. Make and Manage Phone calls
e. Display over other apps
f. Allow the app to always run in the background
The WFC Voice icon should be visible in the list of available applications.
Installing the APK Using ADB Commands
To install the APK using an Android Debug Bridge (ADB) connection, open a command prompt and sendthe following ADB commands to the device:
adb install –g <apk_file_name> adb shell dumpsys deviceidle whitelist +com.symbol.wfc.voice adb shell appops set com.symbol.wfc.voice SYSTEM_ALERT_WINDOW allow
26

Configuring the Client
Where <apk_file_name> is the name of the WFC Voice APK file.
Creating a Shortcut for WFC Voice
Create a shortcut for WFC Voice on the Home screen for quick access.
1. In the Apps screen, press and hold on to the WFC Voice icon.
Number Item
1 WFC Voice Icon
2. Drag the WFC Voice Icon to the Home screen.
3. Drop icon on Home screen.
Opening WFC VoiceOpen WFC Voice from the Home screen or Apps screen.
• To open WFC Voice, use one of the following methods:
• Touch the WFC Voice icon on the Home screen.
• Touch on the WFC Voice icon on the Apps screen.
• If using WFC Voice version 9.0.20306 or later, the Home dashboard displays.
• For versions of WFC Voice earlier than 9.0.20306, the App Activation screen displays.
Activate WFC VoiceWhen WFC Voice starts for the first time, the App Activation screen appears.
CAUTION: Before activating WFC Voice, make sure the time is set correctly on the device.Changing the time on the device after activating WFC Voice may cause licensing to fail.
27

Configuring the Client
A valid license is required for each PBX. The licensing method varies depending on your version of WFCVoice.
• WFC Voice 9.0.20306 or later is activated automatically when using Extension Manager to configurethe client.
• When not using Extension Manager, WFC Voice 9.0.20306 or later is activated using a token (a stringconsisting of numbers and letters) provided by Zebra. You can also request a QR code containing thetoken by contacting Zebra Support. You must configure the desired PBX types before activation.
NOTE: For WFC Voice 9.0.20306 or later, you must configure the desired PBX types beforeactivation. WFC Voice 9.0.212xx and later remains in a Waiting for Configuration state until thePBX types are configured.
• Versions of WFC Voice earlier than 9.0.20306 are always activated using an activation ID.
Both activation IDs and tokens can be sent to the device manually, using a Mobile Device Manager (MDM)intent, or by uploading an XML configuration file with a USB tether.
NOTE: For versions of WFC Voice earlier than 9.0.20306, when activating a device that does nothave direct access to the license source, use a proxy server. See Proxy Server Configuration onpage 164.
Activating Manually
Activate WFC Voice by entering your token or activation ID(s).
1. Open WFC Voice to display the activation screen.
Number Item
1 Toggle button
2 Clear all fields
28

Configuring the Client
2. If you see the Waiting for Configuration screen, you must configure the PBX type(s).
a) Touch > Settings.
b) Enter the settings password.
The default password is zamboni.
c) Touch Connection Parameters
d) Select a PBX configuration.
The default configuration is PBX#1 Configuration
e) Touch PBX#1 Type and select your PBX.
f) Touch Back until you return to the App Activation screen.
3. In the text field, enter your activation ID(s) separated by commas, or enter your token.
Licenses are acquired from the default licensing source.
4. To enter a device alias (versions of WFC Voice earlier than 9.0.20306), touch the toggle button and, inthe device alias field, enter a name to identify the device on the license source.
5. Touch Register App.
The Home screen appears.
Activate with an MDM
Configuring WFC Voice using an MDM requires a deployment package and the WFC Voice configurationfile. The configuration file WFConnect.xml stores all WFC Voice configuration parameters, includinglicensing information, as key and value pairs. For a complete list of parameters, see XML Tags on page139.
29

Configuring the Client
Define the licensing information using the following XML tags:
• license_key - For versions of WFC Voice earlier than 9.0.20306, this contains one or more WFC Voiceactivation IDs separated by commas. For WFC Voice 9.0.20306 or later, this contains the token.
Activation ID Example:
<license_key>abcd-1234-ab12-cd34-5678-efgh-ef56-gh78</license_key>
Token Example:
<license_key>myToken</license_key>
• license_source - URL of a license source server (optional). Not used in WFC Voice 9.0.20306 or later.
When license_source is not defined, the WFC Voice Client uses the default license source. Do notchange the license_source parameter unless instructed to by Zebra Support.
• license_alias - Identifies the device on the license source. (Optional). Not used in WFC Voice 9.0.20306or later.
Activate Using MDM Deployment
During runtime, WFC Voice listens for wfc.voice.ACTION_UPDATE_CONFIG intent. When WFC Voicereceives the intent from an MDM, the configuration file uses WFConnect.xml to update the WFC Voiceconfiguration parameters. Use a single intent to update multiple configuration parameters by includingmultiple element and value pairs.
For WFC Voice 9.0.20306 or later, you can also send just the token to WFC Voice using the followingintent. This intent sends the token without requiring you to configure it in the XML file.
adb shell am start -a android.intent.action.VIEW -d "wfcvp://<token>"
For detailed information on MDM deployment, refer to the Workforce Connect Voice Client ConfigurationGuide for Mobile Device Managers.
Activating with a USB Tether
Send the WFConnect.xml configuration file to the device using a USB tether and Android Debug Bridge(ADB) connection.
NOTE: It is not recommended to install the WFConnect.xml file using a USB tether because itcan cause permission issues on the device.
1. Install the WFC Voice APK. See Download and Install Board Support Package (BSP) Operating Systemon page 26.
30

Configuring the Client
2. Copy the WFConnect.xml file to the WFConnect directory.
• For A11 and above, use following path to copy WFC Voice configuration XML file:
/enterprise/device/settings/WFConnect/
• For A10 and below, use following path:
/sdcard/WFConnect
3. Open a command prompt and send the following adb command to the device:
adb shell am start -a "wfc.voice.ACTION_NEW_CONFIG" --es "profile_uri" "/WFConnect/WFConnect.xml"
Update License
The method for updating licenses varies depending on your version of the WFC Voice.
• For WFC Voice 9.0.20306 or later, contact your Zebra administrator.
• For earlier than WFC Voice 9.0.20306, refer to the Workforce Connect Voice Client AdministrationGuide for Licensing.
• For WFC Voice 9.0.20306 or later, once a new token is provided to you, you can update it using anMDM or enter it on the WFC Voice App Activate screen. To update using the WFC Voice GUI, touch > About > Update License > Register App.
See AlsoActivate Using MDM Deployment
Configure WFC VoiceConfigure WFC Voice using the Graphical User Interface (GUI), an MDM, a USB Tether, or WFC ProfileManager.
NOTE: It is not recommended to install the WFConnect.xml file using a USB tether because itcan cause permission issues on the device.
Configuring with WFC Voice GUI
Configure WFC Voice on the device using the WFC Voice GUI.
NOTE: For information on optional configuration settings, see XML Tags on page 139.
1. Touch > Settings.
2. Enter the settings password. The default password is: zamboni.
3. Touch Connection Parameters.
31

Configuring the Client
4. Select a PBX configuration. The default configuration is: PBX#1 Configuration.
For information on configuring additional PBX types, see Configuring Multiple PBX Types on page50.
5. Enter the following information for Basic CUCM:
a) Touch PBX#1 Type and select Basic CUCM.
b) Touch SIP ID and enter the Phone Directory Number.
c) Touch User ID and enter the Digest User (optional).
d) Touch Password and enter the Digest Password (optional).
e) Enter the PBX Server Address.
Number Item
1 PBX Type
2 SIP ID
3 User ID (optional)
4 Password (optional)
32

Configuring the Client
Number Item
5 Server Address
The optional parameters Server Address2 and Server Address 3 are secondary addresses, used ifthe primary server address is not reachable.
6. Enter the following information for CUCM Premium.
a) Touch PBX#1 Type and select Premium CUCM.
b) Ensure Device Type is Cisco 8865.
c) In the User ID field, enter the Digest User (optional).
d) In the Password field, enter the Digest Password (optional).
e) Enter the MAC Address. See Device Identification on page 37 for more information on MACaddresses.
f) Enter the PBX Server Address.
Number Item
1 PBX Type
33

Configuring the Client
Number Item
2 CISCO Device Type
3 User ID (optional)
4 Password (optional)
5 MAC Address
6 Server Address
The optional parameters Server Address2 and Server Address 3 are secondary addresses, used if theprimary server address is not reachable.
7. Touch the back button three times to return to WFC Voice home screen.
A confirmation that the configuration has been saved to WFConnect.xml displays.
Configure Using an MDM
Configuring WFC Voice using an MDM requires a deployment package and the WFC Voice configurationfile. The configuration file WFConnect.xml stores all WFC Voice configuration parameters, includinglicensing information, as key and value pairs. For detailed information on the XML configuration file, seeSettings on page 47.
Define the licensing information using the following XML tags:
• license_key - For versions of WFC Voice earlier than 9.0.20306, this contains one or more WFC Voiceactivation IDs separated by commas. For WFC Voice 9.0.20306 or later, this contains the token.
Activation ID Example:
<license_key>abcd-1234-ab12-cd34-5678-efgh-ef56-gh78</license_key>
Token Example:
<license_key>myToken</license_key>
• license_source - URL of a license source server (optional). Not used in WFC Voice 9.0.20306 or later.
When license_source is not defined, the WFC Voice Client uses the default license source. Do notchange the license_source parameter unless instructed to by Zebra Support.
• license_alias - Identifies the device on the license source. (Optional). Not used in WFC Voice 9.0.20306or later.
Configure Using MDM Deployment
During runtime, WFC Voice listens for wfc.voice.ACTION_UPDATE_CONFIG intent. When WFC Voicereceives the intent from an MDM, the configuration file uses WFConnect.xml to update the WFC Voiceconfiguration parameters. Use a single intent to update multiple configuration parameters by includingmultiple element and value pairs.
For detailed information on MDM deployment, refer to the Workforce Connect Voice Client 8.xConfiguration Guide for Mobile Device Managers.
34

Configuring the Client
Configuring with a USB Tether
Use an Android Debug Bridge (ADB) connection to send theWFConnect.xml configuration file to thedevice using a USB tether.
NOTE: It is not recommended to install the WFConnect.xml file using a USB tether because it cancause permission issues on the device.
1. Install the WFC Voice APK. See Download and Install Board Support Package (BSP) Operating Systemon page 26.
2. Copy the WFConnect.xml file to the WFConnect directory.
3. Open a command prompt and send the following adb command to the device:
adb shell am start -a "wfc.voice.ACTION_NEW_CONFIG" --es "profile_uri" "/WFConnect/WFConnect.xml"
Updating a Specific Parameter
• To update a specific parameter in the WFConnect.xml configuration file using ADB, open a commandprompt and send an ADB command to the device in the following format:
$ adb shell am start -a wfc.voice.ACTION_UPDATE_CONFIG --es element value
For a list of possible elements and values, see XML Tags on page 139.
Configuring with WFC Profile Manager
Consider the following when configuring WFC Voice using the WFC Profile Manager:
• The WFC Profile Manager can set or overwrite all settings in the WFConnect.xml configuration file.
• Some WFC Voice settings are grayed out.
• The layout_location setting can be used to set an XML button configuration file.
To configure WFC Voice using WFC Profile Manager:
• Log in to the WFC Profile Manager and navigate to WFC Voice settings.
Settings available in the WFC Profile Manager match the parameters in the WFConnect.xmlconfiguration file. For a list of XML tags, see XML Tags on page 139.
35

Dynamic ConfigurationDynamic Configuration
The WFC Voice configuration file defines the operational environment of the SIP client running on Zebramobile Android devices. It has various elements that define the network location of the PBX and, for eachdevice, unique defining operational aspects affecting the user experience. Creating this file manuallyand distributing this file for each device on an enterprise-wide scale introduces significant administrativeoverhead.
Dynamic configuration:
• Reduces the administrative effort preparing WFC Voice for enterprise operation.
• Provides a flexible delivery environment for the customized configuration.
• Provides a method for shared device use without manually reloading the configuration.
• Provides backward compatibility for existing customers.
Rather than manually creating a unique configuration for each device, this approach dynamically configuresWFC Voice using an XML variable file. File delivery can be manual, by an MDM, or automatic throughexisting network services.
Dynamic Configuration OverviewProperly configuring the following elements allows WFC Voice to register to the PBX.
• Providing a new XML tag that triggers dynamic configuration.
• Building a multi-user variable file to build user specific configurations for WFC Voice.
• Re-synchronizing WFC Voice with the variable file on a regular basis.
• Using DHCP resources to provide auto installation for the file.
General Device Use CasesTypical use cases where dynamic configuration may be useful.
• A unique user is typically a supervisor or manager with a device with a more advanced feature set thatis not shared with any other user. This extension may be shared with that person’s desk phone.
• A shared device is typically for line workers or department staff that use a phone representing afunctional area, as opposed to a specific person. The device has a basic feature and may also beuniform, sharing common elements (e.g.; button configurations) across all shared devices.
36

Dynamic Configuration
Device Start-UpThere are three stages of device life-cycle in the customer environment that affect how WFC Voice obtainsthe suitable runtime configuration:
• Initialized out of the box configuration (no configuration)
• A rebooted device previously configured
• A device reassigned to a new extension / user
Device IdentificationThis section describes how the system identifies each mobile device.
The Cisco environment identifies each mobile device by a unique MAC address. This can be the literalinterpretation of the mobile device MAC address, or a pseudo MAC character string.
• Literal MAC - The WFC Voice Client interrogates and insert the mobile device’s MAC address intothe WFC Voice Client configuration using an Android API. Replacing the mobile device requires theAdministrator to modify the configuration. The replacement device then has the same configuration asthe previous device.
• Pseudo MAC - The 12 character MAC string is a simple unit identifier in the PBX. The device can bereplaced without Administration intervention. The pseudo MAC does not represent the actual deviceMAC address. To place a replacement device into service, set the WFC XML configuration set to matchthe existing string defined in the PBX.
Profile ConfigurationFor WFC Voice to connect to a PBX, the Profile section of the WFConnect.xml file must contain XML tagswhich the device uses.
The Profile XML tags are used to:
• Establish a link to the PBX
• Identify itself to the PBX
• Retrieve the correct privileges and settings.
NOTE: Any element in the WFC Voice configuration file can be replaced with a variable.
Connection Attributes
The profile section requires:
• An IP address in the sip_remhost field to target the appropriate PBX.
• A literal or pseudo MAC address in the sip_mac field to identify the device to the PBX.
NOTE: If the MAC address is left blank the device will use the device’s physical MAC address.
When using a pseudo MAC address, the PBX device configuration remains static and the MAC addressof the device is changed to match the desired profile. The field can be populated with a 12 character hexstring resembling a MAC address.
37

Dynamic Configuration
The sip_userid and sip_userpass provide access to the PBX as shown in the following example:
<Profile> ... <profile_type>CUCM</profile_type> <display>true</display> <profname>CUCM-2808</profname> <prof_password></prof_password> <sip_userid>2808</sip_userid> <sip_userpass>123456</sip_userpass> <prof_description>Test-2808</prof_description> <sip_mac></sip_mac> <sip_remhost>10.80.212.44</sip_remhost> ...</Profile>
Enable Using Dynamic ConfigurationInformation on enabling dynamic configuration and working with the wfcvariable.xml file.
Enabling Dynamic Configuration
The var_location tag enables dynamic configuration and reduces the entire profile section of theWFConnect.xml file to one line.
<WFConnect><Profile> <var_location>file:///WFConnect/wfcvariable.xml</var_location></Profile>
NOTE: location is for demonstration purposes. The actual file location may vary.
You can also set var_location in the WFC Voice Client by going to > Settings > Shared Profiles URI.
When WFC Voice initializes and parses the XML file, this tag instructs the device to retrieve thewfcvariable.xml file from the stated location. The location can be:
• A local file on the mobile device
• Provisioned by an MDM
• Side loaded manually
• A URL
wfcvariable.xml File
This file collects and organizes XML tags to populate the run-time WFConnect.xml file. Tags that are notdeclared use default values. The Users tag supports and organizes multiple users. The users' section isdisplayed as a list on the WFC Voice sign-in screen. When the display tag for an entry is set to true, userscan select a profile from the list.
38

Dynamic Configuration
When the display tag is set to false, the profname and prof_password tags are used. These tags are usedfor user authentication when selecting a hidden profile for a dedicated user. For a shared extension, thesetags are rarely used.
Users can each be a complete and unique configuration, or they can re-use components, such as thefollowing buttons example.
<Users> <Entry> <profile_type>CUCM</profile_type> <display>false</display> <profname>Manager</profname> <prof_password>abc123</prof_password> <dept>Mgmt-1</dept> <sip_mac>aaaabbbbccc1</sip_mac> <sip_remhost>192.168.10.50</sip_remhost> <layout_location>file:///WFConnect/buttons_1001.xml</layout_location> </Entry> <Entry> <profile_type>CUCM</profile_type> <display>true</display> <profname>1002</profname> <dept>Pharmacy</dept> <sip_mac>aaaabbbbccc2</sip_mac> <sip_remhost>192.168.10.50</sip_remhost> <layout_location>file:///WFConnect/buttons_1002.xml</layout_location>1 </Entry> <Entry> <profile_type>CUCM</profile_type> <display>true</display> <profname>1003</profname> <dept>Grocery</dept> <sip_mac>aaaabbbbccc3</sip_mac> <sip_remhost>192.168.10.50</sip_remhost> <layout_location>file:///WFConnect/buttons_1002.xml</layout_location> </Entry> <Entry> <profile_type>CUCM</profile_type> <display>false</display> <profname>1050</profname> <prof_password>jsz935</prof_password> <dept>GM</dept> <sip_remhost>192.168.10.49</sip_remhost> <sip_userid>George</sip_userid> <sip_userpass>xyz123</sip_userpass> <layout_location>http://user.server/wfcbutton4.xml</layout_location> </Entry></Users>
39

Dynamic Configuration
XML File Location
The previous example shows the wfcvariable.xml variable file resident on the device. The variablefile can also reside on a centrally accessible server that the client can access. This provides service to alldevices in the enterprise and central administrative control.
The var_location element specifies whether WFC Voice looks for the XML file on the device (a local file) orat a network location, for example:
• Local - file:///WFConnect/wfcvariable.xml
• HTTP - http://10.5.90.10/wfcvariable.xml
• HTTPS - https://10.5.90.10/wfcvariable.xml
• TFTP - tftp://10.5.90.10/wfcvariable.xml
This provides options for deploying the configuration files. For example, an enterprise using an MDM maysupply both the Profile section and the variable file to the device and also have a central location for thevariable file.
DHCP Option 150
WFC Voice also supports DHCP Option 150 for retrieving the wfcvariable.xml file. If thevar_location tag is not specified in the WFConnect.xml configuration, the client attempts to download thewfcvariable.xml file from the TFTP server specified in the Option 150 string.
Configuration ResynchronizationSynchronizing dynamic configuration ensures that devices always have the most current configurationavailable from the network server or MDM.
For example, when a user logs in to an extension, the configuration files may change. The newconfiguration files are available when the user logs off from the current session and the WFC service re-processes the variable files.
NOTE: The system administrator must ensure that updates are posted to the correct locationavailable to WFC Voice.
40

Dynamic Configuration
Dynamic Configuration Start-Up - Server SideThis section describes the steps WFC Voice follows on the server-side to download dynamic configurationduring initialization.
Figure 2 Dynamic Configuration Start-Up Process
41

Dynamic Configuration
Dynamic Configuration Start-Up - Client SideThis section describes the steps WFC Voice follows on the client-side to download dynamic configurationduring initialization.
Figure 3 Dynamic Configuration Start-Up Process - Continued
42

Dynamic Configuration
XML File ExamplesThis section describes the standard profile and different ways WFC Voice is able to retrieve a DynamicWorkforce Configuration XML file. Options include local XML and TFTP downloaded XML configuration.
43

Dynamic Configuration
Figure 4 XML Files Example
44

Dynamic Configuration
Testing Remote Dynamic ConfigurationA test environment can use any remote server supporting web services.
To set up a lab system:
1. Ensure the server is running IIS to support Web services.
2. Establish a WFC Voice website.
3. Create the website and add a virtual folder.
4. Open the Default Documents properties.
Figure 5 Server Manager
5. Set the folder for the WFC Voice configuration file repository.
Figure 6 Edit Virtual Directory
45

Dynamic Configuration
6. Test the settings to verify the system and default user can access the files.
7. To test accessibility of the files, point your browser to the web site.
8. After determining access to the files, modify the XML files accordingly:
a) An example of remote access in WFConnect.xml is:
<Profile> <var_location>http://192.168.10.45/var/wfcvariable.xml </var_location></Profile>
b) An example of remote access in the wfcvariable.xml is:
<layout_location>http://192.168.10.45/var/buttons_5002.xml </layout_location>
A remote server allows consistency of delivery to the remote device. Logging on and off the devicesynchronizes changes to the device. Each login retrieves the existing XML file targeted for that device.
46

SettingsSettings
Use WFC Voice settings to configure and customize WFC Voice.
Accessing SettingsAccess WFC Voice settings from the menu.
1. Launch WFC Voice.
• Touch .
• Or, swipe right from the left side of the screen.
2. Touch Settings.
The password dialog box appears.
3. Enter password (default: zamboni).
4. Touch Enter. The password is preserved until the app quits.
Exit, Reload, or Sign OutExit, reload, or sign out of WFC Voice using the WFC Voice UI.
Exiting WFC Voice
Exit WFC Voice from inside the app or using ADB, an MDM, or a third-party app.
• Choose one of the following methods for exiting the WFC Voice app.
• Go to Settings >Stop Service > Yes.
• Initiate the action using ADB, an MDM, or a third-party app.
Reloading WFC Voice
Reload WFC Voice through the GUI, ADB, an MDM, or a third-party app.
• Choose one of the following methods for reloading the WFC Voice app.
• Touch > Reload.
• Initiate the action using ADB, an MDM, or a third-party app.
47

Settings
Signing Out of WFC Voice
Sign Out of WFC Voice from inside the app or using ADB, an MDM, or a third-party app. This option isnot available when using Profile Manager or Extension Manager to manage WFC Voice.
• Choose one of the following methods for signing out of the WFC Voice app.
• Touch > Sign Out.
• Initiate the action using ADB, an MDM, or a third-party app.
Disabling Sign Out
Configure the Sign Out option using XML or Extension Manager. This option is not available when usingProfile Manager to manage WFC Voice.
NOTE: The Sign Out option is enabled by default.
• Disable the Sign Out option by setting the disable_menu_sign_out parameter to true in the XMLconfiguration file.
If the disable_menu_sign_out parameter is not set or set to false, the Sign Out option isavailable from the three-line menu.
If the disable_menu_sign_out parameter is set to true, the Sign Out option is not available fromthe three-line menu.
XML example of Disable Menu Sign Out.
<WFConnect><Profile> <disable_menu_sign_out>true</disable_menu_sign_out></Profile>...</WFConnect>
Profile SettingsCreating, editing, loading and saving a settings profile.
The WFC Voice profile is an XML file that contains all the settings for the current WFC Voice session.
Creating a Profile
When saving a new profile a new XML file is created in the WFConnect folder.
1. Go to Settings.
2. Touch the menu button, then Create new profile.
3. Touch Save current profile.
4. Enter a file name for the new profile.
5. Touch Save. The file is saved in the WFConnect folder.
48

Settings
6. Touch the Back button to return to the WFC Voice home screen.
Changing a Profile Name
Change the name of the current profile.
1. Go to Settings.
2. Touch Profile name.
3. Enter a file name for the new profile.
4. Touch OK. The file name in the WFConnect folder is updated.
5. Touch the Back button to return to the WFC Voice home screen.
Setting the Shared Profiles URI
Set the URI of a shared profile located on a remote or local server.
1. Copy the profile from the WFConnect folder using a USB tether.
2. Move the profile to a remote or local server.
Supported protocols are file, http, https, and tftp.
3. From WFC Voice, go to Settings.
4. Touch Shared Profiles URI.
5. Enter the URI of the shared profile.
6. Touch OK.
7. Touch the Back button to return to the WFC Voice home screen.
Shared Profiles URI is tagged as var_location in the XML configuration file.
<WFConnect><Profile> <var_location>file:///WFConnect/wfcvariable.xml</var_location></Profile>
Load New Profile
For WFC Voice versions 9.0.213xx and later, profiles are saved to the device in /enterprise/device/settings/WFConnect/. Devices running earlier versions of Android can load profiles previously savedto the WFConnect folder or the SD card.
Loading a New Profile Using the GUI
Load a new profile using the WFC Voice Graphical User Interface (GUI).
1. Go to Settings.
2. Touch Load new profile. The Select Profile File dialog box appears.
3. Select a profile file name.
4. Touch the Back button or Refresh button to load new profile.
49

Settings
Loading a New Profile Using XML
Load a new profile using the XML configuration file.
• Update the Profile tag in the XML configuration file.
<WFConnect><Profile> <profname>WFConnect.xml</profname></Profile>
Loading a Profile Using ADB Commands
Load a profile using an Android Debug Bridge (ADB) connection.
• Open a command prompt and send the following ADB command to the device:
$ adb shell am start -a wfc.voice.ACTION_NEW_CONFIG --es profile_uri <configuration_file>
Where <configuration_file> is the URI of the new XML configuration file.
Save Current Profile
Using the same file name, save the current profile to replace an existing xml file.
1. Go to Settings.
2. Touch Save current profile. The current profile name appears.
3. Touch Save. The file is saved in the WFConnect folder.
4. Touch the Back button to return to the WFC Voice home screen.
Edit a Profile Using XML
To edit a saved profile using XML, copy the new profile from the WFConnect folder using a USB tether.
Connection ParametersConfiguring up to four PBX types.
Users can make and receive a call using any configured PBX type. This section describes how to configureup to three additional PBX types using the WFC Voice GUI or WFConnect.xml file.
To configure the default PBX (PBX#1 Configuration) see Configure WFC Voice on page 31.
Configuring Multiple PBX Types
Set the configuration parameters for additional PBX types using the GUI or XML.
IMPORTANT: When configuring multiple PBXs, ensure the server IP address and credentials arepointing to the correct PBX call server as indicated by the profile type. For example, the CUCMprofile must be configured with the IP address and credentials of a CUCM call manager.
50

Settings
In the GUI, PBXs are referred to as PBX Type, while in the XML they are tagged as <profile_type>.
1. Go to Settings.
2. Touch Connection Parameters.
3. Touch PBX#2 Configuration.
4. Touch PBX#2 Type.
5. Select the PBX type that is the same as the target PBX call server.
6. Enter the configuration information.
Refer to the Getting Started chapter of the WFC Voice Client Administrator Guide for the desired PBXtype.
7. Touch the Back button to return to the Connection Parameters screen.
8. Repeat steps 5 through 7 for up to two more PBX types (optional).
9. Touch the Back button to return to the WFC Voice home screen.
XML example of configuring multiple PBX types.
<WFConnect><Profile> <profile_type>Licensed PBX One</profile_type> <sip_userid>1001</sip_userid> <sip_userpass>1234</sip_userpass> <sip_localport>5060</sip_localport> <sip_remhost>10.5.97.99</sip_remhost> <sip_remport>5060</sip_remport> <sip_transport>UDP</sip_transport> <sip_realm>10.16.2.111</sip_realm> <profile2_type>Licensed PBX Two </profile2_type> <sip2_userid>1002</sip2_userid> <sip2_userpass>1234</sip2_userpass> <sip2_device_type>8865</sip_device_type> <sip2_mac>00-11-22-33-44-55</sip2_mac> <sip2_localport>5060</sip2_localport> <sip2_remhost>10.5.97.99</sip2_remhost> <sip2_remport>5060</sip2_remport> <sip2_transport>UDP</sip2_transport> <sip2_realm>10.16.2.111</sip2_realm></Profile>...</WFConnect>
Color ThemeChoose a theme to select a custom color scheme for the WFC Voice client header, buttons, and otherUI elements.
51

Settings
Choosing a Theme
Choose a theme using the GUI, XML, Extension Manager, or Profile Manager.
NOTE: Available in WFC Voice 9.0.214xx or later.
1. In Settings, select Choose Theme.
2. Select a color using one of the following methods.
• Touch a color on the color wheel.
• Touch the hexadecimal digits to manually enter a value in Alpha Red Green Blue (ARGB) format. Forexample, #FFFFFFFF is the color white.
NOTE: Make sure to prefix # in the Hex color. For example, If you have RGB color, write as #FF.
• Touch DEFAULT to return to the default theme.
3. Touch SET.
The theme changes to the chosen color. Depending on how light or dark the theme color is, the color ofsome text and icons may also change.
XML example of choosing a theme.
<WFConnect><Profile> <base_theme>#FFFF0059</base_theme></Profile>...</WFConnect>
Audio SettingsConfiguring advanced audio settings.
CAUTION: Changing the default audio settings may have adverse results. Do not modify thesesettings unless directed to so by Zebra Technical Support.
This section provides detailed information on configuring advanced audio settings. Use the WFC Voice GUIor WFConnect.xml file to customize the Profile section. Both methods are discussed with each Functiondescription.
Accessing Audio Settings
Access the advanced audio settings.
1. Go to Settings.
2. Touch Advanced Settings > Audio Settings.
52

Settings
Audio Codecs Priorities
Available audio Codecs priorities.
NOTE: Only select audio Codecs available in the PBX.
Field Type Description XML
OPUS When selected, assigns preference priorityfor OPUS Voice codec negotiationsbetween PBX and WFC Voice. <codec_ulaw_priority>1
</codec_ulaw_priority>
G.711 u-Law When selected, assigns preference priorityfor G.711 u-LAW Voice codec negotiationsbetween PBX and WFC Voice. <codec_ulaw_priority>2
</codec_ulaw_priority>
G.711 A-Law When selected, assigns preference priorityfor G.711 A-Law Voice codec negotiationsbetween PBX and WFC Voice. <codec_alaw_priority>3
</codec_alaw_priority>
G.729 When selected assigns preference priorityfor G.729 Voice codec negotiationsbetween PBX and WFC Voice. <codec_g729_priority>4
</codec_g729_priority>
G.722 When selected assigns preference priorityfor G.722 Voice codec negotiationsbetween PBX and WFC Voice. <codec_g722_priority>5
</codec_g722_priority>
GSM When selected assigns preference priorityfor GSM Voice codec negotiations betweenPBX and WFC Voice. <codec_gsm_priority>6
</codec_gsm_priority>
Setting Audio Codecs Priorities
Set the audio Codecs priorities using the GUI or XML.
1. In Audio Settings, select Audio Codecs Priorities.
2. Select the Codec preference (default order preferred). See table for descriptions.
3. Touch Back button to return to the WFC Voice home screen.
XML example of setting the audio Codecs priorities.
<WFConnect><Profile> <codec_ulaw_priority>1</codec_ulaw_priority></Profile>...
53

Settings
</WFConnect>
Jitter Buffer
Setting Jitter Buffer initial delay and maximum size settings.
Setting Jitter Initial Delay
Set the Jitter Initial Delay using the GUI or XML.
1. In Audio Settings, slide the Jitter Initial Delay slider (default 60 msec).
2. Touch Back button to return to the WFC Voice home screen.
XML example of setting the Jitter Initial Delay.f
<WFConnect><Profile> <jitter_min>60</jitter_min></Profile>...</WFConnect>
Setting Jitter Buffer Max Buffer Size
Set the maximum Jitter Buffer size using the GUI or XML.
1. In Audio Settings, slide the Jitter Buffer Size slider (default 250 msec).
2. Touch Back button to return to the WFC Voice home screen.
XML example of setting the maximum Jitter Buffer size.
<WFConnect><Profile> <jitter_max>250</jitter_max></Profile>...</WFConnect>
RTP Parameters
Set the RTP payload size, first port, and last port.
Setting Real-Time Transport Protocol (RTP) Parameters - Payload Size
Set the RTP Payload size using the GUI or XML.
1. In Audio Settings, select RTP payload size.
2. Select the RTP payload size from the dialog box (default 20 ms).
3. Touch the Back button to return to the WFC Voice home screen.
54

Settings
XML example of RTP Payload size.
<WFConnect><Profile> <sip_rtp_ptime>20</sip_rtp_ptime></Profile>...</WFConnect>
Setting First Real-Time Transport Protocol (RTP) Port
Set the First RTP Port using the GUI or XML.
1. In Audio Settings, select First RTP port.
2. Enter the First RTP port number(default 50000).
3. Select OK.
4. Touch the Back button to return to the WFC Voice home screen.
XML example of First RTP Port.
<WFConnect><Profile> <sip_rtp_port1>50000</sip_rtp_port1></Profile>...</WFConnect>
Setting Last Real-Time Transport Protocol (RTP) Port
Select the Last RTP Port using the GUI or XML.
1. In Audio Settings, select Last RTP Port.
2. Enter the Last RTP port number (default 50025).
3. Select OK.
4. Touch the Back button to return to the WFC Voice home screen.
XML example of Last RTP Port.
<WFConnect><Profile> <sip_rtp_port2>50025</sip_rtp_port2></Profile>...</WFConnect>
55

Settings
Audio Enhancements
Enable and disable audio enhancements using the GUI or XML.
Configuring Audio Enhancements
Configure audio enhancements using the GUI or XML.
Set the following audio enhancements:
• Echo Cancellation
• Noise Reduction
• AGC on speaker
• AGC on earpiece
1. In Audio Settings, scroll down to Audio Enhancements.
2. Tap the check boxes next to the items to enable (default: disabled).
3. Touch the Back button to return to the WFC Voice home screen.
XML example of the audio enhancements.
<WFConnect><Profile> <use_aec>false</use_aec> <use_noise>false</use_noise> <use_agc_speaker>false</use_agc_speaker> <use_agc_ear>false</use_agc_ear></Profile>...</WFConnect>
Setting Input / Output Audio
Set the input / output volume using the GUI or XML.
1. In Audio Settings, scroll down to Audio Enhancements.
2. Use the slider to select the volume levels for Input Audio Volume and Output Audio Volume (default 1).
3. Touch the Back button to return to the WFC Voice home screen.
XML example of the input / output volume.
<WFConnect><Profile> <audio_gain_in>1</audio_gain_in> <audio_gain_out>1</audio_gain_out></Profile>...</WFConnect>
56

Settings
Setting Audio Debugging Tools
Set the following audio debugging tools using the GUI or XML.
• Show jitter stats
• Save incoming voice
• Native Sample Rate
1. In Audio Settings, scroll down to Audio Debugging Tools.
2. Tap the check boxes next to the items to enable (default: disabled).
3. Touch the Back button to return to the WFC Voice home screen.
XML example of the audio debugging tools.
<WFConnect><Profile> <show_jitter_stats>false</show_jitter_stats> <save_incoming_voice_to_file>false</save_incoming_voice_to_file> <use_native_sample_rate>false</use_native_sample_rate></Profile>...</WFConnect>
UI SettingsControlling the appearance and functionality of WFC Voice.
Use the GUI to configure the User Interface. Settings made in the GUI are saved to the XML file. The GUIsettings and the XML file drives the WFC Voice look and functionality. Alternatively edit the XML file,WFConnect.xml, to make the same GUI settings. The saved WFConnect.xml file can be modified anduse to configure other devices.
The WFConnect.xml file must be stored on the device in the WFCconnect folder. If this file does not exist,the application uses the default parameter values. The WFC Voice XML configuration file has the followingsections which must be present in the file and in the following order:
• Profile section
• Dashboard section
• Call buttons section.
IMPORTANT: All these sections must be present in the XML file and they must be in the orderlisted above.
Accessing UI Settings
Access UI settings from the WFC Voice app.
1. Go to Settings.
2. Touch Advanced Settings > UI Settings.
57

Settings
Configuration File Sections
This section includes descriptions of the different parts of the WFC Voice GUI.
Profile Section
The Profile section contains all the global settings.
This section only requires a few basic items to begin using the WFC Voice on a PBX.
• SIP (Literal or Pseudo) MAC Address <sip_mac>
• SIP Remote Host (PBX Server Address) <sip_remhost>
Unless specified, the Profile section of WFC Voice uses the default settings for Audio Settings, CallSettings, Miscellaneous Settings, Logging and Optional Services (This is a suggested best practice). Usethe WFC Voice GUI or WFConnect.xml file to customize the Profile section. Both methods are discussedwith each Function description.
See XML Example - Profile on page 156 for a profile section example.
Dashboard Section
The Home Screen Dashboard section defines the buttons in the dashboard area of the screen and theirlayout on the WFC Voice screen.
The Dashboard displays functions and features specific to the end user. A maximum of 12 buttons can bedisplayed on the screen; additional buttons are accessed by scrolling up and down. Use the WFC VoiceGUI or WFConnect.xml file to customize the Dashboard. Both methods are discussed with each Functiondescription.
See XML Example - Dashboard on page 158 for a dashboard section example.
Call Buttons Section
The Call Buttons section defines the buttons in the call buttons area of the screen and their layout on theWFC Voice screen.
In-Call displays the available function and action of call buttons that can be accessed during a call. Whileon a call the user may wish to perform one of the following:
• Add Call
• Home
• Hold
• Resume
• Park
• Transfer
• Conference
• Complete
• End Call.
See XML Example - Call Buttons on page 161 for a call button section example.
58

Settings
Headless Mode
For detailed information on Headless Mode refer to the WFC Voice Programmer's Guide.
Background Logo
Choose a background logo from the icon library or the WFConnect folder using the GUI or XML.
Choosing a Logo from the Icon Library
Choose a background logo from the icon library using the GUI or XML.
1. In UI Settings, select Background Logo.
2. From the LIBRARY tab, select the new background. A yellow box appears around the selectedbackground.
3. Touch the Back button to return to the WFC Voice home screen.
XML example of choosing a background logo.
<WFConnect><Profile> <background_logo>logo</background_logo></Profile>...</WFConnect>
Creating a Custom Background Logo
The user can create a custom background and transfer it to the device.
1. Connect the device to a host computer using a USB cable.
2. From the host computer, copy the icon file to the WFConnect folder on device.
Choosing a Custom Logo
Choose a custom background logo from the WFConnect folder using the GUI or XML.
1. In UI Settings, select Background Logo.
2. From the SDCARD tab, select the new background. A yellow box appears around the selectedbackground.
3. Touch the Back button to return to the WFC Voice home screen.
XML example of choosing a custom background logo.
<WFConnect><Profile> <background_logo>custom_logo.png</background_logo></Profile>...
59

Settings
</WFConnect>
Graphical User Interface Design Tool
Use the GUI Design Tool to customize the Dashboard and In-Call screen from within WFC Voice.
Configure each to fit the specific needs of the customer. The appearance of WFC Voice is configuredusing the GUI or by directly modifying the WFConnect.xml file. Details on specific XML settings and theconstruct of the XML configuration file are discussed in more detail later in this guide.
Accessing the GUI Design Tool
Access the GUI Design Tool from the WFC Voice app.
1. Go to Settings.
2. Touch Advanced Settings > UI Settings.
3. Select Edit Dashboard or Edit In-Call Button.
UI Settings GUI Design Tool
This section describes the buttons available for each area.
Figure 7 GUI Design Tool - Dashboard
Number Item
1 Touch Edit to edit the button configuration.
2 Touch Add to add a button.
3 Buttons available change based on if the selected area to configure is Dashboard orIn-Call.
60

Settings
Number Item
4 Header Label changes based on if the selected area to configure is DashboardDesigner or In-Call Designer.
5 Touch a button to edit. A yellow boarder appears indicating the button to beconfigured.
6 Touch Delete to remove selected button.
7 Touch Up to move the button to the left in the list.
8 Touch Down to move the button right in the list.
9 Touch column toggle to switch between three or four columns (Dashboard designonly)
Home Screen Buttons
Configure buttons on the Home screen dashboard except for the footer buttons.
Figure 8 Home Screen Dashboard
Number Item
1 Dashboard Buttons
2 Footer (Not Configurable)
61

Settings
In-Call Buttons
Configure buttons on the In-Call dashboard except for the footer buttons.
Figure 9 In-Call Dashboard
Number Item
1 In-Call Dashboard Buttons (Configurable)
2 In-Call Footer (Not Configurable)
Buttons Settings
The following sections describes each button that can be placed on the UI. Each section lists the DesignerTool procedure and corresponding XML configuration.
Configuring the Call Button
Configure the Call button using the GUI or XML.
Call is the ability to make a telephone call to a specific number or location using a prefix. The administratoridentifies a target by its extension (phone number) and enters this into the Value field along with the prefix.The user can then use this function to initiate a call to the preset destination.
1. In UI Settings, select Edit Dashboard or Edit In-Call > Add.
2. Select the new button. A yellow box appears around the selected button.
3. Touch Edit.
62

Settings
4. Select the check box next to Confirm On Click to enable this (the default is Disabled).
5. Touch Action and select CALL from the Select Action menu.
6. If the dialed number has a prefix, in the Value field, enter the prefix number.
7. In the Title field, enter Call.
8. In the Description field, enter a short description of the button function.
9. Touch Icon and select an icon from the Select Icon menu. See Icons on page 87.
10. Touch BG to set the background color. See Setting Button Background Color on page 89.
11. Touch FG to set the foreground text color. See Setting Button Text Color on page 89.
12. Touch the Back button to return to the WFC Voice home screen.
XML example of configuring the Call button.
<Dashboard> or <CallButtons>... <Button> <title>Call</title> <action>CALL</action> <value>9</value> <enabled>true</enabled> <confirm>false</confirm> <description>Make a call</description> <bg_color>#FF001425</bg_color> <fg_color>#FFFFFFFF</fg_color> <icon>Default</icon> </Button>...</Dashboard> or </CallButtons>
Configuring the Dial Button
Configure the Dial button using the GUI or XML.
Dial is the ability to dial a specified extension or number to initiate a telephone call. A caller identifies atarget by its extension (phone number) and originates the call.
1. In UI Settings, select Edit Dashboard or Edit In-Call > Add.
2. Select the new button. A yellow box appears around the selected button.
3. Touch Edit.
4. Select the check box next to Confirm On Clickto enable this (the default is Disabled).
5. Touch Action and select DIAL from the Select Action menu.
6. In the Title field, enter Dial.
7. In the Description field, enter a short description of the button function.
8. Touch Icon and select an icon from the Select Icon menu. See Icons on page 87.
9. Touch BG to set the background color. See Setting Button Background Color on page 89.
10. Touch FG to set the foreground text color. See Setting Button Text Color on page 89.
63

Settings
11. Touch the Back button to return to the WFC Voice home screen.
XML example of configuring the Dial button.
<Dashboard> or <CallButtons>... <Button> <title>Dial</title> <action>DIAL</action> <value></value> <enabled>true</enabled> <confirm>false</confirm> <description>Dial a number or extension</description> <bg_color>#FF001425</bg_color> <fg_color>#FFFFFFFF</fg_color> <icon>Default</icon> </Button>...</Dashboard> or </CallButtons>
Configuring the Start App
Configure the Start App button sing the GUI.
Start Application defines a button to launch another application on the device. When the button is pressedWFC Voice minimizes to run in the background and the defined application launches. For example, abutton can be placed in the Dashboard to open an email application.
1. In UI Settings, select Edit Dashboard or Edit In-Call > Add.
2. Select the new button. A yellow box appears around the selected button.
3. Touch Edit.
4. Select the check box next to Confirm On Click to enable this (the default is Disabled).
5. Touch Action and select START_APP.
6. Touch Select App Package and select the application from the Select App Package menu.
7. In the Title field, enter the application name.
8. In the Description field, enter a short description of the button function.
9. Touch Icon and select an icon from the Select Icon menu. See Icons on page 87.
10. Touch BG to set the background color. See Setting Button Background Color on page 89.
11. Touch FG to set the foreground text color. See Setting Button Text Color on page 89.
12. Touch the Back button to return to the WFC Voice home screen.
Opening the music application example is shown in the following XML example.
<Dashboard> or <CallButtons>... <Button> <title>Email</title>
64

Settings
<action>START_APP</action> <value>com.android.email</value> <enabled>true</enabled> <confirm>false</confirm> <description>Open email application</description> <icon>email.png</icon> </Button>...</Dashboard> or </CallButtons>
Configuring the Log Marker
Configure the Log Marker using the GUI or XML.
Log Marker creates a time stamp in the logs. If you experience any issues with WFC Voice functionality, thetime stamp focuses troubleshooting of the device to the time the issue occurred for more rapid resolution.
1. In UI Settings, select Edit Dashboard or Edit In-Call > Add.
2. Select the new button. A yellow box appears around the selected button.
3. Touch Edit.
4. Select the check box next to Confirm On Click to enable this (the default is Disabled).
5. Touch Action and select LOG_MARKER from the Select Action menu.
6. In the Title field, enter Log Marker.
7. In the Description field, enter a short description of the button function.
8. Touch Icon and select an icon from the Select Icon menu. See Icons on page 87.
9. Touch BG to set the background color. See Setting Button Background Color on page 89.
10. Touch FG to set the foreground text color. See Setting Button Text Color on page 89.
11. Touch the Back button to return to the WFC Voice home screen.
XML example of configuring the Log Marker.
<Dashboard> or <CallButtons>... <Button> <title>Log Marker</title> <action>LOG_MARKER</action> <value></value> <enabled>true</enabled> <confirm>false</confirm> <description>Create time stamp</description> <bg_color>#FF001425</bg_color> <fg_color>#FFFFFFFF</fg_color> <icon>Default</icon> </Button>...</Dashboard> or </CallButtons>
65

Settings
Configuring Speed Dial 0-9
Configure the Speed Dial button using the GUI or XML.
Speed Dial places a telephone call to a preset number/extension. Set up to 10 speed dial buttons on thedashboard through the GUI interface.
1. In UI Settings, select Edit Dashboard or Edit In-Call > Add.
2. Select the new button. A yellow box appears around the selected button.
3. Touch Edit.
4. Select the check box next to Confirm On Click to enable this (the default is Disabled).
5. Touch Action and select SPEED_DIALx from the Select Action menu.
6. In the Value field, enter the extension.
7. In the Title field, enter Speed Dial (#).
8. In the Description field, enter a short description of the button function.
9. Touch Icon and select an icon from the Select Icon menu. See Icons on page 87.
10. Touch BG to set the background color. See Setting Button Background Color on page 89.
11. Touch FG to set the foreground text color. See Setting Button Text Color on page 89.
12. Touch the Back button to return to the WFC Voice home screen.
XML example of configuring the Speed Dial button.
<Dashboard> or <CallButtons>... <Button> <title>Speed Dial #1</title> <action>SPEED_DIAL1</action> <value>5133</value> <enabled>true</enabled> <confirm>false</confirm> <description>Speed dial #1</description> <bg_color>#FF001425</bg_color> <fg_color>#FFFFFFFF</fg_color> <icon>Default</icon> </Button>...</Dashboard> or </CallButtons>
Configuring the Redial Button
Configure the Redial button using the GUI or XML.
Redial places a telephone call to the most recently call location.
1. In UI Settings, select Edit Dashboard or Edit In-Call > Add.
2. Select the new button. A yellow box appears around the selected button.
3. Touch Edit.
66

Settings
4. Select the check box next to Confirm On Click to enable this (the default is Disabled).
5. Touch Action and select REDIAL.
6. In the Title field, enter Redial.
7. In the Description field, enter a short description of the button function.
8. Touch Icon and select an icon from the Select Icon menu. See Icons on page 87.
9. Touch BG to set the background color. See Setting Button Background Color on page 89.
10. Touch FG to set the foreground text color. See Setting Button Text Color on page 89.
11. Touch the Back button to return to the WFC Voice home screen.
XML example of configuring the Redial button.
<Dashboard> or <CallButtons>... <Button> <title>Redial</title> <action>REDIAL</action> <value></value> <enabled>true</enabled> <confirm>false</confirm> <description>Dial the last number called</description> <bg_color>#FF001425</bg_color> <fg_color>#FFFFFFFF</fg_color> <icon>Default</icon> </Button>...</Dashboard> or </CallButtons>
Configuring the Suspend Mode Button
Configure the Suspend Mode button using the GUI or XML.
Suspend Mode blocks all incoming or outgoing calls.
1. In UI Settings, select Edit Dashboard or Edit In-Call > Add.
2. Select the new button. A yellow box appears around the selected button.
3. Touch Edit.
4. Select the check box next to Confirm On Click to enable this (the default is Disabled).
5. Touch Action and select SUSPEND_MODE.
6. In the Title field, enter Suspend Mode.
7. In the Description field, enter a short description of the button function.
8. Touch Icon and select an icon from the Select Icon menu. See Icons on page 87.
9. Touch BG to set the background color. See Setting Button Background Color on page 89.
10. Touch FG to set the foreground text color. See Setting Button Text Color on page 89.
11. Touch the Back button to return to the WFC Voice home screen.
67

Settings
XML example of configuring the Suspend Mode button.
<Dashboard> or <CallButtons>... <Button> <title>Suspend Mode</title> <action>SUSPEND_MODE</action> <value></value> <enabled>true</enabled> <confirm>false</confirm> <description>Block all incoming calls</description> <bg_color>#FF001425</bg_color> <fg_color>#FFFFFFFF</fg_color> <icon>Default</icon> </Button>...<Dashboard> or <CallButtons>
Configuring the History Button
Configure the History button using the GUI or XML.
History lists recently called numbers and incoming calls, including missed calls.
1. In UI Settings, select Edit Dashboard or Edit In-Call > Add.
2. Select the new button. A yellow box appears around the selected button.
3. Touch Edit.
4. Select the check box next to Confirm On Click to enable this (the default is Disabled).
5. Touch Action and select HISTORY.
6. In the Title field, enter History.
7. In the Description field, enter a short description of the button function.
8. Touch Icon and select an icon from the Select Icon menu. See Icons on page 87.
9. Touch BG to set the background color. See Setting Button Background Color on page 89.
10. Touch FG to set the foreground text color. See Setting Button Text Color on page 89.
11. Touch the Back button to return to the WFC Voice home screen.
XML example of configuring the History button.
<Dashboard> or <CallButtons>... <Button> <title>History</title> <action>HISTORY</action> <value></value> <enabled>true</enabled> <confirm>false</confirm> <description>Display recently called numbers and incoming calls</description>
68

Settings
<bg_color>#FF001425</bg_color> <fg_color>#FFFFFFFF</fg_color> <icon>Default</icon> </Button>...</Dashboard> or </CallButtons>
Configuring the Contacts Button
Configure the Contacts button using the GUI or XML.
The Contacts button dials a new number by selecting an existing contact. Add and store contacts locally onthe device.
1. In UI Settings, select Edit Dashboard or Edit In-Call > Add.
2. Select the new button. A yellow box appears around the selected button.
3. Touch Edit.
4. Select the check box next to Confirm On Click to enable this (the default is Disabled).
5. Touch Action and select CONTACTS.
6. In the Title field, enter Contacts.
7. In the Description field, enter a short description of the button function.
8. Touch Icon and select an icon from the Select Icon menu. See Icons on page 87.
9. Touch BG to set the background color. See Setting Button Background Color on page 89.
10. Touch FG to set the foreground text color. See Setting Button Text Color on page 89.
11. Touch the Back button to return to the WFC Voice home screen.
XML example of configuring the Contacts button.
<Dashboard> or <CallButtons>... <Button> <title>Contacts</title> <action>CONTACTS</action> <value></value> <enabled>true</enabled> <confirm>false</confirm> <description>Display contacts </description> <bg_color>#FF001425</bg_color> <fg_color>#FFFFFFFF</fg_color> <icon>Default</icon> </Button>...</Dashboard> or </CallButtons>
69
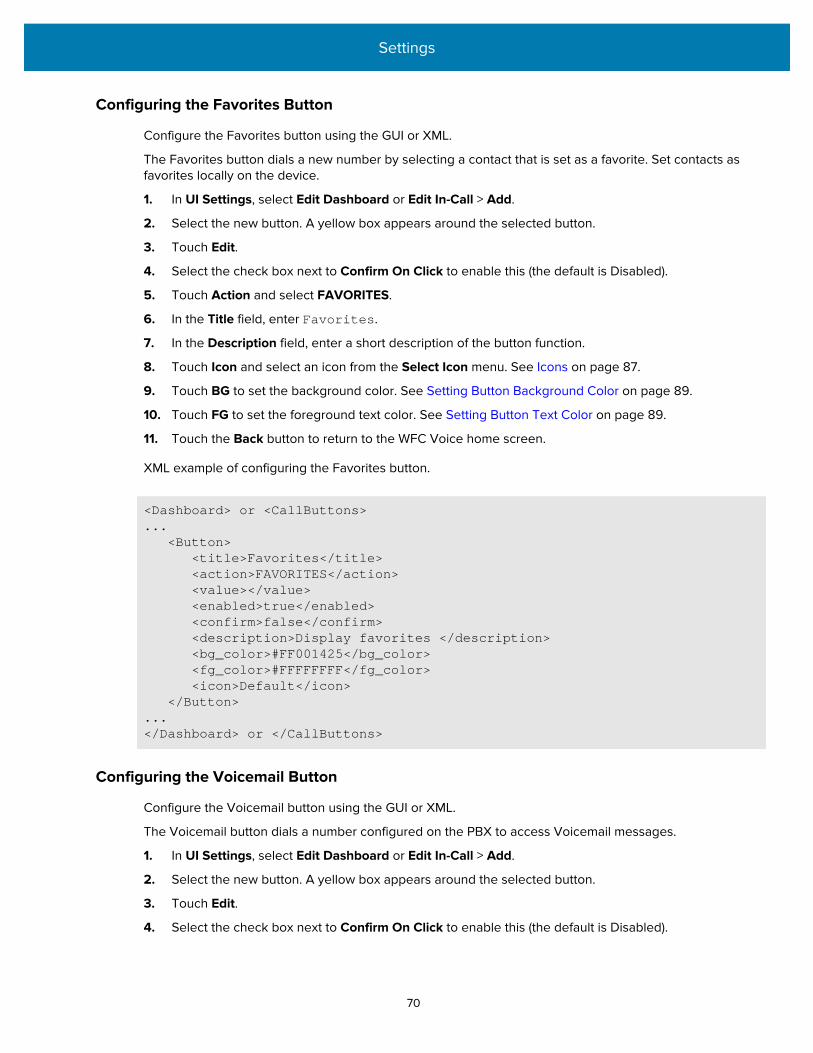
Settings
Configuring the Favorites Button
Configure the Favorites button using the GUI or XML.
The Favorites button dials a new number by selecting a contact that is set as a favorite. Set contacts asfavorites locally on the device.
1. In UI Settings, select Edit Dashboard or Edit In-Call > Add.
2. Select the new button. A yellow box appears around the selected button.
3. Touch Edit.
4. Select the check box next to Confirm On Click to enable this (the default is Disabled).
5. Touch Action and select FAVORITES.
6. In the Title field, enter Favorites.
7. In the Description field, enter a short description of the button function.
8. Touch Icon and select an icon from the Select Icon menu. See Icons on page 87.
9. Touch BG to set the background color. See Setting Button Background Color on page 89.
10. Touch FG to set the foreground text color. See Setting Button Text Color on page 89.
11. Touch the Back button to return to the WFC Voice home screen.
XML example of configuring the Favorites button.
<Dashboard> or <CallButtons>... <Button> <title>Favorites</title> <action>FAVORITES</action> <value></value> <enabled>true</enabled> <confirm>false</confirm> <description>Display favorites </description> <bg_color>#FF001425</bg_color> <fg_color>#FFFFFFFF</fg_color> <icon>Default</icon> </Button>...</Dashboard> or </CallButtons>
Configuring the Voicemail Button
Configure the Voicemail button using the GUI or XML.
The Voicemail button dials a number configured on the PBX to access Voicemail messages.
1. In UI Settings, select Edit Dashboard or Edit In-Call > Add.
2. Select the new button. A yellow box appears around the selected button.
3. Touch Edit.
4. Select the check box next to Confirm On Click to enable this (the default is Disabled).
70

Settings
5. Touch Actionand select VOICEMAIL.
6. In the Value field, enter the Voicemail Pilot number.
7. In the Title field, enter Voicemail.
8. In the Description field, enter a short description of the button function.
9. Touch Icon and select an icon from the Select Icon menu. See Icons on page 87.
10. Touch BG to set the background color. See Setting Button Background Color on page 89.
11. Touch FG to set the foreground text color. See Setting Button Text Color on page 89.
12. Touch the Back button to return to the WFC Voice home screen.
XML example of configuring the Voicemail button.
<Dashboard> or <CallButtons>... <Button> <title>Voicemail</title> <action>VOICEMAIL</action> <value>9999</value> <enabled>true</enabled> <confirm>false</confirm> <description>Voicemail messages</description> <bg_color>#FF001425</bg_color> <fg_color>#FFFFFFFF</fg_color> <icon>Default</icon> </Button>...</Dashboard> or </CallButtons>
Configuring the Do Not Disturb Button
Configure the DND button using the GUI or XML.
DND is enabled/disabled using Feature Access Code (FAC).
Access the Do Not Disturb (DND) feature directly on the phone. Use a Feature Access Code (FAC) toenable or disable this feature. Enabling DND suspends all personal calls targeted to the extension,and sends the call immediately to the defined Coverage Path. DND also removes the extension fromconsideration during any Coverage Answer Group, Simultaneous Ringing, and Hunt Group call. Thisfeature is the PBX-based implementation of an endpoint device Call Ignore feature.
1. In UI Settings, select Edit Dashboard or Edit In-Call > Add.
2. Select the new button. A yellow box appears around the selected button.
3. Touch Edit.
4. Select the check box next to Confirm On Click to enable this (the default is Disabled).
5. Touch Action and select DO_NOT_DISTURB.
6. In the Value field, enter the FAC for the Do Not Disturb feature.
7. In the Title field, enter DND.
8. In the Description field, enter a short description of the button function.
71

Settings
9. Touch Icon and select an icon from the Select Icon menu. See Icons on page 87.
10. Touch BG to set the background color. See Setting Button Background Color on page 89.
11. Touch FG to set the foreground text color. See Setting Button Text Color on page 89.
12. Touch the Back button to return to the WFC Voice home screen.
XML example of configuring the DND button.
<Dashboard> or <CallButtons>... <Button> <title>DND</title> <action>DO_NOT_DISTURB</action> <value></value> <enabled>true</enabled> <confirm>false</confirm> <description>Ignore incoming calls</description> <bg_color>#FF001425</bg_color> <fg_color>#FFFFFFFF</fg_color> <icon>Default</icon> </Button>...</Dashboard> or </CallButtons>
Configuring the Directory Button
Configure the Directory button using the GUI or XML.
Directory accesses corporate contact information on the PBX.
1. In UI Settings, select Edit Dashboard or Edit In-Call > Add.
2. Select the new button. A yellow box appears around the selected button.
3. Touch Edit.
4. Select the check box next to Confirm On Click to enable this (the default is Disabled).
5. Touch Action and select DIRECTORY.
6. In the Title field, enter Directory.
7. In the Description field, enter a short description of the button function.
8. Touch Icon and select an icon from the Select Icon menu. See Icons on page 87.
9. Touch BG to set the background color. See Setting Button Background Color on page 89.
10. Touch FG to set the foreground text color. See Setting Button Text Color on page 89.
11. Touch the Back button to return to the WFC Voice Client home screen.
XML example of configuring the Directory button.
<Dashboard> or <CallButtons>... <Button>
72

Settings
<title>Directory</title> <action>DIRECTORY</action> <value>http://X.X.X.X/system/dir/complete_dir_list </value> <enabled>true</enabled> <confirm>false</confirm> <description>Display company directory</description> <bg_color>#FF001425</bg_color> <fg_color>#FFFFFFFF</fg_color> <icon>Default</icon> </Button> ...</Dashboard> or </CallButtons>
Configuring the Add Call Button
Configure the Add Call button using the GUI or XML.
During an active call the Add Call button can dial a preset number. If there is no number in the Value field,it opens the dialer. The current call is placed on hold while the new call is initiated. When the new callconnects, you can Transfer, Conference, or End the second call and resume the first call.
NOTE: Only available on the In-Call screen only.
1. In UI Settings, select Edit In-Call > Add.
2. Select the new button. A yellow box appears around the selected button.
3. Touch Edit.
4. Select the check box next to Confirm On Click to enable this (the default is Disabled).
5. Touch Action and select ADD_CALL.
6. In the Title field, enter Add Call.
7. In the Description field, enter a short description of the button function.
8. Touch Icon and select an icon from the Select Icon menu. See Icons on page 87.
9. Touch BG to set the background color. See Setting Button Background Color on page 89.
10. Touch FG to set the foreground text color. See Setting Button Text Color on page 89.
11. Touch the Back button to return to the WFC Voice home screen.
XML example of the Add Call button.
<CallButtons>... <Button> <title>Add Call</title> <action>ADD_CALL</action> <value></value> <enabled>true</enabled> <confirm>false</confirm> <description>Add a call by opening the dialer </description> <bg_color>#FF001425</bg_color>
73

Settings
<fg_color>#FFFFFFFF</fg_color> <icon>Default</icon> </Button>...</CallButtons>
Configuring the Home Button
Configure the Home button using the GUI or XML.
During an active call the Home button invokes the Dashboard to provide access to Dashboard functions.
NOTE: Only available on the In-Call screen.
1. In UI Settings, select Edit In-Call > Add.
2. Select the new button. A yellow box appears around the selected button.
3. Touch Edit.
4. Select the check box next to Confirm On Click to enable this (the default is Disabled).
5. Touch Action and select HOME.
6. In the Title field, enter Home.
7. In the Description field, enter a short description of the button function.
8. Touch Icon and select an icon from the Select Icon menu. See Icons on page 87.
9. Touch BG to set the background color. See Setting Button Background Color on page 89.
10. Touch FG to set the foreground text color. See Setting Button Text Color on page 89.
11. Touch the Back button to return to the WFC Voice home screen.
XML example of the Home button.
<CallButtons>... <Button> <title>Home</title> <action>HOME</action> <value></value> <enabled>true</enabled> <confirm>false</confirm> <description>Return to the Home Dashboard</description> <bg_color>#FF001425</bg_color> <fg_color>#FFFFFFFF</fg_color> <icon>Default</icon> </Button>...</CallButtons>
74

Settings
Configuring the Hold Button
Configure the Hold button using the GUI or XML.
Call Hold politely suspends an active call while you tend to other business or place an additional call usingan additional Call Appearance. During call hold, you can switch between the active and held calls at anytime.
NOTE: Only available on the In-Call screen.
1. In UI Settings, select Edit In-Call > Add.
2. Select the new button. A yellow box appears around the selected button.
3. Touch Edit.
4. Select the check box next to Confirm On Click to enable this (the default is Disabled).
5. Touch Action and select HOLD.
6. In the Title field, enter Hold.
7. In the Description field, enter a short description of the button function.
8. Touch Icon and select an icon from the Select Icon menu. See Icons on page 87.
9. Touch BG to set the background color. See Setting Button Background Color on page 89.
10. Touch FG to set the foreground text color. See Setting Button Text Color on page 89.
11. Touch the Back button to return to the WFC Voice home screen.
XML example of the Hold button.
<CallButtons>... <Button> <title>Hold</title> <action>HOLD</action> <value></value> <enabled>false</enabled> <confirm>false</confirm> <description>Place call on hold</description> <bg_color>#FF001425</bg_color> <fg_color>#FFFFFFFF</fg_color> <icon>Default</icon> </Button>...</CallButtons>
Configuring the Resume Button
Configure the Resume button using the GUI or XML.
During an active call touch the Resume button to access the current call on hold.
NOTE: Only available on the In-Call screen.
75

Settings
1. In UI Settings, select Edit In-Call > Add.
2. Select the new button. A yellow box appears around the selected button.
3. Touch Edit.
4. Select the check box next to Confirm On Click to enable this (the default is Disabled).
5. Touch Action and select RESUME.
6. In the Title field, enter Resume.
7. In the Description field, enter a short description of the button function.
8. Touch Icon and select an icon from the Select Icon menu. See Icons on page 87.
9. Touch BG to set the background color. See Setting Button Background Color on page 89.
10. Touch FG to set the foreground text color. See Setting Button Text Color on page 89.
11. Touch the Back button to return to the WFC Voice home screen.
XML example of the Resume button.
<CallButtons>... <Button> <title>Resume</title> <action>RESUME</action> <value></value> <enabled>false</enabled> <confirm>false</confirm> <description>Resume an active call</description> <bg_color>#FF001425</bg_color> <fg_color>#FFFFFFFF</fg_color> <icon>Default</icon> </Button>...</CallButtons>
Configuring the Transfer Button
Configure the Transfer button using the GUI or XML.
Transfer transfers an active call to a third party. While Call Forwarding must be preconfigured, Call Transferallows making such call exchanges in real-time with an active call.
NOTE: Only available on the In-Call screen.
1. In UI Settings, select Edit In-Call > Add.
2. Select the new button. A yellow box appears around the selected button.
3. Touch Edit.
4. Select the check box next to Confirm On Click to enable this (the default is Disabled).
5. Touch Action and select TRANSFER.
6. In the Title field, enter Transfer.
76

Settings
7. In the Description field, enter a short description of the button function.
8. Touch Icon and select an icon from the Select Icon menu. See Icons on page 87.
9. Touch BG to set the background color. See Setting Button Background Color on page 89.
10. Touch FG to set the foreground text color. See Setting Button Text Color on page 89.
11. Touch the Back button to return to the WFC Voice home screen.
XML example of the Transfer button.
<CallButtons>... <Button> <title>Transfer</title> <action>TRANSFER</action> <value></value> <enabled>false</enabled> <confirm>false</confirm> <description>Transfer a call </description> <bg_color>#FF001425</bg_color> <fg_color>#FFFFFFFF</fg_color> <icon>Default</icon> </Button>...</CallButtons>
Configuring the Conference Button
Configure the Conference button using the GUI or XML.
Conference joins two separate calls for collaboration between each party on the line at the same time. Usea Feature Access Code (FAC) to enable or disable this feature.
NOTE: Only available on the In-Call screen.
1. In UI Settings, select Edit In-Call > Add.
2. Select the new button. A yellow box appears around the selected button.
3. Touch Edit.
4. Select the check box next to Confirm On Click to enable this (the default is Disabled).
5. Touch Action and select CONFERENCE.
6. In the Title field, enter Conference.
7. In the Description field, enter a short description of the button function.
8. Touch Icon and select an icon from the Select Icon menu. See Icons on page 87.
9. Touch BG to set the background color. See Setting Button Background Color on page 89.
10. Touch FG to set the foreground text color. See Setting Button Text Color on page 89.
11. Touch the Back button to return to the WFC Voice home screen.
XML example of the Conference button.
77

Settings
<CallButtons> ... <Button> <title>Conf</title> <action>CONFERENCE</action> <value></value> <enabled>false</enabled> <confirm>false</confirm> <description>Start a conference call</description> <bg_color>#FF001425</bg_color> <fg_color>#FFFFFFFF</fg_color> <icon>Default</icon> </Button> ... </CallButtons>
Configuring the Complete Button
Configure the Complete button using the GUI or XML.
This internal type is used for call transfer or conference scenarios.
NOTE: Only available on the In-Call screen.
1. In UI Settings, select Edit In-Call > Add.
2. Select the new button. A yellow box appears around the selected button.
3. Touch Edit.
4. Select the check box next to Confirm On Click to enable this (the default is Disabled).
5. Touch Action and select COMPLETE.
6. In the Title field, enter Complete.
7. In the Description field, enter a short description of the button function.
8. Touch Icon and select an icon from the Select Icon menu. See Icons on page 87.
9. Touch BG to set the background color. See Setting Button Background Color on page 89.
10. Touch FG to set the foreground text color. See Setting Button Text Color on page 89.
11. Touch the Back button to return to the WFC Voice home screen.
XML example of the Complete button.
<CallButtons>... <Button> <title>Complete</title> <action>COMPLETE</action> <value></value> <enabled>true</enabled> <confirm>false</confirm> <description>End a call transfer or conference call</description>
78

Settings
<bg_color>#FF001425</bg_color> <fg_color>#FFFFFFFF</fg_color> <icon>Default</icon> </Button>...</CallButtons>
Configuring the End Call Button
Configure the End Call button using the GUI or XML.
This function ends a call in any state. It is pushed back from WFC Voice to the PBX.
Placing the End Call button on the in-call dashboard replaces the default End Call button.
NOTE: Only available on the In-Call screen.
1. In UI Settings, select Edit In-Call > Add.
2. Select the new button. A yellow box appears around the selected button.
3. Touch Edit.
4. Select the check box next to Confirm On Click to enable this (the default is Disabled).
5. Touch Action and select END_CALL.
6. In the Title field, enter End Call.
7. In the Description field, enter a short description of the button function.
8. Touch Icon and select an icon from the Select Icon menu. See Icons on page 87.
9. Touch BG to set the background color. See Setting Button Background Color on page 89.
10. Touch FG to set the foreground text color. See Setting Button Text Color on page 89.
11. Touch the Back button to return to the WFC Voice home screen.
XML example of the End Call button.
<CallButtons>... <Button> <title>End Call</title> <action>END_CALL</action> <value></value> <enabled>true</enabled> <confirm>false</confirm> <description>End a call </description> <bg_color>#FF001425</bg_color> <fg_color>#FFFFFFFF</fg_color> <icon>Default</icon> </Button>...</CallButtons>
79

Settings
Configuring the Default List Button
Use the GUI to create the Default List button. This only creates a button. Edit the XML file to customize thelist.
By default, List displays the speed dial list 0-9. Alternatively, configure the List button to open a menu builtfrom other WFC Voice buttons.
NOTE: Only available on the In-Call screen.
1. In UI Settings, select Edit In-Call > Add.
2. Select the new button. A yellow box appears around the selected button.
3. Touch Edit.
4. Select the check box next to Confirm On Click to enable this (the default is Disabled).
5. Touch Action and select LIST.
6. In the Title field, enter List.
7. In the Description field, enter a short description of the button function.
The List button description appears at the top of the List popup dialog.
8. Touch Icon and select an icon from the Select Icon menu. See Icons on page 87.
9. Touch BG to set the background color. See Setting Button Background Color on page 89.
10. Touch FG to set the foreground text color. See Setting Button Text Color on page 89.
11. Touch the Back button to return to the WFC Voice home screen.
XML example of the List button.
<Dashboard> ... <Button> <title>List</title> <action>LIST</action> <value></value> <enabled>true</enabled> <confirm>false</confirm> <description>Department extensions </description> <bg_color>#FF001425</bg_color> <fg_color>#FFFFFFFF</fg_color> <icon>Default</icon> </Button> ... </Dashboard>
80

Settings
Configuring the List Buttons Using XML
List buttons are configured using XML.
• Use the XML configuration file to configure the list buttons.
The List button contains each sub button before the closing </Button> element. The List buttondescription appears at the top of the List popup dialog. The sub button description appears as acomment under the button title, identifying which action is performed.
XML example of a list with three custom buttons (Bedding, Electronics and Toys).
Figure 10 List Button Example
<Dashboard> or <CallButtons>... <Button> <title>List</title> <action>LIST</action> <value></value> <enabled>true</enabled> <confirm>false</confirm> <description>Department Extensions </description> <bg_color>#FF001425</bg_color> <fg_color>#FFFFFFFF</fg_color> <icon>Default</icon> <Button> <title>Bedding</title> <action>CALL</action> <value>1111</value> <enabled>true</enabled> <confirm>false</confirm> <description>Bedding Department</description> <bg_color>#FF001425</bg_color> <fg_color>#FFFFFFFF</fg_color> <icon></icon> </Button> <Button> <title>Electronics</title> <action>CALL</action> <value>1122</value> <enabled>true</enabled> <confirm>false</confirm> <description>Electronics Department</description>
81

Settings
<bg_color>#FF001425</bg_color> <fg_color>#FFFFFFFF</fg_color> <icon></icon> </Button> <Button> <title>Toys</title> <action>CALL</action> <value>1133</value> <enabled>true</enabled> <confirm>false</confirm> <description>Toys Department</description> <bg_color>#FF001425</bg_color> <fg_color>#FFFFFFFF</fg_color> <icon></icon> </Button> </Button>...</Dashboard> or </CallButtons>
Configuring the Blank Button
Configure the Blank button using the GUI or XML.
Blank provides an empty space between buttons for a more customized look and feel. If touched, theBlank button does not perform an action.
1. In UI Settings, select Edit Dashboard or Edit In-Call > Add.
2. Select the new button. A yellow box appears around the selected button.
3. Touch Edit.
4. Select the check box next to Confirm On Click to enable this (the default is Disabled).
5. Touch Action and select BLANK.
6. In the Title field, enter Blank.
7. Touch the Back button to return to the WFC Voice home screen.
XML example of the Blank button.
<Dashboard> or <CallButtons>... <Button> <title>Blank</title> <action>BLANK</action> <value></value> <enabled>true</enabled> <confirm>false</confirm> <description>Empty space</description> <icon></icon> </Button>...</Dashboard> or </CallButtons>
82

Settings
Configuring the Reload Button
Configure the Reload button using the GUI or XML.
Reload allows a user to sign out and then automatically sign back in to WFC Voice.
1. In UI Settings, select Edit Dashboard or Edit In-Call > Add.
2. Select the new button. A yellow box appears around the selected button.
3. Touch Edit.
4. Select the check box next to Confirm On Click to enable this (the default is Disabled).
5. Touch Action and select SIGNOUT_CHANGE.
6. Ensure the Value field is empty.
7. In the Title field, enter Sign Out.
8. Touch the Back button to return to the WFC Voice home screen.
XML example of the Reload button.
<Dashboard> or <CallButtons>... <Button> <title>Sign Out</title> <action>SIGNOUT_CHANGE</action> <value></value> <enabled>true</enabled> <confirm>false</confirm> <description></description> <icon></icon> <scale>CENTER_INSIDE</scale> </Button>...</Dashboard> or </CallButtons>
This action can also be initiated using ADB, an MDM, or a third party app. For example, in ADB you can usethe following command:
$ adb shell am broadcast -a wfc.voice.SIGN_OUT
Configuring the Sign Out Button
Configure the Sign Out button using the GUI or XML.
Sign Out allows a user to sign out of WFC Voice.
1. In UI Settings, select Edit Dashboard or Edit In-Call > Add.
2. Select the new button. A yellow box appears around the selected button.
3. Touch Edit.
4. Select the check box next to Confirm On Click to enable this (the default is Disabled).
5. Touch Action and select SIGNOUT_CHANGE.
83

Settings
6. In the Value field, enter 0.
7. In the Title field, enter Sign Out.
8. Touch the Back button to return to the WFC Voice home screen.
XML example of the Sign Out button.
<Dashboard> or <CallButtons>... <Button> <title>Sign Out</title> <action>SIGNOUT_CHANGE</action> <value>0</value> <enabled>true</enabled> <confirm>false</confirm> <description></description> <icon></icon> <scale>CENTER_INSIDE</scale> </Button>...</Dashboard> or </CallButtons>
This action can also be initiated using ADB, an MDM, or a third party app. For example, in ADB you can usethe following command:
$ adb shell am broadcast -a wfc.voice.SIGN_OUT --es change 0
Configuring the Ringtone Button
Configure the Ringtone button using the GUI or XML.
Ringtone allows a user set the default WFC Voice ringtone.
1. In UI Settings, select Edit Dashboard or Edit In-Call > Add.
2. Select the new button. A yellow box appears around the selected button.
3. Touch Edit.
4. Select the check box next to Confirm On Click to enable this (the default is Disabled).
5. Touch Action and select RINGTONE.
6. In the Title field, enter Ringtone.
7. Touch the Back button to return to the WFC Voice home screen.
XML example of the Ringtone button.
<Dashboard> or <CallButtons>... <Button> <title>Ringtone</title> <action>RINGTONE</action> <value></value>
84

Settings
<enabled>true</enabled> <confirm>false</confirm> <description></description> <icon></icon> <scale>CENTER_INSIDE</scale> </Button>...</Dashboard> or </CallButtons>
Configuring the Add Department Button
Configure the Add Department button using the GUI or XML.
NOTE: This feature requires Profile Manager.
Add Department reloads WFC Voice and then displays a list of all available department extensions. Ifan extension was previously configured using a URI it is automatically selected. Users can register withmultiple extensions.
1. In UI Settings, select Edit Dashboard or Edit In-Call > Add.
2. Select the new button. A yellow box appears around the selected button.
3. Touch Edit.
4. Select the check box next to Confirm On Click to enable this (the default is Disabled).
5. Touch Action and select SIGNOUT_CHANGE.
6. In the Value field, enter 3.
7. In the Title field, enter Add Department.
8. Touch the Back button to return to the WFC Voice home screen.
XML example of the Add Department button.
<Dashboard> or <CallButtons>... <Button> <title>Add Department</title> <action>SIGNOUT_CHANGE</action> <value>3</value> <enabled>true</enabled> <confirm>false</confirm> <description></description> <icon></icon> <scale>CENTER_INSIDE</scale> </Button>...</Dashboard> or </CallButtons>
This action can also be initiated using ADB, an MDM, or a third party app. For example, in ADB you can usethe following command:
85

Settings
$ adb shell am broadcast -a wfc.voice.SIGN_OUT --es change 3
Configuring the Change Department Button
Configure the Change Department button using the GUI or XML.
NOTE: This feature requires Profile Manager.
Change Department reloads WFC Voice and then displays a list of all available extensions. Previouslyconfigured extensions are automatically selected.
1. In UI Settings, select Edit Dashboard or Edit In-Call > Add.
2. Select the new button. A yellow box appears around the selected button.
3. Touch Edit.
4. Select the check box next to Confirm On Click to enable this (the default is Disabled).
5. Touch Action and select SIGNOUT_CHANGE.
6. In the Value field, enter 1.
7. In the Title field, enter Change Department.
8. Touch the Back button to return to the WFC Voice home screen.
XML example of the Change Department button.
<Dashboard> or <CallButtons>... <Button> <title>Change Department</title> <action>SIGNOUT_CHANGE</action> <value>1</value> <enabled>true</enabled> <confirm>false</confirm> <description></description> <icon></icon> <scale>CENTER_INSIDE</scale> </Button>...</Dashboard> or </CallButtons>
This action can also be initiated using ADB, an MDM, or a third party app. For example, in ADB you can usethe following command:
$ adb shell am broadcast -a wfc.voice.SIGN_OUT --es change 1
86

Settings
Icons
Choose an icon from the library, use a custom icon, and change icon size and position.
Choosing a Button from the Icon Library
Choose a button from the icon library using the GUI or XML.
1. In UI Settings, select Edit Dashboard or Edit In-Call > Add.
2. Select the new button. A yellow box appears around the selected button.
3. Touch Edit.
4. Select the check box next to Confirm On Click to enable this (the default is Disabled).
5. In the Description field, enter a short description of the button function.
6. Touch Icon.The Select Icon menu is displayed.
7. From the Library tab, select an icon.
8. Touch BG to set the background color. See Setting Button Background Color on page 89.
9. Touch FG to set the foreground text color. See Setting Button Text Color on page 89.
10. Touch the Back button to return to the WFC Voice home screen.
XML example of choosing a button from the icon library.
<Dashboard> or <CallButtons>... <Button> <title>Dial</title> <action>DIAL</action> <value></value> <enabled>true</enabled> <confirm>false</confirm> <description>Dial button from library</description> <bg_color>#FF001425</bg_color> <fg_color>#FFFFFFFF</fg_color> <icon>ic_dialpad</icon> </Button>...<Dashboard> or <CallButtons>
Choosing a Custom Icon
Create custom icons and transfer them to the WFConnect folder on the device. Choose a custom iconusing the GUI or XML.
Icons must be 128 pixels by 128 pixels and in PNG format.
1. Connect the device to a host computer using a USB cable.
2. From the host computer, copy the icon file to the WFConnect folder on device.
3. In UI Settings, select Edit Dashboard or Edit In-Call > Add.
87

Settings
4. Select the new button. A yellow box appears around the selected button.
5. Touch Edit.
6. Select the check box next to Confirm On Click to enable this (the default is Disabled).
7. In the Description field, enter a short description of the button function.
8. Touch Icon.The Select Iconmenu displays.
9. From the SDCARD tab, select an icon.
10. Touch BG to set the background color. See Setting Button Background Color on page 89.
11. Touch FG to set the foreground text color. See Setting Button Text Color on page 89.
12. Touch the Back button to return to the WFC Voice home screen.
XML example of choosing a custom icon.
<Dashboard> or <CallButtons>... <Button> <title>Dial</title> <action>DIAL</action> <value></value> <enabled>true</enabled> <confirm>false</confirm> <description>Custom dial button</description> <bg_color>#FF001425</bg_color> <fg_color>#FFFFFFFF</fg_color> <icon>dialbtn.png</icon> </Button>...<Dashboard> or <CallButtons>
Setting the Icon Scale Type
Set the scale type for an icon using the GUI or XML.
1. In UI Settings, select Edit Dashboard or Edit In-Call > Add.
2. Select the new button. A yellow box appears around the selected button.
3. Touch Edit.
4. In the Scale field, select a scale type.
• CENTER_INSIDE - Position image in the center area above title. Size of the image will be equal to orless than the size of the button. This is the default scale type.
• SCALE_CENTER - Scale image in the center to fill area above title. Maintain aspect ratio of theimage.
• FILL_CENTER - Scale in the center to fill button size (no padding) and maintain the aspect ratio. Thetitle is on top of the image in the center.
• FILL_XY - Scale to fill button size (no padding) in both directions. Does not maintain aspect ratio. Thetitle is on top of the image in the center.
5. Touch the Back button to return to the WFC Voice home screen.
88

Settings
XML example of setting the scale type for an icon.
<Dashboard> or <CallButtons>... <Button> <action>DIAL</action> <title>Title</title> <value></value> <icon>conference</icon> <scale>SCALE_CENTER</scale> </Button>...<Dashboard> or <CallButtons>
Button Color
Customize the background color and text color for a button.
Setting Button Background Color
Set the Button Background Color using the GUI or XML.
Use Button Background Color to set the color of individual buttons. Setting a background color overridesthe Global Button Background Color. The default background color is white (#FFFFFFFF).
1. In UI Settings, select Edit Dashboard or Edit In-Call > Add.
2. Select the new button. A yellow box appears around the selected button.
3. Touch Edit.
4. Touch the BG button.
5. Select a color and touch Set.
6. Touch the Back button to return to the WFC Voice home screen.
XML example of setting the Button Background Color.
<Button> <bg_color>#FFFFFFFF</bg_color></Button>
Setting Button Text Color
Set the Button Text Color using the GUI or XML.
Use Button Text Color to set the color of individual buttons. Setting a text color overrides the Global ButtonText Color. The default text color is dark gray(#FF4A4A4A).
1. In UI Settings, select Edit Dashboard or Edit In-Call > Add.
2. Select the new button. A yellow box appears around the selected button.
3. Touch Edit.
4. Touch the FG button.
89

Settings
5. Select a color and touch Set.
6. Touch the Back button to return to the WFC Voice home screen.
XML example of setting the Button Text Color.
<Button> <fg_color>#FF4A4A4A</fg_color></Button>
Global Button Color Settings
Use Global Button Background Color to set the color of all buttons on the dashboard. The button colorcan be overridden by the individual Button Background Color. The default background color is white(#FFFFFFFF).
Setting Global Button Background Color
Set the Button Background Color using the GUI or XML.
1. In UI Settings, select Buttons Background Color.
2. Select a color from the color wheel for the button background or enter RGB color in hex format.
3. Touch Set.
4. Touch Back button to return to the WFC Voice home screen.
XML example of setting the Button background color.
<WFConnect><Profile> <gbg_color>#FFFFFFFF</gbg_color></Profile>...</WFConnect>
Setting Global Button Text Color
Set the Button Text Color using the GUI or XML.
Use Global Button Text Color to set the color of all buttons on the dashboard. The button color can beoverridden by the individual Button text Color. The default text color is dark gray (#FF4A4A4A).
1. In UI Settings, select Buttons text color.
2. Select a color from the color wheel for the button text or enter RGB color in hex format.
3. Touch Set.
4. Touch Back button to return to the WFC Voice home screen.
XML example of setting the Button Text Color.
<WFConnect>
90

Settings
<Profile> <gfg_color>#FF4A4A4A</gfg_color></Profile>...</WFConnect>
Resetting Colors to Default
Reapply the factory default button colors.
1. In UI Settings, select Reset colors to default.
2. Touch the Back button to return to the WFC Voice home screen.
Restoring Buttons
Reapply the factory default buttons and their layout.
1. In UI Settings, select Restore buttons.
2. Touch the Back button to return to the WFC Voice home screen.
Call SettingsConfiguring advanced call settings.
This section provides detailed information on configuring advanced call settings.
Accessing Call Settings
Access Call setting using the GUI.
1. Go to Settings.
2. Touch Advanced Settings > Call Settings.
Setting the Call Waiting Volume
Set the Call Waiting Volume setting using the GUI or XML.
1. In Call Settings, slide the Call Waiting Volume slider (default 80).
2. Touch Back to return to the WFC Voice home screen.
XML example of setting the Call Waiting volume.
<WFConnect><Profile> <callwaiting_volume>80</callwaiting_volume></Profile>...</WFConnect>
91

Settings
Setting the Call Waiting Interval
Set the Call Waiting Interval setting using the GUI or XML.
1. In Call Settings, slide the Call Waiting Interval slider (default 2000).
2. Touch Back to return to the WFC Voice home screen.
XML example of setting the Call Waiting Interval.
<WFConnect><Profile> <callwaiting_interval>2000</callwaiting_interval></Profile>...</WFConnect>
Ringer OFF In Charger
Enable Ringer OFF in Charger to disable the ringer while the device is charging.
Setting Ringer OFF In Charger
Set the Ringer OFF In Charger using the GUI or XML.
1. In Call Settings, select the check box next to Ringer OFF in Charger to enable this (the default isDisabled).
2. Touch Back to return to the WFC Voice home screen.
XML example of Ringer OFF In Charger.
<WFConnect><Profile> <ringer_off_in_charger>true</ringer_off_in_charger></Profile>...</WFConnect>
Speaker mode
Enable Speaker Mode to answer all incoming calls in speaker mode when the device is placed on ahorizontal surface, such as a desk.
Setting Speaker Mode
Set Speaker mode using the GUI or XML.
1. In Call Settings, select the check box next to Disable Speaker Mode to enable this (the default isDisabled).
2. Touch Back to return to the WFC Voice home screen.
92

Settings
XML example of setting Speaker mode.
<WFConnect><Profile> <disable_speaker>false</disable_speaker></Profile>...</WFConnect>
Speaker on Table
Enable Speaker Mode to answer all incoming calls in speaker mode when the device is placed on ahorizontal surface, such as a desk.
Setting Speaker on Table
Set Speaker on Table using the GUI or XML.
1. In Call Settings, select the check box next to Speaker on table to enable this (the default is Disabled).
2. Touch Back to return to the WFC Voice home screen.
XML example of setting Speaker on Table.
<WFConnect><Profile> <speaker_on_horizontal>false</speaker_on_horizontal></Profile>...</WFConnect>
Call Accept Style
There are various call accept styles on the incoming call screen, such as simple accept and reject buttons,a slider (Gingerbread Android), and Glow Pad buttons (JellyBean Android).
93

Settings
Figure 11 Call Accept Buttons
Number Item
1 Accept-Reject Buttons - The operator touches one of two buttons to accept or rejectan incoming call.
2 Sliding Tab - The operator swipes one of two buttons across the screen to accept orreject an incoming call.
3 Glow Pad - The operator touches a handset symbol to accept or reject an incomingcall.
Configuring the Glow Pad Buttons
Configure the Glow Pad buttons using the GUI or XML.
1. In Call Settings, select Call Accept Style.
2. Select Sliding Tab (GB), Accept/Reject Buttons, or Glow Pad (JB).
3. Touch Back button to return to the WFC Voice home screen.
XML examples of configuring the Glow Pad button.
Sliding Tab (Gingerbread)
<Profile> <incall_widget>incall_gb</incall_widget></Profile>
Accept-Reject Buttons
<Profile> <incall_widget>incall_buttons</incall_widget></Profile>
94

Settings
Glow Pad Buttons (Jellybean)
<Profile> <incall_widget>incall_buttons</incall_widget></Profile>
Setting Auto Answer Mode
Enable Auto Answer Mode to auto-answer all incoming calls using the GUI or XML.
1. In Call Settings, select the check box next to Auto Answer Mode to enable (Default: disabled).
2. Touch Back button to return to the WFC Voice home screen.
XML example of setting Auto Answer mode.
<WFConnect><Profile> <sip_auto_answer>true</sip_auto_answer></Profile>...</WFConnect>
Incoming Call Voice Announcer
Enable Incoming Call Voice Announcer to announce the number or user name of an incoming call.
Setting Incoming Call Voice Announcer
Set the Incoming Call Voice Announcer using the GUI or XML.
1. In Call Settings, select the check box next to Incoming Call Voice Announcer to enable this (Default:disabled).
2. Touch Back button to return to the WFC Voice home screen.
XML example of setting Incoming Call Voice Announcer.
<WFConnect><Profile> <voice_announcer_check>true</voice_announcer_check></Profile>...</WFConnect>
Incoming Call Full Screen
Enable Incoming Call Full Screen to allow the full-screen display of incoming calls when the device screenis on and WFC Voice is running in the background.
NOTE: Available in WFC Voice 9.0.213xx and later.
95

Settings
When connected to a Workstation Connect cradle or hub in desktop mode, this feature isignored.
Enable or disable Incoming Call Full Screen using XML or Extension Manager. By default, this feature isdisabled (false).
<WFConnect><Profile> <incoming_call_full_screen>true</incoming_call_full_screen></Profile>...</WFConnect>
Voice Command
Use Voice Command to call contacts and dial numbers using voice commands. Press the Push to Talk(PTT) button to initiate a call using voice commands.
Setting Voice Command
Enable or disable Voice Command using the GUI or XML
NOTE: If PTT Pro and WFC Voice are installed on the device, both apps must have VoiceCommands either enabled or disabled. Setting Voice Commands to enable in one app anddisable in the other app may cause unexpected behavior when using Voice Commands.
1. In Call Settings, select the check box next to Voice Command to enable this (Default: disabled).
2. Touch Back button to return to the WFC Voice home screen.
XML example of setting Voice Command.
<WFConnect><Profile> <voice_command_check>true</voice_command_check></Profile>...</WFConnect>
Voice Command Confirmation
Enable Voice Command Confirmation to confirm all voice commands before calling contacts or dialingnumbers. This option requires that Voice Command is enabled.
Setting Voice Command Confirmation
Enable or disable Voice Command Confirmation using the GUI or XML.
1. In Call Settings, select the check box next to Voice Command Confirmation to enable this (Default:disabled).
2. Touch Back button to return to the WFC Voice home screen.
96

Settings
XML example of setting Voice Command Confirmation.
<WFConnect><Profile> <voice_command_interrogative>true</voice_command_interrogative></Profile>...</WFConnect>
No Audio Cutoff
Use No Audio Cutoff to disconnect a call when no audio is detected for a set interval.
Setting No Audio Cutoff
Enable or disable No Audio Cutoff using the GUI or XML
1. In Call Settings, select No Audio Cutoff.
2. Select a time interval (Default: 30 seconds).
3. Touch Back button to return to the WFC Voice home screen.
XML example of setting No Audio Cutoff.
<WFConnect><Profile> <no_audio_cutoff>30</no_audio_cutoff></Profile>...</WFConnect>
Audio Prompt File
Use Audio Prompt File to select a custom WAV audio file to play when an incoming call is accepted.
Selecting an Audio Prompt File
Transfer a custom WAV audio file to the device.
1. Save a custom WAV audio file using the following settings: 8 kHz sample rate, Mono, 16-bit, PCM format.
2. Connect the device to a host computer using a USB cable.
3. From the host computer, copy the WAV file to the WFConnect folder on device.
4. In Call Settings, select Audio Prompt File.
5. Select an audio file.
6. Touch Back button to return to the WFC Voice home screen.
XML example of selecting an Audio Prompt file.
97

Settings
<WFConnect><Profile> <prompt_file>chewy_roar.wav</prompt_file></Profile>...</WFConnect>
MOH Enabled
Music on Hold (MOH) Enabled plays a WAV audio file when a user is placed on hold. This feature is onlyused when PBX music on hold is disabled or not available. When this feature is enabled, the app playsmusic on hold file to another party as soon as an active call is placed on hold/suspended.
Setting MOH Enabled
Enable or disable MOH Enabled using the GUI or XML.
1. In Call Settings, select the check box next to MOH Enabled to enable this (Default: disabled).
2. Touch Back button to return to the WFC Voice home screen.
XML example of MOH Enabled.
<WFConnect><Profile> <moh_enabled>true</moh_enabled></Profile>...</WFConnect>
MOH File
Use the Music on Hold (MOH) File to select a custom WAV audio file to play when a user is placed onhold. The supported WAV file format is 8000 sample rate, PCM, 16-bit, mono. If this parameter is not set,the app uses the default music on hold file.
Selecting a MOH File
Before selecting a custom WAV audio file, save the file to the device.
1. Connect the device to a host computer using a USB cable.
2. From the host computer, copy the WAV file to the WFConnect folder on device.
3. In Call Settings, select MOH File (requires MOH Enabled).
4. Select an audio file.
5. Touch Back button to return to the WFC Voice home screen.
XML example of selecting a MOH File
<WFConnect><Profile>
98

Settings
<moh_file>opusno1.wav</moh_file></Profile>...</WFConnect>
BLE PTT Button
Enable the Bluetooth Low Energy (BLE) PTT Button to use a BlueParrot headset with WFC Voice.
Enabling BLE PTT Button
Enable or disable the BLE PTT button using the GUI or XML.
1. In Call Settings, select the check box next to BLE PTT Button to enable this (Default: disabled).
2. On the Use your location popup, select OK.
3. On the Allow WFC Voice to access this device's location popup, select Allow in settings.
4. Touch Allow all the time.
5. Touch Back button to return to the WFC Voice home screen.
If the location permission for WFC Voice is changed to anything other than Allow all the time, the BLE PTTbutton stops responding. If this happens, restart WFC Voice. When the location permission popup displays,select Allow in settings > Allow all the time.
XML example of BLE PTT Button Enabled.
<WFConnect><Profile> <ble_ptt_button>true</ble_ptt_button></Profile>...</WFConnect>
Paging Extension
Paging Extension silences incoming calls from the specified paging extension.
Setting Paging Extension
Silence incoming calls from a paging extension using the GUI or XML.
1. In Call Settings, select Paging extension.
2. Enter the paging extension to silence.
3. Touch OK.
4. Touch Back button to return to the WFC Voice home screen.
XML example of selecting an Audio Prompt file.
<WFConnect>
99

Settings
<Profile> <paging_ext>12345678<paging_ext></Profile>...</WFConnect>
RingtonesConfiguring WFC Voice ringtones.
Configure advanced ringtone settings using the GUI or XML.
Accessing Ringtone Settings
Access Ringtone settings using the GUI.
1. Go to Settings.
2. Touch Advanced Settings > Ringtones.
Line Ringtones
Line Ringtones configures a unique ring tone per line. Custom ring tones are available if preloaded on thedevice. Supported audio formats for custom ring tones are OGG, MP3, and WAV.
NOTE: MP3 and WAV formats are not supported on some earlier releases of WFC Voice.
Setting Line Ringtones
Set Line Ringtones using the GUI or XML
1. In Ringtones, select Line Ringtones.
2. Select a line for which to configure the ringtone.
3. To select the default ringtone, touch Default.
4. To select an Android ringtone:
a) Touch Android Ringtones.
b) Select a ringtone.
c) Touch OK.
5. To select a ringtone from Library:
a) Touch WFCVoice Library.
b) Select a ringtone.
6. To select a ringtone on the device:
a) Touch Custom Ringtones.
b) Select a ringtone.
7. Touch Back to return to the WFC Voice home screen.
100

Settings
XML example of setting Line Ringtones.
<WFConnect><Profile> <ringtone_line1>-1</ringtone_line1> <ringtone_line2>UK_Phone</ringtone_line2> <ringtone_line3>michelle_ringtone.ogg</ringtone_line3></Profile>...</WFConnect>
Miscellaneous SettingsLocating help files and editing the settings password.
This section provides information on the location of help files, flexible TLS, and editing the settingspassword.
Accessing Miscellaneous Settings
Access Ringtone settings using the GUI.
1. Go to Settings.
2. Touch Advanced Settings > Miscellaneous Settings.
Sign Out in Charger
By default, WFC Voice remains signed in when using a cable or cradle to charge the device. Enable thisoption to automatically sign out of WFC Voice when the device begins charging.
NOTE: Sign Out in Charger is not available in WFC Voice when using Profile Manager. To enableSign Out in Charger when using Profile Manager, enable it using WFC Profile Client.
Setting Sign Out in Charger
Set Sign OUT in Charger using the GUI or XML.
1. In Miscellaneous Settings, select the check box next to Sign OUT in Charger to enable this (Default:disable).
2. Touch Back button to return to the WFC Voice home screen.
Using XML
<WFConnect><Profile> <sign_out_in_charger>true</sign_out_in_charger></Profile>...</WFConnect>
101

Settings
Keep Signed In After Reboot
By default, WFC Voice is signed out after reboot when connected with Extension Manager. Enable thisoption to automatically sign in to WFC Voice with the same extension which was used before the reboot.
NOTE:
• Signs in after reboot feature is not available in WFC Voice when using Profile Manager orwhen not using Extension Manager.
• Keeps the device signed in after reboot setting using the GUI, XML, or Extension Manager.
• Available in WFC Voice 9.0.221xx or later.
1. In Miscellaneous Settings, select the check box next to Keep signed in after reboot to enable this(Default: disabled).
2. Touch the Back button to return to the WFC Voice home screen.
Using XML
<WFConnect><Profile> <keep_sign_in_after_reboot>true</keep_sign_in_after_reboot></Profile>...</WFConnect>
Flexible TLS
By default, all remote hosts are trusted for SIP connections. Disable this option to use Android certificatesfor TLS/SSL connections.
Setting Flexible TLS
Set the Flexible TLS using the GUI or XML.
1. In Miscellaneous Settings, select the check box next to Flexible TLS to disable this (Default: enable).
2. Touch Back button to return to the WFC Voice home screen.
Using XML
<WFConnect><Profile> <flex_tls>false</flex_tls></Profile>...</WFConnect>
WiFi Preferred
By default, WFC Voice connects to an available WiFi network. This setting only applies after network statechanges or when the client is restarted. Disable this option to use the device’s default network.
102

Settings
Setting WiFi Preferred
Set WiFi Preferred using the GUI or XML.
1. In Miscellaneous Settings, select the check box next to WiFi Preferred to disable this (Default: enable).
2. Touch Back button to return to the WFC Voice home screen.
XML example of setting WiFi Preferred.
<WFConnect><Profile> <wifi_preferred>true</wifi_preferred></Profile>...</WFConnect>
Help URL
The location of the on-device help file.
Setting Help URL
Set the Help URL using the GUI or XML.
1. In Miscellaneous Settings, select Help URL.
2. Set HELP URL location.
3. Touch OK.
4. Touch Back button to get back to the WFC Voice home screen.
XML example of setting the Help URL.
<WFConnect><Profile> <help_url>file:///WFConnect/help.html</help_url></Profile>...</WFConnect>
Settings Password
WFC Voice uses a password to access the settings.
NOTE: Once the password is changed if it is forgotten the only recovery method is to reload anew client with a new xml file. The password cannot be set in the XML file.
Changing the Settings Password
Change the settings password using the GUI.
1. In Miscellaneous Settings, select Settings password.
103

Settings
2. Enter the current password.
3. Enter the new password and confirm.
4. Touch Enter.
5. Touch Back button to get back to the WFC Voice home screen.
Additional Profile URI
Set the URI of a buttons layout file saved as an XML file on a remote or local server.
Setting Additional Profile URI
Set the Additional Profile URI using the GUI or XML.
1. In Miscellaneous Settings, select Additional Profile URI.
2. Set the additional profile URI location.
3. Touch OK.
4. Touch Back button to get back to the WFC Voice home screen.
Example XML of setting Additional Profile URI.
<WFConnect><Profile> <layout_location>file:///WFConnect/buttons-layout.xml </layout_location></Profile>...</WFConnect>
Show Extension Name
NOTE: Requires Profile Manager.
By default, extensions display in WFC Voice dashboard header line and extensions list as just theextension number. Use Show Extension Name to display extensions using the both the extension numberand the description set in the PBX.
Setting Show Extension Name
Set the Show Extension Name using the GUI or XML.
1. In Miscellaneous Settings, select the check box next to Show Extension Name to enable this (Default:disable).
2. Touch Back button to return to the WFC Voice home screen.
XML example of setting the Show Extension Name.
<WFConnect><Profile>
104

Settings
<show_extension_name>true</show_extension_name></Profile>...</WFConnect>
Contacts URL
The URL of a contacts list saved as a CSV file on a remote or local server. For information on creating acontacts list see Creating a Contacts List on page 105.
Setting Contacts URL
Set the Contacts URL using the GUI or XML.
1. In Miscellaneous Settings, select Contacts URL.
2. Set the contacts URL location.
3. Touch OK.
4. Touch Back button to get back to the WFC Voice home screen.
XML example of setting Contacts URL.
<WFConnect><Profile> <contacts_url>file:///WFConnect/contacts.csv</contacts_url></Profile>...</WFConnect>
Sync Contacts
Use Sync Contacts to import a contacts list saved as a CSV file.
Creating a Contacts List
Create a contacts list using a spreadsheet program.
1. From the host computer, use a spreadsheet program to create a list of contacts where the first rowcontains the following fields:
contactId group firstName lastName cellNumber officeNumber homeNumber photo
2. Enter contact information as needed. For example:
contactId group firstName lastName cellNumber officeNumber homeNumber photo
1 kitchen John Smith 516-555-1234
2001 516-555-1235
file:///wfconnect/john.jpg
2 hardware Jane Doe 516-555-1236
2002 516-555-1237
file:///wfconnect/jane.jpg
105

Settings
3. Save the spreadsheet as a CSV file.
Syncing Contacts
Sync contacts using the GUI.
1. From the host computer, copy the CSV file to the WFConnect folder on device.
2. From WFC Voice, select Settings > Advanced Setting > Miscellaneous Settings.
3. Select Sync Contacts. A confirmation that the contacts are updated displays.
Screen Orientation
Use the screen orientation setting to switch between landscape and portrait modes in WFC Voice. Bydefault, screen orientation is set to landscape on ET5X tablets.
NOTE: Screen orientation is only available for ET5X tablets.
When connected to a Workstation Connect cradle or hub in desktop mode, this feature isignored.
Setting Screen Orientation
Set screen orientation to landscape or portrait mode using XML or Extension Manager.
• Select the screen orientation by setting the screen_orientation parameter to landscape orportrait in the XML configuration file.
• Exit and then restart the app.
XML example of setting Screen Orientation.
<WFConnect> <Profile> <screen_orientation>landscape</screen_orientation> </Profile> ...</WFConnect>
See AlsoExiting WFC Voice
Show Only Voice Contact
By default, WFC Voice displays both native Android contacts and WFC Voice contacts in the app. Whenthis option is enabled, only WFC Voice contacts are displayed in the WFC Voice client.
Setting Show Only Voice Contact
Display or hide native Android contacts using XML, Extension Manager, or Profile Manager.
• Show all contacts by setting show_only_voice_contact to false.
This is the default value.
106

Settings
• Show only WFC Voice contacts by setting show_only_voice_contact to true.
<WFConnect> <Profile> <show_only_voice_contact>true</show_only_voice_contact> </Profile> ...</WFConnect>
Disable Favorites
This feature allows users to enable or disable favorite features inside the contact fragment.
Disabling Favorites
Disable favorites using XML, Extension Manager, and Profile Manager.
• To disable favorites, set the remove_favorite tag to true in the XML configuration file.
<WFConnect><Profile> <remove_favorite>true</remove_favorite></Profile>...</WFConnect>
Disable the Contact Scrolling
This feature allows users to enable or disable the scrolling of contact names inside the contact view whenthe contact name does not fit within the screen.
Disabling the Contact Scrolling
Disable the scrolling of contact using XML, Extension Manager, and Profile Manager. If the contact's namedoes not fit within the screen, then ellipses (...) are displayed at the end of the contact's name. Click theeclipse to see the remaining contact name.
NOTE: Available in WFC Voice 9.0.221xx or later.
• To disable the scrolling of contacts, set the horizontal_contact_scrolling tag to false in theXML configuration file.
<WFConnect><Profile> <horizontal_contact_scrolling>false</horizontal_contact_scrolling></Profile>...
107

Settings
</WFConnect>
By default, the scrolling of contact is in the disabled state.
Hide the Dashboard Footer
This feature allows users to show or hide the footer in the dashboard fragment of the WFC Voice G2Client. Refer to In-Call Buttons on page 62.
Figure 12 Hide Dashboard Footer
108

Settings
Hiding the Dashboard Footer
Hide the dashboard footer using XML, Extension Manager, and Profile Manager.
NOTE: Available in WFC Voice 9.0.221xx or later.
• To hide the dashboard footer, set the hide_dashboard_footer tag to true in the XMLconfiguration file.
<WFConnect><Profile> <hide_dashboard_footer>true</hide_dashboard_footer></Profile>...</WFConnect>
By default, the footer is visible inside the Dashboard.
109

LoggingLogging
This chapter describes the process used to capture and collect WFC Voice log files and Fusion log files.The Log Marker feature records the date and time of an event into a log file. Log files are used to assist introubleshooting the WFC Voice environment during run-time operations.
NOTE: For accurate logging, check that the device date and time are set correctly.
Accessing Logging SettingsAccess the Logging settings using the WFC Voice GUI.
1. Launch WFC Voice.
2. Touch > Settings. The password dialog box appears.
3. Enter password (default: zamboni).
4. Touch Enter. The password is preserved until the app quits.
5. Select Advanced Settings > Logging.
Logging LevelAvailable logging levels are:
• LogCat disabled - Logging is disabled.
• Error - Low level application error - not critical
• Warning - Feedback from application operation and function
• Info - High level / user interaction and call information
• Debug - Captures information for developer troubleshooting
• Verbose - Captures all information for developer troubleshooting.
Setting Logging Level
Set the logging level using the GUI or XML.
1. In Logging, select Logging level.
2. Choose a level for Logging. Default level “Error” is suggested.
110

Logging
3. Touch Back button to get back to the WFC Voice home screen.
XML example of setting logging level.
<WFConnect><Profile> <log_level>Error</log_level></Profile>...</WFConnect>
Logging TypesThere are several types of logging within WFC Voice as well as the native Android OS.
Setting Logging to File
Log information is written to a file on the device. Enable or disable Logging to File using the GUI or XML.
1. In Logging, select Logging to File.
2. Touch the box to enable Logging to File. The file is saved in the WFConnect folder.
3. Touch Back button to get back to the WFC Voice home screen.
XML example of setting Logging to File.
<WFConnect><Profile> <log_console>false</log_console></Profile>...</WFConnect>
Setting SIPCLF Logging
Log information is written to a file in Session Initiation Protocol Common Log Format (SIPCLF). Enable ordisable SIPCLF Logging using the GUI or XML.
NOTE:
• On Android 11 and later, logs are available in the folder /sdcard/Android/data/com.symbol.wfc.voice/files/
• On Android 10 and below, logs are available in the folder /sdcard/WFConnect/
1. In Logging, select SIPCLF Logging.
2. Touch the box to enable SIPCLF Logging. The file is saved in the WFConnect folder.
3. Touch Back button to get back to the WFC Voice home screen.
XML example of setting SIPCLF Logging.
111

Logging
<WFConnect><Profile> <log_sipclf>false</log_sipclf></Profile>...</WFConnect>
Log FilesTwo types of log files can be collected:
• Workforce Connect Logs
• Fusion Logs
Workforce Connect Logs
WFC Voice has the following logging methods:
• Android LogCat - LogCat provides a mechanism for collecting and viewing system and applicationsmessages. By default, WFC Voice automatically logs all messages into LogCat at the VERBOSE level.When Logging to File is enabled, WFC Voice logs all messages in the WFConnect folder.
• Session Initiation Protocol Common Log Format (SIPCLF) - All received and sent SIP messages arecontained in CLF format as single text line. Special software is required to read this file format. Thislogging method is disabled by default.
SIPCLF files can be found in the following location: /WFConnect/WFConnect_<device_id>_<timestamp>.clf
Fusion Logs
The native Android operating system provides an advanced logging feature. Fusion Logs collectunencrypted data, including Real-time Transport Protocol data. The data is imported to third party softwarefor network troubleshooting and protocol analysis. The captured data is output to a .pcap file and an eventlog.
Collecting LogCat with RxLoggerThe RxLogger tool integrates into the operating system and collects WFC Voice log files. There is no needto set the log level inside WFC Voice. When Rxlogger logging starts, WFC Voice is notified via plugin toenable VERBOSE LogCat and SIPCLF logging. By default, SIPCLF is disabled.
Enabling RXLogger
WFC Voice logging is automatically enabled when RxLogger logging is enabled. The LogCat file is saved tothe location specified in the RXLogger configuration.
When RxLogger starts, it overwrites the setting level to VERBOSE. When using RxLogger, WFC Voicelogging is disable and all logging is posted through RxLogger.
Users can customize WFC Voice logging in the RxLogger configurations.
112

Logging
LogCat sets the VERBOSE level in WFC Voice.
• Touch Start to enable logging.
• Touch Stop to disable logging.
Debug Log MarkersLog markers are used to mark specific locations in the LogCat file, identifying when an event occurs. TheLog Marker feature can be used as many times as necessary. The follow example displays a Log Markerentry in LogCat.
08-24 16:59:09.953: E/UI(4587): -------------------------------------------- 08-24 16:59:09.953: E/UI(4587): <<<MARKER>>> 08-24 16:59:09.953: E/UI(4587): <<< optional description >>> 08-24 16:59:09.953: E/UI(4587): --------------------------------------------
Adding a Log Marker for Debugging
Add a Log Marker from the WFC Voice main screen.
1. Touch > Add Log Marker.
2. Enter an optional description.
3. Click SET.
Configure the Log Marker
The Log Marker feature is accessed only by the WFC Voice main screen by default. To provide accesselsewhere in the client, create a customized button. For example, when troubleshooting in-call errors, aLog Marker button is added to the In-Call buttons.
To configure a custom Log Marker button, see Configuring the Log Marker on page 65.
NOTE: When a custom Log Marker button is used, the optional description is not available.
Enable Fusion LogsFusion Logs are enabled in Wi-Fi settings.
Enabling Fusion Logs In Android 6.1 or 7.1.2
1. From the Android Home screen, touch All Apps > Settings > Wi-Fi.
2. Touch the menu button.
3. Touch Advanced.
4. In the Logging section touch Advanced Logging.
5. Ensure the Enable Logging check box is selected. The user can only change the log file location whenAdvanced Logging is disabled.
113

Logging
Fusion Logs are now set. Run WFC Voice. When events occur they are captured in the location set inAdvanced Logging.
NOTE: Powering off the device will delete the collected fusion logs.
Enabling Fusion Logs In Android 8.1
1. From the Android Home screen, swipe up and touch Settings > Network & Internet > Wi-Fi.
2. Touch Wi-Fi preferences > Advanced > Additional Settings.
3. In the Logging section touch Advanced Logging.
4. Ensure the Enable Logging check box is selected. The user can only change the log file location whenAdvanced Logging is disabled.
Fusion Logs are now set. Run WFC Voice. When events occur they are captured in the location set inAdvanced Logging.
NOTE: Powering off the device will delete the collected fusion logs.
Capturing the LogsCapture the WFC Voice logs to a device.
Accurate logging is necessary for effective troubleshooting. Check that the device date and time are setcorrectly.
NOTE: It is recommended to delete and recapture inaccurate log files.
1. Connect the device to the host computer using a USB cable.
2. Copy log files to the computer.
3. Ensure log files were set up correctly and captured relevant data.
4. Identify Log Marker events by date and time stamps.
114

Using the ClientUsing the Client
WFC Voice improves the effectiveness of communications within an organization, providing enterprisevoice communications across multiple media types on unified mobile devices.
With WFC Voice you can:
• Use a rich selection of features on configured wireless devices
• Seamlessly communicate with co-workers or take an outside call from a customer or vendor
• Use the device most appropriate and convenient for each situation.
NOTE: This guide covers default button icons, which the system administrator can modify.
Home Screen DashboardExamples of the Home screen dashboard.
NOTE: If multiple PBXs are configured, the PBX type for each appears on the right.
Figure 13 Home Screen Dashboard
115
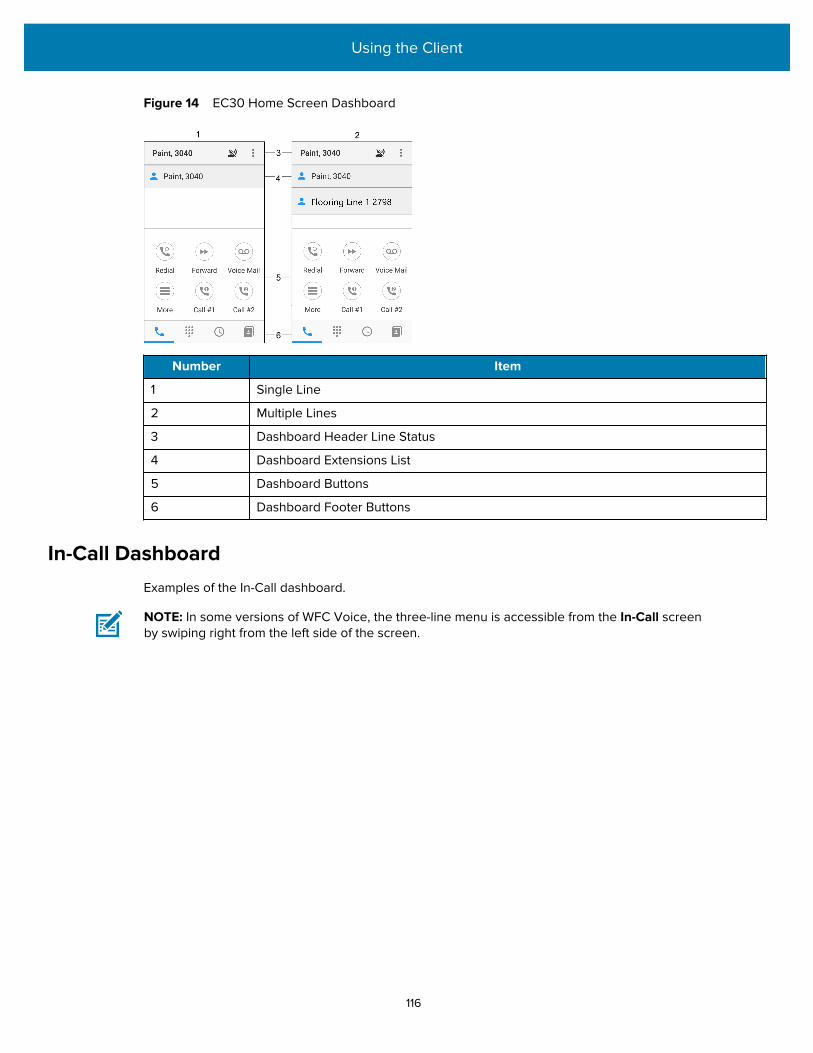
Using the Client
Figure 14 EC30 Home Screen Dashboard
Number Item
1 Single Line
2 Multiple Lines
3 Dashboard Header Line Status
4 Dashboard Extensions List
5 Dashboard Buttons
6 Dashboard Footer Buttons
In-Call DashboardExamples of the In-Call dashboard.
NOTE: In some versions of WFC Voice, the three-line menu is accessible from the In-Call screenby swiping right from the left side of the screen.
116

Using the Client
Figure 15 In-Call Dashboard
Number Item
1 In-Call Header Line Status
2 In-Call Dashboard Buttons
3 In-Call Action Buttons
4 In-Call Footer Buttons
Touching the Back button from the Home Screen Dashboard or In-Call Dashboard minimizes WFC Voiceand switches to the Android home screen.
Signal QualityDuring an active call, the signal quality indicator appears in the upper right portion of the screen, indicatingvoice traffic errors on the network.
Excellent
Good
Acceptable
Bad
117

Using the Client
Initiate a CallThere are various ways to initiate a telephone call:
•Touch to enter a specified extension or phone number, and then touch to initiate a call.
If WFC Voice is configured to use multiple extensions, you can choose which extension to call from bytouching Local Line and then selecting an extension.
• Touch to display a list of previous calls. See Call History on page 128 for more information.
• Touch to display a list of saved contacts. See Contacts on page 124 for more information.
• Touch to display a list of favorite contacts. See Favorites on page 127 for more information.
• Touch to initiate a call to the most recently dialed location.
• Touch to initiate a call to a number preset by the system administrator
• Press the PTT button to initiate a call using voice commands. See Voice Commands on page 118.
For information on initiating a call using a third-party app, refer to the WFC Voice Programmer's Guide.
Voice Commands
Voice commands are disabled by default. To enable voice commands, see Voice Command on page 96.
Using Voice Commands
Use voice commands to call a specified extension, phone number, or contact.
A network connection is required to use the Voice Command feature.
1. Press and release the (Push to Talk) PTT button to initiate a call.
2. Upon hearing the grant tone, say Call or Dial and the specified extension, phone number, or contactname. When calling a contact you can also say the phone type (mobile, work, or home).
• If multiple entries are found, the system prompts you to make a choice. Only the first 10 entries aremade available when using voice commands.
• If no user or phone number entries are found, the system responds that the entry was not found.
Two beeps indicate that the system has stopped listening for voice commands. Press and releasethe PTT button again to start listening for voice commands.
• If an invalid selection is made, the system responds I do not understand.
Two beeps indicate that the system has stopped listening for voice commands. Press and releasethe PTT button again to start listening for voice commands.
118

Using the Client
Voice Command Language Support
A limited set of voice command translations are supported.
Language Commands
English call phone
French Canadian appel téléphone
French appel téléphone
Spanish llamada teléfono
German Anruf Telefon
Dutch bellen telefoon
Italian chiamata Telefono
Swedish ring upp telefon
Hungarian hívás telefon
Polish połączenie telefon
Slovak hovor telefón
Czech hovor telefon
Russian вызов Телефон
Table 1 Translated Voice Commands
Receive a Call
The incoming screen offers various call accept styles, such as accept and reject buttons or sliders.
NOTE: Available ring tones vary. Use the device system settings to set tones and vibrationnotification.
Popup Window
During an active call in WFC Voice, a popup window appears when an incoming call is received. Touch oneof two buttons to accept or reject an incoming call.
Starting in version 9.0.21401, when a WFC Voice call is received while the app is running in thebackground, an Android notification displays instead of the WFC Voice popup window. If there are multipleincoming calls, open the Android notification panel to view all notifications.
When an incoming call is through a wide area network (WAN), the WFC Voice call is placed on hold. If theWAN call is accepted, the WFC Voice call remains on hold.
To resume the WFC Voice call, open WFC Voice and touch .
119

Using the Client
Figure 16 Popup Window
Ending a Call
The End Call feature ends a call in any state.
•Touch or the red End Call icon to end any call.
Adding a Call
During an active call use the dialer to place the current call on hold and initiate a new call. When the newcall connects, you can Transfer, Conference, or End the second call and resume the first call.
1. Touch to display the dial pad.
120

Using the Client
2. Enter the new number and touch .
The first call is on hold with the option to resume and the new number becomes the active call. To resumethe first call, touch the extension.
Using Call Hold and Resume
Use the Hold feature to temporarily disconnect a call, use the telephone for another call, and then useResume to return to the original call.
For information on setting up the Hold and Resume buttons, see Configuring the Hold Button on page 75and Configuring the Resume Button on page 75.
While on a call use the Call Hold and Resume buttons.
• Touch to display the Hold screen.
•Touch to resume the call or touch to place another call.
•Use the Home button or to display the home screen dashboard. From the home screen dashboard,touch an extension to resume a call.
121

Using the Client
Call Park and Unpark(Premium Feature)
Call park and unpark are available on the In-Call dashboard.
NOTE: Feature only available with Cisco CUCM Premium.
Using Call Park
Use the Call Park/Unpark feature to put a call on hold and then retrieve that call from any other telephonewithin the system.
Touch to display the Park screen.
Using Call Originator to Unpark
Unpark a call placed by the call originator touch.
Unpark a call so anyone capable of retrieving the parked call can continue speaking with the caller on anyphone. The method for retrieving a parked call varies depending on who is unparking the call.
Parked on [parked extension].
122

Using the Client
Using Other Users Unpark
Unpark a call placed by someone other than the call originator.
1. Touch the Unpark button.
2. Enter the extension for the [call originator].
3. Touch OK.
Call Park Directed
NOTE: Feature only available with Cisco CUCM Premium.
Use the Call Park Directed feature to transfer a call to a park directed number. Another user then retrievesthat call from any other telephone within the system.
This feature must be set in advance on the PBX. If the park directed number is not configured, the PBXrings back the user attempting to park the call.
Using Call Park Directed
1.Touch Transfer to display the dial screen.
2.Dial the number and touch .
3. Touch Complete Transfer to complete the call transfer.
Using Call Park Directed Retrieval
1. Touch to open the dialer.
2. Enter the [retrieval number].
3.Touch .
Dashboard of Parked Calls (Premium Feature)
The Dashboard of Parked Calls displays when multiple calls are parked.
NOTE: Feature only available with Cisco CUCM Premium.
VoicemailUse the Message Retrieval feature to retrieve voice messages from the voice mail server. For informationon configuring the Voicemail button, see Configuring the Voicemail Button on page 70.
NOTE: To configure Voicemail go to Settings > Advanced Settings > Connection Parameters > > HTTPS Server Address and enter the utility server IP address.
123

Using the Client
Retrieving Voicemail Messages
Voicemail messages appear for each line/extension next to the extension number.
Touch to call the user’s Voicemail box and display a list of received Voicemail.
Number Item
1 Message Waiting Indicator (MWI) with Number of Messages Waiting (count onlyavailable where PBX provides count).
2 Line/Extension Messages
Message Waiting Indicator (MWI)
An Android notification is generated when a new voicemail is received. An Android notification may not begenerated if an unread voicemail already exists.
Message Retrieval
Use the Message Retrieval feature to retrieve voice messages from the voice mail server. Alternatively,retrieve voice messages by pressing the Message Waiting bar or the Voicemail button.
ContactsUse the Contacts feature to store and dial frequently used numbers. See Configuring the Contacts Buttonon page 69 for information on how to create a Contacts button.
124

Using the Client
NOTE: Add and edit contacts from the native Android operating system. Refer to the Androidguide for more information. If the contacts are not synced after adding them, irrespectiveof clicking the CANCEL or ADD ACCOUNT button, the following google prompt message isdisplayed only once:
"Take a minute to add an account that will back up your contacts to Google."
Contacts synced with a Gmail account cannot be sorted within a group.
This feature is separate from the Directory feature and does not affect the PBX.
Using Contacts
Use the Contacts button to access stored contacts.
•Touch the Contacts button to display a list of saved contacts.
•To view contacts in Group mode, touch > Group.
• To view all contacts saved on the device, touch the My Contacts label.
Contacts that are currently available always appear at the top of the list, including when viewingcontacts in Group mode.
Number Item
1 Saved Contact
2 Contacts screen on EC30 device
125

Using the Client
•To search for a specific contact, touch . For EC30, touch > Search.
Search results display with available contacts at the top of the list.
• Touch a contact number to call that contact.
Contact Presence Indicators
Presence is supported when using Profile Manager.
Icon Description
Contact is not assigned an extension.
Contact is available.
Contact in on a call.
Contact is in Do Not Disturb (DnD) mode.
Contact’s device missed the last check-in to Profile Manager.
Contact’s device has passed the check-in threshold with Extension Manager.
Contact is assigned an extension but the contact’s device is not registered.
Table 2 Contact Presence Indicators
126

Using the Client
FavoritesUse the Favorites feature to store and dial contacts that are set as favorites. See Configuring the FavoritesButton on page 70 for information on how to create the Favorites button.
This feature is separate from the Directory feature and does not affect the PBX.
Using Favorites
•Touch the default Contacts button , and select the Favorites tab to display a list of favorite contacts.
•To set contacts as favorites, touch next to a contact name in either the All or Favorites tabs.
Number Item
1 Favorite Contacts
• Touch a contact number to call that contact.
127

Using the Client
Call HistoryUse Call History to view, dial, and delete recent call history.
Viewing Recent Calls
For information on configuring the Call History button, see Configuring the History Button on page 68.
This feature records missed, answered, and outgoing calls in the call history log. Use this log to initiate acall, delete an entry, or view details of an entry.
• Touch the History button to view the call history screen.
Number Item
1 Dial Pad
2 Contacts
3 Received Call
4 Placed Call
5 Missed Call
6 EC30
• Touch a call history button to see the call detail, which includes the caller ID, extension, call type, time,date and duration.
128

Using the Client
Dialing from Call History
Initiate a call from Call History.
•Touch a recent call to display the Call button .
Deleting Call History
Delete a call from Call History.
• Touch the Menu button, then Delete.
Advanced Calling FeaturesWFC Voice supports several advanced calling features.
Multiple Lines(Premium Feature)
WFC Voice supports and displays a presence icon displayed to the left of each line.
Feature only available with Cisco CUCM Premium.
The shape, color, and animation of the presence icon indicates its type and status. The following table listspresence icon combinations.
Icon Status Dedicated Line Shared Line
Idle (Solid Icon)
Active (Solid Icon)
Call on Hold (Blinking Icon)
Busy / Registering Status text appears next tothe extension (Solid Icon)
Busy in a call (Blinking Icon)
Table 3 Presence Icon Descriptions
Multiple Line Appearances (Premium Feature)
Use the Multiple Line Appearances feature to associate and use multiple lines with a device. Configuremultiple lines in the PBX.
129

Using the Client
Busy Indicator(Premium Feature)
WFC Voice supports Busy indicators for multiple extension configurations. An icon is associated with eachextension indicating if the line is idle, active, on hold, or busy. See Presence Icon Descriptions.
Transfer (attended, semi-attended)
The Transfer feature transfers an active call to a third party. While Call Forwarding must be pre-configured,use Call Transfer to make call exchanges in real-time with an active call. To set up the Transfer button, seeConfiguring the Transfer Button on page 76.
There are two types of transfer:
• Call Transfer Attended - The transferring party does not complete the transfer (for example, remains onthe call) until the transferred-to party answers.
• Call Transfer Blind - The transferring party completes the transfer (for example, drops the call) while thetransferred-to party is still ringing.
Initiating a Transfer
Initiate a call transfer using the Transfer button.
1. Touch to display the dial screen.
2. Dial the number and touch .
3. To complete Call Transfer Attended transfers, touch Complete Transfer.
4. To complete Call Transfer Blind transfers, touch Complete Transfer or end the call.
Ad hoc Conference(Premium Feature)
NOTE: Feature only available with Cisco CUCM Premium.
All conference participants must enable the G.711 codec.
Use this feature to create a conference without the assistance of an attendant and with up to sixparticipants. The Conference feature joins two separate calls for collaboration between each party on theline at the same time.
To set up the Conference button, see Configuring the Conference Button on page 77.
Setting Up Ad hoc Conference
Set up an ad hoc conference using the Conference button.
1. During an active call, touch to default Conference button to dial the conference number.
2. Enter a number and touch .
3. Touch the Conference Complete button to join the completed conference call.
Call Forward (All, Busy / No Answer, Disable)
Use this feature to redirect calls to an Internal extension, Off-network number, or Attendant group.
130

Using the Client
Enabling Call Forward
Enable Call Forward using the Forward button.
1. Touch the Forward button . The dialer screen appears.
2. Enter a number.
3. Touch ENABLE. The Call Forward number displays in the header and the Android notification bar.
Disabling or Changing Call Forward
Disable or change Call Forwarding.
1. To disable or change the Call Forward feature touch the Forward button .
2. When the Call Forward popup window appears, choose one of the following.
• To disable the Call Forward feature, touch DISABLE.
• To enter a different Call Forward number, touch CHANGE, enter the new call forwarding number,and touch CHANGE.
The new call forwarding number appears in the header.
Miscellaneous Features
Setting Ringtone
By default, WFC Voice uses the ringtone configured in the native Android settings.
• Touch > Ringtone to change the default ringtone for WFC Voice.
Using Reload
Sign out and then automatically sign back in to WFC Voice.
• Touch > Reload.
Using Sign Out
Sign out of WFC Voice.
• To sign out of WFC Voice, touch > Sign Out.
• To sign back in to WFC Voice, touch SIGN IN.
• To exit WFC Voice, sign out then touch > Quit.
Using Speed Dial Numbers
Speed Dial places a call to a preset number or extension. Up to 10 speed dial buttons are available. Thesystem administrator configures speed dial numbers.
• Touch the Speed Dial button to make a call using the preset destination.
131

Using the Client
Using Do Not Disturb(Premium Feature)
Do Not Disturb (DND) ignores all calls to the extension, and routes the call immediately to an extensionspecified by the system administrator. DND removes the extension from any Coverage Answer Group,Simultaneous Ringing, and Hunt Groups.
NOTE: Feature only available with Cisco CUCM Premium.
• Touch the default DNDbutton to enable Do Not Disturb on the selected line.
Using Suspend Mode
Suspend Mode blocks all incoming or outgoing calls.
•Touch the Suspend Mode button to enable or disable Suspend Mode.
Using the Directory Feature
Use the directory feature to access corporate directory entries.
For information on setting up the Directory button, see .Configuring the Directory Button
NOTE: This feature is separate from the Contacts feature. Only directory entries display.
1. Touch the default Local Dirbutton to list contact directories.
2. Enter contact information and touch Submit.
Only the first 31 results display.
Using the List Button
List displays a speed dial list by default.
NOTE: List is configured by the system administrator.
• Touch the default List button to display the speed dial list.
Using the Home Button
Use the Home button to display the Dashboard and access to Dashboard functions
• During an active call touch Home.
Call Pickup
Use the Call Pickup feature to answer calls for devices belonging to the same pickup group. The CallPickup feature requires that users are defined in advanced and are members of the same pickup group.
There are two Call Pickup variations which provide enhanced functionality above the basic Call Pickup:
• Group Pickup - This enables users to pick up incoming calls in another group. The user dials the pickupgroup number to pick up the call.
132

Using the Client
• Other Group Pickup - This enables users to pick up incoming calls from associated pickup groups. Theassociation between groups is done via administration. For the user, this feature operates similar to callpickup.
To configure Call Pickup, Group Pickup, and Other Group Pickup, see Configuring Premium CUCM on page20 or Configuring Basic CUCM on page 14.
Using Call Pickup
When a call is placed to a device in a Call Pickup group, there is a sound alert.
• Anyone in that pickup group may answer the call by touching the Call Pickup button.
Using Group Pickup
Answer a call using Group Pickup.
1. Touch Group Pickup.
2. Enter the pickup group number for the device that is ringing.
3.Touch to answer the call on the ringing device.
Using Other Pickup
When a call is placed to a device in an associated Pickup group, each device in the associated pickupgroups displays a message and sounds an alert.
• Anyone in the associated pickup groups may answer the call by touching the Other Pickup button.
Adjusting the Ring Volume
Configure using the device’s sound settings. Refer to the User Guide for your Zebra device atwww.zebra.com/support for more information.
Unique Ringtone per Line Appearance(Premium Feature)
NOTE: Feature only available with Cisco CUCM Premium.
To configure ringtones per line, see Setting Line Ringtones on page 100.
Unique Ringtone per Contact (Premium Feature)
NOTE: Feature only available with Cisco CUCM Premium.
Configure using the device’s sound settings. Refer to the device User Guide at www.zebra.com/support formore information.
Distinctive Ringing
Use the Distinctive Ringing feature to distinguish between incoming call types based on the ringing patternof the call. For example, internal versus external calls.
133

Using the Client
Vibrate or Ring Tone
Configure using the device’s sound settings. Refer to the User Guide for your Zebra device atwww.zebra.com/support for more information.
Start Application
WFC Voice can be configured by a system administrator to launch another application on the device. Whenthe button is pressed WFC Voice minimizes to run in the background and the application launches.
Touch the application button to launch another application.
Log Markers
Log Marker creates a time stamp in the logs. If you experience any issues with WFC Voice functionality, thetime stamp focuses troubleshooting of the device to the time the issue occurred for more rapid resolution.
Adding a Log Marker
Add a log marker from the Home screen.
1. Touch > Add Log Marker.
2. Enter a description (optional).
3. Touch SET.
Caller ID
The Caller ID feature displays calling party information on your display telephone that is signaled over ISDNor H.323 trunks. Refer to the WFC Voice Quick Start Guide for more information on setting up and usingthis feature.
Hold Recall
Use Hold Recall to be notified when a call is on hold too long, based on the Hold Recall Timer. Visualand audible warnings are sent to the telephone when a call has been on hold past a specified period oftime. Both visual and audible warnings are used if the telephone is on-hook. If the telephone is off-hook, a“priority ring” is used.
On-hook Dialing
On-hook dialing enables the user to pre-dial digits before going off-hook, or pressing the send key. WFCVoice provides this capability automatically and does not go off-hook until the send key is pressed.
Profile Manager FeaturesThese features require Profile Manager.
When using Profile Manager, some options and information may appear different in the three-line menu.
• Department, roles, user name, ID, or other information may display at the top of the menu.
134
Using the Client
• The Switch Role button replaces the Reload button. Use the Switch Role button to change the ProfileManager role. Refer to the Workforce Connect Profile Client Device User’s Guide for more information.
Adding a Department
Use Add Department to select from list of all available department extensions.
If an extension was previously configured on the device it is automatically selected. Users can add multipleextensions.
1. Touch Add Department. WFC Voice reloads and displays the Add Department list.
2. Touch one or more extensions to select them. Check marks appear next to selected extensions.
3. Touch Apply. The selected extensions and any previously configured extensions are added to theDashboard.
Changing a Department
Use Change Department to select from a list of all available department extensions.
Previously configured extensions are automatically selected.
1. Touch Change Department.
WFC Voice reloads and displays the Change Department list.
2. Touch one or more extensions to select them.
Check marks appear next to selected extensions.
3. Touch Apply.
The selected extensions and any previously configured extensions are added to the Dashboard.
Load Contacts
WFC Voice automatically imports contacts each time it registers or signs in with Profile Manager. Contactsimported from Profile Manager are saved to the device as WFConnect contacts.
135

Button ActionsButton Actions
This section lists all action types available when customizing buttons on the Dashboard or In-call screen.
Action Type Description Value
ADD_CALL Calls the number in Value tag.If there is no numberin Value tag, opens the dialer.Allowed on the in-callscreen only.
Phone number.
BLANK No action.Creates a gap or space between otherbuttons.
N/A
CALL Calls the number in Value tag.If there is no numberin Value tag, opens the dialer.
Phone number.
COMPLETE This is internal type used for call transfer orconference scenarios.Only allowed on the in-callscreen.
N/A
CONFERENCE Joins two separate calls for collaboration betweeneach party on the line at the same time.Onlyallowed on the in-call screen.
N/A
CONTACTS Displays the contacts list. N/A
DIAL Opens the dialer. Prefix to dialed number. Theprefix is not displayed to theuser.
DO_NOT_DISTURB Triggers DND function.This Feature Buttonis pushed from the PBX Configuration duringregistration.
N/A
END_CALL This is internal type used for END call button on in-call screen.Only allowed on the in-call screen.
N/A
FORWARD_BUSY Diverts a telephone call targeted to a busy phoneline to a second phone line.This Feature Buttonis pushed from the PBX Configuration duringregistration.
Feature Access Code
GROUP_PICKUP Retrieves calls targeted to a call group from anyextension in the target group.
N/A
HISTORY Shows a list of recently called numbers. N/A
HOLD Puts the call on hold.Only allowed on the in-callscreen.
N/A
Table 4 Button Actions
136

Button Actions
Action Type Description Value
HOME Jumps to the Home screen.Only allowed on the in-call screen.
N/A
LIST Shows buttons as a pop-up list.This feature can onlybe set in an XML configuration.
N/A
LOG_MARKER Creates a time stamp in the logs. N/A
OTHER_PICKUP Retrieves calls within a users own call group. N/A
PARK Parks the call. Only allowed on the in-callscreen.This Feature Button is pushed from the PBXConfiguration during registration.
The park number.
PICKUP Retrieves any currently ringing phone call onanother extension.
N/A
REDIAL Redials the last number. N/A
RESUME Resumes a call that is on hold.Only allowed on thein-call screen.
N/A
SPEED_DIAL0 Calls the number in Value tag.If there is no numberin Value tag, opens the dialer.
Phone number.
SPEED_DIAL1 Calls the number in Value tag.If there is no numberin Value tag, opens the dialer.
Phone number.
SPEED_DIAL2 Calls the number in Value tag.If there is no numberin Value tag, opens the dialer.
Phone number.
SPEED_DIAL3 Calls the number in Value tag.If there is no numberin Value tag, opens the dialer.
Phone number.
SPEED_DIAL4 Calls the number in Value tag.If there is no numberin Value tag, opens the dialer.
Phone number.
SPEED_DIAL5 Calls the number in Value tag.If there is no numberin Value tag, opens the dialer.
Phone number.
SPEED_DIAL6 Calls the number in Value tag.If there is no numberin Value tag, opens the dialer.
Phone number.
SPEED_DIAL7 Calls the number in Value tag.If there is no numberin Value tag, opens the dialer.
Phone number.
SPEED_DIAL8 Calls the number in Value tag.If there is no numberin Value tag, opens the dialer.
Phone number.
SPEED_DIAL9 Calls the number in Value tag.If there is no numberin Value tag, opens the dialer.
Phone number.
START_APP Starts an application. Path and filename of theapplication.
SUSPEND_MODE Blocks all incoming or outgoing calls. N/A
TRANSFER Transfers the call.Only allowed on the in-call screen. N/A
UNPARK Retrieve a parked call using another telephone.ThisFeature Button is pushed from the PBXConfiguration during registration.
N/A
Table 4 Button Actions (Continued)
137

Button Actions
Action Type Description Value
VOICEMAIL Opens voicemail.Dials voice mail numberconfigured on the PBX.
N/A
Table 4 Button Actions (Continued)
138

XML TagsXML Tags
This section lists the XML tags allowed in the WFConnect.xml file.
Element Description
Call Buttons Defines the buttons available in the in-call area.
Dashboard Dashboard section.
Profile Profile section.
Table 5 WFConnect Tags
Element Description Value
audio_gain_in Input Audio Volume (Optional). Number between 1 and 8
Default: 1
audio_gain_out Output Audio Volume (Optional). Number between 1 and 8
Default: 1
background_logo Set a background image forthe WFC Voice home screendashboard (Optional).
Default: None (Disabled)
callwaiting_interval Interval of call waiting tone. 500ms to 8000ms
Default: 2000ms
callwaiting_volume Call waiting volume. Percentage between 10% and100%
Default: 80%
codec_alaw_priority Assigns preference priorityfor G.711 A-Law Voice codecnegotiations between PBX andWFC Voice.
between -5 and 5
Negative numbers disable thecodec.
Default: 2
Table 6 Profile Tags
139

XML Tags
Element Description Value
codec_g722_priority Assigns preference priority forG.722 Voice codec negotiationsbetween PBX and WFC Voice.
between -5 and 5
Negative numbers disable thecodec.
Default: 4
codec_g729_priority Assigns preference priority forG.729 Voice codec negotiationsbetween PBX and WFC Voice.
between -5 and 5
Negative numbers disable thecodec.
Default: 3
codec_gsm_priority Assigns preference priority forGSM Voice codec negotiationsbetween PBX and WFC Voice.
between -5 and 5
Negative numbers disable thecodec.
Default: 2
codec_ulaw_priority Assigns preference priorityfor G.711 u-LAW Voice codecnegotiations between PBX andWFC Voice.
between -5 and 5
Negative numbers disable thecodec.
Default: 1
contacts_url The URL of the contacts list islocated on a remote or localserver (Optional).
File type: CVS.
Protocols: file, http, https, tftp.
Default: none
disable_menu_sign _out Disable the sign-out option in thethree-line menu (Optional).
true: Disable the sign-out option.
false: Enable the sign-out option.
Default: false
disable_speaker Do not answer incoming calls inspeaker mode when the deviceis placed on a horizontal surface(Optional).
true: Disable speaker mode.
false: Enable speaker mode.
Default: false
flex_tls Set security for SIP connections(Optional).
true: Trust all remote hosts.
false: Use Android certificates forTLS/SSL connections.
Default: true
Table 6 Profile Tags (Continued)
140

XML Tags
Element Description Value
gbg_color Background color used on allbuttons, if not customized inthe button element <bg_color>(Optional).
The color is one of the following:red, blue, green, black, white,gray, cyan, magenta, yellow,lightgray, darkgray, grey,lightgrey, darkgrey, aqua, fuchsia,lime, maroon, navy, olive, purple,silver, teal, or, it is an RGB valuein one of the following formatsexpressed as a decimal, or ahexadecimal, number:
• #RRGGBB
• #AARRGGBB
Default: 0xFF001425
gfg_color Text color used on all buttons,if not customized in the buttonelement <fg_color> (Optional).
The color is one of the following:red, blue, green, black, white,gray, cyan, magenta, yellow,lightgray, darkgray, grey,lightgrey, darkgrey, aqua, fuchsia,lime, maroon, navy, olive, purple,silver, teal, or, it is an RGB valuein one of the following formatsexpressed as a decimal, or ahexadecimal, number:
• #RRGGBB
• #AARRGGBB
Default: 0xFFFFFFFF
headless_mod Headless mode (Optional). true: Headless mode enabled.
false: Headless mode disabled.
Default: false
help_url The URL of the entry point for theon-device online help (Optional).
Default: file:///WFConnect/help.html
incall_widget Call accept style on the incomingcall screen (Optional).
Select one of the following:
• incall_buttons: Simple buttons.
• incall_gb: Slider.
• incall_jb: Glow pad.
Default: incall_gb
jitter_max Maximum jitter buffer inmilliseconds.
250 msec to 1500 msec
Default: 250 msec
Table 6 Profile Tags (Continued)
141

XML Tags
Element Description Value
jitter_min Initial jitter delay in milliseconds. 30 msec to 100 msec
Default: 60 msec
layout_location The URL of the buttons layout file(Optional).
Protocols: file, http, https, tftp.
Default: none
license_alias Identify the device on the licensesource. (Optional)
Device alias.
license_key One or more WFC Voiceactivation keys. When usingthe license_source element,license_key can be used to listone or more PBX types.
Comma-separated list of:
• Activation keys
• PBX types.
license_source The URL of a licensed sourcerunning on the cloud or a localnetwork. Use the license_keyelement to define PBX types. Ifthe license_key value is not set,the client requests the PBX typeset in the WFC Voice profile.
Default: Flexera server
log_file Enable logging for WFC Voice(Optional).Log files are savedto the WFConnect folder on thedevice.
true: Logging enabled.
false: Logging disabled.
Default: false
log_level The log level for all log messagesproduced by Workforce Connect(Optional).
Select one of the following:
• Error
• Warning
• Info
• Debug
• Verbose
For debugging useVerbose.Default: Error
log_sipclf Enable logging of SIP messages.Logs are stored as a CLF file onthe device in SIP Common LogFormat (Optional).
true: Log to a file on the device.
false: Do not log to file.
Default: false
moh_enabled Enable music on hold to play aWAV audio file when a user isplaced on hold (optional).
Default: false
moh_file Select a custom WAV audio fileto play when a user is placed onhold (optional).
WAV file stored in the WFConnectfolder
Default: None
Table 6 Profile Tags (Continued)
142

XML Tags
Element Description Value
no_audio_cutoff Disconnect a call when no audiois detected for a set interval.
Select one of the following:
• 0
• 30
• 60
• 120
• 300
Default: 30
process_cell_call Ignore all call requests from theAndroid dialer. Required on thedevice with call service.
true: Process Android calls
false: Do not process android calls
Default: false
profile_type Primary PBX type. Contents: Text
Default: None
profile2_type Second PBX type (Optional). Contents: Text
Default: None
profile3_type Third PBX type (Optional). Contents: Text
Default: None
profile4_type Fourth PBX type (Optional). Contents: Text
Default: None
profname Profile name (Optional).Forinformation only.
Contents: Text
Default: None
prompt_file Name of the audio prompt file.(Optional).
WAV file stored in the WFConnectfolder
Default: None
ringer_off_in_charger Disable ringer while the device ischarging.
true: Disable ringer while charging
false: Enable ringer while charging
Default: false
ringtone_callback Call back ringtone (Optional). One of the following:
• The name of AndroidRingtone.
• The name of an audio filestored in the WFConnectfolder.
Default: UK_Phone
Table 6 Profile Tags (Continued)
143

XML Tags
Element Description Value
ringtone_external Ringtone for external calls(Optional).
One of the following:
• The name of AndroidRingtone.
• The name of an audio filestored in the WFConnectfolder.
Default: HI_UK_Phone
ringtone_intercom Ringtone for intercom calls(Optional).
One of the following:
• The name of AndroidRingtone.
• The name of an audio filestored in the WFConnectfolder.
Default: French_Phone
ringtone_line1 The ringtone for line #1 (Optional). One of the following:
• The name of AndroidRingtone.
• The name of an audio filestored in the WFConnectfolder.
Default: None (The defaultAndroid ringtone is used.)
ringtone_line2 The ringtone for line #2(Optional).
One of the following:
• The name of AndroidRingtone.
• The name of an audio filestored in the WFConnectfolder.
Default: None (The defaultAndroid ringtone is used.)
ringtone_line3 The ringtone for line #3(Optional).
One of the following:
• The name of AndroidRingtone.
• The name of an audio filestored in the WFConnectfolder.
Default: None (The defaultAndroid ringtone is used.)
Table 6 Profile Tags (Continued)
144

XML Tags
Element Description Value
ringtone_line4 The ringtone for line #4(Optional).
One of the following:
• The name of AndroidRingtone.
• The name of an audio filestored in the WFConnectfolder.
Default: None (The defaultAndroid ringtone is used.)
ringtone_line5 The ringtone for line #5(Optional).
One of the following:
• The name of AndroidRingtone.
• The name of an audio filestored in the WFConnectfolder.
Default: None (The defaultAndroid ringtone is used.)
ringtone_line6 The ringtone for line #6(Optional).
One of the following:
• The name of AndroidRingtone.
• The name of an audio filestored in the WFConnectfolder.
Default: None (The defaultAndroid ringtone is used.)
ringtone_park The ringtone for park (Optional). One of the following:
• The name of AndroidRingtone.
• The name of an audio filestored in the WFConnectfolder.
Default: None (The defaultAndroid ringtone is used.)
Table 6 Profile Tags (Continued)
145

XML Tags
Element Description Value
ringtone_priority Priority call ringtone (Optional). One of the following:
• The name of AndroidRingtone.
• The name of an audio filestored in the WFConnectfolder.
Default: None (The defaultAndroid ringtone is used.)
rtp_stats Show Real-Time TransportProtocol (RTP) Statistics on the in-call screen (Optional).
true: RTP statistics are shown.
false: RTP statistics are not shown.
Default: false
sample_rate Audio sample rate. Selectingan audio codec overrides thissetting (Optional).
Select one of the following:
• 8000
• 16000
• 32000
• 48000
Default: 8000
save_incoming_ voice_to_file Save incoming voice to a file inthe WFConnect folder. The filename is a time-stamp plus PCMextension (Optional).
true: File is saved.
false: File is not saved.
Default: false
show_department_name Display the department nameassociated with an extension(Optional).
true: Department names areshown.
false: Department names are notshown.
Default: false
show_extension_name Display extensions using boththe extension number andthe description set in the PBX(Optional). Requires ProfileManager.
true: Extension names are shown.
false: Extension names are notshown.
Default: false
show_jitter_stats Show jitter statistics (Optional). true: Jitter statistics are shown inaudio debugging files.
false: Jitter statistics are notshown in audio debugging files.
Default: false
Table 6 Profile Tags (Continued)
146

XML Tags
Element Description Value
sign_out_in_charger Automatically sign out of WFCVoice when the device beginscharging (Optional).
true: Sign out when chargingbegins.
false: Stay signed in whilecharged.
Default: false
keep_sign_in_after_reboot Keep WFC Voice signed In afterreboot.
true: Keep signed in after thedevice reboots.
false: Keep signed out after thedevice reboots.
Default: false
sip_auto_answer Auto answer mode (Optional). true: WFC Voice auto-answers allincoming calls.
false: The user must useWorkforce Connect to answer thecall.
Default: false
sip_confnum SIP default conferencenumber.Use with primary PBXtype (Optional).
Default: None
sip_device_type The Cisco device type.Use withprimary PBX type (Optional).
Default: 8865
sip_http_remhost HTTP server address (Optional). Server address
Default: None
sip_localport The primary local listening portfor SIP connections. Use withprimary PBX type (Optional).
Default: 5060
sip_parknum SIP default call parkextension.Use with primary PBXtype (Optional).
Default: None
sip_pbx_logo Identify the PBX type on the WFCVoice home screen dashboard.Enter text or set a logo (Optional).
Default: Displays the default textfor the PBX type.
sip_mac Primary radio MAC address ofthis mobile device. Use withprimary PBX type (Optional).
MAC address
Default: None
sip_realm SIP domain. Use with primaryPBX type (Optional).
Default: None
sip_remhost Primary TFTP server address#1. Use with primary PBX type(Optional).
Server address
Default: The server addressprovided by option 150 in theDHCP.
Table 6 Profile Tags (Continued)
147

XML Tags
Element Description Value
sip_remhost2 TFTP server address #2. Thisis a secondary address usedif the primary address is notreachable. Use with primary PBXtype (Optional).
Server address
Default: None
sip_remhost3 TFTP server address #3. Thisis a secondary address usedif the primary address is notreachable. Use with primary PBXtype (Optional).
Server address
Default: None
sip_remport TFTP server remote port.Use withprimary PBX type (Optional).
Default: 5060
sip_rtp_port1 First RTP port. Default: 51000
sip_rtp_port2 Last RTP port. Default: 51025
sip_rtp_ptime RTP payload size in milliseconds. Select one of the following:
• 20
• 30
• 40
• 50
• 60
• 70
• 80
Default: 20
sip_transport SIP transport type. Use withprimary PBX type (Optional).
Select one of the following:
• UDP
• TCP
• TLS
Default: TCP
sip_userid SIP user or authentication ID. Usewith primary PBX type (Optional).
Default: None
sip_userpass SIP authentication password. Usewith primary PBX type (Optional).
Default: None
sip_vmnum SIP voice mail extension. Usewith primary PBX type (Optional).
Default: None
sip2_confnum SIP default conferencenumber.Use with second PBXtype (Optional).
Default: None
sip2_device_type The Cisco device type. Use withsecond PBX type (Optional).
Default: 8865
Table 6 Profile Tags (Continued)
148

XML Tags
Element Description Value
sip2_localport The local listening port for SIPconnections. Use with secondPBX type (Optional).
Default: 5060
sip2_mac Radio MAC address of thismobile device. Use with secondPBX type (Optional).
MAC address
Default: None
sip2_parknum SIP default call park extension.Use with second PBX type(Optional).
Default: None
sip2_realm SIP domain. Use with secondPBX type (Optional).
Default: None
sip2_remhost TFTP server address #1.Use withsecond PBX type (Optional).
Server address
Default: The server addressprovided by option 150 in theDHCP.
sip2_remhost2 TFTP server address #2. Thisis a secondary address usedif the primary address is notreachable. Use with second PBXtype (Optional).
Server address
Default: None
sip2_remhost3 TFTP server address #3. Thisis a secondary address usedif the primary address is notreachable. Use with second PBXtype (Optional).
Server address
Default: None
sip2_remport TFTP server remote port.Use withsecond PBX type (Optional).
Default: 5060
sip2_transport SIP transport type. Use withsecond PBX type (Optional).
Select one of the following:
• UDP
• TCP
• TLS
Default: TCP
sip2_userid SIP user or authentication ID.Usewith second PBX type (Optional).
Default: None
sip2_userpass SIP authentication password. Usewith second PBX type (Optional).
Default: None
sip2_vmnum SIP voice mail extension. Usewith second PBX type (Optional).
Default: None
sip3_confnum SIP default conference number.Use with third PBX type(Optional).
Default: None
sip3_device_type The Cisco device type. Use withthird PBX type (Optional).
Default: 8865
Table 6 Profile Tags (Continued)
149

XML Tags
Element Description Value
sip3_localport The local listening port for SIPconnections. Use with third PBXtype (Optional).
Default: 5060
sip3_mac Radio MAC address of thismobile device. Use with third PBXtype (Optional).
MAC address
Default: None
sip3_parknum SIP default call park extension.Use with third PBX type(Optional).
Default: None
sip3_realm SIP domain. Use with third PBXtype (Optional).
Default: None
sip3_remhost TFTP server address #1.Use withthird PBX type (Optional).
Server address
Default: The server address isprovided by option 150 in theDHCP.
sip3_remhost2 TFTP server address #2. Thisis a secondary address usedif the primary address is notreachable. Use with third PBXtype (Optional).
Server address
Default: None
sip3_remhost3 TFTP server address #3. Thisis a secondary address usedif the primary address is notreachable. Use with third PBXtype (Optional).
Server address
Default: None
sip3_remport TFTP server remote port.Use withthird PBX type (Optional).
Default: 5060
sip3_transport SIP transport type. Use with thirdPBX type (Optional).
Select one of the following:
• UDP
• TCP
• TLS
Default: TCP
sip3_userid SIP user or authentication ID.Usewith third PBX type (Optional).
Default: None
sip3_userpass SIP authentication password. Usewith third PBX type (Optional).
Default: None
sip3_vmnum SIP voice mail extension. Usewith third PBX type (Optional).
Default: None
sip4_confnum SIP default conference number.Use with the fourth PBX type(Optional).
Default: None
sip4_device_type The Cisco device type. Use withthe fourth PBX type (Optional).
Default: 8865
Table 6 Profile Tags (Continued)
150

XML Tags
Element Description Value
sip4_localport The local listening port for SIPconnections. Use with the fourthPBX type (Optional).
Default: 5060
sip4_mac Radio MAC address of thismobile device. Use with thefourth PBX type (Optional).
MAC address
Default: None
sip4_parknum SIP default call park extension.Use with the fourth PBX type(Optional).
Default: None
sip4_realm SIP domain. Use with the fourthPBX type (Optional).
Default: None
sip4_remhost TFTP server address #1.Use withfourth PBX type (Optional).
Server address
Default: The server address isprovided by option 150 in theDHCP.
sip4_remhost2 TFTP server address #2. This isa secondary address used if theprimary address is not reachable.Use with the fourth PBX type(Optional).
Server address
Default: None
sip4_remhost3 TFTP server address #3. This isa secondary address used if theprimary address is not reachable.Use with the fourth PBX type(Optional).
Server address
Default: None
sip4_remport TFTP server remote port.Use withfourth PBX type (Optional).
Default: 5060
sip4_transport SIP transport type. Use with thefourth PBX type (Optional).
Select one of the following:
• UDP
• TCP
• TLS
Default: TCP
sip4_userid SIP user or authentication ID.Use with the fourth PBX type(Optional).
Default: None
sip4_userpass SIP authentication password.Use with the fourth PBX type(Optional).
Default: None
sip4_vmnum SIP voice mail extension.Use with the fourth PBX type(Optional).
Default: None
sms_enabled Short Message Service (SMS)(Optional).
true: Enable SMS
false: Disable SMS
Default: false
Table 6 Profile Tags (Continued)
151

XML Tags
Element Description Value
speaker_on_horizontal Answer calls in speaker modewhen the device is placed on ahorizontal surface
true: Enable speaker mode
false: Disable speaker mode
Default: false
use_android_dialer Use the native Android dialer toplace calls.
true: Use the Android dialer
false: Use Workforce Connectdialer
use_accelerometer Use the native Androidaccelerometer (Optional).
true: Accelerometer is used.
false: Accelerometer is not used.
Default: false
use_aec Echo Cancellation (Optional). true: Echo cancellation is used.
false: Echo cancellation is notused.
Default: false
use_agc_ear Automatic Gain Control (AGC) onearpiece (Optional).
true: AGC is used.
false: AGC is not used.
Default: false
use_agc_speaker Automatic Gain Control (AGC) onspeaker. (Optional).
true: AGC is used.
false: AGC is not used.
Default: false
use_native_sample_rate Use the native sample rate set byAndroid (Optional).
true: Android native sample rate isused
false: Sample rate is 8000
Default: false
use_noise Noise Reduction (Optional). true: Noise reduction is used.
false: Noise reduction is not used.
Use the native sample rate set byAndroid.
use_prox_wake_ lock Use the Android platform defaultproximity WAKE LOCK (Optional).
true: Uses the Android platformdefault proximity WAKE LOCK.
false: Uses a workaround solution.
Default: true
var_location The URI of the shared profilelocated on a remote or localserver (Optional).
Protocols: file, http, https, tftp.
Default: none (Disabled)
Table 6 Profile Tags (Continued)
152

XML Tags
Element Description Value
vibrate_when_ringing The device vibrates when a call isreceived (Optional).
true: The device vibrates when acall is received.
false: The device does not vibratewhen a call is received.
Default: false
voice_announcer_check Announces the number oruser name of an incoming call(Optional).
true: Incoming calls areannounced.
false: Incoming calls are notannounced.
Default: false
wifi_preferred Connect to an available WiFinetwork. This setting only appliesafter the network state changesor when the client is restarted.
true: Connect to an available WiFinetwork.
false: Only connect to the device’sdefault network.
Default: true
Table 6 Profile Tags (Continued)
Element Description
Columns The number of columns on the dashboard area.
Button The definition of an on-screen button. See Table 9 Button Tags on page153 for details.
Table 7 Dashboard Tags
Element Description
Button The definition of an on-screen button. See Table 9 Button Tags on page153 for details.
Table 8 Call Buttons Tags
Element Description Value
action The button action. This must be one of the action typeslisted in Button Actions on page 136. Ifthis string is not a valid action type thebutton is not created.
Table 9 Button Tags
153

XML Tags
Element Description Value
bg_color Button background color (optional).Ifno color is defined then the profileelement <gfg_color> is used.
The color is one of the following:red, blue, green, black, white, gray,cyan, magenta, yellow, lightgray,darkgray, grey, lightgrey, darkgrey,aqua, fuchsia, lime, maroon, navy,olive, purple, silver, teal, or, it is anRGB value in one of the followingformats expressed as a decimal, or ahexadecimal, number:
• #RRGGBB
• #AARRGGBB
Default: #FF001425
confirm After touching the button, theoperator is asked to confirm theaction before it is executed (optional).
true: Confirm the action
false: Do not confirm the action
Default: false
description The LIST action type uses description. On the LIST action type button:
• It is used as the title on the popupdialog
• It appears as a comment for eachLIST sub button, identifying whichaction is performed by the button.
For all other buttons, the descriptionis optional.
enabled Defines whether the button isavailable on the WFC Voice screen(optional).
true: Button is visible and active.
false: Button is not visible.
Default: true.
fg_color Button text color (Optional).If no coloris defined then the profile element<gfg_color> is used.
The color is one of the following:red, blue, green, black, white, gray,cyan, magenta, yellow, lightgray,darkgray, grey, lightgrey, darkgrey,aqua, fuchsia, lime, maroon, navy,olive, purple, silver, teal, or, it is anRGB value in one of the followingformats expressed as a decimal, or ahexadecimal, number:
• #RRGGBB
• #AARRGGBB
Default: #FFFFFFFF
Table 9 Button Tags (Continued)
154

XML Tags
Element Description Value
icon The icon that appears on the button(Optional).
Select one of the following:
• none: Only the title is displayed onthe button.
• default: Displays the default iconfor the associated action type.
• <filename>: The filename of a PNGfile, containing the icon, in theWFConnect folder. Include .png inthe filename.
Default: default
title Button title (Optional). This text isdisplayed on the on-screen button.If the string contains spaces, the textdisplays on 2 lines; otherwise, all thetext displays on one line. The font sizeadjusts depending on text length.
Contents: Text
Default: New
value Additional information required by the<action> element (Optional).
For details on the values associatedwith each action type see ButtonActions on page 136.
Button The definition of an on-screen button. N/A
Table 9 Button Tags (Continued)
155

XML Example - ProfileXML Example - Profile
This section shows a sample profile in the WFConnect.xml file.
<WFConnect><Profile> <use_android_dialer>true</use_android_dialer> <sip_remhost2></sip_remhost2> <ptt_userid>user</ptt_userid> <background_logo>company_logo.png</background_logo> <lux_threshold>0</lux_threshold> <sip_remhost3></sip_remhost3> <rtp_stats>false</rtp_stats> <prompt_file>greeting.wav</prompt_file> <codec_ulaw_priority>2</codec_ulaw_priority> <show_dialpad>true</show_dialpad> <sip_expires>36000</sip_expires> <use_noise>true</use_noise> <ptt_transport>UDP</ptt_transport> <use_native_sample_rate>false</use_native_sample_rate> <jitter_max>250</jitter_max> <post_log_url></post_log_url> <sip_device_type>8865</sip_device_type> <sip_rtp_ptime>20</sip_rtp_ptime> <sip_transport>TCP</sip_transport> <sip_rtp_port2>50025</sip_rtp_port2> <sip_rtp_port1>50000</sip_rtp_port1> <audio_gain_in>5</audio_gain_in> <use_prox_wake_lock>true</use_prox_wake_lock> <log_console>true</log_console> <use_agc_speaker>true</use_agc_speaker> <sip_realm>10.16.2.111</sip_realm> <jitter_min>60</jitter_min> <sip_subscribe>false</sip_subscribe> <help_url>file:///WFConnect/help.html</help_url> <codec_g722_priority>4</codec_g722_priority> <save_incoming_voice_to_file>false</save_incoming_voice_to_file> <profile_type>Licensed PBX</profile_type> <gfg_color>#FFFFFFFF</gfg_color> <codec_alaw_priority>3</codec_alaw_priority> <codec_g729_priority>1</codec_g729_priority>
156

XML Example - Profile
<sip_userid>1001</sip_userid> <log_file>true</log_file> <rssi_limit>-85</rssi_limit> <incall_widget>incall_buttons</incall_widget> <sip_mac></sip_mac> <sip_auto_answer>false</sip_auto_answer> <audio_gain_out>5</audio_gain_out> <show_jitter_stats>false</show_jitter_stats> <use_aec>true</use_aec> <gbg_color>#FF001425</gbg_color> <license_key>abcd-1234-ab12-cd34-5678-efgh-ef56-gh78</license_key> <sip_remhost>10.5.97.99</sip_remhost> <sip_userpass>1234</sip_userpass> <sip_remport>5060</sip_remport> <use_accelerometer>true</use_accelerometer> <profname>WFConnect.xml</profname> <use_agc_ear>true</use_agc_ear> <codec_gsm_priority>5</codec_gsm_priority> <srtp_type>1</srtp_type> <log_level>Error</log_level></Profile>...
157

XML Example - DashboardXML Example - Dashboard
This section shows a sample dashboard in the WFConnect.xml file.
...<Dashboard> <Columns>4</Columns> <Button> <title>Dial</title> <action>DIAL</action> <value></value> <enabled>true</enabled> <confirm>false</confirm> <description></description> <icon></icon> </Button> <Button> <title>SpeedDial#1</title> <action>SPEED_DIAL1</action> <value></value> <enabled>true</enabled> <confirm>false</confirm> <description></description> <icon></icon> </Button> <Button> <title>SpeedDial#2</title> <action>SPEED_DIAL2</action> <value></value> <enabled>true</enabled> <confirm>false</confirm> <description></description> <icon></icon> </Button> <Button> <title></title> <action>LIST</action> <value></value> <enabled>true</enabled> <confirm>false</confirm> <description></description>
158

XML Example - Dashboard
<icon></icon> </Button> <Button> <title>SpeedDial#3</title> <action>SPEED_DIAL3</action> <value></value> <enabled>true</enabled> <confirm>false</confirm> <description></description> <icon></icon> </Button> <Button> <title>SpeedDial#4</title> <action>SPEED_DIAL4</action> <value></value> <enabled>true</enabled> <confirm>false</confirm> <description></description> <icon></icon> </Button> <Button> <title>SpeedDial#5</title> <action>SPEED_DIAL5</action> <value></value> <enabled>true</enabled> <confirm>false</confirm> <description></description> <icon></icon> </Button> <Button> <title>SpeedDial#6</title> <action>SPEED_DIAL6</action> <value></value> <enabled>true</enabled> <confirm>false</confirm> <description></description> <icon></icon> </Button> <Button> <title>SpeedDial#7</title> <action>SPEED_DIAL7</action> <value></value> <enabled>true</enabled> <confirm>false</confirm> <description></description> <icon></icon> </Button> <Button> <title>SpeedDial#8</title> <action>SPEED_DIAL8</action> <value></value> <enabled>true</enabled> <confirm>false</confirm> <description></description>
159

XML Example - Dashboard
<icon></icon> </Button> <Button> <title>SpeedDial#9</title> <action>SPEED_DIAL9</action> <value></value> <enabled>true</enabled> <confirm>false</confirm> <description></description> <icon></icon> </Button> <Button> <title>Call</title> <action>CALL</action> <value></value> <enabled>true</enabled> <confirm>false</confirm> <description></description> <icon>Default</icon> </Button> <Button> <title>StartApp</title> <action>START_APP</action> <value>Camera</value> <enabled>true</enabled> <confirm>false</confirm> <description></description> <icon>Default</icon> </Button> <Button> <title>LogMarker</title> <action>LOG_MARKER</action> <value></value> <enabled>true</enabled> <confirm>false</confirm> <description></description> <icon>Default</icon> </Button> <Button> <title>Blank</title> <action>BLANK</action> <value></value> <enabled>true</enabled> <confirm>false</confirm> <description></description> <icon>Default</icon> </Button></Dashboard>...
160

XML Example - Call ButtonsXML Example - Call Buttons
This section shows a sample of call buttons in the WFConnect.xml file.
...<CallButtons> <Button> <title>AddCall</title> <action>ADD_CALL</action> <value></value> <enabled>true</enabled> <confirm>false</confirm> <description></description> <icon>Default</icon> </Button> <Button> <title>Home</title> <action>HOME</action> <value></value> <enabled>true</enabled> <confirm>false</confirm> <description></description> <icon>Default</icon> </Button> <Button> <title>Hold</title> <action>HOLD</action> <value></value> <enabled>false</enabled> <confirm>false</confirm> <description></description> <icon></icon> </Button> <Button> <title>Resume</title> <action>RESUME</action> <value></value> <enabled>false</enabled> <confirm>false</confirm> <description></description> <icon>Default</icon>
161

XML Example - Call Buttons
</Button></CallButtons></WFConnect>
162

Directory ButtonConfigurationDirectory Button Configuration
This section describes how to configure and use the directory button.
Creating the Directory ButtonTo define a button that finds contacts in a directory:
1. Open Settings.
2. Select Advanced Settings > UI Settings > Edit Dashboard or Edit In-Call > Add.
3. Select the new button. A yellow box appears around the selected button.
4. Touch Edit.
5. In the Action field, select DIRECTORY.
6. In the Value field there are two options:
• PBX provides the URL, no action is needed
• URL is manually entered
7. In the Title field, enter DIRECTORY.
8. In the Icon field, choose an icon.
9. Touch the Back button to return to the WFC Voice Client home screen.
Using the Directory ButtonOnly the first page of contacts displays. Enter contact information on the Directory Search screen to narrowthe search results.
1. Touch the DIRECTORY button. The Directory Search screen appears.
2. Enter contact information.
3. Touch Search.
163

Proxy Server ConfigurationProxy Server Configuration
To activate WFC Voice, one or more licenses must be retrieved from one of the following types of licensesources:
• Local license server
• Cloud license server.
• Available in WFC Voice versions earlier than 9.0.20306.
A proxy server is required when using a device that does not have direct access to the license source. Forexample, when a device is connected to a local network.
Figure 17 Proxy Server Configuration
Configuring a Proxy Server1. Ensure the proxy server and DNS server are running.
2. Ensure the device running WFC Voice is connected to the DNS server.
164

Proxy Server Configuration
3. In the DNS server, change the DNS information to resolve the licensing server domain to the proxyserver.
The default license server domain is:
zebra-licensing.flexnetoperations.com
4. In the proxy server, allow internet traffic on port 443.
165

Unsupported FeaturesUnsupported Features
WFC Voice does not support the following CUCM features:
• Handoff for Dual Mode SIP phones - Handoff of active calls between WiFi and cellular networks.
• G.Clear codec - Support of a 64kbps transparent data channel carried over RTP between twoendpoints.
• Phone Alarm System - Alarms sent from the phone to the CUCM via SIP REFER messages.
• Intercom - one-way audio call to destination speakerphone.
• Hold Reversion - Reminder of a call on hold.
• Secure Monitoring and Recording - Secure monitoring by a supervisor.
• Call Recording - Recording of conversations.
• Silent Monitoring - Monitoring of a conversation by a supervisor without knowledge of the call parties.
• Private Line Automatic Ringdown / Hotdial - Automatic routing to a destination upon going off-hook.
• Quality Reporting Tool - Ability for an endpoint to report quality results.
• Callback - Requesting a callback from a busy endpoint.
• Malicious Call Identifier - Ability for an endpoint to identify a call as malicious in call detail records.
• Immediate Diversion - Ability for an endpoint to immediately forward an incoming, active, or held call tovoice mail.
• Meet Me Conference - Dynamically reserving a conference number and communicating it to membersof the group.
• Assisted Directed Call Park - Parking a call at a pre-configured extension reserved for call park.
166

Network Ports and ProtocolsNetwork Ports and Protocols
This section provides an overview of the ports and protocols WFC Voice uses on supported Zebra devices.
Zebra devices may contain applications that use the same ports and protocols for normal operation asWFC Voice. Refer to the application documentation for more information.
Port Destination Comments
443 https://zebra-licensing.flexnetoperations.com
License registration and validation for WFCVoice.Available in WFC Voice versions earlier than9.0.20306.
5060 Call Manager server(s) SIP messaging to Call Manager. To usea different port, change both the deviceconfiguration and PBX- Call Manager.
69 TFTP server(s) TFTP services download.
Required for advanced Cisco Premiumfeatures.
51000 –51025
RTP Traffic to other devices To use a different port, change the deviceconfiguration.
80 WebServer HTTP, HTTPS, or TFTP file download of theWFC Voice Configuration file, and the contactslist CSV file, if available.
8443 https://wfc-provisioning1.pttpro.zebra.com:8443/
License registration for WFC Voice versions9.020306 and later.
443 https://<EXM-URL> For customers who use the ExtensionManager. To download profile and licenseinformation.
Table 10 Ports for Advanced Features
167

Services ConfigurationServices Configuration
This section provides an overview on configuring services for WFC Voice. For detailed information onconfiguring these services in CUCM, refer to: https://supportforums.cisco.com.
The following Cisco services are available on WFC Voice:
• Extension Mobility
• IP Phone Services URL (SURL).
Configuring Extension MobilityTo configure the Extension Mobility feature in WFC Voice:
1. From the WFC Voice home screen, select Services.
2. In the Select service popup window, select Extension Mobility.
The Sign On screen appears.
3. In the UserID field, enter muser1.
4. In the PIN field, enter 4321.
5. Select Submit.
6. Touch the back button to return to the WFC Voice home screen.
The Extension Mobility feature is enabled and extension 4321 displays in the dashboard extensions list.
Disabling Extension MobilityTo disable the Extension Mobility feature:
1. Select Services.
2. In the Select service popup window, select Extension Mobility.
The Extension Mobility log out screen appears.
3. Select Yes to logout and disable the Enterprise Mobility feature.
WFC Voice returns to the previously set connection parameters.
168

Services Configuration
IP Phone Services URL (SURL)Use the Cisco IP Phone Services URL feature to create a phone directory that is pushed to WFC Voice froman IIS Web Server. Once configured, access the directory using the Services button on the WFC VoiceHome Screen.
The following sections describe how to configure the IP Phone Services URL feature in WFC Voice.
• Installing IIS Web Services
• Creating IP Phone Services XML Files
• Enabling the Cisco IP Phone Service
• Using IP Phone Services in WFC Voice.
Installing IIS Web Services
This section assumes knowledge of Microsoft IIS. For more information on Microsoft IIS, refer tosupport.microsoft.com.
1. From Microsoft IIS, navigate to Administrative Tools > Server Manager > Roles Summary.
2. Select Add Roles.
3. Select Server Roles.
4. Select Web Server (IIS).
5. Select Next and follow the on screen instructions to install Web Server (IIS).
169

Services Configuration
Create IP Phone Services XML Files
Creating a phone directory using the IP Phone Services URL feature requires one XML file containing themain menu, and one or more additional XML files containing the directory entries. This section provides aset of sample XML files that create the following speed dial directories:
..\wwwroot\SpeedDials contains:
• SpeedDial_Main.xml
..\wwwroot\SpeedDials\SD contains:
• CUSTOMER_SERVICE.xml
• GARDENING.xml
• HARDWARE.xml
• LUMBER.xml
• PLUMBING.xml
• SECURITY.xml
Figure 18 Speed Dial Root Folder
170

Services Configuration
Figure 19 Speed Dial Directory Entries Folder
Example of Main Menu XML File
In the following XML file example, the folder ..\wwwroot\SpeedDials contains the XML menu fileSpeedDial_Main.
<CiscoIPPhoneMenu> <Title>SpeedDial</Title> <Prompt>Please make a selection</Prompt> <MenuItem> <Name>CUSTOMER SERVICE</Name> <URL>http://10.80.212.10/SpeedDials/SD/CUSTOMER_SERVICE.xml</URL> </MenuItem> <MenuItem> <Name>SECURITY</Name> <URL>http://10.80.212.10/SpeedDials/SD/SECURITY.xml</URL> </MenuItem> <MenuItem> <Name>GARDENING</Name> <URL>http://10.80.212.10/SpeedDials/SD/GARDENING.xml</URL> </MenuItem> <MenuItem> <Name>LUMBER</Name> <URL>http://10.80.212.10/SpeedDials/SD/LUMBER.xml</URL> </MenuItem>
171

Services Configuration
<MenuItem> <Name>HARDWARE</Name> <URL>http://10.80.212.10/SpeedDials/SD/HARDWARE.xml</URL> </MenuItem> <MenuItem> <Name>PLUMBING</Name> <URL>http://10.80.212.10/SpeedDials/SD/PLUMBING.xml</URL> </MenuItem> </CiscoIPPhoneMenu>
Example of Directory Entry XML Files
In the following XML file examples, the folder ..\wwwroot\SpeedDials\SD contains multiple XMLdirectory files. Each directory file contains a set of directory entries.
<CiscoIPPhoneDirectory> <Title>CUSTOMER_SERVICE</Title> <DirectoryEntry> <Name>CS1</Name> <Telephone>1000</Telephone> </DirectoryEntry> <DirectoryEntry> <Name>CS2</Name> <Telephone>1001</Telephone> </DirectoryEntry> <DirectoryEntry> <Name>CS3</Name> <Telephone>1003</Telephone> </DirectoryEntry> </CiscoIPPhoneDirectory>
<CiscoIPPhoneDirectory> <Title>GARDENING</Title> <DirectoryEntry> <Name>GARDENING-1</Name> <Telephone>2000</Telephone> </DirectoryEntry> <DirectoryEntry> <Name>GARDENING-2</Name> <Telephone>2001</Telephone> </DirectoryEntry> </CiscoIPPhoneDirectory>
<CiscoIPPhoneDirectory> <Title>HARDWARE</Title> <DirectoryEntry> <Name>HARDWARE-1</Name> <Telephone>2767</Telephone>
172

Services Configuration
</DirectoryEntry> <DirectoryEntry> <Name>HARDWARE-2</Name> <Telephone>2768</Telephone> </DirectoryEntry> <DirectoryEntry> <Name>HARDWARE-3</Name> <Telephone>2769</Telephone> </DirectoryEntry> <DirectoryEntry> <Name>HARDWARE-4</Name> <Telephone>2770</Telephone> </DirectoryEntry> <DirectoryEntry> <Name>HARDWARE-5</Name> <Telephone>2771</Telephone> </DirectoryEntry> </CiscoIPPhoneDirectory>
<CiscoIPPhoneDirectory> <Title>LUMBER</Title> <DirectoryEntry> <Name>LUMBER-1</Name> <Telephone>3000</Telephone> </DirectoryEntry> <DirectoryEntry> <Name>LUMBER-2</Name> <Telephone>3001</Telephone> </DirectoryEntry> <DirectoryEntry> <Name>LUMBER-3</Name> <Telephone>3002</Telephone> </DirectoryEntry> <DirectoryEntry> <Name>LUMBER-4</Name> <Telephone>3003</Telephone> </DirectoryEntry> </CiscoIPPhoneDirectory>
<CiscoIPPhoneDirectory> <Title>PLUMBING</Title> <DirectoryEntry> <Name>PLUMBING-1</Name> <Telephone>1040</Telephone> </DirectoryEntry> <DirectoryEntry> <Name>PLUMBING-2</Name> <Telephone>1041</Telephone> </DirectoryEntry> <DirectoryEntry> <Name>PLUMBING-3</Name>
173

Services Configuration
<Telephone>1042</Telephone> </DirectoryEntry> <DirectoryEntry> <Name>PLUMBING-4</Name> <Telephone>1043</Telephone> </DirectoryEntry> <DirectoryEntry> <Name>PLUMBING-5</Name> <Telephone>1044</Telephone> </DirectoryEntry> </CiscoIPPhoneDirectory>
<CiscoIPPhoneDirectory> <Title>SECURITY</Title> <DirectoryEntry> <Name>Police</Name> <Telephone>911</Telephone> </DirectoryEntry> <DirectoryEntry> <Name>SECURITY</Name> <Telephone>111</Telephone> </DirectoryEntry> </CiscoIPPhoneDirectory>
Enabling the Cisco IP Phone Service
This section provides a brief overview on enabling the Cisco IP Phone Service in CUCM. For moreinformation, refer to https://supportforums.cisco.com.
1. In the Find and List IP Phone Services screen, select Add New to create a directory.
174

Services Configuration
2. In the IP Phone Services Configuration screen, in the Service URL field, enter the URL for the XMLmenu file on the Microsoft IIS Web Server.
Using IP Phone Services in WFC Voice
To use IP Phone Services in WFC Voice:
1. From the WFC Voice home screen, select Services.
2. In the Select Services popup window, select the directory.
The directory menu screen appears.
3. Select a menu item to view directory entries.
4. Touch a directory entry to initiate a call.
175

Hunt GroupsHunt Groups
NOTE: The Voice Hunt Groups feature is only available in Cisco CUCM version 12.5 and higherand requires WFC Voice version 9.0.21109 or later.
This section contains an overview of configuring and using the Hunt Groups feature in the PBX.
The Hunt Groups feature allows incoming calls to a specific number to be directed to a defined group ofextension numbers. When configured, the Hunt Groups feature allows end users to sign in and out of huntgroups in WFC Voice.
For more information on the Hunt Groups feature, refer to cisco.com/c/en/us/td/docs/voice_ip_comm/cucm/admin/12_5_1SU1/cucm_b_feature-configuration-guide-for-cisco1251SU1/cucm_b_feature-configuration-guide-for-cisco1251SU1_chapter_0100001.html
Configuring Hunt Groups1. In the Cisco CUCM PBX, go to > Call Routing > Route/Hunt > Line Group.
a) Ensure at least one Line Group exists. To create a new Line Group, select Add New and use thedefault settings.
2. Go to > Call Routing > Route/Hunt > Hunt List.
a) Ensure at least one Hunt List exists. To create a new Hunt List, select Add New.
b) Select the Hunt List.
c) In Hunt List Configuration, under Hunt List Member Information ensure that Selected Groups hasthe desired Line Group. To add a Line Group, select Add Line Group.
3. Go to > Call Routing > Route/Hunt > Hunt Pilot.
a) Ensure at least one Hunt Pilot exists. To create a new Hunt Pilot, select Add New.
b) Select the Hunt Pilot.
c) In Hunt Pilot Configuration, under Pattern Definition ensure that Hunt List is set to the desiredHunt List.
4. Go to Device > Phone.
a) Select an extension.
b) Select Modify Button Items.
c) In Manage Button Associations, ensure Hunt Group Logout is in the Associated Items column.
Once configured in the PBX, a button is automatically pushed to the WFC Voice app on the device.
176

Hunt Groups
Joining a Hunt GroupJoin a Hunt Group using the Hunt Group button in WFC Voice.
• From the Home Screen, touch Hunt Group.
A confirmation screen displays and the button turns yellow.
Leaving a Hunt GroupLeave a Hunt Group using the Hunt Group button in WFC Voice.
• From the Home Screen, touch Hunt Group.
A confirmation screen displays and the button changes from yellow to the default button color.
177

www.zebra.com