Viking from String: - WordPress.com
25
-
Upload
khangminh22 -
Category
Documents
-
view
0 -
download
0
Transcript of Viking from String: - WordPress.com

i
Table of Contents
Table of Contents............................................................. i
Summary.......................................................................... 1
Overview .......................................................................... 2
Linen: Serk (Underdress) and Cap ................................ 3
Serk (Underdress) ........................................................................................3
Cap...............................................................................................................4
Weaving the Fabric.......................................................................................4
Sewing the Garments ...................................................................................5
Wool: Smokkr (Aprondress) .......................................... 7
Weaving the Fabric.......................................................................................8
Sewing the Garments ...................................................................................9
What I Learned .............................................................. 10
Weaving Linen............................................................................................10
Weaving Wool ............................................................................................10
Sewing the Garments .................................................................................10
References..................................................................... 12
Appendix A: The Challenge ......................................... 13
Appendix B: Project Statistics..................................... 15
Hours Spent................................................................................................15
Project Price ...............................................................................................15
Appendix C: The Aprondress Pattern ......................... 17
Appendix D: Warping The Loom ................................. 18
Cover image: Anglo Scandinavian carving from Pickhill in England [2].
1
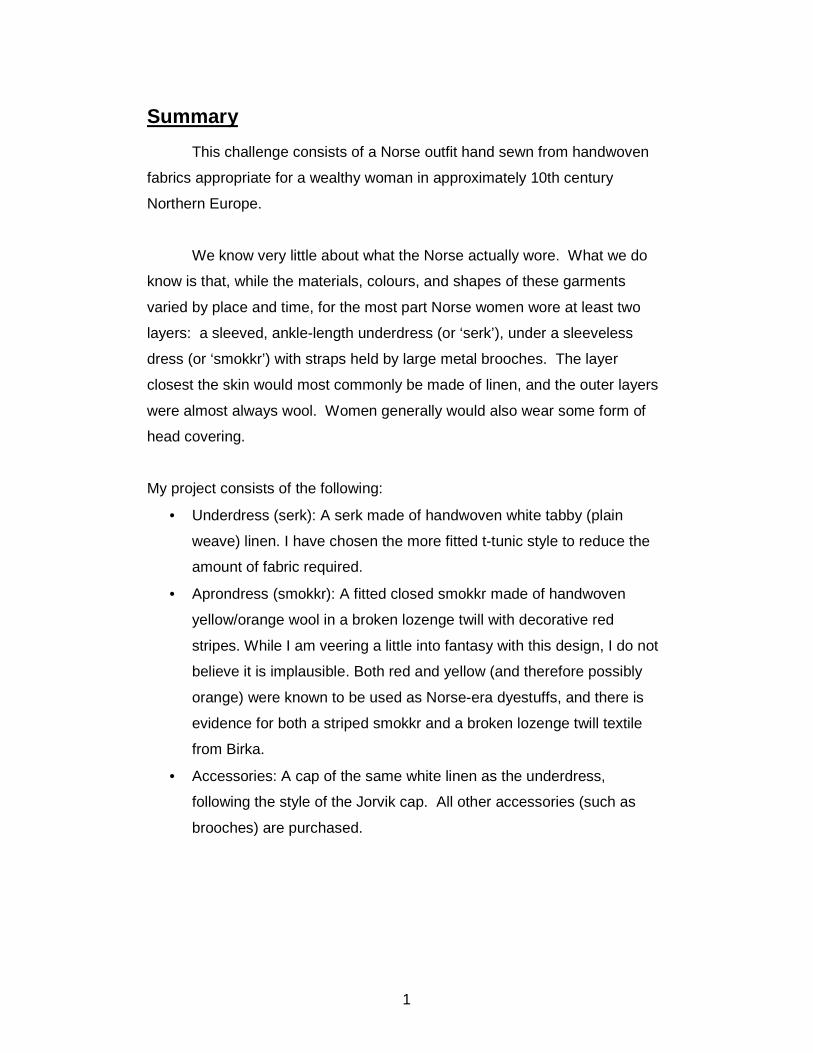
Summary
This challenge consists of a Norse outfit hand sewn from handwoven
fabrics appropriate for a wealthy woman in approximately 10th century
Northern Europe.
We know very little about what the Norse actually wore. What we do
know is that, while the materials, colours, and shapes of these garments
varied by place and time, for the most part Norse women wore at least two
layers: a sleeved, ankle-length underdress (or ‘serk’), under a sleeveless
dress (or ‘smokkr’) with straps held by large metal brooches. The layer
closest the skin would most commonly be made of linen, and the outer layers
were almost always wool. Women generally would also wear some form of
head covering.
My project consists of the following:
• Underdress (serk): A serk made of handwoven white tabby (plain
weave) linen. I have chosen the more fitted t-tunic style to reduce the
amount of fabric required.
• Aprondress (smokkr): A fitted closed smokkr made of handwoven
yellow/orange wool in a broken lozenge twill with decorative red
stripes. While I am veering a little into fantasy with this design, I do not
believe it is implausible. Both red and yellow (and therefore possibly
orange) were known to be used as Norse-era dyestuffs, and there is
evidence for both a striped smokkr and a broken lozenge twill textile
from Birka.
• Accessories: A cap of the same white linen as the underdress,
following the style of the Jorvik cap. All other accessories (such as
brooches) are purchased.

2
Overview
We know very little about what the Norse actually wore. The images left
by the people are stylized and hard to decipher, and descriptions of the
clothing in various sagas are vague. We do have archaeological remains but
these are, for the most part, small fragments. We can know what materials
were used, the types and colours of cloth was available, and how garments
may have been layered – but we really don’t know what they looked like.
What we do know is that, while the materials, colours, and shapes of these
garments varied by place and time, for the most part Norse women wore at
least two layers: a sleeved, ankle-length dress (or ‘serk’), under a sleeveless
dress with straps held by large metal brooches. Commonly referred to as an
‘aprondress’, Thor Ewing suggests the term ‘smokkr’ may be the one used in
period [2]. The layer closest the skin would most commonly be made of linen,
and the outer layers were almost always wool. Women generally would also
wear some form of head covering.
I have chosen to base this outfit mainly on the finds at Hedeby and Birka,
but have collected evidence from several sources simply because of this lack
of information about any one time or place. The material found in Birka is
from 9th and 10th century Sweden. The textile material from Hedeby, in
Northern Germany, is from the 10th century. The Jorvik materials are from
9th-11th century England (under Norse rule). I also referenced the
Herjolfsnes finds (14th-15th century Greenland) because earlier garments
were described as being similar by Inga Hägg [5].
All materials were woven on my horizontal countermarche loom, rather
than a vertical warp-weighted or medieval-style horizontal loom (depending on
the source, it is estimated that the horizontal loom came into use in Northern
Europe from as early as the 9th, to as late as the 12th century).

3
Linen: Serk (Underdress) and Cap
Serk (Underdress)
The excavations at Haithabu were written about extensively by Inga
Hägg. Unfortunately, these articles are not written in English and can be
difficult to find (even if I could read them). I have had to rely on other people’s
interpretations of her writing. Hilde Thunem has posted some fantastic
articles on the finds/interpretations so far, including quotes from many of
these articles, including the following quote [5]:
Hedebydräkten, såväl den manliga som den kvinnliga, är produkter av
avancerad tilskärarkonst, som för länge sedan lämnat de “primära
klädformernas” stadium. Snittmönstren är nära besläktade med den
hög- och senmedeltida dräktens snittmönster, sådan det är känt
framför allt genom fynden från Herjolfsnes.
Inga Hägg: Die Textilfunde aus dem Hafen von Haithabu, p 212
(Translated via Google Translate):
Hedeby costume, both male and female, are products of advanced
tilskärarkonst, who long ago left the “primary clothing form the” stage.
Cut patterns are closely related to the high and late medieval suit cut
patterns, such is known primarily by findings from Herjolfsnes.
If I take the Herjolfsnes finds into consideration, I have a great deal
more information. At this site many nearly intact garments were uncovered,
and were written about extensively in English. Most of these garments
consisted of several different variations on the tunic-style gown. While similar
to earlier rectangularly constructed garments, with gores to increase the width
of the skirt, most of these garments demonstrated some knowledge of sleeve
shaping and curves seams [8].
Carolyn Priest-Dorman describes some of the finds from Birka. She
states that here the serk panels were generally cut on one piece (no shoulder

4
shaping), a small round or keyhole neckline, and triangular gores were added
for additional width in the skirt area.
A very large percentage of the finds show that these garments are
commonly made from a fine linen tabby (plain weave). They are generally
undyed, but that is not always the case.
Cap
The cap is based on a 10th century example found in Jorvik (or York).
The original is a simple hood-shaped cap, made from a rectangle of silk [7].
My cap is made in the same style out of the remaining handwoven
linen fabric.
Weaving the Fabric
I chose to weave the linen from a #10 Belgian tow linen yarn. Linen in
this period would have been much finer, but the expense of these yarns put
them out of my reach. After sampling with this yarn, I decided on a tabby
weave set at 25 epi (warp threads per inch). My original plan was to do 2/2
twill woven linen, however I found after sampling both that I preferred the
appearance of the tabby weave.

5
Linen is notoriously difficult to work with. The lack of elasticity, and it’s
sensitivity to fraying, makes it temperamental. To help combat this, I coated
the threads in sizing before warping to increase their strength.
I hadn’t been able to find any hard evidence of what sizing would have
been used in this period, so I opted to go with linseed. My assumption is that
if they had access to the flax fibre, they would probably also have had access
to the flax seeds. I mixed a formula of eight parts water to one part seeds in a
pot and heated it until the mixture had a consistency of a very runny hair gel
(about 30 minutes). After straining out the seeds I dipped my warp chains in
the mixture. I wrung them out as best I could and hung them up to dry. This
was very messy.
After sizing, the threads were warped and woven as usual. The result
was a heavy fabric that drapes nicely. Final measurements: 9 yards long at
25 inches wide.
Sewing the Garments
My pattern falls somewhere in the middle of the two given two
interpretations. The body is cut in one piece with no shoulder seams,
however I have tapered the sides in to the shoulders to reduce the ‘drooping’
shoulder seam.

6
This garment is sewn from the same linen thread that I used to weave
it with a run and fell stitch. It is coated in beeswax for strength.

7
Wool: Smokkr (Aprondress)
Most of the dress fragments that exist are just the small fabric loops
used to fasten the dress to the brooches, and any other small part of the
garment that were close enough to a metal object to be preserved. This really
doesn’t give us a lot to work from.
The excavations at Haithabu give us a couple of larger pieces. These
fragments suggest a tailored garment that flares at the waist, with darts sewn
along the back. Shelagh Lewins provides a nice article on these, including a
translation of part of Inga Hägg’s Berichte über die Ausgrabungen in
Haithabu: Berichte 20, Die Textilfunde aus dem Hafen von Haithabu.
Part of the translation/summary [3]:
The Haithabu fragments, being larger than previous finds and tailored,
allow us to make some further guesses about the pattern which was
used to make this garment. The garment would have been made from
several pieces of cloth, and brought in at the waist by the narrow cut,
the dart and a belt. This shows that the Viking woman’s dress had
advanced beyond more primitive styles of draped cloth, and that the
tailoring techniques were by advanced by this time. The close-fitting
panels suggest that the garment may have looked like those from the
high Middle Ages, such as the clothing of the Danish Queen Margareta
(died 1412). However, her dress had integral shoulder-pieces (see
Branting 1911).
Hilde Thunem’s article on aprondresses has photos of a reproduction
at the Historical museum in Oslo that matches this description.
We know from excavations in Birka that the fabric straps were
commonly made from linen, but could be made from wool instead [6]

8
Weaving the Fabric
Lozenge and broken lozenge twills are very popular in the Norse
period. There is also evidence for a striped smokkr at Birka. I was unable to
find evidence for differing warp and weft colours in a lozenge twill for this
period, but there was a checked serk discovered at Hedeby [5]. Yellows and
reds were common dyestuff colours. There has been no evidence of an
‘orange’ dyed garment, but the colour would not have been impossible using
natural dyes.
The fabric is woven from fingering weight wool set at 25 epi. The wool
frayed terribly along the selvedges. Sizing may help, but I believe this to be
caused mostly by the quality of the wool I used. The wool developed a nice
loft after finishing, but it is heavier than I would have liked (blanket weight
rather than garment weight). This would be a fantastic wool for a very heavy
coat. Final measurements: 6.17 yards at 23″ wide.

9
Sewing the Garments
The Uppsala gown of the Danish Queen Margareta was a shaped
garment from four pieces of cloth [1]. In order to reduce the amount of fabric
waste, I modified this pattern to use gores. I also custom-wove the stripes so
that I could cut the gores without red stripes at the hips (see Appendix C).
This bias ‘waste’ strip then became the straps of the dress.
After fitting I decided the back darts would not be necessary, as I was
satisfied with the fit.

10
What I Learned
Weaving Linen
Sizing linen really helps. Afterwards, I didn’t have the fraying issues I
expected. In fact, my only broken warp threads were caused by ‘act of cat’.
Linen is inelastic. Once stretched it will not go back to its original
shape. This made keeping tension difficult, especially due to my unusual, but
not unexpected, stretching issues. I found that leaving the lease sticks in
helped even out the tension. If I do another long linen yardage, I will order a
second set of lease sticks and use all four instead of just the two I have. I
also ended up dangling weights on individual threads that stretched.
Weaving Wool
When dealing with a weak wool, use a wider spaced dent. After
switching from a 15 dent to a 10 dent reed, my fraying challenges were
reduced.
Sewing the Garments
I wanted to do a double fold at the hem to prevent the dress from
fraying, but this makes for a thick hem that I am not entirely satisfied with. I

11
redid the hem using a single fold and used a buttonhole stitch to help prevent
fraying. Time will tell how well this holds up.

12
References
[1] Carlson, Marc. "Uppsala Gown." Some Clothing of the Middle Ages. N.p.,
n.d. Web. 30 Oct. 2012. <www.personal.utulsa.edu/~marc-
carlson/cloth/uppsala.html>.
[2] Ewing, Thor. Viking clothing. Stroud: Tempus, 2006. Print.
[3] Lewins, Shelagh. "A Viking Pinafore." Shelagh's Website. N.p., n.d. Web.
30 Oct. 2012.
<http://www.shelaghlewins.com/reenactment/hedeby_apron/hedeby_a
pron.htm>.
[4] Priest-Dorman, Carolyn. "Viking Tunic Construction." Viking Resources for
the Re-enactor. N.p., n.d. Web. 30 Oct. 2012.
<http://www.cs.vassar.edu/~capriest/viktunic.html>.
[5] Thunem, Hilde. "Viking women: Clothing: Underdress (serk)." Hildes side.
N.p., n.d. Web. 30 Oct. 2012. <http://urd.priv.no/viking/serk.html>.
[6] Thunem, Hilde. "Viking women: Clothing: Aprondress (smokkr)." Hildes
side. N.p., n.d. Web. 30 Oct. 2012.
<http://urd.priv.no/viking/smokkr.html>.
[7] "YAT Photographic Archive." YAT portal. N.p., n.d. Web. 30 Oct. 2012.
<http://www.yorkarchaeology.co.uk/piclib/photos.php>.
[8] Østergard, Else. Woven into the earth: textiles from Norse Greenland.
Aarhus: Aarhus University Press, 2004. Print.

13
Appendix A: The Challenge
I propose a ‘Viking from String’ project. A Norse outfit hand sewn from
handwoven fabrics appropriate for the period, sans shoes.
Unfortunately, we don’t have a lot of extant clothing from any one time and
place to work from. In order to have a starting point, I am mostly focusing on
Inga Hägg’s interpretations based on finds at Birka/Haithabu (aka SCA
standard Norse). More specifically, I have chosen to base this recreation on
the garments of a wealthy woman in approximately 10th century Northern
Europe.
• Under dress (serk): A serk made of handwoven white linen in a 2/2
twill. While pleated serks were a possibility, I have chosen the more
fitted t-tunic style to reduce the amount of fabric required. The cost of
the yarn to weave the linen fabric will be the greatest expense of this
project. A plain tabby weave is also more common, but I don’t want to
weave something that could easily be purchased for a much lower
price.
• Aprondress (smokkr): A fitted closed smokkr made of handwoven
yellow/orange wool in a cross twill (kreuzköper) with decorative red
stripes. While I am veering a little into fantasy with this design, I do not
believe it is implausible. Both red and yellow (and therefore possibly
orange) were known to be used as Norse-era dyestuffs, and there is
evidence for both a striped smokkr and a broken lozenge twill textile
from Birka. This same striped smokkr shows evidence of a tablet-
woven band, which I would like to do if there is time.
• Accessories: A coif of the same white linen as the underdress, perhaps
with braided trim. All other accessories (such as brooches and beads)
will be purchased. The part of this project that really appeals to me is
the creation of garb from my own handwoven fabric as a way to
demonstrate different weaves appropriate to the time period Also, this
is an opportunity to make garb from an era/culture I have not tried
before.

14
I will be attempting to use the appropriate methods where possible. The
materials used will be linen and wool, which matched the materials used in
this period. The wool, however, is commercially dyed. I intend to hand sew
the garments, but will be using modern metal sewing needles. I will be
weaving on my horizontal countermarche loom, rather than a vertical warp-
weighted or medieval-style horizontal loom (depending on the source, it is
estimated that the horizontal loom came into use in Northern Europe from as
early as the 9th, to as late as the 12th century).
The major risk factor is time. I have never woven fabric in garment-
sufficient yardages before, nor sewn clothing with handwoven fabric. I have
never woven with linen or wool.
I am, however, a reasonably experienced weaver and costumer. Based
on my abilities I think this is a reasonable project to expect to complete in a
year, while still remaining challenging.

15
Appendix B: Project Statistics
Just for fun, here is some data about this project.
Hours Spent
Aprondress
• Warping the wool: 17 hours
• Winding wool bobbins: 10 hours
• Weaving wool: 39.5 hours
• Finishing the wool: 1.5 hours
• Sewing the aprondress: 24 hours
Total: 92 hours
Underdress
• Warping the linen: 18 hours
• Winding linen bobbins: 4 hours (I got a new bobbin winder – it’s much
faster)
• Weaving linen: 22 hours
• Finishing the linen: 6.5 hours
• Sewing the underdress: 31 hours
Total: 81.5 hours
Cap
• Sewing the cap: 4 hours
Total: 4 hours
Project Total: 177.5 hours.
Project Price
• 6 cones of linen yarn at $16.75 a cone: $100.50 CDN. That boils down
to $11.17 a yard (after finishing). I had enough yarn left over to use as
sewing thread.

16
• At $3.39 a ball for yellow/red, and $3.59 a ball for the orange, my total
cost for the wool was $111.48 US. That boils down to $18.07 a yard
(after finishing). I had enough yarn left over to use as sewing thread.
Total Price: $211.98

17
Appendix C: The Aprondress Pattern

18
Appendix D: Warping The Loom
1) Winding the warp The goal here is to produce many lengths of yarn that are all exactly
the same length. Using a warping board, I wind the threads back and forth.
Near the top, I create a cross – this keeps all the threads in order.
I do this in batches, so the warp doesn’t slip off the pegs. When removing
the warp from the frame, I first add ties to preserve the cross and then wind
the length into a basic crochet chain to keep things from tangling.

19
2) Prereeding Rather than using a raddle, the process uses the reed to ensure that
the warp is spaced correctly before winding it on the beam.
3) Beaming the warp The warp is attached to the back beam while still threaded through the
reed and lease sticks. This is made easy by the fact that the ends here are all
loops – I just thread the stick through the loops and attach it to the warp
beam. The warp then goes over the back beam, through the lease sticks,
through the reed, and over the breast beam, around the foot beam, and up
over the warping trapeze. This step requires an additional person, or
a warping trapeze, to provide tension on the warp while it is being wound. I
have the parts for a trapeze, but it’s not built yet.

20
I then wind the warp onto the back warp beam (inserting beaming
sticks as I go), leaving enough at the front to thread through the heddles.
4) Threading the heddles This is fairly self-explanatory. The pattern I intend to weave determines
the number of shafts and the pattern the heddles on those shafts should be
threaded. The shafts are held steady in temporary holders.

21
5) Sleying the reed and tying up The reed is threaded (or sleyed) in order to achieve a particular
number of threads per inch. The sett of this yarn is 15 ends per inch. It’s
usually a good idea to try to have as few threads per dent as your reed
collection will allow. I happen to have a 15 dent reed, so that’s one I’ll use.
The lease sticks are removed and the warp is then attached to the front cloth
beam with as even tension as possible.

22
6) Countermarche tie-up
The countermarche unit controls the raising and lowering of the shafts.
It is placed on top of the loom and the cords are attached to the shafts and
lamms.
7) Treadle tie up After this, the lamms are attached to the treadles. The short lamms
control ‘down’ and the long lamms control ‘up’. For each treadle, one lamm
per shaft is attached to the treadle (either a ‘down’ or an ‘up’). That means
that when a treadle is pressed, all of the shafts move.

23
8) Final adjustments All that remains is to ensure that the shed is nice and even. If I was
careful in the previous steps this shouldn’t need too much adjustment. A good
clean shed should have all strings aligned vertically. If any threads are out of
alignment the shuttle will catch
.
I do a sample of the pattern in a contrasting colour to make sure
everything is threaded correctly. I am now ready to weave.