User Guide - Bad Request - HP
228
OFFICEJET 4500 OFFICEJET ADVANTAGE 4500 User Guide K710
-
Upload
khangminh22 -
Category
Documents
-
view
1 -
download
0
Transcript of User Guide - Bad Request - HP

OFFICEJET 4500OFFICEJET ADVANTAGE 4500
User Guide
K710


HP Officejet 4500 (G510)/HP Officejet 4575 (K710)/HPOfficejet Advantage 4500(K710) All-in-One seriesUser Guide

Copyright information© 2011 Copyright Hewlett-PackardDevelopment Company, L.P.
Hewlett-Packard CompanynoticesThe information contained in thisdocument is subject to change withoutnotice.All rights reserved. Reproduction,adaptation, or translation of thismaterial is prohibited without priorwritten permission of Hewlett-Packard,except as allowed under copyright laws.The only warranties for HP productsand services are set forth in the expresswarranty statements accompanyingsuch products and services. Nothingherein should be construed asconstituting an additional warranty. HPshall not be liable for technical oreditorial errors or omissions containedherein.
AcknowledgementsWindows, Windows XP, and WindowsVista are U.S. registered trademarks ofMicrosoft Corporation.ENERGY STAR and the ENERGYSTAR mark are registered U.S. marks.
Safety information
Always follow basic safety precautionswhen using this product to reduce riskof injury from fire or electric shock.1. Read and understand all instructionsin the documentation that comes withthe device.2. Observe all warnings andinstructions marked on the product.3. Unplug this product from wall outletsbefore cleaning.4. Do not install or use this product nearwater, or when you are wet.5. Install the product securely on astable surface.6. Install the product in a protectedlocation where no one can step on ortrip over the line cord, and the line cordcannot be damaged.7. If the product does not operatenormally, see Solve a problem.8. There are no user-serviceable partsinside. Refer servicing to qualifiedservice personnel.
AccessibilityThe device provides a number offeatures that make it accessible forpeople with disabilities.VisualThe device software is accessible forusers with visual impairments or low
vision through the use of your operatingsystem's accessibility options andfeatures. It also supports most assistivetechnology such as screen readers,Braille readers, and voice-to-textapplications. For users who are colorblind, colored buttons and tabs used inthe software and on the device controlpanel have simple text or icon labelsthat convey the appropriate action.MobilityFor users with mobility impairments, thedevice software functions can beexecuted through keyboardcommands. The software also supportsWindows accessibility options such asStickyKeys, ToggleKeys, FilterKeys,and MouseKeys. The device doors,buttons, paper trays, and paper guidescan be operated by users with limitedstrength and reach.SupportFor more details about the accessibilityof this product and HP's commitment toproduct accessibility, visit HP's Website at www.hp.com/accessibility.For accessibility information for the MacOS X, visit the Apple Web site atwww.apple.com/accessibility.

Contents
1 Get startedAccessibility................................................................................................................................9Eco-Tips....................................................................................................................................10Understand the device parts.....................................................................................................10
Front view...........................................................................................................................10Printing supplies area.........................................................................................................11Back view............................................................................................................................11
Use the product control panel...................................................................................................12Overview of buttons and lights...........................................................................................12Change product settings.....................................................................................................13
Select the mode............................................................................................................13Change product settings...............................................................................................14
Types of messages.............................................................................................................14Status messages..........................................................................................................14Warning messages.......................................................................................................14Error messages............................................................................................................14Critical error messages.................................................................................................15
Finding the device model number............................................................................................15Select print media.....................................................................................................................15
Recommended papers for printing and copying.................................................................15Recommended papers for photo printing...........................................................................17Tips for selecting and using media.....................................................................................17
Load an original on the scanner glass......................................................................................18Load an original in the automatic document feeder (ADF).......................................................19Load media...............................................................................................................................19Maintain the device...................................................................................................................21
Clean the scanner glass.....................................................................................................21Clean the exterior ..............................................................................................................22Clean the automatic document feeder (ADF) (Some models only)....................................22
Turn off the device....................................................................................................................24
2 PrintPrint documents........................................................................................................................25
Print documents (Windows)................................................................................................25Print documents (Mac OS X)..............................................................................................26
Print brochures.........................................................................................................................26Print brochures (Windows).................................................................................................26Print brochures (Mac OS X)................................................................................................26
Print on envelopes....................................................................................................................27Print on envelopes (Windows)............................................................................................27Print on envelopes (Mac OS X)..........................................................................................27
Print a Web page......................................................................................................................28Print a Web page (Windows)..............................................................................................28Print a Web page (Mac OS X)............................................................................................28
1

Print photos..............................................................................................................................29Print photos on photo paper (Windows).............................................................................29Print photos on photo paper (Mac OS X)...........................................................................29
Print on special and custom-sized paper..................................................................................30Print on special or custom-sized paper (Windows)............................................................30Print on special or custom-sized paper (Mac OS X)...........................................................31
Print borderless documents......................................................................................................31Print borderless documents (Windows)..............................................................................32Print borderless documents (Mac OS X)............................................................................32
3 ScanScan an original........................................................................................................................34
Scan an original from the product control panel.................................................................34Edit a scanned document using optical character recognition (OCR) software.......................35
4 CopyCopy documents.......................................................................................................................36Change copy settings...............................................................................................................36
5 FaxSend a fax................................................................................................................................38
Send a basic fax.................................................................................................................38Send a fax manually from a phone.....................................................................................39Send a fax using monitor dialing........................................................................................40Send a fax from memory....................................................................................................41Schedule a fax to send later...............................................................................................41Send a fax to multiple recipients.........................................................................................42Send a fax in Error Correction Mode..................................................................................42
Receive a fax............................................................................................................................43Receive a fax manually......................................................................................................43Set up backup fax...............................................................................................................44Reprint received faxes from memory..................................................................................45Poll to receive a fax............................................................................................................45Forward faxes to another number......................................................................................46Set the paper size for received faxes.................................................................................46Set automatic reduction for incoming faxes........................................................................47Block junk fax numbers......................................................................................................47
Add numbers to the junk fax list...................................................................................48Remove numbers from the junk fax list........................................................................48Print a Junk Fax Report................................................................................................48
Receive faxes to your computer (Fax to PC and Fax to Mac)............................................49Fax to PC and Fax to Mac requirements......................................................................49Activate Fax to PC and Fax to Mac..............................................................................49Modify Fax to PC or Fax to Mac settings......................................................................50Turn off Fax to PC or Fax to Mac.................................................................................50
2

Change fax settings..................................................................................................................50Configure the fax header....................................................................................................51Set the answer mode (Auto answer)..................................................................................51Set the number of rings before answering..........................................................................51Change the answer ring pattern for distinctive ring............................................................52Set the fax error correction mode.......................................................................................52Set the dial type..................................................................................................................53Set the redial options..........................................................................................................53Set the fax speed................................................................................................................53Set the fax sound volume...................................................................................................54
Fax over Internet Protocol (FoIP).............................................................................................54Use reports...............................................................................................................................55
Print fax confirmation reports..............................................................................................55Print fax error reports..........................................................................................................56Print and view the fax log...................................................................................................56Clear the fax log.................................................................................................................57Print the details of the last fax transaction..........................................................................57Print a Caller ID History Report..........................................................................................58
6 Work with ink cartridgesInformation about ink cartridges...............................................................................................59Check the estimated ink levels.................................................................................................60Handle the ink cartridges..........................................................................................................61Replace the ink cartridges........................................................................................................61Store printing supplies..............................................................................................................65Advanced ink cartridge maintainance.......................................................................................65
Align the ink cartridges.......................................................................................................65Clean the ink cartridges......................................................................................................67
7 Solve a problemHP support................................................................................................................................69
Obtain electronic support....................................................................................................70HP support by phone..........................................................................................................70
Before you call..............................................................................................................70Phone support period...................................................................................................71Telephone support numbers.........................................................................................71After the phone support period.....................................................................................73
General troubleshooting tips and resources.............................................................................73Solve printing problems............................................................................................................74
The device shuts down unexpectedly.................................................................................74Error message appears on control-panel display...............................................................74Alignment fails....................................................................................................................74The device is not responding (nothing prints).....................................................................74Device takes a long time to print........................................................................................75Blank or partial page printed...............................................................................................75Something on the page is missing or incorrect...................................................................76Placement of the text or graphics is wrong.........................................................................76The device prints half a page, then ejects the paper..........................................................77
Contents
3

Poor print quality and unexpected printouts.............................................................................77Solution 1: Use genuine HP cartridges...............................................................................77Solution 2: Check the paper...............................................................................................77Solution 3: Wait a short period of time (if possible)............................................................78Solution 4: Check the print settings....................................................................................78
Step 1: Check the print quality settings........................................................................79Step 2: Check the Print in Grayscale setting................................................................79
Solution 5: Check estimated ink levels and replace low or empty ink cartridges...............80Solution 6: Print and evaluate a diagnostic report and troubleshoot defects......................80
Print Quality Diagnostic Report....................................................................................81Self-Test Report............................................................................................................85
Solution 7: Clean the ink cartridges....................................................................................87Solution 8: Align the ink cartridges.....................................................................................88Solution 9: Replace the problem ink cartridge....................................................................88Solution 10: Service the product.........................................................................................88
Clean the area around the ink nozzles.....................................................................................89Solve paper-feed problems......................................................................................................91Solve copy problems................................................................................................................92
No copy came out...............................................................................................................93Copies are blank.................................................................................................................93Documents are missing or faded........................................................................................93Size is reduced...................................................................................................................94Copy quality is poor ...........................................................................................................94Copy defects are apparent.................................................................................................94The device prints half a page, then ejects the paper..........................................................95Paper mismatch..................................................................................................................95
Solve scan problems................................................................................................................95Scanner did nothing............................................................................................................95Scan takes too long............................................................................................................96Part of the document did not scan or text is missing..........................................................96Text cannot be edited.........................................................................................................97Error messages appear......................................................................................................97Scanned image quality is poor ..........................................................................................97Scan defects are apparent.................................................................................................98
Solve fax problems...................................................................................................................99The fax test failed...............................................................................................................99
Solve wired (Ethernet) network problems (some models only)..............................................111General network troubleshooting......................................................................................111Network port created does not match device IP address (Windows)...............................112
4

Solve wireless problems (some models only)........................................................................112Basic wireless troubleshooting.........................................................................................112Advanced wireless troubleshooting..................................................................................113
Step 1: Make sure your computer is connected to your network................................113Step 2: Make sure that the HP device is connected to your network.........................114Step 3: Check to see if the firewall software is blocking communication....................115Step 4: Make sure the HP device is online and ready................................................116Step 5: Make sure the wireless version of the HP device is set as the default printerdriver (Windows only).................................................................................................116Step 6: Make sure the HP Network Devices Support service is running (Windowsonly)............................................................................................................................117Add hardware addresses to a wireless access point (WAP)......................................117
Configure your firewall to work with HP devices.....................................................................118Solve device management problems.....................................................................................119
Embedded Web server cannot be opened.......................................................................120The EWS is only available in English...............................................................................120
Troubleshoot installation issues.............................................................................................121Hardware installation suggestions....................................................................................121Software installation suggestions.....................................................................................122
Understand the Printer Status Report and Self-Test Report..................................................122Understand the network configuration page (some models only)..........................................124Clear jams...............................................................................................................................125
Clear paper jams..............................................................................................................126Avoid paper jams..............................................................................................................127
A Technical informationWarranty information..............................................................................................................128
Hewlett-Packard limited warranty statement....................................................................129Ink cartridge warranty information....................................................................................130
Device specifications..............................................................................................................131Physical specifications......................................................................................................131Product features and capacities.......................................................................................131Processor and memory specifications..............................................................................131System requirements........................................................................................................132Network protocol specifications (Some models only).......................................................132Embedded Web server specifications (some models only)..............................................133Media specifications.........................................................................................................133
Understand supported sizes.......................................................................................133Understand supported media types and weights.......................................................135Set minimum margins.................................................................................................136Guidelines for two-sided (duplex) printing............................................................137
Print resolution..................................................................................................................137Print specifications............................................................................................................137Copy specifications...........................................................................................................137Fax specifications.............................................................................................................138Scan specifications...........................................................................................................139Operating environment.....................................................................................................139Electrical requirements.....................................................................................................139Acoustic emission specification........................................................................................139
Contents
5

Regulatory information...........................................................................................................140FCC statement..................................................................................................................141Notice to users in Korea...................................................................................................141VCCI (Class B) compliance statement for users in Japan................................................141Notice to users in Japan about the power cord................................................................142Noise emission statement for Germany...........................................................................142LED indicator statement...................................................................................................142Notice to users of the U.S. telephone network: FCC requirements..................................143Notice to users of the Canadian telephone network.........................................................143Notice to users in the European Economic Area..............................................................145Notice to users of the German telephone network...........................................................145Australia wired fax statement...........................................................................................145Regulatory information for wireless products...................................................................145
Exposure to radio frequency radiation........................................................................146Notice to users in Brazil..............................................................................................146Notice to users in Canada..........................................................................................146Notice to users in Taiwan...........................................................................................146European Union regulatory notice..............................................................................147
Regulatory model number................................................................................................147Declaration of conformity..................................................................................................148
Environmental product stewardship program.........................................................................151Paper use.........................................................................................................................151Plastics.............................................................................................................................151Material safety data sheets...............................................................................................151Recycling program............................................................................................................151HP inkjet supplies recycling program...............................................................................151Disposal of waste equipment by users in private households in the EuropeanUnion................................................................................................................................152Power consumption..........................................................................................................152Chemical Substances.......................................................................................................153RoHS notices (China only)...............................................................................................153
Third-party licenses................................................................................................................154HP Officejet 4500 Desktop...............................................................................................155HP Officejet 4500 / HP Officejet 4575 / HP Officejet Advantage 4500.............................158HP Officejet 4500 Wireless...............................................................................................165
B HP supplies and accessoriesOrder printing supplies online.................................................................................................172Supplies..................................................................................................................................172
Supported ink cartridges...................................................................................................172HP media..........................................................................................................................173
6

C Additional fax setupSet up faxing (parallel phone systems)..................................................................................174
Choose the correct fax setup for your home or office.......................................................175Case A: Separate fax line (no voice calls received).........................................................177Case B: Set up the device with DSL.................................................................................178Case C: Set up the device with a PBX phone system or an ISDN line............................179Case D: Fax with a distinctive ring service on the same line............................................179Case E: Shared voice/fax line..........................................................................................180Case F: Shared voice/fax line with voice mail..................................................................181Case G: Fax line shared with computer modem (no voice calls received).......................182
Set up the device with a computer dial-up modem.....................................................183Set up the device with a computer DSL/ADSL modem..............................................184
Case H: Shared voice/fax line with computer modem......................................................185Shared voice/fax with computer dial-up modem.........................................................185Shared voice/fax with computer DSL/ADSL modem..................................................187
Case I: Shared voice/fax line with answering machine....................................................188Case J: Shared voice/fax line with computer modem and answering machine................189
Shared voice/fax line with computer dial-up modem and answering machine...........190Shared voice/fax line with computer DSL/ADSL modem and answeringmachine......................................................................................................................192
Case K: Shared voice/fax line with computer dial-up modem and voice mail..................193Serial-type fax setup...............................................................................................................195Test fax setup.........................................................................................................................196
D Network setup (some models only)Change basic network settings...............................................................................................197
View and print network settings........................................................................................197Turn the wireless radio on and off (some models only)....................................................197
Change advanced network settings.......................................................................................197Set link speed...................................................................................................................198To View IP settings...........................................................................................................198To Change IP settings......................................................................................................198
Set up the device for wireless communication (some models only).......................................199Understand 802.11 wireless network settings..................................................................199To set up wireless communication using the device control panel with wireless setupwizard...............................................................................................................................200To set up wireless communication using the installer (Windows)....................................201To set up wireless communication using the installer (Mac OS X)...................................201Connect the device using an ad hoc wireless network connection..................................201To turn off wireless communication..................................................................................202To print a wireless test page.............................................................................................202Reset wireless settings.....................................................................................................202Change the connection method........................................................................................202Guidelines for ensuring wireless network security............................................................203
To add hardware addresses to a WAP.......................................................................203Other guidelines.........................................................................................................203
Guidelines for reducing interference on a wireless network.............................................203Uninstall and reinstall the software.........................................................................................203
E Device management toolsToolbox (Windows).................................................................................................................206
Contents
7

Use the HP Solution Center (Windows).................................................................................206HP Utility (Mac OS X).............................................................................................................206Embedded Web server (some models only)..........................................................................207
F Errors (Windows)Fax Memory Full.....................................................................................................................209Device Disconnected..............................................................................................................209Ink Alert...................................................................................................................................209Cartridge Problem..................................................................................................................210
Solution 1: Install the ink cartridges correctly...................................................................210Solution 2: Turn the product off and on............................................................................212Solution 3: Clean the electrical contacts...........................................................................212Solution 4: Replace the ink cartridge................................................................................212
Paper Mismatch......................................................................................................................212The cartridge cradle cannot move..........................................................................................212Paper Jam..............................................................................................................................212Paper Jam..............................................................................................................................212The printer is out of paper......................................................................................................213Printer Offline..........................................................................................................................213Printer Paused........................................................................................................................213Document failed to print..........................................................................................................213General printer error...............................................................................................................213Align cartridge.........................................................................................................................214
Index............................................................................................................................................215
8

1 Get startedThis guide provides details about how to use the device and to resolve problems.
• Accessibility• Eco-Tips• Understand the device parts• Use the product control panel• Finding the device model number• Select print media• Load an original on the scanner glass• Load an original in the automatic document feeder (ADF)• Load media• Maintain the device• Turn off the device
NOTE: If you are using the device with a computer running Windows XP StarterEdition, Windows Vista Starter Edition, or Windows 7 Starter Edition, some featuresmight not be available. For more information, see Operating system compatibility.
AccessibilityThe device provides a number of features that make it accessible for people withdisabilities.
VisualThe device software is accessible for users with visual impairments or low vision throughthe use of your operating system's accessibility options and features. It also supportsmost assistive technology such as screen readers, Braille readers, and voice-to-textapplications. For users who are color blind, colored buttons and tabs used in the softwareand on the device control panel have simple text or icon labels that convey the appropriateaction.
MobilityFor users with mobility impairments, the device software functions can be executedthrough keyboard commands. The software also supports Windows accessibility optionssuch as StickyKeys, ToggleKeys, FilterKeys, and MouseKeys. The device doors, buttons,paper trays, and paper guides can be operated by users with limited strength and reach.
SupportFor more details about the accessibility of this product and HP's commitment to productaccessibility, visit HP's Web site at www.hp.com/accessibility.
For accessibility information for Mac OS X, visit the Apple Web site at www.apple.com/accessibility.
Get started 9

Eco-TipsHP is committed to helping customers reduce their environmental footprint. HP hasprovided the Eco-Tips below to help you focus on ways to assess and reduce the impactof your printing choices. In addition to specific features in this product, please visit the HPEco Solutions Web site for more information on HP's environmental initiatives.
www.hp.com/hpinfo/globalcitizenship/environment/
• Duplex printing: Use Paper-saving Printing to print two-sided documents withmultiple pages on same sheet to reduce paper usage. For more information, seeTwo-sided printing (duplexing).
• Smart Web printing (Windows): The HP Smart Web Printing interface includes aClip Book and Edit Clips window where you can store, organize, or print clips youhave gathered from the Web. For more information, see Print a Web page.
• Energy Savings Information: To determine the ENERGY STAR® qualificationstatus for this product, see Power consumption.
• Recycled Materials: For more information regarding recycling of HP products,please visit:www.hp.com/hpinfo/globalcitizenship/environment/recycle/
Understand the device partsThis section contains the following topics:
• Front view• Printing supplies area• Back view
Front view
HP Officejet 4500 / HP Officejet 4575 /HP Officejet 4500 Wireless / HP Officejet
Advantage 4500HP Officejet 4500 Desktop
Chapter 1
10 Get started

1 Control panel
2 Main tray
3 Cartridge access door
4 Scanner glass
5 Automatic document feeder
6 Scanner lid
Printing supplies area
HP Officejet 4500 / HP Officejet 4575 /HP Officejet 4500 Wireless / HP Officejet
Advantage 4500HP Officejet 4500 Desktop
1 Cartridge access door
2 Ink cartridges
Back view
HP Officejet 4500 / HP Officejet 4575 /HP Officejet 4500 Wireless / HP Officejet
Advantage 4500HP Officejet 4500 Desktop
Understand the device parts 11

1 Universal serial bus (USB) port
2 Ethernet port (HP Officejet 4500 / HP Officejet 4575 / HP Officejet Advantage 4500 only)
3 Power input
4 1-LINE (fax)
5 2-EXT (phone)
Use the product control panelThis section contains the following topics:
• Overview of buttons and lights• Change product settings• Types of messages
Overview of buttons and lights
The following diagram and related table provide a quick reference to the device controlpanel features.
Label Name and Description
1 Wireless button (HP Officejet 4500 Wireless): Turns the 802.11 wireless feature on or off. Thebutton is lit when the wireless feature is on.
2 Keypad: Enters values.
3 Attention light: Indicates an error condition.
4 Back button: Reverts back to its previous setting or upper level menu.
5 Left arrow button: Navigates forward through settings in the menus.
6 OK button: Selects the current menu or setting.
7 Right arrow button: Navigates in reverse through settings in the menus.
8 Setup: Presents the Setup menu for generating reports and other maintenance settings, andfor accessing the Help menu. The topic that you select from the Help menu opens a help windowon your computer screen.
Chapter 1
12 Get started

Label Name and Description
9 Start: Initiates a copy, fax, or scan job. Pressing Start processes the job according to the functionselected.
10 Cancel: Stops a job, exits a menu, or exits settings.
11 Scan function indicator
12 Copy Color function indicator
13 Copy B&W function indicator
14 Fax Color function indicator
15 Fax B&W function indicator
16 Power: Turns the device on or off. The Power button is lit when the device is on. The light blinkswhile performing a job.When the device is turned off, a minimal amount of power is still supplied. To completelydisconnect the power supply, turn the device off, and then unplug the power cord.
Change product settingsYou use the control panel to change the product’s mode and settings, print reports, orget help for the product.
TIP: If the product is connected to a computer, you can also change the productsettings using software tools available on your computer, such as the Toolbox(Windows), the HP Utility (Mac OS X), or the embedded Web server (EWS). For moreinformation about these tools, see Device management tools.
This section contains the following topics:
• Select the mode• Change product settings
Select the mode
The mode indicator arrow on the control panel shows the mode currently selected for theproduct.
NOTE: After selecting a mode and changing settings, press (Start button) tostart the job.
(continued)
Use the product control panel 13

To select a different modePress left arrow or right arrow to select the desired mode, and then press OK.
To change settings for a mode1. After selecting a mode, press the arrow buttons to scroll through the available settings
available, and then press OK to select the setting you want to change.2. Press the arrow buttons to change the settings, and then press OK.
NOTE: Use the left arrow button or button when you want to delete an incorrectentry on the display.
Change product settingsTo change the product settings or print reports, use the options available in the Setupmenu:
1. Press the (Setup) button2. Press the arrow buttons to scroll through the menus.3. Press OK to select menus or options.
NOTE: Use the left arrow button or button when you want to delete an incorrectentry on the display.
Types of messagesWhile using the product, messages will appear on the control panel display. Thesemessages provide information about the product's activity. While some types ofmessages just provide information about the product's status, other types of messagesmight require that you take the appropriate action (often specified in the message itself)before the product can continue functioning.
Status messagesStatus messages reflect the current state of the device. They inform you of normaloperation and require no action to clear them. They change as the state of the devicechanges. Whenever the device is ready, not busy, and has no pending warningmessages, the status message READY appears if the device is turned on.
Warning messagesWarning messages inform you of events that require your attention, but they do notprevent the device from operating. An example of a warning message is a low ink warning.These messages appear until you resolve the condition.
Error messagesError messages communicate that some action must be performed, such as addingmedia or clearing a media jam. These messages are usually accompanied by a blinkingred Attention light. Take the appropriate action to continue printing.
Chapter 1
14 Get started

If the error message shows an error code, press the Power button to turn off the device,and then turn it on again. In most situations, this action solves the problem. If the messagepersists, your device might need service. For more information, see Solve a problem.
Critical error messagesCritical error messages inform you of a device failure. Some of these messages can becleared by pressing the Power button to turn off the device, and then turning it on again.If a critical error persists, service is required. For more information, see Solve aproblem.
Finding the device model numberIn addition to the model name that appears on the front of the device, this device has aspecific model number. You can use this number to help determine which supplies oraccessories are available for your product, as well as when obtaining support.
The model number is printed on a label located inside the device, near the ink cartridgesarea.
Select print mediaThe device is designed to work well with most types of office media. It is best to test avariety of print media types before buying large quantities. Use HP media for optimumprint quality. Visit the HP Web site at www.hp.com for more information about HP media.
HP recommends plain papers with the ColorLok logo for printingand copying of everyday documents. All papers with the ColorLoklogo are independently tested to meet high standards of reliabilityand print quality, and produce documents with crisp, vivid color,bolder blacks & dry faster than ordinary plain papers. Look forpapers with the ColorLok logo in a variety of weights and sizesfrom major paper manufacturers.
This section contains the following topics:• Recommended papers for printing and copying• Recommended papers for photo printing• Tips for selecting and using media
Recommended papers for printing and copyingIf you want the best print quality, HP recommends using HP papers that are specificallydesigned for the type of project you are printing.
Select print media 15

Depending on your country/region, some of these papers might not be available.
HP Brochure PaperHP Superior InkjetPaper
These papers are glossy-coated or matte-coated on both sides for two-sided use. They are the perfect choice for near-photographicreproductions and business graphics for report covers, specialpresentations, brochures, mailers, and calendars.
HP Bright White InkjetPaper
HP Bright White Inkjet Paper delivers high-contrast colors and sharptext. It is opaque enough for two-sided color usage with no show-through, which makes it ideal for newsletters, reports, and flyers. Itfeatures ColorLok Technology for less smearing, bolder blacks andvivid colors.
HP Printing Paper HP Printing Paper is a high-quality multifunction paper. It producesdocuments that look and feel more substantial than documents printedon standard multipurpose or copy paper. It features ColorLokTechnology for less smearing, bolder blacks and vivid colors. It is acid-free for longer lasting documents.
HP Office Paper HP Office Paper is a high-quality multifunction paper. It is suitable forcopies, drafts, memos and other everyday documents. It featuresColorLok Technology for less smearing, bolder blacks and vivid colors.It is acid-free for longer lasting documents
HP Office RecycledPaper
HP Office Recycled Paper is a high-quality multifunction paper madewith 30% recycled fiber. It features ColorLok Technology for lesssmearing, bolder blacks and vivid colors. It is acid-free for longer lastingdocuments.
HP PremiumPresentation PaperHP Professional Paper
These papers are heavy two-sided matte papers perfect forpresentation, proposals, reports and newsletters. They areheavyweight for an impressive look and feel.
HP Premium InkjetTransparency Film
HP Premium Inkjet Transparency Film makes your color presentationsvivid and even more impressive. This film is easy to use and handle anddries quickly without smudging.
HP Advanced PhotoPaper
This thick photo paper features an instant-dry finish for easy handlingwithout smudging. It resists water, smears, fingerprints, and humidity.Your prints have a look and feel comparable to a store processed photo.It is available in several sizes, including A4, 8.5 x 11 inch, 10 x 15 cm(4 x 6 inch), 13x18 cm (5 x7 inch) and two finishes – glossy or soft gloss(satin matte). It is acid-free for longer lasting documents.
HP Everyday PhotoPaper
Print colorful, everyday snapshots at a low cost, using paper designedfor casual photo printing. This affordable, photo paper dries quickly foreasy handling. Get sharp, crisp images when you use this paper withany inkjet printer. Available in semi-gloss finish in 8.5 x11 inch, A4, 4 x6 inch and 10 x 15 cm. It is acid-free for longer lasting documents.
HP Iron-On Transfers HP Iron-on Transfers (for color fabrics or for light or white fabrics) arethe ideal solution for creating custom T-shirts from your digital photos.
To order HP papers and other supplies, go to www.hp.com/buy/supplies. If prompted,choose your country/region, follow the prompts to select your product, and then click oneof the shopping links on the page.
NOTE: At this time, some portions of the HP Web site are available in English only.
HP Photo Value Packs:
Chapter 1
16 Get started

HP Photo Value Packs conveniently package Original HP ink cartridges and HPAdvanced Photo Paper to save you time and take the guesswork out of printing affordableprofessional photos with your HP printer. Original HP inks and HP Advanced Photo Paperhave been designed to work together so your photos are long lasting and vivid, print afterprint. Great for printing out an entire vacation’s worth of photos or multiple prints to share.
Recommended papers for photo printingIf you want the best print quality, HP recommends using HP papers that are specificallydesigned for the type of project you are printing.
Depending on your country/region, some of these papers might not be available.
HP Advanced Photo PaperThis thick photo paper features an instant-dry finish for easy handling without smudging.It resists water, smears, fingerprints, and humidity. Your prints have a look and feelcomparable to a store processed photo. It is available in several sizes, including A4, 8.5x 11 inch, 10 x 15 cm (4 x 6 inch), 13 x 18 cm (5 x 7 inch) and two finishes – glossy orsoft gloss (satin matte). It is acid-free for longer lasting documents.
HP Everyday Photo PaperPrint colorful, everyday snapshots at a low cost, using paper designed for casual photoprinting. This affordable, photo paper dries quickly for easy handling. Get sharp, crispimages when you use this paper with any inkjet printer. Available in semi-gloss finish in8.5 x 11 inch, A4, 4 x 6 inch and 10 x 15 cm. It is acid-free for longer lasting documents.
HP Photo Value Packs:HP Photo Value Packs conveniently package Original HP ink cartridges and HPAdvanced Photo Paper to save you time and take the guesswork out of printing affordableprofessional photos with your HP printer. Original HP inks and HP Advanced Photo Paperhave been designed to work together so your photos are long lasting and vivid, print afterprint. Great for printing out an entire vacation’s worth of photos or multiple prints to share.
To order HP papers and other supplies, go to www.hp.com/buy/supplies. If prompted,choose your country/region, follow the prompts to select your product, and then click oneof the shopping links on the page.
NOTE: At this time, some portions of the HP Web site are available in English only.
Tips for selecting and using mediaFor the best results, observe the following guidelines.
• Always use media that conforms to the device specifications. For more information,see Media specifications.
• Load only one type of media at a time into a tray or automatic document feeder (ADF)(some models only).
• When loading the trays and ADF (some models only), make sure the media is properlyloaded. For more information, see Load media or Load an original in the automaticdocument feeder (ADF).
Select print media 17

• Do not overload the tray or ADF (some models only). For more information, see Mediaspecifications.
• To prevent jams, poor print quality, and other printing problems, avoid loading thefollowing media in the trays or ADF (some models only):◦ Multipart forms◦ Media that is damaged, curled, or wrinkled◦ Media with cutouts or perforations◦ Media that is heavily textured, embossed, or does not accept ink well◦ Media that is too lightweight or stretches easily◦ Media that contains staples or clips
NOTE: To scan, copy, or fax documents that contain pages that do not conformto these guidelines, use the scanner glass. For more information, see Load anoriginal on the scanner glass.
Load an original on the scanner glassYou can copy, scan, or fax up to letter- or A4-size originals by loading them on the glass.
NOTE: Many of the special features will not work correctly if the glass and lid backingare not clean. For more information, see Maintain the device.
To load an original on the scanner glass1. Lift the scanner lid.2. Load your original print side down.
TIP: For more help on loading an original, refer to the engraved guides along theedge of the glass.
Chapter 1
18 Get started

3. Close the lid.
Load an original in the automatic document feeder (ADF)NOTE: The ADF is available for some models only.
You can copy, scan, or fax a one-sided, single- or multiple-page, A4- or letter-sizedocument by placing it in the document feeder tray.
CAUTION: Do not load photos in the ADF; this might cause damage to your photos.
NOTE: Two-sided legal-size documents cannot be scanned, copied, or faxed usingthe ADF.
NOTE: Some features, such as the Fit to Page copy feature, do not work when youload your originals in the ADF. You must load your originals on the glass.
The document feeder tray holds a maximum of 50 sheets of plain paper.
To load an original in the document feeder tray1. Load your original, with the print side up, into the document feeder tray. Place the
pages so that the top edge of the document goes in first. Slide the media into theautomatic document feeder until you hear a beep or see a message on the displayindicating that the loaded pages were detected.
TIP: For more help on loading originals in the automatic document feeder, referto the diagram engraved in the document feeder tray.
2. Slide the width guides inward until they stop at the left and right edges of the media.
NOTE: Remove all originals from the document feeder tray before lifting the lid onthe device.
Load mediaThis section provides instructions for loading media into the device.
Load media 19

To load media1. Pull out the tray extender.
2. Insert the media print-side down along the right of the main tray. Make sure the stackof media aligns with the right and back edges of the tray, and does not exceed theline marking in the tray.
NOTE: Do not load paper while the device is printing.
• Envelopes: Load envelopes with the flaps facing up to the right or the back ofthe tray. Depending on the type of envelope you are loading, the flap hinge shouldbe on the left or towards the back of the tray.
• Photo paper: If the photo paper has a tab along one edge, make sure the tab ispointing towards the back of the product.
• Transparencies: Insert transparencies with the rough side down and theadhesive strip pointing towards the back of the product.
• Custom-sized media: Use only custom-sized media that is supported by thedevice. For more information, see Media specifications.
3. Slide the media guides in the tray to adjust them for the media size that you haveloaded.
Chapter 1
20 Get started

Maintain the deviceThis section provides instructions for keeping the device in top working condition. Performthese maintenance procedures as necessary.
• Clean the scanner glass• Clean the exterior• Clean the automatic document feeder (ADF) (Some models only)
Clean the scanner glass
NOTE: Dust or dirt on the scanner glass, scanner lid backing, or scanner frame canslow down performance, degrade the quality of scans, and affect the accuracy ofspecial features such as fitting copies to a certain page size.
To clean the scanner glass1. Turn off the device.2. Lift the scanner lid.3. Clean the glass by using a soft, lint-free cloth that has been sprayed with a mild glass
cleaner. Dry the glass with a dry, soft, lint-free cloth.
CAUTION: Use only glass cleaner to clean the scanner glass. Avoid cleanersthat contain abrasives, acetone, benzene, and carbon tetrachloride, all of whichcan damage the scanner glass. Avoid isopropyl alcohol because it can leavestreaks on the glass.
CAUTION: Do not spray the glass cleaner directly on the glass. If too much glasscleaner is applied, the cleaner could leak under the glass and damage thescanner.
4. Close the scanner lid, and turn on the device.
Maintain the device 21

Clean the exterior
WARNING! Before cleaning the device, turn off the power and unplug the powercord from the electrical socket.
Use a soft, damp, lint-free cloth to wipe dust, smudges, and stains off of the case. Theexterior of the device does not require cleaning. Keep fluids away from the interior of thedevice, as well as from the device control panel.
Clean the automatic document feeder (ADF) (Some models only)
NOTE: The ADF is available for some models only.
If the automatic document feeder picks up multiple pages or if it does not pick up plainpaper, you can clean the rollers and separator pad. Lift the automatic document feedercover to access the pick assembly inside the automatic document feeder, clean the rollersor separator pad, and then close the cover.
If you have lines or dust appearing on scanned documents or faxes, clean the plastic stripin the ADF.
To clean the rollers or separator pad1. Remove all originals from the document feeder tray.2. Lift the automatic document feeder cover (1).
This provides easy access to the rollers (2) and separator pad (3), as shown below.
1 Automatic document feeder cover
2 Rollers
3 Separator pad
3. Lightly dampen a clean lint-free cloth with distilled water, then squeeze any excessliquid from the cloth.
Chapter 1
22 Get started

4. Use the damp cloth to wipe any residue off the rollers or separator pad.
NOTE: If the residue does not come off using distilled water, try using isopropyl(rubbing) alcohol.
5. Close the cover of the automatic document feeder.
To clean the plastic strip inside the automatic document feeder1. Turn off the device and unplug the power cord.
NOTE: Depending how long the device is unplugged, the date and time mightbe erased. You might need to reset the date and time later, when you plug thepower cord back in.
2. Lift the cover of the automatic document feeder until it stops, and then gently pry thecover to release the catch.
3. Continue lifting the automatic document feeder cover to the vertical position.
Maintain the device 23

4. Lift the automatic document feeder mechanism.
5. Clean the plastic strip with a soft cloth or sponge slightly moistened with a nonabrasiveglass cleaner.
CAUTION: Do not use abrasives, acetone, benzene, or carbon tetrachloride onthe plastic strip, since they can damage it. Do not place or spray liquid directly onthe plastic strip. The liquid might seep under the glass and damage the device.
6. Gently lower the automatic document feeder mechanism to avoid dislodging theplastic strip, and then close the cover of the automatic document feeder.
7. Plug in the power cord, and then turn on the device.
NOTE: If you still see dust or lines on scans after cleaning the plastic strip, youmay need to order a new plastic strip. For more information, see Solve aproblem.
Turn off the deviceTurn off the product by pressing the (power) button located on the product. Wait untilthe power light turns off before unplugging the power cord or turning off a power strip. Ifyou improperly turn off the product, the print carriage might not return to the correctposition causing problems with the ink cartridges and print quality issues.
Chapter 1
24 Get started

2 PrintMost print settings are automatically handled by the software application. You need tochange the settings manually only when you want to change print quality, print on specifictypes of paper, or use special features. For more information about selecting the bestprint media for your documents, see Select print media.
This section contains the following topics:
• Print documents• Print brochures• Print on envelopes• Print a Web page• Print photos• Print on special and custom-sized paper• Print borderless documents
Print documentsNOTE: With certain types of paper, you can print on both sides of a sheet of paper(called “two-sided printing” or “duplex printing”). For more information, see Two-sidedprinting (duplexing).
Follow the instructions for your operating system.
• Print documents (Windows)• Print documents (Mac OS X)
Print documents (Windows)1. Load paper in the tray. For more information, see Load media.2. On the File menu in your software application, click Print.3. Select the product you want to print to.4. If you need to change settings, click the button that opens the Properties dialog box.
Depending on your software application, this button might be called Properties,Options, Printer Setup, Printer, or Preferences.
5. Click a type of print task in the Printing Shortcuts list. The preset default settings forthe shortcuts are displayed.
6. If you change any settings on the Printing Shortcuts tab, you can save your customsettings as a new printing shortcut:a. Select the shortcut, and then click Save As.b. To delete a shortcut, select the shortcut, and then click Delete.
TIP: You can change more options for the print job by using the featuresavailable on the other tabs in the dialog box.
7. Click OK.8. Click Print or OK to begin printing.
Print 25

Print documents (Mac OS X)1. Load paper in the tray. For more information, see Load media.2. From the File menu in your software application, choose Print.3. Make sure the product you want to use is selected.4. Change the print settings for the option provided in the pop-up menus, as appropriate
for your project.
NOTE: Click the blue disclosure triangle next to the Printer selection to accessthese options.
5. Click Print to begin printing.
Print brochuresFollow the instructions for your operating system.
NOTE: To set print settings for all print jobs, make the changes in the printer driver.
For more information about the features of the Windows printer driver, see the onlinehelp for the driver. For more information about printing from a specific application, seethe documentation that came with the application.
• Print brochures (Windows)• Print brochures (Mac OS X)
Print brochures (Windows)1. Load paper in the tray. For more information, see Load media.2. On the File menu in your software application, click Print.3. Select the product you want to print to.4. If you need to change settings, click the button that opens the Properties dialog box.
Depending on your software application, this button might be called Properties,Options, Printer Setup, Printer, or Preferences.
5. Select Brochure Printing – Borderless in the Printing Shortcuts list. The defaultsettings are displayed.
6. Change any other print settings.
TIP: You can change more options for the print job by using the featuresavailable on the other tabs in the dialog box.
7. Click Print to begin printing.
Print brochures (Mac OS X)1. Load paper in the tray. For more information, see Load media.2. From the File menu in your software application, choose Print.3. Make sure the product you want to use is selected.
Chapter 2
26 Print

4. Choose Paper Type/Quality from the pop-up menu, and then choose the followingsettings:• Paper Type: the appropriate brochure paper type• Quality: Normal or Best
NOTE: Click the blue disclosure triangle next to the Printer selection to accessthese options.
5. Select any other print settings that you want, and then click Print to begin printing.
Print on envelopesWhen choosing envelopes, avoid envelopes that have a very slick finish, self-stickadhesives, clasps, or windows. Also, avoid envelopes with thick, irregular, or curlededges, or areas that are wrinkled, torn, or otherwise damaged.
Make sure the envelopes you load in the product are tightly constructed and that the foldsare sharply creased.
NOTE: For more information about printing on envelopes, see the documentationavailable with the software program you are using.
Follow the instructions for your operating system.
• Print on envelopes (Windows)• Print on envelopes (Mac OS X)
Print on envelopes (Windows)1. Load paper in the tray. For more information, see Load media.2. On the File menu in your software application, click Print.3. Select the product you want to print to.4. If you need to change settings, click the button that opens the Properties dialog box.
Depending on your software application, this button might be called Properties,Options, Printer Setup, Printer, or Preferences.
5. On the Features tab, change the orientation to Landscape.6. In the Basic Options area, from the Size drop-down list, select More. Then, select
the appropriate envelope type.
TIP: You can change more options for the print job by using the featuresavailable on the other tabs in the dialog box.
7. Click OK, and then click Print or OK to begin printing.
Print on envelopes (Mac OS X)1. Load paper in the tray. For more information, see Load media.2. From the File menu in your software application, choose Print.3. Make sure the product you want to use is selected.4. Choose the appropriate envelope size in the Paper Size pop-up menu.
Print on envelopes 27

5. Select the landscape or horizontal Orientation option.
NOTE: Click the blue disclosure triangle next to the Printer selection to accessthese options.
6. Select any other print settings that you want, and then click Print to begin printing.
Print a Web pageTIP: To print Web pages correctly, you might need to set your print orientation toLandscape.
If you are using a computer running Windows and Internet Explorer 6.0 or higher for Webbrowsing, you can use HP Smart Web Printing to ensure simple, predictable web printingwith control over what you want and how you want it printed. You can access HP SmartWeb Printing from the toolbar in Internet Explorer. For more information about HP SmartWeb Printing, see the help file provided with it.
NOTE: With certain types of paper, you can print on both sides of a sheet of paper(called “two-sided printing” or “duplex printing”). For more information, see Two-sidedprinting (duplexing).
Follow the instructions for your operating system.
• Print a Web page (Windows)• Print a Web page (Mac OS X)
Print a Web page (Windows)1. Load paper in the tray. For more information, see Load media.2. On the File menu in your software application, click Print.3. Select the product you want to print to.4. If your Web browser supports it, select the items on the Web page that you want to
include in the printout.For example, in Internet Explorer, click the Options tab to select options such as Aslaid out on screen, Only the selected frame, and Print all linked documents.
5. Click Print or OK to begin printing.
Print a Web page (Mac OS X)1. Load paper in the tray. For more information, see Load media.2. From the File menu in your software application, choose Print.3. Make sure the product you want to use is selected.4. Some Web browsers include special options for printing Web pages. If available,
choose the option for your Web browser from the pop-up menu in the Print dialog.For more information, see the documentation provided with your Web browser.
NOTE: Click the blue disclosure triangle next to the Printer selection to accessthese options.
5. Select any other print settings that you want, and then click Print to begin printing.
Chapter 2
28 Print

Print photosDo not leave unused photo paper in the input tray. The paper might start to curl, whichcould reduce the quality of your printout. Photo paper should be flat before printing.
Follow the instructions for your operating system.• Print photos on photo paper (Windows)• Print photos on photo paper (Mac OS X)
Print photos on photo paper (Windows)1. Load paper in the tray. For more information, see Load media.2. On the File menu in your software application, click Print.3. Select the product you want to print to.4. If you need to change settings, click the button that opens the Properties dialog box.
Depending on your software application, this button might be called Properties,Options, Printer Setup, Printer, or Preferences.
5. Click Photo Printing – Borderless or Photo Printing with white borders in thePrinting Shortcuts list. The default settings are displayed.
NOTE: To achieve the highest dpi resolution, you can use the Maximum dpisetting with supported types of photo paper. If Maximum dpi is not listed in thePrint quality drop-down list, you can enable it from the Advanced tab.
6. If you change any settings on the Printing Shortcuts tab, you can save your customsettings as a new printing shortcut:• Select the shortcut, and then click Save As.• To delete a shortcut, select the shortcut, and then click Delete.
TIP: You can change more options for the print job by using the featuresavailable on the other tabs in the dialog box.
7. If you want to print the photo in black and white, click the Advanced tab and, in theColor Options area, select the Print in grayscale check box.
8. Click OK, and then click Print or OK to begin printing.
Print photos on photo paper (Mac OS X)1. Load paper in the tray. For more information, see Load media.2. From the File menu in your software application, choose Print.3. Make sure the product you want to use is selected.4. Choose Paper Type/Quality from the pop-up menu, and then choose the following
settings:• Paper Type: The appropriate photo paper type• Quality: Best or Maximum dpi
NOTE: Click the blue disclosure triangle next to the Printer selection to accessthese options.
Print photos 29

5. If necessary, click the disclosure triangle next to Color Options.Select any other print settings that you want, and then click Print to begin printing.
6. Select the appropriate Photo Fix options:• Off: applies no HP Real Life Technologies to the image.• Basic: automatically focuses the image; moderately adjusts image sharpness.
7. If you want to print the photo in black and white, choose the Grayscale from theColor pop-up menu, and then choose one of the following options:• High Quality: uses all the available colors to print your photo in grayscale. This
creates smooth and natural shades of gray.• Black Print Cartridge Only: uses black ink to print your photo in grayscale. The
gray shading is created by varying patterns of black dots, which might result in agrainy image.
Print on special and custom-sized paperIf your application supports custom-sized paper, set the size in the application beforeprinting the document. If not, set the size in the print driver. You might need to reformatexisting documents to print them correctly on custom-sized paper.
Use only custom-sized paper that is supported by the device. For more information, seeMedia specifications.
NOTE: With certain types of paper, you can print on both sides of a sheet of paper(called “two-sided printing” or “duplex printing”). For more information, see Two-sidedprinting (duplexing).
Follow the instructions for your operating system.
• Print on special or custom-sized paper (Windows)• Print on special or custom-sized paper (Mac OS X)
Print on special or custom-sized paper (Windows)1. Load paper in the tray. For more information, see Load media.2. On the File menu in your software application, click Print.3. Select the product you want to print to.4. If you need to change settings, click the button that opens the Properties dialog box.
Depending on your software application, this button might be called Properties,Options, Printer Setup, Printer, or Preferences.
5. If necessary, set up the custom size in the printer driver:a. On the Features tab, click Custom in the Size drop-down list.b. Type a name for the new custom size.c. In the Width and Height boxes, type the dimensions, and then click Save.d. Click OK.
NOTE: To achieve the highest dpi resolution, you can use the Maximum dpisetting with supported types of photo paper. If Maximum dpi is not listed in thePrint quality drop-down list, you can enable it from the Advanced tab.
6. Make sure the custom size is selected in the Size drop-down list.
Chapter 2
30 Print

7. Select the paper type:a. Click More in the Paper type drop-down list.b. Click the desired paper type, and then click OK.
8. Click OK, and then click Print or OK to begin printing.
Print on special or custom-sized paper (Mac OS X)
NOTE: Before you can print on custom-sized paper, you must set up the customsize in the printing software. For instructions, see Set up custom sizes (Mac OS X).
1. Load the appropriate paper in the tray. For more information, see Load media.2. From the File menu in your software application, choose Print.3. Make sure the product you want to use is selected.4. Choose Paper Handling from the pop-up menu.
NOTE: Click the blue disclosure triangle next to the Printer selection to accessthese options.
5. Under Destination Paper Size, click Scale to fit paper size, and then select thecustom size.Select any other print settings that you want, and then click Print to begin printing.
6. Change any other settings, and then click Print to begin printing.
Set up custom sizes (Mac OS X)1. From the File menu in your software application, choose Print.2. Choose the desired printer in the Format for pop-up menu.3. Choose Manage Custom Sizes in the Paper Size pop-up menu.4. Click the + on the left side of the screen, double-click Untitled, and type a name for
the new, custom size.5. In the Width and Height boxes, type the dimensions, and then set the margins, if
desired.6. Choose Paper Handling from the pop-up menu.7. Click OK.
Print borderless documentsBorderless printing lets you print to the edges of certain photo media types and a rangeof standard media sizes.
NOTE: You cannot print a borderless document if the paper type is set to Plainpaper.
NOTE: Before printing a borderless document, open the file in a software applicationand assign the image size. Make sure the size corresponds to the media size on whichyou are printing the image.
NOTE: Not all applications support borderless printing.
Print borderless documents 31

Follow the instructions for your operating system.
• Print borderless documents (Windows)• Print borderless documents (Mac OS X)
Print borderless documents (Windows)1. Load paper in the tray. For more information, see Load media.2. On the File menu in your software application, click Print.3. Select the product you want to print to.4. If you need to change settings, click the button that opens the Properties dialog box.
Depending on your software application, this button might be called Properties,Options, Printer Setup, Printer, or Preferences.
5. Click the Features tab.6. In the Size list, click More, and then select the borderless size loaded in the tray. If
a borderless image can be printed on the specified size, the Borderless check boxis selected.
7. In the Paper type drop-down list, click More, and then select the appropriate papertype.
8. Select the Borderless check box if it is not already checked.If the borderless paper size and paper type are not compatible, the product softwaredisplays an alert and allows you to select a different type or size.
9. Click OK, and then click Print or OK to begin printing.
Print borderless documents (Mac OS X)1. Load paper in the tray. For more information, see Load media.2. From the File menu in your software application, choose Print.3. Make sure the product you want to use is selected.4. Choose Paper Type/Quality from the pop-up menu, and then choose the following
settings:• Paper Type: The appropriate paper type• Quality: Best or Maximum dpi
NOTE: Click the blue disclosure triangle next to the Printer selection to accessthese options.
5. If necessary, select the appropriate Photo Fix options:• Off: applies no HP Real Life Technologies to the image.• Basic: automatically focuses the image; moderately adjusts image sharpness.
6. Select any other print settings that you want, and then click Print to begin printing.
Two-sided printing (duplexing)With certain types of paper, you can print on both sides of a sheet of paper (called “two-sided printing” or “duplex printing”).• Perform two-sided printing (Windows)• Perform two-sided printing (Mac OS X)
Chapter 2
32 Print

Perform two-sided printing (Windows)1. Load paper in the tray. For more information, see Load media and Guidelines for two-
sided (duplex) printing.2. On the File menu in your software application, click Print.3. Select the Two-sided (Duplex) Printing option in the Printing Shortcuts list.4. Click OK, and then click Print or OK to begin printing.5. Follow any onscreen instructions.
Perform two-sided printing (Mac OS X)1. Load paper in the tray. For more information, see Load media and Guidelines for two-
sided (duplex) printing.2. From the File menu in your software application, choose Print.3. Make sure the product you want to use is selected.4. Choose Paper Handling from the pop-up menu, and then choose Odd numbered
pages or Odd only.5. Change any other settings, and then click Print.6. After the odd-numbered pages have printed, rotate the printed pages 180 degrees
and reload them in the tray.
NOTE: Make sure the freshly printed text is face up.
7. From the File menu, choose Print.8. Choose Paper Handling from the pop-up menu, and then choose Even numbered
pages or Even only.9. Click Print to begin printing.
Two-sided printing (duplexing) 33

3 ScanUsing the product’s control panel, you can scan originals and send them to a variety ofdestinations, such as a folder or a program on a computer. You can also scan originalsusing the HP software provided with the product and TWAIN-compliant or WIA-compliantprograms on a computer.
You can use the HP software to convert the text in scanned documents into a format thatyou can search, copy, paste, and edit.
NOTE: Scan functions are only available after you install the software.
This section contains the following topics:
• Scan an original• Edit a scanned document using optical character recognition (OCR) software
Scan an originalYou can start a scan from a computer or from the device control panel.
To use the scan features, your device and computer must be connected and turned on.The HP software must also be installed and running on your computer prior to scanning.To verify that the HP software is running on a computer running Windows, look for thedevice icon in the system tray at the lower-right side of the screen, near the clock.
NOTE: Closing the HP Digital Imaging Monitor icon in your Windows system traycan cause your device to lose some of its scan functionality and result in the NoConnection error message. If this happens, you can restore full functionality byrestarting your computer or by starting the HP Digital Imaging Monitor.
NOTE: If you are using a computer running Windows, you can also use theHP Solution Center to scan an image. Using this software, you can edit a scannedimage and create special projects using a scanned image. For more information, seethe onscreen help that came with your software.
This section contains the following topics:
• Scan an original from the product control panel
Scan an original from the product control panelYou can send a scan to a computer connected directly to the device. You can also senda scan to a program installed on a computer.
NOTE: If you are scanning a borderless original, load the original on the scannerglass, not the ADF.
To scan from the product control panel1. Load the original. For more information, see Load an original on the scanner glass.2. Press left arrow or right arrow to select the Scan function, and then press OK.
34 Scan

3. Press right arrow to select what to do with the scan, and then press OK.4. Press Start.
Edit a scanned document using optical characterrecognition (OCR) software
You can use OCR software to import scanned text into your preferred word-processingprogram for editing. This allows you to edit letters, newspaper clippings, and many otherdocuments.
You can specify the word-processing program that you want to use for editing. If the word-processing icon is not present or active, either you do not have word-processing softwareinstalled on your computer, or the scanner software did not recognize the program duringthe installation. See the onscreen Help for the HP Solution Center for information abouthow to create a link to the word-processing program.
The OCR software does not support scanning colored text. Colored text is alwaysconverted to black-and-white text before being sent to OCR. Thus, all text in the finaldocument is in black and white, regardless of the original color.
Because of the complexity of some word-processing programs and their interaction withthe device, it is sometimes preferable to scan to a text editor, such as Wordpad (Windows)or TextEdit (Mac OS X), and then cut and paste the text into the preferred word-processing program.
Edit a scanned document using optical character recognition (OCR) software 35

4 CopyYou can produce high-quality color and grayscale copies on a variety of paper types andsizes.
NOTE: If you are copying a document when a fax arrives, the fax is stored in thedevice memory until the copying finishes. This can reduce the number of fax pagesstored in memory.
This section contains the following topics:
• Copy documents• Change copy settings
Copy documentsYou can make quality copies from the device control panel.
NOTE: If you are copying a borderless original, load the original on the scannerglass, not the ADF.
To copy documents1. Make sure you have paper loaded in the main tray.2. Place your original face down on the scanner glass. If you are copying a borderless
original, load the original on the scanner glass, not the ADF. For more information,see Load an original on the scanner glass.
3. Use the left arrow or right arrow to select one of the following functions:• Copy B&W: To select a black-and-white copy job.• Copy Color : To select a color copy job.
NOTE: If you have a color original, selecting the Copy B&W function producesa black-and-white copy of the color original, while selecting the Copy Colorfunction produces a full-color copy of the color original.
4. Press OK.5. Change any additional settings. For more information, see Change copy settings6. Press Start.
Change copy settingsYou can customize copy jobs using the various settings available from the product'scontrol panel, including the following:
• Number of copies• Copy paper size• Copy paper type• Copy speed or quality
36 Copy

• Lighter/Darker settings• Resizing originals to fit on different paper sizes
You can use these settings for single copy jobs, or you can save settings to be used asdefaults for future jobs.
To change copy settings for a single job1. Press left arrow or right arrow to navigate between different copy options.2. Make any changes to the copy function settings, and then press OK to accept the
changes.
To save the current settings as defaults for future jobs1. Press left arrow or right arrow to navigate between different copy options.2. Make any changes to the copy function settings, and then press OK to accept the
changes.3. Press right arrow until Set As Default appears, and then press OK.4. Press right arrow to select Yes, and then press OK.
Change copy settings 37

5 FaxYou can use the device to send and receive faxes, including color faxes. You canschedule faxes to be sent at a later time and set up speed-dials to send faxes quickly andeasily to frequently used numbers. From the device control panel, you can also set anumber of fax options, such as resolution and the contrast between lightness anddarkness on the faxes you send.
NOTE: Before you begin faxing, make sure you have set up the device properly forfaxing. You might have already done this as part of the initial setup, by using eitherthe control panel or the software that came with the device. You can verify the fax isset up correctly by running the fax setup test from the control panel. To run the faxtest, press (Setup), select Tools, select Run fax test, and then press OK.
This section contains the following topics:
• Send a fax• Receive a fax• Change fax settings• Fax over Internet Protocol (FoIP)• Use reports
Send a faxYou can send a fax in a variety of ways. Using the device control panel, you can send ablack-and-white or color fax. You can also send a fax manually from an attached phone.This allows you to speak with the recipient before sending the fax.
This section contains the following topics:
• Send a basic fax• Send a fax manually from a phone• Send a fax using monitor dialing• Send a fax from memory• Schedule a fax to send later• Send a fax to multiple recipients• Send a fax in Error Correction Mode
Send a basic faxYou can easily send a single- or multiple-page black-and-white or color fax by using thedevice control panel.
NOTE: If you need printed confirmation that your faxes were successfully sent,enable fax confirmation before sending any faxes.
38 Fax

TIP: You can also send a fax manually from a phone or by using monitor dialing.These features allow you to control the pace of your dialing. They are also usefulwhen you want to use a calling card to charge the call and you have to respond totone prompts while dialing.
To send a basic fax from the device control panel1. Load your originals. If you are faxing a borderless original, load the original on the
scanner glass, not the ADF. For additional information, see Load an original on thescanner glass.
2. Press the left arrow or right arrow to select Fax B&W or Fax Color , and thenpress OK.
3. Enter the fax number by using the keypad.
TIP: To add a pause in the fax number you are entering, press the * buttonrepeatedly, until a dash (-) appears on the display.
4. Press Start.If the device detects an original loaded in the automatic document feeder, itsends the document to the number you entered.
TIP: If the recipient reports issues with the quality of the fax you sent, you cantry changing the resolution or contrast of your fax.
Send a fax manually from a phoneSending a fax manually allows you to make a phone call and talk with the recipient beforeyou send the fax. This is useful if you want to inform the recipient that you are going tosend them a fax before sending it. When you send a fax manually, you can hear the dialtones, telephone prompts, or other sounds through the handset on your telephone. Thismakes it easy for you to use a calling card to send your fax.
Depending on how the recipient has their fax machine set up, the recipient might answerthe phone, or the fax machine might take the call. If a person answers the phone, youcan speak with the recipient before sending the fax. If a fax machine answers the call,you can send the fax directly to the fax machine when you hear the fax tones from thereceiving fax machine.
To send a fax manually from an extension phone1. Load your originals. If you are copying a borderless original, load the original on the
scanner glass, not the ADF. For additional information, see Load an original on thescanner glass.
2. Press the left arrow or right arrow to select Fax B&W or Fax Color , and thenpress OK.
3. Dial the number by using the keypad on the phone that is connected to the device.
NOTE: Do not use the keypad on the control panel of the device when manuallysending a fax. You must use the keypad on your phone to dial the recipient'snumber.
TIP: To switch between Fax B&W or Fax Color , press the Back button.
Send a fax 39

4. If the recipient answers the telephone, you can engage in a conversation beforesending your fax.
NOTE: If a fax machine answers the call, you will hear fax tones from thereceiving fax machine. Proceed to the next step to transmit the fax.
5. When you are ready to send the fax, press Start.
NOTE: If prompted, select Send Fax.
If you were speaking with the recipient before sending the fax, inform the recipientthat they should press Start on their fax machine after they hear fax tones.The telephone line is silent while the fax is transmitting. At this point, you can hangup the telephone. If you want to continue speaking with the recipient, remain on theline until the fax transmission is complete.
Send a fax using monitor dialingMonitor dialing allows you to dial a number from the device control panel as you woulddial a regular telephone. When you send a fax using monitor dialing, you can hear thedial tones, telephone prompts, or other sounds through the speakers on the device. Thisenables you to respond to prompts while dialing, as well as control the pace of yourdialing.
TIP: If you do not enter your calling card PIN fast enough, the device might startsending fax tones too soon and cause your PIN not to be recognized by the callingcard service. If this is the case, you can create a speed dial entry to store the PIN foryour calling card.
NOTE: Make sure the volume is turned on, or you will not hear a dial tone.
To send a fax using monitor dialing from the device control panel1. Load your originals. For additional information, see Load an original on the scanner
glass or Load an original in the automatic document feeder (ADF).
NOTE: The ADF is available for some models only.
2. Press the left arrow or right arrow to select Fax B&W or Fax Color , and thenpress Start.If the device detects an original loaded in the automatic document feeder, you willhear a dial tone.
3. When you hear the dial tone, enter the number by using the keypad on the devicecontrol panel.
4. Follow any prompts that might occur.
TIP: If you are using a calling card to send a fax and you have your calling cardPIN stored as a speed dial, when prompted to enter your PIN, press SpeedDial to select the speed dial entry where you have your PIN stored.
Your fax is sent when the receiving fax machine answers.
Chapter 5
40 Fax

Send a fax from memoryYou can scan a black-and-white fax into memory and then send the fax from memory.This feature is useful if the fax number you are trying to reach is busy or temporarilyunavailable. The device scans the originals into memory and sends them once it is ableto connect to the receiving fax machine. After the device scans the pages into memory,you can immediately remove the originals from the document feeder tray.
NOTE: You can only send a black-and-white fax from memory.
To send a fax from memory1. Load your originals. For additional information, see Load an original on the scanner
glass or Load an original in the automatic document feeder (ADF).
NOTE: The ADF is available for some models only.
2. Press the left arrow or right arrow to select Fax B&W or Fax Color , and thenpress OK.
3. Enter the fax number by using the keypad, press Speed Dial to select a speed dial,or press Redial/Pause to redial the last number dialed.
4. Press right arrow until Fax Method appears, and then press OK.5. Press right arrow until Scan & Fax appears, and then press OK.6. Press Start.
The device scans the originals into memory and sends the fax when the receiving faxmachine is available.
Schedule a fax to send laterYou can schedule a black-and-white fax to be sent within the next 24 hours. This enablesyou to send a black-and-white fax late in the evening, when phone lines are not as busyor phone rates are lower, for example. The device automatically sends your fax at thespecified time.
You can only schedule one fax to be sent at a time. You can continue to send faxesnormally, however, while a fax is scheduled.
NOTE: You can only send faxes in black and white due to memory limitations.
To schedule a fax from the device control panel1. Load your originals. For additional information, see Load an original on the scanner
glass or Load an original in the automatic document feeder (ADF).
NOTE: The ADF is available for some models only.
2. Press the left arrow or right arrow to select Fax B&W or Fax Color , and thenpress OK.
3. Press right arrow until Fax Method appears, and then press OK.4. Press right arrow until Send Fax Later appears, and then press OK.5. Enter the send time by using the numeric keypad, and then press OK. If prompted,
press 1 for AM, or 2 for PM.
Send a fax 41

6. Enter the fax number by using the keypad, press Speed Dial to select a speed dial,or press Redial/Pause to redial the last number dialed.
7. Press Start.The device scans all pages and the scheduled time appears on the display. The faxis sent at the scheduled time.
To cancel a scheduled fax1. Press the left arrow or right arrow to select Fax B&W or Fax Color , and then
press OK.2. Press right arrow until Fax Method appears, and then press OK.3. Press right arrow until Send Fax Later appears, and then press OK.
If there is a fax already scheduled, the Cancel prompt appears on the display.4. Press 1 to select Yes.
NOTE: You can also cancel the scheduled fax by pressing Cancel on the devicecontrol panel when the scheduled time is visible on the display.
Send a fax to multiple recipientsYou can send a fax to multiple recipients at once by grouping individual speed dial entriesinto group speed dial entries.
To send a fax to multiple recipients using group speed dial1. Load your originals. For additional information, see Load an original on the scanner
glass or Load an original in the automatic document feeder (ADF).
NOTE: The ADF is available for some models only.
2. Press the left arrow or right arrow to select Fax B&W, and then press OK.3. Press the left arrow or right arrow until the appropriate group speed dial entry
appears.
TIP: You can also select a speed dial entry by entering its speed dial code usingthe keypad on the device control panel.
4. Press Start.If the device detects an original loaded in the automatic document feeder, it sendsthe document to each number in the group speed dial entry.
NOTE: You can only use group speed dial entries to send faxes in black andwhite, because of memory limitations. The device scans the fax into memory thendials the first number. When a connection is made, it sends the fax and dials thenext number. If a number is busy or not answering, the device follows the settingsfor Busy Redial and No Answer Redial. If a connection cannot be made, thenext number is dialed and an error report is generated.
Send a fax in Error Correction ModeError Correction Mode (ECM) prevents loss of data due to poor phone lines by detectingerrors that occur during transmission and automatically requesting retransmission of theerroneous portion. Phone charges are unaffected, or might even be reduced, on good
Chapter 5
42 Fax

phone lines. On poor phone lines, ECM increases sending time and phone charges, butsends the data much more reliably. The default setting is On. Turn ECM off only if itincreases phone charges substantially, and you can accept poorer quality in exchangefor reduced charges.
Before turning the ECM setting off, consider the following. If you turn ECM off
• The quality and transmission speed of faxes you send and receive are affected.• The Fax Speed is automatically set to Medium.• You will no longer be able to send or receive faxes in color.
To change the ECM setting from the control panel1. Press Setup.2. Press right arrow until Fax Settings appears, and then press OK.3. Press right arrow until Error Correction Mode appears, and then press OK.4. Press right arrow to select On or Off, and then press OK.
Receive a faxYou can receive faxes automatically or manually. If you turn off the Auto Answer option,you must receive faxes manually. If you turn on the Auto Answer option (the defaultsetting), the device automatically answers incoming calls and receives faxes after thenumber of rings that are specified by the Rings to Answer setting. (The default Ringsto Answer setting is five rings.)
If you receive a legal-size fax and the device is not currently set to use legal-size paper,the device reduces the fax so that it fits on the paper that is loaded. If you have disabledthe Automatic Reduction feature, the device prints the fax on two pages.
NOTE: If you are copying a document when a fax arrives, the fax is stored in thedevice memory until the copying finishes. This can reduce the number of fax pagesstored in memory.
• Receive a fax manually• Set up backup fax• Reprint received faxes from memory• Poll to receive a fax• Forward faxes to another number• Set the paper size for received faxes• Set automatic reduction for incoming faxes• Block junk fax numbers• Receive faxes to your computer (Fax to PC and Fax to Mac)
Receive a fax manuallyWhen you are on the phone, the person you are speaking with can send you a fax whileyou are still connected. This is referred to as manual faxing. Use the instructions in thissection to receive a manual fax.
NOTE: You can pick up the handset to talk or listen for fax tones.
Receive a fax 43

You can receive faxes manually from a phone that is:
• Directly connected to the device (on the 2-EXT port)• On the same phone line, but not directly connected to the device
To receive a fax manually1. Make sure the device is turned on and you have paper loaded in the main tray.2. Remove any originals from the document feeder tray.3. Set the Rings to Answer setting to a high number to allow you to answer the incoming
call before the device answers. Or, turn off the Auto Answer setting so that the devicedoes not automatically answer incoming calls.
4. If you are currently on the phone with the sender, instruct the sender to press Starton their fax machine.
5. When you hear fax tones from a sending fax machine, do the following:a. Press left arrow or right arrow to select Black-and-white fax or Color fax.b. Press Start.c. After the device begins to receive the fax, you can hang up the phone or remain
on the line. The phone line is silent during fax transmission.
Set up backup faxDepending on your preference and security requirements, you can set up the device tostore all the faxes it receives, only the faxes it receives while the device is in an errorcondition, or none of the faxes it receives.
The following Backup fax modes are available:
On The default setting. When Backup fax is On, the device stores all receivedfaxes in memory. This enables you to reprint up to eight of the most recentlyprinted faxes if they are still saved in memory.
NOTE: When device memory is low, it overwrites the oldest, printed faxesas it receives new faxes. If the memory becomes full of unprinted faxes, thedevice stops answering incoming fax calls.
NOTE: If you receive a fax that is too large, such as a very detailed colorphoto, it might not be stored in memory due to memory limitations.
On Error Only Causes the device to store faxes in memory only if an error condition existsthat prevents the device from printing the faxes (for example, if the deviceruns out of paper). The device continues to store incoming faxes as longas there is memory available. (If the memory becomes full, the device stopsanswering incoming fax calls.) When the error condition is resolved, thefaxes stored in memory print automatically, and then they are deleted frommemory.
Off Faxes are never stored in memory. For example, you might want to turn offBackup fax for security purposes. If an error condition occurs that preventsthe device from printing (for example, the device runs out of paper), thedevice stops answering incoming fax calls.
Chapter 5
44 Fax

NOTE: If Backup fax is enabled and you turn off the device, all faxes stored inmemory are deleted, including any unprinted faxes that you might have received whilethe device was in an error condition. You must contact the senders to ask them toresend any unprinted faxes. For a list of the faxes you have received, print the FaxLog. The Fax Log is not deleted when the device is turned off.
To set backup fax from the device control panel1. Press Setup.2. Press right arrow until Tools appears, and then press OK.3. Press right arrow until Backup fax appears, and then press OK.4. Press right arrow to select On, On Error Only, or Off.5. Press OK.
Reprint received faxes from memoryIf you set the Backup fax mode to On, the received faxes are stored in memory, whetherthe device has an error condition or not.
NOTE: After the memory becomes full, the oldest, printed faxes are overwritten asnew faxes are received. If all the stored faxes are unprinted, the device does notreceive any fax calls until you print or delete the faxes from memory. You might alsowant to delete the faxes in memory for security or privacy purposes.
Depending on the sizes of the faxes in memory, you can reprint up to eight of the mostrecently printed faxes, if they are still in memory. For example, you might need to reprintyour faxes if you lost the copy of your last printout.
To reprint faxes in memory from the device control panel1. Make sure you have paper loaded in the main tray.2. Press Setup.3. Press right arrow until Print Report appears, and then press OK.4. Press right arrow until Reprint Faxes appears, and then press OK.
The faxes are printed in the reverse order from which they were received with themost recently received fax printed first, and so on.
5. Press Start.6. If you want to stop reprinting the faxes in memory, press Cancel.
To delete all the faxes in memory from the device control panel▲ Turn off the device by pressing the Power button.
All faxes stored in memory are deleted from memory when you turn off the power.
Poll to receive a faxPolling allows the HP All-in-One to ask another fax machine to send a fax that it has inits queue. When you use the Poll to Receive feature, the HP All-in-One calls thedesignated fax machine and requests the fax from it. The designated fax machine mustbe set for polling and have a fax ready to send.
Receive a fax 45

NOTE: The HP All-in-One does not support polling pass codes. Polling pass codesare a security feature that require the receiving fax machine to provide a pass codeto the device it is polling in order to receive the fax. Make sure the device you arepolling does not have a pass code set up (or has not changed the default pass code)or the HP All-in-One will not be able to receive the fax.
To set up poll to receive a fax from the device control panel1. Press left arrow or right arrow to select Black-and-white fax or Color fax, and
then press OK.2. Press right arrow until Fax Method appears, and then press OK.3. Press right arrow until Poll to Receive appears, and then press OK.4. Enter the fax number of the other fax machine.5. Press Start.
NOTE: If you selected Color Fax but the sender sent the fax in black and white,the device prints the fax in black and white.
Forward faxes to another numberYou can set up the device to forward your faxes to another fax number. A received colorfax is forwarded in black and white.
HP recommends that you verify the number you are forwarding to is a working fax line.Send a test fax to make sure the fax machine is able to receive your forwarded faxes.
To forward faxes from the device control panel1. Press Setup.2. Press right arrow until Fax Settings appears, and then press OK.3. Press right arrow until Fax Forwarding appears, and then press OK.4. Press right arrow until On appears, and then press OK.
NOTE: If the device is not able to forward the fax to the designated fax machine(for example, if it is not turned on), the device prints the fax. If you set up the deviceto print error reports for received faxes, it will also print an error report.
5. At the prompt, enter the number of the fax machine that will receive the forwardedfaxes, and then press OK.Fax Forwarding appears on the device control panel display.If the device loses power when Fax Forwarding is set up, it saves the FaxForwarding setting and phone number. When the power is restored to the device,the Fax Forwarding setting is still On.
NOTE: You can cancel fax forwarding by pressing Cancel on the device controlpanel when the Fax Forwarding message is visible on the display, or you canselect Off from the Fax Fwd, Black menu.
Set the paper size for received faxesYou can select the paper size for received faxes. The paper size you select should matchwhat is loaded in your main tray. Faxes can be printed on letter, A4, or legal paper only.
Chapter 5
46 Fax

NOTE: If an incorrect paper size is loaded in the main tray when you receive a fax,the fax does not print and an error message appears on the display. Load letter, A4,or legal paper, and then press OK to print the fax.
To set the paper size for received faxes from the device control panel1. Press Setup.2. Press right arrow until Fax Settings appears, and then press OK.3. Press right arrow until Paper Options appears, and then press OK.4. Press right arrow until Fax Paper Size appears, and then press OK.5. Press right arrow to select an option, and then press OK.
Set automatic reduction for incoming faxesThe Automatic Reduction setting determines what the HP All-in-One does if it receivesa fax that is too large for the default paper size. This setting is turned on by default, sothe image of the incoming fax is reduced to fit on one page, if possible. If this feature isturned off, information that does not fit on the first page is printed on a second page.Automatic Reduction is useful when you receive a legal-size fax and letter-size paperis loaded in the main tray.
To set automatic reduction from the device control panel1. Press Setup.2. Press right arrow until Fax Settings appears, and then press OK.3. Press right arrow until Paper Options appears, and then press OK.4. Press right arrow until Auto Fax Resize appears, and then press OK.5. Press right arrow to select Off or On.6. Press OK.
Block junk fax numbersIf you subscribe to a caller ID service through your phone provider, you can block specificfax numbers so the device does not print faxes received from those numbers. When anincoming fax call is received, the device compares the number to the list of junk faxnumbers to determine if the call should be blocked. If the number matches a number inthe blocked fax numbers list, the fax is not printed. (The maximum number of fax numbersyou can block varies by model.)
NOTE: This feature is not supported in all countries/regions. If it is not supported inyour country/region, Junk Fax Blocker does not appear in the Fax Settings menu.
NOTE: If no phone numbers are added in the Caller ID list, it is assumed that theuser has not signed up for the Caller ID service with the phone company.
• Add numbers to the junk fax list• Remove numbers from the junk fax list• Print a Junk Fax Report
Receive a fax 47

Add numbers to the junk fax listYou can block specific numbers by adding them to the junk fax list.
To manually enter a number to block1. Press Setup.2. Press right arrow to select Fax Settings, and then press OK.3. Press right arrow to select Junk Fax Blocker, and then press OK.4. Press right arrow to select Add, and then press OK.5. To select a fax number to block from the caller ID list, select Select no.
- or -To manually enter a fax number to block, select Enter no.
6. After entering a fax number to block, press OK.Make sure you enter the fax number as it appears on the control-panel display, andnot the fax number that appears on the fax header of the received fax, as thesenumbers can be different.
7. When the Enter Another? prompt appears, do one of the following:• If you want to add another number to the list of junk fax numbers, press
Yes, and then repeat step 5 for each number you want to block.• If you are done, press No.
Remove numbers from the junk fax listIf you no longer want to block a fax number, you can remove a number from your junkfax list.
To remove numbers from the list of junk fax numbers1. Press Setup.2. Press Fax Settings, and then press OK.3. Press Junk Fax Blocker, and then press OK.4. Press Delete, and then press OK.5. Press the right arrow button to scroll through the numbers you have blocked. When
the number you want to remove appears, press OK to select it.6. When the Delete Another? prompt appears, do one of the following:
• If you want to remove another number from the list of junk fax numbers,press Yes, and then repeat step 5 for each number you no longer want to block.
• If you are done, press No.
Print a Junk Fax ReportUse the following procedure to print a list of blocked junk fax numbers.
To print a Junk Fax Report1. Press the (Setup) button.2. Select Print Report, select Junk Fax Report, and then press OK.
Chapter 5
48 Fax

Receive faxes to your computer (Fax to PC and Fax to Mac)Use Fax to PC and Fax to Mac to automatically receive faxes and save faxes directly toyour computer. With Fax to PC and Fax to Mac, you can store digital copies of your faxeseasily and also eliminate the hassle of dealing with bulky paper files.
Received faxes are saved as TIFF (Tagged Image File Format). Once the fax is received,you get an on-screen notification with a link to the folder where the fax is saved.
The files are named in the following method: XXXX_YYYYYYYY_ZZZZZZ.tif, where X isthe sender's information, Y is the date, and Z is the time that the fax was received.
NOTE: Fax to PC and Fax to Mac are available for receiving black-and-white faxesonly. Color faxes are printed instead of being saved to the computer.
This section contains the following topics:
• Fax to PC and Fax to Mac requirements• Activate Fax to PC and Fax to Mac• Modify Fax to PC or Fax to Mac settings• Turn off Fax to PC or Fax to Mac
Fax to PC and Fax to Mac requirements• The administrator computer, the computer that activated the Fax to PC or Fax to Mac
feature, must be on at all times. Only one computer can act as the Fax to PC or Faxto Mac administrator computer.
• The destination folder's computer or server, must be on at all times. The destinationcomputer must also be awake, faxes will not be saved if the computer is asleep or inhibernate mode.
• HP Digital Imaging monitor in Windows Taskbar must be on at all times.• Paper must be loaded in the input tray.
Activate Fax to PC and Fax to MacUse the Fax to PC Setup Wizard to activate Fax to PC. The Fax to PC Setup Wizard canbe started from the Solution Center or the Fax to PC Setup Wizard on the control panel.To set up Fax to Mac on Mac OS X, use the HP Setup Assistant (which can be launchedfrom the HP Utility).
To set up the Fax to PC from the Solution Center (Windows)1. Open the Solution Center. For more information, see Use the HP Solution Center
(Windows).2. Select Settings, and then select Fax to PC Setup Wizard.3. Follow the onscreen instructions to set up Fax to PC.
To set up Fax to Mac (Mac OS X)1. Launch the HP Utility. For instructions, see Open the HP Utility.2. Click the Application icon on the toolbar.3. Double-click HP Setup Assistant, and then follow the onscreen instructions.
Receive a fax 49

Modify Fax to PC or Fax to Mac settingsYou can update the Fax to PC settings from your computer at any time from the FaxSettings page in the Solution Center. You can update the Fax to Mac settings from theHP Setup Assistant. You can turn off Fax to PC or Fax to Mac and disable printing faxesfrom the device control panel.
To modify settings from the device control panel1. Press the (Setup) button.2. Select Basic Fax Setup, select Fax to PC, and then press OK.3. Select the setting that you want to change. You can change the following settings:
• View PC hostname: View the name of the computer that is set up to administerFax to PC or Fax to Mac.
• Turn Off: Turn off Fax to PC or Fax to Mac.
NOTE: Use the Solution Center to turn on Fax to PC or Fax to Mac.
• Disable Fax Print: Choose this option to print faxes as they are received. If youturn off printing, color faxes will still print.
To modify Fax to PC settings the HP SoftwareFollow the instructions for your operating system:
Windows1. Open the Solution Center. For more information, see Use the HP Solution Center
(Windows).2. Select Settings, and then select Fax Settings.3. Select the Fax to PC Settings tab, change the settings, and then click OK.
Mac OS X1. Launch the HP Utility. For instructions, see Open the HP Utility.2. Click the Application icon on the toolbar.3. Double-click HP Setup Assistant, and then follow the onscreen instructions.
Turn off Fax to PC or Fax to Mac1. Press the (Setup) button.2. Select Basic Fax Setup, select Fax to PC, and then press OK.3. Select Turn Off.
Change fax settingsAfter completing the steps in the getting started guide that came with the device, use thefollowing steps to change the initial settings or to configure other options for faxing.
• Configure the fax header• Set the answer mode (Auto answer)• Set the number of rings before answering• Change the answer ring pattern for distinctive ring
Chapter 5
50 Fax

• Set the fax error correction mode• Set the dial type• Set the redial options• Set the fax speed• Set the fax sound volume
Configure the fax headerThe fax header prints your name and fax number on the top of every fax you send. HPrecommends that you set up the fax header by using the software that you installed withthe device. You can also set up the fax header from the device control panel, as describedhere.
NOTE: In some countries/regions, the fax header information is a legal requirement.
To set or change the fax header1. Press Setup.2. Press right arrow to select Fax Settings, and then press OK.3. Press right arrow to select Fax Header, and then press OK.4. Enter your personal or company name using the numeric keypad, and then press
OK.5. Enter your fax number by using the numeric keypad, and then press OK.
Set the answer mode (Auto answer)The answer mode determines whether the device answers incoming calls.
• Turn on the Auto Answer setting if you want the device to answer faxesautomatically. The device answers all incoming calls and faxes.
• Turn off the Auto Answer setting if you want to receive faxes manually. You mustbe available to respond in person to the incoming fax call or the device does notreceive faxes.
To set the answer mode to manual or automatic via the device control panel1. Press Setup.2. Press right arrow to select Fax Settings, and then press OK.3. Press right arrow to select Answer Options, and then press OK.4. Press right arrow to select Auto Answer, and then press OK.5. Press right arrow to select On or Off as appropriate for your setup, and then press
OK.When Auto Answer is On, the device answers calls automatically. When AutoAnswer is Off, it does not answer calls.
Set the number of rings before answeringIf you turn on the Auto Answer setting, you can specify how many rings occur beforeincoming calls are automatically answered.
The Rings to Answer setting is important if you have an answering machine on the samephone line as the device, because you want the answering machine to answer the phone
Change fax settings 51

before the device does. The number of rings to answer for the device should be greaterthan the number of rings to answer for the answering machine.
For example, set your answering machine to a low number of rings and the device toanswer in the maximum number of rings. (The maximum number of rings varies bycountry/region.) In this setup, the answering machine answers the call and the devicemonitors the line. If the device detects fax tones, it receives the fax. If the call is a voicecall, the answering machine records the incoming message.
To set the number of rings before answering via the device control panel1. Press Setup.2. Press right arrow to select Fax Settings, and then press OK.3. Press right arrow to select Answer Options, and then press OK.4. Press right arrow to select Rings to Answer, and then press OK.5. Enter the appropriate number of rings by using the keypad, or press left arrow or
right arrow to change the number of rings.6. Press OK to accept the setting.
Change the answer ring pattern for distinctive ringMany phone companies offer a distinctive ring feature that allows you to have severalphone numbers on one phone line. When you subscribe to this service, each number isassigned a different ring pattern. You can set up the device to answer incoming calls thathave a specific ring pattern.
If you connect the device to a line with distinctive ring, have your telephone companyassign one ring pattern to voice calls and another ring pattern to fax calls. HPrecommends that you request double or triple rings for a fax number. When the devicedetects the specified ring pattern, it answers the call and receives the fax.
If you do not have a distinctive ring service, use the default ring pattern, which is AllRings.
NOTE: The HP fax cannot receive faxes when the main phone number is off thehook.
To change the answer ring pattern for distinctive ring via the device control panel1. Verify that the device is set to answer fax calls automatically.2. Press Setup.3. Press right arrow to select Basic Settings, and then press OK.4. Press right arrow to select Ring Pattern, and then press OK.
When the phone rings with the ring pattern assigned to your fax line, the deviceanswers the call and receives the fax.
Set the fax error correction modeTypically, the device monitors the signals on the phone line while it is sending or receivinga fax. If it detects an error signal during the transmission and the error-correction settingis on, the device can request that a portion of the fax be resent.
Turn off error correction only if you are having trouble sending or receiving a fax, and youwant to accept the errors in the transmission. Turning off the setting might be useful when
Chapter 5
52 Fax

you are trying to send a fax to another country/region or receive a fax from anothercountry/region, or if you are using a satellite phone connection.
To set the fax error-correction mode1. Press Setup.2. Press right arrow to select Fax Settings, and then press OK.3. Press right arrow to select Error Correction, and then press OK.4. Press right arrow to select On or Off, and then press OK.
Set the dial typeUse this procedure to set tone-dialing or pulse-dialing mode. The factory-set default isTone. Do not change the setting unless you know that your phone line cannot use tonedialing.
NOTE: The pulse-dialing option is not available in all countries/regions.
To set the dial type1. Press Setup.2. Press right arrow to select Basic Settings, and then press OK.3. Press right arrow to select Tone or Pulse, and then press OK.4. Press right arrow to select the appropriate option, and then press OK.
Set the redial optionsIf the device was unable to send a fax because the receiving fax machine did not answeror was busy, the device attempts to redial based on the settings for the busy-redial andno-answer-redial options. Use the following procedure to turn the options on or off.• Busy redial: If this option is turned on, the device redials automatically if it receives
a busy signal. The factory-set default for this option is ON.• No answer redial: If this option is turned on, the device redials automatically if the
receiving fax machine does not answer. The factory-set default for this option isOFF.
To set the redial options1. Press Setup.2. Press right arrow to select Fax Settings, and then press OK.3. Press right arrow to select Redial Options, and then press OK.4. Press right arrow to select the appropriate Busy Redial or No Answer Redial
options, and then press OK.
Set the fax speedYou can set the fax speed used to communicate between your device and other faxmachines when sending and receiving faxes.
Change fax settings 53

If you use one of the following, setting the fax speed to a slower speed might be required:
• An Internet phone service• A PBX system• Fax over Internet Protocol (FoIP)• An integrated services digital network (ISDN) service
If you experience problems sending and receiving faxes, try using a lower Fax Speed.The following table provides the available fax speed settings.
Fax speed setting Fax speed
Fast v.34 (33600 baud)
Medium v.17 (14400 baud)
Slow v.29 (9600 baud)
To set the fax speed from the device control panel1. Press Setup.2. Press right arrow to select Fax Settings, and then press OK.3. Press right arrow to select Fax Speed, and then press OK.4. Select an option using the arrow keys, and then press OK.
Set the fax sound volumeUse this procedure to increase or decrease the volume of the fax sounds.
To set the fax sound volume via the device control panel▲ Press Setup, select Fax Sound Volume, and then use the arrow keys to increase or
decrease the volume. Press OK to select the volume.
Fax over Internet Protocol (FoIP)You may subscribe to a low cost phone service that allows you to send and receive faxeswith your device by using the Internet. This method is called Fax over Internet Protocol(FoIP). You probably use a FoIP service (provided by your telephone company) if you:
• Dial a special access code along with the fax number, or• Have an IP converter box that connects to the Internet and provides analog phone
ports for the fax connection.
NOTE: You can only send and receive faxes by connecting a phone cord to the portlabeled "1-LINE" on the device. This means that your connection to the Internet mustbe done either through a converter box (which supplies regular analog phone jacksfor fax connections) or your telephone company.
Some Internet faxing services do not work properly when the device is sending andreceiving faxes at high speed (33600 bps) or when sending color faxes. If you experienceproblems sending and receiving faxes while using an Internet fax service, use a slowerfax speed and only send black-and-white faxes. You can do this by using a lower FaxSpeed setting. For information on changing this setting, see Set the fax speed.
Chapter 5
54 Fax

NOTE: If you have questions about Internet faxing, contact your Internet faxingservices support department or your local service provider for further assistance.
Use reportsYou can set up the device to print error reports and confirmation reports automatically foreach fax you send and receive. You can also manually print system reports as required;these reports provide useful system information about the device.
By default, the device is set to print a report only if there is a problem sending or receivinga fax. A confirmation message that indicates whether a fax was successfully sent appearsbriefly on the control-panel display after each transaction.
NOTE: If the reports are not legible, you can check the estimated ink levels from thecontrol panel, HP Solution Center (Windows), or HP Utility (Mac OS X).
NOTE: Ink level alerts and indicators provide estimates for planning purposes only.When you receive a low-ink alert, consider having a replacement cartridge availableto avoid possible printing delays. You do not need to replace the ink cartridges untilprint quality becomes unacceptable.
NOTE: Ensure that the printhead and ink cartridges are in good conditions andinstalled properly.
This section contains the following topics:
• Print fax confirmation reports• Print fax error reports• Print and view the fax log• Clear the fax log• Print the details of the last fax transaction• Print a Caller ID History Report
Print fax confirmation reportsIf you require printed confirmation that your faxes were successfully sent, follow theseinstructions to enable fax confirmation before sending any faxes. Select either On FaxSend or Send & Receive.
The default fax confirmation setting is Off. This means that a confirmation report is notprinted for each fax sent or received. A confirmation message indicating whether a faxwas successfully sent appears briefly on the control-panel display after each transaction.
NOTE: You can include an image of the first page of the fax on the Fax SentConfirmation report if you choose On Fax Send or Send & Receive, and if you scanthe fax to send from memory.
To enable fax confirmation1. Press the (Setup) button.2. Press right arrow to select Print Report, and then press OK.
Use reports 55

3. Press right arrow to select Fax Confirmation, and then press OK.4. Press right arrow to select one of the following, and then press OK.
Off Does not print a fax confirmation report when you send and receivefaxes successfully. This is the default setting.
On Fax Send Prints a fax confirmation report for every fax you send.
On Fax Receive Prints a fax confirmation report for every fax you receive.
Send & Receive Prints a fax confirmation report for every fax you send and receive.
To include an image of the fax on the report1. Press the (Setup) button.2. Select Print Report, and then select Fax Confirmation.3. Select either On Fax Send or Send & Receive, and then press OK.4. Select Image on Fax Send Report.5. Select On, and then press OK.
Print fax error reportsYou can configure the device so that it automatically prints a report when there is an errorduring transmission or reception.
To set the device to print fax error reports automatically1. Press Setup.2. Press right arrow to select Print Report, and then press OK.3. Press right arrow to select Fax Error , and then press OK.4. Press right arrow to select one of the following, and then press OK.
Send & Receive Prints whenever a fax error occurs. This is the default setting.
Off Does not print any fax error reports.
On Fax Send Prints whenever a transmission error occurs.
On Fax Receive Prints whenever a receiving error occurs.
Print and view the fax logThe logs list faxes that have been sent from the device control panel and all faxes thathave been received.
You can print a log of faxes that have been received and sent by the device. Each entryin the log contains the following information:
• Transmission date and time• Type (whether received or sent)• Fax number• Duration
Chapter 5
56 Fax

• Number of pages• Result (status) of transmission
To print the fax log from the device control panel1. Press Setup.2. Press right arrow to select Print Report, and then press OK.3. Press right arrow to select Fax Log, and then press OK.4. Press OK again to print the log.
To view the fax log from the HP softwareFollow the instructions for your operating system.
Windows1. Open the HP Solution Center software. For instructions, see Use the HP Solution
Center (Windows).2. Click Settings.3. In the Fax Settings area, click More Fax Settings, and then click Fax Log.
Mac OS X1. Open the HP Utility. For instructions, see Open the HP Utility.2. In the Fax Settings area, click Fax Logs.
Clear the fax logUse the following steps to clear the fax log.
To clear the fax log via the device control panel1. On the device control panel, press Setup.2. Press the arrow key to move down to Tools, and then press OK.3. Press the arrow key to move down to Clear Fax Log, and then press OK.
Print the details of the last fax transactionThe Last Fax Transaction report prints the details of the last fax transaction to occur.Details include the fax number, number of pages, and the fax status.
To print the Last Fax Transaction report1. On the device control panel, press Setup.2. Press the arrow key to move down to Print Report, and then press OK.3. Press the arrow key to move down to Last Transaction, and then press OK.
Use reports 57

Print a Caller ID History ReportUse the following procedure to print a list of Caller ID fax numbers.
To print a Caller ID History Report1. Press Setup, select Printer Report, and then select Caller ID History Report.2. Press OK.
Chapter 5
58 Fax

6 Work with ink cartridgesTo ensure the best print quality from the HP All-in-One, you will need to perform somesimple maintenance procedures. This section provides guidelines for handling the inkcartridges, instructions for replacing the ink cartridges, and aligning and cleaning theprinthead.
This section contains the following topics:
• Information about ink cartridges• Check the estimated ink levels• Handle the ink cartridges• Replace the ink cartridges• Store printing supplies• Advanced ink cartridge maintainance
Information about ink cartridgesThe following tips help maintain HP ink cartridges and ensure consistent print quality.
• If you need to replace an ink cartridge, wait until you have the new ink cartridgeavailable to install before removing the old cartridge.
CAUTION: Do not leave untaped ink cartridges outside of the product for anextended period of time. This can result in damage to the ink cartridge.
• Keep all ink cartridges in the original sealed packages until they are needed.• Turn off the HP All-in-One by pressing the (Power) button located on the product.
Wait until the power light turns off before unplugging the power cord or turning off apower strip. If you improperly turn off the HP All-in-One, the print carriage might notreturn to the correct position causing problems with the ink cartridges and print qualityissues. For more information, see Turn off the device.
• Store ink cartridges at room temperature (15-35° C or 59-95° F).• You do not need to replace the cartridges until print quality becomes unacceptable,
but a significant decrease in print quality may be the result of one or more depletedcartridges. Possible solutions include checking the estimated ink levels remaining inthe cartridges, and cleaning the ink cartridges. Cleaning the ink cartridges uses someink. For more information, see Clean the ink cartridges.
• Do not clean ink cartridges unnecessarily. This wastes ink and shortens the life of thecartridges.
Work with ink cartridges 59
• Handle ink cartridges carefully. Dropping, jarring, or rough handling during installationcan cause temporary printing problems.
• If you are transporting the product, do the following to prevent ink leaking from theprint carriage or other damage from occurring to the product:◦ Make sure you turn off the product by pressing the (Power) button.
The print carriage should be parked on the right side in the service station.◦ Make sure you leave the ink cartridges installed.◦ The product must be transported sitting flat; it should not be placed its side, back,
front, or top.
Related topics• Check the estimated ink levels• Clean the ink cartridges
Check the estimated ink levelsYou can check the estimated ink levels from the HP Solution Center, Toolbox (Windows),the HP Utility (Mac OS X), or the embedded Web server. For information about usingthese tools, see Device management tools. You can also print the Printer Status page toview this information (see Understand the Printer Status Report and Self-Test Report).
NOTE: Ink level alerts and indicators provide estimates for planning purposes only.When you receive a low-ink alert, consider having a replacement cartridge availableto avoid possible printing delays. You do not have to replace the cartridges until theprint quality is unacceptable.
NOTE: If you have installed a refilled or remanufactured cartridge, or a cartridge thathas been used in another printer, the ink level indicator might be inaccurate orunavailable.
NOTE: Ink from the cartridges is used in the printing process in a number of differentways, including in the initialization process, which prepares the product and cartridgesfor printing, and in printhead servicing, which keeps print nozzles clear and ink flowingsmoothly. In addition, some residual ink is left in the cartridge after it is used. For moreinformation, see www.hp.com/go/inkusage.
Chapter 6
60 Work with ink cartridges

Handle the ink cartridgesBefore you replace or clean an ink cartridge, you should know the part names and howto handle the ink cartridges.
1 Copper-colored contacts
2 Plastic tape with pink pull tab (must be removed before installing)
3 Ink nozzles under tape
Hold the ink cartridges by their black plastic sides, with the label on top. Do not touch thecopper-colored contacts or the ink nozzles.
NOTE: Handle the ink cartridges carefully. Dropping or jarring cartridges can causetemporary printing problems, or even permanent damage.
Replace the ink cartridgesFollow these instructions when the ink level is low.
NOTE: When the ink level for an ink cartridge is low, a message appears on thedisplay. You can also check the ink levels by using the printer Toolbox (Windows) orthe HP Utility (Mac OS X).
NOTE: Ink from the cartridges is used in the printing process in a number of differentways, including in the initialization process, which prepares the device and cartridgesfor printing. In addition, some residual ink is left in the cartridge after it is used. Formore information see www.hp.com/go/inkusage.
Ink level warnings and indicators provide estimates for planning purposes only. Whenyou receive a low-ink warning message, consider having a replacement cartridge
Replace the ink cartridges 61

available to avoid possible printing delays. You do not need to replace the ink cartridgesuntil print quality becomes unacceptable.
For more information about ordering ink cartridges for the device, see Order printingsupplies online.
To replace the ink cartridges1. Make sure the product is turned on.
CAUTION: If the product is turned off when you open the front access door toaccess the ink cartridges, the product cannot release the cartridges for changing.You might damage the product if the ink cartridges are not docked safely whenyou try to remove them.
2. Open the front access door.The print carriage moves to the far right side of the product.
3. Wait until the print carriage is idle and silent, and then lightly press down on an inkcartridge to release it.If you are replacing the tri-color ink cartridge, remove the ink cartridge from the sloton the left.
Chapter 6
62 Work with ink cartridges

If you are replacing the black ink cartridge, remove the ink cartridge from the slot onthe right.
4. Pull the ink cartridge toward you, out of its slot.
NOTE: HP provides recycling options for used ink cartridges in many countries/regions. For more information, see HP inkjet supplies recycling program.
5. Remove the new ink cartridge from its packaging and, being careful to touch only theblack plastic, gently remove the plastic tape by using the pink pull tab.
1 Copper-colored contacts
2 Plastic tape with pink pull tab (must be removed before installing)
3 Ink nozzles under tape
CAUTION: Do not touch the copper-colored contacts or ink nozzles. Also, donot re-tape the ink cartridges. Doing so can result in clogs, ink failure, and badelectrical connections.
Replace the ink cartridges 63

6. Hold the ink cartridge with the HP logo on top, and insert the new ink cartridge intothe empty cartridge slot. Make sure you push the ink cartridge in firmly until it snapsinto place.If you are installing the tri-color ink cartridge, slide it into the left slot.If you are installing a black ink cartridge, slide it into the right slot.
7. Close the front access door.8. Make sure you have letter or A4, unused, plain white paper loaded in the input tray.
For more information, see Load media.
NOTE: If you have colored paper loaded in the input tray when you align the inkcartridges, the alignment will fail. Load unused plain white paper into the inputtray, and then try the alignment again.
9. Press OKThe HP All-in-One prints an ink cartridge alignment sheet.
Chapter 6
64 Work with ink cartridges

10. Load the ink cartridge alignment sheet face down on the scanner glass in the frontright corner with the top of the page to the right, and then press OK. For moreinformation, see Load an original on the scanner glass.The HP All-in-One aligns the ink cartridges. Recycle or discard the ink cartridgealignment sheet.
Store printing suppliesInk cartridges can be left in the device for extended periods of time. However, to assureoptimal ink cartridge health, be sure to turn off the device properly. For more information,see Turn off the device.
Advanced ink cartridge maintainanceThis section contains the following topics:
• Align the ink cartridges• Clean the ink cartridges
Align the ink cartridgesThe HP All-in-One prompts you to align cartridges every time you install or replace an inkcartridge. You can also align the ink cartridges at any time from the device control panelor by using the software you installed with the device. Aligning the ink cartridges ensureshigh-quality output.
NOTE: If you remove and reinstall the same ink cartridge, the device will not promptyou to align the ink cartridges. It remembers the alignment values for that ink cartridge,so you do not need to realign the ink cartridges.
To align the cartridges from the product control panel1. Load letter or A4, unused, plain white paper in the input tray. For more information,
see Load media.
NOTE: If you have colored paper loaded in the input tray when you align the inkcartridges, the alignment will fail. Load unused plain white paper into the inputtray, and then try the alignment again.
2. Press the (Setup) button on the product control panel.
Advanced ink cartridge maintainance 65

3. Selects Tools and then select Align Cartridge.The product prints an ink cartridge alignment sheet.
4. Place the alignment sheet face down on the scanner glass. For more information, seeLoad an original on the scanner glass.
5. Press OK to scan the alignment sheet.After the alignment sheet is scanned, alignment is complete. Recycle or discard thealignment sheet.
Chapter 6
66 Work with ink cartridges

To align the ink cartridges from the HP software1. Load letter or A4, unused, plain white paper in the input tray. For more information,
see Load media.
NOTE: If you have colored paper loaded in the input tray when you align the inkcartridges, the alignment will fail. Load unused plain white paper into the inputtray, and then try the alignment again.
2. Follow the instructions for your operating system. The product prints an ink cartridgealignment sheet.Windowsa. Open the Toolbox software. For instructions, see Open the Toolbox.b. Click the Device Services tab.c. Click Align the ink cartridges.Mac OS Xa. Open the HP Utility. For instructions, see Open the HP Utility.b. Click Align, and then follow the onscreen instructions.
3. Place the alignment sheet face down on the scanner glass. For more information, seeLoad an original on the scanner glass.
4. Press OK to scan the alignment sheet.After the alignment sheet is scanned, alignment is complete. Recycle or discard thealignment sheet.
Clean the ink cartridgesUse this feature when there is streaking, white lines through any of the lines of color orwhen a color is muddy. Do not clean ink cartridges unnecessarily, as this wastes ink andshortens the life of the ink nozzles.
Advanced ink cartridge maintainance 67

To clean the ink cartridges from the product control panel1. Load letter, A4, or legal unused plain white paper into the input tray.2. Press Setup.3. Select Tools, and then select Clean Cartridge.
The device prints a page that you can recycle or discard.If copy or print quality still seems poor after you clean the ink cartridges, try cleaningthe ink cartridge contacts before replacing the affected ink cartridge.
To clean the ink cartridges from the HP software1. Load letter, A4, or legal unused plain white paper into the input tray. For more
information, see Load media.2. Follow the instructions for your operating system.
Windowsa. Open the Toolbox software. For instructions, see Open the Toolbox.b. Click the Device Services tab.c. Click Align the ink cartridges.Mac OS Xa. Open the HP Utility. For instructions, see Open the HP Utility.b. Click Clean Printheads, and then click Clean.
3. Follow the prompts until you are satisfied with the quality of the output, and then clickDone or Finish.If copy or print quality still seems poor after you clean the ink cartridges, try cleaningthe ink cartridge contacts before replacing the affected ink cartridge. For moreinformation, see Clean the ink cartridge contacts.
Chapter 6
68 Work with ink cartridges

7 Solve a problemThe information in Solve a problem suggests solutions to common problems. If yourdevice is not operating correctly and those suggestions did not solve your problem, tryusing one of the following support services to obtain assistance.This section contains the following topics:
• HP support• General troubleshooting tips and resources• Solve printing problems• Poor print quality and unexpected printouts• Clean the area around the ink nozzles• Solve paper-feed problems• Solve copy problems• Solve scan problems• Solve fax problems• Solve wired (Ethernet) network problems (some models only)• Solve wireless problems (some models only)• Configure your firewall to work with HP devices• Solve device management problems• Troubleshoot installation issues• Understand the Printer Status Report and Self-Test Report• Understand the network configuration page (some models only)• Clear jams
HP support
If you have a problem, follow these steps1. Check the documentation that came with the product.2. Visit the HP online support Web site at www.hp.com/support. HP online support is
available to all HP customers. It is the fastest source for up-to-date device informationand expert assistance and includes the following features:• Fast access to qualified online support specialists• Software and driver updates for the HP all-in-one• Valuable troubleshooting information for common problems• Proactive device updates, support alerts, and HP newsgrams that are available
when you register the HP all-in-oneFor more information, see Obtain electronic support.
3. Call HP support. Support options and availability vary by device, country/region, andlanguage. For more information, see HP support by phone.
Solve a problem 69

Obtain electronic supportTo find support and warranty information, go to the HP Web site at www.hp.com/support. If prompted, choose your country/region, and then click Contact HP forinformation on calling for technical support.
This Web site also offers technical support, drivers, supplies, ordering information andother options such as:
• Access online support pages.• Send HP an e-mail message for answers to your questions.• Connect with an HP technician by using online chat.• Check for software updates.
You can also obtain support from the Toolbox (Windows) or HP Utility (Mac OS X), whichprovide easy, step-by-step solutions to common printing problems. For more information,see Toolbox (Windows) or HP Utility (Mac OS X).
Support options and availability vary by product, country/region, and language.
HP support by phone'The phone support numbers and associated costs listed here are those in effect at timeof publication and are applicable only for calls made on a land line. Different rates mayapply for mobile phones.
For the most current HP list of telephone support numbers and call costs information, seewww.hp.com/support.
During the warranty period, you may obtain assistance from the HP Customer CareCenter.
NOTE: HP does not provide telephone support for Linux printing. All support isprovided online at the following web site: https://launchpad.net/hplip. Click the Ask aquestion button to begin the support process.
The HPLIP Web site does not provide suppport for Windows or Mac OS X. If you areusing these operating systems, see www.hp.com/support.
This section contains the following topics:
• Before you call• Phone support period• Telephone support numbers• After the phone support period
Before you callCall HP support while you are in front of the computer and the HP All-in-One. Be preparedto provide the following information:
• Model number (located on the label on the front of the device)• Serial number (located on the back or bottom of the device)
Chapter 7
70 Solve a problem

• Messages that appear when the situation occurs• Answers to these questions:
◦ Has this situation happened before?◦ Can you re-create it?◦ Did you add any new hardware or software to your computer at about the time
that this situation began?◦ Did anything else occur prior to this situation (such as a thunderstorm, HP All-in-
One was moved, etc.)?
Phone support periodOne year of phone support is available in North America, Asia Pacific, and Latin America(including Mexico).
Telephone support numbersIn many locations, HP provides toll free telephone support during the warranty period.However, some of the support numbers might not be toll free.
HP support 71

For the most current list of telephone support numbers, see www.hp.com/support.
الجزائر
البحرين
℡
℡
مصر
العراقالكويت
لبنانقطراليمن
األردن
عمان
السعوبية
تونس
اإلمارات العربية المتحدة
www.hp.com/support
Chapter 7
72 Solve a problem

After the phone support periodAfter the phone support period, help is available from HP at an additional cost. Help mayalso be available at the HP online support Web site: www.hp.com/support. Contact yourHP dealer or call the support phone number for your country/region to learn more aboutsupport options.
General troubleshooting tips and resourcesNOTE: Many of the steps below require HP software. If you did not install the HPsoftware, you can install it using the HP software CD included with the product, or youcan download the software from the HP support Web site (www.hp.com/support).
Try these when you begin troubleshooting a printing problem.
• For a paper jam, see Clear paper jams.• For paper-feed problems, such as the paper skew and paper pick, see Solve paper-
feed problems.• Power light is on and not blinking. When the device is turned on for the first time, it
takes approximately 12 minutes to initialize it after the ink cartridges are installed.• Power cord and other cables are working, and are firmly connected to the device.
Make sure the device is connected firmly to a functioning alternating current (AC)power outlet, and is turned on. For voltage requirements, see Electricalrequirements.
• Media is loaded correctly in the input tray and is not jammed in the device.• All packing tapes and materials are removed.• The device is set as the current or default printer. For Windows, set it as the default
in the Printers folder. For Mac OS X, set it as the default in the Print & Fax section ofthe System Preferences. See your computer's documentation for more information.
• Pause Printing is not selected if you are using a computer running Windows.• You are not running too many programs when you are performing a task. Close
programs that you are not using or restart the computer before attempting the taskagain.
Troubleshooting topics• Solve printing problems• Poor print quality and unexpected printouts• Solve paper-feed problems• Solve copy problems• Solve scan problems• Solve fax problems• Solve wired (Ethernet) network problems (some models only)• Solve wireless problems (some models only)• Solve device management problems• Troubleshoot installation issues
General troubleshooting tips and resources 73
Solve printing problemsThis section contains the following topics:
• The device shuts down unexpectedly• Error message appears on control-panel display• Alignment fails• The device is not responding (nothing prints)• Device takes a long time to print• Blank or partial page printed• Something on the page is missing or incorrect• Placement of the text or graphics is wrong• The device prints half a page, then ejects the paper
The device shuts down unexpectedly
Check the power and power connectionsMake sure the device is connected firmly to a functioning alternating current (AC) poweroutlet. For voltage requirements, see Electrical requirements.
Error message appears on control-panel display
A non-recoverable error has occurredDisconnect all cables (such as power cord and USB cable), wait about 20 seconds, andreconnect the cables. If the problem persists, visit the HP Web site (www.hp.com/support) for the latest troubleshooting information, or product fixes and updates.
Alignment failsIf the alignment process fails, make sure you have loaded unused, plain white paper intothe input tray. If you have colored paper loaded in the input tray when you align the inkcartridges, the alignment will fail.
If the alignment process fails repeatedly, you might have a defective sensor or inkcartridge. Contact HP support. Go to www.hp.com/support. If prompted, choose yourcountry/region, and then click Contact HP for information on calling for technical support.
The device is not responding (nothing prints)
There are print jobs stuck in the print queueOpen the print queue, cancel all documents, and then reboot the computer. Try to printafter the computer reboots. Refer to the Help system for the operating system for moreinformation.
Check the device setupFor more information, see General troubleshooting tips and resources.
Chapter 7
74 Solve a problem

Check the device software installationIf the device is turned off when printing, an alert message should appear on your computerscreen; otherwise, the device software might not be installed correctly. To resolve this,uninstall the software completely, and then reinstall the device software. For moreinformation, see Uninstall and reinstall the software.
Check the cable connections• Make sure both ends of the USB cable or Ethernet cable are secure.• If the device is connected to a network, check the following:
◦ Check the Link light on the back of the device.◦ Make sure you are not using a phone cord to connect the device.
Check any personal firewall software installed on the computerThe personal software firewall is a security program that protects a computer fromintrusion. However, the firewall might block communication between the computer andthe device. If there is a problem communicating with the device, try temporarily disablingthe firewall. If the problem persists, the firewall is not the source of the communicationproblem. Re-enable the firewall.
Device takes a long time to print
Check the system configuration and resourcesMake sure the computer meets the minimum system requirements for the device. Formore information, see System requirements.
Check the device software settingsPrint speed is slower when you select high print-quality settings. To increase the printspeed, select different print settings in the device driver. For more information, seePrint.
Blank or partial page printed
Clean the ink cartridgeComplete the ink cartridge cleaning procedure. For more information, see Clean the inkcartridges.
Check the media settings• Make sure you select the correct print quality settings in the printer driver for the media
loaded in the trays.• Make sure the page settings in the printer driver match the page size of media loaded
in the tray.
More than one page is being pickedFor more information on paper-feed problems, see Solve paper-feed problems.
Solve printing problems 75

There is a blank page in the fileCheck the file to make sure there is no blank page.
Something on the page is missing or incorrect
Check the margin settingsMake sure the margin settings for the document do not exceed the printable area of thedevice. For more information, see Set minimum margins.
Check the color print settingsMake sure Print in Grayscale is not selected in the print driver.
Check the device location and length of USB cableHigh electromagnetic fields (such as those generated by USB cables) can sometimescause slight distortions to printouts. Move the device away from the source of theelectromagnetic fields. Also, it is recommended that you use a USB cable that is less than3 meters (9.8 feet) long to minimize the effects of these electromagnetic fields.
Check the ink cartridgesMake sure the correct ink cartridges are installed and the ink cartridges are not low onink. For more information, see Device management tools and Handle the ink cartridges.
Placement of the text or graphics is wrong
Check how the media is loadedMake sure the media width and length guides fit snugly against the edges of the stack ofmedia, and make sure the tray is not overloaded. For more information, see Loadmedia.
Check the media size• Content on a page might be cut off if the document size is larger than the media that
you are using.• Make sure the media size selected in the printer driver match the size of media loaded
in the tray.
Check the margin settingsIf the text or graphics are cut off at the edges of the page, make sure the margin settingsfor the document do not exceed the printable area of your device. For more information,see Set minimum margins.
Check the page-orientation settingMake sure the media size and page orientation selected in the application match thesettings in the printer driver. For more information, see Print.
Check the device location and length of USB cableHigh electromagnetic fields (such as those generated by USB cables) can sometimescause slight distortions to printouts. Move the device away from the source of the
Chapter 7
76 Solve a problem

electromagnetic fields. Also, it is recommended that you use a USB cable that is less than3 meters (9.8 feet) long to minimize the effects of these electromagnetic fields.
If the above solutions do not work, the problem may be caused by the inability of theapplication to interpret print settings properly. See the release notes for known softwareconflicts, refer to the application's documentation, or contact the software manufacturerfor specific help.
The device prints half a page, then ejects the paper
Check the ink cartridgesMake sure the correct ink cartridges are installed and the ink cartridges are not low onink. For more information, see Device management tools and Check the estimated inklevels.HP cannot guarantee the quality of non-HP ink cartridges.
Poor print quality and unexpected printoutsIf the quality of the printout is not as expected, try the following solutions to resolve theproblem. Solutions are listed in order, with the most likely solution first. If the first solutiondoes not solve the problem, continue trying the remaining solutions until the issue isresolved.
This section contains the following topics:
• Solution 1: Use genuine HP cartridges• Solution 2: Check the paper• Solution 3: Wait a short period of time (if possible)• Solution 4: Check the print settings• Solution 5: Check estimated ink levels and replace low or empty ink cartridges• Solution 6: Print and evaluate a diagnostic report and troubleshoot defects• Solution 7: Clean the ink cartridges• Solution 8: Align the ink cartridges• Solution 9: Replace the problem ink cartridge• Solution 10: Service the product
Solution 1: Use genuine HP cartridgesHP recommends that you use genuine HP cartridges. Genuine HP cartridges aredesigned and tested with HP printers to help you easily produce great results, time aftertime. HP cannot guarantee the quality or reliability of non-HP supplies. Product serviceor repairs required as a result of using a non-HP ink supply will not be covered underwarranty. HP recommends that you make sure that you are using genuine HP cartridgesbefore continuing.
Solution 2: Check the paperIf you see vertical streaks on your printed documents, the paper or print media might nothave been handled or stored properly. Do not replace cartridges to fix vertical streaks.
Poor print quality and unexpected printouts 77

The images below show the difference between vertical and horizontal streaking.
Horizontal Streaks Vertical streaks
NOTE: Streaks on a copied document commonly appear when the scanner glassor the plastic strip in the automatic document feeder (ADF) is dirty. For informationabout cleaning the scanner glass and plastic strip in the ADF, see Clean the scannerglass and To clean the plastic strip inside the automatic document feeder,respectively.
Use paper or other print media that is appropriate for the print job, and make sure thatyou handle and store it properly:
• Load the paper print-side down in the input tray. (Many papers have printing andnonprinting sides.)
• Make sure that the paper is not wrinkled or curled. Load only clean, wrinkle-free paperinto the product.
• Plain paper is fine for text documents. For photos, HP Advanced Photo paper is thebest choice.
• Try using a different paper. Paper that does not accept ink well is also prone to printdefects. HP ink and paper are designed to work together.
• Store photo paper in its original packaging and inside a resealable plastic bag. Storethe paper on a flat surface and in a cool, dry place. Load photo paper only when youare ready to print, and then put the unused paper back in the packaging.
For more information about selecting paper, see Select print media. For more informationabout loading paper, see Load media.After trying the preceding guidelines, try printing again.
If the issue persists, continue to the next solution.
Solution 3: Wait a short period of time (if possible)A short period of printer inactivity can clear up some problems. If possible, let the printersit idle for 40 minutes, and then try printing again.
If the issue persists, continue to the next solution.
Solution 4: Check the print settingsFollow these steps to check the print settings to make sure that they are appropriate foryour print job.
Chapter 7
78 Solve a problem

Step 1: Check the print quality settingsThe print quality settings in the product software might not be optimized for the type ofdocument you are printing. Follow these steps to check these settings.If the issue persists, continue to the next solution Step 2: Check the Print in Grayscalesetting.
Windows1. In the software program from which you want to print, click the File menu, click
Print, and then click Setup, Properties, or Preferences.(Specific options might vary depending on the application that you are using.)
2. On the Features tab, review the following options, and then make any necessarychanges.• Print quality: If you are not satisfied with the quality of your printouts, increase
the print quality. To print more quickly, decrease the print quality.• Paper type: If one of the options matches your paper type exactly, choose the
matching option rather than Automatic.• Resizing Options: Make sure the selected option matches your paper size.
Mac OS X1. From the File menu in your software application, choose Print.2. Choose Paper Type/Quality from the pop-up menu, review the following options,
and then make any necessary changes.• Paper Type: If one of the options matches your paper type exactly, choose the
matching option.• Quality: you are not satisfied with the quality of your printouts, increase the print
quality. To print more quickly, decrease the print quality.3. Choose Paper Handling from the pop-up menu, review the following options, and
then make any necessary changes.Destination Paper Size: Make sure the selected option matches your paper size.
Step 2: Check the Print in Grayscale settingThe product software might be set to print in grayscale. Follow these steps to check thissetting.
If the issue persists, continue to the next solution.
Windows1. In the software program from which you want to print, click the File menu, click
Print, and then click Setup, Properties, or Preferences.(Specific options might vary depending on the application that you are using.)
2. Click the Color tab.3. Make sure Print in Grayscale is not selected.
Poor print quality and unexpected printouts 79

Mac OS X1. From the File menu in your software application, choose Print.2. Choose Paper Type/Quality from the pop-up menu.3. In the Color Options area, make sure the Color setting is not set to Grayscale.
Solution 5: Check estimated ink levels and replace low or empty ink cartridgesFollow these steps to check the estimated ink levels on your product, and then replacelow cartridges according to the results.
For more information about checking ink levels, see Check the estimated ink levels.
• If the ink-level graphic shows low cartridges, and you are not satisfied with thequality of your prints, replace the cartridges now. For more information aboutreplacing cartridges, see Replace the ink cartridges.
• If the ink-level graphic shows cartridges that are not low, you do not need toreplace the cartridges yet. Continue to the next solution.
Solution 6: Print and evaluate a diagnostic report and troubleshoot defects1. To help diagnose the print quality problems, follow the instructions for your particular
model to print a diagnostic report.• If your product does not support wireless communication, see Print Quality
Diagnostic Report.• If your product supports wireless communication, see Self-Test Report.
2. After evaluating the report, if you see no defects on the diagnostic report, the printmechanism and ink supplies are working correctly. If prints are still unsatisfactory,check the following:• Make sure the image file has sufficient resolution. Images that have been
enlarged too much might appear fuzzy or blurry.• If the problem seems confined to a band near the edge of a print, the problem
might not appear on the other end of the print. Try using a program on yourcomputer to rotate the document or image 180 degrees.
• If the issue persists, visit the HP online support Web site at www.hp.com/support for further troubleshooting information.
NOTE: Stop troubleshooting here. Do not continue with the steps below if thepage shows no defects.
3. If you see one or more defects on the diagnostic report, continue to the nextsolution.
Chapter 7
80 Solve a problem

Print Quality Diagnostic Report1. Load regular, white, letter-size or A4 paper2. On the product control panel, press (Setup), select Print Report, select Print
Quality, and then press OK.3. Evaluate the Print Quality Diagnostic Report:
a Ink level
b Color bars
c Large-font text
d Alignment pattern
a. Ink level: Look at the Ink level boxes to double-check cartridge ink levels. If abox is completely white, you might need to replace that ink cartridge.
Example Ink Level - Black is low - replace. Tri-color is OK.
Poor print quality and unexpected printouts 81

b. Color bars: Look at the color bars in the middle of the page. You should see
seven color bars. These bars should have sharp edges, should be solid (notstreaked with white or other colors), and should be uniform in color throughout.
Example of Good Color Bars: All bars are solid, sharp-edged, and extend with uniformcolor across the entire page. The printer is operating correctly.
• The top black bar is printed by the Black Ink Cartridge• The colored bars are printed by the Tri-color Ink Cartridge
Ragged or irregularly streaked or faded bars
Example of Bad Color Bars: The top bar is irregularly streaked or fading.
Example of Bad Color Bars: The top bar is ragged on one end.
Chapter 7
82 Solve a problem

To prevent problems causing ragged bars on the PQ Diagnostic Report, try thefollowing solutions:• Avoid leaving un-taped ink cartridges outside of the printer for an extended
period of time. For more information about handling ink cartridges, see Handlethe ink cartridges.
• Always turn off the product using the (Power) button, which prevents airfrom getting into the cartridges. For more information about turning off theproduct, see Turn off the device.
Regular white streaks in the bars
Example of bad color bars: The blue bar has regular white streaks.
Bar colors are not uniform
Example of Bad Color Bars: The yellow bar is streaked with another color.
c. Large-font text: Look at the large-font text above the color blocks. The typeshould be sharp and clear.Example of good large-font text
The letters are sharp and clear - the printer is operating correctly.
Poor print quality and unexpected printouts 83

Examples of bad large-font text
The letters are jagged.
The letters are smeared.
The letters are ragged on one end.
d. Alignment pattern: If the color bars and large-font text look OK and the inkcartridges are not empty, look at the alignment pattern directly above the colorbars.Example of a good alignment pattern.
The lines are straight.
Example of a bad alignment pattern
Chapter 7
84 Solve a problem

The lines are jagged.
Self-Test ReportFollow these steps to print, and then evaluate a Diagnostic report.1. Load regular, white, letter-size or A4 paper.2. On the product control panel, press (Setup), select Print Report, select Self-
Test, and then press OK.
Poor print quality and unexpected printouts 85

To evaluate the Diagnostic Page:1. Look at the color bars in the middle of the page. There should be three color bars and
a black bar. All the bars should have sharp edges. They should be solid (not streakedwith white or other colors). They should be uniform in color throughout.
Example of Good Bars - all bars are solid, sharp-edged, and uniformly colored - theprinter is operating correctly.• The black bar is printed by the Black Ink Cartridge• The colored bars are printed by the Tri-color Ink Cartridge Ragged or irregularly streaked or faded bars
Example of bad black bar - The black bar is ragged at one end.
NOTE: To prevent problems causing ragged bars on the Self-Test Report, trythe following solutions:
• Avoid leaving un-taped ink cartridges outside of the printer for an extended periodof time. For more information about handling ink cartridges, see Handle the inkcartridges.
• Always turn off the product using the (Power) button, which prevents air fromgetting into the cartridges. For more information about turning off the product, seeTurn off the device.
Regular white streaks in the bars
Example of bad color bars - the blue bar has regular white streaks.
Chapter 7
86 Solve a problem

Bar colors are not uniform
Example of Bad Color Bars - The yellow bar is streaked with another color.
Black Text2. Look at the black text printed on the page. The type should be sharp and clear.
Example of good black text - the letters are sharp and clear - the printer is operating correctly
Example of bad black text - the letters are smeared.
Solution 7: Clean the ink cartridgesClean the ink cartridges if you see the following in the diagnostic report:
• Color bars: Color bars are ragged or irregularly streaked or faded; have regular,white streaks; or are not a uniform color throughout the bar, clean the ink cartridges.
• Large-font text: Letters are smeared or ragged on one end.
For instructions, see Clean the ink cartridges.
NOTE: Do not clean ink cartridges unnecessarily. Unnecessary cleaning wastes inkand shortens the life of the ink nozzles.
If the issue persists, continue to the next step.
Poor print quality and unexpected printouts 87

Solution 8: Align the ink cartridgesAlign the ink cartridges if you see the following in the diagnostic report:
• Large-font text: Letters are jagged.• Alignment pattern: Lines are jagged.For instructions, see Align the ink cartridges.
If the issue persists, continue to the next step.
Solution 9: Replace the problem ink cartridgeIf you saw defects on the Print Quality Diagnostic Report or Self-Test Report and cleaningand alignment did not help, replace the problem ink cartridge. For instructions, seeReplace the ink cartridges.
If the issue persists, continue to the next step.
Solution 10: Service the productIf you have completed all the steps listed above and are still experiencing a problem, theproduct might need servicing.
To contact HP support, visit www.hp.com/support. If prompted, choose your country/region, and then click Contact HP for information on calling for technical support.
Clean the ink cartridge contactsClean the ink cartridge contacts only if you get repeated messages on the display.
Before cleaning the ink cartridge contacts, remove the ink cartridge and verify that nothingis covering the ink cartridge contacts, then reinstall the ink cartridge. If you continue toget messages to check the ink cartridges, clean the ink cartridge contacts.
Make sure you have the following materials available:• Dry foam rubber swabs, lint-free cloth, or any soft material that will not come apart or
leave fibers.
TIP: Coffee filters are lint-free and work well for cleaning ink cartridges.
• Distilled, filtered, or bottled water (tap water might contain contaminants that candamage the ink cartridges).
CAUTION: Do not use platen cleaners or alcohol to clean the ink cartridgecontacts. These can damage the ink cartridge or the HP All-in-One.
Chapter 7
88 Solve a problem

To clean the ink cartridge contacts1. Turn on the device and open the ink cartridge door.
The print carriage moves to the far right side of the device.2. Wait until the print carriage is idle and silent, and then unplug the power cord from
the back of the device.
NOTE: Depending how long the HP All-in-One is unplugged, the date and timemight be erased. You might need to reset the date and time later, when you plugthe power cord back in.
3. Lightly press down on the ink cartridge to release it, and then pull it toward you, outof the slot.
4. Inspect the ink cartridge contacts for ink and debris buildup.5. Dip a clean foam rubber swab or lint-free cloth into distilled water, and squeeze any
excess water from it.6. Hold the ink cartridge by its sides.7. Clean only the copper-colored contacts. Allow the ink cartridges to dry for
approximately ten minutes.
1 Copper-colored contacts
2 Ink nozzles (do not clean)
8. Slide the ink cartridge back into the slot. Push the ink cartridge forward until it clicksinto place.
9. Repeat if necessary for the other ink cartridge.10. Gently close the ink cartridge door and plug the power cord into the back of the device.
Clean the area around the ink nozzlesIf the device is used in a dusty environment, a small amount of debris might accumulateinside the device. This debris can include dust, hair, carpet, or clothing fibers. Whendebris gets on the ink cartridges, it can cause ink streaks and smudges on printed pages.Ink streaking can be corrected by cleaning around the ink nozzles as described here.
Clean the area around the ink nozzles 89

NOTE: Clean the area around the ink nozzles only if you continue to see streaksand smudges on your printed pages after you have already cleaned the ink cartridgesby using the device control panel or the software you installed with the HP All-in-One.
Make sure you have the following materials available:• Dry foam rubber swabs, lint-free cloth, or any soft material that will not come apart or
leave fibers.
TIP: Coffee filters are lint-free and work well for cleaning ink cartridges.
• Distilled, filtered, or bottled water (tap water might contain contaminants that candamage the ink cartridges).
CAUTION: Do not touch the copper-colored contacts or ink nozzles. Touchingthese parts can result in clogs, ink failure, and bad electrical connections.
To clean the area around the ink nozzles1. Turn on the device and open the ink cartridge door.
The print carriage moves to the far right side of the device.2. Wait until the print carriage is idle and silent, and then unplug the power cord from
the back of the device.
NOTE: Depending how long the HP All-in-One is unplugged, the date and timemight be erased. You might need to reset the date and time later, when you plugthe power cord back in.
3. Lightly press down on the ink cartridge to release it, and then pull it toward you out,of the slot.
NOTE: Do not remove both ink cartridges at the same time. Remove and cleaneach ink cartridge one at a time. Do not leave an ink cartridge outside the devicefor more than 30 minutes.
4. Place the ink cartridge on a piece of paper with the ink nozzles facing up.5. Lightly moisten a clean foam rubber swab with distilled water, and squeeze any
excess water from it.
Chapter 7
90 Solve a problem

6. Clean the face and edges around the ink nozzle area with the swab, as shown below.
1 Nozzle plate (do not clean)
2 Face and edges around the ink nozzle area
CAUTION: Do not clean the nozzle plate.
7. Slide the ink cartridge back into the slot. Push the ink cartridge forward until it clicksinto place.
8. Repeat if necessary for the other ink cartridge.9. Gently close the ink cartridge door and plug the power cord into the back of the device.
Solve paper-feed problems
Media is not supported for the printer or trayUse only media that is supported for the device and the tray being used. For moreinformation, see Media specifications.
Media is not picked up from a tray• Make sure media is loaded in the tray. For more information, see Load media. Fan
the media before loading.• Make sure the paper guides are set to the correct markings in the tray for the media
size you are loading. Also make sure the guides are snug, but not tight, against thestack.
• Make sure media in the tray is not curled. Uncurl paper by bending it in the oppositedirection of the curl.
• When using thin special media, make sure that the tray is completely loaded. If youare using special media that is only available in small quantities, try placing the specialmedia on top of other paper of the same size to help fill the tray. (Some media ispicked up more easily if the tray is full.)
• If you are using thick special media (such as brochure paper), load media so that thetray is between 1/4 and 3/4 full. If necessary, place the media on top of other paperof the same size so that the stack height is within this range.
Solve paper-feed problems 91

Media is not coming out correctly• Make sure the output tray extension is extended; otherwise, printed pages may fall
off the device.
• Remove excess media from the output tray. There is a limit to the number of sheetsthe tray can hold.
Pages are skewing• Make sure the media loaded in the trays is aligned to the paper guides. If needed,
pull out the trays from the device and reload the media properly, making sure that thepaper guides are properly aligned.
• Load media into the device only when it is not printing.
Multiple pages are being picked up• Fan the media before loading.• Make sure the paper guides are set to the correct markings in the tray for the media
size you are loading. Also make sure the guides are snug, but not tight, against thestack.
• Make sure the tray is not overloaded with paper.• When using thin special media, make sure that the tray is completely loaded. If you
are using special media that is only available in small quantities, try placing the specialmedia on top of other paper of the same size to help fill the tray. (Some media ispicked up more easily if the tray is full.)
• If you are using thick special media (such as brochure paper), load media so that thetray is between 1/4 and 3/4 full. If necessary, place the media on top of other paperof the same size so that the stack height is within this range.
• Use HP media for optimum performance and efficiency.
Solve copy problemsIf the following topics do not help, see HP support for information about HP support.
• No copy came out• Copies are blank• Documents are missing or faded
Chapter 7
92 Solve a problem

• Size is reduced• Copy quality is poor• Copy defects are apparent• The device prints half a page, then ejects the paper• Paper mismatch
No copy came out• Check the power
Make sure that the power cord is securely connected, and the device turned on.• Check the status of the device
◦ The device might be busy with another job. Check the control-panel display forinformation about the status of jobs. Wait for any job that is processing to finish.
◦ The device might be jammed. Check for jams. See Clear paper jams.• Check the trays
Make sure that media is loaded. See Load media for more information.
Copies are blank• Check the media
The media might not meet Hewlett-Packard media specifications (for example, themedia is too moist or too rough). See Media specifications for more information.
• Check the settingsThe contrast setting might be set too light. Use the Copy button on the device controlpanel to create darker copies.
• Check the traysIf the product has an automatic document feeder (ADF) and you are copying from theADF, make sure that the originals have been loaded correctly. For more information,see Load an original in the automatic document feeder (ADF).
Documents are missing or faded• Check the media
The media might not meet Hewlett-Packard media specifications (for example, themedia is too moist or too rough). See Media specifications for more information.
• Check the settingsThe quality setting of Fast (which produces draft-quality copies) might be responsiblefor the missing or faded documents. Change to the Normal or Best setting.
• Check the original◦ The accuracy of the copy depends on the quality and size of the original. Use the
Copy menu to adjust the brightness of the copy. If the original is too light, thecopy might not be able to compensate, even if you adjust the contrast.
◦ Colored backgrounds might cause images in the foreground to blend into thebackground, or the background might appear in a different shade.
◦ If you are copying a borderless original, load the original on the scanner glass,not the ADF. For more information, see Load an original on the scanner glass.
Solve copy problems 93

Size is reduced• The reduce/enlarge or other copy feature might have been set from the device control
panel to reduce the scanned image. Check the settings for the copy job to make surethat they are for normal size.
• The HP software settings might be set to reduce the scanned image. Change thesettings, if needed. See the onscreen Help for the HP software for more information.
Copy quality is poor • Take steps to improve the copy quality
◦ Use quality originals.◦ Load the media correctly. If the media is loaded incorrectly, it might skew, causing
unclear images. See Media specifications for more information.◦ Use or make a carrier sheet to protect your originals.
• Check the device◦ The scanner lid might not be closed properly.◦ The scanner glass or lid backing might need cleaning. See Maintain the device
for more information.◦ If the product has an automatic document feeder (ADF), ADF might need
cleaning. See Maintain the device for more information.
Copy defects are apparent• Vertical white or faded stripes
The media might not meet Hewlett-Packard media specifications (for example, themedia is too moist or too rough). See Media specifications for more information.
• Too light or darkTry adjusting the contrast and copy-quality settings.
• Unwanted linesThe scanner glass, lid backing, or frame might need cleaning. See Maintain thedevice for more information.
• Black dots or streaksInk, glue, correction fluid, or an unwanted substance might be on the scanner glassor lid backing. Try cleaning the device. See Maintain the device for more information.
• Copy is slanted or skewedIf the product has an automatic document feeder (ADF), check the following:◦ Make sure that the ADF input tray is not too full.◦ Make sure that the ADF width adjusters are snug against the sides of the media.
• Unclear text◦ Try adjusting the contrast and copy-quality settings.◦ The default enhancement setting might not be suitable for the job. Check the
setting and change it to enhance text or photographs, if needed. For moreinformation, see Change copy settings.
• Incompletely filled text or graphicsTry adjusting the contrast and copy-quality settings.
Chapter 7
94 Solve a problem

• Large, black typefaces look splotchy (not smooth)The default enhancement setting might not be suitable for the job. Check the settingand change it to enhance text or photographs, if needed. For more information, seeChange copy settings.
• Horizontal grainy or white bands in light-gray to medium-gray areasThe default enhancement setting might not be suitable for the job. Check the settingand change it to enhance text or photographs, if needed. For more information, seeChange copy settings.
The device prints half a page, then ejects the paper
Check the ink cartridgesMake sure the correct ink cartridges are installed and the ink cartridges are not low onink. For more information, see Device management tools and Check the estimated inklevels.HP cannot guarantee the quality of non-HP ink cartridges.
Paper mismatch
Check the settingsVerify that the loaded media size and type matches the control panel settings.
Solve scan problemsIf the following topics do not help, see HP support for information about HP support.
NOTE: If you are starting the scan from a computer, see the software Help fortroubleshooting information.
• Scanner did nothing• Scan takes too long• Part of the document did not scan or text is missing• Text cannot be edited• Error messages appear• Scanned image quality is poor• Scan defects are apparent
Scanner did nothing• Check the original
Make sure that the original is placed on the scanner glass correctly. For moreinformation, see Load an original on the scanner glass.
• Check the deviceThe device might be coming out of PowerSave mode after a period of inactivity, whichdelays processing a short while. Wait until the device reaches the READY state.
• Check the softwareMake sure the software is properly installed.
Solve scan problems 95

Scan takes too long• Check the settings
◦ If you set the resolution too high, the scan job takes longer and results in largerfiles. To obtain good results when scanning or copying, do not use a resolutionthat is higher than needed. You can lower the resolution to scan more quickly.
◦ If you acquire an image through TWAIN, you can change the settings so that theoriginal scans in black and white. See the onscreen Help for the TWAIN programfor information.
• Check the status of the deviceIf you sent a print or copy job before you tried to scan, the scan starts if the scanneris not busy. However, the printing and scanning processes share memory, whichmeans that the scan might be slower.
Part of the document did not scan or text is missing• Check the original
◦ Make sure that you loaded the original correctly. For more information, see Loadan original on the scanner glass.
◦ If you are copying a borderless original, load the original on the scanner glass,not the ADF. For more information, see Load an original on the scanner glass.
◦ Colored backgrounds can cause images in the foreground to blend into thebackground. Try adjusting the settings before you scan the original, or tryenhancing the image after you scan the original.
• Check the settings◦ Make sure that the input media size is large enough for the original that you are
scanning.◦ If you are using the HP software, the default settings in the HP software might be
set to automatically perform a specific task other than the one that you areattempting. See the onscreen Help for the HP software for instructions aboutchanging the properties.
◦ If you have selected a picture scanning option, the HP software automaticallycrops the image. However, if you want to scan the entire page, complete thefollowing steps:Windows: From the HP Solution Center software, click Scan Picture, clickAdvanced Picture Settings, and then select Scan the entire glass.Mac OS X: From the HP Scan software, click Scan, select the Picturesscanprofile, click Profile Settings, and then clear the Cropcheck box.
Chapter 7
96 Solve a problem

Text cannot be edited• Check the settings
◦ Make sure the HP software (or any additional OCR software) is properly installed.◦ When you scan the original, make sure that you select a document type or save
the scan in a format that creates editable, searchable text. If text is classified asa graphic, it is not converted to text.
◦ Your OCR program might be linked to a word-processing program that does notperform OCR tasks. See the product software Help for more information aboutlinking programs.
• Check the originals◦ Make sure that you placed the original correctly on the scanner glass. For more
information, see Load an original on the scanner glass.◦ The OCR program might not recognize text that is tightly spaced. For example, if
the text that the OCR program converts has missing or combined characters, "rn"might appear as "m."
◦ The accuracy of the OCR program depends on the image quality, text size, andstructure of the original and the quality of the scan itself. Make sure that youroriginal has good image quality.
◦ Colored backgrounds can cause images in the foreground to blend too much. Tryadjusting the settings before you scan the original, or try enhancing the imageafter you scan the original. If you are performing an OCR operation on an original,any colored text on the original does not scan well, if at all.
Error messages appear"Unable to activate TWAIN source" or "An error occurred while acquiring theimage"◦ If you are acquiring an image from another device, such as a digital camera or another
scanner, make sure that the other device is TWAIN-compliant. Devices that are notTWAIN-compliant do not work with the device software.
◦ Make sure that you have connected the USB cable to the correct port on the back ofyour computer.
◦ Verify that the correct TWAIN source is selected. In the software, check the TWAINsource by selecting Select Scanner on the File menu.
Scanned image quality is poor The original is a second-generation photo or pictureReprinted photographs, such as those in newspapers or magazines, are printed by usingtiny dots of ink that make an interpretation of the original photograph, which degrades thequality. Often, the ink dots form unwanted patterns that can be detected when the imageis scanned or printed or when the image appears on a screen. If the following suggestionsdo not solve the problem, you might need to use a better-quality version of the original.◦ To eliminate the patterns, try reducing the size of the image after scanning.◦ Print the scanned image to see if the quality is better.◦ Make sure that the resolution and color settings are correct for the type of scan job.
Solve scan problems 97

Text or images on the back of a two-sided original appear in the scanTwo-sided originals can "bleed" text or images from the back side to the scan if theoriginals are printed on media that is too thin or too transparent.The scanned image is skewed (crooked)The original might have been placed incorrectly. Be sure to use the media guides whenyou place the original on the scanner glass. For more information, see Load an originalon the scanner glass.The image quality is better when printedThe image that appears on the screen is not always an accurate representation of thequality of the scan.◦ Try adjusting your computer monitor settings to use more colors (or levels of gray).
On Windows computers, you typically make this adjustment by opening Display onthe Windows control panel.
◦ Try adjusting the resolution and color settings.The scanned image shows blots, lines, vertical white stripes, or other defects◦ If the scanner glass is dirty, the image produced does not have optimum clarity. See
Maintain the device for cleaning instructions.◦ The defects might be on the original and not a result of the scanning process.Graphics look different from the originalThe graphics settings might not be suitable for the type of scan job that you areperforming. Try changing the graphics settings.Take steps to improve the scan quality◦ Use high-quality originals.◦ Place the media correctly. If the media is placed incorrectly on the scanner glass, it
might skew, which causes unclear images. For more information, see Load an originalon the scanner glass.
◦ Adjust the software settings according to how you plan to use the scanned page.◦ Use or make a carrier sheet to protect your originals.◦ Clean the scanner glass. See Clean the scanner glass for more information.
Scan defects are apparent• Blank pages
Make sure that the original document is placed correctly. Place the original documentface down on the flatbed scanner with the top-left corner of the document located inthe lower-right corner of the scanner glass.
• Too light or dark◦ Try adjusting the settings. Be sure to use the correct resolution and color settings.◦ The original image might be very light or dark or might be printed on colored paper.
• Unwanted linesInk, glue, correction fluid, or an unwanted substance might be on the scanner glass.Try cleaning the scanner glass. See Maintain the device for more information.
Chapter 7
98 Solve a problem

• Black dots or streaks◦ Ink, glue, correction fluid, or an unwanted substance might be on the scanner
glass, the scanner glass might be dirty or scratched, or the lid backing might bedirty. Try cleaning the scanner glass and lid backing. See Maintain the device formore information. If cleaning does not correct the problem, the scanner glass orlid backing might need to be replaced.
◦ The defects might be on the original and not a result of the scanning process.• Unclear text
Try adjusting the settings. Make sure that the resolution and color settings are correct.• Size is reduced
The HP software settings might be set to reduce the scanned image. See the productsoftware Help for more information about changing the settings.
Solve fax problemsThis section contains fax setup troubleshooting information for the device. If the deviceis not set up properly for faxing, you might experience problems when sending faxes,receiving faxes, or both.
If you are having faxing problems, you can print a fax test report to check the status ofthe device. The test will fail if the device is not set up properly for faxing. Perform this testafter you have completed setting up the device for faxing. For more information, see Testfax setup.
If the test fails, review the report for information on how to fix any problems found. Formore information, see The fax test failed.• The fax test failed• The display always shows Phone Off Hook• The device is having problems sending and receiving faxes• The device is having problems sending a manual fax• The device cannot receive faxes, but can send faxes• The device cannot send faxes, but can receive faxes• Fax tones are recorded on my answering machine• The phone cord that came with my device is not long enough• Color faxes do not print• The computer cannot receive faxes (Fax to PC and Fax to Mac)
The fax test failedIf you ran a fax test and the test failed, review the report for basic information about theerror. For more detailed information, check the report to see which part of the test failed,and then review the appropriate topic in this section for solutions to try.
This section contains the following topics:
• The "Fax Hardware Test" failed• The "Fax Connected to Active Telephone Wall Jack" test failed• The "Phone Cord Connected to Correct Port on Fax" test failed• The "Using Correct Type of Phone Cord with Fax" test failed
Solve fax problems 99

• The "Dial Tone Detection" test failed• The "Fax Line Condition" test failed
The "Fax Hardware Test" failed
Solution:• Turn off the device by using the Power button located on the device control panel
and then unplug the power cord from the back of the device. After a few seconds,plug the power cord in again, and then turn the power on. Run the test again. Ifthe test fails again, continue reviewing the troubleshooting information in thissection.
• Try to send or receive a test fax. If you can send or receive a fax successfully,there might not be a problem.
• If you are running the test from the Fax Setup Wizard (Windows) or HP SetupAssitant (Mac OS X), make sure the device is not busy completing another task,such as receiving a fax or making a copy. Check the display for a messageindicating that the device is busy. If it is busy, wait until it is finished and in the idlestate before running the test.
• Make sure you use the phone cord that came with the device. If you do not usethe supplied phone cord to connect from the telephone wall jack to the device,you might not be able to send or receive faxes. After you plug in the phone cordthat came with the device, run the fax test again.
• If you are using a phone splitter, this can cause faxing problems. (A splitter is atwo-cord connector that plugs into a telephone wall jack.) Try removing the splitterand connecting the device directly to the telephone wall jack.
After you resolve any problems found, run the fax test again to make sure it passesand the device is ready for faxing. If the Fax Hardware Test continues to fail and youexperience problems faxing, contact HP support. Go to www.hp.com/support. Ifprompted, choose your country/region, and then click Contact HP for information oncalling for technical support.
The "Fax Connected to Active Telephone Wall Jack" test failed
Solution:• Check the connection between the telephone wall jack and the device to make
sure the phone cord is secure.• Make sure you use the phone cord that came with the device. If you do not use
the supplied phone cord to connect from the telephone wall jack to the device,you might not be able to send or receive faxes. After you plug in the phone cordthat came with the device, run the fax test again.
• Make sure you have correctly connected the device to the telephone wall jack.Using the phone cord supplied in the box with the device, connect one end to yourtelephone wall jack, then connect the other end to the port labeled 1-LINE on theback of the device. For more information on setting up the device for faxing, seeAdditional fax setup.
Chapter 7
100 Solve a problem

• If you are using a phone splitter, this can cause faxing problems. (A splitter is atwo-cord connector that plugs into a telephone wall jack.) Try removing the splitterand connecting the device directly to the telephone wall jack.
• Try connecting a working phone and phone cord to the telephone wall jack thatyou are using for the device and check for a dial tone. If you do not hear a dialtone, contact your telephone company and have them check the line.
• Try to send or receive a test fax. If you can send or receive a fax successfully,there might not be a problem.
After you resolve any problems found, run the fax test again to make sure it passesand the device is ready for faxing.
The "Phone Cord Connected to Correct Port on Fax" test failedSolution: Plug the phone cord into the correct port.1. Using the phone cord supplied in the box with the device, connect one end to your
telephone wall jack, then connect the other end to the port labeled 1-LINE on theback of the device.
NOTE: If you use the 2-EXT port to connect to the telephone wall jack, youwill not be able to send or receive faxes. The 2-EXT port should only be usedto connect other equipment, such as an answering machine.
Figure 7-1 Back view of the device
1 Telephone wall jack
2 Use the phone cord supplied in the box with the device to connect to the "1-LINE" port
2. After you have connected the phone cord to the port labeled 1-LINE, run the faxtest again to make sure it passes and the device is ready for faxing.
3. Try to send or receive a test fax.• Make sure you use the phone cord that came with the device. If you do not use
the supplied phone cord to connect from the telephone wall jack to the device,you might not be able to send or receive faxes. After you plug in the phone cordthat came with the device, run the fax test again.
• If you are using a phone splitter, this can cause faxing problems. (A splitter is atwo-cord connector that plugs into a telephone wall jack.) Try removing the splitterand connecting the device directly to the telephone wall jack.
Solve fax problems 101
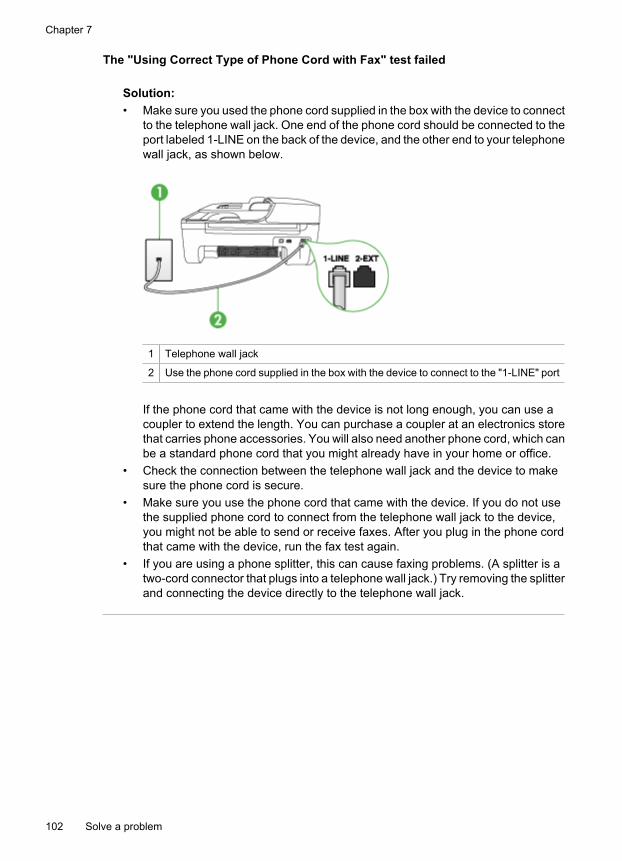
The "Using Correct Type of Phone Cord with Fax" test failed
Solution:• Make sure you used the phone cord supplied in the box with the device to connect
to the telephone wall jack. One end of the phone cord should be connected to theport labeled 1-LINE on the back of the device, and the other end to your telephonewall jack, as shown below.
1 Telephone wall jack
2 Use the phone cord supplied in the box with the device to connect to the "1-LINE" port
If the phone cord that came with the device is not long enough, you can use acoupler to extend the length. You can purchase a coupler at an electronics storethat carries phone accessories. You will also need another phone cord, which canbe a standard phone cord that you might already have in your home or office.
• Check the connection between the telephone wall jack and the device to makesure the phone cord is secure.
• Make sure you use the phone cord that came with the device. If you do not usethe supplied phone cord to connect from the telephone wall jack to the device,you might not be able to send or receive faxes. After you plug in the phone cordthat came with the device, run the fax test again.
• If you are using a phone splitter, this can cause faxing problems. (A splitter is atwo-cord connector that plugs into a telephone wall jack.) Try removing the splitterand connecting the device directly to the telephone wall jack.
Chapter 7
102 Solve a problem

The "Dial Tone Detection" test failed
Solution:• Other equipment, which uses the same phone line as the device, might be causing
the test to fail. To find out if other equipment is causing a problem, disconnecteverything from the phone line, and then run the test again. If the Dial ToneDetection Test passes without the other equipment, then one or more pieces ofthe equipment is causing problems; try adding them back one at a time andrerunning the test each time, until you identify which piece of equipment is causingthe problem.
• Try connecting a working phone and phone cord to the telephone wall jack thatyou are using for the device and check for a dial tone. If you do not hear a dialtone, contact your telephone company and have them check the line.
• Make sure you have correctly connected the device to the telephone wall jack.Using the phone cord supplied in the box with the device, connect one end to yourtelephone wall jack, then connect the other end to the port labeled 1-LINE on theback of the device.
• If you are using a phone splitter, this can cause faxing problems. (A splitter is atwo-cord connector that plugs into a telephone wall jack.) Try removing the splitterand connecting the device directly to the telephone wall jack.
• If your telephone system is not using a standard dial tone, such as some PBXsystems, this might cause the test to fail. This will not cause a problem sendingor receiving faxes. Try sending or receiving a test fax.
• Check to make sure the country/region setting is set appropriately for yourcountry/region. If the country/region setting is not set or is set incorrectly, the testmight fail and you might have problems sending and receiving faxes.
• Make sure you connect the device to an analog phone line or you will not be ableto send or receive faxes. To check if your phone line is digital, connect a regularanalog phone to the line and listen for a dial tone. If you do not hear a normalsounding dial tone, it might be a phone line set up for digital phones. Connect thedevice to an analog phone line and try sending or receiving a fax.
• Make sure you use the phone cord that came with the device. If you do not usethe supplied phone cord to connect from the telephone wall jack to the device,you might not be able to send or receive faxes. After you plug in the phone cordthat came with the device, run the fax test again.
After you resolve any problems found, run the fax test again to make sure it passesand the device is ready for faxing. If the Dial Tone Detection test continues to fail,contact your telephone company and have them check the phone line.
Solve fax problems 103

The "Fax Line Condition" test failed
Solution:• Make sure you connect the device to an analog phone line or you will not be able
to send or receive faxes. To check if your phone line is digital, connect a regularanalog phone to the line and listen for a dial tone. If you do not hear a normalsounding dial tone, it might be a phone line set up for digital phones. Connect thedevice to an analog phone line and try sending or receiving a fax.
• Check the connection between the telephone wall jack and the device to makesure the phone cord is secure.
• Make sure you have correctly connected the device to the telephone wall jack.Using the phone cord supplied in the box with the device, connect one end to yourtelephone wall jack, then connect the other end to the port labeled 1-LINE on theback of the device.
• Other equipment, which uses the same phone line as the device, might be causingthe test to fail. To find out if other equipment is causing a problem, disconnecteverything from the phone line, and then run the test again.◦ If the Fax Line Condition Test passes without the other equipment, then one
or more pieces of the equipment is causing problems; try adding them backone at a time and rerunning the test each time, until you identify which pieceof equipment is causing the problem.
◦ If the Fax Line Condition Test fails without the other equipment, connect thedevice to a working phone line and continue reviewing the troubleshootinginformation in this section.
• If you are using a phone splitter, this can cause faxing problems. (A splitter is atwo-cord connector that plugs into a telephone wall jack.) Try removing the splitterand connecting the device directly to the telephone wall jack.
• Make sure you use the phone cord that came with the device. If you do not usethe supplied phone cord to connect from the telephone wall jack to the device,you might not be able to send or receive faxes. After you plug in the phone cordthat came with the device, run the fax test again.
After you resolve any problems found, run the fax test again to make sure it passesand the device is ready for faxing. If the Fax Line Condition test continues to fail andyou experience problems faxing, contact your telephone company and have themcheck the phone line.
The display always shows Phone Off HookSolution: You are using the wrong type of phone cord. Make sure you are usingthe phone cord that came with the device to connect the device to your phone line. Ifthe phone cord that came with the device is not long enough, you can use a couplerto extend the length. You can purchase a coupler at an electronics store that carriesphone accessories. You will also need another phone cord, which can be a standardphone cord that you might already have in your home or office.
Solution: Other equipment that uses the same phone line as the device might bein use. Make sure extension phones (phones on the same phone line, but notconnected to the device) or other equipment are not in use or off the hook. For
Chapter 7
104 Solve a problem

example, you cannot use the device for faxing if an extension phone is off the hook,or if you are using a computer dial-up modem to send e-mail or access the Internet.
The device is having problems sending and receiving faxesSolution: Make sure the device is turned on. Look at the display on the device. Ifthe display is blank and the Power light is not lit, the device is turned off. Make surethe power cord is firmly connected to the device and plugged into a power outlet.Press the Power button to turn on the device.
After turning on the device, HP recommends you wait five minutes before sending orreceiving a fax. The device cannot send or receive faxes while it is initializing afterbeing turned on.
Solution: If Fax to PC or Fax to Mac has been enabled, you may not be able tosend or receive faxes if the fax memory is full (limited by device memory).
Solution:• Make sure you used the phone cord supplied in the box with the device to connect
to the telephone wall jack. One end of the phone cord should be connected to theport labeled 1-LINE on the back of the device and the other end to your telephonewall jack, as shown below.
1 Telephone wall jack
2 Use the phone cord supplied in the box with the device to connect to the "1-LINE" port
If the phone cord that came with the device is not long enough, you can use acoupler to extend the length. You can purchase a coupler at an electronics storethat carries phone accessories. You will also need another phone cord, which canbe a standard phone cord that you might already have in your home or office.
• Try connecting a working phone and phone cord to the telephone wall jack thatyou are using for the device and check for a dial tone. If you do not hear a dialtone, call your local telephone company for service.
Solve fax problems 105

• Other equipment, which uses the same phone line as the device, might be in use.For example, you cannot use the device for faxing if an extension phone is off thehook, or if you are using a computer dial-up modem to send an e-mail or accessthe Internet.
• Check to see if another process has caused an error. Check the display or yourcomputer for an error message providing information about the problem and howto solve it. If there is an error, the device will not send or receive a fax until theerror condition is resolved.
• The phone line connection might be noisy. Phone lines with poor sound quality(noise) can cause faxing problems. Check the sound quality of the phone line byplugging a phone into the telephone wall jack and listening for static or other noise.If you hear noise, turn Error Correction Mode (ECM) off and try faxing again.For information about changing ECM, see the onscreen Help. If the problempersists, contact your telephone company.
• If you are using a digital subscriber line (DSL) service, make sure that you havea DSL filter connected or you will not be able to fax successfully. For moreinformation, see Case B: Set up the device with DSL.
• Make sure the device is not connected to a telephone wall jack that is set up fordigital phones. To check if your phone line is digital, connect a regular analogphone to the line and listen for a dial tone. If you do not hear a normal soundingdial tone, it might be a phone line set up for digital phones.
• If you are using either a private branch exchange (PBX) or an integrated servicesdigital network (ISDN) converter/terminal adapter, make sure the device isconnected to the correct port and the terminal adapter is set to the correct switchtype for your country/region, if possible. For more information, see Case C: Setup the device with a PBX phone system or an ISDN line.
• If the device shares the same phone line with a DSL service, the DSL modemmight not be properly grounded. If the DSL modem is not properly grounded, itcan create noise on the phone line. Phone lines with poor sound quality (noise)can cause faxing problems. You can check the sound quality of the phone line byplugging a phone into the telephone wall jack and listening for static or other noise.If you hear noise, turn off your DSL modem and completely remove power for atleast 15 minutes. Turn the DSL modem back on and listen to the dial tone again.
NOTE: You might notice static on the phone line again in the future. If thedevice stops sending and receiving faxes, repeat this process.
If the phone line is still noisy, contact your telephone company. For informationon turning your DSL modem off, contact your DSL provider for support.
• If you are using a phone splitter, this can cause faxing problems. (A splitter is atwo-cord connector that plugs into a telephone wall jack.) Try removing the splitterand connecting the device directly to the telephone wall jack.
Chapter 7
106 Solve a problem

The device is having problems sending a manual fax
Solution:
NOTE: This possible solution applies only in the countries/regions that receivea 2-wire phone cord in the box with the device, including: Argentina, Australia,Brazil, Canada, Chile, China, Colombia, Greece, India, Indonesia, Ireland, Japan,Korea, Latin America, Malaysia, Mexico, Philippines, Poland, Portugal, Russia,Saudi Arabia, Singapore, Spain, Taiwan, Thailand, USA, Venezuela, andVietnam.
• Make sure the telephone you use to initiate the fax call is connected directly tothe device. To send a fax manually, the telephone must be connected directly tothe port labeled 2-EXT on the device, as shown below.
1 Telephone wall jack
2 Use the phone cord supplied in the box with the device to connect to the "1-LINE" port
3 Telephone
• If you are sending a fax manually from your phone that is connected directly tothe device, you must use the keypad on the telephone to send the fax. You cannotuse the keypad on the device control panel of the device.
NOTE: If using a serial-type phone system, please connect your phonedirectly on top of the device cable which has a wall plug attached to it.
The device cannot receive faxes, but can send faxes
Solution:• If you are not using a distinctive ring service, check to make sure that the
Distinctive Ring feature on the device is set to All Rings. For more information,see Change the answer ring pattern for distinctive ring.
• If Auto Answer is set to Off, you will need to receive faxes manually; otherwise,the device will not receive the fax. For information on receiving faxes manually,see Receive a fax manually.
Solve fax problems 107

• If you have a voice mail service at the same phone number you use for fax calls,you must receive faxes manually, not automatically. This means that you must beavailable to respond in person to incoming fax calls. For information on setting upthe device when you have a voice mail service, see Case F: Shared voice/fax linewith voice mail. For information on receiving faxes manually, see Receive a faxmanually.
• If you have a computer dial-up modem on the same phone line with the device,check to make sure that the software that came with your modem is not set toreceive faxes automatically. Modems that are set up to receive faxesautomatically take over the phone line to receive all incoming faxes, whichprevents the device from receiving fax calls.
• If you have an answering machine on the same phone line with the device, youmight have one of the following problems:◦ Your answering machine might not be set up properly with the device.◦ Your outgoing message might be too long or too loud to allow the device to
detect fax tones, and the sending fax machine might disconnect.◦ Your answering machine might not have enough quiet time after your outgoing
message to allow the device to detect fax tones. This problem is mostcommon with digital answering machines.
The following actions might help solve these problems:◦ When you have an answering machine on the same phone line you use for
fax calls, try connecting the answering machine directly to the device asdescribed in Case I: Shared voice/fax line with answering machine.
◦ Make sure the device is set to receive faxes automatically. For information onsetting up the device to receive faxes automatically, see Receive a fax.
◦ Make sure the Rings to Answer setting is set to a greater number of ringsthan the answering machine. For more information, see Set the number ofrings before answering.
◦ Disconnect the answering machine and then try receiving a fax. If faxing issuccessful without the answering machine, the answering machine might becausing the problem.
◦ Reconnect the answering machine and record your outgoing message again.Record a message that is approximately 10 seconds in duration. Speak slowlyand at a low volume when recording your message. Leave at least 5 secondsof silence at the end of the voice message. There should be no backgroundnoise when recording this silent time. Try to receive a fax again.
NOTE: Some digital answering machines might not retain the recordedsilence at the end of your outgoing message. Play back your outgoingmessage to check.
Chapter 7
108 Solve a problem

• If the device shares the same phone line with other types of phone equipment,such as an answering machine, a computer dial-up modem, or a multi-port switchbox, the fax signal level might be reduced. The signal level can also be reducedif you use a splitter or connect extra cables to extend the length of your phone. Areduced fax signal can cause problems during fax reception.To find out if other equipment is causing a problem, disconnect everything exceptthe device from the phone line, and then try to receive a fax. If you can receivefaxes successfully without the other equipment, one or more pieces of the otherequipment is causing problems; try adding them back one at a time and receivinga fax each time, until you identify which equipment is causing the problem.
• If you have a special ring pattern for your fax phone number (using a distinctivering service through your telephone company), make sure that the DistinctiveRing feature on the device is set to match. For more information, see Change theanswer ring pattern for distinctive ring.
The device cannot send faxes, but can receive faxes
Solution:• The device might be dialing too fast or too soon. You might need to insert some
pauses in the number sequence. For example, if you need to access an outsideline before dialing the phone number, insert a pause following the access number.If your number is 95555555, and 9 accesses an outside line, you might insertpauses as follows: 9-555-5555. To enter a pause in the fax number you are typing,press Redial/Pause, or press the Space (#) button repeatedly, until a dash (-)appears on the display.You can also send the fax using monitor dialing. This enables you to listen to thephone line as you dial. You can set the pace of your dialing and respond toprompts as you dial. For more information, see Send a fax using monitordialing.
• The number you entered when sending the fax is not in the proper format or thereceiving fax machine is having problems. To check this, try calling the fax numberfrom a telephone and listen for fax tones. If you cannot hear fax tones, thereceiving fax machine might not be turned on or connected, or a voice mail servicecould be interfering with the recipient's phone line. You can also ask the recipientto check the receiving fax machine for any problems.
Solve fax problems 109

Fax tones are recorded on my answering machine
Solution:• When you have an answering machine on the same phone line you use for fax
calls, try connecting the answering machine directly to the device as described inCase I: Shared voice/fax line with answering machine. If you do not connect theanswering machine as recommended, fax tones might be recorded on youranswering machine.
• Make sure the device is set to receive faxes automatically and that the Rings toAnswer setting is correct. The number of rings to answer for the device shouldbe greater than the number of rings to answer for the answering machine. If theanswering machine and the device are set to the same number of rings to answer,both devices answer the call and fax tones are recorded on the answeringmachine.
• Set your answering machine to a low number of rings and the device to answerin the maximum number of rings supported. (The maximum number of rings variesby country/region.) In this setup, the answering machine answers the call and thedevice monitors the line. If the device detects fax tones, the device receives thefax. If the call is a voice call, the answering machine records the incomingmessage. For more information, see Set the number of rings before answering.
The phone cord that came with my device is not long enoughSolution: If the phone cord that came with the device is not long enough, you canuse a coupler to extend the length. You can purchase a coupler at an electronics storethat carries phone accessories. You will also need another phone cord, which can bea standard phone cord that you might already have in your home or office.
TIP: If the device came with a 2-wire phone cord adaptor, you can use it with a4-wire phone cord to extend the length. For information on using the 2-wire phonecord adaptor, see the documentation that came with it.
To extend your phone cord1. Using the phone cord supplied in the box with the device, connect one end to the
coupler, then connect the other end to the port labeled 1-LINE on the back of thedevice.
2. Connect another phone cord to the open port on the coupler and to the telephonewall jack.
Color faxes do not printCause: The Incoming Fax Printing option is turned off.
Solution: To print color faxes, make sure that the Incoming Fax Printing option inthe device control panel is turned on.
Chapter 7
110 Solve a problem

The computer cannot receive faxes (Fax to PC and Fax to Mac)Cause: The HP Digital Imaging monitor is turned off (Windows).
Solution: Check the taskbar and ensure that the HP Digital Imaging monitor isturned on at all times.
Cause: The computer selected to receive faxes is turned off.
Solution: Make sure the computer selected to receive faxes is switched on at alltimes.
Cause: Different computers are configured for setup and receiving faxes and oneof them may be switched off.
Solution: If the computer receiving faxes is different from the one used for setup,both computers should be switched on at all times.
Cause: Fax to PC or Fax to Mac is not activated or the computer is not configuredto receive faxes.
Solution: Activate Fax to PC or Fax to Mac and make sure the computer isconfigured to receive faxes.
Cause: HP Digital Imaging Monitor is not operating properly (Windows).
Solution: Restart the HP Digital Imaging Monitor or restart the computer.
Solve wired (Ethernet) network problems (some modelsonly)
If you are unable to connect the product to your wired (Ethernet) network, perform oneor more of the following tasks.
NOTE: After correcting any of the following, run the installation program again.
• General network troubleshooting• Network port created does not match device IP address (Windows)
General network troubleshootingIf you are unable to install the device software, verify that:
• All cable connections to the computer and the device are secure.• The network is operational and the network hub is turned on.• All applications, including virus protection programs, spyware protection programs,
and firewalls, are closed or disabled for computers running Windows• The device is installed on the same subnet as the computers that will be using the
device.
Solve wired (Ethernet) network problems (some models only) 111

If the installation program cannot discover the device, print the network configurationpage, and enter the IP address manually in the installation program. For more information,see Understand the network configuration page (some models only).
Though it is not recommended that you assign the device with a static IP address, youmight resolve some installation problems (such as a conflict with a personal firewall) bydoing so.
Network port created does not match device IP address (Windows)If you are using a computer running Windows, make sure that the network ports createdin the device driver match the device IP address:
1. Print the device’s network configuration page2. Click Start, point to Settings, and then click Printers or Printers and Faxes.
- or -Click Start, click Control Panel, and then double-click Printers.
3. Right-click the device icon, click Properties, and then click the Ports tab.4. Select the TCP/IP port for the device, and then click Configure Port.5. Compare the IP address listed in the dialog box and make sure it matches the IP
address listed on the network configuration page. If the IP addresses are different,change the IP address in the dialog box to match the address on the networkconfiguration page.
6. Click OK twice to save the settings and close the dialog boxes.
Solve wireless problems (some models only)If the device is unable to communicate with the network after completing the wirelesssetup and software installation, perform one or more of the following tasks in the ordershown below.
• Basic wireless troubleshooting• Advanced wireless troubleshooting
Basic wireless troubleshootingPerform the following steps in the order presented.
NOTE: If this is the first time you are setting up the wireless connection, and you areusing the included software, make sure that the USB cable is connected to the deviceand the computer.
Step 1 - Make sure the wireless (802.11) light is turned onIf the blue light near the HP device's wireless button is not lit, the wireless capabilitiesmight not have been turned on. To turn on wireless, press and hold the Wireless buttonfor three seconds.
NOTE: If your HP device supports Ethernet networking, make sure that an Ethernetcable has not been connected to the device. Connecting an Ethernet cable turns offthe HP device's wireless capabilities.
Chapter 7
112 Solve a problem

Step 2 - Restart components of the wireless networkTurn off the router and the HP device, and then turn them back on in this order: routerfirst and then the HP device. If you still are unable to connect, turn off the router, HPdevice, and your computer. Sometimes, turning off the power and then turning it back onwill recover a network communication issue.
Step 3 - Run the Wireless Network TestFor wireless networking issues, run the Wireless Network Test. To print a WirelessNetwork Test page, press the Wireless button. If a problem is detected, the printed testreport will include recommendations that might help solve the problem.
Advanced wireless troubleshootingIf you have tried the suggestions provided in the Basic troubleshooting section and arestill unable to connect to your HP device to the wireless network, try the followingsuggestions in the order presented:
• Step 1: Make sure your computer is connected to your network• Step 2: Make sure that the HP device is connected to your network• Step 3: Check to see if the firewall software is blocking communication• Step 4: Make sure the HP device is online and ready• Step 5: Make sure the wireless version of the HP device is set as the default printer
driver (Windows only)• Step 6: Make sure the HP Network Devices Support service is running (Windows
only)• Add hardware addresses to a wireless access point (WAP)
Step 1: Make sure your computer is connected to your network
To check a wired (Ethernet) connection▲ Many computers have indicator lights beside the port where the Ethernet cable from
the router connects to your computer. Usually there are two indicator lights, one thatis on and another that blinks. If your computer has indicator lights, check to see if theindicator lights are on. If the lights are not on, try reconnecting the Ethernet cable tothe computer and the router. If you still do not see lights, there might be a problemwith the router, the Ethernet cable, or your computer.
NOTE: Macintosh computers do not have indicator lights. To check the Ethernetconnection on a Macintosh computer, click System Preferences in the Dock, andthen click Network. If the Ethernet connection is working correctly, Built-inEthernet appears in the list of connections, along with the IP address and otherstatus information. If Built-in Ethernet does not appear in the list, there might bea problem with the router, the Ethernet cable, or your computer. For moreinformation, click the Help button in the window.
Solve wireless problems (some models only) 113

To check a wireless connection1. Make sure that your computer's wireless has been turned on. (For more information,
see the documentation that came with your computer.)2. If you are not using a unique network name (SSID), then it is possible that your
wireless computer could be connected to a nearby network that is not yours.The following steps can help you determine if your computer is connected to yournetwork.
Windowsa. Click Start, click Control Panel, point to Network Connections, and then click
View Network Status and Tasks.orClick Start, select Settings, click Control Panel, double-click NetworkConnections, click the View menu, and then select Details.Leave the network dialog box open while you continue to the next step.
b. Disconnect the power cord from the wireless router. The connection status of yourcomputer should change to Not Connected.
c. Reconnect the power cord to the wireless router. The connection status shouldchange to Connected.
Mac OS X▲ Click the AirPort icon in the menu bar at the top of the screen. From the menu
that appears, you can determine if the AirPort is turned on and which wirelessnetwork your computer is connected to.
NOTE: For more detailed information about your AirPort connection, clickSystem Preferences in the Dock, and then click Network. If the wirelessconnection is working correctly, a green dot appears next to AirPort in the listof connections. For more information, click the Help button in the window.
If you are unable to get your computer connected to your network, contact the personwho set up your network or the router manufacturer as there might be a hardware issuewith either your router or computer.If you are able to access the Internet and are using a computer running Windows, youcan also access HP Network Assistant at www.hp.com/sbso/wireless/tools-setup.html?jumpid=reg_R1002_USEN for help in setting up a network. (This Web site is onlyavailable in English.)
Step 2: Make sure that the HP device is connected to your networkIf your device is not connected to the same network as your computer, you will not beable to use the HP device over the network. Follow the steps described in this section tofind out if your device is actively connected to the correct network.
NOTE: If your wireless router or Apple AirPort Base Station is using a hidden SSID,your HP device will not automatically detect the network.
Chapter 7
114 Solve a problem

A: Make sure the HP device is on the network1. If the HP device supports Ethernet networking and is connected to an Ethernet
network, make sure an Ethernet cable is not plugged into the back of the device. Ifan Ethernet cable is plugged into the back, then wireless connectivity is disabled.
2. If the HP device is connected to a wireless network, print the device's WirelessConfiguration page. For more information, see Understand the network configurationpage (some models only).▲ After the page has been printed, check the Network Status and URL:
Network Status • If the Network Status is Ready, the HPdevice is actively connected to anetwork.
• If the Network Status is Offline, the HPdevice is not connected to a network.Run the Wireless Network Test (usingthe instructions at the beginning of thissection) and follow anyrecommendations.
URL The URL shown here is the networkaddress assigned to the HP device by yourrouter. You will need this to connect to theembedded Web server.
B: Check to see if you can access the embedded Web server (EWS)▲ After you establish that the computer and the HP device both have active connections
to a network, you can verify if they are on the same network by accessing the device'sembedded Web server (EWS). For more information, see Embedded Web server(some models only).
To access the EWSa. On your computer, open the Web browser you normally use to access the Internet
(for example, Internet Explorer or Safari). In the address box, type the URL of theHP device as it was shown on the Network Configuration Page (for example,http://192.168.1.101).
NOTE: If you are using a proxy server in your browser, you might need todisable it to access the EWS.
b. If you can access the EWS, try using the HP device over the network (such as toprint) to see if your network setup was successful.
c. If you cannot access the EWS or are still having problems using the HP deviceover the network, continue to the next section regarding firewalls.
Step 3: Check to see if the firewall software is blocking communicationIf you cannot access the EWS and are sure both the computer and HP device have activeconnections to the same network, the firewall security software might be blockingcommunication. Temporarily turn off any firewall security software running on yourcomputer and then try to access the EWS again. If you can access the EWS, try usingthe HP device (for printing).
If you are able to access the EWS and use your HP device with the firewall turned off,you will need to reconfigure your firewall settings to allow the computer and HP device
Solve wireless problems (some models only) 115

to communicate with each other over the network. For more information, see Configureyour firewall to work with HP devices.
If you are able to access the EWS, but are still unable to use the HP device even with thefirewall turned off, try enabling the firewall software to recognize the HP device.
Step 4: Make sure the HP device is online and readyIf you have the HP software installed, you can check the HP device’s status from yourcomputer to see if the device is paused or offline, preventing you from using it.
To check the HP device’s status, complete the following steps:
Windows1. Click Start, point to Settings, and then click Printers or Printers and Faxes.
- Or -Click Start, click Control Panel, and then double-click Printers.
2. If the printers on your computer are not being displayed in Details view, click theView menu, and then click Details.
3. Do one of the following, depending on the printer status:a. If the HP device is Offline, right-click the device, and click Use Printer Online.b. If the HP device is Paused, right-click the device, and click Resume Printing.
4. Try using the HP device over the network.
Mac OS X1. Click System Preferences in the Dock, and then click Print & Fax.2. Select the HP device, and the click Print Queue.3. If Jobs Stopped appears in the window that appears, click Start Jobs.
If you can use the HP device after performing the steps above but find that the symptomspersist as you continue to use the device, your firewall might be interfering. If you stillcannot use the HP device over the network, continue to the next section for additionaltroubleshooting help.
Step 5: Make sure the wireless version of the HP device is set as the default printerdriver (Windows only)If you install the software again, the installer might create a second version of the printerdriver in your Printers or Printers and Faxes folder. If you have difficulties printing or
Chapter 7
116 Solve a problem

connecting to the HP device, make sure the correct version of the printer driver is set asthe default.
1. Click Start, point to Settings, and then click Printers or Printers and Faxes.- Or -Click Start, click Control Panel, and then double-click Printers.
2. Determine if the version of the printer driver in the Printers or Printers and Faxesfolder is connected wirelessly:a. Right-click the printer icon, and then click Properties, Document Defaults, or
Printing Preferences.b. On the Ports tab, look for a port in the list with a checkmark. The version of the
printer driver that is connected wirelessly has Standard TCP/IP Port as the Portdescription, next to the checkmark.
3. Right-click the printer icon for the version of the printer driver that is connectedwirelessly, and select Set as Default Printer.
NOTE: If there is more than one icon in the folder for the HP device, right-click theprinter icon for the version of the printer driver that is connected wirelessly, and selectSet as Default Printer.
Step 6: Make sure the HP Network Devices Support service is running (Windowsonly)
To restart the HP Network Device Support service1. Delete any print jobs currently in the print queue.2. On the desktop, right-click My Computer or Computer, and then click Manage.3. Double-click Services and Applications, and then click Services.4. Scroll down the list of services, right click HP Network Devices Support, and then
click Restart.5. After the service restarts, try using the HP device over the network again.
If you are able to use the HP device over the network, your network setup was successful.
If you still cannot use the HP device over the network or if you have to periodically performthis step in order to use your device over the network, your firewall might be interfering.
If this still does not work, there might be a problem with your network configuration orrouter. Contact the person who set up your network or the router manufacturer for help.
Add hardware addresses to a wireless access point (WAP)MAC filtering is a security feature in which a wireless access point (WAP) is configuredwith a list of MAC addresses (also called “hardware addresses”) of devices that areallowed to gain access to the network through the WAP. If the WAP does not have thehardware address of a device attempting to access the network, the WAP denies the
Solve wireless problems (some models only) 117

device access to the network. If the WAP filters MAC addresses, then the device’s MACaddress must be added to the WAP’s list of accepted MAC addresses.
• Print the network configuration page. For more information, see Understand thenetwork configuration page (some models only).
• Open the WAP’s configuration utility, and add the device’s hardware address to thelist of accepted MAC addresses.
Configure your firewall to work with HP devicesA personal firewall, which is security software running on your computer, can blocknetwork communication between your HP device and your computer.
If you are having problems such as:
• Printer not found when installing HP software• Unable to print, print job stuck in queue or printer goes offline• Scan communication errors or scanner busy messages• Unable to see printer status on your computer
The firewall might be preventing your HP device from notifying computers on your networkwhere it can be found. If the HP software cannot find the HP device during installation(and you know the HP device is on the network), or you have already successfullyinstalled HP software and experience problems, try the following:
1. If you are using a computer running Windows, in the firewall configuration utility, lookfor an option to trust computers on the local subnet (sometimes called the “scope“ or“zone“). By trusting all computers on the local subnet, computers and devices in yourhome or office can communicate with each other while still being protected from theinternet. This is the easiest approach to use.
2. If you do not have the option to trust computers on the local subnet, add incomingUDP port 427 to your firewall’s list of allowed ports.
NOTE: Not all firewalls require you to differentiate between incoming andoutgoing ports, but some do.
Another common problem is that HP software is not set as a trusted software by yourfirewall to access the network. This can happen if you answered “block“ to any firewalldialog boxes that appeared when you installed the HP software.
If this occurs, and if you are using a computer running Windows, check that the followingprograms are in your firewall’s list of trusted applications; add any that are missing.
• hpqkygrp.exe, located in C:\program files\HP\digital imaging\bin• hpqscnvw.exe, located in C:\program files\HP\digital imaging\bin
- or -hpiscnapp.exe, located in C:\program files\HP\digital imaging\bin
• hpqste08.exe, located in C:\program files\HP\digital imaging\bin• hpqtra08.exe, located in C:\program files\HP\digital imaging\bin• hpqthb08.exe, located in C:\program files\HP\digital imaging\bin
Chapter 7
118 Solve a problem

NOTE: Refer to your firewall documentation on how to configure the firewall portsettings and how to add HP files to the “trusted“ list.
Some firewalls continue to cause interference even after you disable them. If youcontinue to have problems after configuring the firewall as described above and if youare using a computer running Windows, you might need to uninstall the firewallsoftware in order to use the HP device over the network.
Advanced firewall informationThe following ports are also used by your HP device and might need to be opened onyour firewall configuration. Incoming ports (UDP) are destination ports on the computerwhile outgoing ports (TCP) are destination ports on the HP device.
• Incoming (UDP) ports: 137, 138, 161, 427• Outgoing (TCP) ports: 137, 139, 427, 9100, 9220, 9500
The ports are used for the following functions:
Printing• UDP ports: 427, 137, 161• TCP port: 9100
Photo card upload• UDP ports: 137, 138, 427• TCP port: 139
Scanning• UDP port: 427• TCP ports: 9220, 9500
HP device statusUDP port: 161
Faxing• UDP port: 427• TCP port: 9220
HP device installationUDP port: 427
Solve device management problemsThis section provide solutions to common problems that involve managing the device.This section contains the following topic:
Solve device management problems 119

NOTE: To use the embedded Web server (EWS), the product must be connectedto a network using either an Ethernet or a wireless connection. You cannot use theembedded Web server if the product is connected to a computer with a USB cable.
• Embedded Web server cannot be opened• The EWS is only available in English
Embedded Web server cannot be opened
Check your network setup• Make sure you are not using a phone cord or a crossover cable to connect the device
to the network.• Make sure the network cable is securely connected to the device.• Make sure the network hub, switch, or router is turned on and working properly.
Check the computerMake sure the computer that you are using is connected to the network.
NOTE: To use the embedded Web server (EWS), the product must be connectedto a network using either an Ethernet or a wireless connection. You cannot use theembedded Web server if the product is connected to a computer with a USB cable.
Check your Web browser• Make sure the Web browser meets the minimum system requirements. For more
information, see System requirements.• If your Web browser uses any proxy settings to connect to the Internet, try turning off
these settings. For more information, the documentation available with your Webbrowser.
Check the device IP address• To check the IP address of the product, obtain the IP address by printing a network
configuration page. Press the Setup button, select Network Setup, and then selectPrint Network Settings.
• Ping the device using the IP address from the command prompt.For example, if the IP address is 123.123.123.123, type the following at the MS-DOSprompt:C:\Ping 123.123.123.123
Or, in Mac OS X, open Terminal (available in the Applications > Utilities folder) andtype the following: ping 123.123.123If a reply appears, the IP address is correct. If a time-out response appears, the IPaddress is incorrect.
The EWS is only available in EnglishIf your product only supports wireless network connections and not Ethernet networkconnections, the EWS is only available in English.
Chapter 7
120 Solve a problem

Troubleshoot installation issuesIf the following topics do not help, see Solve a problem for information about HP support.
• Hardware installation suggestions• Software installation suggestions
Hardware installation suggestions
Check the device• Make sure that all packing tape and material have been removed from outside and
inside the device.• Make sure that the device is loaded with paper.• Make sure that no lights are on or blinking except the Ready light, which should be
on. If the Attention light is blinking, check for messages on the device control panel.
Check the hardware connections• Make sure that any cords and cables that you are using (such as USB cable or
Ethernet cable) are in good working order.• Make sure that the power cord is connected securely to both the device and to a
working power outlet.• Make sure that the phone cord is connected to the 1-LINE port.
Check the ink cartridges• The product prompts you to align ink cartridges every time you install or replace an
ink cartridge. You can also align the ink cartridges at any time from the product’scontrol panel or by using the HP software installed with the product. Aligning the inkcartridges ensures high-quality output. For more information, see Align the inkcartridges. If the alignment fails, check to make sure the cartridges are installedcorrectly, and start the ink cartridge alignment. For more information, see Alignmentfails.
• Make sure that all latches and covers are closed properly.
Check the computer system• Make sure that your computer is running one of the supported operating systems.• Make sure that the computer meets at least the minimum system requirements.
Check the device to ensure the following• Power light is on and not blinking. When the device is first turned on, it takes
approximately 45 seconds to warm up.• The device is in the Ready state, and no other lights on the device control panel are
lit or blinking. If lights are lit or blinking, see the message on the device control panel.• Ensure power cord and other cables are working, and are firmly connected to the
device.• All packing tapes and materials are removed from the device.
Troubleshoot installation issues 121

• Duplexer is locked into place.• Paper is loaded correctly in the tray, and is not jammed in the device.• All latches and covers are closed.
Software installation suggestions
Verify installation preliminaries• Make sure to use the HP software CD that contains the correct installation software
for your operating system.• Before installing software, make sure that all other programs are closed.• If the computer does not recognize the path to the CD drive that you type, make sure
that you are specifying the correct drive letter.• If the computer cannot recognize the HP software CD in the CD drive, inspect the HP
software CD for damage. You can download the device driver from the HP Web site(www.hp.com/support).
Check or perform the following• Make sure the computer meets the system requirements.• Before installing software on a Windows computer, ensure all other programs are
closed.• If the computer does not recognize the path to the CD drive that you typed, ensure
you are specifying the correct drive letter.• If the computer cannot recognize the HP software CD in the CD drive, inspect the CD
for damage. You can download the device driver from the HP Web site (www.hp.com/support).
• In the Windows device manager, make sure that the USB drivers have not beendisabled.
• If you are using a computer running Windows, and the computer cannot detect thedevice, run the uninstallation utility (util\ccc\uninstall.bat on the HP software CD) toperform a clean uninstallation of the device driver. Restart your computer, andreinstall the device driver.
Check the computer system• Make sure that your computer is running one of the supported operating systems.• Make sure that the computer meets at least the minimum system requirements.
Understand the Printer Status Report and Self-Test ReportUse the Printer Status Report or Self-Test Report to:
• View current device information and ink cartridge status• Help troubleshoot problems
The Printer Status Report and the Self-Test Report also contain a log of recent events.
Chapter 7
122 Solve a problem

NOTE: If your product does not support wireless communication, the report is calledthe "Printer Status Report". If your product supports wireless communication, thereport is called the "Self-Test Report".
If you need to call HP, it is often useful to print the Printer Status Report or Self-TestReport before calling.
Printer Status Report
1. Product Information: Shows product information (such as the product name, modelnumber, serial number, and firmware version number), as well as usage information.printed from the tray.
2. Ink Delivery System Information: Shows information about the ink cartridges, suchas the estimated ink levels.
NOTE: Ink level alerts and indicators provide estimates for planning purposesonly. When you receive a low-ink alert, consider having a replacement cartridgeavailable to avoid possible printing delays. You do not need to replace the inkcartridges until print quality becomes unacceptable.
3. Additional Assistance: Provides information about available methods for findingmore information about the product, as well as information about diagnosingproblems.
Understand the Printer Status Report and Self-Test Report 123

Self-Test Report
1. Printer Information: Shows device information (such as the product name, modelnumber, serial number, and firmware version number), and the number of pagesprinted from the tray.
2. Nozzle test pattern: Missing lines indicate problems with the ink cartridges. Trycleaning the cartridges, or replacing the cartridges.
3. Color bars and boxes: Uneven, faded, or faint color bars or boxes indicate low ink.Check the ink levels.
4. Event Log: Shows a log of recent events that have occurred.
To print the Printer Status Report or Self-Test ReportProduct control panel: Press Setup, select Print Report, select Printer Status or Self-Test, and then press OK.
Understand the network configuration page (some modelsonly)
If the device is connected to a network, you can print a network configuration page toview the network settings for the device. You can use the network configuration page to
Chapter 7
124 Solve a problem

help troubleshoot network connectivity problems. If you need to call HP, it is often usefulto print this page before calling.
Network Configuration Page1. General Information: Shows information about the current status and active
connection type of the network, and other information, such as the URL of theembedded Web server.
2. 802.3 Wired: Shows information about the active wired network connection, such asthe IP address, subnet mask, default gateway, as well as the hardware address ofthe device.
3. 802.11 Wireless: Shows information about the active wireless network connection,such as the IP address, the communication mode, the network name, authenticationtype, and signal strength.
4. mDNS: Shows information about the active Multicast Domain Name System (mDNS)connection. mDNS services are typically used on small networks for IP address andname resolution (through UDP port 5353) where a conventional DNS server is notused.
5. SLP: Shows information about the current Service Location Protocol (SLP)connection. SLP is used by network management applications for devicemanagement. The device supports SNMPv1 protocol on IP networks.
To print the network configuration page from the device control panelPress the Setup button, select Print Report, select Network Config, and then pressOK.
Clear jamsOccasionally, media becomes jammed during a job. Try the following remedies beforeyou attempt to clear the jam.
• Make sure that you are printing with media that meets specifications. For moreinformation, see Media specifications.
• Make sure that you are printing with media that is not wrinkled, folded, or damaged.
Clear jams 125

• Make sure that the device is clean. For more information, see Maintain the device.• Make sure that the trays are loaded correctly and are not too full. For more
information, see Load media.
This section contains the following topics:
• Clear paper jams• Avoid paper jams
Clear paper jamsIf the paper was loaded in the main tray, you might need to clear the paper jam from therear door.
Paper can also jam in the automatic document feeder (ADF). If the product has anautomatic document feeder (ADF), several common actions can cause paper to jam theADF:
• Placing too much paper in the ADF tray. For information on the maximum number ofsheets allowed in the ADF, see Load an original on the scanner glass.
• Using paper that is too thick or too thin for the device.• Trying to add paper to the ADF tray while the device is feeding pages.
To clear a paper jam from the rear door1. Press in the tab on the left side of the rear door to release the door. Remove the door
by pulling it away from the device.
CAUTION: Trying to clear a paper jam from the front of the device can damagethe print mechanism. Always access and clear paper jams through the rear door.
2. Gently pull the paper out of the rollers.
CAUTION: If the paper tears when you are removing it from the rollers, checkthe rollers and wheels for torn pieces of paper that might be remaining inside thedevice. If you do not remove all the pieces of paper from the device, more paperjams are likely to occur.
3. Replace the rear door. Gently push the door forward until it snaps into place.4. Press OK to continue the current job.
Chapter 7
126 Solve a problem

To clear a paper jam in the automatic document feeder (ADF) (Some models only)1. Lift the cover of the ADF.
2. Gently pull the paper out of the rollers.
CAUTION: If the paper tears when you are removing it from the rollers, checkthe rollers and wheels for torn pieces of paper that might be remaining inside thedevice. If you do not remove all the pieces of paper from the device, more paperjams are likely to occur.
3. Close the cover of the ADF.
Avoid paper jamsTo help avoid paper jams, follow these guidelines.
• Remove printed papers from the output tray frequently.• Prevent curled or wrinkled paper by storing all unused paper flat in a resealable bag.• Ensure that paper loaded in the input tray lays flat and the edges are not bent or torn.• Do not combine different paper types and paper sizes in the input tray; the entire stack
of paper in the input tray must be the same size and type.• Adjust the paper-width guide in the input tray to fit snugly against all paper. Make sure
the paper-width guide does not bend the paper in the input tray.• Do not force paper too far forward in the input tray.• Use paper types that are recommended for the device. For more information, see
Media specifications.
NOTE: Humidity may cause paper to curl and hence paper jam.
Clear jams 127

A Technical informationThis section contains the following topics:• Warranty information• Device specifications• Regulatory information• Environmental product stewardship program• Third-party licenses
Warranty informationThis section contains the following topics:• Hewlett-Packard limited warranty statement• Ink cartridge warranty information
128 Technical information

Hewlett-Packard limited warranty statement
A. Extent of limited warranty 1. Hewlett-Packard (HP) warrants to the end-user customer that the HP products specified above will be free from defects
in materials and workmanship for the duration specified above, which duration begins on the date of purchase by the customer.
2. For software products, HP’s limited warranty applies only to a failure to execute programming instructions. HP does not warrant that the operation of any product will be interrupted or error free.
3. HP's limited warranty covers only those defects that arise as a result of normal use of the product, and does not cover any other problems, including those that arise as a result of:
a. Improper maintenance or modification; b. Software, media, parts, or supplies not provided or supported by HP; c. Operation outside the product's specifications; d. Unauthorized modification or misuse. 4. For HP printer products, the use of a non-HP cartridge or a refilled cartridge does not affect either the warranty to the
customer or any HP support contract with the customer. However, if printer failure or damage is attributable to the use of a non-HP or refilled cartridge or an expired ink cartridge, HP will charge its standard time and materials charges to service the printer for the particular failure or damage.
5. If HP receives, during the applicable warranty period, notice of a defect in any product which is covered by HP's warranty, HP shall either repair or replace the product, at HP's option.
6. If HP is unable to repair or replace, as applicable, a defective product which is covered by HP's warranty, HP shall, within a reasonable time after being notified of the defect, refund the purchase price for the product.
7. HP shall have no obligation to repair, replace, or refund until the customer returns the defective product to HP. 8. Any replacement product may be either new or like-new, provided that it has functionality at least equal to that of the
product being replaced. 9. HP products may contain remanufactured parts, components, or materials equivalent to new in performance. 10. HP's Limited Warranty Statement is valid in any country where the covered HP product is distributed by HP. Contracts
for additional warranty services, such as on-site service, may be available from any authorized HP service facility in countries where the product is distributed by HP or by an authorized importer.
B. Limitations of warrantyTO THE EXTENT ALLOWED BY LOCAL LAW, NEITHER HP NOR ITS THIRD PARTY SUPPLIERS MAKES ANY OTHER WARRANTY OR CONDITION OF ANY KIND, WHETHER EXPRESS OR IMPLIED WARRANTIES OR CONDITIONS OF MERCHANTABILITY, SATISFACTORY QUALITY, AND FITNESS FOR A PARTICULAR PURPOSE.
C. Limitations of liability 1. To the extent allowed by local law, the remedies provided in this Warranty Statement are the customer's sole and
exclusive remedies. 2. TO THE EXTENT ALLOWED BY LOCAL LAW, EXCEPT FOR THE OBLIGATIONS SPECIFICALLY SET FORTH IN
THIS WARRANTY STATEMENT, IN NO EVENT SHALL HP OR ITS THIRD PARTY SUPPLIERS BE LIABLE FOR DIRECT, INDIRECT, SPECIAL, INCIDENTAL, OR CONSEQUENTIAL DAMAGES, WHETHER BASED ON CONTRACT, TORT, OR ANY OTHER LEGAL THEORY AND WHETHER ADVISED OF THE POSSIBILITY OF SUCH DAMAGES.
D. Local law 1. This Warranty Statement gives the customer specific legal rights. The customer may also have other rights which vary
from state to state in the United States, from province to province in Canada, and from country to country elsewhere in the world.
2. To the extent that this Warranty Statement is inconsistent with local law, this Warranty Statement shall be deemed modified to be consistent with such local law. Under such local law, certain disclaimers and limitations of this Warranty Statement may not apply to the customer. For example, some states in the United States, as well as some governments outside the United States (including provinces in Canada), may:
a. Preclude the disclaimers and limitations in this Warranty Statement from limiting the statutory rights of a consumer (e.g., the United Kingdom);
b. Otherwise restrict the ability of a manufacturer to enforce such disclaimers or limitations; or c. Grant the customer additional warranty rights, specify the duration of implied warranties which the manufacturer
cannot disclaim, or allow limitations on the duration of implied warranties. 3. THE TERMS IN THIS WARRANTY STATEMENT, EXCEPT TO THE EXTENT LAWFULLY PERMITTED, DO NOT
EXCLUDE, RESTRICT, OR MODIFY, AND ARE IN ADDITION TO, THE MANDATORY STATUTORY RIGHTS APPLICABLE TO THE SALE OF THE HP PRODUCTS TO SUCH CUSTOMERS.
HP Limited WarrantyDear Customer,You will find below the name and address of the HP entity responsible for the performance of the HP Limited Warranty in your country. You may have additional statutory rights against the seller based on your purchase agreement. Those rights are not in any way affected by this HP Limited Warranty.Ireland: Hewlett-Packard Ireland Limited, 63-74 Sir John Rogerson's Quay, Dublin 2 United Kingdom: Hewlett-Packard Ltd, Cain Road, Bracknell, GB-Berks RG12 1HN Malta: Hewlett Packard International Trade BV, Branch 48, Sqaq Nru 2, Triq ix-Xatt, Pieta MSD08, MaltaSouth Africa: Hewlett-Packard South Africa Ltd, 12 Autumn Street, Rivonia, Sandton, 2128, Republic of South Africa
HP product Duration of limited warrantySoftware Media 90 daysPrinter 1 yearPrint or Ink cartridges Until the HP ink is depleted or the “end of warranty” date printed
on the cartridge has been reached, whichever occurs first. This warranty does not cover HP ink products that have been refilled, remanufactured, refurbished, misused, or tampered with.
Printheads (only applies to products with customer 1 year replaceable printheads)Accessories 1 year unless otherwise stated
Warranty information 129

Ink cartridge warranty informationThe HP cartridge warranty is applicable when the product is used in its designated HP printing device.This warranty does not cover HP ink products that have been refilled, remanufactured, refurbished,misused, or tampered with.During the warranty period the product is covered as long as the HP ink is not depleted and the endof warranty date has not been reached. The end of warranty date, in YYYY-MM format, may be foundon the product as indicated:
For a copy of the HP Limited Warranty Statement, see the printed documentation that came with theproduct.
Appendix A
130 Technical information

Device specificationsThis section contains the following topics:• Physical specifications• Product features and capacities• Processor and memory specifications• System requirements• Network protocol specifications (Some models only)• Embedded Web server specifications (some models only)• Media specifications• Print resolution• Print specifications• Copy specifications• Fax specifications• Scan specifications• Operating environment• Electrical requirements• Acoustic emission specification
Physical specifications
Size (width x depth x height)433.5 x 401.5 x 216.7 mm (17.1 x 15.8 x 8.5 inches)
Device weight (does not include print supplies)5.9 kg (13 lb)
Product features and capacities
Feature Capacity
Connectivity • USB 2.0-compliant high speed device• Wired (Ethernet) network (some models
only)• Wireless 802.11b/g (some models only)
Ink cartridges Black and tri-color ink cartridge
Supply yields Visit www.hp.com/pageyield/ for moreinformation on estimated ink cartridge yields.
Device languages HP PCL 3 GUI
Duty cycle Up to 3000 pages per month
Device control panel language supportLanguage availability varies by country/region.
Bulgarian, Croatian, Czech, Danish, Dutch,English, Finnish, French, German, Greek,Hungarian, Italian, Japanese, Korean,Norwegian, Polish, Portuguese, Romanian,Russian, Simplified Chinese, Slovak,Slovenian, Spanish, Swedish, TraditionalChinese, Turkish.
Processor and memory specificationsNon-wireless models
Device specifications 131

Processor: 192 MHz ARM9 coreMemory: 64 MB DDR2Wireless modelsProcessor: 180 MHz ARM9 coreMemory: 32 MB SDRAM
System requirements
NOTE: For the most current information about supported operating systems and systemrequirements, visit http://www.hp.com/support/.
Operating system compatibility• Windows XP Service Pack 1, Windows Vista, Windows 7
NOTE: For Windows XP SP1 Starter Edition, Windows Vista Starter Edition, and Windows7 Starter Edition, only printer drivers, scan drivers, and the Toolbox are available.To see system requirements and specifications for Windows 7, see the Readme file. Thisfile is available on your computer after you install the HP software.
• Mac OS X (v10.5, v10.6)• Linux (For more information, see www.hp.com/go/linuxprinting).
Minimum requirements• Microsoft Windows XP (32-bit) Service Pack 1: Intel Pentium II or Celeron processor, 512 MB
RAM, 790 MB free hard disk space, Microsoft Internet Explorer 6.0• Microsoft Windows Vista: 800 MHz 32-bit (x86) or 64-bit (x64) processor, 512 MB RAM, 1.15
GB free hard disk space, Microsoft Internet Explorer 7.0• Mac OS X (v10.5.6, v10.6): 256 MB memory, 500 MB free hard disk space• Quick Time 5.0 or later (Mac OS X)• Adobe Acrobat Reader 5.0 or later
Recommended requirements• Microsoft Windows XP (32-bit) Service Pack 1: Intel Pentium III or higher processor, 512 MB
RAM, 850 MB free hard disk space, Microsoft Internet Explorer 6.0 or later• Microsoft Windows Vista: 1 GHz 32-bit (x86) or 64-bit (x64) processor, 1 GB RAM, 1.2 GB free
hard disk space, Microsoft Internet Explorer 7.0 or later• Mac OS X (v10.5.6, v10.6): 512 MB memory, 500 MB free hard disk space
Network protocol specifications (Some models only)
Network operating system compatibility• Windows XP (32-bit) (Professional and Home Editions), Windows Vista 32-bit and 64-bit
(Ultimate, Enterprise and Business Edition), Windows 7 (32-bit and 64-bit).• Mac OS X (10.5.6, 10.6)• Microsoft Windows 2000 Server Terminal Services with Citrix Metaframe XP with Feature
Release 3• Microsoft Windows 2000 Server Terminal Services with Citrix Presentation Server 4.0• Microsoft Windows 2000 Server Terminal Services• Microsoft Windows 2003 Server Terminal Services• Microsoft Windows 2003 Server Terminal Services with Citrix Presentation Server 4.0• Microsoft Windows 2003 Server Terminal Services with Citrix Presentation Server 4.5
Appendix A
132 Technical information

• Microsoft Windows 2003 Server Terminal Services with Citrix Metaframe XP with FeatureRelease 3
• Microsoft Windows 2003 Small Business Server Terminal Services• Microsoft Windows Server 2008 Terminal Services
Compatible network protocolsTCP/IP
Network management• HP Web Jetadmin plug-ins• Embedded Web server
FeaturesAbility to remotely configure and manage network devices
Embedded Web server specifications (some models only)
Requirements• A TCP/IP-based network (IPX/SPX-based networks are not supported)• A Web browser (either Microsoft Internet Explorer 6.0 or higher, Opera 8.0 or higher, Mozilla
Firefox 1.0 or higher, or Safari 1.2, or higher)• A network connection (you cannot use the embedded Web server connected directly to a
computer with a USB cable)• An Internet connection (required for some features)
NOTE: You can open the embedded Web server without being connected to the Internet.However, some features will not be available.
• It must be on the same side of a firewall as the device.
Media specificationsUse the Understand supported sizes and Understand supported media types and weights tables todetermine the correct media to use with your device, and determine what features will work with yourmedia. See the Set minimum margins section for information about the printing margins used by theproduct, see the Guidelines for two-sided (duplex) printing section for guidelines that should befollowed when printing on both side of a page.
Understand supported sizes
Media size Main tray
Standard media sizes
U.S. Legal (216 x 356 mm; 8.5 x 14 inches)
A4 (210 x 297 mm; 8.3 x 11.7 inches)
U.S. Executive (184 x 267 mm; 7.25 x 10.5 inches)
B5 (176 x 250 mm; 6.9 x 9.8 inches)
A5 (148 x 210 mm; 5.8 x 8.3 inches)
Borderless A4 (210 x 297 mm; 8.3 x 11.7 inches)
Borderless A5 (148 x 210 mm; 5.8 x 8.3 inches)
Device specifications 133
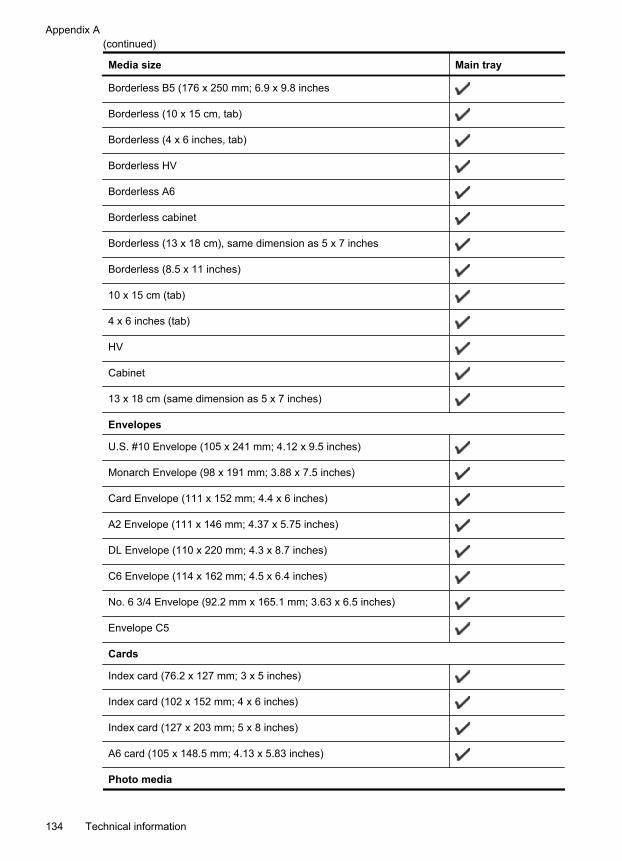
Media size Main tray
Borderless B5 (176 x 250 mm; 6.9 x 9.8 inches
Borderless (10 x 15 cm, tab)
Borderless (4 x 6 inches, tab)
Borderless HV
Borderless A6
Borderless cabinet
Borderless (13 x 18 cm), same dimension as 5 x 7 inches
Borderless (8.5 x 11 inches)
10 x 15 cm (tab)
4 x 6 inches (tab)
HV
Cabinet
13 x 18 cm (same dimension as 5 x 7 inches)
Envelopes
U.S. #10 Envelope (105 x 241 mm; 4.12 x 9.5 inches)
Monarch Envelope (98 x 191 mm; 3.88 x 7.5 inches)
Card Envelope (111 x 152 mm; 4.4 x 6 inches)
A2 Envelope (111 x 146 mm; 4.37 x 5.75 inches)
DL Envelope (110 x 220 mm; 4.3 x 8.7 inches)
C6 Envelope (114 x 162 mm; 4.5 x 6.4 inches)
No. 6 3/4 Envelope (92.2 mm x 165.1 mm; 3.63 x 6.5 inches)
Envelope C5
Cards
Index card (76.2 x 127 mm; 3 x 5 inches)
Index card (102 x 152 mm; 4 x 6 inches)
Index card (127 x 203 mm; 5 x 8 inches)
A6 card (105 x 148.5 mm; 4.13 x 5.83 inches)
Photo media
Appendix A(continued)
134 Technical information

Media size Main tray
Photo media (89 x 127 mm; 3.5 x 5 inches)
Photo media (102 x 152 mm; 4 x 6 inches)
Photo media (5 x 7 inches)
Photo media (8 x 10 inches)
Photo media (10 x 15 cm)
Borderless photo media (89 x 127 mm; 3.5 x 5 inches)
Borderless photo media (102 x 152 mm; 4 x 6 inches)
Borderless photo media (5 x 7 inches)
Borderless photo media (8 x 10 inches)
Borderless photo media (8.5 x 11 inches)
Borderless photo media (10 x 15 cm)
Other media
Custom-sized media between between 76.20 to 210.06 mm wide and101.60 to 762.00 mm long (3 to 8.5 inches wide and 4 to 30 inches long)
Understand supported media types and weights
Tray Type Weight Capacity
Main tray Paper 60 to 105 g/m2
(16 to 28 lb bond)Up to 100 sheets of plainpaper(25 mm or 1 inchstacked)
Transparencies Up to 70 sheets(17 mm or 0.67 inchstacked)
Photo media 280 g/m2
(75 lb bond)Up to 100 sheets(17 mm or 0.67 inchstacked)
Labels Up to 100 sheets(17 mm or 0.67 inchstacked)
Envelopes 75 to 90 g/m2
(20 to 24 lb bondenvelope)
Up to 30 sheets(17 mm or 0.67 inchstacked)
Cards Up to 200 g/m2
(110 lb index)Up to 80 cards
(continued)
Device specifications 135

Tray Type Weight Capacity
Automaticdocumentfeeder(ADF)*
Paper 75 g/m2
(20 lb index)Up to 20 sheets of plainpaper (5 mm or 0.2inches stacked)
Output tray All supported media Up to 50 sheets of plainpaper (text printing)
* Some models only.
Set minimum marginsThe document margins must match (or exceed) these margin settings in portrait orientation.
Media (1) Leftmargin
(2) Rightmargin
(3) Topmargin
(4) Bottommargin*
U.S. LetterU.S. LegalA4U.S. ExecutiveU.S. StatementB5A5CardsCustom-sized mediaPhoto media
3.0 mm(0.125inches)
3.0 mm(0.125inches)
3.0 mm (0.125inches)
3.0 mm(0.125inches)
Envelopes 3.0 mm(0.125inches)
3.0 mm(0.125inches)
3.0 mm (0.125inches)
14.3 mm(0.563inches)
* To achieve this margin setting on a computer running Windows, click the Advanced tab in the printdriver, and select Minimize Margins.
Appendix A(continued)
136 Technical information

Guidelines for two-sided (duplex) printing• Always use media that conforms to the device specifications. For more information, see Media
specifications.• Do not print on both sides of transparencies, envelopes, photo paper, glossy media, or paper
lighter than 16 lb bond (60 g/m2) or heavier than 28 lb bond (105 g/m2). Jams might occur withthese media types.
• Several kinds of media require a specific orientation when you print on both sides of a page.These include letterhead, preprinted paper, and paper with watermarks and prepunched holes.When you print from a computer running Windows, the device prints the first side of the mediafirst. Load the media with the print side facing down.
Print resolution
Black print resolutionUp to 600 dpi rendered black (when printing from a computer)
Color print resolutionUp to 4800 x 1200 optimized dpi color on select HP photo papers with 1200 input dpi. Photo papersinclude the following:◦ HP Premium Plus Photo◦ HP Premium Photo◦ HP Advanced Photo
Print specifications
Black print resolutionUp to 600 dpi rendered black (when printing from a computer)
Color print resolutionUp to 4800 x 1200 optimized dpi color on select HP photo papers with 1200 input dpi. Photo papersinclude the following:◦ HP Premium Plus Photo◦ HP Premium Photo◦ HP Advanced Photo
Copy specifications• Digital image processing• Up to 100 copies from original (varies by model)• Digital zoom: from 25 to 400% (varies by model)• Fit to page, pre-scan• Copy speeds vary according to the complexity of the documentRefer to the following table to determine which paper type setting to choose based on the paperloaded in the main tray.
Paper type Device control panel setting
Plain paper Plain Paper
HP Bright White Paper Plain Paper
HP Premium Presentation Paper, Matte Premium Inkjet
Other inkjet papers Premium Inkjet
Device specifications 137

Paper type Device control panel setting
HP Premium Plus Photo Papers Photo Paper
HP Premium Photo Papers Photo Paper
HP Advanced Photo Paper Photo Paper
HP Everyday Photo Paper, Semi-gloss Photo Paper
HP Everyday Photo Paper, Matte Premium Inkjet
Other photo papers Photo Paper
HP Premium Inkjet Transparency Premium Inkjet
HP Iron-on Transfer Premium Inkjet
HP Photo Cards Photo Paper
Other specialty papers Premium Inkjet
Glossy Greeting Card Photo Paper
Matte Greeting Card Premium Inkjet
HP Brochure & Flyer Paper, Glossy Photo Paper
HP Brochure & Flyer Paper, Matte Premium Inkjet
Other Glossy Brochure Photo Paper
Other Matte Brochure Premium Inkjet
Fax specifications• Walk-up black-and-white and color fax capability.• Up to 99 speed dials (varies by model).• Up to 100-page memory (varies by model, based on ITU-T Test Image #1 at standard
resolution). More complicated pages or higher resolution takes longer and uses more memory.Also, other product functions, such as copying, might affect the number of pages that can bestored in memory.
• Manual fax send and receive.• Automatic busy redial up to five times (varies by model).• Confirmation and activity reports.• CCITT/ITU Group 3 fax with Error Correction Mode.• 33.6 Kbps transmission.• 3 seconds per page speed at 33.6 Kbps (based on ITU-T Test Image #1 at standard resolution).
More complicated pages or higher resolution take longer and use more memory.• Ring detect with automatic fax/answering machine switching.
Photo (dpi) Very Fine (dpi) Fine (dpi) Standard (dpi)
Black 196 x 203 (8-bitgrayscale)
300 x 300 196 x 203 196 x 98
Color 300 x 300 200 x 200 200 x 200 200 x 200
Appendix A(continued)
138 Technical information

Scan specifications• Image editor included• Integrated OCR software automatically converts scanned text to editable text• Scan speeds vary according to the complexity of the document• Twain-compliant interface• Resolution: 2400 x 4800 ppi optical, up to 19,200 ppi enhanced• Color: 16-bit per RGB color, 48-bit total• Maximum scan size from glass: 216 x 297 mm (8.5 x 11.7 inches)
Operating environment
Operating environmentOperating temperature: 5° to 40° C (41° to 104° F)Recommended operating conditions: 15° to 32° C (59° to 90° F)Recommended relative humidity: 20 to 80% noncondensing
Storage environmentStorage temperature: -40° to 60° C (-40° to 140° F)Storage relative humidity: Up to 90% noncondensing at a temperature of 65° C (150° F)
Electrical requirements
Power supplyUniversal power adapter (external)
Power requirementsInput voltage: 100 to 240 VAC (± 10%), 50/60 Hz (± 3Hz)Output voltage: 32 Vdc at 625 mA
Power consumption28.4 watts printing (Fast Draft Mode); 32.5 watts copying (Fast Draft Mode)
Acoustic emission specificationPrint in Draft mode, noise levels per ISO 7779
Sound pressure (bystander position)LpAd 56 (dBA)
Sound powerLwAd 7.0 (BA)
Device specifications 139

Regulatory informationThe device meets product requirements from regulatory agencies in your country/region.This section contains the following topics:• FCC statement• Notice to users in Korea• VCCI (Class B) compliance statement for users in Japan• Notice to users in Japan about the power cord• Noise emission statement for Germany• LED indicator statement• Notice to users of the U.S. telephone network: FCC requirements• Notice to users of the Canadian telephone network• Notice to users in the European Economic Area• Notice to users of the German telephone network• Australia wired fax statement• Regulatory information for wireless products• Regulatory model number• Declaration of conformity
Appendix A
140 Technical information

FCC statement
FCC statement
The United States Federal Communications Commission (in 47 CFR 15.105) has specified that the following notice be brought to the attention of users of this product. This equipment has been tested and found to comply with the limits for a Class B digital device, pursuant to Part 15 of the FCC Rules. These limits are designed to provide reason-able protection against harmful interference in a residential installation. This equipment generates, uses and can radiate radio frequency energy and, if not installed and used in accordance with the instructions, may cause harmful interference to radio communications. However, there is no guarantee that interference will not occur in a particular installation. If this equipment does cause harmful interference to radio or television reception, which can be determined by turning the equipment off and on, the user is encouraged to try to correct the interference by one or more of the following measures:• Reorient the receiving antenna.• Increase the separation between the equipment and the receiver.• Connect the equipment into an outlet on a circuit different from that to which the
receiver is connected.• Consult the dealer or an experienced radio/TV technician for help.For further information, contact:
Manager of Corporate Product RegulationsHewlett-Packard Company3000 Hanover StreetPalo Alto, Ca 94304(650) 857-1501
Modifications (part 15.21)The FCC requires the user to be notified that any changes or modifications made to this device that are not expressly approved by HP may void the user's authority to operate the equipment.This device complies with Part 15 of the FCC Rules. Operation is subject to the following two conditions: (1) this device may not cause harmful interference, and (2) this device must accept any interference received, including interference that may cause undesired operation.
Notice to users in Korea
VCCI (Class B) compliance statement for users in Japan
B
VCCI-B
Regulatory information 141

Notice to users in Japan about the power cord
Noise emission statement for Germany
Geräuschemission
LpA < 70 dB am Arbeitsplatz im Normalbetrieb nach DIN 45635 T. 19
LED indicator statement
Appendix A
142 Technical information

Notice to users of the U.S. telephone network: FCC requirements
Notice to users of the U.S. telephone network: FCC requirements
This equipment complies with FCC rules, Part 68. On this equipment is a label that contains, among other information, the FCC Registration Number and Ringer Equivalent Number (REN) for this equipment. If requested, provide this information to your telephone company.An FCC compliant telephone cord and modular plug is provided with this equipment. This equipment is designed to be connected to the telephone network or premises wiring using a compatible modular jack which is Part 68 compliant. This equipment connects to the telephone network through the following standard network interface jack: USOC RJ-11C.The REN is useful to determine the quantity of devices you may connect to your telephone line and still have all of those devices ring when your number is called. Too many devices on one line might result in failure to ring in response to an incoming call. In most, but not all, areas the sum of the RENs of all devices should not exceed five (5). To be certain of the number of devices you may connect to your line, as determined by the REN, you should call your local telephone company to determine the maximum REN for your calling area.If this equipment causes harm to the telephone network, your telephone company might discontinue your service temporarily. If possible, they will notify you in advance. If advance notice is not practical, you will be notified as soon as possible. You will also be advised of your right to file a complaint with the FCC. Your telephone company might make changes in its facilities, equipment, operations, or procedures that could affect the proper operation of your equipment. If they do, you will be given advance notice so you will have the opportunity to maintain uninterrupted service. If you experience trouble with this equipment, please contact the manufacturer, or look elsewhere in this manual, for warranty or repair information. Your telephone company might ask you to disconnect this equipment from the network until the problem has been corrected or until you are sure that the equipment is not malfunctioning.This equipment may not be used on coin service provided by the telephone company.Connection to party lines is subject to state tariffs. Contact your state public utility commis-sion, public service commission, or corporation commission for more information.This equipment includes automatic dialing capability. When programming and/or making test calls to emergency numbers:• Remain on the line and explain to the dispatcher the reason for the call.• Perform such activities in the off-peak hours, such as early morning or late evening. Note The FCC hearing aid compatibility rules for telephones are not applicable
to this equipment.
The Telephone Consumer Protection Act of 1991 makes it unlawful for any person to use a computer or other electronic device, including fax machines, to send any message unless such message clearly contains in a margin at the top or bottom of each transmitted page or on the first page of transmission, the date and time it is sent and an identification of the business, other entity, or other individual sending the message and the telephone number of the sending machine or such business, other entity, or individual. (The telephone number provided might not be a 900 number or any other number for which charges exceed local or long-distance transmission charges.) In order to program this information into your fax machine, you should complete the steps described in the software.
Regulatory information 143

Notice to users of the Canadian telephone network
Note à l’attention des utilisateurs du réseau téléphonique canadien/Notice to users of the Canadian telephone networkCet appareil est conforme aux spécifications techniques des équipements terminaux d’Industrie Canada. Le numéro d’enregistrement atteste de la conformité de l’appareil. L’abréviation IC qui précède le numéro d’enregistrement indique que l’enregistrement a été effectué dans le cadre d’une Déclaration de conformité stipulant que les spécifications techniques d’Industrie Canada ont été respectées. Néanmoins, cette abréviation ne signifie en aucun cas que l’appareil a été validé par Industrie Canada.Pour leur propre sécurité, les utilisateurs doivent s’assurer que les prises électriques reliées à la terre de la source d’alimentation, des lignes téléphoniques et du circuit métallique d’alimentation en eau sont, le cas échéant, branchées les unes aux autres. Cette précaution est particulièrement importante dans les zones rurales.
Remarque Le numéro REN (Ringer Equivalence Number) attribué à chaque appareil terminal fournit une indication sur le nombre maximal de terminaux qui peuvent être connectés à une interface téléphonique. La terminaison d’une interface peut se composer de n’importe quelle combinaison d’appareils, à condition que le total des numéros REN ne dépasse pas 5.
Basé sur les résultats de tests FCC Partie 68, le numéro REN de ce produit est 0.0B.
This equipment meets the applicable Industry Canada Terminal Equipment Technical Specifications. This is confirmed by the registration number. The abbreviation IC before the registration number signifies that registration was performed based on a Declaration of Conformity indicating that Industry Canada technical specifications were met. It does not imply that Industry Canada approved the equipment.Users should ensure for their own protection that the electrical ground connections of the power utility, telephone lines and internal metallic water pipe system, if present, are connected together. This precaution might be particularly important in rural areas.
Note The REN (Ringer Equivalence Number) assigned to each terminal device provides an indication of the maximum number of terminals allowed to be connected to a telephone interface. The termination on an interface might consist of any combination of devices subject only to the requirement that the sum of the Ringer Equivalence Numbers of all the devices does not exceed 5.
The REN for this product is 0.0B, based on FCC Part 68 test results.
Appendix A
144 Technical information

Notice to users in the European Economic Area
Notice to users in the European Economic Area
This product is designed to be connected to the analog Switched Telecommunication Networks (PSTN) of the European Economic Area (EEA) countries/regions.Network compatibility depends on customer selected settings, which must be reset to use the equipment on a telephone network in a country/region other than where the product was purchased. Contact the vendor or Hewlett-Packard Company if additional product support is necessary.This equipment has been certified by the manufacturer in accordance with Directive 1999/5/EC (annex II) for Pan-European single-terminal connection to the public switched telephone network (PSTN). However, due to differences between the individual PSTNs provided in different countries, the approval does not, of itself, give an unconditional assurance of successful operation on every PSTN network termination point.In the event of problems, you should contact your equipment supplier in the first instance.This equipment is designed for DTMF tone dialing and loop disconnect dialing. In the unlikely event of problems with loop disconnect dialing, it is recommended to use this equipment only with the DTMF tone dial setting.
Notice to users of the German telephone network
Hinweis für Benutzer des deutschen Telefonnetzwerks
Dieses HP-Fax ist nur für den Anschluss eines analogen Public Switched Telephone Network (PSTN) gedacht. Schließen Sie den TAE N-Telefonstecker, der im Lieferumfang des HP All-in-One enthalten ist, an die Wandsteckdose (TAE 6) Code N an. Dieses HP-Fax kann als einzelnes Gerät und/oder in Verbindung (mit seriellem Anschluss) mit anderen zugelass-enen Endgeräten verwendet werden.
Australia wired fax statement
In Australia, the HP device must be connected to Telecommunication Network through a line cord which meets the requirements of the Technical Standard AS/ACIF S008.
Regulatory information for wireless productsThis section contains the following regulatory information pertaining to wireless products:• Exposure to radio frequency radiation• Notice to users in Brazil• Notice to users in Canada• Notice to users in Taiwan• European Union regulatory notice
Regulatory information 145

Exposure to radio frequency radiation
Exposure to radio frequency radiation
Caution The radiated output power of this device is far below the FCC radio frequency exposure limits. Nevertheless, the device shall be used in such a manner that the potential for human contact during normal operation is minimized. This product and any attached external antenna, if supported, shall be placed in such a manner to minimize the potential for human contact during normal operation. In order to avoid the possibility of exceeding the FCC radio frequency exposure limits, human proximity to the antenna shall not be less than 20 cm (8 inches) during normal operation.
Notice to users in Brazil
Aviso aos usuários no Brasil
Este equipamento opera em caráter secundário, isto é, não tem direito à proteção contra interferência prejudicial, mesmo de estações do mesmo tipo, e não pode causar interferência a sistemas operando em caráter primário. (Res.ANATEL 282/2001).
Notice to users in Canada
Notice to users in Canada/Note à l'attention des utilisateurs canadiens
For Indoor Use. This digital apparatus does not exceed the Class B limits for radio noise emissions from the digital apparatus set out in the Radio Interference Regulations of the Canadian Department of Communications. The internal wireless radio complies with RSS 210 and RSS GEN of Industry Canada.Utiliser à l'intérieur. Le présent appareil numérique n'émet pas de bruit radioélectrique dépassant les limites applicables aux appareils numériques de la classe B prescrites dans le Règlement sur le brouillage radioélectrique édicté par le ministère des Communications du Canada. Le composant RF interne est conforme a la norme RSS-210 and RSS GEN d'Industrie Canada.
Notice to users in Taiwan
Appendix A
146 Technical information

European Union regulatory notice
European Union Regulatory Notice
Products bearing the CE marking comply with the following EU Directives: · Low Voltage Directive 2006/95/EC · EMC Directive 2004/108/EC
CE compliance of this product is valid only if powered with the correct CE-marked AC adapter provided by HP.
If this product has telecommunications functionality, it also complies with the essential requirements of the following EU Directive:
· R&TTE Directive 1999/5/EC
Compliance with these directives implies conformity to harmonized European standards (European Norms) that are listed in the EU Declaration of Conformity issued by HP for this product or product family. This compliance is indicated by the following conformity marking placed on the product.
The wireless telecommunications functionality of this product may be used in the following EU and EFTA countries:
Austria, Belgium, Bulgaria, Cyprus, Czech Republic, Denmark, Estonia, Finland, France, Germany, Greece, Hungary, Iceland, Ireland, Italy, Latvia, Liechtenstein, Lithuania, Luxembourg, Malta, Netherlands, Norway, Poland, Portugal, Romania, Slovak Republic, Slovenia, Spain, Sweden, Switzerland and United Kingdom.
Products with 2.4-GHz wireless LAN devicesFranceFor 2.4 GHz Wireless LAN operation of this product certain restrictions apply: This product may be used indoor for the entire 2400-2483.5 MHz frequency band (channels 1-13). For outdoor use, only 2400-2454 MHz frequency band (channels 1-9) may be used. For the latest requirements, see http://www.art-telecom.fr.
ItalyLicense required for use. Verify with your dealer or directly with the General Direction for Frequency Planning and Management (Direzione Generale Pianificazione e Gestione Frequenze).
Regulatory model numberFor regulatory identification purposes, your product is assigned a Regulatory Model Number. Thisregulatory number should not be confused with the marketing name (HP Officejet 4500 (G510) All-in-One series, HP Officejet 4575 (K710) All-in-One series, or HP Officejet Advantage 4500 (K710)All-in-One series) or product number.
Regulatory information 147

Declaration of conformity
DECLARATION OF CONFORMITY according to ISO/IEC 17050-1 and EN 17050-1
Supplier’s Name: Hewlett-Packard Company DoC#: SNPRC-0902-01-A
Supplier’s Address: 138, Depot Road, #02-01 Singapore 109683
declares, that the product
Product Name and Model: HP Officejet 4500 series printer
Regulatory Model Number:1) SNPRC-0902-01
Product Options: All
Power adaptor: 0957-2269
conforms to the following Product Specifications and Regulations:SAFETY: IEC 60950-1:2001 / EN 60950-1:2001 + A11:2004
EN 62311:2008
EMC: B ssalC 7002:1A+ 6002:22055NE / 5002:1A+ 5002:22 RPSIC EN 55024:1998 +A1:2001 + A2:2003 EN 61000-3-2:2006 EN 61000-3-3:1995 +A1: 2001 + A2:2005 FCC CFR 47, Part 15 Class B / ICES-003, Issue 4 Class B
Telecom: TBR 21: 19983)
FCC Rules and Regulations 47CFR Part 68 TIA-968-A-1+A-2+A-3+A-4+A-5 Telecommunications – Telephone Terminal Equipment CS-03, Part I, Issue 9, Feb 2005
Supplementary Information:
1. This product is assigned a Regulatory Model Number which stays with the regulatory aspects of the design. The Regulatory Model Number is the main product identifier in the regulatory documentation and test reports, this number should not be confused with the marketing name or the product numbers.
2. This product complies with the requirements of the Low Voltage Directive 2006/95/EC, the EMC Directive 2004/108/EC & the R&TTE Directive 99/5/EC and carries the mark accordingly. In addition, it complies with the WEEE Directive 2002/96/EC and RoHS Directive 2002/95/EC.
3. This product complies with TBR21:1998, except clause 4.7.1 (DC characteristic), which complies with ES 203 021-3, clause 4.7.1.
4. This Device complies with Part 15 of the FCC Rules. Operation is subject to the following two Conditions: (1) This device may not cause harmful interference, and (2) this device must accept any interference received, including interference that may cause undesired operation.
5. The product was tested in a typical configuration.
Singapore 25 June 2009
Yik Hou Meng Product Regulations Manager
Customer Assurance, Business Printing Division
Local contact for regulatory topics only: EMEA: Hewlett-Packard GmbH, HQ-TRE, Herrenberger Strasse 140, 71034 Boeblingen, Germany www.hp.com/go/certificatesUSA : Hewlett-Packard, 3000 Hanover St., Palo Alto 94304, U.S.A. 650-857-1501
Appendix A
148 Technical information

DECLARATION OF CONFORMITY according to ISO/IEC 17050-1 and EN 17050-1
Supplier’s Name: Hewlett-Packard Company DoC#: SDGOB-0833-Rev.7.0
Supplier’s Address: 138, Depot Road, #02-01 Singapore 109683
declares, that the product
Product Name and Model: HP Officejet J4680 and J4624, HP Officejet 4500 Wireless series printer
Regulatory Model Number:1) SDGOB-0833
Product Options:
Radio Module
All RSVLD-0608
Power adaptor: 0957-2269
conforms to the following Product Specifications and Regulations:
SAFETY: IEC 60950-1:2001 / EN 60950-1:2001 + A11:2004 EN 62311:2008
EMC: CISPR 22:2005 / EN55022:2006 Class B EN 55024:1998 +A1:2001 + A2:2003 EN 61000-3-2:2006 EN 61000-3-3:1995 +A1: 2001 + A2:2005 FCC CFR 47, Part 15 Class B / ICES-003, Issue 4 Class B EN301 489-1 V1.6.1, EN301 489-17 V1.2.1
Telecom:
TBR 21: 19983) FCC Rules and Regulations 47CFR Part 68 TIA-968-A-1+A-2+A-3+A-4+A-5 Telecommunications – Telephone Terminal Equipment CS-03, Part I, Issue 9, Feb 2005
Supplementary Information:
1. This product is assigned a Regulatory Model Number which stays with the regulatory aspects of the design. The Regulatory Model Number is the main product identifier in the regulatory documentation and test reports, this number should not be confused with the marketing name or the product numbers.
2. This product complies with the requirements of the Low Voltage Directive 2006/95/EC, the EMC Directive 2004/108/EC & the R&TTE Directive 99/5/EC and carries the marking accordingly. In addition, it complies with the WEEE Directive 2002/96/EC and RoHS Directive 2002/95/EC.
3. This product complies with TBR21:1998, except clause 4.7.1 (DC characteristic), which complies with ES 203 021-3, clause 4.7.1.
4. This Device complies with Part 15 of the FCC Rules. Operation is subject to the following two Conditions: (1) This device may not cause harmful interference, and (2) this device must accept any interference received, including interference that may cause undesired operation.
5. The product was tested in a typical configuration.
Singapore 4 Aug 2009
Yik Hou Meng Product Regulations Manager
Customer Assurance, Business Printing Division
Local contact for regulatory topics only: EMEA: Hewlett-Packard GmbH, HQ-TRE, Herrenberger St rasse 140, 71034 Boeblingen, Germany www.hp.com/go/certificates USA : Hewlett-Packard, 3000 Hanover St., Palo Alto 94304, U.S.A. 650-857-1501
Regulatory information 149

DECLARATION OF CONFORMITY according to ISO/IEC 17050-1 and EN 17050-1
Supplier’s Name: Hewlett-Packard Company DoC#: SNPRC-0902-01-D
Supplier’s Address: 138, Depot Road, #02-01 Singapore 109683
declares, that the product
Product Name and Model: HP Officejet 4500 series printer, HP Officejet Advantage 4500 All-in-One printer, HP Officejet 4575 All-in-One printer
Regulatory Model Number:1) SNPRC-0902-01
Product Options: All
Power adaptor: 0957-2269
conforms to the following Product Specifications and Regulations:SAFETY: IEC 60950-1:2001 / EN 60950-1:2001 + A11:2004
EN 62311:2008
EMC: CISPR 22:2005 +A1:2005 / EN55022:2006 +A1:2007 Class B EN 55024:1998 +A1:2001 + A2:2003 EN 61000-3-2:2006 EN 61000-3-3:1995 +A1: 2001 + A2:2005 FCC CFR 47, Part 15 Class B / ICES-003, Issue 4 Class B
Telecom:
Energy Use:
TBR 21: 19983)
FCC Rules and Regulations 47CFR Part 68 TIA-968-A-1+A-2+A-3+A-4+A-5 Telecommunications – Telephone Terminal Equipment CS-03, Part I, Issue 9, Feb 2005
Regulation (EC) No. 1275/2008 Energy Star Qualified Imaging Equipment Operational Mode Test Procedure
Supplementary Information:
1. This product is assigned a Regulatory Model Number which stays with the regulatory aspects of the design. The Regulatory Model Number is the main product identifier in the regulatory documentation and test reports, this number should not be confused with the marketing name or the product numbers.
2. This product complies with the requirements of the Low Voltage Directive 2006/95/EC, the EMC Directive 2004/108/EC, the EuP Directive 2005/32/EC & the R&TTE Directive 99/5/EC and carries the marking accordingly. In addition, it complies with the WEEE Directive 2002/96/EC and RoHS Directive 2002/95/EC.
3. This product complies with TBR21:1998, except clause 4.7.1 (DC characteristic), which complies with ES 203 021-3, clause 4.7.1.
4. This Device complies with Part 15 of the FCC Rules. Operation is subject to the following two Conditions: (1) This device may not cause harmful interference, and (2) this device must accept any interference received, including interference that may cause undesired operation.
5. The product was tested in a typical configuration.
Singapore 11 May 2010
Yik Hou Meng Product Regulations Manager
Customer Assurance, Business Printing Division
Local contact for regulatory topics only: EMEA: Hewlett-Packard GmbH, HQ-TRE, Herrenberger Strasse 140, 71034 Boeblingen, Germany www.hp.com/go/certificatesUSA : Hewlett-Packard, 3000 Hanover St., Palo Alto 94304, U.S.A. 650-857-1501
Appendix A
150 Technical information

Environmental product stewardship programHewlett-Packard is committed to providing quality products in an environmentally sound manner.Design for recycling has been incorporated into this product. The number of materials has been keptto a minimum while ensuring proper functionality and reliability. Dissimilar materials have beendesigned to separate easily. Fasteners and other connections are easy to locate, access, andremove using common tools. High priority parts have been designed to access quickly for efficientdisassembly and repair.For more information, visit HP’s Commitment to the Environment Web site at:www.hp.com/hpinfo/globalcitizenship/environment/index.htmlThis section contains the following topics:• Paper use• Plastics• Material safety data sheets• Recycling program• HP inkjet supplies recycling program• Disposal of waste equipment by users in private households in the European Union• Power consumption• Chemical Substances• RoHS notices (China only)
Paper useThis product is suited for the use of recycled paper according to DIN 19309 and EN 12281:2002.
PlasticsPlastic parts over 25 grams are marked according to international standards that enhance the abilityto identify plastics for recycling purposes at the end of product life.
Material safety data sheetsMaterial safety data sheets (MSDS) can be obtained from the HP Web site at:www.hp.com/go/msds
Recycling programHP offers an increasing number of product return and recycling programs in many countries/regions,and partners with some of the largest electronic recycling centers throughout the world. HPconserves resources by reselling some of its most popular products. For more information regardingrecycling of HP products, please visit:www.hp.com/hpinfo/globalcitizenship/environment/recycle/
HP inkjet supplies recycling programHP is committed to protecting the environment. The HP Inkjet Supplies Recycling Program isavailable in many countries/regions, and lets you recycle used print cartridges and ink cartridgesfree of charge. For more information, go to the following Web site:www.hp.com/hpinfo/globalcitizenship/environment/recycle/
Environmental product stewardship program 151
Disposal of waste equipment by users in private households in the European Union
Disposal of Waste Equipment by Users in Private Households in the European UnionThis symbol on the product or on its packaging indicates that this product must not be disposed of with your other household waste. Instead, it is your responsibility to dispose of your waste equipment by handing it over to a designated collection point for the recycling of waste electrical and electronic equipment. The separate collection and recycling of your waste equipment at the time of disposal will help to conserve natural resources and ensure that it is recycled in a manner that protects human health and the environment. For more information about where you can drop off your waste equipment for recycling, please contact your local city office, your household waste disposal service or the shop where you purchased the product.Évacuation des équipements usagés par les utilisateurs dans les foyers privés au sein de l'Union européenneLa présence de ce symbole sur le produit ou sur son emballage indique que vous ne pouvez pas vous débarrasser de ce produit de la même façon que vos déchets courants. Au contraire, vous êtes responsable de l'évacuation de vos équipements usagés et, à cet effet, vous êtes tenu de les remettre à un point de collecte agréé pour le recyclage des équipements électriques et électroniques usagés. Le tri, l'évacuation et le recyclage séparés de vos équipements usagés permettent de préserver les ressources naturelles et de s'assurer que ces équipements sont recyclés dans le respect de la santé humaine et de l'environnement. Pour plus d'informations sur les lieux de collecte des équipements usagés, veuillez contacter votre mairie, votre service de traitement des déchets ménagers ou le magasin où vous avez acheté le produit.Entsorgung von Elektrogeräten durch Benutzer in privaten Haushalten in der EUDieses Symbol auf dem Produkt oder dessen Verpackung gibt an, dass das Produkt nicht zusammen mit dem Restmüll entsorgt werden darf. Es obliegt daher Ihrer Verantwortung, das Gerät an einer entsprechenden Stelle für die Entsorgung oder Wiederverwertung von Elektrogeräten aller Art abzugeben (z.B. ein Wertstoffhof). Die separate Sammlung und das Recyceln Ihrer alten Elektrogeräte zum Zeitpunkt ihrer Entsorgung trägt zum Schutz der Umwelt bei und gewährleistet, dass sie auf eine Art und Weise recycelt werden, die keine Gefährdung für die Gesundheit des Menschen und der Umwelt darstellt. Weitere Informationen darüber, wo Sie alte Elektrogeräte zum Recyceln abgeben können, erhalten Sie bei den örtlichen Behörden, Wertstoffhöfen oder dort, wo Sie das Gerät erworben haben.Smaltimento di apparecchiature da rottamare da parte di privati nell'Unione Europea Questo simbolo che appare sul prodotto o sulla confezione indica che il prodotto non deve essere smaltito assieme agli altri rifiuti domestici. Gli utenti devono provvedere allo smaltimento delle apparecchiature da rottamare portandole al luogo di raccolta indicato per il riciclaggio delle apparecchiature elettriche ed elettroniche. La raccolta e il riciclaggio separati delle apparecchiature da rottamare in fase di smaltimento favoriscono la conservazione delle risorse naturali e garantiscono che tali apparecchiature vengano rottamate nel rispetto dell'ambiente e della tutela della salute. Per ulteriori informazioni sui punti di raccolta delle apparecchiature da rottamare, contattare il proprio comune di residenza, il servizio di smaltimento dei rifiuti locale o il negozio presso il quale è stato acquistato il prodotto.Eliminación de residuos de aparatos eléctricos y electrónicos por parte de usuarios domésticos en la Unión EuropeaEste símbolo en el producto o en el embalaje indica que no se puede desechar el producto junto con los residuos domésticos. Por el contrario, si debe eliminar este tipo de residuo, es responsabilidad del usuario entregarlo en un punto de recogida designado de reciclado de aparatos electrónicos y eléctricos. El reciclaje y la recogida por separado de estos residuos en el momento de la eliminación ayudará a preservar recursos naturales y a garantizar que el reciclaje proteja la salud y el medio ambiente. Si desea información adicional sobre los lugares donde puede dejar estos residuos para su reciclado, póngase en contacto con las autoridades locales de su ciudad, con el servicio de gestión de residuos domésticos o con la tienda donde adquirió el producto.Likvidace vysloužilého zařízení uživateli v domácnosti v zemích EUTato značka na produktu nebo na jeho obalu označuje, že tento produkt nesmí být likvidován prostým vyhozením do běžného domovního odpadu. Odpovídáte za to, že vysloužilé zařízení bude předáno k likvidaci do stanovených sběrných míst určených k recyklaci vysloužilých elektrických a elektronických zařízení. Likvidace vysloužilého zařízení samostatným sběrem a recyklací napomáhá zachování přírodních zdrojů a zajišťuje, že recyklace proběhne způsobem chránícím lidské zdraví a životní prostředí. Další informace o tom, kam můžete vysloužilé zařízení předat k recyklaci, můžete získat od úřadů místní samosprávy, od společnosti provádějící svoz a likvidaci domovního odpadu nebo v obchodě, kde jste produkt zakoupili.Bortskaffelse af affaldsudstyr for brugere i private husholdninger i EUDette symbol på produktet eller på dets emballage indikerer, at produktet ikke må bortskaffes sammen med andet husholdningsaffald. I stedet er det dit ansvar at bortskaffe affaldsudstyr ved at aflevere det på dertil beregnede indsamlingssteder med henblik på genbrug af elektrisk og elektronisk affaldsudstyr. Den separate indsamling og genbrug af dit affaldsudstyr på tidspunktet for bortskaffelse er med til at bevare naturlige ressourcer og sikre, at genbrug finder sted på en måde, der beskytter menneskers helbred samt miljøet. Hvis du vil vide mere om, hvor du kan aflevere dit affaldsudstyr til genbrug, kan du kontakte kommunen, det lokale renovationsvæsen eller den forretning, hvor du købte produktet.Afvoer van afgedankte apparatuur door gebruikers in particuliere huishoudens in de Europese UnieDit symbool op het product of de verpakking geeft aan dat dit product niet mag worden afgevoerd met het huishoudelijk afval. Het is uw verantwoordelijkheid uw afgedankte apparatuur af te leveren op een aangewezen inzamelpunt voor de verwerking van afgedankte elektrische en elektronische apparatuur. De gescheiden inzameling en verwerking van uw afgedankte apparatuur draagt bij tot het sparen van natuurlijke bronnen en tot het hergebruik van materiaal op een wijze die de volksgezondheid en het milieu beschermt. Voor meer informatie over waar u uw afgedankte apparatuur kunt inleveren voor recycling kunt u contact opnemen met het gemeentehuis in uw woonplaats, de reinigingsdienst of de winkel waar u het product hebt aangeschaft.Eramajapidamistes kasutuselt kõrvaldatavate seadmete käitlemine Euroopa LiidusKui tootel või toote pakendil on see sümbol, ei tohi seda toodet visata olmejäätmete hulka. Teie kohus on viia tarbetuks muutunud seade selleks ettenähtud elektri- ja elektroonikaseadmete utiliseerimiskohta. Utiliseeritavate seadmete eraldi kogumine ja käitlemine aitab säästa loodusvarasid ning tagada, et käitlemine toimub inimeste tervisele ja keskkonnale ohutult. Lisateavet selle kohta, kuhu saate utiliseeritava seadme käitlemiseks viia, saate küsida kohalikust omavalitsusest, olmejäätmete utiliseerimispunktist või kauplusest, kust te seadme ostsite.Hävitettävien laitteiden käsittely kotitalouksissa Euroopan unionin alueellaTämä tuotteessa tai sen pakkauksessa oleva merkintä osoittaa, että tuotetta ei saa hävittää talousjätteiden mukana. Käyttäjän velvollisuus on huolehtia siitä, että hävitettävä laite toimitetaan sähkö- ja elektroniikkalaiteromun keräyspisteeseen. Hävitettävien laitteiden erillinen keräys ja kierrätys säästää luonnonvaroja. Näin toimimalla varmistetaan myös, että kierrätys tapahtuu tavalla, joka suojelee ihmisten terveyttä ja ympäristöä. Saat tarvittaessa lisätietoja jätteiden kierrätyspaikoista paikallisilta viranomaisilta, jäteyhtiöiltä tai tuotteen jälleenmyyjältä.Απόρριψη άχρηστων συσκευών στην Ευρωπαϊκή ΈνωσηΤο παρόν σύμβολο στον εξοπλισμό ή στη συσκευασία του υποδεικνύει ότι το προϊόν αυτό δεν πρέπει να πεταχτεί μαζί με άλλα οικιακά απορρίμματα. Αντίθετα, ευθύνη σας είναι να απορρίψετε τις άχρηστες συσκευές σε μια καθορισμένη μονάδα συλλογής απορριμμάτων για την ανακύκλωση άχρηστου ηλεκτρικού και ηλεκτρονικού εξοπλισμού. Η χωριστή συλλογή και ανακύκλωση των άχρηστων συσκευών θα συμβάλει στη διατήρηση των φυσικών πόρων και στη διασφάλιση ότι θα ανακυκλωθούν με τέτοιον τρόπο, ώστε να προστατεύεται η υγεία των ανθρώπων και το περιβάλλον. Για περισσότερες πληροφορίες σχετικά με το πού μπορείτε να απορρίψετε τις άχρηστες συσκευές για ανακύκλωση, επικοινωνήστε με τις κατά τόπους αρμόδιες αρχές ή με το κατάστημα από το οποίο αγοράσατε το προϊόν.A hulladékanyagok kezelése a magánháztartásokban az Európai UnióbanEz a szimbólum, amely a terméken vagy annak csomagolásán van feltüntetve, azt jelzi, hogy a termék nem kezelhető együtt az egyéb háztartási hulladékkal. Az Ön feladata, hogy a készülék hulladékanyagait eljuttassa olyan kijelölt gyűjtőhelyre, amely az elektromos hulladékanyagok és az elektronikus berendezések újrahasznosításával foglalkozik. A hulladékanyagok elkülönített gyűjtése és újrahasznosítása hozzájárul a természeti erőforrások megőrzéséhez, egyúttal azt is biztosítja, hogy a hulladék újrahasznosítása az egészségre és a környezetre nem ártalmas módon történik. Ha tájékoztatást szeretne kapni azokról a helyekről, ahol leadhatja újrahasznosításra a hulladékanyagokat, forduljon a helyi önkormányzathoz, a háztartási hulladék begyűjtésével foglalkozó vállalathoz vagy a termék forgalmazójához.Lietotāju atbrīvošanās no nederīgām ierīcēm Eiropas Savienības privātajās mājsaimniecībāsŠis simbols uz ierīces vai tās iepakojuma norāda, ka šo ierīci nedrīkst izmest kopā ar pārējiem mājsaimniecības atkritumiem. Jūs esat atbildīgs par atbrīvošanos no nederīgās ierīces, to nododot norādītajā savākšanas vietā, lai tiktu veikta nederīgā elektriskā un elektroniskā aprīkojuma otrreizējā pārstrāde. Speciāla nederīgās ierīces savākšana un otrreizējā pārstrāde palīdz taupīt dabas resursus un nodrošina tādu otrreizējo pārstrādi, kas sargā cilvēku veselību un apkārtējo vidi. Lai iegūtu papildu informāciju par to, kur otrreizējai pārstrādei var nogādāt nederīgo ierīci, lūdzu, sazinieties ar vietējo pašvaldību, mājsaimniecības atkritumu savākšanas dienestu vai veikalu, kurā iegādājāties šo ierīci.Europos Sąjungos vartotojų ir privačių namų ūkių atliekamos įrangos išmetimasŠis simbolis ant produkto arba jo pakuotės nurodo, kad produktas negali būti išmestas kartu su kitomis namų ūkio atliekomis. Jūs privalote išmesti savo atliekamą įrangą atiduodami ją į atliekamos elektronikos ir elektros įrangos perdirbimo punktus. Jei atliekama įranga bus atskirai surenkama ir perdirbama, bus išsaugomi natūralūs ištekliai ir užtikrinama, kad įranga yra perdirbta žmogaus sveikatą ir gamtą tausojančiu būdu. Dėl informacijos apie tai, kur galite išmesti atliekamą perdirbti skirtą įrangą kreipkitės į atitinkamą vietos tarnybą, namų ūkio atliekų išvežimo tarnybą arba į parduotuvę, kurioje pirkote produktą.Utylizacja zużytego sprzętu przez użytkowników domowych w Unii EuropejskiejSymbol ten umieszczony na produkcie lub opakowaniu oznacza, że tego produktu nie należy wyrzucać razem z innymi odpadami domowymi. Użytkownik jest odpowiedzialny za dostarczenie zużytego sprzętu do wyznaczonego punktu gromadzenia zużytych urządzeń elektrycznych i elektronicznych. Gromadzenie osobno i recykling tego typu odpadów przyczynia się do ochrony zasobów naturalnych i jest bezpieczny dla zdrowia i środowiska naturalnego. Dalsze informacje na temat sposobu utylizacji zużytych urządzeń można uzyskać u odpowiednich władz lokalnych, w przedsiębiorstwie zajmującym się usuwaniem odpadów lub w miejscu zakupu produktu.Descarte de equipamentos por usuários em residências da União EuropéiaEste símbolo no produto ou na embalagem indica que o produto não pode ser descartado junto com o lixo doméstico. No entanto, é sua responsabilidade levar os equipamentos a serem descartados a um ponto de coleta designado para a reciclagem de equipamentos eletro-eletrônicos. A coleta separada e a reciclagem dos equipamentos no momento do descarte ajudam na conservação dos recursos naturais e garantem que os equipamentos serão reciclados de forma a proteger a saúde das pessoas e o meio ambiente. Para obter mais informações sobre onde descartar equipamentos para reciclagem, entre em contato com o escritório local de sua cidade, o serviço de limpeza pública de seu bairro ou a loja em que adquiriu o produto.Postup používateľov v krajinách Európskej únie pri vyhadzovaní zariadenia v domácom používaní do odpaduTento symbol na produkte alebo na jeho obale znamená, že nesmie by vyhodený s iným komunálnym odpadom. Namiesto toho máte povinnos odovzda toto zariadenie na zbernom mieste, kde sa zabezpečuje recyklácia elektrických a elektronických zariadení. Separovaný zber a recyklácia zariadenia určeného na odpad pomôže chráni prírodné zdroje a zabezpečí taký spôsob recyklácie, ktorý bude chráni ľudské zdravie a životné prostredie. Ďalšie informácie o separovanom zbere a recyklácii získate na miestnom obecnom úrade, vo firme zabezpečujúcej zber vášho komunálneho odpadu alebo v predajni, kde ste produkt kúpili.Ravnanje z odpadno opremo v gospodinjstvih znotraj Evropske unijeTa znak na izdelku ali embalaži izdelka pomeni, da izdelka ne smete odlagati skupaj z drugimi gospodinjskimi odpadki. Odpadno opremo ste dolžni oddati na določenem zbirnem mestu za recikliranje odpadne električne in elektronske opreme. Z ločenim zbiranjem in recikliranjem odpadne opreme ob odlaganju boste pomagali ohraniti naravne vire in zagotovili, da bo odpadna oprema reciklirana tako, da se varuje zdravje ljudi in okolje. Več informacij o mestih, kjer lahko oddate odpadno opremo za recikliranje, lahko dobite na občini, v komunalnem podjetju ali trgovini, kjer ste izdelek kupili.Kassering av förbrukningsmaterial, för hem- och privatanvändare i EUProdukter eller produktförpackningar med den här symbolen får inte kasseras med vanligt hushållsavfall. I stället har du ansvar för att produkten lämnas till en behörig återvinningsstation för hantering av el- och elektronikprodukter. Genom att lämna kasserade produkter till återvinning hjälper du till att bevara våra gemensamma naturresurser. Dessutom skyddas både människor och miljön när produkter återvinns på rätt sätt. Kommunala myndigheter, sophanteringsföretag eller butiken där varan köptes kan ge mer information om var du lämnar kasserade produkter för återvinning.
Engl
ishFr
ança
isDe
utsc
hIta
liano
Espa
ñol
Česk
yDa
nsk
Ned
erla
nds
Eest
iSu
omi
Ελλη
νικά
Mag
yar
Latv
iski
Lietu
višk
aiPo
lski
Portu
guês
Slov
enčin
aSl
oven
ščin
aSv
ensk
a
Appendix A
152 Technical information

Power consumptionHewlett-Packard printing and imaging equipment marked with the ENERGY STAR® logo is qualifiedto the U.S. Environmental Protection Agency’s ENERGY STAR specifications for imagingequipment. The following mark will appear on ENERGY STAR qualified imaging products:
ENERGY STAR is a U.S. registered service mark of the U.S. EPA. As an ENERGY STAR partner,HP has determined that this product meets ENERGY STAR guidelines for energy efficiency.Additional ENERGY STAR qualified imaging product model information is listed at:www.hp.com/go/energystar
Chemical SubstancesHP is committed to providing our customers with information about the chemical substances in ourproducts as needed to comply with legal requirements such as REACH (Regulation EC No1907/2006 of the European Parliament and the Council). A chemical information report for thisproduct can be found at: www.hp.com/go/reach
RoHS notices (China only)
Toxic and hazardous substance table
Environmental product stewardship program 153

Third-party licensesThis section contains the following topics:• HP Officejet 4500 Desktop• HP Officejet 4500 / HP Officejet 4575 / HP Officejet Advantage 4500• HP Officejet 4500 Wireless
Appendix A
154 Technical information

HP Officejet 4500 Desktop
Third-party licenses
AES
rijndael-alg-fst.c
@version 3.0 (December 2000)
Optimised ANSI C code for the Rijndael cipher (now AES)
@author Vincent Rijmen <[email protected]>@author Antoon Bosselaers <[email protected]>@author Paulo Barreto <[email protected]>
This code is hereby placed in the public domain.
THIS SOFTWARE IS PROVIDED BY THE AUTHORS ''AS IS'' AND ANY EXPRESS OR IMPLIED WARRANTIES, INCLUDING, BUT NOT LIMITED TO, THE IMPLIED WARRANTIES OF MERCHANTABILITY AND FITNESS FOR A PARTICULAR PURPOSE ARE DISCLAIMED. IN NO EVENT SHALL THE AUTHORS OR CONTRIBUTORS BE LIABLE FOR ANY DIRECT, INDIRECT, INCIDENTAL, SPECIAL, EXEMPLARY, OR CONSEQUENTIAL DAMAGES (INCLUDING, BUT NOT LIMITED TO, PROCUREMENT OF SUBSTITUTE GOODS OR SERVICES; LOSS OF USE, DATA, OR PROFITS; OR BUSINESS INTERRUPTION) HOWEVER CAUSED AND ON ANY THEORY OF LIABILITY, WHETHER IN CONTRACT, STRICT LIABILITY, OR TORT (INCLUDING NEGLIGENCE OR OTHERWISE) ARISING IN ANY WAY OUT OF THE USE OF THIS SOFTWARE, EVEN IF ADVISED OF THE POSSIBILITY OF SUCH DAMAGE.
Third-party licenses 155

SHA2
FIPS 180-2 SHA-224/256/384/512 implementationLast update: 02/02/2007Issue date: 04/30/2005
Copyright (C) 2005, 2007 Olivier Gay <[email protected]>All rights reserved.
Redistribution and use in source and binary forms, with or without modification, are permitted provided that the following conditions are met:1. Redistributions of source code must retain the above copyright notice, this list of conditions and the following disclaimer.2. Redistributions in binary form must reproduce the above copyright notice, this list of conditions and the following disclaimer in the documentation and/or other materials provided with the distribution. 3. Neither the name of the project nor the names of its contributors may be used to endorse or promote products derived from this software without specific prior written permission.
THIS SOFTWARE IS PROVIDED BY THE PROJECT AND CONTRIBUTORS ``AS IS'' AND ANY EXPRESS OR IMPLIED WARRANTIES, INCLUDING, BUT NOT LIMITED TO, THE IMPLIED WARRANTIES OF MERCHANTABILITY AND FITNESS FOR A PARTICULAR PURPOSE ARE DISCLAIMED. IN NO EVENT SHALL THE PROJECT OR CONTRIBUTORS BE LIABLE FOR ANY DIRECT, INDIRECT, INCI-DENTAL, SPECIAL, EXEMPLARY, OR CONSEQUENTIAL DAMAGES INCLUDING, BUT NOT LIMITED TO, PROCUREMENT OF SUBSTITUTE GOODS OR SERVICES; LOSS OF USE, DATA, OR PROFITS; OR BUSINESS INTERRUPTION) HOWEVER CAUSED AND ON ANY THEORY OF LIABILITY, WHETHER IN CONTRACT, STRICT LIABILITY, OR TORT (INCLUDING NEGLIGENCE OR OTHERWISE) ARISING IN ANY WAY OUT OF THE USE OF THIS SOFTWARE, EVEN IF ADVISED OF THE POSSIBILITY OF SUCH DAMAGE.
Appendix A
156 Technical information

ZLIB
zlib.h -- interface of the 'zlib' general purpose compression library version 1.2.3, July 18th, 2005
Copyright (C) 1995-2005 Jean-loup Gailly and Mark Adler
This software is provided 'as-is', without any express or implied warranty. In no event will the authors be held liable for any damages arising from the use of this software.
Permission is granted to anyone to use this software for any purpose, including commercial applications, and to alter it and redistribute it freely, subject to the following restrictions:
1. The origin of this software must not be misrepresented; you must not claim that you wrote the original software. If you use this software in a product, an acknowledgment in the product documentation would be appreciated but is not required.2. Altered source versions must be plainly marked as such, and must not be misrepresented as being the original software.3. This notice may not be removed or altered from any source distribution.
Jean-loup Gailly Mark [email protected] [email protected]
The data format used by the zlib library is described by RFCs (Request for Comments) 1950 to 1952 in the files http://www.ietf.org/rfc/rfc1950.txt (zlib format), rfc1951.txt (deflate format) and rfc1952.txt (gzip format).
Third-party licenses 157

HP Officejet 4500 / HP Officejet 4575 / HP Officejet Advantage 4500
Third-party licenses
AES
rijndael-alg-fst.c
@version 3.0 (December 2000)
Optimised ANSI C code for the Rijndael cipher (now AES)
@author Vincent Rijmen <[email protected]>@author Antoon Bosselaers <[email protected]>@author Paulo Barreto <[email protected]>
This code is hereby placed in the public domain.
THIS SOFTWARE IS PROVIDED BY THE AUTHORS ''AS IS'' AND ANY EXPRESS OR IMPLIED WARRANTIES, INCLUDING, BUT NOT LIMITED TO, THE IMPLIED WARRANTIES OF MERCHANTABILITY AND FITNESS FOR A PARTICULAR PURPOSE ARE DISCLAIMED. IN NO EVENT SHALL THE AUTHORS OR CONTRIBUTORS BE LIABLE FOR ANY DIRECT, INDIRECT, INCIDENTAL, SPECIAL, EXEMPLARY, OR CONSEQUENTIAL DAMAGES (INCLUDING, BUT NOT LIMITED TO, PROCUREMENT OF SUBSTITUTE GOODS OR SERVICES; LOSS OF USE, DATA, OR PROFITS; OR BUSINESS INTERRUPTION) HOWEVER CAUSED AND ON ANY THEORY OF LIABILITY, WHETHER IN CONTRACT, STRICT LIABILITY, OR TORT (INCLUDING NEGLIGENCE OR OTHERWISE) ARISING IN ANY WAY OUT OF THE USE OF THIS SOFTWARE, EVEN IF ADVISED OF THE POSSIBILITY OF SUCH DAMAGE.
Appendix A
158 Technical information

Expat
Copyright (c) 1998, 1999, 2000 Thai Open Source Software Center Ltd
Permission is hereby granted, free of charge, to any person obtaininga copy of this software and associated documentation files (the"Software"), to deal in the Software without restriction, includingwithout limitation the rights to use, copy, modify, merge, publish,distribute, sublicense, and/or sell copies of the Software, and topermit persons to whom the Software is furnished to do so, subject tothe following conditions:
The above copyright notice and this permission notice shall be includedin all copies or substantial portions of the Software.
THE SOFTWARE IS PROVIDED "AS IS", WITHOUT WARRANTY OF ANY KIND,EXPRESS OR IMPLIED, INCLUDING BUT NOT LIMITED TO THE WARRANTIES OF MERCHANTABILITY, FITNESS FOR A PARTICULAR PURPOSE AND NONIN-FRINGEMENT. IN NO EVENT SHALL THE AUTHORS OR COPYRIGHT HOLD-ERS BE LIABLE FOR ANY CLAIM, DAMAGES OR OTHER LIABILITY, WHETHER IN AN ACTION OF CONTRACT, TORT OR OTHERWISE, ARISING FROM, OUT OF OR IN CONNECTION WITH THE SOFTWARE OR THE USE OR OTHER DEALINGS IN THE SOFTWARE.
Third-party licenses 159

OpenSSL
Copyright (C) 1995-1998 Eric Young ([email protected])All rights reserved.
This package is an SSL implementation written by Eric Young ([email protected]).The implementation was written so as to conform with Netscapes SSL.
This library is free for commercial and non-commercial use as long as the following conditions are aheared to. The following conditions apply to all code found in this distribution, be it the RC4, RSA, lhash, DES, etc., code; not just the SSL code. The SSL documentation included with this distribution is covered by the same copyright terms except that the holder is Tim Hudson ([email protected]).
Copyright remains Eric Young's, and as such any Copyright notices inthe code are not to be removed.If this package is used in a product, Eric Young should be given attributionas the author of the parts of the library used.This can be in the form of a textual message at program startup orin documentation (online or textual) provided with the package.
Redistribution and use in source and binary forms, with or without modification, are permitted provided that the following conditions are met:
1. Redistributions of source code must retain the copyright notice, this list of conditions and the following disclaimer.
2. Redistributions in binary form must reproduce the above copyright notice, this list of conditions and the following disclaimer in the documentation and/or other materials provided with the distribution.
3. All advertising materials mentioning features or use of this software must display the following acknowledgement:
"This product includes cryptographic software written by Eric Young ([email protected])"
The word 'cryptographic' can be left out if the rouines from the library being used are not cryptographic related :-).4. If you include any Windows specific code (or a derivative thereof) from the apps directory (application code) you must include an acknowledgement: "This product includes software written by Tim Hudson ([email protected])"
Appendix A
160 Technical information

THIS SOFTWARE IS PROVIDED BY ERIC YOUNG ``AS IS'' AND ANY EXPRESS OR IMPLIED WARRANTIES, INCLUDING, BUT NOT LIMITED TO, THE IMPLIED WARRANTIES OF MERCHANTABILITY AND FITNESS FOR A PARTICULAR PURPOSE ARE DISCLAIMED. IN NO EVENT SHALL THE AUTHOR OR CONTRIBUTORS BE LIABLE FOR ANY DIRECT, INDIRECT, INCIDENTAL, SPECIAL, EXEMPLARY, OR CONSEQUENTIAL DAMAGES (INCLUDING, BUT NOT LIMITED TO, PROCUREMENT OF SUBSTITUTE GOODS OR SERVICES; LOSS OF USE, DATA, OR PROFITS; OR BUSINESS INTERRUPTION) HOWEVER CAUSED AND ON ANY THEORY OF LIABILITY, WHETHER IN CONTRACT, STRICT LIABILITY, OR TORT (INCLUDING NEGLIGENCE OR OTHERWISE) ARISING IN ANY WAY OUT OF THE USE OF THIS SOFTWARE, EVEN IF ADVISED OF THE POSSIBILITY OF SUCH DAMAGE.
The licence and distribution terms for any publically available version or derivative of this code cannot be changed. i.e. this code cannot simply be copied and put under another distribution licence [including the GNU Public Licence.]========================================================Copyright (c) 1998-2001 The OpenSSL Project. All rights reserved.
Redistribution and use in source and binary forms, with or without modification, are permitted provided that the following conditions are met:
1. Redistributions of source code must retain the above copyright notice, this list of conditions and the following disclaimer.
2. Redistributions in binary form must reproduce the above copyright notice, this list of conditions and the following disclaimer in the documentation and/or other materials provided with the distribution.
3. All advertising materials mentioning features or use of this software must display the following acknowledgment: "This product includes software developed by the OpenSSL Project for use in the OpenSSL Toolkit. (http://www.openssl.org/)"
4. The names "OpenSSL Toolkit" and "OpenSSL Project" must not be used to endorse or promote products derived from this software without prior written permission. For written permission, please contact [email protected].
5. Products derived from this software may not be called "OpenSSL" nor may "OpenSSL" appear in their names without prior written permission of the OpenSSL Project.
6. Redistributions of any form whatsoever must retain the following acknowledgment: "This product includes software developed by the OpenSSL Project for use in the OpenSSL Toolkit (http://www.openssl.org/)"
Third-party licenses 161

THIS SOFTWARE IS PROVIDED BY THE OpenSSL PROJECT ``AS IS'' AND ANYEXPRESSED OR IMPLIED WARRANTIES, INCLUDING, BUT NOT LIMITED TO, THE IMPLIED WARRANTIES OF MERCHANTABILITY AND FITNESS FOR A PARTICULAR PURPOSE ARE DISCLAIMED. IN NO EVENT SHALL THE OpenSSL PROJECT OR ITS CONTRIBUTORS BE LIABLE FOR ANY DIRECT, INDIRECT, INCIDENTAL, SPECIAL, EXEMPLARY, OR CONSEQUENTIAL DAMAGES (INCLUDING, BUT NOT LIMITED TO, PROCUREMENT OF SUBSTITUTE GOODS OR SERVICES; LOSS OF USE, DATA, OR PROFITS; OR BUSINESS INTERRUPTION) HOWEVER CAUSED AND ON ANY THEORY OF LIABILITY, WHETHER IN CONTRACT, STRICT LIABILITY, OR TORT (INCLUDING NEGLI-GENCE OR OTHERWISE) ARISING IN ANY WAY OUT OF THE USE OF THIS SOFTWARE, EVEN IF ADVISED OF THE POSSIBILITY OF SUCH DAMAGE.========================================================This product includes cryptographic software written by Eric Young ([email protected]). This product includes software written by Tim Hudson ([email protected]).========================================================Copyright (c) 1998-2006 The OpenSSL Project. All rights reserved.
Redistribution and use in source and binary forms, with or without modification, are permitted provided that the following conditions are met:
1. Redistributions of source code must retain the above copyright notice, this list of conditions and the following disclaimer.
2. Redistributions in binary form must reproduce the above copyright notice, this list of conditions and the following disclaimer in the documentation and/or other materials provided with the distribution.
3. All advertising materials mentioning features or use of this software must display the following acknowledgment: "This product includes software developed by the OpenSSL Project for use in the OpenSSL Toolkit. (http://www.openssl.org/)"
4. The names "OpenSSL Toolkit" and "OpenSSL Project" must not be used to endorse or promote products derived from this software without prior written permission. For written permission, please contact [email protected].
5. Products derived from this software may not be called "OpenSSL" nor may "OpenSSL" appear in their names without prior written permission of the OpenSSL Project.
6. Redistributions of any form whatsoever must retain the following acknowledgment: "This product includes software developed by the OpenSSL Project for use in the OpenSSL Toolkit (http://www.openssl.org/)"
Appendix A
162 Technical information

THIS SOFTWARE IS PROVIDED BY THE OpenSSL PROJECT ``AS IS'' AND ANYEXPRESSED OR IMPLIED WARRANTIES, INCLUDING, BUT NOT LIMITED TO, THE IMPLIED WARRANTIES OF MERCHANTABILITY AND FITNESS FOR A PARTICULAR PURPOSE ARE DISCLAIMED. IN NO EVENT SHALL THE OpenSSL PROJECT OR ITS CONTRIBUTORS BE LIABLE FOR ANY DIRECT, INDIRECT, INCIDENTAL, SPECIAL, EXEMPLARY, OR CONSEQUENTIAL DAMAGES (INCLUDING, BUT NOT LIMITED TO, PROCUREMENT OF SUBSTITUTE GOODS OR SERVICES; LOSS OF USE, DATA, OR PROFITS; OR BUSINESS INTERRUPTION) HOWEVER CAUSED AND ON ANY THEORY OF LIABILITY, WHETHER IN CONTRACT, STRICT LIABILITY, OR TORT (INCLUDING NEGLI-GENCE OR OTHERWISE) ARISING IN ANY WAY OUT OF THE USE OF THIS SOFTWARE, EVEN IF ADVISED OF THE POSSIBILITY OF SUCH DAMAGE.
========================================================This product includes cryptographic software written by Eric Young ([email protected]). This product includes software written by Tim Hudson ([email protected]).
=======================================================Copyright 2002 Sun Microsystems, Inc. ALL RIGHTS RESERVED.ECC cipher suite support in OpenSSL originally developed bySUN MICROSYSTEMS, INC., and contributed to the OpenSSL project.
SHA2
FIPS 180-2 SHA-224/256/384/512 implementationLast update: 02/02/2007Issue date: 04/30/2005
Copyright (C) 2005, 2007 Olivier Gay <[email protected]>All rights reserved.
Redistribution and use in source and binary forms, with or without modification, are permitted provided that the following conditions are met:
1. Redistributions of source code must retain the above copyright notice, this list of conditions and the following disclaimer.
2. Redistributions in binary form must reproduce the above copyright notice, this list of conditions and the following disclaimer in the documentation and/or other materials provided with the distribution.
3. Neither the name of the project nor the names of its contributors may be used to endorse or promote products derived from this software without specific prior written permission.
Third-party licenses 163

THIS SOFTWARE IS PROVIDED BY THE PROJECT AND CONTRIBUTORS ``AS IS'' AND ANY EXPRESS OR IMPLIED WARRANTIES, INCLUDING, BUT NOT LIMITED TO, THE IMPLIED WARRANTIES OF MERCHANTABILITY AND FITNESS FOR A PARTICULAR PURPOSE ARE DISCLAIMED. IN NO EVENT SHALL THE PROJECT OR CONTRIBUTORS BE LIABLE FOR ANY DIRECT, INDIRECT, INCIDENTAL, SPECIAL, EXEMPLARY, OR CONSEQUENTIAL DAMAGES (INCLUDING, BUT NOT LIMITED TO, PROCUREMENT OF SUBSTITUTE GOODS OR SERVICES; LOSS OF USE, DATA, OR PROFITS; OR BUSINESS INTERRUPTION) HOWEVER CAUSED AND ON ANY THEORY OF LIABILITY, WHETHER IN CONTRACT, STRICT LIABILITY, OR TORT (INCLUDING NEGLI-GENCE OR OTHERWISE) ARISING IN ANY WAY OUT OF THE USE OF THIS SOFTWARE, EVEN IF ADVISED OF THE POSSIBILITY OF SUCH DAMAGE.
========================================================
ZLIB
zlib.h -- interface of the 'zlib' general purpose compression libraryversion 1.2.3, July 18th, 2005
Copyright (C) 1995-2005 Jean-loup Gailly and Mark Adler
This software is provided 'as-is', without any express or implied warranty. In no event will the authors be held liable for any damages arising from the use of this software.
Permission is granted to anyone to use this software for any purpose, including commercial applications, and to alter it and redistribute it freely, subject to the following restrictions:
1. The origin of this software must not be misrepresented; you must not claim that you wrote the original software. If you use this software in a product, an acknowledgment in the product documentation would be appreciated but is not required.2. Altered source versions must be plainly marked as such, and must not be misrepresented as being the original software.3. This notice may not be removed or altered from any source distribution.
Jean-loup Gailly Mark [email protected] [email protected]
The data format used by the zlib library is described by RFCs (Request forComments) 1950 to 1952 in the files http://www.ietf.org/rfc/rfc1950.txt(zlib format), rfc1951.txt (deflate format) and rfc1952.txt (gzip format).
Appendix A
164 Technical information

HP Officejet 4500 Wireless
Third-party licenses
AES
rijndael-alg-fst.c
@version 3.0 (December 2000)
Optimised ANSI C code for the Rijndael cipher (now AES)
@author Vincent Rijmen <[email protected]>@author Antoon Bosselaers <[email protected]>@author Paulo Barreto <[email protected]>
This code is hereby placed in the public domain.
THIS SOFTWARE IS PROVIDED BY THE AUTHORS ''AS IS'' AND ANY EXPRESS OR IMPLIED WARRANTIES, INCLUDING, BUT NOT LIMITED TO, THE IMPLIED WARRANTIES OF MERCHANTABILITY AND FITNESS FOR A PARTICULAR PURPOSE ARE DISCLAIMED. IN NO EVENT SHALL THE AUTHORS OR CONTRIBUTORS BE LIABLE FOR ANY DIRECT, INDIRECT, INCIDENTAL, SPECIAL, EXEMPLARY, OR CONSEQUENTIAL DAMAGES (INCLUDING, BUT NOT LIMITED TO, PROCUREMENT OF SUBSTITUTE GOODS OR SERVICES; LOSS OF USE, DATA, OR PROFITS; OR BUSINESS INTERRUPTION) HOWEVER CAUSED AND ON ANY THEORY OF LIABILITY, WHETHER IN CONTRACT, STRICT LIABILITY, OR TORT (INCLUDING NEGLIGENCE OR OTHERWISE) ARISING IN ANY WAY OUT OF THE USE OF THIS SOFTWARE, EVEN IF ADVISED OF THE POSSIBILITY OF SUCH DAMAGE.
Third-party licenses 165

Expat
Copyright (c) 1998, 1999, 2000 Thai Open Source Software Center Ltd
Permission is hereby granted, free of charge, to any person obtaining a copy of this software and associated documentation files (the "Software"), to deal in the Software without restriction, including without limitation the rights to use, copy, modify, merge, publish, distribute, sublicense, and/or sell copies of the Software, and to permit persons to whom the Software is furnished to do so, subject to the following conditions:
The above copyright notice and this permission notice shall be included in all copies or substantial portions of the Software.
THE SOFTWARE IS PROVIDED "AS IS", WITHOUT WARRANTY OF ANY KIND, EXPRESS OR IMPLIED, INCLUDING BUT NOT LIMITED TO THE WARRANTIES OF MERCHANTABILITY, FITNESS FOR A PARTICULAR PURPOSE AND NONIN-FRINGEMENT. IN NO EVENT SHALL THE AUTHORS OR COPYRIGHT HOLD-ERS BE LIABLE FOR ANY CLAIM, DAMAGES OR OTHER LIABILITY, WHETHER IN AN ACTION OF CONTRACT, TORT OR OTHERWISE, ARISING FROM, OUT OF OR IN CONNECTION WITH THE SOFTWARE OR THE USE OR OTHER DEALINGS IN THE SOFTWARE.
Appendix A
166 Technical information

OpenSSL
Copyright (C) 1995-1998 Eric Young ([email protected])All rights reserved.
This package is an SSL implementation written by Eric Young ([email protected]). The implementation was written so as to conform with Netscapes SSL.
This library is free for commercial and non-commercial use as long as the following conditions are aheared to. The following conditions apply to all code found in this distribution, be it the RC4, RSA, lhash, DES, etc., code; not just the SSL code. The SSL documentation included with this distribution is covered by the same copyright terms except that the holder is Tim Hudson ([email protected]).
Copyright remains Eric Young's, and as such any Copyright notices in the code are not to be removed. If this package is used in a product, Eric Young should be given attribution as the author of the parts of the library used. This can be in the form of a textual message at program startup or in documentation (online or textual) provided with the package.
Redistribution and use in source and binary forms, with or without modification, are permitted provided that the following conditions are met:
1. Redistributions of source code must retain the copyright notice, this list of conditions and the following disclaimer.2. Redistributions in binary form must reproduce the above copyright notice, this list of conditions and the following disclaimer in the documentation and/or other materials provided with the distribution.3. All advertising materials mentioning features or use of this software must display the following acknowledgement: "This product includes cryptographic software written by Eric Young ([email protected])" The word 'cryptographic' can be left out if the rouines from the library being used are not cryptographic related :-).4. If you include any Windows specific code (or a derivative thereof) from the apps directory (application code) you must include an acknowledgement: "This product includes software written by Tim Hudson ([email protected])"
Third-party licenses 167

THIS SOFTWARE IS PROVIDED BY ERIC YOUNG ``AS IS'' AND ANY EXPRESS OR IMPLIED WARRANTIES, INCLUDING, BUT NOT LIMITED TO, THE IMPLIED WARRANTIES OF MERCHANTABILITY AND FITNESS FOR A PARTICULAR PURPOSE ARE DISCLAIMED. IN NO EVENT SHALL THE AUTHOR OR CONTRIBUTORS BE LIABLE FOR ANY DIRECT, INDIRECT, INCIDENTAL, SPECIAL, EXEMPLARY, OR CONSEQUENTIAL DAMAGES (INCLUDING, BUT NOT LIMITED TO, PROCUREMENT OF SUBSTITUTE GOODS OR SERVICES; LOSS OF USE, DATA, OR PROFITS; OR BUSINESS INTERRUPTION) HOWEVER CAUSED AND ON ANY THEORY OF LIABILITY, WHETHER IN CONTRACT, STRICT LIABILITY, OR TORT (INCLUDING NEGLIGENCE OR OTHERWISE) ARISING IN ANY WAY OUT OF THE USE OF THIS SOFTWARE, EVEN IF ADVISED OF THE POSSIBILITY OF SUCH DAMAGE
The licence and distribution terms for any publically available version or derivative of this code cannot be changed. i.e. this code cannot simply be copied and put under another distribution licence [including the GNU Public Licence.]========================================================
Copyright (c) 1998-2001 The OpenSSL Project. All rights reserved.
Redistribution and use in source and binary forms, with or without modification, are permitted provided that the following conditions are met:
1. Redistributions of source code must retain the above copyright notice, this list of conditions and the following disclaimer.
2. Redistributions in binary form must reproduce the above copyright notice, this list of conditions and the following disclaimer in the documentation and/or other materials provided with the distribution.
3. All advertising materials mentioning features or use of this software must display the following acknowledgment: "This product includes software developed by the OpenSSL Project for use in the OpenSSL Toolkit. (http://www.openssl.org/)"
4. The names "OpenSSL Toolkit" and "OpenSSL Project" must not be used to endorse or promote products derived from this software without prior written permission. For written permission, please contact [email protected].
5. Products derived from this software may not be called "OpenSSL" nor may "OpenSSL" appear in their names without prior written permission of the OpenSSL Project.
6. Redistributions of any form whatsoever must retain the following acknowledgment: "This product includes software developed by the OpenSSL Project for use in the OpenSSL Toolkit (http://www.openssl.org/)"
Appendix A
168 Technical information

THIS SOFTWARE IS PROVIDED BY THE OpenSSL PROJECT ``AS IS'' AND ANY EXPRESSED OR IMPLIED WARRANTIES, INCLUDING, BUT NOT LIMITED TO, THE IMPLIED WARRANTIES OF MERCHANTABILITY AND FITNESS FOR A PARTICULAR PURPOSE ARE DISCLAIMED. IN NO EVENT SHALL THE OpenSSL PROJECT OR ITS CONTRIBUTORS BE LIABLE FOR ANY DIRECT, INDIRECT, INCIDENTAL, SPECIAL, EXEMPLARY, OR CONSEQUENTIAL DAMAGES (INCLUDING, BUT NOT LIMITED TO, PROCUREMENT OF SUBSTITUTE GOODS OR SERVICES; LOSS OF USE, DATA, OR PROFITS; OR BUSINESS INTERRUPTION) HOWEVER CAUSED AND ON ANY THEORY OF LIABILITY, WHETHER IN CONTRACT, STRICT LIABILITY, OR TORT (INCLUDING NEGLI-GENCE OR OTHERWISE) ARISING IN ANY WAY OUT OF THE USE OF THIS SOFTWARE, EVEN IF ADVISED OF THE POSSIBILITY OF SUCH DAMAGE.========================================================This product includes cryptographic software written by Eric Young ([email protected]). This product includes software written by Tim Hudson ([email protected]).========================================================
Copyright (c) 1998-2006 The OpenSSL Project. All rights reserved.
Redistribution and use in source and binary forms, with or without modification, are permitted provided that the following conditions are met:
1. Redistributions of source code must retain the above copyright notice, this list of conditions and the following disclaimer.
2. Redistributions in binary form must reproduce the above copyright notice, this list of conditions and the following disclaimer in the documentation and/or other materials provided with the distribution.
3. All advertising materials mentioning features or use of this software must display the following acknowledgment: "This product includes software developed by the OpenSSL Project for use in the OpenSSL Toolkit. (http://www.openssl.org/)"
4. The names "OpenSSL Toolkit" and "OpenSSL Project" must not be used to endorse or promote products derived from this software without prior written permission. For written permission, please contact [email protected].
5. Products derived from this software may not be called "OpenSSL" nor may "OpenSSL" appear in their names without prior written permission of the OpenSSL Project.
6. Redistributions of any form whatsoever must retain the following acknowledgment: "This product includes software developed by the OpenSSL Project for use in the OpenSSL Toolkit (http://www.openssl.org/)"
Third-party licenses 169

THIS SOFTWARE IS PROVIDED BY THE OpenSSL PROJECT ``AS IS'' AND ANY EXPRESSED OR IMPLIED WARRANTIES, INCLUDING, BUT NOT LIMITED TO, THE IMPLIED WARRANTIES OF MERCHANTABILITY AND FITNESS FOR A PARTICULAR PURPOSE ARE DISCLAIMED. IN NO EVENT SHALL THE OpenSSL PROJECT OR ITS CONTRIBUTORS BE LIABLE FOR ANY DIRECT, INDIRECT, INCIDENTAL, SPECIAL, EXEMPLARY, OR CONSEQUENTIAL DAMAGES (INCLUDING, BUT NOT LIMITED TO, PROCUREMENT OF SUBSTITUTE GOODS OR SERVICES; LOSS OF USE, DATA, OR PROFITS; OR BUSINESS INTERRUPTION) HOWEVER CAUSED AND ON ANY THEORY OF LIABILITY, WHETHER IN CONTRACT, STRICT LIABILITY, OR TORT (INCLUDING NEGLI-GENCE OR OTHERWISE) ARISING IN ANY WAY OUT OF THE USE OF THIS SOFTWARE, EVEN IF ADVISED OF THE POSSIBILITY OF SUCH DAMAGE.
========================================================
This product includes cryptographic software written by Eric Young ([email protected]). This product includes software written by Tim Hudson ([email protected]).
========================================================
Copyright 2002 Sun Microsystems, Inc. ALL RIGHTS RESERVED.ECC cipher suite support in OpenSSL originally developed by SUN MICROSYSTEMS, INC., and contributed to the OpenSSL project.
SHA2
FIPS 180-2 SHA-224/256/384/512 implementationLast update: 02/02/2007Issue date: 04/30/2005
Copyright (C) 2005, 2007 Olivier Gay <[email protected]>All rights reserved.
Redistribution and use in source and binary forms, with or without modification, are permitted provided that the following conditions are met:
1. Redistributions of source code must retain the above copyright notice, this list of conditions and the following disclaimer.2. Redistributions in binary form must reproduce the above copyright notice, this list of conditions and the following disclaimer in the documentation and/or other materials provided with the distribution.3. Neither the name of the project nor the names of its contributors may be used to endorse or promote products derived from this software without specific prior written permission.
Appendix A
170 Technical information

THIS SOFTWARE IS PROVIDED BY THE PROJECT AND CONTRIBUTORS ``AS IS'' AND ANY EXPRESS OR IMPLIED WARRANTIES, INCLUDING, BUT NOT LIMITED TO, THE IMPLIED WARRANTIES OF MERCHANTABILITY AND FITNESS FOR A PARTICULAR PURPOSE ARE DISCLAIMED. IN NO EVENT SHALL THE PROJECT OR CONTRIBUTORS BE LIABLE FOR ANY DIRECT, INDIRECT, INCI-DENTAL, SPECIAL, EXEMPLARY, OR CONSEQUENTIAL DAMAGES (INCLUDING, BUT NOT LIMITED TO, PROCUREMENT OF SUBSTITUTE GOODS OR SERVICES; LOSS OF USE, DATA, OR PROFITS; OR BUSINESS INTERRUPTION) HOWEVER CAUSED AND ON ANY THEORY OF LIABILITY, WHETHER IN CONTRACT, STRICT LIABILITY, OR TORT (INCLUDING NEGLI-GENCE OR OTHERWISE) ARISING IN ANY WAY OUT OF THE USE OF THIS SOFTWARE, EVEN IF ADVISED OF THE POSSIBILITY OF SUCH DAMAGE.
========================================================
ZLIB
zlib.h -- interface of the 'zlib' general purpose compression library version 1.2.3, July 18th, 2005
Copyright (C) 1995-2005 Jean-loup Gailly and Mark Adler
This software is provided 'as-is', without any express or implied warranty. In no event will the authors be held liable for any damages arising from the use of this software.
Permission is granted to anyone to use this software for any purpose, including commercial applications, and to alter it and redistribute it freely, subject to the following restrictions:
1. The origin of this software must not be misrepresented; you must not claim that you wrote the original software. If you use this software in a product, an acknowledgment in the product documentation would be appreciated but is not required.2. Altered source versions must be plainly marked as such, and must not be misrepresented as being the original software.3. This notice may not be removed or altered from any source distribution.
Jean-loup Gailly Mark [email protected] [email protected]
The data format used by the zlib library is described by RFCs (Request for Comments) 1950 to 1952 in the files http://www.ietf.org/rfc/rfc1950.txt (zlib format), rfc1951.txt (deflate format) and rfc1952.txt (gzip format).
Third-party licenses 171

B HP supplies and accessoriesThis section provides information on HP supplies and accessories for the device. The information issubject to changes, visit the HP Web site (www.hpshopping.com) for the latest updates. You mayalso make purchases through the Web site.This section contains the following topics:• Order printing supplies online• Supplies
Order printing supplies onlineFor a list of HP cartridge numbers that work with your printer, see Supported ink cartridges. Cartridgeinformation and links to online shopping also appear on ink alert messages.You can order printing supplies online using the following tools:
NOTE: For more information about opening and using these HP software tools, see Devicemanagement tools
• HP Solution Center (Windows): From HP Solution Center, click the Shopping icon, and thenselect Shop Online to order supplies or Print My Shopping List to create a printable shoppinglist. HP Solution Center uploads, with your permission, printer information, including modelnumber, serial number, and estimated ink levels. The HP supplies that work in your printer arepre-selected. You can change quantities, add or remove items, and then print the list or purchaseonline at the HP Store or other online retailers (options differ by country/region).
• HP Toolbox (Windows): On the Estimated Ink Level tab, click Shop Online.• HP Utility (Mac OS X): On the toolbar, click the Supplies icon.• HP SureSupply Web site: In a standard Web browser, go to www.hp.com/buy/supplies. If
prompted, choose your country/region, follow the prompts to select your product, and then thesupplies you need.
• Embedded Web server (EWS): From the EWS, click Order Supplies. Click Send to sendprinter information (such as model number, serial number, and estimated ink levels) to HP, andyou will be re-directed to the HP SureSupply Web site.
NOTE: Ordering cartridges online is not supported in all countries/regions. However, manycountries have information on ordering by telephone, locating a local store and printing ashopping list. In addition, you can select the How to Buy option at the top of the www.hp.com/buy/supplies page to obtain information about purchasing HP products in your country.
SuppliesThis section contains the following topics:• Supported ink cartridges• HP media
Supported ink cartridgesYou can check the following places to find which cartridges are supported by the device:• The ink supplies label (located inside the printer, near the ink cartridges).• The HP SureSuppply Web site (www.hp.com/buy/supplies). For more information, see Order
printing supplies online.• The label of the ink cartridge you are replacing.
172 HP supplies and accessories

• The HP software on your computer:
NOTE: For more information about opening and using these HP software tools, see Devicemanagement tools
◦ Solution Center (Windows): Click Status, and then click Estimated Ink Levels. The MyCartridges tab lists the currently installed cartridges. The All Cartridges tab lists allsupported cartridges for the device.
◦ Toolbox (Windows): Click the Estimated Ink Levels tab, and then click the CartridgeDetails button to view information about replacement ink cartridges.
◦ HP Utility (Mac OS X):: Click the Supplies Info icon in the Information and Support pane.◦ Embedded Web server: Click the Information tab, and then click Device Information in
the left pane.• The self-test diagnostic page. For more information, see Understand the Printer Status Report
and Self-Test Report.
NOTE: When replacing ink cartridges, make sure to use only replacement cartridges that havethe same cartridge number as the ink cartridge you are replacing.
HP mediaTo order media such as HP Advanced Photo Paper, go to www.hp.com.
Supplies 173

C Additional fax setupAfter completing all the steps in the getting started guide, use the instructions in this section tocomplete your fax setup. Keep your getting started guide for later use.In this section, you will learn how to set up the device so that faxing works successfully withequipment and services you might already have on the same phone line.
TIP: You can also use the Fax Setup Wizard (Windows) or HP Setup Assistant (Mac OS X) tohelp you quickly set up some important fax settings such as the answer mode and fax headerinformation. You can access these tools through the software you installed with the device. Afteryou run these tools, follow the procedures in this section to complete your fax setup.
This section contains the following topics:• Set up faxing (parallel phone systems)• Serial-type fax setup• Test fax setup
Set up faxing (parallel phone systems)Before you begin setting up the device for faxing, determine which kind of phone system yourcountry/region uses. The instructions for fax setup differ depending on whether you have a serial-or parallel-type phone system.• If you do not see your country/region listed in the table below, you probably have a serial-type
phone system. In a serial-type phone system, the connector type on your shared telephoneequipment (modems, phones, and answering machines) does not allow a physical connectionto the "2-EXT" port on the device. Instead, all equipment must be connected at the telephonewall jack.
NOTE: In some countries/regions that use serial-type phone systems, the phone cord thatcame with the device might have an additional wall plug attached to it. This enables you toconnect other telecom devices to the wall jack where you plug in the device.You might need to connect the supplied phone cord to the adapter provided for your country/region.
• If your country/region is listed in the table below, you probably have a parallel-type telephonesystem. In a parallel-type phone system, you are able to connect shared telephone equipmentto the phone line by using the "2-EXT" port on the back of the device.
NOTE: If you have a parallel-type phone system, HP recommends you use the 2-wirephone cord supplied with the device to connect it to the telephone wall jack.
Table C-1 Countries/regions with a parallel-type phone system
Argentina Australia Brazil
Canada Chile China
Colombia Greece India
Indonesia Ireland Japan
Korea Latin America Malaysia
Mexico Philippines Poland
174 Additional fax setup

Portugal Russia Saudi Arabia
Singapore Spain Taiwan
Thailand USA Venezuela
Vietnam
If you are unsure which kind of telephone system you have (serial or parallel), check with yourtelephone company.This section contains the following topics:• Choose the correct fax setup for your home or office• Case A: Separate fax line (no voice calls received)• Case B: Set up the device with DSL• Case C: Set up the device with a PBX phone system or an ISDN line• Case D: Fax with a distinctive ring service on the same line• Case E: Shared voice/fax line• Case F: Shared voice/fax line with voice mail• Case G: Fax line shared with computer modem (no voice calls received)• Case H: Shared voice/fax line with computer modem• Case I: Shared voice/fax line with answering machine• Case J: Shared voice/fax line with computer modem and answering machine• Case K: Shared voice/fax line with computer dial-up modem and voice mail
Choose the correct fax setup for your home or officeTo fax successfully, you need to know what types of equipment and services (if any) share the samephone line with the device. This is important because you might need to connect some of yourexisting office equipment directly to the device, and you might also need to change some fax settingsbefore you can fax successfully.1. Determine if your telephone system is serial or parallel (see Set up faxing (parallel phone
systems)).a. Serial-type telephone system — See Serial-type fax setup.b. Parallel-type telephone system — Go to step 2.
2. Select the combination of equipment and services sharing your fax line.• DSL: A Digital subscriber line (DSL) service through your telephone company. (DSL might
be called ADSL in your country/region.)• PBX: A private branch exchange (PBX) phone system or an integrated services digital
network (ISDN) system.• Distinctive ring service: A distinctive ring service through your telephone company provides
multiple telephone numbers with different ring patterns.• Voice calls: Voice calls are received at the same phone number you use for fax calls on the
device.• Computer dial-up modem: A computer dial-up modem is on the same phone line as the
device. If you answer Yes to any of the following questions, you are using a computer dial-up modem:◦ Do you send and receive faxes directly to and from your computer software applications
through a dial-up connection?◦ Do you send and receive e-mail messages on your computer through a dial-up
connection?◦ Do you access the Internet from your computer through a dial-up connection?
Countries/regions with a parallel-type phone system (continued)
Set up faxing (parallel phone systems) 175

• Answering machine: An answering machine that answers voice calls at the same phonenumber you use for fax calls on the device.
• Voice mail service: A voice mail subscription through your telephone company at the samenumber you use for fax calls on the device.
3. From the following table, choose the combination of equipment and services applicable to yourhome or office setting. Then look up the recommended fax setup. Step-by-step instructions areincluded for each case in the sections that follow.
NOTE: If your home or office setup is not described in this section, set up the device as youwould a regular analog phone. Make sure you use the phone cord supplied in the box to connectone end to your telephone wall jack and the other end to the port labeled 1-LINE on the back ofthe device. If you use another phone cord, you might experience problems sending and receivingfaxes.You might need to connect the supplied phone cord to the adapter provided for your country/region.
Other equipment or services sharing your fax line Recommended faxsetup
DSL PBX Distinctive ringservice
Voicecalls
Computerdial-upmodem
Answeringmachine
Voicemailservice
Case A: Separate faxline (no voice callsreceived)
Case B: Set up thedevice with DSL
Case C: Set up thedevice with a PBXphone system or anISDN line
Case D: Fax with adistinctive ringservice on the sameline
Case E: Sharedvoice/fax line
Case F: Sharedvoice/fax line withvoice mail
Case G: Fax lineshared with computermodem (no voicecalls received)
Case H: Sharedvoice/fax line withcomputer modem
Case I: Shared voice/fax line withanswering machine
Appendix C
176 Additional fax setup

Other equipment or services sharing your fax line Recommended faxsetup
DSL PBX Distinctive ringservice
Voicecalls
Computerdial-upmodem
Answeringmachine
Voicemailservice
Case J: Sharedvoice/fax line withcomputer modemand answeringmachine
Case K: Sharedvoice/fax line withcomputer dial-upmodem and voicemail
Case A: Separate fax line (no voice calls received)If you have a separate phone line on which you receive no voice calls, and you have no otherequipment connected on this phone line, set up the device as described in this section.
Back view of the device
1 Telephone wall jack
2 Use the phone cord supplied in the box with the device to connect to the1-LINE portYou might need to connect the supplied phone cord to the adapterprovided for your country/region.
To set up the device with a separate fax line1. Using the phone cord supplied in the box with the device, connect one end to your telephone
wall jack, then connect the other end to the port labeled 1-LINE on the back of the device.
NOTE: You might need to connect the supplied phone cord to the adapter provided foryour country/region.If you do not use the supplied cord to connect from the telephone wall jack to the device,you might not be able to fax successfully. This special phone cord is different from the phonecords you might already have in your home or office.
2. Turn on the Auto Answer setting.
(continued)
Set up faxing (parallel phone systems) 177

3. (Optional) Change the Rings to Answer setting to the lowest setting (two rings).4. Run a fax test.When the phone rings, the device answers automatically after the number of rings you set in theRings to Answer setting. The device begins emitting fax reception tones to the sending fax machineand receives the fax.
Case B: Set up the device with DSLIf you have a DSL service through your telephone company, and do not connect any equipment tothe device, use the instructions in this section to connect a DSL filter between the telephone walljack and the device. The DSL filter removes the digital signal that can interfere with the device, sothe device can communicate properly with the phone line. (DSL might be called ADSL in your country/region.)
NOTE: If you have a DSL line and you do not connect the DSL filter, you will not be able tosend and receive faxes with the device.
Back view of the device
1 Telephone wall jack
2 DSL (or ADSL) filter and cord supplied by your DSL provider
3 Use the phone cord supplied in the box with the device to connect to the1-LINE portYou might need to connect the supplied phone cord to the adapterprovided for your country/region.
To set up the device with DSL1. Obtain a DSL filter from your DSL provider.2. Using the phone cord supplied in the box with the device, connect one end to the open port on
the DSL filter, and then connect the other end to the port labeled 1-LINE on the back of thedevice.
NOTE: You might need to connect the supplied phone cord to the adapter provided foryour country/region.If you do not use the supplied cord to connect from the DSL filter to the device, you mightnot be able to fax successfully. This special phone cord is different from the phone cordsyou might already have in your home or office.As only one phone cord is supplied, you might need to obtain additional phone cords for thissetup.
Appendix C
178 Additional fax setup

3. Connect an additional phone cord from the DSL filter to the telephone wall jack.4. Run a fax test.If you encounter problems setting up the device with optional equipment, contact your local serviceprovider or vendor for further assistance.
Case C: Set up the device with a PBX phone system or an ISDN lineIf you are using either a PBX phone system or an ISDN converter/terminal adapter, make sure youdo the following:• If you are using either a PBX or an ISDN converter/terminal adaptor, connect the device to the
port that is designated for fax and phone use. Also, make sure that the terminal adapter is setto the correct switch type for your country/region, if possible.
NOTE: Some ISDN systems allow you to configure the ports for specific phone equipment.For example, you might have assigned one port for telephone and Group 3 fax and anotherport for multiple purposes. If you have problems when connected to the fax/phone port ofyour ISDN converter, try using the port designated for multiple purposes; it might be labeled"multi-combi" or something similar.
• If you are using a PBX phone system, set the call waiting tone to "off."
NOTE: Many digital PBX systems include a call-waiting tone that is set to "on" by default.The call waiting tone will interfere with any fax transmission, and you will not be able to sendor receive faxes with the device. Refer to the documentation that came with your PBX phonesystem for instructions on how to turn off the call-waiting tone.
• If you are using a PBX phone system, dial the number for an outside line before dialing the faxnumber.
• Make sure you use the supplied cord to connect from the telephone wall jack to the device. Ifyou do not, you might not be able to fax successfully. This special phone cord is different fromthe phone cords you might already have in your home or office. If the supplied phone cord istoo short, you can purchase a coupler from your local electronics store and extend it.You might need to connect the supplied phone cord to the adapter provided for your country/region.
If you encounter problems setting up the device with optional equipment, contact your local serviceprovider or vendor for further assistance.
Case D: Fax with a distinctive ring service on the same lineIf you subscribe to a distinctive ring service (through your telephone company) that allows you tohave multiple phone numbers on one phone line, each with a different ring pattern, set up the deviceas described in this section.
Back view of the device
Set up faxing (parallel phone systems) 179
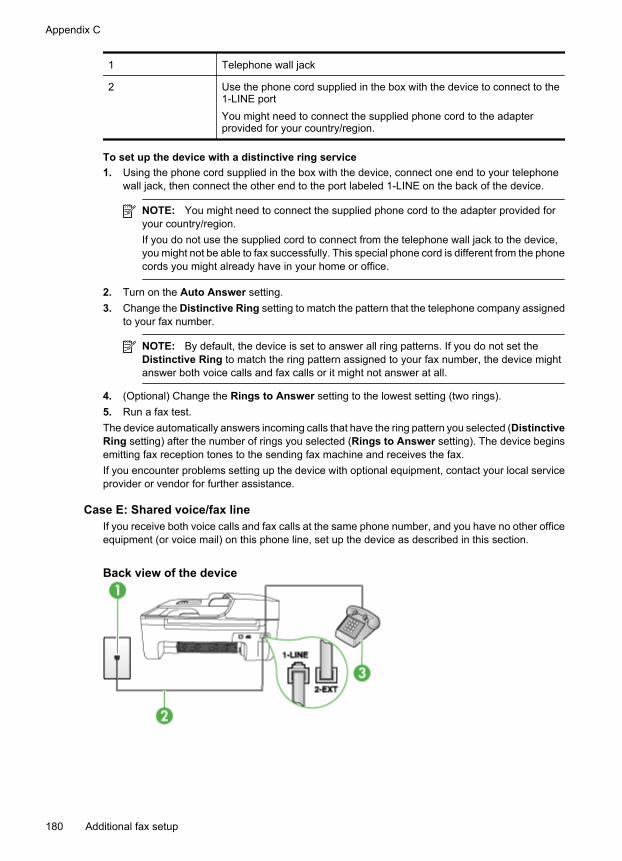
1 Telephone wall jack
2 Use the phone cord supplied in the box with the device to connect to the1-LINE portYou might need to connect the supplied phone cord to the adapterprovided for your country/region.
To set up the device with a distinctive ring service1. Using the phone cord supplied in the box with the device, connect one end to your telephone
wall jack, then connect the other end to the port labeled 1-LINE on the back of the device.
NOTE: You might need to connect the supplied phone cord to the adapter provided foryour country/region.If you do not use the supplied cord to connect from the telephone wall jack to the device,you might not be able to fax successfully. This special phone cord is different from the phonecords you might already have in your home or office.
2. Turn on the Auto Answer setting.3. Change the Distinctive Ring setting to match the pattern that the telephone company assigned
to your fax number.
NOTE: By default, the device is set to answer all ring patterns. If you do not set theDistinctive Ring to match the ring pattern assigned to your fax number, the device mightanswer both voice calls and fax calls or it might not answer at all.
4. (Optional) Change the Rings to Answer setting to the lowest setting (two rings).5. Run a fax test.The device automatically answers incoming calls that have the ring pattern you selected (DistinctiveRing setting) after the number of rings you selected (Rings to Answer setting). The device beginsemitting fax reception tones to the sending fax machine and receives the fax.If you encounter problems setting up the device with optional equipment, contact your local serviceprovider or vendor for further assistance.
Case E: Shared voice/fax lineIf you receive both voice calls and fax calls at the same phone number, and you have no other officeequipment (or voice mail) on this phone line, set up the device as described in this section.
Back view of the device
Appendix C
180 Additional fax setup

1 Telephone wall jack
2 Use the phone cord supplied in the box with the device to connect to the1-LINE portYou might need to connect the supplied phone cord to the adapterprovided for your country/region.
3 Telephone (optional)
To set up the device with a shared voice/fax line1. Using the phone cord supplied in the box with the device, connect one end to your telephone
wall jack, then connect the other end to the port labeled 1-LINE on the back of the device.
NOTE: You might need to connect the supplied phone cord to the adapter provided foryour country/region.If you do not use the supplied cord to connect from the telephone wall jack to the device,you might not be able to fax successfully. This special phone cord is different from the phonecords you might already have in your home or office.
2. Do one of the following:• If you have a parallel-type phone system, remove the white plug from the port labeled 2-
EXT on the back of the device, and then connect a phone to this port.• If you have a serial-type phone system, you might plug your phone directly on top of the
device cable which has a wall plug attached to it.3. Now you need to decide how you want the device to answer calls, automatically or manually:
• If you set up the device to answer calls automatically, it answers all incoming calls andreceives faxes. The device will not be able to distinguish between fax and voice calls in thiscase; if you suspect the call is a voice call, you will need to answer it before the deviceanswers the call. To set up the device to answer calls automatically, turn on the AutoAnswer setting.
• If you set up the device to answer faxes manually, you must be available to respond inperson to incoming fax calls or the device cannot receive faxes. To set up the device toanswer calls manually, turn off the Auto Answer setting.
4. Run a fax test.If you pick up the phone before the device answers the call and hear fax tones from a sending faxmachine, you will need to answer the fax call manually.If you encounter problems setting up the device with optional equipment, contact your local serviceprovider or vendor for further assistance.
Case F: Shared voice/fax line with voice mailIf you receive both voice calls and fax calls at the same phone number, and you also subscribe toa voice mail service through your telephone company, set up the device as described in this section.
NOTE: You cannot receive faxes automatically if you have a voice mail service at the samephone number you use for fax calls. You must receive faxes manually; this means you must beavailable to respond in person to incoming fax calls. If you want to receive faxes automaticallyinstead, contact your telephone company to subscribe to a distinctive ring service, or to obtaina separate phone line for faxing.
Set up faxing (parallel phone systems) 181

Back view of the device
1 Telephone wall jack
2 Use the phone cord supplied in the box with the device to connect to the"1-LINE" portYou might need to connect the supplied phone cord to the adapterprovided for your country/region.
To set up the device with voice mail1. Using the phone cord supplied in the box with the device, connect one end to your telephone
wall jack, then connect the other end to the port labeled 1-LINE on the back of the device.You might need to connect the supplied phone cord to the adapter provided for your country/region.
NOTE: You might need to connect the supplied phone cord to the adapter provided foryour country/region.If you do not use the supplied cord to connect from the telephone wall jack to the device,you might not be able to fax successfully. This special phone cord is different from the phonecords you might already have in your home or office.
2. Turn off the Auto Answer setting.3. Run a fax test.You must be available to respond in person to incoming fax calls, or the device cannot receive faxes.You must initiate the manual fax before voicemail picks up the line.If you encounter problems setting up the device with optional equipment, contact your local serviceprovider or vendor for further assistance.
Case G: Fax line shared with computer modem (no voice calls received)If you have a fax line on which you receive no voice calls, and you also have a computer modemconnected on this line, set up the device as described in this section.
NOTE: If you have a computer dial-up modem, your computer dial-up modem shares the phoneline with the device. You will not be able to use both your modem and the device simultaneously.For example, you cannot use the device for faxing while you are using your computer dial-upmodem to send an e-mail or access the Internet.
• Set up the device with a computer dial-up modem• Set up the device with a computer DSL/ADSL modem
Appendix C
182 Additional fax setup

Set up the device with a computer dial-up modemIf you are using the same phone line for sending faxes and for a computer dial-up modem, followthese directions for setting up the device.
Back view of the device
1 Telephone wall jack
2 Use the phone cord supplied in the box with the device to connect to the"1-LINE" portYou might need to connect the supplied phone cord to the adapterprovided for your country/region.
3 Computer with modem
To set up the device with a computer dial-up modem1. Remove the white plug from the port labeled 2-EXT on the back of the device.2. Find the phone cord that connects from the back of your computer (your computer dial-up
modem) to a telephone wall jack. Disconnect the cord from the telephone wall jack and plug itinto the port labeled 2-EXT on the back of the device.
3. Using the phone cord supplied in the box with the device, connect one end to your telephonewall jack, then connect the other end to the port labeled 1-LINE on the back of the device.
NOTE: You might need to connect the supplied phone cord to the adapter provided foryour country/region.If you do not use the supplied cord to connect from the telephone wall jack to the device,you might not be able to fax successfully. This special phone cord is different from the phonecords you might already have in your home or office.
4. If your modem software is set to receive faxes to your computer automatically, turn off thatsetting.
NOTE: If you do not turn off the automatic fax reception setting in your modem software,the device will not be able to receive faxes.
5. Turn on the Auto Answer setting.6. (Optional) Change the Rings to Answer setting to the lowest setting (two rings).7. Run a fax test.When the phone rings, the device automatically answers after the number of rings you set in theRings to Answer setting. The device begins emitting fax reception tones to the sending fax machineand receives the fax.If you encounter problems setting up the device with optional equipment, contact your local serviceprovider or vendor for further assistance.
Set up faxing (parallel phone systems) 183

Set up the device with a computer DSL/ADSL modemIf you have a DSL line and use that phone line to send faxes, follow these instructions to set up yourfax.
1 Telephone wall jack
2 Parallel splitter
3 DSL/ADSL filterConnect one end of the phone jack that was supplied with the device toconnect to the 1-LINE port on the back of the device. Connect the otherend of the cord to the DSL/ADSL filter.You might need to connect the supplied phone cord to the adapterprovided for your country/region.
4 Computer
5 Computer DSL/ADSL modem
NOTE: You will need to purchase a parallel splitter. A parallel splitter has one RJ-11 port onthe front and two RJ-11 ports on the back. Do not use a 2–line phone splitter, a serial splitter,or a parallel splitter which has two RJ-11 ports on the front and a plug on the back.
To set up the device with a computer DSL/ADSL modem1. Obtain a DSL filter from your DSL provider.2. Using the phone cord provided in the box with the device, connect one end to the DSL filter, and
then connect the other end to the port labeled 1-LINE on the back of the device.
NOTE: You might need to connect the supplied phone cord to the adapter provided foryour country/region.If you do not use the supplied cord to connect from the DSL filter to the back of the device,you might not be able to fax successfully. This special phone cord is different from the phonecords you might already have in your home or office.
3. Connect the DSL filter to the parallel splitter.
Appendix C
184 Additional fax setup

4. Connect the DSL modem to the parallel splitter.5. Connect the parallel splitter to the wall jack.6. Run a fax test.When the phone rings, the device automatically answers after the number of rings you set in theRings to Answer setting. The device begins emitting fax reception tones to the sending fax machineand receives the fax.If you encounter problems setting up the device with optional equipment, contact your local serviceprovider or vendor for further assistance.
Case H: Shared voice/fax line with computer modemThere are two different ways to set up the device with your computer based on the number of phoneports on your computer. Before you begin, check your computer to see if it has one or two phoneports.
NOTE: If your computer has only one phone port, you will need to purchase a parallel splitter(also called a coupler), as shown below. (A parallel splitter has one RJ-11 port on the front andtwo RJ-11 ports on the back. Do not use a two-line phone splitter, a serial splitter, or a parallelsplitter which has two RJ-11 ports on the front and a plug on the back.)
• Shared voice/fax with computer dial-up modem• Shared voice/fax with computer DSL/ADSL modem
Shared voice/fax with computer dial-up modemIf you use your phone line for both fax and telephone calls, use these instructions to set up your fax.There are two different ways to set up the device with your computer based on the number of phoneports on your computer. Before you begin, check your computer to see if it has one or two phoneports.
NOTE: If your computer has only one phone port, you will need to purchase a parallel splitter(also called a coupler), as shown below. (A parallel splitter has one RJ-11 port on the front andtwo RJ-11 ports on the back. Do not use a two-line phone splitter, a serial splitter, or a parallelsplitter which has two RJ-11 ports on the front and a plug on the back.)
Example of a parallel splitter
To set up the product on the same phone line as a computer with two phone ports
Back view of the product
Set up faxing (parallel phone systems) 185

1 Telephone wall jack
2 Use the phone cord supplied in the box with the device to connect to the 1-LINE port.You might need to connect the supplied phone cord to the adapter providedfor your country/region.
3 Computer with modem
4 Telephone
1. Remove the white plug from the port labeled 2-EXT on the back of the product.2. Find the phone cord that connects from the back of your computer (your computer dial-up
modem) to a telephone wall jack. Disconnect the cord from the telephone wall jack and plug itinto the port labeled 2-EXT on the back of the product.
3. Connect a phone to the "OUT" port on the back of your computer dial-up modem.4. Using the phone cord supplied in the box with the product, connect one end to your telephone
wall jack, then connect the other end to the port labeled 1-LINE on the back of the product.
NOTE: You might need to connect the supplied phone cord to the adapter provided foryour country/region.If you do not use the supplied cord to connect from the telephone wall jack to the device,you might not be able to fax successfully. This special phone cord is different from the phonecords you might already have in your home or office.
5. If your modem software is set to receive faxes to your computer automatically, turn off thatsetting.
NOTE: If you do not turn off the automatic fax reception setting in your modem software,the HP product will not be able to receive faxes.
6. Now you need to decide how you want the product to answer calls, automatically or manually:• If you set up the product to answer calls automatically, it answers all incoming calls and
receives faxes. The HP All-in-One will not be able to distinguish between fax and voice callsin this case; if you suspect the call is a voice call, you will need to answer it before the productanswers the call. To set up the product to answer calls automatically, turn on the AutoAnswersetting.
• If you set up the product to answer faxes manually, you must be available to respond inperson to incoming fax calls or the product cannot receive faxes. To set up the product toanswer calls manually, turn off the Auto Answersetting.
7. Run a fax test.If you pick up the phone before the device answers the call and hear fax tones from a sending faxmachine, you will need to answer the fax call manually.If you use your phone line for voice, fax, and your computer dial-up modem, follow these directionsto set up your fax.If you encounter problems setting up the device with optional equipment, contact your local serviceprovider or vendor for further assistance.
Appendix C
186 Additional fax setup

Shared voice/fax with computer DSL/ADSL modemUse these instructions if your computer has a DSL/ADSL modem
1 Telephone wall jack
2 Parallel splitter
3 DSL/ADSL filter
4 Phone cord supplied with the deviceYou might need to connect the supplied phone cord to the adapterprovided for your country/region.
5 DSL/ADSL modem
6 Computer
7 Telephone
NOTE: You will need to purchase a parallel splitter. A parallel splitter has one RJ-11 port onthe front and two RJ-11 ports on the back. Do not use a 2–line phone splitter, a serial splitter,or a parallel splitter which has two RJ-11 ports on the front and a plug on the back.
Set up faxing (parallel phone systems) 187

To set up the device with a computer DSL/ADSL modem1. Obtain a DSL filter from your DSL provider.
NOTE: Phones in other parts of the home/office sharing the same phone number with DSLservice will need to be connected to additional DSL filters, otherwise you will experiencenoise when making voice calls.
2. Using the phone cord supplied in the box with the devices, connect one end to the DSL filter,then connect the other end to the port labeled 1-LINE on the back of the device.
NOTE: You might need to connect the supplied phone cord to the adapter provided foryour country/region.If you do not use the supplied cord to connect from the DSL filter to the device, you mightnot be able to fax successfully. This special phone cord is different from phone cords youmight already have in your home or office.
3. If you have a parallel-type phone system, remove the white plug from the port labeled 2-EXT onthe back of the device, and then connect a phone to this port.
4. Connect the DSL filter to the parallel splitter.5. Connect the DSL modem to the parallel splitter.6. Connect the parallel splitter to the wall jack.7. Run a fax test.When the phone rings, the device automatically answers after the number of rings you set in theRings to Answer setting. The device begins emitting fax reception tones to the sending fax machineand receives the fax.If you encounter problems setting up the device with optional equipment, contact your local serviceprovider or vendor for further assistance.
Case I: Shared voice/fax line with answering machineIf you receive both voice calls and fax calls at the same phone number, and you also have ananswering machine that answers voice calls at this phone number, set up the device as describedin this section.
Back view of the device
1 Telephone wall jack
2 Use the phone cord provided to connect to the 1-LINE port on the back ofthe deviceYou might need to connect the supplied phone cord to the adapter providedfor your country/region.
Appendix C
188 Additional fax setup

3 Answering machine
4 Telephone (optional)
To set up the device with a shared voice/fax line with answering machine1. Remove the white plug from the port labeled 2-EXT on the back of the device.2. Unplug your answering machine from the telephone wall jack, and connect it to the port labeled
2-EXT on the back of the device.
NOTE: If you do not connect your answering machine directly to the device, fax tones froma sending fax machine might be recorded on your answering machine, and you probablywill not be able to receive faxes with the device.
3. Using the phone cord supplied in the box with the device, connect one end to your telephonewall jack, then connect the other end to the port labeled 1-LINE on the back of the device.
NOTE: You might need to connect the supplied phone cord to the adapter provided foryour country/region.If you do not use the supplied cord to connect from the telephone wall jack to the device,you might not be able to fax successfully. This special phone cord is different from the phonecords you might already have in your home or office.
4. (Optional) If your answering machine does not have a built-in phone, for convenience you mightwant to connect a phone to the back of your answering machine at the "OUT" port.
NOTE: If your answering machine does not let you connect an external phone, you canpurchase and use a parallel splitter (also known as a coupler) to connect both the answeringmachine and telephone to the device. You can use standard phone cords for theseconnections.
5. Turn on the Auto Answer setting.6. Set your answering machine to answer after a low number of rings.7. Change the Rings to Answer setting on the device to the maximum number of rings supported
by your device. (The maximum number of rings varies by country/region.)8. Run a fax test.When the phone rings, your answering machine answers after the number of rings you have set,and then plays your recorded greeting. The device monitors the call during this time, "listening" forfax tones. If incoming fax tones are detected, the device emits fax reception tones and receives thefax; if there are no fax tones, the device stops monitoring the line and your answering machine canrecord a voice message.If you encounter problems setting up the device with optional equipment, contact your local serviceprovider or vendor for further assistance.
Case J: Shared voice/fax line with computer modem and answering machineIf you receive both voice calls and fax calls at the same phone number, and you also have a computermodem and answering machine connected on this phone line, set up the HP device as describedin this section.
NOTE: Since your computer dial-up modem shares the phone line with the HP device, youcannot use both your modem and the device simultaneously. For example, you cannot use theHP device for faxing while you are using your computer dial-up modem to send an e-mail oraccess the Internet.
• Shared voice/fax line with computer dial-up modem and answering machine• Shared voice/fax line with computer DSL/ADSL modem and answering machine
(continued)
Set up faxing (parallel phone systems) 189
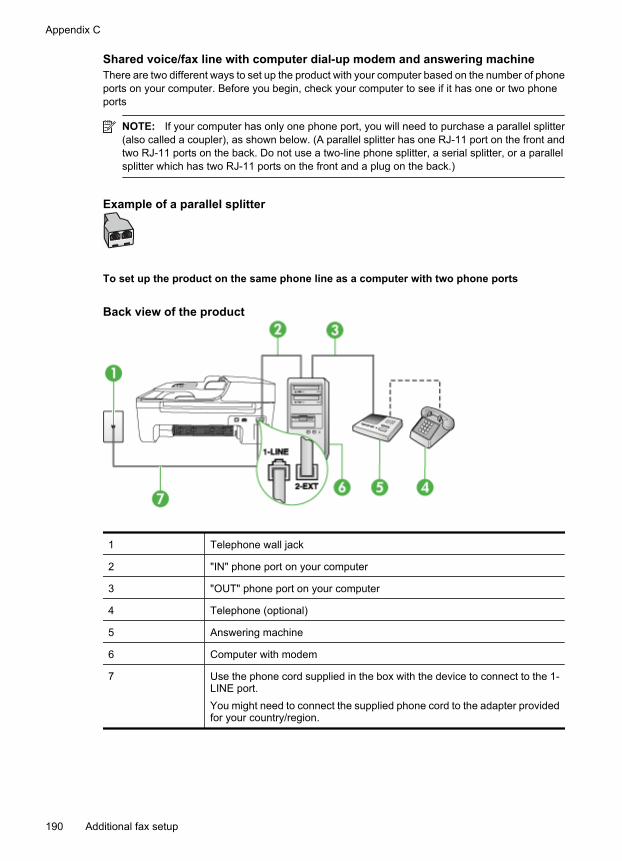
Shared voice/fax line with computer dial-up modem and answering machineThere are two different ways to set up the product with your computer based on the number of phoneports on your computer. Before you begin, check your computer to see if it has one or two phoneports
NOTE: If your computer has only one phone port, you will need to purchase a parallel splitter(also called a coupler), as shown below. (A parallel splitter has one RJ-11 port on the front andtwo RJ-11 ports on the back. Do not use a two-line phone splitter, a serial splitter, or a parallelsplitter which has two RJ-11 ports on the front and a plug on the back.)
Example of a parallel splitter
To set up the product on the same phone line as a computer with two phone ports
Back view of the product
1 Telephone wall jack
2 "IN" phone port on your computer
3 "OUT" phone port on your computer
4 Telephone (optional)
5 Answering machine
6 Computer with modem
7 Use the phone cord supplied in the box with the device to connect to the 1-LINE port.You might need to connect the supplied phone cord to the adapter providedfor your country/region.
Appendix C
190 Additional fax setup

1. Remove the white plug from the port labeled 2-EXT on the back of the product.2. Find the phone cord that connects from the back of your computer (your computer dial-up
modem) to a telephone wall jack. Disconnect the cord from the telephone wall jack and plug itinto the port labeled 2-EXT on the back of the product.
3. Unplug your answering machine from the telephone wall jack, and connect it to the port labeled"OUT" on the back of the computer (the computer dial-up modem).
4. Using the phone cord supplied in the box with the product, connect one end to your telephonewall jack, then connect the other end to the port labeled 1-LINE on the back of the product.
NOTE: You might need to connect the supplied phone cord to the adapter provided foryour country/region.If you do not use the supplied cord to connect from the telephone wall jack to the device,you might not be able to fax successfully. This special phone cord is different from the phonecords you might already have in your home or office.
5. (Optional) If your answering machine does not have a built-in phone, for convenience you mightwant to connect a phone to the back of your answering machine at the "OUT" port.
NOTE: If your answering machine does not let you connect an external phone, you canpurchase and use a parallel splitter (also known as a coupler) to connect both the answeringmachine and telephone to the product. You can use standard phone cords for theseconnections.
6. If your modem software is set to receive faxes to your computer automatically, turn off thatsetting.
NOTE: If you do not turn off the automatic fax reception setting in your modem software,the HP product will not be able to receive faxes.
7. Turn on the Auto Answer setting.8. Set your answering machine to answer after a low number of rings.9. Change the Rings to Answer setting on the product to the maximum number of rings supported
by the product. (The maximum number of rings varies by country/region.)10. Run a fax test.When the phone rings, your answering machine will answer after the number of rings you have set,and then play your recorded greeting. The product monitors the call during this time, "listening" forfax tones. If incoming fax tones are detected, the product will emit fax reception tones and receivethe fax; if there are no fax tones, the product stops monitoring the line and your answering machinecan record a voice message.If you encounter problems setting up the device with optional equipment, contact your local serviceprovider or vendor for further assistance.
Set up faxing (parallel phone systems) 191

Shared voice/fax line with computer DSL/ADSL modem and answering machine
1 Telephone wall jack
2 Parallel splitter
3 DSL/ADSL filter
4 Phone cord provided with the device connected to the 1-LINE port on theback of the deviceYou might need to connect the supplied phone cord to the adapterprovided for your country/region.
5 DSL/ADSL modem
6 Computer
7 Answering machine
8 Telephone (optional)
NOTE: You will need to purchase a parallel splitter. A parallel splitter has one RJ-11 port onthe front and two RJ-11 ports on the back. Do not use a 2–line phone splitter, a serial splitter,or a parallel splitter which has two RJ-11 ports on the front and a plug on the back.
Appendix C
192 Additional fax setup

To set up the device with a computer DSL/ADSL modem1. Obtain a DSL/ADSL filter from your DSL/ADSL provider.
NOTE: Phones in other parts of the home/office sharing the same phone number with DSL/ADSL service will need to be connected to additional DSL/ADSL filters, otherwise you willexperience noise when making voice calls.
2. Using the phone cord supplied in the box with the device, connect one end to the DSL/ADSLfilter, then connect the other end to the port labeled 1-LINE on the back of the device.
NOTE: You might need to connect the supplied phone cord to the adapter provided foryour country/region.If you do not use the supplied cord to connect from the DSL/ADSL filter to the device, youmight not be able to fax successfully. This special phone cord is different from the phonecords you might already have in your home or office.
3. Connect the DSL/ADSL filter to the splitter.4. Unplug the answering machine from the telephone wall jack, and connect it to the port labeled
2-EXT on the back of the device.
NOTE: If you do not connect your answering machine directly to the device, fax tones froma sending fax machine might be recorded on your answering machine, and you probablywill not be able to receive faxes with the device.
5. Connect the DSL modem to the parallel splitter.6. Connect the parallel splitter to the wall jack.7. Set your answering machine to answer after a low number of rings.8. Change your Rings to Answer setting on the device to the maximum number of rings supported
by the device.
NOTE: The maximum number of rings varies by country/region.
9. Run a fax test.When the phone rings, your answering machine will answer after the number of rings you have set,and then play your recorded greeting. The device monitors the call during this time, “listening” forfax tones. If incoming fax tones are detected, the device will emit fax reception tones and receivethe fax; if there are no fax tones, the device stops monitoring the line and your answering machinecan record a voice message.If you use the same phone line for telephone, fax, and have a computer DSL modem, follow theseinstructions to set up your fax.If you encounter problems setting up the device with optional equipment, contact your local serviceprovider or vendor for further assistance.
Case K: Shared voice/fax line with computer dial-up modem and voice mailIf you receive both voice calls and fax calls at the same phone number, use a computer dial-upmodem on the same phone line, and subscribe to a voice mail service through your telephonecompany, set up the device as described in this section.
NOTE: You cannot receive faxes automatically if you have a voice mail service at the samephone number you use for fax calls. You must receive faxes manually; this means you must beavailable to respond in person to incoming fax calls. If you want to receive faxes automaticallyinstead, contact your telephone company to subscribe to a distinctive ring service, or to obtaina separate phone line for faxing.
Set up faxing (parallel phone systems) 193

Since your computer dial-up modem shares the phone line with the device, you cannot use bothyour modem and the device simultaneously. For example, you cannot use the device for faxing ifyou are using your computer dial-up modem to send an e-mail or access the Internet.There are two different ways to set up the device with your computer based on the number of phoneports on your computer. Before you begin, check your computer to see if it has one or two phoneports.• If your computer has only one phone port, you will need to purchase a parallel splitter (also called
a coupler), as shown below. (A parallel splitter has one RJ-11 port on the front and two RJ-11ports on the back. Do not use a two-line phone splitter, a serial splitter, or a parallel splitter whichhas two RJ-11 ports on the front and a plug on the back.)
Example of a parallel splitter
• If your computer has two phone ports, set up the device as described below.
Back view of the device
1 Telephone wall jack
2 Use the phone cord supplied in the box with the device to connect to the1-LINE portYou might need to connect the supplied phone cord to the adapterprovided for your country/region.
3 Parallel splitter
4 Computer with modem
5 Telephone
To set up the device on the same phone line as a computer with two phone ports1. Remove the white plug from the port labeled 2-EXT on the back of the device.2. Find the phone cord that connects from the back of your computer (your computer dial-up
modem) to a telephone wall jack. Disconnect the cord from the telephone wall jack and plug itinto the port labeled 2-EXT on the back of the device.
3. Connect a phone to the "OUT" port on the back of your computer dial-up modem.
Appendix C
194 Additional fax setup

4. Using the phone cord supplied in the box with the device, connect one end to your telephonewall jack, then connect the other end to the port labeled 1-LINE on the back of the device.
NOTE: You might need to connect the supplied phone cord to the adapter provided foryour country/region.If you do not use the supplied cord to connect from the telephone wall jack to the device,you might not be able to fax successfully. This special phone cord is different from the phonecords you might already have in your home or office.
5. If your modem software is set to receive faxes to your computer automatically, turn off thatsetting.
NOTE: If you do not turn off the automatic fax reception setting in your modem software,the device will not be able to receive faxes.
6. Turn off the Auto Answer setting.7. Run a fax test.You must be available to respond in person to incoming fax calls, or the device cannot receive faxes.If you encounter problems setting up the device with optional equipment, contact your local serviceprovider or vendor for further assistance.
Serial-type fax setupFor information on setting up the device for faxing using a serial-type phone system, see the FaxConfiguration Web site for your country/region.
Austria www.hp.com/at/faxconfig
Germany www.hp.com/de/faxconfig
Switzerland (French) www.hp.com/ch/fr/faxconfig
Switzerland (German) www.hp.com/ch/de/faxconfig
United Kingdom www.hp.com/uk/faxconfig
Finland www.hp.fi/faxconfig
Denmark www.hp.dk/faxconfig
Sweden www.hp.se/faxconfig
Norway www.hp.no/faxconfig
Netherlands www.hp.nl/faxconfig
Belgium (Dutch) www.hp.be/nl/faxconfig
Belguim (French) www.hp.be/fr/faxconfig
Portugal www.hp.pt/faxconfig
Spain www.hp.es/faxconfig
France www.hp.com/fr/faxconfig
Ireland www.hp.com/ie/faxconfig
Italy www.hp.com/it/faxconfig
Serial-type fax setup 195

Test fax setupYou can test your fax setup to check the status of the device and to make sure it is set up properlyfor faxing. Perform this test after you have completed setting up the device for faxing. The test doesthe following:• Tests the fax hardware• Verifies the correct type of phone cord is connected to the device• Checks that the phone cord is plugged into the correct port• Checks for a dial tone• Checks for an active phone line• Tests the status of your phone line connectionThe device prints a report with the results of the test. If the test fails, review the report for informationon how to fix the problem and rerun the test.
To test fax setup via the device control panel1. Set up the device for faxing according to your particular home or office setup instructions.2. Make sure the ink cartridges are installed, and that full-size paper is loaded in the input tray
before starting the test.3. From the device control panel, press Setup.4. Select Tools, and then select Run Fax Test.
The device displays the status of the test on the display and prints a report.5. Review the report.
• If the test passes and you are still having problems faxing, check the fax settings listed inthe report to verify the settings are correct. A blank or incorrect fax setting can causeproblems faxing.
• If the test fails, review the report for more information on how to fix any problems found.
Appendix C
196 Additional fax setup

D Network setup (some modelsonly)You can manage network settings for the device through the device control panel as described inthe next section. Additional advanced settings are available in the embedded Web server, aconfiguration and status tool you access from your Web browser using an existing networkconnection to the device. For more information, see Embedded Web server (some models only).This section contains the following topics:• Change basic network settings• Change advanced network settings• Set up the device for wireless communication (some models only)• Uninstall and reinstall the software
Change basic network settingsThe control-panel options enable you to set up and manage a wireless connection and to performa variety of network management tasks. This includes viewing the network settings, restoring thenetwork defaults, turning the wireless radio on and off, and changing the network settings.This section contains the following topics:• View and print network settings• Turn the wireless radio on and off (some models only)
View and print network settingsYou can display a summary of the network settings on the device control panel or the NetworkToolbox. You can print a more detailed network configuration page. The network configuration pagelists all of the important network settings such as the IP address, link speed, DNS, and mDNS. Forinformation on the network settings, see Understand the network configuration page (some modelsonly).1. Press the Setup button.2. Press the arrow keys until Print Report is highlighted, and then press OK.3. Press the arrow keys unitl Network Settings is highlighted, and then press OK.
Turn the wireless radio on and off (some models only)The wireless radio is on by default, as indicated by the blue light on the front of the device. In orderto stay connected to a wireless network, the radio must stay on. However, if your device is connectedto a wired network or you have a USB connection, the radio is not used. In this case you might wantto turn the radio off.1. Press the Setup button.2. Press the arrow keys until Network is highlighted, and then press OK.3. Select Wireless Radio, and then select Yes to turn the radio on, or No to turn the radio off.
Change advanced network settingsThe advanced network settings are provided for your convenience. However, unless you are anadvanced user, you should not change any of these settings. The advanced settings include LinkSpeed, IP Settings, and Default Gateway.
Network setup (some models only) 197

This section contains the following topics:• Set link speed• To View IP settings• To Change IP settings
Set link speedYou can change the speed at which data is transmitted over the network. The default isAutomatic.1. Press the Setup button.2. Press the arrow keys until Network is highlighted, then press OK.3. Select Advanced Setup, then select Link Speed.4. Press the number next to the link speed that matches your network hardware:
• 1. Automatic• 2. 10-Full• 3. 10-Half• 4. 100-Full• 5. 100-Half
To View IP settingsTo view the IP address of the device:• Print the network configuration page. For more information, see Understand the network
configuration page (some models only).• Or, open the Network Toolbox (Windows), click the Network Settings tab, click the Wired or
Wireless tab (depending on the current connection), and then click IP Settings.
To Change IP settingsThe default IP setting for the IP settings is Automatic, which sets the IP settings automatically.However, if you are an advanced user, you might want to manually change, such as the IP address,subnet mask, or the default gateway.
CAUTION: Be careful when manually assigning an IP address. If you enter an invalid IPaddress during the installation, your network components will not be able to connect with thedevice.
1. Press the Setup button.2. Press the arrow keys until Network is highlighted, and then press OK.3. Select Advanced Setup, select IP Settings, and then select Manual IP Settings.4. Press the number next to the IP setting:
• 1. IP Address• 2. Subnet Mask• 3. Default Gateway
5. Enter your changes, and then press OK.
Appendix D
198 Network setup (some models only)

Set up the device for wireless communication (some models only)You may set up the device for wireless communication using one of the following ways:
Setup method Infrastructurewirelesscommunication
Ad hoc wirelesscommunication*
USB cableFor more information, see To set up wirelesscommunication using the installer (Mac OS X) or Toset up wireless communication using the installer(Windows).
Device control panel
* An ad hoc network can be set up using the Wireless Connection Utility on the HP software CD.
NOTE: If you encounter problems, see Solve wireless problems (some models only).To use the device with any wireless connection, you must run the installation program at leastonce from the HP software CD and create a wireless connection.Make sure the device is not connected to the network using a network cable.The sending device must have built-in 802.11 capabilities or an 802.11 wireless card installed.The device and the computers that use it must be on the same subnet.
Before installing the device software, you may wish to find out the settings of your network. Obtainthe information from your system administrators, or complete the following tasks:• Obtain your network's network name or Service Set Identifier (SSID) and communication mode
(infrastructure or ad hoc) from the configuration utility for the network's wireless access point(WAP) or the computer's network card.
• Find out the type of encryption your network uses, such as Wired Equivalent Privacy (WEP).• Find out the security password or encryption key of the wireless device.This section contains the following topics:• Understand 802.11 wireless network settings• To set up wireless communication using the device control panel with wireless setup wizard• To set up wireless communication using the installer (Windows)• To set up wireless communication using the installer (Mac OS X)• Connect the device using an ad hoc wireless network connection• To turn off wireless communication• To print a wireless test page• Reset wireless settings• Change the connection method• Guidelines for ensuring wireless network security• Guidelines for reducing interference on a wireless network
Understand 802.11 wireless network settingsNetwork name (SSID)By default, the device looks for the wireless network name or SSID named "hpsetup." Your networkmay have a different SSID.Communication mode
Set up the device for wireless communication (some models only) 199

There are two communication mode options:• Ad hoc: On an ad hoc network, the device is set to ad hoc communication mode and
communicates directly with other wireless devices without the use of a WAP.All devices on the ad hoc network must:◦ Be 802.11 compatible◦ Have ad hoc as the communication mode◦ Have the same network name (SSID)◦ Be on the same subnet and same channel◦ Have the same 802.11 security settings
• Infrastructure (recommended): On an infrastructure network, the device is set to infrastructurecommunication mode and communicates with other devices on the network, whether the devicesare wired or wireless, through a WAP. WAPs commonly act as routers or gateways on smallnetworks.
Security settings
NOTE: For more information on wireless security, visit www.weca.net/opensection/pdf/whitepaper_wi-fi_security4-29-03.pdf.
• Network authentication: The device's factory default setting is 'Open,' which does not requiresecurity for authorization or encryption. The other possible values are 'OpenThenShared,''Shared,' and 'WPA-PSK' (Wi-Fi® Protected Access Pre-Shared Key).WPA increases the level of over-the-air data protection and access control on existing and futureWi-Fi networks. It addresses all known weaknesses of WEP, the original native securitymechanism in the 802.11 standard.WPA2 is the second generation of WPA security; it provides enterprise and consumer Wi-Fiusers with a high level of assurance that only authorized users can access their wirelessnetworks.
• Data encryption:◦ Wired Equivalent Privacy (WEP) provides security by encrypting data sent over radio waves
from one wireless device to another wireless device. Devices on a WEP-enabled networkuse WEP keys to encode data. If your network uses WEP, you must know the WEP key(s)it uses.
◦ WPA uses the Temporal Key Integrity Protocol (TKIP) for encryption and employs 802.1Xauthentication with one of the standard Extensible Authentication Protocol (EAP) typesavailable today.
◦ WPA2 provides a new encryption scheme, the Advanced Encryption Standard (AES). AESis defined in counter cipher-block chaining mode (CCM) and supports the IndependentBasic Service Set (IBSS) to enable security between client workstations operating in ad hocmode.
To set up wireless communication using the device control panel with wireless setupwizard
The Wireless Setup Wizard provides an easy way to set up and manage a wireless connection toyour device.
NOTE: To use this method, you must have a wireless network set up and running.
1. Set up the device hardware (see the getting started guide or the setup poster that came withyour device).
2. On the device control panel, press the Setup button.3. Press an arrow button to move to Wireless Menu, and then press OK.4. Press an arrow button to move to Setup Wizard, and then press OK.5. Follow the display instructions to complete the setup.
Appendix D
200 Network setup (some models only)

NOTE: If you cannot find the network name (SSID) and WPA key or WEP passphrase, contactyour network administrator or the person who set up the wireless network..
To set up wireless communication using the installer (Windows)
NOTE: For this method, you will need to have a wireless network set up and running. You willalso need a USB cable. Do not attach the USB cable until prompted by the installer.
1. Save any open documents. Close any applications that are running on your computer.2. Insert the HP software CD into the CD drive. The CD menu runs automatically. If the CD menu
does not start automatically, double-click the setup icon on the HP Software CD.3. On the CD menu, click Install Network/Wireless Device, and then follow the onscreen
instructions.
NOTE: If the firewall software on your computer displays any messages during theinstallation, select the “always permit/allow“ option in the messages. Selecting this optionallows the software to install successfully on your computer.
4. When prompted, temporarily connect the USB wireless setup cable.5. Follow the onscreen instructions to complete the installation.
NOTE: If you cannot find the network name (SSID) and WPA key or WEP passphrase,contact your network administrator or the person who set up the wireless network.
6. Disconnect the USB wireless setup cable when prompted.
To set up wireless communication using the installer (Mac OS X)1. Connect a USB wireless setup cable to the port on the back of the HP device and then to any
USB port on the computer.2. Place the HP software CD into the computer.3. Double-click the HP Installer icon on the HP Software CD, and then follow the onscreen
instructions.
NOTE: If you cannot find the network name (SSID) and WPA key or WEP passphrase,contact your network administrator or the person who set up the wireless network..
4. Disconnect the USB wireless setup cable when prompted.
Connect the device using an ad hoc wireless network connection
Method 11. Turn on wireless in your computer and in the device.2. On your computer, connect to the network name (SSID) “hpsetup“. (This network name is the
default, ad hoc network created by the HP device.)
NOTE: If your HP device was previously configured for a different network, you can restorethe network defaults to enable the device to use “hpsetup“. To restore the network defaultscomplete the following steps:Reset the administrator password and network settings: Select Setup, selectNetwork, and then select Restore Network Defaults. For more information, see Generaltroubleshooting tips and resources.
Set up the device for wireless communication (some models only) 201
To turn off wireless communication• Device control panel: Press Setup, then select Wireless, then select Wireless ON/OFF, and
then select either On or Off.• Press the wireless button on the front of the device.
To print a wireless test pagePrint the wireless test page for information about the device's wireless connection. The wireless testpage provides information about the device's status, MAC address, and IP address. If the device isconnected to a network, the test page displays details about the network settings.▲ Device control panel: Press Setup, select Print Report, select Wireless Test, and then press
OK.
Reset wireless settings
Reset network configuration settingsIf the device is still unable to communicate with the network, reset the device’s network settings.• Press Setup. Press an arrow button to move to Network, and then press OK.• Press an arrow button to move to Reset Wireless, and then press OK.• Print the wireless configuration page and verify that the network settings have been reset. For
more information, see Understand the network configuration page (some models only).By default, the network name (SSID) is “hpsetup” and the communication mode is “ad hoc.”
Change the connection methodIf you have installed the software and connected your HP device using a USB or Ethernet cable, youcan change to a wireless connection any time you want.
Change from a USB connection to a wireless connection (Windows)1. Select Start, Programs, HP, select your device, and then select Change Connection
Method.2. Press Add a Device.3. Follow the onscreen instructions and remove the USB cable when prompted.
Change from a USB connection to a wireless connection (Mac OS X)1. Click the HP Device Manager icon on the Dock or in the Hewlett Packard folder in the
Applications folder.2. From the Information and Settings list, select Network Printer Setup Utility.3. Follow the onscreen instructions to configure the network settings.
Change from an Ethernet connection to a wireless connection
NOTE: For Ethernet-enabled HP devices only.
1. Open the embedded Web server (EWS). For more information, see Embedded Web server(some models only).
2. Click the Networking tab, and then click Wireless (802.11) in the left pane.3. On the Wireless Setup tab, press Start Wizard.4. Follow the onscreen instructions to change from an Ethernet connection to a wireless
connection.5. After you finish changing the settings, disconnect the Ethernet cable.
Appendix D
202 Network setup (some models only)

Guidelines for ensuring wireless network securityThis section contains the following topics:• To add hardware addresses to a WAP• Other guidelines
To add hardware addresses to a WAPMAC filtering is a security feature in which a WAP is configured with a list of MAC addresses (alsocalled "hardware addresses") of devices that are allowed to gain access to the network through theWAP.If the WAP does not have the hardware address of a device attempting to access the network, theWAP denies the device access to the network.If the WAP filters MAC addresses, then the device's MAC address must be added to the WAP's listof accepted MAC addresses.1. Print the network configuration page. For information on the network configuration page, see
Understand the network configuration page (some models only).2. Open the WAP's configuration utility, and add the device's hardware address to the list of
accepted MAC addresses.
Other guidelinesTo keep the wireless network secure, follow these guidelines:• Use a password with at least 20 random characters. You can use up to 63 characters in a WPA
password.• Avoid any common words or phrases, easy sequences of characters (such as all 1s), and
personally-identifiable information for passwords. Always use random strings composed ofuppercase and lowercase letters, numbers, and if allowed, special characters such aspunctuation.
• Change the password periodically.• Change the default password provided by the manufacturer for administrator access to the
access point or wireless router. Some routers let you change the administrator name as well.• Turn off administrative access over wireless if possible. If you do this, you need to connect to
the router with a wired Ethernet connection when you want to make configuration changes.• Turn off remote administrative access over the Internet on your router, if possible. You can use
Remote Desktop to make an encrypted connection to a computer running behind your routerand make configuration changes from the local computer you are accessing over the Internet.
• To avoid accidentally connecting to another party's wireless network, turn off the setting toautomatically connect to non-preferred networks. This is disabled by default in Windows XP.
Guidelines for reducing interference on a wireless networkThe following tips will help reduce the chances for interference in a wireless network:• Keep the wireless devices away from large metal objects, such as filing cabinets, and other
electromagnetic devices, such as microwaves and cordless telephones, as these objects candisrupt radio signals.
• Keep the wireless devices away from large masonry structures and other building structures asthese objects can absorb radio waves and lower signal strength.
• For an infrastructure network, position the WAP in a central location in line of sight with thewireless devices on the network.
• Keep all wireless devices on the network within range of one another.
Uninstall and reinstall the softwareIf your installation is incomplete, or if you connected the USB cable to the computer before promptedby the software installation screen, you might need to uninstall and then reinstall the software. Do
Uninstall and reinstall the software 203

not simply delete the device application files from your computer. Make sure to remove them properlyusing the uninstall utility provided when you installed the software that came with the device.There are three methods to uninstall the software on a Windows computer, and one method touninstall on a Macintosh computer.
To uninstall from a Windows computer, method 11. Disconnect the device from your computer. Do not connect it to your computer until after you
have reinstalled the software.2. On the Windows taskbar, click Start, select Programs or All Programs, select the product
name, and then click Uninstall.3. Follow the onscreen instructions.4. If you are asked whether you would like to remove shared files, click No.
Other programs that use these files might not work properly if the files are deleted.5. Restart your computer.6. To reinstall the software, insert the HP Software CD into your computer's CD drive, follow the
onscreen instructions.7. Connect the device when the software prompts you to connect it to the computer.8. Press the Power button to turn the device on.
After connecting and turning on the device, you might have to wait several minutes for all of thePlug and Play events to complete.
9. Follow the onscreen instructions.When the software installation is complete, the HP Digital Imaging Monitor icon appears in theWindows system tray.
To uninstall from a Windows computer, method 2
NOTE: Use this method if Uninstall is not available in the Windows Start menu.
1. On the Windows taskbar, click Start, select Settings, select Control Panel, and then click Add/Remove Programs.- Or -Click Start, click Control Panel, and then double-click Programs and Features.
2. Select the product name, and then click Change/Remove or Uninstall/Change.Follow the onscreen instructions.
3. Disconnect the device from your computer.4. Restart your computer.
NOTE: It is important that you disconnect the device before restarting your computer. Donot connect the device to your computer until after you have reinstalled the software.
5. Insert the HP Software CD into your computer's CD drive and then start the Setup program.6. Follow the onscreen instructions.
To uninstall from a Windows computer, method 3
NOTE: Use this method if Uninstall is not available in the Windows Start menu.
1. Insert the HP Software CD into your computer's CD drive, and then start the Setup program.2. Disconnect the device from your computer.3. Select Uninstall and follow the onscreen directions.
Appendix D
204 Network setup (some models only)

4. Restart your computer.
NOTE: It is important that you disconnect the device before restarting your computer. Donot connect the device to your computer until after you have reinstalled the software.
5. Start the Setup program for the device again.6. Select Install.7. Follow the onscreen instructions.
To uninstall from a Macintosh computer, method 11. Launch the HP Utility. For instructions, see Open the HP Utility.2. Click the Application icon on the toolbar.3. Double click HP Uninstaller.
Follow the onscreen instructions.4. After the software is uninstalled, restart your computer.5. To reinstall the software, insert the HP Software CD into your computer's CD drive.6. On the desktop, open the CD, and then double-click HP Installer.7. Follow the onscreen instructions.
To uninstall from a Macintosh computer, method 21. Open the Finder.2. Double-click Applications.3. Double-click HP Uninstaller.4. Select your device, and then double-click Uninstall.
Uninstall and reinstall the software 205

E Device management toolsThis section contains the following topics:• Toolbox (Windows)• Use the HP Solution Center (Windows)• HP Utility (Mac OS X)• Embedded Web server (some models only)
Toolbox (Windows)The Toolbox provides maintenance information about the device.
NOTE: The Toolbox can be installed from the HP Software CD by selecting the full installationoption if the computer meets the system requirements.
Open the Toolbox• From the HP Solution Center, click the Settings menu, point to Print Settings, and then click
Printer Toolbox.• Right-click the HP Digital Imaging Monitor in the taskbar, point to Printer Model Name and then
click Display Printer Toolbox.• From the printer preferences, click the Features tab, and then click Printer Services.
Network Toolbox (some models only)The Network Toolbox allows you to view and change some network settings. You can change theIP address, perform tests, and print reports.
NOTE: The Network Toolbox is only available if you have connected the product using a wired(Ethernet) network.
To open the Network Toolbox1. Open the Toolbox2. Click the Network Settings tab.3. Click the Change Settings... button.
Use the HP Solution Center (Windows)On a Windows computer, the HP Solution Center is the entry point for the HP software. Use theHP Solution Center to change print settings, order supplies, and access the onscreen Help.The features available in the HP Solution Center vary depending on the devices you have installed.The HP Solution Center is customized to show icons that are associated with the selected device.If the selected device is not equipped with a particular feature, then the icon for that feature doesnot appear in the HP Solution Center.Open the Solution Center using one of these methods:Double-click the Solution Center icon in the desktop.- Or -Double-click the Digital Imaging Monitor icon in the taskbar.
HP Utility (Mac OS X)The HP Utility contains tools to configure print settings, calibrate the device, order supplies online,and find Web site support information.
206 Device management tools

NOTE: On a Macintosh computer, the features available in the HP Utility vary depending onthe selected device.Ink level warnings and indicators provide estimates for planning purposes only. When youreceive an ink alert message, consider having a replacement cartridge available to avoidpossible printing delays. You do not need to replace cartridges until print quality becomesunacceptable.
TIP: When the HP Utility is opened, you can gain access to the Dock menu shortcuts byselecting and holding the mouse button over the appropriate icon for the HP Utility in the Dock.
Open the HP Utility
To open the HP Utility▲ Click the HP Utility icon in the Dock.
NOTE: If the icon does not appear in the Dock, click the Spotlight icon on the right side ofthe menu bar, type HP Utility in the box, and then click the HP Utility entry.
Embedded Web server (some models only)When the device is connected to a network, you can use the embedded Web server to view statusinformation, change settings, and manage it from your computer.
NOTE: For a list of system requirements for the embedded Web server, see Embedded Webserver specifications (some models only).Some settings might be restricted by the requirement for a password.You can open and use the embedded Web server without being connected to the Internet;however, some features will not be available.
The embedded Web server (EWS) places very small text files (cookies) on your hard drive whenyou are browsing. These files let the EWS recognize your computer the next time you visit. Forexample, if you have configured the EWS language, a cookie helps remember which language youhave selected so that the next time you access the EWS, the pages are displayed in that language.Though some cookies are cleared at the end of each session (such as the cookie that stores theselected language), others (such as the cookie that stores customer-specific preferences) are storedon the computer until you clear them manually.You can configure your browser to accept all cookies, or you can configure it to alert you every timea cookie is offered, which allows you to decide which cookies to accept or refuse. You can also useyour browser to remove unwanted cookies.
NOTE: Depending on your device, if you chose to disable cookies, you will disable one or moreof the following features:
• Automatically refreshing the existing page• Starting where you left the application (especially useful when using setup wizards)• Preventing other users from modifying the same settings while you are making changes• Remembering the EWS browser language settingFor information about how to change your privacy and cookie settings and how to view or deletecookies, see the documentation available with your Web browser.
To open the embedded Web server
NOTE: The device must be on a network and must have an IP address.
Embedded Web server (some models only) 207

You can open the embedded Web server by using these methods:• Web browser: In a supported Web browser on your computer, type the IP address or hostname
that has been assigned to the device.For example, if the IP address is 123.123.123.123, type the following address into the Webbrowser: http://123.123.123.123.The IP address and hostname for the device are listed on the status report. For more information,see Understand the network configuration page (some models only).After opening the embedded Web server, you can bookmark it so that you can return to it quickly.
• Windows taskbar: Right-click the HP Digital Imaging Monitor icon, point to the device you wishto view, and then click Network Settings (EWS).
• Windows Vista: In the Network list of devices, right-click the device icon and then select Viewdevice webpage.
Appendix E
208 Device management tools

F Errors (Windows)This list represents some of the errors you might see on your computer screen (Windows) and howto fix the errors.• Fax Memory Full• Device Disconnected• Ink Alert• Cartridge Problem• Paper Mismatch• The cartridge cradle cannot move• Paper Jam• Paper Jam• The printer is out of paper• Printer Offline• Printer Paused• Document failed to print• General printer error• Align cartridge
Fax Memory FullIf Backup Fax Reception or HP Digital Fax (Fax to PC or Fax to Mac) is enabled and the producthas a problem (such as a paper jam), the product saves incoming faxes to memory until the problemis resolved. However, the product’s memory might fill up with faxes that have not been printed yetor transferred to the computer.To solve this problem, resolve any problems with the product.For more information, see Solve fax problems.
Device DisconnectedThe computer cannot communicate with the product because one of the following events hasoccurred:• The product has been turned off.• The cable connecting the product - such as a USB cable or a network (Ethernet) cable - has
been disconnected.• If the product is connected to a wireless network, the wireless connection has been broken.To solve this problem, try the following solutions:• Make sure the product is turned on and that the (Power) light is on.• Make sure the power cord and other cables are working and are firmly connected to the product.• Make sure the power cord is connected firmly to a functioning, alternating current (AC) power
outlet.• If the product is connected to a network, make sure the network is functioning properly. For more
information, see Solve wired (Ethernet) network problems (some models only).• If the product is connected to a wireless network, make sure the wireless network is functioning
properly. For more information, see Solve wireless problems (some models only).
Ink AlertThe ink cartridge identified in the message is low on ink.
Errors (Windows) 209

Ink level warnings and indicators provide estimates for planning purposes only. When you receivea low-ink warning message, consider having a replacement cartridge available to avoid possibleprinting delays. You do not need to replace the ink cartridges until print quality becomesunacceptable.For information about replacing ink cartridges, see Replace the ink cartridges.For information about ordering ink cartridges, see HP supplies and accessories.For information about recycling used ink supplies, see HP inkjet supplies recycling program.
NOTE: Ink from the cartridges is used in the printing process in a number of different ways,including in the initialization process, which prepares the device and cartridges for printing. Inaddition, some residual ink is left in the cartridge after it is used. For more information seewww.hp.com/go/inkusage.
Cartridge ProblemThe ink cartridge identified in the message is missing, damaged, or inserted into the wrong slot inthe product.To solve this problem, try the following solutions. Solutions are listed in order, with the most likelysolution first. If the first solution does not solve the problem, continue trying the remaining solutionsuntil the issue is resolved.Choose your error• Solution 1: Install the ink cartridges correctly• Solution 2: Turn the product off and on• Solution 3: Clean the electrical contacts• Solution 4: Replace the ink cartridge
Solution 1: Install the ink cartridges correctlyMake sure all of the ink cartridges are properly installed:1. Make sure the product is turned on.
CAUTION: If the product is turned off when you open the front access door to access theink cartridges, the product cannot release the cartridges for changing. You might damagethe product if the ink cartridges are not docked safely when you try to remove them.
2. Open the front access door.The print carriage moves to the far right side of the product.
Appendix F
210 Errors (Windows)

3. Wait until the print carriage is idle and silent, and then lightly press down on the ink cartridge torelease it.
4. Pull the ink cartridge toward you, out of its slot.
CAUTION: Do not touch the copper-colored contacts or ink nozzles. Doing so can resultin clogs, ink failure, and bad electrical connections.
5. Hold the ink cartridge with the HP logo on top, and reinsert the ink cartridge. Make sure youpush the ink cartridge in firmly until it snaps into place.
6. Close the front access door and check if the error message has gone away.If the problem persists, try the next solution.
Cartridge Problem 211

Solution 2: Turn the product off and onTurn off the product, and then turn it on again.If the problem persists, try the next solution.
Solution 3: Clean the electrical contactsClean the electrical contacts on the ink cartridge. For more information, see Clean the ink cartridgecontacts.If the problem persists, try the next solution.
Solution 4: Replace the ink cartridgeReplace the indicated ink cartridge. For more information, see HP supplies and accessories.
NOTE: If your cartridge is still under warranty, contact HP support for service or replacement.For more information about ink cartridge warranty, see Ink cartridge warranty information.
If the problem persists after you replace the cartridge, contact HP support. For more information,see HP support.
Paper MismatchThe paper size or type selected in the printer driver does not match the paper loaded in the product.To solve this problem, try one of the following:• Load the correct paper in the product, and then press OK. For more information, see Load media• Press the (Cancel) button on the product’s control panel, select a different paper size in the
printer driver, and then print the document again.
The cartridge cradle cannot moveSomething is blocking the ink cartridge cradle (the part of the product that holds the ink cartridges).
To clear the obstruction, press the (Power) button to turn off the product, and then check theproduct for jams.For more information, see Clear jams.
Paper JamPaper has become jammed in the product.Before you try to clear the jam, check the following:• Make sure that you have loaded paper that meets specifications and is not wrinkled, folded, or
damaged. For more information, see Media specifications.• Make sure that the product is clean. For more information, see Maintain the device.• Make sure that the trays are loaded correctly and are not too full. For more information, see
Load media.For instructions on clearing jams, as well as more information about how to avoid jams, see Clearjams.
Paper JamPaper has become jammed in the automatic document feeder (ADF).
Appendix F
212 Errors (Windows)

Before you try to clear the jam, check the following:• Make sure that you have loaded paper that meets specifications and that is not wrinkled, folded,
or damaged. For more information, see Media specifications.• Make sure that the product is clean. For more information, see Maintain the device.• Make sure that the ADF is loaded correctly and is not too full. For more information, see Load
an original in the automatic document feeder (ADF).
NOTE: Do not load photos in the ADF; this might cause damage to your photos.
For instructions on clearing jams, as well as more information about how to avoid jams, see Clearjams.
The printer is out of paperThe default tray is empty. Load more paper, and then press OK.For more information, see Load media.
Printer OfflineThe product is currently offline. While offline, the product cannot be used.To change the product's status, complete the following steps.1. Click Start, point to Settings, and then click Printers or Printers and Faxes.
- Or -Click Start, click Control Panel, and then double-click Printers.
2. If the printers listed in the dialog box are not being displayed in Details view, click the Viewmenu, and then click Details.
3. If the product is Offline, right-click the product, and click Use Printer Online.4. Try using the product again.
Printer PausedThe product is currently paused. While paused, new jobs are added to the queue but are not printed.To change the product's status, complete the following steps.1. Click Start, point to Settings, and then click Printers or Printers and Faxes.
- Or -Click Start, click Control Panel, and then double-click Printers.
2. If the printers listed in the dialog box are not being displayed in Details view, click the Viewmenu, and then click Details.
3. If the product is Paused, right-click the product, and click Resume Printing.4. Try using the product again.
Document failed to printThe product could not print the document because a problem occurred in the printing system.For information about solving printing problems, see Solve printing problems.
General printer errorThere was a problem with the product.
General printer error 213

Usually, you can resolve such problems by completing the following steps:1. Press the (Power) button to turn off the product.2. Unplug the power cord, and then plug in the power cord again.3. Press the (Power) button to turn on the product.If this problem persists, write down the error code provided in the message, and then contact HPsupport. For more information about contacting HP support, see HP support.
Align cartridgeThe product prompts you to align ink cartridges every time you install or replace an ink cartridge.You can also align the ink cartridges at any time from the product’s control panel or by using the HPsoftware installed with the product. Aligning the ink cartridges ensures high-quality output.
NOTE: When you remove and reinstall the same ink cartridge, the product remembers thealignment values for that ink cartridge and does not prompt you to align the ink cartridge.
If the alignment process fails, make sure you have loaded unused, plain white paper into the inputtray. If you have colored paper loaded in the input tray when you align the ink cartridges, thealignment will fail.If the alignment process fails repeatedly, you might have a defective sensor or ink cartridge. ContactHP support. Go to www.hp.com/support. If prompted, choose your country/region, and then clickContact HP for information on calling for technical support.For more information, see Align the ink cartridges.
Appendix F
214 Errors (Windows)

Index
Symbols/Numerics(ADF) automatic document
feederclean 22feeding problems,
troubleshoot 22
Aaccessibility 3, 9accessories
Printer Status Report 123Self-Test Report 124warranty 129
acoustic emissions 139ADF (automatic document
feeder)capacity 19load originals 19
ADSL, fax setup withparallel phone systems 178
after the support period 73align ink cartridges 65answer ring pattern
change 52parallel phone systems 179
answering machinefax tones recorded 110set up with fax (parallel
phone systems) 188set up with fax and
modem 189automatic document feeder
(ADF)capacity 19clean 22feeding problems,
troubleshoot 22load originals 19
automatic fax reduction 47available 120
BBack button 12backup fax 44baud rate 53
black and white pagescopy 36fax 38
black dots or streaks,troubleshootcopies 94scan 99
blank pages, troubleshootcopy 93print 75scan 98
blocked fax numbersset up 47
broadcast faxingsend 42
buttons, control panel 12
Ccancel
scheduled fax 42Cancel button 13capacity
ADF 19tray 135
cardssizes supported 134tray supporting 135
cleanautomatic document
feeder 22exterior 22ink cartridge contacts 88ink cartridge ink nozzle
area 89ink cartridges 67scanner glass 21
clearfax logs 57
color copy 36colored text, and OCR 35computer modem
shared with fax (parallelphone systems) 182
shared with fax andanswering machine
(parallel phonesystems) 189
shared with fax and voiceline (parallel phonesystems) 185
shared with fax and voicemail (parallel phonesystems) 193
Configurefirewall 118
confirmation reports, fax 55connection type
change 202connectors, locating 11control panel
buttons 12lights 12messages 14
copyquality 94settings 36specifications 137troubleshoot 92
Copy B&W functionindicator 13
Copy Color functionindicator 13
copy settingscopy 37
correct port test, fax 101critical error messages 15custom-sized media
sizes supported 135custom-sized paper
Mac OS 31print on 30
customer supportelectronic 70
cut-off pages, troubleshoot 76
Ddark images, troubleshoot
copies 94scans 98
Declaration of Conformity(DOC) 148
215

default settingscopy 37
deleting faxes from memory 45device control panel
locating 10network settings 197scan from 34send faxes 39
dial tone test, failure 103dial type, setting 53dial-up modem
shared with fax (parallelphone systems) 182
shared with fax andanswering machine(parallel phone syanstems) 189
shared with fax and voiceline (parallel phonesystems) 185
shared with fax and voicemail (parallel phonesystems) 193
distinctive ringingchange 52parallel phone systems 179
DOC 148dots or streaks, troubleshoot
copies 94dots, troubleshoot
scan 99driver
warranty 129DSL, fax setup with
parallel phone systems 178duty cycle 131
EECM. See error correction modeedit
text in OCR program 35electrical specifications 139embedded Web server
about 207opening 207system requirements 133troubleshoot, cannot be
opened 120envelopes
sizes supported 134tray supporting 135
environmentalspecifications 139
environmental sustainabilityprogram 151
error correction mode 42error messages
device control panel 14unable to activate TWAIN
source 97error reports, fax 56error-correction mode, fax 52event log 124EWS. See embedded Web
server
Ffaded copies 93faded stripes on copies,
troubleshoot 94fax
answer mode 51answering machine and
modem, shared with(parallel phonesystems) 189
answering machinetroubleshoot 110
answering machine, set up(parallel phonesystems) 188
auto answer 51backup fax 44blocking numbers 47confirmation reports 55deleting from memory 45dial tone test, failed 103dial type, setting 53distinctive ringing setup
(parallel phonesystems) 179
distinctive ringing, changepattern 52
DSL, set up (parallel phonesystems) 178
error correction mode 42error reports 56error-correction mode 52Fax to Mac 49Fax to PC 49forwarding 46header 51Internet Protocol, over 54ISDN line, set up (parallel
phone systems) 179
line condition test,failed 104
log, clear 57log, print 56manual receive 43modem and answering
machine, shared with(parallel phonesystems) 189
modem and voice line,shared with (parallelphone systems) 185
modem and voice mail,shared with (parallelphone systems) 193
modem, shared with (parallelphone systems) 182
monitor dialing 40, 42paper size 46parallel phone systems 174PBX system, set up (parallel
phone systems) 179phone cord connection test,
failed 101phone cord too short 110phone cord type test,
failed 102poll to receive 45print last transaction
details 57receive 43receive, troubleshoot 105,
107redial options 53reduction 47reports 55reprint 45rings to answer 51schedule 41send 38send, troubleshoot 105, 107,
109separate line setup (parallel
phone systems) 177settings, change 50setup types 175shared phone line setup
(parallel phonesystems) 180
sound volume 54specifications 138speed 53test failed 99
216

test setup 196troubleshoot 99voice mail, set up (parallel
phone systems) 181wall jack test, failed 100
Fax B&W function indicator 13Fax Color function indicator 13Fax to Mac
activate 49modify 49
Fax to PCactivate 49modify 49
Firewallconfigure 118
firewalls, troubleshoot 75FoIP 54forwarding faxes 46
Gglass, scanner
clean 21load originals 18locating 10
grainy or white bands on copies,troubleshoot 95
graphicsincompletely filled on
copies 94look different from original
scan 98
Hhardware, fax setup test 100header, fax 51Help button 12Hewlett-Packard Company
notices 3HP Solution Center 206HP Utility (Mac OS X)
opening 206humidity specifications 139
Iink cartridge door, locating 11ink cartridge latch, locating 11ink cartridges
align 65check ink levels 60clean 67clean contacts 88clean ink nozzle area 89
handle 61locating 11order online 172part names 61replace 61supported 131, 172test 124tips 59warranty 129yields 131
ink levels, check 60installation
troubleshoot 121Internet Protocol
fax, using 54IP address
checking for device 120IP settings 198ISDN line, set up with fax
parallel phone systems 179
Jjams
clear 125media to avoid 18paper 126, 127
junk fax mode 47
Kkeypad, device control panel
locating 12
Llanguage, printer 131left navigation button 12light images, troubleshoot
copies 94scans 98
lights, control panel 12line condition test, fax 104lines
copies, troubleshoot 94scans, troubleshoot 98
link speed, setting 198load
tray 20load media 20log, fax
print 56
MMac OS
custom-sized paper 31Print borderless 32Print photos 29print settings 26two-sided 33
Mac OS XHP Utility 206uninstall software 205wireless communication
setup 201main tray
media supported 136maintenance
align ink cartridges 65check ink levels 60clean ink cartridges 67replace ink cartridges 61
manual faxingreceive 43send 39, 40
marginssetting, specifications 136
mediaADF capacity 19clear jams 125HP, order 173load tray 19print on custom-sized 30selecting 17skewed pages 92specifications 133supported sizes 133troubleshoot feeding 91types and weights
supported 135memory
deleting faxes 45reprint faxes 45save faxes 44
missing or incorrect information,troubleshoot 76
model number 123, 124modem
shared with fax (parallelphone systems) 182
shared with fax andanswering machine(parallel phonesystems) 189
Index
217

shared with fax and voiceline (parallel phonesystems) 185
shared with fax and voicemail (parallel phonesystems) 193
monitor dialing 40, 42multi-feeds, troubleshoot 92
Nnetwork port
address 112networks
advanced settings 197connector illustration 11firewalls, troubleshoot 75IP settings 198link speed 198operating systems
supported 132protocols supported 133settings, change 197system requirements 133view and printsettings 197wireless communication
setup 199wireless settings 124, 199
noise information 139
OOCR
edit scanned documents 35troubleshoot 97
OK button 12On button 13operating environment
specifications 139operating systems
supported 132originals
scan 34output tray
locating 10
Ppages per month (duty
cycle) 131paper
jams 126, 127size, set for fax 46
paper-feed problems,troubleshoot 91
parallel phone systemsanswering machine
setup 188countries/regions with 174distinctive ringing setup 179DSL setup 178ISDN setup 179modem and answering
machine setup 189modem and voice mail
setup 193modem setup 182modem shared with voice
line setup 185PBX setup 179separate line setup 177setup types 175shared line setup 180
PBX system, set up with faxparallel phone systems 179
PCL 3 support 131phone cord
connected to correct porttest failed 101
correct type test failed 102extend 110
phone line, answer ringpattern 52
phone support 70phone support period
period for support 71phone, fax from
receive 43send, 39
photo mediasizes supported 134
poll to receive fax 45ports, specifications 131power
specifications 139troubleshoot 74
power input, locating 11power on button 13print
fax logs 56fax reports 55faxes 45last fax details 57Printer Status Report 124slow 75troubleshoot 74
Print borderlessMac OS 32Windows 32
Print brochuresprint 26
print driverwarranty 129
Print envelope 27Print envelopes
Mac OS 27Print photos
Mac OS 29Windows 29, 30
print qualitytroubleshoot 77
print-carriage access door,locating 11
printer driverwarranty 129
Printer Status Reportinformation on 122print 124
processor specifications 131product control panel
scan 34pulse dialing 53
Qquality, troubleshoot
copy 94print 77scan 97
Rradio interference
reducing 203regulatory information 145
radio, turn off 197rear access panel
clear jams 125illustration 11
receive faxesauto answer mode 51automatically 43blocking numbers 47forwarding 46manually 43polling 45rings to answer 51troubleshoot 105, 107
recycleprint cartridges 151
218

redial options, setting 53reduce fax 47regulatory information 140, 145regulatory model number 147replace ink cartridges 61report
wireless test 202reports
confirmation, fax 55error, fax 56fax test failed 99
reprintfaxes from memory 45
right navigation button 12rings to answer 51
Ssave
faxes in memory 44scan
error messages 97from device control
panel 34OCR 35quality 97scan specifications 139send to a computer 34slow 96troubleshoot 95
Scan function indicator 13scanner glass
clean 21load originals 18locating 10
schedule fax 41security
wirelesscommunication 203
wireless settings 200send faxes
basic fax 38manually 39memory, from 41monitor dialing 40, 42schedule 41troubleshoot 105, 107, 109
send scansfor OCR 35to a computer 34troubleshoot 95
serial number 123, 124
serial phone systemscountries/regions with 174setup types 175
settingscopy 36network 197speed, fax 53volume, fax 54
setupanswering machine (parallel
phone systems) 188answering machine and
modem (parallel phonesystems) 189
computer modem (parallelphone systems) 182
computer modem andanswering machine(parallel phonesystems) 189
computer modem and voiceline (parallel phonesystems) 185
computer modem and voicemail (parallel phonesystems) 193
distinctive ringing 52distinctive ringing (parallel
phone systems) 179DSL (parallel phone
systems) 178fax scenarios 175fax, with parallel phone
systems 174ISDN line (parallel phone
systems) 179PBX system (parallel phone
systems) 179separate fax line (parallel
phone systems) 177shared phone line (parallel
phone systems) 180test fax 196voice mail (parallel phone
systems) 181voice mail and computer
modem (parallel phonesystems) 193
Setup button 12size
scans, troubleshoot 99troubleshoot copy 94
skew, troubleshootcopy 94print 92scan 98
slow print, troubleshoot 75software
OCR 35uninstall from Mac OS
X 205uninstall from Windows 204warranty 129
Solution Center 206sound pressure 139specifications
acoustic emissions 139electrical 139media 133network protocols 133operating environment 139physical 131processor and memory 131storage environment 139system requirements 132
speedtroubleshoot for scanner 96troubleshoot print 75
speed dialsend fax 38
Start button 13status
messages 14network configuration
page 124Printer Status Report 123Self-Test Report 124
storage environmentspecifications 139
streaks, troubleshootcopies 94scan 99
stripes on scans,troubleshoot 98
subscriber identificationcode 51
suppliesorder online 172Printer Status Report 123Self-Test Report 124yields 131
support 69system requirements 132
Index
219

Ttechnical information
copy specifications 137fax specifications 138scan specifications 139
telephone line, answer ringpattern 52
telephone wall jack, fax 100telephone, fax from
receive 43send 39
temperature specifications 139tests, fax
dial tone, failed 103failed 99fax line condition 104fax phone cord type test
failed 102hardware, failed 100port connection, failed 101setup 196telephone wall jack 100
textcannot be edited after scan,
troubleshoot 97incompletely filled on
copies 94missing from scan,
troubleshoot 96splotchy on copies 95troubleshoot 76unclear on copies,
troubleshoot 94unclear scans 99
tone dialing 53Toolbox (Windows)
about 206opening 206
traycapacity 135media sizes supported 133media types and weights
supported 135trays
capacities 135clear jams 125load media 19locating 10media sizes supported 133paper guides illustration 10troubleshoot feeding 91
troubleshootanswering machines 110
blank pages printed 75control-panel messages 14copy 92copy quality 94cut-off pages, incorrect text
or graphics placement 76embedded Web server 120fax 99fax dial tone test failed 103fax hardware test failed 100fax line test failed 104fax phone cord connection
test failed 101fax phone cord type test
failed 102fax tests 99fax wall jack test, failed 100firewalls 75installation 121jams, paper 127media not picked up from
tray 91missing or incorrect
information 76multiple pages are
picked 92network configuration
page 124nothing prints 74paper-feed problems 91power 74print 74print quality 77Printer Status Report 122receive faxes 105, 107scan 95scan quality 97send faxes 105, 107, 109skewed copies 94skewed pages 92slow print 75tips 73
troubleshootinggeneral network
troubleshooting 111wired network 111wireless problems 112
TWAINunable to activate source 97
two-sidedMac OS 33Windows 33
Uuninstall software
Mac OS X 205Windows 204
USB connectionport, locating 10, 11specifications 131
Vvertical stripes on copies,
troubleshoot 94view
network settings 197voice mail
set up with fax (parallelphone systems) 181
set up with fax and computermodem (parallel phonesystems) 193
voltage specifications 139volume
fax sounds 54
Wwall jack test, fax 100warning messages 14warranty 129Web page
print 28Web sites
accessibility information 3, 9customer support 70environmental
programs 151order supplies and
accessories 172supply yield data sheet 131wireless security 200
white bands or stripes,troubleshootcopies 94, 95scans 98
Windowsborderless 32HP Solution Center 206print brochures 26Print photos 29, 30print settings 25set up wireless
communication 201system requirements 132
220

two-sided 33uninstall software 204
wireless communicationadvanced wireless
troubleshooting 113basic wireless
troubleshooting 112Ethernet setup 201radio, turn off 197reducing interference 203regulatory information 145security 203set up 199set up on Mac OS X 201settings 199turn off 202wizard 200
wireless test reportprint 202
Index
221

222


www.hp.com/support
2010 © Hewlett-Packard Development Company, L.P.