


Untitled - Download Center
96
-
Upload
khangminh22 -
Category
Documents
-
view
0 -
download
0
Transcript of Untitled - Download Center

Simply Stunning.Today’s users expect beautiful apps in every part of their lives, from work to home. Now, with
controls into your designs. DXv2 delivers the tools you need to inspire and be inspired.
productivity tools at www.DevExpress.com
Untitled-14 1 12/9/11 4:18 PM

THE MICROSOFT JOURNAL FOR DEVELOPERS
COLUMNSDATA POINTSA Few of My Favorite Things … in the Entity Framework 4.2 DbContext Julie Lerman, page 6
FORECAST: CLOUDY Windows Azure Deployment Domains Joseph Fultz, page 12
TEST RUN Ant Colony Optimization James McCaffrey, page 70
THE WORKING PROGRAMMER Talk to Me: Voice and SMS in the Cloud Ted Neward, page 76
CLIENT INSIGHTGetting Started with Knockout John Papa, page 80
TOUCH AND GO Background Audio on Windows Phone 7.5 Charles Petzold, page 84
DON’T GET ME STARTED Ring Around My Neck David Platt, page 88
FEBRUARY 2012 VOL 27 NO 2
Asynchronous Programming in C++ Using PPLArtur Laksberg . . . . . . . . . . . . . . . . . . . . . . . . . . . . . . . . . . . . . . . . . . . . . . . . . . . . . . . . . . . . . . . . . . . . . . . . . 22
Building a Massively Scalable Platform for Consumer Devices on Windows AzureBruno Terkaly and Ricardo Villalobos . . . . . . . . . . . . . . . . . . . . . . . . . . . . . . . . . . . . . . . . . 28
Features and Foibles of ASP.NET MVC Model BindingJess Chadwick . . . . . . . . . . . . . . . . . . . . . . . . . . . . . . . . . . . . . . . . . . . . . . . . . . . . . . . . . . . . . . . . . . . . . . . . . . 36
Practical Cross-Browser HTML5 Audio and VideoJohn Dyer . . . . . . . . . . . . . . . . . . . . . . . . . . . . . . . . . . . . . . . . . . . . . . . . . . . . . . . . . . . . . . . . . . . . . . . . . . . . . . . . 46
Get Your Windows Phone Applications in the Marketplace FasterCheryl Simmons . . . . . . . . . . . . . . . . . . . . . . . . . . . . . . . . . . . . . . . . . . . . . . . . . . . . . . . . . . . . . . . . . . . . . . . 54
What’s New in Windows Workfl ow Foundation 4.5Leon Welicki . . . . . . . . . . . . . . . . . . . . . . . . . . . . . . . . . . . . . . . . . . . . . . . . . . . . . . . . . . . . . . . . . . . . . . . . . . . . 60
Creating a NuGet GalleryClark Sell . . . . . . . . . . . . . . . . . . . . . . . . . . . . . . . . . . . . . . . . . . . . . . . . . . . . . . . . . . . . . . . . . . . . . . . . . . . . . . . . . 66

Write Once, Experience Many
NetAdvantage®
for jQuery
check out infragistics.com/jquery
BUSINESS CHARTINGCombine interactive
Outlook style grids with
rich business charting to
deliver a complete
portable solution.
TREESimplify the look of
hierarchical data,
while offering the
experience, design
and functionality
your users will love!
Infragistics Sales 800 231 8588 • Infragistics Europe Sales +44 (0) 800 298 9055 • Infragistics India +91 80 4151 8042 • @infragisticsCopyright 1996-2011 Infragistics, Inc. All rights reserved. Infragistics and NetAdvantage are registered trademarks of Infragistics, Inc. The Infragistics logo is a trademark of Infragistics, Inc.
Untitled-5 2 10/12/11 1:24 PM
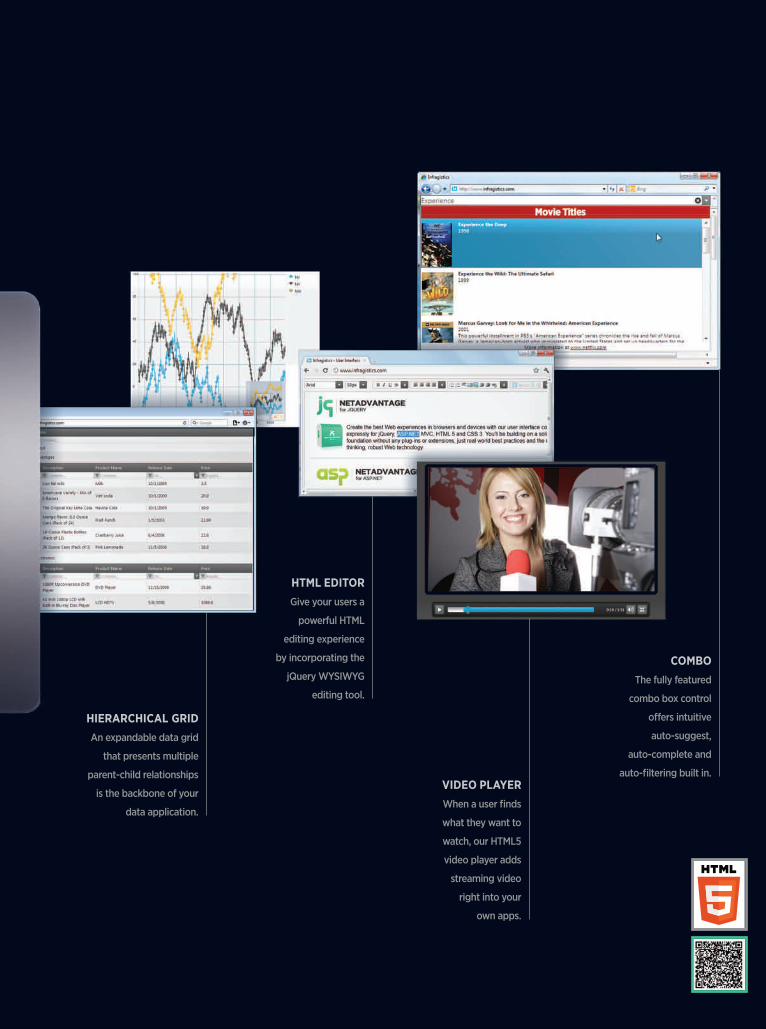
COMBOThe fully featured
combo box control
offers intuitive
auto-suggest,
auto-complete and
auto-filtering built in.
HTML EDITOR Give your users a
powerful HTML
editing experience
by incorporating the
jQuery WYSIWYG
editing tool.
HIERARCHICAL GRIDAn expandable data grid
that presents multiple
parent-child relationships
is the backbone of your
data application.
VIDEO PLAYERWhen a user finds
what they want to
watch, our HTML5
video player adds
streaming video
right into your
own apps.
Untitled-5 3 10/12/11 1:24 PM

magazine
Printed in the USA
LUCINDA ROWLEY DirectorKIT GEORGE Editorial Director/[email protected] O’NEILL Site Manager
MICHAEL DESMOND Editor in Chief/[email protected] RAMEL Technical EditorSHARON TERDEMAN Features EditorWENDY GONCHAR Managing EditorKATRINA CARRASCO Associate Managing Editor
SCOTT SHULTZ Creative DirectorJOSHUA GOULD Art Director
CONTRIBUTING EDITORS Dino Esposito, Joseph Fultz, Kenny Kerr, Julie Lerman, Dr. James McCaffrey, Ted Neward, Charles Petzold, David S. Platt
Henry Allain President, Redmond Media Group Matt Morollo Vice President, PublishingDoug Barney Vice President, Editorial DirectorMichele Imgrund Director, MarketingTracy Cook Online Marketing Director
ADVERTISING SALES: 508-532-1418/[email protected]
Matt Morollo VP, PublishingChris Kourtoglou Regional Sales ManagerWilliam Smith National Accounts DirectorDanna Vedder Microsoft Account ManagerJenny Hernandez-Asandas Director Print ProductionSerena Barnes Production Coordinator/[email protected]
Neal Vitale President & Chief Executive Offi cerRichard Vitale Senior Vice President & Chief Financial Offi cerMichael J. Valenti Executive Vice President
Christopher M. Coates Vice President, Finance & AdministrationErik A. Lindgren Vice President, Information Technology & Application DevelopmentDavid F. Myers Vice President, Event Operations
Jeffrey S. Klein Chairman of the Board
MSDN Magazine (ISSN 1528-4859) is published monthly by 1105 Media, Inc., 9201 Oakdale Avenue, Ste. 101, Chatsworth, CA 91311. Periodicals postage paid at Chatsworth, CA 91311-9998, and at additional mailing offi ces. Annual subscription rates payable in US funds are: U.S. $35.00, International $60.00. Annual digital subscription rates payable in U.S. funds are: U.S. $25.00, International $25.00. Single copies/back issues: U.S. $10, all others $12. Send orders with payment to: MSDN Magazine, P.O. Box 3167, Carol Stream, IL 60132, email [email protected] or call (847) 763-9560. POSTMASTER: Send address changes to MSDN Magazine, P.O. Box 2166, Skokie, IL 60076. Canada Publications Mail Agreement No: 40612608. Return Undeliverable Canadian Addresses to Circulation Dept. or XPO Returns: P.O. Box 201, Richmond Hill, ON L4B 4R5, Canada.
Printed in the U.S.A. Reproductions in whole or part prohibited except by written permission. Mail requests to “Permissions Editor,” c/o MSDN Magazine, 4 Venture, Suite 150, Irvine, CA 92618.
Legal Disclaimer: The information in this magazine has not undergone any formal testing by 1105 Media, Inc. and is distributed without any warranty expressed or implied. Implementation or use of any information contained herein is the reader’s sole responsibility. While the information has been reviewed for accuracy, there is no guarantee that the same or similar results may be achieved in all environments. Technical inaccuracies may result from printing errors and/or new developments in the industry.
Corporate Address: 1105 Media, Inc., 9201 Oakdale Ave., Ste 101, Chatsworth, CA 91311, www.1105media.com
Media Kits: Direct your Media Kit requests to Matt Morollo, VP Publishing, 508-532-1418 (phone), 508-875-6622 (fax), [email protected]
Reprints: For single article reprints (in minimum quantities of 250-500), e-prints, plaques and posters contact: PARS International, Phone: 212-221-9595, E-mail: [email protected], www.magreprints.com/QuickQuote.asp
List Rental: This publication’s subscriber list, as well as other lists from 1105 Media, Inc., is available for rental. For more information, please contact our list manager, Merit Direct. Phone: 914-368-1000; E-mail: [email protected]; Web: www.meritdirect.com/1105
All customer service inquiries should be sent to [email protected] or call 847-763-9560.
FEBRUARY 2012 VOLUME 27 NUMBER 2

msdn magazine4
Conference. He eventually joined Microsoft to help evangelize the company’s RIA eff orts.
“When I got into Silverlight I saw a great opportunity to work with patterns, data and client-side RIA technology,” Papa says. “Th e opportunity I had to be the corporate evangelist for Silverlight/XAML was awesome. Th ey gave me the freedom to run and try new ideas like Silverlight TV, running communities, MIXer parties, open source events, the Silverlight Firestarter and much more.”
So why the Client Insight column, and why now?For one thing, Papa left Microsoft in November to move back
to his native Florida, where he had lived prior to relocating to the Redmond area in 2009. More to the point, the emergence of JavaScript/HTML5, alongside the evolving Microsoft XAML/ Silverlight strategy, has turned the client development space on its ear. Developers are actively rethinking their positions as they weigh up-and-coming platforms and technologies against the challenges posed by an increasingly diverse client space. Papa says developers must keep things in perspective.
“We need to use the right tool for the right job. A lot has changed just in the past two years, but that rule hasn’t,” he says, noting that devel-opers need to stay current even as they work with their existing tools.
“Th e best perspectives I’ve heard are from developers who have researched many alternatives. This prepares them to be armed for in-depth discussions on what technology to choose in what situation,” he says. “Keep an open mind and stay in touch with the evolution.”
Calling out the ClientA month ago in this space, I wrote about an MSDN Magazineauthor and columnist—Charles Petzold—who marked his 25th year as a contributor to this publication. So it’s appropriate, I suppose, that I dwell now on another valued columnist who left the maga-zine aft er more than a decade, only to return to the fold this month.
John Papa first began writing for MSDN Magazine back in December 1998, and for eight years from 2002 through 2009 authored the popular Data Points column, which continues today under the stewardship of Julie Lerman. Papa wrote his last column in February 2009, stepping down when he took on a role with Microsoft as a corporate evangelist for Silverlight and XAML. Now Papa is back, penning a new column called Client Insight, which focuses on the fast-changing arena of rich client development technologies and platforms.
“Client technology has really changed over the past few years with XAML, HTML5 and mobile devices,” says Papa, who adds that he hopes to bring together the best parts of XAML and HTML5.
“I plan on exploring the good, the bad and the challenging aspects of client technologies,” he continues. “Anyone interested in writing soft ware for the next generation should enjoy the column as I plan to cover HTML5, CSS3, JavaScript, patterns, XAML, mobility, tooling and much more.”
For Papa, the new column is a second chance to pursue a passion. Th e Data Points column got its start in 1998 because he felt at the time that data-related topics were being neglected. What started as a series of data-focused features eventually turned into a monthly column that ran for the better part of a decade.
“It always seemed like data access got very little play time in magazines, conferences and books, so I decided to do something about it,” Papa recalls of launching Data Points.
Silverlight Shuffl eOf course, Papa is best known as a leading light in the Rich Internet Application (RIA) space, particularly in the arena of Silverlight devel-opment. A longtime independent developer, Papa became a fi xture on the conference circuit, oft en appearing alongside Microsoft key-noters at events like MIX and the Microsoft Professional Developers
MICHAEL DESMONDEDITOR’S NOTE
© 2012 Microsoft Corporation. All rights reserved.
Complying with all applicable copyright laws is the responsibility of the user. Without limiting the rights under copyright, you are not permitted to reproduce, store, or introduce into a retrieval system MSDN Magazine or any part of MSDN Magazine. If you have purchased or have otherwise properly acquired a copy of MSDN Magazine in paper format, you are permitted to physically transfer this paper copy in unmodifi ed form. Otherwise, you are not permitted to transmit copies of MSDN Magazine (or any part of MSDN Magazine) in any form or by any means without the express written permission of Microsoft Corporation.
A listing of Microsoft Corporation trademarks can be found at microsoft.com/library/toolbar/3.0/trademarks/en-us.mspx. Other trademarks or trade names mentioned herein are the property of their respective owners.
MSDN Magazine is published by 1105 Media, Inc. 1105 Media, Inc. is an independent company not affi liated with Microsoft Corporation. Microsoft Corporation is solely responsible for the editorial contents of this magazine. The recommendations and technical guidelines in MSDN Magazine are based on specifi c environments and confi gurations. These recommendations or guidelines may not apply to dissimilar confi gurations. Microsoft Corporation does not make any representation or warranty, express or implied, with respect to any code or other information herein and disclaims any liability whatsoever for any use of such code or other information. MSDN Magazine, MSDN, and Microsoft logos are used by 1105 Media, Inc. under license from owner.
Visit us at msdn.microsoft.com/magazine. Questions, comments or suggestions for MSDN Magazine? Send them to the editor: [email protected].
“We need to use the right tool for the right job. A lot has changed
just in the past two years, but that rule hasn’t.”

Everything You Need to
Powerful bug tracking.Manage bugs, defects, & issues
The best Scrum tool. A beautiful & fast UI.
Plus:
Team up. Collaborate. Build. Ship great software OnTime.
Visit axosoft.com to learn more.
800.653.0024
Ship Software
Free 2-user hosted license. Forever. Did you know?
Find us on:
@axosoft Axosoft OnTime /axosoft
© Copyright 2002 - 2011 Axosoft LLC | All Rights ReservedAll trademarks and registered trademarks are the property of their respective owners.
Untitled-3 1 1/9/12 12:35 PM

msdn magazine6
You could write that more effi ciently with LINQ methods and a lambda:
var partyHatInstance = context.PartyHats.SingleOrDefault(p => p.Id == 3);
How often have you executed queries that perform this sim-ple task? You might have even abstracted this code in your own simpler method.
This is just what the EF team did for you in the DbContext API. When working with DbContext, PartyHats would be a DbSet<PartyHat>, and you can use the DbSet.Find method to quickly achieve the same query execution with:
context.PartyHats.Find(3)
Th is method presumes the value you provide is the key value for the class you’re searching—in this case, PartyHat. EF will then execute a SingleOrDefault query on your behalf, searching for the data where Id is equal to the value passed in—in this case, 3. You’ll probably pass in a variable, not an actual value.
Th ere’s another benefi t to the DbSet.Find method that you can’t achieve with a query. Th e Find method will fi rst look in memory for a matching object that’s being tracked by the context. If that’s found, then EF won’t bother querying the database. Th is is much more effi cient than executing a query on the database only to throw away the results of the query if the object instance is already in memory—a wasted trip to the database that many developers trigger without realizing it.
You can also use DbSet.Find with composite keys. Th e signature of Find is not to take a single object but to take a parameter array. Th erefore you can pass in a list of values to represent the values that make up the key.
DbSet.LocalWhen working with EF, I frequently found myself wanting to do something with objects that were already in memory and being tracked by a context. Typical places for this logic are in the SaveChanges override or SavingChanges method, where I’ll per-form some validation. (Thanks to the new Validation API that’s available along with DbContext, I’ve been able to reduce much of this logic. But I won’t discuss Validation in this column.)
ObjectContext does provide a way to discover the objects that it’s tracking, but the API logic to do this is neither easy to fi nd nor easy to code. In fact, in my book, “Programming Entity Framework” (O’Reilly Media, 2010), I wrote a set of four method extensions to help make this task simpler and more fl exible.
More commonly, however, developers don’t realize the diff erence between executing a LINQ to Entities query on the context and
A Few of My Favorite Things … in the Entity Framework 4.2 DbContext
Even before Entity Framework 4.1 was released in early 2011, developers were focused on only half of what was given to us in that package: Code First. Code First lets you express your Entity Data Model using your domain classes and Code First confi gurations, a great alternative to developers who don’t want to use the visual designer to defi ne the model. But every bit of sample code that you see for using Entity Framework (EF) with those classes and Code First-defi ned models is driven by another very important feature that came in EF 4.1: the DbContext class.
Th e ObjectContext class is part of the core EF API in the Micro-soft .NET Framework 4 and is the class that allows you to perform queries, change tracking and update the database using the strongly typed classes that represent your model. Th e DbContext class is best described as a wrapper around ObjectContext that exposes the most commonly used features of ObjectContext as well as pro-vides some simpler “shortcuts” to tasks that are frequently used but complicated to code directly with ObjectContext.
It’s my guidance and Microsoft ’s that you should consider Db-Context fi rst when beginning new projects using EF. If you fi nd that you occasionally need to access some of the more granular logic that the ObjectContext class provides, there’s a hook to get from a DbContext instance to its underlying ObjectContext:
var objectContext = (myDbContextInstance as IObjectContextAdapter).ObjectContext
If you know that you’ll be doing work that requires frequent use of ObjectContext features directly, you might prefer to use that rather than DbContext. But in general, the EF team recom-mends that you avoid using ObjectContext directly unless you’re prevented from using DbContext for some reason.
I’ll add the caveat that this guidance is meant for new projects. When working with the DbContext API, you get not only the new slim-mer and smarter DbContext class, but also equally improved DbSet and DbQuery classes (counterparts to ObjectSet and ObjectQuery).
Although I'm a big fan of the DbContext, a few of its features have become my favorite little pets.
DbSet.FindOne of the new methods in the API is DbSet.Find. Th is helps with a common pattern developers use for data access: retrieving a single object based on its primary key.
With ObjectContext, you would have to create a full query and then execute the query using a LINQ method such as SingleOrDefault.
Th at would look like:var partyHatQuery = from p in context.PartyHats where p.Id == 3 select p;var partyHatInstance = partyHatQuery.SingleOrDefault();
DATA POINTS JULIE LERMAN

INCLUDED IN THE NEW 1&1 SERVER PORTFOLIO:
NEW HARDWARE, NEW CONFIGURATIONS,
NOW WITH INTEL®
Flexibility:Choose between AMD or Intel® processors
Security: All 1&1 servers are housed in high-tech data centers owned and operated by 1&1
Speed: Unlimited traffi c, high-speed connectivity
Control: Parallels® Plesk Panel 10.4 for unlimited domains
Value: More power, great pricing
Intel® Xeon® E3-1270 4 (8 HT) Cores with up to 3.8 GHz
(Intel® Turbo Boost Technology 2.0)
24 GB ECC RAM
2 X 1,500 GB SATA HDD
SERVER XL 8i
$299.99per month
SERVER XL6
3 MONTHS
FREE!*
$129.99per month
AMD Hexa-Core 6 Cores with up to 3.3 GHz
(AMD Turbo Core)
16 GB ECC RAM
2 x 1,000 GB
SATA HDD
$99.99per month
SERVER 4i
Intel® Xeon® E3-12204 Cores with up to 3.4 GHz
(Intel® Turbo Boost Technology 2.0)
12 GB ECC RAM
2 x 1,000 GB SATA HDD
* 3 Months Free offer valid for a limited time only, 12 month minimum contract term applies. Set-up fee and other terms and conditions may apply. Visit www.1and1.com for full promotional offer details.Program and pricing specifi cations and availability subject to change without notice. 1&1 and the 1&1 logo are trademarks of 1&1 Internet, all other trademarks are the property of their respective owners. © 2012 1&1 Internet. All rights reserved.
1-855-221-2631 www.1and1.ca1-877-461-2631 www.1and1.com
®
Untitled-3 1 1/9/12 12:33 PM

msdn magazine8 Data Points
interacting with those objects that the context is already tracking. For example, I’ve seen plenty of code where a developer retrieves data using a query and then attempts to perform logic on what’s now being managed by the query:
var balloons = context.Balloons.Where(b => b.Size == "L").ToList(); var balloonCount = context.Balloons.Count();
In fact, these are two separate queries. Th e second line of code executes another query on the database and returns a count of all balloons. Typically, what the developer had intended was to get a count of the results—that is, balloons.Count.
If you don’t have access to a variable but still want to fi nd out how many Balloon objects an ObjectContext is tracking, there’s a way to fi nd out, but it’s not easy: ObjectContext exposes an ObjectState Manager, which has a method called GetObjectStateEntries. Th is method requires that you pass in one or more EntityState enums (for example, Added, Modifed and so on) so it knows which entries to return. Although the results are queryable, fi ltering is unwieldy and even then what it returns is not your entities, but the ObjectStateEntry instances that represent state information about your objects.
Th is means that without the use of my extension methods, code to help get the count of the balloons in memory looks like this:
objectContext.ObjectStateManager .GetObjectStateEntries(EntityState.Added | EntityState.Modified | EntityState.Unchanged) .Where(e => e.Entity is Balloon).Count();
If you want to capture those Balloon objects, not just the Object-StateEntry instances, then you have to add some casting to return the ObjectStateEntry.Entity types as Balloons:
objectContext.ObjectStateManager .GetObjectStateEntries(EntityState.Added | EntityState.Modified | EntityState.Unchanged) .Where(e => e.Entity is Balloon) .Select(e => e.Entity as Balloon);
Seeing this code might make you appreciate the new property DbSet.Local almost as much as I do.
Using DbSet.Local to get all of the tracked Balloon instances from the context, you can simply call:
context.Balloons.Local;
“Local” returns an ObservableCollection that provides two benefi ts. Th e fi rst is that it’s queryable, so you can return whatever subset of the locally cached Balloons you want. Th e second is that your code (or components such as data-binding controls) can listen for and react to objects being added to or removed from the cache.
Besides the discoverable property and the reduced code, there are two other notable diff erences between using DbSet.Local and GetObjectStateEntries. One is that Local returns objects from the particular DbSet only, whereas GetObjectStateEntries returns entries regardless of the type of objects they represent. Th e other diff erence is that Local won’t return objects that the context knows are marked as Deleted. With GetObjectStateEntries, you have access to Added, Modifi ed, Unchanged and Deleted objects as specifi ed in the parameter list that you provide to the method.
NoTracking LINQ QueriesWhen discussing performance with clients, I oft en recommend they take advantage of the EF ability to return data that doesn’t need to be tracked by the context. For example, you may have data you need to supply for a drop-down selection list. You’ll never need to make
changes to that data, much less persist it to the database. Th ere-fore, it’s smart to avoid the performance hit taken when EF creates ObjectStateEntry instances for each object it’s tracking, as well as forcing the context to be aware of any changes made to those objects.
But with ObjectContext, the NoTracking support is available only through the ObjectQuery class, not from LINQ to Entities queries.
Here’s a typical example of getting a NoTracking query using an ObjectContext (called context):
string entitySQL = " SELECT p, p.Filling " + "FROM PartyContext.Pinatas AS p " + "WHERE p.Filling.Description='Candy'";var query=context.CreateQuery<DbDataRecord>(entitySQL);query.MergeOption = System.Data.Objects.MergeOption.NoTracking;var pinatasWithFilling=query.ToList();
Th e retrieved piñatas and fi llings would be objects in memory, but the context would have no knowledge of them.
However, if you were to use the following LINQ to Entities query, which returns an IQueryable, not an ObjectQuery, there would be no MergeOption property:
context.Pinatas.Include("Filling") .Where(p=>p.Filling.Description=="Candy")
One solution is to cast the LINQ query to an ObjectQuery and then set the MergeOption. Th is is not only not obvious but also clunky.
Recognizing this, the EF team found a way to let you have your party cake and eat it, too, with the new AsNoTracking extension method for IQueryables that’s part of the DbContext API. Now I can tack it on to my LINQ query:
context.Pinatas.Include("Filling") .Where(p=>p.Filling.Description=="Candy") .AsNoTracking();
Th is will return a set of Pinatas and Fillings that will be ignored by the context. EF won’t wastethe eff ort of instantiating DbEntityEntry objects (the DbContext API version of ObjectStateEntry) for each object. Nor will it waste the eff ort of forcing the context to inspect those objects when DetectChanges is called.
It’s simple to code and very discoverable through IntelliSense.
Icing on the CakeTh ese three features—Find, Local and AsNoTracking—don’t enable me to perform tasks that weren’t achievable with the ObjectCon-text. But they do make me happy every time I use them. Th ere are so many coding tasks that the DbContext API simplifi es (compared to using the ObjectContext) that it has streamlined my application development quite a bit. I’ve also returned to old ObjectContext code and re factored it to use DbContext along with Code First and have been able to signifi cantly reduce the amount of code in those apps. But for developers who aren’t as intimately familiar with the EF as I am, the discoverability of so many of its capabilities will make a big diff erence for getting up and running with it.
JULIE LERMAN is a Microsoft MVP, .NET mentor and consultant who lives in the hills of Vermont. You can fi nd her presenting on data access and other Microsoft .NET topics at user groups and conferences around the world. She blogs at thedatafarm.com/blog and is the author of “Programming Entity Framework” (2010) and “Programming Entity Framework: Code First” (2011), both from O’Reilly Media. Follow her on Twitter at twitter.com/julielerman.
THANKS to the following technical expert for reviewing this article: Arthur Vickers

© 2011 ComponentOne LLC. All rights reserved. All other product and brand names aretrademarks and/or registered trademarks of their respective holders.
ComponentOne Ultimate™ deliversthe tools and resources to buildeverything …everywhere. Whetheryou're a Windows, Web, or XAMLdeveloper, this ultimate dev toolcollection delivers. Inside you’llfind: 100s of .NET controls, OLAPdata analysis controls, SharePoint Web Parts, documentation tools,LightSwitch extensions, and toolsfor ADO.NET Entity Framework and
RIA Services. No job is too big. Bringspeed, style, and functionality to your
all your applications ...it is your destiny.
Untitled-3 1 11/2/11 2:16 PM

msdn magazine12
Upgrade domains are another matter. You have control over these domains and can perform incremental or rolling upgrades across a deployment by upgrading a group of instances at a time. Whereas fault domains are about physical deployment of the roles, upgrade domains relate to logical deployment. Because an upgrade domain is a logical grouping of roles, a single Web application could easily exist in fi ve diff erent upgrade domains divided into only two separate physical deployments (fault domains). In this case, to update a Web applica-tion, you might update all roles in group 0 (upgrade domain 0) and then all roles in group 1 and so on. You can exercise more fi nite control by updating individual roles one at a time in each Update Domain.
In summary, an application that requires more than one instance will be split into at least two fault domains. To make upgrading a Web application across the whole farm easier, roles are combined into logical groupings that are updated at the same time.
Windows Azure Deployment DomainsLately, I’ve been giving a lot of thought to the deploy-ment of applications. It turns out that for applications, the matrix for fault tolerance and upgrade path gets a bit tricky—and even trickier when applications have a mix of services, a Web UI and back-end processes. Add in geographic distribution and the logistics become even more muddied.
In large IT organizations, a minimum deployment of any Web or application server oft en involves two servers that are geographically separated. Th is easily moves up to four servers if two servers are specifi ed for the expected load and you have a mirror site with the same setup (of course, database and other sup-porting server infrastructure can push the number higher still). What if the company serves multiple locations, such as North America and Europe, the Middle East and Africa (EMEA)? Now the setup gets replicated to both sides of the Atlantic, turning what started as two Web servers into eight servers for geo failover and for staging assets closer to consumers.
Eventually, an application is deployed on all these servers and everything is running along smoothly—and then some cheeky devel-oper creates new functionality and wants to update the deployment.
As you can imagine, it takes a good bit of planning to determine the order in which servers will drain connections, get updated and tested, and then be put back into the pool. Some folks spend late nights working through upgrade plans, and that’s even when there are no real problems.
Windows Azure doesn’t eliminate the need for an upgrade plan, but it does take much of the complexity out of upgrading by handling most of it as part of the fabric. In this column, I’m going to cover fault domains and upgrade domains, and write a little bit of code to apply an upgrade across the deployment.
Fault and Upgrade DomainsWindows Azure includes the concepts of fault domains and upgrade domains, both of which are almost fully described by their names. Fault domains defi ne a physical unit of deployment for an appli-cation and are typically allocated at the rack level. By placing fault domains in separate racks, you separate instances of application deployment to hardware enough that it’s unlikely all would fail at the same time. Further, a failure in one fault domain should not precipitate the failure of another. When you deploy a role with two configured instances, the fabric ensures the instances are brought up in two diff erent fault domains. Unfortunately, with fault domains, you have no control over how many domains are used or how roles are allocated to them.
FORECAST: CLOUDY JOSEPH FULTZ
protected void GetRoleInfo(){ List<RoleInfo> RoleInfos = new List<RoleInfo>();
foreach (var role in RoleEnvironment.Roles) { RoleInfo info = new RoleInfo(); info.RoleName = role.Value.Name;
foreach (RoleInstance roleInstance in role.Value.Instances) { info.InstanceId = roleInstance.Id; info.FaultDomain = roleInstance.FaultDomain.ToString(); info.UpgradeDomain = roleInstance.UpdateDomain.ToString(); } RoleInfos.Add(info); } GridView1.DataSource = RoleInfos; GridView1.DataBind();
}
Figure 2 Finding Role Information
Figure 1 The Windows Azure Management Console

DESIGN INTERFACEOptimize your data
presentation and build
attractive reports with
an integrated and
easy-to-use design-time
experience.
EXPORT TO EXCEL,
WORD AND PDFExport reports from
the client and server
side in the popular
format of your choice!
DATA ACCESS SUPPORT Create MVVM-friendly reports
with data accessed from an
SQL Server, Oracle or any
Object Data Source.
Less Pain, More Gain
NetAdvantage®
for Reporting
check out infragistics.com/reporting
REPORT VIEWERView pixel-perfect
reports with vector
graphics in our
Silverlight, ASP.NET,
WPF and Windows
Forms report viewer.
Infragistics Sales 800 231 8588 • Infragistics Europe Sales +44 (0) 800 298 9055 • Infragistics India +91 80 4151 8042 • @infragisticsCopyright 1996-2011 Infragistics, Inc. All rights reserved. Infragistics and NetAdvantage are registered trademarks of Infragistics, Inc. The Infragistics logo is a trademark of Infragistics, Inc.
Untitled-4 1 10/12/11 1:25 PM

msdn magazine14 Forecast: Cloudy
Viewing the Deployment Confi gurationThe Windows Azure Management Console shows an Update Domain column, but not a Fault Domain column (see Figure 1). (Note that upgrade domain and update domain are interchange-able terms. Th e documentation oft en refers to upgrade domains, but in the API it’s called an update domain.)
In Figure 1 you can see that the numbers for my four deployments run from 0 to 3. By default, Windows Azure uses fi ve update domains for each service and assigns them in a round-robin style. Th is is some-thing you can change in the service defi nition fi le by assigning the desired number of upgrade domains to the upgradeDomainCount attribute of the ServiceDefi nition element. You’ll fi nd links for each of the schemas for Web and Worker roles at msdn.microsoft.com/library/ee758711. To force a WebRole to use only three upgrade domains, for example, you set the upgradeDomainCount in the service defi nition fi le:
<ServiceDefinition name="<service-name>" xmlns=”http://schemas.microsoft.com/ServiceHosting/2008/10/ ServiceDefinition” upgradeDomainCount="3"> <WebRole name="<web-role-name>" vmsize="[ExtraSmall|Small|Medium|Large|ExtraLarge]" enableNativeCodeExecution="[true|false]"> ... </WebRole></ServiceDefinition>
Th is is important, because the number of update domains ultimately aff ects your plan and execution. Unfortunately, there’s no column that lets you see fault domain assignments. By writing a little code, however, you can pull back the curtain a bit on the deployment and see both update domain and fault domain assignments, as Figure 2 shows.
Th is code doesn’t show a small class I defi ned to store the rel-evant information. And unfortunately, though I have this nice nested loop that goes through the roles and the instances, the API allows the code running in the page to return data related to only the specifi c instance running the code. Th us, the code produces a small grid with just the current WebRole information in it (see Figure 3), without any other instance information.
Th is code provides a quick look at the current WebRole’s fault and upgrade domains, but you’ll need to use the Get Deployment REST URI to get more comprehensive data. It returns the deployment XML, which contains, among other things, elements for <Confi guration/>
and for each of the <RoleInstances />. Once you’ve fetched the confi guration, you can change it and put it back. Take a look at my October 2010 column (msdn.microsoft.com/magazine/gg232759) for examples that show many of the same operations that would be involved here.
Upgrade StrategiesTh ere are two basic strategies for updating a Windows Azure deploy-ment: in-place upgrades and virtual IP (or VIP) swap. VIP swap is the simpler approach and allows for full testing of the new or updated application before opening the gates to the public. Moreover, the application can run at full capacity as soon as it’s live. Should there be issues when the swap is complete, you can quickly put the previous version back in place while the new deployment is being worked on.
You’ll fi nd a good reference describing what can and can’t be done in each deployment model at bit.ly/x7lRO4. Here are the points that might force a choice:
• In-place update or delete and deploy are required when changing the type or number of endpoints.
• VIP swap or delete and deploy are required when changing the role name or update domain count, or when decreasing the size of local resources.
Other than these points and some SDK version considerations, it’s up to you to decide.
Swapping the VIP of the staging and production environments is a pretty good solution for many, if not most, cases when rolling out a new version. Sometimes it’s the only way to keep the site mostly available while making changes, though if you’re upgrading a large deployment, bringing up another full deployment can be cumbersome. Th ere’s also a cost associated with deploying a com-plete copy—one compute hour charge for each deployed instance and then the additional compute hours for the two running copies.
In Web farms nowadays, updates are generally rolled out through a farm by either: taking one server offl ine at a time, upgrading, bring-ing the server online and returning it to the farm pool; or dividing the farm into segments and draining the connections on one segment at a time, then upgrading each segment, bringing it online and returning it to the farm, and fi nally moving on to the next segment.
An in-place update works like the second pattern. However, the more upgrade domains used, the more the pattern resembles the fi rst option. Th e upside of using a larger number of upgrade domains is that the site capacity decreases only by the size of the segment during the entire upgrade.
Figure 3 Current WebRole Information
Deployment Strategy Pros Cons
Delete and Deploy All changes can be made Application unavailable during processVIP Swap • Full application capacity
• Most service changes can be made• Can test the new deployment in staging• Quick to undo by performing VIP swap again
• Hiccup in service at time of swap• Cumbersome to bring up two full deployments for larger deployments• Can’t change the number or type of endpoints
In-place Update: 2 Update Domains
• Only one version running at a time• Can change number and type of endpoints• Doesn’t require full deployment
• Site capacity decreased by half• A few operations can’t be performed
In-place Update: 3+ Update Domains
• More site capacity during update• Can change number and type of endpoints• Doesn’t require full deployment
• Multiple versions running simultaneously• A few operations can’t be performed
Figure 4 Upgrade Decision Matrix

MOTION FRAMEWORK
Create data visualizations
that deliver an animated
user experience that tells
the whole story.
MAPEnsure your geospatial
data really goes places
with a feature-laden,
interactive Map Control
for your applications.
XAML-IFY YOUR APPScheck out infragistics.com/xaml
Infragistics Sales 800 231 8588 • Infragistics Europe Sales +44 (0) 800 298 9055 • Infragistics India +91 80 4151 8042 • @infragisticsCopyright 1996-2011 Infragistics, Inc. All rights reserved. Infragistics and NetAdvantage are registered trademarks of Infragistics, Inc. The Infragistics logo is a trademark of Infragistics, Inc.
XAMTRADERBuild high-performance
applications using ultra-
fast grids and charts.
NETWORK NODEHelp your users make
the connection with
visual representations
of simple or complex
network relationships.
NetAdvantage®
for Silverlight Data Visualization
NetAdvantage®
for WPF Data Visualization
NetAdvantage®
for Silverlight
NetAdvantage®
for WPF
Untitled-4 1 10/12/11 1:25 PM

msdn magazine16 Forecast: Cloudy
Th e primary challenge that traditional non-cloud deployments face is the same for cloud deployments: when you perform rolling upgrades, mixed versions of the application will be running. Th e instances might deliver diff erent visuals, use diff erent data and service connections, and so forth. Th is can lead to site errors or even undesirable user experi-ences, and it may be completely unacceptable for your business. More-over, it puts a heavy burden on the development and test teams to make sure the application will run when there are multiple versions in play.
What do you do if you can’t use VIP swap and availability require-ments preclude a delete and deploy? You might try using only two up-date domains and performing an in-place update, which keeps a single version of the application running during the deployment. Th e down-side: half of your site’s capacity will be unavailable during the transition.
Th e grid in Figure 4 might help you consider which approach to employ in performing an upgrade.
In-Place UpgradeNice advancements have been made in the ability to perform the upgrade both within the management console and via scripting. For small to midsize organizations with a relatively modest num-ber of deployments, it’s easiest to manage the updates through the Windows Azure Management Console, shown in Figure 5.
As you can see in the upper left corner of the screen, a Manual Upgrade is running. Th is requires clicking the Start button to initi-ate the process for each upgrade domain—that’s the manual part of it. Once the update is started, the console displays what’s going
on in the instances in each domain, as shown in Figure 6.
Th e manual, push-button meth-od works well for smaller deploy-ments. For larger deployments or those where you want to automate the build-test-deploy process, you should choose a scripted approach. You can automate the process us-ing the CSManage command-line tool, which you can download from bit.ly/A6uQRi. CSManage will initiate the upgrade and walk through the process of upgrading one update domain at a time from the com-mand line. Th ough this is helpful, there’s a level of fi ne control that can only be accomplished using the REST API directly.
Customizing Your Upgrade Strategy with Fault DomainsIf for one reason or another you’ve decided to not walk the update
domains from 0 – n and instead plan to use your own starting point or order, you’ll need to take a look at the combination of update and fault domains. Th e grid in Figure 7 makes it obvious that if you were to update Upgrade Domain 1, and Fault Domain 0 faulted during the update, the site would be completely down. Th is should normally be covered by the fabric, though, and the grid shows that if the update happens in order, there will always be diff erent fault domains running.
Th e lesson here is to consider potential consequences during planning, and to not “fi x” something that’s already working.
Wrapping UpWhen you’re designing a Windows Azure application, you need to take deployment architecture into account. Windows Azure pro-vides the functionality of the fabric to ensure that an application will not fault due to a single hardware failure, while providing an easy, automatic way to incrementally update the deployment. Still, support for an in-place update is something that has to be designed into the application—and the update that’s being pushed.
You can update a Windows Azure service using VIP swap or a two-upgrade-domain, in-place plan where a full in-place update can’t be supported. Last, there are both UI and programmatic means to control the deployment and updates so that you can perform a scheduled update or even use a build-test-deploy schedule or a scheduled update.
JOSEPH FULTZ is a soft ware architect at Hewlett-Packard Co., working as part of the HP.com Global IT group. Previously he was a soft ware architect for Microsoft working with its top-tier enterprise and ISV customers defi ning architecture and designing solutions.
THANKS to the following technical expert for reviewing this article: Don Glover
Figure 5 Windows Azure Management Console
Figure 6 Update Activity
InstanceUpgrade Domain
Fault Domain
0 0 01 1 12 2 0
Figure 7 Domain Matrix

OLAP AXIS CHARTTake your data to new
depths with the
seemingly endless
drilldown capability of
the OLAP Axis Chart.
FINANCIAL
CHARTINGWith support for
multiple chart
styles, and technical
indicators built in,
financial charting
capabilities are on
the money.
TREEMAPCommunicate the relative
differences in data weight
more effectively, with
customizable color and
flexible layouts.
Deliver the Ultimate User Experience
NetAdvantage®
check out infragistics.com/ultimate
OLAP GRID
Provide highly-interactive
pivot grid functionality in
all of your applications.
Infragistics Sales 800 231 8588 • Infragistics Europe Sales +44 (0) 800 298 9055 • Infragistics India +91 80 4151 8042 • @infragisticsCopyright 1996-2011 Infragistics, Inc. All rights reserved. Infragistics and NetAdvantage are registered trademarks of Infragistics, Inc. The Infragistics logo is a trademark of Infragistics, Inc.
Untitled-4 1 10/12/11 1:26 PM

PRODUCED BYPLATINUM SPONSOR SUPPORTED BY
WHAT YOU LEARN IN VEGAS WON’T STAY IN VEGAS
Intense Take-Home Training for Developers, Soft ware Architects and Designers
Las Vegas | March 26-30 | Mirage Resort and Casino
YOUR MAP TO THE .NET DEVELOPMENT PLATFORM
Untitled-5 2 1/10/12 2:08 PM

vslive.com/lasvegas
Register Before February 29 and Save $300!
Coding, Casinos and More!Learn how to maximize the development capabilities of Visual Studio and .NET over 5 information-packed days in Las Vegas. Join us for 60+ sessions & workshops full of unbiased, hard-hitting and practical education lead by industry experts and Microsoft insiders. Trust us, what you learn in Vegas won’t stay in Vegas – your boss will thank you!
View the full conference agenda by scanning this QR code or visiting vslive.com/lasvegas
“ The sessions were informative and will prove highly useful in my job. It really motivated me and gave me new ides for projects.”
Michael Cross, Niagara Regional Police Service
“ The quality of speakers was excellent – they were knowledgeable and interesting. I also really liked the location – Vegas!”
Kiran P. Mody, ASP.NET programmer, Avail Technologies, Inc.
Las VegasMarch 26-30Mirage Resort and Casino
Use Promo Code FEBAD before February 29 and Save $300!
Untitled-5 3 1/10/12 2:08 PM

Keynote:The Future of User Experience: The Natural User Interface (NUI)Tim Huckaby, Microsoft RD & MVP, Chairman/Founder, InterKnowlogy, CEO/Chairman, Actus Interactive Software
Track: Visual Studio 2010+/.NET 4+Session: Application Lifecycle Management and Visual Studio: What’s Next Explore the new features in Team Foundation Server as well as the new Azure-based Team Foundation Service. You’ll learn what’s new for work management, including task boards, how to gather user requirements and ensure better products and much more.
Track: Silverlight / WPFSession: Top 7 Lessons Learned On My First Big Silverlight Project Hear 7 things instructor Ben Day learned while leading his rst big Silverlight application – from unit tests and the
architectural havoc caused by async WCF to real-world ViewModel tips and "x:Name" code smells.
Track: WebSession: Hack Proo ng Your Asp.Net Web Forms and MVC Developers are notoriously lax with including security in their applications. In an age of hacking, this talk aims to arm the developer with an arsenal of protections to use while developing. Techniques such as Cross Site Scripting, SQL Injection, Session Hijacking, and Cross Site Request Forgery will be covered.
Track: Cloud ComputingSession: Architecture Best Practices on Windows Azure Learn Architecture Best Practices that will help make your solutions better in performance, cost, integration, and security. Leave this session with the knowledge needed to start using Windows Azure quickly and the best practices that can help your business.
Track: Data ManagementSession: Entity Framework Code First - Beyond the BasicsGo beyond the basic scenarios – understand performance analysis tips for Entity framework, learn database scheme evolution handling techniques and about the organization of database and conceptual models via complex types and hierarchies.
Track: HTML5Session: Building Windows 8 Applications with HTML5 and jQuery One of the many new advances in Windows 8 is the ability to create Windows applications using HTML, CSS and JavaScript. In this session, take a look at the Windows 8 technology stack on which these applications run, how HTML/CSS/JS apps actually run, and discuss the implications of the different ways to utilize third party libraries such as jQuery. By the end of this session, you'll have a solid idea of what it means to have a Metro-style application built with web technologies.
Track: Windows 8/WinRTSession: Windows 8 Metro-style Application Contracts and Extensibility Explore contracts – a new feature of Windows 8 Metro-style applications that allow applications to interact with the operating system and other Metro-style applications in a standard way – and learn how they can be used in any Windows 8 Metro-style application to provide a seamless, integrated experience for users.
Track: Windows Phone 7Session: Making Money on Your WP7 Apps & Games with the Advertising SDK Learn how to use the Microsoft Advertising SDK and the Microsoft PubCenter to create and display ads in your Windows Phone 7 apps and games.
Track: Cross Platform MobileSession: Building Mobile Apps with CSLA .NETLearn how to create business classes that compile and run on all three mobile platforms, iPhone/iPad (using MonoTouch), Android (using Mono for Android), and Windows Phone (using Silverlight), as well as on .NET. The result is the ability to reuse large portions of your code when building mobile apps.
A Peek at What You’ll Learn at Visual Studio Live! Las Vegas:
Register at vslive.com/lasvegasUse Promo Code FEBAD
Untitled-5 4 1/10/12 2:08 PM

VISUAL STUDIO LIVE! LAS VEGAS AGENDA AT-A-GLANCE
Visual Studio Live! Pre-Conference Workshops: Monday, March 26, 2012 (Separate entry fee required)
MWKS1 Workshop: Full Application Lifecycle with TFS and CSLA .NET
Rockford Lhotka & Brian Randell
MWKS2 Workshop: Creating Today’s User Experiences - An Entry Point for Developers
Billy Hollis
MWKS3 Workshop: SQL Server for Developers
Andrew Brust & Leonard Lobel
Visual Studio Live! Day 1: Tuesday, March 27, 2012Keynote Microsoft To Be Announced
T1 Introduction to the Windows Runtime
Rockford Lhotka
T2 HTML5 and Internet Explorer: A Developer Overview
Ben Hoelting
T3 Introducing SQL Server Data Tools (Codenamed "Juneau")
Leonard Lobel
T4 Application Lifecycle Management and Visual Studio: What’s Next
Brian Randell
T5 Windows 8 Metro-style Application Contracts and Extensibility
Brian Peek
T6 Advanced ASP.NET MVC, HTML5 and the .NET Stack
Ben Hoelting
T7 So Many Choices, So Little Time: Understanding Your .NET 4.0 Data
Access Options Leonard LobelT8 Microsoft - To Be Announced
Lunch & Expo Hall
CTT1 Chalk Talk: Improve Your Code with Anonymous Types and Lamda Expressions Deborah Kurata
CTT2 Chalk Talk: Slice Development Time with ASP.NET MVC and Razor Philip Japikse
T9 Building Data Driven Applications Using WinRT and XAML Sergey Barskiy
T10 HTML5/jQuery On-Ramp Rich Dudley T11 Microsoft - To Be Announced T12 Microsoft - To Be Announced
T13 A Look at Windows 8 Metro Apps and WinRT Internals Vishwas Lele
T14 Building Windows 8 Applications with HTML5 and jQuery Rich Dudley
T15 Entity Framework Code First - Beyond the Basics Sergey Barskiy
T16 What's New in the .NET 4.5 BCL Jason Bock
Welcome Reception
Visual Studio Live! Day 2: Wednesday, March 28, 2012
Keynote: The Future of User Experience: The Natural User Interface (NUI) Tim Huckaby, Microsoft RD & MVP, Chairman/Founder, InterKnowlogy, CEO/Chairman, Actus Interactive Software
W1 Windows Presentation Foundation for Developers
Philip Japikse
W2 Creating a Data Driven Web Site Using WebMatrix and ASP.NET Razor
Rachel Appel
W3 Windows Azure Platform Overview
Vishwas Lele
W4 XNA Games for Windows Phone Brian Peek
W5 MVVM in Practice aka "Code Behind"- Free WPF
Tiberiu Covaci
W6 MVC for WebForms Developers: Comparing and Contrasting
Miguel Castro
W7 Building Your First Azure Application
Michael Stiefel
W8 Building Mobile Apps with CSLA .NET Rockford Lhotka
Birds-of-a-Feather Lunch & Expo Hall
CTW1 Chalk Talk: How Orchard CMS Works Rachel Appel CTW2 Chalk Talk: Parallel Programming 101 Tiberiu Covaci
W9 Silverlight, WCF RIA Services and Your Business Objects
Deborah Kurata
W10 Getting Started with ASP.NET MVC3 with a Dash of 4
Philip Japikse
W11 Deciding Between Relational Databases and Tables in the Cloud
Michael Stiefel
W12 Making Money on Your WP7 Apps & Games with the
Advertising SDK Chris G. Williams
W13 Top 7 Lessons Learned On My First Big Silverlight Project
Ben Day
W14 Fast, Faster ... Async ASP.NET Tiberiu Covaci
W15 Architecture Best Practices on Windows Azure
Nuno Godinho
W16 Mobile + Cloud: Using the Windows Azure Toolkit for
Mobile Devices Eric D. Boyd
Wild Wednesday
Visual Studio Live! Day 3: Thursday, March 29, 2012TH1 WPF Validation - Techniques & Styles
Miguel Castro
TH2 Entity Framework 4.1 for Real Web Applications
Adam Tuliper
TH3 Tips & Tricks on Architecting Windows Azure for Costs
Nuno Godinho
TH4 Consuming Async Web Services In Your Windows Phone Apps & Games
Chris G. Williams
TH5 In nite Whitespace: Implementing Viewport Navigation
in XAML Billy Hollis
TH6 Hack Proo ng Your ASP.NET Web Forms and MVC Applications
Adam Tuliper
TH7 Moving Web Apps to the Cloud Eric D. Boyd
TH8 Reach The Mobile Masses With ASP.NET MVC 4 and jQuery Mobile
Keith Burnell
TH9 Writing Asynchronous Code Using .NET 4.5 and C# 5.0 Brian Peek
TH10 Introduction to jQuery QUnit John Petersen
TH11 SQL Azure Intro and What's New Eric D. Boyd
TH12 LightSwitch Onramp Rich Dudley
Lunch
TH13 Static Analysis in .NET Jason Bock
TH14 Busy Developer’s Guide to NodeJS
Ted Neward
TH15 Power View: Analysis and Visualization for Your
Application’s Data Andrew Brust
TH16 Incorporating LightSwitch Into Your Existing ASP.NET Applications
Michael Washington
TH17 How to Be a C# Ninja in 10 Easy Steps Ben Day
TH18 Extending ASP.NET MVC with jQuery/Ajax and jSON John Petersen
TH19 Microsoft's Big Play for Big Data Andrew Brust
TH20 Creating LightSwitch Control Extensions Michael Washington
Visual Studio Live! Post-Conference Workshops: Friday, March 30, 2012 (Separate entry fee required)
FWKS1 Workshop: Programming with WCF in One Day Miguel Castro FWKS2 Workshop: Architecture Katas Ted Neward
HTML5 Web Visual Studio 2010+/.NET 4+
Cloud Computing
Data Management
Silverlight / WPF
Windows Phone 8/WinRT
Windows Phone 7
Cross Platform Mobile
For the complete session schedule and full session descriptions, please check the Visual Studio Live! Las Vegas web site at vslive.com/lasvegas*Speakers and Sessions Subject to Change.
Untitled-5 5 1/10/12 2:08 PM

msdn magazine22
A S YN CHR ONOUS PR OGR AM M I NG
Asynchronous Programming in C++ Using PPL
Hollywood casting directors are oft en said to brush off aspiring performers with a dismissive “don’t call us; we’ll call you.” For developers, however, that phrase describes the way many soft ware frameworks work—instead of letting the programmer drive the fl ow of control for the whole application, the framework controls the environment and invokes callbacks or event handlers provided by the programmer.
In asynchronous systems, this paradigm lets you decouple the start of the asynchronous operation from its completion. Th e pro-grammer initiates the operation and then registers a callback that will be invoked when the results are available. Not having to wait for completion means you can do useful work while the operation is in progress—service the message loop or start other asynchronous
Artur Laksberg
operations, for example. Th e “frosted window,” the “spinning donut” and other such phenomena will become relics of the past if you fol-low this pattern rigorously for all potentially blocking operations. Your apps will become—you’ve heard this one before—fast and fl uid.
In Windows 8, asynchronous operations are ubiquitous, and WinRT off ers a new programming model for dealing with asyn-chrony in a consistent way.
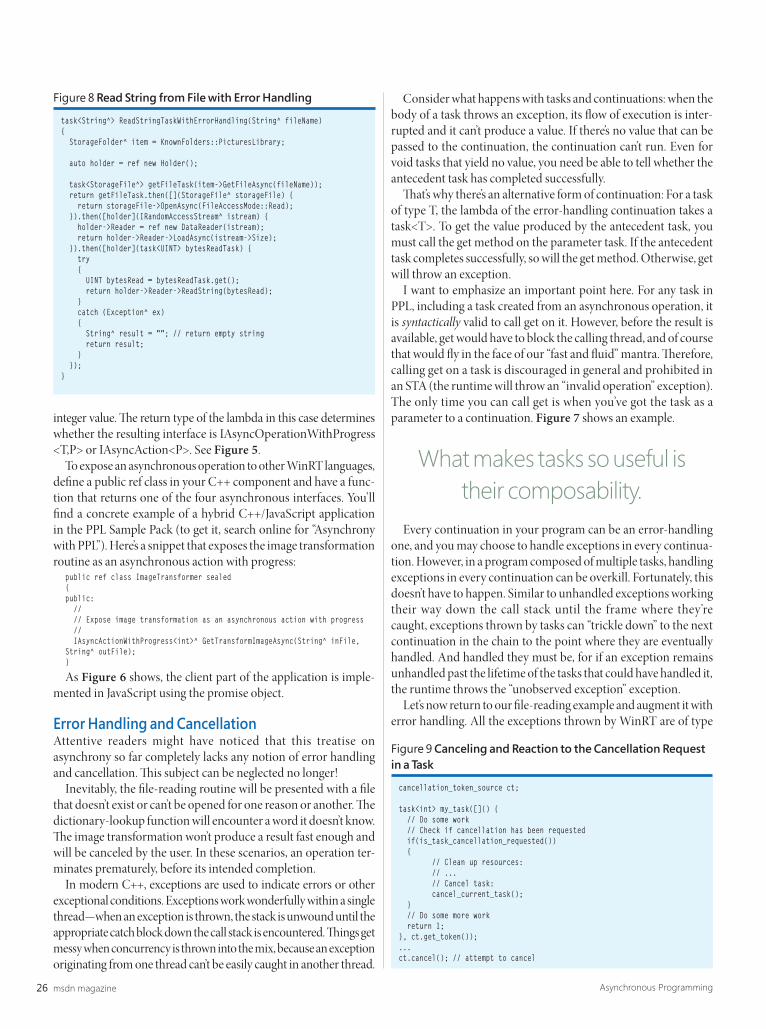
Figure 1 demonstrates the basic pattern of working with asynchro-nous operations. In the code, a C++ function reads a string from a fi le.
Th e fi rst thing to notice is that the return type of ReadString is void. Th at’s right: Th e function doesn’t return a value; instead it takes a user-provided callback and invokes it when the result is available. Welcome to the world of asynchronous programming—don’t call us; we’ll call you!
The Anatomy of a WinRT Asynchronous OperationAt the heart of the asynchrony in WinRT are the four interfaces defi ned in the Windows::Foundation namespace: IAsyncOperation, IAsyncAction, IAsyncOperationWithProgress and IAsyncAction-WithProgress. All potentially blocking or long-running operations in WinRT are defi ned as asynchronous. By convention, the name of the method ends with “Async” and the return type is one of the four interfaces. Such is the method GetFileAsync in the example in Figure 1, returning an IAsyncOperation<StorageFile^>. Many asynchronous operations do not return a value and their type is IAsyncAction. Th e operations that can report progress are exposed via IAsync-OperationWithProgress and IAsyncActionWithProgress.
This article uses prerelease versions of Windows 8 and Visual Studio 2012. All information is subject to change.
This article discusses:• Asynchronous programming in WinRT• The anatomy of a WinRT asynchronous operation• Composing multiple asynchronous operations• Using Parallel Patterns Library tasks• Error handling and cancellation
Technologies discussed:C++, Windows 8, Visual Studio 2012, Visual Studio Parallel Patterns Library

23February 2012msdnmagazine.com
To specify the completion callback for an asynchronous opera-tion, you set the Completed property. Th is property is a delegate that takes the asynchronous interface and the status of the com-pletion. Th ough the delegate can be instantiated with a function pointer, most oft en you’d use a lambda (I expect that by now you’re familiar with this part of C++11).
To get the value of the operation, you call the GetResults method on the interface. Notice that though this is the same interface returned to you from the GetFileAsync call, you can only call GetResults on it when you’re within the completion handler.
Th e second parameter to the completion delegate is AsyncStatus, which returns the status of the operation. In a real world applica-tion, you’d check its value before calling GetResults. In Figure 1, I omitted this part for brevity.
Very often, you’ll find yourself using multiple asynchronous operations together. In my example, I first get an instance of StorageFile (by calling GetFileAsync), then open it using OpenAsync and getting IInputStream. Next, I load the data (LoadAsync) and read it using the DataReader. Finally, I get the string and call the user-provided callback func.
CompositionSeparating the start of the operation from the completion is essential for eliminating blocking calls. Th e problem is, composing multiple callback-based asynchronous operations is hard, and the
resulting code is diffi cult to reason about and debug. Something has to be done to rein in the ensuing “callback soup.”
Let’s consider a concrete example. I want to use the ReadString function from the previous sample to read from two fi les sequen-tially and concatenate the result into a single string. I’m going to again implement it as a function taking a callback:
template<typename Callback>void ConcatFiles1(String^ file1, String^ file2, Callback func){ ReadString(file1, [func](String^ str1) { ReadString(file2, [func](String^ str2) { func(str1+str2); }); });}
Not too bad, right?If you don’t see a fl aw in this solution, though, think about this:
When will you start reading from fi le2? Do you really need to fi nish reading the fi rst fi le before you start reading the second one? Of course not! It’s far better to start multiple asynchronous operations eagerly and deal with the data as it comes in.
Let’s give it a try. First, because I start two operations concurrently and return from the function before the operations complete, I’ll need a special heap-allocated object to hold the intermediate results. I call it the ResultHolder:
ref struct ResultHolder{ String^ str;};
As Figure 2 shows, the fi rst operation to succeed will set the results->str member. Th e second operation to complete will use that to form the fi nal result.
Th is will work … most of the time. Th e code has an obvious race condition, and it doesn’t handle errors, so we still have a long way to go. For something as simple as joining two operations, that’s an awful lot of code—and it’s tricky to get right.
Tasks in the Parallel Patterns LibraryTh e Visual Studio Parallel Patterns Library (PPL) is designed to make writing parallel and asynchronous programs in C++ easy and productive. Instead of operating at the level of threads and thread
template<typename Callback>void ReadString(String^ fileName, Callback func){ StorageFolder^ item = KnownFolders::PicturesLibrary;
auto getFileOp = item->GetFileAsync(fileName); getFileOp->Completed = ref new AsyncOperationCompletedHandler<StorageFile^> ([=](IAsyncOperation<StorageFile^>^ operation, AsyncStatus status) { auto storageFile = operation->GetResults(); auto openOp = storageFile->OpenAsync(FileAccessMode::Read); openOp->Completed = ref new AsyncOperationCompletedHandler <IRandomAccessStream^> ([=](IAsyncOperation<IRandomAccessStream^>^ operation, AsyncStatus status) { auto istream = operation->GetResults(); auto reader = ref new DataReader(istream); auto loadOp = reader->LoadAsync(istream->Size); loadOp->Completed = ref new AsyncOperationCompletedHandler<UINT> ([=](IAsyncOperation<UINT>^ operation, AsyncStatus status) { auto bytesRead = operation->GetResults(); auto str = reader->ReadString(bytesRead); func(str); }); }); });}
Figure 1 Reading from a File
template<typename Callback>void ConcatFiles(String^ file1, String^ file2, Callback func){ auto results = ref new ResultHolder();
ReadString(file1, [=](String^ str) { if(results->str != nullptr) { // Beware of the race condition! func(str + results->str); } else{ results->str = str; } });
ReadString(file2, [=](String^ str) { if(results->str != nullptr) { // Beware of the race condition! func(results->str + str); } else{ results->str = str; } }); }
Figure 2 Reading from Two Files Concurrently
Very often, you’ll fi nd yourself using multiple asynchronous
operations together.
msdn magazine24 Asynchronous Programming
pools, users of PPL get to use higher-level abstractions such as tasks, parallel algorithms like parallel_for and the parallel_sort and concurrency-friendly containers such as concurrent_vector.
New in Visual Studio 2012, the task class of the PPL allows you to succinctly represent an individual unit of work to be executed asynchronously. It allows you to express your program logic in terms of independent (or interdependent) tasks and let the runtime take care of scheduling these tasks in the optimal manner.
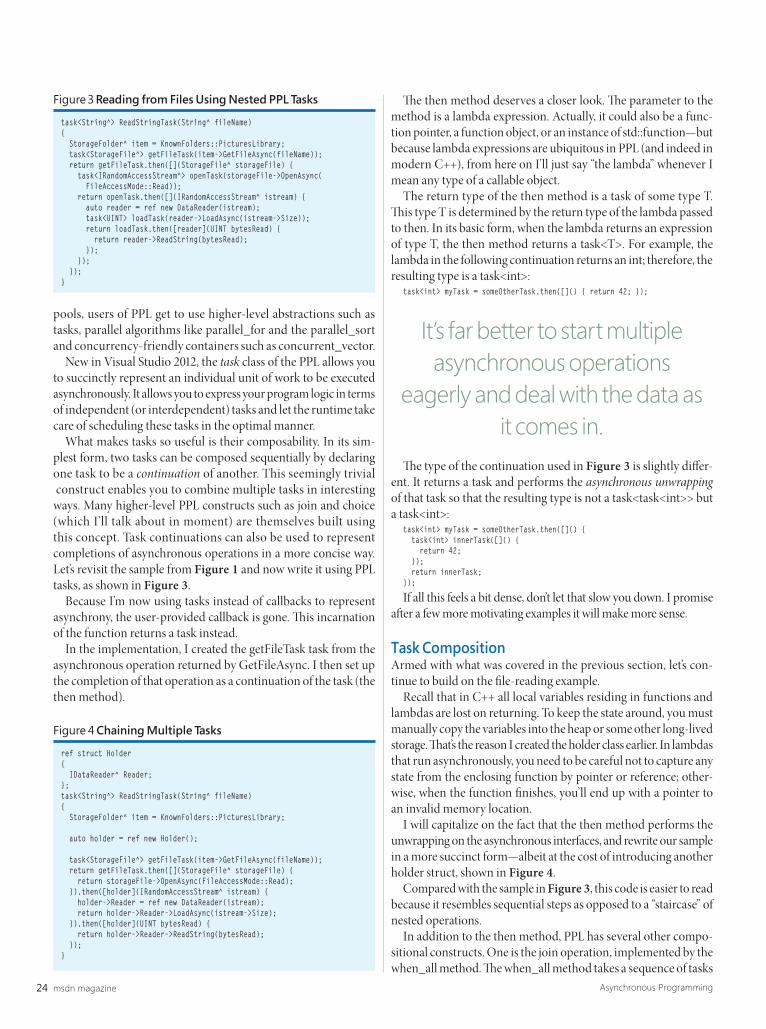
What makes tasks so useful is their composability. In its sim-plest form, two tasks can be composed sequentially by declaring one task to be a continuation of another. This seemingly trivial construct enables you to combine multiple tasks in interesting ways. Many higher-level PPL constructs such as join and choice (which I’ll talk about in moment) are themselves built using this concept. Task continuations can also be used to represent completions of asynchronous operations in a more concise way. Let’s revisit the sample from Figure 1 and now write it using PPL tasks, as shown in Figure 3.
Because I’m now using tasks instead of callbacks to represent asynchrony, the user-provided callback is gone. Th is incarnation of the function returns a task instead.
In the implementation, I created the getFileTask task from the asynchronous operation returned by GetFileAsync. I then set up the completion of that operation as a continuation of the task (the then method).
Th e then method deserves a closer look. Th e parameter to the method is a lambda expression. Actually, it could also be a func-tion pointer, a function object, or an instance of std::function—but because lambda expressions are ubiquitous in PPL (and indeed in modern C++), from here on I’ll just say “the lambda” whenever I mean any type of a callable object.
The return type of the then method is a task of some type T. Th is type T is determined by the return type of the lambda passed to then. In its basic form, when the lambda returns an expression of type T, the then method returns a task<T>. For example, the lambda in the following continuation returns an int; therefore, the resulting type is a task<int>:
task<int> myTask = someOtherTask.then([]() { return 42; });
Th e type of the continuation used in Figure 3 is slightly diff er-ent. It returns a task and performs the asynchronous unwrapping of that task so that the resulting type is not a task<task<int>> but a task<int>:
task<int> myTask = someOtherTask.then([]() { task<int> innerTask([]() { return 42; }); return innerTask;});
If all this feels a bit dense, don’t let that slow you down. I promise aft er a few more motivating examples it will make more sense.
Task CompositionArmed with what was covered in the previous section, let’s con-tinue to build on the fi le-reading example.
Recall that in C++ all local variables residing in functions and lambdas are lost on returning. To keep the state around, you must manually copy the variables into the heap or some other long-lived storage. Th at’s the reason I created the holder class earlier. In lambdas that run asynchronously, you need to be careful not to capture any state from the enclosing function by pointer or reference; other-wise, when the function fi nishes, you’ll end up with a pointer to an invalid memory location.
I will capitalize on the fact that the then method performs the unwrapping on the asynchronous interfaces, and rewrite our sample in a more succinct form—albeit at the cost of introducing another holder struct, shown in Figure 4.
Compared with the sample in Figure 3, this code is easier to read because it resembles sequential steps as opposed to a “staircase” of nested operations.
In addition to the then method, PPL has several other compo-sitional constructs. One is the join operation, implemented by the when_all method. Th e when_all method takes a sequence of tasks
ref struct Holder{ IDataReader^ Reader;};task<String^> ReadStringTask(String^ fileName){ StorageFolder^ item = KnownFolders::PicturesLibrary;
auto holder = ref new Holder();
task<StorageFile^> getFileTask(item->GetFileAsync(fileName)); return getFileTask.then([](StorageFile^ storageFile) { return storageFile->OpenAsync(FileAccessMode::Read); }).then([holder](IRandomAccessStream^ istream) { holder->Reader = ref new DataReader(istream); return holder->Reader->LoadAsync(istream->Size); }).then([holder](UINT bytesRead) { return holder->Reader->ReadString(bytesRead); });}
Figure 4 Chaining Multiple Tasks
task<String^> ReadStringTask(String^ fileName){ StorageFolder^ item = KnownFolders::PicturesLibrary; task<StorageFile^> getFileTask(item->GetFileAsync(fileName)); return getFileTask.then([](StorageFile^ storageFile) { task<IRandomAccessStream^> openTask(storageFile->OpenAsync( FileAccessMode::Read)); return openTask.then([](IRandomAccessStream^ istream) { auto reader = ref new DataReader(istream); task<UINT> loadTask(reader->LoadAsync(istream->Size)); return loadTask.then([reader](UINT bytesRead) { return reader->ReadString(bytesRead); }); }); });}
Figure 3 Reading from Files Using Nested PPL Tasks
It’s far better to start multiple asynchronous operations
eagerly and deal with the data as it comes in.

vslive.com/lasvegas
➤ Windows 8 / WinRT➤ Silverlight / WPF➤ Web➤ Visual Studio 2010+ / .NET 4.0➤ Cloud Computing
➤ Data Management➤ HTML5➤ Windows Phone 7➤ Cross Platform Mobile
Check out the hot track topics that will make YOU a more valuable part of your company’s development team:
Las Vegas | March 26-30 | Mirage Resort and Casino
YOUR MAP TO THE .NET DEVELOPMENT PLATFORM
Intense Take-Home Training for Developers, Soft ware Architects and Designers
WHAT YOU LEARN IN VEGASWON’T STAY IN VEGAS

PLATINUM SPONSOR SUPPORTED BY PRODUCED BY
➤ In-depth training for all levels of developers➤ A stellar speaker lineup that includes top
industry experts and Microsoft insiders➤ 55+ educational sessions ➤ 9 tracks that cover today’s hot topics➤ Pre- and post-event full-day workshops➤ Special events and networking opportunities Scan the QR
code for more information on Visual Studio Live!
Use Promo Code MTIP
Register BeforeFebruary 29thand Save $300!
vslive.com/lasvegas
Las Vegas | March 26-30 | Mirage Resort and Casino
25February 2012msdnmagazine.com
and returns the resulting task, which collects the output of all the constituent tasks into an std::vector. For the common case of two arguments, PPL has a convenient shorthand: the operator &&.
Th is is how I used the join operator to re-implement the fi le concatenation method:
task<String^> ConcatFiles(String^ file1, String^ file2){ auto strings_task = ReadStringTask(file1) && ReadStringTask(file2); return strings_task.then([](std::vector<String^> strings) { return strings[0] + strings[1]; });}
Th e choice operation is also useful. Given a series of tasks, choice (implemented by the when_any method) completes when the fi rst task in the sequence completes. Like join, choice has a two-argument shorthand in the form of the operator ||.
Choice is handy in scenarios such as redundant or speculative execution; you launch several tasks and the fi rst one to complete delivers the required result. You could also add a timeout to an operation—start with an operation that returns a task and com-bine it with a task that sleeps for a given amount of time. If the sleeping task completes fi rst, your operation has timed out and can therefore be discarded or canceled.
PPL has another construct that helps with composability of tasks—the task_completion_event, which you can use for interop-erability of tasks and non-PPL code. A task_completion_event can be passed to a thread or to an IO completion callback that’s expected
to eventually set it. A task created from the task_completion_event will be completed once the task_completion_event is set.
Authoring Asynchronous Operations with PPLWhenever you need to extract the last ounce of performance from your hardware, C++ is the language of choice. Other languages have their place in Windows 8: Th e JavaScript/HTML5 combo is great for writing GUIs; C# off ers a productive developer experience; and so on. To write a Metro style app, use what works for you; use what you know. In fact, you can use many languages in the same app.
Oft en, you’ll fi nd yourself writing the front-end of the application in a language like JavaScript or C#, and the back-end component in C++ for maximum performance. If the operation exported by your C++ component is either compute-bound or I/O-bound, it’s a good idea to defi ne it as an asynchronous operation.
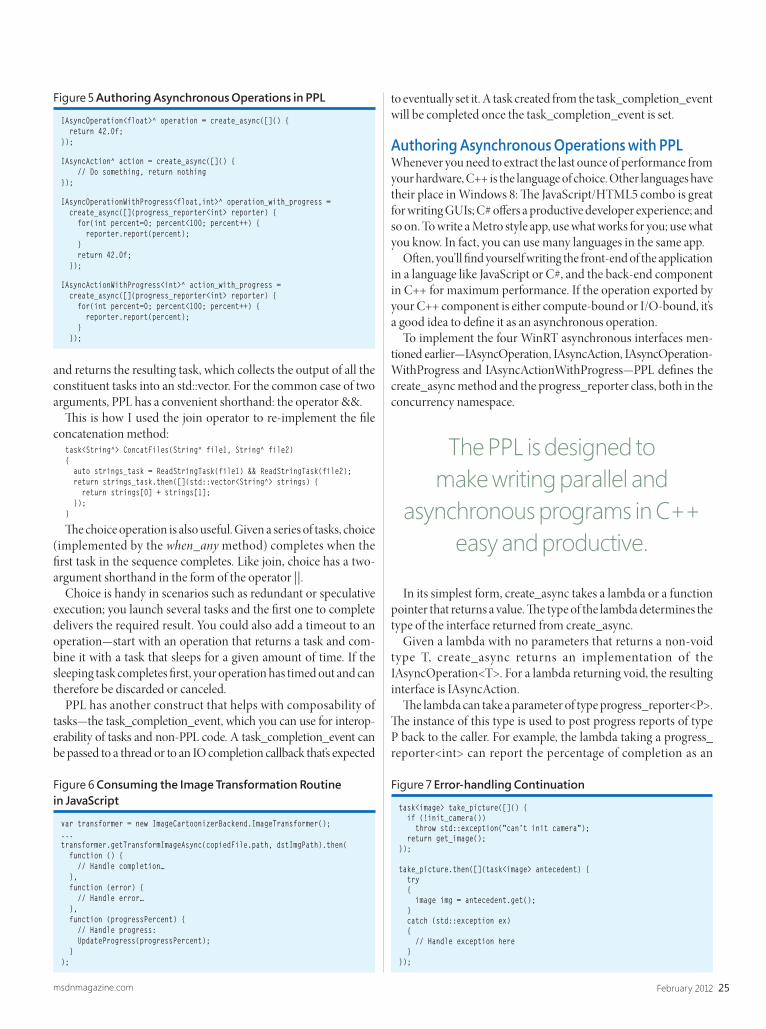
To implement the four WinRT asynchronous interfaces men-tioned earlier—IAsyncOperation, IAsyncAction, IAsyncOperation-WithProgress and IAsyncActionWithProgress—PPL defi nes the create_async method and the progress_reporter class, both in the concurrency namespace.
In its simplest form, create_async takes a lambda or a function pointer that returns a value. Th e type of the lambda determines the type of the interface returned from create_async.
Given a lambda with no parameters that returns a non-void type T, create_async returns an implementation of the IAsyncOperation<T>. For a lambda returning void, the resulting interface is IAsyncAction.
Th e lambda can take a parameter of type progress_reporter<P>. Th e instance of this type is used to post progress reports of type P back to the caller. For example, the lambda taking a progress_reporter<int> can report the percentage of completion as an
IAsyncOperation<float>^ operation = create_async([]() { return 42.0f;});
IAsyncAction^ action = create_async([]() { // Do something, return nothing});
IAsyncOperationWithProgress<float,int>^ operation_with_progress = create_async([](progress_reporter<int> reporter) { for(int percent=0; percent<100; percent++) { reporter.report(percent); } return 42.0f; });
IAsyncActionWithProgress<int>^ action_with_progress = create_async([](progress_reporter<int> reporter) { for(int percent=0; percent<100; percent++) { reporter.report(percent); } });
Figure 5 Authoring Asynchronous Operations in PPL
var transformer = new ImageCartoonizerBackend.ImageTransformer();...transformer.getTransformImageAsync(copiedFile.path, dstImgPath).then( function () { // Handle completion… }, function (error) { // Handle error… }, function (progressPercent) { // Handle progress: UpdateProgress(progressPercent); });
Figure 6 Consuming the Image Transformation Routine in JavaScript
The PPL is designed to make writing parallel and
asynchronous programs in C++ easy and productive.
task<image> take_picture([]() { if (!init_camera()) throw std::exception("can’t init camera"); return get_image();});
take_picture.then([](task<image> antecedent) { try { image img = antecedent.get(); } catch (std::exception ex) { // Handle exception here }});
Figure 7 Error-handling Continuation
msdn magazine26 Asynchronous Programming
integer value. Th e return type of the lambda in this case determines whether the resulting interface is IAsyncOperationWithProgress<T,P> or IAsyncAction<P>. See Figure 5.
To expose an asynchronous operation to other WinRT languages, defi ne a public ref class in your C++ component and have a func-tion that returns one of the four asynchronous interfaces. You’ll fi nd a concrete example of a hybrid C++/JavaScript application in the PPL Sample Pack (to get it, search online for “Asynchrony with PPL”). Here’s a snippet that exposes the image transformation routine as an asynchronous action with progress:
public ref class ImageTransformer sealed{public: // // Expose image transformation as an asynchronous action with progress // IAsyncActionWithProgress<int>^ GetTransformImageAsync(String^ inFile, String^ outFile);}
As Figure 6 shows, the client part of the application is imple-mented in JavaScript using the promise object.
Error Handling and CancellationAttentive readers might have noticed that this treatise on asynchrony so far completely lacks any notion of error handling and cancellation. Th is subject can be neglected no longer!
Inevitably, the fi le-reading routine will be presented with a fi le that doesn’t exist or can’t be opened for one reason or another. Th e dictionary-lookup function will encounter a word it doesn’t know. Th e image transformation won’t produce a result fast enough and will be canceled by the user. In these scenarios, an operation ter-minates prematurely, before its intended completion.
In modern C++, exceptions are used to indicate errors or other exceptional conditions. Exceptions work wonderfully within a single thread—when an exception is thrown, the stack is unwound until the appropriate catch block down the call stack is encountered. Th ings get messy when concurrency is thrown into the mix, because an exception originating from one thread can’t be easily caught in another thread.
Consider what happens with tasks and continuations: when the body of a task throws an exception, its fl ow of execution is inter-rupted and it can’t produce a value. If there’s no value that can be passed to the continuation, the continuation can’t run. Even for void tasks that yield no value, you need be able to tell whether the antecedent task has completed successfully.
Th at’s why there’s an alternative form of continuation: For a task of type T, the lambda of the error-handling continuation takes a task<T>. To get the value produced by the antecedent task, you must call the get method on the parameter task. If the antecedent task completes successfully, so will the get method. Otherwise, get will throw an exception.
I want to emphasize an important point here. For any task in PPL, including a task created from an asynchronous operation, it is syntactically valid to call get on it. However, before the result is available, get would have to block the calling thread, and of course that would fl y in the face of our “fast and fl uid” mantra. Th erefore, calling get on a task is discouraged in general and prohibited in an STA (the runtime will throw an “invalid operation” exception). The only time you can call get is when you’ve got the task as a parameter to a continuation. Figure 7 shows an example.
Every continuation in your program can be an error-handling one, and you may choose to handle exceptions in every continua-tion. However, in a program composed of multiple tasks, handling exceptions in every continuation can be overkill. Fortunately, this doesn’t have to happen. Similar to unhandled exceptions working their way down the call stack until the frame where they’re caught, exceptions thrown by tasks can “trickle down” to the next continuation in the chain to the point where they are eventually handled. And handled they must be, for if an exception remains unhandled past the lifetime of the tasks that could have handled it, the runtime throws the “unobserved exception” exception.
Let’s now return to our fi le-reading example and augment it with error handling. All the exceptions thrown by WinRT are of type
task<String^> ReadStringTaskWithErrorHandling(String^ fileName){ StorageFolder^ item = KnownFolders::PicturesLibrary;
auto holder = ref new Holder();
task<StorageFile^> getFileTask(item->GetFileAsync(fileName)); return getFileTask.then([](StorageFile^ storageFile) { return storageFile->OpenAsync(FileAccessMode::Read); }).then([holder](IRandomAccessStream^ istream) { holder->Reader = ref new DataReader(istream); return holder->Reader->LoadAsync(istream->Size); }).then([holder](task<UINT> bytesReadTask) { try { UINT bytesRead = bytesReadTask.get(); return holder->Reader->ReadString(bytesRead); } catch (Exception^ ex) { String^ result = ""; // return empty string return result; } });}
Figure 8 Read String from File with Error Handling
cancellation_token_source ct;
task<int> my_task([]() { // Do some work // Check if cancellation has been requested if(is_task_cancellation_requested()) { // Clean up resources: // ... // Cancel task: cancel_current_task(); } // Do some more work return 1;}, ct.get_token());...ct.cancel(); // attempt to cancel
Figure 9 Canceling and Reaction to the Cancellation Request in a Task
What makes tasks so useful is their composability.

27February 2012msdnmagazine.com
Platform::Exception, so this is what I’m going to catch in my last continuation, as shown in Figure 8.
Once the exception has been caught in a continuation, it’s consid-ered “handled,” and the continuation returns a task that completes successfully. So, in Figure 8, the caller of the ReadStringWith-ErrorHandling will have no way of knowing whether the file reading completed successfully. Th e point I’m trying to make here is that handling exceptions too early isn’t always a good thing.
Cancellation is another form of premature termination of a task. In WinRT, as in the PPL, cancellation requires the cooperation of two parties—the client of the operation and the operation itself. Th eir roles are distinct: Th e client requests the cancellation, and the operation acknowledges the request—or not. Because of a natural race between the client and the operation, the cancellation request isn’t guaranteed to succeed.
In PPL, these two roles are represented by the two types, the cancellation_token_source and the cancellation_token. An instance of the former is used to request the cancellation by calling the cancel method on it. An instance of the latter is instantiated from the cancellation_token_source and passed as the last parameter into the constructor of the task; the then method; or in the lambda of the create_async method.
Inside the task’s body, the implementation can poll the cancella-tion request by calling the is_task_cancellation_requested method, and acknowledge the request by calling the cancel_current_task method. Because the cancel_current_task method throws an exception under the covers, some resource cleanup is appropriate before calling cancel_current_task. Figure 9 shows an example.
Notice that many tasks can be canceled by the same cancellation_token_source. Th is is very convenient when working with chains and graphs of tasks. Instead of canceling every task individually, you can cancel all the tasks governed by a given cancellation_ token_source. Of course, there’s no guarantee that any of the tasks will actually respond to the cancellation request. Such tasks will com-plete, but their normal (value-based) con-tinuations will not run. Th e error-handling continuations will run, but an attempt to get the value from the antecedent task will result in the task_canceled exception.
Finally, let’s look at using cancellation tokens on the production side. Th e lambda of the create_async method can take a cancellation_token parameter, poll it using the is_canceled method, and cancel the opera-tion in response to the cancellation request:
IAsyncAction^ action = create_async( [](cancellation_token ct) { while (!ct.is_canceled()); // spin until canceled cancel_current_task();});...action->Cancel();
Notice how in the case of the task continuation, it’s the then method that takes the cancellation token, whereas in the case of create_async, the cancellation token is passed into the lambda. In the latter case, cancellation is initiated by calling the cancel method on the resulting asynchronous interface, and that gets plumbed by the PPL into a cancellation request through the cancellation token.
Wrapping UpAs Tony Hoare once quipped, we need to teach our programs to “wait faster.” And yet, wait-free asynchronous programming remains diffi cult to master and its benefi ts are not immediately obvious, so developers shun it.
In Windows 8, all blocking operations are asynchronous, and if you’re a C++ programmer, PPL makes asynchronous program-ming quite palatable. Embrace the world of asynchrony, and teach your programs to wait faster!
ARTUR LAKSBERG leads a group of developers working on the Parallel Patterns Library and the Concurrency Runtime at Microsoft . In the past, he has worked on the C++ compiler front end and was involved in the implementation of the Axum programming language. Artur can be reached at arturl@microsoft .com.
THANKS to the following technical experts for reviewing this article: Genevieve Fernandes and Krishnan Varadarajan

msdn magazine28
W IN DOWS A ZUR E
Building a Massively Scalable Platform for Consumer Devices on Windows Azure
This article is about scalability and interoperability, two characteristics that are required in architectures to support the diversity of today’s popular mobile platforms, which potentially have millions of users. Figure 1 depicts this diversity, a common—yet challenging—scenario for today’s developers. Supplying Web-based services to mobile devices is a daunting task, requiring distinct and diverse tooling, languages and IDEs. Beyond this diversity is the need for elastic scale—in terms of available Web services and for data that can reach terabytes in size.
Developers need to scale their Web applications in two diff erent dimensions. The first dimension is compute, which simply boils down to the number of Web service instances made available by the hosting provider to respond to mobile Web requests. Th e second dimension is scalable data: Some cloud platforms offer scalable data through dedicated storage services, letting developers
Bruno Terkaly and Ricardo Villalobos
scale terabytes of data to millions of mobile users and eff ortlessly partition it across multiple servers, resulting in fast performance, redundancy and support for petabytes of capacity.
To support communication to as many diverse clients as possible, an interoperable approach is crucial. Everything from data formats to network protocols needs careful consideration. A solution must minimize custom coding and leverage open standards to the great-est extent possible.
We’re using RESTful Web services hosted in Windows Azure—the Microsoft cloud platform—in this article to solve both the interoperability challenges and the elastic scale problem.
A reference architecture based on RESTful Web services is depicted in Figure 2. RESTful architectures are interoperable because they’re developed alongside HTTP/1.x and provide consis-tent communication across a vast array of clients. Th e architecture alternative to REST is SOAP. We chose not to use SOAP because it has larger, slower data payloads and additional complexities.This article discusses:
• Using the Windows Azure Portal to provision a RESTful Web service
• Building the Web service
• Deploying the Web service
• Consuming the Web service
Technologies discussed:Windows Azure, RESTful Web services, JSON
Code download available at:bit.ly/syTize
Application Type PlatformDevelopment Environment Language
Mobile Windows Phone Visual Studio C#Mobile Android Eclipse JavaMobile iOS Xcode Objective-CCloud-Based Web Server
Windows Azure Visual Studio C#
Figure 1 A Diverse Set of Mobile Technologies Is a Challenge for Developers

29February 2012msdnmagazine.com
Windows Azure makes it easy to increase and decrease scale on demand. By simply changing a number—the “Instance Count”—through either the Windows Azure Portal or a management API, you can scale RESTful Web services almost eff ortlessly to meet any level of demand.
Our implementation uses JSON (and not XML) as the data format because it’s compact and widely supported. XML suff ers from larger payloads.
Although many vendors off er cloud hosting solutions for RESTful Web services, Windows Azure has some advantages. For starters, you can choose from among six highly automated datacenters in Asia, Europe and North America, including support from 24 Content Delivery Networks (CDNs), making it possible to connect to users with low latency and data locality.
Windows Azure off ers an array of storage and computing options in addition to powerful developer tooling. A variety of storage mechanisms are available, from Binary Large Objects (BLOBs) to relational stores. Windows Azure also provides identity management systems, secure messaging and hybrid cloud/on-premises connectivity capabilities.
Getting StartedThe remainder of this article will divide the architecture and implementation into four parts:
1. Provision an account using the Windows Azure Portal.2. Create a Windows Azure Cloud Project and write some
code to defi ne a RESTful Web service.3. Deploy the cloud project to the account using the
Windows Azure Portal.4. Build mobile applications for: Windows Phone, Android
and iOS (iPhone/iPad).Let’s go through these steps together. Th e fi rst one takes place at
the Windows Azure Portal, which you can access at windows.azure.comif you have a subscription. (For more information, visit azure.com.)
Part 1: Provisioning the Web Service at the Windows Azure PortalTh e two key options at the Windows Azure Portal are: New Hosted Service and New Storage Account.
Figure 3 illustrates the workfl ow for provisioning a “hosted ser-vice.” Th is process will result in a URL that represents the endpoint in a Microsoft datacenter where the RESTful Web service will be deployed. Developers of Windows Phone, Android and iOS apps will need this URL to communicate with the service.
Th e workfl ow to get all this working is straightforward: 1. Log in to the Windows Azure Portal. 2. Select “New Hosted Service.” Specify an account name, a
URL and a region (location of datacenter). 3. Store the URL the Windows Azure Portal generates; it will
be used—along with the account name—when building both the RESTful Web service and the mobile clients. Th e account name will also be used in Part 3.
Note: Th e example in this article uses the account name “fastmotor-cycleservice,” with the URL “http://fastmotorcycleservice.cloudapp.net.”
The second task at the Windows Azure Portal is creating a Storage Account. Figure 4 illustrates this process, including the name and location of the Windows Azure tables. Once again, it’s possible to choose from among the six datacenters. It makes sense to host both the Web service and the data in the same datacenter to reduce cost and improve performance.
Th e workfl ow is similar to the “hosted service” explained previously: 1. Log in to the Windows Azure Portal. 2. Create a new storage account and provide an account
name and a region.3. Store the access key the Windows Azure Portal generates
and provides, as well as the account name; they’ll be required when building the RESTful Web service.
Now that Part 1 is complete, the needed Windows Azure Portal information can be used to write the RESTful Web service as well as the Windows Phone, Android and iOS applications.
Figure 2 A Solution Based on Open Standards
RESTful Web Service
Cloud-BasedData Storage
HTTP Verb + URLWindows Azure
JSON Data
Figure 3 Provisioning the Windows Azure RESTful Web Service
Account NameFirst part of URL (fastmotorcycleservice)Region
URLhttp://fastmotorcycleservice.cloudapp.net
URLhttp://fastmotorcycleservice.cloudapp.net
Windows Azure Portal
Hosted Service
Account NameFirst part of URL (fastmotorcycleservice)Region
URLhttp://fastmotorcycleservice.cloudapp.net
URLhttp://fastmotorcycleservice.cloudapp.net
Build Mobile Applications using URL
Figure 4 Provisioning the Windows Azure Storage Account
Account Name (fastmotorcycle)Region
Access Key
Account Name and Access Key(fastmotorcycle)
Windows Azure Portal
Storage Account
Account Name (fastmotorcycle)Region
Access Key
Account Name and Access Key(fastmotorcycle)
RESTful Web Service Application

msdn magazine30 Windows Azure
Part 2: Building the Windows Azure-Hosted RESTful Web ServiceBuilding a RESTful Web service in Visual Studio is simple. Open Visual Studio as administrator from Start | All Programs | Microsoft Visual Studio 2010 by right-clicking the Microsoft Visual Studio 2010 shortcut and choosing “Run as administrator.” From the File menu, choose New | Project.
In the New Project dialog, expand the language of preference in the Installed Templates list and select Cloud. Choose the Windows Azure Project template, set the name of the project to Fast-MotorcycleProject and set the location to anything convenient.
A video demonstrating these steps in detail can be found at bit.ly/ VideoAzureRestfulService.
Th e Solution Explorer will look like Figure 5.
Figure 6 shows some basic steps not covered in this article (but which are covered in the referenced video).
These steps are common to almost all Windows Azure proj-ects. For example, it’s standard practice to use a Web Role to host RESTful Web services. A DataConnectionString is needed to access the storage account defi ned previously at the Windows Azure Portal. Startup code is needed inside the Visual Studio project to read account names and access keys from the confi guration fi les to use against the storage accounts.
Once the preliminary steps are complete, a RESTful Web service can be added using the WCF Service template in Visual Studio.
To add a WCF Service, right-click the FastMotorcycleProject_WebRole folder, select Add | New Item dialog and set the name of the class to FastMotorcycleService.
FastMotorcycleService.svc.cs will be generated. Replace the entire code of the class with the code shown in Figure 7.
Th e key to making this work is to know how to map diff erent URIs and verbs to RESTful methods. For this, the WebGet and WebInvoke attributes must be added to the code in Figure 7.
Th ese attributes tell the framework that the method should respond to HTTP GET requests. WebInvoke is mapped to HTTP POST by default. Also by default, the URI is determined by the name of the
method (added onto the base URI of the endpoint). Some experts or REST pur-ists might argue that our method names should not be verbs but rather nouns.
Th e WCF REST programming model shown in Figure 8 allows customization of URIs for each method by using tem-plates that can be set via the UriTemplate property on the WebInvoke and Web-Get attributes. Th e model is explained in the following list, with numerals corresponding to those in Figure 8: 1. A mobile application uses stan-
dard HTTP to send a message request, which includes an HTTP verb plus a URL.
2. Th e RESTful Web service intercepts the mobile application message request (request for data) and makes a call to GetItems, passing “Bruno” as a parameter. GetItems queries for data using a LINQ query, using “Bruno” as part of the where clause.
3. Only the records in which the PartitionKey is equal to “Bruno”
are returned from the Windows Azure Table Service.4. Th e data is converted to JSON format (automatically) and
returned to the mobile device.5. Th e data is available to the mobile application. Th e data
is used to populate a ListBox and presented to the mobile application user.
Task Covered in Video Notes
Adding an ASP.NET Web Role Will be used to host the RESTful Web service
Adding a DataConnectionString Will include the account name and access key
Adding some basic startup code to initialize data
Add code to global.asax.cs to read the DataConnectionString
Figure 6 Basic Steps Not Covered in This Article
[ServiceContract]public class FastMotorcycleListService{ private FastMotorcycleListDataProvider _data; public FastMotorcycleListService() { _data = new FastMotorcycleListDataProvider(); }
[OperationContract] [WebGet(UriTemplate = "/list/{owner}", ResponseFormat = WebMessageFormat.Json)] public List<string> GetItems(string owner) { return _data.GetItems(owner); }
[OperationContract] [WebInvoke(UriTemplate = "/list/{owner}", Method = "POST", RequestFormat = WebMessageFormat.Json)] public void AddItem(string owner, string item) { _data.AddItem(owner, item); }
[OperationContract] [WebInvoke(UriTemplate = "/list/{owner}/{item}", Method = "DELETE")] public void DeleteItem(string owner, string item) { _data.DeleteItem(owner, item); }}
Figure 7 FastMotorcycleListService.svc.cs
Figure 5 Creating a New Windows Azure Project
msdn magazine32 Windows Azure
Th e next three classes we discuss are helper objects, which are needed to interact with the Windows Azure Table Service. Fast-MotorcycleListDataProvider, FastMotorcycleListItem and Fast-MotorcycleList are classes that abstract away storage and Windows Azure Table-specific API details from the code in Figure 9, allowing the application to perform Create, Read, Update and Delete (CRUD) operations with the Windows Azure Table Service.
In Visual Studio, add a new class module called FastMotorcycle-ListDataProvider.cs. Replace the code with the code in Figure 9.
Part 3: Deploying the RESTful Web ServiceTh is is one of the areas where Windows Azure really shines. It’s as simple to deploy 100 RESTful Web service instances as it is to deploy only one. Note the following list of steps:
1. In Visual Studio, right-click on FastMotorcycleProject and select Package.
2. Return back to the browser with the portal and select “Hosted Services, Storage Accounts & CDN.”
3. In the top pane, select “Hosted Services.”4. In the middle pane, select the Hosted Service you
previously created.5. Right-click and select “New Production Deployment” and
upload the fi les (FastMotorcycleProject.cspkg and ServiceCon-fi guration.Cloud.cscfg); these were generated in the fi rst step.
Part 4: Consuming the RESTful Web Service from Mobile ApplicationsNow we’ll discuss consuming the RESTful Web services from various mobile applications. Th is section is meant to highlight the interoperability this approach provides.
Th e JSONKit (github.com/johnezang/JSONKit) makes interacting with the RESTful Web service from iOS devices easier. With a few lines of code, it’s possible to call the RESTful Web service, download the JSON-formatted data, convert it to a more usable format and attach the converted data to a Table View control, used by iPhone or iPad applications (see Figure 10).
Developing for Android involves the Java programming language, which has been around for a long time and can natively
public class FastMotorcycleListDataProvider{ private FastMotorcycleList _list;
public FastMotorcycleListDataProvider() { string configValue = RoleEnvironment.GetConfigurationSettingValue( "DataConnectionString"); var account = CloudStorageAccount.Parse(configValue);
_list = new FastMotorcycleList(account.TableEndpoint.ToString(), account.Credentials); } public List<string> GetItems(string owner) { var results = from entity in _list.Items where entity.PartitionKey == owner select entity;
var list = new List<string>(); foreach (var item in results) { list.Add(item.RowKey); }
return list; } public void AddItem(string owner, string item) { _list.AddObject("FastBikes", new FastMotorcycleListItem(owner, item)); _list.SaveChanges(); }
public void DeleteItem(string owner, string item) { var entity = (from i in _list.Items
where i.PartitionKey == owner && i.RowKey == item select i).Single();
_list.DeleteObject(entity); _list.SaveChanges(); }}
public class FastMotorcycleListItem : TableServiceEntity{ public FastMotorcycleListItem() { } public FastMotorcycleListItem(string partitionKey, string rowKey) : base(partitionKey, rowKey) { }} public class FastMotorcycleList : TableServiceContext{ public FastMotorcycleList(string baseAddress, StorageCredentials storageCredentials) : base(baseAddress, storageCredentials) { } public DataServiceQuery<FastMotorcycleListItem> Items { get { return this.CreateQuery<FastMotorcycleListItem>("FastBikes"); } }}
Figure 9 The FastMotorcycleListDataProvider, FastMotorcycleListItem and FastMotorcycleList Classes
Figure 8 Workfl ow for Mobile Application Requesting RESTful Data
HTTPVerb
+URL
WindowsAzure Table
HTTP verb GET
URL http://fastmotorcycleservice.cloudapp.net/FastMotorcycleListService.svc/list/Bruno
The mobile client application issues a GET, sending the following URL:
RESTful Web Servicepublic List<string> GetItems(string owner){var results = from entity in _list.Items where entity.PartionKey == owner select entity;
PartitionKey RowKey
Bruno GSXR1000
Bruno Hayabusa
John ZX-10
John Repsol
John Harley
All the Data
PartitionKey RowKey
Bruno GSXR1000
Bruno Hayabusa
Subset of the Data

msdn magazine34 Windows Azure
parse JSON data. Figure 11 shows an example. The Windows Phone SDK includes native support to call RESTful Web services and process the JSON-formatted data. The SDK makes it easy to process JSON data with DataContractJsonSerializer. Figure 12 shows an example. Finally, if you’d like to see a more robust toolkit for developing for Android and iOS, you can visit this Microsoft -sanctioned link: github.com/microsoft-dpe.
Access to Entire Spectrum of DevicesBecause Windows Azure-hosted RESTful Web services are based on HTTP, any client application that supports this protocol is capa-ble of communicating with them. Th is opens up a wide spectrum of devices for developers, because the majority of devices fall into this category. Although we covered mobile platforms in this article, JavaScript implementations such as jQuery are also capable of consuming RESTful Web services. Regardless of the path mobile platforms take in regard to UI diversity, it will always make sense to build on simple, open, HTTP-based Web service architectures.
BRUNO TERKALY works as a developer evangelist for Microsoft . His depth of knowledge comes from years of experience in the field, writing code using a multitude of platforms, languages, frameworks, SDKs, libraries and APIs. He spends time writing code, blogging and giving live presentations on building cloud-based applications, specifi cally using the Windows Azure platform.
RICARDO VILLALOBOS is a seasoned soft ware architect with more than 15 years of experience designing and creating applications for companies in the supply chain management industry. Holding diff erent Microsoft certifi cations, as well as an MBA in Supply Chain Management from the University of Dallas, he joined Microsoft in 2010 as a Windows Azure architect evangelist.
THANKS to the following technical experts for reviewing this article: Reza Alizadeh and Wade Wegner
// HttpClient used to talk to Web serviceHttpClient httpclient = new DefaultHttpClient(); String url = "http://your_hosted_service_name.cloudapp.net/"+ "FastMotorcycleListService.svc/list/Bruno";// This will be the array we need to convert// We get the data from the Web serviceJSONArray listItems = null;String jason = null; // Set up the RESTful call to 'GET' the dataHttpGet request_http_get = new HttpGet(url); // Read the JSON data and assign it to ListViewtry { // Fill a response object using a request HttpResponse response_http_get = httpclient.execute(request_http_get); // Length represents the number of data items returned // by RESTful Web service long length = response_http_get.getEntity().getContentLength();
// "entity" ends up being the data coming back from Web server HttpEntity entity = response_http_get.getEntity(); // Read the bytes, one byte at a time InputStream stream = entity.getContent(); // Allocate a series of bytes byte[] buffer = new byte[(int) length]; // Read bytes from RESTful Web service // After this loop, we end up with something like -> // ["busa","gxr1000","ninja250"] for (int i = 0; i < length; i++) { buffer[i] = (byte) stream.read(); } // Create an array of strings jason = new String(buffer); // Convert to JSON array for Android ListBox // listItems ends up being a three-element JSON array (see "busa") listItems = new JSONArray(jason); } catch (Exception e) { System.out.println(e); }
Figure 11 Android Code That Parses JSON Data
private void LoadList(){ string uri = @"http://your_hosted_service_name.cloudapp.net/"+ "FastMotorcycleListService.svc/list/Bruno"; var webRequest = (HttpWebRequest)WebRequest.Create(uri); webRequest.Method = "GET"; try { webRequest.BeginGetResponse(new AsyncCallback((result) => { var webResponse = (HttpWebResponse)webRequest.EndGetResponse(result); if (webResponse.StatusCode == HttpStatusCode.OK) { var jsonDeserializer = new DataContractJsonSerializer(typeof(List<string>)); List<string> items = (List<string>)jsonDeserializer.ReadObject( webResponse.GetResponseStream());
shoppingListBox.Dispatcher.BeginInvoke(new Action(() => { shoppingListBox.Items.Clear(); foreach (var item in items) { shoppingListBox.Items.Add(item); } })); }
}), null); } catch { // Ignored }}
Figure 12 C# Code That Parses JSON Data
NSString *username = @"Bruno"; // Gets passed to the RESTful Web Service NSString *serviceUri = "http://your_hosted_service_name.cloudapp.net/"+ "FastMotorcycleListService.svc/list/";// Build the service URI (will point to our RESTful Web serviceNSString *url = [NSString stringWithFormat:@"%@%@", serviceUri, username]; // Retrieve the data in the form of a JSON arrayNSData *json = [NSData dataWithContentsOfURL:[NSURL URLWithString:url]]; // Convert from JSON array to NSArray// This allows us to populate the table view more easilyNSArray *itemArray = [json objectFromJSONData]; // Assign the array to the TableView// fastbikes is the name of our TableView controlself.fastbikes = [[NSMutableArray alloc] initWithArray:itemArray];
Figure 10 Objective-C Code That Parses JSON Data

www.DevExpress.com
DXv2 is the next generation of tools that can take your applications to a whole new level. Your users are ready—what will you build for them?
Download your free 30-day trial at www.DevExpress.com
devvelopment skkills to tap into the groowingg ddemand for stunning tablet & touuch--enabled appsacrooss all platforrms, including WinForms, WWPF annd ASP.NET. Build for todaay ass you begin to
re-imagine busineess applications for thhe Winddows 88 Metro design aesthetic. DXXvv2 delivers thegestures, themes,, andd ccontrolss to put Touch within yourr reeaach, right now.
Copyright © 1998-2011 Developer Express Inc. ALL RIGHTS RESERVED. All trademarks or registered trademarks are property of their respective owners.
Untitled-13 1 12/9/11 3:47 PM
msdn magazine36
A S P. N E T MVC
The Features and Foibles of ASP.NET MVC Model Binding
ASP.NET MVC model binding simplifi es controller actions by introducing an abstraction layer that automatically populates controller action parameters, taking care of the mundane property mapping and type conversion code typically involved in working with ASP.NET request data. Th ough model binding seems simple, it’s actually a relatively complex framework composed of a number of parts that work together to create and populate the objects that your controller actions require.
Th is article will take you deep into the heart of the ASP.NET MVC model binding subsystem, showing each layer of the model binding framework and the various ways you can extend the model bind-ing logic to meet your application’s needs. Along the way, you’ll see a few frequently overlooked model binding techniques as well as how to avoid some of the most common model binding mistakes.
Jess Chadwick
Model Binding BasicsTo understand what model binding is, fi rst take a look at a typical way to populate an object from request values in an ASP.NET application, shown in Figure 1.
Then compare the action in Figure 1 with Figure 2, which leverages model binding to produce the same result.
Th ough the two examples both achieve the same thing—a pop-ulated Product instance—the code in Figure 2 relies on ASP.NET MVC to convert the values from the request into strongly typed values. With model binding, controller actions can be focused on providing business value and avoid wasting time with mundane request mapping and parsing.
Binding to Complex ObjectsAlthough model binding to even simple, primitive types can make a pretty big impact, many controller actions rely on more than just a couple of parameters. Luckily, ASP.NET MVC handles complex types just as well as primitive types.
Th e following code takes one more pass at the Create action, skip-ping the primitive values and binding directly to the Product class:
public ActionResult Create(Product product){ // ...}
Once again, this code produces the same result as the actions in Figure 1 and Figure 2, only this time no code was involved at all—the complex ASP.NET MVC model binding eliminated all of the boilerplate code required to create and populate a new Product instance. Th is code exemplifi es the true power of model binding.
This article discusses:• Model binding basics
• Binding to complex objects
• Examining parts of the framework
• Recursive model binding
• Model binding limitations
• Using custom attributes
Technologies discussed:ASP.NET MVC

37February 2012msdnmagazine.com
Decomposing Model BindingNow that you’ve seen model binding in action, it’s time to break down the pieces that make up the model binding framework.
Model binding is broken down into two distinct steps: collect-ing values from the request and populating models with those values. Th ese steps are accomplished by value providers and model binders, respectively.
Value ProvidersASP.NET MVC includes value provider implementations that cover the most common sources of request values such as querystring parameters, form fi elds and route data. At run time, ASP.NET MVC uses the value providers registered in the ValueProviderFactories class to evaluate request values that the model binders can use.
By default, the value provider collection evaluates values from the various sources in the following order:
1. Previously bound action parameters, when the action is a child action
2. Form fi elds (Request.Form) 3. Th e property values in the JSON Request body (Request.
InputStream), but only when the request is an AJAX request4. Route data (RouteData.Values) 5. Querystring parameters (Request.QueryString) 6. Posted fi les (Request.Files)
Th e value providers collection, like the Request object, is really just a glorifi ed dictionary—an abstraction layer of key/value pairs that model binders can use without needing to know where the data came from. However, the value provider framework takes this abstraction a step further than the Request dictionary, giving you complete control over how and where the model binding framework gets its data. You can even create your own custom value providers.
Custom Value ProvidersTh e minimum requirement to create a custom value provider is pretty straightforward: Create a new class that implements the System.Web.Mvc.ValueProviderFactory interface.
For example, Figure 3 demonstrates a custom value provider that retrieves values from the user’s cookies.
Notice how simple the CookieValueProviderFactory is. Instead of building a brand-new value provider from the ground up, the CookieValueProviderFactory simply retrieves the user’s cookies and leverages the NameValueCollectionValueProvider to expose those values to the model binding framework.
After you’ve created a custom value provider, you’ll need to add it to the list of value providers via the ValueProviderFacto-ries.Factories collection:
var factory = new CookieValueProviderFactory();ValueProviderFactories.Factories.Add(factory);
It’s pretty easy to create custom value providers, but be cautious in doing so. Th e set of value providers that ASP.NET MVC ships out of the box exposes most of the data available in the HttpRequest (with the exception of cookies, perhaps) pretty well and generally provides enough data to satisfy most scenarios.
To determine whether creating a new value provider is the right thing to do for your particular scenario, ask the following question: Does the set of information provided by the existing value providers contain all the data I need (albeit perhaps not in the proper format)?
If the answer is no, then adding a custom value provider is prob-ably the right way to address the void. However, when the answer is yes—as it usually is—consider how you can fi ll in the missing pieces by customizing the model binding behavior to access the data being provided by the value providers. Th e rest of this article shows you how to do just that.
The main component of the ASP.NET MVC model binding framework responsible for creating and populating models using values provided by value providers is called the model binder.
Default Model BinderThe ASP.NET MVC framework includes default model binder implementation named the DefaultModelBinder, which is designed to eff ectively bind most model types. It does this by using relatively simple and recursive logic for each property of the target model:
1. Examine the value providers to see if the property was dis-covered as a simple type or a complex type by checking to see if the property name is registered as a prefi x. Prefi xes are simply the HTML form fi eld name “dot notation” used to rep-resent whether a value is a property of a complex object. Th e
public ActionResult Create(){ var product = new Product() { AvailabilityDate = DateTime.Parse(Request["availabilityDate"]), CategoryId = Int32.Parse(Request["categoryId"]), Description = Request["description"], Kind = (ProductKind)Enum.Parse(typeof(ProductKind), Request["kind"]), Name = Request["name"], UnitPrice = Decimal.Parse(Request["unitPrice"]), UnitsInStock = Int32.Parse(Request["unitsInStock"]), }; // ...}
Figure 1 Retrieving Values Directly from the Request
public ActionResult Create( DateTime availabilityDate, int categoryId, string description, ProductKind kind, string name, decimal unitPrice, int unitsInStock ){ var product = new Product() { AvailabilityDate = availabilityDate, CategoryId = categoryId, Description = description, Kind = kind, Name = name, UnitPrice = unitPrice, UnitsInStock = unitsInStock, }; // ...}
Figure 2 Model Binding to Primitive Values
It’s pretty easy to create custom value providers, but be
cautious in doing so.

msdn magazine38 ASP.NET MVC
prefi x pattern is [ParentProperty].[Property]. For example, the form fi eld with the name UnitPrice.Amount contains the value for the Amount fi eld of the UnitPrice property.
2. Get the ValueProviderResult from the registered value providers for the property’s name.
3. If the value is a simple type, try to convert it to the target type. Th e default conversion logic leverages the property’s TypeConverter to convert from the source value of type string to the target type.
4. Otherwise, the property is a complex type, so perform a recursive binding.
Recursive Model BindingRecursive model binding eff ectively starts the whole model bind-ing process over again but uses the name of the target property as the new prefi x. Using this approach, the DefaultModelBinder is able to traverse entire complex object graphs and populate even deeply nested property values.
To see recursive binding in action, change Product.UnitPrice from a simple decimal type to the custom type Currency. Figure 4 shows both classes.
With this update in place, the model binder will look for the values named UnitPrice.Amount and UnitPrice.Code to populate the complex Product.UnitPrice property.
Th e DefaultModelBinder recursive binding logic can eff ectively populate even the most complex object graphs. So far, you’ve seen a complex object that resided only one level deep in the object hierarchy, which the DefaultModelBinder handled with ease. To demonstrate the true power of recursive model binding, add a new property named Child to Product with the same type, Product:
public class Product { public Product Child { get; set; } // ...}
Th en, add a new fi eld to the form and—applying the dot notation to indicate each level—create as many levels as you’d like. For example:
<input type="text" name="Child.Child.Child.Child.Child.Child.Name"/>
Th is form fi eld will result in six levels of Products! For each level, the DefaultModelBinder will dutifully create a new Product instance and dive right into binding its values. When the binder is all done, it will have created an object graph that looks like the code in Figure 5.
Even though this contrived example sets the value of just a single property, it’s a great demonstration on how the DefaultModelBinder recursive model binding functionality allows it to support some very complex object graphs right out of the box. With recursive model binding, if you can create a form fi eld name to represent the value to populate, it doesn’t matter where in the object hierarchy that value lives—the model binder will fi nd it and bind it.
Where Model Binding Seems to Fall DownIt’s true: Th ere are some models that the DefaultModelBinder simply won’t be able to bind. However, there are also quite a few scenarios in which the default model binding logic may not seem to work but in fact works just fi ne as long as you use it appropriately.
Following are a few of the most common scenarios that developers oft en assume the DefaultModelBinder can’t handle and how you can implement them using the DefaultModelBinder and nothing else.
new Product { Child = new Product { Child = new Product { Child = new Product { Child = new Product { Child = new Product { Child = new Product { Name = "MADNESS!" } } } } } }}
Figure 5 An Object Graph Created from Recursive Model Binding
public interface IProduct{ DateTime AvailabilityDate { get; } int CategoryId { get; } string Description { get; } ProductKind Kind { get; } string Name { get; } decimal UnitPrice { get; } int UnitsInStock { get; }} public ActionResult Create(IProduct product){ // ...}
Figure 6 Binding to an Interface
public class CookieValueProviderFactory : ValueProviderFactory{ public override IValueProvider GetValueProvider ( ControllerContext controllerContext ) { var cookies = controllerContext.HttpContext.Request.Cookies; var cookieValues = new NameValueCollection(); foreach (var key in cookies.AllKeys) { cookieValues.Add(key, cookies[key].Value); } return new NameValueCollectionValueProvider( cookieValues, CultureInfo.CurrentCulture); }}
Figure 3 Custom Value Provider Factory that Inspects Cookie Values
public class Product{ public DateTime AvailabilityDate { get; set; } public int CategoryId { get; set; } public string Description { get; set; } public ProductKind Kind { get; set; } public string Name { get; set; } public Currency UnitPrice { get; set; } public int UnitsInStock { get; set; }} public class Currency{ public float Amount { get; set; } public string Code { get; set; }}
Figure 4 Product Class with Complex Unitprice Property

msdn magazine40 ASP.NET MVC
Complex Collections Th e out-of-the-box ASP.NET MVC value providers treat all request fi eld names as if they’re form post values. Take, for example, a collection of primitive values in a form post, in which each value requires its own unique index (whitespace added for readability):
MyCollection[0]=one &MyCollection[1]=two &MyCollection[2]=three
Th e same approach can also be applied to collections of complex objects. To demonstrate this, update the Product class to support multiple currencies by changing the UnitPrice property to a collection of Currency objects:
public class Product : IProduct{ public IEnumerable<Currency> UnitPrice { get; set; }
// ...}
With this change, the following request parameters are required to populate the updated UnitPrice property:
UnitPrice[0].Code=USD &UnitPrice[0].Amount=100.00 &
UnitPrice[1].Code=EUR &UnitPrice[1].Amount=73.64
Pay close attention to the naming syntax of the request param-eters required to bind collections of complex objects. Notice the indexers used to identify each unique item in the area, and that each property for each instance must contain the full, indexed reference to that instance. Just keep in mind that the model binder expects property names to follow the form post naming syntax, regardless of whether the request is a GET or a POST.
Th ough it’s somewhat counterintuitive, JSON requests have the same requirements—they, too, must adhere to the form post nam-ing syntax. Take, for example, the JSON payload for the previous UnitPrice collection. The pure JSON array syntax for this data would be represented as:
[ { "Code": "USD", "Amount": 100.00 }, { "Code": "EUR", "Amount": 73.64 }]
However, the default value providers and model binders require the data to be represented as a JSON form post:
{ "UnitPrice[0].Code": "USD", "UnitPrice[0].Amount": 100.00,
"UnitPrice[1].Code": "EUR", "UnitPrice[1].Amount": 73.64}
Th e complex object collection scenario is perhaps one of the most widely problematic scenarios that developers run into because the syntax isn’t necessarily evident to all developers. However, once you learn the relatively simple syntax for posting complex collections, these scenarios become much easier to deal with.
Generic Custom Model Binders Th ough the DefaultModel-Binder is powerful enough to handle almost anything you throw at it, there are times when it just doesn’t do what you need. When these scenarios occur, many developers jump at the chance to take advantage of the model binding framework’s extensibility model and build their own custom model binder.
For example, even though the Microsoft .NET Framework provides excellent support for object-oriented principles, the DefaultModel-Binder off ers no support for binding to abstract base classes and interfaces. To demonstrate this shortcoming, refactor the Product class so that it derives from an interface—named IProduct—that consists of read-only properties. Likewise, update the Create con-troller action so that it accepts the new IProduct interface instead of the concrete Product implementation, as shown in Figure 6.
Th e updated Create action shown in Figure 6—while perfectly legitimate C# code—causes the DefaultModelBinder to throw the exception: “Cannot create an instance of an interface.” It’s quite understandable that the model binder throws this exception, considering that DefaultModelBinder has no way of knowing what concrete type of IProduct to create.
public class ProductModelBinder : IModelBinder{ public object BindModel ( ControllerContext controllerContext, ModelBindingContext bindingContext ) { var product = new Product() { Description = GetValue(bindingContext, "Description"), Name = GetValue(bindingContext, "Name"), }; string availabilityDateValue = GetValue(bindingContext, "AvailabilityDate");
if(availabilityDateValue != null) { DateTime date; if (DateTime.TryParse(availabilityDateValue, out date)) product.AvailabilityDate = date; } string categoryIdValue = GetValue(bindingContext, "CategoryId");
if (categoryIdValue != null) { int categoryId; if (Int32.TryParse(categoryIdValue, out categoryId)) product.CategoryId = categoryId; } // Repeat custom binding code for every property // ... return product; } private string GetValue( ModelBindingContext bindingContext, string key) { var result = bindingContext.ValueProvider.GetValue(key); return (result == null) ? null : result.AttemptedValue; }}
Figure 7 ProductModelBinder—a Tightly Coupled Custom Model Binder
JSON requests must adhere to the form post naming syntax.

msdn magazine42 ASP.NET MVC
Th e simplest way to solve this issue is to create a custom model binder that implements the IModelBinder interface. Figure 7 shows ProductModelBinder, a custom model binder that knows how to create and bind an instance of the IProduct interface.
Th e downside to creating custom model binders that implement the IModelBinder interface directly is that they oft en duplicate much of the DefaultModelBinder just to modify a few areas of logic. It’s also common for these custom binders to focus on specifi c model classes, creating a tight coupling between the framework and the business layer and limiting reuse to support other model types.
To avoid all these issues in your custom model binders, consider deriving from DefaultModelBinder and overriding specifi c behaviors to suit your needs. Th is approach oft en provides the best of both worlds.
Abstract Model Binder Th e only problem with trying to apply model binding to an interface with the DefaultModelBinder is that it doesn’t know how to determine the concrete model type. Consider the higher-level goal: the ability to develop controller actions against a non-concrete type and dynamically determine the concrete type for each request.
By deriving from DefaultModelBinder and overriding only the logic that determines the target model type, you can not only
address the specifi c IProduct scenario, but also actually create a general-purpose model binder that can handle most other interface hierarchies as well. Figure 8 shows an example of a general-purpose model abstract model binder.
To support model binding to an interface, the model binder must fi rst translate the interface into a concrete type. To accomplish this, AbstractModelBinder requests the “__type__” key from the request’s value providers. Leveraging value providers for this kind of data provides fl exibility as far as where the “__type__” value is defi ned. For example, the key could be defi ned as part of the route (in the route data), specifi ed as a querystring parameter or even represented as a fi eld in the form post data.
Next, the AbstractModelBinder uses the concrete type name to generate a new set of metadata that describes the details of the concrete class. AbstractModelBinder uses this new metadata to replace the existing ModelMetadata property that described the initial abstract model type, eff ectively causing the model binder to forget that it was ever bound to a non-concrete type to begin with.
Aft er AbstractModelBinder replaces the model metadata with all the information needed to bind to the proper model, it simply releases control back to the base DefaultModelBinder logic to let it handle the rest of the work.
Th e AbstractModelBinder is an excellent example that shows how you can extend the default binding logic with your own custom logic without reinventing the wheel, by deriving directly from the IModelBinder interface.
Model Binder SelectionCreating custom model binders is just the first step. To apply custom model binding logic in your application, you must also register the custom model binders. Most tutorials show you two ways to register custom model binders.
The Global ModelBinders Collection Th e generally recommend-ed way to override the model binder for specifi c types is to register a type-to-binder mapping to the ModelBinders.Binders dictionary.
The following code snippet tells the framework to use the AbstractModelBinder to bind Currency models:
ModelBinders.Binders.Add(typeof(Currency), new AbstractModelBinder());
Overriding the Default Model Binder Alternatively, to replace the global default handler, you can assign a model binder to the ModelBinders.Binders.DefaultBinder property. For example:
ModelBinders.Binders.DefaultBinder = new AbstractModelBinder();
Although these two approaches work well for many scenarios, there are two more ways that ASP.NET MVC lets you register a model binder for a type: attributes and providers.
public class AbstractModelBinder : DefaultModelBinder{ private readonly string _typeNameKey;
public AbstractModelBinder(string typeNameKey = null) { _typeNameKey = typeNameKey ?? "__type__"; }
public override object BindModel ( ControllerContext controllerContext, ModelBindingContext bindingContext ) { var providerResult = bindingContext.ValueProvider.GetValue(_typeNameKey);
if (providerResult != null) { var modelTypeName = providerResult.AttemptedValue;
var modelType = BuildManager.GetReferencedAssemblies() .Cast<Assembly>() .SelectMany(x => x.GetExportedTypes()) .Where(type => !type.IsInterface) .Where(type => !type.IsAbstract) .Where(bindingContext.ModelType.IsAssignableFrom) .FirstOrDefault(type => string.Equals(type.Name, modelTypeName, StringComparison.OrdinalIgnoreCase));
if (modelType != null) { var metaData = ModelMetadataProviders.Current .GetMetadataForType(null, modelType);
bindingContext.ModelMetadata = metaData; } }
// Fall back to default model binding behavior return base.BindModel(controllerContext, bindingContext); }}
Figure 8 A General-Purpose Abstract Model Binder
To support model binding to an interface, the model binder must fi rst translate the interface
into a concrete type.

(888) 850-9911Sales Hotline - US & Canada:
/update/2012/02
US Headquarters ComponentSource650 Claremore Prof WaySuite 100WoodstockGA 30188-5188USA
© 1996-2012 ComponentSource. All Rights Reserved. All prices correct at the time of press. Online prices may vary from those shown due to daily fluctuations & online discounts.
European Headquarters ComponentSource30 Greyfriars RoadReadingBerkshireRG1 1PE United Kingdom
Asia / Pacific Headquarters ComponentSource3F Kojimachi Square Bldg3-3 Kojimachi Chiyoda-kuTokyoJapan102-0083 www.componentsource.com
www.componentsource.com
We accept purchase orders.Contact us to apply for a credit account.
FusionCharts from $195.02Interactive Flash & JavaScript (HTML5) charts for web apps.
BEST SELLER
Spread for .NET Professional from $1,439.04Includes MultiRow, Stand-Alone Chart, Formula Provider and Runtime Spread Designer.
BEST SELLER TX Text Control .NET for Windows Forms/WPF from $1,045.59Word processing components for Visual Studio .NET.
NEW RELEASE
Janus WinForms Controls Suite V4.0 from $889.00Add powerful Outlook style interfaces to your .NET applications.
BEST SELLER
BEST SELLER
Untitled-3 1 1/5/12 3:47 PM

msdn magazine44 ASP.NET MVC
Adorning Models with Custom AttributesIn addition to adding a type mapping to the ModelBinders dictionary, the ASP.NET MVC framework also off ers the abstract System.Web.Mvc.CustomModelBinderAttribute, an attribute that allows you to dynamically create a model binder for each class or property to which the attribute is applied. Figure 9 shows a CustomModelBinderAttribute implementation that creates an AbstractModelBinder.
You can then apply the AbstractModelBinderAttribute to any model class or property, like so:
public class Product{ [AbstractModelBinder] public IEnumerable<CurrencyRequest> UnitPrice { get; set; } // ...}
Now when the model binder attempts to locate the appropriate binder for Product.UnitPrice, it will discover the AbstractModel-BinderAttribute and use the AbstractModelBinder to bind the Product.UnitPrice property.
Leveraging custom model binder attributes is a great way to achieve a more declarative approach to confi guring model binders while keeping the global model binder collection simple. Also, the fact that custom model binder attributes can be applied to both entire classes and individual properties means you have fi ne-grain control over the model binding process.
Ask the Binders!Model binder providers off er the ability to execute arbitrary code in real time to determine the best possible model binder for a given type. As such, they provide an excellent middle ground among explicit model binder registration for individual model types, static attri-bute-based registration and a set default model binder for all types.
The following code shows how to create an IModelBinder-Provider that provides an AbstractModelBinder for all interfaces and abstract types:
public class AbstractModelBinderProvider : IModelBinderProvider{ public IModelBinder GetBinder(Type modelType) { if (modelType.IsAbstract || modelType.IsInterface) return new AbstractModelBinder();
return null; }}
Th e logic dictating whether the AbstractModelBinder applies to a given model type is relatively straightforward: Is it a non-concrete type? If so, the AbstractModelBinder is the appropriate model binder for the type, so instantiate the model binder and return it. If the type is a concrete type, then AbstractModelBinder is not appropriate; return a null value to indicate that the model binder isn’t a match for this type.
An important thing to keep in mind when implementing the .GetBinder logic is that the logic will be executed for every property that’s a candidate for model binding, so be sure to keep it lightweight or you can easily introduce performance issues into your application.
In order to begin using a model binder provider, add it to the list of providers maintained in the ModelBinderProviders.Binder-Providers collection. For example, register the AbstractModel-Binder like so:
var provider = new AbstractModelBinderProvider();ModelBinderProviders.BinderProviders.Add(provider);
And that easily, you’ve added model binding support for non-concrete types throughout your entire application.
Th e model binding approach makes model binding selection much more dynamic by taking the burden of determining the proper model binder away from the framework and placing it in the most appropriate place: the model binders themselves.
Key Extensibility PointsLike any other method, the ASP.NET MVC model binding allows controller actions to accept complex object types as parameters. Model binding also encourages better separation of concerns by separating the logic of populating objects from the logic that uses the populated objects.
I’ve explored some key extensibility points in the model binding framework that can help you leverage it to the fullest. Taking the time to understand ASP.NET MVC model binding and how to use it prop-erly can have a large impact, even on the simplest of applications.
JESS CHADWICK is an independent software consultant specializing in Web technologies. He has more than a decade of development experience ranging from embedded devices in startups to enterprise-scale Web farms at Fortune 500 companies. He’s an ASPInsider, Microsoft MVP in ASP.NET, and book and magazine author. He is actively involved in the development community, regu-larly speaking at user groups and conferences as well as leading the NJDOTNET Central New Jersey .NET user group.
THANKS to the following technical expert for reviewing this article: Phil Haack
[AttributeUsage( AttributeTargets.Class | AttributeTargets.Enum | AttributeTargets.Interface | AttributeTargets.Parameter | AttributeTargets.Struct | AttributeTargets.Property, AllowMultiple = false, Inherited = false)]public class AbstractModelBinderAttribute : CustomModelBinderAttribute{ public override IModelBinder GetBinder() { return new AbstractModelBinder(); }}
Figure 9 A CustomModelBinderAttribute Implementation
Taking the time to understand ASP.NET MVC model binding and how to use it properly can
have a large impact, even on the simplest of applications.

PRODUCED BYSUPPORTED BY
YOUR MAP TO THE .NET DEVELOPMENT PLATFORM
Register Today and
Save $300!Use Promo Code
NYFEB
Visit vslive.com/newyork or scan the QR code to register and for more
event details.
Brooklyn, NY | May 14-17 | NY Marriott at the Brooklyn Bridge | vslive.com/newyork
Visual Studio Live! is thrilled to be back in New York! Join developers, software architects and designers in Brooklyn for 4 days of unbiased and cutting-edge education on the Microsoft Platform with topics such as Windows 8 / WinRT, Silverlight / WPF, Visual Studio 2010+ / .NET 4.0+, Web, HTML5, Windows Phone 7 and more!
BIG CODE IN THEBIG APPLE
Untitled-10 1 1/6/12 3:28 PM

msdn magazine46
B U I LD ING HT ML 5 APPS
Practical Cross-Browser HTML5 Audio and Video
When the HTML5 audio and video tags were fi rst introduced, codec and browser incompatibilities made them diffi cult to use and unrealistic to deploy on large-scale Web sites. Th e tags were great for companies writing experimental code or doing cross-browser media development, but the HTML5 media API was too unreliable for general use.
Today, things are diff erent. Browsers and JavaScript libraries have matured to the point where you can—and should—use HTML5 media as the default for any projects that will display audio and video content. Even retrofitting existing Flash and Silverlight video content for HTML5 playback has become fairly simple. In this article, I’ll explore the benefits of using HTML5 for media playback, show some sample code, address some major issues that developers face and present solutions to those problems.
John Dyer
Benefi ts of HTML5 MediaTh e advantage of using HTML5 for media is that you can leverage your HTML, CSS and JavaScript skills rather than learning Flash or Silverlight. If you can create buttons in HTML and control them with JavaScript, you already know all you need to develop HTML5 media. HTML5 media has built-in support for captions and subtitles using the new track element, and proposals for additional features—such as direct byte access for video manipulation—are already being considered.
Moreover, media that uses HTML5 video and audio performs better than media played through plug-ins such as Flash or Silverlight, resulting in longer battery life and smoother playback. In addition, mobile devices running Windows Phone 7.5, Apple iOS and Android (as well as the Metro-style browser in Windows 8) support media playback only through HTML5 video and audio. Some Android devices include Flash, but Adobe has recently dis-continued its mobile Flash eff orts, which means that HTML5 will be the only way to play media on mobile devices in the future.
Simple HTML5 Playback and ControlsIn the days of using Flash or Silverlight for video playback, the simplest possible markup to display a video (video.mp4 in this case) would have looked something like this:
<object width="640" height="360" classid="clsid:d27cdb6e-ae6d-11cf-96b8-444553540000" codebase="http://fpdownload.macromedia.com/pub/shockwave/cabs/flash/swflash.cab#version=8,0,0,0"> <param name="src" value="player.swf?file=video.mp4"> <embed src="player.swf?file=video.mp4" width="640" height="360"></embed></object>
This article discusses:• Simple HTML5 playback and controls
• HTML5 media attributes
• Issues with HTML5 Media
• HTML5 video and audio JavaScript libraries
Technologies discussed:HTML5 Video and Audio, JavaScript, MediaElement.js
Code download available at:code.msdn.microsoft.com/mag201202HTML5
47February 2012msdnmagazine.com
Compare those nested object, param and embed tags with this HTML5 video tag used to play the same h.264-encoded video:
<video src="video.mp4" controls></video>
It’s much simpler—just plain HTML that needs very little expla-nation. When the browser has downloaded enough of a video to determine its native height and width, it resizes the video accord-ingly. But, just as with img tags, it’s always best to specify the height and width attributes so that the page doesn’t need to refl ow. You can also use the style attribute to specify px or % width and height values (I’ll use both in the examples that follow).
Th e one attribute I added is controls. Th is tells the browser to display its own built-in playback control bar, which usually includes a play/pause toggle, a progress indicator and volume controls. Controls is a Boolean attribute, which means it doesn’t need to have a value assigned to it. For a more XHTML-like syntax you could write controls="controls", but the browser always considers controls to be false if it’s not present and true if it is present or assigned a value.
HTML5 Media Attributes and Child Source TagsTh e audio and video elements introduce several new attributes that determine how the browser will present the media content to the end user.
• src specifi es a single media fi le for playback (for multiple sources with diff erent codecs, please see the discussion below).
• poster is a URL to an image that will be displayed before a user presses Play (video only).
• preload determines how and when the browser will load the media fi le using three possible values: none means the video will not download until the user initiates playback; metadata tells the browser to download just enough data to determine the height, width and duration of the media; auto lets the browser decide how much of the video to start downloading before the user initiates playback.
• autoplay is a Boolean attribute used to start a video as soon as the page loads (mobile devices oft en ignore this to preserve bandwidth).
• loop is a Boolean attribute that causes a video to start over when it reaches the end.
• muted is a Boolean attribute specifying whether the video should start muted.
• controls is a Boolean attribute indicating whether the browser should display its own controls.
• width and height tell a video to display at a certain size (video only; can’t be a percentage).
Timed Text TracksBrowsers are also beginning to implement the track element, which provides subtitles, closed captions, translations and commentaries to videos. Here’s a video element with a child track element:
<video id="video1" width="640" height="360" preload="none" controls> <track src="subtitles.vtt" srclang="en" kind="subtitles" label="English subtitles"></video>
In this example, I’ve used four of the track element’s five possible attributes:
• src is a link to either a Web Video Timed Text (WebVTT) fi le or a Timed Text Markup Language (TTML) fi le.
• srclang is the language of the TTML fi le (such as en, es or ar).• kind indicates the type of text content: subtitles, captions,
descriptions, chapters or metadata.• label holds the text displayed to a user choosing a track.• default is a Boolean attribute that determines the startup
track element.WebVTT is a simple text-based format that begins with a
single-line declaration (WEBVTT FILE) and then lists start and end times separated by the --> characters, followed by the text to display between the two times. Here’s a simple WebVTT fi le that will display two lines of text at two diff erent time intervals:
WEBVTT FILE
00:00:02.5 --> 00:00:05.1This is the first line of text to display.
00:00:09.1 --> 00:00:12.7This line will appear later in the video.
<script>// Wrap the code in a function to protect the namespace(function() {// Find the DOM objectsvar video = document.getElementById("video1"), playBtn = document.getElementById("video1-play"), muteBtn = document.getElementById("video1-mute"), current = document.getElementById("video1-current"),duration = document.getElementById("video1-duration");
// Toggle the play/pause stateplayBtn.addEventListener("click", function() { if (video.paused || video.ended) { video.play(); playBtn.value = "Pause"; } else { video.pause(); playBtn.value = "Play"; }}, false);
// Toggle the mute statemuteBtn.addEventListener("click", function() { if (video.muted) { video.muted = false; muteBtn.value = "Mute"; } else { video.muted = true; muteBtn.value = "Unmute"; }}, false);
// Show the duration when it becomes availablevideo.addEventListener("loadedmetadata", function() { duration.innerHTML = formatTime(video.duration);}, false);
// Update the current timevideo.addEventListener("timeupdate", function() { current.innerHTML = formatTime(video.currentTime);}, false);
function formatTime(time) { var minutes = Math.floor(time / 60) % 60, seconds = Math.floor(time % 60);
return (minutes < 10 ? '0' + minutes : minutes) + ':' + (seconds < 10 ? '0' + seconds : seconds);}
})();</script>
Figure 1 Controlling Video Playback
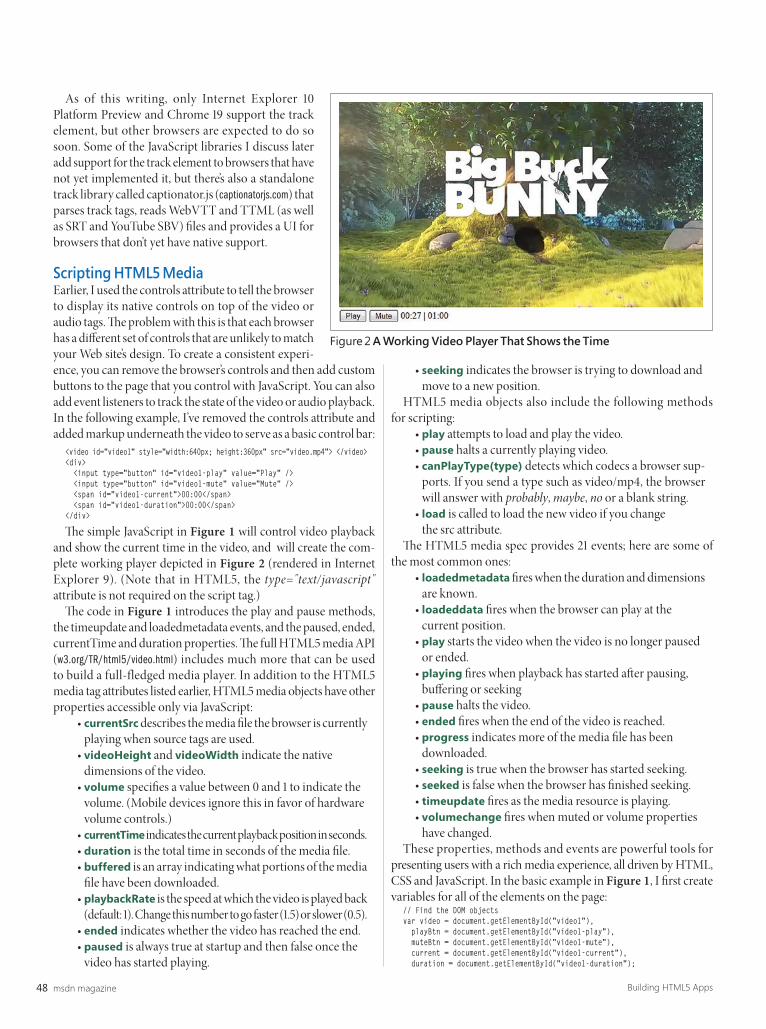
msdn magazine48 Building HTML5 Apps
As of this writing, only Internet Explorer 10 Platform Preview and Chrome 19 support the track element, but other browsers are expected to do so soon. Some of the JavaScript libraries I discuss later add support for the track element to browsers that have not yet implemented it, but there’s also a standalone track library called captionator.js (captionatorjs.com) that parses track tags, reads WebVTT and TTML (as well as SRT and YouTube SBV) fi les and provides a UI for browsers that don’t yet have native support.
Scripting HTML5 MediaEarlier, I used the controls attribute to tell the browser to display its native controls on top of the video or audio tags. Th e problem with this is that each browser has a diff erent set of controls that are unlikely to match your Web site’s design. To create a consistent experi-ence, you can remove the browser’s controls and then add custom buttons to the page that you control with JavaScript. You can also add event listeners to track the state of the video or audio playback. In the following example, I’ve removed the controls attribute and added markup underneath the video to serve as a basic control bar:
<video id="video1" style="width:640px; height:360px" src="video.mp4"> </video> <div> <input type="button" id="video1-play" value="Play" /> <input type="button" id="video1-mute" value="Mute" /> <span id="video1-current">00:00</span> <span id="video1-duration">00:00</span></div>
Th e simple JavaScript in Figure 1 will control video playback and show the current time in the video, and will create the com-plete working player depicted in Figure 2 (rendered in Internet Explorer 9). (Note that in HTML5, the type="text/javascript" attribute is not required on the script tag.)
Th e code in Figure 1 introduces the play and pause methods, the timeupdate and loadedmetadata events, and the paused, ended, currentTime and duration properties. Th e full HTML5 media API (w3.org/TR/html5/video.html) includes much more that can be used to build a full-fledged media player. In addition to the HTML5 media tag attributes listed earlier, HTML5 media objects have other properties accessible only via JavaScript:
• currentSrc describes the media fi le the browser is currently playing when source tags are used.
• videoHeight and videoWidth indicate the native dimensions of the video.
• volume specifi es a value between 0 and 1 to indicate the volume. (Mobile devices ignore this in favor of hardware volume controls.)
• currentTime indicates the current playback position in seconds.• duration is the total time in seconds of the media fi le.• buffered is an array indicating what portions of the media
fi le have been downloaded. • playbackRate is the speed at which the video is played back
(default: 1). Change this number to go faster (1.5) or slower (0.5).• ended indicates whether the video has reached the end.• paused is always true at startup and then false once the
video has started playing.
• seeking indicates the browser is trying to download and move to a new position.
HTML5 media objects also include the following methods for scripting:
• play attempts to load and play the video. • pause halts a currently playing video.• canPlayType(type) detects which codecs a browser sup-
ports. If you send a type such as video/mp4, the browser will answer with probably, maybe, no or a blank string.
• load is called to load the new video if you change the src attribute.
Th e HTML5 media spec provides 21 events; here are some of the most common ones:
• loadedmetadata fi res when the duration and dimensions are known.
• loadeddata fi res when the browser can play at the current position.
• play starts the video when the video is no longer paused or ended.
• playing fi res when playback has started aft er pausing, buff ering or seeking
• pause halts the video.• ended fi res when the end of the video is reached.• progress indicates more of the media fi le has been
downloaded.• seeking is true when the browser has started seeking.• seeked is false when the browser has fi nished seeking.• timeupdate fi res as the media resource is playing.• volumechange fi res when muted or volume properties
have changed.These properties, methods and events are powerful tools for
presenting users with a rich media experience, all driven by HTML, CSS and JavaScript. In the basic example in Figure 1, I fi rst create variables for all of the elements on the page:
// Find the DOM objectsvar video = document.getElementById("video1"), playBtn = document.getElementById("video1-play"), muteBtn = document.getElementById("video1-mute"), current = document.getElementById("video1-current"), duration = document.getElementById("video1-duration");
Figure 2 A Working Video Player That Shows the Time

msdn magazine50 Building HTML5 Apps
Th en I add a click event to my buttons to control media playback. Here I toggle the play and pause state of the video and change the label on the button:
// Toggle the play/pause stateplayBtn.addEventListener("click", function() { if (video.paused || video.ended) { video.play(); playBtn.value = "Pause"; } else { video.pause(); playBtn.value = "Play"; }}, false);
Finally, I add events to the media object to track its current state. Here, I listen for the timeupdate event and update the control bar to the current time of the playhead, formatting the seconds to a minutes:seconds style:
// Update the current timevideo.addEventListener("timeupdate", function() { current.innerHTML = formatTime(media.currentTime);}, false);
Issues with HTML5 MediaUnfortunately, getting HTML5 media to work across all browsers and devices is not quite as simple as in my example. I’ve already mentioned that not all browsers support the track element, and now I’ll address three additional issues that you encounter when using the audio and video tags, along with solutions to overcome them. At the end of the article, I’ll introduce some JavaScript libraries that wrap all of these solutions into single, easily deployable packages.
HTML5 Audio and Video Codec Support Th e fi rst issue you face when developing with HTML5 media is the inconsistent sup-port for video and audio codecs. My examples work in Internet Explorer 9 and later, Chrome and Safari, but they won’t work in Firefox or Opera because although those browsers support the HTML5 video tag, they don’t support the h.264 codec. Due to copy-right concerns, browser vendors have split into two codec camps, and that brings us to the familiar HTML5 Media chart in Figure 3, showing which codecs work with which browsers.
Internet Explorer 9+, Safari, Chrome and mobile devices (iPhone, iPad, Android 2.1+ and Windows Phone 7.5+) all support the h.264 video codec, which is usually placed in an MP4 container. Firefox and Opera, in contrast, support the VP8 video codec, which is placed inside the WebM container. Chrome also supports WebM, and has pledged to remove h.264 support at some point. Internet Explorer 9+ can render WebM if the codec has been installed by the
end user. Finally, Firefox, Opera and Chrome also support the Th eora codec placed inside an Ogg container, but this has been largely phased out in favor of WebM (unless you need to support Firefox 3.x), so I’ve left it out of the chart and examples for simplicity.
For audio, the browser vendors are again split into two camps, with the first group (Internet Explorer 9, Chrome and Safari) supporting the familiar MP3 format and the second group (Firefox and Opera) support-ing the Vorbis codec inside an Ogg container. Many browsers can also play the WAV file
format. See Figure 4.To deal with these diff erences, the video and audio tags support
multiple child source tags, which lets browsers choose a media fi le they can play. Each source element has two attributes:
• src specifi es a URL for a media fi le.• type specifi es the mimetype and optionally the specifi c
codec of the video. To offer both h.264 and VP8 video codecs, you’d use the
following markup:<video id="video1" width="640" height="360"> <source src="video.mp4" type="video/mp4"> <source src="video.webm" type="video/webm"></video>
Note that earlier builds of iOS and Android need the MP4 fi le to be listed fi rst.
Th is markup will work on all modern browsers. Th e JavaScript code will control whichever video the browser decides it can play. For audio, the markup looks like this:
<audio id="audio1"> <source src="audio.mp3" type="audio/mp3"> <source src="audio.oga" type="audio/oga"></audio>
If you’re hosting audio or video content on your own server, you must have the correct MIME type for each media fi le or many HTML5-ready browsers (such as Internet Explorer and Firefox) will not play the media. To add MIME types in IIS 7, go to the Features View, double-click MIME Types, click the Add button in the Actions pane, add the extension (mp4) and MIME type (video/mp4), and then press OK. Th en do the same for the other types (webm and video/webm) you plan to use.
Supporting Older Browsers Including two media fi les (such as MP4 and WebM for video) makes HTML5 media work in all modern browsers. But when older browsers (such as Internet Explorer 8) encounter the video tag, they can’t display the video. Th ey will, however, render the HTML put between the opening <video> and closing </video> tags. Th e following example includes a message urging users to get a newer browser:
<video id="video1" width="640" height="360" > <source src="video.mp4" type="video/mp4"> <source src="video.webm" type="video/webm"> <p>Please update your browser</p></video>
To allow visitors with non-HTML5-ready browsers to play the video, you can provide an alternative with Flash embedded that plays the same MP4 you supply for Internet Explorer 9, Safari and Chrome, as shown in Figure 5.
Video IE8 IE9+ Chrome Safari Mobile Firefox Opera
MP4 (h.264/AAC) no yes yes yes yes no noWebM (VP8/Vorbis) no install yes no no yes yes
Figure 3 Codec Support in Various Browsers
Audio IE8 IE9+ Chrome Safari Mobile Firefox Opera
MP3 no yes yes yes yes no noOgg Theora no install yes no no yes yesWAV no no maybe yes yes yes yes
Figure 4 Audio Support in Various Browsers

msdn magazine52 Building HTML5 Apps
Th is markup presents all browsers with some way to play back video. Browsers with neither HTML5 nor Flash will see a message urging them to upgrade. For more information on how and why this nested markup works, see Kroc Camen’s “Video for Everybody” (camendesign.com/code/video_for_everybody).
Th is approach has some drawbacks, however. First, there’s a lot of markup to maintain. Second, you have to encode and store at least two media fi les. And third, any HTML/JavaScript controls you add to the page will not work with the embedded Flash player. Later, I’ll suggest several JavaScript libraries that can help you overcome these issues, but fi rst, let’s address one fi nal issue.
Full-Screen Support Flash and Silverlight both include a full-screen mode that lets users watch video and other content on their entire screen. You can implement this feature by creating a simple button and tying it to an ActionScript (for Flash) or C# (for Silverlight) full-screen command.
Today’s browsers have a similar full-screen mode that users can trigger with a keyboard or menu command (oft en F11 or Ctrl+F). But until recently, no equivalent JavaScript API allowed developers to initiate full-screen mode from a button on a page. Th is meant that HTML5 video could be displayed only in a “full window” that fi lled the browser window but not the entire screen.
In late 2011, Safari, Chrome and Firefox added support for the W3C proposed FullScreen API, which off ers capabilities similar to those in Flash and Silverlight. Th e Opera team is currently working on implementing it, but the Internet Explorer team has, as of this writing, not yet decided whether it will implement the API. Th e Metro-style browser in Windows 8 will be full screen by default, but desktop Internet Explorer users will need to enter full-screen mode manually using menu options or the F11 key.
To enter full-screen mode in browsers that support it, you call the requestFullscreen method on the element to be displayed full screen. Th e command to exit full screen is called on the document object: document.exitFullscreen method. Th e W3C proposal is still a work in progress, so I won’t go into more detail here, but I am tracking the state of the API on my blog: bit.ly/zlgxUA.
HTML5 Video and Audio JavaScript LibrariesA number of developers have created JavaScript libraries that make HTML5 video and audio easier by integrating all of the relevant code into a single package. Some of the best open source libraries are MediaElement.js, jPlayer, VideoJS, Projekktor, Playr and LeanBack. You’ll fi nd a complete list with feature comparison at praegnanz.de/html5video.
All you need to do is provide a video or audio tag and the library will automatically build a set of custom controls, as well as insert a Flash player for browsers that don’t support HTML5 Media. Th e only problem is that the Flash players many libraries insert don’t always look or function like the HTML5 player. Th is means that any HTML5 events you add won’t work with the Flash player and any custom CSS you use won’t be visible, either.
In my own work, I was asked to create an HTML5 video player with synchronized slides and transcripts (see online.dts.edu/player for a demo). We had an existing library of more than 3,000 h.264 video fi les and it was deemed unfeasible to transcode them to WebM for Firefox and Opera. We also needed to support older browsers such as Internet Explorer 8, but a separate Flash fallback wouldn’t work because it wouldn’t respond to events for the slides and transcripts.
To overcome these difficulties, I created one of the players mentioned previously called MediaElement.js (mediaelementjs.com). It’s an open source (MIT/GLPv2) JavaScript library that includes special Flash and Silverlight players that mimic the HTML5 API. Instead of a totally separate Flash player, MediaElement.js uses Flash only to render video and then wraps the video with a JavaScript object that looks just like the HTML5 API. Th is eff ectively upgrades all browsers so they can use the video tag and additional codecs not natively supported. To start the player with a single h.264 fi le using jQuery, you need only the following code:
<video id="video1" width="640" height="360" src="video.mp4" controls></video><script>jQuery(document).ready(function() { $("video1").mediaelementplayer();});</script>
For browsers that don’t support the video tag (like Internet Explorer 8) or those that don’t support h.264 (Firefox and Opera), MediaElement.js will insert the Flash (or Silverlight, depending on what the user has installed) shim to “upgrade” those browsers so they gain the HTML5 media properties and events I’ve covered.
For audio support, you can use a single MP3 fi le:<audio id="audio1" src="audio.mp3" controls></audio>
Alternatively, you could include a single Ogg/Vorbis fi le:<audio id="audio1" src="audio.oga" controls></audio>
Again, for browsers that don’t support the audio tag (Internet Explorer 8) or those that don’t support Ogg/Vorbis (Internet Explor-er 9+ and Safari), MediaElement.js will insert a shim to “upgrade” those browsers so they all function as if they supported the codec natively. (Note: Ogg/Vorbis will not be playable on mobile devices.)
MediaElement.js also includes support for the track element, as well as native full-screen mode for browsers that have implemented the JavaScript API. You can add your own HTML5 events or track properties and it will work in every browser and mobile device.
I hope I’ve shown you that despite a few quirks, the HTML5 video and audio elements, especially when paired with the excellent libraries I’ve suggested, are easy to add to existing Web sites and should be the default for any new projects.
JOHN DYER is the director of Web Development for the Dallas Theological Seminary (dts.edu). He blogs at j.hn.
THANKS to the following technical experts for reviewing this article: John Hrvatin and Brandon Satrom
<video id="video1" width="640" height="360" > <source src="video.mp4" type="video/mp4"> <source src="video.webm" type="video/webm"> <object width="640" height="360" classid="clsid: d27cdb6e-ae6d-11cf-96b8-444553540000" codebase= "http://fpdownload.macromedia.com/pub/ shockwave/cabs/flash/swflash.cab#version=8,0,0,0"> <param name="SRC" value="player.swf?file=video.mp4"> <embed src="player.swf?file=video.mp4" width="640" height="360"></embed> <p>Please update your browser or install Flash</p> </object></video>
Figure 5 Video Playback with Flash

msdn magazine54
W IN DOWS PHONE MAR KET P L ACE
Get Your Windows Phone Apps into the Marketplace Faster
The Windows Phone SDK 7.1 includes some great tools for evaluating the adherence to certification guidelines and improving the performance of your applications that target Windows Phone 7.5, prior to submission to the marketplace. In this article, I’ll walk you through using the Marketplace Test Kit and Per-formance Analysis tool on a sample application and show how you can use these tools to evaluate the marketplace-readiness of your application. I’ll show you how to use data from the tools to make improvements that will help get it accepted into the marketplace on the fi rst try. For more information about marketplace certifi -cation requirements, see the MSDN Library article, “Application Certifi cation Requirements for Windows Phone” (wpdev.ms/certreq).
All of the tools used in this article are included with the Windows Phone SDK 7.1, which you can get at wpdev.ms/wpsdk71rtw.
Sample Application and Test ToolsTo exercise the Marketplace Test Kit and Performance Analysis tool, I created a sample application called Examine the Stamen, a simple fl ower identifi cation application. I created it with my mother in mind;
Cheryl Simmons
she can use it to improve her fl ower identifi cation skills. Th e appli-cation displays several small images of fl owers on the start screen. A user taps a fl ower and the application navigates to another page, where it displays a larger picture of the selected fl ower. Another tap and the fl ower’s name is displayed in a MessageBox. Figure 1 shows the images displayed as I navigate through the application. (As a side note, I used the new screenshot tool in the Windows Phone Emulator for these screenshots. For more information, see the MSDN Library article, “How to: Create Screenshots for Windows Phone Marketplace” (wpdev.ms/rYoZKP).
Although this application isn’t completely real world, it does represent a reasonable navigation model for a phone application. I’ll evaluate this application using the Marketplace Test Kit in Visual Studio and then examine it further with the Windows Phone Performance Analysis tool. Once I identify any problems, I’ll use documentation resources to fi gure out how to fi x the problems, and then I’ll retest with the tools.
Let’s get started.
This article discusses:• Using the Marketplace Test Kit
• Running monitored tests
• Using the Windows Phone Performance Analysis tool
• Finding and fi xing problems
• Rerunning tests after fi xes
Technologies discussed:Windows Phone
Figure 1 Images Displayed in the Examine the Stamen Program
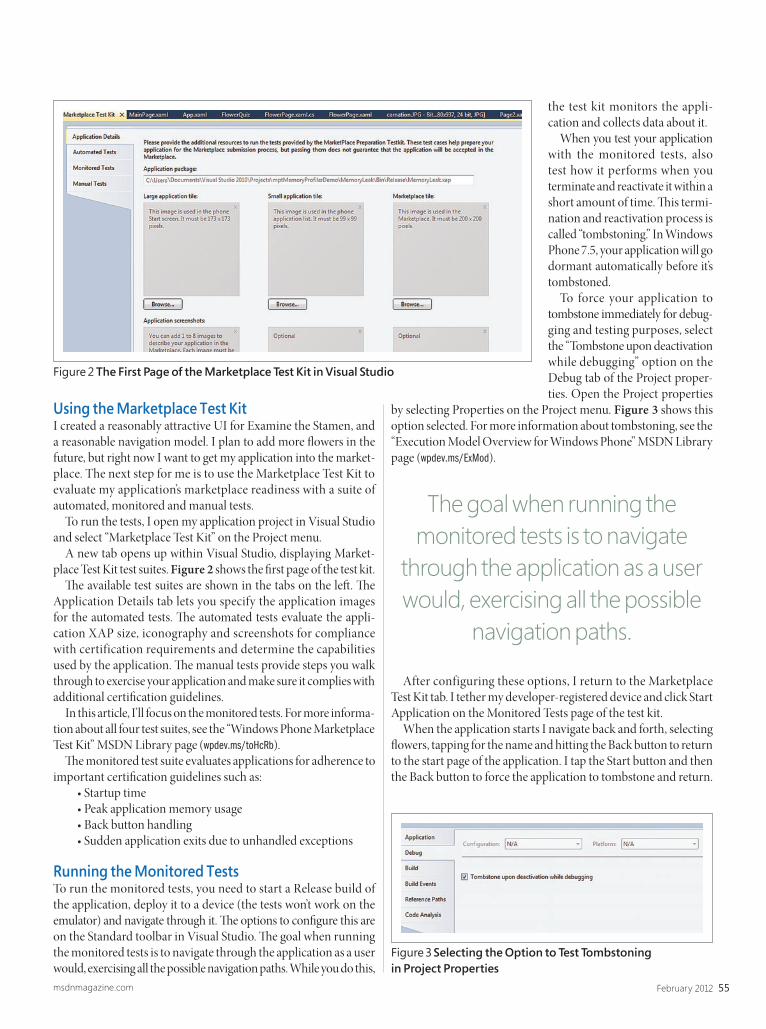
55February 2012msdnmagazine.com
Using the Marketplace Test KitI created a reasonably attractive UI for Examine the Stamen, and a reasonable navigation model. I plan to add more fl owers in the future, but right now I want to get my application into the market-place. The next step for me is to use the Marketplace Test Kit to evaluate my application’s marketplace readiness with a suite of automated, monitored and manual tests.
To run the tests, I open my application project in Visual Studio and select “Marketplace Test Kit” on the Project menu.
A new tab opens up within Visual Studio, displaying Market-place Test Kit test suites. Figure 2 shows the fi rst page of the test kit.
Th e available test suites are shown in the tabs on the left . Th e Application Details tab lets you specify the application images for the automated tests. Th e automated tests evaluate the appli-cation XAP size, iconography and screenshots for compliance with certification requirements and determine the capabilities used by the application. Th e manual tests provide steps you walk through to exercise your application and make sure it complies with additional certifi cation guidelines.
In this article, I’ll focus on the monitored tests. For more informa-tion about all four test suites, see the “Windows Phone Marketplace Test Kit” MSDN Library page (wpdev.ms/toHcRb).
Th e monitored test suite evaluates applications for adherence to important certifi cation guidelines such as:
• Startup time • Peak application memory usage • Back button handling• Sudden application exits due to unhandled exceptions
Running the Monitored TestsTo run the monitored tests, you need to start a Release build of the application, deploy it to a device (the tests won’t work on the emulator) and navigate through it. Th e options to confi gure this are on the Standard toolbar in Visual Studio. Th e goal when running the monitored tests is to navigate through the application as a user would, exercising all the possible navigation paths. While you do this,
the test kit monitors the appli-cation and collects data about it.
When you test your application with the monitored tests, also test how it performs when you terminate and reactivate it within a short amount of time. Th is termi-nation and reactivation process is called “tombstoning.” In Windows Phone 7.5, your application will go dormant automatically before it’s tombstoned.
To force your application to tombstone immediately for debug-ging and testing purposes, select the “Tombstone upon deactivation while debugging” option on the Debug tab of the Project proper-ties. Open the Project properties
by selecting Properties on the Project menu. Figure 3 shows this option selected. For more information about tombstoning, see the “Execution Model Overview for Windows Phone” MSDN Library page (wpdev.ms/ExMod).
After configuring these options, I return to the Marketplace Test Kit tab. I tether my developer-registered device and click Start Application on the Monitored Tests page of the test kit.
When the application starts I navigate back and forth, selecting fl owers, tapping for the name and hitting the Back button to return to the start page of the application. I tap the Start button and then the Back button to force the application to tombstone and return.
Figure 2 The First Page of the Marketplace Test Kit in Visual Studio
Figure 3 Selecting the Option to Test Tombstoning in Project Properties
The goal when running the monitored tests is to navigate
through the application as a user would, exercising all the possible
navigation paths.
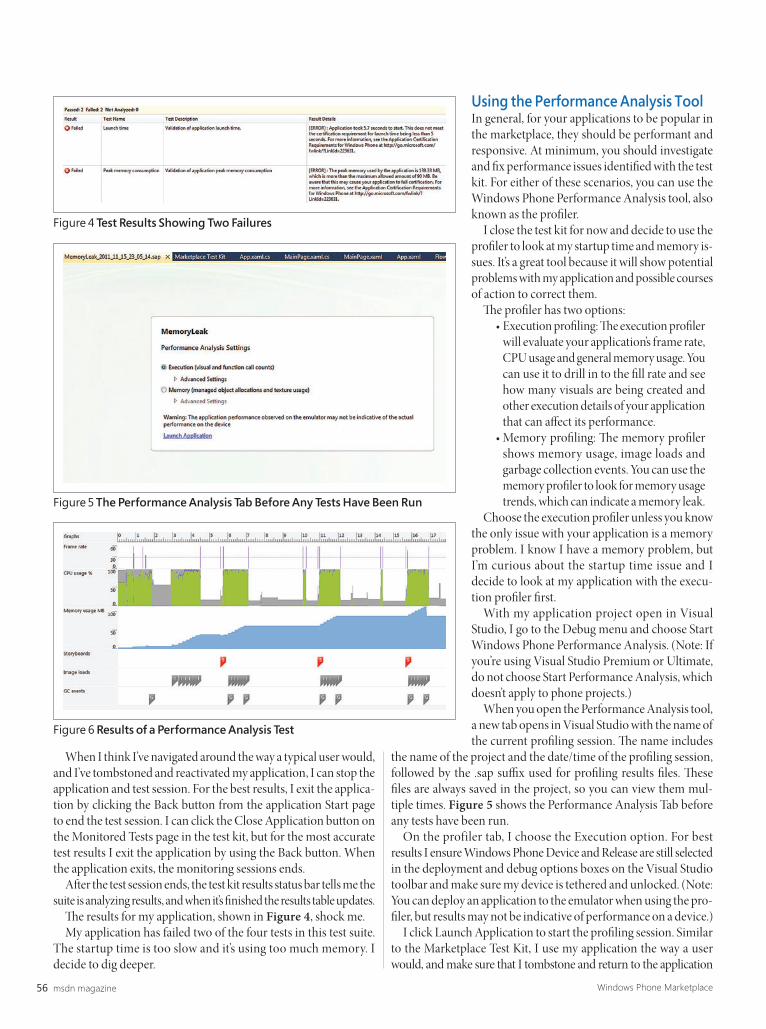
msdn magazine56 Windows Phone Marketplace
When I think I’ve navigated around the way a typical user would, and I’ve tombstoned and reactivated my application, I can stop the application and test session. For the best results, I exit the applica-tion by clicking the Back button from the application Start page to end the test session. I can click the Close Application button on the Monitored Tests page in the test kit, but for the most accurate test results I exit the application by using the Back button. When the application exits, the monitoring sessions ends.
Aft er the test session ends, the test kit results status bar tells me the suite is analyzing results, and when it’s fi nished the results table updates.
Th e results for my application, shown in Figure 4, shock me.My application has failed two of the four tests in this test suite.
The startup time is too slow and it’s using too much memory. I decide to dig deeper.
Using the Performance Analysis ToolIn general, for your applications to be popular in the marketplace, they should be performant and responsive. At minimum, you should investigate and fi x performance issues identifi ed with the test kit. For either of these scenarios, you can use the Windows Phone Performance Analysis tool, also known as the profi ler.
I close the test kit for now and decide to use the profi ler to look at my startup time and memory is-sues. It’s a great tool because it will show potential problems with my application and possible courses of action to correct them.
Th e profi ler has two options: • Execution profi ling: Th e execution profi ler
will evaluate your application’s frame rate, CPU usage and general memory usage. You can use it to drill in to the fi ll rate and see how many visuals are being created and other execution details of your application that can aff ect its performance.
• Memory profi ling: Th e memory profi ler shows memory usage, image loads and garbage collection events. You can use the memory profi ler to look for memory usage trends, which can indicate a memory leak.
Choose the execution profi ler unless you know the only issue with your application is a memory problem. I know I have a memory problem, but I’m curious about the startup time issue and I decide to look at my application with the execu-tion profi ler fi rst.
With my application project open in Visual Studio, I go to the Debug menu and choose Start Windows Phone Performance Analysis. (Note: If you’re using Visual Studio Premium or Ultimate, do not choose Start Performance Analysis, which doesn’t apply to phone projects.)
When you open the Performance Analysis tool, a new tab opens in Visual Studio with the name of the current profi ling session. Th e name includes
the name of the project and the date/time of the profi ling session, followed by the .sap suffi x used for profi ling results fi les. Th ese fi les are always saved in the project, so you can view them mul-tiple times. Figure 5 shows the Performance Analysis Tab before any tests have been run.
On the profiler tab, I choose the Execution option. For best results I ensure Windows Phone Device and Release are still selected in the deployment and debug options boxes on the Visual Studio toolbar and make sure my device is tethered and unlocked. (Note: You can deploy an application to the emulator when using the pro-fi ler, but results may not be indicative of performance on a device.)
I click Launch Application to start the profi ling session. Similar to the Marketplace Test Kit, I use my application the way a user would, and make sure that I tombstone and return to the application
Figure 4 Test Results Showing Two Failures
Figure 5 The Performance Analysis Tab Before Any Tests Have Been Run
Figure 6 Results of a Performance Analysis Test

57February 2012msdnmagazine.com
at least once. I exit the application using the Back button, which is the preferred method for the most accurate results, although you can also end the profi ling session using the Stop Profi ling option in the Performance Analysis tool. Th e profi ler spends some time analyzing the results and displays them on the page in graph format (shown in Figure 6). My results are very interesting.
Th e green portion of the graphed CPU usage indicates screen updates and touch input. I can see high CPU usage initially, which isn’t surprising given the slow startup time. I also see huge spikes in CPU usage aligned with images being loaded, and that my mem-ory usage creeps higher and higher. Viewing these results without further examination tells me that my memory use problem is probably related to how I’m handling images in my application. Although any memory used by my application is released when my application exits, based on this graph, I’m concerned that my application could crash a device if it’s left running for more than the few seconds I spend testing it.
Now I rerun the performance analysis tool with the memory option selected, and this confi rms my growing memory-use problem.
Finding and Fixing the ProblemTo track down problems using the profi ling tool, select problem areas in the graph and review the instructions in the Observation Summary section.
In the execution profi ler results, I click and drag with the mouse to select a portion of the graph that shows a CPU usage spike. The Performance Warning sec-tion immediately updates with an issue to investigate (see Figure 7).
According to the Observation Summary, the application uses a lot of CPU to execute functions on the UI thread. Th is would certainly lead to slow startup time and poor per-formance overall, but I’m not sure
it would contribute to the memory problem. Th e profi ler is great in that it gives me some instructions to fol-low, so I do this. I select CPU Usage and then Functions. Th e results table updates and I sort the results by the Inclusive Samples (%) column. My application function calls are displayed in blue with fully qualifi ed names that include the namespace (suspiciously, MemoryLeak in this case), class and method name. Also, the function calls are live links to the methods in my code. Figure 8 shows these results.
I can tell by looking at these results that the methods executing when I load the second page are using a lot of CPU. Th is probably won’t fi x my start-time issue, but it defi -nitely could be contributing to the memory issue.
I click the link to view the FlowerPage.OnNavigatedTo method. Th is method creates a list of Flower objects and loads a bitmap for each Flower using the LoadBitmap method. Following is a typical call I make to the LoadBitmap method:
bitmap = LoadBitmap("/MemoryLeak;component/Images/tulip.jpg");
And the LoadBitmap method, which loads the resource:private BitmapImage LoadBitmap(string urlString){ var streaminfo = App.GetResourceStream(new Uri(urlString, UriKind.Relative)); BitmapImage bitmap = new BitmapImage(); bitmap.SetSource(streaminfo.Stream); return bitmap;}
When a user navigates to the page, I extract the name of the fl ower that was clicked on the main page from the navigation URI and load the same fl ower image on the FlowerPage.
It’s clear that loading the images is causing a memory problem, but it’s not clear to me what I should do next.
Figure 7 A Performance Warning About High CPU Usage on the UI Thread
Figure 8 The Peformance Analysis Tool Shows Methods That Might Be Causing Problems
Figure 9 Changing Image Handling Results in Passing All Four Marketplace Tests

msdn magazine58 Windows Phone Marketplace
If the Observation Summary doesn’t give you enough informa-tion to solve the performance issues in your application, you should check MSDN and the Web for performance guidance. Following are some great resources:
• “Performance Considerations in Applications for Windows Phone” (under the “Media” section) (wpdev.ms/utCq6h)
• “Performance Techniques for Windows Phone” (wpdev.ms/perfTech)• Silverlight for Windows Phone Performance team blog
(wpdev.ms/slmperf)• Analyzing and Improving Windows Phone Application
Performance (video from MIX11) (wpdev.ms/mixwpperf)• Expert Lessons: Top Tips for Building a Successful Windows
Phone Application (video from MIX11) (wpdev.ms/mixwptoptips)I start researching performance and loading resources on phone
applications and discover something important. According to the Media section of the “Performance Considerations in Applications for Windows Phone” MSDN Library article, I should be specifying my image fi les as content rather than resources, because the phone is opti-mized to use fi les. When a media fi le is compiled as a resource, the con-tent is copied to a fi le before being used, which decreases performance.
I change the build action of my image fi les to Content and make a small change to my code to accommodate this.
In my LoadBitmap method, I specify the UriSource of the BitmapImage rather than calling SetSource:
private BitmapImage LoadBitmap(string urlString){ BitmapImage bitmap = new BitmapImage(); bitmap.UriSource = new Uri(urlString, UriKind.Relative); return bitmap;}
And when I make the call to LoadBitmap, I pass the relative URL to each bitmap: bitmap = LoadBitmap("/Images/tulip.jpg");
Rerunning the Test Kit and Performance Analysis ToolsOnce you think you’ve fixed the issues raised in the Marketplace Test Kit and the Performance Analysis tool, you can run these tools again.
I recompile my application and run the Marketplace Test Kit again, and I can’t believe the diff erence in the results (see Figure 9). Th e app now passes all four tests. Th e startup time isn’t great, but at least it’s meeting the bar.
Finally, I run the execution profiler a final time. I see a big diff erence in results (see Figure 10).
Now instead of big CPU spikes and images being loaded over and over as the user navigates between pages, the images are loaded once, when the application starts. This graph also tells me that my application’s memory use is remaining constant and relatively low compared to my previous version of the application. Next, I select some of the smaller CPU spikes and see the results shown in Figure 11.
I’m relieved to see that the profi ler doesn’t see any performance problems and I make plans to submit my application to the market-place. I have confi dence it will be accepted, and I can continue to improve my application and submit updates if I want.
Follow This PatternIn this article I’ve described how to identify and fix issues in a sample Windows Phone application by using the Market-place Test Kit and the Performance Analysis tool. These tools are integrated into Visual Studio and install as part of the Windows Phone SDK. Th e Marketplace Test Kit helps you deter-mine if your application will meet certifi cation requirements. Th e Performance Analysis tool will help you identify memory and CPU performance issues. Before you submit your applications to the marketplace, I recommend a pattern similar to what I’ve shown in this article:
1. Use the tools I’ve shown, including all the test suites in the Marketplace Test Kit.
2. Identify and fi x any issues.3. Retest to verify fi xes.
If you follow this pattern, you’ll fi nd problems earlier and create better applications faster. Also, this will help ensure your applica-tions are accepted into the marketplace on the fi rst attempt.
CHERYL SIMMONS is a senior programming writer on the Windows Phone Developer Content team at Microsoft .
THANKS to the following technical experts for reviewing this article: Pratap Lakshman, Raghuram Lanka and Nitin Madnikar
Figure 10 Image Handling Changes Result in CPU and Memory Performance Analysis Improvements
Figure 11 Investigating a CPU Spike Shows No Performance Warnings

Word Processing Components for Windows Forms, WPF & ASP.NET
US +1 877 - 462 - 4772 (toll-free)EU +49 421 - 4270671 - 0WWW.TEXTCONTROL.COM
VERSION 17.0 RELEASED
WORD PROCESSINGCOMPONENTS
WINDOWS FORMS | WPF | ASP.NET | ACTIVEX
NEW SPELL CHECK COMPONENT
CELL MERGING, COL SELECTION PAGE BORDERS DIGITAL SIGNATURES IN PDF
Untitled-3 1 1/5/12 3:49 PM

msdn magazine60
W IN DOWS W OR KFLOW FOU NDAT ION 4 . 5
What’s New in Windows Workfl ow Foundation 4.5
At the BUILD conference last September (buildwindows.com), Microsoft unveiled the next version of Windows Workfl ow Foundation (WF 4.5) and made available a public preview as part of the Windows 8 Developer Preview (msdn.microsoft.com/windows/apps/br229516). In this article, I’ll walk through the key new features added in WF 4.5. Given the general scope of the article and the size of the feature set, each discussion will be brief, but I hope you’ll get excited enough to download the Windows 8 Developer Preview and start playing with WF 4.5.
WF: Yesterday, Today and TomorrowWF 4 shipped in 2010 to a great reception from the developer community. WF 4 included signifi cant advances over its predecessor (WF 3.5): improved runtime, better overall performance, simplifi ed activity authoring, full Windows Communication Foundation (WCF) integration, declarative authoring and dramatically sim-plified designer rehosting. 2011 brought a fully featured version of StateMachine in the Microsoft .NET Framework 4 Platform
Leon Welicki
Update 1, available today with the same quality and support guar-antees as any other component of the framework. With WF 4.5, our goal was to solve the major issues we learned about from our customers. We’ve also been working to take all the power of WF to the cloud; there’s a great BUILD presentation you can watch to see what the team has been up to (bit.ly/rbJROw).
As you read through this article, I’m sure you’ll have questions about compatibility between WF 4 and WF 4.5. Be assured that the versions are built on the same code base and are fully compatible. All your WF 4 investments will be preserved in WF 4.5 without needing any changes.
Aft er we shipped WF 4, we received a lot of great feedback we used to plan the next release. In WF 4.5, we wanted to address your top concerns and add features to provide the best framework for building workfl ow applications. Figure 1 shows customer requests and the features created in response to those requests.
Notice that the table is organized by themes; I’ll use the same themes in the upcoming sections to present the most important features.
Authoring ImprovementsC# Expressions WF 4 lets you write expressions using Visual Basic and, when used in Visual Studio, the expression editor provides all the language services you might expect, such as auto-complete, IntelliSense and so forth. But our WF 4 customers told us they’d rather write C# than Visual Basic, so we added support for C# expressions. Now, if you create a C# project you get C# expressions in your work-fl ow. Don’t worry, though. You still get Visual Basic expressions if you create a Visual Basic project. C# support also comes with all the language services you’d expect, as shown in Figure 2. Notice the IntelliSense box showing second C# overload for string.Format.
If you want to try C# expressions, just create a C# Workfl ow project. You can also open the CSharpExpressions project in the companion code for this article.
Windows Workfl ow Foundation 4.5 is currently a community technical preview. All information is subject to change.
This article discusses:• Authoring improvements in WF 4.5
• New versioning support in WF 4.5
• Runtime enhancements in WF 4.5
Technologies discussed:Windows Workfl ow Foundation, Windows 8 Developer Preview, Windows Communication Foundation
Code download available at:code.msdn.microsoft.com/mag201202WF45
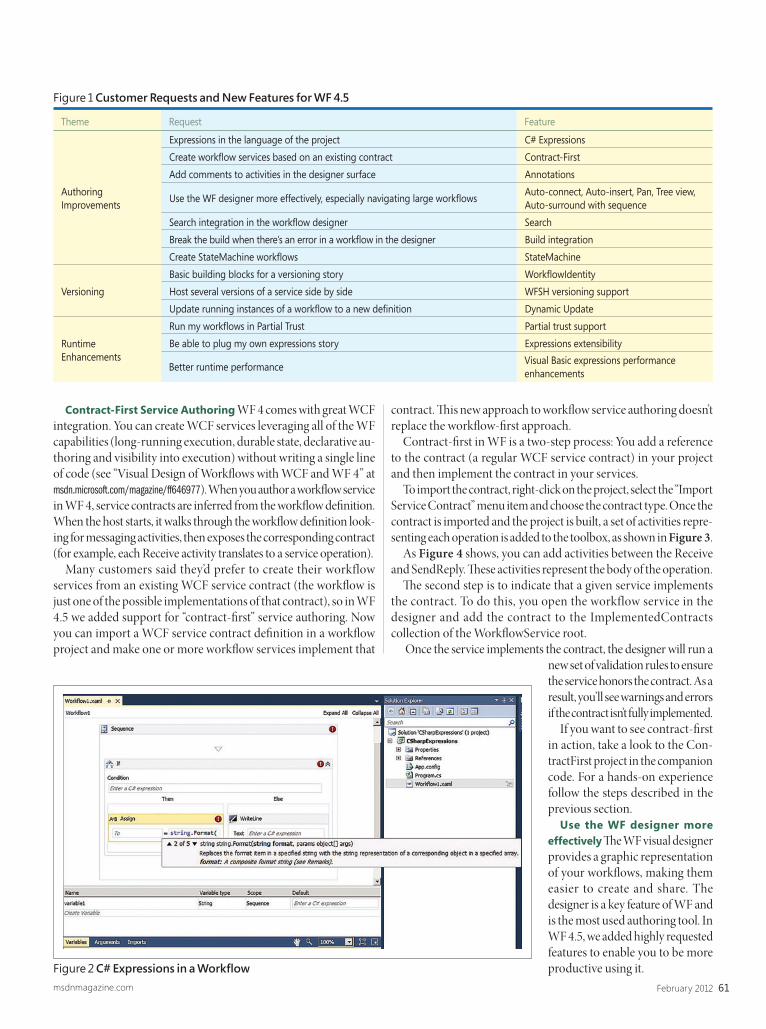
61February 2012msdnmagazine.com
Contract-First Service Authoring WF 4 comes with great WCF integration. You can create WCF services leveraging all of the WF capabilities (long-running execution, durable state, declarative au-thoring and visibility into execution) without writing a single line of code (see “Visual Design of Workfl ows with WCF and WF 4” at msdn.microsoft.com/magazine/ff646977). When you author a workfl ow service in WF 4, service contracts are inferred from the workfl ow defi nition. When the host starts, it walks through the workfl ow defi nition look-ing for messaging activities, then exposes the corresponding contract (for example, each Receive activity translates to a service operation).
Many customers said they’d prefer to create their workflow services from an existing WCF service contract (the workfl ow is just one of the possible implementations of that contract), so in WF 4.5 we added support for “contract-fi rst” service authoring. Now you can import a WCF service contract defi nition in a workfl ow project and make one or more workfl ow services implement that
contract. Th is new approach to workfl ow service authoring doesn’t replace the workfl ow-fi rst approach.
Contract-fi rst in WF is a two-step process: You add a reference to the contract (a regular WCF service contract) in your project and then implement the contract in your services.
To import the contract, right-click on the project, select the “Import Service Contract” menu item and choose the contract type. Once the contract is imported and the project is built, a set of activities repre-senting each operation is added to the toolbox, as shown in Figure 3.
As Figure 4 shows, you can add activities between the Receive and SendReply. Th ese activities represent the body of the operation.
Th e second step is to indicate that a given service implements the contract. To do this, you open the workflow service in the designer and add the contract to the ImplementedContracts collection of the Workfl owService root.
Once the service implements the contract, the designer will run a new set of validation rules to ensure the service honors the contract. As a result, you’ll see warnings and errors if the contract isn’t fully implemented.
If you want to see contract-fi rst in action, take a look to the Con-tractFirst project in the companion code. For a hands-on experience follow the steps described in the previous section.
Use the WF designer more effectively Th e WF visual designer provides a graphic representation of your workfl ows, making them easier to create and share. The designer is a key feature of WF and is the most used authoring tool. In WF 4.5, we added highly requested features to enable you to be more productive using it.
Theme Request Feature
Authoring Improvements
Expressions in the language of the project C# ExpressionsCreate workfl ow services based on an existing contract Contract-FirstAdd comments to activities in the designer surface Annotations
Use the WF designer more effectively, especially navigating large workfl ows Auto-connect, Auto-insert, Pan, Tree view, Auto-surround with sequence
Search integration in the workfl ow designer SearchBreak the build when there’s an error in a workfl ow in the designer Build integrationCreate StateMachine workfl ows StateMachine
VersioningBasic building blocks for a versioning story Workfl owIdentityHost several versions of a service side by side WFSH versioning supportUpdate running instances of a workfl ow to a new defi nition Dynamic Update
Runtime Enhancements
Run my workfl ows in Partial Trust Partial trust supportBe able to plug my own expressions story Expressions extensibility
Better runtime performance Visual Basic expressions performance enhancements
Figure 1 Customer Requests and New Features for WF 4.5
Figure 2 C# Expressions in a Workfl ow

msdn magazine62 Windows Workfl ow Foundation 4.5
Annot ations In WF 4, the only place you can add text in the designer is the DisplayName section of an activity, which is a one-line text area at the top of the activity. Th ere’s no other way to add non-structured descriptive information to your workfl ow. However, you wanted to be able to add comments or text in your activity designer to convey more than just the workfl ow defi nition (such as adding a description of the behavior of a process step).
In WF 4.5 we added annotations, which enable you to add textual comments and descriptions to activities in the designer. Figure 5shows a workflow with and without annotations. Notice how you can now add descriptive information to any activity. With annotations, a printout of the designer can fully convey what the workfl ow is doing.
You can display annotations as always visible or as a sticky note in the DisplayName bar of an activity.
Annotations are an opt-in feature and have no execution-time impact. They’re added to the workflow XAML file as attached properties, as shown in the following code snippet:
<Activity mc:Ignorable="sap2010" x:Class="DesignerImprovements.Annotations" xmlns="http://schemas.microsoft.com/netfx/2009/xaml/activities" xmlns:mc="http://schemas.openxmlformats.org/markup-compatibility/2006" xmlns:sap2010="http://schemas.microsoft.com/netfx/2010/xaml/activities/presentation" xmlns:x="http://schemas.microsoft.com/winfx/2006/xaml"> <Sequence sap2010:Annotation.AnnotationText="This is an example annotation"> <WriteLine Text="Hello Dev11"/> </Sequence></Activity>
To see annotations in action, take a look at the attached Annota-tions project in the companion code. For a hands-on experience, open a WF 4.5 workfl ow project, add an activity to the designer and select “Add annotation” in the activity’s context menu.
Enh ancing Flowchart and StateMachine Designers You asked us to improve aspects of the design experience to make you more productive, particularly with regard to adding new activ ities to a Flowchart or StateMachine (available through .NET Framework Platform Update 1). We listened.
We added auto-connect, which enables automatically connect-ing a new activity to an existing activity in the designer. And we added auto-insert, which lets you insert an activity between two existing activities by dropping the new activity on the connecting line. Figure 6 shows these features.
To try this, just create a WF project and add a Flowchart or StateMachine. When adding a new activity, you’ll notice dropping targets for auto-connect. Aft er you’ve connected two activities, you can add a third by dropping it on the connecting line.
Large-Workfl ow Navigation In WF 4, when a workfl ow is larger than the screen, you move around using the vertical and horizontal scrollbars. You told us that moving around a large workfl ow this way is painful and limits your productivity.
In WF 4.5 we added panning, which allows moving through the designer canvas using the mouse. You can enable Pan mode by clicking the Pan button in the designer. Panning is available as a general designer feature, so you can use it with any existing activity.
To try panning, open any workfl ow in the designer, click the Pan button and enjoy panning around!
WF 4.5 also provides a tree view that allows you to visualize the document outline of your workfl ow. Th is gives you a very succinct and structured view of your workfl ow, enabling you to navigate large workfl ows more easily. When you click an activity in this view, it’s selected in the workfl ow defi nition, as shown in Figure 7.
To try this feature, open a workfl ow in the designer, go to the View menu, select Other Windows and choose Document Outline.
Search Integration in the Designer In WF 4 you can use the Visual Studio search when using the WF designer, but search results aren’t integrated with the WF designer. Clicking a search result doesn’t take you to a partic-ular location in a workflow. You made it clear how this aff ects your productivity and how important it was for us to provide this capability.
In WF 4.5 we integrated the WF designer with Visual Studio search. Now clicking on a search result takes you to an activity in a workfl ow, even if it’s nested several levels away.
To try this out, create a workfl ow project and start editing a workfl ow in the designer. Add some activities Figure 4 A Simple Service Method That Computes a Value
Figure 3 The Generated Activities Are Added to the Toolbox

63February 2012msdnmagazine.com
and confi gure their properties. Now, search for a keyword using Visual Studio search. The search results should take you to the activity that matches the keyword.
Auto-Surround with Sequence Th e WF 4 activity model sup-ports composition at its very core; activities can be composed without restrictions. For example, the Body property of a While activity can be a Sequence, Parallel, Flowchart, StateMachine, WriteLine, Delay or any other existing activity. Often, composite activities have a Body property that accepts just one activity (instead of a set), which can be any other leaf or composite activity.
One of the more common activities for Body is Sequence, especially with control fl ow activities like While, ForEach and so forth. With these, if you add a single child and then change your mind in favor of a sequence of elements, you need to cut the child in the Body, then add a Sequence to the Body and paste the child. Th is is tedious and error prone.
In WF 4.5, we added an “auto-surround with Sequence” feature. For example, if you have a While and its Body is a WriteLine, when you drop another activity, a Sequence containing both the existing activity and the new one is automatically created, as illustrated in Figure 8.
To try this, follow the steps in Figure 8. Build I ntegration In WF 4 you can create a new activity
declaratively in the designer. When you do so, you’re actually defi ning a new type that will be placed in the assembly generated when the project is compiled. However, if you build a WF 4 project and there are errors in the XAML, the build still succeeds though your workfl ow is not included in the resulting assembly.
In WF 4.5 we fi xed this problem. If you build a workfl ow that has an error, the build will break, as you’d expect.
To implement this solution, we added extensibility to XamlBuild-Task so it can be accessed during compilation of XAML activities, breaking the build when a XAML workfl ow fi le has errors.
To try this feature, create a new WF application and add an incor-rectly confi gured activity to a workfl ow. You’ll get a build error. You can also try the ErrorBreaksTh eBuild project in the companion code.
State M achine out of the Box StateMachine is a very important control fl ow activity that didn’t make it to WF 4. Th at brought tons of
feedback about the importance of this activity, so now StateMachine is available in WF 4 aft er you install the .NET Framework Product Update 1. In WF 4.5, you won’t need to install any update to take advantage of StateMachine—it’s included right out of the box.
To try this feature, create a workflow project and add a StateMachine activity or just open the StateMachine sample project in the companion code for this article.
Versioning SupportWF 4 doesn’t include support for workfl ow versioning. If you wanted versioning, you had to write everything on your own, oft en hitting issues that are hard to work around. WF 4.5 includes new features that enable versioning.
Workfl o wIdentity In WF 4, the host is responsible for associa-tions between defi nitions and instances. Once an instance has been persisted and unloaded from memory, the host must provide the right defi nition to continue the execution of the instance. One big challenge is that there is no information in the persisted instance state that helps the host determine what defi nition has been used to create the instance. Furthermore, if the host is confi gured with the wrong defi nition when loading an instance, the user will get an awkward exception because the error is a side eff ect of not being able to match the instance state with the defi nition, rather than a real version mismatch.
WF 4.5 introduces Workfl owIdentity, a new type that refers to a fully confi gured workfl ow defi nition and is part of the instance runtime state. A Workfl owIdentity contains a name (string), a ver-sion (System.Version), and a package (string). Name and version are self-explanatory; package is an optional string used for disambigu-ation. It refers to the container of the workfl ow defi nition (assembly name, service URI, or any string of your choice). Workfl owIdentity is the cornerstone for all WF versioning features.
One of the most useful traits of Workfl owIdentity is that it’s a part of the workfl ow instance state and lives through the entire lifecycle of an activity: It’s saved during persistence, can be queried from the instance store and is emitted with the tracking informa-tion for a workfl ow instance.
Using Workfl owIdentity is easy. Th e following snippet shows how to use it with WorkflowApplication, our single-instance,
Figure 6 Auto-Connect and Auto-Insert
Figure 5 A Workfl ow with and Without Annotations

msdn magazine64 Windows Workfl ow Foundation 4.5
single- defi nition, in-process host (you just have to pass an instance of Workfl owIdentity to the constructor of Workfl owApplication):
WorkflowIdentity identity = new WorkflowIdentity("Sample", new Version(1, 0, 0, 0), "MyPackage");WorkflowApplication application = new WorkflowApplication(new MyActivity(), identityV1);
We just confi gured the Workfl owApplication with a Workfl ow-Identity, but we haven’t yet done anything useful. Th e next code sample shows how to use the identity to detect a version mismatch and to provide an actionable error message. In the event of a version mismatch when trying to load an instance, you’ll get a VersionMismatchException that states the cause of the problem and contains the supplied and expected identities. Th is informa-tion can be used for logging or recovering from the error:
try{ WorkflowIdentity wrongIdentity = new WorkflowIdentity("Sample", new Version(2, 0, 0, 0), "MyPackage");
WorkflowApplication application = new WorkflowApplication(new WrongActivity(), identityV2);
application.Load(instanceId);}catch (VersionMismatchException ex){ Console.WriteLine("Version Mismatch! {0}", ex.Message); Console.WriteLine("Expected: {0}; Provided: {1}", ex.ExpectedVersion, ex.ActualVersion);
}
Finally, you can learn the identity of a given workfl ow instance before loading it from the instance store. To query the identity, you need to get a Workfl owApplicationInstance, a new type introduced in WF 4.5 that represents an instance that has not been associated with a defi nition. It’s used to retrieve metadata about the instance—in this case, the identity. See bit.ly/ssAYDn for more information.
Note that WorkflowIdentity works not only with Workflow-Application, but also with Workfl owServiceHost.
If you want to try this feature, open the WorkflowIdentity project in the companion code.
Workfl ow ServiceHost Workfl owServiceHost (WFSH) is the out-of-box, single-defi nition, multiple-instances host for work-fl ows provided in WF 4. However, an unfortunate WF 4 limitation is that changes to the workfl ow defi nition result in an exception if you try to load a previously persisted instance into the WFSH. Th is is because the host is unable to run these instances using the new defi nition (this is the problem we noted in the Workfl owIdentity section). Some customers worked around the lack of built-in ver-sioning support in WF 4 using multiple WFSHs and a WCF routing service as an intermediary between the client app and the workfl ows. Clients send messages to the router, which routes the messages to the corresponding WFSH confi gured with the right version of the defi nition. Th e downside is that this requires the client application to be version-aware to successfully send messages to a service instance.
In WF 4.5, WFSH has become a multiversion host; you can deploy multiple versions of a workfl ow service within the same WFSH and it will deliver incoming messages to the correct version.
Th e semantics are very simple: New instances start with the latest version of the service, and running instances continue executing with the version used to start them. Th ere are some restrictions on what you can change from one version to the next; you can’t remove service operations (Receives), but you can add new ones (the rules are similar to creating a derived interface in the CLR).
Th e key enabler for this feature is Workfl owIdentity. To determine the version of a service defi nition you need to confi gure its identity. Old versions of the service must be placed in a “supported versions” folder, which is a folder in App_Code with the same name as the workfl ow service (see Figure 9). Alternatively, old versions can also be loaded explicitly into the Workfl owServiceHost by adding to the SupportedVersions collection prior to opening the host.
With this new feature, the router is no longer needed, and client apps don’t have to be version-aware. They just send a message; the usual correlation mechanism resolves it to the right instance and the host uses the corresponding defi nition (because the per-
sisted instance state contains the identity of the defi nition needed to load it). XCopy deployment semantics are preserved, so you don’t need to write a single line of code to use it. Th is feature is also available in self-hosting scenarios (hosting WFSH in your own app).
To try this feature, open the WFSH_SxS project in the com-panion code.
Dynamic Update In WF 4, once a workflow instance has begun, there’s no supported way to change the defi nition of the workfl ow. Th is is oft en a problem when programs need to be updated due to bug fi xes or changing requirements.
Our enterprise customers were emphatic about the importance of this capability, because they oft en Figure 7 Document Outline View of a Workfl ow

65February 2012msdnmagazine.com
need to change a particular workfl ow instance in long-running workflows. For example, suppose a workflow that models an interview process has four interviewers but, given a new company policy, now needs to be changed to add a fi ft h interviewer. You can’t do that with WF 4.
You can in WF 4.5. Dynamic Update allows you to make changes to a running instance of a workfl ow to accommodate a new work-fl ow defi nition. Such changes might be motivated by omissions at design time, bugs in the workfl ow, or new requirements. Dynamic Update isn’t intended for situations that require wholesale changes, resulting in a workfl ow that diff ers signifi cantly from its original design. In that sort of case, you should design a new workflow instead of making changes to a running instance.
Dynamic Update is generally a two-step process: When changing the workfl ow defi nition, you also need to create an update map: a structure that contains information about the changes. When the new version is deployed, the map can be used to update running instances to the new defi nition. Running instances can be updated only when they’re idle and persisted.
Dynamic Update, which is available in both Workfl owApplica-tion and Workfl owServiceHost, is an advanced, complex feature, and it has far more capabilities than I’ve mentioned. It supports
updating activities, providing custom update semantics, emit-ting tracking information and more. It gives you a rich API you can use in your applications to pro-vide update capabilities for your running instances.
Runtime EnhancementsI want to briefl y describe some run-time enhancements in WF 4.5.Due to space constraints, I won’t be delv-ing into them with the same level of detail as the other features; these are more scoped and advanced.
Partial Trust WF 4 requires full-trust to execute. WF 4.5 can run in partially trusted AppDomains.
Expressions Extensibility We modified ExpressionTextBox to bind to an object instead of a string. As a result, you can provide your own expression editing experience and you’re not limited to a textual representation. We also exposed fast-path capabilities that can be used with code activities for authoring expression activities with better performance.
Visual Basic Performance Enhancements We signifi cantly improved VisualBasicValue/ VisualBasicReference perfor-
mance by changing their internal implementation. WF 3 Obsoleted WF 3 types have been marked as obsolete in
WF 4.5 assemblies.
Wrapping UpWe took WF 4 and, based on your feedback, made it better. We added much-requested features and fi xed some key issues to provide you with the best workfl ow framework for your .NET applications.
WF 4.5 is an in-place replacement for WF 4 and is fully compatible with WF 4. We have thoroughly tested that WF 4.5 doesn’t break any WF 4 scenarios; all your WF 4 investments will be fully preserved in WF 4.5 without need of any changes.
If you’re writing WF 4 applications, keep doing so! When you’re ready to move to WF 4.5, your code will just work, and you and your customers will be able to leverage and enjoy all the improvements described in this article.
LEON WELICKI is a senior program manager on the WF team focusing on the WF programming model and runtime.
THANKS to the following technical experts for reviewing this article: Joe Clancy, Dave Cliff e, Dan Glick, Hani Khoshdel Nikkhoo and Isaac Yuen
Figure 9 Workfl owServiceHost Side-by-Side Versioning
Figure 8 Auto-Surround with Sequence

msdn magazine66
N U GE T
Creating a NuGet Gallery
This is the third and last article in our series on NuGet, a new package management ecosystem for developers. NuGet, a project of the Outercurve Foundation, gives .NET developers a way to consume, author and publish packages. So far, the series showed you how to manage project libraries with NuGet (msdn.microsoft.com/magazine/hh547106) and how to become a NuGet author (msdn.microsoft.com/magazine/hh708753). In this article, we’ll take a look at hosting your own NuGet gallery and creating a build process to help manage your packages.
Why Host the Gallery?NuGet.org already exists as a public repository for NuGet packages, so you might question the point of hosting a gallery. Th at’s understand-able, but what about leveraging that ecosystem infrastructure within the walls of your own dev environment? Why not set up your own private gallery not only to facilitate your product’s development eco-system but, better yet, to tie it directly to your build and deployment processes? Moreover, anything you see at NuGet.org is available to you free.
In this article, we’ll explore the steps necessary to create and consume your own NuGet gallery. As we’ve said before, incorporating NuGet into your development lifecycle isn’t complicated and will be well worth the eff ort. Once you’ve done it, your package consumption, creation and distribution problems will become no more than a distant memory.
Clark Sell and Mark Nichols
Before diving in, let’s explore a use case that most developers have encountered: versioning. Your product, depending on its overall size and complexity, is very likely the result of many teams, diff ering release schedules and a variety of assemblies. Of course the released product is nicely bundled for your customers, but its journey to completion included hundreds if not thousands of builds, churning out many diff erent versions of product assets.
Over the past decade, development practices—including auto-mated build and deployment systems—helped reduce the pain, but they always fell short in terms of distribution and choice. Package management systems provide the solution for this.
Th ink of your own development ecosystem, in which diff erent teams work independently to publish the versions they choose for consumption. Each team, with its own build and release sched-ule, wants control and an easy way to publish its products. With a package management system, each team gets to decide what the product is and how it should get installed, and the customers get to decide when they should consume it.
To some degree, this is very similar to how open source communities operate, using proven practices that easily scale. Although the packages you fi nd on NuGet.org are fairly “large grained,” you can follow those same practices for your building your own applications. A good, concrete example of the type of soft ware this would be useful for might be a helper library your company builds and maintains for its public products.
Maybe your company restricts only the libraries and versions its developers may use. Th is is another great reason for you to host your own proprietary gallery with the approved packages and package versions.
Fast and SimpleTh e easiest way to host your own NuGet gallery is to expose a fi le share. Th is might sound a bit rudimentary, but if you need something fast and simple, this method works extremely well. Th e share can be struc-tured as you see fi t, placing your packages—that is, your *.nupkg fi les—anywhere on the share. You can refer to the share as a package source.
This article relies on beta versions of the NuGet Gallery and NuGetFeed.org.
This article discusses:• Why you should host your own NuGet gallery
• A fast and easy way to host a NuGet gallery
• Getting the NuGet Gallery source
• Integrating your NuGet gallery with your existing build processes
Technologies discussed:NuGet, Visual Studio, Windows PowerShell, ASP.NET MVC, TFS Nugetter

67February 2012msdnmagazine.com
With the package source created, let’s add it to the development environment. You can have as many package sources as desired and easily move between each. To edit your package sources in Visual Studio, navigate to Tools | Options | Package Manager | Package Sources (see Figure 1). Note that as of this writing, version 1.5 was current. You should expect slight diff erences across NuGet versions.
Here you can add, remove and change the default package source. If you prefer, you can do the same in WebMatrix, a free develop-ment environment. Just click on the NuGet Gallery icon on the main menu and select Add Source, as shown in Figure 2.
As you can see, both fi gures list two package sources. You can choose to use just one or all at any given time.
Introducing NuGet Gallery While the fi le system package source is very easy to set up and start using, it breaks down pretty quickly when you start scaling out. Luck-ily, NuGet.org was built with exactly this in mind, to provide an open platform for people to take, extend and build on for their own needs. You can fi nd the NuGet Gallery project at github.com/NuGet/NuGetGallery.
Th e NuGet Gallery is an ASP.NET MVC 3 project built on top of Razor, OData, SQL Server and Windows Azure.
Th e best way to understand the features and function-ality the NuGet Gallery has to off er your development ecosystem is to simply explore NuGet.org.
Before you can create and publish a package, you need to be a registered user. Once you’ve registered, you have full rights to upload and manage your packages and edit your profi le. You can also generate the unique API key that lets you automate publishing packages to the Gallery (see Figure 3). For more information about publishing a package, please see the previous article in this series, “Becoming a NuGet Author.”
When you upload a package to the NuGet Gallery, it automatically receives its own place in the Gallery, as shown in Figure 4.
Th is is where you can view all of the important information about a package. For each package, the NuGet Gallery tracks the version downloads, total downloads, dates, licenses and so on. Of course, a package on the NuGet.org site will most likely yield considerably larger download numbers given its ecosystem, but these statistics are vital to any package author, regardless of project size.
Th e package feed is clearly the most important feature in the overall stack. It’s an OData feed you’ll fi nd at http://YourGallery/api/v2. Th is is the same URL you’ll use as your package source. Without this feed, all of the power of NuGet is lost.
Getting Started Before getting started, verify you have the following installed:
• Visual Studio 2010: microsoft.com/visualstudio• Windows PowerShell 2.0: microsoft.com/powershell• NuGet: docs.nuget.org/docs/start-here/installing-nuget • Windows Azure SDK: microsoft.com/windowsazure/sdk
At the time of this writing, there are no installers for the Gallery and the project is under very active development. Th at means it’s
always best to go to the project’s homepage for the latest information. You’ll need to download the source and build it, which is simple.
To get the source, you can either just download a zipped copy of the latest master branch or clone the source base with git, like so: $ git clone https://github.com/NuGet/NuGetGallery.git
When you’ve done this, you’ll have the entire source base locally. At its root you’ll fi nd a Windows PowerShell script called Build-Solution.ps1. Run this script to set up your machine and build the source.
If you run the source, you’ll notice it looks and feels exactly like NuGet.org. You might be thinking of tweaking the UI, perhaps modifying the homepage. Th at’s under-standable, but be cautious, especially if your intentions are to stay in sync with the master source base.
Build Process Meets NuGet GalleryTh e next logical step is integrating your NuGet gallery with your existing build processes. If you don’t have a Figure 2 Adding a Package Source in WebMatrix
Figure 1 Adding a Package Source in Visual Studio

msdn magazine68 NuGet
build process and you’re looking for a little “getting started” guidance with Team Foundation Server (TFS) build processes, check out the Microsoft Visual Studio ALM Rangers Build Customization Guide at rabcg.codeplex.com.
All right: You have a library you want to make available on a gallery, which could be the offi cial NuGet Gallery, a proprietary gallery or even a local fi le share. No matter which, you’ll have to perform certain tasks to create the NuGet package, and they’re generally the same tasks no matter where the gallery resides.
Th rough the course of developing your product, you’ll repetitively go through the process of coding, compiling, packaging, pushing and publishing. You’ll also, we hope, include a couple of healthy doses of testing; results from that testing might make you deviate from publishing to the gallery if you fi nd any issues (see Figure 5).
Keeping consumers happy with working soft ware is a good thing, and you’ll have an easier time doing so using a managed process. Remember, though, the managed process can’t be entirely automated; there’s no replacement for human verifi cation. Don’t assume you can publish just because your soft ware passes all the automated tests. You could easily publish a package that isn’t ready and make your consumers angry. More-over, they won’t be happy if you publish constantly and they can’t keep up with the ever-changing versions. Make pub-lishing a conscious decision.
Use the build process to build, pack-age and push your NuGet library to a gallery where you perform final tests and do that human verifi cation. Th at way, you can choose continuous integration or a scheduled build to automatically push the package and make it ready for you to test. How might you do that? Here’s an example using TFS and its workflow-based automated build capability.
NuGet.exe is a stand-alone, parameter-driven console application, but it can easily be called by another process, such as TFS Team Build. Team Build executes a workfl ow; in TFS terms, this is a set of custom activities controlled through a build template and initiated by a build definition. One packaged solution for automating the NuGet development process is the NuGetter project at nugetter.codeplex.com. Th is proj-ect provides an automated shell around the NuGet.exe application. We’ll use
this package to show what can be done and things to think about as you work toward automating your own NuGet packages.
As Figure 6 shows, the build defi nition in TFS is where you pro-vide all the necessary information to do the packaging, push and publish. Building a fl exible and repeatable build process for NuGet requires several pieces of data and the switches that turn portions of the process on or off . Th e data is organized into categories that are titled to give you a sense of the order in which the steps are executed.
Th e PrePackaging section is used for complicated or multiframe-work NuGet packaging that requires some initial preparation. NuGetter can call a Windows PowerShell script (if you desire) to organize the
Figure 4 A Package Uploaded to the NuGet Gallery
Figure 3 A Registered User Account in NuGet
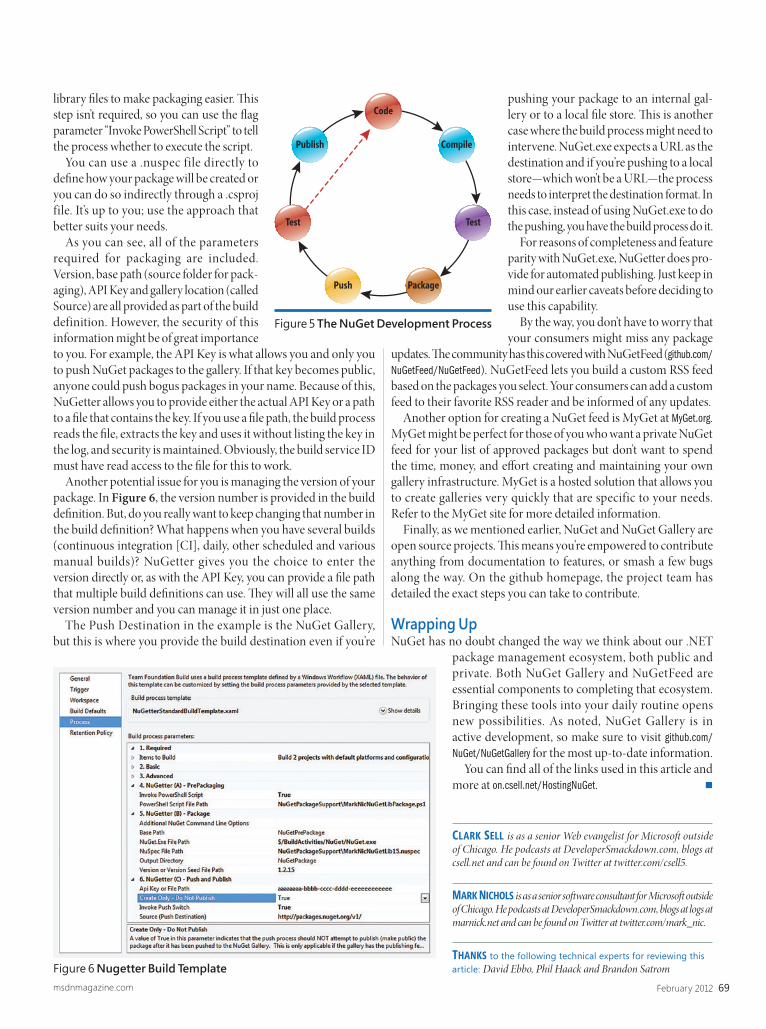
69February 2012msdnmagazine.com
library fi les to make packaging easier. Th is step isn’t required, so you can use the fl ag parameter “Invoke PowerShell Script” to tell the process whether to execute the script.
You can use a .nuspec file directly to defi ne how your package will be created or you can do so indirectly through a .csproj file. It’s up to you; use the approach that better suits your needs.
As you can see, all of the parameters required for packaging are included. Version, base path (source folder for pack-aging), API Key and gallery location (called Source) are all provided as part of the build definition. However, the security of this information might be of great importance to you. For example, the API Key is what allows you and only you to push NuGet packages to the gallery. If that key becomes public, anyone could push bogus packages in your name. Because of this, NuGetter allows you to provide either the actual API Key or a path to a fi le that contains the key. If you use a fi le path, the build process reads the fi le, extracts the key and uses it without listing the key in the log, and security is maintained. Obviously, the build service ID must have read access to the fi le for this to work.
Another potential issue for you is managing the version of your package. In Figure 6, the version number is provided in the build defi nition. But, do you really want to keep changing that number in the build defi nition? What happens when you have several builds (continuous integration [CI], daily, other scheduled and various manual builds)? NuGetter gives you the choice to enter the version directly or, as with the API Key, you can provide a fi le path that multiple build defi nitions can use. Th ey will all use the same version number and you can manage it in just one place.
The Push Destination in the example is the NuGet Gallery, but this is where you provide the build destination even if you’re
pushing your package to an internal gal-lery or to a local fi le store. Th is is another case where the build process might need to intervene. NuGet.exe expects a URL as the destination and if you’re pushing to a local store—which won’t be a URL—the process needs to interpret the destination format. In this case, instead of using NuGet.exe to do the pushing, you have the build process do it.
For reasons of completeness and feature parity with NuGet.exe, NuGetter does pro-vide for automated publishing. Just keep in mind our earlier caveats before deciding to use this capability.
By the way, you don’t have to worry that your consumers might miss any package
updates. Th e community has this covered with NuGetFeed (github.com/ NuGetFeed/NuGetFeed). NuGetFeed lets you build a custom RSS feed based on the packages you select. Your consumers can add a custom feed to their favorite RSS reader and be informed of any updates.
Another option for creating a NuGet feed is MyGet at MyGet.org. MyGet might be perfect for those of you who want a private NuGet feed for your list of approved packages but don’t want to spend the time, money, and eff ort creating and maintaining your own gallery infrastructure. MyGet is a hosted solution that allows you to create galleries very quickly that are specific to your needs. Refer to the MyGet site for more detailed information.
Finally, as we mentioned earlier, NuGet and NuGet Gallery are open source projects. Th is means you’re empowered to contribute anything from documentation to features, or smash a few bugs along the way. On the github homepage, the project team has detailed the exact steps you can take to contribute.
Wrapping UpNuGet has no doubt changed the way we think about our .NET
package management ecosystem, both public and private. Both NuGet Gallery and NuGetFeed are essential components to completing that ecosystem. Bringing these tools into your daily routine opens new possibilities. As noted, NuGet Gallery is in active development, so make sure to visit github.com/NuGet/NuGetGallery for the most up-to-date information.
You can fi nd all of the links used in this article and more at on.csell.net/HostingNuGet.
CLARK SELL is as a senior Web evangelist for Microsoft outside of Chicago. He podcasts at DeveloperSmackdown.com, blogs at csell.net and can be found on Twitter at twitter.com/csell5.
MARK NICHOLS is as a senior soft ware consultant for Microsoft outside of Chicago. He podcasts at DeveloperSmackdown.com, blogs at logs at marnick.net and can be found on Twitter at twitter.com/mark_nic.
THANKS to the following technical experts for reviewing this article: David Ebbo, Phil Haack and Brandon SatromFigure 6 Nugetter Build Template
Figure 5 The NuGet Development Process
Publish Compile
Push Package
Code
Test Test
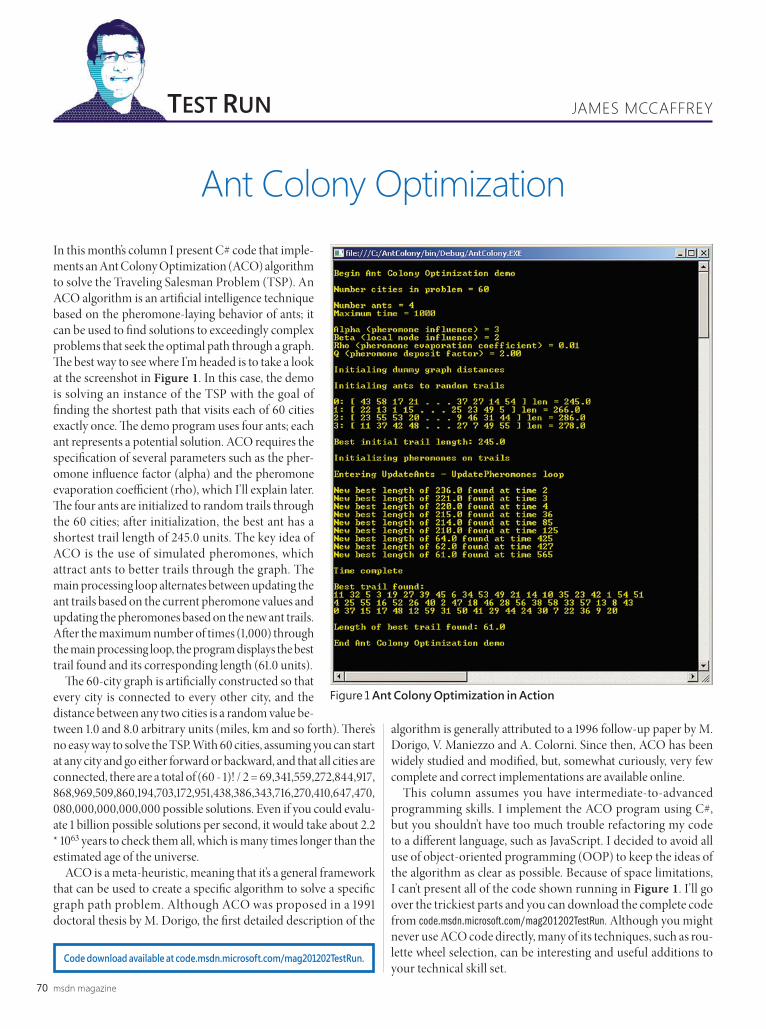
msdn magazine70
algorithm is generally attributed to a 1996 follow-up paper by M. Dorigo, V. Maniezzo and A. Colorni. Since then, ACO has been widely studied and modifi ed, but, somewhat curiously, very few complete and correct implementations are available online.
This column assumes you have intermediate-to-advanced programming skills. I implement the ACO program using C#, but you shouldn’t have too much trouble refactoring my code to a diff erent language, such as JavaScript. I decided to avoid all use of object-oriented programming (OOP) to keep the ideas of the algorithm as clear as possible. Because of space limitations, I can’t present all of the code shown running in Figure 1. I’ll go over the trickiest parts and you can download the complete code from code.msdn.microsoft.com/mag201202TestRun. Although you might never use ACO code directly, many of its techniques, such as rou-lette wheel selection, can be interesting and useful additions to your technical skill set.
Ant Colony OptimizationIn this month’s column I present C# code that imple-ments an Ant Colony Optimization (ACO) algorithm to solve the Traveling Salesman Problem (TSP). An ACO algorithm is an artifi cial intelligence technique based on the pheromone-laying behavior of ants; it can be used to fi nd solutions to exceedingly complex problems that seek the optimal path through a graph. Th e best way to see where I’m headed is to take a look at the screenshot in Figure 1. In this case, the demo is solving an instance of the TSP with the goal of fi nding the shortest path that visits each of 60 cities exactly once. Th e demo program uses four ants; each ant represents a potential solution. ACO requires the specifi cation of several parameters such as the pher-omone infl uence factor (alpha) and the pheromone evaporation coeffi cient (rho), which I’ll explain later. Th e four ants are initialized to random trails through the 60 cities; after initialization, the best ant has a shortest trail length of 245.0 units. The key idea of ACO is the use of simulated pheromones, which attract ants to better trails through the graph. The main processing loop alternates between updating the ant trails based on the current pheromone values and updating the pheromones based on the new ant trails. Aft er the maximum number of times (1,000) through the main processing loop, the program displays the best trail found and its corresponding length (61.0 units).
Th e 60-city graph is artifi cially constructed so that every city is connected to every other city, and the distance between any two cities is a random value be-tween 1.0 and 8.0 arbitrary units (miles, km and so forth). Th ere’s no easy way to solve the TSP. With 60 cities, assuming you can start at any city and go either forward or backward, and that all cities are connected, there are a total of (60 - 1)! / 2 = 69,341,559,272,844,917,868,969,509,860,194,703,172,951,438,386,343,716,270,410,647,470,080,000,000,000,000 possible solutions. Even if you could evalu-ate 1 billion possible solutions per second, it would take about 2.2 * 1063 years to check them all, which is many times longer than the estimated age of the universe.
ACO is a meta-heuristic, meaning that it’s a general framework that can be used to create a specifi c algorithm to solve a specifi c graph path problem. Although ACO was proposed in a 1991 doctoral thesis by M. Dorigo, the fi rst detailed description of the
TEST RUN JAMES MCCAFFREY
Code download available at code.msdn.microsoft.com/mag201202TestRun.
Figure 1 Ant Colony Optimization in Action

71February 2012msdnmagazine.com
Program StructureI implemented the ACO demo program as a single C# console application. The overall structure of the program, with most WriteLine statements removed, is shown in Figure 2. Although some parts are tricky, the program isn’t as complicated as Figure 2 suggests because many of the methods are short helper methods.
I used Visual Studio to create a console application program named AntColony. In the Solution Explorer window I renamed the default Program.cs fi le to AntColonyProgram.cs, which auto-matically renamed the single class in the project. I deleted all the template-generated using statements except for the System namespace—ACO typically doesn’t need much library support. Th e two key methods are UpdateAnts and UpdatePheromones. Method UpdateAnts calls helper BuildTrail, which calls NextCity, which calls MoveProbs. Method UpdatePheromones calls helper EdgeInTrail, which calls IndexOfTarget.
I declared a class-scope Random object named random. ACO algorithms are probabilistic as you’ll see shortly. Th e class-scope variables alpha, beta, rho and Q control the behavior of the ACO
algorithm. I use these variable names because they were used in the original description of ACO.
Setting up the ProblemI used method MakeGraphDistances to set up an artifi cial graph:
static int[][] MakeGraphDistances(int numCities){ int[][] dists = new int[numCities][]; for (int i = 0; i < dists.Length; ++i) dists[i] = new int[numCities]; for (int i = 0; i < numCities; ++i) for (int j = i + 1; j < numCities; ++j) { int d = random.Next(1, 9); // [1,8] dists[i][j] = d; dists[j][i] = d; } return dists;}
For a real-world graph problem, you’d probably read graph- adjacency and distance-between-node data from a text fi le into some sort of data structure. Here I simulated a graph by creating an array of arrays where the row index i represents the from-city and the column index j represents the to-city. Notice that all cities are connected, distances are symmetric and the distance from a city to itself is 0.
using System;
namespace AntColony{ class AntColonyProgram { static Random random = new Random(0); static int alpha = 3; static int beta = 2; static double rho = 0.01; static double Q = 2.0;
static void Main(string[] args) { try { Console.WriteLine("\nBegin Ant Colony Optimization demo\n"); int numCities = 60; int numAnts = 4; int maxTime = 1000;
int[][] dists = MakeGraphDistances(numCities); int[][] ants = InitAnts(numAnts, numCities);
int[] bestTrail = BestTrail(ants, dists); double bestLength = Length(bestTrail, dists);
double[][] pheromones = InitPheromones(numCities);
int time = 0; while (time < maxTime) { UpdateAnts(ants, pheromones, dists); UpdatePheromones(pheromones, ants, dists); int[] currBestTrail = BestTrail(ants, dists); double currBestLength = Length(currBestTrail, dists); if (currBestLength < bestLength) { bestLength = currBestLength; bestTrail = currBestTrail; } ++time; }
Console.WriteLine("\nBest trail found:"); Display(bestTrail); Console.WriteLine("\nLength of best trail found: " + bestLength.ToString("F1"));
Console.WriteLine("\nEnd Ant Colony Optimization demo\n"); } catch (Exception ex) { Console.WriteLine(ex.Message); } } // Main
static int[][] InitAnts(int numAnts, int numCities) { . . } static int[] RandomTrail(int start, int numCities) { . . } static int IndexOfTarget(int[] trail, int target) { . . } static double Length(int[] trail, int[][] dists) { . . } static int[] BestTrail(int[][] ants, int[][] dists) { . . } static double[][] InitPheromones(int numCities) { . . } static void UpdateAnts(int[][] ants, double[][] pheromones, int[][] dists) { . . } static int[] BuildTrail(int k, int start, double[][] pheromones, int[][] dists) { . . } static int NextCity(int k, int cityX, bool[] visited, double[][] pheromones, int[][] dists) { . . }
static double[] MoveProbs(int k, int cityX, bool[] visited, double[][] pheromones, int[][] dists) { . . } static void UpdatePheromones(double[][] pheromones, int[][] ants, int[][] dists) { . . } static bool EdgeInTrail(int nodeX, int nodeY, int[] trail) { . . } static int[][] MakeGraphDistances(int numCities) { . . } static double Distance(int cityX, int cityY, int[][] dists) { . . } static void Display(int[] trail) { . . } static void ShowAnts(int[][] ants, int[][] dists) { . . } static void Display(double[][] pheromones) { . . } }}
Figure 2 Ant Colony Optimization Program Structure

msdn magazine72 Test Run
Once I have a distances data structure I can use it for a Distance method:
static double Distance(int cityX, int cityY, int[][] dists){ return dists[cityX][cityY];}
To minimize the amount of code presented, I’ve omitted normal error checking, such as making sure that the cityX and cityY parameters are valid.
Initiating the Ants and the PheromonesIn this non-OOP implementation, an ant is simply an array of int values that represent the trail, or path, from an initial city through all other cities. A collection of ants is an array of arrays in which the fi rst index indicates the ant:
static int[][] InitAnts(int numAnts, int numCities){ int[][] ants = new int[numAnts][]; for (int k = 0; k < numAnts; ++k) { int start = random.Next(0, numCities); ants[k] = RandomTrail(start, numCities); } return ants;}
Th e initialization method allocates a row for the trail for each ant, picks a random start city and then calls a helper method RandomTrail:
static int[] RandomTrail(int start, int numCities){ int[] trail = new int[numCities]; for (int i = 0; i < numCities; ++i) { trail[i] = i; }
for (int i = 0; i < numCities; ++i) { int r = random.Next(i, numCities); int tmp = trail[r]; trail[r] = trail[i]; trail[i] = tmp; }
int idx = IndexOfTarget(trail, start); int temp = trail[0]; trail[0] = trail[idx]; trail[idx] = temp;
return trail;}
Th e RandomTrail helper allocates a trail and initializes it to 0, 1, 2, ... numCities-1. Next, the method uses the Fisher-Yates shuffl e algorithm to randomize the order of the cities in the trail. Th e spec-ifi ed start city is then located and swapped into position trail[0].
Pheromones are chemicals ants place on their trails; they attract other ants. More ants will travel on a shorter trail to a food source—and deposit more pheromones—than on longer trails. Th e phero-mones slowly evaporate over time. Here’s method InitPheromones:
static double[][] InitPheromones(int numCities){ double[][] pheromones = new double[numCities][]; for (int i = 0; i < numCities; ++i) pheromones[i] = new double[numCities]; for (int i = 0; i < pheromones.Length; ++i) for (int j = 0; j < pheromones[i].Length; ++j) pheromones[i][j] = 0.01; return pheromones;}
Pheromone information is stored in an array-of-arrays-style sym-metric matrix where the row index i is the from-city and the column index j is the to-city. All values are initially set to an arbitrary small value (0.01) to jump start the UpdateAnts-UpdatePheromones cycle.
Updating the AntsTh e key to the ACO algorithm is the process that updates each ant and trail by constructing a new—we hope better—trail based on the pheromone and distance information. Take a look at Figure 3. Sup-pose we have a small graph with just fi ve cities. In Figure 3 the new trail for an ant is under construction. Th e trail starts at city 1, then goes to city 3, and the update algorithm is determining the next city. Now suppose the pheromone and distance information is as shown in the image. Th e fi rst step in determining the next city is construct-ing an array I’ve called “taueta” (because the original research paper used the Greek letters tau and eta). Th e taueta value is the value of the pheromone on the edge raised to the alpha power, times one over the distance value raised to the beta power. Recall that alpha and beta are global constants that must be specifi ed. Here I’ll assume that alpha is 3 and beta is 2. Th e taueta values for city 1 and city 3 aren’t computed because they’re already in the current trail. Notice that larger values of the pheromone increase taueta, but larger distances decrease taueta.
static int NextCity(int k, int cityX, bool[] visited, double[][] pheromones, int[][] dists){ double[] probs = MoveProbs(k, cityX, visited, pheromones, dists);
double[] cumul = new double[probs.Length + 1]; for (int i = 0; i < probs.Length; ++i) cumul[i + 1] = cumul[i] + probs[i];
double p = random.NextDouble();
for (int i = 0; i < cumul.Length - 1; ++i) if (p >= cumul[i] && p < cumul[i + 1]) return i; throw new Exception("Failure to return valid city in NextCity");}
Figure 5 The NextCity Method
Figure 3 Updating Ant Information
7.81 x 64.00 x 10.45
taueta
82.26sum
0.09 0.00 0.78 0.00 0.13
probs
0.00 0.09 0.09 0.87 0.87 1.00
[0]
taueta[0] = 5^α * (1/6)^β = 7.81
α = 3 β = 2
pher = 4dist = 1
pher = 8dist = 7
pher = xdist = x
pher = 5dist = 6
[1] [2] [3] [4]
[0] [1] [2] [3] [4]
[0] [1] [2] [3] [4] [5]
cumul
0.538p4
3
2
1
0
trail
1 3 ?
static int[] BuildTrail(int k, int start, double[][] pheromones, int[][] dists){ int numCities = pheromones.Length; int[] trail = new int[numCities]; bool[] visited = new bool[numCities]; trail[0] = start; visited[start] = true; for (int i = 0; i < numCities - 1; ++i) { int cityX = trail[i]; int next = NextCity(k, cityX, visited, pheromones, dists); trail[i + 1] = next; visited[next] = true; } return trail;}
Figure 4 The BuildTrail Method
ement1); areaSeries Add(seriesElement2); areaSeries Add(seriesElement3); // Add series to the plot area plotArea Series Add(areaSeries); //page Elements Add( new LayoutGrid() ); // Add the page elements to the page AddEAement1); areaSerieies.AAdd(se(s rriesElement2t2); a) reaSeries.AdA d(seriesElement3); // Add series to the plot area plotArea.Series.Add(areaSeries); //page.Elemenem ts.Add( ddd( new ne LaLayyoutGrid() ); // A/ dd the page elements to the page AddEA
s, 240, 0); AddEAN1AN 3SupSup5(pa5(p ge.Elemeentnts, 480, 0); AdddUPCVersionA(page.Elemene ts, 0, 135); AddUPCVersionASup2(page.Elements, 240, 135); AdddUPCddUPCd CVerssionAionAo Sup5((page.Elemennts, t 480, 135); AddEAN8(page.Elements, 0,
.Elements, 480, 2270);; AddddUUPCVersionE(papage.Elementts, 0, 405); AddUPCVersionESuE p2(page.Elements, 240, 405); AddUPCVersionESup5(pageage.Ele.Elelemmments, 4s, 48800, 4405); // AAdd the page toe t the document document.Pages.Add(pa
CaptionAndRectanga lee(elemeements, “EAN/JA/JAN 13 Bar Codde”, x, y, 204, 99); BarCode barCode = new Ean13(“123456789012”, x, y + 21); barCode.ode.X +=X +X +=X + ((2004 -4 - baarCoode.GettSymbolWidth()h ) / 2; elements.Add(barCode); } private vovo
dRectangle(elemente s,, “EANEAN/JAN 13 Bar Car Code, 2 digit supplement”, x, y, 204, 99); BarCode barCode = new Ean13Sup2(“12 234556789678 0121212”, 2”, x, yy + 2+ 211); 1); barCoode.XX += (204 - barCode.GetSymbolWidth()) / 2; elements.Add((barC
ts, float x, float yy) { A{ AddCaCaptionAndRectanangle(elements, “EAN/JAN 13 Bar Code, 5 5 digit supplement”, x, y, 204, 99); BaB rrCodee barrCode == new Ean13SupS 5(“12345678901212345”, x, y + 21); ba
s.Add(barCode); } } pprivate te vooid AddUPCVPCVersiers onA(Group elements, float x, float y) {Add{ CaptionAndRectangle(elements, “, UPC VersVersVersVersion ionoi A Baar Cr Coode”, x, y,y, 204, 99);; BarCoode barCode = new UpcVersionA(“12345678901”, xx, y +
s.Add(barCode); } } pprivate te vooid AddUPCVPCVersiers onASup2(Group elements, float x, floato y) { AddCaptionAndRectangle(elementm ““UPCC Version E Bar Code, 2 digit supplement”, x, y, 204, 94 9); BarCoode od
21) ; barCode.X ++= (2= ( 04 - barba Code.GeetSymbymbolWidth()) / 2; elements.Add(barCode); e } private void AddUPCVersionASSSSuup5(up5(u Group elements,n float x, flfloaflo t VV
digit supplement”,t” xx, y, 22004, 99); BarCodeCode bbarCode = new UUpcVep rsionASuAS p5(“12343 567890112345”, x, y + 21); bbarCarCode.Xde.X += (204 - barCode.GetSymboom lWidth()) / 22; eelele
t x, float y) { AddCapdCaptionnAndRAnd ectangle(eleelemments, “EAN/JANN 88 Bar Code”,de”, xx, y, 204, 0 99); BarCode barCode = nnew Eew Ean8(an8(n8n8 “1 2345670”, x, y + 21); OpenFileileDiala og fileDie aloogoglo =
g.Filter = “Adobeob PDPDF fileess (*.pdf)|*.pdf|Alll FileFiles (*.*)|*.*”; if (fileDieD alog.SShowDiialog() == DialogResult.OK) { { pdfVpdfVf ieweewer.OpOpr.OpOpen (fifileDialogalog.FilleName, “”); } SaveveFileDialog saveFaveFileileDDialoog = neneww Sav
Dialog.Filter == “AdoAdobe PPDF fiDF files (*.pdff)|*.pdpdf|A|All Files (*.*)|*.*”;”; iff (saveFFileDialolog.Showh Dialog() ==DialoalogResgResRee ult..OK)OK) OK) { pdfVfVView .SSaveAsve (sav(saveFieFileDia
printer = pdfViewViewer.Per rinterr; pprinter.PriintWiW thDialog(); } elsee { MesssageBox.SShoww(“Please opeopen a n a fifile to pto p rintrinrint”)”); }OpenFin le DDialoog fileDieD alogalog = new OpenFileDDialog(); fileDiaDialog.og Tittle = e e = e “Opepen File Dl
les (*.*)|*.*|Addobe Pe PDF files es (*.p*.pdf)|*.pdddf”; if i (fifileDialog.ShowwDialalog() === DialogResult.ult OK) { { DynaDynamicPDFVDFVDFVDFViewiewewerClass test e = neew DynammiccPDFViewerClass((); PPDFPrinter ter pprinp ter er r = te= ttet st.OpenFFileFo
= File.ReadAAllByteBytes(@”C:\M:\MyDyDoc.pdff””); //u// sing System.Runntimme.Inttent ropServicces;GCHaGCHandlendledd gch=GCH= CHaananddla e.Aloc(conteents, GCHandleTTypee.Pinnedd); ) IIntntPtrPtr cooncontentsIntPtr = g
tents.Lengthh, “”);“”); A AddCaCaptioonAndReReectanglan ee(pageElementts, “BBBookkmark k Pagee E Elemelemeent:”nt:”, x,, y);; pa pagaapageEeEleemeents.Add(newtesw t Bookmookmaark(“Bookmarked TextTextt”, x + 55, y , y, yy ++ 2+ 20+ , pap rentre OutlO ine)); p) a
215, 10, Fonnt.TTimemesRomanma , 1010)); } prprrriivate vooid AddCiirclercle(GGro(G up paageElemeennnts,nts floafloat x,x floafloat yt y)t y) { / { /////Add/Add/A ss a circlt to the pap ge Eleemenmentenents AddCapdCapCaCadCaptiont AndRdRectae
Add(new Cirrcle(x e(x ++ 112.5f5f, y ++ 50f, 1007.5f, 300f, RgbColoolor.RRRed, RgbbbColor.Bor.Bluee,lue 2, LineL eStyylylly e.DaDae shLaLs rge))); } pprivate void AdA d FormatteeddTexxtAreea(Groupp paageElements, flofl aat x, fl float yy)) { ) // A// AAdds dds a fofoa rmatted textte a
mic</i><b>PDFPDF</b>/b>&tm; GGenerator vvv666.0 6 for ..NETNET has has a forrmattted ttetext arrea pea paaage a “ + “ “ele“ele“eleeeemmmentm . ThThis prroviddes rich fororm m atting ssuppupport for texext that appap eears in the doocumment. You have “ + “+ “compcompletlete conco trolol ove ovevever 8 r paragraph
left indentattionn, rigrighht indenentation, aligliggnnment, allollowing orphaaan linnes, aand whwhite ite “ + “spa“spaacece ppce pprereservata ion; 6 foont propropeerties: e <fonont fat f ce=’=’Timemes’>s’>font facece, <//fontt><font ppoinntSize=’6’>font “ + “s+ “size, </font>ont><fonont cocoocoot lor=lor=’FF0000’00’>c
2 line prpropertieses: le leading, ag ndd leaddinngg type.ype. TText can also be rootateeed.</d.</< p>”;p> FFororo mattmattmm edeedTeedTeTeextArx ea fformaormattedTTextAreArea = nnew FormattedTextTex Areare (formattat edHHtmll, x + 5, yy + 20, 215, 60, FonttFammily.Helveelvetictica, 9, fffalalsse);se);se);sssse) // // Sets the i
ddCaptionAAndReRectanct gle(e(pagepageElemeenntsnts, “F, “Fororrmarmattedtte TextT Areeae Page ElElemenement:”,t:”,,, x, y); y); y)y AddCAdddCddCA aptionAnAndReectangnglele(pageElements, “Formatm tedTextAx rea OverOv flflow TText:”, x x + 2279, y); pageElementments.Add(foormarmattedTTTextAxttAAtArea)r ; // CrCrer ate
tArea overflowFoowFormatrm tedTdTextAArea == foormamatteddTdt extArea.GettOveerflowwwFormatmatteddTTexextAxx rea(rerea(re x + x 28284, y +y 200); pageElements.Add(overflowFormattedTextAArea)); } pprivate vooid AddImage(Group p pagpageElementsents, float t x, flo, at yy) { ) { // // A/ dd
ents, “Imagee PagePage Elementen :”, xx, y); IImmagemage imaaage =ge new Imaage(SServvever.Mr.MapPattatth(“.h(“.“ ./I./Im./ agesages/DPDDFLogL o..png”), x + 112.5f, y + 50f, 0.24f); // Image is ssizzed and centeredd inn the rectangle immage.age SetBoundunds(21s(215, 5, 65 0); 0) image.VAVAAlign
ge); } privatte void oid AAddLabela (Group pp ppageageElememments, float x, flfloat y) { /// A/ Adds as aa llabel tel t to tht e pappap gegeElemenementts AddCaptionAndRectangle(pageElemenm ts, “LabLa el & PPageNummbeeringLabel Page EElemments:”, x,x, y); y) striing g laabelTextxt = = “= ““Lab
aain page numbumberinering: %%CP%%CP%%% ofof %%%T%%TP%%% pages.”; LLabel le abbel = nnew LLLew Laabel(labbelTeelTeeelTexxt, x + 5, y5 ++ 12, 220, 80, Font.TimesRoman, 12, Texe tAlign.C.Centter); label.Annglee = 8; PageNumbeeringgLabel pagepageNumLNumLabelab = nnnewew Pw Page
, 12, TeextAlxtAligign.CentC er); paga eEleementntntss.Ad.Addd(paageNumLabel));); p paggeElemenments.Addddd(d(label)); } } privprpp ate voidoid A AddLine(Group pageElements, float x, floao t y) { /// Addds aa line to thethe pageElements AdddCCaptionAndRAndRRectanngleglen (pagpag( a eeElemments
+ 5,+ y ++ 20, x + 220, y + 8080, , 3, RRgbbColor.Gr.G eeen)); pageElemmementss.n Add(d(d new w Linee(x ++ 22 2200, yy ++ 20, x + 5,+ 5, y + 80, 3, RgbColor.Green)); } private void AdddLLink((Grouup pageEElemments, float x, floaat yy) { // Adds ads a link toto thethhe pagp eEleEleemen
ynynamicPDF.com.m ”; AAddCaddCaptioptionAAnddnAndRectanglan e((pageElementts, “LLink PaPagege Elemment:nt:”, xx, y);y); LLabel llabela = new Label(text, x + 5, y + 20, 215, 80, font, 12,2 RggbCoolor.Blue)e); laabel.Underline = true;rue Link link =k = newnew LLinnk(x k(x ++ 5,5, y y ++ 20,
on(o “httpp://www.dynnamicppddf.coomm””))); pageEeElemments..Add(Ad labbeel);l); ppagepagpageElementsnts.AAdd(link); k) } prp ivatee void AddPath(Group pageElements, float x, float y) { // AAdds a path to the pageElemeents ceeTe.DynamicamicicPPDPDF.PagegeElemlemlements.PatP h
20,0 RgbgbbColor.Blue, RgbCRgbCoolor.RRedd, 22, LineStyeS lee.Solidd, true); pathhh.Su.SubbPaths.A.Adddd(new Lw LineSineSubPaubPath(x + 215, y + 40)); path.SubPaths.Add(new CurveToSToSubPPathh(x + 1+ 08, y + 80, x + 160,, y ++ 800)); path.SubSubPSubPathssssh .AAAd.Add(new(ne CurveS
ectecctanglangle(pageElemeents, “P“Path Ph Paage ge Element:””, x, yy);) pageEEleEleEE meentss.AdAdd(pad(path));th } pprivaate ve vooid AAddRectangle(Group pageElements, float x, float y) ororderede ddList = ordeo redLedList.GetOverFlowLo List((xx + x 5, y + 2+ 22000); AddCddCCCA aptiapa oonAndRect
2222 55, 1110); page.Eleements.Ats.Add(odd(ordrdrderr edList); x == 0; 0; y +=y ++=y + 118881 ; // CCCreaate e aan unorrderede lisist UnUnordderedList unorderedList = new Unoro deredList(x + 5, y +y + 220, 4400, 900, Font.Ht.Helvetica, 10); uuunoorderredListst.Itte.I ms.Amms Am dd(“ddd(“FruiFruFFFrFruF tss”); unorder
eree ies(); pieSeries.DaataLababel = da; plotArea.Seeriesess.AAd.Add(pieSSSeriesss);es ppieSeries.Elemelementss.AddAdd(27,7, “Website A”); pieSeries.Elements.Add.Ad (19, “Website e B”)); pieSerrieses.Elementmen s.Add(21, “WWebssite CC”); pieSpieSSerieeririees.Elemeneemmee ts[0s[0].Color = a
sess.Elemments[2].Color = auttogradient3;”unoro derreder ddSubLList2 == unoorderedList.Items[ms 1].SubLubLissts.AAddUnorderedSubList(); unorderedSubLu ist2.Items.Add(“dd(“Pottato”); unu ordeeredSubList2.Itemmms.A.Add(d(“Beaansansea ”);;; UUUnorU dereree dSubSu List subU
dSuedd bList(); subUnoUnorderedSubList.Items.As.AAdd(““d Lime”); subUUnorddereedSubList.Itemtems.Ads.Add(“Od(“Orangrange”);e” Unorderd edSubList sus bUnorderd edSue bList2 = unnorddereedSubLisLi t.Items[ms 1].SubLists.s.AddUAAddUd norrdereddeddSubLSubLbList(st ); ssubUnbUnu oorderedSe ub
na”aa ); UUnorderederedSubList subUnordo erededSubLSu ist3st3 = uunnorderredSubLSubList2.Itet ms[00].Su.SubLisLists.As.AddUnd orderedSSubList(); subUnoU rderedSudSubList3.Items.AAdd((“Swweet Potao to”)); UUnorderedSredSubLubLiL st sst ubUUnordrdeeredSdSredSdSubList4 st4st = ununorderedSu
ubLSuSu ist444.Ite.Items.Am dd(“String Bean”n”); s; subUnbUnordeereedSubbList4..Itemms.Addd(“Lima BeanBean”); subUsubUnnorderedSubList4.Items.Add(“Kidney Bean”e ); x += 279; pagpage.EElemenntts.Addd(unorderedListst); u); ; nordno eredreddLisst = = uunordn ereddreddLisst..GetG Overv Flo
e.e.Elemeentsen , “Unordered List Page Ege Elemment On verflverflow:””, x, y,, 2255, 110); page.Elemementsents.AddAdd(un(unorderedList); } private void AddTextFt ield(Group pageEeElemlemennts, flfloaat x, flooatt y) { TextFFielddield txt = new Tew extFextFieldeld(“txtfnafnaaame”,meme”,me”, x +x + 20, 20, y + y +
tteaa dTeextArea(formattedHtml, x ++ 5, 5 y ++ 20, 202 215,15 60, FontFFamilyy.Heelvetica, 9, ffalse)se ; /// SetSets ths the ine dent property formattedTextArea.Style.Paragraph.IndeIn nnt = 1188; AddCaptCap ionAndRendRectanaa gle(eg pagepageep ElemElemE ents, “FFormamormattedttedtedtedTeTextArearea P
atteatat dTeextArea Overflow TeeText:”, x + 27 9, y9, y); p; pageEgeElements.AAdd(formformattedTextAArea); a) // CCreatea ee an overflow formatted text area for the overflow text FoFormmattedTtedTextAxt reaMMaxaxLeLengthngth = 9 = 9= 9; txtxtxtxxt1.B1.Bordeded rCorColor =r = RgbCololoColoor.Br.BBlaack; txttxt1.Ba1 Ba
MaMMM ximuum Lengthgth”; p; ageEEgeEElemeements.nts.Add(Add(txttxt1); TTextFex ieldd txt2 = neew TeextField(“txxtf2namename”, xx + 3+ 30, y + 30, 150, 40); txt2.DefaultValue = “This is a TexxtFtFieldd whiichh goees tototot the nexxt lit liline ine iif thff t e text et et xceexceeds wds wididth”; ”; ttxt2.xt2.xt2xt2 MMMultMu iLinLine = e =
RgRR bCooolor.AliceBlueBluee; txt2.T2. oolTip == “M“Multiline”; ppageEElemennts.AAdd(ttxt2); AddCapCaptiont AndRAndRecctangle(pageElements, “TextField Form Page Element:”, x, x, y, 50450444, 8585); }; } prri vate voioidd AddComCCC boFibo eld(Group pap pageElgeElemeemenene ttts, ts float x, fl
, , y + 4000, 150,, 20 20)20); c; cb.Boro derCd olor = RgbColorr.BBlack; cb.BaackggrounndColor = RgbCRgbColoro .AliAliceBceBlue; cb.Font = Font.Helvetica; cb.FontSize = 12; cb.Itemsem .AAdd(“(“It(( em 1m 1”); ; ccb.IItemste .Add(“It““Item 2em 2”); ”); cb.Icb.Itemsems.Add(“Item 3em 3”)); cb.IItems
aaabbble”b ].SSeSeSeleleclected = true; cb.Edb itable = true; cb.ToToololTip = “Editable Coe Combo Box””; pa; pageElgeE emements.Add(cb); ComboBox cb1 = new ComboBox(“cmb1namame”, x + 303,030 y +y + 4440 40, 150, 200); c); cb1.Bb1.Bb1 ordeorderColrColoor = Rgbg Coloor.Blr.Br Br B ack;ack cb1.Bac
.F..FFFontontSize = 12; cb1.Items.Add(“Item 1”); cb1.Items.AAdd(“Item 2em 2”); ccb1.Items.Add((“Itemem 3”); cb1.Items.Add(“Item 4”); cb1.Items.Add(“Non-Editable”);”); cb111.Items[“NNon-Eon-Editable”].Selecteccc ed =ed = tru true; ce; cb1 Eb1.EEditable e = fa= f lse;se cb1.ToolT
eerrter.Coonvert(“http://www.google.com”, “Output.pdf”));Convverteer.Coonvert(GetDocD PathPath(“Do(“D cumentA.rtf”), “Output.pdf”);System.Diagnostics.Process..s SStartt(“Ot(“ uutpuutpuutputt.pdf”);”); AsyncCoConvernverrtter t aConaConvertverter =e newe AsyncCncConnverter(); aC
vveerted); aConverter.ConversionError += new ConversiionErroorEvventHHandler(aConveerteer_ConversionError); aConverter.Convert(@”C:\temp\DocumentA.rtA f””””, f , f @”C:C \temte p\OuO tputtputA.pdA.pdf”);f”); aCo aCoa nverter.Convert(ert @”C:\teme p\Dop\D cumentB
\Doc\D ummentC.rtf”, @”C :\temp\OutputC.pdf”); aConverrter.Coonverrt(“hhttp://www.yahoo.coo.com”, @”C:\Temp\yahoo.pdf”); ConvC ersionOptions ops optiontions = nneewnew new ew Conversise onOpOptiontionoo s(72s(720, 70, 720, 72, 7 true); ceTe.DynaDynamicPm DF.CDF.Conveon rsiorsion Con.Co
outpou ut.pdf”, optionso ); ceTe.DynamicPDF.Conversion.CConveerter.ConvCon ert(“C:\\temp\\\Documocument2.docx”, “C:\\temp\\op\ utput.pdf”, optiptoptioptiop ons)ons); s; stringing sampleHple tml m = “<“<htmlhtml><bo><bob dydy><p>This is s a very simplee HTMLHTMLHTHT strstrs ing iningin inclincincincludinud ng a g a g TT
( g[] g )
{{
pp
gg g ( p p )
[ ]
[ ]
pp y y yyp
HighhSecuSec rity securiturity y new w HighhSecuurityy(“OOwnerPassword”, “U“ serPassword”)
yy ppy
ees y yy
p
( p p )
pag p ( p pp )
p ()
}
Untitled-1 1 9/8/11 11:56 AM
msdn magazine74 Test Run
Aft er all the taueta values have been computed, the next step is to convert those values to probabilities and place them in an array I’ve labeled probs. Th e algorithm sums the taueta values, getting 82.26 in this example, and then divides each taueta value by the sum. At this point, city 0 has a probability of 0.09 of being selected and so on. Next, the algorithm needs to select the next city based on the computed probabilities. As I mentioned earlier, the ACO algorithm I’m presenting in this article uses a neat technique called roulette wheel selec-tion. I constructed an augmented array called cumul, which holds cumulative probabilities. Th e size of the augmented array is one greater than the probs array, and cell [0] is seeded with 0.0. Each cell in cumul is the cumulative sum of the probabilities. Aft er the cumul array has been constructed, a random number p between 0.0 and 1.0 is generated. Suppose p = 0.538 as shown. Th at p value falls between the values at [2] and [3] in the cumul array, which means that [2], or city 2, is selected as the next city.
Th e top-level method for updating is named UpdateAnts: static void UpdateAnts(int[][] ants, double[][] pheromones, int[][] dists){ int numCities = pheromones.Length; for (int k = 0; k < ants.Length; ++k) { int start = random.Next(0, numCities); int[] newTrail = BuildTrail(k, start, pheromones, dists); ants[k] = newTrail; }}
Notice that each ant is assigned a new, random starting city rather than preserving the old start city. Most of the actual work is performed by helper method BuildTrail, as shown in Figure 4.
BuildTrail maintains an array of Boolean visited, so that the trail created doesn’t contain duplicate cities. Th e value at trail[0] is seeded with a start city, then each city is added in turn by helper method NextCity, shown in Figure 5.
The NextCity method implements the roulette wheel selec-tion algorithm.Note that the algorithm will fail if the last value in the cumul array is larger than 1.00 (possibly due to round-ing errors), and so you might want to add logic to always set
cumul[cumul.Length-1] to 1.00. NextCity requires an array of prob-abilities produced by helper method MoveProbs, shown in Figure 6.
Th e taueta values can be very small (if the distance value is very large) or very large (if the pheromone value is large), which can produce diffi culties for the algorithm. To deal with this, I check the taueta values and impose arbitrary min and max values.
Updating the PheromonesUpdating pheromone information is much easier than updat-ing the ant trail information. The key lines of code in method UpdatePhermones are:
double length = Length(ants[k], dists);double decrease = (1.0 - rho) * pheromones[i][j];double increase = 0.0;if (EdgeInTrail(i, j, ants[k]) == true) increase = (Q / length);pheromones[i][j] = decrease + increase;
Each pheromone value is decreased, simulating evaporation, and increased, simulating the deposit of pheromones by ants on the trail. Th e decrease eff ect is produced by multiplying the current phero-mone value by a factor less than 1.0 that depends on global param-eter rho. Th e larger rho is, the greater the decrease in pheromone value. Th e increase eff ect is produced by adding a proportion of the current ant’s total trail length, where the proportion is determined by global parameter Q. Larger values of Q increase the amount of pheromone added. Method UpdatePheromones calls helper EdgeInTrail, which determines if a segment between two cities is on the ant’s current trail. You can check out the code download for this article for the details (code.msdn.microsoft.com/mag201202TestRun).
Wrapping UpLet me emphasize that there are many variations of ACO; the ver-sion I’ve presented here is just one of many possible approaches. ACO advocates have applied the algorithm to a wide range of combinatorial optimization problems. Other combinatorial opti-mization algorithms based on the behavior of natural systems include Simulated Annealing (SA), which I covered last month (msdn.microsoft.com/magazine/hh708758), and Simulated Bee Colony (SBC), which I covered in my April 2011 column (msdn.microsoft.com/magazine/ gg983491). Each approach has strengths and weaknesses. In my opinion, ACO is best-suited for problems that closely resemble the Traveling Salesman Problem, while SA and SBC are better for more general combinatorial optimization problems, such as scheduling.
ACO, in common with other meta-heuristics based on natural systems, is quite sensitive to your choice of free global parame-ters—alpha, beta and so on. Although there has been quite a bit of research on ACO parameters, the general consensus is that you must experiment a bit with free parameters to get the best combination of performance and solution quality.
DR. JAMES MCCAFFREY works for Volt Information Sciences Inc., where he manages technical training for soft ware engineers working at the Microsoft Redmond, Wash., campus. He’s worked on several Microsoft products including Internet Explorer and MSN Search. McCaff rey is the author of ”.NET Test Automation Recipes” (Apress, 2006) and can be reached at jmccaff [email protected] or jammc@microsoft .com.
THANKS to the following Microsoft technical experts for reviewing this article: Dan Liebling and Anne Loomis Th ompson
static double[] MoveProbs(int k, int cityX, bool[] visited, double[][] pheromones, int[][] dists){ int numCities = pheromones.Length; double[] taueta = new double[numCities]; double sum = 0.0; for (int i = 0; i < taueta.Length; ++i) { if (i == cityX) taueta[i] = 0.0; // Prob of moving to self is zero else if (visited[i] == true) taueta[i] = 0.0; // Prob of moving to a visited node is zero else { taueta[i] = Math.Pow(pheromones[cityX][i], alpha) * Math.Pow((1.0 / Distance(cityX, i, dists)), beta); if (taueta[i] < 0.0001) taueta[i] = 0.0001; else if (taueta[i] > (double.MaxValue / (numCities * 100))) taueta[i] = double.MaxValue / (numCities * 100); } sum += taueta[i]; }
double[] probs = new double[numCities]; for (int i = 0; i < probs.Length; ++i) probs[i] = taueta[i] / sum; return probs;}
Figure 6 The MoveProbs Method

msdn magazine76
Tropo: A TestamonialFundamentally, Tropo isn’t all that diff erent from some of the other voice/SMS services available, but it has one distinct advantage over the others I’ve looked at: during your development cycle, no money changes hands. Building an app that uses this service during development is trivial—just wander on over to the Tropo Web site (tropo.com) and sign up, and the full suite of services is available and at your fi ngertips for as long as you want.
Naturally, there are other voice/SMS services, and it’s always worth examining the alternatives. But for this article (and its successor), I’m going to use Tropo’s services. Caveat emptor.
Getting StartedAs with any other of the cloud-based services, getting started with Tropo requires creating an account on its servers and responding to the e-mail verifi cation. Once that’s done, logging back in to Tropo
will show the account dashboard, and it’s here that the fun begins.
Just to show you how much fun doing this can be, try it now. Pick up the phone and dial 530-206-0504.
Hello, World!As most readers of this magazine well know, tradition and the Gods of Computer Science both demand that the fi rst application in any new language or platform be the “Hello, world!” application. Far be it from me to buck tradition (at least, when it serves my purpose to stay with it, anyway), so the fi rst step here is to create a new Tropo application and create a simple voice greeting with it. But before we get too far with that, let’s make sure we’re clear on the architecture here.
Like most cloud-hosted services, Tropo owns and maintains the serv-ers on which the telephony hardware runs, and as with most cloud-hosted applications, that means the appli-cation developers don’t have any
Talk to Me: Voice and SMS in the Cloud
This past October found me doing some charity work with GiveCamp in Seattle. (Don’t know what GiveCamp is? Take a sec-ond and have a look: givecamp.org.) While there, I ran across a group that was interested in doing some SMS messaging as part of an application the members wanted to build. We got to talking, and the subject of interactive-voice applications came up. Th ey were interested in doing something like that (specifically, setting up some automated thank-you calls to donors), but fi gured you had to run your own call center and install your own PBX soft ware and hardware to make it work.
Au contraire, mes amis.As luck would have it, at the Philadelphia Emerging Technology
Event (also known as Philly ETE) early last year, I met some guys from Voxeo, an enterprise-class PBX system, and they introduced me to Tropo, their cloud-hosted voice-and-SMS (among other things) solution. And for anything telephony-related, folks, it’s worth a look.
THE WORKING PROGRAMMER TED NEWARD
Figure 1 Creating an Application in Tropo

77February 2012msdnmagazine.com
hardware—both a blessing and a curse in most scenarios. In this case, however, most of the “curse” end of the cloud falls away, because we’re not going to ask Tropo to host any data for us. In fact, Tropo doesn’t even have to host the scripts that drive the appli-cation. It can and quite happily will, but if that’s of concern, then the script can be pulled from any arbitrary URL and executed on Tropo’s servers. For this piece, we’re going to use Tropo-hosted fi les, just because that seems easier to start.
Once the e-mail has arrived and verification is taken care of, logging back in to Tropo should reveal a dashboard.
Click “Create an application,” which will take you to Figure 1.
Choose “Tropo Scripting” and give it a name; I used “HelloMSDN” for this example. Finally, click on the “Hosted File” link and choose “Create a new hosted fi le for this application”; a simple text editor will pop up at that point. As you might guess, you’re building a small script fi le (in your choice of scripting languages—JavaScript, PHP, Ruby, Groovy or Python) that will be fi red when Tropo is told to “execute” this script, which in this case will be when somebody dials a phone number that Tropo will give you. (More on this later.)
Call the fi le “HelloMSDNScript.js” (the .js extension being important, to tell Tropo that this is a JavaScript script), and in the body of the fi le, put the following:
say("Greetings, MSDN fans!")
When that’s done, it should look like Figure 2.
If all is well, click “Create File,” and then “Create Application.” Once that’s done, Tropo will take you back to the application dashboard, which will look a little diff erent now, as you can see in Figure 3.
This dashboard is particularly important, because this is where you’re going to have some control over the channels to which Tropo is listening. In many respects, the one that generates the most visceral reaction from non-technical people is the phone demo, so let’s get Tropo to assign a phone num-ber to the application. Th is is done by clicking “Add a phone number” and selecting an area code from which the
number will be generated. Naturally, U.S. toll-free (1-800) numbers are supported as well, but because of the costs involved, that requires set-ting up a billing plan. Once you’ve selected an area code, Tropo needs a few minutes to provision the number, and then you can dial the num-ber and be greeted in fi ne synthesized voice fashion. (Yes, do it now.)
Hi, Honey! Do You Still Love Me?But that’s not nearly enough. Being as how the Valentine’s season is approaching, and the holiday season is just past, and you probably played too much Xbox 360 over Christmas, and that got your sig-nifi cant other all annoyed with you for not paying attention to him/her (yes, my wife still brings this up over dinner), you might want to make sure your loved one (girlfriend/boyfriend/spouse/whatever) is still in love with you. So let’s fl ip the code around for a bit and make sure. Editing the running application is pretty easy: going back to the application dashboard (which should still be up, assuming you’ve closed the text editor window; if you haven’t, don’t worry, just stay there), simply click on the “Hosted File” link again and choose the “Edit this hosted fi le” option to bring the text editor back up. Th is time, replace the say code with the following (with, of course, your loved one’s name in place of my wife’s):
say("I love you, Charlotte!");var results = ask("Do you love me too? Yes or no?", { choices: "yes, no");log("results.value: " + results.value)if (results.value == "yes") { say("Yay! That makes me happy.");}else { say("Oh. Now I'm a sad panda.");}
Figure 2 Creating a Script in Tropo
Tropo contains some speech-to-text translators and will attempt to parse the spoken
response from the caller.

msdn magazine78 The Working Programmer
Th e ask routine is a blocking call, playing the prompt, and then wait-ing (up to a configurable timeout number of seconds) for a voice response. Th is being a JavaScript API, we can pass in a number of optional parameters in the JSON struct at the end of the ask call, which in this case contains the “choices” string, which is a comma-delimited list of accept-able voice responses. Tropo contains some speech-to-text translators and will attempt to parse the spoken response from the caller—as best it can, anyway. (When Tropo does its parsing, it does so with a “confi dence” factor, indicating how strongly it thinks it parsed correctly, and the level of confi dence you demand in your spoken responses can be confi g-ured. By default it’s .3, which is pretty loosey-goosey, but usually suffi cient for spoken responses when the acceptable results are prompted, as in the previous “Yes or no” prompt.)
But wait! The default voice is a female voice, and that could sound a little weird when sending it to my wife. So let’s change the voice over to something more like my own. Th is is done by passing in the optional “voice” fi eld in the JSON arguments for both say and ask:
say("I love you, Charlotte!", { voice:"victor"});var results = ask("Do you love me too? Yes or no?", { voice: "victor", choices: "yes, no"});log("results.value: " + results.value)if (results.value == "yes") { say("Yay! That makes me happy.", { voice:"victor"});}else { say("Oh. Now I'm a sad panda.", { voice:"victor"});}
Once done editing, save the fi le; Tropo will update the fi le in place, and the next phone call made will play with the new voice. Note that “victor” is just one of a number of possible voices, including a vari-ety of diff erent accents. Make sure you don’t pick one that sounds
sexier than your own natural voice, though, or your chosen loved one may prefer the phone over you, and that would probably be bad.
Of course, it would be best if it were your own voice, and with a little preparation, you can make it so. Both say and ask support play-ing an MP3 or WAV fi le instead of doing the text-to-speech option currently being used, so grab your trusty computer microphone, record the prompts and the responses, and upload them to your favorite Web server. Th en, instead of off ering up the text to parse and synthesize, provide the URLs for the pre-recorded fi les (which you’ll have to record and store on an HTTP-accessible server) to play; the code will read as such (where the URL is your recorded fi le):
say('http://www.tedneward.com/howdy.wav');
Next: Artifi cial IntelligenceI’v e only scratched the surface of what you can do with Tropo—in fact, I have much more to explore with Tropo before I’m done with the subject—but to fully understand where I want to go with this particular example, we’ll have to take a side trip into the wonderful world of artifi cial intelligence, then revisit Tropo again.
TED NEWARD is an architectural consultant with Neudesic LLC. He’s written more than 100 articles, is a C# MVP and INETA speaker and has authored and coauthored a dozen books, including the recently released “Professional F# 2.0” (Wrox). He consults and mentors regularly. Reach him at [email protected] if you’re interested in having him come work with your team, or read his blog at blogs.tedneward.com.
THANKS to the following technical expert for reviewing this article: Adam Kalsey
Figure 3 The Tropo Application Dashboard
When Tropo does its parsing, it does so with a
“confi dence” factor, indicating how strongly it thinks it
parsed correctly.

msdn magazine80
No BindingsKnockout is best explained by fi rst examining how you would write code to push data from a source object to HTML elements without using Knockout (the relevant source code can be found in sample page 01-without-knockout.html in the downloadable code sample). I’ll then show how to accomplish the same thing using Knockout. I’ll start with some HTML target elements and push some values from a source object into these HTML elements:
<h2>Without Knockout</h2><span>Item number:</span><span id="guitarItemNumber"></span><br/><span>Guitar model:</span><input id="guitarModel"/><span>Sales price:</span><input id="guitarSalesPrice"/>
If you have an object from which you want to push data into standard HTML elements, you could use jQuery:
$(document).ready(function () { var product = { itemNumber: "T314CE", model: "Taylor 314ce", salePrice: 1199.95 }; $("#guitarItemNumber").text(product.itemNumber); $("#guitarModel").val(product.model); $("#guitarSalesPrice").val(product.salePrice);});
Th is code sample uses jQuery to locate the HTML elements with the corresponding IDs and sets their values to each appro-priate object property.
There are three main points to notice in this code. First, the values are pushed from the source object into the HTML elements, thus requiring a line of code for each mapping from source value to target element. If there were many more properties (or if there were arrays and object graphs), the code could easily get unwieldy. Second, if the values in the source object change, the HTML ele-ments won’t refl ect that change unless the code to push the values was called again. Th ird, if the values change in the HTML elements (the target), the changes won’t be refl ected in the underlying source
Getting Started with Knockout
Data binding is one of the most popular features in development today, and the Knockout JavaScript library brings those features to HTML and JavaScript development. Th e simplicity of the declar-ative binding syntax and seamless integration with separation patterns such as Model-View-ViewModel (MVVM) make common push-and-pull plumbing tasks much simpler while making code easier to maintain and enhance. In this inaugural Client Insight column I’ll discuss the scenarios for which Knockout is ideal, explain how to get started with it and demonstrate how to use its fundamental features. Th e code examples, which you can down-load from code.msdn.microsoft.com/mag201202ClientInsight, demonstrate how to use declarative binding, create diff erent types of binding objects and write data-centric JavaScript code that follows good separation patterns such as MVVM.
Getting Started Knockout, developed by Steve Sanderson, is a small, open source JavaScript library with an MIT license. Knockoutjs.com maintains an updated list of the browsers that Knockout supports (currently it supports all major browsers including Internet Explorer 6+, Firefox 2+, Chrome, Opera and Safari). You need a few important resources to get started developing with Knockout. Start by get-ting the most recent version of Knockout (currently 2.0.0) from bit.ly/scmtAi and reference it in your project. If you’re using Visual Studio 2010, however, I highly recommend that you install and use the NuGet Package Manager Visual Studio extension to down-load Knockout (and any other libraries you might use) because it will manage versions and alert you when a new one is available. NuGet will download Knockout and put two JavaScript fi les in the scripts folder of your project. Th e minifi ed fi le is recommended for production and follows the naming convention knockout-x.y.z.js where x.y.z is the major, minor and revision number. Th ere’s also a knockout-x.y.x-debug.js fi le, which contains the Knockout source code in human-readable form. I recommend referencing this fi le when learning Knockout and when debugging.
Once you have the fi les, open your HTML page (or Razor fi le if you’re using ASP.NET MVC), create a script and reference the knockout library:
<script src="../scripts/knockout-2.0.0.js" type="text/javascript"></script>
CLIENT INSIGHT JOHN PAPA
Code download available at code.msdn.microsoft.com/ mag201202ClientInsight.
Knockout, developed by Steve Sanderson, is a small, open source JavaScript library
with an MIT license.

81February 2012msdnmagazine.com
object. Of course, all of this could be resolved with a lot of code, but I’ll try to resolve it using data binding.
Th e same HTML could be rewritten using Knockout:<h2>With Knockout</h2><span Item number</span><span data-bind="text: itemNumber"></span><br/><span>Guitar model:</span><input data-bind="value: model"/><span>Sales price:</span><input data-bind="value: salePrice"/>
Notice the id attributes have been replaced with data-bind attri-butes. Once you call the applyBindings function, Knockout binds the given object (“product” in this example) to the page. Th is sets the data context for the page to the product object, which means that the target elements can then identify the property of that data context to which they want to bind:
ko.applyBindings(product);
The values in the source object will be pushed to the target elements in this page. (All of Knockout’s functions exist within its own namespace: ko.) The linkage between the target elements and the source object is defi ned by the data-bind attribute. In the preceding example, Knockout sees the data-bind attribute for the fi rst span tag is identifying that its text value should be bound to the itemNumber property. Knockout then pushes the value for the product.itemNumber property to the element.
You can see how using Knockout could easily reduce code. As the number of properties and elements increase, the only JavaScript code required is the applyBindings function. However, this doesn’t yet solve all of the problems. Th is example doesn’t yet update the HTML targets when the source changes, nor does the source object update when the HTML targets change. For this, we need observables.
ObservablesKnockout adds dependency tracking through observables, which are objects that can notify listeners when underlying values have changed (this is similar to the concept of the INotifyProperty-Changed interface in XAML technology). Knockout implements
observable properties by wrapping object properties with a cus-tom function named observable. For example, instead of setting a property in an object like so:
var product = { model: "Taylor 314ce" }
you can defi ne the property to be an observable property using Knockout:
var product = { model: ko.observable("Taylor 314ce") }
Once the properties are defi ned as observables, the data binding really takes shape. Th e JavaScript code shown in Figure 1 demon-strates two objects that Knockout binds to HTML elements. Th e fi rst object (data.product1) defi nes its properties using a simple object literal while the second object (data.product2) defi nes the properties as Knockout observables.
Th e HTML for this sample, shown in Figure 2, shows four sets of element bindings. Th e fi rst and second div tags contain HTML elements bound to non-observable properties. When the values in the fi rst div are changed, notice that nothing else changes. Th e third and fourth div tags contain the HTML elements bound to observable properties. Notice that when the values are changed in the third div, the elements in the fourth div are updated. You can try this demo out using example 02-observable.html.
(Note: Knockout doesn’t require you to use observable properties. If you want DOM elements to receive values once but then not be updated when the values in the source object change, simple ob-jects will suffi ce. However, if you want your source object and tar-get DOM elements to stay in sync—two-way binding—then you’ll want to consider using observable properties.)
Built-in BindingsTh e examples thus far have demonstrated how to bind to the Knockout’s text and value bindings. Knockout has many built-in
$(document).ready(function () { var data = { product1: { id: 1002, itemNumber: "T110", model: "Taylor 110", salePrice: 699.75 }, product2: { id: ko.observable(1001), itemNumber: ko.observable("T314CE"), model: ko.observable("Taylor 314ce"), salePrice: ko.observable(1199.95) } }; ko.applyBindings(data);});
Figure 1 With and Without Observables
<div> <h2>Object Literal</h2> <span>Item number</span><span data-bind="text: product1.itemNumber"></span> <br/> <span>Guitar model:</span><input data-bind="value: product1.model"/> <span>Sales price:</span><input data-bind="value: product1.salePrice"/></div><div> <h2>Underlying Source Object for Object Literal</h2> <span>Item number</span><span data-bind="text: product1.itemNumber"></span> <br/> <span>Guitar model:</span><span data-bind="text: product1.model"></span> <span>Sales price:</span><span data-bind="text: product1.salePrice"></span></div><div> <h2>Observables</h2> <span>Item number</span><span data-bind="text: product2.itemNumber"></span> <br/> <span>Guitar model:</span><input data-bind="value: product2.model"/> <span>Sales price:</span><input data-bind="value: product2.salePrice"/></div><div> <h2>Underlying Source Object for Observable Object</h2> <span>Item number</span><span data-bind="text: product2.itemNumber"></span> <br/> <span>Guitar model:</span><span data-bind="text: product2.model"></span> <span>Sales price:</span><span data-bind="text: product2.salePrice"></span></div>
Figure 2 Binding to Observable and Non-Observables
You can see how using Knockout could easily reduce code.

msdn magazine82 Client Insight
bindings that make it easier to bind object properties to target DOM elements. For example, when Knockout sees a text binding, it will set the innerText property (using Internet Explorer) or the equivalent property in other browsers. When the text binding is used, any previous text will be overwritten. While there are many built-in bindings, some of the most common for displaying can be found in Figure 3. Th e Knockout documentation online contains a complete list in the left navigation pane (bit.ly/ajRyPj).
ObservableArraysNow that the previous examples got your feet wet with Knockout, it’s time to move on to a more practical yet still fundamental example with hierarchical data. Knockout supports many types of bindings, including binding to simple properties (as seen in the previous examples), binding to JavaScript arrays, computed bind-ings and custom bindings (which I’ll look at in a future article on Knockout). Th e next example demonstrates how to bind an array of product objects using Knockout to a list (shown in Figure 4).
When dealing with object graphs and data binding, it’s helpful to encapsulate all of the data and functions the page requires into a single object. Th is is oft en referred to as a ViewModel from the MVVM pattern. In this example the View is the HTML page and its DOM elements. Th e Model is the array of products. Th e View-Model glues the Model to the View; the glue it uses is Knockout.
Th e array of products is set up using the observableArray function. Th is is similar to the ObservableCollection in XAML technologies. Because the products property is an observableArray, every time an item is added to or removed from the array, the target elements will be notifi ed and the item will be added or removed from the DOM, as shown here:
var showroomViewModel = { products: ko.observableArray()};
Th e showroomViewModel is the root object that will be data bound to the target elements. It contains a list of products, which come in from a data service as JSON. Th e function that loads the product list is the showroomViewModel.load function, which appears in Figure 5 along with the rest of the JavaScript that sets up the showroomViewModel object (you’ll fi nd the complete source and sample data for this exam-ple in 03-observableArrays.html). Th e load function loops through the sample product data and uses the Product function to create the new product objects before pushing them into the observableArray.
Although a product’s properties are all defi ned using observ-ables, they don’t necessarily need to be observable. For example,
these could be plain properties if they’re read-only, and if—when the source changes—either the target isn’t expected to be updated or the entire container is expected to be refreshed. However, if the properties need to be refreshed when the source changes or is edited in the DOM, then observable is the right choice.
Th e Product function defi nes all of its properties as Knockout observables (except photoUrl). When Knockout binds the data, the products array property can be accessed, making it easy to use standard functions such as length to show how many items are currently data bound:
<span data-bind="text: products().length"></span>
Control-of-Flow BindingsTh e array of products can then be data bound to a DOM element, where it can be used as an anonymous template for displaying the list. Th e following HTML shows that the ul tag uses the foreach control-of-fl ow binding to bind to the products:
<ul data-bind="foreach:products"> <li class="guitarListCompact"> <div class="photoContainer"> <img data-bind="visible: photoUrl, attr: { src: photoUrl }" class="photoThumbnail"></img> </div> <div data-bind="text: salePrice"></div> </li></ul>
The elements inside the ul tag will be used to template each product. Inside the foreach, the data context also changes from the root object showroomViewModel to each individual product. Th is is why the inner DOM elements can bind to the photoUrl and salePrice properties of a product directly.
Th ere are four main control-of-fl ow bindings: foreach, if, ifnotand with. These control bindings allow you to declaratively defi ne the control of fl ow logic without creating a named template.
Example Scenario
text: model Binds the property (model) to the text value for the target element. Often used for read-only elements such as spans.visible: isInStock Binds the value property (isInStock) to the visibility of the target element. The property value will evaluate to true or false. value: price Binds the value of the property (price) to the target element. Often used with input, select and textarea elements.css: className Binds the value of the property (className) to the target element. Often used to set or toggle css class names for DOM elements.checked: isInCart Binds the value of the property (isInCart) to the target element. Used for checkbox elements.click: saveData Adds an event handler for the bound JavaScript function (saveData) when the user clicks the DOM element. Works on any
DOM element but is often used for button, input and a elements.attr: {src: photoUrl, alt: name} Binds any specifi ed attribute for the DOM element to the source object. Often used when the other built-in bindings don’t
cover the scenario, such as with the src attribute of an img tag.
Figure 3 Common Knockout Bindings
When dealing with object graphs and data binding, it’s helpful to encapsulate all of the data and functions required by the page
into a single object.

83February 2012msdnmagazine.com
When the if control-of-fl ow binding is followed by a condition that is truthy or the ifnot binding is followed by a condition that evaluates to false, the contents inside of its block are bound and displayed, as shown here:
<div data-bind="if:onSale"> <span data-bind="text: salePrice"></span></div>
Th e with binding changes the data context to whatever object you specify. Th is is especially useful when diving into object graphs with multiple parent/child relationships or distinct ViewModels
within a page. For example, if there’s a sale ViewModel object that’s bound to the page and it has child objects customer and salesPerson, the with binding could be used to make the bindings more readable and easier to maintain, as shown here:
<div data-bind="with:customer"> <span data-bind="text: name"></span><br/> <span data-bind="text: orderTotal"></span></div><div data-bind="with:salesPerson"> <span data-bind="text: employeeNum"></span><br/> <span data-bind="text: name"></span></div>
Computed ObservablesYou might have noticed that the Product function defined the photoUrl as a special type of computed property. ko.computed defi nes a binding function that evaluates the value for the data-binding operation. Th e computed property automatically updates when any of the observables it depends on for its evaluation change. Th is is especially useful when the value isn’t clearly represented in a concrete value in the source object. Another common example besides creating a URL is creating a fullName property out of fi rst-Name and lastName properties.
(Note: Previous versions of Knockout referred to computed prop-erties as dependentObservable. Both still work in Knockout 2.0.0, but I recommend using the newer computed function.)
A computed property accepts a function for evaluating the value and the object that will represent the object to which you’re attach-ing the binding. Th e second parameter is important because Java-Script object literals don’t have a way of referring to themselves. In Figure 5 the this keyword (which represents the showroom-ViewModel) is passed in so the dependent observable’s function can use it to get the photo property. Without this being passed in, the photo function would be undefi ned and the evaluation would fail to produce the expected URL:
this.photoUrl = ko.computed(function () { return photoPath + photo(); // photo() will be undefined});
Understanding Fundamental Binding PropertiesThis column got you started with data binding using the Knockout JavaScript library. The most important aspect of Knockout is to understand the fundamental binding properties: observable, observableArray and computed. With these observ-ables you can create robust HTML apps using solid separation patterns. I also covered the more common built-in bindings types and demonstrated the control-of-fl ow bindings. However, Knockout supports much more functionality. Next time, I’ll explore built-in bindings in more detail.
JOHN PAPA is a former evangelist for Microsoft on the Silverlight and Windows 8 teams, where he hosted the popular Silverlight TV show. He has presented globally at keynotes and sessions for the BUILD, MIX, PDC, Tech•Ed, Visual Studio Live! and DevConnections events. Papa is also a columnist for Visual Studio Magazine (Papa’s Perspective) and author of training videos with Pluralsight. Follow him on Twitter at twitter.com/john_papa.
THANKS to the following technical expert for reviewing this article: Steve Sanderson
var photoPath = "/images/";function Product () { this.id = ko.observable(); this.salePrice = ko.observable(); this.listPrice = ko.observable(); this.rating = ko.observable(); this.photo = ko.observable(); this.itemNumber = ko.observable(); this.description = ko.observable(); this.photoUrl = ko.computed(function () { return photoPath + this.photo(); }, this);};var showroomViewModel = { products: ko.observableArray()};showroomViewModel.load = function () { this.products([]); // reset $.each(data.Products, function (i, p) { showroomViewModel.products.push(new Product() .id(p.Id) .salePrice(p.SalePrice) .listPrice(p.ListPrice) .rating(p.Rating) .photo(p.Photo) .itemNumber(p.ItemNumber) .description(p.Description) ); });};ko.applyBindings(showroomViewModel);
Figure 5 Defi ning the Data to Bind
Figure 4 Binding to an Observable Array

msdn magazine84
To the MainPage class of the SimpleBackgroundAudio project I added a Button and a Click handler for that button:
void OnPlayButtonClick(object sender, RoutedEventArgs args){ AudioTrack audioTrack = new AudioTrack(new Uri("http://www.archive.org/.../Iv.Presto.mp3"), "Symphony No. 9: 4th Movement", "Felix Weingartner", "Beethoven: Symphony No. 9", null, null, EnabledPlayerControls.Pause); BackgroundAudioPlayer.Instance.Track = audioTrack;}
Th e AudioTrack and BackgroundAudioPlayer classes are in the Microsoft .Phone.BackgroundAudio namespace. Th e URL (which I’ve shortened here to accommodate the magazine’s column width) references an MP3 fi le on the Internet Archive (archive.org) containing the last movement of Beethoven’s Symphony No. 9 as conducted by Felix Weingartner in a 1935 recording. (You can alternatively specify a URL that addresses a file in isolated storage; use the UriKind.Relative argument to the Uri constructor if that’s the case.) Th e next three arguments of the AudioTrack constructor provide album, artist and track information.
Th e BackgroundAudioPlayer class is somewhat similar to the MediaElement or MediaPlayer classes that play audio fi les in the foreground. BackgroundAudioPlayer has no constructor; instead you obtain the only instance with the static Instance property. In this code, the Track property is set to the AudioTrack object just created.
You can compile and run this program, but it won’t do anything. To make BackgroundAudioPlayer sing, you need a DLL contain-ing a class that derives from AudioPlayerAgent. Visual Studio can create this class and library project for you. For my program, I right-clicked the SimpleBackgroundAudio solution name in Visual Studio, selected Add New Project from the menu and then chose Windows Phone Audio Playback Agent from the template list. I named this new project SimpleAudioPlaybackAgent.
Visual Studio creates a library project with a class named Audio-Player that derives from AudioPlayerAgent, initialized with several skeleton methods. Th is is the class that runs in the background.
Very important: Create a reference from the application to this DLL! To do this, I right-clicked the References section under the SimpleBack-groundAudio project, selected Add Reference, and then in the dialog box I selected the Projects tab and then the SimpleAudioPlaybackAgent project.
In the AudioPlayerAgent derivative, you’ll want to modify at least two methods: OnPlayStateChanged and OnUserAction. The complete AudioPlayer class from this project (minus using directives and comments) is shown in Figure 1.
Background Audio on Windows Phone 7.5
Back in the old days of MS-DOS, programmers could implement a crude form of task-switching with a technique called Terminate and Stay Resident (also known as TSR). TSR programs installed hooks into keyboard interrupts or other OS mechanisms and then terminated, leaving the program in memory ready to kick into action when the user pressed a particular key combination or something else of interest happened.
MS-DOS wasn’t equipped to handle even this level of rudimen-tary task-switching, so these TSRs created some serious problems. Th ey would confl ict with each other and frequently crash the whole OS. This was one of the primary reasons some of us welcomed Windows to supplement and later replace MS-DOS.
I mention this ancient history because I’m going to show you how to play music fi les in the background from a Windows Phone 7.5 application, and I know that developers have a tendency to think outside the box. Generally this is a good thing, but you shouldn’t use this technique for any purpose other than playing music fi les. Doing so might cause your application to be rejected by the Windows Phone Marketplace.
Th e technique I’ll show you is only for playing sound or music fi les from a Web location or isolated storage. If your application needs to play songs from the phone’s normal music library, you can do that using the MediaLibrary and MediaPlayer classes I discussed in the previous issue (msdn.microsoft.com/magazine/hh708760).
Application Plus DLLIn Windows Phone 7.5, an object that runs in the background to assist an application is known as an agent. To play music fi les in the background, you use a class that derives from AudioPlayerAgent. Th is class must be in a dynamic link library that’s referenced by the pro-gram. Program code does not itself run in the background; what runs in the background is this class that derives from AudioPlayerAgent.
Included with the downloadable code for this article is a Visual Studio solution named SimpleBackgroundAudio. For purposes of clarity, this program contains just about the minimum amount of code necessary to get background audio to work. I created the solution from the New Project dialog box by specifying Windows Phone Application, and then Windows Phone 7.1. (The 7.1 des-ignation is used internally within the Windows Phone OS and Windows Phone applications, but it means the same thing as the more common 7.5 designation.)
TOUCH AND GO CHARLES PETZOLD
Code download available at code.msdn.microsoft.com/mag201202TouchNGo.

85February 2012msdnmagazine.com
Look at the OnPlayStateChanged override fi rst. Th is method is called when the PlayState property of the BackgroundAudioPlayer changes. Th e fi rst argument is the same BackgroundAudioPlayer referenced in the program code; the last argument is a member of the PlayState enumeration.
When the program sets the Track property of the BackgroundAudio-Player in the Click event handler, the BackgroundAudioPlayer access-es the music fi le over the Internet; the SimpleAudioPlaybackAgent DLL is loaded and the OnPlayStateChanged method eventually gets a call with the playState argument set to PlayState.TrackReady. It is the responsibility of OnPlayStateChanged to call the Play method of the BackgroundAudioPlayer object to start playing that track.
If the phone’s regular music player happens to be playing some-thing at the time, it will be stopped. At this point, you can navigate away from the program or even terminate it by pressing the phone’s Back button, and the music will continue playing.
You can run this program in the Windows Phone emulator, but you’ll want to try it on an actual phone so you can press the phone’s volume control. Th is invokes a little drop-down known as the Universal Volume
Control (UVC), which is an important part of background audio. Th e UVC displays the name of the track being played and the artist, based on the arguments that the application supplied to the AudioTrack con-structor. Th e UVC also displays buttons for Previous Track, Pause and Next Track. In this program, only the Pause button is enabled because that’s what I specifi ed in the last argument to the AudioTrack construc-tor. When you press the Pause button, it toggles between Pause and Play.
Th e AudioPlayer class handles these Pause and Play commands in the OnUserAction override shown in Figure 1. Th e UserAction argument indicates the particular button pressed by the user. OnUserAction responds by calling the appropriate method in the BackgroundAudioPlayer object.
When the track finishes playing, OnPlayStateChanged gets a call with PlayState.TrackEnded. Th e method responds by setting the Track property of the BackgroundAudioPlayer to null, which removes the item from the UVC. If you want, you can go back into the application and start the music playing again.
Notice that both OnPlayStateChanged and OnUserAction con-clude with calls to NotifyComplete: Th is is required. Also notice that neither method includes a call to the base class method. Th ese base class calls are part of the template that Visual Studio creates for you, but I had a problem with the OnUserAction override when the base method was called. Th e background audio sample code from Microsoft (available online from the Windows Phone 7.5 documentation area) also doesn’t include calls to the base methods.
A Very Strange DLLWhen experimenting with background audio, you’ll want to keep a watch on the Output window in Visual Studio. When you run SimpleBackgroundAudio from the debugger, the Output window lists all the system libraries that are loaded on the phone to run the program, as well as the program itself, which is SimpleBack-groundAudio.dll. Th e lines in the Output window that list these libraries begin with the words “UI Task,” indicating the program.
When you tap the button in SimpleBackgroundAudio, you’ll see many of the same DLLs being loaded—but now with each line prefaced by the words “Background Task.” Th ese DLLs include the application DLL as well as SimpleAudioPlaybackAgent.dll. Th e loading of these DLLs is one reason it takes a little bit of time for the music to begin playing aft er you tap the button.
As you experiment with programs that play background audio, you’ll probably want to insert Debug.WriteLine statements in all method overrides in the AudioPlayer class, and then study their real-time behavior in the Output window.
You also might want to create a constructor for the AudioPlayer class with another Debug.WriteLine statement. You’ll discover that a new instance of AudioPlayer is instantiated whenever a call needs to be made to OnPlayStateChanged or OnUserAction. Every call gets a new instance!
Th is simple fact has a profound implication: If you need this AudioPlayer class to maintain information between calls to OnPlayStateChanged and OnUserAction, you must keep that infor-mation in static fi elds or properties.
What if you need to pass information from a class in the Simple-BackgroundAudio program to the AudioPlayer class in the Simple-
namespace SimpleAudioPlaybackAgent{ public class AudioPlayer : AudioPlayerAgent { protected override void OnPlayStateChanged(BackgroundAudioPlayer player, AudioTrack track, PlayState playState) { switch (playState) { case PlayState.TrackReady: player.Play(); break;
case PlayState.TrackEnded: player.Track = null; break; } NotifyComplete(); } protected override void OnUserAction(BackgroundAudioPlayer player, AudioTrack track, UserAction action, object param) { switch (action) { case UserAction.Pause: player.Pause(); break;
case UserAction.Play: player.Play(); break; } NotifyComplete(); }
protected override void OnError(BackgroundAudioPlayer player, AudioTrack track, Exception error, bool isFatal) { base.OnError(player, track, error, isFatal); NotifyComplete(); } protected override void OnCancel() { base.OnCancel(); NotifyComplete(); } }}
Figure 1 The AudioPlayer Class in SimpleBackgroundAudio
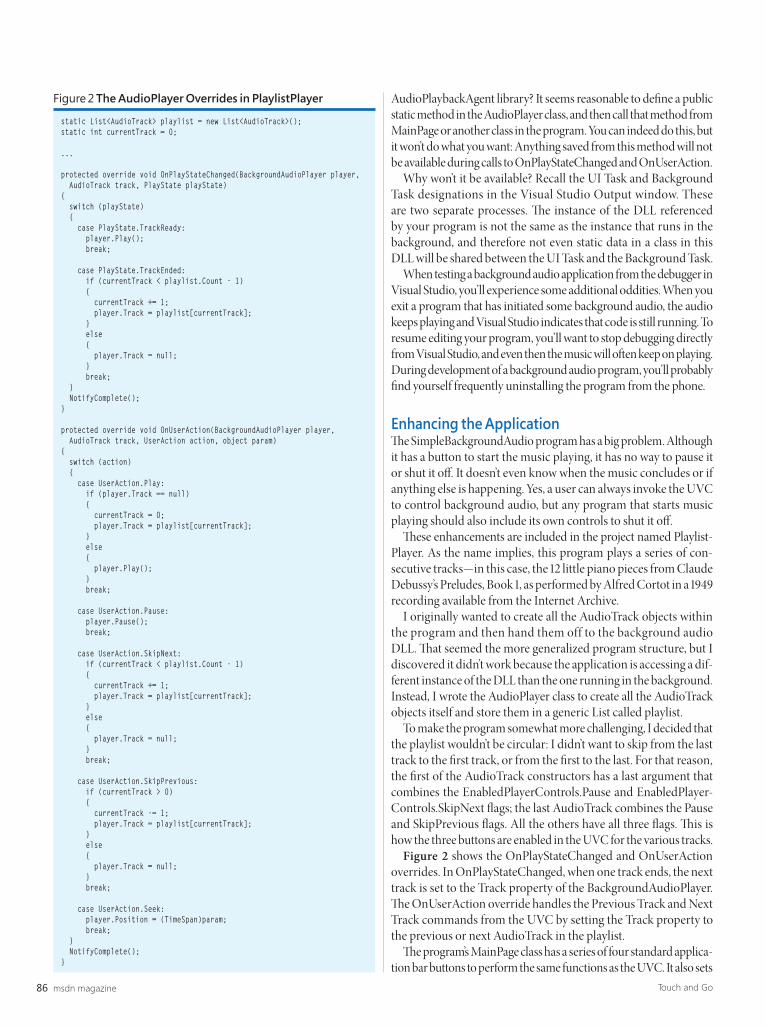
msdn magazine86 Touch and Go
AudioPlaybackAgent library? It seems reasonable to defi ne a public static method in the AudioPlayer class, and then call that method from MainPage or another class in the program. You can indeed do this, but it won’t do what you want: Anything saved from this method will not be available during calls to OnPlayStateChanged and OnUserAction.
Why won’t it be available? Recall the UI Task and Background Task designations in the Visual Studio Output window. These are two separate processes. Th e instance of the DLL referenced by your program is not the same as the instance that runs in the background, and therefore not even static data in a class in this DLL will be shared between the UI Task and the Background Task.
When testing a background audio application from the debugger in Visual Studio, you’ll experience some additional oddities. When you exit a program that has initiated some background audio, the audio keeps playing and Visual Studio indicates that code is still running. To resume editing your program, you’ll want to stop debugging directly from Visual Studio, and even then the music will oft en keep on playing. During development of a background audio program, you’ll probably fi nd yourself frequently uninstalling the program from the phone.
Enhancing the ApplicationTh e SimpleBackgroundAudio program has a big problem. Although it has a button to start the music playing, it has no way to pause it or shut it off . It doesn’t even know when the music concludes or if anything else is happening. Yes, a user can always invoke the UVC to control background audio, but any program that starts music playing should also include its own controls to shut it off .
Th ese enhancements are included in the project named Playlist-Player. As the name implies, this program plays a series of con-secutive tracks—in this case, the 12 little piano pieces from Claude Debussy’s Preludes, Book 1, as performed by Alfred Cortot in a 1949 recording available from the Internet Archive.
I originally wanted to create all the AudioTrack objects within the program and then hand them off to the background audio DLL. Th at seemed the more generalized program structure, but I discovered it didn’t work because the application is accessing a dif-ferent instance of the DLL than the one running in the background. Instead, I wrote the AudioPlayer class to create all the AudioTrack objects itself and store them in a generic List called playlist.
To make the program somewhat more challenging, I decided that the playlist wouldn’t be circular: I didn’t want to skip from the last track to the fi rst track, or from the fi rst to the last. For that reason, the fi rst of the AudioTrack constructors has a last argument that combines the EnabledPlayerControls.Pause and EnabledPlayer-Controls.SkipNext fl ags; the last AudioTrack combines the Pause and SkipPrevious fl ags. All the others have all three fl ags. Th is is how the three buttons are enabled in the UVC for the various tracks.
Figure 2 shows the OnPlayStateChanged and OnUserAction overrides. In OnPlayStateChanged, when one track ends, the next track is set to the Track property of the BackgroundAudioPlayer. Th e OnUserAction override handles the Previous Track and Next Track commands from the UVC by setting the Track property to the previous or next AudioTrack in the playlist.
Th e program’s MainPage class has a series of four standard applica-tion bar buttons to perform the same functions as the UVC. It also sets
static List<AudioTrack> playlist = new List<AudioTrack>();static int currentTrack = 0;
...
protected override void OnPlayStateChanged(BackgroundAudioPlayer player, AudioTrack track, PlayState playState){ switch (playState) { case PlayState.TrackReady: player.Play(); break;
case PlayState.TrackEnded: if (currentTrack < playlist.Count - 1) { currentTrack += 1; player.Track = playlist[currentTrack]; } else { player.Track = null; } break; } NotifyComplete();}
protected override void OnUserAction(BackgroundAudioPlayer player, AudioTrack track, UserAction action, object param){ switch (action) { case UserAction.Play: if (player.Track == null) { currentTrack = 0; player.Track = playlist[currentTrack]; } else { player.Play(); } break;
case UserAction.Pause: player.Pause(); break;
case UserAction.SkipNext: if (currentTrack < playlist.Count - 1) { currentTrack += 1; player.Track = playlist[currentTrack]; } else { player.Track = null; } break;
case UserAction.SkipPrevious: if (currentTrack > 0) { currentTrack -= 1; player.Track = playlist[currentTrack]; } else { player.Track = null; } break;
case UserAction.Seek: player.Position = (TimeSpan)param; break; } NotifyComplete();}
Figure 2 The AudioPlayer Overrides in PlaylistPlayer

87February 2012msdnmagazine.com
an event handler for the PlayStateChanged event of BackgroundAudioPlayer to update the screen with current track information, and a Composi-tionTarget.Rendering handler to update a Slider with current track progress, as shown in Figure 3.
Th e logic to enable and disable the application bar buttons is fairly simple: the Previous Track and Next Track buttons are enabled based on the PlayerControls property of the current Audio-Track; thus they should be consistent with the UVC. Th e Pause button is enabled if the player is playing; the Play button is enabled if the player is paused. If the current track is null, Play is enabled and all the other buttons are disabled.
Th e Click handlers of the four application bar buttons make calls to the BackgroundAudio-Player methods SkipPrevious, Play, Pause and SkipNext, respectively. It’s important to under-stand that these method calls don’t directly con-trol the operation of music playback. Instead, these method calls from the program trigger OnUserAction calls in the AudioPlayer class, and it’s the code in AudioPlayer that actually starts and stops the music.
Th is is somewhat peculiar, because it means that calls to the Play and Pause methods of BackgroundAudioPlayer behave diff erently depending whether they’re called from a program or from the OnUserAction override.
I also added a ValueChanged handler for the Slider to move to a particular location in the track. Th e handler calculates a new position for the track and sets an appropriate TimeSpan object to the Position property of the BackgroundAudioPlayer. Similar to the case with Play and Pause calls, setting this property does not change the position of the track. Instead, it generates a call to the OnUserAction override in AudioPlayer with an action argument of UserAction.Seek and the TimeSpan encoded in the param argument. Th e OnUserAction over-ride then sets this TimeSpan object to the Position property of the BackgroundAudioPlayer, and that’s what actually causes the jump.
In practice, this Slider works fi ne when you just tap it to move ahead or back in the track by 10 percent. If you try to slide it, mul-tiple Seek calls seem to build up, and the result is an audible mess. I would much prefer to use a regular ScrollBar rather than a Slider because then I could wait for an EndScroll event, which occurs when the user stops manipulating the control. Unfortunately, I’ve never been able to persuade the Windows Phone ScrollBar to work at all.
The LimitationsIt’s been interesting to see how Windows Phone 7.5 has given programmers more direct access to the phone’s hardware (such as the video feed) as well as the ability to perform some background processing. But I can’t help thinking there’s a piece missing from this implementation of background audio.
Suppose a program wants to let the user pick from a list of music fi les to play in sequence. Th e program can’t hand off the entire list to the DLL, so it needs to take responsibility to setting the Track
property of the BackgroundAudioPlayer when each track ends. But this can happen only when the program is running in the foreground.
It’s possible to pass some information between the application and the background DLL through the string Tag property of the AudioTrack class. But don’t bother deriving a new class from AudioTrack in hopes of passing additional information to the DLL: A copy is made of the AudioTrack object created by the application for passing to the DLL overrides.
Fortunately, the DLL has access to the appli-cation’s area of isolated storage, so the program can save a small fi le describing the playlist and then the DLL can access the playlist from the fi le. Th e bonus program for this column is a project named PlaylistFilePlayer, which demonstrates a simple approach to this technique.
CHARLES PETZOLD is a longtime contributing editor to MSDN Magazine. His recent book, “Programming Windows Phone 7” (Microsoft Press, 2010), is available as a free download at bit.ly/cpebookpdf.
THANKS to the following technical expert for reviewing this article: Mark Hopkins
Figure 3 The PlaylistPlayer Program

msdn magazine88
My phone does the opposite of the Ring—instead of making me invisible to others, it makes them invisible to me. Th is self-encapsulation started with the Sony Walkman 30 years ago, when we started playing music in headphones to isolate ourselves from our surroundings.
We retreat from physical society and join a virtual one. Former Economist editor Frances Cairncross called this process “Th e Death of Distance” in her book of that title. But as technology closes the distance between people around the world, it simultaneously creates distance between people in close proximity.
Our smartphones cast a strange field that attracts our hands strongly within a range of about a meter, like the strong nuclear force. It then repels other people out to a range of about 5 meters, like similar electrical charges. Th e fi eld then attracts people with similar interests, out to infi nity like gravity, but doesn’t vary with distance. I’ve discovered the fi ft h fundamental force of physics. My Nobel Prize awaits.
Our thoughts bounce around the world but bypass the people sitting with us on the couch or standing next to us on the train plat-form, the ones we’re sharing food with or competing for food against.
Th is much I know: When my daughter sends me a text message at dinner asking me to pass the salt, things have gone too far.
DAVID S. Platt teaches Programming .NET at Harvard University Extension School and at companies all over the world. He’s the author of 11 programming books, including “Why Soft ware Sucks” (Addison-Wesley Professional, 2006) and “Introducing Microsoft .NET” (Microsoft Press, 2002). Microsoft named him a Soft ware Legend in 2002. He wonders whether he should tape down two of his daughter’s fingers so she learns how to count in octal. You can contact him at rollthunder.com.
A Ring Around My Neck
Th is column marks the start of my third year ranting in this space as MSDN Magazine’s designated curmudgeon. On refl ection, I’d call this the biennium of the smartphone, which has crossed over from technophile early adopters to the middle class mainstream. I drank the Kool-Aid and got mine last summer, the day before Verizon shut off its unlimited data plan. Now, like any proud geek, I whip out my phone and demonstrate my cool apps at the slightest excuse, annoying the heck out of everyone else. (“Have you seen this fl ash-light app? I use it at night, when I’m fumbling for my keys and …”)
Whenever you buy an expensive toy, you start noticing people who have the same thing. Take a look at the picture (right) I took last summer at a commuter rail station near Boston. Every one of the waiting passengers has his or her nose stuck into a palmtop device. I did too, until I noticed the others around me, and sur-faced long enough to snap the picture. I wonder how long it’ll be before someone drift s onto the tracks and gets crushed like a bug.
We laugh at the Microsoft commercial of the guy checking his phone at the urinal (bit.ly/ufvwyW), but I see that every day. And I have seen them get dropped in, more than once. Really.
I wish I had Superman’s X-ray vision to spy on my fellow travelers and their gadgets. How many are doing mundane tasks such as pay-ing bills, how many are joining brain power with others into a super-human Overmind, and how many are just looking at dirty pictures?
What is wrong with us? Can we not be alone with our thoughts for the five minutes it takes the train to arrive? Can we not contemplate the summer leaves, or the concept of railroads, or our families, or tonight’s dinner? Do we have to stream action videos every instant? Have we irretrievably devolved from admiring a fellow commuter’s sleek fi gure and wondering how much she paid for her clothes, to admiring her sleek Droid Razr and wondering how much she pays for her data plan?
“Daddy, I hope you’re not going to become one of those boring geeks who always has his nose in his phone,” said my daughter, 11, who desperately wants one of her own.
I try, but I’m astounded how diffi cult it is. Like Frodo in Tolkien’s “Lord of the Rings,” carrying the One Ring of Power around his neck, I fi nd my hand creeping toward my smartphone, and I have to exert a conscious effort to refrain from pulling it out at the Thanksgiving dinner table. Boston’s transportation authority had to ban even the possession of a cell phone while on duty, as employees seem unable to refrain from using them and causing crashes (bit.ly/u4D8Yg). Do we need Gollum to save us from ourselves by biting these things out of our hands?
DON’T GET ME STARTED DAVID PLATT
David Platt looked up from his smartphone during his commute one morning and took this snapshot.