Trimble Connect for Browser - BuildingPoint Scandinavia
166
©2020 Trimble Solutions Corporation User Guide Trimble Connect for Browser October 2020
-
Upload
khangminh22 -
Category
Documents
-
view
0 -
download
0
Transcript of Trimble Connect for Browser - BuildingPoint Scandinavia

©2020 Trimble Solutions Corporation
User Guide
Trimble Connect for BrowserOctober 2020

Trimble Connect for Browser
Table of Contents
Before You Begin 1
Connect Licensing 2
View & Manage Licenses 3Trimble Account & Trimble Subscriptions 3
Tekla Online Subscriptions 3
Check for an Updated License 4
Managing Your Trimble Account & Connect Profile 5
Creating Your Trimble ID & Connect Profile 5Create Your Trimble ID 5
Creating Your Connect Profile 7
Update Your Profile & Preferences 7Supported Languages 9
Removing Your Account 10Delete Account 10
Disable or Deactivating an Account 11
Installation Guide 12
Requirements 12
Projects 13
Understanding Project Types & Features 13
Creating Projects 14Create a New Project 14
Create a Project from a Template 16

Trimble Connect for Browser
Filter, Sort & Change Project View 18Project Server Locations 18
Project Views 18
Switching Projects 19
Leave or Delete Projects 20Leave a Project 20
Delete Project 21
Restore Project 22
Files & Folders 23
Project Folder Structure 23Making Selections 24
Supported File Formats 25Supported 2D File Formats 25
Supported 3D File Formats 26
Supported Geospatial File Formats 27
File & Folder Naming Conventions 28
Upload Files 29File Upload Dialog 29
Drag and Drop Files 31
Upload Progress 32
Add Folders 34Errors 34
Other Ways to Add Data 35Trimble Connect Sync Tool 35
Import From Other Applications 35
Create a new SketchUp model 35
Create a New Map Workspace 35

Trimble Connect for Browser
View File & Folder Details 36View File Details 36
View Folder Details 37
File Assimilation 38Issues Viewing Files 39
Open, View & Edit Files 40Opening a File into Corresponding Viewer 40
Opening Multiple Files in the 3D Viewer 40
Edit in Microsoft Office 365 41
Open in SketchUp 42
File Versions & Revision History 43View Version History for Files 43
Upload a New File Version 43
Download a Revision 44
Known Limitations 44
Share Files 45Share with Specific Members of the Project 46
Share with Signed In Users with a Link 48
Share with Any Users with a Link 50
Update Share Settings 52
Who Can See What I Have Shared 52
Change Control with Check In/Out 53Check Out Files 53
Checking Out Folders 54
See Who's Checked Out a File 54
Check In Files 55
Checking In Folders 55
Check In Someone Else’s File 56
Check In/Out Permissions 56

Trimble Connect for Browser
Download Files & Folders 57
Move Files & Folders 57Drag and Drop to Move 57
Use the “Move to…” Panel 59
Merge & Replace 61
Rename Files & Folders 63Errors 63
Delete Files & Folders 64File Restrictions 64
Restore Deleted Files & Folders 65Restoring Folder Permissions 66
Exporting File Lists 67
Supported Bulk Operations for Files 68
Supported Bulk Operations for Folders 68
Folder Permissions 69Folder Permissions Overview 69
Inherited Folder Permissions 70
Override Folder Permissions 71
Managing Folder Permissions 73
File Permissions 75
Commenting 76
Adding Comments 76Add Attachments 77
Managing Comments 77Edit a Comment 77
Delete an Attachment 78

Trimble Connect for Browser
Delete a Comment 78
Comment Permissions 79
Known Limitations 79
Tags 80
Create or Add New Tags 80
Removing Tags 81
Known Limitations 81
Views 82
Sort & Filter Views 82
View, Modify, Share or Delete Views 83View Details 83
Edit View Details 84
Share Views 84
Unshare a View 85
Delete Views 85
View in 2D or 3D Viewer 86
2D & 3D View Permissions 86
Releases 87
Create a Release 87Add Files to a Releases 87
Understanding File Versions & Releases 90
View & Manage Releases 91Sort & Filter Releases 91
See a Release's Detail Information 92
Managing Open Releases 93

Trimble Connect for Browser
View, Download & Manage a Release’s Files 96View a Release’s Files 96
Download Release Files 97
Export File List to Excel 98
Other Supported File Operations 98
Release Permissions 99
Known Limitations 99
ToDos 100
ToDo Schema 100Topic 100
Comments 101
Viewpoints 102
Create a ToDo 102Create a ToDo in Trimble Connect for Browser 102
Create a ToDo in the 2D or 3D Viewer 103
Add Files or Views to a ToDo 103
View & Manage ToDos 105Sort & Filter ToDos 106
See a ToDo’s Detail Information 107
View ToDo in the 2D or 3D Viewer 107
Edit ToDo Details 108
Edit Multiple ToDos 108
ToDo Attachments 110
Delete a ToDo 111
Import ToDos from an Excel File 112Supported Functions for Import from Excel 112
Import ToDos to a Project 114
Export ToDos 115

Trimble Connect for Browser
Export as BCF Zip Files 115
Export to Excel 115
ToDo Visibility 115
ToDo Permissions 116
Known Limitations 117
Team 118
User Roles 118Project Users 118
Project Administrators 118
Invite Users 119Project Member Invitation Settings 119
Resend an Invitation Email 120
Managing Users 120Change User Roles 120
Remove Users from the Project 121
Deleted Users 123
Benefits of Groups 124View Group Members 124
See What Groups You’re In 125
Managing Groups 125Create New Groups 125
Add a User to a Group 126
Remove a User from a Group 127
Deleting a Group 127
Import and Export Users & Groups 128Supported Functions for Import from Excel 128
Inviting Users to a Project 129

Trimble Connect for Browser
Updating Team Members Information 130
Create Groups by Importing an Excel Spreadsheet 131
Export a Project’s Team Data 132
Activity 133
Tracked Activities 133
View & Filter Activities 138
Export Activities to Excel 139
Search 141
Using Search 141Accepted Search Parameters 141
Supported Bulk Operations 142
Filtering the Results 142
Global Search 143
Searching within a Project 143Advanced Search 143
Project Settings & Details 144
Project Details 144Transfer Project Ownership 144
Notification Settings 145Setting Up Notifications 147
Unit Settings 147Supported Settings 147
To Set the Project Unit Settings 150
User Permission Settings 151

Trimble Connect for Browser
ToDo Visibility 151
Manage Project Invitations 151
Sync Settings 152Sync Mode 152
Sync Filters 153
Resources & Training Material 154
Trimble Connect App Store 154Accessing the App Store 154
Browse and Download 154
User Guides & Documentation 155
Skill Builder Videos 155

Trimble Connect for Browser › Before You Begin 1
Before You BeginTrimble Connect is a collaboration tool that connects the right people to the right constructible data, at the right time.With Trimble Connect you can work anytime, anywhere and from any device – it’s at your fingertips. You are always working with reliable and accurate information. Trimble Connect can be used in different phases of workflows, such as design coordination and review, on-site and off-site communication, and when managing activities and tasks during the entire project.
You can share 3D models, drawings and other documentation: View, review, reference and archive with revision history. Trimble Connect has easy-to-use user interfaces for desktop and mobile (both iOS and Android) and even on Mixed Reality (MR) devices. The platform helps you maintain control over changes thanks to constant collaboration, so that costly rework caused by outdated information becomes an inconvenience of the past.
Trimble Connect links data throughout each phase of the building life cycle to keep your project on schedule and on budget. You can upload and share documents from over 60 industry tools, or add your own source using the powerful API (Application Programming Interface). Trimble Connect and workflow tools are available in 17 languages.

Trimble Connect for Browser › Before You Begin 2
Connect LicensingConnect has 5 main levels of licensing which will give you access to certain areas in the application. Using Trimble Connect requires an active license.
PERSONAL BUSINESS PREMIUM PROJECT ENTERPRISE
Project Creations 1 Unlimited Unlimited 1 Unlimited
Invites to Project 5 Unlimited Unlimited Unlimited Unlimited
Storage 10 GB Unlimited Unlimited Unlimited Unlimited
Project Joins 5 Unlimited Unlimited n/a Unlimited
BIM Coordination � � � � �
Clash Detection � � � � �
Task Management � � � � �
Metadata for Files -- � � � �
Workflow Extensions
Read-only access
Read-only access Full access Full access1 Full access2
Overview & Management Users
-- � � � �
Overview & Management of Projects
-- � � � �
Learn more about our purchasing options here.
1 Full access for everyone on your project, including external users outside your organization2 Full access for everyone in your account as well as external users on projects created under your account.

Trimble Connect for Browser › Before You Begin 3
View & Manage LicensesThere are two places Trimble Connect paid licenses can be managed, the Trimble Account Management Portal or the Tekla Online system. You can quickly access either system directly in the Trimble Connect for Browser application by opening the User () dropdown menu, where you will see options for My Trimble Subscriptions and/or My Tekla Online Subscriptions.
Note: Users with Personal licenses only will not see either of these menu options.
Trimble Account & Trimble SubscriptionsBusiness licenses for Trimble Connect can be purchased directly from the Connect Storefront, via your Trimble Sales Rep or as part of a bundle with other Trimble Applications.
1. After purchasing your license, you will receive an entitlement letter by email.
2. Now you have access to Trimble Account Management Portal that allows you to manage your subscriptions: change plans, add/remove seats, and adjust auto-renewal settings.
Tekla Online SubscriptionsWith one license, you have access to full Trimble Connect functionality and Tekla Structures Workflow Tools. See the phases of managing licenses.
1. After purchasing your license, you receive an entitlement letter by email. Now you have access to Tekla Online Admin tool that allows you to manage your organization's users access rights to Tekla Online services.
2. Invite users to your Tekla Online services organization to grant them Trimble Connect licenses. For more information about inviting users, see Trimble Identity FAQ.
For more information about managing licenses in Tekla Online Admin Tool, see Manage Trimble Identities and Tekla Online licenses.

Trimble Connect for Browser › Before You Begin 4
Check for an Updated LicenseWhen a new Connect license is applied, you can make it available faster (on demand) using the new “Check for updated license” option in the User dropdown menu.
Update a Project LicenseIf you have recently been assigned a new license and want to change the license that is being used on one or more of your projects, you can update the project license by going to the Trimble Connect for Browser application, Project › Settings › Project Details tab. Click the dropdown for Project Billing Account, where you will be able to choose the license you want to be used on this project.
Changing the project billing account and license will change the ownership of the project to the new account. Any existing file metadata being used on the project will be removed and will be replaced by the new account owner’s file metadata template (if the new account is using the feature).
If the license you are trying to use comes from the same account, the ownership of the project will remain the same.
Note: This is a Project Admin function only and not available to all project users.

Trimble Connect for Browser › Managing Your Trimble Account & Connect Profile 5
Managing Your Trimble Account & Connect ProfileYou'll need your Trimble ID to log into any of the Trimble Connect applications.
Creating Your Trimble ID & Connect ProfileIf you are new to Connect, and have never signed up for any other Trimble applications before, you will first need to create a Trimble Identity User Account, which you can use to sign in to any Trimble application, including Trimble Connect.
Create Your Trimble ID 1. Start by going to Trimble Connect
2. You will be asked to sign in to your Trimble Account
3. Click Create new Trimble ID to create a new account
4. You will be taken to the Create your account page
5. Enter your name, email address, and password. Click Create new account
6. You will be asked to confirm your email
7. Go to your inbox and open the confirmation email. Click Activate

Trimble Connect for Browser › Managing Your Trimble Account & Connect Profile 6
8. You can now sign in to your account
9. Once you sign in to your account, you will be asked to complete your Connect Profile (covered in the next section)
IMPORTANT NOTES
Email Address This must be a unique email address and cannot be associated to any existing Trimble Accounts. If you get an error that the email address is being used already, you can go through the Forgot Password flow to reset your password if you have forgotten it.
Password Passwords must contain• 8 Characters• A digit [ 0-9 ]• A combination of lower & uppercase letters [ aA-zZ ]• A special character [ !@#$%&*^_-+ ]

Trimble Connect for Browser › Managing Your Trimble Account & Connect Profile 7
Creating Your Connect ProfileIf you are signing in to Connect for the first time, you will be asked to complete your Connect profile before you can continue.
Once you have completed this step, you will be taken to the Projects page where you can now start using Trimble Connect!
Update Your Profile & PreferencesYou can update various parts of your user profile by going to the My Profile page.

Trimble Connect for Browser › Managing Your Trimble Account & Connect Profile 8
All of this information is part of your Trimble Identity User Account (also known as TID—which includes your user name and password credentials).
EDITABLE FIELDS
First & Last Name Choose how you want your name to be displayed inside Trimble Applications.
Profile Photo This will be displayed in Connect projects on the Team page.
Job Title Choose from a predefined list of options of type your own.
Time zone This is used for showing the timestamps localized to where you are.
Language Connect can be translated into 17 different languages.
For more information see Trimble Connect Supported Languages
NON-EDITABLE FIELDS
Email Address You cannot change an email address tied to an existing TID account. You will need to create a new account to use a new email address.
Company Name The company name cannot be changed without the help of Trimble Support. When the first user from an email domain (e.g. @mycompany.com) registers in Trimble Connect, the company name that they provide becomes associated with that company name. All new users who register with the same email domain are linked to the same company in Trimble Connect.
Trimble Connect for Browser › Managing Your Trimble Account & Connect Profile 9
Removing Your Account
ATTENTION: Deleting your account is not recommended! Your Trimble Identity (TID/username and password) is shared and used by other Trimble Applications—it is NOT specific to just Trimble Connect.
By deleting your account, you will lose access to your Trimble Account and any subscriptions that have been assigned to your TID.
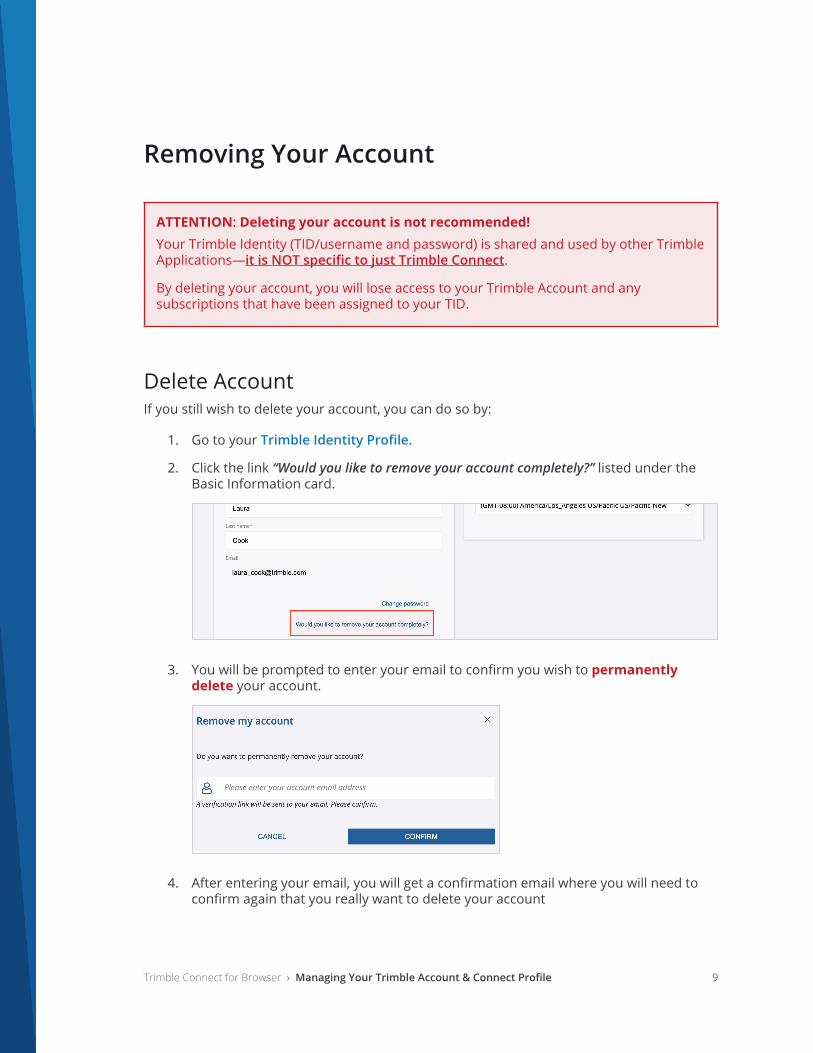
Delete AccountIf you still wish to delete your account, you can do so by:
1. Go to your Trimble Identity Profile.
2. Click the link “Would you like to remove your account completely?” listed under the Basic Information card.
3. You will be prompted to enter your email to confirm you wish to permanently delete your account.
4. After entering your email, you will get a confirmation email where you will need to confirm again that you really want to delete your account

Trimble Connect for Browser › Managing Your Trimble Account & Connect Profile 10
Note:
Once your account has been deleted, our support team will not be able to restore it for you.
If you have any questions or concerns about your account, please reach out to one of our Support Team before you delete your account so we can try to help or address any issues you might be facing.
Disable or Deactivating an AccountCurrently it is not possible to disable or deactivate your account.

Trimble Connect for Browser › Installation Guide 11
Installation GuideWhile there is no software or plugins required to be installed for you to use the Trimble Connect for Browser application, there are some browser requirements to keep in mind.
RequirementsDue to the advanced requirements of the 3D viewer technology, 3D viewing is not supported in Internet Explorer.
Starting November 1st 2020, Internet Explorer 11 will no longer be a support browser. We recommend Internet Explorer users to use Microsoft Edge or another supported browser (listed below).
SUPPORTED BROWSERS
Chrome
Safari
Edge
Firefox
Recommended Internet Connection
• Recommended 10+ Mbps
• Minimum 2 Mbps
For the full list of requirements please see System Requirements

Trimble Connect for Browser › Projects 12
Projects
Understanding Project Types & Features Project type and Connect licenses go hand-in-hand. When you create a project, the license that is assigned to you also gets applied to the project. Some features may be restricted based on the license that is associated with the project.
As a general rule of thumb, the following is a breakdown of the type of project that is created based off the license that is used/assigned to the project:
PROJECT TYPE LICENSE
Personal / Free Project Trial or Personal license
Business Project Business or Business Premium
Enterprise Project Project License or Enterprise License
Overview of the Project Type & Available Features
PERSONAL PROJECT BUSINESS PROJECT ENTERPRISE PROJECT
Storage 10 GB Unlimited Unlimited
Project members 5 total3 Unlimited with some license restrictions4
Unlimited - no license restrictions
Project invitations 5 total5 Unlimited Unlimited
Workflow Extensions
Available only for users with Business Premium6
Available only for users with Business Premium6
Available to all users - no license restrictions
3 The number of project users includes removed users. Trimble Connect doesn't support re-inviting removed users to a project with a free license.
4 Business projects require users to have a business or higher license. Personal license users can join up to 5 business projects with full business access, after the limit is reached, users will have read-only access.
5 Per the Personal license, you are only allowed to send 5 total project invitations.6 Users with a Business Premium license can collaborate in all project types and be able to use all the Workflow Exten-
sions. If other members in the project do not have Business Premium, they will have Read-only access to any data

Trimble Connect for Browser › Projects 13
Creating ProjectsYou can create a new Trimble Connect project, or you can use an existing project as a template for your project.
Create a New Project 1. Log into Trimble Connect for Browser.
2. Click the New button at the top-right of the page.
3. Enter the project name, project image, project location and other optional details.
4. Click Submit.
5. Your project is now ready for use.
created and stored in the Organizer or Property Set Service.

Trimble Connect for Browser › Projects 14
Project Fields & Descriptions
OPTION DESCRIPTION
Project Server Location
The project server location setting is important as Trimble Connect servers are located in three different regions, North America, Europe, and Asia, to increase the performance for customers located all over the world. Select the region closest to you.
Note: The project server location cannot be changed once the project is created.
Project Subscription Inside the dropdown menu, you will see a list of all licenses available for your Trimble Identity, along with the account information where the license comes from. Select the license/account you want the new project to belong to. The selection can be changed later in Project Details.
Note: Project ownership is determined by the project’s license which is applied during project creation. The account which owns the license is considered the project owner.
Description Add a description for what the project is about or for. The information can be changed later in Project Details.
Start Date/End Date Add duration of the project. The information can be changed later in Project Details.
Watch the Skill Builder Video: Creating a New Project

Trimble Connect for Browser › Projects 15
Create a Project from a Template You can create a new project by including the project settings, project members, project groups, and folder structure from an existing project. Please note you must be a Project Administrator for the project to do this function.
Template Options and DescriptionsBelow are the options you can choose to copy to the new project
OPTION DESCRIPTION
Project Settings This will copy the project settings for:• Notification settings• Unit settings• User permissions• Sync settings• Viewer settings
Project Members Copy the current project members and their role in the project.
Note: This does not include members who have been removed from the existing project.
Groups Copy all groups that have been defined in the project. If the Project Members option is selected, they will be added to the same groups.
Folder structures Copy the entire folder structure and all permissions that have been specified for the copied project members or groups.
Note: If you do not select the Project Members or Groups check boxes, the permissions related to those members or groups are not copied to the new project folders.

Trimble Connect for Browser › Projects 16
To Create a Project from a Template
1. On the projects page, click the Overflow Menu () on an existing project. Select Use as template for a new project.
2. The New from existing project dialog box opens.
3. Select the following check boxes to define the configuration of the new project
4. Click Next. The New Project dialog box opens.
5. Type in a name for the new project.
6. Click More options to add Description, Start Date and End Date. The project server location menu is deactivated and a new project is created in the same server location as the original project.
7. Click Submit.
8. Trimble Connect will send email notification once a new project has been created and ready in Trimble Connect.
Quick Tip
Depending on the sort order of your projects, your new project may appear at the end of the project listing page.

Trimble Connect for Browser › Projects 17
Filter, Sort & Change Project View
Project Server LocationsThe Project Location setting is important as we have our servers in three different regions to increase performance for customers located all over the world. Please choose the region closest to you.
The servers are located at the following regions:
• North America
• Europe
• Asia Pacific
Projects that you have created or been invited to will be separated by these regions. The default region is set to North America.
Project ViewsChoose between list () and tile () view to list your projects. The default sorting for projects is Last Visited by Me.

Trimble Connect for Browser › Projects 18
By using the table view you can sort projects by:
• Name
• Size
• Last Visited by Me
• Last Modified
Switching Projects Quickly switch between recent projects by using the Project Dropdown (accessible once you are inside a project. The 5 most recent projects will be listed. You can also search for a project if the one you are looking for is not listed.
Note: The project search function inside this widget is restricted to the active project region.

Trimble Connect for Browser › Projects 19
Leave or Delete Projects
Leave a ProjectIf you no longer wish to be a part of a project, you can leave the project. Once you leave a project, you will not be able to rejoin unless you are invited back into the project by an active project member.
If you are the only Project Admin in the project, you cannot leave until you assign the Project Admin role to another project member.
Changing Project Ownership Before you LeaveIf a project was created using your license, leaving the project does not remove your license from the project. If ownership of the project needs to be transferred to another account, please do so before you leave the project.
Any Project Admin can change the project’s Subscription/Billing Account (found on the Project Details page).
To leave a project:
1. Log into Trimble Connect for Browser.
2. Click on the Overflow Menu () of the project.
3. Select Leave Project.
4. A dialog will appear to confirm your choice.
5. After you select Leave, you will be removed from the project and it will be removed from your projects listing.

Trimble Connect for Browser › Projects 20
Alternative option
1. Log into Trimble Connect for Browser.
2. Go into the project.
3. Go to Settings › Project Details.
4. Click Leave Project (located at the bottom of the page).
5. A dialog will appear to confirm your choice.
6. After you select Leave, you will be removed from the project and taken back to the Projects page
Important Note for Personal License Users
Leaving a project does not affect the number of allotted projects you can join (5 total).
Delete ProjectOnly a Project Admin in the project is allowed to delete a project forever. This delete action is executed through 2-step confirmation with a clear note that the project will not be restored once deleted.
We do not recommend deleting a project that others may have been collaborating with you on as this any data inside the project will be lost forever. If you do wish to delete, please back up the project's data before deleting the project as this cannot be undone, users will not be able to restore the project after completing this process and the project will no longer be available for all members.

Trimble Connect for Browser › Projects 21
If you need to delete a project:
1. Log into Trimble Connect for Browser.
2. Go into the project.
3. Go to Settings › Project Details.
4. Click Delete Project (Located at the bottom of the page).
5. A dialog will appear to confirm your choice.
6. After you select ‘Delete project forever’, you will be taken back to the Projects page and the project will be deleted.
Restore ProjectAccidents happen. If you accidentally deleted a project, please contact [email protected] for restoration of the project.
Currently there is no way for a user to restore the deleted project.

Trimble Connect for Browser › Files & Folders 22
Files & Folders
Project Folder StructureBrowsing your project folder structure has never been easier.
To Access the Folder Structure:
1. Navigate to a project
2. Open the Data Menu
3. Click on the Folder () icon shown next to Explorer
4. The Folder Tree will open
Quick Tip
Within this view, you can easily change permissions () or download () the folder to your computer by clicking the Overflow Menu () for the desired folder.

Trimble Connect for Browser › Files & Folders 23
Making Selections
Use the SHIFT key to select a group of consecutive files or folders
1. Select the first file or folder you want (by clicking anywhere in the highlighted green area shown below).
2. Press and hold the SHIFT key.
3. Select the last file you want.
4. Release SHIFT key and all selected files remain highlighted.
Use the checkbox to select a group of individual files:
1. Select the first file you want (by clicking anywhere in the highlighted green area shown above).
2. Continue to select files by clicking the check box (located in the first column).
Trimble Connect for Browser › Files & Folders 24
Supported File FormatsTrimble Connect supports multiple 2D, 3D, and geospatial file formats.
Supported 2D File Formats 2D files can be photos, text files, excel sheets, documents, or other similar files.
• BMP
• DOC
• DOCX
• DWG
• GIF
• JPEG
• JPG
• PNG
• PPT
• PPTX
• RTF
• TIF
• TIFF
• TXT
• XLS
• XLSX

Trimble Connect for Browser › Files & Folders 25
Supported 3D File Formats • DGN (.dgn)
• DWG (.dwg - AutoCAD 2013 and below)
• DXF
• IFC (2x3, 4)
• IFC XML (.ifcXML)
• IFC ZIP (.ifcZIP)
• IGES
• IGS
• LAS
• LAZ
• Potree (Point Cloud)
• Revit (2019, 2020 and 2021, with Revit Add-On)
• SKP (2019 and below)
• STEP (.stp, .step)
• STP
• TC ZIP (.tcZIP)
• TRB
• XML
Note
Files related to Rhinoceros applications are no longer supported. This means that the file formats OBJ, FBX, 3DS, STL, 3DM, and SLDASM cannot be viewed using Trimble Connect 3D Viewer.
The 3D Viewer does not work with Digital Project and CATIA formats because of changes in licensing agreements. As a workaround, you can export your models from Digital Project and CATIA to IFC format and then import them to Trimble Connect.

Trimble Connect for Browser › Files & Folders 26
Supported Geospatial File Formats• GDB (when compressed as .zip files)
• Geospatial .zip files
• JOB
• JXL
• KML
• KMZ
• SHP (when compressed as .zip files)
• VCA
• VCE
Note
The file size limit when imported in Map Viewer is 40 MB, beyond which the files are supported in the read-only mode.
One .zip file should only have one type of geospatial files. For example, a .zip file having SHP and VCE files is not recommended.
Shape files may not be processed correctly if the coordinate system information in a .PRJ file cannot be matched to a known coordinate system.

Trimble Connect for Browser › Files & Folders 27
File & Folder Naming ConventionsDue to certain operating system (OS) file name restrictions, do not use the following characters in file names:
• < (less than)
• › (greater than)
• : (colon)
• " (citation mark)
• / (forward slash)
• \ (backslash)
• | (vertical bar or pipe)
• ? (question mark)
• CHAR. (Characters followed by dot)
• * (asterisk)
• .. (double dot)

Trimble Connect for Browser › Files & Folders 28
Upload Files When creating a new project Trimble Connect for Browser provides a quick on-boarding experience for users to upload files, create folders, create a new Sketchup model, create map workspace or synchronize the project from a local desktop to the project data tab.
Later on, the files or folders can be added and created using menu commands or automated synchronization.
File Upload Dialog1. Navigate to a project.
2. Go to the Explorer page.
3. Click the + Add button.
4. Select Upload Files.

Trimble Connect for Browser › Files & Folders 29
5. The File Upload Dialog will open.
6. Click Browse to open your local File Explorer.
7. Or simply select files on your desktop, then drag and drop them in the Drop Area.

Trimble Connect for Browser › Files & Folders 30
Drag and Drop FilesSimply select files on your desktop, then drag and drop them in the Data tab area.
You can also drag and drop files into specific folders by hovering over the desired folder.
Note
It is not possible to upload folders.

Trimble Connect for Browser › Files & Folders 31
Upload Progress A file upload progress widget will appear while files are uploading, indicating how many files have been successfully uploaded.
You can expand the widget to:
• See the individual status for each file
• Cancel all the remaining uploads
• Cancel a single upload
• See details for failed uploads

Trimble Connect for Browser › Files & Folders 32
Failed UploadsFailed uploads can be the result of improper file names, lost Internet connection, or size limitations. You can verify the issue by hovering over the See Details link.
Restart an UploadIn the case of failed uploads or canceled uploads, you can restart the process by hovering over the Info () or Canceled () icon and clicking the Restart () button.

Trimble Connect for Browser › Files & Folders 33
Add Folders1. Navigate to a project.
2. Go to the Explorer page.
3. Click the + Add button.
4. Select Create Folder. The Create Folder in dialog box opens.
5. Type in the folder name.
6. Click Submit.
ErrorsFolder names must be unique. If you attempt to create a folder with the same name, an error will show and not allow you to create the folder.

Trimble Connect for Browser › Files & Folders 34
Other Ways to Add Data
Trimble Connect Sync ToolUsers can download the Trimble Connect Sync tool from the Trimble Connect App Store. The Sync Tool allows you to synchronize the project data from your local desktop to your Trimble Connect project on the server.
Import From Other ApplicationsYou can upload files to Trimble Connect directly from SketchUp, Tekla and Revit:
• For SketchUp you can use the SketchUp extension.
• For Tekla you can use the Trimble Connector.
• For Revit you can use the Trimble Connect for Revit add-in.
Create a new SketchUp model1. Go to the Explorer page.
Alternatively, go to the my.sketchup.com page.
2. Click the + Add button.
3. Select Create 3D Model. A new window opens where you can create a SketchUp 3D model. You do not need to install the tools on your local computer.
Create a New Map WorkspaceIn the map workspace, you can manage GIS data collection.
1. Click the + Add button.
2. Select Map Workspace. The Map workspace details dialog box opens in a new window.
3. Type in a name and a description for the new map workspace.
4. Click Save.

Trimble Connect for Browser › Files & Folders 35
View File & Folder Details
View File DetailsFrom the Data › Explorer Page, click on a file listed in the table. The file detail panel will appear on the right side of the screen.
All files will include the basic information:
1. View Button
2. Action buttons: Delete, Share, Download, Overflow Menu
3. Details Tab
a. Thumbnail
b. File name
c. Created by
d. Size
e. Modified by
f. Tags
g. File Metadata7
4. Activity Tab
5. Comments Tab
6. Revisions Tab
7 If the owning account has a template

Trimble Connect for Browser › Files & Folders 36
View Folder DetailsFrom the Data › Explorer Page, click on a folder listed in the table. The folder detail panel will appear on the right side of the screen.
All folders will include the basic information:
1. Action buttons: Delete, Download, Overflow Menu
2. Details Tab
a. Thumbnail
b. Folder name
c. Created by
d. Size
e. Modified by
f. Tags
g. Folder Permissions
3. Activity Tab
4. Comments Tab
5. Revisions Tab

Trimble Connect for Browser › Files & Folders 37
File Assimilation In order to view supported files in Trimble Connect, they must complete the assimilation process. This process includes translating the file format so it can be viewed in Trimble Connect and to collect data from the file that is used in reporting, clashes, etc. Depending on the number size and complexity of files that are uploaded, it may take some time before they can be processed. You can verify the status by selecting the file and viewing the status in the right pane.
When a 3D model file is uploaded, it needs to go through an assimilation process in order to be loaded by the viewer. This process is not instant and can take a few minutes to complete.
• While processing, the file will not be available for viewing and a message will appear stating the "File is still being processed…"
• Once this process is complete, you will be able to view the model in the viewer as well as the thumbnail of the model in the properties section of the model.
• The status of a file that is being processed can be checked by selecting the file and viewing the right pane. Users can subscribe to a processing completion notification email on any file by selecting the "Notify me when done" checkbox.
Processing Status Explained
STATUS DESCRIPTION
Processing Viewer Data (In queue)
This means the file is waiting in the queue and will get picked up once other files are done processing.
Processing Viewer Data (xx%)
This means the file has been picked up and is currently being processed. The percentage shows the estimated amount of the progress from 0 to 100%.
Note: Select and unselect the file to refresh the % status of processing.
Processing: Generating Thumbnail
This means the processing is complete and the thumbnail is now being generated.
Once the processing is complete the processing status is no longer visible and you will now see a thumbnail for the file.

Trimble Connect for Browser › Files & Folders 38
Issues Viewing FilesThere are a few reasons why your file is not displaying in the 2D or 3D Viewer. Some of those issues are caused by incompatible files or issues with the Trimble Connect server.
CAUSE DESCRIPTION
Processing Failed Files may have failed due to an internal server issue. If the file fails to pass Assimilation, please contact Trimble Connect Support.
Unsupported Format You may have uploaded the file which isn't supported by Trimble Connect. See "Supported File Formats" section for the list of supported formats.
Note: Some files require you to use an add-in/plug-in from the original authoring tool.

Trimble Connect for Browser › Files & Folders 39
Open, View & Edit Files
Opening a File into Corresponding Viewer1. Go to the Explorer page.
2. Select a file by selecting clicking anywhere in the row Note: clicking the file name will open the file in the Viewer application automatically.
3. When you have selected a file, you can see a preview of the file in the Details panel on the right-side.
4. To view the file, click the View button or the model thumbnail in the Details panel on the right-side.
Note: DWG and DFX files have the option to open in the 2D or 3D Viewer:
Opening Multiple Files in the 3D Viewer All files listed in "Supported 3D File Formats" can be opened in the 3D Viewer at the same time.
To view multiple 3D models at the same time in the 3D Viewer:• Go to the Explorer page.• Select multiple 3D files.• Click the View button to open the models in the 3D Viewer.
Note: Attempting to open multiple Geospatial or 2D files simultaneously will result in an error indicating the operation could not be completed.
User Guides for our 2d & 3D Viewers Coming Soon!
Watch the Skill Builder Video: Viewing Project Files

Trimble Connect for Browser › Files & Folders 40
Edit in Microsoft Office 365Connect for Browser now enables opening Microsoft documents in Office 365 applications! The file detail panel offers an option to open documents in Office 365 applications:
Read and edit support is provided for .docx (Word), .xlsx (Excel) and .pptx (PowerPoint) formats; read-only access is available for .doc, .xls, .ppt and .vsdx (Visio) files.
Users with Office 365 Business license are able to edit documents and save changes directly to Trimble Connect. After activation of “Edit” mode, Office file content can be changed without downloading the file to your local machine and re-uploading after completing your edits. Actions that save the content in the document after editing to Connect are:
• Closing the browser window• Refreshing the browser• Changing the mode from “Editing” to “Viewing”
Changes made to the file content are saved directly to Connect and result in a new version of the file, accessible through the file details in the right-side panel in Data Explorer.
Note: There is a delay of about a minute for the file version change to be visible.
Watch the Skill Builder Video: Microsoft Office 365 Integration

Trimble Connect for Browser › Files & Folders 41
Open in SketchUpYou can view SketchUp files in the My SketchUp web viewer. All the SketchUp files on the project have a SketchUp button.
1. Go to the Explorer page.
2. Select a SketchUp file that you want to view.
3. Details panel opens on the right side.
4. Click the SketchUp button to launch the My SketchUp web viewer in another tab.
Changes made to the file content are saved directly to Connect and result in a new version of the file, accessible through the file details in the right-side panel in Data Explorer. Note that there is a delay of about a minute for the file version change to be visible.

Trimble Connect for Browser › Files & Folders 42
File Versions & Revision HistoryTrimble Connect allows you to track, download and view the revision history of your uploaded files. The right panel that displays file/folder properties will allow you to view all of the revisions of a file, download a particular revision of the file and view a particular revision of the file.
View Version History for Files1. Go to the Explorer page.
2. Select a file. The Details panel opens on the right side.
3. To view the version history click the Revisions tab on the Details pane.
4. The Revisions tab lists all revisions of the file or the folder from it's first upload.
5. Click the thumbnail image of a revision to view that revision. The file is loaded in the 2D or the 3D Viewer.
Upload a New File VersionTo upload a new file version, the file must have the same name as the file stored in Trimble Connect. If the name of the file does not match the file you are trying to upload, it will be considered a new file and not replace the current one stored in Connect.

Trimble Connect for Browser › Files & Folders 43
Download a RevisionYou can download revisions of files and folders.
1. Go to the Explorer page.
2. Select a file. The Details panel opens on the right side.
3. To view the version history click the Revisions tab on the Details pane.
4. The Revisions tab lists all revisions of the file or the folder from it's first upload.
5. Click the Download button under the revision information.
The revision is automatically downloaded onto your device.
Known Limitations• Moving the file to a different folder creates a new version of the file or folder
• Renaming the file creates a new version of the file or folder
• It is not possible to upload a new revision of a file with a different name

Trimble Connect for Browser › Files & Folders 44
Share FilesThe Share Data feature allows users to share files from a project with internal and external users.
You can share the files that are stored in Trimble Connect in 3 ways:
SHARE SETTING DESCRIPTION
Specific members of the project
Files can be shared with specific project members which will override any folder level restrictions previously applied to the user.
Signed in users with the link
Using this setting will allow any logged in user who has the link to be able to access the file.
Any users with the link Public or anonymous link sharing. Anyone who has the link can access the file, without signing in to their Trimble Account.

Trimble Connect for Browser › Files & Folders 45
Share with Specific Members of the ProjectUse this share option to share a file or files with project members. An email notification will be sent to the specified users so they can access the file(s).
Note: If the file(s) are stored in a folder that the user does not have access to, sharing with them will override this setting. However, they will still have no access to the folder, which means they will not be able to navigate or access the file from inside the project folder structure.
Share Options
OPTION DESCRIPTION
Notify Field Specify individual project member(s) or Group(s).
Note Field Add a personal message that will be shown in the email notification to the user(s).
To share with specific members of the project
1. Go to the Explorer page.
2. Select a file or files. The Details panel opens on the right side.
3. Click the Share button at the top of the Details pane.

Trimble Connect for Browser › Files & Folders 46
4. The Share Data dialog box opens. Enter the needed information.
5. Click Share.
Email Notification to the Recipient(s)After you share the file, the recipients will receive an email where they can download the file(s) or open them in the 2D or 3D Viewers.
Note
Viewing of a file is not tracked as an activity, but if the recipient downloads the file(s), this will be shown in the Activity Feed.

Trimble Connect for Browser › Files & Folders 47
Share with Signed In Users with a LinkUse this share option to share a file or files with users who are not part of your project, but have a Trimble Account. An email notification will be sent to the specified users so they can access the file(s). They will be required to sign in to the application before gaining access.
Share Options
SHARE SETTING DESCRIPTION
Notify Field Specify the email address for the user(s).
Note Field Add a personal message that will be shown in the email notification to the user(s).
Link expires on Time limit for the shared data. Users can only view/download the shared data within the selected time limit.
Allow access to Select whether users can View only or View & download the share data.
Show latest version Version restriction for the file. When selected, only the latest version of the file is shown to the user.

Trimble Connect for Browser › Files & Folders 48
To share with signed in users
1. Go to the Explorer page.
2. Select a file or files. The Details panel opens on the right side.
3. Click the Share button at the top of the Details pane.
4. The Share Data dialog box opens.
5. Change the Share with field to Signed in users with a link
6. Enter the needed information.
7. Click Share
Email Notification to the Recipient(s)After you share the file, the recipients will receive an email where they can download the file(s) (if that option was selected) or open the file(s) in the 2D or 3D Viewers.
Note
Viewing of a file is not tracked as an activity, but if the recipient downloads the file(s), this will be shown in the Activity Feed.

Trimble Connect for Browser › Files & Folders 49
Share with Any Users with a LinkUse this share option to share a file or files with users who are not part of your project, and do not have a Trimble Account. An email notification will be sent to the specified users so they can access the file(s). They will not be required to sign in to the application to gain access to the file(s).
Share Options
SHARE SETTING DESCRIPTION
Link expires on Time limit for the shared data. Users can only view/download the shared data within the selected time limit.
Allow access to Select whether users can View only or View & download the share data.
Show latest version Version restriction for the file. When selected, only the latest version of the file is shown to the user.
Notify Field Specify the email address for the user(s). This is required.

Trimble Connect for Browser › Files & Folders 50
To share with any user with a link
1. Go to the Explorer page.
2. Select a file or files. The Details panel opens on the right side.
3. Click the Share button at the top of the Details pane.
4. The Share Data dialog box opens.
5. Change the Share with field to Any users with a link
6. Enter the needed information and email address of the recipient.
7. Click Share
8. The Share links dialog will show. You can copy the links or click Ok.
Email Notification to the Recipient(s)After you share the file, the recipients will receive an email where they can download the file(s) (if that option was selected) or open the file(s) in the 2D or 3D Viewers.
Note: Viewing of a file is not tracked as an activity, but if the recipient downloads the file(s), this will be shown in the Activity Feed.

Trimble Connect for Browser › Files & Folders 51
Update Share Settings If you need to make changes to any of the share settings, this can be done by going to the Activity page and editing the Share, this is also how you can revoke or cancel a share.
These options are also available to Project Administrators.
Who Can See What I Have SharedOnly you and the Project Administrators can see what has been shared and who it has been shared with.

Trimble Connect for Browser › Files & Folders 52
Change Control with Check In/OutUse check-in and check-out in Trimble Connect for Browser for collaborative revision control. You can check out a file to prevent other users from making changes while you modify it. After modifications the file can be checked back in. A file will not be synchronized if the file is currently checked out.
When you want to check out and edit files, do it in the following order:
1. Check out the file(s)
2. Open the document in a supported app
3. Edit the file(s)
4. Save the file(s) and upload back to Trimble Connect
5. Check in the file(s)
Check Out Files1. Go to the Explorer page.
2. Select a file. The Details panel opens on the right side.
3. Click the Overflow Menu () on the Details pane.
4. Select Checkout File(s).
5. A lock () icon appears on the left of the file that you checked out.

Trimble Connect for Browser › Files & Folders 53
Checking Out FoldersFolders cannot be checked out. However, files inside the folder can be checked out. To check out all the files inside a folder - do the same steps as above (but with a folder selected instead of a file).
See Who's Checked Out a FileIf you need to get to a file but it's checked out, you can view which user has it checked out so you can contact them. To see the user, go to the Detail Tab in the File Detail Panel. The user who checked out the file will be listed below the Last Modified information.
Checking out and checking in files is also tracked as an activity. Learn more about tracking activities in the "Activity" section.

Trimble Connect for Browser › Files & Folders 54
Check In Files1. Go to the Explorer page.
2. Select a file. The Details panel opens on the right side.
3. Click the Overflow Menu () on the Details pane.
4. Select Checkin File(s).
5. After the files are checked back in, the lock will be removed and actions can be done on the files by others.
Checking In FoldersFolders cannot be checked in. However, files inside the folder can be checked in. To check in all the files inside a folder - do the same steps as above (but with a folder selected instead of a file).

Trimble Connect for Browser › Files & Folders 55
Check In Someone Else’s FileOnly a Project Admin can check a file back in that was checked out by someone else.
When you check-in the file, you'll get a warning dialog asking you to confirm you want to override the checked out file. Select Yes to check the file back in.
Check In/Out Permissions
USER WHO CHECKED OUT THE FILE
OTHER PROJECT USERS8
PROJECT ADMINISTRATORS
Rename/Move � � �
Delete9 � � �
Download Checked-Out File � � �
Share � � �
Add to Release � � �
Add to ToDo � � �
Upload New Version � � �
Check-In the File � � �
8 Assuming the user has permission to do these actions9 Files that are associated to ToDos or Releases cannot be deleted

Trimble Connect for Browser › Files & Folders 56
Download Files & Folders
To Download:
1. Go to the Explorer page.
2. Select the files or folders you want to download. The panel on the right side lists the selected files and folders.
3. Click the Download button at the top of the pane.
The selected files and folders are added to a .zip file which is downloaded to your local computer.
Move Files & Folders
Drag and Drop to Move1. Make a selection
a. Use the SHIFT key to select a group of consecutive files or folders
b. Use the checkbox to select a group of individual files or folders
c. Select a single item
2. Use the mouse or trackpad to press and hold anywhere on the selected group
3. Drag and drop the group into a folder
Trimble Connect for Browser › Files & Folders 57
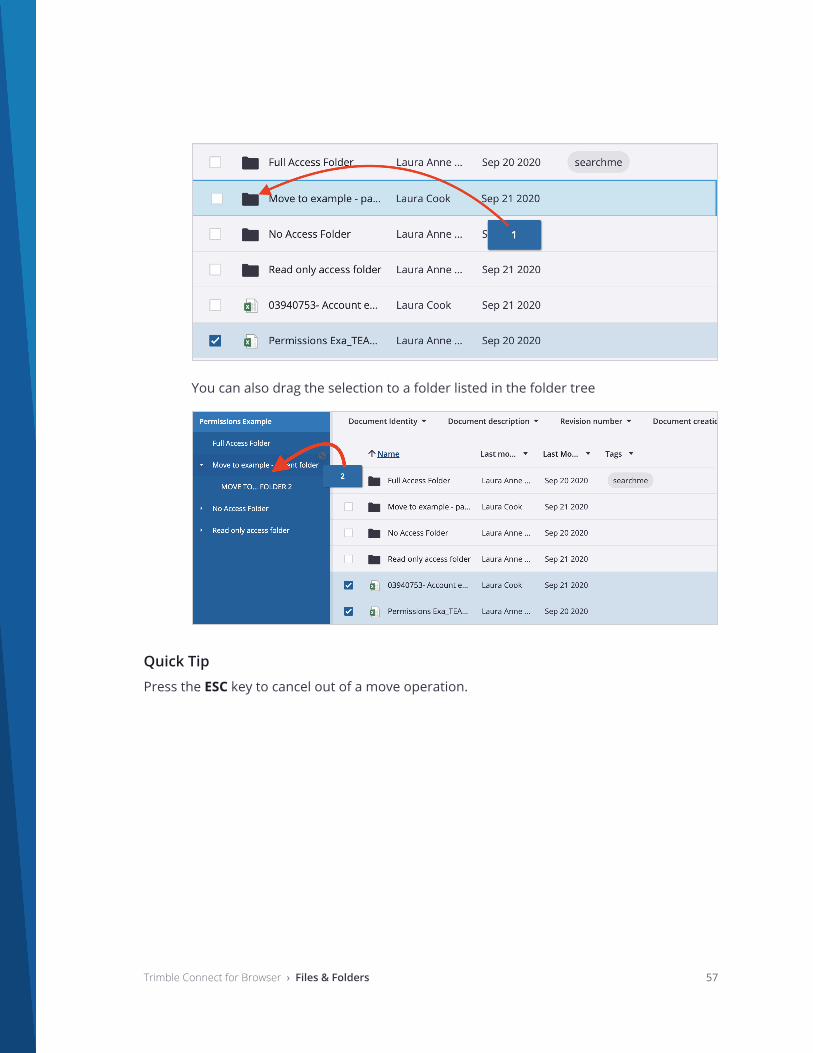
You can also drag the selection to a folder listed in the folder tree
Quick Tip
Press the ESC key to cancel out of a move operation.

Trimble Connect for Browser › Files & Folders 58
Use the “Move to…” Panel If you don't like to drag and drop, you can use the Move to… widget to easily navigate to the folder where your selected items should be moved to.
1. Make a selection
2. Open the Overflow Menu () and select Move to…
3. The Move to… panel will open
4. The Move here button is disabled since you cannot move an item to its current location.
5. If you are at the Root level of the project, the project name will be listed in the header

Trimble Connect for Browser › Files & Folders 59
Note: Folders that you only have Read Only Access will be shown grayed out
6. You can select one of the listed folders or use the arrow () button to navigate to a nested folder
7. Navigate to the desired folder and click Move here
If there are no conflicts (ex. Moving files to a location which already contains other files with the same name), then you will see a confirmation message that the file(s) were moved successfully.

Trimble Connect for Browser › Files & Folders 60
Merge & ReplaceTwo files with the same name cannot live in the same folder. If you are trying to move a file to a new location in your folder structure that already contains another file with the same name, you will be asked if you wish to merge the files. Moving this file to the new location will override all the contents of the existing file and the revisions of both files will be merged.
At this time, it is not possible to merge two folders. Folders existing with the same name in the destination folder will be skipped/not moved.
Example of Merged Files
In the example below, each file has 2 versions. After the move operation, the file now has 5 versions (the 5th version is the result of the move operation itself).
File 1 - in Folder A File 1 - in Folder B

Trimble Connect for Browser › Files & Folders 61
File 1 - After Merge & Replace operation
The merge operation does not happen automatically. You will be presented with the choice to skip the files which have conflicts or merge & replace the files.
Move & Replace Dialog Move & Replace inside the Panel

Trimble Connect for Browser › Files & Folders 62
Rename Files & FoldersTrimble Connect allows you to rename files and folders.
1. Go to the Explorer page.
2. Select the file or folder you want to rename. The Details panel opens on the right side.
3. On the Details panel, click the file or folder name.
4. Type in the new name.
5. Click the � button to save the changes.
6. Discard changes by clicking � button.
Note: Renaming a file or folder will result in a new revision.
Errors
The following operations are not allowed and will result in an error message being shown:
1. You do not have correct permissions to rename a file or folder
2. Removing of the file extension
3. A folder or file with the same name already exists

Trimble Connect for Browser › Files & Folders 63
Delete Files & FoldersIf you need to delete files or folders from Connect:
1. Select the items.
2. Clicking the Trash () button located in the detail panel.
3. A confirmation dialog will appear. Click Submit.
4. An alert will display after the items have been deleted.
File RestrictionsThere are a few reasons why you may not be able to delete certain files:
1. The file is checked out by another user
2. The file is part of a Release package
3. The file has been attached to a ToDo
4. You may not have permission to delete the file

Trimble Connect for Browser › Files & Folders 64
Restore Deleted Files & FoldersFiles and folders can be recovered using the Restore feature. Once the file/folder has been deleted, an activity will be shown for this action on the Activity page where there will be an option to restore the deleted content.
Note: This functionality is only available for Project Admins.
To Restore Deleted Files & Folders
1. Go to the Activity Page
2. The delete activity will be listed on the page. You may need to filter the page by Activity Type › File › Files Deleted and/or Activity Type › Folder › Folders Deleted
3. Click the Restore button listed under the activity item
4. The button will change to Restore Pending until the operation is complete

Trimble Connect for Browser › Files & Folders 65
5. Once the operation is complete, you will receive an email notification and the item will be shown as Restored.
Restoring Folder PermissionsIf you are attempting to restore a deleted folder, you will be presented with a dialog to restore permissions to the folder. Please note that the files will always inherit parent folder permissions irrespective of the preference selected.
OPTION DESCRIPTION
Restore with permissions inherited from parent folder
This will change the restored folder permissions to match the folder permissions for the parent or root folder.
Restore with original permissions
This will restore the folder with the permissions that were previously applied before the folder was deleted.

Trimble Connect for Browser › Files & Folders 66
Exporting File ListsYou can export a list of files using the Export Files To Excel feature. From the data page click the Overflow Menu () › Export Files To Excel. This will export the list of files for a particular folder, or for the entire project if you perform this operation on the root level.
Once the operation is complete and the file is ready to download, an email is sent to the user with a link to download the Microsoft Excel list. The download link is valid for 72 hours.
The exported file list will contain the following information:
• File ID
• File Version ID
• File name
• File location (Folder path)
• Size
• Tags
• Created by user
• Creation date
• Last modified by user
• Last modified date

Trimble Connect for Browser › Files & Folders 67
Supported Bulk Operations for Files1. Share the selected files
2. Download the selection
3. Delete files10
4. Move selection to new folder11
5. Add selected files to a Release
6. Add selected files to a ToDo
7. Checkin/Checkout12
8. Export the selected files details Excel
9. Add tags
Supported Bulk Operations for Folders1. Download selected folders
2. Delete folders13
3. Modify folder permissions14
4. Move selection to new folder15
5. Export the selected files details Excel
6. Add tags16
10 Depending on user’s permissions inside the folder11 Depending on user’s permissions inside the folder & destination folder12 Depending on user’s permissions inside the folder13 Depending on user’s permissions inside the folder14 Depending on user’s permissions inside the folder15 Depending on user’s permissions inside the folder & destination folder16 Depending on user’s permissions inside the folder

Trimble Connect for Browser › Files & Folders 68
Folder Permissions
Folder Permissions OverviewMultiple user groups can work on one project in Trimble Connect for Browser. With folder permissions, visibility of folders can be restricted based on user groups or individual user accounts or can be specified as a default setting to be applied to all users in the project.
PERMISSION LEVEL DESCRIPTION
Full Access People can open, edit, delete, or move any files within the folder. People can also add files or new folders to the folder.
Read Only Access People can see the folder and they can open all files within the folder.
No Access Folder and files are hidden from the user.
Note: Users that have No Access to a folder will not be able to see Views, ToDos or attachments made from any files in that folder (even if the View/ToDo is shared/assigned to them.
View Folder Permissions
1. Go to the Explorer page.
2. Select a folder. The Details panel opens on the right side.
3. At the bottom of the Details pane, you can view the folder permissions.

Trimble Connect for Browser › Files & Folders 69
Folder Permissions Segmented by Access & User RoleHere’s what people can do with folders depending on the permission level and their role within the project:
Full Access Read Only Access No AccessUSER ADMIN USER ADMIN USER ADMIN
Manage Permissions � � � � � �
View/Open Folder � � � � � �
Download Folder � � � � � �
Edit/Update/Rename � � � � � �
Move � � � � � �
Delete � � � � � �
Restore � � � � � �
Export to Excel � � � � � �
Comment17 � � � � � �
Inherited Folder PermissionsWhen you manage large folder structures, child and parent folder permissions can be different. You can override inherited permissions of child folders to be different than the parent folder. You can also remove parent permissions from a child folder.
The default option for folder permissions is to apply the rule to the parent folder only.
17 Please see Comment Permissions for a further breakdown of permissions

Trimble Connect for Browser › Files & Folders 70
Override Folder Permissions
Override by Applying a Different Permissions to a SubfolderYou can apply different permissions to child folders that may differ from the parent folder.
Example: Shown in the image below - the user has no access to the Folder called “No Access Folder”, but they have Read Only Access to the subfolder "Read Only Access Folder". Using a direct URL - they are able to go into the Read Only Access folder, but both the parent and child folder is hidden from the user in the project.
Notice both folders are not listed in the Folder Tree.
Override by Giving Access to Specific Users or GroupsPermissions applied to groups override the default access applied to all project members.
Override by Applying Permissions to Groups that Contain the Same User(s)If a user is in more than one group, the least restrictive setting is applied to the user.

Trimble Connect for Browser › Files & Folders 71
Example: The Contractor Group has full access to a folder, while the Architect Group has Read Only Access; If a user is in both groups, they will have Full Access to the folder.
Trimble Connect for Browser › Files & Folders 72
Managing Folder Permissions
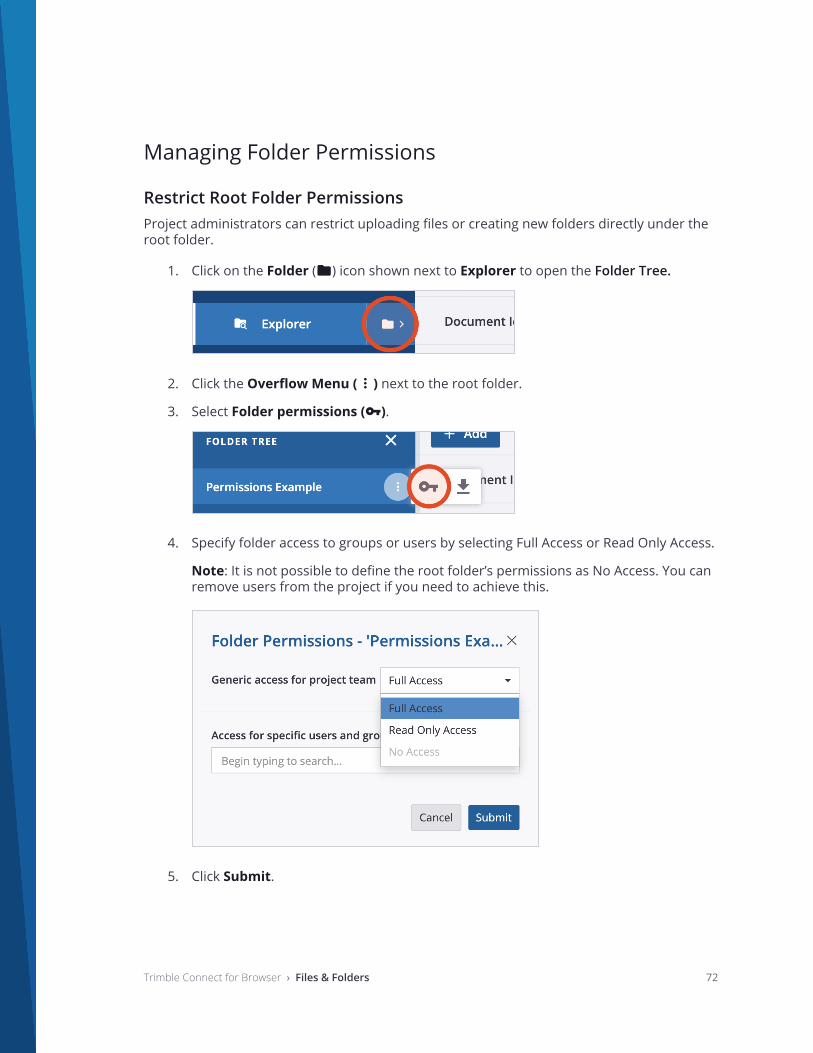
Restrict Root Folder PermissionsProject administrators can restrict uploading files or creating new folders directly under the root folder.
1. Click on the Folder () icon shown next to Explorer to open the Folder Tree.
2. Click the Overflow Menu () next to the root folder.
3. Select Folder permissions ().
4. Specify folder access to groups or users by selecting Full Access or Read Only Access.
Note: It is not possible to define the root folder’s permissions as No Access. You can remove users from the project if you need to achieve this.
5. Click Submit.

Trimble Connect for Browser › Files & Folders 73
Change Specific Folder Permissions
1. Go to the Explorer page.
2. Select a folder.
3. Click the Overflow Menu () › Folder Permissions.
4. Alternatively, click the Permissions () button on the bottom of the Details panel on the right side.
5. You can also open the Folder Permission dialog from the Folder Tree
6. Set folder access to all users, user groups or specific users by selecting Full Access, Read Only Access, or No Access.
7. Click Submit.
Watch the Skill Builder Video: Managing Folder Permissions

Trimble Connect for Browser › Files & Folders 74
File PermissionsAll files in Connect inherit their permissions from their parent folder. Setting the folder permission is the only way to apply permissions to files.
File permissions based on folder access:
Full Access Read Only Access No AccessUSER ADMIN USER ADMIN USER ADMIN
Upload versions � � � � � �
View/Open � � � � � �
Download � � � � � �
Edit/Update/Rename � � � � � �
Move � � � � � �
Delete � � � � � �
Restore (after delete) � � � � � �
Checkin/Checkout � � � � � �
Add to ToDo/Release � � � � � �
Share Files � � � � � �
Export to Excel � � � � � �
Comment18 � � � � � �
Create a View � � � � � �
18 Please see Comment Permissions for a further breakdown of permissions

Trimble Connect for Browser › Commenting 75
CommentingComments can be added to most data types in Connect. You can comment on: folders, files, ToDos, Releases, Views, or Clashsets.
To view comments
1. Select the item to open the item’s detail panel
2. Click on the Comment tab
3. Scroll through the comments
Adding CommentsTo add a comment, type in to the comment text field and click Comment when you are done. Comments cannot be made with just attachments - a message must be included before you can add the comment.

Trimble Connect for Browser › Commenting 76
Add AttachmentsThere are 4 attachment types that can be added to comments:
ATTACHMENT TYPE DESCRIPTION
Uploaded files Files stored on your machine can be uploaded as an attachment.
Note: Uploaded files can only be added after a comment has been created (this option will be hidden when you are adding a new comment).
Project files Files stored in your Connect project can be added as attachments.
Views You can choose between 2D or 3D views to add as attachments.
Web links Add a URL to a comment as an attachment. You can customize the display text.
Managing CommentsIf you are the creator of a comment, you can edit the text and attachments of a comment.
Edit a Comment1. Hover over your comment.
2. Click on the text.
3. The comment will turn to an edit state.

Trimble Connect for Browser › Commenting 77
4. Click the � button to save the changes.
5. Discard changes by clicking � button.
Delete an Attachment 1. Click the � button next to the attachment.
2. A confirmation dialog will appear. Click Submit.
Delete a Comment1. Click the Trash () button next to the comment.
2. A confirmation dialog will appear. Click Submit.

Trimble Connect for Browser › Commenting 78
Comment PermissionsMany of the rules and permissions for comments are inherited from the object (i.e. Files, Folders, ToDos etc.) that the comment is being associated to.
Here’s what people can do after a comment is created:
AUTHOR PROJECT USERS PROJECT ADMIN
Update/Edit � � �
Delete � � �
Add/Remove attachments � � �
View comments � �19 �
Open attached project files � �20 �
Open attached uploaded files
(not stored in the project)� �21 �
Open attached views � �22 �
Open URL attachments � �23 �
Known Limitations• It is not possible to use @mentions
• It is not possible to reply to a certain user’s comment
19 Assuming the user has Full Access to the parent object (file, folder, Release, ToDo or View)20 Assuming the user has at least Read-only Access to the folder where the file is located in Connect & assuming the user
has Full Access to the parent object (file, folder, Release, ToDo or View)21 Assuming the user has Full Access to the parent object (file, folder, Release, ToDo or View)22 Assuming the user has at least Read-only Access to the folder where the file is located in Connect & assuming the user
has Full Access to the parent object (file, folder, Release, ToDo or View)23 Assuming the user has Full Access to the parent object (file, folder, Release, ToDo or View)

Trimble Connect for Browser › Tags 79
TagsTag can be added to most data types in Connect.
You can add tags to:
• Folders
• Files
• ToDos
• Views
• Clashsets
Once a tag has been created, it can be reused across the whole project. Tags can be used and are visible to all project members.
Create or Add New Tags1. Enter the tag name.
2. If no tag with the same name exists, hit Enter to create a new tag.

Trimble Connect for Browser › Tags 80
3. If a tag already exists in the project, select it from the dropdown menu.
4. Click the � button to save the changes.
5. Discard changes by clicking � button.
Removing Tags 1. Click the � button next to the tag name.
2. Click the � button to save the changes.
3. Discard changes by clicking � button.
Known Limitations• It is not possible to edit or delete tags from the project
• You cannot filter by tags
• Searching by tags does not always return correct results

Trimble Connect for Browser › Views 81
ViewsAll the Views you created or that have been shared with you in the 3D and 2D Viewer will be listed in the Views page on the Browser application.
Views are separated by type. Views created in the 2D Viewer will be listed under the 2D Tab. Views created in the 3D Viewer will be listed under the 3D tab.
Learn more about Saving Views in 3D
Sort & Filter ViewsYou can sort the Views data by Name, Description or Last Modified Date.
You can refine the list of views by using the filters.
FILTER DESCRIPTION
Owner Created by me: Filters all views for only the ones you created.
Shared with me: Filters all views for only the ones shared with you.
User Filters the list by Shared with or Modified by users
Groups Filters the list by shared with or modified by groups or users in that group.

Trimble Connect for Browser › Views 82
FILTER DESCRIPTION
Modified date Filter views modified today, yesterday, past 7 days, past 30 days, or by a custom date range.
View, Modify, Share or Delete Views
View DetailsSelect a view to see detailed information about that particular view. The Detail panel will open on the right of the screen.
All Views will include the basic information:
1. View in 3D or 2D Viewer button
2. Action buttons: Delete, Overflow Menu
3. Details Tab
a. Thumbnail
b. View name
c. Description
d. Created by
e. Shared with
f. Tags
4. Activity Tab
5. Comments Tab

Trimble Connect for Browser › Views 83
Edit View DetailsYou can edit the Name, Description, Shared with users and Tags.
1. Hover over the field you want to edit
2. Click on the text.
3. The text will turn to an edit state.
4. Click the � button to save the changes.
5. Discard changes by clicking � button
Share ViewsViews can be shared with individual project members or groups of users. Learn more about share permissions in the following section.
1. Begin typing the name of the User or Group you want to share a view with.
2. The autocomplete dropdown will list matching results. Select from the dropdown menu.
3. Click the � button to save your changes and share the view. An email notification will be sent to the recipients.

Trimble Connect for Browser › Views 84
4. Click the � button to discard
Unshare a View1. Click the � button next to the user or group name
2. Click the � button to save your changes. Click the � button to discard
Delete Views1. Select the view or views you want to delete
2. Clicking the Trash () button located in the detail panel
3. A confirmation dialog will appear. Click Submit

Trimble Connect for Browser › Views 85
View in 2D or 3D Viewer 1. Select the view
2. Click View in 3D or 2D button located in the detail panel
3. The Viewer application will open in a new tab
2D & 3D View PermissionsBy default Views are private and must be explicitly shared with another user in order for them to see them. Only Project Admins can see views created by others without them needing to be shared.
Here’s what people can do with Views after it’s been shared:
AUTHOR SHARED WITH PROJECT USERS PROJECT ADMIN
View/Open � �24 � �
Edit � � � �
Delete � � � �
Share � � � �
Comment � � � �
24 A user’s ability to see a View is going to be dependent on their access to the parent folder where the file is located in Connect. For example, if the recipient has no access to the parent folder - then that user will not be able to open the View.

Trimble Connect for Browser › Releases 86
ReleasesReleases are used to send versions of files privately to users who are part of a project. You can create and manage Releases in Trimble Connect for Browser on the Releases page.
Releases have two states, Open and Sent. If a Release is in the Open state, it can still be edited. After a Release has been sent, it will be locked and not editable.
Create a ReleaseYou can create a new Release directly from the Releases page, or from the Explorer page. To create a Release from the Explorer page, see Add Files to a New Release below.
Create a New Release
1. Go to the Releases page.
2. Click the Create Release on the top of the page. The Create Release dialog box opens.
3. Enter the needed information, such as Release name, Due Date, and Recipients.
4. Click Submit.
Add Files to a ReleasesAll files stored in your Connect project can be added to a Release. Simply select the files you want to add to your Release and click the Overflow Menu () › Add Files to Release located in the detail panel on the right of the page.

Trimble Connect for Browser › Releases 87
After clicking the Add Files to Release option, the Release dialog box will open. You will be presented with the option to add files to a new Release or add files to an existing Release.
Add Files to a New ReleaseIf you have not created a Release already, you can add your selection to a new Release.
1. Select the desired files
2. Click the Overflow Menu () › Add Files to Release.
3. The Release dialog box opens.

Trimble Connect for Browser › Releases 88
4. Enter the needed information, such as Release name, Due Date, and Recipients.
5. Click Send Release if you are ready to send the Release. Important Note: After a Release has been sent, it cannot be modified or deleted.
6. Click Save if you are not ready to send the Release to the recipients yet.
Add Files to an Existing ReleaseIf you have already created a Release and wish to add more files to it, you can add your selection to an existing Release.
1. Select the desired files
2. Click the Overflow Menu () › Add Files to Release.
3. The Release dialog box opens.
4. Click the Add to Existing Release Tab
5. Select the desired Release. Note: You can select more than one Release to add the selected files to.

Trimble Connect for Browser › Releases 89
6. Click Send Release if you are ready to send the Release. Important Note: After a Release has been sent, it cannot be modified or deleted.
7. Click Save if you are not ready to send the Release to the recipients yet.
Note: If you want to remove any of the files from your selection before adding to a Release, click the Show Selected Files link in the dialog, and unselect any unwanted files; Unchecked files will not be added to the Release.
Understanding File Versions & ReleasesWhen you add a file to a Release, you are adding that particular version of the file as it is, at that exact point in time - which includes the values for the file metadata. Even if you do not send the Release till a later point in time, and a new file version has been added or metadata values have been changed - the file that is in the open Release will not get updated.

Trimble Connect for Browser › Releases 90
View & Manage ReleasesYou can view all the Releases you have created or been sent to you on the Releases page.
Sort & Filter ReleasesYou can sort the Releases table by:
• Name
• Status
• Due date
• Last Modified date
You can refine the list of Releases by using the filters located at the top of the page.
FILTER DESCRIPTION
Status Open: Releases that have not been sent and can still be edited
Sent: Releases that have been shared with recipients and are locked (not editable)
User Filters the Releases by users. This will apply to the recipients, created by or modified by columns.

Trimble Connect for Browser › Releases 91
FILTER DESCRIPTION
Groups Filters the Releases by user groups. This will apply to the recipients, created by or modified by columns.
Due date Filter Releases which have a due date marked as today, yesterday, past 7 days, past 30 days, or by a custom date range.
Owner Filter Releases created by you, modified by you, sent by you, or sent to you.
See a Release's Detail InformationSelect a Release to see detailed information about that particular Release. The Detail panel will open on the right of the screen.
Trimble Connect for Browser › Releases 92
All Releases will include the basic information:
1. Action buttons: Delete, Download Release contents
2. Details Tab
a. Release name
b. Status
c. Due date
d. Created by & date
e. Modified by & date
f. Recipients
g. Notes
h. Send & Delete buttons25
3. Activity Tab
4. Comments Tab
Managing Open ReleasesBefore a Release has been sent, you can perform the following operations:
• Edit the Release name, due date, recipients and note
• Add or remove files
• Delete the Release
• Send the Release
25 For Open Releases only

Trimble Connect for Browser › Releases 93
Edit Release DetailsYou can edit the Name, Due date, Recipients and Release Notes.
1. Click on the Release to open the detail panel
2. Hover over the field you want to edit
3. Click on the text.
4. The text will turn to an edit state.
5. Click the � button to save the changes.
6. Discard changes by clicking � button
Remove Files from a Release
1. Click on the desired Release name in the table on the Release page
You will be taken inside the Release.
2. Select the desired files
3. Click the Remove file button located in the Detail panel
Delete a Release
1. Click on a Release to open the detail panel
2. Click on the Trash () button located in the detail panel to delete
3. A confirmation dialog will appear
4. Click Submit

Trimble Connect for Browser › Releases 94
Send a Release
1. Click on the Release to open the detail panel
2. Click on the Send button located at the bottom of the detail panel
3. A notification email will be sent to the user. (Example shown below)

Trimble Connect for Browser › Releases 95
View, Download & Manage a Release’s Files
View a Release’s FilesTo see, download or export the contents of a Release, click on the Release name in the table. You will be taken inside the Release.
Once you are inside the Release, you will be able to see all the files that have been added to that particular Release. You can refine the list of files by using the filters located at the top of the page. If your project uses File Metadata those will also be shown as part of the filters.
FILTER DESCRIPTION
Data type Filter by document type: 3D models, Drawings, Geospatial, Images, Documents or Other
User Filters the files by users who last modified the file
Date modified Filter files by modified date ranging from today, yesterday, past 7 days, past 30 days, or by a custom date range

Trimble Connect for Browser › Releases 96
Download Release Files
Download All Files
1. Click on the desired Release in the table on the Release page.
2. Click the Download () button located in the top right of the detail panel
3. A Zip file will be downloaded to your computer
Download a Selection of Files
1. Click on the desired Release name in the table on the Release page. You will be taken inside the Release.
2. Select the desired files
3. Click the Download () button located in the detail panel
4. A Zip file will be downloaded to your computer

Trimble Connect for Browser › Releases 97
Export File List to ExcelYou can export a list of files using the Export Files To Excel feature.
The exported file list will contain the following information:• File ID• File Version ID• File name• File location (Folder path)• Size• Tags• Created by user• Creation date• Last modified by user• Last modified date
Export All Files in the Release
1. Click the Overflow Menu () › Export Files To Excel. This will export the list of files in the Release.
2. Once the operation is complete and the file is ready to download, an email is sent to the user with a link to download the Microsoft Excel list. The download link is valid for 72 hours.
Other Supported File Operations
OPERATION DESCRIPTION
View the file in the respective viewer
Open the file version in the 2D, 3D or Map viewer
Add files to a Release Add the particular file version to a new or existing Release
Share files Share a particular file version with project members, signed in users with a link or any users with a link
Add files to a ToDo Add the particular file version to a new or existing ToDo
Add files to a folder Adding a file to a folder from a Release will create a separate file in the Connect project (based on the particular file version in the Release).

Trimble Connect for Browser › Releases 98
Release PermissionsBy default Releases are private and must be explicitly shared with another user in order for them to see them. Only Project Admins can see Releases created by others without them needing to be shared.
Here’s what people in the project can do with Releases:
CREATOR RECIPIENT PROJECT MEMBERS PROJECT ADMIN
See Open Releases � � � �
Edit Open Releases � � � �
Delete Open Releases � � � �
Send Open Releases � � � �
See Sent Releases � � � �
Modify Sent Releases � � � �
Delete Sent Releases � � � �
See Files Inside a Sent Release � �26 � �
Known Limitations• There is no way to edit a Sent Release
• Releases do not support Approval workflows
• Releases can only be seen on the Web Application
26 A user’s ability to see a file in a Release is going to be dependent on their access to the parent folder where the file is located in Connect. For example, if the recipient has no access to the parent folder - then that user will not be able to open the file inside the Release.

Trimble Connect for Browser › ToDos 99
ToDosUse ToDos to assign, track and resolve issues within a project. ToDos can be assigned to a user or a group with a due date when the ToDo needs to be resolved.
ToDos is a helpful tool to assign, track and resolve issues with a model. Authoring tools such as Tekla Structures and Revit can export BCFs for issue and task management which can then be imported to Trimble Connect as a ToDo. The ToDo can then be assigned and prioritized with any project user.
Trimble Connect supports the BCF 2.0 format for import, and BCF 1.0 format for export.
ToDo Schema
Topic
ELEMENT OPTIONAL DESCRIPTION
Title No Title of the ToDO.
Description No Description of the ToDo.
Priority Yes ToDo priority. The list of possible values are
• Critical• High• Normal• Low
Type Yes ToDo type. The list of possible values are
• Comment• Undefined• Issue• Request• Fault• Inquiry• Clash• Solution• Remark
Tags Yes Tags for grouping ToDos.

Trimble Connect for Browser › ToDos 100
ELEMENT OPTIONAL DESCRIPTION
Status Yes ToDo status. The list of possible values are
• New• In Progress• Waiting• Done • Closed
Creation Date No Date when the ToDo was created.
Creation Author No User who created the ToDo.
Modified Date No Date when the ToDo was last modified. Exists only when ToDo has been modified after creation.
Modified Author No User who modified the ToDo. Exists only when ToDo has been modified after creation.
Due Date Yes Date until when the ToDos issue needs to be resolved.
Assigned To Yes The user to whom this ToDo is assigned to. You can assign a ToDo to a project member or Group in the project.
Attachments Yes Files, clashes or views.
CommentsThe ToDo file can contain comments related to it. Comments also have an ID attribute for identifying it uniquely. In addition, it has the following:
ELEMENT OPTIONAL DESCRIPTION
Date No Date of the comment
Author No Comment author
Comment No The comment text

Trimble Connect for Browser › ToDos 101
ViewpointsThe ToDo file can contain 1 viewpoint related to the ToDo. In addition, it has the following:
ELEMENT OPTIONAL DESCRIPTION
Viewpoint Yes Filename of the viewpoint
Snapshot Yes Filename of the snapshot
Create a ToDoToDos can be created in the Web Application, 3D Viewer and 2D Viewer . ToDo created in a Viewer application will have an Embedded View which will allow you to open the ToDo in the future to that particular Viewpoint. ToDos created in the web application will not have an Embedded View but you can add Views to them as an attachment.
Create a ToDo in Trimble Connect for Browser 1. In Trimble Connect for Browser, go to the ToDo page.
2. Click the Add ToDo () button at the top of the page.
3. The New ToDo dialog box opens.

Trimble Connect for Browser › ToDos 102
4. Enter the required information: Title and Description
5. Click More options to add the additional information, such as, Priority, Type, Status and Due Date and Assignee
6. Click Submit.
Create a ToDo in the 2D or 3D Viewer 1. Open a model or drawing in the 2D or 3D Viewer .
2. When you have found an issue, click the Add ToDo () button on the toolbar
3. The New ToDo panel opens.
4. Enter the required information: Title and Description
5. Add the optional information, such as, Priority, Type, Status and Due Date.
6. Assign the ToDo to a user or to a user group.
7. Click Save.
Add Files or Views to a ToDoAll files & Views stored in your Connect project can be added to a ToDo.
To Add Files Simply select the files you want to add to your ToDo from the Explorer Page and click the Overflow Menu () › Add Files to ToDo located in the detail panel on the right of the page.

Trimble Connect for Browser › ToDos 103
To Add Views Simply select the Views you want to add to your ToDo from the Views Page and click the Overflow Menu () › Add Views to ToDo located in the detail panel on the right of the page.
After clicking the Add Files/Views to ToDo option, the ToDo dialog box will open. You will be presented with the option to add your selection to a new ToDo or to an existing ToDo.
Add to a New ToDoIf you have not created a ToDo already, you can add your selection to a new ToDo.
1. Select the desired files or views
2. Click the Overflow Menu () › Add Files/Views to ToDo. The ToDo dialog box opens.

Trimble Connect for Browser › ToDos 104
3. Enter the required information: Title and Description
4. Add the optional information, such as Assignee, Priority, Type and Due date.
5. Click Submit.
Add to an Existing ToDoIf you have already created a ToDo and wish to add files or Views to it, you can add your selection to an existing ToDo.
1. Select the desired files or Views
2. Click the Overflow Menu () › Add Files/Views to ToDo. The ToDo dialog box opens.
3. Click the Add to Existing ToDo Tab
4. Select the desired ToDo. Note: You can select more than one ToDo to add the selected files or views to.
5. Click Submit
Note: If you want to remove any of the files or Views from your selection before adding to a ToDo, click the Show Selected Files link in the dialog, and unselect any unwanted files or Views; Unchecked files or Views will not be added to the ToDo.
View & Manage ToDosYou can view all the ToDos in the project27, that you have created or that has been assigned to you on the ToDo page.
27 Depending on the project’s ToDo privacy setting. See "ToDo Visibility" for more details.

Trimble Connect for Browser › ToDos 105
Sort & Filter ToDosYou can sort the ToDo table by:
• Priority
• Label
• Title
• Status
• Completion
• Last Modified Date
You can refine the list of ToDos by using the filters located at the top of the page.
FILTER DESCRIPTION
Type Filters the ToDos by Assignee or Author. The list of possible options are assigned to you, created by you, unassigned.
Status Filter by ToDo status. The list of possible options are New, In Progress, Waiting, Done and Closed.
Priority Filter by ToDo priority. The list of possible options are Critical, High, Normal, Low.
User Filters the ToDos by users. This will apply to the Assignee, Created by or Modified by fields.
Groups Filters the ToDos by user groups (or users inside the group). This will apply to the Assignee, Created by or Modified by fields.
Due date Filter ToDos which have a due date marked as today, yesterday, past 7 days, past 30 days, or by a custom date range.

Trimble Connect for Browser › ToDos 106
See a ToDo’s Detail InformationSelect a ToDo to see detailed information about that particular ToDo. The Detail panel will open on the right of the screen.
All ToDos will include the basic information:
1. Action buttons: Delete, Overflow Menu (Export to BCF, Export to Excel, Import from Excel, Add Tags, Edit ToDo)
2. Details Tab
a. ToDo Thumbnail28
b. ToDo Labelc. Titled. Descriptione. Due datef. Typeg. Priorityh. Statusi. Completion (Percentage)j. Assigneek. Tagsl. Attachments m. Created byn. Modified by & Modified date
3. Activity Tab
4. Comments Tab
View ToDo in the 2D or 3D Viewer 1. Click on the ToDo to open the detail panel
2. Click on the Embedded View to open in the 2D or 3D Viewer
Known Issues & Limitations
• Clicking the thumbnail from a ToDo created in the 3D Viewer does not load the view with the corresponding ToDo panel open
• Opening a View from the Web application into the 3D Viewer does not load the latest model version
28 ToDos created in the web application will not have an Thumbnail

Trimble Connect for Browser › ToDos 107
• Clicking the thumbnail from a ToDo created in the 2D Viewer does not load the view in the correct position inside the 2D Viewer
Edit ToDo DetailsUnless you are a Project Admin, you can only edit ToDos that you have created or that have been assigned to you.
1. Click on the ToDo to open the detail panel
2. Hover over the field you want to edit
3. Click on the text.
4. The text will turn to an edit state.
5. Click the � button to save your changes
6. Click the � button to discard
Edit Multiple ToDosIf you need to make the same changes to multiple ToDos, you can use the Bulk Editing function.
With the Bulk Edit function you can make changes to a single field (while leaving the remaining fields unchanged). The editable fields are the Due date, Type, Priority, Status, Completion (Percentage), Assignee and Tags.
For the Assignee and Tag Fields, you have the following options:
OPTION DESCRIPTION
Add to existing Allows you to add new values without removing any of the existing data
Replace existing Allows you to new values and remove any of the existing data
Remove existing Allows you to remove specific values from the existing data without removing any of the other existing data.

Trimble Connect for Browser › ToDos 108
To Bulk Edit ToDos:
1. Select the ToDos you want to edit
2. Click the Overflow Menu () › Edit ToDos, located in the detail panel
3. The Edit ToDos dialog will open
4. Make the needed changes
5. Click the Edit ToDos button to save your changes
6. A confirmation banner will appear if the changes were successful

Trimble Connect for Browser › ToDos 109
ToDo AttachmentsToDos support 4 attachment types, and depending on the type of attachment and your permissions, different functions will be available for each.
ATTACHMENT TYPE DESCRIPTION
Connect Project Files Attached project files always point to the latest version of the file stored in the Connect Project.
Supported actions: View, Download, Locate in Explorer, Remove
Uploaded Files Uploaded files are not visibility stored in the Connect Project. They do however support versions if you upload the same file.
Uploading of files is only possible in the 3D Viewer .
Supported actions: View, Download, Remove
Views Both 2D & 3D Views are supported as attachments.
Supported actions: View, Remove

Trimble Connect for Browser › ToDos 110
ATTACHMENT TYPE DESCRIPTION
Clashes Individual clash items can be added to a ToDo in the 3D Viewer .
Supported actions: Remove
Manage ToDo Attachments If you want to Download all File attachments or remove all attachments, click the Overflow Menu () next to the Attachments section header.
Note: The download option will only be shown when there are file attachments.
Delete a ToDo1. Click on the ToDo to open the detail panel
2. Click on the Delete () button located in the detail panel
3. A confirmation dialog will appear
4. Click Submit

Trimble Connect for Browser › ToDos 111
Import ToDos from an Excel FileUse the Import from Excel function to quickly add or update ToDos in your project.
As a Project Administrator, you can modify all ToDos in the project. For Project Users, you can use the Import from Excel to add new ToDos or update ToDos you have created or been assigned to you.
Supported Functions for Import from Excel
The following operations are supported from the import function:
• Creating new ToDos
• Update an existing ToDo’s Title, Description, Due date, Type, Priority, Status, Completion (Percentage), Assignee or Tags
Setting Up the SpreadsheetTo use the import function, your spreadsheet must contain the following columns with the exact spelling listed.
COLUMN DESCRIPTION
Label To Update Existing: Use the label of ToDo you are trying to update
For New ToDos: Leave blank if you wish to use the project’s label and numerical order; Custom labels are supported, but cannot be edited in the future
Title To Update Existing: Modify the title or leave blank if you don’t want to make changes
For New ToDos: Required

Trimble Connect for Browser › ToDos 112
COLUMN DESCRIPTION
Description To Update Existing: Modify the description or leave blank if you don’t want to make changes
For New ToDos: Required
Type Leave blank if you don't want to make changes or don't want to add a type.
Accepted values: Comment, Undefined, Issue, Request, Fault, Inquiry, Clash, Solution or Remark
Priority Leave blank if you don't want to make changes or don't want to add a priority.
Accepted values: Critical, High, Normal, Low.
Status Leave blank if you don't want to make changes or don't want to add a status.
Accepted values: New, In Progress, Waiting, Done and Closed
Completion Leave blank if you don't want to make changes or don't want to add a percentage.
Accepted values: Add a whole number value. Add % after the value
Due date Leave blank if you don't want to make changes or don't want to add a date.
Accepted format: mm/dd/yyyy or mm/dd/yy
Assignee(s) Leave blank if you don't want to make changes or don't want to add an assignee.
Accepted values: email addresses of existing project members or existing Group names
To add multiple assignees separate each one by a semicolon ( ; )

Trimble Connect for Browser › ToDos 113
COLUMN DESCRIPTION
Tags Leave blank if you don't want to make changes or don't want to add tags.
Accepted values: existing tags or new tags
To add multiple tags separate each one by a comma ( , )
Import ToDos to a Project1. Set up the spreadsheet
2. Click the Overflow Menu () at the top of the right side of the page.
3. Select Import from Excel.
4. The Import Excel as ToDo dialog box opens. Click Browse to select the Excel file.
5. Select the file from your computer and click Open.
6. After the import has been processed, you receive an email with a link to download the import log file. You must be signed into Trimble Connect to download the log file. The log file will contain information in the event that an import failed.
Note: For updating ToDos by Importing from Excel, it is recommended you first download the project’s ToDos (via Export to Excel) so you have the correct ToDo labels and current information. Then you can follow the steps from above.

Trimble Connect for Browser › ToDos 114
Export ToDos
Export as BCF Zip FilesA ToDo created in Trimble Connect can be exported as a BCF and shared with other 3D modeling software.
1. Select the ToDo(s) you want to export.
2. Click the Overflow Menu () at the top of the detail panel on the right side of the page.
3. Select Export as BCF
4. Once Export to BCF has been selected, a prompt will appear notifying you that the request is being processed. After the BCF files are prepared, an email will be sent to the user. In the email, click the Download BCF link and download the file. The download link will be valid for 72 hours.
Export to ExcelYou can export all the ToDos in your project or just a selection of ToDos.
1. To Export all ToDos, click the Overflow Menu () at the top of the right side of the page Or Select the ToDo(s) you want to export and click then Overflow Menu () at the top of the detail panel on the right side of the page.
2. Select Export to Excel
3. Once Export to Excel has been selected, a prompt will appear notifying you that the request is being processed. After the Excel sheet is prepared, an email will be sent to the user. Click the Download Excel link and download the Excel file. The download link will be valid for 72 hours.
ToDo Visibility ToDos can be made private to the author or public to all users in the project. By default, ToDos are visible for all users in the project.
If you are a Project Admin, you can change the privacy settings by going to the Settings › User Permissions page.

Trimble Connect for Browser › ToDos 115
ToDo Permissions
CREATOR ASSIGNEE29 PROJECT MEMBERS30 PROJECT ADMIN
View/Open � � � �
Edit � � � �
Delete � � � �
Reassign � � � �
Add/Remove Attachments � � � �
Open Clash Attachments � �31 � �
Open Attached Views � �32 � �
Open Attached Project Files � �33 � �
Open Uploaded Files � � � �
Comment � � � �
Import (update ToDo) � � � �
Export � � � �
29 If a ToDo has an Implicit View associated to it (meaning it was made in the 2D or 3D Viewer ), then the visibility of the Implicit View is going to be dependent on the user’s access to the folder where the file is stored in Connect. For exam-ple, if the assignee or a project member has no access to the folder, then that user will not be able to see the Implicit View, but they will still be able to see the ToDo information (like the detail information).
30 ToDos will be visible to all users in the project by default, but the Project Admin can change this so ToDo visibility is restricted to only the Project Administrators, ToDo creator and assignees. If the ToDo visibility is restricted for project members, users cannot perform the listed action.
31 The assignee must have access to the file & clash set in order to view. 32 The assignee's ability to open a view is dependent on the user’s access to the folder where the file is stored in Connect. 33 The assignee's ability to open attached project files is going to be dependent on the user’s access to the folder where
the file is stored in Connect. For example, if the assignee or a project member has no access to the folder where the attached files are stored in the project, then that user will not be able to open the attachments.

Trimble Connect for Browser › ToDos 116
Known Limitations• BCF 2.1 is not supported

Trimble Connect for Browser › Team 117
Team
User RolesCertain actions are limited in Trimble Connect based on the user role. The two user roles inside a Trimble Connect Project are User and Project Administrator.
Project Users• Depending on project settings, users can invite others to collaborate in projects.
• A user has access to all folders and files of the project unless the access is restricted by the administrator.
• Users will have be able to perform some management operations for the data that they create within the project, like deleting Views, ToDos, Revoking access to data they shared with a specific user—but they will not be able to restore deleted file or folder content (even if they were the one who performed the delete operation).
• Users will have limited access to data created by other users unless it has been explicitly shared with or assigned to them
Project Administrators• An administrator can invite anyone to the project and provide administrator access
to the project. An administrator can create/edit/delete user groups.
• An administrator can also assign a user group to a user while inviting them.
• An administrator can set folder permissions for any user, however folder permissions do not apply to administrators because they have full access.
• An administrator can remove any user and edit user roles.
• Project admins can also perform other operations like setting up notifications, defining Property Set Libraries34, including having full access to all the data created by project users.
34 Creation of Property Set Libraries require a Business Premium License as well as being a Project Admin
Trimble Connect for Browser › Team 118
Invite UsersYou can invite users in Trimble Connect for Browser on the Team page. If the invited user already has a Trimble Account, they will receive an email with the project link. Otherwise they are instructed to create a new account. When the users have joined, they can access the project and the folders and the files to which they have permissions to.
To Invite:
1. Go to the Team page.
2. Click the + Invite button at the top of the page. The Invite Users dialog box opens.
3. Enter the email of the user or add users from company directory You can enter multiple email addresses. Use semicolon (;) or comma (,) as a separator.
4. Select Group and Role for the user. The role can be either Admin or User.
5. To send the invite, click Submit. The user receives an email with instructions on how to join the project.
Note: If the user does not have a Trimble Account, the user's status appears as Activation Pending until the user has an active account.
Project Member Invitation SettingsSome projects may require more strict control for inviting users into the project. A Project Administrator can select the option to allow all users to invite new project members or restrict project invitations to Project Administrators only for enhanced security.
If a Project Administrator has restricted this functionality, the + Invite button will be disabled/not work.
Watch the Skill Builder Video: Creating Groups & Inviting Users

Trimble Connect for Browser › Team 119
Resend an Invitation EmailIf a user has not received the Trimble Connect invitation email, it can be sent again.
1. Go to the Team page.
2. Select the user whose status is Activation pending. A user details panel opens on the right side.
3. Click the Resend Activation Email button on the pane. A confirmation dialog box opens. The invitation email is sent again.
4. Click Close.
Managing UsersThe following section contains functionality that only a Project Administrator can perform.
Change User RolesUser roles assigned at invitation can be changed after users have been added.
1. Go to the Team page.
2. Select the user whose data you want to modify. The User Details panel opens on the right side.
3. Change the role from the Role dropdown list. The role is changed automatically.

Trimble Connect for Browser › Team 120
Remove Users from the ProjectA Project Administrator can change user roles, add or remove users from groups, and remove users from a project.
1. Go to the Team page.
2. Select the user whose data you want to modify. The User Details panel opens on the right side.
3. Click the Remove user from project button to remove the user from the project
4. A dialog will open asking you to confirm your choice. Click Submit.
5. The user appears as Removed on the Team page after the user has been removed from the project.

Trimble Connect for Browser › Team 121
Notes About Removed Users
FEATURE DESCRIPTION
View removed users from a project
Only Project Admins can see the removed users in the team page.
Filter by Removed Users
Removed users will continue to be shown in the team page—currently it is not possible to remove them from the list.
You can choose to show/hide removed users by using the Status filter.
Removed users not listed in Activity Feed
Once a user has been removed, you will not be able to filter the activity feed by that user.

Trimble Connect for Browser › Team 122
Deleted UsersIf a user has deleted their TID account, all their Personal Identifying Information is removed from our system. The deleted user will still be listed in the project, but that user will not be able to access the project since their username/password information has been removed.

Trimble Connect for Browser › Team 123
Benefits of GroupsGroups are created by a Project Admin and are for creating groupings of multiple project members.
User groups can be used in a variety of ways:
1. Sharing data with Groups
2. Assign ToDos to Groups
3. Assign folder permissions to Groups
4. Assign Property Set Library permissions to Groups
5. Filter Activity by Groups
If you are not a Project Admin, you will not be able to add, remove, edit or delete groups.
View Group Members1. Go to the Team page.
2. Select a group
3. The detail panel will open where you can see the users inside the group

Trimble Connect for Browser › Team 124
See What Groups You’re In1. Go to the Team page.
2. Select yourself from the Team list
3. The detail panel will open. Scroll down to the Groups section
Managing GroupsThe following section contains functionality that only a Project Administrator can perform.
Create New GroupsAs a Project Admin, you can create groups directly from the browser application interface or by importing an Excel spreadsheet. Using the import function is a great way to create groups in a bulk operation. See "Import and Export Users & Groups" on page 128 for details.
1. Go to the Team page.
2. Click the Create Group () button at the top of the page.
3. The Create Group dialog box opens.

Trimble Connect for Browser › Team 125
4. Enter the Group name. Note: The Group name must be unique. An error message will be shown if you try to create a new group using the same name as an existing group
5. Click Submit.
Watch the Skill Builder Video: Creating Groups & Inviting Users
Add a User to a GroupThere are three ways you can add a user to a group. If you want to perform bulk operations like adding a multiple user to multiple groups - use the Import feature to accomplish this. See "Import and Export Users & Groups" on page 128 for details.
Add from the User Detail Panel
1. Go to the Team page.
2. Select the user who you want to Groups. The User Details panel opens on the right side.
3. Type the Group name into the Find group field
4. An auto-complete dropdown menu will appear for the Groups available in the project
5. Add as many groups as needed then click Add
6. The User will now be a part of the Groups
Add from the Group Detail Panel1. Go to the Team page.
2. Select the Group which you want to add users to.
3. Type the user’s name into the Add team members field
4. An auto-complete dropdown menu will appear for the Groups available in the project

Trimble Connect for Browser › Team 126
5. Add as many groups as needed the click Add
6. The User will now be a part of the Groups
Remove a User from a Group
From the User Detail Panel
1. Go to the Team page.
2. Select the User
3. Click the � button next to the Group name that you wish to remove them from
From the Group Detail Panel
1. Go to the Team page.
2. Select the Group
3. Click the � button next to the user name that you wish to remove

Trimble Connect for Browser › Team 127
Deleting a Group1. Go to the Team page.
2. Select the Group
3. Click the Delete () button
4. A confirmation dialog will open. Click Submit.
Note: There is no undo function

Trimble Connect for Browser › Team 128
Import and Export Users & Groups
Supported Functions for Import from Excel The following operations are supported from the import function:
1. Inviting users to a project
2. Updating user roles
3. Adding users to Groups
4. Creating new Groups
Setting up the spreadsheetTo use the import function, your spreadsheet must contain the following columns with the exact spelling listed:
• User email
• User group(s)
• Role: Supported variables are User or Admin

Trimble Connect for Browser › Team 129
Inviting Users to a Project1. Set up the spreadsheet
a. Only the User email column is mandatory for successful import.
b. If the Role column is left blank, the user will be invited with the role of User
c. If the user email does not match an existing project member, they will be invited/added to the project during the import process
d. To import a single user to multiple groups, separate the group names by using a semicolon ";".
e. If the group does not exist in the project, it will be created during import
2. Go to the Team page.
3. Click the Overflow Menu () at the top of the right side of the page.
4. Select Import from Excel
5. The Import Excel as Team in dialog box opens. Click Browse to select the Excel file.
6. Select your file. Click Open.
7. After the import has been processed, you receive an email with a link to download the import log file. You must be signed into Trimble Connect to download the log file. The log file will contain information in the event that an import failed.

Trimble Connect for Browser › Team 130
Updating Team Members InformationYou can change the user’s role or add them to groups using the Import function. Note: It is not possible to remove users from the project or remove them from a group using this process.
1. Set up the spreadsheet
a. Only the User email column is mandatory for successful import.
b. Change the user role by adding User or Admin under the Role column. If the role does not match their existing role in the project, it will get updated accordingly
c. To import a single user to multiple groups, separate the group names by using a semicolon ";".
d. If the group does not exist in the project, it will be created during import
2. Next: Go to the Team page.
3. Click the Overflow Menu () at the top of the right side of the page.
4. Select Import from Excel.
5. The Import Excel as Team in dialog box opens. Click Browse to select the Excel file.
6. Select your file. Click Open.
7. After the import has been processed, you receive an email with a link to download the import log file. You must be signed into Trimble Connect to download the log file. The log file will contain information in the event that an import failed.

Trimble Connect for Browser › Team 131
Create Groups by Importing an Excel Spreadsheet
1. Set up the spreadsheet
a. Only the User group(s) column is mandatory for successful import.
b. If you are only creating new groups, leave the User email and Role columns blank
c. If a group with the same name already exists in the project, it will be skipped during import
2. Next: Go to the Team page.
3. Click the Overflow Menu () at the top of the right side of the page.
4. Select Import from Excel.
5. The Import Excel as Team in dialog box opens. Click Browse to select the Excel file.
6. Select your file. Click Open.
7. After the import has been processed, you receive an email with a link to download the import log file. You must be signed into Trimble Connect to download the log file. The log file will contain information in the event that an import failed.

Trimble Connect for Browser › Team 132
Export a Project’s Team DataUse the Export function to get a report of the projects team members. The following information will be provided (if it’s available for the user)
• User name
• User Title
• User company
• User email
• Role
• User group(s)
• Phone number
• Timezone preference
• Skype
• Date joined project
• Membership Status
• Last accessed
• Date left project
To export:
1. Go to the Team page.
2. Click the Overflow Menu () at the top of the right side of the page.
3. Select Export to Excel Note: for projects with many team members, the process might take some time to complete
4. A dialog will appear to inform you that the process is in progress
5. When the Excel file is ready to be downloaded, Trimble Connect sends you a download link in an email. The download link will be valid for 72 hours.

Trimble Connect for Browser › Activity 133
ActivityThe Activity page in Trimble Connect for Browser is a summary of most events that happen within your project.
The Activity page shows the activity regarding file synchronization, downloads, user actions, messages, comments and Releases. Activities can be filtered using the filters at the top of the page.
Tracked ActivitiesEach activity includes the user's avatar, name, the groups they belong to, and the time stamp of the activity.
CATEGORY ACTIVITY TYPE INCLUDED INFORMATION
Files35 Files Uploaded User’s info, time stamp, file name, thumbnail and hyperlink to file
Files Deleted User’s info, time stamp, file name, thumbnail, hyperlink to file and Restore36 button
Files Restored User’s info, time stamp, file name, thumbnail and hyperlink to file
Files Moved User’s info, time stamp, file name, thumbnail, hyperlink to file, before and after location
Files Renamed User’s info, time stamp, before and after name and hyperlink to file
File Download User’s info, time stamp, file name, thumbnail and hyperlink to file
File Checkout User’s info, time stamp, file name, thumbnail and hyperlink to file
File Checkin User’s info, time stamp, file name, thumbnail and hyperlink to file
35 Activity will only be shown based on what the user has access to. For Project Admins, all File activity in the project will be shown
36 Operation only available for Project Admins

Trimble Connect for Browser › Activity 134
CATEGORY ACTIVITY TYPE INCLUDED INFORMATION
Sync User’s info, time stamp, file/folder name, thumbnail and hyperlink to file for updated, uploaded, added or downloaded files & folders
Folders37 Folder Added Activity includes the folder name
Folder Deleted Activity includes the folder name and Restore38 button
Folder Restored Activity includes the folder name
Folder Moved Activity includes the folder name and the before and after location
Folder Renamed Activity includes the before and after name and hyperlink to folder
Folder Download Activity includes folder name and hyperlink to folder
Users User Joined User’s info, time stamp, name, email address, user’s company and user’s groups of the new user
User invited to project
User’s info, time stamp, name of the invited user
User Removed39 User’s info, time stamp, name of the removed user
User Left User’s info, time stamp, user name who left the project
Team Imported40 User’s info, time stamp, total number of imported group & users, number of added vs updated users, number of added vs updated groups
Views41 View Added User’s info, time stamp, a thumbnail, hyperlink and view name
37 Activity will only be shown based on what the user has access to. For Project Admins, all File activity in the project will be shown
38 Operation only available for Project Admins39 Operation only available for Project Admins40 Operation only available for Project Admins41 For project users, all View activity is filtered to only show activity for views created by them or shared with them. For
Project Admins, all View activity in the project will be shown

Trimble Connect for Browser › Activity 135
CATEGORY ACTIVITY TYPE INCLUDED INFORMATION
View Updated User’s info, time stamp, View name
View updates include moving of the camera position, add/remove markups, changing transparency etc.
View Renamed User’s info, time stamp, before and after view name
View Description User’s info, time stamp, view name and the before and after description
View Deleted User’s info, time stamp, view name
Clashsets42 Clash added User’s info, time stamp, clashset name
Clash deleted User’s info, time stamp, clashset name
Releases43 Release Created Activity includes a Release name, hyperlink to file, due date and status
Release files added
User’s info, time stamp, Release name, Release hyperlink, file name, thumbnail and file hyperlink to file
Release files removed
User’s info, time stamp, Release name, Release hyperlink, file name, thumbnail and file hyperlink to file
Release files downloaded
User’s info, time stamp, Release name, Release hyperlink, file name, thumbnail and file hyperlink
Release Sent User’s info, time stamp, Release name, Release hyperlink
Release Renamed Activity includes before and after name and hyperlink to Release
Release update due date
User’s info, time stamp, Release name and hyperlink to Release
42 For project users, all Clash activity is filtered to only show activity for clashes created by them or shared with them. For Project Admins, all Clash activity in the project will be shown
43 For project users, all Release activity is filtered to only show activity for Releases created by them or shared with them. For Project Admins, all Release activity in the project will be shown

Trimble Connect for Browser › Activity 136
CATEGORY ACTIVITY TYPE INCLUDED INFORMATION
Release edit notes User’s info, time stamp, Release name, Release hyperlink, before and after notes
Release deleted User’s info, time stamp, Release name
ToDos ToDo added User’s info, time stamp, ToDo label and title, embedded view thumbnail and hyperlink to file
ToDo Edited User’s info, time stamp, ToDo label and the before and after values of the changed attribute
Edits include a change in Type, Status, Priority, Completion, Due date, Title or Description
ToDo Deleted User’s info, time stamp, ToDo label
Files added to ToDo
User’s info, time stamp, ToDo label, file name, thumbnail and file hyperlink
File associated to ToDo is removed
User’s info, time stamp, ToDo label, file name, thumbnail and file hyperlink
View added to ToDo
User’s info, time stamp, ToDo label, View name, thumbnail and View hyperlink
View removed from a ToDo
User’s info, time stamp, ToDo label, View name, thumbnail and View hyperlink
ToDo’s View Updated
User’s info, time stamp, ToDo label
Clash added to ToDo
User’s info, time stamp, ToDo label, total number of clashes added
ToDo assigned to a user
User’s info, time stamp, ToDo label and the assignee user name
Assignee removed from a ToDo
User’s info, time stamp, ToDo label and the removed user name
ToDo Imported User’s info, time stamp, total number of imported ToDos, number of added and vs updated ToDos

Trimble Connect for Browser › Activity 137
CATEGORY ACTIVITY TYPE INCLUDED INFORMATION
Comments Comment added User’s info, time stamp, name of the object (File, Folder, View etc), hyperlink to file and thumbnail (for files only), and the comment text
Comment edited User’s info, time stamp, name of the object (File, Folder, View etc), hyperlink to file and thumbnail (for files only), and the before and after comment text
Comment deleted User’s info, time stamp, name of the object (File, Folder, View etc), hyperlink to file and thumbnail (for files only)
Shares44 Share created User’s info, time stamp, number of files shared, file name, thumbnail, file hyperlink, Edit and Revoke buttons;
Using the Edit function, information about the recipients, share type, share settings can be found
Share revoked User’s info, time stamp, number of files share was revoked for and share status
Share updated User’s info, time stamp, field that was changed (not the before or after information)
Examples: Recipient changed, version setting changed, Access changed
Other Project Renamed User’s info, time stamp, before and after project name
Project Updated User’s info, time stamp, Project name and the before and after values of the changed attribute
Updates tracked are change in the start or end date or description of project
44 For project users, all Share activity is filtered to only show activity for shares created by them. For Project Admins, all Share activity in the project will be shown

Trimble Connect for Browser › Activity 138
View & Filter Activities You can view all the Project’s activity by going to the Activity page. You can refine the list of Activities by using the filters located at the top of the page.
FILTER DESCRIPTION
Type Filter the activity by category (file, folder, user, views etc.) or by specific activity (listed above)
Users Filters the activities by users who performed or were involved in the operation/activity.
Groups Filters the activities by user groups (or users in a group) who performed or were involved in the operation/activity.
Date modified Filters the activities by date: Today, Yesterday, Past 7 days, Past 30 days, Custom date range
Trimble Connect for Browser › Activity 139
Export Activities to ExcelYou can export all the activity of a project into an Excel Spreadsheet.
1. Go to the Activity page.
2. Click the Overflow Menu at the top of the right side. Select Export to Excel to export project activities.
3. A Export activities to Excel dialog box opens.
4. When the exported Excel file is ready to be downloaded, Trimble Connect sends you a download link in an email. The link is valid for 72 hours.
5. To close the dialog box, click Close.
The exported activity list will contain the following information:
FILTER DESCRIPTION
Activity Batch Identifier Unique identifier
Activity Date Date recorded for the activity type
Activity Type Activity type based off the listed Activities above
Activity Description Specific activity tracked; Example: 3 Files uploaded; 2 Files updated
Object Type Connect object the activity was done to. Example: File, Folder, View etc.
Object Name Object name
Object Version Number Version number listed for files only
Object Path File, Folder or Views path in the project
Object Identifier Unique ID for the object
Object Thumbnail For Files or Views
Object hyperlink URL to open object

Trimble Connect for Browser › Activity 140
FILTER DESCRIPTION
User Name Information about the user who performed the activity
User Title Job title of the user who performed the activity
User Company Company name of the user who performed the activity
User Group(s) Groups the user who performed the activity is in
Share Mode For Share activities only
Notified to For Share activities only

Trimble Connect for Browser › Search 141
Search
Using SearchSearch can be used to search all projects (also called Global search) or to search within a project. Clicking on any of the search results will load the particular result, for instance if you have clicked on a 3D file then it will be opened in the 3D Viewer
A user can search for and filter by the following objects:
• Projects
• Folders
• Files
• ToDos
• Releases
• Snapshots
• Clashes
Accepted Search Parameters
PARAMETER DESCRIPTION
Object name or title Results will be shown for Partial or full matches
Object description Typing keywords or phrases from a ToDo description will return results
File extensions Searching for .PDF or .IFC for example will return results
By tags Use the tag operator to research for tags:
tag:tagName
Quick Tip: Use the back arrow to be taken back to where you were before you executed the search

Trimble Connect for Browser › Search 142
Supported Bulk OperationsThe following mass operations can be done for the search results:
OPERATION DESCRIPTION
Delete45 Delete files46, folders, ToDos, views, Releases from the project. Project delete is also supported.47
Download files48 Download files to your local computer.
Share files49 Share files to others.
View multiple files50 View files in the 2D Viewer or in the 3D Viewer.
Export to Excel Export a list of files to Excel.
Add multiple files to a Release51
Add files to a new or existing Release.
Add multiple files to a ToDo52
Add files to a new or existing ToDo.
Filtering the ResultsA user can filter the results by the following:
FILTER DESCRIPTION
Projects Multi-selection of projects to search within is supported
Object type Projects, Folders, Files, ToDos, Releases, Views, Clashes
Modified date Today, Yesterday, Past 7 days, Past 30 days, Custom date range
45 Dependent on users role or permissions in the project46 Files that are attached to ToDos or Releases cannot be deleted47 Some restrictions apply - see "Leave or Delete Projects" on page 19 for details48 Only when searching within a project49 Only when searching within a project50 Dependent on users role or permissions in the project51 Dependent on users role or permissions in the project; Only when searching within a project52 Dependent on users role or permissions in the project; Only when searching within a project

Trimble Connect for Browser › Search 143
Global SearchGlobal search allows you to search across all the projects you are part of (it is not region specific). To execute a search across multiple projects, use the Search button located in the header of the application starting on the project page. You can also click the Search other projects button on the search results page if you had executed a search inside a project.
Note: If you are searching for files based off file metadata attributes, you will not be able to use global search.
Searching within a Project
Advanced Search53
You can search for files based on the metadata values by clicking the Advanced Search text in the search header.
You can search by 1 or all the metadata attributes that were defined in the metadata template.
53 Feature dependent on the owning account to be using the file metadata feature

Trimble Connect for Browser › Project Settings & Details 144
Project Settings & DetailsProject administrators can adjust project settings to set project preferences. You can access the project settings on the Settings page in Trimble Connect for Browser.
Project DetailsTo get an overview of the project or to make changes to some of the Project’s Settings, Go to the Settings › Project Details page in your project.
On the project details page you can view:
• Project Name (editable)
• Project Image (editable)
• Project Billing Account (editable)
• Project Location
• Project Size
• Number of Files
• Number of Users in the Project
• Date of Project Creation
• Project Description (editable)
• Start/End Date (editable)
Transfer Project OwnershipProject ownership is determined by the project’s license which is applied during project creation. The account which owns the license is considered the project owner.
Setting Project OwnershipFor new projects, there is an option in the creation dialog to Choose subscription for project. Inside the dropdown menu, you will see a list of all licenses available to you along with the account information where the license comes from.
For existing projects, ownership can be set (or changed) by going to the Settings › Project Details tab. This is a Project Admin function only and not available to all project users.

Trimble Connect for Browser › Project Settings & Details 145
Note: Changing project ownership will remove any existing file metadata being used on the project and will be replaced by the new account owner’s file metadata template (if the new account is using the feature).
Notification SettingsE-mail notifications allow you to receive project updates via email. The project administrator can set notifications to be sent on a daily basis and/or choose to have them sent in real time as the activity happens.
The administrator can also choose to let others modify their own email notification settings. Notifications can be generated for every activity such as a file being uploaded, downloaded or updated. Notifications can also be sent when new users or groups are added and when todos are created or modified.
The default notification settings for projects are instant email notifications for:
• Shared Views
• Shared Clashsets
• ToDo assignment

Trimble Connect for Browser › Project Settings & Details 146
You can receive notifications for the following activities:
CATEGORY ACTIVITY TYPE
Files Files Uploaded, Files Deleted, Files Restored, Files Moved, Files Renamed, File Download, File Checkout, File Checkin, Sync
Folders Folder Added, Folder Deleted, Folder Restored, Folder Moved, Folder Renamed, Folder Download
Users User Joined, User invited to project, User Removed, User Left
Views View Added, View Deleted, View assignment
Clashsets Clash added, Clash deleted, Clash assignment
Releases Release Created, Release files added, Release files removed, Release Sent, Release Renamed, Release update due date, Release edit notes
ToDo ToDo added, ToDo Edited, ToDo Deleted, ToDo added Files, File associated to ToDo is removed, ToDo assignment
Comments Comment added, Comment edited, Comment deleted
Other Project Renamed, Project Updated
Please note: Turning on Instant emails will send emails to all project members (including to the user who performed the action) whenever any of these activities are performed.
It is not recommended to turn on Instant Notifications for all activities for all project members.

Trimble Connect for Browser › Project Settings & Details 147
Setting Up NotificationsEmail notifications allow you to receive project updates via email.
The administrator can let others modify their own email notification settings. Notifications can be generated for every activity, such as a file being uploaded, downloaded or updated.
1. To set up notifications, go to Settings page › Notifications.
2. Project Administrators: on top of the page, select whether users can modify their own settings.
3. Click the menu for each category to display all activities within that category.
4. Each activity has the option to have the notification sent instantly or in a daily digest.
5. From the bottom of the page, select the daily digest time and your timezone.
6. Click Save.
Unit SettingsSet the standard units to be used throughout the project. Trimble Connect has expanded units settings for the project system and allows users to specify display precision on each unit e.g. Length, Area, Volume Angle and Measurements Length.
Unit setting support varies by application.
Supported Settings
Unit System
BROWSER APP 3D VIEWER MOBILE APP WINDOWS APP
Metric � � � �
Imperial (decimal) � � � �
Imperial (fractional) � � � �
Custom � � � �

Trimble Connect for Browser › Project Settings & Details 148
Display Precision
BROWSER APP 3D VIEWER MOBILE APP WINDOWS APP
0, 0.1, 0.01, 0.001 � � � �
½, ¼, ⅛, 1/16 1/32 1/64 � � � �
Distance
BROWSER APP 3D VIEWER MOBILE APP WINDOWS APP
Millimeter (mm) � � � �
Centimeter (cm) � � � �
Meter (m) � � � �
Kilometer (km) � � � �
Inch (in) � � � �
Foot (ft) � � � �
Yard (yd) � � � �
Ft-in � � � �
Mile (mi) � � � �

Trimble Connect for Browser › Project Settings & Details 149
Area
BROWSER APP 3D VIEWER MOBILE APP WINDOWS APP
mm2 � � � �
cm2 � � � �
m2 � � � �
in2 � � � �
ft2 � � � �
yd2 � � � �
Volume
BROWSER APP 3D VIEWER MOBILE APP WINDOWS APP
mm3 � � � �
cm3 � � � �
m3 � � � �
in3 � � � �
ft3 � � � �
yd3 � � � �

Trimble Connect for Browser › Project Settings & Details 150
Weight
BROWSER APP 3D VIEWER MOBILE APP WINDOWS APP
Milligram (mg) � � � �
Gram (g) � � � �
Kilogram (kg) � � � �
Tonne (t) � � � �
Ounce (oz) � � � �
Pound (lb) � � � �
Short ton (sh tn) � � � �
Ton (ton) � � � �
Angle
BROWSER APP 3D VIEWER MOBILE APP WINDOWS APP
Degree (deg) � � � �
Radius (rad) � � � �
To Set the Project Unit SettingsSet the standard units used throughout the project.
1. Under the Settings tab, go to the Units.
2. Select the Unit system: Imperial, Metric, Custom
3. Note: Custom allows you to combine units from both Imperial and Metric systems.
4. Select the display precision for each unit.
5. Click Save.

Trimble Connect for Browser › Project Settings & Details 151
User Permission Settings
ToDo Visibility ToDos can be made private to the author or public to all users in the project. By default, ToDos are visible for all users in the project.
If you are a Project Admin, you can change the privacy settings by going to the Settings › User Permissions page.
Change ToDo Visibility
1. On the Settings page, go to the User permissions.
2. Select whether ToDo visibility is shared or restricted. Shared: ToDos are visible to everyone in the project. Restricted: ToDos are visible to project administrators, ToDo creators and ToDo assignees.
3. Click Save.
Manage Project InvitationsA Project Administrator can select the option to allow all users to invite new project members or restrict project invitations to Project Administrators only for enhanced security. This setting is available on the User permissions page.
Set Project Member Invitations
1. Under the Settings tab, go to the User permissions.
2. Select whether all users can invite new members or only project administrators.
3. Click Save.

Trimble Connect for Browser › Project Settings & Details 152
Sync SettingsUnder sync settings there are two sections "Sync Mode" and "Exclude Files and Filters".
Sync ModeThese settings are used to help establish change control standards. Here are the options and how they work:
MODE DESCRIPTION
Enable automatic file checkout when uploading a file
When you sync the project this option allows you to download the file with read/write access. You can update the file locally and sync it to the server. While the sync is in progress, the files are checked out. When the sync is complete, the files are checked in. Other users can edit and update the file locally and also on the server.
Require file checkout before being able to upload files
When you sync the project this option allows you to download the file with read/write access. But you cannot update it on the server until you have not checked out the file. To update the file on the server you need to check out the file on the server and then update the file. After you finish working with the file,you can sync the file back to the server.
Require file checkout before being able to upload files, and set non-checked out files as read-only
When you sync the project this option allows you to download the file in read only mode. If you want to update the file first you need to check out the file then update the file locally and sync the project. It will update the file on the server. Other files that are not checked out will download in read only mode.
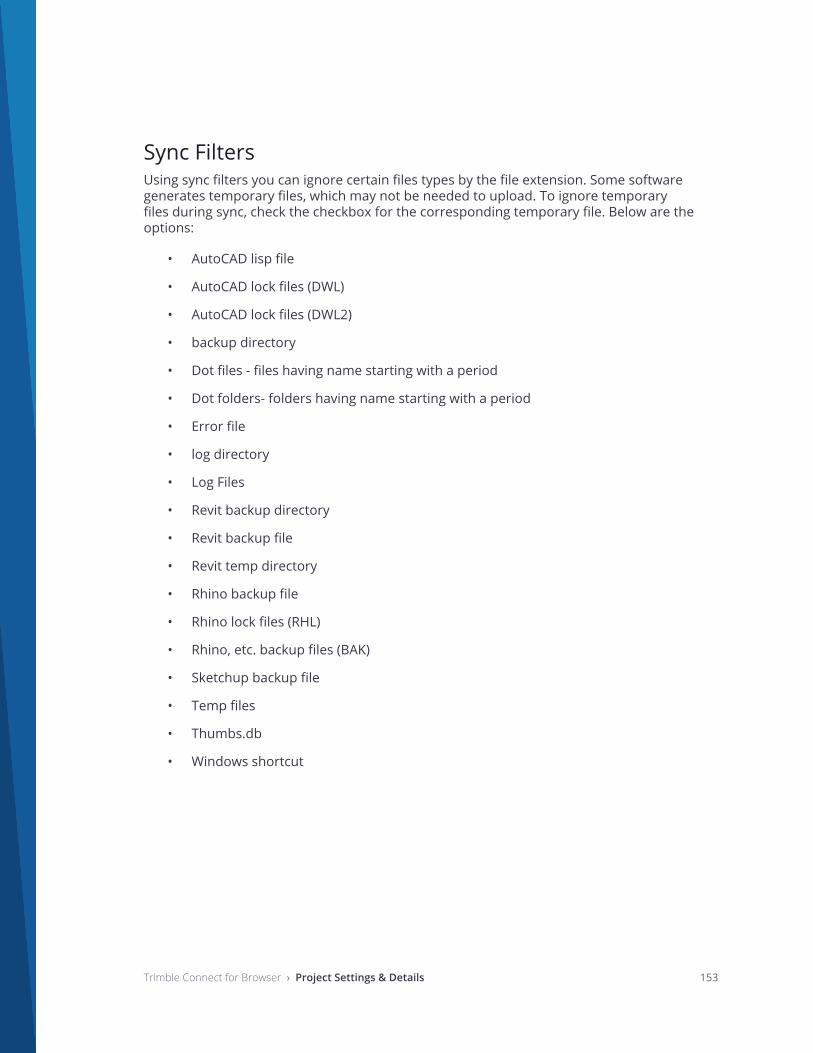
Trimble Connect for Browser › Project Settings & Details 153
Sync FiltersUsing sync filters you can ignore certain files types by the file extension. Some software generates temporary files, which may not be needed to upload. To ignore temporary files during sync, check the checkbox for the corresponding temporary file. Below are the options:
• AutoCAD lisp file
• AutoCAD lock files (DWL)
• AutoCAD lock files (DWL2)
• backup directory
• Dot files - files having name starting with a period
• Dot folders- folders having name starting with a period
• Error file
• log directory
• Log Files
• Revit backup directory
• Revit backup file
• Revit temp directory
• Rhino backup file
• Rhino lock files (RHL)
• Rhino, etc. backup files (BAK)
• Sketchup backup file
• Temp files
• Thumbs.db
• Windows shortcut

Trimble Connect for Browser › Resources & Training Material 154
Resources & Training Material
Trimble Connect App StoreTrimble Connect Apps expand the capabilities of Trimble Connect by integrating with multiple applications to increase workflow efficiency and productivity.
Accessing the App StoreYou can access the Trimble Connect App Store while logged in Trimble Connect by clicking the App Store icon in the top right corner.
Browse and DownloadIn the App Store you can browse and download available apps that can integrate with Trimble Connect.

Trimble Connect for Browser › Resources & Training Material 155
User Guides & Documentation
SpecificationsApplications Feature Comparison
Application Settings
Supported Languages
Support Policy
System Requirements
User GuidesAccount Administration Dashboard User Guide
Connect for Browser 2D Viewer User Guide — Coming Soon!
Connect for Browser 3D Viewer User Guide — Coming Soon!
Trimble Connect for Windows User Guide
Trimble Connect for Mobile User Guide
Trimble Connect Sync User Guide
Skill Builder Videos
BasicsCreating a New Project
Creating Clash Sets
Creating Groups & Inviting Users
Managing Folder Permissions
Microsoft Office 365 Integration
Viewing Project Files
3D ViewerAttachments Panel

Trimble Connect for Browser › Resources & Training Material 156
Creating & Sharing "Views"
Creating Markups & ToDos
Layer Management Tool
Navigating 3D Models
Measurement Tool