
Triangle MicroWorks IEC 61850 Library Evaluation Kit
21
Triangle MicroWorks IEC 61850 Library Evaluation Kit T
-
Upload
khangminh22 -
Category
Documents
-
view
0 -
download
0
Transcript of Triangle MicroWorks IEC 61850 Library Evaluation Kit

Triangle MicroWorks
IEC 61850 Library
Evaluation Kit
T

This Documentation and its associated distribution media contain proprietary information of Triangle
MicroWorks, Inc. and may not be copied or distributed in any form without the written permission of
Triangle MicroWorks, Inc. © 2016 Triangle MicroWorks, Inc. All rights reserved
Introduction
The IEC 61850 Library Evaluation Kit from Triangle MicroWorks provides a Demo Server
application to demonstrate the functionality of the ANSI C library and show how the
library is integrated into a target platform. The Evaluation Kit also provides a way to
experiment with the data handler concepts of the library. Along with the included
Source Code Library User Manual, this document explains how to use the Evaluation
Kit to explore and evaluate the library prior to purchase.
Note about Activating the Evaluation Kit
The Evaluation Kit requires a product key to be activated. Contact
[email protected] for a free license which can be used to activate
the Evaluation Kit.

This Documentation and its associated distribution media contain proprietary information of Triangle
MicroWorks, Inc. and may not be copied or distributed in any form without the written permission of
Triangle MicroWorks, Inc. © 2016 Triangle MicroWorks, Inc. All rights reserved
Setting Up the Evaluation Kit
The Evaluation Kit example is distributed as a Windows™ installer which installs a
Microsoft Visual Studio™ project.
Download
Download the installer for the Evaluation Kit from the Triangle MicroWorks customer
portal. It is easy to register for portal access by providing basic contact information.
Triangle MicroWorks Portal: https://trianglemicroworks.com/Login
While in the customer portal, download both the Evaluation Kit and the IEC 61850
Test Suite which will be used for testing the Demo Application.
Install
After downloading the Evaluation Kit, run the installer executable on a Windows™
PC. Make sure you run the installer with Admin privileges.
Request License
After the installation is complete, contact [email protected] for a free
license which can be used to activate the Evaluation Kit.
Activate License
Follow these steps to activate your product key:
1. Start the License Manager located here:
C:\TMW61850LibraryEval\SNLicManager.exe
2. Select “IED 61850 C Library Evaluation Kit”
3. Select “Activate Product Key”
4. Select “Activate Online”
Note: the PC will need to be connected to the Internet
5. Enter the product key and select “Submit”
6. Verify that the product key has been activated
a. Open a web browser on the PC
b. Go to http://localhost:1947
c. Select “Products” on the left
d. Select the features button for the product “Clib61850dll”
e. A license for 21 days should be listed

This Documentation and its associated distribution media contain proprietary information of Triangle
MicroWorks, Inc. and may not be copied or distributed in any form without the written permission of
Triangle MicroWorks, Inc. © 2016 Triangle MicroWorks, Inc. All rights reserved
Install Visual Studio
Visual Studio™ 2015 is required for the Evaluation Kit project to build.
Download Visual Studio™ Community from Microsoft for free and then install on the
PC where the Evaluation Kit will be installed.
Visual Studio™ information: https://www.visualstudio.com/vs/
Running the Demo Application
1. Start Visual Studio™
2. Open the project TMW61850ServerDemo2.vcxproj located here:
C:\TMW61850LibraryEval\examples\ServerDemo2\TMW61850ServerDemo2\
Figure 1: Opening the Project in Visual Studio
3. Build the Demo Application in debug mode by selecting “Local Windows
Debugger” or pressing F5:

This Documentation and its associated distribution media contain proprietary information of Triangle
MicroWorks, Inc. and may not be copied or distributed in any form without the written permission of
Triangle MicroWorks, Inc. © 2016 Triangle MicroWorks, Inc. All rights reserved
4. This will start the Demo Server as a console application which will ask to select
the Ethernet adaptor for GOOSE messages:
Figure 2: Console Application window for Demo Server
5. The list presented shows the Ethernet adapters on your PC. Select one of the
hardware devices. For testing with Hammer on the local PC it does not matter
which. To connect an IEC 61850 Client from a different host, you’ll need to
select the adapter which is connected to the same network as that host.

This Documentation and its associated distribution media contain proprietary information of Triangle
MicroWorks, Inc. and may not be copied or distributed in any form without the written permission of
Triangle MicroWorks, Inc. © 2016 Triangle MicroWorks, Inc. All rights reserved
Connect an IEC 61850 Client
An IEC 61850 Client can now be used to connect to the Demo Server. Below are
directions for using the Hammer tool which is part of the IEC 61850 Test Suite from
Triangle MicroWorks. Any other IEC 61850 Client could also be used to connect to
the Demo Server.
Download IEC 61850 Test Suite
Download the IEC 61850 Test Suite from the Triangle MicroWorks customer portal. It is
easy to register for portal access by providing basic contact information.
Triangle MicroWorks Portal: https://trianglemicroworks.com/Login
Install IEC 61850 Test Suite
After downloading the IEC 61850 Test Suite, run the installer executable on a
Windows™ PC. Make sure you run the installer with Admin privileges.
You can install the IEC 61850 Test Suite on the same PC as the Evaluation Kit or on
another PC which is connected to the same network.
Hammer Test Tool
Hammer is one of the tools in the IEC 61850 Test Suite. It is a simulated Client for IEC
61850 testing. It can connect to any IEC 61850 Server either using an SCL File or using
Discovery to see the Server model. For the Demo Server, Discovery will be used.
Connect to the Demo Server
Follow these steps to connect to the Demo Server (see Figure 3 and Figure 4):
1. Start Hammer
2. Select “Connect to IEDs” and “Create new IED connection”:
Figure 3: Create a connection with Hammer
3. Configure the IP Address and GOOSE Adapter

This Documentation and its associated distribution media contain proprietary information of Triangle
MicroWorks, Inc. and may not be copied or distributed in any form without the written permission of
Triangle MicroWorks, Inc. © 2016 Triangle MicroWorks, Inc. All rights reserved
If running Hammer on the same PC as the Demo Server: set IP Address
to 127.0.0.1 (software loopback) and set the GOOSE Loopback to True
If running Hammer on a different PC: set the IP Address to the PC where
the Demo Server is running and set the GOOSE Loopback to False
4. Select “Start Client”
Figure 4: Configuration of IEC 61850 Client in Hammer
5. Hammer will then connect to the Demo Server, discover the data model for
the Demo Server and then show the discovered data model.

This Documentation and its associated distribution media contain proprietary information of Triangle
MicroWorks, Inc. and may not be copied or distributed in any form without the written permission of
Triangle MicroWorks, Inc. © 2016 Triangle MicroWorks, Inc. All rights reserved
Reports
Enable Reports
After connecting to the Demo Server, enable the Report Control Block by following
these steps:
1. Expand each of these levels in the data model:
BayControllerQ (IED name)
LLN0 (Logical Node)
Report Control Buffered (Buffered Reports Section)
brcbMEAS01 (Report Control Block)
2. Enable the analog measurement report by right-clicking on “brcbMEAS01”
and selecting “Enable Report Control Block”.
Figure 5: Enable Report in Hammer

This Documentation and its associated distribution media contain proprietary information of Triangle
MicroWorks, Inc. and may not be copied or distributed in any form without the written permission of
Triangle MicroWorks, Inc. © 2016 Triangle MicroWorks, Inc. All rights reserved
Generate Reports
The Demo Server application provides a command to change the analog values to
demonstrate library functions. In the application console window, entering ‘c’ will
update all the analog values (including the 3 phase currents in the MMXU logical
node). When these analog values change, the Demo Server generates a report for
the report control block.
Figure 6: Update analog values in Demo Server
Deadbanding Analog Values
The Demo Server application implements a deadbanding algorithm according to
IEC 61850-7-1. When the Demo Server updates the analog values, the updated
values are written to the “instCVal” (instantaneous value) attributes in the data
model. The deadband threshold is the “db” data attribute in the data model is in
units of 0.001% (10% in this example). If the updated value exceeds the deadband
threshold, then the value will be written to the “cVal” attributes and this will cause a
report to be generated. For the Demo Server, the updated analog values should
exceed the deadband and generate a report 90% of the time that “c” is pressed.

This Documentation and its associated distribution media contain proprietary information of Triangle
MicroWorks, Inc. and may not be copied or distributed in any form without the written permission of
Triangle MicroWorks, Inc. © 2016 Triangle MicroWorks, Inc. All rights reserved
Figure 7: Deadbanding in Data Model
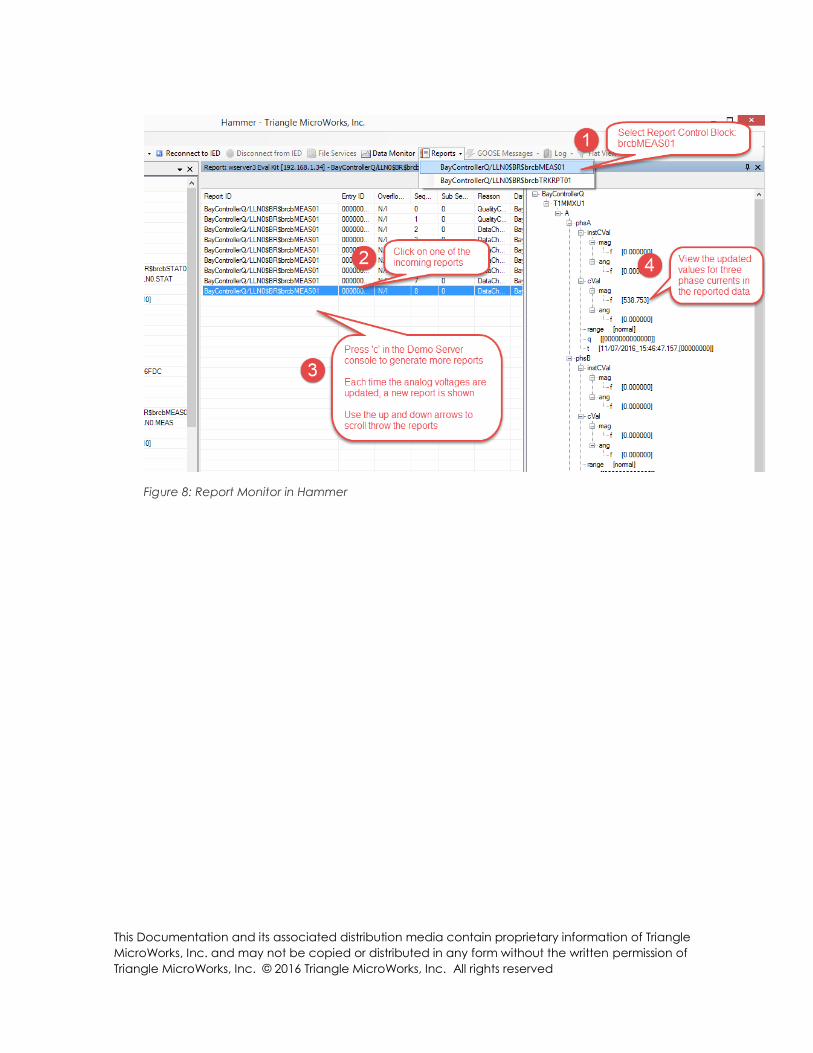
View Reports
After entering ‘c’ to update the analog values, the Report Monitor will be enabled in
Hammer. Follow these steps to view reports in the Report Monitor (see Figure 8):
1. Click on the Reports icon on the ribbon bar in Hammer and select the
Report Control Block “brcbMEAS01”
2. Click on one of the incoming reports on the left side
3. Press ‘c’ in the Demo Server console to generate more reports. Use the up
and down arrows to scroll through the reports in Hammer.
4. View the data contained in the report on the right side – in this case the
value for the three phase currents has been updated in each report
This Documentation and its associated distribution media contain proprietary information of Triangle
MicroWorks, Inc. and may not be copied or distributed in any form without the written permission of
Triangle MicroWorks, Inc. © 2016 Triangle MicroWorks, Inc. All rights reserved
Figure 8: Report Monitor in Hammer

This Documentation and its associated distribution media contain proprietary information of Triangle
MicroWorks, Inc. and may not be copied or distributed in any form without the written permission of
Triangle MicroWorks, Inc. © 2016 Triangle MicroWorks, Inc. All rights reserved
GOOSE
To subscribe to a GOOSE Control Block, follow these steps:
1. Expand each of these levels of the data model:
BayControllerQ (IED name)
LLN0 (Logical Node)
GOOSE Control (GOOSE Section)
gcbGPIO (GOOSE Control Block)
2. Right-click on the GOOSE Control Block to subscribe:
Figure 9: Subscribe to GOOSE in Hammer
3. A hollow lightning bolt will appear next to the GOOSE Control Block. When
Hammer receives GOOSE re-transmissions for this Control Block, then the
lightning bolt will become solid. GOOSE re-transmissions are used to confirm
the GOOSE publisher is still active.
4. The GOOSE Messages Monitor will become active after a data value or
quality in the GOOSE data set changes.

This Documentation and its associated distribution media contain proprietary information of Triangle
MicroWorks, Inc. and may not be copied or distributed in any form without the written permission of
Triangle MicroWorks, Inc. © 2016 Triangle MicroWorks, Inc. All rights reserved
Generate GOOSE Events
For a GOOSE event to be published by the Demo Server, one of the data members
of the GOOSE data set will need to be updated. Press ‘b’ in the application console
window to update the status value for “QA1CSWI.Pos” in the data set for the GOOSE
Control Block “gcbGPIO”.
Follow these steps to view the GOOSE messages in the GOOSE Monitor in Hammer
(see Figure 10):
1. Click on the GOOSE Messages icon on the ribbon bar in Hammer and
select the GOOSE Control Block "gcbGPIO"
2. Select one of the GOOSE messages on the left side
3. Press ‘b’ in the Demo Server console to generate GOOSE events. Use the
up and down arrows to scroll through the GOOSE messages in Hammer.
4. View the data in the GOOSE message on the right side
Figure 10: GOOSE Monitor in Hammer
Note: the GOOSE Monitor only shows the GOOSE messages in which there is an
event (for example a change to the data value or quality). Re-transmission
GOOSE messages are not shown in the GOOSE Monitor.
Testing Other IEC 61850 Services
Hammer will allow you to exercise all the functionality of the server. For further
information, the Hammer User Manual is available from the Help menu.

This Documentation and its associated distribution media contain proprietary information of Triangle
MicroWorks, Inc. and may not be copied or distributed in any form without the written permission of
Triangle MicroWorks, Inc. © 2016 Triangle MicroWorks, Inc. All rights reserved
Server Implementation Steps
Object Model
The first task in implementing an IEC 61850 server is modeling the device functionality.
IEC 61850 describes data in terms of a model which attaches semantic meaning to
Data Objects and Data Attributes. The standard, in parts IEC 61850-5 and 61850-7-1,
describes the process of Decomposition of application functions and information to
create a data model that represents your device. The Evaluation Kit provides an
example data model so that you can experiment without this step. A review of your
IEC 61850 data model is included with the purchase of a license for the IEC 61850
Source Code Library. Triangle MicroWorks can also provide consulting services to
assist with creating your model.
Target Platform
The second task in implementing the server is porting to the target platform. The
Evaluation Kit is currently available for Windows™ only, so this step is completed. The
target layer is isolated to contain the platform related porting tasks. These consist of
clocks, threads, filesystem, sockets (including layer 2), and mutexes.
Mapping Application Data
The next step in the implementation is mapping the application data. The library
requires functions to map the various data attributes. The library has a default set
that allocates RAM for all data, but this can be customized as needed for your
application. The Evaluation Kit demonstrates one scheme for mapping to application
data via sAddr elements in the SCL file. Any mapping scheme could be used. The
sAddr allows a level of abstraction enabling the 61850 data model to be flexible with
respect to the application data.
The library provides handlers for all basic and complex types defined by the IEC
61850 standard. The types and handler functions are described in XML files in the
sclclasses directory. The “classes” files describe the IEC 61850 data structures, and
the “primitives” files map the handler functions for each type. Any of the default
functions can be replaced with customized functions. This is demonstrated with the
file “demoprimitives.xml” in the example code. The demo_mapping.c shows how
the custom functions are mapped, and also how the library functions can be
“wrapped” with application code. This is shown in the control handlers.
This Documentation and its associated distribution media contain proprietary information of Triangle
MicroWorks, Inc. and may not be copied or distributed in any form without the written permission of
Triangle MicroWorks, Inc. © 2016 Triangle MicroWorks, Inc. All rights reserved
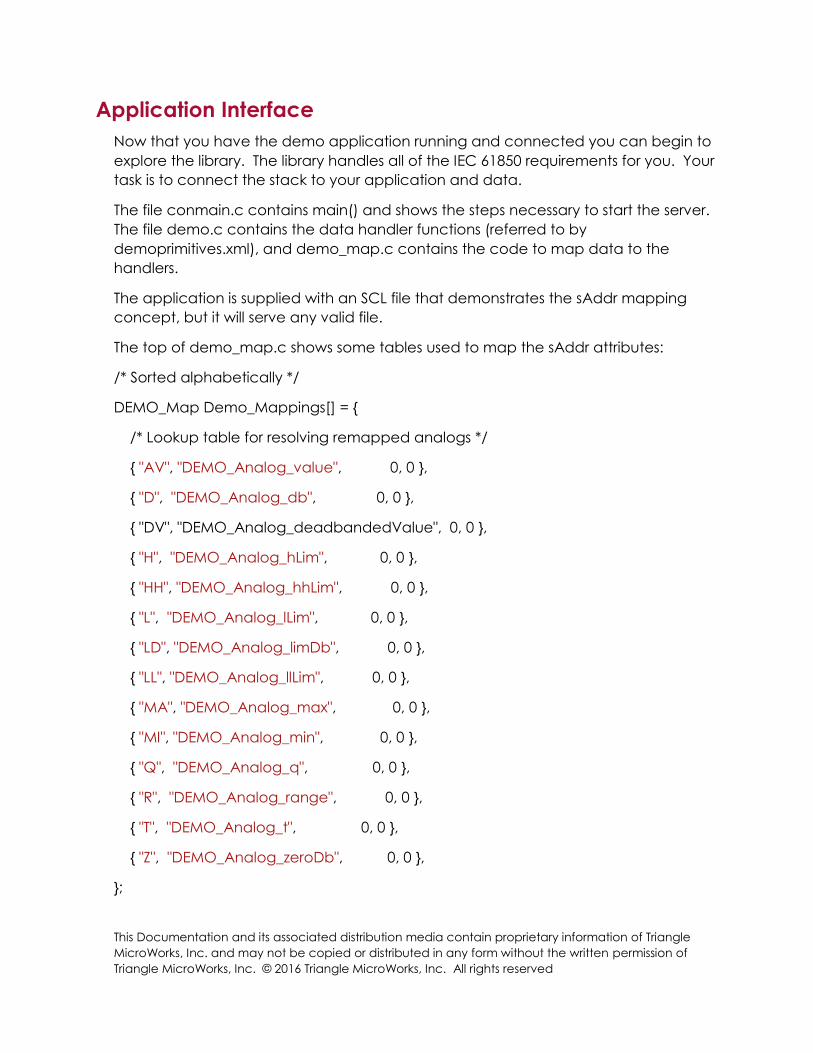
Application Interface
Now that you have the demo application running and connected you can begin to
explore the library. The library handles all of the IEC 61850 requirements for you. Your
task is to connect the stack to your application and data.
The file conmain.c contains main() and shows the steps necessary to start the server.
The file demo.c contains the data handler functions (referred to by
demoprimitives.xml), and demo_map.c contains the code to map data to the
handlers.
The application is supplied with an SCL file that demonstrates the sAddr mapping
concept, but it will serve any valid file.
The top of demo_map.c shows some tables used to map the sAddr attributes:
/* Sorted alphabetically */
DEMO_Map Demo_Mappings[] = {
/* Lookup table for resolving remapped analogs */
{ "AV", "DEMO_Analog_value", 0, 0 },
{ "D", "DEMO_Analog_db", 0, 0 },
{ "DV", "DEMO_Analog_deadbandedValue", 0, 0 },
{ "H", "DEMO_Analog_hLim", 0, 0 },
{ "HH", "DEMO_Analog_hhLim", 0, 0 },
{ "L", "DEMO_Analog_lLim", 0, 0 },
{ "LD", "DEMO_Analog_limDb", 0, 0 },
{ "LL", "DEMO_Analog_llLim", 0, 0 },
{ "MA", "DEMO_Analog_max", 0, 0 },
{ "MI", "DEMO_Analog_min", 0, 0 },
{ "Q", "DEMO_Analog_q", 0, 0 },
{ "R", "DEMO_Analog_range", 0, 0 },
{ "T", "DEMO_Analog_t", 0, 0 },
{ "Z", "DEMO_Analog_zeroDb", 0, 0 },
};

This Documentation and its associated distribution media contain proprietary information of Triangle
MicroWorks, Inc. and may not be copied or distributed in any form without the written permission of
Triangle MicroWorks, Inc. © 2016 Triangle MicroWorks, Inc. All rights reserved
These mapping strings are completely arbitrary and are only interpreted by this
server. An sAddr of “AV2” will be mapped to the row 2 instVal in the table in
demo.c, which is the application data for our simple example:
AnalogOperationalValues analogOperationalValues[ MAX_MAPPING_VALUES ] = {
/* instVal dbVal t q range lastRange */
/* -------------------------------------------------------- */
{ 100.0, 100.0, { 0, 0, 0 }, { 0, 0 }, RangeKind_normal, RangeKind_normal },
{ 101.0, 101.0, { 0, 0, 0 }, { 0, 0 }, RangeKind_normal, RangeKind_normal },
{ 102.0, 102.0, { 0, 0, 0 }, { 0, 0 }, RangeKind_normal, RangeKind_normal },
{ 103.0, 103.0, { 0, 0, 0 }, { 0, 0 }, RangeKind_normal, RangeKind_normal },
{ 104.0, 104.0, { 0, 0, 0 }, { 0, 0 }, RangeKind_normal, RangeKind_normal },
{ 105.0, 105.0, { 0, 0, 0 }, { 0, 0 }, RangeKind_normal, RangeKind_normal },
{ 106.0, 106.0, { 0, 0, 0 }, { 0, 0 }, RangeKind_normal, RangeKind_normal },
{ 107.0, 107.0, { 0, 0, 0 }, { 0, 0 }, RangeKind_normal, RangeKind_normal },
{ 108.0, 108.0, { 0, 0, 0 }, { 0, 0 }, RangeKind_normal, RangeKind_normal },
{ 109.0, 109.0, { 0, 0, 0 }, { 0, 0 }, RangeKind_normal, RangeKind_normal }
};
Again, this sAddr scheme is completely arbitrary. You simply define an appropriate
set of tags based on how your application data is structured.
There are the two typical situations that developers have when implementing a
61850 server – either a new product, or adding 61850 to an existing product. In the
latter, the data already exists, and you are simply mapping the 61850 server to find it.
Your database is probably somewhat more complex than the array of structures
used in the example, but the job is the same. In the case of a new product you
have the option of letting the library allocate all of the memory and informing the
application of it. This is done by having the mapLeafNode function supply the pointer
to the application data rather than receiving it. You may use either depending on
your constraints and preferences.

This Documentation and its associated distribution media contain proprietary information of Triangle
MicroWorks, Inc. and may not be copied or distributed in any form without the written permission of
Triangle MicroWorks, Inc. © 2016 Triangle MicroWorks, Inc. All rights reserved
The TMW library provides a set of XML files that describe the data models and links to
the data handler functions for each type. These are in the sclclasses folder. Any of
these can be overridden by custom handlers for more specific data. The file
demoprimitives.xml in the example folder is the key to this.
<Primitive ident="DEMO_Analog_value" size="sizeof(MMSD_FLOAT_DATA_TYPE)"
readhandler="DEMO_readAnalog_value"
writehandler="DEMO_writeAnalog_value"
attrhandler="MMSd_attrFloat"
evalhandler="DEMO_evalAnalog_value"
indexhandler="DEMO_indexAnalog_value"
array="NOARRAY">
<typedef baseType="MMSD_FLOAT_DATA_TYPE"
primitiveType="DEMO_Analog_value"/>
<declare>
int DEMO_readAnalog_value( void *N, int size, void *parameter, void *E ) ;
</declare>
<declare>
void DEMO_writeAnalog_value( void *N, void *D, int size, void *parameter, void *E
);
</declare>
<declare>
int DEMO_evalAnalog_value( void *val, int siz, void *save, void *db, void *scale,
unsigned char *reason );
</declare>
<declare>
void *DEMO_indexAnalog_value( int index, void *parameter, int size );
</declare>
</Primitive>

This Documentation and its associated distribution media contain proprietary information of Triangle
MicroWorks, Inc. and may not be copied or distributed in any form without the written permission of
Triangle MicroWorks, Inc. © 2016 Triangle MicroWorks, Inc. All rights reserved
This snippet shows the example application code overriding the library default
handler for FLOAT with the DEMO handlers. In this case, call the library function
MMSd_writeFloat() to extract the value from the incoming message into temporary
storage, then perform the range checking and dedbanding functions. These
Primitives can be further restricted by Functional Constraint, Attribute name, or
Common Data Class. See 3.2.3.1 of the Server Manual for more information.
void DEMO_writeAnalog_value( void *N, void *D, int size, void *parameter, void *E )
{
int index = DEMO_PTR_TO_INDEX( parameter );
float fNewValue;
MMSd_context *pMmsContext;
if ( index >= MAX_MAPPING_VALUES ) {
MMSd_setError( MMSd_data_invalid_address, E );
return;
}
MMSd_writeFloat( N, D, size, &fNewValue, E );
if ( ( fNewValue < analogConfigValues[ index ].min )
|| ( fNewValue > analogConfigValues[ index ].max ) ) {
MMSd_setError( MMSd_data_object_value_invalid, E );
return;
}
pMmsContext = MMSd_get_handler_mms_context( E );
MMSd_LockReporting( pMmsContext );
if ( DEMO_StoreAnalogValue( fNewValue, index ) ) {
This Documentation and its associated distribution media contain proprietary information of Triangle
MicroWorks, Inc. and may not be copied or distributed in any form without the written permission of
Triangle MicroWorks, Inc. © 2016 Triangle MicroWorks, Inc. All rights reserved
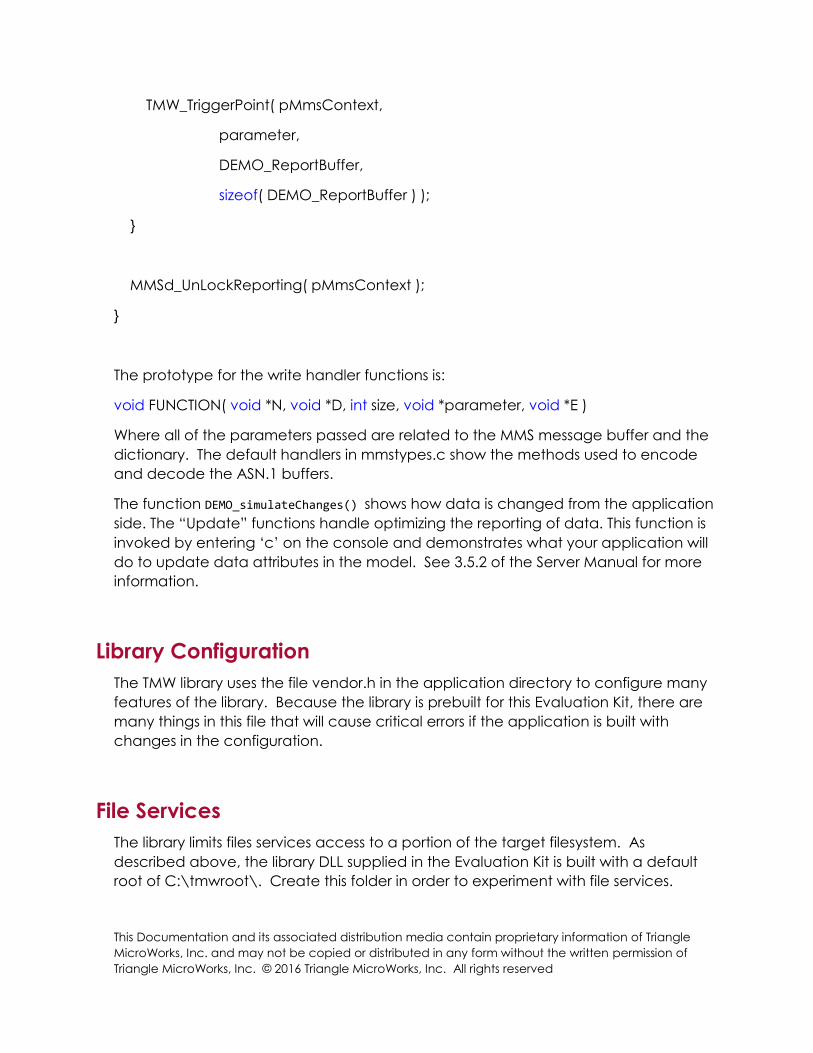
TMW_TriggerPoint( pMmsContext,
parameter,
DEMO_ReportBuffer,
sizeof( DEMO_ReportBuffer ) );
}
MMSd_UnLockReporting( pMmsContext );
}
The prototype for the write handler functions is:
void FUNCTION( void *N, void *D, int size, void *parameter, void *E )
Where all of the parameters passed are related to the MMS message buffer and the
dictionary. The default handlers in mmstypes.c show the methods used to encode
and decode the ASN.1 buffers.
The function DEMO_simulateChanges() shows how data is changed from the application
side. The “Update” functions handle optimizing the reporting of data. This function is
invoked by entering ‘c’ on the console and demonstrates what your application will
do to update data attributes in the model. See 3.5.2 of the Server Manual for more
information.
Library Configuration
The TMW library uses the file vendor.h in the application directory to configure many
features of the library. Because the library is prebuilt for this Evaluation Kit, there are
many things in this file that will cause critical errors if the application is built with
changes in the configuration.
File Services
The library limits files services access to a portion of the target filesystem. As
described above, the library DLL supplied in the Evaluation Kit is built with a default
root of C:\tmwroot\. Create this folder in order to experiment with file services.

This Documentation and its associated distribution media contain proprietary information of Triangle
MicroWorks, Inc. and may not be copied or distributed in any form without the written permission of
Triangle MicroWorks, Inc. © 2016 Triangle MicroWorks, Inc. All rights reserved
Available Library Packages
C Library
Processor and operating system independent
Designed for use in embedded systems and applications that require high performance
Supports any ANSI-Standard C compiler
Library includes examples with target layers for Windows and Linux
Customers have implemented on many platforms including real time OS (RTOS)
C++ Library
Supports Windows and Linux
C++ wrapper built on top of C Library
Underlying ANSI-C source code is included to allow for customization
Library includes examples with target layers for Windows and Linux
.NET Components
Supports Windows
Built on top of C and C++ Libraries
Underlying ANSI-C and C++ source code is included to allow for customization
Available Library Components
IEC 61850 Server
The Server Source Code Library is optimized for high performance
in a variety of device-level implementations including embedded
systems with limited resources.
IEC 61850 Client
The Client Source Code Library can be used in embedded or non-
embedded environments to provide very efficient, high-speed
client services.
GOOSE
The GOOSE (Generic Object Oriented Substation
Event) Publisher/Subscriber component implements an additional
protocol used for protection functions and other applications
requiring high speed multicast peer-to-peer communications
capabilities.
Sampled Values
The Sampled Values (IEC 61850-9-2) component is used to transmit
high speed streams of data set samples encoded in multicast or
unicast Ethernet frames. The protocol uses a publisher/subscriber
model, in which a publisher transmits unacknowledged data
to subscribers.

This Documentation and its associated distribution media contain proprietary information of Triangle
MicroWorks, Inc. and may not be copied or distributed in any form without the written permission of
Triangle MicroWorks, Inc. © 2016 Triangle MicroWorks, Inc. All rights reserved
Contact Us
Please contact us for more information about our IEC 61850 Source Code Library.
Sales
Request a quote from our website:
http://trianglemicroworks.com/sales/sales-request
Or contact our sales team directly:
Technical Support
Submit a support request on our website:
http://trianglemicroworks.com/support/source-code-libraries
Or email our support team:
Triangle MicroWorks, Inc.
Sales: +1 919.870.5101
Support: +1 919.781.1931
Fax: +1 919.870.6692