
Trees for Teens: Project Tree House! - Iowa DNR
33
Trees for Teens 2010‐2011 – Iowa DNR Page 1 Trees for Teens: Project Tree House! 2010-2011 School Year Middle Level
-
Upload
khangminh22 -
Category
Documents
-
view
0 -
download
0
Transcript of Trees for Teens: Project Tree House! - Iowa DNR

Trees for Teens 2010‐2011 – Iowa DNR Page 1
Trees for Teens:
Project Tree House!
2010-2011 School Year
Middle Level
Trees for Teens 2010‐2011 – Iowa DNR Page 2
Table of Contents Introduction…………………………………………………………………….3 Lesson 1: What’s Inside a Tree House?………………………………………..4 Expand- Tree Part Riddles……………………………………………..6 Other Activity- Parts of a Tree Crossword…………………………….7 Lesson 2: What Do Tree Houses Need?.............................................................11 Expand-Testing Leaves for Starch……………………………………..14 Lesson 3: Habitats Working Together?...............................................................16 Expand- Our Homes or Different Forest Types………..........................18 Lesson 4: Loss of Tree Houses………………………………………………..19 Expand- Invasive Species….…………………………………………...22 Lesson 5: Schoolyard Rangers………………………………………………….23 Expand-Neighborhood Field Guides..………..25 Lesson 6: Our House & Trees……………………..…26 Expand- “Wood” You Believe It?..............…..27 Resource List…………………………………………30 Reading Rangers……………………………………...31 Supplemental Materials……………………………….32 A special thank you to all the Trees for Kids/Teens partners for 2010!

Trees for Teens 2010‐2011 – Iowa DNR Page 3
Trees for Teens 2010-2011
The Program Trees for Teens is an educational program that incorporates educational experiences with planting trees. A focus is placed on Iowa’s elementary and secondary school students. Its goals are to educate students about the values of trees and to encourage tree planting projects at schools or at other public areas around the state of Iowa. This unique program is sponsored by the Iowa Department of Natural Resources – Bureau of Forestry, MidAmerican Energy, Black Hills Energy, Alliant Energy, Trees Forever, Iowa Tree Farm Committee, Iowa Woodland Owners Association, Iowa Bankers Association, and Iowa Landscape and Nursery Association. This year the educational materials included are lesson plans, learning centers, bulletin boards, and resource lists. This group of six lesson plans can be seen as a thematic unit about trees and the habitats they provide. The unit is linked to the Iowa Core Curriculum and it incorporates the multiple intelligences. Some of the subject areas touched upon are science, reading, geography, computer skills, social studies, and math. Feel free to utilize any or all of the materials provided. You may print or photocopy as needed. If you would like a hard copy please contact the Iowa DNR Trees for Kids Coordinator at 515-281-6749 or visit the TFK/TFT webpage at: www.iowadnr.gov/forestry/treesforkids. The Trees Trees for Kids and Trees for Teens offers grant funding to plant trees at your school every spring and fall. Schools are selected based on their grant application. Over 20 projects are funded a year. Please visit the Trees for Kids website www.iowadnr.gov/forestry/treesforkids for an application. If you have questions about the application process or the program contact the Iowa DNR Trees for Kids Coordinator at 515-281-6749. Materials, Layout and Design Allison McInroy, Iowa DNR Trees for Kids/Teens Coordinator Laura Wagner, Iowa DNR 502 E. 9th Des Moines, IA 50319 515-281-6749
Bureau of Forestry

Trees for Teens 2010‐2011 – Iowa DNR Page 4
Lesson 1: Build a Classroom Tree House
Grade Level: 6-8 Preparation Time: See Getting Started. Lesson Time: 50-60 minutes Goal: Students will know that trees have many different parts. Objectives:
• Using the materials provided, students will use problem solving skills to put together a tree.
• Students will use communication skills to work effectively in a group environment. Iowa Core Curriculum:
Grades 6-8 Life Science: Understand and apply knowledge of the basic components and functions of cells, tissues, organs, and organ systems. Understand and apply knowledge of the complementary nature of structure and function and the commonalities among organisms.
Multiple Intelligences:
• Visual/Spatial- The classroom tree acts as a visual that can be used throughout the unit. • Verbal/Linguistic- Students are given tree part definition cards that require reading. • Logical/Mathematical- Students use problem solving to draw out and put together a tree
using the materials provided. • Bodily/Kinesthetic- Students have the opportunity to move around while building their
tree. • Interpersonal- Students have the opportunity to work in groups. • Intrapersonal- Students have the opportunity to work individually.
Materials:
• Newspapers, magazines, scrap paper, paper towel rolls, and other recycled materials. • Straws, popsicle sticks, pipe cleaners, toothpicks, etc. • Markers, paint • A lot of glue and masking tape for each group • Scissors • 3 large poster boards • Tree part definition card for each student (provided)
Vocabulary:
• See tree part cards. What will Happen:
• Students will work together to form a classroom definition of each tree part and will build a classroom tree using recycled materials.
Getting Started:

Trees for Teens 2010‐2011 – Iowa DNR Page 5
To complete this activity you will need to collect materials. Attached is a letter asking for recycled materials that you can send home with students. You will also need to print enough tree-part cards so that each student has one tree part, not one set. Engage: 10 minutes
• Hand each student one tree-part card, and then form small groups according to what part they were given. There should be nine groups. Allow time for students to discuss the part they were given.
• In those groups have students create a simple definition of their tree part, including the information that they feel is most important. Have each group share their definition (write the definition on the board) and have all students write it down in their notebook for later use.
• Bring up this photo on the computer and explain that we are going to build classroom trees using all of these recycled materials. (You can leave this photo up for a reference during the activity.)
o This photo can be found at: http://www.ncforestry.org/webpages/classroom%20activities/trees/partsoftree/index.htm
Explore: 25-30 minutes
• Break the class into three groups. Each group will make one section of the tree. Group 1- crown, Group 2-Trunk, Group 3- roots.
• Explain: o You will have 20 minutes to make your section of a tree that includes the parts we
talked about. o You must use the materials provided. o Your section must fit on this piece of poster, and we will be putting each section
together at the end to make a full tree. o Every tree part that is found in your section must be visible and easily identified.
Provide a key or label each part.
Trees for Teens 2010‐2011 – Iowa DNR Page 6
• Begin by giving the whole class 3 minutes to decide how to be sure their sections will fit together at the end. They may put their poster boards together and do a rough outline of a tree so they have an idea of what size they should be making their section.
• Introduce the materials, and make sure that each group has a set of the tree part cards that they can use as a reference.
• Allow the trees to dry and then put them together. Explain: 10 minutes
• Bring the class together around their tree. • Discuss each part and how they work together to provide life and growth.
Evaluate: 5-10 minutes • To evaluate you could have students draw a tree incorporating each part and its
definition. • Or have students do a write up on how each part works together.
Expand: 15-20 minutes • To expand have each student pick a part of the tree to write a riddle. Write the following
directions on the board: o Line 1- Where am I? o Line 2- What’s my function? o Line 3- Your Choice. o Line 4- “What tree part am I?”
• Number students off and have them write that number on their riddle. Have them set their riddle out and allow students to go from riddle to riddle writing the answer of each.
• Finish by having each student share the correct answer to their riddle. Or
• Have a discussion about fine feeder roots vs. large structural roots. o Fine feeder roots absorb water and nutrients that are essential to food production
by the leaves. o The large woody roots provide support for the plant and allow water to go from
the fine feeder roots to the stem.
Trees for Teens 2010‐2011 – Iowa DNR Page 7
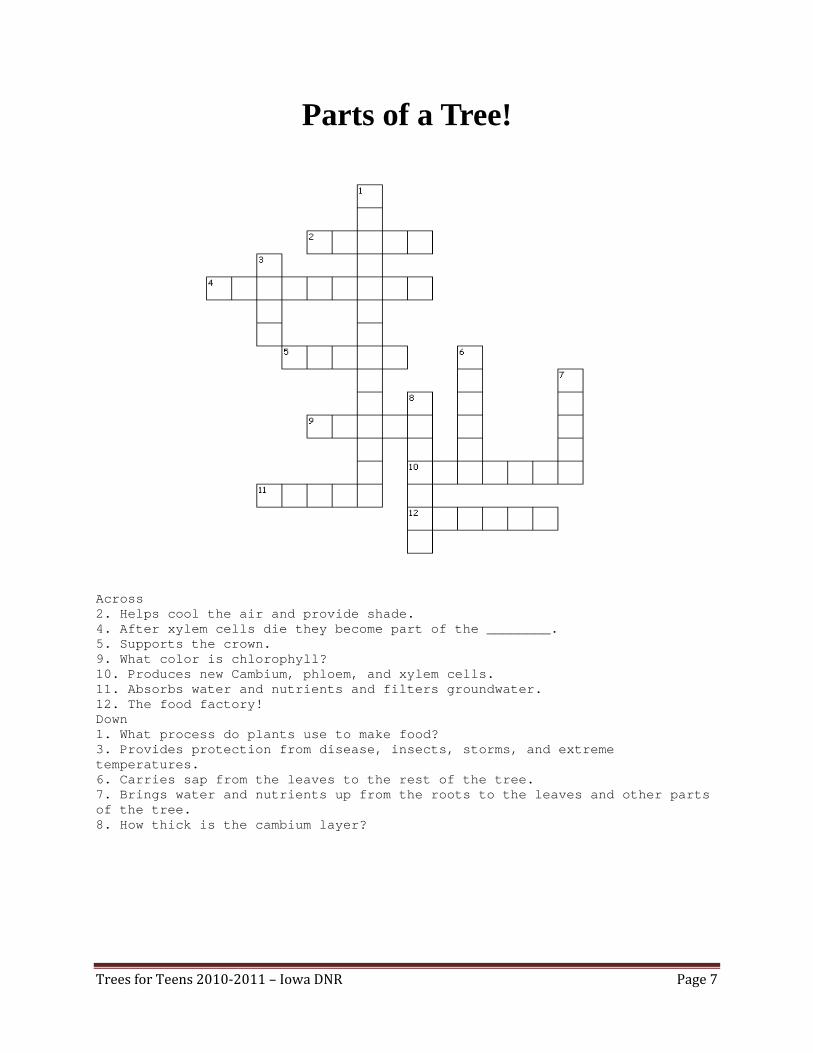
Parts of a Tree!
Across 2. Helps cool the air and provide shade. 4. After xylem cells die they become part of the ________. 5. Supports the crown. 9. What color is chlorophyll? 10. Produces new Cambium, phloem, and xylem cells. 11. Absorbs water and nutrients and filters groundwater. 12. The food factory! Down 1. What process do plants use to make food? 3. Provides protection from disease, insects, storms, and extreme temperatures. 6. Carries sap from the leaves to the rest of the tree. 7. Brings water and nutrients up from the roots to the leaves and other parts of the tree. 8. How thick is the cambium layer?

Trees for Teens 2010‐2011 – Iowa DNR Page 8
Create your own puzzle at: http://puzzlemaker.discoveryeducation.com/ Answer Key: Across 2. Helps cool the air and provide shade. Crown 4. After xylem cells die they become part of the Heartwood 5. Supports the crown. Trunk 9. What color is chlorophyll? Green 10. Produces new Cambium, phloem, and xylem cells. Cambium 11. Absorbs water and nutrients and filters groundwater. Roots 12. The food factory! Leaves Down 1. What process do plants use to make food? Photosynthesis 3. Provides protection from disease, insects, storms, and extreme temperatures. Bark 6. Carries sap from the leaves to the rest of the tree. Phloem 7. Brings water and nutrients up from the roots to the leaves and other parts of the tree. Xylem 8. How thick is the cambium layer? One Cell (No space)
Trees for Teens 2010‐2011 – Iowa DNR Page 9
Parent letter: Dear Family and Friends, We are getting ready to begin a unit on trees. In order to complete the first activity we need a number of materials. Most of these materials can be found around the house, and many of them are things that you recycle! Here is a list:
• Newspapers, magazines, scrap paper, paper towel tubes, and other recycled materials. • Straws, popsicle sticks, pipe cleaners, toothpicks, etc. • Markers, paint. • Glue and masking tape. • 3 large poster boards.
If you have any of these things around the house feel free to send them to school! We would greatly appreciate it. Thank you, Parent letter: Dear Family and Friends, We are getting ready to begin a unit on trees. In order to complete the first activity we need a number of materials. Most of these materials can be found around the house, and many of them are things that you recycle! Here is a list:
• Newspapers, magazines, scrap paper, paper towel tubes, and other recycled materials. • Straws, popsicle sticks, pipe cleaners, toothpicks, etc. • Markers, paint • Glue and masking tape • 3 large poster boards
If you have any of these things around the house feel free to send them to school! We would greatly appreciate it. Thank you,
Trees for Teens 2010‐2011 – Iowa DNR Page 10
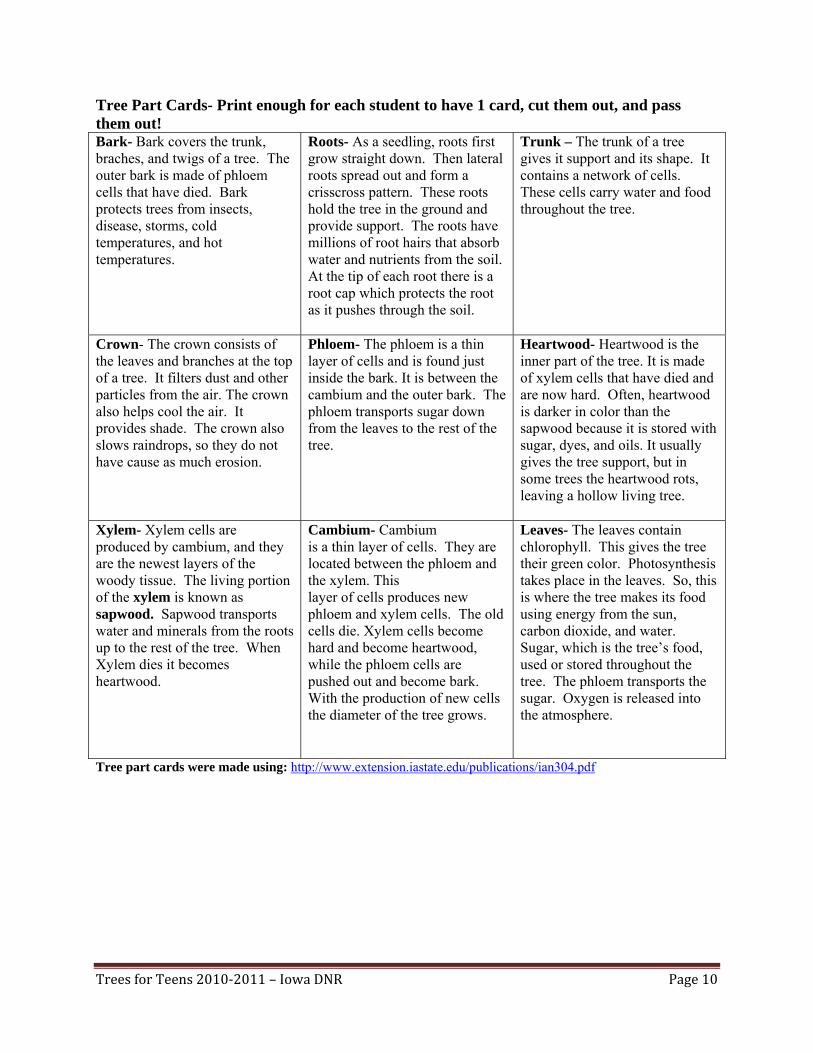
Tree Part Cards- Print enough for each student to have 1 card, cut them out, and pass them out! Bark- Bark covers the trunk, braches, and twigs of a tree. The outer bark is made of phloem cells that have died. Bark protects trees from insects, disease, storms, cold temperatures, and hot temperatures.
Roots- As a seedling, roots first grow straight down. Then lateral roots spread out and form a crisscross pattern. These roots hold the tree in the ground and provide support. The roots have millions of root hairs that absorb water and nutrients from the soil. At the tip of each root there is a root cap which protects the root as it pushes through the soil.
Trunk – The trunk of a tree gives it support and its shape. It contains a network of cells. These cells carry water and food throughout the tree.
Crown- The crown consists of the leaves and branches at the top of a tree. It filters dust and other particles from the air. The crown also helps cool the air. It provides shade. The crown also slows raindrops, so they do not have cause as much erosion.
Phloem- The phloem is a thin layer of cells and is found just inside the bark. It is between the cambium and the outer bark. The phloem transports sugar down from the leaves to the rest of the tree.
Heartwood- Heartwood is the inner part of the tree. It is made of xylem cells that have died and are now hard. Often, heartwood is darker in color than the sapwood because it is stored with sugar, dyes, and oils. It usually gives the tree support, but in some trees the heartwood rots, leaving a hollow living tree.
Xylem- Xylem cells are produced by cambium, and they are the newest layers of the woody tissue. The living portion of the xylem is known as sapwood. Sapwood transports water and minerals from the roots up to the rest of the tree. When Xylem dies it becomes heartwood.
Cambium- Cambium is a thin layer of cells. They are located between the phloem and the xylem. This layer of cells produces new phloem and xylem cells. The old cells die. Xylem cells become hard and become heartwood, while the phloem cells are pushed out and become bark. With the production of new cells the diameter of the tree grows.
Leaves- The leaves contain chlorophyll. This gives the tree their green color. Photosynthesis takes place in the leaves. So, this is where the tree makes its food using energy from the sun, carbon dioxide, and water. Sugar, which is the tree’s food, used or stored throughout the tree. The phloem transports the sugar. Oxygen is released into the atmosphere.
Tree part cards were made using: http://www.extension.iastate.edu/publications/ian304.pdf
Trees for Teens 2010‐2011 – Iowa DNR Page 11
Lesson 2: Tree Needs Photosynthesis
Grades: 6-8 Preparation time: 15-20 minutes Lesson Time: Day 1: 30-50 minutes. Day 2: 40-50 minutes. Goal: Students will know the process of photosynthesis and will identify the importance of sunlight in this process. Objectives:
• Students will form a hypothesis about what they think will happen to the covered areas of the leaf.
• Students will observe a change in color after removing their cardboard from the leaf, and will infer that the cause of this color change is a lack of chlorophyll in that area due to the lack of sunlight.
• Students will describe the process of photosynthesis and the importance of sunlight in this process.
Iowa Core Curriculum:
6-8: Life Science Understand and apply knowledge of the basic components and functions of cells, tissues, organs, and organ systems. Physical Science: Understand and apply knowledge of forms of energy and energy transfer. Science as an Inquiry: Design and conduct different kinds of scientific investigations. Use evidence to develop descriptions, explanations, predictions, and models. Think critically and logically to make the relationships between evidence and explanations. Communicate and defend procedures and explanations.
Multiple Intelligences:
• Visual/Spatial – The plant acts as a visual. • Verbal/Linguistic- Students discuss and questions are verbalized. • Interpersonal- The activity allows students to work as a group. • Intrapersonal- The activity allows students to reflect and work on their own. • Naturalist- Students see the importance of sunlight for plants.
Materials:
• Small scraps of cardboard (Enough for each student to have at least one piece) • Large paper clips (Enough for each student to have at least one) • A house plant with large leaves or an easily accessible tree
Vocabulary:
• Photosynthesis: Sunlight, air, water, and nutrients work together to make food for trees and other green plants. The process begins with the roots absorbing water and minerals. They are carried to the leaves and come into contact with chlorophyll and air (CO2). Then, sunlight passes through the leaf, striking the chlorophyll. Once the sun has struck the chlorophyll it provides energy for the water molecules (H2O) to break apart. The hydrogen from the water molecule and the carbon from the carbon dioxide combine. This combination forms carbohydrates.

Trees for Teens 2010‐2011 – Iowa DNR Page 12
• Chlorophyll: Green pigment in leaves and stems.
What will Happen: • After forming a hypothesis, students will place pieces of cardboard on the leaves of the
chosen plant. When students remove the cardboard there should be yellowish spots where the leaves were covered. This is because the lack of sunlight causes photosynthesis to stop or slow. The leaf then stops producing chlorophyll in that area.
Getting Started:
1. Choose a tree, shrub, or green plant with many leaves. These leaves must be within reach. This is a great activity to get students outside, but you may use a green houseplant in the classroom. (It is important to make sure the plant or tree is safe for all of your students to touch.)
2. Cut out enough small circles or squares of cardboard, one for each student. These pieces should be small enough so they do not cover the leaf, but big enough to observe the change that will occur.
Engage: 20-30 minutes Photo what? Photosynthesis!
Did you know that photo means light and synthesis means putting together? What does the word photosynthesis tell us? It tells us that the process of photosynthesis means putting together light. Does anyone know how photosynthesis uses light? Discuss photosynthesis-
Plants take in water and nutrients through their roots. This water then travels through the stem/trunk. There are two types of tubes. The water and nutrients are carried in the xylem tube up to the leaves where photosynthesis takes place. Leaves have a layer of cells that contain chloroplasts, which is where the chlorophyll is found. What color is chlorophyll? When sunlight shines on the leaf, light energy is trapped by the chlorophyll! This energy is stored. Air comes into the leaf through little holes. These holes are on the bottom of the leaf. CO2 reaches the cells with chlorophyll and energy from the sunlight. The energy changes the CO2 into different sugars and oxygen. The sugars travel down the second type of tube, phloem. They are then stored as sugars and starches in the stem and root so the plant can grow. The oxygen is let out into the air. Have participants act out the process of photosynthesis.
• Roots- at least 1 person • Xylem- at least 2 people • Leaves- at least 4 people • Chloroplasts- at least 3 people • Chlorophyll- at least 1 person • Air- at least 2 people • Phloem- at least 2 people • Sun- everyone else
1. Have the roots sit on the ground making a slurping sound. 2. Have the xylem lock arms and make the sound of running water.
Trees for Teens 2010‐2011 – Iowa DNR Page 13
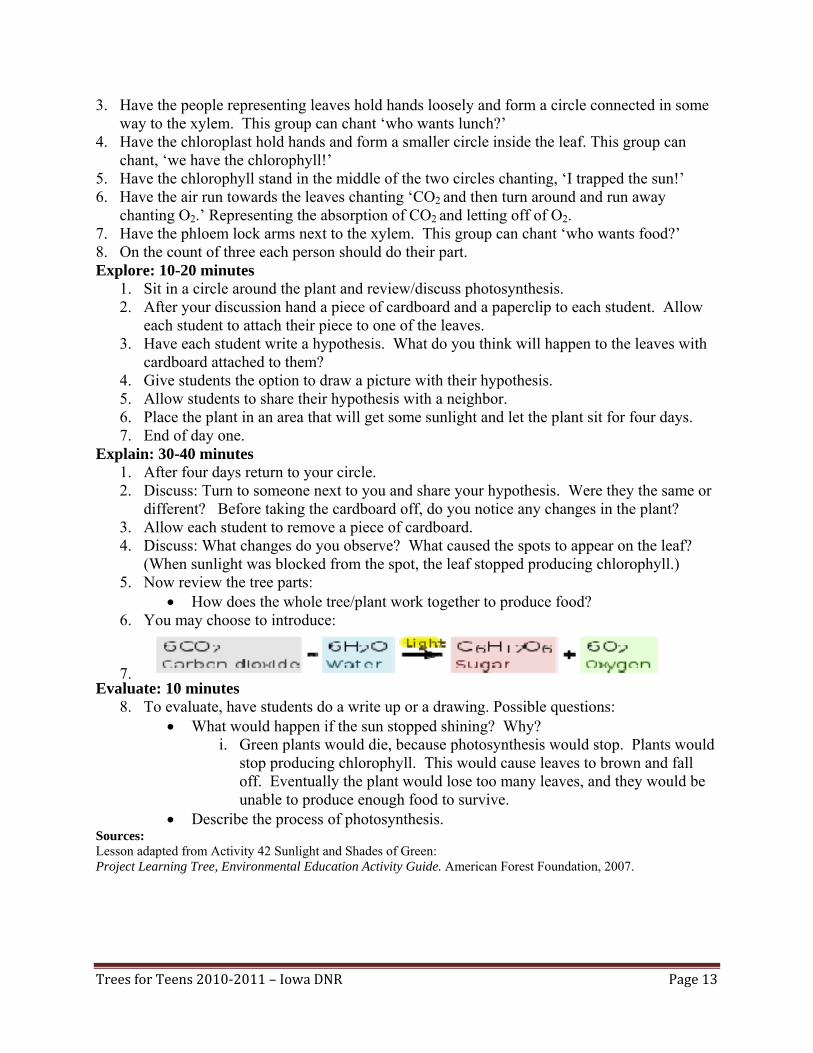
3. Have the people representing leaves hold hands loosely and form a circle connected in some way to the xylem. This group can chant ‘who wants lunch?’
4. Have the chloroplast hold hands and form a smaller circle inside the leaf. This group can chant, ‘we have the chlorophyll!’
5. Have the chlorophyll stand in the middle of the two circles chanting, ‘I trapped the sun!’ 6. Have the air run towards the leaves chanting ‘CO2 and then turn around and run away
chanting O2.’ Representing the absorption of CO2 and letting off of O2. 7. Have the phloem lock arms next to the xylem. This group can chant ‘who wants food?’ 8. On the count of three each person should do their part. Explore: 10-20 minutes
1. Sit in a circle around the plant and review/discuss photosynthesis. 2. After your discussion hand a piece of cardboard and a paperclip to each student. Allow
each student to attach their piece to one of the leaves. 3. Have each student write a hypothesis. What do you think will happen to the leaves with
cardboard attached to them? 4. Give students the option to draw a picture with their hypothesis. 5. Allow students to share their hypothesis with a neighbor. 6. Place the plant in an area that will get some sunlight and let the plant sit for four days. 7. End of day one.
Explain: 30-40 minutes 1. After four days return to your circle. 2. Discuss: Turn to someone next to you and share your hypothesis. Were they the same or
different? Before taking the cardboard off, do you notice any changes in the plant? 3. Allow each student to remove a piece of cardboard. 4. Discuss: What changes do you observe? What caused the spots to appear on the leaf?
(When sunlight was blocked from the spot, the leaf stopped producing chlorophyll.) 5. Now review the tree parts:
• How does the whole tree/plant work together to produce food? 6. You may choose to introduce:
7. Evaluate: 10 minutes
8. To evaluate, have students do a write up or a drawing. Possible questions: • What would happen if the sun stopped shining? Why?
i. Green plants would die, because photosynthesis would stop. Plants would stop producing chlorophyll. This would cause leaves to brown and fall off. Eventually the plant would lose too many leaves, and they would be unable to produce enough food to survive.
• Describe the process of photosynthesis. Sources: Lesson adapted from Activity 42 Sunlight and Shades of Green: Project Learning Tree, Environmental Education Activity Guide. American Forest Foundation, 2007.
Trees for Teens 2010‐2011 – Iowa DNR Page 14
Expand: To expand test leaves for starch! Preparation Time: 30 minutes Lesson Time: 30-40 minutes
• Materials:
• Plant with medium to large leaves • Beakers • Ethyl alcohol • Iodine solution in dropper bottles • Tweezers • Heating units • Petri dish • Goggles • Water
1. Read the directions sheet that your students will be using and decide if there is anything
you would like to change or do differently. Do the experiment before allowing your students to participate in this activity.
2. Decide if your students will be working in pairs or in small groups. 3. Put supplies together for each group. Have them on trays or set them up at each lab
station. 4. Each group needs 1 burner/heating unit, 1 beaker, 1 test tube, ethyl alcohol, Iodine
solution in dropper bottles, tweezers, a Petri dish, goggles, and leaves. *Make sure the ethyl alcohol and iodine solutions are labeled. The alcohol is flammable*
5. Have each group get together and hand out the directions sheet. 6. When finished have a class discussion:
• What did you see? • Why did you boil the leaf? • Why did the leaf turn white when you boiled it in ethyl alcohol? • Why did the leaf turn blue-brown when you put iodine on it? • Do you think we would have the same outcome if we used leaves from a plant
that has not been in light for a day or two? 7. The hot water killed the leaf, and the alcohol broke down the chlorophyll. The iodine is
an indicator that turns blue-black in the presence of starch. If your plant was well lit it should turn blue-black, indicating that starch is present and that your plant has been producing food.
Sources: The expand activity has been modified from its original version which can be found on: http://dev.nsta.org/ssc/pdf/v4-TS_35.pdf and http://dev.nsta.org/ssc/pdf/v4-TS_32.pdf

Trees for Teens 2010‐2011 – Iowa DNR Page 15
Directions sheet:
1. Make sure you have all of the needed materials. You should have 1 burner/heating unit, 1 beaker, 1 test tube, ethyl alcohol, Iodine solution in a dropper bottle, water, tweezers, a Petri dish, goggles, and leaves. 2. Fill one beaker with water, about halfway. 3. Place it on the burner and bring it to a boil.
4. Tear or cut off a piece of leaf, about the size of a quarter.
5. Using tweezers or forceps to pick up the piece of leaf and hold it in the
boiling water for 1 minute.
6. Remove the leaf from the boiling water. How has it changed?
7. Turn off the burner, and leave the beaker of water on the burner.
8. Fill 1/4th of the test tube with ethyl alcohol.
9. Place the test tube in the hot water, giving it time to get hot.
10. Using your tweezers or forceps place the leaf in the ethyl alcohol for about two minutes. What changes do you notice?
11. Remove the leaf from the ethyl alcohol and place it in a Petri dish.
12. Using the dropper bottle with iodine, cover the leaf with iodine.
13. Watch what happens. Write/draw your observations. What do you see? Why is this happening?
14. If you have time repeat with another leaf.
15. Clean up all the materials carefully. Leave the beaker of hot water and ethyl alcohol on the burner. I will pick them up once they have cooled.
Trees for Teens 2010‐2011 – Iowa DNR Page 16
Lesson 3: Habitats Working Together Relationships between living and non-living things
Grade Level: 6-8 Preparation Time: 20 minutes Lesson Time: 1.5 hours, or two 50 minute periods Goal: Students will understand the relationships between living and non-living things in prairies, wetlands, and woodlands. Objectives:
• Students will classify things as biotic and abiotic. • Students will do research on an ecosystem, and will communicate/work in small groups
to create a pamphlet or poster representing the research completed. Iowa Core Curriculum:
Grades 6-8 Life Science: Understand and apply knowledge of: interdependency of organisms, changes in environmental conditions, and survival of individuals and species, and the cycling of matter and energy in ecosystems. Understand and apply knowledge of the complementary nature of structure and function and the commonalities among organisms. Physical Science: Understand and apply knowledge of forms of energy and energy transfer.
Multiple Intelligences:
• Visual/Spatial- Students are provided with visuals, videos, etc. • Verbal/Linguistic- Students communicate verbally and use written text. • Interpersonal- Students have the opportunity to work in groups. • Intrapersonal- Students have the opportunity to work individually.
Materials:
• 1 picture of an Iowa prairie scene • 1 picture of an Iowa woodland scene • 1 picture from an Iowa wetland scene • Computer lab • Notepaper and pen/pencil
Vocabulary: • Ecosystem- All of the living and non-living parts of a given area in nature and their
relationships to one another. • Abiotic- nonliving • Biotic- living
What will Happen:
• Students will work individually and in groups while researching their area of the ecosystem. Students will then bring their notes together and put together a poster or pamphlet about their ecosystem.
Trees for Teens 2010‐2011 – Iowa DNR Page 17
Getting Started:
To prepare for this activity become familiar with the lesson, find possible resources, and decide how you will place students into groups. Engage: 10 minutes
• In groups of four or five, have students form definitions and examples for abiotic, biotic, and ecosystem.
• Create class definitions for each on the board, and have students write these definitions down.
• How are these things linked? • Place a picture of an Iowa prairie on the overhead.
o Turn to a partner and talk about what you see. Identify abiotic and biotic features in this ecosystem.
• Place a picture of an Iowa woodland/forest. o Turn to a partner and talk about what you see. Identify abiotic and biotic features
in this ecosystem. • Place a picture of an Iowa wetland on the overhead.
o Turn to a partner and talk about what you see. Identify abiotic and biotic features in this ecosystem.
• Explain that today we are going to be researching these different ecosystems. Explore: 1 hour or two 30 minute periods.
1. Place students in groups of 3-5 and assign each group prairie, wetland, or woodland. 2. Take students to the computer lab. 3. In your groups you will be researching an ecosystem. When finished you should be able
to answer the following questions: a. What living things are found in your ecosystem? b. What non-living things are found in your ecosystem? c. What is the climate like? d. What examples of food chains are present in your ecosystem?
4. Remind students to take notes, because they will hand them in with their final product. 5. Make sure students split the research so that all areas are covered. 6. Return to the classroom and allow students to work with their groups to create a poster or
pamphlet about their ecosystem. Explain: Your pamphlet or poster should include what living and non-living things are found in the ecosystem, an example of a food chain, and the climate and other characteristics that allow this ecosystem to function. Include visuals and writing.
Explain: 20 1. Allow each group to share their pamphlet with the class. 2. As a class, make a chart of abiotic and biotic things found in each ecosystem. 3. Save the woodland chart for the following lesson. 4. You may also choose to put this chart in Venn diagram form. Then students can see how
the habitats are similar and different. 5. Discuss:
a. How are the living and non-living things dependent on each other? b. Are there some things that can be found in multiple ecosystems?
Trees for Teens 2010‐2011 – Iowa DNR Page 18
c. Are there some things that cannot be found in multiple ecosystems? Evaluate:
6. Collect the pamphlet/poster and their notes. Expand:
1. To expand, have students think of their home as their ecosystem. What abiotic and biotic things do we rely on daily? Do we rely on more biotic or abiotic things? What other living things could survive in our ecosystem/home?
Or 1. To expand, have students research different forest types found on dry, mesic, or wet sites.
a. What biotic organisms are found there? b. What does it look like?
2. Come together as a class and make a chart for each type of forest. Compare them.

Trees for Teens 2010‐2011 – Iowa DNR Page 19
Lesson 4: Loss of Tree Houses!
Grade Level: 6-8 Preparation Time: 10-15 minutes Lesson Time: 45-60 minutes Goal: Students will recognize that there are many things causing our ecosystems, such as woodlands, to become smaller. Objectives:
• Students will take on a role in the Iowa’s Shrinking Habitats game. • Students will complete a write up on what is causing habitat loss and how we can prevent
it. Iowa Core Curriculum: Grades 6-8 Life Science: Understand and apply knowledge of: interdependency of organisms, changes in environmental conditions, and survival of individuals and species. Understand and apply knowledge of the complementary nature of structure and function and the commonalities among organisms. Understand and demonstrate knowledge of the social and personal implications of environmental issues. Multiple Intelligences:
• Visual/Spatial- The game provides a visual of shrinking woodlands. • Verbal/Linguistic- The chart is written out for students to use as a reference. • Bodily/Kinesthetic- Students are up and moving to play the game. • Interpersonal- Students have the opportunity to work to work in groups. • Intrapersonal- students have the opportunity to work individually.
Materials:
• Soft balls • Cones or something to set boundaries • 3 bandanas • Chart listing different things found in a woodland/forest.
Vocabulary:
• Invasive species- A non-native species whose introduction does or is likely to cause economic or environmental harm or harm to human health.
• Abiotic- Non-living things • Biotic- Living things
What will Happen:
• Students will form two teams: team habitat and team developer. Team developer will throw balls at team habitat, causing them to shrink in numbers. There will be one environmentalist, one forester, and one informed citizen who can try to get people from team developer out.
Getting Started:
To prepare for this activity find a space that suites the needs of your class and this game.

Trees for Teens 2010‐2011 – Iowa DNR Page 20
Engage: 5-10 minutes 1. In the last 150 years Iowa’s prairies, woodlands, and wetlands have all been greatly reduced
in size. They are being replaced by farms, towns, and roads. 2. Ask: What effect does this have on the wildlife?
o As a class, review the list of biotic and abiotic things found in woodlands that you created in the previous lesson. What are some things that cause us to lose habitats like the woodlands/forests?
Have students make a list. o Make a class list on the board. (Add it to the list of biotic and abiotic things you
created the lesson before.) Human use, e.g. cutting trees down for farming, urban development, and
use for wood materials. Pollution Disease/sickness Many ecosystems are affected by invasive species. These can be plants,
animals, or insects that take over other things. o Ask: What do we lose as forests shrink?
Woodland/forest‐ Here is what your lists may look like: Animals/insects Biotic
Plants Biotic
Abiotic
What do forests give us?
What causes us to lose forests?
• Squirrel • Woodpecker • Small birds • American toad • Moles • Deer • Mice, rabbits, & chipmunks, • Insects & • Spiders, • Raccoons, &
opossums, • Owls, & red-
tailed hawks • Bobcats. • Songbirds • Turkey • eagle
• Canopy Trees. Large leafy trees that produce nuts. Examples- red and white oak, hickory, and walnuts. These trees provide food for animals and are often used for harvesting lumber.
• Bottomland • Woodlands-
Large, leafy trees that produce seeds. These seeds are transported by water or wind. Examples are cottonwood, maple and green ash.
• Shrubs-gooseberries, raspberries, honey locust, hawthorn, and prickly ash.
• Vines- Virginia creeper and wild grape
• Wildflowers-May apple, Virginia waterleaf, bluebells, spring beauty, yellow jack in the pulpit, and columbine.
Soil Rock Water Oxygen Carbon
dioxide Nitrogen Sun Wind Temp.
• Recreation-hunting,
• Fishing, hiking, bird watching, and camping.
• Provide history
• Provide ingredients for paper products, food, medicine, clothing, construction and furniture, etc.
• Provide jobs. More than 12,000 Iowans are employed by the wood industry.
• Solitude • Shade • Oxygen
Disease Cutting
down trees for urban development or farming development
Used in the Industrial Revolution to fuel fires and build railroads
Invasive species- Emerald Ash Borer
Pollution Trash

Trees for Teens 2010‐2011 – Iowa DNR Page 21
Explore: 20 minutes 3. Split the class into two groups. Group one is team woodland. Group two is team developer. 4. Assign three roles on team woodland- 1 person is a wildlife agency employee, 1 person is a forester, and 1 person is an informed citizen. Give these three a colorful bandana to tie to their wrist. They are then easily identified. Everyone else on the team chooses a biotic organism from the list you created. 5. Assign four roles on the developer team- 2 people in agriculture, 2 people in urban development. Everyone else should choose something from your “what causes us to lose forests” list. 6. Directions:
a. Begin by going outside or to an open area and mark your playing area. b. Make sure students tie their shoes and check for other safety hazards. c. Explain that the students from team developer will stand on the outside of the playing area. They will try to hit members of the habitat team with the balls. d. The biotic organisms of the woodland team will try to dodge the balls. If they are hit they are out. These members CANNOT catch the ball. They can only dodge the ball. e. The wildlife employee, the forester, and the informed citizen are there to protect the woodland. If they catch a ball, the person who threw it is out. Have these three wear bandanas on their wrist. f. Have a designated area for those who get out. g. As a lot of the woodland members get out, bring in the perimeters, allowing the space to shrink.
7. Play multiple rounds to show the shrinking habitat. Explain: 10-15 minutes
8. When finished, have students sit in a cluster or circle and have a class discussion. What did you see? Was it fair? Was it easier for team woodland to get someone from team developer out or was
it easier for someone on team developer to get someone on team woodland out? What do the balls represent? How do you think the biologist, forester, and informed citizen felt watching their
habitat shrink? How did the developers feel? How can we take on the role of an informed citizen? Where could the plants and animals of the habitat go when they were hit by a
team developer member? Would they survive there? What would happen if a certain species no longer existed in that habitat? We know that many biotic organisms are impacted by habitat loss, but how does
this affect abiotic features like soil, air, etc.? 7. Final comments: Our Iowa habitats have been shrinking since the 1840’s, and it
continues today. How do/can we slow this process? Why is it important for us to conserve forests?
8. Some people feel that we should just leave forests alone. This can be just as harmful as things like cutting trees down. Why?

Trees for Teens 2010‐2011 – Iowa DNR Page 22
9. Because humans have settled around forests, their environments change. They need to be maintained through different management techniques in order to keep them healthy. One example- We often spread disease/invasive species. If we do nothing about stopping the spread many forests would not last.
This activity was modified from its original version that can be found on the Idaho Public Television’s Dialogue For Kids. http://idahoptv.org/dialogue4kids/season6/wetlands/shrinkwetland.cfm
Evaluate: 10-15 minutes
11. Have students complete a write up about the impact we have on forests and how we can keep them from disappearing.
Expand: 30-50 minutes • Invasive species are a cause of forest loss that we do not tend to focus on. Assign an
invasive species to each student. o Emerald Ash Borer, Gypsy moth, Japanese Knotweed, Tree-of-Heaven, Japanese
Honeysuckle, Garlic Mustard, Oriental Bittersweet, Multiflora Rose, Autumn Olive, Common Buckthorn, pine wilt, oak wilt, Dutch elm disease.
• Have students find their invasive species on: o http://www.iowadnr.gov/forestry/invasive.html
• Using the information they found, have them create a pamphlet that describes the invasive species. The pamphlet should also tell how it spreads, how it was introduced to the area, how it affects the habitat, where it is found, and how to manage it.
• Allow students to share their pamphlets and hang them throughout the classroom. Or
• Check out this packet on Emerald Ash Borer, http://www.emeraldashborer.info/files/edpacket.pdf. There are many activities that are made for the classroom.
And • Introduce the Forestry Bureau’s poster contest. Check out the newsletter for more
information.

Trees for Teens 2010‐2011 – Iowa DNR Page 23
Lesson 5: Tree Identification! Identify the Tree Houses Found in your Habitat
Grade Level: 6-8 Preparation Time: 20 minutes Lesson Time: Day 1: 45-60 minutes Day 2: 50 minutes Goal: Students will know what information is needed to properly identify the genus and species of a tree. Objectives:
• Students will gather data from numerous, and will compare it to information in tree identification books or field guides. They will decide whether or not they have gathered enough data to correctly identify each tree.
• Using what they learned, students will create a blank data sheet that calls for enough data collection to identify the genus and species of a tree.
Iowa Core Curriculum:
Grades 6-8 Life Science: Understand and apply knowledge of the complementary nature of structure and function and the commonalities among organisms. Science as Inquiry: Select and use appropriate tools and techniques to gather, analyze and interpret data. Use evidence to develop descriptions, explanations, predictions, and models. Think critically and logically to make the relationships between evidence and explanations. Communicate and defend procedures and explanations.
Multiple Intelligences:
• Visual/Spatial- The trees and field guides act as visuals. • Verbal/Linguistic- Students have the opportunity to collect written data. • Logical/Mathematical- Data collection- may include diameter or height. • Bodily/Kinesthetic- Students are out and moving. • Intrapersonal- Students have the opportunity to work individually.
Materials:
• Students need notebooks and pencils • Field guides • Crayons or markers if students want to do leaf or bark rubbings • Zip top bags for students to collect materials.
Vocabulary:
• Dendrology-the study of woody plants and their taxonomy. • Taxonomy-how we classify organism. • Taxonomic ranking tree- kingdom, phylum, class, order, family, genus, and species.
What will Happen:
• Students will decide what data they want to collect from each tree. They will then use that data to see if they can correctly identify the genus and species of the tree using field guides. If students do not have enough information, they will use the field guides to decide what other information they need. Students will then create a data sheet that they feel will cover all the data needed to correctly identify the genus and species of a tree.

Trees for Teens 2010‐2011 – Iowa DNR Page 24
You will collect these data collecting sheets, remove the student’s name, mark them in some way so you know whose is whose (numbering), pass them out randomly, and allow another student to complete the data sheet. This student will decide if the data sheet required you to find enough information to correctly identify the genus and species of a tree.
Getting Started:
To prepare for this activity find an area with a variety of trees for your students to work. Engage: 5-10 minutes
• We have spent time learning about the structure of trees, how they function, and where they are found. Now let’s talk about characteristics that differ from tree to tree.
• What are some characteristics that differ from tree to tree? o leaves, bark, fruit/seeds/cones, twigs, buds, flower, etc.
• Make a list of student answers on the board. • Using these characteristics we can identify different trees. • Today we are going to be dendrologists, which are people who study woody plants and
their taxonomy. Taxonomy is how we classify organisms. • Introduce the whole taxonomic ranking tree, but focus on genus and species. • Dendrologists focus on the last two groups of the taxonomic ranking tree. • An example of a genus is maple, but within the genus group of maple trees there are
many different species of maple. Acer is the Latin name for maple and saccharum is the Latin name for sugar. So, as a dendrologist you would identify a sugar maple as Acer saccharum.
Explore:20-30 • Explain: Today you are going to head outside to gather data from trees. It is your job to
gather enough information about a few trees around the schoolyard to identify its genus and species. I am leaving it up to them to decide what information you would like to gather. After finishing outside you will return to the classroom to identify your trees using your data and field guides. (Hold up a field guide and explain what it is.) Make sure to take good notes, and feel free to use these materials.
• Have a table with different materials that students are free to use. o Crayons, markers, plastic bags, measuring tape, etc.
• Give students 20-30 minutes to gather data using their notebooks. Have other materials accessible to them. They may choose to do bark or leaf rubbings or to measure the circumference of the tree.
Explain: 20-30 minutes • When you return to the classroom give students about 10-20 minutes to use field guides
to identify the trees that they gathered data from. If you do not have field guides allow each student to access a computer and use these websites:
o http://www.cnr.vt.edu/dendro/forsite/key/intro.htm o http://www.uwsp.edu/cnr/leaf/Treekey/tkframe.htm
• Have students discuss the following in small groups o What data did you collect? o Did you collect the same data for every tree?

Trees for Teens 2010‐2011 – Iowa DNR Page 25
o Are you able to identify the trees genus and species with the data you collected? Why or why not?
o What could you have done differently? o What data did you have that you did not necessarily need to identify the tree?
Evaluate: 30-50 minutes • Observe students while collecting data. Are they engaged? • Have students create a blank data collecting sheet. Explain this sheet should require me
to collect enough data to identify its genus and species. So, if I take you data sheet outside, I would gather enough information to identify the tree using a tree identification book.
• Take the names off of each sheet, number them (make sure you know what number goes with each name). Randomly hand the data collecting sheets out, making sure that the person who made it does not get their own. Have each student use a classmate’s sheet to go outside and gather information about a tree. Once finished gathering data come inside. Using a tree identification book or field guide, have the students assess whether or not this data collecting sheet requires you to gather enough information to identify a tree. Where you able to identify the tree using the data you collected on this sheet? Why or why not? On the back of the sheet, have students give their explanation. Have students hand it in and you can use these to assess students’ data collecting sheet.
Expand: • Allow students to take these sheets home. They can then identify trees around their
neighborhood. Have students bring in their completed data sheets and hang them around the room! Let’s see the tree diversity in your area!

Trees for Teens 2010‐2011 – Iowa DNR Page 26
Lesson 6: Trees and Our Habitat How trees impact our daily lives and the importance of tree placement
Grade Level: 6-8
Preparation Time: 10-20 minutes Lesson Time: 45-70 minutes Goal: Students will recognize that tree placement is something that takes thought. Objectives:
• Students will use the websites provided to create a map that includes trees that are placed properly.
• Students will relate what they learned about tree placement to their home/neighborhood. Iowa Core Curriculum:
Grades 6-8 Life Science: Understand and demonstrate knowledge of the social and personal implications of environmental issues.
Multiple Intelligences:
• Visual/Spatial- Students have the opportunity to use websites that provide photos and diagrams.
• Verbal/Linguistic- Students have the opportunity to use websites that allow them to read and listen.
• Logical/Mathematical- Students have the opportunity to map, work with numbers, and to properly place trees.
• Interpersonal- Students have the opportunity to participate in a class discussion. • Intrapersonal- Students have the opportunity to work individually.
Materials:
• Paper for mapping • Writing utensils • Computer lab
Vocabulary:
• Canopy spread- How wide the tree spreads. • Deciduous trees- Shed their leaves annually. • Coniferous- Needle-leaved trees that do not shed their leaves annually.
What will Happen:
• Students will draw a map of their neighborhood. They will then research the benefits of tree placement. After doing so, students will draw their neighborhood placing trees in areas that they feel would benefit their community.
Getting Started: To prepare for this activity become familiar with the websites. You may want to do the activity yourself.

Trees for Teens 2010‐2011 – Iowa DNR Page 27
Engage: 5-10 minutes 1. We have spent time talking about the habitats that trees provide and what makes a good
home. Now let’s take a look at our homes. 2. Begin by having students draw a map of their neighborhood.
a. What did you include in your neighborhood? b. Did you include grassy areas? Trees? Plants? Animals?
3. Believe it or not, the placement of trees in your neighborhood has an impact on you! Explore: 20-30 minutes
1. Allow students to explore these websites: o http://www.arborday.org/trees/rightTreeAndPlace/index.cfm o http://www.arborday.org/TREES/benefits.cfm o http://www.arborday.org/trees/righttreeandplace/righttree.cfm
2. While researching, have students draw a new map of their neighborhood, placing trees in areas that they feel would benefit their community.
3. Have them do a write up on what they learned about tree placement. a. How do trees increase the value of a home? b. How do trees save money? c. Why is it important to have trees of a certain height in areas with telephone wires? d. How does your new drawing differ from your neighborhood? How would these
changes benefit your community? e. What else did you learn about tree placement?
Explain: 10 minutes 1. Have students set both of their maps on their desk. 2. Allow students to walk around the room and look at the changes their classmates made to
their neighborhood. 3. Have a class discussion using the questions above.
Evaluate: 1. Collect student write ups or drawings.
Expand: 10-20 minutes 2. To expand have students take The Right Tree in the Right Place quiz on arborday.org
a. http://www.arborday.org/trees/rightTreeAndPlace/quiz.cfm
Or Other Activity: 20-30 minutes “Wood” you believe it or not? Materials:
• 5-8 items made using an ingredient from a tree • Worksheets • Table tents to label each item • Each student needs notebook paper or blank paper • Pencil/pen • Crayons
Vocabulary:
• Tree gum is a sap extracted from trees.

Trees for Teens 2010‐2011 – Iowa DNR Page 28
• Cellulose is a carbohydrate found in plants. • Wood Pulp is ground up tree that is soft and moist. • Bark is the outer layer of a tree. It provides protection for the tree. • A log is piece of a trunk or large branch.
What will Happen:
• Students will move from table to table deciding what items they believe come from a tree.
Getting Started: To prepare for this activity you will need to gather different materials that have ingredients that come from trees. Many of these items will not look as though they have an ingredient that comes from a tree. Make sure to use an item from each category. Pick 1 or 2 obvious items, and include others that are not. Using these items set up different tables or stations with items at each. Students will move from table to table deciding whether they believe the item is made with an ingredient that come with a tree or they do not believe it. List of things that come from trees:
• Nuts: walnuts, hazelnuts, acorns, almonds, cashews, and pistachios. (Peanuts do not grow on trees!)
• Fruits: apples, pears, peaches, cherries, oranges, lemons and limes, mangos, plums, pineapples, figs, and pomegranates.
Tree Gum Cellulose Wood Pulp Bark Log
Band‐Aids Candles Crayons Gum Maple Syrup
Clothing Cough Syrup Crackers Eyeglass Frames Football Helmets Ice Cream Lipstick Makeup Paint Parmesan Cheese Shampoo Sponges Toothpaste
Milk Cartons Newspaper Toilet Paper
Perfume Baseball Bat Pencils
(Make sure to check for allergies.) Engage:
• Begin with all of the items at the front of the room with you. • State: “If I told you that every one of these items has an ingredient that comes from a tree
would you believe it or not?” • One at a time, hold up each item and place it at the table with its labeled table tent.
Explore:

Trees for Teens 2010‐2011 – Iowa DNR Page 29
• Explain to students that they will be going from table to table with their notebook. Have them split one notebook sheet in half. (Depict this on the board) On one side write “name of item.” Label the other side “Believe it or not? Why or Why not.” In column one students write the name of the item (which can be found on the table-tent). In column 2 they write whether they believe it or they don’t believe it, and why.
• Give 3-5 minutes at each item. Explain:
• Have students return to their seats. • Using total physical response: • Example-
o Stand up if you believe that a band-aid has an ingredient that comes from a tree. o Stand up if you do not believe it.
Tell a person next to you why or why not. • Believe it! Band-aids have the ingredient tree gum in them which is a sap extracted
from trees. • Before moving on have students look at their list and decide if there is anything they
would like to change now that they know the definition of tree gum. • Do this for each item you had students look at. • Many of us knew that things like paper and wood come from trees, but lots of other
things are made with cellulose, tree gum, wood pulp, bark, and logs. • Stress the importance of this. As humans, we use trees for more than just paper.
Now that you have completed the Trees For Kids unit, make a difference in your community. Plant a tree using a tree planting
guide found on http://www.alliantenergy.com/wcm/groups/wcm_internet/@int/documents/contentpage/016443.pdf
Or
http://www.extension.iastate.edu/Publications/Pm1591.pdf
Make sure to review what students have learned and to discuss the planting process.

Trees for Teens 2010‐2011 – Iowa DNR Page 30
Resources Iowa Department of Natural Resources- Bureau of Forestry 502 E. 9th; Des Moines, IA 50319-0034 http://www.iowadnr. Gov/forestry/index.html MidAmerican Energy www.midamericanenergy.com Iowa State University- Forestry Extension Department of Natural Resource Ecology and Management 339 Science II, Iowa State university; Ames, Iowa 50011-3221 www.forestry.iastate.edu Project Learning Tree Barbara Gigar, Local PLT Coordinator 2473 160th Rd; Guthrie Center, IA 50115 www.plt.org http://www.iowadnr.com/education Natural Resources Conservation Service Find your local office by visiting: www.ia.nrcs.usda.gov Black Hills Energy www.blackhillscorp.com
Alliant Energy www.alliantenergy.com Trees Forever 770 7th Avenue; Marion, IA 52302 319/373-0650 Iowa Woodland Owners Association Carol Fullenkamp 319/837-6178 www.iowawoodlandowners.org Iowa Tree Farm Committee www.treefarmsystem.org Iowa Nursery and Landscape Association PO Box 1647; Waterloo, IA 50704 319/215-6855 www.iowaanla.org Iowa Bankers Association 8800 NW 62nd Ave; Johnston, IA 50131 515/286-4300 www.iowabankers.com Iowa One Call www.iowaonecall.com 1-800-292-8989
Trees for Teens 2010‐2011 – Iowa DNR Page 31
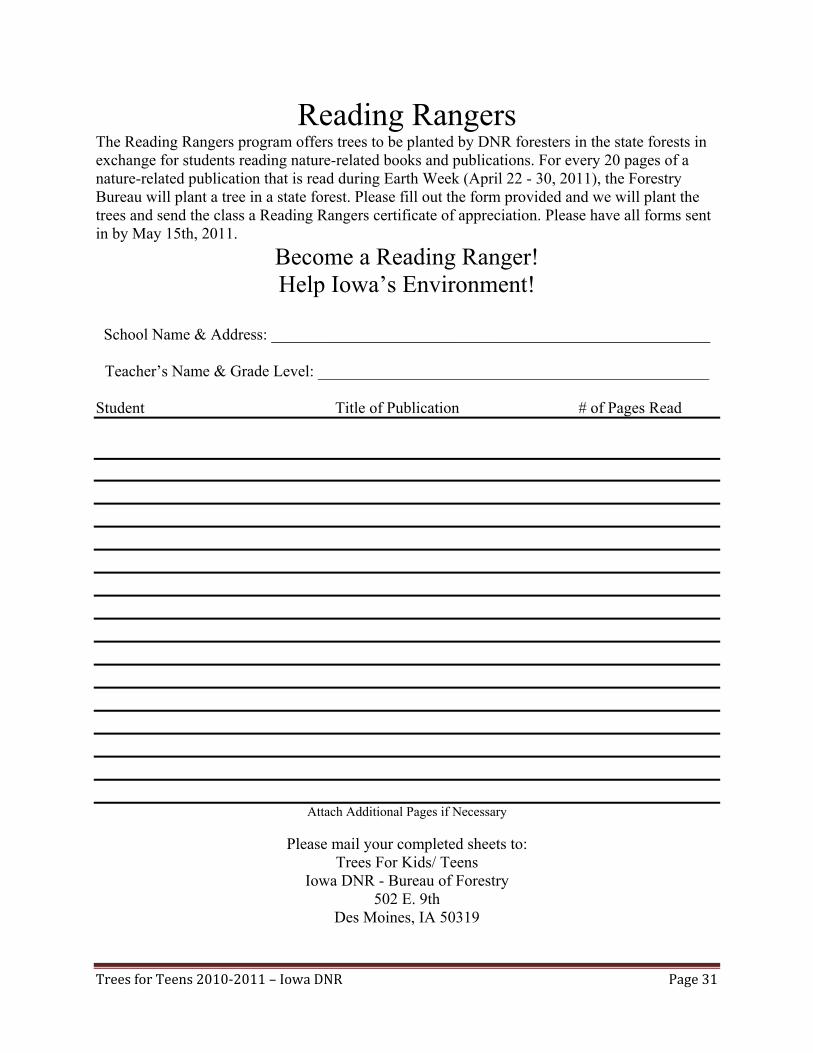
Reading Rangers The Reading Rangers program offers trees to be planted by DNR foresters in the state forests in exchange for students reading nature-related books and publications. For every 20 pages of a nature-related publication that is read during Earth Week (April 22 - 30, 2011), the Forestry Bureau will plant a tree in a state forest. Please fill out the form provided and we will plant the trees and send the class a Reading Rangers certificate of appreciation. Please have all forms sent in by May 15th, 2011.
Become a Reading Ranger! Help Iowa’s Environment!
School Name & Address: _______________________________________________________
Teacher’s Name & Grade Level: _________________________________________________
Student Title of Publication # of Pages Read
Attach Additional Pages if Necessary
Please mail your completed sheets to: Trees For Kids/ Teens
Iowa DNR - Bureau of Forestry 502 E. 9th
Des Moines, IA 50319

Trees for Teens 2010‐2011 – Iowa DNR Page 32
Supplemental Materials The supplemental materials can be found on the Trees For
Kids/Teens CD or on our website. Bulletin Boards
• Emerald Ash Borer! • Parts of a Tree • Photosynthesis! • Life, In A Dead Tree? • Where to put your field guide to use!
Learning Centers
• Parts of a Leaf • Believe it or not!
Trees for Teens 2010‐2011 – Iowa DNR Page 33
Trees For Kids: Project Tree House!
2010-2011
Please contact the Trees For Kids / Teens Coordinator at 515 / 281-6749 if you would like a printed copy of these materials or go to the Trees For Kids webpage at:
www.iowadnr.gov/forestry/treesforkids
If you decide to print this booklet, please use recycled paper. Federal law prohibits employment discrimination on the basis of race, color, age, religion, national origin, sex, or disability. State law prohibits employment discrimination on the basis of race, color, creek, age, sex, sexual orientation, gender identity, national origin, religion, pregnancy, or disability. State law also prohibits public accommodation (such as access to services or physical facilities) discrimination on the basis of race, color, creed, religion, sex, sexual orientation, gender identity, national origin, or disability. If you believe you have discriminated against in any program, activity, or facility as described above, or if you desire further information, please contact the Iowa Civil Rights Commission at 1-800-457-4416, or write to the Iowa DNR at 502 E. 9th; Des Moines, Iowa 50319.