This manual should be considered a permanent part ... - Honda
107
This manual should be considered a permanent part of the motorcycle and should remain with the motorcycle when it is resold. This publication includes the latest production information available before printing. Honda Motor Co., Ltd. reserves the right to make changes at any time without notice and without incurring any obligation. No part of this publication may be reproduced without written permission. The vehicle pictured in this owner’s manual may not match your actual vehicle. © 2018 Honda Motor Co., Ltd. 20181113114552_32K08D110_eng_BOOK Page 1 Tuesday, November 13 2018 11:49:25 JST
-
Upload
khangminh22 -
Category
Documents
-
view
0 -
download
0
Transcript of This manual should be considered a permanent part ... - Honda

This manual should be considered a permanent part of themotorcycle and should remain with the motorcycle when it is resold.
This publication includes the latest production information availablebefore printing. Honda Motor Co., Ltd. reserves the right to makechanges at any time without notice and without incurring anyobligation.
No part of this publication may be reproduced without writtenpermission.
The vehicle pictured in this owner’s manual may not match youractual vehicle.
© 2018 Honda Motor Co., Ltd.
20181113114552_32K08D110_eng_BOOK Page 1 Tuesday, November 13 2018 11:49:25 JST
WelcomeCongratulations on your purchase of a newHonda motorcycle. Your selection of aHonda makes you part of a worldwide familyof satisfied customers who appreciateHonda's reputation for building quality intoevery product.
To ensure your safety and riding pleasure:● Read this owner's manual carefully.● Follow all recommendations and
procedures contained in this manual.● Pay close attention to safety messages
contained in this manual and on themotorcycle.
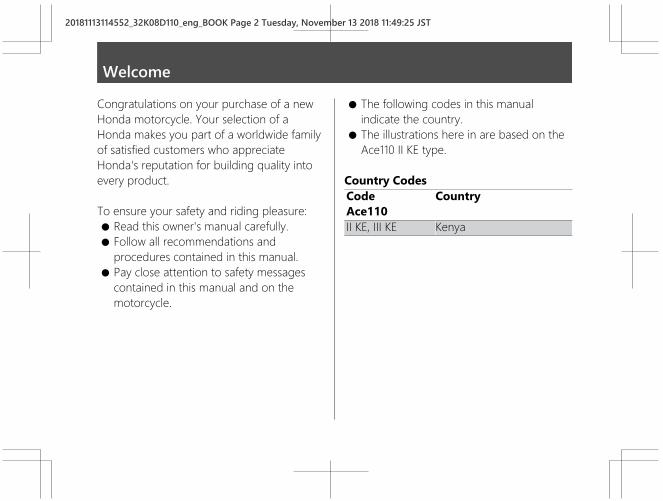
● The following codes in this manualindicate the country.
● The illustrations here in are based on theAce110 II KE type.
Country CodesCodeAce110
Country
II KE, III KE Kenya
20181113114552_32K08D110_eng_BOOK Page 2 Tuesday, November 13 2018 11:49:25 JST

A Few Words About SafetyYour safety, and the safety of others, is veryimportant. Operating this motorcycle safely isan important responsibility.To help you make informed decisions aboutsafety, we have provided operatingprocedures and other information on safetylabels and in this manual. This informationalerts you to potential hazards that couldhurt you or others.Of course, it is not practical or possible towarn you about all hazards associated withoperating or maintaining a motorcycle. Youmust use your own good judgement.
You will find important safety information in avariety of forms, including:● Safety labels on the motorcycle● Safety Messages preceded by a safety alert
symbol and one of three signal words:DANGER, WARNING, or CAUTION.These signal words mean:
3DANGERYou WILL be KILLED or SERIOUSLYHURT if you don’t follow instructions.
3WARNINGYou CAN be KILLED or SERIOUSLYHURT if you don’t follow instructions.
3CAUTIONYou CAN be HURT if you don’t followinstructions.
Other important information isprovided under the following titles:
NOTICE Information to help you avoiddamage to your motorcycle,other property, or theenvironment.
20181113114552_32K08D110_eng_BOOK Page 3 Tuesday, November 13 2018 11:49:25 JST

Contents
Motorcycle Safety P. 2
Operation Guide P. 12
Maintenance P. 28
Troubleshooting P. 75
Information P. 87
Specifications P. 98
Index P. 100
20181113114552_32K08D110_eng_BOOK Page 4 Tuesday, November 13 2018 11:49:25 JST

Safety Guidelines .................................................P. 3Safety Precautions...............................................P. 6Riding Precautions ..............................................P. 7Accessories & Modifications...........................P. 10Loading ................................................................P. 11
20181113114552_32K08D110_eng_BOOK Page 5 Tuesday, November 13 2018 11:49:25 JST
This section contains important information for safe riding of your motorcycle.Please read this section carefully.
Motorcycle Safety

Safety GuidelinesFollow these guidelines to enhance your safety:● Perform all routine and regular inspections
specified in this manual.● Stop the engine and keep sparks and flame
away before filling the fuel tank.● Do not run the engine in enclosed or partly
enclosed areas. Carbon monoxide inexhaust gases is toxic and can kill you.
Always Wear a HelmetIt's a proven fact: helmets and protectiveapparel significantly reduce the number andseverity of head and other injuries. So alwayswear an approved motorcycle helmet andprotective apparel. 2 P. 6
Before RidingMake sure that you are physically fit, mentallyfocused and free of alcohol and drugs. Check
that you and your passenger are both wearingan approved motorcycle helmet and protectiveapparel. Instruct your passenger on holdingonto the grab rail or your waist, leaning withyou in turns, and keeping their feet on thefootpegs, even when the motorcycle is stopped.
Take Time to Learn & PracticeEven if you have ridden other motorcycles,practice riding in a safe area to become familiarwith how this motorcycle works and handles,and to become accustomed to the motorcycle'ssize and weight.
Ride DefensivelyAlways pay attention to other vehicles aroundyou, and do not assume that other drivers seeyou. Be prepared to stop quickly or perform anevasive maneuver.
20181113114552_32K08D110_eng_BOOK Page 6 Tuesday, November 13 2018 11:49:25 JST
Safety GuidelinesM
otorcycle Safety
3Continued
Make Yourself Easy to SeeMake yourself more visible, especially at night,by wearing bright reflective clothing, positioningyourself so other drivers can see you, signalingbefore turning or changing lanes, and usingyour horn when necessary.
Ride within Your LimitsNever ride beyond your personal abilities orfaster than conditions warrant. Fatigue andinattention can impair your ability to use goodjudgement and ride safely.
Don't Drink and RideAlcohol and riding don't mix. Even one alcoholicdrink can reduce your ability to respond tochanging conditions, and your reaction timegets worse with every additional drink. Don'tdrink and ride, and don't let your friends drinkand ride either.
Keep Your Honda in Safe ConditionIt's important to keep your motorcycle properlymaintained and in safe riding condition.Inspect your motorcycle before every ride andperform all recommended maintenance. Neverexceed load limits (2 P. 11), and do not modifyyour motorcycle or install accessories thatwould make your motorcycle unsafe (2 P. 10).
If You are Involved in a CrashPersonal safety is your first priority. If you oranyone else has been injured, take time toassess the severity of the injuries and whether itis safe to continue riding. Call for emergencyassistance if needed. Also follow applicable lawsand regulations if another person or vehicle isinvolved in the crash.
20181113114552_32K08D110_eng_BOOK Page 7 Tuesday, November 13 2018 11:49:25 JST
Safety Guidelines
Motorcycle Safety
4

If you decide to continue riding, first turn theignition switch to the (Off) position, andevaluate the condition of your motorcycle.Inspect for fluid leaks, check the tightness ofcritical nuts and bolts, and check the handlebar,control levers, brakes, and wheels. Ride slowlyand cautiously.Your motorcycle may have suffered damagethat is not immediately apparent. Have yourmotorcycle thoroughly checked at a qualifiedservice facility as soon as possible.
Carbon Monoxide HazardExhaust contains poisonous carbon monoxide, acolourless, odorless gas. Breathing carbonmonoxide can cause loss of consciousness andmay lead to death.
If you run the engine in confined or even partlyenclosed area, the air you breathe couldcontain a dangerous amount of carbonmonoxide.
Never run your motorcycle inside a garage orother enclosure.
3WARNINGRunning the engine of your motorcyclewhile in an enclosed or even partiallyenclosed area can cause a rapid build-up of toxic carbon monoxide gas.
Breathing this colourless, odorless gascan quickly cause unconsciousness andlead to death.
Only run your motorcycle's enginewhen it is located in a well ventilatedarea outdoors.
20181113114552_32K08D110_eng_BOOK Page 8 Tuesday, November 13 2018 11:49:25 JST
Safety GuidelinesM
otorcycle Safety
5

Safety Precautions● Ride cautiously and keep your hands on the
handlebar and feet on the footpegs.● Keep passenger's hands onto the grab rail
or your waist, passenger's feet on thefootpegs while riding.
● Always consider the safety of yourpassenger, as well as other drivers andriders.
Protective ApparelMake sure that you and any passenger arewearing an approved motorcycle helmet, eyeprotection, and high-visibility protectiveclothing. Ride defensively in response toweather and road conditions.
# HelmetSafety-standard certified, high-visibility, correctsize for your head● Must fit comfortably but securely, with the
chin strap fastened.
● Face shield with unobstructed field of visionor other approved eye protection
3WARNINGNot wearing a helmet increases thechance of serious injury or death in acrash.
Make sure that you and any passengeralways wear an approved helmet andprotective apparel.
# GlovesFull-finger leather gloves with high abrasionresistance# Boots or Riding ShoesSturdy boots with non-slip soles and ankleprotection# Jacket and TrousersProtective, highly visible, long-sleeved jacketand durable trousers for riding (or a protectivesuit)
20181113114552_32K08D110_eng_BOOK Page 9 Tuesday, November 13 2018 11:49:25 JST
Safety Precautions
Motorcycle Safety
6
Continued
Riding PrecautionsRunning-in Period
During the first 500 km (300 miles) of running,follow these guidelines to ensure yourmotorcycle's future reliability and performance.● Avoid full-throttle starts and rapid
acceleration.● Avoid hard braking and rapid down-shifts.● Ride conservatively.
BrakesObserve the following guidelines:● Avoid excessively hard braking and
downshifting.u Sudden braking can reduce the
motorcycle's stability.u Where possible, reduce speed before
turning; otherwise you risk sliding out.● Exercise caution on low traction surfaces.
u The tyres slip more easily on suchsurfaces and braking distances arelonger.
● Avoid continuous braking.u Repeated braking, such as when
descending long, steep slopes canseriously overheat the brakes, reducingtheir effectiveness. Use engine brakingwith intermittent use of the brakes toreduce speed.
● For full braking effectiveness, operate boththe front and rear brakes together.
20181113114552_32K08D110_eng_BOOK Page 10 Tuesday, November 13 2018 11:49:25 JST
Riding PrecautionsM
otorcycle Safety
7

# Engine BrakingEngine braking helps slow your motorcycledown when you release the throttle. For furtherslowing action, downshift to a lower gear. Useengine braking with intermittent use of thebrakes to reduce speed when descending long,steep slopes.
# Wet or Rainy ConditionsRoad surfaces are slippery when wet, and wetbrakes further reduce braking efficiency.Exercise extra caution when braking in wetconditions.If the brakes get wet, apply the brakes whileriding at low speed to help them dry.
Parking● Park on a firm, level surface.● If you must park on a slight incline or loose
surface, park so that the motorcycle cannotmove or fall over.
● Make sure that high-temperature partscannot come into contact with flammablematerials.
● Do not touch the engine, muffler, brakesand other high-temperature parts until theycool down.
● To reduce the likelihood of theft, always lockthe handlebar and remove the key whenleaving the motorcycle unattended.Use of an anti-theft device is alsorecommended.
# Parking with the Side Stand or CentreStand
1. Stop the engine.2. Using the side stand
Push the side stand down.Slowly lean the motorcycle to the left until itsweight rests on the side stand.
20181113114552_32K08D110_eng_BOOK Page 11 Tuesday, November 13 2018 11:49:25 JST
Riding Precautions
Motorcycle Safety
8

Using the centre standTo lower the centre stand, stand on the leftside of the motorcycle.Hold the left handle grip and the grab rail.Press down on the tip of the centre standwith your right foot and, simultaneously, pullup and back.
3. Turn the handlebar fully to the left.u Turning the handlebar to the right
reduces stability and may cause themotorcycle to fall.
4. Turn the ignition switch to the (Lock)position and remove the key. 2 P. 20
5. Turn the fuel valve to the (Off) position.
Refuelling and Fuel GuidelinesFollow these guidelines to protect the engineand fuel system:● Use only unleaded petrol.● Use recommended octane number. Using
lower octane petrol will result in decreasedengine performance.
● Do not use fuels containing a highconcentration of alcohol. 2 P. 97
● Do not use stale or contaminated petrol oran oil/petrol mixture.
● Avoid getting dirt or water in the fuel tank.
20181113114552_32K08D110_eng_BOOK Page 12 Tuesday, November 13 2018 11:49:25 JST
Riding PrecautionsM
otorcycle Safety
9
Left handle grip
Grabrail
Centre stand

Accessories &ModificationsWe strongly advise that you do not add anyaccessories that were not specifically designedfor your motorcycle by Honda or makemodifications to your motorcycle from itsoriginal design. Doing so can make it unsafe.Modifying your motorcycle may also void yourwarranty and make your motorcycle illegal tooperate on public roads. Before deciding toinstall accessories on your motorcycle be certainthe modification is safe and legal.
3WARNINGImproper accessories or modificationscan cause a crash in which you can beseriously hurt or killed.
Follow all instructions in this owner'smanual regarding accessories andmodifications.
Do not pull a trailer with, or attach a sidecar to,your motorcycle. Your motorcycle was notdesigned for these attachments, and their usecan seriously impair your motorcycle's handling.
20181113114552_32K08D110_eng_BOOK Page 13 Tuesday, November 13 2018 11:49:25 JST
Accessories & Modifications
Motorcycle Safety
10

Loading● Carrying extra weight affects your
motorcycle's handling, braking and stability.Always ride at a safe speed for the load youare carrying.
● Avoid carrying an excessive load and keepwithin specified load limits.Maximum weight capacity / Maximumweight on rear carrier 2 P. 98
● Tie all luggage securely, evenly balancedand close to the centre of the motorcycle.
● Do not place objects near the lights or themuffler.
3WARNINGOverloading or improper loading cancause a crash and you can be seriouslyhurt or killed.
Follow all load limits and other loadingguidelines in this manual.
20181113114552_32K08D110_eng_BOOK Page 14 Tuesday, November 13 2018 11:49:25 JST
LoadingM
otorcycle Safety
11
Basic Operation Flow
20181113114552_32K08D110_eng_BOOK Page 15 Tuesday, November 13 2018 11:49:25 JST
Operation Guide
12
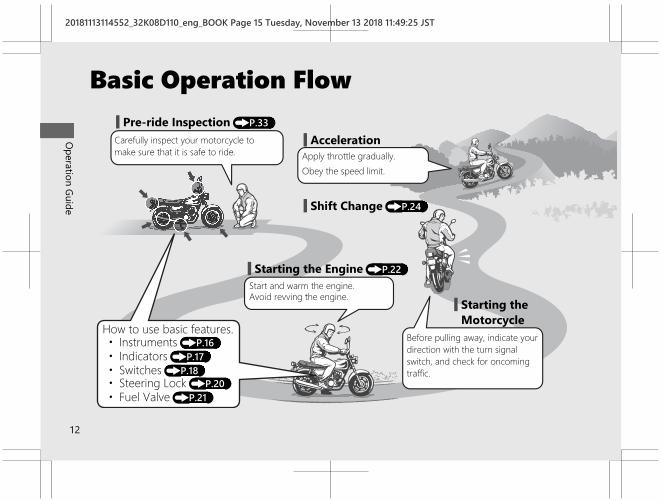
# Pre-ride Inspection (P.33)Carefully inspect your motorcycle tomake sure that it is safe to ride.
# AccelerationApply throttle gradually.Obey the speed limit.
# Shift Change (P.24)
How to use basic features.• Instruments (P.16)• Indicators (P.17)• Switches (P.18)• Steering Lock (P.20)
# Starting the Engine (P.22)Start and warm the engine.Avoid revving the engine. # Starting the
MotorcycleBefore pulling away, indicate yourdirection with the turn signalswitch, and check for oncomingtraffic.
• Fuel Valve (P.21)
20181113114552_32K08D110_eng_BOOK Page 16 Tuesday, November 13 2018 11:49:25 JST
Operation Guide
13
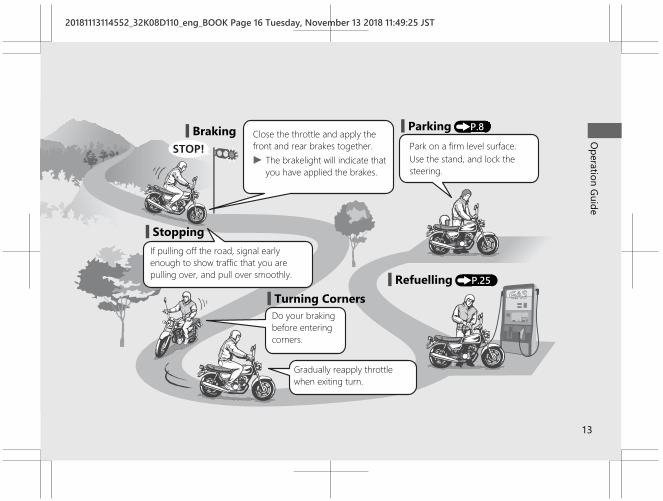
# Braking Close the throttle and apply thefront and rear brakes together.u The brakelight will indicate that
you have applied the brakes.
# Parking (P.8)
# StoppingIf pulling off the road, signal earlyenough to show traffic that you arepulling over, and pull over smoothly.
# Turning CornersDo your brakingbefore enteringcorners.
Gradually reapply throttlewhen exiting turn.
# Refuelling (P.25)
Park on a firm level surface.Use the stand, and lock thesteering.

Parts Location
20181113114552_32K08D110_eng_BOOK Page 17 Tuesday, November 13 2018 11:49:25 JST
Operation Guide
14
Fuse holder (P.85)
Battery (P.46)
Spark plug (P.50)
Throttle grip (P.71)
Rear suspension springpreload adjuster (P.74)
Engine oil fill cap/dipstick (P.52)
Kickstarter pedal (P.22)
Front brake lever (P.57)
Tool kit (P.27)Document bag (P.27)
Side cover (P.49)
Rear brake pedal (P.56)
20181113114552_32K08D110_eng_BOOK Page 18 Tuesday, November 13 2018 11:49:25 JST
Operation Guide
15
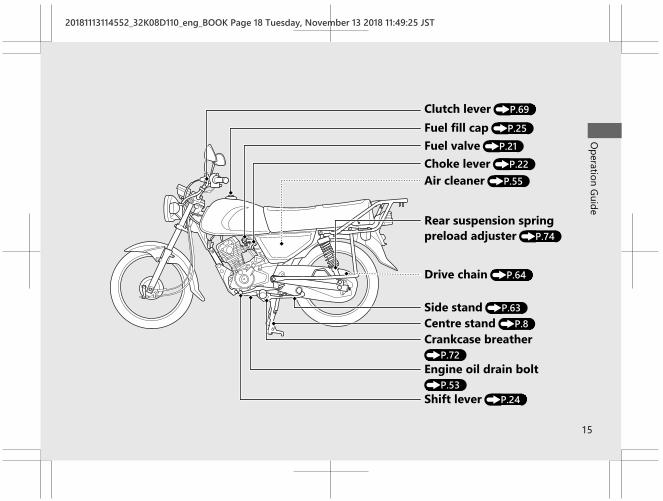
Clutch lever (P.69)
Crankcase breather(P.72)
Fuel fill cap (P.25)
Drive chain (P.64)
Side stand (P.63)
Shift lever (P.24)
Choke lever (P.22)Air cleaner (P.55)
Rear suspension springpreload adjuster (P.74)
Centre stand (P.8)
Fuel valve (P.21)
Engine oil drain bolt(P.53)

Instruments
20181113114552_32K08D110_eng_BOOK Page 19 Tuesday, November 13 2018 11:49:25 JST
Operation Guide
16
Total distance ridden.Odometer
This shows your speed in kilometreper hour (km/h).
Speedometer

IndicatorsIf one of these indicators does not come on when it should, have your dealer check forproblems.
20181113114552_32K08D110_eng_BOOK Page 20 Tuesday, November 13 2018 11:49:25 JST
Operation Guide
17
Turn signal indicator
High beam indicator
Neutral indicatorComes on when the transmission is inNeutral.
Switches
20181113114552_32K08D110_eng_BOOK Page 21 Tuesday, November 13 2018 11:49:25 JST
Operation Guide
18
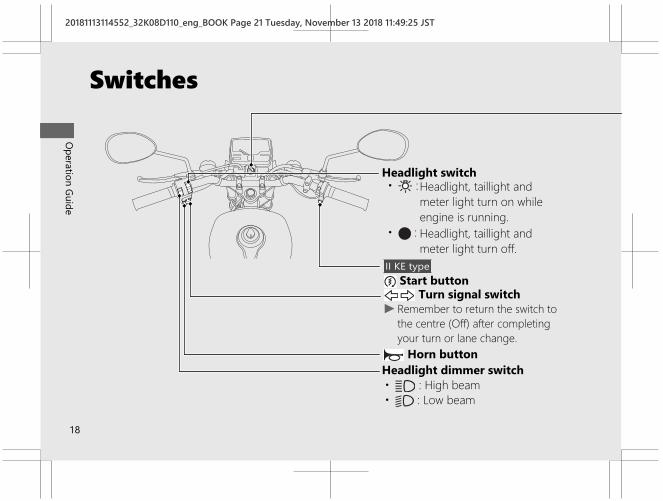
Headlight dimmer switch• : High beam• : Low beam
Turn signal switch
Horn button
Headlight switch• :
• :
Headlight, taillight andmeter light turn on whileengine is running.Headlight, taillight andmeter light turn off.
u Remember to return the switch tothe centre (Off) after completingyour turn or lane change.
II KE type Start button

20181113114552_32K08D110_eng_BOOK Page 22 Tuesday, November 13 2018 11:49:25 JST
Operation Guide
19Continued
Ignition switchSwitches the electrical system on/off,locks the steering.u Key can be removed when in the (Off)
or (Lock) position.
(On)Turns electrical systemon for starting/riding.
(Off)Turns engine off.
(Lock)Locks steering.

Steering LockLock the steering when parking to helpprevent theft.A U-shaped wheel lock or similar device isalso recommended.
# Lockinga Turn the handlebar all the way to the left.b Push the ignition key down, and turn the
ignition switch to the (Lock) position.u Jiggle the handlebar if the lock is difficult
to engage.c Remove the ignition key.
# UnlockingInsert the key, and turn the ignition switch tothe (Off) position.
20181113114552_32K08D110_eng_BOOK Page 23 Tuesday, November 13 2018 11:49:25 JST
Operation Guide
20
Switches (Continued)
a
Ignition key
PushbTurn

Fuel ValveThe three-way fuel valve is used to controlthe flow of fuel from the fuel tank to thecarburetor.
(On): normal position for riding. (Off): for parking, storing, or
transportation. (Res): for extra fuel to get to a gas station
for refuelling.
20181113114552_32K08D110_eng_BOOK Page 24 Tuesday, November 13 2018 11:49:25 JST
Operation Guide
21
On Off Res
Starting the EngineStart your engine using the followingprocedure.
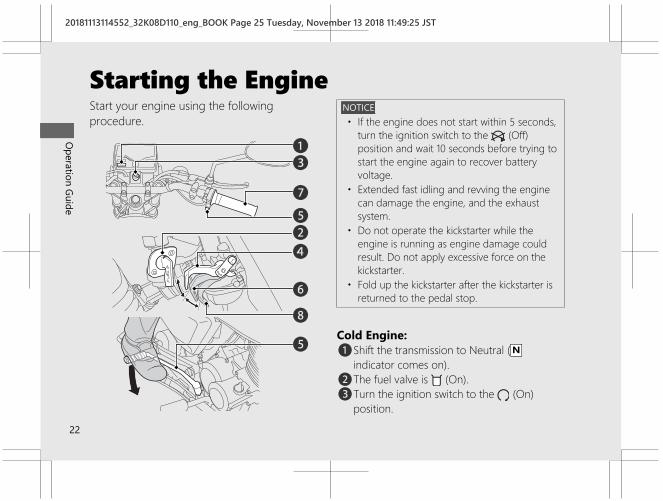
NOTICE• If the engine does not start within 5 seconds,
turn the ignition switch to the (Off)position and wait 10 seconds before trying tostart the engine again to recover batteryvoltage.
• Extended fast idling and revving the enginecan damage the engine, and the exhaustsystem.
• Do not operate the kickstarter while theengine is running as engine damage couldresult. Do not apply excessive force on thekickstarter.
• Fold up the kickstarter after the kickstarter isreturned to the pedal stop.
Cold Engine:a Shift the transmission to Neutral ( N
indicator comes on).b The fuel valve is (On).c Turn the ignition switch to the (On)
position.
20181113114552_32K08D110_eng_BOOK Page 25 Tuesday, November 13 2018 11:49:25 JST
Operation Guide
22
a
b
c
d
f
g
h
e
e

d Pull the choke lever up all the way to fullyon.
e Using the start buttonWith the throttle slightly open, press thestart button.Using the kickstarterLightly depress the kickstarter untilresistance is felt. Then let the kickstarterreturn to the top of its stroke.With the throttle slightly open, operatethe kickstarter. Kick from the top of thestroke through to the bottom with arapid, continuous motion.
f Immediately after the engine starts, push thechoke lever down to the halfway position.
g Warm up the engine by opening andclosing the throttle slightly.
h Continue warming up the engine until it runssmoothly and responds to the throttle, whenthe choke lever is at fully off.
Warm Engine:aDo not use the choke.b Follow steps 1-3 and 5 under “Cold Engine.”If the engine does not start:aTurn the ignition switch to the (Off)
position.bPush the choke lever down all the way to
fully off.cOpen the throttle fully.dCrank the engine several times with the
kickstarter.e Follow steps 1-2 under “Warm Engine.”
# If Engine Will Not Start (P.76)
20181113114552_32K08D110_eng_BOOK Page 26 Tuesday, November 13 2018 11:49:25 JST
Operation Guide
23
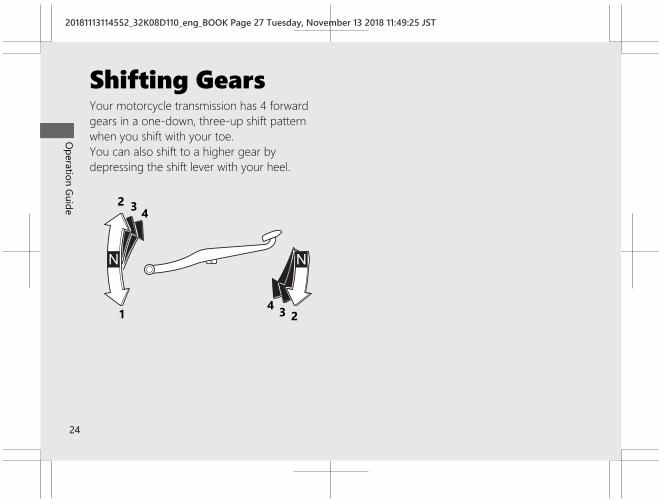
Shifting GearsYour motorcycle transmission has 4 forwardgears in a one-down, three-up shift patternwhen you shift with your toe.You can also shift to a higher gear bydepressing the shift lever with your heel.
20181113114552_32K08D110_eng_BOOK Page 27 Tuesday, November 13 2018 11:49:25 JST
Operation Guide
24
41
432
3 2

Refuelling
Do not fill with fuel above the lower edge ofthe filler neck.Fuel type: Unleaded petrol onlyFuel octane number: Your motorcycle isdesigned to use Research Octane Number(RON) 91 or higher.Tank capacity including the reserve:12.0 L (3.17 US gal, 2.64 Imp gal)Reserve capacity:1.4 L (0.37 US gal, 0.31 Imp gal)
The tank should be refilled as soon aspossible after switching to reserve, and thefuel valve should be returned to the (On)position after refuelling to avoid running outof fuel with no reserve. 2 P. 21
# Refuelling and Fuel Guidelines (P.9)
Opening the Fuel Fill CapaOpen the lock cover.b Insert the ignition key, and turn it clockwise
to remove the fuel fill cap.
20181113114552_32K08D110_eng_BOOK Page 28 Tuesday, November 13 2018 11:49:25 JST
Operation Guide
25Continued
Ignition key
Lower edgeof filler neck
Fuel fill cap
Lock coverSlot

Closing the Fuel Fill Capa After refuelling, align the fuel fill cap latch
with the slot in the filler neck.b Push the fuel fill cap into the filler neck until
it snaps closed and locks.c Remove the ignition key and close the lock
cover.u The ignition key cannot be removed if
the cap is not locked.
3WARNINGPetrol is highly flammable andexplosive. You can be burned orseriously injured when handling fuel.
• Stop the engine, and keep heat,sparks, and flame away.
• Handle fuel only outdoors.• Wipe up spills immediately.
20181113114552_32K08D110_eng_BOOK Page 29 Tuesday, November 13 2018 11:49:25 JST
Operation Guide
26
Refuelling (Continued)

Storage EquipmentTool Kit/Document BagThe tool kit and the document bag are in thecompartment box behind the right sidecover.Push the tabs to open the compartment boxlid.
# Removing the Side Cover (P.49)
Rear CarrierNever exceed the maximum weight limit.Maximum Weight: 5.0 kg (11.0 lb)
20181113114552_32K08D110_eng_BOOK Page 30 Tuesday, November 13 2018 11:49:25 JST
Operation Guide
27
Document bag
Tool kit
Compartmentbox lid
Tabs
Rear Carrier
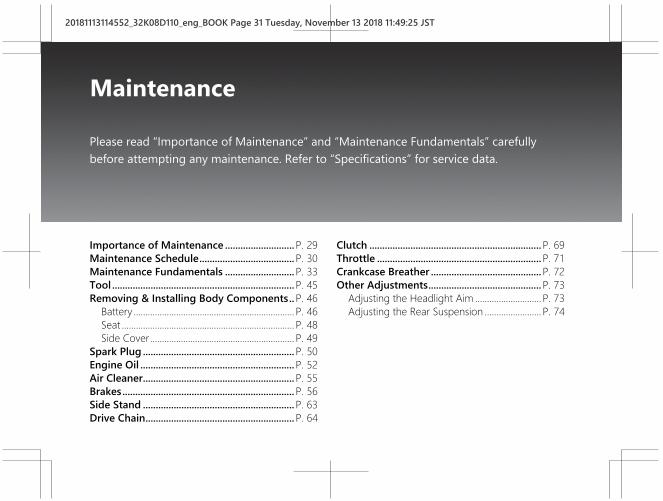
Importance of Maintenance ...........................P. 29Maintenance Schedule.....................................P. 30Maintenance Fundamentals ...........................P. 33Tool .......................................................................P. 45Removing & Installing Body Components..P. 46
Battery .................................................................... P. 46Seat ......................................................................... P. 48Side Cover............................................................. P. 49
Spark Plug ...........................................................P. 50Engine Oil ............................................................P. 52Air Cleaner...........................................................P. 55Brakes...................................................................P. 56Side Stand ...........................................................P. 63Drive Chain..........................................................P. 64
Clutch ...................................................................P. 69Throttle ................................................................P. 71Crankcase Breather ...........................................P. 72Other Adjustments............................................P. 73
Adjusting the Headlight Aim ............................ P. 73Adjusting the Rear Suspension ........................ P. 74
20181113114552_32K08D110_eng_BOOK Page 31 Tuesday, November 13 2018 11:49:25 JST
Please read “Importance of Maintenance” and “Maintenance Fundamentals” carefullybefore attempting any maintenance. Refer to “Specifications” for service data.
Maintenance

Importance of Maintenance
Importance of MaintenanceKeeping your motorcycle well-maintained isabsolutely essential to your safety and toprotect your investment, obtain maximumperformance, avoid breakdowns, and reduce airpollution. Maintenance is the owner'sresponsibility. Be sure to inspect yourmotorcycle before each ride, and perform theperiodic checks specified in the MaintenanceSchedule. 2 P. 30
3WARNINGImproperly maintaining yourmotorcycle or failing to correct aproblem before you ride can cause acrash in which you can be seriously hurtor killed.
Always follow the inspection andmaintenance recommendations andschedules in this owner's manual.
Maintenance SafetyAlways read the maintenance instructionsbefore you begin each task, and make sure thatyou have the tools, parts, and skills required.We cannot warn you of every conceivablehazard that can arise in performingmaintenance. Only you can decide whether ornot you should perform a given task.
Follow these guidelines when performingmaintenance.● Stop the engine and remove the key.● Place your motorcycle on a firm, level
surface using the side stand, centre stand ora maintenance stand to provide support.
● Allow the engine, muffler, brakes, and otherhigh-temperature parts to cool beforeservicing as you can get burned.
● Run the engine only when instructed, anddo so in a well-ventilated area.
20181113114552_32K08D110_eng_BOOK Page 32 Tuesday, November 13 2018 11:49:25 JST
Maintenance
29

Maintenance ScheduleThe maintenance schedule specifies themaintenance requirements necessary toensure safe, dependable performance, andproper emission control.
Maintenance work should be performed inaccordance with Honda's standards andspecifications by properly trained and equippedtechnicians. Your dealer meets all of theserequirements. Keep an accurate record ofmaintenance to help ensure that yourmotorcycle is properly maintained.Make sure that whomever performs themaintenance completes this record.
All scheduled maintenance is considered anormal owner operating cost and will becharged to you by your dealer. Retain allreceipts. If you sell the motorcycle, thesereceipts should be transferred with themotorcycle to the new owner.
Honda recommends that your dealer shouldroad test your motorcycle after each periodicmaintenance is carried out.
20181113114552_32K08D110_eng_BOOK Page 33 Tuesday, November 13 2018 11:49:25 JST
Maintenance
30
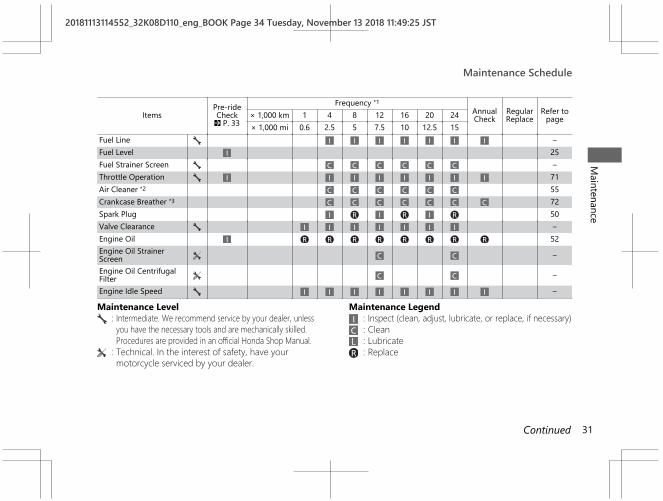
ItemsPre-rideCheck2 P. 33
Frequency *1AnnualCheck
RegularReplace
Refer topage× 1,000 km 1 4 8 12 16 20 24
× 1,000 mi 0.6 2.5 5 7.5 10 12.5 15Fuel Line –Fuel Level 25Fuel Strainer Screen –Throttle Operation 71Air Cleaner *2 55Crankcase Breather *3 72Spark Plug 50Valve Clearance –Engine Oil 52Engine Oil StrainerScreen –
Engine Oil CentrifugalFilter –
Engine Idle Speed –
Maintenance Level Maintenance Legend: Intermediate. We recommend service by your dealer, unless
you have the necessary tools and are mechanically skilled.Procedures are provided in an official Honda Shop Manual.
::::
Inspect (clean, adjust, lubricate, or replace, if necessary)CleanLubricateReplace: Technical. In the interest of safety, have your
motorcycle serviced by your dealer.
20181113114552_32K08D110_eng_BOOK Page 34 Tuesday, November 13 2018 11:49:25 JST
Maintenance ScheduleM
aintenance
31Continued
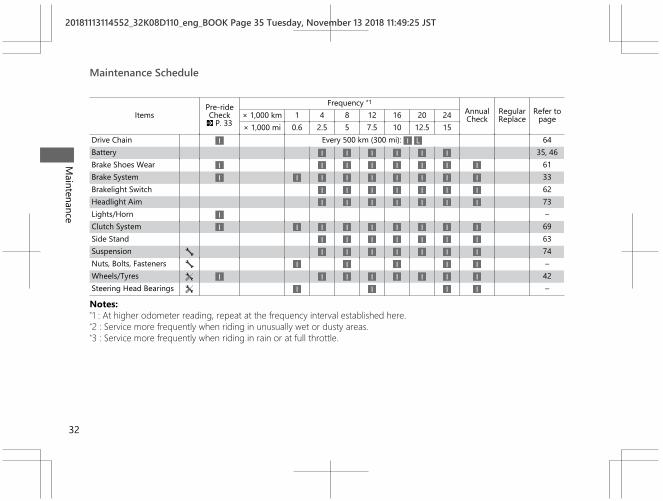
ItemsPre-rideCheck2 P. 33
Frequency *1AnnualCheck
RegularReplace
Refer topage× 1,000 km 1 4 8 12 16 20 24
× 1,000 mi 0.6 2.5 5 7.5 10 12.5 15Drive Chain Every 500 km (300 mi): 64Battery 35, 46Brake Shoes Wear 61Brake System 33Brakelight Switch 62Headlight Aim 73Lights/Horn –Clutch System 69Side Stand 63Suspension 74Nuts, Bolts, Fasteners –Wheels/Tyres 42Steering Head Bearings –
Notes:*1 : At higher odometer reading, repeat at the frequency interval established here.*2 : Service more frequently when riding in unusually wet or dusty areas.*3 : Service more frequently when riding in rain or at full throttle.
20181113114552_32K08D110_eng_BOOK Page 35 Tuesday, November 13 2018 11:49:25 JST
Maintenance Schedule
Maintenance
32
Maintenance Fundamentals
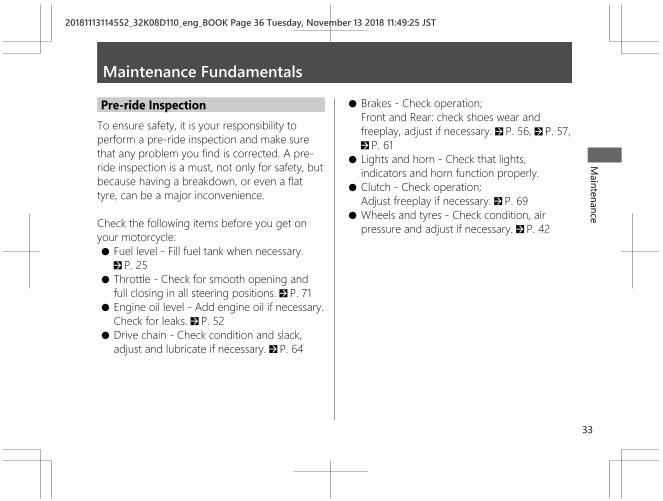
Pre-ride InspectionTo ensure safety, it is your responsibility toperform a pre-ride inspection and make surethat any problem you find is corrected. A pre-ride inspection is a must, not only for safety, butbecause having a breakdown, or even a flattyre, can be a major inconvenience.
Check the following items before you get onyour motorcycle:● Fuel level - Fill fuel tank when necessary.
2 P. 25● Throttle - Check for smooth opening and
full closing in all steering positions. 2 P. 71● Engine oil level - Add engine oil if necessary.
Check for leaks. 2 P. 52● Drive chain - Check condition and slack,
adjust and lubricate if necessary. 2 P. 64
● Brakes - Check operation;Front and Rear: check shoes wear andfreeplay, adjust if necessary. 2 P. 56, 2 P. 57,2 P. 61
● Lights and horn - Check that lights,indicators and horn function properly.
● Clutch - Check operation;Adjust freeplay if necessary. 2 P. 69
● Wheels and tyres - Check condition, airpressure and adjust if necessary. 2 P. 42
20181113114552_32K08D110_eng_BOOK Page 36 Tuesday, November 13 2018 11:49:25 JST
Maintenance
33

Replacing PartsAlways use Honda Genuine Parts or theirequivalents to ensure reliability and safety.
3WARNINGInstalling non-Honda parts may makeyour motorcycle unsafe and cause acrash in which you can be seriously hurtor killed.
Always use Honda Genuine Parts orequivalents that have been designedand approved for your motorcycle.
20181113114552_32K08D110_eng_BOOK Page 37 Tuesday, November 13 2018 11:49:25 JST
Maintenance Fundamentals
Maintenance
34

BatteryIf the motorcycle is operated with insufficientbattery electrolyte, sulfation and battery platedamage will occur.If rapid loss of electrolyte is experienced, or ifyour battery seems to be weak, causing hardstarting or other electrical problems, see yourdealer.II KE typeClean the battery terminals if they become dirtyor corroded.
NOTICEAn improperly disposed of battery can beharmful to the environment and human health.Always confirm local regulations for properbattery disposal instruction.
20181113114552_32K08D110_eng_BOOK Page 38 Tuesday, November 13 2018 11:49:25 JST
Maintenance FundamentalsM
aintenance
35Continued

# What to do in an emergencyIf any of the following occur, immediately seeyour doctor.● Electrolyte splashes into your eyes:
u Wash your eyes repeatedly with coolwater for at least 15 minutes. Using waterunder pressure can damage your eyes.
● Electrolyte splashes onto your skin:u Remove affected clothing and wash your
skin thoroughly using water.● Electrolyte splashes into your mouth:
u Rinse mouth thoroughly with water, anddo not swallow.
3WARNINGThe battery contains sulfuric acid(electrolyte) which is highly corrosiveand poisonous.
Getting electrolyte in your eyes or onyour skin can cause serious burns.
The battery gives off explosivehydrogen gas during normal operation.
A spark or flame can cause the batteryto explode with enough force to kill orseriously hurt you.
Wear protective clothing and a faceshield, or have a skilled mechanic dothe battery servicing.
20181113114552_32K08D110_eng_BOOK Page 39 Tuesday, November 13 2018 11:49:25 JST
Maintenance Fundamentals
Maintenance
36

# Checking the Battery Electrolyte1. Park your motorcycle on its centre stand on
a firm, level surface.2. Remove the right side cover. 2 P. 493. Check the electrolyte level must be
maintained between the UPPER and LOWERLEVEL marks.
If the electrolyte level is low, remove the battery(2 P. 46) and filler caps. Carefully add distilledwater to UPPER LEVEL mark.
u Filling the battery above the UPPERLEVEL line may cause the electrolyte tooverflow, resulting in corrosion to engineor frame parts. Immediately wash off anyspilled electrolyte.
u After checking battery fluid level, oradding distilled water, make surebreather tube is connected to the batterybreather outlet. The battery breathertube must be routed as shown on thelabel.Do not bend or twist the breather tube.
NOTICE• Battery fluid is highly corrosive and can
damage metal or painted surface. Use carewhen adding distilled water.
• A bent or kinked breather tube maypressurize the battery and damage its case.
20181113114552_32K08D110_eng_BOOK Page 40 Tuesday, November 13 2018 11:49:25 JST
Maintenance FundamentalsM
aintenance
37Continued
Batterybreathertube
UPPERLEVEL
LOWERLEVEL
Battery

# Cleaning the Battery TerminalsII KE type1. Remove the battery. 2 P. 462. If the terminals are starting to corrode and
are coated with a white substance, washwith warm water and wipe clean.
3. If the terminals are heavily corroded, cleanand polish the terminals with a wire brush orsandpaper. Wear safety glasses.
4. After cleaning, reinstall the battery.
The battery has a limited life span. Consult yourdealer about when you should replace thebattery. Always replace the battery with thesame type.
NOTICEInstalling non-Honda electrical accessories canoverload the electrical system, discharging thebattery and possibly damaging the system.
FusesFuses protect the electrical circuits on yourmotorcycle. If something electrical on yourmotorcycle stops working, check for andreplace any blown fuses. 2 P. 85
20181113114552_32K08D110_eng_BOOK Page 41 Tuesday, November 13 2018 11:49:25 JST
Maintenance Fundamentals
Maintenance
38

# Inspecting and Replacing FusesTurn the ignition switch to the (Off) positionto remove and inspect fuses. If a fuse is blown,replace with a fuse of the same rating. For fuseratings, see “Specifications.” 2 P. 99
NOTICEReplacing a fuse with one that has a higherrating greatly increases the chance of damage tothe electrical system.
If a fuse fails repeatedly, you likely have anelectrical fault. Have your motorcycle inspectedby your dealer.
Engine OilEngine oil consumption varies and oil qualitydeteriorates according to riding conditions andtime elapsed.Check the engine oil level regularly, and add therecommended engine oil if necessary. Dirty oil orold oil should be changed as soon as possible.
# Selecting the Engine OilFor recommended engine oil, see“Specifications.” 2 P. 99
If you use non-Honda engine oil, check thelabel to make sure that the oil satisfies all of thefollowing standards:● JASO T 903 standard*1: MA● SAE standard*2: 10W-30● API classification*3: SG or higher
20181113114552_32K08D110_eng_BOOK Page 42 Tuesday, November 13 2018 11:49:25 JST
Maintenance FundamentalsM
aintenance
39Continued
Blown fuse

*1. The JASO T 903 standard is an index for engineoils for 4-stroke motorcycle engines. There aretwo classes: MA and MB. For example, thefollowing label shows the MA classification.
*2. The SAE standard grades oils by their viscosity.*3. The API classification specifies the quality and
performance rating of engine oils. Use SG orhigher oils, excluding oils marked as “EnergyConserving” or “Resource Conserving” on thecircular API service symbol.
Drive ChainThe drive chain must be inspected andlubricated regularly. Inspect the chain morefrequently if you often ride on bad roads, ride athigh speed, or ride with repeated fastacceleration. 2 P. 64
If the chain does not move smoothly, makesstrange noises, has damaged rollers, has loosepins, or kinks, have the chain inspected by yourdealer.
Also inspect the drive sprocket and drivensprocket. If either has worn or damaged teeth,have the sprocket replaced by your dealer.
20181113114552_32K08D110_eng_BOOK Page 43 Tuesday, November 13 2018 11:49:25 JST
Maintenance Fundamentals
Maintenance
40
Oil codeOil classification
Not recommended RecommendedNormal(GOOD)
Worn(REPLACE)
Damaged(REPLACE)

NOTICEUse of a new chain with worn sprockets will causerapid chain wear.
# Cleaning and LubricatingAfter inspecting the slack, clean the chain andsprockets while rotating the rear wheel. Use adry cloth with high flash-point solvent. Use asoft brush if the chain is dirty.After cleaning, wipe dry and lubricate with therecommended lubricant.
Recommended lubricant:Drive chain lubricantIf not available, use SAE 80 or 90 gearoil.
Never use petrol or low flash point solvents forcleaning the drive chain.A fire or explosion could result.Avoid getting lubricant on the brakes or tyres.Avoid applying excess chain lubricant to preventspray onto your clothes and the motorcycle.
20181113114552_32K08D110_eng_BOOK Page 44 Tuesday, November 13 2018 11:49:25 JST
Maintenance FundamentalsM
aintenance
41
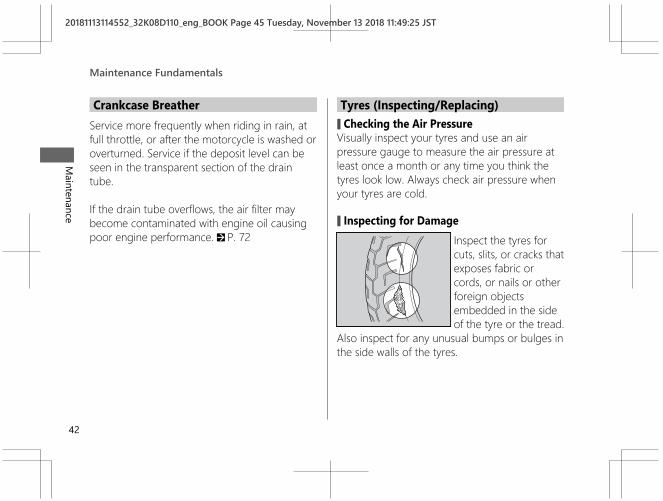
Crankcase BreatherService more frequently when riding in rain, atfull throttle, or after the motorcycle is washed oroverturned. Service if the deposit level can beseen in the transparent section of the draintube.
If the drain tube overflows, the air filter maybecome contaminated with engine oil causingpoor engine performance. 2 P. 72
Tyres (Inspecting/Replacing)# Checking the Air PressureVisually inspect your tyres and use an airpressure gauge to measure the air pressure atleast once a month or any time you think thetyres look low. Always check air pressure whenyour tyres are cold.
# Inspecting for DamageInspect the tyres forcuts, slits, or cracks thatexposes fabric orcords, or nails or otherforeign objectsembedded in the sideof the tyre or the tread.
Also inspect for any unusual bumps or bulges inthe side walls of the tyres.
20181113114552_32K08D110_eng_BOOK Page 45 Tuesday, November 13 2018 11:49:25 JST
Maintenance Fundamentals
Maintenance
42

# Inspecting for Abnormal WearInspect the tyres forsigns of abnormal wearon the contact surface.
# Inspecting Tread DepthInspect the tread wear indicators. If theybecome visible, replace the tyres immediately.
3WARNINGRiding on tyres that are excessivelyworn or improperly inflated can cause acrash in which you can be seriously hurtor killed.
Follow all instructions in this owner'smanual regarding tyre inflation andmaintenance.
20181113114552_32K08D110_eng_BOOK Page 46 Tuesday, November 13 2018 11:49:25 JST
Maintenance FundamentalsM
aintenance
43Continued
Wear indicatorlocation mark
or TWI

Have your tyres replaced by your dealer.For recommended tyres and air pressure, see“Specifications.” 2 P. 99Follow these guidelines whenever you replacetyres.● Use the recommended tyres or equivalents
of the same size, construction, speed rating,and load range.
● Remember to replace the inner tubewhenever you replace a tyre. The old tubewill probably be stretched, and it could fail ifinstalled in a new tyre.
3WARNINGInstalling improper tyres on yourmotorcycle can adversely affecthandling and stability, and can cause acrash in which you can be seriously hurtor killed.
Always use the size and type of tyresrecommended in this owner's manual.
20181113114552_32K08D110_eng_BOOK Page 47 Tuesday, November 13 2018 11:49:25 JST
Maintenance Fundamentals
Maintenance
44

ToolThe tool kit is stored in the compartment box.2 P. 27
You can perform some roadside repairs, minoradjustments and parts replacement with theprovided tools.
● Spark plug wrench● No.2 Screwdriver● 10 x 14 mm Open end wrench● 19 mm Box end wrench● Extension bar
20181113114552_32K08D110_eng_BOOK Page 48 Tuesday, November 13 2018 11:49:25 JST
Maintenance
45

Removing & Installing Body Components
BatteryII KE type
III KE type
20181113114552_32K08D110_eng_BOOK Page 49 Tuesday, November 13 2018 11:49:25 JST
Maintenance
46
Positive terminal
Batterybreathertube
Negative terminal
Battery
Bolt
Batteryholder
Terminal nutTerminal nut
Positive terminalconnector
Batterybreathertube
Negative terminalconnector
BatteryBolt
Batteryholder

# RemovalMake sure the ignition switch is in the (Off) position.1. Remove the right side cover. 2 P. 492. Remove the battery holder by removing
the bolt.3. II KE type
Disconnect the negative - terminal fromthe battery.III KE typeDisconnect the negative - terminalconnector.
4. II KE typeDisconnect the positive + terminal fromthe battery.III KE typeDisconnect the positive + terminalconnector.
5. Disconnect the battery breather tube.
6. II KE typeRemove the battery taking care not todrop the terminal nuts.III KE typeRemove the battery.
# InstallationInstall the parts in the reverse order ofremoval. Always connect the positive +terminal first. Make sure that bolts and nutsare tight.For proper handling of the battery, see“Maintenance Fundamentals.” 2 P. 35“Battery Goes Dead.” 2 P. 82Make sure breather tube is connected to thebattery breather outlet. The battery breathertube must be routed as shown on the label.Do not bend or twist the breather tube.
NOTICEA bent or kinked breather tube may pressurizethe battery and damage its case.
20181113114552_32K08D110_eng_BOOK Page 50 Tuesday, November 13 2018 11:49:25 JST
Removing & Installing Body Components u BatteryM
aintenance
47

Seat # Removal1. Remove the side covers. 2 P. 492. Remove the mounting bolts and collars.3. Pull the seat forward and up.
# Installation1. Insert the tab into the guide.2. Install the collars and tighten the
mounting bolts securely.3. Install the side covers. 2 P. 49Make sure that the seat is locked securely inposition to pull it up lightly.
20181113114552_32K08D110_eng_BOOK Page 51 Tuesday, November 13 2018 11:49:25 JST
Removing & Installing Body Components u Seat
Maintenance
48
Mounting bolts
Collars
Seat Tab
Guide
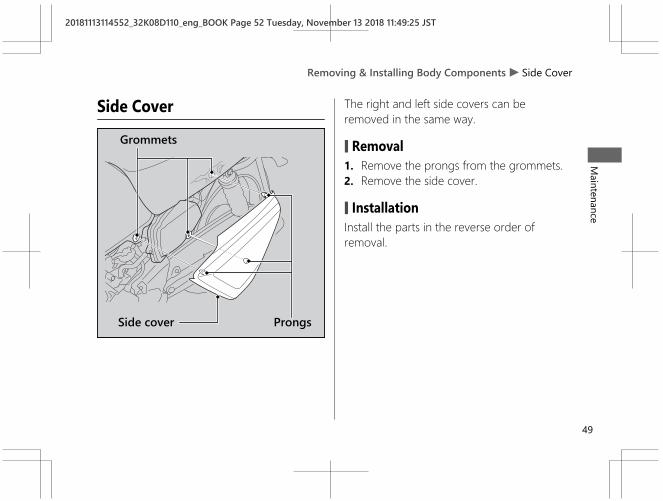
Side Cover The right and left side covers can beremoved in the same way.
# Removal1. Remove the prongs from the grommets.2. Remove the side cover.
# InstallationInstall the parts in the reverse order ofremoval.
20181113114552_32K08D110_eng_BOOK Page 52 Tuesday, November 13 2018 11:49:25 JST
Removing & Installing Body Components u Side CoverM
aintenance
49
Grommets
ProngsSide cover
Spark Plug
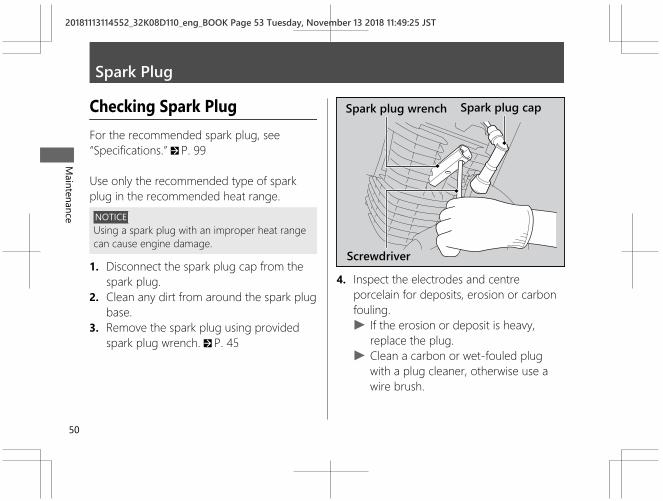
Checking Spark PlugFor the recommended spark plug, see“Specifications.” 2 P. 99
Use only the recommended type of sparkplug in the recommended heat range.
NOTICEUsing a spark plug with an improper heat rangecan cause engine damage.
1. Disconnect the spark plug cap from thespark plug.
2. Clean any dirt from around the spark plugbase.
3. Remove the spark plug using providedspark plug wrench. 2 P. 45
4. Inspect the electrodes and centreporcelain for deposits, erosion or carbonfouling.u If the erosion or deposit is heavy,
replace the plug.u Clean a carbon or wet-fouled plug
with a plug cleaner, otherwise use awire brush.
20181113114552_32K08D110_eng_BOOK Page 53 Tuesday, November 13 2018 11:49:25 JST
Maintenance
50
Spark plug capSpark plug wrench
Screwdriver
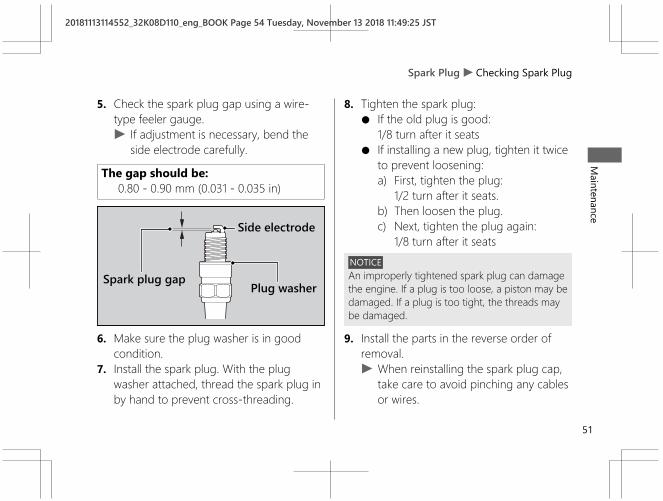
5. Check the spark plug gap using a wire-type feeler gauge.u If adjustment is necessary, bend the
side electrode carefully.
The gap should be:0.80 - 0.90 mm (0.031 - 0.035 in)
6. Make sure the plug washer is in goodcondition.
7. Install the spark plug. With the plugwasher attached, thread the spark plug inby hand to prevent cross-threading.
8. Tighten the spark plug:● If the old plug is good:
1/8 turn after it seats● If installing a new plug, tighten it twice
to prevent loosening:a) First, tighten the plug:
1/2 turn after it seats.b) Then loosen the plug.c) Next, tighten the plug again:
1/8 turn after it seatsNOTICEAn improperly tightened spark plug can damagethe engine. If a plug is too loose, a piston may bedamaged. If a plug is too tight, the threads maybe damaged.
9. Install the parts in the reverse order ofremoval.u When reinstalling the spark plug cap,
take care to avoid pinching any cablesor wires.
20181113114552_32K08D110_eng_BOOK Page 54 Tuesday, November 13 2018 11:49:25 JST
Spark Plug u Checking Spark PlugM
aintenance
51
Spark plug gap
Side electrode
Plug washer

Engine Oil
Checking the Engine Oil1. If the engine is cold, idle the engine for 3
to 5 minutes.2. Turn the ignition switch to the (Off)
position and wait for 2 to 3 minutes.3. Place your motorcycle on its centre stand
on a firm, level surface.4. Remove the oil fill cap/dipstick and wipe it
clean.5. Insert the oil fill cap/dipstick until it seats,
but don't screw it in.6. Check that the oil level is between the
upper level and lower level marks on theoil fill cap/dipstick.
7. Securely install the oil fill cap/dipstick.
20181113114552_32K08D110_eng_BOOK Page 55 Tuesday, November 13 2018 11:49:25 JST
Maintenance
52
Oil fill cap/dipstick
Lowerlevel
Upperlevel

Adding Engine OilIf the engine oil is below or near the lowerlevel mark, add the recommended engine oil.2 P. 39, 2 P. 991. Remove the oil fill cap/dipstick. Add the
recommended oil until it reaches theupper level mark.u Place your motorcycle on its centre
stand on a firm, level surface whenchecking the oil level.
u Do not overfill above the upper levelmark.
u Make sure no foreign objects enter theoil filler opening.
u Wipe up any spills immediately.
2. Securely reinstall the oil fill cap/dipstick.NOTICEOverfilling with oil or operating with insufficientoil can cause damage to your engine. Do not mixdifferent brands and grades of oil. They mayaffect lubrication and clutch operation.
For the recommended oil and oil selectionguidelines, see “Maintenance Fundamentals.”2 P. 39
Changing Engine OilChanging the oil requires special tools. Werecommend that you have your motorcycleserviced by your dealer.
1. If the engine is cold, idle the engine for 3to 5 minutes.
2. Turn the ignition switch to the (Off)position and wait for 2 to 3 minutes.
20181113114552_32K08D110_eng_BOOK Page 56 Tuesday, November 13 2018 11:49:25 JST
Engine Oil u Adding Engine OilM
aintenance
53Continued

3. Place your motorcycle on its centre standon a firm, level surface.
4. Place a drain pan under the drain bolt.5. Remove the oil fill cap/dipstick, drain bolt
and sealing washer to drain the oil.u Discard the oil at an approved
recycling centre.
6. Install a new sealing washer onto thedrain bolt. Tighten the drain bolt.
Torque: 24 N·m (2.4 kgf·m, 18 lbf·ft)
7. Fill the crankcase with the recommendedoil (2 P. 39, 2 P. 99) and install the oil fillcap/dipstick.
Required oilWhen changing oil:0.9 L (1.0 US qt, 0.8 Imp qt)
8. Check the oil level. 2 P. 529. Check that there are no oil leaks.
20181113114552_32K08D110_eng_BOOK Page 57 Tuesday, November 13 2018 11:49:25 JST
Engine Oil u Changing Engine Oil
Maintenance
54
Sealingwasher Drain bolt

Air Cleaner
Cleaning the Air CleanerElement1. Remove the left side cover. 2 P. 492. Remove the air cleaner housing cover by
loosening and removing the screws.3. Remove the air cleaner element.
4. Wash the air cleaner element in clean,nonflammable or high flash point solventand let it dry thoroughly.
u Never use petrol or low flash pointsolvents for cleaning the air cleanerelement. A fire or explosion couldresult.
u Inspect for tears or cracks in the foamor seams of the air cleaner element.Replace the air cleaner element if it isdamaged.
NOTICEUsing the wrong air cleaner element can result inserious damage to the engine.
5. Soak the air cleaner element in 4-strokemotorcycle engine oil (10W-30 MA or20W-40 MA) until saturated, thensqueeze out the excess oil.
6. Thoroughly clean the inside of the aircleaner housing.
7. Install the air cleaner element.8. Install the parts in the reverse order of
removal.
20181113114552_32K08D110_eng_BOOK Page 58 Tuesday, November 13 2018 11:49:25 JST
Maintenance
55
Screws
Air cleanerelement
Screws
Air cleanerhousing cover
Brakes
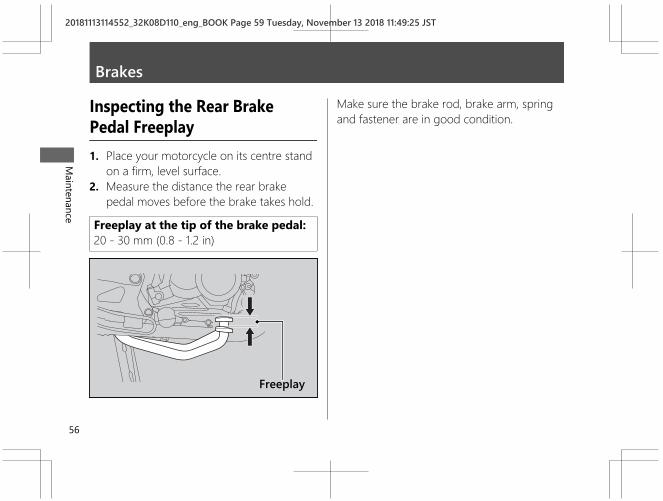
Inspecting the Rear BrakePedal Freeplay1. Place your motorcycle on its centre stand
on a firm, level surface.2. Measure the distance the rear brake
pedal moves before the brake takes hold.
Freeplay at the tip of the brake pedal:20 - 30 mm (0.8 - 1.2 in)
Make sure the brake rod, brake arm, springand fastener are in good condition.
20181113114552_32K08D110_eng_BOOK Page 59 Tuesday, November 13 2018 11:49:25 JST
Maintenance
56
Freeplay

Inspecting the Front BrakeLever Freeplay1. Place your motorcycle on its centre stand
on a firm, level surface.2. Measure the distance the front brake
lever moves before the brake takes hold.
Freeplay at the tip of the brake lever:10 - 20 mm (0.4 - 0.8 in)
Check the brake cable for kinks or signs ofwear. If necessary have it replaced by yourdealer.Lubricate the brake cable with acommercially available cable lubricant toprevent premature wear and corrosion.Make sure the brake arm, spring and fastenerare in good condition.
20181113114552_32K08D110_eng_BOOK Page 60 Tuesday, November 13 2018 11:49:25 JST
Brakes u Inspecting the Front Brake Lever FreeplayM
aintenance
57
Freeplay

Adjusting the Rear Brake PedalFreeplayMake sure the cut-out on the adjusting nut isseated on the brake arm pin when adjustingthe freeplay.
If proper adjustment cannot be obtained bythis method, see your dealer.
1. Adjust by turning the rear brake adjustingnut a half-turn at a time.
2. Apply the brake several times and checkfor free wheel rotation after the brakepedal is released.
20181113114552_32K08D110_eng_BOOK Page 61 Tuesday, November 13 2018 11:49:25 JST
Brakes u Adjusting the Rear Brake Pedal Freeplay
Maintenance
58
Brake arm pinAdjusting nut
DecreaseFreeplay
IncreaseFreeplay
Brakearm pin
Adjusting nut
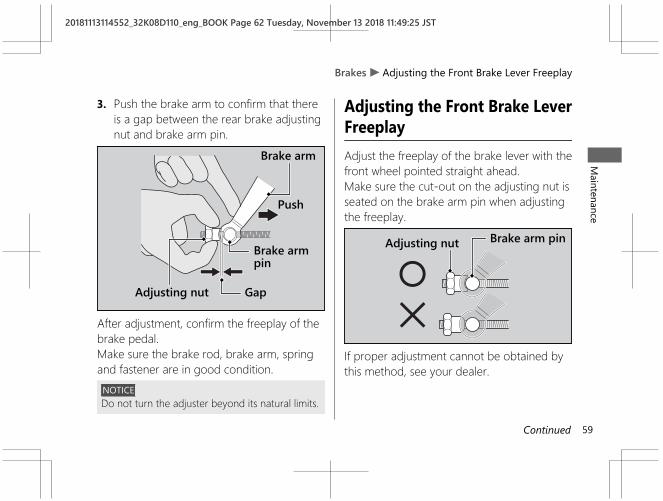
3. Push the brake arm to confirm that thereis a gap between the rear brake adjustingnut and brake arm pin.
After adjustment, confirm the freeplay of thebrake pedal.Make sure the brake rod, brake arm, springand fastener are in good condition.
NOTICEDo not turn the adjuster beyond its natural limits.
Adjusting the Front Brake LeverFreeplayAdjust the freeplay of the brake lever with thefront wheel pointed straight ahead.Make sure the cut-out on the adjusting nut isseated on the brake arm pin when adjustingthe freeplay.
If proper adjustment cannot be obtained bythis method, see your dealer.
20181113114552_32K08D110_eng_BOOK Page 62 Tuesday, November 13 2018 11:49:25 JST
Brakes u Adjusting the Front Brake Lever FreeplayM
aintenance
59Continued
Brake arm
Push
Brake armpin
GapAdjusting nut
Brake arm pinAdjusting nut
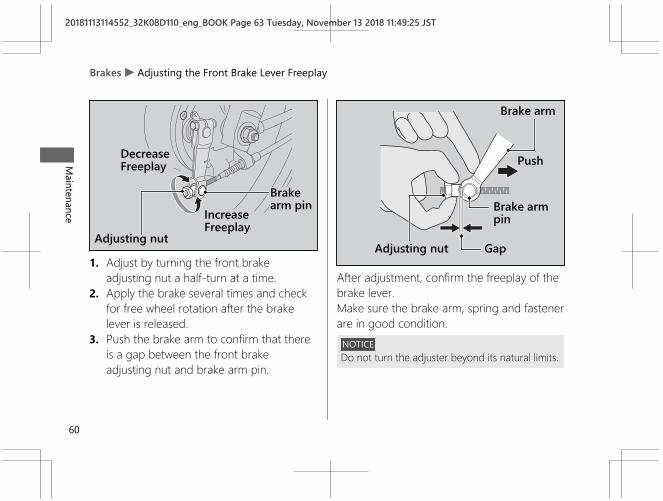
1. Adjust by turning the front brakeadjusting nut a half-turn at a time.
2. Apply the brake several times and checkfor free wheel rotation after the brakelever is released.
3. Push the brake arm to confirm that thereis a gap between the front brakeadjusting nut and brake arm pin.
After adjustment, confirm the freeplay of thebrake lever.Make sure the brake arm, spring and fastenerare in good condition.
NOTICEDo not turn the adjuster beyond its natural limits.
20181113114552_32K08D110_eng_BOOK Page 63 Tuesday, November 13 2018 11:49:25 JST
Brakes u Adjusting the Front Brake Lever Freeplay
Maintenance
60
Adjusting nut
DecreaseFreeplay
IncreaseFreeplay
Brakearm pin
Brake arm
Push
Brake armpin
GapAdjusting nut
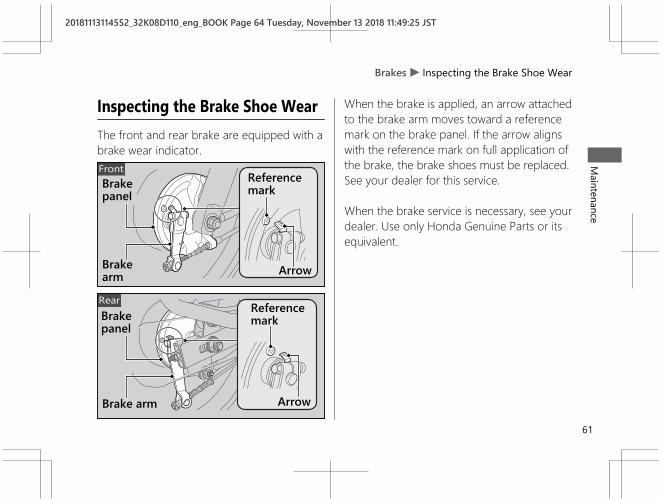
Inspecting the Brake Shoe WearThe front and rear brake are equipped with abrake wear indicator.
When the brake is applied, an arrow attachedto the brake arm moves toward a referencemark on the brake panel. If the arrow alignswith the reference mark on full application ofthe brake, the brake shoes must be replaced.See your dealer for this service.
When the brake service is necessary, see yourdealer. Use only Honda Genuine Parts or itsequivalent.
20181113114552_32K08D110_eng_BOOK Page 64 Tuesday, November 13 2018 11:49:25 JST
Brakes u Inspecting the Brake Shoe WearM
aintenance
61
FrontBrakepanel
Brakearm
Referencemark
Arrow
RearBrakepanel
Brake arm
Referencemark
Arrow

Adjusting the Brakelight SwitchCheck the operation of the brakelight switch.Hold the brakelight switch and turn theadjusting nut in the direction A if the switchoperates too late, or turn the nut in thedirection B if the switch operates too soon.
20181113114552_32K08D110_eng_BOOK Page 65 Tuesday, November 13 2018 11:49:25 JST
Brakes u Adjusting the Brakelight Switch
Maintenance
62
Brakelight switch Adjustingnut
B A
Side Stand
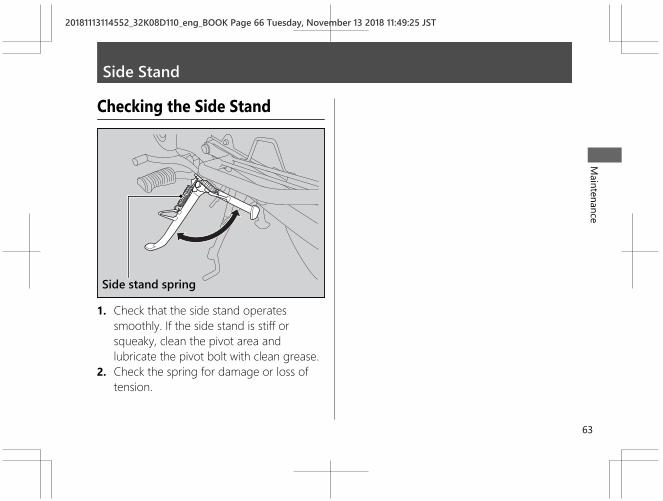
Checking the Side Stand
1. Check that the side stand operatessmoothly. If the side stand is stiff orsqueaky, clean the pivot area andlubricate the pivot bolt with clean grease.
2. Check the spring for damage or loss oftension.
20181113114552_32K08D110_eng_BOOK Page 66 Tuesday, November 13 2018 11:49:25 JST
Maintenance
63
Side stand spring
Drive Chain
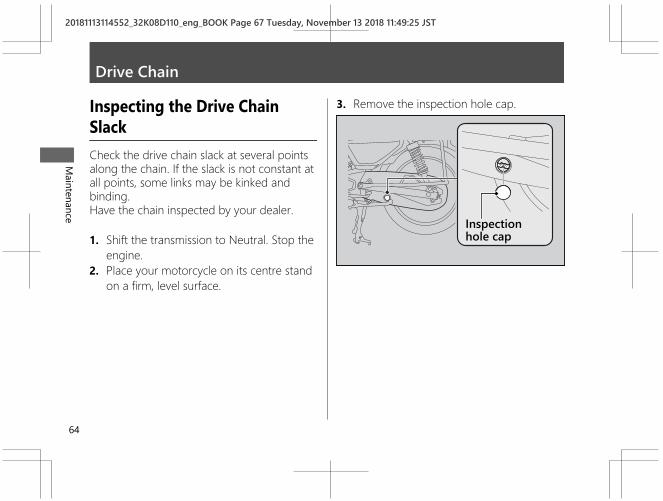
Inspecting the Drive ChainSlackCheck the drive chain slack at several pointsalong the chain. If the slack is not constant atall points, some links may be kinked andbinding.Have the chain inspected by your dealer.
1. Shift the transmission to Neutral. Stop theengine.
2. Place your motorcycle on its centre standon a firm, level surface.
3. Remove the inspection hole cap.
20181113114552_32K08D110_eng_BOOK Page 67 Tuesday, November 13 2018 11:49:25 JST
Maintenance
64
Inspectionhole cap

4. Move the drive chain up and down withyour finger.
Drive chain slack:20 - 30 mm (0.8 - 1.2 in)
u Do not ride your motorcycle if theslack exceeds 50 mm (2.0 in).
5. Rotate the rear wheel and check that thechain moves smoothly.
6. Remove the chain covers by removing thebolts.
7. Inspect the sprockets. 2 P. 408. Clean and lubricate the drive chain.
2 P. 419. Install the parts in the reverse order of
removal.
20181113114552_32K08D110_eng_BOOK Page 68 Tuesday, November 13 2018 11:49:25 JST
Drive Chain u Inspecting the Drive Chain SlackM
aintenance
65
Bolts Chain covers
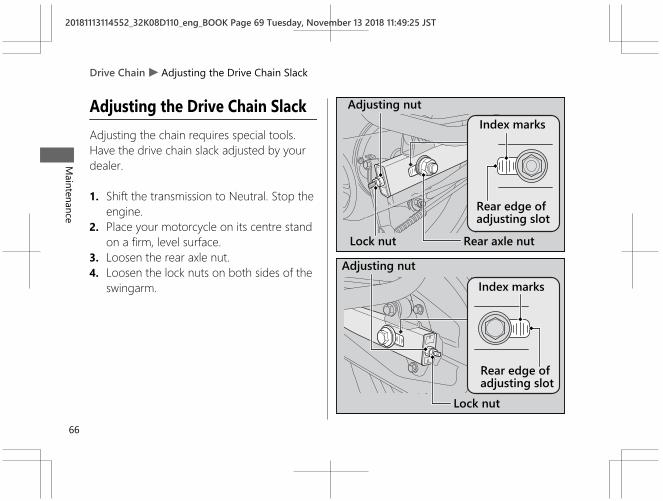
Adjusting the Drive Chain SlackAdjusting the chain requires special tools.Have the drive chain slack adjusted by yourdealer.
1. Shift the transmission to Neutral. Stop theengine.
2. Place your motorcycle on its centre standon a firm, level surface.
3. Loosen the rear axle nut.4. Loosen the lock nuts on both sides of the
swingarm.
20181113114552_32K08D110_eng_BOOK Page 69 Tuesday, November 13 2018 11:49:25 JST
Drive Chain u Adjusting the Drive Chain Slack
Maintenance
66
Rear axle nutLock nut
Adjusting nutIndex marks
Rear edge ofadjusting slot
Index marks
Rear edge ofadjusting slot
Adjusting nut
Lock nut

5. Turn both adjusting nuts an equalnumber of turns until the correct drivechain slack is obtained. Turn the adjustingnuts clockwise to tighten the chain. Turnthe adjusting nuts counterclockwise andpush the rear wheel toward the front toprovide more slack.Adjust the slack at a point midwaybetween the drive sprocket and thedriven sprocket.Check the drive chain slack. 2 P. 64
6. Check rear axle alignment by making surethe chain adjuster index marks align withthe rear edge of the adjusting slots.Both marks should correspond. If the axleis misaligned, turn the right or leftadjusting nut until the marks are alignedand recheck chain slack.
7. Tighten the rear axle nut.
Torque: 59 N·m (6.0 kgf·m, 44 lbf·ft)
8. Tighten the drive chain adjusting nutslightly, then hold the adjusting nuts andtighten the lock nuts.
9. Recheck drive chain slack.10.Rear brake pedal freeplay is affected
when repositioning the rear wheel toadjust drive chain slack. Check rear brakepedal freeplay and adjust as necessary.2 P. 56
If a torque wrench was not used forinstallation, see your dealer as soon aspossible to verify proper assembly.Improper assembly may lead to loss ofbraking capacity.
20181113114552_32K08D110_eng_BOOK Page 70 Tuesday, November 13 2018 11:49:25 JST
Drive Chain u Adjusting the Drive Chain SlackM
aintenance
67Continued
# Checking the Drive Chain WearIf the drive chain slack is excessive when therear axle is moved to the furthest limit ofadjustment, the drive chain is worn and mustbe replaced.
Chain:KMC428DH
If necessary have the drive chain replaced byyour dealer.
20181113114552_32K08D110_eng_BOOK Page 71 Tuesday, November 13 2018 11:49:25 JST
Drive Chain u Adjusting the Drive Chain Slack
Maintenance
68

Clutch
Checking the Clutch# Checking the Clutch Lever FreeplayCheck the clutch lever freeplay.
Freeplay at the clutch lever:10 - 20 mm (0.4 - 0.8 in)
Check the clutch cable for kinks or signs ofwear. If necessary have it replaced by yourdealer.Lubricate the clutch cable with acommercially available cable lubricant toprevent premature wear and corrosion.
NOTICEImproper freeplay adjustment can causepremature clutch wear.
20181113114552_32K08D110_eng_BOOK Page 72 Tuesday, November 13 2018 11:49:25 JST
Maintenance
69
FreeplayClutch lever

Adjusting the Clutch LeverFreeplay1. Loosen the lock nut.2. Turn the adjusting nut until the clutch
lever freeplay is 10 - 20 mm (0.4 - 0.8 in).3. Tighten the lock nut and check the clutch
lever freeplay.4. Start the engine, pull the clutch lever in,
and shift into gear. Make sure the enginedoes not stall and the motorcycle doesnot creep. Gradually release the clutchlever and open the throttle. Yourmotorcycle should move smoothly andaccelerate gradually.
If proper adjustment cannot be obtained orthe clutch does not work correctly, see yourdealer.
20181113114552_32K08D110_eng_BOOK Page 73 Tuesday, November 13 2018 11:49:25 JST
Clutch u Adjusting the Clutch Lever Freeplay
Maintenance
70
Adjusting nut Lock nut
+
–
Throttle
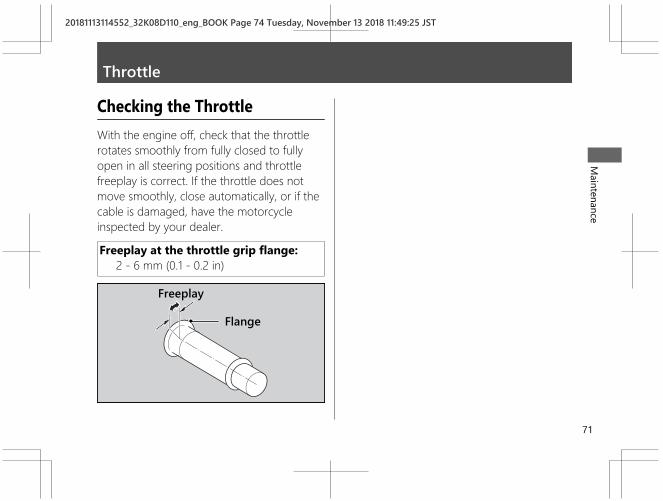
Checking the ThrottleWith the engine off, check that the throttlerotates smoothly from fully closed to fullyopen in all steering positions and throttlefreeplay is correct. If the throttle does notmove smoothly, close automatically, or if thecable is damaged, have the motorcycleinspected by your dealer.
Freeplay at the throttle grip flange:2 - 6 mm (0.1 - 0.2 in)
20181113114552_32K08D110_eng_BOOK Page 74 Tuesday, November 13 2018 11:49:25 JST
Maintenance
71
Freeplay
Flange

Crankcase Breather
Cleaning the CrankcaseBreather1. Place a suitable container under the
crankcase breather tube.2. Remove the crankcase breather tube plug
from the tube.3. Drain deposits into a suitable container.4. Install the crankcase breather tube plug.
20181113114552_32K08D110_eng_BOOK Page 75 Tuesday, November 13 2018 11:49:25 JST
Maintenance
72
Crankcase breathertube plug

Other Adjustments
Adjusting the Headlight AimYou can adjust vertical aim of the headlightfor proper alignment. To move the headlightcase, loosen the bolts.Tighten the bolts after adjustment.Obey local laws and regulations.
20181113114552_32K08D110_eng_BOOK Page 76 Tuesday, November 13 2018 11:49:25 JST
Maintenance
73
Bolts
Raise
Lower
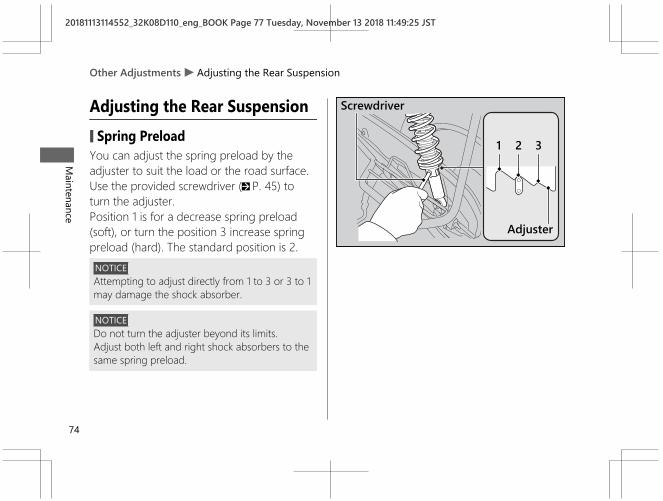
Adjusting the Rear Suspension# Spring PreloadYou can adjust the spring preload by theadjuster to suit the load or the road surface.Use the provided screwdriver (2 P. 45) toturn the adjuster.Position 1 is for a decrease spring preload(soft), or turn the position 3 increase springpreload (hard). The standard position is 2.
NOTICEAttempting to adjust directly from 1 to 3 or 3 to 1may damage the shock absorber.
NOTICEDo not turn the adjuster beyond its limits.Adjust both left and right shock absorbers to thesame spring preload.
20181113114552_32K08D110_eng_BOOK Page 77 Tuesday, November 13 2018 11:49:25 JST
Other Adjustments u Adjusting the Rear Suspension
Maintenance
74
Adjuster
Screwdriver
1 2 3

Engine Will Not Start........................................P. 76Tyre Puncture .....................................................P. 77Electrical Trouble ...............................................P. 82
Battery Goes Dead .............................................. P. 82Burned-out Light Bulb........................................ P. 82Blown Fuse ............................................................ P. 85
20181113114552_32K08D110_eng_BOOK Page 78 Tuesday, November 13 2018 11:49:25 JST
Troubleshooting
Engine Will Not Start
Starter Motor Operates ButEngine Does Not StartII KE typeCheck the following items:● Check the correct engine starting
sequence. 2 P. 22● Check that there is petrol in the fuel tank.
Starter Motor Does NotOperateII KE typeCheck the following items:● Check the correct engine starting
sequence. 2 P. 22● Check for a blown fuse. 2 P. 85● Check for a loose battery connection
(2 P. 46) or battery terminal corrosion(2 P. 35).
● Check the condition of the battery.2 P. 82
If the problem continues, have yourmotorcycle inspected by your dealer.
20181113114552_32K08D110_eng_BOOK Page 79 Tuesday, November 13 2018 11:49:25 JST
Troubleshooting
76

Tyre PunctureRepairing a puncture or removing a wheelrequires special tools and technical expertise.We recommend you have this type of serviceperformed by your dealer.After an emergency repair, always have thetyre inspected/replaced by your dealer.
Tube Repair and ReplacementIf a tube is punctured or damaged, youshould replace it as soon as possible. A tubethat is repaired may not have the samereliability as a new one, and it may fail whileyou are riding.If you need to make a temporary repair bypatching a tube or using an aerosol sealant,ride cautiously at reduced speed and havethe tube replaced before you ride again.Anytime a tube is replaced, the tyre shouldbe carefully inspected as described.
3WARNINGRiding your motorcycle with atemporary tyre or tube repair can berisky. If the temporary repair fails, youcan crash and be seriously injured orkilled.
If you must ride with a temporary tyreor tube repair, ride slowly and carefullyand do not exceed 50 km/h (30 mph)until the tyre or tube is replaced.
Removing WheelsFollow these procedures if you need toremove a wheel in order to repair apuncture.
20181113114552_32K08D110_eng_BOOK Page 80 Tuesday, November 13 2018 11:49:25 JST
Troubleshooting
77Continued

# Front WheelRemoval1. Place your motorcycle on its centre stand
on a firm, level surface.2. Raise the front wheel off the ground by
placing a support block under the engine.3. Remove the speedometer cable by
removing the screw.
4. Remove the front brake adjusting nut andremove the front brake cable from thebrake arm.
5. Remove the front axle nut.
6. Remove the front axle shaft, side collarand front wheel.
20181113114552_32K08D110_eng_BOOK Page 81 Tuesday, November 13 2018 11:49:25 JST
Tyre Puncture u Removing Wheels
Troubleshooting
78
Speedometercable
Front brake cable
Brake arm
ScrewFront brakeadjusting nut
Front axle nut
Front axle shaft Side collar
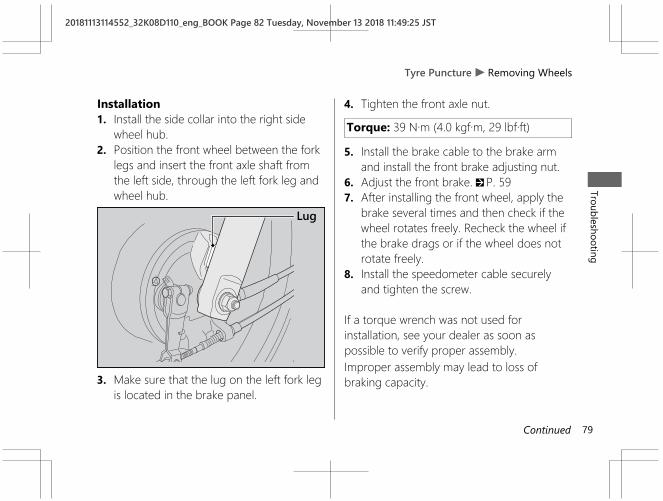
Installation1. Install the side collar into the right side
wheel hub.2. Position the front wheel between the fork
legs and insert the front axle shaft fromthe left side, through the left fork leg andwheel hub.
3. Make sure that the lug on the left fork legis located in the brake panel.
4. Tighten the front axle nut.
Torque: 39 N·m (4.0 kgf·m, 29 lbf·ft)
5. Install the brake cable to the brake armand install the front brake adjusting nut.
6. Adjust the front brake. 2 P. 597. After installing the front wheel, apply the
brake several times and then check if thewheel rotates freely. Recheck the wheel ifthe brake drags or if the wheel does notrotate freely.
8. Install the speedometer cable securelyand tighten the screw.
If a torque wrench was not used forinstallation, see your dealer as soon aspossible to verify proper assembly.Improper assembly may lead to loss ofbraking capacity.
20181113114552_32K08D110_eng_BOOK Page 82 Tuesday, November 13 2018 11:49:25 JST
Tyre Puncture u Removing WheelsTroubleshooting
79Continued
Lug

# Rear WheelRemoval1. Support your motorcycle securely and
raise the rear wheel off the ground usingthe centre stand or a hoist.
2. Remove the chain covers. 2 P. 653. Remove the rear brake adjusting nut.4. Disconnect the brake rod from the brake
arm.5. Disconnect the brake stopper arm from
the brake panel by removing the cotterpin, stopper arm nut, washer and rubbergrommet.
20181113114552_32K08D110_eng_BOOK Page 83 Tuesday, November 13 2018 11:49:25 JST
Tyre Puncture u Removing Wheels
Troubleshooting
80
Drive chain adjusting nut
Brakestopper arm
Lock nut
Brake arm
Rear brakeadjusting nut Stopper arm nut
Cotter pin
Brake rod
Rear axlenut/washer
Side collar

6. Loosen the lock nuts and drive chainadjusting nuts.
7. Remove the rear axle nut and washer.8. Remove the drive chain from the driven
sprocket by pushing the rear wheelforward.
9. Remove the rear axle shaft, washer, sidecollars and rear wheel from the swingarm.
Installation1. To install the rear wheel, reverse the
removal procedure.2. Adjust the drive chain. 2 P. 663. Install the chain cover.4. Tighten the rear axle nut.Torque: 59 N·m (6.0 kgf·m, 44 lbf·ft)
5. Adjust the rear brake. 2 P. 586. After installing the wheel, apply the brake
pedal several times, then check if thewheel rotates freely. Recheck the wheel ifthe brake drags or if the wheel does notrotate freely.
If a torque wrench was not used forinstallation, see your dealer as soon aspossible to verify proper assembly.Improper assembly may lead to loss ofbraking capacity.A used cotter pin may not effectively secure afastener. Always replace a used cotter pinwith a new one.
20181113114552_32K08D110_eng_BOOK Page 84 Tuesday, November 13 2018 11:49:25 JST
Tyre Puncture u Removing WheelsTroubleshooting
81
Washer
Drive chain
Rear axleshaft
Lock nut
Drivechainadjustingnut
Side collar

Electrical Trouble
Battery Goes DeadCharge the battery using a motorcyclebattery charger.Remove the battery from the motorcyclebefore charging.Do not use an automobile-type batterycharger, as these can overheat a motorcyclebattery and cause permanent damage. If thebattery does not recover after recharging,contact your dealer.
NOTICEJump starting using an automobile battery candamage your motorcycle's electrical system andis not recommended.
Burned-out Light BulbFollow the procedure below to replace aburned-out light bulb.Turn the ignition switch to the (Off) or (Lock) position.Allow the bulb to cool before replacing it.Do not use bulbs other than those specified.Check the replacement bulb for correctoperation before riding.
For the light bulb wattage, see“Specifications.” 2 P. 99
20181113114552_32K08D110_eng_BOOK Page 85 Tuesday, November 13 2018 11:49:25 JST
Troubleshooting
82

# Headlight Bulb
1. Remove the screws from the headlightcase.
2. Gently pull the lower end of the headlightforward and remove the headlight.
3. Remove the seat rubber.4. Turn the socket counterclockwise and
remove it from the headlight.
5. Slightly press the bulb in and turn itcounterclockwise.
6. Install a new bulb and parts in the reverseorder of removal.
Do not touch the glass surface with yourfingers. If you touch the bulb with your barehands, clean it with a cloth moistened withalcohol.
20181113114552_32K08D110_eng_BOOK Page 86 Tuesday, November 13 2018 11:49:25 JST
Electrical Trouble u Burned-out Light BulbTroubleshooting
83Continued
Headlight
Screw
Screw
Seat rubber
Socket
Bulb
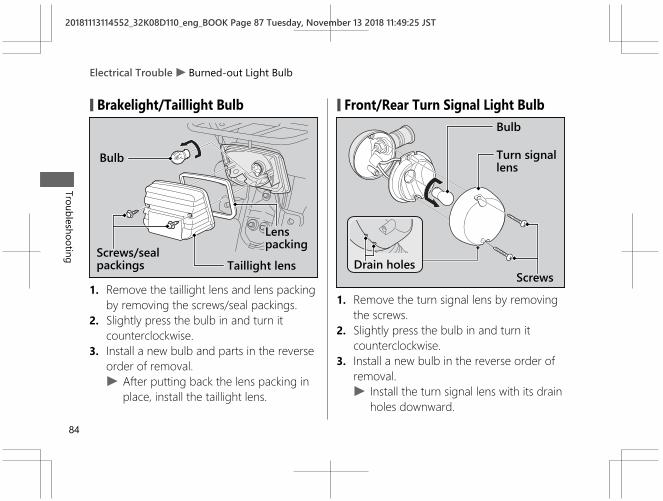
# Brakelight/Taillight Bulb
1. Remove the taillight lens and lens packingby removing the screws/seal packings.
2. Slightly press the bulb in and turn itcounterclockwise.
3. Install a new bulb and parts in the reverseorder of removal.u After putting back the lens packing in
place, install the taillight lens.
# Front/Rear Turn Signal Light Bulb
1. Remove the turn signal lens by removingthe screws.
2. Slightly press the bulb in and turn itcounterclockwise.
3. Install a new bulb in the reverse order ofremoval.u Install the turn signal lens with its drain
holes downward.
20181113114552_32K08D110_eng_BOOK Page 87 Tuesday, November 13 2018 11:49:25 JST
Electrical Trouble u Burned-out Light Bulb
Troubleshooting
84
Screws/sealpackings
Bulb
Taillight lens
Lenspacking
Turn signallens
ScrewsDrain holes
Bulb
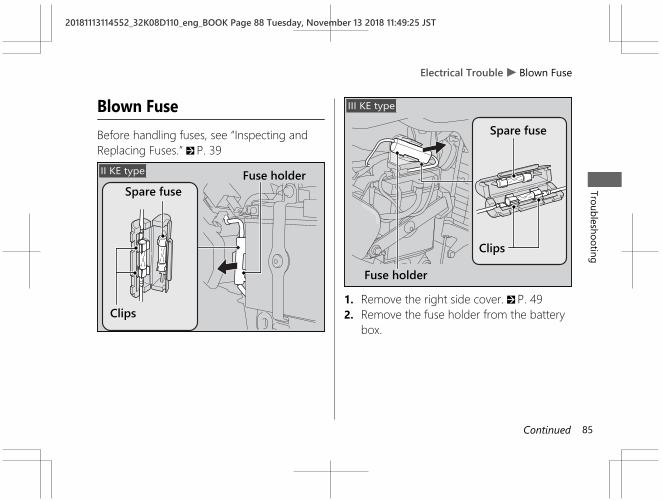
Blown FuseBefore handling fuses, see “Inspecting andReplacing Fuses.” 2 P. 39
1. Remove the right side cover. 2 P. 492. Remove the fuse holder from the battery
box.
20181113114552_32K08D110_eng_BOOK Page 88 Tuesday, November 13 2018 11:49:25 JST
Electrical Trouble u Blown FuseTroubleshooting
85Continued
Fuse holderSpare fuse
Clips
II KE type
Spare fuse
Clips
III KE type
Fuse holder
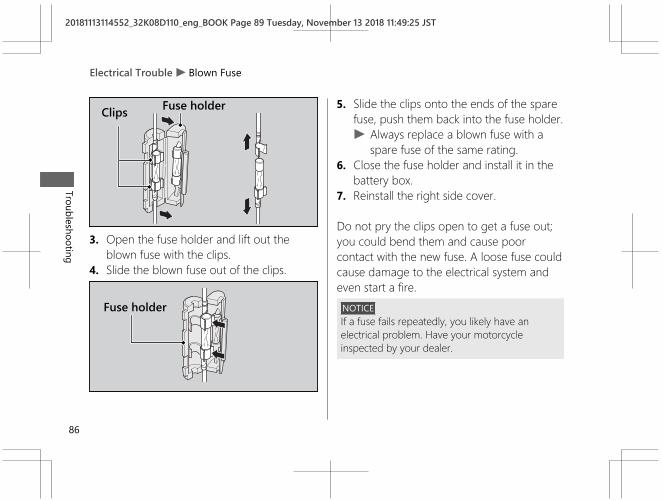
3. Open the fuse holder and lift out theblown fuse with the clips.
4. Slide the blown fuse out of the clips.
5. Slide the clips onto the ends of the sparefuse, push them back into the fuse holder.u Always replace a blown fuse with a
spare fuse of the same rating.6. Close the fuse holder and install it in the
battery box.7. Reinstall the right side cover.
Do not pry the clips open to get a fuse out;you could bend them and cause poorcontact with the new fuse. A loose fuse couldcause damage to the electrical system andeven start a fire.
NOTICEIf a fuse fails repeatedly, you likely have anelectrical problem. Have your motorcycleinspected by your dealer.
20181113114552_32K08D110_eng_BOOK Page 89 Tuesday, November 13 2018 11:49:25 JST
Electrical Trouble u Blown Fuse
Troubleshooting
86
Fuse holderClips
Fuse holder

Keys.......................................................................P. 88Instruments, Controls, & Other Features.....P. 89Caring for Your Motorcycle ............................P. 90Storing Your Motorcycle .................................P. 93Transporting Your Motorcycle.......................P. 94You & the Environment....................................P. 95Serial Numbers...................................................P. 96Fuels Containing Alcohol.................................P. 97
20181113114552_32K08D110_eng_BOOK Page 90 Tuesday, November 13 2018 11:49:25 JST
Information
KeysIgnition Key
Be sure to record the key number provided withthe key number plate. Store the spare key andkey number in a safe location.To make a duplicate, take the spare key or thekey number to your dealer.If you lose all ignition keys and the key number,the ignition switch assembly will probably haveto be removed by your dealer to determine thekey number.
A metal key holder may cause damage to thearea surrounding the ignition switch.
20181113114552_32K08D110_eng_BOOK Page 91 Tuesday, November 13 2018 11:49:25 JST
Keys
Information
88
Instruments, Controls, &Other FeaturesIgnition Switch
Leaving the ignition switch in the (On)position with the engine stopped will drain thebattery.
Do not turn the key while riding.
OdometerThe odometer returns to 0 when the read-outexceeds 99,999.9.
Document BagThe owner's manual, registration, and insuranceinformation can be stored in the plasticdocument bag in the compartment box behindthe right side cover.
20181113114552_32K08D110_eng_BOOK Page 92 Tuesday, November 13 2018 11:49:25 JST
Instruments, Controls, & Other FeaturesInform
ation
89
Caring for Your MotorcycleFrequent cleaning and polishing is important toensure the life of your Honda. A cleanmotorcycle makes it easier to spot potentialproblems.In particular, seawater and salts used to preventice on roads promote the formation ofcorrosion. Always wash your motorcyclethoroughly after riding on coastal or treatedroads.
WashingAllow the engine, muffler, brakes, and otherhigh-temperature parts to cool before washing.1. Rinse your motorcycle thoroughly using a
low pressure garden hose to remove loosedirt.
2. If necessary, use a sponge or a soft towelwith mild cleaner to remove road grime.u Clean the headlight lens, panels, and
other plastic components with extra careto avoid scratching them.
Avoid directing water into the air cleaner,muffler, and electrical parts.
3. Thoroughly rinse your motorcycle withplenty of clean water and dry with a soft,clean cloth.
4. After the motorcycle dries, lubricate anymoving parts.u Make sure that no lubricant spills onto
the brakes or tyres. Brake discs, pads,drum or shoes contaminated with oil willsuffer greatly reduced brakingeffectiveness and can lead to a crash.
5. Lubricate the drive chain immediately afterwashing and drying the motorcycle.
6. Apply a coat of wax to prevent corrosion.u Avoid products that contain harsh
detergents or chemical solvents. Thesecan damage the metal, paint, and plasticon your motorcycle.Keep the wax clear of the tyres andbrakes.
20181113114552_32K08D110_eng_BOOK Page 93 Tuesday, November 13 2018 11:49:25 JST
Caring for Your Motorcycle
Information
90
u If your motorcycle has any mat paintedparts, do not apply a coat of wax to themat painted surface.
# Washing PrecautionsFollow these guidelines when washing:● Do not use high-pressure washers:
u High-pressure water cleaners candamage moving parts and electricalparts, rendering them inoperable.
u Water in the air intake can be drawn intothe carburetor and/or enter the aircleaner.
● Do not direct water at the muffler:u Water in the muffler can prevent starting
and causes rust in the muffler.● Dry the brakes:
u Water adversely affects brakingeffectiveness. After washing, apply thebrakes intermittently at low speed tohelp dry them.
● Do not direct water at the compartmentbox:u Water in the compartment box can
damage your documents and otherbelongings.
● Do not direct water at the air cleaner:u Water in the air cleaner can prevent the
engine from starting.● Do not direct water near the headlight:
u The headlight's inside lens may fogtemporarily after washing or while ridingin the rain. This does not impact theheadlight function.
u Any condensation inside the headlightshould dissipate after a few minutes ofrunning the engine with the headlight(s)on.However, if you see a large amount ofwater or ice accumulated inside thelens(es), have your vehicle inspected byyour dealer.
20181113114552_32K08D110_eng_BOOK Page 94 Tuesday, November 13 2018 11:49:25 JST
Caring for Your MotorcycleInform
ation
91Continued
● Do not use wax or polishing compounds onmat painted surface:u Use a soft cloth or sponge, plenty of
water, and a mild detergent to clean matpainted surfaces. Dry with a soft cleancloth.
Aluminium ComponentsAluminium will corrode from contact with dirt,mud, or road salt. Clean aluminium partsregularly and follow these guidelines to avoidscratches:● Do not use stiff brushes, steel wool, or
cleaners containing abrasives.● Avoid riding over or scraping against curbs.
PanelsFollow these guidelines to prevent scratchesand blemishes:● Wash gently using a soft sponge and plenty
of water.● To remove stubborn stains, use diluted
detergent and rinse thoroughly with plentyof water.
● Avoid getting petrol or detergents on theinstruments, panels, or headlight.
Exhaust Pipe and MufflerWhen the exhaust pipe and muffler are painted,do not use a commercially available abrasivekitchen cleaning compound. Use a neutraldetergent to clean the painted surface on theexhaust pipe and muffler. If you are not sure ifyour exhaust pipe and muffler are painted,contact your dealer.
20181113114552_32K08D110_eng_BOOK Page 95 Tuesday, November 13 2018 11:49:25 JST
Caring for Your Motorcycle
Information
92

Storing Your MotorcycleIf you store your motorcycle outdoors, youshould consider using a full-body motorcyclecover.If you won't be riding for an extended period,follow these guidelines:● Wash your motorcycle and wax all painted
surfaces (except mat painted surfaces). Coatchrome pieces with rust-inhibiting oil.
● Lubricate the drive chain. 2 P. 40● Place your motorcycle on its centre stand
and position a block so that both tyres areoff the ground.
● After rain, remove the body cover and allowthe motorcycle to dry.
● Remove the battery (2 P. 46) to preventdischarge. Fully charge the battery and thenplace it in a shaded, well-ventilated area.u If you leave the battery in place,
disconnect the negative - terminal toprevent discharge.
After removing your motorcycle from storage,inspect all maintenance items required by theMaintenance Schedule.
20181113114552_32K08D110_eng_BOOK Page 96 Tuesday, November 13 2018 11:49:25 JST
Storing Your MotorcycleInform
ation
93

Transporting YourMotorcycleIf your motorcycle needs to be transported, itshould be carried on a motorcycle trailer or aflatbed truck or trailer that has a loading rampor lifting platform, and motorcycle tie-downstraps. Never try to tow your motorcycle with awheel or wheels on the ground.
NOTICETowing your motorcycle can cause seriousdamage to the transmission.
20181113114552_32K08D110_eng_BOOK Page 97 Tuesday, November 13 2018 11:49:25 JST
Transporting Your Motorcycle
Information
94
You & the EnvironmentOwning and riding a motorcycle can beenjoyable, but you must do your part to protectthe environment.
Choose Sensible CleanersUse a biodegradable detergent when you washyour motorcycle. Avoid aerosol spray cleanersthat contain chlorofluorocarbons (CFCs) whichdamage the atmosphere's protective ozonelayer.
Recycle WastesPut oil and other toxic wastes in approvedcontainers and take them to a recycling centre.Call your local or state office of public works orenvironmental services to find a recycling centrein your area, and to get instructions on how todispose of non-recyclable wastes. Do not placeused engine oil in the trash, or pour it down adrain or on the ground. Used oil, petrol, andcleaning solvents contain poisons that can hurtrefuse workers and contaminate drinking water,lakes, rivers, and oceans.
20181113114552_32K08D110_eng_BOOK Page 98 Tuesday, November 13 2018 11:49:25 JST
You & the EnvironmentInform
ation
95
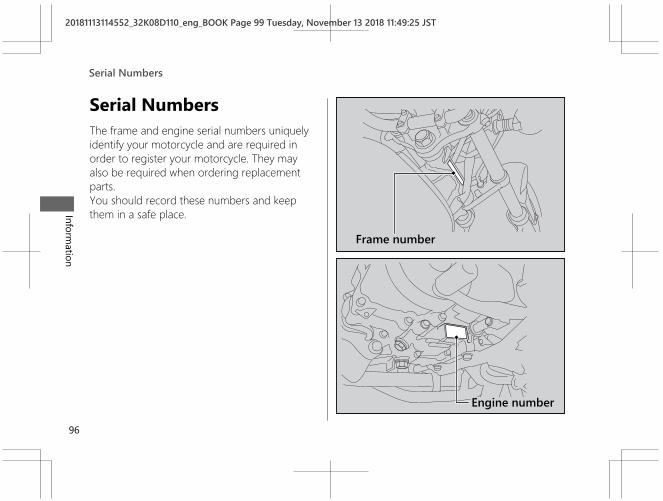
Serial NumbersThe frame and engine serial numbers uniquelyidentify your motorcycle and are required inorder to register your motorcycle. They mayalso be required when ordering replacementparts.You should record these numbers and keepthem in a safe place.
20181113114552_32K08D110_eng_BOOK Page 99 Tuesday, November 13 2018 11:49:25 JST
Serial Numbers
Information
96
Frame number
Engine number
Fuels Containing AlcoholSome conventional fuels blended with alcoholare available in some locales to help reduceemissions to meet clean air standards. If youplan to use blended fuel, check that it isunleaded and meets the minimum octanerating requirement.
The following fuel blends can be used in yourmotorcycle:● Ethanol (ethyl alcohol) up to 10% by volume.
u Petrol containing ethanol may bemarketed under the name Gasohol.
The use of petrol containing more than 10%ethanol may:● Damage the painting of the fuel tank.● Damage the rubber tubes of the fuel line.● Cause corrosion of the fuel tank.● Cause poor drivability.NOTICEUse of blended fuels containing higher thanapproved percentages can damage metal,rubber, plastic parts of your fuel system.
If you notice any undesirable operatingsymptoms or performance problems, try adifferent brand of petrol.
20181113114552_32K08D110_eng_BOOK Page 100 Tuesday, November 13 2018 11:49:25 JST
Fuels Containing AlcoholInform
ation
97
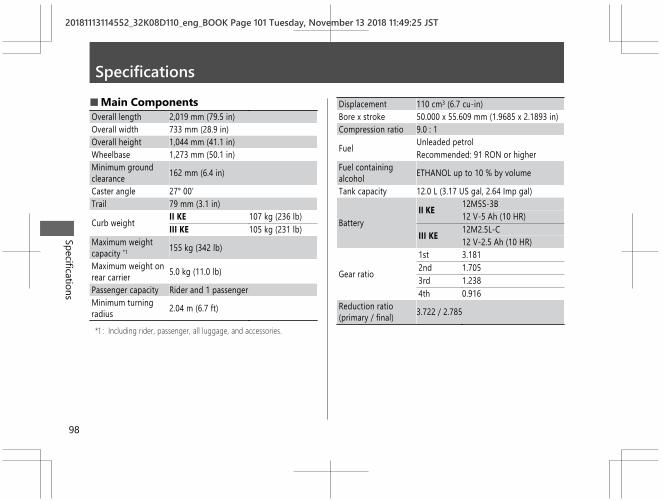
Specifications■ Main ComponentsOverall length 2,019 mm (79.5 in)Overall width 733 mm (28.9 in)Overall height 1,044 mm (41.1 in)Wheelbase 1,273 mm (50.1 in)Minimum groundclearance 162 mm (6.4 in)
Caster angle 27° 00’Trail 79 mm (3.1 in)
Curb weight II KE 107 kg (236 lb)III KE 105 kg (231 lb)
Maximum weightcapacity *1 155 kg (342 lb)
Maximum weight onrear carrier 5.0 kg (11.0 lb)
Passenger capacity Rider and 1 passengerMinimum turningradius 2.04 m (6.7 ft)
*1 : Including rider, passenger, all luggage, and accessories.
Displacement 110 cm3 (6.7 cu-in)Bore x stroke 50.000 x 55.609 mm (1.9685 x 2.1893 in)Compression ratio 9.0 : 1
Fuel Unleaded petrolRecommended: 91 RON or higher
Fuel containingalcohol ETHANOL up to 10 % by volume
Tank capacity 12.0 L (3.17 US gal, 2.64 Imp gal)
BatteryII KE 12M5S-3B
12 V-5 Ah (10 HR)
III KE 12M2.5L-C12 V-2.5 Ah (10 HR)
Gear ratio
1st 3.1812nd 1.7053rd 1.2384th 0.916
Reduction ratio(primary / final) 3.722 / 2.785
20181113114552_32K08D110_eng_BOOK Page 101 Tuesday, November 13 2018 11:49:25 JST
Specifications
98
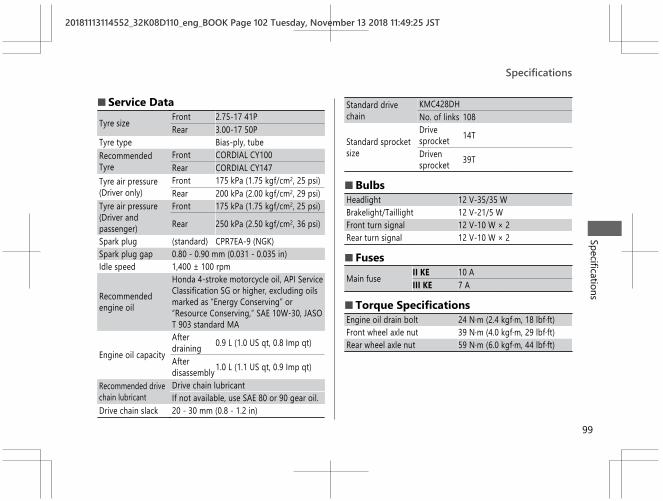
■ Service DataTyre size Front 2.75-17 41P
Rear 3.00-17 50PTyre type Bias-ply, tubeRecommendedTyre
Front CORDIAL CY100Rear CORDIAL CY147
Tyre air pressure(Driver only)
Front 175 kPa (1.75 kgf/cm2, 25 psi)Rear 200 kPa (2.00 kgf/cm2, 29 psi)
Tyre air pressure(Driver andpassenger)
Front 175 kPa (1.75 kgf/cm2, 25 psi)Rear 250 kPa (2.50 kgf/cm2, 36 psi)
Spark plug (standard) CPR7EA-9 (NGK)Spark plug gap 0.80 - 0.90 mm (0.031 - 0.035 in)Idle speed 1,400 ± 100 rpm
Recommendedengine oil
Honda 4-stroke motorcycle oil, API ServiceClassification SG or higher, excluding oilsmarked as “Energy Conserving” or“Resource Conserving,” SAE 10W-30, JASOT 903 standard MA
Engine oil capacityAfterdraining 0.9 L (1.0 US qt, 0.8 Imp qt)
Afterdisassembly1.0 L (1.1 US qt, 0.9 Imp qt)
Recommended drivechain lubricant
Drive chain lubricantIf not available, use SAE 80 or 90 gear oil.
Drive chain slack 20 - 30 mm (0.8 - 1.2 in)
Standard drivechain
KMC428DHNo. of links 108
Standard sprocketsize
Drivesprocket 14T
Drivensprocket 39T
■ BulbsHeadlight 12 V-35/35 WBrakelight/Taillight 12 V-21/5 WFront turn signal 12 V-10 W × 2Rear turn signal 12 V-10 W × 2
■ FusesMain fuse II KE 10 A
III KE 7 A
■ Torque SpecificationsEngine oil drain bolt 24 N·m (2.4 kgf·m, 18 lbf·ft)Front wheel axle nut 39 N·m (4.0 kgf·m, 29 lbf·ft)Rear wheel axle nut 59 N·m (6.0 kgf·m, 44 lbf·ft)
20181113114552_32K08D110_eng_BOOK Page 102 Tuesday, November 13 2018 11:49:25 JST
SpecificationsSpecifications
99

IndexAAccessories ........................................................ 10Air Cleaner......................................................... 55
BBattery.......................................................... 35, 46Brakelight Switch............................................. 62Brakelight/Taillight ......................................... 84Brakes
Freeplay ......................................................... 56, 57Shoe Wear ........................................................... 61
Braking ................................................................. 7Bulb
Brakelight/Taillight ............................................. 84Front/Rear Turn Signal Light ........................... 84Headlight.............................................................. 83
CCaring for Your Motorcycle .......................... 90Choke Lever ...................................................... 22Clutch
Freeplay ......................................................... 69, 70Clutch System................................................... 69Compartment
Owner's Manual .......................................... 27, 89Tool Kit.................................................................. 27
Crankcase Breather ................................... 42, 72Crash ..................................................................... 4
DDocument Bag ........................................... 27, 89Drive Chain.................................................. 40, 64
EElectrical Trouble ............................................. 82Engine
Number ................................................................ 96Oil............................................................. 39, 52, 99Starting ................................................................. 22Will Not Start....................................................... 76
Environment...................................................... 95Equipment
Owner’s Manual .......................................... 27, 89Tool Kit.................................................................. 27
FFlooded Engine ................................................ 22Frame Number ................................................. 96
20181113114552_32K08D110_eng_BOOK Page 103 Tuesday, November 13 2018 11:49:25 JST
Index
100

FuelRecommended ................................................... 25Tank Capacity............................................... 25, 98Valve...................................................................... 21
Fuels Containing Alcohol............................... 97Fuses............................................................. 38, 85
GGasohol .............................................................. 97
HHeadlight ........................................................... 83Headlight Aim .................................................. 73Headlight Dimmer Switch ............................. 18Headlight Switch.............................................. 18High Beam Indicator....................................... 17Horn Button ...................................................... 18
IIgnition Key....................................................... 88Ignition Switch..................................... 19, 22, 89Indicators........................................................... 17Instruments ....................................................... 16Instruments, Controls, &Other Features ... 89
KKeys..................................................................... 88Kickstarter.......................................................... 23
LLoad Limits.................................................. 11, 98Loading Guidelines.......................................... 11
MMaintenance
Fundamentals ..................................................... 33Importance .......................................................... 29Safety .................................................................... 29Schedule............................................................... 30
Maximum Weight Limit ........................... 11, 98Modifications.................................................... 10
NNeutral Indicator ............................................. 17
OOdometer .................................................... 16, 89Oil
Engine ..................................................... 39, 52, 99
20181113114552_32K08D110_eng_BOOK Page 104 Tuesday, November 13 2018 11:49:25 JST
Index
101
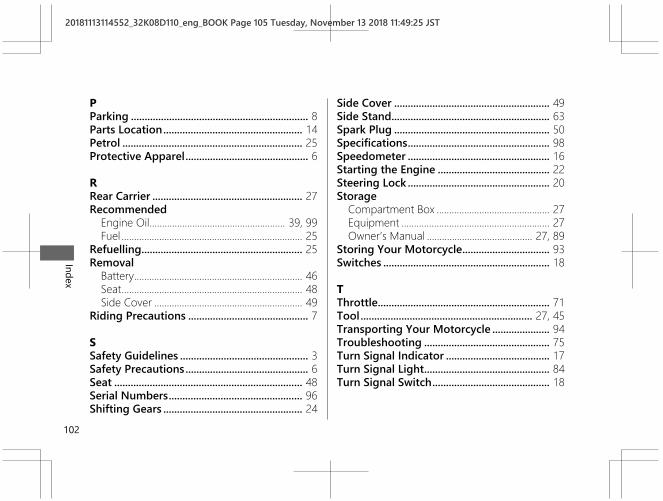
PParking ................................................................. 8Parts Location................................................... 14Petrol .................................................................. 25Protective Apparel............................................. 6
RRear Carrier ....................................................... 27Recommended
Engine Oil...................................................... 39, 99Fuel ........................................................................ 25
Refuelling........................................................... 25Removal
Battery................................................................... 46Seat........................................................................ 48Side Cover ........................................................... 49
Riding Precautions ............................................ 7
SSafety Guidelines ............................................... 3Safety Precautions............................................. 6Seat ..................................................................... 48Serial Numbers................................................. 96Shifting Gears ................................................... 24
Side Cover ......................................................... 49Side Stand.......................................................... 63Spark Plug ......................................................... 50Specifications.................................................... 98Speedometer .................................................... 16Starting the Engine ......................................... 22Steering Lock .................................................... 20Storage
Compartment Box ............................................. 27Equipment ........................................................... 27Owner’s Manual .......................................... 27, 89
Storing Your Motorcycle................................ 93Switches ............................................................. 18
TThrottle............................................................... 71Tool............................................................... 27, 45Transporting Your Motorcycle ..................... 94Troubleshooting .............................................. 75Turn Signal Indicator ...................................... 17Turn Signal Light.............................................. 84Turn Signal Switch........................................... 18
20181113114552_32K08D110_eng_BOOK Page 105 Tuesday, November 13 2018 11:49:25 JST
Index
102
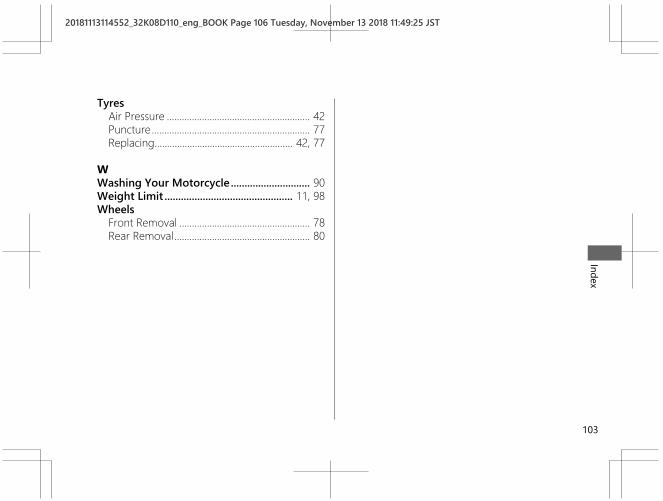
TyresAir Pressure ......................................................... 42Puncture............................................................... 77Replacing....................................................... 42, 77
WWashing Your Motorcycle ............................. 90Weight Limit ............................................... 11, 98Wheels
Front Removal .................................................... 78Rear Removal...................................................... 80
20181113114552_32K08D110_eng_BOOK Page 106 Tuesday, November 13 2018 11:49:25 JST
Index
103

20181113114552_32K08D110_eng_BOOK Page 107 Tuesday, November 13 2018 11:49:25 JST