Third Party System Management Integration Solution - Oracle ...
81
Third Party System Management Integration Solution Sun Deployment Pack 1.0 for Microsoft System Center Configuration Manager 2007 Supported servers: Sun Fire x64 Servers Sun Blade x64 Server Modules A complete list of currently supported Sun servers, service processors, and service processor firmware is available at the following web site: http://www.sun.com/system-management/tools.jsp Please consult this web site before configuring the Sun Deployment Pack 1.0 for Microsoft System Center Configuration Manager 2007. Sun Microsystems, Inc. www.sun.com Part No. 821-0020-10 June 2009, Revision A
-
Upload
khangminh22 -
Category
Documents
-
view
3 -
download
0
Transcript of Third Party System Management Integration Solution - Oracle ...

Third Party System ManagementIntegration Solution
Sun Deployment Pack 1.0 for Microsoft System CenterConfiguration Manager 2007
Supported servers:
Sun Fire x64 Servers
Sun Blade x64 Server Modules
A complete list of currently supported Sun servers, service processors, and service processor firmware is available at the following web site:
http://www.sun.com/system-management/tools.jsp
Please consult this web site before configuring the Sun Deployment Pack 1.0for Microsoft System Center Configuration Manager 2007.
Sun Microsystems, Inc.
www.sun.com
Part No. 821-0020-10
June 2009, Revision A

Copyright 2009 Sun Microsystems, Inc., 4150 Network Circle, Santa Clara, California 95054, U.S.A. All rights reserved.
Sun Microsystems, Inc. has intellectual property rights relating to technology that is described in this document. In particular, and without limitation, these intellectual property rights may include one or more of the U.S. patents listed at http://www.sun.com/patents and one or more additional patents or pending patent applications in the U.S. and in other countries.
This document and the product to which it pertains are distributed under licenses restricting their use, copying, distribution, and decompilation. No part of the product or of this document may be reproduced in any form by any means without prior written authorization of Sun and its licensors, if any. Third-party software, including font technology, is copyrighted and licensed from Sun suppliers.
Parts of the product may be derived from Berkeley BSD systems, licensed from the University of California. UNIX is a registered trademark in the U.S. and in other countries, exclusively licensed through X/Open Company, Ltd.
Sun, Sun Microsystems, the Sun logo, Sun Blade, and Solaris are trademarks or registered trademarks of Sun Microsystems, Inc., or its subsidiaries, in the U.S. and in other countries.
U.S. Government Rights—Commercial use. Government users are subject to the Sun Microsystems, Inc. standard license agreement and applicable provisions of the FAR and its supplements.
DOCUMENTATION IS PROVIDED "AS IS" AND ALL EXPRESS OR IMPLIED CONDITIONS, REPRESENTATIONS AND WARRANTIES, INCLUDING ANY IMPLIED WARRANTY OF MERCHANTABILITY, FITNESS FOR A PARTICULAR PURPOSE OR NON-INFRINGEMENT, ARE DISCLAIMED, EXCEPT TO THE EXTENT THAT SUCH DISCLAIMERS ARE HELD TO BE LEGALLY INVALID.
Copyright 2009 Sun Microsystems, Inc., 4150 Network Circle, Santa Clara, California 95054, États-Unis. Tous droits réservés.
Sun Microsystems, Inc. possède les droits de propriété intellectuels relatifs à la technologie décrite dans ce document. En particulier, et sans limitation, ces droits de propriété intellectuels peuvent inclure un ou plusieurs des brevets américains listés sur le site http://www.sun.com/patents, un ou les plusieurs brevets supplémentaires ainsi que les demandes de brevet en attente aux les États-Unis et dans d’autres pays.
Ce document et le produit auquel il se rapporte sont protégés par un copyright et distribués sous licences, celles-ci en restreignent l’utilisation, la copie, la distribution, et la décompilation. Aucune partie de ce produit ou document ne peut être reproduite sous aucune forme, par quelque moyen que ce soit, sans l’autorisation préalable et écrite de Sun et de ses bailleurs de licence, s’il y en a.
Tout logiciel tiers, sa technologie relative aux polices de caractères, comprise, est protégé par un copyright et licencié par des fournisseurs de Sun.
Des parties de ce produit peuvent dériver des systèmes Berkeley BSD licenciés par l’Université de Californie. UNIX est une marque déposée aux États-Unis et dans d’autres pays, licenciée exclusivement par X/Open Company, Ltd.
Sun, Sun Microsystems, le logo Sun, Sun Blade, et Solaris sont des marques de fabrique ou des marques déposées de Sun Microsystems, Inc., ou ses filiales, aux États-Unis et dans d’autres pays.
LA DOCUMENTATION EST FOURNIE "EN L’ÉTAT" ET TOUTES AUTRES CONDITIONS, DÉCLARATIONS ET RANTIES EXPRESSES OU TACITES SONT FORMELLEMENT EXCLUES DANS LA LIMITE DE LA LOI APPLICABLE, Y COMPRIS NOTAMMENT TOUTE GARANTIE IMPLICITE RELATIVE À LA QUALITÉ MARCHANDE, À L’APTITUDE À UNE UTILISATION PARTICULIÈRE OU À L’ABSENCE DE CONTREFAÇON.
Contents
Preface..................................................................................................................1
How this Document is Organized................................................................1
Before You Read This Document..................................................................1
Typographic Conventions..............................................................................2
Terms and Definitions....................................................................................2
Related Third-Party Web Site References....................................................3
Introduction.........................................................................................................4
Menu Utilities..............................................................................................4
Overview of Sun Server Bare Metal Custom Task Sequence...............5
Installation...........................................................................................................9
Installing Sun DP.........................................................................................9
Getting the Latest Version..............................................................................9
Installing...........................................................................................................10
Uninstallation...................................................................................................14
Overview......................................................................................................14
Automatic Uninstall....................................................................................14
Interactive Uninstall....................................................................................14
Verifying and Activating the Sun DP Integration Components..............17
Sun Customized Win PE Boot Images.....................................................17
Activating the Boot Images........................................................................20
Sun Custom Deployment Utility Packages.............................................21
Sun Server Drivers......................................................................................22
Sun Server Driver Packages.......................................................................23
Using Sun DP......................................................................................................24
Overview..........................................................................................................24
Modes of OS Deployment Supported......................................................24
Task Sequence Editor..................................................................................25
Creating a Sun Server Task Sequence......................................................26
Merging Sun DP Tasks to an Existing Task Sequence...........................30
Adding Sun DP Tasks to a Task Sequence..................................................36
iii

Sun DP Custom Actions....................................................................................40
Custom Actions Overview.............................................................................40
Working with Actions....................................................................................41
Action Settings Tab.....................................................................................41
Variable Replacement Tab.........................................................................42
Log / Return Files Tab................................................................................44
Configuring Actions...................................................................................46
Sun DP Actions Reference..............................................................................49
Sun DP Feature Reference................................................................................53
Sun Server Configuration Custom Action...............................................53
Bare Metal Server Deployment Template................................................53
Process Used for Implementing Reboot to PXE/USB Actions.............59
Troubleshooting.................................................................................................64
Release Notes...................................................................................................64
Invalid Packages Error Message...............................................................64
Task Sequence Fails.....................................................................................64
OS Deployment on Sun x6400 Blades......................................................64
General Guidelines..........................................................................................64
Read the Documentation............................................................................65
Check your Action Settings.......................................................................65
Check the Log files and Use Debug Logging..........................................65
Installation Issues............................................................................................65
Custom Action Does Not Appear in Menu.............................................65
Sun DP Does Not Completely Uninstall..................................................66
Administrator Console Issues.......................................................................66
MMC Crash, Exception, or Property Not Found Errors........................66
WinPE / Task Sequence Issues.....................................................................67
WinPE Does Not Start the Task Sequence...............................................67
Servers Does Not Boot Using PXE............................................................67
Boot Order Prevents PXE Booting When a Valid Drive Exists.............68
After Initializing an Array Controller the Task Sequence to Fail.........68
Failed to Download Policy Message.........................................................69
Package is not Downloading.....................................................................69
Task Sequence does not Run Again..........................................................70
iv Sun Deployment Pack 1.0 for Microsoft System Center Configuration Manager 2007

Files or Logs Are Not Returned from the Client....................................70
Logs are Returned without Output Files.................................................70
Task Step Execution does not Change.....................................................70
Task Sequence Fails at Apply Operating System...................................71
What to do if WAIK was not Upgraded to Vista SP1............................73
System Environment variables are not Carried Over............................73
General Issues..............................................................................................73
Logs do not Show all Expected Information...........................................73
Testing WinPE-based Actions...................................................................73
Restarting a Failed PXE-based Task Sequence........................................74
Additional Resources......................................................................................75
v

CHAPTER 1
Preface
This documentation explains how to install and use the Sun DeploymentPack 1.0 for Microsoft System Center Configuration Manager 2007.
─────How this Document is OrganizedThis document contains the following sections:
Introduction
Installation
Using Sun DP
Sun DP Custom Actions
Sun DP Feature Reference
Troubleshooting
This document is intended for experienced IT professionals, field sales representatives and support engineers.
─────Before You Read This DocumentTo fully understand the information provided in this document and perform the tasks discussed, you should use it in conjunction with the documentation and on-line help that is supplied with Microsoft System Center Configuration Manager 2007.
1
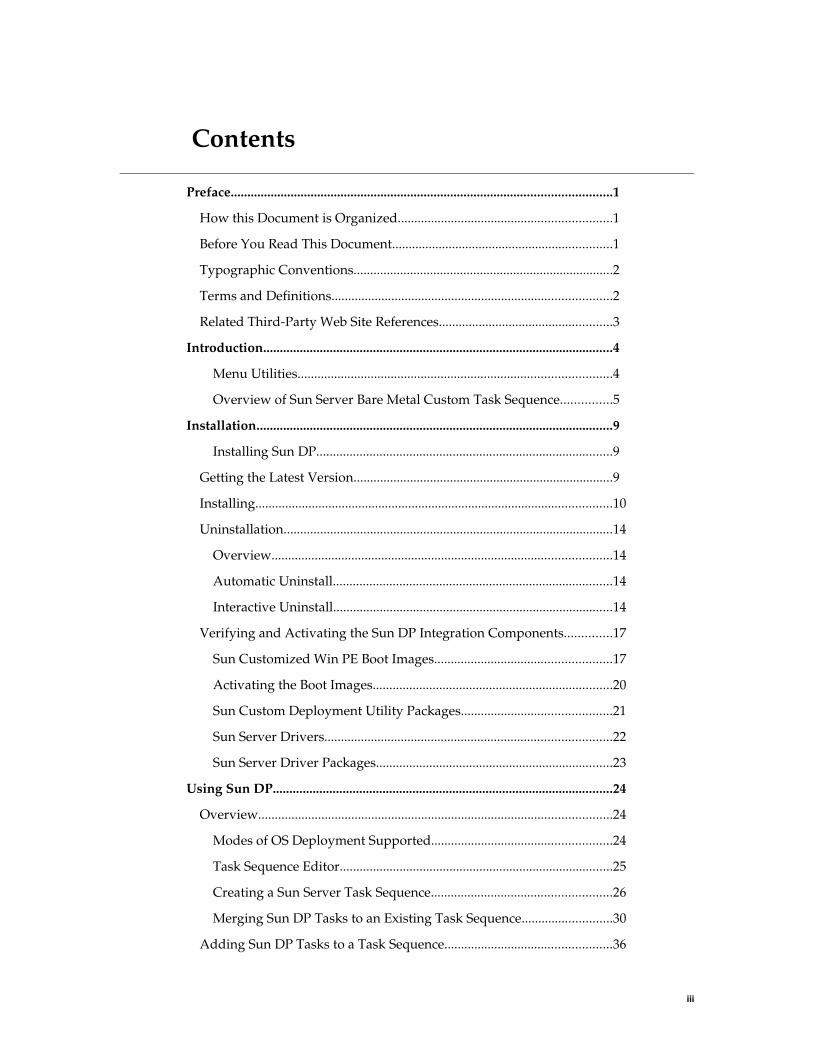
─────Typographic ConventionsThe following typographic conventions are used in this document:
Typeface Meaning Examples
AaBbCc1234 Elements written as seen on screen.
Click the File menu.
Select Open=>New.
AaBbCc1234 Code that you type. cd ..
AaBbCc1234 Hyperlink to an external web site.
www.sun.com
AaBbCc1234 Cross reference within this document.
See Installing for more information.
─────Terms and DefinitionsThe following terms are used in this manual:
Term Definition
ILOM Integrated Lights Out Manager
HBA Host Bus Adapter
Media CDROM or DVD removable media
OS Operating System
PXE Preboot Execution Environment
WinPE Windows Preinstallation Environment
2 Sun Deployment Pack 1.0 for Microsoft System Center Configuration Manager 2007
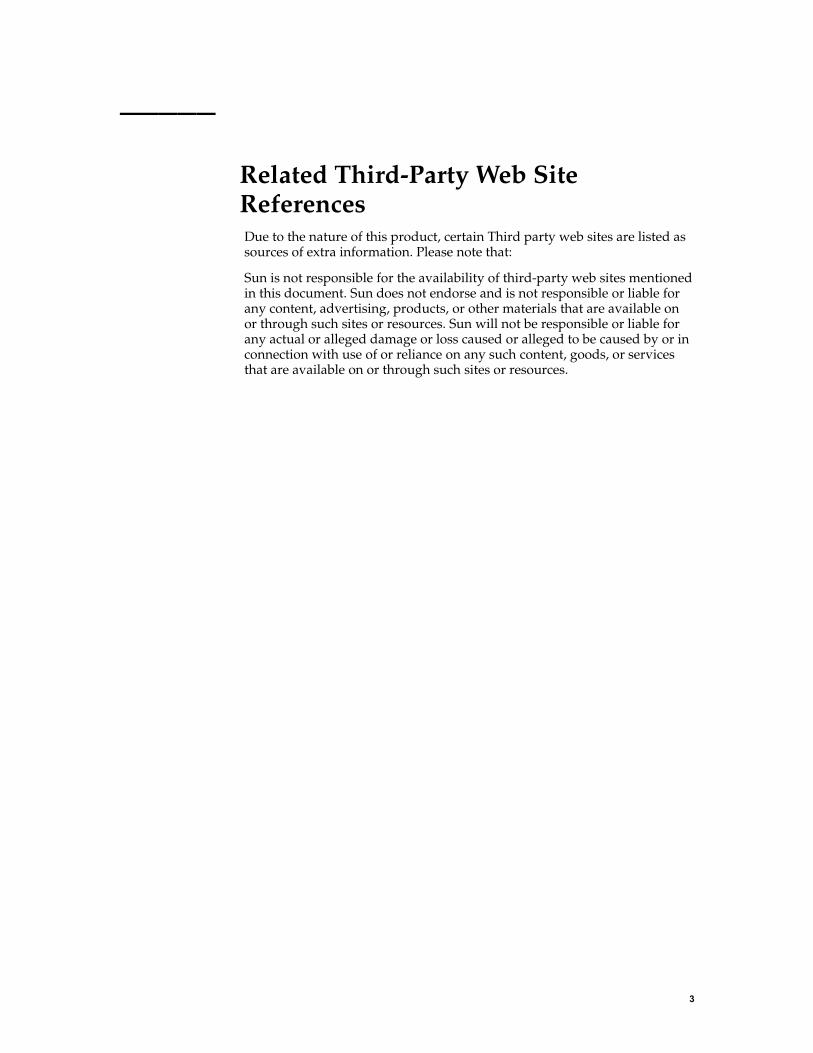
─────Related Third-Party Web Site ReferencesDue to the nature of this product, certain Third party web sites are listed as sources of extra information. Please note that:
Sun is not responsible for the availability of third-party web sites mentioned in this document. Sun does not endorse and is not responsible or liable for any content, advertising, products, or other materials that are available on or through such sites or resources. Sun will not be responsible or liable for any actual or alleged damage or loss caused or alleged to be caused by or in connection with use of or reliance on any such content, goods, or services that are available on or through such sites or resources.
3

CHAPTER 2
Introduction
The Sun Deployment Pack 1.0 for Microsoft System Center ConfigurationManager 2007 (hereafter Sun DP) provides a solution for quickly and easily authoring Sun hardware-specific task sequences for operating system deployment using Microsoft System Center Configuration Manager 2007 (hereafter SCCM). Sun DP seamlessly integrates a custom task sequence action into SCCM, which enables you to easily configure your Sun x64 server hardware as part of an overall operating system deployment.
This guide provides conceptual, technical and usage information about the Sun DP. This guide does provide user information on the Sun-specific tools and functions provided by the Sun DP.
The information in this guide is designed to:
Provide an overview of the Sun DP and how it integrates with SCCM.
Describe installing and using the product.
Explain the core scenarios for creating and using task sequence custom actions.
─────Menu UtilitiesAs part of the Sun DP installation, some right-click menu items are installed in SCCM.
Figure 1: Sun DP Menu Utilities Example
4 Sun Deployment Pack 1.0 for Microsoft System Center Configuration Manager 2007

These menu items open custom Sun wizards that help you to build Sun Server Bare Metal Custom Task Sequence.
─────Overview of Sun Server Bare Metal Custom Task SequenceA custom task sequence that is built using Sun DP contains several task steps that are essential to complete Sun hardware configuration and Operating System (hereafter OS) deployment.
The features of a custom task sequence built using the Create a Sun Server Deployment Template function are as follows:
All the task sequences have Restart in Windows PE as the first task step. This step ensures that the automation environment is WinPE.
Figure 2: Restart in Windows PE Step
If the environment is WinPE, it goes to the next task step, otherwise the client reboots into WinPE using the boot image assigned to this task sequence (assuming the boot image assigned to this task sequence is a WinPE boot image) as shown in Figure 3.
5

Figure 3: Assigned Boot Image
All the task sequences have Set RebootStep Variable as the second task step. This step connects back to the SCCM Server with a user name and password that you provide. The task sequence then checks to see if the task sequence variable called RebootStep exists. If the RebootStep variable exists, it is incremented by 1. If the RebootStep variable does not exist, it is created. This variable is used to keep track of the progress of the task sequence.
6 Sun Deployment Pack 1.0 for Microsoft System Center Configuration Manager 2007
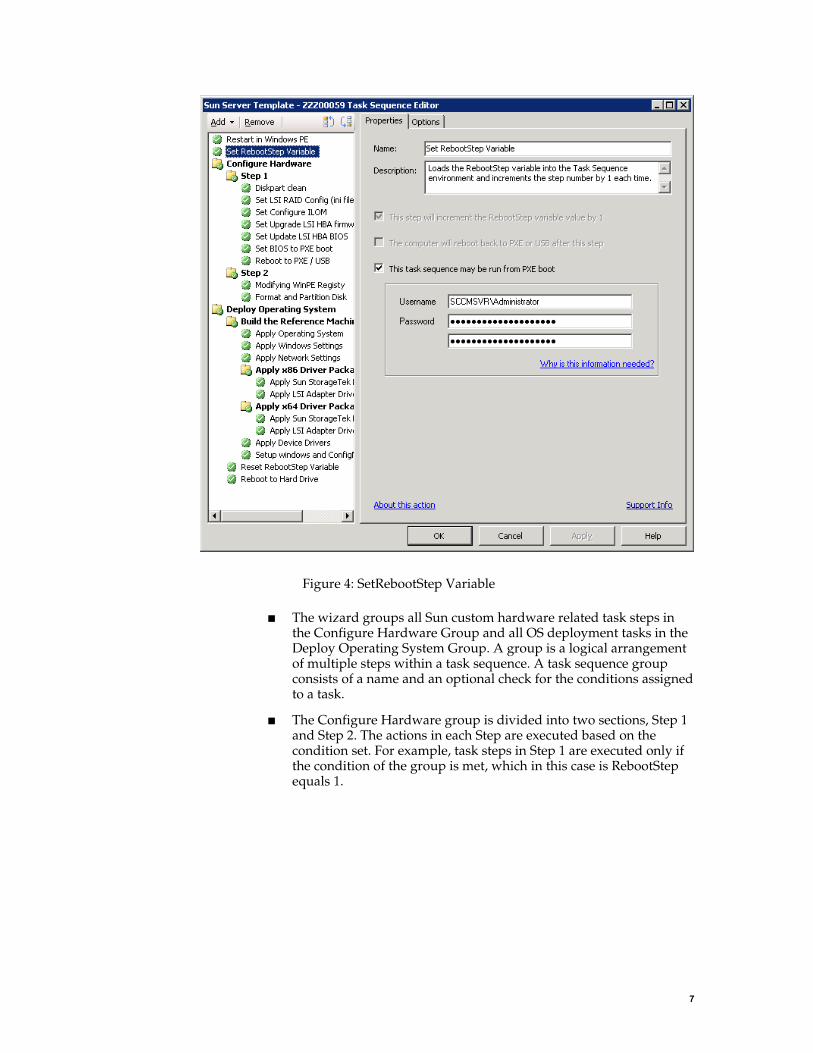
Figure 4: SetRebootStep Variable
The wizard groups all Sun custom hardware related task steps in the Configure Hardware Group and all OS deployment tasks in the Deploy Operating System Group. A group is a logical arrangement of multiple steps within a task sequence. A task sequence group consists of a name and an optional check for the conditions assigned to a task.
The Configure Hardware group is divided into two sections, Step 1 and Step 2. The actions in each Step are executed based on the condition set. For example, task steps in Step 1 are executed only if the condition of the group is met, which in this case is RebootStep equals 1.
7

Figure 5: Configure Hardware Step 1
The Set BIOS to PXE boot and Reboot to PXE/USB actions are added to Step 1 and Step 2 groups. The Set BIOS to PXE boot action configures the server's BIOS to use PXE as the first boot option and the Reboot to PXE/USB action resets the advertisement on the SCCM Server, so that when a client boots it gets the advertisement again from the SCCM Server and perform the remaining steps in task sequence. Both these steps help a client machine to boot into PXE when rebooting.
All the steps that are necessary for OS deployment are grouped under the Deploy Operating System Group. Some of the options such as Operating System Image and the unattended text file that are configured in the Create Task Sequence Server Deployment GUI are transferred here.
8 Sun Deployment Pack 1.0 for Microsoft System Center Configuration Manager 2007

CHAPTER 3
Installation
The Sun DP installer creates the Sun specific tasks in the Administration console and installs the packages, programs and drivers to the SCCM site infrastructure, but not necessarily on the site server.
─────Installing Sun DPA default installation of SCCM 2007 provides all of the elements that are required for running the Sun DP. There are no other specific prerequisites for installing the Sun DP other than having SCCM installed. The Sun DP installation only runs if either the SCCM 2007 Administrator console or a site server is installed.
Note - Sun DP is supported only on SCCM systems using WinPE 2.1 (available from the Vista WAIK SP1). This is due to an issue with multi-disk system configuration in WinPE that is fixed in SP1. For more information about this issue, see Task Sequence Fails at Apply Operating System.
If you are installing onto a computer that has only the Administrator console installed, you can only select the Administrator console features.
If you are installing to a SCCM 2007 site server, all features are available and pre-selected. You cannot unselect certain features such as the Administrator Console and WinPE updates.
All other prerequisites are met when installing the SCCM 2007 components.
─────Getting the Latest VersionThe latest version of the Sun Deployment Pack 1.0 for Microsoft SystemCenter Configuration Manager 2007 can be downloaded from the following web page:
http://www.sun.com/system-management/tools.jsp
Once you have downloaded the latest version of Sun Deployment Pack 1.0for Microsoft System Center Configuration Manager 2007, you should uncompress the downloaded file.
9
─────InstallingOnce you have downloaded and uncompressed the installer, you are ready to install Sun Deployment Pack 1.0 for Microsoft System CenterConfiguration Manager 2007.
To install the Sun DP:
1. Start the installation by double-clicking on the Sun_Deployment_Pack_for_SCCM_v1_00.msi file provided.
After initializing, the start page appears.
10 Sun Deployment Pack 1.0 for Microsoft System Center Configuration Manager 2007

Figure 6: Sun DP Installation Welcome Page
2. Click Next to go to the License Agreement page.
3. Read the license agreement. To accept the license agreement and enable the Next button, click Next.
The Setup type window opens.
11

Figure 7: Sun DP Installation Setup Type
4. If you chose the Custom install, you can see the different components of the installation and can modify some of them. You can also change the path where some of the components are stored.
Note - Only paths local to the site server have been tested at this time. We do not recommend changing the path to a location that is not on the site server.
Choose the installation type you wish to perform. Click Next.
To begin the installation process, click Install.
As the installation continues, you may see a blank status bar with a status that may change or may not change for several minutes. This is normal. If any errors occur during installation, you are notified appropriately.
5. When the installation is complete, the install wizard displays whether the installation finished successfully or with errors.
12 Sun Deployment Pack 1.0 for Microsoft System Center Configuration Manager 2007
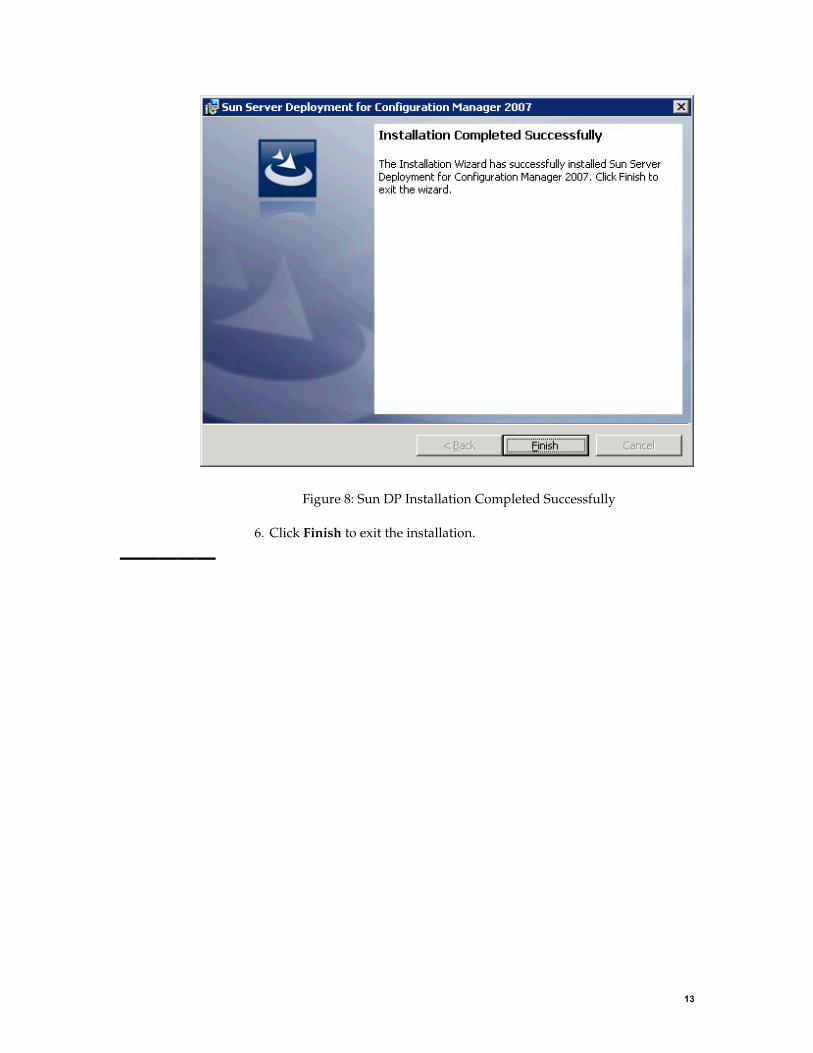
Figure 8: Sun DP Installation Completed Successfully
6. Click Finish to exit the installation.
─────
13

UninstallationSun DP can be uninstalled in two ways, either using the automatic uninstall or the interactive uninstall.
OverviewBy design, the uninstall process does not remove the Sun customized boot images created during installation. This is because they could be tied to task sequence packages, and removing the boot image may invalidate otherwise working task sequences that you are using. If you are no longer using the boot images created by this product, you may simply delete them from the Administrator console.
During installation, the uninstall process replaces the custom action with a stub interface. This stub is simply a blank, non-operational task step that fills in the steps held by the previous custom action. This is done so that you can keep your existing task sequences and open them for editing. Without the stub the non-existent custom action causes a system exception error. You can delete these stub steps if you like, but they are left in place to remind you of the previous location of the custom actions.
Note - With the stub replacement, your task sequence, although it will not cause an exception when loading, may not function correctly if the remaining steps rely on actions performed by the previous custom actions. Please be aware of this when uninstalling the product.
─────Automatic UninstallYou can use the automatic uninstall by navigating to Control Panel > Add/Remove Programs (or Programs and Features in Vista/Windows Server 2008). Find the Sun DP in the list of currently installed software and click Uninstall. After confirming uninstallation, the process continues without further interaction.
─────Interactive Uninstall
To uninstall interactively:
1. Double-click on the Sun_Deployment_Pack_for_SCCM_v1_00.msi file to start uninstalling Sun DP.
After initializing, the maintenance page appears.
2. Click Next.
The Start page opens.
14 Sun Deployment Pack 1.0 for Microsoft System Center Configuration Manager 2007

Figure 9: Sun DP Maintenance
3. Select Remove, and then click Next.
Note - The Modify and Repair options are not supported at this time even though they are enabled in this dialog.
15

Figure 10: Remove Sun DP Option
4. Click Remove to begin the uninstall process.
5. You may receive a warning about uninstalling when certain files are in use. Click OK to continue.
6. When the uninstall is complete, the summary page opens and you have the option of viewing the log file by checking the box.
16 Sun Deployment Pack 1.0 for Microsoft System Center Configuration Manager 2007

Figure 11: Sun DP Uninstallation Complete
7. Click Finish to end the wizard.
─────Verifying and Activating the Sun DP Integration ComponentsA successful Sun DP installation creates Sun customized Win PE boot images, drivers, driver packages, custom utilities software packages, and right click menu items that you use to build custom task sequences that can be executed on Sun x64 servers.
Once Sun DP is installed, objects such as Sun customized Win PE boot images, software packages and driver packages need to be distributed to distribution points so they can be used.
─────Sun Customized Win PE Boot ImagesThe Sun DP provides operating system deployment boot images, which are Windows Pre-Installation Environment (WinPE) images used during the operating system deployment process. Within the Administrator console, the Boot Images node displays a list of the Operating System Deployment
17
boot images that have been created, the actions that can be run and so on. When a boot image is selected from the Boot Images list, specific actions can be run for that boot image.
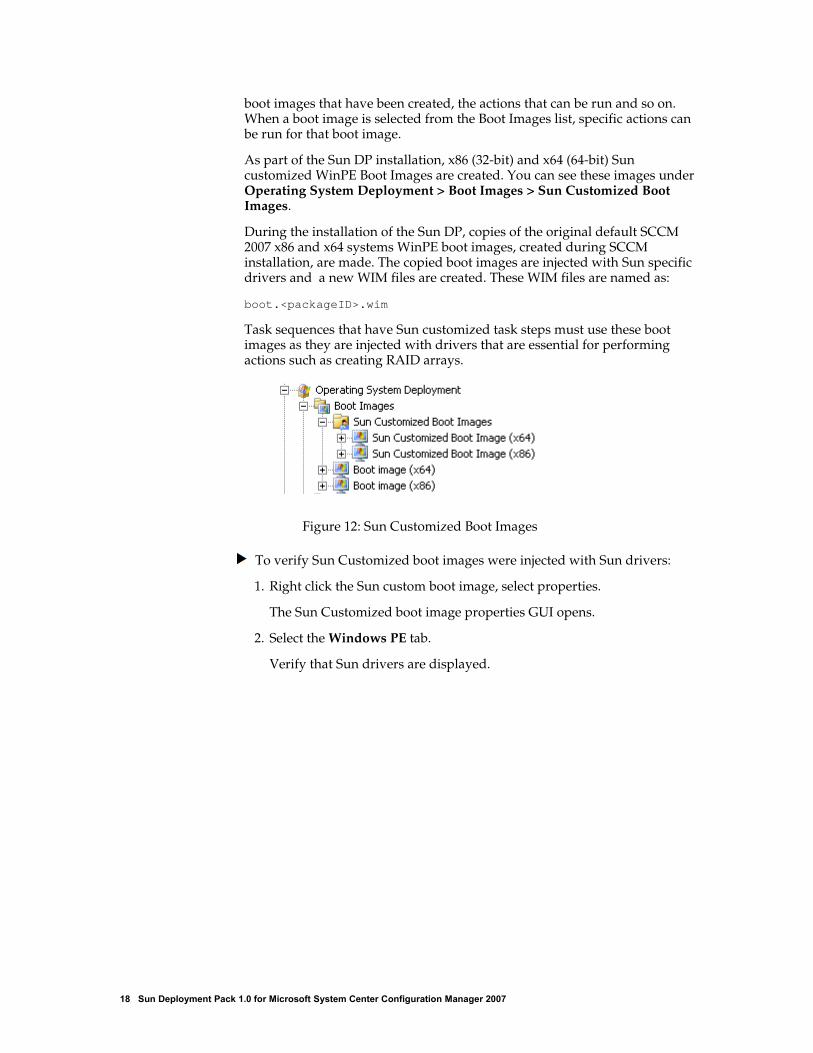
As part of the Sun DP installation, x86 (32-bit) and x64 (64-bit) Sun customized WinPE Boot Images are created. You can see these images under Operating System Deployment > Boot Images > Sun Customized Boot Images.
During the installation of the Sun DP, copies of the original default SCCM 2007 x86 and x64 systems WinPE boot images, created during SCCM installation, are made. The copied boot images are injected with Sun specific drivers and a new WIM files are created. These WIM files are named as:
boot.<packageID>.wim
Task sequences that have Sun customized task steps must use these boot images as they are injected with drivers that are essential for performing actions such as creating RAID arrays.
Figure 12: Sun Customized Boot Images
To verify Sun Customized boot images were injected with Sun drivers:
1. Right click the Sun custom boot image, select properties.
The Sun Customized boot image properties GUI opens.
2. Select the Windows PE tab.
Verify that Sun drivers are displayed.
18 Sun Deployment Pack 1.0 for Microsoft System Center Configuration Manager 2007
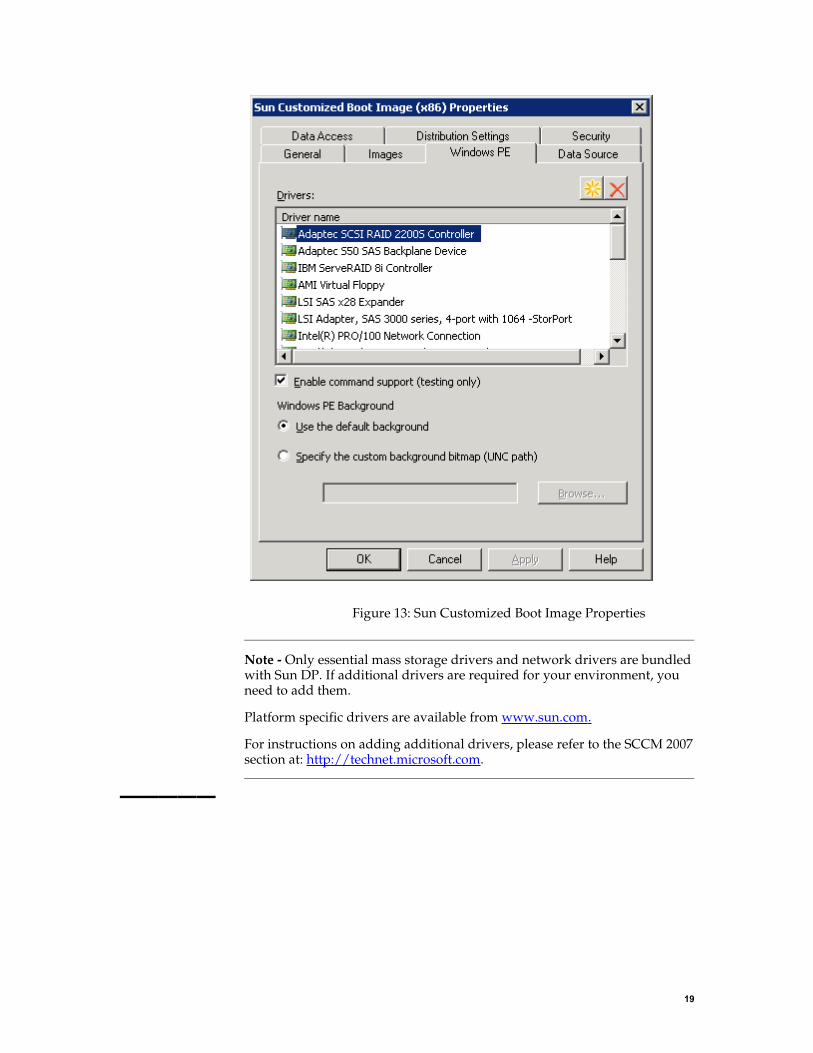
Figure 13: Sun Customized Boot Image Properties
Note - Only essential mass storage drivers and network drivers are bundled with Sun DP. If additional drivers are required for your environment, you need to add them.
Platform specific drivers are available from www.sun.com .
For instructions on adding additional drivers, please refer to the SCCM 2007 section at: http://technet.microsoft.com.
─────
19
Activating the Boot ImagesIn order for task sequences to start using these Sun customized boot images, they should be distributed to the appropriate SCCM Distribution Points. All the WinPE images should be copied to PXE share. Regular packages should be copied to non PXE shares. The PXE share image is the one that is loaded initially into a client and it is better to keep it small and packed with only essential packages.
To activate the boot images:
1. Launch the SCCM 2007 Administrator console.
2. From the Administrator console , open the Computer Management > Operating System Deployment > Boot Images > Sun Customized Boot Images node.
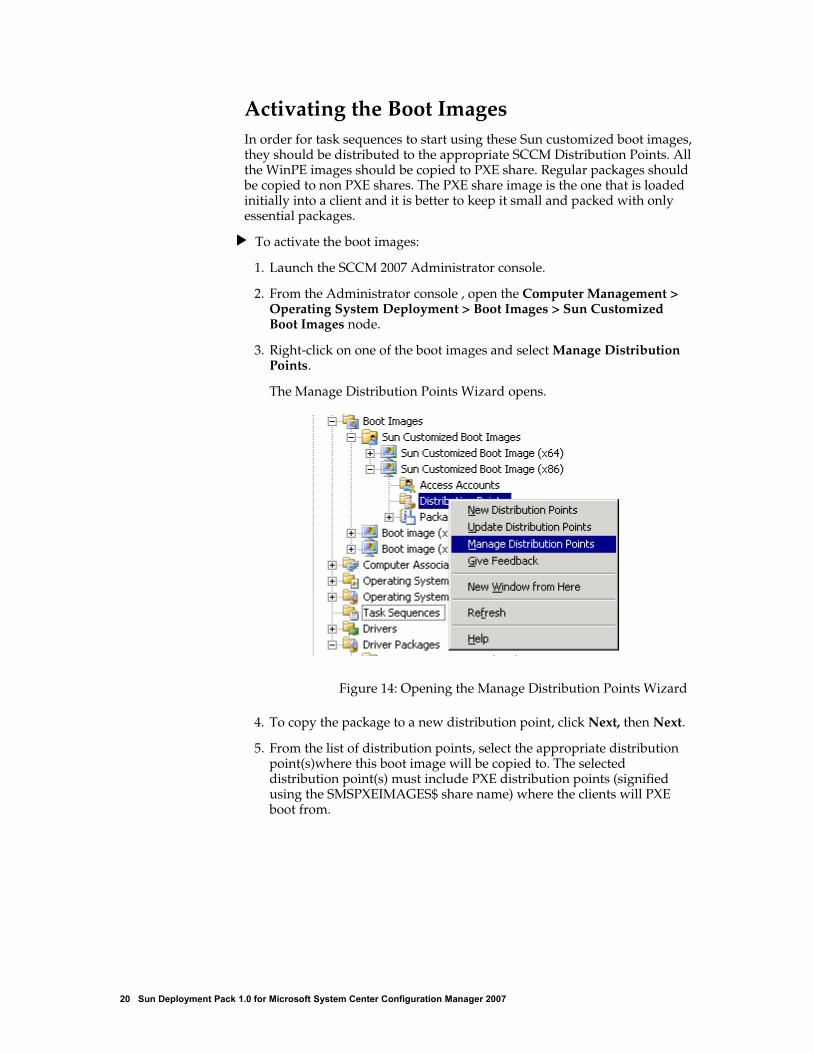
3. Right-click on one of the boot images and select Manage Distribution Points.
The Manage Distribution Points Wizard opens.
Figure 14: Opening the Manage Distribution Points Wizard
4. To copy the package to a new distribution point, click Next, then Next.
5. From the list of distribution points, select the appropriate distribution point(s)where this boot image will be copied to. The selected distribution point(s) must include PXE distribution points (signified using the SMSPXEIMAGES$ share name) where the clients will PXE boot from.
20 Sun Deployment Pack 1.0 for Microsoft System Center Configuration Manager 2007
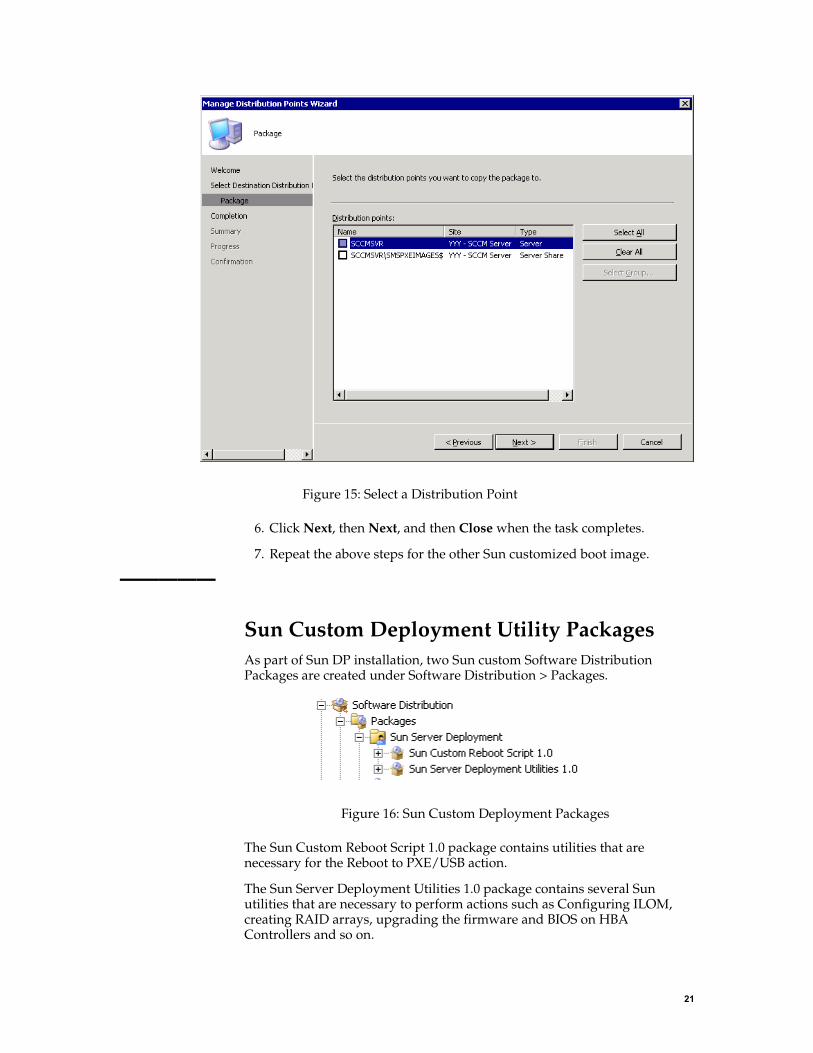
Figure 15: Select a Distribution Point
6. Click Next, then Next, and then Close when the task completes.
7. Repeat the above steps for the other Sun customized boot image.
─────Sun Custom Deployment Utility PackagesAs part of Sun DP installation, two Sun custom Software Distribution Packages are created under Software Distribution > Packages.
Figure 16: Sun Custom Deployment Packages
The Sun Custom Reboot Script 1.0 package contains utilities that are necessary for the Reboot to PXE/USB action.
The Sun Server Deployment Utilities 1.0 package contains several Sun utilities that are necessary to perform actions such as Configuring ILOM, creating RAID arrays, upgrading the firmware and BIOS on HBA Controllers and so on.
21

In order for task sequences to start using these Sun custom deployment utilities, they should be distributed to the appropriate SCCM Distribution Points. For more information on updating SCCM server Distribution Points with Sun custom deployment utilities, see Activating the Boot Images.
Note - These utilities do not need to be distributed to PXE distribution points (signified using the SMSPXEIMAGES$ share name).
─────Sun Server DriversAs part of the Sun DP installation, the Sun Server Drivers folder is created under Operating System Deployment > Drivers.
Note - Each driver is visible in duplicate because one is 32-bit and the other is 64-bit driver. There is no activation for drivers.
Figure 17: Sun Server Drivers
All of the drivers required for your Sun x64 servers hardware are listed under the Sun Server Driver folder.
22 Sun Deployment Pack 1.0 for Microsoft System Center Configuration Manager 2007
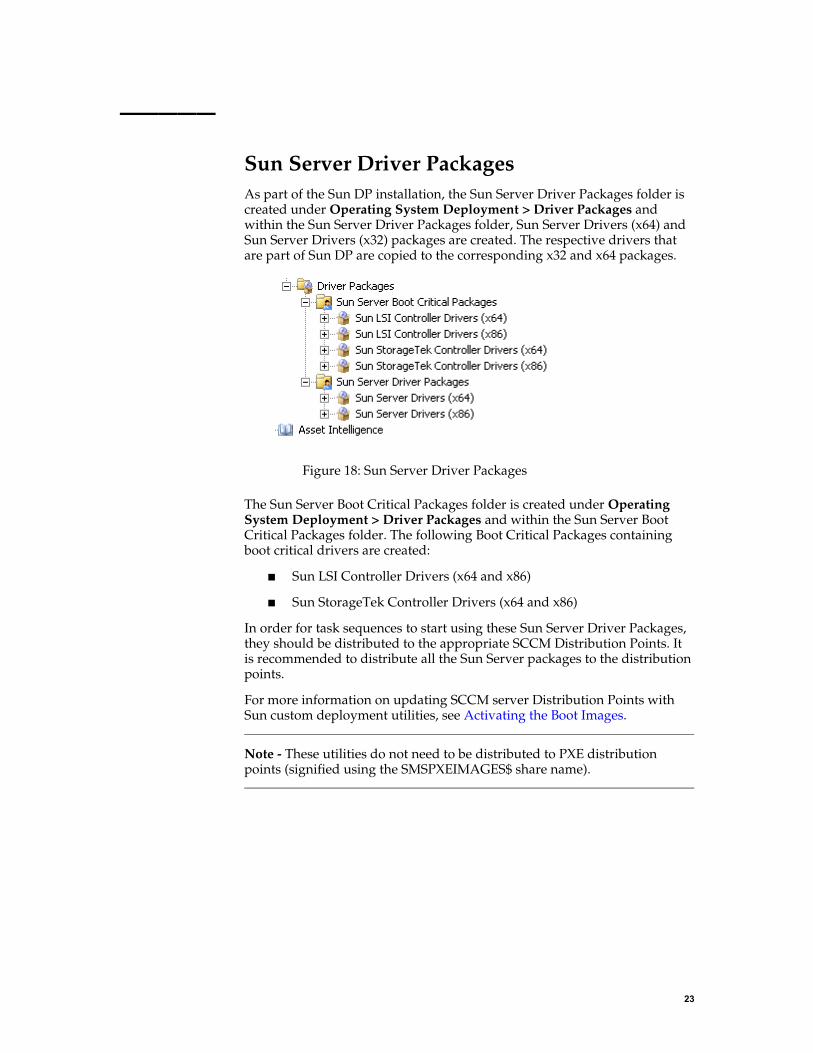
─────Sun Server Driver PackagesAs part of the Sun DP installation, the Sun Server Driver Packages folder is created under Operating System Deployment > Driver Packages and within the Sun Server Driver Packages folder, Sun Server Drivers (x64) and Sun Server Drivers (x32) packages are created. The respective drivers that are part of Sun DP are copied to the corresponding x32 and x64 packages.
Figure 18: Sun Server Driver Packages
The Sun Server Boot Critical Packages folder is created under Operating System Deployment > Driver Packages and within the Sun Server Boot Critical Packages folder. The following Boot Critical Packages containing boot critical drivers are created:
Sun LSI Controller Drivers (x64 and x86)
Sun StorageTek Controller Drivers (x64 and x86)
In order for task sequences to start using these Sun Server Driver Packages, they should be distributed to the appropriate SCCM Distribution Points. It is recommended to distribute all the Sun Server packages to the distribution points.
For more information on updating SCCM server Distribution Points with Sun custom deployment utilities, see Activating the Boot Images.
Note - These utilities do not need to be distributed to PXE distribution points (signified using the SMSPXEIMAGES$ share name).
23
CHAPTER 4
Using Sun DP
The Sun DP provides several custom components that help you build task sequences utilizing Sun custom hardware configuration tasks.
The following sections explain the purpose of the Sun custom menu items that are created as part of Sun DP installation and when you should use them.
─────OverviewCreating a bare-metal server deployment task sequence can be complex, especially with computer variables, conditional groups and conditional steps. To help you in this process Sun DP provides a mini-wizard that creates a sample task sequence for you based on a predefined template. Using this template saves time and frustration from building the task sequence step-by-step and helps ensure proper configuration of all of the custom steps related to the hardware configuration.
The task sequence that is built also includes the necessary reboots in the appropriate sequence. The task sequence is broken into several groups that represent the logical organization of the task sequence steps and also represent the sets of actions to be performed in a reboot sequence.
Modes of OS Deployment SupportedCurrently 2 modes of OS Deployment are supported. These are:
Windows Image Format (WIM): WIM is a file based disk image format developed by Microsoft. This image needs a sysprep.inf file specifying parameters that are necessary for installing OS partially or completely unattended.
Scripted OS Install: Scripted OS Install is a process where the source files from a vanilla Windows OS install media are slipstreamed with components like drivers, updates, patches, applications and so on. that you want to install as part of OS Installation. Usually this is accompanied by a unattend.txt which helps in installing the OS partially or completely unattended.
You can either select a Scripted OS Install package slipstreamed with mass storage drivers and other components or vanilla CD Source files from either Windows Server 2003 or 2008 install media. If you choose to deploy an OS using source files from a Windows Server 2003 vanilla install media, some manual steps need to be executed to include mass storage drivers provided
24 Sun Deployment Pack 1.0 for Microsoft System Center Configuration Manager 2007
with Sun DP. For more information, please see Building a Task SequenceUsing a Vanilla Install Media.
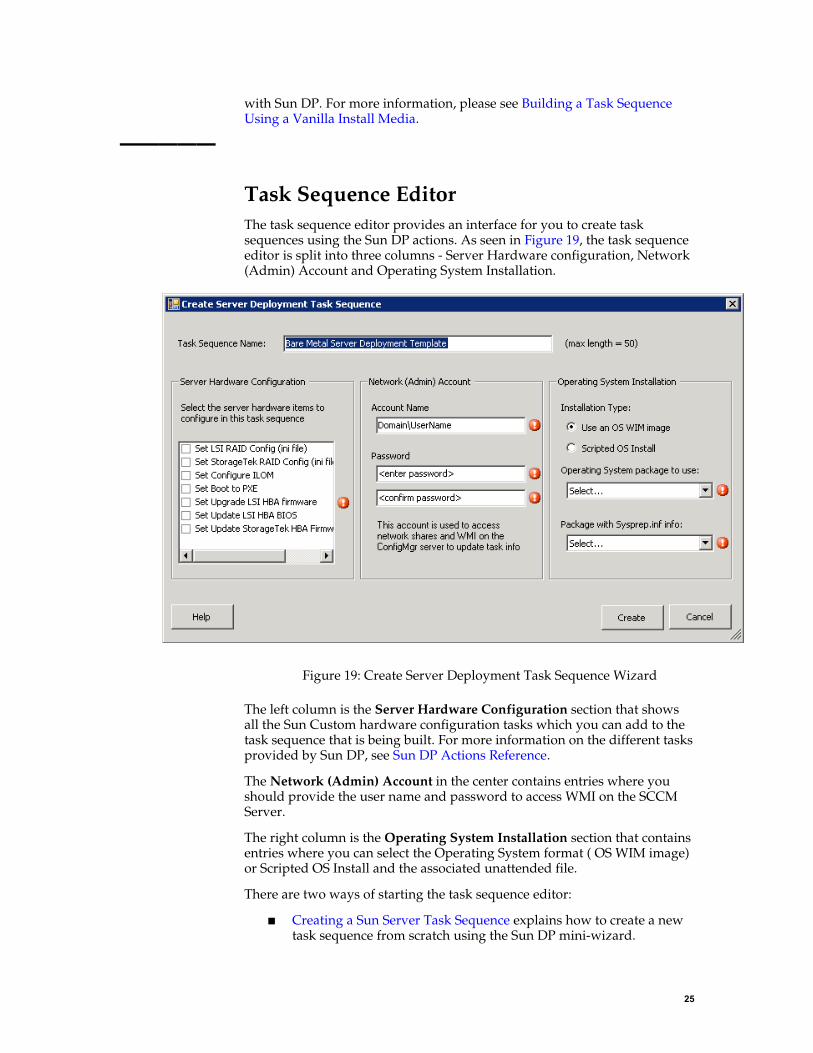
─────Task Sequence EditorThe task sequence editor provides an interface for you to create task sequences using the Sun DP actions. As seen in Figure 19, the task sequence editor is split into three columns - Server Hardware configuration, Network (Admin) Account and Operating System Installation.
Figure 19: Create Server Deployment Task Sequence Wizard
The left column is the Server Hardware Configuration section that shows all the Sun Custom hardware configuration tasks which you can add to the task sequence that is being built. For more information on the different tasks provided by Sun DP, see Sun DP Actions Reference.
The Network (Admin) Account in the center contains entries where you should provide the user name and password to access WMI on the SCCM Server.
The right column is the Operating System Installation section that contains entries where you can select the Operating System format ( OS WIM image) or Scripted OS Install and the associated unattended file.
There are two ways of starting the task sequence editor:
Creating a Sun Server Task Sequence explains how to create a new task sequence from scratch using the Sun DP mini-wizard.
25
Merging Sun DP Tasks to an Existing Task Sequence explains how to add the Sun DP custom actions to an existing task sequence.
Creating a Sun Server Task SequenceYou can build a Bare Metal Server Deployment task sequence from scratch using the mini-wizard. The task sequence can have hardware configuration Sun custom task steps, as well as OS deployment tasks steps.
To create a Bare Metal Server Deployment task sequence:
1. In the administrator console, right-click on the Operating System Deployment > Task Sequences node and select Bare Metal Server Deployment > Create a Sun Server Deployment Template.
The Create Server Deployment Task Sequence Wizard opens.
2. Select the Sun Custom hardware configuration tasks that need to part of task sequence that is being built. Under Server Hardware Configuration (Figure 19) check the box next to the appropriate Sun Custom hardware configuration task(s).
3. Provide a user name and password to access WMI on SCCM Server. These credentials are necessary for resetting the PXE advertisement on SCCM server in case the client needs to be rebooted to complete a Sun hardware configuration task step. For more information, please see BareMetal Server Deployment Template.
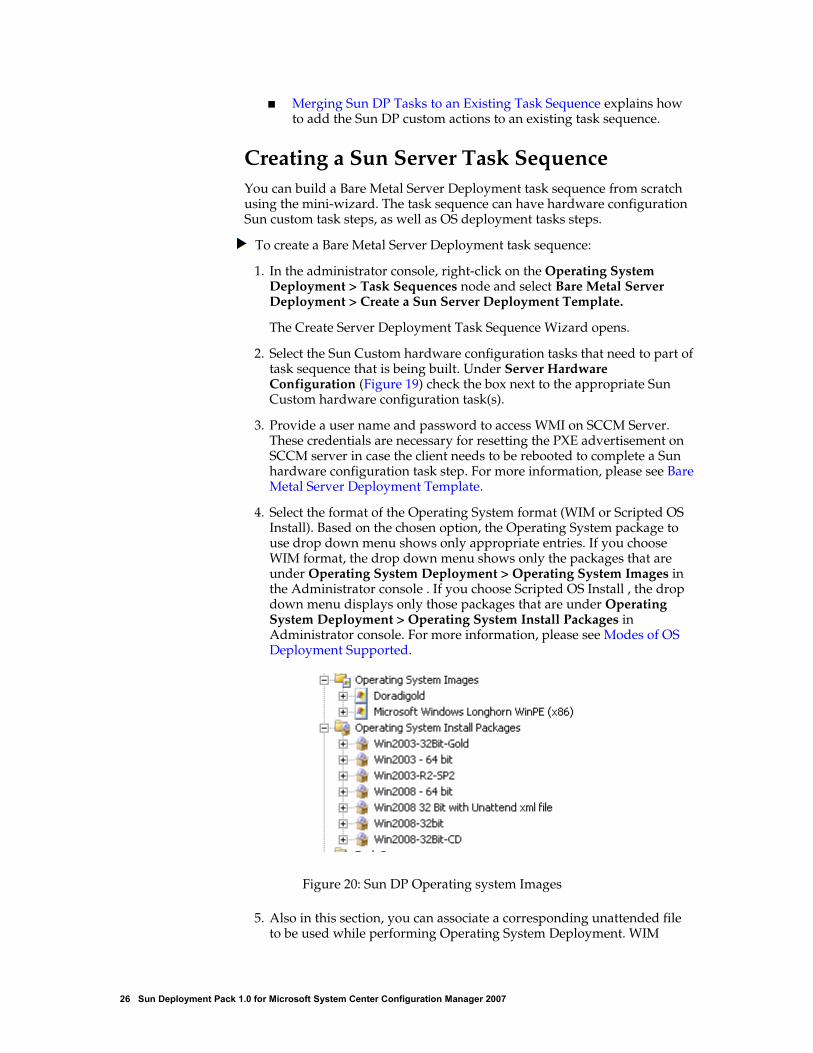
4. Select the format of the Operating System format (WIM or Scripted OS Install). Based on the chosen option, the Operating System package to use drop down menu shows only appropriate entries. If you choose WIM format, the drop down menu shows only the packages that are under Operating System Deployment > Operating System Images in the Administrator console . If you choose Scripted OS Install , the drop down menu displays only those packages that are under Operating System Deployment > Operating System Install Packages in Administrator console. For more information, please see Modes of OSDeployment Supported.
Figure 20: Sun DP Operating system Images
5. Also in this section, you can associate a corresponding unattended file to be used while performing Operating System Deployment. WIM
26 Sun Deployment Pack 1.0 for Microsoft System Center Configuration Manager 2007
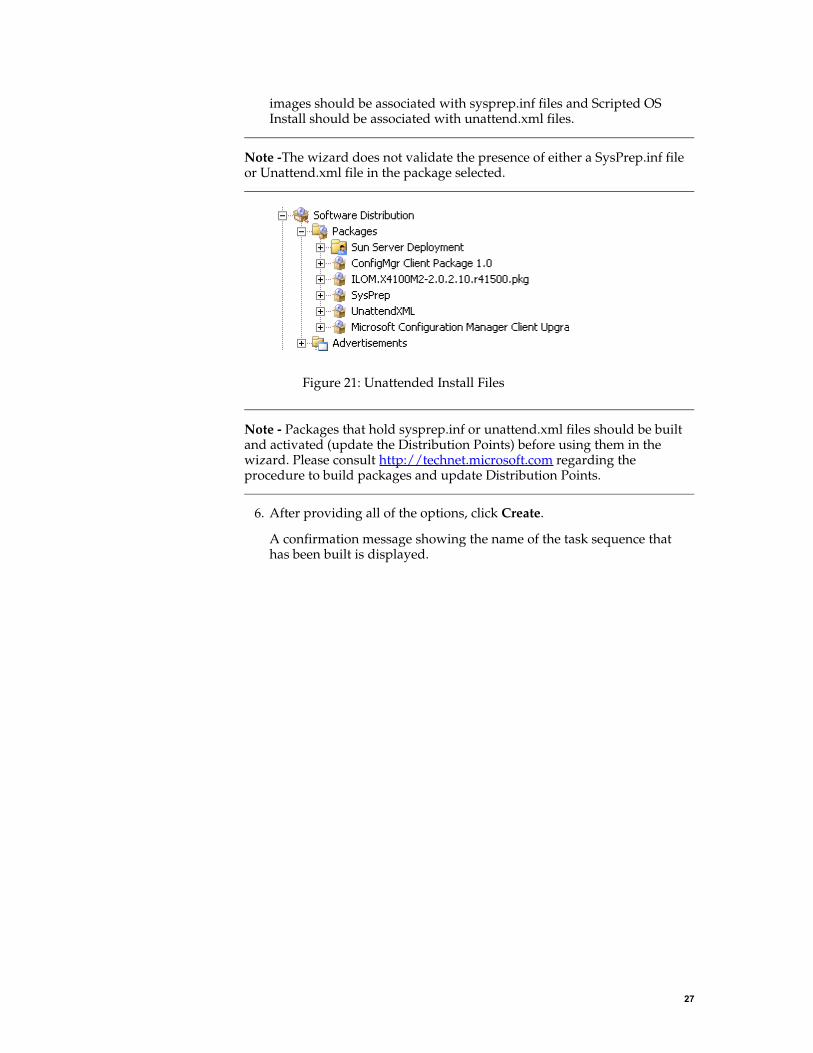
images should be associated with sysprep.inf files and Scripted OS Install should be associated with unattend.xml files.
Note -The wizard does not validate the presence of either a SysPrep.inf file or Unattend.xml file in the package selected.
Figure 21: Unattended Install Files
Note - Packages that hold sysprep.inf or unattend.xml files should be built and activated (update the Distribution Points) before using them in the wizard. Please consult http://technet.microsoft.com regarding the procedure to build packages and update Distribution Points.
6. After providing all of the options, click Create.
A confirmation message showing the name of the task sequence that has been built is displayed.
27

Figure 22: Task Sequence Created
7. Click Close.
8. Open the list of task sequences in the Administrator console by selecting Operating System Deployment and clicking Task Sequences.
You should see the task sequence that was built.
At this point, you need to go through each individual task step and select or verify whether the settings and configuration files selected are appropriate. This is especially important for Sun custom task steps, as the configuration files associated with each Sun custom task are sample files provided as examples. For more information on the tasks available, please see Sun DPCustom Actions. After the task sequence is created, you should ensure that you go through each step and confirm all of the settings.
You should also ensure all the packages that are used in the task sequence are available at the Distribution Points. Otherwise, the task sequence will fail.
You can further customize this task sequence by inserting or deleting task step(s) to suit your environment.
28 Sun Deployment Pack 1.0 for Microsoft System Center Configuration Manager 2007

Note - The task sequence that is built using this wizard uses Sun Customized Boot Image (x86) as the boot image by default. You should make appropriate changes based on your needs.
To edit the Task Sequence:
1. Select the task sequence that was built in the previous section, right-click the task sequence and select Edit in the menu list.
Note -When a task sequence is opened for editing, if any of the configuration items for a task step are not configured, it displays an information box displaying the task steps that need to be configured.
2. A sample task sequence that is built using Create a Sun Server Deployment Template is shown below.
Figure 23: Sun DP Task Sequence Editor
The grouping and order used in the sample task sequence is important. Do not delete any groups or remove any of the steps for rebooting to PXE or
29

setting task sequence variables. Also, do not modify the conditions set on the groups. Doing so may cause the task sequence to function incorrectly.
The following steps should not be modified or moved from their relative positions:
Reboot To PXE / USB
Set RebootStep Variable
Set BIOS to PXE Boot
Configure Hardware group
Deploy Operating System group
Reset RebootStep Variable
─────Merging Sun DP Tasks to an Existing Task SequenceIn some situations, you have a custom task sequence (a combination of Sun Tasks and non Sun Tasks or just all non Sun Tasks) customized to your environment and would like to merge it with the Sun specific custom hardware configuration task actions provided by Sun DP. In such cases, the Reboot to PXE or USB menu actions provide a very user friendly GUI to select one or more Sun custom hardware configuration task steps, creating a new task sequence that combines your existing task sequence with Sun DP hardware configuration task steps.
The task sequence generated is very similar to the task sequence generated in the earlier section except that the task steps of your existing task sequence are replicated in the Deploy Operating System group of the newly created task sequence.
The task sequence that is built also includes the necessary reboots in the correct sequence.
Note - The task sequence that is built using this wizard uses Sun Customized Boot Image (x86) as the boot image by default . You should make appropriate changes based on your needs.
To add Sun DP tasks to a task sequence:
1. In the Administrator console, select the task sequence that you want to merge with Sun DP hardware configuration tasks.
2. Right click the task sequence and select Edit.
The Task Sequence Editor opens.
3. Select Add > Sun Deployment > and click Reboot to PXE or USB.
30 Sun Deployment Pack 1.0 for Microsoft System Center Configuration Manager 2007

Figure 24: Selecting the Reboot to PXE or USB Step
The Reformatting Task Sequence dialog opens.
4. In the Reformatting Task Sequence dialog, click OK.
Figure 25: Reformatting Task Sequence
31

5. The Create Server Deployment Task Sequence window opens. This is similar to the window that was displayed when the Create a Sun Server Deployment Template menu action was selected, except that the Operating System Installation section is deactivated.
Figure 26: Create Server Deployment Task Sequence
6. Select the Sun DP Custom hardware configuration tasks that need to part of the task sequence that is being built and modify the Network (Admin) Account settings.
For more information on using the Create Server Deployment Task Sequence window, see Creating a Sun Server Task Sequence.
Note - there are no Operating System Installation parameters available.
7. Once you have selected the Sun custom tasks that you want to be part of the task sequence, select Create.
A confirmation displaying the name of the task sequence created opens.
32 Sun Deployment Pack 1.0 for Microsoft System Center Configuration Manager 2007
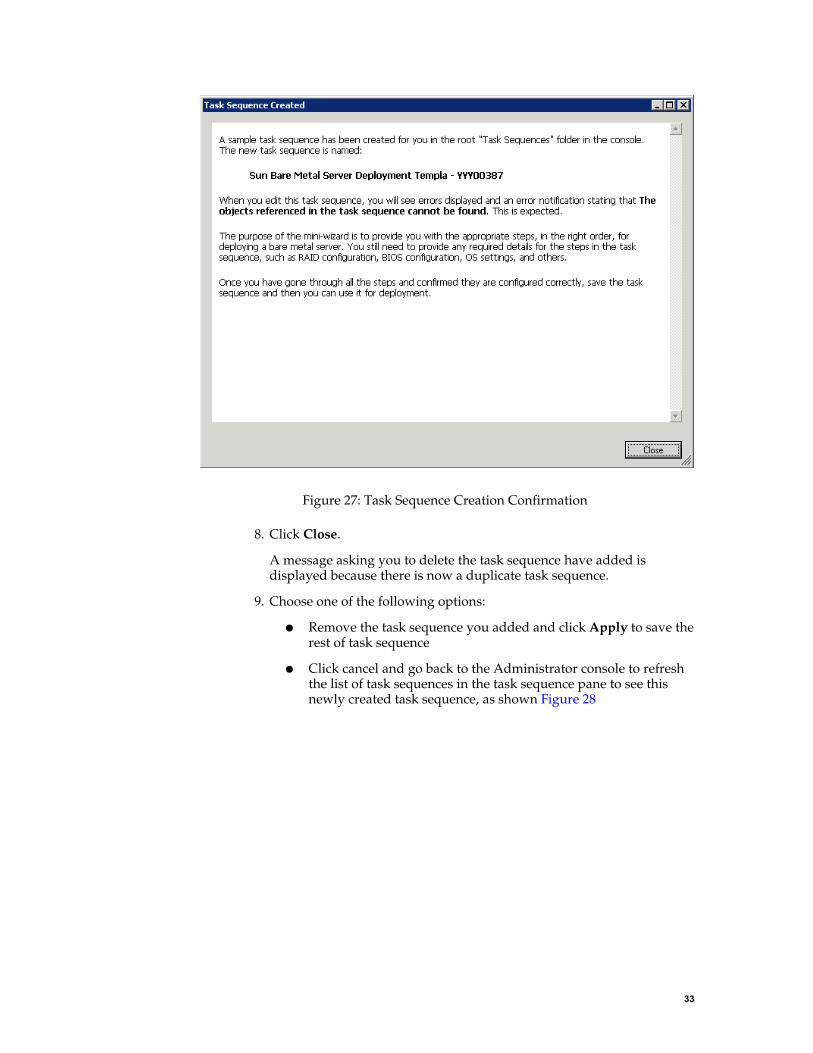
Figure 27: Task Sequence Creation Confirmation
8. Click Close.
A message asking you to delete the task sequence have added is displayed because there is now a duplicate task sequence.
9. Choose one of the following options:
● Remove the task sequence you added and click Apply to save the rest of task sequence
● Click cancel and go back to the Administrator console to refresh the list of task sequences in the task sequence pane to see this newly created task sequence, as shown Figure 28
33

Figure 28: Refresh the List
10.Launch the task sequence that was created by selecting the task sequence and select Edit in the right click menu.
The task sequence that was created by merging the Sun DP task sequence is very similar to the task sequence that is created when using the Create a Sun Server Template menu action. The only difference is that the task steps that you merged with Sun custom hardware task steps appear between Reset RebootStep variable task step and Reboot to Hard drive task step. For example where the Existing Task Step is shown in Figure 29.
34 Sun Deployment Pack 1.0 for Microsoft System Center Configuration Manager 2007

Figure 29: Sun DP Tasks Merged with an Existing Task Sequence
At this point, you need to go through each individual task step and select or verify whether the settings and configuration files selected are appropriate. This is especially important for Sun custom task steps, as the configuration files associated with each Sun custom task are sample files provided as examples. For more information on the tasks available, please see Sun DPCustom Actions. After the task sequence is created, you should ensure that you go through each step and confirm all of the settings.
You should also ensure all the packages that are used in the task sequence are available at the Distribution Points. Otherwise, the task sequence will fail.
You can further customize this task sequence by inserting or deleting task step(s) to suit your environment.
─────
35

Adding Sun DP Tasks to a Task SequenceIn certain situations, you would like to add one or more Sun custom hardware configuration tasks to an existing task sequence.
To add a Sun custom task step:
1. In the Administrator console , select the task sequence that you would like to add Sun hardware configuration tasks to.
2. Right click the task sequence and select Edit.
The Task Sequence Editor opens.
3. Select Add > Sun Deployment > Sun Server Configuration as shown in screen shot.
Figure 30: Adding a Sun DP Task
4. If the task sequence that was selected for editing does not have any Sun custom sequences (which means this will be the first Sun custom task that is going to be added), then a dialog asking you whether you want to add any array configuration to this task sequence opens.
36 Sun Deployment Pack 1.0 for Microsoft System Center Configuration Manager 2007
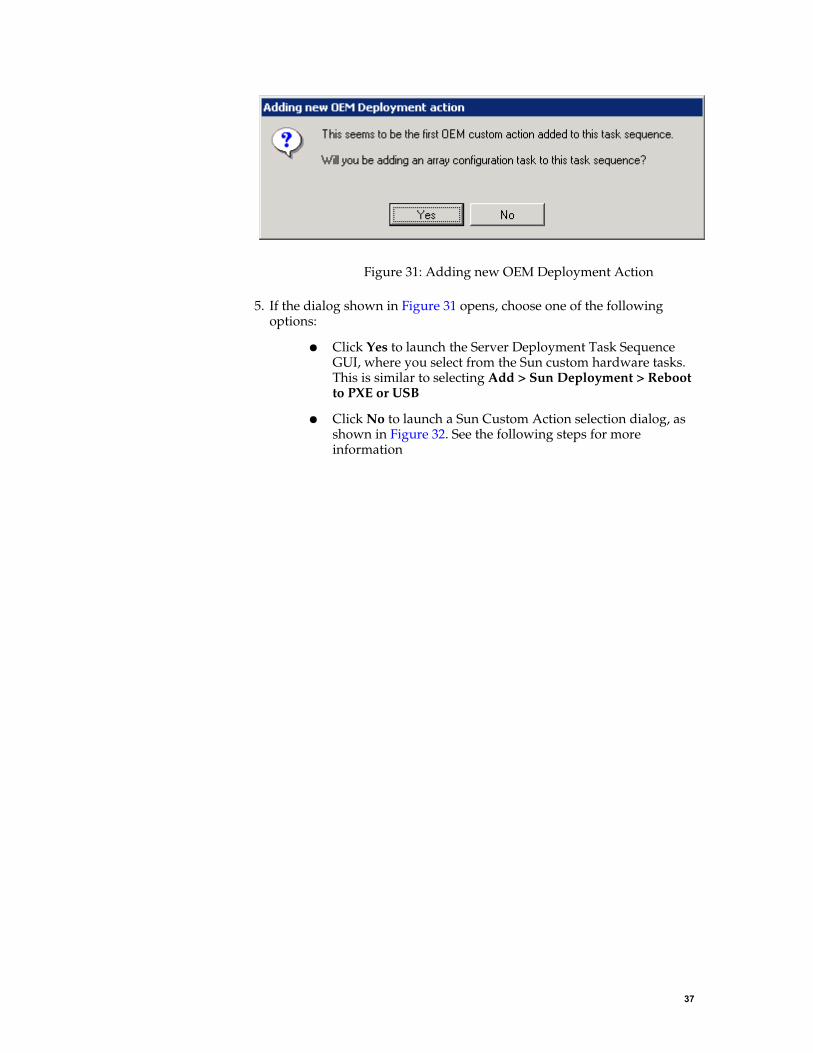
Figure 31: Adding new OEM Deployment Action
5. If the dialog shown in Figure 31 opens, choose one of the following options:
● Click Yes to launch the Server Deployment Task Sequence GUI, where you select from the Sun custom hardware tasks. This is similar to selecting Add > Sun Deployment > Reboot to PXE or USB
● Click No to launch a Sun Custom Action selection dialog, as shown in Figure 32. See the following steps for more information
37

Figure 32: Sun Custom Action selection GUI
6. Select an individual Sun custom hardware configuration task step from the list of available actions that appear in the Configuration action type drop-down list.
Figure 33: Configuration Action Type
38 Sun Deployment Pack 1.0 for Microsoft System Center Configuration Manager 2007

7. Select the Sun custom hardware configuration action you want to add to the task sequence and click Set in the Action window.
8. The available controls and how the various controls behave changes based on the action selected. For more information, please see Sun DPCustom Actions.
39

CHAPTER 4
Sun DP Custom Actions
This section describes the various custom actions provided by Sun DP, their functionality and configuration options. It also explains how to work with the actions and edit configuration files so that you can customize them to your environment.
─────Custom Actions OverviewMost of the Sun DP custom actions need some sort of configuration files, firmware or BIOS image files to complete the action. For example the Configure ILOM action configuration file enables you to control exactly how ILOM should be configured during the task sequence. For the actions that need a configuration file the appropriate file should be selected from the Configuration file / Command line parameters drop down box.
Some of the custom actions, such as Boot To PXE, do not need any configuration files, the configuration file selection box is deactivated for these actions.
Figure 34: Action without Configuration Settings
The list of files that appear in the Configuration file/Command line parameters drop down box is determined by the following conditions:
Presence of a file in a particular directory
Extension of the file
For more information on the configuration files necessary for specific actions in the Sun DP, please see Sun DP Actions Reference.
Sun DP provides the necessary tools to run these actions. However, you have to provide the necessary configuration files and firmware or BIOS images depending on which Sun x64 servers the task sequence is designed
40 Sun Deployment Pack 1.0 for Microsoft System Center Configuration Manager 2007

for. Please download the relevant firmware and BIOS images for your Sun x64 servers from http://www.sun.com.
─────Working with ActionsThe custom action page enables you to configure the action. There are two sets of tabs:.
The tabs at the top of the custom action dialog switch between the main Properties part of the form and the Options (or Conditions) page. The Options page contains the controls for disabling the action and for establishing conditional tests to determine if the action should run in a task sequence.
The tabs in the middle of the page are specific to this custom action and allow you to edit the different options available for the custom action.
Action Settings TabThe Configuration Action Type drop-down menu displays the available configuration actions in this version of Sun DP. It represents the types of major activities used to configure Sun servers, such as configuring the RAID array controller, configuring ILOM, upgrading HBA firmware and BIOS, or other functions. The actions available in this list are Sun-specific.
Figure 35: Action Settings
41

When you first create a new task step, Configuration Action Type and Action are the only two visible, with Action greyed out. Once you select a configuration action type from the list, Action is enabled.
The Action drop-down menu displays the available options for the currently selected configuration action type, which can be either Get or Set. Depending on which Configuration Action Type is selected, only one Action may be available. The use of these Actions is as follows:
Use Set to apply a configuration to the targeted machine
Use Get to capture a configuration from a reference machine
Once you select an available Action, additional controls are displayed.
Note - In this version of Sun DP, only the Set Action is supported and available in the Action drop-down menu.
If the chosen action requires a configuration file, the Configuration file / Command line parameters drop down menu becomes active. You can choose a configuration file to use for the action from the drop-down menu. The View button displays the currently chosen configuration file and also enables you to edit the file.
Timeout check box
The Timeout check box controls the use of the timeout value control. The timeout value controls how long SCCM 2007 waits for an action to complete. If checked, the timeout value control is enabled.
Timeout Value
The Timeout Value contains an integer value between 5 and 100 which specifies the number of minutes that the task sequence engine should wait for the task step to complete. If the action's status is not returned within this time period, the step is marked as failed. This is a standard control on all task sequence steps.
─────Variable Replacement TabThe Variable Replacement tab contains all of the settings related to the use and replacement of variables within the task. Variables can take several forms:
System Variables
Task Sequence Variables
Machine Variables
Collection Variables
42 Sun Deployment Pack 1.0 for Microsoft System Center Configuration Manager 2007

Figure 36: Variable Replacement Tab
Action to take for uninitialized / null variables
Use a null/blank value
In cases where you wish a variable that is not initialized or has a blank value to remain blank, you should select this option. This causes the processing of the task on the client side to continue if any variable is undefined or blank.
Fail the task
In some instances, if variables are intended to be replaced but are not found within the environment, the action would be left in an unusable or misconfigured state. If an environment variable is not set or is set to null, an invalid value is returned. When this checkbox is checked, any failure to retrieve a valid variable value results in the action being marked as failed. This allows you to more easily see what is wrong with the action rather than trying to debug a failed command line or a misconfigured system
Search all text input files for variables to replace
This setting enables the client-side script to search for and replace variables in the command line or within files specified and replace them with values found in the task sequence environment or the Windows system environment. If you do not have any variables in the command line or in files specified, leaving this checkbox unchecked provides for greater performance of the action (since it does not have to search for the variables in every file).
Replace %PASSWORD% variables with this password
In some instances, configuring a hardware component requires the use of a password. Rather than embedding the password in plain text within the XML or displaying it on the command line, you can utilize this option to
43

hide the password as a task sequence variable. Checking this box enables the two password textboxes. The two textboxes are used to ensure you confirm the password entered.
Manually define additional variables
In some instances, you may need to set additional variables on the system prior to a task running. This may be because the utility or script being run needs to have specific variables defined to direct it to a specific path, other utilities, or to define options for program execution. This data grid allows you to define an unlimited number of additional variables for this task, which will be set prior to the start of the command that runs the associated utility.
Each variable must have a name, but the value can remain empty (if you want to create a null variable). Also, each variable can be set as a system, task sequence, or machine variable. If you wish to remove a variable, simply click the X button on the appropriate row.
Note - a variable�s value can contain another variable. This is useful in the case that an existing variable holds the value you need, but the program needs to access that information from a different variable name.
Log / Return Files TabThe settings on this tab relate to log files that are returned to a network share provided that it is accessible using the credentials provided after the task runs.
Figure 37: Logs / Return Files
44 Sun Deployment Pack 1.0 for Microsoft System Center Configuration Manager 2007

Retrieve the task sequence log file
When a task sequence runs, SCCM 2007 tracks and logs command execution through the SMSTS.LOG file stored in the local path on the client (for example, on the X: drive in WinPE). This log file contains valuable debugging information, yet when using WinPE, the log is lost at each reboot. This checkbox enables the SMSTS.LOG file to be sent back to a designated location (specified previously in a Connect to Network Drive action).
After the command executes, the client gathers the SMSTS.LOG file and pushes it back to the mapped network location specified in the Drive Letter drop-down menu and the Path textbox. If the path does not exist, it is created before the log file is placed there. If a filename is specified in the path, the SMSTS.LOG file is saved as that file. If the file already exists, the file name is modified with an incremental value and then saved.
Enable extended / debug logging
By default, a limited amount of information regarding the task execution by the script is displayed in the SMSTS.LOG file. By enabling debug-level logging, a much greater amount of information is included in the log file, which may assist with troubleshooting a failure in the task sequence.
Note - this setting only affects the logging by the custom action script and not the logging by the task sequence client itself.
Retain network folder settings checkbox
If you have an extensive task sequence with many of these custom actions, rather than require you to enter the same network path and login information in each task step, this checkbox allows you to simply copy over the settings from a previous step that sets these network settings.
Note - Since network settings are not retained across a reboot, checking the box will only copy settings from a prior task if there are no reboots between them. If there is a reboot after the previous task with network settings and before this task, an error message will display and you will be required to re-enter the network settings.
Log Path
Enables the log file to be stored in a location other than the root directory of the mapped drive. If a path is specified, the log is stored there. If the directory does not exist, it is created if possible. If a filename is specified at the end of the path, the log file is saved as that file name. If the file name already exists, then an incremental value is added to the name so the file can be saved without overwriting an existing file.
Account
The domain and account name to be used to access the above path.
Password
The password associated with the account name above. Stored and transmitted in encrypted form.
45

Map a drive checkbox
This checkbox enables the drop-down list for mapping a drive. A mapped drive is not necessary to store files on a network share (a UNC path can be used), but it is recommended. A mapped drive is required for accessing any batch files (.CMD or .BAT).
Mapped Drive
This drop down contains a list of drive letters that will be used as the drive to store the log file or the captured settings file (from the Get action). This drive needs to already have been mapped using a Connect to Network Folder action prior to this task step.
Configuring ActionsThe Sun DP actions provide template configuration files which you modify to customize the action correctly for your hardware. The configuration files can be either edited by hand or you can use the text editor.
Text Editor Overview
On the Action settings tab, for an action which provides an ASCII configuration file, the text editor is accessed by clicking View. The currently selected configuration file under Configuration file / Command line parameters is displayed.
46 Sun Deployment Pack 1.0 for Microsoft System Center Configuration Manager 2007

Figure 38: Text Editor
The text editor shows the current content of the configuration file. You can modify the configuration file to pass commands to the utilities which provide the functionality of the Sun DP actions. The options in the text editor are:
Import File enables you to search for and import an existing text-based file. The contents are displayed in the text editor.
Save to a file exports the contents of the text editor to a file when you click OK. This enables you to create new configurations that can be reused.
Note - The package must be updated to distribution points before any changes are available to task sequences. This is what is displayed in the dialog that appears when the box is checked.
If you do not choose to save the configuration file to the package, the configuration is saved as a string within the task sequence and sent as a variable to the client during deployment. When this occurs, you receive the
47

notification [Configuration saved as a variable]. The configuration can be saved as a file in the package instead by simply opening the editor again, checking the box on the left and clicking OK, then selecting the file to save to.
Modifying Configuration Files
The exact commands to use in the Sun DP action configuration files vary depending on the action being configured. This procedure provides a generic example of modifying Sun DP action configuration files. For specific information about the configuration file for each Sun DP action, as well as the commands you can use for an action, see Sun DP Actions Reference.
Note - Whenever a configuration file is updated or a new configuration file or an image file is placed in Sun DP folder, SCCM server Distribution Points need to be updated. Otherwise, there is a chance that the client might get an old package from the distribution point.
To modify Sun DP action configuration files:
1. Identify an action which requires a configuration file. For example the Configure ILOM action.
Figure 39: Action with Configuration Settings
2. Select the configuration file you want to edit from the Configuration file / Command line parameters drop-down menu. There may be only the default configuration file available.
3. Click View.
The text editor opens. For more information on the text editor, see TextEditor Overview.
4. Modify the configuration file so that the commands match your hardware. The header of the default configuration files supplied with the Sun DP provides an overview of the command syntax you can use in the file. For more detailed information, the description of each action at Sun DP Actions Reference provides details about the manual for the utility which provides the functionality of the Sun DP actions.
5. To illustrate this process, if you wanted to use the LSI RAID Config Sun DP action to create a RAID0 array you would refer to the Sun LSI 106x RAID User's Guide.
48 Sun Deployment Pack 1.0 for Microsoft System Center Configuration Manager 2007

This document tells you that the command to enter at the command line is:
cfggen <controller-number> auto <volume-type> <size> <size> [qsync]
You decide that you want to use the auto option with size MAX, so you would execute the following command:
cfggen 0 create auto IS MAX
The commands after cfggen are what you would use in the Sun DP configuration file. In this case you would type:
0 create auto IS MAX
Each command must be entered on a new line. It is possible to enter more than one command in the configuration file.
6. Once you have finished editing the configuration file, check Save to a file in the toolkit package for this custom action when I click OK.
The modified configuration file is saved to the appropriate directory.
Note - it is also possible to modify the configuration file by hand. The exact location of the configuration file for each action is provided in Sun DPActions Reference.
─────Sun DP Actions ReferenceThis section details the Sun custom actions that are provided by Sun DP, as well as the configuration files and firmware image file locations.
LSI RAID Config (ini file)
Functionality: This action enables you to create, delete or rebuild RAID0 and RAID1 arrays on LSI Controllers on Sun x64 servers.
Configuration options: You have to provide a configuration file that has a list of commands that need to be executed. These commands are the commands that the LSI cfggen utility supports. The portion of the command that you would normally pass to cfggen on the command line should be entered into the configuration file.
For a list of commands and supported configurations, please refer to the Sun LSI 106x RAID User's Guide available at:
http://docs.sun.com/
Location of Configuration files: All configuration files for this action must have the extension .ini and be at the following path:
<Microsoft Configuration Manager>\OSD\lib\Packages\Deployment\Sun\Server\1.0\config\RAID\LSI
49

StorageTek RAID Config (ini file)
Functionality: This action enables you to create, delete or rebuild RAID0 and RAID1 arrays on StorageTek Controllers on Sun x64 servers.
Configuration options:You have to provide a configuration file that has a list of commands that need to be executed. These commands are the commands that the StorageTek arcconf utility supports. The portion of the command that you would normally pass to arcconf on the command line should be entered into the configuration file.
For a list of commands and supported configurations, please refer to the Uniform Command-Line Interface User�s Guide available at:
http://docs.sun.com/
Location of Configuration files: All configuration files for this action must have the extension .ini and be at the following path:
<Microsoft Configuration Manager>\OSD\lib\Packages\Deployment\Sun\Server\1.0\config\RAID\StorageTek
Configure ILOM
Functionality: This action enables you to configure Sun x64 server's ILOM using the KCS interface.
Note - This action uses the ipmitool sunoem cli command to configure ILOM over KCS. Please check whether the firmware image on your Sun server's ILOM supports this command. If it is not supported, please upgrade the ILOM firmware. For documentation explaining upgrading firmware on your Sun x64 server's ILOM, please see the appropriate documentation at www.sun.com.
Configuration options: You have to provide a configuration file that has a list of components that need to be configured and the values that the components need to be configured with.
In the configuration file, each parameter that needs to be configured should be entered on a separate line and must be in the following format
<ILOM Configuration Parameter> = <Value> | <Task Sequence Variable>
For example:
/SP system_identifier = 'MySystemIdentifier'
Alternatively, if you have set a Task Sequence Variable (for example: %ILOM_SYSTEM_IDENTIFIER%) for a client machine or collection that a client machine is part of, then you can use the Task Sequence Variable as a right hand side parameter
For example:
/SP system_identifier = %ILOM_SYSTEM_IDENTIFIER%
50 Sun Deployment Pack 1.0 for Microsoft System Center Configuration Manager 2007

Note - The left hand side parameters are case-sensitive. Strings using special characters can be escaped using single quote marks.
Location of Configuration files: All configuration files for this action must have the extension .ini and be at the following path:
<Microsoft Configuration Manager>\OSD\lib\Packages\Deployment\Sun\Server\1.0\config\SP
Boot to PXE
Functionality: This action enables you to configure PXE as the first boot option in the BIOS.
Configuration options: No configuration is required for this action. The Boot to PXE action executes the following command:
ipmitool chassis bootdev pxe
PowerCycle Server
Functionality: This action enables you to power cycle the host server.
Configuration options: No configuration is required for this action. The PowerCycle Server action executes the following command:
ipmitool chassis power cycle
Note - This action power cycles the host as soon as the action is executed. The preceding task steps dictate how the server behaves after the reboot. For example, if you want the system to PXE boot when rebooted, you must add an appropriate step before the PowerCycle Server step so that the server is configured to PXE boot after the reboot.
Upgrade LSI HBA firmware
Functionality: This action enables you to upgrade an LSI Controller's HBA firmware on Sun Servers. The existing firmware on the LSI Controller should be v1.20 or higher. Currently, this command supports upgrading firmware on all controllers only. It does not support upgrading individual controllers.
Configuration options:You have to select a firmware image from the drop down menu that should be used to upgrade the LSI Controller's HBA firmware.
Location of Configuration files: All configuration files for this action must have the extension .FW and be at the following path:
<Microsoft Configuration Manager>\OSD\lib\Packages\Deployment\Sun\Server\1.0\firmware\HBA\LSI
51
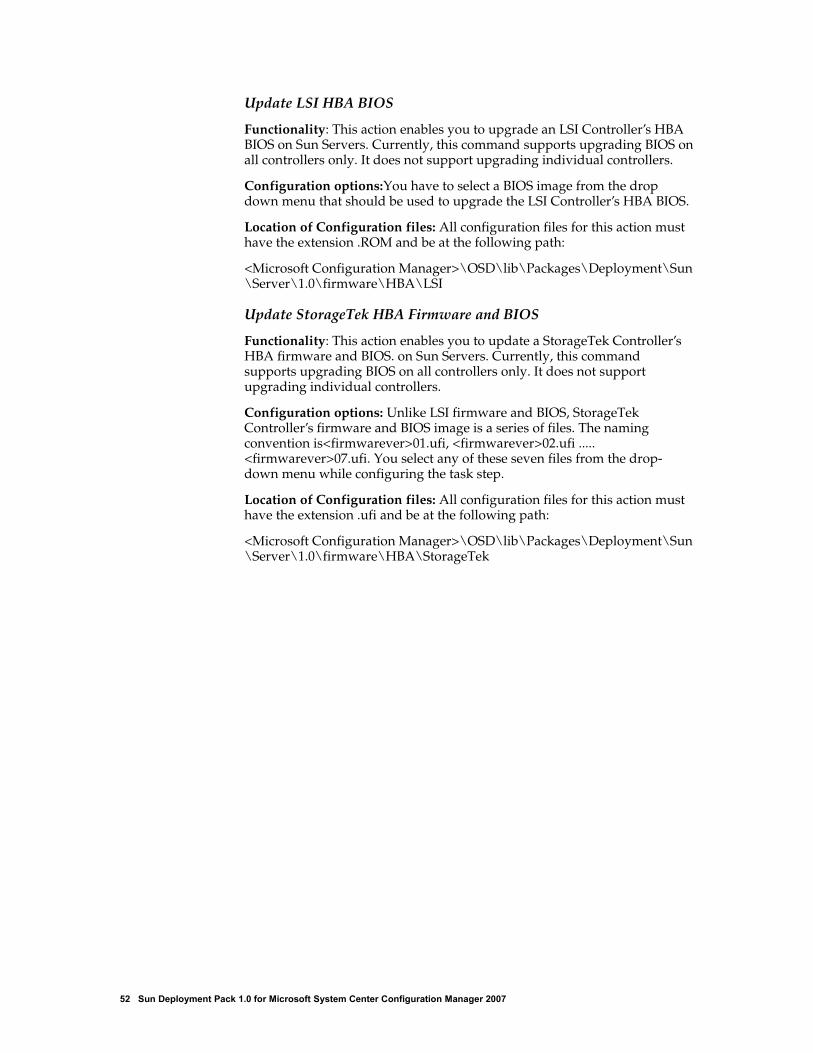
Update LSI HBA BIOS
Functionality: This action enables you to upgrade an LSI Controller's HBA BIOS on Sun Servers. Currently, this command supports upgrading BIOS on all controllers only. It does not support upgrading individual controllers.
Configuration options:You have to select a BIOS image from the drop down menu that should be used to upgrade the LSI Controller's HBA BIOS.
Location of Configuration files: All configuration files for this action must have the extension .ROM and be at the following path:
<Microsoft Configuration Manager>\OSD\lib\Packages\Deployment\Sun\Server\1.0\firmware\HBA\LSI
Update StorageTek HBA Firmware and BIOS
Functionality: This action enables you to update a StorageTek Controller's HBA firmware and BIOS. on Sun Servers. Currently, this command supports upgrading BIOS on all controllers only. It does not support upgrading individual controllers.
Configuration options: Unlike LSI firmware and BIOS, StorageTek Controller's firmware and BIOS image is a series of files. The naming convention is<firmwarever>01.ufi, <firmwarever>02.ufi ..... <firmwarever>07.ufi. You select any of these seven files from the drop-down menu while configuring the task step.
Location of Configuration files: All configuration files for this action must have the extension .ufi and be at the following path:
<Microsoft Configuration Manager>\OSD\lib\Packages\Deployment\Sun\Server\1.0\firmware\HBA\StorageTek
52 Sun Deployment Pack 1.0 for Microsoft System Center Configuration Manager 2007
CHAPTER 5
Sun DP Feature Reference
This section details the features and functionality available in the Sun DP.
─────Sun Server Configuration Custom ActionAs part of a bare metal server deployment process, you often need to perform many hardware configurations like configure the array controller, configure ILOM, upgrade HBA firmware and BIOS, or other items specific to Sun hardware, and you need to do it before the operating system is installed. Sun provides server configuration tools for this purpose, but they require use in a command line environment using scripts and configuration files. The server configuration custom action provided as part of Sun DP abstracts the complexity of those tools into an easy-to-use graphical interface, where you simply need to know what type of action you need to perform and a sample configuration file to do it with. More complex actions are still available, such as using command line parameters or variable replacement inside configuration files. Sun DP comes with several Sun custom actions that can be added as a task action steps either to an existing task sequence or can be inserted as a part of task sequence built using a wizard.
─────Bare Metal Server Deployment TemplateThe Bare Metal Server Deployment Template is the template used to create a new Sun DP task sequence. This template provides all of the actions necessary to enable you to deploy Sun x64 servers quickly and efficiently.
When deploying a new, unconfigured server, there are no configured disks from which to boot. This means that the system must boot from other media, such as a CD\DVD drive, from USB, or from the network via PXE. At times, the server being deployed may need to be rebooted during the task sequence in order to complete initialization of a configuration, such as defining array disks. In fact, if the disks on a system are defined or redefined after WinPE boots, WinPE does not recognize the new system partition, which means a reboot is necessary in order to successfully complete a deployment.
The primary issue is that when using a Reboot Computer standard action within the task sequence editor, the action requires a writeable partition, either to reboot into the existing OS, or to copy WinPE to the disk and reboot to WinPE again. If you assign a reboot task to a machine and these
53

conditions do not exist, the task sequence fails at that action. The capability of rebooting the machine in the middle of a task sequence without a valid boot partition does not exist.
If you were using PXE and the machine were to simply end the task sequence and reboot on its own, SCCM 2007 does not re-advertise the PXE boot to the computer. The PXE advertisement must be reset if it is to run the same task sequence again. This means the server would likely reboot into an unknown state and stop at a No Operating System prompt. You could assign a second task sequence to the machine, but when the first task sequence ended, the second would start immediately, without a reboot between them.
If you were using boot media such as a USB drive or CD/DVD media, the result would be the same in that the task would fail when the reboot task was run because a valid boot partition did not exist. If you simply made the task sequence end instead of using a reboot, the system would reboot and start the task sequence again, but without some sort of conditional flow control, it would simply re-run the same tasks over and over.
Solution
The solution to these issues relies on (1) setting a state variable during the task sequence, (2) using that state variable to control which steps are run in that sequence, and if using PXE, (3) using WMI remote calls to reset the PXE advertisement for the computer so that when it reboots it will re-run the task sequence.
In order to control the flow of the task sequence across reboots, groups are created that have conditions set on a state variable. This state variable is a task sequence variable, set via the SCCM 2007 server or via a file-based method (in case of a disconnected deployment).
In order to set the state variables, a custom action is used to read the variable from the task sequence environment and increment it appropriately.
Finally, if using PXE, the custom action also calls to WMI on the SCCM 2007 server and resets the PXE advertisement so that the machine can boot into PXE again.
Workaround Method
You can manually work around this issue by creating the task sequence steps and groups using the procedure shown in the Solution Overview section. This also involves creating a custom script that will connect remotely to the SCCM 2007 server (with appropriate credentials), accessing WMI, and resetting the PXE advertisement for the specific computer running the task sequence.
Modifying WinPE Registry Task Step
The Modifying WinPE Registry task step modifies WinPE registry entries as a workaround for the issue "You cannot install Windows Server 2003 successfully after you use Windows Vista or Windows PE 2.0 to create partitions on a hard disk" discussed at the following website:
http://support.microsoft.com/default.aspx?scid=kb;EN-US;931761
54 Sun Deployment Pack 1.0 for Microsoft System Center Configuration Manager 2007
The script Win2003Issue.vbs that is executed as part of the Modifying WinPE Registry task step sets the following registry entries in WinPE to 0:
HKEY_LOCAL_MACHINE\SYSTEM\CURRENTCONTROLSET\SERVICES\VDS\ALIGNMENT\LessThan4GB
HKEY_LOCAL_MACHINE\SYSTEM\CURRENTCONTROLSET\SERVICES\VDS\ALIGNMENT\Between4_8GB
HKEY_LOCAL_MACHINE\SYSTEM\CURRENTCONTROLSET\SERVICES\VDS\ALIGNMENT\Between8_32GB
HKEY_LOCAL_MACHINE\SYSTEM\CURRENTCONTROLSET\SERVICES\VDS\ALIGNMENT\GreaterThan32GB
Building a Task Sequence Using a Vanilla Install Media
If you are using a vanilla install media there are some manual steps that need to be performed after building a task sequence. This applies if you are using source files from a vanilla Windows Server 2003 install media.
Note - This manual step is necessary only when deploying Windows Server 2003 using source files from Windows Server 2003 (32-bit or 64-bit) vanilla install media. This step is not necessary when a WIM image or Scripted OS install (containing mass storage drivers) is used for OS Deployment. Also this step is not necessary if you are installing Windows Server 2008 using source files from Windows Server 2008 (32-bit or 64-bit) install media.
Vanilla Windows Server 2003 install media does not have most of the mass storage drivers that are necessary to install Windows Server 2003 on Sun x64 servers. Sun DP provides mass storage drivers installation steps as part of the task sequence that is generated using the Bare Metal Deployment wizard. You can manually add the the drivers required for your Sun x64 servers.
To manually add mass storage drivers when using vanilla install media:
1. Open the task sequence you want to edit and right-click the name. In the menu that select opens, choose Edit.
2. Open the Mass Storage Driver Apply step that you would like to activate. Mass Storage Driver Apply steps are in the groups Apply x86 Driver Package and Apply x64 Driver Package.
For example, if you would like to apply the LSI Adapter Driver (x86), select the task step Apply LSI Adapter Driver (x86) in group Apply x86 Driver Package.
55

Figure 40: Applying a Driver Manually
3. Select the check box next to Select the mass storage driver within the package that needs to be installed before setup on Pre-Vista operating systems.
56 Sun Deployment Pack 1.0 for Microsoft System Center Configuration Manager 2007
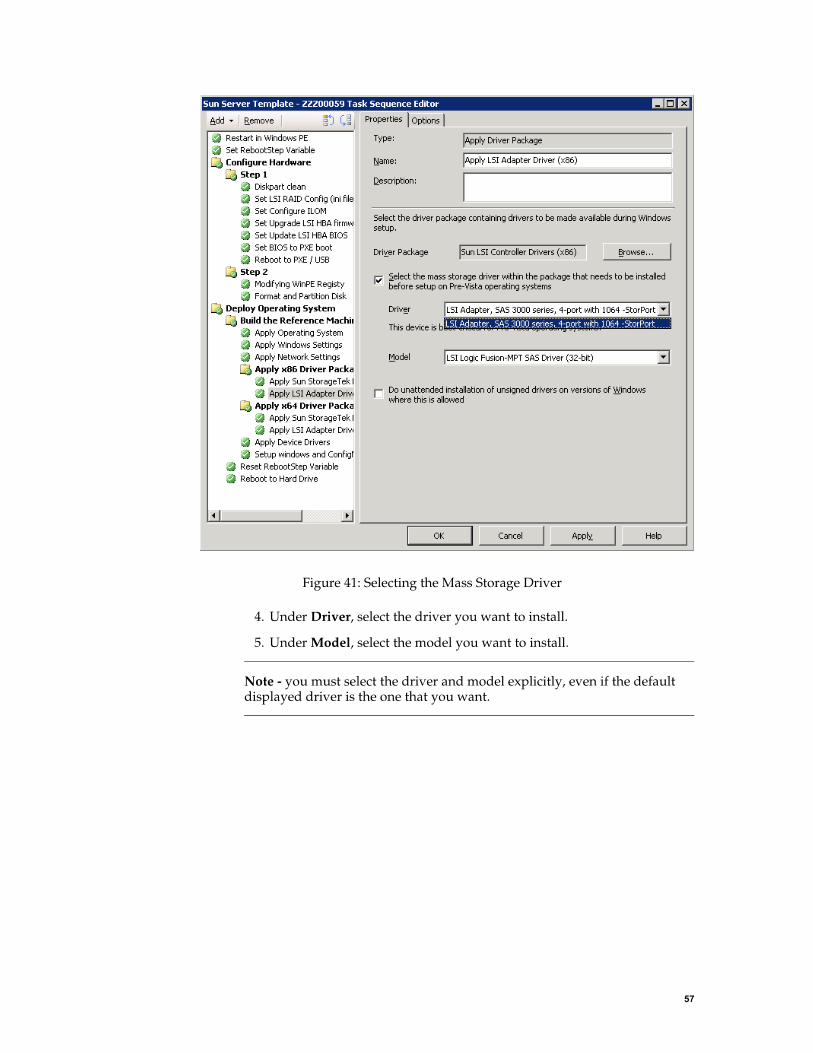
Figure 41: Selecting the Mass Storage Driver
4. Under Driver, select the driver you want to install.
5. Under Model, select the model you want to install.
Note - you must select the driver and model explicitly, even if the default displayed driver is the one that you want.
57

Figure 42: Selecting the Appropriate Model
6. Click Apply.
This process has to be performed for each individual mass storage driver that you want to be installed before Windows setup starts, or you can opt to perform this step for all the mass storage task steps located under groups Apply x86 Driver Packages and Apply x64 Driver Packages group.
Each mass storage driver apply step has a condition set in the Options tab. Based on the condition set in the options tab of the task step, the driver will be copied to SCCM client only if it detects that particular SCSI or SATA Controller.
58 Sun Deployment Pack 1.0 for Microsoft System Center Configuration Manager 2007

Figure 43: WMI Query Properties
Note - if the selected OS to be installed is Windows Server 2008 from vanilla install media, please disable the groups Apply x86 Driver Packages and Apply x64 Driver Packages. Based on devices discovered, the SCCM client automatically selects the best matched drivers available on SCCM server and installs them during the Apply Device Drivers task step, including mass storage drivers.
─────Process Used for Implementing Reboot to PXE/USB ActionsWhen deploying a new server from bare metal, a specific process is followed that takes certain factors related to SCCM and WinPE into account. This process is defined in this manner to ensure that the server being deployed is configured correctly and no issues are encountered as a result of disk discovery or disk modification. When using the built-in templates for deploying a server (either through the mini-wizard or merging with an
59
existing task sequence), this standard task sequence configuration is applied.
A sample task sequence that has Reboot to PXE/USB task actions is shown in the screen shot below. Reboot to PXE/USB task action primary functions are:
Use the credentials you provide to connect back to SCCM Server.
Create a machine variable called RebootStep. This variable is controlled by the Reset RebootStep variable and Set RebootStep variable task steps.
Reset RebootStep variable resets the value of RebootStep variable to 0, so that if the task sequence is rerun, then it runs from the beginning without skipping any steps.
Set RebootStep variable creates RebootStep variable if it is not already present on the machine or increments it by 1 if it is already present. Setting the RebootStep machine variable allows the task sequence to branch off and perform only specific actions based on conditions set in the task sequence on groups or steps.
Clear the PXE advertisement for the machine, so that the SCCM server offers PXE boot to this machine for completing the rest of the task sequence.
Note - Please do not edit the client script.
The Set BIOS to PXE boot task step configures PXE as the boot option, so that computer looks for PXE offers as the first option. Please do not delete this step.
The next section explains the logic how the task sequence operates while executing the sample task sequence shown.
60 Sun Deployment Pack 1.0 for Microsoft System Center Configuration Manager 2007
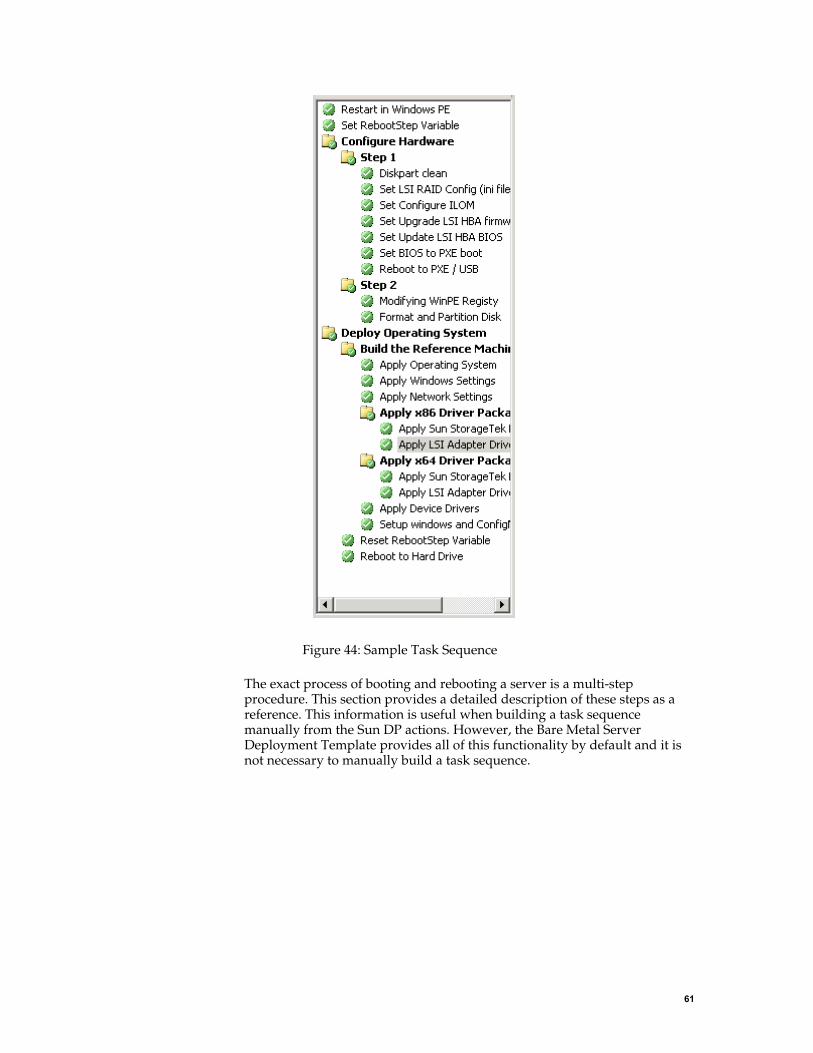
Figure 44: Sample Task Sequence
The exact process of booting and rebooting a server is a multi-step procedure. This section provides a detailed description of these steps as a reference. This information is useful when building a task sequence manually from the Sun DP actions. However, the Bare Metal Server Deployment Template provides all of this functionality by default and it is not necessary to manually build a task sequence.
61

•Boot #1
1. The Server boots into the WinPE automation environment via PXE.
2. The Set RebootStep variable action creates the machine variable and sets the variable to 1. If the RebootStep variable is not already present, this step creates it and sets it to 1. If it is already present then it increments it by 1.
3. The Configure Hardware group runs.
4. Group The Step 1 group's condition evaluates to TRUE, in other words RebootStep = 1
a.Actions inside this group run.
b.Set BIOS to PXE boot configures PXE boot as the first boot option in BIOS.
c.Reboot to PXE/USB resets the PXE advertisement
5. The Step 2 group's condition evaluates to FALSE, steps skipped.
6. The Deploy Operating System group's condition evaluates to FALSE
7. The task sequence ends and server reboots.
•Boot #2
1. The server boots, receives the advertisement from the SCCM server (as the advertisement was reset in the previous step Boot #1) and boots into WinPE. At this step, RebootStep is equal to 1.
2. The Set RebootStep variable action increments the variable to 2
3. The Configure Hardware group runs
4. The Step 1 group's condition evaluates to FALSE, steps skipped
5. The Step 2 group's condition evaluates to TRUE. In other words RebootStep = 2
a. Actions inside group 2 run (no reboot at the end)
6. The Deploy Operating System group's condition evaluates to TRUE
a. Actions inside the group run.
b. Reset RebootStep variable sets the variable to 0
7. The task sequence ends and server reboots.
Removing the RebootStep variable
The RebootStep variable that is created during task sequence execution is used to sequentially execute the task steps as discussed in the above section. This computer variable is used by the task sequence to track the current stage in the process and the value of this variable determines which groups or steps are run during each phase of the deployment. However, if an error occurs during the task sequence execution, this variable is not automatically reset, and your task sequence may not work as it is supposed to be because of RebootStep variable's value. It is recommended that you remove the
62 Sun Deployment Pack 1.0 for Microsoft System Center Configuration Manager 2007

computer variable for any computer that has failed the task sequence, which ensures it will restart the task sequence from the beginning.
To delete the RebootStep computer variable:
1. Right-click on the computer resource in the appropriate collection.
2. Select Properties, click on the Variables tab, select the RebootStep variable, then click Delete.
3. Click Apply, then OK.
63
CHAPTER 6
Troubleshooting
This section provides tips and solutions for the most common problems you may encounter when installing and using Sun Deployment Pack 1.0 forMicrosoft System Center Configuration Manager 2007. In addition you can find the release notes for the current version.
─────Release NotesThis section provides the late breaking information about Sun DeploymentPack 1.0 for Microsoft System Center Configuration Manager 2007.
Invalid Packages Error MessageIf you are using the Create a Sun Server Deployment Template functionality and you have disabled and then reenabled any group containing apply driver packages steps, make sure you repeat the process of reselecting each driver for every apply driver package step and then clicking apply, otherwise you can encounter a Referencing invalid packages error message.
Task Sequence FailsIf you have used the the apply driver packages steps as part of the Create a Sun Server Deployment Template functionality (for example when installing from vanilla media) and the created task sequence fails, make sure you repeat the process of reselecting each driver for every apply driver package step and then clicking apply. For more information, see Building aTask Sequence Using a Vanilla Install Media.
OS Deployment on Sun x6400 BladesWhen using Sun x6400 Blades (x6240, x6250, x6440, x6450) configured with Sun Blade 6000 Disk Module OS deployment is not supported.
─────General GuidelinesThis section provides some general guidelines how to solve issues.
64 Sun Deployment Pack 1.0 for Microsoft System Center Configuration Manager 2007

Read the DocumentationThe majority of issues related to the use of this product are covered in the documentation, including this section. Please ensure you have checked this documentation first before you call support. Here are some related sections of the SCCM 2007 documentation you should be familiar with:
Troubleshooting Operating System Deployment
Troubleshooting Operating System Image Deployment Using USB Devices
Check your Action SettingsThe primary cause of task sequence failures is related to the settings you provide in the task sequence steps. Be sure to check the task sequence steps for the following:
Valid environment or task sequence variable references
Valid file references : You should use DOS 8.3 naming whenever possible. Never use file names with embedded spaces
Valid directory references - When capturing files from a target computer, ensure that the destination directory already exists. The process does not automatically create directory structures.
Check the Log files and Use Debug LoggingThe custom actions in Sun DP provide for capturing the SMSTS.LOG file from WinPE and bringing it back to the SCCM server. It also allows for extended logging by the custom action to assist with troubleshooting issues. Enabling this logging (on the Logs / Return Files tab in the action) will assist greatly in resolving issues.
─────Installation IssuesThis section provides information about how to solve issues using installation.
Custom Action Does Not Appear in MenuSCCM 2007 uses information stored in WMI to load the custom action assemblies from disk. This WMI information is imported into the site system�s WMI database during installation through the use of MOF files. If there was an error during importation, or for some reason the WMI information is incorrect, the MMC may hit an exception when trying to load the assembly, likely because the file name or assembly name is not found. Check WMI under root\SMS_<SiteCode>\SMS_TaskSequenceStep\SMS_TaskSequenceAction for Sun_ServerDeployment WMI class.
65
If the desired class does not exist, the custom action will not appear in the menu. Try re-installing the site server files using the installer. A good tool for viewing and editing WMI information is WMI CIM Studio, available from Microsoft at: http://www.microsoft.com/downloads/details.aspx?FamilyID=6430f853-1120-48db-8cc5-f2abdc3ed314&DisplayLang=en
Sun DP Does Not Completely UninstallBy design, the uninstall process does not remove boot images. This is because they are tied to task sequence packages, and removing the boot image may invalidate otherwise working task sequences that you are using. If you are no longer using the boot images created by this product, you may simply delete them from the console.
─────Administrator Console IssuesIf you have customized the configuration XML and did not get the XML right, the actions in the UI may not work properly. In that case, turning on debug logging on the Admin UI part of the custom action may be helpful. Logging is enabled by setting the Debug Logging key (DWORD value in the base registry key for the Sun) to a value of 1. For example, for Sun, set the following key to 1:
HKLM\SOFTWARE\Microsoft\SMS\Deployment\Sun\Server\/
Debug Logging
The debug log file is saved in the Sun DP installation folder within the AdminUI folder.
MMC Crash, Exception, or Property Not Found ErrorsSCCM 2007 uses information stored in WMI to load the custom action assemblies from disk. This WMI information is imported into the site system�s WMI database during installation through the use of MOF files. If there was an error during importation, or for some reason the WMI information is incorrect, the MMC may hit an exception when trying to load the assembly, likely because the file name or assembly name is not found. Check WMI for Sun_ServerDeployment WMI class under the following location:
root\SMS_<SiteCode>\SMS_TaskSequenceStep\SMS_TaskSequenceAction
You can either re-install the site server files using the installer, or if you are already familiar with the contents of the WMI classes, you can modify the class as appropriate to correct the error. A good tool for viewing and editing WMI information is WMI CIM Studio, available from Microsoft at: http://www.microsoft.com/downloads/details.aspx?FamilyID=6430f853-1120-48db-8cc5-f2abdc3ed314&DisplayLang=en
66 Sun Deployment Pack 1.0 for Microsoft System Center Configuration Manager 2007

─────WinPE / Task Sequence IssuesThis section provides information about issues with the WinPE task and other tasks.
WinPE Does Not Start the Task SequenceCheck the SMSTS.LOG file at X:\windows\temp\smstslog\smsts.log. If a package never downloaded, it is likely that you simply do not have the appropriate network drivers installed, so the machine cannot communicate with SCCM 2007. Check your driver catalog to ensure you have the right network drivers available and installed into the boot image, and update the boot image to your distribution points.
Additional network or storage drivers may be needed in the boot image to enable the WinPE boot to function correctly. You should add those through Drivers in the Operating System Deployment node.
The right drivers have been added to the boot image, but are not loading
The original boot.wim file (WinPE boot image) created during SCCM installation is copied and modified with Sun-specific drivers and other files. Your task sequences that use the Sun tools must use this boot image or the tools may not work properly.
Check to make sure the image you loaded the drivers into is the same one being used by the task sequence. This is actually a common error for admins who maintain multiple boot images.
Server Does Not Boot Using PXEPXE is an extension of DHCP, which uses a broadcast type of communication. Broadcast communication uses standard timeout values that are not readily changeable. As a result, a computer will wait for a default timeframe to receive a DHCP or PXE response before timing out and causing a failure condition.
Each time a server is rebooted, it must renegotiate the connection to the switch. Some network switches arrive configured with default settings that may incur connectivity delays. That is, the settings on the switch may cause a DHCP or PXE timeout because they fail to negotiate a connection in time.
One of the features that can be affected by this issue is Spanning Tree Protocol (STP). STP is a protocol that prevents loops and provides redundancy within a network. A networking device using this algorithm may experience some latency as it collects information about other network devices. During this period of information collection, servers may boot to PXE and time out while waiting for a response from Windows Deployment Services. Disable the STP or enable PortFast on end-node ports for the target server to prevent such occurrences. Refer to the manufacturer�s user guide for further information.
67
Another feature that can be affected by this issue is the EtherChannel or Port Aggregation Protocol (PAgP). EtherChannel allows multiple links between devices to act as one fast link that shares the load between the links. Running the EtherChannel Protocol in automatic mode can cause a connectivity delay of up to 15 seconds. Switch to a manual mode or turn off this feature to eliminate this delay.
Speed and duplex negotiation can also play a role in negotiation timeouts. If auto-negotiation on the switch is set to off, and the server is not configured to that speed and duplex setting, the switch will not negotiate with that server.
More information regarding these settings can be found at the Cisco website:
www.cisco.com
Specific documents related to this issue include:
Using PortFast and Other Commands to Fix Workstation Startup Connectivity Delays
www.cisco.com/warp/public/473/12.html
Configuring and Troubleshooting Ethernet 10/100Mb Half/Full Duplex AutoNegotiation
www.cisco.com/warp/public/473/3.html
Boot Order Prevents PXE Booting When a Valid Drive ExistsWhen an active partition is created on a hard drive, it automatically becomes a bootable device if a valid operating system has been installed. If your PXE NIC is after the hard drive in the boot order, the hard drive will try to boot before PXE and boot to Windows, or cause an Invalid System Partition error if Windows is not installed. To resolve this issue, be sure that PXE is placed before the hard drive in the boot order. Keep in mind that even if PXE is first in the boot order, the computer will not actually boot to PXE unless SCCM 2007 has a task sequence for it to run.
After Initializing an Array Controller the Task Sequence to FailSCCM2007 does not allow a task sequence to reboot back to PXE. It can reboot back to WinPE or to an installed OS, both of which require a disk partition and the appropriate installed software. Without a disk partition, SCCM 2007 will fail when attempting to reboot during a task sequence because it expects to copy WinPE to the disk. Additionally, the management point tracks when a machine has booted to PXE to run a task sequence, and once a machine has booted to PXE for a task sequence, it cannot use PXE as a boot method again for that task sequence unless the advertisement is reset.
So how can you perform a reboot to PXE if you need to within a task sequence? A custom action has been developed called Reboot To PXE / USB. This custom action, written using C# and VBScript, connects to the
68 Sun Deployment Pack 1.0 for Microsoft System Center Configuration Manager 2007

SCCM 2007 SDK, and contains custom code to drive actions in the Administrator console as well as the machine being deployed. This custom action performs all the steps necessary to perform the reboot to PXE and allow for proper program flow when it occurs.
The only other way to accomplish a reboot to PXE is to use more than one task sequence, let the computer fall off the end of the first task sequence and manually reset the PXE advertisement for the computer.
Failed to Download Policy MessageIf you receive a failed to download message and either code 0x80093102 or 0x80004005 his error code typically refers to a certificate validation issue. The SMSTS.LOG file will show an entry with the following text:
CryptDecryptMessage ( &DecryptParams, pbEncrypted, nEncryptedSize, 0, &nPlainSize, 0 ), HRESULT=80093102
or
no cert available for policy decoding
Possible causes are:
Misconfiguration of your domain or site server such as DNS not pointing to the site server, or the site server not specifying a valid FQDN (which is referred to by the DNS listing). If your site server does not specify a FQDN (and only specifies the NETBIOS name), and your DNS server refers to the FQDN, a faulty lookup may cause this error.
The certificate being used for PXE and boot media. Check the certificates under the Site Settings node and see if any certificates are blocked or missing. Open the certificates and ensure that they are actually installed into the certificate store. If not, install them.
If the above do not work, try removing the package from the distribution point (via Manage Distribution Points), and then add it back. This will cause the package hash to be regenerated.
Task Sequence Fails with Failed to Download Policy
If you receive a failed to download message and error code 0x80004005, this error code typically refers to a certificate validation issue. The SMSTS.LOG file will show an entry with the following text:
Check the certificates under the Site Settings node and see if any certificates are blocked or missing. Open the certificates and ensure that they are actually installed into the certificate store. If not, install them.
Package is not DownloadingIn WinPE, the default option of Download content locally when needed by running task sequence will not work. When in WinPE, the task sequence engine will ignore (and fail) all actions that have packages set for this option. Instead, you should set all packages needed for use in WinPE to Access content directly from a distribution point when needed by the running task sequence.
69

Task Sequence does not Run AgainYou must ensure that the advertisement is set to Always rerun so that any time you reset the PXE advertisement the advertisement will be applied to the computer regardless of whether it ran the task sequence before.
Files or Logs Are Not Returned from the ClientThere are a number of issues that might cause failure of the task sequence to return files or logs back from the client:
Failure of the client-side script prior to the file copy. Usually evident in the log file. Repeat the task and press F8 during the task to get to a command prompt (Enable command support checkbox must be checked on the boot image properties > Windows PE page). Then open the SMSTS.LOG file (location varies - in WinPE via PXE, it will be at X:\Windows\Temp\Smstslog\smsts.log).
Malformed XML in the Sun DP's configuration file for the Sun.
The command being executed actually had an error but exited with code 0. This can occur when a severe error is encountered in the script while the script is set to ignore errors and use programmatic error handling (and the error handling did not catch the error). Report this issue to the product team.
The task sequence cannot access the share or mapped drive to where the files should be copied.
Logs are Returned without Output FilesSome possible causes are:
No return file parameters specified in the configuration XML
Return file parameters specified in the configuration XML are incorrect
An error is occurring with the operation of the utility that generates the output file
There is an error in the filename for the return file because of a null variable.
Task Step Execution does not ChangeIf you change the configuration XML, existing tasks are not changed unless they are edited. In order to fix the existing task steps, open the task sequence editor and go through each custom action step in the sequence and modify it (just a space or point in the description will do). Click Apply. The task sequence steps are now saved with the updated information from the new XML file.
70 Sun Deployment Pack 1.0 for Microsoft System Center Configuration Manager 2007

Task Sequence Fails at Apply Operating SystemIf you receive a Failed to make volume X:\ bootable message, this issue is indicated by log content similar to the text below:
MakeVolumeBootable( pszVolume ), HRESULT=80004005 (e:\nts_sms_fre\sms\client\osdeployment\applyos\installcommon.cpp,759)
Failed to make volume E:\ bootable. Please ensure that you have set an active partition on the boot disk before installing the operating system.
Unspecified error (Error: 80004005; Source: Windows)
ConfigureBootVolume(targetVolume), HRESULT=80004005 (e:\nts_sms_fre\sms\client\osdeployment\applyos\applyos.cpp,326)
Process completed with exit code 2147500037
This issue can be related to two different scenarios:
If you are using a Format & Partition action in your task sequence to partition the hard drives, make sure that on one of the partitions you check the box "Make this the boot partition". If you fail to do this, and the computer has only a single hard drive, then the task sequence engine automatically makes one of the partitions the boot partition. But if there are multiple drives, it can't automatically figure out which one should be bootable, so you will get an error.
(This applies only to users who upgraded from SCCM RTM to SP1)If both of the hard drives are completely raw -- they have never been partitioned -- then there is a known bug in Windows PE that it can't properly figure out which drive it was booted from and the error you see will occur. This situation can particularly occur on a server with a RAID controller where you have just formed two or more RAID sets -- the new RAID sets will be completely raw because they have never existed before. The only workaround to this problem with multiple raw drives is to manually boot into Windows PE and run "diskpart" to partition at least one of the drives. Then go back and run the task sequence again and it should work. The known problem with Windows PE is fixed in Windows Vista SP1 (and hence in the Windows PE that it derived from Vista SP1).
SCCM 2007 SP1 includes the SP1 version of the Windows Automated Installation Kit (WAIK). You should download and install SCCM 2007 SP1.
71

Note - The product installer detects the version of WinPE that is currently in use by the default boot images. If the default boot images are not Vista SP1, the product will not install.
How to tell if your boot images are upgraded to Vista SP1
The boot image properties contain an identifier for OS Version.
To view the version of WinPE for your boot images:
1. Open the Computer Management > Operating System Deployment > Boot Images >Sun Deployment folder.
2. Right-click the boot image and select Properties.
3. Click on the Images tab
4. Check the OS version property. It should read 6.0.6001.18000 (or greater).
What to do if your boot images are not upgraded to Vista SP1
You can manually recreate your boot images by using the WAIK and following the steps listed in the SCCM 2007 documentation, in the section titled How to Add a Boot Image to Configuration Manager. However, if your SCCM 2007 processes permit, you might find it easier to remove the old boot image packages using the Admin Console, delete the files in the OSD\boot directories, and re-run the SP1 upgrade installation.
How to tell if WAIK was upgraded to Vista SP1
The WAIK version is stored in the Registry.
To view the WAIK version number:
1. Click on Start > Run and type Regedit.
The Registry editor opens.
2. Navigate to the following location: HKEY_LOCAL_MACHINE\SOFTWARE\Microsoft\ComponentStudio
3. There should be a single key under this key, which is named as the version number of the WAIK.
72 Sun Deployment Pack 1.0 for Microsoft System Center Configuration Manager 2007

Note - There is only one version of WAIK allowed to be installed, but a previous uninstall may not have removed the registry key. In that case, the registry key with the highest version number should be the correct version number.
What to do if WAIK was not Upgraded to Vista SP1SCCM 2007 is supposed to automatically upgrade the WAIK version during an upgrade to SCCM SP1. If that did not occur, try manually uninstalling WAIK and re-running the SCCM SP1 upgrade.
If you need to manually download and upgrade WAIK, you can obtain it here: http://www.microsoft.com/downloads/details.aspx?FamilyID=94BB6E34-D890-4932-81A5-5B50C657DE08&displaylang=en
System Environment variables are not Carried OverWhen a task sequence runs, commands are executed in a command shell. When that task ends, so does that command shell environment, causing the loss of any system variables defined within that task. To ensure that any variables pass between tasks, you should ensure they are set as Task Sequence variables or set as Collection variables or Machine variables.
─────General IssuesThis section provides information about general issues that you may encounter.
Logs do not Show all Expected InformationWhen viewing logs with the Trace32 utility, the logs appear to be cut off - they do not show everything. Try viewing the logs using WordPad (Notepad does not show tab characters correctly). For some reason, Trace32 does not always display the entire log file and it may appear that large slices of time are missing from the log, when in fact they are there.
Testing WinPE-based ActionsAlways configure advertisements with the following settings when using PXE:
Make this task sequence available to boot media and PXE
Schedule: Mandatory assignment : As soon as possible
Schedule: Program rerun behavior : Always rerun program
73

Distribution Points : Access content directly from a distribution point when needed by the running task sequence
Interaction: Show task sequence progress
Always configure WinPE boot images with the following settings:
Windows PE : Enable command support (testing only)
Restarting a Failed PXE-based Task SequenceThis procedure explains how to restart a failed PXE-based task sequence.
To restart a failed PXE-based task sequence:
1. Right-click on the computer you are testing and select Clear last PXE advertisement, select the advertisement and click OK.
2. If you updated anything in the package used by the client, find the package under Software Distribution and right-click on it, then select Update Distribution Points.
3. If you updated any DLL associated with task sequences, go back through the task sequences and EDIT each step that uses that DLL. Task steps are not changed automatically unless edited. All that is required is a keystroke in the Description box and then you can click Apply.
4. If you updated anything in the WinPE Boot Image, find the boot image under Operating System Deployment > Boot Images and right-click on it, then select Update Distribution Points
74 Sun Deployment Pack 1.0 for Microsoft System Center Configuration Manager 2007

Additional ResourcesThe following blog provides an inside look at System Center Configuration Manager 2007 (ConfigMgr 07) Operating System Deployment (OSD):
http://blogs.technet.com/inside_osd/
The following forum provides a discussion on the Operating System Deployment feature for SCCM 2007:
https://forums.microsoft.com/TechNet/ShowForum.aspx?ForumID=1824&SiteID=1
75

76 Sun Deployment Pack 1.0 for Microsoft System Center Configuration Manager 2007