The Sweet Corn Toolkit - Process Vegetables NZ
70
The Sweet Corn Toolkit Manual Second Edition December 2016
-
Upload
khangminh22 -
Category
Documents
-
view
2 -
download
0
Transcript of The Sweet Corn Toolkit - Process Vegetables NZ

The Sweet Corn Toolkit Manual Second Edition December 2016

Sweet Corn Toolkit Manual Second Edition, December 2016 Edited by Jeff Reid The New Zealand Institute for Plant & Food Research Limited Private Bag 1401, Havelock North 1401, New Zealand
Contents
1 Introduction and acknowledgements ........................................................................................................ 1 Challenges ................................................................................................................................................................. 1 This manual ............................................................................................................................................................... 1 Acknowledgements .................................................................................................................................................. 1 Further information .................................................................................................................................................. 1
2 Crop development & growth .................................................................................................................... 2 Introduction .............................................................................................................................................................. 2 Plant development ................................................................................................................................................... 2 How long will the crop take? .................................................................................................................................... 3 Growth vs development ........................................................................................................................................... 3 Growth and potential yield ....................................................................................................................................... 3 Variety and potential yield ....................................................................................................................................... 4 Sowing time and potential yield ............................................................................................................................... 4 Plant population and potential yield ........................................................................................................................ 5 Ear quality and population ....................................................................................................................................... 5 Real yields ................................................................................................................................................................. 6 Further information .................................................................................................................................................. 6
3 Site selection ............................................................................................................................................ 7 Check before visiting the site ................................................................................................................................... 7 Check when visiting the site ..................................................................................................................................... 7 Further information .................................................................................................................................................. 9 Appendix–assessing soil texture ............................................................................................................................... 9 Appendix - Soil structure scorecard........................................................................................................................ 10
4 Cultivation ............................................................................................................................................. 11 General principles of cultivation............................................................................................................................. 11 Protecting the soil resource–important considerations when cultivating ............................................................. 11 Conventional vs. conservation tillage ..................................................................................................................... 13 How to manage cultivations and soil water content: Deciding on the timing ....................................................... 15
5 Plant nutrition and fertilisers .................................................................................................................. 16 Introduction ............................................................................................................................................................ 16 Essential mineral nutrients ..................................................................................................................................... 16 Plant food?.............................................................................................................................................................. 16
Disclaimer The New Zealand Institute for Plant and Food Research Limited, the Sustainable Farming Fund, McCain Foods (NZ) Ltd, Heinz Wattie’s Australasia Ltd, Cedenco Foods, Ballance Agrinutrients Ltd, Process Vegetables NZ a subsidiary of Horticulture NZ and the authors of this manual do not give any prediction, warranty or assurance in relation to the accuracy of or fitness for any particular use or application of, any information or scientific or other result contained in this manual. Neither The New Zealand Institute for Plant and Food Research Limited not any of the above organizations nor any of their employees nor any of the authors shall be liable for any cost (including legal costs), claim, liability, loss, damage, injury or the like, which may be suffered or incurred as a direct or indirect result of the reliance by any person on any information contained in this manual.

Macronutrients ....................................................................................................................................................... 16 Micronutrients ........................................................................................................................................................ 19 Plant analysis .......................................................................................................................................................... 21 Soil chemical analysis ............................................................................................................................................. 22 Soil sampling ........................................................................................................................................................... 22 Nutrient management plans .................................................................................................................................. 24 Fertiliser requirements ........................................................................................................................................... 25 Nutrient balances and fertiliser rates ..................................................................................................................... 27 Code of practice for fertiliser use ........................................................................................................................... 28 Further information ................................................................................................................................................ 28
6 Crop establishment ................................................................................................................................ 29 What is crop establishment? .................................................................................................................................. 29 Characteristics of the sweet corn plant .................................................................................................................. 29 Seed factors ............................................................................................................................................................ 30 Soil factors .............................................................................................................................................................. 32 Planting ................................................................................................................................................................... 33 Checklist for optimum establishment .................................................................................................................... 35
7 Weeds.................................................................................................................................................... 36 Common weeds of sweet corn ............................................................................................................................... 36 When to tackle the weeds in sweet corn ............................................................................................................... 38 Main weed control practices in sweet corn ........................................................................................................... 39 Herbicide resistance ............................................................................................................................................... 42 Herbicide residues and the environment .............................................................................................................. 42 Issues and alternatives for organic production ...................................................................................................... 43 Final notes .............................................................................................................................................................. 43 Further information ................................................................................................................................................ 44 Appendix - Broom corn millet (Panicum miliaceum): A new menace for sweetcorn growers .............................. 45
8 Pests ...................................................................................................................................................... 48 Green vegetable bug .............................................................................................................................................. 48 Slugs ........................................................................................................................................................................ 50 Argentine stem weevil ............................................................................................................................................ 52 Lepidoptera............................................................................................................................................................. 53 Greasy cutworm ..................................................................................................................................................... 54 Heliothis or corn earworm...................................................................................................................................... 56 Cosmopolitan army worm ...................................................................................................................................... 60 Aphids ..................................................................................................................................................................... 63 Other pests ............................................................................................................................................................. 66 Natural enemies ..................................................................................................................................................... 67 How to benefit from natural enemies .................................................................................................................... 74 Further information ................................................................................................................................................ 75
9 Diseases ................................................................................................................................................. 76 Head smut ............................................................................................................................................................... 76 Common rust .......................................................................................................................................................... 78 Northern leaf blight ................................................................................................................................................ 79 Seed rots, damping-off and seedling blight ............................................................................................................ 81 Further information ................................................................................................................................................ 82
10 Irrigation and water management .......................................................................................................... 83 Why irrigate? .......................................................................................................................................................... 83 The Irrigation System .............................................................................................................................................. 84 The big aims of irrigation practice .......................................................................................................................... 84 Ponding- Big problems from the small end of the scale? ....................................................................................... 84 Scheduling irrigation–when and how much? ......................................................................................................... 86 Irrigation Scheduling with a water balance ............................................................................................................ 87 Water balances and bank accounts ........................................................................................................................ 88

Water quality .......................................................................................................................................................... 89 Critical growth stages for irrigation? ...................................................................................................................... 89 Further information ................................................................................................................................................ 89 Appendix: Glossary of irrigation terminology ........................................................................................................ 90
11 Harvest and postharvest ......................................................................................................................... 91 When will the crop be mature? .............................................................................................................................. 91 How is harvest planned? ........................................................................................................................................ 91 Kernel maturity and moisture ................................................................................................................................ 92 Sampling for moisture measurements ................................................................................................................... 92 Harvesting ............................................................................................................................................................... 93 And out of the paddock… ....................................................................................................................................... 93 Postharvest crop management .............................................................................................................................. 94
12 Sweet corn deductions ........................................................................................................................... 96 Unusable cobs......................................................................................................................................................... 96 Head smut ............................................................................................................................................................... 97 Blemish cobs ........................................................................................................................................................... 97 Damaged kernels .................................................................................................................................................... 97 Green vegetable bug .............................................................................................................................................. 98 Foreign material ..................................................................................................................................................... 98 Leaf and stalk .......................................................................................................................................................... 98 Extraneous vegetable matter ................................................................................................................................. 98
13 Trouble shooting your crop ..................................................................................................................... 99 What if the germination test % is low? .................................................................................................................. 99 What if a crust has developed? .............................................................................................................................. 99 Diagnosing an emergence problem ........................................................................................................................ 99 Is frost damage fatal? ........................................................................................................................................... 100 Should I replant? ................................................................................................................................................... 100 Unusual foliage or plant height? .......................................................................................................................... 100
14 Contacts ............................................................................................................................................... 101 Authors of this manual ......................................................................................................................................... 101 The Sweet corn Toolkit – ongoing contacts.......................................................................................................... 102

Top of the Document Sweet Corn Toolkit Manual 2nd Edition December 2016 1
1 Introduction and acknowledgements
Jeff Reid, editor
Sweet corn is grown in New Zealand to supply domestic and export markets with fresh and processed product. Production is very diverse in terms of geography, the nature of growers (individual growers and companies) and end uses of the product (fresh, frozen and canned).
Sweet corn is the fourth largest export vegetable crop, and the main export markets are Australia, South East Asia and Japan. In 2015, the value of processed sweet corn for export and domestic markets was about NZ$39m and NZ$14m respectively. The equivalent figures for fresh sweetcorn were NZ$0.1m and NZ$9m.
Annual production is about 91,000 tonnes from about 4700 ha land. The main growing areas are Gisborne, Hawke’s Bay, Marlborough and Canterbury. There are pockets of production in the Coromandel, Waikato and Northland, supplying the early season fresh market.
Sweet corn is processed in a variety of ways. The major processing method is freezing, producing frozen cobs and kernel. Canned whole kernel and cream style corn, corn powder, and cobs packed in pouches are also produced.
CHALLENGES In 2015, Horticulture NZ, Cedenco Foods, Heinz Watties Australasia Ltd, McCain Foods Ltd, Ballance Agrinutrients Ltd, many individual growers, and Crown Research Institutes recognised that the industry faced a number of challenges.
This group started a project called the “Sweet corn Toolkit” to assist the industry improve crop management practices by up-skilling growers with the latest scientific information. The project also aimed to:
produce decision support tools, based on economic return, to aid growers with key crop management decisions
make the industry more attractive to new growers by providing more crop management information
document the ‘business memory’ of the sweet corn industry
identify knowledge gaps for future investigation
THIS MANUAL This manual is a crucial output from that project. It is intended to be a living document that is updated as fresh information becomes available.
ACKNOWLEDGEMENTS To Process Vegetables New Zealand for funding this revision of the toolkit manual.
To The Sustainable Farming Fund, McCain Foods (New Zealand) Ltd, Heinz Wattie’s Australasia Ltd, Cedenco Foods, Ballance Agrinutrients Ltd and Horticulture NZ for the direct and in-kind funding of the original Sweet Corn Toolkit project.
To Andrea Pearson and Sarah Bromley for their work putting together the original project.
To Andy Lysaght, Andrew Jones, Diana Mathers, Ivan Angland, Mike Flynn, Scott Clelland, Jim Sim, Jo Honey, Sue Page,Kim Harris, Tracy Dohnt, Andrea Bourhill, Ron Prebble, Chris Ward and Luke Hansen, for their organisational skills and constructive criticisms of earlier plans and drafts.
To the sweet corn growers of NZ who attended field days and meetings to share their visions for the original the Sweet Corn Toolkit project.
And finally to the chapter authors for their care and enthusiasm for the task in hand.
FURTHER INFORMATION Aitken, AG and Hewett, EE (2015) FreshFacts. http://www.freshfacts.co.nz/files/freshfacts-2015.pdf Accessed November 2016.

Top of the Document Sweet Corn Toolkit Manual 2nd Edition December 2016 2
2 Crop development & growth
Jeff Reid, Plant & Food Research Hawke’s Bay
INTRODUCTION Sweet corn is a tropical or subtropical grass that grows and develops quite differently from broadleaf crops like potatoes and brassicas. It is similar to maize (they are the same species) – but needs rather more care. Maize and sweet corn also differ from most other grasses in that the male and female flowers are far apart.
Sweet corn started as maize with a natural spontaneous mutation at a single gene. The gene (called su for sugary) slows but does not stop conversion of sugar to starch in the kernels. Crop breeders isolated and developed other mutants, including se (sugary enhanced) and sh2 (shrunken-2) mutants. The sh2 gene encourages sweetness by minimising production of the enzyme that converts sugar to starch. Varieties also exist with combinations of su, se and sh2 genes. At present, the sh2 or supersweet types dominate in NZ.
These sweetness genes are all recessive. This means that sweet corn must be grown in isolation from maize so it is not cross-pollinated. The sh2 types must even be grown in isolation from other sweet corn. If cross-pollination occurs the kernels are usually starchy and the whole crop will be rejected.
PLANT DEVELOPMENT The way the plant progresses through its life cycle is called development. It is measured by things like the number of leaves on the main shoot, or if the crop has flowered.
The key developmental events are:
Emergence;
Production of each new leaf at its own node on the stem;
A period when the stem between the nodes rapidly extends so the crop gets much taller over a couple of weeks;
Pollen shedding by male flowers (tassels); Silking, when the female flowers that will form the
kernels produce long pollen tubes (the silks on a cob) to accept the pollen shed by the tassels; and
Physiological maturity, when the seeds (kernels) can survive removal from the plant.
In practice, we are not interested in physiological maturity–by then sweet corn is no longer palatable. We are much more concerned with “harvest maturity”. With most varieties this occurs when the moisture content of the kernels on the main cobs is about 72% (see Chapter 11).
Development stages of sweet corn. The times given in days are not definitive–there is a lot of difference between varieties. “Maturity” in this diagram is harvestable maturity. As the plant grows more than about 6 leaves you may begin to notice it forming extra stems or tillers.

Top of the Document Sweet Corn Toolkit Manual 2nd Edition December 2016 3
HOW LONG WILL THE CROP TAKE? Development of sweet corn is strongly influenced by temperature. As temperatures increase it takes fewer days for leaves to emerge from the stem and for the crop to reach silking and then harvest maturity.
The temperature effect is so strong we usually forecast crop development from degree days from sowing instead of calendar days.
To calculate the degree days, for each day after sowing we take the average air temperature and subtract a base temperature (usually 5 or 10°C). We then add up all the positive values of this from sowing till the day in question, and that is the degree days.
Each variety takes a characteristic number of degree days to reach each developmental stage. What we call “long” varieties produce more leaves and take more degree days to reach silking and harvest than “short” varieties. For example ‘Challenger’ takes about 1420 degree days from sowing to harvest, whereas ‘Sheba’ takes about 1200 (in both cases the base temperature is 5°C). If the average air temperature is 15°C then Challenger will take (1420 - 1200)/(15 - 5) = 22 days longer.
GROWTH VS DEVELOPMENT Growth and development are not the same. They respond differently to temperature–development rate increases with temperature, growth usually does not.
Development is the accumulation of growth stages and is measured in leaf numbers or times of silking or maturity.
Growth is the accumulation of mass and is measured in kg or tonnes.
Crops that develop at the same rate may not have the same biomass or yield.
GROWTH AND POTENTIAL YIELD Potential yield is the maximum yield that a crop can achieve when sown at a certain time, place and population. It occurs when there are no limitations to growth caused by inadequate water, nutrients or soil physical characteristics.
The process by which potential yield is formed is simple and well understood. These ‘rules’ apply to virtually all healthy sweet corn crops.
First, sunshine (radiation) is absorbed by the crop according to the amount of leaf area that it has.
This sunshine is converted to crop biomass via photosynthesis, according to the sunshine use efficiency (SUE). For sweet corn, crop biomass increases by about 1.6 t/ha for every 100 MJ of sunshine intercepted. This takes about 10 days for a rapidly growing crop.
Crop biomass is converted to yield according to the harvest index (HI, yield as a % of crop biomass). In sweet corn, HI at maturity is around 50%, so about half of the total biomass is in the harvestable ears.
Sunshine is the driving force behind potential yield, but the ability to use sunshine most effectively is altered by temperature, variety, sowing time and plant population. These affect potential yield mainly because they affect the amount of sunshine absorption. Let’s look at the effect of each of them.
Key point: Temperature and potential yield Temperature affects potential yield mainly because it affects the rate of crop development.
As temperature rises, leaves are produced more quickly and the times taken to reach silking and harvestable maturity decline. These are signs of increased development rate.
Increased temperatures generally reduce yield because they shorten the duration of crop growth. This gives crops fewer days to absorb sunshine, reducing the total amount absorbed and so reducing growth and yield. This largely explains why average sweet corn yields in the relatively cool NZ environment (~18 t/ha) are higher than those in the much warmer environments in Australia (~13 t/ha) or the USA (~13 t/ha).
Many people assume that crop growth increases with temperature. In most cases it does not. Total growth seems to be greater as temperature rises because plant parts are produced more quickly. This is actually evidence of enhanced development, not increased growth. Best yields are achieved in cool, sunny conditions.

Top of the Document Sweet Corn Toolkit Manual 2nd Edition December 2016 4
VARIETY AND POTENTIAL YIELD Your choice of variety affects potential yield mainly because it affects sunshine absorption.
Cultivars differ very little in either their sunshine use efficiency or harvest index–but each cultivar has a fixed maximum number of leaves that it can potentially produce. In general, short-season cultivars yield less than long-season cultivars because they have:
fewer and smaller leaves, and consequently less ability to absorb sunshine, and
a shorter lifespan, and consequently fewer days in which to absorb sunshine.
The advantage of the long-season hybrids depends on you sowing them early enough, and on the weather being warm enough for them to reach maturity before there is any frost damage.
SOWING TIME AND POTENTIAL YIELD Sowing time can affect potential yield strongly.
This is mainly because it affects sunshine absorption in two main ways:
First, the amount of sunshine varies dramatically during the growing season, and sowing time has a major influence on whether growth occurs when there is more or less sunshine
Second, sowing time affects the temperature during crop growth and so influences crop development, duration and yield.
Maximum potential yields occur when long-season crops are sown so they reach maximum leaf area close to the longest day of the year. For many varieties this equates to silking between Christmas and the New Year.
Change in sunshine energy available to crops through the year. Data are for Gisborne, 1990.
Effect of maturity length on potential yield. Results are for three sweet corn varieties that produce a different maximum number of leaves.
Effect of sowing time on yield of sweet corn grown near Hastings
Key Point: late sowing and yields For long-season varieties, the later you leave sowing
the smaller the potential yield will be.
On the other hand sowing them very early brings some risks from frost–and your crops need to be planted across a range of dates so they are not all ready at the same time!
Short-season varieties have their place–in some environments the frost risk with long-season varieties is unacceptable. Planting a short-season variety very early will not necessarily guarantee a higher potential yield. The key is planting so that the crop has maximum leaf area around Christmas.

Top of the Document Sweet Corn Toolkit Manual 2nd Edition December 2016 5
PLANT POPULATION AND POTENTIAL YIELD Plant population affects potential yield mainly because it affects the amount of–you guessed it - sunshine absorption.
As plant population increases so does total crop leaf area. This has a two-fold effect on sunshine absorption:
More leaf area gives more rapid row closure, which minimises wasteful loss of sunshine to the soil surface and maximises use by the crop.
More leaf area increases the amount of sunshine absorption after canopy closure.
The net effect is that sweet corn growth and yield increases with plant population, to a maximum at over double normal sowing rates.
Of course, the response to population will be limited if nutrient or water deficiencies constrain growth. Furthermore, the beneficial effects of high plant population on yield need to be balanced against increased seed costs and the possible negative effects on quality.
Effect of plant population on yield of sweet corn ‘Challenger’ grown near Hastings in 1997 (results of Stone, Sorensen and Reid). Note that total yield was still rising as populations went beyond 120,000 per ha -but harvestable yield started to decline beyond about 80,000 per ha.
EAR QUALITY AND POPULATION Low plant populations encourage tillering on the plants, and those tillers may produce ears. If you are hand harvesting for fresh market and sequential harvests are an option then ears on the tillers may be important. But tillering is often a waste of energy for plants harvested by machine–generally tillers ears are too small or immature when the primary ears are ready.
Process growers often worry that increasing plant populations will decrease ear quality. Experiments near Hastings in the 1990s showed that increasing population steadily reduced the average mass per ear, while increasing the total yield per hectare. For fresh market production this could be a backwards step because of the premium paid for big ears. But for processed products the extra yield might be very profitable. Individual kernel size (an important quality measure for many consumers of processed sweet corn) was not changed by increasing plant populations as much as 10,000 per ha above current practice. So as long as the ears remain large enough for the harvesting and processing machinery there could be good money to be made by increasing plant populations above current practice.
Watch this space - Population and planting date interactions
Currently the sweet corn processing industry uses a target plant population around 65,000 per ha for all planting dates. Recently we have started to check if this is always best. Calculations so far suggest that for the main crop plantings populations can be increased profitably. For early and late plantings, lowering plant populations reduces the amount of money at risk due to frost damage to the crop–but the potential yield is reduced too. Field experiments are planned to see to check if in practice growers should consider adjusting plant populations to balance these sorts of risks.

Top of the Document Sweet Corn Toolkit Manual 2nd Edition December 2016 6
REAL YIELDS Potential ear yield of sweet corn in Gisborne or Hawke’s Bay may reach 30-40 t/ha. In Blenheim and Canterbury the potential is not as high but may still reach 30 tonnes. Commercial crops rarely reach these dizzy heights of potential yield. Why?
Well one key factor is unavoidable. We can’t all plant long-season crops so they reach maximum leaf area around Christmas. If we did then the factories and markets would be swamped with all the crops ready about the same time.
Remember each variety has a characteristic maximum number of leaves that it can produce on the main stem. Stresses that prevent a crop from producing that number will reduce yield.
Our team surveyed commercial sweet corn crops in Gisborne and Hawke’s Bay in 1998 to 2000. Even allowing for the necessary spread of planting dates and losses due to patchy establishment many crops didn’t reach their potential because of water and nutrient deficiencies.
Yield losses due to drought and inadequate supply of nutrients. Results are from a survey of sweet corn crops in Gisborne and Hawke’s Bay, 1998-2000.
Seventy percent of the crops suffered noticeably from drought. This is to be expected around Gisborne, where irrigation is often not available. However, many of the irrigated Hawke’s Bay crops suffered because either too little irrigation was applied or because it was not applied when most needed (see Chapter 10). About 84% of the crops lost yield because they did not receive all of the nutrients that they needed. The nutrients most often lacking were nitrogen and phosphorus (see Chapter 5).
And also... 68% of the crops lost an average of 5.7 t/ha yield because of other factors. We think these factors were mainly related to soil physical or biological quality. So, our results suggest that improving soil quality will benefit yield and profitability at 68% of the sites we surveyed.
Key Point: Remember the $$$
Often it is not economic to aim to fully achieve potential yield.
Growers need to look carefully at whether extra investment in seed, fertilisers, or irrigation will be profitable
FURTHER INFORMATION (1) Reid, J.B.; Pearson, A.J.; Stone, P.J. 2001. Land Management for Sweet corn. Recommended best management
practices for New Zealand. Crop & Food Research Confidential Report 362 for Sustainable Farming Fund and VegFed NZ, 48pp
(2) Rogers, B.T.; Sorensen, I.B.; Stone, P.J. 1999. Is sweet corn just another maize hybrid? Agronomy NZ 29: 87-90. (3) Rogers, B.T.; Stone, P.J.; Shaw, S.R.; Sorensen, I.B. 2000. Effect of sowing time on sweet corn yield and quality.
Agronomy NZ. 30: 55-61. (4) Stone, P.J.; Sorensen, I.B.; Reid, J.B. 1998. Effect of plant population and nitrogen fertiliser on yield and quality of
super sweet corn. Proceedings Agronomy Society of NZ 28: 1-5.

Top of the Document Sweet Corn Toolkit Manual 2nd Edition December 2016 7
3 Site selection
Jeff Reid, Plant & Food Research Hawke’s Bay
If you are looking to lease a paddock, or you are prioritising paddocks already available to you, we recommend you apply the following selection procedure. Of course also make sure that any lease fee is fair and will leave you with a sufficient profit margin!
You may rightfully negotiate a lower rental if the soil significantly falls short of the rules outlined below.
CHECK BEFORE VISITING THE SITE Your first priority is to see if you or a friend has already used the site and has experience of it. Check to see how the paddock has performed in the past. Also identify if the paddock is in an unusually cold area–local knowledge is best for this. Also ask if anyone has experience of any particular weed or pest problems in the paddock. Avoid paddocks with a history of herbicide-resistant weeds or summer grasses.
Use soil maps as a preliminary guide to suitability. There is no guarantee the soil type(s) in a given paddock will be exactly as mapped, but the maps available from Landcare Research or your Regional Council are an excellent start. Note that the texture classes attached to the soil names mainly reflect topsoil properties, and subsoil textures may be quite different from the topsoil.
In general, give top priority to silt loams, followed by silty clay loams and sandy loams. In many areas, clay loams may have dense subsoils that can cause problems in wet conditions. Compared to sandy loams, clay loams and silty clay loams tend to be lower in the landscape, often with the silt loams between.
Obtain whatever copies of recent soil test results are available. Use these to check that you will not need to apply large amounts of fertilisers. We suggest you try to select paddocks with Quicktest K >5, and Olsen P >22, and a pH of about 5.5 to 6.5.
CHECK WHEN VISITING THE SITE Is the paddock size and shape suitable? Ensure you can
arrange paddock layout and access to minimise driving over or parking agricultural machinery on cultivated areas. Aim to minimise the number of turns tractors and harvesting machinery will need to make.
Machinery access is important–the paddock will need 14 foot gateways, and any bridges/culverts will need to be able to take 20 tonne machinery.
Give priority to paddocks that are tile drained, have irrigation available, and have some shelter along fence lines (but avoid small paddocks with high shelter belts that will shade the crop greatly or affect harvester access).
Give priority to sites that are level or nearly level, and avoid paddocks that are a low point in the landscape. Under heavy rainfall or irrigation, low points within paddocks can become ponded, which can reduce crop yields and damage soil.
Rushes in the paddock are a good sign of poor drainage conditions. As a rule of thumb, if the soil grows good grass over winter then it will grow good corn.
Examine the soil, checking the soil profile for soil texture, the presence of compact layers, evidence of a shallow water table, and soil structure score (refer appendix at end of chapter).
Check for water tables. If the paddock is bordered by open drains, check for signs that the water level comes close to the soil surface–if you are not familiar with the paddock then ask. It is a good idea to use an auger or posthole digger to check for a water table in the top 120 cm or so. A water table at about 100 cm depth during the season can be beneficial - but if there are signs that a water table comes within 50 cm or so of the soil surface then beware. When you are digging or augering the soil look for gleying (where the soil has an unusually grey or even faint blue hue), or strong red mottles on a pale grey background–these are signs that the soil has been waterlogged.

Top of the Document Sweet Corn Toolkit Manual 2nd Edition December 2016 8
If the site looks good…
If the site seems to meet all the above requirements then there’s two more checks to make:
Check if there will be cross pollination problems from adjacent crops (see Key Point below), and if that’s OK you can spend some money on…
Checking the chemical fertility. Take soil samples to assess the chemical fertility of the soil 4-6 weeks before planting. Take soil samples to 15 cm depth (see Chapter 5). Keep copies of all test results.
An example of a paddock with poor access. Photograph courtesy of Andy Lysaght.
An example of the damage that can done by harvest procedures. In this case the damage has arisen because access needed to be through a low point in the landscape–and the weather was wet. Photograph courtesy of Andy Lysaght.
Key point: DIY soil assessments Laboratory assessments of soil fertility are fine,
but there’s a lot more important information you can get from inspecting the soil yourself.
It is a very good idea to assess soil texture and soil structure at three or more locations per paddock. For texture and soil structure, carefully excavate the soil to 15 cm depth using a spade. Record its soil structure score and texture using the score card (see the appendices to this chapter. Then repeat the process for 15-30 cm depth. It is a good idea to check at greater depths also - in case there is a subsoil pan. If the average structure score at any depth is less than 6.5 then there is a good chance that poor soil structure will restrict yield. Assessing soil structure is important because it has a large influence on crop performance.
Key point: Isolation Do not plant sweet corn crops within 77 m of
maize crops. Do not plant supersweet (sh2) varieties within
77 m of other sweet corn types such as su corn or bicolour cultivars.
Note: some NZ processors require the above isolation distances to be 100 m rather than 77 m–make sure that you meet their requirements.
Sweet corn pollen is shed by the tassels and fertilises the female flowers by moving down the silks. The pollen is moved and mixed by wind. Unfortunately for most modern varieties the kernel quality depends on the source of the pollen. The best pollen is that from the same variety. Pollen from maize or the wrong sweet corn varieties can result in inedible kernels, and colour problems–and processors can reject a crop on this basis (see Chapter 12).
In theory, maize and other sweet corn varieties can be planted nearby–provided they do not flower at the same time as your crop. This is difficult to forecast at the time you are selecting paddocks for lease, so stick to the isolation distances given above. If necessary you may have to delay planting or sacrifice any crop planted within those distances.

Top of the Document Sweet Corn Toolkit Manual 2nd Edition December 2016 9
FURTHER INFORMATION Anon (2004a). Sweet Corn for Fresh Market. Oregon State University Commercial Vegetable Production Guides.
http://hort-devel-nwrec.hort.oregonstate.edu/corn-fr.html (downloaded 25-Jun-2006. Anon (2004b). Sweet Corn for Processing. Oregon State University Commercial Vegetable Production Guides. http://hort-
devel-nwrec.hort.oregonstate.edu/corn-pr.html (downloaded 25-Jun-2006. Reid, J.B.; Pearson, A.J.; Stone, P.J. 2001. Land Management for Sweet corn. Recommended best management practices
for New Zealand. Crop & Food Research Confidential Report 362 for Sustainable Farming Fund and VegFed NZ, 48pp
Shepherd, T.G. 2000. Visual Soil Assessment. Volume 1: Field guide for cropping & pastoral grazing on flat to rolling country. Horizons.mw & Landcare Research, Palmerston North. 84p.
APPENDIX–ASSESSING SOIL TEXTURE “Soil texture” describes the proportions of sand, silt and clay sized particles in the soil. The effective diameters of these
particles are: coarse sand 0.2–2 mm, fine sand 0.02–0.2 mm, silt 0.002–0.02 mm, clay <0.002 mm. Laboratory analyses of soil texture require the soil to be thoroughly dispersed so all the primary particles are separate
before the amount in each size range is measured. While this yields important information for soil scientists, field soil behaviour is often strongly influenced by small, tightly joined particles of clay and silt (“microaggregates”). Growers need to be more concerned with what we call the field texture of the soil. This is more closely related to how the soil behaves under field conditions, where those microaggregates can be important.
To assess field texture, take a small sample of the soil (removing particles >2 mm if possible), and moisten it while working it thoroughly between thumb and fingers. Stop adding water and working it when there is a thin surface film of moisture that reflects light. Then classify the soil texture according to its feel, using the table below as a guide.
Assessing soil texture by hand.
Feel and sound Cohesion and plasticity Field texture class
Gritty and rasping Cannot be moulded into ball Sand Can almost be moulded into a ball–but falls
apart when flattened Loamy sand
Slight grittiness/rasping sound Moulds into a ball that cracks when pressed flat
Sandy loam
Smooth soapy feel Moulds into a ball that cracks when pressed flat
Silt loam
Very smooth, slightly sticky to sticky Plastic, moulds into a ball that deforms without cracking
Clay loam
Very smooth, sticky to very sticky Very plastic, moulds into a ball that deforms without cracking
Clay
Clay textures are rare for topsoils in Hawke’s Bay and Gisborne, but intermediate textures are common.
You will often find silty clay loams (between silt loam and clay loam) and fine sandy loams (usually these are silt loams but with a recognisable feel and sound of fine sand).
Generally, clay feels sticky, silt feels soapy, and sand makes a rasping sound when worked between finger and thumb. Organic matter often feels like silt. If there is a lot of organic matter (usually this makes the soil very dark) then sandy and clay soils feel more loamy, and you may need to correct your assessment. Clay in soils formed from papa mudstone (especially around Gisborne) feels particularly sticky, and you may overestimate the clay content of those soils.

Top of the Document Sweet Corn Toolkit Manual 2nd Edition December 2016 10
APPENDIX - SOIL STRUCTURE SCORECARD (for mineral soils that are not of volcanic origin)
Score 1–2
Soil consists of large (> 5 cm) compact clods with
few aggregates of smaller size. Soil breaks with
effort into angular blocks with smooth flat sides.
Some discolouration (dark blue to black) may be
apparent.
Score 3–4
Soil consists of large (> 5 cm) firm clods that break
into angular blocks with mostly flat or round
smooth sides. Smaller unstable aggregates or
loose fine powdery soil may be evident.
Score 5–6
Few large and medium (> 3 cm) firm soil
aggregates but mostly smaller (< 3 cm) aggregates
in friable mix of loose soil. Some smaller unstable
aggregates or loose powdery soil may be evident.
Score 7–8
Friable soil consisting of many distinct soil
aggregates (< 3 cm) of a rounded or nutty shape.
Little loose powdery unaggregated soil.
Score 9–10
Porous loose soil of many distinct stable soil
aggregates (< 3 cm) of a nutty or rounded shape.
Aggregates are prominent with little or no loose
powdery unaggregated soil. Roots may be growing
in and around aggregates.
Source Reid et al. (2001)

Top of the Document Sweet Corn Toolkit Manual 2nd Edition December 2016 11
4 Cultivation
Dan Bloomer, Page Bloomer Associates, Hawke’s Bay
Paul Johnstone and Jeff Reid, Plant & Food Research Hawke’s Bay
GENERAL PRINCIPLES OF CULTIVATION The importance of a healthy soil is often overlooked in crop production. Through the soil, plant roots absorb water and nutrients for growth. Managing the soil to ensure that the plant can capitalise on these is essential for high yields. Management requires good awareness of the practices that promote and degrade soil health.
Cultivation can serve many important purposes. These include preparing the seed bed, incorporating fertilisers, controlling weeds, managing plant residues, breaking surface crusts and deep pans, and improving soil characteristics for water infiltration and erosion control.
Poorly timed or managed tillage practices can result in soil compaction, wind and water erosion, and a general decline in soil quality and crop productivity.
Cultivation is only one part of the cropping system. In conventional systems most cultivation is carried out to repair damage done by some other operation.
Review all practices and try to avoid those that create a need for remediation. This will require working soil with the right equipment at the right time, and minimising vehicle tracking including harvest equipment and trucks.
Know your soil. Cultivation degrades soil structure and reduces its stability, although the extent of damage depends on a number of factors including soil type. Understanding soil in each field is important when making decisions as to the type of equipment that can be used and when. A quick assessment of soil texture can be done in the field (see the Appendix to Chapter 3). Consider managing different soil areas (zones) differently. For example, if half of the paddock is a heavier soil type than the other, it will dry down at a much slower rate after rainfall. To minimise potential damage to the soil resource, tillage activities should be timed to reflect such differences.
Restrict cultivation to productive areas and grass the headlands. Wherever possible, cultivate only areas that will be planted and achieve economic yields. Align crop rows to minimise the amount of turning by tractors and trucks; machinery traffic is the leading cause of compaction, particularly when the soil is wet. In addition to cultivating the headlands as little as possible, consider planting them in grass to improve soil stability.
PROTECTING THE SOIL RESOURCE–IMPORTANT
CONSIDERATIONS WHEN CULTIVATING Look ahead. Pay attention to increasing soil organic matter and reducing machinery and cultivation passes. Intensive management practices pose a significant risk to soil health. Degraded soils can reduce yields, increase environmental damage and are hard to remediate. Protecting and enhancing the soil resource is key to maintaining the productivity of cropping land.
Minimise cultivation. Cultivation weakens the soil and encourages loss of organic matter. Keep cultivation to a minimum through careful timing and application. It is very easy to over-cultivate with powered implements. Do not cultivate when the soil is very wet or very dry. Such practices are particularly damaging to soil structure.
Planting sensitive headland areas in grass rather than cultivating them will improve their stability, reduce erosion and avoid loss of nutrients to waterways.

Top of the Document Sweet Corn Toolkit Manual 2nd Edition December 2016 12
IMPORTANT CONSIDERATIONS (CONTD)
Keep machinery as light as possible. Heavier machinery causes more, deeper compaction which is difficult and costly to remove. Wider tyres do not avoid deep compaction problems.
Use GPS/autosteer for controlled traffic farming. Controlled traffic farming has major benefits where suitably implemented. It focuses on providing a good “road base” for vehicles while retaining optimum soil conditions for plant growth. Selecting bout-width matched equipment enables the same wheel tracks to be used for all field management activities (cultivation, spraying, harvesting, etc). This confines compaction to a small part of the paddock and allows for a reduction in tillage operations across the rest. The protected soil improves, giving better plant conditions and resilience to stresses such as heavy rain events.
Prepare a uniform seed bed. Balance the need to prepare a fine seed bed with the need to retain soil structure; cultivation degrades the latter, so prepare the seed bed with an eye for uniformity. An uneven seed bed can cause uneven seeding depth and poor seed-to-soil contact. Both can have a significant impact on crop establishment.
Minimise cultivation for weed control. Herbicides may offer a better solution. Where mechanical weed control is required, ensure tillage is shallow and well-timed to prevent damage to plant roots and soil structure.
Irrigation after cultivation. For some time after cultivation the soil is in a weakened state and overhead irrigation or heavy rainfall can cause substantial damage to the soil surface. Waiting at least three days between cultivation and irrigation reduces the chances of such damage.
Practice good hygiene. Ensure cultivation equipment is cleaned between paddocks to reduce the spread of weed seeds and soil-borne diseases between sites. This may eliminate additional management operations to control weeds or disease at a later point.
Monitor soil health over time. Monitoring soil health does not have to be complicated but can highlight potential problems before they become difficult and costly to remedy. A number of simple tests are available. See for example, Soil Visual Assessment, VSA.
Time seed bed preparations as close as is practical to planting. Conservation tillage practices may make timeliness much easier to achieve.
Avoid leaving fine seed beds exposed to rain or wind. It is also important to recognize that too fine a seed bed tilth can be counterproductive if the soil “caps” (crusts) when it rains or is irrigated. This can cause poor and uneven germination, and reduce the movement of air and water in the soil.
Preparation of the seed bed can substantially weaken soil structure, increasing the chance that heavy rain will destroy surface aggregates. It may even lead to soil erosion on slopes.
Wind erosion of the soil is also more likely with fine seed beds. This leads to losses of yield, crop quality, soil and nutrients. It can also pollute waterways and lead to irate neighbours.
Cultivation changes nutrient supply. Consider nutrient availability timing when making fertiliser decisions. Tillage practices result in the breakdown of organic matter. If there are many stalks and old grass residues the hastened breakdown of these may lock up soil mineral N initially, but release much more later. It may be necessary to increase N application rates at planting but reduce them at side-dressing. This can reduce the risk of nutrients being leached or lost in surface runoff.
Weigh up residue management options. Good crop residue management is important. Minimising soil disturbance is preferable if incorporation is not required to allow subsequent operations or to manage slugs or diseases. Natural processes will incorporate surface residues in time. Cultivation disrupts the natural soil pores and can reduce internal drainage over winter.
Incorporate organic composts. If soil organic matter is less than about 2.5% or if a comparison with previous tests indicates that it is likely to fall to that level in the next two years consider applying organic composts. This will help sustain microbiological activity, which is crucial to improving soil health. Keep living plants growing to feed the microbes.
Key Point: Why enhance soil organic matter? helps strengthen soil aggregates and improve soil
structure improves aeration and water infiltration increases the soils water holding capacity gives greater ability to retain and supply nutrients
providing a food source for soil micro-organisms

Top of the Document Sweet Corn Toolkit Manual 2nd Edition December 2016 13
CONVENTIONAL VS. CONSERVATION TILLAGE Full cultivation is more costly than alternative approaches. It requires more time, machinery, labour and fuel, and reduces soil quality and resilience. This is particularly important where production is being driven onto more marginal land. Such land is not as forgiving of cultivation and requires careful management to maximise the chances of high yield outcomes.
Conservation tillage methods protect soil and water resources while increasing the efficiency of production inputs such as fuel, fertiliser and labour. A number of conservation tillage practices exist, all looking to reduce the disturbance of the soil surface and maintain crop residue on the soil surface.
Most conservation tillage approaches can be classified as strip tillage, reduced tillage, or no-till.
Strip tillage cultivates only the area to be planted, reducing soil impact and energy use.
Much of the soil surface remains undisturbed and with some form of residue on top. This reduces the risk of wind and water erosion, particularly early in the season when the seed bed is exposed.
Pest and disease management must be reviewed as residues can provide food and shelter. A significant period of spray-fallow can be required to reduce populations of pests such as cut worm and grass grub.
Mobilisation of nutrients from crop residues is delayed under strip tillage, so fertiliser management also requires review, particular in respect of starter applications and timing of side-dressing.
Strip tillage technology has advanced considerably in the last ten years. Non-powered equipment has been shown suitable, cheaper and faster. Some other specialist equipment may necessary such as for side-dressing through a thick layer of residue. However the residue mulch can also provide a useful “weed-mat”, potentially lowering weed pressures.
Reduced tillage approaches eliminate unnecessary field tillage operations. Soil organic matter levels can be maintained, plough pans avoided and biological diversity increased. Examples of reduced tillage include eliminating deep ripping where there is no plough pan, and eliminating cultivation where chemical control of weeds is sufficient. Reduced tillage is probably the easiest of the conservation approaches, but requires a commitment to identifying and eliminating non-critical field operations. Importantly, reducing tillage does not require specialist equipment.
Strip tillage reduces the amount of soil that is worked during cultivation. Seed is sown directly into the tilled zone, the between row is undisturbed.
The disturbance caused by strip tilling.

Top of the Document Sweet Corn Toolkit Manual 2nd Edition December 2016 14
CONVENTIONAL VS CONSERVATION TILLAGE (CONTD
No-till approaches eliminate tillage operations by planting the crop without prior seed bed preparation. Whilst having the most beneficial effect on soil health, no-till can be a difficult option to manage for process sweetcorn crops.
Soil can take longer to dry and warm under no-till, compromising planting schedules. There can be significant issues in achieving uniform emergence and stand-establishment, particularly for earlier planted super-sweet varieties.
As with strip tillage, a significant period of spray-fallow can be required to reduce populations of pests such as cut worm and grass grub. Protective seed chemistry may be needed in some cases.
Specialist equipment is necessary and local experience suggests further refinements in no-till are necessary for successful use with sweet corn
No-till eliminates disturbance of the soil surface and residues, but can be difficult to manage to achieve high yields
Less is best. Keep cultivations to a minimum, and make sure they occur when the soil is not too wet or too dry.
Key Point: Avoid, eliminate, reduce, manage
Avoid practices that require remediation. They create extra work.
Identify non-critical cultivation passes and eliminate them. This protects the soil resource and reduces production inputs. If you can’t eliminate them, consider reducing the number of passes required or equipment used to achieve the desired outcome. Utilise conservation tillage approaches as these will reduce disturbance at the soil surface. Also, minimise cultivation in sensitive headland areas as these often sustain the most compaction damage.
Manage the timing of tillage practices carefully. The soil should not be too wet or to dry. Similarly, allow the soil to settle for three days before irrigating after cultivation.

Top of the Document Sweet Corn Toolkit Manual 2nd Edition December 2016 15
HOW TO MANAGE CULTIVATIONS AND SOIL
WATER CONTENT: DECIDING ON THE TIMING Correctly-timed cultivation practices prevent unnecessary damage to the soil. This requires careful consideration of soil water content. If a cultivation is necessary, use the following considerations to help schedule your field operations.
Cultivate when the soil has the right consistency. As the soil goes from very dry to very wet, the consistency changes from hard to friable, to plastic, to liquid. The ideal time to cultivate is when the soil is friable.
Not too wet, not too dry. Cultivating wet soil smears soil, increases wheel slip to further damage soil structure, all increasing the need for further cultivation. It is energy inefficient and is not recommended. Cultivation of topsoil when it is too dry also increases energy demand. It produces a large proportion of hard clods and very fine aggregates. The clods make formation of the seed bed difficult and can have a significant impact on the emergence and establishment of the crop. The very fine aggregates are susceptible to wind erosion, and readily form crusts on the soil surface under rain or irrigation, reducing water and air infiltration into the soil, and increasing local runoff.
Key point: How can I check if the soil is friable?
Take some soil from the depth at which the tillage implement will operate (say 15–20 cm for a plough) and roll it in your hand several times. Check if you can roll it into a worm about 4 mm thick:
If the soil is too dry and hard to form into a worm, then it is most likely too dry to cultivate;
If the soil cracks as the worm is being made, then it is friable, and suitable for cultivation;
If it forms a worm readily, then the soil is plastic and too wet for cultivation;
If it is too wet (liquid) to form a worm, then it is definitely too wet for cultivation.
Repeat these measurements at a number of places across the paddock. Concentrate on the low points where you would expect the soil to be wettest, as these are the most-at-risk areas. The actual water content at which a soil becomes too wet or dry for cultivation can differ greatly from paddock to paddock, so be sure to test each separately.
Subsoiling to break up pans in the soil is a special case. Cracking of pans allows roots, air and water to more freely move through the profile. But subsoiling must be done when the soil is reasonably dry to increase soil shattering. Take advantage of any extended dry weather in winter or spring; if you are reusing a previous paddock then it may pay to cultivate deeply very soon after harvest if the soil is dry. Subsoiling when the soil is moist is at best poorly effective, and often can make the pan worse.
Strip tillage machinery reduces soil impact and together with other bout-matching equipment enables tramlining or controlled traffic farming to confine vehicle compaction.

Top of the Document Sweet Corn Toolkit Manual 2nd Edition December 2016 16
5 Plant nutrition and fertilisers Tehseen Aslam, formerly Department of Soil Science, Massey University Jeff Reid, Plant & Food Research Hawke’s Bay
INTRODUCTION Adequate nutrients will give the plants the best chance to produce high yields of good quality cobs. Nutrient supply is an important part of your profitable crop production system. The information in this chapter is useful in planning a sweet corn nutritional programme and to adjust the soil to the crop’s requirements before planting.
ESSENTIAL MINERAL NUTRIENTS There are 20 mineral elements necessary or beneficial for plant growth. Carbon (C), hydrogen (H), and oxygen (O) are supplied by air and water. The six macronutrients, nitrogen (N), phosphorus (P), potassium (K), calcium (Ca), magnesium (Mg), and sulphur (S) are required by plants in large amounts.
The rest of the elements are required in trace amounts (micronutrients). Essential trace elements include boron (B), chlorine (Cl), copper (Cu), iron (Fe), manganese (Mn), sodium (Na), zinc (Zn), molybdenum (Mo), and nickel (Ni).
PLANT FOOD? It is misleading to think of plant nutrients like we do human food. If you eat more and more then you’ll get bigger and bigger, but mineral nutrients for plants are a bit like vitamins for you. Beyond a certain limit If you supply more and more the plant does not grow more - and in fact it might go into decline. It can be false economy to supply more mineral nutrients than your crop actually needs.
MACRONUTRIENTS The nutrients taken up in the largest quantities by sweet corn crops are N, P and K. The table below shows the approximate amounts of these elements that can be removed from the soil by a sweet corn crop. Nutrients in the stems, leaves and roots are usually returned to the soil system after harvest.
Typical amounts of N, P and K removed from the soil by a 28 t/ha sweet corn crop. The nutrients in the cobs are the amounts removed from the paddock. If the yield was 18 t/ha, these removals in the cobs would be about 70, 10, and 38 kg/ha for N, P and K respectively.
Amount of nutrient removed (kg/ha) N P K
Plant (stems, leaves) 200 24 150 Cobs 110 16 60 Total (Kg/ha) 310 40 210 Total (Kg/tonne) 11.1 1.4 7.5
Tip: Diagnosing nutrient deficiencies and toxicities
In many cases you can diagnose a nutritional problem from the visual appearance of plantS in the field, and you may need to back this up with a chemical analysis. To help the visual diagnosis there is an excellent smartphone app called CHECKIT, produced by Yara. You can get it free from http://yara.com/media/apps/checkit/
You will often need to look at the photographs and descriptions for maize as there are few of sweet corn–but it is still very good.

Top of the Document Sweet Corn Toolkit Manual 2nd Edition December 2016 17
Nitrogen (N)
N is a major component of proteins, hormones, chlorophyll, vitamins and enzymes essential for plant life. Nitrogen metabolism in plants has a huge influence on yield because it affects:
the amount of sunshine absorbed by crops, and the efficiency of conversion of sunshine to
biomass.
N deficiency directly reduces leaf size, which reduces total crop leaf area and consequently the overall yield. N deficiency will result in stunted growth, the older (lower) leaves are usually pale or yellow. If treated too late the crop will produce small, pale green cobs.
Typical symptoms of N deficiency in sweet corn leaves: the left leaf is N deficient, the right leaf is normal.
Symptoms develop first in young leaves and are more severe in older leaves. Low N levels before tasseling can affect cob size and at silking or grain filling will affect grain development and yield.
Plants take up N in the form of ammonium (NH4+) or
more usually nitrate (NO3-). These mineral forms of N
are formed by microbial action on soil organic matter. Nitrate is easily leached from soil by excess rain or irrigation. Therefore, N deficiency is more likely to occur in sandy soils or soils low in organic matter or waterlogged.
Phosphorus (P)
P is necessary for seed germination, photosynthesis, protein formation and almost all aspects of growth and metabolism in plants. It is essential for flower and fruit formation. The effects of P on sweet corn yield can be substantia.
Deficiency symptoms are red/purple thin stems and smaller leaves and smaller root size; maturity and growth are retarded. Yields of fruit and flowers are poor. Symptoms develop first, and are more severe in the older leaves. A red/purple colour is also common in older leaves, which is evidence of the fact that under P deficiency P is moved to younger expanding leaves. However, under severe P deficiency in some varieties, the plants will be stunted with short size and having purple/reddish leaves and stems.
Typical symptoms of advanced P deficiency in (left leaf). The right leaf is not P deficient.
P must be applied close to the plant's roots in order for the plant to utilise it. In high yielding plants P concentration is generally stable over time. It is maintained at around 0.2% of crop dry matter (DM). So ample P supply is important during periods of rapid growth.
P deficiency may occur in soils high in iron and aluminium or low in organic matter. It is also likely in highly limed, alkaline, or calcareous soils where topsoil has been eroded. P is not readily leached from the soil.
Key point: The role of organic matter
Ammonium and nitrate are formed by microbes using soil organic matter as an energy source–provided the ratio of C:N in the organic matter is less than around 12. If you add to the soil organic matter that has a higher C:N ratio (e.g. sawdust) then this will have the opposite effect–the microbes can “lock up” ammonium and nitrate for quite a while. That can induce N-deficiency in plants

Top of the Document Sweet Corn Toolkit Manual 2nd Edition December 2016 18
Potassium (K)
K is necessary for formation of sugars, starches, carbohydrates, protein synthesis and cell division in roots and other parts of the plant. It helps to adjust water balance, improves stem rigidity and cold hardiness, and enhances flavour and colour on fruit and vegetable crops. K is the third major nutrient required by sweet corn crop, but its function within the crop is less clearly observed than that of N and P. However, a significant amount of K is required for crop growth.
Typical symptoms of relatively mild K deficiency in sweet corn (left leaf). A normal leaf is shown on the right.
Mildly K deficient plants will be stunted with short, thin stems and pale green leaves. Severely deficient plants will be very stunted with spindly stems and dead lower leaves hanging down around the stem. Symptoms develop first, and are most severe, in the older leaves. Cobs are often very pointed with poor tip fill and small grains.
A mature sweet corn crop contains about 2% K. Despite this high requirement of sweet corn for K, there is generally little need to apply K fertiliser to crops, because there are usually abundant supplies of plant available K in NZ cropping soils.
However, K deficiencies can occur in low organic matter soils, sandy soils, acidic soils below pH 5.4 and also alkaline soils above pH 7.5. K is leached from soil by excessive rain or irrigation, but not as easily as N.
Sulphur (S)
Little information is available on the response to S of sweet corn crops in NZ, but for maize there have been no reported increases in grain yield following S application. Sulphur is a structural component of amino acids, proteins, vitamins and enzymes and is essential to produce chlorophyll. It imparts flavour to many vegetables. Deficiencies show as light green leaves. Sulphur in soils is mainly present as sulphate ions (SO4
2-) which are quite readily lost by leaching (but much less so than nitrate is). Dedicated S fertilisers are rarely necessary for sweet corn as the amounts needed by the crop are quite small and sulphate is applied to the soil in many other fertilisers, such as superphosphate.
Magnesium (Mg)
At present there is no evidence to support application of Mg to sweet corn or maize crops in NZ. Most East Coast soils have large reserves of Mg. Mg is a critical structural component of the chlorophyll molecule and is necessary for functioning of plant enzymes to produce carbohydrates, sugars and fats. It is used for fruit and nut formation and essential for germination of seeds. Deficient plants appear chlorotic (yellow and unhealthy) with yellowing especially between the veins of older leaves; leaves may drop. Mg is leached by watering and must be supplied when feeding. It can be applied as a foliar spray to correct deficiencies.
Calcium (Ca)
Little information is available in NZ on the effect of Ca on sweet corn yield. However, Ca deficiencies are unlikely because mist NZ soils contain a great deal of readily available Ca. Inside plants Ca activates enzymes, is a structural component of cell walls, influences water movement in cells, and is necessary for cell growth and division. Calcium is easily leached from soils, but as mentioned above the amounts naturally present are very large. Calcium, once deposited in plant tissue, stays there, so there must be a constant supply for growth. Deficiency causes stunting of new growth in stems, flowers and roots. Symptoms range from distorted new growth to black spots on leaves and fruit. Yellow leaf margins may also appear.

Top of the Document Sweet Corn Toolkit Manual 2nd Edition December 2016 19
MICRONUTRIENTS In NZ there has been little research on the effect of micronutrients on sweet corn crops. Serious micronutrient deficiencies are rarely identified in sweet corn or maize crops. Overseas research has reported micronutrient deficiencies and made some recommendations for sweet corn. In many cases, deficiencies are most likely to be caused by an unsuitable pH affecting micronutrient solubility rather than there being inadequate amounts actually in the soil.
If you suspect any micronutrient deficiency then take specialist advice. Growers can waste a lot of money on micronutrient treatments–and with many there is a risk of poisoning the crop through excessive applications of micronutrients.
Zinc (Zn)
Zn is important for many enzymes including plant growth hormones. It is essential to carbohydrate metabolism, protein synthesis and stem growth. Deficient plants can be very small and have mottled leaves with irregular chlorotic areas. Zn deficiency leads to iron deficiency which also causes similar symptoms.
Compared to other micronutrients, sweet corn has relatively high demand for Zn. Deficiency of Zn may occur in alkaline soils (pH > 7.0), sandy soils, and soil containing high P levels. Lowering soil pH can increase Zn availability to the point of toxicity–but we are not aware of this happening in NZ.
Iron (Fe)
Fe is needed for many enzymes and it acts as a catalyst for the synthesis of chlorophyll. It is essential for the young growing parts of plants. Deficiencies show in the leaves as a pale colour followed by yellowing and unusually prominent veins. Most NZ soils hold large amounts of Fe. However, under alkaline conditions (high pH), Fe is rendered unavailable to plants. Excessive liming can induce Fe deficiency, and even Fe fertilisers will be effective.
Suspected Zn deficiency in the sweet corn variety Challenger. The plants are severely stunted but are still attempting to set cobs. Healthy plants of this variety should be nearly 1.8 m tall.
Suspected Zn deficiency – close up of one of the plants in the previous photograph
Oddity: Micronutrient interactions
Occasionally plants show Fe deficiency even when they have taken up plenty of the element. In 2007, we found symptoms of Fe deficiency in a sweet corn crop, but plant analysis revealed there was a lot of Fe in the leaves. The paddock was poorly drained and waterlogging seemed to have increased uptake of Fe and copper to the point where copper toxicity prevented the plants using the Fe properly.

Top of the Document Sweet Corn Toolkit Manual 2nd Edition December 2016 20
Manganese (Mn)
Mn is involved in enzyme activity for photosynthesis, respiration, and nitrogen metabolism. Deficiency in young leaves may show a network of green veins on a light green background similar to an iron deficiency. In the advanced stages the light green parts become white, and leaves are shed. Brownish, black, or greyish spots may appear next to the veins. In neutral or alkaline soils plants often show deficiency symptoms. In highly acid or very wet soils, Mn may be available to the extent that it results in toxicity.
Molybdenum (Mo)
Without Mo, the synthesis of proteins is blocked and plant growth ceases. Seeds may not form completely, and N deficiency may occur if plants are lacking Mo. Molybdenum deficiency can occur in acid soils and symptoms appear most severe in the seedling stage. Deficiency signs are pale green leaves with rolled or cupped margins
Boron (B)
Boron affects at least 16 functions in plants including flowering, pollen germination, fruiting, cell division, water relationships and the movement of hormones. It is necessary for cell wall formation, membrane integrity, and calcium uptake. Also it may aid in movement of sugars around the plant. Boron must be available throughout the life of the plant. It is not translocated from old to new growth, and it is easily leached from soils. Deficiencies kill terminal buds leaving a rosette effect on the plant. Deficient leaves are thick, curled and brittle. Fruits, tubers and roots are discoloured, cracked and flecked with brown spots. B deficiency reduces cob size and affects pollination, which results in blank portions on the cob.
There is a fine line between mild deficiency and toxicity of B. Cases of tree death are sometimes caused by uneven mixing of B applied with other fertilisers.
.
Key Point: Micronutrient deficiencies and excesses can come and go In NZ cropping soils micronutrient deficiencies and
excesses can seem important one season but not the next.
Often it is recommended to apply trace elements if soil or plant analysis results suggest deficiencies in your previous planted crop. Applications of trace elements to soils will often last a few years, whereas foliar applications will benefit only the plants to which they are applied.
But, micronutrient deficiencies and excesses can be transient. Fe and Mn may have been taken up in large amounts by crops simply because the weather had been very wet (poor aeration in the soil can increase their solubility). Such excessive availability can fade as the soil dries out, although the crop may still suffer from excessive concentrations of micronutrients in the older tissues. Similarly, sudden changes in soil acidity (due to liming say) can cause sudden changes in micronutrient availability.
See also Chapter 13 Trouble shooting your crop

Top of the Document Sweet Corn Toolkit Manual 2nd Edition December 2016 21
Key point: Plant vs soil analysis When deciding fertiliser rates, soil analysis has
some important advantages over plant analysis.
To diagnose nutrient deficiencies you can use plant or soil analysis. In theory, plant analysis has a huge advantage–it is a direct measure of what the plant experiences. Soil testing is indirect, and usually carried out before the crop has even been planted.
But wait… by the time leaf nutrient concentrations are in the deficient range growth has already been reduced. Add to that the time taken to take samples, get the results back–and you can understand why many soil scientists think of leaf nutrient testing as a form of post-mortem. More rapid plant testing techniques are under development, but for now sweet corn growers should always use pre-planting soil testing as the primary source of information on whether their crop will require fertiliser.
Remember it can be difficult or expensive to make applications of fertiliser after the crop is about six weeks old, and fertiliser left on the soil surface will be poorly effective in that season.
PLANT ANALYSIS Plant analysis can help you identify whether the fertilisers already applied have been adequate. In some cases it can be timely enough to indicate if micronutrient foliar sprays would be helpful.
Generally, plant analysis amounts to either leaf analysis or sap testing.
Leaf analysis
For sweet corn, it is recommended to do a leaf analysis at the tasselling to initial silking stage. This analysis will help you to identify the effectiveness of the fertilising schedule for this and the next crop. A difficulty is that usually the results arrive rather late for you to apply fertiliser if there is a deficiency. Often the only options are expensive–applying a foliar fertiliser or a solid by helicopter.
Leaf analysis can be complicated by the fact that it measures the % by mass of the nutrients in the dried leaves–and even in perfectly healthy crops these nutrient concentrations fall as the plant ages. Always sample the youngest fully expanded leaf. The Table below shows the optimum levels for sweet corn.
Optimum leaf nutrient levels for sweet corn on a dry weight basis for the ear leaf at silking (Piggot 1986; Weir and Cresswell, 1993). One mg/kg is 0.0001%.
Nutrient Normal levels
Nitrogen (N) Phosphorus (P) Potassium (K) Sulphur (S) Calcium (Ca) Magnesium(Mg) Chloride (Cl) Copper (Cu) Zinc (Zn) Manganese (Mn) Iron (Fe) Boron (B) Molybdenum (Mo)
2.6 - 3.5% 0.2 - 0.3% 1.8 - 2.5% 0.1– 0.3 0.15–0.3% 0.2–0.3% 0.34–0.53% 6 -20 mg/kg 20-40 mg/kg 20 -150 mg/kg 60–160 mg/kg 50–70 mg/kg 0.6 1.0 mg/kg
Sap analysis
This is a quick assessment of crop nutrient status during growth. Faster than leaf analysis, it can help you identify if last minute nutrient applications are needed before yield or cob quality are too seriously affected.
The test is carried out on the youngest fully expanded leaves, extracting sap and analysing its nutrient content. It can be taken at 5–6 leaf stage and continue every 2 weeks to tasseling. The difficulty with sap analysis is to know what the critical nutrient concentrations are, and how these change with time. This requires a lot of experience with each variety and location. For that reason sap testing is not often used for sweet corn in NZ.

Top of the Document Sweet Corn Toolkit Manual 2nd Edition December 2016 22
SOIL CHEMICAL ANALYSIS There are a wide range of soil tests available from the commercial laboratories. The following are the standard soil tests for NZ conditions, and these are the minimum that you should request from the analytical laboratory:
soil pH (1:2.5 w/v in water);
Olsen P (bicarbonate extractable P) in units of µg/ml, ppm or MAF QuickTest units;
Exchangeable K, Na, Ca and Mg in MAF QuickTest units or in meq/100 g ;
Cation exchange capacity at pH 7.0;
In addition, we strongly recommend two extra tests:
Readily available or readily mineralisable N, measured by anaerobic incubation at 40°C (Keeney and Bremner, 1967).
Soil organic C (% w/w), measured using either an automated CHN analyser (a furnace method) or a wet chemistry method.
You must use a representative and standardised sampling procedure in the field (see below).
Key point: soil tests for N There is no single universally-accepted measure of
how much N in the soil will be available to a crop.
Plants mainly take up the mineral forms of N (nitrate and ammonium). Concentrations of those can vary greatly from day to day, and the amounts present at any one time are often only a fraction of the total amount the soil will provide during the crop’s life.
We can estimate how much mineral N the soil can supply if it is incubated under standard conditions. The usual test for this in NZ is called the readily mineralisable N test. For this the soil is incubated anaerobically at 30ºC for 15 days.
The readily mineralisable N figure from a laboratory is not absolute–a value of 50 kg N/ha does not tell you that the field soil will release only 50 kg N/ha or that crops can take up only 50 kg N/ha. However, readily available N is useful index to compare paddocks or seasons, and it is useful for forecasting the response to N fertiliser. If the readily available N figure is 50 kg N/ha then you are much more likely to get a response to N fertiliser than if the readily available N is 100 kg N/ha.
SOIL SAMPLING The key to effective monitoring of soil nutrient status is to ensure the soil samples are collected in a representative and consistent manner. For effective monitoring chemical soil analyses should be conducted at least every year.
Get the soil sampling done at least three weeks before planting–this allows time for the results to come back and for you to use them to decide and apply base fertilisers.
Some growers collect their own soil samples, but others have the job done by company representatives (e.g. merchant suppliers, fertiliser companies). Regardless of who collects the samples, you should make sure that from year to year the samples are collected from the same areas using the same sampling depth and the same sampling plan. That way meaningful comparisons can be made with previous soil tests.
Soil sampling units
For each paddock you need to determine how many sampling units you will need. Each sampling unit will be sampled and measured separately. Usually a sampling unit is an area of relatively uniform soil type or management history. If your sampling unit mixes up soil types or soils with very different management histories then interpreting soil test results is very difficult - and forecasts of fertiliser requirements etc become less reliable.
If your paddock is clearly identifiable on a recent soil map then use that soil map and your knowledge of prior management to work out how many sampling units you need and where they are. If you do not have a soil map, then you will need to dig some holes around the paddock and look for some clues from the topography (and perhaps ask a soil scientist to help). Usually the soil types will differ substantially between areas that obviously were old river beds or levees, compared to lower lying areas where flood water would have ponded for significant periods.
A sampling unit should not exceed 5 ha unless the soils are extremely consistent.

Top of the Document Sweet Corn Toolkit Manual 2nd Edition December 2016 23
Sampling pattern
Once we have defined our sampling unit, we need to determine the best sample collection method. Variations in soil test results from year to year and between sampling units are much easier to interpret when the soil samples have been collected using a standardised sampling pattern. There are a number of repeatable sampling patterns we can use to collect our samples. The most common are described below.
Key Point: Make and keep a map Make up a soil sampling map of each paddock, and
include on it details of your sampling system.
Wherever possible a soil map should be the basis for this. However a few other precautions are important. Avoid collecting soil samples from unusual areas, such as:
Gateways, headlands, fence lines, shelter belts;
Water troughs, sheep dips, dump sites, fire sites;
Tracks, buildings, stockyards;
Areas of top soil removal or deposition;
Small localised low lying areas.
It is a good idea to add in current features to your soil sampling map such as shelter belts and structures, but keep in mind there may be historic features you don’t know about. Ask the previous owner for the location of any unusual areas on the property you might not see.
Grid pattern
This involves collecting samples at evenly spaced intervals down selected evenly spaced rows (e.g. every 40m) within the sampling unit). The same lines are used for sampling each time.
Representative monitoring sites
A number of permanent monitoring sites can be identified and noted within the sampling unit and these sites used each time for collecting soil samples. Consider using a GPS to record the location of the monitoring sites so they can still be used if other landmarks change. These monitoring sites can also be used to collect other nutrient information such as leaf or petiole samples. The system is very good for tracking changes in time in a paddock, but you will need many permanent monitoring sites to adequately characterise soil properties in the whole sampling unit.
Transects
Permanent sampling transects are often used for soil sampling cropping land. The start and end of the transect are permanently marked (e.g. by a painted fence post), and samples are taken at regular intervals along the transect. If the sampling unit is quite large (say more than 2 ha) then look at setting up two or more transects. Do not start or end transects close to or in gateways.
Remember, avoid sampling unusual areas and use the same sampling pattern each year.

Top of the Document Sweet Corn Toolkit Manual 2nd Edition December 2016 24
Sampling method–chemical analyses
Sample before fertiliser or lime is applied. Where possible, avoid sampling within 3 months of fertiliser application.
Sample to the standard horticultural sampling depth of 15 cm (six inches) using a corer. While crops will source nutrients below this depth, the top 15 cm is typical of the zone that contains most of the nutrients that are stored and most of the crop roots.
Collect approximately 20 cores per sampling unit, discarding any part cores. It is a good idea to place the samples in a clean bucket or bag as you go. At the end, mix the samples thoroughly by hand and then seal at least 0.5 kg into a clean plastic bag to go to the laboratory. Make sure that the bag is clearly labelled with the origin of the samples and your name.
Keep the samples cool (e.g. in the fridge) and get them to the laboratory as soon as possible. The soil testing laboratories can supply the plastic bags, and you will also need to fill in a laboratory submission form, indicating which soil tests you require.
Key Point: Use a corer not a spade To collect your soil samples it is best to use a soil corer.
A soil corer is designed to collect the soil evenly through the profile. This is especially important if previously applied fertilisers have not been incorporated, as there will then be a strong nutrient gradient with depth. It is difficult to sample well using a spade. A spade should only be used for collecting soil samples from very stony soils which soil samplers cannot penetrate, or for sampling at depth.
Soil sampling tools. The 15 cm depth tube corers (2nd and 4th from the left) are recommended for taking samples for soil chemical analysis.
NUTRIENT MANAGEMENT PLANS Several regions in NZ now require growers to take a proactive approach to nutrient management to help mitigate the environmental impact of their activities. To meet these obligations, growers are expected to develop –and maintain–a nutrient management plan for their operation.
A nutrient budget is an integral part of your nutrient management plan. Best developed using OVERSEER®, a nutrient budget is used to estimate the nutrient inputs and outputs for your crops, taking into account farm-specific factors such as soil type, rainfall, crop management practices, etc. Develop nutrient budgets in collaboration with your fertiliser representative or other qualified specialist.
For more guidance on preparing and using nutrient
management plans, talk to your fertiliser professional.
Key point what’s in a nutrient management plan? detailed information about the business, including its
description, your objectives, a farm map showing the various land management units
and environmentally sensitive areas a summary of any consent requirements, an assessment of the environmental risks that may arise
from your farming practices–and a list of actions that could be taken to mitigate those risks
an up-to-date nutrient budget and details of fertiliser recommendations.
Capturing all of this information in one document will help you to retain control over your nutrient management.
Nutrient management plans need to be maintained, reviewed and updated regularly.

Top of the Document Sweet Corn Toolkit Manual 2nd Edition December 2016 25
FERTILISER REQUIREMENTS Fertiliser management is not only important from a crop production point of view, but also from an environmental point. Recommendations for fertilisers are generally based on soil test results. Growers should plan the fertiliser application times and methods carefully. It is recommended that fertiliser applications should be consistent with the Fertiliser Association’s Code of Practice for Fertiliser Use.
Typically starter fertilisers have been mixes or blends containing N and P or N, P and K. Urea (46% N) is the most common fertiliser used for side-dressing. In recent years there has been a move towards compound NPK fertiliser rather than blends or mixes. The advantages of the compound fertilisers include greater uniformity of granule size and less dust, allowing more accurate placement. This is important when using Airseeder technology.
Nitrogen
Avoid N fertiliser applications prior to planting.
Keep N applications to a minimum if the soil has been under pasture in the previous 2 years.
Remember that mineralisation of soil N goes on during the life of the crop. Often if you apply enough fertiliser N to replace all of what is taken up then you increase the risk of nitrate leaching and spend more money on fertiliser than you need to. Remember also that the results from the mineralisable N test are relative not absolute (see Key point: soil tests for N above).
For sweet corn, N fertiliser is rarely needed if the mineralisable N test at 0–150 mm depth is greater than about 110 kg N/ha. If the N test is 80–100 kg N/ha, then apply up to 90 kg N/ha for early sown crops with yield target of 30 t/ha. The general recommended rate of N application for sweet corn is 100–150 kg N/ha in total. Usually this is split into two applications, one at planting with the starter fertiliser and the majority applied as a side-dressing 4–6 weeks later.
For side-dressing, use a soluble N fertiliser like urea. Banding rather than broadcasting is likely to be more reliable.
Up to 60% of the N is taken up in the period from two weeks before to two weeks after tasselling.
Phosphorus
If the soil test (Olsen) P is greater than 35 µg/ ml then P fertiliser is unlikely to improve yield, and there is no need to apply P.
If the soil test P is 26-35 µg/ml then P fertiliser may increase yield slightly, but such applications are unlikely to be profitable.
If the soil test P is less than 26 µg/ml then 35 kg/ha of P is recommended as a starter fertiliser.
Use the most rapidly available form of P that is available and suitable for your growing system. Generally you will get the best efficiency if you band the P near the seed at planting.
Potassium
Generally, K fertiliser applications are not economic unless the soil is severely depleted in K. Apply K fertiliser only if the soil test value is less than 5 MAF Quicktest units or 0.31 meq/100g.
Under those conditions apply K to replace the anticipated removal in the ears, that is about 53 kg K/ha for a crop yielding 25 t/ha at 76% moisture. Use the cheapest source of readily available K that you have available. Apply K fertilisers either pre-planting (if large applications are to be made and broadcast) or at planting–but do not apply large rates (say >50 kg/ha) down the spout close to the seed.
Magnesium
Many NZ cropping soils have received a lot of unnecessary Mg fertiliser, and it is very rare to see any clear evidence of sweet corn responding to Mg applications in NZ. Plants usually require much less Mg than K.

Top of the Document Sweet Corn Toolkit Manual 2nd Edition December 2016 26
Micronutrients
To our knowledge, very few micronutrient deficiencies have been reliably identified in sweet corn crops on mineral soils in NZ. If you are confident that a micronutrient deficiency has or will occur then the following information should assist you.
If Zn deficiency is diagnosed or likely then apply 20–30 kg/ha of zinc sulphate monohydrate or 40 kg/ha of zinc sulphate heptahydrate before planting, or apply 3–4 foliar sprays of zinc sulphate heptahydrate at 200-250 g/100L, 1 week apart starting 1-2 weeks after emergence.
If noticed early, Fe deficiency can be treated with a foliar spray of iron chelate or sulphate at about 100g/100L 2–3 weeks after emergence. Soil applications will be useless.
If B deficiency is likely (based on soil test results or previous seasons leaf testing results) then a foliar spray may be effective. Starting 2 weeks after emergence, apply 2–3 foliar sprays of Solubor at 250 g/100L, 2 weeks apart, or you can apply 1.25–2.5 kg/ha of Solubor (20.5% B) before planting.
It is not unknown for B enthusiasts to kill their crops by applying too much B or simply not spreading it carefully.
In the unlikely event that Mo deficiency is diagnosed, apply a foliar spray of sodium molybdate at 60 g/100L, 2 weeks after emergence and 2 weeks later.
Key Point: Lime Lime requirements depend on the soil type and its
pH.
Sweet corn will not tolerate an unsuitable pH. Apply lime if pH is less than 5.5. Growers should target a pH of 6.5.
Apply fine lime 2–3 month before planting, and before ploughing.
A silt loam soil requires about 1 tonne of lime (80% CaCO3) for each 0.1 unit increase. Clay soils will require greater amount of lime. Normally about 2.5 t/ha of lime is required every 3–5 years to maintain soil pH.
Foliar fertilisers
Plants absorb most nutrients through their root systems. However, the leaf surfaces of plants do have some ability to absorb mineral nutrients if they are carefully applied in sprays. Applying the major nutrients like N, P and K through foliar fertilisers can be an expensive process. Furthermore it can be risky. The quantities of these nutrients that the crop requires are quite large and applying enough through sprays runs the risk of scorching the leaves. For nutrients such as Mg and the micronutrients, foliar fertilisers can be rather more effective (see above for some suggestions).
Typical amounts of N, P and K taken up and removed per tonne fresh weight of harvested ears (Wood et al., 1986).
N P K Nutrient uptake by crop (kg/ha) 11 14 7.4 Nutrient removed in harvested ears (kg/ha) 3.9 0.6 2.1

Top of the Document Sweet Corn Toolkit Manual 2nd Edition December 2016 27
NUTRIENT BALANCES AND FERTILISER RATES We do not recommend applying fertilisers just to replace anticipated nutrient removal by the crop. Instead we recommend that fertilisers are applied only when you know they will increase the profit from the crop. Why?
The $ argument
Generally, don’t put extra fertiliser on a crop just in case it may be needed by a later crop. Spend the money when you know it will increase profit.
On the other hand, if you are sure to use the same site for several years and wish to use slow-release fertilisers like rock phosphate then putting on several seasons’ applications at once can be good practice.
The environmental argument
Fertiliser increases the nutrient loading in the soil. This increases the chances that runoff, erosion or leaching will transfer nutrients into the wider ecosystem where they can be undesirable (this is not to say that fertilisers directly increase say nitrate leaching–merely that more nutrients can be lost from high-fertility soils). Losses of nitrates into groundwater can have severe environmental effects. However, there is increasing evidence that tiny amounts of P leached or lost through runoff or erosion can have very serious effects on water in creeks, rivers and lakes. The amounts of P needed to cause this damage are often very small–agronomically almost insignificant. So, environmentally it makes good sense to keep N and P concentrations in the soil fairly small, and apply those nutrients as fertilisers where and when they are needed.
Economic and environmental needs coincide
Amounts of P, K and Mg (but not N) are often greater in horticultural soils than in virgin soils, and sometimes they are so large that there will be no economic return on fertiliser use. Then there is little to gain and something to lose from maintaining such elevated concentrations with “maintenance” applications. Why increase the environmental and financial risks unless you have a good economic reason to apply the fertiliser?
Organic growing?
Nutrient concentrations are usually small in soil amendments such as composts and rock products. Restoring fertility with these and with legume crops can be slow. So, for organic production it is important to quickly replace nutrients removed by the crop. Having said that, some organic growers may inherit situations where previous fertiliser applications have raised nutrient levels beyond the range required by their crops. Then we advise a carefully observed run down in nutrient concentrations.
What would maintenance applications be?
You can estimate this from the kg of each element taken up or removed per tonne of harvested ears (see Table on previous page).
A crop yielding 25 t/ha at 76% moisture would remove about 25 x 3.9 = 97.5 kg N/ ha in the ears. Removal of P and K would be about 15 and 53 kg/ha respectively. Uptake figures for Mg and S are not available for NZ crops, but they will invariably be rather less than the values given for P (provided the crop is healthy).
It is worth noting that the values in the table on the previous page are typical–nutrient concentrations can vary between crops. Generally, using typical values to calculate maintenance fertiliser applications does not show what you need to apply to achieve a given yield. Crops can absorb more of some nutrients than they actually need (“luxury uptake”). On the other hand, when sweet corn crops are growing rapidly, the rate of nutrient supply from soil sources may be less than the crop demand, even though there may be seem to be enough nutrient present. In those cases, the crop will respond to applications of readily soluble nutrients, and the application rates may be justifiably larger than the maintenance estimates.
Nutrient removals by crops are rarely so large that you cannot restore safely 5 years’ losses in a few applications of concentrated fertiliser on crops that will subsequently produce a profitable yield. This is rarely an option for organic growers, though, because organically approved sources of N and P in particular can be bulky and slow to release the nutrients.

Top of the Document Sweet Corn Toolkit Manual 2nd Edition December 2016 28
CODE OF PRACTICE FOR FERTILISER USE This was produced by the Fertiliser Association of New Zealand. All use of fertilisers should be consistent with this code.
The code gives valuable information on the transport, storage, application and disposal of fertilisers, and relates these processes to growers’ responsibilities under the Resource Management Act. It also contains an excellent glossary of technical terms.
The code does not contain a user guide specifically for sweet corn production; however, the user guide for arable farming is appropriate.
The Code of Practice can be downloaded from http://www.fertiliser.org.nz/Site/code_of_practice/default.aspx
FURTHER INFORMATION Cornforth, I.S. 1980. Soils and fertilisers - soil analysis and interpretation. AgLink AST 8. Media Services, New Zealand
Ministry of Agriculture and Fisheries, Wellington. Keeney, R.R.; Bremner, J.M. 1966. Comparison and evaluation of laboratory methods of obtaining an index of soil
nitrogen availability. Agronomy Journal 58: 498-503. Piggot, T.J. 1986. Vegetable crops. In: Plant Analysis. An Interpretation Manual. Editors Reuter, D.J. & Robinson, J.B. Inkata
Press, Melbourne. Pp 148-187. Reid, J.B. 2002. Yield response to nutrient supply across a wide range of conditions. 1. Model derivation. Field Crops
Research 77: 161-171. Reid, J.B.; Stone, P.S.; Pearson, A.J.; Wilson, D.J. 2002. Yield response to nutrient supply across a wide range of conditions.
2. Analysis of maize yields Field Crops Research 77:173-189. Weir, R.G.; Cresswell, G.C. 1993: Plant Nutrient Disorders 3. Vegetable Crops. Inkata Press, Melbourne. 105 pp. Wood, R.J., Cornforth, I.S.; Douglas, J.A.; Malden, G.E.; Prasad, M.; Wilson, G.J. 1986. Vegetables. In: Clarke, C.J.; Smith,
G.S.; Prasad, M.; Cornforth, I.S. (Eds) Fertiliser recommendations for horticultural crops. First Edition. New Zealand Ministry of Agriculture and Fisheries, Wellington. pp. 57-67.

Top of the Document Sweet Corn Toolkit Manual 2nd Edition December 2016 29
6 Crop establishment
Diana Mathers, formerly Heinz Watties Ltd, now Foundation for Arable Research
WHAT IS CROP ESTABLISHMENT? Crop establishment is the time between planting and the point at which the plant becomes established, with a functioning root system and leaves that are photosynthesising. This occurs at the two-leaf stage, about two weeks after the cotyledon (or seed leaf) emerges above the soil surface. Until this time, the plant has been dependent for nourishment on the food stored in the endosperm of the seed and protection from fungicide and seed treatments. Adverse conditions during the plant’s emergence will increase its vulnerability.
During emergence, as the cotyledon is pushing through the soil to the surface, its delicate tissues are protected by a tougher shield called the coleoptile. If all goes to plan, the coleoptile ruptures when it is exposed to sunlight at the soil surface, releasing the leaf so it can expand freely. If the coleoptile ruptures before it emerges from the soil, the plant may “leaf out” underground (leaves open before the crop emerges) and usually the plant will die or perform very poorly.
Crop performance is strongly influenced by environmental conditions at planting and within the following 3 weeks of establishment. Cool soil temperatures at early planting dates restrict nutrient uptake and growth is slow. As the planting season progresses soils warm up but moisture may become a limiting factor. The grower can help manage these factors by careful seed placement in the seed bed.
Once planting is complete there is little that can be done to protect the young plant from adverse weather events. Frost, hail and wind may damage the leaves, but if the growing point of the plant is undamaged, there will be no adverse effect on the end yield. Flooding at any time, when the growing point is below water may result in plant death.
CHARACTERISTICS OF THE SWEET CORN PLANT The original sweet corn plants grew in the subtropics; soils were warm, the sun shone and it rained frequently. Successful establishment of today’s sweet corn hybrids depends on providing the right environmental conditions for germination and plant growth.
The sweet corn that is grown today is very different from its ancestors. Breeders have made countless selections to improve agronomic and quality characteristics and today we plant and process a range of standard, supersweet and bicolour varieties. Supersweet varieties are less vigorous than other sweet corn types and are especially sensitive to adverse environmental conditions. They need extra attention at planting to get good germination and crop establishment.
There are several reasons for this;
These varieties have smaller, shrunken seeds and are more brittle than standard (su) sweet corn seed, so the seed is more prone to damage through handling.
Supersweet seeds have less starch than the su varieties. This means there is less stored energy available for germination. The high concentration of sugars in the seed of supersweet varieties is attractive to soil fungi and bacteria which increases the risk of damage.
Successful crop establishment is achieved by planting good quality seeds in an environment that promotes even germination and plant growth.
Key Point: Poor emergence costs money The potential of the crop is determined by what
happens at emergence. Crops that have gaps, because the seed has failed to germinate or the plants haven’t emerged, or crops that have uneven plants, early in the season, will not reach their yield potential.

Top of the Document Sweet Corn Toolkit Manual 2nd Edition December 2016 30
Key Point: What causes poor establishment?
It could be due to a single factor or a number of interacting factors, such as:
seed that is of poor quality seed rots caused by seed or soil-borne fungi planting into cold, wet soils planting into soils that are too dry planting the seed too deep or shallow soil crusting after planting insect and bird damage
SEED FACTORS Sweet corn seed is usually purchased by the processing company and then on-sold to the grower. This allows the processors to select varieties that suit their processing requirements and hopefully also provide good economic returns to the grower.
Understand the agronomic characteristics of the varieties that you are offered. If you do not think that the variety you are being asked to grow will suit your conditions, discuss it with your processing agronomist before planting.
Poor establishment due to a dry and cloddy seed bed.
Many processors test the seed lines and have the seed treated with insecticides before it is sold to the grower. Find out from your agronomist what seed testing has been done and what treatments have been added.
Is my seed of good quality?
Poor seed quality can occur if the seed is old or hasn’t been dried, handled or stored properly after harvest. It is important to have the seed tested before planting. The standard seed tests to ask for are:
A simple germination test. This tells you the germination rate. The results are expressed as a percentage. A 90% germination means that 90 seeds out of 100 will germinate.
A cold vigour test. This tells you how the seed performs under cold conditions. The results state how many seeds were good, abnormally developed or dead.
Retest seed that is carried over from the previous season. Germination rates decrease with seed age and some seed treatments may cause loss of viability.
Ask your agronomist for the seed test results before you begin planting.
The seed test results provide some information about the potential performance of the seed line, but remember that the tests are carried out under ideal conditions. These may bear little resemblance to the environment that the seed is going to be planted in. Your personal experience with a particular variety is often the best information to use for understanding its potential and limitations.

Top of the Document Sweet Corn Toolkit Manual 2nd Edition December 2016 31
Is my seed going to rot?
Commercial sweet corn seed is treated with fungicides to prevent damage to the seed and emerging plants. In good conditions the protection that this gives is sufficient to allow germination and emergence to occur.
Seed rots and seedling blights are caused by a number of fungal species. Some of these, such as Pythium species, Fusarium species and Rhizoctonia solani, are common soil fungi found wherever corn is grown. Some, such as Fusarium moniliforme and Penicillium oxalicum, may be either soil-borne or seed-borne.
Key Point: If you are buying your own seed Ensure that you buy from a reputable distributor.
Specify a germination rate of >90%.
Find out what seed treatments have been applied. Most commercial seed is treated with a number fungicides to give protection against the common soil and seed fungi.
Organise independent germination and cold vigour tests for each seed line you purchase. You will need to send seed samples to a seed testing laboratory for these tests1. Include samples from each seed line that you are purchasing.
Organise additional seed treatments. The most common additional treatment is Gaucho® for Argentine stem weevil control.
Seed rots and seedling diseases on corn are more severe in wet soils. Problems may occur in low-lying areas in a paddock and in soils that have been compacted or remain wet for an extended period of time.
When the soil temperature is below 12°C, germination is delayed and the risk of the seed rotting or the plant being attacked is increased.
The severity of seedling diseases is also affected by planting depth, soil type, seed quality, mechanical injury to seed, crusting, herbicide injury or other mechanical factors that prevent or delay germination and emergence.
Residues left on the soil surface may influence the incidence and severity of seedling blight as they affect soil temperature and soil moisture.
Use seed that has been properly treated with fungicides and insecticides for maximum germination and crop establishment.
Poor establishment and growth in a sweet corn crop in Hawke’s Bay. In this case the problems were caused by waterlogging.
1 Seed germination tests are generally about $120 for each test. Contact the National Seed Laboratory of AgriQuality NZ Ltd, PO Box 609 Palmerston North, ph 06 351-7940, www.seedlab.co.nz/index.HTM

Top of the Document Sweet Corn Toolkit Manual 2nd Edition December 2016 32
SOIL FACTORS
Temperature
The time it takes for a corn seed to germinate and begin to grow is closely related to the soil temperature. The optimum soil temperature for germination and emergence is 20–22°C. Emergence occurs in 7–10 days at these temperatures. Sweet corn takes about 16–18 days to emerge from 10°C soils.
If soil temperatures drop below 10°C, it takes much longer for plants to emerge. If soils become too cold or wet after planting, then germination and emergence may slow significantly or stop altogether.
The minimum soil temperature for germination depends on the cultivar. In general, su cultivars require 10°C, se's 12°C and sh2’s or supersweets 12°C.
Moisture
Seeds will germinate over a wide range of soil moisture conditions. There must be enough moisture available to swell the seed and to trigger the utilisation of starch in the kernel. Seeds will not germinate in dry soils. If the soil is dry at planting, adjust the planting depth so that the seeds are placed into moist soil. If there is no soil moisture in the planting zone delay planting and irrigate (if possible).
Uneven soil moisture causes uneven emergence. Often the seeds will germinate after the next rain or irrigation, but the emerging plants will be too small to compete. The crop will yield less and quality will be compromised because of the mixed maturity of the plants.
Too much rain after planting can have adverse effects, particularly if the temperature is cold or the soils are compacted and not well drained. Germinating seeds will easily rot under these conditions.
Key Point: Characteristics of a desirable seed bed fine enough to give good contact between seed and
soil loose enough for good air circulation warm adequate available moisture minimum of weeds no crust
Soil structure and fertility
Soil type, structure and fertility, all contribute to the success or failure of crop establishment.
Soil type has a big influence on whether the soil is well drained, what its water holding capacity is and whether it has the potential for crusting. Soil type also contributes to the rate of soil warming in the spring–usually light soils warm up quicker than heavy soils because they hold less water.
The soil structure and moisture influences how the soil responds to cultivation when preparing the seed bed. A firm, moist seed bed allows close contact between the soil and the seed and provides optimum conditions for germination and emergence.
Planting into rubbly seed beds can cause problems. Uneven beds cause uneven seeding depth and poor seed to soil contact. Rubbly soils also let light penetrate into the bed. If light hits the tip of the growing seedling, before it fully emerges, the tip of the coleoptile stops growing and the plant will “leaf out” (see above).
Soil fertility also has been shown to have an effect on seedling emergence. Fertilisers added to seed beds can prevent germination or kill seeds if they are too close to the seed, especially in dry soils. Ensure that banded fertiliser is not placed too close to the seed or at too high a rate.

Top of the Document Sweet Corn Toolkit Manual 2nd Edition December 2016 33
A crust formed in a silt loam soil.
PLANTING
Crusting
A crust can form a physical barrier which the plant is unable to break through. If this happens, the emerging plants are likely to “leaf out” underground. If they survive this they may be so far behind their healthy neighbours that they produce little or no yield. Plants that have been able to emerge are often stunted and yellow.
Working with your planting contractor
Take the time to develop a good relationship with your planting contractor and be there in the paddock before planting starts. A little bit of care and communication at this stage goes a long way towards ensuring that you have a good planting job done.
Working with your processor
A process crop, grown under contract for a processor, comes with a few strings. The grower must understand the processor’s business and work closely with the company to get a good outcome.
The processor’s aim is to have good quality corn to the factory in a timely manner. They do not want all the corn to be ready on one day, nor do they want to have gaps in their production plans. To achieve this goal the processor will work with varieties that are chosen for specific qualities and a planned harvest schedule.
The harvest schedule drives the planting schedule. The company’s agronomist will endeavour to put together a planting schedule that maximises yield and minimises harvesting cost and downtime. Generally, the planting plan will start with paddocks in the warmer areas with least frost risk, and then move around the region in a structured way. If irrigation is unavailable then heavier soils that retain water will tend to be planted later.
Take the time to get to know your agronomist. Express any concerns that you might have about the variety you have been allocated or the proposed planting date as soon as you can.
Not every paddock can be planted at the optimum planting dates, but with good management practices, every paddock is capable of producing a good crop.
Try to negotiate your planting date. Generally companies will pay bonuses for sweet corn that is planted early or late.
Before you begin planting have a walk around the paddock with your contractor and identify any potential problems with the seed bed and the soil moisture. Seed placement can be adjusted to give a good germination result.
Check the following before starting:
Is the correct seed being loaded into the planter? It is easy to get seed lots muddled. During a busy planting season the contractor may have mixed loads of sweet corn and maize on his truck. Also make sure the drill has been emptied before filling with sweet corn seed begins.
Is the correct seeding rate programmed into the planter? Double-check with your agronomist what the correct seeding rate/population is.
Is the correct fertiliser rate programmed into the planter?
Is there enough fertiliser and seed in the paddock to complete the job?
Stop the planter after a short run and check where the seed is being placed. Readjust the setting if necessary.
Seed depth and spacing are functions of the planter.

Top of the Document Sweet Corn Toolkit Manual 2nd Edition December 2016 34
How many plants per hectare?
The target population for most sweet corn crops is between 60,000 and 70,000 plants per hectare. This equates to a plant spacing of roughly 21.5 to 19 cm (8.5 to 7.5 inches) on a standard 76cm (30 inch) row width. The achieved plant population depends on the germination rate and the soil conditions.
See also Chapter 13 “Trouble shooting your crop”
How deep should I plant the seed?
The most important factor to look at when deciding where the seed should be placed is the soil moisture. The seed must be in contact with moist soil, otherwise germination will not be initiated. Place the seeds in the moist zone of the soil.
Key point: Check the seeding rate Use this technique to check the calibration on your
seed drill.
Before planting, fill one or two row units and run the drill at planting speed over some level ground (raise the units, so they drop the seed onto the ground surface). Then count the number of seeds dropped by each unit over a measured distance.
What distance? Well the further the better, and the calculation to convert the seed number to seeds per hectare varies with the between-row spacing. It’s easiest if you follow the procedure below for population counts. Average the values from the different row units. Unlike a population count though, you won’t need to repeat the procedure several times.
When there is no issue with soil moisture, the depth of seeding should be no greater than is required to maintain a cover over the seed. Otherwise, 40 to 60 mm of soil coverage is desirable, depending on conditions and the soil type.
Plant the seeds shallow, at 40 mm, when the soil is cold and/or moist. Plant the seeds deeper when the soil is warm and/or dry.
Plant seed shallower in heavy soils or where soil crusting is anticipated.
Shallow planting (40 mm or less) increases the risk of poor seed coverage and uneven emergence in dry conditions.
Inadequate seed coverage can cause variable plant emergence and variable plant stands. Planting too deeply can also cause uneven emergence.
It is important to check the actual seed depth at the start of planting. Adjust the planter if the seeds are not at the optimum depth.
Key point: Doing a population count Use this technique to check the plant population
that you did achieve.
What you need to do is measure the number of plants in 10 m2 of ground.
Make a string measure with wire pegs at both ends. The length of string in metres between the pegs should be 10 divided by the between-row spacing of your crop (again in metres).
So if your row spacing is 77cm (0.77m) then your string length needs to be 10/0.77 = 13m.
Walk out into the crop and stretch your measure out along the row on the soil surface.
Count the number of plants along the string measure. Multiply your count by 1000 to convert the count to plants per hectare. So 55 plants counted means there are 55,000 plants/ha.
Repeat the counts at least 10 times and average them to get a representative count for the whole paddock. If there are parts of the crop where the emergence is different from the main emergence pattern, make separate counts for these areas.

Top of the Document Sweet Corn Toolkit Manual 2nd Edition December 2016 35
CHECKLIST FOR OPTIMUM ESTABLISHMENT 1. Prepare your seed bed well. Avoid practices that
Allow moisture to escape from the soil
Produce rubbley, rough seed beds
Produce overworked seed beds 2. Know the quality of your seed
What are the germination and cold vigour tests like?
Do the planting conditions match the seed quality?
Is the seed treated with fungicide?
Is the seed treated with an insecticide? 3. Be in the paddock before the planter starts
Discuss seed placement with the operator
Check that the planter is operating correctly
Is it the right seed?
Is the seeding rate correct?
Is the fertiliser rate correct? 4. Before planting progresses too far, stop the planter and have a dig around to find the seed
Is it sitting in moist soil?
Is it too deep for the environmental conditions?
Where is the fertiliser in relation to the seed?
Make adjustments if necessary 5. Keep an eye on the crop after planting, particularly if the weather is cold and wet
Check for delayed emergence, dig up some seeds and see what’s happening to them
Check for soil crusting–if there is significant crusting and the soil is drying out you may need to lightly cultivate (e.g., using a light harrow such as a pea harrow, or using a rotary harrow like a finger weeder)
6. Once the crop has emerged:
Check for argentine stem weevil damage
Check for cutworm damage
Check for weeds
Do a population count

Top of the Document 36
7 Weeds
Trevor James & Anis Rahman, AgResearch, Ruakura
Weeds play a big part in sweet corn production. In general, the cost of controlling weeds is substantial and economic production without weed control is virtually impossible. In NZ where the soil weed seed banks and the weed populations are high, competition from uncontrolled weeds can result in substantial yield losses. Recently, the availability of new post-emergence herbicides has made it easier to manage some problem weeds in sweet corn.
Weeds decrease crop yields through competition for nutrients, water and light. Like many crops, sweet corn suffers the worst weed competition in the early stages of growth. This is mainly because the young plant grows slowly during the first 10 to 12 weeks. Sweet corn is less vigorous and much less competitive than maize. The common warm-zone grasses, like summer grass, barnyard grass and smooth witchgrass, are serious competitors.
The composition of the weed flora can vary widely between fields and between different growing regions. It is usually influenced by the site history. The list includes a large number of both annual and perennial species. However, weed populations are often so high that usually only a few species dominate at any one time. Our maritime climate encourages sequential emergence of weeds well into the summer.
Some common weeds of sweet corn crops–photographed at the seedling stage when it is important to recognise them.
These factors highlight only some of the rather special problems faced by sweet corn growers in NZ which are somewhat different from the large maize and sweet corn growing areas of the world. In the following sections we provide brief information on major weeds of sweet corn in NZ and the main weed control options available currently, and describe the major challenges of weed control in maize and sweet corn in recent years.
COMMON WEEDS OF SWEET CORN The major weed spectrum in sweet corn crops can vary widely, and is usually influenced by the site history. During the first and second year out of pasture, broadleaf weeds are the main problem. However, in subsequent years and when the earlier germinating broadleaf species have been removed, grass weeds become the major problem.
The continuous use of atrazine in many fields has been one major factor in the shift of the weed spectrum to grass species and some persistent perennial weeds. When sweet corn follows a crop other than pasture, the weeds present will be determined largely by the preceding crop and the crop species itself could become a weed in the sweet corn.
Tables 7-1 and 7-2 summarise the common broadleaf and grass weeds of sweet corn crops in NZ. These include both annual and perennial species. It must be emphasised that many of these species are not necessarily the most difficult to control but rather those which are most prevalent.
Key point: help with weed identification The Ute Guide of the Sweet Corn Toolkit
contains more photographs of the most common weeds of sweet corn crops.

Top of the Document 37
Table 7-1: Major broadleaf weed species of sweet corn crops in NZ. * Prevalent in peat soils and wet fields.
Common Name Botanical Name
annuals fathen Chenopodium album black nightshade Solanum nigrum redroot Amaranthus powellii willow weed Persicaria maculosa water pepper* Persicaria hydropiper spurrey Spergula arvensis apple of Peru Nicandra physalodes thorn apple Datura stramonium hemlock Conium maculatum twincress Lepidium didymum wavy bitter cress Cardamine flexuosa wire weed Polygonum aviculare perennials Californian thistle Cirsium arvense broad-leaved dock Rumex obtusifolius pink bindweed Calystegia sepium cornbind Fallopia convolvulus field bindweed Convolvulus arvensis oxalis Oxalis spp.
Table 7-2: Major grass weed species of sweet corn crops in NZ.
Common Name Botanical Name
annuals summer grass Digitaria sanguinalis smooth witchgrass Panicum dichotomiflorum witchgrass Panicum capillare broomcorn millet Panicum miliaceum barnyard grass Echinochloa crus-galli yellow bristle grass Setaria pumila rough bristle grass Setaria verticillata crowfoot grass Eleusine indica perennials couch Elytrigia repens paspalum Paspalum dilatatum Mercer grass Paspalum distichum Indian doab Cynodon dactylon
Black nightshade (Solanum nigrum) seedling
Black nightshade plant

Top of the Document 38
.
.
Seedling of Velvet leaf (Abutilon theophrasti)
Velvet leaf plant
WHEN TO TACKLE THE WEEDS IN SWEET CORN Sweet corn, unlike maize, is a short-season crop; is far less competitive in growth; it lacks a dense plant canopy and allows considerable light to enter for weed development. Sweet corn breeding for improved market acceptance has resulted in cultivars with increased sugar content and improved shelf life. Sweet corn seeds differ from those of maize by containing less starch and more soluble sugars which results in low seed and seedling vigour. This poor early season emergence and crop development, combined with the less competitive nature of the maturing crop, result in sweet corn being highly susceptible to weed interference and more susceptible to certain herbicides.
The most sensitive time to weed competition is about 2-3 weeks after weed/crop emergence. This is when the sweet corn plants are small and weeds are beginning a period of rapid growth and root extension. It is critical that weeds be well controlled at this time. Sweet corn remains susceptible to weed competition for about another 8 weeks. After this the presence of weeds should not affect sweet corn development but the weeds could host undesirable diseases and insect pests and interfere with harvest.

Top of the Document 39
MAIN WEED CONTROL PRACTICES IN SWEET
CORN
Cultivation and minimum tillage
Mechanical weed control practises used until the 1960s have been largely discontinued by maize and sweet corn growers because of their dependence on weather, mechanical injury to plants, soil compaction and loss of soil structure. Although cultivation and tillage are still integrated with herbicide application in many countries, they are used now in NZ mainly where control of weeds with herbicides has been inadequate. Timing of cultivation is quite critical as it is ineffective when the soil is wet. Also if weed and trash build up on the tines, sweet corn seedlings can be injured.
Chemical weed control in sweet corn
The primary role of herbicides is to control weeds. A secondary role is to reduce the requirement for cultivation for crop establishment. The use of selective herbicides for weed control in maize and sweet corn started in NZ in the 1950s with the introduction of hormone herbicides 2,4-D and MCPA. Many other chemicals have been investigated since and the array of herbicides available today enables growers to effectively control most of the major weeds in sweet corn.
Control of broadleaf weeds
Most broadleaf weeds can be effectively controlled up to the young seedling stage with a pre-emergence or early post-emergence application of atrazine. The closely related herbicide cyanazine is used widely in North America and Europe, due to its shorter soil persistence and suppression of certain annual grass weeds. It has not proved as useful in NZ due to its lower activity on broadleaf weeds.
Both of these herbicides have been largely replaced or complemented, particularly in Europe, by a closely related herbicide, terbuthylazine (but not in NZ due to its cost). This has lower water solubility and shorter persistence than atrazine, causing fewer problems with soil and water contamination. Saflufenacil (Sharpen®) is a recent pre-emergence herbicide for broadleaf weeds. It has some advantages over the triazine herbicides particularly where triazine-resistant weeds are a problem.
Atrazine is probably the cheapest option for broadleaf weed control. However, we must be judicious in its use because certain weeds are developing resistance to it and it has caused surface and groundwater contamination overseas and to a limited extent in NZ. Most of the grass-specific herbicides also provide limited control of many broadleaf weeds.
There are other herbicides registered for post-emergence control of broadleaf weeds in sweet corn. Bromoxynil (Emblem®) is a non-residual, desiccant type herbicide that will burn off nearly all broadleaf weeds but has no effect on grasses. Topramezone (Arietta®) and nicosulphuron (NeekoTM Oleo only) are effective on a range of broadleaf weeds and offer good control of many grass weeds. Clopyralid (available under various trade names) has specific activity on Californian thistle, Bathurst bur and volunteer potatoes.
Key Point: Post-emergence applications For optimum efficacy apply post-emergence
herbicides inter-row (ideally with nozzles at 75 cm spacing and centred between rows) and to weeds less than 10 cm high.
Fathen (Chenopodium album) seedling.
Fathen (Chenopodium album) plant.

Top of the Document 40
Control of annual grass weeds
There are now options for control of grass weeds in sweet corn both pre- and post-emergence. However, it is still advisable to use a pre-emergence herbicide as the first option, backing it up with a post-emergence application of either nicosulphuron (NeekoTM Oleo only) or Topramezone (Arietta®) if required.
The pre-emergence herbicides (Table 7-3) are all from the same chemical family and have some variation in efficacy on the different grass weeds. Some experimentation with these herbicides for control of the various grass weeds might be required. These pre-emergence herbicides only control annual weeds that have not emerged from the soil and require a seed bed of fine tilth and rain (or irrigation) soon after application to ensure optimum efficacy. If rainfall is unreliable then the herbicides should be lightly incorporated to a maximum depth of 50 mm. Very few grass weeds emerge from below 50 mm and therefore any herbicide placed below this depth is wasted.
Combining cultivation and chemical weed control is an option, particularly where strip tillage is used. Band spraying a narrow strip either side of the plant row greatly reduces the amount of herbicide required and the use of hooded sprayers for between-row application of non-selective herbicide is also an option, as is inter-row cultivation following band spraying.
Seedling of summer grass (Digitaria sanguinalis).
Summer grass (Digitaria sanguinalis) plant.
Witchgrass (Panicum capillare) seedling.
Witchgrass (Panicum capillare) seed head.

Top of the Document 41
Table 7-3: Major herbicides for weed control in sweet corn in NZ.
Common name Chemical name Weeds controlled
Pre-emergence herbicides acetochlor various Grasses and some broadleaf alachlor Alanex®, Corral®, Taipan® Encaps® Grasses and few broadleaf metolachlor Dual® Gold Grasses propachlor Ramrod® Grasses and few broadleaf dimethanamid Frontier-P® Grasses and some broadleaf cyanazine Bladex®, Bruno®, Cytec® Broadleaf and few grasses saflufenacil Sharpen® Broadleaf Pre- or post-emergence herbicides atrazine Various Broadleaf and few grasses terbuthylazine Various Broadleaf and few grasses Post-emergence herbicides topramezone Arietta® Broadleaf and grasses bromoxynil Emblem® Flo Broadleaf nicosulphuron NeekoTM Oleo* Grasses and broadleaf clopyralid VersatillTM PowerFlo Californian thistle, Bathurst bur and
volunteer potatoes
* Only formulation of nicosulphuron registered for use in sweet corn.
Control of perennial and hard to kill weeds.
Most of the herbicides used for weed control in sweet corn have little effect on perennial weeds. Control of these weeds must be accomplished outside the cropping period. Some options include:
Cultivation. Weeds with shallow-growing rhizomes such as couch and the bindweeds are susceptible to repeat cultivation, with harrows or tines, which bring the rhizomes to the surface where they wither and die.
Pre-cultivation and postharvest spraying with glyphosate. Problem weeds that start to grow in late winter/early spring (eg docks and buttercups) can be controlled by spraying with glyphosate 2–3 days prior to cultivation. Others that are present in the crop at harvest (eg bindweeds, paspalum, and couch) can be sprayed at this time reducing their vigour in the following spring. Nicosulphuron (NeekoTM Oleo) offers good control of couch and some of Mercer grass when used post-emergence.
Some other weeds can be specifically targeted with herbicides during growth. Oxalis is partly susceptible to acetochlor but the additional use of either topramezone (Arietta) or nicosulphuron (NeekoTM Oleo) will improve control. Many perennial broadleaf weeds are greatly reduced by post-emergence spraying with Emblem.
Broomcorn millet (Panicum miliaceum) plant in sweet corn.
Field bindweed (Convolvulus arvensis).
Key point: The best approach is to not let difficult to control weeds establish in the first instance. Use regular crop inspections to find and identify new
weeds. These can then be controlled by hand pulling or spot treatment with herbicides.
Control weeds along fence lines, field margins and drains to stop them intruding into the crop. This is particularly important for weeds such as Mercer grass, Indian doab and the bindweeds.

Top of the Document 42
A young plant of couch (Elytrigia repens) showing the early development of rhizomes.
HERBICIDE RESISTANCE Most maize crops in NZ are grown as a non-rotational monoculture where the ground is usually left fallow during the winter and atrazine has been regularly used every year for control of broadleaf weeds. This is a classical scenario for development of herbicide resistance. The weed fathen developed resistance to triazine herbicides in the 1980s and is now widespread. In the 1990s willow weed and black nightshade also developed resistance to atrazine and more recently fathen has also developed resistance to dicamba.
Where sweet corn is grown as a monoculture then herbicide resistance could become a problem. However, most sweet corn crops are grown in rotation and as long as the herbicides used in the rotational crops are from different families then resistance is less likely to occur. Where atrazine-resistant fathen is already a problem, post-emergence herbicides such as topramezone (Arietta) nicosulphuron (Neeko Oleo) or bromoxynil (Emblem Flo) will give excellent control.
HERBICIDE RESIDUES AND THE ENVIRONMENT The herbicides mentioned principally for grass weed control in Table 8-3 have a relatively short residual life; most of them persist in amounts toxic to susceptible species for between 10 and 14 weeks. Therefore, phytotoxic residues of these herbicides should disappear by the end of the growing season and should not adversely affect the establishment of the following crop or pasture.
Among the herbicides used for broadleaf weeds, atrazine is the main one which has been phytotoxic to susceptible crops following sweet corn in the rotation such as ryegrass, lettuce, beans, clovers and brassicas Residual activity of atrazine depends on the soil type and is likely to be high in light soils with low organic matter levels. Also persistence is longer in dry, cold seasons than in warm, wet seasons. Trials have further shown that residues of atrazine last longer in the Gisborne area than in the Waikato region, and care is needed in selecting a follow up crop for autumn around Gisborne and Hawke’s Bay. Thorough cultivation has been shown to help in dispersing the residues in the soil.
Use of post-emergence herbicides may also increase the incidence of herbicide carry over, possibly affecting subsequent crops. This is more critical when the post-emergence herbicide is applied very late and/or when there is very little rainfall after the application.
Müller et al. (2004) noted that 33 different pesticides have been detected in NZ groundwater resources. Of these, 26 were herbicides, with simazine and atrazine showing the highest occurrence, and alachlor detected in some cases. Although all the surveys have detected only traces to very low concentrations, they have been noted in most regions of NZ; they serve as a warning to the industry to use residual herbicides very judiciously.
Where some residual herbicides such as atrazine have been used repeatedly on the same site, their residual activity may be shortened due to enhanced microbial breakdown of the herbicide in the soil. Where this is suspected, growers should change the pre-emergence herbicide used or switch to a post-emergence herbicide to control weeds.
Key point: Avoid repeated use It is important to avoid repeated use of the same
herbicide or herbicides belonging to the same chemical family.
Key point: If carryover is suspected
If herbicide carryover is suspected then either get the soil analysed by a laboratory or carry out a test yourself by planting seeds of the proposed crop in the suspect soil. In both cases the soil should be sampled to 75 mm depth and collected from many places throughout the field.

Top of the Document 43
ISSUES AND ALTERNATIVES FOR ORGANIC
PRODUCTION Much of the previous discussion will also apply to organic production of sweet corn. Key elements in the control of weeds in these crops will be:
Reducing overall weed pressure by employing strategies that minimise or eliminate weed seed production. This might involve hand weeding to remove surviving weeds and cultivation and burial of weeds immediately after the crop has been harvested. Weeds should not be allowed to set seed in any fallow periods.
Planting the sweet corn into a stale seed bed where the weeds have been removed either by repeat, light cultivation of the soil surface or by use of an approved herbicide such as Organic InterceptorTM.
Inter-row cultivation will, however, still be the main method of weed control in organic production. To be effective it needs to be carried out when the weeds are small. Grass weeds with their fibrous roots are more difficult to control than tap-rooted broadleaf weeds and therefore must be controlled before tillering commences.
FINAL NOTES For improved consistency of herbicide performance, ensure that the spraying equipment is clean and free of residues of previous sprays and that it is correctly calibrated. The most critical factor with post-emergence weed control is the timing of application. For best control of annual species the weeds should be small but perennial species require maximum leaf area for best control. However if the herbicide is applied too late in the season then there could be some carry-over to affect the next crop. In this regard the concept of using soil weed seedbanks for predicting future weed infestations could play a crucial role in planning and selecting the most appropriate strategies for managing the weeds in sweet corn.
Herbicide resistance and enhanced degradation are real threats to the ongoing sustainability of herbicide use. Herbicides should be used judiciously and not wasted and the use of cultural alternatives should be maximised.
NZ has suffered from an influx of unwelcome weeds over the past few years. Growers need to remain vigilant and have new or unusual weeds properly identified to curtail the spread of weeds like broom corn millet, velvetleaf or other new species.

Top of the Document 44
FURTHER INFORMATION Hall, M.R., Swanton,C.J., Anderson, G.M. 1992. The critical period of weed control in grain corn (Zea mays L.). Weed
Science 40: 441-447. Heap, I.M. 2005. International survey of herbicide resistant weeds. http://www.weedscience.com/ (accessed 23
November 2016). Harrington, K.C., James T.K. 2005. Managing herbicide resistance in maize crops. Pp 147–150. In: Pesticide Resistance;
Prevention and Management Strategies 2005 Eds. Martin, N.A., Beresford, R.M., Harrington, K.C.–New Zealand Plant Protection society, Hastings, New Zealand.
James, T.K., Lauren, D.R., Rahman, A. 1994. Measurement of atrazine residues in soil and groundwater. Proceedings N.Z. Plant Protection Conference 47: 401–405.
James, T.K., Rahman, A., Holland, P.T., McNaughton, D.E., Heiermann, M. 1998. Degradation and movement of terbuthylazine in soil. Proceedings NZ Plant Protection Conference 51: 157-161.
James TK, Rahman A, McGill CR, Trivedi P. 2011. Biology and survival of broom corn millet (Panicum miliaceum) seed. NZ Plant Protection 64: 142-148.
James, T.K., Rahman, A., Mellsop, J.M. 2000. Weed competition in maize crop under different timings for post-emergence weed control. New Zealand Plant Protection 53: 269-272.
James TK, Rahman A, Trivedi P 2010. Broom corn millet (Panicum miliaceum): a new menace for maize and sweetcorn growers in New Zealand. Proceedings 17th Australasian Weeds Conference. (ed SM Zydenbos) New Zealand Plant Protection Society. 32-35.
James TK, Rahman A, Trolove MR, Parker MD 2010. Enhanced degradation of atrazine in soils with a history of repeated use. Proceedings 17th Australasian Weeds Conference. (ed SM Zydenbos) New Zealand Plant Protection Society. 24-27.
Müller, K., Rahman, A., James, T.K. 1994. Pesticide contamination of water bodies in New Zealand and the role of agriculture. AgResearch Report–prepared for MAF Policy. 46 pp.
Naish, R.W., Forgie, C.D. 1976. Atrazine residues under commercial maize cropping conditions. Proceedings N.Z. Weed and Pest Control Conference 29: 120-123.
Popay I, Champion P and James T 2010. An illustrated guide to common weeds of New Zealand. New Zealand Plant Protection Society, Lincoln, New Zealand. 416 pp. ISBN 978-0-472-16285-6.
Rahman, A., Brown, N.S. 1977. Atrazine residues in the Gisborne Plains and Waikato regions. Proceedings N.Z. Weed and Pest Control Conference 30: 19-24.
Rahman, A., Manson, B.E., Burney, B., Whitham, J.M. 1975. Residual activity of atrazine, alachlor and linuron under different soil and climatic conditions. Proceedings N.Z. Weed and Pest Control Conference 28: 104-103.
Rahman, A., James, T.K. 1993. Patterns of weed seedling emergence in two New Zealand soils. Proceedings 8th EWRS Symposium, Braunschweig 1993: 665-672.
Rahman, A., James, T.K., Grbavac, N., Mellsop, J.M. 1996. Spatial distribution of weed seedbank in maize cropping fields. Proceedings N.Z. Plant Protection Conference 49: 291-295.
Rahman, A., James, T.K., Seefeldt, S. 2001. The current situation with herbicide resistant weeds in New Zealand. Proceedings 18th Asian-Pacific Weed Science Society Conference: 500–508.
Rahman, A., James,T.K., Mellsop, J.M., Grbavac, N. 2003. Relationship between soil seedbank and field populations of grass weeds in maize. NZ Plant Protection 56: 215-219.
Rahman, A., James, T.K., Mellsop, J.M., Grbavac, N. 2004. Predicting broadleaf weed populations in maize from the soil seedbank. New Zealand Plant Protection 57: 281-285.
Robinson, D.K., Monks, D.W., Schultheis, J.R. 1994. Effect of nicosulphuron applied post emergence and post directed on sweet corn (Zea mays) tolerance. Weed Technology 8: 630–634.

Top of the Document 45
APPENDIX - BROOM CORN MILLET (PANICUM MILIACEUM): A NEW MENACE FOR SWEETCORN GROWERS
Broom corn millet is a weedy biotype of the common northern hemisphere crop proso millet. The two weedy characteristics it has developed are the premature shattering of the seed head and the dark pigmentation of its seed. These, combined with traits derived from its cropping history (large seed, quick germination etc.) make broom corm millet the most pernicious weed sweet corn growers are likely to have to deal with. Therefore, if you don’t already have broom corn millet, do everything in your power to avoid introducing it onto your property. Broom corn millet was accidently introduced into New Zealand in birdseed but has since been spread to many new locations, primarily on sweet corn harvesters, but also probably by cultivation and other agricultural equipment.
How to recognise broom corn millet
Broom corn millet is a fast-growing summer annual grass that can grow more than 2 m tall in crops. It is readily identified by its quick germination, rapid and vigorous growth, wide leaves (up to 2 cm wide), hairy stem and distinctive large black seed in a large, open, drooping seed
head (panicle).
Seedling
Young plant
In sweet corn
Seed
Seed head

Top of the Document 46
What we know about this weed
Broom corn millet has a C4 photosynthetic pathway, so its growth rate is determined mainly by temperature rather than moisture. Very little seed will germinate below 16°C and only 50% will germinate at 26°C. Maximum germination is at 31°C. In early planted sweet corn crops, broom corn millet is most likely to emerge after several weeks and will need to be controlled with
a post-emergence herbicide.
Broom corn millet can emerge even from 150 mm depth. So it cannot be controlled by ploughing. It also means that deeply buried seed is likely to cause ongoing problems for many years!
Germination of broom corn millet at various temperatures.
Emergence of broom corn millet from different planting depths
Broom corn millet seed has no dormancy and will grow immediately if conditions are favourable. So if you take the sweet corn crop off early and plant another crop, it could get infested from broom corn millet seed dropped earlier in the season.
Broom corn millet can set seed within 5 weeks of germination. This means that even very late germinating plants are likely to set seed, creating an ongoing infestation.
A seed survival experiment
We examined the emergence of broom corn millet seeds at three intervals (o1, 2 and3 years) after they had been buried to either 50 or 200 mm depth. The results are in the Table on the next page.
Most broom corn millet seed germinated in the first year, with very little subsequent germination. In other words, the amount of viable seed declines rapidly in the first year after burial and then remained steady for the next 3 years (Table 7-5).
We also found that broom corn millet seed showed greater persistence in the soil when buried at 200 mm depth.
Bringing seed to the surface will make it germinate and eliminate it from the soil seed bank.

Top of the Document 47
Table 7-4 Survival of broom corn millet seed after 1, 2, and 3 years when buried at two depths at 8 sites throughout NZ
Burial location Seedlings emerged (per of those buried)
50 mm depth 200 mm depth
Year 1 Year 2 Year 3 Year 1 Year 2 Year 3
Kaitaia 6 4 1 16 19 11 Hamilton 1 10 211 10 18 45 Matata 34 40 12 45 37 32 Gisborne 3 1 0 32 46 34 Havelock North 1 10 28 21 50 62 Palmerston North 10 7 6 23 24 16 Motueka 3 3 5 46 51 19 Lincoln 20 8 0 46 37 61
Management suggestions
Broom corn millet is difficult to manage but not necessarily difficult to kill.
It is difficult to manage due to its rapid emergence and the fact that it will continue to germinate throughout the summer as the weather gets warmer and conditions are suitable. For example there might be several flushes of germination through the season, usually associated with rainfall, soil disturbance (side dressing) or other event. This means that more than a single post-emergence application may be required to manage this weed.
Broom corn millet can germinate and emerge in just 3 days.
So, if there is a delay between cultivation and planting, broom corn millet may have already emerged by planting time. Also if the soil is dry and/or there is no immediate rain (or irrigation) following spraying of pre-emergence herbicides, the herbicide will not be sufficiently activated to control the broom corn millet.
If sweet corn is planted early then broom corn millet will probably begin to emerge later when the sweet corn is larger and a late post-emergence application will be required to control it.
If sweet corn is planted later, broom corn millet will come up simultaneously with the crop and subsequent germination flushes can also be expected. If this happens then more than one post-emergence application may be required.
Clean-up the paddock immediately the crop is harvested so that any broom corn millet present does not continue to grow and set seed.
Crop rotation is also an option for reducing the soil seedbank. The most effective crops are broadleaf crops (peas, tomatoes, etc.) where post-emergence grass killing herbicides (Fusilade, Gallant, Leopard, Sequence, etc.) can be used. The aim is to stop any broom corn millet from dropping seed and thus refreshing the soil seed bank.
The standard, pre-emergence grass herbicides (acetochlor, metolachlor etc.) are effective provided they are activated in a timely manner. Therefore, plant immediately following cultivation and apply pre-emergence herbicide immediately after planting. Irrigate straight away if possible or incorporate the herbicide in the soil (to 25 mm). It is best to apply pre-emergence herbicides to a moist soil surface.
Broom corn millet is effectively controlled by the herbicide nicosulphuron. Note there are several different formulations of this herbicide on the market, some require adjuvants and others do not; so read the label carefully.
If other weeds are present, the double knock method can be very effective. A sound option is mesotrione (Callisto®) early post-emergence and nicosulphuron (NeekoTM Oleo) later. Do not apply them the other way around as the nicosulphuron will reduce the activity of mesotrione.
Take care when applying post-emergence herbicides. The nozzles must be centred between the rows and be on droppers if the crop is well advanced. Broom corn millet plants that are sheltered by crop plants are not likely to be controlled.
Inter-row spraying with a non-selective herbicide using a shielded sprayer is also an option.
If you cannot plant immediately after cultivation, or want to use the stale seed bed technique, then plant 7-14 days after cultivation and mix glyphosate with the pre-emergence herbicide. The worst thing to do is to plant 3-5 days after cultivation as this is too early for the broom corn millet to have emerged (so glyphosate is not effective) but the weed is on the verge of emergence (so the pre-emergence herbicides is also largely ineffective). A stale seed bed will only be effective if the broom corn millet is germinating–you must have warm and wet soil conditions. This excludes early planting.
A variation of the above is to separate the glyphosate application from the pre- emergence herbicide application. In this case the pre-emergence herbicide is applied immediately after planting and the glyphosate applied just prior to crop emergence. This technique picks up the early germinating broom corn millet that remerged too early to be controlled by the pre-emergence herbicide.

Top of the Document 48
8 Pests
Peter Cameron, Independent Researcher
Graham Walker, Plant & Food Research, Auckland
GREEN VEGETABLE BUG This is sometimes known as green shield bug. They can often be seen resting in the sun. When disturbed they move slightly to hide, or drop to the ground, or fly away. They defend themselves by emitting a characteristic smell that provides a third name, stink bug.
It is a sporadic and mobile pest that is more common in warmer regions of NZ and in hot summers.
What does it look like?
The forewings are divided into a green hardened base, and transparent tips folded into the shape of a shield. The adult is about 15 mm long and has three white spots in a line between the wing bases. These spots distinguish it from the slightly smaller native green bug.
There are several beneficial shield beetles that are similar to green vegetable bug, but are brown or grey in colour. Learn to differentiate these bugs because they are useful predators of caterpillars (see section on Natural Enemies).
Eggs are laid in rafts of 60–80 usually on the underside of leaves, and often in weedy crop margins. The rafts are about 10 mm long and develop from yellow to orange. The eggs go black if they have been parasitized (see below).
Green vegetable bug nymphs are orange when they emerge from the eggs and then turn black. Small nymphs remain aggregated. As they develop into larger nymphs they become greener.
Life cycle
There are usually two generations each year. The adults overwinter and lay eggs in spring. These hatch in 1–3 weeks and the nymphs develop into adults in another 8–10 weeks, giving an overall generation time of about 12 weeks depending on the time of year. Nymphs develop in a variety of crops and the resulting adults infest sweet corn from January to March. The adults live for about a month with peak numbers in February and March. The second generation can develop in sweet corn or surrounding crops, and this generation produces adults which overwinter.
Adult green vegetable bug (Nezara viridula).
Egg raft of green vegetable bugs ready to hatch.
Early instar stage of green vegetable bug.
Late instar stage of green vegetable bug.

Top of the Document 49
Damage and hosts
Adults and nymphs feed on sweet corn cobs by inserting their piercing mouth parts through the husk leaves, penetrating the kernels, injecting digestive fluids, and sucking out the contents. This causes discolouration, shrivelling and pitting of kernels, and allows entry of pathogens.
Nymphs and adults suck sap from a wide variety of plants, especially tomatoes, potatoes, beans, brassicas, cucurbits, lucerne and clovers, fruits such as peach and tamarillo, and many weed species including Amaranthus, black nightshade, and wild radish. These plants provide alternate hosts and potential sources of invading pests
How to control green vegetable bug Biological control
The egg rafts of this pest are attacked by a tiny parasitoid (Trissolcus basalis) that develops in and emerges from each single egg. It occurs sporadically and is common only later in the season. Artificial releases of this parasitoid have increased parasitism in some situations.
The activity of Trissolcus may be increased by planting alternative host plants to attract them to your crop. Providing nectar sources, particularly umbellifers such as wild carrot, parsley or fennel, may be important in maintaining parasitoids.
Crop rotation
Rotation of sweet corn to nearby locations is unlikely to avoid infestation because adults are strong fliers and may disperse 1 km a day. But flights may be interrupted by trap crops.
Ground preparation
Destroying crop debris and surrounding weeds may reduce populations that occasionally persist after harvest. This may reduce overwintering populations, but re-infestation can occur
Insecticidal control
Action thresholds for chemical control depend on the tolerance for kernel damage by the particular market, and the percentage of cobs damaged in the crop. Low thresholds of 6% crop damage can be reached quickly so, in high-risk seasons, crops should be monitored at least weekly.
Applications of an organophosphate are registered for aerial application against green vegetable bug infestations and have been shown to be effective when applied with good timing.
Damage to sweet corn from green vegetable bug.
A black, parasitised egg raft of green vegetable bug, and an adult parasitoid
Crop management
Monitoring - search plants close to the cobs. Infestations are usually detected first in the edge rows of a crop, but wider infestations can occur quickly. Heavy pest pressure, rapid infestation between flowering and harvest may require sampling 3, 2 and 1 week(s) prior to harvest.
Sowing date - green vegetable bug is usually more of a problem in late crops, especially those maturing in March. Early sowing may avoid damage by pest populations that develop later in the season.
Trap crops - you can sow alternative crops to intercept adults and provide more attractive environments for them when they fly into crops from weedy areas.
Trap crops of mustard or soybeans planted early in the season can be effective.
Sow trap crops as strips along the edge of a crop to intercept adults moving in
When trap crops become infested, cultivate and crush them with rollers to destroy the bugs.
Edge areas of crops can also trap bugs. These areas can be identified at harvest and sacrificed if the level of damage is too high.
Harvesting - if cob examinations show that damage is confined to edge rows, then harvesting may be restricted to the inner rows.
Key points: Green vegetable bug It is more of a risk in warm seasons and regions. It can fly in from neighbouring crops and weeds. Keep
records to identify crops or parts of crops most at risk. Because of edge effects, crops smaller than about 4 ha may
suffer more damage Trap crops may be used to intercept adults flying into crops. Monitor crops frequently in high-risk seasons, and in late
season crops.
When risks are high or thresholds are exceeded, use timely applications of registered insecticides.

Top of the Document 50
SLUGS Grey field slug (Deroceras reticulatum) and brown field slug (D. panormitanum) can occasionally cause severe damage to seedlings and shred early leaves of sweet corn and maize. Both species are widespread but the grey field slug is usually noted as the main pest species. Young slugs eat decomposing vegetable matter and, as they mature, feed on plants. They are most active at night, during wet weather, and near water sources.
What do they look like?
The grey field slug extends to about 50 mm and has a thick body wall, usually cream or pale brown with darker spots. It produces milky mucus when disturbed.
The brown field slug extends to about 30 mm and is slim in shape. The body wall is thin and transparent, and has a uniform chocolate brown, grey or black appearance. It produces clear mucus.
See www.landwise.org.nz for more information on slug species identification and control.
Grey field slug (Derocerus reticulatum).
Life cycle
Slug eggs are laid in the soil in groups of 10–20 in a jelly-like mass and hatch into miniature forms of the adult. Peak egg laying occurs in spring and autumn, but in favourable conditions egg laying can occur year round. Eggs hatch in about 6 weeks depending on temperature and slugs may live for 4 months to a year. The juveniles grow into adults of 10–25 mm long.
Damage and hosts
Slugs move on a flat foot, which leaves a diagnostic trail of slime on affected plants. Damage to plants is caused by a rasp-like tongue, which causes rough-edged wounds in soft plant parts. Many vegetable crops and broad-acre crops including peas, clover rye grass, and maize or sweet corn are susceptible. In emerging sweet corn, slugs may cause cavities in the seed and shred early leaves. Direct drilled or reduced tillage crops can be particularly susceptible because slugs can be abundant.
Brown field slug (Derocerus panormitanum).

Top of the Document 51
How to control slugs Site choice and crop rotation
Your choice of field will strongly influence risk from slugs. Clay soils with coarse structures offer more refuges so are more risky than sandy soils. Populations are also strongly influenced by the aspect of the field, its drainage, nearby water sources, and foliage cover. Slugs build up in fields that have a cropping history of dense vegetative cover.
Crops planted from slug-infested pasture may be at risk. Dense slug populations can persist for several weeks in damp soils following cultivation of pasture.
In sweet corn, cultivated debris is slow to rot and is a good food source for slugs.
Ground preparation
Preventative control usually relies on cultivation.
Avoid clumps or clods and aim for a fine soil tilth to minimise soil cracking and reduce crevices for slugs.
Control is assisted by allowing soils to dry out following cultivation.
Reduced tillage, especially after pasture, is associated with increased slug damage to seedling maize.
Biological control
Predators of slugs are common in some field crops. Techniques for increasing the efficacy of predators are currently being investigated.
Ground beetles (carabids) are active in soil and on the soil surface. Small species can climb plants and larger beetles such as Rhytisternus miser can feed on ground-dwelling slugs.
Other general predators such as rove beetles and click beetles may also feed on slugs.
Crop management
Slugs and snails can migrate in from weedy headlands.
Mowing headlands reduces populations of slugs (but this should be weighed against the value of some headlands as sources of beneficial insects).
Maintain control of weeds, especially broadleaf weeds, to reduce food and cover for slugs.
Chemical control
Control requires specific chemicals (molluscicides). These are usually applied as baits with carbamates or metaldehyde. They are effective but durability in wet conditions varies with formulation of the bait.
Some research indicates that regular (1–3 week) application of baits is a better option than 1 heavy application.
Baits are best applied in damp conditions, preferably after rather than before rain.
Product registrations recommend pre-baiting, application at sowing, and post plant broadcast; efficacy of these techniques is likely to be variable.
Monitoring slugs.
Monitoring is often based on crop damage or soil sampling, but trapping techniques are probably better. Traps depend on slugs hiding in damp locations under objects placed on the soil surface. However, the results vary depending on soil water status, current weather, and the need for slugs to seek refuge.
Convenient traps include wet sacks or boards that can be placed on the soil in the field. Researchers use 400 x 400 mm pieces of plywood.
Your choice between preventative controls (cultivation, baits), and curative sprays depends on:
Time of year; Stage of cropping–preplant, emergence, or
established; Slug numbers compared to previous records; The effect of weather and soil moisture on slug
counts; Field history of damage.
Key points–slugs The grey field slug is probably the most common in
field crops. Slugs can occasionally cause severe damage to
seedlings and shred early leaves. Populations are strongly influenced by paddock
history, especially factors influencing soil moisture. Preventative control usually relies on cultivation. Monitoring techniques and comparisons with
previous records can assist control decisions. Molluscicides are usually applied as baits of
carbamates or metaldehyde.

Top of the Document 52
ARGENTINE STEM WEEVIL Argentine stem weevil occurs throughout NZ. Emergence failure, wilting, tillering and stunting of plants due to stem weevil attack can be widespread in fields.
What does it look like?
The adult is a hard-bodied compact weevil about 3.5 mm long. It is grey- brown with three stripes along the thorax, behind the head. During the day the adult hides among litter on the soil. At night it climbs cereal plants to feed and lay eggs in the leaf sheath. Newly hatched larvae feed to form a mine in the tiller. They grow as a legless larva to about 5 mm long and form a white pupa in the soil.
Adult Argentine stem weevil (Listronotus bonariensis).
Life cycle
Adults overwinter in plant litter and become active, mate and lay eggs from early spring till autumn. Eggs are laid in the leaf sheath of grasses; larvae mine the stem and damage tillers, which may then break off. There are usually two generations a year. First generation larval numbers peak in October to November. The second generation is from December to March.
Damage and hosts
The main hosts are pasture grasses or grass weeds, and cereals including seedling maize and sweet corn. Stem weevil larvae from heavily infested pastures are probably the main source of the pest in sweet corn. Damage occurs when larvae present in residues from previous pasture transfer to emerging sweet corn. The larvae burrow to the base of the plant and sever the growing point. Plants may fail to emerge, or wilt and collapse, up to the four leaf stage.
Damage to a ryegrass stem by Argentine stem weevil. Photograph courtesy of Landcare Research.
How to control Argentine stem weevil Crop rotation–check the preceding crop
High populations in the preceding crop or pasture are bad news. If you find that then consider rotation to a less favoured crop such as a brassica, linseed or legume, together with increased cultivation and longer fallows to reduce numbers.
Ground preparation
Argentine stem weevil can be almost completely controlled by cultivation and a 4–6 week fallow period during which grass residues have been completely buried. Some recommendations suggest that the cultivation period may be reduced to 2 weeks in late season plantings when hot dry soils hasten the death of larvae.
Biological control
An introduced parasitic wasp (Microctonus hyperodae) lays eggs in the adult weevil, which is then sterilised and killed. This parasite gives substantial control of the pest. Commercial releases have distributed this parasitoid in the North Island and Canterbury. It has reduced the summer generation but has little impact on populations in the spring.
Crop management
Sowing high endophyte ryegrasses will reduce stem weevil in pastures that may subsequently be used for sweet corn.
Treatments applied after emergence of the crop are unlikely to be successful because infestation usually occurs earlier.
Insecticidal control
All treatments for stem weevil are registered for use at planting. These are organophosphate treatments for in-furrow application and imidacloprid seed treatment.

Top of the Document 53
LEPIDOPTERA The Lepidoptera include four main species whose caterpillars are pests of sweet corn in NZ; greasy cutworm, Heliothis, cosmopolitan armyworm and southern armyworm.
General description and life cycle
All of these moths are members of the family Noctuidae, or night-flying moths. They are sturdy moths with wing spans of about 40 mm and lay many eggs. The caterpillars grow to 40–50 mm and pupae may form on plants or in the soil. This metamorphosis through different stages provides these pests with separate feeding and dispersing stages. Other caterpillar pests found on sweet corn include true looper caterpillars (family Geometridae), native noctuid moths (genus Graphaniai), and leafroller caterpillars; these cause little damage and should not need control. The table below will help to distinguish the main groups. .
Typical moth life cycle
Key characters for caterpillars. Combinations of the following characters help to identify caterpillars.
Feeding habit
Inhabit rolled leaf nests tied with silk:
Feed openly on leaf surface (or in the soil):
Leafrollers
Others
Eggs and young larvae
Hatch from egg mass:
Clumped or single eggs:
Single eggs
Graphania
Cutworm, Armyworm
Heliothis, Loopers
Shape and size of larvae
Body tapered to ends, slightly flattened and less than 20 mm long:
Other
Leafrollers
Noctuids (e.g. Heliothis, Cutworm, Armyworm)
Pairs of prolegs on the mid abdomen
1:
2:
4:
True looper caterpillars (Geometridae)
Semi-loopers (e.g. green looper)
Heliothis, Cutworm, Armyworm (& leafrollers apart from body shape
Body hairs
Hairs on prominent tubercles (and see skin):
Hairs not on tubercles:
Heliothis
Others
Skin texture
Rough with spicules (little spikes):
Smooth or pebbly surface:
Greasy appearance:
Heliothis
Armyworm
Cutworm
Colour Varies with each pest

Top of the Document 54
GREASY CUTWORM Greasy cutworm (Agrotis ipsilon) is named after the black, greasy appearance of this large caterpillar that cuts seedlings off just below the ground. During the day it is found curled up in burrows in the soil. It is widespread in gardens and field crops where it emerges from the soil at night and nips off leaves or whole plants and sometimes draws them into its burrow. Damage is erratic but weedy areas are often more affected.
What does it look like?
The adults are large, sturdy moths, with the blackish grey of the wings being their predominant colour. The forewings are longer and narrower than the other moth pests of sweet corn, with a wing span of about 45 mm. They are strong, night flying moths that hide among plants during the day, but also fly if disturbed.
A female moth generally lays 600–800 eggs in small clumps or singly on plants, or even on the open ground. The eggs are smooth and white, about 0.5 mm in diameter, and quickly turn brown. Young caterpillars are a grey brown. They feed on leaves until they are about 15 mm long then they darken to the characteristic greasy, grey colour. At this stage they begin to tunnel in the soil, emerging to feed at night. Large caterpillars reach about 50 mm long. During the day they are commonly found curled up in the soil. Fully grown caterpillars make a cell in the soil and form a reddish brown pupa. The new adult emerges and forces its way to the soil surface.
Life cycle
Greasy cutworm has up to three generations a year in warmer areas and two in cooler areas of NZ. In the summer, eggs hatch in about 5 days, the caterpillars develop over 4–6 weeks, and adults emerge from pupae after 2–3 weeks.
The insect usually overwinters as pupae in the soil, but caterpillars may survive the winter in warmer areas. The moths may be caught year round, but regular flights usually begin in October-November and continue until May-June
Damage and hosts
Small caterpillars climb plants and eat small holes in leaves or skeletonise the foliage. Larger caterpillars emerge from their burrows at night and may browse on leaves or cut them off and take them into the burrow to feed. Large caterpillars commonly cut through stems of seedlings just below the ground and then feed on the foliage. Greatest damage occurs when large cutting caterpillars coincide with crop emergence. After the four leaf stage of plant growth, the caterpillars bore into stems and do not kill the plant but may weaken the base of the stem and cause lodging.
Moths commonly lay eggs in weedy areas, especially pasture dominated by docks, plantain and chickweed. As well as sweet corn, crops infested by cutworm include tomatoes, beans, brassicas, lucerne and clovers. A common source of infestation in crops is carry-over of caterpillars from pasture.
Moth of cutworm (Agrotis ipsilon).
Cutworm caterpillar.
Cutworm pre-pupa and pupa.

Top of the Document 55
How to control greasy cutworm
Greasy cutworm is a generalist that can feed on many plants. Control is initially based on minimising infestation using cultural techniques.
Crop rotation
Sowing of sweet corn into land previously in pasture, potatoes or weeds can provide risks from all seedling pests including cutworm, especially when there are high pest populations.
Assess cutworm populations when sowing from pasture, and use thorough cultivation.
Ground preparation
Soil dwelling pests including cutworm can be managed with adequate cultivation. Reduced tillage, especially in establishment from pasture, increases the risk of greasy cutworm damage.
Cutworm caterpillars may be damaged or starved by cultivation and removal of plant matter 7 or more days prior to planting.
Weedy seed beds containing docks and chickweed are particularly susceptible to greasy cutworm.
Cutworm pupae can be damaged by autumn cultivation, but there are no specific control recommendations.
Biological control
Cutworm has relatively few natural enemies and attempts to introduce new species have been unsuccessful. The armyworm parasitoid (Cotesia ruficrus) also attacks cutworm caterpillars, but parasitism is usually at a low rate of about 5%. Parasitoid larvae emerge from dying caterpillars and spin a small silky mass of white to yellow cocoons. General predators like soldier beetles occasionally attack caterpillars and a native fly parasitoid has been recorded on cutworm.
Crop management
Forecasting techniques to predict the initiation of damage have been used for this pest in the USA and in preliminary trials in NZ.
For a particular area, long-term records of moth catches in pheromone traps or light traps may indicate the timing of infestations, but not the level of attack.
Crop sampling for caterpillars requires further development for accurate predictions of damage. Some damage can be tolerated because plants compensate for some losses.
Yield losses in maize have been associated with populations of three to six caterpillars (based on freshly damaged plants) per 100 plants up to the four-leaf stage.
Figure 8-1: Cutworm in action.
Insecticidal control
Cutworm are considered to be most effectively and economically controlled by spray applications after seedling emergence. However, early detection and treatment is important to gain maximum benefit. In maize, few plants are damaged after the 4-leaf stage so unless populations are high, later treatments may not be warranted. Several organophosphates, synthetic pyrethroids and carbamates are registered for control of cutworm, with recommendations to apply to the base of plants and surrounding soil at first signs of damage. Applications in the evening are sometimes recommended.
Key points: Greasy cutworm Identify cutworm by damage and characteristic
caterpillars. Risk of infestation is increased by carryover of
cutworm from previous pasture, infested crops, or weeds.
Weed control and cultivation reduces the risk of infestation.
Records of moth flights may help predict the timing of infestations.
Scout fields regularly to ensure early detection of caterpillars and damage.
Insecticidal controls (in maize) may be economic when three to six caterpillars (based on freshly damaged plants) are present per 100 plants up to the four-leaf stage.

Top of the Document 56
HELIOTHIS OR CORN EARWORM Heliothis (Helicoverpa armigera) is a pest worldwide and is known by several other names including corn earworm, tomato fruitworm, and cotton bollworm. It occurs on a wide range of host plants so the name “Heliothis” is commonly used to avoid names associated with only one crop. This insect is a key pest of sweet corn overseas but is a more sporadic problem in NZ. It can be a pest throughout the North Island and in the north of the South Island. Where it is present, this caterpillar is important because it can burrow into cobs and cause severe damage.
What does it look like?
The adults are sturdy moths with a wing span of about 40 mm. The forewings are typically brown with green to yellow or red tones. The hind wings are pale with a broad, dark, outer margin. At rest, the wings are folded flat over the body by contrast with the tent shape of looper moths. The moths fly at night (so are called noctuid moths), but also fly during the day when they are disturbed.
A female moth lays up to 1000 eggs, usually singly on the upper surface of leaves but also on stems, and on flowers and fruit in other crops. Freshly laid eggs appear as white ribbed domes about 1 mm in diameter (but are not as wide as green looper eggs). Close to hatching they become more yellow and develop an orange ring near the top. Parasitised eggs turn black.
Newly emerged caterpillars are about 1.5 mm long and pale brown with dark heads. Small caterpillars up to about 15 mm long are generally creamy brown. Larger caterpillars develop up to 50 mm and vary in colour from brown to green, yellow, or reddish, with a broad, pale band within the coloration along their sides. The caterpillars can be distinguished from loopers by the presence of four pairs of prolegs on the mid-abdomen. The presence of microscopic spines on the skin (see Lepidoptera) of Heliothis are used to separate this caterpillar from armyworm and other species with four pairs of prolegs.
Full-grown caterpillars leave their host plants, burrow into the soil, form an earthen cell, and pupate. The pupa is brown to dark brown and similar to pupae of other noctuid moth species (e.g. armyworm, cutworm). The newly emerging moth forces its way through the soil before expanding its wings to fly.
Heliothis adult female moth.
Side view of Heliothis egg showing domed appearance and ridges.
Heliothis larvae showing the four pairs of prolegs on the mid-abdomen and colour and size variations.

Top of the Document 57
Heliothis (contd)
Life cycle
Heliothis has three generations a year. In the summer, the eggs hatch in about 5 days, the caterpillars develop over 4–6 weeks, and moths emerge from pupae after about 2 weeks. The moths can live for several weeks and are strong fliers. Heliothis hibernate or diapause overwinter in the pupal stage, and the first generation moths emerge from October to December and infest other crops such as tomatoes. Second-generation moths emerge from mid-January to February, and from this time to about April caterpillar populations may increase enough to cause economic damage. Records of second generation flights for a region may provide a means of predicting the onset of damaging infestations in sweet corn.
Heliothis larvae feeding on sweet corn commonly eat their way into the cob.
Damage and hosts
Small Heliothis caterpillars feed on silks and less commonly on leaves higher on the plant and cause holes similar to those formed by loopers. Larger caterpillars tend to burrow into the silks and, when they reach the cob, they damage kernels and contaminate produce with droppings. Some caterpillars bore through the side of the cob. Heliothis has a wide host range but the caterpillars usually prefer fruit and flowers. It is a major pest of tomatoes, sweet corn, beans, and a minor pest of capsicums, peas, lettuce, cabbage, pumpkin, legume seed crops, and many ornamentals. The major plant hosts may provide a source of infestation for other crops.

Top of the Document 58
How to control Heliothis Crop rotation
Continuous cropping with sweet corn and tomatoes may favour Heliothis, but moths are very mobile and can also fly in from legume crops, brassicas, weeds and ornamentals.
Ground preparation
Cultivate to a depth of 10–15 cm after harvest to destroy pupal cells and damage the pupa itself. Cultivation may also prevent any surviving adults emerging from the soil.
Biological control
(see also the section “Natural enemies”). Natural enemies attack all stages of this pest but parasitism rates are often low in sweet corn in NZ.
Parasitoids - Heliothis eggs parasitised by Trichogramma can be recognised when the eggs turn black just before the exit of the adult parasitoid wasp. Rates of parasitism are usually low but occasionally rise exceed 60%. High parasitism may be related to warmer weather or the absence of insecticides.
Heliothis caterpillars are attacked by three small parasitoid wasps. Each produce different cocoons but the adults are difficult to recognise in the field. Look for the solitary cocoons of Heliothis parasitoids. By contrast, the armyworm parasitoid has silky masses of 30–100 cocoons. Low rates of parasitism occur in sweet corn, but the parasitoids may reduce invasions of Heliothis from tomato and other crops.
Cotesia kazaklays a single egg in small caterpillars, the parasitoid larva develops inside the caterpillar and then emerges to form a single, white silk cocoon (about 3 mm long) that is visible on foliage. The caterpillar usually dies before it is large enough to cause significant damage.
Microplitis croceipes. This larger wasp (about 7 mm) attacks slightly larger Heliothis larvae. It also forms single cocoons but as they are in the soil they are not easily seen.
Meteorus pulchricornis. This wasp has appeared recently and may become a more important parasitoid of Heliothis. It is distinguished from other parasitoids by its cocoon that is suspended by a thread.
Several larger wasps (10–20 mm long) attack larvae or attack pupae of Heliothis, and emerge from the pupa in the soil. These wasps can sometimes be seen searching in the crop for Heliothis.
Predators - several soldier bugs (predatory shield bugs), and a damsel bug are predators of Heliothis caterpillars.
Diseases - caterpillars can be infected by fungi and viruses.
Unparasitised Heliothis caterpillar (left), cocoon of Cotesia kazak beside dead caterpillar (right) and adult C. kazak (inset).
Meteorus pulchricornis cocoon suspended by a silken thread.

Top of the Document 59
How to control Heliothis (contd)
Crop management
Monitoring - you can assess the risk of infestation by using the following methods:
Monitoring moth activity in crops with pheromone traps to identify damaging later generation flights in February and March.
Measuring temperature accumulations (degree days) to determine when damaging populations have had enough time to develop. This is estimated by accumulating the mean daily air temperature above a base of 11°C (the temperature required for Heliothis to grow). In sweet corn, damage mostly occurs from the 3rd generation which occurs after about 1160 degree days above 11°C.
Development rates and commencement of moth flights, and hence the risk of infestations, vary by several weeks from year to year–so monitoring moth flights or calculating degree days can save time by indicating when to increase the rate of crop scouting.
Crop scouting - prior to mid-February you should also sample plants weekly for caterpillars and identify each species.
From about mid-February, or as indicated by increased pheromone trap catches, sample plants twice weekly.
Sample at least 50 plants per 5 ha. Examine cobs, especially the silks for small caterpillars. The presence of larger caterpillars is often indicated by feeding damage or frass.
Pheromone trap for Heliothis.
Insecticidal control
Action thresholds for treatment have not been determined but are dependent on the market and end use of the crop. Minor damage at the tip of the cob may be acceptable for some purposes. Caterpillars in silks are difficult to control therefore most infested cobs will be damaged. Keep records to relate infestation levels to damage.
Count the number of eggs and caterpillars and apply insecticides only if your threshold for the plant stage is exceeded.
Estimate parasitism by rearing caterpillars and increase action thresholds when parasitism rates are high (above 60%).
Use different insecticide groups in early and late crops. The resistance management strategy for Heliothis recommends restricting the use of synthetic pyrethroids to after mid-January.
If early-season applications are needed, the use of more selective insecticides will favour beneficial species.
Several synthetic pyrethroids, organophosphate and carbamate insecticides are registered for control of Heliothis.
Resistance
Resistance to synthetic pyrethroids may limit control. A low frequency of resistance to synthetic pyrethroid insecticides has been detected in Heliothis in NZ. In Australia this resistance has led to control failures in some crops. In NZ, the Heliothis resistance management strategy recommends using crop scouting to minimise pesticide applications, and restricts the use of synthetic pyrethroids until after mid-January.
Key points: Heliothis Use pheromone traps to identify risk periods. Distinguish Heliothis larvae from other less damaging
caterpillars (armyworm). Identify natural enemies that will provide biological
control. Scout crops, especially silks, for Heliothis larvae. Keep records of scouting to develop and refine
thresholds for your fields. When thresholds are exceeded and there are few
natural enemies, apply registered insecticides, follow the pyrethroid resistance management strategy, and use selective materials especially early in the season.

Top of the Document 60
COSMOPOLITAN ARMY WORM Cosmopolitan armyworm (Mythimna separata) is named after the large, army-like populations that can sometimes develop when these caterpillars move through grass and cereal crops. It is present throughout the North Island and the north of the South Island. It is a sporadic pest of pasture and grain crops. Populations regularly caused severe defoliation of sweet corn and maize until the mid 1970s when a new strain of the armyworm parasitoid was introduced to NZ. Armyworm is still widespread in sweet corn but, as plants can tolerate some defoliation and biological control is good, insecticidal control is often unnecessary.
What does it look like?
The adults are large sturdy moths, generally a dull yellowish-brown but sometimes varying to a reddish-brown. They have a wing span of 30–40 mm and usually fly at night. The female moths lay pale cream eggs in clusters on the lower leaves of sweet corn and grasses, usually between blades or in sheaths.
The younger caterpillars are green and develop into larger, pale greenish-brown caterpillars with a thin white line down the back and dark lines on each side of the body. Caterpillars from high-density outbreak populations develop into darker-coloured forms. Fully grown caterpillars are up to 40 mm long. They form a cell in the soil just below ground level, often under stones or debris, and form a reddish brown pupa.
Life cycle
Armyworm does not have a winter diapause, instead caterpillars continue to develop slowly. They pupate in the soil and adults emerge in spring flights. Caterpillars develop in about 1 month, depending on the weather. The development times are greatly extended during the colder winter months. The generation time in summer is 6–8 weeks, which allows 3 or 4 generations in a year.
Damage and hosts
The caterpillars feed on the foliage of sweet corn and maize, small grain crops, and grass in pastures. Typically, armyworm has one damaging generation of caterpillars, which appears after silking in January or February. The caterpillars feed on leaves from the edges towards the midrib. They remove irregular sections of the leaf to give it a jagged appearance, and when populations are dense they leave only the midrib. They feed on the lower leaves first and then move up the plant and may feed on stems, silks and cobs.
Armyworm (Mythimna separata) caterpillar, pupa and moth.
Army worm damage to sweet corn ears (above) and defoliation in maize (below).
They can cause major damage to kernels at the tip of the cob in cultivars with open sheaths.
Following the introduction of the parasitic wasp Cotesia ruficrus, the incidence of damaging outbreaks has been greatly reduced. Biological control, combined with good identification to separate armyworm from the more damaging corn earworm, has greatly reduced insecticide applications in sweet corn.

Top of the Document 61
How to control cosmopolitan armyworm Cultural controls
Cosmopolitan armyworm can originate from nearby grasses and cereals, so crop rotation or ground preparation will not prevent moths flying in to initiate infestations. Thorough cultivation may reduce existing populations by damaging caterpillars or pupae. Control of grass weeds in crops may reduce the risk of outbreaks.
Resistant cultivars
Varieties with tight sheathes help to minimise armyworm damage to tip kernels.
Biological control
The major natural enemy of cosmopolitan armyworm is the small parasitic wasp Cotesia ruficrus. This parasitises small caterpillars, reducing their feeding rate and eventually killing them. This parasitoid now gives widespread control in sweet corn and maize, but occasional outbreaks may still occur.
Small masses of yellowish-white cocoons on sweet corn plants indicate that Cotesia ruficrus is active. Larvae of the parasitoid emerge from dying caterpillars and spin the silk cocoons in masses of 30–100. You can also detect the parasitoids in the field by squashing caterpillars to reveal the maggot-like larvae inside. Rates of parasitism are often high (70–95%.)
Small caterpillars and eggs are attacked by lacewings, hoverfly larvae, damsel bugs and spiders. Caterpillars of all sizes are also attacked by soldier bugs. Several larger parasitoids (e.g., orange caterpillar parasite and dusky winged ichneumon) occasionally parasitise up to 30–50% of armyworm pupae. The combined effects of these predators may contribute significantly to control in some situations.
Maggot-like larvae of the armyworm parasitoid emerge from a caterpillar (above) and then form cocoons on leaves or silks (below).
Crop management
There are no available tools for predicting population outbreaks, so detection relies on scouting. Check crops regularly for several weeks following silking. The decision to spray depends on the age of the crop, the variety of corn, the number of caterpillars and the rate of parasitism. Research in maize suggests that following silking, when parasitism is 70–95%, caterpillar densities of up to 10 per plant do not cause severe defoliation. Defoliation levels in excess of 50% are usually required to cause significant yield reductions in grain maize. In sweet corn, the potential for caterpillars to damage kernels at the tip of the cob will decrease the thresholds compared with maize.
Insecticidal control
Several organophosphate, synthetic pyrethroids and carbamate insecticides are registered for use against armyworm, with recommendations to ensure good penetration of the crop. Good identification of caterpillars to differentiate armyworm from Heliothis has resulted in greatly decreased spray applications in sweet corn over the last decade.
Key points: cosmopolitan armyworm Identify cosmopolitan armyworm (by characteristic
striped, smooth, green-brown body with four prolegs) and differentiate it from Heliothis.
Moths can fly into the crop from many grass habitats. Control of grass weeds within the crop may reduce
the risk of outbreak populations. Crops should be checked at regular intervals for
several weeks following silking. The armyworm parasitoid often causes 70–95%
mortality and significantly reduces crop damage. In maize, when parasitism is high, caterpillar densities
of up to 10 per plant do not cause severe defoliation. If necessary, spray with registered insecticides.

Top of the Document 62
Other Lepidoptera–Southern Armyworm
Southern armyworm (Persectania aversa) has a similar biology to Cosmopilutan armyworm. It occurs sporadically in cooler southern regions. Like cosmopolitan armyworm its pupae are formed in the soil.
Southern armyworm (Persectania aversa). Photograph courtesy of Landcare Research.
Other Lepidoptera–Green Looper Green looper (Chrysodeixis eriosoma) caterpillars are distinguished by their distinct green colour and looping movements. They are normally restricted to the silks of cobs, cause little damage, and pupate on plants. These should not be confused with the smaller true looper caterpillars (see the proleg illustrations in the caterpillar recognition table). The adult moths are also known as silver-Y moth, because of the marking on their wings.
Green looper caterpillar (Chrysodeixis eriosoma).

Top of the Document 63
APHIDS Two species of aphids are commonly found on sweet corn. Cereal aphid (Rhopalosiphum padi) and corn leaf aphid (Rhopalosiphum maidis) infect sweet corn crops contaminating plants with sticky honeydew. They also occur on maize, grasses and small grain crops. Neither aphid is recorded as transmitting viruses in sweet corn in NZ; their main importance here is as contaminants.
Heavily infested plants showing honey dew and mould.
What do they look like?
Corn leaf aphid (Rhopalosiphum maidis) has an elongated or rectangular soft body about 2 mm long, and is greenish or greenish-blue in colour. It has black antennae, legs and cornicles (a pair of tube-like structures protruding from the rear). The body often appears to have a powdery coating. Feeding aphids secrete honey dew which is often associated with the development of blackish moulds. Winged and wingless females occur, but males are rarely found. Females give birth to live young, called nymphs, without mating.
Cereal aphid (Rhopalosiphum padi) has a bulb-shaped body (by contrast with corn leaf aphid) about 2 mm long and is dark green to yellow green with a brown patch on its back. It is found low down on the stems and leaves (except when the populations are large) on all types of cereals. Winged and wingless females, and nymphs, occur in mixed populations.
Corn leaf aphid.
Cereal leaf aphid (photo courtesy of Ric Bessin, University of Kentucky).
Life cycle
Winged adults emigrate from small grain cereal crops and grasses and fly into sweet corn in the spring. Adults produce from 3 to 5 nymphs per day for up to several weeks. This allows for rapid population build-up. The nymphs pass through several instars before moulting into adults in 7 to 12 days. They rapidly produce wingless offspring and appear in clusters on the leaves and the stalk. They may completely cover large areas of the plant. Adult and immature aphids feed on sap sucked from leaves, stems, tassels, and husks through their piercing-sucking mouth parts. Excess water and sugars produce honeydew deposits on leaves which serve as a food source for sooty mould fungi, ants, various beetles, and flies. When aphid numbers increase, winged aphids are formed and they spread to infest more plants in the vicinity.

Top of the Document 64
Damage and hosts
Clusters of aphids may cause leaf curl and yellow patches on leaves. In large numbers, the aphid bodies contaminate cobs so that removal of wrapper leaves or cold treatment and controlled atmosphere storage may be required. Honeydew causes similar problems, and with heavy infestations, sticky accumulations may interfere with pollination. Silks, tassels and cobs may also turn sooty black as mould grows on the honeydew.
There are no studies of the economic importance of aphids in sweet corn in NZ. In normal conditions, in the absence of virus infections, aphid populations are unlikely to cause yield reductions. However, in late-planted crops when large aphid numbers coincide with flowering, some yield reductions may occur.
Cereal aphid is recorded from cereals and grasses, whereas corn leaf aphid is noted from cereals but more often in sweet corn and maize. These hosts provide abundant early season sources of both aphids.
How to control aphids
As aphids may fly into sweet corn crops from many grass and cereal habitats, crop rotations and ground preparation do not contribute directly to control.
Biological control
(see also section Natural Enemies) There are several natural enemies that commonly attack both aphid species. (see section Natural Enemies). Their impact is unclear, but you should be able to identify these beneficial insects because they probably limit the growth of aphid populations.
Aphid parasitoids - Parasitic wasps lay eggs in aphids, which then hatch into small larvae which eat the body contents and cause it to form into a smooth, black or brown, swollen, mummified dead aphid. These mummies are often abundant and clearly visible in aphid colonies.
Aphidius parasitoids are most common and can be identified by their brown swollen mummies, some with small holes through which the new adult wasps have emerged .
Fungi - Parasitic fungi infect and kill aphids by forming furry, brown mummified aphids and are abundant in moist conditions.
Predators - several predators, especially brown lacewings and hoverfly larvae but also damsel bugs and 11-spotted ladybirds, feed on aphids. The immature stages of these predators have different forms from the adult, so be sure these beneficial insects are not mistaken as: Brown lacewings can be the most common predator and
the most useful because they occur early in the season and may prevent aphid populations from increasing. The adults and small alligator-like larvae feed voraciously on aphids, and the small stages can penetrate into small spaces under leaves and leaf sheaths.
Hoverfly adults are easily identified by their hovering flight, but it is the larvae or maggots that are the predators which move and feed within aphid colonies.
Ladybird beetles are the most recognisable predators but, again, the larvae are not as easily identified. Ladybirds are more common later in the growing season.
Parasitised aphids showing ‘mummies’ and aphid skins.
Encouraging natural enemies - The activity of natural enemies may be increased by having non-cereal crops nearby to support non-cereal aphids that can act as alternative host insects and food sources. The economic value of these techniques has not been assessed in sweet corn.
Using non-cereal crops in adjacent fields may attract natural enemies without increasing pest species. For example, hover flies make extensive use of pollen in fields of flowering brassicas and this in turn increases predation of cereal aphids in adjacent crops.
Some aphid parasitoids can shift between aphids on lucerne and aphids on cereals.
Predators such as lacewings, damsel bugs, and ladybirds may increase their population levels on aphids in lucerne crops and may then be encouraged to move by harvesting the crop.
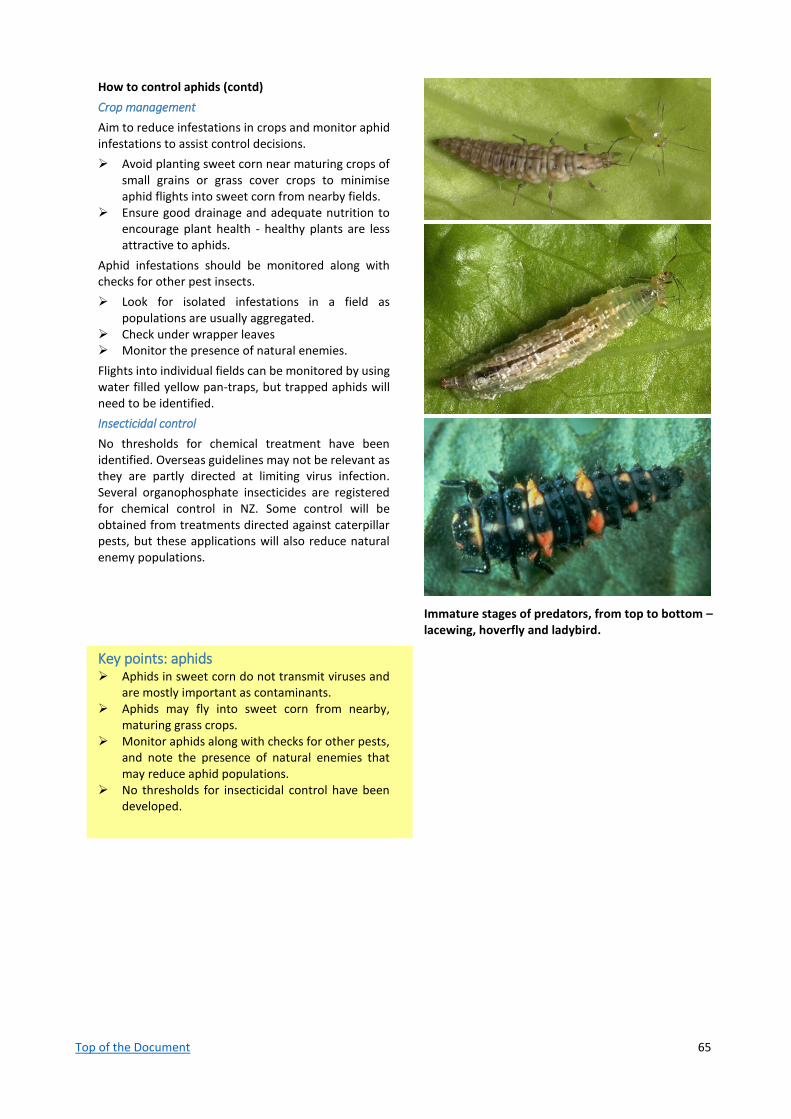
Top of the Document 65
How to control aphids (contd)
Crop management
Aim to reduce infestations in crops and monitor aphid infestations to assist control decisions.
Avoid planting sweet corn near maturing crops of small grains or grass cover crops to minimise aphid flights into sweet corn from nearby fields.
Ensure good drainage and adequate nutrition to encourage plant health - healthy plants are less attractive to aphids.
Aphid infestations should be monitored along with checks for other pest insects.
Look for isolated infestations in a field as populations are usually aggregated.
Check under wrapper leaves Monitor the presence of natural enemies.
Flights into individual fields can be monitored by using water filled yellow pan-traps, but trapped aphids will need to be identified.
Insecticidal control
No thresholds for chemical treatment have been identified. Overseas guidelines may not be relevant as they are partly directed at limiting virus infection. Several organophosphate insecticides are registered for chemical control in NZ. Some control will be obtained from treatments directed against caterpillar pests, but these applications will also reduce natural enemy populations.
Immature stages of predators, from top to bottom – lacewing, hoverfly and ladybird.
Key points: aphids Aphids in sweet corn do not transmit viruses and
are mostly important as contaminants. Aphids may fly into sweet corn from nearby,
maturing grass crops. Monitor aphids along with checks for other pests,
and note the presence of natural enemies that may reduce aphid populations.
No thresholds for insecticidal control have been developed.

Top of the Document 66
OTHER PESTS Several other pests are regionally or occasionally important in sweet corn.
Australian Soldier Fly (Ionopus rubriceps)
Larvae (maggots) of soldier fly can feed on the germinating seed and also feed in large numbers on fibrous roots. This pest can be important in crops sown after pasture that has been heavily infested with soldier fly.
Adult soldier fly
Black Beetle (Heteronychus arator)
Black beetle adults may attack early sweet corn plantings in warmer parts of the North Island. The over-wintering adults become active in October and tunnel into the bases of the plants, causing centre leaves to wilt around the four-leaf stage. Plants can die or tiller and become stunted.
Wireworms
Wireworms are the larval stage of click beetles. They are generalist feeders that damage seed and tunnel at the base of seedlings causing centre leaves to wilt. Two common wireworms are pasture wireworm (Conoderus exsul) and variable wireworm (Agrypnus variabilis).
Adult, pupa and larva of Conoderus exsul (photograph courtesy of Landcare Research).
Maize seed beetles
These ground beetles (Clivina rugithorax and C. basalis) cause occasional damage to seedlings.
(a) Adult black beetle; (b) Clivina basalis ground beetle (photograph courtesy of Landcare Research). NB C. basalis is about half the length of black beetle.
Whitefringed Weevil (Naupactus (=Graphognathus) leucoloma)
Grubs of whitefringed weevil occasionally attack sweet corn or maize causing damage similar to wireworm.
Adult white fringed weevil
Green Looper and Southern Armyworm are other occasional pests that are described in the section on Lepidoptera, so are not noted here.