The Secret Life of ACID MIDI - Access Training Materials for ...
24
10 The Secret Life of ACID MIDI The addition of MIDI capabilities to the 3.0 version of an already formidable multimedia application is amazing. In typical Sonic Foundry style, the execution of this feature is solid and uncompromising. While ACID is not a tool to edit or create MIDI files and does not have the depth of tools that a dedicated MIDI editing application might have, the new MIDI features expand ACID’s creative potential dramatically. In addition to the ability to include MIDI songs in your project, ACID 3.0 lets you change the instrumentation and perform other simple modifications as well as record your own MIDI tracks straight into the timeline. The surprising thing about all of this, especially considering the complexity of MIDI, is that the simplicity of ACID remains. MIDI MIDI stands for Music Instrument Digital Interface. It is a relatively simple and universal computer communication standard that allows synthesizers, sequencers, drum machines, electronic instruments, controllers, and computers to talk to one another. MIDI data is not audio data that can be used to create noise out of a speaker, unlike *.wav or other media files with audio data. Instead, it is a set of instructions that tell a MIDI instrument how to play. In the case of your computer, your sound card may act as a MIDI instrument or device. While MIDI is a fairly simple standard, the huge variety of devices and possible configurations can rapidly lead to confusion. It is very important to understand the distinction between a MIDI device that creates sound out of your speakers and the actual source of the MIDI data itself. One of the easiest ways to identify this difference is to look at the size of a MIDI file versus the size of an audio file. Thirty seconds of MIDI data is only a very small fraction of the size of thirty seconds of audio data, no matter how highly compressed it is. A simple example of a MIDI device is a MIDI keyboard plugged into your computer. The simplest MIDI keyboard is only a “dummy” device that outputs MIDI data such as the note played and how long the key is pressed. The keyboard does not actually make any music by itself, but sends this MIDI data to the sound card, where it is interpreted and then output to your speakers. Ultimately, the quality of the sound depends on the quality of the device that interprets the MIDI data and not on the device that generated it. Some keyboards do make sounds by http://www.muskalipman.com The Secret Life of ACID MIDI — Chapter 10 203 CHAPTER 10
-
Upload
khangminh22 -
Category
Documents
-
view
3 -
download
0
Transcript of The Secret Life of ACID MIDI - Access Training Materials for ...

10The Secret Life of ACID MIDI
The addition of MIDI capabilities to the 3.0 version of an already formidable multimediaapplication is amazing. In typical Sonic Foundry style, the execution of this feature is solid anduncompromising. While ACID is not a tool to edit or create MIDI files and does not have thedepth of tools that a dedicated MIDI editing application might have, the new MIDI featuresexpand ACID’s creative potential dramatically. In addition to the ability to include MIDI songsin your project, ACID 3.0 lets you change the instrumentation and perform other simplemodifications as well as record your own MIDI tracks straight into the timeline. The surprisingthing about all of this, especially considering the complexity of MIDI, is that the simplicity ofACID remains.
MIDIMIDI stands for Music Instrument Digital Interface. It is a relatively simple and universalcomputer communication standard that allows synthesizers, sequencers, drum machines,electronic instruments, controllers, and computers to talk to one another. MIDI data is not audiodata that can be used to create noise out of a speaker, unlike *.wav or other media files withaudio data. Instead, it is a set of instructions that tell a MIDI instrument how to play. In the caseof your computer, your sound card may act as a MIDI instrument or device. While MIDI is afairly simple standard, the huge variety of devices and possible configurations can rapidly leadto confusion.
It is very important to understand the distinction between a MIDI device that creates sound outof your speakers and the actual source of the MIDI data itself. One of the easiest ways to identifythis difference is to look at the size of a MIDI file versus the size of an audio file. Thirty secondsof MIDI data is only a very small fraction of the size of thirty seconds of audio data, no matterhow highly compressed it is.
A simple example of a MIDI device is a MIDI keyboard plugged into your computer. Thesimplest MIDI keyboard is only a “dummy” device that outputs MIDI data such as the noteplayed and how long the key is pressed. The keyboard does not actually make any music byitself, but sends this MIDI data to the sound card, where it is interpreted and then output to yourspeakers. Ultimately, the quality of the sound depends on the quality of the device that interpretsthe MIDI data and not on the device that generated it. Some keyboards do make sounds by
http://www.muskalipman.com
The Secret Life of ACID MIDI — Chapter 10 203C
HA
PTER 10

themselves without being plugged into your computer. These synthesizers and pianos may bethought of as two MIDI devices in one: one to generate the MIDI data and one to interpret thisdata and output sounds. Many times, these devices will have two or more outputs, one or morefor MIDI data and one for audio out. The sound that comes straight out of the keyboard into anamplifier will sound very different from the MIDI data as interpreted by your sound card.
In ACID, “MIDI” means MIDI data and not the sound produced by your MIDI instrument. If youhave a high-quality keyboard with excellent audio output, you may want to record the audiosignal into ACID, just as you would record any audio source (see Chapter 6). MIDI files, MIDItracks, and recording MIDI data in ACID are MIDI data issues.
MIDI StandardThe first version of the MIDI standard was released in 1983 as a way to ensure that all electronicinstruments (and now home computers) would speak the same language. While the protocol has been modified and extended a number of times in the intervening years, the basics remainthe same.
MIDI DataThe stream of MIDI data from a MIDI keyboard or a MIDI file being played back in ACIDcontains information about the music to be produced by the MIDI playback device (your soundcard synthesizer). For a single note, this information includes (among other things) the key ofthe note; how long it is played (duration); the instrument used (voice, patch); how hard the noteis played (velocity); whether it is sustained with a sustain pedal; how it fades after the note isreleased; modulation; volume; and panning. As one example of MIDI data, the key or pitch of anote can be expressed as a numerical value from 000-127. This gives MIDI a total range of 128semitones, or half-steps, which is considerably more than a standard 88-key piano keyboard.Figure 10.1 shows this range against a piano keyboard. The frequency of the sound is marked inHertz (Hz) along the top of the diagram.
Figure 10.1The total range of possible MIDI notes extends well beyond a standard keyboard and well below the thresholdof human hearing.
General MIDIThere are 128 instrument sounds (patches) in the MIDI standard. General MIDI (GM) specifieshow that basic repertoire of 128 sounds is assigned to the various patch numbers. These may benumbered 1-128 or 0-127. These sounds can be broken up into sixteen family groups.
The Secret Life of ACID MIDI — Chapter 10
http://www.muskalipman.com
204

Table 10.1General MIDI patch number assignments.
The General MIDI standard was created so that generic Standard MIDI Files created on asequencer or notation application may be played back on another device while preserving theintegrity of the original selection. Another part of this standard is a separate set of percussioninstrument sounds, usually assigned to Channel 10. This is a special instrument (patch), sinceeach note on the keyboard may be assigned to a different instrument (for example, C= snare, D =woodblock, E = cymbal).
Program Instrument number sound
Piano1 Piano2 Bright Piano3 Grand Piano4 Honky Tonk5 Electric 16 Electric 27 Harpsichord8 Clavichord
Melodic Percussion9 Celesta10 Glockenspiel11 Music Box12 Vibraphone13 Marimba14 Xylophone15 Tubular Bells16 Dulcimer
Organ17 Drawbar18 Percussive19 Rock20 Church21 Reed22 Accordion23 Harmonica24 Tango
Accordion
Guitar25 Nylon26 Steel27 Jazz28 Electric29 Muted Electric30 Overdriven31 Distorted32 Harmonic
Program Instrument number sound
Bass33 Acoustic34 Fingered35 Picked36 Fretless37 Slap 138 Slap 239 Synth Bass 140 Synth Bass 2
Strings41 Violin42 Viola43 Cello44 Contrabass45 Tremolo Strings46 Pizzicato
Strings47 Harp48 Timpani
Ensemble49 Strings50 Slow Strings51 Synth Strings 152 Synth Strings 253 Choir Aahs54 Voice Oohs55 Synth Vox56 Orchestral Hit
Brass57 Trumpet58 Trombone59 Tuba60 Muted Trumpet61 French Horns62 Brass63 Synth Brass 164 Synth Brass 2
Program Instrument number sound
Reed65 Soprano Sax66 Alto Sax67 Tenor Sax68 Baritone Sax69 Oboe70 English Horn71 Bassoon72 Clarinet
Pipe73 Piccolo74 Flute75 Recorder76 Pan Flute77 Blown Bottle78 Shakuhachi79 Whistle80 Ocarina
Synth Lead81 Square Wave82 Sawtooth Wave83 Calliope84 Chiff85 Charang86 Solo Vox87 Fifths
(sawtooth)88 Bass � Lead
Pads89 New Age90 Warm91 Polysynth92 Choir (Vox)93 Bowed Glass94 Metallic95 Halo96 Sweep
Program Instrument number sound
Synth FX97 Rain98 Soundtrack99 Crystal100 Atmosphere101 Brightness102 Goblins103 Echoes104 Sci-Fi
Ethnic105 Sitar106 Banjo107 Shamisen108 Koto109 Kalimba110 Bagpipe111 Fiddle112 Shenai
Percussive113 Tinker Bell114 Agogo115 Steel Drums116 Woodblock117 Taiko 118 Melodic Toms119 Synth Drums120 Reverse
Cymbal
FX121 Guitar Fret122 Breathe123 Seashore124 Bird Tweet125 Telephone126 Helicopter127 Applause128 Gunshot
http://www.muskalipman.com
The Secret Life of ACID MIDI — Chapter 10 205C
HA
PTER 10

Different companies have expanded on the basic GM standard over the years—for example,Roland uses what it calls GS (General Standard) and Yamaha uses XG—but all basicallyfunction the same way and are largely compatible. All of these standards specify only how theinstruments are organized and do not have anything to do with the quality of the sound or thetype of sound synthesis.
MIDI SynthesisThe most important issue in sound card quality as it relates to MIDI is synthesis of the data intosound. Up until this point, the quality of your sound card has not mattered very much whenworking with ACID. Beyond a certain basic level, all sound cards play back and output audiofiles with fairly high fidelity. Of course, there may be important differences in the quality of thecard itself, such as whether it outputs analog or digital signals and how electronically “quiet” itis, but essentially all cards play back media files the same way. Even consumer-level hardwareoutputs very high-quality sound. MIDI is a different story.
FM SynthesisThe quality of your sound card’s MIDI is very important if you use it to synthesize MIDI data, asmost people do. At the lowest quality levels, MIDI data can be interpreted by the FM synthesizeron your sound card. This device will probably sound a bit like a video game. Unless you aregoing for a Casio sound as Trio famously did with “Da Da Da” back in the early Eighties—or youwant only artificial electronic-sounding instruments (perfect for techno or other electronicagenres)—FM synthesis is limited. Most sound cards come with some sort of hardware-based FMsynthesizer that may even be the default MIDI playback device. Since this is usually on thesound card itself, your computer does not need to process any information when playing backMIDI files, it only needs to send the MIDI data to the sound card. This frees up your CPU formore important tasks and is a real advantage. Many games use the hardware FM synthesizer onyour sound card for just this reason.
Wavetable SynthesisA step up in quality from FM synthesis is wavetable synthesis, which interprets MIDI data andthen plays back this data using actual samples (not unlike *.wav files) from real instruments.This is a huge improvement over a basic FM synthesizer and may be all you ever need. Keep inmind that the quality of the sound from wavetable synthesis depends on the quality of thesamples, so wavetable is not a magic way to get perfect MIDI. On a sub-$100 sound card, it isunlikely that the samples are going to be of the highest quality. On the high end, for example,professional-level electronic pianos often have extremely high-quality samples from realinstruments that most of us would not be allowed to touch in real life.
Wavetable synthesis on a sound card is sometimes hardware based. This means that the MIDIinstructions are sent to the card and played back and mixed on the card, which is where theinstrument samples (wavetable) are stored. Generally speaking, this is good, since this means thatthe samples that make up the wavetable do not take up any memory (RAM) on your computer.Many popular sound cards load the wavetable into RAM, which can impede your computer’sperformance. Some sound cards allow you to replace the samples on the wavetable with othersamples, either of your own creation or as created by professionals. Examples of this are CreativeLabs and Ensoniq SoundFonts and the more general DLS (DownLoadable Sounds) standard.
The Secret Life of ACID MIDI — Chapter 10
http://www.muskalipman.com
206

Wavetable samples are similar to ACID loops and fall very near one another on a musicalcontinuum. Samples typically used for MIDI applications are shorter in duration than mostACID loops and are most frequently only a single note. With the right software—say, SoundForge and Creative Labs Vienna—you can edit *.wav files to be used as loops in ACID fromSoundFont samples or convert ACID loops into SoundFont samples.
Software SynthesisSo far, the discussion of synthesis has focused on your sound card and what it can do in termsof MIDI. In the past, sound cards have been a critical part of the MIDI equation since computermemory (RAM) and CPU speed were at a premium and needed to be optimized. It was veryimportant for the sound card to take care of as much of the MIDI processing as it could to freeup the rest of your computer for other tasks. While we’d all like to maximize our computer’sperformance, it is not as important to free up RAM or CPU cycles anymore. Modern multimediamachines in the 21st century are quite powerful and are loaded with RAM. This has led to thepossibility of using a software synthesizer to interpret MIDI data. As with any software on yourcomputer, software synths get loaded into RAM and use your CPU to generate music. Perhapssurprisingly, many of the most popular sound cards with wavetable synthesis actually load thewavetable samples into RAM anyhow, although the actual wavetable synthesizer is on thesound card itself. The great advantage to this is that you do not need to be limited to your soundcard’s hardware. Most sound cards also come with some sort of software synthesizer. If you havea decent sound card but are unhappy with the MIDI playback, you might consider purchasing agood software MIDI synthesizer instead of buying new hardware. See the next section on thelimitations of using a software synth with ACID.
A huge variety of software-based synthesizers are available, including software emulation of FMsynthesis, ancient tube organs, classic arena rock synthesizers, some of the best modernsynthesizers from famous manufacturers, and wavetable synthesis. Microsoft has a DirectXSoftSynth included with DirectX7 that is easily and extensively used in Windows applications,including ACID; it is optimized to use as few resources as possible. Ultimately, this SoftSynthuses your sound card to produce the actual sound.
Configuring MIDI in ACIDAs mentioned, the quality of the MIDI output from ACID does not depend on ACID but on yoursound card. Configuring ACID to use the correct MIDI device can be a complicated task. Sincewavetable synthesis is often the highest-quality synthesis on a sound card, getting ACID tooutput wavetable samples properly is important. Unfortunately, wavetable synthesizers oftenuse some of the same circuitry that the sound card needs to play back regular media files, andthis can cause conflict. This section is going to discuss how to configure ACID MIDI tracks to getthe highest quality and talks about some workarounds for a few potential problems.
http://www.muskalipman.com
The Secret Life of ACID MIDI — Chapter 10 207C
HA
PTER 10

PreferencesTo begin configuring ACID for MIDI, from the Options menu, choose Preferences. In thePreferences dialog box, click the MIDI tab. The list at the top of the tab contains all of thepossible MIDI devices that are currently available on your system. This list is identical to thedevices listed in the Windows Multimedia Properties dialog, which can be accessed by clickingthe Start button on the taskbar and selecting Control Panel. Then, in the Control Panel, double-click the Multimedia item and click the MIDI tab. You can add new instruments to the list inthis dialog box, but that is usually automatically done when you install the software for a newdevice. The list of instruments in ACID can be made a subset of all instruments by selectingonly preferred instruments (see Figure 10.2). Notice that the title of the list in ACID is “Makethese devices available for MIDI track playback and Generate MIDI Clock.” This means that youcan route ACID MIDI tracks through these devices for playback; you cannot route tracks throughany of these devices and render the track to an audio file (see the next section).
MIDI Playback—Track RoutingWhile there are a large number of ways to interpret and play back MIDI data on your computerusing any number of hardware and software devices, there is only one way to use MIDI torender a project in ACID. On the Track Header for MIDI tracks, the track must be routed throughthe Master device, which is the DirectX SoftSynth that ACID uses internally to process MIDIdata. Click the Device Selection button (the Bus Selection button on audio tracks—see Figure10.2) to see the list of available devices. The specific device that is available is set up on theAudio tab in the Preferences dialog box (see Figure 10.2).
NOTEMIDI tracks must be routed through the Master bus in order to be renderedwith the project. All other devices are external to ACID.
Figure 10.2Select a subset ofdevices in ACID tomake available forplayback and MIDIClock generation.
The Secret Life of ACID MIDI — Chapter 10
http://www.muskalipman.com
208

ACID MIDI tracks need to use the Master bus (DirectX SoftSynth) to render projects. Other MIDIdevices listed on the Bus Selector (see Figure 10.2) act as external devices and are used only forplayback. All MIDI tracks in a project automatically use the same device; changing the device onone MIDI track changes all MIDI tracks. As one example, if you are using a Yamaha SXGsoftware synthesizer, your project will sound as if the MIDI track was being mixed into theproject. In reality, the audio tracks in the project are mixing in ACID, but the MIDI track is beingprocessed by an external device (software, in this case) that is mixed with the output from ACIDoutside of ACID on the sound card. Therefore, when you render the project, the MIDI track issilent. There is a way around this problem, however.
Track routing of MIDI devices also has an impact when using other applications simultaneouslywith ACID. Typically, only one application can use any particular device at a time. So, if you areusing Cakewalk SONAR and it is using the B synthesizer on your sound card, you will beunable to use that synthesizer in ACID. Fortunately, most sound cards come standard with atleast one hardware synthesizer and one software synthesizer. Installing additional softwaresynthesizers is also another option. MIDI track routing is also important when generating MIDITime Code and Clock, as discussed later in this chapter (see “Recording Audio Output fromMIDI Playback”).
MIDI Rendering—Track RoutingThe most important aspect of using the Master device for MIDI is when you render projects, asdiscussed above. Since the Master device is internal to ACID and the other devices are external,tracks that use these devices for MIDI playback will not be able to take advantage of any FX orpitch shifting. Notice that the Master device track (bottom) in Figure 10.3 has an FX button,while the other track does not.
Rendering projects with MIDI tracks is exactly the same as rendering any other project and isdiscussed in detail in Chapter 12. Just to repeat: If you render a project and find that the MIDItrack is silent, but the track previews when you play back the project, the problem is that youare not using the Master device for the MIDI tracks.
Working with MIDIACID 3.0 is not a MIDI editing or creation tool. Still, ACID deftly handles MIDI files—goingbeyond simply allowing you to include MIDI in your project—by matching the tempo and beatof the MIDI file to the project. Unlike audio files, tempo, beat, and measures are an inherent partof the MIDI file, making this a straightforward task.
Figure 10.3The number of theexternal MIDI device is displayed on theTrack Header.
http://www.muskalipman.com
The Secret Life of ACID MIDI — Chapter 10 209C
HA
PTER 10

Adding MIDI to ACIDAdding MIDI files (and, thus, MIDI data) to a project is as simple as adding any other type ofmedia file to ACID, although the data itself is fundamentally different. To add a MIDI file (*.mid,*.smf, or *.rmi) to ACID, use the Explorer window to locate and preview the file, then double-click it or drag it to the timeline. A blank MIDI track is inserted into the timeline and you onlyneed to paint or draw an event on the timeline to add the data (see Figure 10.4). MIDI events donot display waveform information as audio events do, since MIDI files are not composed ofaudio data. Instead, the short horizontal lines in the event roughly correspond to the duration ofindividual notes while the vertical position roughly indicates the tone or pitch of the notes. Thisis meant to provide visual cues that correspond to the contents of the event and, like waveforms,is very useful in eyeballing alignment of events in ACID. As with other types of files, the tempoand beat information inherent in the file is used to synchronize the MIDI data with the projectand with other media in the project. Key (pitch) information is not a separate part of a MIDI fileand cannot be detected by ACID.
Since MIDI files are often longer than just a few seconds, MIDI events are not usually looped,although they will loop if the events are made long enough. When you begin drawing a MIDIevent on the timeline, no matter where you begin, the event will start drawing at the beginningof the event (as with all events). This can make finding short sections in the middle of a five-minute MIDI file difficult to find. One way to deal with this is to draw out the entire event andlocate the parts you want, splitting the event where needed (press S on your keyboard). Also tryusing the Slip Trim technique, where you can move the media around within the event withoutchanging the event boundaries: Press and hold the Alt key while dragging inside an event.
MIDI Track PropertiesAs with standard audio files in ACID, a number of variables can be changed in the TrackProperties dialog box for MIDI files. In addition to pitch shifting and markers, you can alsochange the instruments used in a MIDI file from within ACID.
General TabThe General tab looks and functions much like the General tab in all of the other track types.
� The Reload button allows you to reset any changes you’ve made to the MIDItrack back to the defaults of the MIDI file by reloading it into the project. TheReplace button lets you browse for another MIDI file to use in place of thecurrent one. This is most useful when you have used a number of envelopes onthe main timeline and don’t want to have to redo them or when you have editedthe MIDI file in an external application and saved it to a new name. The Savebutton saves the root note to the MIDI file, but it does not save any otherinformation. Most of the changes made in the Track Properties dialog box aresaved at the project level when you save the project.
Figure 10.4A MIDI track and events as inserted intoan ACID project.
The Secret Life of ACID MIDI — Chapter 10
http://www.muskalipman.com
210

� The Track type and other information about the MIDI file cannot be changed.
� Pitch shift allows you to adjust the key, or pitch, of the MIDI file without settinga root note on the Voices tab. The shift is measured in semitones, or half-steps,and is limited to �/�24. The changes made here are reflected on the TrackHeader.
� The MIDI timeline graphically displays the MIDI information. Individualhorizontal lines represent individual voices or instruments. The length of theline shows the duration of individual notes. The up and down wiggle of the linecorresponds to the pitch of the note, although this is only a rough visualindication and is not particularly accurate. ACID is not a MIDI editingapplication, and details in pitch are, therefore, not very important. You cancreate markers and regions on the timeline, but they can’t be saved with theMIDI file by using the Save button at the top of the window. Instead, you willneed to save this information with the project.
Voices TabWhile ACID is not a MIDI editing program, you can change the voices or instruments used in aMIDI file on the Voices tab. Here’s how:
� The Root note functions the same as in other Track Properties dialog boxes. MostMIDI tracks will use Don’t transpose as a root note, since MIDI events areusually longer and may contain internal key changes. If you would like a MIDItrack to change key as the project does, set the root note of the MIDI file to be thesame as the project key. This will ensure that the MIDI file will play back in thedefault key it was created in and will not be transposed initially. Transpositionfor MIDI files poses less of a distortion problem than with audio files. The rootnote can be saved to the MIDI file using the Save button at the top of the TrackProperties window.
� A Voice set is the set of voices or instruments for MIDI. Windows and mostsound cards come with a default set of sounds (usually 128—see Table 10.1), but you can get additional sets. Some voice sets might be grouped by genre (forexample, a techno set) or may specialize in a particular instrument (for example,a piano voice set). The Voice set list in ACID allows you to select additional
Figure 10.5The General tab forMIDI files is similar tothe one for audio files.
http://www.muskalipman.com
The Secret Life of ACID MIDI — Chapter 10 211C
HA
PTER 10

DownLoadable Sound sets (DLS) on your computer. As the name suggests, DLSfiles have a *.dls extension and can be downloaded from a number of sites onthe Internet. Some examples of some DLS sets are the Roland GS or Yamaha XGsets. DLS sets use the DirectX SoftSynth for playback and thus can be mixed intoACID projects and rendered out using the Master device. Both DLS-1 and DLS-2formats are supported in ACID, but your sound card may not support both. Thedifference between the two is not important in ACID. The default GS sound set(16 bit) is found here: C:\WINDOWS\SYSTEM32\DRIVERS\GM.DLS. TheLoad button allows you to add DLS files to the Voice set list.
The Voice set list occupies the largest section of the Voices tab and allows you to change thevoices that are played back in the MIDI file. Changes made to these options are not saved to theMIDI file, and the Save button does not make any of these changes permanent. The changesmade here can be saved with the project, however.
� The Channel sets how the voice is routed in the MIDI device (in this case, thesound card). There are sixteen possible MIDI channels, and multiple voices canbe set to a single channel. By and large, it doesn’t matter what channel isselected for which program, but the drums have been traditionally placed inChannel 10. Many MIDI files will have multiple percussion voices all set toChannel 10.
� The Program is really the voice selected, and it is the most important control onthe tab. Sometimes called a patch, voice, or instrument, the program can beselected by clicking the triangle (arrow) next to the instrument name on the list.This will drop down a rather long list (depending on the Voice set selected andthe MIDI device used for output) that has all of the instrument names on it. Topreview an instrument sound, click it once on the list. This selects thatinstrument and allows you to hear how it sounds in your project while it isplaying back. To select an instrument (program) and close the list, double-clickthe entry.
This list may be subdivided into a number of banks (see Figure 10.6), each ofwhich contains a different set of patches (programs). Anything on the list can beselected, regardless of the bank. The voices and banks that are available againdepends on the Voice set and the MIDI output device selected.
TIPThe Get Media from the Web option on the File menu allows you to get freeDLS sets from Sonic Foundry.
The Secret Life of ACID MIDI — Chapter 10
http://www.muskalipman.com
212

� The Mute and Solo buttons function to mute and solo individual voices in theMIDI file. Multiple Solo buttons can be pushed at a single time, as can multipleMute buttons, of course.
� The Volume and Pan sliders likewise function to adjust the volume and panningof individual voices, giving you more control over the mix of the MIDI file. ThePan sliders can be especially useful in creating a larger sense of space in a MIDIfile, which are usually all bunched up in the middle.
MIDI Tracks on the TimelineMIDI tracks and events behave much the same as other tracks and events in ACID. The TrackHeader contains Mute and Solo buttons as well as a Multipurpose slider to control panning andvolume. Tracks and events can be pitch shifted by right-clicking the track header or an envelopeor by pressing the � or � keys on your keyboard’s number pad. Unfortunately, MIDI trackscannot take advantage of Volume or Pan Envelopes and, since MIDI tracks cannot be routedthrough a bus in the Mixer window, they cannot use FX envelopes, either. Besides theselimitations, everything else is the same. See Chapter 2 for more information on working withtracks and events in general in ACID.
NOTEDLS sets are similar in many ways to the proprietary SoundFonts fromCreative Labs and Ensoniq. SoundFonts can be converted to the DLS formatwith the right software (such as Audio Compositor or Awave Studio), butsome quality may be lost as many SoundFonts use audio filters (for example,compression or low-pass filters to make the various notes in a set moreuniform).
Figure 10.6Different Banks contain different sets of instruments.
http://www.muskalipman.com
The Secret Life of ACID MIDI — Chapter 10 213C
HA
PTER 10
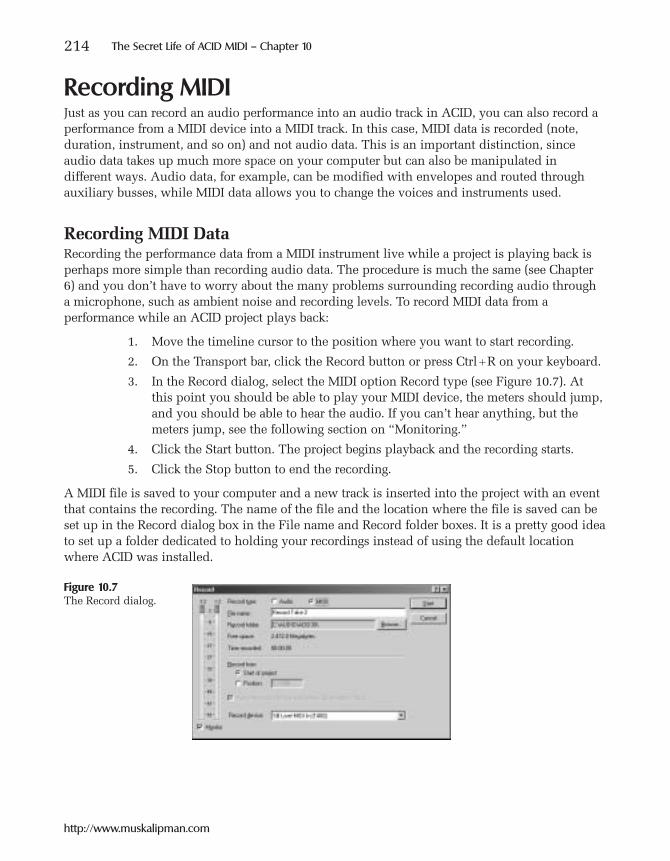
Recording MIDIJust as you can record an audio performance into an audio track in ACID, you can also record aperformance from a MIDI device into a MIDI track. In this case, MIDI data is recorded (note,duration, instrument, and so on) and not audio data. This is an important distinction, sinceaudio data takes up much more space on your computer but can also be manipulated indifferent ways. Audio data, for example, can be modified with envelopes and routed throughauxiliary busses, while MIDI data allows you to change the voices and instruments used.
Recording MIDI DataRecording the performance data from a MIDI instrument live while a project is playing back isperhaps more simple than recording audio data. The procedure is much the same (see Chapter6) and you don’t have to worry about the many problems surrounding recording audio through a microphone, such as ambient noise and recording levels. To record MIDI data from aperformance while an ACID project plays back:
1. Move the timeline cursor to the position where you want to start recording.
2. On the Transport bar, click the Record button or press Ctrl�R on your keyboard.
3. In the Record dialog, select the MIDI option Record type (see Figure 10.7). Atthis point you should be able to play your MIDI device, the meters should jump,and you should be able to hear the audio. If you can’t hear anything, but themeters jump, see the following section on “Monitoring.”
4. Click the Start button. The project begins playback and the recording starts.
5. Click the Stop button to end the recording.
A MIDI file is saved to your computer and a new track is inserted into the project with an eventthat contains the recording. The name of the file and the location where the file is saved can beset up in the Record dialog box in the File name and Record folder boxes. It is a pretty good ideato set up a folder dedicated to holding your recordings instead of using the default locationwhere ACID was installed.
Figure 10.7The Record dialog.
The Secret Life of ACID MIDI — Chapter 10
http://www.muskalipman.com
214
The files are automatically named and numbered according to a default scheme: Record Take1.mid, Record Take 2.mid, etc. While the file name can be changed in the Record dialog, ACIDdefaults back to this numbering for every take. As with all tracks, the name of the track is takenfrom the name of the associated media file. If you alternately record both Audio and MIDI data,the file names will continue to increment (for example, Record Take 1.mid, Record Take 2.wav,Record Take 3.mid, etc.).
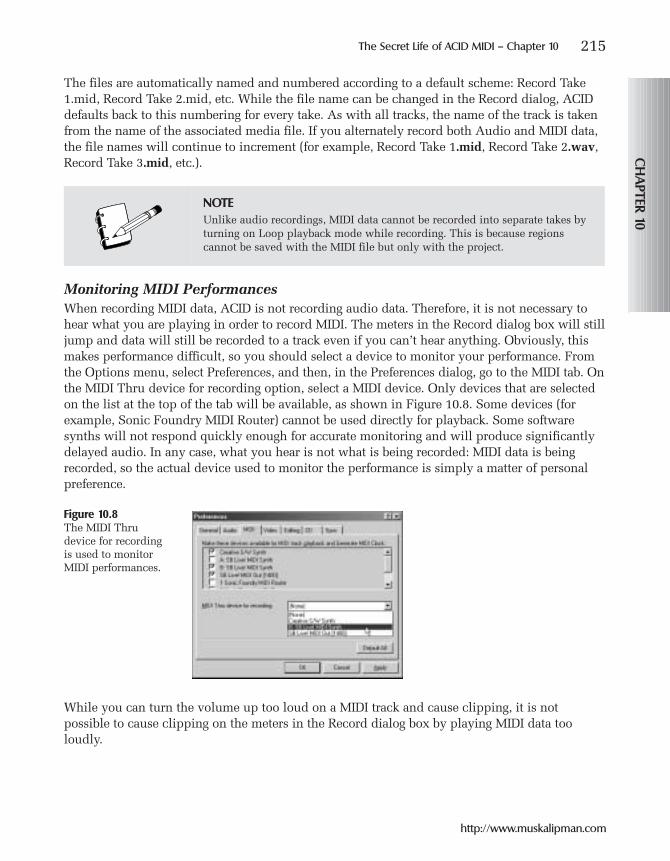
Monitoring MIDI PerformancesWhen recording MIDI data, ACID is not recording audio data. Therefore, it is not necessary tohear what you are playing in order to record MIDI. The meters in the Record dialog box will stilljump and data will still be recorded to a track even if you can’t hear anything. Obviously, thismakes performance difficult, so you should select a device to monitor your performance. Fromthe Options menu, select Preferences, and then, in the Preferences dialog, go to the MIDI tab. Onthe MIDI Thru device for recording option, select a MIDI device. Only devices that are selectedon the list at the top of the tab will be available, as shown in Figure 10.8. Some devices (forexample, Sonic Foundry MIDI Router) cannot be used directly for playback. Some softwaresynths will not respond quickly enough for accurate monitoring and will produce significantlydelayed audio. In any case, what you hear is not what is being recorded: MIDI data is beingrecorded, so the actual device used to monitor the performance is simply a matter of personalpreference.
While you can turn the volume up too loud on a MIDI track and cause clipping, it is notpossible to cause clipping on the meters in the Record dialog box by playing MIDI data tooloudly.
Figure 10.8The MIDI Thru device for recording is used to monitor MIDI performances.
NOTEUnlike audio recordings, MIDI data cannot be recorded into separate takes byturning on Loop playback mode while recording. This is because regionscannot be saved with the MIDI file but only with the project.
http://www.muskalipman.com
The Secret Life of ACID MIDI — Chapter 10 215C
HA
PTER 10

Selecting an InstrumentThe MIDI data recorded into ACID is recorded without a specific instrument selected. To changethe voice or the instrument used in the track, open the Track Properties dialog box for the newlycreated track. Then go to the Voices tab and, under the Program data field, click the arrow andselect a Bank and instrument (voice), as shown in Figure 10.9. This new instrument informationis not saved with the MIDI file, even if you click the Save button at the top of the window.Instead, instrument information is project specific and will be saved with the project thatcontains the media file. To make this a permanent part of the MIDI file, you will need to use aMIDI file editing application.
Recording Audio Output from MIDI playbackSelecting various MIDI devices in the Track Header for MIDI playback was discussed in thesection on “Track Routing.” While any MIDI device on your system, both hardware andsoftware, can be used to play back MIDI data in ACID, you can render only the audio outputfrom MIDI tracks that use the Master (internal DirectX SoftSynth) device. It may seem like atease to be allowed to select from a large list of possible MIDI devices but not have the outputrendered to the final media file. Remember that these alternate MIDI devices are to beconsidered as external devices. They should be thought of as synthesizers external to yourcomputer that receive MIDI data from ACID and then send analog audio output back into yoursound card’s AUX port. As with all audio that comes into your sound card, the sound fromthese external devices can be recorded into an ACID track. This will record the output fromthese devices as an audio file, just as you would record any other audio source (see Chapter 6).The most important concept to remember is that you are not recording MIDI data (to bediscussed later), but you are, instead, recording the analog audio signal from an external device.To do this:
1. Insert a MIDI file into a track and solo the track.
2. In the Track Header, select the MIDI device you want to use.
3. In your sound card’s mixer, find the Record settings or Windows Record Controlpanel (see Chapter 6) and isolate the output from the MIDI device (see below).This will not be the MIDI output (which will be your sound card’s default MIDI).This is the most difficult step, and it is discussed in more detail later.
Figure 10.9Selecting an instrument(program) in the TrackProperties dialog.
The Secret Life of ACID MIDI — Chapter 10
http://www.muskalipman.com
216
4. In ACID, click the Record button.
5. In the Record dialog, make sure the Record type is Audio. Remember, you wantto record the audio signal, not MIDI data.
6. Set the Record from to Start of project.
7. Click Start.
8. The project (with the MIDI track soloed) will play back using the MIDI deviceselected. Click Stop when finished. A new track will be inserted with aBeatmapped audio file of the MIDI track.
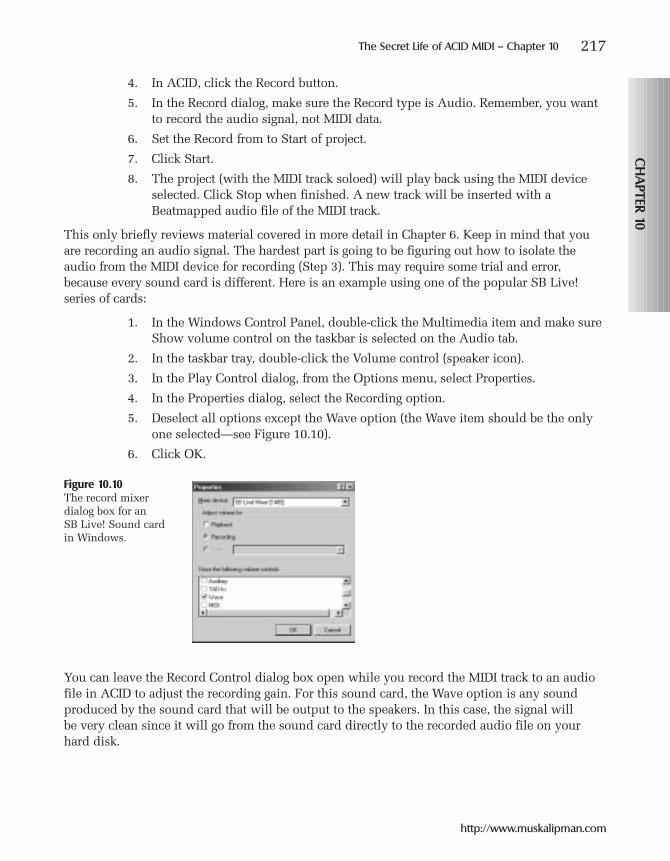
This only briefly reviews material covered in more detail in Chapter 6. Keep in mind that youare recording an audio signal. The hardest part is going to be figuring out how to isolate theaudio from the MIDI device for recording (Step 3). This may require some trial and error,because every sound card is different. Here is an example using one of the popular SB Live!series of cards:
1. In the Windows Control Panel, double-click the Multimedia item and make sureShow volume control on the taskbar is selected on the Audio tab.
2. In the taskbar tray, double-click the Volume control (speaker icon).
3. In the Play Control dialog, from the Options menu, select Properties.
4. In the Properties dialog, select the Recording option.
5. Deselect all options except the Wave option (the Wave item should be the onlyone selected—see Figure 10.10).
6. Click OK.
You can leave the Record Control dialog box open while you record the MIDI track to an audiofile in ACID to adjust the recording gain. For this sound card, the Wave option is any soundproduced by the sound card that will be output to the speakers. In this case, the signal will be very clean since it will go from the sound card directly to the recorded audio file on yourhard disk.
Figure 10.10The record mixer dialog box for an SB Live! Sound card in Windows.
http://www.muskalipman.com
The Secret Life of ACID MIDI — Chapter 10 217C
HA
PTER 10

It is also possible to record the output from another application—for example, a specific MIDIplayback or editing application—or record the audio data from a live performance as it is playedback through another application. This is going to require some deft juggling of the various MIDIand Wave devices on your computer, making sure that the MIDI application and ACID usedifferent devices for playback. When conflicts occur, ACID will most often gracefully display anerror message saying that playback cannot occur since the device is already in use (see Figure10.11). Click the Details button in that dialog box to see which device ACID is trying to use and then change either ACID or the other application. At times, unfortunately, one or bothapplications may crash or lock up as they both struggle to use the same device for playback andrecording. You may be able to select the “What U Hear” option in the mixer for SB Live! cards to record the audio data you want.
MIDI Triggers and Time CodeACID can act as a MIDI device in a studio setup, both outputting MIDI Time Code (MTC) toother devices and accepting MIDI triggers from other devices and applications. The purpose ofthis is to synchronize ACID with your MIDI setup by allowing other devices to start ACIDplayback or to start and synchronize other devices from within ACID when you start playback of a project. The MIDI device or software application needs to be able to send and/or receiveMTC, so simple dummy keyboards will not work. More complex synthesizers with sequencers,however, often have this capability. In professional MIDI studios, there is often a small box thatis dedicated to generating timecode and synchronization and sometimes called a controller or a sync unit.
TIPIf you’ve been scouring this book looking for the best way to crash ACID (orany other MIDI application), this is it: Try to use the same MIDI device withtwo different applications at the same time. To avoid conflicts, be verycautious about setting up MIDI devices in applications you are going to runsimultaneously. Most of the time, ACID will handle these conflicts gracefullywith an error message, but they can sometimes cause your system to hang.
Figure 10.11A device conflict errormessage in ACID (butnot a crash!)
The Secret Life of ACID MIDI — Chapter 10
http://www.muskalipman.com
218
MIDI Time Code (MTC) is a standard way of measuring time in MIDI and is not the same as aMIDI Clock. MIDI Clock is based upon musical beats from the start of a song, played at a specifictempo, and is therefore relative to time in the real world. Both MTC and MIDI Clock data can beused to trigger ACID and can be generated by ACID to trigger other devices and applications.MTC is not the same as timecode as used in video, although the two can be set to measure timethe same way. For clarity, in this book, “timecode” is used to refer to the various types ofSMPTE video timecode, and MIDI code is referred to as MTC or MIDI Timecode (also a standardfrom the Society of Motion Picture and Television Engineers—SMPTE, pronounced “simpty”),as it is in ACID. This is not a widely followed convention, however. In this discussion, a masterdevice is the device or application that generates the MTC or MIDI Clock that is used to controlthe slave device, which is triggered and synchronized with the master.
MTC or MIDI Clock? MIDI Clock is also a better choice for MIDI exclusive applications, such as MIDI editors andsequencers. MIDI Timecode, on the other hand, is more broadly targeted and can be used witheverything from tape machines to video production equipment. In the end, the right choice isthe one that works.
Generate or Trigger?Should you generate MTC or trigger from MTC in ACID (you cannot trigger from MIDI Clock)?In other words, should ACID be the master device or the slave? Very broadly speaking, ACIDseems to be better in the role of master, generating MTC or MIDI Clock to trigger and sync aslave application.
Generating MTC and MIDI Clock from ACIDWhether you choose MTC or MIDI Clock is largely a matter of what the slave application wantsto use. In some situations—for example, when your project has tempo changes—the MIDI Clockmay work better.
ACID can be configured to output or generate MTC to trigger and synchronize compliantexternal hardware devices and other MIDI software applications on your computer. Any ACIDproject can generate MTC regardless of whether you are using MIDI in the project. AlthoughACID’s new MIDI features are pretty spiffy, ACID is not primarily a MIDI tool, so using ACID forthe loop-based part of a larger project with a dedicated MIDI device or application is a veryuseful combination.
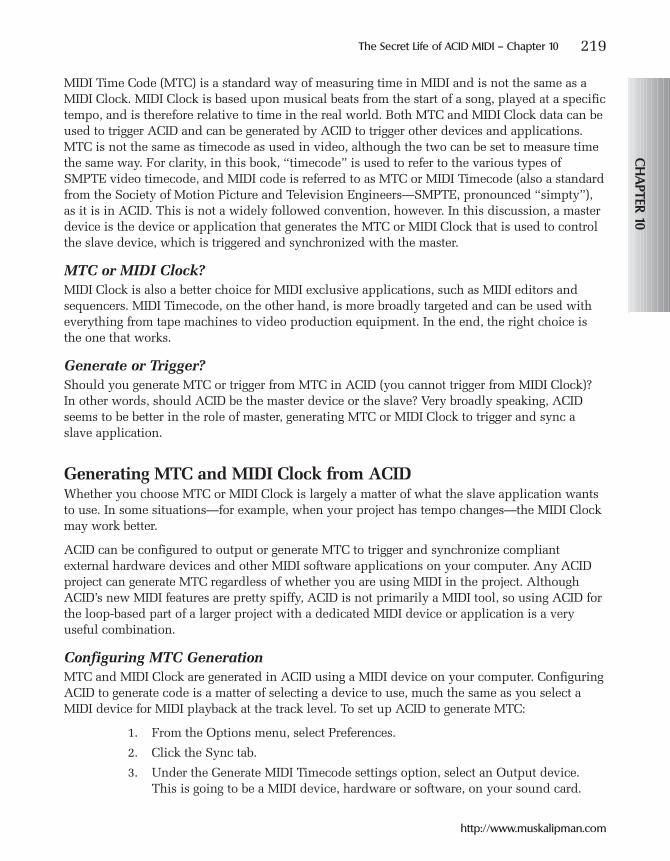
Configuring MTC GenerationMTC and MIDI Clock are generated in ACID using a MIDI device on your computer. ConfiguringACID to generate code is a matter of selecting a device to use, much the same as you select aMIDI device for MIDI playback at the track level. To set up ACID to generate MTC:
1. From the Options menu, select Preferences.
2. Click the Sync tab.
3. Under the Generate MIDI Timecode settings option, select an Output device.This is going to be a MIDI device, hardware or software, on your sound card.
http://www.muskalipman.com
The Secret Life of ACID MIDI — Chapter 10 219C
HA
PTER 10

4. From the Frame rate list, select the format you want to use to measure time.
5. The frame rate does not speed up or slow down time, only how it is measured.These are all various standards that have been used for different purposes overthe years. For example, movies are twenty-four frames per second (fps), whilecolor television in the United States is 29.97 fps. In audio, 30 fps is probably themost frequently used standard. More important than which particular standardyou choose is that both of your devices (ACID and the other application) areusing the same standard. MTC and other relevant timecodes are measured inhours, minutes, seconds, and frames (hh:mm:ss:ff), with the number of frames ina second being the only difference.
Triggering Another Device with ACIDOnce ACID is set up as the master device to generate the appropriate MTC, the next step is toconfigure the slave device that will be triggered and synchronized. For software applications,this will involve selecting a port to listen from for MTC and making sure the frame rates are thesame. The process will be very much like setting up ACID to listen for MTC, so see thefollowing section for more information on that process. Of particular interest will be the sectionon Sonic Foundry’s Virtual MIDI Router, which allows you to select a port other than the defaulthardware MIDI port. Once the device is configured:
1. Cue the slave device or application to listen for MTC.
2. In ACID, from the Options menu, go to the Timecode item and select GenerateMIDI Timecode or press F7.
Figure 10.12MIDI devices cannot be used for conflictingpurposes.
NOTEJust as it is not possible to use the same MIDI device in ACID and anotherapplication at the same time, so it is also not possible to play back MIDI inACID and generate MTC using the same device (see Figure 10.12). When youselect a device to output MTC on the Sync tab, that device will be grayed outon the MIDI tab. MIDI Clock is slightly different and can be generatedsimultaneously with playback on the same device.
The Secret Life of ACID MIDI — Chapter 10
http://www.muskalipman.com
220

3. Play back the ACID project.
4. ACID will immediately begin playback and will generate the MTC at the sametime, using the output device or port specified in the Preferences dialog box.ACID’s transport controls (Play and Stop) will be used to control the externaldevices.
Since there are many types of devices, both hardware and software, that can listen for and betriggered by MTC, it is not possible to tell you how to set up your specific device. In the case ofanother software application, however, the behavior is very likely to be similar to the way ACIDlistens for MTC: For more information, see the next section on how to trigger ACID playbackusing an external MTC device.
There is a specific example later in this chapter detailing how this all works between ACID andCakewalk Pro Audio (now SONAR).
The time display at the upper left of the timeline can display the MTC and MIDI Clock beingsent out from ACID from the chosen device. To view the MTC that is being generated by ACID,right-click the time display and select MIDI Timecode Out from the context menu (see Figure10.13).
As you have noticed, configuring and generating MIDI Clock is a similar process. As with MTC,you will need to select an output device, but MIDI Clock is measured in terms of tempo,measures, and beats, so it is not necessary to select a format. MIDI Clock can be generated by ashared device used for playback.
Figure 10.13ACID-generatedMTC can be viewed on the time display.Notice that you can also enable generationhere as well.
NOTEWhile playback will begin almost immediately and be perfectly synchronized,there can be a 1 to 3 second delay between when you press Stop in ACID andwhen the slave device stops.
http://www.muskalipman.com
The Secret Life of ACID MIDI — Chapter 10 221C
HA
PTER 10

Triggering ACID with MTCACID can also be used as the slave device, receiving MTC from a master device and using that to cue project playback and synchronize with a master device. A master device might be anothersoftware application on your computer or an external sequencer or dedicated MTC generator.The process is basically the reverse of the above: configure ACID, enable (arm) ACID to listen for MTC, begin playback or generation of MTC from the master device. To configure ACID toaccept MTC:
1. From the Options menu, select Preferences.
2. Click the Sync tab.
3. Under the Trigger from MIDI Timecode settings option, select an Input device.This is going to be a MIDI device, hardware or software, on your sound card.
Most consumer-level sound cards have only one hardware MIDI port and, therefore, only onedefault driver for MIDI input. This input driver can be shared between two applications runningat the same time, so you can trigger and synchronize playback from two applications at the sametime. It is not possible to use this port to communicate between two software applications, butyou can install a software-based Virtual MIDI Router (VMR) to create another MIDI input port soyou can use another software application to trigger ACID. Sonic Foundry has included its VMRon the ACID CD. Specific usage is discussed later in this chapter. Once you have configured themaster device to generate MTC, make sure the frame rate of the device and ACID match and then:
1. Ready the master device for playback and generation of MTC.
2. In ACID, from the Options menu, go to the Timecode item and select TriggerFrom MIDI Timecode or press Ctrl�F7.
3. Right-click the time display and select MIDI Timecode In. The display will showa MIDI Timecode In–Waiting…message to verify that ACID is listening for MTC.
4. Begin generation of MTC from the external device or start playback of the masterdevice.
When ACID is chasing MTC, the time display message will show MIDI Timecode In–Locked andall controls within ACID will be disabled. While ACID can generate MTC and MIDI Clock data,it can only be triggered by MTC. This is not unusual, and you may find many devices that canaccept MIDI Clock data from another device but may not be triggered by it.
Advanced Sync PreferencesThere are a number of advanced MTC generation and triggering options. These can be accessedby clicking the Advanced button on the Sync tab in the Preferences dialog box. This opens theAdvanced Sync Preferences dialog box with three tabs, one for each of the three sync options. Ifyou have not selected a device in the Preferences dialog, the corresponding tab will not be visiblein this dialog. Many of these options will need to be adjusted only when you are having problemswith devices incorrectly interacting with ACID, perhaps responding, but not quickly enough.
� The MTC Input tab corresponds to the Trigger from MIDI Timecode settings itemand allows ACID to compensate for breaks, delays, and other irregularities thatmay occur when listening to MTC generated by a master device. Once ACID hasbeen triggered and synchronized, it can continue at the same rate and stay more
The Secret Life of ACID MIDI — Chapter 10
http://www.muskalipman.com
222

or less in sync without any additional input. If ACID is responding to triggermessages but is falling out of sync, these options may help. You can keep Free-wheel for timecode loss selected in almost all situations. If ACID remainswaiting (listening) and is not triggered by the master device, these options willnot solve the problem.
� The MTC Output tab corresponds to the Generate MIDI Timecode settings itemand allows you to configure which messages are sent to the slave device. In mostsituations, it will be necessary to generate Full-frame messages only on start andstop of playback and record. In almost all situations, you should not use internaltimer, as this can cause the applications to drift out of sync.
� The MIDI Clock Output tab corresponds to the Generate MIDI Clock settings.This tab configures the Song Position Pointer (SSP) and is specifically used tosync the timeline cursor. The optional item at the top of the tab can be selectedto always send a start signal when playing back, even if playback starts in mid-song. This will always make the slave device start at the beginning of the song. Ifthis is not selected (which I recommend) and you begin playback in ACID inmid-song, the slave device will begin playback from the current cursor positionin ACID, allowing you to stop and play ACID and maintain control of the slave.
Virtual MIDI RouterSonic Foundry’s Virtual MIDI Router should be included on your ACID CD in the /extras/ folder,but it can also be downloaded (with your ACID serial number) from the Web site:
www.sonicfoundry.com/download/step2.asp?DID=317
To install this tiny (less than 10 KB) application/driver, you must install the VMR as a NewHardware device from the Windows Control Panel (see Figure 10.14). Detailed instructions canbe found in the README file that is included with the driver and in ACID’s online Help andManual. The final step is to select the number of ports you want to make available, from one tofour. If you only want to communicate between ACID and one other application, one virtual portis sufficient. You will need to restart Windows after installing the VMR driver. After restarting,the number of ports created by the VMR can be configured by going to the Windows ControlPanel, selecting the Multimedia option, and then clicking the Devices tab. Under the MIDIDevices and Instruments option, you will find the Sonic Foundry MIDI Router. You will need torestart your computer before these changes will take effect.
Figure 10.14Final configuration of the Virtual MIDIRouter after installation.
http://www.muskalipman.com
The Secret Life of ACID MIDI — Chapter 10 223C
HA
PTER 10

To use the VMR for syncing purposes, select a Sonic Foundry MIDI Router port (numbered 1-4)on the Sync tab in the Preferences dialog in ACID (see Figure 10.15) and set up the otherapplication to listen or send over the same port.
Syncing Example: SONAR to ACIDAll of this talk of MTC, syncing, and virtual routing can seem rather complicated, and it is whenyou consider all of the potential devices that can be hooked together. As one real-worldexample, the following procedure shows you how to use ACID to trigger and sync CakewalkSONAR (or Pro Audio 9) using MIDI Clock. In this case ACID is the master device and SONARis the slave. If you have a choice, this seems to work better than the other way around. And,since SONAR is primarily a MIDI application, in this example, ACID is going to generate MIDIClock, which SONAR also seems to prefer:
1. Run both ACID and SONAR.
2. Configure ACID to output MIDI Clock using 1 Sonic Foundry MIDI Router as anOutput device for the Generate MIDI Clock settings on the Sync tab of thePreferences dialog box.
3. Right-click the time display and select MIDI Clock Out to view the generatedclock. Press Shift�F7 on your keyboard to enable (arm) ACID. The time displaywill read “MIDI Clock Out–Enabled.”
4. In SONAR, from the Options menu, select MIDI Devices. In the MIDI Portsdialog, on the Input Ports list, select 1 Sonic Foundry MIDI Router (single click itto highlight it) and click the OK button.
5. From the View menu, select Toolbars and make sure the Sync toolbar is selectedand visible. Click the MIDI button and press Play. A message will appear in thelower left corner of the workspace reading, “Press ESCAPE to cancel… Waitingfor MIDI Sync.”
6. Press Play in ACID. ACID will begin playing and SONAR will immediatelyfollow.
Figure 10.15ACID-generated MTCcan be viewed on thetime display. Notice that you can also enablegeneration here as well.
The Secret Life of ACID MIDI — Chapter 10
http://www.muskalipman.com
224

Every time you stop playback in ACID, you will need to re-arm SONAR to listen for MIDI Clock.SONAR will automatically sync playback beginning at any point in your ACID project. SeeFigure 10.16 for a summary of the various settings and what you should see when everything isproperly configured and armed.
FX and MIDI TracksOne of the largest criticisms about MIDI sound is that it sounds very unnatural. This makessense since it is computer generated, but advances in MIDI technology have made it more andmore realistic. Perhaps the greatest advance in recent years has been the widespread use ofwavetable synthesis, which uses real instruments to create the sound. MIDI authoring tools havealso gotten better and better, even allowing the composer to add imperfections in timing toindividual notes, simulating real human performers. Of course, controlling the quality ofsamples and the details of MIDI authoring are all well outside of ACID’s domain.
MIDI files using even the best wavetable synthesis also tend to sound very clean and flat. This isbecause the samples need to be created to be used in the widest variety of situations. Almost allsamples are, therefore, completely devoid of any sense of space or ambience. ACID FX plug-inscan be very useful in making an artificially perfect and balanced MIDI file sound more naturalby adding this sort of space to the track.
NOTESONAR seems to work better as the slave, with ACID as the master. You cancrash your computer by assigning SONAR to output MTC and listen for MTCon the same port, especially if ACID is already using the port to output MTC.
Figure 10.16ACID as the masterdevice triggering andsyncing Cakewalk ProAudio with MIDI Clock. SONAR worksthe same way, althoughthe application has adifferent look.
http://www.muskalipman.com
The Secret Life of ACID MIDI — Chapter 10 225C
HA
PTER 10

The best plug-in for creating space is probably the Reverb FX. To add a Reverb plug-in to a MIDI track:
1. Make sure the MIDI track is using the Master device for playback.
2. Click the FX button on the MIDI track.
3. In the Audio Plug-in window, click the Edit Chain button.
4. In the Plug-In Chooser dialog, select a Reverb plug-in, click the Add button, thenclick the OK button.
5. The controls for the Reverb plug-in are visible in the Audio Plug-in window.Solo the MIDI track and adjust the Reverb. Then unsolo the track and finishadjusting the FX in relation to the project.
There is more detailed information on using FX in general in Chapter 8, where you can also finda detailed examination of the Reverb plug-ins. Be careful not to overdo the Reverb effect, whichis easy to do since more space generally sounds better. At some point, however, the Reverb willbegin to sound like, well, reverb and will be instantly perceived as artificial. You also need tocarefully try to match the sense of space in the MIDI track with the other media files used in theproject. While it is not technically an effect, panning individual voices 10 percent to 20 percentleft and right in the Track Properties dialog box for a MIDI track can do wonders for a sense ofspace. MIDI files very often have all of the various voices bunched up in the middle, which addsto the artificial sound of the files.
Especially useful in improving the quality of MIDI in ACID are Equalization plug-ins. Any ofthese can be used to bring out the specific voices you want to emphasize, although keep in mindthat you can also do this by increasing the volume of individual voices in the Track Propertiesdialog box. Boosting the bass frequencies a little can often add richness to MIDI tracks.
NOTEMIDI tracks must be routed through the Master device on the Track Header touse FX. Other devices are external to ACID and cannot be processed by ACID,but they will still work for playback.
The Secret Life of ACID MIDI — Chapter 10
http://www.muskalipman.com
226