The Definitive Guide To Always Expose Your Photos Correctly!
458
www.photopills.com The Definitive Guide To Always Expose Your Photos Correctly!
-
Upload
khangminh22 -
Category
Documents
-
view
1 -
download
0
Transcript of The Definitive Guide To Always Expose Your Photos Correctly!

1Mark Gee proves everyone can take contagious images
www.photopills.com
The Definitive Guide To Always Expose Your
Photos Correctly!

© PhotoPills
December 2017
Feel free to share this eBook

The Definitive Guide to Shooting Hypnotic Star Trails
How To Shoot Truly Contagious Milky Way Pictures
Understanding Golden Hour, Blue Hour and Twilights
Never Stop Learning

The Ultimate Photography Guide to Depth of Field (DoF)
MORE TUTORIALS AT PHOTOPILLS.COM/ACADEMY
Understanding Azimuth and Elevation
How to find moonrises and moonsets
How To Plan the Milky Way Using The Augmented Reality
How To Plan The Next Full Moon
PhotoPills Awards
Get your photos
featured and win $6,600
in cash prizes
Learn more+

Join PhotoPillers from around the world for a 7 fun-filled days of learning and
adventure in the island of light!
Learn More
Index
introduction
1 - 15 quick answers to 15 questions about exposure
2 - It all starts with light
3 - What’s exposure?
4 - Caution! The exposure serves your ideas (not the other way round)
5 - Understanding the exposure triangle
6 - The stop and how to use it
7 - The reciprocity law and some examples
8 - What’s the exposure value (EV) and what is it for
9 - Scene dynamic range vs. your camera’s dynamic range
10 - Check the exposure, examine the histogram
11 - Your allies (the light meter and the handheld photometer)
12 - Your camera’s light metering modes
13 - Your camera’s exposure modes
14 - How and when to use the exposure compensation (±EV)
15 - How and when to lock the exposure (AEL o AE-L)
16 - Be careful with the light meter (it sees everything at an 18% gray)

17 - Expose your histogram to the right (ETTR)
18 - How to expose step by step
19 - How to expose without a light meter: the “Sunny f/16” and “Looney f/11” rules
20 - How to expose with the Ansel Adams zone system
21 - How to expose a video
22 - Use filters to successfully capture high contrast images
23 - Use auto exposure bracketing to successfully capture high contrast images
24 - 30 practical examples of exposure
25 - The 12 mistakes you should avoid when exposing
26 - 10 amazing photographers to inspire you and learn how to expose
27 - Your time has come...

8Introduction
Introduction
Let’s face it.
The world is divided into two categories.
Those who know how to correctly expose their photographs regardless of the scene they
have in front of them... and those that don’t.
If you belong to the first category, congratulations! You are a genius and there’s little I
can do for you.
But if you are like the rest of the mortals and want to learn how to easily expose your
photographs in countless different situations, you’re in the right place!
Keep reading.
You will not only learn how to expose pictures like portraits, the Milky Way, Star Trails,
wildlife, travel, black and white, landscapes, long exposures, Moon, sunrises and
9Introduction
sunsets, street, light painting, macro, eclipses, pannings...
You’ll also master your camera in such a way that you’ll capture those images that
you dream of, both from the point of view of the story you want to tell as well as the
exposure.
I’ll give you everything you need to succeed.
Basic concepts (light, exposure triangle, reciprocity law, exposure modes, metering
modes, and much more), tools such as PhotoPills that will help you with exposure
calculations, a ton of practical examples, the mistakes you should avoid... And even the
most advanced techniques such as the use of filters and bracketing.
Ready?
Welcome to the wonderful world of the exposure.
“Exposure is less about twiddling knobs and pressing buttons than about managing light and
knowing what you want from an image.” - Michael Freeman, Perfect exposure

1Quick answers to depth of field
questions
115 quick answers to 15
questions about exposure

1115 quick answers to 15 questions about exposure
As I did in the guide about depth of field (DoF) and before going to the point, let me give
you some quick answers to the main questions regarding exposure.
Here we go!
What’s exposure? (1)
It’s the amount of light that reaches a photosensitive material (i.e. the film or your
camera’s sensor) to create an image.
Why should I care? (2)
Dominating the exposure will give you complete creative control over what appears
illuminated and what doesn’t in your images, allowing you to tell the story the way you
want to.
What affects exposure? (3)
Three variables affect exposure: aperture, shutter speed and sensitivity (or ISO). That’s
what called the exposure triangle.
Once you dominate these parameters, you’ll dominate exposure.
What’s the aperture? (4)
The diaphragm aperture (hole through which light travels through the lens) regulates the amount of light that goes through your lens to the camera’s sensor.
The greater the aperture of the diaphragm, the more light will be collected by the sensor.
In addition to exposure, the aperture you use will also have an impact on depth of field. So you should choose its value not only thinking about the exposure, but also about the depth of field you want to get in the photo.

1215 quick answers to 15 questions about exposure
What’s the shutter speed? (5)
The shutter is a sort of curtain that’s in your camera. It allows you to let light pass
through the sensor for a certain period of time. That period of time when the shutter is
open is the shutter speed.
The slower the shutter speed the more light will be collected by the sensor.
What’s the sensitivity (or ISO)? (6)
Sensitivity (or ISO) is a parameter that allows you to tell the sensor how much it has to
amplify the signal it receives. The higher the ISO, the more the signal will be amplified
and therefore the sensor will seem to have captured more light. The photo will be
brighter.
Therefore, when you read on the internet that “the higher the ISO the more light the sensor
captures”, it’s not referring to the amount of light it captures, but to the amplification of
the signal from the light itself. Therefore, when the signal is amplified too much (high
ISOs), noise appears in the photo.
Are there any exposure calculators? (7)
Take a look at PhotoPills. Not only does it include an awesome exposure calculator but
many more tools. All of them will help you plan your photos to always be in the right
place at the right time to capture the scene you’ve imagined. It’s about turning your
ideas into real photos. :P
What’s a stop? (8)
A stop is a relative measure of the amount of light reaching the sensor. Imagine that
there is an amount x of light coming into the sensor. If 2x amount of light reaches the
sensor when you take the next photo, you’ve increased the exposure by 1 stop. On the

1315 quick answers to 15 questions about exposure
contrary, if half of the light (x/2) reaches the sensor, the exposure of your photo has
decreased by 1 stop.
By changing the exposure triangle parameters, the light reaching the sensor will vary in
a given number (or fractions) of stops.
What’s the exposure value (EV)? (9)
The exposure value (EV) is a combination of aperture (f number), shutter speed and ISO.
It indicates how much light reaches the sensor.
What’s the dynamic range? (10)
The dynamic range is measured in stops or in exposure values (EV). It establishes
the relationship of the existing light intensity between the darkest shadows and the
brightest highlights.
Therefore, a camera with a large dynamic range is capable of capturing simultaneously
(in the same frame) the detail in some very dark areas of the scene and in others that are
brighter.
What’s the histogram and what’s its practical use? (11)
The histogram is a statistical graph. It’s very useful because it gives you information
about the range of tones or levels of brightness (how dark or bright a color is) present in
your image.
With the help of the histogram you can know if the photo is “correctly” exposed or not.

1415 quick answers to 15 questions about exposure
What’s the exposure compensation (±EV)? (12)
It’s a setting, measured in stops or in exposure values (EV), that brightens or darkens
the picture depending on whether you do it positively or negatively. If you use positive
values you brighten the image (you overexpose it). Conversely, if you use negative values
you darken it (you underexpose it).
What’s the correct exposure of an image? (13)
It depends! Establishing a “correct” exposure is totally subjective. A photograph
may have a correct exposure for you but not according to another photographer. The
important thing is that you consider you’ve achieved a correct exposure if you get the
effect you want to convey or the result you have in mind.
What’s depth of field (DoF)? (14)
Depth of field (DoF) is the distance between the closest and farthest element of a scene
that appears “acceptably sharp” on the image. If you want to read more about it, take a
look at the definitive depth of field guide.
What’s long exposure photography? (15)
It’s a technique that consists in leaving the shutter open for a relatively long period of
time. By doing this you get amazing results like car light trails, ghostly people or a photo
of the coast with the silky water effect.
In section 22 you will discover how to take long exposure photos with the help of filters.
You will also learn how to use the PhotoPills exposure calculator to determine the
shutter speed you need when using a filter.
But let’s not jump ahead, let’s start from the beginning...

2It all starts with light

16It all starts with light
Nikon 4Ds | 200mm macro | f/4 | 1/200s | ISO 100 | 7900K
Light is the soul of photography. Without light there is no photo.
So if you want to make truly legendary pictures, you should master the light (both
natural and artificial).
Without knowing light properly, you can’t expose correctly, nor create the desired effect.
Therefore, you’re not able to take that photo you’re looking for.
Ultimately, learning the attributes of light (intensity, direction, quality and color), as well
as the difference between incident and reflected light, gives you a solid base to take your
equipment, expose and make the most of out of the different scenes that you’ll face.
Go for it!
What’s light
Sorry to all the physicists in the room! I’m trying to simplify as much as possible, so
I dare say that light is the visible part of the electromagnetic radiation generated by a
specific source of energy (the Sun, a flashlight, a LED bulb, a flash, a fire, etc.).
It’s formed by elementary particles called photons.

17It all starts with light
And what’s a photon
A photon is a particle without mass that carries all forms of electromagnetic radiation,
including gamma rays, X-rays, ultraviolet light, visible light, infrared light, microwaves
and even radio waves.
But to make things easier, a photon is a tiny particle. Light is made of a whole bunch of
them.
That said, let’s leave physics aside and talk about what really matters to us.
Let me show you what the attributes of light are and how they affect you when you take
photos.
Light attributes
As I told you at the beginning of this section, light is the soul of photography, the raw
material, the basic ingredient. Without it, it wouldn’t be possible to take pictures. It’s
essential.
This means that depending on how you use it, you get one result or another, expressing
in different ways what you saw or happened.
That’s why it’s fundamental to know its attributes, so you’re able to understand it and
manage it the way you want.
And I don’t refer only to natural light but also to any kind of artificial light.
The four attributes of light are:
• Intensity: high or low.
• Direction: front, side, rear, zenith or nadir.
• Quality: hard or soft.
• Color: warm or cold.

18It all starts with light
Light intensity
Intensity is the amount of light that falls on (or falls upon) a subject. It determines how
much the subject is illuminated.
If the light is very intense, it brightens the subject too much and the shadows are very
noticeable (very dark).
Nikon D700 | 85mm | f/8 | 1/125s | ISO 200 | 6250K
On the other hand, if it’s not very intense (or dim), the subject is darker, less
illuminated, but the shadows are less dark, less harsh.

19It all starts with light
Nikon D700 | 85mm | f/11 | 1/125s | ISO 200 | 5500K
Depending on the intensity of light in the scene and the area(s) you want to highlight,
you should decide your camera settings in one way or another when exposing your
photos to allow the amount of light you want to reach the sensor.
So knowing how to correctly measure the intensity (or quantity) of light in the scene
plays a fundamental role when calculating the exposure. Especially if you want to get in
your photos this “right” exposure you are looking for.
And how do you measure, or meter, light?
You measure it with a photometer, whether it’s internal (inside the camera) or external.

20It all starts with light
In section 18 I will explain you in full detail how and where to meter light with your
camera when exposing your pictures.
Can you control light intensity?
Yes.
As a photographer, you can often affect the light intensity that you want to have in the
scene you are photographing.
For example, if you’re shooting outdoors, choose the time of day when the light is less
intense (golden hour, blue hour and twilight) or more intense (rest of the day).

21It all starts with light
Nikon D700 | 14mm | f/13 | 20s | ISO 100 | 5399K
Or use, both outdoors and in the studio, different techniques and lighting devices or
light reducers.
For example, flashes, flashlights and LED panels are active elements that produce light
by themselves and are used to add brightness to the scene. In addition, passive elements
(diffusers, filters, reflectors) alter the illumination although they are not light producers.

22It all starts with light
Nikon D700 | 85mm | f/5.6 | 1/500s | ISO 200 | 7050K
Light direction
Light direction determines many of the effects that you’ll capture with the camera
(volume, textures, silhouettes, etc.).
Therefore, you have to work with natural light and/or artificial light (light schemes) to
achieve the effect you’re looking for in your photo.
Remember that light direction is the angle with which light hits the subject.
As a rule of thumb, when you are exposing your picture, ask yourself:
• How does light shine on the subject from the position in which I am (i.e. from your
camera)?
• How do I want it to affect the subject (or scene) according to the type of photo I’m
looking for?

23It all starts with light
Light can have several types of directions:
• Frontal lightning. It’s located in front of the subject so it faces it. It illuminates all
visible surfaces of the subject. It highlights the color but it eliminates shadows,
subtracting volume and texture.
Nikon D700 | 85mm | f/8 | 1/80s | ISO 200 | 5500K
• Side lightning. It affects the subject from the side. Thanks to this light the spectator
has a sensation of more volume and it increases the texture of the subject.
For example, in night photography, when photographing the Milky Way or Star
Trails, you can take advantage of the side light provided by a low Moon (when it has
little elevation) to capture volume and texture in the foreground.

24It all starts with light
Nikon D4s | 20mm | f/4 | 1h 24min | ISO 1600 | 4000K | 168 photos edited in Lightroom and stacked with StarStaX
• Back lightning. It comes from behind the subject. It helps to highlight the subject’s
silhouette, but subtracts information from other elements such as color or texture.
Back lightning allows you to make spectacular portraits with perfectly shaped
subjects, landscape and even spectacular silhouettes of full Moon.

25It all starts with light
Nikon D4s | 35mm | f/2.8 | 1/1250s | ISO 100 | 7000K
• Zenith lightning. It comes from a single point of light located vertically above
the subject. When you control it shooting in the studio, you can create incredibly
mysterious pictures.

26It all starts with light
Olympus OM-D E-M1 | 60mm macro | f/2.8 | 1/8s | ISO 200 | 5500K
• Nadir lightning. It comes from below. It rarely occurs in natural conditions,
although good examples are snow and water reflections. You can also use it to make
risky portraits, such as the one you can see below.
Here you can see Rafael (the Bard) playing tough guy as in Matrix:
“This is your last chance. After this, there is no turning back. You take the Skull pill: the story
ends, you wake up in your bed and believe whatever you want to believe. You take PhotoPills:
you stay in Wonderland and I show you how deep the rabbit-hole goes. Remember: all I’m
offering are Legendary Photos and Goosebumps, nothing more.”

27It all starts with light
Nikon D4s | 85mm | f/2.8 | 48s | ISO 100 | 5100K
In addition to light direction, there are two other factors that you should keep in mind
when taking the picture:
• Light direction rarely comes from exactly one side or the other. Most of the time it
comes from a combination of several directions.
• An object isn’t usually illuminated by a single source of light but by several ones.
Depending on the intensity (i.e. weighting) of each of them, the scene will be
different. Obviously, the most intense light will be the main one.
Light quality
Light quality shows the distribution of lights and shadows in your scene. That is, the
transition between the two.
When I refer to light quality, I don’t mean whether it is good or bad but whether it’s hard
or soft:

28It all starts with light
• Hard. It comes from a very specific source and produces a marked and sudden
transition from light to shadow. The shadows are very dark and contrasted with very
well defined edges.
Nikon D700 | 85mm | f/2 | 1/1500s | ISO 200 | 5700K
For example, the light produced by the flash or the Sun at noon (in most of the
world) is a hard light. There is hardly (pun intended… :)) a transition between lights
and shadows. In this case, there is a lot of contrast.

29It all starts with light
Hard light gives you a feeling of aggressiveness and strength.
You can use it, for example, to create high contrast scenes with portraits or still lifes
while separating dramatically the contrast from the scene.
High contrast scenes are a challenge for any photographer. In section 22 I’ll show
you how to capture high contrast scenes with filters. And in section 23, I’ll explain
you how to do it using the bracketing technique.
• Soft. Unlike hard light, soft light causes a progressive transition between lights and
shadows. It’s a very dim light and it blurs the outlines of the shadows. It smooths the
image, removing contrasts and textures.
Soft light helps you convey tenderness, melancholy...

30It all starts with light
Nikon D300 | 85mm | f/1.4 | 1/350s | ISO 200 | 5700K
Depending on the light quality you have in the scene you can take different types of
pictures. If you’re skilled enough you can also use a tool to change light quality.
For example, to soften a hard light use a diffuser or a reflector. And to add a hard light,
use a flash or a flashlight.
As for natural light, take advantage of the moments of soft light that occur during the
day: the golden hour and the blue hour.
You know what they say, if you can’t beat the enemy, join them!
Throughout the net you’ll find tons of web pages that will tell you when these hours
happen on an exact date.
But if you are one of us (you use the PhotoPills app), you have all the information about
the golden hour, the blue hour and the twilight, for any date and part of the world, both
in the Sun tool and in the Planner.

31It all starts with light
PhotoPills - Planner Tool. PhotoPills - Sun Pill Tool.
Finally, there are two more factors to keep in mind:
• The size of the light source relative to the illuminated subject is crucial to know what
type of light you have. Thus, a source of light produces hard light over an object
when this object (your subject) is larger than the light source. On the contrary, it
produces soft light when the object (your subject) is smaller than the light source.
• Similarly, for a given size, the distance to which the subject’s light source is located
determines the light quality. I’ll give you an example. The Sun is a huge source
of light. However, when it’s far away from your subject, it becomes a point and it
produces harsh shadows.

32It all starts with light
Light color
“Light is therefore color” - J. M. W. Turner
Nikon D4s | 14mm | f/11 | 0.4s | ISO 100 | 7000K
When light strikes a body, there is a part that is reflected, another one that is transmitted
through it and another one that is absorbed.
The thing is you only see color when the reflected light reaches your eyes. And, as long
as light doesn’t interact with matter and reaches your eyes, you don’t see it, you don’t see
color.
Think of deep space, you see it completely dark. However, it’s full of light.
Before taking a picture, if you pay attention to the scene, you’ll realize that light tends
towards two extremes (or dominances):

33It all starts with light
• Hot colors (yellow, orange, red)
Nikon D300 | 500mm | f/6.7 (½ stop scale) | 1/1500s | ISO 200 | 7500K

34It all starts with light
• Cold colors (purple, blue, green)
Nikon D4s | 24mm | f/11 | 1s | ISO 100 | 7500K
Actually, the way the scene colors are displayed in a picture depends on you and your
artistic vision. And you might not always want the final image colors to be the same as
those in the scene. Sometimes you may want to change them.
When we lived in the days of film negatives and slides, or when you took pictures in
black and white and wanted to change the light color, you had no choice but to use color
filters.
Today, everything is different.
Although I am a lover of analog photography, I must admit that in the digital world,
apart from the color filters, we have another very powerful tool: the white balance.
“Did you say while balance Toni?”
Yes, I know the word sounds a little bit intimidating...

35It all starts with light
But it’s not.
In my opinion, the white balance is a tool that we photographers have to show our
artistic side in terms of how colors look in our photos.
I’m not going to go too far on this concept, but I would like you to keep in mind that you
can adjust the white balance directly on camera or later on with an editing software.
This tool allows you to add a warm or cool cast to your photos.
Incident light vs. reflected light
It’s important to know the difference between incident and reflected light, especially
when you take pictures in a studio. It helps you understand where you need to meter
light in order to calculate the exposure.
Don’t tell me you’ve never metered light in the wrong place! It’s a typical rookie error... :P
On the one hand, incident light is the light that the subject you’re going to photograph
receives. You can meter it with your camera’s light meter or a hand-held photometer by
placing it next to the subject and point it towards the camera.
The photometer gives you exact exposure values because it’s not affected by the
reflectance of the objects you’re capturing (the amount of light they reflect).
You usually meter incident light when you’re shooting in a studio, where you need high
precision and you can be very close to the subject.
On the other hand, reflected light is the light that the subject you’re going to photograph
reflects. You can meter it with your camera’s light meter or a hand-held photometer
placed next to the camera and facing the subject. Sometimes, it gives you an estimated
result that may require your interpretation.
Usually, when you expose your photos you meter the reflected light using your camera’s
light meter. It’s also the only way to determine the exposure value when you can’t be
close to the subject you’re about to photograph.

36It all starts with light
In section 12 I’ll give you more details on the different methods that you can use to meter
reflected light with your camera and when to use each one of these methods.
Reflected light vs. incident light metering
Great!
Now that you have the basic notions of what light is and what its attributes are, let’s
move on.
Let’s see what exposure is, the journey that the light performs until reaching the sensor
and what settings of your photo gear you can use to make the “correct” (or desired)
exposure.
There’s no way back.
It gets bumpy from here on out!

3What’s exposure?

38What’s exposure?
Exposure is a quantity of light.
It’s the amount of light that reaches a photosensitive material (the film or the sensor of
your camera) to create an image.
“Great Toni, exposure is a quantity of light. But how much light do I need to expose a photo correctly?”
That, my friend, depends on the scene you have in front of you, and the result you want
to get.
It depends on whether you want to capture more or less detail in the dark (shadows) or
bright tones (highlights). In the end, it depends on the story you want to tell.
Therein lies the art of photography. You must exercise the right control over the light
that reaches the sensor (or film) to get the image you want.
In other words, your photo will vary depending on how much light you let into the
sensor, that is, it will vary depending on how you expose the photo.
Note: To avoid repeating the same thing over and over, let’s assume you have a digital camera, so I’ll
always talk about the sensor. If you use a film camera, the explanation would be the same, you just
have to replace “sensor” with “film”.
39What’s exposure?
How exposure affects your pictures
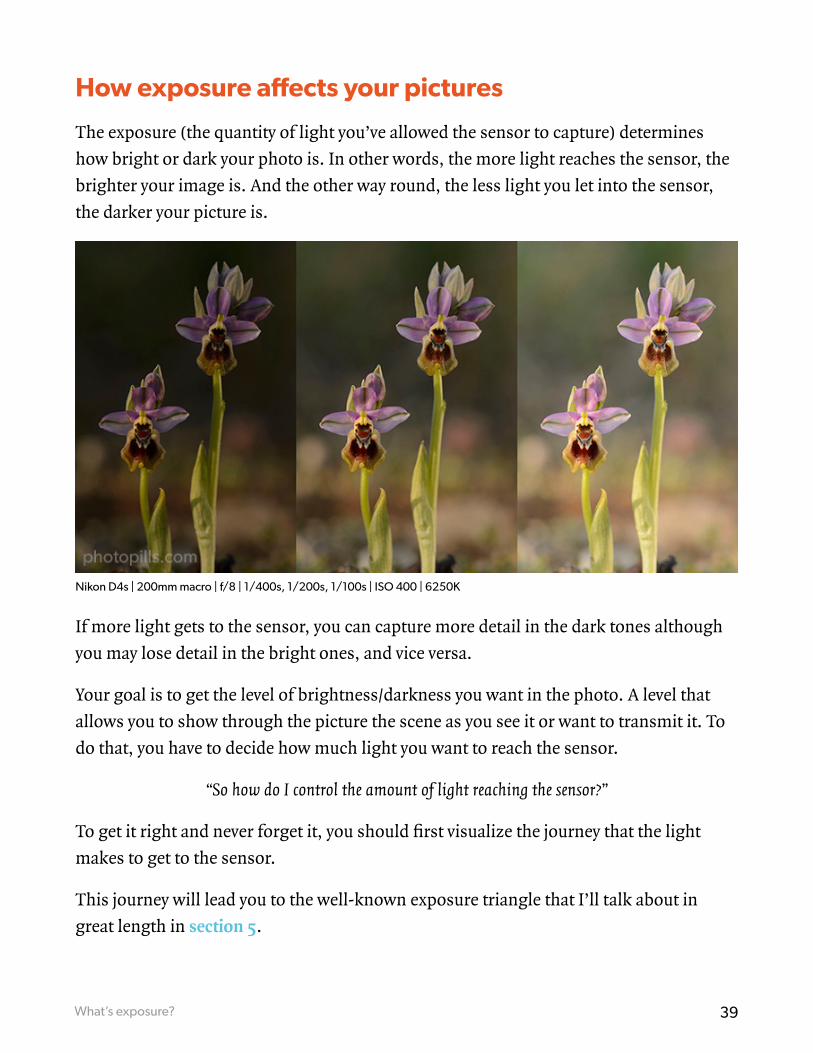
The exposure (the quantity of light you’ve allowed the sensor to capture) determines
how bright or dark your photo is. In other words, the more light reaches the sensor, the
brighter your image is. And the other way round, the less light you let into the sensor,
the darker your picture is.
Nikon D4s | 200mm macro | f/8 | 1/400s, 1/200s, 1/100s | ISO 400 | 6250K
If more light gets to the sensor, you can capture more detail in the dark tones although
you may lose detail in the bright ones, and vice versa.
Your goal is to get the level of brightness/darkness you want in the photo. A level that
allows you to show through the picture the scene as you see it or want to transmit it. To
do that, you have to decide how much light you want to reach the sensor.
“So how do I control the amount of light reaching the sensor?”
To get it right and never forget it, you should first visualize the journey that the light
makes to get to the sensor.
This journey will lead you to the well-known exposure triangle that I’ll talk about in
great length in section 5.
40What’s exposure?
The elements that are part of the exposure triangle (aperture, shutter speed and
sensitivity) allow you to control the amount of light that reaches the sensor in your
camera and, therefore, the exposure.
How to control exposure: initial thoughts
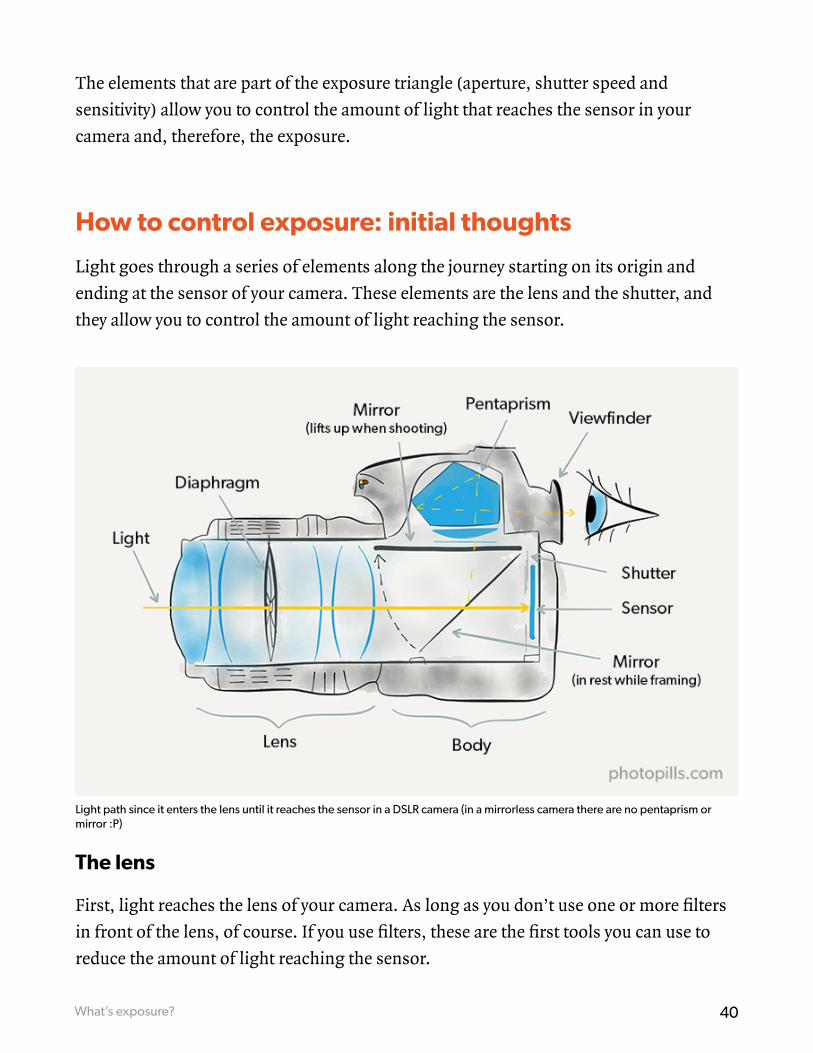
Light goes through a series of elements along the journey starting on its origin and
ending at the sensor of your camera. These elements are the lens and the shutter, and
they allow you to control the amount of light reaching the sensor.
Light path since it enters the lens until it reaches the sensor in a DSLR camera (in a mirrorless camera there are no pentaprism or mirror :P)
The lens
First, light reaches the lens of your camera. As long as you don’t use one or more filters
in front of the lens, of course. If you use filters, these are the first tools you can use to
reduce the amount of light reaching the sensor.

41What’s exposure?
I’ll talk about filters and how you can use them in section 22. For now, and to make
things simpler, I’m going to assume you don’t use filters.
Well, once inside the lens, the beam of light goes through the diaphragm. It allows more
or less light depending on the aperture you have selected.

42What’s exposure?
So the aperture is the first element of the exposure triangle that you can use to adjust
exposure.
Of course, the larger the diaphragm, the higher quantity of light reaches the sensor and
vice versa. If you want to allow less light through, use smaller apertures. In other words,
close the diaphragm.
Once it has gone through the diaphragm, the light beam reaches the shutter. Here
comes the second element of the exposure triangle: the shutter speed.

43What’s exposure?
The shutter
The shutter is a sort of curtain that allows light to reach the sensor (when it’s open) or
prevents it (when closed).
The period of time during which the shutter is open is called the shutter speed. It’s also
known as exposure time. I’ll use both terms along the article.

44What’s exposure?
During the time the shutter is open, the beam of light hits the sensor of your camera.
Therefore, when you set its value, you are affecting the exposure.
The slower the shutter speed, the more light reaches the sensor and vice versa.

45What’s exposure?
The sensor
The sensor is the place where the image is created inside the camera. It’s made of
photosites or semiconductors sensitive to light.
When the photons of the light beam impact on the photosites, they are captured and
processed, generating the digital image of the scene that the camera sees.
The sensor has the ability to digitally amplify the captured signal giving you the
impression that it captures more light. Depending on the sensitivity (ISO) you select, the
sensor amplifies the signal more or less. Mastering the sensitivity of the sensor is a key
factor to expose your photos correctly.
In a film camera the film has a certain sensitivity. In this case, when the light beam
hits the film, the image is printed on it. Subsequently, the film is revealed by a series of
chemical processes.
Don’t worry if there are some concepts that you don’t understand. In section 5 I’ll
explain you in a clear and simple way what the aperture (diaphragm), shutter speed

46What’s exposure?
(shutter) and ISO (sensitivity) are, what they are for and how you can control them.
But for now, I want you learn that these parameters allow you to control the exposure
and the creative effects that we’ll see in section 4.
Now, before going into the details, let’s dig a little deeper into the concept of exposure
triangle.
Introduction to the exposure triangle
When I explained to you the path that the light follows through the camera, I mentioned
three key parameters: aperture, shutter speed and sensitivity (generally referred to as
ISO).
Together they form the well-known exposure triangle.
Once you master the exposure triangle, you will dominate your camera (and even the
world!).
You might have forgotten it, but I also mentioned a fourth element that will help you
control the light: the use of filters.
But this is an additional element that not all photographers use, and if they do they use it
only in certain situations. So I’ll explain how and when to take advantage of the filters in
section 22.
Going back to the exposure triangle...
Depending on what decisions you take when setting the aperture, the shutter speed and
the ISO you’ll get one exposure or another. That is, one photograph or another.

47What’s exposure?
Aperture and shutter speed affect directly the amount of light reaching the sensor:
• If you close the aperture, you reduce the size of the hole (the diaphragm) through
which the light enters the lens, so the amount of light reaching the sensor is smaller.
• If you open the aperture, more light comes to the sensor.
• If the shutter speed is fast, the amount of light reaching the sensor is lower.
• If the shutter speed is slow, more light arrives to the sensor.
At the same time, the higher the ISO value, the more sensitive the sensor is to light. That
is, the sensor has more capacity to capture that light. And vice versa, the smaller the ISO,
the less ability the sensor has to capture the light.
All in all, aperture, shutter speed and ISO give you total control over the amount of
light captured by the sensor. In other words, the total control over the exposure of your
pictures.
“Very well Toni, I understand more or less how to control the amount of light captured by the sensor.
But... How much light is the right amount? What is the correct exposure?”
The “correct” exposure
What’s the correct exposure?
Well... It depends.
Determining the “right” exposure is totally subjective.
For a certain photographer, a picture may have a correct exposure while another
photographer may consider it badly exposed. It all depends on whether or not you get
the effect you want to convey, or the result you have in mind.
If you get it, then you have the photo you want and the exposure is perfect for you.
“OK Toni, but there surely is a consensus on what could be considered to be a correct exposure”.
You’re right.

48What’s exposure?
One way to define the correct exposure in a more technical way, although not always
applicable, is that:
The correct exposure is the one in which you don’t lose information in the shadows or the highlights.
In other words, it’s the exposure that takes full advantage of the camera’s sensor
capacity to capture as much information as possible from the scene, capturing detail in
both the shadows and the highlights.
But getting that “right” exposure is not always possible. Unfortunately, the sensor in
your camera is not capable of capturing the same brightness levels as your eyes does.
And this is where the difficulty lies.
Sometimes, you’ll face situations where you won’t be able (or will not want) to capture
all the information in the scene and you’ll have to decide what to do:
• Lose information in the shadows (there will be areas that will be black).
• Lose information in the highlights (you will have areas that will be white).
• Use other techniques so that the sensor is able to capture all the actual information,
such as the use of filters (section 22), blending of several shots (section 23) or
adding light to the scene (artificial light, the Moon...).

49What’s exposure?
In this type of situations, you have no choice but to go out on a limb and decide what you
want to capture in the image.
If you choose to lose information (detail) in the shadows or blacks, you will get an
underexposed photo. On the other hand, if you decide to lose information in the
highlights or whites, you will get an overexposed photo.
Sometimes you will want to use one of these two effects in your favor. For example, to
get what is called a low key or a high key.
In the picture below I decided to shoot a high key, overexposing a large part of the
scene, so that the musicians would blend perfectly with the environment. That’s

50What’s exposure?
how I managed to focus on the most important parts of the scene: the faces and the
instruments.
Nikon D4s | 85mm | f/2.8 | 1/160s | ISO 100 | 5650K
In the previous image I overexposed to focus on subjects, so in the next one (below) I
decided to underexpose (shoot a low key) to highlight the beauty of the model’s eyes and
face.

51What’s exposure?
Nikon D4s | 85mm | f/2 | 1/200s | ISO 400 | 6250K
Photography is imagination... And, sometimes, a scene that seems impossible to
capture becomes a whole story.
The spectacular silhouettes that you can capture by completely underexposing the
foreground are a good example.
52What’s exposure?
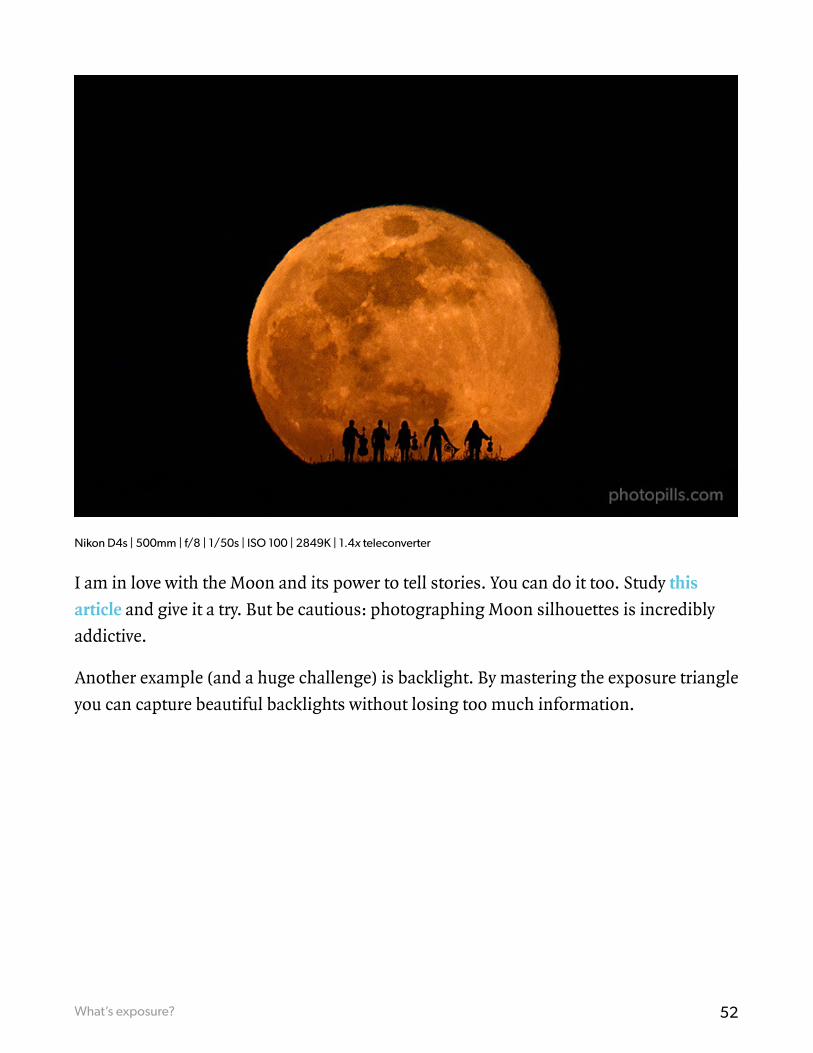
Nikon D4s | 500mm | f/8 | 1/50s | ISO 100 | 2849K | 1.4x teleconverter
I am in love with the Moon and its power to tell stories. You can do it too. Study this
article and give it a try. But be cautious: photographing Moon silhouettes is incredibly
addictive.
Another example (and a huge challenge) is backlight. By mastering the exposure triangle
you can capture beautiful backlights without losing too much information.

53What’s exposure?
Nikon D700 | 85mm | f/2 | 1/1500s | ISO 200 | 6500K
The “wrong” exposure
What’s real is a “wrong” exposure!
For me, a wrong exposure is the one you get when, in certain light conditions, you can’t
shoot the picture with the exposure you want.
That is, the final image is much darker or much brighter than your original idea. You
don’t get the photo you want.

54What’s exposure?
Nikon D4s | 19mm | f/5.6 | 1/2.3s | ISO 100 | 9100K
This can happen for several reasons and my goal with this article is to help you overcome
them:
• Gear limitations (camera, lens, etc.): When gear limitations don’t allow you to get
the result you want.
Lack of control of the exposure triangle: Aperture, shutter speed and ISO.
TIPS
Aperture, shutter speed and ISO allow you to get the correct exposure. But as you’ll see
in section 4, what determines these settings is not the exposure but the idea of the photo
you want to do (freeze motion, get a silky water effect, increase depth of field, capture
stars as bright as possible, etc.).

55What’s exposure?
Once you have an idea, decide one or two settings (aperture, shutter speed, ISO) to get
the effect you’re looking for, and then use the third (or the other two) to get the correct
exposure.
At this point, you should go deeper into learning about the exposure triangle and I
should teach you how to expose. But photography isn’t only knowing how to expose.
In fact, I dare say that exposing the photo is the last thing you do before actually taking
the picture.
So what comes first?
The first thing is that you should know how to capture the photo that conveys the idea
you want to express.

4Caution! The exposure serves
your ideas (not the other way round)

57Caution! The exposure serves your ideas (not the other way round)
What came first? The egg or the chicken? The exposure or the idea?
Right answer: The idea!
What do I mean by this?
You always have to choose the aperture, shutter speed and ISO depending on the photo you want to
take, the effect you want to capture, the story you want to tell.
Normally, you will determine one or two of the variables to get the picture you’re looking
for and then decide the third (or the other two) to get the correct exposure.
To sum up, depending on the aperture, shutter speed and ISO settings that you use,
you’ll not only affect the exposure but you’ll also be able to express one idea or another,
create one effect or another.
Let’s see what these effects are...
The aperture effects
Depth of field
The aperture allows you to control the depth of field: the part of the scene that appears
sharp on the image.
On the one hand, if you intend to show the spectator what’s happening in a larger part of
the scene (increase the depth of field), you can do this by closing the diaphragm (reducing
the aperture to f/8, f/11, f/16). In section 5 I’ll explain in detail what these f numbers are.
To maximize depth of field if you’re using long focal lengths (70-500mm), use small
apertures (f/8, f/11, f/16) and focus within two-thirds of the scene.
If you’re using short focal lengths (14-35mm), you can maximize depth of field without
using small apertures. In this case, just focus at the hyperfocal distance.
On the other hand, if you open the diaphragm (increasing the aperture to f/1.4, f/2.8, f/4),
the depth of field decreases. It helps you to direct the attention of the spectator to a specific
point or area of the scene.

58Caution! The exposure serves your ideas (not the other way round)
The starburst effect
If you want the Sun, Moon or any other light spot (street lamp, lighthouse, etc.) to have
the starburst effect in the photo, simply use small apertures (close the diaphragm to f/8,
f/11, f/16).

59Caution! The exposure serves your ideas (not the other way round)
Nikon D4s | 18mm | f/16 | 5s | ISO 100 | 5850K
Capture more stars
In astrophotography, if you want to capture a huge number of stars, you must capture as
much light as possible during the exposure. So use large apertures (f/2.8, f/4, depending
on your lens).
60Caution! The exposure serves your ideas (not the other way round)
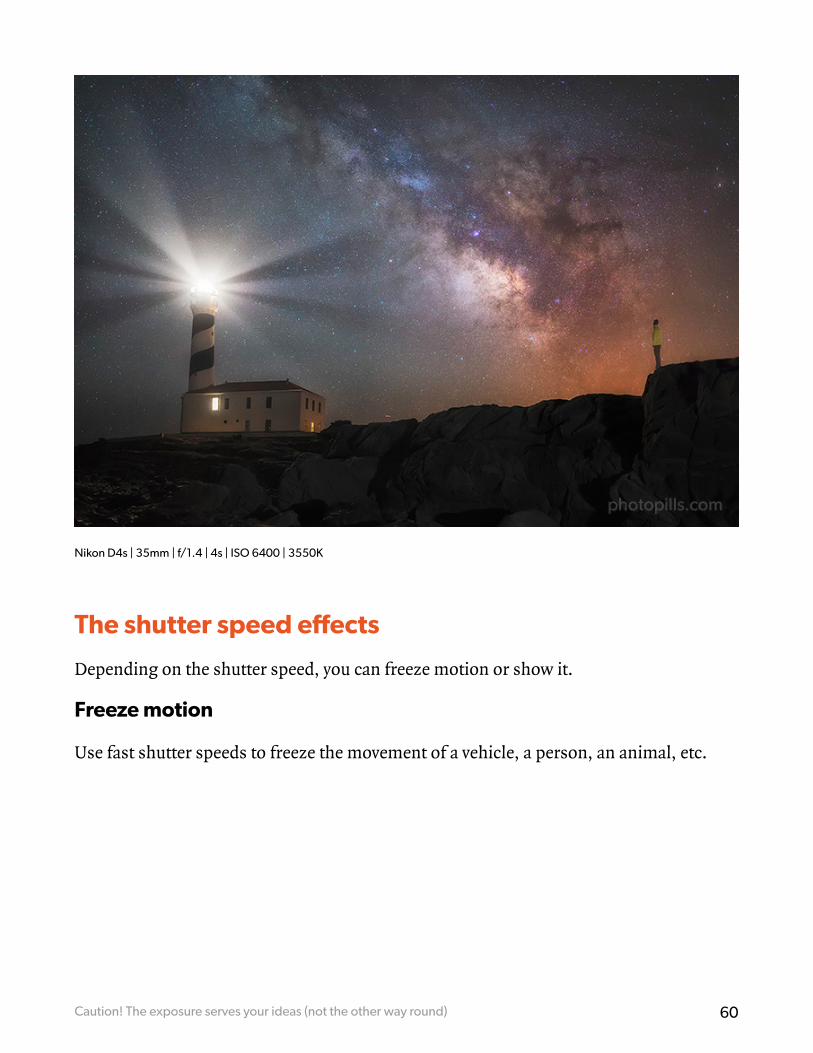
Nikon D4s | 35mm | f/1.4 | 4s | ISO 6400 | 3550K
The shutter speed effects
Depending on the shutter speed, you can freeze motion or show it.
Freeze motion
Use fast shutter speeds to freeze the movement of a vehicle, a person, an animal, etc.

61Caution! The exposure serves your ideas (not the other way round)
Nikon D4s | 200mm | f/5.6 | 1/1800s | ISO 1600 | 6250K
These are some examples of shutter speeds that you can use to freeze motion.
• Bird flying: 1/800s - 1/2000s.
• Person walking: 1/125s at least.
• Sports (football, etc.): 1/500s - 1/2000s.
• Car at 50 km/h: 1/1000s - 1/2000s.
• Car racing: 1/1000s - 1/8000s.
• Fast vehicles panning: 1/250s.
• Mountain bikers panning: 1/60s.
• Road cyclists panning: 1/30s.
• Runners or animals moving panning: 1/15s.

62Caution! The exposure serves your ideas (not the other way round)
• Avoid star trails: use the NPF rule or the 500 rule, or use the PhotoPills Spot Stars
calculator.
• Avoid Moon trail: 1s maximum.
Show motion
Use slow shutter speeds to show to the spectator the motion in the scene (water, clouds,
people, vehicles, Stars Trails, etc.).
Nikon D700 | 200mm | f/6.7 | 0.7s | ISO 200 | 6700K

63Caution! The exposure serves your ideas (not the other way round)
Here are some examples (you need a tripod).
• Waterfall silky water: 1s.
• Sea silky water: 1s.
• Show people moving, slow cars: 1/15s.
• Slow water motion: 1/2s.
• Fast water motion: 1/8s.
• People walking: 1/4s.
• Short star trails: 1min - 10min.
• Long star trails: 30min - 4h.
ISO effects
Normally, once you have decided the aperture and shutter speed settings, you use the
ISO to balance the exposure.
When using high ISOs (1600, 3200, 6400), the sensor digitally amplifies the signal of
the captured light. This allows you to take pictures that wouldn’t be possible otherwise,
such as when shooting the Milky Way or a meteor shower.

64Caution! The exposure serves your ideas (not the other way round)
Nikon D4s | 14mm | f/2.8 | 15s | ISO 8000 | 3300K
Of course, be careful with the noise levels produced by the sensor of your camera
because the higher the ISO, the more noise the image has.
This is because the sensor doesn’t capture more light (it doesn’t capture more
information), but it amplifies the captured light signal to try to show more detail in
the image. When stretching the information, the sensor isn’t able at a certain point to
reproduce reality and produces the effect of noise (or grain).
Cheat sheet of the aperture, shutter speed and ISO effects
Since a picture is worth a thousand words, here’s a summary of the effects that you
should take into account when deciding the aperture, shutter speed and ISO settings.

65Caution! The exposure serves your ideas (not the other way round)
To sum up:
Higher aperture (lower f number) -> Lower depth of field.
Lower aperture (greater f number) -> Greater depth of field.
Slower shutter speed (longer exposure time) -> Show motion (blur, silk effect).
Faster shutter speed (shorter exposure time) -> Freeze motion (no movement).
Greater ISO -> More grain (more noise).
Less ISO -> Less grain (less noise).
Let’s have a look now at three practical examples of how to choose the aperture, shutter
speed and ISO settings to get the photo you want with the right exposure.

66Caution! The exposure serves your ideas (not the other way round)
Three examples of photographic reasoning: idea + exposure
In section 24, you have 30 examples in which I explain you step by step how I managed
to capture the photo I was looking for with the exposure I wanted.
But for now I’d like to go over three of the examples so that you can see the logical
reasoning behind my photographs. I hope that it will help you embrace the workflow I
follow to set the exposure triangle parameters.
Remember, the idea always goes before the exposure.
Portrait
Nikon D4s | 85mm | f/8 | 1/160s | ISO 100 | 5600K
The idea behind this photo is that the spectator focuses all her attention on the subject.
I want her, the spectator, to first notice the model’s eyes. What I am looking for is that
both glances, the model’s and the spectator’s, meet. I want the spectator to feel that the
model is really looking at her...

67Caution! The exposure serves your ideas (not the other way round)
To achieve this I chose a fixed focal lens (85mm) that is ideal for portraits both for its
sharpness and its speed (in this case the aperture reaches f/1.8).
However, I don’t need such a large aperture here. f/8 is more than enough since I’m
shooting in a studio, with a totally controlled lighting environment. Also, because
there’s a black background, I don’t need a large aperture to create a bokeh (or blur) in the
background so it doesn’t distract the spectator.
I stand about 3m from the model and focus on her right eye. With all this information
and thanks to the PhotoPills calculator, I know that the depth of field is 0.59m.
PhotoPills DoF Calculator - Depth of field values for a Nikon D4s | 85mm | f/8 | 3m subject distance
PhotoPills DoF Calculator - Depth of field values for a Nikon D4s | 85mm | f/2.8 | 3m subject distance

68Caution! The exposure serves your ideas (not the other way round)
I’m using a fairly closed aperture (f/8) so this piece of information is not critical. But if
I had used a much larger aperture, f/2.8 for example, I would have needed to know the
depth of field accurately. That way I would have known where to position my subject
according to which parts of her face or body I wanted sharp on the final shot.
Once I know the depth of field and the model is at the right place, I meter the light using
the spot metering mode of my camera. It’s my favorite metering mode because it’s the
most precise one. I meter the lighter tone of the model’s face so I don’t blow out the
highlights (I’ll explain more about this in section 17).
Since I’ve selected the Manual exposure mode (M), and I’ve set my aperture, I have to
decide the ISO and shutter speed settings.
I set the ISO to the native ISO of my camera to reduce noise as much as possible: ISO
100. If you want to know more about noise, you have all the details in section 5.
Finally, I set the last parameter, the shutter speed. In order to do this, I just have to
look at the light meter and find the shutter speed value at which the light meter is zero-
centered (section 11). In this case, 1/160s.

69Caution! The exposure serves your ideas (not the other way round)
Travel photography
Nikon D4s | 200mm | f/2.8 | 1/500s | ISO 100 | 5600K
Taking photos during a trip is the best way to visually document a story. You can actually
add more or less artistic ingredients or use the image as a pure document. All you have
to do is be a spectator of what’s happening around you.
In this photo I just wanted to capture the joy of beginning an Icelandic adventure. Part
of the PhotoPillers group was heading to the Reykjavik church. The only thing I did
was to walk a few meters away to capture what was happening, to keep that moment’s
atmosphere.
In this type of photography, one of the most important decisions that you have to take is
what focal length and what depth of field you want to use. These settings always depend
on what you want to capture: a landscape, a portrait or simply capture the atmosphere of
the place you’re visiting.
Here the idea was to separate the group of photographers from the background.
Considering the distance between the subjects and my camera, I chose a large aperture

70Caution! The exposure serves your ideas (not the other way round)
and a telephoto lens. I used the center-weighted metering mode to make sure I metered
the correct exposure in the group.
I chose a shutter speed fast enough to freeze any motion. In this case I set an automatic
ISO and it was the camera who set it to 100.
Sunset photography
Nikon D4s | 14mm | f/13 | 20s | ISO 100 | 5399K | ND64 filter and reverse GND 0.6 (2 stops)
Landscape photography is one of my favorite types of photography, not to say my
favorite. Here, the focal distance, the field of view and the framing are the prime factors.
Depending on the frame I choose a specific focal length.
I work my composition with the camera on the tripod. This composition takes me to set
a certain focal distance. In this case I sought a balance between the clouds illuminated
by the Sun setting, the arch and part of the coast, and the close-up detail of rocks and
plants.

71Caution! The exposure serves your ideas (not the other way round)
Once this is done, I choose my aperture. In this previous photo, I closed the diaphragm
to f/13 to maximize the shutter speed.
Subsequently, I use PhotoPills to calculate the hyperfocal distance. When I focus I make
sure that I focus at a distance a little bit longer (between 0.5m and 1m) and I put the
focus in manual mode.
As for ISO, I always try to use an ISO as low as possible to avoid noise in my image.
Here, ISO 100.
Now I have to meter the light of the scene. To do this, I use the spot metering mode, I
meter the brightest area of the scene I want in detail and, taking into account the camera
I use, I overexpose by 2 stops (+2EV). In section 17 I’ll explain in detail why I do this.
However, I want to use a shutter speed a bit slower so that the silk effect in the water
is perfectly noticeable. So I decide to use a neutral density filter (ND). Thanks to the
PhotoPills exposure calculator, I find out that I need a 6-stop filter (ND64) to get the
correct exposure.
Finally, I’m in front of a sunset. Since there is a difference of light between the sky and
the foreground, I use a 2-stop reverse graduated filter (GND 0.6) to further darken the
area of the horizon where the Sun is located.
Once this is done, I shoot while enjoying the scenery and the spectacular sunset.
Conclusion
In short, to take the photo you want, first establish the settings allowing you to get
the desired effect (aperture and/or shutter speed), and then adjust the third (or the
remaining two) to get the right exposure.
Are you still there?
Yes? Great!
Time to go deeper into the key to learn to expose: the exposure triangle and its three
elements.

5Understanding the exposure
triangle

73Understanding the exposure triangle
We have seen in the previous two sections that you have three elements to adjust the
exposure: aperture (using the diaphragm), shutter speed (thanks to the shutter) and
sensor sensitivity (also called ISO).
These three elements form the so-called exposure triangle.
How the exposure triangle works
It’s quite simple.
You increase the exposure by using large apertures, slow shutter speeds, and high ISOs.
On the contrary, you reduce the exposure with small apertures, fast shutter speeds and
low ISOs.
Technically the ISO doesn’t affect the amount of light captured because the number of
photons that are captured is defined by the aperture and the shutter speed. When you
increase the sensitivity of the sensor (ISO), you’re actually amplifying the signal in order

74Understanding the exposure triangle
to get a brighter image.
Therefore, for a given exposure, the aperture, shutter speed and ISO settings are closely
related. In other words, they are linked one another.
What does this means?
Imagine that you set an aperture, shutter speed and ISO setting that allows you to get the
photograph you want correctly exposed.
Awesome! You’ve captured the right amount of light!
Now, if you modify one of the parameters that make up the triangle, you have to adjust at
least one of the other two to keep the same exposure (capture the same amount of light).
Check this out. If you change a parameter, you break the balance of the exposure triangle
(by capturing a greater or smaller amount of light), so you have to modify at least one of
the other two so that the triangle is balanced again (to capture the same light).
For example, imagine that you have determined the aperture, shutter speed and ISO that
allow you to freeze the movement of a bird in flight and get a well exposed photograph.
If you decide to close the diaphragm to increase the depth of field (letting in less light),
and you want the balance to be maintained (the exposure is the same), you have to
change one of the other two parameters (or both) depending on the effect you want to
capture:
• You can reduce the shutter speed, to let light reach the sensor for a longer period of
time. But if you do so, the bird will surely be blurred. You won’t freeze the movement.
• Or you can increase the ISO, to keep a fast shutter speed and thus to freeze the bird’s
movements.

75Understanding the exposure triangle
In conclusion, depending on which parameter (aperture, shutter speed or ISO) you
modify to adjust the exposure, you get one effect or another (depth of field, frozen
motion, blurred subject, silk effect, etc.).
Therefore, as we saw in section 4, the idea of the picture that you have in mind will tell
you which parameter you should adjust.
But let’s review one thing at a time.
Let’s have a closer look at each of the elements that are part of the exposure triangle.
The aperture
What’s the aperture?
We have seen in section 3 that you can control the amount of light that reaches the
sensor of your camera using the diaphragm of your lens.
The diaphragm leaves a hole that allows light to go through it before reaching the
sensor. Well, the size of that hole is what’s called aperture.

76Understanding the exposure triangle
But how do you know the hole size you’ve selected?
The f number (f/2.8, f/4, f/5.6, etc.) indicates the size of the aperture you’ve selected.
You usually say:
“I’ve shot this picture at an aperture of f/8.”
Well, the f number indicates the relationship between the diameter of the diaphragm
(hole) and the focal length you’ve selected.
More specifically, it’s the result of dividing the focal length (in mm) by the aperture
diameter (in mm).
So, for a given focal length, the larger the aperture, the smaller the f number, and vice
versa.
An aperture of f/2.8 is larger than one of f/4.
What?
Oh! Don’t you know what the focal length is?

77Understanding the exposure triangle
Let’s make a quick aside.
The focal length
The focal length of a lens is the distance between the optical center of the lens (where
the lens is situated) and the sensor (or focal plane, where the image is generated).
It’s measured in millimeters (always, no imperial units here!) and covers a wide range of
values. For example 14mm, 18mm, 35mm, 50mm, 70mm, 105mm, 200mm...
Like the aperture and the shutter speed, the focal length is a parameter you can use to
boost your creativity. It allows you to decide what part of the scene you want to include in
the photo (field of view) and how big or small the subject appears in the photo.
To give you a better idea:
• The smaller the focal length, the larger the field of view, and the greater the part of
the scene included in the photograph.
• On the contrary, the greater the focal length, the smaller the field of view, and the
smaller the area of the captured scene.

78Mark Gee proves everyone can take contagious images
So, depending on the photo you want to take, you choose a certain focal distance or
another.
A short focal distance allows you to capture more landscape, as in this photo taken in
Iceland with the dragon rock, Hvítserkur.

79Understanding the exposure triangle
Nikon D4s | 14mm | f/10 | 1/80s | ISO 100 | 7500K
And the longer the focal length, the smaller the field of vision, allowing you to focus on
the subject.
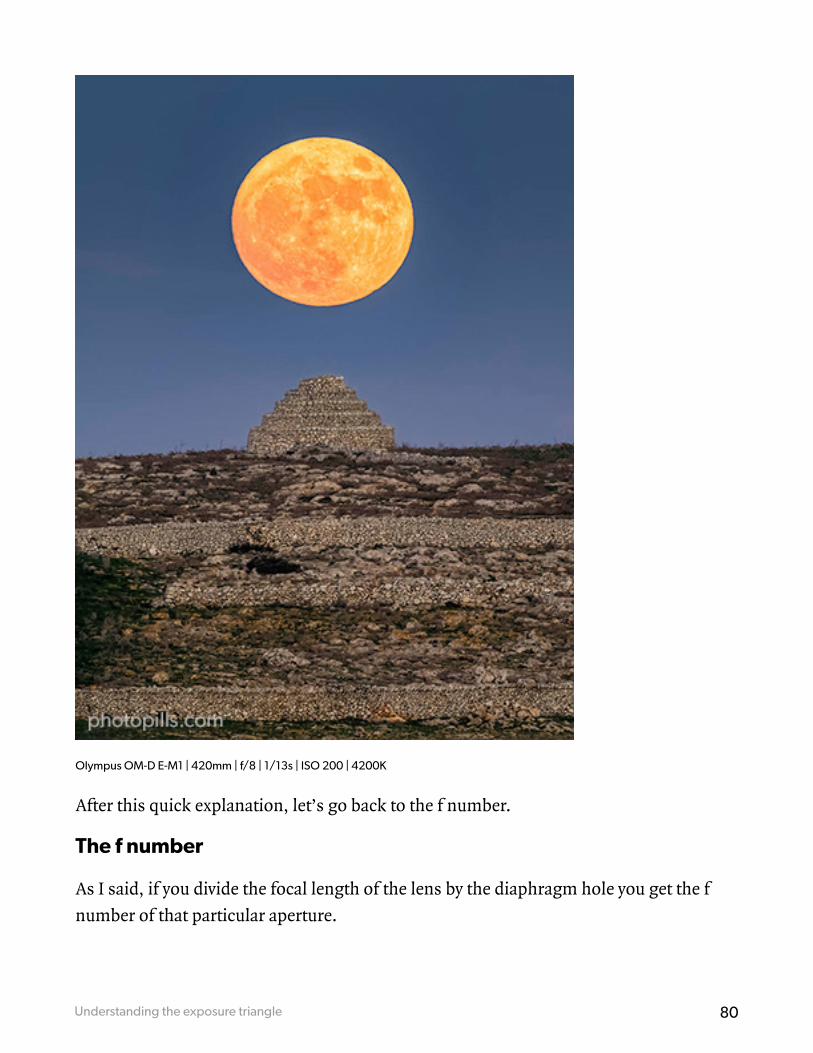
80Understanding the exposure triangle
Olympus OM-D E-M1 | 420mm | f/8 | 1/13s | ISO 200 | 4200K
After this quick explanation, let’s go back to the f number.
The f number
As I said, if you divide the focal length of the lens by the diaphragm hole you get the f
number of that particular aperture.

81Understanding the exposure triangle
• Let’s have a look at an example. Consider a focal length of 50mm and calculate the
f number for two different diaphragm apertures:
• If you open the diaphragm up to a 28mm diameter hole, the f number is 1.8 (50mm /
28mm = 1.8). In this case, the selected aperture is f/1.8.
If you close the diaphragm, leaving a hole diameter of only 6.25mm, your f number is 8
(50mm / 6.25mm = 8) and the selected aperture is f/8.
Oh, oh... Don’t look at me like that...
Relax! You don’t need to do any math.
You select the diaphragm directly with the f number, so you just need to know that:
• The smaller the value of the f number (f/1.8, f/2.8, f/4, etc.) the bigger the diaphragm
is open and the more light you let pass.
• The larger the f number (f/8, f/11, f/16, etc.) the smaller the diaphragm and the less
light you let pass.
Thus, an f number of f/1.8 indicates a considerably larger diaphragm hole than that of
an f/8, so it allows a lot more light to go through it.
Remember that the greater the f number, the less light you let reach the sensor.

82Understanding the exposure triangle
The f number standard scale
The f number standard scale is:
1, 1.4, 2, 2.8, 4, 5.6, 8, 11, 16, 22, 32…
We say it’s the standard scale because, as you close the diaphragm, each of these holes (f
number) allows exactly half the light through than the previous f number.
For example, an aperture of f/2 lets out twice as much light as an aperture of f/2.8, but
half of an aperture of f/1.4.

83Understanding the exposure triangle
This is because the area of the diaphragm orifice through which the light travels is
halved when you close the aperture from f/2 to f/2.8. And it’s doubled when you open
the diaphragm from f/2 to f/1.4.
In photography, this gap, this doubling (or halving) of the diaphragm orifice area is
called a stop.
Therefore, between two consecutive apertures of the standard scale there is a difference
of one stop.
Knowing the amount of light you reduce or increase when shifting from one aperture
to another is key when exposing your photographs. This allows you to adjust the
parameters according to the amount of light you want to increase or decrease.
In section 6 I go into more detail when explaining the concept of stop.
How do you select the aperture on your camera?
Each camera is different. Have a look at your camera’s manual.
In most cameras, you can change the f number by turning a control wheel.
Because I’m a nostalgic, when I use manual lenses I change my settings in the menu so I
can change the aperture using the diaphragm ring.
What aperture do you need?
As we’ve seen in section 4, you don’t always choose the aperture setting depending on
how much light you want to capture to expose the photo.
Normally, there are other factors that determine its value depending on the picture you
have in mind:
• If you want more or less depth of field.
• Do you want to create a starburst effect on light sources?
• If you are looking to maximize the light the sensor has captured during a certain
exposure time (shutter speed). For example, in night photography, the dim light will
rarely allow you to use small apertures.

84Understanding the exposure triangle
• You want to avoid diffraction. If you don’t want to lose sharpness in your photos,
avoid closing the diaphragm as much as you’d like (f/22, f/32, etc.).
The shutter speed
The shutter is a sort of curtain that’s in your camera.
It allows you to let light go through the sensor for a certain period of time. It opens
when you press the shutter release button on the camera and it closes after a period of
time you’ve previously selected.
What’s the shutter speed?
The time period during which the shutter is open is called the shutter speed, and it’s
measured in seconds, minutes, or hours.
Therefore, the longer you have the shutter open, the more light you allow to reach the
sensor. On the contrary, the less time, the less light reaches the sensor.
The shutter speed standard scale
The standard scale of full stops corresponds to the following series (in seconds):
1, 1/2, 1/4, 1/8, 1/15, 1/30, 1/60, 1/125, 1/250...
In this series 1/2 is half a second, 1/4 is a quarter of a second, and so on.
As with the aperture, there is one stop between two consecutive values of the scale.
For example, shooting at 1/4s you allow twice as much light as at 1/8s, but only half than
at 1/2s.
In other words, halving the shutter speed also doubles the amount of light that reaches
the sensor, increasing the exposure (captured light) in one stop.
How do you select the shutter speed on your camera?
Each camera is different. Have a look at your camera’s manual.

85Understanding the exposure triangle
In most cameras, you can change the shutter speed by turning a control wheel.
What shutter speed do you need?
Depending on the idea of the picture you have, you need one shutter speed or another.
Similarly to how the aperture helps you control depth of field, the shutter speed helps
you control how the motion appears. You can freeze the subject or leave it blurry and
fuzzy.
For example, to freeze motion you only have to set a fast shutter speed.
On the contrary, with a slow shooting speed, you blur elements that are moving in the
scene. Or you can even get a very interesting silk effect in the water (a river, a waterfall or
the sea).
All in all, you always have to keep in mind the photo you want to produce, taking into
account the message you want to convey and the exposure you need for it.
In section 4 you’ll find some reference values of shutter speeds that you can use
depending on the effect you’re looking for.
Sensitivity (or ISO)
The third element that helps you control exposure is the sensor and its sensitivity to
light, generally known as ISO.
What’s ISO?
Actually, the ISO sensitivity measures the sensor reaction to a certain level of light in the
scene.
When you use high ISOs on your camera, the sensor digitally amplifies the signal from
the captured light. It doesn’t capture more light (more information) but it amplifies the
signal, producing a brighter image. This gives you the impression that the exposure has
increased.
And vice versa, by using low ISOs, the sensor amplifies the captured signal to a lesser

86Understanding the exposure triangle
extent and the resulting image is darker. This gives you the impression that the exposure
has been reduced.
So, and it’s worth repeating it, technically the ISO doesn’t affect the amount of light
captured, because the number of captured photons is defined by the aperture and the
shutter speed. When you use a higher ISO, the camera amplifies the sensor signal so it
can produce a brighter image.
However, although ISO technically does not affect the exposure, I like to consider ISO
as one of the exposure triangle variables that you should take it into account when
exposing your photographs.
Depending on the sensor sensitivity you set, you can play with different aperture and
shutter speed settings.
The ISO standard scale
Sensitivity doesn’t have a unit of measure.
And as with aperture and shutter speed, between two consecutive values of the ISO
standard scale there is one stop, doubling or halving the light captured.
Thus, the standard scale of full stops corresponds to the following series:
100, 200, 400, 800, 1600, 3200, 6400, 12800, 25600…
As the ISO doubles its value, so does the amount of light that the sensor picks up. So an ISO
of 400 is twice as sensitive as an ISO of 200, and the sensor captures twice as much light.
The base or nominal sensor sensitivity is usually ISO 100 or 200, depending on the
brand and model of the camera.
Any ISO higher or lower than this base value is an amplification or attenuation of the
signal that the sensor photosites receive. This signal amplification is done digitally,
always causing a loss of quality of the final image.
It’s as if you force the sensor to capture more light. Or less, if you can set it below the
base ISO. Some cameras, generally high-end ones, allow you to set ISOs of 64 or 50, for
example.

87Understanding the exposure triangle
That’s why I recommend, whenever possible, that you select the native ISO base of your
camera (the lowest) or an ISO that is closest to it.
Obviously, there are situations in which you can only take the picture by increasing the
ISO a lot (800, 1600, 3200 or more), such as when photographing the Milky Way or Star
Trails.
In these cases, you’ll use the highest ISO you can. That is, the one with which your
camera doesn’t produce too much noise.
Increasing the ISO implies a small problem: noise
As you’ve read in the sections on the other two elements of the exposure triangle
(aperture and shutter speed), you always have to pay the price when you want your
camera sensor to capture more light.
Summarizing:
• If you select a large aperture, you have a shallow depth of field.
• If you use a slow shutter speed, it’s harder to get the moving elements of the photo in
focus (frozen).
• And now, if you increase the ISO your images begin to have grain or noise, as it is
usually called.
“Toni, what’s noise exactly?”
Noise is some sort of grain that appears in the photograph. It’s really ugly and it can
ruin your photo.

88Understanding the exposure triangle
The higher the ISO you use, the greater the amount of noise that appears in the image.
Actually, you can barely see noise with low ISO values (between 100 and 400). Even
zooming in the image a lot on a computer, you’ll have a hard time seeing noise. But
from ISO 400 on, noise begins to become more and more visible.

89Understanding the exposure triangle
Although the ISO value scale is standardized, the amount of noise corresponding to
each of those values is not. This means that the amount of noise depends on the quality
of the sensor your camera has.
In fact, one of the first things you need to figure out is what is the maximum ISO that
you can use on your camera while maintaining a reasonable noise level.
How can you fight against noise?
Again, it depends.
Don’t stare at me! Photography is not an exact science.
If you’re shooting outdoors, on a clear sunny day, you can use a low ISO so your photos
will be sharp and will have no noise.
However, a low light situation like a forest on a cloudy day forces you to increase the ISO
value. So, noise will be higher.
In this case, you can use a tripod. So, even if you are forced to use a slow shutter speed,
you can keep the ISO as low as possible. But be careful, your subject must be perfectly
still or it will be blurry in the image.
How do you select the ISO in your camera?
Each camera is different. Have a look at your camera’s manual.
Usually you can select the ISO in 3 different ways:
• Manual mode: use the camera controls to select the ISO value you want.
• Automatic mode (Auto ISO): The camera selects the ISO value for you depending on
the aperture and shutter speed settings.
• Automatic mode with bracketing values: The camera selects the ISO value from a
range of values that you set. For example, you can let the camera choose the ISO
between the native ISO (100 or 200) and the highest ISO to avoid having too much
noise in the photo (800, 1600, 3200, etc.).
90Understanding the exposure triangle
What ISO do you need?
In many cases, ISO allows you to use the right aperture or shutter speed that allows you
to take the picture you have in mind, either to get a certain depth of field, or to freeze or
blur the movement.
If you use a low ISO, you can use larger apertures to get a shallower depth of field in a
portrait, shoot with slower shutter speeds to blur motion or, in night photography, to
get Star Trails.
In most cases you should use a low ISO, mainly to avoid having grain or noise in the
image.
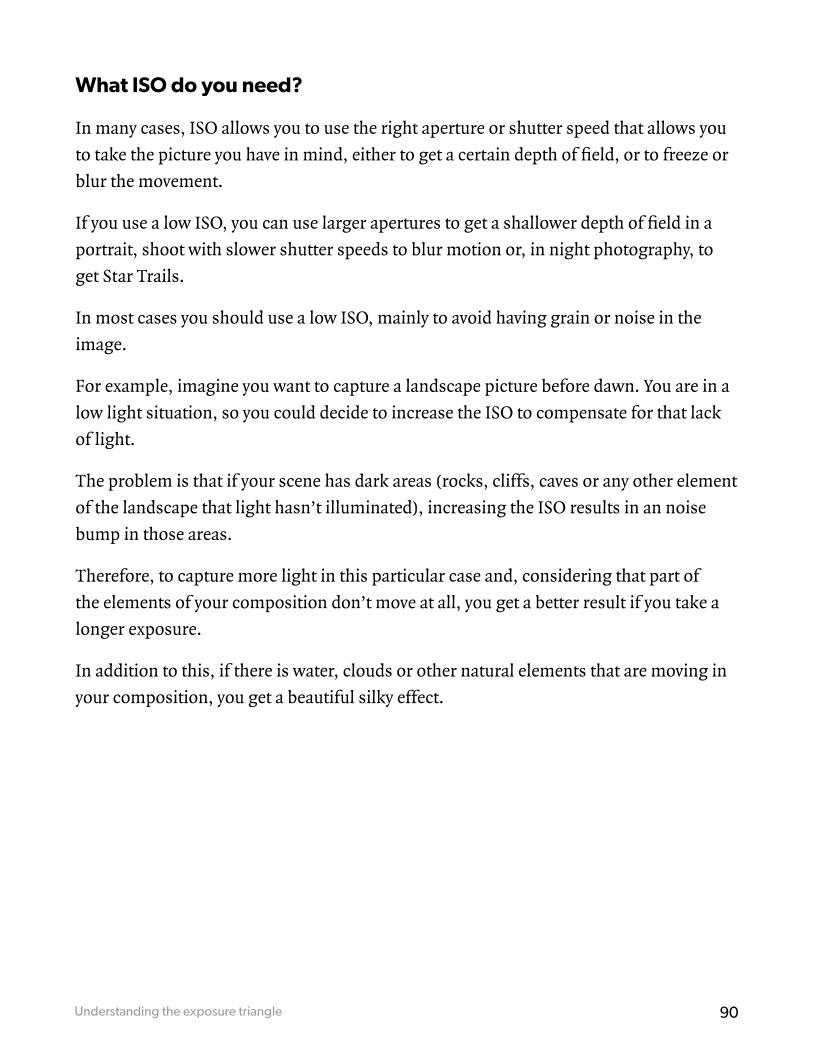
For example, imagine you want to capture a landscape picture before dawn. You are in a
low light situation, so you could decide to increase the ISO to compensate for that lack
of light.
The problem is that if your scene has dark areas (rocks, cliffs, caves or any other element
of the landscape that light hasn’t illuminated), increasing the ISO results in an noise
bump in those areas.
Therefore, to capture more light in this particular case and, considering that part of
the elements of your composition don’t move at all, you get a better result if you take a
longer exposure.
In addition to this, if there is water, clouds or other natural elements that are moving in
your composition, you get a beautiful silky effect.

91Understanding the exposure triangle
Nikon D700 | 35mm | f/8 | 1min 50s | ISO 200 | 5000K
On the contrary, a high ISO allows you to shoot using a faster shutter speed if you
happen to be indoors without using flash or take a night shot where you want the stars
to be big bright spots (no trails).
One of the obvious situations in which it’s essential to use a high ISO is night
photography.
Imagine that you want to capture a landscape scene that shows an outstanding rock
formation in the foreground, and in the composition you also want to include the
Milky Way.

92Understanding the exposure triangle
Nikon D700 | 14mm | f/2.8 | 30s | ISO 3200 | 3500K
Take the picture using the largest aperture (smallest f number) of your lens. By doing this
you allow the sensor to capture more light.
In addition to this, you can’t use a very slow shutter speed because the stars won’t appear
as big bright spots. You’ll end up with Star Trails. The Earth does not stop rotating because
you’re taking a picture!
You can calculate the maximum exposure time to avoid Star Trails using the NPF rule or
the classic 500 rule.
Due to the light conditions and the type of photo, you have no options when deciding your
aperture and shutter speed settings. So, what parameter do you have to nail the exposure?
Correct! The sensitivity.
And in this particular case, you have no choice but to increase the ISO (1600, 3200, 6400,
etc.) so that your exposure is correct.
93Understanding the exposure triangle
A consideration on automatic ISO
Making a good use of automatic ISO depends a lot on your camera.
If you have a low-end camera (these are usually low-budget cameras aimed at
beginners), my recommendation is that you shouldn’t use the automatic ISO function.
This type of cameras usually begin to show noise problems at relatively low ISOs,
starting at 800.
Therefore, it’s best to keep the ISO as low as possible and determine the most suitable
exposure for your photo by playing around with the aperture and shutter speed.
However, if you have a mid-range or high-end camera, the automatic ISO function is a
good option as long as you set an ISO range according to your camera’s limitations.
Let’s assume that from ISO 1600 on your camera generates a lot of noise and the grain is
clearly visible in the photo. In that case, select an automatic ISO range between 100 and
1600.
This way, you have more room to play with the aperture and shutter speed when
deciding the exposure you want.
By letting the camera always adjusting the ISO between 100 and 1600, you keep the noise
under control.
Exposure for beginners
Is the triangle exposure concept still not clear in your mind?
That’s an easy problem to solve.
The analogy of the bucket and the faucet is perfect to explain how aperture, shutter
speed and ISO affect the exposure.
“Bucket and faucet Toni? Aren’t we talking about photography?”
Well, yes… But it’s a great way of explaining it. ;)

94Understanding the exposure triangle
Here we go!
Imagine you want to fill a bucket to the brim with a faucet.
There are three parameters that come into play to achieve this goal:
• How much open or closed is the faucet.
• How long you let the water run.
• And the size of the bucket.
You can vary each of these settings separately to get different combinations that will
result in a full bucket.
Does this ring a bell?
Well, your camera works in pretty much the same way:
• Water would be the light and, while we are at it, the water pressure would be its
intensity.
• How much open or closed is the faucet would be the aperture of the diaphragm.
• How long you let the water run would be the shutter speed.
• The bucket size would be the equivalent to sensitivity. A small bucket equals a high
ISO.

95Understanding the exposure triangle
Let’s say a correct exposure would be to have a brimful bucket.
If you don’t control any of the parameters properly, the bucket may overflow. You would
have an overexposed photo: certain parts of the photo come out white (or blown out).
There is too much light!
On the contrary, if the bucket is too empty you are underexposing the image: certain
areas of the image come out black (without any detail). You don’t have enough light!
The comparison of ISO to the bucket size is also interesting. A high ISO equals a small
bucket.
The smaller the bucket the less water you need to fill it. Similarly, the higher the ISO, the
less light you need to expose the photo correctly.

96Understanding the exposure triangle
That means that the image will be well exposed but with less light, so noise appears in
the image since the camera has actually captured less information (the water has less
water).
To conclude, in order to get a correct exposure (a brimful bucket) you need to use a
suitable aperture, shutter speed and ISO.

6The stop and how to use it

98The stop and how to use it
While explaining the aperture, shutter speed and ISO, I’ve mentioned the word “stop”
several times.
Well, the stop is a basic and essential concept that you need to understand to know how
to expose.
Let’s examine in depth its meaning and how to use it.
What is a stop?
Modifying the exposure one stop means to double (or halve) the amount of light
captured by the sensor when you take a photo.
It’s also the difference in the exposure of an image when you capture double or half the
light.
Maybe if I explain it to you otherwise, you’ll understand better.
Imagine that you have an aperture, shutter speed and ISO setting that gives you a certain
exposure. If you change one of these three parameters to double the light, you’ve
increased the exposure one stop. If instead of doubling the light, you halve it, you’ve
decreased the exposure one stop.
What are stops used for?
A stop helps you to quickly expose your photos. It’s a measure that you can use as a
reference as you change the exposure until you get the exposure that you consider correct.
In photography, you must control completely the amount of light that the sensor
captures and, at the same time, you must be able to associate that amount of captured
light with the way the photograph you just took looks (its exposure).
That’s why it’s critical that you know how the amount of light captured by the sensor
varies when you change the aperture, shutter speed, and ISO settings. That way, you’ll
know how the photo will change at all times.

99The stop and how to use it
Look at the three photos below and how the exposure changes when you increase or
decrease by one stop the light that the sensor captures.
In short, when you’re exposing a photo, knowing the stops between one exposure and
another will make your work much easier.
If the picture is underexposed (you haven’t captured enough light), you can increase
the exposure by one stop (by doubling the amount of light when opening the aperture,
using a slower shutter speed or increasing the ISO) and check how the image looks. And
if you need more light, you can go up another stop, doubling again the amount of light
captured.
On the other hand, if the photo is overexposed (you have captured too much light), you
can reduce the exposure by one stop at a time to expose the photo correctly.
“Ok Toni, I now know how to double or halve the captured light, but... What if I need to be more
precise when changing the exposure?”
Well, light has different scales.
The stop scale (whether it’s the aperture, the shutter speed or the sensitivity one) can be
divided into half stops or in thirds of stop as well.

100The stop and how to use it
Most cameras allow you to work with a scale of thirds of stop. This scale is the most
common one among photographers. The great advantage of this scale is that it gives
you much more control as you are able to increase (or decrease) the light captured more
accurately.
Let’s see how the stop scales are in each of the exposure triangle variables.
The aperture stop scale
If you want to use the diaphragm to increase the exposure by one stop, choose an
aperture that lets you double the light compared to the one you have previously set.
Remember the aperture scale of full stops:
1, 1.4, 2, 2.8, 4, 5.6, 8, 11, 16, 22, 32...
So if you have set an f/8 aperture, open the diaphragm to an aperture of f/5.6 to double
the light (increase the captured light by one stop).
On the contrary, if you have selected an aperture of f/8 and you want to decrease the
exposure in one stop, set the aperture to f/11.
What if you want to change the exposure in less than one stop?
As I told you before, if you want to make precise adjustments, the scale of stops can be
divided into half stops or into thirds of stop. The latter is available in almost all cameras
and it’s the most common one among photographers.
Here you have the scale of thirds of stop. I have bolded the full stops so you can
differentiate them from the thirds of stop:
1, 1.1, 1.2, 1.4, 1.6, 1.8, 2, 2.2, 2.5, 2.8, 3.2, 3.5, 4, 4.6, 5, 5.6, 6.3, 7.1, 8, 9, 10, 11, 13, 14, 16...
In this case, each f number lets one third less of light go through the diaphragm than
the previous f number. For example, f/2 allows a third less of light than f/1.8, but a third
more than f/2.2.

101The stop and how to use it
The shutter speed stop scale
The shutter speed follows the same pattern as the aperture.
And luckily for you, it’s even easier to use.
If you have set a shutter speed of 1/15s and you want to allow one more step of light
(capture twice as much light), select a speed of 1/8s (twice as long).
On the contrary, to halve the captured light (reduce the exposure in one stop), select
1/30s, which is exactly half as long as 1/15s.
As with the aperture, the scale can also be divided into halves or thirds of stop. Again,
the most popular scale is the thirds of stop one:
1, 1/1.3, 1/1.6, 1/2, 1/2.5, 1/3, 1/4, 1/5, 1/6, 1/8, 1/10, 1/13, 1/15, 1/20, 1/25, 1/30, 1/40, 1/50,
1/60, 1/80, 1/100, 1/125...
Each of these shutter speeds allows one third of light less in the sensor than the previous
one, but one third more than the next.
The sensitivity (ISO) stop scale
Finally, you can also increase or decrease the ISO using stops. The calculation is very
simple:
• Doubling the ISO you double the captured light (you increase the exposure by one
stop)
• Halving the ISO you halve the captured light (you decrease the exposure by one stop)
If you select an ISO of 400, one less stop is an ISO of 200 (half the light). Instead, an ISO
of 800 is one more stop (twice the light).
And yes, you guessed it. The scale can be divided into halves or thirds, the latter being
the most common:
100, 125, 160, 200, 250, 320, 400, 500, 640, 800, 1000, 1250, 1600…

102The stop and how to use it
Now that you understand perfectly the concepts of stop and exposure triangle, you can
start playing with them.
Let’s see how you can capture the exposure with different aperture, shutter speed and
ISO settings. To do this, you need to use the reciprocity law.

7The reciprocity law and some
examples

104The reciprocity law and some examples
The reciprocity law… What a name! Don’t you think?
Take it easy, there’s nothing to be afraid of.
With such a name it looks like something awfully complicated, but it’s not.
You should know by now that the exposure is determined by the amount of light
(controlled by the aperture) that reaches the camera sensor (configured to a certain ISO)
for a certain time (shutter speed).
And, as we saw in section 4, depending on the aperture, shutter speed and ISO settings
you will capture different effects (more or less depth of field, frozen motion or not, more
or less noise, etc.).
Now it’s time to learn how you can get the same exposure (capture the same light) with
different combinations of aperture, shutter speed and ISO settings.
This allows you to change the aperture, shutter speed and ISO settings to get the effect
in the photo you’re looking for while maintaining the correct exposure.
To achieve this, use the reciprocity law.
What’s the reciprocity law?
Imagine that you have an aperture, shutter speed and ISO settings that gives you the
correct exposure.
Now, if you increase the aperture by one stop (to allow twice as much light) and you also
decrease by one stop the shutter speed (so that half the light enters), you get the same
exposure than with your initial settings.
Therefore, you capture the same amount of light.
This, my friend, is the reciprocity law:
“If you maintain the ratio between aperture, shutter speed and ISO, you get the same exposure.”

105The reciprocity law and some examples
What is it for?
Once you get a correct exposure, the reciprocity law allows you to modify the aperture,
shutter speed and/or ISO as you want to get the effect you’re looking for while keeping
the same exposure. That is, capturing the same amount of light.
Get the effect you’re looking for? What effect?
As we saw in section 4, you may want to change the depth of field or freeze the motion
(or not)... And to get that effect in the photo, you have to change the aperture, the
shutter speed or even the ISO.
Therefore, to maintain the exposure, depending on the parameter you change, you must
apply the reciprocity law to adjust the other two.
In conclusion, the reciprocity law allows you to modify the aperture, shutter speed and/
or ISO to get the photo you are looking for while keeping the same exposure.
Let’s have a look at an example.
Practical example of the reciprocity law
Imagine that you have in front of you a scene that you want to photograph. After carrying
out some exposure tests, you managed to get the correct exposure with the following
settings:
• Aperture: f/8
• Shutter speed: 1/250s
• ISO: 800

106The reciprocity law and some examples
Nikon D4s | 130mm | f/8 | 1/250s | ISO 800 | 4800K
Now, you decide that you want to decrease the depth of field to separate the subject from
the background. And to get this you open three stops the aperture (f/8 -> f/2.8).
Since you’re opening the aperture three stops, the sensor receives three times twice as
much light, overexposing the photo.
Well, the reciprocity law says that if you want to capture the same light (same exposure)
you must modify the shutter speed and/or the ISO.
Imagine that you are in low light conditions and you want to use a high ISO (800 in this
case). All you have to do is reduce by three stops the shutter speed (1/250s -> 1/2000s), to
capture less light, and thus compensate the exposure.

107The reciprocity law and some examples
Nikon D4s | 130mm | f/2.8 | 1/2000s | ISO 800 | 4800K
To conclude, keeping an ISO 800, and applying the reciprocity law, you can deduce that
the following combinations of aperture and shutter speed will allow the sensor of your
camera to capture the same amount of light (the same exposure):
• f/22 – 1/30s
• f/16 – 1/60s
• f/11 – 1/125s
• f/8 – 1/250s
• f/5.6 – 1/500s
• f/4 – 1/1000s
• f/2.8 – 1/2000s

108The reciprocity law and some examples
In this example you’ve used full stops, but the law is the same if you use thirds of stop.
The important thing is to maintain the balance between the exposure triangle elements
in order to capture the same light.
So you get the same exposure than the one of previous combinations if you use an ISO of
800, an f/7.1 aperture and a 1/320s shutter speed.
Why?
Because an aperture of f/7.1 is one-third greater than f/8 (its captures one-third more
light). And, at the same time, you’ve reduced the shutter speed by a third of the time,
from 1/250s to 1/320s. So the amount of light you’re going to capture will be the same.
And what about the ISO? Why have you kept this parameter constant so far?
As you may have already guessed, you can also use the ISO as a tool to keep the same
exposure.
For example, if you double the ISO (capturing twice as much light), you can compensate
for it by using an aperture one stop narrower or exposing for half the time.
Thus, applying the reciprocity law you get the following equivalent combinations:
• f/2.8 – 1/500s – ISO 200
• f/2.8 – 1/1000s – ISO 400
• f/5.6 – 1/125s – ISO 200
• f/5.6 – 1/250s – ISO 400
• f/8 – 1/125s – ISO 400
• f/8 – 1/500s – ISO 1600
As you can see, there are many combinations that produce the same exposure, and all of
them are equivalent.
But remember!
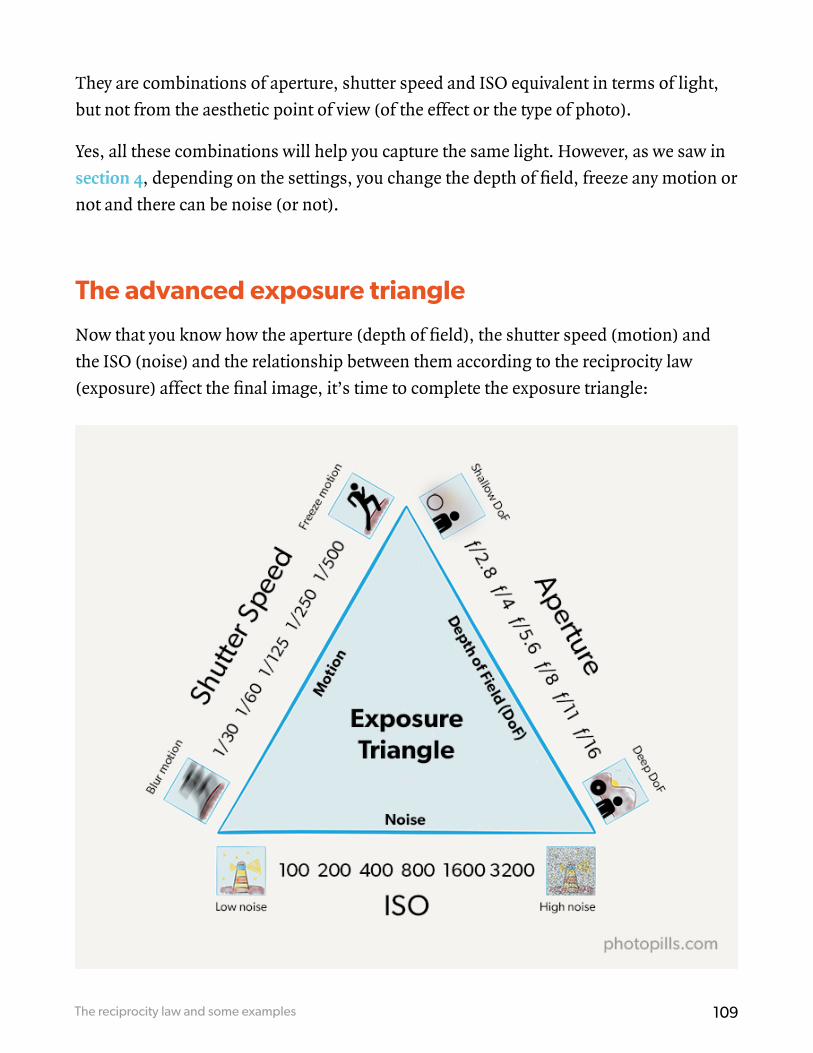
109The reciprocity law and some examples
They are combinations of aperture, shutter speed and ISO equivalent in terms of light,
but not from the aesthetic point of view (of the effect or the type of photo).
Yes, all these combinations will help you capture the same light. However, as we saw in
section 4, depending on the settings, you change the depth of field, freeze any motion or
not and there can be noise (or not).
The advanced exposure triangle
Now that you know how the aperture (depth of field), the shutter speed (motion) and
the ISO (noise) and the relationship between them according to the reciprocity law
(exposure) affect the final image, it’s time to complete the exposure triangle:

110The reciprocity law and some examples
From the previous triangle you deduce that:
• When opening the diaphragm (large apertures) you capture more light, and a
shallower depth of field. And when you close the diaphragm (small apertures), you
capture less light, but a greater depth of field.
• By using a slower shutter speed, you capture more light but you don’t freeze the
movement (silky effect or blur). And by using a faster shutter speed, you capture less
light and you can freeze the movement.
• By increasing the ISO, you capture more light but also generate more noise (grain) in
the image. And by reducing the ISO, you reduce the noise and capture less light.
When you change the aperture, shutter speed and/or ISO you have to check the
exposure, and you also have to keep in mind how the photo will change.
More practical examples on the reciprocity law
Let me insist.
Two different aperture, shutter speed and ISO combinations can give you the same
exposure, but can produce different effects in the photo. Therefore, you’ll take two
different photos.
Let’s see some practical situations in which you first find out the aperture, shutter speed
and ISO combination that gives you a correct exposure. Then you change their settings
depending on the photo you are looking for.
I’ll use the manual exposure mode in all the examples to have a complete control over
the exposure.
I’ll also use the PhotoPills exposure calculator so I don’t have to do the calculations of
the reciprocity law in my head.

111The reciprocity law and some examples
A single long exposure Star Trails picture
Nikon D700 | 14mm | f/2.8 | A single shot of 10min 11s | ISO 200 | 3400K
If you want to take a single long exposure Star Trails image (one unique photo), you’ll
have to use slow shutter speeds (10min or more) to get longer and aesthetic trails.
But when you are in your shooting position, taking test pictures until you find the
correct exposure, the last thing you want is waiting for so long between one shot and the
next.
Can you imagine having to wait for 10min, 20min or even hours to find out if the photo
is correctly exposed? It would be crazy!
You need a much faster method to find the exposure you want. The solution is the
reciprocity law.
The idea is to take test photos until you reach the correct exposure. To do this use the
maximum aperture that your lens allows you, a very fast shutter speed and a high ISO.

112The reciprocity law and some examples
Once you find the combination of aperture, shutter speed and ISO that gives you the
correct exposure, apply the reciprocity law to use a shutter speed as slow as possible to
get the length of star trails you want.
In order to do this, you’ll have to reduce the ISO or even close the aperture a little bit.
As you know that high ISOs produce noise (grain) in the photo, being able to use lower
ISOs (as close as possible to your camera’s nominal one) will help you reduce this
horrible effect.
Let’s see how you would do it.
Imagine that you’ve taken a test photo of 20s at f/2.8 and ISO 3200, and the photo is
underexposed. Take a second test photo by decreasing the shutter speed to 30s for
example.
Conversely, if the picture is overexposed, use a faster shutter speed (shorter exposure
time).
The issue is to modify the shutter speed until the photo is well exposed.
Imagine that at 30s, f/2.8 and ISO 3200 the test photo is perfectly exposed.
Although it depends on your camera, when shooting at 3200 ISO your image may have
some noise. But it doesn’t matter because you’re not going to take your final photo at
ISO 3200.
Remember that you’re just taking a test photo. You’ll take the final shot using the
nominal ISO of your camera, ISO 100 for example. And that will reduce the noise to the
maximum extent.
So if you want to use an ISO of 100 and an aperture of f/2.8... What shutter speed allows
you to keep your photograph properly exposed?
Use the reciprocity law.
Between ISO 3200 and ISO 100 there are 5 stops (100, 200, 400, 800, 1600 and 3200), so
you have to double the shutter speed 5 times. Doubling the shutter speed (30s) 5 times
in a row gives you the new shutter speed:
113The reciprocity law and some examples
30 × 25 = 30 × 32 = 960s = 16min
If you would like to continue slowing the shutter speed, you could close the aperture.
For example, closing the aperture one stop (from f/2.8 to f/4) you can use a shutter
speed of 32min (the double).
When you’re shooting in the field, doing the math is a pain in the back. Besides, you
should avoid wrong calculations. It would be a pity to realize after waiting for 30min
that you haven’t applied the reciprocity law correctly!
Since it’s the easiest way and it prevents mistakes, I always use the PhotoPills exposure
calculator.
In this case, first set the shutter speed as the parameter you want to calculate.
Then, it’s very simple: enter the aperture, shutter speed and ISO values of the test photo
correctly exposed. Once this is done, enter the aperture (f/2.8 or f/4) and ISO (100)
values that you want to use in the final photo (they are the equivalent settings).
The calculator gives you the new shutter speed you have to use: 16min at f/2.8 or 32min
at f/4.

114The reciprocity law and some examples
PhotoPills Exposure Calculator - Aperture f/2.8, ISO 100 and shutter speed calculation 16min.
PhotoPills Exposure Calculator - Aperture f/4, ISO 100 and recalculation of shutter speed 32min.

115The reciprocity law and some examples
Portraiture
Nikon D4s | 35mm | f/1.4 | 1/500s | ISO 160 | 7500K
Let me introduce you Aina, my youngest daughter. The truth is that she loves modeling,
contrary to her mother who hates it (I hope Assumpta, my wife, doesn’t read this).
To shoot the first photo, I use an aperture of f/5.6 to get more depth of field. Why do I
want more depth of field? To show some details of the rocks at the back.
I set the ISO to 160 and the shutter speed to 1/30s so the photo is well exposed. I check
this by making sure the light meter is centered at zero.
I don’t quite like the resulting photo, so I decide to open the diaphragm 4 stops to f/1.4
to reduce the depth of field. So, keeping the ISO at 160, the reciprocity law tells me that I
should use a shutter speed of 1/500s. That is, reduce the light by 4 stops.

116The reciprocity law and some examples
As you see in the final result (the photo above), the rocks behind Aina come out very
blurred thanks to a shallow depth of field. At the same time, the exposure is correct
because it’s neither too dark (underexposed) nor too bright (overexposed).
Long exposure photography with filters
Nikon D4s | 15mm | f/11 | 1min 30s | ISO 100 | 9000K | ND64 (6 stops) filter
Na Joanassa is a long and relatively low rock formation. It’s located near the coast, on
the island of Menorca, Spain.
It’s one of the ensembles that have always caught my attention in Menorca and
photographing it has been fascinating.
That day the intensity of the wind and the rain are constantly changing. Both become
strong at times and I’m having a hard time keeping the camera on the tripod.
A small rock that resembles a cave allows me to hide the backpack with all my
equipment while I wait for the rain to let up.

117The reciprocity law and some examples
However, during those moments the wind and the waves create an atmosphere that is
worth photographing. So I decide to stay there despite the weather. Actually, what I want
is an image that conveys what’s happening right at that moment.
I seek to capture a dramatic scene with the sky and the water breaking on the rocks.
I want to capture the movement of the clouds in the sky and the waves whipping the
stone.
The first thing I do is to work on the composition and I choose the lens that allows me to
capture the rock formation completely, part of the water in the lower strip of the frame
and a lot of sky so that it shows tons of clouds. I take the Nikon 14-24mm f/2.8 from the
backpack and attach it to the camera.
Now I have to determine the focal length. The rocks are very close to the coast, so I’m
forced to open a very wide angle of vision. I select 14mm, I slightly twist the wheel, and
when I reach 15mm I like how the framing looks.
Here comes the key moment: the exposure settings!
I know that I want to convey motion in the water and clouds. In order to do this, I need a
slow shutter speed that allows me to get that silk effect in the clouds and in the water.
In this case, I determine the parameters in order to extend the exposure.
First, I set the aperture to f/11 to have a large depth of field and also to use a slow shutter
speed.
Then, I select a low ISO to avoid noise: ISO 100.
Finally, I need to decide the shutter speed.
But how much time do I need?
I generally shoot in Manual mode (M). In section 13 I’ll explain you the different modes
of exposure (or shooting). But for now, stick with the idea that I determine the shutter
speed by making sure the light meter is centered at zero so the photo is correctly
exposed.
I take the photo. The shutter speed that gives me a correct exposure is 1.3s. But I realize

118The reciprocity law and some examples
that the image doesn’t reflect the motion with the intensity that I would like. I need an
even slower shutter speed.
How do I get it? Using a 6-stop neutral density filter (ND). This type of filter allows to
decrease the shutter speed since it reduces the amount of light that enters through the
lens. I’ll explain it in more detail in section 22.
However, when I put this element in front of the camera, my exposure settings are no
longer useful. I take a picture and, as expected, it’s too dark (underexposed).
So we’re back to the initial question: what shutter speed do I need to get a correctly
exposed picture with the filter I’m using?
It’s a piece of cake!
I use the PhotoPills exposure calculator to calculate the equivalent shutter speed: 1min 30s.

119The reciprocity law and some examples
PhotoPills Exposure Calculator - Set the test shot settings (f11, 1.3s, ISO 100)
PhotoPills Exposure Calculator - Set the shot settings (f11, ISO 100, 6-stop ND filter) to calculate the shutter speed (1min 30s) that gives you the correct exposure and the effect you want.
Finally, I set the white balance (I briefly mentioned it in section 2). It’s another variable
that I like to control manually.
In this case, when using a Haida ND filter, I know from my experience that it has a cool
cast (it slightly dyes the image with a blueish tone). So I decide to increase the color
temperature to 9000K to avoid too much blue color cast in the image. As you can see, the
image is now very cold conveying an even more gloomy atmosphere.

8What’s the exposure value (EV)
and what is it for

121What’s the exposure value (EV) and what is it for
From the reciprocity law you have deduced that there are many combinations of
aperture, shutter speed and ISO that allow you to obtain the same exposure. In other
words, you can capture the same amount of light with different settings.
This brings me to the concept of exposure value (EV).
What’s the exposure value (EV)?
The exposure value (EV) is simply a number representing all combinations of aperture,
shutter speed and ISO that produce the same exposure (capture the same amount of
light).
In other words, all configurations that capture the same amount of light (produce the
same exposure) have the same EV number.
For example, EV0 is the amount of light that captures the sensor with an aperture of f/1
for 1s and with an ISO of 100 (and all equivalent configurations).
The EV increases by one unit for each stop that you increase the exposure. And,
conversely, the EV decreases by one unit for each stop that you decrease the exposure.
How do you calculate the EV?
Math alert!
If you don’t like math, skip this section. :P
The exposure value (EV) is calculated using the following formula:
EVISO
= log2
(N2/t) + log2
(ISO/100)
N is the f number, t is the shutter speed in seconds, and ISO is the ISO level you are using.
For example, what EV do you get with a combination of f/8, 1/4s and ISO 100?
EV = log2
(82/0.25) + log2
(100/100) = +8

122What’s the exposure value (EV) and what is it for
Thus, we can say that all configurations equivalent to f/8, 1/4s and ISO 100 correspond to
an EV of +8.
There is a much easier way to calculate the EV from the aperture, shutter speed and ISO
values: using the PhotoPills exposure calculator.
Enter the values on the first row of the calculator (test settings) and you will get the EV in
the results table.
You can use the second row (equivalent settings) to apply the reciprocity law, whether you
are using filters or not (although I’ll tell you more about them later on, in section 22).
PhotoPills Menu - Different photographic tools among which is the exposure calculator.
PhotoPills Exposure calculator after entering values for aperture, shutter speed and ISO to calculate the EV (+8EV).

123What’s the exposure value (EV) and what is it for
What is the EV for?
The EV helps you reduce the “try and fail” when exposing. Use it as an indicator to
quickly find the aperture, shutter speed and ISO settings.
There are tables, such as the one included with PhotoPills in your exposure calculator,
that suggest the exposure value (EV) at ISO 100 for different lighting conditions.
That said, take these values as orders of magnitude or starting points, not as absolute
truths.
For example, according to the table of the first screenshot below, to correctly display a
“Rainbow with Clear sky background” you should use a combination of the exposure
triangle that gives you an EV of +15 at ISO 100.

124What’s the exposure value (EV) and what is it for
PhotoPills Exposure Calculator - EV Values Table at ISO 100 and daylight situation.
PhotoPills Exposure Calculator - Table of EV values at ISO 100 and outdoor artificial light scene.
Therefore, you can begin to expose looking for the combination of aperture and shutter
speed at ISO 100 gives you an EV of +15. If you click on the “Rainbows” row, PhotoPills
gives you a valid combination: f/8, 1/500s and ISO 100.
If you’re not happy with these values, you can calculate other equivalents. Select the
setting you want to calculate, in this case “shutter speed”, and enter the values you want
to use in the “Equivalent settings” row. In your case f/10 and ISO 100. The new speed is
1/320s.

125What’s the exposure value (EV) and what is it for
PhotoPills Exposure Calculator - Rainbow exposure settings (f/8.0, 1/500s, ISO 100).
PhotoPills Exposure Calculator - Equivalent settings (f/10, 1/320s, ISO 100).
This is your starting point. Now take a test photo and adjust the parameters accordingly.
First, make sure the photo has the exposure you want. Otherwise, adjust some of the
settings until the photo is well exposed.
Once you’ve got the exposure you are looking for, if you don’t like the resulting photo or
you haven’t achieved the effect you want, adjust the aperture and/or shutter speed and/
or ISO values by applying the reciprocity law. You can do the calculations on your own
(section 7) or use the PhotoPills exposure calculator again.

126What’s the exposure value (EV) and what is it for
Adjusting the EV on camera
All DSLR and mirrorless cameras have a tool to compensate the exposure (±EV). This
setting allows you to increase or decrease the exposure calculated by the camera in a
series of stops (or fractions of stop).
For example, if you select +1/3EV, the camera will overexpose your photo in one third of
a stop.
I’ll explain it in depth in section 14, but I anticipate you that it’s a very useful tool in
many situations since it allows you to give a little more (or less) light to the image:
• When you use the automatic mode P.
• When you use the semi-automatic modes of Aperture Priority (A or Av) or Shutter
Speed Priority (S or Tv).
• When you use the Manual mode (M) and you have selected the automatic ISO
(remember to set it within an interval so that it doesn’t go beyond the ISO from
which your camera generates a lot of noise as I explained in section 5). However,
if you shoot in fully Manual mode (M), this tool is useless because you control the
exposure yourself.
• That is, you modify the exposure by manually adjusting the aperture, shutter speed
and ISO settings.

9Scene dynamic range vs.
your camera’s dynamic range
128Scene dynamic range vs. your camera’s dynamic range
The light is distributed unevenly in the scene. Typically, there are areas where the light
is more intense and looks brighter. On the other hand, there are areas where the light is
less intense and looks darker.
When you’re working on your picture’s exposition, it’s essential that you understand the
different light intensities of the scene.
When you face a scene, you should know if your camera is capable of capturing detail
everywhere in the scene. That is, if it’s capable of capturing detail in both the darkest
areas of the scene and the brightest ones.
This brings me to the main concept so you understand how to expose: the dynamic
range.
What’s the dynamic range?
The dynamic range is measured in stops or exposure values (EV) and it shows the
difference in light intensity between the darkest shadows and the brightest highlights of
the scene.
In this section I’ll explain you why you have to differentiate between the dynamic range
of the scene you want to shoot and the dynamic range that your camera is capable of
capturing.
When the camera is not able to capture in a single exposure and with enough detail
the darker and brighter areas, we say that the dynamic range of the scene you’re facing
surpasses that of the camera.
In section 22 and section 23 I’ll give you several solutions so you can expose for this type
of high contrast scenes.
But first, let’s dig deeper into the concept of the scene’s dynamic range.

129Scene dynamic range vs. your camera’s dynamic range
The dynamic range of the scene
What is it?
The dynamic range of the scene is the brightness difference that you have in the scene
you want to shoot. This range depends on how the light is distributed in the scene and
it’s measured in stops or exposure values (EV).
How do you calculate it?
You probably understand it better with an example. Look at the picture below.
Nikon D4s | 18mm | f/8 | 1/40s | ISO 400 | 5800K
130Scene dynamic range vs. your camera’s dynamic range
Let’s calculate the dynamic range of the scene. That is, the number of stops between the
highlights and the shadows.
If you meter with the camera the light of the brightest highlights, you get a combination
of aperture, shutter speed and ISO to correctly expose for these highlights (with the light
meter centered at zero).
Thanks to these three values you can obtain an exposure value or EV.
“Meter the light? How do I do that Toni?”
You’ll understand it perfectly when I’ll explain you the different metering (section 12)
and exposure (section 13) modes that the camera has.
For now I just want you to keep in mind that you have to select the Aperture Priority (A
or Av), Shutter Speed Priority (S or Tv) or Manual (M) exposure mode. Either of them is
useful.
Once this is done, select the spot metering mode. This mode allows you to accurately
meter the light wherever you want.
In the photo bellow, to correctly expose for the highlights you need to shoot at f/8,
1/160s and ISO 400.

131Scene dynamic range vs. your camera’s dynamic range
Nikon D4s | 18mm | f/8 | 1/160s | ISO 400 | 5800K
In section 8 you learnt that any combination of the three parameters giving the same
exposure can be represented as an exposure value or EV. In this particular case, the
highlights have a value of +11 1/3 EV.
You can find out the EV thanks to the PhotoPills exposure calculator. Simply enter the
values of the exposure triangle and the EV will be displayed in the lower results table.

132Scene dynamic range vs. your camera’s dynamic range
PhotoPills Exposure calculator - Enter the test settings (f/8.0, 1/160s, ISO 400) that expose the highlights correctly to calculate the EV (11 1/3 EV).
PhotoPills Exposure calculator - Enter the test settings (f/8.0, 3min 12s, ISO 400) that expose the shadows correctly to calculate the EV (-3 2/3 EV).
Repeat the same process for the shadows, and you’ll get another combination of
aperture, speed, and ISO. And therefore, another EV. According to the previous
PhotoPills screenshot you get a -3 2/3
EV.

133Scene dynamic range vs. your camera’s dynamic range
Nikon D4s | 18mm | f/8 | 3min 12s | ISO 400 | 5800K
Once you have both exposure values, subtract the shadows from the highlights.
11 1/3 - (-3 2/3
) = +15 EV
Therefore, in this case the dynamic range of this scene is +15 EV.
And what does this mean?
The dynamic range of the scene is +15 EV. What does it mean?
To put it bluntly, that there’s a difference of 15 stops between the settings to correctly
expose the shadows and the ones to correctly expose the highlights. And if you want
to capture detail in both areas (shadows and highlights) you need a camera capable of
successfully capturing these 15 stops.

134Scene dynamic range vs. your camera’s dynamic range
Since my camera has a dynamic range of about 10 stops or so, it won’t be able to capture
the entire dynamic range of the scene, so I decided to shoot a silhouette.
Nikon D4s | 18mm | f/8 | 1/40s | ISO 400 | 5800K
I was composing the scene in this cave when, suddenly, Joanma appeared in the frame.
“Stand still!” I said. His silhouette gave me an opportunity to capture a different sunset
photograph and use his silhouette to break the great negative space produced by the
shadows.
I didn’t have to change any settings since I was going to photograph the same
composition but metering the highlights to boost the colors of the impending sunset.
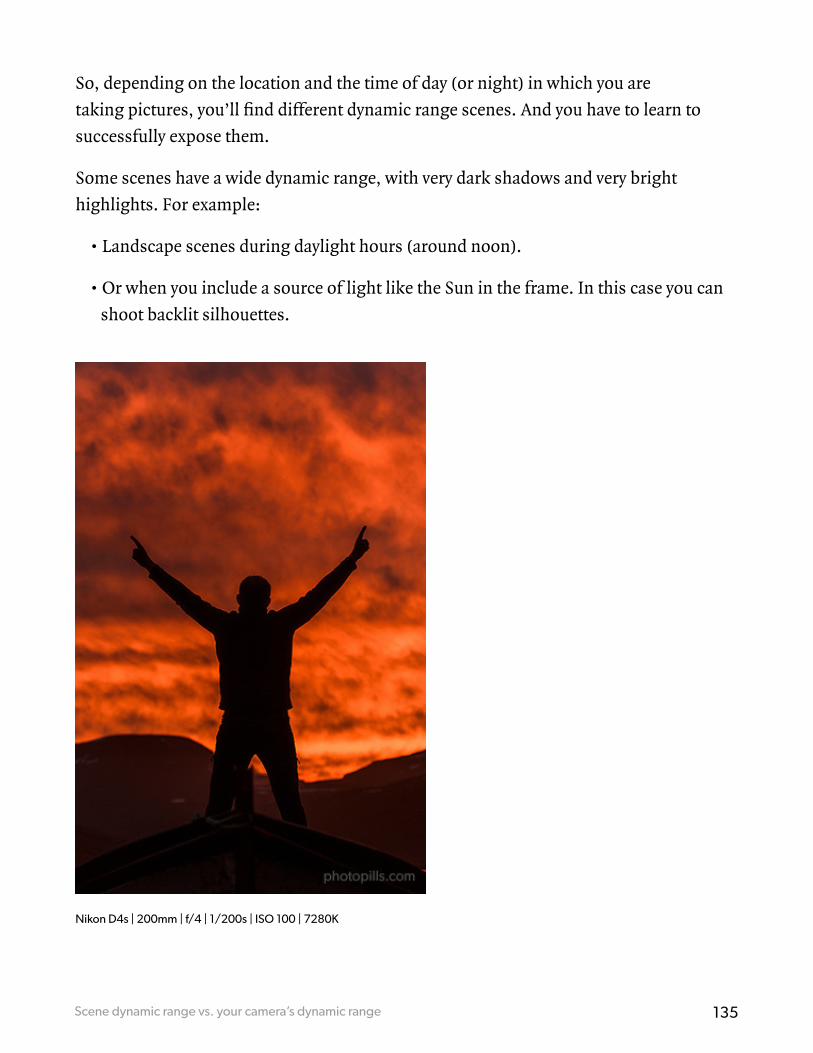
135Scene dynamic range vs. your camera’s dynamic range
So, depending on the location and the time of day (or night) in which you are
taking pictures, you’ll find different dynamic range scenes. And you have to learn to
successfully expose them.
Some scenes have a wide dynamic range, with very dark shadows and very bright
highlights. For example:
• Landscape scenes during daylight hours (around noon).
• Or when you include a source of light like the Sun in the frame. In this case you can
shoot backlit silhouettes.
Nikon D4s | 200mm | f/4 | 1/200s | ISO 100 | 7280K

136Scene dynamic range vs. your camera’s dynamic range
However, other scenes have a narrower dynamic range, such as a landscape during
the golden hour or the blue hour. These are two moments during which you can
photograph, for example, the landscape and the Moon in a single exposure. And that’s
possible because of the narrow dynamic range of the scene.
Olympus OM-D E-M1 | Nikkor 105mm macro | f/4 | 1/125s | ISO 200 | 6700K
The dynamic range of the camera
It’s time to combine the dynamic range of the scene with the dynamic range that your
camera is capable of capturing. You need to understand both to expose.
What’s the dynamic range of the camera?
Do you remember when I explained to you that the sensor on your camera is much less
accurate and efficient than your eyes?
Unfortunately, the sensor of any digital camera is only capable of capturing a certain
amount of dynamic range in a single exposure (single photo). Currently, that range is
between 8 and 14-15 stops depending on the sensor.
And what does that imply?
As long as the difference in intensity between the brightest highlights and the darkest
shadows of the scene falls within the dynamic range of your camera, you’ll be able to

137Scene dynamic range vs. your camera’s dynamic range
capture all the detail of the scene in a single shot. You won’t have any overexposed or
underexposed areas in the photo.
What happens when the dynamic range of the scene exceeds that of the camera?
If the dynamic range of the scene exceeds that of your camera, you will have to resort to
multiple exposures or to use of filters. In section 22 and in section 23 we’ll see in detail
how to expose when you face situations with a high dynamic range.
Once again, let’s look at an example. Imagine that you want to photograph a scene with
an 8-stop dynamic range (or EV). If your camera has a dynamic range of 10 or more
stops, you can capture the scene seamlessly in a single photo.
But what if the dynamic range of the scene exceeds that of your camera?
In this case, the camera overexposes the brighter areas or underexposes the darker
areas. The point is that you will have to choose between:
• Overexposing certain areas, and lose information in the highlights.
• Underexposing other areas, and lose information in the shadows.
• Taking a bracketing or a multiple exposure. That is, take two or more photographs
to cover the whole dynamic range of the scene and then blend them together in post-
processing.
• Producing a bracketing directly on camera. The camera takes a number of pictures to
cover the dynamic range of the scene and it blends them, displaying the final image.
• Using filters, although this is a more advanced level. We’ll look at the filters in detail
in section 22.
Another option is to look for the hours of day when the light is soft and with a low
dynamic range. I’m referring to the golden hour or the blue hour, which are fantastic
moments for any type of photography (landscape, Moon, urban, portrait, street ...).

138Scene dynamic range vs. your camera’s dynamic range
The last option is to use a camera capable of capturing a high dynamic range, which
allows you to simultaneously record the detail in both very dark and very bright areas of
the scene. I’m talking about high dynamic range cameras.
How do you know if the dynamic range of the scene exceeds that of the camera?
I guess after this section you’ll be asking yourself:
“And how can I know if the dynamic range of the scene “fits” in my camera?”
It’s super easy, just check out the histogram. :P

10Check the exposure, examine
the histogram

140Check the exposure, examine the histogram
Imagine you are in front of the perfect scene, you take the camera, you meter the light,
you set the aperture, shutter speed and ISO settings... You frame, you focus and you
shoot.
You look at the photo and you hesitate. You’re not sure if part of the image has been
overexposed (or underexposed).
Would you like to clear up any doubts?
Well, check the histogram of the photo that the camera produces.
What’s the histogram and what’s it for
The histogram is a statistical graph that represents the scene tones (or brightness levels)
captured by the camera.
In other words, it gives you information about the tones that appear in the photo (how
dark or clear is a color).
And why is it useful?
Because it lets you know if a picture is well exposed or not. It clearly tells you if
you’re overexposing (when the histogram touches the right edge of the graph) or
underexposing (when the histogram touches the left edge of the graph) some areas of
the scene.
On the other hand, it also lets you know if your camera is capable of capturing the entire
dynamic range of the scene.
You’ll understand it better if you see how your camera generates the histogram of a
photo.

141Check the exposure, examine the histogram
How the histogram is produced
Each photo you take is composed of pixels. The camera picks up the tone of each of
those pixels, regardless of color. When I say tone, I mean its luminosity. Are they bright,
are they dark?
It then turns them into white, black or in different shades of gray, depending on how
bright or dark the tone is. Normally, the camera uses up to 256 light values (also known
as levels) to generate the histogram.
Once it has converted the last pixel of your photo, the camera counts the number of
pixels of each tonality and builds a bar chart.
This bar chart or histogram has two axes:
• The horizontal axis (x) represents the tone of the color. Pure white is at the far right
of the histogram and pure black at the far left.
• The vertical axis (y) shows the number of pixels with that tone.

142Check the exposure, examine the histogram
Therefore, the more a tone is repeated in the image, the higher the bar of that tone in the
histogram is.

143Check the exposure, examine the histogram
How to read the histogram
The histogram is a crucial tool to expose your photographs. So you must learn to read it,
to interpret it.
Cameras use 256 different light values (also known as levels) to generate the graph.
Along the horizontal axis (x) and from left to right you have:
• First the black tones, with pure black on the left edge.
• Then come the shadows.
• Then the midtones.
• Followed by the highlights.
• And finally, the white tones, with pure white on the right edge.
The histogram shows you all the light values the camera has been able to capture in a
certain scene and in a single shot. In short, it shows you how the tones that fit within the
dynamic range of the camera are distributed.

144Check the exposure, examine the histogram
In other words, between the tone located at the left end of the histogram and the tone at
the right end there is a certain number of stops. This number of stops corresponds to
the dynamic range of your camera.
Let’s have a look at an example. Look at the following picture and its corresponding
histogram. There you can observe the tonal distribution.
Olympus OM-D E-M1 | 300mm | f/4 | 1/100s | ISO 200 | 5850K
Where to find a picture’s histogram
Each camera is different. Some cameras show you the histogram right after you take the
picture. Others don’t.
Mirrorless cameras, for example, let you decide to see a live histogram in a corner of
your electronic viewfinder. This option is very useful and makes the shooting a lot easier.

145Check the exposure, examine the histogram
You can modify the settings while you are looking through the electronic viewfinder and
observe the changes before pressing the shutter release button.
I suggest you take a look at the instruction manual of your camera to find out how to
display the histogram of a photo.
How do you know if a picture is overexposed or underexposed?
The histogram lets you know if a photograph is well exposed or not. It clearly tells you
if you are overexposing (when the histogram touches the right edge of the graph) or
underexposing (when the histogram touches the left edge of the graph) some parts of
the scene.
It also lets you know if your camera is capable of capturing the entire dynamic range of
the scene.
Overexposed histogram

146Check the exposure, examine the histogram
Underexposed histogram
Usually, a correctly exposed scene has a histogram that doesn’t touch the right or left
end or, if it does, it is minimally.

147Check the exposure, examine the histogram
Olympus OM-D E-M1 | 60mm macro | f/2.8 | 1/125s | ISO 200 | 7200K
I say “usually” because sometimes you can be interested in (or you may have no choice
but to) overexposing a part of the image. The typical example is backlighting.

148Check the exposure, examine the histogram
Nikon D4s | 200mm | f/16 | 1/250s | ISO 400 | 6250K
The truth is that there isn’t a specific or standard histogram shape that tells you
if the photograph is correctly exposed. It all depends on your artistic criteria as a
photographer and the tones of the scene.
But for the sake of simplicity and as a rule of thumb, you can consider that a histogram
is correct if it’s centered or slightly shifted to the right. Nevertheless, remember that
there is no correct exposure as I explained in section 3.
Check how the exposure changes depending on the histogram in the following photos.

149Check the exposure, examine the histogram
Centered histogram

150Check the exposure, examine the histogram
Histogram to the right

151Check the exposure, examine the histogram
Histogram to the left

152Check the exposure, examine the histogram
Nikon D4s | 14mm | f/16 | 10s | ISO 400 | 7500K Histogram with two tones clearly separated

153Check the exposure, examine the histogram
Avoid blown out highlights and clipped shadows
When it comes to exposing correctly, you have to face two enemies: blown out
highlights and clipped shadows.
In both cases your camera is not able to capture all the information in the scene. And the
problem is that you’re missing detail in the photo. You’re losing image quality.
Blown out highlights
If your image produces a histogram that is touching the right edge of the graph, it’s
overexposed. What’s happened is you’ve lost information because one or more areas are
completely white.
In other words, part of the image has been burnt out or, as photographers say,
highlights are blown out.
Nikon D4s | 17mm | f/11 | 39s | ISO 100 | 7500K

154Check the exposure, examine the histogram
In this case, unless that’s the result you’re looking for, you can:
• Reduce the exposure through the exposure triangle (aperture, shutter speed, ISO),
capturing less light overall in the photo and preventing the histogram from touching
the right side.
• Use filters (ND) to capture less light (section 22).
• Use graduated filters (GND) to capture less light selectively in the scene. For
example, by overlapping the darkest part of the filter with the clearest area of the sky
(section 22).
• Shoot multiple exposures to blend them in post-processing (section 23) or capture a
high dynamic range (HDR) image straight out of your camera.
As if this were not enough, you should also be careful with the specular highlights!
Specular highlights are glitter or very bright spots that usually appear on shiny (and wet)
surfaces on sunny days.
Nikon D4s | 125mm | f/8 | 1/6400s | ISO 1600 | 5500K

155Check the exposure, examine the histogram
In fact, every time you try to photograph a glowing object with a lot of Sun you’ll see
specular highlights in your photo.
For example, take a picture of a car and you’ll see specular highlights in parts of the
body or other metallic elements as a result of a strong light source reflected in them. The
body is acting like a mirror reflecting the sunlight.
And as you may have already guessed, these highlights are completely overexposed: the
image highlights are blown out.
Another element that can cause specular highlights is the flash. If you shoot against
a reflective surface, the light produced by the flash will bounce and will create these
highlights.
To avoid against specular highlights you can do the following.
If you are outdoors, the best solution is to use a polarizing filter. I’ll tell you more details
about other types of filters in section 22, but you should know what it is and what it can
do for you.
A polarizing filter is a circular piece of glass or resin surrounded by a metal structure.
On the one hand, the metal structure has a thread so you can screw the filter to your
lens. On the other hand, it has a wheel that, when you turn it, increases or reduces the
filter’s polarizing effect.
What do you achieve with a polarizing filter?
• Limit the glare and reflections of all surfaces except metal surfaces.
• Limit the reflection of glasses, window shops...
• Other effects like saturating the green tones or darken the sky.
The filter is circular and threaded, so its diameter must be the same as your lens one.
If you are indoors, specular highlights are difficult to avoid due to artificial lighting. But
you can play with them to your advantage or at least limit them.
For starters, don’t point the light source directly to your subject. Make it bounce on a
surface (the ceiling, for example) or use an accessory like a diffuser.

156Check the exposure, examine the histogram
Also, try to have a light source as large as possible. The light will be more diffuse and
softer.
In doing so the reflections’ edges won’t be very bold, they will be mixed up with the
surrounding areas and they will be less intense.
If you use a flash, the most important thing is to avoid using a hard light. In this case,
use a diffuser for example.
And try to avoid pointing the flash to your subject. If you modify the light beam and
bounce it on a surface (a wall, for example), this light will cause fewer reflections and
highlights.
Clipped shadows
Your second enemy are the clipped shadows.
Contrary to what happens with blown out highlights, here the histogram is touching the
left edge of the graph. In other words, the photo is underexposed.
What’s happened is that you’ve lost information from the scene (no detail is shown)
because one or more areas are completely black. In other words, the shadows are
clipped.

157Check the exposure, examine the histogram
Nikon D4s | 125mm | f/8 | 1/50s | ISO 200 | 4500K
In this case, unless that is the result you are looking for, you should:
• Increase the exposure using the exposure triangle (aperture, shutter speed, ISO)
by capturing more light overall in the photo and preventing the histogram from
touching the left side.
• Add artificial light with a flash, a flashlight or a LED. In night photography, you can
use the moonlight to illuminate the foreground if you plan it in advance. To learn
how to do this you can check out our guide “How to Plan the Next Full Moon”.
Conclusion
An overexposed (blown out highlights) or underexposed (clipped shadows) image is
caused by two different reasons:

158Check the exposure, examine the histogram
1- You made a mistake when exposing the scene. You can easily solve it by simply
exposing more or less, or using filters (in case the scene is overexposed). At the same
time, you should try to make sure that the histogram does not touch either edge or, if
it does, that it does so minimally.
2- The dynamic range of the scene exceeds the dynamic range of your camera. In this
case you have no choice but to use other techniques such as the use of filters (section
22) or a bracketing (section 23), blending several captures into a unique image in
post-processing. These solutions allow you to capture the full dynamic range of the
scene by capturing information in both the shadows and the highlights.
TIPS
Most cameras have an display option set to show you on the LCD the areas of the image
that are overexposed. They are the highlights alert blinks or “flashing blinkies”.
As the name states, these areas usually blink so you can quickly spot them. It’s a very useful
tool since the camera itself is telling you to change the exposure in order to capture detail
in those areas.
If you shoot in RAW, take into account that the histogram the camera shows you is
produced using a JPG file created from the original RAW. This JPG file has being edited by
the camera, applying the image style you have configured (standard, landscape, portrait
or neutral, among others). Depending on the style you set, the histogram may tell you
that you are overexposing or underexposing certain areas. However, once you come
back home and see the RAW file on your computer, you may find that these areas weren’t
actually over or underexposed.
The best solution is to use a predefined style (or create your own one). What you ideally
want is that the camera produces a histogram as similar as possible as the one you get on
your editing software. If you manage to do so you get an accurate result on your LCD after
exposing.
Most cameras have this option. All you have to do is create a user style of image and
customize it according to your tests. To do this, adjust the histogram values to be as close
as possible to what you see when you import your RAW files into Lightroom, CaptureOne,
or any other editing software program.

159Check the exposure, examine the histogram
Obviously, these values are applied in camera but don’t change or edit in any way the
original RAW file. It’s a setting that affects only the way the camera interprets the RAW file
and how it’s displayed on the LCD.
In my case, I have all the histogram values set to 0. I shoot in a RAW format without any
modification or customization. At the time of taking the photo, the only thing I adjust is the
white balance because I like doing it manually.
Then, in the Lightroom Develop module, I choose the “Neutral Camera” profile so
that the image is accurate compared to what I saw on my camera’s LCD. Sometimes,
depending on the camera I used during the session, I choose the “Standard Camera”
profile.
Why do I do this? To avoid the Lightroom “Adobe Standard” default profile. This profile
has very little to do with any camera’s profile.
As you can see by clicking on the drop-down menu, Lightroom offers you many different
camera profiles (Standard, Vivid, Neutral, Landscape...). Even if you have two identical
camera models, the software is able to differentiate them by their serial number.
All you have to do is choose the profile that matches as much as possible the photo you
saw on the LCD.
The other three histograms (or the RGB histogram)
At this point, you know what the histogram is. But, you should also know that most
cameras allow you to display not one, not two histograms, but three!
Each histogram corresponds to a color channel: red, green and blue. R-G-B...

160Check the exposure, examine the histogram
Nikon D4s | 80mm | f/4 | 1/500s | ISO 100 | 6500K
But let’s take a little break before continuing with the different histograms.
What’s this RGB thing?
RGB is an acronym consisting of the words red, green and blue.
It’s a concept that usually refers to a chromatic model. This model represents different
colors from the mix of these three primary colors.
When to check the RGB histograms
Back to the three histograms...
Should you check the three RGB histograms in each of the photos you take?
In most cases the answer is “no”.
However, it can be useful if you are photographing a landscape during a sunset, the
detail of some flowers or any element that has a very saturated color palette.

161Check the exposure, examine the histogram
Depending on the scene, one of the three channels (red, green, or blue) may be
overexposed and your camera’s histogram (or the “blinkies”) may not warn you.
In this case, the histogram is not enough and you should review all three RGB
histograms.
Overexposing a color channel could result in a significant loss of detail in the highlights
of some areas with a lot of color.
When you shoot RAW (you don’t shoot JPG, right? Tell me you don’t), you could get
some of this detail back during the editing. Nevertheless, I won’t fool you, it depends on
your camera and how overexposed that particular channel is.
So when shooting very colorful subjects, check out the RGB histogram. If one of the
histograms shows a peak touching the right end of the graphic, reduce the exposure and
shoot the same frame again.
Histogram vs. dynamic range
As we have seen previously in this section, these are the dangers of having a histogram
that touches one of the graph edges:
• If it touches the left edge or goes over it, the shadows are clipped.
• If you touch the right edge or goes over it, the highlights are blown out.
That means that when taking the picture, the camera hasn’t been able to capture
information about those tones, losing image quality. That is, the dynamic range of the
scene does not “fit” into the dynamic range of the camera.
Let’s see some examples of each of the 4 situations you can face, so you understand it
better.

162Check the exposure, examine the histogram
Nikon D4s | 24mm | f/8 | 3min 30s | ISO 100 | 9100K
This picture’s histogram is a clear representation of the image tonal balance. Look at the
width of the graph. As you can see, shadows, midtones and highlights are represented
from left to right.
Moreover, have a close look at the height of the graph and its “mountains”. The higher
they are, the more that tone has the picture.
In terms of dynamic range, this photo is perfect.

163Check the exposure, examine the histogram
Nikon D4s | 200mm | f/8 | 1/500s | ISO 100 | 4700K
Here’s a perfect example of clipped shadows. Look at the histogram.
Do you see the peak on the left side of the graph? It’s completely out of the graph. This
shows that in a large part of the shadows (the darkest area) all the information has been
lost.

164Check the exposure, examine the histogram
Nikon D7100 | 300mm | f/4 | 1/1000s | ISO 100 | 6500K
Conversely, look at the photo above. The histogram is almost flat, except at the far right
end. Here you can clearly see that this part goes out of the graphic indicating that all the
information has been lost in the brightest areas of the image.

165Check the exposure, examine the histogram
Olympus OM-D E-M1 | 300mm | f/6.3 | 1/640s | ISO 400 | 7500K
Here’s a weird example: the histogram is mostly flat except at the ends. And on top of it,
at each end the histogram goes out of the graph.
So, although visually the photo doesn’t strike you for being too dark or too bright, if you
wanted to edit it it would be difficult to recover information from the highlights (almost
all the sky and the chest of the puffins) and from the shadows (the back and the wings of
the puffins).
Histogram vs. tone
At the beginning of this section, I explained to you that the histogram graphically
illustrates the distribution of captured tones in the image. More specifically, it shows
you how many pixels each tone (or level of color intensity) has.

166Check the exposure, examine the histogram
Therefore, by displaying the shadows (on the left side), midtones (in the center) and
highlights (on the right) details, the histogram allows you to quickly see the tonal range
or tonality of the picture.
In other words, depending on the main tone (dark, bright or medium), the detail of an
image is focused on a certain area of the picture:
• Dark main tone, the detail is focused on the shadows.
• Bright main tone, the detail is focused on the highlights.
• Mid-main tone, the detail is focused on midtones.
Nikon D4s | 200mm | f/16 | 0.4s | ISO 100 | 6500K
The above image is a good example in which the main tone is intermediate. It’s
something that you can easily notice by looking at the colors displayed.
But you can also use the histogram to confirm it. In this case, most of the histogram is
in the center of the graph. In fact, this “mountain” has a considerable height, indicating
that the photo has a large number of midtones.

167Check the exposure, examine the histogram
Nikon D4s | 85mm | f/4 | 1/5s | ISO 400 | 6500K
This photo, on the other hand, has a bright main tone. There is a lot of white, light
gray... And if you take a look at the histogram you can observe that most of it is located
in the right half. In addition, the peaks have a very narrow base showing the amount of
bright tones in the image.

168Check the exposure, examine the histogram
Nikon D4s | 85mm | f/1.4 | 1/250s | ISO 100 | 7500K
Without a doubt, here the main tone is dark. There are mostly shadows in the photo.
In addition, most of the histogram is in the left half of the graph. In fact, that
“mountain” on the far left has a considerable height, indicating that the picture has a
large number of dark tones.
What histogram should you look for when exposing?
It depends on the scene you have in front of you and how you want to show it.
Remember that the ideal histogram doesn’t exist. If you’re looking for a perfect
histogram to use it as a base on your photos on, forget about it.
The histogram is nothing more than a representation of the tonal range of the scene and
what you as a photographer want to convey. So, since there aren’t two identical scenes or
two photographers alike, nor there are two equal histograms!

169Check the exposure, examine the histogram
Histogram vs. contrast
In addition to the exposure, the histogram also gives you information about the contrast
of your image.
Contrast is measured by the difference in brightness or tone between the brightest and
darkest parts of the image.
If you notice wide differences, then your image has a high contrast. On the contrary, if
you barely see differences your image is flat, without contrast.
If there is little contrast in the scene the histogram is compressed (with a narrow base)
towards the center. In contrast, if you have a lot of contrast, the histogram shows a
larger graph and expands to the edges.
Nikon D4s | 200mm | f/8 | 1/200s | ISO 100 | 7500K
Look at the photo above. Don’t you think it looks dull and flat?
That dullness or lack of contrast is very noticeable on the histogram. Or more precisely
at the base of the histogram: it’s very narrow.

170Check the exposure, examine the histogram
Moreover, most of the tones are midtones, they are in the central area of the histogram.
The “mountain” is in the center of the graph and it’s very high in that specific area.
Nikon D4s | 17mm | f/8 | 1/125s | ISO 100 | 6500K
This photo shows the opposite because it has a high contrast. And you can see it on the
histogram because it has a very large base with high peaks near the edges. It shows that
there is a larger number of dark and bright tones.
The contrast depends on the type of light you have. For example, a photo taken during
the golden hour, or on a cloudy or foggy day, will generally have little contrast due to
the diffuse light present in the scene. On the contrary, a photo taken at noon with a hard
light will have a high contrast.

171Check the exposure, examine the histogram
Conclusion
Once you’ve taken the picture (or while you’re shooting if you have a mirrorless camera),
the histogram is the key tool you’ll use. It will let you know if you’ve got the exposure
you were looking for or not and, depending on this, if you need to adjust to the exposure
triangle or not.
But, fortunately, before taking the photo, you can use two extra tools to get the right
exposure: the camera’s light meter and the handheld photometer.

11Your allies (the light meter and
the handheld photometer)

173Your allies (the light meter and the handheld photometer)
You’ve learnt that to expose a photograph you have to decide the aperture, shutter speed
and ISO settings.
You also know that these three settings depend on the message you want to convey with
your picture (depth of field or motion, for example, as you read in section 4) and the
amount of light present in the scene (and its distribution as you have seen in section 10).
At this point, I can guess your next question:
“And how can I know how much light the scene has?”
To measure the light you need the help of two great allies: your camera’s light meter
and/or a handheld photometer.
What is the camera’s light meter for
In photography, the light meter is a device built into your camera that uses a light meter
to measure (or meter) the intensity of light in the scene. Thanks to it, the camera helps
you determine the right exposure to take the picture.
In other words, the light meter helps you choose a combination of aperture, shutter
speed and ISO that results in a properly exposed photo.
Don’t forget that your camera’s light meter is only able to meter reflected light, not the
incident light present in the scene (section 2).
That is, it meters the amount of light that bounces back into the scene (not the one that
hits it) and then enters through the camera lens. That’s why it’s called TTL (through the
lens) light meter.

174Your allies (the light meter and the handheld photometer)
Sometimes you’ll want to meter the incident light on a subject. In these cases, and as
we’ll see later, you’ll need to use the hand-held photometer.
How the light meter works
Once you have metered the light (section 12) for a certain aperture, shutter speed and
ISO settings, the camera’s light meter tells you if you’ve got a correct exposure. But, it
also tells you if you are over or underexposing your image, and in how many stops (or in
fractions of a stop; don’t forget that the most popular scale is the thirds of stop one).
Let’s see what the light meter shows you on the camera LCD.

175Your allies (the light meter and the handheld photometer)
Screenshot of a camera LCD where you can see the light meter (+...0…-)
The combination of aperture, shutter speed and ISO settings that gives you a zero-
centered light meter indicator zero allows you to capture a photo with an exposure that
the light meter considers to be correct.

176Your allies (the light meter and the handheld photometer)
On the other hand, when the light meter moves to the right (+1, +2, etc.), you are
overexposing the scene.
And when the light meter moves to the left (-1, -2, etc.), you are underexposing the
scene.
In section 16 you’ll find out that the light meter is not always accurate. Therefore, you
will have to learn to interpret its values.
In section 18 I’ll show you the different ways to choose a combination of aperture,
shutter speed and ISO settings so that the exposure of your picture is always the one
you’re looking for (or the correct one).

177Your allies (the light meter and the handheld photometer)
What is the handheld photometer for
In addition to the camera’s light meter, some photographers use an additional tool: the
handheld photometer.
Compared to your camera’s light meter, the handheld photometer allows you to meter
the light more accurately.
This is because you can meter both the incident light, the one the subject you’re
capturing receives (if you place it next to the subject you want to photograph), and the
light reflected in the scene (if you place it next to the camera).

178Your allies (the light meter and the handheld photometer)
And, because you can meter light more accurately, you have more control over your
pictures’ exposure.
In practice, you usually use the hand-held photometer in situations where you plan to
use artificial lighting, such as in a studio. But in the vast majority of cases, your camera’s
light meter will be more than enough.
How to meter light
Great!
Now you know that you can use the light meter to meter the light intensity of the scene
so you can expose your pictures... But how does it meter it?
Light is obviously distributed unevenly in the scene. There are brighter and darker areas.
So how do you meter the light to calculate the exposure?
You’ll find the answer in the next section. ;)

12Your camera’s light metering
modes

180Your camera’s light metering modes
It’s logical!
To know if the amount of light captured by the sensor when taking the picture is
appropriate, you have to tell the camera what the light intensity of the scene is.
Yes, the light meter meters the light intensity...
But, usually, the scene is illuminated with different intensities (brighter, darker lights).
So you have to tell the camera how to meter the intensity of light in the scene.
Do you want to meter the brightest tones? The darkest? Or use the average intensity of
the scene?
What’s obvious is that the tone on which you meter the light is correctly exposed. You’ll
capture all the detail in the elements of the scene that has that tone.
How and where you meter the light depends on the scene and what you want to get it
in the photo. Sometimes you'll be interested in metering light on a single point (spot
metering). Other times, you will want to use an average of the different light intensities
of the scene (matrix or evaluative metering).
So you should choose the light metering system to calculate the exposure that suits you
in each situation.
That is, depending on the tone distribution in the scene, use the metering method that
allows you to correctly meter the tone intensity of the areas you want to capture in detail
(expose correctly).
Fortunately, in order to accurately expose different light situations, cameras generally
allow three (or four) different metering modes:
• Matrix (or evaluative) metering.
• Center-weighted average metering.
• Spot metering.
• And in some models, the partial metering.

181Your camera’s light metering modes
Each of these methods works by assigning a relative weight to each of the areas of the
image. Thus, heavier areas will be considered more credible and contribute more to the
final calculation of exposure.
Take your camera’s user manual and discover how to set up the metering method... It’s
essential!
Matrix or evaluative metering
The matrix or evaluative metering takes into account the entire image (i.e. what is within
the frame) to carry out the light intensity metering and the exposure calculation.

182Your camera’s light metering modes
How to meter the light and calculate the exposure
The camera divides the image into several zones and analyzes the existing tones in each
of them, giving greater weight to the area surrounding your focus point.
Finally, it establishes an average of the light intensities and calculates the correct
exposure, also taking into account other variables like the scene color or the distance to
the subject.
This type of metering is usually the default metering of all current DSLR and mirrorless
cameras because it’s the easiest to use.
When you should use it
The matrix method is ideal for scenes with very little contrast (similar tonalities), as the
calculated intensities mean is similar to the different intensities or tones present in the
scene. All in all, you are telling the camera that the light in the scene is homogeneous
(very similar).
Olympus OM-D E-M1 | 300mm | f/4 | 1/640s | ISO 100 | 5850K

183Your camera’s light metering modes
When you shouldn’t use it
Unfortunately, this system has a flaw. The camera won’t be able to solve certain scenes
with high contrasts, so you won’t always get the result you are looking for.
Look at the photo below carefully.
Tell me, what do you think about its exposure? Is it correct?
Nikon D4s | 85mm | f/2.8 | 1/60s | ISO 100 | 5650K
If your answer is "yes", I have no choice but to correct you...
In general, the photo is dark. That is, underexposed.
Look closely at the people, don’t you see they are dark? The main source of light (the
Sun) comes from the right and is quite close to the horizon (the shadows in the bottom
left corner are very long).
Let me use another example. Imagine that you are at a concert of your favorite group.

184Your camera’s light metering modes
Surely at some point in the show the singer is illuminated by a beam of light and the rest
of the band and the stage remain in total darkness. And that's exactly the moment you
want to capture.
If you leave your camera in matrix metering mode, the internal light meter will mess up.
Try to compensate for the areas of maximum brightness (the singer illuminated by the
spotlight) with the zones of maximum darkness (the rest of the scene) to establish an
average.
You take the picture and... Epic fail! :P
Center-weighted average metering
With the center-weighted average metering, the camera gives a greater weight to the
light intensity located in a circular area in the center of your frame.
How to meter the light and calculate the exposure
The size of this circular area depends on the camera manufacturer. And on some
models, you can even set it. When metering, all the areas outside this circular area also
count, despite having a very small weight.
Unlike matrix metering, your camera doesn’t take the focus point into account. It always
gives priority to the central area of your frame.
When you should use it
This metering method is useful when you want to photograph a subject that has a high
contrast compared to the background because it allows you to meter the light of that
particular subject.
At the same time, as the camera takes into account the rest of the areas of the frame, it
allows you to include them giving some exposure (light).
Thus, you have your subject perfectly exposed and framed in it environment.
For example, pay attention to the photo below.

185Your camera’s light metering modes
Nikon D4s | 125mm | f/2.8 | 1/100s | ISO 1600 | 3250K
As you can see, the emphasis of the exposure (and focus) is on the conductor. He’s
almost in the center of the composition, he’s the person who receives more light and the
one that is perfectly exposed.
Simultaneously, the rest of the musicians are slightly underexposed in such a way that
they are part of the scene, you look at them, but they’re not the main focus.
Your attention is focused on the conductor although the other people provide enough
context for you to know where he is and what’s happening around him.
Here’s another example where the center-weighted average metering is extremely
useful: the portrait.

186Your camera’s light metering modes
Nikon D4s | 85mm | f/1.4 | 1/125s | ISO 160 | 6250K
Here your intention is to highlight your subject. She’s in the center of the image so that
the spectator ignores everything else.
The center-weighted average metering gives more importance to the center of the frame.
In other words, the outside area has hardly any impact on the exposure calculation.
187Your camera’s light metering modes
Therefore, in your portrait the person’s face is correctly exposed. It doesn’t matter if the
background looks a little brighter or darker than how it is on the scene. Your intention is
to isolate your foreground from the background.
When you shouldn’t use it
The big drawback with respect to the matrix metering is that it isn’t as automatic. As a
photographer, you have to tell the camera where to meter the light. In addition, you have
to recompose the scene once the camera has metered the exposure.
Therefore, if you can apply the matrix metering, try to avoid the center-weighted average
metering.
At the same time, it’s not really useful if you are in front of a high contrast scene. In
this case, the important thing is to meter the light that predominates in the scene (or to
which you want to give more importance). Here the most appropriate metering mode is
the spot one.
Spot metering
The spot metering takes into account only a small area of the image (in the center of the
frame or in the selected focus point) to carry out the exposure calculation.
How to meter the light and calculate the exposure
In the spot metering your camera only takes into account a very small circular area. And unlike center-weighted average metering, this metering point can be placed either in the center or in any of the focus points of your camera.
This allows you to choose precisely where to meter the light.
This restricted metering system allows you to decide exactly what composition point you want to use to calculate the exposure.
Therefore, in scenes where there is a very bright or very dark element in the composition, but it’s not your main subject, it’s best if you use this metering mode. That way you expose your subject correctly without other elements within the frame altering
the metering.

188Your camera’s light metering modes
When you should use it
As I said, it’s extremely useful for high-contrast scenes, such as a scene where your
subject is much darker or brighter than the rest of the frame.
In the backlit portrait you have below, you have to meter the light on the face of your
subject (the child who is looking at the camera) and avoid keeping only his silhouette.
Nikon D4s | 98mm | f/2.8 | 1/100s | ISO 1400 | 5250K
In fact, because I deliberately chose to expose correctly the kid’s face, the upper body of
the other child and the windows are overexposed (much clearer and brighter than they
should).

189Your camera’s light metering modes
Another example: you want to capture detail of the surface of the Moon in the middle of
the night. Thanks to the spot metering you can measure exactly the light of the Moon
and avoid capturing it like a white circle. That's how it would look if you used the matrix
metering.
Nikon D7100 | 500mm | f/8 | 1/125s | ISO 200 | 4000K
Many photographers use this metering mode by default as it allows you to control the
exposure as much as possible.

190Your camera’s light metering modes
But the truth is that, like many other decisions in photography, it’s best to experiment
and see what you like (or what’s better) in each situation.
When you shouldn’t use it
Actually, there is no particular scene where you don’t want to use this metering mode.
As I told you before, this is the most precise metering mode so it’s useful in any scene.
Partial metering
This metering mode is very similar to the spot one, but with a larger circle. So you can
use it pretty much in the same way, even though you use a larger area of the scene to
carry out the metering.
This metering mode isn’t available on all cameras. Depending on the brand and model
of the camera, you may or may not have it.
When you should use it
Taking into account that this metering mode is very similar to the spot metering mode,
you can use it in the same way and in similar scenes.
That is, in high contrast scenes or scenes in which your subject is much darker or
brighter than the rest of the scene.
When you shouldn’t use it
Don’t use it if you want to make a more generic metering because your scene is lit up
homogeneously.
Same thing if you want a very precise metering. In that case, it’s better to use the spot
metering.
191Your camera’s light metering modes
Conclusion
Depending on the scene and the result you are looking for, use a different metering
mode.
Once you have decided the mode and you’ve metered in the right place, you only need to
determine the aperture, shutter speed and ISO settings, take the photo and review the
exposure using the histogram.
Therefore, it's time to analyze the different systems you have to determine the exposure
triangle settings.
Let's have a look at the different exposure modes of the camera.

13Your camera’s exposure
modes

193Your camera’s exposure modes
When you choose the exposure mode of your camera, you’re determining who (you or
the camera) will decide the aperture, shutter speed and ISO settings.
You can choose among the following exposure modes:
• Automatic, if you want your camera to have absolute control of the three variables.
• Manual, if you want to be the one who decides the exposure triangle value.
• Or some of the semi-automatic modes when you want to set one of the settings and
let the camera decide the other two.
You can choose the exposure mode directly in the exposure selector of your camera.
Don’t confuse the exposure modes with the metering modes
Don’t mess them up!
The exposure modes have nothing to do with the metering modes I just explained in the
previous section.
The metering modes allow you to tell your camera what method to use when metering
the light of the scene. Instead, exposure modes let you tell your camera how to choose
the aperture, shutter speed, and ISO settings.
In other words, you can consider each exposure mode of your camera as a shooting
mode. That is why sometimes you say you shot in automatic, in manual, etc.
Let’s see how does each one of them works and how you can use them to expose your
photographs.
Let’s dive in!

194Your camera’s exposure modes
Automatic mode (Auto)
When you use a camera for the first time it’s the easiest way to quickly start taking
pictures like crazy.
In fact, many photographers never use the other exposure modes, wasting the great
creative potential that the camera offers them.
How it works
The camera does it all for you. You just have to worry about framing and pressing the
shutter release button.
It determines the aperture, shutter speed and ISO settings to get the correct exposure.
That is, having the light meter centered (indicator on the zero). It even takes care of
choosing the metering mode.
In addition, the camera also activates its flash if it considers that there is not enough
light in the scene you are capturing.
Everything seems so simple!
However, you’ll soon discover that you have no control over your camera settings.
Since it’s the camera that makes all the decisions for you, you lose a lot of (or almost
everything) your creative power.
When you should use it
Like everything in life, you learn step by step, practicing. Usually, if you are starting out
in photography, it’s the first exposure mode you use before taking the next step.
And if you keep improving, you’ll realize that there are many pictures you can’t take.
Since you’re unable to control the aperture, shutter speed and ISO settings as you want,
you’ll notice that your creativity is very limited:
• You don’t control the depth of field to guide the spectator’s attention.
• You don’t control the movement (freezing it or not).
• You don’t control the exposure.

195Your camera’s exposure modes
• You don’t control the light.
• You don’t have any control on your image.
In fact, I recommend you abandoning the automatic exposure mode as soon as possible.
It’s the only way to become a photographer.
When you shouldn’t use it
Most photographers who take photography seriously never use the automatic mode.
As a photographer you’ll want to make the most out of your gear to tell different stories.
And, for this, you’ll have to use the semi-automatic and manual exposure modes.
In short, no matter what type of photo you want to take, the automatic mode limits you.
Scene modes
In addition to the automatic mode, the vast majority of cameras allow you to choose an
exposure mode depending on the different scenes you face.
The scene modes tell the camera what kind of picture you have in mind, so that it makes
the adjustments allowing you to get that photo.
How it works
Depending on the selected scene mode, your camera automatically decides the aperture,
shutter speed and ISO settings so that the light meter is centered (indicator on the zero).
Here are some scene modes:
• Action or sport: Your camera chooses a fast shutter speed in order to freeze motion.
If necessary, it also increases ISO to get a proper exposure.
• Landscape: Your camera selects narrow apertures to increase the depth of field.
• Portrait: Your camera uses wide apertures to a get a shallow depth of field and a
blurred background behind the subject.

196Your camera’s exposure modes
• No flash: Your camera turns off the flash and tries to get the right exposure without
having to use it.
• Night portrait: Your camera sets a slower shutter speed than in portrait mode to
capture detail from the background. At the same time, it automatically activates the
flash to illuminate the subject.
• Macro: Your camera tries to close the diaphragm as much as it can to increase the
depth of field.
When you should use it
When you face a scene in which you need to quickly change the shooting mode and you
don’t have time to change the aperture, shutter speed and ISO settings.
These modes are kind of a shortcut.
Also, you can use a “wrong” mode to get the effect you are looking for. The fact that a
scene mode has a specific purpose doesn’t mean you can’t use it in a different situation,
and thus get a different result.
Let me give you some examples so you get it.
If you want to photograph a sport scene, use the portrait mode.
“What are you talking about Toni? The portrait mode? Seriously?”
Of course. In this case the camera uses a large aperture so it’s forced to use a fast shutter
speed. And this is exactly what you need to freeze the action or a quick movement.
Magic! ;)
Another example.
Use the night portrait mode even if your scene is illuminated or when you’re indoors.
This way you are using the flash as a fill taking into account the ambient light the scene
has. Thus, both help you get a better exposure.
And the last one (although I could give you many more).

197Your camera’s exposure modes
If your camera has it and even if it’s not New Year’s Eve, use the fireworks mode to create
long exposures in which you convey motion. In this case, the camera uses a slow shutter
speed so some parts of your image will be blurred, like water or a moving vehicle.
When you shouldn’t use it
In general, scene modes are very limited and can be useful if you are a beginner and want
to experiment with them.
A good exercise is to try several of them in the same scene and analyze the different
results you get. Look how the photo looks like and try to understand why it turned out
that way.
Is the background out of focus? It’s probably due to a big aperture because this causes a
shallow depth of field.
Is the photo too bright (overexposed)? It may be because the shutter speed is too slow:
light has reached the sensor for too long.
As soon as you have an idea of what each scene mode does, stop using them.
It’s time for you to decide.
Program mode (P)
It’s a similar mode to the automatic one. The big difference is that it gives you a little bit
more freedom when deciding the exposure triangle settings.
How it works
In this case, your camera automatically chooses a combination of aperture and shutter
speed settings to get the right exposure (zero-centered light meter).
However, it doesn’t automatically trigger the flash or modify the ISO. In this case, you
can change the ISO manually if you see fit.
You can also select the metering mode, use the exposure compensation (±EV), change
the white balance and some other functions.

198Your camera’s exposure modes
How to change the aperture and shutter speed while maintaining the exposure
The P mode has a rather peculiar functionality called Program Shift or Program Flexible
(P* or Ps).
This shooting mode allows you to change the aperture and shutter speed settings
combination while keeping the same exposure.
To use the Program Flexible, you only have to press the shutter release button halfway
and turn the selection dial on your camera.
Let’s look at an example.
Imagine you’re at the beach and you want to take a picture of the landscape that
surrounds you. You have your camera in P mode.
When you press the shutter release button halfway, the camera tells you that an aperture
of f/8 and a shutter speed of 1/125s allows you to get the right exposure for that specific
scene. Turn the selection wheel. Now the camera provides you an aperture of f/11 and a
shutter speed of 1/60s as an alternative, always keeping the same exposure.
This allows you to have more control over the effect you want your final image to have.
Therefore, if you’re looking to blur the background, you can select a combination
where the aperture is larger. However, if you want to freeze the motion, you can select a
combination in which the shutter speed is faster.
But there is a drawback!
The camera doesn’t let you choose the aperture and shutter speed separately. You must
use the settings that the camera considers to be “correct”.
In order to have a greater control over the exposure, you have an ace up the sleeve. You
can compensate the exposure (section 14).
When compensating the exposure, you are telling the camera to overexpose or
underexpose the image to a certain number of exposure values or EV (section 8).

199Your camera’s exposure modes
When you should use it
The P mode is very useful if you’re a beginner photographer. It helps you understand the
relationship between aperture and shutter speed.
Regardless of your photographic level, the P mode is very useful in street photography.
In this genre of photography, composition and speed are essential. That’s why, when
you’re walking down the street and several things happen at the same time, you only
have a few seconds to compose and shoot. Actually, in most cases, you don’t have time
to think about the settings you need to expose correctly, or to set them!
So here the P mode (or the P* alternative) comes handy. Let the camera find out the
shooting settings for you and take care of two essential things: composing and focusing.
When you shouldn’t use it
In general, and as I said, this mode is automatic. Too automatic. And this limits your
creative power.
Forget about taking photos of the Milky Way, long exposures, a sports event (and an
endless list of other types of image) in P mode.
Aperture Priority mode (A or Av)
This is one of two semi-automatic modes that all DSLR and mirrorless cameras on the
market have.
“Toni, what’s this “semi” thing?”
Basically, semi-automatic modes allow you to freely choose the aperture or the shutter
speed settings. One or the other. This gives you partial control over the exposure
settings.
At the same time, your camera helps you achieve a correct exposure by adjusting
the other two parameters of the exposure triangle so that the light meter is centered
(indicator on the zero).
200Your camera’s exposure modes
How it works
In Aperture Priority mode, you can choose the aperture, as the name implies.
Once you’ve selected the aperture you want, your camera automatically selects the
shutter speed that results in a well-exposed photo (the light meter is centered at zero),
taking into account the configured exposure mode.
As for the ISO, you can set it manually or leave it in automatic. If you decide to leave it in
automatic, I recommend that you set a range of ISO values as I explained in section 5.
Usually the range goes from the native ISO (100 or 200) and the maximum ISO at which
the camera doesn’t produce a lot of noise (800, 1600, 3200, depending on your camera’s
performance).
It’s a way to keep the noise under control.
What it is for
“And what do I get by controlling the aperture?”
To determine the depth of field.
I already did a brief introduction of how useful it is in section 4. But if you want to
become a master I suggest you read “The Ultimate Photography Guide to Depth of Field
(DoF)”.
If you read this guide, you’ll acquire the superpower to decide which part of the photo
you want perfectly focused and which part you want to be completely out of focus, and
thus tell the story that you have in mind.
Remember that thanks to the depth of field you can get:
• Sharp photos from the foreground to infinity.
• Or leave certain areas of the image out of focus on purpose to lead the spectator to a
specific subject or point.
In short, use the Aperture Priority mode (A or Av) to control the depth of field your
photo will have.

201Your camera’s exposure modes
How can you blur the background?
If you want to blur the background to enhance your subject only, for example when you
want to make a portrait, use a wide aperture. For instance, set an aperture of f/1.4, f/2.8
or f/3.5, depending on the lens you are using.
Once it’s set, focus on your subject and take the picture. Your camera automatically
decides the shutter speed so that the photo is correctly exposed (zero-centered light
meter) based on:
• The light available in the scene.
• And the metering mode that you’ve selected.
It will most likely be a fast shutter speed to compensate for the large diaphragm
aperture. However, keep in mind that this will depend entirely on the light of the scene.
The camera may indicate that you can’t get a correct exposure (usually with the “Hi”
indicator) because you don’t have a shutter speed fast enough to expose correctly.
In this situation, you must reduce the amount of light the sensor is capturing. In order
to do this, you have several options:
• Bring down the ISO.
• Use a narrower aperture.
• Or use a neutral density filter to reduce the amount of light reaching the sensor.
How can you get everything focused?
If you do landscape photography or astrophotography (a type of night photography), you generally try to maximize the depth of field so that everything is perfectly focused.
How can you get it?
It depends on the focal length you use.
If you use a wide angle lens, that is a short focal length (14mm, 18mm, etc.), and regardless of the aperture you want to use, the easiest is to focus at the hyperfocal
distance and forget about everything else.

202Your camera’s exposure modes
You can learn how to do it in less than 1min watching the following video.
If you use longer focal lengths (70mm, 200mm, 500mm) instead, choose a relatively
narrow aperture, f/8 or f/11 for example, and focus on a point located in the lower third
of the scene.
In this case, as you close the aperture, your camera will obviously determine a slower
shutter speed. Keep in mind that the diaphragm is allowing less light through it so the
camera compensates it with a slower shutter speed.
The problem now is that depending on the shutter speed determined by the camera,
you’ll have use a tripod. If you don’t, your photo will be blurred unless you have an
extremely steady hand.
On the other hand, the camera may indicate that you can’t get a correct exposure
(usually with the “Lo” indicator) because you don’t have a shutter speed slow enough to
expose correctly.
Remember that for shutter speeds over 30s, you must use the Bulb mode of your camera.
That means using the camera in Manual exposure mode (M).
203Your camera’s exposure modes
To increase the amount of light captured by the sensor, you have two solutions:
• Select a wider aperture, getting a shallower depth of field.
• Or set a higher ISO to increase the amount of light reaching the sensor (but be
careful with the noise!).
If your goal isn’t to maximize the depth of field, but to increase it, use smaller apertures
(f/8, f/11, etc.).
Don’t forget motion
Remember that it’s the camera that sets the shutter speed and not you. So you should
examine whether the motion you’ve got in the final image is what you want or not
(freeze motion or not).
When you should use it
The Aperture Priority mode is very versatile and is useful in most situations.
Let’s look at some examples.
Imagine a situation where the light is good or the day is sunny. When the light is
relatively steady, the risk of blurring your photos is minimal: the shutter speed is always
going to be fast enough to capture motion.
What’s more, the “Sunny f/16” rule that I’ll explain in section 19 establishes that when
there is a lot of Sun it’s best to shoot at a small aperture (at f/16). And the truth is that
it works. So the best thing you can do is to focus on determining the depth of field you
want or use a small aperture to focus on everything in your frame.
In this sense, this also applies to a portrait. Ask yourself what you want to get:
• A huge blur to make the background completely out of focus?
• Your subject’s face incredibly sharp?
Finally, these questions are also useful when capturing a landscape during the day. Your
aperture determines if you want the whole landscape in your frame to be focused or not.

204Your camera’s exposure modes
When you shouldn’t use it
As I said, this mode is very versatile so there are few situations in which you can’t use it.
Perhaps the two most common ones are the following.
On the one hand, a scene where there is a constant action.
For example, in sports photography (if you attend a school event) the important thing
is to freeze motion, to see the faces of the players and what they were doing at that
moment (kicking a ball, throwing a basket, etc.). In this case, it’s essential to control the
shutter speed, the depth of field is not the key factor.
On the other hand, a scene in which there is no light, at night for example. If you
practice night photography, you have to set the aperture, but you can’t rely on you
camera to set the shutter speed and ISO settings in order to get the right exposure.
It’s, without a doubt, a demanding type of photography that requires you to shoot in
Manual mode (M).
TIPS
Please note that depending on the metering mode you have selected (evaluative, center-
weighted average, spot), the photo may be underexposed or overexposed.
Remember that you can always use the exposure compensation button (± EV) of your
camera to make the necessary adjustments so that the histogram is balanced. With this
setting you force your camera to use a slower shutter speed (avoid underexposure) or
faster (avoid overexposure) than the one it has initially set.

205Your camera’s exposure modes
Shutter Speed Priority mode (S or Tv)
This is the other semi-automatic mode that all the DSLR and mirrorless cameras on the
market have.
How it works
In this particular mode, you can choose the shutter speed.
Once you have selected the shutter speed you want, your camera automatically selects a
diaphragm aperture that results in a well-exposed photo (zero-centered light meter).
As with the Aperture Priority mode, you can manually choose the ISO or leave it in
automatic.
What it is for
“And what do I get by controlling the shutter speed?”
To freeze motion or, on the contrary, leave blurry areas of the image to convey this motion.
In short, you use the Shutter Speed Priority mode (S or Tv) to control how the motion is
reflected in your picture.
You can freeze it, if you photograph a racing car at full speed or a bird in flight. Or you
can blur a subject, creating a silk effect in a waterfall or capturing the trail of a few
clouds as they move.
How can you freeze a moving subject?
Easy peasy!
Simply select a fast shutter speed. In section 4 you have many examples of shutter
speeds for a multitude of different scenes.
For example, suppose you want to freeze a moving race car. To achieve this, use a speed
of 1/1000s or 1/2000s and let the camera choose an aperture to get the correct exposure.
It will certainly set a wide aperture to compensate for the fast shutter speed so that you
can expose the image correctly.

206Your camera’s exposure modes
However, your lens may not have a aperture large enough to get a correct exposure.
If this happens, you can choose between two solutions:
• Use a longer exposure time without, perhaps, freezing any motion.
• Or crank up the ISO (but be careful with the noise!)
How can you blur a moving subject?
If you want to indicate that there is motion by showing silky water or blurring a subject,
select a slower shutter speed.
How slow?
The amount of time depends on you. But after a second the effect will be stronger.
Obviously when you select a slower shutter speed, the camera automatically chooses a
narrow aperture to try to reduce the amount of light captured, thus exposing the picture
correctly.
What if your camera can’t close the diaphragm enough to get a correct exposure?
Once again, you have three alternatives:
• Use a faster shutter speed.
• Reduce the ISO (if you’re not using the native ISO).
• Or use neutral density filters to reduce the amount of light reaching the sensor.
Don’t forget the depth of field
Bear in mind that depending on the shutter speed you choose, your camera will select a
certain aperture. And this decision of the camera will affect your picture’s depth of field.
When you should use it
In the previous section, I told you that it is better not to use the Aperture Priority mode
(A or Av) when you are in a situation where there is action around you and you want to
freeze the motion.

207Your camera’s exposure modes
And I gave you the example of a sports competition.
Here is when you have to use the S (or Tv) mode!
Because that’s exactly what you want: control the time the sensor receives light in order
to freeze the action you have in front of you.
When you shouldn’t use it
When it’s better to use the Priority to Aperture mode (A or Av)... :P
That is, when you want to have great control over the depth of field or when you need to
make sure the sensor captures plenty of light.
In fact, both modes are complementary: when one of them is useful, you shouldn’t be
using the other one and vice versa.
TIPS
When you shoot handheld, without a tripod, the picture may be blurred. To avoid this use
a shutter speed of at least 1 divided by the lens effective focal length (1/effective focal).
For example, if you use a full frame sensor camera, with a 50mm focal length lens, you can
use a shutter speed of up to 1/50s. With a focal length of 100mm, the minimum shutter
speed is 1/100s.
Furthermore, I recommend you using a shutter speed shorter than that. For example,
when shooting with a 50mm focal length use a shutter speed of 1/60s. Or a shutter speed
of 1/250s with a 200mm focal length.
If you have a camera with a crop factor (1.5x for example) with a lens at a focal length of
50mm, the minimum shutter speed is 1/(50 × 1.5) = 1/75s. In this case, you must use the
effective focal length (focal length × crop factor of your sensor).
Don’t forget that if the lens or camera has a vibration reduction system you can use 1 or 2
stops slower shutter speeds, or even more. Unfortunately, if your pulse is not very good,
your pictures may be blurred. With slow shutter speeds, the easy way is to use a good
tripod. With a sturdy tripod, you don’t need to use the vibration reduction system.

208Your camera’s exposure modes
As with the Aperture Priority mode (A or Av), depending on the metering mode you have
selected (evaluative, center-weighted average, spot), the picture may be underexposed or
overexposed.
Remember that you can always use the exposure compensation button (± EV) of your
camera to make the necessary adjustments so that the histogram is balanced. With this
setting you force your camera to use a wider (avoid underexposure) or narrower (avoid
overexposure) aperture than the one it has initially set.
Manual mode (M)
This is the mode of the bravest ones! No more automatisms!
With the Manual (M) mode you have absolute control over exposure and other
photographic effects (depth of field, motion) to get the picture you crave.
All responsibility lies with your hands.
How it works
There are many situations in which your camera is wrong or can not automatically set
some of the exposure triangle values you need to get a particular photo.
For example, in night photography the camera is unable to help you expose because
there is hardly any light (it’s pitch black).
With the Manual mode (M), you are the one that chooses the aperture, shutter speed and
ISO settings to get the result you are looking for.
Hard?
Don’t feel hopeless. You’re not alone.
You can count on two great allies that will make your life much easier when working on
your exposure: the light meter and the histogram.
The important thing is to capture the photo you have in your head and know how to
decide the settings. After carrying out a few tests (trial and error photos), you can’t fail.
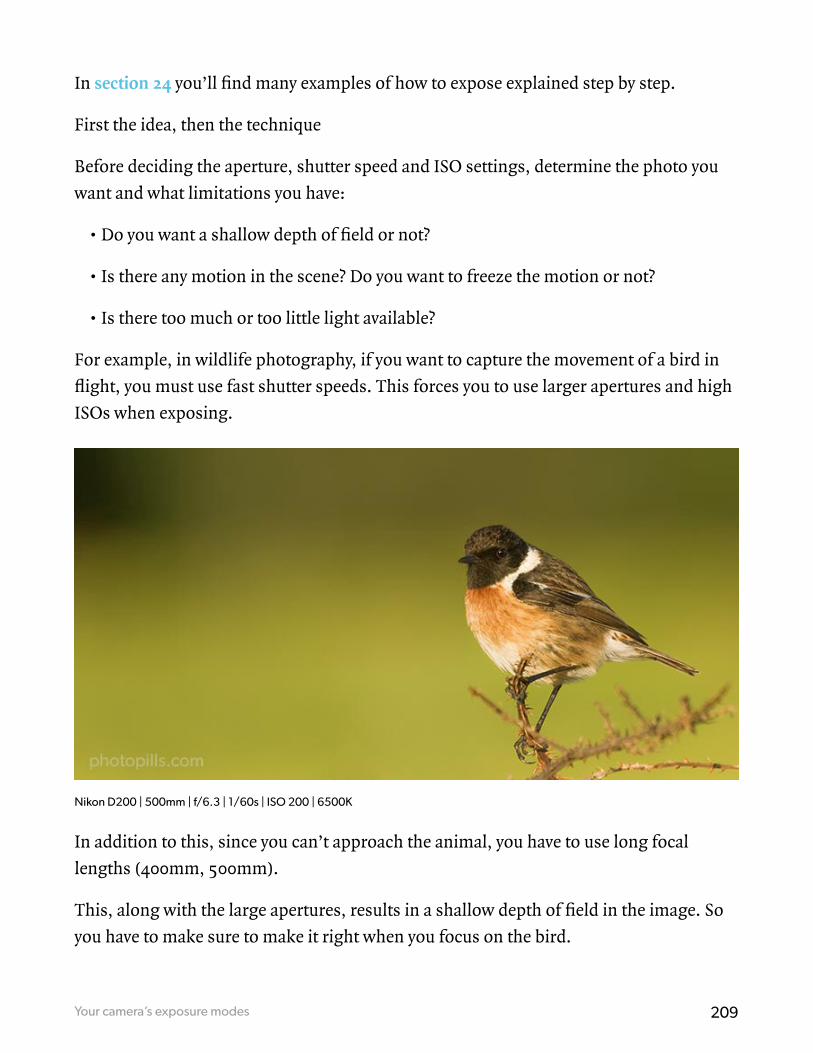
209Your camera’s exposure modes
In section 24 you’ll find many examples of how to expose explained step by step.
First the idea, then the technique
Before deciding the aperture, shutter speed and ISO settings, determine the photo you
want and what limitations you have:
• Do you want a shallow depth of field or not?
• Is there any motion in the scene? Do you want to freeze the motion or not?
• Is there too much or too little light available?
For example, in wildlife photography, if you want to capture the movement of a bird in
flight, you must use fast shutter speeds. This forces you to use larger apertures and high
ISOs when exposing.
Nikon D200 | 500mm | f/6.3 | 1/60s | ISO 200 | 6500K
In addition to this, since you can’t approach the animal, you have to use long focal
lengths (400mm, 500mm).
This, along with the large apertures, results in a shallow depth of field in the image. So
you have to make sure to make it right when you focus on the bird.

210Your camera’s exposure modes
Another example. If you want to photograph the Milky Way, I don’t think you want to
capture Star Trails, so use a fast shutter speed (calculate it with the PhotoPills Spot Stars
calculator, either with the NPF rule or the 500 rule).
Nikon D4s | 14mm | f/2.8 | 25s | ISO 3200 | 3200K | 7 images stitched together in Lightroom
In order to capture the maximum number of stars and expose the image correctly, you
have to use very large apertures (f/2.8) and high ISOs (1600, 3200, 6400, depending on
how your camera’s noise performance).
In this case, when using short focal lengths (14mm, 18mm), you can focus at the
hyperfocal distance to maximize depth of field and thus have in focus everything from
the foreground to the stars.
In short, depending on the photo you are looking for, the logic when choosing aperture,
shutter speed and ISO settings will be different.
In section 18 I’ll explain you how to choose the exposure triangle values to get the result
you’re looking for, both in terms of the desired effect and the desired (correct) exposure.

211Your camera’s exposure modes
How to expose when you are looking for a certain depth of field
Nikon D4s | 85mm | f/1.4 | 1/800s | ISO 100 | 6250K
212Your camera’s exposure modes
If you are looking for a specific depth of field, your first step is to choose the right
aperture.
• Do you want a shallow depth of field? Select a big aperture (small f number, for
example f/2.8 or f/3.5).
• Do you want a greater depth of field? Select a small aperture (big f number, for
example f/8 or f/11).
• Do you want to maximize the depth of field?
• If you use a short focal length (14mm, 18mm), focus at the hyperfocal distance
regardless of aperture. In this case, the depth of field criterion is not critical when
choosing the aperture so you have more freedom to set the shutter speed.
• If you use a long focal length (200mm, 500mm), select a small aperture (big f
number, for example f/8 or f/11).
Once you’ve set the aperture, your next step is to determine which shutter speed and ISO
results in the exposure you’re looking for.
Moreover, when setting the ISO use values that don’t cause a lot of noise in the image
(keep it as low as the scene allows it).
How do you determine the exposure?
If you have a DSLR camera, you’ll have no choice but to go for the “try and fail” strategy.
So meter the light and set the three parameters in this order, aperture, shutter speed and
ISO, to get the exposure you want. A good starting point is to set the parameters so that
the light meter is centered at zero.
Then, take the picture and check the result on the LCD and the histogram.
If you got the exposure you were looking for, great!
Otherwise, change the shutter speed (or the ISO) accordingly. Increase it if the picture is
underexposed or lower it if the image is overexposed.

213Your camera’s exposure modes
Take another picture and look at the LCD and histogram again. If it’s still not what you
are looking for, keep changing the shutter speed (or the ISO)...
And so on until you hit the nail on the head.
It may seem complicated at first but, with the practice you’ll get facing different
shooting situations, you’ll know exactly which parameters to change first, and its
settings to quickly get the right exposure.
What I want now is that you begin to understand the logic that you should apply
when exposing and taking a picture. In section 18, you’ll find a much more detailed
explanation.
Finally, if you have a mirrorless camera, the electronic viewfinder makes your life much
easier. You’ll see on the screen how the exposure varies as you change the shutter speed
and the ISO.

214Your camera’s exposure modes
How to expose when you seek to freeze motion or not
Nikon D4s | 22mm | f/5.6 | 13min 47s | ISO 200 | 8000K

215Your camera’s exposure modes
If you are looking to play with motion blur, your first step is to choose the right shutter
speed.
• Do you want to freeze motion? Set a fast shutter speed (for example 1/2000s).
• Do you want to have some blurry elements or trails? Set a slow shutter speed (for
example 1/4s, 1s, 5s, etc.).
In section 4 you’ll find many examples of shutter speed values that I suggest you
according to the scene you want to photograph.
Now, the second step is to determine which aperture and ISO results in the exposure
you’re looking for.
Do you remember the method I just explained in the previous section (the depth of field
one)?
You surely do.
Well the procedure is the same:
• If you have a DSLR, you’ll have to use the “try and fail” strategy.
• If you have a mirrorless camera, everything will be much easier thanks to the
electronic viewfinder.
Alternative mode: combining the semi-automatic modes (A or Av, S or Tv) or Manual (M) with the automatic ISO tool
Although It’s not an exposure mode on its own, you can go a step further combining
one of the semi-automatic modes (Priority to Aperture or Priority to Speed) or Manual
together with the automatic ISO tool.
First, let me remind you what this tool is about and explain how you can set it.
Then, we’ll see how you can get the most out of each of the different exposure modes.

216Your camera’s exposure modes
All aboard!
How it works
At the end of section 5 I talked about the danger of using the automatic ISO of your
camera without setting any limits. The problem is that depending on the camera model
you use, your noise tolerance is different. That is, the ISO up to which you can shoot
without noticing the noise is different: in some cameras it’s 800, in others it may be
6400...
So my recommendation is that you always keep the ISO as low as possible when you’re
exposing. Especially if you have a low end camera (the low budget ones aimed at
beginners).
If you have a mid or high-end camera, using the automatic ISO can be a very interesting
option. But you have to make sure to set an ISO range according to your camera’s
capacities.
What range?
Easy.
The bottom is always the ISO base of your camera (ISO 100 or 200). And the top is the
ISO level from which your camera generates a lot of noise and the grain is visible in the
image.
Imagine that this level is 6400. In that case, the automatic ISO range you have to set in
the camera is between 100 and 6400.
This keeps the noise under control.
In addition to this, the vast majority of cameras allow you to decide the minimum
shutter speed. That is, you force the camera to maintain a shutter speed equal to or
faster than the one you selected.
For example, if you know that to freeze a moving car you must shoot at least at 1/1000s,
enter this value. So the camera, whenever possible, will use this shutter speed or a faster
one (1/1250s, 1/1600s...) so that your subject is always frozen.

217Your camera’s exposure modes
Once these parameters are defined, you can use this function by combining it with the
Aperture Priority (A or Av), Speed Priority (S or TV) and Manual (M) exposure mode.
Let’s see how taking the following parameters as a reference for this example:
• The lens has an aperture between f/2.8 and f/22.
• The automatic ISO has a range between ISO 100 (base) and ISO 1600.
• The minimum shutter speed has been set at 1/500s.
• The maximum shutter speed of the camera is 1/4000s.
How to use the Aperture Priority mode (A or Av) with the automatic ISO
We saw in section 4 that the aperture is the element that allows you to control the depth
of field, that is the area of the scene is in focus on the picture.
As I explained above in this section, when I mentioned the Priority to Aperture mode (A
or Av), once you choose the aperture the camera sets the shutter speed.
And now that you have set the automatic ISO, the camera is also busy setting the ISO.
But an ISO restricted to the range that you have determined. In this case, and following
the example, between 100 and 1600.
Imagine that you get a correct exposure thanks to an aperture of f/8, a speed of 1/500s
and an ISO 100.
If you are looking to reduce your depth of field, increase the aperture (f/5.6, f/4, f/2.8 for
example).
At the same time, according to the reciprocity law (section 7), if you change the aperture,
the shutter speed changes as well. In this case it’s increased (1/1000s, 1/2000s, 1/4000s
for example).
And the ISO? It remains the same because 100 is within the reference range.
If, on the other hand, you want to increase the depth of field, reduce the aperture (f/11,
f/16, f/22 for example).

218Your camera’s exposure modes
Again, thanks to the reciprocity law, the shutter speed would have to change as well. In
this case, the shutter speed would be slower. However, when you decide the auto ISO
settings, you have told the camera that it can’t use a speed slower than 1/500s. And you
get the correct exposure at 1/500s.
If the camera can’t slow the shutter speed, what parameter can it increase?
Exactly: the ISO.
How much? As much as the aperture has changed. And according to the example that
would be 1, 2 or 3 stops: 200, 400 or 800.
Aperture Shutter Speed ISO
f/2.8 1/4000 100
f/4 1/2000 100
f/5.6 1/1000 100
f/8 1/500 100
f/11 1/500 200
f/16 1/500 400
f/22 1/500 800
But... There’s always a but, I know.
Imagine now that you have a scene somewhat darker than the previous one and the
settings for a correct exposure are f/4, 1/500s and ISO 100.

219Your camera’s exposure modes
You want to get a starburst effect with a light source and you decide to close the
diaphragm as much as possible (f/22). As an ISO of 1600 (the maximum you have told
the camera you can use) isn’t enough to get a correct exposure, the camera decides to
reduce the shutter speed to 1/250s. It’s more important to get a correct exposure, despite
the minimum shutter speed is changed.
Aperture Shutter Speed ISO
f/2.8 1/1000 100
f/4 1/500 100
f/5.6 1/500 200
f/8 1/500 400
f/11 1/500 800
f/16 1/500 1600
f/22 1/250 1600
According to these examples, you can deduce that using the Aperture Priority mode (A
or Av) combined with the automatic ISO:
• It’s very unlikely that your photo will be dark (underexposed), as the camera gives
more importance to the correct exposure than to the minimum shutter speed you
have selected, and it can be up to 30s. Of course, from a certain shutter speed
onwards you need a tripod to avoid a blurred picture.
• It’s much more likely that your photo will be blown out (overexposed). Imagine you
have selected a very wide aperture and the camera is already using the lowest ISO.
The camera may need a shutter speed faster than the maximum speed allowed by the

220Your camera’s exposure modes
camera (for example 1/4000s), so the sensor will get more light than necessary. Here
the solution would be either to close the diaphragm, or to use an ND filter.
How to use the Shutter Speed Priority mode (S or Tv) with the automatic ISO
As with the aperture, I explained in section 4 that you can freeze motion or show it
thanks to the shutter speed.
Moreover, I told you when describing the Speed Priority mode (S or Tv) in this section
that as soon as you choose the shutter speed, the camera is concerned with determining
the aperture.
And now that you have set the automatic ISO, the camera is also busy setting the ISO.
But an ISO restricted to the range that you have determined. In this case, and following
the example, between 100 and 1600.
Imagine that you get a correct exposure thanks to an aperture of f/5.6, a shutter speed of
1/30s and an ISO of 100.
If you want to show more motion blur, slow down the shutter speed (1/15s, 1/8s, 1/4s for
example).
At the same time, according to the reciprocity law (section 7), if you change the shutter
speed, the aperture varies as well. In this case it’s narrower, to compensate for a slower
shutter speed (f/8, f/11, f/16 for example).
And the ISO? It remains the same because 100 is within the reference range.
But be careful! If you use a shutter speed slower than 1/2s the picture is overexposed. You
can no longer close the diaphragm nor can you lower the ISO...
If, on the other hand, you want to freeze the motion, use a faster shutter speed (1/60s,
1/125s, 1/250s for example).
Again, thanks to the reciprocity law, the aperture would have to change as well. In this
case, the aperture would be wider. However, your camera can not open the diaphragm
beyond f/2.8 with a shutter speed of 1/250s. What parameter can you increase?

221Your camera’s exposure modes
Exactly: the ISO.
How much? As much as the shutter speed has changed. And according to the example
that would be 1 stop, or ISO 200.
Aperture Shutter Speed ISO
f/2.8 1/4000 1600 (underexposed)
f/2.8 1/2000 1600
f/2.8 1/1000 800
f/2.8 1/500 400
f/2.8 1/250 200
f/2.8 1/125 100
f/4 1/60 100
f/5.6 1/30 100
f/8 1/15 100
f/11 1/8 100
f/16 1/4 100
f/22 1/2 100
f/22 1s 100 (overexposed)
However, a shutter speed of 1/250s is not fast enough to freeze motion the way you want.
That’s why you decide to set it to 1/4000s, the maximum the camera allows.

222Your camera’s exposure modes
And… Oh surprise! The image is underexposed because you would need an ISO of 3200
but your ISO range only allows the camera to use a maximum ISO of 1600.
According to these examples, you can deduce that using the Shutter Speed Priority mode
(S or Tv) combined with the automatic ISO:
• If you need an ISO that goes beyond the top of the range you set, your photo is dark
(underexposed).
• If you need a slow shutter speed your photo will be probably blown out
(overexposed) because the sensor received light for too long.
How to use the Manual mode (M) with the automatic ISO
Thanks to the Manual mode (M) you are the master of the universe: you control the
aperture and the shutter speed as you like.
Let’s see an example to see how you can combine it with the automatic ISO.
You are in a basketball court watching a game and you want to take pictures of the
players in action.
You want to have enough depth of field to capture the players in their environment. You
also want to freeze the motion.
These artistic and circumstantial decisions lead you to the correct exposure settings: f/8
and 1/1000s. The camera automatically chooses ISO 1600 to get the correct exposure.
It’s a high ISO because, although there is artificial lighting, the light in the scene is not
powerful enough to use a lower ISO.
After the first photos, you check that you can freeze the motion at this particular shutter
speed.
But you try to see how the pictures look at 1/2000s. You check the photo and you see
that it’s dark (underexposed). Of course, you would need an ISO of 3200 but you have
determined a maximum ISO of 1600 to control the noise. You set the shutter speed back
to 1/1000s.

223Your camera’s exposure modes
Everything is going well, but at some point of the match you decide to capture a few
close-ups of the players while they are shooting some free throws. You slower the
shutter speed to 1/250s. They stand still so you don’t need such a fast shutter speed.
Moreover, you increase the aperture to f/4 to separate the players from the background,
getting a blurred background and a sharp player. The camera automatically reduces the
ISO to 100 to keep the right exposure.
The pictures aren’t bad, but you decide to shoot at the maximum aperture that your
lens allows, f/2.8. You’re curious to see what the bokeh looks like. You get a blown out
(overexposed) image.
The reason is that the camera had already reached the ISO base of 100 for f/4, so you
can’t lower it anymore. Furthermore, the camera sensor captures more light than
necessary. The solution would be to increase the shutter speed 1 stop to have a correct
exposure again by selecting 1/500s.
Aperture Shutter Speed ISO
f/2.8 1/250 100 (overexposed)
f/4 1/250 100
f/8 1/1000 1600
f/8 1/2000 1600 (underexposed)
If you have any questions, write them in the comments section at the end of this guide. I
am here to help you!
Let’s keep going.
In this section, I’ve mentioned several times the exposure compensation button. It’s a
very useful function that allows you to force the camera to overexpose or underexpose a
scene by a certain number of stops (or fractions of stops).
In short, it helps you get the exposure you are looking for.

14How and when to use
the exposure compensation (±EV)

225How and when to use the exposure compensation (±EV)
Imagine that you select the metering method that suits you best. In addition, you
choose an advanced exposure mode: P mode or one of the semiautomatic (neither the
Automatic nor the Manual).
After performing different exposure tests with different aperture, shutter speed and
ISO settings, you can’t make the camera give you the exposure you’re looking for on no
account.
The photo is either a bit underexposed or a bit underexposed.
How can you fix it?
Don’t panic because you have an ace up the sleeve: your camera’s exposure
compensation tool (±EV).
Exposure compensation button (±EV) located at the bottom right

226How and when to use the exposure compensation (±EV)
I’ve spoken briefly about it throughout the article but it’s time to analyze it in depth.
How it works
First, let me tell you that if you use the camera in Manual mode (M), it doesn’t make any
sense to use the exposure compensation. Depending on the final image you’re looking
for, you can get the same result by increasing or decreasing a stop (or a fraction of a
stop) the aperture, shutter speed or ISO.
To use the exposure compensation function (±EV) to increase or decrease the exposure
(capture more or less light), select the P mode or one of the semi-automatic modes
(Aperture Priority mode or Shutter Speed Priority mode).
In other words, this function forces the camera to decrease or increase by a certain
number of stops (or fractions of steps) the exposure measured by the light meter
(centered at zero).
What happens when you compensate the exposure in Aperture Priority mode (A or Av)?
Imagine that you set the aperture to f/8 and that the camera suggests a shutter speed of
1/40s and an ISO of 100. With these values, the light meter establishes that the exposure
is going to be correct (light meter centered at zero):
If the resulting photo looks too dark, you can compensate the exposure and
overexposing the next shot.

227How and when to use the exposure compensation (±EV)
How much should you compensate?
Whatever you consider appropriate. It’s about trying and adjusting the exposure as you
want.
Check the histogram, it will help you choose the appropriate exposure compensation
value (±EV).
If you compensate exposure one stop, the light meter will display this:
Now, take a second picture.
Nikon D4s | 18mm | f/8 | 1/40s, 1/20s, 1/80s | ISO100 | 6650K
What happened?
The camera has established that the new combination to get that exposure you have set
is an aperture of f/8, a shutter speed of 1/20s (one more stop) and an ISO of 100.
If you think the first image is too bright, compensate it by underexposing the next shot.
For example, one stop. And so your light meter now displays this:

228How and when to use the exposure compensation (±EV)
What’s the new combination that your camera establishes?
An aperture of f/8, a speed of 1/80s (one stop less) and an ISO of 100.
As you can see, you’re changing the shutter speed, since the diaphragm is where you
had set it before taking the photo.
In short, when overexposing, the camera uses a slower shutter speed (captures more
light) and when underexposing, it uses a faster shutter speed (capture less light).

229How and when to use the exposure compensation (±EV)
What happens when you compensate the exposure in Shutter Speed Priority mode (S or Tv)?
Imagine that you set a shutter speed of 1/250s. And the camera suggests an aperture of
f/8 and an ISO of 100.
If the resulting photo looks too dark, compensate the exposure overexposing the next
shot. What you deem appropriate, for example, one stop. Now your light meter shows
this:
What happened?
The camera has established that the new combination to get that exposure that you have
set is an aperture of f/5.6 (one more stop), a shutter speed of 1/250s and an ISO of 100.
If you think the first image is too bright, compensate the exposure underexposing the
next shot. And if you compensate the exposure decreasing it by one stop, the light meter
displays this:
What’s the new combination that your camera establishes?
An aperture of f/11 (one stop less), a shutter speed of 1/250s and an ISO of 100.

230How and when to use the exposure compensation (±EV)
As you can see, you’re changing the aperture, since the shutter speed is where you had
set it before taking the photo.
In short, when overexposing the camera uses a greater aperture (captures more light)
and, when underexposing it uses a smaller aperture (captures less light).
Perfect! Now you know how you can compensate the exposure.
Let’s move on to the next section. I’ll teach you another technique that will allow you
greater control of exposure: blocking the exposure.

15How and when to lock
the exposure (AEL o AE-L)

232How and when to lock the exposure (AEL o AE-L)
When you use one of the automatic or semi-automatic exposure modes, pressing the
exposure lock button (AEL or AE-L) prevents the camera from recalculating the exposure
for each new shot.
Once you have metered the light where and when you want (it doesn’t have to be in the
scene you want to photograph or at the time of the photo), and calculated the exposure
with the light meter based on that light, this allows you to recompose your frame and
take the photo while maintaining the same exposure.
You can use this button in landscape photography for example. Take the camera, meter
the light in the sky (brighter area) with the spot metering mode, lock the exposure,
overexpose so that the dark areas aren’t underexposed (by +2EV according to my
experience), recompose and take the picture.
If you shoot in Manual mode (M) it doesn’t make sense to use this button.
In this case, you decide the exposure metering the light where you want and selecting
all the parameters. By definition, in Manual mode (M) the camera doesn’t automatically
change the exposure at each shot. Actually, the camera doesn’t change anything… ;)
How it works
The camera’s internal light meter continuously meters the light reaching the sensor.
So for every new shot, the camera performs a new light metering and a new exposure
calculation.
When shooting, depending on the exposure mode you’ve chosen, your camera does one
of these three things:
• In the automatic modes (Auto, Scenes, P), the camera meters the light and decides
for you all the exposure settings (aperture, shutter speed and ISO).
• In the semi-automatic modes, when shooting the camera meters the light and
chooses the variable that you don’t set. For example, if you select the Aperture
Priority mode (A or Av) and set the aperture to f/5.6, the camera decides the most
appropriate shutter for that aperture (taking into account ISO). On the contrary,

233How and when to lock the exposure (AEL o AE-L)
in the Shutter Speed Priority mode (S or Tv) you set the shutter speed (for example
1/1000s) and your camera, depending on the metering (and ISO), selects the suitable
aperture to balance the exposure.
• In Manual mode (M), you meter the light and the camera indicates to you through
the light meter if the aperture, shutter speed and ISO combination you have set will
result in a correctly exposed, underexposed or overexposed photograph. And the best
part is that, in the last two cases, it also tells you how dark or bright your image will
be. But it never changes the exposure, it simply informs you.
However, even if the metering is continuous, when you use the automatic or semi-
automatic exposure modes, you can force your camera to meter the light at a certain
time and place, and then decide the best time and frame to shoot.
This is what we call locking the exposure.
Note: In addition to locking the exposure you will also lock the white balance if you have
it set to automatic.
How to lock exposure with the AEL or AE-L button
To lock the exposure, use the AEL, AE-L or asterisk (*) button, depending on the camera
model you have.
The exposure lock button works in at least two different ways:
1-If you press it first and then release it, the exposure remains locked until you take the
picture or press it again.
2- If you hold the button down, the exposure remains locked. And as soon as you
release it, the light meter recalculates the exposure settings with which you are going
to take the picture.
It all depends on your camera and how it’s configured. Take a look at the instruction
manual to see how you have yours and not getting mixed up.

234How and when to lock the exposure (AEL o AE-L)
When you can use it
I’ll give you an example so you can see how and when you can use the exposure lock
button.
Imagine that you want to take a portrait using the semi-automatic Aperture Priority
mode (A or Av). You chose this mode because you are interested in controlling the depth
of field through the aperture. You, not the camera, want to determine the aperture.
To expose, you want to use only the light that bounces off the model. You don’t want the
camera to use the scene backlight of the scene.
Nikon D4s | 85mm | f/1.4 | 1/800s | ISO 450 | 7200K
In that case, choose the aperture you want, and use the spot metering system to meter
the light on the face of the model. Then press the exposure lock button.
That way, you can recompose while ignoring the camera. In fact, it will recalculate the
exposure according to the light of a spot of the scene other than the model.

235How and when to lock the exposure (AEL o AE-L)
But be careful!
There’s a small detail to keep in mind.
When locking the exposure, and before recomposing, you should press the shutter
button halfway to lock the focus on the model.
Another solution may be to choose a focus point that falls on the model, but that
depends on the number of points your camera has.
Let’s look at a second example.
Exposure locking is very useful when taking a panoramic picture from multiple shots.
This ensures that all shots are homogeneous and have the same light.
In this case, you should lock the exposure in the first photo. Then, use the same
exposure for the rest of the shots.
Exposure lock in Manual mode (M)
By definition, the exposure is always locked in Manual mode (M) because it only depends on the aperture, shutter speed and ISO values you’ve set.
Therefore, if you want to manually expose for a certain light, you simply have to meter that light and look at the light meter when adjusting the exposure triangle values. Once you have the exposure you want, recompose, focus and shoot.
Of course, if you use a wide aperture (f/1.4, f/1.8, f/2.8...) be careful because focusing and recomposing can result in an image out of focus.
Remember that when moving you are varying the distance between the sensor and the subject so your depth of field varies as well!
So far, the light meter has been a great help in exposing your photographs. And it will continue to help you.
But, there are situations where it fails, it doesn’t measure light correctly. When you face such situations, you should know how to react.
I’ll tell you how in the next section.

16Be careful with the light meter
(it sees everything at an 18% gray)

237Be careful with the light meter (it sees everything at an 18% gray)
Although the light meter is an essential tool to expose your photographs, it isn’t always
accurate when estimating the exposure. So you have to know its limitations and act
accordingly.
For example, when you take a photo, the white elements of the scene appear sometimes
gray in the image. This indicates that the image is underexposed.
Other times, however, the black elements of the scene look gray. Your image is
overexposed.
Well, if you have any of these problems, the light meter is guilty.
If you face these issues, overexpose or underexpose the scene depending on the case. Or
calibrate the light meter so that whites in the scene look white in the photo as well.
Later on we’ll see how you can do it.
How the light meter works
When calculating the exposure, your camera’s internal light meter assumes that the
scene you’re about to photograph reflects on average 18% of the incident light.
In other words, the light meter assumes that the middle tone of the scene is a medium
gray. It’s like it’s watching the whole scene in a medium gray tone.
It’s called “medium gray” because it’s the tone that lies right in the middle of white and
gray. This tone reflects an 18% incident light. Remember that white reflects 100% of
incident light and black 0%.
Surely after reading this sentence you are wondering...
“Why is the medium gray a tone that reflects 18% of incident light and not 50%? Didn’t you say it
was in the middle? Why not 50%?”
Don’t put on that face, sometimes I have fortune-teller skills. ;)
Well, I’ll try to explain it to you as simply as possible.

238Be careful with the light meter (it sees everything at an 18% gray)
Legend has it that it was Ansel Adams who devised that “18% gray”. While he was
developing the zone system I’ll tell you about in section 20, he needed to define
somehow a “medium gray”. And, quite arbitrarily, he decided to set it at 18%.
As time went by this concept became popular among photographers, and nowadays it
has become a reference figure.
However, this figure is neither exact nor mathematical. What’s more, camera
manufacturers choose their own “medium gray” and most likely your digital camera will
use a figure of about 12% as a “medium gray” reference.
The truth is that the number is not important because 12% or 18% means nothing. The
concept of “medium gray” has nothing to do with the fact that “medium gray reflects
50% of light”. Not even with the idea that “it is a tone halfway between that which
absorbs all light (pure black) and that which reflects all light (pure white).”
Actually, it has to do with your perception. Or rather, your eyes.
Did you know that your eyes are logarithmic, and nonlinear, receptors?
Yep. That’s the way it is.
This means that if a light source increases its brightness 4 times, your eyes will only see
it twice (2x) as brighter. If that same source increases its brightness 32 times, your eyes
will only perceive it 5 times brighter. And if it increases 128 times, your eyes will only
notice it 7 times brighter.
Obviously, these figures are not real at all. They are only an order of magnitude for
you to understand the concept. As you can imagine, measuring how you perceive the
brightness of anything is very complicated and varies from one person to the other.
The important thing, the idea that you have to keep in mind, is that this strange
logarithmic nature of your eyes is what prevents the “average gray” from being 50%.
That said, let’s go back to the light meter and how it works.
After this explanation, there is no doubt that the cameras’ light meters are designed to
average the bright and dark tones of the scene when they’re exposing. Therefore, this
average is the starting point to calculate the exposure.
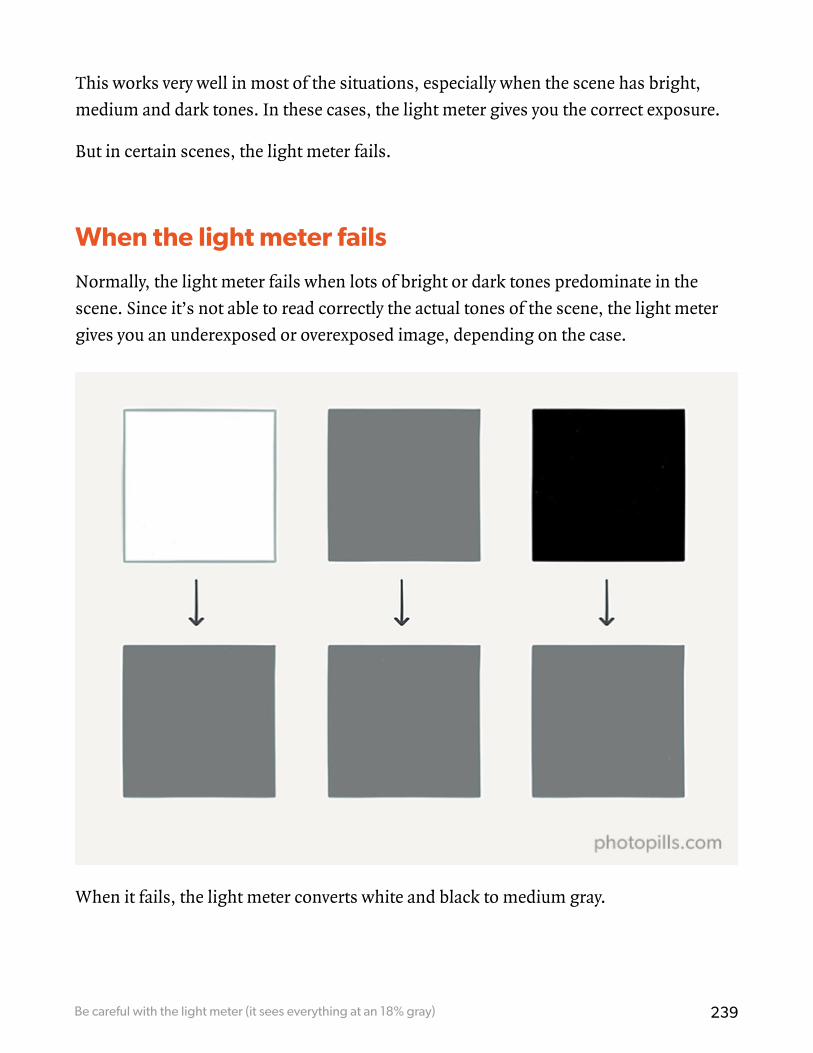
239Be careful with the light meter (it sees everything at an 18% gray)
This works very well in most of the situations, especially when the scene has bright,
medium and dark tones. In these cases, the light meter gives you the correct exposure.
But in certain scenes, the light meter fails.
When the light meter fails
Normally, the light meter fails when lots of bright or dark tones predominate in the
scene. Since it’s not able to read correctly the actual tones of the scene, the light meter
gives you an underexposed or overexposed image, depending on the case.
When it fails, the light meter converts white and black to medium gray.

240Be careful with the light meter (it sees everything at an 18% gray)
For example, if you capture a scene where white predominates (a landscape with ice or
snow), the light meter assumes that only 18% of light is reflected. As a result, it gives you
an exposure that turns the white color into a medium gray. The image is underexposed.
Nikon D4s | 112mm | f/16 | 1.9s | ISO 100 | 8100K
The same thing happens if blacks predominate: the light meter gives you an exposure
that turns black into medium gray. In this case, the image is overexposed.

241Be careful with the light meter (it sees everything at an 18% gray)
Olympus OM-D E-M1 | 300mm | f/5.6 | 1/320s | ISO 200 | 7100K
How to prevent it from failing
To get correctly exposed photographs so that the whites are white and the blacks are
black, you only have to compensate the exposure as I explained in section 14.
The other alternative is to calibrate the light meter using an 18% gray card.

242Be careful with the light meter (it sees everything at an 18% gray)
How can you do it?
Place the 18% gray card where the subject you want to photograph is to match the light
that will then hit it. I suggest you tilt the card a bit to avoid reflections.
Set your camera to spot metering, meter the light on the card, expose it so the light
meter is centered at zero and lock the exposure.
243Be careful with the light meter (it sees everything at an 18% gray)
The larger the frame surface the card occupies, the better. The light meter now
recognizes that the scene is correctly exposed.
Once you’ve done this, remove the gray card and take the photo.
Since you have calibrated the light meter, you get a correctly exposed photo. Indeed,
whites appear white and blacks are black.
At this point, you should know enough to understand what I’ll explain shortly: how to
expose!
In other words, I’ll teach you how to get a properly exposed photograph straight on
camera.
But before moving on, I’d like to explain you a somewhat different exposure technique.
With this technique you’re going to expose your photographs not to have them correctly
exposed in the camera, but to capture the maximum information of the scene and
expose later in post-processing.
Let me explain you how to expose your histogram to the right (ETTR).

17Expose your histogram
to the right (ETTR)

245Expose your histogram to the right (ETTR)
Nikon D4s | 85mm | f/2 | 1/800s | ISO 100 | 7500K
Exposing to the right (ETTR) is a useful and controversial exposure technique.
Considered by some photographers as the Philosopher’s Stone of digital exposure,
the ETTR technique allows you to get images with the maximum possible detail in the
shadows while the highlights are intact (no information loss). That is, without blowing
out the highlights.
But be careful, you could ruin your photos if you don’t use this technique correctly.
You should know that this technique is not for beginners. If you still don’t understand
and master the basics of the exposure (basically everything I’ve explained so far!), then
this section can be a bit confusing.
But if you do understand the exposure basics and you want to get photos with the best
quality possible (technically of course, the artistic aspect is another subject), the ETTR is
certainly a technique that will be very useful in certain situations.
Later on we’ll see which ones.

246Expose your histogram to the right (ETTR)
What is the histogram ETTR
The idea behind the ETTR technique is to optimize the exposure in such a way that you
get a photo with the best quality possible. In other words, so that the sensor captures the
maximum information possible.
Let’s put it another way, what you’re looking for is to get a photo with as much detail as
possible in both the shadows and the highlights.
All in all, it’s about exposing the photo to get the histogram as far as possible to the
right (but without touching the right side).
Example of histogram using the ETTR technique. You’ll find the picture corresponding to this histogram a few paragraphs below.
Remember that if the histogram touches the right side it means that you are losing information on some of the brighter tones. And you won’t be able to capture any detail there, they’ll be blown out.
Many photographers expose the scene to get the correct looking image exposed directly on camera, so no further editing is needed. However, finding the optimal exposure is a completely different matter.

247Expose your histogram to the right (ETTR)
When using the ETTR technique, instead of exposing the scene “correctly”, you
overexpose it so that the photo is as bright as possible, but without blowing out the
highlights (because you don’t want to lose information). This way, you capture a lot of
detail in the shadows.
Nikon D4s | 85mm | f/2 | 1/640s | ISO 100 | 7000K
To do this, you have to increase the exposure, usually opening the diaphragm more or
using a slower shutter speed to capture more light.
I don’t recommend you to push the histogram to the right by increasing the ISO.
Actually, it doesn’t make any sense. The only thing you do is increasing the grain (noise)
in the photo, counteracting the positive effects of the ETTR.
Then, using a post-processing software (Lightroom in my case), you just have to darken
the photo by reducing the exposure until you get the result you want.
Take a look at these two histograms (taken from the photo at the beginning of this
section).
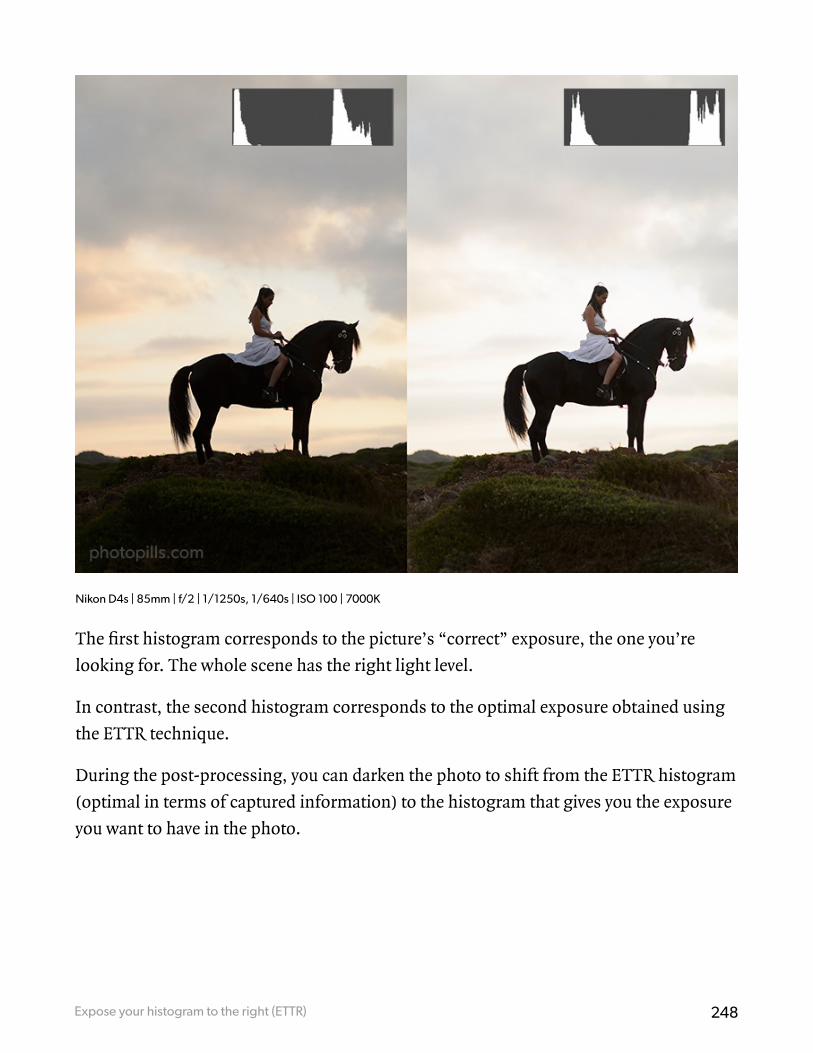
248Expose your histogram to the right (ETTR)
Nikon D4s | 85mm | f/2 | 1/1250s, 1/640s | ISO 100 | 7000K
The first histogram corresponds to the picture’s “correct” exposure, the one you’re
looking for. The whole scene has the right light level.
In contrast, the second histogram corresponds to the optimal exposure obtained using
the ETTR technique.
During the post-processing, you can darken the photo to shift from the ETTR histogram
(optimal in terms of captured information) to the histogram that gives you the exposure
you want to have in the photo.

249Expose your histogram to the right (ETTR)
The histogram you should avoid
The rule of thumb when exposing to the right is to avoid overexposing too much. You
should prevent the histogram from touching the right side.
Yes, you should capture more light than “usual” but without going overboard!
If you capture too much light, the whites (or highlights) of your image are completely
white. This means that you aren’t capturing any information in that part of the image. It
doesn’t have any detail.
Also, keep in mind that bringing back the detail in the blacks and the shadows is
relatively easy with the editing process. However, it’s almost impossible to retrieve
information from the blown out highlights.
This is one of the main reasons why many photographers prefer not to use the ETTR, for
fear of blowing out the highlights.
So prevent by all means the right side of the histogram from touching the right edge of
the graph. The histogram below is an example that you should avoid no matter what.

250Expose your histogram to the right (ETTR)
Nikon D4s | 85mm | f/2 | 1/640s | ISO 100 | 7000K You’ve clearly overexposed the image too much. The histogram is out of the picture!
“Fine Toni, but how do I get a good ETTR?”
I’ll tell you right away.

251Expose your histogram to the right (ETTR)
How to expose using the ETTR technique
To use the ETTR technique you should:
• Shoot in RAW.
• Use the native ISO.
• Use the Manual exposure mode (M) or one of the semi-automatic (Aperture Priority
or Shutter Speed Priority) modes.
That being said, there are several ways to ETTR without blowing out the highlights.
I’m going to explain you two methods, an easy one and a more advanced one (the one I
use).
Easy method: Look at the histogram
Take a photo with light meter centered at zero and analyze the right part of the resulting
histogram.
If the histogram doesn’t touch the right edge, take a second photo after increasing the
exposure:
• If you use the Manual mode (M), use a larger aperture or a slower shutter speed.
Changing one or the other depends on what is essential in the photo (depth of field
or motion).
• If you use one of the semi-automatic exposure modes, use the exposure
compensation button (±EV).

252Expose your histogram to the right (ETTR)
Nikon D4s | 85mm | f/2 | 1/2500s | ISO 100 | 7000K This histogram isn’t touching the right edge. You have room to increase the exposure without blowing out the highlights.
Keep shooting while increasing the exposure (overexposing) until the histogram warns
you that the highlights are blown out. Keep the exposure that gives you a histogram as
far to the right as possible but without touching the right side.

253Expose your histogram to the right (ETTR)
This is the histogram you were looking for. It’s about to touch the right edge.
Apart from the histogram, you can use the “blinkies” on your camera.
When you select this option, pure white areas blink on your camera screen. You’ll see
that the camera shows you these areas blinking from white to another color, depending
on the model of your camera.

254Expose your histogram to the right (ETTR)
Although the “blinkies” are more visual than the histogram, they are also more limited.
They show only one value: white.
This method works great when you’re shooting and you haven’t previously calculated
the overexposure limit of your camera.
This is something that I’ll teach you right away with the advanced method.
Advanced method: Compensate the exposure
I personally prefer to use this second method because it gives me more precision and
saves me a lot of time when I’m out photographing.
The above method isn’t 100% reliable. Unfortunately, your camera’s histogram is not
as accurate as it seems. Current cameras are not able to show you the histogram of the
RAW file, even though you’re shooting RAW (which you should always do, whether you
want to ETTR or not).
In fact, your camera displays the histogram of a JPG file developed from a RAW file.

255Expose your histogram to the right (ETTR)
This means that even if your camera is telling you that you’ve taken the exposure to the
limit, blowing out some of the highlights (the histogram touches the right side), there
may still be scope to recover those highlights in post-processing.
Similarly, the “blinkies” option has the same problem: its basis for setting the measure
is the developed JPG file, not the RAW one.
If you want to be more precise, use the following alternative.
Your goal with this method is to find out how much you can overexpose the scene with
respect to what the light meter considers to be the correct exposure (centered at zero),
without blowing out the highlights, (i.e. capturing detail).
In other words, you should calculate the overexposure limit of your camera. And for
that, use a sheet of white paper.
Here we go!
At home, take a white sheet of paper and go to a room with good lighting. The paper
sheet should have a pure white color (neither dull nor grayish).
Now select the Manual shooting mode (M) and the spot metering mode.
Point the metering point at the blank sheet and adjust the aperture, shutter speed and
ISO setting to center the light meter at zero.
Imagine this happens when you select f/2.8, 1/60s, and ISO 800. Then, take a picture of
the white sheet of paper.
As we have seen in section 16, when you center the light meter at zero the white sheet
has a medium gray in the photo (gray reflecting only 18% light).
Well, the idea is to take photos by gradually increasing the exposure until the histogram
almost touches the right side and, at the same time, you get a truly white sheet of paper.
To do this, simply use a larger aperture or use a slower shutter speed.
Then, check the light meter and keep the overexposure value you had to use to get a pure
white paper sheet in the picture.

256Expose your histogram to the right (ETTR)
This value is called overexposure limit of the camera. It’s usually between +1.5EV and
+3EV.
Imagine that your final exposure is f/2.8, 1/13s and ISO 800. There are 2 and 1/3 stops
between 1/60s and 1/13s (1/60 -> 1/30 -> 1/15 there are 2 stops and from 1/15 to 1/13 there is
1/3 of stop). So, in this case, the overexposure limit of your camera would be +2 1/3 EV.
Nikon D4s | 70mm | f/2.8 | 1/60s | ISO 800 | 3400K

257Expose your histogram to the right (ETTR)
Nikon D4s | 70mm | f/2.8 | 1/13s | ISO 800 | 3400K
Imagine that the overexposure limit of your camera is +2 1/3 EV. To simplify it we can
suppose it’s +2EV, this way it will be easier to use.
Now you know that metering the light on the scene’s brightest spot (using the spot
metering) and overexposing the light meter by +2EV, you’ll never blow out the photo.
You’ll always capture detail in the brighter tone.
Congratulations!
Now you know how to ETTR.

258Expose your histogram to the right (ETTR)
When you should use the ETTR
The best situations to ETTR are those in which the light is relatively controlled. It’s also
important that they allow yourself some extra time if you don’t get what you’re looking
for at the first attempt.
First, in scenes in which you really want to create a very high quality image and in which
the risk of generating noise is minimal.
Most landscape (nature and urban), architecture, in studio (where you are the one who
controls the light) photos, and some kind of portraits are the perfect excuse to put the
ETTR into practice.
Secondly, in scenes with an average contrast. The fact that there is such a wide range
between the highlights and the shadows confuses the camera and turns it into a difficult
metering scene. Here the ETTR helps you get a very precise exposure to avoid blown out
highlights or clipped shadows while minimizing noise.
For example, imagine that you are on the beach photographing a couple of people
dressed in white.
It’s essential that the clothes aren’t blown out. So a good option is to meter the light in
the clothes of your subjects (the brightest part of your frame) and overexpose depending
on the metering you get. In doing this, you take the histogram to the limit while
preserving the bright areas (highlights), making sure that they have the maximum detail
possible.
Finally, in high contrast scenes with a strong dynamic range.
For example, imagine that you’re in a forest where the shadows of the trees and the parts
of the trunk that the Sun isn’t illuminating are very dark. At the same time, the sunrays
that go through the treetops are very strong and brighten the scene.
In this case, the best option is to sacrifice part of the sky and concentrate on the shadows
to get the maximum detail in the tree barks and the foliage of the ground. Meter the
light in one of the trunks (the darkest part of your frame) and overexpose depending on
the metering you get. Thus, you take the histogram to the limit preserving the dark areas
(shadows), making sure that they have the maximum detail possible.

259Expose your histogram to the right (ETTR)
When you shouldn’t use the ETTR
In theory, ETTR works in any situation because there is always an optimal exposure for
every image. The brightest possible one without blowing out the highlights.
But if you think for a minute, in practice this is not quite true.
When is it not?
When the scene doesn’t allow you to use the base ISO
This happens when you are forced to increase the ISO to get the exposure you want.
This happens in:
• Night photography.
• Indoors photography without a tripod and without a flash.
• Concert photography.
For example, imagine that it’s very windy and you want to photograph a landscape with
dark rocks and trees.
The scene seems perfect to ETTR and thus capture detail in the darker areas. But it’s
actually not because if you try to increase the exposure with a slower shutter speed, the
trees are blurred because of the wind.
On the other hand, if you open the diaphragm, you will capture a shallower depth of
field, and when photographing a landscape, you seek the maximum depth of field
possible.
Therefore, to increase the exposure, and thus effectively ETTR, you would have to crank
up the ISO.
The problem is that ETTR playing around with the ISO doesn’t make any sense because,
as soon as you darken the photo in post-processing, noise will appear. And this
counteracts the positive effects of ETTR.
So increase the ISO only if you need so to get a correct exposure.

260Expose your histogram to the right (ETTR)
When you can miss the shot
It’s hard to ETTR if you don’t have time to take the photo you want.
For example, wildlife or wedding photographers prefer not to miss the shot, and use a
safer and faster exposure.
That is, an exposure that, even if it’s darker, presents a lower risk of blowing out the
highlights. Some photographers call this technique “exposing to the left” (ETTL).
In this case, although it would be great to have as much detail as possible, it’s better not
to miss the shot.
When you shoot in JPG
Finally, if you usually shoot in JPG (something you should stop doing NOW; haven’t I
told you? :P), ETTR doesn’t make any sense. Darkening a JPG in post-processing can
corrupt the colors.
Moreover, a JPG file contains very little information compared to a RAW file. They are
8-bit files. It doesn’t make sense to use a technique like ETTR in an image format with
so many limitations.
Why not centering the light meter, without ETTR
The obvious answer is: because you lose information. The sensor captures less
information in the shadows.
And if you lose information, you aren’t able to recover detail from the shadows (dark
tones).
“Yes Toni, I get it, but why do I lose information in the shadows?”
Oh, that’s a very good question my friend.
The answer is in the sensor.
Warning!

261Expose your histogram to the right (ETTR)
From here on, you can continue reading if you are a photography geek. But if you don’t
consider yourself geek enough, you can skip to the next section: “How to expose”.
Let’s start!
Why the sensor captures less information in the shadows
Well, because the sensor captures light in a linear way.
As I explained to you in section 16, your eyes respond to light in a non-linear,
logarithmic way, and they are more sensitive to the shadows than to the highlights.
But the sensors of the cameras respond to light in a linear way. Each photosite is
proportionally loaded with information according to the amount of light it receives.
This means that if the camera displays the image as the sensor captures it, you would
realize that it doesn’t look like the scene your eyes are seeing.
Let’s dig deeper... Let’s see how the camera captures the information.
Imagine that a camera has a dynamic range of 6 stops. That is, there are 6 stops between
the darkest and brightest tone you can capture in detail in the same frame.
Assume also that the camera has 12 bits of information per RGB channel (red, green and
blue as we saw in section 10).
The number of different values that the camera can store for each channel depends on
the number of bits it has:
• With 1 bit, it can represent 2 different values (21): 0 and 1.
• With 2 bits, 4 values (22): 00, 01, 10, 11.
• With 3 bits, 8 values (23): 000, 001, 010, 011, 100, 101, 110, 111.
Have you noticed the pattern? The number of different values is 2 raised to the number
of bits. With n bits, you could represent 2n different values.
Thus, in this case, each channel can store 4096 (i.e. 212) different values, with 0 being
the darkest tone (pure black) and 4095 being the brightest value (pure white).

262Expose your histogram to the right (ETTR)
Usually, you would assume that having 4096 values and 6 stops, the camera allocates
682 values (4096/6) to capture in detail the tones of each stop.
But no, it’s not.
Actually, of the 4096 values, half of them are devoted to the brightest stop.
This is because the CCD or CMOS image sensor of your camera responds to light in a
linear fashion. Instead, the amount of light captured in each stop varies exponentially.
Each stop captures twice as much light as the previous one.
Therefore, a fully charged sensor shows pure white, saving all the 4096 values.
When you underexpose by 1 stop (-1EV) the sensor only captures half the light and,
having a linear response, retains half of the values: 2048.
Therefore, the brightest stop keeps 2048 values. The other values are divided among the
other stops.
If you keep underexposing by 1 stop, the sensor recaptures half light, halving the saved
values, which gives us a total of 1024.
As you can see, for each stop you decrease, the sensor only holds half the values of the
previous stop. The brightest stop has 2048 different values, the next one has 1024, the
third 512 and so on until you reach 64 for the darkest tone.

263Expose your histogram to the right (ETTR)
Graphically, the brighter the stop, the more information the sensor preserves to
represent it.
In the previous diagram you can see that there are many values to encode the highlights
zone, an area where people don’t have a lot of sensitivity to differentiate tones. In
contrast, less values are allocated to the dark areas, where we do have the ability to
differentiate tones. This is due to the linear nature of the camera sensors.
But you see the scene (you capture the light) in a logarithmic way, not in a linear way.
So, in order to display an image similar to what your eyes see, the camera applies a
gamma curve to the image.
This curve stretches the tones of the dark areas and compresses the tones of the bright
areas, distributing the tones in similar way to what your eyes perceive.
Let’s see the difference in the following simulation.
The left side shows how a photo would look showing what captures the sensor and the
right side how it would look corrected with a gamma curve, adapting it to what your eyes
see. You can clearly see that the shadows area has much more detail when applying the
curve.

264Expose your histogram to the right (ETTR)
The problem is that by applying the gamma curve to the image, the tonal distribution is
corrected, but the amount of values (or information) for each tone remains the same. So
you’ll have much more detail and different shades in the highlights than in the shadows.
And you have to take noise into account as well.
When capturing light, the sensor photosites generate noise that’s added to the signal.
This is due mainly to sensor heating or electronics imperfections. This noise is more or
less constant, so the more light is obtained (more number of photons), the greater the
signal-to-noise ratio, making noise less visible.
On the contrary, if few photons are obtained, the signal-to-noise ratio will be very low,
so the noise will be very visible.
This inevitably causes noise in the darker areas of the image due to the little information
the camera has captured compared to the brighter tones.
The conclusion I want you to retain is that the camera captures less information and
noise becomes more visible in the shadows than in the highlights.
Therefore, use the right side of the histogram whenever you can. You’ll get a photograph

265Expose your histogram to the right (ETTR)
with the maximum information possible both in the shadows and the highlights while
reducing the noise level. But always avoiding blowing out the highlights.
Later on in post-processing you can reduce the exposure until you reach the one that
you consider “correct”. All this without generating noise, since you’ll be using all the
original information.

18How to expose step by step
267How to expose step by step
Each photographic situation or type of photograph requires its own exposure method.
Exposing to capture the Milky Way, taking a portrait or shooting wildlife is completely
different.
So the smart thing is to teach you how to expose in each case. That’s why, in section 24,
you’ll find lots of examples explained step by step. I recommend that you study them
well and practice them.
But before studying specific cases, I would like you to have a more general view of how
to expose. To do this, I want to show you a logical flow of decisions that you should take
when exposing your photos.
The decisions that you should take
It’s nothing new. It’s the same logical flow that I’ve been using throughout the article
and that can be summarized in the following steps:
• Decide the photo you want to take, analyze the light conditions and the scene limitations (section 4). The photo you have in mind (the desired effect) determines some values of the exposure triangle as well as the exposure mode, the light metering mode, whether or not to compensate the for exposure, where to focus, etc. It all starts with the idea.
• It determines the aperture and/or shutter speed and/or ISO that gives you the creative aspect you are looking for: depth of field, motion or not, starburst effect of the light spots, etc. (section 4).
• Choose the exposure mode that suits you best (section 13): Aperture Priority (A or Av), Shutter Speed Priority (S or Tv), Manual (M), etc.
• Set the metering mode that suits you best (section 12): spot, evaluative, etc.
• Meter the light where you think is best. Normally it will be in the so-called key tone. I’ll explain everything later on in this section.
• Use the light meter to adjust the aperture and/or shutter and/or ISO settings that give
you the exposure you want.

268How to expose step by step
• Compensate the exposure if necessary (section 14). O use the ETTR technique if you
wish (section 17).
• Focus, frame and shoot.
• Verify that you have captured the desired effect (depth of field, motion, etc.) and the
desired exposure (check the histogram as explained in section 10). Otherwise, adjust
the aperture and/or shutter speed and/or ISO accordingly.
• If the dynamic range of the scene exceeds that of the camera, use filters (section 22)
or the bracketing technique (section 23).
In some situations you can skip some of these steps. For example, when you are
photographing the Milky Way, you won’t have to meter the light (it’s nighttime). So
forget about metering modes and key tone.
In this case, simply select the Manual exposure mode (M) and set the exposure triangle
values allowing you to get the photo you are looking for:
• You want the stars as spots, so set the maximum shutter speed to avoid Star Trails
(with the NPF rule or the 500 rule).
• The idea is to capture the maximum number of stars and the brightest possible,
so set the maximum aperture (f/2.8 or whatever your lens allows) to capture the
maximum light within the set shutter speed .
• To compensate the exposure and capture more stars, crank up the ISO as much as
you can within your camera noise limits (1600, 3200, 6400, etc.).
• Take a test photo and adjust the exposure triangle setting by checking the histogram.
Do you want to learn how to expose your photographs?
Let’s start from the beginning.

269How to expose step by step
Decide the picture you want to take
Your idea of the photo you want to take is everything.
It’s what determines the aperture, shutter speed and ISO settings you need both to
convey the message you want and to get the exposure you are looking for.
To get your photo, and before exposing, you should master how to use the aperture,
shutter speed and ISO to produce the desired effects (section 4):
• Play with the depth of field:
• Shallow depth of field: use wide apertures (f1.4, f/2.8, f/4, etc.).
• Increase the depth of field: use narrow apertures (f/8, f/11, f/16).
• Maximize depth of field when using long focal lengths (70-500mm): use narrow
apertures (f/8, f/11, f/16) and focus within two-thirds of the scene.
• Maximize depth of field when using short focal lengths (10-35mm): regardless of
the aperture you use, focus at the hyperfocal distance.
• Freeze motion: slow shutter speed
• Bird flying: 1/800s - 1/2000s.
• Person walking: 1/125s at least.
• Sports (football, etc.): 1/500s - 1/2000s.
• Car at 50 km/h: 1/1000s - 1/2000s.
• Car racing: 1/1000s - 1/8000s.
• Fast vehicles panning: 1/250s.
• Mountain bikers panning: 1/60s.
• Road cyclists panning: 1/30s.
• Runners or animals moving panning: 1/15s.

270How to expose step by step
• Avoid star trails: use the NPF rule or the 500 rule, or use the PhotoPills Spot Stars
calculator.
• Avoid Moon trail: 1s maximum.
• Show motion: fast shutter speed (you need a tripod).
• Waterfall silky water: 1s.
• Sea silky water: 1s.
• Show people moving, slow cars: 1/15s.
• Slow water motion: 1/2s.
• Fast water motion: 1/8s.
• People walking: 1/4s.
• Short star trails: 1min - 10min.
• Long star trails: 30min - 4h.
• Starburst effect in light spots: narrow apertures (f/8, f/11, f/16).
• Capture very bright stars: wide apertures (f/2.8, f/4), high ISOs (1600-6400).
• Capturar very bright meteor showers: wide apertures (f/2.8, f/4), high ISOs (1600-
6400).
Once you have decided the effect and aperture and/or shutter speed and/or ISO settings
to achieve this, you can start thinking about how to expose the photo.
The next logical question is: what exposure mode should you use?

271How to expose step by step
Choose the exposure mode
Not all exposure modes allow you to capture the photo you want. Here’s what I use each exposure mode for:
• Aperture Priority (A or Av):
• When I want to emphasize the depth of field.
• And when the scene doesn’t allow lots of time to photograph it.
• Shutter Speed Priority (S or Tv):
• When I want to capture motion.
• And when the scene doesn’t allow lots of time to photograph it.
• Manual (M): This is the mode I use when I have time to capture the scene. It allows
me greater control over the final result.
Choose the metering mode
The way the light is distributed in the scene along with the idea of photo you have determines the metering mode you need:
• Matrix (or evaluative) metering: It’s ideal for very low contrast scenes (similar tonalities), because the calculated average intensity is not far from the different intensities or tones in the scene.
• Center-weighted average metering: It’s useful when you want to photograph a subject that has a high contrast to the background because it allows you to measure the light of that particular subject.
• Spot metering: Perfect for high contrast scenes or scenes where your subject is much darker or brighter than the rest of the scene.
• And in some cases, the partial metering: This metering mode is very similar to the spot one, but it uses a larger circle. So you can use it pretty much in the same way, but
the metering will be done on a larger area of the scene.

272How to expose step by step
Where to meter: the key tone
To expose a photograph you should choose where to meter the light to get the picture
you are looking for.
That spot is the so-called key tone of the scene.
“What’s the key tone Toni?”
It’s the tone of the scene where you meter the light to get the photo you are looking for.
Depending on the photo you have in mind, you should meter one tone or another.
Sometimes, you are interested in metering the tone of your subject so that it is perfectly
exposed. Other times, you meter the brightest tone in the scene to capture the most
detail in both the highlights and the shadows.
It all depends on the outcome you are looking for.
Let’s look at some examples.
Scene with little contrast
In a scene with little contrast the shadows are not too dark and the highlights don’t have
an excessive brightness. In this case, the key tone is the tone of your subject.
Since it’ll be the main subject of your image and there is no other factor in the scene that
is going to be predominant in the shot, it’s best that you meter the light in your subject
(in spot mode) and expose accordingly.
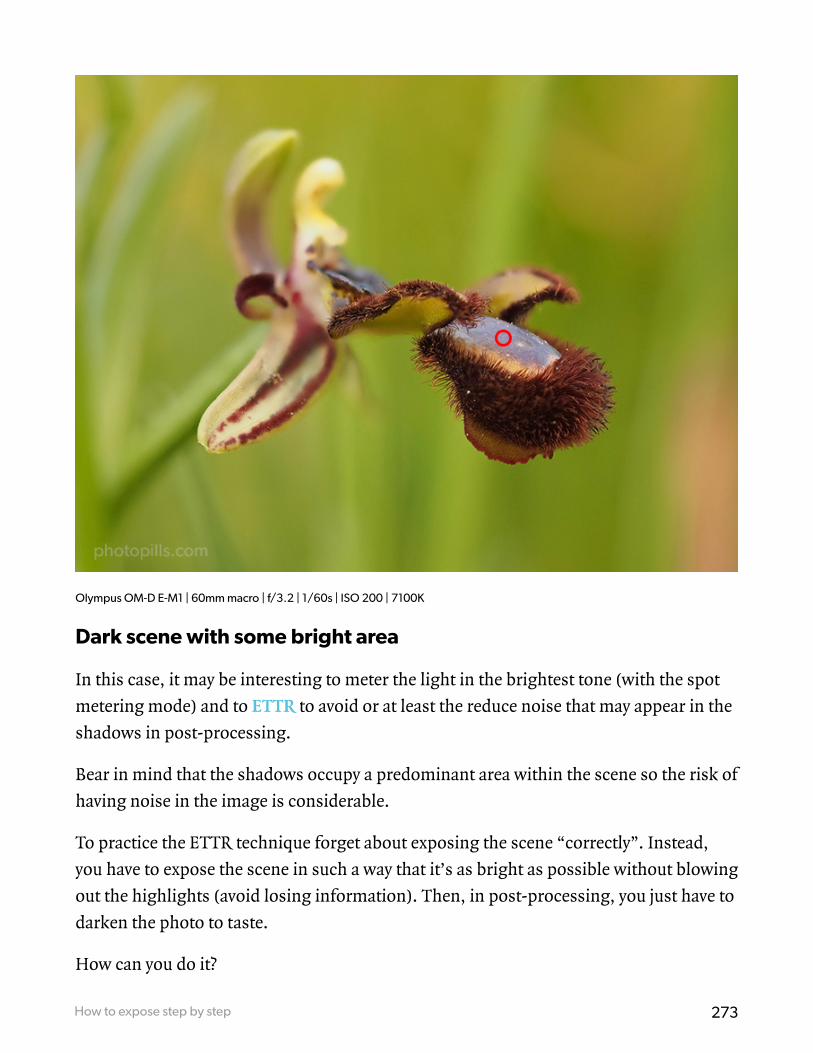
273How to expose step by step
Olympus OM-D E-M1 | 60mm macro | f/3.2 | 1/60s | ISO 200 | 7100K
Dark scene with some bright area
In this case, it may be interesting to meter the light in the brightest tone (with the spot
metering mode) and to ETTR to avoid or at least the reduce noise that may appear in the
shadows in post-processing.
Bear in mind that the shadows occupy a predominant area within the scene so the risk of
having noise in the image is considerable.
To practice the ETTR technique forget about exposing the scene “correctly”. Instead,
you have to expose the scene in such a way that it’s as bright as possible without blowing
out the highlights (avoid losing information). Then, in post-processing, you just have to
darken the photo to taste.
How can you do it?

274How to expose step by step
In section 17 you will find an explanation in full detail on how to use the ETTR
technique.
Olympus OM-D E-M1 | 300mm | f/4 | 1/100s | ISO 200 | 6550K
Bright scene with some dark area
The problem with a scene in which highlights predominate is that the camera’s light
meter can misinterpret the light. When you perceive an excessive brightness, the camera
is tempted to darken the scene and you come across an underexposed photo.

275How to expose step by step
In a situation like this, the best thing to get a proper exposure (to get the natural colors
of the scene), is to meter the light on an 18% gray card. See section 16 to learn how to
use this card.
Or, you can meter the exposure in one of the darkest areas of the scene and then use the
exposure compensation function (±EV) to adjust the final result.
Nikon D4s | 85mm | f/2.8 | 1/500s | ISO 100 | 5650K
High contrast scene
You’ll remember that in section 9 I explained to you that the dynamic range in the scene
isn’t always the same as that of the camera. Unfortunately, you will encounter many
situations in which the dynamic range of the scene is higher than your camera sensor
capacity.
In other words, in a high contrast scene, the shadows are very dark and the highlights
are very bright. And your camera is unable to capture detail in both areas in a single
exposure.

276How to expose step by step
If that weren’t enough (you should know by now that photography is full of challenges!)
the camera sometimes doesn’t correctly capture the brightness of the scene. In most
cases you won’t be able to adjust the camera dynamic range to all the tones that your
scene has.
One solution is to correctly determine the key tone of the scene and meter its light.
For example, suppose you want to shoot a sunset on the coast. The Sun is setting but it’s
still above the horizon.
The sky, the sea and the rocks are additional elements in your scene. Therefore, the main
subject is the Sun, which sets the key tone.
By now, you should have noticed that the dynamic range of the scene is excessively high
and your camera is not going to be able to capture it completely.
What happens then with the exposure? How can you get the photo?
The exposure will be defined by the subject. You already have identified it (the Sun in the
previous example) so you only have to expose according to your tone and that’s it.
In this case, the tone of the Sun is the key tone of your scene.
Therefore, the photo that you’ll get is a low key of the sunset.

277How to expose step by step
Nikon D4s | 85mm | f/1.4 | 13s | ISO 200 | 8100K
If you don’t want to capture a low key of the sunset, you will need to use filters (section
22) or the bracketing technique (section 23).
Great! Let’s keep going!
Once you have decided the exposure triangle settings that allow you to capture the
desired effect, the exposure and the metering modes you have to use and where you will
meter the light... it’s time to start exposing the photo.
Next, I’ll explain you how to expose with different exposure modes.
How to expose with the Aperture Priority mode (A or Av)
When using the Aperture Priority mode (A or Av), you must choose the aperture that
gives you the depth of field you’re looking for.
278How to expose step by step
Then, depending on the ISO you use, the camera calculates the shutter speed so that the
light meter is centered at zero.
As we saw in section 4, depending on the aperture you choose, the depth of field will
vary:
• A large aperture allows you to have a shallow depth field (you let in more light). Only
one area of the image will be sharp.
• A small aperture allows you to have a greater depth field (you let in less light). A large
part of the image will be sharp.
Therefore, in order to expose the photo, you should set the ISO (ISO selection in manual
or in automatic mode by presetting a range of values) and let the camera choose the
corresponding shutter speed.
If you use low ISOs, you have less noise in the image, and the camera uses slower shutter
speeds (you can show motion). However, if you use high ISOs, the noise increases and
the shutter speed is faster (possibility of freezing motion).
As always, the result you are looking for determines the settings that you should use.
Let’s see how you should expose, step by step.
1- Select the Aperture Priority exposure mode (A or Av).
2- Adjust the aperture according to the depth of field you want to get. Do several tests.
A larger aperture produces a shallower depth of field. A smaller aperture produces a
greater depth of field.
3- With the ISO set in manual, select the base ISO of your camera to avoid noise in
the image. Or, if your camera allows it, you can select the automatic ISO by setting a
range of values (for example 100-1600). In this case, the lower limit is the base ISO of
your camera and the upper limit is the ISO value from which your camera generates
too much noise (section 5).
4- Select the metering mode you prefer. I usually use the spot mode because it allows
me to have more control over the end result.

279How to expose step by step
5- Meter the light in the key tone (the brightest one, your subject, etc.).
6- Focus and shoot. The camera chooses the shutter speed so that the photo is
exposed correctly according to the light meter (zero-centered).
7- Once you’ve shot the photo, check the result on the LCD of your camera to check
the depth of field you captured. Also check if you managed to freeze or not the scene
motion (if there is any).
8- At the same time, check the histogram to see how the bright and dark tones are
been distributed in your photograph.
9- If you didn’t get the photo you’re looking for, try changing the aperture to adjust the
depth of field or increase the ISO so the camera increases the shutter speed (if you’re
looking to freeze motion).
10- You can also compensate the exposure. Remember that positive values brighten
the picture and negatives darken it.
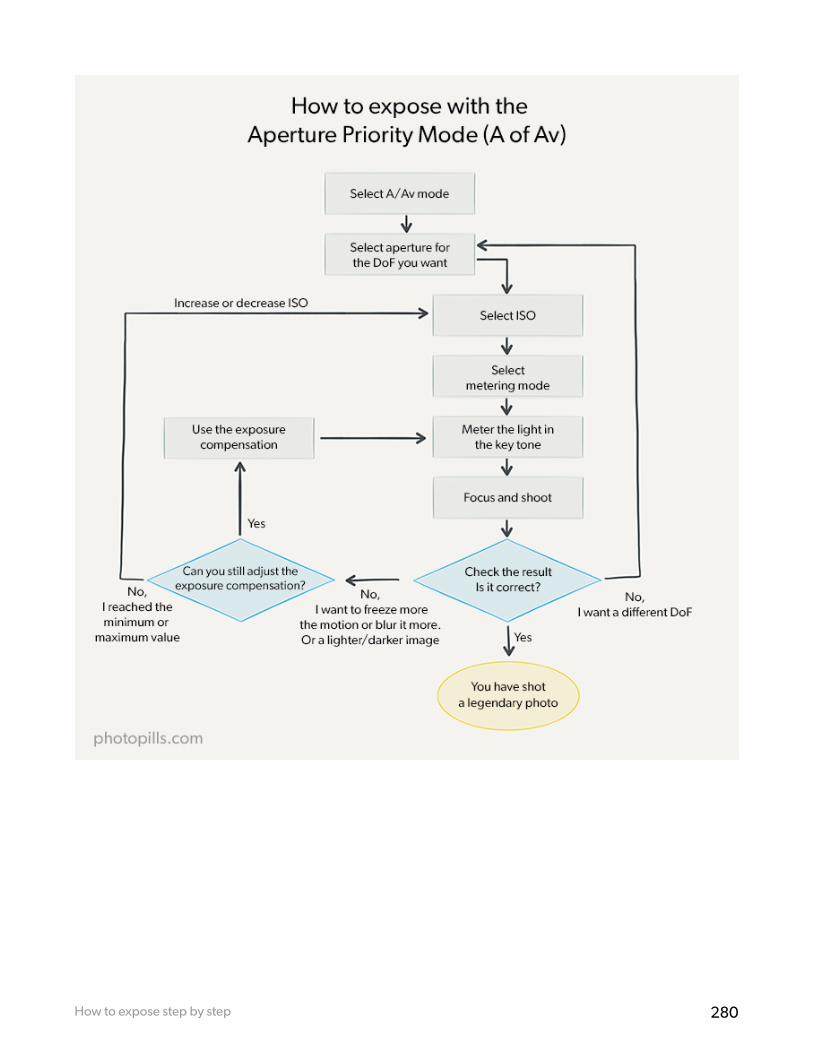
280How to expose step by step

281How to expose step by step
How to expose with the Shutter Speed Priority mode (S or Tv)
When using the Speed Priority mode, you choose the shutter speed that allows you to
produce the desired motion effect (freeze motion or not).
Then, depending on the ISO you use, the camera calculates the aperture so the light
meter is centered at zero.
As we saw in section 4, depending on the aperture you choose, you’ll show motion in
the picture in one way or another:
• High shutter speeds allow you to freeze the motion that is occurring in the scene. For
example, to capture a bird in flight.
• Slow shutter speeds allow you to show motion. For example, getting the subject
blurred or the silk effect of moving water.
Therefore, in order to expose the photo, you should set the ISO (ISO selection in manual
or in automatic mode by presetting a range of values as I explained in section 5) and let
the camera choose the corresponding aperture.
If you use low ISOs, you have less noise in the image, and the camera uses larger
apertures (shallower depth of field). On the contrary, if you use high ISOs, the noise
increases and the aperture used is smaller (greater depth of field).
Again, the result you are looking for determines the settings that you should use.
Let’s see how you should expose, step by step.
1- Select the Shutter Speed Priority exposure mode (S or Tv).
2- Adjust the shutter speed depending on how you want to reflect the scene motion.
Do several tests. A slower shutter speed shows motion (subject blurred, silk effect in
water).
A faster shutter speed freezes motion (bird in flight, runner).
3- With the ISO set in manual, select the base ISO of your camera to avoid noise in

282How to expose step by step
the image. Or, if your camera allows it, you can select the automatic ISO by setting a
range of values (for example 100-1600). In this case, the lower limit is the base ISO of
your camera and the upper limit is the ISO value from which your camera generates
too much noise (section 5).
4- Select the metering mode you prefer. I usually use the spot mode because it allows
me to have more control over the end result.
5- Meter the light in the key tone (the brightest one, your subject, etc.).
6- Focus and shoot. The camera chooses the shutter speed so that the photo is
exposed correctly according to the light meter (zero-centered).
7- Once you’ve shot the photo, check the result on the LCD of your camera to check if
the motion is shown as you want, and if you managed to get enough depth of field or
not.
8- At the same time, check the histogram to see how the bright and dark tones are
been distributed in your photograph.
9- If you didn’t get the photo you’re looking for, try changing the shutter speed to
adjust how the motion is shown or increase the ISO so the camera reduces the
aperture (if you want a larger depth of field).
12- You can also compensate the exposure. Remember that positive values brighten
the picture and negatives darken it.

283How to expose step by step

284How to expose step by step
How to expose with the Manual mode (M)
The Manual mode (M) allows you to choose the aperture, shutter speed and ISO settings
to fully control both the exposure and the creative aspect of your photos.
How do you expose in manual?
As always, you must first decide what you want to get (section 4).
A certain depth of field? Show motion in a particular way (freezing it or not)?
You want to get a specific depth of field
In this case, the first parameter that you should set is the aperture that gives you the
depth of field you are looking for.
Follow these steps to expose the picture:
1- Select the Manual exposure mode (M).
2- Adjust the aperture according to the depth of field you want to get. Do several tests.
A larger aperture produces a shallower depth of field. A smaller aperture produces a
greater depth of field.
3-Select the lowest ISO possible. That is the base ISO (usually ISO 100 or 200). You
could also use the automatic ISO setting a range (section 5).
4- Select the metering mode you prefer. I usually use the spot mode because it allows
me to have more control over the end result.
5-Meter the light in the key tone (the brightest one, your subject, etc.).
6- Select the shutter speed so that the photo is exposed correctly according to the light
meter (zero-centered).
7- Focus and shoot.
8- Once you’ve shot the photo, check the result on the LCD of your camera to check
the depth of field you captured. Also check if you managed to freeze or not the scene
motion (if there is any).

285How to expose step by step
9- At the same time, check the histogram to see how the bright and dark tones are
been distributed in your photograph.
10- If you don’t like the depth of field you’ve captured, adjust the aperture accordingly.
Repeat the previous steps to center the exposure meter at zero.
11- If the shutter speed is too slow (you don’t like how motion appears in the photo),
reduce it by cranking up the ISO (always controlling the noise) or use a larger
aperture (if you don’t mind having a shallower depth of field).
12- If the shutter speed is too fast (you don’t want to freeze motion), increase it using
a smaller aperture (if you don’t mind having a greater depth of field). If you want
to maintain the depth of field, use a neutral density filter (ND) to decrease the light
entering the lens.
13- If you use a neutral density filter (ND), focus first and then place the filter in front
of the lens. As I’ll explain in section 22, these filters are very opaque and, depending
on their opacity, the camera may not be able to focus because it’s not receiving
enough light.
14- If the picture results underexposed (darker than what you’re looking for), you need
more light to reach the sensor: reduce the shutter speed (monitoring motion) and/
or crank up the ISO (controlling noise). Ultimately, if there is no choice, open the
diaphragm (reducing the depth of field).
15- If the picture results overexposed (brighter than what you’re looking for), you
need less light to reach the sensor: increase the shutter speed. You can also use a
neutral density filter (ND). If you don’t mind having a greater depth of field, close the
diaphragm (smaller aperture).
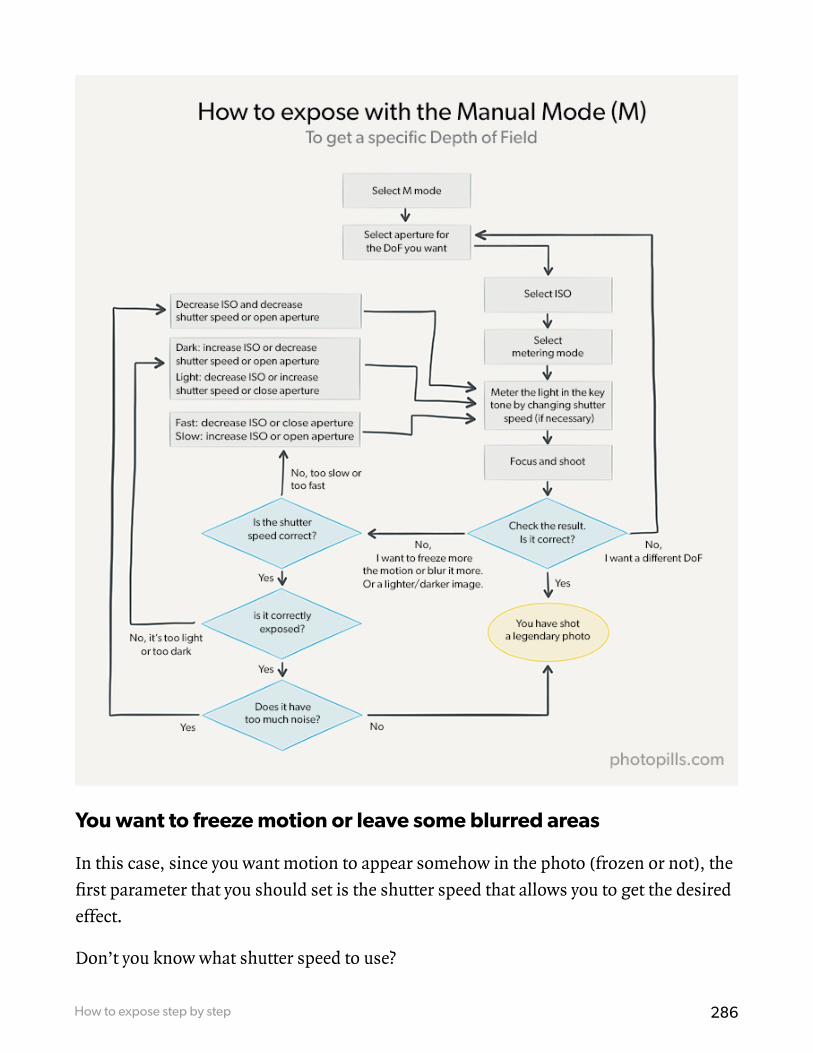
286How to expose step by step
You want to freeze motion or leave some blurred areas
In this case, since you want motion to appear somehow in the photo (frozen or not), the
first parameter that you should set is the shutter speed that allows you to get the desired
effect.
Don’t you know what shutter speed to use?

287How to expose step by step
Check the table in section 4 where you can see what shutter speed you need to get the
effect you’re looking for. You will also find them at the beginning of this section.
Follow these steps to expose the picture:
1- Select the Manual exposure mode (M).
2- Adjust the shutter speed according to the motion effect you want to get. Do several
tests. A slow shutter speed shows motion (subject blurred, silk effect in water). A fast
shutter speed freezes motion (bird in flight, runner, etc.).
3- Select the lowest ISO possible. That is the base ISO (usually ISO 100 or 200). You
could also use the automatic ISO setting a range (section 5).
4- Select the metering mode you prefer. I usually use the spot mode because it allows
me to have more control over the end result.
5- Meter the light in the key tone (the brightest one, your subject, etc.).
6- Select the aperture so that the photo is exposed correctly according to the light
meter (zero-centered).
7- Focus and shoot.
8- Once you’ve shot the photo, check the result on the LCD of your camera to check
the motion effect you captured. Also, check the depth of field.
9- At the same time, check the histogram to see how the bright and dark tones are
been distributed in your photograph.
10- If you don’t like the motion effect you’ve captured, adjust the shutter speed
accordingly. Repeat the previous steps to center the exposure meter at zero.
11- If the depth of field is too shallow, increase it by reducing the aperture. You’ll be
forced to crank up the ISO (always controlling the noise) to keep the exposure.
12- If the depth of field is too large, set a wider aperture to reduce it. Or use a neutral
density filter (ND) to decrease the light entering the lens.

288How to expose step by step
13- If you use a neutral density filter (ND), focus first and then place the filter in front
of the lens. As I’ll explain in section 22, these filters are very opaque and, depending
on their opacity, the camera may not be able to focus because it’s not receiving
enough light.
14- If the picture results underexposed (darker than what you’re looking for), you need
more light to reach the sensor: open the aperture (monitoring the depth of field)
and/or crank up the ISO (controlling noise). Ultimately, if there is no choice, use a
slower shutter speed (possibly giving up freezing any motion).
15-If the picture results overexposed (brighter than what you’re looking for), you need
less light to reach the sensor: close the aperture. You can also use a neutral density
filter (ND). If you don’t mind freezing motion in the picture, use a faster shutter
speed.

289How to expose step by step
So far, you’ve relied on the camera’s light meter to expose the photographs. And when
necessary, you calibrated it with an 18% gray card.
But what if your camera has no light meter or it doesn’t work such as when you’re using
a manual lens?
The answers are in the next section. :P
19How to expose without a light meter: the “Sunny f/16” and
“Looney f/11” rules

291How to expose without a light meter: the “Sunny f/16” and “Looney f/11” rules
Imagine that your camera doesn’t have a light meter. Or, you’re using a manual lens that
doesn’t allow the light meter to work properly.
Don’t panic!
Depending on the situations, you can use a couple of very simple rules that allow you
to expose correctly very quickly, without having to spend a lot of time blindly adjusting
exposure using the “try and fail” strategy.
How to expose correctly on a sunny day
The so-called “Sunny f/16” rule helps you expose your pictures on a sunny day.
This rule states that:
“On a sunny day, if your subject receives facing light, you can use an aperture of f/16, set the ISO you
want ( for example the base one) and set the shutter speed that results from dividing 1 by the ISO you
set (1/ISO)”.
Therefore, if you are outdoors photographing during a sunny day and you have the
camera set to ISO 100, use an aperture f/16 and the shutter speed as close to 1/100s that
the camera lets you use.
And what if you have the camera set to ISO 200?
You should then use an aperture of f/16 and a shutter speed of 1/200s.
Bear in mind that an aperture of f/16 aperture produces a large depth of field. Therefore,
if you want to reduce it, you only need to use a smaller aperture and apply the reciprocity
law to calculate the other two exposure triangle variables (shutter speed and ISO).
Similarly, if you want to use a certain shutter speed to capture motion in a certain way
(freeze that motion or not), use the reciprocity law to change the other two variables
(aperture and ISO), and thus obtain the combination that allows you to get the effect
you’re looking for.

292How to expose without a light meter: the “Sunny f/16” and “Looney f/11” rules
And if you don’t want to do the reciprocity law calculations yourself, you can always use
the PhotoPills exposure calculator.
How to properly expose a photo with full Moon light
If you want to expose a night photograph correctly under the full Moon light, there is
another very useful rule: the “Looney f/11” one.
The principle is identical to the Sunny f/16 rule, but here you have to use an aperture of
f/11.
And use a shutter speed equal to 1 divided by the ISO that you have set (1/ISO).
As always, you can use the reciprocity law (and the PhotoPills exposure calculator) if you
want to use a different combination of aperture, shutter speed and ISO to get the photo
you want.

20How to expose with the Ansel
Adams zone system

294How to expose with the Ansel Adams zone system
Ansel Adams and Fred R. Archer created the zone system in the late 1930s. Their goal
was to help photographers expose photographs so that the printed photo was as close as
possible to reality.
The reasoning behind the zone system
The human eye is able to recognize up to 1,000,000 different tones between pure black
and pure white.
However, a digital camera, however modern it may be, recognizes a maximum of
512 tones. Although as times goes by technology should improve, usually a camera
recognizes 256 tones.
In other words, and as you have already seen in the article, the dynamic range of your
eyes is much greater than that of your camera.
Moreover, as you saw in section 16, the light meter doesn’t always give you an adequate
light metering. So you’ll have to modify the exposure to get the photo you are looking
for.
Therefore, if you want the camera to capture what your eyes see as accurately as possible,
you have to be able to overcome your camera limitations.
In other words, you have to be able to expose in a way that the camera interprets, as
accurately as possible, in the photograph the tones you see in the scene.
That’s why the zone system is very useful.
What is it about
The zone system helps you figure out how many stops you have to underexpose or
overexpose the scene to get the photo you are looking for. In doing so you either
accurately reflect what you see on the scene or you give it your own artistic feel.

295How to expose with the Ansel Adams zone system
This exposure technique is based on grouping the different tones that the camera can
capture in 11 zones (there is a stop between each zone) and 11 representative tones of
each zone (the middle tone of each zone). The ensemble of all zones (and tones) forms
the so-called zones diagram.
With this diagram in mind, study the scene thoroughly, divide it into areas according to
the tones and decide which area of the scene you want correctly exposed (its color will be
in the photo as your eyes see it). This is the area where you are going to meter the light.
Then, identify the tone of the scene area with the corresponding tone of the zone
diagram, and keep the zone number (I, II, III, etc.). By doing this, you’re linking the
tones of the scene with the tones that your camera can capture.
From here, knowing that your camera’s light meter assumes that the scene has a middle
gray tone (reflects an 18% of light) corresponding to zone V, and that between two
consecutive zones there is a 1-stop difference, adjust the exposure by overexposing or
underexposing the stops between your target zone and the zone V.
I’ll explain in more detail how to use the zone system in a minute.
But first, I want you to understand how you can get the zone diagram.
How to create a zones diagram
Imagine that the tonal gradation bar below represents the full range of tones your
camera is capable of capturing (from pure black to pure white).

296How to expose with the Ansel Adams zone system
Now, divide the bar into 11 identical zones.
Finally, keep the middle tone of each zone and list the 11 zones.

297How to expose with the Ansel Adams zone system
Now, you can use the diagram to link each zone (middle tone) to the tones you are going
to see in reality.
Source: Zone System, Wikipedia

298How to expose with the Ansel Adams zone system
How to expose with the zone system
Remember that by centering the light meter indicator at zero, you are exposing correctly
for the tone of zone V, a middle gray that reflects only 18% of the light.
Consequently, as you saw in section 16, when the white or dark tones prevail on the
scene, the photo isn’t correctly exposed. The captured tones are not what your eyes see.
In this case, in order to obtain a correctly exposed picture, you need to compensate the
exposure.
How many stops?
The zone diagram tells you how many.
Imagine that you have a snowy landscape before you. You metered the light in the snow
and exposed by centering the light meter at zero.
And, crap, the snow has a middle gray color in the photo (zone V).
So you decide to correct the exposure so that the snow has a nice and textured white
color in the picture.
Looking at the zone diagram, you come to the conclusion that you have to expose the
photo not for the middle gray tone of zone V, but for the white tone of zone VIII.
Since you know that between two consecutive zones there is 1 stop, in order to
transition the middle gray of the zone V (five) to the white of zone VIII (eight) you must
compensate the exposure in 3 stops (VIII-V).
So you take the camera, meter right on the snow, and overexpose the scene 3 stops
(+3EV).
Eureka! The snow looks as white as in the scene!
How can you compensate the exposure?
If you use the Manual exposure mode (M), adjust the exposure triangle to overexpose the
scene by 3 stops (+3EV). However, if you use any of the semi-automatic modes, use the
exposure compensation button (section 14).

299How to expose with the Ansel Adams zone system
To sum up, the key to the zone system is to visually determine how you want the areas
of your scene to appear in the final image. You have to decide which area of the zone
diagram matches with the tone of the scene you want to expose.
All in all, you have to choose the area of the scene that you want perfectly exposed,
identify its tone in the zone diagram (imagine the tone corresponds to zone III), meter
its light, and finally compensate the exposure (overexposing or underexposing) by the
number of stops between zone V and your target zone (zone III).
Easy, right?
Unfortunately, like any system, it has its “cons”...
Caution! Details to take into consideration...
The first “con” is that you have to be careful with your camera’s light meter sensitivity.
The zone system is designed for narrow-angle light meters (such as a hand-held
photometer, for example).
However, DSLR or mirrorless cameras have light meters that, by default, meter in the center. Therefore, its sensitivity is higher in the center of the frame and fades towards the edges. In addition, the size of that meter point depends on the focal length of the lens.
So if you use your camera’s light meter, even if you use the spot metering, your result may not be accurate enough.
To avoid this you have two solutions (although they aren’t infallible):
• Meter with a super telephoto lens so that the area of your metering point is as small as possible.
• Fill the entire metering area with an 18% gray card, meter and follow the rest of steps with that metering.
The second “con” is that the final photo depends on your ability to choose the area of the frame you want to meter, the area you want correctly displayed and in detail... and its
corresponding area of the zone diagram.

300How to expose with the Ansel Adams zone system
For example, imagine that you want to take a portrait of a light-skinned woman. In this
case, it’s very important that you expose the skin correctly. So I recommend you to meter
on the skin of your model and expose in an area between zone IV and VI, depending on
the case.
The only secret is to practice until you are able to choose without hesitation the
appropriate area where to meter and its corresponding zone of the zone diagram.
The third “con” is how to determine your exposure settings so you can adjust the
number of stops needed. In short, you must learn to compensate the exposure.
The easiest way is to use Manual shooting mode (M) and select the aperture, shutter
speed and ISO settings that give you the effect you want in the photo and the exposure
you need.
If you decide to use one of the semi-automatic exposure modes, use the exposure
compensation button.
A simplified summary of the zone system
To use the Ansel Adams zone system, follow these steps:
1- Choose the scene area where you want to meter the light (the key tone), the one you
want to be correctly exposed (or want to expose according to your taste).
2- In the zone diagram, identify the tone area you want a specific area to have in the
photo and keep the zone number. For example, you may want to place a dark foliage
in zone IV or, as we have seen before, a snowy mountain in zone VIII.
3- Choose the Manual exposure mode (M) or one of the semi-automatic ones.
4- Select the metering mode you prefer, usually the spot one, and meter the light in the
scene area you’ve chosen.

301How to expose with the Ansel Adams zone system
5- Set the exposure (centering the light meter at zero) and adjust it according to the
difference of stops between the area you have chosen and the zone V. For example, if
you want your favorite area to be in zone VII, increase the exposure in 2 stops (+2EV)
according to what the (centered) light meter tells you.
6- Practice, practice, practice. Work on your technique and know your equipment.
It may seem like an outdated system, but Ansel Adams knew what he was doing. If you
apply it correctly, it always works!

21How to expose a video

303How to expose a video
Video is another form of expression. It allows you to tell stories in a different way.
In my case, from time to time I like to record the Moonrise on video.
Both me and the rest of the PhotoPills team, we like planning shooting sessions with
the full Moon so that it rises just behind an old stone construction located in Punta Nati
(Menorca). And when that day comes, we use the silhouettes that the Moon creates to
tell stories.
Here’s an example, our particular tribute to the “Halloween” movie.
You can learn how we imagined it, planned it and shot it in the following article: How to
Shoot Striking Full Moon Silhouettes Videos.
When recording video with your camera, you won’t usually have a RAW file format
(uncompressed and with as much information as possible) where you can adjust the
exposure in post-processing. If your final file has overexposed or underexposed areas,
correcting them will be quite complicated.
Only some high-end cameras or some “non-proprietary” firmware offer the ability to
record video in RAW.

304How to expose a video
Therefore, it’s essential to obtain a correct exposure directly on the camera.
If you are a video enthusiast, here are a number of helpful tips to properly expose your
videos.
Use all your camera settings in manual
To get good quality results, forget about automatic stuff and manually control all camera
settings! And by “all” I mean exactly that, everything: the exposure mode, the focusing
mode, the exposure compensation...
Trust the histogram only
Ignore how the image looks on the LCD of your camera, as well as what the light meter
tells you.
You should base your exposure on the correct reading of the histogram. It will help you
know if all the information of the scene is within the dynamic range of the camera.
Use the base ISO
Use the base ISO value (the lowest value your camera has) whenever possible.
Calculate the shutter speed
Set the shutter speed according to the 180 degree rule. This is a basic rule in the world of
video that comes from the time when 35mm film cameras were used.
In this type of film cameras, the shutter is a semicircular piece that rotates continuously.
Thus, the frame is exposed during the time when the shutter doesn’t cover it (that is, it
allows light to pass through).

305How to expose a video
At the same time, the film is moving from top to bottom. Therefore, when the shutter
has finished rotating, the next frame is just in front of the lens, ready to expose itself and
receive the light.
And so in an endless cycle...
I’m sure this diagram helps you to understand it better.
When the shutter is open, the film is exposed. When it closes, the next frame of film is brought into position by the claw. Diagram by Joram van Hartingsveldt.
Why is the 180 degree rule linked to the shutter speed?
Because it helps your recording to have natural motion and that the way it looks the way
you see in the movies.
If you don’t apply this rule and you have people, animals or moving objects in your
frame, the resulting sequence will be awkward (at least visually speaking). People,
animals or objects are either very blurred or very sharp. To make things worse, they
move in spasms rather than continuously.
The shutter speed is determined by the frames per second (fps) you are recording.
Therefore, select a shutter speed equal to one divided by the double of fps you use:
shutter speed = 1/(2 × frames per second)

306How to expose a video
For example, if you record at 24 or 25 fps (frames per second) your shutter speed should
be 1/48s or 1/50s respectively. Instead, if you record at 50 fps, use a shutter speed of
1/100s.
If you aren’t a math geek and you hate mental calculation, these are the most frequent
shutter speeds:
• at 24 fps -> 1/48
• at 25 fps -> 1/50
• at 30 fps -> 1/60
• at 50 fps -> 1/100
• at 60 fps -> 1/120
As I said, this rule allows the movement in the scene to have a natural, film-like look.
How is that possible?
When you record a video in Shutter Speed Priority mode (S or Tv), you define the
sharpness of the moving image (i.e. the frame).
Watch a movie and stop the picture at one frame.
Surprised? In fact, the sharpness is scarce and it seems that the image is “blurred”.
In video there is an effect called motion blur, inevitable and to which the human eye is
used to. If you individually watch a frame of any video, it’s out of focus.
However, when the human eye sees a sequence at a given rate (determined in fps) of the
frame set, it perceives them clearly. That’s if a suitable shutter speed has been used...
Which one? The one that the 180 degree rule determines.
If you don’t do so, the frames may not be sharp and most probably the motion won’t be
fluid, but it will rather show spasms or jumps. Obviously this will always depend on the
creativity of the director. ;)

307How to expose a video
Be careful with the white balance
If you shoot in RAW, you don’t have to worry too much about the white balance. It’s a
parameter that you can easily modify in post-processing.
Unfortunately, in video this is completely different.
As with the exposure, it’s essential that you adjust the white balance as accurately as
possible before you start recording. This way you will avoid complicated corrections in
post-processing and losing image quality.

22Use filters to successfully capture
high contrast images

309Use filters to successfully capture high contrast images
How many times have you walked through the door and notice that the Sun was shining
brightly, the sky was completely blue and you thought “today is a perfect day to take
pictures”?
And how many times have you returned home with tons of bad pictures?
Blame the huge contrast between the highlights and the shadows of the scene.
The good news is that there are several ways to successfully capture high contrast
scenes. I’ll explain you two specific ways of doing this:
• Using graduated neutral density, or GND, filters (this section).
• Using the bracketing technique or HDR (section 23).
But before talking about filters and how you can use them, let’s start from the
beginning...
What is a high contrast scene (high dynamic range)
In a high contrast scene the difference of stops between the darkest and the brightest
tone is very large. In fact, the difference is so great that your camera is unable to capture
detail in both tones (underexposing the darkest one or overexposing the brightest one).
When this happens, we say that the dynamic range of the scene exceeds the dynamic
range of the camera.

310Use filters to successfully capture high contrast images
Nikon D300Ir | 8mm | f/11 | 1/125s | ISO 200 | 2150K The dynamic range of the scene exceeds that of the camera. Notice that the shadows have become too dark to expose the highlights correctly.

311Use filters to successfully capture high contrast images
Typical examples of high contrast scenes are:
• In landscape photography, when the sky has a very bright tone and the landscape is
dark.
Nikon D700 | 70mm | f/11 | 1/10s | ISO 200 | 4800K

312Use filters to successfully capture high contrast images
• In portrait photography, a backlight.
Nikon D700 | 250mm | f/8 | 1/2000s | ISO 200 | 7500K
When you face this type of scenes, you’ll have to figure them out...
Or, depending on the scene you are facing, you can use a super useful tool: filters.
Let’s see what types of filters you can use and how to do it.

313Use filters to successfully capture high contrast images
Types of filters
ND and GND filters.
I’m going to talk about two types of filters:
• Neutral density filters (ND) that limit light uniformly over their entire surface.
• Graduated neutral density filters (GND) that limit light gradually (non-uniform)
along their surface. This type of filters are very useful for photographing high
contrast scenes.
To understand how graduated neutral density filters (GND) work, which you will use
to successfully capture high contrast scenes, you should first understand how non-
graduated or uniform neutral density filters (ND) work.
So let me start by explaining in detail the ND filters.

314Use filters to successfully capture high contrast images
Neutral density filters (ND) and their uses
A neutral density filter (ND) is a piece of glass or semitransparent resin that you place in
front of the lens.
And what makes it special?
The ND filter allows you to reduce the light reaching the sensor evenly. It allows you to
subtract light. This helps you capture certain effects without overexposing the scene:
• You can slow the shutter speed to create beautiful effects without overexposing the
highlights. It allows you, for example, to capture the silk effect in the sea during a
sunset.
• You can use larger apertures (without overexposing the scene) to capture a shallower
depth of field. It’s useful, for example, if you want to separate the subject from the
background in a backlight.
The effect you get depends on the number of stops (section 6) that the filter you use
subtracts (1, 2, 3 stops...).
Another advantage of the neutral density filter is that it subtracts the light evenly.
Therefore, it doesn’t affect the contrast or the sharpness of your image. Nor does it
produce any color cast (although, unfortunately, this isn’t always the case depending on
the filter manufacturer).
The adjective “neutral” refers to this lack of color cast.
In short, they are opaque sunglasses for your lens.

315Use filters to successfully capture high contrast images
Types of ND filters according to their shape
Filters have two formats: circular screw-on or square.
The circular screw-on ones are not easy to use. And to top it off, they have two
drawbacks:
• Since they should fit into the thread of your lens, they must have a specific diameter,
so they are difficult to interchange between one lens and another.
• When you want to stack several filters by placing one on top of another, they produce
vignetting (a darkening towards the corners of the frame).
That’s why I recommend that you use the square filters.
In this case, to use them, you need a good filter holder. I use one from Lucroit.
A filter holder is a structure, generally made of resin, that you screw to your objective
with an adapter ring and that allows you to fit the square filter that you want.
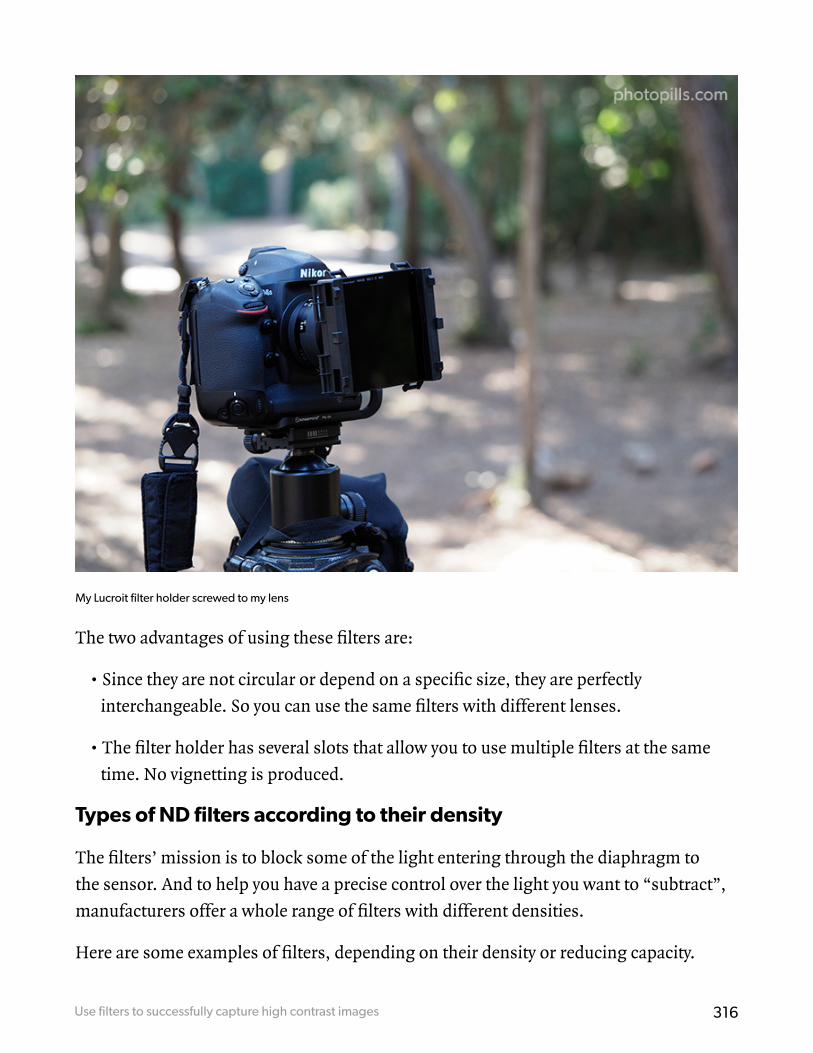
316Use filters to successfully capture high contrast images
My Lucroit filter holder screwed to my lens
The two advantages of using these filters are:
• Since they are not circular or depend on a specific size, they are perfectly
interchangeable. So you can use the same filters with different lenses.
• The filter holder has several slots that allow you to use multiple filters at the same
time. No vignetting is produced.
Types of ND filters according to their density
The filters’ mission is to block some of the light entering through the diaphragm to
the sensor. And to help you have a precise control over the light you want to “subtract”,
manufacturers offer a whole range of filters with different densities.
Here are some examples of filters, depending on their density or reducing capacity.

317Use filters to successfully capture high contrast images
Stops Light reduction Density Light
transmission %
1 ND2 0.3 50%
2 ND4 0.6 25%
3 ND8 0.9 12.5%
4 ND16 1.2 6.25%
5 ND32 1.5 3.125%
6 ND64 1.8 1.563%
7 ND128 2.1 0.781%
8 ND256 2.4 0.391%
8 2/3 ND400 2.6 0.25%
9 ND512 2.7 0.195%
10 ND1024/ND1000 3.0 0.098%
Thus, an ND2 filter reduces 1 stop the light reaching the sensor. An ND4 filter 2 stops,
an ND8 filter 3 stops and an ND400 filter between 8 and 9 stops, and so on.
Remember, each time you reduce the exposure 1 stop, the sensor captures half the light
(section 6).
Therefore, a filter allows only 1/2power of the initial light to go through it. In this case,
“power” is the number of stops that the filter subtracts.

318Use filters to successfully capture high contrast images
For example, a 3-stop neutral density filter only allows 1/8 of the light to go through your
lens:
1/23 = 1/(2×2×2) = 1/8
Depending on the light you want to subtract, choose a more or less dense filter.
What ND filters you should buy
These are the neutral density filters (ND) I have in my arsenal. I have them in two sizes,
depending on the sensor of the camera that I’ll use.
• I have several 100x100mm filters (ideal for Micro 4/3 or APS-C sensors):
• A 6-stop (ND64 o ND1.8) filter from Lucroit.
• A 10-stop (ND1000 o ND3.0) filter from Lucroit.
• A 6-stop (ND64 o ND1.8) filter from Haida.
• I have a couple of 165x165mm (ideal for full frame sensors):
• A 6-stop (ND64 o ND1.8) filter from Lucroit.
• A 10-stop (ND64000 o ND4.8) filter from Hitech Firecrest.
Let’s look at some examples of how you can use the ND filters.
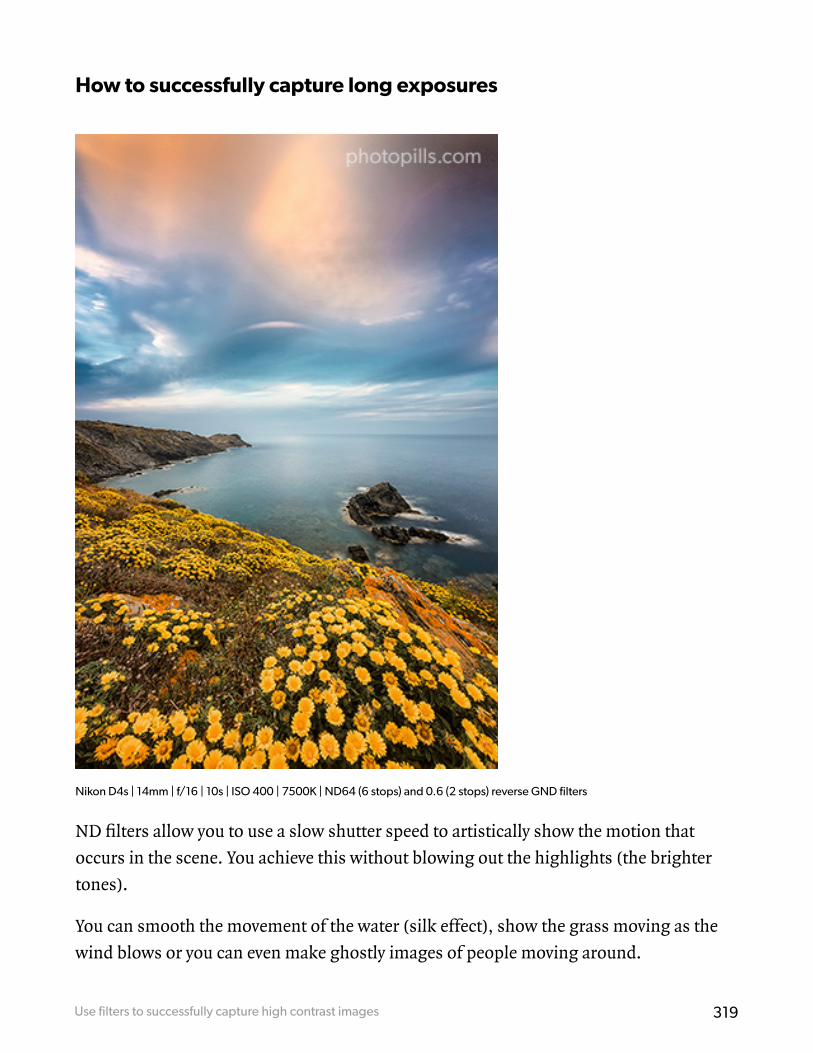
319Use filters to successfully capture high contrast images
How to successfully capture long exposures
Nikon D4s | 14mm | f/16 | 10s | ISO 400 | 7500K | ND64 (6 stops) and 0.6 (2 stops) reverse GND filters
ND filters allow you to use a slow shutter speed to artistically show the motion that
occurs in the scene. You achieve this without blowing out the highlights (the brighter
tones).
You can smooth the movement of the water (silk effect), show the grass moving as the
wind blows or you can even make ghostly images of people moving around.

320Use filters to successfully capture high contrast images
If you set the shutter speed you need to achieve a certain effect, the photo is overexposed
or you’re forced to close the diaphragm a lot, take advantage of the ND filters power.
“But Toni, why can’t I use an aperture of f/22 or even a narrower one?”
Because using such a closed aperture you risk losing sharpness due to diffraction.
Use an ND filter and you won’t need to close the diaphragm as much. Thus the
diffraction disappears.
The key is to experiment. To try and fail, to try and fail and to try again.
How to get a shallow depth of field
Nikon D700 | 85mm | f/1.7 (½ stop scale) | 1/500s | ISO 200 | 5700K | ND8 (3 stops) filter
Although ND filters are generally used to capture long exposures, you can also use them
when you want to use larger apertures. By doing this you can get a shallower depth of
field in bright light situations.

321Use filters to successfully capture high contrast images
For example, the maximum shutter speed of many cameras is 1/4000s. This means that
if you want to photograph a subject lit by the Sun, using an ISO 100, you can open the
diaphragm as much as f/2.8 to expose it correctly.
If you want to open the diaphragm more to get a shallower depth of field and completely
separate your subject from the background, your subject won’t be properly exposed,
since you can not use shutter speeds greater than 1/4000s.
In this case, you can use for example a 2-stop ND filter to reduce the light, allowing
you to open the diaphragm 2 stops up to f/1.4 (as long as your lens allows it) while
maintaining the exposure but achieving a shallower depth of field.
In short, ND filters allow you to use a larger aperture and a slower shutter speed to
achieve effects that would be impossible to get without overexposing the photo.
In other words, when you use an ND filter, you can reduce the light the sensor gets
evenly. In return, you can increase the aperture and/or reduce the shutter speed while
keeping the correct exposure.
Well, now that you know what a neutral density filter is, what it is for and what you can
get with it, let’s go with the most interesting part... How to use it!
How to expose when using an ND filter
First, take a photo that correctly exposes the area of the scene you want without using
the filter.
Then set the aperture or shutter speed you need to get the effect you’re looking for.
Finally, use the reciprocity law to calculate what filter you need to keep the exposure.
With this filter you can use the aperture or the shutter speed that gives you the effect you
are looking for and, at the same time, keep the correct exposure.
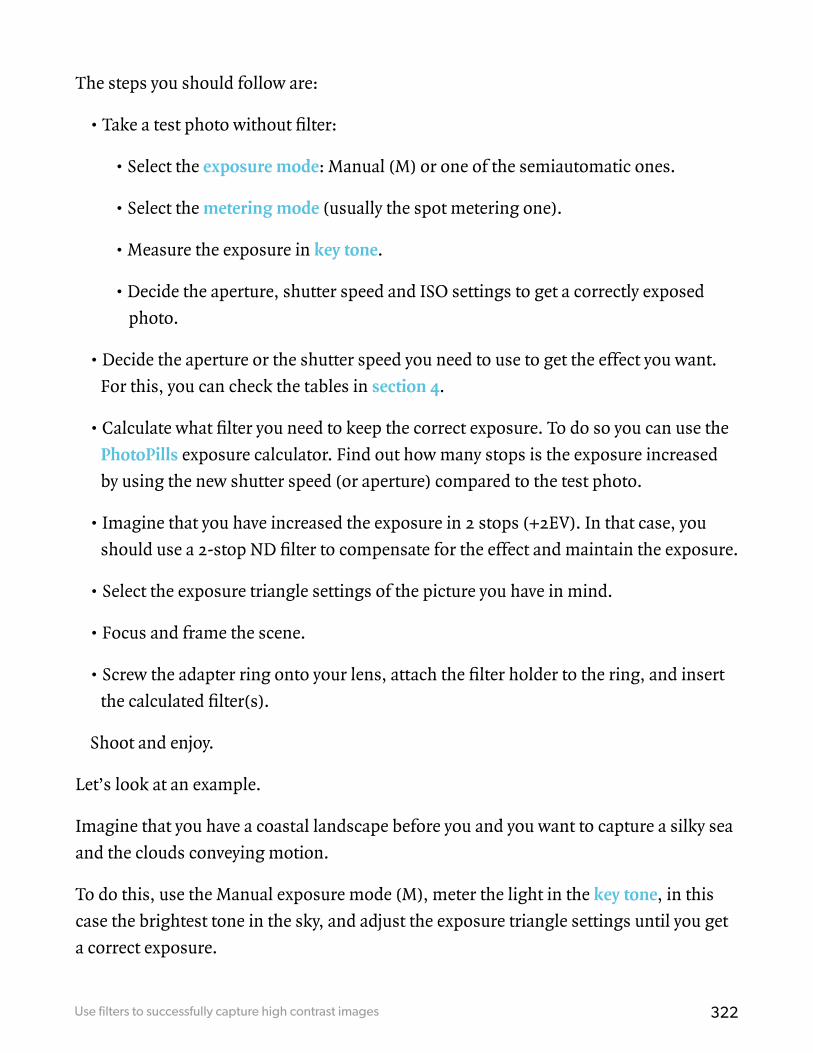
322Use filters to successfully capture high contrast images
The steps you should follow are:
• Take a test photo without filter:
• Select the exposure mode: Manual (M) or one of the semiautomatic ones.
• Select the metering mode (usually the spot metering one).
• Measure the exposure in key tone.
• Decide the aperture, shutter speed and ISO settings to get a correctly exposed
photo.
• Decide the aperture or the shutter speed you need to use to get the effect you want.
For this, you can check the tables in section 4.
• Calculate what filter you need to keep the correct exposure. To do so you can use the
PhotoPills exposure calculator. Find out how many stops is the exposure increased
by using the new shutter speed (or aperture) compared to the test photo.
• Imagine that you have increased the exposure in 2 stops (+2EV). In that case, you
should use a 2-stop ND filter to compensate for the effect and maintain the exposure.
• Select the exposure triangle settings of the picture you have in mind.
• Focus and frame the scene.
• Screw the adapter ring onto your lens, attach the filter holder to the ring, and insert
the calculated filter(s).
Shoot and enjoy.
Let’s look at an example.
Imagine that you have a coastal landscape before you and you want to capture a silky sea
and the clouds conveying motion.
To do this, use the Manual exposure mode (M), meter the light in the key tone, in this
case the brightest tone in the sky, and adjust the exposure triangle settings until you get
a correct exposure.

323Use filters to successfully capture high contrast images
Let’s say you set an aperture of f/11 to get a suitable depth of field, an ISO of 100 to avoid
noise in the photo and an shutter speed of 1/125s to expose the picture correctly.
Nikon D4s | 110mm | f/11 | 1/125s | ISO 100 | 5800K
You immediately realize that a shutter speed of 1/125s doesn’t allow you to capture the
silk effect in the water. You need to use a slower shutter speed, but you don’t want to
further close the aperture. So the only alternative you have is to use an ND filter.
But what shutter speed do you need?

324Use filters to successfully capture high contrast images
Having a look at the table in section 4, you deduce that you need a shutter speed slower
than 1s to achieve the silk effect.
The slower the speed, the silkier the water will be.
In this case, the easiest way to figure out what shutter speeds you can use with the filters
you have is to use the PhotoPills exposure calculator.
So open PhotoPills, and in the exposure calculator set that you want to calculate the
“shutter speed”. Then, enter the settings you used in the test photo: f/11, 1/125s and ISO
100 (“Test settings” in the first screenshot that you have a couple of paragraphs below).
Next, enter the settings of the photo you’re looking for (“Equivalent settings”): use the
same aperture f/11 and ISO 100 settings. Then, adjust the ND filter stops until you get a
shutter speed that allows you to obtain the effect you want.
For example, in the second screenshot, you are using a 3-stop filter that allows you to
expose for 1/15s. This shutter speed isn’t enough.
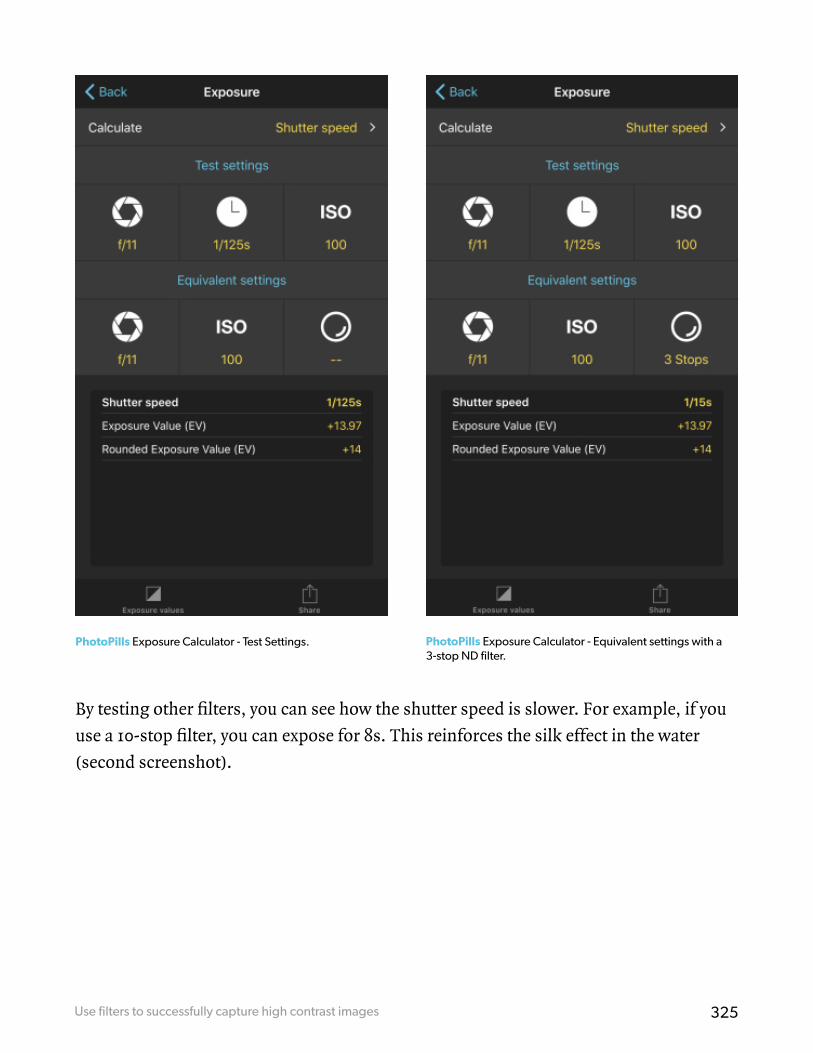
325Use filters to successfully capture high contrast images
PhotoPills Exposure Calculator - Test Settings. PhotoPills Exposure Calculator - Equivalent settings with a 3-stop ND filter.
By testing other filters, you can see how the shutter speed is slower. For example, if you
use a 10-stop filter, you can expose for 8s. This reinforces the silk effect in the water
(second screenshot).

326Use filters to successfully capture high contrast images
PhotoPills Exposure Calculator - With a 6-stop filter you can expose for 0.5s.
PhotoPills Exposure Calculator - With a 10-stop filter, the shutter speed is 8s.
In practice, the best thing you can do is to take photos with different ND filters and
their corresponding shutter speed. You can then decide what shutter speed gives you the
effect on the water you’re looking for.

327Use filters to successfully capture high contrast images
Nikon D4s | 110mm | f/11 | 8s | ISO 100 | 5800K | ND1000 (10 stops) filter
Now that you know what a filter is, let’s go back to the aim of this section: successfully
shoot high contrast scenes.
This leads us to another type of filters, the graduated neutral density filters (GND).

328Use filters to successfully capture high contrast images
Graduated neutral density filters (GND) and their uses
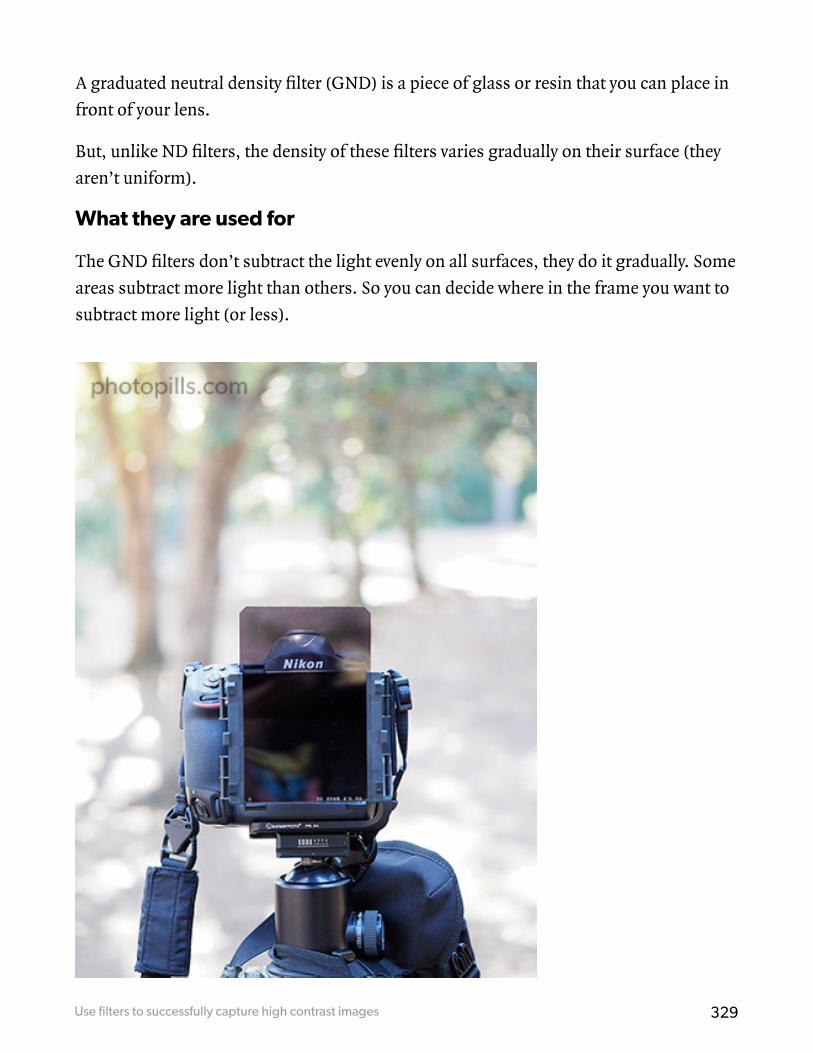
329Use filters to successfully capture high contrast images
A graduated neutral density filter (GND) is a piece of glass or resin that you can place in
front of your lens.
But, unlike ND filters, the density of these filters varies gradually on their surface (they
aren’t uniform).
What they are used for
The GND filters don’t subtract the light evenly on all surfaces, they do it gradually. Some
areas subtract more light than others. So you can decide where in the frame you want to
subtract more light (or less).

330Use filters to successfully capture high contrast images
When you place the dense area (the one that subtracts more light) over the highlights of
the frame, your camera is able to correctly capture a high contrast scene. That is, without
having to modify the exposure triangle.
Nikon D4s | 110mm | f/11 | 1/60s | ISO 100 | 5850K | Soft GND 0.9 (3 stops) filter
They are called graduated neutral density filters because:
• They subtract the light gradually. The density varies gradually.
• First, this gradual variation goes from transparent to a neutral gray tone.
• Then, this gray’s density gradually increases, subtracting more and more light.
To summarize, they are sunglasses for your lens whose crystals have a progressive tint.
Although some photographers consider that filters are an artificial tool that alters
reality, the truth is that a graduated neutral density filter helps you get just the opposite:
capture a photo that is very close to what your eyes see.
This type of filter allows you to modify two aspects of a picture:
1- The dynamic range. It allows you to capture scenes whose brightness level exceeds
the capabilities of your camera. This is the best known feature of this filter.
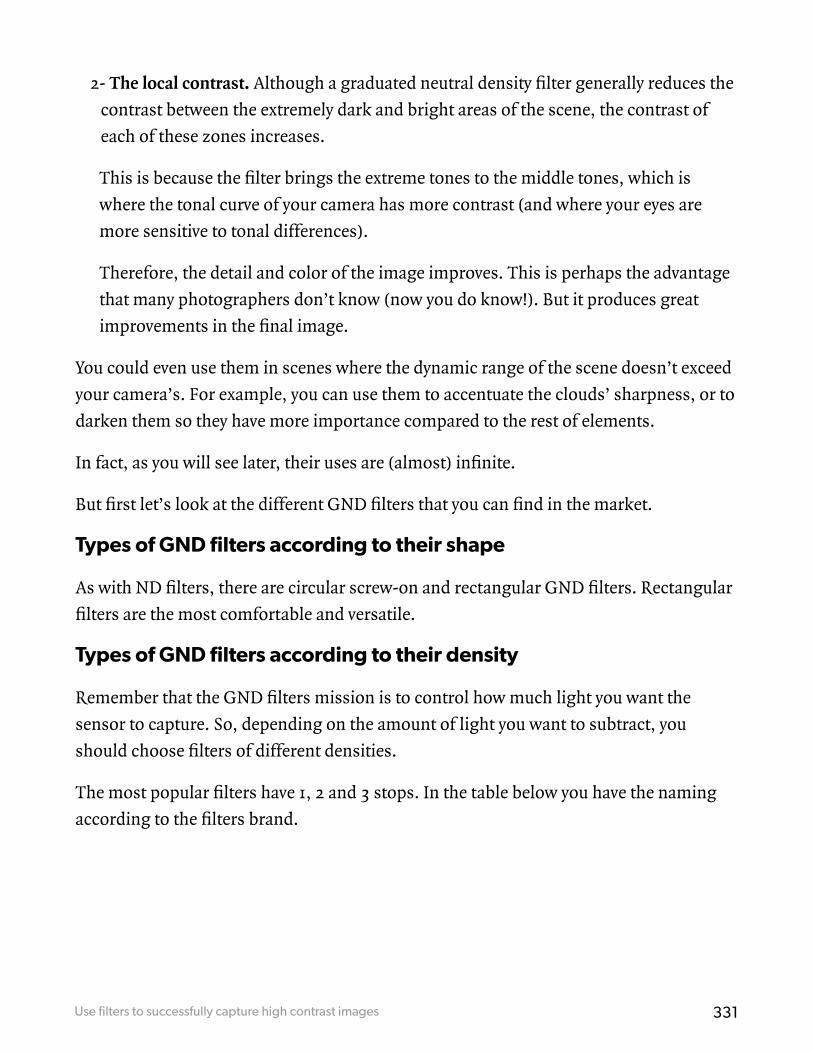
331Use filters to successfully capture high contrast images
2- The local contrast. Although a graduated neutral density filter generally reduces the
contrast between the extremely dark and bright areas of the scene, the contrast of
each of these zones increases.
This is because the filter brings the extreme tones to the middle tones, which is
where the tonal curve of your camera has more contrast (and where your eyes are
more sensitive to tonal differences).
Therefore, the detail and color of the image improves. This is perhaps the advantage
that many photographers don’t know (now you do know!). But it produces great
improvements in the final image.
You could even use them in scenes where the dynamic range of the scene doesn’t exceed
your camera’s. For example, you can use them to accentuate the clouds’ sharpness, or to
darken them so they have more importance compared to the rest of elements.
In fact, as you will see later, their uses are (almost) infinite.
But first let’s look at the different GND filters that you can find in the market.
Types of GND filters according to their shape
As with ND filters, there are circular screw-on and rectangular GND filters. Rectangular
filters are the most comfortable and versatile.
Types of GND filters according to their density
Remember that the GND filters mission is to control how much light you want the
sensor to capture. So, depending on the amount of light you want to subtract, you
should choose filters of different densities.
The most popular filters have 1, 2 and 3 stops. In the table below you have the naming
according to the filters brand.

332Use filters to successfully capture high contrast images
Stops Light reduction Density
1 ND2, ND2X, 2X 0.3 ND
2 NDND4, ND4X, 4X 0.6 ND
3 ND8, ND8X, 8X 0.9 ND
4 ND16, ND16X, 16X 1.2 ND
5 ND32, ND32X, 32X 1.5 ND
Types of GND filters according to the transition
Not all filters have the same transition from the darkest part to the clearest or more
translucid part.
The transition can be hard or soft.

333Use filters to successfully capture high contrast images
Hard filter - Soft filter
In hard filters the transition between the dark and the transparent area is marked by a line.
Use these filters when the scene has a clean horizon (when there are no elements above
the horizon). Or when there is an obvious straight line separating the bright tones in the
scene from the dark ones.
In soft filters, however, the transition is so gradual that you can barely notice the
difference going from the dark to the transparent area.
These filters come in handy when you have elements above the horizon. That is, when
the separation between the brighter and darker tones isn’t marked by a straight line.
Unfortunately, filter manufacturers don’t agree on standard gradient values, that is, how
fast the filter changes from dark to transparent. So the gradient can vary considerably
from one brand and another.

334Use filters to successfully capture high contrast images
What GND filters you should buy
These are the graduated neutral density filters (GND) I have in my arsenal. I have them
in two sizes, depending on the sensor of the camera that I’ll use.
• I have several 100x150mm filters (ideal for Micro 4/3 or APS-C sensors):
• A 3-stop (ND8 o ND0.9) GND filter from Lucroit.
• A 2-stop (ND4 o ND0.6) reverse GND filter from Lucroit.
• A 3-stop (ND8 o ND0.9) reverse GND filter from Hitech.
• I have a couple of 165x185mm (ideal for full frame sensors):
• A 3-stop (ND8 o ND0.9) GND filter from Lucroit.
• A 3-stop (ND8 o ND0.9) reverse GND filter from Hitech.
Let’s see how you should choose the density of your GND filters.
Choosing the right filter density
With GND filters, the key question is:
“What density do I need?”
To determine the filter density you need (the stops it subtracts), you should calculate the
stops difference between the brightest and darkest areas of the scene.
Let’s figure it out!
Imagine that you want to use a GND filter to capture the sea landscape in the picture
below. In this case, you use a soft-edge filter because you don’t have a clean horizon.
When you have a clean horizon you can use:
• A soft-edge filter as well.
• A hard-edge filter.

335Use filters to successfully capture high contrast images
• A reverse soft-edge filter. A reverse GND filter is very dark in the middle and
graduated towards the top. The bottom is almost translucent. I’ll talk about them
further down this section.
Nikon D4s | 18mm | f/16 | 6s | ISO 100 | 5850K
Take the camera and select the spot metering mode.
Now, meter the light in the sky and determine the exposure so that the light meter
is centered at zero (5 1/3 EV). Then meter the light on the rocks and determine the
exposure again (7 1/3
EV).
How can you calculate exposure values (EV)?
Simply enter the aperture, shutter speed and ISO settings into the PhotoPills exposure
calculator and you’ll automatically get the EV.

336Use filters to successfully capture high contrast images
PhotoPills exposure calculator - Calculating the EV ( 7 1/3) on the sky based on the shot settings (f/11 | 1.6s | ISO 100).
PhotoPills exposure calculator - Calculating the EV (5 1/3) on the rocks based on the shot settings (f/11 | 6s | ISO 100).
The exposure difference (5 1/3
- 7 1/3
= 2) indicates the stops between the two zones.
In other words, it tells you the density of the filter that you should use to match the
exposure of that particular scene.

337Use filters to successfully capture high contrast images
Nikon D4s | 18mm | f/16 | 6s | ISO 100 | 5850K | Soft GND 0.6 (2 stops) filter
However, in my experience, I advise you to use a filter of a somewhat lower intensity if
you want to get a natural effect.
Let’s look at another example.
Suppose you are using the Aperture Priority shooting mode (A or Av) and your camera’s
light meter estimates a shutter speed of 1/100s for the sky (background) and 1/25s for
the ground (foreground) to correctly expose the scene.
Taking into account the shutter speed scale, you deduce that there are 2 stops between
1/100s and 1/25s. That is, the foreground needs four times more light to be correctly
exposed (zero-centered light meter).

338Use filters to successfully capture high contrast images
1/100 > 1/80 > 1/60 > 1/50 > 1/40 > 1/30 > 1/25
In this case, I recommend using a GND filter with a 2-stop density (or even something
less).
As soon as you start using the filters, it’ll become easier to decide which filter to use to
get the photo you are after.
How to use a GND filter
Imagine you are on the coast. You have the sea in front of you, and a fantastic rock very
close to your position.
Although your eyes let you enjoy all the beauty of the scene, your camera isn’t able to
expose it correctly. Take a test shot and you’ll notice that you have to decide between
exposing for the sky or for the foreground.

339Use filters to successfully capture high contrast images
Nikon D4s | 110mm | f/11 | 1/125s | ISO 100 | 5850K
In the first picture, the sky looks correctly exposed but, in contrast, the foreground looks
very dark (underexposed).

340Use filters to successfully capture high contrast images
Nikon D4s | 110mm | f/11 | 1/15s | ISO 100 | 5850K
While in the second one, the foreground is exposed correctly (detail’s been captured),
but the sky is too bright (overexposed).
Therefore, you should use a graduated neutral density filter.
So which filter should you use and how?
Before you start playing with different filters, you should decide three parameters:

341Use filters to successfully capture high contrast images
density, transition and position.
First, you should determine the density of the filter you need based on the number of
stops between the brightest and darkest area of the scene. To calculate the filter density,
follow the steps in the previous section.
For the rock scene, the exposure difference between the sky and the foreground is 3
stops (1/125s -> 1/60s -> 1/30s -> 1/15s). So you use a 3-stop GND filter.
Secondly, you must decide the type of filter transition (hard or soft) depending on
whether the bright and dark tones are separated by a line or not.
When you have a clean horizon (no elements above the horizon), you can use a hard-
edge filter. Otherwise, a soft-edge filter will help make its effect more subtle over those
elements that are above the horizon.
In any case, I always recommend that you use soft-edge filters. They are more versatile
and you also carry less equipment. Your back will thank you!
Going back to our example, the scene doesn’t have a clean horizon, there are rocks
above it. So you should use a soft-edge filter.
The filter transition is also affected by the focal length, the aperture, and the sensor size.
Due to the “zoom” effect, the transition looks much softer on a super telephoto lens
(focal lengths over 200mm) compared to it how looks on a wide angle lens (focal
lengths below 24mm).
In addition to this, the greater the aperture, the more blurred the gradient looks, of the
shallower depth of field.
You also have to take into account the size of the sensor. The same GND filter can work
with a full frame camera and not work, for example, in a Micro 4/3 camera because the
gradient area is too large compared to the size of the sensor. Before you buy a filter, find
out if it works properly your camera.
Finally, regarding the filter position, the key is where to place the transition zone from
bright to dark.

342Use filters to successfully capture high contrast images
Although you can see the transition zone more or less clearly when you look through
the filter (before placing it in front of the lens), the position in which you have to place it
with respect to the lens is much less obvious when you look through of the viewfinder.
Normally, you get the optimal position of the filter by placing the transition zone in such
a way that it matches the horizon of the photo (or the line that separates the bright tones
from the dark ones). However, you are likely to get more realistic results by placing it
slightly below.
If you put the filter in the wrong position, for example, with the transition zone too high
from the horizon, you will get a very annoying bright strip just above the horizon.
Nikon D4s | 18mm | f/16 | 1/3s | ISO 100 | 6250K | Hard GND 0.9 (3 stops) filter
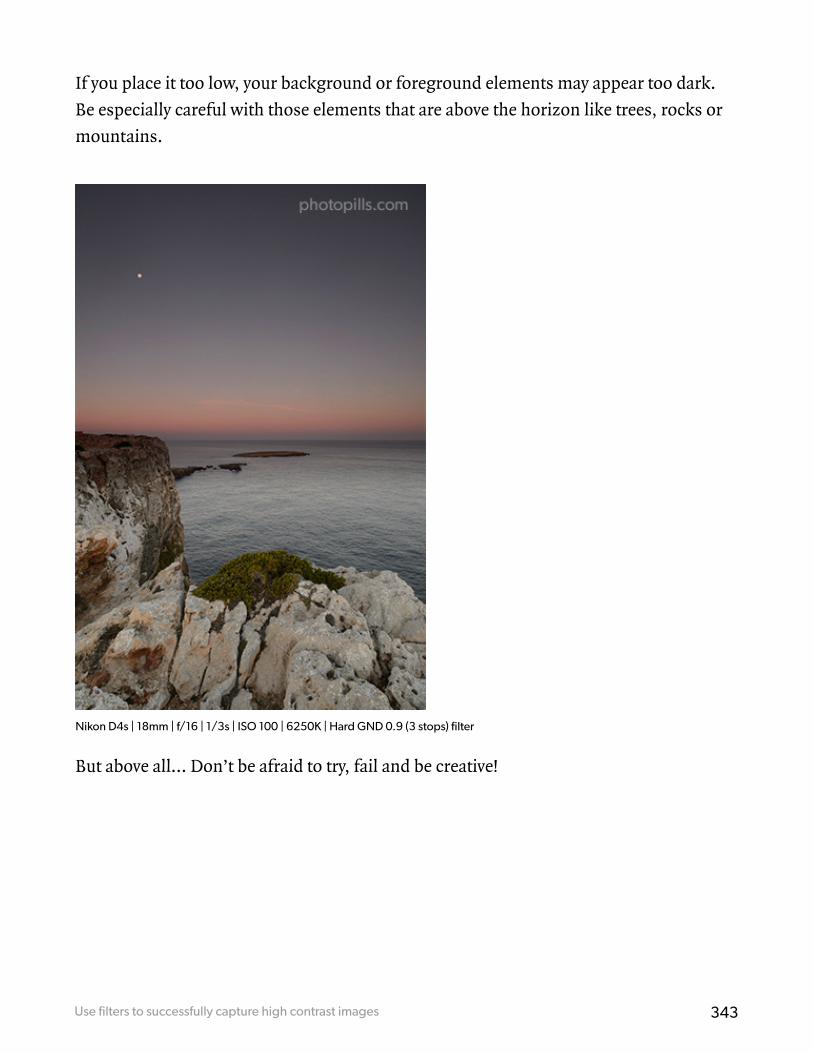
343Use filters to successfully capture high contrast images
If you place it too low, your background or foreground elements may appear too dark.
Be especially careful with those elements that are above the horizon like trees, rocks or
mountains.
Nikon D4s | 18mm | f/16 | 1/3s | ISO 100 | 6250K | Hard GND 0.9 (3 stops) filter
But above all... Don’t be afraid to try, fail and be creative!

344Use filters to successfully capture high contrast images
Nikon D4s | 18mm | f/16 | 1/3s | ISO 100 | 6250K | Hard GND 0.9 (3 stops) filter
The problem of GND filters and their color cast
Perhaps the main problem with a GND neutral density filter is that it limits your
composition.
Why?
Because those elements that are above the horizon can look in the final image darker
than the rest of the scene.

345Use filters to successfully capture high contrast images
You can solve this problem with a post-processing software like Photoshop. But in order
to do so you should know how to use, for example, luminosity masks.
However, you should ideally avoid, if possible, additional tools that force you to you
spend more hours in front of the computer than taking photos.
We’re almost done with this section. I just have to tell you a couple of more advanced
things that I hope you find useful.

346Use filters to successfully capture high contrast images
The reverse GND filter
The reverse GND filter is nothing more than a variation of the GND filter.
Its peculiarity is that the darkest part, the one that determines the filter density, is in the
middle of the filter, and it progressively brighten towards the top. On the contrary, the
lower half is completely transparent (to avoid subtracting light in the foreground).
That’s why it’s called reverse.
You can mainly use it for photographing backlit sunrises and sunsets with a clean
horizon (without elements above).
By having the Sun on the horizon (either inside or outside the frame, as in the example
I have put below), the central part of the image is the brightest one, so this is where you

347Use filters to successfully capture high contrast images
should subtract more light. In contrast, the top of the image won’t need such a high
filter density.
Nikon D4s | 18mm | f/16 | 2min | ISO100 | 7500K | ND64 (6 stops) and reverse GND 0.6 (2 stops) filter
These are the reverse graduated neutral density filters (GND) I have in my arsenal. I have
them in two sizes, depending on the sensor of the camera that I’ll use.
• I have several 100x150mm filters (ideal for Micro 4/3 or APS-C sensors):
• A 2-stop (ND4 o ND0.6) reverse GND filter from Lucroit.
• A 3-stop (ND8 o ND0.9) reverse GND filter from Hitech.
• I have one 165x185mm (ideal for full frame sensors) 3-stop (ND8 o ND0.9) reverse
GND filter from Hitech.

348Use filters to successfully capture high contrast images
Move the GND filter during the exposure
Sometimes it can be interesting to move the filter while the camera is taking the photo.
This allows you to adjust the amount of light you subtract in each part of the scene. It
also helps you avoid to have traces of the transition line between dark and bright tones
in your picture.
But I warn you in advance: it isn’t easy at all. It’s very difficult to control how the final
photo will be and requires a lot of practice.
If you are interested in practicing this technique, I suggest that you take a look at “El uso
de los filtros en movimiento”, an article of my friend José B. Ruiz in which he explains it
with great detail. Unfortunately, it’s only available in Spanish.

23Use auto exposure bracketing to
successfully capture high contrast images

350Use auto exposure bracketing to successfully capture high contrast images
Auto exposure bracketing consists of taking a series of photographs of different
exposures so that, when blended with an editing program (Lightroom, Photoshop, etc.),
you get a photograph with detail in both the shadows and the highlights.
In other words, with the bracketing technique, you can generate a high dynamic range
(HDR) image that fits the dynamic range of the scene.
Nikon D4s | 28mm | f/5.6 | 1/800s, 1/200s, 1/50s | ISO 100 | 6500K
Photo resulting from bracketing

351Use auto exposure bracketing to successfully capture high contrast images
This technique allows you to artificially stretch the limited dynamic range of your
camera to access a new world of possibilities. A world that you couldn’t reach before
because of your camera limitations.
Unfortunately you have to pay a small price. Extending the captured dynamic range will
inevitably result in reduced contrast in certain tones. To avoid this, you can always adjust
the contrast in post-processing.
Another major disadvantage of bracketing is that all elements of your scene must be
static since each shot must be identical to the others, except for the exposure.
When you should use bracketing
In my opinion, you should ideally use the bracketing technique only when a GND filter
doesn’t allow you to capture the high dynamic range of the scene.
If you can use a filter, you can capture the scene in a single frame, and you also keep the
contrast on every area of the frame.
Filters are ideal for those scenes where dark and bright tones are separated by a straight
line, such as landscapes that include the horizon.
On the other hand, use the bracketing technique in scenes with a more complex tone
distribution, such as the following photographs.

352Use auto exposure bracketing to successfully capture high contrast images
Nikon D4s | 20mm | f/8 | 10s (underexposed picture), 86s (overexposed picture) | ISO 200 | 9100K
The scene in the photographs above has three tonal zones delimited by the abrupt
transitions that occur at its edges: the sea, the rocks and the sky.
You would need a customized filter to capture this scene in a single exposure.
However, if you were there watching the scene yourself, you would appreciate detail in
the three zones because your eyes are easily accustomed to the light differences.
In this case, to capture an image similar to what your eyes see, you should use the
bracketing technique.

353Use auto exposure bracketing to successfully capture high contrast images
How to use a bracketing
It’s super easy!
Use a good tripod
I recommend using a sturdy tripod and a good ballhead, although you can also perform
a handheld bracketing (if you have a good pulse). In this case I use a high shutter speed
and I enable the burst shooting mode enabled.
As for the tripod...
How sturdy should it be?
Enough to bear the weight of your camera and your lens. The idea is that it has to be a
very stable support even in windy conditions or when you want to get into the water,
on the bank of a river or the sea. I use the Gitzo 4542 Systematic together with the Kirk
Enterprise BH-1 ballhead.
You have to take several shots of the same scene with different exposures. So it’s
essential that the frame is always the same. Your camera can’t move!
Yes, I know that both Lightroom and Photoshop include very powerful tools that are able
to overlay and align photos that have a slight deviation. But the smaller the deviation, the
better. And if there is no deviation, great!
Take at least 3 exposures (or as many as you need)
Make sure to take at least 3 shots, though I’d rather take 5 shots to have an even more
precise result.
A greater number of exposures allows you to get a more balanced tonal distribution
during the post-processing.
Let’s see how this works using the previous example. In this case, I took 3 shots.

354Use auto exposure bracketing to successfully capture high contrast images
Nikon D4s | 20mm | f/8 | 10s (-1EV), 20s (0EV), 40s (+1EV) | ISO 200 | 9100K
When exposing, it’s very important that:
• The brightest shot doesn’t have the highlights blown up.
• The darkest shot doesn’t have the shadows clipped, nor noise in the dark areas.
The exposure difference between each shot varies according to the taste of each
photographer, but I like to have 1-stop brackets, ideally by varying the shutter speed
(while maintaining the aperture and the ISO).
Remember that each stop involves doubling (+1 stop) or halving (-1 stop) the light
captured by the sensor.
-2 stops (-2EV) < -1 stop (-1EV) < 0 < +1 stop (+1EV) < +2 stops (+2EV)
TIPS
You can use the bracketing technique to reduce noise in the shadows. Even if your
scene doesn’t have a high contrast, your final photo improves reducing the noise
in the shadows.
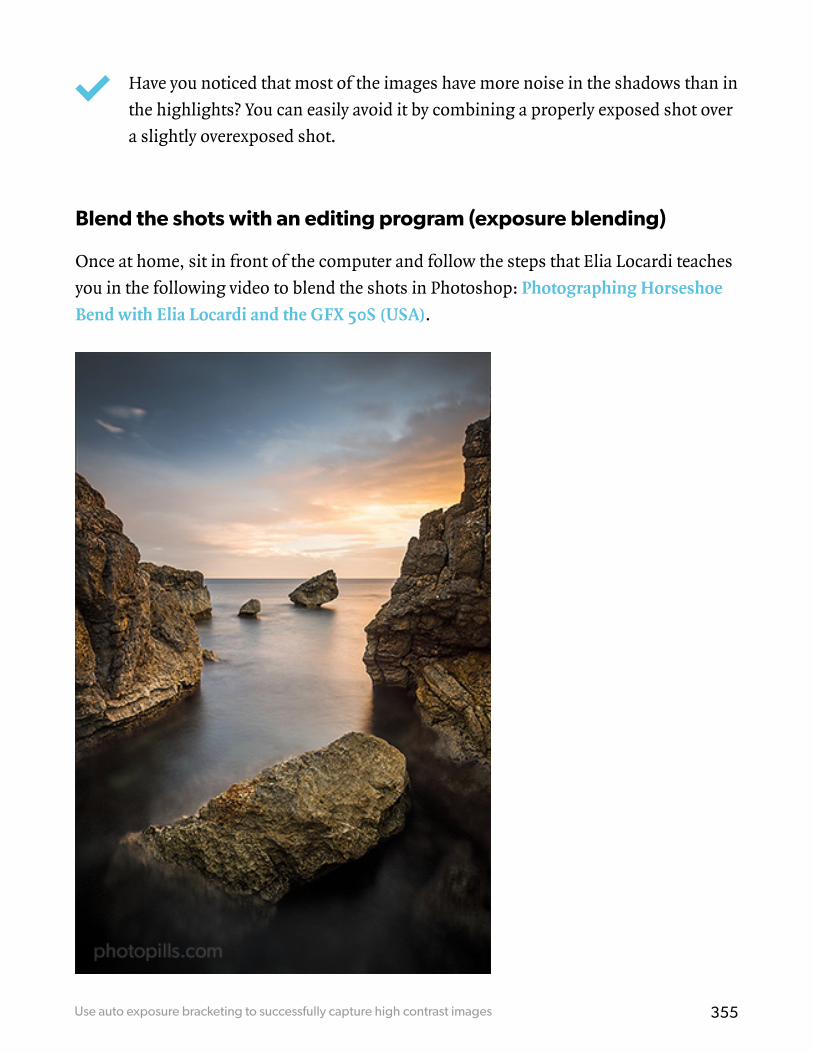
355Use auto exposure bracketing to successfully capture high contrast images
Have you noticed that most of the images have more noise in the shadows than in
the highlights? You can easily avoid it by combining a properly exposed shot over
a slightly overexposed shot.
Blend the shots with an editing program (exposure blending)
Once at home, sit in front of the computer and follow the steps that Elia Locardi teaches
you in the following video to blend the shots in Photoshop: Photographing Horseshoe
Bend with Elia Locardi and the GFX 50S (USA).

2430 practical examples
of exposure

35730 practical examples of exposure
I love theory, but I admit that the best way to help you learn is by seeing examples and
practicing.
So I can’t think of a better way to help you understand what I’ve covered in this article
than showing you lots of examples with real photos – photos that I have made myself.
Study them thoroughly and you will become Lightmeter-man... The exposure
superhero!
On my most inspiring days, I wear my Lightmeter-man t-shirt and I go for a drive on a Porsche 911 Carrera... (Jokes aside, the Porsche is not mine!)
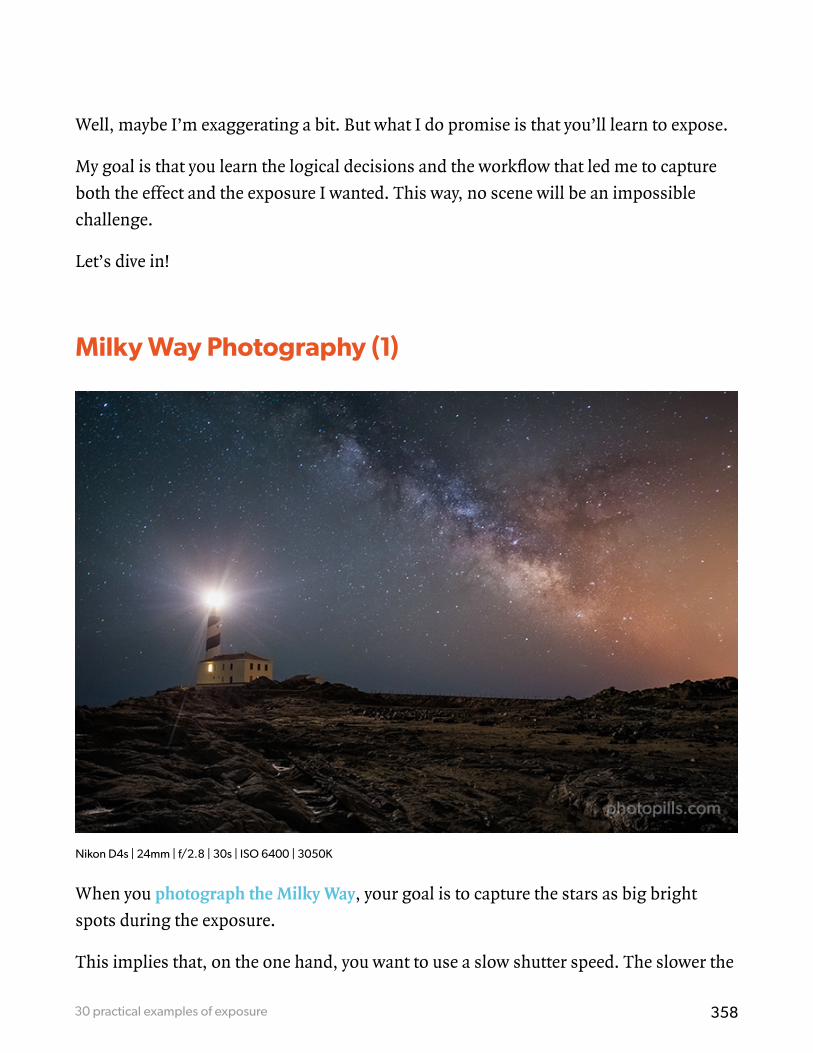
35830 practical examples of exposure
Well, maybe I’m exaggerating a bit. But what I do promise is that you’ll learn to expose.
My goal is that you learn the logical decisions and the workflow that led me to capture
both the effect and the exposure I wanted. This way, no scene will be an impossible
challenge.
Let’s dive in!
Milky Way Photography (1)
Nikon D4s | 24mm | f/2.8 | 30s | ISO 6400 | 3050K
When you photograph the Milky Way, your goal is to capture the stars as big bright
spots during the exposure.
This implies that, on the one hand, you want to use a slow shutter speed. The slower the

35930 practical examples of exposure
shutter speed, the brighter and bigger the stars.
But, as you will learn in the guide on how to photograph Stars Trails, because of the
Earth rotation from a certain shutter speed the stars stop being big bright spots in the
photo, and become Star Trails.
And what is that limit shutter speed?
The answer is in the NPF rule or the 500 rule.
To use the 500 rule simply divide 500 by the effective focal (focal × cropping factor) you
use and you’ll get the minimum shutter speed (slowest) that will allow you to avoid Star
Trails. It’s very easy to calculate but it has a drawback: it fails in modern cameras with
many megapixels.
The NPF rule is more accurate, but more complicated. It takes into account the size
of the camera’s pixels, the aperture, the focal length and the declination of stars. To
calculate it you can use the PhotoPills Spot Stars calculator. You can do it even with the
Augmented Reality!
Normally, the minimum shutter speed is less than 35s. And considering the conditions
of low light (it’s pitch black), you should use the highest aperture that your lens allows
you (f/2.8, f/4...) to capture the maximum amount of light.
Remember that the wider the aperture, the more light and stars you’ll capture.
By using a short focal length (14-35mm) to capture most of the landscape and the sky,
and a wide aperture to capture as much light as possible, you can maximize the depth of
field focusing at the hyperfocal distance.
Finally, choose the ISO setting that gives you a correctly exposed photo. Normally you’ll
use high ISOs (800, 1600, 3200, etc.), so be very careful with the noise that is generated.
Therefore, first set the aperture and shutter speed to get the photo you want. Then,
take several test shots and check the histogram to adjust the ISO giving you the correct
exposure.

36030 practical examples of exposure
To sum up, the steps you should follow to take the photo are:
• Gear: Camera (full frame is best), wide angle lens, intervalometer, robust tripod
and ballhead, flashlights, LEDs and anti-moisture systems (take a look at the gear to
photograph the Milky Way).
• Camera settings: RAW. Turn off the image stabilization function if your lens has it.
• Focal length: Short focal length (10mm, 14mm, 24mm, etc.) to cover as much
landscape and sky as possible.
• Exposure mode: Manual (M).
• Metering mode: You can’t meter the light because there is none. Determine the
exposure by taking test pictures and checking the histogram to see if it is correct.
• Aperture: The widest that your lens allows you (f/2.8 is great). You need to capture as
much light as possible during the exposure. Remember that a large aperture allows
you to capture more stars, and that they are larger and brighter.
• Shutter speed: The maximum possible but avoiding Star Trails. Calculate it with the
NPF rule, the 500 rule or with PhotoPills. Usually below 30-35s.
• ISO: Use the highest ISO possible (1600, 3200, 6400) at which your camera doesn’t
produce too much noise. As for the aperture, you need a high ISO to capture more
light.
• White balance: Manual. Start with 3900K if there is no light pollution or with 3400K
if there is, and then adjust according to the result. Nevertheless, you can always
correct it in post-processing.
• Where to focus: Focus at the hyperfocal distance to maximize the depth of field.
• Illumination: Illuminate the foreground if necessary. If you dare, you can use the
light of the Moon as a lighting system. Plan your shooting session so that the Moon
has a little elevation and brings light to the scene from the side.
• Take the picture, check that everything is focused and with the lighting you want.
Otherwise, refocus to the hyperfocal and/or correct the illumination.

36130 practical examples of exposure
• Make sure the photo is correctly exposed (check the histogram). Otherwise, adjust
the ISO accordingly.
If you want to take spectacular photos of the Milky Way, you will find all the secrets in
our guide “How To Shoot Truly Contagious Photos Of The Milky Way”.
Wildlife photography freezing motion (2)
Nikon D700 | 500mm | f/5.6 | 1/1500s | ISO 800 | 5700K
When you are photographing wildlife, the chances of being able to approach your
subject are minimal. Therefore, you’ll have to use a super telephoto lens (300-600mm).
And what happens when you use a super telephoto lens (long focal lengths)?

36230 practical examples of exposure
Well, the depth of field you get in the photo is very shallow. So you may be tempted to
close the aperture to increase the depth of field.
But the truth is that you won’t be able to use a small aperture.
Why?
Blame the short shutter speed (below 1/1000s) that you have to use to freeze the
movement of the animal (or animals).
When using a slow shutter speed, you have to use large apertures and high ISOs (and
even add light with a flash) so that the sensor captures the proper amount of light to get
a correct exposure.
To sum up, the steps you should follow to take the photo are:
• Gear: As for the camera, it depends on the type of wildlife. I usually recommend
APS-C or Micro 4/3 cameras, but I used a full format one to take this picture. You
need a super telephoto lens, a robust tripod and ballhead (ideally a gimbal one).
When using a gimbal ballhead your movements are more fluid and safer.
• Camera settings: RAW. Activate the image stabilization function if your lens has it.
• Focal length: A long focal length to maximize the subject in the frame.
• Exposure mode: Aperture priority mode (A or Av).
• Metering mode: Use the spot metering mode to focus on the bird and then
recompose. In any case, evaluate the light and select the settings taking into account
the background of the image. If the bird is against the sky compensate the exposure
by 1 stop (+1EV) to ensure a good exposure. It will always depend on the color of the
bird. If it’s white, the correction factor has to be higher. If it’s black, you barely have
to compensate the exposure.
• Focus Mode: For birds in flight, use the continuous focus mode (AF-C), with
shooting priority. This way you can have the bird focused at all times. Everything is
easier if you start focusing when the bird is still far away.
• Aperture: A large aperture to be able to use a fast speed.

36330 practical examples of exposure
• Shutter speed: 1/1000s or more if you want to freeze the bird’s flight. If, on the other
hand, you want to add motion, reduce it to 1/500s or so to capture the wings moving
and conveying a feeling of speed in the subject.
• ISO: Start with a low ISO and crank it up according to the light conditions you are
in. The most important thing is to know the limits of your camera. It’s better if
you give up and come back another day when the conditions are better than being
discouraged by the results you got.
• White balance: Manual. It depends on the time of day and the quality of light.
Nevertheless, you can always correct it in post-processing.
• Where to focus: Focus on the eyes of the bird. This way you will get the whole head
in focus. On this occasion, I was inside a hide so I could work at the height of the
bird, and thus get a more visually attractive shot.
• In this type of photography (and in all, honestly) it’s very comfortable to have the
shot dissociated from the focus. Thus, you focus with the exposure lock back button
(AEL or AE-L) and you only use the shutter button to take the photo.
• Take the picture, check that everything is focused and with the lighting you want.
Otherwise, and if you can take the picture again, compensate the exposure and make
sure the photo is correctly exposed (check the histogram).
• You will get better results avoiding the central hours of the day. The best time is at
dawn or dusk, where the warm light gives a special touch to the final result.
• As you may have guessed, shooting in burst mode is crucial in this type of
photography. Activate the burst shooting mode (and if you can choose the burst
speed, set it on High).
When I mentioned the type of camera I had a reason to do so...
In this particular photo, when I was waiting in the hide I had an APS-C camera ready
with a 1.4x teleconverter and a 500mm lens. When I saw the bird was still approaching,
something out of the ordinary, I quickly removed the teleconverter.
But I sensed that the bird wouldn’t go away, it would come closer instead. The problem

36430 practical examples of exposure
is that if this was the case, my ASP-C would only allow me to capture a simple portrait
and not the entire bird. So I quickly changed the body and mounted a full-frame camera.
You can see the result above. If it had taken me a couple of seconds more or the bird had
come closer, I wouldn’t have gotten it into the frame.
I was very lucky that day.
Long distance Moon photography (3)
Nikon D700 | 500mm | f/4.8 | 1/30s | ISO 1600 | Daylight WB

36530 practical examples of exposure
Long distance Moon photography requires great stability and a long focal length. You
should use a super telephoto lens (between 300mm and 600mm, for example).
And what happens when you use a super telephoto lens?
As in wildlife photography, the depth of field you get in the photo is very shallow and
you also have the problem of stabilizing the gear.
This type of photography settings don’t differ much from the previous one, except for
the shutter speed. Here you can use shutter speeds of few seconds without having the
Moon blurred in the frame.
To sum up, the steps you should follow to take the photo are:
• Gear: I recommend an APS-C or Micro 4/3 camera to take advantage of the cropping
factor. Tripod, telephoto lens and shutter release.
• Camera settings: RAW. Activate the image stabilization function if your lens has it.
• Focal length: A long focal length, from 300mm onwards. It’s better if it’s stabilized.
• Exposure mode: Manual (M).
• Metering mode: Spot metering mode.
• Aperture: f/5.6 and f/8 to close the diaphragm towards the lens sweet spot and get
a sharp image. The sweet spot of your lens is the f number at which the lens offers
maximum sharpness while reducing distortion and chromatic aberration. You’ll find
this spot by closing the maximum aperture 1 or 2 stops.
• Shutter speed: Adapt to the existing light, taking into account that you can use a
shutter speed of up to 2s before the Moon is blurred.
• ISO: The minimum possible, taking into account that the maximum shutter speed
you can use is 2s before the Moon is blurred. If the light meter isn’t centered at zero,
crank up the ISO gradually, always within the noise limits of your camera.
• White balance: Manual. It depends on the time of day and the quality of light.
Nevertheless, you can always correct it in post-processing.

36630 practical examples of exposure
• Where to focus: Focus on the element you want to highlight in the foreground. If
the distance is long enough, the Moon will be focused as well. For example, with a
full frame camera and using a focal length of 500mm and an aperture of f/5.6, the
hyperfocal distance is 1,473m (you can calculate it with the PhotoPills depth of field
calculator). If the element is at that distance (or higher) you get infinity focus to
infinity.
• In this type of photography stabilizing your equipment is essential. Use a tripod and
a bean bag depending on the surface and the wind. You need a shutter release or an
intervalometer to shoot successfully. Avoid vibrations at all costs!
• Take the photo, check that everything is focused and with the lighting and contrast
you are looking for. If not, compensate the exposure and make sure the photo is
correctly exposed (check the histogram). The full Moon only comes out once a
month, check the results by enlarging the resulting image.
• An interesting trick in this type of photography is locking up the mirror. Although the
camera is on a tripod the weight of the body plus the lens can play a dirty trick on you.
• Have a look at your camera’s instruction manual to learn how to lock up the
mirror and see the option is within the menus. This trick, of course, is useless on a
mirrorless camera… :P
This photo is unique because of the unexpected result. Thinking of Cartier-Bresson and
his decisive moment, this one really was really a true one.
It’s the only image in which the two girls (who were partying and are out of focus)
moved away from the imaginary line between my camera and the horsewoman.
I was really lucky to get this image because, although it wasn’t their intention, the two
girls complete the frame of the horsewoman and the Moon.
You have a whole world of possibilities when capturing pictures with the Moon.
If you want to learn the art of storytelling with the Moon, and learn how to plan any
photo you imagine, I recommend you to take a look at our article “7 Tips to Make The
Next Supermoon Shine In Your Photos”.

36730 practical examples of exposure
Moon silhouettes photography (4)
Nikon D7100 | 500mm | f/8 | 1/200s | ISO 400 | 5400K
The contrast created by highlighting a silhouette with the bright light of the Moon
makes this type of photography an endless source of ideas. Using the Moon as a stage
you have a whole book of stories.
Again, it’s a type of photography that needs the use of a super telephoto lens (300-
600mm).
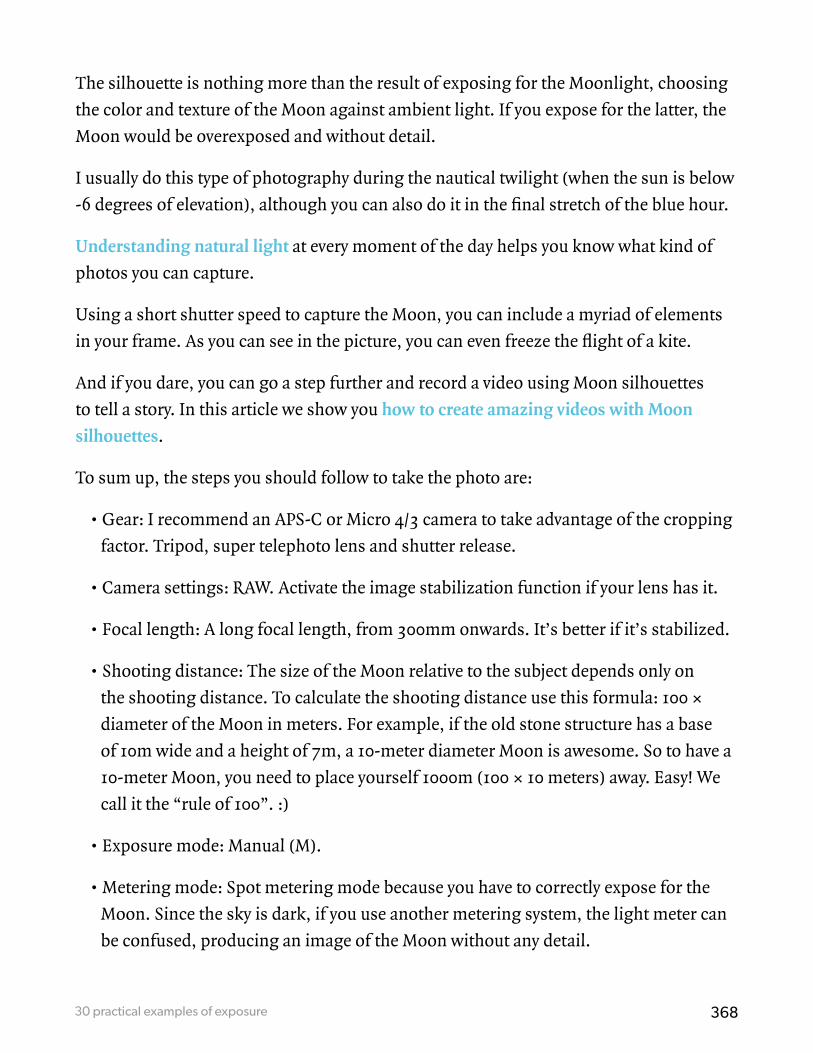
36830 practical examples of exposure
The silhouette is nothing more than the result of exposing for the Moonlight, choosing
the color and texture of the Moon against ambient light. If you expose for the latter, the
Moon would be overexposed and without detail.
I usually do this type of photography during the nautical twilight (when the sun is below
-6 degrees of elevation), although you can also do it in the final stretch of the blue hour.
Understanding natural light at every moment of the day helps you know what kind of
photos you can capture.
Using a short shutter speed to capture the Moon, you can include a myriad of elements
in your frame. As you can see in the picture, you can even freeze the flight of a kite.
And if you dare, you can go a step further and record a video using Moon silhouettes
to tell a story. In this article we show you how to create amazing videos with Moon
silhouettes.
To sum up, the steps you should follow to take the photo are:
• Gear: I recommend an APS-C or Micro 4/3 camera to take advantage of the cropping
factor. Tripod, super telephoto lens and shutter release.
• Camera settings: RAW. Activate the image stabilization function if your lens has it.
• Focal length: A long focal length, from 300mm onwards. It’s better if it’s stabilized.
• Shooting distance: The size of the Moon relative to the subject depends only on
the shooting distance. To calculate the shooting distance use this formula: 100 ×
diameter of the Moon in meters. For example, if the old stone structure has a base
of 10m wide and a height of 7m, a 10-meter diameter Moon is awesome. So to have a
10-meter Moon, you need to place yourself 1000m (100 × 10 meters) away. Easy! We
call it the “rule of 100”. :)
• Exposure mode: Manual (M).
• Metering mode: Spot metering mode because you have to correctly expose for the
Moon. Since the sky is dark, if you use another metering system, the light meter can
be confused, producing an image of the Moon without any detail.

36930 practical examples of exposure
• Aperture: To get enough detail and sharpness use intermediate apertures, using f/8
as a starting point. But if you use a fast super telephoto lens, you start to get enough
detail from f/5.6 on.
• Shutter speed: If the speed is very slow, the Moon and the main subjects are blurred.
I recommend that you use a speed of around 1/250s to freeze people moving around.
Although it goes against the rule between focal distance and minimum speed,
photographing the Moon is different.
• ISO: It’s preferable to start with your camera’s base ISO (the lowest) and crank it up
as long as the shutter speed is less than 1/125s. Sometimes it’s preferable to increase
the ISO than to open the diaphragm, so you can control the depth of field or general
sharpness of the image. Remember that you should know the sensitivity limits of
your camera (noise).
• White balance: Manual. It depends on the moment of capture. You’re going to take
this image before the Sun comes out or after it’s set. Therefore, a warm temperature
can reinforce the orange color of the Moon as long as your composition includes
the Moon near the horizon. On the contrary, when the Moon is quite high, select
a 4000K white balance approximately if you want to maintain a temperature that
corresponds to its natural color. Nevertheless, you can always correct it in post-
processing.
• Where to focus: Focus on the element you want to highlight in the foreground. If the
distance is long enough, the Moon will be focused as well. For example, with a full
frame camera using a focal length of 500mm and an aperture of f/5.6, the hyperfocal
distance is 1,473m (you can calculate it with the PhotoPills depth of field calculator).
If the element is at that distance (or higher) you get infinity focus to infinity. In this
case it was about 1,500m away from the old stone structure, so the Moon is focused.
The sense of blur of the Moon is nothing but the effect of the atmosphere near the
surface of the Earth that clouds the vision when the Moon is so low.
• In this type of photography stabilizing your equipment is essential. Use a tripod and
a bean bag depending on the surface and the wind. You need a shutter release or an
intervalometer to shoot successfully. Avoid vibrations at all costs!
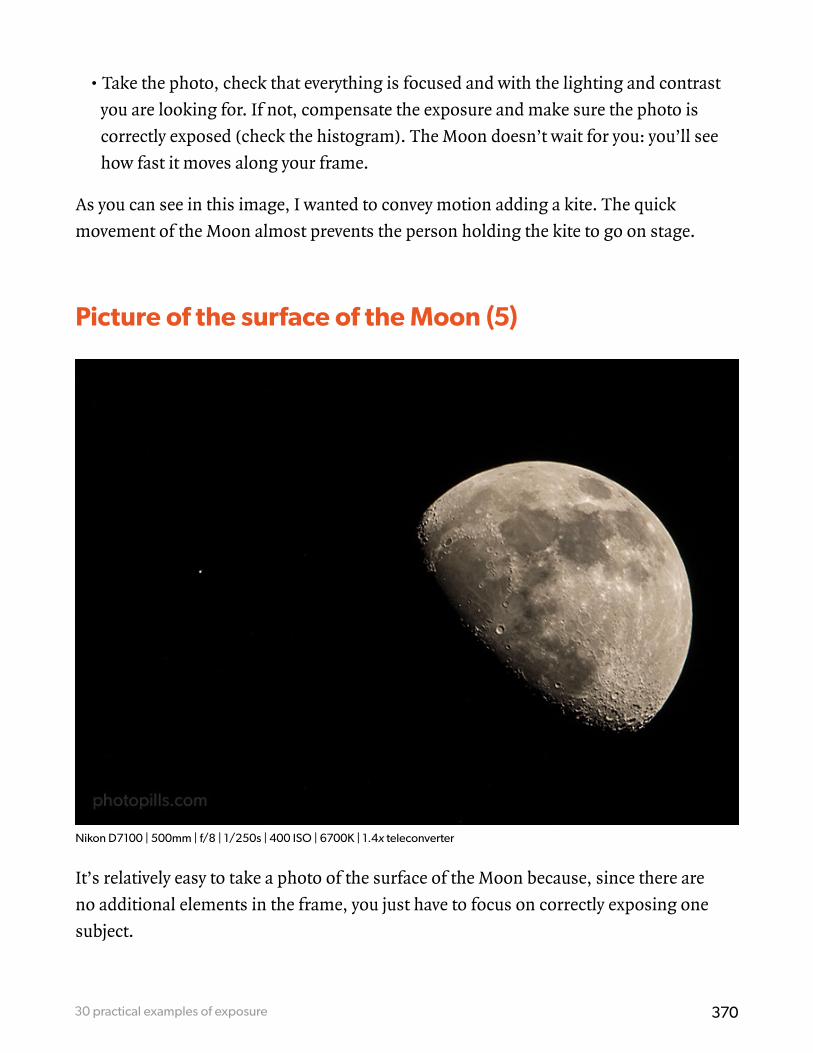
37030 practical examples of exposure
• Take the photo, check that everything is focused and with the lighting and contrast
you are looking for. If not, compensate the exposure and make sure the photo is
correctly exposed (check the histogram). The Moon doesn’t wait for you: you’ll see
how fast it moves along your frame.
As you can see in this image, I wanted to convey motion adding a kite. The quick
movement of the Moon almost prevents the person holding the kite to go on stage.
Picture of the surface of the Moon (5)
Nikon D7100 | 500mm | f/8 | 1/250s | 400 ISO | 6700K | 1.4x teleconverter
It’s relatively easy to take a photo of the surface of the Moon because, since there are
no additional elements in the frame, you just have to focus on correctly exposing one
subject.
37130 practical examples of exposure
It requires great stability and a long focal length. Therefore, you should use a super
telephoto lens (300-600mm).
Don’t photograph the full Moon only. The previous or next phases emphasize the
contrast of the craters and you can observe in more detail the volume of the lunar
surface.
In this case I included Mars (that tiny little dot on the left) in the frame along with the
crescent Moon.
To sum up, the steps you should follow to take the photo are:
• Gear: I recommend an APS-C or Micro 4/3 camera to take advantage of the cropping
factor. Tripod, super telephoto lens and shutter release.
• Camera settings: RAW. Activate the image stabilization function if your lens has it.
• Focal length: A long focal length, starting at 300mm. Better if it’s stabilized.
• Exposure mode: Manual (M).
• Metering mode: Spot metering mode.
• Aperture: f/5.6 and f/8 to close the diaphragm towards the lens sweet spot and get a
sharp image.
• Shutter speed: From 1/125s on, taking into account that, with slower shutter speeds
(no more than 2s) and with the equipment well stabilized, you can capture the Moon
correctly exposed.
• ISO: The minimum possible, taking into account that the minimum shutter speed
you can use is 2s before the Moon is blurred. If the light meter isn’t centered at zero,
crank up the ISO gradually, always within the noise limits of your camera.
• White balance: Manual. It depends on the time of day and the quality of light.
Nevertheless, you can always correct it in post-processing.
• Where to focus: Focus directly on the Moon. In this case I used the Live View
function on the LCD of my camera to focus accurately. Then I zoomed the image,
always with the Live View function on, until I saw the detail of the Moon’s surface.
37230 practical examples of exposure
Then, I slowly turned the focus ring of the lens until the detail of the surface was tack
sharp. If you’re not used to focusing manually, turn the focus ring very subtly and
when you notice that your subject (the Moon) is focused, keep turning the ring until
you go a little out of focus and then, turn the ring in the opposite direction to get
everything in focus again. This way you’ll see very clearly how everything is now in
focus again.
• In this type of photography stabilizing your equipment is essential. Use a tripod and
a bean bag depending on the surface and the wind. You need a shutter release or an
intervalometer to shoot successfully. Avoid vibrations at all costs!
• Take the photo, check that everything is focused and with the lighting and contrast
you are looking for. If not, compensate the exposure and make sure the photo is
correctly exposed (check the histogram).
• An interesting trick in this type of photography is locking up the mirror (if it has one,
of course :P). Although the camera is on a tripod, the weight of the body plus the lens
can play a dirty trick on you.
Here’s a challenge!
Capture the different phases of the moon with the same settings. You’ll see that when
blending them all together in a composite you’ll get a surprising composition.

37330 practical examples of exposure
Single long exposure Star Trails (6)
Nikon D700 | 14mm | f/2.8 | One single exposure (shot) of 10min 11s | ISO 200 | 3400K
Capturing a single long exposure Star Trails is a challenge for any photographer and for
any sensor, depending on how much noise it produces. But it’s also a very rewarding
and exciting experience that I recommend living.
Before getting to the point, let me give you some general advice:
• Look for locations without light pollution.
• Avoid, if possible, the full Moon. It reflects a lot of light and makes it difficult to
capture stars.
• Try to be in a group. Doing night photography alone is dangerous. I myself have
fallen more than once but I’ve been lucky to be with more people.
In our guide on how to photograph Star Trails you’ll find many more examples and step
by step explanations.

37430 practical examples of exposure
In this case, and contrary to photographing the Milky Way, the idea is to show Star
Trails in the picture, not stars as big bright spots.
Taking into account the low light conditions (it’s pitch black) you are in, use your lens
largest aperture (f/2.8, f/4...) to capture the maximum amount of light. The larger the
aperture, the more light and more stars you capture.
Work on a composition including a compelling foreground that enhances the Star
Trails. Include a tree, a building or a model in your frame and your final image will be
truly powerful.
Using a short focal length (14-35mm) to capture most of the landscape and the sky, and
a large aperture to capture the maximum light possible, you can maximize depth of field
focusing at the hyperfocal distance.
Finally, choose the ISO setting that results into a correctly exposed photo. As usual, use
low ISOs (100-200) to avoid noise during a long exposure.
In this type of photography, I recommend doing a few seconds exposure test (20-30s)
at a high sensitivity (ISO 1600, 3200). Once you get a correctly exposed photo, bring
down the ISO and apply the reciprocity law to calculate the equivalent shutter speed. For
calculations you can use the PhotoPills exposure calculator.
To sum up, the steps you should follow to take the photo are:
• Gear: Camera (regardless of its sensor size), wide angle lens, intervalometer, robust
tripod and ballhead, flashlights, LEDs and anti-moisture systems (take a look at the
gear to photograph Star Trails).
• Camera settings: RAW. Turn off the image stabilization function if your lens has it.
• Focal length: Short focal length (10mm, 14mm, 24mm, etc.) to cover as much
landscape and sky as possible. Also, turn off the long exposure noise reduction, if
your camera has this function. The reduction is applied while you are taking the
picture, so in a 20s image, on most cameras you will have to wait another 20s for the
camera to process the image trying to eliminate noise.
• Exposure mode: Manual (M).

37530 practical examples of exposure
• Metering mode: You can’t meter the light because there is none. Determine the
exposure by taking test pictures and checking the histogram to see if it is correct. You
can do reciprocity calculations with the PhotoPills exposure calculator.
• Aperture: If you use the widest aperture (for example f/2.8), you can capture many
stars. But the shutter speed may not be as slow as you want, getting shorter Star
Trails than what you’re looking for. In that case, close the aperture a bit (1 or 2
stops). You won’t be capturing so many stars, but you’ll get longer Star Trails and
sharper stars by closing the diaphragm towards your lens sweet spot.
• Shutter speed: The maximum possible to be able to capture Star Trails as long as
possible. A shutter speed of 30-60min is more than enough.
• ISO: Considering that you shoot a single very long exposure to get your Star Trails as
long as possible, both the shutter speed and noise determine the aperture and ISO
settings you can use. The biggest problem you have is noise. Therefore, keep the ISO
as low as possible (100, 200). Then choose the appropriate aperture to get the shutter
speed you’re looking for.
• White balance: Manual. Start with 3900K if there is no light pollution or with 3400K
if there is, and then adjust according to the result. Nevertheless, you can always
correct it in post-processing.
• Where to focus: Focus at the hyperfocal distance to maximize the depth of field.
• Illumination: Illuminate the foreground if necessary. If you dare, you can use the
light of the Moon as a lighting system. Plan your shooting session so that the Moon
has a little elevation and brings light to the scene from the side.
• Take the picture, check that everything is focused and with the lighting you want.
Otherwise, refocus to the hyperfocal and/or correct the illumination.
• Make sure the photo is correctly exposed (check the histogram). Otherwise, adjust
the ISO accordingly.
If you want to take spectacular Star Trails pictures, you’ll find all the secrets in our
article “The Definitive Guide to Shooting Hypnotic Star Trails”.

37630 practical examples of exposure
Multiple long exposure Star Trails (7)
Nikon D4s | 14mm | f/4 | 15s (1h 20min total exposure time) | 800 ISO | 3250K | 320 photos edited in Lightroom and stacked with StarStaX
Shooting multi long exposure Star Trails has many advantages compared to capturing
them in a single exposure.
One advantage of capturing multiple short exposures and then blending them together
in a single frame is to prevent the sensor from overheating. By doing this you get an
image without thermal noise. It’s also easier to remove distracting elements such as
traces of airplanes, satellites or other light sources, as well as tripod vibrations.
You also have more control over the foreground illumination because you can add light
in the first and last photo. So, you have two options to choose the base photo.

37730 practical examples of exposure
In addition to this, the night is much more productive since you can go home with a
photo, a timelapse and the blended result of all the pictures you take. A nice shooting
session!
The best example of a productive shooting session are the meteor showers.
Again, in our guide on how to photograph Star Trails you’ll find many more examples
and step by step explanations.
To expose this type of image, take a test photo with a very wide aperture (f/2.8 for
example), a short focal length (14mm for example), a shutter speed of 20-30s and a high
ISO (1600-6400). Check the histogram and, if necessary, adjust the shutter speed or ISO
to obtain a correctly exposed photo.
Once you have the exposure you want, you just have to let the camera continue taking
photos for hours.
To sum up, the steps you should follow to take the photo are:
• Gear: Camera (regardless of its sensor size), wide angle lens, intervalometer, robust
tripod and ballhead, flashlights, LEDs and anti-moisture systems (take a look at the
gear to photograph Star Trails).
• Camera settings: RAW. Turn off the image stabilization function if your lens has it.
• Focal length: Short focal length (10mm, 14mm, 24mm, etc.) to cover as much
landscape and sky as possible. Also, turn off the long exposure noise reduction,
if your camera has this function. The reduction is applied while you’re taking the
picture, so in a 20s image, on most cameras you will have to wait another 20s for the
camera to process the image trying to eliminate noise.
• Exposure mode: Manual (M).
• Metering mode: You can’t meter the light because there is none. Determine the
exposure by taking test pictures and checking the histogram to see if it is correct. You
can do reciprocity calculations with the PhotoPills exposure calculator.
• Aperture: If you use the widest aperture (for example f/2.8), you can capture many
stars.

37830 practical examples of exposure
• Shutter speed: It depends on how you want the final photograph to look like. You can
take pictures using the NPF rule or the 500 rule to have the stars as big bright spots
or use a slower shutter speed if you don’t mind minor Star Trails. After all, you’ll use
a software to stack the photos and get the final Star Trails image. You can use the
PhotoPills Star Trails calculator to calculate the total shutter speed you need to get a
certain Star Trails length.
• ISO: If you take multiple exposures to obtain Star Trails long enough, both the
shutter speed and and noise set the aperture and ISO settings you can use. The
biggest problem you have is noise. So, keep the ISO between 400 and 1600,
depending on how much light you work with. If you want to capture the color of the
stars, don’t go over ISO 1600. By doing so you’ll preserve the colors of the stars. If
you crank up the ISO too much you’ll overexpose them and you’ll have white trails.
• White balance: Manual. Start with 3900K if there is no light pollution or with 3400K
if there is, and then adjust according to the result. Nevertheless, you can always
correct it in post-processing.
• Where to focus: Focus at the hyperfocal distance to maximize the depth of field.
• Illumination: Illuminate the foreground if necessary. If you dare, you can use the
light of the Moon as a lighting element. Plan your shooting session so that the
Moon has a little elevation and brings light to the scene from the side. In this type
of photography you just need illuminate, if necessary, the first and last image. Then
decide which one you like best and use it as a base photograph.
• Take the picture, check that everything is focused and with the lighting you want.
Otherwise, refocus to the hyperfocal and/or correct the illumination.
• Check that everything is focused on the first photo. Do all the tests at the beginning
because, once you start the shooting, you can’t change anything. Make sure the
photo is correctly exposed (check the histogram). Otherwise, adjust the ISO
accordingly.
If you want to take spectacular Star Trails pictures, you’ll find all the secrets in our
article “The Definitive Guide to Shooting Hypnotic Star Trails”.

37930 practical examples of exposure
Sunrise or sunset photography (8)
Nikon D700 | 500mm | f/8 | 1/40s | ISO 200 | 6850K | 10-picture panorama
Once again it’s important to remember that light is the essential element to take a
photo. Pictures taken in sunlight will change their look as the Sun’s elevation changes.
Knowing the daylight phases, and depending on the elevation of the Sun, you can know
what light you’ll have at a precise moment of the day. This way you know when is the
best time to take a specific photo.
The best moments to photograph a landscape are when the Sun is low, near the horizon,
giving you an awesome light to enhance colors, shapes and textures.
The light phase that you enjoy with the Sun near the horizon is called golden hour (Sun
elevation between 6 and -4 degrees). During this time of day, the sky becomes bright, the
clouds can pick up orange, yellow, magenta, red and blue colors. The light is soft and
diffused.
Then, the sky becomes more bluish when entering what is called the blue hour. This
moment happens when the Sun is between -4 and -6 degrees below the horizon.
Don’t worry about memorizing degrees, PhotoPills tells you the exact hours of the
golden hour and the blue hour for a specific location.
To sum up, the steps you should follow to take the photo are:

38030 practical examples of exposure
• Gear: Camera (regardless of its sensor size). A wide angle lens if you want a
general landscape or a telephoto if you want to capture an abstraction of it. An
intervalometer. A robust tripod and ballhead. Sometimes, depending on the terrain
you can use a bean bag that give a lot of stability.
• Camera settings: RAW. Turn off the image stabilization function if your lens has it.
Sometimes and depending on the camera and lens you use, it may be useful to lock
up the mirror as I did in the photo above. However, you don’t need to do it if you’re a
using a shutter speed slower than 1s.
• Focal length: It depends on the type of landscape you want to capture. You can use
from a small focal length (10mm, 14mm, 24mm, etc.) to cover as much landscape
and sky as possible to a telephoto or super telephoto lens, as I used here (500mm).
• Exposure mode: Manual (M).
• Metering mode: Spot metering mode. Meter the brightest area of the scene you want
in detail and overexpose it by 1 or 2 stops (+1EV or +2EV). Then, recompose, focus
and shoot.
• Aperture: From f/4 to f/16. Be careful not to use from f/16 onwards to avoid
diffraction because it ruins the sharpness and quality of the image.
• Shutter speed: Since you’re shooting in Manual mode (M), the shutter speed is
determined by the aperture-ISO combination you select. Here, your personal style
comes into play depending on how much light you want in the photo.
• ISO: In landscape photography you usually use a tripod, although you may not need
it if you have other intentions. Therefore, use the minimum ISO you can.
• White balance: Manual. It depends on the time of day and the quality of light.
Nevertheless, you can always correct it in post-processing.
• Where to focus: Focus at the hyperfocal distance to maximize the depth of field.
• Take the picture and check that everything is focused. Make sure the photo is
correctly exposed (check the histogram). Otherwise, adjust the exposure accordingly.

38130 practical examples of exposure
Long exposure photography with ND and GND filters (9)
Nikon D4s | 14mm | f/5.6 | 10s | ISO 200 | 7500K | 4-picture panorama | ND64 (6 stops) filter and GND 0.9 (3 stops) filter to balance the sky with the foreground (darker).
“The use of filters is essential if you are serious about landscape photography” - José B. Ruiz
This quote of José B. Ruiz, great photographer and friend, arises a doubt referring to
what he means by “serious”. For me, José Benito considers you to be serious if you
master the exposure.
I already explained in section 22 that there are two types of filters:
• Neutral density filters (ND) that limit light uniformly over their entire surface. They
can be circular screw-on or squared filters.
• Graduated neutral density filters (GND) that limit light gradually (non-uniform)
along their surface. This type of filters is very useful for photographing high contrast
scenes. Except in few exceptional cases they are usually rectangular.
An ND filter function is to reduce the intensity of light going through your lens. The
filter should be neutral, without any color cast.

382Mark Gee proves everyone can take contagious images
I use the GND filters to balance the scene contrasts. Depending on my intention I
choose a certain filter density or another. Usually, a 3-stop difference is enough.
A good filter system for landscape photography is based on:
• A filter holder.
• An adapting ring to fit the filter holder on your lens.
• A set of ND and GND filter.
To sum up, the steps you should follow to take the photo are:
• Gear: Camera (regardless of its sensor size). A wide angle lens if you want a
general landscape or a telephoto if you want to capture an abstraction of it. An
intervalometer. A robust tripod and ballhead. Sometimes, depending on the terrain
you can use a bean bag that give a lot of stability.
• Camera settings: RAW. Turn off the image stabilization function if your lens has it.
Sometimes and depending on the camera and lens you use, it may be useful to lock
up the mirror as I did in the photo above. However, you don’t need to do it if you’re a
using a shutter speed slower than 1s.
• Focal length: It depends on the type of landscape you want to capture. You can use
from a small focal length (10mm, 14mm, 24mm, etc.) to cover as much landscape
and sky as possible to a telephoto or super telephoto lens.
• Exposure mode: Manual (M).
• Metering mode: Spot metering mode. Meter the brightest area of the scene you want
with detail and overexpose it by 1 or 2 stops (+1EV or +2EV). Then recompose, focus
and shoot. When working with a GND filter, your intention is to balance the contrast
of the scene. Therefore, study the scene in advance to observe the light difference in
stops between the highlights and the shadows (section 9). Once you know the stop
difference, place the corresponding filter. Always choose a filter with less density
(less stops) than what you’ve metered in the scene. Thus you avoid an unreal image
in which, for example, the sky is darker than the ground. Once the filter is set up
meter the highlights and, if necessary, compensate the exposure.

38330 practical examples of exposure
• Aperture: From f/4 to f/16. Be careful to use from f/16 onwards to avoid diffraction
because it ruins the sharpness and quality of the image.
• Shutter speed: Since you’re shooting in Manual mode (M), the shutter speed is
determined by the aperture-ISO combination you select. Here, your personal style
comes into play depending on how much light you want in the photo. However, I
usually recommend using slow shutter speeds. If you’re using an ND filter, first take
a test photo without the filter to get the exposure you are looking for. Then, calculate
the equivalent shutter speed when using the filter. You can use the PhotoPills
exposure calculator to calculate the shutter speed you need when using a filter.
• ISO: In landscape photography you usually use a tripod, although you may not need
it if you have other intentions. Therefore, use the minimum ISO you can.
• White balance: Manual. It depends on the time of day and the quality of light.
Nevertheless, you can always correct it in post-processing.
• Where to focus: Focus at the hyperfocal distance to maximize the depth of field.
• Take the picture and check that everything is focused. Make sure the photo is
correctly exposed (check the histogram). Otherwise, adjust the exposure accordingly.
Imagine that you’re facing a brief sunset or sunrise and you want to use a neutral density
filter of 10 or 16 stops.
You’ll probably only have one chance to photograph it. Plan the photo well to take
advantage of it!

38430 practical examples of exposure
White background portrait photography (10)
Nikon D4s | 105mm | f/16 | 1/80s | ISO 100 | 6250K
Were you expecting another picture perhaps?
Orchids are one of the most photogenic species of flora, and because of its slender form,
Anacamptis pyramidalis wins the first prize... Why not take a good portrait to enhance
the shape and attributes of this plant?

38530 practical examples of exposure
In this type of photography the subject is the only element. This discipline is practiced
in the field, without disturbing the models, using only the light of a flash to blow out the
background.
It’s a relatively simple technique. A white background (I generally use a medium light
window to completely blow out the background) with a flash behind, a flash with a
diffusing window at 45 degrees as the main light and a reflector opposite the main flash.
Start by taking test photos until the background is blown out. Check it on the LCD of
your camera with the “blinkies” turned on. Once the backlight is correctly overexposed
(without part of the rear light contaminating the subject) turn off the flash in front of you.
Then turn on the front flash at about 45 degrees and place it close enough to create soft
shadows. Take several test shots to see how much light the flash needs to illuminate the
subject backlit (created by the rear flash) by adjusting only the flash power. Start at a 1/16
of power and change it gradually.

38630 practical examples of exposure
Keep in mind that if you change the ISO or the aperture you change the whole exposure,
including the background light.
This type of portrait makes the plant (or model) unique, and it allows the spectator to
fully enjoy it.
To sum up, the steps you should follow to take the photo are:
• Gear: Camera (regardless of its sensor size). A macro or telephoto lens to isolate the
subject.
• Lighting equipment: A portable flash with a diffusing window placed against the
subject, a flash at about 45 degrees from the subject with another diffuser window
and a reflector on the opposite side.
• Camera settings: RAW. Turn off the image stabilization function if your lens has it
and you’re shooting with a tripod.
• Focal length: Any macro focal length (60mm to 200mm). Another option is a focal
length starting at 200mm with a telephoto lens.
• Exposure mode: Manual (M).
• Metering mode: Spot metering mode. Meter twice, once on the background (your
intention is to leave it white) and then on the flower. The flash light is key to get the
correct exposure.
• Aperture: By having a white background without any texture, the aperture may be
narrow (f/11, f/16). That way you get detail of the whole flower.
• Shutter speed: Since you’re shooting in Manual mode (M), the shutter speed is
determined by the aperture-ISO combination you select.
• ISO: The lowest possible to avoid losing image quality.
• White balance: Manual. Use an X-Rite ColorChecker Passport card to calibrate the
light and get the actual color of the flower. Nevertheless, you can always correct it in
post-processing.

38730 practical examples of exposure
• Where to focus: Focus on an intermediate point of the orchid so that the whole plant
is sharp.
• Take some test shots and check that everything is focused. Make sure the photo is in
focus and correctly exposed (check the histogram). Otherwise, adjust the exposure
accordingly.
If you like this photo don’t miss the work of its maximum promoter: Niall Benvie.
Black background portrait photography (11)
Nikon D4s | 85mm | f/1.4 | 1/4s | ISO 100 | 3200K
A mother is everything. This image, which already has a message of tenderness, is even
more direct in black and white.
I really like taking black and white portraits with black background. The model is
dressed in black as my intention is to blend her dark clothes with the black background.

38830 practical examples of exposure
So I only show what I want: hands, face and baby.
Looking at the EXIF data below the photo you can deduce that this image isn’t exposed
with a strobe light. The strobe light is a light source that continuously produces a series
of very short flashes. It’s generally used to take multiple exposures of the phases of a
movement.
In fact, this image was taken in the studio with the help of a continuous light source as
the main light, located on the left side, and a reflector on the opposite side.
When I take this type of photographies I have the best assistant, my dear Nikon 85mm
f/1.4. This lens never disappoints me. It always works wonderfully even though it’s
difficult to master, especially in its maximum aperture.
To sum up, the steps you should follow to take the photo are:
• Gear: Camera (regardless of its sensor size). Medium telephoto lens (±85mm).
• Lighting equipment: A continuous light bulb (1000W) with a diffusing window and a
reflector on opposite the side to brighten the shadows.
• Camera settings: RAW.
• Focal length: Any medium focal length (50mm to 200mm).
• Exposure mode: Manual (M).
• Metering mode: Spot metering mode on the model skin.
• Aperture: Choose the widest aperture possible to artistically take advantage of the
shallow depth of field you have.
• Shutter speed: In this type of portraits the shutter speed is relatively slow due to the
continuous light.
• ISO: Once you have the aperture, use the minimum ISO that allows you to get a
correct exposure without the blurring the picture.

38930 practical examples of exposure
• White balance: Manual. Use an X-Rite ColorChecker Passport card to calibrate the
light and get the actual color of the flower. Nevertheless, you can always correct it in
post-processing.
• Where to focus: Focus on the baby’s eyes, located in the same focal plane as his
mother. This allows you to get the models focused even if you’re using the maximum
aperture.
• Take the picture and check that everything is focused. Make sure the photo is
correctly exposed (check the histogram). Otherwise, adjust the exposure accordingly.
When you take baby portraits, try to make them with natural or constant artificial light
so you don’t bother the little baby with strobe lights.

39030 practical examples of exposure
Outdoors backlit portrait photography (12)
Nikon D700 | 85mm | f/13 | 1/250s | ISO 200 | 7050K

39130 practical examples of exposure
An outdoors backlit portrait has its charms. On the one hand, it’s an opportunity to get
a good bokeh. On the other hand, you can balance the lights, giving to the photograph a
very peculiar atmosphere.
Another type of backlit portraits are those in which you use the sunlight as an additional
element in the image. Thus, you get silhouettes on a bright background that often
convey drama. You can also use the Sun to sketch out the model.
In this case the image is a good example for you to understand, along with the session
making of, how you can take this type of picture.
Raquel, the model, is backlit, at the mouth of the port of Ciutadella de Menorca. A
110cm octobox gently illuminates the model, while the Sun is setting behind her.
I moved the light source closer and closed the diaphragm in order to use a shutter speed
that synchronized well: 1/250s in this case. As Raquel was in shadow a 1/8 flash power
was enough to fill her body with soft, diffused light and illuminate her.

39230 practical examples of exposure
In portrait, I don’t fail when I use my dear Nikon 85mm f/1.4. It’s a spectacular lens for
both portrait and landscape.
To sum up, the steps you should follow to take the photo are:
• Gear: Camera (regardless of its sensor size). Medium telephoto lens (±85mm).
• Lighting equipment: Studio flash powered with a portable battery and with an
octobox diffuser window.
• Camera settings: RAW.
• Focal length: Any medium focal length (50mm to 200mm).
• Exposure mode: Manual (M).
• Metering mode: Use the spot metering mode so you can meter the light efficiently
and then control the backlight. In this case, meter the background light first. Keep
in mind that the exposure for the background you are looking for doesn’t have
to be correct. Sometimes it can be interesting to have your background over or
underexposed. Once you have exposed for the background use the octobox to change
the main flash intensity. Use the “try and fail” method to determine the intensity you
are looking for.
• Aperture: It depends on the idea of photo that you have in mind. In this case I used a
narrow aperture to have a great depth of field. This photo is an exception within my
portraits, since I always open the diaphragm a lot to create pleasing bokehs.
• Shutter speed: As I pointed out above, I used the maximum synchronization speed of
my camera, 1/250s.
• ISO: Once you have the aperture, use the minimum ISO that allows you to get a
correct exposure without the blurring the picture.
• White balance: Manual. Use an X-Rite ColorChecker Passport card to calibrate the
light and get the actual color of the flower. Nevertheless, you can always correct it in
post-processing.
• Where to focus: Focus on the model’s eyes.

39330 practical examples of exposure
• Take the picture and check that everything is focused. Make sure the photo is
correctly exposed (check the histogram). Otherwise, adjust the exposure accordingly.
I recommend doing this type of photography during the golden hour, when the quality
of the light is spectacular.
In studio portrait photography (13)
Nikon D4s | 85mm | f/11 | 1/250s | ISO 100 | 4500K

39430 practical examples of exposure
In study, lighting is essential to get a good portrait.
Usually, when you work in a studio the conditions are rarely completely dark. There is
always a light source (a fluorescent, a light bulb...) that can become a small obstacle
when taking the picture.
If you use a shutter speed of 1/200s or 1/250s (as long as they are within the flash sync
range), you avoid the ambient light from the room or study to interfere with the final
result.
The lighting scheme of this photograph is simple. I used a flash as the main light to the
right of Maty, the model, and a less powerful one on the opposite side to fill the shadows
up. To the left of the frame and from the bottom, another flash with a snoot sketches out
the back of Maty.
To sum up, the steps you should follow to take the photo are:
• Gear: Camera (regardless of its sensor size). Medium telephoto lens (±85mm) to get
as close to the model as possible.
• Lighting equipment: A set of three studio flashes with different powers, two with a
rectangular diffuser window and another one with a snoot to sketch out the back of
the model.
• Camera settings: RAW.
• Focal length: Any medium focal length (50mm to 200mm).
• Exposure mode: Manual (M).
• Metering mode: In the studio, use the metering provided by the handheld light
meter. Meter the main flash light (the light meter tells you which combination of
aperture, shutter speed and ISO you’ll need for a given light intensity). If you have the
handheld light meter at ISO 100 and an shutter speed of 1/250s for example, the light
meter indicates the aperture required for that given light intensity. Once you know
it, you can change the aperture and the shutter speed, always taking into account the
reciprocity law. You can use the PhotoPills exposure calculator if you wish.

39530 practical examples of exposure
• Aperture: It depends on the idea of photo that you have in mind. In this case I used a
narrow aperture to have a great depth of field.
• Shutter speed: Since you’re shooting in Manual mode (M), the shutter speed is
determined by the aperture-ISO combination you select and the synchronization
speed limit of the flashes (1/250s).
• ISO: Use the minimum ISO that you can.
• White balance: Manual. Use an X-Rite ColorChecker Passport card to calibrate the
light and get the actual color of the flower. Nevertheless, you can always correct it in
post-processing.
• Where to focus: Focus on the model’s eyes. The first thing that should capture the
attention of the viewer is a sharp and deep look.
• Take the picture and check that everything is focused. Make sure the photo is
correctly exposed (check the histogram). Otherwise, adjust the exposure accordingly.

39630 practical examples of exposure
Street photography (14)
Olympus OM-D E-M1 | 300mm | f/5 | 1/1000s | ISO 200 | 5100K
On the 23th and 24th of June, horses and crowds fill the streets of Ciutadella to enjoy the Sant Joan festival. The absolute protagonist of these festival of centenary tradition is the athletic and black menorquín horse.
The horses, together with their avid horsemen, the caixers, make people crazy with their jumps and pirouettes.
In the image above the dust from the sand in the ground further enhances the dynamism of the scene.
In street photography the most important thing is not missing the photo, so I don’t recommend shooting in Manual mode (M). Instead, use the Aperture Priority mode (A or Av) and shoot in burst mode (set on High) so the camera helps you both expose and maximize the chances of capturing the moment you are looking for.

39730 practical examples of exposure
To sum up, the steps you should follow to take the photo are:
• Gear: Camera (regardless of its sensor size). In general, use a fast fixed focal of
around 35mm equivalent. You can also use a telephoto lens like I did in this case.
• Camera settings: RAW.
• Focal length: Use a telephoto lens to isolate the horse.
• Exposure mode: Aperture Priority mode (A or Av). The speed of the horses’
movements and people moving around force you to be fast while exposing. I also
suggest that you take this type of photos using the burst mode so you don’t miss the
photo.
• Metering mode: Use the spot metering mode on the horse’s black coat. Then,
underexpose by 1 or 2 stops (-1EV or -2EV). I have to say that in this type of
photography I always take the risk and prioritize the light of the main subject,
whatever this subject is. In this case, the bright light of the background (early
afternoon) highlights even more the slender figure of the caixer and his horse.
• Aperture: Choose a wide aperture (depending on your lens, between the widest
possible and f/5.6) to be able to shoot at a fast shutter speed.
• Shutter speed: The shutter speed is determined by the aperture. Using a wide
aperture, a shutter speed of 1/1000s is fast enough to freeze the jump.
• ISO: Use the minimum ISO possible to minimize noise. Don’t change it until the
light dims and you are forced to open the diaphragm further. First adjust the shutter
speed and, finally, the ISO. In street photography the moment you want to capture
is more important than the exposure itself. I often select the automatic ISO setting
a range in which the noise doesn’t affect the image quality. In my case, I set a range
from 100 to 1600 ISO.
• White balance: In manual almost always. But if you walk around locations where the
color temperature varies a lot, put it in automatic.
• Where to focus: In this case, on the horse’s head, to ensure that the eyes are focused.

39830 practical examples of exposure
• Take the picture and check that everything is focused. Make sure the photo is
correctly exposed (check the histogram). Otherwise, adjust the exposure accordingly.
As a rule of thumb, when I’m doing street photography I like to stay in a specific spot
and work with an appropriate scenario. Then, I wait for something to happen.
I focus the scenario in advance and wait for something to happen, that unexpected
moment. It’s a matter of waiting and having patience.
Blue hour photography. Starburst effect and the Moon lit by earthshine (15)
Nikon D700 | 85mm | f/13 | 8s | ISO 200 | 3550K
During the blue hour the sky turns into a bluish color with touches of oranges and
yellows on the horizon. It’s a magical moment for urban landscape photography. The
orange tones of the city complement each other perfectly with the intense blue.

39930 practical examples of exposure
Closing the diaphragm at f/13, as I did in this case, you manage to get a starburst effect
on the lights of the streetlamps and the lighthouse. This effect occurs because the light
is scattered through the blades of the diaphragm.
In this case, I used a quite long focal length to compress the urban element a little, so
the Moon plays an important role in the composition.
On top of it, I managed to capture the Moon lit by earthshine.
Have you seen how the dark area of the Moon is perfectly visible? This occurs because
the Earth reflects the light of the Sun on the dark area of the Moon. That light is called
earthshine.
To sum up, the steps you should follow to take the photo are:
• Gear: Camera (regardless of its sensor size). A wide angle lens if you want a
general landscape or a telephoto if you want to capture an abstraction of it. An
intervalometer. A robust tripod and ballhead. Sometimes, depending on the terrain
you can use a bean bag that give a lot of stability.
• Camera settings: RAW.
• Focal length: Any focal length, it depends on the idea you have.
• Exposure mode: Manual (M).
• Metering mode: Use the spot metering mode in the brightest part of the scene you
want in detail. Then, overexpose by 1 or 2 stops (+1EV or +2EV). In this particular
case, I metered on the left promenade while it was being lit by the streetlamps.
• Aperture: Narrow enough to get a good depth of field and the starburst effect of the
lights. I recommend using an aperture from f/11 onwards.
• Shutter speed: The shutter speed should be long enough so your scene is properly
exposed. In this case, the metering indicates that 2s are enough but you can go up to
8s. A tripod, a shutter release and, if you have a DSLR, the mirror lock up (from 1/15s
to 1s) are essential.
• ISO: When working with a tripod, use the lowest ISO possible.

40030 practical examples of exposure
• White balance: Manual. It depends on the time of day and the quality of light.
Nevertheless, you can always correct it in post-processing. In this photo I set 3550K
to balance the oranges of the scene while maintaining a blue sky.
• Where to focus: Focus at the hyperfocal distance to maximize the depth of field. In
this case, I focused at about 20m (the hyperfocal was at 19.05m). So I could have
everything focused from more or less 9.5m to infinity. I also managed to capture the
coast of the island of Mallorca perfectly sharp.
• Take the picture and check that everything is focused. Make sure the photo is
correctly exposed (check the histogram). Otherwise, adjust the exposure accordingly.

40130 practical examples of exposure
Panorama photography with bokeh (Brenizer method) (16)
Nikon D700 | 85mm | f/1.4 | 1/125s | ISO 200 | 5000K | 57 photos edited in Lightroom and stitched with PTGui pro
When you look at the photo, you get the impression that the image was taken with
a wide angle but with a shallow depth of field. This photo is the result of 57 frames
blended with the software PTGui Pro. The worst part of the work was for my daughter
Aina, who had to remain completely still during the session.

402Mark Gee proves everyone can take contagious images
The Brenizer method, named after its creator Ryan Brenizer, is a technique that consists
in making a series of photographs with a fast telephoto lens to create a panorama.
The result is very impressive. You get a photo with a very shallow depth of field, so it
looks like you’ve taken it with a wide angle. But, at the same time, the image has the
typical bokeh of any medium or long fast telephoto lens.
I recommend you to use at least an 85mm lens or longer, and if possible, with a
minimum aperture of f/2.8. The faster the lens the more impressive the effect.
To sum up, the steps you should follow to take the photo are:
• Gear: Camera (regardless of its sensor size). Medium telephoto lens from 85mm
onwards. A robust tripod and ballhead if you’re using a heavy telezoom lens.
• Camera settings: RAW.
• Focal length: Any focal length from 85mm onwards, it depends on the idea you have.
• Exposure mode: Manual (M).
• Metering mode: Use the spot metering mode in the key element of the scene. In this
case it doesn’t matter if you don’t have any detail in the background, it depends on
the bokeh you want to create.
• Aperture: As wide as possible.
• Shutter speed: The shutter speed has to be fast enough if you’re doing a portrait so it
doesn’t come out blurred. Otherwise, use the one that suits you if you’re shooting on
a tripod.
• ISO: It depends. If you don’t shoot with a tripod, use an ISO that allows a shutter
speed fast enough to prevent a blurred image. If you’re shooting with a tripod, use
the lowest possible ISO.
• White balance: Manual. It depends on the time of day and the quality of light.
Nevertheless, you can always correct it in post-processing.
• Where to focus: Focus on the key element of the scene (a person, a natural
element…). Once it’s in focus set the AF in manual.

40330 practical examples of exposure
• Take the picture. This is a panorama of many shots. If you’re photographing a
person, you have to be fast enough so that the person stays still during the whole
shooting. Otherwise, you’ll end up with a bunch of pictures that are hard to stitch.
Make sure the photo is correctly exposed (check the histogram). Otherwise, adjust
the exposure accordingly.
• Stitch the pictures using your favorite panorama software.
Lightning and storms photography (17)
Nikon D300 | 24mm | f/5.6 | 8s | ISO 200 | 4300K

40430 practical examples of exposure
A night with a lead colored sky can be attractive if you see a storm. Lightnings are both
fascinating and dangerous, so you have to be safe to photograph them. In the case of the
photo above, I took it from the window of my bedroom.
Lightnings are pretty unpredictable. Be extremely patient and have the camera ready at
all times. In addition, your priority is to capture the maximum of lightnings, so it’s best
to opt for a long exposure.
That day I wanted to capture a lightning no matter what. First, I calculated the exposure
for the mill. Then I set the intervalometer to shoot an 8s picture every 2s. The camera
spent 2h working while I quietly read a novel lying on the bed.
To sum up, the steps you should follow to take the photo are:
• Gear: Camera (regardless of its sensor size). A wide angle lens if you want a
general landscape or a telephoto if you want to capture an abstraction of it. An
intervalometer. A robust tripod and ballhead.
• Camera settings: RAW.
• Focal length: It depends on the type of landscape you want to capture. You can use
from a small focal length (10mm, 14mm, 24mm, etc.) to cover as much landscape
and sky as possible to a telephoto or super telephoto lens.
• Exposure mode: Manual (M).
• Metering mode: Spot metering mode on the white buildings that are to the right of
the mill to then overexpose them so as not to blow out the whites.
• Aperture: It depends on the depth of field you’re looking for, although it will usually
be enough for you to focus the lightning and what’s around its. In this case I used an
aperture of f/5.6 to be able to have a good depth of field.
• Shutter speed: Each case is very particular. I recommend you try out various shutter
speeds until the buildings are correctly exposed. In the case of photography, the
shutter speed for the buildings and the mill to be correctly exposed was 8s.
• ISO: Use the minimum ISO you can.

40530 practical examples of exposure
• White balance: Manual. It depends on the time of day and the quality of light.
Nevertheless, you can always correct it in post-processing.
• Where to focus: Focus at the hyperfocal distance to maximize the depth of field.
• Take the picture and check that everything is focused. Make sure the photo is
correctly exposed (check the histogram). Otherwise, adjust the exposure accordingly.
Fireworks photography (18)
Olympus OM-D E-M1 | 17mm | f/8 | 4min 20s | ISO 200 | 4300K | Nikon lens adaptor | Live Composite option
New Year’s Eve is a good opportunity to shoot fireworks.
To get a spectacular picture, try to include more than one crackling palm tree in the
frame. The challenge is to do it in a single frame.
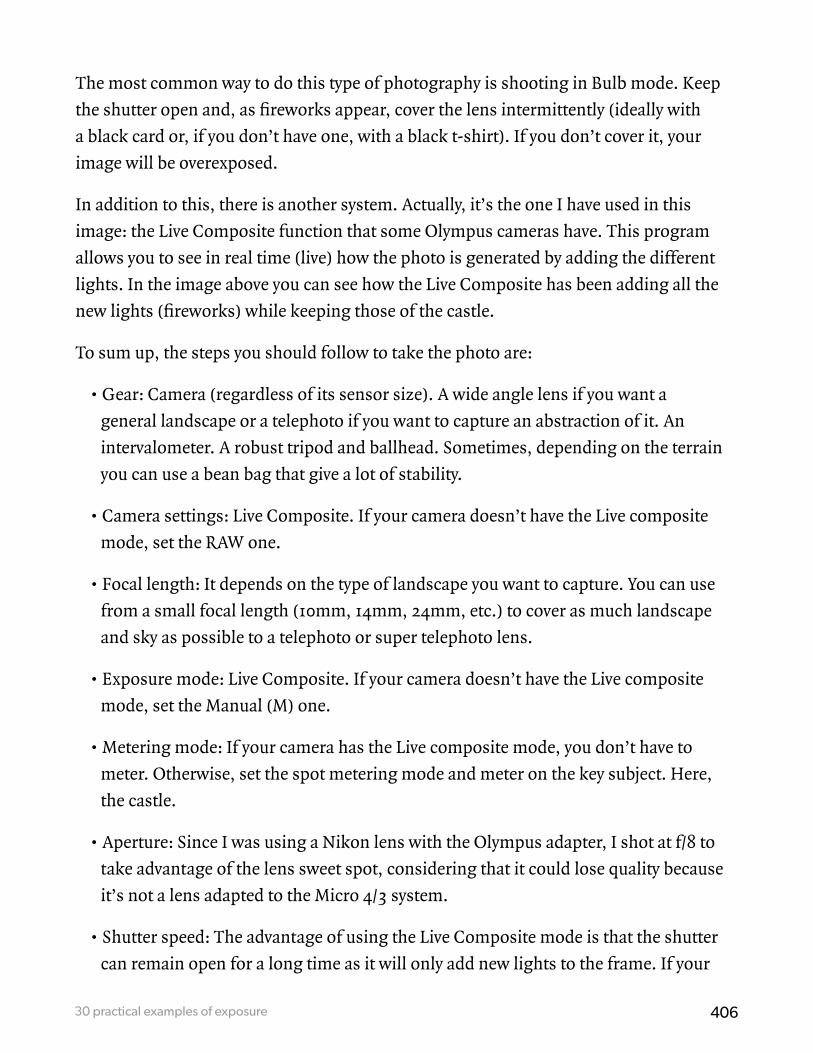
40630 practical examples of exposure
The most common way to do this type of photography is shooting in Bulb mode. Keep
the shutter open and, as fireworks appear, cover the lens intermittently (ideally with
a black card or, if you don’t have one, with a black t-shirt). If you don’t cover it, your
image will be overexposed.
In addition to this, there is another system. Actually, it’s the one I have used in this
image: the Live Composite function that some Olympus cameras have. This program
allows you to see in real time (live) how the photo is generated by adding the different
lights. In the image above you can see how the Live Composite has been adding all the
new lights (fireworks) while keeping those of the castle.
To sum up, the steps you should follow to take the photo are:
• Gear: Camera (regardless of its sensor size). A wide angle lens if you want a
general landscape or a telephoto if you want to capture an abstraction of it. An
intervalometer. A robust tripod and ballhead. Sometimes, depending on the terrain
you can use a bean bag that give a lot of stability.
• Camera settings: Live Composite. If your camera doesn’t have the Live composite
mode, set the RAW one.
• Focal length: It depends on the type of landscape you want to capture. You can use
from a small focal length (10mm, 14mm, 24mm, etc.) to cover as much landscape
and sky as possible to a telephoto or super telephoto lens.
• Exposure mode: Live Composite. If your camera doesn’t have the Live composite
mode, set the Manual (M) one.
• Metering mode: If your camera has the Live composite mode, you don’t have to
meter. Otherwise, set the spot metering mode and meter on the key subject. Here,
the castle.
• Aperture: Since I was using a Nikon lens with the Olympus adapter, I shot at f/8 to
take advantage of the lens sweet spot, considering that it could lose quality because
it’s not a lens adapted to the Micro 4/3 system.
• Shutter speed: The advantage of using the Live Composite mode is that the shutter
can remain open for a long time as it will only add new lights to the frame. If your

40730 practical examples of exposure
camera doesn’t have the Live Composite mode, select the Bulb mode and cover the
lens intermittently. It’s the only way to prevent the photo from being overexposed.
Do several tests to determine the gap between covering and uncovering the lens.
• ISO: Use the lowest ISO possible.
• White balance: Manual. It depends on the fireworks color (if there is any).
Nevertheless, you can always correct it in post-processing.
• Where to focus: Focus at the hyperfocal distance to maximize the depth of field.
• Take the picture and check that everything is focused. Make sure the photo is
correctly exposed (check the histogram). Otherwise, adjust the exposure accordingly.
While I was planning this photo, I knew that I had to get far enough away to work quietly
and avoid as much as possible the pressure from the spectators.
It’s important to work on a good framing. In this case, the Castle of Sant Nicolau
balances the composition of the image.

40830 practical examples of exposure
Macrophotography (19)
Nikon D7100 | 105mm macro | f/8 | 1/40s | ISO 100 | 5145K
Photographing orchids in season is a therapy for me. I love to photograph them because
it allows me to enter into their micro world. You see things differently when you lay on
the floor.

40930 practical examples of exposure
That day I found a huge colony of Ophrys speculum. About 600 specimens lived in an area
with low grass, and I thought that the spot was great to photograph them.
I was looking for a graceful and beautiful plant. And I also wanted to convey into the
frame what my eyes saw: hundreds of orchids placed randomly in a clear field.
On this occasion, the evening dusk light help me get what I was looking for.
To sum up, the steps you should follow to take the photo are:
• Gear: Camera (regardless of its sensor size). A macro lens, but you can also use a
fast lens with an extension tube. I didn’t used a tripod here. A bean bag helped me
stabilize the image and blend the grass in the foreground with my subject.
• Camera settings: RAW.
• Focal length: A 105mm macro lens. Depending on what I want to shoot I use a
200mm f/4 lens.
• Exposure mode: Manual (M).
• Metering mode: Spot metering mode. In this case, I metered on a small area of
the plant. After metering, the light meter warned me of a slight overexposure so I
underexposed by half a stop (-½ EV).
• Aperture: Depth of field is essential and your artistic taste is what determines the
aperture. Here, the other orchids were a bit far away from my subject, so I decided to
use an aperture of f/8 to blur the other plants while keeping their orchid shape.
• Shutter speed: It depends on your aperture. Use the PhotoPills exposure calculator
to spare you the calculations. In my case, I set a shutter speed according to the
metering.
• ISO: Use the lowest ISO possible.
• White balance: Manual. Use an X-Rite ColorChecker Passport card to calibrate the
light and get the actual color of the flower. Nevertheless, you can always correct it in
post-processing.

41030 practical examples of exposure
• Where to focus: Focus just on the labellum of the orchid to have a balanced depth
of field between the front and back of the flower. You can use the PhotoPills macro
depth-of-field calculator to do all the calculations.
The blur of the foreground gives the final image a special atmosphere, resulting into an
even more important subject.
Black and white photography (20)
Nikon D4s | 200mm | f/5.6 | 1/2000s | ISO 100 | 6645K
Iceland. Speechless. A photographic trip that marked a before and after in my
photographic life.
A place full of sensations, light and images everywhere.

41130 practical examples of exposure
Two days before starting a photographic trip with some PhotoPillers, Rafa, Germán and
myself got lost in the company of the guide, photographer and friend Donal Boyd in the
Highlands, located in the center of the island. My eyes couldn’t believe such beauty.
After wading a few rivers, the Sun’s rays were strongly illuminating the immense
landscape. I couldn’t help shouting “Stop Donal!” so he would stop the car. In a few
seconds we were out camera in hand.
As I was watching this scene I thought of Sebastião Salgado, in his light, in his “Salt of
the Earth”. The fog, the clouds, the mountains, the Sun... All of them had united to give
me this opportunity.
In this case, the exposure settings (f/5.6, 1/2000s and ISO 100) may seem inappropriate.
However, the light changed very fast, we ran out of the car... So I didn’t have time to
change the aperture according to the reciprocity law in order to have more depth of
field.
It could have changed to f/8, with a shutter speed of 1/1000s, enough to take the photo
handheld. However, I preferred to start taking pictures as soon as possible so as not to
miss the opportunity to capture that light and that moment.
To sum up, the steps you should follow to take the photo are:
• Gear: Camera (regardless of its sensor size). Anyone from a wide angle lens to a
telephoto lens.
• Camera settings: RAW.
• Focal length: It depends on the type of landscape you want to capture. You can use
from a small focal length (10mm, 14mm, 24mm, etc.) to cover as much landscape
and sky as possible to a telephoto, as I used here (500mm), or a super telephoto lens.
• Exposure mode: Manual (M).
• Metering mode: Spot metering mode. Meter the brightest area of the scene you want
in detail and overexpose it by 1 or 2 stops (+1EV or +2EV). Then, recompose, focus
and shoot.
• Aperture: From f/4 to f/16. Be careful to use from f/16 onwards to avoid diffraction

41230 practical examples of exposure
because it ruins the sharpness and quality of the image.
• Shutter speed: Since you’re shooting in Manual mode (M), the shutter speed is
determined by the aperture-ISO combination you select. Here, your personal style
comes into play depending on how much light you want in the photo.
• ISO: Use the minimum ISO you can.
• White balance: Manual. It depends on the time of day and the quality of light.
Nevertheless, you can always correct it in post-processing. As I got out of the car, I
decided to use the “Cloudy” option.
• Where to focus: Focus at the hyperfocal distance to maximize the depth of field.
• Take the picture and check that everything is focused. Make sure the photo is
correctly exposed (check the histogram). Otherwise, adjust the exposure accordingly.
While I was in the car, I was impressed by the incredible light contrast of the scenes I
was seeing. As light changed, just before getting off the vehicle I decided that this photo
would look perfect in black and white.
Obviously, I took it in color. Later, I post-processed it in black and white, resulting in
what you can see it above.

41330 practical examples of exposure
Celebration photography (21)
Olympus OM-D E-M1 | 300mm | f/6.3 | 1/40s | ISO 200 | 7000K
If someone had told me a year ago that I was going to take a picture of some Asian
newlyweds posing in front of a glacier in Iceland I wouldn’t have believed it.
But life is unpredictable and sometimes you find yourself in a myriad of surreal
situations like this one.

41430 practical examples of exposure
The explanation is easy.
We’d just been shooting at the Jökulsárlón glacier, where we’d been waiting to capture
the Arctic terns. I was carrying the Olympus with the 300mm lens and when we got back
to the cars we found this scene. A happy couple of newlyweds were being photographed
by a professional.
I was at around 50m from them. So I was able to take a series of stolen portraits without
disturbing them.
To sum up, the steps you should follow to take the photo are:
• Gear: Camera (regardless of its sensor size). A wide angle lens if you want a general
scene or a telephoto if you want to capture an close up or a detail.
• Camera settings: RAW.
• Focal length: It depends on the type of landscape you want to capture. You can use
any focal length from a short one (10mm, 14mm, 24mm, etc.) to cover as much
landscape and sky as possible to a long one (85mm, 200mm).
• Exposure mode: Aperture Priority mode (A or Av) to be able to take photos faster and
not miss anything.
• Metering mode: Spot metering mode. Meter the brightest area of the scene you want
in detail and overexpose it by 1 or 2 stops (+1EV or +2EV). Then, recompose, focus
and shoot.
• Aperture: From f/4 to f/16. Be careful to use from f/16 onwards to avoid diffraction
because it ruins the sharpness and quality of the image.
• Shutter speed: Since you’re shooting in Aperture Priority mode (A or Av), the shutter
speed is determined by the aperture you select. Here, your personal style comes into
play depending on how much light you want in the photo. I don’t usually shoot at
shutter speeds lower than the effective focal length (in this case 600mm because
of the Micro 4/3 cameras 2x cropping factor). But I shot at 1/40s with hardly any
reaction time. I fully relied on the Sync IS system that manages to coordinate the
camera stabilization systems, getting a compensation of up to 6 stops.

41530 practical examples of exposure
• ISO: Use the minimum ISO you can.
• White balance: Manual. It depends on the time of day and the quality of light.
Nevertheless, you can always correct it in post-processing.
• Where to focus: Always focus on the main subject (the bride’s face, for example,
making sure that the eyes are sharp).
• Take the picture and check that everything is focused. Make sure the photo is
correctly exposed (check the histogram). Otherwise, adjust the exposure accordingly.
In wedding photography, I recommend that you use several lenses (from a wide angle to
a telephoto lens). In addition, you need a spark of originality and, above all, spontaneity.
I have photographed few weddings, but I have always tried to photograph spontaneous
and ephemeral moments. These photos are the ones that generally surprise the couple
the most when they review the work.
I’m going to give you a safety recommendation. Whenever you can, shoot with two
bodies and back up the memory cards as soon as you can. Today, many cameras have
dual card slots, so another option is to make a copy directly on your camera.
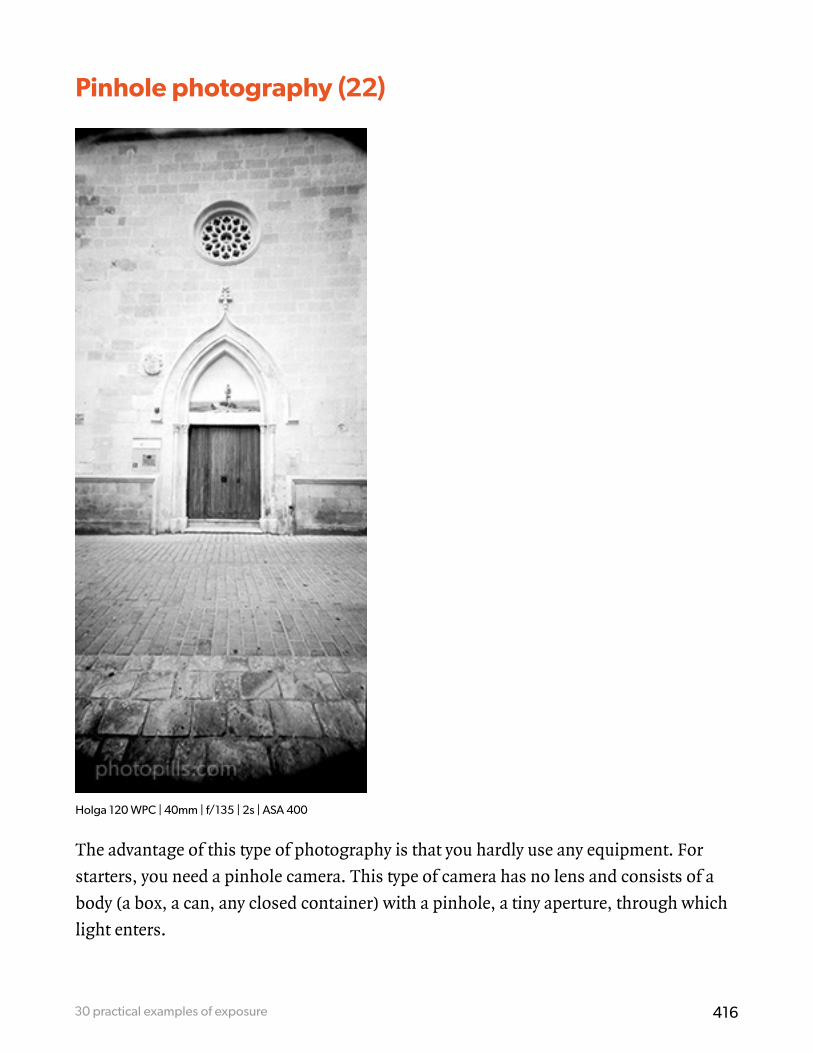
41630 practical examples of exposure
Pinhole photography (22)
Holga 120 WPC | 40mm | f/135 | 2s | ASA 400
The advantage of this type of photography is that you hardly use any equipment. For
starters, you need a pinhole camera. This type of camera has no lens and consists of a
body (a box, a can, any closed container) with a pinhole, a tiny aperture, through which
light enters.

41730 practical examples of exposure
You also need to put a film or photographic paper inside, depending on the camera you
have made. In this case I used the Holga 120 WPC (wide pinhole camera) with a Kodak
film of 400 ASA monochrome ed 120mm.
The most notable feature in this type of photography is that the depth of field is always
infinite.
The subsequent chemical development of the film and its surprising results make it
impossible for me to get rid of the chemical process. At least every two months, I usually go
out with some of my pinhole or traditional cameras, and enjoy the wait. It’s a life therapy.
To sum up, the steps you should follow to take the photo are:
• Gear: Pinhole camera. The one I used in this photograph is a Holga panoramic with
120mm film. The resulting negatives are 120x60mm. An ideal size for large prints. A
stable tripod to expose a few seconds, minutes... or hours!
• Camera configuration: The photosensitive material is the monochrome negative. It
replaces the sensor and, at the same time, is the equivalent of a RAW file.
• Focal length: The lens is the pinhole, a tiny hole (about 0.3mm in diameter). If you
measure the distance from the hole to the film plane you get the focal length. In this
case, 40mm.
• Exposure mode: Manual. The trigger is a simple lever that allows light to reach the film.
• Metering mode: Evaluative metering.
• Aperture: You can calculate it according to the diameter of the pinhole. I use Pinhole
Assist (iOS) or Pinhole Calculator (Android). In this photo the aperture is f/135.
• Shutter speed: Basically, I calculated it following some exposure guidelines that are
usually given for an ASA 100. As it was a sunny day, I metered the light with a hand
held photometer and got an exposure of 8s. Then, knowing that the ASA of the film
is 400 and using the reciprocity law, I shot at 2s. If you don’t have an exposure guide
you can always calculate the exposure with an ASA 100 and an x diaphragm. Then,
with the help of PhotoPills you can calculate the exposure for f/135. To do this, use
the exposure calculator.

41830 practical examples of exposure
• ISO: The film’s one.
• White balance: There isn’t, so don’t worry about it.
• Where to focus: You don’t focus with this type of cameras because there is no
mechanism to do so. And with an aperture of f/135 the depth of field is infinite so the
whole scene comes out focused.
In this case the pinhole is a 0.3mm hole. Taking into account that the distance to the
film is 40mm, the aperture is 40 / 0.3 = 133.33. Rounding, f/135.
After taking the shots, develop the negatives in a developing tank, let them dry and flush
them in the laboratory. Nowadays, you can skip the last step and scan the negatives,
although you lose some of the processing magic.
Yes, I confess I’m a romantic lover of traditional photography. I enjoy it and it makes me
disconnect.

41930 practical examples of exposure
Solarigraphy (23)
Beer can | 80mm | f/400 | 6 months | ASA 6 (Ilford photographic paper)
Go figure. If you have to be incredibly patient to get the final image with a pinhole
camera, imagine how much more patience you need with solarigraphies.
In this case I had to wait for six months. Yes, you read it right. Six months!
I wanted to capture the transition from the winter solstice to the summer solstice and I
did it.
To properly position the camera and be able to capture the Sun’s trajectories, I used the
PhotoPills Planner to know exactly where the Sun would be at the beginning of each
solstice.
Let me briefly explain what this technique is about.
Solarigraphy is a photographic technique in which you only use photographic paper and
a pinhole camera (a can of cookies, soda...) prepared to be outdoors for a long time.
The pinhole is an orifice (of a diameter of 0.25mm in this case) made with a pin on a
piece of aluminum can and then taped to the can.

42030 practical examples of exposure
The development occurs because the Sun burns the photographic paper day by day
sculpting the final image.
Once you’ve finished the photo, remove the paper from the holder and place it on a quality flatbed scanner. Do it as fast as possible because the image you see on the raw paper is ephemeral. If you wait for too long the light will impress the emulsion and you’ll ruin the picture.
Don’t use the chemicals of an analogic development. Don’t use a fixer either. Since there are no silver halides developed, you don’t need to put the paper into a tray with fixer.
If you did, you would completely ruin the photo and the waiting time!
To sum up, the steps you should follow to take the photo are:
• Gear: Beer can. Ilford photographic paper ASA 6
• Camera configuration: The photosensitive material is the photographic paper. It replaces the sensor and, at the same time, is the equivalent of a RAW file.
• Focal length: The lens is the pinhole, a tiny hole (about 0.25mm in diameter). If you measure the distance from the hole to the film plane you get the focal length. In this case, 80mm.
• Exposure mode: Manual. The shutter is a piece of tape
• Metering mode: You can’t meter anything.
• Aperture: You can calculate it according to the diameter of the pinhole. I use Pinhole Assist (iOS) or Pinhole Calculator (Android). In this photo the aperture is f/135.
• Shutter speed: Depending on what you want to capture, you can perform a 1-month, a 6-month or a 1-year solarigraphy. You set the limit!
• ISO: The film’s ASA one.
• White balance: There isn’t, so don’t worry about it.
• Where to focus: You don’t focus with this type of cameras because there is no mechanism to do so. And with an aperture of f/400 the depth of field is infinite so the
whole scene comes out focused.

42130 practical examples of exposure
Solarigraphies are incredibly surprising because of the traces the Sun leaves day after day
in the paper.
If one day is cloudy and the Sun isn’t visible, it won’t leave a line. Look at the spaces
between lines in the picture above: these are cloudy days.
Due to the circular support I used (a beer can), notice how the resulting photograph is
an angular-looking image. This photograph was taken from the main bell tower of the
cathedral of Ciutadella de Menorca.
Bracketing photography (24)
Nikon D700 | 18mm | f/8 | 9 images | ISO 100 | 4500K

42230 practical examples of exposure
As we saw in section 23, a bracketing consists on taking a series of photographs of
different exposures. Then, you blend them with an editing software (Lightroom,
Photoshop, etc.), and you get a photograph with detail both in the shadows and in the
highlights.
In other words, with the bracketing technique, you can generate a high dynamic range
(HDR) image that fits the dynamic range of the scene.
One of the major drawbacks of bracketing is that all elements of your scene must be
static. Each shot must be identical to the others, except for the exposure.
As you can see in the image above, the scene meets the requirements: it has a high
dynamic range and its elements are static.
Here, the idea is to get an image with all the highlights correctly exposed. And thanks to
the bracketing, this is the result.
To sum up, the steps you should follow to take the photo are:
• Gear: Camera (regardless of its sensor size). A wide angle lens if you want a general
scene or a telephoto if you want to capture an abstraction of it or a detail. An
intervalometer. A robust tripod and ballhead. Sometimes, depending on the terrain
you can use a bean bag that give a lot of stability.
• Camera settings: RAW.
• Focal length: It depends on the type of landscape you want to capture. You can use
any focal length from a short one (10mm, 14mm, 24mm, etc.) to cover as much
landscape and sky as possible to a long one (85mm, 200mm).
• Exposure mode: Manual (M). But you can also use one of the semiautomatic modes
(A/Av or S/Tv) combined with the bracketing function that most cameras have.
Depending on your camera, this function allows you to take a bracketing of 3, 5, 7
or 9 photos in which you set the difference of a third of stop, a half stop or a full stop
between each one of them. Although this picture is not the case, you could take 5
exposures of -2EV < -1EV < 0 < +1EV < +2EV for example.

42330 practical examples of exposure
• Metering mode: Spot metering mode. Meter the brightest area of the scene you want
with detail and overexpose it by 1 or 2 stops (+1EV or +2EV). Then recompose, focus
and shoot. Here I used a little extreme settings because of the number of light zones.
As usual, I spot metered the brightest light with detail of the scene. I recomposed
and overexposed by 2 stops (+2EV). Then, I set the camera to take a shot according to
the given metering and 3 exposures underexposing by 1 stop (-1EV) each and 3 more
overexposing by 1 stop (+1EV) each as well.
• Aperture: From f/4 to f/16. Be careful to use from f/16 onwards to avoid diffraction
because it ruins the sharpness and quality of the image. Here f/8 gave me enough
depth of field and a very good sharpness, since I was taking advantage of lens’ sweet
spot.
• Shutter speed: Since you’re shooting in Manual mode (M), the shutter speed is
determined by the aperture-ISO combination you select. I took the first picture at
1/125s. Then I underexposed at 1/60s, 1/30s and 1/15s. Then, I overexposed at 1/250s,
1/500s and 1/1000s.
• ISO: Use the minimum ISO you can.
• White balance: Manual. Use an X-Rite ColorChecker Passport card to calibrate the
light and correct the color cast dominant inside the cathedral, which was very warm.
Nevertheless, you can always correct it in post-processing.
• Where to focus: Focus at the hyperfocal distance to maximize the depth of field.
• Take the picture and check that everything is focused. Make sure the photo is
correctly exposed (check the histogram). Otherwise, adjust the exposure accordingly.
The use of the bracketing technique helped me get an image perfectly exposed, from the
shadows to the stained glass windows, including their reflection on the wall.

42430 practical examples of exposure
Still life photography (25)
Nikon D700 | 85mm | f/3.3 | 1/180s | ISO 200 | 4950K
I have to admit that still life photography has never attracted me too much.
That doesn’t mean I don’t enjoy watching still life images of my friend Bosco Mercadal
for example. I love his artwork.

42530 practical examples of exposure
Another influential photographer in still life photography is Toni Catany, who recently
passed away, and who was able to transform any object in a masterpiece. Other
photographers who are an inspiration for me: Olivia Parker, Suzanne Cummings and
Imogen Cunningham.
The image you can see above is a small tribute to the photography of the last century. In
particular, I took this still life for a poster of the exhibition of the history of the Artistic
Circle of Ciutadella photography club.
These are photographs from the 1950s that give life to a city and transport you into the
past. I took it only with the help of a continuous light bulb and a reflector, playing with
the depth of field.
What does it take to capture a still life?
An object, a good idea and light. And, of course, use those three things so you clearly
convey the idea, your message, to the spectator.
To sum up, the steps you should follow to take the photo are:
• Gear: Camera (regardless of its sensor size). A wide angle lens if you want a general
scene or a telephoto if you want to capture an abstraction of it or a detail. An
intervalometer. A robust tripod and ballhead.
• Camera settings: RAW.
• Focal length: Medium telephoto (±85mm) or a very fast fixed focal (maximum
aperture of at least f/2.8). Due to its sharpness and brightness I always have with me
the 85mm f/1.4 lens when shooting portraits and products.
• Exposure mode: Manual (M).
• Metering mode: Spot metering mode. Meter the brightest area of the scene you want
with detail and overexpose it by 1 or 2 stops (+1EV or +2EV). Then recompose, focus
and shoot.

42630 practical examples of exposure
• Aperture: It depends on the idea of photo you have in mind. In this case I opened the
diaphragm to have a great depth of field. I wanted to give more importance to the
ephemeral passage of time of the photographs and not to the camera. I chose to leave
it out of focus but softly so the spectator can guess its shape.
• Shutter speed: Since you’re shooting in Manual mode (M), the shutter speed is
determined by the aperture-ISO combination you select.
• ISO: Use the minimum ISO you can.
• White balance: Manual. Use an X-Rite ColorChecker Passport card to calibrate the
light and get the actual color of the flower. Nevertheless, you can always correct it in
post-processing.
• Where to focus: Focus at the closest picture, so the spectator’s view enters to the rest
of the frame from there.
• Take the picture and check that everything is focused. Make sure the photo is
correctly exposed (check the histogram). Otherwise, adjust the exposure accordingly.
Getting a good still life photo is a demanding job: the idea and the message have to be
original so they reach the spectator.
In this genre, you make the picture, you don’t shoot it.

42730 practical examples of exposure
Infrared photography (26)
Nikon D300Ir | 170mm | f/8 | 1/250s | ISO 200 | 4500K
“Seeing light is a metaphor for seeing the invisible in the visible” - Arthur Zajonc
Since I started in infrared photography back in 2006, I have always wanted to
experiment with “seeing” what we don’t perceive. I like to show my surroundings in a
very different way from what I see.
The landscape of this particular example seems imaginary and surprises the spectator.
What looks like a snowy landscape is, in fact, a set of green grass pastures on the
volcanic earth formations of Iceland in the middle of August.
To create infrared images outdoors I always look for clouds with volume that stand out
with the contrast of the scene and create a striking image.
For 8 years I have used a camera converted to infrared, although I still have some filters
like the Hoya R72.

42830 practical examples of exposure
The difference between using a filter or using a converted camera is, among other
things, the shutter speed. An infrared filter is practically opaque. Therefore, if you use a
filter and depending on the infrared spectrum you capture and the type of low-pass filter
on the camera, the shutter speed can be between 5-6s to up to 1min. So it’s impossible
to take the shot hand held.
Taking photos with the converted camera is much easier.
In this case I use a filter that lets the infrared spectrum go through the lens (720nm
approx.). Since I don’t need to put any elements in front of the lens, I can take photos
hand held.
To sum up, the steps you should follow to take the photo are:
• Gear: Camera converted to infrared in which you changed the low-pass filter to an
infrared one of 720nm. A wide angle lens if you want a general scene or a telephoto if
you want to capture an close up or a detail.
• Camera settings: RAW.
• Focal length: It depends on the type of landscape you want to capture. You can use
any focal length from a short one (10mm, 14mm, 24mm, etc.) to cover as much
landscape and sky as possible to a long one (85mm, 200mm).
• Exposure mode: Aperture Priority mode (A or Av).
• Metering mode: In infrared photography, the metering mode is the same as in other
disciplines. But in this case, you get a resulting red image on the LCD and you’re not
able to evaluate the scene well, so meter and use a bracketing of 3 shots.
• Aperture: From f/4 to f/16. Be careful to use from f/16 onwards to avoid diffraction
because it ruins the sharpness and quality of the image. Here f/8 gave me enough
depth of field and a very good sharpness, since I took advantage of the lens’ sweet
spot.
• Shutter speed: Since you’re shooting in Aperture Priority mode (A or Av), the shutter
speed is determined by the aperture you select.
• ISO: Use the minimum ISO you can.

42930 practical examples of exposure
• White balance: The resulting picture on the LCD is a completely red image. Calibrate
the white balance to reduce that red and to see on the screen some more brownish
tones, allowing you to better assess the final result.
• Where to focus: Focus at the hyperfocal distance to maximize the depth of field.
• Take the picture and check that everything is focused. Make sure the photo is
correctly exposed (check the histogram). Otherwise, adjust the exposure accordingly.
In this picture, the combination of a deep blue sky with voluminous clouds created an
unreal sky, with completely black deep areas that contrast with the white color of the
grass.
In this type of photography, the subject is very important. Look for greens, contrast and
a dreamy composition.
It’s mandatory to develop the infrared images. Here, I chose a black and white edition.

43030 practical examples of exposure
Total solar eclipse photography (27)
Nikon D500 | 750mm | f/8 | 1/8000s | ISO 100 | 7460K
After writing the guide on total solar eclipse photography, it had to be put into practice.
Fortunately, we were in an eclipse year, one of the most anticipated: the total solar
eclipse of August 21, 2017... A worldwide event, and particularly magical in the United
States.
We didn’t think it twice. The whole PhotoPills team gathered and we used our Swiss
army knife (PhotoPills) to plan the eclipse.
In fact, we implemented a specific tool in PhotoPills to plan eclipses. In this video the
Bard teaches you how to plan a solar eclipse: How to plan the total solar eclipse of
August 21, 2017.
Once planned, we bought the plane tickets... A new PhotoPiller adventure was waiting
for us!

43130 practical examples of exposure
Photographing the total solar eclipse of August 21, 2017 in Portland (Oregon, USA)
has been one of the most fulfilling photographic experiences that I’ve ever had. It was
amazing to be able to live a moment as spectacular as this. And it was also a challenge to
capture each and every one of the phases of a total solar eclipse.
On top of it, I enjoyed capturing that moment in full contact with nature.
For this type of photos, you need to be very concentrated and to know beforehand the
phases of a total solar eclipse. The diamond ring, the Baily’s beads, the chromosphere
and the solar corona are different moments that occur just before or during the entire
eclipse.
The changes in light are spectacular and you need to set a shutter speed from 1/4000s to
1-2s if you want to capture everything from the faint reddish light of the chromosphere
to the Moon covering the Sun.
I decided that when the Moon began to cover the Sun I would take brackets of 9 photos
with different base exposures. Thus, I would capture all the dynamic range needed to get
a legendary picture.
I chose this example to explain you how I took one of the most striking photos: the
Baily’s beads, especially for the atmosphere that it conveys. When the light of the Sun
illuminates the craters of the Moon, it forms light beams that combine perfectly with the
warm bulges of the Sun.
To sum up, the steps you should follow to take the photo are:
• Gear: Camera (regardless of its sensor size). Here, I recommend you an APS-C or
Micro 4/3 camera to take advantage of the cropping factor. A telephoto or a super
telephoto lens. A sturdy tripod and ballhead, and an intervalometer.
• Camera settings: RAW. Turn off the image stabilization function if your lens has it.
• Focal length: Long focal length (300mm, 450mm, 600mm, etc.) to cover the area of
the sky where the Sun and Moon are located so they take most of the frame.

43230 practical examples of exposure
• Metering mode: Spot metering mode. Meter the brightest area of the scene you want
in detail and overexpose it by 1 or 2 stops (+1EV or +2EV). Then, recompose, focus
and shoot. This is the theory but in this occasion and to avoid missing the moment
(and the photo!) I took several bracketings.
• Aperture: Use a relatively narrow aperture so the stars are perfectly focused. Since
this picture is a close-up, depth of field is not a critical. In this case I shot at f/8 to get
the maximum detail of the chromosphere.
• Shutter speed: The fastest shutter speed that your camera lets you use, respecting
the exposure triangle. The Moon moves faster than it looks and you only have a few
seconds to capture the Baily’s beads and the reddish color around the Sun resulting
from the hydrogen emission.
• ISO: Use the minimum ISO you can.
• White balance: Manual. Nevertheless, you can always correct it in post-processing.
In this photo I opted for a warm white balance (7460K) to capture the colors of the
chromosphere.
• Where to focus: The first thing you have to do is to put the solar filter on your lens
(this is essential if you don’t want the Sun to scorch the sensor!). Focus on the edge
of the Sun. Use the Live View tool on your camera’s LCD to make sure the Sun is
perfectly focused.
The steps to get this image are the following.
As soon as you mount the camera on the tripod, put the solar filter on your lens. Then,
focus on the Sun as I just explained (using the LCD). Focus is key. Double check that you
have focused correctly!
A few seconds before totality begins, remove the solar filter to capture all the details of
the eclipse. To make sure your photos are properly exposed, take a series of bracketings
with different base exposures and covering the maximum dynamic range possible.
These photos require practice, concentration and you have to be fast. But the results are
so spectacular and a total solar eclipse is so rare that all efforts are worth it.

43330 practical examples of exposure
Panning (28)
Nikon D700 | 120mm | f/22 | 1/125s | ISO 200 | 6100K
I took this picture during a practice session with some students while a rally was held in
Menorca.
One of the exercises was to do a panning. You shoot using a relatively slow shutter speed
as you follow the subject along its path with your camera. In this case, you follow the car
from right to left.
As you can see, the car seems frozen and the background and/or foreground blurred.
To get a good image you need patience and lots of practice. Also, you have to be careful
when deciding the shutter speed you’re going to use: it can’t be too short. If so, you
would freeze the whole scene and your photo wouldn’t convey any motion.
Depending on the element you want to photograph (runner, bike, motorcycle, car...), I
suggest you to try different shutter speeds. Always slower than the one you would use to
freeze your subject.

43430 practical examples of exposure
To sum up, the steps you should follow to take the photo are:
• Gear: Camera (regardless of its sensor size). A wide angle lens if you want a general
scene or a telephoto if you want to capture a detail or a close-up.
• Camera settings: RAW.
• Focal length: It depends on the type of picture you want to capture. You can use any
focal length from a short one (10mm, 14mm, 24mm, etc.) to cover as much of the
scene as possible to a long one (85mm, 200mm) if you want to isolate the subject
from the background.
• Exposure mode: Manual (M).
• Metering mode: Spot metering mode. Meter the brightest area of the scene you want
with detail and overexpose it by 1 or 2 stops (+1EV or +2EV). Then recompose, focus
and shoot.
• Aperture: In this type of photo the shutter speed is crucial so the aperture is the last
thing you set, applying the reciprocity law. In this case I shot at f/22. I’m not a fan of
such small apertures, but the time of the day and the light forced me to close it to get
a slower shutter speed.
• Shutter speed: Since you’re shooting in Manual mode (M), the shutter speed is
determined by the aperture-ISO combination you select. Here, you decide how much
motion you want to show. In this case, the PhotoPills exposure calculator suggested
a shutter speed of 1/125s.
• ISO: Use the minimum ISO you can.
• White balance: Manual. It depends on the time of day and the quality of light.
Nevertheless, you can always correct it in post-processing.
• Where to focus: Always focus on your subject, the vehicle in this case, with AF-C (AF-
continuous or servo mode) to make sure it’s sharp in the photo.
• Take the picture and check that everything is focused. Make sure the photo is
correctly exposed (check the histogram). Otherwise, adjust the exposure accordingly.

43530 practical examples of exposure
In these types of photography your movements are very important. Follow the car from
far away and press the shutter just when you have it in front of you. Make sure it’s as
perpendicular to your position as possible, to prevent the subject from being blurred.
Showing motion (29)
Nikon D700 | 500mm | f/5.6 | 0.7s | ISO 200 | 5700K | ND4 (2 stops) filter
Like panning, this technique needs patience and practice.
I recommend you to use at least a medium telephoto lens to have a long focal length.
While shooting, use a slow shutter speed and make a slight movement. Ideally, it should
be a continuous movement from bottom to top or from one side to the other.
There is nothing better than the trunks of some trees or a reedbed to practice this type of
photography.
I had the idea for this shot when I had my 500mm mounted on the gimbal ballhead

43630 practical examples of exposure
and I was about to photograph birds near the torrent of La Vall in Menorca. Because of
the softness of this ballhead and its stability, I thought of doing a vertical movement
framing the reedbed while the shutter remained open.
To sum up, the steps you should follow to take the photo are:
• Gear: Camera (regardless of its sensor size). A wide angle lens if you want a general
scene or a telephoto if you want to capture a detail or a close-up.
• Camera settings: RAW.
• Focal length: It depends on the type of landscape you want to capture. You can use
any focal length from a short one (10mm, 14mm, 24mm, etc.) to cover as much of
the landscape and sky as possible to a long or very long one like the one I used here
(500mm to compress the perspective and isolate the area I liked).
• Exposure mode: Manual (M).
• Metering mode: Spot metering mode. Meter the brightest area of the scene you want
with detail and overexpose it by 1 or 2 stops (+1EV or +2EV). Then recompose, focus
and shoot. However, here I used the center-weighted metering mode because the
light wasn’t changing much.
• Aperture: It depends on the depth of field you want. Since I didn’t want it to be very
large I decided to use an aperture of f/5.6. This way the distant areas look a little
blurred in the strokes as they’re out of focus.
• Shutter speed: Relatively long, use 0.5s as a reference and then “try and fail”. In
this case I used 0.7s. With such a slow shutter speed I had enough time to press the
shutter and make the movement from the bottom to the top that I wanted.
• ISO: Use the minimum ISO you can.
• White balance: Manual. It depends on the time of day and the quality of light.
Nevertheless, you can always correct it in post-processing.
• Where to focus: Focus on the elements closest to your lens. Here, in the first
branches.

43730 practical examples of exposure
• Take the picture and check that everything is the way you like because depending on
how blurred the elements are or how you moved the camera the motion will be visible
or not. Make sure the photo is correctly exposed (check the histogram). Otherwise,
adjust the exposure accordingly.
I don’t recommend shooting (that starts the exposure) and doing the movement
simultaneously. Shoot first and then start making the movement.
Hold on for a moment so the details look better. For example, if you want to take a
picture of 1s, wait 1/4s and then start the movement from the bottom to the top.
Light painting with steel wool (30)
Nikon D4s | 14mm | f/2.8 | 8s (26min of total exposure time) | ISO 1600 | 3200K | 196 pictures edited in Lightroom and stacked with StarStaX

43830 practical examples of exposure
If you can complicate it, why make it easy?
That’s what we thought when planning this picture. We wanted to blend some Star
Trails with the fire show that the steel wool produces. Obviously, we did so in a location
where there was no danger of fire!
I first shot the steel wool picture (14mm | f/2.8 | 11s | ISO 1600 | 3200K). Germán was
standing behind the old stone structure, burning the sparking steel wool.
Once I took the steel wool shot, I used the intervalometer with the settings you see in
the caption and hit the start button. With the next 195 photos, I managed to capture Star
Trails.
To sum up, the steps you should follow to take the photo are:
• Gear: Camera (regardless of its sensor size), wide angle lens, intervalometer, robust
tripod and ballhead, flashlights, LEDs and anti-moisture systems (take a look at the
gear to photograph Star Trails).
• Camera settings: RAW. Turn off the image stabilization function if your lens has it.
• Focal length: Short focal length (10mm, 14mm, 24mm, etc.) to cover as much
landscape and sky as possible. Also, turn off the long exposure noise reduction, if
your camera has this function. The reduction is applied while you are taking the
picture, so in a 20s image, on most cameras you will have to wait another 20s for the
camera to process the image trying to eliminate noise.
• Exposure mode: Manual (M).
• Metering mode: You can’t meter light because there is none. Determine the exposure
by taking test pictures and checking the histogram to see if it’s correct. You can do
reciprocity calculations with the PhotoPills exposure calculator.
• Aperture: If you use the widest (for example f/2.8), you can capture many stars.
Shutter speed: It depends on how you want the final photograph to look like. You can
take pictures using the NPF rule or the 500 rule to have the stars as big bright spots
or use slower shutter speeds if you don’t mind minor Star Trails (15s or more). After
all, you’ll use a software to stack the photos and get the final Star Trails image. You

43930 practical examples of exposure
can use the PhotoPills Star Trails calculator to calculate the total shutter speed you
need to get a certain Star Trails length.
• ISO: If you take multiple exposures to obtain Star Trails long enough, both the
shutter speed and noise determine the aperture and ISO settings you can use.
The biggest problem you have is noise. So, keep the ISO between 400 and 1600,
depending on how much light you work with. If you want to capture the color of
the stars, don’t go over ISO 1600. By doing so you’ll preserve the colors of the stars.
Since you only want to add light from the stars, use a low ISO to capture only the
stars’ spotlight.
• White balance: Manual. Start with 3900K if there is no light pollution or with 3400K
if there is, and then adjust according to the result. Nevertheless, you can always
correct it in post-processing.
• Where to focus: Focus at the hyperfocal distance to maximize the depth of field.
• Illumination: Illuminate the foreground with the light of the steel wool.
• Take the picture, check that everything is focused and with the lighting you want.
Otherwise, refocus to the hyperfocal and/or correct the illumination.
• When you are about to start capturing the Star Trails, check that everything is
focused on the first photo. Do all the tests at the beginning because, once you start
the shooting, you can’t change anything. Make sure the photo is correctly exposed
(check the histogram). Otherwise, adjust the ISO accordingly.

25The 12 mistakes you should avoid
when exposing

441The 12 mistakes you should avoid when exposing
The only way to improve is to shoot and make mistakes. You learn a lot failing. That’s
why I leave you here a list of the most common mistakes that students make in my
courses (and that I myself did).
Your photos don’t have the depth of field you want (1)
The aperture not only allows you to control how light goes through the lens, it also helps
you to control the depth of field (DoF).
Do you want most of your photo to be out of focus? Open the diaphragm wide (use a low
f number, such as f/2.8 or f/3.5 for example).
Conversely, do you want most of your image to be focused? Close the diaphragm instead
(use a high f number, such as f/8 or f/11 for example).
And if you want to take your photo to the extreme and have all the elements in focus,
focus at the hyperfocal distance.
Once this is done, focus again and make sure that you are focusing a distance slightly
above the hyperfocal. Focus at 0.5m or 1m beyond the exact hyperfocal distance. Above
all, make sure you are not focusing at a distance closer than the hyperfocal distance.
Learn how to focus at the hyperfocal distance by reading this explanation or through
this video.
You don’t know if your photo is out of focus or blurred (2)
A picture out of focus is an image where the focus isn’t where it should be or where you
wanted. The only solution is to learn to focus correctly. If the photo is out of focus, it’s
almost impossible to “fix” it.
A blurred photo occurs when you shoot at an excessively slow shutter speed and the
camera’s own movement prevents the final image to be tack sharp. The result is a fuzzy
photo. To solve this problem, simply increase the shutter speed or use a tripod.

442The 12 mistakes you should avoid when exposing
As a rule of thumb, you won’t get a blurred picture if you shoot at a rate equivalent to 1s
divided by the focal length you’re using.
You can also end up with a blurred image if you’re shooting at between 1/15s and 1s on
a tripod with a telephoto lens. In this case, use the mirror lock-up (if you’re not using a
mirrorless camera).
Finally, a photo can also be motion blurred. This usually occurs when you are shooting
in motion or during a long exposure if the tripod isn’t well stabilized.
For example, if you are in a moving vehicle and you don’t use a fast shutter speed, your
camera won’t be able to freeze the scene, so it’ll be motion blurred. In this case the
solution would be to use a faster speed.
Another example would be a night photography or a long exposure with filters. If you
haven’t properly fixed the tripod on the ground, it could shake while you’re taking
the picture, and it wouldn’t be sharp. Or you probably hadn’t tightened your ballhead
properly, and the camera was falling downwards as you were exposing.
In both cases the solution is to make sure that the tripod is completely stable in the
ground by securing it and making sure that the ballhead is tight.
Your photos are blurred (3)
Your photos can be blurred for various reasons.
You want to freeze motion but you have used a slow shutter speed. Use a faster one. And
if you’re shooting in Manual mode (M), remember to set the aperture and ISO to get the
same exposure.
You want to take a long exposure, leaving static certain areas of the elements in your
frame while others are moving. If your photo is blurred it’s because your camera and
your lens have vibrated during the shooting.
Make sure you avoid these vibrations:

443The 12 mistakes you should avoid when exposing
• Use a sturdy tripod that bears the weight of your equipment. Make sure it’s in a
stable position and not in contact with anything that can make it vibrate.
• Turn off your lens stabilization system. You’re using a tripod so you don’t need this
feature. When the lens doesn’t vibrate, it may try to correct non-existent movements,
causing the opposite effect.
• Use an external shutter release (wired or remote), an intervalometer or your camera’s
self-timer. Avoid touching your camera as your finger will cause a vibration.
Your picture has a lot of noise (4)
In general, if your photo has a lot of noise it’s because you’ve used a very high ISO. To
avoid this noise you must reduce the ISO setting, letting more light to the sensor.
In doing so, remember that you must sacrifice something in return:
• Either you open the diaphragm to increase the aperture.
• Or you increase the exposure time, so the shutter is open during a longer period of
time.
You use auto ISO (5)
The problem with automatic ISO is that you allow your camera to be the one that
determines it. You risk letting it set an excessively high ISO and your photo ends up with
(a lot of ) noise.
As a rule of thumb, regardless of the camera model you have, use the lowest ISO
possible.
If you have a mid-range or high-end camera, the automatic ISO can be of great help as
long as you set an interval. If your camera generates noise from ISO 1600 for example,
set an automatic ISO range between 100 and 1600.

444The 12 mistakes you should avoid when exposing
From there on, you can play with the aperture and shutter speed knowing that it’ll be the
camera that determines the ISO, without going beyond 1600.
Your photos are too dark (underexposed) (6)
That’s because you haven’t let enough light reach the sensor.
You can solve it in several ways:
• Select a wider aperture if you want to control motion (which means you don’t want
to change the shutter speed).
• Select a slower shutter speed if you want to control depth of field (which means you
don’t want to change the aperture).
• Crank up the ISO (but be careful with the noise!).
• Use the exposure compensation tool (±EV) by moving the indicator to the right
(positive scale) if you aren’t shooting in Manual (M).
Your photos are too bright (overexposed) (7)
In this case the sensor has captured too much light.
You can solve it in several ways:
• Select a narrower aperture if you want to control motion (which means you don’t
want to change the shutter speed).
• Select a faster shutter speed if you want to control depth of field (which means you
don’t want to change the aperture).
• Reduce the ISO.
• Use the exposure compensation tool (±EV) by moving the bar to the left (negative
scale) if you aren’t shooting in Manual (M).

445The 12 mistakes you should avoid when exposing
You have your camera set to the wrong metering mode (8)
And that leads you to an incorrectly exposed photo.
It’s probably because you are using the evaluative (or matrix) metering mode. This mode
is often accurate, but not always.
Use the spot metering mode. It’s much more accurate.
Depending on the camera, it may be a very small circular area right in the center of the
frame or the selected focus point.
You’re not using the exposure compensation correctly (9)
When you shoot in one of the two semi-automatic modes, whether in Aperture
Priority (A or Av) or Speed Priority (S or Tv), the best way to correct the exposure is to
compensate it.
If once compensated, the resulting image comes out:
• Too dark (underexposed), shift the exposure compensation indicator (±EV) to +1.
Look at the histogram of the new photo and evaluate if it’s necessary to take another
shot at +2, +3, +4, etc.
• Too bright (overexposed), shift the exposure compensation indicator (±EV) to -1.
Look at the histogram of the new photo and evaluate if it’s necessary to take another
shot at -2, -3, -4, etc.

446The 12 mistakes you should avoid when exposing
You don’t get out of the auto white balance (10)
By keeping the white balance in automatic, sooner or later you’ll face a situation where
your camera has failed to correctly capture the colors of your scene.
• If the colors in your photo are warm (there is a red, orange and yellow cast), cool
down the colors by reducing the color temperature (select a lower Kelvin number).
• If the colors in your photo are cold (there is a purple, blue and green cast), warm up
the colors by increasing the color temperature (select a higher Kelvin number).
The white and/or black of your photos is gray (11)
Most of the time this problem happens because of a wrong metering. Your camera’s
light meter suggests correct exposure values when the element where you meter the
light on has a neutral gray tone (it reflects 18% of the light it receives).
It’ll be often difficult for you to find an element with a neutral gray tone where metering
the light in the scene you are going to photograph. Use a gray cardboard that reflects
exactly
• 18% of light and you will make sure that both blacks and whites have the right color
in your pictures.
• Use the spot metering mode.
• Measure the light on a neutral gray card that receives the same light as the subject
you are photographing.

447The 12 mistakes you should avoid when exposing
When exposing you blindly trust the LCD (12)
Don’t rely on the image that your camera’s LCD shows to determine the exposure.
Even if you’re shooting RAW (which you should do already, if you still don’t) your
camera is unable to show the histogram of a RAW file. In fact, your camera shows the
histogram of the developed JPG file that is embedded in your RAW file.
Always use the histogram. It’s the most reliable tool to expose your scene.

2610 amazing photographers
to inspire you and learn how to expose

44910 amazing photographers to inspire you and learn how to expose
It won’t be the first time, nor the last that I recommend you to follow the work of great
photographers. It’s, without a doubt, the best way to inspire you, to experiment and,
above all, to evolve learning.
So every time you find an exciting photo or even a jaw-dropping one, look at it for a few
minutes. Observe it carefully and analyze it in detail.
Try asking yourself the following questions:
• What’s the story?
• What elements does it include?
• How is the composition?
• Where has the photographer focused?
• What is the key tone? How did she meter the light?
• What exposure method did she use?
• What parameters did she use (aperture, shutter speed, ISO)?
• How has it been post-processed?
If you do it, you’ll see how little by little you will come up with ideas and multiply your
chances of taking spectacular photos.
If you don’t know where to start, here’s a list with some of my favorite photographers.
They are all true masters.
And if you can think of another photographer, don’t forget to share it in the comments
section at the end of this article!
José B. Ruiz (1)
Simply the most renowned Spanish nature photographer of all time! José Benito Ruiz
has won (and also participated as jury) several international competitions like Wildlife
Photographer of the Year or the Golden Turtle.

45010 amazing photographers to inspire you and learn how to expose
His photos have been published in more than 40 countries through the most prestigious
agents (Planet Earth Pictures, Oxford Scientific Films and Nature Picture Library) in pro
for the preservation of Nature.
Devoted naturalist and author of more than 10 books on photography and wildlife, when
José is not writing or out there shooting, he is teaching others the art of photography.
Michael Shainblum (2)
Eat. Create. Sleep! Michael Shainblum has been creating art as a professional
photographer/filmmaker since the age of 16. And this is all he longs for: Creating Art.
Well, he also loves playing with Legos and doodling comics strips. Isn’t it Michael?
His stunning photography and timelapses have gained him international fame. His
work has been published in National Geographic, Wired Magazine, Huffington Post and
The Weather Channel among others. He has worked for companies like Disney, Google
and Nike, just to mention a few. And with more than 488k followers on Instagram, he is
continuously inspiring the world.
Trey Ratcliff (3)
Trey Ratcliff’s work became popular when the Smithsonian Institute posted one of his
photos on its walls. His particular way of executing bracketing and, above all, of post-
processing his images (usually using the HDR or high dynamic range technique) has
given him an unmistakable style.
In addition, his passion for traveling has taken him to the farthest destinations on the
planet. He is, as he defines himself, “a warm-hearted, old-school gentleman explorer with really
cool toys”. As you can see, he has a very peculiar sense of humor.
His experience, his way of understanding photography and his simplicity have made
him a tremendously popular and successful photographer.

45110 amazing photographers to inspire you and learn how to expose
Rafa Irusta (4)
For Rafa Irusta, photography is a way of transmitting sensations, considering that
nature deeply moves him. His main objective is to document the beauty of the natural
environment, always with the aim of raising awareness and inspiring a will for its
conservation among the spectators.
Thanks to a very purist style, Rafa tries to achieve images of great realism and beauty
while using nature as a source of inspiration. This allows him to capture a multitude of
fascinating scenes, playing with both lights and colors.
Donal Boyd (5)
Donal Boyd has been into photography for more than 10 years. First as an amateur
and, since 2015, as a professional. That year, he decided to follow his heart, quitted his
job and moved to Iceland to operate his business as a professional photographer and
photography instructor.
His mastery of light, combined with an extensive knowledge of PhotoPills, help him to
achieve stunning nature images, his favorite genre. In his gallery of images you’ll see his
passion for both landscape and wildlife. Oh! And he has a drone too!
Albert Dros (6)
This award winning photographer has been published amongst some of the biggest
media channels in the world, like Time, Huffington Post, Daily Mail, National
Geographic and so on.
When you meet Albert Dros you realise that he is truly addicted to landscape
photography and capturing the beauty of the world. He is obsessed in fact!
His goal, to capture places in the best possible way. His method, to plan every single
detail to achieve shots that are stuck in his head: Imagine. Plan. Shoot!

45210 amazing photographers to inspire you and learn how to expose
Samuel Aranda (7)
Samuel Aranda is one of the most prestigious and renowned Spanish photojournalists.
In addition to the World Press Photo (2012), he has won multiple awards, such as the
National Photography Prize in Spain (2006), the Nikon Photography (2015) and more
recently the Ortega y Gasset Prize (2016).
He has been photographing conflicts, immigration and social problems around the
world for over 15 years. His work has been published in National Geographic, The New
York Times, Le Monde or El País for example.
A large part of his work is shot in black and white, usually very dramatic, seeking to
represent in the most realistic way what his eyes see.
Bencé Maté (8)
He is, without a doubt, one of the most awarded nature photographers nowadays. Bencé
Maté starts to become interested in this genre at the age of 14, soon getting his first
success: in 2002 he wins the BBC Young Nature Photographer of the Year.
In 2005 and 2007 he won the Eric Hosking prize. He has been 5 times Young Nature
Photographer of the Year in Hungary, his native country. The following year he won
the Nature Photographer of the Year from naturArt (Association of Hungarian Nature
Photographers).
He’s specialized in bird photography, thanks to which he earns his living as a
professional since 2004. His images are incredibly original thanks to the equipment and
shelters he builds.
Ian Norman (9)
If you love photographing the Milky Way, you probably know Lonely Speck, one of the
most famous and useful blogs to learn astrophotography in the net.

45310 amazing photographers to inspire you and learn how to expose
Through Lonely Speck, Ian Norman and his wife Diana Southern inspire thousands
and thousands of photographers to take action, go out and photograph the night sky.
They have inspired me on more than one occasion to plan photos that I never imagined
possible.
If you’ve ever wanted to know how to make those incredible images of the Milky Way
and Star Trails or wondered what gear, techniques and post processing methods are
used to produce those images that leave all of you speechless, Ian’s blog will become an
endless source of information to which you’ll return again and again...
Marina Cano (10)
Wildlife photography captivated Marina Cano when she was only 15 years old. Her
images reflect sensitivity, passion, perseverance, creativity, sense of aesthetics, and
above all an unconditional love for animals.
A large part of her work takes place in the African continent, which she calls “her park,
her little Africa”. But for Marina, photographing nature has become more than a passion.
Her goal now is to do everything possible to protect them by awakening the interest and
curiosity of the spectator: to teach him about conservation.
Get inspired by other PhotoPillers (11)
Oh! You can also get inspired by PhotoPillers from around the world. Check the images
that we’re featuring everyday in the PhotoPills Awards.
You can access all the photos from the Awards button you’ll find in the “My Stuff ” menu
of your PhotoPills app (or in our Instagram account).
And you can submit yours too, and inspire others.

27Your time has come...

455Your time has come...
“Action is the key to success” - Pablo Picasso
Are you still alive?
If you are here, reading these words... Congrats!
You have managed to get safely to the last screen of the famous videogame “Perfect
Exposure”, and you are about to rescue the princess.
You only have to put into practice what you’ve learned!
I admit that the game hasn’t been easy. You’ve had to destroy countless villains. All of
them terrifying.
And with equally terrifying names... Do you remember them?
“Exposure triangle, dynamic range, exposure value, metering mode, exposure mode, histogram, light
meter...”
I know... It hasn’t been easy to get here.
Don’t worry, it’s normal!
As in all video games, the difficulty has increased as you went to the next level.
But the most important thing is that you didn’t give up, that you continued reading, that
you overcame all the obstacles... You kept playing.
And now, at last, your mastery of light and, thus, of exposure, is total.
Your ability to make truly legendary photographs is infinite.
You just have to prove it in the field, the moment that you’ve expecting for so long has
come... Your time.
So turn off the computer and take the camera. Go from theory to practice, from fiction
to reality.

456Your time has come...
You know, the world is divided into two categories... Those who know how to expose
and those who don’t.
You just have to decide which category you want to belong to.
So unleash your creativity and put into practice everything you know.
No matter how crazy your idea is, go for it!
And if you don’t get it the first time, review this guide, learn what it takes and try again.
Practice, practice and keep practicing.
Don’t despair or let yourself be carried away by frustration. In the end, if you don’t give
up, your efforts will be rewarded. I’m sure you’ll take the photos you dream of.
On top of it, you’re not alone in this game. You already know that you can count on me
and the rest of the PhotoPills team regardless of what you need.
We PhotoPillers are here to help each other!
So no matter the question you have, if you need help, write a comment at the end of this
article, and we’ll answer you as soon as possible.
Dream, act, create!

457
Antoni Cladera is a landscape and conservation photographer. Artist of the Spanish Confederation of Photography and member of the Spanish Association of Nature Photographers (AEFONA). He’s a part of the PhotoPills Team.
Special thanks to Sandra Vallaure, a great photographer and friend, for her tremendous help in making this article possible.
Note: some links on this page are affiliate links. What does this mean? If you buy/rent using these links you’re helping support us and it costs you nothing extra. Thank you for your support.