Textbook of Footwear Manufacture
597
-
Upload
khangminh22 -
Category
Documents
-
view
1 -
download
0
Transcript of Textbook of Footwear Manufacture


Compiler�s NotesTHE FOLLOWING is a faithful digitalization of the TEXTBOOK OF
FOOTWEAR MANUFACTURE as edited by J.H. Thornton.I have taken the liberty of using this originally blank page to comment
on the material within. Insofar as I was able, I have endeavoured topreserve the appearance, formatting, kerning, spacing, etc,. of theoriginal work. Sometimes, however, this was simply not possible. Thetypefaces used in the original text are not precisely duplicated in any ofthe font sets to which I have access. Then too, the spacing betweenchapter, paragraph, and graphic elements is often inconsistent within theoriginal text. Sometimes a chapter heading will be set an inch and aquarter below the edge of the page, sometime an inch and a half.Sometimes, using a given set of paragraph styles, a page would formatalmost to the exact word at the bottom margin...and then the next pagewould run over or come up substantially short. Nevertheless, I havepreserved page numbers and the contents of those pages to fairly closeextent.Additionally, there are some illustrations that I have �re-drawn,� so to
speak. This process involved �tracing� the original (as faithfully as ishumanly possible) in order to clarify a drawing, or areas of a drawingwhich, because of �shading� or other �textures,� would not havedisplayed or printed well. I had some initial qualms about this but, in theend, felt that the result was no different than substituting a contemporarytypeface for one that was no longer available. Presenting the informationin a clear forme is the whole point, after all.I have also taken the liberty to superimpose the title of Thornton�s book
on the digital cover. In the version I used, the title was confined to thespine of the book.Beyond that, nothing has been added or subtracted from the text as it is
contained in the original volumes in my possession. It is my fervent hopethat this work will help to preserve the Trade and make this invaluableresource more accessible to those students seeking to learn from the pastmasters.
DWFII�15 March 2009

TEXTBOOK OF FOOTWEAR MANUFACTURE


TEXTBOOK OFFOOTWEAR MANUFACTURE
EditorJ. H. THORNTON, M.A., F.B.S.I.Head of the Boot and Shoe Department,Northampton College of Technology
LONDONTHE NATIONAL TRADE PRESS LTD
1953

COPYRIGHTALL RIGHTS RESERVED
PRINTED IN GREAT BRITAIN BYJ. W. ARROWSMITH LTD., QUAY STREET AND SMALL STREET, BRISTOL

FOREWORDBy Geoffrey N. Barrett, B.E.M., F.B.S.I.,
Chairman of the Council of the British Boot and Shoe institutionTODAY HAS BEEN CALLED the Age of Technology, and it has certainlybecome more and more apparent that the competition of modern lifecompels all energetic and far-seeing students to make an intensive studyof the trade or profession which they have chosen as their life�s work.The old craft trades, of which boot and shoe manufacture is one, are, to
a large extent, being revolutionised by the application of better machinesand a more scientific and mechanical approach to all problems, and notraining can be done without adequate textbooks.We, in boot and shoe manufacture, have felt the need, for some years,
of modern textbooks, and the matter has often been raised at the Councilmeetings of the British Boot and Shoe Institution.It is, therefore, with very great pleasure, that we welcome this new
book, a tribute to the knowledge and perseverence of Mr. J. H. Thorntonand his fellow authors. It is also a tribute, of course, to the lateMr. E. J. C.Swaysland that his textbook of Boot and Shoe Manufacture published in1905 should still be quoted, but it is also a reflection on the shoe trade forhaving produced since that time so few adequate and more modernbooks.The Journal of the British Boot and Shoe Institution has endeavoured
to spread the knowledge of modern techniques, but it was not conceivedas, and could never take the place of, a textbook. The authors of thisbook, however, have been able to make use of much of the mattercontained in articles of the Journal. The inclusion of a section on slippermaking is also particularly welcome, as it makes this the first book tocover the whole range of footwear manufacture.May I congratulate Mr. Thornton on the production of this book, and
also thank his extremely competent team of contributors on their workfor the benefit of all students of the Boot and Shoe Industry.
GEOFFREY N. BARRETT
v

vii
User
Text Box

GENERAL INTRODUCTIONTHE SCOPE OF THIS book is defined by its title and in this respect it differsfrom several earlier works. Although last making, leather manufacture,weaving and the anatomy and measurement of the foot are all mostinteresting topics, they are not a part of footwear manufacture within thefactory but ancillary to it. Therefore, although there are many referencesto them, as will be seen from the index, they are not dealt with in anygreat detail.Except for a section on area measurement in the clicking room, costing
has also been omitted in view of the fact that there is in the course ofpreparation by the Federated Associations of Boot and ShoeManufacturers a very detailed and authoritativework on this subject. Onthe other hand, the background of the trade has been established in thefirst part of the book dealing with the origin and development of shoedesign.It is very difficult to study boot and shoe manufacture away from a
recognised trade centre, but to assist pattern cutting students to practise athome several of the last manufacturers whose advertisements appear inthis book have agreed to supply, at a nominal cost, lasts suitable for thispurpose.I would like to thank the following people for the great help they have
given during the preparationof the book:Mr. J. Barnet,Mr. R.W. Brown,F.L.A. (Curator, Northampton Museums), Messrs. G. A. Kirby, H. J.Stafford and C. M. Strudwicke (The British United ShoeMachinery Co.,Ltd.), Mr. E. H. Lusty (Messrs. Phipps and Son, Ltd.), Mr. R. P. Swain(The Standard Engineering Co., Ltd.), and the authors of the variousarticles appearing in the Journal of the British Boot and Shoe Institution,the titles of which are given in the Bibliography, which articles have beenfreely consulted.In addition, very welcome practical assistance in the form of
information, illustrations or blocks, some specially prepared, has beengiven by the following: the B.B. Chemical Co., Ltd. (Figures 239, 240);the British Boot, Shoe and Allied Trades Research Association (Figures234, 241); The British United Shoe Machinery Co., Ltd. (Figures 4-15,129, 134, 142, 157, 184, 186, 187, 189, 228c, 238); Northamptonlibraries Committee (Figures 23, 24); the Pedoscope Co., Ltd. (Figure21); the Singer Sewing Machine Co., Ltd. (Figures 78-80, 82-9); theStandard Engineering Co., Ltd. (Figures 124, 126, 128, 131, 133, 135,137, 139, 141, 144, 149, 150,
vii

152, 154, 155, 158, 159, 160, 167, 169, 173, 174, 176, 179, 181, 185, 188,194-200, 203b, 204a, 205-9, 226, 227, 228a, b, 229, 230, 235-7 and thechart on p. 254; Vantona News (Figure 57); the Victoria and AlbertMuseum (Figure 18).
J. H. THORNTON
viii
GENERAL INTRODUCTION

CONTENTSPAGE
FORWARD vGENERAL INTRODUCTION vii
PART I. SHOE DESIGN: ITS BASIS ANDDEVELOPMENT
J. H. Thornton, M.A., F.B.S.I.INTRODUCTION 3
The Basis of Design1. THE PURPOSE OF SHOES 52. SHOEMATERIALS 83. METHODS OF SHOECONSTRUCTION 20
The Sandal��The Moccasin��The Shoe4. FASHION 34
PART II.PATTERN CUTTING
A. V. Goodfellow, A.B.S.I.5. LASTS 57
Sizes and Fittings��Last Specification.6. PRACTICAL INSTRUCTION 63
7. GENERAL 80
PART III. CLICKINGA. V. Goodfellow, A.B.S.I.
INTRODUCTION 1078. MATERIALS 108
ix
Tools�Marking the Last��The Insole Pattern��The SolePattern�The Slotted Forme�Men�s Shoe Standards andSections�Ladies� Shoe Standards and Sections�Grading.
Design��Lasts��Forme Cutting��Standards��Section Patterns��Pattern Allowances��Spring in Patterns��Proving New Styles��PatternStandardisation��Castor Shapes��Principles of Grading��GradingMachines��Pattern Making��Stitch Marking��Pattern Storage.
Classification��Characteristics of Shoe Leathers��Fabrics��Synthetics.
Upper Appearance��Sole Shape��Sole Height��Heel Heightand Shape��Fastening.

9. CLICKING TECHNIQUE 117
10. MANAGEMENT 134
PART IV. CLOSINGL. W. Elliot, A.B.S.I.
INTRODUCTION 14911. PREPARATION 150
12. STITCHING AND PROCESSES 166
13. MANAGEMENT 202
PART V. BOTTOM STOCKG. B. Agutter, A.B.S.I.
14. CUTTINGBOTTOM STOCK 213
15. PREPARATION OF SOLES AND INSOLES 22516. LIFTS, WELTS ANDHEELS 23917. MANAGEMENT 246
PART VI. MAKINGW. Moore, A.B.S.I.
18. HAND LASTING (ByG. Lewin) 25519. HANDWELTING (ByF. Bending) 26020. MACHINELASTING FORWELTEDWORK 270
x
CONTENTS
Cutting Fabrics��Variations in Leather��Cutting Leather��PressClicking
Upper Costing��Leather Buying��The Leather Store��LeatherSorting��Quality Control��Organisation
Opening or Checking��Identification Marking��Skiving��Perforating and Gimping��Edge Treatments��Backing or
Seams��Stitching Threads used in the Closing Department��Needles��Stitch Formations��Types of Stitching Machines used inthe Closing Department��Sequence of Operations.
Lay-out and Planning of a Closing Department��Control ofQuality and Quantity��Training of Labour��methods of dealingwith Samples, Specials and Repairs��The Purchase, Storage andRecording of Use of Findings and Grindery��Machine
The Press��Insole Cutting��Sole Cutting��Cutting other Sections.
Departmental Lay-out��Good Pressmanship.
Preparing the Upper for the Last��Lasting.

21. THE GOODYEAR WELTED METHOD 289
22. THE MACHINE-SEWN METHOD 325
23. METALLIC METHODS OF ATTACHMENT 34023. THE CEMENTED METHOD 348
25. VELDTSCHOEN, TURNSHOE AND LITTLEWAYMETHODS 36126. MANAGEMENT 376
PART VII. FINISHINGJ. Harris, A.B.S.I.
INTRODUCTION 38327. HEELATTACHING 385
Methods of Attaching Heels��Slugging.28. HEELTREATMENT 392
Heel Breasting��Heel Trimming��Heel Scouring.29. EDGE TREATMENT 401
30. BOTTOM TREATMENT 419
31. LOUISHEELS 431
32. MANAGEMENT 438
PART VIII. SHOE ROOME. J. Clarke, A.B.S.I.
INTRODUCTION 44533. EXAMINATION AND PRELIMINARYOPERATIONS 447
Examination��Sole Stamping and Embossing��Socking.34. UPPERCLEANING, IRONING ANDDRESSING 454
Upper Cleaning��Ironing or Hot Blast��Dressing
xi
CONTENTS
Sewing in the Welt��Attaching the Sole��Variations in the WeltedMethod.
Lasting��Attaching the Sole.
Adhesives��Single Sole Cemented Shoe��Variations of the SingleSole Cemented Shoe.
Edge Trimming��Putting into Colour��Heel Burnishing��SeatWheeling��Edge Setting��Edge Polishing or Brushing.
Bottom Scouring��Bottom Making��Top Ironing and SideIroning��Taking-off��Brushing-off��Last Slipping.
Introduction��Insole Preparation��Preparation of the Sole��Heeling��Finishing��Conclusions.

35. OTHEROPERATIONS 469
36. FINAL INSPECTION, PACKING ANDDISPATCH 472
37. MANAGEMENT 480
PART IX. SLIPPERMANUFACTUREJ. W. Johnson, F.B.S.I.
INTRODUCTION 48538. THE �DOWIE� SLIPPER 48739. SLIP-LASTED SLIPPERS 49640. SLIPPER TURNSHOES AND INDOOR TURNS 50341. VELDTSCHOEN,WELDED ANDMACHINE-SEWN SLIPPERS 51442. MOCCASIN SLIPPERS 523
43. SHEARLING ANDWOOLSHEEPSKIN SLIPPERS 535
BIBLIOGRAPHY 539INDEX 543INDEX TOADVERTISERS 582
xii
CONTENTS
Panel Trimming��Ornamental Attachments��Quarter Reforming��Repairing.
Examination�Final Operations��Packing and Dispatch.
Stock Control��Supervision��Departmental Lay-out.
Variations of the �Dowie� Method.
Simple Moccasin Slippers��Moccasin Type Slippers with separateAttached Soles.

PART I
SHOE DESIGN: ITS BASIS ANDDEVELOPMENT
J. H. THORNTON


INTRODUCTIONIT MUST BE STATED at the outset that the purpose of this first section on thebasis and development of shoe design is not to try and teach anyone howto design shoes. In the first place, in spite of the thousands of wordswhich have been written about shoe design (or, rather, shoe fashion),particularly during the past few years, it is still very doubtfulwhether it isa subject which can be taught by a textbook; in the second place itappears to be quite impossible to differentiate between what is basicdesign, fundamental and unchanging, and what is transitory fashion.Each generation produces new articles such as shoes, furniture, vehicles,domestic equipment and so on, different in appearance from what hasgone before, and each is advertised as the best ever to be designed. Yetfifteen or twenty years later these articles are �old-fashioned� and onceagain we are shown the �best ever�. Furthermore, reasons, apparentlysound, are given on each occasion that a new design is produced stalingwhy it is so much better than the old�but these reasons have a habit ofbecoming unsound with the passage of time.This apparent anomaly is partly due to the indiscriminate use of thevery much overworked term �design� instead of �style�. Designingshoes* is something more than drawing a pleasing upper, a factsometimes overlooked when the designer has received his, or her,training in art and has not acquired the necessary knowledge of shoefunction and construction. On the other hand, the technician whobecomes a designer often lacks the necessary appreciation of the basicideas of line, form and colour and may tend to use ornament anddecoration indiscriminately without relation to the whole design. A shoedesigner, in the correct sense of the title, is both an artist and a technician;a shoe stylist is more likely to belong to the first category.It would appear to be a logical assumption that if a design isfundamentally sound then its life should be at least as long as that of theconditions it was first intended to meet, always allowing, of course, foralterations and improvements with increasing knowledge. This brings usup against the commercial considerations, however, and the need to altera design, not because it improves it in any way but because it makes itdifferent from someone else�s product; it is then the duty of theadvertising department to think up for the benefit of the consumer somereasons why the new design is so superior to the old. The customarypractice of producing seasonal �models� fosters this practice and basicdesign is often subordinated to commercial fashion or novelty.* The term � shoe � is used throughout Part I as the generic name for all types of
footwear, including boots.
3

Shoe design, in common with the design of all articles of clothing,particularly women�s, is much more susceptible to the vagaries offashion than the design of any other manufactured articles. At the sametime, however, shoes are among the oldest of our man-madecommodities and it is possible to trace through the centuries certainfundamental characteristics of them which we may properly call �basicdesign�. It is these characteristicswhich will be dealt with in this section,together with a brief summary of modern methods of shoe constructionso that, if taken in conjunction with the later sections on shoemanufacture, the student will have at least an indication of how toprepare himself to be a shoe designer.
THE BASIS OF DESIGNAproperly designed article, whether it be a shoe or a rabbit-hutch,may becompared with a three-legged stool of which the seat forms the designresting firmly on the three legs of purpose,material and method.The purpose, or what the article is made for, must be clearly
understood and constantly kept in mind by the designer. Every otherconsideration should be subordinate to this; none must in any wayinterfere with the fulfilment of the design when the article is eventuallyused for its intended purpose.Thematerial, or what the article is made of, is primarily controlled by
the purpose for which the design is intended and secondarily by theavailability of it. Having been chosen, it then itself controls to aconsiderable extent the method of construction, the third leg.The method, or how the article is to be made, both influences the
design and is influenced by-it; the designer, therefore, should have athorough knowledge of the actual manufacturing processes throughwhich his design will have to pass on its way from paper to reality.The three-legged stool of design so described would stand firmly if it
were not for the fact that a fourth interchangeable leg, that of fashion, hasso often to be inserted, especially where clothing is concerned, and moreoften than not the stool wobbles. The perfect design, like the perfectstool, remains steady on the four legs of purpose, material, method andfashion, but such a design is as rare as a non-wobbling four-legged stool.Let us now consider how these legs� of purpose, material, method and
fashion have influenced shoe design in time and space�from timeimmemorial and in the most remote parts of the world�and willpresumably go on doing so.
4
INTRODUCTION

1THE PURPOSE OF SHOES
THE SHOEHAS TWO primary functions to performand has acquired throughthe years other lesser ones. The primary functions are:(1) To protect the sole of the foot from the heat, cold, dampness, dirt or
roughness of the ground in walking and standing. In its simplest form thisis achieved in the primitive sandal (see p. 20) which is nothing more norless than a piece of leather, wood or othermaterial, fixed under the foot bya strap or other means.(2) To protect the upper part of the foot, and, if required, the leg, from
the cold, rain, thorns and insect or other bites. In its simplest form this is abag of leather or material wrapped round the foot and is here given thegeneric name of moccasin (see p. 22).Lesser functions are:(3) To assist the foot to perform some abnormal task. This includes thevarious sports such as football, cricket, hockey, running, fishing, riding,mountaineering, dancing, etc., all of which today have their own specialfootwear. So, also, have many trades, such as mining, deep-sea diving,munitions manufacture and fire-fighting, and the armed services. Itshould be noted here that more primitive peoples with much stronger andtougher feet can tackle many of these sports, pastimes or occupationswithout special shoes, or, in fact, without shoes of any kind.(4) To overcome abnormalities in the. foot itself, the surgical bootbeing the extreme example of this, while many shoes incorporatecorrective devices, some more corrective in name than in fact.(5) To complete a costume. This is particularly important today whencostume designing includes not only the dress but also the hat, shoes,gloves and handbag. In fact, the main purpose of the shoe may be tocomplete or enhance the remainder of the costume, the primary functionsof foot-covering and sole- protection being subordinate to this.Shoes for ceremonial occasions, such as a man�s court shoe, also comeunder this heading.(6) To indicate rank or office. This is not applicable in westerncivilisations, unless we include the notorious �jackboot� in this category,but formerly it was important, certain types of shoe being restricted tocertain classes; there is obviously a very close link here with the purposestated in (5) above.If the shoe designer had to cater for only one of the above purposesthen, of course, his task would be comparatively simple, but except,perhaps, for the most primitive sandal, this is never the case and he isfaced with the problem of combining several of them. Whatever may bethe main purpose or purposes, however, one primary fact
5

remains�the shoe is intended to be worn on the foot and the foot is aliving, mobile part of the human body.In natural walking the foot bends, and so the shoe must normally bendtoo, and at the same places as the foot (there are exceptions to thisprinciple which are dealt with on p. 11 under the heading �Flexibility�).Furthermore, the foot is asymmetrical both in its construction and itsmovements and so this bending does not take place as it would do if thefoot were a divided block of wood with a simple transverse hinge joiningthe front and back parts; foot bending is an extremely complicated actionwith many bone joints coming into play. The foot also turns at the anklethrough two ball joints�the lower one being on the outside and thehigher one on the inside; these joints influence the height of shoe quarters(the rear portions of the shoe upper) and arementioned again in Part II (p.87).The upper portion of the foot is soft, yields easily to pressure andquickly shows the results of it; the toes in particular grow �corns� wherethe shoe continually presses against them, and a bunion on the big toejoints is caused by pointed-toe shoes constantly forcing the big toes awayfrom their natural straight-forward position towards an imaginary centreline down each foot. The shoe designer is in no smallmeasure responsiblefor these effects; the last (the block of wood on which the shoe is made,see p. 26) may be the wrong shape or have insufficient width or depth orboth, and his upper design may introduce seams or double thicknesses ofmaterial, and consequently unyielding stiffness, at the very places wherecomfort demands softness. One frequently sees multi-strap sandals wornwithout stockings and so designed that one or more of the toes finds itsway between the straps, or the edge of a strap rubs against the tender littletoe. The currently fashionable �peep-toe� shoe usually has its �peep-hole�placed centrally so that the big toe tends to be turned from its normal,alignment and pokes through the hole, especially when the addition of ahigh heel to the shoe causes the foot to slide forward into thewedge-shaped forepart.A shoe designer, then, should have a working knowledge of the foot inaction and should be in a position to examine after wear both the shoes hehas designed and the feet which have worn them. Only then will heappreciate the practical faults in his design and be able to rectify them infuture ones; in this task, he must have, of course, the full co-operation ofthe foot fitter�he can hardly be blamed for the ill-effects of incorrectfitting if he never has an opportunity of inspecting his design when it isfulfilling its intended purpose on the foot.
Special Purpose ShoesPerhaps the greatest difference between the wardrobe of the woman(and to a lesser extent, theman) of today and her ancestors is that whereasthe latter had the same pattern of clothes, including shoes, varied only byornament, for every purpose, today every occasion,
6
SHOE DESIGN: ITS BASIS AND DEVELOPMENT

occupation, sport, even time of day, has its own costume speciallydesigned for it. A woman may change her complete outfit several timesduring the day.On the other hand, the former distinction between the clothes of therich and those of the poor has gone, at least, as far as pattern is concerned;the quality of them is still determined by pocket but superficially theylook alike. Gone also has the clothes-difference of the town-dweller andthe rustic.The change has been brought about by the cinema, the fashionmagazines, the increased urbanisation of the country by industry andimproved transport, a general class-levelling due to improved educationand two world wars, and the mass production of clothing copied from�exclusive models� and brought within the price-reach of the now highlyfashion-consciousand better paidworking population. Today, almost anyyoung woman in paid employment will have at least six pairs of shoes inuse: the pair she goes to work in, the pair she wears on Sundays and for�dressy� occasions, a pair for dancing, holiday or beach sandals, winterbootees (or overboots) and her bedroom slippers. If she plays tennis, orsome other sport, then a further pair may be required.Occasionally, however, a shoe designer is called upon to produce ashoe for a special purpose in which fashion or custom plays no part; hethen joins the ranks of the scientists and the engineers and his product canbe compared with theirs. Examples are the R.A.F. �Escape� bootproduced in 1944, the �Jungle� boot for the war in Burma in 1945 and the�Korean� boot of 1951. Each of these was designed to meet the peculiarcircumstances in which each was to be used. The �Escape� boot, forexample, was primarily a flying boot fleece-lined for warmth, but inaddition it had a shrapnel-proof leg lining consisting of loose layers ofsilk and a leg which could be cut off with a knife (enclosed in a pocket inone of the boots) leaving a normal Oxford shoe (see p. 69) and soenabling the baled-out airman to escapemore easily from enemy territorywithout recognition. The �Jungle� and �Korean� boots have bothdeveloped from the normal Army boot but include materials andcomponents (leather, metal, thread, etc.) specially treated or made towithstand or insulate against extremes of heat, cold and damp.In a more peaceful direction we have the miner�s boot with its steeltoe-case, and the British Boot, Shoe and Allied Trades ResearchAssociation has spent considerable time in developing �occupationalfootwear� for different trades, an idea suggested by James Dowie in 1861in his The Foot and its Covering. It is curious, however, that the shoetrade has never yet produced a shoe specially designed for its ownworkers, the majority of whom are standing all day at the bench or themachine.Most of theseworkers keep an old pair at the factorywith piecescut out here and there to give them the maximum comfort and freedom tocontrol the machine pedals and it would seem that the shoe designermight begin by setting his own house in order.
7
THE PURPOSE OF SHOES

2SHOE MATERIALS
THERE CAN BE FEW solid materials in the world which at some time orother have not been used for shoes� leather, cloth, wood, brass, glassand grass. The two controlling factors have always been and always willbe, availability and suitability.The wooden clogs of Western Europe, the Middle East, India andJapan, the straw slippers and sandals of Korea, Egypt and Finland, thedelicate fabric shoes of China and the universal leather foot-coveringhave all been made where the particular material happens to be availableand suitable for local conditions. One may compare them with the stonehouses of the limestone districts, the wooden structures of the timbercovered Scandinavian countries, the grass and mud huts of the jungles orthe granite buildings of Aberdeen. Only with improved transport does anotherwise local material become universal and even then its use may berestricted by unsuitability for changed conditions.From time immemorial, leather has been the pre-eminent shoematerialand it is essential that a shoe designer should understand why it hasachieved and maintained this position by virtue of its unique physicalproperties if he (or she) is to produce a design suitable for the intendedpurpose and at the same time practicable from the manufacturingstandpoint. This does not imply that the shoe designer must chooseleather, but it is true to say that any other material which has proved to besuitable for shoes invariably has one or more of the properties of leatheras detailed below.There has beenmuch speculation as to how andwhen leather, or, rather,rawhide, first came to be used but there seems to be little doubt that thereal reason was availability followed by suitability. Some primitive manfound that the hide of the animal he had killed in self-defence or for food,although in itself unsuitable for eating, proved to be an excellentprotective covering for his home, his bed, his body and his feet. Helearned to soften it with oils and fats from the animal itself, a primitivemethod of tanning (or more correctly �dressing�) which still survives forwash-leathers. Later, either by accident or by design in early attempts atdyeing, he found that infusions of vegetable materials such as oak-bark,chestnut, sumach and many others would convert the raw hide into anon-putrefying substance�leather. This �vegetable tanning� processwith many improvements and refinements is still the method by whichthe bulk of our sole and insole leather is made.Within the last hundred years, the chemist, without reference to
primitive man or traditional methods, has given us �chrome tanned�leather, now universally used for shoe uppers.
8

Our predecessors, right down to recent years, probably never tried toanalyse the reasons why leather was so suitable for shoemaking and footcomfort�they knew that it was and took it for granted. Today we arebeginning to understand some of these reasons; we can describe andexplain many of its economic and physical properties even if we cannotyet control them all. A description of these properties now follows andalthough it does not pretend to be complete it is hoped that the studentmay realise from it what are the desirable properties for any shoematerial, quite apart from leather, always bearing in mind the primaryfunction of suitability for purpose.(1) AvailabilityAs long as meat is eaten, hides and skins (see p. 108 )will be available.There appears to be no inhabited place in the worldwhere animals cannotalso live and, in many cases, be domesticated and bred. The commercialand economic aspects of hide supply are outside the scope of this bookbut obviously they may considerably influence a shoe designer at someparticular time. Many examples of this were shown during the warperiods, the shortage of leather for civilian purposes making it necessaryfor designers to try all sorts of materials instead�likely and unlikely.During the occupation period of the Second World War for example,Norway made a shoe with an upper of woven paper and fish-skin and asole of birch-bark.At the other end of the scale, a designer working in the very high-classtrade can afford to specify materials such as crocodile, antelope, gold kidand so on which would be quite impossible in the lower price ranges.
(2) AreaApoint not often stressed in discussing leather and its virtues is that itcan have the largest area of any natural flexible material. Large cattlehides as used for the upholstery trade average about 58 sq. ft. in area buthave been known to reach 120 sq. ft.; only such man-made materials aswoven, knitted or felted fabrics, or milled paper-board, rubber and plasticcan equal or exceed this.This area has very important practical aspects in the actual cuttingeconomywhich are dealt with in some detail in Part III (p. 134). There is,however, a very important difference between a large area of leather and asimilar area of fabricated sheet. The latter is approximately constant in itsproperties all over and also does not differ materially from another sheetof the same batch. On the other hand, leather varies considerably fromhide to hide and from point to point in the hide (see p. 122). Thesevariations are generally a hindrance to mass production methods but asfar as foot comfort and wear are concerned they may be made to coincidewith the different requirements of the various sections of the shoe. Part ofthe art of shoemaking is the correct matching of these variables with thedemands of the foot in action.
9
SHOE MATERIALS

(3) Elasticity and PlasticityThese are two properties often discussed loosely under the heading of
stretch, give or flexibility; they have, however, precise meanings and athorough understanding of them is extremely valuable in shoe designingand manufacture.An elasticmaterial is one which after distortion (stretch, compression,
twist or shear) and release will completely recover its original shape.A plastic material is one which after distortion and release will retain
the new shape produced by the distortion.Good examples of the first are rubber and steel; of the second, putty,
dough and, at some stage other than the final one in theirmanufacture, theever-growing family of synthetic �plastics�.As will be described in the section on �Making� (p. 255), almost all the
methods of shoe manufacture involve moulding a flat material to thecurved surface of a last. If thismoulding is to be permanent, even after thelast is removed, then thematerialmust be plastic. On the other handwhena shoe is being worn it is continually being flexed, but is expected torecover its original shape when it is removed from the foot. Since allbending of any material entails the stretching of the layers on the outsideof the bend and the compression of those on the inside, the shoe materialmust, therefore, be elastic, otherwise the shoewill rapidly lose its shape.We are thus faced with the problem of finding a material which is
plastic during part of its processing and then becomes, or remains,mainlyelastic. The answer is leather, but there are also other materialspossessing this dual property to a lesser extent, fabric for example.During the lasting process (see p. 256) the �stretch� is taken out of the
leather, in other words, the laster makes use of the plasticity of leather tomould it to the curves of the last by stretching it, twisting it, compressingit and possibly by subjecting it to heat and moisture. The elasticity of theleather ensures a tight fit of the upper on the last during manufacture andsubsequent shape retention in wear. The plasticity, however, is notentirely removed so that in wear the shoe gradually adjusts itself to theshape of the foot and either increases in comfort or finally becomescomfortable thus carrying out the shop assistant�s promise that it will�give�. (The effect of this �breaking-in� process on the foot itself is oftenpainfully obvious on bathing beaches!)The properties of elasticity and plasticity are important not only for
shoe upper materials but also for soles and insoles. These are normallymade fromvegetable tanned leatherwhich becomes soft and plasticwhenwetted (see p. 235). In this state, soles and insoles can be moulded to thebottom of the shoe or last but on drying out they resume their normalelasticity and so help the whole shoe to retain its shape in wear. For heels,many people prefer an elastic
10
SHOE DESIGN: ITS BASIS AND DEVELOPMENT

material such as rubber which helps to soften the blow of putting the footto the ground in walking on a hard surface and also makes less noise as aresult of this cushioning. Rubber and synthetic soles have a similar effectbut they also possess disadvantages which are dealt with below.(4) Strength and StretchPresent methods of shoe manufacture, other than for rubber footwear
and some strip sandals and slippers, require the upper material to besubjected to considerable tension in order to achieve the mouldingdescribed in (3) above. The material must therefore stretch adequatelybefore the breaking point is reached if it is to be properly lasted. Thisemphasises a point not always appreciated�namely, that stretch isfrequently more important than strength. No upper material at present inuse is as strong as the machines used to process it but if it has adequatestretch it will yieldwithout breaking. Similar considerations also apply tothe threads used for making the upper seams.Leather can have both a very high tensile strength and adequate stretch
before it breaks depending upon the type of hide or skin it came from, itsmethod of tanning and finishing and its thickness (�substance�).It is obvious that the designer should knowwhether his chosenmaterial
will stand up to manufacturing processes with or without reinforcement;in the former case hemay be able to incorporate such reinforcement in thedesign itself.Another factor to which less attention is paid than should be is how the
shoe stands up to tension and stretch in wear, particularly at the seams.The very act of putting on the shoe forms a severe test for certain parts ofit, for example the back-seam, and unless the designer realises this andsimilar facts, the inevitable result will be burst seams or material. Again,it is only by a study of shoes which have been worn and returned withcomplaints that the designer can realise why his choice of material andmethod of using it in his design is at fault.(5) FlexibilityThis property is somewhat akin to elasticity and plasticity; it means the
ease with which the material may be bent. This depends not only on thenature of the material but also on its thickness and is an importantproperty of both upper and bottommaterials. Leather varies considerablyfrom the highly flexible kidskins used for delicate shoe uppers to the stiffheavy cattle hides required for army boot soles, and the actual tanningitself can be adjusted to vary the property within limits. Whether or notthe upper of the shoe needs to be flexible, however, depends upon theultimate purpose of the shoe, the thickness of the sole and the method ofwalking.If the shod foot is to bend naturally in walking as it would do if
11
SHOE MATERIALS

bare then either both the upper and the sole must be flexible, or else theupper must be so reduced in quantity that the rear part of the foot canleave the sole entirely as is the practice for many Eastern sandals and�mules�; this also occurs with modern open-back (or �sling-back�)women�s shoes. In the latter cases, the sole may be quite inflexible,especially if it takes the form of a thick �platform�.On the other hand, boots designed for the greatest amount of walking,such as the army boot, are very inflexible, this being due both to the verystout soles (this includes here all the bottoming components) and thecorrespondingly heavy uppers. Walking in them is accomplished by arolling action from heel to toe, the bottom of the boot being deliberatelycurved upwards at the toe end (increased �toe spring�, see p. 61) for thispurpose. The reduction of the actual flexing of the foot itself causes lessfatigue in excessive walking.Wooden shoes which cover the greater part of the foot, such as the�sabots� of France, the �klompen� of the Netherlands and the �traesko� ofDenmark are completely inflexible but they arewalked in comfortably bymany of the inhabitants of these countries partly because of the bottomcurvature and partly because the foot can easily lift out at the heel as withthe sandals mentioned above. This heel lifting is not possible, however,with Lancashire clogs and some of the wooden-soled boots and shoesproduced during the Second World War; here, walking has to beaccomplished by the heel-toe rolling action, assisted by the pronounced�toe spring� and sometimes by a similar but less pronounced curving ofthe heel bottom.There is no point in putting a very flexible upper on an inflexible soleunless the upper extends above the ankle joint, in which case, of course, itmust be able to bend with the ankle in walking, and also permit entry ofthe foot. Also, an inflexible upper will prevent a flexible sole frombending; the balance, therefore, between upper and bottom flexibilityshould always be borne in mind by the designer.
(6) PermeabilityThe ability of a shoematerial to pass air, water and water-vapour is oneof the most important factors contributory to foot comfort. The shoedesigner has here a constant problem which the majority of otherdesigners do not have to face; the article he is designing has its interior inintimate contact with a mobile, warm and perspiring part of the humanbody while its exterior may be subjected to heat, cold, rain, wet grass,snow or very dry air. At the same time it may be carrying the wholeweight of the body, frequently for long periods.Ability to perspire and the subsequent removal of the perspiration byevaporationor absorption is essential to body comfort. The foot is usuallymuchmore tightly enclosed than are other parts of the body and so specialsteps must be taken to assist this essential waste-elimination process. Ifthe perspiration is not to be trapped, as it is
12
SHOE DESIGN: ITS BASIS AND DEVELOPMENT

in a rubber boot, it must be allowed to penetrate the shoe materials andsubsequently to evaporate into the air, such evaporation taking placeeitherwhen the shoe is removed, or directly through thematerial, or both.Leather is permeable both to water and water-vapour, the former beinga particularly important property of vegetable tanned insole leather, thelatter of chrome tanned upper leather. The desirability of an absorbentinsole is well known and in recent years, absorbent �socks�(loose insoles)of synthetic materials have appeared which can be removed from theshoe, washed and replaced.The phrase leather breathes� has long been a common one whenextolling the virtues of leather. It is, however, rather misleading as itsuggests that the leather has some internalmechanismwhich enables it toinhale and exhale air like lungs; all that is meant is that it will permit air topass through it when there is a difference of pressure between theopposite sides to cause such a flow.Recent research has tended to show that this property of passing air, orair permeability, is not as important as formerly believed and certainlynot as important as the ability to pass water-vapour, or water-vapourpermeability, an essential property if perspiration is to escape. Rubberand synthetic plastic materials, such as polyvinyl chloride (P.V.C.) sheet,are normally quite impermeable to air, water and water-vapour. Thisreduces their suitability for shoe uppers which cover a large part of thefoot, such as an ordinary man�s shoe upper, particularly when the shoemay be worn for long periods without rest. The perspiration cannotescape and the foot becomes either hot or cold, clammy and mostuncomfortable.Although, as stated above, leather is free from these disadvantages, thisfreedom can be destroyed either by covering the surface with animpermeable layer such as the enamel of a patent leather or a syntheticplastic finish, or by sealing the under side with an impermeable adhesivefabric �backer� (for added strength and support), such a backer beingcoated with gutta percha and wax and commonly used on suede leathers.Patent shoes and suede shoes frequentlymake the foot uncomfortablyhotbecause of this imposed impermeability.If impermeable materials are to be used, however, and with leathersupplies uncertain and the number of plastics increasing, they certainlywill be used more and more, then the designer should aim at open-worktypes of shoes and sandals, or shoes with ventilated uppers, where somuch of the foot is exposed to the air that the intimate contact of the upperwith the foot in a few places does not seriously affect foot comfort.The permeability of shoe materials to liquid water is also veryimportant. As mentioned above, insoles require to be water- (and,therefore, perspiration-) absorbent; on the other hand, soles and uppersshould be waterproof, or, at least, water-resisting.Again, leather seems toprovide the best answer, bearing in mind other
13
SHOE MATERIALS

factors. It can be made waterproof (by waxes) for soles, andwater-absorbent for insoles; upper leather can bemadewater-repellent onits surface but at the same time permeable to air and water-vapour in amanner similar to tent canvas.Lastly, there is one effect which, although easier to measure in thelaboratory than in wear, may help to make the foot more comfortable. Ona hot day when the foot perspiration escapes by evaporation from thesurface of the upper leather, the leather is actually cooled down in theprocess; the effect is similar to that of cooling milk or butter by coveringthemwith a damp earthenware cover. On a dampwinter day, however, thereverse effect may take place; the leather, absorbing moisture from theair, becomes slightlywarmer and so helps to prevent loss of foot heat (see(7) below).
(7) Thermal ConductivityThe ease with which a shoe material transmits heat is yet anotherimportant factor in foot comfort. Heat will only travel from a substance ata higher temperature to one at a lower temperature and so it depends onthe temperature of the air or floor in contact with the shoe as comparedwith the foot temperature whether heat will escape from the foot or passinto it from outside.Rubber has a higher thermal conductivity than leather and so in winterconditions the heat can escape from the foot through a rubber boot or arubber sole more easily than it can do through leather of the samethickness; consequently the foot feels cold. Similarly, in the summer,when outside temperatures may be hotter than the foot temperature, heatmay get into the shoe from outside more easily if it is encased in rubberrather than leather, and so the foot may become uncomfortably hot. Thepersonal element, however, cannot be ignored, as some people can wearrubber soles continually, apparently without discomfort.In designing shoes for hot or cold conditions, therefore, the designermust consider both the nature of the material and the extent to which thefoot is to be covered by it. The sandal, which has been worn from timeimmemorial (see p. 20), is the answer to hot desert conditions where thefoot requires as little covering as possible but still wants protection fromthe heat and roughness of the ground.For cold conditions, the designer invariably turns to the natural heatinsulation of animals�fur, hair and wool. All these, and many otherfibrous cellular materials such as leather itself, enclose immobile airbetween the fibres, and air which cannot move (and so produceconvection currents) is one of the best, and certainly the mostwidespread, forms of heat insulation. (Witness the bird puffing up itsfeathers at night or the strawwrapped round the parish pump inwinter.)Thus we have sheepskin linings for boots and wool felt for house
slippers. Incidentally the first provides us with another example of theprinciple of availability and suitability. The flood of shearling-
14
SHOE DESIGN: ITS BASIS AND DEVELOPMENT
lined bootees for women since the end of the second world war has beenpartly due to the availability of sheepskins formerly required for flyingboots.(8) Abrasion ResistanceAs the parents of schoolboys (and schoolgirls) know to their (literal)cost, the ability of shoe materials, both upper and bottom, to withstandabrasion is one of their most important desirable properties. Leather doesnot show up as well here as do rubber, both crepe and vulcanised, and themore recently introduced plastic soling materials known as theresin-rubbers.The abrasive wear of shoe soles is the first cause of their wantingrepairing and for years this wear has been countered by the thrifty by suchdevices as metal studs or �stuck-on� rubber half-soles. The similar wearwhich occurs on uppers, however, although very common, seems to betaken for granted, both by the designer and the wearer, and far moreattention should be paid to it than hitherto. There are at present available,for example, several well-known brands of children�s shoes, the shapeand fit of which (when properly ascertained in the shop) are based on agreat amount of research and the measurement of literally thousands offeet. Yet the first time one of these shoes is worn by a normal healthychild the grain is �scuffed� from the toe-cap because he has kicked a ballor crawled on the ground.The increasing use of resin-rubber soles is helping to solve thesole-wear problem and it would seem that the replacement of leather by aplastic in the more vulnerable parts of the upper would also be desirable.During the secondworldwar, boys�bootswith P.V.C. capswere producedexperimentally and after four months wear, these caps were still almostfree from scratches. It should not be impossible to produce a child�s shoewhich lasts without repair or undue signs of wear for the same length oftime as its particular size is required by the child; no longer, in theinterests of correct fitting, and no less, for the sake of economy.An alternative method open to the designer who wishes to counterabrasion of the upper is to hide the scratches instead of preventing theirbeing made. This can be accomplished by choosing a material whichalready has a rough or teazed surface, such as a reversed leather, or coarsesuede. It is said that �thornproof uppers were first introduced by amanufacturer who had a considerable quantity of leather on hand with avery poor and damaged grain surface�he simply reversed it!
(9) Surface CharacteristicsThese include colour, smoothness, and pattern. Leather can bemade inany colour, it can be highly polished or given a suede nap surface, it canhave an unlimited variety of natural patterns typical of the animal, bird,fish or reptile from which it came, or artificial ones, either in imitation ofthe natural, or original creations of the
15
SHOE MATERIALS
designer. It is possibly a tribute to the universal appeal of leather but anegation of good design that rubber and synthetic upper, bag andupholsterymaterials are frequentlymade to resemble leather as closely aspossible. New materials should be used by the designer to exploit to thefull their own individual characteristics.(10) Ease of WorkingAs already mentioned all methods of making shoes, other than certaintypes of sandal, slippers and rubber footwear, involve the conformingof aflat material to the curved surface of the last. In addition the upper has tobe joined on to the bottom (except for simple moccasins, see p. 22). It isnecessary, therefore, that the material should be capable of being easilycut and rejoined in a different position or to a different material by athread seam, thong, metallic attachment, cement or weld.With the exception at present of welding, leather can be joined to itselfor to other materials by any of these methods. On the other hand, some ofthe new. synthetics present difficulties such as failure to hold stitches oradhesives of the normal type. Here the designer is facedwith the problemthat most shoe factories are laid out to deal with shoes made fromtraditional materials by traditional methods and that he cannot possibly,for economic reasons, ignore this fact. The special methods of handlingrequired by the new materials may require special equipment and untilsuch equipment is available he cannot have full scope in the use of thesematerials.Here then is a very close link between materials and methods ofconstruction; this will be dealt with in the next chapter but it isimmediately obvious that the designer must be fully aware of this link.
(11)MaintenanceThe attitude of a person towards the maintenance and repair of anypossession which may deteriorate through wear and tear depends upon anumber of factors. These include nationality, personal pride, financialposition, thrift and immediate necessity. The Englishman, for example,expects that a cheap alarm clock should last indefinitely withoutmaintenance, keep time accurately and, if the worst comes to the worst,be repairable; on the other hand the American view is that when the clockstops through sheerwear it should be thrown away and a newone bought.A similar state of affairs applies to shoes�the Englishman (andEnglishwoman) expects shoes to be easily maintained and several timesrepairable. Anyone who has been �behind the scenes� in a shoe repairshop or factory must have been amazed at some of the aged remnants ofshoeswhich the customer expects the repairer to restore to something liketheir original form and appearance.The operationmay involve new soles,heels, linings and other parts and the eventual cost will not be far short ofthe price of a new pair; the repaired shoes will still contain, however,parts which have not been replaced but
16
SHOE DESIGN: ITS BASIS AND DEVELOPMENT

which are nearing the end of their useful life. Unless new shoes are quiteunobtainable it would seem that the whole business of �rebuilding� shoesis a waste of materials and man-power.Leather, unfortunately perhaps from some aspects, lends itself to repairbetter than most other shoe materials, its fibrous structure enabling it togo on receiving new stitches and tacks long after its original appearanceand suitability for purpose have gone.The method of shoe construction also has a vital bearing on ease ofrepair, some methods lending themselves to repair much more thanothers. This is dealt with in more detail in the next chapter but thedesigner should remember that although the repair of high-fashionspecial-occasion shoes may not be important, most people expecteveryday general purpose shoes to be repaired at hast once or evenseveral times.The ease of maintenance of a shoe for the immediate purpose ofappearance and the eventual effect of longer life is of considerableimportance and not always appreciated by shoe stylists. Leather has to bemaintained if it is to retain several of the desirable properties alreadylisted above, and if the shoe is given proper daily attention with restperiods some of these properties will actually be improved. Good qualitywax polish, for example, will increase the shoes� water resistance,flexibility and life; they will also gradually acquire the prized �antique�appearance which only leather has (and which today is sometimesdeliberately applied to new shoes in the factory).On the other hand, synthetics such as P.V.C. and rubber require onlywashing to remove dirt and as they are self-coloured and extremelyresistant to abrasion, their original appearance remains indefinitley.Suede-finished leathers and fabrics are the most difficult to maintainand therefore far less adaptable to varying conditions of wear.Upper designs specifying two colours of leather are currently popularand yet shoes of this type are among the most awkward to keep clean,particularly when one of the leathers used is white suede and the other apolished dark leather. Uppers with perforated overlays are similarlydifficult to clean as the perforations become filled with dirt and polish.White or yellow sole stitching showing round the edge of the shoe (or onthe upper itself) is only effective during the early life of the shoe; dirt, andattempts to remove it, eventually effectively camouflage the thread.
(12) SlippinessThe importance of non-slip soles is something we frequently overlookuntil we overbalance. With the one exception of the soles of shoes forballroom dancing, soling materials are required to be non-slippy. If wewere only concerned with one type of ground surface the problemwouldbe comparatively easy to solve but unfortunately we are not; wearingconditions today include concrete and stone pavements, asphalt, metalplatforms and steps, wooden floors,
17
SHOE MATERIALS

linoleum and other surfaces, and these may in many cases be dry, wet, or,worst of all, wet and muddy. Such floors and their condition may bebeyond our control but there is one type which we can abolish�theabominable polished floor, whether it be wood, tile or linoleum. No shoedesigner can cope with or cater for the fetish of house-pride runningcontrary to common sense and safety.The property of slippiness, or �coefficient of friction� is assessable in
the laboratory and new synthetic materials are subjected to a routine testby the British Boot, Shoe and Allied Trades Research Association tomeasure this property underwet and dry conditions on different surfaces.Leather gives a reasonable grip on most surfaces and is probably least
effective on dry grass. On wet surfaces, a certain suction effect isapparent, giving added grip; this effect may be nullified by the presenceof mud, the particles of dirt then acting rather like ball-bearings. Fordancing shoes, the polished wood floor (plus a dry lubricant such asFrench chalk) and smooth leather make an ideal slipping combination.The grip of leather on soft wet surfaces can be considerably increased
by the use of studs (leather or metal) or spikes, and sports shoes, such asthose for football, cricket or running, incorporate these devices.Patterned rubber and synthetic soles again give a good grip on most
surfaces, especially when dry but smooth soles of the same materialsapproximate to leather. Crepe has the highest coefficient of friction ondry concrete or wood; when wet it may slide suddenly.The heel is probably more important than the sole in considering
slippiness as there is such a small area of heel material in contact with theground (and none of the sole) when the weight of the body is transferredto the forward leg in walking. In this respect there is no doubt that underdry conditions at any rate, a rubber top-piece on the heel is considerablysafer than a leather one, particularly if the latter is metal studded.(13) Chemical Constitution and Reaction with the FootThe long-term effect of the shoematerials on the foot and of the foot on
the shoe materials can only be assessed by prolonged testing andcustomers� complaints�the object of the former being to prevent thelatter. The human factor is so variable however, that it is impossible tocater for every contingency.One of the main causes of material failure is the foot perspiration. This
varies so much in composition and quantity from one person to anotherthat it is extremely difficult to cope with it completely. In one case theperspiration may have no ill-effect on the shoe whereas in another thethread seamswill rot and the leather discolour and crack in a fewmonths.The reverse effect, that of the materials on the foot is usually less
18
SHOE DESIGN: ITS BASIS AND DEVELOPMENT
pronounced, the materials in common use being normally harmless.Cases of dermatitis are occasionally reported but here again the personalallergy is the usual reason.Nevertheless, in specifying newmaterials, the interactionwith the foot
cannot be ignored and they should certainly be tested for this.It may be thought that in the above account of desirable properties forshoe materials undue stress has been placed on the virtues of leather. It isprobably true to say that if just one or two of these properties wererequired then it would not be difficult to find a material better thanleather. For example, steel is stronger andmore perfectly elastic, rubber ismore resilient and water-resistant, a sponge is more absorbent, and so on.The virtue of leather is that it possesses so many more useful propertiesthan does any other material yet discovered, these properties being due toits unique fibrous structure which it is impossible to reproduceartificially.It has achieved and maintained its pre-eminent position through the
centuries on sheer merit, and modern research has confirmed andexplained what the craftsman and his customers have discovered by trialand error during these years.
19
SHOE MATERIALS
3
METHODS OF SHOE CONSTRUCTION
THE SANDAL
THE TWO BASIC TYPES of footwear—the sandal and the moccasin—in theirsimplest forms require little constructional skill. The sandal, which ismerely a protection for the sole of the foot, is a flat piece of rawhide,leather, wood, metal, plaited straw, or other material, cut or formed to theshape of the foot sole. This sandal sole has then to be held on to the foot insome way, and the various methods which have been adopted in variousparts of the world at different times still appear in modern shoe designsfor the very sound reason that all the possible methods appear to havebeen discovered, and therefore, new designs must incorporate them.
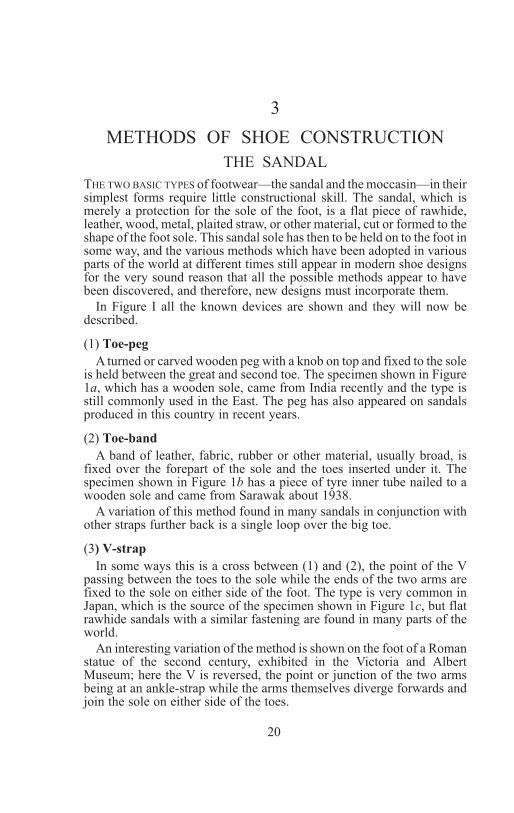
In Figure I all the known devices are shown and they will now bedescribed.
(1) Toe-peg
A turned or carved wooden peg with a knob on top and fixed to the soleis held between the great and second toe. The specimen shown in Figure1a, which has a wooden sole, came from India recently and the type isstill commonly used in the East. The peg has also appeared on sandalsproduced in this country in recent years.
(2) Toe-band
A band of leather, fabric, rubber or other material, usually broad, isfixed over the forepart of the sole and the toes inserted under it. Thespecimen shown in Figure 1b has a piece of tyre inner tube nailed to awooden sole and came from Sarawak about 1938.
A variation of this method found in many sandals in conjunction withother straps further back is a single loop over the big toe.
(3) V-strap
In some ways this is a cross between (1) and (2), the point of the Vpassing between the toes to the sole while the ends of the two arms arefixed to the sole on either side of the foot. The type is very common inJapan, which is the source of the specimen shown in Figure 1c, but flatrawhide sandals with a similar fastening are found in many parts of theworld.
An interesting variation of the method is shown on the foot of a Romanstatue of the second century, exhibited in the Victoria and AlbertMuseum; here the V is reversed, the point or junction of the two armsbeing at an ankle-strap while the arms themselves diverge forwards andjoin the sole on either side of the toes.
20

(4) Instep-band
This is similar to the toe-band but further back on the foot (Figure 1d).There is usually in addition a toe-loop or a strap passing forward from theinstep-band to a point on the sole between the toes to anchor the forepartof the foot. A common variation of the method is to include also a strappassing round the back of the heel, this type having been found inEgyptian tombs and on wall paintings. These specimens and paintingsshow that in some cases, ‘ears’were left on the sides of the soles in cuttingso that, when subsequently turned up by the sides of the foot, a thongcould join them together over the instep; here we have the prototype ofthe latchet shoe of later centuries (see p. 52).
(5) Crossed Bands
Two bands cross over each other and the toes from either side of the toeend of the sole to the opposite sides further back (Figure 1e). Thewell-known, and much copied, Indian ‘chupplie’ is a version of thismethod, as also are many modern interlaced sandals.
(6) Multi-strap
The number of straps or bands passing over the foot from one side ofthe sandal sole to the other may be increased in number (Figure 1f); theymay be widened, interlaced, taken round the ankle and up the leg to givean infinite variety of patterns and increasing coverage of the foot untileventually a complete upper is produced and the foot-
21
METHODS OF SHOE CONSTRUCTION
Figure 1. Sandal fastenings: Top row––a toe-peg; b toe-band; c V-strap;Bottom row––d instep-band; e crossed bands; f multi-strap (Author’s
collection).

wear can no longer be termed a sandal. It may also become necessary tohave some sort of fastening (see p. 50) which may be undone to allow thesandal to be put on or taken off.
Attachment of Straps to Sole
There is a variety of methods by which the straps or bands may befastened to the sandal-sole depending to some extent upon the materialfrom which this sole is made. For a wooden sole, as shown in Figure 1b,nails are adequate and universally used, the straps being attached to theedges of the sole. With leather and plaited or woven materials, the ends ofthe straps are frequently enclosed between the sole and an insole placedon top, the two being fixed together by stitching, thonging, nailing orsticking; the straps themselves may pass over the edge of the insole orpass through slots near the edge of it. Another variation is to stitch, thongor nail the ends of the straps directly on to the sole surface.
A variant which was very popular in the 1930’s was the so-called‘Sahara’ sandal which had a moulded leather sole with an upturnedmargin perforated to take the straps of the plaited upper. This same typeof moulded sole is also found in Cyprus but in this case a complete upperis seamed on to it.
THE MOCCASIN
As previously described (p. 5) the moccasin is essentially a bag ofleather or other material wrapped round the foot in order to protect it fromthe weather, thorns, etc. It must be emphasised that the basic type has noseparate sole, the leather on which the foot rests being drawn up and overthe foot. Having drawn it up in this manner the problem of closing it upand fastening it arises as it is the widest outer portion of an originallyroughly oval and flat piece of material which now has to be reduced inarea down the front of the foot and the back of the heel in order tocomplete the closure and fit the foot.
The three methods of accomplishing this are (1) to cut the materialaway and make a seam, (2) to gather it up in folds, and (3) to combine (1)and (2). An example of method (1) is shown in Figure 2a, this specimenhaving a thong running through holes to gather up the leather. Method (2)is shown in Figure 2b, where the material, in this case raw goatskin, hasbeen thoroughly wetted, drawn over a wooden last and moulded to it, cutdown the centre of the instep nearly to the toe and also down the back ofthe heel and then seamed with a thong of the same material at both theseplaces. The plastic nature of the wet raw skin has enabled all the wrinklesand fold to be removed and the shape of the last to be assumed andretained.
This process of stretching and removing wrinkles is the basis oflasting’, a fundamental process in most methods of modern shoemanufacture. It is dealt with in detail in Chapter 18 in Part VI of
22
SHOE DESIGN: ITS BASIS AND DEVELOPMENT

this book and the admirable way in which leather lends itself to theprocess has already been described on p. 10.
The specimens illustrated in Figure 2 are all demonstration modelsmade by the author but moccasins of this type appear to have been usedby primitive man and still are in some remote places according to somewriters. In Iceland today sheepskin slippers of a very similar type aremade and before being worn for the first time are soaked in water tosoften them so that the foot lasts’ them to its own shape (see Figure 2c).
The North-American moccasin, which gives its name to the family,combines methods (1) and (2) by having wrinkles round the toe wherethe skin is drawn over but then the bigger folds are cut away and an‘apron’ is overlaid and stitched in position as shown in Figure 2d (adecorative apron, shown in Figure 1e, overlays the first apron).
Modern bedroom slippers are often made on the same principle (see p.523) but with the addition of an extra sole; the folds round the toe formone of the distinctive and attractive ‘design’ features of this type ofslipper. Infants’ boots and shoes sometimes follow a similar pattern,particularly in U.S.A.
It is also possible by expert lasting to remove the wrinkles completelyround the toe even when the leather is very much heavier than that usedfor slippers and infants’ shoes, and this method is occasionally used forapron-fronted men’s (see Figure 8) and women’s sports shoes; an extrasole is, of course, added in such cases, but even then the resulting shoesare extremely flexible when compared with those made by moreorthodox methods.
The lasting process for a moccasin is only necessary where the chosenmaterial, such as rawhide or leather, is flat in the first place and has to bemade to conform to the curves of the last or foot. With
23
METHODS OF SHOE CONSTRUCTION
Figure 2. Types of moccasin: left to right; a cut and thonged; b pleated;c cut and sewn; d apron front; e apron from d (Author’s collection)
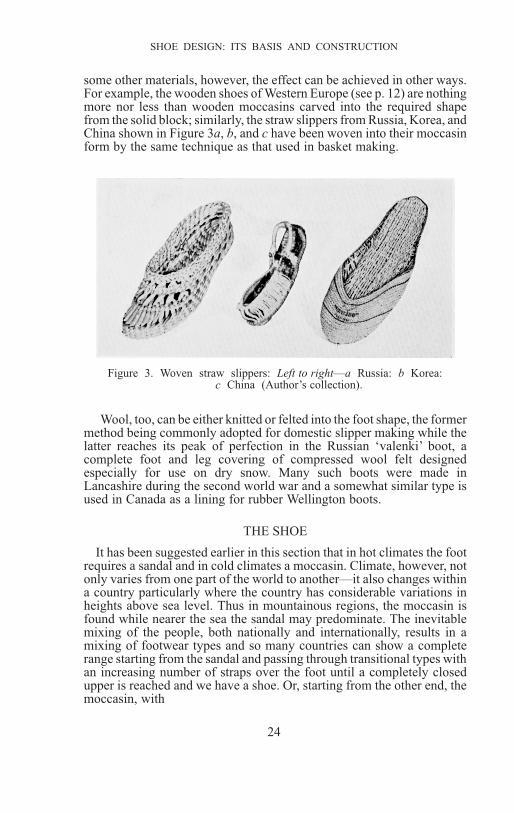
some other materials, however, the effect can be achieved in other ways.For example, the wooden shoes of Western Europe (see p. 12) are nothingmore nor less than wooden moccasins carved into the required shapefrom the solid block; similarly, the straw slippers from Russia, Korea, andChina shown in Figure 3a, b, and c have been woven into their moccasinform by the same technique as that used in basket making.
Wool, too, can be either knitted or felted into the foot shape, the formermethod being commonly adopted for domestic slipper making while thelatter reaches its peak of perfection in the Russian ‘valenki’ boot, acomplete foot and leg covering of compressed wool felt designedespecially for use on dry snow. Many such boots were made inLancashire during the second world war and a somewhat similar type isused in Canada as a lining for rubber Wellington boots.
THE SHOE
It has been suggested earlier in this section that in hot climates the footrequires a sandal and in cold climates a moccasin. Climate, however, notonly varies from one part of the world to another—it also changes withina country particularly where the country has considerable variations inheights above sea level. Thus in mountainous regions, the moccasin isfound while nearer the sea the sandal may predominate. The inevitablemixing of the people, both nationally and internationally, results in amixing of footwear types and so many countries can show a completerange starting from the sandal and passing through transitional types withan increasing number of straps over the foot until a completely closedupper is reached and we have a shoe. Or, starting from the other end, themoccasin, with
24
SHOE DESIGN: ITS BASIS AND CONSTRUCTION
Figure 3. Woven straw slippers: Left to right––a Russia: b Korea:c China (Author’s collection).

increasing care and craftsmanship in the preparation and construction ofthe ‘foot bag’and the addition of an extra sole, produces the same result.
The shoe, then, appears to be the logical outcome of the marrying of thesandal and the moccasin. It is possible that the shoe of Western Europe isthe result of the mingling of the sandal worn by the conquering Romanlegions and the crude moccasins of the tribes they fought.
The union of sandal sole and moccasin upper, or, in modern tradeterms, the attaching of the bottom to the upper of a shoe is anotherfundamental process of shoemaking as it has been known for hundreds ofyears and the whole of Part VI of this book is devoted entirely to it. In thispresent section, however, it is intended only to indicate the generalprinciples involved and to summarise the modern methods so that thewould-be designer will be aware of the problems which arise.
The Seam
The seam, by which one piece of material can be joined to another isprobably one of the most important discoveries of mankind ranking withthe wheel and the lever. In shoemaking it is not only required to jointogether the various parts of the upper but also to unite the upper and thebottom.
No doubt the earliest method was that already described in which athong of the same material, or an animal ligament, was threaded throughholes in the two sections. It must soon have been discovered that it wasnecessary to have some method of leading the thong or ligament throughthe holes and the answer was the needle, prehistoric bone ones havingbeen found.
The next step was the discovery of spinning—the twisting together ofanimal hairs or vegetable fibres to form a thread very much finer thanthongs or ligaments and capable of being made into any length. Thisenabled a far neater seam to be made than hitherto and it must also havebeen found out at an early date that an exceptionally strong and easily ledthread could be built up by waxing and twisting together several strandsof an otherwise light yarn and at the same time tapering each end andworking in a pig’s bristle to act as a needle. The method has survived tothis day for handsewn work, the only innovation being the substitution ofa nylon ‘bristle’ for the natural one (see p. 265). The introduction of steelneedles and the nineteenth-century invention of the sewing machine didnot alter the basic method of shoe construction— they just speeded up theprocess.
The increasing use of metals, however, following the IndustrialRevolution, introduced a different type of seam—that employingmetallic fastenings such as nails, rivets, screws and staples. Suchmethods lend themselves particularly well to power machinery and thenecessity of supplying large quantities of heavy boots to the armiesduring the Napoleonic wars led to the invention of the
25
METHODS OF SHOE CONSTRUCTION

riveting machine and the riveted boot which still survives (see p. 340).
Not very dissimilar to nailing and probably older is the use of woodenpegs to hold the bottom on—a method of especial value wherewater-resistance is required since the pegs swell in water, or where metalmight cause dangerous sparks on hard ground in explosives factories.
The latest method of upper and bottom union is by sticking with anadhesive, usually a synthetic cement, and present trends seem to suggestthat this will be the most important method of the future (see p. 348).
The Last
In order that a shoe may be made the required shape it is necessary tobuild it up gradually on a mould, this mould being called a last. Today,lasts are usually made of wood (maple) or, for the rubber boot trade,aluminium, but formerly iron was used as well as wood. It is not knownwhen lasts came into use; the earliest picture of one known to the writer isdated 1688 but they must have been known centuries before then as thereare references to them in literature before this date.
As mentioned on p. 23, some moccasins, after being wetted, areactually lasted on the foot itself and it is also on record that theSouth-American Indians used to dip their feet into rubber latex anddeposit rubber boots on them; a method similar to the latter is nowemployed, but with aluminium lasts, for making Wellington boots.
The shape of the finished shoe is (or should be if it is correctly made)the shape of the last on which it has been built and therefore the designermust always have the last before him and should, in fact, have had aconsiderable hand in the design of the last itself. It cannot be emphasisedtoo strongly that a design starts with a last and finishes on the foot; it isnot correct designing to produce an upper and bottom pattern for anunsatisfactory last and to have no idea what happens to the final shoe inwear. The transfer or adaptation of a particular pattern from one last toanother may completely upset the design but such a practice is verycommon.
The fashion aspects of last shape (and therefore shoe shape) are dealtwith in the next chapter and will not be discussed further here; there are,however, a number of functional considerations of which the designershould be aware.
It is sometimes assumed by those interested in foot comfort but with noknowledge of shoemaking that the last should be the same shape as thefoot but possibly a little larger. This is not so; it might be true if the shoewere intended as a foot covering only, like a bedsock, but since mostshoes have to be walked in, quite apart from manufacturingconsiderations, deviations from foot shape have to be made at variousplaces. There must, for example, be an extension at the toes to allow for aslight moving forward during walking; nothing is more uncomfortablethan a shoe fitted too short in length. Also, if the shoe
26
SHOE DESIGN: ITS BASIS AND DEVELOPMENT

is too large, the movement of the foot inside will cause chafing andblisters, particularly at the heel where the foot tries to lift out in walking; atight shoe may even be more comfortable as it is more likely to become anintegral part of the foot and move with it.
In designing lasts for court shoes (see p. 75) which rely solely on theirown fit in order to stop on the foot and have no form of fastening, thedesign of the last becomes of even greater importance as no latitude ispermissible; the last is either right or wrong and errors in design (or, ofcourse, foot fitting) cannot be overcome by tighter lacing or otherfastening as is possible with ordinary walking shoes.
As will be seen in the next chapter, it is mainly the foreparts of lastswhich alter with fashion; the rear portions, which also correspond to theleast mobile part of the foot, need not vary and the modern factorypractice is to standardise the back parts for any particular heel height (seep. 93).
Manufacturing requirements also cause differences between last andfoot shape—simple examples of this are the sharp bottom edge of the lastand the higher and narrower instep or ‘cone’.
Lasts are dealt with in several places in this book and the reader isadvised to refer to the index for further information concerning them; theuse of them in shoemaking, however, introduces problems of a practicalcharacter which have influenced the methods of shoe construction andtheir development, and these will now be considered.
In Chapter 2 (p. 10) it was pointed out that the ideal shoe materialshould be plastic so that it would mould itself to the curved surface of thelast. It is also true to say that the longer the material can be left in tightcontact with the last the longer it is likely to retain the imposed shape afterthe last has been removed, in other words, in storage and wear.
This prolonged retention of the last within the shoe during the lastingoperations, however, brings in a problem—the inside of the shoe (or,rather, the lasted upper) is inaccessible and so any form of sole and heelattaching has to be done from the outside only.
This is a straightforward enough matter when a metallic attachment isused; rivets, for example, can be driven through the sole, upper and insoleand clenched on a metal plate covering the bottom of the last (see p. 32).Similarly, modern methods of adhesive attachment (see p. 348) withcellulose or other cements do not require the inside of the shoe to beaccessible. Thread seams, however, can only be made when both theentrance and exit for the thread are accessible either to the hands ormachine parts (note: it is not necessary to see both sides) and adescription of the ways in which this difficulty has been met now follows.
Figures 4-15, with their captions, illustrate modern methods of shoeconstruction, all of which will be dealt with in detail in subsequentsections. It will be noted that some combine several methods so as toinclude the desirable features of each.
27
METHODS OF SHOE CONSTRUCTION

Thread Attachments
The simplest method of thread attachment of sole and upper is found inthe VELDTSCHOEN (Dutch: field shoe) (Figure 14) where the edges of theupper are turned outwards away from the last on which the shoe is beingmade and then stitched on to the edge of the sole. The origin of themethod is lost in antiquity, many of the mediaeval specimens in thevarious museum shoe collections being variations of it. It is still used forchildren’s and adults’ sandals (see p. 361).
An extension of the veldtschoen method is found in the TURNSHOE
(Figure 13) where the upper is lasted inside out and stitched on to the sole,also reversed. The actual position of the seam appears to have been veryvariable; in some specimens the thread has passed through the upper andthen the actual vertical edge of the sole and out through the exposed face;in others, as in the modern turnshoe, the upper has been brought over theedge of the reversed sole and sewn through a channel on the face of thesole.
After the sole and upper have been united, the last is withdrawn and theshoe turned inside out so that the seam is now inside; the last is thenreplaced to ‘re-last’ the shoe (see pp. 368-72).
Both the veldtschoen and the turnshoe are examples of what is called a‘direct attachment’—the direct union of sole and upper without anyintermediate sections or seams. The turnshoe, with its flat internal seam,has a very neat appearance and great flexibility and has long been popularas a high-grade construction where cost is of secondary consideration. Itsurvives today in the slipper (see p. 503) and women’s dress shoe tradesbut in the latter case it is being replaced by the cemented (‘stuck-on’)method of attachment (see p. 348).
During the seventeenth century the soft turnshoe types began to giveway to the thick-soled heavy leather riding boots, at least, for men. TheCivil War—the first since the disappearance of armour (other thanbreast-plates and helmets) now rendered ineffective bygunpowder—may have been the reason for this. Such boots could not be‘turned’ and so the WELTED method was developed (the writer has foundsome evidence that it was used before this period).
Welting, the modern version of which is shown in Figure 4 anddescribed in detail on pp. 289-324, is the most important method ofconstruction at present in use. It is an extension of the tumshoe methodbut with several important differences. The upper is not reversed but islasted in its final position and sewn on to an insole tacked on to the lastinstead of a reversed sole as in the tumshoe method. As before, the threadpasses through the margin of the upper and a channel cut in the surface of(in this case) the insole and close to its edge; it also takes in, however, along narrow strip of flexible leather, the ‘welt, which eventually projectsoutwards from the upper (see Figure 4) not unlike the flange of aveldtschoen. In some cases, this welt may go completely round the shoe;in others it stops short at the heel on each side.
28
SHOE DESIGN: ITS BASIS AND DEVELOPMENT
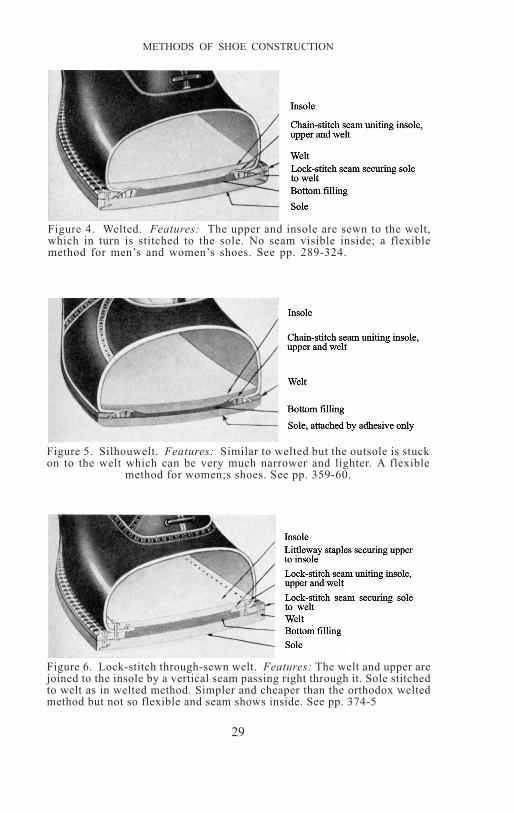
29
METHODS OF SHOE CONSTRUCTION
Figure 4. Welted. Features: The upper and insole are sewn to the welt,which in turn is stitched to the sole. No seam visible inside; a flexiblemethod for men’s and women’s shoes. See pp. 289-324.
Figure 5. Silhouwelt. Features: Similar to welted but the outsole is stuckon to the welt which can be very much narrower and lighter. A flexible
method for women;s shoes. See pp. 359-60.
Figure 6. Lock-stitch through-sewn welt. Features: The welt and upper arejoined to the insole by a vertical seam passing right through it. Sole stitchedto welt as in welted method. Simpler and cheaper than the orthodox weltedmethod but not so flexible and seam shows inside. See pp. 374-5

30
SHOE DESIGN: ITS BASIS AND DEVELOPMENT
Figure 7. Fairstitched. Features: The insole, upper and middlesole aresewn together. The sole is then stitched to the projecting edge of the middle-
sole (the ‘fairstitching’). See pp. 337-8.
Figure 9. Machine-sewn (Blake or McKay). Features: Sole, upper and in-sole are united by a single chain-stitch seam. Used for medium grade women’sshoes. Variations of the method include the use of ‘Littleway’ lasting staples(which do not show on the insole) and a lock-stitch in place of the chain-stitch,
giving added flexibility. See pp. 325-39.
Figure 8. Moccasin. Features: The upper passes right under the foot. Amiddlesole is stitched on to the upper and the sole stitched on to the middle-sole edge. A very flexible and waterproof construction for sport shoes. A
variation of the method used for slippers. See pp. 523-34

31
METHODS OF SHOE CONSTRUCTION
Figure 10. Cemented. Features: The upper is secured to the insole by ‘Little-way’ staples and then the sole is attached by cellulose or similar cement. Alarge proportion of women’s shoes, children’s shoes and some men’s light-weight shoes are made cemented. See pp. 348-60. The method can be made tolook heavier by extending the sole and stitching a ‘rand’ or false welt round the
edge.
Figure 11. Riveted. Features: The sole is riveted through the upper on tothe insole. Used for football boots and cheap boys’ boots and shoes, being
a rigid method of construction. See pp. 340-41
Figure 12. Riveted, screwed and stitched. Features: Uses three methods ofattachment: (1) the middlesole is riveted through the upper to the insole as inprevious method, (2) the sole is stitched to the projecting edge of themiddlesole, (3) the sole, middlesole, upper and insole are united by screwing.The method can be varied by omitting one of the attachments. Widely used
for army and other heavy-duty boots. See pp. 342-5.

32
SHOE DESIGN: ITS BASIS AND DEVELOPMENT
Figure 13. Turnshoe. Features: A single-sole shoe of exceptional flexibilityand with only a very light sole edge showing. The upper and sole are sewntogether and the shoe then ‘turned’. Used for high-grade women’s shoes,
and slippers. See pp. 368-72
Figure 14. Veldtschoen. Features: the upper is turned outwards and stitchedto the sole (as at ‘A’). A variation is to stitch a crepe rubber middle (or acrepe-faced leather middle) on to the flange, and then to stick a crepe sole
on to this (as at ‘B’). See pp. 361-8.
Figure 15. Slip-lasted (Californian or force-lasted). Features: The upper isstitched on to a sock lining and a platform cover. A last is forced into theupper to give it its shape, the platform (and wedge heel) are stuck in positionand their edges covered. Finally, the sole is stuck on. A cheap method of con-struction for women’s sandals, light fashion shoes and slippers. See pp. 496-502.

On to this welt, after it has been beaten out flat, the sole is stitched by asecond, vertical seam. Since by this process the upper is not uniteddirectly to the sole but has an intermediate section, the welt, the method iscalled an ‘indirect attachment’. It must be emphasised that the last hasremained in position inside the shoe during the operations described andthere is eventually no seam showing inside.
Machine welt-sewing arrived at the end of the nineteenth century, themachine being originally invented for machine turnshoe sewing, buthandsewn shoes survive for high-class bespoke work because of theirflexibility, strength and comfort. An account of handsewing is given onpp. 260-69.
If the last is removed after lasting (on to an insole) then a direct threadattachment can be made, a single seam taking in sole, upper margin andinsole. This method, which has the seam showing on the inside, is knownas BLAKE, MCKAY (after the inventors of the machine) or MACHINE-SEWN
and is shown in Figure 9 and described on pp. 325-39. It is extensivelyused for women’s and children’s shoes.
The SLIP-LASTED or FORCE-LASTED construction (Figure 15) is of fairlyrecent origin but based on older methods. The upper is stitched on to asoft sock instead of a firm insole or sole. The last is then forced into it anda proper sole stuck on to the bottom. It is a cheap method of constructionwhich lends itself to short-lived fashion shoes and summer sandals oflight materials but has not sufficient strength in the seam for heavier dutyfootwear. A description of the method will be found on pp. 496-502.
33
METHODS OF SHOE CONSTRUCTION

4
FASHION
WE NOW COME TO the fourth leg of our stool of Design—the unstable,unpredictable leg of Fashion. A designer could produce a shoe whichfulfilled the essential purpose of foot-covering, which used the materialbest suited for the intended purpose, and which used the best possiblemethod having regard for both the purpose and the chosen material—andyet nobody would buy it because it was not fashionable!
When an object designed for sale has fulfilled the requirements ofpurpose, material and method, it must still satisfy one more condition—itmust be acceptable to the public, or, rather, to the wholesale buyer, sincethe public does not know of the existence of it until it appears in the shopwindow or is nationally advertised on a large scale. To achieve this endand make a shoe acceptable, the shoe designer becomes a shoe stylist whohas to take into account many influences such as general trends incostume as a whole, national characteristics and current events; above all,his product must be different from that of his competitors and yetpreserve certain points of similarity. This last requirement is illustratedby such features as toe shape and heel shape; if pointed toes are ‘in’, thenhe may alter his upper style but must still have a pointed toe.
The fashion element or ‘difference’ is present even in the primitivesandals and moccasins already described. Whatever method and
34
Figure 16. Fashion development of the toe-peg sandal (Author’s collection).

material is chosen there always appears to be a similar development fromthe plain functional type to the elaborately ornamented ‘fashion’version.Figure 16 illustrates this development for a wooden peg sandal, the lastone being inlaid with mother-o’-pearl and having an intricately turnedpeg. The sole shape also departs from the natural foot form to resemblesomething like a fish. Figure 17 shows a similar sequence of events forthe toe-band sandal.
No matter what article we consider we always find that fashion followsfunction and frequently survives long after the function has disappeared(diamond-paned windows in modern houses, for example). It alsoappears to be true to say that every craftsman has a natural desire toornament his work (witness the carvings on church benches) but it mustnot be forgotten that ornament without craft is vulgarity.
In order to see how ‘fashion difference’ may be achieved in modernshoe design, let us analyse a shoe into its variable, visible components,variable, that is, from a fashion standpoint. These variables as they havebeen exploited through the ages are:
(1) Upper appearance—amount, pattern, material, decoration,colour
(2) Sole shape
(3) Sole height
(4) Heel height (and, to a lesser extent, shape)
(5) Fastening
They will now be considered in detail.
35
FASHION
Figure 17. Specimens from the Middle and Far East showing fashion develop-ment of the toe-band sandal. Some have a marked resemblance to the pattens
of Western Europe (Author’s collection).

UPPER APPEARANCE
(a) The Amount of the Upper
The upper may vary from a single strap to a knee- or thigh-length boot.Obviously the question of purpose is important here since primarily aboot is intended to give added protection to the ankle and leg. Thisfunction, however, is frequently forgotten in the interests of fashion bothby the designer and the wearer and so we get ankle boots intended forevening dress wear and even a boot with a peep-toe! On the other hand,strap sandals are frequently seen in conjunction with a fur coat on awinter’s day.
As far as can be ascertained from museum specimens, fashionablewomen appear to have worn low shoes for several hundred years prior tothe Victorian era when the side-laced or elastic-gusset leather or clothankle boots came into fashion round about the middle of the century. Theboot increased in height and, with the moving of the lace to the front ofthe instep, or the replacement of the lace by buttons, became the popularhigh boot of Edwardian and early Georgian times.
After the first world war, the so-called ‘Russian’ boot appeared, a plainleather knee-high boot similar to the man’s Wellington. These weredisplaced by the rubber overboots but have now turned up again asfleece-lined boots, or lower-cut ‘bootees’ for cold weather wear. RubberWellingtons in all heights and colours have also to a large extent filled theneed for a really waterproof boot for both men and women.
The covering of the leg, or part of it, from a fashion angle has its rootsin antiquity. Grecian and Roman sandals frequently had their securingstraps going well up the leg, probably for the express purpose of drawingattention to the leg itself. In the 1920’s women often wore ‘tango’ shoeswith multi-straps round the ankle, probably for the same purpose.
The wearing of boots by men has always been much more common dueto the requirements of riding, hunting and fighting. The long-toed‘poulaines’, mentioned below (p. 40) were sometimes made as ankleboots. As mentioned on p. 28, the disappearance of steel armour led to themaking of heavy welted leather riding boots in the seventeenth centuryand, once again, fashion took a hand.
Astudy of the contemporary paintings of the Stuart royalty and nobilityby Van Dyck and others will reveal the elaborate ornamentation andextravagance of the fashionable boots of the time; the tops, wide, turneddown and filled with lace are particularly notable.
The boot moved from the field of sport or battle to the town, and by theRegency period in the early nineteenth century every well-dressed ‘buck’wore them, the ‘Hessian’ with its curved top and tassel being verypopular. Famous generals such as Wellington, Napoleon and Blucher allgave their names to the boots they favoured
36
SHOE DESIGN: ITS BASIS AND DEVELOPMENT

and, as usual, the utility article became a fashion and the ‘dressWellington’ of the 1870’s has remained in various forms ever since,particularly as a uniform or ceremonial boot.
In general, however, the legs gradually shortened for men’s wear andabout 1860 the elastic-gusset ankle boot, or ‘spring-sided Jemima’became the fashionable boot not only for women, as described above, butalso for men. Again, as for women, laces and buttons replaced the gussetand whereas women’s boots reached the knee, men’s boots consolidatedinto the laced ‘Balmoral’made popular by Edward VII and the open-frontBlucher or Derby boot for heavy duty. Shoes for men and womengradually increased in numbers and styles and, since 1920, the man’sboot has moved to the functional away from the fashionable so that today,except for the older generation or where there is some ankle weakness,the majority of men wear shoes for all everyday occasions. Boots are stillessential, of course, for certain industries, occupations, and sports.
In discussing the amount of upper, it should not be forgotten that theactual joining of the hose and shoe has also occurred from time to time.Contemporary paintings show that during the fourteenth century men(and women) often wore, especially for ceremonial occasions, aone-piece leg and foot covering, sometimes called a ‘buskin’. Shoes with‘stocking tops’ also appeared about 1830, there being a very finespecimen in Northampton Museum. Currently popular in the U.S.A. isthe knitted stocking or sock with a leather slipper sole fastened eitherpermanently or detachably (with a zip fastener) so that the sock may bewashed. A somewhat similar child’s shoe is found in Switzerland.
(b) The Pattern of the Upper
This, of course, is closely allied to the amount of the upper which hasjust been discussed, but the pattern may be altered in an infinite numberof ways even if the overall area of the upper remains the same. Some shoedesigners (so-called) seem to think that alteration of upper pattern is thebeginning and end of design.
The use of sectionalised upper patterns probably arose, as usual,through necessity and appears to be an outcome of the nineteenth centurymechanisation of shoemaking and the arrival of mass-productionmethods. Specimens before about 1830 generally have few sections;three is quite common—the front (or vamp) and the two quarters (thesides of the back), the fronts of the quarters being extended to formfastening straps over the instep. As mentioned on p. 10, in order to makeflat leather (or other material) conform to the curved surface of a last itmust be stretched in some places and compressed in others; even then itmay be necessary to pleat it, fold it or cut it away at the most prominentcurves, as for example, with the moccasin. If, however, the material isfirst cut into sections and these are then stitched together in a newposition, a certain amount of solid shape can be given to the whole somaking the subsequent lasting
37
FASHION

operation easier. This operation of upper making is known as ‘closing’and is the subject of Part IV of this book.
Another advantage of the sectionalised upper is that the different partsof it can be cut from material specially suited to the particular needs of theshoe and foot at the place covered by the particular section. Theseconsiderations are dealt with in detail in Part III of the book, from whichit will also be seen that economy in cutting out the upper is also animportant factor in determining the number, shape and area of thesections into which it is divided.
Yet a third advantage of the sectionalised upper is that it permits bothcontrasting materials and section outlines to be used as fashion points.Examples of the former are the currently popular two-colour shoes forwomen and the use of suede and smooth-faced leather of the same colourin one shoe. An older example of the second is the brogue shoe which ischaracterised by its multi-sectioned upper and serrated edges (see p. 195).There are in both men’s and women’s shoes, however, certain basicsectional outlines and these are dealt with in Part II.
(c) The Material of the Upper
Today more than ever before, the designer has an enormous range ofmaterials from which to specify his upper. As explained in Chapter 2 on‘Materials’, availability is one of the main controlling factors in thischoice and, in the past, shoes were of necessity limited to very fewlocally-obtainable materials. Modern industrial research, manufactureand transport have removed the obstacles, other than the economic ones,so that today the upper may consist of two or more quite differentmaterials combined together, such as leather, rubber, synthetic plastics, ortextiles in a wide range of colours and surface textures. In choosing hismaterials, however, the designer should bear in mind the desirablecharacteristics they should possess for ease of manufacture and footcomfort as set out in Chapter 2.
(d) The Decoration of the Upper
Here again there is an infinite variety of possibilities. One of the oldestforms of decoration, used in ancient civilisations and still popular, is the“cut-out’. Holes in an upper—circles, triangles, rectangles, squares,intricate patterns—seem to exert a fascination on designers. In somecases these holes serve a useful ventilating purpose as, for example, onsummer shoes; in others the only possible reason is ornament. It has beensuggested that the perforations in a brogue shoe, which do not todaycompletely penetrate the upper, are a survival of the day when theyformed drains for the water taken in when crossing the mountain streams;presumably they also formed inlets! Incidentally, some R.A.F. overbootwaders do have perforations in the waist for drainage.
Additive decoration (a phrase which has no absolute meaning butvaries with the current fashion) of the upper may consist of
38
SHOE DESIGN: ITS BASIS AND DEVELOPMENT

ornamental but non-functional rows of stitching, sometimes with acontrasting thread, overlays or ‘appliques’ of other materials, piping,interlacing, metallic threads, beads, etc. All these pass in and out offashion and presumably will go on doing so.
The embossing of leather uppers by heated tools has not been exploitedin the shoe trade in this country to the same extent as it has in otherbranches of leather work and in other countries, but the cowboy boots,perhaps because of their link with the Red Indian crafts, often use thisform of ornamentation. Such embossing can be done on themulti-purpose presses described in Part IV and so may increase in extent.
The fastening of the upper on the foot is dealt with later in this chapterbut it may be noted here that it is frequently more of an upper decorationthan a method of securing and releasing the foot within the shoe.
(e) Colour
Although it seems that the ancient Greeks, Romans, Hebrews andothers wore brightly-coloured footwear, museum specimens, which ingeneral are only fragmentary remains of anything earlier than Tudortimes, are rather drab as far as men are concerned; black and tan havealways been the predominant colours and remain so to this day, but white(again see Stuart paintings) was worn for full dress occasions. Thewomen’s shoes, on the contrary, were, as now, very much brighter, redmorocco leather, coloured silks and heavily embroidered damasks beingvery popular right down to the black or white slippers, and later, boots, ofthe nineteenth century.
Today, any colour is acceptable providing it is fashionable, whichimplies a link-up with the current trends in general costume design. In anattempt to co-ordinate such trends, the British Colour Council issues listsof costume and accessory colours each season. As indicated earlier,current events and national feeling may influence shoe design andperhaps colour is one of the design elements most susceptible to theseinfluences. It also appears to be influenced by climate, sunshine andbright colours going together.
SOLE SHAPE
Perhaps of all the variable elements in a shoe, the characteristic which‘dates’ it most is its sole shape, or, to be more precise, its foe shape. Againjudging from museum specimens, the shape of the back portion of thesole has not appreciably altered in centuries and has always followed,more or less, the shape of the heel of the foot. The central portion or‘waist’ has sometimes been much narrower than the foot and sometimesas wide as the thickest part of the ankle. The foot has an arch on the insideof the waist, the body weight being carried along the outer edge from theheel to the forepart, and so the
39
FASHION

main function of the sole waist is to join together the front and backportions. As the heel (shoe) increases in weight, less weight is borne bythe waist and so it becomes narrower.
Modern high-heeled shoes have a strong steel ‘shank’ (see p. 300) toreinforce this narrow bridge between front and back, otherwise the shoewould collapse with the heel pointing backwards. As will be describedinthe paragraph below on ‘Heels’ (p. 46), the older shoes had heels withvery much broader seats and extending much further down the waisttowards the forepart so that shanks were not necessary.
It is from the waist forwards that the most variation in sole shapebecomes apparent as we examine shoes from all ages in our museums,particularly the width across the forepart and the length and shape of thetoe. Toes have lengthened and shortened again, have become pointed androunded or sometimes square. The ‘poulaines’ of the fourteenth century,
shown in Figure 18a, were stuffed with moss or hay and reached such alength that they had to be fastened to the leg below the knee with a chainand were eventually restricted by law in 1420 to those whose incomeexceeded £40 per annum! A somewhat similar style is (or was) shown inthe Cluny Museum in Paris, where the toe has a fish-tail shape and iscurved right back and joined to the instep of the shoe itself. An Englishshoe of about 1905 and an Indian slipper, both with pointed toes, areshown in Figure 19.
A Papal ‘bull’ against long pointed shoes in 1468 was followed by anincrease in width instead of length and once again the fashion
40
SHOE DESIGN: ITS BASIS AND DEVELOPMENT
Figure 18. a Top Fourteenth-century poulaine; b Bottom fifteenth-centurybroad shoe (Victoria and Albert Museum, Crown copyright reserved).
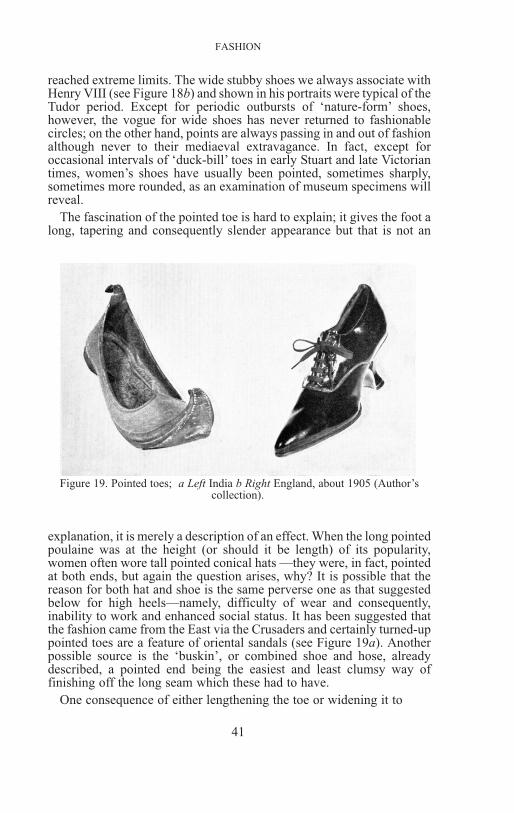
reached extreme limits. The wide stubby shoes we always associate withHenry VIII (see Figure 18b) and shown in his portraits were typical of theTudor period. Except for periodic outbursts of ‘nature-form’ shoes,however, the vogue for wide shoes has never returned to fashionablecircles; on the other hand, points are always passing in and out of fashionalthough never to their mediaeval extravagance. In fact, except foroccasional intervals of ‘duck-bill’ toes in early Stuart and late Victoriantimes, women’s shoes have usually been pointed, sometimes sharply,sometimes more rounded, as an examination of museum specimens willreveal.
The fascination of the pointed toe is hard to explain; it gives the foot along, tapering and consequently slender appearance but that is not an
explanation, it is merely a description of an effect. When the long pointedpoulaine was at the height (or should it be length) of its popularity,women often wore tall pointed conical hats —they were, in fact, pointedat both ends, but again the question arises, why? It is possible that thereason for both hat and shoe is the same perverse one as that suggestedbelow for high heels—namely, difficulty of wear and consequently,inability to work and enhanced social status. It has been suggested thatthe fashion came from the East via the Crusaders and certainly turned-uppointed toes are a feature of oriental sandals (see Figure 19a). Anotherpossible source is the ‘buskin’, or combined shoe and hose, alreadydescribed, a pointed end being the easiest and least clumsy way offinishing off the long seam which these had to have.
One consequence of either lengthening the toe or widening it to
41
FASHION
Figure 19. Pointed toes; a Left India b Right England, about 1905 (Author’scollection).

extremes is the masking of the essential asymmetry of the foot, in otherwords, the fact that we have a left foot and a right foot and that one is (orshould be) the ‘mirror image’ of the other. Shoe designers throughout theages have seemed determined to mask this essential fact and the majorityof shoes still have their uppers designed as though a foot weresymmetrical about a central line from the big toe to the centre of the back
of the heel instead of being one half of a pair of opposites; the onlyconcession they have made is to put the fastening on the outside (if it isnot in the middle) of each shoe, e.g. buckles or buttons on strap shoes andthis has been done to prevent the fastening of one shoe from rubbing onthe other foot.
This objection to foot asymmetry has also extended, although to alesser extent, to the last and sole shape. The mediaeval shoe soles shownin Figure 20 are definitely left or right, whereas the Stuart and Georgianwomen’s shoes were ‘straights’ and appear to have been interchangeable.In Victorian times, both lefts and rights’ and ‘straights’ were made as,indeed, they still are in the slipper and sandal trades.
There has been a trend towards asymmetry in upper patterns for
42
SHOE DESIGN: ITS BASIS AND DEVELOPMENT
Figure 20. Mediæval shoe soles and a portion of upper from City ofLondon excavations (Author’s collection).

some time now in the women’s Fashion trade but men’s shoes still remainin general, solidly symmetrical as far as their uppers are concerned.
Another noticeable feature of shoes in museums is the generalnarrowness of the sole and the small volume of upper, and one oftenwonders how it was ever possible to insert the foot at all, quite apart fromwalking in them. It must be remembered, however, that such specimenshave usually been the property of the upper classes (which is why theyhave not been worn to destruction) and were probably only on the foot forshort periods during which elegance was more important than comfort.What the working classes wore can only be assessed from contemporarypaintings and drawings and it seems probable from such evidence that
their boots and shoes were ample in size if clumsy and heavy inconstruction, and that they walked far more comfortably than did their‘betters’.
Before leaving the question of sole shape and pointed toes, the effect onthe toes themselves must be mentioned. Figure 21 is an x-ray photographof a foot inside a pointed shoe showing how the big toe has been turned into the others and has developed a bunion joint in consequence of wearingshorter and possibly more pointed shoes. The effect is considerablyincreased in a high-heeled pointed-toe shoe since the foot then tends toslide down the sloping waist of the shoe and the toes are bunched togetherin the toe end. Modern ‘peep-toe’ shoes again aggravate the distortionsince they normally have the ‘peep-hole’ in the centre and there is noextension of the sole beyond the toes to allow for the tapering effect.
43
FASHION
Figure 21. X-ray photograph of toes distorted by pointed shoes fitted tooshort.

If pointed toes must be introduced, then the tapering should not startuntil the foot has finished; there should be adequate toe-extension of thelast, but this is all too rarely the case. Even today (1952) there appears tobe a return to pointed symmetrical toes on women’s shoes withoutadequate extension; it is to be hoped that the fashion will die a naturaldeath before it permanently distorts young feet.
SOLE HEIGHT
The actual separation of the foot from the ground by the sole hasutilitarian origins as already described in the first chapter. The groundmay be unpleasantly rough, damp, muddy, cold or hot and so aninsulating layer or sole is introduced. The thickness of this sole willobviously depend in the first instance upon the degree to which any of theconditions mentioned exists. The inevitable fashion element, however,
begins to creep in and so the thickness of the sole or its height above theground increases to the usual extravagant limits. In the absence of anysound utilitarian reasons for this height it is only possible to suggest suchperverse reasons as giving added stature to the wearer and thereforesuperiority in the presence of the less fortunate who are more down toearth (literally), or feminine physical instability in the presence of theopposite sex. A thick ‘platform’ for the forepart only of a shoe enables amuch higher heel to be worn without a corresponding increase indiscomfort and, as is discussed below, this is a very important fashionpoint.
Figure 22 shows five examples of extreme sole height or thickness. a isan African sandal with a 11
2to 21
2in. thick laminated rawhide sole, b a
Chinese slipper with a 11
2in. laminated leather sole, c a Chinese
44
SHOE DESIGN: ITS BASIS AND DEVELOPMENT
Figure 22. Examples of sole elevation: Top—a Africa; b China: Bottom—c
Middle East, d China; e Great Britain. 1948 (Author’s collection).

slipper with a central pedestal 2 in. high, d a. Middle East clog 8 in. high,e a 1948 woman’s ‘platform’ shoe. The first, and possibly the second, ofthese is probably utilitarian but it is difficult to explain the others excepton the grounds of fashion mentioned above.
In the sixteenth century, fantastic heights were achieved by giving theshoe, a mule type, a pedestal similar to Figure lie but higher; it was calleda ‘chopine’ and the fashion spread from Venice to England and there areseveral references to it in contemporary literature (Hamlet, Act ii, scene2; John Evelyn’s Diary, June 1645).
Men’s military boots have, of necessity, always had thicker soles thanthose for town and dress wear but, after the short-lived ‘chopine’ period,
the shoes of upper-class women were made with soles as thin as possibleright down to the 1940’s when the ‘platform’ soles migrated from thebathing beaches to the town and became a feature of many fashion shoes.The cause for this was probably the shortage of materials during thesecond world war, particularly on the Continent, and the necessity forreplacing sole leather by wood or cork, both of which are available inmuch greater thicknesses than is leather and lend themselves to carving.
One result of the use of thin leather soles, particularly on delicate fabricuppers, was the introduction of the ‘patten’, or overshoe, to protect them.They were used with poulaines in the Middle Ages and resembled thetoe-band clogs shown in Figure 17. In Stuart times they were curved to fitunder the heel as shown in Figure 23 and by Victorian times, they werecommonly worn by all classes to protect their boots from the mud andconsisted of a wooden sole on an iron
45
FASHION
Figure 23. Shoes with broad heels and pattens (Northampton CentralMuseum).

hoop placed centrally. Today, they have been replaced by the rubberovershoe and golosh and some manufacturers of these commodities havebeen admitted to the old Pattenmakers’ Company—one of the ancientLondon livery companies.
HEEL HEIGHT AND SHAPE
Heel height is closely allied with sole height but its exaggerationpresents additional problems to the student of fashion, costume andhuman behaviour. The first question to be answered is ‘Why does a shoeneed a heel at all?’. The writer has never yet heard of a convincinganatomical reason why the foot should require any elevation at the heel toassist either in walking or in standing; presumably, if such elevation wererequired, the human foot would by now have acquired it through aprocess of natural evolution. An argument frequently advanced is that ifwe wear perfectly flat shoes for long periods our legs and ankles becomevery tired. This is probably true but it ignores the rather obvious fact thatwe normally wear shoes which have heels and that the muscles andligaments of our legs and feet become accustomed to the resultingposition caused by this elevation; this is particularly true in the case ofwomen who normally wear high-heeled shoes and then change to flatones, such as tennis shoes, or vice-versa. If we never wear heeled shoes atall, however, then there appears to be no reason why the lack of a heelshould cause fatigue; millions of primitive peoples in the world wear noshoes at all, or at most, a flat sandal, and they walk, run, carry loads, andperform other arduous tasks without, apparently, feeling the need for aheel.
Apart from anatomy, however, there is a variety of reasons for a shoeacquiring a heel; these are:
(a) Utility
This is usually the first reason for any development and it holds goodfor shoe heels as for many other things. In walking, whether in a flat shoeor one with a heel, it is the back of the heel end which strikes the groundfirst and wears away quickest. In a flat-soled heelless shoe, therefore, itwould be economical to cover this worn portion with another piece ofleather—and the heel is born. The piece so added could either be replacedin due course or covered with yet another section, in which case the heelgrows in height.
In either case, the idea of a replaceable part of the sole at the placewhich receives the most wear is a sensible one and today, shoes otherwiseflat-soled have a single lift’ heel for this very purpose. Incidentally,mediaeval shoe soles in our museums frequently show signs that therewas this additional piece of leather attached at the heel end of the solealthough contemporary illustrations do not reveal a heel of any sort.
46
SHOE DESIGN: ITS BASIS AND DEVELOPMENT

(b) Stirrups
A heel prevents the shoe from slipping either way in the stirrup inriding, cowboy boots having heels especially high for this purpose. Shoeswith heels of noticeable height, however, did not appear in this countryuntil late Tudor times (latter half of sixteenth century) and peoplecertainly rode horses before then. Northampton Museum has aphotograph of a mediaeval heel-less poulaine with a spur attached andmodern riding boots do not carry an exceptionally high heel.
(c) Height
As in the case of high platform soles, heels increase the overall heightof the wearer and some small women certainly wear extremely high onesfor this purpose. Popular legend has it that the high heel was introducedby Louis XIV of France because he was of short stature, and then rapidlybecame a court fashion; the name ‘Louis’has certainly survived for a typeof heel much curved and with the front or ‘breast’ covered by the solecurving downwards. As usual, the legend is suspect as this type of heelappears to have been worn before Louis became king in 1643.
(d) Instability
No one pretends that walking in high-heeled shoes is easier than in lowones if the foot has been accustomed to the latter but this may be the veryreason why for the last 400 years except for an occasional ‘flat’ periodthey have always been fashionable. Until the twentieth century with itstwo class-levelling world wars and world economic crises, the costumeof the aristocracy was notable for its extravagance and unsuitability forwear for any sort of manual work; it was, in fact, a ‘badge of office’.Long-toed poulaines, high chopines, high heels, neck ruffs, wasp-waistcorsets, hobble skirts and, to seek an example from abroad, the bound feetof Chinese women, all restricted the movements of their wearers—andwere, therefore, desirable. Servants were required to fetch and carry and,in the case of the high chopine, to support the elevated lady who wasliterally above work. These considerations have applied at various timesequally as much to men as to women. With women, instability and itssister, fragility, have the added attraction of enlisting the sympathy of theopposite sex.
Thomas Wright in his The Romance of the Shoe sums up this perversestate of affairs in describing the sandals of the ancient Egyptians:
‘As to men, while the favoured aristocrats indulged in a long and ofteninconveniently curved sandal, the down-trodden peasant, who wasunable to go to the expense of making himself miserable, had to put upwith a really comfortable shoe that approximated to the shape of his foot.’
(e) Appearance
The wearing of high-heeled shoes accentuates the curvature of the
47
FASHION

instep and arch of the foot, makes the foot look smaller, shortens the stepand generally draws attention to the foot and leg. This undeniably hasattractions both for the wearer and for the beholder, particularly if thelatter is of the male sex and the shoe is worn by a woman.
For the above reasons, and perhaps others, the high-heeled shoe is anestablished article of a fashionable woman’s apparel, and, as statedabove, has been so with occasional lapses since Tudor times.
The earliest heel in the Northampton Museum collection occurs on thewhite leather shoe shown in Figure 24.
Its date is uncertain but judging from contemporary pictures, it isprobably late sixteenth or early seventeenth century. It has a long‘duck-bill’ toe and a high heel very similar in shape to the ‘cuban’ typepopular today. Its chief peculiarity is that the rear portion of the sole from
the tread backwards divides, one part going upwards in the usual mannerto form the waist arch and then turning down to become the heel breastand under the heel to form the ‘top-piece’; the other, lower portion of thesole is carried straight backwards to form a platform on which the heelstands loosely. This unique construction, which appears to have beenfashionable on the Continent at this time, has never had a serious revival,although there has appeared in recent years a somewhat similar shoehaving a high ‘wedge’ heel from which the central portion has beenremoved leaving a kind of bridge.
The seventeenth and first quarter of the eighteenth centuries were theera of the heavy brocade shoes for women, with high broad heels andpointed toes as shown in Figure 23. Towards the middle of the eighteenthcentury, the heels became much more delicate and assumed thehour-glass shape as in Figure 25.
48
SHOE DESIGN: ITS BASIS AND DEVELOPMENT
Figure 24
Figure 24. Late sixteenth- or early seventeenth-century shoe with extendedsole (Northampton Central Museum).
Figure 25
Figure 25. Shoe with turned-up pointed toe and ‘hour-glass heel’, eighteenthcentury (Author’s collection).

The dawn of the nineteenth century saw the almost total disappearanceof the heel and although it reappeared in a modified form and shape onsome Victorian shoes, it seems to have little fashion significance till theend of the century when it came back again in its full ‘Louis’ form as oneof the most exaggerated and fashionable features of the high buttoned orlaced boots of the London society lady (see Figure 26) and remained sothroughout the Edwardian period.
The boot gradually went out of fashion but the heel remained, the Louisform now acquiring rivals in the ‘Spanish’ and ‘Cuban’ types, straighter,narrower and with a smaller bearing surface, or top-piece. ‘Built’ heels,consisting of several layers of leather or board, also increased in heightand decreased in cross-sectional area, the layered effect, not possible withthe covered ‘one-piece’ wooden type which has been used for centuries,being one of their main attractions.
The re-introduction of the platform sole has permitted even higherheels to be worn without increasing the slope and consequent discomfortof the foot but has not added to its stability (see Figure 22e).
Another re-introduction has been that of the wedge heel (see Figure213) which fills up the whole of the space under the waist arch andappears to have its origin in a type of slipper worn round about1750-1820. When carried to extremes in conjunction with a platformsole, one is forcibly reminded of a surgical boot worn to correctunevenness in leg length and the shoe can hardly be regarded as delicateor feminine. Such a large mass of material below the foot heel, however,gives scope to the designer and these wedge heels are grooved, turned,carved and otherwise decorated, in rather the same way aseighteenth-century heels were sometimes painted with landscapes orflowers by fashionable artists. Other forms of heel decoration such asstudding with real or imitation precious stones have also gone in and outof fashion and the Northampton Museum has a very fine collection ofsuch heels.
More recently, experimental heels have been made of plastic (opaqueand transparent) and tubular steel; in fact there appears to be no limit tothe ingenuity of the designer, or stylist, in finding fresh ways of makingshoes different via the heel. The high heel persists as one of the mostimportant fashion and selling features of a woman’s shoe; it is an integralpart of shoe styling which survives all the attacks of the medicalprofession and common sense.
Heel Position
Before leaving the question of heels, some mention must be made oftheir position relative to the back of the shoe and the leg. Obviously whenthe heel is broad as in the seventeenth- and eighteenth-century types(Figure 23), and has a large area in contact with the ground, the preciseposition on the shoe is not critical. As the heel becomes narrower and thetop-piece smaller, however, it would be expected
49
FASHION

that the exact position would influence considerably the stability of thewearer. In spite of this the placing has varied considerably from time totime, as Figures 24, 25 and 26 show. In some eighteenth-centuryspecimens it is about halfway along the sole while in others it is put rightat the very back. The nineteenth-century Louis heel (see Figure 26) wasconsiderably curved so that the top-piece came well forward.
The actual height of the heel, of course, decides to some extent theposition of the top-piece relative to the forepart of the sole; some extremeexamples of high heels (about 7 in.) in the Northampton Museum, forexample, have the arch so much curved that there is hardly any spacebetween the forepart and the heel and top-piece, and the body weightmust be carried almost entirely on the toes.
Since the heel strikes the ground first in normal walking, there is,presumably, an argument for putting the heel and its top-piece in the samevertical line as the leg, rather like the single stilts of the ‘chopines’described earlier; this still gives considerable latitude in placing since theleg is not a single narrow line but has thickness. Precisely whereaboutsunder the leg the top-piece of the heel should be placed still seems to be avariable factor, with fashion playing a bigger part in the decision thandoes knowledge of the anatomy and weight-bearing mechanism of thefoot in standing and walking.
FASTENING
Some types of boot and shoe may ‘give’sufficiently to allow them to beput on or taken off the foot without the necessity for any form of fasteningwhich can be undone; for example, the Wellington boot and the courtshoe. When actually being worn there is either sufficient coverage of thefoot, ankle or leg, or a tight enough fit to prevent their slipping offaccidentally. Neither of these conditions makes for comfort, however,and so, since sandals, moccasins and shoes were first made, means ofopening the upper and closing it again for insertion and removal of thefoot have been provided. These have all become fashion features and willnow be considered in detail.
Laces
A knotted thong or string is undoubtedly the simplest and oldestmethod; it may either be one of the actual sandal thongs or straps asalready described in Chapter 3, or it may be a separate string or lacethreaded through holes (or attached loops) in the upper as is the commonpractice today.
Roman and Grecian sandals were often laced and somefifteenth-century poulaines had side-lacing (Figure 18a), a fashion whichreappeared in the first half of the nineteenth century with the advent of theankle boot. The opening and consequently the lacing then moved
50
SHOE DESIGN: ITS BASIS AND DEVELOPMENT

round from the side to the instep where it has, in general, remained eversince for the majority of shoes, particularly men’s.
The number of holes, which by the end of the nineteenth century hadacquired eyelets, increased with the height of the boot and the lacingbecame a definite fashion feature (Figure 26). The lacing also extendedfurther towards the toe than was necessary for utilitarian purposes. Thetime taken to lace so many eyelets led to the introduction of the boot-hookwith its much quicker fastening; this often replaces the eyelet down to thelevel below which it is only necessary to loosen the lace rather than toremove it completely for foot insertion and withdrawal.
The knotting of a thong or lace into a bow made the bow itself a fashionfeature, especially when the lace took the form of a wide ribbon and so, asalways, even when the lace was no longer required, the bow survived inall sizes, shapes and colours as a decoration, not only at the place where itwas originally required but at any point where fashion decreed it shouldbe. The simple bow is now made in an infinite variety of forms whichcould not actually be tied at all in a lace—pleats, folds, rolls, rosettes, etc.,combined with metals, wood and other materials—and there is now nofirm boundary between the bow and the button.
Buckles
The woman’s shoe which remained popular throughout theseventeenth and eighteenth centuries had a very simple upper patternalthough the materials used varied considerably in texture andappearance—a policy which might with advantage be carried out
51
FASHION
Figure 26. Laced and buttoned boots, about 1900 (Author’s collection)

today. Most of them were as shown in Figure 23 and simply had a vampwith extended tongue and two quarters, each with the front end narrowedinto a strap either nearly meeting, or overlapping over the instep. In theformer case, the two straps each had a single hole and were tied togetherwith a string or ribbon, the ‘latchet’; in the latter, they were fastenedtogether with a buckle. Both methods were also used for men’s shoes andsoon, for both sexes, the buckle became perhaps the most importantbadge of rank and fashion. Made of silver and steel and inlaid with real orartificial gemstones, they grew in size and brilliance until they dominatedthe shoe. By the end of the eighteenth century the fashion had passedexcept for ceremonial dress. Few museum shoe specimens show thembecause they were not an integral part of the shoe but were transferredfrom one shoe to another and kept in a case when not in use.
Today, mass production methods have enabled buckles of everyconceivable colour, size and shape to be made, some being purelydecorative and others functional; their position on the shoe is as variableas that of the bow with the difference that their shiny metallic appearancecalls more immediate attention to the shoe and foot. It is interesting tonote that the vamp of the mediaeval shoe shown in Figure 20 has abuckle.
Buttons
Although buttons have been used on garments for many years,buttoned boots do not appear until towards the end of the nineteenthcentury, buttoned shoes following shortly afterwards; both men andwomen wore them then but today they are only seen on women’s andchildren’s shoes. The ‘one-bar’, i.e., single-strap, women’s shoe withbutton was the standard shoe of the early 1920’s and retained itspopularity till the 1930’s when it began to give pride of place to thebuckle. As for a buckle, however, there is no limit to the size, shape andcolour of the button when it leaves the functional for the fashionable; if itis really required to be used as a button in a buttonhole, then it is usuallysmall and well rounded.
Gussets
Although hardly fastenings in the true sense of the word, elastic gussetsor inserts at some portion of the upper to permit the entry and withdrawalof the foot must be mentioned here. The development of the rubber tradein the first half of the nineteenth century led to the manufacture of elasticcloth and, as already described, the ‘spring-sided Jemima’ of the 1860’shad an enormous popularity, coinciding as it did with the advent offactory methods of shoemaking.
Gussets, however, are not usually regarded with much favour and whenthey are introduced into an upper design they are often covered with abow or tongue of other material. One remarkable shoe of about 1905 inthe Northampton Museum has laces (through eyelets), buttons and agusset!
52
SHOE DESIGN: ITS BASIS AND DEVELOPMENT

Elasticised leathers, which were invented by James Dowie anddescribed by him in his The Foot and its Covering in 1861, are being usedto an increasing extent in shoes today and might be regarded as themodern equivalent of the gusset, although this still remains.
Other Fastenings
There are, of course, other ways of fastening shoes such as hooks andeyes, press-studs, interlaced loops and zip-fasteners, all of which arecapable of utility or fashion development. Their drawback generally isthat they have no latitude, that is to say they can only be fixed in apredetermined position and cannot be adapted easily for different sizefeet; buttons suffer from the same defect. Laces and buckles, therefore,retain their popularity for sound utilitarian reasons just as screw-downwater taps and simple wooden lever latches on gates survive in spite ofnumerous ‘improved’ inventions intended to replace them.
We have now seen the various factors which have influenced shoedesign, consciously or unconsciously, throughout the ages and which willgo on doing so in the years to come—purpose, material, method andfashion. In the following parts of this book, modern methods of shoemanufacture are dealt with in considerable detail and it is hoped that thestudy of them will convince the would-be shoe designer that it is notsufficient just to paint or draw a pretty upper pattern in order to create anew shoe; the shoe has still to be manufactured by one of the methodsdescribed from available materials, and when it has been manufactured, itwill still have to be worn for one of the purposes listed in Chapter 1.
If the student can produce a four-legged stool design which does notrock unsteadily but is evenly balanced on its four legs of purpose,material, method and fashion, then he can call himself a shoe designer.
53
FASHION


PART II
PATTERN CUTTING
A. V. GOODFELLOW


5
LASTS
SIZES AND FITTINGS
Length Scales
The orthodox size scale in use in this country has three sizes to the inchand commences with size 0 which is 4 in. long. The scale continues withintervals of 1
3in. up to size 13 which is 81
3in. Long. The numbering breaks
off at this size, recommencing with size 1 which is 82
3in. long and
continuing to include the largest sizes. The English size scale is thusdivided into two, a children’s scale ranging from 0 to 13 (4 to 81
3in.) and
an adults’ scale ranging from 1 to 12 (82
3to 121
3in.). Half sizes (1
6in.
difference) are usually made.The scale is further divided according to the type of shoe to be made.
The characteristics of the foot vary while growth is taking place,consequently lasts for different age groups must be modelled differently.The following ranges are typical but should not be regarded asunalterable. There is some overlapping between ranges particularly in theolder groups.
Girth Scales
Between each length size there is a difference of 1
3in. The larger size
will also have a greater girth measurement and the orthodox increaseis 1
4in. Thus if size 7 has a joint girth of 9 in., size 8 will have a joint
girth of 9 1
4in. The actual measurements will vary according to the type
of shoe to be made. A shoe made from heavy materials will have agreater girth than one made from light materials since this is necessary inorder to compensate for the loss of flexibility and the greater thickness ofthe upper.
Fitting ScalesLasts are made not only with different girths for different lengths but
also with different girths for the same length. This practice gives severalsets of lasts covering the same length scale but with different girthmeasurements, enabling a greater number of feet to be efficiently fitted,although the objection to the extension of this custom in all cases lies inthe fact that by increasing the variety of the product we reduce thequantity that can be produced and increase its cost.
The difference between these fittings as they are called is not fixed, butthe most widely used grade is 1
4in. This is usually distributed with
57
Infants’ . . 0 to 6Children’s . . 7 to 11Boys’and Girls’ 12 to 2
Youths’ and Maids’ 3 to 6Women’s . . 3 to 9Men’s . . 5 to 12

1
12in. across the width of the last and 1
6in. on the top, the measurement
being taken across the joints, i.e. corresponding to the widest part of thefoot.
As indicated, the number of fittings will vary according to the type ofshoe being made. Each fitting is identified either by a number or a letter.If D is taken as an average fitting the number corresponding would be 4and the range of fittings made would be as follows: 3 =C; 4=D; 5=E. Thisdoes not refer to the ranges of shoes made in what are calledmulti-fittings.
Taking the girth measurement of 9 in. already given for a size 7 andnow adding the fact that it refers to a D fitting, Table 1 shows the jointgirth measurements for a limited fitting range.
Table 1. Girth Measurements for Various Sizes and Fittings
Multi-fittings
Usually associated with the manufacture of women’s shoes, thismethod may involve as many as ten or eleven different fittings, rangingfrom 4A (AAAA) to 4E (EEEE). The orthodox grade of 1
4in.
Table 2. Length and Girth for Multi-fittings, Size 5
58
PATTERN CUTTING
Fitting
CDE
Girth (in). for sizes
6 7 8 9 10 11
8 12
12
12
12
88
34
34
34
34
34
9 99
9 999
999
9
914
14
14
1410 10
10
Fitting
AAAAAAAAAAB
} }
}}
Length (in.) Girth (in.)
CDE
EEEEEEEEE
10
1010
10
1010
99999 2 4
2 4
2 2
2
2
2 2
2
2
2 4
4
4
4
2 4 2 4
2 4
2 4
2 4
2 4
2 4
1
1
1
1
1
1
1
1
1
111
11
1
1
1
111
1
111
1
Reduction
No alteration
Increase Grade
Grade
Grade
998
888
87777 6
6
6
6
6
6
6
6
6
6
66
6
5
5
53
3
3
3
8
8
9
0

is not satisfactory for such a wide range and it is a general practice for thisto be reduced to 3
16in. between the larger and smaller fittings. The
increase of 1
4in. makes the larger fittings too large for good foot fitting
and the smaller fittings become too small. A further complication isintroduced by the practice of lengthening the lasts by 1
24in. between each
of the larger fittings and making a similar reduction between each of thesmaller fittings. Table 2 illustrates this grade.
Precision Grade
It was pointed out above that the orthodox girth increase of 8 in. hashad to be modified for multi-fittings and this has become standardpractice. A large-scale investigation into the actual size and shape ofwomen’s feet, carried out by the British Boot, Shoe and Allied TradesResearch Association has led to the introduction of a new scale of girthincreases known as precision grading. Investigations showed that wheresingle fitting lines of shoes were made with a 1
4in. girth increase between
each size there was a tendency for shoe fitters to fit the larger feet ‘short’in order to get the correct joint fitting; also the smaller feet were fittedlong’ because the correct size was too small across the joints.
The use of multi-fittings overcame this difficulty, but the fact that thescale was wrong received further emphasis when an analysis of salesfigures showed that in the wider fittings there was a demand for smallersizes and in the narrower fittings the demand was for larger sizes.
The measurements taken by the Research Association showed that thecorrect girth increase between sizes should be, not 1
4in., but 3
20, in. This
reduction means a large reduction in volume and it was felt that half sizescould be left out. The difference between fittings does not derive fromfoot characteristics but may vary according to the accuracy of the fittingproperties required in the shoes to be made. The Research Associationhave suggested that as the precision grade is adjusted to the actual girthincreases of feet, the difference between fittings may safely be increasedto 7
20in. The recommended scale for precision graded lasts is, then, as
follows:
Length increase between sizes 1
3in.
Joint girth increase between sizes 3
20in.
Joint girth increase between fittings 7
20in.
New Developments
In an endeavour to find a more satisfactory length size scale than theone in general use experiments are being made using 1 in. as the size unit.Three proposals have been made:
(1) ‘The size marked on a shoe shall be the length of the foot which theshoe properly fits when the foot is correctly measured on the “standard”length scale’.
(2) ‘The “standard” length shall be in divisions of twelfths of an inchand, to avoid three figure numbers at the larger sizes, the scale
59
LASTS

shall start with zero at 4 in., the 1
12in. divisions being then numbered
consecutively.’(3) ‘The Research Association shall produce a foot-measuring
instrument embodying the above proposals and including in it thecorresponding heel/ball scale.’
The purpose of the 1
12in. interval is to permit the use of 1
3in., 1
6in., or 1
4
in., size intervals, all on the same basic scale. The appropriate size
interval can be selected for the type and price of shoe.
American Size Scale
The length size scale is exactly the same as the orthodox scale in use inthis country, with the exception that the American begins with size 0=311
12
in. Each size is therefore 1
12in. shorter than its English equivalent. The
method of numbering and the size interval of 1
3in. are the same.
Unfortunately the matter is complicated by the American practice ofstamping shoes 11
2sizes up; thus size 4 is marked size 51
2. In addition the
fittings are marked two down thus D fitting becomes B.
Paris PointsLength Scale—On the Continent the size unit is the Paris point whichequals 2
3cm. (centimetre). The size scale begins at 0 cm. and continues
without a break up to the largest sizes. Half sizes are made.
To convert English sizes into Paris points the following calculationsshould be made:
(1) Convert English size into inches.(2) Convert inches into centimetres (1 in. = 2×54 cm.).(3) Convert centimetres into Paris points (multiply by 3
2).
Example 1—Convert size 8 adults’ into Paris points.(1) Size 8 has a length of 11 in.(2) 11 ´ 2×54 = 27×94 cm.(3) 27×94 ´
3
2= 42 Paris points (nearest size).
Example 2—Convert 36 Paris points into English sizes.(1) 36 ´
2
3= 24 cm.
(2) 24/2×54 = 9×45 in.(3) 9×45 in.= size 3 (nearest size).An easy method of conversion is suggested by the fact that size 5 adults
(10 in.) is practically the same as 38 Paris points. English inches may beconverted into Paris points thus:
Paris points =Inches ´ 38
10Girth Scale—The girth scale has the following dimensions:
5 mm. (millimetres) between sizes;12
3mm. across the tread.
CentimetreLength Scale—This is another scale in use on the Continent with one sizeequal to 1 cm.
60
PATTERN CUTTING

Girth Scale—The girth scale has the following dimensions:71
2mm. between sizes; 21
2mm. across the tread.
LAST SPECIFICATION
Several of the points mentioned are obtained by measuring a certainproportion of the standard length. This practice is continued in Chapter 6and has the advantage that the instructions hold good, regardless of thesize of the model. The standard length is the length in inches of any givenEnglish size and may be found by referring to p. 57. It is important toavoid confusion here because the actual length of a last may varyaccording to the shape of the toe, whereas the standard length is fixed fora particular size regardless of the length of any individual last.
61
LASTS
E
Forepart
J
MN
J
Waist
B
B
B
SeatS
E
E
TV
J
I
L
C
S
P
P
Ground line
Comb
Figure 28 The profile of the last: J = point of contact or tread, PP¢ = heelheight or pitch; EE¢ = toe spring; S = seat position; E = end of toes;C = counterpoint; SC = 1
5SL; V = vamp position; CV = 7
10SL; I = in-
step; CLI = 90°; L is 1
2SL from C; T = top of toes (highest point over
toes).
Figure 27. The bottom of the last. E = centre of the toe shape; S = centreof the heel shape. (The positions of E and S are difficult to define , but canbe located easily on the last); SB = 1
4SL (standard length); B¢B² = breast
of heel; SM = 2
3SL; MN = 1
10SL; SNJ¢ = 90° (outside joint position);
SMJ = 90° (inside joint position)

Pitch
All lasts are made to carry a definite height of heel and the mostsatisfactory way of finding the heel height for a last is to consult the lastmanufacturer. If this is not convenient the following points should beobserved:
(1) The heel height should be measured 3
8in. behind the breast of heel.
(2) The last should be placed on a level surface and for a 1 in. heel, theseat should be parallel to the ground. For heel heights above 1 in. the seatshould be raised until the last seems to be well balanced, i.e. the amountof the toe spring and pitch look right. The amount of toe spring varies buta man’s medium walking shoe should have about 3
8in. spring and a
woman’s light-weight shoe with a high heel about 1
4in. It will be seen
from this that on normal types of shoes the variation in toe spring is notgreat.
(3) High heels are measured from the centre of the top-piece atright-angles to the ground.
(4) The general practice is for built and wood heels to be measured in 1
8
in., e.g. a 22/8 heel is 23
4in. high.
Toe Spring
As already pointed out the amount of toe spring varies with the type ofshoe. As one of the objects of toe spring is to compensate for the loss offlexibility caused by encasing the foot, it follows that the more rigid theshoe the more will be the amount of toe spring required. Also in shoeswith high heels the foot is already flexed and little toe spring is neededbecause the action of walking is stilted rather than heel and toe.
Secondary advantages of toe spring are:
(1) As the shoe is already partly flexed the amount of creasing acrossthe vamp is reduced.
(2) On court, slipper and some casual styles the downward pressure ofthe toes helps to tighten the top line of the shoe.
62
PATTERN CUTTING
6
PRACTICAL INSTRUCTION
THE INSTRUCTIONS GIVEN ARE framed in such a way as to enable anystudent to follow them and to produce his own patterns even if he iswithout previous experience. It is hoped that students will make theattempt, regarding these notes as exercises that are meant to give a clearerunderstanding of what is involved in pattern cutting. Certain practices,desirable in themselves, have been omitted for the sake of simplicitysince these notes are not intended to form a set of completepattern-cutting instructions.
TOOLS
Fortunately very few tools are needed, although there are many ‘extras’that prove useful.
Cutting Surface
Although the factory pattern cutter usually has a clicking board it is notessential. Sheet zinc or plate glass will give excellent results.
Knife
Any of the various types of clicking knives are suitable, but the shapeof the blade must be suited to cutting paper, i.e. it should be straight andnot curved, and should be rigid enough to give perfect control. Studentsmay like to experiment with the type of knife used on the Continentwhich is held like a pencil instead of being gripped in the hand. Theknives sold for the use of model aeroplane makers are of this type and canbe used.
Steel Rule
This is one of the essential tools; a 12 in. or 18 in. rule is best. It isnecessary because of the need for accurate measurement and becausestraight lines in patterns should be cut to the rule.
Dividers
A pair of 4 in. dividers will be found easy to handle and is needed forthe many parallel lines that have to be drawn.
Scriber
This tool is far better than the clicker’s awl since it is used primarily formarking lines and not for stabbing. All lines should be traced with thescriber and a pencil only used for sketching in curves.
Tape Measure
The shoemaker’s tape measure is graduated in 1
8in. and 1
16in. and has
the English size scale marked on the reverse side. It is essential forchecking last measurements when forme cutting.
63

French Curves
Many beginners experience difficulty in obtaining satisfactory curves,but if these are lightly sketched in first and then connected with a Frenchcurve the results will be much better. They are made in sets of celluloidshapes with various curves.
MARKING THE LAST
For convenience in transferring the shape of the last (Figures 30 and31) on to a flat piece of paper, lines are drawn dividing the last into threeparts, the bottom or insole shape and the inside and outside top sections.The lines must be drawn in before any pattern is cut and since the waistcurves are primarily intended to give the insole shape it is logical to beginwith that.
Insole Shape
The majority of lasts are designed with a clearly-defined forepart andseat and this edge is used. The waist curves connecting forepart and seatmust be shaped to blend with the lines of the last and some experience isnecessary before really good results are obtained.
Outside Waist—This is always fairly straight and can be drawn in withoutdifficulty.
64
PATTERN CUTTING
a
b
Figure 29. Typical insole waist shapes: a heavy shoe (low heel); b lightshoe (high heel).

Inside Waist—This varies with the type of shoe and the contours of the last.A light shoe will have a narrow waist and a heavy shoe a wide waist. A shoewith a high heel carries a narrower waist than one with a low heel. Figures29a and b show typical insole waist shapes.
Centre Line—Draw a straight line connecting E and S. The student isadvised to compare inside shapes, noting the differences between them.Made up shoes can be used for this purpose.
Top Sections
The inside and outside sections are divided by means of a line drawndown the front of the last and one down the back.
Centre Line (Figure 30)—The line is drawn by connecting E the centre ofthe toe shape, T the top of toes, I the instep, and V the vamp position. It isnot necessary for I to be located exactly, but it should be in the centre of thetop of the comb. E and T can also be located easily.
The vamp position should be located by holding the last level with theeyes and with the inside joint uppermost, dropping a perpendicular fromthe most prominent point across the front of the last. Now hold the last withthe toe pointing towards you and mark a point on the perpendicular whichappears to be on a straight line between I and T.
Back Line (Figure 31)—Connect C and S. Follow the centre of the backcurve.
65
PRACTICAL INSTRUCTION
Figure 30. The centre line. Figure 31. The back line.

THE INSOLE PATTERN
Use paper that can be moulded easily to the last without tearing. Roughout a rectangle large enough for the purpose.
Draw a line on the paper corresponding to the line ES (Figure 27) onthe last. On the line cut three ‘windows’ approximately 1 in. ´
3
8in.,
positioned at the toe, the seat and in the waist. Fasten strips of 5
8in.
transparent adhesive tape over the windows. Stick the paper to the last sothat the line ES on the last corresponds with the line on the paper.
Mark round the forepart and seat outline with a sharp pencil. Cut slotsin the waist until the paper can be pressed gently on to the wood. Transferthe waist curves to the paper. Remove the paper and cut around theoutline thus marked. Replace the insole pattern on the last and check at allpoints.
A working insole pattern is then made by reducing behind the insidejoint by 1
64in. and increasing the length at the seat by 1
12in. for trimming.
THE SOLE PATTERN
Mark round the original insole pattern and add the following allowances :
The making of sole caster patterns is described on p. 94.
THE SLOTTED FORME
Draw a straight line along the side of the last from the counterpoint to I in.away from the centre of the toe shape
Lay the last on its side and with a long pencil mark out the profile—itwill be necessary to mark first the back, and then to tip the last so that theforepart is down to the paper, before completing the marking.
Remove the last and cut round the pencilled outline leaving on amargin of about 1 in. Draw a line on the paper to correspond with the onejust drawn on the last.
Cut three 1 in. ´3
8in. windows on the line as indicated in Figure 32.
Reverse the paper and stick strips of cellulose tape over the win-
66
PATTERN CUTTING
Upper substance
Stiffener substanceand
Toe-puff substance
Welt
Finishing
Obviously this varies but 1
8in. may be used
as an average.
An allowance of 1
8in. should be made in and
length and continued round the side,tapering off where the components areskived away.
Again this must vary according to the widthof sole required. For a man’s welted shoe anallowance of 1
4in. should be made, tapered
off to 1
8in. at the seat.
An allowance of 1
16in. may be made.

dows. Fasten the paper to the last so that the paper and wood lines agree(the wood line can be seen through the windows).
Where the paper stands away from the last, cut slots deep enough toenable the paper to be pressed down. The aim should be to make the slotsas few and short as possible to avoid distortion later.
Transfer the lines on the last to the paper taking particular care at thetoe and seat. When marking the back curve a short line should be madeshowing the position of the bottom line. When marking the front line amark should be made showing the length.
Remove the forme from the last and cut along the lines marked. Theforme should now be replaced on the last (the tape facilitates this) and itsaccuracy checked. Additional checks should be made by measuring thelength of the last with the tape measure and comparing with the formelength.
Repeat the procedure on the other side of the last.
67
PRACTICAL INSTRUCTION
Slots
Windows
Rough outline
Last
outline
Slots
Figure 32. The slotted forme.
Figure 33. Mean forme. ( outside forme – – – inside forme . . . mean forme.)

Mean Forme
When formes have been cut for both inside and outside the two shouldbe compared to see if a mean or average forme can be made or if specialinside and outside patterns must be cut. In most cases it is possible to cuta mean forme as follows:
Mark round the outside forme, indicating the counterpoint. Place theinside forme on the outline with the two counterpoints together. Pivot theinside forme until the two front lines are brought together at the top of toeposition.
The difference between the two formes should be divided to obtain themean forme line, except along the bottom where the lower line shouldalways be followed (Figure 33).
MEN’S SHOE STANDARDS AND SECTIONS
Standard Construction
The abbreviation SL refers to the standard length and the followinginstructions may be used for any size of men’s shoes.
Trace the mean forme, showing both inside and outside forepart lines.Mark in the following reference points (Figure 34):
Connect QA and extend to meet a perpendicular dropped from T.Design the quarter curve from T through A to Q. Add a stiffenerallowance from 3
16in. at S to nothing at C. Continue the line to 1
16in. inside
Q to give added tension to the top line of the upper which will
68
PATTERN CUTTING
SC
CQCVVT
SB
SBABA
= =
=
===
=
====
==
15
15
90°
14
14
14
127
10
SL
SLSL
SL
SL
in.
in.+
C Counterpoint.QVT
B
A
Top of quarter at the back.Vamp point.Top of facing.
Breast of heel.
Outside of ankle bone.
EV
A
B S
C
Q
90°
90°
Forme line
T
Figure 34. Men’s shoe standard construction.
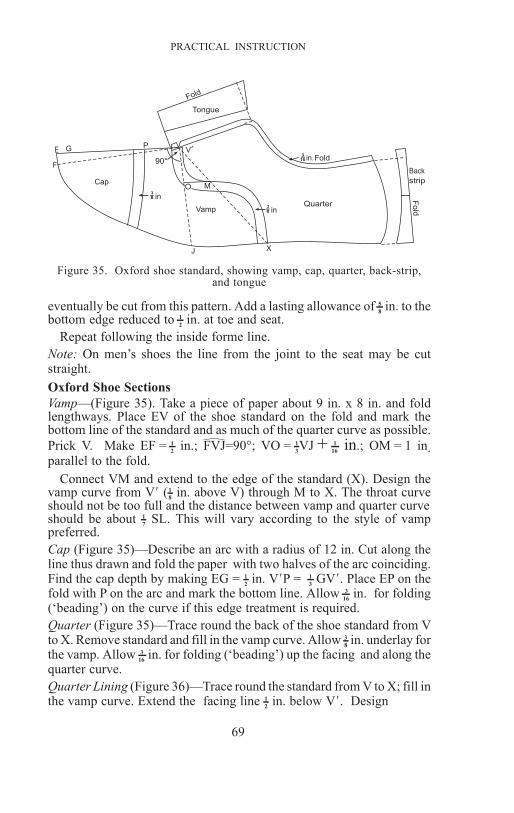
eventually be cut from this pattern. Add a lasting allowance of 5
8in. to the
bottom edge reduced to 1
2in. at toe and seat.
Repeat following the inside forme line.
Note: On men’s shoes the line from the joint to the seat may be cutstraight.
Oxford Shoe Sections
Vamp—(Figure 35). Take a piece of paper about 9 in. x 8 in. and foldlengthways. Place EV of the shoe standard on the fold and mark thebottom line of the standard and as much of the quarter curve as possible.
Prick V. Make EF = 1
2in.; FVJ=90°; VO = 1
3VJ + 1
16in.; OM = 1 in.
parallel to the fold.
Connect VM and extend to the edge of the standard (X). Design thevamp curve from V′ (1
8in. above V) through M to X. The throat curve
should not be too full and the distance between vamp and quarter curveshould be about 1
7SL. This will vary according to the style of vamp
preferred.
Cap (Figure 35)—Describe an arc with a radius of 12 in. Cut along theline thus drawn and fold the paper with two halves of the arc coinciding.Find the cap depth by making EG = 1
2in. V′P = 1
3GV′. Place EP on the
fold with P on the arc and mark the bottom line. Allow 3
16in. for folding
(‘beading’) on the curve if this edge treatment is required.
Quarter (Figure 35)—Trace round the back of the shoe standard from Vto X. Remove standard and fill in the vamp curve. Allow 3
8in. underlay for
the vamp. Allow 3
16in. for folding (‘beading’) up the facing and along the
quarter curve.
Quarter Lining (Figure 36)—Trace round the standard from V to X; fill inthe vamp curve. Extend the facing line 1
2in. below V′. Design
69
PRACTICAL INSTRUCTION
Fold
Tongue
90°
PV
I
O M
Vamp
J
Cap
GE
F
3I
8 in
3I
8 in
X
Quarter
Fold
Back
strip
in.Fold3I
16
Figure 35. Oxford shoe standard, showing vamp, cap, quarter, back-strip,and tongue
^

the lining curve as shown in Figure 36 taking care to clear the vamp curveas this would cause undesirable bulk. Different curves can be usedaccording to the degree of economy wanted, bearing in mind that it isnormal practice to cut quarter linings from leather and vamp linings fromthe cheaper cloth. Those cut nearer to the seat will cut from a smallerarea. The curve should be one that will interlock easily. Add 1
8in.
undertrimming allowance along the facing and top of quarter. Reduce theback of the lining for stiffener pocket by 1
8in. at the top and 1
4in. at the
bottom.
Vamp Lining (Figure 36)—Fold a piece of paper as for the vamp. Markthe quarter lining curve on the standard. Place the standard on the foldand mark the bottom. Prick through the lining curve. Remove thestandard and fill in the lining curve. Add 3
8in. underlay to the vamp lining
increased to 1
2in. in the throat.
Outside Strip (or Back-strap) (Figure 35)—Fold a piece of paper and cuta strip to the following measurements:
Tongue (Figure 35)—Fold a piece of paper and cut a tongue to thefollowing measurements:
The top of the tongue may be shaped as preferred.
Note: These sections are obtained by tracing round the standard, filling inthe curves afterwards. Other methods are described on p.87.
70
PATTERN CUTTING
1 I4 in.
in.
in.
in.
1 I
8
1 I
8
VI
Standardountline
Slot
Undertrimming
3I
8
LengthWidth
==
Back of quarter + in.in.3
8_
38_
at the top516- in. in the centre
5-8 in. at the bottom
Measured onthe fold.
LengthWidth
== in. at the top
in. at the bottomMeasured onthe fold.
Length of folded quarter facing8_113_4

The practice of cutting patterns to a folded edge is an extremely usefulone since, for example, the two halves of a vamp curve are cut togetherand are identical. The crease made must be sharp.
Reference to a ‘net’ pattern means one without any addition for edgetreatment. Lasting and underlay allowances are not referred to.
Derby Shoe Sections
Finding the Tab Point (Figure 37)—Draw the line VJ on the shoestandard. Mark J′ (the intersection of VJ and the forme).
VO = 1
2VJ′− 1
16in.
Derby Quarter (Figure 37)—Trace the back of the standard. Mark V, C,O. Make X about 2
5SL from the back. Connect OV and OC. Make
VW= 1
8in. Connect WO. Design the side curve from O to X keeping
below the line OC.
Reduce the facing by 1
8in. Round off the corners.
Derby Vamp (Figure 37)—Transfer the curve OX to the standard. PlaceEV on a folded edge, trace the bottom line and mark VOX. Remove thestandard and fill in the side curve with the quarter pattern. Connect VO.Make VG = 7
8in. Add 3
8in. underlay from O to W. To find the fitting point
(F) measure 1
2in. from O along OV and 1
2in. from that point parallel to
OW. Design the throat from G through F to blend with OW, rememberingthat the curve through F must be wide enough to cut round easily.
Derby Cap—Construction is as for the Oxford except that the radius isreduced to 10 in. as the vamp tends to pull forward in the centre whenlasted.
71
PRACTICAL INSTRUCTION
E
F
F
O
WG
X
V
C
J/
in.
in.
in.
in.
in.in.
1-2
1-2
-38
-38
11-4
1-4
Figure 37. Derby shoe standard, showing location of the tab point, quarter,vamp and tongue.

Quarter Lining (Figure 38)—Mark round the net quarter. Add 1
8 in.undertrimming allowance from O to Q. Add 1
4 in. trimming allowancefrom O to X. Reduce for the stiffener pocket 1
8 in. to 1
4 in. Slot the quarterfrom F through O.
Vamp Lining (Figure 38)—Follow the vamp pattern except in the throatwhere an allowance of 1
8 in. at G and 3
8 in. at F should be added.
Tongue (Figure 37)—Place the vamp on a folded edge and mark thethroat and side curve; prick through O and F. Place net quarter on O withthe facing parallel to the fold, add 1
4 in. to the length for top of tongue.Design the tongue to be 11
4 in. wide at the top; follow the side curve,passing through F to 3
16 in. above O. Allow 3
8 in. underlay below G.
72
PATTERN CUTTING
QG
F
O
X
Vamp liningunderlay
1
1-8
8
in Underttimming
3-
-
in.
in.4
Figure 38. Derby quarter lining and vamp lining.
AI
A
90°
II
I
M 90°
D
O
E
S
C
Q
GB
IB
in.
in.
1-2
3 - 8
T
Figure 39. Monk shoe standard.

Monk Shoe Standard and Sections
Standard (Figure 39)—Trace round the mean forme. Find the instep byconnecting CE, making CM = 1
2SL and erecting a perpendicular from M.
Draw a line (AB) through I at right-angles to the instep line. Make A′B′
parallel to AB and 7
8in. below. Make DG parallel to A′B′ and 7
8in. below.
Make DO = OG. Make CQ = 1
2in. Length of strap IA from instep = 3 in.
Design the top curve from Q to I touching CM and blending with thestraight strap line. Make top of tongue (T) 3
4in. above I. Add stiffener and
lasting allowances.
Quarter (Inside)—Trace the back of the standard from D to G. Mark Oand B. Design the front curve from I′ to O without a break at I′. Designthe side curve from O to B.
Quarter (Outside)—This is as for the inside quarter except that it isreduced 5
8in. below and parallel to instep line.
Vamp (Figure 40)—Cut a vamp to the front of the standard following,where indicated, the tongue line. Place the line TD on a folded edge andmark in the tongue. Pivot between D and O until the lowest point of thefront curve is on the fold, mark the side curve and to the joint. Pivot 1
2in.
below this fresh position until the ‘top of toe’ point is on the fold andcomplete marking.
Linings—The quarter linings may be cut in the same way as for the Derbyshoe. In many cases the same pattern is used for both inside and outsidelinings, a separate bar piece being joined with a lap seam
73
PRACTICAL INSTRUCTION
Pivot
Pivot
D T Fold
Figure 40. Monk vamp.
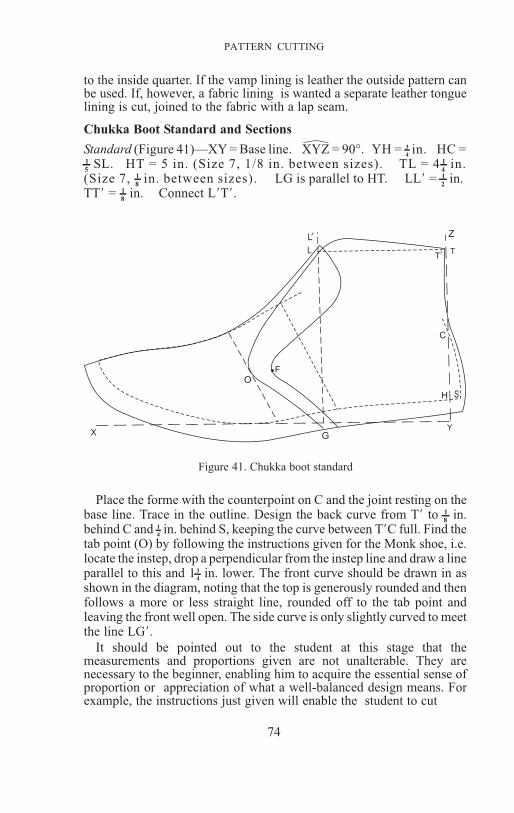
to the inside quarter. If the vamp lining is leather the outside pattern canbe used. If, however, a fabric lining is wanted a separate leather tonguelining is cut, joined to the fabric with a lap seam.
Chukka Boot Standard and Sections
Standard (Figure 41)—XY = Base line. XYZ = 90°. YH = 3
4in. HC =
1
5SL. HT = 5 in. (Size 7, 1/8 in. between sizes). TL = 4 1
4in.
(Size 7, 1
8in. between sizes). LG is parallel to HT. LL′ = 1
2in.
TT′ = 1
8in. Connect L′T′.
Place the forme with the counterpoint on C and the joint resting on thebase line. Trace in the outline. Design the back curve from T′ to 1
8in.
behind C and 1
4in. behind S, keeping the curve between T′C full. Find the
tab point (O) by following the instructions given for the Monk shoe, i.e.locate the instep, drop a perpendicular from the instep line and draw a lineparallel to this and 13
4in. lower. The front curve should be drawn in as
shown in the diagram, noting that the top is generously rounded and thenfollows a more or less straight line, rounded off to the tab point andleaving the front well open. The side curve is only slightly curved to meetthe line LG′.
It should be pointed out to the student at this stage that themeasurements and proportions given are not unalterable. They arenecessary to the beginner, enabling him to acquire the essential sense ofproportion or appreciation of what a well-balanced design means. Forexample, the instructions just given will enable the student to cut
74
PATTERN CUTTING
^
X G
OF
L
LI Z
TT
I
C
H S
Y
Figure 41. Chukka boot standard
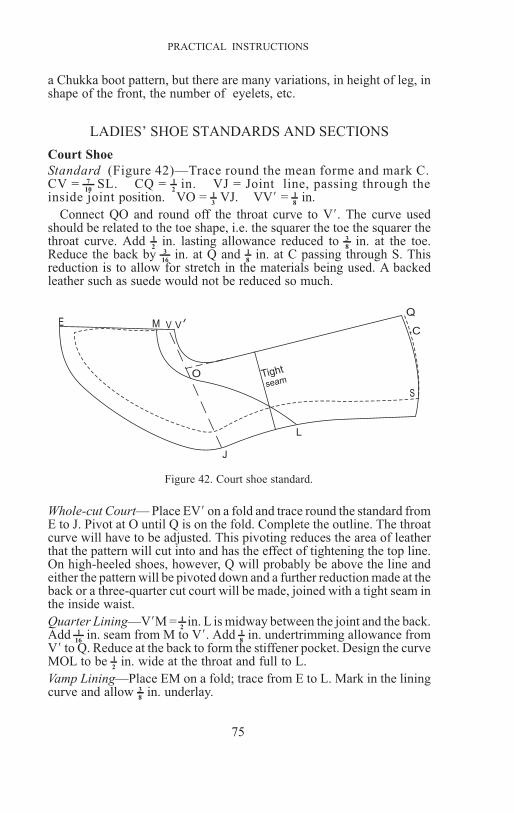
a Chukka boot pattern, but there are many variations, in height of leg, inshape of the front, the number of eyelets, etc.
LADIES’ SHOE STANDARDS AND SECTIONS
Court Shoe
Standard (Figure 42)—Trace round the mean forme and mark C.CV = 7
10SL. CQ = 1
2in. VJ = Joint line, passing through the
inside joint position. VO = 1
3VJ. VV′ = 1
8in.
Connect QO and round off the throat curve to V′. The curve usedshould be related to the toe shape, i.e. the squarer the toe the squarer thethroat curve. Add 1
2in. lasting allowance reduced to 3
8in. at the toe.
Reduce the back by 3
16in. at Q and 1
8in. at C passing through S. This
reduction is to allow for stretch in the materials being used. A backedleather such as suede would not be reduced so much.
Whole-cut Court— Place EV′ on a fold and trace round the standard fromE to J. Pivot at O until Q is on the fold. Complete the outline. The throatcurve will have to be adjusted. This pivoting reduces the area of leatherthat the pattern will cut into and has the effect of tightening the top line.On high-heeled shoes, however, Q will probably be above the line andeither the pattern will be pivoted down and a further reduction made at theback or a three-quarter cut court will be made, joined with a tight seam inthe inside waist.
Quarter Lining—V′M = 1
2in. L is midway between the joint and the back.
Add 1
16in. seam from M to V′. Add 1
8in. undertrimming allowance from
V′ to Q. Reduce at the back to form the stiffener pocket. Design the curveMOL to be 1
2in. wide at the throat and full to L.
Vamp Lining—Place EM on a fold; trace from E to L. Mark in the liningcurve and allow 3
8in. underlay.
75
PRACTICAL INSTRUCTIONS
E M
J
O
V VI
Q
C
S
L
Tight
seam
Figure 42. Court shoe standard.

Heel Grip—Most court shoes have a suede heel grip. This may consist ofa suitably shaped patch stitched on to the lining or a piece of the liningmay be cut out and reversed.
Ghillie Shoe
Standard (Figure 43)—Trace round the mean forme.
SC = 1
5SL. CQ = 1
2in. CV = 7
10SL. VT = 1
4SL. WX = 1
4in.
below VT. YZ = 1
2in. below WX.
Design the quarter curve from Q to T; add stiffener and lastingallowances. Mark on WX the loop positions, each loop to be 3
8in. wide
with 7
16in. between each one. Draw lines through each point at
right-angles to WX. A front loop is made above V, 3
16in. wide on the
standard. Each loop is extended for 5
8in. above WX and in closing is
stitched down about 5
16in. below WX.
Ghillie shoes may be made whole cut, in which case the loops are cutseparately. In the diagram a quarter curve has been drawn in and the shoemay, if required, be ‘brogued’ by the addition of wing cap and countertogether with punching and gimping.
The lining may be cut 1
2in. in front of V as for the court shoe and up the
line VT, having 1
16in. seam allowance added. This will hold the loops in
place during lasting without their having to be laced. The surplus lining istrimmed away when the shoe is finished.
GRADING
Patterns for different sizes are obtained by making and proving a model,usually a medial size, and then with the aid of one of the modern gradingmachines, producing from the model the range of sizes and fittingsrequired. Modifications of this straightforward procedure are describedon pp. 98-9.
76
PATTERN CUTTING
V
W
Y
T
X
Z Q
C
S
VI
Figure 43. Ghillie shoe standard.

The grading machines give proportional enlargement where this isrequired, and this result is obtained geometrically by the use Of theproperties of similar triangles (p. 95).
Hand grading is done, quite simply with triangles called the radial andrestriction tools.
Hand Grading
These notes are intended only to provide practical instruction; adiscussion of the principles involved will be found on pp. 95-7.
Insole Grading—Grade: length, 1
3in., width, 1
12in.
Cut an insole from a selected last and trace the outline on paper. Mark Eand S and connect the two. Find the inside and outside joint positions andthe breast of heel (Figure 44).
The number of grading points used may vary but sixteen should besufficient and they will be closest together where the curvature isgreatest, i.e. at the toe, heel and inside waist.
Connect each grading point at right-angles to ES. These are therestriction lines.
Restriction Tool—This is a right-angled triangle. XY= MJ + NJ′ andYZ=XY– 3
12ES (Figure 44).
Place XY of the restriction tool on each of the restriction lines in turnwith X on the line ES. Fold the tool parallel to YZ where it crosses theoutline of the insole, and set off the width of the tool at that point alongthe restriction line measuring from the outline.
77
PRACTICAL INSTRUCTION
C Radial tool
B
Restrictiontool
X Y
Z
Fold
J
Amountof
restriction
R NM
adial lineGrading line
R
ES
II
9
75
JI
A
Figure 44. Insole grading, using restriction tool and radial tool.

Select a radial centre (R). This may, in theory, be anywhere, but forconvenience it is placed on ES.
Connect R to each of the restriction points, with radial lines and drawlines parallel to these through the grading points (grading lines).
Radial Tool—This is a right-angled triangle with the height (AB) equal toES and the base equal to 1
3in. (Figure 44). To avoid moving the triangle
for each size to be graded it is usual to mark as many 1
3in. as sizes
required, e.g. in the diagram there are six.
Place A of the radial tool on R with AB along a radial line; fold the toolparallel to BC at the restriction point and along the fold will be found aseries of divisions. These divisions represent the amount to be graded atthat point. The grade should be marked on the grading line; the pointsnearest to R represent the smaller sizes. Repeat at every grading point.
When complete the stencil should be placed over a piece of paper andthe sizes above or below the model marked, e.g. prick through each size 7grading point and connect these points up with the model pattern. Thesize 6 points will be joined up with the size 7 pattern and so on.
Standard Grading
Trace round the standard to be graded. Find the width restriction bysetting off along the line VJ the distance VK = 3
12EC.
Connect EK and continue the restriction line parallel to the standard toS′. The back of quarter is further restricted to give a grade of 1
16in and
S′D = 3
16EC.
Select grading points as indicated in Figure 45 and transfer them wherethe grade is restricted. Make BA equal to S′D.
78
PATTERN CUTTING
A
B
CD
K
J
Q
S
SI
R (V)E
Figure 45. Standard grading: length 1
3in., width 1
12in.

The radial tool is made in the same way as for the insole grading withEC being the length.
The radial centre has been placed at V.
The procedure is from this point, the same as for insole grading.
Section Grading
The radial tool is the same as for standard grading and the restrictionline is taken from the standard. Figure 46 shows that restriction is madewherever pattern allowances have been added, i.e. folding and underlayallowances.
79
PRACTICAL INSTRUCTION
R
D
SI
Figure 46. Section grading.

7
GENERAL
THE NOTES WHICH FOLLOW form brief discussions of many of theproblems that have to be faced by the pattern cutter, and where possible,references are given in the Bibliography that will enable a student tocontinue his reading in the subject discussed.
DESIGN
More attention has been paid to the importance of design during thepast few years than ever before and no attempt will be made to repeatwhat has already been well said. But although pattern cutting is not shoedesigning nevertheless it does play a vital part in the production of acompleted design, i.e. the finished shoe. The pattern cutter frequently hasthe responsibility of preparing for three-dimensional production adrawing in two dimensions that has often been executed with the objectof attracting attention rather than to give technical information.
As has been stressed in Part I of this book the design of a shoe involvesfar more than the styling of an upper or the selection of materials; thecomplete design is only seen when the shoes have been made and theshape of the last used is just as important as the two factors of uppermaterials and style. The pattern cutter may not be in a position to select anew last for a style, but he must be familiar with the relationship betweenupper styling and last shape, since some modification of the style is oftennecessary to bring the two parts into harmony. A design is intended tohave a certain effect, e.g. lightness, robustness, or in recent years, of‘casualness’, and the last itself should have this effect. This effect must beinherent in the lines of the last and not only through the association ofideas; a last may be regarded as suitable merely because it has alwaysbeen used for a particular type of shoe whereas a fresh approach wouldreveal that a different last would give a better result.
The pattern cutter should remember that if he is unable to use a last thatblends with the style, then the style must be adapted if he is to produce anintegrated design.
LASTS
As explained in the preceding section the last must blend with the style tobe used and also it must be modelled so that the contours are harmoniousand suitable for use with a certain type of shoe. There is ample scope forchanges in appearance while still retaining the graceful lines that give atown shoe its sleek appearance and the more abrupt lines that give thesports shoe its robust look.
80
Economic factors may necessitate the use of one last for severaldifferent designs but even so the pattern cutter will find his work moreeffective if he realises that he is being asked to join two differingconceptions.
The student should obtain silhouettes of different last shapes andsketch simple shoe styles that are suitable for each. He should then try toswitch styles from one last to another, noting the incongruities that occurand the modifications that are necessary.
FORME CUTTING
The shape of the last plays a great part in forme cutting and it may bethat different methods of forme cutting should be used for different lastshapes. In practice, however, experience and dexterity play such a largepart in the successful cutting of formes that it is rare to find a patterncutter who does vary his method in such a way.
The difficulties that arise in forme cutting are due to the varyingcontours of the last and the necessity of reproducing these on a flatsurface. Forme cutting by measurement has been experimented with butthe majority of methods in use today consist of moulding some flexiblematerial to the last and marking its outline while so moulded. Inaccuracyis caused by the distortions involved either in moulding the formematerial to the last, or in flattening it out again afterwards. The unceasingflow of new methods introduced is an indication of the difficultiesinvolved in achieving a satisfactory standard of accuracy andconsistency. The methods to be described have been selected either fortheir particular interest or their general use. In each case the last is markedas explained on p. 65.
Solid Forme
A flexible yet strong fabric or paper is generally used and afterroughing out, the approximate shape is held to the last with the fingerswhile the last marks are transferred to the forme by a series of pencillines. The use of transparent paper greatly facilitates this.
As the material is moulded to the last a number of wrinkles form,particularly about the joint line, and the effect of these wrinkles is tocause the toe of the forme to be twisted across the front of the last. If theforme is marked in this position the toe will return to its normal positionwhen released and the result will be a ‘dead’ forme (Figure 47).Experience enables a pattern cutter to guard against this tendency and themethod is one of the most widely used, particularly on low-heeled lastswhere the tendency to be ‘dead’ is less serious and where the shallowcurves do not present so many difficulties in moulding. A further point tobe noted is that the compressive effect of the wrinkles results in a formethat is larger when the wrinkles are smoothed out, than the area of the lastcovered.
81
GENERAL

Slotted FormeThe method described on p. 66 is only one of the many versions of the
slotted forme which range from fastening a solid forme to the last andputting in the minimum number of slots to the ‘herringbone’ forme whichhas 3
8in. strips left on each side of a central ‘backbone’. These methods
simplify the task of moulding the material to the last and the solid formewrinkles can be eliminated. It should be noted however that the distortionnow takes another form as the slots open and overlap thus giving a patternwhich is in some places larger and in other places smaller than thecorresponding section of the last.
The slots tend to open down the front of the last and the effect of this isto twist the toe of the forme away from the front of the last and when thetoe returns to its normal position the result is a ‘sprung’ forme (Figure47). Again, an experienced pattern cutter is able to guard against thistendency.
Blocked Forme
The object of this method is to obtain greater accuracy in the forme andthus get a better fit of the upper on the last. The last is fitted with insole,toe-puff and stiffener thus eliminating the necessity for makingapproximate allowances for these on the standard. A paper forme, wholecut, is tacked closely to the last, as many cuts being made as are necessaryand the strips made are allowed to overlap or part. The surplus round thefeather is lasted’ over and stuck down. The tacks are then removed andreplaced by strips of adhesive tape thus forming a complete shell over thesurface of the last, the tape being prevented from sticking to the last bythe paper forme.
The shell is then cut round the feather of the last, down the back and upthe instep from the vamp point. On removal from the last the shape isretained.
The flattening process is the key to the whole operation and must bedone with the greatest care. Cuts are made in the shell but except
82
PATTERN CUTTING
Sprung forme‘
‘
‘
‘
Dead forme
Figure 47. ‘Sprung’ and ‘dead’ formes.

round the toe the strips must meet round the perimeter thus retaining theactual measurements of the last.
The amount of spring given to the forme varies with individuals andwith the method of flattening. Experiment is necessary to discover theappropriate amount of spring for the different types of last.
It is claimed that the better fitting properties of this method reduce theamount of seam breakages in manufacture and that the uppers can belasted more easily.
Geometric Forme
As already remarked, attempts have been made to overcome thedistortion involved in moulding forme material to the last, by measuringthe distance between selected points on the last and transferring to paper,gradually building up a complete forme based on accurate measurements.One advantage claimed for formes constructed in this way is thatdifferent people should get the same results. This method has neverbecome popular partly owing to the extra time taken, (an objection whichapplies even more strongly to the blocked forme) and partly because it isbelieved that traditional methods give results which are as good.
Stretch and Substance in Forme Cutting
Discussion about accuracy in forme cutting has tended to overlook thegreat difference in substance and stretch in the materials used for shoeuppers. What is the advantage, so the argument runs, in gaining 1
32in. here
or there in cutting the forme, when the upper may vary in substance andstretch enough to nullify a much larger saving? Until we have uniformmaterial such small increases in accuracy do not affect the issue.
A method of forme cutting has been described by F. P. Wootton (seeBibliography) which is intended to allow for these two factors by usingthe actual upper material for the forme. The procedure is as follows.Formes are cut by an orthodox method and lining patterns are producedcut from the material to be used and lasted into position over the insole;toe puff and stiffener are also positioned.
A whole-cut upper with an instep piece inserted is prepared from theactual leather to be used and lasted over the fitted-up last. The feather lineis then marked.
Experiment has shown that if the lasted upper is removed and flattenedwithin 10 min. the permanent distortion is restricted to a small area overthe top of the toes; elsewhere the leather regains its original shape.
Thus a forme is produced which allows for the substance and stretch ofthe material to be used, and the lasting allowance which is added is forlasting and not a combination of lasting, substance and reduction forstretch allowance.
83
GENERAL

Designing on the Last
One of the oldest methods of forme production was to use two pieces ofbasil cut to a forme obtained in paper, add a small lasting allowance andthen fasten the leather to the last. This method has been revived with theintroduction of the open type of shoe fashionable today, particularly thoseshoes with an upper consisting of straps. Inside and outside paper formesare cut and the shapes reproduced in leather. The two sections arezigzagged together down the front and back and then stuck down to thelast.
When the leather has been stuck the pattern cutter designs his upper onthe last thus avoiding one of the problems that arises when designing onthe flat, that is, what effect will the contours of the last have upon the linesdrawn. Removal of the leather from the last may result in some stretchingso the ‘shell’ is coated with pyroxylin cement before attempting to take itoff the last.
STANDARDS
The instructions already given for standard construction have consistedof definite proportions and measurements. Such an approach is quitesuitable for styles that are not subject to the vagaries of fashion, althoughof course even a man’s Oxford shoe varies slightly. The most noticeablechanges as compared with some years ago are the widening of the throatto match the wide-toed lasts and the greater use of perforation. Neither ofthese changes affects the standard however, and the instructions givenwill not have to be varied within a few months. It has already beenpointed out that the Chukka boot and, it may be added, the Ghillie stylegiven, are not so stable; there are many versions of both. At the extremeend of the fashion trade we have a difference between each shoe producedand there can be no question of producing the standard pattern to somepre-determined measurements. Each style presents new problems whichapply to that style alone.
It is worth while enquiring why certain styles have retained theirpopularity with such slight changes. Part of the answer lies, doubtless, inthe reputed conservatism of men, but it is also likely that the stylesthemselves are fundamental in that they are reduced to essentials and areperfectly integrated. The Oxford shoe is, on this theory, a satisfactorydesign from the point of view of foot protection (given urban conditions),as an article of dress (appearance) and, lastly the dividing up of thesections into vamp, cap and quarter enables leather to be cut to the bestadvantage and lasting to be carried out correctly.
Shoe Standards
The proportions used in the production of an Oxford shoe are obtainedprimarily from a study of foot anatomy and movement. The depths ofback and sides are governed by the position of the ankle
84
PATTERN CUTTING

bones and the necessity of keeping the shoe on the foot. The top of thefacing must not be so high as to restrict the free movement of the anklejoint and the vamp position must be low enough to permit easy entry andyet high enough to clear the ‘crease’ line of the shoe, caused by theflexing of the foot. The cap depth must not rub the foot when the shoe isflexed. Obviously these requirements do not lead to definitemeasurements, and certain proportions, notably the vamp depth, mayvary. For example a plain front Oxford should have a vamp 3
16in. shorter
than one with a cap. Also shoes in the lower-priced ranges often have ashorter vamp as this increases cutting economy and enables leather with asmaller proportion of prime to be used effectively.
Ankle Boot Standards
The additional factor that must be considered is the relation betweenthe foot and the leg. The leg should be at right-angles to the foot, but asthe heel is raised this angle changes and of course the angle of the leg onthe pattern must be changed accordingly. There are different methods ofboot standard construction allowing for this changing angle or ‘pitch’as itis called. Figure 48 illustrates one of these methods.
In the method of construction shown in Figure 48 it is assumed that aperpendicular through the counterpoint will be crossed by the back of legcurve at the ankle line. As the heel is raised the back of leg on the ankleline is in front of perpendicular. The distance then between T and T′ is theamount of pitch imparted to the pattern.
85
GENERAL
T ¢ T
Figure 48. Ankle boot standard.

The pitch increases as the heel is raised and also with boots made fromheavy leathers, since the forward tendency of the upper is less.The usual‘seats up’ method of lasting tends to hold back the upper and thereforemore forward pitch is needed than for a hand lasted (hoisted) upper.
High Leg Boots
When a boot that covers the calf is to be made two fresh factors comeinto the construction:
(1) the inclination of the front of the leg;(2) in the case of riding boots, the pass point.
The line of the front of the leg curves slightly and the relationshipbetween this line and the ground will vary as the heel is raised. High legboots are usually made with low heels and the inclination line is often
made at right-angles to the ground, the slight curvature of the leg beingdisregarded. An alternative method puts the front of leg 1
8in. forward at
the top, thus giving a slight forward inclination (Figure 49).
As the riding boot has no means of adjustment the leg must be madelarge enough to permit the insertion of the foot. This means that whatwould normally be the slimmest part of the leg, the ankle, must be madeequal to, or slightly larger than the long heel measurement of the foot(Figure 49).
86
PATTERN MAKING
Forward
inclination
Pass line
Figure 49. High leg boot.

Fashion Shoes
Assuming that a design has been approved and that the pattern cutternow has the task of translating the drawing into a set of patterns, he mayachieve this in two different ways:
(1) He may sketch the design direct on to a tracing of his forme, usingsome well-established measurements such as height of back, depth ofvamp to assist him. (The design may require a short front, but the patterncutter still needs to know the normal vamp depth to use as a guide.) Apartfrom these few basic measurements he must rely on his own sense of stylein modifying, if necessary, the lines of the drawing, making them blendwith the lines of the last. He will rely on his experience in makingallowances for the effect of lasting on the lines and curves drawn on theflat paper.
(2) This method is described on p. 84. The shoe is designed on the lastand the patterns obtained after the formes have been removed by prickingthrough on to paper. It has already been pointed out that the popularity ofshoes with numerous straps, all of which need to be positioned verycarefully, has made this method of standard construction an extremelyuseful one.
Inside and Outside Standards
When the inside and outside formes have been cut and compared, itmay be found that there are very great differences between them, due tothe shape of the last and the distribution of the wood. These differencesare as follows: (1) the shape of the forepart, (2) the amount of spring, (3)the length, (4) the distance from back to vamp.
The difference across the forepart of the last can be adjusted very easilyby cutting a mean forme and marking both inside and outside lines readyfor transferring to the standard and sections.
The other differences are usually present to some extent and if not toomarked a compromise can be made. If however the differences are verygreat it will be necessary to cut inside and outside standards.
The use of asymmetrical designs makes it necessary to produce insideand outside standards and the practice of designing these and other styleson the last has this effect.
When inside and outside patterns are being cut one of the mostimportant differences that derives from the anatomy of the foot is thequarter curve under the ankle bones. The inside ankle bone is higher andfurther forward than the outside and the quarter curve can then beadjusted accordingly.
SECTION PATTERNS
Once the standard has been prepared the cutting of the sections does not,as a rule, present many difficulties. The actual tracing of the sections maybe done with a blunt knife or by cutting along the section curves on thestandard, leaving small ‘bridges’ to keep the standard
87
GENERAL
Intact; the sections are then obtained by marking through the cuts with ascriber and adding the necessary allowances.
Further adjustments may be made necessary in order to obtain greatereconomy, e.g.the wings of a vamp may be ‘sprung’ in towards each otherin order to provide a closer interlock or an inconspicuous seam may bemade in order to avoid having an awkwardly shaped pattern.
PATTERN ALLOWANCES
Tables 3, 4 and 5 give a simple and easily memorised list of allowances,but it should be noted that there are variations. The leather may be light,such as a reptile, but it is necessary to apply an adhesive backer thatprevents nearly all stretching; under these
88
PATTERN CUTTING
Material
Allowance (in.) for types of edge
Folded Gimped*Bur-
nishedBagged† Bound
Fabric
Light leather
Medium leatherHeavy leather
14
1414
14
532
532
316
316
18
00
0
0
0
Table 3. Edge Allowances for Various Types of Edge andDifferent materials
* The gimping allowance includes 1
4in. for giving a clean edge over the actual
size of the gimp.
† The allowance of 1
4in. for bagging must be balanced by a reduction on the
corresponding section (see Figure 72). The actual reduction may vary according to thecurvature of the edge.
MaterialAllowance (in.) for types of seam
Fabric
Light leatherMedium leatherHeavy leather
7161238
38
14
112
116
18
Tight Lap Zigzag
.. ..
.. ......
..
..
..
..
Table 4. Seam Allowances for Various Types of Seam andDifferent Materials

circumstances a lasting allowance suitable for a heavy upper may have tobe used. The converse of this can be found in the use of a heavy leatherthat is very stretchy.
In addition to this the lasting allowance is not the same from toe to seat.The practical instructions given show an increase of 1
8in. over the joints
and leave the waist full, since the heel to toe tension set up makes the sidepulls more difficult.
SPRING IN PATTERNS
This practice has been referred to several times and it can now be dealtwith in some detail. The object to springing a pattern may be one of thefollowing or a combination:
(1) to effect economy in cutting (Figure 50);(2) to improve fit in lasting and therefore in wear (Figure 51);(3) to make possible the use of certain sections (Figure 52).
The effect of springing a pattern, or changing the relationship betweenone part and another of the same patterns is to lengthen one line andshorten another. This effect is seen on Figure 51 where the springing isdone for that purpose. The same thing happens in Figures 50 and 52 but isincidental since the springing is done for another purpose.
89
GENERAL
MaterialHand
Allowance (in.) for methods of lasting
WeltedMachine
SewnVeldt-schoen
Light leatherMedium leatherHeavy leather
. .
. .
61 6
71 6
71 6
81 6
81 6
81 6
91 6
91 6
91 6
1 01 6
1 01 61 11 6
Table 5. Lasting Allowance for Various Methods of Lasting andDifferent Materials
Sprung
Figure 50. By springing, a closer interlock will beobtained.

In Figure 51 S′I and Q′I are shorter than SI and QI thus giving addedtension when the back of the quarter is pulled down to its originalposition. The amount of spring ( 3
16in. is suggested) must be applied with
care since if the tension set up is too great the result may be burst seams inmanufacture or a distorted quarter when the last is removed.
PROVING NEW STYLES
The procedure adopted in producing a new range of shoes varies with thetype of shoe and the extent of the size and fitting scale to be used.
The sample should be made on a middle size last since when thepatterns are graded there is a danger that the desired appearance may
90
PATTERN CUTTING
Q¢
Q
I
¢S
SPivot
Pivot
Figure 51. Springing the toe enables the laster to get the upper down to the lastacross the front; springing the back increases the tension along the top line.
Figure 52. The tongue must be sprung in order to cut vampand tongue in one piece.

become distorted if too many sizes have been graded from the model. Inaddition to this a style which looks most attractive on a size 4 may notlook so well on a size 9.
When the sample pattern has been cut the following steps may be takenin preparing for bulk production:
(1) Pull-over
This is a form often used in testing out a new design. The leatherselected is used and one odd shoe cut, possibly unlined. This quick test isintended to give a clearer idea of what the finished shoe will look like andmay be used before the design is approved.
(2) Samples
This is a more prolonged and exacting test. The pair of shoes is cut andmade throughout, watched and checked at every point since what iswanted here is not only a finished sample, but a report on the productionof the shoe. Certain stages in making the sample may reveal unexpectedhitches and these must be eliminated before the next step can be taken.
(3) Pilot Experiment
When the sample has been approved by both sales and productionmanagers the patterns may be graded, not fully, but into the smaller andlarger sizes and fittings. This test on a larger scale will show whether thegrade is right, and provide a further check on production problems. It willalso show whether the grading has resulted in any distortion of theproportion of the shoe.
(4) Pattern Making
Finally the patterns are graded in the sizes required and duplicatedwhere necessary. Stitch markers are made and any clicking press knives,cut-out dies, etc., that are wanted placed on order.
An additional point that should be checked is the range of leathers to beused for the new sample. These should be tested to see if the same patterncan be used or if some modification is necessary.
PATTERN STANDARDISATION
The wide variety of shoes made today by the shoe manufacturer meansthat the number of patterns to be stored has been very greatly increased.This increase affects not only capital expenditure but also productionspeed, since modern methods of production are most effective whenvariety is reduced to a minimum. The urgency of standardisation is evengreater when the considerably more expensive clicking dies are used.
The list which follows gives some of the advantages derived from
91
GENERAL

the standardisation of patterns. Not all are of equal importance, but allshould be considered:
(1) The outlay on patterns and knives is reduced.(2) The storage space required is less.(3) The clicker handles fewer patterns and can increase his output.(4) The cost of cut-out and marking dies is reduced.(5) Styles can be ‘switched’ from one last to another.(6) Fewer stitch markers are needed, speeding up closing.(7) Press cutting can be made economical.
Cost of Patterns and Knives
The cost of a pattern for a hand clicker is not great, in view of thenumber of times it will be used, and any saving on this ground alone is notlikely to be worth while, since some sacrifice in accuracy or appearance isusually involved. When a die for the clicking press is affected the matteris different because of the much higher cost and the saving may be worthmaking.
Storage Space
Again any saving here on patterns is not likely to be of greatimportance, although this is not to say that such small economies shouldbe ignored. The storage of press knives is very different. As far aspossible these knives are stored near to the presses and there is space foronly a limited number; economy of numbers is therefore essential,whether the knives are hung on boards beside the presses, placed on rackscontaining shallow shelves or kept in specially-made cabinets fitted withshallow drawers.
Fewer Patterns to Handle
The more patterns a clicker has to handle the less time will he be able todevote to cutting. Where the quantity being produced is large enough thepractice is to use work tickets of, say, twelve pairs all the same size. Thisachieves the same result as a standardised pattern, as far as the clicker isconcerned. Where this practice is not possible some saving can be madeby using some sections in sizes only, e.g. caps. Another means is to usehalf fittings. Thus if 3, 4, 5 and 6 fitting shoes are being made the patternsmay be graded into 3 1
2and 5 1
2fittings only effecting quite a large saving.
The press clicker gains even more from such practices because theknives he has to use are relatively more cumbersome and must be handledwith greater care. A great advance has been made possible by theintroduction of the double-edged knife eliminating the need for rights andlefts (see p. 131).
Cost of Cut-out Dies
The introduction of the Freeman and other cut-out presses (see p. 157)has resulted in the greatest demand for a standardised pattern.
92
PATTERN CUTTING

The cost of these cut-out dies is so great that even where some adjustmentfor different sizes is possible the whole system of pattern grading hasbeen modified to make one die do as much work as possible. This gradingchange is called centre grading and is described more fully on p. 99.
Using One Pattern for Several Lasts
In the fashion trade it is not at all unusual for an order to be receivedspecifying a certain style but asking that it should be made on a differentlast. If the required last is completely different there is little that can bedone except decide whether the size of the order is sufficient to justifymaking what is, in effect, a new shoe. If however the two lasts are notdissimilar, a little forethought and planning can make it possible for oneupper to be fitted on to several different lasts. The way in which this canbe done has been very fully explained by C. R. Wilkinson in a thesiscalled ‘Rational Pattern Cutting’, and every student is advised to studythis carefully. There is not the space here to deal with the method, exceptto indicate the general approach.
Lasts are grouped according to their principal characteristic (heelheight) and a master forme prepared from the individual formes for eachlast. The master forme is not simply one bigger than all the others; anyindividual forme that differs greatly may have to be treated separately orit may be possible to record the fact that the last needs a larger or smallerforepart than the others in that group. In the same way master standardsare prepared so that different styles can be designed that may yet havesome features in common.
An essential part of the system is the control of new lasts, to ensure that,as far as possible, a new last will fit into an existing group.
Stitch Markers
Although the cost of dies mentioned above is a more potent factor, theeffect of the use of stitch markers on production has also been important(see p. 153). For a long time these machines were used solely to imprintguide lines on the upper for decorative stitching and punching. Morerecently the same method has been used for marking the lines ofunderlays on sections, thus providing the closer with a continuous line towork to instead of three or four widely-spaced small holes. The value ofthis change when linked with the ‘held-together’ method of closing isobvious.
At the same time if the marker and matrix had to be changed for eachsize the operation would be slowed up and again there is pressure forstandardisation that will enable one marker to be used for several sizes.
Economy in the Use of Press Cutting
Owing to the cost of press knives the use of the press is not economicalunless a sufficient quantity is to be cut, so that the advantage of
93
GENERAL
speed outweighs the capital expenditure. If every style were completelydifferent it would be impossible for any save the largest or mostspecialised factories to use clicking presses. If however steps are taken sothat one pattern can be used for two or more different sizes of shoes thenecessary quantity can be achieved (see p. 99).
CASTER SHAPES
Sole Shapes
The wide variety of shoe styles made in most shoe factories todayinvolves a large number of different sole shapes. To make separate pressknives or dies for each size and shape would be an extremely expensiveundertaking, the storage space needed would be enormous and the pressman would be obliged to change his knives frequently resulting in lowercutting totals. The last point is even more important when the varyingqualities and substances found in any one bend are considered; it wouldbe almost impossible for the press man to use the different knives so as toobtain even approximately the correct grade in all cases.
In addition, the sole for a welted shoe is rounded to shape on the shoe,since there can be no certainty that all shoes will be exactly the sameshape as the insole channelling, lasting and welt sewing operations arepartly governed by the quality of the material being used as well as theskill of the operator.
Master Shapes
If all the soles of a given size could be included in a master shape, thecutting and sorting of the cut stock would be greatly simplified. Such ameasure of standardisation is seldom if ever practicable, because of thedifferences that are likely to occur between different sole shapes of thesame size, but it is usually possible for three master shapes to be madecovering the majority of sole shapes required; an extreme style may betreated separately if enlarging a master shape to include it would involvean undesirable amount of waste.
It should be realised that the use of master knives will involve morewaste than the use of individual sole shapes, but this is outweighed by thefactors listed above.
Two of the most important differences when grouping soles to obtain amaster shape, are (1) the amount of ‘twist’ in the sole, and (2) the widthacross the tread. The shape of the toe may be the most noticeabledifference but it is not the most important since caster shapes can be madewith wide toes, using leather that would otherwise be wasted in imperfectinterlocking.
When deciding on the range of soles to be included in any one mastershape it is necessary to take into account not only the amount of wasteinvolved but also the relative sales value of the different shapes, e.g. asole pattern that is only likely to be required in small quantities would notbe included in a sole master shape if its
94
PATTERN CUTTING

inclusion meant making the master shape larger, since extra waste wouldbe involved on all the other shapes. These calculations can be made by atrial and error method, whereby the different shapes are grouped,examined and moved from one group to another until what is thought tobe the best grouping is obtained. Amore precise method has been evolvedby the Research Association, whereby the different shapes are classified,a sales value given to each and the most economical grouping determinedmathematically.
Caster KnivesThe master shapes so obtained are marked out on a sheet of paper in the
system to be used by the press man, and the inevitable waste betweensoles can be reduced by adding to the master outline until an almostperfect interlock is obtained, nearly all waste being made at thesubsequent rounding operation.
This adjustment has the advantages that in some cases a larger soleshape can be included without additional waste, and the press man has aclearly defined system, which is simple to follow.
PRINCIPLES OF GRADING
Shoes, and therefore patterns, are made in different sizes and thepattern-cutter produces the range of sizes required by enlarging orreducing the model pattern which has been tested. This process is knownas grading. In the factories a power grading machine is used, and byadjusting the setting of the machine patterns of any required size can beobtained. Hand grading is much slower, but demonstrates the principleson which all geometric grading is based; it will be noticed that on p. 77reference is made to a radial and a restriction tool, both of which aretriangles, and it is on the properties of similar triangles that all grading,whether by hand or machine, rests.
Properties of Similar TrianglesTriangles having their corresponding angles equal are said to be
similar. Thus in Figure 53 the triangles ABC and DEF are similar because
BAG = EDF, ABC = DEF, ACB = DFE. The triangles differ in size butare the same shape.
95
GENERAL
^^^^^^
A
B C
D
E F
Figure 53. Similar triangles.

The important fact for pattern grading is that their corresponding sidesare proportional, thus, AB : DE = AC : DF = BC : EF. Or, to give asimple example, if the difference in size is such that DE = 1
2AB, then DF
= 1
2AC and EF = 1
2BC.
Radial Projection
The properties of similar triangles make possible the proportionalenlargement of any figure by means of radial projection. Thus in Figure54a the figure MNOP is enlarged so that its perimeter is twice as long asbefore.
The enlargement is done by drawing lines from a radial centre R(which may be inside (Figure 54a) or outside (Figure 54b) the figure)through the points MNOP. If these radial lines are extended so that RM′=
2RM and RP′ = 2RP, then M′P′ will be twice MP, since RMP and RM′P′
are similar triangles and their corresponding sides are proportional.
Similar considerations give the proportional enlargement of OP, ON, andNM. The two diagrams show that what is involved in each case is reallyfour pairs of similar triangles. The triangles RMP and RM′P′ in Figure54a are different from those in Figure 54b but the enlarged figure is thesame because the proportions are the same, e.g. RP′= 2 RP in each case.
The Pantograph
The properties of similar triangles are used in hand grading exactly asdescribed in the preceding section, but for machine grading a mechanicaldevice must be used to carry the principle into effect. The device isknown as a pantograph, and the following explanation describes apantograph which can be used to grade shoe patterns in the traditionalsizes.
The pantograph illustrated in Figure 55 consists of four rods FA, AT,CP, BP, jointed at B, A, C, P. F is a follower, T a tracing point
96
PATTERN CUTTING
a
MM
I
MI
N
O OI O
I
P
PI
PI
R
N
I
NI
N
O
P
R
M
b
Figure 54. Radial projection

and P a fixed point. BP is equal and parallel to AC, CP is equal andparallel to BA, thus no matter how the device is moved, ABPC willalways be a parallelogram. BF = BP = AC; CT = CP = AB. It can beshown by similar triangles that FPT always remain in a straight line.
If P is fixed to a table and the follower (F) moved round a figure, thetracing point (T) will mark out a similar figure. If the sections FB, BA,BP, PC, AC, CT are equal the figure traced will be exactly the same as theoriginal or model.
If the sections CT, CP, AB are longer than the sections FB, BP, AC thefigure traced will be correspondingly larger, and the ratio of the perimeterof the new figure to the original one will be the same as the ratio of BA toFB. Therefore any desired size can be produced from an original modelby altering the length of the parts of the pantograph to the required ratio.
Grading for shoe patterns can be done with a device similar to the onedescribed if made to the necessary dimensions. Assume the length of astandard pattern to be 12 in. and the required increase 1
3in., this
represents an increase in the ratio 36:37 (12 in. = 36
3in., 12 1
3in. = 37
3in.)
If the pantograph illustrated is made so that it is adjustable and a newsetting made so that FB, BP, AC = 36 units and CT, BA, PC = 37 units apattern 12 in. long can be enlarged by 1
3in. in length and proportionally in
all directions, e.g. if at one point the width is one-quarter of the length theincrease applied at that point will be one-quarter of the length increase.
In general terms, as the width or length of the part is to the length of thewhole so the grade of the part is to the grade of the whole.Example—Length of the whole 12 in. Grade of the whole 1
3in.
Length of the part (e.g. a cap) 3 1
2in.
Let grade of the part be xThen x/ 1
3= 3 1
2/12
\ x = 1
3´ 1
12´ 7
2in.
= 1
10in. (nearest fraction).
97
GENERAL
F
B
A
C
PT
Figure 55. The pantograph.

Restrictions
In pattern grading the increases are seldom left to proportional grading,but are fixed beforehand. The method of grading is unchanged but mustbe modified or restricted to give the required increase.
Example—Length of the whole 12 in. Grade of the whole 1
3in.
Length of the part 3 1
2in. Grade of the part 1
12in.
It is obvious that the figures do not give the correct geometricproportion, therefore one factor, the length of the part, must be modified.To discover what length will give 1
12in. grade the following calculation
must be performed:
Let y be required lengthThen 1
12/ 1
3= y
∴ y = 1
12× 3
1× 12
1in.
= 3 in.
The difference between the actual length (3 1
2in.) and the restricted
length (3 in.) is the amount of restriction, in this case 1
2in.
In machine grading an adjustment is made to the pantographmechanism so that although the follower is moved round the originalmodel the tracer applies the required increase of 1
12in. as if the part were
only 3 in. long.An example of the application of restriction to hand grading is given in
Figure 44.Further restrictions are applied to pattern grading when it is necessary
for certain parts to be controlled in their size.Underlays and folding allowances may be completely restricted so that
no increase is applied throughout the range of sizes. The width of bars orstraps is also controlled so that there is no increase. Lastly there is the useof co-ordinated and centre grading both of which involve the applicationof restriction to the model patterns.
Co-ordinated Grading
The name derives from the fact that the grade is primarily applied tolasts, and if the uppers are to fit correctly it is essential that the patterngrade should be modified in the same way.
Lasts graded normally would be enlarged in all directions when largersizes were being graded. This would mean that the toe spring, heel heightand waist curvature would change along with the rest of the last. Theobject of co-ordination is to produce lasts of all sizes in a range with thesame toe spring, heel height and waist curvature, thus simplifying shoemaking when selecting heels, shanks and stiffeners. Instead of gradingfrom one model size all the sizes that are required, a few key sizes aregraded and then wedged at the joint and breast of heel to bring the springand heel height back to the model measurements. These alterations meanthat the measurements on the lasts have been altered, but the modelmaker adjusts this, in
98
PATTERN CUTTING

effect creating not one but a range of models all having the samecharacteristics.
Full co-ordination is not always practised, it being regarded assufficient if the heel height alone is controlled. When patterns are gradedfor this co-ordination it is essential that the position of the back of thequarters should be controlled so that again, the same heel height is keptthroughout the range.
Centre Grading
It has already been pointed out that normal grading involves theenlargement or reduction of all lines on a pattern. Further, it was notedthat the increasing use made of cut-out and marker dies together withtheir high cost had led to a demand for a standardised pattern.Standardised in this connection, means patterns that retain certainfeatures unchanged regardless of their size.
Centre grading may be done using, for example, one vamp curve for awhole range of sizes (Figure 56, one die). This is an extreme form andmust involve an appreciable change in the appearance of the larger andsmaller sizes. A better practice is to use two curves or even three (two dieand three die grading). Examples of this grouping are as follows:
99
GENERAL
5
3 4 5 6 7
3 5 6
12
12
12
12
12
12
Normal grading from one model size.
Co-ordinated grading from threemodels.
77 88 99
Figure 56. One die centre grading.
Range of sizes in groupCentre grade size
.... ..
3 to 96
3 to 65
12
and 7 to 98
One Die Two Die
When centre grading is done the lasting edge and the back curve aregraded normally to sizes and half sizes.
GRADING MACHINES
All grading machines are based on the principle of the pantograph (p. 96),most making use of a double-linked pantograph that enables length andwidth settings to be made. Modifications of this straight-forward gradeconsist of restriction devices that enable certain features such asunderlays, folding allowances, straps, etc., to be kept at their originalwidth and not graded up or down. Further modifications are necessary inorder to produce the co-ordinated and centre-graded patterns alreadydescribed.
The list which follows is not exhaustive but includes those machines ingeneral use.
Hartford
This is a hand-operated machine that marks on card or cuts from paperthe sizes required. The model is fastened to the bed of the machine and afollower wheel attached to one carriage is moved round the model. Atracer wheel on another carriage linked to the first then marks out thegraded pattern. The machine is still used very widely by lastmanufacturers for grading the paper models used to check the accuracy ofthe graded lasts.
Reed
This machine is a power grader that cuts the patterns out at the sametime as they are graded. Although newer machines have additionalfeatures it is claimed that the Reed gives adequate results.
Linham
This Swedish machine which is popular in this country is capable ofgiving all the refinements that are expected in pattern grading.
Universal
This is a BUSMC machine. The most recent model, the No. 2, isclaimed to be the last word in pattern grading. The machine has a fixedbase which carries the cutting mechanism and adjustable pivots for thetwo pantographs. The moving part or jack carries a frame to which isfastened the model and the pattern board or other material to be used.
The pantographs are fixed to the jack and also to the base at a movablepoint. As the jack can be moved in any direction it is clear
100
PATTERN CUTTING
Range of sizes in groupCentre grade size
.... ..
3 to 54
and 5 to 76
12
12
and 7 to 98
Three Die

that the pantographs will also be moved. A guide pin is situated at thecentre of the pantograph bars and will therefore move as the jack ismoved. The model is run round the guide pin which is not fixed but has itsrange of movement limited by the size adjustments made.
With a model size setting the jack is moved, carrying the model round astationary guide pin, the pattern material follows the same line round thecutting punch. If a larger setting is made, the guide pin moves as themodel passes round it with the result that the pattern material travels agreater distance, producing a larger pattern.
PATTERN MAKING
When a sample pattern has passed all tests and has received finalapproval it is sent to the pattern room along with instructions as to therange of sizes and fittings required, the sizes that may need to beduplicated or triplicated and (vitally important), the method of grading tobe used.
Grading models are cut from sheet iron, checked with the greatest care,and the full range of patterns graded on one of the machines referred toabove. If the patterns have been cut from card no filing or sandpaperingwill be necessary, except perhaps at the corners. The use of sheet iron orzinc for the cutting patterns complicates this, because although thegraders will cut such patterns, most patternmakers prefer to avoid thestrain on the machine and grade in stiff paper, cutting the metal patternsby hand with a pair of gap shears.
After grading the patterns are checked for the accuracy of the grade andthen stamped with any details that may be necessary for identification.The information so put on the pattern will vary according to the codingused in the factory and the system of pattern storage. In most cases detailsof edge treatment, e.g. folded, gimped, will be stamped near the edgereferred to and in the centre of the pattern will appear the size, fitting, lastno. and style no. of the pattern. In some cases these items can becombined in a single code, the size only being separate. In this case thecode number can only refer to that pattern on that last, and if the numberis also printed on the clickers’ instructions the danger of mistake isreduced.
Card patterns are now ‘bound’ with brass or steel strip. This tape maybe bought ready moulded into a U-shape or it may be obtained in coils offlat tape and moulded as required in the factory on a strip-formingmachine which also can be used to measure the exact length required forany pattern. The binding machine consists of two wheels and a guide, thepattern, with the moulded tape in position is placed in between the wheelsand pressure put on thus clamping the tape on the pattern which is then‘fed’between the wheels. The tape may be secured by soldering the join.
If the clickers have to ‘prick’ the sections, small holes will be punchedwhere necessary and protected by the insertion of an eyelet.
101
GENERAL

STITCH MARKING
The increasing use of stitch markers both for decorative stitching and forunderlay marking has already been noted. This has meant additionalwork in the pattern room where the markers are prepared. There are, ofcourse, a number of variations in the way these are made.
Differences in construction between the machines used are restrictedto:
(1) the way in which the markers are fitted into the machine;(2) the marking medium (usually marking ink on sponge rubber);(3) the means of operation (by hand or foot).
The markers themselves vary considerably, but the following areamong the best known:
(a) 1
2in. plywood is grooved with a special machine (or a closing
machine fitted with a chisel instead of a needle) to the required depth, anda strip of 1
4in. phosphor-bronze tape inserted and pressed home. The
board is often coated with shellac to help keep the tape in place andfinally treated with varnish.
(b) A strip of metal, triangular in cross-section, is soldered on to a metalplate.
(c) The tape is held on to the board by means of small split pins whichare clamped into holes punched into the board.
The matrix or bed on which the section to be marked is fitted usuallyconsists of a sheet of card on to which part of the outline of the section cutfrom card is fastened.
Another method is to cut the outline of the section from one sheet ofcard and fasten the skeleton on to another piece of card.
The operation of stitch marking is described on p. 153.
PATTERN STORAGE
Undoubtedly the most satisfactory method is for the pattern store to beunder the control of one man, who issues patterns to the clickers. Theadvantages may be claimed to be as follows:
(1) Patterns can be checked in and out, lessening the number of losses.(2) Patterns can be examined and repairs carried out when necessary.(3) The clicker is saved time.(4) There should be no mistakes in the pattern used.
This method is not widely used, largely because the size of the averageshoe factory makes it more economical for the clickers to be paid forfinding their own patterns. A pattern system is therefore needed whichwill enable clickers to return a set of patterns to the correct place quickly.
102
PATTERN CUTTING

One of the best methods of pattern storage makes use of metal racksinto which are fitted bins holding the patterns. If the racks are clearlynumbered and the bins numbered correspondingly a glance will showwhether a bin is in its right place. Each bin is fitted with a small frame intowhich can be inserted a card carrying details of the patterns in the bin.
A system of coding which gives the patterns consecutive numbers willenable them to be stored so that locating any style will be easy and quick.
103
GENERAL


PART III
CLICKING
A. V. GOODFELLOW


INTRODUCTION
ALTHOUGH MOST SHOE FACTORIES are organised on a departmental basisthis should not be allowed to obscure the fact that the making of a shoeinvolves a sequence of processes each of which affects, to a greater orlesser extent, other processes. The work done in the clicking room affectsa greater number of subsequent operations than any other single process,and this fact alone is sufficient to justify the closest study. If leather isused, it is often so variable that great difficulty will be experienced inmaking the shoes unless the clicker is thoroughly familiar with hismaterial, and thus able to make the best use of it. In order to enable him todo this every effort must be made to simplify clicking by purchasingmaterials that are suited to the shoes for which they are intended, and bycareful sorting before issue. Even with this help the clicker must be askilled craftsman, and a further check applied in the close scrutiny of hisresults.
Methods of cutting have been established by hand clickers, but the everincreasing use of the press means that traditional methods must beinvestigated to see if any modifications are needed in order to take fulladvantage of the new technique. Attempts are continually being made tointroduce some uniformity into the material by the use of fabric backers,and where these are used some change in traditional cutting systems ispossible. If a new synthetic and uniform material were successfullyintroduced the use of presses would be greatly extended, but it should be apoint of special concern to all supervisors to ensure that practicesperfectly adapted to hand clicking should not be taken over and used,uncritically, by the press clicker.
The cost of upper materials is such that the greatest care must be takenwhen estimating or checking their use. A systematic examination of therecords kept is necessary in order to check the profit or loss that may bemade on cutting, with the object of discovering the cause and finding aremedy if one is needed.
The section is concerned then, not only with the tools and technique ofthe clicker, but also with the buying and selection of the materials used,their special characteristics as they affect the shoe maker, with themethods of costing in general use and with the management of the roomand leather store.
107

8
MATERIALS
CLASSIFICATION
A STRICTLY SCIENTIFIC CLASSIFICATION into animal, vegetable and,perhaps, synthetic categories would not prove satisfactory or particularlyhelpful since the materials used for shoe uppers may cut across thesedivisions. Amore useful classification is under the broad headings as theyare used in the trade, i.e. leather, fabric, synthetics.
Leather
(1) Mammals (domestic), e.g. cattle, goat, sheep, pig, horse.(2) Mammals (wild), e.g. kangaroo, badger, deer, seal.(3) Reptiles, e.g. snake, lizard, crocodile, alligator.(4) Birds and fishes, e.g. ostrich, shark, sea leopard.
Fabric
(1) Vegetable, e.g. fabrics made of cotton, flax, jute, hemp.(2) Animal, e.g. fabrics made of silk, wool.
Synthetics
(1) Rayon, e.g. fabrics made of artificially formed cellulosefilaments.
(2) Nylon, e.g. nylon mesh fabric.(3) P.V.C., e.g. materials made of polyvinylchloride.
Note: Although rayon and nylon mesh are both synthetic products theyare included in the tables on fabrics because of the form in which they areused.
CHARACTERISTICS OF SHOE LEATHERS
The properties of leather as they are described on pp. 8-19 are asufficient reason for its use as a shoe material, but there must also beconsidered the special characteristics of the skins that vary according tothe kind of animal and with such differences as environment, age, sexand food.
The skins of younger animals are softer and more supple than those ofthe old, yet possess greater strength in relation to their substance andweight. The bull calves are more likely to be marked badly with growthmarks and cattle that have been fed on cattle cake will have skins that arecoarser and less firm than those from pasture fed animals. Again, thefinest goatskins come from countries that provide poor pasturage, theskins being stronger than those
108

from the richer fed animals. All these differences are of great importancewhen the quality, and therefore value, of the skin is assessed. The methodof curing, or temporary preservation after flaying, also makes a lot ofdifference to the finished product; those skins that have the loose fleshscraped off and are then salted and left to dry will not soak back easily andthe resultant leather tends to be harsh.
The great bulk of shoe upper leather is obtained from calf-skins andcattle hides, with goat and sheep coming next in order of importance. Thedifferent characteristics of the cattle skins are those of degree rather thankind, and the leather can be distinguished by the appearance of the grain*,and a ‘feel’ that is distinctive (particularly when it has been chrometanned). Goatskins and sheepskins are quite different, but there is a typeof sheepskin, the Persian, that occupies an intermediate position andcannot always be readily picked out, if mixed with the softer lininggoatskins.
The wide variety of fancy shoe leathers, represented in the pages thatfollow by snakes, lizards, ostrich, etc., are not used in large quantities, butthey make it possible to select leather that is in keeping with the type ofshoe to be made, giving perfectly adapted materials for footwear thatrange from miners’ boots to the lightest shoes for evening wear.
Full Chrome Calf
The leather that is made from the skin of a calf, i.e. an animal that is stillmilk fed or has not been out to pasture long enough for the skin to becometoo coarse, and is tanned with chromium salts, is universally recognisedas the finest material available for ordinary footwear. A full description ofan ideal calf-skin will therefore provide a standard against which thevalue of other leathers can be judged.
Size—The ‘spread’ or area of a calf-skin may vary considerably since thedefinition given above (i.e. milk fed) is not always closely followed.Skins from 5 sq. ft. up to as much as 18 to 20 sq. ft. have all beendescribed as calf-skins if the general standard of quality is suitable.
Structure—The fibrous structure should be strong so that the leather willnot break easily. The strength should not fall away too much in the belly.
Grain—When folded grain inwards the creases formed, i.e. ‘the break’,should be small. Folded grain outwards and doubled, there should be nocracking, showing too tight a grain. The ‘holes’, i.e. sweat glands, andhair follicles must be small (fine).
Substance—The thickness should be greatest in the butt, with littlevariation over the rest of the skin.
* The trade name for the surface or outside of the skin.
109
MATERIALS

Tab
le6
.C
hara
cte
rist
ics
of
Calf
and C
att
leS
kin
s
Ch
ara
cte
rist
ics
Use
Fin
ish
Su
bst
an
ce*
Tannage
Siz
e(s
q. ft
.)O
rig
inL
eath
er
Mil
k c
alf
Calf
Veal
Kip
s
Sid
es
Full
y g
row
n c
att
le
Sm
all
bre
eds
of
catt
le,
specia
lly
E.
Ind
ian
Sk
ins
fro
mcatt
le
not
yet
matu
re
Mil
kfe
dE
uro
-
pean c
alf
Wo
rld
wid
esu
pply
,
mid
-Euro
pean
best
inquali
ty
4-
6
7-
10
11-
20
81
0-
(sid
es)
11
24
-
(sid
es)
Ch
rom
e
Ch
rom
e
Ch
rom
e
Chro
me
Chro
me
Sem
i-C
hro
me
Stu
ffed
L.
L.M
./M
.
H.M
.
H.M
.
H.M
./H
.
H./
XH
.B
oard
ed
or
pri
nte
dg
rain
heavy
sued
es
Board
ed g
rain
Bo
ard
ed
gra
in
Bo
ard
ed
gra
in
Sm
ooth
gra
in
or
sued
e
Lad
ies’
1st
quali
ty
quali
ty
quali
ty
quali
ty
quali
ty
Men
’san
d
lad
ies’
1st
Men
’s2
nd
Men’s
2n
d
Men’s
2n
d,
an
d3rd
3rd
an
d4th
Ex
trem
ely
fine
gra
in,so
ftsu
pple
‘fee
l’,
very
ela
stic
.F
ine
nap
on
suede.
Bull
calf
co
ars
eran
dli
able
togro
wth
mark
s.
Sli
ghtl
ycoars
er
gra
in,
liab
leto
bad
gro
wth
mark
s.V
ery
stro
ng,
ela
stic
,
plu
mp
‘fee
l’.
Co
ars
er
gra
inth
an
calf
,fi
bre
stru
c-
ture
islo
ose
r,g
ivin
ga
stre
tch
yle
ath
er.
Av
ery
firm
leath
er,
wit
ha
tight
gra
in.
Good
cutt
ing
are
a.
Ara
ther
coars
eh
eav
yle
ath
er
wit
h
num
ero
us
defe
cts
,i.
e.
bra
nds,
ticks,
warb
lehole
s,w
ire
scra
tches.
*T
he
lett
ers
use
dto
ind
icate
sub
stan
ce
are
abbre
via
tions,
i.e.
L.=
Lig
ht.
M.=
Mediu
m.
H.=
Heav
y.
110

111
Ost
rich
Afr
ica
Kangaro
oA
ust
rali
a
Hors
eE
uro
pean
Liz
ard
East
Indie
s
Snake
Ind
ia,
Afr
ica
Goat
Bes
tq
uali
tyfr
om
ho
tco
un
trie
s
Kid
Mil
kfe
d
Leath
er
Ori
gin
Tab
le7.
Ch
ara
cte
risti
cs
of
Go
at
and
Specia
lL
eath
ers
Siz
e
-sq
.ft.
4-
6sq
.ft
.
1-3
m.
(length
)
8-
20
in.
(wid
th)
8-10
ft.
Chro
me
Chro
me
Chro
me
Chro
me
or
stuff
ed
Vegeta
ble
Vegeta
ble
or
synth
eti
c
Tannage
Su
bst
an
ce
L.
L./
L. M
.
L.
L.
H.M
./H
.
M.
L.M
.
Board
ed
Sm
ooth
gra
in
Usu
all
ydyed
Wh
ite
or
slig
htl
yti
nte
d
Moro
ccan
gra
in
Gla
zed
Gla
zed
,g
old
or
silv
er
kid
Fin
ish
Use
Ladie
s’1st
qu
ali
tyto
wn
an
devenin
g
Lad
ies’
2nd
qu
ali
tyto
wn
Sli
ppers
Ladie
s’
Ladie
s’
1st
1st
quali
ty
quali
ty
fash
ion
fash
ion
Fash
ion
sho
es
sho
es
sho
es
Men
’s
Men
’s
sport
s
sho
es
an
d
runnin
gsh
oes .
Chara
cte
rist
ics
Tig
htgra
in,
recognis
ed
by
reg
ula
rpat-
tern
form
ed
by
hair
foll
icle
sand
sweat
gla
nds.
Str
ong
for
its
subst
ance.
Co
ars
en
ess
of
the
gra
inin
cre
ase
sw
ith
size
of
skin
.
So
ftle
ath
er,
round
gra
info
rmed
by
bo
ard
ing
indif
fere
nt
dir
ecti
on
s.
Bo
ldnatu
ral
patt
ern
dis
tincti
ve
of
each
type
e.g
.pyth
on,
boa,
karu
ng
;
thin
leath
er
but
hard
weari
ng.
No
dis
tin
cti
ve
patt
ern
oth
er
than
the
no
rmal
scal
esex
cept
inth
ecase
of
the
ring
mark
ed
Jav
ali
zard
.S
trong.
Ho
rse
fro
nts
use
din
pla
ce
of
side
leath
ers
,ra
ther
co
ars
eand
ten
den
cy
to
loo
sen
ess
.C
rup
isa
stuff
edle
ath
er.
Ahard
weari
ng
yet
soft
leath
er
that
rese
mble
sb
oth
calf
and
kid
.
Aso
ftle
ath
er
easi
lyre
co
gn
ised
by
the
pro
min
ent
quil
lh
ole
sw
hic
hperf
ora
te
the
leath
er.
11 2
31 2

112
Table
8.
Chara
cte
rist
ics
of
Pri
ncip
al
Sh
oe
Leath
ers
(Lin
ing
s)
Leath
er
Ori
gin
En
gli
shcalf
U.K
.
E. I
.ca
lf
Kip
sid
es
Sh
ou
lders
Bel
lies
Go
at
Pers
ian
Sh
eep
Lam
b
Basi
l
Sh
earl
ing
E.
Ind
ies
Afr
ica,
Am
eri
ca,
etc
.
As
abo
ve
Ind
ia
Asi
aM
ino
r
Vari
ou
s2-
3
6-
8
6-
8
Veg
eta
ble
Veg
eta
ble
Veg
eta
ble
Veg
eta
ble
Veg
eta
ble
Veg
eta
ble
Veg
eta
ble
Veg
eta
ble
4-
6
4-
6
4-
8
6-1
0
8-1
2
7-
10
7-
10
Siz
e(f
t.)
Tan
nag
eS
ub
stan
ce
L.M
. /M
.
L.M
. /M
.
M. M
.
/H.
H.
H.
M.
L.
L.
L.
L.M
.5th
qu
ali
ty
2n
d
2n
d
2n
d
2n
d
2n
d
qu
ali
ty
qu
ali
tyqu
ali
ty
qu
ali
ty
qu
ali
ty
qu
ali
ty
qu
ali
ty
qu
ali
ty
an
d
an
d
an
d
an
d
an
d
an
d
an
d 3rd
3rd
1st
Lad
ies’
5th
Men
’s
Men
’s
Men
’s
Men
’s
Men
’s
4th
4th
1st1st
lad
ies’
lad
ies’
Use
Gen
era
ldesc
rip
tio
n
Afi
rmplu
mp
leath
er,
soft
feel
yet
go
od
weari
ng
qu
ali
ties.
Natu
ral
or
tin
ted
.
Natu
ral
or
tin
ted
.
Natu
ral
or
tin
ted
.
Natu
ral
or
tin
ted
.
Sim
ilar
toth
eab
ov
e,
ten
din
gto
be
hars
her.
Natu
ral
an
dti
nte
d.
Afi
rmle
ath
er,
soli
dra
ther
than
soft
,gra
in
co
ars
er
than
E.I
.calf
.T
en
den
cy
tow
ard
s
loo
segra
inon
som
e.
Hars
h,
co
ars
egra
in,
loo
sefi
bre
dst
ructu
re.
As
the
sho
uld
er
excep
tth
at
the
leath
er
is
oft
en
mo
reso
lid
.
Lig
ht
bu
tst
ron
g.
Usu
all
ygla
zed
an
ddy
ed
.
May
be
iden
tifi
ed
by
reg
ula
rgra
inpatt
ern
.
Fin
ish
ed
as
ab
ov
e,
bu
tno
rmall
ym
att
.A
loo
ser
stru
ctu
reth
an
go
at
an
dir
regu
lar
gra
inpatt
ern
.
Aso
ftw
hit
ele
ath
er
use
din
ch
ild
ren
’ssh
oes.
Aco
ars
elo
wgra
de
lin
ing
.
Bo
ote
eli
nin
gs.

113
‘Feel’—This term refers to the way leather handles. Calf should berubbery, indicating elasticity not mere plasticity, and ‘plump’ anotherterm which means that the ‘feel’ is lively and of good substance.
Colour—The dye should have penetrated well so that there are no lightpatches.
Clear Grain—There should not be an excessive number of vein marksunder the grain, and the surface blemishes should be few.
FABRICS
New uses for fabrics are continually being introduced into the shoeindustry and there seems to be no limit to the variety that is available fordifferent parts of the shoe upper. The simplest preliminary classificationis into (1) outsides, (2) linings, (3) inter-linings. The last categoryincludes a number of materials that are not true fabrics but are includedbecause of their function.
Outside Fabrics
The increasing use of fabric for shoes of widely differing types hasgreatly helped the shoe designer by providing him with a choice ofmaterials, whatever the style of shoe being designed. Slippers, sandals,evening shoes, and even bootees are all made with fabric uppers rangingfrom a plain heavy canvas through the gaberdines, corduroys and plaidsto the brocades and satins. A definite advantage of fabric over leather isits uniformity which makes clicking much simpler, makes press cuttingmore advantageous, and results in uppers that will not vary in substanceor stretch. Outside fabrics are usually combined with at least one otherlining or backing layer to give added strength; in some cases a three-plyis used and no lining is necessary.
Lining Fabrics
The most important development of recent years has been the practice ofusing combined instead of single fabrics. The duck and drill singlefabrics were usually supported by a swansdown interlining in the lightershoes and this has resulted in a pre-combining of the two, reducingcutting costs and also eliminating a closing room operation. A combinedfabric known as faille is used a great deal in the better quality shoes as itsappearance is lustrous and attractive owing to the use of a rayon warp.
Interlinings
This category may be further divided into backers, interlinings, underlaysand stiffeners. The backers are of the acme backer type (see Table 9) andare ironed on to cut sections in order to in-
MATERIALS

114
Tab
le9.
Ch
ara
cte
rist
ics
of
Pri
ncip
al
Lin
ing
Fabri
cs
Fabri
cF
ibre
Duck
Co
tto
n
Dri
llC
ott
on
Co
tto
n
Co
tto
n
Co
tto
n
Co
tto
n
Sw
an
sdo
wn
Fla
nn
ele
tte
Co
mbin
ed
linin
gs
Fail
leR
ayo
nand
cott
on
or
all
ray
on
Acm
eback
er
Weav
eU
se
Pla
in1
/ //
//
1V
am
pli
nin
gs,
sid
eli
nin
gs
and
‘all
fab
ric’
sho
es
Dri
ll2
1or
31
Vam
pli
nin
gs
Vam
pli
nin
gs
Vam
pli
nin
gs
Tw
ill
22
or
dri
ll2
1or
pla
in
Inte
rlin
ing
s
Inte
rlin
ing
sT
wil
lor
pla
in
Tw
ill
or
pla
in
Pla
in
Pla
in
and
qu
art
er
linin
gs
Backers
Backin
gclo
thcoate
don
on
esi
de
wit
hth
erm
op
last
icgu
tta
perc
ha
and
wax
,or
rubb
er/w
ax
.A
vail
ab
lein
vari
ou
sw
eig
hts
and
colo
urs
.
As
abo
ve
exce
pt
that
the
top
clo
thhas
ara
yon
warp
close
lypack
ed
and
ast
ou
tcott
on
wef
t,giv
ing
ara
yon
faced
clo
thw
ith
heav
yri
bs
runn
ing
fro
mse
lved
ge
tose
lved
ge.
Lig
ht
tom
ed
ium
linin
g,
bo
nd
ed
wit
hla
tex
or
past
e.
Bo
tto
mclo
th
usu
all
ya
swansd
ow
n.
Norm
all
ya
con
dense
rclo
thra
ised
wit
ha
sho
rtfe
lted
nap
.
Afa
irly
op
en
wea
ve
wit
ha
loo
sely
twis
ted
con
dense
rw
eft
whic
hm
ay
be
rais
ed
on
on
eor
bo
thsi
des
giv
ing
‘sin
gle
’or
‘dou
ble
’sw
ansd
ow
n.
Th
ew
eav
egiv
esa
soft
er
clo
thth
an
du
ck
and
the
chara
cte
rist
icdia
g-
on
al
lines
am
ore
att
racti
ve
app
eara
nce.
Ast
ron
gw
eav
epre
senti
ng
abro
ken
surf
ace.
Wid
evari
ati
on
inqu
ali
ty,
acco
rdin
gto
fib
reand
clo
thsp
ecif
icati
on
use
d.
May
be
hea
vil
ysi
zed
for
sid
eli
nin
gs.
Gen
era
ldesc
ripti
on

115
Tab
le10
.C
hara
cte
rist
ics
of
Pri
ncip
al
Outs
ide
Fabri
cs
Fabri
cF
ibre
Weav
e
Sati
nS
ilk
or
ray
on
wit
h
cott
on
wef
t
Cre
pe
Sil
kor
ray
on
Bro
cade
Sil
k,cott
on
,ra
yon
,
meta
llic
cov
eri
ng
Canv
as
Co
tto
n
Lin
en
Fla
x
Co
rdu
roy
Co
tto
n
Nylo
nN
ylo
nm
esh
Use
Sati
nE
venin
gw
ear
Ev
enin
gw
ear
Ev
enin
gw
ear
Pla
in
Pla
in
Pla
in
Fig
ure
d
Spo
rts
or
fan
cy
Spats
and
even
ing
wea
r
Co
mple
xC
asu
als
and
slip
pers
Knit
ted
Ev
enin
gw
ear
and
inse
rts
Gen
era
ldesc
ripti
on
Th
ew
eav
egiv
esth
echara
cte
rist
icall
ysm
ooth
surf
ace
all
ow
ing
the
silk
’slu
stre
tobe
effe
ctiv
e.A
lway
scom
bin
ed
toa
cott
on
bo
ttom
clo
thfo
r
stre
ngth
and
sup
po
rt.
Hard
twis
ted
(cre
pe)
yarn
sare
use
din
the
wef
t :th
ese
shri
nk
pro
ducin
g
the
peb
ble
dapp
eara
nce.
Usu
all
ycom
bin
ed
toa
cott
on
bo
ttom
clo
thfo
rst
ren
gth
and
sup
po
rt.
Add
itio
nal
silk
wef
tsor
go
ldor
silv
erth
read
sin
clu
ded
togiv
ea
patt
ern
.U
suall
ycom
bin
ed
toa
cott
on
bo
ttom
clo
thfo
rsu
ppo
rt.
Ahea
vy
cott
on
clo
thusu
all
ycom
bin
ed
and
wate
rpro
ofe
d.
Aw
ide
vari
ety
of
clo
ths
ispro
duced
by
usi
ng
fan
cy
yarn
sand
specia
l
wea
ves
.
Rib
sfo
rmed
by
aw
eft
pil
eru
nn
ing
the
leng
thof
the
mate
rial.
Flo
ats
of
the
pil
ew
eft
are
bo
un
din
soth
at
they
may
be
cut
by
akn
ife.
Ch
ara
cte
rist
icsm
ooth
app
eara
nce.

crease strength; the backers are made in various colours, weights anddegrees of stretch. Single backing fabrics may also be stuck to wholeskins before cutting, a practice used on light suedes. Interlinings do notincrease strength appreciably, but are used to give a softness andplumpness to thin leathers; swansdown and flannelette are the usualmaterials. The perforated uppers common today have underneath theholes pieces of light, suitably coloured fabrics, such as croydon andsuedene (used under suede uppers). Stiffeners such as tufsta, andbuckram are used in the first instance to strengthen weak places in theupper e.g. seams at the back of the shoe and, on sliplasted shoes, wherethe upper is stitched to the sock. Buckram is used as a stiffener of, forexample, a tongue that forms part of the design.
Tables 9 and 10 give brief descriptions of some of the principal shoefabrics.
SYNTHETICS
Sheet plastics, as used in the shoe industry, have not proved very popular,largely owing to the fact that they are impervious to air and water-vapour.Used in a shoe upper they should comprise 50 per cent or less of the totalarea (see p. 12).
Although available plastics have had these disadvantages however, itshould not be assumed that such impermeability is a characteristic of allplastics. As synthetic materials, plastics can be made with very differentproperties, and if the demand were sufficient it is quite possible that aporous plastic could be developed.
Strips of plastic have been used on sandals and the bright attractivecolours have made them particularly suitable for this type of footwear.
A third use of plastic for upper materials is the practice of coatingleather with a resin emulsion which when plated gives a high polish. Suchleather has the advantage that it can be cleaned easily but theimpermeable coating may give the leather the same disadvantages asthose of plastic sheet.
Perhaps the most important development will prove to be the use ofplastic coated fabric as an imitation leather quarter lining.
116
CLICKING

9
CLICKING TECHNIQUE
APART FROM THE USE of the knife, the clicker’s technique is entirelygoverned by the quality requirements of a shoe and the characteristics ofthe material to be cut. The shape and variations in the leather or fabric,the different pattern shapes and the quality requirements, all combine toform problems which vary with each change in one of the conditions. Thelast of the three factors does not vary to any great extent, although subjectto modifications. The shape of the pattern presents a problem that,experimentally, with some ability, can be solved. The clicker tries to findan arrangement of the patterns that can be repeated and does not result inunnecessary waste between the patterns. The variations met with in thematerial are most diverse in leather and this material calls for longexperience if the best use is to be made of its special properties. Moreuniform materials such as the fabrics are not so difficult to handle sinceonce a pattern system has been devised that takes account of the width ofthe fabric and of the direction of warp and weft threads, a little care willenable the clicker to repeat the system as often as he wishes. An analysisof some of the customary systems serves as an introduction to the morecomplex systems necessary on leather.
The variations met with can be defined and, in a sense, standardised fortraining purposes so that ‘ideal’ pattern lay-outs can be devised thatavoid waste, and make full use of the quality in the leather while allowingfor these variations. In practice, these lay-outs would need considerablemodification, but they do supply a starting point for further study basedon the characteristics of individual skins.
The technique in using the clicker’s tools is rather summarily treatedbelow but it is, of course, important though more easily mastered than theother aspects of the craft treated at greater length in these prefatoryremarks.
Equipment
The equipment of the hand clicker is very simple, but not all clickersare equally adept at keeping their tools in good condition.The board onwhich the cutting is done is made up of small blocks of wood clampedtogether so that the knife edge cuts across the grain giving a greaterdegree of control than would be possible if the cut followed the line of thegrain. If too much cutting is done and too little attention paid tomaintenance the surface becomes rough and ‘picks-up’, i.e. small piecesof wood become detached leaving a very rough surface which hampersthe free movement of the knife. The board should be scraped (buffed)regularly with a broad flat
117

scraper or buff knife to remove the top layers of wood on which thecutting has taken place and then dressed with boiled linseed oil which isabsorbed by the wood and causes it to swell, closing up the cuts whichwere too deep to be buffed off. It follows from this that the expert clickerdoes not cut too deeply into his board, exerting just enough pressure tosever the material.
The knife used most widely is the ‘American handle’, a type which canbe fitted with knife blades that are renewed or changed when necessary. Achange of blade is necessary when the clicker has to cut differentmaterial. For example the heavy or thick leathers are best cut with a bladethat is curved, as the strength exerted by the clicker is aimed at pulling theblade through the leather and the curvature of the blade ensures that thecutting edge is nearly at right-angles to the surface of the leather. Such ablade used on thin leather would result in dragging or rucking the leatherand probably forcing the point too far into the board. A straighter bladeresults in some downward pressure being exerted, thus helping to keepthe leather in place.
The blade is usually shaped on a Carborundum grindstone and keptkeen and smooth with a ‘rifle’ or ‘emery bat’, alternative names for apiece of wood with emery paper and greased leather attached.
Prick holes for closing guides are made with an awl and a crayon isused for marking the different sizes and fittings.
CUTTING FABRICS
Fabrics are supplied in rolls varying in length and width, although a rollof lining fabric would probably be 100 yd. long and about 36 in. wide.The only limitation of shape or size that need be considered then, is thewidth. The structure of all fabrics consists, basically, of sets of yarnsrunning at right-angles to each other and interwoven in different ways.The yarns running the length of the fabric are called ‘warp threads’ andare made strong so that they stand up to the tensions set up and the frictionincurred in weaving. The yarns running across the width of the fabric aretermed ‘weft threads’ and need not be as strong, although some shoelining fabrics are deliberately woven with weft threads as strong as if notstronger than the warp threads, a sufficient reason for having new fabricstested before use.
The weft threads usually stretch more than the warp since the ‘crimp’imparted in weaving is first pulled out.
The patterns, as they are placed on lining fabrics should be in one ofthree positions: (1) with warp threads in the heel to toe direction; (2) withweft threads in the heel to toe direction; (3) placed on the bias. For manyyears the ‘warp’ system was regarded as the only good one since thestrength of the warp threads made it possible to set up a good heel to toetension in lasting. Unfortunately the lack of stretch in some of the fabricsled to breakages and the practice
118
CLICKING

grew of cutting with the weft threads from heel to toe which gave agreater degree of plasticity, or even with the bias in the heel to toedirection, a method which avoided breakages but was criticised on thegrounds that the linings tended to be loose because little tension could beset up. The increasing use of combined fabrics has led to the wide use ofbias systems since only thus can sufficient stretch be obtained.
The different patterned fabrics used for outsides result in amodification of the simple lining systems, since the patterns must beplaced so that the pattern is correctly positioned on the shoe upper.
The illustrations given are of the structure of a simple fabric (Figure57), a warp system of cutting (Figure 58), a weft system
119
CLICKING TECHNIQUE
Figure 57. Plain weave as used in ducklining. Warp and weft interface alternately.
Weft
Figure 58. Warp system of cutting. In this and similar diagrams the spacebetween patterns is much greater than that actually allowed in clicking.
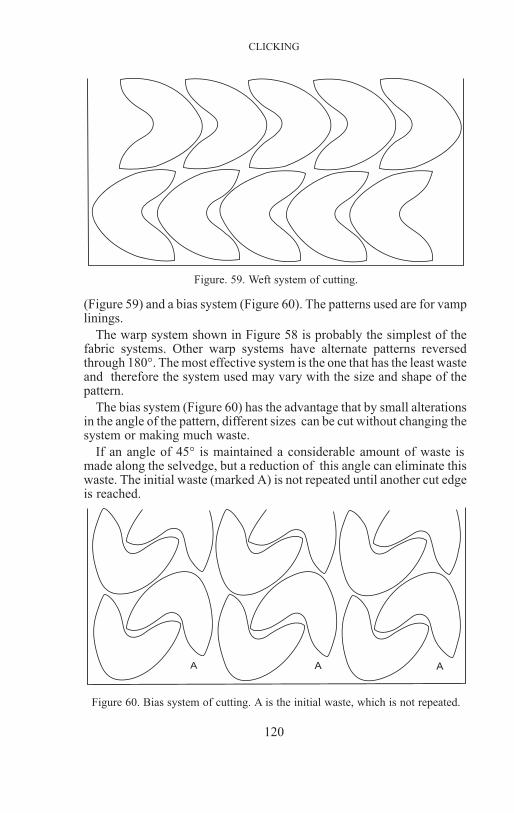
(Figure 59) and a bias system (Figure 60). The patterns used are for vamplinings.
The warp system shown in Figure 58 is probably the simplest of thefabric systems. Other warp systems have alternate patterns reversedthrough 180°. The most effective system is the one that has the least wasteand therefore the system used may vary with the size and shape of thepattern.
The bias system (Figure 60) has the advantage that by small alterationsin the angle of the pattern, different sizes can be cut without changing thesystem or making much waste.
If an angle of 45° is maintained a considerable amount of waste ismade along the selvedge, but a reduction of this angle can eliminate thiswaste. The initial waste (marked A) is not repeated until another cut edgeis reached.
120
CLICKING
Figure. 59. Weft system of cutting.
A A A
Figure 60. Bias system of cutting. A is the initial waste, which is not repeated.

VARIATIONS IN LEATHER
The characteristics of leather from different animals have already beenoutlined, but before commenting on the ways in which the clicker useshis material to the best advantage it is necessary to examine the variationsbetween the different parts of the same skin. The differences vary withthe type of leather, but the three outstanding ones are those of quality,substance and stretch.
Quality—The term covers a number of different properties among whichmay be listed texture of the grain, structure of the leather and surfacedefects.
Substance—This refers to the thickness of the leather which will befound to vary more on medium size calf-skins than on larger skins whichare shaved in the tannery.
Stretch—This is one of the ‘hidden’ differences that must be closelywatched since any error in judgement can easily result in an upper that isseriously distorted.
A calf-skin is used in the examples given.
Figure 61 has the virtue of being easily memorised, and it will be usedas the key for the description of differences in quality and substance; it is,however, only a diagram and the student must always remember thatthere are no sharp lines of division on the actual skin.
121
CLICKING TECHNIQUE
Fore shank Fore shankNeck
Shoulder
Butt
Belly Belly
Off al
Off alOff al
Off al
H ind shankH ind shank
Figure 61. Diagram showing different sections of a skin.

Variations in Quality
The leather in the butt is the ideal from the shoemaker’s point of viewbeing relatively free from surface defects of any kind, of a strongcharacter and with a fine texture in relation to other parts of the skin. Thelines drawn in Figure 61 show the extent of the leather that can beregarded as of this first quality, but there are, of course, differences evenhere. The leather near the bottom is lighter and of a less compactstructure. That part of the butt which adjoins the belly or flank begins totake on some of the character of the belly, i.e. the leather stretches moreeasily and the ‘break’ (i.e. creases formed when the leather is pinched,grain inwards) becomes larger. Towards the shoulder the falling off inquality is less noticeable, but growth marks often create serious problemsif they extend far into what should be butt leather.
The shoulder comes next in order of quality since it has good wearingproperties. Disadvantages here lie in the fact that the leather is so oftenbadly affected by growth marks and other defects. There is usually asmall area on either side of the backbone that is free from these blemishesand the extent of this area governs the use made of the leather and the wayin which it is cut.
On a calf-skin the neck and belly are very different in appearance,strength and texture and yet it may not always be a simple matter todecide which is the better quality. The neck is undoubtedly the firmer,stronger leather of the two, but the belly may be clear, i.e. free fromdefects, whereas the growth marks on the neck are often very deep anddisfiguring. The neck may be classed as third in quality following the buttand shoulder, on the grounds that it is a firmer stronger leather than thatfound in the belly. The belly then takes fourth place.
The shanks vary considerably in length and in quality. In some casesthey are useable and may be classified as fifth quality leather, whereas inothers much of the shanks must be classified with the shaded patches ofoffal which occur just inside the legs, the armpit and groin as it were.
Variations in Substance
The lines of demarcation follow closely those used for the qualitydivisions, and indeed the two are very closely linked. The butt is thethickest leather with a gradual loss of substance towards the shoulder andbelly. The neck is often slightly thicker than the shoulder, and the shanksare usually thin. The order of substance is not of great value because itcan vary so much. Once the butt has been accepted as the thickest, theremainder can vary from skin to skin. For example, the belly may, insome cases be slightly thicker than the neck, and yet the neck leather is sosolid in structure that there is no comparison in their wearing qualities.Again the shoulder may be a little thinner than the neck but its superiorityin quality again more than cancels out this slight difference.
122
CLICKING
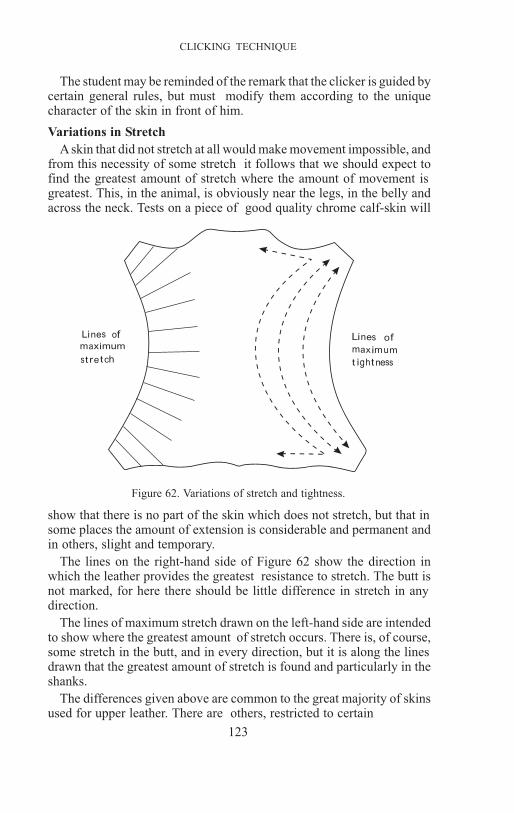
The student may be reminded of the remark that the clicker is guided bycertain general rules, but must modify them according to the uniquecharacter of the skin in front of him.
Variations in Stretch
A skin that did not stretch at all would make movement impossible, andfrom this necessity of some stretch it follows that we should expect tofind the greatest amount of stretch where the amount of movement isgreatest. This, in the animal, is obviously near the legs, in the belly andacross the neck. Tests on a piece of good quality chrome calf-skin will
show that there is no part of the skin which does not stretch, but that insome places the amount of extension is considerable and permanent andin others, slight and temporary.
The lines on the right-hand side of Figure 62 show the direction inwhich the leather provides the greatest resistance to stretch. The butt isnot marked, for here there should be little difference in stretch in anydirection.
The lines of maximum stretch drawn on the left-hand side are intendedto show where the greatest amount of stretch occurs. There is, of course,some stretch in the butt, and in every direction, but it is along the linesdrawn that the greatest amount of stretch is found and particularly in theshanks.
The differences given above are common to the great majority of skinsused for upper leather. There are others, restricted to certain
123
CLICKING TECHNIQUE
Lines ofmaximum
stre tch
Lines of
max imum
t ightness
Figure 62. Variations of stretch and tightness.

types of skins, for example, differences in shade and pattern; these aredescribed at greater length in the sections on leather sorting and specialtechniques in cutting.
CUTTING LEATHER
The Shoe Upper
The variations found in the same skin mean that the clicker mustexercise considerable care in placing his patterns. Before he can do thishe must know not only what those variations are, but also what isexpected of the different parts of the shoe upper.
The front is easily the most conspicuous part of a made-up shoe, and itis essential that it should be of good quality and appearance. Further back
the flexing of the foot sets up considerable tension and leather of poorquality would soon crack and break under the strain. As this part is alsoeasily visible, it follows that not only do we require leather with goodwearing qualities but also a good appearance, i.e. free from blemishes.The facing of a tie shoe must be strong enough to withstand the strain oflacing and to hold the eyelets securely in position. The top edge of a shoemust be solid enough to keep its shape without any strong reinforcing, butthe presence of a stiffener supports the back of the shoe, so leather thathas less substance can be used. Lastly it should be noted that the inside ofthe shoe (particularly the inside waist) is less noticeable than the outside,so the clicker will try to place his patterns so that the poorer qualitycomes on the inside. This is particularly important when cutting thequarters.
124
CLICKING
L ast ing
5 th
4 th
3
3
rd
rd
U
U
n
n
d
d
e
e
r
r
l
l
a
a
y
y
2
2
nd
nd
Last i ng
Ist
Figure 63. Qualities of leather required for toe-cap, vamp and quarters.

Quality Requirements
When the shoe upper is divided into sections, familiarity with thequality requirements described above will enable the clicker to place thepatterns correctly even though their shape may be new to him. Thevariations he will meet with mean that no section is equal in quality allover, and in some cases the difference will be considerable. Where this isso, the clicker must be able to place the section so that the better qualityleather will occur where it is most needed. He must also remember thatthe different sections will be joined together after he has cut them andtherefore there must be no sudden change in quality from one section toanother along the line of the seam. This is also of importance for thestrength of the seam.
The portions marked in Figure 63 which represent the underlay andlasting allowances are not seen, and any leather can be used, regardless ofappearance, so long as it is strong enough to withstand the strains oflasting and to hold the closing seams securely. The divisions shown are,of course, arbitrary ones; a vamp cut from the centre of the butt will be of
first quality throughout, but in many cases decisions will have to be madewhich correspond to the distribution illustrated.
Comparing the different qualities of the different parts of the skin andthe requirements of the shoe upper it will become apparent that on a skinof average quality the vamps will be cut from the leather that is both goodto look at and hard wearing, i.e. the butt. The caps must be clear and,where it is not marked by growth marks, the shoulder is used for thepurpose. The remainder, neck, belly and shanks must be used for thequarters where the quality is good enough.
The requirements for a quarter lining (Figure 64) are rather different.The front or ‘nose’ of the quarter is completely hidden unless the shoe isspecially unlaced and examined.
125
CLICKING TECHNIQUE
I st
Last i ng
2nd
Figure 64. Qualities of leather requiredfor quarter lining.

The back receives the greatest amount of wear and is easily seen; itmust therefore be cut from the best available material.
Lines of Tightness
A last and most vital point before beginning to place patterns on theskin is to remember that all major sections must be cut tight to toe. That is,the lines of tightness must run in the heel to toe direction. The importanceof this rule will be realised by anyone who watches a shoe upper beingpulled over the last (see p. 278). In machine lasting the upper is firstsecured at the back and then placed in the machine and pulled down to thelast. The pair of pincers which grips the toe takes the strain first and setsup a very great heel tension. Any weakness in this direction will meanthat the weak part will stretch more than the others, even if it does notactually break. This distortion means that the proportions and lines of theupper are thrown out of true. A very common fault is to find that onequarter (the quarters are cut from the part which stretches most) stretchesmore than its fellow with the result that one side of the upper is larger thanthe other. The laster must keep the cap or vamp straight and as a result theback-strip is twisted to one side. There are numerous other distortionsthat may occur, not only in lasting, but also in closing, although the latterare more likely to be caused by leather which stretches too much in thetransverse direction. Any naturally stretchy leather should be reinforcedwith a fabric backer. The lines of tightness and the rule, cut tight to toe, donot apply when the leather is not likely to stretch very much in anydirection, e.g. in the butts of good quality skins, or, as already stated,where a fabric backer has been applied.
Pattern Systems
Owing to the irregular shape of upper patterns it is inevitable that somewaste should be made when fitting them together on the skin. The moreintricate the shape of the pattern the more waste will be made, and thiswaste will, when the butt is being cut, be the best in quality. The patterncutter should test his patterns to see how much waste will be made, andmake adjustments where possible, but he must retain the essentialfeatures of the design and the two requirements are often contradictory.The clicker should experiment to find the way of fitting patterns togetherwhich throws the smallest amount of waste and then repeat thearrangement so far as the leather will allow. This method of placing orpattern system should be established and used wherever possible.Examples of pattern systems were given when illustrating the cutting offabrics and the methods given there are true systems in that they may berepeated indefinitely in any direction. This may seem a strange demandwhen leather is so variable in quality and limited in area but the object isto ensure that the system which results in the least waste shall be foundand used.
126
CLICKING

The area and shape of the skin must play a great part when decidingwhich pattern system to use. On large skins or sides an arbitrary systemcan be applied, but on small calf- or kid-skins the system must bequalified as the most economical for that pattern on that particular skin,since most of the waste is likely to be caused by the restricted area.
The examples of pattern placing which follow consist of systems thatmay be used on skins of different types that can be regarded as ‘ideal’,that is, there are no serious surface blemishes and the extent of butt etc. isnormal. Such lay-outs must, of course, be modified when cuttingimperfect leather, but they are examples of ideal lay-outs and as such, areof greater use than lay-outs adapted to an imperfect skin.
The suggested lay-out for shoe quarter linings (Figure 65) should bestudied since it shows how three of the rules have been applied. The rowof quarters along the tail edge has been placed so that they are inaccordance with the lines of tightness as have the linings near the fourshanks. It will also be noted that the noses of the quarters are placed sothat the poorer quality leather is included. Lastly, a definite system hasbeen adopted and maintained.
Figure 66 shows a lay-out for three-quarter cut court shoe and heelcover. The use of such a pattern means that very little poor quality leathercan be included; only the inside counter can be said to be at allinconspicuous. The patterns are placed therefore with the object ofensuring the best possible quality. Waste is best avoided by carefulselection of skins that are the right size and shape.
127
CLICKING TECHNIQUE
Figure 65. Small calf-skin with quarterlining lay-out.
Figure 66. Goatskin with three-quarter court shoe and heel
cover lay-out.

The lay-out in Figure 67 shows vamps and caps fitted in a system andwithin the butt and shoulder areas respectively. The vamps near the tailare placed so that the inside wing comes nearest the edge. The belly andneck are too limited to allow a system for quarters, but they are placedtight to toe and with the better quality leather near the position of thevamp seam.
Figure 68 shows a Derby shoe (cap) lay-out. The Derby shoe vampswill not interlock closely and therefore a different system has been used.
128
CLICKING
Figure 67. Medium size calf-skin with Oxford shoelayout.
Figure 68. Box side with Derby shoe (cap) lay-out.
Examples of this kind may be repeated with endless variations, but thefour which have been given illustrate different techniques and show theinteraction of pattern shape, skin shape, quality and shade upon eachother. If leather has been closely sorted it will be possible for the clickerto develop a lay-out for the whole skin and repeat it, with only smallchanges, throughout the whole bundle of skins. A control of this typemeans that ideal lay-outs can be developed and used instead of each skinbeing cut by improvised methods. Such a control is only practicable,however, where large quantities of leather are being cut into severaldifferent qualities and styles of shoes.
Quality Variations
The areas marked ‘butt’ and ‘shoulder’ are by no means consistent;they indicate only the approximate extent of first or second qualityleather. On examining a bundle of leather issued to him the clicker willoften notice that on some skins the area of first quality leather is greaterthan on others, even where the total area is the same. If there are no othercomplications the cutter will try to ‘force’ vamps from the better skins.That is, he will, from a skin 10 sq. ft. in area estimate that he should cut,for example, five pairs complete, but instead of doing this he will cut sixor seven pairs of vamps with correspondingly fewer caps and quarters.The balance is restored when cutting the poorer quality leather, a higherproportion of quarters being cut in this case.
Colour Variations
The differences in colour or shade, can cause the clicker some of hisbiggest troubles. The differences may be between different skins or partsof the same skin. Small coloured kid-skins often vary appreciably inshade and before cutting the clicker should grade them carefully fromlight to dark shades, so that if, in cutting, he is compelled to complete apair from another skin he knows that the difference between the two skinswill not be enough to matter.
The large sides, dyed in a shade of brown, often reveal considerabledifferences between butt and neck or between butt and belly. The fibrestructure is different in all three cases and the dye absorption is different.There is a noticeable darkening in shade between butt and shoulder andagain between shoulder and neck; the belly too, is often darker. A side ofthis sort, cut according to the principles already given, would result inlight vamps, dark caps and still darker quarters. To avoid this the clickermust cut his work in pairs, making sure that vamp, cap and quarters are allcut from parts of the same shade. In order to achieve this he must depart,to some extent, from the best standards of quality cutting. Caps andvamps will be cut from the butt and matched with ‘belly’ quarters; capsand vamps cut from the shoulder will be paired up with ‘neck’quarters.
129
CLICKING TECHNIQUE

Patterned Leathers
The ever popular reptile leathers, python, karung, crocodile, lizard etc.require special cutting techniques because of the very limited area and theoutstanding pattern on many of the skins. The pattern is the attractive partof the leather and the clicker must make full use of it. For example, thecharacteristic pattern on a python skin must be placed in the front of thevamp and in the same position on both shoes in a pair. This requirement,combined with the narrowness of the skin, restricts the clicker’s freedomof movement and often causes wasteful cutting. The sides of the skin thatare not patterned must be placed in the inside waist as far as possible. Inorder to make the best use of the leather and to avoid undue waste thepatterns are usually kept small by making a number of sections. Thishelps the clicker in some ways, but introduces a further complication inthat each section must be cut so that its pattern blends with thecorresponding pattern of the piece to which it is joined.
Cutting Plans
It is assumed in the following account that the clicker holds his knife inhis right hand.
In most cases the clicker begins at the bottom or butt end of the skin,but the first cut may be taken either next to the backbone or in the shank.In either case the cutter will make sure that there is enough room for thepieces he wishes to place before beginning to cut. Again some clickersprefer to start with the right- hand shank and work across to the left, theargument being that the cuts are made away from the main body of theleather. Those who begin with the left-hand shank maintain that they havea clearer view of the leather to be cut.
Whichever practice is adopted the vital points to remember are: (1)never cut any section without making quite sure where the next two cutsare to be made, and (2) always keep the skin ‘square’, i.e. do not leavelong, narrow, or awkwardly shaped pieces to be used afterwards, but cutacross the skin from side to side.
PRESS CLICKING
The Clicking Press
The different clicking presses in general use are all based on the principleof a swing beam which can be brought over any part of the cutting blockand then depressed by a hand-operated tripping mechanism, so strikingthe knife below it. In most types a safety device is included which takesthe form of a second handle that must also be used to operate the machine,thus ensuring that both hands are on top of the beam. The leather, unlikebottom leather, is lying flat on the block and the knife need not be held inposition.
130
CLICKING

The amount of pressure exerted can be adjusted according to thematerial being cut.
When double-edge knives (see below) are being used the swing beamis fitted with an aluminium plate which does not damage the upper edgeof the knife.
The cutting blocks may be of hard wood, hard rubber or bondedfibre-board. Whichever is used it is most important that the surfaceshould be hard and level to prevent sticking and to get a clean cut.
Press Knives
The early knives were extremely strong and had a long life but weresubject to three serious objections: (1) they were expensive; (2) beingsingle-edge, two knives were needed for left and right patterns; (3) theywere awkward to handle. Research has tried to improve in all threedirections and the result has been a hard steel alloy knife which is cheaperthan the ordinary single-edge forged steel one, very much lighter and hasa double edge, thus avoiding duplication for lefts and rights (see also p.508).
The double-edge knife may be forged or a prepared steel strip may beused which is shaped while cold and, in one type, ‘bound’ on to a steelpattern. These latter often have rubber studs fitted which help to preventsticking in the cutting block. The larger forged knives are provided withstruts to increase rigidity. The prick holes made by the hand clicker aremade simultaneously by the single-edge clicking knife which has thepoints incorporated. Anewer practice on the double-edge knife is to makea V on the edge showing the depth of the underlay. Sizes are usuallyindicated by a system of notches on the edge of the knife.
Comparison of Hand and Press Clicking
One of the advantages of the clicking press is the greatly increasedspeed of cutting over the hand method. In order to take full advantage ofthis speed all the factors tending to slow the press clicker down must beeliminated as far as possible. Too great a variety of knives has this effectand therefore the aim should be to give the clicker as few different sizesas possible, thus helping to reduce the number of times that he has tochange over. Another way of achieving this is to use skins with a largearea that will enable the clicker to use one pattern a number of times insuccession. The job which involves a number of different knives, andskins that are small in area, causes the clicker to spend excessive time inputting down and picking up knives which are not so easily handled as thecard patterns of the hand clicker.
Some of the advantages of the two methods have already beendescribed or implied, but the lists which follow will make them clearer.There are, in addition to the factual advantages and disadvantages, otherswhich at the present time appear to be matters of opinion. These will bereferred to separately and assessed as far as it is possible
131
CLICKING TECHNIQUES

to do so. The important point to remember is that the advisability ofcutting by hand or machine should never be discussed in isolation, butalways with reference to some particular job of work when the weight ofthe various arguments, for and against, can be more accurately tested.
The use of press clicking has increased considerably and wouldincrease still further were it not for the fact that the average shoe factory issmall and makes a fairly wide variety of styles; thus only short productionruns are possible.
In order to assess the saving to be made by press clicking some of thepoints already made should be taken into consideration:
(1) Long ‘runs’enable cutters to use one knife for a large number ofcuts.
(2) Leather that has a good spread should be preferred as this againgives the opportunity for continuous use of one knife.
(3) The double-edge knife has greatly reduced the cost.
Bearing in mind these points, the advisability of cutting a new line onthe press may be decided by taking into consideration the followingadditional factors:
(4) The cost of making card patterns may be omitted, unless the knivesare ordered by supplying models in stiff paper instead of card.
(5) Hand-cutting costs—wages.
(6) Press-cutting costs—wages.knives—cost, repair.press—initial cost—depreciation and in-
terest, maintenance, power.
Note: Wages—The piece-rates for press clicking are at present (1952)33 1
3per cent less than those for the hand process.
Knives—The estimated cost of repairs may be based onexperience.
Press—Depreciation can be found by estimating the life expected.Maintenance costs can be based on experience.
Press Clicking Advantages
(1) It gives greatly increased speed of cutting over the hand method.The actual difference depends on the intricacy of the outline to be cut (themore intricate the shape the greater the difference) and the number oftimes a knife can be used without changing for another shape or size.
(2) Intricate outline can be cut with absolute accuracy.
(3) The sections are always cut true and there is no danger of waste dueto overcutting.
(4) The increased speed results in a lowering of labour costs when longenough runs can be set up to cover the increased initial cost of the knives.
132
CLICKING

Hand Cutting Advantages
(1) The cost of the patterns is much less, and therefore, short runs canbe cut more economically.
(2) Storage space is greatly reduced.
(3) The patterns are easily handled, so that on small skins from whichseveral different shapes must be cut, very little time is lost in changingfrom one pattern to another.
In addition to the above considerations, there is a widespread opinionthat the use of clicking presses leads to a lowering of the standard ofquality. The argument in favour of this view is that the mere effect ofincreasing the speed of the operation tends to result in less time beingspent on examining the leather, although this need not follow. The answerto these objections is that any such tendency can be effectively controlled(a) by careful selection of the leather to be cut, (b) by proper training andsupervision, and (c) by sorting the cut stock. In brief, by an intensive formof quality control.
Once the initial cost has been established the point at which a savingcan be made becomes evident. Only the wages cost increases at allrapidly and at a certain pairage the total cost of cutting by hand becomesgreater (and will continue to increase) than the cost of press clicking.
The point at which the saving commences may be brought lower bycutting extreme sizes by hand since there are not likely to be many ofthem. Another method is to use knives for whole and half sizes,* andcombining knives of two sizes into one upper,† thus keeping very close tothe required shape. Practices of this kind mean that styles which are notlikely to be made in sufficient quantity for ordinary press clicking to pay,may be brought within the scope of the method.
*A size 7 knife is also used for size 61
2.
† e.g. size 7 quarter and size 6 vamp.
133
CLICKING TECHNIQUE

10
CLICKING ROOM MANAGEMENT
UPPER COSTING
THE HIGH COST OF upper materials has resulted in more attention beingpaid to the accurate estimation of the cost of the shoe upper. The word‘estimation’ points to the source of the difficulties involved since costingafter cutting is simple enough, but costing before cutting, or estimating,means that all the variable factors must be listed in advance and anallowance made for each. Detailed descriptions of these variable factorsand of the way in which allowances for them may be arrived at can befound in the text-books and articles listed in the Bibliography. Thesepresent notes are intended to survey the whole field and provide thestudent with enough background information to enable him to read with aclearer understanding the articles and books mentioned. Since mostupper leather is bought by area the methods of costing described arebased on area, although a reference will be made to the use of weight as acheck on costs.
Variable Factors
(1) The area of the patterns when fitted together.(2) The size and shape of the leather to be cut.(3) The effect of different quality requirements on the area used.(4) The size of the patterns used.
Pattern Area—The area of the pattern itself is not needed since it is itsshape which determines the waste made.
A square pattern would obviously cut in quantity without wastewhereas a round pattern of identical area could not be cut without waste.This waste which cannot be prevented is called the first waste and whenadded to the actual area of the pattern gives the basic cutting area. This isthe area that would be used if the patterns were cut repeatedly fromuniform material of unlimited extent and is the first factor.
There are a number of methods used in finding the basic cutting areaand all consist of placing the patterns to be used on paper and measuringthe area thus covered. Sometimes all patterns are used and fitted togetherwithout system, the avoidance of waste being the only guide. To totalareas thus obtained are added percentages which include second waste orthe waste involved in cutting leather of limited area and variable quality.These percentages are based on past experience of cutting figures.
It may be objected that this process could well be shortened by markingup an average skin of the type to be used, and this method
134

has been and no doubt still is used. The disadvantages are the difficulty offinding (a) an average skin, (b) an average clicker and (c) of ensuring thatthe clicker will take ‘average’ care. The method is too imprecise whenaccurate costing is essential.
The most reliable method of ascertaining the basic cutting area, is thatoriginally described by Russ and Small in their book ScientificAllowance and Cost System. Each pattern is marked up separately, theclosest possible interlocking system being used. After marking the firstpattern, the second is rotated through 180° without being turned over,and interlocked as shown in Figure 69. This procedure is repeated until
there are at least eight patterns marked, four in each of the two positions.Connect four corresponding points on the four patterns in the sameposition, and the area of the parallelogram thus formed will equal thebasic cutting area of two patterns. The shaded sections in Figure 69 willfit together to form two whole vamps.
Size and Shape of the Skin—Having calculated the basic cutting area forthe different sections, the second waste can then be found by referring tothe tables provided in the text-books and articles quoted. The percentagethus found refers to patterns’ of a given size cut from a skin of fixed area,and is converted to a multiplier (see example below). (Note: a number isincreased by 5 per cent if it is multiplied by 105/100, i.e. 1⋅05). Thetables give figures for patterns and skins of all reasonable sizes.
135
MANAGEMENT
Figure 69. Basic cutting area.

Variations for Quality—As the perfect skin is not likely to be met with,further allowances must be made for the different grades of leather. Theleather is sorted into qualities according to the surface blemishes thatoccur and an appropriate percentage added to the second waste factormultiplied by the basic cutting area. It has been suggested that adifference of 5 per cent should be made between the different grades.
Grade .. .. .. .. .. 1st 2nd 3rd 4th
Percentage added to the pair allowance 0 5 10 15
The total area thus obtained represents the cutting area for that particularpattern from leather of a particular size and quality.
Pattern Sizes and Fittings—The use of different sizes and fittings meansthat fresh allowances are needed. These are calculated from the actualincrease or decrease in pattern area. The percentage suggested isconverted to a multiplier as before, therefore, if there is a difference of 5per cent between sizes the size 9 cutting area would be calculated bymultiplying the area of the size 8 model by 1⋅05.
A variation of 2 per cent is suggested for fittings.
Example—Man’s Oxford Shoe, sample size and fitting 8/4, cut from boxcalf, average size 10 ft., grade 2.
To the total add a further 5 per cent for grade 2 quality = 2⋅06 sq. ft.Calculate the area for the range of sizes and fittings to be cut by addingthe percentages given above.
The Krippendorf System
The Krippendorf Kalculator Company render a service to theAmerican shoe industry which is based on the method of areameasurement already described. On receipt of a set of patternsaccompanied by full details the Company work out and return to themanufacturer feetage allowances for ten different leathers.
136
CLICKING
Basic cuttingarea
Second wastefactor
Total(sq. ft .)
Cap (2 to pair)
Vamp (
(
(
2
2
2
t
t
t
o
o
o
p
p
p
a
a
a
i
i
i
r
r
r
)
)
)
Q
Q
u
u
a
a
r
r
t
t
e
e
r
r
s
s
(
(
2
2
)
)
Strip
Tongue
0
0
0
0
0
0
×
×
×
×
×
×
280
420
365
365
050
120
´
´
´
´
´
´
´
1
1
1
1
1
1
×
×
×
×
×
×
235
247
223
223
211
216
=
=
=
=
=
=
=
0
0
0
0
0
0
×
×
×
×
×
×
×1 964
146
056
446
446
524
346

Before this can be done, however, a representative of the Companyvisits the shoemaker and examines the leather to be used and the grade ofwork cut. From this information, the Company are able to work out thefeetage for any pattern supplied to them.
A machine is also supplied which can be set to the range of sizes andfittings for any ticket together with the estimated allowance and onoperation will produce the total area for that ticket.
Checking Costs
One of the variable factors that has not so far been considered is theability of the clicker who is cutting the shoes that have been so carefullycosted. The efficiency of the whole room varies from time to time and it isone of the most important of the foreman clicker’s duties to see that thelevel of efficiency is kept high. He is assisted in this by the system ofissuing stock sheets with the work to be cut. The information that thesesheets convey is often extensive, but, for the purpose of checking costsonly, all that is needed is the area and value of the leathers allowed setagainst the area and value used, showing the gain or loss that has beenmade in feet and money. The stock sheets often provide space for detailsof the time taken on the job, labour costs and the weight of the sectionsused as a check. In this last item, the leather-issued is weighed, and onreturn the cut sections, offal and scrap are weighed and checked againstan approximate percentage figure. Such a check is of value when there issome doubt whether a loss is due to wasteful cutting or an unduly highproportion of offal. The offal cannot easily be measured but it can besorted out and weighed.
The stock sheets are examined on return and any unexplaineddiscrepancies investigated; the information is then transferred to thestock ledger as described on p. 142. The results may also be used to checkon the efficiency of any individual clicker over a period of time, on someparticular leather or in general. It is the proper use of records of this kindwhich enables the foreman to maintain a high standard of work in hisdepartment, since by their help he is able to put his finger on any weakspots and take appropriate action.
Labour Costs
The prices to be paid to clickers are based upon the definitions ofstandard patterns which appear in the Statement of Prices for Clickers, astatement agreed between manufacturers and trade union representatives.There are, in addition to these standard pattern definitions, further tablesshowing the extra payment which may be claimed for work which ismore elaborate than the standard.
There are allowances for size marking and shading (where this has tobe done by the clicker) for small tickets (under twelve pairs) and for‘hard’ cutting. The full list is, of course, too lengthy for inclusion, but thedetails given show the type of variations for which allowance is made.
137
MANAGEMENT
If a new pattern shape is introduced a fresh price is agreed upon,usually by referring to an existing shape and allowing for the differences.
As the wage agreement in the shoe industry is ‘tied’ to the cost of livingindex it follows that the simplest way of dealing with the changes thatoccur, is not to recost each individual item, but to add a percentage to thewhole.
LEATHER BUYING
The responsibility for buying leather is usually placed on one of thefactory executives with a sound knowledge of the material, but theforeman clicker or the chief leather storeman, will be expected to giveexpert advice. In the small factory, the foreman clicker will also bestoreman and buyer, only seeking executive authority for large orders.
The buyer, whatever his position, must be familiar with the productionplans of the factory, and the type of order he places will vary according tothose plans. A stock line of work that is not subject to any great extent toseasonal variations requires a steady supply of leather, each deliverybeing comparable in quality and price as far as the market conditions willallow. For such a line, a contract may be entered into for a delivery of acertain quantity (based on production requirements) at monthly orquarterly intervals, the contract being cancelled only after an agreednotice has been given.
Seasonal lines of shoes may be covered by a single order, the quantityagain being calculated after production plans and costing estimates havebeen made.
The great bulk of upper leather is measured in square feet, this beingdone mechanically in the tannery and written or printed on the back of theskin. Certain waxed leathers are still bought by weight since this is anindication of quality. Other exceptions to the general rule are snakes, thelengths of which are measured in metres, and lizards which are measuredin inches across the width of the skin, but are not purchased at a fixedprice per inch. The skins are sorted into widths and sold at a fixed priceper skin e.g. 16 or 18 in. skins. Crocodiles are also measured in inchesacross the width but the price is per inch and not per skin. Leather assupplied by the tanner is usually carefully sorted into qualities andpossibly into substances as well. The variations will, of course, depend onthe use the shoe manufacturer has for the different types. One shoe-oneleather has serious disadvantages since all the leather bought must go intothat shoe with unavoidable variations in quality, unless the tanner iswilling to supply one carefully sorted selection. In most cases, the tannerwill have sorted the leather into various qualities the differences betweenthem being as follows: (1) clearness of grain; (2)
138
CLICKING

percentage offal; (3) grain texture; (4) grain structure (must not be tootight or too loose). If different substances can be used, these selectionsare sorted in light, light medium etc. as shown on p. 141. Sometimesleather can be bought ‘table run’, that is unsorted by the tanner. Sorting ofsuch a purchase in the factory will probably result in a wide variation ofqualities but can show a good profit on buying.
All leather, whether sorted by the tanner or bought ‘table run’should becarefully examined against a sample when received in the factory, andthen sorted or re-sorted into factory grades. The reason for this is that thetanner’s standards are not likely to be exactly the same as those of thefactory; also the tanner sorts for value whereas the factory sorting is forquality, e.g. a badly damaged skin of low value may yet produce uppers offirst quality even though a loss on cutting is made. Each factory has itsown standards of quality and the leather should be sorted into thesedifferent grades. After re-sorting, the leather may be revalued accordingto factory costs, thus showing a profit or loss on buying and providing anindication of the buyer’s efficiency. It does not follow automatically thata profit shows efficiency or a loss inefficiency since rising or fallingprices are outside the buyer’s control. The system of recosting aftersorting into factory grades may be too rigid, but in this case, thecalculation is carried out when the leather is issued to the clicker, thebuying price being set against the estimated price and the profit or lossrecorded and kept distinct from the profit or loss that may be made by theclicker on his cutting.
THE LEATHER STORE
The value of the leather stored and the fact that deterioration occurswhen conditions are unsuitable makes it essential that the store should becarefully sited and, where practicable, the temperature and humiditycontrolled.
Strong sunlight will cause leather to fade and lose its suppleness, so agenerally diffused light should be sought; it is better to depend onartificial light between the racks. Too much heat can also dry the leatherand if combined with a low degree of humidity the tendency will beaggravated; a damp store will involve the danger of mould.
The racks used for storing the leather should vary in size or may becombined so that a single rack can be used for small skins and sides whiletwo racks placed back to back will accommodate the larger skins. Ideally,the racks should not extend to the ceiling, but considerations of spaceoften require this sacrifice of accessibility. The lowest shelf should bewell clear of the floor and no leather allowed to be placed under the racks.To simplify handling the heavy leathers should be kept on the lowershelves.
The storeman’s memory should not be regarded as a sufficient
139
MANAGEMENT

record of where leather has been placed and all racks should be numberedand lettered or coded in some way, so that each section can be identified.This rack code is entered in the stock ledger and a glance at this will showwhere the lot is to be found.
An essential piece of equipment is an adding machine, both forchecking receipts and for counting the leather issued to clickers. A doublesaving is made since the clicker can check the leather issued to himquickly and easily.
LEATHER SORTING
Several references have been made to leather sorting as the differentpeople who handle the material sort it into the different grades suitable fortheir purposes; the tanner because the different grades can be pricedseparately, the clicker because it is necessary to the efficient carrying outof his job, and reception sorting to put the different qualities bought intoline with factory requirements. The sorting done before issue is the mostimportant of all these, since on the grade of leather issued, and itssuitability for the job in hand, will depend the quality and appearance ofthe finished shoe upper. Reception sorting, thoroughly carried out, will ofcourse, greatly simplify sorting for issue, but some sorting will remain tobe done, for there will always be variations. Before describing sorting forissue in more detail, it will be as well to consider the various differencesthat are found between skins of the same type, and their relevance to theclicker’s work.
Differences between Skins of the Same Type
Size—The tolerance permitted in the size of skins in the same grade willvary very widely according to the average size. Small kid-skins with anaverage size of 2 1
2sq. ft. should not vary through a bundle by more
than 1
4sq. ft. above or below this average. Calf-skins with an average
size of 10 sq. ft. may vary between 9 sq. ft. and 11 sq. ft. and large sidesmeasuring 20 sq. ft. on the average may vary by as much as 2 1
2sq. ft. up
or down, i.e. 17 1
2to 22 1
2sq. ft. The size of the skin is not of such great
importance to the clicker except that he may cut the larger sizes from thelarger skins which give him greater freedom of movement.
Shape—A skin that is long in relation to its width will be more wasteful incutting than one which is well grown i.e. square in shape. The reason forthis is that the line of the backbone often effectively divides a skin in twoand there is little space on a narrow skin between the backbone and thelower quality leather in the belly. Even if the backbone may be includedin some parts of the upper, there is still considerable restriction ofmanoeuvre on a narrow skin. The importance of shape in this connectionis well known; what is, perhaps, less appreciated is the importance of therelationship
140
CLICKING

between the shape of the skin and the size and shape of the pattern. It doesnot always follow that large patterns should be cut from the largest skins;a little experiment may show that the large pattern will cut from amedium size skin with very little waste, whereas the larger skin merelythrows more waste with no increase in pairage. The shape of the skin isjust as important as the size in this connection, since the sorter shouldknow what width of skin is needed for the efficient cutting of any givenstyle.
Substance—The thickness of leather (variously referred to as heavy orlight, good or thin) is measured in millimetres. The code in general usehas already been referred to and there is no definite scale used by theindustry in which is laid down that, for example, leather of mediumsubstance shall be of a certain thickness. The following scale is then, onlyintended to give the student some idea of the range used.
Outside this scale there are the ‘X’ grades, XL. or very light, XH. or veryheavy; also a bundle of large calf-skins may be marked XXH. and indeedthey would be very heavy indeed as calf-skins, although, if comparedwith other leathers the code H. would be the right one.
The thicker skins are used for the heavier types of footwear and also forthe larger sizes. The sorter, then, must ensure that the substance is rightfor the shoe to be made and that if a variation in substance is unavoidable,there shall be a sufficient quantity of the heavier skins for the larger sizes.It sometimes occurs that large skins vary widely in substance overdifferent parts of the same skin, and the variation is such that the thinnerparts are unsuitable for the shoe to be cut. Where such an issue is made,the sorter can mark the skin to give the clicker a guide as to what iswanted.
Percentage Prime—Prime leather in this connection refers to all that,regardless of quality, which can be used in the shoe to be cut. Theremainder or offal is usually of so loose a structure that it would notwithstand the strains of making and wear. The percentage of primeleather really indicates the size of the skin from the clicker’s point ofview, rather than the figure marked on by the tanner. The policies oftanners may vary, since some prefer to round the skins very closely so thatlittle offal remains; needless to say such a skin commands a higher priceper square foot than one which has had considerable areas of loose offalleft on. The feetage allowed the clicker is based on a certain allowance foroffal, but if this is exceeded a feetage over that allowed, will be taken. Thesorter is responsible for maintaining a balance over the whole parcel ofleather issued.
141
MANAGEMENT
CodeThickness (mm.)
Light
L.
Light
medium
L.M.
Medium
M.
Heavy
medium
H.M.
Heavy
H.0×75- - - - -1 1× × × × × × × × ×0 0 1 125 25 1 15 5 1 175 75 2 0

Texture—The size and character of the hair follicles gives to leather muchof its characteristic appearance, and those skins with very small holes aresaid to have a fine grain or texture. This texture is of particularimportance on glace kid-skins where it is one of the chief indications ofquality. A lady’s shoe cut from glace kid is expected to have a grain of acertain appearance (the higher the cost of the shoe, the finer must be thegrain) and each skin should be carefully examined to see that it is of theright texture for the shoe to be cut.
Grain Structure—The nature of the skin, method of curing and tanningprocesses all affect the finished grain which should be closely knit to thefibre structure so that there is no looseness when the leather is creased.Too tight a grain will mean that when folded cracks will appear. Thesepoints affect the quality of the leather and if either is present to excess thematerial is not suitable for shoe making, but sometimes they do notbecome apparent until the shoe is lasted or in wear. Heavily plated (i.e.ironed) leathers sometimes break up very badly when creased, thesmooth appearance may be recovered by ironing in the shoe room, butthis is only a temporary measure since a few minutes’ wear will break upthe surface again.
Clear Grain—The number of blemishes that can mar the surface ofleather can seriously affect the cutting value of the leather, but they do notnecessarily affect the quality of the leather itself. The butt of a skin maycarry a large brand, and a large number of scratches may disfigure it, butthose parts which are clear may be suitable for the best quality shoes.Growth marks and veins, warble holes and scab marks all reduce thecutting value of the leather more by interfering with the close fittingtogether of the patterns than by the actual area they cover. The sorteragain must endeavour to issue a parcel of skins, only a fair percentage ofwhich are badly flawed.
Shade—The differences in shade that occur on coloured leathers havealready been described. The sorter should try to avoid issuing any skinsthat are ‘odd’, i.e. abnormally dark or light, unless there are other skinsclose enough in shade to make combination possible. The type of lightingavailable in the clicking room is of vital importance when colouredleathers are being sorted.
Pattern—Reptiles and similar skins with a conspicuous but varyingpattern should be issued in quantities that will enable the clicker to cutwhole pairs from skins that are practically identical.
Records—The person in charge of the skin room is expected to be able tosupply at a moment’s notice a close approximation of the stock held ofany particular leather. Production plans cannot be completed untilexisting stocks are known and fresh orders (if needed) placed. Theinformation wanted is kept in an upper leather stock ledger. Theinformation obtainable from such a ledger is more comprehensive thanthat needed by the skin room man. Not only are details of the leather,remaining stock and its value recorded,
142
CLICKING

but also the profit or loss made on issue, profit or loss made on cutting andlabour charges, these last being used for departmental cost accounts.
When a fresh sheet has been filled in with details of the leather in stock,each cutting sheet received from a clicker is checked and entered up, thusmaintaining an up-to-date record of existing stocks and showing whetherany leather is consistently showing a profit or loss on cutting, or whetherany particular style is not cutting according to the estimate made. Withthis information, the supervisors are able to discover any unusual featuresand carry out an investigation into their causes.
Where large stocks are held, the skin room staff may keep an additionalrecord on a card which carries the feetage of each bundle of leather. As abundle is removed or broken into the card is marked off accordingly andthus gives an approximate total of the remaining stock and an additionalcheck on the quantities held.
Sorting Cut Stock
It is impossible for any individual to maintain, without reference tosome existing standard, an even quality in his work. This is particularlytrue of the clicker who uses material which may itself vary in quality. Thecareful sorting of the leather issued and the accurate estimation of thefeetage allowed go far towards the maintenance of quality standards. Anadditional check is supplied, however, when it is important that a uniformstandard of quality should be maintained; the cut stock passes from theclicker to a sorter and is closely examined to ensure that the clicker haskept to the required standard and that no blemishes have escaped hisnotice. The sorter himself is usually a skilled clicker, but care should betaken to see that the standard of quality set by him should not vary.
QUALITY CONTROL
This term which has come into use of recent years covers a very widefield. In the shoe industry, practically every supervisor is concerned withquality control, although the work he does with this in view may notalways be part of a plan that covers the whole of the factory. As far as theclicking room is concerned quality control begins with the establishmentof a definite standard of quality for each grade of shoe. Next comes thework of the leather buyer whose object is to obtain leather of the requiredquality at (or perhaps slightly under) the allowed price. The sorting intofactory grades, sorting before issue and sorting of cut stock are all aspectsof quality control. Also the clicker himself must be familiar with thestandard required since he is the key man and the efforts of buyer andsorters are aimed at making his work more effective.
These safeguards on quality are sometimes reinforced by a bonussystem in which a careful record is kept of the clicker’s results (as
143
MANAGEMENT

observed by the sorter) and a bonus awarded according to the way inwhich he has kept to the standard set. It is worth while emphasising here,that such a quality bonus can only work fairly if the greatest care is takenin the buying, and sorting of the leather and in the estimation of thefeetage allowance.
ORGANISATION
The planning of a clicking room is far less complex than for the othermajor departments since the problem of securing a balance of productionfrom many different machines with varying outputs does not arise. Theplanner has to ensure that there are enough clickers to do the work andthat they are working under conditions conducive to efficiency. It is, ofcourse, the last requirement which is most difficult.
The equipment needed by the clicker has already been described; theextent to which it is supplied by his employer varies from factory tofactory. The cutting board and the working bench need carefulconsideration as do other points, but the really vital consideration is thelight. Close scrutiny of the leather is essential; to make this possible theclicker requires a good light source with an absence of glare.
Light
In most factories daylight provides the main supply with electric lightas an emergency measure when the daylight is inadequate. The daylightmay come from side or roof windows (north lighting) or from both. Theadvantage of roof lighting is that an even quantity is available over thewhole room, whereas the light from side windows lessens as the distancefrom the windows increases so that in the centre of a large room artificiallight may be necessary throughout the day. Where side windows only arepresent, the most skilled clickers, i.e. those cutting the most difficultleathers, are placed nearest the windows, thus imposing a fairly rigidform on the physical organisation. Roof lighting or complete dependenceon artificial light enforces no such limitation.
The artificial light may be obtained from tungsten filament lamps orfrom fluorescent tubes, the latter giving a more even distribution of thelight without heavy shadows or glare. The lights may be suspended orfastened to the benches.
Benches and Scrap Disposal
These two may be taken together since the clicking benches are oftendesigned to facilitate disposal of the scrap. The benches should be wideenough to accommodate the cutting board with a sufficient margin forarranging cut stock and patterns: the depth of the bench should be thesame as the length of the rectangular cutting board so
144
CLICKING

that the ends of the board can be used, otherwise the clicker cuts in oneplace only and the board rapidly becomes uneven. Ashelf is often fitted atthe back of the bench so that cut sections can be kept clear of the workingarea and of scrap. Skins to be cut are arranged on a rail which is fastenedto the front of the bench, the clicker using the rail on the bench behindhim.
The pieces of waste or scrap are saleable and should therefore beplaced in a bin so that they can be collected easily. This is not always sosimple as it sounds, since the easiest way of disposing of small scrap is toflick it on to the floor while larger pieces are thrown to the back of thebench. In some benches a hole is cut in one corner with a scrap bin on theshelf underneath, but this is not always used. The ideal would appear tobe a wide chute at the front of the bench, similar to those used on clickingpresses, if this can be arranged without forcing the clicker to stand too faraway from the front of his bench. Some benches are fitted with drawerson either side which can be used for scrap.
Pattern Store and Skin Room
These should be regarded as integral parts of the clicking room, and sosituated that the clicker can collect leather and patterns without delay.
Supervision
Many of the aspects of the foreman clicker’s work have already beentouched on, but in addition to these may be recorded the need for trainingjuvenile labour, and maintaining a labour force able to deal with the quotaof work for each day. The production plan is usually based on the daysheet and should consist of a balanced programme for the whole factory.Although clickers are adaptable it frequently occurs that some specialiseon certain types of leather and the foreman should be ready to have cutany given quantity of one style. The number of patterns available shouldmatch the quantity of work to be cut, but this should be arranged betweenthe production and pattern departments.
A last point of vital importance: the ‘jobs’ should be issued to theclicker without delay. This can only be done if the skin room hassufficient notice and if the foreman knows approximately when eachclicker will finish the work he is on.
145
MANAGEMENT


PART IV
CLOSING
L. W. ELLIOT


INTRODUCTION
CLOSING IS THE NAME given to the preparation, fitting together andstitching of the various cut sections to produce the completed uppers inreadiness for lasting. This involves a considerable number of smalloperations, varied, and in different sequence for different types of uppers.
The sub-divisions of (1) preparation, and (2) fitting together andstitching, to which can also be added in certain circumstances finishingoff, are important since they constitute two main sections of thedepartment, and can therefore be used to give a clear picture of thegeneral work of the department and the gradual build up of the finisheduppers.
It should be realised that the first appearance of most closing roomsdoes tend to awe or confuse the student, and that he or she finds difficultyin discovering the sequence of operations at certain stages at least. Thisdifficulty grows steadily worse as types and styles multiply, but if it isborne in mind that basic types are quite few, and that the sub-division ofthe department is as previously stated, it will become an easier matter tofollow the course of the uppers.
149

11
PREPARATION
PREPARATION IS, AS THE name suggests, a series of operations in preparingsections for the ultimate stitching.
Its importance is very great, and the necessity for constant supervisionat all points is essential.
Difficulties and failures at later stages of manufacture can be, and are,regularly traced to indifferent preparation, and it must be the firstconsideration of any supervisor to be conversant with all aspects of thissection.
It is possible not only to call the preparation department a subsection ofa closing room, but if the size of the factory and output warrant it, it maybe a complete separate unit with its own supervision. The advantages ordisadvantages of this course will vary according to the individual firms,but from the point of view of supervision a possible advantage will begained. Whether the ultimate responsibility should be upon the generalclosing department is a matter of opinion, but if it is not, a considerableamount of friction seems probable owing to the effects of poorworkmanship, mentioned above, upon the stitching operations.
The method of receiving work from the clicking department andnumber of pairs per lot will vary with different firms. It is customary touse a type of carton or similar receptacle with divisions foraccommodating the sections which must be kept in their correct order ofsizes to avoid trouble at a later stage. For this reason small parts, such asback-strips, must be tied up. The amount per carton is dependent upon theprocedure adopted in making—size of rack, type of production etc. It isessential that a regular flow of work should enter the department from theclicking room; once again the method employed e.g. day sheet system,will determine the intervals and amounts.
OPENING OR CHECKING
Before commencing major operations in the department a system ofchecking is necessary, not only to assure that the correct number of pairsis in the container, but also that the correct sections, fittings, backers, orany other items for the particular shoe concerned are all there. It will beappreciated that this important task demands a person with considerableknowledge of the varying styles and the parts necessary for thecompletion of the uppers. It is very disconcerting to reach a certain stageof production and then discover that some minor but essential fitting orbacker has been forgotten. The checking is not always done in the closingroom,
150

but it is performed by the clicking department in many firms. This cancause friction between supervisors, and the question of blaming theopeners in such cases is bound to cause bad feeling. However, it is theclicking room’s responsibility to ensure that everything is correct, and ifthe checker does his or her work properly no undue trouble should result.
Whichever method is used the sectional parts should be complete in thecontainer and a work ticket attached. Details of style, method of closing,treatment of edges, thread to be used, perforations etc. must be includedin the appropriate sections of the ticket. The number of pairs and sizesetc., will, of course, also be included.
A ll parts are counted and if errors are found the whole container shouldbe returned at once for rectification, care being taken to note time anddate of return. It should be realised that re-cutting one quarter or evenback-strip can cause considerable delay owing to difficulty in finding thecorrect colour to match. If checking is carried out in the clickingdepartment this trouble is automatically the responsibility of thatdepartment and the problem is solved.
Before describing the individual operations, it would perhaps be anadvantage to give a very brief picture of the course of events in theclosing of the uppers.
Firstly it should be understood that although it is possible for oneoperative to close an upper completely on one type of machine, this is notdone. Sub-sections of closing machines are laid out with the object ofperforming one operation or a small series of operations; thus it will berealised at an early stage in the department that the breaking down, orparting of sections of uppers is done to feed the sub-sections of machinessimultaneously.
IDENTIFICATION MARKING
It is necessary to provide some method of identification for the benefit oflater stages of closing when the upper is being assembled, and it is alsonecessary to give identification of size and possibly fitting during mostoperations.
It is essential also in the case of coloured work to give information ofshade coding. Methods adopted by various organisations are as follows:
(1) Crayon Marking—This is no doubt the original method—markingsize and colour by crayon on the back of the leather plus ticket number onat least one section of vamps, quarters, caps, etc.
(2) Notch Marking—This method is of more concern when uppers are cuton the press, consisting of a code of notches in the lasting edges of cutparts. It is essential to mark lot numbers by crayon on the back of theleather.
(3) Colour Marking—A series of coloured paints is coded to sizes, andthe lasting edges of cut sections are then painted the
151
PREPARATION

appropriate colour. This is an excellent method for tickets of one or twosizes, but is rather involved with long size runs when colour shading isrequired. An example of the coding is given.
Care must be taken to ensure the edges being painted will later becovered, or lasted away
(4) Machine Marking—This method is by far the best but is unfortunatelythe most costly. With intricate work, long size runs and fittings, and alsocolours it does give better results and cause less trouble later. With theBUSMC Match Marking Machine it is possible to stamp all informationsuch as size, fitting, lot number, colour number, etc., with one movement.
Colour of stamping can be quickly changed to suit varying colouredleathers. Position of stamping is adjustable to suit the needs of differentsections.
Here again the lasting edge is used, or any position which willsubsequently be covered.
To sum up, marking is an important operation to avoid difficulties atlater periods of upper construction. It is sometimes combined withopening or checking and performed by one operative.
Lining MarkingNot only for identification during manufacture, but also for
information to the wholesaler and retailer, it is essential to provide certaindetails in a conspicuous position without detracting from the appearanceof the footwear. The quarter lining is the usual position chosen, but insome cases the tongue has to be used, or even a small tab speciallystitched in.
Essentials to be stamped are the size, fitting, last and shoe number.Other details to assist in repeat orders being executed correctly can beticket numbers, order numbers and date code. There is not a standardmethod of stamping and in many instances codes are in use for sizes, etc.;this may be perfectly satisfactory to manufacturers and retailers but isconfusing to the general public.
Types of printing are manifold, but the main requirements are clarityand neatness.
It is worthy of note that marking by hand using Indian ink is stillpractised and does make an attractive method giving a certain‘hand-made’ appearance to the shoe; in fact it is copied to a certain extentby some forms of machine type.
A useful machine for lining marking is the BUSMC Lining Markingand Embossing Machine with its controlled heating element and simpletype change. Any colour of paper can be used up to 3 in.
152
CLOSING
Mauve
5
Yellow
Men’s sizes
Colour
Women’s sizes
Half sizes Pink
Shading by a previously arranged second colour code.
6 7 8 9 10 11
765432
Red White Blue Green Brown

width; it is fed from a roll and pressed on to the leather by the hot die. TheStandard Engineering Co. machine uses compressed air to apply thepressure and the length of time of contact or ‘dwell’ of the stamp with thematerial, is controlled automatically by an adjustable time switch.
Stitch Marking
Ornamental stitching and perforating etc. are commonly used on manystyles of shoes, and it is.. essential to provide a means of supplying thenecessary marks to enable the operators to perform their work accurately.The methods used are:
(1) Slotted Patterns—Board patterns of the same shape and size as the cutsections are slotted along the required design lines; these are placed onthe leather and a pen with a coloured ink, or alternatively, a dull awl, isrun along the slot.
(2) ‘Pimple’ Marking—The required design is punched on to a metalpattern so as to give a row of depressions along the design line. This isthen put into a small mangle with the leather section which therebyreceives a corresponding series of depressions.
(3) Stitch Marking Machines—There are several makes available butthey all work on the same principle. A flat horizontal plate carrying themarking pattern is joined by a parallel linkage to the base of the machineso that it can either be pressed on an ink pad or paint-impregnated cloth atthe back of the machine, or brought forwards and downwards on to theaccurately positioned upper section in front. The forward movement iseffected either by hand or foot pedal; a spring returns the carrier to the restposition. (The method of producing the actual markers is described on p.102.)
Not only does the marker provide the means of doing stitching etc., butit can incorporate the positions for any overlaying sections, eyelet holes,or cut-out positions. It is often necessary to provide dies for each size toobtain perfect results, which although costly repays if a considerablequantity of that particular style is produced.
Markers used in conjunction with group graded patterns reduce theneed very often for dies for each size.
The use of marker lines for the accurate holding of one section toanother for machining gives better results than the older method of usingclickers’ pierce holes, which were very unsatisfactory on such leathers assuedes and grains, and also great assistance is given to the trainee toproduce a higher standard of work.
SKIVING
Skiving is the reduction in thickness of certain edges of upper sections tofacilitate various treatments of edges, to allow seams to be producedwithout bulkiness, to avoid discomfort in wear, to improve the
153
PREPARATION

appearance of the finished upper, and to give a uniform substance of edgewhen sections vary considerably.
To a large degree all these conditions are complementary; if a seam isproduced with a thick unsightly appearance it will obviously beuncomfortable to the foot; and since the treatment of edges is usually forappearance’s sake, a neat edge will also be comfortable in wear.
Skiving is a machine operation although it is by no means unusual for afitter to be seen with a long knife and marble slab attending to the finerdetails.
The machine usually to be found in closing rooms today is the BUSMC‘Marvel’ Skiver which is composed of a rotating disc type of knife, anadjustable guide for varying length and depth of skive, and a feed forcarrying the work to the knife. The knife is sharpened by a pair ofrevolving grinding stones which can be instantly brought into use evenwhile the operator continues her work. A safety device is fitted (or shouldbe fitted to comply with the Factories Acts regulations) to prevent theoperator from opening the top of the machine while the knife is revolving.
Also in use is the ‘Fortuna’ Skiver comprising a drum-shaped type ofknife.
The No. 8 ‘Marvel’ skiver has an attachment which permits two pre-setskives resulting in a considerable saving of time in handling sections.
Before describing the actual types of skive used it would be as well tostress the importance of the good workmanship necessary at thisoperation. More troubles can and do develop from indifferent skiving, notonly in the department itself but also in subsequent departments (lastingchiefly), than, probably, from any other cause.
Types of Skive for Various Edges
Raw Edge—Upper sections are occasionally left with raw cut edges andthe only skive necessary is to obtain uniformity of substance. In the caseof box and willow calf of average substance a skive of up to one thirdsubstance is taken as shown in Figure 70a. Heavier leathers such as grainscan be treated similarly; the substance remaining will be greater than thecalf, but will be in keeping with the heavier appearance required in thattype of shoe. Light calf will be very lightly skived. It will be realised thata certain responsibility always remains upon the operator and strictsupervision is always necessary.
Gimped or Gouged Edge—The same principle of raw edges applies hereif gimping is performed first. If skiving is done before gimping theallowance of waste must be provided for, a slightly longer skive beingused.
Edged—The description of this edge is given later, the skive requiredbeing as Figure 70b. This is produced on a machine, the BUSMC
154
CLOSING

‘Marvel’ No. 5 specially set for a 40° skive, for this operation only, andany adjustments should be made by a skilled mechanic. To obtain goodedging results a perfect skive is essential and great care should be taken inacute curves.
Folded Edge—Once again the description is given later, but the skiverequired (Figure 70c) is twice the amount of fold, which can varyfrom 1
8in. to 3
16in, therefore for light leathers a skive is usually 1
4in. and on
heavier materials 3
8in. The ideal is to reduce to a very fine edge, but the
machine folder requires a slight substance at the edge to obtain a uniformamount of turn-in. The object is to obtain, when folded, the normalsubstance of material.
Bound Edge—As binding is chiefly used on women’s shoes of a lighttype the skiving of the edge is not always necessary. The details givenregarding raw edges will apply in cases of materials of a slightly heaviernature.
Type of Skive for Various Seams
Closed Seam— The general principles applied to raw edge skiving applyequally to reduction required to produce the closed seam. As this seam isprincipally used for back-seams it is of the greatest importance that careis taken in skiving, otherwise trouble will be experienced in broken backsat a later stage of manufacture. By skiving too much away the materialwill ultimately break; and, alternatively, if insufficient is removed onheavier leathers the thread in the seam is under a great strain and willpossibly break. With light leathers it is unnecessary to skive at all. Thereal object in a seam of this type (described later) is that when rubbeddown it is as flat as possible, to prevent unsightly appearance or hurt tothe wearer.
155
PREPARATION
dcba
Figure 70. Skives for various edges and seams: a raw edge; b edged; c foldededge; d lapped seam.

Lapped Seam—It is essential to skive away the underlaying part whentwo sections are joined by being lapped one over the other to preventridges showing, and other troubles. This type of seam (Figure 70d) is themost commonly used in the shoe and attention to detail in skiving willresult in a good appearance of the finished upper, and also of course thefinished shoe. The amount to skive is indicated to the operative by pierceholes, marker lines, or corners cut away. It should be the maxim of theskiver never to skive to the depth of the marks, but to reachapproximately 1
16in distance away. This will give full substance for the
machinist for the first row of stitching and strength is not impaired. Theskive is taken to the finest possible edge to prevent a ridge printingthrough later.
To sum up, it is the management’s duty to pay particular attention tothis operation, continual supervision being essential to check depths andwidths of skives in relation to the varying leathers in use, to check fordamages which can be a very expensive item today, to make certaindamages are quickly re-cut, and also to watch carefully for leathers whichmay cause later troubles unless skived in a manner slightly different fromthe usual.
PERFORATING AND GIMPING
Perforating is an operation for ornamenting the uppers by means of seriesof holes of varying shapes along edges of sections and also in some stylesto give pleasing effects on the body of the upper; in some cases, the holespass through the lining also.
It may be true to say that the machinery available today for perforatingand incorporating other subsidiary operations has advanced during thelast few years more than any other machinery in the department.
The BUSMC No. 3 ‘Royal’ Perforator and the BUSMC No. 4Perforator are machines in extensive use in most factories, and in contrastto types described later, a single punch or die is used, the work being fedthrough the machine. The die can be a single hole or a small number ofholes; innumerable variations are available, and as each movement of thedie is completed the feed carries the work forward to position for the nextpunch movement. A narrow strip of paper also feeds directly beneath thedie and under the work to produce a clean-cut punch hole, at the sametime protecting the cutting edge of the die. Great skill is required toproduce good results especially when acute curves have to be negotiatedand when it is borne in mind that a machinist has probably to stitch eachside, in many cases one of those sides being the edge row. Correct spacingis important to give a good appearance; the popular large hole and twosmall which are contained on the one die should be spaced to give theeffect of a continuous flow.
Gimping, which is the serrating of an edge, can be done by the ‘Royal’Perforator. A die containing the knife is inserted in the
156
CLOSING

machine and work is fed through as in perforating. Spacing is againimportant to obtain a clear cut sawtooth effect; overcutting or a ragged cutmust be avoided. It is also necessary for the operator to use the correctmargin as allowed by the pattern cutter, otherwise material is lost and thefit of the sections affected. This margin is usually 1
12in, just sufficient to
obtain a clear cut without undue waste.
It is sometimes possible to combine gimping and perforating in oneoperation, the qualification being that the section must be fairly straight,otherwise spacing is destroyed.
A method of perforating differing from the foregoing is the use of acomplete set of punches to suit a certain section, and a press movement tocomplete the operation.
In its simplest form a series of punch tubes to the shape of a straight capare made up and affixed in a suitable type of light press. The cap isinserted to a pre-arranged template and after power is applied perforationis complete. To enlarge on this it is possible to instal a gimp knife and alsothe centre design, so one operation is producing a uniform result, veryquickly, and by the use of unskilled labour.
An example of this type of machine is the Freeman Press which isto-day becoming almost the universal method of perforating. Its scope isvery wide as the size of the working plates is 14 in. × 10 in., the designsbuilt into the plates being almost unlimited, variations being possiblebetween sizes on the one plate, and several small sections being alsoaccommodated if necessary. Gimp, gouge or straight-cut knives areinterchangeable; sections of punches are also interchangeable; markerlines in coloured ink can be used, and a method of raising a moccasinfront or similar style by the use of heat and pressure is possible. Sizemarking etc. can also be performed. As in the ‘Royal’ Perforator thepunch tubes are protected and a clean cut ensured by the use of a roll ofthick cartridge paper feeding through the machine.
The use of this machine or similar types and the heavy cost of plates hasresulted in somewhat revolutionary changes in principles of patterngrading, which although outside the scope of this section will bediscussed from the viewpoint of the closing room.
When a certain style has been adopted and sales considered to warrantthe cost of dies, one must decide the minimum number of dies necessaryto produce the range of sizes, and possibly fittings, without the characterof the shoes being destroyed. If, for the sake of argument, the numberrequired is reduced to three, then the size range is divided into threesections, and in the case of men’s shoes we may use size 6 shape for 5 to6 1
2; size 8 shape for 7 to 8 1
2; size 10 shape for 9 to 11.
Taking a wing cap as an example, the operator on the Freeman Press isonly concerned with (a) die number 1 (including sizes 5 to 6 1
2) which has
the peak and wing shape of one common size (6)
157
PREPARATION

although varying around the lasting edge, (b) die number 2 (sizes 7 to 8 1
2),
common size of 8, and (c) die number 3 (sizes 9 to 11), common size of10.
A certain amount of waste cannot be avoided in using the press type ofperforator as the section is placed to the template and a margin ofapproximately 1
8in. is given to clear the top die from the template. From
this is will be seen that intricate curves and difficult cutting in the clickingroom can be avoided by skilful use of the template shapes, the cuttermerely casting a shape rather than the desired finished shape.
Several types of machine are available with a smaller effective workarea. The BUSMC No. 3 Fancy Design Punching and Marking Machinehas a sliding work table of 9 in. × 7 1
2in. and is suitable for single sections
for perforating and marking. It is also possible to perforate closed upperson this machine.
EDGE TREATMENTS
Cementing
Before folding it is necessary to apply a cement to the skived edge to beturned, the adhesive keeping the margin in position until it is ultimatelystitched. Latex is commonly used, a machine applying a film to theleather to a pre-determined width. Rubber solution can also be used, themethod of applying being by hand brush to a group of sections spacedquickly to the approximate margins. Great care should be taken to avoidsolution being spread on the face of suedes or fabrics and damaging theappearance of the finished shoe. Cements can also take colour from calfleathers, but if precautions are taken and facilities provided for placingsections to dry no serious trouble should develop.
Folding
Folding is the turning of an edge of a section, usually to the amount ofbetween 1
8in. and 3
16in. to give a pleasing and finished appearance (Figure
71a).
The variations in the amount of turn in are usually the result of differingsubstances of leather in use. For light calf or glace kid 1
8in. is sufficient;
and the other extreme, heavy grain will need 3
16in. It is impossible to have
patterns for all types of leathers, and it is no unusual occurrence for amargin of 1
6in. to be allowed as a standard. It is also common for factories
producing women’s shoes to standardise at 1
8in.
Folding a straight piece of leather presents no difficulty providingskiving is correct but to fold a convex curve it is necessary to pleat theexcess material in the shorter circumference. The concave curvedemands the opposite; the folded edge must assume a greatercircumference and short cuts are made at right-angles to the edge, which,
when turned, open and provide the extension required (Figure 71b).
158
CLOSING

Pleating should be neat and regular and be invisible in the finishedupper. If indifferently performed the bumps will cause irregular stitchingand probably show badly later.
Troubles due to lack of cutting of concave curves are lifting of the fold,small allowance taken and loss of shape.
Overcutting can cause serious troubles later; the cut will possibly tear ifsubject to strain; shape will be lost if cuts are widely spaced, the curveresulting in a series of semi-straight lines.
Folding is possible on most leathers except the heavier and greasytypes. It is usual to fold all sections of glace kid, quarters of box andwillow calf and the lighter grains.
All fabrics are folded to avoid the shredding of the threads; a ratherlarger allowance is made in this case.
Folding can be efficiently and quickly done by machine; the BUSMCModel ‘H’ Folder is in general use and a skilled operative will produceexcellent results.
The edge is lifted, turned over and tapped down as the section is fedthrough the machine. The feed is controlled to facilitate difficult curvesand allow pleating in a uniform manner, and a knife attachment can bebrought into work to cut the concave curves. The machine istreadle-controlled leaving the operator with free hands to control andguide the work.
A fairly recent development is the applying of a 3
16in. tape to the leather
while folding, the turn of the edge lapping the tape, which has previouslyrun through a quick drying cement. This gives a firm top line whenapplied to quarters.
An older method, using the ‘Booth’ Folder, still in use in somefactories, is to turn the edge to a template, the whole operation beingcompleted in one movement of the machine. A standard-
159
PREPARATION
Figure 71. Edge treatments: a folding straight edge; b folding curved edge;c edging

ised shape is necessary; for instance, the cap curve is readily consideredfor this type of folding machine.
Points to watch in folding are:(1) correct allowance being taken;(2) retention of shape of curves and corners;(3) pairing of sections, e.g. lengths of facing etc.;(4) running off at end of fold and loss of shape;(5) checking with exact patterns on intricate straps, etc.
Edging
Like many other operations in the shoe trade, edging has severaldiffering names including ironing, setting, searing and burnishing. Thelast named can cause confusion as burnishing has in the past been awell-known method of edge treatment; actually a raw edge is stained andfed past a heated tool, producing a burnished and well finishedappearance. It is not, therefore, unusual to find the name applying to asimilar operation in popular use today.
Mention has been made of the importance of the skive in producinggood edging and unless the machine is in correct adjustment and auniform skive is made, it is impossible for the edging operator tocontinue.
Edging can be defined as the treatment of a specially skived edge,which, when passed under a small heated iron causes a sharp contractionand turning of the grain of the leather and produces what is in effect anexcellent imitation fold (Figure 71c). A feed carries the work under theiron which is heated by an oxy-acetylene flame or electricity, a guidekeeping the edge of the section in its correct position in relation to theiron. A hammer movement completes the operation.
Materials suitable for this treatment are calf or light grains, but notglace kid. Vamps and caps are generally edged, giving an excellentappearance, considered by many equal to folding. The bulkinessexperienced with folded vamps on the heavier calf is completely absentwith edging, and also the saving of the fold allowance is of greatimportance from a cost point of view, as the folded vamp pattern will notusually lock and is extremely wasteful in cutting allowance.
Quarters are not suitable for edging, a firm top line being essential; thefolded edge is the better of the two.
Important points are:(1) correct skiving;(2) correct heat adjustment for type of material used;
(a) burning causes undue turn of edge and cracking of edge,(b) insufficient heat gives little turn of edge and poor appearance;
(3) checking of acute concave curves which are often by-passed,causing edge to be unturned;
(4) checking of convex curves, often pressed unduly against guidecausing ridging, or excess turning.
160
CLOSING

Binding
Binding is the treatment of an edge by the use of a fabric tape or leatherstrip, stitched and turned in several differing methods.
Perhaps the most popular type in use in the shoe trade is the narrowfabric bound edge, often referred to as galloon binding, French binding orParis binding.
This tape which can vary in width, but is usually 3
8in. for normal
purposes has selvedged edges, is of good appearance, and is firm andnon-stretchy.
The method of applying to the required edge is to stitch the binding tothe outside section face to face, very close to the edge (Figure 72a). Afterapplying solution the binding is lifted and pulled tightly over the top and
cemented down at the back of the leather (Figure 72b). Later the liningwill cover this surplus and stitching will permanently secure it.
The type of machine to stitch this material will be described later; itwill suffice to say here that it is necessary to stitch very close to the edgeof the leather and also the binding; in the first case, if wavy stitching isdone, a wavy width of binding edge results; in the second if the binding isstitched irregularly, difficulty may be experienced in not havingsufficient to turn over.
The same difficulties apply to turning binding as in folding, and cuttingis done to negotiate curves. Often a type of binding is used with a serratededge on one side so avoiding the need to cut.
The seam in stitching is, in effect, a close seam, and in cases of leatherssuch as calf it may be necessary to rub down that seam to
161
PREPARATION
Figure 72. Edge treatments: a binding, stitched; b binding, completed; c flatbinding; d slip-beading; e bagged edge, stitched; f bagged edge, turned but
not rubbed down.

secure a neat turn of binding. The machine, known as the French Binding,Straightening and Cementing Machine, which applies the cement alsorubs down the seam at the same time.
The BUSMC Turning-over Machine Model ‘G’ follows the foldingmachine principles, lifting the binding, turning and hammering down.This machine is often used with a heating element for use with pre-coatedbinding, the heat fusing the strip of thermo-plastic cement on the back ofthe binding, and cementing securely.
A more recent machine applies a thin stream of cement to the edge asthe work proceeds through the turning-over machine.
The advantages of a bound edge are strength, non-stretching andexcellent appearance, all qualities very essential in certain women’sstyles such as courts, bars, etc. It is a good edge treatment for fabricuppers, preventing fraying, and being of similar appearance.
On many sports shoes a similar edge treatment is done by means of astrip of leather, either in self or contrasting colour. The production of theedge is the same, but in many cases a bolder binding is shown by stitchingslightly away from the edge of the section, in which case a greater widthof binding is required. Binding can be used to form the inside collar onsuch shoes as unlined casuals, but it must be remembered no cuttingshould be done or appearance will be bad.
Other types of binding include a fabric strip to bind fabric shoes, thestitching machine turning the strip to the shape of a U and then stitchingthrough. This method is known as flat binding (Figure 72c).
Narrow binding is also turned over the combined outside and lining togive a finished effect, especially on fabric-lined styles.Points to watch in binding are:
(1) Check width of stitching.(2) Check allowance cut away by knife attachment.(3) Check selvedged edge is not cut by knife attachment causing
breaking away at turning-over.(4) Confirm tightness of turning over.(5) Watch for solution (if used) on suedes, etc.
Slip-heading
This is an edge treatment usually confined to the more exclusive typesof footwear, as it is essentially a hand operation and therefore costly.
A prepared leather strip, folded and approximately 1
4in. in width, is
fitted under the outside section to protrude slightly from the edge(Figure 72d). Cement is used to retain the fit until stitching finallysecures. Curves are negotiated by the usual method of having the slipbead slashed along its bottom edge. Good effects are achieved bycontrasting colours and neat workmanship on women’s styles, while agood edge results by slip- heading the gimped ankle curve of a man’sbrogue shoe.
162
CLOSING

Bagged Edge
The bagged edge is not used to the same extent today as previously, buta brief description follows.
The amount of bagging or turn can vary, but it is usually approximately1
6in. as this produces a neat appearance without any undue difficulties.
The skive is double the turn, in this case 1
3in, but a reasonable substance
must be left on the edge to hold stitching. The lining and outside areplaced face to face and seamed 1
16in. from the edge (Figure 72e), the seam
is opened out and rubbed down, and then the outside is rubbed flat at its‘net’ edge, leaving a collar of outside material to the extent of 1
6in.
showing on the inside (Figure 72f).
Shoe quarters along the ankle edge are suitable for bagging, as areDerby and Balmoral top quarter edges.
BACKING OR DOUBLING
Backing or doubling is the application of a material to the reverse side ofthe outside sections to assist in the manufacture and wearing qualities offootwear.
A number of materials are used, including swansdown. Acme, Tufsta,leather, adhesive tapes and woven tapes.
Swansdown is commonly used, and is an excellent material for lightleathers, giving a feel of plumpness, preventing undue stretch duringlasting, and assisting the shoe to retain its shape during wear. Rubbersolution is used to keep swansdown in position but a very lightapplication is preferable for best results. The BUSMC ‘New York’Cementing Machine is ideal for this operation.
An adhesive backer such as Acme is fused to the reverse side of theleather by means of the application of heat either by hand-iron or press.As a means of preventing stretch it is very useful.
Leather is occasionally used, especially for light-weight reptiles,rubber cement being the adhesive. Tufsta is a firm non-stretchingmaterial, excellent for maintaining shapes of cut-outs or narrowstrappings. Adhesive tapes are used for staying seams, applying to theankle edge of quarters to preserve a firm top line, underlaying punching,etc. Opinions differ as to the advisability of stitching through doubles oralternatively sticking on after stitching. Quarter doubles stitched into theback-seam do help to retain straight backs, and any fancy rows stitchedthrough assist in keeping uniform and limited stretch. One disadvantageis the tearing of swansdown when held rigid at the back, the tear printingthrough the outside. If a considerable amount of stitching is throughoutsides and doubles this trouble will probably be negligible.
Stitching-through will also cause an upper to be tight in lasting iforiginally it was not doubled, or if doubles were lightly cemented in.
163
PREPARATION

FITTING
The main preparatory operations are now complete, although it must besaid at this juncture that certain stitching operations are necessary toallow the completion of some sections in various styles, (e.g. seamingbacks for galloon binding). However, although the definite division of thepreparation department is fairly obvious in most factories, a clearlydefined line cannot be claimed between the fitting-together and thestitching sections; indeed they are interwoven in varying degreesaccording to types of uppers in production, and in some cases are one andthe same operation.
For the sake of clarity a description of fitting will now be given, but itshould be clearly understood that as sections of uppers are graduallybrought together, so in various positions in the department will be foundfitters for that work.
Fitting as an operation is the positioning of a section, or sections, toother single or partially completed portions of the upper. Rubber solutionis the normal adhesive used to retain the fit until the machinist hasstitched to secure permanently.
It is of course possible to fit every part of the upper before machining,and if cost is of minor importance, such as in the production of highestgrade hand-made footwear, then this procedure may be adopted. Cost isof major importance to the majority of firms and varying degrees offitting are to be found. If we turn to the other extreme and decide themachinist must stitch without the benefit of the parts being ‘fitted’together, the term ‘held-together’ is used.
Several considerations are involved in deciding which system. shouldbe used, or indeed perhaps a part of each system.
(1) Type of work is of great importance; intricate designs may makefitting imperative.
(2) Class of work, mentioned above.(3) Skill of operatives; it may be advantageous to fit certain parts to
secure good results if using moderate labour.
Flat Fitting
Flat fitting is the positioning of section to section on a flat surface,usually with the object of stitching on a flat bed machine. Examples arecap to vamp, counter to insertion, quarters to quarter linings, etc.Advantages gained are perfect fit and detail. Disadvantages are cost, and,in the case of quarters to linings or similar parts which will eventuallyassume a round shape, an enlargement of the inside section developswhich can cause difficulties in lasting and the finished shoe.
Block Fitting
Block fitting or round fitting is a method in which sections are placedover a wooden block of similar shape to a last, plus the
164
CLOSING

addition of a leg, and positioned to assume a shape relative to the finalshape of the shoe. Examples are outsides to linings, vamps to quarters,etc.
Advantages are obvious; a far better shaped upper results, and liningsare clear and well fitted. Another point is that the responsibility islessened for the machinist who can concentrate on the stitching withoutworrying if the section is correctly in position.
Disadvantages are cost—block fitting is a fairly slow job under anyconditions—and, unless carefully watched, the use of excess adhesivecan cancel out the advantages of clear linings. Care must be exercised inthe use of adhesive on outside sections otherwise uppers can be undulydirtied.
Fitting is a highly skilled operation, something more than justcementing one piece of leather to another; it has been said a well fittedupper is half lasted, and a certain amount of truth is contained in thatassertion. Unfortunately it is a craft that is dying, the ‘held-together’principle being now in general use and producing, in the circumstances,quite good results.
Held-Together
This system simply means the machinist positions the sections to themarks provided, and stitches along while still maintaining the fit byholding firmly. It is natural therefore, that some loss of exactness results;the top section tends to ‘grow’ as stitching proceeds; detail work such asthe centring of peaks or narrow straps is difficult; the machining of vampsand at the same time maintaining correct underlay and centralising,demands great skill. A flat, poorly-shaped upper in comparison to a fittedupper is often the rule rather than the exception when vamps are held andstitched in a flat machine. However, by the use of post machines forcertain operations many such faults can be overcome and satisfactoryuppers produced.
Many firms combine the two systems and hold together some of theless important parts and fit the more important ones; for example, in abrogue shoe, lining making, counters and backstrip and undertrimmingcould be held, wings and vamps fitted.
165
PREPARATION
12
STITCHING AND PROCESSES
SEAMS
SEVERAL METHODS ARE EMPLOYED in stitching sections together, manyfactors being involved, including type of shoe, substance of leather,position in shoe and strength required in manufacture and wear.
Plain Closed Seam
Plain closed seams are produced by facing together the two sectionsand stitching approximately 1
16in. from the edge (Figure 73a). After
opening outwards a ridge is left rather prominently exposed on the inside(Figure 73b); a ridge that would cause much discomfort in wear unlessflattened, an operation usually termed rubbing-down (Figure 73c).
The first point of importance in a closed seam must be the skiving (seeFigure 70). It must be understood that uniformity is essential, so unlessthe material is very light skiving should be done even if only to reduce theodd section or even part of section which is plump. In the case of stouterleathers it may be advantageous to reduce a little more than the third ofthe substance skived away, as suggested earlier. A considerable amountof tension exists in the stitching after the seam is opened out and this risesas substance increases; the fact that seams break in manufacture does notautomatically point to inferior thread. It is entirely a responsibility of theforeman to consider the skiving in relation to substance andcharacteristics of the leather involved.
The stitching should be a uniform distance from the edges, great carebeing taken that the underside does not slip away causing a weakness orperhaps a broken seam: also stitching back can be adopted, that is, thefirst few stitches made are repeated to fix firmly the end of the seam andprevent its pulling open. Care must be taken that this does not causecutting of the material by the needle and eventual breaking of the leatherlater in manufacture. The length of stitch should also be constant, amachine with fixed stitch length being the most suitable.
To flatten the resulting ridge on the back of the leather it is usual to runthe seam through the BUSMC No. 4 Rubbing-down Machine whichseparates the two substances and presses them back. If one part varies insubstance or is more harsh than the other, it is difficult to rub the seamflat, the tendency being for the weaker side to fold over, a bulky seamresulting.
166

An adhesive tape is often placed down a seam of this character, givingslightly more strength and spreading the ridge substance. A machine isavailable for this operation, or alternatively seam rubbing and taping canbe done on a combined machine. It should be stressed at this point, thatclosed seams must never be hammered, as this will break the seamwithout doubt. This applies equally to the lasting room as to the closingroom.
Any two parts of the same shape are suitable for this type of seam, themost obvious and most generally used being the back seam, in theoutsides and in the linings. It is also quite common to see a seam of thistype up the centre of the front of the shoe.
If a closed seam is required in which the two sections are of differentshapes, then the stitching assumes an increasing importance and greaterskill is needed by the operator.
Silked or Open Stitched Seam
This seam is originally produced as the plain closed seam and alldetails as to skiving and stitching etc., are identical, but after rubbingdown, a tape, preferably a woven type of a good quality, is stitched downthe seam as shown in Figure 74. The stitching is parallel to the originalseam, and to secure good results a twin machine, that is a flat bed machinewith twin needles, is used; a guide keeps the seam in position, a roll oftape being fed also through a guide under the leather, the stitching beingautomatically on the margin of the tape.
167
STITCHING AND PROCESSES
Figure 73. Plain closed seam: a stitched; b opened; c rubbed down.
Figure 74. Open stitched seam.

A considerable increase in strength results from this method, and thesilked seam is used extensively for back-seams on the heavier women’sand ordinary men’s types. It can be used on front seams, when the addedstrength resists collapse over the toe often experienced with the plainclosed seam.
To add strength at the top of a back-seam, it is often an advantage to
stitch a light substance piece of leather across the seam (Figure 75). Thisis cemented and turned over the top edge and later stitched in the top row.
One other method to resist breaking of the back-seam is the addition ofa small wing of leather, sometimes called a dog-tail, on one quarter,which is stitched over the opposite quarter as shown in Figure 76. Thisnecessitates the taping rows being stitched by single needle machine.
168
CLOSING
Figure 75. Close seam stay: a stitched; b cemented, turned and stitched.
Figure 76. Dog-tail method of strengthening back-seam.

Welted Seam
Welted seams are a variation of the closed seam and are often used onheavy leathers. Mention has been made of the tension of thread whenheavy substance leathers are close seamed, and it has been found that byinserting another substance, often of the same material, between the twosections to be stitched (Figure 77a, b ) a flatter seam is produced and thethread is buried in the extra substance. The welt, as it is known, is stitchedflush with the other sections and when opened out the excess material isploughed out and stained to give a neat appearance.
This method can also be used to give pleasing effects on women’sshoes; a contrasting coloured material is obtainable not as a singlesubstance but a prepared folded piping. In this case we require the foldededge to be in an exact position relative to the seam, but to add to thedifficulties, it is out of sight between the two sections to be stitched.Consequently the piping is fed through a guide which is set in a positionin relation to the needle, and a uniform width of piping is shown when the
seam is made. The amount is variable, and to suit certain styles The guideis moved to produce heavier or lighter types of piping.
Lapped Seam
This seam, the most extensively used in the closing room, is producedby placing one section above the other and stitching through (Figure70d). It is the strongest of seams and it is possible to use more stitches tothe inch than in any other type. The top section has usually had someprevious treatment to the edge, while the under section has been skived toa feather to prevent unsightly appearance and discomfort in wear. Detailsof skiving have already been made in the section concerned with thatoperation but a few remarks concerning allowances are appropriate here.Underlays vary according to materials and number of rows of stitching,but for light substance leather to be stitched with one row or two closerows the allowance can be as small as 1
4in. As substance increases so
should the underlay
169
STITCHING AND PROCESSES
Figure 77. A welted seam, before trimming; b piped seam.

increase to prevent a sudden drop from the two sections to the one, agradual diminishing allowance being the objective.
If two or more spaced rows are used there must be sufficient materialfor the outer stitching to secure. This is very important if perforating isused on the edge of the top section; the failure of the second row to stitchon the underlay will cause the perforations to elongate when lasted, andappearance will be ruined. It is quite common for underlays forperforations to reach 1
2in. or 5
8in.
Note has been made previously in skiving of the importance ofstitching the first row on full substance, and it is emphasised here thatsupervisors should watch carefully for over-skiving, and itsseam-weakening effect.
Examples of lapped seams are cap to vamps and vamps to quarters.
Zigzagged or Butted Seam
This is a seam, usually of a temporary nature, in which the cut edges oftwo sections are butted together and a special machine stitches by aneedle which alternates from one section to the other, forming a zigzagstitch as shown in Figure 92a. The seam has little strength, but itsadvantage is that it is completely flat, and is ideal for backs of quarters,for instance, when a back-strip is to be put on later. Owing to the fact thata large amount of thread is used in the seam it is a comparatively elasticmethod of stitching, another advantage for taking the strain when lasting.
Hand-Closed Seam
Another type of seam used extensively in shoes of the moccasin orapron-front style is the butted or hand-closed seam. As the namesuggests, the two sections (the apron and front in the style mentioned),are cut to fit edge to edge and the seam is produced by sewing throughpart of the substance of both sections. Several variations of this seam canbe made; both edges may be shown by sewing through full substance ofthe two sections; either cut edge may be shown by sewing full substanceof the one section and part substance of the other.
The principles of sewing and also thread used are similar tohand-sewing of welts, except of course, a lighter weight thread andfinished seam is required.
A system of producing a similar seam by machinery has been evolvedby an attachment fitted to the BUSMC Model ‘O’ Stitcher (see p. 308).Preliminary work necessary for this method is the skiving of bothsections, a very stunted skive being required, the turning outwards of theedges which can be accomplished by a folding machine and thecementing and careful fitting-together of the edges.
170
CLOSING

STITCHING THREADS USED IN THE CLOSING
DEPARTMENT
The choice of thread for closing any particular type of upper is governedby several factors:
(1) breaking strength,(2) elasticity,(3) appearance,(4) uniformity,(5) functional use.
It is true that these factors are to some extent complementary to eachother, but each one must be considered separately.
(1) Breaking strength is obviously of great importance, not only for theeventual strength of the seam to be made, but also to withstand theproduction of the stitches by the machine, with which we shall deal later.
(2) Elasticity allied with strength is an important asset in threads,allowing a certain degree of ‘give’ to a seam in lasting and in wear. Athread which stretches is less likely to break suddenly.
(3) Appearance must be considered, especially in the case of women’sfootwear, conformity of stitching with the style and type of product beingmost essential.
(4) The sewing machine being in most cases a delicate and finelyadjusted mechanism, a uniform thread is required for its satisfactoryoperation.
(5) Stitching agents must be suitable for the eventual function of theshoe involved, whether it be dancing pump or army boot.
The threads extensively used are:
(1) cotton, (2) linen, (3) silk and (4) nylon.
Cotton
A thread which possesses to a reasonable degree the characteristics andthe factors listed above is cotton, produced from fibres of the seed pod ofthe cotton plant. Relatively cheap, uniform, of good appearance, ofadequate strength and slight elasticity, and suitable for most types offootwear, cotton is used widely in all closing rooms.
Strands of cotton are twisted to produce the final thread, the methodadopted being to twist three strands or cords of a certain size, giving whatis known as a three-cord thread. Multiples of three are taken and twistedto give six-, nine-, twelve-cord threads, strong, uniform and wellbalanced threads resulting.
Linen
Linen fibre is obtained from the stalk of the flax plant and produces avery strong thread. It has the tendency to be coarse, and for this reason isunsuitable generally for fine threads for light uppers, and is consequentlyused for footwear requiring strong,
171
STITCHING AND PROCESSES

heavy stitching. Being suitable for waxing (it is sometimes known as waxthread), the thread is often run through a waxpot on the machine; thishelps to lubricate the thread during stitch production and also makes awater-resisting seam. Special machines are used for heavy linen threads.
Silk
Silk thread is produced from the filaments spun by the silkworm, andas a stitching agent gives excellent results. It is strong, very elastic, and,as is expected, has a fine appearance, but unfortunately is very expensive.Strands are twisted in a manner similar to cotton giving three, six, etc.,cords.
Nylon
The use of spun nylon thread as a cheaper alternative to silk in closingwomen’s shoes is increasing. It has a greater breaking load and stretchthan cotton and stands up well to repeated strain and abrasion such as isexperienced, for example, by the back-seam of a shoe. The SATRABulletin for February 1952 describes tests carried out on nylon thread andgives several hints on its proper use. No particular difficulties occur institching leathers up to 1 1
4mm. in substance but after that frictional heat
may cause fusing of the separate nylon strands. The strands of silk threadused on a 13
4mm. leather were broken but not fused. No really practical
and effective way has yet been found of applying a lubricant to the nylonto reduce the friction and the main point to be watched is that both needleand shuttle threads should be at exactly the right tension which should beobtained by setting both at a minimum to begin with and then increasing.The winding tension of the shuttle should be a minimum.
Thread Sizes
A considerable amount of doubt exists concerning the origin ofnumbers applicable to threads used in the closing department.
As a result of enquiries to thread manufacturers it has been foundimpossible to give definite information of any accepted system in generaluse.
To quote one manufacturer: ‘The origin of many of these numbers hasbeen lost in antiquity, but as a result of long and constant use, they havebecome trade custom and there tends to be a different range of numbersapplicable to threads supplied for different purposes.’
As an example of variations, types suggested by this producer assuitable for upper closing, were:
nine-cord—No. 70, 80, 90 and 100.six-cord—No. 24 and 36.
It should be stated that thickness of thread is not a means ofmeasurement.
172
CLOSING

In numbering cotton yarn, the number of hanks (840 yd. being astandard hank) to make 1 lb. weight gives the count or number. This mayproduce the 70 to 100 type of number, but obviously bears no relation tothe 16 to 36 type which is also in common use.
NEEDLES
The selection of the correct size of needle, and also size and quality ofthread for the sewing machine, is of great importance in the producing ofa strong seam of good appearance.
The three main points to consider are:(1) eye, (2) point and (3) grooves.
Eye
In forming a stitch the thread passes backwards and forwards through theeye a considerable number of times and it is essential it should bepolished to a high degree of smoothness to prevent fraying andbreaking. Also the size must be correct for the thread size to preventundue movement, but at the same time must not obstruct free movement.
Point
The function of the needle point is to pierce the leather or fabric withthe minimum of friction and at the same time shape the punctures so thatthe stitch will have the desired appearance. The cutting edges on thepoints of the needles are therefore set at various angles to meet therequirements of each class of work.
(a) Round Point (Figure 78a)—Although this style of point is designedfor stitching cloth, it is also used for sewing lighter grades of leather, butit is not recommended for leather work where high speed or heavy sewingis involved. It makes a round penetration, enlarging the needle holewithout cutting. It is therefore adapted for sewing the cloth linings ofshoes, because it does not cut the strands of the fabric but penetratesbetween them (Figure 790).
(b) Narrow Wedge Point (Figure 78b)—This is similar to the wedgepoint (with its two almost flat sides forming a slightly rounded cuttingedge in line with the eye), but its cutting edge is narrower and particularlysuited for leathers of a soft character. This results in smaller perforationsin the leather and allows the stitches to be brought still closer together.The straight cuts in the material at right-angles to the line of stitchingresult in slightly raised diagonal stitches (Figure 79b’)
This type of needle is used very extensively in the closing of shoeuppers.
(c) Cross Point (Figure 78c)—This needle might be considered as beingthe opposite to the wedge point. It also has two sides, almost
173
STITCHING AND PROCESSES

flat, but the cutting edge formed by them lies at right-angles to the line ofthe eye.
As the straight cuts made by this style of point follow the line ofstitching, it is obvious that the cross point needle cannot be used for veryshort stitches. However, this needle point produces a straight stitch andburies the thread deeply in the seam (Figure 79c). Of similarcharacteristics is the reverse spear point needle.
Many other types of point are available for special purposes includingtwist points cutting at varying angles to the line of stitching. Diamond andtriangular points are self explanatory.
Grooves
The needle has two grooves, one long, the other short; the long one,which is of considerable length reaching from the point to the shank, isthere for the object of guiding and protecting the thread during themaking of the stitch. The point in entering the material makes a puncturesufficient only for itself, and the thread immediately above would besubject to severe frictional strain and chafing unless the recess in theneedle were present. It is obvious, therefore, that the needle is inserted inthe machine with the long groove to the thread feed and opposite to thebobbin.
The short groove is opposite to the long one and is to assist in
174
CLOSING
Figure 78. Needle points: a round point; b narrow wedge point; c crosspoint; d left twist groove narrow wedge point.

175
the producing of the loop for the lock-stitch. Some needles are made witha twist groove below the eye of the needle on the short-groove side toassist in the prevention of chafing (Figure 78d).
Needle Sizes
The characteristics of the needle having been considered, especiallywith regard to threads and the production of a good stitch, it is apparentthat choice of threads to be in harmony with the material will dictate thesize of needle to be used.
As a guide to needle sizes, size 12 is an average for women’s work, andsize 16 for men’s; variations in both cases are made for lighter andheavier materials and threads.
STITCH FORMATIONSStitching machines used in the closing departments produce, in the vastmajority of cases, a lock-stitch, although a machine making a chain-stitchis occasionally used for some operations.
Lock-stitch
The lock-stitch is made by the use of two threads, the top threadfeeding through the needle, and the bobbin thread contained on a smallmetal reel in the bed of the machine.
The action necessary to complete a stitch is as follows:(1) The descending needle pierces the material, and carries the thread
below the needle plate.
STITCHING AND PROCESSES
Figure 79. Stitches made by various types of needle: a roundpoint; b narrow wedge point; c cross point.
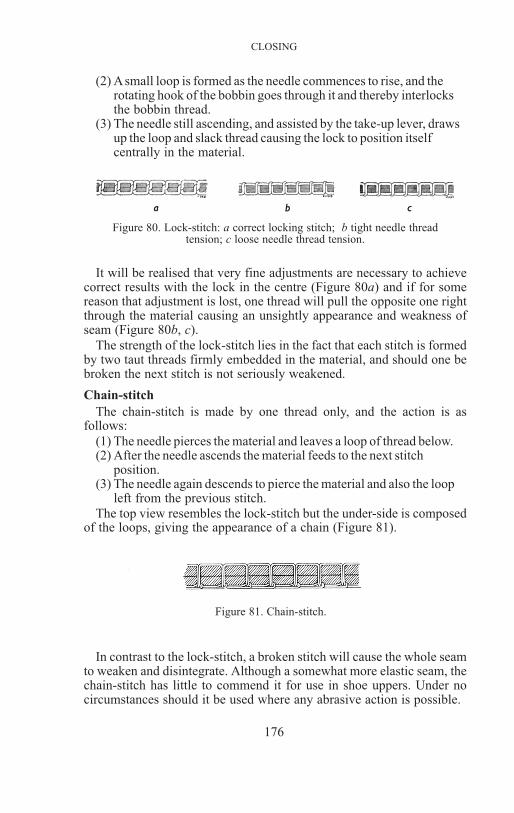
(2) Asmall loop is formed as the needle commences to rise, and therotating hook of the bobbin goes through it and thereby interlocksthe bobbin thread.
(3) The needle still ascending, and assisted by the take-up lever, drawsup the loop and slack thread causing the lock to position itselfcentrally in the material.
It will be realised that very fine adjustments are necessary to achievecorrect results with the lock in the centre (Figure 80a) and if for somereason that adjustment is lost, one thread will pull the opposite one rightthrough the material causing an unsightly appearance and weakness ofseam (Figure 80b, c).
The strength of the lock-stitch lies in the fact that each stitch is formedby two taut threads firmly embedded in the material, and should one bebroken the next stitch is not seriously weakened.
Chain-stitch
The chain-stitch is made by one thread only, and the action is asfollows:
(1) The needle pierces the material and leaves a loop of thread below.(2) After the needle ascends the material feeds to the next stitch
position.(3) The needle again descends to pierce the material and also the loop
left from the previous stitch.
The top view resembles the lock-stitch but the under-side is composedof the loops, giving the appearance of a chain (Figure 81).
In contrast to the lock-stitch, a broken stitch will cause the whole seamto weaken and disintegrate. Although a somewhat more elastic seam, thechain-stitch has little to commend it for use in shoe uppers. Under nocircumstances should it be used where any abrasive action is possible.
176
CLOSING
Figure 80. Lock-stitch: a correct locking stitch; b tight needle threadtension; c loose needle thread tension.
Figure 81. Chain-stitch.

TYPES OF STITCHING MACHINES USED IN THECLOSING DEPARTMENT
A considerable variety of stitching machines is to be found in mostclosing rooms and it will be noticed that modifications exist even onapparently similar types. The essential characteristics of most machinesare the same, however, and the description of one type will cover manyothers.
Without going deeply into the mechanical workings of the sewingmachine it is necessary to understand the functions of the majormechanisms and movements essential to produce the stitch.
The machine used for many operations in all sections of the departmentis known as the flat-bed machine, of which there are two distinct types,the variable stitch length, and the fixed stitch length or gear machine.
The variable stitch length machine is an excellent all-purpose machinewhich is used extensively for many stitching operations in men’s upperproduction, and is also used in many rooms producing women’s uppers.
The fixed stitch length machine is very suitable for women’s upperproduction.
The Variable Stitch Length Flat Machine (21W162—SSMC)
Machines of this type have the vertical rotating sewing hook withstationery bobbin case mechanism on the right of the needle for makingthe lock-stitch. The hook driving shaft receives its rotary motion from thearm shaft and link connections.
To Thread the Needle—Place the spool of thread on the spool holder; passthe thread through the thread leader (1, Figure 82) near the needle bar,then under the thread retaining guide wire 2, up over the thread retainer 3,and draw it between the tension discs 4, under and up over the notch in thethread controller 5, under the controller spring 6, thence up through thetake-up lever 7, down through the thread guide 8, and through the needlebar thread guide 9, threading the needle 10 from the left towards the arm.
To Thread the Bobbin Case—Place the bobbin in the machine so that theunwinding thread will turn it in the same direction that the hook runs, anddraw the thread down into the notch and under the bobbin case tensionspring.
To Regulate the Tension—The tension on the needle thread is regulatedby the thumb nut (4, Figure 82) at the front of the tension discs.
To tighten the tension turn thumb towards front of machine; to loosenturn nut away.
The tension discs are of great importance, and consist of two steel discspressed together by the action of a coiled spring. The
177
STITCHING AND PROCESSES

thread passing between the discs is restricted in its movement by thepressure applied by the spring.
To ensure the locking of the thread in the centre of the material themachinist must use this simple but effective device with intelligence andgreat care.
The tension of the bobbin thread is regulated by a screw at the centre ofthe bobbin case tension spring.
To Change the Length of Stitch—A lever on the right side of the machineis provided to vary stitch length; to shorten stitch, raise lever, to lengthenstitch lower lever.
The Pressure on the Material—To keep the material in contact with thefeed during stitching a presser wheel tensioned by an adjustable spring isprovided. The pressure should only be heavy enough to assure an evenlength of stitch and to prevent the work from rising with the needle; if tooheavy it will make the machine run harder
178
CLOSING
Figure 82. Threading the needle on a Singer21W162 machine. The thread passes from left
to right through the needle.

and may damage fine-grained leather. The edge of the presser wheel ismilled. Various sizes of wheel are available to suit different types of workand stitching, e.g. a small wheel assists in stitching acute curves. Thepresser wheel can be raised by knee pressure against a knee plate, leavingboth hands free to manipulate the work. A lever is also provided at theback of the machine to lift the presser wheel.
The Feed—The feed on this type of machine is a milled wheel, slightlyprojecting from the needle plate, which moves forward with the materialone stitch length during the period of time the needle is above the work.When the needle descends the feed is stationary for the completion of thestitch; any forward movement at this time would obviously break theneedle. The feed is therefore of an interrupted movement and althoughbarely noticeable, a difference is seen and felt in comparison with thegear type of feed machines described later.
The Thread Controller—The function of the thread controller spring is tohold back the slack of the upper thread until the eye of the needle reachesthe material in its descent.
The Take-up Lever—In forming a lock-stitch a considerable amount ofthread is used to pass around the shuttle, consequently, after a stitch isformed, the take-up lever pulls back the slack thread to complete thestitch.
Fixed Stitch Length Flat Machine (110W124—SSMC)
This machine is fitted with a continuously moving wheel feed incombination with an oscillating needle feed; the material being stitchedis therefore moving forward smoothly, even while the needle is below theneedle plate. After ascending from the material the needle returns to itsoriginal position for the next stitch.
To Thread the Needle—Pass the thread from the spool holder, over fromright to left through the upper hole, from left to right through the centrehole from right to left through the lower hole in the thread leader (1,Figure 83), at the front of the machine, down, under from right to leftbetween tension discs (2). Pull thread up under the thread take-up spring(4), until it enters the retaining fork (3), then pass the thread up throughthe thread guide (5), and from right to left through the hole (6) in the endof the thread take-up lever, down through the thread guide (7), betweenthe felt pad and felt pad retaining finger (8), into the thread nipper (9),down through the hole (10), at the lower end of the needle bar, and fromleft to right through the eye of the needle (11).
To Replace the Bobbin and Thread the Bobbin Case—Hold the bobbinbetween the thumb and forefinger of the right hand, the thread drawingon the bottom from left to right, and place it on the centre stud of thebobbin case, then push down the latch (D, Figure 84).
179
STITCHING AND PROCESSES

Draw the thread into the slot (1), under the back of the projection (2),leaving a loose end of thread about 2 in. long above the slide.
To Regulate the Tension—The tension on the needle thread is regulatedby the thumb nut (2, Figure 83), at the front of the tension discs.Toincrease the tension, turn thumb nut to the right; to decrease the
tension turn the thumb nut to the left. The tension of the bobbin thread isregulated by means of the screw nearest the centre of the tension springon the outside of the bobbin case.
To Change the Length of Stitch—The continuous wheel feed is driven bygears, the sizes of which determine the length of stitch. The three pairs offeed gears are located at the left underneath the bed of the machine, eachpair of gears making a different length of
180
CLOSING
Figure 83. Threading the needle on a Singer110W124 machine.

stitch. The location of the knurled collar (W2, Figure 85) on its shaftdetermines which pair of gears is engaged; e.g. when the knurled collar isat the outer end of the shaft the outermost pair of gears (A3) is engaged.
To change the length of stitch, raise the roller presser, then slide theknurled collar (W2) to the desired position on the shaft and turn it ineither direction until the engaging latch (X2) enters the notch in the gear.
Sets of gears are available for various lengths of stitch other than thosenormally supplied with the machine.
Many characteristics of this type of machine are the same as thevariable stitch length type, and similar work is performed on bothmachines. The continuous gear feed with its attendant needle movementis an important variation which should be closely studied by the student.
The Under Edge Trimmer (110W128—SSMC)
This machine is essentially the same as the gear feed flat bed machinepreviously described, but it has the addition of a knife attachment, fortrimming away the surplus lining around the top edge of the shoe duringthe stitching operation.
The knife attachment is mounted on, and is parallel to, the bed of themachine and works with an oscillating movement; adjustment is possibleto the knife for trimming at varying distances from the stitching (Figure86).
It is usual to stitch slightly away from the edge of the material and trimthe lining very close to the stitching with the object of producing a neatappearance with the lining invisible.
The knife can be put out of action if desired, and normal stitchingcontinued. It is important that the knife should be kept very sharp,otherwise the lining is left ragged and unsightly.
181
STITCHING AND PROCESSES
Figure 84. Threading the bobbincase on a Singer 110W124 machine.
Figure 85. Changing the stitch lengthon a Singer 110W124 machine (gear
machine)

Two other knife attachments to the same machine are the vertical knife(Figure 87) which cuts square to the edge of the outer material, and theoblique knife, cutting at an angle and giving an undertrimmed effect.
The Twin Needle Flat Machine
This machine has two needles and two rotary hooks, and makes twoparallel rows of lock-stitching. The width between the needles isvariable, and can be supplied by the makers to produce close rows 1
32in.
apart, to spaced rows 1
4in. apart.
For sections without any undue curvature excellent results are obtainedby the twin machine, but for acute curves, it will be found the inside rowhas a shorter length of stitch.than the outer row.
This machine can be adapted for open stitching or rowing, and gives auniform result not obtained by the use of a single needle machine. Asmall guide is attached to the machine to centralise the seam, and a roll oftape is fed from beneath the machine and guided over the feed.
When the seamed quarters are positioned correctly and stitching iscommenced, the guide automatically keeps the rows central and the tapeis also in position underneath.
An interesting point to be noticed in this type of machine is the feed,known as a step feed, or four motion feed, a serrated rectangular shapeprotruding from the base of the machine. The feed moves forward thestitch length, lowers beneath the surface, returns to the original position,and lifts above the plate to continue the next movement.
182
CLOSING
Figure 86. Horizontal undertrimmer on flat machine (gear). H2 =
adjustable edge guide; J2 = screw holding edge guide; L2 = knife blade;K2 = disengaging handle.
Figure 87. Vertical trimmer flat machine (gear). O, P, R, S, U, = fixingand
Figure 86 Figure 87

183
The Zigzag Machine
Another variation of a flat machine, the zigzag machine, producing thestitch described previously, has a needle bar that moves horizontally 3
16in.
to the left and right for each stitch, which in conjunction with the usualfeed gives a zigzag effect.
The Post Machine
The post bed machine is easily recognised in the closing room as itsname adequately describes the upright pillar of some 7 in. height with asmall working area of some 2 in. rising from the flat bed of the machine.
The great advantage of this type of machine is the ease in which certainparts of the upper may be stitched compared with the flat machine; alsothe upper is kept in its true shape and distortion minimised.
Knife attachments are supplied with certain post machines for thepurpose of under-edge trimming (Figure 88), and other operations suchas galloon binding etc., and are of the horizontal knife, oblique knife, andvertical knife types, all of which can be thrown out of action and thestitching carried on normally.
Post machines will be found with gear-type feeds, and there are alsomany of the step feed type.
STITCHING AND PROCESSES
Figure 88. Post undertrimmer (gear feed). The arrowsindicate oiling points.

One other point of interest is the lack of a knee lifter, and thesubstitution of a treadle on certain machines. Also the stitch lengthchanging device on some types is a knurled wheel set in the balancewheel. There is a notch in the hub of the balance wheel, and the numberappearing in the notch shows the number of stitches per inch that themachine is ready to make.
The Cylinder Machine
This machine is often known as the golosh machine, and by that nameit identifies the work for which it is very suitable. The cylinder or arm ishorizontal and the machine can be obtained either with left or right arms.Most cylinder machines are of the step feed type (Figure 89), but a gearfeed is available.
The post machine has taken the place of the cylinder machine for suchoperations as vamping and the number of arm machines at work at thepresent day is very small, compared with what it was when the Balmoralboot was popular years ago.
184
CLOSING
Figure 89. Cylinder machine.

The type of cylinder machine similar to the one shown in Figure 89 isused extensively for back-stripping; a wheel presser foot is suppliedinstead of the foot shown.
Wax Thread Machines
Heavier types of machines are available which are suitable for usingthe heavy linen thread often known as wax thread. A cylinder machinewith left-hand arm is in general use for this work, and is very useful forsuch stitching as sides of Derbies.
Normal flat machines are often adapted to work heavy wax thread. The‘Puritan’ machine is a heavy wax thread machine (the thread runningthrough a waxpot), used for heavy service footwear, agricultural boots,etc. This machine produces a chain-stitch.
Special Machines
Many types of machines other than those described are used for specialoperations, such as the barring machine for stitching the tack across thefacings of an Oxford, the welting machine for inserting the welt in a closeseam, the button-hole machine, an elaborate machine which cuts the holeand stitches all round the cut in a matter of a few seconds, button andbuckle sewing machines, oversewing machines used for lambswool etc.,cording machines for inserting a cord and stitching a raised seam, etc.
SEQUENCE OF OPERATIONS
A description of the process of closing is given, together with a diagramshowing the build-up of the style in question. For simplicity, only theabsolute minimum number of operations is shown, but variations andadditions will be described in the text. The basic styles are given, but itmust always be remembered different firms have different methods tosuit their particular trade, even in the basic types. The general principleshowever, hold good even if the details vary.
Oxford Shoe (Closed on the Flat)
The first point to consider after the preparatory operations of checking,identification marking, and skiving are completed is the breaking-up, orgrouping of the various sections. We may decide one skiver will beresponsible for the whole basket of work; alternatively, a less skilledoperative will skive the linings and tongues. The breaking-up is usualafter skiving if one person has skived the complete work.
The grouping is as follows:(1) vamps and caps,(2) tongues and tongue linings,(3) quarter linings,(4) quarters and back-strips,(5) vamp linings.
185
STITCHING AND PROCESSES
Groups (2) and (3) may be kept together for one lining machinist, andgroup (5) (vamp lining), not being required until much later in thesequence, is kept near at hand for that late operation.
(1) Vamps and caps, being edged, have the special skive for thatpurpose (at vamp throat and cap curve), and the vamp is skived forunderlay at front edge. The two sections go to the edging machine, afterwhich it is necessary to perforate the caps, possibly using the BUSMC‘Royal’ Perforator. It is not essential that the caps should be parted fromthe vamps for this solitary operation, although a mistake can be made bythe operator misreading the ticket instructions and perforating bothsections. Therefore safety is achieved by sending caps only.
The complete caps are now ready for machining to the vamps, in thiscase, one row each side of the perforations; guiding marks are pierceholes or possibly marking lines. A fixed stitch length or as it is called, agear machine, gives excellent results on caps. It is usual
186
CLOSING
CAP VAM P TONGUE QUARTERQUARTER
LINING
BACK-
STRIP
Skive
VAMP
LINING
Skive Skive Skive Skive Skive
Edged Edged
Perforate
Perforate
Machine
Machine
Machine
lining
Size mark
Seam backs
Rub seam back-strip
Machine facing row
Cement
Fold
facingFix stay
Under-edge trim
cap
Eyelet
Join front of quarters
Lace
Machine vamp
Machine vamp
lining
Attach tongues
Trim
Examine
Figure 90. Sequence of operations for Oxford shoe (closed on the flat).
Description: Folded quarter, edged vamp and cap, perforated cap and tongue,leather quarter lining, fabric vamp lining.
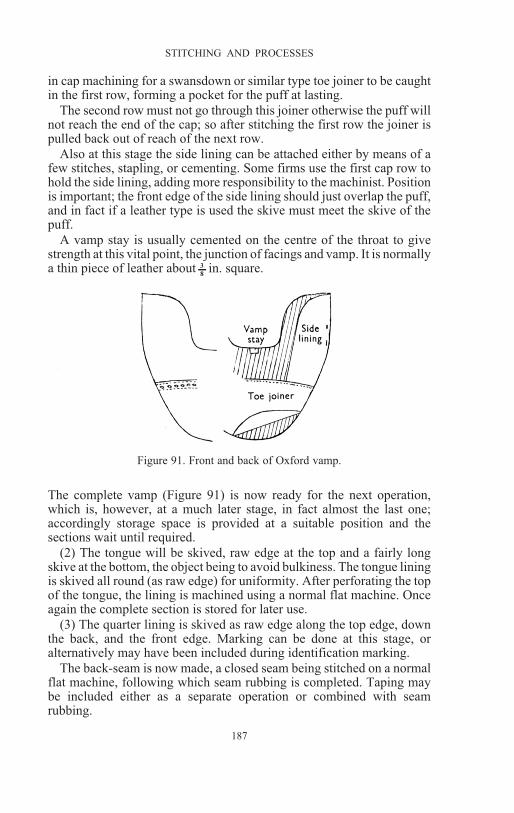
in cap machining for a swansdown or similar type toe joiner to be caughtin the first row, forming a pocket for the puff at lasting.
The second row must not go through this joiner otherwise the puff willnot reach the end of the cap; so after stitching the first row the joiner ispulled back out of reach of the next row.
Also at this stage the side lining can be attached either by means of afew stitches, stapling, or cementing. Some firms use the first cap row tohold the side lining, adding more responsibility to the machinist. Positionis important; the front edge of the side lining should just overlap the puff,and in fact if a leather type is used the skive must meet the skive of thepuff.
A vamp stay is usually cemented on the centre of the throat to givestrength at this vital point, the junction of facings and vamp. It is normallya thin piece of leather about 3
8in. square.
The complete vamp (Figure 91) is now ready for the next operation,which is, however, at a much later stage, in fact almost the last one;accordingly storage space is provided at a suitable position and thesections wait until required.
(2) The tongue will be skived, raw edge at the top and a fairly longskive at the bottom, the object being to avoid bulkiness. The tongue liningis skived all round (as raw edge) for uniformity. After perforating the topof the tongue, the lining is machined using a normal flat machine. Onceagain the complete section is stored for later use.
(3) The quarter lining is skived as raw edge along the top edge, downthe back, and the front edge. Marking can be done at this stage, oralternatively may have been included during identification marking.
The back-seam is now made, a closed seam being stitched on a normalflat machine, following which seam rubbing is completed. Taping maybe included either as a separate operation or combined with seamrubbing.
187
STITCHING AND PROCESSES
Figure 91. Front and back of Oxford vamp.

Different styles of lining will probably require some modification fromthis procedure; for instance if a back leather is included a closed seam isnot necessarily used, but a lap seam is the more usual, hence rubbingdown is omitted.
Also the machinist may be responsible for the whole of the fittings, thatis lining making and tongue making.
Again, the quarter linings are stored for later use.(4) While work has been proceeding on the sections just described the
quarters are also receiving a considerable amount of attention.First, the top edges are skived for a fold, and the front edges for
underlay.The backs are then zigzagged, care being taken to keep the top edges
level.The back-strip, which has been skived for raw edge at the sides and a
long fold at the top, can now be machined to the quarters. Great care mustbe taken to secure a straight back-strip, central on the seam, a commonfault being the excess curvature on one side and loss of shape on theopposite, causing distorted backs at lasting. It is possible to use either flat,post, or arm machines for this operation, the post or arm giving the betterresults, the curvature of the quarters being retained. The flat machine, incontrast, stitches with the quarters in a concave shape, and when turned tonormal position later, a certain amount of fullness appears under theback-strip.
Next the facing rows are stitched on a flat machine to a mark previouslymade by the stitch marker, or to marks made by a blunt awl to a facingpattern.
The quarters are now ready for folding; first the top edges are cementedand, when in a suitably dry condition, are passed to the folder. In thissequence of operations it is necessary for the folder to turn the back-stripwhile attending to the quarters, and, unless some provision is made, acertain amount of bulky substance results from the two sections turningover. The pattern can be reduced at this position of the quarter, oralternatively a small piece can be trimmed out by scissors, giving a neaterturn by the back-strip. If folding is done before the back-strip is stitchedthe top of the strip will need to be turned over by hand later.
Another modification is the addition of a tape to the ankle curve, eitherbefore folding, in which case the turn-in is over the tape and so getscaught in the top row of stitching, or after folding, when it isproblematical if the advantage of stitching it in is accomplished. Tapingis a machine operation, the BUSMC No. 3 Taping Machine giving goodresults.
A facing stay is now fixed to the quarters in a position to coincide withthe eyelets (Figure 920). The reason for this additional substance, whichcan be swansdown or similar type of material, is to support or stiffen theuppers for the eyelets and prevent them from pulling out or distorting theshape of the facing. For invisible eyelets it is imperative to affix a stay, inthis case on the lining,
188
CLOSING

STITCHING AND PROCESSES
but for heavy leathers with outside eyelets a stay is not always necessary.
It is now time to collect our third sub-section, the quarter linings, andstitch them to the quarters, an operation called undertrimming. The row ofstitching around the top edge through quarter and lining demands greatskill from the machinist, not only to produce a good line of stitching but toposition and keep the lining perfectly clear. It is obviously impossible to fitthe two edges together perfectly for stitching so a margin is left on thelining, usually 1
8in., called the trimming allowance, and by means of a knife
attachment fixed to the machine the surplus lining is trimmed away asstitching proceeds (Figure 92b). This knife is positioned relative to theneedle, and when stitching is placed slightly away from the edge of thequarter; the knife trimming the lining cuts under that edge giving a neateffect and so producing the name undertrimming. Although it was usual tofit by hand the quarter to the lining it is now the practice to hold thesections, the machinist placing the quarter on the lining showing the trimallowance and commencing to stitch, at the same time keeping the liningtaut and so retaining the tightness required to allow for the later insertion ofthe stiffener.
Both flat and post undertrimmer are available for this operation.
Eyeletting follows, care being required to space correctly and matcheach side. Several machines are available including the BUSMC ‘Epoch’No. 3 for both outside and invisible eyelets, and the BUSMC ‘Duplex’which does two quarters together for outside eyelets.
Up to the present the quarters are in a ‘flat’ position and we now have tobring the nose or front parts together. It is an advantage to butt the twoedges together for flatness, remembering a considerable number ofthicknesses will eventually be at this position, a point on the lower instepof the foot easily made uncomfortable. A machine called a barring ortacking machine will stitch in a butted position, the needle placing severalstitches from side to side, and finishing with several stitches at right-anglesacross the centre. The position
189
Figure 92. Oxford quarter: a (inside view) prepared for undertrimming;b (outside view) partially undertrimmed

of the barring can be either at the tip of the quarters, or at a pointimmediately above the vamp position, in which case the one bar alsoserves the purpose of staying the quarters.
Another method of attaching the quarter fronts is to close seam forapproximately 1
4in., stitching very close to the edge. If the seam is wide
the danger of a bulky upper at the vamp point is possible.Although the quarters are now in a position to allow stitching of vamp
linings and vamps, a certain amount of movement pivoting on the barringwill make the operation difficult. Therefore it is advisable now to lace theeyelets which will make the section firmer.
Lacing is a temporary means of controlling the position of the quartersand upper for manufacturing and is achieved on the BUSMC Model ‘A’Lacing Machine, by threading the eyelets on to needles; then, by amovement of the machine, a series of threads lace each pair of eyeletsindependently to any pre-determined spacing, from zero to about 3
4in.
(5) The section which, until now, has been of little trouble to anyone,the vamp lining, is next stitched to the quarter lining, the edge of which isprotruding 1
8in. beyond the quarter (Figure 93).
The shape of the front edge of the quarter lining may vary considerablyfor economy, or other reasons, but the greater the variation from the typementioned above, the greater the difficulty in stitching the vamp lining. Itis important that the vamp lining should be positioned correctly, and it isusual to either have pierce holes or marks for underlay allowance. Flat orpost machines are quite suitable for this operation, stitching either one ortwo spaced rows.
The tongues are next stitched in, with a row of machining along thebottom edge through the quarter and quarter lining. This operation isoften incorporated with the previous vamp lining attaching, using flat orpost machines.
190
CLOSING
Figure 93. Oxford shoe (closed ‘flat’) ready for vamping.
Vamping follows and is a skilled operation, and unless attention is paidto careful positioning and stitching a number of troubles can develop laterin lasting.
To ‘hold on’ the vamps it is essential to have clear underlay allowancemarks, preferably by stitch marker, on the quarters and also a centralpoint mark in the throat of the vamp, which must be, when stitched, at thecorrect position, the centre of the two quarters facings. Three types ofmachines are used for vamping, the flat, post, and arm or cylinder.
The flat machine will produce an upper, bearing in mind the stitching isright through quarter and lining, which bears little resemblance to therounder curves of the last; in fact the vamp tends to curve slightly thereverse way. This is to be expected when the backs of the quarters arepartially turned inside out to allow the underlay portion to lie flat for thevamp stitching.
In contrast the post machine allows the upper to retain its roundedeffect, the working area being so small, the only difficulty being the extraskill required in holding the sections, there being no support as on a flatbed type.
The arm or cylinder machine originally intended for goloshes and oftencalled by that name is excellent for vamping, the upper literally circlingthe arm as stitching progresses.
One important point to watch in vamping by the ‘held on’ method is the‘growing’ of the vamp; the section can be very easily pulled and thethroat shape distorted, causing extra material to develop by the end ofstitching; hence the need for the central marking point. If this trouble isallowed to continue it will be impossible to last the upper straight, capswill be down on one side, and backs will go round to the side.
After vamping, the uppers are trimmed of cotton ends or any othersurplus pieces of lining, etc. Vamp linings which have been stitched toone side and may be short on the other, or pieces of vamp that have‘grown’ and lap beyond their normal position, should not be trimmedaway.
All that now remains is the examination for faults, following up for thelasting room, and tying up or perhaps hanging on suitable frames.
This method of closing is widely used for men’s work and is quite anefficient and satisfactory system. It will be found that some firms fit thevamps before machining, while others may fit the quarters to the liningsbefore undertrimming; in fact variations in some detail or other exist withevery closing room.
Derby Shoe (Closed on the Flat)
The Derby shoe processes shown in Figure 94 are equivalent in detailsto the Oxford previously described, although it will be seen the sequenceof operations does vary considerably. The chief difference is the greateramount of work involved in the fronts which
STITCHING AND PROCESSES
191

are in fact a complete unit, and eventually meet the complete quarter unitat the last stitching operation.
The sequence of operations for the quarter is the same as for theOxford, so no problems arise from this direction, but it is the tongue andtongue lining and the method of assembling which will causemodifications to the original system and affect the labour grouping.
The methods of cutting the tongue and its lining are many, and usuallycall for a different sequence of stitching but once again a simple type hasbeen chosen for our diagram.
Grouping of sections after skiving will be:(1) vamp and cap,(2) tongue, tongue lining and vamp lining,(3) quarter lining,(4) quarters and back-strip.Once again groups (2) and (3) may go to one lining machinist.(1) The caps are exactly as the Oxford: edge skived, edged, and
perforated. The vamps will be skived for underlay at the front edge and atthe wings, the amount of underlay quite possibly being different at thetwo places, and for raw edge at the centre of the vamp. Cap machining iscarried out as before.
192
CLOSING
CAP VAMP TONGUELINING
VAMP
LINING
TONGUE QUAR-
TER
BACK-
STRIP L
QUAR-
TER
INING
Skive Skive Skive Skive Skive SkiveSkiveEdge
Machine
Machine
Machine
Machine
Machine
Machine
Machine
PerforatePerforate
cap
sides
tongue
tongue
tongue
lining
back strip
facing row
vamp to Cement
Fold
Fix facing stay
Under edge trim
Eyelet
Trim
Lace
Examine
Mark
Seam
back
Rub
seam
-
Figure 94. Sequence of operations for Derby shoe (closed in the flat).
Description: folded quarters, edged and perforated cap, perforated tongue,leather quarter and tongue lining, fabric vamp lining.

(2) The tongue lining is skived as raw edge all round, following whichit is stitched along its bottom edge to the vamp lining (Figure 95a).
Meanwhile the tongue is skived raw edge at the top and sides, and forunderlay at the bottom edge. Perforated along the top edge, it is nowready for stitching to the lining. This involves carefully placing inposition, in this case the edge of the tongue to the edge of the lining, and arow is stitched 1
8in. inside the edge of the sides and under the perforating
at the top leaving a margin of lining to be trimmed away (Figure 95b).This operation is better done if an undertrimming machine is used,ensuring a neatly trimmed lining.The vamp is now placed on the underlay allowance marks on the tongue
and a row of stitching machined in the throat, thereby closing thewhole sub-section, vamp, vamp lining, tongue, and tongue lining, whichcan be stored until required (Figure 95c).
(3) The quarter lining follows the same procedure as in the Oxfordshoe.
(4) The quarter is also in the same sequence as it is in the Oxford shoe,the lining meeting the quarter for undertrimming at the same stage,following which is eyeletting.
From now on a difference will be noticed; the vamps join the quartersand an operation known as stitching sides is performed. Skilledmachinists are required for this, as sides are usually ‘held-together’; thevamps are inserted between the quarter and quarter lining to an underlayallowance marked on the vamps. To achieve this insertion of the vampwings and to expose at the same time the throat of the vamp, it isnecessary to slot the quarter lining from A to B (Figures 96, 97). This issometimes done by the machinist,
STITCHING AND PROCESSES
193
Figure 95. Derby shoe: a tongue lining stitched to vamp lining; b tonguestitched to lining; c completed front.

or possibly cut by the clicker to his pattern. Considering its importance inthe correct fitting of the side and especially the tab of the quarter, thehaphazard way in which machinists can be seen slotting the lining withtheir scissors is surprising. If the cut is too long a long slash is visiblewhen the shoe is closed, if too short, difficulty is experienced in makingthe tab of the quarter reach its mark. There is no doubt that the bettermethod is to have the cut made by the clicker, provided all operationsfollowing, such as seaming of linings, undertrimming, etc., are carriedout efficiently, otherwise the correct fit will be lost.
The first side is stitched, and at the same time a stay row, sometimescalled a tab row, is made; the machine used can be a flat, or, to produce abetter-shaped upper, a post. This is the easy side for the machinist as thequarter is still in an open form, but now the second side is brought roundand placed in position and a tendency to open out will be experienced,making the operation quite difficult.
Whichever side is done first it will be realised that the machinist willcommence from the edge of the lasting allowance on the left side of theshoe, and from the corner of the tab on the right side; consequently it is nounusual occurrence to find tabs at a tilt in the same directions on bothshoes making pairing up difficult at lasting.
The upper is now trimmed of cotton ends and also the excess lining atthe side rows.
Lacing follows and after examination the complete order is ready forthe next department.
194
CLOSING
Figure 97. Front inserted between quarter and quarterlining showing position of slot AB.

Brogue Shoe (Closed on the Flat)
In effect the brogue shoe is a basic Oxford type and the sequence ofoperations follows closely that style but with numerous additions;however, to give a clearer picture of the additional machinery and labourrequired, and the re-planning necessary to accommodate this design in aclosing room, a detailed description follows.
STITCHING AND PROCESSES
195
CAP VAMP TONGUE
QUAR-
TER
LINING
COUN-TER
I NSER-
TION
BACK-
STRIP
VAMP
LINING
Skive Skive Skive Skive Skive Skive Skive
Gimp Gimp Gimp Gimp
Perforate Perforate Perforate Perforate
Perforate
Cement
Fold
Mark facingStain
edges
Stain
edges
Stain
edges
Marking
Seam
backs
Rub
‘Centre’
design
Underlay
Underlay
‘centre’
Fit caps
Machinecaps
Machine
Machine
Machine
Machine
Machine
lining
lining
seamperforation
facing
2nd
ankle row
counter
back-strip
back-stripTurn top of
Fix facing stay
Under-edge trim
Eyelet
Join front of quarters
Machine vamp
Machine vamp
Attach tongue
Trim
Examine
Figure 98. Sequence of operations for Brogue shoe (closed on the flat).
Description: folded quarter; gimped and perforated wing cap, vamp, and
counter; perforated quarter; gimped and perforated tongue; cap centre design;
leather quarter lining; fabric vamp lining.

The break-up of sections is similar to the Oxford, but it will be notedthat several parts go to the perforators before parting to their deviousroutes:
(1) vamps and caps,(2) tongue and tongue lining,(3) quarter lining,(4) counter,(5) insertion and back-strip,(6) vamp linings.
(1) Caps and vamps are skived, gimped (or possibly vice versa) andperforated, and the gimped edges are now stained to improve theappearance. The centre design on the cap will be punched out on one ofthe press type of perforators described previously, and then follows theunderlaying of the design by a backer of the adhesive type, or in somecases leather of similar shade. This not only adds to the appearance,especially in the case of large holes, but prevents the spewing out of thepuff at the lasting operation.
The cap is now fitted to the vamp, care being taken to place accuratelyto the appropriate marks to be followed by the machinist. If caps (wing)are held on, a very experienced machinist is needed, as shape of the peakand general positioning are easily spoilt. Vamps are now complete andcan be put aside for later use.
(2) The tongue and tongue lining are, with the addition of gimping,exactly the same as the Oxford.
(3) The quarter lining is also as the Oxford.(4) Accompanying the vamps and caps will be the counters which are
gimped, perforated, and stained, but from there they await alone to laterjoin the insertion.
(5) The insertion which can be described as the ankle section of theOxford quarter, varies considerably in its build-up and number ofoperations from that section.
After skiving, the top edge is cemented and folded (note: it is still asingle section), following which the facing is marked; the ‘Royal’Perforator punches not only the facing but along the ankle curve. Unlessan underlay is placed behind the perforations the lining will showthrough, not a pleasant feature if a natural or tinted lining is used. Acoloured tape is suitable and serves the double purpose of staying the topedges as well as being an underlay. Leather is sometimes used, andanother well-known method is to stain the linings at the necessarypositions.
One row of stitching is now placed each side of the facing punching,the bottom row continuing under the ankle perforations. It will be realisedthe top row at the ankle curve is the row for undertrimming, a lateroperation. Next the counter is brought along and the machinist places it tothe allowance marking on the insertion and stitches one row on each sideof the punching. The quarter has now assumed the same shape as theOxford and procedure follows closely to the
196
CLOSING

Oxford method: zigzag, machining back-strip. Notice should be taken ofthe extra work involved in the brogue up to this point, in point of fact thezigzagging is second on the Oxford sequence but tenth on the brogue.
After back-stripping the top edge must be turned over by hand asfolding of the insertions was carried out previously.
The rest of the operations follow exactly those of the Oxford shoe.If a Freeman Perforating Machine or similar type is available the
sequence is not altered, as cap, vamp and counter will all be perforatedtogether, the only point being that skiving may follow this operation.
Variations of sequence in the early stages of the insertion and counterare possible, but the method shown allows easy perforating and stitching,the sections being ‘flat’.
Oxford Shoe (Closed on the Round or Loose Lined)
The term ‘closed on the round’ is used when the sequence of operationsis arranged for a style to be closed, after preliminary operations, in arounded or natural shape. This is achieved by closing the outsides andclosing the linings as two separate units, fitting together and thenundertrimming, producing a better-shaped upper and linings free fromany through-stitching.
For ease of comparison, the same type of Oxford as was previouslyshown in ‘flat closing’ is again chosen for description. Although sectionsare shown in different order in the diagram the grouping is exactly thesame for the early operations:
(1) vamp and caps,(2) quarters and back-strips,(3) tongue and tongue lining,(4) quarter lining,(5) vamp linings.
(1) Vamps and caps follow procedure as before.(2) Quarters and back-strips follow normal procedure until facing stays
are fixed, at which stage the front ends of the quarters are broughttogether and joined, either by barring or a few stitches. The vamp is thenbrought along and vamping takes place, producing the completedoutside.
(3) Tongues and tongue linings are treated in the normal manner andawait inclusion in the upper at a later stage.
(4) Quarter linings are prepared as usual up to seam rubbing, afterwhich the front parts are brought together and seamed for approximately1
2in. similar to the quarter.(5) The vamp lining is next stitched to the quarter linings completing
the lining section.Linings and outsides are assembled for undertrimming, a post machine
with the trimming attachment being used for this operation; the smallworking area of this type of machine allows the stitching
STITCHING AND PROCESSES
197
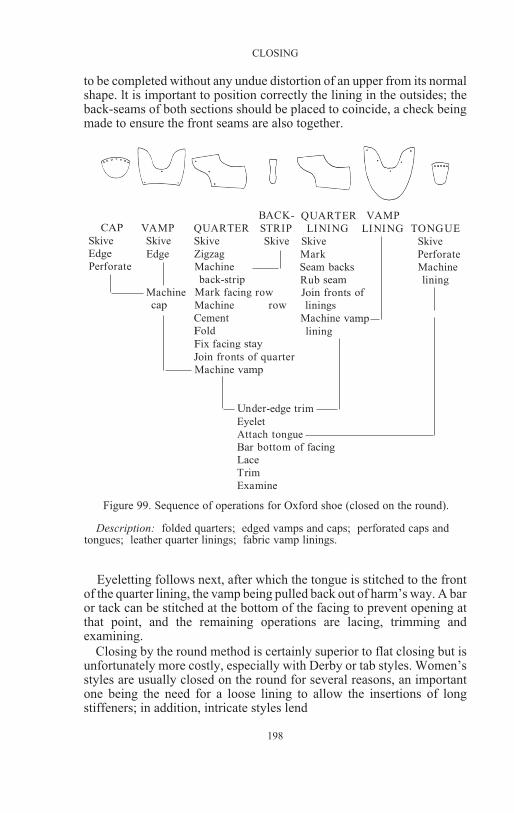
to be completed without any undue distortion of an upper from its normalshape. lt is important to position correctly the lining in the outsides; theback-seams of both sections should be placed to coincide, a check beingmade to ensure the front seams are also together.
Eyeletting follows next, after which the tongue is stitched to the frontof the quarter lining, the vamp being pulled back out of harm’s way. A baror tack can be stitched at the bottom of the facing to prevent opening atthat point, and the remaining operations are lacing, trimming andexamining.
Closing by the round method is certainly superior to flat closing but isunfortunately more costly, especially with Derby or tab styles. Women’sstyles are usually closed on the round for several reasons, an importantone being the need for a loose lining to allow the insertions of longstiffeners; in addition, intricate styles lend
198
CLOSING
CAP VAMP QUARTER
BACK-
STRIP
QUARTER
LINING LINING
VAMP
TONGUESkive Skive Skive Skive Skive Skive
PerforatePerforate
Edge Edge
Machine
Machine
Machine
Machine vamp
Machine
Machine
vamp
lining
lining
liningscap
Zigzag
back-strip
Mark
Mark
facing
facing
row
row
Cement
Fold
Fix stay
Join fronts of quarter
Seam backs
Rub seam
Join fronts of
Under-edge trim
Eyelet
Attach tongue
Bar bottom of facing
Lace
Trim
Examine
Figure 99. Sequence of operations for Oxford shoe (closed on the round).
Description: folded quarters; edged vamps and caps; perforated caps andtongues; leather quarter linings; fabric vamp linings.

themselves to this method, added to which a very clear and neat lining ispossible. It is quite understandable therefore that departments wholly onwomen’s styles are planned for round closing, against which men’s stylesare usually planned for flat closing.
Uppers such as courts, whole-cut styles, golosh shoes, etc., areobviously types for closing on the round
Woman’s Whole·cut Shoe (Perforated through Lining)
Certain styles are designed for the perforations to go through thelinings, which may be of a light substance leather, or a fabric if the risk ofstranding of threads is not great. To make up the upper in theconventional way is not always convenient, as spot perforatmg
199
STITCHING AND PROCESSES
GOLOSH FACING LINING
Skive Skive
Cement
Fold
Fit facing
Machine
Machine
Machine
facing
Fit lining
lining
binding
bindingTurn
counter row
Perforate
Seam
Seam
Rub
Rub
seam
seam
quarter
Re-bead at back-seam
Under trim
Eyelet
Lace
Trim
Examine
Figure 100. Sequence of operations for woman’s whole-cut shoe (perforatedthrough linings).
Description: folded quarters; French bound throat; perforated facing andgolosh through lining; leather through lining.

on the ‘Royal’ Perforator can be tedious and a long job with intricate andnumerous holes, and so a press-type shape containing the completedesign is constructed necessitating a flat upper.
Therefore a different sequence of operations is needed. The diagramshown is of a simple nature but the method employed can be adapted tosuit the needs of more intricate styles.
The three sections are:(l) lining,(2) facing,(3) golosh.
(l) The lining preparation is merely skiving and marking.(2) The facing is skived, French binding stitched in the throat and the
binding turned.(3) After skiving, the golosh or body shape is solutioned at the ankle
curves and then folded, leaving the end at the back not turned down. Thefacing is now fitted to its marks and machined.
The linings are also fitted, care being taken to position exactly and alsoto solution thoroughly the area of punching. It may be advisable tomachine the facing through the lining at this stage.
Stitching of the imitation counter row follows, the reason formachining through the lining being that the lasting strains may move thelining from the outside, with dire results to the perforation. Consequently,any rows stitched through relieve this possibility.
Perforating is now proceeded with on the golosh and facing. We nowhave to return to operations carried out quite early in the conventionaltypes: seaming lining, rubbing seam, seaming quarter, rubbing seam. Thefold at the top of the back seam must be adjusted, as, it will beremembered, it was left up at folding.
Subsequent operations follow the normal course: under-edgetrimming, eyeletting, lacing, trimming and examining.
The responsibility for planning the sequence of operations of any styleslies with the supervisor, who must work in very close relationship withthe designer and pattern cutter.
This is of particular importance with the introduction `of new sampleswhich must be considered relative to bulk production. It is usual to have asection of operatives, which may vary from a machinist and a fitter, to anumber of each plus other specialists, according to the size of production,to form a sample team.
Excellent results may be obtained from this team due to their skill, butbefore bulk production is commenced it is a wise procedure to try asample dozen or more through the normal run of the department, whendifficulties and troubles are more likely to be seen.
Considerable experience is necessary to judge styles and their effect onthe machinery available, and of course on the labour position. It is uselessto give an opinion that a certain number of a
200
CLOSING

particular style can be accommodated unless it is known what quantity ofother types will also be expected at the same time.
It will be appreciated after studying the diagrams of various styles thatto keep work flowing smoothly in a forward direction is no meanachievement especially if the types vary considerably; also it must berealised, descriptions given were of very simple and straight-forwardbasic styles but very extravagant variations are made regularly.
STITCHING AND PROCESSES
201

13
CLOSING ROOM MANAGEMENT
THE LAY-OUT AND PLANNING OF ACLOSING DEPARTMENT
MANY FACTORS MUST BE considered when planning a new department orre-planning an inefficient old one. Such factors are:
(1) size of the room available;(2) facilities available in the room (lighting, power, etc.);(3) position of preceding and following departments;(4) type of work to be produced;(5) possibilities of periodic changes of types of production.
(l) The size of the department is usually predetermined by the size ofthe building, but should any latitude in shape or area be available it isrecommended that a rectangular shape be used to allow short benches tobe set across the room and a central gangway to give easy access to themachines for supplying with work.( 2) The building construction may dictate the natural lighting, but anoverhead north light is superior to side window lighting and avoids sunglare at certain periods of the day, a rather serious matter when the sunreflects on plated machine parts.
Side window lighting will give satisfactory results with the system ofbenching described in (1) but will obviously be inferior in the centrebenches compared with the window benches. Heights of ceilings andcolour of decorating will affect intensity of light and reflection.
Artificial lighting has progressed enormously of late years andfluorescent tubes are now to be found in most departments. Positions oflights are scientifically arranged to avoid shadows and provide uniformlight intensity without causing glare at work level, or even normal eyelevel.
It is usual to provide each machine with a ‘needle light’, a smalladjustable lamp, well shaded, to concentrate illumination on the workingarea.
Power arrangements will be governed chiefly by the method ofbenching adopted.
If short lengths of four or five benches are placed transversely acrossthe room a motor coupled to a shaft can drive the complete number ofmachines on each bench. The motor may be mounted on the floor inwhich case guarding is necessary for the length of the bench, oralternatively the mounting may be directly under the bench and shaftingenclosed, so leaving clear space beneath the bench and adding to thecleanliness of the department.
202

Another method is to have an individual motor for each machine,producing a saving of power as machines are only switched on whenactually in use, and also, being free of shafting, etc., cleanliness is againachieved.
Single benches powered by small individual motors are installed insome closing rooms, and although the area necessary for a given numberof machines will be greater than the old system of rows of benches it willbe found that the ease of changing from a certain style sequence ofoperations to another is greatly improved. One regularly sees rows orbenches carrying machines which are rarely used, but left in place`shouldan order call for their use. In contrast the single bench can bedisconnected from its power supply and moved to store in a matter ofmoments and re-planning of the section is quickly completed. The singlebench is ideal for placing in line for conveyor systems and also lendsitself for the doubling up necessary in the case of bottle-necks.
Banks of machines can be arranged to allow team work for separatestyles or types, and the feeding of sections is facilitated.
(3) The object of any planning of a department should be to keepmovement of work to a minimum, and also if possible in a forwarddirection. The last qualification is made very difficult if a number ofdifferent types of uppers is being produced.
The position of the department feeding the room, the clicking room inthis case, will affect the positioning of the machines. The ideal of courseis to receive work one end of the room and dispose of it at the oppositeend, but unfortunately many departments have only one entrance whichleaves the alternatives of planning the work to move round the room andout at the place of receiving, or to start one end and finish the opposite endand carry the completed product back through the room for disposal.
(4) The sales policy of the firm will affect the planning of the closingroom considerably; two extreme examples will explain this simply. Onefactory produces for direct stocking of its own retail stores; its plans aremade for styles to cover several months ahead; planning of a departmentis therefore eased, preparations to absorb given amounts of certain shoesbeing put in hand immediately.
A second factory produces for the small individual retailer who mayorder in dozens; advanced planning is difficult as certain shoes may bepopular for a short period and then suddenly the demand may peter out,others of completely differing types taking their place. Machines andwhole sections are often heavily taxed one week and unused thefollowing week. .
(5) The last factor is to some extent bound up with the fourth; at variousseasons of the year new ranges of styles are often put into production andit is naturally of some concern to the closing department when changes ofsequence, additional labour for some operations and redundant labour forother operations must be considered and action taken.
203
MANAGEMENT

Other points to consider in the lay-out of the department are adequategangways—not only as a general thoroughfare for the personnel, but thegangways for the benches to facilitate feeding of the machinists withoutdisturbing the operatives—and provision for assembly tables at suitablepositions.
The plan for a closing department given in Figure 101 is a simple
204
CLOSING
Figure 101. suggested lay-out for a closing department.

and straightforward sequence for producing an Oxford shoe, withspecification as for the shoe previously described (Figure 90). Singlewidth benching is used. An output of up to 1,000 pairs per day issuggested but it should not be implied that the number of machines ineach section is capable of that output exactly. Variations in quantity occurfrom person to person; spare machines or partly employed machines areincluded; some machines may be dual purpose to cope with certainsections. Neither is it suggested that the number of benches (64) meansthat number of operatives.
Centre benches are for distribution and storage e.g. bench ‘a’ will bethe distribution bench after skiving, and progress is followed for eachsection by dotted lines. The dotted lines are drawn as a continuingsequence of operations, but in actual fact the storage benches ‘b’, ‘c’ and‘d’ are in use to absorb the varying quantities held at each stage; it willalso be seen some parts of the upper are completed early in the room (e.g.vamps and caps at 23 and 24), these are stored on an appropriate benchready for the next operation; in this case vamps and caps are transferred to‘d’.
Problems to be faced with the introduction of further styles will bereadily appreciated by the study of Figures 90, 94, 98, 99, 100. Thevariations of sequence and the extra machines needed must be consideredand allowed for; then comparison made with the specimen lay-out justdescribed.
A certain amount of compromise is necessary to ensure that adepartment will work smoothly and efficiently with varying types ofupper, and it is the supervisor’s responsibility to be constantly looking formeans of improving the flow of work as changes of style develop.
CONTROL OF QUALITY AND QUANTITY
It is always a debatable point whether quality and quantity can bemerged together especially if quantity is the result of piece-work, butunder modern mass production methods it is essential for a
205
MANAGEMENT
The key to benches is as follows:1. Opening2. Identification marking3. Stitch marking4. Lining stamping5, 6, 7, 8, 12. Skivers9, 10. Edging machine11. Edging skiver13, 14. Zigzag machines15, 16, 17, 18, 19, 20. Flat machines
for back-strips and facings21. Flat machine for tongue linings22. Perforator23, 24. Flat machine for caps25, 26. Flat machines for seaming
linings27. Seam rubbing
28. Seam taping29, 3l, 32. Folders30. Cementing machine33, 34, 35, 38, 39, 40. Undertrimmers36, 37. Benches for fixing facing stays
and fellowing linings to quarters41, 42, 43, 44. Flat machines for vamp
lining45. Lacing46. Tacking47, 48. Eyeletting49, 50, 51, 52, 54, 55, 56. Vamping53. Attaching tongues59, 61, 63. Trimming and examining
benches (double benches)

balanced output and quantity assumes a high degree of importance.Details have been previously discussed relative to the effect of changes ofstyles upon the closing room and the importance of this point inmaintaining a regular quantity of work and preventing seriousbottle-necks is stressed once again.
The responsibility of maintaining the flow of work or quantity and alsocontrolling the quality rests with:
(1) Supervisory staff. The number involved will of course vary with thesize of the production unit; one forewoman may be quite adequate for asmall room but for larger departments it may be necessary to divide theresponsibility into two or more sections with assistants in charge of each,and also feeders to distribute work to sub-sections. The supervisor of alarge department is often found to be a man as against the usualforewoman for smaller rooms, the heavier responsibility to be carried andlack of suitable women willing to bear the burden making the choice of amale essential.
(2) A planning system to ensure full use of machinery available and touse efficiently the labour employed. The intelligent planning of types andstyles with careful consideration of key machines will assist thesupervisors in controlling the flow of work.
(3) An efficient training system to make full use of all labouremployed, to adapt labour to varying operations and to counteractchanging styles, irregular hours of work and the high rate of sickness andabsenteeism.
To sum up, the quality is entirely dependent upon the supervision of thedepartment by the enforcement of strict inspections and standards, andadequate training of labour. Piece-work or any incentive methodadvantageous regarding total must be carefully watched from a qualitystandard; prices for higher grade work are sometimes increased to allowfor more detail work, and it is the supervisor’s responsibility to see thatthe standard is upheld.
TRAINING OF LABOUR
The labour problems in the closing rooms have, since the second worldwar, been very acute, and, with the return of intricate styles from the moreaustere types, the work involved has increased considerably.Improvements in certain machines e.g. for perforating, have certainlymade a great saving of labour, but stitching is still a problem that cannotbe solved without an adequate supply of young girls and a long period oftraining. A number of years is often necessary to produce a skilledmachinist capable of taking over a key operation efficiently, andunfortunately it is now increasingly difficult to persuade operatives toprogress from a fairly simple operation, which may pay a fair wage, to amore responsible and difficult one even if it is more profitable.
A study of the sequence of operations and variations necessary fordiffering styles, described earlier in this section, will plainly show
206
CLOSING

that the labour force must be flexible or capable of transfer to alternativeoperations to secure an efficient and balanced output. This is even moredesirable when part, or broken time is prevalent, and also absenteeism isvery high, two disadvantages to be faced unfortunately by most closingroom supervisors under present conditions.
The progressive training of the machinist is helped by the fact thatseveral minor operations are available in most styles which do notdemand quality stitching, although exactness is still most important, andwhen competent the trainee can transfer to other sections of greaterimportance. There is used, however, a considerable number of machinesother than stitching machines, and the training of labour in this case isless efficient and often more costly, but it should always be the aim of themanagement to have labour trained and organised for any emergency, beit sickness or changing of production.
The method employed for training of labour will vary with theindividual firm, the smaller type usually absorbing the new entrant intothe department under the direct supervision of the forewoman. In thelarger output factories it is becoming increasingly popular to establish asection or small department solely for training under a trainingsupervisor, who must obviously not only have qualities of being anexcellent all-round operative but also have patience and ability to transferknowledge to the trainee.
The capabilities of a newcomer are quickly judged by an experiencedperson and adjustments to suit the individual can be made with aminimum waste of time and teaching. Although it may appear to be anexpensive method, including cost of equipment and staff etc., it must beconsidered from many angles.
(1) Labour is efficiently trained by one method, as against a fewminutes’ tuition by a busy forewoman and advice from all and sundrysitting around the trainee.
(2) Production of the main department is not affected, anythingproduced by the training section having been carefully checked, eithercomplete uppers or sections only.
(3) If the system results in an efficient and productive closingdepartment then it must effect an economy as the rest of the factory canwork efficiently.
METHODS OF DEALING WITH SAMPLES, SPECIALS ANDREPAIRS
Comments have been made previously regarding the organisationfrequently used for the production of samples, i.e. the team system,usually of highly skilled personnel. This method achieves excellentresults but often of a much higher quality than can be expected fromgeneral production. This fact must always be borne in mind when
207
MANAGEMENT

considering bulk production and should always be used as a standard toachieve during production.
If it is desired to produce samples by general bulk methods, or in otherwords to send them around the room, someone in authority mustconstantly inspect results at various stages to ensure fit and workmanshipand so obtain data for later production. A certain amount of specialisedwork will be performed by normal operators even in the team system(eyeletting, etc.), and it will be found many firms do compromise, that is,they use partly room work, partly sample hands such as flat machinistsand fitters.
Specials are dealt with on similar lines to samples, if quantities aresmall, often in conjunction with them. Room facilities may be used rathermore than in the case of samples.
Repairs are a continual source of irritation especially in the case oflasting and factory repairs. Obviously wanted quickly to prevent a serioushold up, the repair can be a long job for the closing room. In some casesthe complete upper needs dissembling, many operators areinconvenienced by having to change their machines, and even if onemachinist is solely kept for repairs, delays can occur frequently. Alsoafter re-closing, one can never be completely satisfied as to the quality ofthe upper. The room’s internal repairs can also cause serious hold-up ofwork and to keep the flow even, it is necessary for a good service ofre-cuts from the clicking room. According to output it is good practice tohave labour available with priority on repairs.
THE PURCHASE, STORAGE AND RECORDING OF USEOF FINDINGS AND GRINDERY
The number of items used in the closing of uppers is surprisingly large;needles and threads may appear to the casual observer as the only ones,but such items as tapes, bindings, eyelets, buttons, buckles, cements,stains, beadings, etc., in differing colours, widths and grades are only afew of the necessary findings required. They are usually known asgrindery and findings.
The supervisor must work in co-operation with the central buyingauthority and also the planning office to ensure future commitments areprovided for.
It is usual for a central stores to hold the main stocks of materials, andresponsibility for accurate recording of issues and stocks held will restwith that department.
A small departmental store ordering daily or weekly according to sizeand type of production supplies the needs of the room and should be theresponsibility of an assistant to the forewoman. On the basis of weeklyissues, cost can be assessed by division of the total production for thatperiod. This average cost is quite satisfactory in most cases butoccasionally certain expensive items may be used, e.g. elaborate andcostly buckles, in which case the uppers in question should bear this cost.
208
CLOSING

MACHINE MAINTENANCE
To maintain the efficiency and to control the output of the closing roomadequate servicing of machines is necessary. Nothing is worse thanhaving a breakdown of a key machine and finding that spare parts areunobtainable or that the mechanic is not available for hours.
The larger establishments usually employ a staff of mechanics, but inthe case of small firms, the general engineer, while capable of smallrepairs, cannot be expected to be a specialist and obviously is not alwaysavailable at a moment’s notice. The machine firms give an excellentservice for repairs, but once again it is not always possible to supply amechanic immediately.
Spare machines are of great value especially when, in the case ofsewing machines, the faulty one can be taken from the bench and anotherone put down in a matter of a few minutes. Where individual benches areused replacement of any type of machine is facilitated provided, ofcourse, that spares are kept in readiness.
The sewing machine is a very finely adjusted and intricate machinerunning at a very fast speed and in consequence requires regular oiling.Operators are usually fairly generous with the oil—can but one seriousfault is prevalent; to assist in clearing cotton fluff from the bobbinmechanism, etc. paraffin is used in liberal quantities and then themachine is run at speed. This will cause undue wear and, unlesscontrolled, serious troubles will follow.
SUPERVISION
The person controlling the closing department, probably the mostdifficult from a supervisory point of view of the whole factory, must bepossessed of many qualities and qualifications.
A few of the difficulties which are to be expected and probablyencountered should be considered.
The staff is usually completely female or at least has a very highpercentage of females; the work to be produced is often intricate andrequires highly skilled and specialised operators; the styles are oftenchanged causing frequent reorganisation. Added to this one mustconsider conditions existing post-war: a serious shortage of labour, a highdegree of labour turnover, a heavy rate of absenteeism especially withmarried women, broken time working, etc.
Discipline is of great importance to maintain control of the department.The supervisor must be fair in his or her dealings with the operators, mustcommand respect, be tactful, and be able to explain clearly an order.
A complete knowledge of all systems of closing, the implications ofchanging types of uppers, the limitations of sub-sections, and a fairknowledge of all the machines employed in the department are necessaryqualifications for the supervisor.
209
MANAGEMENT

He or she should be able to maintain good relations with other foremenof departments, and a reasonable knowledge of the work of thesedepartments will assist in understanding any problems which may arise.
The teaching of labour assumes greater importance than ever and thesupervisor must take steps to arrange a suitable scheme to coach the newlabour, and improve the work of the semi-skilled.
210
CLOSING

PART V
BOTTOM STOCK
G. B. AGUTTER


14
CUTTING BOTTOM STOCK
THE NAME ‘BOTTOM STOCK’ or ‘roughstuff’ is given to the department ofthe shoe factory in which all the bottoming parts—soles, heels, insoles,etc.—are cut from the appropriate leather or other material and thenprepared ready to meet the uppers in the lasting department.
The most important and the most difficult operation in the bottom stockdepartment is the actual cutting from bends, bellies and shoulders of thevarious sections in the most economic and suitable manner. The cuttingof crepe, composition, resin-rubbers and fibre-boards is not so difficultsince these do not vary in quality and substance (thickness) over a sheet.
The hide of a cow when stripped from the animal and laid out flat is asshown in Figure 102. Before tanning it is cut or ‘rounded’ into the varioussections shown—a pair of bends, a pair of bellies, the shoulder andcheeks; these are tanned separately and differently according to thepurpose for which they are most suitable. The bends are used for solesand top-pieces (the part of the heel which rests on
213
Figure 102. Cattle hide laid out flat showing divisions.

the ground); the bellies for insoles, throughs, middles, lifts (heel); theshoulders for insoles, some light soles, and welts; the cheeks for lifts.
The sections are baled and sold by weight; thus, a bale of bends maycontain from twenty-five to fifty, the heavier bends usually being in balesof twenty-five while the lighter ones are baled in proportionally largernumbers. The bends themselves are classified according to quality andweight, the latter being stated as, for example, 8 to 10 lb. bend or 10 to l2lb. bend. Bellies and shoulders are baled in a similar proportion theaverage bale being about 3 cwt.
The unit of measurement used to describe the substance or thickness ofbottom stock material is known as an ‘iron’.
1 iron = 1
48in., 12 irons = 1
4in.
A gauge (Figure 103) is used for testing accuracy of substance.
THE PRESS
Bottom stock cutting is invariably carried out on some type of press.Briefly, the operation consists of placing the material to be cut on a blockof wood or fibre consisting of separate sections clamped together with aniron band; a press knife of the desired shape, some 4 in. high andsharpened on the lower edge, is placed in the desired position on thematerial and then, by depressing a pedal, a buffer descends and pushesthe knife with considerable force through the material and a little wayinto the surface of the block. The cut portion passes up inside the knifeand is removed when several more have been cut.
There are several types of press in use but by far the most widely usedone is the BUSMC ‘Revolution’ Press. The advantage of this type ofpress is the large cutting area available, the block measuring 7 ft. × 14 in.wide; when new it is 10 in. deep. A safety device is fitted which preventsthe upper beam or buffer from descending again until the foot pedal isreturned to its original position and again
214
BOTTOM STOCK
Figure 103. Circular and rectangular substance hand gauges.

depressed. It will be seen that the cutter is able to move about at will andmake several cuts without having to move the material but only the knife.This is a great advantage when cutting bends as the operator is able to cutalong the full length of the material with the knife for one foot, right orleft, and then return with the opposite foot. This gives both speed andclose cutting.
Another type of press uses only a small round block on which thematerial and knife are placed in position and then all three are pushedover a metal table under the circular buffer which is either brought intooperation with a foot pedal, or else is moving up and down continually. Avariety of this press has buffers at each end of the shaft so that twooperators can use it at the same time.
Still another variety resembles a pair of clicking presses (see p. 130)placed at each end of the long rectangular block, but the arms do notswing sideways as they do for clicking; they almost touch each other sothat either can be depressed by the hand release according to the positionof the knife on the material.
INSOLE CUTTING
Systematic Cutting of Insoles from Bellies
As the first components required are insoles, these will be consideredfirst.
The majority of welted insoles are cut from bellies which are speciallytanned for this purpose and are close in fibre and flexible.One end of the belly, the butt or tail end, will be found to be much thickerthan the other and will be referred to as the stout end; the opposite. end istermed the light end. Care should be taken when cutting bellies to see thatinsoles cut from these respective ends are ‘fellowed’, i.e. made into pairs.
Prime leather is found only in the centre of the belly. In Figure 104 theweaker parts have been shaded; these should be avoided as much aspossible but they can, within limits, be used providing they are in the seat(or heel end) of the insole and also for inferior sections as describedbelow.
The flow of the grain of the leather is of course longitudinal. It is mostimportant to observe this ‘flow’; the direction of stretch is at
215
CUTTING BOTTOM STOCK
Figure 104., Cutting insoles from bellies. The weaker parts are shaded.

right-angles to it and under no circumstances must an insole be cut acrossthe ‘flow’ as it will distort badly when graded and levelled later.
Insoles are cut with knives made to a pre-determined caster shape (seep. 94) from which it should be possible to round all the various shapes tofit the lasts in use.
The example chosen is a second quality, 7 to 9 iron welting belly to becut into men’s insoles; a second quality belly has the weaker parts moreprominent and the various points can be more clearly illustrated.
It is often argued that no set system can be applied in the cutting ofinsoles from bellies; this is not so. A system can be used providing it issufficiently elastic in its application to cover the wide variation in length,width and shape of the welting belly. To cut straight along with the knifefor one foot and back again with the other is a method often used but theonly point in its favour is that it makes little waste. A large percentage ofthe insoles so cut will be weak at the toe and will be classed as suitableonly for riveted work or as requiring reinforcing by the ‘gemming’method (see p. 230) thereby losing considerable value.
The system outlined below has the following features:(l) no insole will be weak at the toe;(2) a proportion of the poorer parts of the belly can be cut into welted
insoles because the weaker portions will be found in the seats—a pointthat has a marked effect in the completed stock sheet (see p. 228);
(3) the insoles follow the flow of the grain producing an even substanceand quality. This will show to advantage when grading and sorting; thegrade will show very little split and the sorter will find no insoles withonly one half fit for welted work and which therefore have to be reducedin substance for gemming.
Cutting (Figure 104) is commenced at the prime leather in the centre.The cuts are numbered in sequence and insoles suitable for welted workare marked W, those requiring gemming are marked G, while thosesuitable only for riveted work are marked R.
Most bellies are folded across the centre; this particular one was notand such an exception is a great advantage to the pressman. If the bellyhas a fold, the first cut is made with the toe to the fold in the sequence asshown. Some bellies will take four rows, some five, a very narrow oneonly three; the one chosen has between four and five.
To overcome the waste if the normal lock were used, cut 7 is made asshown; this allows the seat of the knife for the next cut to lock in withlittle waste. This disposes of the belly centre.
Next, the piece on the right is taken (in this case it is the stout end); it isturned round and cuts 9, 10 and 11 are made, all with the toe towards whatwas the centre, 9 and l0 left, and 11 right. Cuts 12 and 13 are made withthe left foot knife taking care to avoid the hard part near the edge, and cuts14 and 15 are cut with the right foot
216
BOTTOM STOCK

knife as shown, following the flow of the grain. Cut 15 is not alwayspossible as most bellies are poor quality at this point but in actual fact thebelly chosen produced a good riveted insole here; the remainder was toostout for anything other than piece-soles or heel-lifts.
Now the light end must be considered. This again is turned round andcuts 16, 17 and 18 made with the left knife, 16 and 18 with toe to centreand 17 reversed. This is done to allow more room for cut 18, thesubstance being even at this point. (The seat of cut 19 in the actual cuttingwas weak but was passed for welted.) Cut 20 is made next with the leatherturned back to its original position, cuts 21, 22 and 23 straight along, 24locked in, then 25 right up the side of the fore flank. This last one is alsonot always possible. Cuts 26 and 27 complete the insoles. It will benoticed how the last three cuts follow the flow of the grain. They were allactually good quality 5 to 5 1
2iron ‘gemmed’ insoles of even substance,
the weaker parts again being in the seat.The remainder is cut into slip-middles, piece-soles and lifts, the belly
having produced ten pairs of welted insoles, two and a-half pairs ofgemmed insoles and one pair of riveted insoles. The advantage of thesystem outlined is shown in the high proportion of welted insolesobtained by it.
Ladies’ insoles are cut in much the same way, but usually from a 5 to 7iron belly. If some of the factory’s output is made machine-sewn orcemented (see pp. 325, 348) most of the belly will be cut into insolesvarying from 4 to 6 irons; if this is not so, then a larger proportion ofslip-middles will be cut from the 4 iron material. It will be found thatmany more rows of insoles will be cut than with the men’s knife but thisneed not alter the system; always follow the flow of grain and wherevariation of quality of substance occurs make sure that the best or stoutestmaterial is in the toe.
Insoles from Shoulders
Many firms, who, for various reasons, require a large number of insolesand few lifts, buy a specially dressed shoulder for the purpose. Theseshoulders have been squared, i.e. the cheeks or faces have been removed,the grain well buffed and a larger proportion of fat introduced to givegreater flexibility. These produce quite a good insole, not so close in fibreor as flexible as a belly and somewhat hard towards the centre, but quitesound. If the insoles are cut in rows (heel to toe) straight across theshoulder it will be found that some will be very hard at the toe, andconsequently difficult to channel (the hard portions are shaded in Figure105).
The method advised is shown in Figure 105; it takes a little longer as itinvolves more changing of knives but only two insoles will be hard, andthese hard all over. The two insoles cut on either side of the centre willalso be on the hard side, but are again the same all over; this is far betterthan having one hard area near the toe as it
217
CUTTING BOTTOM STOCK
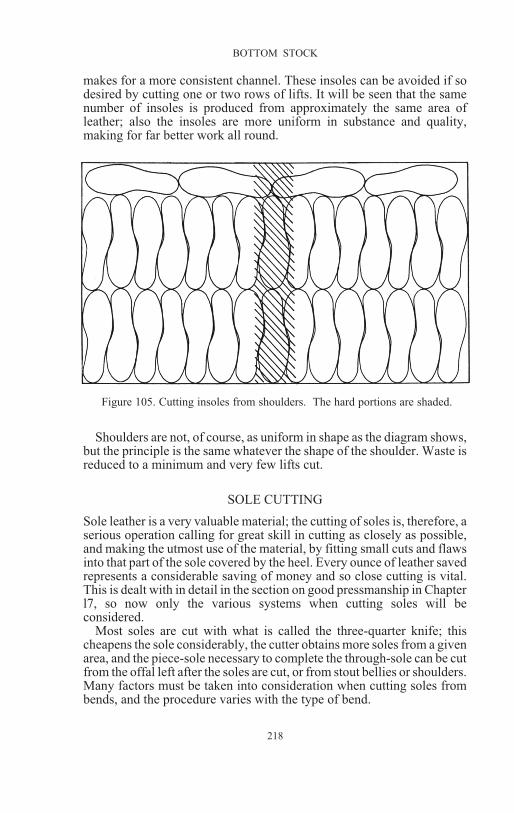
makes for a more consistent channel. These insoles can be avoided if sodesired by cutting one or two rows of lifts. It will be seen that the samenumber of insoles is produced from approximately the same area ofleather; also the insoles are more uniform in substance and quality,making for far better work all round.
Shoulders are not, of course, as uniform in shape as the diagram shows,but the principle is the same whatever the shape of the shoulder. Waste isreduced to a minimum and very few lifts cut.
SOLE CUTTING
Sole leather is a very valuable material; the cutting of soles is, therefore, aserious operation calling for great skill in cutting as closely as possible,and making the utmost use of the material, by fitting small cuts and flawsinto that part of the sole covered by the heel. Every ounce of leather savedrepresents a considerable saving of money and so close cutting is vital.This is dealt with in detail in the section on good pressmanship in Chapterl7, so now only the various systems when cutting soles will beconsidered.
Most soles are cut with what is called the three-quarter knife; thischeapens the sole considerably, the cutter obtains more soles from a givenarea, and the piece-sole necessary to complete the through-sole can be cutfrom the offal left after the soles are cut, or from stout bellies or shoulders.Many factors must be taken into consideration when cutting soles frombends, and the procedure varies with the type of bend.
218
BOTTOM STOCK
Figure 105. Cutting insoles from shoulders. The hard portions are shaded.

Short Cut Bend
The easiest is the short cut bend and this will be considered first.By short cut, it is meant that the shoulder end has been cut away,
leaving a much shorter bend with considerably less variation in substancethan its longer brother. For all practical purposes, the variations insubstance and quality in a bend are almost identical, with the possibleexception of the extreme belly edge where the quality deterioratesrapidly.
Cutting is always begun on prime leather; therefore the belly edge willbe away from the operator. The first row of soles must be cut in a straightline; this is most important as any mistake in the first row is repeated in allsubsequent rows and much waste is made. Commence with the toe of theknife at the shoulder end (this applies in general to short cuts only) andcut the first row, using the edge of the press block as a guide to keep in astraight line, and taking care to see there is no waste between toe and seat.If the bend has a very pronounced curve, some little waste is made inkeeping to a straight line, but nothing compared to that made if thecontour of the bend is followed; then, waste will occur on almost everycut across the whole width of the bend. Proceed as far along the bend aspossible, four soles being about average.
This row is the only one cut with the toe of the knife pointing oppositethe direction of travel. Now, take the opposite foot and lock in as shownin Figure 106, taking care to keep the inside corner of the knife as close aspossible; if this is not done, the outside corner will project and spoil thelock on the next row; take care too that the inside forepart locks in close tothe outside waist of the first row. Continue across the bend in that order; ifa flaw is encountered and
219
CUTTING BOTTOM STOCK
Figure 106. Cutting soles from a short cut bend. A soft spot usually occurs inthe area shaded black.

it is impossible to cut it in the extreme seat end of the sole where it will becovered by the heel, miss one sole completely and so preserve the lock.
The normal bend takes from five to six rows, the one illustrated inFigure 106, between five and six; soles numbered 2l and 22 wereconsidered good enough though very close to the belly edge. Thepressman should be on the look-out for a soft spot in the area shadedblack; this is present in most bends, is easily missed and is the cause ofmany soles being rejected.
The butt end is always a problem and no set rules can be laid down as tothe best method of cutting. The quality and substance deteriorate rapidlyin the direction of the rounded end and an effort should be made to cut allsoles from this part with the seat to the edge. Two soles numbered 25have been shown; the one in dotted lines is not always possible owing tovarious markings made by the tanner at this point, and the alternative 25is more usual, but if the dotted sole 25 is possible, then 26 is possible.
220
BOTTOM STOCK
Figure 107. Two methods of cutting soles from a long cut bend.

The short strip left on the belly side can be cut into smaller size soles; ayouths’ or boys’ knife is very useful for this purpose. The few portionsleft will cut a few top-pieces and piece—soles; there is very little offal ona short cut bend.
Long Cut Bend
When cutting a full length bend there are two alternative methods, theuse of which will all depend upon the particular bend being cut. If theshoulder end is reasonably good, we can commence in the manner as for ashort cut (see Figure l07a). These will be a risk however that solesnumbered 1, 15 and 25 will be considered too weak at the toe andrejected.
The other alternative is shown in Figure l07b. In this we start with theseat of the knife as close as possible to the butt end, and proceed along thebend in the sequence shown. In this method we make the most use of thesubstance, the area uncut being at the shoulder end where cuts 29 and 30are made with the toe away from the edge. This method should always beused on bends carrying a lot of shoulder with its heavy growth marks andpoor grain. The portion left at the butt end can be cut into top-pieces, therest into throughs, top-pieces, and lifts.
CUTTING OTHER SECTIONS
Through-Soles
In cutting through-soles much the same system is used. The lock,however, is much easier, one row following another evenly across thebend. An effort should be made to keep as many flaws as possible into theseat of the sole; this can be done to a much greater extent than when usinga three-quarter knife.
Before we leave bend cutting, the use of the material left after all soleshave been cut, must be discussed. First, all large top-pieces should be cutusing the curve of the breast of the knife to ht closely to any round edgewhere a sole has been cut, thus saving scrap; follow with the piece-soleknife and cut all rough leather of sufficient substance, and lastly, theremaining small pieces into ladies’ top-pieces. If all cutting has beenclose, the scrap will be about 10 to 12 per cent of the weight of the bend.All material should be weighed as it leaves the cutter and entered on thestock sheet in the appropriate places. This serves as a double check asmaterial sorted can be checked against weight, and the cutter can beassured that he is credited with all cut stuff. Scrap is also entered alongwith scrap allowance, the percentage allowed, and the gain or loss onscrap, the cutter being allowed ld. or 2d. per lb. on all scrap saved.
Half-Soles
The best method of cutting half-soles is to cut a whole bend into onefoot at a time (Figure 108). Always commence at the light end,
221
CUTTING BOTTOM STOCK
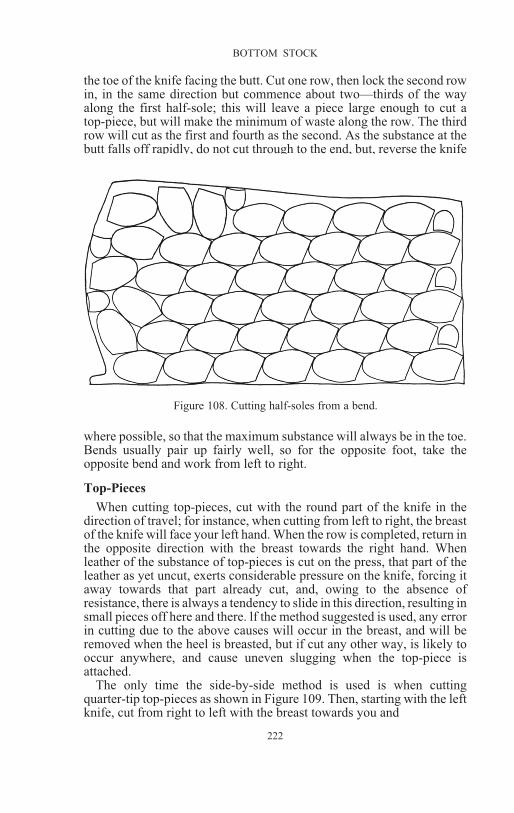
the toe of the knife facing the butt. Cut one row, then lock the second rowin, in the same direction but commence about two—thirds of the wayalong the first half-sole; this will leave a piece large enough to cut atop-piece, but will make the minimum of waste along the row. The thirdrow will cut as the first and fourth as the second. As the substance at thebutt falls off rapidly, do not cut through to the end, but, reverse the knife
where possible, so that the maximum substance will always be in the toe.Bends usually pair up fairly well, so for the opposite foot, take theopposite bend and work from left to right.
Top-Pieces
When cutting top-pieces, cut with the round part of the knife in thedirection of travel; for instance, when cutting from left to right, the breastof the knife will face your left hand. When the row is completed, return inthe opposite direction with the breast towards the right hand. Whenleather of the substance of top-pieces is cut on the press, that part of theleather as yet uncut, exerts considerable pressure on the knife, forcing itaway towards that part already cut, and, owing to the absence ofresistance, there is always a tendency to slide in this direction, resulting insmall pieces off here and there. lf the method suggested is used, any errorin cutting due to the above causes will occur in the breast, and will beremoved when the heel is breasted, but if cut any other way, is likely tooccur anywhere, and cause uneven slugging when the top-piece isattached.
The only time the side-by-side method is used is when cuttingquarter-tip top-pieces as shown in Figure 109. Then, starting with the leftknife, cut from right to left with the breast towards you and
222
BOTTOM STOCK
Figure 108. Cutting half-soles from a bend.

cut one complete row; next start the second row above the first cut of thefirst row, with the same knife reversed, that is the breast away from youand cut another row. Then cut the next two rows with the other footstarting of course from the left. This is the only practical method; if anyother is used there is always a tendency to lose the lock and makeconsiderable waste.
Seat Lifts
These lifts are attached to the seat of the shoe in such a way as tocontinue the line of the welt round the heel (see p. 298). They are requiredto be from material 5 to 6 irons in substance and of good solid texture;they can be run in along with other lifts from a good welting belly, but it ismore usual to cut them from a 4 to 6 iron shoulder. For a stitched orextended seat, it is usual to use a whole lift, but for all close seat work askeleton lift is cut. This reduces the cost of the lift by some 25 per cent.
The cutting of the skeleton lift involves the most intricate of all locks.The method shown in Figure 110 is by far the most economical providingone has a long enough area to cut. The difficulty is, that the second rowdoes not lock in squarely with the first. The knife is moved some 3 in. tothe left. The third row, however, moves back 1 1
2in., and the fourth row
locks in perfectly again; small ordinary lifts can be cut from the portionsleft.
223
CUTTING BOTTOM STOCK
Figure 109. Cutting quarter-tip top pieces.
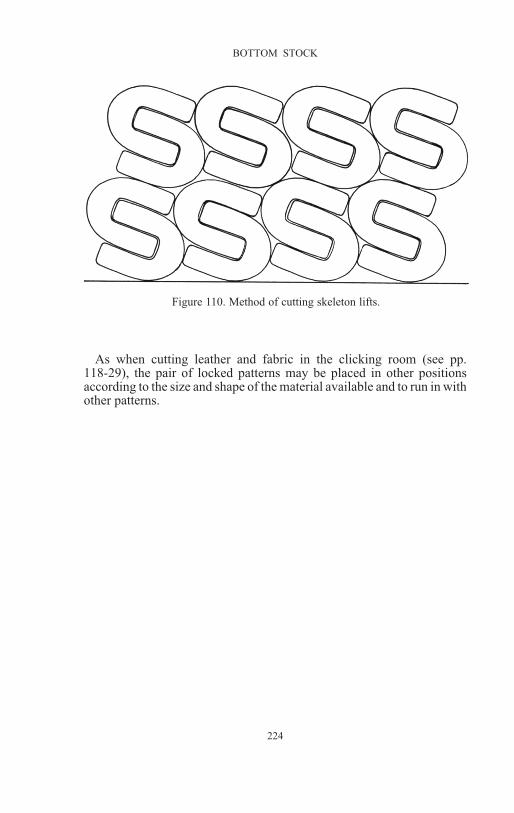
As when cutting leather and fabric in the clicking room (see pp.118-29), the pair of locked patterns may be placed in other positionsaccording to the size and shape of the material available and to run in withother patterns.
224
BOTTOM STOCK
Figure 110. Method of cutting skeleton lifts.

15
PREPARATION OF SOLES AND INSOLES
Sole and Piece-sole Beveling
Before grading, the three-quarter length soles must be skived at theseat. This is done on a guillotine-type machine which cuts a stunt scarf,and as the piece-soles are skived on the same machine a perfect join ispossible.
Evening and Grading
The next operation after bevelling is grading, which is performed onthe ‘Nichols’ Evening and Grading Machine manufactured by theB.U.S.M. Co. This is a vital operation and well repays the care andattention that should always be taken to ensure that the machine is in goodcondition and properly adjusted. By means of spring- loaded rollers, thismachine finds the thinnest part of the article being graded, stamps thesubstance in irons and levels to that substance. It can also be set to split atany desired substance; for instance, men’s insoles are usually graded upto 8 iron and all above are split to that substance. An additional stampwheel is fitted and can be used to stamp the sizes, or a number thatdenotes a particular tannage. The spring loading on the front roller isvariable and should be adjusted to suit the type of material being graded.A belly insole will offer much less resistance than a bend sole, andpressure should be reduced for the insole and increased for the soles; itthis is not done the sole will not be level and not up to the substancestamped and the insole may show a whole split.
It is possible to grade pieces to be level all over and middles, lifts,top-pieces and piece-soles are graded this way, but it is not economical ornecessary to grade soles and insoles like this. Consequently, anadjustment is provided so that we may grade from any desired point. Thispoint is usually about l in. behind the joint. To set the trip which controlsthis, place the insole or sole with the seat facing the direction of travelthrough the machine, with the joint level with the mark on the casingimmediately above the first roller; now adjust the trip, which is on a rodlying between the twin-feed chain, so that it is level with the leading endof the insole. The effect is then as follows: if a sole is correctly cut, it will,if there is any variation in substance, be stout at the toe and light at theseat. As it passes through the machine the rack which registers thesubstance will continue to rise until the trip is raised; the substance is heldat this point, stamped and all surplus levelled off. lf a sole measures 8irons in the seat and 10 irons in the toe it will grade at 9 irons; the fact thatthe waist and seat will be under substance is not really
225

important—a whole iron is saved and this represents a considerableeconomy; this applies also to insoles, though of course the sorter mustdecide if the waist is too light. If, however, the substance falls off towardthe toe, then the rack is allowed to slide back until about 2 in. of the soleremains between the rollers and the substance is set at this point. If thesole is the reverse of the previous one and measures 10 irons in the seatand 8 irons in the toe then it will be graded at 8 irons. Should one wish tograde level all over, the trip is placed as near the first rollers as possible.
The accuracy of bottom stock costing depends entirely upon the workof this machine; we cost, particularly in the case of soles, by the numberof irons, so incorrect setting may result in a 1
2iron reduction on every sole
graded, and consequently, a serious loss will be shown on the stocksheets. Pressure should be carefully adjusted so that all materials arereasonably level with the minimum amount of skive. If the machine iscarefully maintained a large amount of work can be done accurately andspeedily. Great care should be taken of the knife; it should be carefullyhoned at least once a day. A machine is provided which ensures accuracy,but it can be done quite well by hand. The extreme edges should receiveextra grinding to compensate for lack of wear as even the widest soles donot cover the whole knife. Any trace of wire edges due to over-grinding,should be removed with a hand-stone. The brass stops against which theknife rests should be removed when they become slotted, or the knifemay possibly foul the rollers. As the knife wears, a tendency will benoticed for the material to be over substance; an adjustment is providedon the head of the machine which will raise or lower the top rollers theequivalent of half an iron which is normally all that is required tocompensate for wear. When a new knife is fitted this adjustment shouldbe at its highest point, it can then be lowered gradually as wear takesplace. Providing these adjustments are carefully carried out, gradingaccurate to half an iron or even less is possible.
Surface Scouring
From grading, the insoles pass to the surface scourer which removesthe surface of the grain leaving it cleaner and much more flexible; it alsohelps considerably to minimise the risk of the grain cracking during wear.All throughs and middles are scoured, mainly to obtain better adhesionwhere rubber solution or latex is applied for sole laying purposes.
INSOLES
Sorting
The ideal sorter is a man with many years of experience of cutting andpreparation. The necessary knowledge is acquired only by the constanthandling of leather in all stages. Without this experience it is extremelydifficult to distinguish between the variations of fibre found in a weltingbelly.
226
BOTTOM STOCK

Fibres are spoken of as being long or short, of horizontal or verticalweave; these terms tend to mislead and the author prefers to speak ofthem as being tight or loose. lf they are too loose, the channel will beweak and pull away when the welt is sewn in; if too tight, the insole isdifficult to channel and open, and the lips tend to break away duringsewing. The ideal insole is sufficiently loose to channel and open easily,yet sufficiently tight to stand the strains of staple side-lasting and weltsewing. It should be cleanly fleshed but not too deeply; an insole with noflesh is difficult to channel, the knives bite deeply, produce a stout lip thatis difficult to open, and frequently leave a ridge on the grain, a ridgewhich is unsightly in the finished shoe and causes the edge of the insole tocurl up in wear. An excess of flesh produces weak channel lips whicheither stretch badly in sewing resulting in wide waists where the strains ofside lasting have proved too great, or they fail completely, and the shoehas to be remade.
It is usual to sort into six qualities in the case of men’s insoles:handsewn, No. l welted, No. 2 welted, gemmed, riveted, andmachine-sewn. The sorter must use his judgement quickly and decide forwhich purpose the insole is most suited. For handsewn, select thoseslightly on the loose side preferably with the flesh on; if fleshed it isdifficult for the sewer to penetrate with his awl.
The best of the 7 to 7 1
2iron insoles are selected for No. l welted; any
with excess flesh are taken down an iron on the splitter and sorted againwith the 6 iron. Those too hard for welted are placed in the riveted class.
The 6 iron are then sorted, the prime into No. 2 welted, those too hardor too loose into machine-sewn and, again, those that are firm but withtoo much flesh are reduced an iron and sorted again with the 5 to 51
2iron.
These are usually gemmed, and only those too weak for this purpose arerejected and used, sometimes with a leather and sometimes with acardboard backer, for cheap riveted work. They are all counted, andentered on a sheet.
A sorter must observe all these points: he must look for flesh flaws, anyweak spots other than in the seat, and any bad grain blemishes, as thewelted shoe has only a seat sock; he should also refer to his foremanregarding the standard of sorting as any variation has a marked effect onthe completed stock sheet. The best method of testing an insole is to holdit by the seat, flesh uppermost in the right hand, place the thumb of the lefthand above and the fingers below, and draw the left hand along the insole,pressing down with the thumb and up with the fingers, holding the handat such an angle as to cause the insole to flex; the varying resistance willgive the sorter an indication of quality, and, if the fibres are loose, theywill lift and show small or large corrugations according to the degree oflooseness. It is by observing the length of these corrugations that thesorter decides upon the best use for which the insole is suited.
227
PREPARATION OF SOLES AND INSOLES
The same procedure is observed with ladies’ work except that the bestare 6 to 6 1
2iron, the second 5 1
2, and the 5 and best of the 4 1
2are gemmed,
the rest being machine sewn.It is of great assistance when sorting to use a ‘cub’* with six or eight
partitions, as is used on the grading machine. By placing the sortedinsoles in the correct partition much time is saved as they can be placedthere quickly, they stay there and do not fall over as so often happensotherwise. When the particular size is completed they can be easilyremoved, counted and placed in the appropriate cubs for fitting up.
To complete the stock, the sorter must examine and count all throughsand middles, count all piece—soles and enter the weight of lifts etc. Hethen forwards the completed sheet to the foreman for examination, whoin turn returns it to the pressman for him to check, after which it goes tothe office for wages and costing.
Fitting-up
The fitter—up takes the insoles from the cubs in which they have beenplaced by the sorter and counts them out in the sizes required by the workticket. In most cases the quality required is plainly marked, according tothe grade of the shoe, but the good fitter uses his judgement, and, if theshoe is a heavy grain he will use a heavy insole and vice-versa; he will beon the look-out for flaws missed by the sorter and group his work as far aspossible, that is to say, if he has a number of tickets of the same last,fitting, and quality, he will get them out together, so helping the rounderconsiderably as he will not have to change his pattern so often; he willmark all sizes plainly, also ticket and plan numbers.
It is of great advantage to production, if work can be issued inhalf-gross lots; much time is saved and the insoles can be finally dividedinto twelve or twenty-four pairs after preparation has been completed, or,as is preferable, after lip cutting and scouring, operations that areperformed later.
Rounding
Here again, good work can only be done if the machine, the BUSMC‘Planet’ Rounder, is maintained in good condition. In this machine thecaster insole is clamped on a wooden template made to the exact shaperequired and a knife then follows round this template cutting off surplusmaterial.
Great care should be taken of the knife, it should always be held in theholder supplied, and ground with the stone held flat. The flat side of theknife must not be touched apart from removing a wire edge, the result oftoo much grinding on the hollow-ground side. Replacement is usuallynecessary after 10,000 pairs. The knife holder
* ‘Cub’ is a trade name for any cupboard, shelf, or other receptacle in which cut parts, etc.
are stored.
228
BOTTOM STOCK

on this machine pivots on a small pin, and is subject to considerablepressure; this should be lubricated twice a day and as soon as anyappreciable play develop the pin and the two bushes should be renewed.The guards or shims which hold the knife block the required distancefrom the pattern also wear and should be replaced periodically. Theseguards are from 1
64in. To 1
8in. thick and can be used to leave any desired
allowance over and above the 1
64in. which is usual.
Channelling
In this operation which prepares the insole to receive the welt seam, asin most machine operations in which knives are used, the maintenanceand setting-up are of major importance. Only if the knives are correctlyground and set can accurate work be done. The original angle of thecutting edge of the knives must be maintained; this is square to thedirection of the cut. The points of the knives always wear more rapidlythan any other parts and the area unworn must be ground away tocompensate for this wear and so retain the original angle of cut; if this isnot done an uneven lip will result at the toe and joints where the insole isturned quickly. This grinding is best done with a fine file, holding theknife while doing so in the special tool supplied for this purpose. Theedge should be finally set with an oilstone.
Setting-up the Knives—The angle of the outside knife is fixed but it canbe adjusted vertically. It is usual to set this to cut a lip one-third of thesubstance of the insole. Having done this, the inside knife should be setwith the point 3
16in. from that of the outer for men’s work, 1
32in. less for
ladies’, and as near level as possible. One may safely set it a little higher,but under no circumstances should it be lower or trouble will beexperienced with insoles ridging on the inside of the shoe and curling upat the edge during wear. This inside knife can be adjusted to a widevariety of angles, but the best results are obtained with it cutting as flat aspossible; great care should be taken when grinding this knife, and bothfaces should receive equal attention; many operatives having a tendencyto neglect the vertical one. There are many other adjustments, but theseare covered in the handbook supplied with the machine and need not bementioned here.
The width of the outer lip is varied to make allowances for stiffenersand toe-puffs and the particular style of shoe being made. For a mediumweight man’s shoe the following measurements are satisfactory: waist 9
32
in., joint 5
32in. and toe 7
32in.
The position of the change of distance is determined by the style of theshoe which is stated on the work ticket. This may be channel waist,square outside, square waist, blind welt, etc. An example is shown inFigure 111. The change from one distance to another should be donegradually; approximately l in. of travel should take
229
PREPARATION OF SOLES AND INSOLES

place when passing from one to another, and if done correctly the finishedshoe will show an even feather line all round.
There are many variations of the above measurements brought aboutby such things as upper and lining substance and the type of welt to beused, but in all cases they should be decided upon in close co-operationwith the head of the making department.
The B.U.S.M.Co. have recently developed a new channelling machine,the No. 2 ‘Universal’, which changes distance by an arrangement ofcams; this reduces the possibility of human error to a minimum. A deviceis also fitted which nicks both the inner and outer channel lips. When thismachine is used, the double lip turner is fitted with a convex table, theresult being almost the equivalent of a moulded insole. The feather edge,being turned down slightly, fits closely to the last and lessens the risk ofthe edge being swept up by the bed laster.
Handsewn—For this work, a satisfactory method is to take out the innerknife and cut a single outer lip; this will open quite well on the double lipturner if the insole is first wetted on the flesh side and the plough andinner tool of the double lip turner raised the equivalent of the substance ofthe outer lip.After opening, the insoles should be carefully stacked to allow them todry before they are placed in their respective cubs.
Gemming
There are two main methods of gemming, the ‘Gimson’ method, and theBUSMC ‘Economy’ method.
Gimson Method—Of the many methods which can be used for preparingfelt insoles for welted work, gemming by the ‘Gimson’ method gives thebest results. The same procedure is followed with
230
BOTTOM STOCK
Figure 111. Square waist insole. The outside lip is slashed from A to A′ and B to B′.Score marks are shown at C, and the triangular shaded portions indicate where awedge-shaped section is removed from the outside lip.

leather insoles, except of course that the machines have to be adjusted totake the lighter materials.
This method cuts a flat square inside lip which, when gemmed, hasproved much stronger than a double one. Felt insoles are usually cut onthe clicking press with knives made to the shape of the last; they can becut by hand using a pattern prepared as for clicking, but it is difficult tomaintain a square edge owing to the flexing of the knife. They can also berounded on the older type ‘Planet’ Sole Rounding Machine providing thematerial is cut into ranges of the correct length; if the range is placed onthe platform behind the machine, and turned over after rounding eachone, it will be found to be very economical.
For men’s work, felt 1
4in. thick should be used. The channel lip should
be one-third of the total substance and should show the followingmeasurements: waist 10
32in. joint 6
32in. and toe 8
32in; this is 1
32in. more than
for leather and is necessary to compensate for stretch when the welt issewn in.
It is impossible to stamp the size, so this is marked in crayon; the lipsare cut on the lip cutting and scoring machine by special knives whichsever the inside channel only. Four cuts are then made in the lip one ateach joint and two in the toe to assist opening; the lip is then opened and acoating of latex applied to the inside. When this has dried, a strip ofadhesive tape 7
16in. wide is pressed into the angle formed by the lip and
insole, then, the whole is covered to the top of the lip in the usual way by agemming canvas care being taken when bedding in to keep the lip asupright as possible. Any surplus is then trimmed off on another machinewhich beds in the canvas firmly to the insole at the same time.
All that remains to be done is to reinforce the seat with a light but firmboard of 1
32in. substance cut to shape on the press; this not only stiffens
the seat but provides a base for the seat-lasting tacks to obtain a firm hold;it is attached by ordinary rubber solution.
Economy Method—The ‘Economy’ method consists of cutting a doublechannel similar to that for ordinary welted, except that it is done on aspecial machine which cuts a series of nicks on the edge of the inner lip;the between substance is less than for ordinary welted varying from 1
8in.
for ladies’ to 5
32in. for men’s. Two small wedges are then cut from the
inside channel at the toe, the lips are cut, the insole scored and sizestamped and then passed through a machine which deposits a layer oflatex all over. After being allowed to dry the lips are opened and it is thencovered by the ‘gem’ canvas which is bedded in and trimmed
This method is very rapid and efficient, but needs an insole of at least 5to 5 1
2irons in order to leave a reasonable substance on the feather edge. It
is the ability of the ‘Gimson’ to channel insoles of 4 1
2irons that gives it an
advantage over the ‘Economy’ method; its disadvantage is that it is muchslower.
231
PREPARATION OF SOLES AND INSOLES

Lip Cutting and Scoring
In this operation the chief points to observe are: (l) the size should beplainly stamped; (2) the score marks should be prominent; this isimportant because it serves as a guide for the welt sewer to commenceand finish this seam, accuracy here is important as any variation results inbad work on subsequent operations as they too rely on the same scale ofmeasurement; (3) the lips should be cut deep enough to sever cleanly,but not more, or the insole will be weakened.
An improvement in this operation is the provision of special kniveswhich cut a wedge-shaped portion from the outer lip, behind the scoremarks; this avoids the tendency for this part of the channel to be sweptback when lasting, so causing a variation in the line of the seat (Figure111).
Double Lip Turning
The purpose of this operation is to raise both lips to an upright position.It is to these lips that the upper and the welt are sewn.
For this operation to be successful a layer of good quality latex must beevenly applied to the surface of both lips. Care must be taken to avoidgetting any latex on the insole beyond the lips, or great difficulty will beexperienced in opening them at all. The tools of the double lip turner havea wide range of movement and care in setting will be well repaid as themachine runs for long periods with only slight adjustment to compensatefor wear.
Opinions vary, but in the opinion of the writer, the best results areobtained with both lips standing as upright as possible having beenpressed together tightly at the top and showing no pressure at the basethus leaving a small cavity between the base of the lips.
The machine is fitted with three pedals of which the centre onedepresses the table, and opens the tools to allow the insole to be inserted.The one on the right operates a reduction gear which slows the drive andshould be used on all pointed and square toes. The third operates a knifewhich slashes the outer lip; this should be done for about 1 1
2in. each side
of both joints; these cuts open when the insole is attached to the last, andthis lessens the tendency for the lips to part.
All that remains now to be done to the insoles is a final check to see thatall is correct; then they are tied together, not too tightly or the channelswill be damaged, and they go to numbered cubs (see p. 248) to await theuppers from the closing room.
Preparation of Insoles for the Machine-sewn Methods
Insoles for the machine-sewn methods of attachment (see p. 325) canbe, and are, cut from many leather substitutes but the only point in theirfavour is cheapness. The ideal insole is leather, light in substance andflexible. For ladies’ work 4 1
2irons is most suitable, and for men’s from 5
to 6 irons.
232
BOTTOM STOCK

These insoles are rounded on the ‘Planet’ Rounder, and for ladies’work are then flexed by passing them through a machine which makes aseries of cuts across the insole from the joint forward, in which areaflexibility is most desired.
The edges of the insoles are then bevelled on both sides of the waist;this bevel should be 3
16in. wide and the edge reduced to 2 irons.
When the shoe is designed to carry a heel 2 in. or more, it becomesnecessary to reinforce the waist of the insole. This is done with lightboard, cut or rounded to shape and attached to the insole before mouldingwith a suitable adhesive.
The insoles are then moulded on the Twin Sole Moulder care beingtaken to see that the machine is adjusted to mould correctly so that aperfect lit is obtained.
For men’s work the same procedure is followed except that forLittleway 5 to 5 1
2irons is stout enough, for riveted, sewn and stitched 6 to
6 1
2irons, and for screwed 7 to 8 irons.
All have the size stamped clearly in the centre of the seat and areshaped on moulds giving a rather exaggerated form to the insole whichensures the edge fitting close to the last.
SOLES
Sorting
To describe sole sorting on paper is difficult. Whereas, with an insole,one flexes and grades to some extent by feel and vision, with sole sortingit is almost entirely visual; one only flexes the sole in extreme casesparticularly when handling men’s soles; with ladies’, the substance isless, and flexing being easier, is used more often.
To commence, one lays the graded soles in a row on the bench with theflesh side towards the sorter. This enables him, as he picks up each sole inturn, to see any flesh flaws; these are mainly flay marks caused by thefleshing knife; then, turning the sole over he looks for any warble holes,brands or bad scratches. These are obvious and require no great skill todetect but the sorting into three or four qualities is a different problem.
One infallible guide is colour. The prime leather in any bend is alwayslighter in colour, gradually shading darker towards the belly side andshoulder end. This combined with the appearance of growth marks as theshoulder end is approached, gives the sorter his clue as to which part ofthe bend the sole was cut from.
As stated in Chapter 14, quality and substance follow much the sameline, but it does not follow that a 9 iron sole from one bend will be as goodas another of the same substance cut from another bend from the samebale. Although the two bends may weigh the same, one may be muchgreater in area, and consequently will be lighter in substance, and a solecut from exactly the same part of the bend may be lighter in substance byas much as 2 irons
233
PREPARATION OF SOLES AND INSOLES
when compared with a sole cut from a smaller bend. This is where use ismade of colour variation to determine quality, and substance isdisregarded. Soles of poor colour are reserved for those shoes which areto have a black or dark stain bottom finish, which will cover manyblemishes.
Only when sorting the lower irons does a sole sorter flex, and this timeit is the grain he observes. It is not possible to flex a sole in the same wayas an insole as the resistance is too great; instead, he holds the sole, grainup, firmly by the toe and seat and bends both ends in an upward direction.The quality is judged by the amount the grain lifts, the more lift theweaker the sole.
Those too weak are classed as throughs and used as through middlesfor welted, sewn and stitched, or riveted work. Any rejects are returned tothe cutter who should cut them up immediately and return the cut stuff tothe sorter.
Having completed the sole sorting the offal remains; this comprisestop-pieces, lifts, and piece-soles. The latter are counted and entered on astock sheet. Then the top-pieces are sorted in two or more qualities. It ispossible to grade top-pieces on the ‘Nichols’ Evener and Grader withoutstamping the substance; this is desirable as the stamp disfigures thefinished shoe. The operator sorts the various substances by watching adial on the machine, placing each substance in a separate receptacle. Besttop-pieces are sorted from those over 9 irons and second quality from 8 to9 irons. Below this substance, everything is a lift, and is entered in poundsweight on the sheet along with those that are badly branded, or arerejected for other reasons. The sorting is entirely visual and colour is thebest guide. All top-pieces are counted and entered on the stock sheet inqualities.
Having completed all sorting, total weight should be checked againstweight issued and if correct the sheet passed on to the foreman.
Fitting up and Preparation of the Welted Sole
The work ticket usually shows the range of sizes and the number ofpairs of each size, the shape and fitting of the last, the substance andquality of the sole required, the width of welt and total edge substance.
The edge substance on men’s work can be anything from 11 irons for adress shoe to 30 for a veldtschoen where the upper is included. There aremany`ways of making up the edge substance; welts can be of 4, 5 or 6irons, middles and throughs from 3 to 7 and soles from 6 to 12. Middlesare not often used when the edge is 15 irons or less, but chiefly from 15 to19 and throughs on anything from 18 to 24.
From the fitter the next operation is to reduce the substance of the solein the waist. This is performed by a machine which takes one pair at atime and skives them by means of a matrix roller revolving over asplitting knife, the usual reduction being approximately one-
234
BOTTOM STOCK

third of the total substance. For a square outside waist edge, the insidewaist only is reduced; for ‘channel’ waists (rounded edges), both sidesare reduced. The correct length of skive is from immediately behind thejoint to a point where it is estimated the breast of the heel will fit. Thesoles are then given a coating of heavy rubber solution, placed on racks,left for 24 hr. to dry thoroughly and then stacked away in numbered cubs.
There are two more minor items to be prepared—throughs andmiddles. Both are cut from the lighter parts of bellies and shoulders, aregraded, surface-scoured to enable the solution to obtain a firm hold, and,in the case of middles, skived with a wide scarf so that the change fromwaist to forepart substance is gradual. Both are covered with latex orsolution, and attached to the soles after wetting.
Preparation for the Machine-sewn Method
Before any operation can be performed, the soles must be correctlywetted. It is impossible to channel accurately unless they hold a uniformdegree of moisture throughout. If the following rules are observed, goodchannelling will result and no trouble experienced with water stain.
Soles are first placed in the toast-rack type of holder; if made of metal,this must be painted as bare metal stains (unless it is brass, one of thealuminium alloys or stainless steel). These racks of soles are thenimmersed in clear water, and left in 1 min. for every iron of solesubstance*. After this period, they are withdrawn, and placed on drainingboards, still in their racks for all surplus water to drain away; this onlytakes a few minutes, and more soles can be placed in racks and wettedduring the draining. They are then removed, still in the racks, and placedin a convenient spot and left until all surface moisture has disappeared;this is most important as any residual surface moisture will cause stain.This takes about l hr; the soles are then taken from the racks, stackedclosely together, and placed in a mulling cabinet, or covered with dampsacks, a crude, but entirely satisfactory method, and left for l2 hr. usuallyovernight; this period is necessary to allow the fibres to absorb themoisture, which, up to that time, has only penetrated a small proportion ofthe entire substance. The soles, after this period, will have a uniformmoisture content, and will, as a result, channel and mould easily, and willdry free from stain.
The soles are then rounded on the ‘Planet’ Sole Rounder and should bechannelled immediately; this is done on the BUSMC ‘Apex’ Machine.There are two main types of channel, usually termed the English andAmerican. Both are shown in Figure 112.
The former is cut into the grain of the sole at an angle, determined bythe substance of the sole. It is an advantage to channel as deeply
*This l min. per iron immersion time is much shorter than that normally given, but theauthor has found it quite satisfactory in practice.
235
PREPARATION OF SOLES AND INSOLES

as possible as the stitches will then have a greater covering and as a resultwill not be exposed to wear so soon, but the channel must not be so deepas would materially weaken the sole beneath the stitches; therefore thelighter the sole, the more shallow must be the channel.
There are many types of knife supplied, each giving a different cut. It isalso possible to tip the knife in the holder and obtain further variation.The width of cut is 1
4in. and the cut should commence 1
32in. from the edge
for close work, and more for wheeled welt, according to the width ofwheel desired. This distance is varied by moving the head carrying theknife away from the guide wheel, against which the edge of the sole isheld during the operation. This wheel can also be moved inwards bydepressing a pedal; this is done in both waists, when it is the usualpractice to sew in slightly. The pedal should be depressed slowly toobtain a gradual change, the amount of change being varied by simpleadjustment.
ln addition to the channel, a groove is cut near the base of the lip toallow the sewing to bed in; this should not be so deep as to weaken thesole, but sufficiently deep to allow the lip to be closed after sewingwithout showing the imprint of the thread. The knife should be set to cutthe groove 1
32in. away from the channel base; this will allow the operator
to sew flat, and avoid the ballooning effect on the sole which happenswhen the sewer tips the shoe to enable him to sew in a groove cut too farin.
236
BOTTOM STOCK
Figure 112. Channeling by Apex machine, for the machine-sewn method;a American split edge; b English with groove; c American, edge reduced
(open and closed); d English, flesh side reduced (open and closed).

The other channel, the American, or split edge, is also shown in Figure112. This cuts a horizontal lip from the edge of the sole. It is used for verylight shoes, as the bottom lip can be bevelled, leaving an edge, afterclosing, the substance only of the upper lip. This channel is often used inconjunction with the English one. When this is done the forepart ischannelled English and the waist American; the result shows a pleasingvariation and adds considerably to the shoe’s appearance.
After channelling, the soles are slightly bevelled on the flesh side,removing about l iron from the forepart; this leaves a clean edge forfinishing. In the case of the English channel, the waist is reduced in thesame operation by depressing a pedal which alters the angle of the knife.The amount of travel is determined by an adjustable stop, and the edgecan be reduced to any desired substance, within reasonable limits.
If the sole fitted is of 7 irons, the prepared edge can be 6 iron forepartand 4 iron waist, etc. This should be plainly marked on the work ticket.
The point at which the bevelling of the waist should commencecoincides with the sewing-in variation of the channel. Again thedepression of the pedal must be gradual or the effect will be completelylost.
After bevelling the soles should be moulded at once. Sufficientpressure should be applied to mould the sole permanently without unduebruising of the fibres. Care should be taken to see that the machine is setcorrectly and that the mould coincides with that of the insole. The metalfingers holding the sole in position should fit closely otherwise the mouldwill be out of alignment.
If possible the soles should be solutioned and passed direct to themaking room where they are placed in a mulling cabinet and used as soonas possible, preferably the same day; this saves a second wetting and thepossibility of discoloured soles. lf this is not possible they should beplaced in racks and left to dry, or mould will develop.
Preparation of Cemented Soles
Soles for this work, cut from flexible bend, are prepared dry. All fleshis removed, and after rounding, the flesh side is roughed up to a width ofapproximately the same as that of the lasted-in portion of the upper(see p. 350). This is done by a machine fitted with a wire brush. Cementis applied to the roughed part by machine and the soles are left to dry,before being placed in cubs. Most of the cement used today is of thecellulose variety (see p. 348).
Preparation of Sewn and Stitched, Riveted and Stitched, andScrewed and Stitched Soles
Soles, throughs and middles are all wetted then rounded; the throughsare moulded and the middles, if any, attached by solution or wire-griptacker. The soles are grooved on the ‘Apex’ machine in
237
PREPARATION OF SOLES AND INSOLES

much the same way as a machine-sewn sole is channeled. The centre ofthe groove should measure 3
16in. to 1
4in from the edge of the sole, varying
according to the width of the welt. After grooving they are moulded, leftto dry and placed in cubs with their fellow throughs and middles.
238
BOTTOM STOCK

16
LIFTS, WELTS AND HEELS
SEAT LIFTS
THERE ARE TWO KINDS of seat lifts—skeleton and whole. The former areused for close seat work, are cut from the firm parts of bellies or from firmlight shoulders. They are levelled to 5 or 6 irons and the ends skived tomatch up with the angle of skive on the welt butting machine. Solid liftswhich are used for all stitched and extended seat work should be cut to theshape shown in Figure 113. These are levelled and the whole of the breastskived. This is possible on the BUSMC No. 2 Skiving Machine. Theadvantage of this shape is that, when correctly fitted, the recessed part fitssnugly over the bevel of the shank, leaving a level seat, whereas, if anordinary lift is used, as it so often is, a bump is created where the liftpasses over the shank; not only is this unsightly, but it throws the heelout of pitch.
WELTSThe manufacture of welts is today largely in the hands of a number offirms who specialise in this production.
Shoulders are bought rough tanned; they are then trimmed, the facesand coarse parts that are unsuitable being removed. They are then placedin water vats to be broken down and when soft they are split to thesubstance required and drummed. During drumming a larger proportionof fat than is found in most leather is introduced; the reason for this is thatthe welt not only has to resist water during wear, but must stand up to oneor more additional rows of stitching
239
Figure 113. Shape of lifts for stitched and extendedseat work. The shaded area is skived.

when the shoe is repaired. The extra fat helps to preserve the leather andso prolongs the life of the shoe. After drumming, the shoulder is passedthrough a setting-out machine, which rolls and stretches the leather, andremoves a lot of the growth marks that are so prominent in a shoulder.After setting they are hung to dry for two or three days and then rolled tobreak them down to a mellow condition:
They are then coloured either by cellulose or water-bound pigment. Ifthe former is used the grain is lightly buffed before the colour is applied.With the latter the grain is left on, and the pigment, which is usuallymixed with a fixing or sealing agent to prevent the colour from ‘running’when the welt is wetted, applied by brush.
The shoulders are ranged into the lengths required, and the welts cut tothe desired width on a multi-knife machine which cuts six pairs at once.They are then bevelled, grooved and split to substance all in the sameoperation. The extent of the bevel, and the position of the groove is shownin Figure 114. The bevel is cut on the grain side on the edge which lies
next to the upper when sewn in. The groove is on the flesh side, and itspurpose is to receive the thread of the seam so that it beds down and doesnot project above the level of the welt. This in conjunction with the bevel,allows the welt to be beaten out at right—angles to the upper after thesurplus leather has been trimmed from the seam.
Welts are made in all colours and in substance from 2 1
2to 7 iron or even
more in some special types. There are many variations of the ordinarywelt, the most popular being the storm welt. This has a raised bead on thegrain side, so placed that when sewn in it rests tightly in the feather lineand helps to prevent the ingress of water; hence its name. This bead isobtained by splitting the edge of the welt, then doubling the grainupwards to form the bead. The surplus created by this operation istrimmed off, the bead being held in position by rubber solution. There areseveral variations of the storm; the two most popular are the top-notch, inwhich the bead is notched at intervals, and the double-deck, in which arow of stitching is run through the bead the effect on the finished shoebeing that of a double welt.
All these welts can be bought cut in lengths or in coils of 50 yd. Thesecoils are made by skiving the ends of the ranges, one on the grain, theother on the flesh, joining them together and cutting a continuous welt.
240
BOTTOM STOCK
Figure 114. Bevel and groove of a welt:AB is perpendicular; AC=
1
8 in.; CD =1
16in. For lighter welts CD is proportion-
ately less.

HEELS
In heel building there are three main factors that must be considered,height, pitch, and coupling.
Height—The height of heel is determined by the style of last; in the caseof men’s work the casual type may require a heel giving an overall heightof only 7
8in.; at the other extreme some lasts need a heel of 1 1
4in. to give a
correct stance. Also, a shoe with a middle needs a higher heel tocompensate. The correct height of a heel is that which gives from 1
4in. to
5
16in. toe spring. If the amount of toe spring is reduced, the angle of pitch
is increased and vice versa, therefore the correct amount of toe springmust be decided first and from that the angle of pitch is obtained and theheel made accordingly.
Pitch—Pitch may be defined as the angle of the seat base in relation to thebase line after the correct toe spring has been ascertained. On some laststhis angle is almost non~existent and the heel requires the minimum of
pitch and on others the reverse is true. With the former the small amountof pitch is easily obtained on the heel compressor but in acute cases it isnecessary to use a lift skived across the breast with as wide a scarf aspossible to form a wedge in order to obtain sufficient variation betweenthe height of the breast and back.
Coupling—The seat of a last is slightly convex; it follows therefore, thatto obtain a close fit a heel base must be concave. This is known ascoupling and is obtained in various ways: see Figure 115.
(l) by taking an 8 or 9 iron lift and ‘gouging’ out an area in the centre ofthe lift, (Figure 1150) thereby reducing the centre of the breast toabout 4 irons: this method is efficient if sufficient lifts of goodsubstance are available but is extremely wasteful as the portiongouged away is of no use;
241
LIFTS, WELTS AND HEELS
Figure 115. Four types of seat lift: a gouged; b rand; c skived skeleton;d half lifts. The shaded portions are skived.

(2) by tacking or stitching a skived rand round the edge of the lift(Figure 115b);
(3) by using a skeleton lift, skived on its inner edge (Figure 115c);(4) by using a skived half-lift (Figure 115d).The last is by far the cheapest method and there do not appear to be any
disadvantages in its use.The half-lift is cut from pieces of leather that would otherwise be
wasted and, like the rand can be attached to a lift of any substance, andcan be guaranteed to give the same amount of coupling if they areaccurately prepared.
Preparation of Materials
All lifts should be graded; only by so doing can a level, solid heel, bemade. The size should be stamped at the time of grading and the liftsstored in cubs handy to the heel builders. Lifts are numbered according tosize, the smallest being size 0, the next size l, up to size 30, this being acomplete range. Half-lifts are levelled at 5 irons and skived with a scarf ofsuch width, that, when placed on a lift of the same size, the join matchesup with no increase in edge substance (see Figure 115d). They areattached to the lift by the No. 4 Rand Tacker (BUSMC) with the randingmechanism removed.
Building Men’s Heels
The majority of heels for men’s work are built and compressed by whatis known as a two-gauge method, that is, only two sizes of lift are used.This builds an almost square heel. The average height for a man’s heelwhen finished is 1 1
8in., the necessary height being obtained in this way.
Suppose we require a substance of 54 irons (48 irons = l in.). Assume thatthe welt is of 5 irons and seat lift to match, the sole and piece-sole 9 ironsand the top-piece 10 irons; we require another 30 irons, 30
48in. or a 5
8in.
heel. (5 + 9 + 10 + 30 = 54.)To help us in building the heel, we shall require a tool known as a
gauge. This is a piece of light metal about 4 to 5 in. long and l 1
2in. wide,
fitted with a wooden handle. The metal is slotted; for a 5
8in. heel the slot
measures 3
4in. at the open end and 5
8in. at the closed.
The heel is built up, using a base lift with half-lifts, rand, or skeleton liftattached, and one or more lifts to make up approximately 15 irons; then,as many lifts of one size smaller are added to make up another 15, making30 irons in all. Having assembled the lifts the height is tested by pressingthem into the slot in the gauge; if the height is correct it should be justpossible to force them through to the closed end; if too loose a fit, astouter lift is substituted, if too tight a lighter one. It is always better to erron the tight side when building, as the heel compressor can take care of alittle excess, but if the heel is built too low, it will be loose, finish badly,and will open up in wear.
As they are built, the heels are placed in trays and passed to the nextoperation, that of fastening the lifts together. One method is to
242
BOTTOM STOCK

place the lifts in a machine which holds them in a mould and drives threeor more rivets of correct length through the centre and clenches themfirmly together. The disadvantage of this method is that the rivetsfrequently turn when being driven through the lifts. If they do, then thereis a chance that they may foul the heel pins when the heel is attached,causing broken drivers and a serious hold-up. Sometimes the pins areturned so that they are near the edge of the heel and in this position areliable to foul the knives in the heel trimmer. The preferable method is tohold the lifts together by hand and insert seven tacks on the wire-griptacker (see p. 334). These should be equally spaced and should not benearer the breast than 1
2in.; a little more is safer and there will be no
danger of fouling the knife when the heel is breasted. When the heel iscompressed the wire tacks clench on both sides, holding the lifts firmlytogether, and no trouble is ever experienced with broken drivers when theheel is attached, as the wire does not deflect the heel pins.
Compressing—After pinning, the heels are compressed. The com-pressing machine brings enormous pressure to bear on the heel fromall directions, moulding it into shape and stamping the size andshape. The heel is placed in a mould fitted in the machine, a heel builtwith size 18 base and 17 top-lifts will be compressed into a 16 mould(Note: there is 1
16in. difference in width between one ‘number’ and
the next). As the machine is put in motion, the sides of the mould
243
LIFTS, WELTS AND HEELS
Figure 116. Increasing heel height H and angle of pitch A by reducing toespring T.

close in, rising at the same time and pressing the heel against the followerwhich is fixed above and is stationary.
This follower is important, because its shape imparts the degree ofpitch and coupling required and several variations of the same size offollower can be used to obtain different results. Figure 116 shows how,by reducing the toe spring the heel height and the angle of pitch areincreased. To obtain the increased pitch the follower would need to bethicker at the breast, thereby compressing the heel lower at this point; tokeep this a lift skived along the breast is built into the heel as there is alimit to the amount that can be obtained by compressing alone.
The amount of pressure brought to bear on the heel is regulated byadding or taking away compression plates. These plates which vary insubstance from 1
64in. to 1
2in. are placed under the smooth top-plate and
reduce or increase the distance between the top-plate and followerthereby raising or lowering the compression. The height of the heel canbe varied by the use of these plates alone but it is not good practice asexcessive pressure can stall or even break the machine and too littleproduces a poor heel.
Top-pieces are compressed in the same way, using a flat follower witha milled surface on which the size is cut, leaving a raised print on the fleshside. Heels for outside attaching are sent to the heeler with top-piecesunattached and are breasted after, but heels for inside attaching have thetop-pieces attached by various kinds of slugging wires varying from fineround brass to steel wire having cross-sections that may be square,oblong, wedge, or round. These are driven in near the edge of thetop-piece in a variety of patterns. Cutlan nails of different sizes are alsoused for heavy work. Care should be taken to see that they penetrate wellinto the heel or there will be a tendency for the top-pieces to lift; theyshould be near the edge to secure maximum wear, but not too near it or itwill break away (see p. 389).
lt is an advantage to compress the heels again after slugging as thischecks any tendency for the top-pieces to lift and makes a very solid heel.After this the front of the heel is trimmed on the breasting machine (see p.392), and then scoured; that completes its preparation.
If a sheet rubber top-piece is used, this is first stuck on and thenattached by small cutlan nails on the loose nailing machine (see p. 340).Moulded rubber top-pieces are attached on a similar machine by drivingone large-headed nail at a time through the holes in the top-pieces.
Building Ladies’ Heels
In building heels for ladies’ work, much the same principle is followed.For a low-heeled walking shoe, the only difference is size, but, as theheight is increased, more curvature is introduced. To build a typical 1 1
4in.
heel we use 6 gauges, or sizes, each of 9 irons, and a top-piece also ofapproximately 9 irons; this totals up to 54
244
BOTTOM STOCK

irons in lifts, but this is reduced to 48 when compressed. 9 iron lifts, orany combination of lifts adding up to 9 irons may be used for each gauge;a little variation either way is permissible but must not be overdone or thecontour of the heel will be spoilt.
After building, the heels are pinned with five l in. pins and then tightlycompressed. The pins must be carefully spaced in such a way that theywill not foul the other pins when the heel is attached, but at the same timemust not be too near the centre or the lifts will be loose at the edges andfinish badly. Many variations are possible on the machine used for thispurpose, and the best should be decided on in co-operation with thoseresponsible for heel attaching.
After compressing, the top-piece is attached, usually by fine pin wire,and the heel compressed again after removing the necessary compressionplate to compensate for the added top-piece. This time it is compressedone size lower than before; this makes a very tight heel and removes allsigns of steps caused by the different sizes of lifts. It is not oftennecessary to use a wedge lift in a l1
4in. heel but if it is required it should be
inserted in the second gauge from the base. As the heel height isincreased, another wedge lift becomes necessary; these lifts are skivedwith a scarf of at least half the length of the heel and reduced to whateversubstance is necessary to obtain the pitch required but it should not bebelow 3 irons.
After compressing, the heels are breasted; care should be taken to seethat the cut is straight and at right-angles to the top-pieces. Trouble in thisoperation is usually the result of the knife being ground with a faultybevel; a special grinding machine is made, and should be used, in whichthe knife is ground correctly. If possible the breast should be scouredbefore the heel is attached; not only is it easier and quicker to do so, but amuch cleaner line at the heel base is obtained.
Fitting-up
To fit heels accurately to a wide variety of shapes and styles, it isnecessary to make use of a chart on which all particulars are entered. Inaddition to height, pitch and coupling one must contend with variation ofseat width in different lasts, the type of seat, which may be close,wheeled, extended, or stitched, and the fitting of such things as outsidecounters, all of which call for a variation in heel size. All heels should betested when samples are produced and particulars entered ready for bulkwork. A shape we will call X, size 7 men’s, requires a close seat; this willneed a heel size 16, but the same shoe with wheeled seat will require aheel size 19, and for an extended seat size 20, etc. One man, fullyconversant with his job, does not need a chart, but the human body is notinfallible and should this man fall ill, the chart will prove invaluable.
It follows that a large number of cubs are required for heel storage, andfull allowance for this should be made when planning the layout of adepartment.
245
LIFTS, WELTS AND HEELS

17
THE MANAGEMENT OF THE BOTTOM
STOCK DEPARTMENT
DEPARTMENTAL LAY-OUT
IN PLANNING THE LAY-OUT of a department one must keep in mind thefollowing essentials:
(1) There must be sufficient room for ample movement of operativesand materials.
(2) Work must flow through the department and under nocircumstances should it have to move back for another operation.
(3) At each operation, or group of operations, there should be sufficientbench room to hold a reservoir of work (the larger the reserve thesmoother the flow). This is necessary to counteract the effect of the manyhold-ups that take place from time to time such as illness, accident,machine trouble, difficult work etc. If a half-day’s work can be kept inreserve, one has a breathing space in which to overcome the difficulty,and so keep production moving. This is most essential when dealing withpiece-work operations.
The lay-out of any department depends on the shape of the areaavailable, but the principle now suggested can be applied to any shape.We will take for our example a department producing 7,000 to 8,000pairs of men’s and ladies’ mixed work.
For this we will need a floor space of 3,600 sq. ft. This should besufficient for all purposes including cub space for several days’completed work. An actual department measuring 120 ft. ´ 30 ft. isplanned as follows:
A 4-ft. passage runs throughout the length of the department. This isone of the feed-ways from the warehouse to the presses which are so setout that leather is fed to them, and cut stuff taken away, withoutdisturbing the operative (a good point when one considers the nature ofthe job). There is ample room near the presses for two racks and severalbaskets to receive cut stuff.
The presses are set out in pairs, back to back, the operators facing oneanother, and the feed-ways immediately behind. This saves space andmakes for efficient lighting which, if fluorescent, has one tube betweeneach pair of presses at buffer level, (this provides efficient back light forboth machines with no shadow from the buffer and, being in a reflectortrough, no eyestrain) and one tube per press immediately behind theoperator’s head; this provides all the light one could wish for, casts noshadows, and gives off no heat.
There is another feed-way behind the second row of presses, connectedwith the first by a passage which leads direct to the warehouse. Along thepassage walls and behind the pressmen, are the
246

cubs holding the press knives; they are therefore within easy reach of anyone of them. .
After leaving the presses, the cut stuff must be weighed, so the scalesmust be in the most convenient position. These, if they are of the platformtype, should be let into the floor, so that a rack full of soles can beweighed with little effort. The piece-sole and sole beveller is close by,and all soles and piece-soles are bevelled before grading, the solespassing to the first grader and the piece-soles to the second as do the lifts,which, when graded, are placed in the cubs ready for heel building. Thepiece-soles too, when graded, are placed in cubs in size and iron at the farend of the department near the making room. The soles after grading,move only a matter of feet to the sole sorter whose cubs are immediatelybehind him. The insoles when graded are placed on racks and pushedacross to the surface scourer and from there to the sorter whose cubs are,again, behind him.
Opposite the end of the bench and close to the insole sorter is a‘Summit’ Splitter; this he uses frequently to remove loose flesh frominsoles, and is also used by the sole sorter.
The cubs holding the sorted material may be of any design to suit thetype of work, but usually hold, in the case of insoles, a full range of sizesand three or four qualities. With soles one must have a full range of sizesand irons; the usual method is for sizes to run from left to right and ironsfrom the bottom to top. These cubs extend over the full width of thedepartment. Nearby is a cylinder knife skiver for skiving the middles andalso half-lifts.
The fitting-up bench runs parallel with the sorting bench on theopposite side of the cubs, the sole fitter being opposite the sole sorter. Bythis arrangement there is no passing and re-passing in the cubs.
The soles being fitted-up to the ticket requirements pass to thesole-stamper, then to the waist-reducer and from there to large steelfixtures, each holding one day’s work; these are drawn from as required,clearing one day’s work at a time. The soles are solutioned, placed inracks and left one day to dry completely; then they are taken from theracks, placed together, and put into numbered cubs.
The insoles pass to the ‘Planet’ Rounder from the fitter-up (again withthe minimum of movement), who places them on the top of cubs 3 ft. highand 15 in. wide which hold all rounding blocks and surround on threesides the two rounding machines; a considerable amount of work can beplaced on these. After rounding, the insoles are placed on a bench acrossthe passage, 3 ft. high and 3 ft. wide, into which the three channellingmachines are fitted. These benches are extended on the left-hand side ofeach machine to reduce the distance of travel from bench to machinewhen operating, thus saving time. If driven by overhead shaft the benchwill need to be slotted to receive the driving belts. The purpose of thislarge bench is to hold a reserve of work for each machine, one for men’swork,
247
MANAGEMENT

one for ladies’ work and one for gemmed. The operator in each case hasonly to lean forward and he can draw any line of work to him withoutleaving the machine.
After channelling, the operator turns and places the work on a bench onwhich is placed the lip cutting and scoring machine; from here the workmoves to the left to the machine which applies the latex to the insole lips.From here they are placed on a bench in ‘toast’ racks to dry, from whichthey are taken by the operator of the double-lip turning machine, who inturn places them on a mobile rack after completion. Between all theseoperations there is again the minimum of movement.
The work to be gemmed passes to the right after lip cutting and scoringand so round the opposite way to the same rack: when full, the rack istaken to the bench in the main passage where the insoles are examined,checked for size and number of pairs, then tied up and placed in cubs atthe end of the department to await the uppers.
These cubs extend across the department, are ten in number and arenumbered 0 to 9. All tickets ending in any one number are placed in thesame cub; this greatly simplifies the finding of any one lot and savesmuch time, for instance, if a ticket number were 2678 then it would beplaced in the cub marked 8 and so on. The same procedure is followedwith the soles, which, when the solution is thoroughly dry, are placed insimilar cubs.
In the heel building department, the builders sit at a bench, behindwhich are the cubs holding the full range of graded lifts. Gouged lifts, orthose with half lifts or rands attached, are fed to the builder from the randtacker in baskets. When built the heels are placed in trays and pass to thewire-grip tacker or heel pinning machine; after pinning, the heels areplaced in baskets and the trays returned to the builders. From pinning theheels pass to the compressor, then those for inside attaching pass to theslugger to have the top-piece attached and from there to the breastingmachine and so to the cubs. All these machines should be placed, so thatwork may pass easily from one to another in sequence, at the same timespace must be provided for a reserve of work at each operation.
The cubs holding the heels and top-pieces should be placed in line withthe department and will then be accessible to those filling them and to thefitter-up, whose bench should be placed across the department. Heels arefitted up in trays holding twelve or twenty-four pairs of heels andtop-pieces, and are taken to the heeling department on a rack designed tocarry eight trays, and are there placed in cubs numbered in the samemanner as those for soles and insoles.
There the department ends; the lay-out described ensures that workdoes indeed flow and is not obstructed at any time; the result must be anincrease in production. The lay-out can be adapted for overhead orindependent drive of machines with very little modification.
248
BOTTOM STOCK

GOOD PRESSMANSHIP
With leather at present day prices, a good pressman is a valuable asset.Every pound of scrap saved, every iron gained by intelligent cuttingrepresents a considerable saving. The good pressman is usually of aboveaverage intelligence; he, like a chess or draughts player, must develop theability to see several moves or cuts ahead. He must be a good judge ofleather, have a good eye for substance, and above all keep a level surfaceto his press block. This last item will be dealt with first.
Very few pressmen acquire the knack of keeping a level block, thoughit is of the utmost importance that they do so. If the block is not level,whether it has a ridge down the centre, or along the front edge, or if theends are high he cannot cut his material cleanly and evenly, a slope in anydirection causing the knife to slide; the result is an undercut on one sideand the reverse on the other. He will find some of his cut stuff returned bythe sorter to be cut down and bits taken off here and there, all because hisknife has moved at the moment of cutting as a result of an uneven cuttingsurface. The result is a loss all round—the firm’s material, trouble in themaking room with undercut soles, and his own time which affects hispocket. How then can he best keep a level block?
First of all, his knives must be all of the same height to maintain thesame degree of penetration into the block. He must look after his knivesto ensure a good cutting edge; at least three types of file should be kepthandy, to touch up the edge when, as so often happens, it comes intocontact with another knife, or part of machine.
Then the block itself. This should be kept bolted up as tight as possible,block dressing can be used to reduce the amount of dust but the writerprefers not to use it as it loosens the surface.
The method of cutting described below reduces wear to a minimumand makes little dust; by adopting it, the same block (a BUSMC fibreblock) has been used five and a half days per week for a period of eightyears before being discarded.
The block must be securely bolted to the bed and pushed as far back asit will go, as this makes it easier to cut on the front edge and brings theknives more under the centre of the upper beam. When cutting, work overa width of 8 to 9 in. of the full width (14 in.); this will bring the knives alittle over the centre and leave a rather narrow cutting surface when theblock is turned; this soon becomes level and, providing the block isturned in time (once a fortnight is enough), will cause no inconvenienceand will avoid the centre ridge. When cutting up and down, try to moveabout the block as much as possible; cut one row near the front, the nextone 1 in. or so back and so on and work over the whole area. If there areany signs of a ridge forming along the front, remove it with the BUSMCBlock Plane, an old Fortuna skiving knife, or a wood rasp. Do not let itdevelop.
249
MANAGEMENT

Now for the ends of the block. These should be used for the cutting ofall small stuff; only insoles, soles, etc., should be cut in the centre and itshould be a golden rule never to use the centre if the end will do.
Grade the knives in sizes, insole or sole in the centre then middles,men’s lifts, ladies’ lifts, half-lifts, etc., so that the small knives are all atone end. After cutting the prime material with the large knives movealong, taking the material to the next knife and so on, until the smallestknife is used on the end of the block.
This method has advantages other than the keeping of a level block; itmakes for speed. The operator has no need to look for any particularknife, it will always be in the same spot, he can pick it up without lookingdown and in the meantime he is able to concentrate on his leather anddecide what cuts to make. The saving in time is surprising, and of courseresults in increased production, and benefits the cutter financially.
In time it will be found that the end in use is wearing low, and theknives are not cutting clear; now transfer all knives to the other end in thereverse order and work until that, too, is down to the same level, thenraise the bed. The usual method of raising the block is by revolving theadjustable wheel one half-turn; this is too much, and causes too deep apenetration into the block which breaks up the surface and causesconsiderable block wear, and, of course, dust. If a piece of strong cord istied securely to the side of the press and from there to one of the spokes ofthe adjusting wheel it will be found possible to raise the bed by one-sixthof a revolution instead of a half; this is enough to obtain a clean cutwithout disturbing the surface block. The advantages are obvious—littlewear, next to no dust from the block, and very little strain on the machine;consequently, mechanical failures are almost unknown.
Safety First
The press is considered to be the most dangerous machine in the trade.Admittedly, the element of danger is always present but the majority ofaccidents are the result of carelessness, lack of proper training, or neglectof the machine.
A good pressman rarely has an accident, and here are a few rules that healways obeys:
(l) Never pick up a knife by placing the hand over the top.(2) Always pick up with the same grip as when cutting; if too heavy use
both hands.(3) The same rule applies to removing the knife after cutting. As the
foot is placed on the pedal to make the cut the second and third and fourthfingers should be raised clear of the knife in a horizontal position, at thesame time pressing down firmly with the thumb and first finger of bothhands, then even if the press repeats, or the knife tips, the hands are out ofharm’s way. It is often necessary to feel around the lower edge of theknife with the fourth fingers, and many
250
BOTTOM STOCK

a finger has been lost when doing so but, if the above practice is observedand persevered with, it becomes a habit and involves no loss of time orefficiency, and reduces risk to a minimum.
(4) Never tip a knife. Always keep it level when placing under thebeam, or taking away.
(5) Always raise the safety catch when not using the machine or whenmaking an adjustment.
(6) Keep the press clean, and oil regularly, but not excessively.(7) Every week, examine the plunger that returns the trip to its position
after every revolution; if the spring appears to be at all weak removeplunger and examine spring for possible breakage; most repeats arecaused by the failure of this spring.
Press Knives
Many attempts have been made to reduce the danger of press cutting.Press knives are made in various forms, but probably the best and safestknife to handle is that with four or five horizontal corrugations into whichthe fingers and thumbs fit naturally. This knife is popular with pressmenbecause it is easy to grip and there is no danger of the fingers sliding up ordown as the surface wears smooth, after constant use. Other styles havethick leather or rubber bands around the top edge of the knife; others havea wide fiat band of rubber projecting 1 in. or more over the fingers butthese are clumsy to handle and are not popular owing to the rubber gettingin the path of any projecting piece of leather, and they take up too muchroom on the knife tray in front of the press.
251
MANAGEMENT


PART VI
MAKING
W. MOORE
Chapter 18 by G. Lewin
Chapter 19 by F. Bending

254
Welt
beati
ng
Tack
pu
llin
gW
elt
bu
ttin
gB
ott
om
fill
ing
and
shank
ing
Wir
eta
ckin
gB
ott
om
solu
tio
nin
gS
ole
layin
gR
ou
nd
ing
and
chan
neli
ng
Ch
an
nel
op
en
ing
So
lest
itchin
gS
eat
nail
ing
Seat
rou
nd
ing
Ch
an
nel
closi
ng
Sti
tch
sep
ara
tin
gW
elt
whee
lin
gS
ole
level
lin
gH
eel
att
ach
ing
Slu
ggin
g
ME
TH
OD
SO
FC
ON
ST
RU
CT
ION
MA
CH
INE
SE
WN
WE
LT
ED
ST
AP
LE
WE
LT
ED
SC
RE
WE
DS
TIT
CH
ED
and
Ch
art
show
ing
seq
uen
ceof
op
era
tio
ns
of
last
ing
and
mak
ing
for
wel
ted
,st
ap
lew
elte
d,
scre
wed
and
stit
ched
,M
cK
ay
sew
nand
cem
ente
dfo
otw
ear.
Inso
leatt
ach
ing
Inso
lehee
lse
atbev
ell in
gB
ack
tackin
gP
ull
ing
ov
erS
ide
last
ing
Bed
last
ing
Seat
last
ing
Upp
er
trim
min
gW
elt
sew
ing
Tack
pu
llin
gIn
seam
trim
min
g
Inso
leatt
ach
ing
Inso
lehee
lse
atbev
elli
ng
Bac
kta
ckin
gP
ull
ing
ov
er
‘Co
nso
l’la
stin
gS
eat
last
ing
Po
un
din
g
Bo
tto
mfi
llin
gand
shank
ing
HE
EL
SB
UIL
TW
OO
DH
EE
LS
FIT
TE
DH
EE
LS
LO
UIS
HE
EL
S
To
p-p
iece
To
p-p
iece
To
p-p
iece
To
p-p
iece
att
ach
ing
att
ach
ing
trim
min
g
trim
min
g
Join
tra
spin
gB
reas
tro
ugh
ing
Fla
pso
luti
onin
gF
lap
closi
ng
Sid
etr
imm
ing
Seat
fitt
ing
Hee
latt
ach
ing
Upp
er
rou
gh
ing
Bo
tto
mfi
llin
gand
shank
ing
So
leatt
ach
ing
(cem
ent)
Last
rem
ov
ing
CE
ME
NT
ED
Tem
pora
ryso
leatt
ach
ing
Las
tre
mo
vin
gS
ole
sew
ing
Ch
an
nel
closi
ng
Sea
tnail
ing
So
lele
vel
lin
gH
eel
att
ach
ing
Mid
-so
leatt
ach
ing
Las
tre
mo
vin
gL
oo
senai
lin
gS
ole
level
lin
gS
ole
att
ach
ing
So
lest
itchin
gP
iece
-so
leatt
ach
ing
Scr
ewin
gS
eat
rou
nd
ing
Sti
tch
sep
ara
tin
gS
ole
level
lin
g(o
ffla
st)
(off
last
)H
eel
att
ach
ing
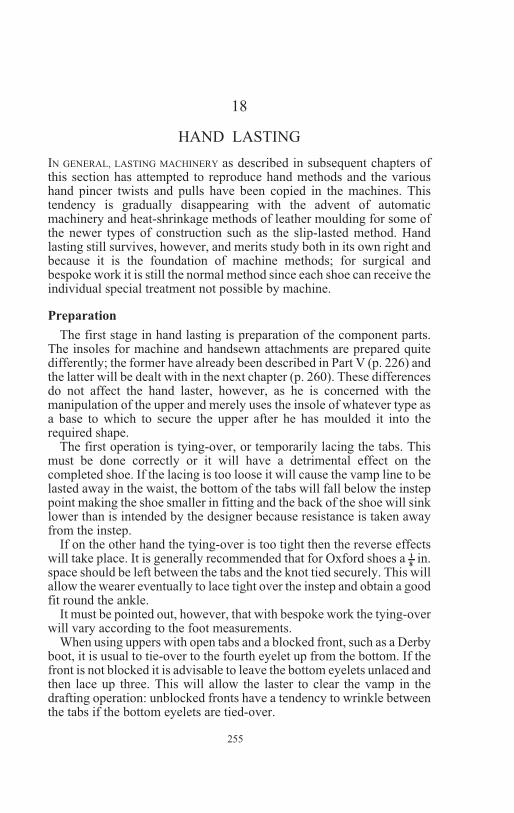
18
HAND LASTING
IN GENERAL, LASTING MACHINERY as described in subsequent chapters ofthis section has attempted to reproduce hand methods and the varioushand pincer twists and pulls have been copied in the machines. Thistendency is gradually disappearing with the advent of automaticmachinery and heat-shrinkage methods of leather moulding for some ofthe newer types of construction such as the slip-lasted method. Handlasting still survives, however, and merits study both in its own right andbecause it is the foundation of machine methods; for surgical andbespoke work it is still the normal method since each shoe can receive theindividual special treatment not possible by machine.
Preparation
The first stage in hand lasting is preparation of the component parts.The insoles for machine and handsewn attachments are prepared quitedifferently; the former have already been described in Part V (p. 226) andthe latter will be dealt with in the next chapter (p. 260). These differencesdo not affect the hand laster, however, as he is concerned with themanipulation of the upper and merely uses the insole of whatever type asa base to which to secure the upper after he has moulded it into therequired shape.
The first operation is tying-over, or temporarily lacing the tabs. Thismust be done correctly or it will have a detrimental effect on thecompleted shoe. If the lacing is too loose it will cause the vamp line to belasted away in the waist, the bottom of the tabs will fall below the insteppoint making the shoe smaller in fitting and the back of the shoe will sinklower than is intended by the designer because resistance is taken awayfrom the instep.
If on the other hand the tying-over is too tight then the reverse effectswill take place. It is generally recommended that for Oxford shoes a 1
8in.
space should be left between the tabs and the knot tied securely. This willallow the wearer eventually to lace tight over the instep and obtain a goodfit round the ankle.
It must be pointed out, however, that with bespoke work the tying-overwill vary according to the foot measurements.
When using uppers with open tabs and a blocked front, such as a Derbyboot, it is usual to tie-over to the fourth eyelet up from the bottom. If thefront is not blocked it is advisable to leave the bottom eyelets unlaced andthen lace up three. This will allow the laster to clear the vamp in thedrafting operation: unblocked fronts have a tendency to wrinkle betweenthe tabs if the bottom eyelets are tied-over.
255

The next operation is stiffener insertion. For hand lasting it is best touse leather stiffeners and their preparation will be governed by the type ofshoe being made. For ‘sewn seats’ (see p. 266), a 5
8in. skive is given to the
curved top line of the stiffener only; for tacked seats, the 5
8in. skive is put
all round.The stiffener should come behind the breast of the heel to give solidity
to that part of the shoe during wear. The skive (or ‘scarf’) should end in afine edge so that the stiffener is not visible in the finished shoe. Thestiffener is pasted and inserted between the quarter lining and the upper toa position 1
16in. below the edge of the upper (which is upside-down). The
linings are then cleared of any wrinkles and sprinkled with French chalkto allow easy exit of the last later on.
The toe-puff is then prepared and inserted. For handsewn work, aleather toe-puff is normal and this is skived all round.
Drafting
The insole, either for hand or machine work, being in position on thelast, the next stage in hand lasting is known as drafting.This means taking the initial stretch out of the upper and giving it theapproximate shape of the last in preparation for the actual lasting itself.Drafting is done with a series of pulls taken with the hand pincers indifferent directions according to the shape of the last in such a way thatuniform tension is set up and the moulding is balanced so that when theshoe is eventually slipped from the last it will retain during its life theshape which has been given to it.
Drafting the upper on to the last by hand, therefore, is a very importantoperation. The ‘hoisted method’ is used; the prepared upper is placedloosely over the last and then both are turned upside down and the last isplaced in position on the peg of a lasting stand or ‘jack’. The upper is thenadjusted so that bottom edge of the back is 3
4in. below the seat of the last.
(Note: Some confusion of terms arises here as the upper and last areboth upside down; the term ‘bottom edge’, however, means the bottomedge of the upper as it appears in the actual shoe, right way up.)
The strains are then taken with the lasting pincers in the order shown inFigure 117, beginning at the toe end.
Taking the outside, lining and toe-puff in the pincers the three arepulled over together 1
2in. beyond the edge of the insole (this amount
varies according to the type of work). A lasting rivet is then driventhrough the lasted margin into the feather or shoulder of the insole. Thispull is usually called the longitudinal strain as it sets up tension from heelto toe.
The upper is then held in a central position to bring the toe-cap andthroat of the vamp in the correct place and the next strain is taken on theinside of the cap line (2, Figure 117). This is followed by 3 on the outsideof the cap line.
256
MAKING

It is now necessary to take the shoe from the last jack and turn it over tosee if the cap line is straight. If it is not it is usually a simple matter toadjust it. The upper now being in the correct position with the cap linestraight and securely fixed at the front, the back is hoisted or pulled upand over the seat of the last.
If sewn seats are specified a rivet is driven into the upper (outside),stiffener, lining and feather of the insole. It is not driven right home as it
will have to be taken out after sewing. If, on the other hand, the shoe is tohave a tacked seat, a tack is driven right through to clench on the insole.
This strain increases the longitudinal tension set up by the first pullbecause the last has been forced into the upper by a wedge action.
The next strain, 5, is taken at the corner of the seat, again on the insole,and a rivet is driven in. This is followed by 6, at the opposite corner. Careshould be taken at these places to clear the linings and pull the stiffenersinto position and secure them, otherwise the linings will be loose at theheel and a bulging seat will be formed.
257
HAND LASTING
Figure 117. Direction and order of hand drafting strains.

The next strains are taken, 7 just below the inside joint pulling theupper towards 3, and 8 just below the outside joint pulling towards 2. Thestraining forward takes surplus material away from the waist.
To ensure that the vamps are tight down to the last, pull 9 is now takenon the inside midway between 2 and 7, and then 10 at the correspondingposition on the outside. These strains are not always taken but it isconsidered that they are very important as they produce a much betterlasted upper and reduce the amount of tension required later duringside-lasting.
Finally, strains 11 and 12 are taken at the inside and outside of the waistrespectively, being careful not to disturb what is usually called the‘top-line’ of the upper—the tops of the quarters.
The drafting now being completed it is advisable to examine the shoefor any faults. The cap should be straight, the upper tight on to the last, thelinings clear, the back-seam central and straight, the top line tight and thegap between the tabs in line with the centre of the toe.
Lasting (for Welted Work)
Now follows the actual lasting of the upper. It is best to commence atthe inside waist and in order to give the very strong pull required at thispoint it is advisable to use the tool known as a ‘waist drag’, the upperbeing levered into position before the securing rivet is driven in.Continuing with the inside waist a series of pulls is taken at about 1
2in.
intervals, rivets being inserted for each.Next the outside waist is lasted but without the ‘waist drag’ as there is
less curvature on the last.The forepart (excluding the toe) is now lasted, first the inside and then
the outside. The tension used in these strains should be just sufficient tomake the upper fit tightly to the last without disturbing the lines of thepattern. Then follows lasting of the seat, again without too muchstraining. The upper here is taken in the pincers and twisted towards theback as shown in Figure 118, held over the insole with the thumb andtacked down. The tacks should be driven
258
MAKING
Figure 118. Directions of strains in hand lasting.

through outside, stiffener and lining to ensure a sound seat; they shouldbe approximately 3
8in. from the feather of the insole to allow room for the
piece-sole rivets which will be inserted later. Care should be taken totighten the corners of the seat to prevent what is termed ‘fish-tailing’.
The toe is the most difficult part of the shoe to last because of thesharper curves and the excess of material to be cleared. Starting from theend of the toe and working round to the cap line, first the inside and thenthe outside, the upper is gripped with the pincers, pulled and twisted intosmall pleats and secured by rivets driven through into the shoulder of theinsole (Figure 118).
All the side strains are turned towards the toe end.Having now completed the lasting, a beater or ‘jigger’ is used to beat
the shoulder just below the rivets so as to give the hand welt sewer adistinct feather line on which to work. The upper is then trimmed offalmost level with the rivets and the shoe is ready for the sewer.
259
HAND LASTING

19
HAND WELTING
THE CAREFUL SELECTION OF materials for a handsewn shoe is a veryimportant contributory factor to the ultimate comfort, flexibility anddurability of this type of footwear. Oak-bark tanned leather is stillpreferred by the handsewn maker but, as already described in Part V, afactory including handsewn shoes in its production may require othertannages to be used for such work.
Preparation of Bottom Leather
The various bottoming sections may be cut as already described, butthe handsewn man will undoubtedly prefer to do the whole of his owncutting and preparation so that he can select every section and give it theindividual attention which a handsewn shoe merits.
The tempering of the sections is extremely important for this work asthe hand sewer can only produce the best results if his materials are in thecorrect condition. The wetting is best carried out in a wooden bowl or anearthenware bowl or sink and not in an iron bucket which may produceblack iron stains. In any case it is advisable to cover the vessel to preventrivets dropping in and again producing stains where they touch theleather. Iron stains are extremely difficult to remove and it is impossibleto get a good finish on the bottom or keep the insoles white unless specialcare is taken. After a period of an hour or two according to the substanceand quality of the materials, the insoles, stiifeners, lifts and toe-puffs maybe removed from the water. The insoles should be drained toe downwardsso that any stain left at the toe will be trimmed out in the roundingoperation or hidden by the toe of the shoe when finished.
Soles are removed from the water after a longer period againdepending on the substance and firmness of the leather. They should bedrained with the seat downwards so that any residual stain will becovered by the heel.
After the sections have been well drained they are wrapped in a piece ofcloth or sacking to mellow for several hours and are then ready for use.
Blocking Insoles
The insole used by the handsewn maker is prepared in quite a differentway from that intended for machine work and described on pp. 226-33. Arectangular piece of leather (shoulder) large enough to cover the bottomof the last is mellowed and placed on a skiving board—a piece of wood
about 18 in. ´ 6 in. ´1
2in.; the
260

grain is then taken off with a buff-knife. This is simply a steel blade4 in. ´ 2 in. with one of the longer edges sharpened and then blunted withan old sewing awl. The insole is then dusted well on the grain side withFrench chalk to keep it clean.
It is now placed on the bottom of the last, grain side to the wood and theblocking is commenced, fine l in. rivets being used to secure the leather tothe last. Three rivets are first driven into the side of the seat, at positionsA, B and C in Figure 119. These stop the insole shifting from side to side.They are followed by rivets l to 9 as shown. 1 and 2 are inserted in the lastwall at the inside and outside front of heel, 3 at the centre of the insidewaist and 4 at the centre of the outside waist. 5 is at the top of the insidewaist, 6 at the outside joint, 7 at the middle of the inside forepart and 8 atthe corresponding position on the outside. The final one is 9 which isinserted about 1
2in. from the end of the toe. With the exception of this
final one, all rivets are driven into the wall of the last just above thefeather (or bottom) edge. Rivet 9 is driven into the bottom to preventdamage to the toe of the last and a piece of leather is held under thehammer of the pincers to prevent damage to the sides of the last.
The directions of the strains on the insole in order to block it must betowards the toe for 9 and transverse for l to 8. The tension at 3, 5 and 7must be greater than at the other positions in order to get the leather downinto the arched waist of the last.
Rounding and Feathering
After the blocked insole has dried out it is ready for rounding. Fiverivets are put in a straight line down the centre from heel to toe andequally spaced. The top third of each rivet is bent over towards the toe tokeep the insole flat to the last.
The blocking rivets are then removed and holding the last in the lefthand with the insole downwards, a sharp knife is used to trim the leatherwith clean sweeping cuts to the shape of the last bottom,
261
HAND WELTING
Figure 119. Positions of rivets for blocked insole. All except 9 are driveninto the wall of the last.

remembering that different types of footwear require different lengths ofheel, waist or forepart. For example, a man’s dress shoe has a shorter andlower heel and a walking shoe a higher and longer one.
After the insole has been rounded as required, the next operation is tomark the lengths of heel, waist and forepart. For an ordinary walkingshoe, the heel is marked at a quarter of the length of the bottom (seeFigure 120) and is followed by a mark about 1
8in. all round the seat. The
edge mark is continued slightly further in, about 3
16in., up the inside waist
to the toe. Round the toe it is still further in, about 1
4in., to allow for the
thickness of the toe-puff and then continued at 3
16in. to the outside joint.
At the outside joint, the width is reduced to 1
8in. so as to make the welt
wider at that point, and from the outside joint down the waist to the frontof the heel it is 3
16in. If the waist is to be bevelled the distance is 1
4in. This
outside line is called the outside feather.
A further mark is now made 3
16in. in from the first one and carried all
the way round the insole. This is called the inside feather and the spacebetween the two lines is known as the holdfast.
A sharp pointed knife is then held between the thumb and fingers like apencil and a cut is made on the outside and feather marks, the depth of thecuts being about one—third of the thickness (substance) of the leatherand slanting outwards.
The bottom of the insole is then wetted and the cuts are opened out intochannels as shown in Figure 121a.
A steel feather ‘plough’ is now used to cut away the inside and outsidefeathers by a pushing action and leaves the insole as shown in Figure121b. Approximately one-third of the substance is taken away in thisoperation leaving the ‘holdfast’ standing above the general level asshown.
262
MAKING
Figure 120. Insole, showing position of heel ( 1
4SL from seat). The portion
shaded black is the holdfast which is 3
16in. wide all round.

HolingThe next operation is to hole the insole with a sewing awl; this has a
curved blade about 3 1
2to 4 in. long and well sharpened at the tip but not at
the sides. If this were not so the holes would be too large for the threadand the shoe would lose some of its watertight character.
In holing or piercing the holdfast of the insole, the awl is held in theright hand and the point is put into the bottom of the inside channel of theholdfast. The right elbow is then lifted and the awl is pushed through theholdfast into the outside feather in a half-circle or swing-boat motion.The hole so made is oval in cross-section. It is usual to make three perinch for a sewn seat and four per inch for the welt sewing in the case ofmen’s work; ladies’ shoes may have five or six per inch according to thetype.
Figure 122 shows the directions of the holes, these varying at differentpoints on the insole.
263
HAND WELTING
Figure 121. Cross-sections of insole: a showing channels opened after cutting;b after ploughing. The bevel is cut to prevent curling.
Figure 122. Directions of holes made by awl.

When the insoles have been holed the point of a sharp knife is used toremove the sharp upstanding edge of the grain side of the insole. Somehandsewn makers do this immediately after rounding; this does notmatter as long as it is done before lasting. It occurs when the insole isbeing rounded in a mellow condition and must be removed as when itdries it turns in at the edge and will hurt the bottom of the foot in wear.
Next follow the preparation of the toe-puff and stiffener and theirinsertion in the upper prior to lasting. These operations and also thelasting itself have been described in detail in Chapter 18 and so are notdealt with further here. It should be emphasised, however, that in somebespoke and surgical shoemaking one has often to depart from theorthodox order of drafting strains as the shoes may be of an entirelydifferent shape from the normal.
Making the Thread
In making the thread for welt-sewing, the main point to be consideredis the weight of the boot or shoe to be sewn. For example, a heavyshooting boot with a 24 iron edge would require a thread consisting ofabout fourteen strands of no. 15 hemp, whereas for a shoe with a 15 ironedge a nine or ten-cord thread would be sufficient. In every case each holemust be completely filled with thread to ensure watertightness.
The hemp should be kept in a small round tin large enough to take a 4oz. ball and with a small hole in the centre of the lid through which thehemp can pass. The lid keeps the hemp clean and also helps to preserve itby keeping away the air.
A welt·sewing thread when complete is about 11 ft. long. It is preparedby ‘casting’ in the following manner. The hemp in its tin is placed on thefloor on the right with the end of the ball coming through the hole. Thistaken by the left hand, led over the right knee and the first point is madeby rolling the right hand along the right knee away from the body with 5to 6 in. of the hemp between the two hands. This will cause it to unraveland break leaving a fine point.
About 9 ft. of hemp is now pulled out of the tin with the left hand lettingit slip through the right, then it is grasped by the left hand about 7 in. fromthe right and is again rolled and broken with the palm of the right hand asbefore.
To make up a thread of the required number of strands (or cords), theoperation is repeated, each successive strand being broken off 1
2to l in.
shorter or longer than the one before.Next follows the waxing, the wax being either black or brown and
made by heating together pitch, Russian fat and resin. During the summermore resin is put in while in the colder weather extra fat keeps the mixturepliable. It is essential to use a good wax as it
264
MAKING

fulfils several purposes, e.g. it keeps the strands together, reduces frictionand consequently fraying during sewing, ensures that the holes arecompletely filled and gives a positive adhesion between thread andleather even after the loops may have worn away.
The wax is applied as follows. The thread, consisting of the separatestrands placed together, is twisted round the left hand about 3 ft. from theright end so as to get a firm grip; the wax is taken in the right hand andrubbed into the strands close up to the left hand and then pulled alongfirmly to the point. All the strands should be waxed as evenly as possibleand after the first section is done the long portion remaining in the lefthand should be treated similarly.
The thread is next twisted by taking the middle of it round a nail driveninto a bench or a hook placed to the left of the sewer. One of the points,usually the one furthest away, is then rolled on the right knee with thepalm of the right hand while the left hand supports the two halves of thethread and prevents their untwisting again. A similar operation is thencarried out on the other point (nearer the sewer). A piece of upper leatheris rubbed up and down the thread to smooth it, it is removed from thesupporting nail and the portion which had passed round this support isalso twisted.
After twisting, the thread is again well waxed and is then ready for thebristles to be put on. The bristles that have been used for centuries comefrom the wild boar but today, nylon ones are becoming increasinglypopular. To attach the bristle, the point of the thread is taken between theleft finger and thumb while the bristle, waxed to within 2 in. of the thickend, is taken between the right finger and thumb. The fine end of thethread is put on the waxed portion of bristle and the two are rolled ortwisted away from the person spreading the thread finely down and roundthe bristle until about 1
2in. away from the end. Then, with a fine round awl
a hole is pierced through the thread itself about l in. from the tail end ofthe bristle and the bristle itself is threaded through this and the whole isstraightened out. The end of the bristle is now sharpened into a point bygently rubbing it with emery paper and after another bristle has beenattached in a similar way at the other end, the thread is ready for use.
Sewing in the Welt
The size of sewing awl is very important; the thickness of its blade mustbe less than that of the thread, and it must be curved to pass through theholdfast at seat and toe as a straight awl gives wide seams. The shoe isheld between the knees with a stirrup, an endless leather belt about l in.wide which passes over the shoe and under the left foot; a hand-leather orold glove with the fingers removed is worn on the left hand to protect it.
The bristle is taken in the left fingers and the awl in the right and a holeis made through the holdfast from the inside to the outside at the left frontcorner of the seat (note: seats are always sewn in
265
HAND WELTING

first) so that the point of the awl protrudes about 1
8to 1
4in. As the awl is
withdrawn its point is followed through the holdfast by the bristle andthread. The two ends of the thread are then placed together and the threadpulled through until there is an equal amount on either side of theholdfast.
The left thumb is now kept pressed against the upper to prevent itsbeing pushed away from the last and the awl is passed through the secondhole and upper as before. Again it is followed back by the bristle andthread entering from the left and then the right bristle is inserted from theright-hand side. To make a lock, the thread is ‘overcast’ by taking thethread from the last stitch over the bristle that is coming out on the outsideof the upper. The two ends are then pulled evenly across the body and astightly as possible with a little more pressure on the right than on the left.This process is then continued round the seat, there being about threestitches per inch
266
MAKING
Figure 123. Sewing in the welt. The portion shaded black consists of theholdfast and the edge of the upper.

When going round the back of the seat the stirrup should be betweenthe legs with the heel end of the shoe resting on the left knee. The heel isthen gradually turned away from the person as sewing continues. Lastingtacks should be removed about 1
2in. before they are reached.
The reason for overcasting on the outside in sewn seats is to prevent thethread from being pulled through the upper; in addition the stitch shouldlie on the outside to enable the heel awl to pick it up when the heel is sewnon.
Now comes the most important operation of all—that of sewing in thewelt itself (Figure 123). The tempered welt should first be bevelled at anangle of 45°; this is done by putting the welt flesh side downwards on askiving board across the knees and pulling it with the left hand past theknife held in the right hand and with the right forefinger acting as a guide.The end of the welt is then skived to a width of 3
8in.
The shoe is now positioned on the knees, toe towards the sewer and thestirrup over the heel, each side of the left leg and under the left foot. Thewelt is then placed with its bevelled edge close to the feather edge of thelasted upper and the first hole is made next to the last seat stitch on theleft-hand side of the shoe, the awl passing through the holdfast, upper andbevel of welt. It is essential to hold the welt close to the upper with the leftthumb and fingers while the awl is being passed through, otherwise it ispushed away rather than pierced.
The left bristle is then put through the hole following the awl as this iswithdrawn and then the right bristle from the opposite direction nearer tothe sewer. The stitch is ‘overcast’ (see below) and tightened by pulling onthe threads, using hand-leather and awl haft to get more pressure, andpulling more on the right thread so as to keep the welt and upper tight tothe holdfast. This stitch must come over the end of the welt skive.
Sewing then continues round the shoe, the welt being continuallypulled between the left thumb and forefinger so as to prevent loosenessshowing after sewing. Four stitches per inch is usual and each one is‘overcast’ on the inside of the holdfast, the method of doing this varyingwith the locality. One method of making this ‘overcast’ is as follows:when the right·hand bristle has been passed through the hole from theright it is transferred to the left hand and passed under the inside loop ofthread (lying on the insole) and up through it making an ordinaryoverhand knot. The two ends of thread are then pulled tight as described.
In the case of a bevel waist, the welt is sewn in flat in the waist with thewelt skived to half substance on the grain side; when the joints arereached sewing continues in the normal way.
It will be seen from the above description that welt sewing is continuedtowards the operator; this means that the stirrup is altered from time totime and when the toe is reached the shoe is gradually
267
HAND WELTING

turned away so that in the end the seat is in the same position as it waswhen seat-sewing commenced, i.e. nearest the sewer.
When the last stitch has been made the five insole rivets are taken outand the welt is tapped into the feather with a small hammer. The welt andseam are then trimmed all round flat to the seam with a sharp knife. Thenthe welt is smoothed out flat from the shoe and beaten; this is done byusing a ‘welt beater’—a piece of iron with 1
2in. turned over at
right-angles—which is held in the left hand and pressed into the featherunder the welt so as to act as a small table on to which the welt and seamcan be beaten with a hammer in the right hand.
Sole Attaching
The welt is now trimmed to the required finished shape and then thecavity in the forepart and waist is filled with coarse tarred felt sold for thepurpose. The piece to be inserted must be skived round the edge to thelevel of the welt seam. It should be left fairly flat in the forepart but maybe rounded in the waist. (A shank is not normally put into a handsewnshoe; the curvature of the waist of the sole is sufficient.)
The tempered full-length sole is now prepared for attaching by firstskiving out the waist on the flesh side, the amount removed depending onthe type of shoe. Then a slight depression is cut in the flesh at the seat soas to fit snugly over the seat of the lasted shoe; the link stitches round theseat should just be visible so that they can easily be picked up when theheel is sewn on. If a three-quarter length sole is used, then the piece-solemust be treated in the same way.
The sole is now stuck on the bottom of the shoe with rubber solutionand it is trimmed to within 1
32in. of the welt, this working allowance being
necessary since in channel closing and bottom levelling the edges tend tobe pushed in. Then follows channelling which is done by putting thepoint of the knife into the grain of the leather 1
16in. away from the sole
edge and then pushing it at an angle of 45° into the leather towards thecentre of the sole to a depth of one-third of the substance (thickness) ofthe sole; holding the shoe with the toe towards the operator the knife ispulled from its starting point on the right-hand side just beyond theeventual position of the heel front, and as the cutting continues rightround to the other side, the shoe is slowly turned. lt is important that thechannelling should be continuous and that the knife should not be takenout until it is complete so that a double cut is avoided.
The channel is then opened by a piece of bone or metal, spear pointed,and the sole is stitched on. Here a square-sectioned awl is used instead ofthe oval type used for welt sewing so that more stitches per inch arepossible; otherwise the operation is similar. The ‘overcast’ is made in thechannel. For a man’s l2 iron edge shoe, about twelve stitches per inch issuitable.
268
MAKING

After stitching, the stitches themselves in the channel are rubbed levelwith a piece of bone, the channel is solutioned and closed and the bottomis levelled by hammering with a double-faced hammer.
Heel Attaching
First the sole seat is bevelled at 45° thus leaving it wider on the fleshside (next to the shoe) than on the grain. The grain is then roughened to awidth of 5
8in. round the edge to receive the split-lift which is a wedge of
leather shaped like a horseshoe 5
8in wide, 1
8in. thick round the outside
edge and skived to a knife-edge on the inside edge; the purpose of this isto level the seat ready for the heel since the centre of the seat is raised.Adhesive is applied to the seat and the split-lift attached with a few shorttacks. The top is then levelled, adhesive applied, and the first lift put on,this again being attached with a few tacks. A channel is then cut roundthis lift near the outside edge ready to receive the heel stitches.
A ten-cord thread about 9 ft. long is prepared as before and then theshoe is placed on its side under the stirrup on the left knee, toe pointing tothe front and sole turned to the left. The heel awl is lubricated with soap orbeeswax and then pushed with the right hand (forefinger on blade tosteady it) under the first link-stitch, through the sole and split-lift and intothe channel of the lift. As it is withdrawn it is followed by the bristle andthe thread, again under the link-stitch, and is then pulled through anddivided equally between the two sides by putting the two bristlestogether. Sewing then continues in exactly the same manner as for thewelt, each stitch being overcast on the left-hand side. As before the rightthread is pulled harder and the number of stitches will, of course, be thesame as the number of link-stitches since one of these is taken into eachheel-stitch.
After sewing all round, the channel is closed and the marks left by theawl on the seat of the upper round the sides are rubbed out with a bone.The edge of the sole next to the upper at the seat is beaten down (or‘peened’) with a small hammer so as to cover up the link-stitches.
The top of the lift is then roughened with a rasp, an adhesive appliedand the next lift put on and attached with 3
4in. nails. If the height is
sufficient the top—piece is then fitted or it may be necessary to use morelifts according to requirements.
The seat line is now marked by drawing a stitching awl point round theside of the heel, thumb and finger resting on the top-piece, and thematerial below this line is cut away. Finally the seat of the heel close tothe upper is closed with a ‘seat breaker’, an iron with a curved milled faceand having a lip which follows the edge of the seat.
269
HAND WELTING

20
MACHINE LASTING FOR WELTED WORK
Insole TackingThe insole is attached to the last using an insole tacking machine, or by
hand; it is usual to insert the tacks commencing at the toe (Figure 124). Ifthe insole has been accurately rounded it should be possible for theoperator to locate the insole accurately on the last in the forepart andwaist; the seat of an insole is cut fairly full chiefly to account for anyvariation in the bottom of the last. It is very desirable to specify thenumber of tacks as this enables the operator removing them to account fora precise number at a given place; these tacks should be as close aspossible to the edge of the full substance left in the middle of the insole.The machines used are the ordinary single-tack machines such as theBUSMC No. 3 Insole Tacker or the Standard Engineering Co. TwinRaceway Machine Model 230.
The stapler is undesirable for this operation as it causes undue wear onthe lasts with its double point. The tacks used are 7
16in. square shank
machine tacks. Figure 125 shows the cross-section after insole tacking.
Insole Seat Rounding and Bevelling
This operation removes the fullness at the insole seat by trimming theinsole level with the last so as to follow the curve of the seat. As eachinsole is ‘fitted’ in this way to its individual last it ensures the fitting of thestiffener to the back curve of the last. Such an operation is important tosubsequent stages as it enables accurate piece-sole riveting on theextreme edge of the insole thus eliminating the opening of seats afterheeling.
PREPARING THE UPPER FOR THE LAST
At this stage, having the insole and last ready, the upper must be preparedto meet them.
Stiffeners and their Insertion
Stiffeners are usually made of fibre-board already skived at the edgesand moulded to the shape of the last they are designed to fit. It is a goodidea as far as possible to standardise seats so that one or two moulds caterfor a number of lasts; it is not possible to standardise the outside shape asthis will vary with the type of upper. The action of moulding not onlyshapes the stiffener, but also compresses the board itself so that it ishardest where the stiffening effect is
270

most required, that is, from the edge of the lasted seat upwards until theskived portion at the top is left comparatively flexible.
Leather stiffeners may be, and often are, pre-moulded, the processbeing as for fibre; they are usually moulded damp and allowed to dry aftermoulding. The action of the stiffener moulder in making the seat, both onleather and fibre stiffeners, contributes greatly to the success of the seatlaster but care must be taken in inserting them to ensure that the edge ofthe moulding corresponds with the upper edge of the insole; this isextremely important as the action of the wiper plates on the seat lasterfollow those of the stiffener moulder with considerably less pressure.
Some leather stiffeners are simply skived and conditioned, and insertedwith no moulding at all; this is essential on hand-lasted work with theseats down. Their advantage, from a working point of view, is that theircondition at the time they are inserted enables them to conform to the lastand upper much better than fibre and their wearing qualities areindisputable; they are not however suitable for lasting on a seat laster andif lasted in this way a certain amount of pounding or seat hammering isessential.
The stiffener should either be dipped in a solution to make it stick, orpasted by hand. The composition of this solution is very importantindeed; while it should, in its finished state, form an efficient adhesive itshould remain tacky enough to allow the surfaces, lining and outside, tobe moved about over its surface within a
271
MACHINE LASTING FOR WELTED WORK
Figure 124. The insole after tacking.
Figure 125. Cross-section of shoe after insole tacking.

reasonable time. When using pre-moulded stiffeners, the last shouldhave been previously fitted, with an insole of the correct substanceattached, as in these circumstances it is possible to see quite clearlywhether the fit (or ‘clip’) at the top of the last is correct when themoulded portion is down to the wood. It is not enough, however, just tocheck the insole feather and the top fit, as if the moulded portion is notalso down to the wood, the toe to heel tension of the pull-over will bringit down, thus springing out the top and making the stiffener extremely
prominent at the back of the finished shoe. This rule does not apply, ofcourse, in the case of wetted leather, or celastic, or other stiffeners ofthis type which automatically mould themselves to the last on theoperations of pulling over and sidelasting.
Within the upper the stiffener should fit, and be inserted with itsforward edge pressing hard against the seam of vamp and quarterlining, perhaps at this stage distorting the quarter lining slightly. Thiswill be taken care of by the pull-over in the toe to heel strain and ensuresthat the skived end of the stiffener shall be right up to the seam.
272
MAKING
Figure 126. A Curved waist stiffener for ladies’ work; b Standard type ofstiffener; c Veldt stiffener.

In the case of ladies’ work, where a completely loose lining (that is thelining being independent of the outside at this point) is used, the stiffeneris very much longer and the mould used follows the shape of the last, insome cases almost to the joint. Even more accurate fitting to the last isthen required and the operation of insertion calls for much more accuratelocation at the back, although appearing easier. It is always desirable touse lefts and rights when using moulded stiffeners; with ladies’ work it isabsolutely necessary. The stiffeners are moulded with the usual lastingallowance and the feather (the moulded edge) should be inserted withinabout 1
2in. of the edge of the upper; when lasted, the upper, having a
wider arc, should be just behind the edge of the stiffener, the latter justshowing beyond the upper. It is of` paramount importance that the mouldfits accurately the edge of the insole.
The height of the stiffener in relation to the back and depth of quarter, isa subject of some difference of opinion; in ladies’ work it is higher inproportion to the total height and keeps its height further down the quarterthan in men’s (see Figure 126).
A dipping tank with a vertical moving grid is supplied by variousmachinery companies. This is very much quicker for moulded stiffenerswhen using a fluid adhesive; paste, however, must be applied by hand.Celastic and similar stiffeners are softened (or conditioned) by varioustypes of conditioning machines identical to those used for puffs (see p.274).
A small upright and oval-shaped roller is frequently used forsmoothing the linings down to the stiffener at the seat and pulling themforward, otherwise this has to be done with the fingers.
Puffs and their Insertion
The object of the toe-puff` (see Figure 127) is to reproduce the shape ofthe last and to retain that shape permanently throughout the life of theshoe. Its use as a protector of the foot is practically negligible as thematerial used is in many cases of an extremely light substance. Anexception to this rule is a protective steel cover placed
273
MACHINE LASTING FOR WELTED WORK
Figure 127. Standard shape of toe-puff for men’s work. Theshaded portion os skived.

over the toe in the case of boots made for miners; this is, however, not apuff but, if anything, serves to illustrate the fact that the puff inside thecap is inadequate to afford any substantial protection by itself.
The combination of the puff at the toe end of the foot and the stiffener atthe heel serves to keep the shoe in shape during the whole of its life.
There are various types of puff or toe-case used at the present time, butthe three main types are: (l) the celastic or similar type, (2) the vulco unit,and (3) the celluloid type. In Goodyear welted work the first is now themore popular type. In this case the puff is of a cotton ply baseimpregnated with celluloid and before treatment is fairly soft. It isconditioned usually by being passed through a number of rollersimpregnated with acetone, or acetone—type solvent. After suchtreatment the celluloid partially dissolves in the acetone leaving the puffin an extremely soft and workable condition. Such a condition can becontrolled in length of time by the type of solvent used in softening; forinstance a puff for machine-sewn work should have a much shorterdrying time than is necessary for a welted type, as it has to be slipped offthe last very much sooner than the welted and the puff should be reallyhard before sewing. It will be found that the portion of a welted puffexposed to air, that is above the wire (see bed lasting, p. 283), will drymuch quicker than the area below the cap; in this case it should be drybefore removing the wire. In all cases the shoe is better left for a shortperiod after slipping, as the inside face of the puff (formerly next to thelast) does not really dry hard until it has been exposed to air for a shortwhile.
In the case of the vulco unit or hot puff, the puff in its original conditionis hard, of a tarred nature. It is brought to a mellow condition in a heatedpress and has to be pulled over fairly quickly after being inserted; it maythen be left if required as its subsequent softening treatment is by steam.The apparatus used is a steamer with either electrically or gas-heatedwater, the toe being inserted into a small hole with the shoe standing on ashelf. These heaters can be obtained to accommodate up to four pairs;they require a certain amount of attention however, and deteriorate verysoon. This method is perhaps slightly cheaper, and the puff can besoftened at any time after pulling over. It will be seen that this is a decidedadvantage as work may be simply pulled on and left for any period; bybeing inserted in the steamer it becomes workable again whereas acelastic type has to be completely lasted within a certain time. The lastsmay thus be slipped much more quickly. It was widely used in the pastbut has died out to some extent in recent years, the main reason being thatwhen it has been broken in wear it will not recover like celastic.
The celluloid type is soft and in condition for working in its initialform. It is kept in an airtight container and must be lasted fairly soon afterbeing exposed to air; it is used fairly extensively on
274
MAKING

heavy boots but can be obtained for almost any kind of work. Its chiefdisadvantage is that it must be completely lasted within a reasonable timeof insertion as it is practically impossible to soften once it has set andextremely difficult to remove.
The celastic and hot puffs may be obtained in almost any substance orany shape and the skive may be lengthened and shortened at will. In theformer type the edge may be treated so that the extreme edge of the skivenever sets hard, thus eliminating the hard edge one sometimes feels inshoes with very light vamp linings.
In all three cases it is necessary to treat the last to ensure that the solventused for softening the toe-case, and in the case of the hot puff, the tar,which becomes liquid when hot, does not stick to the last; althoughplaced furthest away from it this liquid is inclined to seep through thelining causing the toe to stick to the wood. It is usual to use a chalkysolution, or grease, for this purpose and this is placed on the toe of the lastbefore pulling over either after or before insole tacking.
Attempts have been made with a measure of success to treat the lastswith a surface lacquer so that the above treatment is eliminated and thelasts may be used for forty or fifty times without attention.
With unlined shoes it is usual to stick the celastic puff to the inside ofthe vamp or cap with a strip of solution across the skive, before lasting. Itis important that the extreme edge of the skive be thoroughly stuck downas when the wearer inserts his foot into the shoe he may cause a fold toappear across the vamp on the inside which may prove extremelyuncomfortable. The puff in this case is conditioned with a brush dipped inacetone.
In the normal manner the puff is inserted after conditioning by placingit next to the upper and folding the pocket and vamp lining over it, that is,between the puff and the last. It is sometimes advisable to use sidelinings; in the case of ordinary cap work these may have been previouslyinserted in the closing room, but with plain fronts, brogues etc. a wingpuff is used and the side linings are placed up to the end of the skive anddown to the seam joining vamp and vamp lining. These have to someextent been eliminated by the use of swansdown-backed combinationvamp linings and their value, except with very light leather on men’swork, is very debatable.
Using heated puffs, the puff is laid to the cap and both are inserted intoa press the plates of which are heated both top and bottom, pressure isapplied from the top plate and the cap and puff are fused together. Thepresses are electrically heated and are known as fusing presses.
It was the practice before the previously described materials becameuniversal to use leather puffs, and some are still being used. The puffs inthis case were cut to shape on a press and whatever skiving was necessarywas often carried out either by hand or on a machine such as the ‘Fortuna’Skiver. The puffs were wetted and left to mellow after which a paste suchas ‘dextrin’ was applied
275
MACHINE LASTING FOR WELTED WORK

to stick them to the caps. A considerably longer period was necessary toallow the puffs to dry and harden. lt was difficult to obtain such neat toesas with ‘celastic’ puffs as their substance had to be so much greater. Theirwearing qualities, however, were undisputed and they could be shapedinto their original position after being broken down.
The upper is now ready for lasting (see Figure 128) unless it is to bemulled.
Mulling
Lasters are familiar with the fact that on damp days uppers last moreeasily; they stretch with less effort, are more fiexible and breakages arereduced. The purpose of the BUSMC Mulling Plant is to reproduceartificially the conditions existing on a damp day but at the same time tospeed up the resulting effects by using heat in addition to moisture.
Laboratory tests show that if full-chrome leather is subjected to anatmosphere of 100 per cent relative humidity (R.H.) for a long enoughperiod (about a week at ordinary temperatures or 2 to 4 hr. at l00° F.) itsbreaking strength and stretch are increased and it stretches more easilyunder a given load. lt also becomes more flexible and increases in areaabout 10 per cent.
When the mulling plant was first introduced too much emphasis wasplaced on the area increase as a means of clicking economy. In fact, in aclosed upper, as distinct from an isolated piece of chrome leather, theincrease is much less and the chief advantage of it is that when the mulledupper is lasted in this enlarged condition and then allowed to dry, theshrinkage gives very tight lasting.
Other materials such as vegetable leather and fabric show the variouseffects mentioned to a lesser extent than full-chrome leather but ingeneral the treatment appears to be beneficial and gives improved lasting.
The mulling apparatus itself is composed of a number of chambersthrough which warm saturated air (l00° F. and 100 per cent R.H.) iscirculated by fans. The moisture is obtained by passing
276
MAKING
Figure 128. The upper, laced up ready for lasting.

the air over water. The uppers are hung in the chambers on hooksmounted on pillars in the centre of each. The humid air circulates roundall of them, thus ensuring equal treatment. The chambers themselves arelined with asbestos to provide insulation and resistance to damp. Thenormal time is 2 to 4 hr.
A criticism of mulling is that the fibre of the leather is adverselyaffected. Repeated tests, however, have shown that this is not the case andthe natural fat of the leather is not displaced or removed in any way as aresult of conditioning.
In U.S.A., mulling is much more commonly done than in this country,but, as will be seen in Part IX, steaming, which is a form of mulling, isused extensively in the slipper and slip-lasted trade in this country.
Drying or Setting
Although this process actually follows lasting, it is regarded as anintegral part of the mulling process and, accordingly, is dealt with here.
The mulled upper after lasting is rather damp and it is necessary toremove this dampness before the last is slipped. This operation isnecessary in the case of work which has to be slipped after lasting. It isusual to instal a drying plant in departments making machine-sewn workafter pounding, the drying-out process taking about l hr. It certainlybrings the uppers down to the lasts and at the same time helps to hardenthe puffs. With welted work again it serves a very useful purpose; it isinstalled after welt beating and in addition to drying the uppers it alsodries out the welts, thus speeding up the time between welt sewing androunding, and reducing the schedule of the last turnover.
The same apparatus is extensively used after levelling to dry out thesoles. In both cases of course the upper is dried in the process although onwelted work the extra time on the last enables the uppers to dry outnaturally.
These dryers are not installed exclusively with the mulling chamber,they are in much wider use for welts and soles than for setting the uppers,especially the sole drying plant.
The plants are supplied with a varying number of chambers in whichwarm dry air(ll0° F. and 30 per cent R.H.) is continually being circulated,both in the chamber and around their walls. The heating is usually byelectricity or steam although gas-heated plants are available. In all casesthe temperature is kept constant automatically and can be set forwhatever use the plant is put to. Dryers are made in various shapes to fit inwith the lay-out of the department concerned, and it is claimed that adryer takes up no floor space as its area is very little greater than the floorspace that the racks in it would take up. There is a good deal of` truth inthis, and it is a very useful piece of equipment to have in the factory.
277
MACHINE LASTING FOR WELTED WORK

LASTING
Tacking Backs
The upper of the correct size and correct foot is first placed in aninverted position over an upright stand with a last peg; this applies to bothhand and machine methods. The correct last is then placed on the peg andthe upper is lifted until the moulded feather line on the stiffener fits theupper edge of the insole; the centre of the upper, either the seam,back-strip or counter, is located centrally to the back of the last and theupper is drafted over.
Hand Method—Holding the upper in position with his left hand theoperator tacks over the upper, lining and stiffener with one or two tacks.On ladies’ work he smooths down the back and inserts a rivet about 1
2in.
from the top of the quarter to keep this portion straight during pullingover; this rivet should not be hammered down and should be withdrawn,preferably after side lasting, to avoid its being driven home by the backplate and heel band of the bed and seat lasters; if not the upper may bedamaged in removing it.
Machine Method—The upper is placed on the last, with the stiffenercorrectly located; the operator, holding both hands either side of theupper and last, stretches it evenly to locate it centrally and keep itsposition, and then moves the stand into the machine. This action causesthe machine to wipe over the upper and insert two tacks, about 7
16in.
square shank machine tacks for men’s and 5
16to 3
8in. for ladies’, the
substance of upper lining, stiffener and insole being the deciding factor asto length of tack.
Pulling Over
The upper having been tacked to the insole the next step is the pullingover operation. Types of machines vary considerably in their mechanicaldevices, but all of them incorporate the following few essential features:
(l) a central foot against which the insole and last are placed;(2) a front pincer, and in the case of the five pincer machine, two more
sets of pincers on each side. On the three pincer machine there is one setonly on each side with wider jaws.
(3) a heel rest which automatically finds its own level on the back of theshoe when the machine is tripped.
(4) an oil check attachment in which oil passing through a valvecontrols the speed of movement of the updraw levers. These updrawlevers draw the pincers, after they have gripped the shoe, upwards ordownwards. The word updraw originally applied to the upright machinewhen their movement was in that direction. With the inverted machinetheir movement is down, but the direction in relation to the last isunaltered.
(5) a tackpot and devices for feeding the tacks to the carrier blocks fromwhere drivers will drive them into the shoe. While the
278
MAKING

tackpots, raceways and separators are very much the same, the method offeeding the tacks into the carrier blocks varies. With the ‘Rex’ or uprightmachines the problem is simple, they just drop point first down the sevenor five tubes into the carrier blocks and are in the correct position for thedrivers to drive them in. On the inverted machine tack delivery presents amore difficult problem. On the BUSMC No. 6 machine the tacks were
pumped (air pump) upwards into the tubes and after rounding the bend inthe tube their position was inverted and ready to enter the carrier block inthe correct position. The Standard method is to invert the tacks by theseparators themselves. On the BUSMC No. 7 however, the bend of thetube is inverted. The tacks fall from the separator as far as this bend, as onthe ‘Rex’, by gravity; the pump in this case then takes over and pumps thetacks straight into the carrier blocks. They are thus in an
279
MACHINE LASTING FOR WELTED WORK
Figure 129. BUSMC No. 7 Pulling Over Machine.

inverted position ready for the upward movement of the drivers to drivethem in. These pumps are worked by compressed air, this beinggenerated inside the cylinder while the machine is moving in the normalway, but their release into the tack tubes is instantaneous.
The BUSMC No. 7 Pulling Over Machine is illustrated in Figure 129.
In the operation itself the operator takes the initial stretch out of theupper by a bench pincer mounted on the tray of the machine, or by a pairof hand pincers; he then places the front into the front pincers in a centralposition, and then, one side at a time, the remainder of the forepart intothe side pincers, pressing the insole down to the foot. The machine is thentripped by a pedal, the pincers gripping the upper while the foot forces thelast into it.
At this stage the operator, on viewing the upper on the last, may use thevarious devices for straightening, lengthening or shortening the cap,straightening the front, and for releasing the front pincer for readjustmentof the cap; on most machines there is a foot-operated device formeasuring the length of cap. On the BUSMC No. 7 machine there is alsoa device for reversing the machine, releasing the shoe from the pincers,thus enabling the operator to remove it from the machine and start again.The Standard machines have provision for the shoe to be released withoutreversing.
Having located and gripped the upper correctly in the machine, thepedal is again tripped, the pincers drawing the upper over the feather andinwards. The clamp arms close and hold the shoe and the machineproceeds to drive in the seven tacks (five in the case of the three pincermachine) into the portion of the insole left between the edge of the insoleand the bottom of the already turned back outside insole channel rightthrough upper and insole and into the wood of the last. The width of thisportion is about 3
16in.
The machine has to be adjusted to the particular width of last, to ensuresuch accurate driving of the rivets, the adjustment being carried out verysimply by two pincer locating handles on either side of the machine. Theone on the left alters side and front pincers together, and the right sidehandle alters the width of the side pincers only.
280
MAKING
Figure 130. Cross-sectionof shoe after pulling over.The pull-over tacks pene-trate upper, lining andoutside edge of insole, andare embedded in the wood
of the last.

As all the rivets (approximately 9
16in.), have ultimately to be
withdrawn, they are left sufficiently high to enable the heads to be takenout (Figure 130). The distance they are driven in may be regulated by theheight of the drivers themselves. The height of the foot also effects this,besides deciding how much upper shall be gripped by the initial hold ofthe pincers.
The correct location for men’s work is one rivet at the toe, two oneither side across the line of the cap, or where the cap line would lie, andone further down the forepart nearer the joint on either side (Figure 131).It is common practice when using the five pincer machine to use theselatter two rivets as anchor tacks for the wire to be inserted by the bedlaster. This is not possible, of course, on the three pincer machine as therivets are not low enough.
Machines in common use are the BUSMC ‘Rex’, No. 6 and No. 7(I.P.O.) and the Standard Engineering Co. No. 5 and No. 7.
Side Lasting
The upper should now have assumed the shape of the last in its mainfeatures, but the means of securing it are only very temporary. The nextportion to assume a more permanent fixing should be the sides. At thispoint it should be emphasised that this is the correct sequence ofoperations from pulling over to toe lasting. It is extreme ly unwise to alterthe sequence as this will almost certainly result in untidy linings, andfullness in the waist and the front of the seat.
The ‘Consol’ machine which drives a soft tack through the upper,insole and into the wood, has almost entirely disappeared. lt was firstdisplaced by a stapler driving a staple from the upper side, through upperlining and the raised outside and inside channel of the insole, finallyclenching itself on an anvil located by the operator in the
281
MACHINE LASTING FOR WELTED WORK
Figure 131. Boot after pulling over. There are three tacksat the side (two at cap and one at side) and one in toe.

inside channel. These machines, which have been used extensively forsome time, are the BUSMC Goodyear Upper Stapler, and the StandardUpper Side Staple Laster Model 73.
These, of course, save the lasts as there is no penetration of the wooddown the sides; they also eliminate the difficulty of getting out the sidetacks, and so save innumerable needles on the welt sewers. By cutting outan operation and saving these needles it is very much cheaper. Theoperator requires to use his hand pincers for lining, clearing andtightening the upper. Both of the machines mentioned are said to have awiping action. The machine construction itself is not of great importance;the great fact is that it changed a principle of machine welting. Previouslythe method of machine welting attempted to follow the hand method onthe insole; the outside channel only was opened when wet and the insidechannel left down, this being wetted just before welt sewing and opened
up with an old knife or similar tool. After welt sewing it was closed andsometimes stuck down; this practically eliminated the ridge seennowadays on welted shoes particularly those with lighter insoles and italso made welted shoes considerably more flexible. With the advent ofthe stapler, however, the inside channel was permanently opened on thedouble lip turner, and the stapler ensured that there was no possibility ofits ever being closed. Further steps to ensure this are the use of solutionover both channel lips and opening dry; the ridge is thus permanently onthe insole (Figure 132). Whatever way we view this sacrifice of principleto speed, it has certainly not improved the flexibility of machine-madewelted shoes, and apart from easing the problems of manufacture in theshape of clean insoles and ease of access of the staple, it appears to be aretrograde step. The wire used on these earlier machines was 0-022 in.gauge.
The latest machine for side lasting, however, is a much improvedmodel as it incorporates pincers which can be used at will by the operatorby his use of an alternative pedal, and uses a larger and stronger staple.
The number of staples is really a question of the substance of upper andlining and the fit of the upper from toe to heel; an average size 8 shoeshould not require more than seven or eight staples down each
282
MAKING
Figure 132. Cross-section ofshoe after side lasting. Thestaples are not removablealthough they are superfluousafter sewing; being slightlyup the channel they are some-times cut out by the inseamtrimmer.

side (see Figure 135) with a staple over each seam if possible. Themachines in use generally of the latter type are the BUSMC Model ‘B’and the Standard Engineering Co. Pincer Side-staple Laster Model 172.
Toe Lasting
The bed laster has now completely superseded the ‘Consol’ for thelasting of welted toes. The principle of the machine is that a moving head,with a pair of plates accurately fashioned to fit the contour of the last,moves upwards over the upper, drawing it to the last and finally movingin to the channel. In such a position a wire is secured to an anchor tack(either inserted by the operator or placed there by the pull-over), placeddirectly under the plates and tightened as the plates are withdrawn, tohold the upper in the position in which the plates have placed it (Figure
133) the other end of the wire being wound around the anchor tack on theother side, and being finally cut off as close to the tack as practicable.This is important as stray ends of tacks and wire are sources of damage.
While the plates make their upward movement, the last, which hasbeen previously mounted on a jack pin by the operator, is held in positionon a rest, which fits across the cap line, by means of a ‘foot’ or ‘holddown’ whose shape approximately corresponds to the contour of theinside channel.
Although in principle most bed-lasters are the same, various typesdiffer slightly in operation. On the BUSMC No. 7 the shoe is placed on toa jack pin, the ‘hold-down’ is brought down manually by the operator andthe head adjusted to the length of last by a hand wheel at the extreme endof the machine; the plates can be adjusted to the angle of the last as it isheld down, by tipping the head to either side or up and down to level theplates with the last in length
283
MACHINE LASTING FOR WELTED WORK
Figure 133. Shoe after toe lasting.

as required. The operation of wiping-in the toe vertically is carried out bythe foot and the horizontal movement by a handle ; it is usual to applydownward pressure with the heel after the toe has been wiped-in, theobject being to flatten the feather as much as possible; the ‘hold-down’ isthen released with the knee, the wire attached and the head released andthe shoe removed.
The seats, too, may be lasted using wiper plates at the opposite end ofthe machine to wipe the upper over the insole; in the case of the seats,however, the jack is brought to the level of the wiper plate by a small,direct, vertical movement of a pedal, the sequence in this case being thatthe wiper plates are placed over the already lasted seats while the toes arebeing lasted. On completion of the toes the plates are half withdrawn anda hand tacker is employed to tack down the upper, stiffener and lining,through the insole, the tacks just clenching on the seat plate of the last.This method of lasting seats
284
MAKING
Figure 134. BUSMC No 8 Toe Lasting Machine.

however, has been largely superseded by the use of the heel seat lastingmachine but the standard of work when properly carried out wasextremely high.
The BUSMC No. 8 Toe Laster, while in principle being the same as theNo. 7, differs very much in mechanical details resulting in very much lesseffort to the operator and consequently greater output. The shoe is placedon to the rest and by one movement only the operator secures the shoe by(l) a forward movement of the back plate, (2) an upward movement of thetoe rest, (3) a forward and slightly upward movement of the foot. Thewhole of the carriage, with the shoe inserted, is floating, and is located bythe wiper plates themselves.
As one movement locks the shoe for lasting, so one knee movementreleases it. The action of the plates is controlled, as in the No. 7, by footand hand levers; their action however, is an hydraulically assistedmovement, and after starting to wipe, is automatic. It will be noted thatthere is no jacking pin, and no arrangement for lasting seats, as themovement of the plates is entirely forward, and so it cannot be used formachine-sewn work but is purely a welted toe laster, The BUSMC No. 8Toe Laster is illustrated in Figure 134.
With all types of bed lasters the operator himself removes the frontrivet, and spreads the toe over and above the plates during their upwardmovement with a tool known as a toe spreader. The use of this tooltogether with the timing of the horizontal wipe, forms the greater part ofthe skill required to carry out successfully what is perhaps the best of allmethods of lasting toes.
To summarise, the BUSMC No. 7 and the Standard Engineering Co.‘Evolution’ are both manually operated and are capable of lasting bothtoes and seats. The BUSMC No. 8 however, is the onlyhydraulically-assisted machine. The Standard Engineering Model 240 isfor toes only and is manually controlled. On all these types the toe platesare changeable for lefts and rights by simply reversing them in themachine. They are made in pairs with a division in the centre of the toe.
It is usual after toe lasting to allow the toe cases to harden beforeproceeding further, although the seats may be lasted. It is a good stage atwhich to carry out any inspection, as any correction may be made whilethe toe is soft, and without having to remove numerous seat lasting tacks.
Seat Lasting
This operation (Figures l35 and 136) may be carried out by a ‘Consol’,bed lasting machine or a heel seat lasting machine.
‘Consol’—The ‘Consol’ has again been largely displaced by the heel seatlaster, but the method was in use for many years and deserves somecomment. The machine itself is partly described in Chapter 22 (p. 329).The operator starts at the back, lasting towards the
285
MACHINE LASTING FOR WELTED WORK

toe and in this operation the pincers are kept straight (pincers are operatedwith right and left twist, controlled by the knee of the operator). Thecarrier block wipes the upper over and inserts the tack. These machinesare fitted with a double tackpot and raceways to provide two sizes of tack,so that any variation of substance can be taken care of. The tacks shouldbe on the inside, as near to the edge of the upper as possible; this appliesto all seat lasters. Tacks should be long enough just to penetrate the insoleand clench on the plate of the last; the flatness of the finished seat by thismethod is not to be compared with that of the other two.
Bed Laster—The plates are made in pairs and are closed by amanually—operated lever. The method is usually used in conjunctionwith the lasting of the toes; the shoe is placed on a jack and a pedal bringsthe seat up so that the feather (uppermost side of the edge of the insole) isabout level with the underside of the plates. The plates are closed so thatthey just cover the upper and stiffener when wiped in; the action ofclosing the plates may be repeated if necessary to ensure a flat surface.The plates are then brought partly back so that about 1
8in. of upper is
showing beyond the edge of the plate. The operator takes in his left hand ahand tacker replenished by a mechanical tackpot, places the nozzle up tothe plates, and holding with his right hand a small grip hammer, taps theend of the driver bar driving in the tack. The plates may, if required, bepassed over the seat to emphasise its flatness still further.
286
MAKING
Figure 135. Shoe after seat lasting. The diagram also illustrates the positionsof the side lasting staples.
Figure 136. Cross-sectionof seat after lasting. Theinsole is flat with no chan-nel and the upper is foldedover, machine-sewn fash-ion. The tacks go throughthe upper and the insoleand clench over on theplated seat of the last.

The result of all this is a very flat seat. Given well cut uppers of suitablematerial, the correct stiffener etc. it is doubtful whether any furtheroperation, in the form of Seat hammering or pounding will improve it.
Heel Seat Laster—This latest method of lasting seats is many timesquicker than either of the two previously mentioned. The machine has atackpot, or two tackpots, with tacks fed by gravity through tubes to the
drivers, the tacks for each shoe being separated and fed to the drivers bythe action of the machine on the previous shoe. An adjustable heel bandregulates the distance the shoe is placed into the machine and clamps theupper. The shoe is placed on a jack and is slid into the machine with apedal moving the shoe up to a foot; the adjustment of this foot is veryimportant as it decides the relation of the wiper plates to the feather. Thewiper plates them-
287
MACHINE LASTING FOR WELTED WORK
Figure 137. Standard Heel Seat Lasting MachineModel 216AMO.

selves carry the tacks, and the distance they travel is regulated by an armon either side of the machine and consequently deciding where the tacksare driven in. The Standard machines use tack fingers for carrying thetacks, their position being regulated by hand wheels. The wipersthemselves have a double action, the first stroke being a breaking-downmovement and the second a levelling and tack-driving movement. Thereis a lever to suspend the tack driving action on either side of the machineand it is used for setting-up purposes. The machine is tripped by theoperator using his right hand while in his left he holds the toe of the shoe.These machines deliver about eleven tacks per side, but the amount maybe reduced, as for ladies’ work, by closing up some of the raceways on thetackpot, or disconnecting the tubes. They are manufactured by theB.U.S.M.Co., Standard Engineering Co. and by Moenus (Germany).
The tacks used are from 5
16in. upwards according to the substance it is
required to penetrate, and are always square shanked machine tacks. TheStandard Heel Seat Lasting Machine Model 2l6 AMO is illustrated inFigure 137.
Pounding as Applied to Seat Lasting
With the ‘Consol’ method it is necessary to pound the work after seatlasting (see p. 332). The Standard Engineering Co. had a seat-hammeringmachine for levelling the seats, but the usual method is pounding. Withthe bed and seat laster a much flatter seat is obtained and with a goodoperator and good conditions pounding is not absolutely necessary; thereis no hard and fast rule over this, it being largely a matter of the standardrequired and the materials used, and the preparation which goes intoprevious operations.
It may be noted in all three methods that emphasis is laid on the tacksbeing as far in as possible. As there is only about 1
2in. Of upper lasted
over, one should bear in mind that beyond these tacks, the seat rivets andheeling pins have to be inserted, the former being as close to the edge ofthe insole as possible without going over the edge, and the heeling pinsbetween the two. ln the case of the seat laster the further in the tacks thegreater the area of wipe. and the flatter the seat.
288
MAKING
21
THE GOODYEAR WELTED METHOD
SEWING IN THE WELT
Upper Trimming
Having now completed the whole operation of lasting the shoe, thenext operation is solely for the purpose of preparing for welt sewing.Having ensured that the puffs are reasonably dry, the surplus materialabove the staples in the sides and the wire at the toe is trimmed off (Figure138).
It is undesirable to trim off more than is necessary as (l) the wires areapt to slip over the trimmed surface, (2) there is less possibility of theneedle holes made by the welt sewer ‘running’ and (3) it is far better forthe circular knife of the inseam trimmer to have material to ‘bite’ intothan to slip over a too closely trimmed surface, thus ensuring a flatterseam.
The machines commonly used are the BUSMC ‘Rex’ Upper Trimmerand the Standard Engineering Co. Model 76. These machines are ofsimilar construction, the method being that two circular cutters are set,with their circumferences overlapping, very close together, one outsideand one inside; the inner knife incorporates a feed wheel which runs onthe inside channel and besides helping to feed the work along ensures thatthe upper is trimmed to the required level. A water pot is also includedwhich drips water on to the surface of the lower knife with the idea ofpreventing clogging; this happens more frequently however, in the caseof vulco units or other tarred puffs than with the celastic type.
An earlier model ‘Rex’ Upper Trimmer had a semi-circular kniferunning on to the upper lip of the inside feed wheel; this feed wheel,before the advent of the double lip turner, was used to open the insidechannel; the knife had a forward prong projecting beyond the feed wheel.This machine has, however, been largely displaced.
289
Figure 138. Cross-sectionof shoe showing the sur-plus upper which is re-moved to assist the weltsewer.

After upper trimming,the pull-over and jointing rivets are removed,and the anchor tacks holding the wire are raised, so that they areaccessible for removal after welt sewing. lt may be that these tacks andwires are removed altogether at this stage, the bonding of puff, outsideand lining keeping the toe in shape.
In the opinion of the writer however, this method, although cutting outthe subsequent operation of removing the wires before inseam trimmingand saving needles during welt sewing, is not to be recommended as theshape of the toe is liable to be distorted.
Welt Sewing
The idea of the machine is to reproduce as nearly as possible, bymechanical means, the action of the hand sewer. That is, by passing aneedle through the welt, upper, lining, and the upturned lips of apreviously prepared insole, the effect will resemble to a great extent thehand method. Figures 139 and 140 show where the differences lie,especially in the insole.
It will be noted that the welt is sewn, in the case of the machine, in apartly vertical position in relation to that of the hand method. On themachine the needle passes through the groove of the welt from theoutside, through the welt itself, penetrating on the edge of the bevelwhere it meets the grain, through upper and lining, through and slightlyunder the upturned lips of the insole, emerging at the bottom of the insidechannel (Figure l40c). The double thread of the chain-stitch made by themachine is thus buried in the groove of the welt. In subsequentoperations, inseam trimming and welt beating, the welt is turned back sothat the edge of the bevel and the centre of the groove form a hinge and noundue strain on the stitches should result from the hinging.
The welt-sewing machines themselves do not vary between makers intheir fundamental essentials which are (1) a welt guide, (2) a
290
MAKING
Figure 139. Boot after welt sewing.
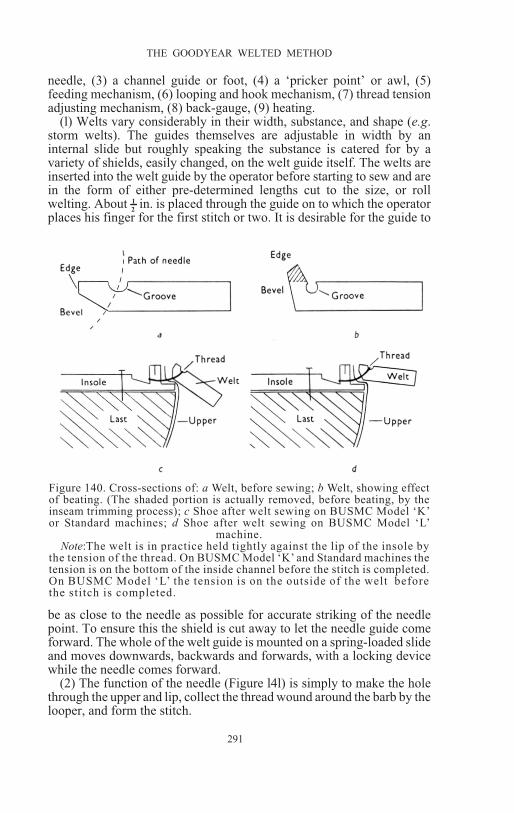
needle, (3) a channel guide or foot, (4) a ‘pricker point’ or awl, (5)feeding mechanism, (6) looping and hook mechanism, (7) thread tensionadjusting mechanism, (8) back-gauge, (9) heating.
(l) Welts vary considerably in their width, substance, and shape (e.g.storm welts). The guides themselves are adjustable in width by aninternal slide but roughly speaking the substance is catered for by avariety of shields, easily changed, on the welt guide itself. The welts areinserted into the welt guide by the operator before starting to sew and arein the form of either pre-determined lengths cut to the size, or rollwelting. About 1
2in. is placed through the guide on to which the operator
places his finger for the first stitch or two. It is desirable for the guide to
be as close to the needle as possible for accurate striking of the needlepoint. To ensure this the shield is cut away to let the needle guide comeforward. The whole of the welt guide is mounted on a spring-loaded slideand moves downwards, backwards and forwards, with a locking devicewhile the needle comes forward.
(2) The function of the needle (Figure l4l) is simply to make the holethrough the upper and lip, collect the thread wound around the barb by thelooper, and form the stitch.
291
THE GOODYEAR WELTED METHOD
Figure 140. Cross-sections of: a Welt, before sewing; b Welt, showing effectof beating. (The shaded portion is actually removed, before beating, by theinseam trimming process); c Shoe after welt sewing on BUSMC Model ‘K’or Standard machines; d Shoe after welt sewing on BUSMC Model ‘L’
machine.Note:The welt is in practice held tightly against the lip of the insole by
the tension of the thread. On BUSMC Model ‘K’ and Standard machines thetension is on the bottom of the inside channel before the stitch is completed.On BUSMC Model ‘L’ the tension is on the outside of the welt beforethe stitch is completed.

(3) The channel guide or foot runs in the inside channel and movesbackwards and forwards with the awl; together they form the feedingmechanism; the cut of the needle also has a considerable bearing on thefeed. The main function of this channel guide is to determine the height ofthe needle penetration in relation to the insole channel. The single threadshould be at the bottom of the channel and it is a good guide if the needlemarks are showing slightly on the insole.
(4) The pricker point or awl, moves in and out and backwards andforwards. Its function in the former action is to bring itself slightly in theinside channel in front of the needle in which position it feeds the shoeinto the direct line and withdrawing as the latter moves forward, it thenmoves to its original position by the length of stitch required. A gauge isfitted to the machine to set its forward position.
(5) Feeding mechanism—see (3).(6) Looper and hook (or thread finger). The looper has an eye through
which the thread is permanently threaded. It moves through 360° aroundthe needle, the hook holding the thread in position while the looper placesthe thread in the barb of the needle.
(7) There is always a ‘constant’ tension easily adjustable, and themovement of a take-up lever gives a variable tension. This take-up levermoves through a fixed arc giving a maximum tension at its uppermostpoint. Both of these are adjustable by two knurled knobs located at theback of the machine above the thread tension wheel. Any slack orvariation is taken up by a separate spring-loaded lever situated directly infront of the main take-up lever.
(8) The back-gauge is spring-loaded and self locating, working on theportion of the last below the feather of the insole; its function is to help theoperator to steady the shoe as the needle enters it and it is timed to lock atthis point.
(9) The direct method of gas heating, a gas-heated water jacket on thewaxpot with gas on the rolls, has practically died out. It was replaced by asteam generator feeding steam to all parts of the machine through anumber of pipes. This was an excellent method of heating as all partswere kept at a constant temperature. The modern method is a number ofelectrical elements situated at the various points necessary to keep thewax warm.
292
MAKING
Figure 141. Goodyear type stitching machine needle.

The BUSMC Model ‘K’ Welter and the Standard Engineeringcompany Model 77 are in common use and both have a reversing actionto enable the operator to dispense with the hand wheel and ensure thecorrect stopping position, that is, with the needle right back and minimumtension on the thread. A thread cutting device is mounted on the looper toenable the operator to dispense with a hand knife for cutting the thread.
The operation of the machine is highly skilled as the shape of thebottom of the shoe and the level of the feather line depends on theoperator’s skill. If it were possible to sew these welts in automatically,with a guarantee that all shoes would be alike, the operation of roundingwould be unnecessary and the soles could be pre-rounded and channelledbefore attaching.
The size of needle used depends on the type of work — about size 41needles with nine or ten-cord thread for men’s and size 43 needles forladies’ with six, seven or eight-cord. It is always desirable to carry aslarge a thread as the needle will take, provided it is satisfactorily buried inthe groove of the welt, both for strength and the filling up of the needlehole thus adding to the waterproofing qualities of the shoes, although toolarge a thread is subject to friction when passing through the hole madeby the needle which tends to weaken it.
The insole scarf mark of the lip cutter and scorer (see p. 232) are thestarting and stopping points for the operator. The first and last stitchshould be high up on the insole channel to prevent the seats from‘fish-tailing’ or spreading.Model ‘L’ Welt Sewer—The latest machine for sewing in welts is theBUSMC Model ‘L’. This machine incorporates many new features; It isexclusively motor and shaft driven with a complete absence of belts; thelubrication system is entirely automatic, the drip feed system beingvisible for checking by the operator. The machine is illustrated in Figure142.
The greatest change perhaps is the location and action of the awl, whichstands on the same side as the needle close to it and working parallel to it.This ensures a much more positive and continuous feed as the awl reallypenetrates the material coming almost right through to the inside channel,and the needle merely follows in the hole instead of having to punch itsway right through; both of course enter from the welt side.
The back-gauge fitted to all previous types of welt sewers has also beendispensed with.
The welt is presented to and laid on to the feather in a different manner.It is put in a position very much nearer to the ultimate position it will takeup after welt beating. This practically eliminates the hinging effect, andconsequently the strain on the stitches is almost nil. On all previous typesof welt sewers the welt is laid virtually flat to the side of the last; theturning back, therefore, involves a considerable amount of strain on thestitches especially around the
293
THE GOODYEAR WELTED METHOD

toe, as the width of the top side of the welt has to be increased when thewelt is turned back. The knife attachment on the welt beater (see below) isdesigned to ease this strain, but it must be borne in mind that the welt willalready have been turned from the natural position in which it was sewninto by the feed wheel of the inseam trimmer. This strain is considerablyincreased if the needle has penetrated the groove and bevel of the welt too
far down, or the welt is sewn below the feather. The failing of the seam inwelted shoes is not uncommon and this method seems a considerable steptowards helping to lessen it. Another new feature is that the pull on thethread is made towards the centre line of the insole and the tensionincreases gradually from after the loop is made until the stitch iscompleted. It is thus drawn tight on the welt without undue strain on theinsole.
The operation of this machine is considerably less exacting than that ofprevious types it being claimed that 33 per cent less energy
294
MAKING
Figure 142. BUSMC Model ‘L’ Welt Sewing Machine.

is expended than on any previous model. The heating is all electric, thetemperature of the waxpot being thermostatically controlled.
Tack PullingBefore inseam trimming it is necessary to remove the anchor tacks and
the wire attached to them; this is carried out by hand with a pair of cuttersor a tack knife. The insole tacks are removed on a machine with a rotatingscoop. This scoop goes under the heads of the tacks and digs them out ofthe insole. lt is important that no tacks are left in at this stage as it will bedifficult both to slip the shoe off the last and to remove the tacksafterwards from the inside of the shoe.
Inseam Trimming
The machine used consists of a large adjustable, funnel-shaped,sawtoothed, rotating knife, a feed wheel running on the uppermost side ofthe welt (flesh side), another feed wheel running on the inside channel, afloating spring-loaded lower table, and a means of taking away thesurplus material, usually a fan.
The operator, by means of a pedal, opens the inside feed and lowers thetable. The shoe is fed by the rotary movement of the upper feed wheel onthe welt and the inside feed wheel, thus bending it back. As the shoemoves along, the rotating knife cuts off the surplus material to just abovethe sewn seam (Figures 143 and 144) a fan taking away the wastematerial. The machine is fitted with a grinding
295
THE GOODYEAR WELTED METHOD
Figure 143. Cross-sectionof shoe showing inseamtrimming. All surplus mat-erial above the dotted lineis removed. The action ofthe feed wheels tends tobring the welt nearer itsultimate position.
Figure 144. Boot after inseam trimming.

wheel for knife sharpening. The knife itself may be moved downwards atabout 45° or horizontally, by a simple quick adjustment.
It is an extremely important operation, for if mishandled the stitches arecut (knife too low) or the seam left too high. The consequences of theformer are that the whole bottom of the shoe will come away, and of thelatter that the seam will show through the insole, the shoe will be too rigidand excessive bottom filling will have to be used to fill the cavity. Thisoperation should be carried out as soon after welt sewing as possible andwhile the welts are in a mellow condition. The machines in use are theBUSMC Model ‘C’ and the Standard Engineering Co. Model 171.
Welt Beating
As with inseam trimming the welt should be in a mellow or pliablestate. The object of the operation is to complete the ‘hinging’ effect, andflatten the welt so that it is at right·angles to the upper (Figure 145). Afterbeing wet prior to insertion the welt is swollen and the operation brings itback to its original substance and closes the fibres.
The welt is placed, with the shoe inverted, on a flat round floatingtable. A hammer moving in a vertical direction descends on to the flesh
side of the welt and on to the already trimmed seam. A knife is fittedwhich inserts a series of cuts in the flesh side of the welt only just overhalf` way through and lying at a flat angle in the welt. These cuts ease thestrain on the outside circumference of the welt at the toe only; they shouldfinish short of the seam; the action of the knife is automatic when thepedal is depressed.
The pressure on the hammer is spring—loaded and is adjustable, as isthe height, in order to cater for various substances of welt; the strength ofthe blow can thus be completely controlled.
Welt Drying
At this state it is advisable to create a pool of work to let the welts dryand harden. A drying cabinet is often installed to cater for this; with thismethod dry air is passed over the work several times per
296
MAKING
Figure 145. Cross-section ofshoe after welt beating. Thewelt is in the correct position,the ‘hinging’ effect havingalmost closed the groove withthe thread inside it.

minute according to the speed of the fan, while being kept at atemperature of about 98° F.
With both sides of the welt exposed to dry and partly heated air it driesvery rapidly, about 20 min. being the usual time for welts in a dryer. If theflesh side of damp leather is exposed, the drying time of the whole isgreatly reduced. Natural drying at this stage takes considerably longerthus tying up floor space and lasts.
The sole, being on the average considerably thicker than the welt andbeing cut from bend, is the stronger part of the two. The problem then is tomake the stronger member conform to the weaker, i.e. the sole comedown to the welt.
It is essential for good shoemaking to make welts dry and rigid, andsoles soft and pliable for rounding and stitching.
It will be found that any form of skiving, e.g. welt shank skiving andwelt butting, can only be carried out accurately on perfectly dry leather.
Welt Shank Skiving
On work carrying a leather sole it is customary to differentiate betweenthe substance in the waists by reducing the soles, reducing the welts, orinserting a middle in the forepart. The reducing of the welts takes place atthis stage of manufacture. With ladies’ work carrying a heel above 1 1
4in.
it is usual to reduce both waists. In men’s work the reduction depends onthe type of bottom.
The operation is very simply performed on a welt shank skivingmachine, which consists of a smooth table for the grain side of the welt,and a coarse feed wheel on the flesh side, both feed wheels beingmechanically driven. These wheels feed the welt into a stationary knifeset for whatever substance it is desired to remove. The operator simplyinserts the welt, holding the shoe in an inverted fashion, at the point whenthe reduction should start, and guides the shoe to the shape of the waist.
The skive itself should be slanted, that is it should be at its thinnest onthe edge of the welt, tapering until the seam is reached. This is achievedby setting the knife at whatever angle to the rollers it is desired. There isusually a shoulder on the corner of the knife to keep it away from thestitches. The main difficulty with this type of machine is that it is notpossible to keep a razor edge on the knife, and as with all splitting types ofmachines, the knives dig on hard welts and only skim soft ones.
The later types have dispensed with the stationary knives and top feedroll; instead a rotary cutter works from the flesh side of the welts to agiven depth. These machines are faster, and give a really consistent depthof skive with much less effort for the operator. The stationary knifemachine is in more common use; stationary and rotary cutter models aremade by both the B.U.S.M.Co. and Standard Engineering Co.
297
THE GOODYEAR WELTED METHOD

Seam Levelling
The level of the bottom having been now determined and the surplustrimmed down to the seam, the seam itself is sometimes levelled. Themachine used is an auto-leveller (see p. 316), fitted with stirrups, and theshoe is jacked up on to a pin and toe rest with the stirrup covering theseam. Whether the result is worth the trouble is a matter of personalopinion and it would hardly be wise yet to consider this operation as partof the process.
Welt Butting
The object of this operation is to skive the ends of the welts to meet theseats, or, if a seat lift is used, to blend the two together (Figure 146).
As a bench operation, each end of the welt was skived in turn to justbeyond the insole scoring mark. The ends were then tacked down and thewhole levelled with a hammer. This operation when carried out by a goodbenchman can hardly be equalled, as it is almost inevitable that the
gradual fall of an upper and lining standing vertical (when stapled to thechannel) to a position of being flat (when tacked over by the seat) will bedisturbed to some extent by welt sewing.
The machines in use do a good job, however, but approach the problemfrom a different angle. The back of the shoe is inserted up to a flat stopplate, which determines the place of the skive in proportion to the seat,and is adjustable to each size by a lever on the
298
MAKING
Figure 146. The ends of the welt: a before butting and tacking; b afterbutting and tacking. The seam is pressed in and a tack inserted in each sideof the upper. The welt is skived off to ensure continuity of like with either
seat or seat lift.

side of the machine. The shoe is held in an inverted position. Two platesgrip the seat immediately below the welt actually pressing into the seamitself; this action forces the two sides of the seat together with the weltsabove the plates. The knives, which partly find their own level on theanvils, move forward from the toe towards the seat, shearing off the weltsat an angle which is decided by the angle of the crease finders; thesecrease finders are made in angles from 3° to 7°, 3° for a light welt or longscarf, 5° for a medium, and 7° for a heavy welt or short scarf; they areeasily fitted into the anvils. The top surfaces of the anvils are perfectlyflat, as are the undersides of the knives; a jig is supplied for grinding theseknives to ensure the continuity of this surface; the whole is a precision joband even a small piece of wax will upset the scarf.
The BUSMC machine goes further since, while the anvils arecompressing the seat, two tacks, one on each side, are driven into theupper in an attempt to hold the seat in position after the anvils release theshoe. The Standard Engineering Co. machine is a welt butter only.
ATTACHING THE SOLE
Bottom Filling
There is now a difference in the height of the seam and the level of theinsole of about 1
8to 3
16in., that is, from the bottom of the inside channel to
the edge of the trimmed seam. It is the usual practice to fill this cavity andbring to one level the whole of the forepart ready for sole attaching(Figure 147).
The most usual method of doing this is with a compound of resin andcork. The compound itself is supplied already mixed, and is conditionedin a steam-heated cabinet until ready for use. It is applied with a spreaderwhich in turn is kept hot to prevent sticking. The compound is inserted toa level above the seam and rolled or pressed down. If correctly appliedthis is the best known method of filling bottoms, the theory being that theresin fills the needle holes and bonds the cork, and as the cork is thelightest and coolest known
299
THE GOODYEAR WELT METHOD
Figure 147. Cross-section ofshoe after bottom filling. Thesurface from the extreme edgeof the welt on one side to theextreme edge on the other sideshould be as flat as possible.

component for the purpose and the whole is easily applied, the
combination is ideal.
The compound is now applied with a spreader and pressed with a
vertical heated plate moving continually up and down. The operator
simply inserts the shoe between a spring-loaded rest and the moving
plate. A separate steamer keeps the compound in condition, the two
machines being placed side by side, electrically heated, with the press
electrically driven. The usual equipment is the Livingstone and Doughty
‘Setite’ Press and Conditioner.
On the old type of machine, water was gas-heated and steam kept the
filler at one temperature, the whole being one unit with the pressure being
applied manually by the operator by means of a heated roller.
There are a number of cold fillers available, but their use is chiefly
confined to the lighter ladies’ or machine-sewn work. In this case the
filler arrives in condition for applying in airtight tins and hardens when
exposed to air. There is now a machine for the application of cold bottom
filling which is also made by Livingstone and Doughty Ltd.
As to the operation itself, if insufficient bottom filling is used the sole
will cave in during manufacture showing the seam, and the insole will
cave in whilst in wear. This too, is one of the main causes of bottom
filling moving but on the other hand if too much is used the effect is very
obvious in the roundness of the forepart after levelling.
Shanks and Seat Lifts
Shanks are inserted at this stage to act as a bridge between heel and
forepart of the shoe. The shanks themselves are made of a variety of
materials, especially in ladies’ work.
With men’s work they are in the main of wood or steel, shaped to give
support to the waist, and at the same time about equal in thickness to the
height of seam. The method of attaching these shanks is to drive two tacks
through the shank and insole, clenching to the plate of the last.
Ladies’ shanks are made with a much greater curve to fit the waist.
Many of them are made of fibre, moulded steel being attached to it.
At this stage and on the same machine (an insole tacker) the seat lifts
are put on with about four tacks; the skive should be identical with the
welt and the edge placed at the start of the welt butting scarf.
They are placed with the grain side to the lasting allowance to permit
the finished or grain side to be visible on completion.
On work which has a stitched or wheeled seat, the lifts themselves are
bigger to allow for a row of stitching or indenting; their substance is the
same as that of the welt and their use seems to ensure the continuation of
the line of the feather, more so on the heavier type of shoe.
300
MAKING

It is not by any means universal to use seat lifts on all types of work. Itis difficult to lay down when and when not to use them, but generally 12to 13 iron edge is the limit; above that a seat lift is desirable.
It should also be borne in mind that this combination has a markedeffect on the pitch of the heel when the shoe is finished.
Solutioning
At this stage the bottom of the shoe is solutioned. The solution shouldbe spread primarily around the seam and welts, as the sole when appliedshould be stuck to the more permanent part of the bottom.
It is often stated that this layer of rubber helps to waterproof the shoebottom. This is rather wishful thinking as most rubber solutions used forthis purpose have a very small rubber content which is comparativelyinsignificant when the solvent has completely evaporated.
It is desirable to use rubber solution and not latex for this operation aspart of the area to be covered incorporates the seam and a narrow strip ofthe bottom filling; latex has to penetrate and ‘key’ into the material onwhich it is used, and these portions of the bottom do not absorb latex inthis way.
There are various machines for applying solution, but the fastest andbest method yet discovered is a brush in the operator’s hand with adispenser or some kind of airtight container in which to dip it.
Sole Tempering
There are two main reasons for tempering soles. The first and mainreason is to enable the sole to conform to the bottom and, being naturallythe stronger component, to come down to the already dry welt. Secondly,tempering enables the rounder to cut a channel to carry the stitching, sucha channel being opened, stitched, and closed again while the sole is in amellow state.
Sole tempering is a much debated operation for which numerousmethods are the ‘only one’. It is generally agreed that to find a universalmethod for all tannages and substances is really out of the question (seealso p. 235).
The usual method is for soles, which have already been solutioned orlatexed, to be placed in grids in a tank of water, and wetted for a suitableperiod, after which they are collected together and placed in a mellowingcabinet to remove excessive wetness and bring them to the soft mellowcondition ideal for working.
The great problem is time, the more precise the sorting the greater thechance of correct wetting. It is unreasonable to expect good results in adozen pairs which contains two or three different tannages but which areall given the same tempering time.
Two machines have been introduced for doing the job rapidly, thebetter known one being the Standard Engineering Co. Vacuum
301
THE GOODYEAR WELTED METHOD

Tempering Apparatus Model 78. ln this the soles are placed in a rackabove water in a chamber which is sealed and then evacuated by a pump.The soles, from which the air has now been removed, are then loweredinto the water by an external lever and the vacuum is broken. Air pressurethen drives the water into the empty spaces in the leather very rapidly (forvery heavy soles, pressure may be built up above that of the atmosphere, amodified machine being available for this).
After a few minutes, the soles are raised from the water and the vacuumis again produced; this helps to clear the surface water. The vacuum isthen broken and the soles are removed ready for use. The total time takenin some cases is only 6 min. giving an output of forty dozen pairs perhour. No further mellowing is required before attaching.
With the BUSMC machine the soles are placed in a cylinder which issealed and ,water is forced into the leather with a pressure of about 1,500lb/sq. in.
These machines certainly tempered the leather, but they did not stopthe tannages or grease moving, and are not at present in very general use.There are, however, a number of tempering and anti-mould solutions onthe market which seem to help the problem by speeding up normalwetting methods.
With light bend soles, which are stitched aloft, and waterproof soles, itis a sound idea to mould these dry with the correct mould; in some casesthe former may be lightly wetted. This saves drying time, and removesthe danger of staining, the only disadvantage being that it makes thingsrather hard for the stitcher.
A great deal of well-reasoned and scientifically sound facts have beenamassed by the British Boot, Shoe and Allied Trades ResearchAssociation on this matter, and although it would be foolish to say that nosuccessful standard method will be evolved, at present it is rather an openquestion.
Sole Laying
The solution on the bottom of the shoe being dry and the sole correctlywetted, the sole is carefully applied to the shoe and the two pressedtogether (Figures 148 and 149).
There are a number of machines designed to carry out this operationbut generally speaking the method is standard in all of them; a lower padpresses the sole against the bottom of the shoe with the last inside it; thelast having been already jacked by a pin or a plate and toe rest.
Some of these machines are fitted with a pre-shaped solid rubber pad;others have water-filled bags. Another common type uses compressed airbags to force the sole against the shoe.
On all the above-mentioned machines the action is that by theoperation of a pedal; one pad rises putting the shoe under pressure whileanother falls, releasing the adjoining shoe.
302
MAKING

It seems that with such an arrangement the soles are not under pressurelong enough; it is therefore common practice to overcome this difficultyin the following manner. When the sole is being prepared for laying,either a rivet is inserted by hand at the seat, under the heel, or two staplesby a machine installed next to the sole layer for such a purpose. While thisoperation is being carried out, the previous sole and shoe remain underpressure. Ten-division presses (Standard) are also in common use tolengthen the time under pressure.
If the soles and piece-soles are chopped, it is necessary to attach thepiece-soles separately on this stapler, all these operations beingperformed while the preceding shoe remains under pressure. It is a facthowever, that the longer the soles are under pressure the better, as theyconform to the bottom and remain stuck.
The B.U.S.M.Co., the Ralphs Engineering Co. and the StandardEngineering Co. all make twin sole layers, the last two models beingarranged with the pans side by side directly in front of the operator, theRalphs using compressed air in the bags and the Standard water.
303
THE GOODYEAR WELTED METHOD
Figure 149. Boot after sole laying.
Figure 148. Cross-section ofshoe after sole laying. Bothsole and bottom are solu-tioned.
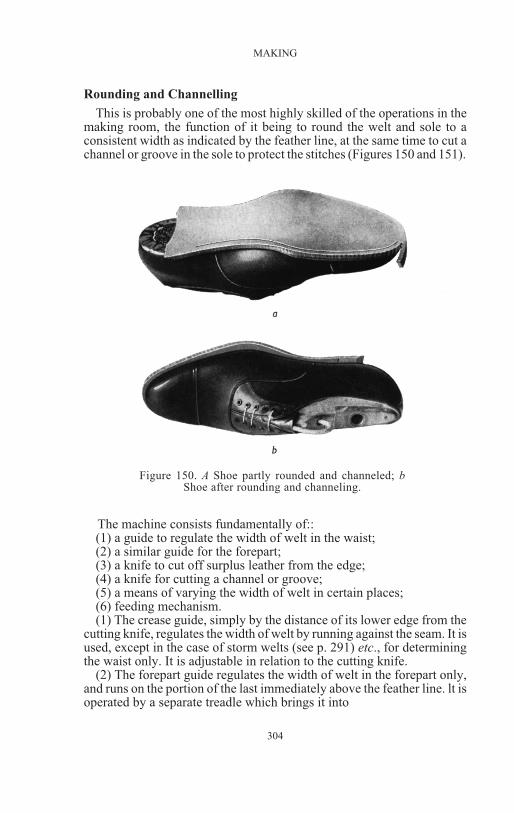
Rounding and Channelling
This is probably one of the most highly skilled of the operations in themaking room, the function of it being to round the welt and sole to aconsistent width as indicated by the feather line, at the same time to cut achannel or groove in the sole to protect the stitches (Figures 150 and 151).
The machine consists fundamentally of::(1) a guide to regulate the width of welt in the waist;(2) a similar guide for the forepart;(3) a knife to cut off surplus leather from the edge;(4) a knife for cutting a channel or groove;(5) a means of varying the width of welt in certain places;(6) feeding mechanism.(1) The crease guide, simply by the distance of its lower edge from the
cutting knife, regulates the width of welt by running against the seam. It isused, except in the case of storm welts (see p. 291) etc., for determiningthe waist only. It is adjustable in relation to the cutting knife.
(2) The forepart guide regulates the width of welt in the forepart only,and runs on the portion of the last immediately above the feather line. lt isoperated by a separate treadle which brings it into
304
MAKING
Figure 150. A Shoe partly rounded and channeled; bShoe after rounding and channeling.

action just below the joints, at the discretion of the operator. The action ofthe same pedal also varies, if required, the distance between the channeland the edge of the sole.
(3) The knife which operates backwards and forwards cuts the surplusleather from welt and sole, slightly burying itself into a small piece ofbrass inserted in the feed block. The position of this knife is fixed and thevariation is brought about by the guides as previously described. The
speed of this knife, which is cam operated, is about 1,000 cuts per minute.Attached to the knife and clamped with it is a small ‘sticker’ point whichsteadies the leather while cutting and prevents the feed over-running thewidth of the knife: if this happened the cut would not be continuous. Theaction of this sticker causes no impression on the sole, but merely uponthe waste material being cut off.
It should be remembered that the sole as attached is the shape as cut bythe caster knife on the press and until reaching the rounder its outline hasnot been disturbed (see pp. 94, 218).
(4) A channel knife block runs along the sole carrying a channel knife.The depth of this channel can be varied by the position of the channelknife in the block. Its distance from the edge is varied by a small eccentricstud just below it, and its distance in the waist by a small slide block onthe right-hand side of the machine which operates when the foreparttreadle is depressed, or released, by the operator.
The whole of the stand feeds backwards and forwards with the feedblock working from a fulcrum. The distance travelled is about 3
16in. on
each stroke with a radius of about 3 1
2in.
305
THE GOODYEAR WELTED METHOD
Figure 151. Cross-section of: a Shoe after rounding and channeling. Theedges are squared and the surplus removed and a channel is cut in the sole;
b The channel; c Alternative groove instead of channel.

The angle of the channel (Figure l5lb) can be varied by the angle atwhich the knife is cut, and its length by the length of blade, the blades aremade as standard in five lengths 1
8, 5
32, 3
16, 1
4, 5
8in. And the angle from 0° to
20°, going up in steps of about 2°.The angle 0° which is parallel to the sole is naturally used for very light,
ladies’ soles, the usual angle being from 8° to 10° for 5, 6 or 7 iron solesfor ladies’ work and 10° to l6° upwards
for men’s work. It is usual to set the machine so that when the edgetrimmer has finished, the edge of the channel is just in the edge beingtrimmed by the cutter. It follows, therefore, that in the case of solesbevelled all around, it is further in and with bevelled waists only thevariation between foreparts and waist is defined.
For a groove (Figure l5lc) the machine is set so that the distance
306
MAKING
Figure 152. Standard Rough Rounding andChanneling Machine Model 86MO.
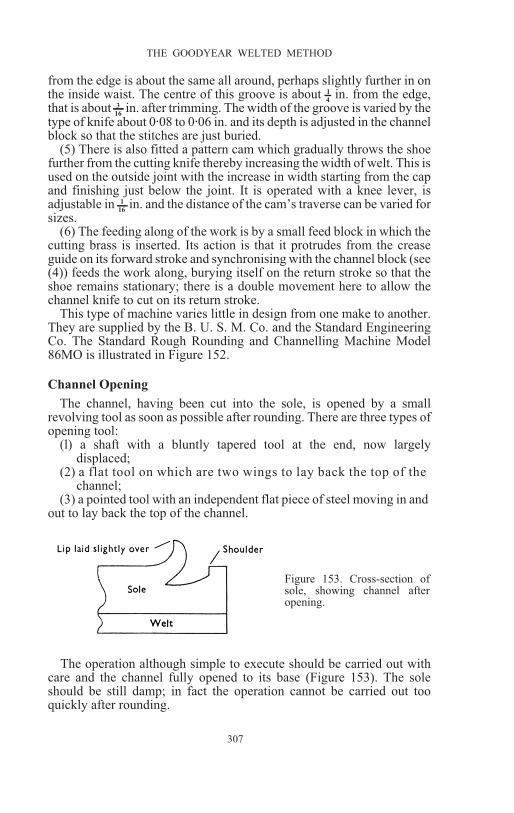
from the edge is about the same all around, perhaps slightly further in onthe inside waist. The centre of this groove is about 1
4in. from the edge,
that is about 3
16in. after trimming. The width of the groove is varied by the
type of knife about 0@08 to 0@06 in. and its depth is adjusted in the channelblock so that the stitches are just buried.
(5) There is also fitted a pattern cam which gradually throws the shoefurther from the cutting knife thereby increasing the width of welt. This isused on the outside joint with the increase in width starting from the capand finishing just below the joint. It is operated with a knee lever, isadjustable in 1
16in. and the distance of the cam’s traverse can be varied for
sizes.(6) The feeding along of the work is by a small feed block in which the
cutting brass is inserted. Its action is that it protrudes from the creaseguide on its forward stroke and synchronising with the channel block (see(4)) feeds the work along, burying itself on the return stroke so that theshoe remains stationary; there is a double movement here to allow thechannel knife to cut on its return stroke.
This type of machine varies little in design from one make to another.They are supplied by the B. U. S. M. Co. and the Standard EngineeringCo. The Standard Rough Rounding and Channelling Machine Model86MO is illustrated in Figure 152.
Channel Opening
The channel, having been cut into the sole, is opened by a smallrevolving tool as soon as possible after rounding. There are three types ofopening tool:
(l) a shaft with a bluntly tapered tool at the end, now largelydisplaced;
(2) a flat tool on which are two wings to lay back the top of thechannel;
(3) a pointed tool with an independent flat piece of steel moving in andout to lay back the top of the channel.
The operation although simple to execute should be carried out withcare and the channel fully opened to its base (Figure 153). The soleshould be still damp; in fact the operation cannot be carried out tooquickly after rounding.
307
THE GOODYEAR WELTED METHOD
Figure 153. Cross-section ofsole, showing channel afteropening.

Sole Waist Reducing (Ladies’ work only)
It is usual at this stage with the channel open to reduce the sole furtherby bringing the edge down to the level at the bottom of the channel. Themachines used are similar in character to the shank reducers described onp. 297. The object of the operation is to reduce the edge as much aspossible in order that it may be broken down to the upper, thus producinga light rounded waist, a very desirable feature of a ladies’ shoe with ahigher heel.
Sole Stitching
All stitching machines for securing sole to welt are lock-stitchmachines, that is, they employ two threads penetrating from each sideand locking together with the shuttle thread uppermost (Figure 154).There are numerous types, the oldest type in use being the ‘Rapid’
(BUSMC). In describing the stitch formation of this machine we describeit for all types, although the feeding and shuttle mechanism is different onother models.
The shoe is held in an inverted position by the operator. and the soleand welt are pressed together by a table and presser foot, the former beingfixed and the latter movable up and down; the foot is lifted, eitherautomatically or manually to allow the shoe to be placed on the table.
An awl (Figure 155) passing upwards through the table while the footis locked in its lowest position pinches the welt and sole together. Whenthe awl reaches its highest point the foot releases and the awl moves theshoe to a position directly in line with the needle, the
308
MAKING
Figure 154. Lock-stitch.
Figure 155. Goodyear type awl and needle.

distance being variable at the discretion of the operator, the awltraversing the length of one stitch at each revolution of the machine. Atthis point the awl withdraws and the needle (Figure 155) closely followsthrough the hole left by the awl and through the table.
The thread, which runs through the machine over several rollers andthrough a looper and the table, is placed on to the barb of the needle by theaction of the looper and thread hook. The needle which has followed theawl down withdraws back through the shoe, thus drawing a doublethickness of thread through the hole. A lifter takes the right-hand threadand raises it vertically and with the thread still on its barb the needlecontinues to draw back. A loop is thus formed by the lifter and needle; atake-up lever which is, at this point, moving downwards with the threadon its roller keeps the thread taut and helps to keep the loop in its positionby taking up the slack thread.
The shuttle, which is round and fundamentally consists of a point ornose and a separate ball of thread contained internally (bobbin), movesround until the nose enters this loop; it lifts the thread off the needle. Atthe same time the lifter changes direction and begins to move downwardsthus releasing its hold on the thread and leaving the loop over the nose ofthe shuttle. The shuttle continuing on its circular course, in ananti-clockwise direction, lifts the loop until it passes over the centre. Thenose is now pointing downwards. The take-up lever continues itsdownward course and pulls the thread off the nose, tightening the loopdown to the sole with the bobbin thread inside it, thus forming the stitch.
309
THE GOODYEAR WELTED METHOD
Figure 156. Cross-section of: a Shoe after sole stitching, showing lock-stitchseam securing sole to welt; b Sole and welt showing stitched aloft threadfilling groove and buried below surface of sole. The loop is actually formed
parallel to the edge, although shown at right-angles to it.

The thread, measured off for the thickness required, is automaticallycontrolled by the height of the foot which rises and falls with the changeof substance of the material which occurs at the joints.
The stitch itself should be locked at about one-third of the substancemeasuring from the sole (Figure 156), that is the bobbin thread should bepulled in to that depth.
All modern machines incorporate a ‘Scotch edge’ device consisting ofa piece of flat steel over the table which runs on the edge of the sole andwelt and determines how far from the edge the stitching should be; it isabsolutely essential for welted work. It is of vital importance that thestitch should be clear of the welt sewing; the cutting of the seam by thestitches is a common cause of welts failing; it also happens after beingstitched on a repairer’s machine without this attachment. It is usual toincorporate the putting on and taking off of the Scotch edge with thestitch variation adjustment so that when the Scotch edge is pulled off italso lengthens the stitch in the waist. This lengthening of the stitch in theinside waist helps to strengthen the already reduced waist, it is quicker,and on ‘royalty’ machines shows a small monetary saving as there arefewer stitches.
The stitch may be varied from about three and a half stitches per inchup to about sixteen, but certain modifications are necessary all up thescale.
It is usual to have the awl slightly bigger than the needle on men’s workas this reduces friction through the hole. Table 11 shows thread sizes,needles etc. It should also be noted that the table should be changed, withany variation above two or three stitches per inch, the slots varying inwidth with the amount of feed required.
The machines are manufactured by the Standard Engineering
310
MAKING
Table 11. Stitching Machine Data
Edge
(irons)
Number of
stitches
per inch
Needle Awl
Thread
LowerShuttle
4– 5
6– 9
9–11
11–13
13–15
15–20
” ”
”
””””””
””””””””
”””””””
12 upwards
11
9
8
7
6
5
4
4
56 56
54
54
54
52 52
52
50 50
50
47
47
45
45
43
43
43
4141
41
3939
39
or or
or
or
or
or
or
or
or
or
oror
or
35
35
cord cord
to
3
4
4
5
5
5
5
6
6
6
7
7
7
8
8
8
8
9
9
9
9
1010 12
• This table is approximate and is intended only as a rough guide.
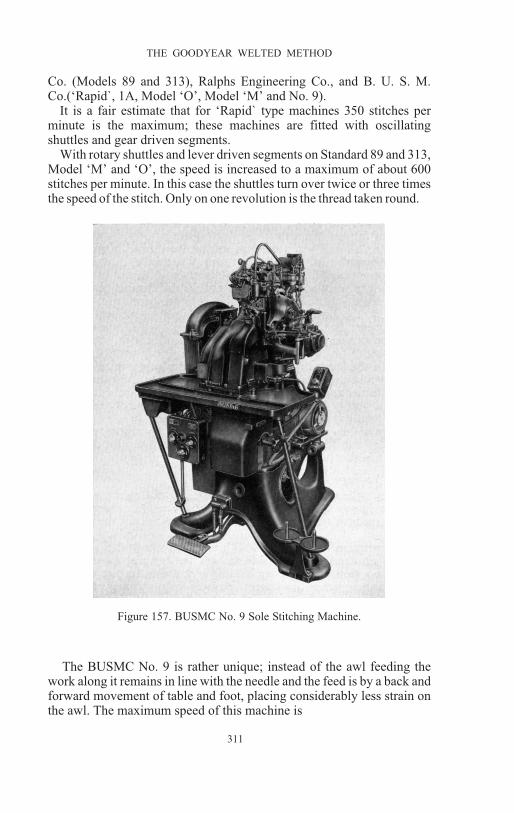
Co. (Models 89 and 313), Ralphs Engineering Co., and B. U. S. M.Co.(‘Rapid`, 1A, Model ‘O’, Model ‘M’ and No. 9).
It is a fair estimate that for ‘Rapid` type machines 350 stitches perminute is the maximum; these machines are fitted with oscillatingshuttles and gear driven segments.
With rotary shuttles and lever driven segments on Standard 89 and 313,Model ‘M’ and ‘O’, the speed is increased to a maximum of about 600stitches per minute. In this case the shuttles turn over twice or three timesthe speed of the stitch. Only on one revolution is the thread taken round.
The BUSMC No. 9 is rather unique; instead of the awl feeding thework along it remains in line with the needle and the feed is by a back andforward movement of table and foot, placing considerably less strain onthe awl. The maximum speed of this machine is
311
THE GOODYEAR WELTED METHOD
Figure 157. BUSMC No. 9 Sole Stitching Machine.

about 950 stitches per minute. An illustration of the machine is given inFigure 157.
The twist of the thread is determined by the direction of rotation of theshuttle and may be both left and right with a variation of the number oftwists per inch. It is usual on all machines to run the bobbin thread astrand or two lighter than the needle thread. The number of the ballindicates the number of single strands while the letter indicates thedirection of the twist.
It is always better to use as small an awl as possible, and as small aneedle as will take the thread without trouble. This somewhat increasesfriction while stitching but alternatively a large hole with a small stitchwill weaken the welt and the hole itself will be very visible on the finishedwelt.
It is the universal practice to use wax on the shuttle thread which shouldalways be slightly lighter than the needle thread. It is also the practicewith work stitched in channel to use as light a thread in the shuttle aspossible to enable the channel to be laid without the stitches showingthrough. It is fairly obvious that on aloft work the thread is subject toconsiderably greater friction when in wear; for this reason the shuttlethread on this type of work should be as heavy as possible and should bethoroughly buried in the groove.
Wax on the lower thread is desirable on the heavier men’s work, but onlighter shoes and ladies’ shoes it is better to use gum, which gives acleaner and whiter stitch. In both cases the thread is passed through a pot;in the case of the wax, however, both pot and rollers must be kept hot.This is usually done electrically.
A form of cold wax is available for both shuttle and waxpot, butalthough it has been marketed for some years its use for stitchingmachines is still rather limited.
Channel Laying
After stitching, the open channel is brushed with rubber solution orlatex; the sole being still damp, it will be found that the adhesive does notreadily dry. After its wetness has gone, however, the channel is laid.
The operation is carried out with a ribbed wheel; the operator, workingon the downward side, strokes the channel down to its original position,the adhesive holding it down. A further sleeking tool presses together theextreme edge of both channel and sole. The machines used are known aschannel layers and sleekers.
There are machines for putting on both solution and latex, the formerwith a thin circular brush, gravity fed from a pot, and the latter with ametal wheel about the shape of the channel, fed in turn from a wheelrunning in latex, the depth of which is predetermined, and isautomatically replenished from a can or bottle. These machines may be alittle faster than the hand operation, and they are certainly moreeconomical in the use of adhesive.
312
MAKING

Piece-Sole Attaching, Seat Nailing and Paring
This operation is carried out by a number of methods, the finishedproduct, however, being practically standard. The most common methodof attachment is by means of nails of a suitable length which pin the seatlift, upper and insole and having just penetrated the latter, clenchthemselves on the seat plate of the last as close to the edge of the insole aspracticable. This latter point is important in the making of solid seats. lt isusual to incorporate the seat paring with this operation and a knife is fittedbehind the guard for this purpose thus carrying out the two operations inone (Figure l58).
The older types of seat nailers were slower but the cutting speedrelatively higher; an extremely satisfactory result was obtained. If rivets
are close together it is much easier to get this clean cut, but as too manyrivets are not desirable a compromise has been reached which enables arivet to be missed on every other stroke of awl and driver.
Undoubtedly the better method is to rivet the seats separately and thenpare them on a heel seat trimmer.
In striving for a high standard, it should be borne in mind that it is alltaken off on the heel trimmer afterwards, so that provided the shape isthere for the heeler to work accurately, such a standard, at this stage, iswasted.
lt is a matter of opinion whether the piece-soles are to be previouslyattached, or held on by this operator. Both methods are in general usealthough the latter method requires much more skill. On the other handthere is no extra grindery in the seat and the temporarily attachedpiece-sole will not drop off on its passage thus far.
Ladies` work generally carries a full through-sole and only requiressecuring and trimming with nails, fibre or pegs.
The nailing machine used for this purpose employs an awl whichmakes the hole and feeds the work along, the distance being decided by apre-set throat and the machine adjustment, and this decides the
313
THE GOODYEAR WELTED METHOD
Figure 158. Boot with piece-sole attached, nailed andpartly pared.

space between the nails. The rivets are fed down a raceway from amechanically driven pot, are separated one at a time and driven into thepiece-sole or sole by a separate driver. It is usual to start and finish on thesole just behind where the breasted front of the heel will lie. This involvesone or two rivets on the sole itself. On the high speed nailers the nails arefed to the throat every other one by a mechanical device on the separatoritself.
The knife is mounted behind the guard and has a reciprocating action;the amount to be taken off is adjusted in conjunction with the distance ofrivets from the edge. Both guard and knife are adjustable.
In the case of stitched seat work it is usual to rivet an extra large seat liftof slightly thicker substance than usual. The rivets are in every hole andshould have an extra large head as this seat lift has to hold the stitching;the piece-sole is tacked on to the seat lift and up to the sole and trimmedon a heel seat trimmer or rounder; the whole is then stitched together andno rivets are through the piece-sole.
If the seats are pegged, as is desirable with ladies’ work, the feed of thepegging machine is identical to a nailer. Here, however, the machine cutsoff fibre pegs from a coil and drives them in instead of nails. The machinehas no device for trimming so that this constitutes a separate operation.
It is important to see that the angle of the chop or skive on sole andpiece-sole are identical and that the join is neither too far away from nortoo far under the sole.
The shoe is placed in the machine by inserting the jack pin mounted onthe horn into the hole in the last. The pitch of this pin is variable and isimportant, as it determines the angle at which the nails are driven in andthe angle of the cutting edge of the knife. On the high speed machine thishorn automatically lowers at the termination of each shoe and is raised tothe throat and the machine started by one pedal. On the older type thelowering of the horn to insert the shoe is by a separate pedal, the positionof the horn otherwise being always up.
The nailers and pegging machines are supplied by both theB.U.S.M.Co. and Standard Engineering Co. and the nails used vary from7
16to 3
4in. according to the substance it is required to penetrate, the usual
gauge being l7 to l2 or 16 to 10. To change the gauge of the rivets used, itis necessary to change both raceway and throat. All these rivets arespear-pointed.
Stitch Separating and Wheeling
Separating—It is usual on men’s work to separate the stitches showingon the welt with an indent at right-angles to the upper (Figure 159). Thetheory to justify this operation is that it tightens the stitches; it is quitedecorative, however, and justifies itself on this ground alone.
314
MAKING

The machine is set to the same length of stitch as the stitcher and theshoe inserted between a rotary spring-loaded table and a tool with awobbling motion which comes down between the stitches. If this is notprecisely between them the tool will slide off the stitch into the cavitybetween. Having located the cavity a hammer action presses the tool intothe welt and into the feather while the table is locked. This tool is gas orelectrically heated to emphasise the impression. It is usual to separate (orprick up) from the seat on the outside to the inside joint and the result isimproved if a hand plough is used first. The feed is obtained by the toolwhile it is pressed down, being moved across the distance of one stitchbefore rising.
Wheeling—The wheeling machine is also fitted with a rotary table, alsospring-loaded and floating. The feed is obtained with a reciprocatingwheel with exactly the same number of teeth per inch as there are stitchesper inch. There is a loose action in the wheel itself which partlycontributes to finding the stitches, but no claim is made that a wheel willdo so and, in fact, it seldom does.
If the stitching is very precise and the operator good, the effect is aheavy indentation of the welt at regular intervals (Figure 160).
The edge is placed between table and wheel and the amount of spring inthe table governs the boldness of the effect.
With wheeled-indented work the stitch on the welt is buried into thewelt by means of a small knife which runs in the throat of the table on thestitching machine itself. This is called the sunk stitch attachment. Thethread is thus buried just below the surface of the welt, and, if the awl andknife are properly cut, difficult to see.
315
THE GOODYEAR WELTED METHOD
Figure 159. Separated stitches.

The operation of wheeling is then carried out as previously described,but the wheel has in this case from fourteen to twenty indentations perinch, thus giving a very fine mark on an even surface and hiding the stitch(about five per inch) altogether.
The wheel on this machine is also heated, in the latest model byelectricity.
Stitch separators and wheelers are both supplied by the StandardEngineering Co. and B.U.S.M.Co. The separators are practicallyidentical, the B.U.S.M.Co. being the originators of the separators and theStandard being the pioneers of the reciprocating wheeler.
Levelling
It is desirable to emphasise that leather soled work cannot reach thispoint too quickly after sole laying, and if possible such work should becleared up every night. lt is usual, if at all possible, to keep substitutesoles until late in the day for this reason. The purpose of the operation isto make the sole conform to the bottom of the last and set it permanentlyin such a position and remove all unevenness and in addition to force thesole towards the welt and the welt to its original position after weltbeating. There are exceptions to this rule; ladies’ channel waists forexample should be brought down to the upper as much as possible havingthe effect of no substance on the edge and a rounded waist. The forepartshould be perfectly level. Quite a few men`s shoes have a channel waist,but the emphasis is not too heavy in this case. Generally speaking men`saloft work needs to be as nearly level as possible.
316
MAKING
Figure 160. Wheeled welt.

Where waists have been reduced by a reduction in the welts, and thereis, therefore, weakening of that component, one occasionally finds thatafter stitching, the welt has gone down to the sole more than in theforepart and after stitching, the sole overhangs the welt, throwing thestitching wide. Although this cannot be put right on levelling, provision ismade on the automatic type of machine for extra tip to be given to therollers at any particular part of the shoe.
This type of machine consists of a jack and toe-rest which, carrying theshoe moves backwards and forwards under two brass rollers. Adjustmentis made on the jack for the height of the shoe and the length of the roll, forvarying sizes. All other adjustments are on the rollers themselves. The tipcan be varied for waist and forepart by an adjustment to the levers. On theBUSMC Model ‘ D’ machine and the Standard Engineering Co. Model95, a series of cams gives a very much wider range of adjustment of tip.The pressure is applied by springs and is variable.
The path of action of the machine is (1) the rollers level straight downthe centre from toe to seat, (2) inside waist to joint and back to seat withrollers tipped as required, (3) inside length from seat to toe rollers tipped,(4) outside length rollers tipped from toe to seat, (5) outside waist fromseat to joint and back to seat, rollers tipped, (6) down centre from seat totoe, rollers level.
By having the rollers rotating a rubbing down action is claimed, but it isgenerally accepted that this is not really desirable as this action tends toburnish the surface of the leather. The latest machines have dispensedwith the mechanism for this purpose.
The other main types of machine for levelling, the BUSMC No. 5 andNo. 8, consist of a cradle and a pre-moulded form which fits the bottom.The shoe and last are held to the cradle and are moved into a positionunder this form which has been carefully shaped to the bottom required.The form itself lifts to allow the entry of the
317
THE GOODYEAR WELTED METHOD
Figure 161 The completed welted seam. Lock-stitch fastens the sole to thewelt and the chain-stitch passes from the bottom of the inside channel throughthe lips of the insole, the lining and the outside of the upper to the welt.

shoe. After coming down on the shoe however, the subsequentmovement is in the form of a rocking action by the cradle itself. Theadjustment to locate the shoe in the form is by varying its position in thecradle. The forms themselves are rather expensive and require attentionas they wear.
A type of leveller which has to a great extent been replaced consisted ofa jack and toe-rest with a roller moving backwards and forwards. Theadjustments of tipping and pressure were applied by the operator by aseries of treadles and levers. Only one shoe was levelled at a time but theeffect was extremely good when carried out by an experienced operator.The type of machine is still used to a great extent by repairers and thegeneral effect is probably better than that of any machine on the market.
Machines for levelling are made by the B.U.S.M.Co. and StandardEngineering Co. the automatic model being practically identical in eachcase. The Model ‘ D ’ is a BUSMC product.
The welted attachment is now complete as shown in Figure 161.
VARIATIONS IN THE WELTED METHOD
Attachment of Substitutes
Vulcanised Rubber—The attachment of vulcanised composition rubberis usually extremely simple insomuch that apart from being unable tochannel it, it responds very much as does mellowed leather with fewercomplications, i.e. wetting, drying and bottom finishing. The maindifference is that it is inadvisable to stitch with a small stitch as the holesmade by the awl are apt to run into one another. Quite a number of rubbersoles have a pattern moulded into them; they are bought as cut soles andthough supplied in sizes are all of a standard shape.
Resin-rubber—This behaves, for attaching, very much like ordinarysheet rubber; it is also bought in sheet form. It is a common belief that it isdifficult to channel, but this is not quite the case. It is in fact very easy tocut the channel into the sole on any ordinary machine used for thepurpose and no particular modifications are necessary; the difficulty is tomake the channel stay open for stitching, as when the tool of the channelopener passes beyond the particular section it has opened, the channelsimply closes again. To try and overcome this difficulty a foot for thestitcher, which opens the channel as the machine feeds alongimmediately in front of the awl and needle, has been designed; it slowsdown the machine very considerably, however, and as yet is not, in theopinion of the writer, at all a practical proposition; further attempts havebeen made to stick the channel back without any appreciable results. Theonly way is to cut a groove in the surface and bury the stitches in it as withordinary rubber, a perfectly satisfactory method, or simply to stitch ontop of the plain surface.
318
MAKING

It is desirable to bury the stitch in a groove to protect it from wear, andwith welted and staple welted work this only requires modification of therounder channel block and accuracy in the sole laying to cut this grooveso that it clears the pattern.
With machine-sewn work, however, the groove is usually dispensedwith, the soles being attached in the shape in which they are bought, thesurplus being trimmed to the welt after stitching.
Crepe—With crepe soles, however, the attaching is rather morecomplicated (Figure 162).
The seats are all stitched as there is no solid material to insert the pinsinto on the sole side. The usual method is to secure a good quality seat lift,up to and blending with the skive on the welt. This seat lift is nailed on,using if possible a rivet with a slightly larger head. It cannot be toostrongly emphasised that this seat lift holds the whole heel to the shoe.
It is desirable to have next to the welt a light leather middle over theforepart or even a light leather through over the whole bottom. Thiscounteracts to some extent the turning up of the welts due to there beingno stable bottom across from inside to outside of the welts.
The first layer of crepe is placed next to this leather through. The mostcommon practice is to stick with ordinary rubber solution, the leathermiddle or through to the crepe through and attach them both together, thatis with the crepe through furthest from the welt. They are stuck to thebottom as for an ordinary welted sole.
The next stage is to round the welt leather and crepe roughly on anordinary rounder without the groove or channel knife in.
In all cases of crepe the stitching is governed by the seam, and not bythe Scotch edge on the edge of sole and welt. It is thus desirable
319
THE GOODYEAR WELTED METHOD
Figure 162. Cross-section showing method of attaching crepe bottoms towelted shoe. The leather middle is optional. The lock0stitch seam passes
from welt to through only and the crepe is stuck on.

to use a table with a fairly wide front, to keep out the stitching from theseam, and as small a needle and awl as possible (holes in crepe ‘run’ veryeasily). The stitch itself should not be shorter than four or five stitches perinch. To dispense with any undue heat on awl and needle, and its adverseeffect on crepe, cold wax is advocated in all cases where crepe has to besewn or stitched.
It is not always necessary to round before stitching; if the throughs arecut reasonably well to shape, rounding can be dispensed with from heel toheel, but it is nearly always desirable to shape the seats roughly.
After stitching all around the shoe, it resembles a shoe with a singlecrepe sole with the stitching aloft. It would be impractical, however inthis state for wear, as the stitching would very soon wear and the crepewould fall off.
At this stage the surface of the crepe through and the surface of the solewhich meets it are solutioned. The solution used differs from that ofordinary solution as it softens or jellifies the surface of the crepe. Afterleaving for a short period long enough for this to happen, the sole isapplied to the through and the two are pressed together in a sole layer.Another method is that the crepe through already stitched, is scoured on asingle roll bottom scourer. This has the effect of roughing the surface ofthe crepe and the effect of the heat generated by the friction of thescouring also leaves the surface sticky; the sole is applied to this stickysurface and the result is a very satisfactory bond. The sole may, if desired,be similarly treated to make doubly sure although this is not reallynecessary. The danger with this latter method is that the thread may bedamaged in the scouring. It is also much slower than the solution method,although a better bond is obtained. As the former method is, in theopinion of the writer, quite satisfactory a more complicated methodseems unnecessary. Crepe to crepe bonds are very satisfactory, if thecorrect methods are used, as they are welds more than sticks and seem toimprove with time. It is the crepe to leather which is the real problem.
The whole shoe is now rounded again and is ready for heeling. Thesubstance of the crepe through and sole depends of course on the edgerequired; as a general rule however it is not advisable to have the soleheavier than the through, as the latter is rather heavier at the toe on thestitches. This is where most of the trouble with crepe work comes, thethrough parting with the welt as the stitches have pulled through it.
A further form of this attachment gives a corrugated effect on the edge(Figure 163). The method of carrying this out is described above exceptfor the following additional details: (l) A wider welt is used. (2) When theshoe is rounded the knife is set back from the cutting brass so that only thecrepe is cut, up to, but not through, the welt, giving a step effect. (3) Theedge is trimmed with a stone and cutter stepped, the welt portion beingcoloured and set. (4) The
320
MAKING

rand, in the form of corrugated strips of crepe, is stuck on by hand, afterboth the strip and edge have been thoroughly solutioned. The surpluscrepe from the strip above the sole is trimmed off either with a heatedknife or on a machine.
Curtain Crepe, Welted Method
This method of attachment has come into use comparatively recently,and gives a flexible and pleasing result. It is also cheap and easy tomanufacture but rather difficult to repair, a fact which is somewhat offsetby its long life.
The insole is channelled as for welted work with the channel extendedall around the seat, usually at about 5
32in. from the edge of the insole
except at the outside joint where it may be brought slightly nearer,although any swell required may be obtained by the edge trimmer.
The lasting is carried out as for the Goodyear welted method exceptthat the seat is stapled to the inside channel on the side laster or lastedwith wire on a bed laster.
A strip of corrugated crepe, about l3
8in. wide is sewn all around on the
normal welt sewer fitted with a special welt guide (Figure 164a). Thesurplus upper, above the seam is trimmed off on a surplus upper trimmer,or it may be removed on an ordinary bottom scourer using a rough paper.After the bottom has been filled, and a suitable shank inserted, the crepesole and through, together making the required substance, are stuck to thebottom with rubber solution, and on a sole layer. They should slightlyoverhang the seam (Figure l64b).
The heel is now stuck on either by friction or solution and the workgoes to an edge trimmer, who shapes the bottom according to the last andin relation to the amount of welt it is required to show beyond the shoe.
The edge thus formed is solutioned, as is the plain side of the crepewelt; the corrugated portion is lying next to the upper at this stage. Afterallowing both surfaces to dry thoroughly, the crepe welt is turned up andstuck to the edge of the sole by hand; a certain
321
THE GOODYEAR WELTED METHOD
Figure 163. Cross-sectionshowing al ternat ivemethod. The fundamentalconstruction is as for ord-inary crepe, with a runnerstuck to the edge.

amount of stretch should be taken out of the welt before its solutionedsurface comes into contact with that of the sole as this tension holds thesole up to the shoe.
The surplus welt above the sole and heel is trimmed off, either by handor on an ordinary machine-sewn surplus upper trimmer. It is usual to heatthe knives for this operation and the heating of the hand knife also speedsit up (Figure 164c); the latter is in fact probably the quicker method.
Veldtschoen Welted
A method used to a fairly large extent for golf shoes, shooting bootsand shoes where the waterproofing needs to be as positive as possible, is acombination of veldts and welted, the lining being welted and the outsidemade as a veldt.
The insole is channelled in the ordinary way, either to heel or aroundthe seat, and the shoe for lasting purposes is treated as welted except forone or two details. The seat should be flanged on the outside of the upperonly in a manner described for ordinary veldts (p. 361). A stiffener isinserted and the back tacked over, without the outside, that is, stiffenerand lining only, paste being used on the inside of the stiffener, next to thelining, not on the outside.
322
MAKING
Figure 164. Cross-section illustrating the curtain crepe welted method :a Corrugated or plain crepe runner is sewn all round with the corrugatedside (if any) next to the upper; b Seams levelled, bottom filled, crepe solestuck on and edges trimmed; c Runner turned back on sole and stuck to itsedges (crepe to crepe bond). The corrugated side is now outside. The process
is completed by trimming off surplus.
Note: The through is optional, and is not shown here.

The puff is put next to the lining, and a piece of paper inserted above itto prevent the vamp sticking to it.
The shoe is pulled on in the ordinary way, and the toe is lasted aswelted. The sides are, however, lasted with rivets on a welt ‘Consol’ withtheir heads left standing (Figure l65a). The shoe is now left standing untilthe puff is thoroughly dry and has set to the shape of the toe. When thiscondition has been reached the wire is removed as are the pull-over rivetsand the rivets holding the sides. The
outside is turned back all around and the sides of the linings may bestapled on an ordinary side laster (Figure l65b). It will be noted that theeffect of the bed laster plates and the tension on the wire has had the effectof flanging the vamp.
We have now a shoe in which the lining is lasted and the outside turnedback. A welt is sewn in, either to heel, or all around the seat. This welt is anormal welt except for the fact that it is slightly wider and has either thegrain taken off it, or is bevelled and grooved the reverse way round. Thereason for this is explained later. After inseam trimming, welt beating andbutting, the welt is left to dry (Figure 165c).
If the shoe has been channelled and the welt sewn all around, themeeting of the two ends of the welt needs trimming up on the bench.
323
THE GOODYEAR WELTED METHOD
Figure 165. Cross-section illustrating the veldtschoen welted method:a Upper lasted in normal welted fashion except that rivets are used in sidesinstead of staples; b Rivets removed, outsides turned back, and liningstapled to lip on side laster; c Welt sewn in, inseam trimmed, welt beaten;d completed bottom, with outside solutioned and stuck to lining and upperside of welt, bottom filled and sole attached with lock-stitch seam through
sole, outside and welt.

If the stiffener and lining have been lasted with tacks machine-sewnfashion and the welt sewn only to heel, a seat lift of good quality is tackedon up to the welt, flesh side to the upper, and nailed to the edge of theinsole through the stiffener, lining and insole. This is perhaps the bettermethod, as welted seats sewn on a machine are not highly successful,either in process or wear, the riveted method giving a much more levelinsole, the grindery in any case being covered with a heel sock.
The surface of the degrained welt and lining and the flesh side of`theupper are now solutioned and allowed to dry, after which the outside isbrought down and stuck to the welt being thoroughly pressed into thefeather. This bond may be finally pressed together on a welt beater whichalso serves to define the feather line along the upper (Figure l65d). lt isusual to use a good leather lining and a stout upper, bearing in mind theeventual purpose of the shoe.
The seam is sealed with wax to ensure filling the needle holes, thebottom filled and usually a sole and through stitched on with one row ofheavy wax stitching through sole, welt and outside. It is then treated asheavy welted, except for the fact that no stitch separating is eitherdesirable or necessary.
324
MAKING
22
THE MACHINE-SEWN METHOD
Blake Sewn, Machine-Sewn, McKay or Tacked work
The expression machine-sewn, just M/S or McKay is often used incases where no machine sewing is done to the shoe whatever; it definesthe method of lasting in so far as the tacks (l) are shorter, (2) are clenchedon the inner side of the insole through contact with the plate of the last, (3)are permanently in position for the life of the shoe. Variations are shownin Figures 166 and 167.
LASTINGLasts
The lasts themselves are plated all over the bottoms in order to clenchthe lasting tacks. There are three holes in this bottom plate of about 1
2in.
diameter; they are located near the toe, at the joint, and in the seat; threeholes only are quoted as this is the standard number, but any number canbe made anywhere in the centre of the last as the important part of theplate is about 3
4in. in from the feather all round, the part on which the
tacks are to clench.
325
Figure 166. Cross-section showing three methods of machine-sewn lasting:a Tacks clenched on plate of last; b Littleway stapled; c Upper stuck down.
In all cases the rivets securing insole to last are afterwards removed.

Machine-sewn lasts usually carry a little more toe spring than weltedlasts, the assumption being that the forepart of the finished shoe is not asflexible as that of a Goodyear welted shoe. This is especially true of lastson which screwed or riveted work is made; there is no flexibility in thefinished shoes so that the assistance for the foot in walking has to beincorporated in the shoe (see p. 61). Lasts used for the making of woodensoled clogs are the most exaggerated form of this practice.
As the lasts are slipped after lasting in all work of this character,except staple welted, the time schedule for lasts is considerably shorter.Stuck-on work is usually slipped after sole attaching. Some of the lowerheel and crepe work may be completed on the last but these areexceptions to the rule.
On some ladies’ work the lasts are not slipped until the work is readyfor socking in the shoe room, the heels being attached by inserting ascrew through the last which has been drilled right through and securingthe heel temporarily to the insole until it can be attached permanently inthe ordinary manner. This involves some trouble but the advantages arevery obvious.
326
MAKING
Figure 167. Bottom appearance after lasting by thethree variations of the machine-sewn method:
a Tacked; b Littleway stapled; c Stuck sides.

Insole Tacking
The insole for this type of manufacture is perfectly plain, the onlypreparation (see p. 228) being the rounding to shape of the last; on theheavier type of boot it is desirable to bevel the insole slightly around theedge on the flesh side. Insoles are not always rounded to exact shape oflast: on ladies’ high-heeled shoes they are often rounded under at theinside joint.
The last is jacked up on a pin and toe-rest and the insole located on thelast; three rivets are inserted, through the insole and the holes in the plateinto the wood, that is, one at each point (Figures 168 and 169). There is acertain amount of skill required to drive the rivet into the insole at a pointwhere it will enter the hole in the plate, as the hole is blind when the insolehas covered it.
In some cases a staple tacker or ordinary machine tacker is used, inwhich case the operator does not jack up the lasts, but holds the insole andlast up to the nozzle of the machine for the staple to be inserted, judgingwhere the hole is in the process. This method may be a little quicker, butis not in such widespread use as the hand method, the disadvantagesbeing that a double hole is made in the last. Lasts worn at these places canbe repaired easily with wooden plugs.
The nails used are approximately 9
16in. and should be of a fairly light
gauge with a fairly large head. Provided they are long enough to hold theinsole their length and gauge are not really critical.
327
THE MACHINE-SEWN METHOD
Figure 168. Cross-section illustratinginsole tacking for machine-sewn work.The rivets pass through the insole andthe holes in the plate of the last intothe wood.
Figure 169. Machine-sewn insole attached to last.

It is worth mentioning that it is the practice in some factories for thepulling-over operator to hold the insole to the last, usually on ladies’ workonly, without any previous form of attaching. This method is carried outon the upright and inverted pull-over machines on cheaper classes ofwork, and while it is desirable from the point of view that it eliminatestwo operations, tacking on insoles and withdrawing nails, the location ofthe insoles leaves much to be desired and the practice is gradually dyingout.
It is also quite common practice to back ladies’ insoles, especially inthe waists on work carrying the higher heels, with fibre-board, thecompleted component being moulded to fit the last. The process is knownas insole reinforcing and is designed to support the wooden heels and toprevent them from ‘walking over’.
Seat Rounding and Bevelling
These operations are carried out in the same manner as for welted work(see p. 270).
Stiffeners and Puffs
These are the same as used in welted work (see p. 270). The paragraphon preparing the uppers for the lasts also applies to this type of work.
Back Tacking
This operation is also carried out as for welted work (see p. 278).
Pulling Over
The machines are exactly as those described for welted work (see p.278). The difference in their operation lies in (1) the action of the drivers,(2) the type of tacks and (3) the location of the tacks.
The drivers in this case drive the tacks home until the heads are levelwith the upper material which is now lying flat on to the insole. The usualamount to fold the upper over the last is about 1
2in. The tacks penetrate the
upper, lining, puff and insole, and should be just long enough to clench onto the plate of the last. Their position as it refers to centre of toe, cap lineetc. is the same, but whereas they should be as far out as possible onwelted, on machine-sewn work they should be further in, as all forms ofsubsequent attachment come between the edge of the insole and thelasting tacks.
The tacks themselves are shorter and have square shanks; they vary inlength as the substance of cap, lining,puff and insole demands. All tacksin this type of work are left in and are a permanent part of the shoe,although it is the custom to remove the front one for bed lasting.
Jointing and Seating (Hand Operation)
It is the practice on ladies’ work on lasts carrying above l 1
2in. heel to
tack over the corners of the seats and joints. The lining should
328
MAKING

be cleared and the stiffener located so that it fits the seat at the mouldededge. The inside should be tacked down first and then the outside.
The next tack should be just below the joint with the lining first cleared,the whole being vertically strained or slightly towards the toe. The insideis always done first, as such lasts are very much more hollow at the insidewaists. Two tacks are inserted at this point, one on each side.
Although it is not usual to joint men’s work, it is sometimes thepractice to tack over the seats before side lasting on welted work.
The sequence stated is controversial; many people prefer the jointingfirst.
Side Lasting
‘Consol’ Machine—The machine most commonly used is the ‘Consol’.This machine is based primarily on the hand method of lasting as its fullname (Consolidated Hand Method Lasting Machine) implies. Themachine has every device to reproduce the actions and methods of a handlaster and with a good operator the difference cannot be detected.
It consists of pincers which grip the upper and pull it over the edge ofthe insole, these pincers being adjustable as to strength of pull and grip.Their action is that they are open until they have reached the bottom oftheir downward stroke, the height of this movement in relation to theinsole being determined by a foot on the insole itself; they then close anddraw the upper upwards. At this point they twist at the operator’sdiscretion to dispose of any fullness of material.
Their next action is backwards, still gripping the upper, drawing it overthe insole. At this point the carrier block working horizontally comesforward with a wiping action. This carrier block contains an alreadysorted tack. When it has reached a point almost at the end of its stroke thepincers open and release the upper. The carrier block continues movingforward until it has reached the end of its stroke. At this point a slantingdriver bar comes down and working through a hole in the carrier blockdrives home, in an inwards direction, the tack which the latter is carrying.It then withdraws to be fed with another tack.
The machine is fitted with a double tackpot and double raceway for twosizes of tack, the extra length to cater for extra material at toe and seat;this is easily adjustable by the operator, a small handle on the right-handside moving the raceway. Each tack is accurately separated and theraceways are fed by a rotary movement of the pot itself in which are anumber of shelves delivering the tacks into a chute.
Fitted to the machine also is a pair of knives, a left and a right-handknife; these knives are used in the pleating of toes when the latter arelasted on the machine. They are controlled by a hand lever
329
THE MACHINE-SEWN METHOD

on the left-hand side of the machine and are instantly brought into actionby a lever at the discretion of the operator. They are used on heavy workonly.
‘Littleway’ Machine-—This machine is made exclusively by theB. U. S. M. Co. and its full title is the Staple Side Lasting MachineModel C. This machine leaves the inside of the insole perfectly free fromany grindery round the margin at the edge of the insole. The pincers are ofthe straight type and their action is to pull the upper up and over the edgeof the last. A rather important feature, too, is that the staple is driven intothe shoe and clenched before the pincers release the upper. There is alsono vertical, or near-vertical, blow from the driving bar as on the ‘Consol’(see Figure l65b).
The staples are formed in the first place in the orthodox manner fromvery fine wire (0A022 in.). They are wider than normal when formed andthe curving action is obtained by their hitting a baffle plate. The staple isdriven in with the points curving inwards towards the centre of the shoe,so that the whole action tends to keep the wire away from the needle ofany sewing machine following.
The insoles for such a machine should not be less than about 4 irons andshould be not too tight in texture.
The staple making speed of the machine is around 150 staples perminute.
Micro-Tacks—A new development made necessary by the fact that theneedle of the Lock-stitch Model ‘C’ machine does not relish hitting tacks,is the ‘Consol’ using a tiny form of tacks about a third the thickness inhead and shank of the ordinary tacks.
This is a particularly commendable innovation as it reduces the size ofthe point penetrating the insole and to some extent reduces the weight andadds to the flexibility. Any reduction in metal in shoemaking is desirableand the lasting tacks, except in cemented, are made superfluous when theseam is made outside them. An ordinary ‘Consol’ is used, fitted with aspecial raceway, separators, carrier blocks etc. The method is as yet, verynew, but the idea seems to be a definite step forward.
Toe Lasting
There are three machines for lasting toes: (l) ‘Consol’, (2) bedlaster, (3) BUSMC No. 9 Toe Laster.
(l) ‘Consol’—This is not the oldest method, as the bed laster preceded it,and although the latter was itself displaced, it has returned in an improvedform and the earlier model has not the universal use it had some twenty totwenty-five years ago.
The machine has been described above, and its action plus the use of abuffer and, for heavy work, the use of the knives, is that for side lasting.
The finished result from this machine is not to be compared with that ofa well-operated bed laster or BUSMC No. 9. It is an accepted
330
MAKING

fact that toes lasted on this machine always require pounding and theoperation itself is really hard work for the operator. The fact that the puffsare not cut out on this machine also contributes to a heavier and moreclumsy toe.
(2) Bed Laster—The machine and action of the head have been describedpreviously (p. 283). There are one or two modifications in the operatingfor tacked work. The method of inserting the shoe and adjusting the platesis the same. The action of the plates in moving in however, is not limitedin the distance they travel by a channel, as the insole is perfectly flat. Theplates are therefore brought forward so that the upper is wiped flat overthe insole for the area of the lasting allowance. The plates are thenwithdrawn to allow about 1
8in. of upper to show beyond them. A hand
tacker is used to insert a row of tacks around the edge of the plates. Theplates are moved again over the whole area, withdrawn, and the shoeremoved from the machine. The result is a flat lasted surface which, ifproperly produced, should in many cases not require any further handlingin the form of pounding etc.
The hand tacker itself consists of a barrel containing a spring-loadeddriver and part of a raceway and separator. It is worked by the operator byholding the barrel in his left hand while with a grip hammer in his righthand he strikes sharply the top of driver forcing a tack through the nozzleand driving it into the shoe. The angle at which this tack is driven in isdecided by the angle at which the operator holds the barrel to the plates.
The tacker is hooked back to a tackpot with the remaining part of theraceway and is automatically replenished.
The Standard model 240 ZAMO is very similar.
(3) No. 9 Toe Laster—The function and action of the machine is to carryout mechanically on machine-sewn toes, the job described forbed-lasting, the movement of the wiper plates being practically identicalin direction. The toe spreading action of spreading the upper over theplates by a shaped frame in the operator’s hand is reproduced in the formof upper spreading lingers. The manual action of wiping in the plates witha hand lever, the spreading of the toe and the driving in of the tacks, whichare all done by hand on the No. 7, are carried out completelymechanically by this machine.
In construction and general working the machine is very similar to theseat laster. Seats are more or less standard in shape, but toes are adifferent proposition and vary in shape very considerably. Thisstandardisation of seats has contributed to the seat laster in its presentuniversal form being such a success. The action of the tackpot andseparators and the feeding of the tacks to the drivers is identical, the maindifference being that fourteen are inserted instead of twenty-two.
The wiper plates are made in such a shape as to reproduce the outsidecontours of the toe of the last. Each set is accompanied by a set
331
THE MACHINE-SEWN METHOD

of tacker guide plates to locate the tacks in relation to the outside shape ofthe toe.
The position of the shoe may be varied forwards and backwards. Thisplus the adjustment of the wiper plates determines the amount of areawiped and the location of the tacks, which should be as near the edge ofthe upper as possible, both to be out of the way of the seam and to give agreater area of wipe to flatten the toe.
Provision is made, by a compensating device, so that the shoe, once themachine has been set, is held up to the plates at the same height and at thesame pressure. A toe rest, as on the bed laster, provides a rest for the toe;this is slightly further forward nearer the toe, is adjustable and locks totake the weight of the drivers as they drive in the tacks.
A foot or guide pressing on the insole ensures the correct location of thelast; side plates also locate the position of the shoe in relation to the wiperplates and centralise the toe. The combination of this foot and the toe restlocks the shoe in position while the machine is working.
The machine is tripped by a knee lever, the clamping, wiping andinserting of the tacks being carried out on tripping. The operator thus hashis two hands free to handle the shoe.
There are two tackpots for varying sizes of tacks, these being changedby a single lever as on the seat laster.
The machine is extremely fast and efficient. As in a great manysemi-automatic machines the work has to be right before being put up toit. The setting for each shape and pattern calls for considerableintelligence and mechanical initiative and really constitutes 90 per cent ofthe skill required to turn out a first-rate job.
Pounding
The operation consists of flattening the surface of the lasted portion ofthe upper, smoothing and defining the feather of the insole and removingany creases which may have occurred in lasting.
The machine consists of a shaft running at fairly high speed carrying adrum, mounted in the centre. This drum is composed of a number ofspindles on which are loosely mounted rings, which give a hammeringeffect when running at speed. Also mounted on the shaft on theright-hand side is a grater or cutter, the object of which is to remove thesurplus material which has collected at the toe during lasting. A leatherpad or smooth steel wheel on the left-hand side of the machine irons outthe creases above the feather and an eccentric operates a seat and feathertapping device; this operates when the shoe is pressed against a smallsteel plate which is gas heated. The machines are made both by theB.U.S.M.Co., and the Standard Engineering Co.
It is customary for the machine to be fitted with a fan and a unit forcollecting dust from the grater.
332
MAKING

Surplus Upper Trimming
The machine cuts away surplus leather after lasting from inside the lineof tacks. lt is used extensively in the cement process and should be usedon light machine-sewn work as well. It consists of two knives, onestationary and one moving backwards and forwards to give a shearingaction. Models are made by the B.U.S.M.Co., the Standard EngineeringCo. and the Ralphs Engineering Co.
Filling
The insole rivets may now be removed and the bottom fillinginserted (Figure 170). This takes the form of either a cold filler or feltcut to shape. It should be borne in mind that any form of shoe lastedas described above may be fitted up with pre·rounded bottommaterial as the shape of the insole determines the shape of thebottom. Apart from any deliberate variations the shape of the bottom
of each shoe is a faithful copy of its fellow. The width of the lastededge of the upper may vary considerably due to the variation ofstretch, and the tacks may not all be in the same place on every shoe;this shape may also be varied by the surplus upper trimmer. It maytherefore be said that the cold filler rather than the felt is the surestway of filling the whole of the bottom.
Note: The method of lasting which has just been described applies towork which is to be cemented (except when cement lasted),machine—sewn, riveted, screwed and stitched, Littleway lock-stitchedand staple welted.
ATTACHING THE SOLE
There are various forms of machine-sewn work and these will be dealtwith under the following headings:
(l) Machine·sewn.(2) Machine-sewn middle, stitched forepart, sewn waist;(3) Machine-sewn through, stitched to heel.
333
THE MACHINE-SEWN METHOD
Figure 170. Cross-section show-ing machine-sewn shoe afterinsole tack removing and bottomfilling.

(l) Machine-Sewn
Sole Tacking—The sole which has been previously rounded andchannelled is now attached before the last is slipped, the most commonmethod being to stick it on and open the channel afterwards. Soles areattached, with the channel open, on a wire-grip tacker either by placingthe metallic fasteners on the sole or in the channel. They may also beattached after the last has been slipped by the method described below.This is not to be compared with the stuck-on method, however, and isdescribed for the reason that it is cheaper as it cuts out an operation and isstill in use in some factories. .
This machine is an ordinary tacker with a wire spool and a feedmechanism to feed sufficient wire to the knives for each sprig. Havingmeasured off the correct amount a driver drives the sprig into the grainsurface.
The operator, having located the sole, turns the shoe and sole over inhis right hand, and while ensuring that the sole will not move, depresses aspring-loaded horn with either his left hand or foot and places the horninside the shoe. The machine is tripped separately for each tack which isto be put in; it is usual to put one at the toe, one at each joint and two ateither side of the sole at the seat, The sole is thus temporarily attached andthe shoe is removed (Figure 171). The horn tip is a flat surface andwhatever the position of it the tip is always immediately under the driverensuring that if the sprigs come through they will be flattened andclenched.
Blake Sewing—This operation is to sew the sole in the channel, throughthe lasted upper, to the insole (Figures 172 and 173). The sewing shouldbe about 1
8in. or less from the edge of the insole. It will be obvious why
lasting tacks should be as far in as possible, as
334
MAKING
Figure 171. Cross-sec-tion of machine-sewnshoe with the soleattached on a wire-griptacker. The wire fasten-ers are left with headsstanding so that theycan be removed aftersewing.

the hitting of a tack tends to break or blunt the needle or at least strand thethread.
There are two chain—stitch machines commonly used for thisoperation and one lock-stitch machine which is described later (p. 373).
The machine consists of a freely swinging horn through which thethread passes after previously going through a waxpot; the hornitself is heated. Inside the horn is a geared mechanism in which a
pinion drives a whirl; the thread passes continuously through a hole inthis whirl (which is equivalent to the looper on the welt sewer).
The needle or hook acts as an awl and makes its own hole. Its action isvertical and, when it has passed through sole and insole, the whirl placesthe thread on to the barb with a circular movement. The needle movesupwards with the thread, pulls it right through the sole and begins todescend again leaving the thread looped round its own shank. A smallcast-off, which fits over the barb but does not descend with the needleensures that the previously made loop
does not get on to the barb during its next downward movement, butremains in such a position that the new loop will be drawn up inside it(Figure 174).
While the needle is out of the shoe a small feed point moves the shoealong the required distance so that when the needle again
335
THE MACHINE-SEWN METHOD
Figure 173. Shoe after Blake sewing.
Figure 172. Cross-section ofmachine-sewn shoe after Blakesewing. The chain-stitch seampasses through insole, upperand sole into the bottom of thechannel.

descends and ascends, the new loop it carries is passed through theprevious one. As it was standing vertical the amount it covers lying in thechannel is equivalent to the length of stitch; this is adjusted mechanicallyon the machine. The length of stitch, the thread tension and the pressureon the foot may all be adjusted.
The two types of machines are the Blake sewer and the improved orRichardson sole sewer. The actual stitch formation is the same but thelatter is fitted with two speeds and various refinements and a smaller hornand is very much faster. It has largely displaced the ordinary Blakemachine which, it is claimed, is considerably more robust and suitable forheavier work. Sewers are made by most shoe machinery firms, whosemodels are almost identical.
On all classes of Blake sewing it is desirable to use as small a needle aspossible. It is true to say that the larger the needle the easier it is for theoperator to eliminate thread breakages. The result however, is anexcessively large hole showing on the insole and the hole through the soletends to make the shoe less waterproof as wax will only partially fill it.
Below is given a table of needles and the thread they should reasonablycarry, but the sizes are bound to be dependent on the harshness of theleather on sole and insole. It is desirable to have the soles nicelymellowed when sewing, as with all horn machines there is a tendency totwist the shoe from toe to heel when turning the horn, especially on thesecond side of the toe.
(2) Machine-Sewn, Stitched Forepart
In this case the shoe is taken after bottom filling and a middle isattached with a staple tacker; this middle should be mellowed. The lastshould now be slipped and the middle sewn on the flat surface
336
MAKING
Figure 174. Chain-stitch

of the flesh side. The Blake machine is again used for this operation, theonly difference being that a flat foot is used for a flat surface, as againsta pointed one for insertion into the channel.
The staples may or may not be taken out although they are better out,and the middle levelled and the ‘welt’ formed by the middleoverhanging the feather smoothed out. The middle should be ofsufficient size to allow enough welt for stitching. A guide ensures thecorrect placing of the stitches in relation to the feather. After allowingthe middle to dry, a sole, which has been suitable channelled forstitching in the forepart and sewing in the waist, is attached by a wiregrip or stuck on.
The sole is stitched to the middle. The shoe is then placed on the hornof the Blake machine and each waist from seat to joint is sewnseparately in channel straight through to the insole. This form ofattachment is fairly common for a cheaper shoe and is, in fact, a goodmethod. It is direct attachment in the waist and indirect in the forepart.The channel is solutioned and laid and the shoe is ready for levelling.
A form of attachment which looks like the above is an ordinary Blakesewn, already described, with a slightly wider sole. The overhungportion is placed on to the table of a stitcher through which runs a rand.The forepart is then stitched; the rand being stitched to the sole gives theshoe the appearance of a stitched forepart, or even a welted shoe withthe waists closed. This latter operation is purely decorative; the onlyreason for doing it in preference to a machine—sewn stitched forepart isthat it is claimed to be more flexible.
(3) Machine·Sewn, Stitched to Heel
The conditions for this type of work are as with the stitched forepart.Instead of a middle being tacked to the lasted shoe a ‘through’, eitherwhole or to toe, is attached (Figure l75a) and, while ‘ mellow, is sewnon the Blake machine to the insole (Figure 175b). After some form oflevelling and laying back the welt, the sole is attached (wire-griptacker), and the shoe is stitched to heel; it is thus an example ofmachine-sewn which is indirectly attached (Figure l75c).
It is quite common practice to put the shoe back on to the original last;in this case the sole can be stuck on, rounded, stitched, levelled etc., as awelted one. The fact that the shoe is back on its original last is of coursea decided advantage; otherwise the advantages obtained are notparticularly great.
The real advantage of the two latter types over Goodyear welted isthat they are very much easier to repair; the seam is vertical and there isvery little chance of disturbing it when removing the sole. Inmanufacture the possibility of the stitching getting into the seam ispractically nil, a fault so common in welted work. Their disadvantagelies in the fact that they are not nearly so flexible in wear as
337
THE MACHINE-SEWN METHOD

Goodyear welted shoes this being due to the vertical seam and thefact that the whole of the forepart is covered by a layer of leatherwhich has to be fairly substantial, this being at the point where thefoot is flexed. An attempt to compromise on this question is theLittleway welted method which is described on p. 374.
Pre-fabricated Bottoms
A completely pre-fabricated bottom may be used only in the caseof McKay work, as the shape will not vary with the seam. The bottomis stuck to the bottom of the shoe, the corrugated edge effect beingincorporated in the pre-fabricated bottom.
A method in fairly common use especially for bootees is that of apre-fabricated crepe bottom stuck to the bottom of an ordinarymachine-sewn lasted shoe. The edge of this bottom is solutioned, asis the upper, about 1
2in. above the feather. A wide strip of crepe,
usually plain, is stuck to the upper and on the edge of the bottom; thisstrip of crepe thus holds the bottom on and as it covers the gapbetween sole and upper makes the shoe waterproof over the whole ofits width. The method is not confined to bootees, however, as it ischeap and easy to make and in addition to being waterproof is
338
MAKING
Figure 175. Cross-sections of machine-sewn shoe, stitched to heel: a Lasted,and slipped, with the through temporarily attached with staples. Tacks mayhave been used for lasting on a plated last; b The through is sewn to theinsole through the edge of the upper, possibly a lock-stitch machine. Staplesare removed; c Sole secured to ‘welt’ portion of through on stitching machine.
The method is completed by closing the channel.

flexible and light in weight. Crepe runners of any width or design arestuck to the edges of shoes and are often incorporated in prefabricatedbottoms, being sometimes sewn on as part of the bottom.
The combinations of methods of attaching bottoms to machine-sewnand stuck-on work, and the ingenious devices for carrying out suchmethods seem never ending. If the fundamental construction of thesetypes, and the use to which the available plant can be put in carrying outany variations of the method is thoroughly understood, then any verbalexplanation can be understood or any particular shoe analysed.
339
THE MACHINE-SEWN METHOD
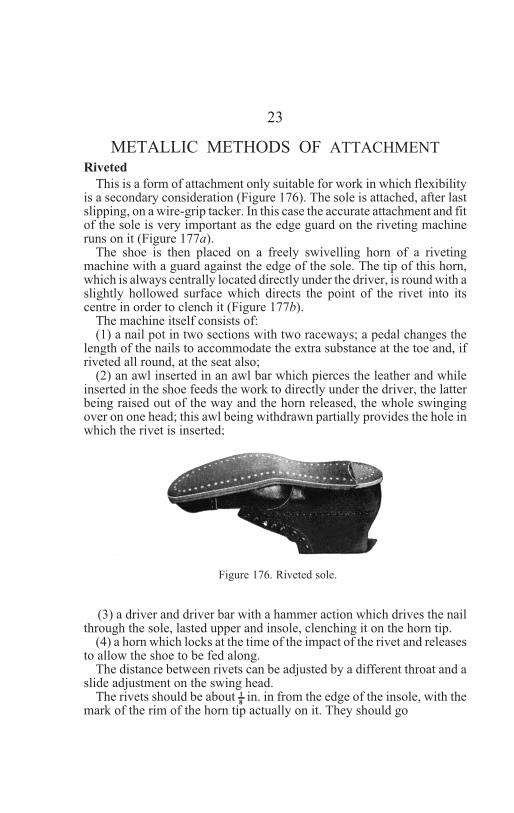
23
METALLIC METHODS OF ATTACHMENT
Riveted
This is a form of attachment only suitable for work in which flexibilityis a secondary consideration (Figure 176). The sole is attached, after lastslipping, on a wire-grip tacker. In this case the accurate attachment and fitof the sole is very important as the edge guard on the riveting machineruns on it (Figure 177a).
The shoe is then placed on a freely swivelling horn of a rivetingmachine with a guard against the edge of the sole. The tip of this horn,which is always centrally located directly under the driver, is round with aslightly hollowed surface which directs the point of the rivet into itscentre in order to clench it (Figure 177b).
The machine itself consists of:(1) a nail pot in two sections with two raceways; a pedal changes the
length of the nails to accommodate the extra substance at the toe and, ifriveted all round, at the seat also;
(2) an awl inserted in an awl bar which pierces the leather and whileinserted in the shoe feeds the work to directly under the driver, the latterbeing raised out of the way and the horn released, the whole swingingover on one head; this awl being withdrawn partially provides the hole inwhich the rivet is inserted;
(3) a driver and driver bar with a hammer action which drives the nailthrough the sole, lasted upper and insole, clenching it on the horn tip.
(4) a horn which locks at the time of the impact of the rivet and releasesto allow the shoe to be fed along.
The distance between rivets can be adjusted by a different throat and aslide adjustment on the swing head.
The rivets should be about 1
8in. in from the edge of the insole, with the
mark of the rim of the horn tip actually on it. They should go
Figure 176. Riveted sole.

through sufficiently to clench, but if too long will form a blob of metal inthe centre of the ring. It is a good idea to extract one; it will be easy toextract if not clenched, but will have to be knocked out if it is.
The machine is supplied by the B.U.S.M.Co. and StandardEngineering Co., the two makes being practically identical. It is alsoknown as a loose nailing machine.
Screwed Through
It is the practice in some cases to screw the through to the insole insteadof riveting (Figures 178 and 179). This method although following theidea of riveted work, requires some small adjustment in its sequence. Forthe reason that a screw has no head like a rivet, and depends on thenumber of threads into the leather, and the pressure of that leather aroundthe screws, it is customary either to use a heavier through or, instead offixing the middle through to the sole, to put the two throughs on togetherand screw them both to the insole; this of course requires a longer screw,the extra length on threads helping it to bite. An adjustment to the lengthof screw is necessary and the shoe is fed by an auxiliary feed described onp. 345.
341
METALLIC METHODS OF ATTACHMENT
Figure 177, Cross-sections of riveted work: a Lasted and slipped, bottomfilled and sole temporarily attached on wire-grip tacker; b Sole riveted. Therivets pass through the sole, upper and the insole being clenched on a horn tip
inside the shoe.
Figure 178. Cross-section illus-trating the screwed throughmethod. The method is similarto the riveted through method.Extra substance is needed in thethrough and sometimes throughand middle are combined, thescrews penetrating both. Thesole is attached as for the riveted,screwed and stitched method
(see Figure 180).

The single sole is stitched on and extra screws may be added ifrequired. Such screws are in this case superfluous as this method,although very rigid, if correctly carried out is probably the strongestmethod of attachment known.
During the operation a feather guide formed by a shaped metal blockruns along the edge of the insole, being adjustable back and forwards by asmall hand lever. Its action locates the screws on the insole, the distancefrom the edge of the insole being about the same as for the rivets.
Pegged
In every respect the method of attachment before pegging is the sameas for riveting. Instead of rivets however, wooden or fibre pegs areinserted from sole to insole. There are not many of this type of boot madenowadays, but they are more flexible than screwed or riveted boots. It isclaimed that they are more waterproof than the former and their chief useis for sea boots. They are extensively made for boots used in ammunitionstores etc. where the presence of a metal is, to say the least, undesirable.
The machine itself makes its own pegs from a reel mounted on the side.They are fed into a throat and cut off in widths in the throat itself beforebeing driven in by a driver bar. As the pegs are relatively soft the awl,besides feeding the work along has to pierce the leather almost rightthrough in order that the pegs may penetrate the insole.
The machine itself is often used for ladies’ seats and is a very lightand efficient form of attachment for this purpose.
Riveted, Screwed and Stitched
This method of construction is used exclusively for boots which haveto undergo a considerable amount of rough wear. The weight of such aboot is of secondary importance and its flexibility is practically nil.
342
MAKING
Figure 179. Screwed through-sole.

The single through is attached on a staple fastener preferably in amellow condition (Figure l80a). The boot is then placed on a rivetingmachine. In this case the through is sufficiently large to allow the sole tobe stitched to it; consequently the guard is of a different type from thatused with riveted soles. It consists of a spring-loaded wheel of about 2 1
2
in. diameter with a brass rim. This rim runs on the feather of the insoleand locates the position of the rivets according to
the setting of an adjustable slide on which it is mounted. Apart from thisthe riveting machine used is the same as that previously described, therivets themselves being shorter (Figure 180b).
The shoe is now levelled and the welt portion of the through turnedback. There is a machine which runs around this welt, the correct titlebeing a Welt Feather Bending Machine, but commonly known as a‘Jigger’. A cylindrical-shaped table acts as a rest for the bottom of thethrough, and above the welt is a small roller over which is a hammer headmoved backwards and forwards by a small cam whenever the shoe ispushed against the hammer.
343
METALLIC METHODS OF ATTACHMENT
Figure 180. Cross-sections illustrating the riveted, screwed and stitchedmethod: a The boot has been lasted and slipped, the bottom filled and thethrough temporarily attached with staples; b The brass or iron rivets securingthrough, upper and insole are clenched on the horn of the riveting machine;c The sole is tacked on and then secured to the through by a lock-stitchseam. The rivets holding the through are sometimes removed before the soletacking; d The screws are inserted, passing between lasting tacks and rivetsthough sole, though, upper and insole, terminating on the horn of the
screwing machine.

It is a matter of opinion whether nailing around the seat is reallynecessary. If nailed to just below the front of the heel it should besufficient as the nails in the piece-sole and the action of the insideattaching of the heel are enough to make the seat solid. If it is desired tostitch around the seat, however, nailing is of course necessary.
It is usual for this type of work to carry a middle or another throughbetween the sole and the already riveted through. We assume that this hasbeen already attached to the sole which has been rounded and grooved forstitching. The sole is now attached on a wire-grip tacker.
This type of work is usually stitched on a ‘ Rapid’ Lock-stitch Machine(Figure l80c), a very much slower stitcher than those previouslydescribed (p. 3l l). Its principle in forming the stitch is the same and in this
respect it carries the same fundamental devices, looper thread hook,shuttle, awl and needle etc. The mechanism for holding down the footuses ratchets and pawls; it is awl fed and has gear and cam drivensegments. Its maximum capacity is about 350 stitches per minute. Amodel ‘O’ stitcher or Standard 89 may be used for lighter work.
It is usual to stitch work of this kind at about six stitches per inch.The table of thread, awls and needles as already given applies also to
this machine.After stitching comes the screwing. It is usual to place the screws
about 3
4in. apart from heel to heel, but this is a matter of opinion; in some
cases three or four are inserted at each joint and the toes only (Figure180d). ln any case, whatever the number of screws they should be placedinside the stitching on a level with or slightly inside the rivets on thethrough and outside the tacks used for lasting. As the ring on the horn tipof the screwer is larger, the screws themselves will be just slightly furtherin than the rivets. It is not desirable to go too close to the edge of the insoleas the screwing effect tends to break down the edge (Figure 181).
The Screwing Machine—The machine itself is composed of (l) a horn,(2) a spindle, (3) wire feed and cutting mechanism and (4) feedmechanism.
(l) The horn is of the same type as used on the riveting machine, with alarger horn tip convex in shape. lt is located immediately
344
MAKING
Figure 181. An example of a nailed runnerwith the sole screwed and stitched. The
spacing can be regulated up to 1 in.
below the centre of the spindle and is locked by ratchets and pawls duringthe period that the screw is being driven into the shoe and clenched on thehorn tip.
(2) The spindle is a high-speed spindle carrying the wire, which is on ametal spool at the top. The wire and spool turn with the spindle itself, thewire being fed inside and down the centre. The spindle speed is about3,000 revolutions per minute. The lower half of this spindle contains partof the wire mechanism in the form of three pawls whose teeth areengaged with the thread, cut into the wire, and feed it down.
(3) The wire feed mechanism itself is cam-operated by two arms andsegments, and moves the nozzle of the spindle up and down to therequired length of screw; the maximum is about l in. or slightly over. Thewire is cut off by the shearing action of two knives, also cam operated,separate from the spindle and located immediately below its nozzle. Theknives are each set at about 45° to the surface of the sole with their cuttingedges parallel to it, a table ensuring that the marks of the knives are notshown on the sole itself.
(4) The feed mechanism is a small toothed wheel running on the edgeof the sole and parallel to it. There is also an alternative feed mechanismconsisting of an arm carrying a milled foot which operates on top of thethrough itself; this however, is not used for soles. The machine uses ironor brass wire.
Staple Welted
This is a form of indirect attachment used for cheaper classes of weltedfootwear, but very much inferior to the Goodyear method.
A shoe is lasted by the machine-sewn method, with tacks, and while itis still on its plated last a plain welt is stapled to it by staples verticallypenetrating the welt, upper and insole from heel to heel (Figure 182a).The staples themselves are set just long enough to clench on to the plateof the last. They should be as near the edge of the insole as possible. lfthese staples do not clench the result is disastrous, as the whole bottom islikely to drop off.
It is usual to beat out the welt immediately after stapling, and afterhaving removed the nails holding down the insole, to fill the bottom andtreat as Goodyear welted (Figure 182b). Alternatively it may be slippedbefore levelling and levelled on a ‘Hercules’ or a No. 8 machine toemphasise the clenching of the staples.
The stapling machine used is an ordinary staple fastener as used forvarious operations in the making room, in so far as the formation of thestaple is concerned.
A wire feed mechanism feeds forward into a throat, from a coil,sufficient wire for the whole length of the staple and lays it across twoknives; the distance between these knives decides the width of the staple.A piece of steel, suitably shaped to form the staple, rises between theseknives forcing the middle of the straight wire upwards, the end of the wirebeing also forced upwards to be shaped by a former.
345
METALLIC METHODS OF ATTACHMENT

The length of wire, when correctly measured off, is cut by a shearingaction of the knives giving both legs of the staple a sharpened point. Astrongly spring—loaded driver descends on the top of the rounded headand drives the completed staple into the shoe through a guide and nozzleto keep it into shape during the process.
It will be noted that no previous hole is made for the staple so that thesharpening effect in the shearing is essential for the staple to drive its waythrough.
This description is of the ordinary staple fastener used for temporaryattachment on machine—sewn and welted insoles, piece-soles, soles etc.
For staple-welted work the only additional attachments are a weltguide which carries the welt under the nozzle of the machine, a pedalattachment to vary the length of staple to cater for the extra substancearound the toe and a small device to feed thread between the legs of thestaple making a continuous line of thread on the welt. The insoles shouldbe consistent in substance so that the staples are (j)ust clenched.
The object of the thread is to prevent the staples burying themselves inthe welt; it also tends to help space the staples. If the staples have notclenched however, they can all be pulled out by simply pulling the thread.It plays no part in making the bottom solid and the term ‘staple stitching’,by which this method is sometimes called, seems rather misleading, as itimplies that the thread has been used in making the seam itself whereas itsimply lies on top of the welt.
The method requires, on completion, a full length sock. It is quitecommon to split the grain off the insole in the preparation room on ade-graining machine and to use the split grain, flesh side up, in thefinished shoe as a sock.
All such methods are to make the shoe look welted as the term is usedfor Goodyear welted. Their advantages are all however in
346
MAKING
Figure 182. Cross-sections of a staple welted shoe: a After staple welting.The shoe remains on the last after lasting and staples secure the welt to theinsole through the upper; b After sole laying. The insole tack is removed,the bottom filled and the sole laid. The shoe is then treated as a welted shoe.

cheapness—an inferior insole, with no channelling and preparing,sometimes backed by board, no welt preparing, cheaper lasting, no uppertrimming or inseam trimming. The disadvantages are chiefly rigidity inwear and heaviness in weight.
The method was in extensive use some years ago, but its popularity haswaned in favour of the Goodyear method.
It was sponsored by the B. U. S. M. Co. and Standard Engineering Co.,both of whom supply the stapler in practically the same form.
347
METALLIC METHODS OF ATTACHMENT

24
THE CEMENTED METHOD
THIS METHOD OF ATTACHMENT is in universal use and takes many forms.It is usually used for single sole work.
ADHESIVES
Nitrocellulose
In spite of many suggested and actual alternatives, nitrocellulose(pyroxylin) cement remains supreme for permanently attaching solesinstead of having thread or metal. It is relatively cheap, simple to use andproduces a strong, permanent bond resistant to heat, moisture andflexing; it can also be used by the repairer. lt is normally applied to bothsole and roughened upper (see Figure l86) and allowed to dry (byevaporation of the solvent which is of the acetone family), 3 processwhich may be speeded up by infra-red heating. When the sole is requiredto be attached, the dried nitrocellulose is reactivated by applying thesolvent; then the sole and lasted margin are immediately brought togetherin a press. In the case of the sole, reactivation may be carried out bydipping it into the solvent; this not only softens the cement but alsotempers the sole without the removal of water-solubles.
Neoprene
Neoprene cements can be used in the same way as other pressure-sensitive cements, e.g. rubber solution and latex; that is to say, the dry ornearly dry surfaces are brought together under pressure and they thenfuse. There is a danger with neoprene, however, of imperfect fusionunless the cement films are first softened, and SATRA recommendheat-activation by infra-red lamps to do this. A few minutes under thelamps is sufficient to soften most neoprene cements it being the usualpractice to apply the heat to the soles if they are leather, or to the lastedshoe bottom if resin-rubber soles are to be attached. As soon as the partscool down the bond is permanently made so only a few minutes’ pressurein the press is necessary. On the other hand, nitrocellulose cements onlyreach their maximum strength when the last traces of solvent have gone,and this may take some time. Further details of neoprene cements will befound in the SATRA Bulletin for February, 1952.
SINGLE SOLE CEMENTED SHOE
The shoe, after lasting, is basically machine-sewn inasmuch as theupper is wrapped over and fastened to the flat surface of the insole;
348

it may be lasted with tacks all around, with tacks at the toe and seat andLittleway staples in the sides, or the lasting allowance may be stuckdown. The first two methods have already been described; the thirdmethod is as follows:
The shoe is pulled over as for machine-sewn, the tacks being left withtheir heads slightly standing (they are subsequently removed); theirposition in relation to the front and cap line is the same but in this casethey should be as close to the edge of the insole as possible to enable latexto be applied to the upper and insole after pulling over. The latex isapplied either with a brush or a spray at this stage and should cover thearea over which the two surfaces are to be bonded together.
After the adhesive has partially dried, the toe is placed in a bed lastingmachine as used for tacked work, and wiped in. To ensure a perfectly flatsurface and to complete the drying out, a flat piece of steel, heated on agas jet or electric hot plate, is placed under the plates of the toe laster andpressure applied, the pull-over tacks having been removed. The seat mayalso be wiped in or it may be lasted with tacks as required on the samemachine, and while the toe is under pressure.
Latex is more usually applied, however, when the shoe is in the bedlaster, and the up-draw has been taken. lf the upper and the insole havebeen previously solutioned they tend to stick to each other and it isimpossible to draft the shoe correctly.
The sides are now lasted either on a lasting machine or simply by theaction of hand pincers with the thumb pressing the upper down to theinsole.
The upper, forming the lasting allowance, is thoroughly roughed, thatis, the grain of the leather is removed and the flesh penetrated, the objectbeing to ensure that the adhesive penetrates the leather in its fluid stateand after setting is permanently `keyed’ into it (Figure 183a). Thisoperation is performed with a revolving wire brush.
Cement, usually of a nitrocellulose type, is applied by a machine onwhich provision has been made for a consistent flow of the particularadhesive to be fed through the nozzle. Mechanical methods are farsuperior to any hand operation as the adhesive is laid on evenly andeconomically. Cleanliness is indeed next to godliness in this type of workas the adhesive is most difficult to remove from places where it is notwanted.
After allowing the cement to dry thoroughly, either naturally, or to anincreasing extent today, by the use of infra-red radiation in cabinets (ortunnels if a conveyor system is used), a softener is used to activate theadhesive immediately before it is required to use it. The softener isapplied to the sole only when it is placed on to the shoe. The shoe withsole attached is now put in a press. There are a number of suitable pressesin the market each having a slightly different method of applyingpressure, and the number of sections
349
THE CEMENTED METHOD
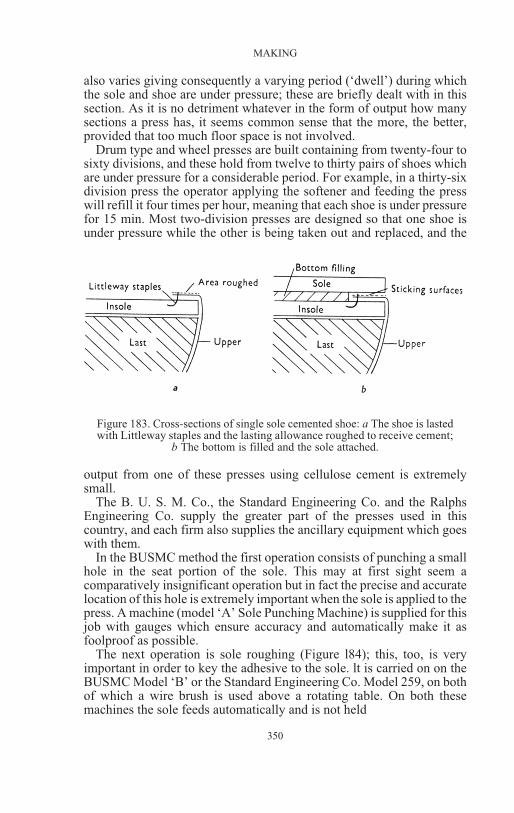
also varies giving consequently a varying period (‘dwell’) during whichthe sole and shoe are under pressure; these are briefly dealt with in thissection. As it is no detriment whatever in the form of output how manysections a press has, it seems common sense that the more, the better,provided that too much floor space is not involved.
Drum type and wheel presses are built containing from twenty-four tosixty divisions, and these hold from twelve to thirty pairs of shoes whichare under pressure for a considerable period. For example, in a thirty-sixdivision press the operator applying the softener and feeding the presswill refill it four times per hour, meaning that each shoe is under pressurefor 15 min. Most two-division presses are designed so that one shoe isunder pressure while the other is being taken out and replaced, and the
output from one of these presses using cellulose cement is extremelysmall.
The B. U. S. M. Co., the Standard Engineering Co. and the RalphsEngineering Co. supply the greater part of the presses used in thiscountry, and each firm also supplies the ancillary equipment which goeswith them.
In the BUSMC method the first operation consists of punching a smallhole in the seat portion of the sole. This may at first sight seem acomparatively insignificant operation but in fact the precise and accuratelocation of this hole is extremely important when the sole is applied to thepress. A machine (model ‘A’ Sole Punching Machine) is supplied for thisjob with gauges which ensure accuracy and automatically make it asfoolproof as possible.
The next operation is sole roughing (Figure l84); this, too, is veryimportant in order to key the adhesive to the sole. lt is carried on on theBUSMC Model ‘B’ or the Standard Engineering Co. Model 259, on bothof which a wire brush is used above a rotating table. On both thesemachines the sole feeds automatically and is not held
350
MAKING
Figure 183. Cross-sections of single sole cemented shoe: a The shoe is lastedwith Littleway staples and the lasting allowance roughed to receive cement;
b The bottom is filled and the sole attached.

by the operator during the roughing operation. The fact that the solepasses under the brush at a regular speed ensures a constant finishedthickness of sole edge. The width of the roughed surface is adjustable torequirements. The Ralphs machine operates in a similar way but uses acutting blade in place of the wire brush. The Standard Sole RoughingMachine Model 259 AFMO is illustrated in Figure 185.
The sole is now ready for‘the adhesive. This is applied by theBUSMC Model ‘B’ or Standard Engineering Co. Model 296 SoleCement Applying Machine, or the Ralphs Sole Cement ApplyingMachine. It is common practice to cement the soles in bulk, allowingthem to dry out completely. Provision is made for an evendistribution of the cement by keeping a constant pressure inside thecement pot; a gauge mounted on the machine allows this pressure to
be checked. The cement itself is forced by this pressure through anozzle and is spread over the already roughed surface, the width andthe distance from the edge being adjustable.
To ensure that the finished edge is clean and entirely free fromcement the edge of the sole is now bevelled on a cement sole bevellingmachine. This operation is made necessary by the fact that it is verydifficult to prevent cement getting into the edge and on the upper, andonce there it is extremely difficult to remove.
When there is likely to be any curvature in the sole in order toconform to lasts that carry a high heel or have a rounded waist, amethod of shaping the sole before applying it to the shoe is advisable.This is done on the BUSMC Sole Conforming machine or the StandardEngineering Co. Model 188. The operation is very accurate,conforming the waist only with the help of gauges. By a process
351
THE CEMENTED METHOD
Figure 184. Punched and roughed sole.

described later this operation may be eliminated. It also ensures that thewhole of the two cemented surfaces shall be brought together. Themoulding is carried out by the wiping action of rubber pads thuseliminating the squashing, and consequent enlarging of the component,so commonly met with in ordinary moulding. The BUSMC machine isalso used for the moulding of welted insoles as in silhouwelts and ladies’work of the lighter type, the moulding being carried out after the lips havebeen raised.
Upper roughing may be carried out on any type of machine built forthis purpose. A wire brush is again used and the shoe is held by theoperator, and the success of the operation must depend on the skill of thisoperator, who must not rough over the feather line and more importantstill, must take care not to cut through the leather at the feather line(Figure 186).
352
MAKING
Figure 185. Standard Sole Roughing Machine Model259 AFMO (fitted with edge trimming attachment).

The shoe itself is now ready for the adhesive to be applied to it in muchthe same manner as it has already been applied to the sole. A layer of thesame type of cement as used on the sole is applied to the roughed surfaceof the lasting allowance. ln this case the nozzle of the machine used isslightly different. Machines used are BUSMC Model “B’, StandardEngineering Co. Model 245, and the Ralphs Bottom CementingMachine. After the operation the cement is allowed to dry.
The shoe is now ready to be applied to the sole on the press. It will beborne in mind that both cemented surfaces are dry. To activate the cementalready applied to these surfaces a softener is used. This is applied bymachine immediately prior to the sole and the lasted upper being placedtogether. A machine for this purpose must be placed in a convenientposition so that the operator can use both the softener applying machineand the press with the minimum of movement.
The BUSMC Model ‘C’ and the Standard Engineering Co. Model 306Softener Applying Machines apply the activator in a series of lines whichspread together and form a band when the sole and lasted upper areplaced together. It should be borne in mind that the activator is applied tothe sole only, and the cement on the lasted upper is affected only when thetwo are placed together, the object being to use the minimum amountrequired to activate the two surfaces, and to avoid any surplus whichwould prolong the drying time before the shoe can be removed from thepress.
The BUSMC Press (Figure 187) is an extremely ingenious machinedesigned with the obvious object of eliminating the chance of humanerror as far as possible. The sole is first placed on the pad and the
353
THE CEMENTED METHOD
Figure 186. Roughed upper.

peg is placed over the hole previously made by the punching machine;pre-set levers touching the edge of the sole ensure the accuracy of itsposition in the pad. The sole being now held in approximately its correctposition, the shoe is placed on to it; again levers determine its positionover the sole and hold it there thus eliminating any possibility ofinaccurate location. The machine is now tripped. The initial pressure maybe up to 300lb/sq. in., but this is much reduced when it is actually appliedto the shoe; it is also adjustable.
There are eight pads; these are water-filled bags, for both men`s andwomen’s work. For curved waists, pre-moulded solid rubber pads areplaced over the water-filled ones. The waists are formed by separaterubber profiles. The seat itself has a solid rubber pad.
The shoes themselves are in the machine for about 3 min.; it is notadvisable to reduce this time, as approximately 11 min. is taken up by thecement being forced into the fibres under pressure. The real keying effectdoes not take place till this stage is reached. The actual drying and settingtakes a much longer period, possibly 1 hr. after the shoes are taken out. ltis for this reason that the writer believes that they should be as long aspossible under pressure.
The Standard Engineering Co. has developed air presses and air pressunits for all purposes and all classes of work. The air press units can beused independently by placing them on benches, or a press can beassembled with a number of units suitable for any particular production.In this way it is possible for a manufacturer to instal sufficient units toensure that each shoe is left under pressure
354
MAKING
Figure 187. Shoe in BUSMC Press.

for the requisite time to suit his particular needs, which must bedetermined by the type of shoe, type of leather, type of cement,atmospheric conditions etc.
The units all use the inflated bladder but the containers for thesebladders vary very considerably from a flexible case with a leather top toa container with a firm but flexible moulded rubber top which is requiredon certain classes of work to ensure a perfectly flat forepart. The dishcasting is easily interchangeable so that the units can be adapted for highor low heels, and the bridge which clamps the shoe is adjustable for allsizes.
Standard Air Press Unit Model ‘R’ is illustrated in Figure l88 and asexplained above, these can be built into air presses of any size. TheStandard Two Division Air Press Model 326 is shown in Figure 89.
The press supplied by the Ralphs Engineering Co. also uses airpressure, the best known model being the Ralphs l2 Division Press.
lt is common practice to Hex the insole in the forepart to ensureflexibility in wear. This is often carried out on a converted welt cutting
machine with an open end, but more complicated versions carry out abending and cutting operation in a slower fashion with more elaboratedetail without apparently influencing the ultimate result in any markeddegree.
Water vapour is sometimes used for tempering the soles, andelectrically heated tables to help drying, the theory being that the heatwhich should be in the shoe while it is in the press helps to speed up thesticking part of the process.
A new introduction by Vik Supplies Ltd. is certainly a new departure inthe process of stuck-on work, and is to be greatly commended for itssimple ingenuity. The sole before attachment is dipped into a solutionwhich serves as a softener for the already hard adhesive; at the same timethe solution mellows the sole to a state equivalent to that condition itwould reach if it were immersed in water and
355
THE CEMENTED METHOD
Figure 188. Standard Air Press Unit ‘R’.

mellowed; in this case however the drying out time is comparativelynegligible. It will be obvious that in such a case the sole conformingmachine will be superfluous as the sole would naturally conform
to the shape of the shoe, due to its mellow and flexible state. Thepossibilities of such a process of mellowing are extremely wide, eg. weltsand their quick drying, and perhaps eventually the heavier types of soles.
VARIATIONS OF THE SINGLE SOLE CEMENTED SHOE
The previous descriptions are all for an ordinary single sole cementedshoe both for men’s and women’s. There are many variations in the formof wedges plus stuck-on soles.
356
MAKING
Figure 189. Standard Two Division Air Press Model 326

Wedge Heels
It has been previously stated that all bottoming parts for machine-sewnlasted work can be pre-rounded to shape before attaching. ln the case ofwedge heels, or wedge and platform combined, the unit is pre-fabricatedand covered before attaching, the wedge, usually of wood, is alreadystuck to the platform, the latter being made of a flexible material, usuallyof a rubber bonded nature.
After the platform has been attached a Blake sewer sews around theforepart through the stuck-on or tacked-on platform, the needle passingthrough the folded-over- portion of the platform cover, the platformitself, the platform cover next to the lasting allowance, the lastingallowance itself, and finally the insole. This applies to the forepart only;the wooden portion is fastened by nails driven in from the inside. The soleor, as in many cases, a sole and heel-piece is then stuck to the whole of thebottom. The wedge thus takes the place of the heel. Sometimes atop-piece is required on top of the sole; this may be either slugged on orstuck, and is easily replaceable after wear (Figure 190).
A pre-fabricated platform, attached as a through, is often used; in thiscase it may be sewn all around, the sole being stuck on. This methodinvolves a low heel of one or two lifts to make the shoe stand correctly.
Another method involves using a wrapper (Figure 191a) of a differentmaterial from the upper, and stitched around it during closing. The line ofthis stitching is about 1
4in. above where the feather of the insole usually
comes. The upper is lasted in the usual way ignoring the wrapper; whenthis latter is turned back a pocket is formed between the outside and thewrapper into which a narrow strip of stiff tape is inserted (Figure 191b).The wrapper is then stuck down to the lasted portion of the upper or, as ismore usual, to the surface of a thin through previously attached to it(Figure 191c). The sole may then be either stuck or Blake-sewn on in thenormal
357
THE CEMENTED METHOD
Figure 190. Cross-sections of platform shoe: a Last slipped, platform sewnto insole and top area of platform cover roughed; b Sole stuck to platform
cover with last re-inserted.

manner. There are a number of adhesives both for sticking down theuppers and for attaching the soles.
There has recently been introduced a type of welted shoe with astuck-on sole. In this case the insole is channelled and opened all aroundwith the channel about 5
32in. or less from the edge. The shoe is lasted in
the ordinary manner, the seats being stapled. The wrapper in two pieces isthen stapled on the wider section to the seat in order to cover the wedge,and the narrower section around the forepart. The staples are level withthe ordinary side lasting staples (Figure l92a).
358
MAKING
Figure 191. Cross-sections showing alternative method for platform shoe: aWrapper stitched to outside in its position after lasting; b Tape stuck tosides; c Wrapper brought up and stuck to lasting allowance above the ordinary
upper. The sole is subsequently stick to it.
Figure 192. Cross-sections of welted shoe with stuck-on sole: a Wrapperstapled in with upper and felt welt sewn on: b Wrapper stuck to platform
and sole stuck on.

A felt welt or a silhouwelt is sewn all around and the surplus materialabove the seam taken off on an upper trimmer or bottom scourer. Afterthe bottoms have been filled, the platform and wedge are stuck on slightlyoverhanging the seam, to allow for variation; the surplus is trimmed offlevel with the seam and the wrapper turned back and stuck down over theplatform. This turned-back portion represents a lasting allowance andafter being roughed etc. (Figure 192b) the sole is stuck in the manneralready described. The result is an extremely flexible shoe, but theprocess is rather expensive.
Silhouwelt
This method is used in the construction of a better type of ladies’light shoes.
The insole is channelled with the same channel as an ordinaryGoodyear welted shoe except for the fact that the channel is the samedistance from the edge all around with usual allowances for puff andstiffener. It is also desirable to mould the insole after channelling andbefore opening as is usual with better class of higher-heeled ladies’ shoes.After lasting the operations are as for welted shoes.
The welt is sewn in dry on an ordinary welt sewer with a lighterneedle, about size 45 to 47, the welt itself being about 2 to 2 1
2iron
and being 1
8to 3
16in. wide; owing to the light substance no bevel is
needed, just a very light groove. The welt is turned back and thesurplus upper above the seam removed (Figure 193a).
At this stage the whole of the surface of the welt, and the thickness ofthe seam, is roughed on a special roughing machine, the roughing in thiscase being at right—angles to the seam (see p. 353), and the sole afterbeing similarly prepared is treated with a suitable stick-on adhesive andsolvent and stuck on a turret press (Figure 193b).
359
THE CEMENTED METHOD
Figure 193. Cross-section of silhouwelt: a After sewing. The seams aretrimmed and the area indicated roughed; b After sole attaching. The
area for sticking the sole is mainly the flesh side of the welt itself.

The advantages are:(l) As there is no stitching, the edge may be trimmed right up to the
upper.(2) There is no channel in the sole, therefore its substance may be as
light as required although, of course, the thickness of thewelt must be added to obtain the total substance.
(3) It is possible to obtain a perfectly flat forepart, the welt itselfstopping any roundness at the edges.
(4) The shoe itself is almost as flexible as a turnshoe and is extremelylight in weight.
The method does not entirely lend itself to constant repairing and theprocess itself requires above the average of skill and supervision. It is aBUSMC process and is not yet in universal use for mass production.
360
MAKING

25
VELDTSCHOEN, TURNSHOE AND LITTLEWAYMETHODS
VELDTSCHOEN
THE VARIATIONS OF THIS particular type of work are so numerous that it isperhaps safe only to say that the upper, instead of being lasted in as onmachine-sewn work, is turned out and stitched through to the sole with avertical lock-stitch. A rand is often stitched above the upper throughwhich the stitching passes, but this is only one variation of the method asit is known now.
Seat Flanging
In order to ensure that the feather line at the seat is clearly defined andbearing in mind that turning the upper outwards is really an unnaturalposition for it, it is necessary to give it some shape resembling that whichit will eventually take up (Figure 194). This is carried out on a heel seatflanging machine. The degree of moulding required in this operation mayvary very considerably, but fundamentally the idea is to turn the upperoutwards at a defined place, the feather line, and ensure as far as possible
that it stays there. The machine consists of a metal seat-piece resemblingthe back of a last, around which is a pair of moulds which fits the last andclamps over the seat. The upper is placed over the seat-piece, that isbetween the moulds, and the outside clamps close and hold it, leaving amargin protruding above their surfaces.
A plate descends and with a wiping action by the moulds comingforward, spreads the seat out over the flat surface of the moulds. Thesemoulds may be heated if required to make the crease more definite andhelp shape the back.
361
Figure 194. Veldt upper after seat flanging.

The Standard Veldtschoen Heel Seat Flanging Machine Model 182Zis shown in Figure 195.
It is not always desired to make the seat in the manner described. In thiscase the procedure varies slightly. Half an insole is tacked to the last andthe back is tacked up to it with an ordinary stiffener inserted, and lasted inthe usual machine-sewn way on a ‘Consol’, not a seat laster, the upperbeing cut as illustrated (Figure 196. This method can be extended right upthe waist (Figure 197).
Veldt Assembler
The upper is placed over the last and is inserted into a veldt assemblingmachine (Figure 198). This machine has three pincers, one at the toe andone on each side. The pincers draw the upper
362
MAKING
Figure 195. Standard Veldtschoen Seat FlangingMachine Model 182Z.

over the last with emphasis on the forward pull, bringing the upper downto the last. While the upper is held in this position two or three nails areinserted around the position of the vamp seam, or if a sandal, at the top ofthe throat.
The idea is to stretch the upper to the position it will finally assume andhold it there with the tacks. It cannot be too strongly emphasised that thismachine is in no sense of the word a pull-over. With veldts themselves theemphasis on ‘down to the wood’ is not possible or even necessary. Theoperation described however, does ensure the fitting of the top line to thelast.
The sole is now attached either by hand or on a wire-grip or stapletacker (Figure 199). The component itself is in appearance muchwider than the shape of the bottom of the last, this extra widthvarying from 3
8to 3
4in. depending on what it is desired to do to the
welt (e.g. double stitching).It is desirable to put three or four fasteners of the same kind in the
bottom, as this should be held fairly solidly in position. They are leftprotruding slightly to facilitate their removal (Figure 199). The gauge ofthese fasteners, however, should be as light as possible as the hole leftwhen they are withdrawn disfigures the insole.
The upper is now stapled or stuck to the insole around the seat and upto a line just below a toe-cap (Figures 200 and 201). It may seem difficultto rub the upper in to get a clearly defined line, but using the proper lastthis is not so. A veldt last has a bevel on the feather line which facilitates asharp 90° angle of the upper (see Figure 202).
363
VELDTSCHOEN, TURNSHOE AND LITTLEWAY METHODS
Figure 196. Veldt to heel,with seat tacked over.This shows the insole atthe seat only and how theupper is cut to enable theupper to be outflanged tothe heel.
Figure 197. Veldt forepartwith waist and seat lastedin. In this case the insoleextends to the waist.

Not all veldts are stapled however, especially smaller sizes ofchildren’s work. With bigger sizes the amount of upper tends to becomeunmanageable if not fastened in some way.
The actual cementing process involves a different technique. Theupper and insole may be cemented. and stuck down by hand. A better wayhowever, although not in general use, is to use a toe
364
MAKING
Figure 198. Shoe held in veldt assembling machine. Three pairs of pincers andthe nails A at the top of the throat can be seen.
Figure 199. Veldt sole tacked on.
Figure 200. a Upper stapled to insole all round. b Upperstapled to toe, with toe stuck only.

flanging machine which also takes the form of a cement laster. The edgesof upper and insole are cemented before assembling on the last. The shoeis put in the machine, the plates, made to fit the last, draw the upper overthe last and wipe the toe; it is thus something of a ‘pull-over-cum-toelaster’. The lower plates come back and the wiper plates press togetherthe insole and upper moving slightly inwards to give a clearly definedfeather. These machines are made in pairs so that one may remain inwhile the other is being assembled.
The seats are similarly treated on a machine of similar design.
It should be mentioned that the two operations are for better classwork and are not essential for the making of veldts. Many operations canbe and are cut out in the interests of economy. If they were all put in theprice of the shoes would be prohibitive. For children’s shoes especiallythey are not necessary at all.
Stitching
The shoe is now ready for the insole and sole to be permanentlyattached (Figure 203). The basic veldt is stitched on an ordinary ‘Rapid’type of machine or a special veldt stitcher (No. 4) fitted with attachmentsto throw out the second row of stitching, and pincers to pull out the upperjust before the awl enters the shoe. These pincers are behind and in linewith the table and work with an in-and-out action.
365
VELDTSCHOEN, TURNSHOE AND LITTLEWAY METHODS

The No. 4 machine is exactly like the ‘Rapid’ except that it has aself-stopping device, automatic foot-lifting mechanism and a threadsaving device. Again the type of machine is not rigid; many veldts arestitched on machines with no pincers and just the standard Scotch edgeattachments for throwing out the second row of stitching such as theBUSMC Model ‘O’ or the Standard Engineering company Model 89.The operator does both rows; having completed the first he brings theScotch edge lever forward and completes the second.
A further version of this method of attachment is for the through to bestitched to the insole by the inside row of stitching; the through and thesole are then solutioned, the latter being then applied to the former. Thetwo are then stitched together by a row of stitching outside the previousrow, the object being to enable the sole to be removed separately, bycutting through the outside row of stitching thus eliminating anypossibility of disturbing the inside row which
366
MAKING

constitutes the main seam holding the shoe together. This makes thereplacing of the sole, after it has worn out, a comparatively simple matter(Figure 203c).
Where a rand has to be stitched above the upper it is simply fed into aspecial table immediately under the awl which thus passes through therand, the upper and the sole (Figure 204).
It is quite common also to round the work on a machine such as theordinary Model ‘E’ Rounder or Standard 86V, the Scotch edgeattachment of the stitcher working on the rounded edge. This is useful if a
leather sole is incorporated on top of the insole as this may be grooved atthe same time, no forepart guard or outside swell being used. It is difficultto cut a channel however, as it has to be extra wide to contain the tworows of stitching. If only one row is used the problem presents nodifficulties. (For information as to the assembly of the soles and throughsetc. see Part V.)
The staples holding the insole to the last will, of course, have to beremoved before anything is put on top of the insole.
Alternatively to a Model ‘E’ rounder, a surplus upper trimmer may beused for removing the surplus upper material and the edge trimmer willfinish off the rest, or even an ordinary heel seat rounder will do the job allround. This is usual on veldt foreparts where a Model ‘E’ or similarmachine would be of no use.
The seats are sometimes nailed on top of leather soles but there is notmuch point in this if they are already stitched, except to make a solid basefor the low heel commonly used.
367
VELDTSCHOEN, TURNSHOE AND LITTLEWAY METHODS
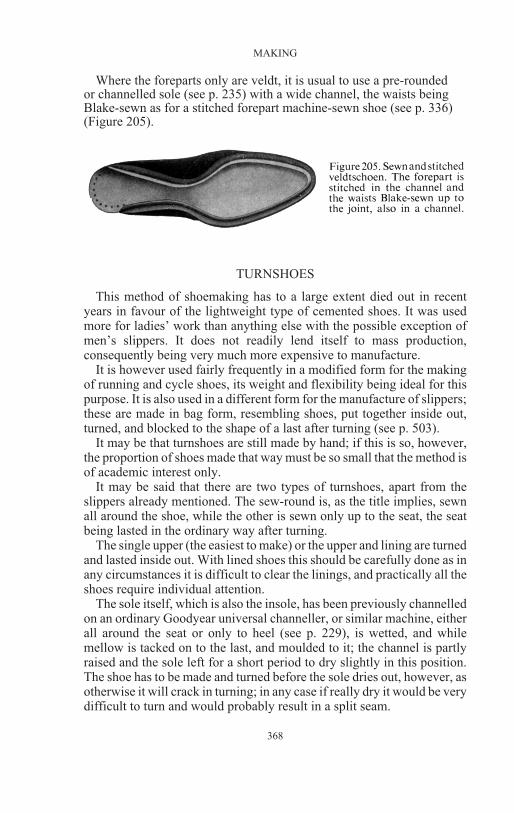
Where the foreparts only are veldt, it is usual to use a pre-roundedor channelled sole (see p. 235) with a wide channel, the waists beingBlake-sewn as for a stitched forepart machine-sewn shoe (see p. 336)(Figure 205).
TURNSHOES
This method of shoemaking has to a large extent died out in recentyears in favour of the lightweight type of cemented shoes. It was usedmore for ladies’ work than anything else with the possible exception ofmen’s slippers. It does not readily lend itself to mass production,consequently being very much more expensive to manufacture.
It is however used fairly frequently in a modified form for the makingof running and cycle shoes, its weight and flexibility being ideal for thispurpose. It is also used in a different form for the manufacture of slippers;these are made in bag form, resembling shoes, put together inside out,turned, and blocked to the shape of a last after turning (see p. 503).
It may be that turnshoes are still made by hand; if this is so, however,the proportion of shoes made that way must be so small that the method isof academic interest only.
It may be said that there are two types of turnshoes, apart from theslippers already mentioned. The sew-round is, as the title implies, sewnall around the shoe, while the other is sewn only up to the seat, the seatbeing lasted in the ordinary way after turning.
The single upper (the easiest to make) or the upper and lining are turnedand lasted inside out. With lined shoes this should be carefully done as inany circumstances it is difficult to clear the linings, and practically all theshoes require individual attention.
The sole itself, which is also the insole, has been previously channelledon an ordinary Goodyear universal channeller, or similar machine, eitherall around the seat or only to heel (see p. 229), is wetted, and whilemellow is tacked on to the last, and moulded to it; the channel is partlyraised and the sole left for a short period to dry slightly in this position.The shoe has to be made and turned before the sole dries out, however, asotherwise it will crack in turning; in any case if really dry it would be verydifficult to turn and would probably result in a split seam.
368
MAKING

The range of styles is limited to what will turn easily, the more open thestyle the better for easy turning; most of the work made is very light opencourt shoes, with light uppers and evening shoes of better class fabrics.The stiffener has to be of some flexible material, usually leather of a lightsubstance, and should be in a mellow state and it is usual for the laster toprepare his own components. A hard toe case is also out of the question.
The upper is now lasted with the outside next to the last. The sides mustbe lasted by hand (Figure 206a) or on a ‘Consol’ using about a 1
2in. soft
rivet which is left standing up for easy removal after sewing. The seat islasted in a similar manner (sew-rounds) but may be held in position with a
tape and two anchor tacks located at the corners of the seat. The toes maybe lasted by hand but are perhaps better done on a manually operated bedlaster BUSMC No. 7, or Standard ‘Evolution’ (Figure 206b). In the pastthe ‘Consol’ was in fairly common use for lasting toes. The toes also arebetter held by tape and anchor tacks.
On a lined shoe the upper may be cut in such a fashion that the seam atthe vamp is left open, with the lining turned back; this lining is, after theshoe has been turned, smoothed down and then stuck to the edge of thesole inside the shoe—a hand operation and rather complicated. The lastedshoe is now sewn on an ordinary
369
VELDTSCHOEN, TURNSHOE AND LITTLEWAY METHODS
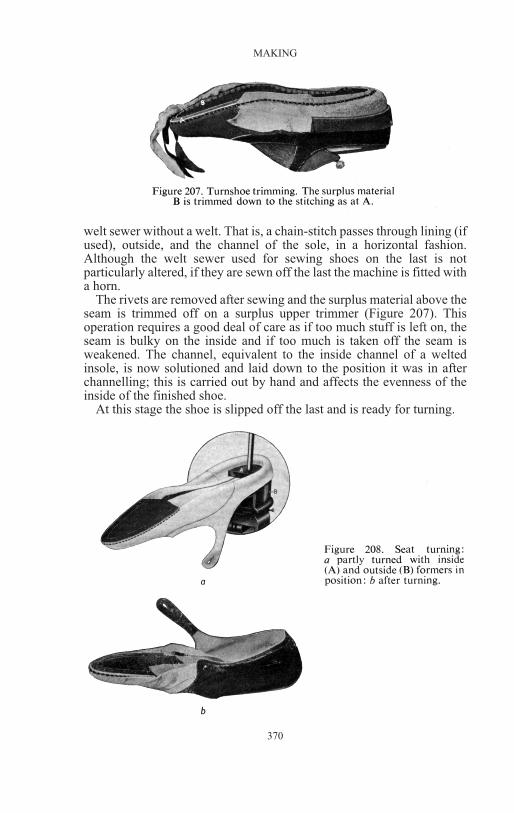
welt sewer without a welt. That is, a chain-stitch passes through lining (ifused), outside, and the channel of the sole, in a horizontal fashion.Although the welt sewer used for sewing shoes on the last is notparticularly altered, if they are sewn off the last the machine is fitted witha horn.
The rivets are removed after sewing and the surplus material above theseam is trimmed off on a surplus upper trimmer (Figure 207). Thisoperation requires a good deal of care as if too much stuff is left on, theseam is bulky on the inside and if too much is taken off the seam isweakened. The channel, equivalent to the inside channel of a weltedinsole, is now solutioned and laid down to the position it was in afterchannelling; this is carried out by hand and affects the evenness of theinside of the finished shoe.
At this stage the shoe is slipped off the last and is ready for turning.
370
MAKING

The seat is first turned; this may be carried out by hand, or on amachine. The machine consists of an inside and outside former (Figure208a). The outside former is placed with its ridge within the shoe itself,this ridge roughly resembling the outside contour of the seat (Figure208a). The inside former comes down to the seat, the operator exertingthe necessary amount of pressure with a pedal; as it continues downwardsit forces the centre of the seat down while the upper stays where it is. Thusthe seat is forced inside the quarter until that portion of the shoe is turnedabout (Figure 208b). lt is often necessary for the operator to use hisfingers to assist to roll the upper back; the operation itself requires a gooddeal of care.
We thus have a shoe with the forepart inside out and the back normal,the former below the seam and the latter above it.
The forepart is next turned; it may be done by hand with the assistanceof two pieces of wood, but is better turned on a forepart turning machine.The forepart to be turned is placed over a tool which is in size and shapesimilar to that of the shoe (Figure 209a). A piece of metal rests against thetoe on both sole and upper; this tool can be moved forward by a treadleand its return movement is spring-loaded. The operator takes the upperwith thumb and fingers and as he eases, with the treadle, the outside toolforwards, turns the forepart right side out (Figure 209b).
The shoe is now the correct way round. If the lining has been cut aspreviously mentioned and the quarter lining not sewn in, this
371
VELDTSCHOEN, TURNSHOE AND LITTLEWAY METHODS

lining is pasted and carefully inserted with the fingers. The creases shouldall be removed and the upper laid on the insole as evenly as possible; along sock is always used on this type of work.
It is fairly obvious that a shoe treated in this way is at this stage hardly areplica of the last it was made on. It is now put on a turnshoe re-formerconsisting of a last in two halves, slightly smaller in length than theoriginal when the gap is closed to ease the operation of placing the shoeon it. This gap is spring-loaded, widening as the machine is tripped, untilthe original last is reproduced. The subsequent action of the machine islike that of a leveller except that the bottoms are levelled by hand by theoperator and only the upper is shaped by the machine.
When this operation is completed the bottom is filled with a shank ifnecessary, and a pre-shaped filler; this filler is often complete with shankand sometimes a thin insole of leather with swansdown backing, havingbeen completely assembled before insertion.
On turns carrying a higher or Louis heel (evening shoes etc.) the sewnseat does not provide a solid enough base for the heel. The sole is in thiscase channelled only to heel and the seat is as for a Louis, or the sole maybe cut to heel only (see p. 218). The seam is sewn to heel only, the seatbeing completely left alone. After turning, half an insole (to the jointonly) is stuck in or tacked to the last at the seat before the shoe is replacedon it, the seat is then lasted in the ordinary McKay manner, with the Louisheel flap turned back.
A shoe made by this method is probably the lightest and most flexibleshoe made. It is essentially a job for a craftsman right through andimpossible to mass produce as the term is understood now. Its greatestdisadvantage is that it is practically impossible to repair without ruiningits character as the ‘sole-cum-insole’ cannot be removed. The only way todo anything with it after the sole has worn out is to scour the sole lightlyjust above the depth of the channel and stick a sole on top. lt then becomesa rather poor replica of the type of shoe that, to a very great extent, hasreplaced it.
THE LITTLEWAY METHOD
In describing the Littleway method it should be borne in mind that exceptfor Littleway welted work the processes follow closely those of themachine-sewn. The fact that no metal shows on the insole and the seam ismuch more flexible and neat, justifies the extra trouble and expense thatthe use of these machines involves.
The Littleway lasting machine has been described on p. 330.As the lasting machine is critical, and with all better class work this is
the case, the insoles have to be carefully chosen for consistency in textureand substance; they are usually buffed or degrained before being tackedon. On slipping a shoe after lasting its appearance resembles that of anordinary machine-sewn shoe except that the insole has grindery showingonly at the seat and toe. The lasting
372
MAKING

of these shoes is often followed by the mere sticking on of a sole; a heelsock is inserted so that the inside appearance is clean and pleasing.
The laster is used in conjunction with the lock-stitch machine. Thesemethods, with one exception follow those already described formachine-sewn work.
The Littleway Stitcher
Being a lock-stitch machine there is a single thread on both sole (inchannel) and insole; the stitch itself is much smaller and it is customary touse white cold wax through the horn, that is the insole side, but hot waxwith the bobbin.
It consists of a horn with a whirl-driven pinion with the thread passingthrough a waxpot as it does on the Blake machine. The difference herelies in the fact that the lock-stitch machine has a thread lock mechanismsimilar to a ‘Rapid’ stitcher, a compensating roller and a thread lockinglever, but no thread saving device.
The stitch is formed by the action of the needle drawing the loopthrough the insole and sole. This loop is parted by a spreader to allow thenose of the shuttle, containing the bobbin, to pass into it. The rotarymovement of the shuttle passes the thread over it and the thread is pulledtight by the thread locking lever situated below the horn; in other wordsthe thread, unlike on the Blake machine, leaves the needle completely.
To allow for the movement of the thread locking lever, a length ofthread is pulled through at the start of each shoe and clipped to the hornitself, the bobbin thread being left sufficiently long to be locked into theloop. The bobbins themselves are wound on a metal cap, but unlike on thestitcher the metal bobbin is not inserted into the shuttle, the wound capbeing removed and just the thread placed in. The shuttle itself is lighterthan that on a stitcher and is situated just by the needle.
The feed mechanism is the same as on the Blake machine, that is, thepoint feeds the shoe to immediately below the needle, then withdraws theneedle making its own hole through the sole and insole.
The machine is rather delicate and, if it encounters too many tacks atthe toe, trouble may ensue; for this reason it is essential that such tacks areplaced fairly well in and are not unduly plentiful. Stick lasting is the bestway of lasting for this machine, especially at the toe.
The machine itself is not suitable for heavy work and is ratherextravagant on thread at the beginning of the shoe, due to the length ofstroke of the take-up lever; for the same reason, coupled with the smallsize of the shuttle, the thread has to pass over it a number of times.
It is usual to insert only a heel sock with Littleway stitching of this typeand combined with a buffed or degrained insole and a clean lining theinside appearance is very pleasing.
373
VELDTSCHOEN, TURNSHOE AND LITTLEWAY METHODS
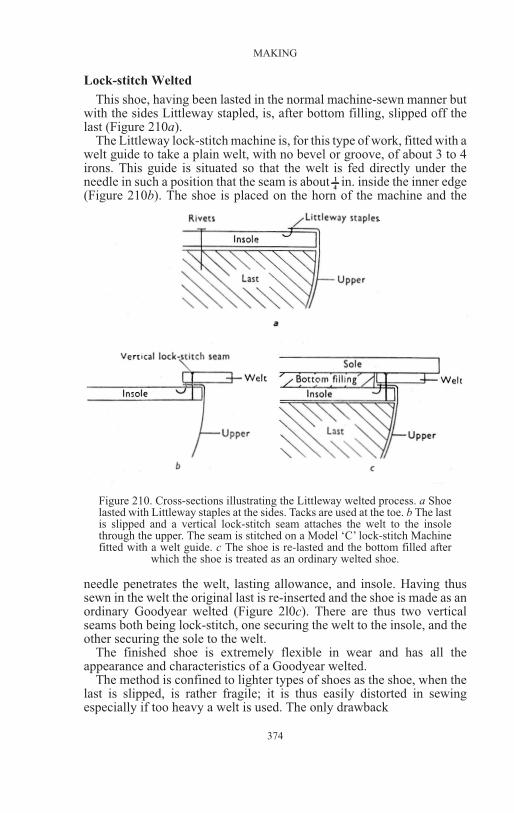
Lock-stitch Welted
This shoe, having been lasted in the normal machine-sewn manner butwith the sides Littleway stapled, is, after bottom filling, slipped off thelast (Figure 210a).
The Littleway lock-stitch machine is, for this type of work, fitted with awelt guide to take a plain welt, with no bevel or groove, of about 3 to 4irons. This guide is situated so that the welt is fed directly under theneedle in such a position that the seam is about 1
4in. inside the inner edge
(Figure 210b). The shoe is placed on the horn of the machine and the
needle penetrates the welt, lasting allowance, and insole. Having thussewn in the welt the original last is re-inserted and the shoe is made as anordinary Goodyear welted (Figure 2l0c). There are thus two verticalseams both being lock-stitch, one securing the welt to the insole, and theother securing the sole to the welt.
The finished shoe is extremely flexible in wear and has all theappearance and characteristics of a Goodyear welted.
The method is confined to lighter types of shoes as the shoe, when thelast is slipped, is rather fragile; it is thus easily distorted in sewingespecially if too heavy a welt is used. The only drawback
374
MAKING
Figure 210. Cross-sections illustrating the Littleway welted process. a Shoelasted with Littleway staples at the sides. Tacks are used at the toe. b The lastis slipped and a vertical lock-stitch seam attaches the welt to the insolethrough the upper. The seam is stitched on a Model ‘C’ lock-stitch Machinefitted with a welt guide. c The shoe is re-lasted and the bottom filled after
which the shoe is treated as an ordinary welted shoe.

as compared with welted is the seam on the insole, but as the stitches aresmall and neat and the thread is lubricated with cold wax only, thisdrawback is visual and is not felt by the wearer; it is usual only to insert aheel sock and leave the seam showing. The insole itself will remain quiteflat with no chance of the inside channel showing through as with a goodmany Goodyear welted made with too light an insole.
This method is not in very great use, but has many points to commendit.
375
VELDTSCHOEN, TURNSHOE AND LITTLEWAY METHODS

26
THE MANAGEMENT OF THE LASTING ANDMAKING DEPARTMENT
THE TWO DEPARTMENTS ARE really separate units and as lasting andmaking each demand different techniques it is better if they can besub-divided. For economical reasons, however, they are often combinedespecially where the output is small but as this is a brief general surveythis consideration is not essential.
The management of the room is a matter better approached from apractical point of view but a knowledge of the theory behind it isabsolutely vital to get the utmost out of it. It is a fact that 95 per cent of theoperations in the department are machine operations. All these machines,however involved their construction may be, are merely tools for theoperator to use, in the sense that they are not completely automatic like,say, a machine making pans, which, once it is set up will proceed to stampout thousands by itself, merely being fed with sheet metal.
Bearing this in mind, not only have the capabilities and limitations ofthese machines to be known and understood, both from the point of viewof output and standard of work, by the person in charge, requiring bothstudy and experience, but the operator’s capabilities must be known aswell; this latter is a rather more formidable job for which the executivehas to rely solely on his own judgement—there is no standardisation orset rules.
It has been the practice of some sections of the trade for many years toapproach the product of the machine with an attitude of tolerance of areally unwanted economic necessity and at every opportunity to compareit, to its disadvantage, with the hand-made job. A good many executiveshave been brought up in this tradition and have been trained in handmethods to the exclusion of machine methods. Fortunately this outlook ischanging. In the opinion of the writer, with one or two exceptions,machines turn out a job equal to, and in a good many cases better than,hand shoemakers. Top grade hand-made shoes are indeed works of artbut there are not many top grade shoemakers and the products of the lessskilled are often missing when comparisons come to be made.
The task, then, of running a room is chiefly to know what standard canbe attained by operators, as a team, in view of their collective capabilities,and the tools at their disposal, and how much and how good is going to bethe product of each. This latter aspect is very important in the lasting andmaking departments; each operation is different in character and thestandard of skill required; each one is also dependent on the onepreceding it. Each individual only
376

carries out a small item of the job as a whole. If one additional operator isset on, for example, a rounder, the total output will not automaticallyincrease; only the skill of the executive in balancing the rest of hisdepartment and using the additional man-hours available will result in anincrease. If he fails the only increase in total will be on rounding,resulting in this output being too great and thus the department becomingunbalanced.
It is not often found that the executive himself is an expert on everyoperation and he does not need to be; if he is he has to curb hisinclinations to do the job himself. He should never work physicallyhimself except in factories where the output is too small to carry him.While he is working something may be going wrong or someone elsemay be taking things easy. He will find that he will collect no medals forhis physical efforts and operating skill when something has gone wrongwhile he was thus engaged, and for which he is responsible. He isemployed to assess those under him and to organise and use them to dothe work. If he should be absent for a period and the department runssmoothly that indeed is a tribute to his skill. There is an all too commonopinion among executives that if something happens when they are notthere, which throws the department out of gear, that will enhance theirpersonal prestige when they return. If it is something which ought to havebeen foreseen beforehand, it should be their responsibility whether theyare present or not.
The efforts of the department should be subjected to the generalinterests of the firm whenever humanly possible, and any inconveniencecaused by so doing shouldered without hesitation. No firm should besubject to the limitations of one particular section, or any department tothose of a single operation. This may not always be possible, but it shouldalways be an ultimate aim; such limitations should never be regarded aspermanent and inevitable.
It may be that the whole of the planning is done by a centraldepartment, but it is better that such a department do the bulk planning,and the sub-dividing and method be decided in the department itself.Planning is of course a necessity but it can be overdone. It then becomes acase of the ‘tail wagging the dog’! Planning departments can develop intohuge unwieldy departments from whence emerge large numbers ofimportant people who carry mysterious looking documents, who arealways overworked and must have assistance, and the stranglehold getsstronger and stronger.
The fitting-up of work coming into the department depends on theamount of such fitting-up and the type of work. Arrangements must bemade so that everything required is at hand before the work is started on;mistakes in this direction can be disastrous. Such arrangements as, forexample, soles going for solutioning and tempering in the same order asinsoles are tacked on, are vital. These in turn may be completely upset bydamages and oddments, as all broken lots should not be allowed to go toofar before awaiting
377
MANAGEMENT

completion. Whether it is advisable or even economical to count out suchcomponents as puffs, stiffeners, welts, seat lifts and all the other parts isvery doubtful; losses still seem to occur even when this is carried out tothe full and no inquests seem to bring the missing pieces to light. Apartfrom the fact that components get spoiled even in the best rundepartments, mistakes in counting do occur and the process of makingthese up is often a comparatively lengthy and argumentative one.Meanwhile time is being wasted to a far greater value than that of themissing component, in addition to work being held up.
It is of great help to the person responsible if he is set a standard ofquality and output plus economy and judged on that without being undulyinterfered with. It is a fact that everyone gets to the state that one ‘cannotsee the wood for the trees’ and outside comments are justified andhelpful; such comments should be made to him personally—any goodman is annoyed with himself if he has made a stupid mistake and such selfmortification is enough. The departmental head should know of anychanges contemplated especially where such changes are to be madefrom other sources, and he should be consulted on such matters. Not onlydoes this go a long way to ensuring his co·operation it also gives himconfidence and enhances his prestige with those under him.
On his part he should co·operate with and even accept responsibility formethods with which he does not personally agree. This is perhaps askinga lot, but to have ideas of one’s own and at the same time to realise thatthere may be better ones is one of the greatest assets anyone can possess.There is nothing worse for an executive to hear of some contemplatedchange in his department from perhaps one of the men under him, but itsometimes happens that by his own attitude he has brought such a state ofaffairs on himself.
All too often one hears of a foreman transmitting a disagreeabledecision to someone under him with the preface, ‘It is not my doing butMr. So-and-So’s.’ He is in this case either afraid of his men or he does notwant to make himself unpopular. If he thinks that he will retain hispopularity with those in his charge he is grossly mistaken in using suchmethods. He is merely advertising the fact that he is not strong enough tomake or transmit decisions and damaging his own prestige in themeantime. To make and convey unpleasant decisions as pleasantly aspossible is his job, and his attitude is quite as important as his technicalability.
The transport of work through the department has undergone veryconsiderable changes during the past few years; the two alternatives seemto be the conveyor, or the twelve pair rack, the twenty-four pair rackhaving almost entirely disappeared, at least for Goodyear welted work.The argument against it is simple enough; while an operator is workingon one shoe, forty-seven lasts are standing still in addition to the extrafloor space required. The three pair trays of a conveyor go to the otherextreme, too far for Goodyear welted,
378
MAKING

in the writer’s opinion; it is a very true statement that a shoe that has beenon the last four days is a better shoe than one that has been on only two,although the increasing use of dryers has speeded up the setting processvery considerably. Smaller rack are now the standard equipment of mostfactories and take the form of slotted racks, pegged racks in which theshoe is held in an inverted position by the peg of the last, or ordinary shelfracks; these latter are more liable to damage work, however, as it is betterthat the shoes should be separated. On cemented work the conveyorcomes more into its own; the main suppliers of this type of transport areMessrs. Freeman and Wright who have been the chief pioneers and havedeveloped it to a very great extent with remarkable results in the saving ofspace and effort.
379
MANAGEMENT


PART VII
FINISHING
J. HARRIS


INTRODUCTION
IT IS DIFFICULT TO give adequate reasons for some of the titivating done infinishing except to describe it as an expression of craftsmanship in thesame way as some of the Victorian furniture was embellished.
Further, the methods used, the order of operations, the type of machine,lay-out of plant and other considerations beyond the intention of thepresent text, all have a bearing on the kind of result.
However, it is generally considered that finishing operations fall undertwo headings—the useful and the ornamental. It is not always possible toseparate entirely these two groups as some useful operations may beconsidered very decorative, but, for the purpose of grouping, anyoperation which serves a partially useful purpose may be included in thatgroup. Such a process is edge trimming which is primarily concernedwith shape and appearance, but without the smoothing of the edge, waxpenetration and sealing would be impossible by present methods. Seatwheeling is another job where the emphasis seems to be ornamental, butif properly done, it serves to seal the seat as well.
It must be realised that some variation in sequence is possible in orderto provide for special circumstances; two typical sequences are nowgiven, one orthodox and one specially planned for an economical ‘blackthrough’ finish.
*The heeling operation is included in this section for no other reason than that it is a
border line operation, essentially attaching or ‘ making ’ but very often included in finishing
departments. ln large plants it may be a separate entity but, if so, usually includes slugging,
heel trimming and breasting.
383
ORTHODOX SIMPLE BLACK THROUGH
Heeling*BreastingHeel trimmingHeel scouring—rough and fineApplying ‘Smoothene’ or dyeCombination heel trimmingSuperfine heel scouringEdge and heel colouringHeel burnishingSeat wheelingEdge settingEdge and heel brushingBottom scouring
As orthodox method to :
Superfine scouringBottom scouringPutting whole bottoms into
colourHeel burnishingSeat wheelingEdge setting

384
FINISHING
Bottom makingTop ironingSide ironingMarking-overCrowingBrushing-offLast slipping
Bottom burnishingSide ironingBrushing-offSlipping
Note: No hand operations.

27
HEEL ATTACHING
Heel Heights
It is important to realise that the height of a heel is determined by thedesign of the last, i.e. the pitch of the last, and using arbitrarily a heel ofany height according to whim will not produce satisfactory results. Thedesign of a last blends the toe spring with the pitch, which implies that,having fixed the toe spring, the correct heel height must be used tosafeguard this. Also, for orthodox grading it will be found that tomaintain a proper balance between toe and seat, the heel will have to beraised as the size increases (see p. 98).
Pitch of Heel
This must not be confused with pitch of last. It may be defined as theplacing of the back of the heel forward, normally, or backward in relationto the back curve of the last (Figure 211).
In connection with this, the type of pitch used on a man’s shoe heel willusually be related to the style of footwear. Light dress shoes have aforward pitch, heavy brogues a slightly backward pitch, and in this waycharacter is added to the shoe.
Ladies’ shoes having heels of more than l 1
2in. will normally have a
back shape which follows the shape of the back curve of the last. Theposition of the top-piece on a heel 2 1
2to 3 in. high must coincide with the
weight·bearing centre of the seat. This seems to come forward (towardsthe waist) as the heel is raised (see also p. 80).
Stand
This may be expressed as the relationship between the top-piece andthe tread. Correct stand is obtained when the whole length of top-piece ison the same level surface as the tread and the toe springis true (Figure 211).
385

METHODS OF ATTACHING HEELS
Heels may be attached by a variety of methods, but the following willcover those mostly used:
(l) inside attaching;(2) outside attaching;(3) temporary attaching;(4) stuck attaching.
Inside Attaching
By inside attaching is meant that the nails are driven through the insoleand sole seat into the heel from the inside of the shoe; the last has first tobe withdrawn (Figure 212a).
The most popular type of machine in use for ladies’ wood heels is theBUSMC No. l0 Heel Attaching Machine. This machine has automaticloading and feeding and in action holds the heel very firmly on either sideand back whilst the screw nails are being driven home. Normally sixscrew nails are used from 7
8to l 1
4in. according to height of heel.
The BUSMC No. 11 Inside Attaching Machine has developed from theNo. 8, is of much sturdier construction than No. 10 and is more suitablefor leather heels.
Outside Attaching
When this method is used the last is retained in the shoe and the heel isattached separately from the top-piece. The pins used are
386
FINISHING

normally l in. long having no heads, being slightly tapered and having arectangular section. When the heel is attached the pins are driven throughthe heel first and then into the seat and the ‘heads’ or ends of the pins areleft standing up about 1
12in. (Figure 212b) so that on the second trip of the
pedal the top-piece, which automatically comes under the seat, can be‘blinded’ on to the heel temporarily, ready for slugging. The chiefmachines are the No. 8 and now the No. 11. The No. 8 and No. 11machines are both convertible for either inside and outside attaching. Arecent innovation is the still largely experimental BUSMC No. 12Heeling Machine which combines some of the features of both themethods already mentioned. Firstly, the last is retained in the shoe. Thenthe heel to be attached is a complete heel with top-piece already on andslugged, breasted and if desired front scoured and finished. The methodof operating, briefly, is as follows. The die is automatically loaded withspecial bifurcated pins of the screw type and the shoe is placed over thedie and these pins are driven into the seat but left protruding about 1
2in.
Simultaneously with this happening the heel is pricked with a numberof holes to correspond exactly with the number and location of the pins.Then as the shoe is lifted clear of the die the heel is automaticallytransferred by runway to rest immediately under the pins in the shoe seat.The second pressure ‘spanks’ the heel on to the pins by way of the holespricked in the heel.
Although an average of only nine pins is used against an average offifteen on the No. 8 or 11, it is claimed that the holding power is greater.The possibilities of this machine are very great as it might mean the endof any form of temporary attachment.
Temporary Attaching (Wood Heels)
It has long been realised that the ‘setting’ of the upper after lastingdepends on the length of time it can be kept on the last. For this reason andthe fact that when making cemented shoes the last does not have to beremoved for sole attaching, it became evident that a method ought to beevolved for the temporary fixing of the heel (wood) whilst the last wasstill in the shoe.
The first step is to bore a hole through the last from the top to the seat atan angle to suit the pitch of the last. Then the shoe and heel are held rigidin a machine fitted with a clamp whilst a long drill is passed downthrough the hole in the last and drills a hole in the seat of the shoe and theheel. A screw long enough to go through the last and enter the heel forabout 1 in. is mechanically forced into position (Figure 212c).
When the shoe is finished the screw is removed, again mechanically,the last slipped and the heel firmly attached on the No. 10 Heel AttachingMachine. When using the temporary screw method some firms put a dabof hot glue on the seat before screwing the heel.
387
HEEL ATTACHING

Stuck Heels
Certain types of shoes such as slip-lasted shoes have no firm insole orseat to act as the foundation for heel attaching and it is customary to use acover to wrap or last over the wedge heel (Figure 213a) but
388
FINISHING

some slip-lasted shoes are made with through platforms of the samesubstance extending to the seat and the platform cover is used to coverthis, allowing no material for the heel. The heel is then covered in thenormal way and is simply stuck to the bottom of the through platform(Figure 213b).
Another type of stuck heel may be termed the ‘internal wedge’ (Figure213c). This needs a special last having wood where the heel wouldnormally fit (Figure 214). The upper is lasted over in the usual way, madeup and the wedge heel inserted after finishing; the heel is then coveredwith a soft rubber pad and a through sock.
SLUGGING
Universal Slugging Machine (BUSMC)
This machine with minor mechanical alterations can work with (1) heeloff the shoe, (2) heel on the shoe, or (3) top-piece of a wood heel either onor off the shoe.
Wire used is of two kinds, soft steel and brass, and may be obtained in avariety of cross-sectional shapes, square, circular, triangular, etc.
Mechanical Details—The machine uses a coil of wire which is fitted in afreely moving reel and the end passes between two pressure cogs andthen into the fixed shear. The pressure cogs are controlled by a cam whichadjusts the amount of wire to be fed into the shears. When the wire is fedinto the fixed shear the full cycle of operation can begin as follows: theawl descends and makes the hole and then goes back; simultaneouslywith this happening the wire passes through the fixed shear into thethroat, at the top of which is the complementary shear. When the fullamount of wire is delivered, the throat gives a fractional turn whichbrings both shears into action and severs the wire in the throat which thentravels forward to rest at the point where the awl made the hole. A driverthen comes down and knocks the piece of wire or ‘slug’ into the hole thuscompleting the operation. It will be understood from the foregoing thatthe ‘timing’ of the movements to occur at the correct time and place is ofthe greatest impor-
389
HEEL ATTACHING

tance. For instance, the awl must not be bent or it will put the hole in thewrong place, and the wire groove in the throat must be absolutely in linewith the driver or broken drivers will occur. Also the driver must be set todrive the slug just flush with the grain of the top-piece or difficulties willbe caused at bottom scouring.
Slugging Leather Heels
When this is being done either on or off the last, it must be rememberedthat the top-piece is the template and that little alteration of the outline ispermissible. The guide for spacing the slugging from the edge must betouching the edge of the top-piece to obtain uniformity. Fancy sluggingof half rows or double rows is often indulged in but it is common for adouble row to have much shorter slugs on the inside row (long enough topenetrate thickness of top-piece).
Slugging Top-pieces on Wood Heels
The guide must be changed when dealing with this type of heel becausethe template is the wood heel and not the top-piece. It must be realisedthat the wood heel is a finished heel whereas the leather heel has a marginfor finishing. For this reason the top-piece for wood heels is bigger than
the surface to be covered allowing a margin for trimming. The guide usedmakes contact with the heel and is made from hard rubber—round andfree to rotate on its own centre to provide an easy movement for theoperator. The positioning of the top-piece is relatively unimportant,providing there is a trim allowance (Figure 215). The most suitable wirefor small Spanish heel
390
FINISHING

top-pieces is a fine round brass either ‘OA’ or ‘A’ having diameters of0@048 in. and 0@055 in. Respectively.
General Observations
The awl should always penetrate further than the length of the slug tobe used as the slug is cut off square and cannot make its own hole. Wherethis is overlooked ‘checking’, i.e. parting of the lifts, may result. Anothercause of checking may be the angle of the top-piece position in relation tothe awl. The peg should be set so that when the last is placed on it in theworking position, the top-piece is tilting towards the operator veryslightly and so sending the awl a little inwards. Care should be taken toensure that both shears are ground properly and set so close that whenshearing takes place the cut is square. Badly sheared slugs cause troubleat the bottom scouring stage. Dissatisfaction is often caused at bottommaking when using a natural gum finish because iron stains are streakedacross the forepart. These are produced when steel slugging wire is usedand top-pieces and soles are treated at the same time. As this is a wetfinish it is better to work on soles only and then top-pieces only or,alternatively, to use brass slugging wire.
391
HEEL ATTACHING

28
HEEL TREATMENT
HEEL BREASTING
Unquestionably the best place for heel breasting is in the bottom stockdepartment (see p. 244), because then no damage can arise from solesbeing cut, even slightly. Unfortunately, this is not always possible as forinstance, when the No. 8 Machine is used for attaching men’s heels. Asthe top-piece is attached separately, there is not a close enough unionbetween heel and top-piece to proceed directly with front scouring. Whencarried out on the shoe, breasting does become an important operation forthree reasons:
(1) danger of cutting into the sole;(2) centralising the heel corners;(3) obtaining the correct angle with the top-piece.(1) The responsibility for some of this is due to the bottom levelling
being inefficiently done and much danger would be eliminated if atemplate of the same shape as the knife on the breasting machine could beused across the waist, as very often the breasting knife is cutting in thecentre on some shoes and at the edges on others. The machine is fittedwith a cut-out lever which makes contact with the waist and prevents thesole from going down any further, but it is not fool-proof.
(2) A bone of contention among shoemakers is the position of the frontof the heel in relation to the forepart or the sole shape as a whole. Somelasts have pronounced twisted foreparts whilst others are nearly straightand the problem is to determine the position of the heel front in all cases.The majority seem to favour the heel being attached so that the comersare parallel to an imaginary line drawn across the centre of the waist. Theheel breaster has an opportunity to correct slight variations in attachingby cutting off a little more of the top-piece on one side than the other, butit must be remembered that this cannot be carried too far as the top-pieceis a finished shape with little allowance anywhere.
(3) Correct angle is not always easy to determine but as a general rule itis slightly less than 90° for light-weight shoes and slightly more for heavyshoes. A smart effect is obtained on men’s city wear shoes when the angleis acute by a few degrees. A stolid heavy appearance is obtained on heavyboots and shoes when the angle is just above 90° (Figure 216).
A standard of 90° is best for ladies’ heels but these are almost alwaysbreasted before heeling.
The position of heel breasting in the sequence of operations hasaroused some controversy, it being placed either after slugging or
392

after heel trimming (paring). Those who favour the second positionmaintain that where board lifts are used there is a tendency for the cuttersto drag pieces of the board lifts out on the second side and, if breasting hasnot been done, some attempt may be made to rectify this, as in any eventpart of that corner must be removed at breasting.
HEEL TRIMMING
This is known as heel paring in some districts and broadly speakingsimply consists of removing the surplus material (leather and board) fromthe heel.
The Cutters (‘UItima’ Machine, BUSMC)
These are two in number and are shaped to produce the style of curveintended in the heel (Figure 217). The width of the cutters varies with theheight of heel and it is important when dealing with high heels to measurethe cutter against the side of the heel about 3
8in. from the heel corner. This
will determine the width of cutter to be used, as a cutter which wouldaccommodate all the back height will cut into the upper in the waist. Thiswill be referred to in a later paragraph. The other cutter is known as therander and may be obtained in a variety of styles and cutting angles.
393
HEEL TREATMENT

Sharpening Cutters—There is a machine for cutter grinding whichmaintains the same angle and grinds the cutters to the same extent andthus keeps the cutters true. Some operators still prefer to grind the cutterssingly and have their own methods for extracting the best results from thecutters. It seems true to say that cutters used on heels containing pulp(fibre-board) lifts should be ground with a shorter scarf, say 1
2in., than
cutters used on all leather heels, say 3
4in. The shorter scarf is necessary so
as to keep a solid edge against the very hard pulp and even so, it is veryunusual for an operator to trim more than twelve pairs of heels of 13
4in. or
higher containing fibre-board lifts on one grinding of the cutters. On theother hand, it is possible on men’s shoes having all leather heels of 1 1
16to
1 1
8in. to trim five or six dozen pairs.
Importance of Setting the Machine
The operating of the machine is fairly simple and, except for high heeltrimming which is a tricky operation, it is quickly learned. Speed is anasset, especially on pulp heels, as dulling of the cutters occurs much morerapidly when they are revolving continuously against the surface of theheel.
When operating, it becomes more obvious that the top-piece is thetemplate for the heel shape, especially where straight-back top-pieces areused (see Figure 218). As previously mentioned, the cutters must notexceed the height of the front of the heel, and when operating care mustbe taken to slide the top-piece down on to the top-piece guard and also toforce the heel between the counter guard. It must be explained that thecounter guard (back guard) works on a spring which allows it to open, butalthough it does open, the height of heel at the back which is in excess ofthe width of the cutters will not be trimmed. This must be removed by therander
394
FINISHING

(Figure 218). lt will be appreciated that as cutters are sharpened theybecome shorter but a new cutter which is approximately 23
4in. in length
can still be used when it is only l in. long. This reduction in length, whichcould mean a decrease in ft/min. travelled by the cutting edges, iscompensated for by having movable back stops. Both stops (to which thebacks of the cutters go) are part of one piece of steel plate and are movedby the same ratchet so both must move forward or backwards the sameextent, ensuring the same cutting periphery whatever the length of thecutters.
Another point of importance, when setting, is to undercut the top-pieceby about 1
32in. This will assist the heel scourer in obtaining a clean edge as
top-pieces often suffer from pitted edges on the flesh side, resulting fromdull press knives, badly worn press blocks or hard dry leather. Further,the counter guard has a cam-like face and can be turned to give threedistinct widths of seat, i.e. the upper may be touching the counter guardand the width of seat may be one of three widths.
The heel rest is also an important feature as this takes the shock of thefirst ‘bite’ of the cutters. It must be set to give the maximum assistance.Leather heels having rubber top-pieces, especially soft rubber, needcareful treatment. The top-piece guard should be opened and eachtop-piece rubbed with a wet sponge .This will ensure perfect safety andthe lubricant will enable the operator to slide the shoe round easier.
Randing
This is important even on men’s heels, because it takes the place of ahand job known as seat breaking which was always included in handfinishing. Firstly, when the body of the heel is trimmed the action of thecutters is to push the seat lift away rather than cut it (it must be realisedthat the material is not supported in any way apart from being firmly fixedto the shoe) there being no shield or lip as on the forepart parer (edgetrimmer). When randing, therefore, the action is to pull the seat liftagainst the shield and lip of the rander. This removes any burred-up seatlift and forms a clean seat line for the edge trimmer to work to.
General Observations
The two guards on the machine plus the heel rest guarantee uniformresults, but first-class work can only be done on a machine running with atight belt and with cutters which are true and correctly ground. It is afundamental truth that the successful finisher is the one who realises thatthe majority of finishing machines depend upon the accuracy of thecircle. The circle referred to is the path of the cutting edge of the twocutters when revolving, the felt refill of the heel scourer, rolls and pads ofother machines and satisfactory results can only be obtained when thisfact is properly understood.
395
HEEL TREATMENT

More must be said concerning this in connection with edge trimmingand heel scouring; its importance cannot be over emphasised.
In connection with heel trimming it is better to true up the cutters and toinsert them in the machine to the same stop rather than to put them inhaphazardly. When the cutters are running at speed, a piece of chalk helddelicately to the cutters will show if one cutter is larger than the other.This one should be ground and the operation repeated until both arecutting the chalk. Then if care is taken with the grinding and their setpositions maintained, clean edges will be obtained.
There has been an extensive experiment by the Boot, Shoe and AlliedTrades Research Association with the use of ‘Stellite’ andtungsten-carbide tip cutters. These alloys, used in engineering for thecutting of all kinds of steel, have proved to be very successful but both aremore expensive than the steel cutters. Tungsten-carbide especially isdifficult to sharpen as the normal Carborundum stone will not regrind it.
HEEL SCOURING
In principle, the heel scouring machine has not changed since itsinception. It has been made more compact to reduce the ‘whip’ on thespindle, better bearings have been introduced, fan hoods have becomemore efficient, the method of securing the abrasive strip has beenchanged and finally the abrasives have changed too, but, the machine isstill only a refined hand tool relying solely on manual dexterity forfirst-class results. Not only must the heel be perfectly smooth all round,but no part of the upper must be scratched by the abrasives; this is verydifficult to avoid on close seats where the heel may be within 1
64in. of the
upper.The optimum speed of the machine has for some time been the subject
of much interest, various claims being made. For instance, a faster speedis suggested for the finer grit abrasives and undoubtedly if uniformpressure is exerted then there is an optimum speed for each grit size. Thevariables inherent in scouring are the kind of material (i.e. crepe rubber,vulcanised rubber, fibre and leather‘compo’ board or leather, bothchrome and vegetable tanned), the speed of the machine, the kind ofabrasive, grit size and the pressure exerted. For the heavier grades ofCarborundum where more pressure is used to scour the final shape asquickly and cleanly as possible, there would be a tendency for the shoe tosnatch if the speed were too high or conversely, the operator would needto be too careful to obtain consistent results. One of the problemsconfronting all persons concerned with abrading or scouring is thequestion of scorching or charring. The two chief causes of this are (1)continuing to use an abrasive after its effective life is finished, and exertingtoo much pressure in an effort to overcome the lack of cutting power, and(2) scouring on wet leather. Dealing with (1) it is surprising how
396
FINISHING

much heat is generated by the friction between abrasive and heel andwhere this is excessive, charring of the surface results. This will notproduce a polished heel. For (2) it is essential that when scouring, thesurface must be dry as the friction-generated heat seems to be retained bythe moisture, causing excessive charring. Even with the sharpest ofabrasives it is still unwise to scour wet leather as the tendency is for wetleather, being plastic, to be pushed aside rather than cut away; it relaxeson drying to leave a very uneven surface completely unsuitable forfinishing.
Abrasives
The breaking down of the silicon-carbide particles into fine fragmentsis necessary to provide varying grades of abrasive to perform differenttasks, i.e. shaping (coarse) and polishing (fine). The normal grades in usein the shoe industry vary from approximately 30 to 320 for Carborundum(silicon carbide) and relate to the number of threads to the inch of the silkor phosphor-bronze sieves used to pass the particles.
Where garnet and red flint are used there is an arbitrary number or letterreference for grit size.
It is not intended to give a detailed account of abrasives in this section,but to point out that each grit size can only be expected to do a certain job,consequently the coarser grits must only be used for the first scouring andwhere an all leather heel is used, this first abrasive need not be too coarseif the heel trimmer has taken enough material away. Some firms are usinga grit as fine as 60 for what is called rough scouring, but the usual is eitherl 1
2to 2 in red flint or garnet or 30 to 36 in Carborundum.One of the difficulties in using abrasive cloths or papers is the tendency
to clog between the grit particles and to counteract this, most kinds ofabrasives may be obtained with what is known as an ‘open coat’. Thistype is produced with a much sparser layer of particles on the glue,leaving spaces between the particles to avoid clogging.
Another feature of abrasives is that they are obtainable with three kindsof backer—paper, cloth or a combination of these. Apart from beingcheaper, some operatives prefer the paper backed abrasives because theybed down on to the felt more closely. The combination (loosely wovencotton with a paper back) is used largely on the coarser grades of flint etc.When heel dyes are ‘backed-in’ it is the cloth backer which is used.
Sequence of Operation
Front scouring, where necessary, is normally the first operation. This isperformed on a cone-shaped roll fitted on the end of the top spindle. Thefitting of the abrasive to the heel breast scouring roll
397
HEEL TREATMENT

is important and any abrasive protruding beyond the end of the breast rollmust be cut away, as this excess would scour into the sole.
When heels are attached from the inside, it is an advantage to breastand scour, in fact to finish the heel breast before attaching.
Rough Scouring—This produces the final shape in the heel and the shapeof the ‘x-ray’ refill should closely follow the shape of the heel trimmingcutters. Only in extreme cases should the top-piece be scoured beyond theundercut made by the heel trimmer. The exception is where the heel hasbeen attached slightly more to one side than another and the heel scourerattempts to true it. This may only be attempted to a limited extent owingto the line of slugging which would appear much nearer to the edge onone side if too much scouring were done.
Fine Scouring—The rough scouring is followed by the fine scouringwhich is done mainly to remove the scratches made by the rough scourer.The grit size used will obviously depend on the grit used for roughscouring and if 60 grit has been used the fine scouring could use 120 or150. But if 15 to 2 red flint is used then 60 to 80 would be better.Superfine Scouring—Normally a superfine scouring is the third and finalscouring and grits 150, 180 or 220 are used.
There are many variations, but chief among them is the practice ofdyeing the lifts of a composition heel to produce a uniform finish effectand ‘backing-in’ or using a very worn abrasive. The dye chosen musthave good sticking power and it is usual to use a spirit base dye.
Observations
The ‘x-ray’ wheel with its easily detachable felt refills was introducedto effect speedy changes from one shaped felt to another, according to theheight and shape of the heel. It is a surprising fact that some finishers donot take advantage of the fact that wide felts are obtainable for high heelsand they have been observed finishing heels up to 3 in. on 1 1
4in. felts
instead of at least 2 in.Again, it must be emphasised that the scouring wheel must run true and
a simple method of testing this is to tear off two pieces of abrasive andplace them between the holding spikes to ensure that the wheel will beopen to the same extent as when in normal use. Then run the machine andhold a soft lead pencil to the revolving felt to mark the ‘high’ spots. Thesecan be rubbed off by using a piece of coarse abrasive whilst the machineis stationary and finished off by again running the machine and holding astrip of abrasive stretched along a solid board (pressed firmly to thebottom of the fan cover) and lightly bringing it in contact with the feltwheel. This should produce a true surface and consequently a heelsurface free from ribbiness.
The method of holding the shoe is relatively unimportant, but theaction should be free and should allow an easy return swing, so
398
FINISHING

that the shoe moves against the direction of the abrasive. This returnswing is important because it clears the heel surface of dust making itready for colour. Otherwise an extra operation is involved—to removethe dust, which, if left on, would mar the appearance of the heel.
Another interesting feature about heels is the use on these of heavyviscous gummy materials marketed as ‘Finene’ or ‘Smoothene’. Theseconsist of gum arabic and shellac in water or methylated spirits,according to requirements. The application is mostly made after finescouring, each heel being treated (generally sponged) as it is scoured. Theeffect of the application is to harden the fibres especially where soft bellylifts are used and to give the appearance of a solid heel when finished.
A bone of contention among finishers is the condition or appearance ofthe heel after scouring. Very often a piece of carnauba wax may be seenamong the odds and ends in the dust tray. This means that whensuperfining, the operator believes it is his duty to wax the abrasive so thathe can obtain a highly polished heel. This may have the effect ofimproving the appearance of his work but the practice is not to berecommended as it may have a contrary effect at heel burnishing. Thiscontrary effect may easily arise in the shape of ‘red heels’. ‘Red heels’ areso named when it is possible to discern the colour of the lifts in anotherwise black heel and may be caused through using hard, horny lifts,greasy lifts or carnauba (or similar) wax at heel scouring. It is often curedor prevented by adding ammonia to the ink. This ‘kills’ the grease andallows the ink to penetrate. Further to this, some firms will not tolerate theuse of any grit higher than 150 so that the excessive polishing is avoided.The 150 grit leaves a surface free from visible scratches and yet having a‘nap’ which will allow the colour to strike.
A final point, but not the least important, is the decision on the positionof the various scouring operations in the process line. Circumstancesoften affect the issue, but it can be stated that as a general rule the roughand fine stages are performed before edge trimming and jointing and thesuperfine and/or backing-in after edge trimming. Various reasons may begiven: for instance, all operations in finishing have a definite bearing onthe appearance of the finished shoe and the edge trimmer might cut veryslightly into the corner of the heel with his hob cutter. lf the heel scouringwere complete the effect would be spoiled. On the other hand, if morethan superfining remained, the scouring would go beyond the heel cornerand spoil the waist trimming.
A further reason for dividing is that only two rolls are used on themachine; thus a change up is necessary. Where output is high enough it isthen better to engage one man to do all the superfining. Where machineploughing by the No. 8 Edge Trimmer (BUSMC) is done, the superfiningafter trimming takes away any fluffy edge thrown up at the seat by theseat plough.
399
HEEL ATTACHMENT

End of Preparation
The completion of superfining often marks the end of the preparationgroup of operations although the job of corner squaring is sometimesdone. This is accomplished with abrasive cone similar to the type used onheel scouring machines. The advantage of a special corner squaringmachine, is that by foot pedal operation, the rotation of the cone can bereversed to scour either corner towards the centre of the breast leaving aclean corner free from loose fibres.
Inspection at this point makes correction much simpler.
400
FINISHING

29
EDGE TREATMENT
EDGE TRIMMING
THIS IS A MOST important operation and one which improves theappearance of the shoe to a marked extent as well as making theoperation of edge setting possible. It can be examined under sevenheadings:
(1) shape;(2) angle;(3) substance;(4) quality;(5) care of cutters;(6) styles of cutters;(7) materials.
It must be understood, however, that there is bound to be someover-lapping when referring to each section.
Shape
On shoes having leather heels, this embraces all the sole edge at thefeather including taking out the seat. This may be done by hand with ahand plough or by machine on the BUSMC Jointing Machine or the No. 8Combination Edge Trimming and Jointing Machine by using themachine Seat Plough. The importance of bottom levelling and carefulblending of seat lift to welt can be plainly seen at this stage as the edgetrimmer is responsible for the ‘range’ of the shoe (Figure 219) which maybe defined as the harmonious blending of forepart, waist and seat. Wherethe seat is ‘close’ it is important not to take too much out with the ploughas this would give the effect of widening or extending the seat.
401

In general, the shape of the forepart is normally governed by the shapeof the last, but there are several variations of this. Orthodox trimmingmay be so-called when the shape of the last is reproduced by the edgetrimmer with an allowance of up to 1
16in. on the outside joint (from the
toe-cap line to the joint). There is another section of finishers who, whilstfollowing the shape to a considerable extent, have the inside edge of thesole much closer than the outside to allow for the ‘treading-over’ whichinvariably takes place on men’s shoes. Further, fashion plays a small partin shape; very often square corners are required on the sales for round toelasts.
Another important point is the ‘width of welt’; finishers are not agreedas to the width of welt for different types of shoes and very exaggeratedresults are sometimes produced. It is true to say that the wider the welt thegreater the accuracy needed to produce a good shape.
In connection with shape, the terms pump, close, bare free, free, halfwide and wide are often used on work tickets, but with the exception ofthe first the others might be more accurately described respectively, 1
8, 3
16,
1
4, 5
16and greater than 5
16in. If normal trimming is carried out then 1
16in.
must be gradually added from toe-cap line to joint on the outside.The term ‘pump edge’ appears to be derived from tumshoe (pump)
making and consequently there can be very little margin beyond thefeather (edge of last) for any ‘width of welt’, as the sole, before itbecomes the sole, must first act as the insole and must be rounded to theshape of the last. The modern counterpart to a pump edge is found largelyon cemented footwear which has superseded the turnshoe. The pumpedge has no swell on the joint, it being trimmed close to the feather fromjoint to joint. Waist trimming is important in connection with shapeespecially when it is done with a different style of cutter from that usedfor the forepart, and waist marking is part of the ‘taking-off’. Unless theedge trimmer shapes the waist to a known position for each size, it willnot be possible to obtain the correct position for the waist mark ortwo-colour finish. Also, where a bevel waist cutter is used in conjunctionwith a square forepart cutter, the meeting of waist to forepart should be awell defined semi-circular stop (or start) by the waist cutter exactly on thejoint. Fashion has played some part in determining the style of waisttrimming; there was, for example, the ‘spade waist’ which meant that thewaist was trimmed almost at right-angles to the forepart at the joint andstraightened out at the heel corner.
Finally, a simple point: all shoes having a ‘width of welt’ should betrimmed in pairs.
Angle
The angle of the edge should be determined by the style of the cutters,e.g. where a ‘floating’ edge is desired, it should be provided for by beingshaped into the profile of the cutter. Nevertheless, the
402
FINISHING

shoe is controlled by the operator who can at will tip the shoe towards oraway from the bed of the cutter. Variation in angle of this kind isrelatively unimportant on light edges of 5 or 6 irons, but the faultbecomes increasingly noticeable, especially on stouter edges of over 14irons. The fault is especially obvious when one side is floating and the
other side is under, as shown in Figure 220. A consequence of this is that,where the deviation is excessive, it is difficult to deal with on theAutomatic Edge Setting Machine and the part of the edge nearest to thesetting iron will receive the pressure, leaving the remainder to be set onthe ‘Regal’ type waist setting attachment.
Substance
The style of cutter in most common use for men’s work has two creaseswhich, when the cutter is properly used, will produce two parallel ‘beads’on the edge, but this result can only be obtained by maintaining a constantor uniform pressure on the shield. This point has more bearing onsuccessful edge trimming than any other single item and too muchemphasis cannot be placed upon it—successful trimming can only beobtained by steady and constant pressure on the shield (Figure 221). Thefault which results in failure to achieve this is often found at the joints andfor two reasons, the first of which is lack of pressure on the shield; thesecond is through trying to negotiate the joint too quickly and as the soleedge passes obliquely across the cutter it reduces its effective width. Thisreduces the width of bed trimmed on the sole edge and increases theamount of bevel or undercut and accurate edge setting is almostimpossible under such conditions.
If the sole edge is not held firmly to the shield, the cutter lip cannotwork and this results in a loose welt which will not set properly. Thevariation between cutters is normally only 1
48in. and occasionally 1
96in. so
that full use must be made of that cutter and any tendency to relax frompulling against the lip results in unnecessary and unsightly bevelling ofthe sole. Also the margin of error increases,
403
EDGE TREATMENT

and consequently the need for care increases, as the number ofcomponents in the edge substance increases, e.g. the welted veldtschoenhas very often four distinct substances, the upper, welt, middle and solethus creating difficulties in maintaining even substance for any numberof pairs, causing considerable variation in edges. Very often an operatormust change the cutter two or three times for one rack of work.
Quality
As the skill of the operator determines the result, it is true to say that asthe speed of any one operator increases beyond his particular optimum,then his quality suffers. The degree of variation in quality and output isvery high, as some men have a natural aptitude and others find the taskonerous.
Some of the more obvious faults encountered, such as sawingbackwards and forwards on the cutter and taking many short strokes toaccomplish what could be done in one, may be easily corrected. Whilstno hard and fast rule may be made to guarantee success, the two or threemovement methods are accepted, the first for quality trimming and thesecond for speed or mass production trimming. Whatever method is used,the first requirement is a comfortable stance and a sense of balance,followed by a clear view
404
FINISHING

of the further side of the shield, i.e. standing at an angle of about 45° to themachine. Then the shoe must be held firmly but gently to the cutter, andfollowing the contour of the last, pulled in one continuous action to thetoe; next, by dropping the left hand down so that it grasps the shoe acrossthe instep, the shoe can be swung (by the left hand using the wrist as thepivot and steadying with the right hand moved to the toe-cap line) rightround the toe, followed by a third movement where the left hand isbrought back so that the heel is resting on the palm of this hand and theright hand remains in approximately the same position it had occupied forthe second movement. A useful tip in connection with this method is thatif stops and starts need to be avoided, then after rough trimming, as
explained in the three movement method, the shoe edge should be wettedand finally trimmed by completing the third movement first, i.e. pullingfrom toe to joint or waist on the second side, then the toe and finally whatshould have been the first movement. This reversal enables the operatorto pass over both starts which occur on either side of the toe as a finishingstroke, thus gliding very lightly over the surface and so eliminating anymarks caused by heavy starting (Figure 222a). The speed method of twomovements is as follows: first movement is to the toe as in previousmethod, i.e. grasping the shoe firmly with the right hand around the heeland cradling the forepart in the left hand. The second movement is fromthe toe right round and down the second side. This is done by holding theshoe with the right hand at the heel and swinging the shoe from behind thecutter (Figure 222b).
405
EDGE TREATMENT

Any operator, with practice, should be able to produce more pairs perday by this method; the quality may be doubtful, but again allowancemust be made for individual skill.
In connection with quality it must be mentioned that leather will trimbetter when mellow. Edges will also look better if a dilute gum solution isapplied to the edge after trimming and rubbed in in the same direction asthe shoe is trimmed. Wet rubbing is essential on stout edges (men’s) ifany trimming fault is to be discovered and corrected at this stage.
Quality must take everything into consideration, those points alreadyenumerated, shape, angle, substance and also other points still to bediscussed, such as style of cutters, care of cutters and not least of all theoutput required. Perhaps to a greater extent than heel scouring thisoperation relies on the skill of the operator and on the vigilance of theinspection.
Care of Cutters
There are two distinct features of this, (l) the cutting angle and (2) theaccuracy of the cutting circle.
(l) lf continuous keenness is to be achieved then care must be taken tomaintain throughout the life of the cutter the same angle that wasprovided by the engineers. The only difference that can
then arise is the loss of power through the gradual thinning down of theblades at grinding and also a slight decrease in ft/min. travelled by thecutter as the periphery becomes smaller through grinding (Figure 223).
(2) The relationship between the bore and the periphery is the mostimportant point in connection with smooth running free from ribbiness orscratching. lf the shaft of the machine is true then the bore and cuttingedges must be concentric.
406
FINISHING

It is claimed, and can easily be checked by a clock indicator gauge, thatthe spindle (shaft) is running true to within 0·000l in.; then there is a goodfoundation for accuracy. If on setting up a new cutter (not sharpened) it isfound to have some blades longer than others, it must be concluded thatthe cutting edges of the blades are not true to the bore.
The method of ‘truing’ is as follows: take a worn dish-shapedgrindstone as used on the machine and hold it carefully up to therevolving cutter and pass it lightly across the ‘bed’. If the action is madewith care and precision, the blades which are longer will be ground awayflat on their cutting edges, these are then ground on the grindingattachment (as for sharpening) until the flat disappears. If necessary, thiscan be repeated for further slight adjustment until all the blades areuniform. This method is not sufficient in itself if the spindle hasdeveloped a wobble, however slight. In this case, the procedure is asfollows (incidentally, some operators follow this rule as part of theireveryday method): first, grind a mark on the exposed rim of the thimbleand place the thimble in the cutter at a known position, e.g. the sizenumbers, so that the mark on the thimble and the size number correspond.The shield is chosen to suit the cutter and this too may be lined up. Thisbeing done, a recognisable spot is selected on the spindle, and shield,cutter and thimble are lined up to it. This means that even if the spindle isnot true and the blades are ground by holding the stone up to them, theamount of eccentricity transferred to the cutter by the spindle is removedby grinding and if the same marks are used each time the cutter is used,the periphery will be true and smooth trimming will be obtained.
When the cutter is true it can only be kept true by extreme care insharpening. First, never disregard the pillar, as, strange as it may seem,some operators have been known to use the same doubtful technique as isused for sharpening randing cutters on the heel trimming machine. Whensharpening correctly, slide the cutter down the pillar and apply pressureon the return or up stroke. The pressure must be the same for all blades.Also, sharpen according to the number of blades, i.e. fourteen, sixteen, orexact multiples of these.
Finally, in connection with cutters with creases; these creases losesome of their definition or depth through burring at grinding and bypassing a thin awl along the creases when the cutter is in motion they willbe restored to the full depth and shape.
Styles of Cutters
There is no limit to the shape of the profiles of cutters but, generally,they may be grouped into square, bevel and round. The bevel forepartcutter should not be confused with the bevel waist cutter. The former hasa flat bed and a continuous outer edge (unless it is a definition bevel) andthe waist cutter has an arc-like profile (Figure 224).
407
EDGE TREATMENT

The chief variation found in square forepart cutters whether of flat,convex or concave bed is in the size of the lip. This varies normally from1
2to 2 although some special cutters are made for ladies’ fudge-wheel
edges which may have a 4 lip, and each size is 1
32in. measured vertically
from the bed. The angle of the lip is also variable so that a narrow anglesay 30° with a 2 lip will take a greater substance than the same bed with a45°, 1
2lip. Some confusion has arisen between the bottom stock fitting-up
department
and the finishing department owing to this factor not being sufficientlyrealised by those concerned. It is not enough to read the substance of thecutter as 14 or 16 because due regard must be taken of the lip angle andsize, by the bottom stock department. For a 1 to l 1
2lip at 45° an allowance
of 1 to 2 irons must be added.There is a growing tendency to use the edge trimmer as a heel trimmer
as well, by using a cutter which will produce a solid edge on the forepartand heel. Two such cutters are the double-roll and multi-roll (Figure225a). Round-edge cutters described as ‘cork
408
FINISHING

edges’ or pipe edges have been fashionable for some time on casual shoesand also for a longer period on bowls shoes. Another cutter which hasbeen introduced is one which undercuts the edge of crepe-soled shoes.This leaves the welt ‘proud’ and reduces the rest of the edge by 1
16to 1
8in.
according to the thickness of the rand or ‘curtain’ it is proposed to stick on(Figure 225b, c).
No-lip cutters have been very successful on pump edges for producingan edge which is tight to the upper. When a shield only slightly bigger,say 1
48in. bigger, than the cutter is used the effect is very good. The
definition bevel cutter which forms a kind of step on the grain side of thesole instead of the continuous outer edge has also been popular on pumpedges. This type of trimming close to the upper needs a plain shield whichis thinner than the ribbed type.
The ribbed shield is used in conjunction with forepart cutters on‘welted’ work (used as a general term to include all methods ofmanufacture having a stitched sole). This ridge or rib on the shield liesbetween each blade on the cutter and assists the lip to make the welt firmand bevelled to the full extent of the lip.
The choice of shields is very important, especially on pump edge work.A fine shield must be used when trimming reptile such as karung as this iseasily cut through by the shield if it extends too far beyond the cuttingedge. Patent leather will also scorch up in contact with the shield and forthis reason machines are fitted with oil lubricators which feed a little oilby means of`a felt pad touching the shield to prevent undue friction.
Mention must be made of the seat plough which may be obtained invarious angles or more accurately, wedge thicknesses. A very shallowwedge of 12° is used for close seats but on imitation extended seats amachine seat, plough having a heavier wedge section of about 20° is used(Figure 226).
409
EDGE TREATMENT

The hob cutter is also useful as this may have a lip and welt crease butno outer edge or back guard. This allows it to be used for jointing, i.e.between the waist and heel corners, without the fear of cutting into theheel. An especially large one having a larger bore is used on the No. 8Edge Trimmer on the same spindle as the waist cutter. An extraattachment is supplied to slip over the grinding pillar to make sharpening
possible. The bevel waist jointing attachment consisting of planer andside knives should correspond to the shape of the waist cutter butgenerally one set is used to suit all styles. The planer oscillates rapidlyand shaves off the part of the waist near the heel corner which isinaccessible to the waist cutter and as it reaches the heel comer a levercontacts the front of the heel and trips the side knife which descends andchops the shaving off.
Materials
There are many types of materials to be trimmed including leather(vegetable and chrome tanned), vulcanised rubber, vulcanised rubberwith canvas backer, crepe rubber, various plastics and synthetics all ofwhich need varying techniques.
Vegetable tanned butt or bend is normally firm fibred and with areasonably sharp cutter will produce a good edge especially if the leatheris mellow. Shoulder or belly soles (especially belly) will respond better toa sharp cutter if trimmed dry, as water will over soften the fibres andpossibly push the grain up.
Chrome soles are difficult to trim as there is little chance of mouldingthe soles by wetting. There are two ways to treat them, firstly by trimmingwith a very sharp cutter and trimming only a few pairs beforere-sharpening or secondly by ‘wetting’ with a specially prepared fluidwhich hardens the fibres so they will stand up to the cutter. This method isoften used on veldtschoen edges where the upper forms part of the edge.
Vulcanised rubber trims very much like leather excepting there is agreater resistance and a bigger tendency to snatch at the toe. When therubber is canvas backed, the cutter dulls and the canvas
410
FINISHING

will fray and leave a very ragged edge. This type of sole will have a betterappearance if it is scoured with a fine abrasive after trimming.
Crepe rubber varies with the temperature but it will always trim betterwhen it is cold as then it is much firmer and ‘stands up’ to the cutter muchbetter. An exceptionally smooth finish is obtained if, after cutting theedge, it is either scoured on a fine grit on the heel scouring machine or thecutter is replaced by an emery stone on the edge trimming machine andthe edge is lightly passed over this abrasive wheel. ln all cases a smoothersurface will be obtained if the edge is rubbed down with the thumb whilstthe surface is still warm. It is an advantage in trimming crepe and similarsoft rubber to use a lower speed than for leather but this is only possiblewith a variable-speed machine such as the Italian ‘Ferrari’ model; suchmachines are not at present made in this country.
PUTTING INTO COLOUR
Since the days of the finishing room foreman having his own secretformulae, much progress has been made by industrial chemists who haveproduced a wide range of products for finishing edges and bottoms.
The important attributes of edge and heel colours are as follows:(l) evenness of colour;(2) transparency;(3) lustre;(4) ease of application;(5) ease of burnishing.(l) There has always been some variety of opinion about the
terms—natural heel, transparent heel, evenness of colour—and it israther difficult to separate them. However, evenness means that if a tan isrequired, then that colour should be the only colour and dark and lightpatches should be avoided. The manner of heel scouring as alreadyoutlined has a part in this, as the colour may be rubbed off a very finelyscoured heel during the later burnishing operation. The method ofapplication is another factor and a steady flowing action should be aimedat. Any charred patches on the heel will account for variation in colour; sowill erratic burnishing, but that will be dealt with later. The difference intreatment of the heel from that of the edge often tends to make the edgedarker than the heel. To compensate for this some finishers will use adarker colour on the heel.
(2) As already mentioned, the terms transparency and natural are oftenconfused, but there is a definite meaning for each. A natural finish is onehaving no dye or pigment and although the edge may be waxed andpolished the original surface of the edge and heel is visible in its naturalstate. Transparent implies that the finish is thin enough to see through. ltmay be coloured, i.e. dyed or pigmented but is not opaque. The opaquefinishes known as ‘russets’
411
EDGE TREATMENT

are rather like water paints and are thick enough to cover all the fibrousnature of the lifts—almost thick enough to hide the line of individual lifts.This effect is considered too common even for the cheapest shoes and isseldom seen nowadays.
It has been made possible to introduce pigments which are normallyopaque into transparent edge stains because grinding mills have beenproduced which will grind the pigments finer than flour and thus makethem more easily dispersable in liquid. In this way a fine film of colourapart from dye may increase the evenness without interfering too muchwith the transparency.
(3) Lustre is imparted to a heel by two means, first by burnishing, andsecondly, by wax. Very little wax is necessary to produce a shine on heelswhen using a hand ‘dummy’ even with a blue-black burnishing inkcontaining nut galls, ferrous sulphate, water and little else. Skilledfriction burnishing, therefore, can produce lustre. But wax, either addedto the colour as in quick black or applied to the surface of the edge, willassist in obtaining lustre much more quickly and, having obtained it, willpreserve the edge as well. It is not intended to give details of formulae orof all waxes but reference must be made to carnauba wax, paraffin andbeeswax, the most important ingredients. One of the hardest vegetablewaxes, carnauba, is widely used in the shoe trade, both alone and inconjunction with beeswax and paraffin waxes, for producing lustre. Theintroduction of paraffin and beeswax is done for two reasons: (a) theresulting compound of waxes is cheaper, and (b) the compound has alower melting point than pure carnauba and consequently when used as astick wax for edge setting will flow more easily on the edge.
(4) The term ‘flow’ has already been used but it must be understoodthat edge and heel colours are brush applied and enough colour must beheld to complete one shoe. The type of brush will vary according to thesubstance of the edge and the width of welt. For edges having a width ofwelt, unless the component forming the welt has been pre-coloured, atoothbrush is most convenient. This brush is best fitted with fairly softbristles and not nylon. Close or pump edges are best coloured with astraight flat brush, and an ordinary pen serves admirably to get into thefeather. When leather heeled shoes are coloured it is better to colour edgeof forepart and seat first with the toothbrush and follow up with a flatcamel-hair brush on the heel only. By using the brushes in this order, thewhole surface of the heel will be evened off.
(5) This will be elaborated under the heading of heel burnishing but,nevertheless, it is true to say that colours must be chosen carefully toensure smooth bumishing, whatever the method. If an edge colourcontains an excessive amount of glue or resin, tackiness will occur andthe setting iron will stick. On the other hand, if the colour is not bindingclosely to the heel, it will be pushed off. This is seen when quick black isused on pulp heels which have not been previously dyed.
412
FINISHING

HEEL BURNISHING
This is a subject which has provided much thought for the finisher, anda variety of machines has been introduced to secure good results. Mostshoe machines in all departments have been developed with the handmethod as the basis and this is also true of heel burnishing. The‘Expedite’ Heel Burnishing Machine was one of the first. Heelburnishing may conveniently be grouped into three varieties:
(l) hot iron burnishing;(2) cold wax burnishing;(3) hot wax burnishing.(1) The two-handled dummy was extensively used for hand finishing;
it was heated to ‘sizzling’ heat and a little ‘heel-ball’ was then melted onthe surface and dummied in. This was ‘balled-off’ by rag wrapped tightlyround the thumb to smooth off the wax and to give a shine. The‘Expedite’ machine consisted of a circle of separate segments each onemounted on a spring and heated to the required temperature.
(2) Pads and brushes have been in general use for cold wax burnishingfor many years and have, generally speaking, proved very successful.The pad has been made up of various material e.g. strips of upper leatherof the same width as the pad and placed at right-angles to the centre orstrips of woven cloth, according to the degree of hardness required.Speeds of between 900 and l,000 r.p.m. are considered suitable and,unless too much pressure is used in one place, will burnish withoutburning. Pad wax is held to the revolving pad and is transferred to it byfrictional heat. The wax is then transferred from the pad to the heel. Thisis followed by brushing. Various grades of brushes are available fromfine silky hair brushes to stiff bristles according to requirements.
(3) The hot wax machine or ‘Universal’ Heel Burnishing Machine(BUSMC) has been in use for more than twenty years, but has not yetoutmoded the cold wax method. This may be accounted for by the longertime taken to burnish a heel by this process. Firstly the melted wax fromthe heated container, is transferred by tap or valve to a heated covered feltroll. This heated roll retains the wax in a molten condition ready forapplication to the heel. The first stage is the waxing of the heel from thehot wax roll, followed by the burnishing roll. This is a second coveredroll. The cover, known as a ‘Riley’ cover, is woven cotton and has distinct‘ribs’ woven in about 1
4in. apart. These force the wax into the surface and
provide a well burnished, solid looking heel. Brushing completes theprocess.
General Remarks
The pressure must be evenly distributed for good results especially onlight brown heels. Dark patches will appear if scorching through
413
EDGE TREATMENT

heavy pressure is allowed to occur. When brushing, a smooth action isnecessary or an uneven spread of wax will be left on the surface. Cleanbrushes will also provide better results.
SEAT WHEELING
This may be studied under the following headings:(l) position in sequence;(2) type of wheel;(3) style of wheel;(4) purpose.(l) The position of seat wheeling can either be before or after edge
setting but a good case can be made out for putting it before edge setting.The reason for this is that, if the marks overrun the heel corner, they maybe obliterated by the edge setting iron.
(2) There are two distinct types of seat wheels. Firstly, the rotary andsecondly the reciprocating, or solid type. The rotary type can be mountedon the same shaft as the polishing brush of the BUSMC No. 3 ‘Universal’Heel Finishing Machine. The solid type is fitted in the BUSMC ‘Regal’or Standard ‘Valley’ type Edge Setter and reciprocates in the same way asthe setting iron. The most important point of difference between thesetwo methods is the amount of control over the shoe when performed onthe ‘Regal’; because of this, the impression of the wheel and the tightnessof the seat are much better done by this method (Figure 227).
(3) The style of wheel must be selected to suit the character of the shoeand for this purpose the various parts of the iron and wheel must beunderstood: the length of lip, the distance from the lip to
414
FINISHING

the wheel, the width of the wheel and the number of indentations to theinch, the amount of adjustment of the wheel and the angle of the bed.From these details given, all of which are variable, it will be realised thatselection is not easy. However, in general, a ladies’ seat wheel will be afine wheel with up to forty indentations per inch and with a narrow gapbetween the lip and wheel.
(4) When dividing finishing operations into utilitarian and decorative itis difficult to decide into which category to put this operation. The actualindentations must be considered purely ornamental, but the compressingof the heel seat by the lip and that part of the bed between the lip andwheel (providing the shoe making and heel scouring have been carefulyexecuted) so that the sealing is complete must be considered to beutilitarian. This state of perfection is more difficult to obtain on a rotaryseat wheel.
Observations
Unless care is taken to perform this comparatively simple operationwith great accuracy it will detract from the appearance of the shoe and isbetter not done. ln fact, some continental countries do not include seatwheeling in finishing as it is considered unnecessary.
Better results will be obtained if a little wax is melted against the heatedwheel as this will help to seal the seat.
EDGE SETTING
Edge setting, like burnishing, has the useful purpose of sealing the fibresagainst water and so preserving the shape and appearance of the bottom.Wet leather is very plastic and the edge would become quite shapeless ifexposed to the wet for even a short time, especially if knocked as well.
Apart from the useful function of sealing the edge, this operation alsoenhances the appearance of the shoe by giving increased shine andgreater definition to the style of edge created by the edge trimming cutter.The operation may be performed in the following ways:
(l) by hand;(2) by rotary wheel;(3) by ‘Regal’ type machine;(4) by automatic machine.(l) The hand method is still in use for very high-class shoes and is still
considered by some to force the wax further into the edge. lt is heavywork and requires considerable skill. For all methods, a most importantconsideration is the temperature of the iron which must be sufficient tomelt the wax but not high enough to burn the edge. When the edgebecomes charred, it will not polish. Brown edges require greater skill asstopping in one place will result in the edge being darker at that spot. Thismay be listed as an advantage of the automatic machine as the traverse ofthe shoe is steady and
415
EDGE TREATMENT

invariable. The hand iron is still used on the bench for `taking-off’ whichwill be referred to later.
(2) The use of a stepped hollow cone having the steps graded intovarious ‘irons’ has become established in the repair trade. The faces ofthe steps are usually tiled at intervals to form ‘flats which tend to knockthe wax into the edge.’ The use of this circular form of setting iron isrestricted in manufacture to a Louis heel top-piece setting machine but inthis instance the movement is only a high speed reciprocating one and notrotary, so that only a small part of the circumference is being used at onetime. One of the main objections to the method is the lack of control overthe shoe to give adequate pressure and the limitations of the stepped coneto provide for all kinds of edges.
(3) This method of setting is still preferred by many finishers andcertainly, where done consistently well, excellent results are obtained.The ‘Regal’ or “Valley’ machines are only mechanised hand irons,oscillating at high speed but with the advantage over the hand tool thatboth hands are holding the shoe. There is a hook provided behind the ironwhich assists the operator to control the shoe at the toe. The oscillationtends to knock the edge unless the first finger of one hand is firmlyholding the hook as the toe of the shoe is held to the iron. A distinctadvantage is the ease with which pressure may be varied according to therequirements of a particular shoe. Also the angle of the shoe to themachine may be changed to allow for changes in the edge made byinferior edge trimming. Among the disadvantages of this method is thedifficulty of maintaining the pressure required for good settingthroughout the day. The iron is spring loaded and enough pressure mustbe exerted to lift the iron on the spring for each shoe. lt is not enough tosmear wax round the edge and melt the wax on the surface; the wax mustpenetrate the fibres. Another important point in connection with this isthat ‘Regal’ setting is a warm job and both hands are firmly holding theshoe, so some care should be taken either to choose operators who havecool hands, or to provide those who perspire freely with gloves. Wherework is divided into black and coloured, the cleaner workers should be onthe coloured section.
(4) The BUSMC Automatic Edge Setter has established itself againstconsiderable opposition largely for two reasons: firstly for increase inoutput, and secondly for consistent results throughout a day or any otherperiod. lt is difficult to describe the intricate system of valves and springswhich go to make up this machine but one important item is that onlyforeparts are set and waists must be set on a subsidiary machine placedalongside the main machine. The practice is to set the waist of one shoewhilst the forepart of the other is being automatically set. The correct ironis selected and inserted into the machine and electrically heated. The shoeis jacked up in the machine and the head containing the iron is brought tothe shoe by the control handle. The sole feelers are fed under the
416
FINISHING

sole and when the iron is seated on the edge the operating lever is pushedover. When the iron is set to run there are four feelers to locate variationsin contour and transfer these variations to the iron. Two of these feelersare on the sole in front and behind the iron and the other two running onthe edge of the shoe on either side of the iron. The traverse can becontrolled and set to run for one or more times but the general rule is threecomplete traverses of the shoe and the mechanism may be set so that theiron which is normally oscillating is stationary for the third movementand sleeks the edge. This machine can also accommodate a combinationiron, i.e. fudge wheel and set at the same time. In fact it is considered animprovement in the setting to run the fudge wheel at the same time.
Although the feelers will transmit variations, the point raised at edgetrimming regarding angles crops up here as the iron will not tip to anyextent and it is possible that only the edge nearest to the iron will be set.
A fault with the automatic machine is that once set it will give the sameresult regardless of the quality of the leather.
Mention must be made of the supplementary mechanism for waistsetting. This has a ‘Regal’-like oscillating action and can carry two ironsback to back with a lever for quick change of the two irons. In this wayone iron may be used to blend the forepart with the waist (square) and theother may be a bevel waist iron.
General Remarks
Edges set better whilst mellow; for this reason it is better not to allowcolouring to be done too far in advance. Irons wear and lose their trueshape and must be periodically inspected and re-cut. All
417
EDGE TREATMENT

profiles of irons must be exact copies of the profiles of cutting edges(Figure 228) and when new edge trimming cutters are bought, newirons must be obtained to match. If an exceptionally tight edge isrequired, the iron may be marked as the cutter but the ‘bed’ can bereduced by 1
2iron ( 1
96in.). Where only the welt has to be set an idea has
been used which has possibilities. Simply, it consists of a circularwooden shape with shield and, if desired, it may be covered with a fineabrasive with the exception of the part which will be used for setting. Thetool is used on an edge trimming machine and enough heat is generatedby friction to melt paraffin (candle) wax on the edge. In this way, thesetting and rubber scouring may be accomplished at the same time.
EDGE POLISHING OR BRUSHING
This operation is not always carried out at this stage but is better donehere especially when coloured or natural finishes are used on black shoes.Edge setting, however well done, will require brushing to remove heavydeposits of wax, requiring some pressure on the brush. No special care isnecessary to prevent the brush from spoiling the bottom if bottomscouring has not been done; consequently, edge brushing can beefficiently performed with greater speed.
418
FINISHING

30
BOTTOM TREATMENT
BOTTOM SCOURING
THIS OPERATION HAS ALWAYS been criticised by the layman as one whichtakes a week’s wear from the sole and does not serve any useful purpose.Both these statements are untrue, because in the first place only about0·002 in. need be removed and in the second a useful purpose is served inthe waist as leather with the grain layer removed will be much less liableto crack than leather with this layer intact. A further reason is found forbottom scouring in the fact that scoured bottoms will respond to stainingor colouring much easier than grain with the hyaline layer still there. Thehyaline is more horny or compact than the rest of the grain and will resistthe application of almost any kind of finish. Besides obtaining a goodsurface for bottom making, bottom scouring takes off the dirty surfaceand evens the colour to make the finish uniform. It is incorrect to believe,however, that scouring will unify a variety of tannages—it will not, but itwill clean up soles of the same tannage to uniformity.
First a brief description of the machine must be given, a typical onebeing the BUSMC No. l0.
It has at least three abrasive points (some have more) but three areessential for rough, fine and naumkeag scouring. The rough and fine rollsusually have different materials to form the pad over which the abrasivesheet is held. Circular pieces of felt or cotton fabric tightly placedtogether form a very suitable base; another type has soft thin strips ofsheep lining leather radiating from the centre. There is a fairly large rangeto choose from and judgement must be used to decide which pair will bemost suitable for the particular work being done, the softer base usuallybeing the best for fine scouring. When new, the surface is true and level,but inevitably most of the wear occurs in the centre which causes it to sag.This is one of the causes of burst bands because puckering occurs, and,eventually, splitting.
It is important to keep the abrasives as tight as possible on the roll toprevent puckering or wrinkling as this tends to produce waves orribbiness on the surface.
The rolls have a double action, i.e. both rotary and reciprocating. Thisreciprocating motion is provided to break up the line of scratches whichwould be produced by pulling the shoe backwards and forwards againstthe roll. The split type of roll is seldom used today. The solid type withend clips and using ‘Webster’ diamond sheets is preferred. One reasonfor this is that the diamond sheet can be wound more tightly to the rollthan the split one.
419

The ‘naumkeag’, which is conical or mushroom-shaped-according totype, can have a soft felt or rubber pad or a pneumatic rubbercover(Figure 229). The first two types are applicable to the older kinds ofmachine and the pneumatic to the No. 10. Again, the type of pad willdepend on the work being done and the choice of the operator. Thenaumkeag has no reciprocating movement but a skilled operator canimpart this effect by manipulation. The machine is also fitted with a brushwhich ought to be used to remove the dust from every shoe. There is noset order for rough, fine and naumkeag scouring, but experience showsthat rough, fine and naumkeag in that sequence do produce a good resultfree from any ridge which might be made across the top of the waist iffine scouring were done last.
The operation may be studied under the following headings:(l) rough scouring and shaping;(2) naumkeag for waists;(3) fine scouring;(4) attention to detail;(5) care to preserve surface;(6) faults in previous operations.(l) The degree of rough scouring and shaping depends largely on the
weight of the sole leather, the kind of metal used in top-pieces and the gritsize of the abrasive. Generally, men’s soles need a fairly coarse abrasiveand an 80 grit may be used. This is necessary where no previous top-piecesanding has been done. lf cutlan nails are used for slugging, then an 80grit will be necessary to clean up the top-piece. The shaping referred to isespecially applicable to all edges having a sole bead (crease) or a`definition bevel`. For accurate finishing, care must be taken to scour tothe sole bead and for this reason precise edge trimming must be attained.Where a cutter is tight and the step cuts into the sole, the bottom scourerwill have to remove too much to blend the edge in with the rest of the sole.On the other hand, if no crease is present, the edge will be only half
420
FINISHING

finished. When scouring the top-piece particular care must be taken toensure a flat surface with no rounding off either at the back or at the heelcorners.
Ladies’ soles, especially for cemented shoes, are often pre-scoured inthe preparation department, but where no scouring is done previous tofinishing, it is not necessary to use more than a 100 to 120 grit paper forrough scouring as the hyaline layer is not so hard or deep. In fact, somefirms use only one scouring of either 150 or 180 grit plus the naumkeag.
(2) The naumkeag, already described, covered with a cloth-backedabrasive, revolves against the shoe held in position by the operator.Usually only one grade of abrasive is used, of either 150 or 180 grit. It isdifficult to learn the technique of control over the shoe and to marry theforepart with the waist without leaving either a ridge across the top of` thewaist or partly circular scratches. However, most operators have a pieceof abrasive handy to rub over and clear the waist. Where fitted heels areused, i.e. covered wooden heels having no leather flap, it is an advantageto scour about half of the waist so that there is no danger of the naumkeagscouring the heel cover. The pneumatic type of naumkeag of about 6 in.diameter has largely taken the place of the finger cones for Louis heel flapscouring. Some firms on cheaper work scour the whole of the bottom onthe naumkeag type of scouring wheel and do not use scouring rolls at all.
(3) Fine scouring is done to remove the scratches of the rough paperand also to raise a fine nap on the surface ready for the bottom finish. It isdone on both forepart and top-piece and the grit size will be between 150and 220 according to the kind of leather being finished.
(4) As has already been mentioned, attention to detail is most importantin finishing if accurate and pleasing results are to be obtained. The pointabout scouring to the sole bead should not be overlooked especially whena natural forepart and ‘top iron’ is included in the finishing. The topironing effect will be spoilt if a brown top iron mingles with the remnantsof a black border left after edge setting. If slight hammer dents are left onthe bottom or deep grooves remain after bottom levelling, it is likely thatthe naumkeag will have to be used in the forepart. If so, extreme caremust be exercised to remove any scratches which may appear. Whateverfinish is used the fine scouring must be adequate, as a bottom finish caneasily be ruined if deep scratches from the rough scouring are left on thebottom.
(5) Whatever else is neglected, the complete removal of the grain intothe corium or central part of the leather should be avoided at all costs.There may be remedies for other faults but there is no remedy for this. Nopolish can be obtained on any part of the bottom where the grain iscompletely removed. This may be bad enough to produce a reject shoe.
421
BOTTOM TREATMENT

(6) Some of the faults such as uneven surface and tight edge trimminghave already been dealt with, but there are others such as thin channellips, unstuck channels, stitching not in the groove, greasy soles, dampsoles and stained soles. Thin lips will show the imprint of the stitch andwill often become scoured through, leaving a very unsightly appearance.Unstuck channels often lift up and tear away and cause much trouble.When soles are stitched in a groove it is important that no part of thestitching is on the surface as this will become frayed when scoured, andalthough it will not affect the wearing qualities of the shoe, it will disturbthe potential customer and possibly lose a sale. Greasy soles will notscour well and present a problem to the finisher. They are caused veryoften by too much oil at rolling or finishing in the tannery. Damp leatherwill not scour and this is true whether it is the heel or the bottom. Theeffect of damp is to increase the risk of charring enormously. It alsoincreases the rate of clogging of the paper. Very often racks of shoes areplaced in drying cabinets before bottom scouring and some finishers havesmall two pair cabinets which have a gas jet. The shoes are placed in themfor a short time at the commencement of the period and as a shoe is takenout another is put in so that normally the shoes are in the cabinet for aslong as it takes the operator to complete two pairs. Simpler still, someoperators have a gas ring placed on top of the machine and if a particularshoe seems damp he can hold the shoe over the flame for a few seconds.Stained soles are not strictly the province of the bottom scourer but it is atthis stage that they become most apparent. Apart from iron stains causedby tools and iron benches and poor tempering, there are stains caused bythe movement of the free tans around the channels especially onmachine-sewn shoes. There is, however, nothing that the bottom scoureris able to do to correct these faults which must be passed on to the bottommaking section.
BOTTOM MAKING
This section is one which confuses many people, being so variablein methods, choice of medium and suitability for different types offootwear; even those types similar in constitution vary in method.However, it is possible to classify finishes into two broad groups(l) transparent, and (2) opaque. The modern types of finishes,however, are a compromise of these two and it is very difficult todecide to which group a particular finish belongs. Two such finishesare ‘damp-down’ and gum stains both of which, if analysed, willnormally be found to contain a good percentage of pigment. Asalready mentioned in discussing edge stains, pigment is non-solubleand is opaque but may be ground fine enough to appear transparent;that is, the layer of pigment is fine enough to settle in the surfacerather than on it.
422
FINISHING

Another point which can be discussed at this stage is the desirability orotherwise of bleaching the bottom before the application of the bottomfinish. However it is viewed, there can be little doubt that some harm isdone, but perhaps not sufficient to prohibit its use. Bleach is not a newthing, as the old hand finishes such as ‘damp-down’, used to contain suchingredients as salts of lemon (potassium binoxalate), which is a closechemical associate of oxalic acid, also used. Epsom salts (magnesiumsulphate) has also been used. It would appear that modern bleachescontain stronger acids such as sulphuric but it is difficult to obtainaccurate analyses. Where bleaching is done separately it is carried outwith a flat camel-hair brush, the bleach being in liquid state.
Owing to the number of firms manufacturing bottom finishes, it israther difficult to classify them but roughly they are as follows:
(1) ink;(2) natural gum finish;(3) transparent gum stain;(4) pigmented gum stains;(5) damp-down finish;(6) ‘Silco’ variations;(7) paints.
Ink
Strictly, the application of ink to bottoms is not considered to bebottom making, the degree of skill entailed being less than for any othertype. Nevertheless the application, consistency and kind of ink play a bigpart in obtaining a satisfactory burnish. None of the other types isburnished by padding. The application is by camel-hair brush and the inkmust be applied evenly in the direction of the heel to toe and leaving asfew brush marks as possible. The 1 1
4or 1 1
2in. brushes make a quick job.
When inking, care must be taken to cover every part requiring ink or theresult is most unsatisfactory. Level inking cannot be obtained unless theink is fairly thin, enabling it to flow, and to achieve this the ink must notbe allowed to ‘settle’ especially when quick black is used. These arerather out of favour since the introduction of the BUSMC No. 4 BottomBurnishing Machine. The reason is that quick black containswater-soluble nigrosine dye which always has a tendency to ‘run’ incontact with wet and if the waxing and burnishing have beenineffectively performed, much harm can be caused by soiling of carpets.On the other hand, quick black is a fairly soft ink and responds to frictionpadding quite well and consequently was very popular. The Hot WaxBurnisher (No. 4) however, will deal successfully with the harder spiritinks and very good bottoms have been obtained. The spirit seems to havean astringent action on the surface, opening up the grain and making itharsh. This surface is very difficult to pad excepting when a film of hotwax is applied first. Another advantage of the hot wax method is that purecarnauba can be easily used. The waist pad has
423
BOTTOM TREATMENT

a heated cover which keeps it hot for good results in the waist. It has beenstated that the black bottom is not a paint and this should be clearlyunderstood. Although iron stains and water stains will not show, theformation of the grain, barbed-wire marks and other blemishes will beclearly visible. The fact must be borne in mind when the soles are lookedout.
Natural Gum Finishes
These have the greatest appeal on coloured shoes of the finest quality.To be fully effective the leather must be clear and white. The gum used isgum tragacanth commonly called by finishers, gum dragon. This issoaked in water to the consistency of jelly, called a mucilage. The finishertakes a sponge, dips it in the mucilage and circulates it evenly over thebottom until a saturated surface is obtained. Unless this is done, a stainedpatchy surface will result. This can then be wiped over by hand rag orpower brush to remove the surplus lying on top. If the brush is used,continued brushing will quickly dry out the water leaving a clear film ofgum. A small but important point arises here. When iron is used forgrindery in the top-piece, it is better to leave the top-piece to be doneseparately as very often the water content of the mucilage picks up an ironstain and smears the forepart and waist with long smears of dirty blackwhich are very difficult to remove. Some finishers prefer simply to wipeoff the surplus gum and leave the bottom to dry naturally and then toapply a smear of fake (polish) and to brush by machine.
Transparent Gum Stain
This needs no further mention apart from the fact that it is similar inconstitution to the simple gum with the addition of dye or colouringmatter. As most finishers desire a leather finish the dye used will be onesuch as golden brown aniline dye or a vegetable dye such as annatto. Theamount of dye will depend upon the depth of colour required. Except forthis the operational details are as for clear gum mucilage.
As it is well within the scope of any finisher to make up such a gumstain, some details of preparation follow: put loz. of leaf gum tragacanthin a porcelain dish and pour on l quart of water. Stir occasionally for twodays. The consistency of thin jelly should be aimed at. Some prefer thickand others thin mucilages; the quantity of water is simply altered to suitindividual requirements. The mucilage should be strained (after soakingfor 48 hr.) in a muslin bag. This is necessary as one constituent of thegum, bassorin, is insoluble in water and remains in the mucilage as messylumps. After straining, the dye, which is prepared by adding the powderto boiling water, is carefully added to give depth of colour. Vigorousstirring is essential.
424
FINISHING

Pigmented Gum Stains
These are of two main types, one fairly thick and sponged on and theother thin enough to brush on. This is the second stage in the developmentof ‘cover’ for doubtful leather. The presence of chalk in a transparentgum stain does help to cover some of the less obvious blemishes and alsoevens up the colour and makes it more uniform. The method is similar tothe other two previously mentioned but wiping away the surplus isusually done by power brush and faking is done before polishing.
Damp-down Bottom Wash
This is a legacy of the hand finisher and consists chiefly of ‘bottomballs’ (chalk), water-thin gum and Epsom salts with some oxalic acid aswell. The modern version may have some binding material such as ryeflour, casein or even dextrin. The method, too, has changed somewhat.The hand finisher would apply it with a piece of flannel, rubbing well inand wiping off with another clean piece of flannel and lightly rubbing inFrench chalk to a polish; the modern method is to brush on and then ragoff, often using the palm of the hand to smooth over the surface stillfurther. The brushing on does not seem to be effective as many shoeshave been observed having a streaky appearance. Now also the finish iscompleted by fake which is another departure from older methods.
‘Silco’ (B.B. Chemical Co.)
This is a form of paint which is brushed on in the normal way by a flatcamel-hair brush. This is allowed to dry. The next step is to choose thecorrect mop for the cutting of the surface. A rag mop tapered to thin edgeis rotated at a good speed, say l,000 to 1,200 r.p.m. and forms a firmsurface to work against. The third requirement for a successful finish by‘Silco’ is a friction stick wax which contains an ingredient of a causticnature. This is rubbed against the rag mop and when operating the mopplus the friction wax, the thickness (depth) of the layer of paint is reducedso that the appearance is very similar to that of the pigmented gums.Faking and brushing will add further lustre to a ‘Silco’-type finish.
Paints
There are many different types in use in many different colours but allof them have one thing in common and that is the ability to hideblemishes such as tick marks and faint wire marks. The natural grainformation disappears and the surface is clean and neat but withoutcharacter. That is the disadvantage of paint—the qualities of the materialare hidden; no cabinet maker would paint oak and no finisher would paintoak-bark leather. However, such are the variations of quality in leatherthat reasonable appearance is often unobtainable in any other way. Paintis a natural leveller and presents the shoes in a uniform manner.
425
BOTTOM TREATMENT

True as this is, paint is still confined to the very cheapest footwear or onfootwear without the tradition of quality behind it.
To be successful the paint used must have some particular qualities:ease of flow, fineness of pigment, tightness of bond, and elasticity.However fine the brush, some brush marks will appear when the paint isapplied, but these should disappear as the paint settles down, leaving aperfectly even surface.
The surface must be smooth so the pigment must be finely ground. Theingredients should be well bonded and must adhere firmly to the surfaceand not flake off. Finally, as it is possible the shoe will be flexed beforepurchase, the paint should be flexible or elastic to prevent cracking. Oneprecaution is that the painted bottom must be perfectly dry before puttingit on a brush for polishing. A pleasing effect may be obtained bypowdering on French chalk instead of polishing. One seriousdisadvantage of paint from the ‘taking-off’ point of view (see p. 427) isthat top ironing, waist marking and crowing are wasted as the marks areindistinguishable on a painted bottom. The iron does not reach the leatherand the typical brown mark is unobtainable. This will also apply tobranding.
Two-colour Bottoms
Many methods are used to obtain satisfactory results, but one willsuffice to explain the process.
When a gum stain is used for the forepart care must be taken to apply itevenly and also to prevent it from going too far over the waist. When theforepart finish is on and dry, the waist ink is applied with a camel-hairbrush to obtain a definite line at the joint. The style of line, either curved,straight, fish-tailed or any other variation must be at the discretion of thefinisher. When the ink is dry some fake should be smeared over theforepart just above the waist and if any black goes on the forepart at waistburnishing it is easily rubbed off with the polish (fake). An alternativemethod when padding (burnishing) the waist is to take a thin leather strapand shape it to the waist curve and hold it over the forepart to preventsoiling the forepart. Another kind of strap may be made from useddiamond shape abrasives. A strap made from one of these sheets will notstretch or slip and will last long enough to make its use worth while.
A two-colour finish need not be confined to black work or entirelyacross the waist. The accentuating of arch supports by colouring only theinside waist is very effective. Finally, on black or coloured shoes having atwo-colour finish, a natural front enhances the appearance of the shoe.
General Remarks
As with all finishing operations, attention to minute details at thebottom making stage is vital for good results. Some shoes manufacturedrecently have been left unfinished, i.e. bottoms
426
FINISHING

scoured but not finished. No justification can be found for adopting thisexcept perhaps ‘fashion’ and that is always whimsical. During the war itwas compulsory.
TOP IRONING AND SIDE IRONING
These form part of the ‘taking-off’ section (below) but as they may beperformed by machine it is better to mention them first.
Top ironing has always been favoured by high-class finishers forputting a border round the forepart to form a `frame’ for the edge and alsoto hide any channel not trimmed into the edge. On a black shoe having anatural forepart, the top iron is better made brown by staining and waxingor only waxing. Side ironing or heel corner ironing is a minor operationand very sadly neglected by some finishers. The aim should be to set theactual corner as firmly as possible in the same way as a Vienna edge is seton a Louis heel shoe. It would seem that the ambition of some machinesand operators is to scratch a mark about 1
16in. from the heel corner and
parallel with it leaving the corner unset.
TAKING-OFF
This bench job is gradually dying out as fewer items are being included infinishing off. Red bevels, scallops, strips, fiddle waists have disappearedand bunking, janking, crowing and corrugating are not so common asformerly. There is little doubt that no one suffers from the deletion ofthese operations, but some manufacturing blemishes may be obliteratedby judicious use of crow and bunk wheels. This taking-off operation isnowadays performed standing, and the tools, apart from the hand tools,are gas jet and a soft leather covered pad shaped like an inverted U withfairly wide arms and a gap in the middle for the shoe to rest in. Variouskinds of wax polish and colours are necessary.
Top Ironing
Although a machine may be used, a better effect is obtained by using asingle lip hand iron. Again stain and wax may be used. The length of thelip will determine the width of border and care must be taken to keep theiron firmly pressed to the edge to ensure an even mark.
Waist Marking
If carefully done so that the mark separates the waist from the forepart,and accurately paired, this improves the appearance of the bottom. Theusual tools are either a dull knife or crow wheel but some special effectscan be obtained by finishers using tools of their own design.
427
BOTTOM TREATMENT

Bunking
There has always been some difference of opinion about the names ofthe operations consisting of putting a fancy pattern by means of a heatediron on the edge of a gum or damp-down bottom. It is called bunking. Thedifference between bunking and crowing is that the crow wheel ispositioned between a fork and the bunk wheel is adjustable to allow thepattern to be placed nearer to or further away from the edge but stillproviding a guide for accuracy (Figure 230a).
Janking
Janking may be best described as stitch separating on the sole. It maybe done by hand with a single tool, by machine with a single tool, bymachine on the ‘Regal’ with a circular tool, or by hand with a similar tool.Janking should, theoretically, be performed only on stitched in a grooveor stitched aloft work. When done by the ‘Regal’ machine the tool is verysimilar to a fudge wheel (Figure 230b) and very often a subsidiary bunkwheel is fixed to the jank wheel. This may have led to the confusion ofbunking with janking.
Crowing
Already mentioned with bunking, this tool may be obtained in manyvariations, e.g. single dot, herringbone, straight indent etc. The use of acrow is reserved for the waist either for waist marking, channel coveringor marking across the breast of heel on the waist.
Corrugating
This is another embellishment confined to waists, consisting of a seriesof marks of definite spacing. The marks are made with either a dull knifeor single dot crow wheel. Patterns may be
428
FINISHING

produced and among these the diamond or lattice pattern is outstanding.For straight across marking the B.U.S.M.Co. introduced a machinewhich is very quickly and easily operated to give a series of dull knifemarks accurately spaced.
The taking-off operator is also responsible for filling any slight holeswith wax and running wax in the seat of leather heeled shoes.
BRUSHING-OFF
When all finishing operations are complete, the whole of the bottom isbrushed up to give the final polish. In fact, some firms are now cleaningthe upper by a stitch and upper cleaning machine before last slipping (seep. 454).
LAST SLIPPING
This is generally a hand operation but machines have been introduced toassist the operator. One machine is fitted with a revolving roller and ajack. The shoe is placed on the jack peg and swung towards the rollerwhich grips the back of the shoe by friction and lifts it from the last, theoperator completing the process.
Another type of last removing machine is the Standard machine whichemploys an action similar to the hand method. The shoe is placed on thepeg and when the pedal is depressed the rubber pad presses against theback of the shoe and lifts in a forward arc whilst the operator is pressingdown the toe. This enables the operator to slide the shoe easily away fromthe last. This machine has a rod attached at the right-hand side which isinserted into the block hole of scoop block lasts to facilitate the removingof the block. The success of last slipping will depend largely on the styleof pattern, i.e. amount of opening, the treatment of the last before lastingto prevent sticking and the withdrawal of grindery used for anchoringbracing wire and tacking on insoles.
Another important aspect is the style of last, i.e. whether ‘easy-exit` orblock last, and also upon the degree of thinness along the counter linebecause this means that the narrow top line must be pulled over the wideseat.
Types of Lasts
There are several types of easy-exit lasts designed to ‘break’ in thewaist, such as the circular hinge, link hinge, spring gap, coil-spring hingegap and more recently the reverse cut. With the exception of the lastmentioned all these can be handled by the last removing machines. Thereverse cut last possesses the unique feature of shortening immediately itbegins to break, whereas other types must
429
BOTTOM TREATMENT

lengthen slightly, before breaking. The introduction of this last was dueto the need for easier insertion of lasts for slip lasting and it is now gainingground for other methods of shoe making; it has, however, one drawbackas yet, namely, it cannot be slipped by existing machines.
430
FINISHING
31
LOUIS HEELS
INTRODUCTION
Definition—For practical purposes the term Louis heel is any style ofheel which has part of the sole fitted up the front (of the heel) in the formof a flat. This will embrace Cuban, Louis and various types of Spanishheels.
Louis Heel Shoe Manufacture from Bottom Stock to Finishing—Theemphasis must be on those operations which are peculiar to Louis heelsbut to preserve continuity the names of all operations will be included. Itwill also be impracticable in a chapter of this brevity to include all thevariations of method which abound in different factories. The secret ofsuccessful Louis heel shoes lies in the extent of preparation of thecomponent parts, i.e. insole, sole and heel.
INSOLE PREPARATION
The preparation of the insole using the Unishank method will have asequence as follows and those operations which apply only to Louis heelsare printed in capitals:
(1) press cutting of material to caster shape;(2) grading where necessary;(3) sorting where necessary;(4) ticketing (making up into work tickets);(5) “Planet’ rounding;(6) forepart scoring (to increase flexibility);(7) UNISHANK ASSEMBLY (BUSMC);(8) ‘Apex’ waist reducing;(9) scouring waists;
(10) moulding.
Unishank Assembly
The waist and seat of the insole are latexed together with the waistreinforcement so that when placed in the assembling machine a goodbond is obtained.
If a range of sizes is required by the work ticket it is possible to set firstof all the largest size and then the position of the smallest and the machineis fitted with a gauge which will grade the joint or locating position for allintermediate sizes and half sizes. This accurate location is essential forsteel shanks.
The method is simply to place the insole in position and bring down theshank holder; this holds the steel shank in position whilst the waistreinforcement is laid over; at this stage the mould is positioned over thewaist and seat to form a solid single unit.
431

The use of Unishanks is not confined to Louis heels, but does help toachieve that solidity of heel and seat so essential to that form and doeshelp to eliminate one of the common faults—breaking of the sole at thefront of the heel. Great care must be taken to ensure the correct size andcurve of shanks so that the completed insole fits the waist curve of thelast.
A very important point in connection with wooden-heeled shoes is thatthe heel is a finished width when it goes on the shoe and this must beborne in mind when preparing the insoles. No scouring can be done to thesides of the seat of the insole which will reduce the width unless a systemof heel fitting is carried out after lasting. To repeat, if heels are looked outand covered at the same time as the insoles are prepared, then rigidcontrol must be exercised over the width of the seat to ensure accuratelyfitting heels.
PREPARATION OF THE SOLE
The sequence for the preparation of the sole is as follows:(l) press cutting;(2) grading;(3) sorting;(4) fitting-up;(5) planet rounding;(6) sole stamping;(7) joint marking (to denote position of waist reducing);(8) BACK SPLITTING;(9) FLAP SPLITTING;
(10) TONGUEING;(11) reducing waists and foreparts (‘Apex’);(12) seat punching;(13) sole roughing;(14) sole cementing;(15) edge cleaning;(16) sole staining (on roughed portion to obviate colouring on to the
feather in finishing room).
Back Splitting
This is done on the same machine as the flap splitting and the purpose isto reduce the substance of the waist and seat where soles of more than 6irons are needed for the foreparts. If the sole is more than 6 irons in thewaist and seat the tongue and flap will be too stout.
Flap Splitting
Whereas back splitting actually removes some material from the solein a similar way to grading, flap splitting only opens or divides the sole atthe seat to allow part to go up the heel and the other under the heel.
432
FINISHING

The BUSMC Louis Heel Sole Splitting Machine is adjustable toproduce very thin flaps for batted edges (not set or ironed at the sides ofthe heel) or thicker flaps for Vienna edges (which are ironed). The extentof the flap will depend upon the length of the base of the heel and theheight of the heel plus a small margin ( 1
2in.) for applying glue or cement
between heel and flap.Mention has already been made of the possibility of the sole breaking
and in order to prevent this as much as possible, the roller which keeps thesole down to the knife has a shallow depression which reduces thepressure and leaves the flap thicker where it joins the sole. Anothermethod is to dispense with the tongue entirely, the flap being formed inthe same way as when back splitting. When this method is used solebreaking is avoided but extreme accuracy is necessary to produce a neatjoin between heel front and sole.
Tongueing
To revert to the orthodox system, after flap splitting the flesh split isplaced in a machine which forms the tongue thus providing areinforcement under the heel.
Lasting
No essential differences occur from standard practice and consequently itcan be passed over here.
Attaching
Again the sole attaching will not be altered in any way for Louis heels.
HEELING
The heeling section contains machines which have been devisedespecially for Louis heels and deserve special mention.
The sequence after sole cementing is as follows:(1) heel fitting and seat cutting;(2) heel attaching (temporary or permanent);(3) front cutting;(4) glueing;(5) flap sticking; a(6) side Hap trimming;(7) tab forming and sleeking;(8) slugging; .(9) top-piece trimming.
Heel Fitting, Sole Seat Cutting and Heel Attaching
The machine is fitted with two sets of knives, one pair operatingtowards the waist from the seat, the other across the seat at the locationpoint. The principle involved for accurate fitting is quite simple. Eachheei becomes its own template and its length when held
433
LOUIS HEELS

in a clamp on top of the machine is transferred to the shoe rest or stop andthus the exact cutting position is located on the underneath split (Figure231). It must be pointed out again that this fitting is only in the lengthdirection and many factors influence the fitting across the heel. Factorssuch as the substance of the stiffener, the type of seat lasting machine etc.will affect this.
Heel attaching by the BUSMC No. 10 Heeling machine or thetemporary screw method (see p. 387) is followed by front cutting.
Front Cutting
There is seldom complete continuity between the flesh split and thefront of the heel after heel attaching and there is the option of using asmall machine fitted with a narrow circular rasp or any irregularities canbe removed with a hand knife. Should a gap be present a little plasticwood will till it.
Glueing
Various adhesives are used such as ‘O’ glue, plastic film, latex . andliquid pyroxylin. ‘O’ glue is the standard adhesive and is of the bone orfish type and is specially prepared for flap sticking. It is prepared bysteam heating to a running consistency and a thin film is spread on thefront of the heel and the flap. This is allowed to dry.
434
FINISHING

Flap Sticking by the Turret Press
This is a specially designed press for sticking up flaps and will hold sixpairs. The centre of the machine is fitted with a steamer from which steamescapes at a point arranged to hold one shoe. The heel rests over theescaping steam and both flap and ‘O’ glue are softened. The shoe isimmediately transferred to one of the circle of clamps. Some skill isnecessary to avoid wrinkles when the rubber pads press down and toavoid this some operators tack the flap to the top of the heel. The flap willbe stuck firmly enough in the time taken to complete one circuit of themachine (about 5 min.).
The method of having no tongue under the heel involves the use ofslightly different treatment. In this ease it must be realised that the flapsticking is a continuation of the sole sticking and for this reason a similaradhesive is used, i.e. pyroxylin. Latex is also used by some shoemakersespecially where a very thin flap is used and very often no press is used,but instead a wide elastic band firmly secures flap to heel until a bond isobtained.
Side Flap Trimming
When ‘O’ glue is used this operation should be carried out immediatelyafter the turret press before the glue has become too brittle. Variousmethods are in use and although an efficient machine has been introducedmany firms still prefer to trim by hand. Even at this
level some differences exist some preferring a simple shoe knife whilstothers use a kind of two-pronged fork or ‘V’ and cutting at the bottom ofthe ‘V’. The machine method incorporates a small cylinder knifemounted at the end of a shaft, and in front of the knife are mounted twoguards shaped to fit round the knife but leaving a narrow gap for thesurplus flap to pass (Figure 232). The knife can move in anti-clockwiseand clockwise directions so that the
435
LOUIS HEELS

flap is always trimmed from the front of the heel, i.e. from the grain andtowards the flesh of the flap to avoid cutting the cover (see Figure 233).
Broadly speaking, it may be stated that where Vienna edges arerequired the flap-trimming machine does a better job because it leaves theflap just proud of the cover and square, whereas when batted edges arerequired, hand methods are better as the knife can be tilted inwardsslightly and assist in producing the wafer-like edge.
Tab Forming and Sleeking
This is also the subject of controversial opinion, two methods beingused; a third ‘method’, not having a tab at all, is also in use.
(a) The machine methods are at least two in number and the firstconsists of cutting away the flap above the top edge with the exception ofa triangular piece to go under the top-piece. This piece or tab is scouredvery thinly.
Another type of machine cuts away the surplus and leaves a skived tabwhich is also cut in the centre to form a kind of double tab. This cut allowsthe tab to fit quite snugly when pressed flat.
(b) When done by hand the operator usually leaves a tab occupyingabout one third of the width of the front located in the centre the rest of theflap being cut away flush to the top edge. It has also been observed thatthere is a tendency to disregard the tab altogether and remove all the flapabove the top edge of the heel. The sleeking is important to improve thecurve of the breast and to flatten the surface from waist to facilitatebottom scouring. The sleeker consists of a shaped rod of highly polishedsteel revolving at high speed against which the shoe is rubbed.
Slugging is carried out as referred to in Chapter 27 (p. 389).
FINISHING
The operations in finishing that have special significance for Louis heelsare those which apply to the front of the heel and the ironing
436
FINISHING

of the sides of the flap; otherwise the finishing is as for other kinds ofshoes.
The sequence for finishing is as follows:(1) top-piece trimming;(2) edge trimming (forepart and waist);(3) edge colouring including side of flap if Vienna edge;(4) top-piece setting;(5) edge setting and flap setting;(6) edge brushing (polishing);(7) bottom scouring and breast scouring;(8) bottom making;(9) taking-off`;
(10) polishing-off;(11) slipping.
Flap Setting
This is usually done by machine and simply consists of an appropriateheated setting iron oscillating in the usual way. Wax may be used.
Breast Scouring
Since the introduction of the No. 10 Bottom Scourer (see p. 419) withits specially designed pneumatic rim fitted to a naumkeag pad, the use ofthe cone has largely disappeared. The moulded abrasive band fits wellinto the curve of the front of the heel and the distance from the edge of therim to the centre spindle allows 3 in. heels to be scoured without the heelfouling the top-piece.
It is suggested that pre-scouring of the waist and seat of the sole assistsin front scouring but there is a greater difficulty in cleaning the soiledsurface.
CONCLUSIONS
The character of a well-made Louis heel shoe must inevitably lie in theheel section and every effort must be made to obtain perfection of line ofheel in relation to the back, perfectly fitting flap, accurate blending ofheel to sole; small details which if correct produce beauty of line but ifincorrect spoil the shoe completely.
437
LOUIS HEELS

32
FINISHING ROOM MANAGEMENT
IT IS MOST DIFFICULT to formulate a set of rules for management whichmight be considered general for all factories, as conditions vary with eachfactory. The following factors are typical of the variables:
(1) quality of work;(2) size of plant;(3) nature of output;(4) type of supervision and welfare;(5) method of payment;(6) method of transporting work;(7) purchase and usage of grindery and findings.
(1) Quality of Work
This again is most difficult to assess, as there are so many standards ofquality and the work of one district would not be accepted by another.However, whatever quality is decided upon, there should be someattempt made to maintain that standard and the departmental managerwill have to be vigilant to detect any lowering of the standards. Thenumber of inspectors and their positions in the department will generallydepend upon the output and the selling price.
Where two inspections are carried out, the first should be immediatelybefore putting the edges into colour. Any faults with heels and edges canthen be more easily corrected. The second inspection would be bestplaced before last slipping so that faults with edge setting could beproperly dealt with.
Quality must also affect output because our machines are normallyonly moving tools which will work as fast as the operator will allow and,although there may be exceptions, it is nevertheless true to say that ingeneral speed and quality do not mix. Many faults appear when speed isdemanded but in many cases these faults have crept in so insidiously thatthey have become accepted as normal for the particular standard ofquality. Clearly, all shoes cannot be of high standard but far too muchquality has been sacrificed for increased output.
The increasing efficiency of machines in other departments of the shoefactory, such as the automatic toe and seat lasting machines, has notoccurred to any extent in the finishing department and only the automaticedge setter has materially increased output, but even that has notimproved quality. There are, of course, automatic edge trimming, inkingand setting machines for use in cheap cemented shoes, but no criticalcustomer would buy such shoes. Finishing
438

machine improvement has taken place but the improvements haveusually made the machines faster and smoother; the degree of skillremains as high and as much time is necessary to produce a good result.In this connection the range of trimmers and other finishing machinesmade by Fred Hawkes (N.V. Engineers) Ltd., is noteworthy. They arecharacterised by their large diameter bearings, more bearing points on thespindles and their method of assembly from a number of easilyreplaceable units, this last factor reducing servicing time, and thereforeproduction delay, to a minimum. In order to increase productivity or toreduce the price of finishing, many hand processes have been eliminatedand fewer two-colour finishes are used. The trend has been to produce avery plain simple finish but even so, skill and craftsmanship is rewardedby the production of good shoes.
(2) Size of Plant
This question has never been satisfactorily solved and as the targetfigures of certain automatic and other machines keep going up, itbecomes increasingly difficult to decide just how big the plant should be.It seems impossible to base output on any one machine or group ofmachines, although some consideration is bound to be given to machineswhich are expensive to run and maintain. The following comparativeoutputs indicate the nature of the problem—1,200 pairs per day for heeltrimming, 240 pairs per day for men’s welted edge trimming and 720pairs per day for men’s bottom scouring; this shows the difficulty ofbuilding up a plant to interlock and produce efficient use of all machines.The usual solution to this problem is to utilise the spare time of anyoperator who is not fully employed by giving him subsidiary jobs such ascorner squaring, colouring, side ironing or any similar operation.
Another disadvantage of shoemaking by mass production methods isthat duplication of small units, i.e. single machines, is inevitable forincreasing production, consequently where the output of a firm reachessay 24,000 pairs per week, twenty combination edge trimmers will berequired, each producing 240 pairs per day for five days. This means thatthe shoes must travel a considerable distance from the nearest heelscourer to the furthest trimmer. This will lead to another problem, namelythe dispersal or collection of dust from scouring, paring and polishingmachines. Considerable thought must be given to the selection of themost suitable type of equipment, but where the space is available anoutside cyclone system is preferred. Where the department is large andthe amount of extraction is rapid, some compensatory intake of air mightbe necessary to prevent accidents due to doors suddenly closing on aperson entering or leaving. This, of course, applies especially during thewinter months when windows are closed. The practice of fitting filterbags to individual machines or groups is frowned upon as the air, stillcontaining very fine dust in suspension, is discharged into the departmentand in
439
MANAGEMENT

any case is seldom as efficient as a main trunk. The bag system has a greateconomic advantage, however, during the winter as expensively heatedair is kept within the room and not discharged to the outside as is the casewith the cyclone separator.
Finally, careful planning is essential when installing the dust extractionsystem owing to the cost of fitting machines to the trunk and conversely,the trunk must be adequate for any calls made upon it as nothing hindersline finishing more than a dusty atmosphere, quite apart from its effectupon health.
(3) Nature of Output
This must lead to a consideration of the methods used to deal with avariety of work, such as men’s shoes with leather bottoms, men’s shoeswith rubber bottoms, ladies’ shoes with leather heels, ladies’ shoes withcovered heels and ladies’ shoes with rubber bottoms.
Firstly, where the output is large enough, it is better to separate entirelymen’s shoes from women’s shoes especially if the latter are cementedand with covered heels. One firm has developed a system of finishing thewomen’s shoes in the centre of the room and the men’s around the edge orwalls and both have their own supervision. The technique of heeltrimming and edge trimming 1adies’ shoes differs considerably frommen’s and best results are obtained from operators having time toconcentrate on one type.
However, this is not the only problem. The seasonal demand of rubber,both crepe and vulcanised, upsets the working of the finishingdepartment as this type of work needs no bottom scouring, bottommaking and little ‘taking-off’. These operatives must be found alternativeemployment or it might be better to plan the making of rubber bottoms tospread them over the whole year. One firm at least has solved the problemto some extent by having the bottoms of shoes fitted with resin-rubbersoles buffed and gummed. It is claimed that this treatment is necessaryafter the bottoms have collected the usual factory dirt. Also black andcoloured work are better separated or routed to special operatives.‘Regal’ edge setting is a good example of the type of machine operationdemanding special consideration in connection with coloured work,because the shoe has to be held firmly by both hands and perspiration cansoil a shoe quickly. An operator should thus be chosen who has coolhands or alternatively gloves should be provided. Padding and brushingmachines, both hot and cold, must be specialised for either black orcoloured and some firms do attempt to have two distinct channels of workafter superfine heel scouring.
(4) Type of Supervision and Welfare
The days of the bullying foreman have, we hope, gone for ever, but,nevertheless, many firms are very apathetic in their regard for theiremployees, paying little attention to their suggestions, and
440
FINISHING

assessing their ability no higher than the manner in which they performone machine operation. Some attempt is being made now to train youngoperatives more thoroughly both in factories and technical colleges and itis hoped more co-operation will result from this. Tea breaks, canteens,hygienic toilet facilities, casualty room, cheerful surroundings andcleanliness must, if added to efficient technical management, producemore and better shoes. An austere management invariably results in lackof harmony and very often produces shoddy work; this, the departmentforeman must detect and control. Another feature of supervision is to givethe lead in matters concerning quality. Where the factory manager has athorough grasp of all departments and the departmental manager has acomplete practical ability in all operations in his department, a feeling ofconfidence is established and good work results.
(5) Method of Payment
Most jobs in the finishing room are paid by results and, as a rule, thesystem in general operation in the industry is the supplementary systemwhich guarantees the day rate whilst in attendance, and severalpercentages above the rate according to the grade of work. In otherwords, prices per dozen for edge trimming should be fixed to enable theoperator to earn about 37 per cent above the minimum rate, whilst bottomscouring prices are fixed to secure for an operative 25 per cent above theminimum rate. These percentages have varied since 1939 owing to theminimum rates being tied to the cost of living index figure and prices perdozen have remained unchanged. There is no doubt that this form ofpiece-work has proved a definite incentive to earn more money and hasincreased productivity enormously. Snags do arise, however, especiallywhen day workers are sandwiched between piece workers and much tactmust be exercised by the executive to obtain harmony. Also, the arbitraryfixing of prices has led to many anomalies and many cases are reported ofinking ‘boys’ earning more than edge trimmers and bottom paintersearning more than the foreman. These variations are bound to causeill-feeling and often a lowering of quality. Any system of payment byresults will bring with it a greater need for inspection.
(6) Methods of Transporting Work
A considerable amount of study has gone into the question of movingthe shoes in work from one operation to the next and there is no doubt thatconsiderable time is taken up by operatives pushing and pulling heavyracks of shoes. The type of rack has also been investigated and one ‘must’for the finishing department is a rack which isolates one shoe fromanother, retains pairs and holds the shoes bottoms up. There are manytypes of racks available but they all seem to have one disadvantage oranother, such as lack of manoeuvrability over rough floors, spacewasting, or three or four levels from which shoes must be taken.
441
MANAGEMENT
It would seem then that a system which allowed the work to proceed inan orderly manner at the correct height and in the best position forworking would be an advantage and yet many experiments have beenmade, and generally discarded, in the use of conveyors. The mistakegenerally has been to have a travelling belt which gave workers a feelingof frustration and slavery and any type of conveyor which does that isbound to fail. One of the more recent ideas is to have a light but sturdyframework, the track of which is light angle-iron, the width betweenoutside walls of the track being slightly more than the width of the tray.The tray, having pegs for last thimbles, holds three pairs of shoes and isfitted with a small wheel at each corner and the tray is easily pushed alongthe track by the operator. The fixing of the wheels to the trays simplifiesthe construction of the ‘conveyor’ enormously and consequently lowersthe cost. Also, it is comparatively easy to have several tiers so that workof various importance, urgency, colour, etc., can be accommodatedseparately. Where this ‘static’ type of conveyor is used, it is normal tohave two or three stations to hold accumulated work caused by any of theusual bottle-necks, machine breakdowns, illness, shortage ofcomponents etc. which reduces friction to a minimum.
(7) Purchase and Use of Grindery and Findings
One of the most serious errors any executive may commit is that ofcomplacency in the acceptance of the traditional methods and materials.It is difficult to decide how and when introductions will be made and forhow long a trial can be extended. The use of cheap (in price) materialsespecially waxes and abrasives, is seldom economical eventually.
The selection of bottom finishes from natural gums to opaque paintsmust be related to quality, market and leather but some safeguards may betaken with the heavier finishes to maintain consistency; mechanicalagitators are essential in this connection.
Some firms will spend thousands of pounds on advertising and remainparsimonious about allocating bottom makers sufficient clean cloth tokeep work clean.
Finally, judicious buying is essential to prevent waste—gums may gosour, abrasive papers may lose their grit owing to the softening of the glueetc.—but alternatively, it is fatal to allow stocks to fall below a minimumsafety level.
442
FINISHING

PART VIII
SHOE ROOM
E. J. CLARKE
443


INTRODUCTION
THERE IS NOW AN increasing awareness of the importance of the workdone in this department. Coming as it does at the end of themanufacturing processes, it has not been generally recognised as aproductive department, and planners have been apt to think that themoment goods left the finishing room, very little remained to be done andalmost immediate despatch could be easily arranged.
It is, of course, quite true that some types of shoes are easily andquickly dealt with and can be despatched quite expeditiously. Othersinvolve more work, require treatment other than normal, or perhaps haveto be delayed through circumstances beyond the control of the shoe roomforeman.
Very often the department suffers from lack of space and it becomesimperative that the work should pass through in the shortest possibletime. Any hold—ups, therefore, become the cause of serious congestionand may quickly affect the productivity of other departments. Forinstance, where the factory uses racks for the transport of work, abottle-neck in the shoe room, even though there may be special racks forthat department, will soon cause a slowing down, or perhaps a stoppageof work in the lasting department, due to the fact that they no longer haveempty racks upon which to place the freshly lasted shoes.
Quite an appreciable part of the shoe room needs to be set aside for thestorage of boxes, a factor not always understood by those allocating floorspace to various departments, but a fact nevertheless which quicklybecomes apparent if not allowed for, and results in either a congestion ofspace or a frequent hold-up of work awaiting the delivery of boxes.
These, however, are general remarks and in order to study thedepartment in more detail it would be better to start with the work as itenters the shoe room and follow through each succeeding operation untilthe shoes are finally despatched to the customer.
It is assumed that the lasts have been slipped already and that all thefinishing room processes have been completed.
A normal sequence of operations would be as shown below; there mayof course be minor variations due to the type of footwear manufactured.
Sole stampingInsole tack removingSockingLining edge reducingCleaningTreeing and hot blastingPigment finishing
445

Quarter reformingDressingSprayingOrnament attachingRepairingExaminingFellowingLacing and taggingBoxing up.
446
SHOE ROOM

33
EXAMINATION AND PRELIMINARY
OPERATIONS
EXAMINATIONS
THE WORK SHOULD NOW be examined and checked. It is the custom insome factories to leave the examination of work until the stageimmediately before boxing. This is, indeed, very necessary, but aninspection at first can often save a lot of extra work later on. Whateverhappens, however, the line of shoes should certainly be checked forquantity and an incomplete lot should not be accepted. Manycomplications may arise later if lines of work are sent through short of anodd shoe or single pair, and moreover, the finishers will more readilypush an oddment along if a whole ticket is held in their departmentawaiting completion, than will be the case if the work is allowed to passthrough regardless of any shortages.
This process of examination can be the cause of much discord betweensupervisors, but after all, it is the responsibility of the shoe room foremanto see that the work is sent to the customer in a presentable condition, andfully up to the particular firm"s standard of manufacture. Whilst it isadmitted that much can be done in the shoe room to remedy otherdepartments’ shortcomings, any defects that may be remedied should besent back to those concerned for rectification. This returning of work hasa salutary effect upon those to blame and tends to remind the responsiblesupervisor of the standard that must be maintained.
A practice adopted in some factories, that has much to recommend it, isto have the examiner stationed to pass the work, after it leaves thefinishing department and before it enters the shoe room. This examiner isresponsible for accepting the work or rejecting it, in accordance with thestandard required at that stage. He is subject to the authority of nodepartmental supervisor but is answerable only to the works manager.
The examiner should check that the work has been made tospecification, see that no seams have been burst, ensure that eyelets havebeen properly clenched and are all complete, see that the insoles andlinings are not defective. If for any reason a shoe has to be returned to beremade, the line of work should be retained to await completion.
An item of great importance, concerning welted shoes especially, is theexamination of insoles for nails. A nail left in the shoe can be the cause ofmuch trouble if discovered only when a person is trying on the shoe in thestore; such incidents must be avoided at all costs.
It is not always possible to see a tack inside the shoe or boot, and

even the hand pushed well down to the toe and drawn back across theinsole may not locate one. On the other hand of course, the examiner maytear his fingers quite badly on some of these tacks, which, incidentally,have been the cause of septic fingers to some operatives. The obviousanswer to this is to ensure that all tacks are withdrawn in the makingdepartment but, of course, it sometimes happens that the heads of tacksbreak off leaving the tack itself standing proud on the insole.
The Research Association have given considerable thought to thismatter and a cabinet has been devised to locate nails inside shoes bymeans of x-rays; their comments are quoted from the Research Bulletinof August 1948:
‘We have recently completed the construction of an x-ray inspectioncabinet which has been designed for the special purpose of detecting thepresence of tacks accidentally left in the forepart of Goodyear weltedboots or shoes. The need for a device of this kind was suggested to us by amember firm and we undertook to design and make a prototypeinstrument. The idea is not new and it has been commercialised inAmerica, but we decided to tackle the job ·on rather different lines, and avery useful and efficient piece of equipment has resulted.
Any risk of tacks being left in the insoles of welted shoes is serioussince the goodwill which can be lost by a customer cutting his foot on asharp projection can be out of all proportion to the magnitude of theinjury itself. The usual hand method of searching for tacks cannot becompletely certain, whereas the x·ray inspection makes the chance offailing to notice a tack remote, unless the operative’s attention wandersentirely, since one glance suffices to take in the whole area of the forepartof a pair of shoes and the presence of any stray piece of metalimmediately strikes the eye. The seats can, of course, be visuallyinspected without difficulty and an x-ray view is unnecessary; nor wouldit be practicable because of the mass of metallics normally present in theheel. Another advantage of the x-ray device is that it makes the job amuch less unpleasant one for the operative.
The general arrangement of the instrument is shown in Figure 234which illustrates the machine with the carriage open; when in thisposition a pair of shoes is taken from the shoe rack and positioned on twinplatforms which form part of the carriage. The carriage, which isbalanced for easy opening and closing, is then pushed in and theinspection is carried out. Whilst the shoes are under observation the twinplatforms can be partially rotated by means of the handles seen in thephotograph. This allows the shoes, which are first seen in plan, to beturned into an edgewise position and thus makes it easy to tell whether atack is protruding through the insole or lying in a harmless or inaccessibleposition. With the aid of this "two-view" device tacks can be locatedexactly, and their subsequent removal is facilitated. The twin platformsare fitted with adjusters which enable
448
SHOE ROOM

them to receive anything from children’s shoes to full-sized ankle boots.No adjustment is needed except when a big change of size is made.
Careful consideration has been paid to the protection of the operativefrom radiation, and adequate screening has been incorporated in thedesign. Even the slots through which the handles controlling theplatforms pass are protected by a sliding screen. Furthermore, a switch isincorporated so that the tube does not emit until the carriage is closed; this
makes it impossible for the operative to place his hands within the zone ofemission, either by accident or through carelessness. With the usualcircuit arrangement this safety feature would entail a wait of severalseconds for the x-ray tube to warm up and start emitting after the carriageis closed, but a transformer and circuit has been used which allows thetube to come to life instantly.
449
EXAMINATION AND PRELIMINARY OPERATIONS
Figure 234. X-ray inspection cabinet developed by theResearch Association.
The tube life is lengthened by a device which reduces the filament to halfpower when the carriage is fully opened, this being its normal restposition.’
Another method of tack detection recently introduced is a ‘minedetector’ in miniature. A probing tool, electrically connected to anamplifier, is pushed into the shoe and, if it passes over any metal, anaudible buzz is made.
Tack Cutting
Long-handled tack cutting nippers are used to remove or cut off tacksfrom the insole. A certain dexterity has to be acquired with this tool.When the tack has been located the nippers are pushed down with thecutting jaws open and when in such a position that the tack is between thecutters, gentle pressure is applied to the handles so that it can be heldwithout being cut. It is sometimes possible then to lever the tack outcompletely, otherwise it must be cut as close to the insole as possible, anymetal still standing proud being rasped down smooth or hammered out onan iron last, taking care, of course, not to damage the bottom finishing.
Singeing
Now that knot-tying is seldom done in closing rooms, strands of threadvery often show at the end of stitching rows. These threads look untidyand are not always trimmed successfully with scissors; they can be singedoff however quite quickly and completely. A handy instrument for thispurpose consisting of a handle with a gas jet producing a very narrowflame is produced by Livingston and Doughty Ltd.
Protection of Finished Shoe Bottoms
All shoes entering the department should stand on suitably coveredsurfaces to prevent the scratching or dirtying of the finished bottoms.Often paper is used to cover racks or benches for this purpose, but thiscannot be recommended. The surface of most paper is very hard and canquickly spoil the wax finish of the shoe bottom. Good cloth is the mostsuitable material, but this must be kept free from dust and grit to retain itsusefulness.
SOLE STAMPING AND EMBOSSING
Sole stamping is usually the first actual operation and if done properlycan enhance the appearance of the bottom finish. It is important that whenbranding the forepart, the stamp should be in the centre and straight to thetoe. The amount of pressure used must bear relation to the substance ofthe shoe bottom, otherwise a very light impression will not markproperly, or a too deep indent will mar or even damage the sole.
450
SHOE ROOM

The type of finish and the temperature of the stamp must also bear closerelationship with each other. An ordinary waxed bottom will take a hotstamp well, although even this should not be so hot as to burn the hand.
A painted bottom however, will quickly spoil if the brand is hot, thebest result being obtained when the stamp is nicely warm. No precisetemperature can be stated, experience being the deciding factor.
Painted bottoms readily lend themselves to the use of embossingpapers. Papers are obtainable in a large number of colours and tastefully
used can be quite effective in enhancing the appearance of the shoe. It isnecessary when using them, however, to have a rather hotter stamp toobtain a good transfer of the colour.
A machine worthy of mention in respect of this operation is the TradeMark Embossing Machine (Figure 235) produced by the StandardEngineering Co. This machine incorporates a toggle movement whicheliminates adjustments for different thicknesses of leather. After theinitial adjustment for the required depth of impression the machineautomatically adjusts itself to give the same impression on substanceswithin a range of 1
2in. A paper feed attachment can also be supplied and
adapted for the stamping of socks etc.
451
EXAMINATION AND PRELIMINARY OPERATIONS

SOCKING
This operation, though in itself quite simple, involves many variationsaccording to the type of work, the kind of sock and the method of pasting.
For instance machine-sewn shoes, shoes with common or fibre insoles,and practically all fleecy-lined bootees, need a long sock, that is, acovering for the whole of the insole.
Welted shoes need only a seat sock to cover the grindery at the heel,although a half-sock covering the seat and the waist is often used on highgrade footwear.
Heavy riveted, screwed and stitched footwear has usually only a seatsock, and not even that sometimes, although so much metal is used in theattachment of the bottoms. The fact that this type of boot is generallylevelled in the making room on iron feet ensures that the insoles are quitesmooth.
Slip-lasted shoes, children’s veldts, and handsewn footwear usuallyhave no sock whatever.
The sock itself may vary according to the quality of the shoe fromcheap paper, cork, leather skiver etc., to good grade calf or goat cut fromthe same material as used in the quarter lining, thus making an idealmatch of sock and lining.
It should always be the aim to have the same colour sock as lining. Theexception to this, of course, is when the shoe or boot is unlined, in whichcase cork socks may be used or the matter left to the good taste of thesupervisor.
There are various ways of decorating the sock. Very often it is stampedin some way either in gold, silver or colour. It is usual for export work tocarry the merchant’s name and the source of production in gold letteringon the sock.
Socks may be gimped and/or perforated with quite good effectaccording to the type of footwear. A man’s conventional shoe is of coursebest with a plain sock, perhaps merely skived at the front to make asmooth blend to the insole. On the other hand a suitably gimped andperforated sock will much improve the appearance of a lady’s shoe.
Methods of applying the paste to the sock also vary. In some cases agrid, that can be submerged into a tray containing the paste, is used. Uponemerging from the paste, the grid being completely coated, socks aredrawn across and then inserted into the shoes; when all the paste is used,the grid is again submerged.
Rollers, caused to rotate in a tray containing paste, are also used. Therollers may be power driven or merely rotated when the sock is placed tothe roller for pasting. In other cases paste is poured on to a flat plate andthe sock brought to the paste and dragged across a dry portion of the plateto eliminate surplus paste before insertion. This method is wasteful anddirty, as there is a tendency for the paste to get on the bench and thus spoilthe bottoms of the shoes.
452
SHOE ROOM

The choice of paste is very important. Glue, flour or latex are the mainitems in various preparations used for socking. Of the three, a latexcompound is the most suitable owing to the fact that it will hold the sockmore permanently in position during wear. Adhesives of the glue or flourpaste type tend to soften with perspiration particularly when the wearerhas a hot foot; the sock then begins to slide about on the insole,sometimes ruckling up in the waist and causing great discomfort.Grindery will also be exposed and cause staining of the feet and hose andmay quickly damage a lady’s stocking especially.
Another disadvantage with paste of this type is the fact that mould mayalso develop inside the shoes, especially if they are stored in a damp orclosed cupboard. This tendency may however, be overcome if the paste isantisepticised in the first instance with alum or borax. This apparentlysimple operation is worth a little thought; for instance in the ResearchAssociation Monthly Bulletin for October 1947, a report is madeconcerning dermatitis from socking materials. In three separateinstances, shoes were alleged to have caused dermatitis and themanufacturer was unable to obtain an unqualified assurance that theshoes were definitely free from suspicion. It was stated that therubberised socking material showed the presence of free sulphides andthough this was not likely to have caused the trouble it could not beentirely ruled out as an impossibility.
A final word on the operation itself. When inserting the sock afterpasting, it is essential that the lining of the shoe should be kept clean. Thesock then must be almost folded together between thumb and linger withthe pasted side innermost, then placed in position and smoothed out flat.Long socking, particularly with bootees, needs special care. Evenordinary seat socks in welted shoes are not entirely fool-proof, for in thiscase if the sock is not located in its proper position upon the immediateinsertion, the paste will cause an unsightly stain on the insole whereverthe sock has been.
453
EXAMINATION AND PRELIMINARY OPERATIONS

34
UPPER CLEANING, IRONING AND DRESSING
UPPER CLEANING
The extent to which this operation needs to be done depends a great dealupon the type of footwear and on the amount of care exercised in otherdepartments to keep the work as clean as possible.
Dirty workmen are usually shoddy workmen and it will generally befound that the cleaner the work is when it enters the shoe room the higherthe standard of workmanship will be. It is obvious that it is difficult tokeep Goodyear welted work equally as clean as stuck-on work, owing tothe extra handling and the stitching operations involved in the weltedprocess; that is no excuse, however, for indiscriminate smothering withwax, water stains, oil etc., that ultimately cause a great deal of trouble inbeing removed.
The aim of the shoe room is to restore that clean, fresh, attractiveappearance that characterises the upper material in the first place whetherit is leather or fabric.
Machines such as the BUSMC Stitch and Upper Cleaning Machine andthe Standard Shoe Cleaning Machine shown in Figure 236 are frequentlyused, especially for box calf and black glacé kid. The machines usuallyhave a stiff bristled circular brush for cleaning the welt, a wider, softerbrush that can be fed with a regulated amount of cleaning fluid, a mop fordrying off, and a final brush for polishing up (Figure 237).
Coloured leathers can be successfully cleaned on the machine, but careneeds to be exercised to prevent bruising or removal of pigment finishes.
Patent shoes must also be treated carefully, otherwise if too muchpressure is put on the brush, the heat so generated by the friction of thebrush on the upper will cause the enamel to soften and becomecompletely removed.
Some firms take advantage of the heat that can be generated in thisway, to smooth out the uppers of glacé shoes, especially ladies’ footwear.For this purpose the shoes are cleaned while still on the last and thus theoriginal lines of the last are retained, no further ironing or hot blastingbeing necessary. This method is very useful where little or no distortionof the upper occurs in last slipping.
The cleaning fluid is usually a weak ammoniacal solution and maycontain some soft or liquid soap and colouring materials although someof the modern detergents could well be used as they assist in thespreading power of the liquid and also help to retain the colour in tanshoes. The welt brush will generally clear any wax, solution or dried inkstains, leaving the damp brush for the general cleaning.
454

When cleaning by hand, a small blunt knife is used to scrape away anydried ink in the leather or surplus wax around the seat. Petrol or benzolineis used to remove wax or slight oil stains, an odd piece of crepe rubber iskept handy to rub off any solution, and a fluid, similar to that used on themachine, for general cleaning. It
often happens that small amounts of celluloid are transferred to the upperfrom the fingers of the worker inserting celastic toe-puffs. These marksdo not show very plainly in the cleaning stage but appear veryprominently when the dressings are applied. It is important therefore, thatthey be completely removed and the tendency is for operatives to try andscrape them clear with a knife or finger nail.
455
UPPER CLEANING, IRONING AND DRESSING

This spoils the surface of the leather and must be stopped. The only wayto remove the marks is to use some of the spirit supplied for the softeningof the puff itself.
Coloured Work
Very little of the coloured leather now used in shoe manufacture isstraight dyed. It has become almost general practice to apply a pigmentfinish after dyeing to give a uniform shade of colour over not only thewhole skin but over the complete batch.
Some tanners produce leather with a good fast finish; other leathersquickly lose their finish and require special treatment in the shoe room.
In the first place, care must be taken in cleaning and for this purpose itwill be found that a spirit cleaner will usually be the best. Solutionscontaining ammonia will generally make matters worse and musttherefore be avoided. The use of water to damp a cloth or sponge, whichis then rubbed on some saddle soap for cleaning shoes with a loose finish,often helps to level up the colour and may eliminate the use of a pigmentto restore the original even shading.
However, if the uppers are patchy after cleaning it will be necessary torefinish the leather. There are two main types of finish that may be used,either a water pigment finish or a cellulose finish.
The water pigment is easily applied and can give good results. It willgenerally be found most convenient to keep a small number of shadesfrom which a suitable match can be blended for the particularrequirement. It is advisable to thin down the finish with a good shellacdressing; this will help to bind the colour to the leather.
When selecting or mixing up pigment finishes, it is a good practice toobtain pieces of leather of the identical type from which the shoes havebeen cut, and by trial and error find the exact shade of finish required.
456
SHOE ROOM

It must be borne in mind, however, that the leather pieces will appearvery different from the uppers that have suffered the strains and stress oflasting and the handling throughout the factory. Furthermore, if they havebeen through the mulling process, the leather will need extra care as itwill usually be found to be rather on the ‘hungry’ side. The cuttings of theleather must therefore, be used as a guide to what must be the appearanceof the finished article.
457
UPPER CLEANING, IRONING AND DRESSING
Table 12. Cleaners which may be used to remove different types of stains from
various materials
(based on ABC of Shoe Science SATRA)
Stain Type of material Cleaning agent
2, 3, 4 , 5, 6, 7
4, 5, 6
2
Smooth leathers
Reversed leathers or suede splits
Rubber combined fabrics
Grease
Wax Suedes or splits
Other leathers
9 + 4, 5, 6
13 or 14 + 3
General soiling Smooth leather (cellulose finish)
Smooth leather (casein or water
pigment finish)
Suedes and splits
Leather linings
Linen
Satin (crepe-de-chine)
Rayon
Tarnishing Silver tinsel
Gold tinsel
1
2
5, 12
11
3, 4
2, 4
3, 5
15
16
Key to Cleaning Agent Column
1 10 per cent watery ammoniacleaner with or without deter-gent
2 Acetone3 Benzine4 Carbon tetrachloride5 Ligroine6 Methylated ether7 Oil remover. (Thin solution of
crepe rubber pieces in carbonbisulphide)
8 Wood naphtha9 Sharp knife
10 Emery cloth11 10 per cent watery oxalic acid12 Pumice powder13 Cleaning machine welt brush14 Blunt knife15 Potassium silver cyanide plus pre-
cipitated chalk16 Potassium gold cyanide plus pre-
cipitated chalk

‘Flexomel‘, supplied by the B.B. Chemical Co. is an example of acellulose finish. This is highly inflammable and care must be taken tocomply with the appropriate regulations concerning its use.
It is best applied with a camel-hair brush, making as few movements aspossible and as quickly as possible. This method is more permanent butneeds more skill in its execution. Whatever the type of pigment finish isused, however, it is better to apply two thin coats instead of one heavycoat.
The first coat must also be left to get thoroughly dry before theapplication of the second, otherwise the whole effect will be ruined. Aheavy painted look must be avoided.
Suede or Buck Leather
Shoes of these materials need especial care in manufacturing in orderto keep them as clean as possible, for they seem to pick up oil and dirtmuch more readily than other leathers and are more difficult to clean. Thebrushing, so necessary, causes a great deal of dust which is mostunpleasant to the operative. Cabinets have been designed to obviate thisand a dust extracting system is embodied. This makes the job cleaner andalso prevents dust settling on shelves nearby.
Wire brushes intelligently used are of great assistance in the cleaningof suede, although if used too vigorously the fibres of the leather will beexcessively roughened up. This is particularly the case with suede splits.A piece of emery cloth rubbed round the leather will clear any ink stains,but care must be taken to keep the bottom and edge finish unspoiled.Spots of wax or rubber solution should be cleaned off dry. lf a solvent isused, the dirt merely spreads over a larger surface and becomes moredifficult to clear. lt will be found that a razor blade delicately handled willremove a blob of wax or solution and leave no trace of anything havingbeen there. Oil stains require especial care. A solvent such as ligroine,benzine, or methylated ether should be used and applied to the centre ofthe stain with a piece of cloth wrapped around the finger, then with aquick circular movement the area is widened until the solvent is perfectlydry. This process is repeated until the stain is entirely removed.
The continual rubbing over a widening area until the solvent dries, isnecessary to prevent a ring forming. lf a wet patch is allowed to drynaturally it will be found that a clear mark will show exactly where thesolvent has been. This mark will be exceedingly difficult to remove orcover. Powder of a matching shade is used to even up any patchy shoesbut the least amount of powder used the better, for it must remain loose onthe leather and makes rather dirty handling when taken from the box. Thiscan cause a bad impression upon the customer who is bound to besuspicious of the colour if a lot of coloured powder is seen to be in the boxand on the tissue, perhaps also spoiling the hose when trying the shoes on.It is sometimes advisable to use a liquid colour stain to even up the shadesof suede,
458
SHOE ROOM

but the shoes must be left to get thoroughly dry before finally brushingover to raise the nap. It is advisable to use dry cleaning methods as far aspossible and fine emery paper, pumice powder and art gum will be foundof much assistance for this purpose.
Should the leather fibres appear too rough, due perhaps to excessivebrushing with the wire brush, or even to the inferior quality of thematerial, it will be found that the use of a gas jet or the hot blast, speciallyadjusted with a low air thrust, to singe off the long fibres, will greatlyenhance the shoe. The leather will need brushing after singeing, but novigorous treatment should be necessary.
Spray equipment is often used to improve the appearance of suede, andVelvetta Spray supplied either black or colourless by the B.B. ChemicalCo. is produced for use in this way. This spray does not put new colourinto the shoes but does seem to put some life into the material.
Of course many factories use covers of various types to protect suedeor white buck, but as the shoes are not usually thus protected until afterlasting, they are not perfectly clean. The covers themselves also presentproblems in the shoe room. If of paper, the feather line must be madeabsolutely clear. Should the cover be cut out, then care must be taken thatthe upper or welt is not cut. The best procedure is first to slit the coverfrom the back of the seat to the top of back-strip, and from the vamp pointto the toe; then by holding the cover in the hand and at the same timepressing the index linger firmly to the feather line, the cover should bepulled away. The feather line should thus be absolutely clear of paperfragments, but if any should remain, they can be pressed back into theseam with a blunt knife. This method can be done quickly and involvesno risk of damage to the shoe. Sometimes adhesive paper is used, but veryoften when torn off, some of the colour comes off with the paper, or thepaper peels away from the adhesive, thus causing more work in the shoeroom than would have occurred had no covers been used at all.
Suede protectors are also sprayed on. These are of a latex base andshould, if properly used and applied, give excellent results. The spray setsas a coating of rubber and should peel off easily in the shoe room, leavingthe upper perfectly clean. Unfortunately, things do not always goaccording to plan. Variations in the chemical properties of the spray,different upper materials, and insufficient attention to required thicknessof the coating by the operator tend to make the process more trouble thanit is worth, because if something does go wrong it is almost impossible toremove completely the cover from the upper. The shoes have therefore,to be rejected. It is obvious that a great deal of trouble could be avoided ifsuede shoes could be handled cleanly by operatives without the use ofcovers. It can be done, and in fact is done in some establishments.
White leather can be protected by the application of a suspension ofpowdered pipe clay in water with a little detergent added to assist
459
UPPER CLEANING, IRONING AND DRESSING

in the flow. This coating is purely temporary and can easily be cleaned offin the shoe room with a rubber sponge or a fairly stiff brush.
Whilst on the subject of cleaning, the use of fabrics for uppers must notbe overlooked. Cotton and linen do not usually present much difficulty aspetrol, benzine or soap and water, or a weak solution of salts of lemon,can safely be used. Care must be taken however, if the fabric should be ofcombined material, so that the bonding of the two fabrics shall not bedisturbed. For instance, if the fabrics are cemented together with a rubberadhesive then obviously, petrol, benzine, carbon tetrachloride, etc., willweaken the bond and cause the materials to come apart. Acetone may alsocause this especially when the fabric is backed with P.V.C. Rayons willalso suffer much damage from the use of acetone.
Tinsel Shoes
W. D. John in his book Modern Shoe Dressings gives the followinginstructions in this matter: ‘Gold and silver tinsel shoes frequentlybecome tarnished before they come to the shoe room, this being mostpronounced over a backing of fabric lining, the salts of which react withthe metal filaments and alter the original lustre and colouring. Forrestoration, the surface is rubbed with a long-handled brush dipped in asolution of the simple cyanides of sodium gold cyanide and potassiumsilver cyanide, usually in conjunction with a suspension of precipitatedchalk.
These cyanide solutions are deadly poisons and only well-trained,intelligent operatives should be trusted to use them. Rubber gloves mustbe worn and no eating allowed until the hands have been washedthoroughly.
Silver tinsel restorer.1 quart 5 per cent solution of potassium silver cyanide.1
4lb. precipitated chalk.
Gold tinsel restorer.l quart 5 per cent solution of potassium gold cyanide.1
4lb. precipitated chalk.’
Satin Shoes
Again, quoting from Modern Shoe Dressings: ‘Shoes made of satinand similar materials require rather careful treatment in the shoe room; toclean them is frequently a tricky operation, as the natural lustre is easilyimpaired in the process. The ordinary shoe room cleaners are of little use,and anything containing water should be avoided, as it quickly soaksthrough the surface and stains the linings. Methylated spirits 74° o.p., ifhandled carefully gives a fair result but the material "par excellence" isrectified white wood naphtha, used either alone or with a smallproportion of benzol; it not only thoroughly cleans all types of satins, butmaterially maintains and restores the original lustre. Only a very smallamount is required and it is most suitably applied on a piece of clean softflannel, which
460
SHOE ROOM

should be first moistened and any surplus squeezed out. It is rubbedlightly and evenly over the whole of the shoe, and when dry the shoeshould be rubbed with an old silk handkerchief. The rectified woodnaphtha is colourless and can be used on the most delicate shades, but todevelop the sheen on black satin to the maximum, a trace of black spiritdye can be dissolved in it.’
IRONING OR HOT BLAST
It is usually necessary to give leather uppers some form of heat treatmentto remove wrinkles and tighten up the grain surface of the leather. Theheat is used in conjunction with the treeing feet which may be of the oldwooden type or the modern pneumatic kind. The purpose of thisoperation is to iron or hot blast the shoe whilst it is held on a shapeidentical to the original last, so that no distortion may appear in the shoeas it is prepared for the final process of boxing up. The treeing feet are somade, that they can be withdrawn from the shoe without disturbing in anyway the freshly treated upper. It will be found that only the lighter typesof shoe, such as glacé kid, are treated in this way, and that box and willowcalf are ironed or hot blasted on the hand. Hot blast equipment isillustrated in Figure 238.
Hot irons, of which there are various types, will remove wrinkles andsmooth out the legs of boots much better than the hot blast, and for thisreason the hot blast tool is fitted with an iron tip which is trigger-operatedand can be brought into use instantaneously to deal with the moreobstinate parts that need smoothing out. Of course, if the leather is printedthe grain will be simply smoothed out if heat is used, but even so there aretimes when some ironing has to be done to obviate serious wrinkling. Theaim in such cases must be to act in moderation and try to clear the defectwithout entirely removing the print of the grain.
When using heat on leather it must also be borne in mind that seriousdamage may be done to the upper by excessive heat. Full chrome willstand a higher temperature than semi-chrome, and vegetable tannedleather, of course, will burn with very little heat. Care must be taken thenmerely to smooth out the leather and not to shrivel it up. The hot blast alsoneeds particular care in operation to prevent scorching, as, if the blast istoo fierce, not only will the leather be burnt but the upper stitching, andprobably the finish of the heels and edges also ruined.
Incidentally, an advantage the hot blast tool has over the iron is that theshade of coloured leather is not spoiled by blast as it sometimes is by thedirect contact of the hot iron. Also when properly used the hot blast toolwill also singe off any loose threads without causing damage to theseams.
461
UPPER CLEANING, IRONING AND DRESSING

462
SHOE ROOM

DRESSING
This is really the main operation in the shoe room and, of course, is doneto make the shoe presentable and attractive to the customer. Nevertheless,if the previous operations have not been properly carried out the bestresults will not be obtained. Dressing is usually split up into two parts;firstly the application of fillers, normally by sponge; secondly the finaldressing which may be applied by sponge or spray.
No hard and fast rule can be made as to how many coats of fillers arerequired as this varies according to the type and tannage of the leather,and also the degree of brightness that is finally required It will be foundthat even similar leather from two different tanneries will requiredifferent treatment to give the same degree of brightness in the finishedarticle. The supervisor has therefore to arrange for a varied treatment ofsimilar shoes according to the type of leather and to the result of hisprevious experiments in dealing with it. When he is faced with leatherfrom a new source of supply, he must find the dressing to give therequired result. lt is most important, therefore, that work tickets shouldclearly state the tanner’s name in order to simplify the arrangements fordealing with the dressing. Another factor that has a bearing on this iswhether the leather is full grain, or snuffed or corrected grain, as the lattertype will most likely need either a heavier filler or perhaps two coats offiller, whereas the full grain leather will need only one coat.
Coloured leather may also need some treatment to rectify patchiness.Most coloured leathers are finished with pigment, the fastness of whichvaries a great deal according to the source of supply. Here again it willusually be found that full grain leather holds its colour better than thecorrected grain.
However, whatever the type of leather, if the shoe has become patchyeither in the making or from the cleaning, it must be restored to a levelshading. It is best to inspect the complete line and to apply first to theaffected parts by sponge, camel-hair brush, or spray, a coat of finish of therequired colour. It is better to apply two thin coats than one heavy coat asthere will then be less likelihood of getting a tear mark or an obviouspainted look.
This patching process should then be followed by the application of acoat of uniformer over the whole of the shoe; indeed it is best to pair theshoes up and thus treat the pair. This uniformer may be a water pigmentmixed with some shellac dressing to assist in bonding and applied bysponge, or a liquid cellulose renovator, such as B.B. Chemical Co.‘Flexomel’, could be used and applied with a camel-hair brush.
After these base coats have been applied, the shoes are ready for thefinal coat, which may be shellac, liquid polish, or synthetic resin, and canbe applied by sponge or spray.
463
UPPER CLEANING, IRONING AND DRESSING

Shellac dressings on some leathers have a tendency to crack and giverise to adverse comment from retailers who find that after the shoes havebeen tried on or merely handled, the finish of the upper has badlydeteriorated, and shows a whitish flaking wherever the leather has beenonly slightly wrinkled. On the other hand, this type of dressing suits someleathers admirably and because of its ease of application, its varyingdegrees of gloss, and smooth clean feel when dry, still holds a strongplace among the finishes now used.
Liquid polishes do not usually crack so readily, but do not give thesame degree of lustre as shellac, but where a high gloss is not soimportant these dressings are very useful.
They dry, giving the shoe a “calfy’ feel without the stickiness that isevident after the use of cream or wax polish.
Of course, in the case of all dressings that are sponge applied, thecondition of the sponge itself is of first importance. It must be of finetexture; if there are large holes, an uneven flow will result from thesponge and unsightly streaks will show. It must also be thoroughly clean.New sponges contain a large amount of sand, much of which can belightly hammered out whilst the sponge is still dry, after which thoroughrinsing in water should clear the remainder. Should the sponge be usedwhilst still containing sand, the surface of the shoe will dry with a coarsegritty, finish, and will feel very harsh, and similar to a fine emery cloth.The same effect will result if the sponge is not thoroughly rinsed eachday, otherwise the dressing previously used will dry whilst contained inthe sponge, and emerge when the sponge is used again, in fine particlessimilar to grains of sand.
Liquid polishes and shellac dressings at times also tend to froth,particularly in hot weather. This frothiness makes dressing very difficult,but can be entirely overcome by the addition to the dressing of a smallquantity of milk, a dessertspoonful to a pint of dressing generally beingadequate.
Synthetic resins have recently been developed for use in shoe dressingsand are usually applied by the spray method. They are flexible and can besupplied in various degrees of brightness. It is obvious that in the generalapplication by spray, the dressing must be colourless, otherwise thelinings and edges will become stained. Even so the utmost care must beexercised in order to prevent the dulling of the waxed heels and edges. Acolourless dressing, however applied, leaves the leather with a rather raw,hungry look and for this reason it is essential that even when the final coatof dressing is sprayed on, the coats of filler must be sponged on.
The System of Spray Dressing
Spray dressings are becoming almost universally used in shoe rooms,and the equipment is very similar to that used for spraying leather ormotor cars, although a cellulose dressing is rarely used. There are, ofcourse, special regulations to be complied with if cellulose dressings areused, and as there are a number of suitable
464
SHOE ROOM

shellac or synthetic resin dressings available, that can be freely used, andgive good results, there is no need to bother with cellulose.
It is necesary, however, to have a cabinet with an exhaust fan to takeaway the surplus spray (Figure 239). The shoe is held at the open end ofthe cabinet and the jet blown on to the shoe, and the unused mist is thusdrawn away. The gun itself can be suspended on a spring, sufficiently
strong to carry the weight of the gun, but not so strong that an effort isneeded to manoeuvre the instrument when spraying is in process.
As in the case of many other processes, good preparation is essentialfor good spraying. Firstly, the leather must be well cleaned. All factorydirt, ink, solution, etc., must be completely removed. Greasy leather or oilmarks should be cleaned with a spirit cleaner. Whereever colouredleathers have come up patchy, a uniformer must be
465
UPPER CLEANING, IRONING AND DRESSING

applied to restore level colour throughout. Most leathers will need at leastone coat of filler applied by sponge. Fillers of various strengths can beused, light, medium or heavy, although better results are obtained byusing two coats of light filler than one heavy coat. Should experienceshow the need for “bloom’ prevention, special fillers for this purpose maybe used.
After the fillers have become perfectly dry, the spray may be applied.Dressings can be obtained to give degrees of gloss from a light matt finishto extremely bright.
The best results are only obtained by using the spray carefully and bymoving both the shoe and the gun in the correct way. It is also of thegreatest importance that the air pressure to the gun is maintained at 50lb/sq. in.
The left hand is first inserted into the shoe, and at the same time thespray gun is held in readiness in the right hand. The shoe is lifted from therack and by spreading the fingers open, it can be turned about as required.Whilst holding the shoe bottom uppermost, with the whole of one sidefacing the operator, the spray is applied from the gun held about 4 in.away (Figure 240a) and by moving the gun and turning the shoe as inFigures 240b, c and d, (the arrows showing the direction of the spray)making sure that the
466
SHOE ROOM

back is properly treated. When the toe is reached a half turn of the leftwrist brings the shoe front directly in line for the finish off.
If oil or water is allowed to get into the gun, a spotted finish will result.Slow movement or too close an application will cause the shoe to becometoo wet and unsightly marks will appear as the dressing will tend to "run’leaving a blotchy uneven finish.
A ‘pebbly’ finish will result if the pressure is too low or it may becaused by insufficient grease removal at the cleaning stage, or by leavingtoo long after the filler has been applied. Whilst it is important to have thefiller dry before spraying, shoes should not be left too long, e.g.overnight, before spraying. This also applies in cases where the final coatof dressing is sponge applied, otherwise some of the grease in the leathermay rise to the surface and make it very difficult to get a good clear finishwhen the final dressing is applied.
The Cleaning and Dressing of Heavy Boots
There is not usually any elaborate treatment given to boots of this kind,although of course they may vary enormously in quality and price. It isnot always a good thing to grease such boots, even though they may laterbe subjected to excessive wear in wet conditions, because once a coatingof grease has been applied it is difficult to get anything like a good polishafterwards. A shepherd’s boot could be safely greased, but a coat of fillerand one coat of dressing would suffice for a heavy work boot. Agentleman’s shooting boot or a ski-boot would be better wax polishedand brushed. This is a rather laborious operation but has the advantage ofgiving a water-resisting finish to the leather without spoiling the boot forfurther polishing. Boots of this type are usually expensive and justify alittle extra labour in the shoe room.
Heavy splits and kip boots are best greased with the grease warmed up.This allows for easier application and better penetration into the leather.
In some cases heavy boots are merely cleaned on the cleaning machineand well brushed up, without applying wax, grease, dubbin or dressing.
Antique Dressings
This type of finish although not new is now widespread, but needs to bedone properly to give the best result. Usually, heavily punched andgimped shoes of either grain or smooth leathers are so treated but evenplain shoes are also antiqued especially if made from some of the lightershades of brown. The purpose is to remove the ‘newish’ look from theshoes, especially with regard to men’s wear. The process is as follows:
The uppers must first be cleaned in the normal way, otherwise theantique dressing will ride on any surface dirt and give a patchy finish.
The antique stain or dressing is then applied with a sponge taking greatcare to see that all gimped edges and punched holes are
467
UPPER CLEANING, IRONING AND DRESSING

thoroughly soaked. The whole of the shoe must be coated andimmediately the dressing has been applied, the shoe must be wiped overwith a dry cloth to remove all surplus dressing. This leaves all the rawedges properly darkened, the crevices of the printed surface suitablylined, and the shoe slightly darkened all over. A final dressing of therequired lustre is afterwards applied either by sponge or spray tocomplete the operation. The shoe should then have a well cared for andpolished look, rather like that of well kept harness leathers.
Bloom
Sometimes a bloom or spue appears on the uppers even after the shoeshave been boxed up. It may be due to any one of several causes, perhapsto inferior oils used in the fat liquoring of the leather, or to the presence ofsulphur in the tanning. It can also be caused in the shoe room by the use ofcheap soap in the cleaning process, or by using a ‘wet’ sponge, that hasbeen washed out in water, perhaps soapy water, and used to applydressings whilst still containing a quantity of the rinsing water. A bloomso caused, while not being obvious for several days, will clearly show anumber of streaky markings, indicating the directions the sponge wastaken. Blooms having their origin in the shoe room have their obviousremedies, but in other cases the use of ‘Raflex’ anti-bloom wash, assupplied by the Research Association is of great assistance.
Spirit dressings can also be obtained, and applied by spray orcamel-hair brush, which have the effect of preventing the bloom fromcoming through. It may well be that new developments taking place withsilicone polishes will also be of assistance in this respect in that they cleanand polish without any appearance of haze.
468
SHOE ROOM

35
OTHER OPERATIONS
PANEL TRIMMING
‘Boothco’ Trimming Machine
This machine is installed in many shoe rooms, particularly whereladies’ shoes are dealt with, and is used to trim out the fronts of courtshoes and others that have rather open fronts. It can also be used to clearthe linings of quarters showing Cut-Out designs although where thepieces to be cut out consist of a number of small sections it may be betterto cut out by hand with a clicking knife, as the operator may damage theshoes through cutting too far on the machine.
Where a fairly long cut is required, the machine is quite satisfactory butwith very short cuts it may be more trouble than it is worth, as anydamage done at this stage, of course, damages a whole shoe and meansthe rejection of a pair.
ln some factories this machine is used to trim quarter linings also, but itcan only trim to the edge and not undertrim, thus the full substance of thelining shows at the edge, and to obviate this the BUSMC No. 2 LiningEdge Reducing machine is installed. This machine is used to hammer theedge and cause the freshly trimmed lining to be reduced in substance sothat it becomes barely visible.
ORNAMENTAL ATTACHMENTS
Many ladies’ shoes of the plain court type are given a most attractiveappearance by the attachment of suitable accessories. Many shoes aremade with old patterns that appear modern only by reason of the newlydesigned bow or trimming. The production of trimmings, althoughsometimes done in the shoe room or closing room, has given rise to theaddition of a new industry ancillary to the shoe trade.
There are some firms in existence solely for the production of theseaccessories and the designs they produce are both varied and attractive.The changing of these bow or buckle styles is of great assistance to theladies’ trade in enabling apparently different designs to be produced eachseason.
Although the fittings are purchased separately, they must be attached inthe shoe room and are usually stitched or stapled on by machine, althoughin some cases they may be stitched on by hand. If a stapling machine isused great care must be exercised to ensure that the staple shall not beable to contact the hose of the wearer, otherwise a ladder in the stockingwill quickly ensue. It is for this reason that stitching is generally preferredand that in some cases the stitching is done by hand. It is now possible,however, to staple from the inside of the shoe so that the points cannottouch the stocking.
469

QUARTER RE-FORMING
The ‘Compo’ Shoe Forming Machine
This machine supplied by the Standard Engineering Co. is used to:(1) shrink and press the top edge of the quarter lining in under the
top edge of the upper;(2) turn or roll inwards, towards each other, the top edges of the
shoe along the lining;(3) iron or shrink out any fullness in material at the top edge of
the opening.The machine is composed of a number of shaped moulds, similar to the
top of a last, with a manually operated clamp which is used to press theoutside of the quarter firmly on to the mould. This being electricallyheated and thermostatically controlled causes the shoe to take the shapeof the mould round the top of the quarter and giving a neat snugappearance to the shoe.
The BUSMC No. 2 Shoe Quarter Re-forming Machine does the samework.
REPAIRING
Patent Repairing
Patent shoes require rather specialised treatment for the repair ofdamages. There is always a larger proportion of these shoes needingrepair, due in the main to the large amount of cracking of the enamel thatoccurs especially at the toes. For minor repairs special patent repairingcrayon may be used to fill in, polishing off with a fine cloth. In other casesit is necessary first to remove the damaged enamel. This is done byscouring with line emery cloth, either by hand or machine but there is nodoubt that the result by a tip scouring machine is much the best. Thescouring is liner and the scoured surface smoother. These machines arequite simple having merely a flexible drive directly off a small motor.Various shapes of tip scourer can be easily attached to the shaft. Themachines may be placed in a convenient bench and plugged in to anordinary light socket.
Whatever the method of scouring, however, it must be thoroughly doneand not confined merely to the damaged part, otherwise a definite hollowwill be formed; instead, the area around should be lightly scoured to givea gradual deepening to the bottom of the damage. Should the cracks bereally too deep, a first filling may be made with a repair crayon, and thenthe normal scouring proceeded with. It is important that the leather fibresshall not be roughed up, otherwise it will be impossible to effect a smoothrepair. All scoured dust must then be removed from the shoes, and thenew enamel may be applied. This is done by taking a little of the enamelon to a fine cloth held on the finger tip and quickly rubbing it into thescoured area. It is better to take small amounts and rub in until dry, than to
470
SHOE ROOM

try to cover the damaged area with only one or two applications ofenamel, as it will then tend to become blotchy. When the whole surfacehas been covered and built up to the original substance a fresh piece ofcloth is taken on the finger tip and moistened with a small quantity ofthinner; this is used to smooth over the newly repaired area and removesany streaks and helps to blend in the new enamel with the old. Finally, acoat of varnish is quickly applied with a camel-hair brush. This must bedone to a nicety with as few strokes as possible and covering the wholepiece of leather in which the damage is contained, i.e. if a part of the cap isdamaged the whole of the cap must be varnished. Spray equipment mayalso be used for the repair, special enamel and varnish being produced forthe purpose, but the preparation for the repair must be done in exactly thesame way as that already outlined.
Repairs to Gold or Silver Kid
Advice in this respect is given in The A.B.C. of Shoe Science (BritishBoot and Shoe and Allied Trades Research Association) from which thefollowing extract has been taken:
‘Repair—Silver. The ideal form of repair would be to renew the metal bya further application of the leaf. As the breakages are often scattered in apatchy manner over a considerable area of the shoes, this becomes adifficult matter to accomplish without leaving definite traces of therepair. Better and more practical results are obtained by the use of silveror aluminium powder. For this method petrol, powder and beeswax arerequired.
The repair can be best carried out with the bare linger. Dip the fingerinto the petrol and rub over the block of beeswax. Next rub the finger overthe areas needing repair, repeating once or twice to ensure a fair depositof beeswax upon the leather. Then dip the dry finger into the powder andrub gently on the leather. Repeat until the area is satisfactorily coveredand dust off loose powder with a fine brush. Dexterity at this operationcan soon be achieved, and remarkably neat repairs made. lt is not alwayswise to use bare fingers, for in the case of some operatives, who aresusceptible, dermatitis may develop.
This form of repair is not suitable for shoes intended for export. Forsome reason not yet ascertained, a repair of this nature is made visible bya green discolouration after a sea passage.
Repair—Gold. Repair in the case of gold kid is best carried out byapplication of gold leaf after dressing the bare area with gold-size, or itmay be made with powder as described for silver.’
471
OTHER OPERATIONS

36
FINAL INSPECTION, PACKING AND
DESPATCH
EXAMINATION
THE SHOES MUST BE submitted for a final examination before boxing. Anydamages to the upper must be repaired if possible, or the shoes rejected orreturned to be pulled up and put in order. lf a damage is of such a naturethat a part of the upper is shown to be peeling up, this should be firmlystuck down with a glue, such as Croid or something similar that iscontained in a tube ready for use. Rubber solution must not be used as itleaves a slight ridge at the edge of the tear, which when rubbed may causethe damage to open up again.
After the glue or cement has thoroughly dried, the area around thedefect should be finely scoured and the surface filled in with a repairingcrayon of an identical colour to the original leather.
Scratches or cuts that are not too deep can also be finely scoured andfilled in in the same way taking care, of course, to brush away any surplusscourings before using the crayon. Damages in the feather caused by thestitching machine, usually because the leather guard has worn andallowed the awl to contact the upper, are difficult to repair, but are bestdealt with by melting some crayon on the end of a hot knife and filling inthe incisions. The surplus wax is rubbed off with a cloth wrapped aroundthe end of the finger. Sometimes a series of grinning holes appears roundthe toe due to bad welt sewing. These can also be filled in in the sameway. Damages are not the only things to be looked for; sometimes aneyelet is missing, and even a row of stitching may have been missed. Heelbreasting may be the cause of many returns, if the knife has been allowedto go too deep, particularly in rubber soles. This, therefore, requiresconstant vigilance.
It is also not only the outside of the shoe that must be examined but alsothe inside. There must be a final check to see that no nails are left stickingthrough the insole. Torn linings, burst seams, damaged insoles due to thewelt sewer striking through, are other points that must be checked. TheResearch Association have developed an Optical Inspection Devicemarketed by Cox and Wright Ltd., for the examination of the interior ofshoes. The device is comprised of a lamp with a shield fitted to protect theeyes from glare and a mirror so constructed that upon bringing up theshoe so that the mirror rests on the seat sock, the whole of the inside of theshoe is clearly reflected and any defects can immediately be discerned(Figure 241).
It is also usual to pair the shoes up at this stage and a check must
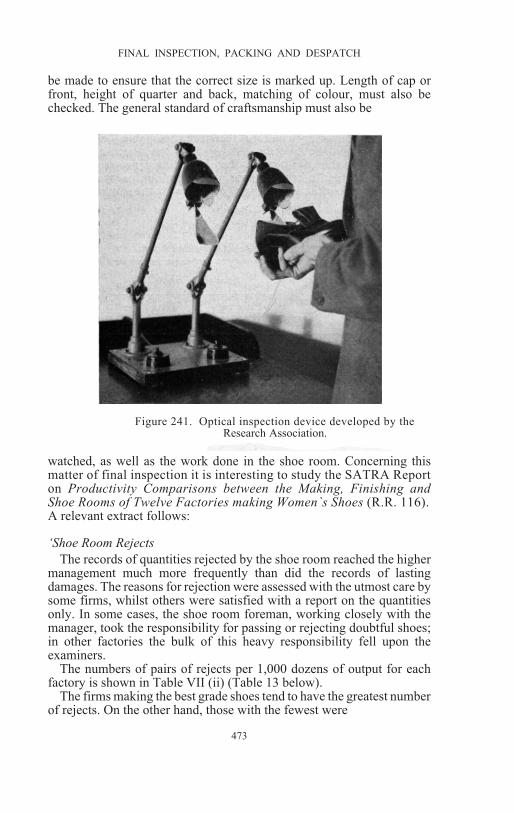
be made to ensure that the correct size is marked up. Length of cap orfront, height of quarter and back, matching of colour, must also bechecked. The general standard of craftsmanship must also be
watched, as well as the work done in the shoe room. Concerning thismatter of final inspection it is interesting to study the SATRA Reporton Productivity Comparisons between the Making, Finishing andShoe Rooms of Twelve Factories making Women`s Shoes (R.R. 116).A relevant extract follows:
‘Shoe Room Rejects
The records of quantities rejected by the shoe room reached the highermanagement much more frequently than did the records of lastingdamages. The reasons for rejection were assessed with the utmost care bysome firms, whilst others were satisfied with a report on the quantitiesonly. In some cases, the shoe room foreman, working closely with themanager, took the responsibility for passing or rejecting doubtful shoes;in other factories the bulk of this heavy responsibility fell upon theexaminers.
The numbers of pairs of rejects per 1,000 dozens of output for eachfactory is shown in Table VII (ii) (Table 13 below).
The firms making the best grade shoes tend to have the greatest numberof rejects. On the other hand, those with the fewest were
473
FINAL INSPECTION, PACKING AND DESPATCH
Figure 241. Optical inspection device developed by theResearch Association.

far from being the least particular, so that special scrutiny of the causes ofrejects by those firms with high figures might enable reductions to bemade without loss of quality.
From a cost point of view, shoe room rejects and lasting damages aresimilar in importance and it is therefore reasonable that control over themshould be co-ordinated. At R.19 the directors kept a closer watch on shoeroom rejects than on lasting damages, with the result that, in order to keepthe shoe room rejects as low as possible, a quantity far above the averagewas "pulled up" in the making room.’
FINAL OPERATIONS
Final Mopping and Polishing
After the final examination and repairing, the shoes are given a lastpolishing up of the edges and bottoms, which may have become slightlydulled, during the various shoe room processes. The B. U. S. M.Co. havea special machine for this, the Shoe Cleaning Machine Model ‘A’. Twomotor-driven, quick-change mops are provided and also an attachmentfor edge cleaning and polishing. Simple self-contained dust collectingapparatus is also available. This latter accessory is really essential,otherwise the operator will be bothered with fluff and dust.
474
SHOE ROOM

Lacing, Tagging, etc.
Men’s lace-up shoes are usually supplied with the lace threadedthrough the bottom two holes only, although sometimes for quickness thepair of laces is threaded through two top holes of a single quarter of theright shoe, and the ends loosely knotted together.
The lace should be of a type suitable for the shoe. Blinded eyelets needa thin round lace, large eyelets a wide flat lace, grain shoes a round cordedlace or perhaps a leather lace. The colour should also be something of amatch for men’s shoes, but with ladies’ the colour of the lace may be partof the design and may be of the same shade as some part of the shoe orperhaps of a contrasting colour. The length of the lace must also bearrelation to the shoe, for instance a man’s five or six eyelet shoe willobviously need a longer lace than a two or three eyelet shoe.
The lace for the lady’s shoe will not only vary in length, thickness andcolour, but may also be of mercerised cotton, silk, nylon etc., and willmost likely carry an adornment at the end. Thus the lady’s shoe must becompletely laced and the fringe, tassel, acorn, or bow etc., then affixed tothe ends of the lace.
Tags of various kinds are sometimes attached to the shoes at this stage;some may extol the virtues of the special upper leather or soling material,or it may be the policy of the particular manufacturer to make somepublicity in that way concerning that particular brand of footwear.
It is at this stage, too, that some ladies’ shoes are fitted with a smallcane. A piece of tissue paper is pushed up inside the toe and the caneinserted; being a little longer than the length of the insole it is sprung towedge at the seat of the shoe. Thus the shoe is kept straightened out andalmost as if it were fitted with a shoe-tree.
PACKING AND DESPATCH
Boxing
Boxes, of course, vary in size according to the types and sizes of shoeswhich they are to accommodate. They may also vary according toquality, whether lined or unlined, and according to the paper covering theboard. Where a factory is supplying its own shops, usually a standardtype of box will be used, which naturally simplifies the matter of orderingand storing boxes a great deal. If however, the manufacturer is supplyinga number of factors or multiple firms, then it will most likely be necessaryto have some quite different boxes for similar shoes according to thecustomers" requirements. Shoe boxes are bulky articles to store and asmost shoe rooms have an inadequacy of space, they cannot be orderedvery long before they are required. It is very necessary, therefore, for thesupervisor to be well informed of the progressing of work so that he canmake sure that he has the right cartons at the right time. He neither wantswork to stand on racks awaiting the arrival of the required boxes,
475
FINAL INSPECTION, PACKING AND DESPATCH

nor a quantity of boxes, occupying floor space, possibly for quite a longtime.
There is also the matter of the label. In some cases the boxes aresupplied already labelled and then marked on a machine with the size andstyle number, as and when they are needed. Others merely rubber stampthe size and style number, but this is really a poor job and not at all neat. Amost satisfactory method is to have the boxes delivered without labels,and either print the labels or order them to be printed to cover the sizes,styles, and descriptions as the goods are put into work. The labels canthen await the arrival of the work and be stuck on to the boxes whenrequired.
In an endeavour to standardise the sizes of shoe cartons and therebyavoid the waste contingent upon the manufacturer of an enormous varietyof sizes to suit individual requirements and tastes, the IncorporatedFederated Associations of Boot and Shoe Manufacturers of Great Britainand Ireland have issued the following list of suggested standardised sizes.It is estimated that if all shoe manufacturers and distributors employedthe standard sizes a saving of many tens of thousands of pounds would beeffected to the trade annually. In addition to this cash saving, uniformitywould benefit all sections of the industry.
476
SHOE ROOM
Sizes of Boxes Recommended
(all outside measurements ( )in. without lids)
(1) Men’s boots (7) Youths’ boots
5 to 7 12
12
12
12
12
12
12
12
12
12
12
12
12
12
12
12
12
12
12
12
12
12
12
12
12
12
12
12× × × ×
× ×
× ×
× ×
× ×
× ×
× ×
× ×
× ×
× ×
× ×
× ×
× ×
× ×
× ×
× ×
××
××
××
××
××
××
× ×
× ×
· ·
· ·
· ·
· ·
· ·
· ·
· ·
· ·
· ·
· ·
· ·
· ·
· ·
· ·
· ·
· ·
· ·
· ·
14
14
14
14
14
14
14
14
14
14
14
14
14
14
14
14
14
14
18
78
14
14
14
14
14
14
43
43
43
43
43
43
43
43
43
43
43
43
83
11
11
11
11
11
11
11
12
12
12
12
12
7
7
7
4
4
4
8 to 9
10 to
(8)
2 to 5
Boys’ shoes
11 to 1
7 to 10(2) Men’s shoes
shoes
shoes
5 to
to
to
to
7
8
8
8
to 9
10 to 11
(3)
11 6
6
6
6
4
4
4
4
4
4
4
555
5
55
3
3
3
102
Men’s slippers
slippers
(4)
(5)
(6)
Women’s
Women’s
without heels
all sizes
with heels
Youths’
”
” ”” ”
””
””
””
””
””
(9) Boys’ boots
11 to 1
11 to 1
7 to 10
7 to 10
(10) Maids’ shoes
2 to 5(11) Girls’ shoes
(12) Infants’ shoes
Veldtschoen 4 to 6
4 to 6
7 to 8
7 to 8
Pump edge 0 to 3
4
4
4
4
4
4
4
4
5
5
5
5
10 6
6
6
6
9
9
9
3
3
3
3
3
3
33
3
8
8
8
11
7
2
2
2
27
1
Depths of Lids
Boxes of a depth of 4 in. in.
in.in.
in. in.
in.
deep.
deep.
deep.
and over to
to
to
have
have
have
a
a
a
lid
lid
lid
4
3
3
less than
and up to

The sizes of cartons quoted above, however, are not always acceptableto overseas buyers and even some firms in England insist on their ownspecial sizes. The reason for this is that the shop fittings are also made tospecial sizes and if the cartons vary in size, disorderly shelves result; thusfor men’s shoes, for instance, whatever the size of shoe only one size ofbox is required. Should any variation be allowed at all it is in length only,to accommodate probably sizes 12 or 13. Of course the use of only onesize of carton simplifies the method of packing for export.
There are many ways of placing the shoes in the box, three of which areillustrated in Figure 242. Sometimes the shoes are each completelywrapped in tissue paper before boxing, or a layer of tissue paper placedbetween the shoes and folded over the top. The toes may also be
prevented from rubbing on the other. shoe by placing a strip of thickpaper between or a padding of tissue paper. Also instead of ordinarysulphite tissue paper, cellulose wrappings of two or three ply are used forthe better quality productions.
These wrappers may also be printed with the brand name of the productor supplier.
Ladies’ tinsel shoes are best wrapped in black paper, as the metallicthreads sometimes tarnish with light and the black paper helpsconsiderably in keeping the fresh appearance that is so desirable.
477
FINAL INSPECTION, PACKING AND DESPATCH
Figure 242. Three methods of packing footwear in boxes.

Stock Room and Despatch
The shoes, having been boxed up, are passed to the stock room to awaitcompletion of the order, to be put into stock if an ‘in-stock’ service isoperated or for immediate despatch.
The work ticket must be sent with the complete batch which is againchecked for quantity and should not be accepted in to stock if there is anydeficiency. When the goods have been placed on the stock room shelves,the sizes are entered on to the appropriate stock card and the work ticket isthen returned to the office.
One large organisation runs a shuttle service of transport from factoryto central warehouse. The finished shoes are placed on racks after boxingand the complete racks are wheeled into the lorry and taken away, thelorry returning with a load of empty racks. This method of despatch isdelightfully simple and involves no packing whatsoever, but of course, isfar from being the general practice; in any case the ultimate sorting out oforders and despatch has, of course, still to be done by another section ofthe organisation.
Packing for Despatch
Shoes may be despatched in their boxes tied in bundles, or packedin cartons or cases.
Men’s or ladies’ shoes are frequently tied in six-pair bundles with acardboard protector at the bottom and top of the bundle to prevent thecord damaging the boxes. These bundles are then loaded on to the lorryand taken away. This is a quick method of packing but is not used whensending goods by rail or by road transport, if changes of transport areinvolved. Shoes packed in such a way are very easily tampered with andmany losses in transit may result. If the lorry is going direct from factoryto destination however, the risk of loss is clearly very slight.
Fibre-board cartons are frequently used and may contain six, twelve,eighteen or twenty-four pairs of men’s shoes. Men’s heavy boots are notusually placed more than eighteen pairs to a carton otherwise the packagebecomes rather too heavy for normal handling. Ladies’ shoes are packedin up to thirty-six pair lots, and cartons may hold from sixty to seventypairs of children’s shoes.
The cartons when packed are usually sealed with strips of adhesivepaper and finally bound with rope or fastened with wire. Should thecarton be tampered with in course of transit it will be obvious from thedamaged paper strips or binding that all is not well, so that the consigneewill then not give a clear signature upon receipt of the goods.
Wooden cases are also used, and may contain up to 72 pairs of men’sshoes, or up to 108 pairs of ladies’. The lids are fastened down, the casewired or roped around and sometimes in addition eyelet holes are put atthe corners, through which a tell-tale rope is threaded and knotted and cutclose to the knot in such a way
478
SHOE ROOM

that once undone, there is insufficient rope to tie a knot again. Thetell-tale rope is so called because it has a single strand of a special colourwoven into it that clearly identifies the source of supply. Such rope is notgenerally available and if once removed the corner must then be securedby new rope thus clearly indicating that the case has been tampered with.
Packing for Export—Strong wooden cases are essential for this type oftrade and should be lined with strong waxed paper. The goods must betightly packed and securely fastened. The case must be clearly markedwith the destination, gross weight, net weight of the goods, and the nameof the ship that is to carry the consignment. It must be borne in mind thatno goods are accepted at the docks after about 36 hr. before the boat is tosail, so that transport must be arranged for in good time. It is advisablealso to forward by Air Mail all relevant papers concerning theconsignment, so that the goods can be cleared from the Customsimmediately upon arrival, otherwise a delay of several days may resultbefore the consignment is released.
479
FINAL INSPECTION, PACKING AND DESPATCH

37
SHOE ROOM MANAGEMENT
STOCK CONTROL
In-Stock Service
This service is given by many manufacturers of branded lines dealingdirect with retailers. Stocks of regular running lines are built up to meetthe demands of retailers and the idea is to give delivery by return of ordersof large or small quantities. It is of the utmost importance to store theseshoes correctly in sizes, fittings, and style numbers. It is the practice ofsome manufacturers to use differently coloured boxes or box labels foreach fitting and this helps considerably in seeing that the shoes are putaway properly.
A correct record must be kept of the state of the stock, not only of thebulk quantity but of each particular size, so that a proper balance of sizescan always be held and good service given. To do this, therefore, as eachline of shoes is put into stock the sizes must be added to the stock card,and a daily reduction must be made of all sizes taken from stock.
Made-to-Order Work
It is obvious with work made to order, whether for a factor, multiple, orretailer, that the customer will require delivery of a complete range ofsizes.
As each work ticket comes round, therefore, the shoes should be storeduntil the order is complete. There may be a number of such orders incourse of completion at the same time so that careful check must be madeof the exact location of each batch to avoid any mixing of orders. Whendealing with this type of business it often happens that identical shoes arebeing made for various customers. It is unwise however, to bulk the shoestogether in stock and send an order away as soon as there is a sufficiencyof sizes to cover a particular customer’s requirements, for it very oftenhappens that although the shoes are similar, some customers may have aseat sock inserted, bearing their own particular name and address.Obviously then, these shoes must not be mixed with others, and toprevent such mishaps occurring the principle of keeping each orderself-contained should be strictly adhered to.
SUPERVISION
The shoe room supervisor usually has to contend with a wide varietyof work. Even the difference between black and brown involves adifference in method.
480

The black work will proceed much more easily through thedepartment. The brown work, of course, involves greater care incleaning, probably extra work in colouring, more difficult repairing ofdamages, and a further complication in pairing-up, because not only mustthe shoes match in measurements but also in shade.
Suedes require different treatment and take much longer to clean,unless of course, care is taken in other departments to ensure cleanlinessin all stages. It will usually be found that Goodyear welted shoes aremuch dirtier than those made by other methods.
Patent leathers also involve greater numbers of repairs and certainlytake much longer than most other types to progress through thedepartment.
Antique finish also lengthens out the shoe room processing and cannotbe skimped over quickly.
It frequently happens that shoes requiring extra work enter thedepartment in large batches and a bottle-neck or hold-up here mayquickly affect the progress of work in other departments by causing ashortage of racks.
Whether racks or conveyors are used it is obvious that to keep thingsmoving freely the racks or shoe containers must be emptied and returnedto the finishing department. If`, due to a hold-up in the shoe room, thefinishers have no means of transport for the shoes, the makers will soonbe halted and may have to curtail the quantity of work pulled on the last.
The shoe room supervisor has, therefore, the responsibility not only ofkeeping his own department clear, but of also ensuring that a stoppage isnot caused in other departments. lt is essential that most of the operativesin the shoe room shall be able to do more than one particular job, as it isonly possible to cope with the many types of work by switching theavailable labour to wherever the bottle-neck may be.
The supervisor must also try to prevent any hold-ups arising due to lackof incidentals. ln some factories, ornaments and bows are made in theshoe room, and they must be ready by the time the work arrives.
The delivery of boxes must also be arranged so that regular supplies ofthe required sizes are available.
Boxes take a large amount of storage space and it is not usuallypracticable to hold a large quantity in stock.
In addition to problems of the different leathers to deal with, a tactfulhandling of the labour force is necessary. There are usually a number ofboth sexes in the department and the supervisor must be scrupulously fairin his attitude to the work people and in the allocation of the differentwork to them.
He also has the responsibility of keeping the standard of workmanshipof the factory at the required level. Should he allow matters to growsteadily worse without taking steps to have things tightened up, thestandard will quickly fall. The shoe room is the last checking
481
MANAGEMENT

place and whereas other departments stand a chance of having any faultsthey may have missed being spotted and rectification made, the work ofthe shoe room has to be right and there can be no second chance.
The supervisor has the added responsibility of deciding whether shoesthat are imperfect or damaged can either be allowed to go through or berejected.
Organising ability, tactful administration, and decisiveness areattributes that are clearly required for successful supervision of the shoeroom.
DEPARTMENTAL LAY-OUT
As in all departments, the flow of work should be continuously forwardwith no back-tracking and as little side-tracking as possible. The list ofoperations in the shoe room already given on p. 445 is the sequence inwhich these should be placed in the room. It may be asked whether racksor conveyors would be more suitable for this department. There does notappear to be any reason why conveyors should not be successfully used,especially in factories con- fined to straightforward types of work. Wherelarge quantities of suede shoes or patent leathers have to be processed,complications may ensue, but even so these operations could be so placedthat work could be diverted from the track until it had been dealt with. Insuch cases, great assistance can be given to the shoe room if the planningdepartment is able so to adjust the input of work that a steady flow ofshoes made of these leathers shall enter the department, and thus allowproper organisation to get them through.
482
SHOE ROOM

PART IX
SLIPPER MANUFACTURE
J. W. JOHNSON


INTRODUCTION
THE MANUFACTURE OF SLIPPERS has been carried on in Great Britain formany generations. It is really a continuance of the old handcraft dayswhen, in the eighteenth century, ladies’ slippers were the vogue foroutdoor wear, covered by a patten for travel through the mud of the roads.
Prior to the seventeenth century, footwear of the light type had beenworn by ladies of leisure for street wear. It was not developed on popularlines until the reign of George III (1760), after which, with theintroduction of improved means of travel, because of the making of betterroads throughout the villages, and with more development of city life bythe condensing of industry, and extra maritime activities in the ports,there came a call for heavier types of street walking shoes. The slipperwas thus relegated to the more fashionable occasions of balls and partiesand the comfort of the home.
The development of machinery made it possible to manufactureslippers on mass production lines. Consequently, towards the close of thenineteenth century we find factories being set up to cater for slippers forthe people of the world.
Before the introduction of mass production in this country there hadbeen a vast trade carried on between the Continent and Great Britain, butin the later stages of the nineteenth century the slipper industry received anew impetus by the introduction of the Blake sewing machine (see p.334). From this date onwards we find that certain sections of the countryhave specialised in slippers and particularly is this true of the RossendaleValley in Lancashire, where, in the early l920’s, the annual production ofslippers was estimated to be twenty million pairs.
From the manufacture of slippers the trade of the district turned over tocheaper types of footwear which are still being made on mass productionprinciples. Consequently the manufacture of slippers declined and nowthe production, whilst being somewhere near the same amount, is sharedby other areas of the country.
To the uninitiated in the craft the term ‘slippers’ would probably meanlighter and more flexible types of footwear than those usually worn on thestreet, although to some ‘slippers’ embrace evening shoes and casualsandals. To the craftsman, slippers have a distinct meaning according tothe type of manufacture and in the pages that follow an attempt has beenmade to separate the different categories of manufacture and in so doingto point to the special characteristics that each particular method hasretained for special purposes throughout past centuries.
485

It is worthy of note that whilst footwear has been bought and worn forvaried occasions, the choice of slipper is generally made with an eye tothe practicability of the slipper for its purpose. The character of theslipper is assisted by the choice of materials and these are blendedtogether with the skill of the craftsman, the method of making beingdevised in keeping with the purpose the slipper has to serve in wear.
486
SLIPPER MANUFACTURE

38
THE ‘ DOWIE ’ SLIPPER
THE FIRST TYPE OF slippers to receive our attention will be the ‘Dowie’,the principle of which was established in the early days of mankind’shistory when men would pierce the hide which they were to wrap aroundthe foot and thread a cord through the hole so made. They would draw upthe cord tightly and thereby hold the skin to the foot (see p. 22).
In the making of the ‘Dowie" slipper the position is reversed. Theupper is laid over the last, the string is passed through the lasting edge andwhen drawn tight moulds the upper to the last. At this stage the bottomingwork is carried out. There is no metal attachment required in theconstruction; consequently, the result is a very flexible slipper. This typeof footwear has soft uppers cut from leather of fine glazed kid, light goat,or sheepskin, and is equally suitable for camel-hair cloth or other woollyfabric.
The principle of lasting is that of a gentle caressing of the upper overthe last, giving a soft flimsy pocket for the foot without in any wayimpairing the stretchability of the material. Footwear made on thisprinciple keeps the shape of any embroidered patterns or directional lineson the upper.
Where the attaching of the sole has not impaired the flexibility of theuppers, the ‘Dowie’ method is ideal for footwear for such use as cleaningin the home which necessitates kneeling and bending of the foot, suitablechoice of materials being made for the purpose. The principle has alsobeen applied to the manufacture of handmade slippers in which caseadhesive lasting is co-related with it and attaching strings are taken outafterwards.
Shearling and wool sheepskins are often used for this type of slipper;the wool sheepskin can either be used with the wool side inwards to thefoot or with a suede-backed finish inwards to the foot. For comfort andwarmth the wool inwards is to be preferred, and when the top edge isturned over the result is an attractive collar.
Many fabrics are employed for this type of manufacture, the chiefamongst these being wool cloth woven on the double warp principle witha connecting thread combining the two together, which we receive ascamel-hair cloth in various patterns, and these are often substituted by acombination of wool cloth. Worsted fabrics are sometimes usedlaminated to a wool cloth to give a cheaper, yet hard wearing fabric. Feltis ideal too for this type of manufacture.
The upper is generally of the zip-fastener bootee type (see Figure 254a,p. 521) or the more popular camel collar type whilst other varieties are theanklets for children and the Albert tab slipper for men.
487

Design
In using wool material the design is much improved by having higherquarters at the back-seam than is normal with other types of slippers. Thecurving of the back-seam is of paramount importance and this shouldfollow the shape of the ankle bone much more closely than is customaryon many types of slippers sold. Where the back curve follows the shape ofthe foot the leverage of the foot on the sole is assisted and the slipper fitsmuch better and gives longer service in wear.
The appearance of this type of slipper is improved by the use of a frontcentre seam. By cutting to fit down at the comb of the last, the slipperstands up much better in wear and the appearance is enhanced.
When the design of the slipper has been chosen, the next problem is tochoose the last. Lasts for ‘Dowie’ purposes are best made from maple, thehard wood serving as a useful foundation for the strains which are set upin string lasting processes.
lt is customary to bevel the feather edge of the last slightly in order toassist the fabric to come over the edge more easily. The inside line of thebevel requires a sharp outline. No metal plate is required on the last, solidwooden lasts being acceptable, but the last with a forward break is to bepreferred for leather slippers made on this principle. A forward break lastallows the heel portion of the last to move forward in slipping andshortens the line from the toe-puff point to the counter point, therebyassisting in the removal of the slipper from the last.
Pattern Cutting
Pattern cutting is carried out on the usual method of standardconstruction (see p. 66).
The mean forme taken from the last can be of the straight pattern,which is used for soft fabric slippers, or of the right and left type, which ismore customary for the heavier fabrics and leather varieties.
Having taken the mean forme to the inside edge of the bevel on the soleshape, the standard is now constructed by the addition of the makingallowances for the respective materials. The allowances for uppers arethe customary ones used for shoe-making, and for lasting allowance werequire a minimum of 3
8in. for leather uppers and a maximum of 5
8in. for
heavy wool cloth, but for wool sheepskins we require 7
8in. in order to
allow for the greater margin of substance through the pile of the woolstriking the last.
The insole or sock shape offers no problem and is taken to the net lineof the inside bevel on the last.
Leather uppers are cut by the normal methods of hand or machine (seepp. 117-33), but fabrics are often cut on the band knife machine. Due tothe bulk quantities of slippers generally made the machine process is aneconomic proposition and is the usual practice.
488
SLIPPER MANUFACTURE

For leather materials special care has to be taken for the irregularsubstance of some of the materials used and in order to overcome this tipskiving is carried out, whereas for wool sheepskins the last edge isgenerally shaved with a shearing machine. Other fabrics offer no problemfor special treatment, and the work is passed over to the closing room forassembly.
Closing
Much use is made of chain-stitch machines in the closing departmentfor fabrics, but where these are not used extensively the circular wheelfeed is preferred to the step feed for ordinary flat machines (see p. 177).
A major principle in closing is to make as many seams as possible onthe flat bed type machine, remembering that all closing is best done in thesequence which results in the upper gradually taking the shape of thefinished slipper until the final operation. Twin-needle machines are usedfor silking the back-seams and woven narrow fabrics are used for tapingseams.
After assembly of the upper the lasting edge has a cord stitched aroundit on the 32W or 107W class machines (Figure 243). For a whole-cutpattern one loop is formed at the opposite side to the finished edge of thecord, so that in starting on zigzag stitch the operator begins around theperiphery of the lasting edge at the inside waist, the stitch being carriedround to the opposite waist and the operator stops the machine to lift overthree stitches, and recommences sewing, finishing off within 1
2in. of the
starting point. Approximately 5 in. of cord is left loose for the stringlasting operation.
489
THE ‘DOWIE’ SLIPPER

On slippers with a back and front portion it is customary to start sewinghalf-way between the joint and the toe and having travelled around to theopposite side, to lift the foot for the three stitches there. Then sewing iscontinued around the heel portion, lifting the foot twice for this purpose atpoints opposite each other at the heel seat and then finished off againwhere the cording commenced between the toe and joint position.
Later, in lasting, the cord is carried across the sock diagonally resultingin separate lasting of the vamp and quarter whilst on the last.
For slippers it is the general practice to sew into the quarters apreviously lined composition stiffener. This may be of rubberised fabricor it may be a matching lining fabric with a composition stiffener insertedinto a counter pocket. This principle is often followed too in the case oftoe-puffs. Should these be necessary they are inserted prior to theattachment of the lasting string.
Effective use is made of chevron, galloon or braid binding in theclosing room, for the finishing of slipper edges. Rosettes or silk poms areattached on the zigzag or bar-tacking type machine in the closingdepartment and, when completed, the uppers are passed forward forlasting.
Lasting
Previously prepared socks are laid on the last, preparation consisting ofassembly of such materials which have to be used. In some cases the sockis of matching material to the upper lining and is combined to stiff board.In other cases the sock is of rayon or a silk nature with the edge foldedover a board or leatherette interior. After preparation by the insertion oftags bearing the manufacturer’s brand mark, the edge of the sock and theinside edge of the upper are both treated with an adhesive.
The string lasting is often carried out with the aid of a treadle machine.This machine consists of a lasting jack together with pincer grips at theend of cords which by a series of levers are pulled up by the action of atreadle. This machine leaves both hands free for the lasting operation.
The upper is placed on the lasting jack, then the last is placed over it.The sock is laid face downwards on to the last and the upper is brought upto the last with both hands. The pincer grip takes hold of the lastingmargin and then the treadle is depressed and the upper pulled tightly tothe last. At this stage the operator pulls the lasting cords tight and in sodoing lifts the slip stitch opposite with the aid of a hook and secures theends of the cords across the insole or sock by knotting, so holding theupper firm to the last (Figure 244).
Another type of lasting jack has no pincers for the upper material, butinstead it has a series of grips which take hold of the cord and so
490
SLIPPER MANUFACTURE

pull up the string tightly. In each machine the object is to leave both handsof the operator free for manipulative purposes.
When attaching mules by this method it is possible to put an attachmenton the machine which gives automatic spacing for the vamp length andholds one end of the lasting thread until such time as the string, being
pulled tight, has moulded the upper to the last.At this stage the upper is hammered fiat to the last and then the string isremoved from the holder on the quarter positioning plate of the machine.After tying the cords the lasted upper is removed from the machine andpassed on to the next operation which consists of pounding and knockingdown the upper so that the feather edge of the upper is clearly defined andno bumps are present to hinder the attachment of the sole.
Bottoming
The bottom filling for this type of slipper is generally composed of hairfelt which acts as a cushion for the foot and adds to the comfort of thewearer. Hair felt for slipper making has been greatly improved duringrecent years by a process of rendering the fibrous materials sterile andactively antiseptic.
The choice of sole to use is varied. A popular one is of vulcanisedrubber made by a moulded process. These moulded soles requireroughing on the inner edges to remove the sulphur or protective filmwhich is present after vulcanisation. Then an adhesive is coated on theinside of the sole, and after drying, either by infra-red or turbulent air, thesoles are ready for attaching. The upper edges are also treated with asuitable adhesive and passed through the air drying chamber.
At the correct time the soles are placed on the uppers and weldedtogether in an air press, great care being taken in the timing of theseoperations. This is assisted by a conveyor installation in the factory.Various components are fed on to the conveyor under controlled timing.This ensures uniform results and prevents mistakes in the weldingprocess. The air drying chambers are best positioned along the conveyor.
491
THE ‘DOWIE’ SLIPPER

Many types of presses are available but the most uniform one is thatworking on a controlled pressure of 50 lb/sq. in. The timing of thismachinery varies with the type of material handled but it is customary toleave the slippers in the press for a maximum of 12 min. for rubber-typeadhesive, although the process can be speeded up by pre-drying and bythe use of activators on the adhesive used. It is also possible to getinstantaneous bonding with pressure-sensitive latex adhesive.
Hot Vulcanised Method of Sole Making
This is done by using a para rubber sole, placing this in a mould andvulcanising it on to the upper in a heated chamber. This results in a longerwearing slipper and the rubber is impregnated into the fibres of the uppermaterial forming a complete weld. Care must be taken in the making ofthe mould to prevent air pockets, and the timing here is again important.The time taken for vulcanising rubber of this kind on slippers is generallyabout 17 min.; consequently a battery of such machines is required tokeep an adequate size range moving in a mass production factory.
Further patented developments have been made recently usingextruded plastics inside the moulds, and it has also been found that highfrequency electric currents passed through specially prepared mouldswill give satisfactory work instantaneously, but the cost of suchinstallation is beyond the savings made on the old method. Most of thesesoles give a long life and the resultant cheapness is welcomed by thepublic.
492
SLIPPER MANUFACTURE

Other types of soles are sponge rubber (Figure 245), leather, leathersubstitutes, and also hair felt sewn to a leather outer covering.
There are also other platform units and crepe units which are attachedto this type of slipper and in each of these cases the method ofmanufacture is that of welded footwear, the resultant slipper being acombination of a sole member to an upper by a permanent bond.
The object of the ‘Dowie’ process is to give shape and outline to theupper and to mould the upper to the last. The sock is a covering for thethread lasting and the preparation of the sock is to produce a paddingwhich will be resilient to the pressure of the foot. Properly carried outthese processes result in an attractive and flexible slipper which giveslong life in wear.
VARIATIONS ON THE ‘DOW1E’ METHOD
Cement Lasting
A variation of the method of ‘Dowie’ manufacture is that of cementlasting which follows practically the same routine as ‘Dowie’ making,without the aid of string lasting.
Cement lasting requires a stronger sock or insole than in the ‘Dowie’method but in all other respects the slipper follows the same process. Thismethod does not result in quite as pliant and flexible a type of slipper asthe ‘Dowie’ process, but it is cheaper to produce, the equipment requiredfor cement lasting being small, whether it be cement lasting of the hand orof the machine variety.
The operations followed are practically the same as for the ‘Dowie’and the materials and combinations of design, pattern cutting, and colour,are the same.
By this method the sock is temporarily held on to the last and havingbeen treated with an adhesive the upper is brought into contact with it,and lasted over by means of an adhesive, after which the slipper ispounded or the pleats hammered flat. After time setting the slipperfollows the same process as for the ‘Dowie’, and the choice of solingmaterial is the same as for those previously described.
Bag Method
The bag method of closing an upper is another useful variation andderives its name from making the upper in the form of a ‘bag’. This hasdeveloped into the slip-lasted process which we shall consider at a laterstage in Chapter 39 (see p. 496).
The making of a bag from the upper is a process which has long beencarried out for some felt and camel-hair slippers. To commence thismethod a line is drawn on the plantar or sole surface of the last parallelwith the feather edge. This is generally l in. inwards on a woman’s lastand continues_ right around the last. The small portion within the centreof the last is cut out in a fabric material to which is
493
THE ‘DOWIE’ SLIPPER

added 3
16in. seaming allowance. The lasted edge of the upper is designed
to this insole mark and the upper is stitched to the fabric insole (Figure246).
There are various points to remember in pattern cutting but the chief ofthese is that the line of the lasting edge has to be reduced to the exactmeasures of the line on the canvas or fabric insole. This is accomplishedby using seam-to-toe patterns on which a large sweep has been takenaway at the toe and heel, and also by springing the bottom edge of thepattern, resort being made to cutting straight the curved portion, therebyshortening the bottom line. Whatever is done in this respect it is necessaryfirst to choose the design line of the upper and then to fix constant pointsaround the lasting edge at frequent intervals so that any corrections madeto the upper are automatically balanced by the time a new `constant’ isreached.
494
SLIPPER MANUFACTURE

This method is only suited for materials which have a good stretch inthem, such as loosely woven textiles.
In lasting, the last is forced into the bag formed by the upper and thenthe operative pulls the centre canvas sock lining straight (Figure 247a).The upper is then pulled tight and after attaching the sole by an adhesivethe upper is steamed into shape. No packing is used for this method andthe result is a cheap and flexible slipper, soundly constructed, forbedroom wear (Figure 247b).
495
THE ‘DOWIE’ SLIPPER

39
SLIP-LASTED SLIPPERS
THIS METHOD OF MANUFACTURE of slippers has been termed ‘randed turn’for many generations in the North of England. Slippers of this characterwere made up without lasts and then re-formed over a shoe tree with ahorizontal stitched seam on the platform cover. The platform filler wasgenerally of flock and hair mixture and the outsole of soft kid handsewnaround the edge.
A later development of this manufacture was to sew the platform outersole and then, reversing the platform, to stitch the upper to the rand whilstinside out and, after turning, to pack the filling in the bottom material,sewing in the sock by hand around the seat afterwards.
Machinery development, however, has brought this modern so-called‘Californian’ method to the front. We therefore turn from the delightfulfabric, often hand-embroidered or hand-woven from the genteel ladies’book of needlework, to mass production methods as practised today,noting the similarity of designs with examples of eighteenth-centurywork, the broad rands of which period resemble both the platforms of ourday and also those of Stuart and Tudor times. The fine handsewing of therand has given place to adhesives but the soft padded soles of fine suedebuck leather still remain.
The method popularly described as ‘Californian slip-lasted’ is but adevelopment of centuries-old tradition on newer mass production lines.
In 1925 mules were made on this principle in contrasting coloursreminiscent of Turkish inspirations with gold crested moons embroideredon black velvet, red silk linings and 2 1
2in. heels.
Not very dissimilar were the polka dots of 1948, the gay stripes of1950, and the faille linings, rayon checks and tartans of l95l.
Lasts
The choice of lasts is most important for this type of work. A flat bottomis to be preferred and, because the footwear is flexible, very little toespring, if any, is required. A cross section of the lasts would reveal theforepart almost flat; this is done both for the shape of the footwear to bemade and also for the ease of manufacturing, relying on the resilience ofthe fillers for comfort. This creates a broad tread area and gives addedcomfort to the wearer.
The inside joint should be well defined to create an anchor for the footin order to prevent wear on the toe of the platform. A broad seat isnecessary to carry the weight of the body without a forward thrust. Ashallow upper on the outside and deep wood over the
496

great toe is helpful and gives attractive comfort in appearance and alsoassists good pattern making and ease in closing. The ‘range’ of the lastsshould fall gently away on the outside whilst the sharp fall on the insidejoint assists the fitting properties, makes for ease in lasting, and preventsthe breaking away of side pieces on open-back models.
Pattern Cutting
Pattern cutting is all-important; the portions to be cut and assembledare to fit around a definite line, coincidental with the feather edge of thelast. Once this line has been decided upon the upper and sole pattern mustbe synchronised with it.
In order to avoid many alterations for change of material and style amaster pattern should be set up and fixed location points selectedbetween which variations may take place but at which all fittings must beaccurate (Figure 248). The location points are generally successful ifplaced at the point of each side of the sole and upper pattern where theopen-toe shape would come should the pattern be made for this type ofslipper, and also at the points where open waist on vamp and quarterswould come and where open-back point would be located.
This makes eight points in all towards the centre of each open space.The patterns may be sprung to avoid excess of material for the
497
SLIP-LASTED SLIPPERS

sock stitching operation. Between these points seam allowances may bevaried. These points are known as ‘constants’ and provide a series oflocation points between which the closing machinists have straight runsof stitching without any necessity to take up slack in the upper material.This is achieved by aligning the finished line of the pattern with thedesigner’s intention.
Should any spring be placed in the pattern it is essential that the outlineof the pattern be in keeping with the original curve.
Some failures have been caused by too much skiving on these points.The full substance of material should be sewn in order that the opening ofseams may be done without the curling tendency of reduced portions.
Having fixed these points the pattern cutter varies the feather-edge lineto give character to the finished product in keeping with the designer’sintention. He must bear in mind that the measures of his upper patternsmust coincide with such portions of measures of the feather edge linewhich he intends to use.
The designer can fix his design centres according to this plan knowingthat the finished result will be a faithful replica of the original.
The last, therefore, is used for the design of the upper and for obtainingfoot measures therefrom, but when the upper portion has been machinedtogether in the closing department the last is only used as a foundation forthe making because all shapes have been given in the closing room. It isonly necessary in the making department to carry out faithfully the strainsof platform making to their original plan using the last as a base forholding the work.
Materials
These points must be borne in mind in choosing materials for theslippers and wherever there is a tendency to stretch, the materials must bereinforced to give a fixed result.
In the same way, where pleatings or frills are required, it is necessary tomake these in the upper prior to the attaching of the backers or linings.Consequently the finished upper has the fine appearance of dressmakingand needlework much more enhanced than is customary in other types ofslippers.
For slippers of this type there is a choice of leather of the more mellowvarieties, many of which are embossed or finished with high glazes.Leathers with deep-set designs can be used because they are not distortedin the strain of lasting. Such leathers are generally lined with attractivefabrics or with pastel shades of leather, resulting in pleasing tones in thefinished slipper.
ln fabric slippers there is a choice of many materials, either for the bodyof the slippers or for style or ornamentation purposes. Almost any fabriccan be used as a slipper fabric but the treatment given to each must be inkeeping with the balance required in the finished
498
SLIPPER MANUFACTURE
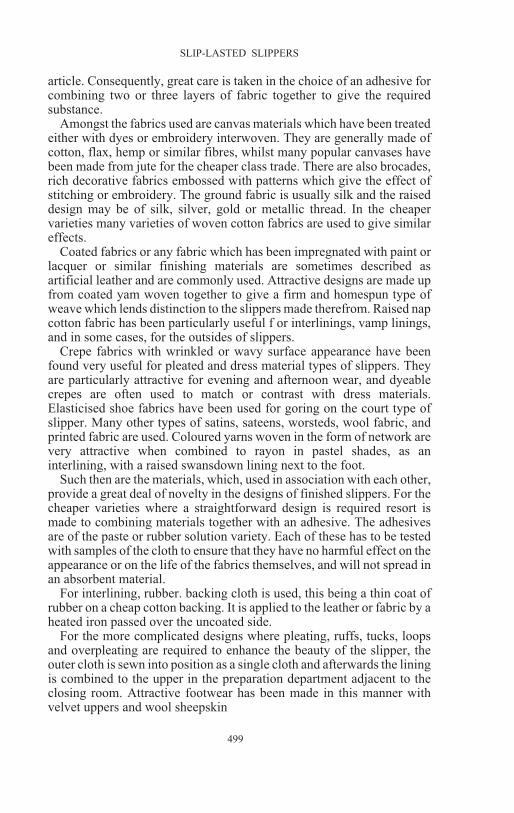
article. Consequently, great care is taken in the choice of an adhesive forcombining two or three layers of fabric together to give the requiredsubstance.
Amongst the fabrics used are canvas materials which have been treatedeither with dyes or embroidery interwoven. They are generally made ofcotton, flax, hemp or similar fibres, whilst many popular canvases havebeen made from jute for the cheaper class trade. There are also brocades,rich decorative fabrics embossed with patterns which give the effect ofstitching or embroidery. The ground fabric is usually silk and the raiseddesign may be of silk, silver, gold or metallic thread. In the cheapervarieties many varieties of woven cotton fabrics are used to give similareffects.
Coated fabrics or any fabric which has been impregnated with paint orlacquer or similar finishing materials are sometimes described asartificial leather and are commonly used. Attractive designs are made upfrom coated yam woven together to give a firm and homespun type ofweave which lends distinction to the slippers made therefrom. Raised napcotton fabric has been particularly useful f or interlinings, vamp linings,and in some cases, for the outsides of slippers.
Crepe fabrics with wrinkled or wavy surface appearance have beenfound very useful for pleated and dress material types of slippers. Theyare particularly attractive for evening and afternoon wear, and dyeablecrepes are often used to match or contrast with dress materials.Elasticised shoe fabrics have been used for goring on the court type ofslipper. Many other types of satins, sateens, worsteds, wool fabric, andprinted fabric are used. Coloured yarns woven in the form of network arevery attractive when combined to rayon in pastel shades, as aninterlining, with a raised swansdown lining next to the foot.
Such then are the materials, which, used in association with each other,provide a great deal of novelty in the designs of finished slippers. For thecheaper varieties where a straightforward design is required resort ismade to combining materials together with an adhesive. The adhesivesare of the paste or rubber solution variety. Each of these has to be testedwith samples of the cloth to ensure that they have no harmful effect on theappearance or on the life of the fabrics themselves, and will not spread inan absorbent material.
For interlining, rubber. backing cloth is used, this being a thin coat ofrubber on a cheap cotton backing. It is applied to the leather or fabric by aheated iron passed over the uncoated side.
For the more complicated designs where pleating, ruffs, tucks, loopsand overpleating are required to enhance the beauty of the slipper, theouter cloth is sewn into position as a single cloth and afterwards the liningis combined to the upper in the preparation department adjacent to theclosing room. Attractive footwear has been made in this manner withvelvet uppers and wool sheepskin
499
SLIP-LASTED SLIPPERS

linings. The subtle elegance of these types of slippers is well known andthe service they give to the wearer is outstanding.
In the making of uppers many reinforcements are used both underseams and at fitting points where stays are attached to give extra strength.For bindings on the edges of slippers we have the choice of rayons,braids, pure silk material, and cotton tapes, narrow fabrics and ribbonsetc. all adding their quota of elegance to the finished result.
Platform covers are generally of two-ply material as against three-plyfor most upper fabrics. Contrasting colours, and stripes running in theopposite direction to the upper give a pleasing effect.
Clicking
The clicking department puts first emphasis on finished appearance ofslippers rather than on the interlocking of patterns which is customary inshoe manufacture. It is also more important in slipper manufacture tohave the lay of the fabric or leather in the correct direction than to make asaving on the interlocking.
Consequently, in the clicking room the off-cuts on materials which areused for the bodies of slippers, are stored away to make attractive fittings,ornaments, bows etc. for other types of slippers.
The lay of the patterns on the design is more important than the stretchof the material, cutting becoming a matter of lay-out of pattern rather thanany other consideration.
Another exception to the general rule in the clicking department is theshape of cutting blade when cutting by hand to a card pattern. Thestraighter blade is chosen because of the softness of the weft thread whenthe material is of an unbalanced nature such as in raised fabrics and pilefinished fabrics. The warp threads are usually harder and cut more easily.The shape of blade is equally important for rubberised fabric such assuedette, suedene, and plastics coated material.
All other details in the clicking room are similar to those experienced inordinary shoe factories.
Closing
The closing department has an extra section attached to it in the form ofa preparation department, where pleating, cord stitching, embroidering,bow making etc. are carried out. With these reservations the normal typeof shoe machinery is used in making slippers. Multi-needle machines areoften in evidence and for quilted linings and velvet uppers machines withup to sixteen needles are in common use. Some specialist firms, however,produce these materials in the roll for slipper manufacture, thus. savingmuch complicated work inside the factory.
To impart a softer feel in the more exclusive type of slippers, cottonwadding is used for padding between the lining and the upper,
500
SLIPPER MANUFACTURE

giving added comfort to the wearer. It is customary for fabric seams tohave Frenched or welted seams according to the design of the slipper.
Having closed the various parts together similar to the sample providedby the designer, the platform rand is now sewn to the upper with a 1
8in.
seam for most light-weight material and a 3
16in. seam for the heavier
types.After this the rand is turned back to the upper and a previously prepared
sock is sewn in. Should the sock be of leather or other variable material, itwill be necessary to reinforce this either with a thin coated rubber backingcloth or with a canvas backing.
Making
After closing to the location points previously described the uppers arepassed forward to the making department. Success in this departmentcomes from the correct choice of lasts and materials, together with abalanced routine of drying processes under modern methods of adhesiveassembly.
In the making department the choice of cement will depend upon thetype of material used for the upper. Latex adhesives are used in manycases but there comes a time when these have to be localised in theireffect because of the spreading that takes place in absorbent materials orbecause of the chemical reaction which is set up when the latex isabsorbed by some types of fibres. Research in this respect has provided awide range of adhesives to meet modern conditions.
Since the assembly of the footwear is mostly a hand process and theparts are prepared outside the department, the major problem in themaking of the slippers is the timing of the operations with correctprocedure for drying processes; for this we have infra-red andturbulent-air drying as our assistants. Sprays are used for the coating ofthe upper with cement around the platform edges, and pressure brushesfor the platforms.
The platforms are generally made from wood flour and latex mixturesrolled into sheeting form, from foamed rubber, or from hair or jute feltedmaterials which have had a gas treatment to render them antiseptic andfree from germ contamination. For the more rigid type of slipper,platforms of cork combined to canvas or pulp board are acceptable. Theyare lighter in weight than a wood-flour base, but have a greater tendencyto crack up in wear unless they have a canvas reinforcement.
After the laying-over of the rand and the cutting away of small pleatsthat are formed, the sole is attached by the usual adhesive method. Solesfor slip-lasted slippers can be cut from light-weight suede-finished upperleather, the reverse split from furniture hide or from specially preparedcurried shoulders which give long life and good appearance.
Slip-lasted slippers in fabric are used for most of the ‘dressy’
501
SLIP-LASTED SLIPPERS

occasions in office, home and club, and have wide scope for attractivestyle and design for ladies` work (Figure 249).
For men they are ideal in the club or home, and the style is useful forchildren for novelty types of footwear such as replicas of ducks, rabbitsand other animals that give delight to the world`s children.
The cost of production is low compared to the value of the material inthe slipper and, when necessity demands, material can be used in keepingwith the size of the purse of the purchaser so that the finished range ofprices is suitable for any customer.
502
SLIPPER MANUFACTURE

40
SLIPPER TURNSHOES AND INDOOR TURNS
SLIPPER TURNSHOES
EVER SINCE THE EARLY shoemakers became separate craftsmen,hand-lasted and handsewn turnshoes have been a feature of the slippertrade. By this method slippers of dainty materials, much lighter in weightthan by other methods, can be worked, and materials so delicate that onlyhandwork can mould them carefully into the shapes they will retain afterthe lasts have been withdrawn.
In this category we also find many types of travelling slippers andspecial indoor footwear which has often been made for invalids whospend long months indoors. All the daintiness of the glittering courtfootwear of the past has been retained in the manufacture of hand-lastedslipper turnshoes as carried out at the present time.
In this method, a single sole is used producing a flexible slipper whichderives its name from the fact that the sole and upper are sewn togetherwith a horizontal chain-stitch, whilst wrong side out on the last. The shoeis then removed from the last, turned right side out, re-lasted and finished.Its chief benefit is its light weight and flexibility.
Materials
Only the best grades of materials are used for hand-lasted turnshoesand these are thoroughly conditioned before they are used, to render themmellow, soft and pliable.
For ladies’ indoor footwear, for ballrooms and state occasions, softglacé-kid leathers are used, especially those with glittering finishes suchas silver, gold and opalescent kids.
Soft slippers lined with an all-wool lining form beautiful travellingslippers, and are ideally suitable for sick rooms. In the men’s varietygoatskins and pig grain leathers are used for uppers, and with theseleathers an all wool lining can again be used since 100 per cent pure woolwill last almost as long as the upper itself. The requirements are flexibleleathers, which will withstand turning without cracking, and although useis made of mulling, heavy pigment or enamelled surfaces on the leatherare to be avoided.
Processing
Design offers limited scope in these kinds of leathers, and best resultsare obtained by shorter vamps than is customary, and by a lower yetcloser fitting quarter lining. In pattern cutting, great care must be taken ingrading to see that the extreme sizes have satisfactory restrictions on thegrade to prevent distortion.
503

Clicking and closing follow the usual routine but in lasting it iscustomary to allow a much smaller lasting allowance than usual on othertypes of footwear.
The completely fitted upper is assembled by hand or machine and ispulled over the last the reverse side out. The sole has previously beenprepared with a shoulder cut around the outside edge, against which theupper is lasted, and opposite, and parallel to this shoulder a channel is cutinto in which the stitches are embedded (see p. 229). (Note: A morecomplete description of turnshoe making will be found on pp. 368-72.)
The shoe is lasted and the tack heads are left standing out. A horizontalchain-stitch is then made either by hand or on the slipper turnshoemachine. This gives the loop on the outside of the shoulder edge. Afterthe stitching operation the tacks are removed, and the surplus material ofthe upper is trimmed away.
The seam is now smoothed out on a pounding-up machine designed forthe purpose and with a rotary hammer to turn the seam flat.
The last is then removed from the shoe, and after the shoe has beenturned right side out with the aid of a jig and treadle machine the shankand seat insole are inserted; it is re-lasted and is re-formed by the use ofheated irons or a jet of warm air.
After re-forming, the last is once again slipped and the heel is attachedby the use of an inside heel attacher and the finishing operations arecarried out in the usual way.
Special care is taken in the fitting of the sock which is cut frommaterials which blend with the character of the slipper.
There are many variations of this type of making. The first variationconsists of the insertion of a toe-puff and heel stiffener; these are chosenfrom flexible materials and can be of leather, composition, or celasticmaterial.
Care must be taken in making the pockets holding these fittings,particularly when we remember that the curve of the outside lining islarger on its first application to the last than it is on the secondapplication.
These difficulties are overcome by the use of humid air currents in there-forming process, and can be guarded against by cutting the patternstight to the last on the original model.
Another variation is the soft filled, wedge-heel design. In the old daysdextrin-bonded cork dust was used for this purpose but in later yearsimpregnated hardened felt has superseded this.
No problems arise in turning and the heel is conformed to its shape on aheated machine for this purpose. This principle is used for the making ofwhat are commonly called S.T.S. (Slipper Turn Shoe) lines in soft fabricslippers. These are made from velvets, velvet cords, felts, camel-hairmaterials and sateens.
One variation has been to make a padded sock with an uptumed lip towhich the upper is sewn on the S.T.S. machine, and then after
504
SLIPPER MANUFACTURE

levelling the uptumed edge of the slipper is sewn on a whipping machineto an inner lining. After turning, the slipper is re-formed on the last, thefirst inserted sock now becoming the sole.
This type of sock has often been made of leather fibres impregnatedwith latex and rolled out into sheet form, and also plastic sheeting orcellulose sprayed fabrics.
Further use has been made of felt and leather soles, and also ofpre-vulcanised soles for this method of attachment.
INDOOR TURNS
The modern mass-produced versions of the handsewn type of tumshoeare now known as ‘indoor turns’. This type of manufacture is ideallysuited for travelling slippers and also for bedroom slippers (Figure 250).Many attractive types are manufactured and when made in felt haveribbon trimming and other drawn-thread embroidery.
The soles of these slippers are mostly from chrome split leathersalthough in the cheaper varieties cellulose-finished fabrics are used, andsometimes plastic coated cloth. Between the sock lining and the outsole isplaced a cushion of soft hair felt and the combination of resilientmaterials results in a long-wearing yet comfortable slipper.
A further development of this slipper is the men’s and ladies’ leathergrecian with soft flexible soles (see Figure 253c, p. 519).
It is a principle requiring very light machinery and consequently haspossibilities for high-class trade where the combination of calf leatherswith chrome soles results in long-wearing, dignified slippers.
505
SLIPPER TURNSHOES AND INDOOR TURNS
Figure 250. Ladies’ slippers. a Felt ‘cozy’ slipper with sewn-through platform.b Felt indoor turn slipper. c Indoor turn slipper with nylon lining.

Further combinations of silk fabrics and velvet corduroys are often used.
The manufacture of ‘indoor turns’ is a specialised trade and isgenerally carried out in factories devoted to this one type of construction.
Felt
Shoe materials are described in Part I of this book but this is aconvenient place in which to discuss felt as it is one of the mostextensively used slipper materials.
The felt for most slippers ranges in weight from 24 oz. to 40 oz. forslipper bodies, these weights being the average weight per yard of 60 in.wide material.
For slipper trimmings the weight will vary from l6 oz. to 28 oz. whilstthe insoles or socks are made from 10 oz. to 16 oz. felt.
Where slipper soles are made of felt then a very much heavier variety ischosen, and compression of the fibres succeeds in giving firm and solidcutting edges.
Sometimes felt has to be combined with itself in order that attractivecontrasts may be created in lining material. Whenever this is done acombination of various weights is used sufficient to give a substance inkeeping with the general tone and purpose of the slipper.
It is found that a weak latex adhesive for combining purposes ispreferable to a paste under most manufacturing conditions, but whereconsiderable shrinkage is expected from the steaming operation then apaste combining is preferable. The paste combining does not impart thegentle plump feel to felt which is so pleasant in the cheaper varieties, butthe hardened result is to be preferred on thicker substances.
Design
In designing these slippers it is important for the designer to rememberthe limitations of felt. Consequently sharp comers are best avoided;equally interesting designs can be made by avoiding acute angles. Topedges of materials are attractively finished and serve their purpose forwear when completed with small gimped designs around the edges.
In choosing ribbon for threading through felt it is important to use alatex combining for the felt, or else to thread the ribbon through a feltoverlay or to design the curve through which the ribbon is threaded insuch a manner that allowance is taken of the effect of shrinking in thesteaming process.
It is also important to see that the balance of substance is heavier in thebody of the trimming than in the actual interlacing which is passedthrough it.
506
SLIPPER MANUFACTURE

Pattern Cutting
Basic lines for pattern cutting for ‘cozy’ slippers are on a differentstandard of construction from shoes (see Figure 251). It is essential forthis type of manufacture that ‘constants’ are remembered for furthertreatment.
The first ‘constant’ is the length of the line around the edge of the lastfeather. The length of this line is very important for the attachment ofskirting and for the attachment of the sock. The pattern cutter, therefore,must place around this line location points for such things as seam fixing,and balancing points for curves.
These location points then become fixed points around the edge of thecut upper, so that any stretch or slack to be taken up in the material isautomatically corrected by the time a new location point is reached.
In like manner the profile of the last is repeated in the mean forme takenfrom the last. The first principle to bear in mind here is to decide where
shall the centre line be for design purposes along the front of the vamp.Having decided this, it is important that the location point for the centreline of the pattern is fixed in close proximity to the centre line of design.
This means that, in closing the upper, any alteration by variation inmaterial is automatically corrected by the time the location point isreached.
In the development of this method of pattern cutting, the base line ofthe last is very important and any alteration in the design must be donewithin the limits prescribed by the location points. The situation occursfrequently that the design of the upper, whilst not immediately fitting thelast, nevertheless fits the other portion of the slipper, and the actual shapeof the last is embodied into the slipper in the steaming operation.
When the slipper has been designed on the last and the location pointstransferred to correspond with the sole shape of the last, a set of patternscan be created by orthodox methods.
507
SLIPPER TURNSHOES AND INDOOR TURNS

Lasts for turned slippers are not required until shaping and steamingafter the slipper has been completely made. Consequently, the tit of thefinished slipper depends on the accuracy of the pattern cutting.
Clicking
In cutting felt slippers resort is made to band-knife cutting where up totwenty-four sheets of felt are ranged to the pattern width and then cut intotwelve pairs of uppers at once around a wood forming pattern.
Where bulk production, however, is not required then the normallight-weight steel cutting dies and metal edge wood clicking block cuttersare used (Figure 252).
Where regular strips of felt are to be used, varying from 3
8to l 1
2in. in
width, they are easily cut on the strap cutting machine which can beadapted by the use of serrated cutters to give a gimped edge if this isdesired.
Sole cutting is generally done on the clicking press with the usualknives.
508
SLIPPER MANUFACTURE

Closing
The closing department for felt slippers has a different appearancefrom one making leather shoes.
In felt slipper manufacture, bulk quantities are to be dealt with, andconsequently work transportation becomes a major problem. Thetransport of work is generally done in fibre cases on castors althoughsome factories have made a success of overhead travelling belts carryingwire rods on a wooden base which carry twelve pairs of uppers eachbetween the rows of machinery.
The actual closing room operations are of a simpler nature than forshoes although accuracy here is most important.
The type of sewing machine used for stitching is often the chainstitchmachine which, by its increased speed and the flexibility of the stitchgives a satisfactory slipper for general purposes. Where, however, thelock-stitch is required for stronger seams or for taping seams then it isimportant to use a softer thread than is normally used for shoes.Allowance must be made in the type of thread chosen for the shrinkagethat takes place in steaming in order that the thread shall not cut throughthe materials which are being used.
In sewing felt to felt nine stitches per inch gives a satisfactory pull onthe material without breaking into the fibres of the felt.
The actual closing operation becomes a series of sewing runs frompoint ‘A’ to point ‘B’ which, in practical closing, means that experiencedshoe operatives have to forget much of their skill in order to treat this as astraightforward sewing operation rather than the assembly of a slipper.The reason for this is apparent when we remember that the various partsare sewn together inside out. Consequently the turning operation willreveal the finished result in a different light from that in which the sewingmachine operator sees the work.
In the assembly of the slipper the upper must first be closed in the usualmanner and then any attachments which are required for heels orplatform covering are added to the upper. When the heel covers havebeen sewn to the upper then the whole of the upper is turned inside-outand the lasting edge is sewn to the outside curve of the chrome split orsubstitute sole that is to be used.
When this stitching of the sole to the upper, which is normally carriedout on a post type machine, is completed the bottom of the slipper is filledwith such filler as may be required. In general practice this will be asimple hair felt filler to act as a padding for the thin felt sock which isattached in the next operation.
After the heel receptacle and forepart have been filled, the light-weightsocking felt is placed over the filler and sewn on a special overlookingmachine around the edge of the upper. After this the whole of the slipperis turned inside-out with the aid of a turning machine. This turns the toefirst in order to avoid any damage taking place and then having turned theheel portion, the last is
509
SLIPPER TURNSHOES AND INDOOR TURNS

inserted into the completely finished upper. The slipper on the last is thenpassed through a chamber containing steam and from the steam cabinet tothe drying chamber. After drying, the last is removed from the finishedslipper.
Steaming
One of the objects of steaming is to restore the nap finish on pilematerial but in felt slipper manufacture a further use is to impregnate thefelt with the steam in order to moisten the fibres; this is followed by rapiddrying, thereby giving a firm and stiffened appearance to the finishedslipper.
It has been found possible to use a felt stiffening compound for thispurpose although great care must be used in the selection of this so that nochemical action shall be set up with a starch solution which may havebeen used for combining felt together.
The steaming operation is carried out by the insertion of the last into theslipper and then the passing of the slipper through a jet of steam. There isa patented conveyor-type machine for this process which also makes useof the exhaust gases expended in the heating process for drying purposes.The conveyor passes through the wet and dry chambers in turn, returningthe finished slipper to the starting point in a condition suitable forremoval of the last.
Further developments have been also made with a fibre last of a porousnature. The use of maple-wood lasts has one disadvantage in that a slightshrinking takes place when the lasts have been used for a long periodwhereas this fibre is now impregnated with a plastic material whichprevents such shrinkage. These lasts are not yet satisfactory because ofthe uneven drying which takes place after the removal of the lasts throughthe forming of water globules on the inside of the slipper.
A further disadvantage has been a slight reaction of latex combining,forming a deposit on the outer surface of the slipper. This is easilyremoved, however, with a weak solution of ammonia which restores thebright nature of the felt used.
Another method of steaming is in process of development. Thisemploys an aluminium last through which a jet of steam is sprayed fromthe inside to the outside of the material.
After the completion of the steaming operation it is customary to fix aloose fitting sock inside the shoe by an adhesive. Sometimes this sock isreinforced underneath in order to give an added cushion effect and thecushion is often made of various thicknesses of material. Under the archof the foot multi-layers of material have been used, and also under theseat for the resting of the os-calcis or heel bone. The surface of the sockgenerally has a decorative appearance with a fancy overstitched edge andname tags are often sewn on this type of sock. It is also possible toperforate socks of this nature and to allow air pockets to form givingadded comfort to the wearer.
510
SLIPPER MANUFACTURE

The manufacture of indoor turn slippers of this felt variety is lookedupon as a balance of harmonious colours and materials in order to givethe suggestion of pleasure with leisure to the wearer. The success withwhich this has been done is reflected in the large export trade that Britainhas for this type of footwear.
Other Materials
Although the manufacture of a felt turn has been described at length itis important to note that the manufacture of this same slipper in othermaterials presents certain problems which must not be overlooked in theoriginal pattern making. The chief of these is in deciding the amount ofallowances to make for the respective seams that are used when differentsubstances or textures of materials are used. It is, therefore, important toremember that any allowances that are made must be corrected betweenthe fixed constant points of pattern cutting as previously outlined.
The special features of leather turn slippers are largely dependent uponthe properties of the leather itself.
Such properties as plasticity and air permeability (see p. 12) addcomfort in wear and suitable leathers are chiefly found amongstgoatskins and light calf-skins. Kid-skins and sheepskins are not assuitable for this type of manufacture, but goatskins and calf-skins areideal, providing that care is taken in reinforcing the leather at the backwith a suitable textile backer.
The adhesive properties of the backer are very important and great careshould be taken to see that in the application of heat from the steam nochemicals are set free from the adhesive which might react with theupper. Should this occur, then a wash in benzine followed by a weaksolution of ammonia will clear the surface of the leather sufficiently toprevent a recurrence of this chemical reaction after the dressing has beenapplied to the upper.
A felt lining is generally acknowledged to be the best for this type offootwear, and has the added advantage of clinging to the last in theshrinking operation, whereas if a woven textile were used then thedifficulties of controlled shrinking would depend very largely uponaccurate placing of the patterns on the lining in the cutting process due tothe diversity of strength between the warp and weft threads.
Sometimes it is desired to give a plump and pliable appearance to theupper by the use of an interlining, This interlining, which is often used inaddition to the backing cloth of the upper, is best chosen from materialwhich is almost neutral in the steaming operation. Therefore, the choicewould lie between jute fibres and heavily raised swansdown.
Having fitted the upper together in the closing room the processesfollow much the same direction as for felt, but when it comes to theinsertion of the last a last is used from which the heel portion can be
511
SLIPPER TURNSHOES AND INDOOR TURNS

removed. The forepart of the last is inserted first and then, having used amechanical aid devised for the purpose to press the forepart of the lastforward into the toe, the rear portion of the last is inserted on a forcedlasting machine.
The last, so inserted with the minimum of disturbance to the lining,allows the shrinking process of steaming to be carried on exactly as forfelt. The timing of the conveyor through the drying chamber is varied inorder that the steaming process may mellow the fibres and allow a slightnatural curl before the drying process takes place. The time taken fordrying is longer for leather work than for felt and consequently the lastsstay in the upper a much greater time. When the uppers are partially dry itis an advantage to pass over the slippers the glossing iron which succeedsin putting the finer curves on the outside of the upper, reproducing morenearly the character of the last. Sometimes in the steaming process areaction from tannic acid in the shoe uppers affects the suede-finishedsoles and in case of stains of this kind a weak solution of oxalic acid onthe sole will remove such stain. It is advisable, however, to give a washover both soles afterwards with a weak solution of ammonia to neutralisethe effect of the acid on the fibres of the leather.
Platform-type indoor turn slippers are a development of the indoor turnslipper of orthodox pattern. These came into fashion in 1938 but were arevival of centuries-old footwear. In this development there is built intothe shoe a cushion of resilient material adding height to the wearer andinsulating the foot from the ground. This raised type of platform gives anadded flair to the designer’s occupation and results in gay and cheerfulcontrasts being made. When carried out in felt the effect is one of balancein design and has sales appeal in the atmosphere that the slipper creates.In the men’s variety the added height gives dignity to the deportment ofthe wearer.
There are many ways by which this result can be obtained. Muchdepends upon the insulating material which is used in the construction ofthe platform. Some manufacturers use a patented method of constructionwhich uses as a platform a soft spongy hair felt or similar substancehaving the properties of hardening under the steaming operation. Othersare content to use a soft and resilient filler which does not harden. Thesefillers are inserted into the pockets made at the operation between theclosing of the upper and the insertion of the sock lining.
In other constructions cork and rubber-bonded materials are usedresulting in a firm and insulating base. For this process it is advisable tofill the upper as previously described for an ordinary turn slipper and thento lay over the curtain of the platform in the same manner as slip-lastedfootwear is now made.
Another method of making slippers with platforms is to build theplatform from the sole upwards, closing the seams that are attached to thesole first, and having filled the cavity between the platform
512
SLIPPER MANUFACTURE

and the ribbon curtain covering, the upper is then sewn together onspecialised machinery.
Whichever method is adopted it is vital to remember that all seamsmust be carefully planned and location points made on the pattern so thatany twist or stretch of the material is corrected within known limits.
A further development of this platform type of slipper is the insertionof varying types of heels, some of which show on the outside by thearrangements of the seams or pleats but others of which are of the hiddenheel construction, the heel being inserted into a previously made pocketfrom the joint position on the sole before the slipper is turned. Slippers ofthis kind are ideally suited where kneeling operations in the home areinvolved and particularly so when travelling to and fro between corridorswith tiled or rubber floors.
One slipper of this type is manufactured with a latex foam platform.The total outside surface of the slipper is made complete, as a glove, andthen the latex foam platform which has previously had a sock attached isinserted and the walls of the platform are fixed to the outside platform bythe use of an adhesive.
513
SLIPPER TURNSHOES AND INDOOR TURNS

41
VELDTSCHOEN, WELDED AND MACHINE-SEWN SLIPPERS
VELDSCHOEN SLIPPERS
SLIPPERS MADE BY THE veldtschoen process are ideal from a flexibilitypoint of view. They are not waterproof but will give long life for ordinarypurposes.
The principles of veldtschoen making and the machines used havealready been described (Chapter 25, pp. 361-68). Here we are moreconcerned with the variations for the slipper trade.
The easiest type to make consists of a single sole and an upper. Thelasting edge of the upper is turned outwards instead of being turned in aswhen it is attached to an insole. The upper and outsole are joined togetherwith an adhesive, in position on the last before sewing. The two parts arethen stitched together on a lock-stitch machine with the seam carriedcompletely around the slipper. After sewing, the surplus is trimmed awayand this leaves a raw edge of upper and sole showing around the edge,and resort has to be made to finishing to cover this and prevent spreadingin wear. Consequently, the range of suitable materials is limited.
Fortunately, the number of manufacturing operations is smaller thanfor machine-lasted and machine-sewn slippers, and the quality ofmaterial from a manufacturing point of view is not so important. It ispossible to make good, cheap veldtschoen slippers, and equally possibleto make expensive ones from good materials. For casual wear the cheapermaterials and methods are satisfactory.
There are further developments of the single upper and the single soleconstruction, such as the use of a lining in the upper which complicatesthe question of edge finishing. Therefore, alternative variations of thisconstruction have to be employed in making. Further improvements havealso been made by the use of a middlesole, or middlesole and insolecombined, and also by the use of ordinary lasted seats and counters andveldtschoen foreparts.
The purpose of veldtschoen slippers is to produce a wide welt inkeeping with the heavy leathers such as sandal sides for Albert tab shapes(see Figure 253d,p. 519) or bootee models and also to give the additionalwidth required for older men for swollen feet; for this type of slipper abroad last is required.
For boys’ work there is a tendency for the customer to demand these forgrowing children in order to copy father’s slippers, but whilst theappearance is of a substantial nature, the single substance of the sole isnot good and often causes disappointment if
514

the customer expects the thick substance of the finished edge to give acommensurate amount of wear.
For women and girls the broad welt is not in keeping with the slimdainty look so often expected for leisure footwear, although this methodcan be used with great success for manufacturing thick woolly materialsinto comfortable broad fitting slippers for them.
To sum up, the veldtschoen method is recommended for Albert tabslippers for men and boys, for heavy bootees for indoor wear, forrecovery from accidents and for patients suffering from rheumatism orgout, for Cambridge elastic gusset sided slippers for use inside schoolsand similar places, for women’s and girls’ shearling type of slippers or formaterials which will not stand heavy strain in lasting.
Materials
The materials chosen for these types of slippers must be in keepingwith the length of life expected. Harsh finished leathers and fabrics are tobe avoided, but for the cheaper grade of slippers plastics coated cloth,heavy suede splits and grained shoulders from hides are suitable. Forbetter quality slippers made by this system, goatskins, sheepskins andside leathers are satisfactory, whilst for soles, for cheaper grades, belliesare generally used. The better grades have soles from squared shouldersor from composition latex and leather fibre boards.
When stiffeners are used these are generally of fibre composition, butfor the sewn-round seat method the lip has to be turned outside whilst theusual lip turned inside is suitable for lasted seats.
It is also necessary to consider the shape of the corners on the stiffenersor counters to bring these in close alignment with the finished appearanceof the slipper. Consequently we find that the lasting allowances on thestiffeners which are turned inwards are rounded away at the corners whenseats are lasted, whilst for sew-rounds the extra extension of the stiffenerwithout lip gives added strength and prevents bulky corners in thestitching operation.
Where puffs are required they should be in keeping with the generalquality of the other substances in the slipper, and heated puffs will bepreferred for heavy grain slippers, whilst the canvas-dextrin types areused for finer fabrics. Spirit solvent puffs and cellulose puffs both havetheir place under controlled conditions.
For lasted seats it will be necessary to use an inside seat supportgenerally cut from fibre or pulp board. Due to the large area involved inbroad fitting slippers it is generally considered necessary to use athree-quarter sole with a graft piece joined underneath the heel of theslipper.
Lasts
Lasts for veldtschoen are of full dimensions with plenty of wood overthe instep and also of broad heel contour. This is in keeping
515
VELDTSCHOEN, WELDED AND MACHINE-SEW SLIPPERS
with the purpose for which the slipper is designed. In addition to the extrawood required through the cross section of the last, the feather edge of thelast is chamfered at an angle of 45° (see Figure 202), for a width of 1
4in.
all round the feather edge up to the heel fitting line for lasted seats, butright round the last for any other type. The object of this is to allow theplatform of the lock-stitch sewing machine to come up close to the lastand give a broader outstanding welt. Heel plates are required on the lastfor the slugging of heels, but no plate is required on the forepart.
Patterns
The production of patterns follows the usual routine of ordinaryshoemaking patterns. Close reference to the design centre line on the lastis required since the extra wood gives a balance of inside and outsideshape on the last so that only under rare conditions are right and leftpatterns necessary.
The lasting allowance on this method varies with the type of leatherused but is generally from 1
2to 5
8in. around the lasting edge.
Making
In order to clarify the method of making we shall study the making of aslipper with a single substance of upper. Therefore, if a lining wererequired it would be combined to the upper material before cutting andthe finished upper would be of one single substance of materialthroughout with the exception of the toe-puff cover and the counterlining.
After the customary method of clicking and closing the making iscommenced (see p. 361) by paste fitting the stiffeners inside the counterpocket. When this has been done the heel portion of the slipper is put intothe seat Hanging machine which presses the upper outwards in keepingwith the moulds on the stiffener. This operation is now carried out on thetoe, the toe-puff being inserted at the same time. Having then formed theshape of the toe and the heel on the toe and heel forming machine theupper is placed over the last to which has been previously attached theout-sole, by the aid of temporary wire grips. The toe is then placed inposition aligning the sole and upper and the two are assembled togetherwith temporary wire-grip fasteners on the veldt assembly machine.Having corrected any faults which have occurred up to this stage the shoeis then presented to the veldt stitching machine, and using a lockstitch theoperator sews the upper to the sole through the channel previously cut onthe sole. The stitching continues right round the shoe and, after channelsolutioning and closing, the shoe bottom is levelled on the veldt levellingmachine.
At this stage the wire grips are removed and, after levelling, the edgesare trimmed; thereafter the slipper follows the usual routine of
516
SLIPPER MANUFACTURE

finishing. This will include slugging on the heel, heel trimming andfinishing, and the removal of the last. After the last has been removed itwill be necessary to insert a sock inside the slipper.
Variations
The first variation to this simple method comes by the use of liningsinside the slipper, particularly linings of raised fabric construction. It willbe readily seen that where the edges of the fabric show on the outside ofthe slipper then finishing with a clean line is difficult. This edge treatmentis overcome by the use of a narrow welt or randing usually cut fromtextiles, pressed fibre materials, plastics or leather. This randing isprepared or purchased by the gross yard length and is fed into thestitching machine through a guide, around the feather edge of the slipperin stitching, so that the upper and lining is sewn between the rand and thesole. Consequently, after trimming, the finished result gives a stout edgeappearance and this edge is fed into the edge setting irons to give a solid,hard-wearing, resistant edge.
The second variation comes from the lasted seat type of veldtschoen. Inlasted seats, the seat flanges, which on sew-rounds were attached to theflesh side of the outsole, are now attached temporarily to the last and at alater stage the heel is ‘Consol’ lasted in the usual manner in order that thelasting allowance of the forepart of the slipper may be turned outwards.The benefit of this type of seat lasting comes from the closer fittingcounter. Should this method be employed, the shape of heel seat of thesole requires care in designing so that the rear view of the slipper is apleasing one with a gentle ranging from the broader forepart to the scatshape so that the mannish appearance is continued from the back view.Care also must be taken in the alignment of the sewing operation to giveclean finished comers, particularly when a rand is employed as a mockwelt.
Another variation comes in the temporary attachment of the upper tothe sole. Some people prefer an adhesive method of attaching rather thanthe wire grip method with its consequent wear upon the cutters of thesurplus upper trimming machine.
Should this adhesive method be employed, care must be taken in thepreparation of the sole edge so that the adhesive is in the correct conditionwhen brought into contact with the upper, avoiding pleats in the lastingoperation.
A further variation to this veldtschoen method is achieved by using athinner type of midsole and sewing aloft in the stitching operation. Then,after insertion of a shank in the waist, an outer sole is applied by theordinary welded attachment procedure. The advantage of this method ofmaking is seen when the slippers are required to be repaired after wear.
Yet another variation of this method is carried out by the making
517
VELDTSCHOEN, WELDED AND MACHINE-SEW SLIPPERS

of a lining complete with sewn-in sock, and attaching the outside of theslipper to the completed lining. In the veldtschoen process the lined upperis placed over the last and a fibre seat-piece attached to the heel seat of thelining as it faces the outsole. The upper is then lasted by turning the edgeoutwards all the way round the shoe. The upper and sole are now stitchedtogether by the sew-round process, after which the trimming operationsare carried out and the resultant slipper has a very pleasing effect inside.This method is usually employed where linings are heavy pile fabrics.
If made by any of these methods, the finished slippers are flexible andhave very few metallic fastenings left in them, apart from those used forthe attachment of the graft piece on the sole, for the attachment of the heellift, such as slugging wire, nails for the loose nailing machine, or ‘Consol’lasting tacks around the seat. For all these methods of veldtschoenmaking, the use of heavy fabrics with raised pile linings is satisfactoryand the soft heel and broad measures inside the slipper are a great comfortto the wearer.
WELDED AND MACHINE-SEWN SLIPPERS
The manufacture of slippers by machinery has brought special purposefootwear within easy reach of the purse of even the poorest of thepopulation of the world. This mass production method of assembly hasgiven the comfort and ease of slippers to those who otherwise could nothave afforded the speciality footwear required.
In machine lasting there is virtually no limit to the types of materialsthat can be used and the purposes to which the slippers can be put. Withstout sturdy uppers, slippers made by this method are used for potteringabout in the garden, for the manual operations around the home orworkshop and their utilitarian purpose is in sharp contrast to the heavyworking boots, which are discarded on arrival at home. The sturdinessand stoutness of this machine-sewn footwear will respond to the strongmasculine development of the foot which has taken place through themanual labour of the populace.
Machine lasting has been a boon to many people in so far as it has beenpossible to create a slipper which, being flexible in wear, and havingsturdy materials will give plenty of foot movement inside the slipper forthe more laborious type of work. Also under this category we can includethe whole of the activities of growing juveniles and the fuller necessitiesof household duties of man and woman alike. We can widen it still furtherto embrace nurses’ shoes for hospitals, special footwear for people incanteens, kitchens, bakehouses, and inmates of institutions. Footwear ofthis type is also manufactured for use on ships and for work in the paddyfields in hot countries; also for gymnasium footwear and for games suchas bowls, cycling and the like.
518
SLIPPER MANUFACTURE

Whilst the operations of manufacture are very similar to those for thecheaper class of walking shoes as described in Chapter 22, neverthelessin the slipper the requirements of bottom filling, the correct choice oflining materials, and the application of strain to the variety of materialsused are of paramount importance. Consequently, this section calls forspecial treatment as distinct from ordinary footwear.
The choice of lasts is most important for this type of manufacture. Theusual type of gap spring last with a metal plate will be used but the shapeof the bottom is very important. Whereas in shoes it is permissible to havea rounded plate on the bottom of the last, for machine-sewn slippers thereare great advantages in having a more fiat bottom and particularly a fiatplate at the seat. The amount of toe spring required is greater for this
method of manufacture than for normal shoes or other types of slippers.The comb of the last should be well defined with extra wood so that acentre line is central over the comb of the last independent of whether thelast has a straight inside line or a more balanced uniform toe shape.
In designing footwear on this type of last it is necessary to design a tighttop line. This is made easy by the wood on the last being plentiful oneither side of the heel bone and also the high comb previously mentioned.In pattern cutting it is necessary to draft or spring the patterns towards thehigh front in order to assist the lasting operations. Footwear made on thistype of last is generally cylinder bound with galloon type binding, or afolded edge is used on leather linings. In either case it will be necessary toreinforce any corners on the patterns such as low vamp curves on a man’sAlbert slipper.
519
VELDTSCHOEN, WELDED AND MACHINE-SEW SLIPPERS
Figure 253. Men’s slippers. a Machine-lasted Grecian slipper with weldedsole. b Machine-lasted Grecian slipper with platform collar, force lasted.
c Grecian indoor turn. d Veldtschoen Albert tab slipper.

Upper leathers are generally made from kip or sides, in attractiveimitation (printed) reptiles or else from whole skins such as sheep or goat.The goatskin bears a familiar grain pattern which is retained in thefinished slippers. Sheepskins can either be embossed or plated plain. Ifthey are to be finished smooth then the opportunity can be taken in thefinishing processes in leather dressing to give a starch finish on thereverse side which helps greatly to prevent opening of grain in lasting.
Where fabric linings are used these are generally of raised swansdown,velours or wool cloth. In every case it is better to have a well-balancedcloth with equal strength in the warp and weft in order to avoid breakagesdue to the amount of springing put in the pattern.
For men’s slippers the most popular patterns are the Albert tab and theGrecian (Figure 253 a, b). The Albert tab slipper generally has awhole-cut swansdown lining and a galloon bound edge. The Grecianslipper usually has a folded or bagged edge and orthodox methods ofclosing are employed. The majority of operations are the same forslippers of this class as for shoes.
Imitation moccasin fronts are often used on ladies’ slippers and for thepleating and cording special machines are available. In ladies’ slipperswith a low heel it is customary to sew a leather cover for the wooden heelsto the upper before lasting, thereby forming a pocket for the insertion ofthe heel.
Ward and hospital slippers made on this principle are generally cutfrom glacé kid. Owing to the stretchy nature of the material it is foundnecessary to reinforce the kid on the back with an adhesive backer whichis attached by the aid of a heated iron plate.
After assembly of the uppers in the closing department we turn ourattention to the bottom stock required. Most important is the insole whichdoes not need to be strong in itself since the upper and sole will be weldedor sewn together into a complete whole, yet the insole must support theslipper until such time as the sole has been attached. It is necessary,therefore, to test such materials as are used whether pulp boards, fibrecompositions, combinations of leather layer, or belly leather. Thematerial must be tested for its ability to hold the stitches which are later tobe used or to hold the lasting tacks or cement without laminating.
All other components are of grade equivalent to the life the slipper hasto endure for the purpose for which it has been designed, and somanufacture of this slipper proceeds on orthodox lines of ordinaryshoemaking as already described in Part VI of this book.
Lasting machinery is employed, the pull-over first pulling the upperover the last and temporarily attaching it to the insole, after which the‘Consol’ and seat laster are used for attaching the upper permanently tothe insole with lasting tacks. Variations of this method are available, suchas cement lasting, or staple side lasting, or wire bracing around the toeand heel.
520
SLIPPER MANUFACTURE

After lasting, the bottom is filled, wood shanks and compositiongenerally being used. Bottom filling should be firm so as to resist themovement taking place in wear.
The method of sole attachment chosen will depend upon the purposefor which the slipper is being made. There is a choice of a variety ofmethods according to the nature of the material, and these will now beconsidered.
The use of vulcanised rubber composition soling materials, whethervulcanised on or off the shoe, has to be considered as they give a hardwearing yet soft and springy cushion tread; the use of this type offootwear for purposes requiring a great deal of bending and kneelingmust also be considered. These soles can be attached to machine-lastedfootwear but are not ideal for sewing purposes. They are more suited tocamel-hair and felt slippers already described in Chapter 38 (Figure254a, b).
Welded sole materials are a development of the system of adhesiveattaching which came into popularity around 1929. This method ofattaching soles, replacing as it did the machine-sewn attachment, resultedin a far daintier appearance in the finished article, and yet by choice ofmaterials it has been possible to give to the wafer sole edge the same wearthat otherwise was achieved by one of much stouter appearance. Weldedor cemented footwear, therefore, is to be found at popular functions suchas dances, cocktail parties, and on other formal occasions where lightfashion shoes are essential. It is also the popular choice for men’s slippersfor indoor use, and whilst not carrying the substance of the machine-sewnattachment which is
521
VELDTSCHOEN, WELDED AND MACHINE-SEW SLIPPERS
Figure 254. Men’s slippers. a Camel cloth zip bootee with welded pre-vulcanised sponge rubber sole. b Felt and leather machine-sewn house boot.
c Machine-lasted welded sole zip bootee.

more suitable for garden wear, yet the gracefulness of the line andcomfort is expressed in slippers of this type and is appreciated by thewearer (Figure 254b, c). Soling material for this type varies fromlatex-bonded leather composition boards, to specially prepared andspecially tanned shoulder leathers.
The requirements for any of these types of materials for slippers isflexibility. This is generally embodied as an integral part of the materialitself but can be artificially produced by the use of slashing on the reverseside of the sole providing the substance is satisfactory for this purpose.
When the sole has been prepared to the pattern designed to lit theupper, there is a choice of using pre-finished soles or finishing on theslipper itself. A combination of these two is mostly used by rounding thesoles to the close approximation of the finished slipper and then roughingthe reverse side of the sole on automatic machinery. The coating of thesole and upper after roughing is a standard method employed for anyother type of footwear and the adhesives used vary with the type ofmaterial, but either the pyroxylin cellulose or latex types are suitable.Having attached the sole the normal method of finishing shoes isemployed through various stages of trimming, setting, staining,polishing, socking and boxing.
The machine-sewn method of attaching is exactly the same for slippersas for shoes. Greater care must be taken, however, of the correct tensionin Blake sewing due to the flimsier types of insoles used, and also to thecorrect fitting of feet and forms on the ‘Cyclops’ Levelling Machine inorder that the toe spring shall be maintained and that the arch line shall besuch that the flatter type of wood shanks that are used shall not bedistorted in levelling.
It is customary to attach heels on a slugging or loose nailing machinefrom the outside of the heel. This means that the insole must be reinforcedat this point, or else be made of such a compactness in fibre that the burrof the slug or rivet will hold without damage to the hose of the wearer.The stouter kinds of footwear including those made for public institutionsare made on this principle.
522
SLIPPER MANUFACTURE
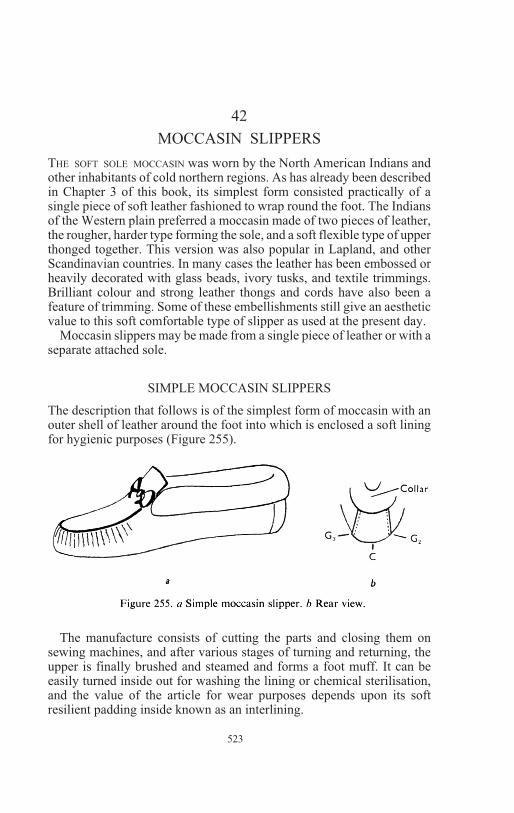
42
MOCCASIN SLIPPERS
THE SOFT SOLE MOCCASIN was worn by the North American Indians andother inhabitants of cold northern regions. As has already been describedin Chapter 3 of this book, its simplest form consisted practically of asingle piece of soft leather fashioned to wrap round the foot. The Indiansof the Western plain preferred a moccasin made of two pieces of leather,the rougher, harder type forming the sole, and a soft flexible type of upperthonged together. This version was also popular in Lapland, and otherScandinavian countries. In many cases the leather has been embossed orheavily decorated with glass beads, ivory tusks, and textile trimmings.Brilliant colour and strong leather thongs and cords have also been afeature of trimming. Some of these embellishments still give an aestheticvalue to this soft comfortable type of slipper as used at the present day.
Moccasin slippers may be made from a single piece of leather or with aseparate attached sole.
SIMPLE MOCCASIN SLIPPERS
The description that follows is of the simplest form of moccasin with anouter shell of leather around the foot into which is enclosed a soft liningfor hygienic purposes (Figure 255).
The manufacture consists of cutting the parts and closing them onsewing machines, and after various stages of turning and returning, theupper is finally brushed and steamed and forms a foot muff. It can beeasily turned inside out for washing the lining or chemical sterilisation,and the value of the article for wear purposes depends upon its softresilient padding inside known as an interlining.
523

Patterns
In order to make this slipper, a last is used which has had a designpreviously drawn upon it (Figure 256a, b). The method of taking a formewill be around the construction line previously drawn on the last and willbe taken by the aid of adhesive tape which, when removed from the last,is laid flat upon a sheet of paper on which is drawn a geometric base.
Method of Cutting a Pattern for a Moccasin Slipper¾Draw a base line A(Figure 257). From this base line erect a perpendicular B, passing throughthe centre of this base line point C. Take a sole shape from the last, drawon this a centre line, and place the heel of the sole shape to point C. Withthe centre line of the sole shape on the perpendicular line. Next transferthe directional lines from the joint position D1, D2, D3, D4, D5, from the lastto the centre line, using a protractor to obtain the correct angle.
We follow out this geometric method of transferring the measures fromlast to paper and design a whole-cut pattern to meet these measures.Measure the back of the last from the seat position to the counter point,and mark on behind the base line A giving point F1. Measure the width ofthe seat position across line G and draw lines up to the counter point F1,parallel to the perpendicular line, giving points F2 and F3. Draw lines fromD2, to F3, and from D4, to F2, and add the width of the collar to this.Continue the collar beyond
524
SLIPPER MANUFACTURE
D
D
D
D D
DD
C C
Collar
F
a
b
Figure 256. a Last with construction lines marked
1
1
1
1
2
2
3 4
5
on it. b Sole of last with joint directional linesmarked.

the base line A for the distance F1 to H2 to give the length of the collar(collars are usually cut separately from lambswool strips and machinedon to the closed upper).
The lining pattern can be cut the same as for the upper pattern or can becut with a back-seam (see Figure 258). Measure the length of the seatcurve from C to G1 and transfer this measure to points J1 and J2. Continuethe same distance behind line C from points F2 and F3, and draw in theback curve to J3 and J4. This method can also be used as an alternative tothe method shown in Figure 257 for a moccasin upper pattern.
The sole periphery line is an abstract one since it is only used fordesign purposes and does not appear either in the finished pattern or theslipper. Whilst the measure of the vamp plug is important, the crimpingoperation is designed to give this finished measure although the patternbears no resemblance to the measure in its first form. Starting from thecentre point on the outside of the
525
MOCCASIN SLIPPERS
D
A
B
C
C
D
D D
D
F F
F
G
GG
H H1
1
1
1
1
2
2
2
2
3
3
3
4
5
Figure 257. Moccasin upper pattern.

pattern the outer line of the pattern becomes the seam of the vamp plug inthe finished slipper. In designing the shape of the outer line of the patternit is well to leave a tiny notch as location point for the fitting of the vampplug. Five of these points are necessary—one each at the top edge of thevamp plug or apron, one in the centre and one half way between each as atransfer point from the last to the pattern. By fixing these location points acheck can be kept on the amount of crimping or pleating that has to beinserted in the upper material prior to sewing.
After design of the whole-cut pattern for the outside, a copy of thispattern is made as a lining pattern, but the outside periphery is reduced toallow for tighter fitting of the top line due to the substance of the liningmaterial. If a padding is to be used between the upper and the lining aseparate pattern for the interlining is also required. A pattern for the plugor apron of the vamp is also needed. This is generally embellished with anembossed design or with embroidery trimming or bead ornamentation(see Figure 259b). Resort is also made to interlacing or the use of plaitedmaterials in which case the necessary design lines will need to be markedon the pattern.
526
SLIPPER MANUFACTURE
C
C
D
D
D
D
D
F F
G
J J JJ
1
1
1
1
2
2
2
3
3
3
4
4
5
Figure 258. Moccasin lining pattern.

Patterns are also required for lining the vamp plug and for the paddingwhich is inserted between the outer material and the lining. In addition apattern is needed for the interlining for the sole shape, and one for aninterlining counter of rubberised or pliable material between theback-seam of lining and upper.
Each of these patterns will require normal seam allowances dependingupon the materials used. `
Materials
Materials for uppers are generally of sheep, goat, cabretta leathers, orof suede splits. These are mostly required in pastel shades when theslipper is to be worn either as a travelling slipper or for use inheavily carpeted rooms.
Where the slippers have to stand stronger wear such as receptionistpurposes in hospitals and surgeries where tiled floors are in use, it iscustomary to make them in natural hide or calf with a leather lining. Inthis case there will be a leather collar with eyelets or thread holes for acord trimming, for which a pattern will be required.
For lining materials with uppers in pastel shades of leather quiltedsatins combined to cotton wool backers or rayon and cotton ginghams areused. These are generally produced in pastel shades to tone with the upperleather being used. For the heavier type of moccasin we shall use a basillining of natural shade. For interlining, soft pressed felts of wool, jute, orof vegetable fibres are satisfactory although these have also been madefrom soft, cold flock, and also from latex foam.
Counters or stiffeners are generally cut from rubberised fabrics to givespringiness without rigidity, although some prefer to use jaconet* andothers strong hessian or buckram interlining to strengthen the backsupport.
Ornaments and trimmings are favoured from narrow fabrics wovenfrom silk and rayon whilst mercerised cotton is acceptable for the cheapergrades. Much use is also made of metallic cloth brocade for insertions onthe vamp plug, and many firms specialise in the production ofembroidered vamps to the slipper manufacturer’s own design.
Bindings for top edges are chosen from animal skin with hair attached,and furs and also from cut strips of shearling, and from silk braid, eachbeing chosen according to the use of the slipper, and each being preparedby finishing and dyeing to tone with the general appearance of the slipper.Leather collars are used on the heavier types of moccasins, and if theedges are left raw cut they add to the primitive native effect.
*Jaconet is strictly speaking a plain cloth of open weave. In the slipper trade, however,
the name is popularly used to denote this type of cloth combined with thin rubber sheet as a
backing.
527
MOCCASIN SLIPPERS

Sometimes moccasins are made from sheepskins with the woolattached and these are simpler to make, but follow the general outline asgiven for the more complicated one, the finished result being in the formof a foot muff.
Preparation of Materials
Slipper fabrics are generally treated with size or starch to give stiffnessto the material, thereby preventing fraying of the edges duringmanipulation in the factory and also preventing pleats forming wherethey are not required. Care must be exercised in the degree of stiffness ofthe material employed for moccasin slippers because the pleats in theforepart of the slipper should have a soft feel and are required to bendaround the sharp curves without cracking.
This is important too in the choice of upper preparation and attentionmust be given to the pliability of the surface of the material to be used.Any starching of the reverse side of the sheep or goat-skins must becarefully watched so that no breaking away of filling material takes placein wear. Latex spraying equipment has been of considerable benefit in thepreparation of materials for this type of slipper, but the sprayingoperation is generally carried out by the suppliers of the material and notby the slipper manufacturer.
Clicking
Firms who specialise in moccasin manufacture prefer hand cutting tomachine cutting because of the large areas involved and the small relationof the cutting cost to the price of the finished article. For fittings andvamp plugs, the ordinary type of clicking press is used with steel dies.Lining materials are often cut on the band-knife cutting machine, andeffective work is achieved by this means on soft and fluffy materialsusing card patterns.
For moccasins the appearance of the finished article is much moreimportant than the stretch in the material; therefore, the cutter is mostlyconcerned with the lay of his pattern on the material rather than thequality of the material he is using, other than the surface appearance.
Preparation for Closing
Materials leaving the cutting room have to be prepared for closing bythe size marking, attaching of brand, and reference labels, jointing andoverlooking of bindings where required, gimping of fittings and pleatingof the vamp line at its meeting with the vamp plug and embroidery ofplugs. These operations are generally carried out in a special departmentwhere the hand-work involved is done in more pleasant surroundingsthan with the noise of machinery in the closing department.
528
SLIPPER MANUFACTURE

Closing
This generally commences with the lining preparation. lf a sockpadding is used this is stitched to the lining on its reverse side after whichwe have the closing of the lining back-seam and the sewing in of thecounter lining. The lining so prepared is now placed over a replica of thelast and the interlining is paste fitted on to the lining.
The upper is then prepared by the closing of the back-seam and stayingthe crimping. Crimping is of two kinds. In the first method the upper ispassed through carefully prepared serrated wheels which crimp therequired amount which has been arranged by the size of wheel in relationto the length of the crimp line which has to be reduced. At this stage anadhesive tape is pressed on the back to hold the crimp in position.
On the second type of crimping the procedure is through heatedserrated wheels after which a cord is sewn on the back of the crimpingwhich holds the pleats in position for stitching in its later stages. Thesecond method is most applicable to heavier types of uppers and to themethod of closing where the plug is sewn on to the upper before the upperis attached to the lining.
We now revert back to our description which precedes the first methodof crimping.
The upper having been closed at the back-seam, and any collar or outertrimming having been put into position, the closed upper is then laid overthe fitting block or last replica, and paste fitted together with the lining onthe last.
The previously prepared vamp plug is now galloon or braid bound,ready for fitting on to the paste fitted upper. Having been paste fitted it isthen sewn into position through the lining and the upper, after which thetop edge is treated as specifications, then follows the fur binding,trimming, combing, or electrification, according to the type of materialused.
Variations in Closing
One variation resorted to is to make this type of slipper by a ‘heldtogether’ method instead of paste fitting, but the result is not nearly sogood, and great care must be exercised in the training of operatives forthis type of work. On mass production, however, this is often done as itincreases the output and cheapens the product.
A further variation from the standard method is the preparation of thelining with interlining, the lining having the vamp plug lining attachedeither all in one piece with itself or attached as a separate piece before theupper is attached to the vamp plug.
Another variation in method is brought about by the lining being madeas a slip-lasted lining with a padded sock seamed to the toe lining beforecoming into contact with the upper. The pattern making for this type ofslipper will vary for the lining from the previously outlined method. Inthis case an insole shape is taken
529
MOCCASIN SLIPPERS

and the seam allowances added for the upper and lining attachment. Thelining forme is also taken from the last and seaming allowances added.When the linings have been cut true to pattern, the upper and sock liningare machined together ready to close in, with the outside edge of the sewnupper. No trimming allowance is required because on this type of slipperfur or braid binding are used and the net top line is satisfactory. Thecrimped upper is closed completely by the attachment of the vamp plug,and the closing of the back seam. When this method is carried out, thestring insertion on the reverse side of the crimping which was put on bythe aid of a zigzag closing machine, is more suitable than the tape methodchosen for the simpler method of making. The lining is then inserted as acomplete unit into the closed upper and the top edge finished according torequirements by binding or trimming, the slipper being completed bysteaming or hot-air blast to give the final shape after insertion of the last.Lasts for steaming are not required to be the exact shape of the modelfrom which the patterns were cut but the top edge must be close up tothese measures in order to give the cling necessary for a satisfactoryfinished appearance. After the lasts are removed the slippers are ready forboxing and despatch.
Still a further variation of this method is when the slipper is made fromwhole shearling or wool sheepskins, or from imitation which has a pilefabric previously combined to the outside material. In these cases theprocedure is much simplified for closing and making since only onesubstance of material is involved but the method of cutting patterns foruppers is followed as previously outlined, and the making-up follows thegeneral procedure of the more difficult type of lined slipper.
MOCCASIN TYPE SLIPPERS WITH SEPARATE ATTACHEDSOLES
There are three main types of separately attached soles to moccasinslippers.
First Method
The first type of slipper is where the moccasin upper is made on theprocesses previously described with the upper going right underneath thefoot, and after manufacture a welded or sewn sole is attached to the partwhich comes in contact with the ground (Figure 259a). By this method itis possible to have a longer wearing slipper but some of the flexibility andsoft comfort is lost in the sole attaching process.
Second Method
The second variation of this method is to attach on the outside an extrasole of the soft padded type (Figure 259c). This is generally stitched to theupper before closing. In the pattern cutting for this
530
SLIPPER MANUFACTURE

particular type of slipper it is as though a slit were made down the centreof the whole-cut pattern and the two ends joined together on the inside ofthe slipper later (Figure 260). Actually in practice a separate method offorme construction is taken whereby the upper and the portion that goesunder the sole are cut on a sprung pattern in two halves, resulting in aconsiderable saving of materials in the prime portion of the skin.
Figure 260a shows a standard with the sole shape positioned along thefeather edge of the upper. The seam follows line V along the sole, so thatone half of the sole shape has to be sprung to fit along the feather edge ofthe upper.
Figure 260b shows the shape of a pattern with the sole shape sprung onto the upper pattern. As in other types of moccasins the vamp plug is cutseparately. The two sides are first joined together down the centre seamby a zigzag machine from points W to X. Then points X to Y and W to Zare closed and silked.
The vamp plug is then attached to the main part after crimping and thepreviously prepared soft padded sole is attached on a vertical type hornmachine (Figure 261). The lining, cut by the same method, is made wholeand machined in around the top edge and bound, or a collar is attached.Sometimes heels are attached to this type of slipper in which case they aregenerally made of wood, cellulosed or covered with upper material, witha leather top-piece, and for attaching purposes a seat sock of fibre-boardis fixed inside in order to hold the heel pins.
531
MOCCASIN SLIPPERS
Figure 259. Various types of ladies’ moccasin slippers. a Machine-lastedmoccasin with welted sole. b Slipper with sole and upper in one piece withornamented plug attachment on vamp. c Slipper with single sole sewn through
the upper with padded stock.
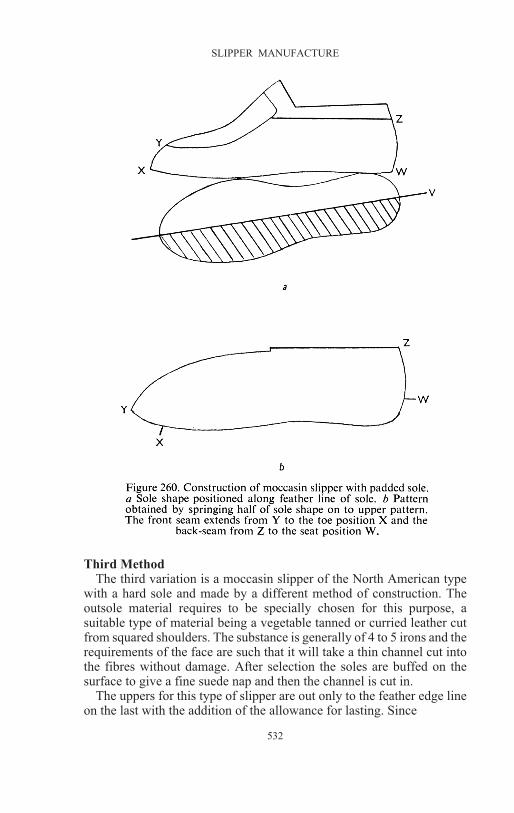
Third MethodThe third variation is a moccasin slipper of the North American type
with a hard sole and made by a different method of construction. Theoutsole material requires to be specially chosen for this purpose, asuitable type of material being a vegetable tanned or curried leather cutfrom squared shoulders. The substance is generally of 4 to 5 irons and therequirements of the face are such that it will take a thin channel cut intothe fibres without damage. After selection the soles are buffed on thesurface to give a fine suede nap and then the channel is cut in.
The uppers for this type of slipper are out only to the feather edge lineon the last with the addition of the allowance for lasting. Since
532
SLIPPER MANUFACTURE

these uppers are sewn to the sole without the last being inserted theamount required for lasting purposes is generally about 3
8in. on fine goat
uppers with slightly less for softer Persian leathers.Upper making for this class of slipper takes the usual form of
machine-sewn slippers. Pattern cutting also follows the usual routine, butan extra point to watch is the design of the pocket for the hidden heelwhich is usual in this construction.
It has to be borne in mind that the feather edge line of the upper is netplus a seam allowance for the total measures of the heel line, whereasafter making a pattern for the heel cover to join this line the 3
8in. lasting
allowance has to be added to the heel pattern for the portion of the seatand not to the upper pattern. After these allowances are made it is usual torange the completed pattern, with heel attached, in a gentle curve to jointhe lasting allowance line that was added to the feather edge of theforepart of the pattern. It will be seen that the only need of a seamallowance is exactly where the heel pattern fits and this seam allowanceof 1
16in. added to the height of heel at the centre of the back of the pattern,
running out to the net line on the forepart, gives a finished pattern ofdifferent appearance from that usually encountered for other classes offootwear.
After the parts have been assembled in the closing department thecompleted upper is passed to the making section, generally located in theclosing department. At this stage the upper is turned inside out and thelining is pulled through the top line of the slipper in order to allow freeaccess to the inside of the slipper. The upper is then centralised on thesole and is sewn on a post machine through the channel to the lastingallowance. This is a highly skilled operation but experienced workers cansew accurately through the channel keeping to the 3
8in. lasting allowance
around the edge, after which trimming over the seams is sometimesnecessary but should not reach undue proportions. At this stage the seamsso formed are rubbed down and then the slipper is turned, and with thelining still pulled outwards, the heel is fitted inside the slipper.
It is usual to use a solutioned heel made of skived or bevelled-edgecork, or light-weight wood such as obeche. After fitting the heel thelining is pressed inside the slipper and solutioned into
533
MOCCASIN SLIPPERS

position. After this has been carefully done the last is inserted for the firsttime. This type of last has to stand up to steaming or to hot-air blasts and itis customary to use lasts which either have a very wide forward break foreasy entry or which are made with the rear portion detachable completelyin order to force the last forepart right up into the toe of the slipper.
After lasting, the uppers are steamed or passed through a current ofwarm air to settle the fibres on to the last form. Afterwards the last iswithdrawn and a previously prepared sock is pasted inside the slipper.They are now ready for boxing and despatch to the customer.
This type of manufacture produces a slipper which has long life withmaximum comfort and flexibility.
534
SLIPPER MANUFACTURE

43
SHEARLING AND WOOL SHEEPSKIN
SLIPPERS
SHEARLING SKINS WITH FINE curled wool and sheepskins with wool left onwhich has been treated by a process of electrification to make the woollook like hair are regarded as choice materials from which to manufactureslippers. In some cases the skins are used with the wool outside so thattextile linings of fine quality are used next to the foot and for this type ofslipper pastel shades are used in the dyehouse in order to give a pleasingfinish to the article.
In other types of slippers the wool outside is used for trimmingpurposes for cuffs and collars whilst in the majority of cases the wool ismade up into the slipper next to the foot either as a lining or as a completeslipper.
Wherever the slipper is completely made of shearling the skin is suedefinished on the flesh side in order to give a pleasing appearance to thefinished product. In addition to the sueding of the skin, dyeing is done tothe required shade which in popular fancy varies from ecru through thepastel shades to deep brown and burgundy.
There is a wide scope for this material for ladies’ mules to be worn withdressing gowns and negligées and whilst having a frivolous look they areadmirably suited for the well dressed person of leisure on specialoccasions. Such footwear is also ideally suited for the nursing home orthe fashionable hotel.
The warmth of shearling skins has been known ever since man startedto hunt for his food; the use of modern tanning methods, however, hasbrought this comfort, without the obnoxious smell, right into theseclusion of ‘My Lady’s Boudoir’. Those who served in the air in the1939-45 War were grateful for shearling, and since the war its use forcivilian purposes has increased, the warmth and cheerful attractiveness ofthese slippers being well known.
Method
The method of making slippers of shearling varies according to thepurpose to which the slipper is put. Drawn cords are used formanufacturing a whole-cut moccasin type of slipper with heel attached.
The method of making this slipper is in accord with the methodemployed for an ordinary sheepskin or goatskin slipper with a separatelining and heel pocket. A whole-cut pattern is made but the part that hasto come over the surface of the foot at the toes has loops or holes fixedaround the edge of the shearling at approximately
535

3
16in. from the edge and through these holes a strong cord is fitted which,
when pulled tight, pleats the upper in comfortable curves around thevamp.
The back portion of the slipper generally has a thonged back-seammade by hand, and the top edge is finished with a roll collar.
On some models the cord is plaited through the collar by a series ofloops which, when drawn tight, fit very close to the foot. Animprovement is made in this type of drawn cord shearling slipper when aseparate heel unit is attached with heel pins to a heel stiffener unit,previously prepared, which is fitted in the inside heel pocket of theslipper.
The manufacture of this slipper is very simple, the equipment requiredbeing mostly hand tools, and the finished slipper is all that could bedesired for long life and comfort purposes.
A further development of shearling type slippers are those made on theslip-lasted process. By this method an upper is designed on the lastwith 1
8jn. sewing allowance for the upper on to the sock. The sock is sewn
to the upper after closing the upper to the design required, and then theplatform cover is sewn on to the finished upper. After bringing the upperover the last an insole is fitted underneath the platform and then theoutsole attached to the platform either by adhesive methods or byoverlock sewing.
A combination of this method is used along with that of ordinarylasting when it is desired to put on an heel above 1
2in. in height. For these
requirements machine-sewn lasted methods are chosen for the backportion of the slipper whilst the slip-lasted method is used for theforepart.
The heel-seat having been lasted in the usual manner, the last iswithdrawn and the heel attached and the sole finished, as for a Louis heelshoe made by an adhesive process.
Mules
Attractive mules, with or without a sling-back strap are often made inshearling. These are particularly pleasing when the shearling has beenused as a lining, and the outside covering is of raised velvet or rayon (seeFigure 249b, p. 502).
The method of making here is generally that of machine-sewnconstruction with a soft flexible leather sole as the outer sole. Othermethods of making are the hand thonging of the shearling for all seamsand attaching the uppers by thong to a prepared sole with a walledconstruction. This method of sole building requires care, particularly inthe choice of the construction of the walling material so that it is not toostrong to tread over the outsole in wear, yet strong enough to support theweight of the foot against the pull of the front.
A further method of manufacturing shearling slippers is on theveldtschoen principle but with a platform cover attached to the
536
SLIPPER MANUFACTURE

made-up upper before sewing the upper to an insole on veldtschoenmachinery. The platform cover can be of sheepskin or of fabric, itspurpose being to cover the raw edges of the thick pile of the shearlingupper prior to the attachment of the sole.
Tests on Shearlings
It is important when manufacturing shearling or wool sheepskinslippers to have the skins tested for salt content. A substantial amount ofwork has been carried out on this subject by the British Boot, Shoe andAllied Trades Research Association, and they have recommended thatthe maximum figure for soluble salts (measured as sulphated ashed watersolubles) should be l per cent, as for fabric shoe linings. A shearlingshowing a higher figure than this is likely to produce white deposits onthe upper, particularly at the vamp and above the heel where the salt hasbeen carried in solution by the foot perspiration.
Another important point is that grease stains are also likely to appear onuppers if the fat content of the shearling lining is more than 8 per cent (seeSATRA Monthly Bulletin for November, 1949, for further details of boththese effects).
537
SHEARLING AND WOOL SHEEPSKIN SLIPPERS

BIBLIOGRAPHY
Shoe Design
BALLY SHOE FACTORIES LTD. The Bally Exhibition, Felsgarten (Schoenenwerd,1948).
BRITISH UNITED SHOE MACHINERY CO. Shoe Fashion Through the Ages (Leicester,1933).
BROOKE, I. A History of English Footwear (London, 1949).C.I.D. ‘Design Training’ Nat. Instn. Boot Shoe Ind. J.* 3(1946)l70.FRASER, G. and RAYNE, E. ‘Design in Industry’ Ibid. 3(l947)349.HALL, J. H. ‘Design for Bulk Production’ Ibid. 4(1949)33.MCLACHLAN, N. W. ‘The Mechanics of Women’s High·Heeled Shoes’ Ibid .
2(l941)35l.WATERER, J. W. Leather in Life, Art and Industry (London, 1946).WILCOX, R. T. The Mode in Footwear (London, 1948).WRIGHT, T. The Romance of the Shoe (London, 1922).
Lasts and Shoe Sizes
GREGORY, A. H. ‘Toe Spring’ Nat. Instn. Boot Shoe Ind. J. 2(1936)5l4.MOBBS, H. W. ‘The Development of Last Making’ Ibid. 3(1947)238.‘RATAE’ ‘Co-ordination of Lasts’ Ibid. 3(l946)55.ROBERTS, F. W. ‘The Datum Last’ Ibid. 3(1948)777.SAYER, A. W. ‘Ball to Seat Standardisation of Lasts’ Nat. lnstn. Boot Shoe Ind. J.
3(1947) 13.THORNTON, J. H. ‘The English Shoe Size Scale’ J. Brit. Boot Shoe Instn.* 4(195l)
514.WILKINSON, C. R. ‘Last Development and Design’ Ibid. 3(1948)472.
Pattern Cutting
AKESTER, F. E. ‘An Improved Method of Using the Blocked Forme System ofForme Product1on’ J. Brit. Boot Shoe Instn. 5( l952)l75.
BRADLEY, H. ‘Forme Cutting’ Nat. Instn. Boot Shoe Ind. J. 3(1947)497.BRADLEY, H. ‘More about Forme Cutting’ Ibid. 3(1948)569.BURTON, S. ‘The BUSMC No. 2 Universal Grader ' J. Brit . Boot Shoe Instn.
4(1951)458.RESEARCH STAFF ‘The Blocked Forme System’ Nat. Instn. Boot Shoe Ind. J .
4(l949)l2l.WILKINSON, C. R. ‘Rational Pattern Cutting’ Ibid. 2(l942)385.WOOTTON, F. P. ‘A New Approach to Forme Production` J. Brit . Boot Shoe
Instn. 4(l95l)588.
Materials
BATEMAN, L. C. ‘Adhesives for Cemented Footwear’ Nat. Instn. Boot Shoe Ind. J.2(l936)l 30.
BORDOLI, (Ed.) The Boot and Shoe Maker, Vols. 1 and 2 (London, 1935).BRADLEY, H. ‘About Moisture’ Nat. Instn. Boot Shoe Ind. J. 3(l946)l75.BRADLEY, H. ‘Know Your Leathers’ Ibid. 3(1947)363.FURNESS, S. ‘Quality Factors for Shoe Linings’ Ibid. 3(l946)l29.HALL, A. J. Standard Handbook of Textiles (London, 1950).HUGGETT, L. P. ‘Properties of Shoe Leather (1)’ Nat. Instn:. Boot Shoe Ind. J.
3(1948)584.JONES, F. L. ‘Properties of Shoe Leather (2)’ Ibid. 3(1948)732.
* The National Institution of the Boot and Shoe Industry (Incorporated) Journalis now published as the Journal of the British Boot and Shoe Institution.
539

KORNREICH, E. Introduction to Fibres and Fabrics (London, 1952).LEWIS, T. R. G. and RATCLIFF, E. Science of Shoe Trade Materials (Leicester,
1951).LIVINGSTON, G. H. ‘The Development of Thermoplastic Shoe Filling Materials’
Nat. Instn. Boot Shoe Ind. J. 3(1946)l l l.OSTICK, E. Textiles for Salesmen (London, 1948).PUDDLEFOOT, L. E. ‘Compounded Latex Adhesives’ Nat. Instn. Boot Shoe Ind. J.
3(l948)662.SALT, H. Substitutes for Leather (H.M.S.O. London, 1946).SPEIRS, C. H. Leather for Shoes (London, 1952).TARBERT, D. J. ‘Plastics with Reference to Footwear’ Nat. Instn. Boot Shoe Ind. J.
3(l9 6)l7.THORPE, G. ‘Lastex’ Ibid. 3(1948)794.WOODROFFE, D. Leather Manufacture (London, 1950).WOODROFFE, D. ‘Plastic Finishes on Upper Leather’ Nat. Instn. Boot Shoe Ind. J.
4(l949)45.WOODROFFE, D. (Ed.) Standard Handbook of Industrial Leathers (London, 1949).WOODS A. D. ‘Rubber Solutions in the Shoe Industry’ Nat. Instn. Boot Shoe Ind. J.
4(l949)10.
Clicking
KORN, J. ‘Breakages of Upper Seams’ Nat. Instn. Boot Shoe Ind. J. 2(l939)243.WOOTTON, F. P. ‘Economy in the Use of Upper Leather’ Ibid. 2(l94l)329.VARIOUS AUTHORS ‘Technical Report on Switzerland’ Ibid. 3(l947)389.
‘Press Cutting Knives in Sweden’ Ibid. 4(l949)l46.‘Saving on Press Cutting’ Ibid. 4(l950)242.
Upper Costing
DICKENSON, H. ‘Upper Costing’ Nat. Instn. Boot Shoe Ind. J. 2(l939)225.HALL, K. W. ‘The Effect of Size on Cutting Areas’J. Brit. Boot Shoe Instn. 4(l95l)
62l.HALL, K. W. ‘A Simplified Method of Assessing Upper Leather Cutting Allow-
ances’ Ibid. 5( l952) l26.LEDGER, R. F. ‘The Krippendorf System’ Nat. Instn. Boot Shoe Ind. J. 3(l948)547.LONG, J. V. A. ‘Upper Costing’ Ibid. 4(l950)303.
Closing
FACEY, I. M. S. ‘The Importance of the Closing Room’ J. Brit. Boot Shoe Instn .4(l95l)53l.
HUTCHESON, G. A. and MORLEY, J . F. ‘Operative Training for Closing RoomWork’ Nat. Instn. Boot Shoe Ind. J. 3(l948)704.
KORN, J. ‘Breakages of Upper Seams’ Ibid. 2(l939)243.LEDGER, R. F. ‘The Stampress Folding System’ Ibid. 3(l948)654.LOWETH, C. F. ‘Closing Room Equipment’ Ibid. 3(l948)750, 8l3.MADDOCK, W. W. ‘Organisation of the Closing Room’ J. Brit. Boot Shoe Instn.
5(l952)23.SAMUEL, W. ‘The Closing Room’ Nat. Instn. Boot Shoe Ind. J. 2(l937)l77.
Bottom Stock
AGUTTER, G. B. ‘Cutting Insole Bellies’ Nat. Instn. Boot Shoe Ind. J. 4(l950)385.AGUTTER, G. B. ‘The Use and Abuse of Water in Shoemaking’ J. Brit. Boot Shoe
Instn. 5(l952)62.B OND , G . W. ‘ lnne r so le s and Foo t Comfor t ’ Nat . Ins tn . Boo t Shoe Ind . J .
3(l948)592.BREAM, E. S. and BROOKES, R. H. Shoe Bottom Costing (London, 1936).EDWARDS, R. S. ‘The Microscope and Sole Leather’ Ibid. 2(l936)l36.H UMPHREYS , G . H . W. ‘Bo t tom Stock—the Tanner ’ s Po in t o f View’ Ib id .
3(l948)803.HALL, E. F. ‘The Tempering and Drying of Sole Leather’ Ibid . 3(l948)64l.
540
BIBLIOGRAPHY

LLOYD, D. J. ‘Judging Quality in Sole Leather’ Ibid. 2( l936)l11.‘RATAE’ ‘The Preparation of Welted Insoles’ Ibid. 3(1946)l60.‘RATAE’ ‘Sole and Insole Moulding’ Ibid. 3(1947)232.‘RATAE’ ‘Welt Preparation and Welt Sewing’ Ibid. 3(l947)34l.
Making
BATEMAN, L. C. ‘Adhesives for Cemented Footwear’ Nat. Instn. Boot Shoe Ind. J.2(1936)130 .
GRAVES, A. L. ‘Slip-lasted Manufacture’ J. Brit. Boot Shoe Instn . 4(l95l)594.HODGKIN, A. E. ‘Shank Construction’ Nat. Instn. Boot Shoe Ind. J. 2(1942)438.LAKIN, C. N. ‘Leather Mulling’ Ibid. 4(l950)344.LIVINGSTON, G. H. ‘The Development of Thermoplastic Shoe Filling Materials’
Ibid. 3(l946)l l1.LUCK, J. R. ‘Stiffeners’ Ibid. 3(l948)743.‘RATAE’ ‘We1t Preparation and Sewing’ Ibid. 3(l947)34l.‘RATAE’ ‘After Welt Sewing’ Ibid. 3(l947)4l2.‘RATAE’ ‘From Rounding to Levelling’ Ibid. 3(l947)479.‘RATAE’ ‘Some Details in the Construction of Open-toe, Open-heel Shoes’ Ibid.
3(l948)769.SWEDISH SHOE RESEARCH INSTITUTION ‘Elimination of Vibrations from Pounding
Machines’ Ibid. 4(l949)209.TAYLOR, T. T. ‘Requirements for Making Cemented Shoes’ Ibid . 3(l946)157THORPE, G. A. ‘The Use of Neoprene for Crepe Soles’ Ibid. 3(l948)712.WEST, A. E. ‘The Inverted Pulling-over Machine No. 6’ Ibid. 4(1949)27.WEST, A. E. ‘The Lasting Machine No. 7 (Bed Laster)’ Ibid. 4(1950)266.
Finishing
HARRIS, J. ‘Edge Trimming’ J. Brit. Boot Shoe Instn. 5(l952)27.WRIGHT, P. F. ‘ Modern Improvements in Shoe Finishing Processes and MateriaIs’
Nat. Instn. Boot Shoe Ind. J. 3(l948)727.WRIGHT, P. F. ‘Waterproof Black Heel Finishes’ Ibid. 4(l949)l19.
Shoe Room
CLARKE, E. J. ‘Shoe Room Practice’ Nat. Instn. Boot Shoe Ind. J . 2(l942)425.DOVE, G. H. ‘Uniform Impression in Sole Embossing’ Ibid. 3(1946)l38.
Slipper Making
GRAVES, A. L. ‘Slip-lasted Manufacture’ J. Brit. Boot Shoe Instn. 4(l95l)594.
541
BIBLIOGRAPHY

INDEX
543
Abrasion resistance, 15abrasives, 396-7activation (of cements), 348, 353, see
also ‘adhesives’adhesive backers, 114, 163, 499adhesives for cemented method, 348,
491-2— — combining fabric, 499— — felt, 506— — folding, 158— — heel flaps, 434— — slip-lasted method, 501— — socks, 452-3— — sole crepe, 320— — sole laying, 301— — stiffeners, 271air permeability, 12-13air press for cemented method, 354-6,
Figures 188-9Albert slipper, 518-22, Figure 253antique dressings, 467-8area, basic cutting, 134, Figure 69— hides, 9— measurement (Russ and Small), 135— pattern, 134— skins, 135assembling, veldtschoen, 362-5, Figure
198attaching, heel, hand, 269— — inside, 386, Figure 212a— — Louis, 433-6·— — outside, 386, Figure 212b— — slippers, 513, 522, 531-3— — temporary, 387, Figure 212c— piece-sole, 313, Figure 158·— top-piece, 387a t t a c h i n g , s o l e , c e m e n t e d m e t h o d ,
348-60, Figures 10, 183, 190-2— — — — slippers, 491-3, 518-22— — hand, 268— — machine-sewn, 333-8, Figures
9, 171-5— — Littleway, 373, Figures 6, 210— — pegged, 342— — riveted, 340, Figures 11, 176-7— — screwed, 341-2, Figures 12,
178-9— — slipper turnshoes, 504, 509— — turnshoe, 368-72, Figure 13— — veldtschoen, 365-8, Figure 14— — slippers, 516-8— — welted, 298-324, Figures 4,
147-57
Back splitting, (Louis heel), 432— tacking, 278, 328
backing cloth (Acme), 113-4, 163— process, 163bagged edge, 163, Figure 72e, fbag method (slippers), 493-5basic cutting area, 134basil, 112beating welts, hand, 268— — machine, 296, Figure 145bed lasting, 283-7, 331-2bellies, bottom leather, 215-7, Figures
102, 104— upper leather, 112bends, 213, Figure 102— long cut, 221, Figure 107— short cut, 219-21, Figure 106binding (edges), 161-2, Figure 72Blake-sewn method, see ‘machine-
sewn method’bleaching, 423block fitting, 164blocking insoles (handsewn) , 260 ,
Figure 119bloom, 468board, cutting, 63, 117boot, development of, 36-7— constructions, 340-4— standards, 85-6bottom filling, handsewn, 268— — machine-sewn, 333, Figure 170— — slipper, 491— — welted, 299-300, Figure 147— levelling, 316-8, 337, 343— making, 422-7— scouring, 419-22— stock, 213-51— — depar tmenta l lay ·out , 246-8— — — management , 246-51— treatment, 419-30bows, 51boxing, 475-7, Figure 242breast scouring (Louis heels), 437breasting heels, 392-3, Figure 216bristle (handsewing), 265British Boot, Shoe and Allied Trades
Research Association, 7, 18, 59,95, 172, 302, 348, 396, 448, 453,457, 468, 471, 473, 537
brocade, 115brogue shoe, closing operations, 195-7— — origin, 138brushing-off, 429buckles, 51-2buckram, 116bunions, 6, 43bunking, 428, Figure 230burnishing heels, 413-4

butted seam, 170butting welts, 298, Figure 146buttons, 52buying findings and grindery (closing),
208— upper leather, 138
Calf, chrome, 109-10— E. I., 112— English, 112— milk, 110Cambridge slipper, 515Canvas, 115Carborundum, 396-7caster knives, 95— sole shapes, 94celluloid toe-puffs, 274cellulose cement, 434, see also ‘ad-
hesives’cement lasting, 349, 493cemented method, 348-60, Figures 10,
183, 190-3— slipper soles, 491-3, 518-22cementing for folding, 158chain-stitch, uppers, 176, 489, Figure 81— — bottoms, 336, Figure 174channel laying, 312— opening, 307, Figure 153channelling insoles, handsewn, 262,
Figure 121— — welted, 229-30, Figure 111— soles, handsewn, 268— — machine-sewn, 235, Figure 112— — welted, 304-6, Figures 150-2chemical interaction between shoe and
foot, 18chrome calf, 109— soles, 505chukka boot s tandard and pat te rns ,
74, Figure 41cleaners, 457cleaning shoes, 17, 474— uppers, 454-61, Figure 236clicking, 107-45— board, 117— equipment, 117— for slippers, 500-8, 528— knife, 118— — press, 131, 508, Figure 252— press, 130-1— room management, 134-45— technique, 117-33closing, 149-210— brogue shoe, 195-7— Derby shoe, 191-4— Dowie slipper, 489-90— indoor turn slipper, 509— moccasin slipper, 528-30— Oxford shoe, flat, 185-91
closing Oxford shoe, round, 197-9,Figures 90-3, 99
— room layout, 202-5— — management, 202-10— s1ip·1asted work, 500-1— whole-cut shoe (court), 199-200colour, edges, 411-2— footwear, 39— heels, 411-2— marking, 151-2— variations in leather, 129combined linings, 113-4, 499conditioning, see ‘mu1ling’‘Conso1’ lasting, 281, 329-30conveyor systems, 378-9, 441-2, 482corduroy, 115corrugating waists, 428-9costing uppers, 134-8cot ton fabrics , 114-6, see also ‘ma-
teria1s’— thread, 171court shoe (ladies`), closing operations,
199-200— — standard and pat terns , 75-6,
Figure 42crepe fabric, 115, 499— rubber, 18— — sole attaching, 319-22, Figures
162-3crimping, 529crowing, 428crup, 111curtain crepe welted method, 321-2,
Figure 164cut-outs (upper), 38cutter, edge trimming, 402-10, Figures
221-5— rabbet, 409, Figure 225cutting fabrics, 118-20, Figures 58-60— leather , bot tom, 213-24, Figures
104-10— — upper, 124-33, Figures 63-8— tacks, 450cylinder machine (closing), 184, Fig-
ure 89
Dance shoes, 17-18decoration of uppers, 38-9Derby shoe, closing operations, 191-4,
Figures 94-7— — standard and patterns, 71-2,
Figures 37-8design, 3-53, 80, 87— Dowie slipper, 488— indoor turns, 506— on the last, 84, 87doubling, 163Dowie, James, 7, 53Dowie slipper, 487- 95
544
INDEX

drafting (hand lasting), 256, Figure117
dressing uppers, 463-8, 511drill (fabric), 114drying, 277, 491— welts, 296-7duck (fabric), 114, Figure 57dust extraction, 439-40
Edge colouring, 411-2— setting, 415-8, Figure 228— treatment, bottoms, 401-18— — uppers, 158-63, Figures 71-2— trimming, 401-11, Figures 221-2elasticised leather, 53elasticity, 10electrification of shearling, 535embossing uppers, 39— soles, 450-1, Figure 235evening bottom sections, 225-6examination (shoe-room), 447-50, 472-
4, Figures 234, 241eyeletting, 189
Fabric, cutting, 118-20— interlinings, 113— linings, 113-4, Figure 57— outsides, 113, 115, 487, 498-9,
504, 518facing rows, 188faille, 114, 496fairstitched method, 337-8, Figures 7,
175fashion, 34-53, 87fastenings (uppers), 39, 50-3feather (handsewn insoles), 262, Figure
120felt insoles, 230-1— slippers, 506finishes (bottom), 422-7finishing, 383-442— Louis heels, 436-7— room management, 438-42— sequence of operations, 383-4fitting scales, 57-61— uppers, 164-5fitting-up heels, 245— insoles, 228— lasting, 377— soles, 234flanging veldt seats, 361-2, Figures
194-5— — toes, 364-5flannelette, 114-6flap setting (Louis heel), 437— splitting, 432-3, Figure 231— sticking, 435— trimming, 435-6, Figures 232-3
flat machine (closing), 177, Figures82-6
flexibility, 11—12flint, 397foot comfort, 10-14force-lasted method, see ‘slip-lasted
method’forme, blocked, 82— ‘dead’, 81, Figure 47— geometric, 83— mean, 67-8, Figure 33— slotted, 66-7, 82, Figure 32— solid, 81— ‘sprung’, 82, Figure 47— Wootton’s method, 83Freeman press, 92, 157French binding, 161front cutting (Louis heels), 434
Galloon binding, 161garnet, 397ghillie shoe standard and patterns, 76,
Figure 43gimping, 156-8glue, 434, 453, see also ‘adhesives’goatskin, 109, 111-2grading, bottom sections, 225-6— centre, 99-100, Figure 56— co-ordinated, 98-9— insole, 77, Figure 44— machines, 100-1— principles, 95-100— upper patterns, 78-9, Figures 45-6Grecian slipper, 518-22, Figure 253grease removal, 457— staining (shearling), 537grit numbers (abrasives), 397gum tragacanth, 424, see also ‘adhe-
sives’gussets, 52
Half-sole, 221-2, Figure 108hand-closed seam, 170— lasting, 255-9— welting, 260-9heat insulation (footwear), 14, 535heel attaching, hand, 269— — inside, 386, Figure 212a— — Louis, 433-6— — outside, 386, Figure 212b— — slippers, 513, 522, 531-3— — temporary, 387, Figure 212c— breasting, 392-3, Figure 216— building, 242-4— burnishing, 413-4— colouring, 411-2— coupling, 241-2— fitting (Louis), 433
545
INDEX

heel height, 46-50, 241, 385, Figure 116— Louis, 49, 431-7— pitch, 241, 243, 385, Figures 116,
211— purpose, 46-50, Figures 23-6— scouring, 396-400— treatment (finishing), 392-400— trimming, 393-6, Figures 217-8— wedge, 49, 357, 388, 504, Figure 213,
see also ‘platform’— wood, 387held-together method (closing), 165,
529hide divisions, 213, Figure 102holdfast (handsewn), 262, Figure 120holing (handsewn), 263, Figure 122horse, 111hot blast treatment, 461-2, Figure 238humidity, 276, see also ‘steaming’
Identification marking, 151-3indoor turns (slippers), 505-l3infra-red drying, 348, 491ink, 423-4inseam trimming, 295-6, Figures 143-4insole blocking (handsewn), 260, Fig-
ure 119— channelling, 229-30, Figure 111— — hand, 262-3, Figure 121— cutting, 215-8, Figures 104-5— evening and grading, 225-6— feathering (handsewn), 262, Figure
120— fitting-up, 228— flexing, 233— gemming, 230-l— holing (handsewn), 263, Figure 122— lip cutting and scoring, 232— lip turning, 232— machine-sewn, 232-3— moulding, 233— pattern, 66, Figures 27, 29— preparation, 225-33— — Louis heels, 431-2— rounding, 228-9— — handsewn, 261— scouring, 226— seat rounding and bevelling, 270,
328— shape, 64-5, Figure 29— sorting, 226-8— tacking, machine-sewn, 327, Fig-
ures 168-9— — welted, 270, Figures 124-5inspection, optical, 472, Figure 241,
see also ‘examination’in stock system, 480iron, 214, Figure 103— edge setting, Figure 228
ironing backers, 163— edges, 415-8, Figure 228— sides, 427— top, 427— uppers, 461-2, Figure 238
Janking, 428John, W. D., 460joint girths, 57-9jointing, 328jungle boot, 7
Kangaroo, 111kid, 111kip, 110— side, 112knife, hand, 63, 500— press, bottom stock, 94, 214, 251— — clicking, 131, 508, Figure 252Korean boot, 7Krippendorf system, 136
Laces, 50-1, 475lacing, 475— temporary, 190lamb, 112last, 26-7, 57-62, 80— Dowie slipper, 488— exit devices, 429-30— fitting scales, 57-9— girth scales, 57— indoor turns, 510— internal wedge, 389, Figure 214— length scales, 57, 60— machine-sewn work, 325— marking for pattern cutting, 64-5,
Figures 27-8— moccasin, 530, 534— multi-fitting, 58— pitch, 62, Figure 28— precision grade, 59— slip-lasted work, 496— slipping, 429-30— specification, 62— toe spring, 62, Figure 28— treatment to prevent shrinkage, 510— — — — sticking, 275— types, 429-30— veldtschoen, 365, 515-6, Figure 202lasting, Dowie slipper, 490-1— hand, 255-9, Figure 118— machine, machine-sewn, 325-33,
Figures 166-70— — slippers, 518-9— — welted, 270-88, Figures 129-37— seats, 285-8, Figures 135-7— sides, 281-3, 329-30, Figure 132
546
INDEX

lasting toes, 283-5, 330, Figures 133-4latex, 158, 301, 434, 453, see also
‘adhesives`— foam, 493, 513leather, bottom, 213-4— characteristics, 108-13— elasticised, 53— linings, 112— outsides, 110-1— properties, 8-19— surface characteristics, 15-16levelling bottoms, 316-8, 522— welt seam, 298lifts, seat, attaching, 300— — cutting, 223-4, Figure 110— — types, 239, Figures 113, 115lighting, bottom stock department, 246— clicking room, 144— closing room, 202linen, fabric, 115— thread, 171, 185, 310, 336lining cutting, 118-20, 127, Figures 58-
60, 65— fabric, 114— leather, 112— marking, 152— quality, 125, Figure 64Littleway lasting, 330, Figure 6— method, 372-5lizard, 111, 130, 142lock-stitch, sole, 308, Figure 154— — upper, 175-6, Figure 80— — welt, 374-5, Figures 6, 210Louis heel, 47, 431-7
Machine-sewn method (Blake or Mc-Kay), 325-339, Figure 9
— — sole, 334-5, Figures 172-3— — stitched forepart, 336-7— — stitched to heel, 337-8, Figure
175maintenance, closing machines, 209— footwear, 16-17management, bottom stock depart-
ment, 246-51— clicking room, 134-45— closing room, 202-10— finishing room, 438-42— last ing and making rooms, 376-9— shoe room, 480-2marking, lining, 152— stitch, 153, see also ‘stitch marking’— waists, 427materials, 8-19— effect on edge trimming, 410-1— handsewn, 260— indoor turns, 511-3— moccasin slippers, 527-8— platforms, 501
materials, shoes (general), 8-19— slippers, 487, 498-500, 520-2— — soles, 491-3, 521— socks, 452— turnshoes, 503-6— uppers, 108-16— veldtschoen slippers, 515McKay method, see ‘machine-sewn
method’micro-tacks, 330middles, 214, 217moccasin, 5, 22-4, Figure 2— slippers, 523-34, Figures 255, 259m o n k s h o e s t a n d a r d a n d p a t t e r n s ,
73-4, Figures 39-40mules, 536-7, Figure 249bmulling, 276-7, see also ‘steaming’multi-fitting shoes, 58
Naumkeag, 419-21, 437, Figure 229needle, 25— sole stitching, 308, Figure 155— upper closing, 173-5, Figure 78— welt sewing, 291, Figure 141neoprene, 348, see also ‘adhesives’Nitrocellulose cement, 348, see also
‘adhesives’nylon bristle, 25, 265— mesh, 115— thread, 172
Occupational footwear, 5, 7ornaments, 469, see also ‘fastenings’ostrich, 111overcast (handsewn), 267Oxford shoe, closing operations, 185-
91, 197-9— — cutting area, 136— — standard and patterns, 68-71,
Figures 34-6
Packing, 478-9paint, 425-6panel trimming, 469pantograph, 96-7, 100, Figure 55Paris points, 60pass-line (boots), 86, Figure 49paste, see ‘adhesives’patent leather, 409, 481— — repairing, 470-1pattens, 45, Figure 23pattern allowances, 88-9— area, 134-6— chukka boot, 74-5, Figure 41— court shoe, 75, Figure 42— Derby shoe, 71-2, Figures 37-8— Dowie slipper, 488— cutting, 57-102
547
INDEX

pattern, caster, 94— ghillie shoe, 76, Figure 43— grading, 77, 95-101, Figures 44-6,— indoor turns, 507, Figure 251— making, 101— moccasin slipper, 524-7, 530-3,
Figures 256-61— monk shoe, 73-4, Figures 39-40— Oxford shoe, 68-71, Figures 34-6— proving, 90-1— restrictions, 77-8, 98, Figure 44— standardisation, 91-4— storage, 102— systems (clicking), 118-20, 126-9,
Figures 58-60, 65-8— upper, 37-8— upper, spring, 89-90, 497, Figures
50-2, 248patterned leathers, 15-16, 93, 130peep-toe, 6perforation of uppers, 38, 156-8permeability, 12-14Persian (sheepskin), 109, 112perspiration, 18piece-sole attaching, 313-4, Figure 158— — cutting, 218pigment, 422-6— upper leather finishes, 456-7pitch for handsewing, 264— heel, 385, Figure 211— last, 62, 385plastics, 13, 116plasticity, 10platform materials, 501— shoes , 357-9 , 493 , 501 , 512-3 ,
Figures 190-2post machine (closing), 183, Figure 88poulaines, 40, Figure 18apounding, 288, 332power for closing machines, 202-3precision grade, 59pre-fabricated bottoms, 338, 357preparation, bottom stock, 225-38— closing, 150-65— hand lasting, 255— hand welting, 260press, air, 354-6, Figures 188-9— block, care of, 249— bottom stock, 214-5— clicking, 93-4, 130-3, 508— cutting (bottoms), 214-24, 249— hydraulic, 353-4, Figure 187— knives, bottom, 251— upper, 131, 508, Figure 252puffs (toe), 256, 273-6, 328, Figure 127— — slippers, 515pulling tacks, 295pulling-over, machine·sewn, 328— — welted, 278-81, Figures 129-31
pump edge, 402purpose of shoes, 5-7P.V.C. (polyvinyl chloride), 13, 15, 17,
18pyroxylin cement, 434, see also ‘ad-
hesives’
Quality, closing, 205-6— upper leather, 121-2, 125, 143-4,
Figures 63-4quarter linings, 124-7, Figures 63-5— patterns, see ‘pattern’— re-forming, 470— tip top-piece, 222, Figure 109
Rabbet cutter, 409, Figure 225racks, 378-9, 441-2, 482radial projection, 96, Figure 54R.A.F. ‘Escape’ boot, 7randing heels, 393-5, Figure 218rayon, 114-5, 496, 536re-forming quarters, 470repairing gold kid, 471— patent leather, 470-1— silver kid, 471repairs (closing room), 208reptiles, 111, 130, 142resin-rubber, 10-1 1, 312restrictions (patterns), 77-8, 98, Fig-
ure 44r iveted method, 340-4, Figures 11,
176-7, 180— s c r e w e d a n d s t i t c h e d m e t h o d ,
342-5, Figures 12, 180-1roughing soles, 350, Figures 184-5— uppers, 352, Figure 186rounding insoles, 228-9— — handsewn, 261— insole seats, 270— soles, machine-sewn, 235— — wel ted , 304-7 , Figures 150-2rubber, crepe, 18— shoes, 17— sole attaching, 318-22— soles and heels, 10-11— solution, see ‘adhesives’— top-piece attaching, 244Russ and Small (area measurement),135
Safety in press cutting, 250salts, soluble, 537samples and specials (closing room),
207-8sandal, 5, 20-22, Figures 1, 16, 17satin, 115SATRA see ‘British, Boot, Shoe and,
Allied Trades Research Associa-tion’
548
INDEX

Scotch edge, 310scoring insole lip, 232scouring, bottom, 419-22— breast, 437— heel, 396-400— insole, 226screwed method, 341-5, Figures 178-
81— and stitched method, 342-5, Fig-
ures 180-1searing edges, 160seat breaking (handsewn), 269— flanging (veldt), 361-2, Figures
194-5— lasting, 285-8, Figures 135-7— lift attaching, 300— — cutting, 223-4, Figure 110— — types, 239, Figures 113, 115— paring, 313, Figure 158— plough, 409-10, Figure 226— rounding and bevelling, 270, 328— sewing (handsewn), 265-7, Figure
123— wheeling, 414-5, Figure 227seating (machine-sewn lasting), 328-9separating stitches, 314-6, Figure 159setting, see ‘drying’— edges, 415-8, Figure 228sewing in welt, hand, 265-8, Figure 123— — — machine, 290-5, Figures 142-4sequence of operations, closing, 185-
201, Figures 90, 94, 98-100— — — making, 254— — — finishing, 383-4— — — shoe room, 445-6shank, 40, 300shearling, 14, 112, 535-7sheepskin, 109, 112shoe room, 445-82— — management, 480-2— — rejects, 473-4shoulder, bottom leather, 217-8, Fig-
ures 102, 105— upper leather, 112, 515side ironing, 427— lasting, 281-3, 329-30, Figure 132— leather, 110, Figure 128silhouwelt method, 359-60, Figures 5,
193silicon carbide, 397silk fabric, 115, 499— thread, 172similar triangles, 95-6, Figure 53singeing, 450skin, characteristics, 110-2— sections, Figure 61— pattern lay-outs, Figures 65-7— variations, Figure 62skiving lifts, 239, Figures 113, 115— soles, 225
skiving uppers, 153-6, Figure 70— welt shanks, 297slip beading, 162, Figure 72d— lasted method, 496-502, 536, Fig-
ures 15, 248slipper manufacture, 485-537— — Dowie, 487-95— — machine-sewn, 518-22— — moccasin, 523-34— — shearling, 535-7— — slip-lasted, 496-502— — turnshoe, 503-13— — veldtschoen, 514-8— — welded, 518-22slippiness, 17-18slugging, 244, 389-91, Figure 215snake, 111, l30, l42socks and socking, 452-3sole attaching, see ‘attaching, sole’— caster shapes, 94-5— cementing, 351— channelling, hand, 268— — machine-sewn, 235-7, Figure112— — welted, 304-7, Figures 150-2— conforming, 351-2— cutting, 218-21, Figures 106-7— elevation, 44-6, Figure 22— embossing, 450-1, Figure 235— fitting-up, 234— laying, 302-3, Figures 148-9— pattern, 66— platform, see ‘platform’— preparation, 225, 233-8— — Louis heels, 432-3— punching, 351, Figure 184— riveting, 340-1, Figure 177— roughing, 350-1, Figures 184-5— rounding, machine-sewn, 235— — welted, 304-7, Figures 150-2— screwing, 341-5, Figures 178-80— shape, 39-44— solutioning, 301— sorting, 233-4— stamping, 450-1, Figure 235— stitching, hand, 268— — machine, 308-12, Figures 156-7— substance, 214— tempering, 235, 301-2— waist reducing, 308sorting insoles, 226-8— soles, 233-4splitting backs (Louis heels), 432,
Figure 231— flaps (Louis heels), 432-3— machine (bottom stock), 247sponge rubber, 493, 513sports footwear, 6-7spray dressing, 464-6, Figures 239-40stamping linings, 152-3
549
INDEX

stamping soles, 450-1, Figure 235stand of heel, 385, Figure 211standard, ankle boot, 85, Figure 48— chukka boot, 74, Figure 41— court shoe, 75, Figure 42— Derby shoe, 71, Figure 37— ghillie shoe, 76, Figure 43— grading, 78, Figure 45— inside and outside, 87— man’s shoe, 68-9, Figure 34— monk shoe, 73, Figure 39— Oxford shoe, 69, Figure 35standardisation of patterns, 91-4staple lasting, 282, 330, Figure 132— welted method, 345-7, Figure 182steaming, 510, 530, 534stiffeners, 270-3, 328, Figure 126— slippers, 499stitch formation, 175-6, Figures 80-1— marking, 93, 102, 153— separating, 314-6, Figure 15a— types, Figure 79stitching machines (closing), 177-84,
Figures 82-3, 88-9— needles, upper, 173-4, Figure 78;— — sole, Figure 155— soles, 308-12, Figures 156-7— — Littleway, 373— threads (upper), 171-3— uppers, 166-201— veldtschoens, 365-8, Figures 203-4stocking-top shoes, 37‘straights’, 42strength (shoe materials), 11stretch, fabrics, 118-9— shoe materials, 10-11— upper leather, 121-3, Figure 62substance, bottom leather, 214, Figure
103— upper leather, 121-2suede, backing, 116— cleaning, 458-9, 481supervision, see ‘management’swansdown, 114, 116synthetic materials, 13, 108, 116
Tab forming and sleeking (Louisheels), 436
tack cutting, 450— pulling, 295tacked work, see ‘machine - sewn
method’tacking backs, 278, 328— insoles, 270, 327, Figures 124-5,
168-9— lifts, 243taking-off, 427-9tanning, 8taping (closing), 188
tempering soles, 235, 301-2thermal conductivity (shoe materials),
14, 535thread, closing, 171-3— handsewn, 264— sole stitching, 310through, 221tightness (upper leather), 121-3, 126,
Figure 62tinsel cleaning, 460toe lasting, 283-5, 330, Figures 133-4— puffs, 256, 273-6, 328, Figure 127— — slippers, 515— shape, 39-44— spring, 12, 62, 241, 244, 326,
Figure 116tongueing (Louis heels), 433, Figure
231tools, pattern cutting, 63-4top ironing, 427top-piece attaching, 387— — — rubber, 244— — cutting, 222-3, Figure 109training labour, clicking, 145— — closing, 206-7— — finishing, 441transport of work, 378-9, 441-2, 482treeing, 461-2, Figure 238trimming, heel, 393-6, Figures 217-8— inseam, 295-6, Figures 143-4— panel 469— upper, closing, 181-2, Figure 86-7— — welted, 289, Figure 138tufsta, 116, 163turnshoe , 28 , 368-72 , Figures 13 ,
206-9— slipper, 503-13, Figure 250
Unishank assembly, 431-2upper closing, 149-210— cleaning, 454-61, Figure 236— dressing, 463-8— ironing, 461-2, Figure 238— leather, 108-13— — buying, 138— — cutting, 117, 121-33— — quality control, 143-4— — sorting, 140-3— — store, 139— trimming, 289, 333, Figure 138
Vamp patterns, see ‘patterns’— requirements, 124, Figure 63veal, 110veldtschoen, 27, 361-8, Figure 14— slippers, 514-8, Figure 253— welted method, 322-4, Figure 165vulcanised soles, 492
550
INDEX

Waist marking, 427— reducing, 308water-resistance, 13-14, 467— vapour permeability, 12-13waxes, 412waxing thread (handsewn), 264-5weave, plain, 118, Figure 57wedge heels, 49, 357, 388, 504, Figure
213, see also ‘platform’— point needles, 174, Figure 18welded method, see ‘cemented method’welt, 239-40, Figure 114— beating, hand, 268— — machine, 296, Figure 145— — butting, 298-9, Figure 146— drying, 296-7— seam levelling, 298— sewing, hand, 265-8, Figure 123— — machine, 290-5, Figures 139-40,
142— shank skiving, 297welted method, 28, 289-324. Figures 4,
161— — hand, 260-9
welted method, lock-stitch throughsewn, 374-7, Figures 6, 210
— — veldtschoen, 322-4, Figure 165wheeling, seat, 414-5, Figure 227— welts, 315-6, Figure 160whole-cut shoe, closing operations, 199Wilkinson, C. R., 93wooden shoes and soles, l2Wootton, F. P., 83wrappers for platform soles, 357-9,
Figures 190-2, see also ‘plat-forms’
Wright, Thomas, 47
X-ray inspection of shoes, 448-50,Figure 234
— photograph of distorted foot, 43,Figure 21
— wheel (finishing), 398
Zigzag seam, 170, l83zip fastener, 53, Figure 254
551
INDEX

552
553

554

555

556

557

558

559

560

561

562

563

564
565

566

567

568

569

570

571

572

573
574

575

576

577

578

579

580

581

582