
TCI Release 3.7 Installation Manual - T-Systems
75
TCI Release 3.7 Installation Manual
-
Upload
khangminh22 -
Category
Documents
-
view
2 -
download
0
Transcript of TCI Release 3.7 Installation Manual - T-Systems

TCI Release 3.7 Installation Manual
TCI Release 3.7 - Installation Manual ii
Copyright
© 2012, 2021 T-Systems International GmbH.
All rights reserved. Printed in Germany
Issued by
T-Systems International GmbH
Business Area PLM
Fasanenweg 5
70771 Leinfelden-Echterdingen
Germany
Contacts
web: http://www.cmi-support.com
email: [email protected]
phone: +49 (0) 40 30600-5544
Brief details
Installation manual for TCI.
This guide describes the installation and configuration of TCI.
Before using this guide, be sure you understand:
▪ the administration of 3DEXPERIENCE,
▪ the administration of Teamcenter.
Trademarks
3DEXPERIENCE is a registered trademark of Dassault Systèmes.
Teamcenter is a registered trademark of Siemens Digital Industries Software.
Oracle is a registered trademark of Oracle Corporation.
Names of other products mentioned in this manual are used only for identification purpose
and may be trademarks of their companies.

TCI Release 3.7 - Installation Manual iii
Table of Contents
1 Overview ....................................................................................................... 1
1.1 System and Software Requirements................................................................ 1 1.1.1 Required 3DEXPERIENCE roles ..................................................................... 1 1.1.2 Software Requirements for Oracle Database ................................................... 2 1.2 Shipment........................................................................................................ 2
2 Infrastructure Overview ................................................................................ 3
2.1 Overview ........................................................................................................ 3 2.2 Infrastructure Remarks ................................................................................... 3
3 Installing TCI................................................................................................. 5
3.1 Prerequisites .................................................................................................. 5 3.1.1 Teamcenter .................................................................................................... 5 3.1.2 3DEXPERIENCE ............................................................................................ 5 3.2 TCI setup ....................................................................................................... 6 3.2.1 Setup TCI as web application .......................................................................... 6 3.2.2 Setup XCI_FC as web application ................................................................... 7 3.2.3 Setup XCI_CS as web application ................................................................... 8 3.3 TCI configuration ............................................................................................ 8 3.3.1 Logging configuration ..................................................................................... 8 3.3.2 General TCI configuration ............................................................................... 9 3.3.3 3DEXPERIENCE Environment File ............................................................... 48 3.3.4 3DEXPERIENCE Custom Configuration ........................................................ 48
4 Installing the TCI Teamcenter Rich Client Plugin....................................... 50
4.1 Installation .................................................................................................... 50 4.2 Silent Installation .......................................................................................... 55 4.2.1 Parameters .................................................................................................. 55 4.2.2 Usage .......................................................................................................... 56 4.3 Environment variables .................................................................................. 56
5 Installing the TCI Teamcenter Active Workspace Enhancement ............... 58
5.1 Installation .................................................................................................... 58
6 Installing the TCI 3DEXPERIENCE Rich Client Extension.......................... 59
6.1 Installation .................................................................................................... 59 6.2 Silent Installation .......................................................................................... 59 6.2.1 Parameters .................................................................................................. 59 6.2.2 Usage .......................................................................................................... 60 6.3 Environment variables .................................................................................. 61 6.4 Client extensions configuration ...................................................................... 62
7 Installing the XCI 3DEXPERIENCE Batch ................................................... 63
7.1 Installation .................................................................................................... 63 7.2 Additional Configuration for Post Processing for XPDM .................................. 63 7.2.1 Copy required library from the 3DEXPERIENCE environment ........................ 63 7.2.2 Configuration of the TSI 3DEXPERIENCE xPDM Post Process behavior ........ 64 7.2.3 Create an encrypted password for the TSI 3DEXPERIENCE xPDM Post Process 65 7.2.4 Test the TSI 3DEXPERIENCE xPDM Post Process environment ................... 65
8 Installing the license manager ................................................................... 67

TCI Release 3.7 - Installation Manual iv
8.1 Remarks ...................................................................................................... 67 8.2 Running Licman as a regular executable on Windows .................................... 67
9 Installing the COMReconV5 package ......................................................... 68
9.1 Installation .................................................................................................... 68 9.1.1 Unzip the COMReconV5 package ................................................................. 68 9.1.2 Create CATIA V5 environment file ................................................................. 68 9.1.3 Configuration ................................................................................................ 68 9.1.4 Install Microsoft Visual C++ Redistributable Packages ................................... 69

TCI Release 3.7 - Installation Manual v
List of Figures
Figure 1: TCI Infrastructure Overview .......................................................................................... 3
Figure 2: Setup – Start page ..................................................................................................... 50
Figure 3: Setup – License Agreement page ............................................................................... 51
Figure 4: Setup – Choose Users page ....................................................................................... 51
Figure 5: Setup – Choose Install Location page ......................................................................... 52
Figure 6: Setup – Choose Teamcenter Directory page ............................................................... 52
Figure 7: Setup – Choose Rich Client start file page .................................................................. 53
Figure.8: Setup – TCI settings page .......................................................................................... 53
Figure.9: Setup – Subsumption page ........................................................................................ 54
Figure 10: Setup – Installation Complete page........................................................................... 54
Figure 11: Setup – Finished page ............................................................................................. 55
Figure 12: COMReconV5 package content ................................................................................ 68
TCI Release 3.7 - Installation Manual vi
List of Tables
Table 1: Teamcenter settings ...................................................................................................... 5
Table 2: TCI web application environment variables .................................................................... 7
Table 3: XCI_FC web application environment variables .............................................................. 7
Table 4: XCI_CS web application environment variables .............................................................. 8
Table 5: Silent installation parameters for TCI Teamcenter Rich Client Plugin ............................. 55
Table 6: TCI Teamcenter Rich Client Plugin - environment variables .......................................... 57
Table 7: Silent installation parameters for 3EXPERIENCE Rich Client Extension ........................ 60
Table 8: TCI 3DEXPERIENCE Rich Client Extension environment variables .............................. 61

TCI Release 3.7 - Installation Manual 1
1 Overview
1.1 System and Software Requirements
TCI Installation on the following minimum operation systems and software prerequisites:
▪ Windows Server 2012 R2
▪ Oracle Java JRE 8 Windows x64
▪ Apache Tomcat 8.5.50
For the file cache, at least 500GB of disk space are recommended.
For each 3DEXPERIENCE batch server, please consult the Dassault Systemes recommendations:
http://media.3ds.com/support/certified_hardware/Windows_10_64-bit.html
The following remote systems are supported:
▪ 3DEXPERIENCE R2015x
▪ 3DEXPERIENCE R2016x
▪ 3DEXPERIENCE R2017x
▪ 3DEXPERIENCE R2018x
▪ 3DEXPERIENCE R2019x
▪ 3DEXPERIENCE R2020x
▪ 3DEXPERIENCE R2021x
▪ Teamcenter 10.1.0 (4-tier)
▪ Teamcenter 11.2.0 (4-tier)
▪ Teamcenter 12.0.0 (4-tier)
▪ Teamcenter 13.0.0 (4-tier)
The following DBMS are supported:
▪ Oracle Database 11g Release 2 and above
▪ H2 DB 1.4
1.1.1 Required 3DEXPERIENCE roles
Collaborative Business & Industry Innovation PCS
Engineering Adapter for X-PDM MUX (Gateway installation is not required)
3D Component Designer for PLM Services XCD (replaced with UES in R2021x)
+RichClient Role such as EXH, MDG, …
To use the Batch Import/Export in a CAS environment, a permanent Login Ticket is required.

TCI Release 3.7 - Installation Manual 2
1.1.2 Software Requirements for Oracle Database
For legal reasons TCI does no longer contain the oracle driver (ojdbc). You need to get the OJBDC
driver matching your database version (e.g. ojdbc8.jar). You can either get it from your Oracle
installation or download it from Oracle. The driver should be copied to the lib folder of the Tomcat
that runs TCI.
1.2 Shipment
The software delivery contains the following parts (depending on desired operating system
architecture):
▪ TCI
▪ TCI Converter Server (XCI_CS)
▪ TCI File Cache (XCI_FC)
▪ TCI Teamcenter Rich Client Plugin (TCI_TC_UI)
▪ TCI 3DEXPERIENCE Rich Client Extension (TCI_3DX_UI)
▪ XCI 3DEXPERIENCE Batch (XCI_3DX_BATCH)
▪ COM/ReconV5 (COMReconV5)
▪ Licman20
▪ TCI documentation
The product makes use of 3rd Party and Open Source Software. A list of the used products and its
licenses is distributed with the software.

TCI Release 3.7 - Installation Manual 3
2 Infrastructure Overview
2.1 Overview
Browser3DEXPERIENCE Rich Client1
Teamcenter Rich Client3
TCI_TC_UI
7
TCI_3DX_UI6
TCI
5
TCIdata base
COMReconV512
XCI_3DX_BATCH9
XCI_CS10
XCI_FC11
TCI_WEB8
3DEXPERIENCEPlatform Server
2
3DX
data base
Teamcenter Server4
Teamcenter
data base
XCI_3DX_BATCH9
Figure 1: TCI Infrastructure Overview
1. 3DEXPERIENCE Rich Client
2. 3DEXPERIENCE Server
3. Teamcenter Rich Client
4. Teamcenter Server
5. TCI
6. TCI 3DEXPERIENCE Rich Client Extension
7. TCI Teamcenter Rich Client Plugin
8. TCI Web Client
9. XCI 3DEXPERIENCE Batch
10. TCI Converter Server (XCI_CS)
11. TCI File Cache (XCI_FC)
12. CATIA V5 CAD data processing (COM/ReconV5) Batch
2.2 Infrastructure Remarks
The TSI3DXBatch (XCI 3DEXPERIENCE Batch) must be installed at each TCI Converter Server
which uses the TSI3DXBatch.
web app server
Dassault Systèmes
T-Systems
Siemens PLM

TCI Release 3.7 - Installation Manual 4
If V5ToV6Preprocessing or V6ToV5Postprocessing is enabled, the COMReconV5 package must be
installed at the configured hosts. A CATIA V5 client environment with the same CATIA V5 version is
a prerequisite.
If the usage of the TSI3DXBatch (XCI 3DEXPERIENCE Batch package) is configured, the XCI
3DEXPERIENCE Batch must be installed at the configured hosts. A 3DEXPERIENCE rich client
environment (CATIA V6) is a prerequisite.
TCI Release 3.7 - Installation Manual 5
3 Installing TCI
3.1 Prerequisites
3.1.1 Teamcenter
The Teamcenter 4-tier server has been installed.
The following values will be used in the following steps below:
Setting Name Setting Value
Teamcenter URL http://my.tc-server.url:8080/tc
Table 1: Teamcenter settings
3.1.1.1 Teamcenter SOA Client
The Teamcenter SOA Client libraries of the file soa_client.zip of the Teamcenter installation
package have to be extracted to a known directory, e.g. C:\TC1120\soa_client.
This directory will be called <SOA_CLIENT> in this document.
3.1.1.2 Teamcenter file handling
Teamcenter can use FileServerCache or FileClientCache, see Teamcenter->FileManagement
settings.
For FileClientCache the Teamcenter TCCS package must be installed to a known directory, e.g.
C:\TC1120\tccs. This directory will be called <FMS_HOME> in this document.
3.1.2 3DEXPERIENCE
3.1.2.1 Direct access to 3DEXPERIENCE server
TCI offers functionality that requires a direct access to the 3DEXPERIENCE server:
▪ Query for and display of 3DEXPERIENCE CAD objects from within Teamcenter rich client
▪ Import/export of CAD objects with the TSI 3DEXPERIENCE batch
As a prerequisite the following libraries must be copied from the 3DEXPERIENCE server installation:
<3DEXPERIENCE install path>\win_b64\docs\javaserver\eMatrixServletRMI.jar
<3DEXPERIENCE install path>\win_b64\docs\java\FcsClient.jar
to the Apache Tomcat lib directory:
<TCI install path>\apache-tomcat-8.5.50\lib
For secure communication with 3DEXPERIENCE (https) make sure that the necessary certificates
are installed at the TCI host. See chapter 3.3.2.4.1 for more details about 3DEXPERIENCE server
access.
Please refer to Chapter 3.2.1 for how to install the TCI web application.

TCI Release 3.7 - Installation Manual 6
3.2 TCI setup
This section describes how you should install the TCI, XCI_FC, and XCI_CS.
TCI uses the XPDM infrastructure of the 3DEXPERIENCE to exchange data between
3DEXPERIENCE and Teamcenter. Both systems must be accessible from TCI.
3.2.1 Setup TCI as web application
TCI will be deployed to a web application server.
TCI will be installed in a directory on the host machine. This directory will be called installation
directory in the following steps.
For example:
C:\TCI
This directory will be called <TCI_HOME> in this document.
The web application server Tomcat has to be installed to a known directory, e.g.
C:\TCI\apache-tomcat-8.5.50.
This directory will be called <CATALINA_HOME> in this document.
The web application must have access to the Teamcenter File Client Cache (FCC) libraries in the
classpath. Therefore the following lines have to be added to the Tomcat configuration file
<TOMCAT_HOME>/conf/catalina.properties:
#
# Teamcenter environment configuration
shared.loader=<SOA_CLIENT>/java/libs/*.jar,<FMS_HOME>/jar/*.jar
Where <FMS_HOME> needs to be replaced by the absolute or relative path to the FMS_HOME
directory (for example: C:/TC1120/tccs).
And <SOA_CLIENT> is the location of the extracted JAR files from the Teamcenter SOA Client
libraries (soa_client.zip) distributed with Teamcenter (see chapter 3.1.1.1).
Make sure to include any third-party libraries for the soa_client. E.g. for Teamcenter 11:
#
# Teamcenter environment configuration
shared.loader=<SOA_CLIENT>/java/libs/*.jar,<SOA_CLIENT>/java/libs/com.te
amcenter.rac.external_11000.2.0/*.jar,<FMS_HOME>/jar/*.jar
The following environment variables need to be set for the TCI web application:

TCI Release 3.7 - Installation Manual 7
Environment
Variable
Example Value Description
XCI_HOME C:\TCI XCI home directory
FMS_HOME C:\TC1120\tccs Teamcenter FMS
home directory
CATALINA_HOME C:\TCI\apache-tomcat-8.5.50 Tomcat Catalina
home directory
JRE_HOME C:\Program Files\Java\jre1.8.0_202 JRE home directory
JAVA_OPTS %JAVA_OPTS%
-Djlicman.platform="Windows_2003_amd64"
-Djava.library.path=%FMS_HOME%;%FMS_HOME%/lib
Append additional
Java
options
Table 2: TCI web application environment variables
The following batch file can be used to start the Tomcat application server:
set FMS_HOME=<Teamcenter FMS Home directory>
set PATH=%FMS_HOME%\bin;%FMS_HOME%\lib;%PATH%
set XCI_HOME=<TCI Home directory>
set CATALINA_HOME=<Tomcat Catalina Home directory>
set JRE_HOME=<JRE Home directory>
set JAVA_OPTS=%JAVA_OPTS% -Djlicman.platform="Windows_2003_amd64" -Xms256m -Xmx2048m
call %CATALINA_HOME%\bin\startup.bat
The TCI war file can now be deployed to the application server.
Copy the war file of TCI, e.g. XCI.war, to the webapps directory of the web application server.
3.2.2 Setup XCI_FC as web application
If the XCI_FC is configured (TDXExportMode is ExportFiles and FileCache is enabled) the XCI_FC
must be set up as web application.
XCI_FC will be deployed to a web application server.
The following environment variables must be set for the XCI_FC web application:
Environment Variable Example Value Description
XCI_FC_HOME C:\TCI\XCI_FC_HOME XCI_FC home directory
CATALINA_FC_HOME C:\TCI\XCI_FC_HOME\apache-tomcat-
8.5.50
Tomcat Catalina home directory
JRE_HOME C:\Program Files\Java\jre1.8.0_202 JRE home directory
JAVA_OPTS %JAVA_OPTS%
-Xms256m -Xmx2048m
Append additional Java
options
Table 3: XCI_FC web application environment variables
The following batch file can be used to start the Tomcat application server:
set XCI_FC_HOME=<TCI FC Home directory>

TCI Release 3.7 - Installation Manual 8
set CATALINA_FC_HOME=<Tomcat Catalina Home directory>
set JRE_HOME=<JRE Home directory>
set JAVA_OPTS=%JAVA_OPTS% -Xms256m -Xmx2048m
call %CATALINA_FC_HOME%\bin\startup.bat
The XCI_FC war file can now be deployed to the application server.
Copy the war file of XCI_FC, e.g. XCI_FC.war, to the webapps directory of the web application
server.
3.2.3 Setup XCI_CS as web application
If the XCI_CS is configured (usecs is true in one of the following settings: V5ToV6Preprocessing,
V6ToV5Postprocessing, SendToXPDMProcessing, XPDMExportProcessing, XPDMImportProcessing,
FolderExportProcessing, FolderImportProcessing, FileExportProcessing) the XCI_CS must be set up as
web application.
XCI_CS will be deployed to a web application server.
The following environment variables have to be set for the XCI_CS web application:
Environment Variable Example Value Description
XCI_CS_HOME C:\TCI\XCI_CS_HOME XCI_CS home directory
CATALINA_CS_HOME C:\TCI\XCI_CS_HOME\apache-tomcat-
8.5.50
Tomcat Catalina home directory
JRE_HOME C:\Program Files\Java\jre1.8.0_202 JRE home directory
JAVA_OPTS %JAVA_OPTS%
-Xms256m -Xmx2048m
Append additional Java
options
Table 4: XCI_CS web application environment variables
The following batch file can be used to start the Tomcat application server:
set XCI_CS_HOME=<TCI CS Home directory>
set CATALINA_CS_HOME=<Tomcat Catalina Home directory>
set JRE_HOME=<JRE Home directory>
set JAVA_OPTS=%JAVA_OPTS% -Xms256m -Xmx2048m
call %CATALINA_CS_HOME%\bin\startup.bat
The XCI_CS war file can now be deployed to the application server.
Copy the war file of XCI_CS, e.g. XCI_CS.war, to the webapps directory of the web application
server.
3.3 TCI configuration
After the installation TCI must be configured in the following configuration files in the installation
directory.
3.3.1 Logging configuration
TCI will read and apply the log4j configuration from the following files in the TCI_HOME directory:
log4j.xml

TCI Release 3.7 - Installation Manual 9
log4j.properties
Copy the properties file log4j.properties of the installation package to the installation directory.
It is recommended to create an empty logging directory at <TCI_HOME>/logs.
Please check the *.File entries of the properties file if they are pointing to a valid directory.
Replace all placeholders <PATH_TO_LOG_DIR> by the correct path to <TCI_HOME>/logs.
Further information about the configuration can be obtained from https://logging.apache.org/log4j/.
If none of the files is present when starting TCI it will apply its embedded default configuration,
logging only to the standard output. To simplify the configuration a sample is distributed with TCI.
3.3.2 General TCI configuration
Copy the files XCISettings.xml (XCISettings.xml.sample) and XCISettings.xsd of
the installation package to the installation directory.
The file XCISettings.xml defines all the functional settings for TCI. The settings file can be
evaluated using the XCISettings.xsd file delivered with TCI.
It is divided into the five sections Conversion, Pdm, Teamcenter, Enovia, and XciWeb.
In the next chapters the configuration of these sections will be described in detail.
3.3.2.1 Conversion
In the following chapters the configuration options for the tag Conversion are described.
3.3.2.1.1 Database configuration
TCI makes use of a database to store and keep track of required data. The used database can be
configured using the resource definition of the application server. TCI will read the resource defined
as “jdbc/xciDB”.
The default resource can be overridden by defining the PersistenceUnitName in the settings
(/XCISettings/Conversion/Database).
<Database> <PersistenceUnitName>jdbc/myXciDB</PersistenceUnitName>
</Database>
Example resource definitions in Tomcat 8 (e.g. <CATALINA_HOME>/conf/context.xml):
<Resource name="jdbc/xciDB" type="javax.sql.DataSource" auth="Container" driverClassName="org.h2.Driver" maxTotal="100" maxIdle="10" maxWaitMillis="-1" url="jdbc:h2:C:\XCI\XCI_HOME\xciDB\xciDB;AUTO_SERVER=TRUE" username="XCI" password="XCI" />
or
<Resource name="jdbc/xciDB" type="javax.sql.DataSource" auth="Container" driverClassName="oracle.jdbc.OracleDriver" maxTotal="100" maxIdle="10" maxWaitMillis="-1" url="jdbc:oracle:thin:@my.db-server-url.com:1521:orcl" username="XCI" password="XCI" />
TCI Release 3.7 - Installation Manual 10
If the resource is not defined a local and file based H2DB will be created in the home directory.
The selection of the database can be overridden by defining a custom Database in the settings
(/XCISettings/Conversion/Database).
<Database override="true" driverClassName="oracle.jdbc.OracleDriver" url="jdbc:oracle:thin:@my.db-server-url.com:1521:orcl">
<Property name="user" value="tci" /> <Property name="password" value="tci" /> <Property name="maxTotal" value="20" /> <Property name="maxIdle" value="10" /> <Property name="maxWaitMillis" value="-1" /> </Database>
With
▪ override: true to use database defined here; false to use definition from JNI context ▪ driverClassName: Database driver class ▪ url: Database connection URL
3.3.2.1.2 General settings
<TempDir>C:\temp</TempDir>
Optional definition of a temporary directory to be used by TCI. TCI must have read and write access
to this directory.
If the value is not defined the path “<TCI_HOME>\temp” will be used.
<PersistentDir>C:\persistent</PersistentDir>
Optional definition of a directory to be used by TCI to store persistent data. TCI must have read and
write access to this directory.
If the value is not defined the path “<TCI_HOME>\persistent” will be used.
<RenameFilesAfterDownload>true</RenameFilesAfterDownload>
Rename the files after download from Teamcenter to the value of the original_file_name
attribute.
The default setting is “true”.
<RenameFileTypesAfterDownload enabled="true"> <FileType>CATDrawing</FileType> </RenameFileTypesAfterDownload>
List of file types which will be renamed to obid.extension, to support multiple objects with the
same file name. Should only be used with file types which are not referenced by other files
(CATDrawing, JT, etc.). This setting is ignored if RenameFilesAfterDownload preference is set to
“false”.
<ImportPdm enableLevelSplitUp="true" enableLevelSetBased="false" enableQueuing="false" timeoutQueuing="600000" enableLevelQueuing="true" timeoutLevelQueuing="600000" />

TCI Release 3.7 - Installation Manual 11
Strategy how to import the V6 structures to Teamcenter:
enableLevelSplitUp: The default value is “false”. True will enable the split up of the Teamcenter
import in a level-based import.
enableLevelSetBased: The default value is “false”. True will enable the set-based approach for the
import of one level.
The level-based import will start at the deepest level nodes of the product structure and will first
import these leave nodes, then the parent objects up to the top level are imported including the direct
children. If enableLevelSetBased is set to “true” then the same levels are imported in one import
process (using the set-based import), else each object is imported in its own import process.
enableQueuing: true will enable the functionality to not handle the same part number in parallel
running PDM imports.
timeoutQueuing: Timeout for the import queuing [ms]. Default value 10 minutes.
enableLevelQueuing: true will enable the functionality to not handle the same part number in parallel
running PDM level imports.
timeoutLevelQueuing: Timeout for the import queuing [ms]. Default value 10 minutes.
<DisablePdmImportSkipNotModified>true</DisablePdmImportSkipNotModified>
To disable the skipping the import of objects to Teamcenter which are not modified since the last
import, it must be set to “true”.
The default setting is “false”.
<LegacyTransformationSupport enabled="true" />
Enables the support for legacy transformation in Teamcenter if enabled is set to “true”.
The default setting is “true”.
<IgnoreNon3DPartGeometries enabled="true" />
Enables the ignoring of geometries which are not 3DPart in 3DEXPERIENCE if enabled is set to
“true”.
The default setting is “false”.
3.3.2.1.3 XpdmXmlExportChecks definition
<XpdmXmlExportChecks> <AttributeCheck enabled="true"> <XType xname ="Product"> <XAttribute xname="Description" mappingtype="DefaultCustomization" maxlength="60" truncate="true" /> </XType> </AttributeCheck> <InstanceNameCheck enabled="true" /> <FileRefCheck enabled="false" /> <FileNameCheck enabled="false" /> <ProductLeafRepresentationCheck enabled="false" onlyWarning="true" />
TCI Release 3.7 - Installation Manual 12
<RepNameCheck enabled="true" /> </XpdmXmlExportChecks>
Definition of the export checks.
Each AttributeCheck must be enabled and disabled with the enabled attribute. The optional
onlyWarning attribute can be set to “true”. Then the check is handled as warning condition not as
error condition.
The AttributeCheck is used to check the maxlength attribute in the CustomAttribute (see chapter
3.3.2.2.1) setting.
Additionally, the standard attribute length can be checked. The example above shows the limitation
of the “Description” to maximum length of “60”. If the maximum length of the attribute is defined, the
truncate attribute flag enables the truncate functionality which will truncate the attribute to the
maximum length.
The InstanceNameCheck checks the uniqueness of instance name per parent object.
The FileRefCheck checks the multiple use of a File Ref from different Objects.
The FileNameCheck checks the uniqueness of file names in the files section.
The ProductLeafRepresentationCheck checks the existence of an attached Representation at a
Product node, if the Product node is a leaf node.
The RepNameCheck checks for duplicate representation names. ID Attribute in Rep3D, Drawing,
Document, and GenericDocument Object.
These five tags have the attributes enabled and onlyWarning. The attribute enabled is required. The
attribute onlyWarning is optional and has the default “false”.
3.3.2.1.4 Teamcenter Project definitions
<Projects> <DefaultProject name="Default"> <ProjectName>Standard</ProjectName> <Organization>Company Name</Organization> <Owner>DemoDesigner</Owner> <LifeCycle>VPLM_SMB</LifeCycle> <Maturity>RELEASED</Maturity> <MaturityNoStatus>IN_WORK</MaturityNoStatus> </DefaultProject> </Projects>
Definition of projects and the corresponding values for ProjectName, Organization, Owner,
LifeCycle, Maturity and MaturityNoStatus. The Projects section must include one DefaultProject that
will be used when no other defined project matches.
The defined values for the projects define which values will be set to the items when sending them
to 3DEXPERIENCE. If no project is defined or no values are defined for a project the values from
the default project are used.
The values for Organization and Owner can be left blank. These will be set to the values of the
importing administration user on the 3DEXPERIENCE import.
The value for MaturityNoStatus will be used for objects without status. If this value is not defined, the
value for Maturity will be used.

TCI Release 3.7 - Installation Manual 13
For the Non-CATIA document import the Maturities and LifeCycle can be defined for Document and
GenericDocument types.
The defaults for Document and GenericDocument types are:
Default Document Maturity: Exists
Default Document Lifecycle: Document
Default GenericDocument Maturity: WIP
Default GenericDocument Lifecycle: Controlled Production Release Rev2
These defaults can be set in the Project settings:
<DefaultProject name="Default"> … <DocumentLifeCycle>Document Release</DocumentLifeCycle> <DocumentMaturity>RELEASED</DocumentMaturity> <DocumentMaturityNoStatus>IN_WORK</DocumentMaturityNoStatus> <GeneralDocumentLifeCycle>Controlled Production Release Rev2</GeneralDocumentLifeCycle> <GeneralDocumentMaturity>Released</GeneralDocumentMaturity> <GeneralDocumentMaturityNoStatus>WIP</GeneralDocumentMaturityNoStatus> </DefaultProject>
3.3.2.1.5 Teamcenter User and Group definitions
<UserMappingForPdm owner="user1" group="Engineering"> <AdditionalChangeOwnerObjectsForPdm> <ExpandRelationType>IMAN_specification</ExpandRelationType> <ExpandRelationType>IMAN_master_form</ExpandRelationType> <ExpandType>CMI2Product</ExpandType> <ExpandType>ItemRevision Master</ExpandType> </AdditionalChangeOwnerObjectsForPdm> </UserMappingForPdm>
The owner will be used for new objects in Teamcenter.
Warning: This can cause access problems, if you want to transfer objects a second time to
Teamcenter. If owner is not configured, the default Teamcenter behavior defines the owner.
The group will be used for new objects in Teamcenter. If group is not configured, the default
Teamcenter behavior defines the group.
If AdditionalChangeOwnerObjectsForPdm is configured, all objects of the configured relation types
ExpandRelationType and expand types ExpandType will be determined and also assigned to the
Teamcenter owner and group.
3.3.2.1.6 Teamcenter Item Revision cleanup setting
<RevisionCleanupForPdm> <cleanChildren enabled="true" bvrType="view" /> <cleanDocuments enabled="true"> <ExpandRelationType>IMAN_specification</ExpandRelationType> <ExpandRelationType>IMAN_Rendering</ExpandRelationType> <ExpandType>CMI2Part</ExpandType> <ExpandType>CMI2Product</ExpandType> <ExpandType>CMI2Drawing</ExpandType> <ExpandType>DirectModel</ExpandType> </cleanDocuments> </RevisionCleanupForPdm>

TCI Release 3.7 - Installation Manual 14
If cleanChildren is enabled, all children are removed for new created Item Revisions during
Teamcenter import. The default BVR type is “view” and can be configured by the bvrType attribute.
The default for the enabled flag is “false”.
If cleanDocuments is enabled, all documents configured by type (ExpandType) and relation
(ExpandRelationType), are removed from new created Item Revisions during Teamcenter import.
The default for the enabled flag is “false”.
3.3.2.1.7 Revision mapping
<PdmRevisionMapping >alphabetical</PdmRevisionMapping >
The PdmRevisionMapping defines the revision numbers in Teamcenter as numerical or alphabetical.
If PdmRevisionMapping is configured, TCI will perform a direct assignment between the revisions of
Teamcenter and 3DEXPERIENCE via XPDMXML (e.g. Teamcenter revision “D” will be transferred
as revisionindex “4” to 3DEXPERIENCE). As a result of this configuration, the revisions in
Teamcenter or 3DEXPERIENCE may have gaps if only selected revisions are transferred.
If the PdmRevisionMapping is not configured the next free revision/index will be used.
3.3.2.1.8 Document Revision mapping
<PdmDocumentRevisionMapping>alphabetical</PdmDocumentRevisionMapping>
The PdmDocumentRevisionMapping defines the revision numbers for documents in Teamcenter as
numerical or alphabetical.
If PdmDocumentRevisionMappingis configured, TCI will perform a direct assignment between the
revisions of Teamcenter and 3DEXPERIENCE via XPDMXML (e.g. Teamcenter revision “D” will be
transferred as revisionindex “4” to 3DEXPERIENCE). As a result of this configuration, the revisions
in Teamcenter or 3DEXPERIENCE may have gaps if only selected revisions are transferred.
If the PdmDocumentRevisionMapping is not configured the next free revision/index will be used.
3.3.2.1.9 File type mapping definitions
3.3.2.1.9.1 V6 to Teamcenter file type mapping
<V6PdmFileType> <V6FileFormat v6format="CATPart"> <Main> <PdmDocType>CMI2Part</PdmDocType> <PdmDocRelation>IMAN_specification</PdmDocRelation> <PdmRefType>CATPart</PdmRefType> </Main> <Aux> <PdmDocType>CMI2AuxPart</PdmDocType> <PdmDocRelation>IMAN_specification</PdmDocRelation> <PdmRefType>CATPart</PdmRefType> </Aux> </V6FileFormat>
</V6PdmFileType>
The V6PdmFileType can contain multiple V6FileFormats defining how the specified file should be
imported to Teamcenter.
Each V6FileFormat defines a PdmDocType, a PdmDocRelation, and a PdmRefType in the Main
section. The same is defined for Aux documents. The Aux definition is used for shared
representations.
TCI Release 3.7 - Installation Manual 15
3.3.2.1.9.2 Teamcenter to V6 file type mapping
<PdmV6FileType> <V6Representation fileextension="CATPart" doctype="CMI2Part"> <RepresentationType>Rep3D</RepresentationType> <DerivedType>DirectModel</DerivedType> </V6Representation>
<V6Representation fileextension="prt.*" fileformat="Creo" doctype="CreoPart"> <RepresentationType>Rep3D</RepresentationType> </V6Representation> </PdmV6FileType>
The PdmV6FileType can contain multiple V6Representations defining how the specified file should
be exported from Teamcenter. The V6Representation has the optional attribute aux with default
“false”. The fileextension can also contain wildcards. The fileformat can be used if the file extension
is not the file format in the XPDMXML file.
Each V6Representation defines a RepresentationType and a DerivedType.
3.3.2.1.10 Customization registration
<Customizations> <CustomizationPoint custpoint="com.tsystems.xci.customization.CustomizationPointX"
entrypoint="my.customization.MyCustomizationPointImpl" /> </Customizations>
The behavior of the integration can be modified using customization points. The Customizations tag
may contain multiple CustomizationPoints defining which customization implementation should be
used. Each CustomizationPoint defines a custpoint to be overridden and an entrypoint specifying
the overriding implementation. The optional attribute enabled has the default “true”.
It is not necessary to set a customization point. All customization points are implemented using the
integration default behavior.
If you require any kind of customization please contact the support team.
3.3.2.1.11 SetTimeModified setting
<SetTimeModified> <Rep3D disabled="true" /> <Drawing disabled="true" /> <Document disabled="true" /> <GenericDocument disabled="true" /> <ProductFile disabled="true" /> <Product disabled="true" /> <ProductInst disabled="true" />
</SetTimeModified>
The <TimeModified> tag is by default written to the <Rep3D>, <Rep3DAggr>, <Drawing>,
<DrawingAggr>, <Document>, <GenericDocument>, <Product>, and <ProductInst> tags in the
Metadata.xml import file. With this time information the import can skip already imported files and
optimize the performance of the import process.
This optimization can be disabled, e.g. to resolve multi model links in several contexts.
SetTimeModified has the attribute enabled with default “true”.
3.3.2.1.12 SharedFileTypeExtensions setting
<SharedFileTypeExtensions> <SharedFileTypeExtension>model</SharedFileTypeExtension>

TCI Release 3.7 - Installation Manual 16
<SharedFileTypeExtension>cgr</SharedFileTypeExtension> <SharedFileTypeExtension>CATDrawing</SharedFileTypeExtension> </SharedFileTypeExtensions>
Documents are by default written as Rep3DAggr or DrawingAggr object in the metadata.xml input
file. All file extensions which are defined in the SharedFileTypeExtensions setting are written as
shared object type Rep3DInst/Rep3D or DrawingInst/Drawing objects in the metadata.xml input
file and they will be created as a shared object in the 3DEXPERIENCE.
3.3.2.1.13 Exclusion List File settings
<ExclusionListFile>C:\tmp\exclusionlist.xml</ExclusionListFile>
The ExclusionListFile is the exclusion list with the invalid CAD objects which should not be imported
to 3DEXPERIENCE and are replaced by the Dummy Item. The Dummy Item can be configured with
the <DummyProductData> setting.
<ExclusionCATProductsListFile>C:\tmp\exclusioncplist.xml</ExclusionCATProductsListFile>
The ExclusionCATProductsListFile is the exclusion list with the CAD objects for which the
CATProduct files should be ignored.
<TimeModifiedExclusionListFile removeTimeStamp="false">C:\tmp\exclusiontmlist.xml</TimeModifiedExclusionListFile>
The TimeModifiedExclusionListFile is the exclusion list with the CAD objects for which the
TimeModified tag should be changed/removed. The optional attribute removeTimeStamp has the
default “false”.
Example for an Exclusion list settings file.
<?xml version="1.0" encoding="ISO-8859-1" standalone="yes"?>
<EL>
<ItemRev>
<Id>DREP2-TSI2-0001</Id>
<Type>Design Revision</Type>
<Revision>1</Revision>
</ItemRev>
<Item>
<Id>DREP2-TSI2-0001</Id>
<Type>Design Revision</Type>
</Item>
</EL>
3.3.2.1.14 V5ToV6Preprocessing setting
<V5ToV6Preprocessing enabled="true"> <V5PreprocessingCommand>C:\TCI\COMReconV5_R28\go\COMReconV5.bat C:\TCI\COMReconV5_R28\go\XCI_V5_V6.opt</V5PreprocessingCommand> </V5ToV6Preprocessing>
The functionality for the V5 Preprocessing with COMReconV5 must be enabled to use the
COMReconV5 tool from T-Systems.
<V5ToV6Preprocessing enabled="true" usecs="true" tdsUrl="http://my.tci-integration-server.url:port/XCI/XCI_TDS">
<V5PreprocessingHost local="false"> <Url>http://my.tci-integration-server.url:port/XCI_CS</Url>
TCI Release 3.7 - Installation Manual 17
<Command>C:\TCI\COMReconV5_R28\go\COMReconV5.bat C:\TCI\COMReconV5_R28\go\XCI_V5_V6.opt</Command> </V5PreprocessingHost> </V5ToV6Preprocessing>
If usecs is set to “true” the V5PreprocessingHost setting is used.
Details for tdsUrl please see in chapter 3.3.2.4.4.
3.3.2.1.15 V6ToV5Postprocessing setting
<V6ToV5Postprocessing enabled="true"> <V6PostprocessingCommand>C:\TCI\COMReconV5_R28\go\COMReconV5.bat C:\TCI\COMReconV5_R28\go\XCI_V6_V5.opt</V6PostprocessingCommand> </V6ToV5Postprocessing>
The functionality for the V6 Postprocessing with COMReconV5 must be enabled to use the
COMReconV5 tool from T-Systems.
<V6ToV5Postprocessing enabled="true" usecs="true" tdsUrl="http://my.tci-integration-server.url:port/XCI/XCI_TDS">
<V6PostprocessingHost local="false"> <Url>http://my.tci-integration-server.url:port/XCI_CS</Url> <Command>C:\TCI\COMReconV5_R28\go\COMReconV5.bat C:\TCI\COMReconV5_R28\go\XCI_V6_V5.opt</Command> </V6PostprocessingHost> </V6ToV5Postprocessing>
If usecs is set to “true” the V6PostprocessingHost setting is used.
Details for tdsUrl please see in chapter 3.3.2.4.4.
3.3.2.1.16 CoexistenceXpdmXmlProcessing setting
<CoexistenceXpdmXmlProcessing disabled="true" />
The coexistence processing functionality (remove of objects which are not controlled by XPDM) can
be disabled with this setting.
The default setting is “false”.
3.3.2.1.17 FileConversion setting
The file conversion functionality (convert non importable file types to importable file types) can be
enabled with this setting.
Import without the Converter Server:
<FileConversion enabled="true"> <ConversionCommand inputtype="iges" outputtype="cgr"> <Command>C:\converter\iges_cgr_converter.bat</Command> </ConversionCommand> </FileConversion>
Import with the use of the Converter Server:
<FileConversion enabled="true" resource="CV" usecs="true" tdsUrl="http://my.tci-integration-server.url:port/XCI/XCI_TDS"> <FileConversionHost local="false"> <Url>http://my.tci-integration-server.url:port/XCI_CS</Url> <Command>Command1</Command> </FileConversionHost> <FileConversionCommand commandName="Command1"> <ConversionCommand inputtype="iges" outputtype="cgr">

TCI Release 3.7 - Installation Manual 18
<Command>C:\converter\iges_cgr_converter.bat</Command> </ConversionCommand> </FileConversionCommand> </FileConversion>
For configuration details, please see chapter 3.3.2.4.4. For all CS the same converter functionality
must be available.
The following windows batch file can be used to start a third-party converter:
REM get the input file path
set INPUTFILE=%TCI_CONVERTINPUTFILE%
REM get the output file path
set OUTPUTFILE=%TCI_CONVERTOUTPUTFILE%
if EXIST %INPUTFILE% GOTO CONTINUE1
echo "cannot find >%INPUTFILE%<"
GOTO END_ERROR
:CONTINUE1
if NOT EXIST %OUTPUTFILE% GOTO CONTINUE2
del %OUTPUTFILE%
:CONTINUE2
echo "converting %INPUTFILE% to %OUTPUTFILE%
REM call the converter
converter.exe %INPUTFILE% %OUTPUTFILE%
set retval=%ERRORLEVEL%
:END
exit /b %retval%
:END_ERROR
REM not equal 0 for error
exit /b 1
3.3.2.1.18 V6MaturityToPdmStatusMappingList setting
<V6MaturityToPdmStatusMappingList enabled="true"> <V6MaturityToPdmStatusMapping v6maturity="RELEASED" pdmTyp=”Design Revision”
pdmstatus="TCM Released" /> </V6MaturityToPdmStatusMappingList>
The maturity status mapping list defines the mapping between the V6 Maturity and the Status object
name in Teamcenter. When the functionality is enabled all 3DEXPERIENCE Objects with the
Maturity defined in the v6maturity attribute will get a Status object with the name from the pdmstatus
attribute. The attribute enabled has default “false”.
3.3.2.1.19 PdmStatusUpdateHandling setting
<PdmStatusUpdateHandling enabled="true"> <AdditionalPdmStatusUpdate sourceType="Design Revision" targetRelationType="IMAN_master_form" targetObjectType="Design Revision Master" /> <AdditionalPdmStatusUpdate sourceType="Design Revision" targetRelationAttribute="structure_revisions" targetObjectType="BOMView Revision" />
TCI Release 3.7 - Installation Manual 19
</PdmStatusUpdateHandling>
Used to set the Item Revision Status to objects which are not directly mapped to a
3DEXPERIENCE object, e.g. Master forms, BOMView Revisions, PDF document.
The sourceType defines the Item Revision type under which the additional objects should be
updated. The attribute enabled has default “false”.
The example settings show an example for a Relation based setting (“IMAN_master_form”) and an
Attribute based setting (“structure_revisions”).
3.3.2.1.20 UseXidFromOccId setting
<UseXidFromOccId>true</UseXidFromOccId>
Use the Occurence ID for the Instance XID generation and only the instance name for identification
of instances. If the setting is “true” but the child does not match the last known child, the instance is
marked for a post processing task to correct the children in 3DEXPERIENCE.
The default setting is “false”.
3.3.2.1.21 CleanupPersistentDir setting
<CleanupPersistentDir>true</CleanupPersistentDir>
Used to clean up the persistent directory when the content is successfully transferred.
The default setting is “false”.
3.3.2.1.22 RenameDuplicateInstanceNames setting
<RenameDuplicateInstanceNames>true</RenameDuplicateInstanceNames>
Used to rename duplicate instance names. Duplicates will be renamed to the Object Id of the relation.
The default setting is “false”.
3.3.2.1.23 CopyInstanceOrderNumberToV6 setting
<CopyInstanceOrderNumberToV6>false</CopyInstanceOrderNumberToV6>
The default setting is “true”.
3.3.2.1.24 TDXExportMode setting
<TDXExportMode>ExportXPDM</TDXExportMode>
The 3DXExportMode can be configured.
Possible values are:
▪ ExportXPDM: Direct export of a structure from 3DEXPERIENCE using the ExportBatch
utility.
▪ ExportFiles: Direct export of a structure from 3DEXPERIENCE using the DWC utility.
Default setting is “ExportFiles”.
3.3.2.1.25 TDXImportMode setting
<TDXImportMode>ImportXPDM</TDXImportMode>
The 3DXImportMode can be configured.
Possible values are:
▪ ImportXPDM: Direct import of a structure to 3DEXPERIENCE using the ImportBatch utility.
Default setting is “ImportXPDM”.

TCI Release 3.7 - Installation Manual 20
3.3.2.1.26 ProcessStatusOnlySessionUser setting
<ProcessStatusOnlySessionUser>true</ProcessStatusOnlySessionUser>
Filter the result of the ProcessStatus by the actual session user.
The default setting is “true”.
3.3.2.1.27 ProcessStatusMaxReturn setting
<ProcessStatusMaxReturn>50</ProcessStatusMaxReturn>
The maximum number of ProcessStatus information to return for the ProcessStatus command.
The default setting is “50”.
3.3.2.1.28 ProcessStatusMaxDuration setting
<ProcessStatusMaxDuration>P7D</ProcessStatusMaxDuration>
The search period until now used to search for ProcessStatus information for the ProcessStatus
command.
The default setting is “P7D”.
3.3.2.1.29 ReceiverMaxEventNumber setting
<ReceiverMaxEventNumber>5</ReceiverMaxEventNumber>
The maximum number of the events to handle. Minimum is “1”. A restart is needed to use the new
value.
The default setting is “1”.
3.3.2.1.30 ReceiverThreadPoolSize setting
<ReceiverThreadPoolSize>10</ReceiverThreadPoolSize>
The size of the Receiver thread pool. Minimum is “1”. A restart is needed to use the new value.
The default setting is “1”.
3.3.2.1.31 JobReceiverThreadPoolSize setting
<JobReceiverThreadPoolSize>10</ JobReceiverThreadPoolSize>
The size of the Job Receiver thread pool. Minimum is “3”. Restart needed to use the new value.
The default setting is “5”.
3.3.2.1.32 JobReceiverComplexThreadPoolSize setting
<JobReceiverComplexThreadPoolSize>6</JobReceiverComplexThreadPoolSize>
The size of the Job Receiver complex thread pool (used for Folder transfers). Minimum is 1. Restart
needed to use the new value.
The default setting is “3”.
3.3.2.1.33 JobReceiverMaxJobNumber setting
<JobReceiverMaxJobNumber >10</JobReceiverMaxJobNumber >
The maximum number of the jobs to handle. Minimum is “1”. Restart needed to use the new value.
The default setting is “20”.
3.3.2.1.34 FolderNamingConcatenation setting
<FolderNamingConcatenation enabled="true">_</FolderNamingConcatenation>

TCI Release 3.7 - Installation Manual 21
Set enabled to “true” to build the new folder name in PDM from Root Folder Name, this setting,
and the Folder Name.
The attribute enabled has default “false”.
3.3.2.1.35 ReconciliationMode setting
<ReconciliationMode>xPDMMaster</ReconciliationMode>
The Reconciliation Mode can be defined.
Possible values are:
▪ CATProductMaster: Use CATProduct structure information.
▪ xPDMMaster: Use XPDMXML structure information.
The default setting is CATProductMaster.
3.3.2.1.36 ConverterService Resource Balancing definition
<CSResourceBalancer> <Resource>
<Name>V6</Name> <MaxParallel>2</MaxParallel>
</Resource> </CSResourceBalancer>
Limits concurrent use of resources across all Converter Server hosts. Resource can be licenses etc.
and is identified by a string.
Resources are then applied to different Processing Host types.
The resource names can be defined with the Resource attribute at the processing settings.
3.3.2.1.37 PartNumberMapping definition
<PartNumberMapping enabled="true"> <Default> <To3DXPrefix>TCI_</To3DXPrefix> </Default> <TypeMapping typePDM="MyItemRevision"> <Mapping> <To3DXPrefix/> <To3DXPostfix/> <ToPDMPrefix/> <ToPDMPostfix/> </Mapping> </TypeMapping> </PartNumberMapping>
The part number mapping is used to add pre and postfixes to part numbers in PDM and 3DX. The
definition can be set for all types in the default section, or for types defined with TypeMapping. The
new mapping will only be used for new transfers, the old mapping from the database is used before
using this part number mapping.
The attribute enabled has default “false”.
3.3.2.1.38 SetFilterIn3DX setting
<SetFilterIn3DX>true</SetFilterIn3DX>
Set SetFilterIn3DX to “true” to enable the functionality to set filter in 3DX when sending structure
names.

TCI Release 3.7 - Installation Manual 22
The default for SetFilterIn3DX is “true”.
See also TCIXpgPostProcess_SETFILTER setting in TCI XPGPostprocessing.
3.3.2.1.39 StoreNamedStructuresetting
<StoreNamedStructure>false</StoreNamedStructure>
Set StoreNamedStructure to “true” to enable the functionality to store named structures.
The default for StoreNamedStructure is “false”.
3.3.2.1.40 HandleAuxFileAsMainFile
<HandleAuxFileAsMainFile>true</HandleAuxFileAsMainFile>
Set HandleAuxFileAsMainFile to “true” to handle auxiliary files like main files -> Create Product
and Rep3DAggr in XpdmXml.
The default for HandleAuxFileAsMainFile is “false”.
3.3.2.1.41 JobRetrySeconds
<JobRetrySeconds>0</JobRetrySeconds>
The number of seconds to wait for the Job retry if the job fails. 0 will disable the retry.
The default for JobRetrySeconds is “30”.
3.3.2.1.42 SkipRepWithoutFile
<SkipRepWithoutFile>false</SkipRepWithoutFile >
True to remove Representations without file -> no document without file.
The default for SkipRepWithoutFile is false.
3.3.2.1.43 OverwriteReleasedWithForce
<OverwriteReleasedWithForce>false</OverwriteReleasedWithForce>
True to update released objects if force is true.
The default for OverwriteReleasedWithForce is false.
3.3.2.1.44 JobQueuing
<JobQueuing enabled="true" timeout="1200000"/>
Set the enabled attribute to true to enable the job queuing. Enabled Job Queuing is used to not
work on the same persistent directory in parallel. The default for JobQueuing enabled attribute is
false.
The timeout attribute defines the timeout for the queuing in milli seconds. If the timeout is reached
the Job is started. The default for timeout is 10 minutes.
3.3.2.1.45 TypeMapping
<TypeMapping enabled="true"> <V6ToPdm> <Mapping v6Type="VPMReference" pdmType="ItemRevision"/> <Mapping v6Type=" VPMReference" pdmType="Design Revision"/> </V6ToPdm> <PdmToV6> <Mapping v6Type="VPMReference" pdmType="ItemRevision"/> <Mapping v6Type=" VPMReference" pdmType="Design Revision"/> </PdmToV6> </TypeMapping>
TCI Release 3.7 - Installation Manual 23
Set the enabled attribute to true to enable the type mapping. Enabled Type Mapping is used to
define the Type mapping between 3DEXPERIENCE and Teamcenter.
3.3.2.2 Pdm
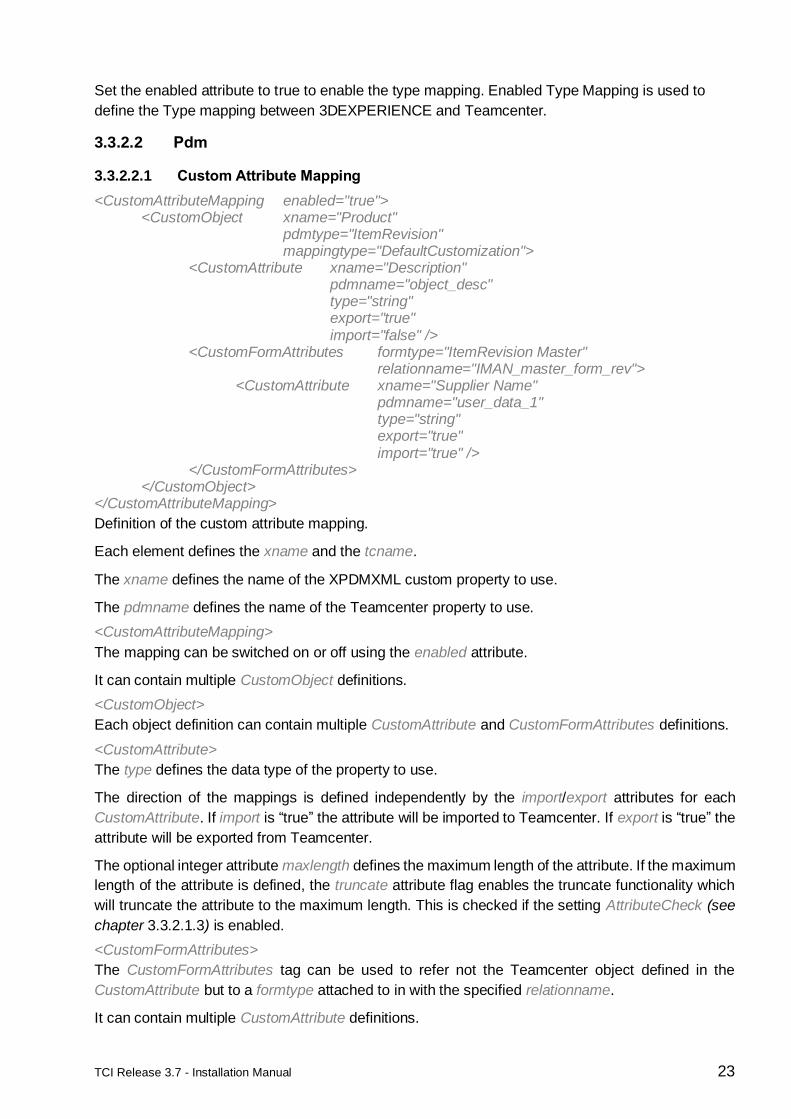
3.3.2.2.1 Custom Attribute Mapping
<CustomAttributeMapping enabled="true"> <CustomObject xname="Product"
pdmtype="ItemRevision" mappingtype="DefaultCustomization"> <CustomAttribute xname="Description" pdmname="object_desc" type="string" export="true" import="false" /> <CustomFormAttributes formtype="ItemRevision Master" relationname="IMAN_master_form_rev"> <CustomAttribute xname="Supplier Name" pdmname="user_data_1" type="string"
export="true" import="true" /> </CustomFormAttributes>
</CustomObject> </CustomAttributeMapping>
Definition of the custom attribute mapping.
Each element defines the xname and the tcname.
The xname defines the name of the XPDMXML custom property to use.
The pdmname defines the name of the Teamcenter property to use.
<CustomAttributeMapping>
The mapping can be switched on or off using the enabled attribute.
It can contain multiple CustomObject definitions.
<CustomObject>
Each object definition can contain multiple CustomAttribute and CustomFormAttributes definitions.
<CustomAttribute>
The type defines the data type of the property to use.
The direction of the mappings is defined independently by the import/export attributes for each
CustomAttribute. If import is “true” the attribute will be imported to Teamcenter. If export is “true” the
attribute will be exported from Teamcenter.
The optional integer attribute maxlength defines the maximum length of the attribute. If the maximum
length of the attribute is defined, the truncate attribute flag enables the truncate functionality which
will truncate the attribute to the maximum length. This is checked if the setting AttributeCheck (see
chapter 3.3.2.1.3) is enabled.
<CustomFormAttributes>
The CustomFormAttributes tag can be used to refer not the Teamcenter object defined in the
CustomAttribute but to a formtype attached to in with the specified relationname.
It can contain multiple CustomAttribute definitions.

TCI Release 3.7 - Installation Manual 24
3.3.2.2.2 MetaUpdate
<MetaUpdate enabled="true"> <MetaObject type="ItemRevision"> <MetaAttribute name="item_id" export="true" readonly="true" v6name="attribute[PLMEntity.PLM_ExternalID]"/> <MetaAttribute name="object_desc" export="true" v6name="attribute[PLMEntity.V_description]"/> <MetaAttribute name="object_name" export="true" v6name="attribute[PLMEntity.V_Name]"/> <MetaFormAttributes formtype="ItemRevision Master" relationname="IMAN_master_form_rev"> <MetaAttribute name="project_id" export="true" readonly="true"/> <MetaAttribute name="user_data_1" export="true" readonly="true"/> <MetaAttribute name="user_data_2" export="true" readonly="true"/> <MetaAttribute name="user_data_3" export="true" readonly="true"/> </MetaFormAttributes> </MetaObject> <MetaObject type="Design Revision"> <MetaAttribute name="item_id" export="true" readonly="true" v6name="attribute[PLMEntity.PLM_ExternalID]"/> <MetaAttribute name="object_desc" export="true" v6name="attribute[PLMEntity.V_description]"/> <MetaAttribute name="object_name" export="true" v6name="attribute[PLMEntity.V_Name]"/> </MetaObject> </MetaUpdate>
The MetaUpdate section defines the Teamcenter and 3DEXPERIENCE attributes for the metadata
update command. The meta update functionality can be switched on or off using the enabled
attribute.
MetaObject defines the Teamcenter type with the type attribute. The MetaAttribute defines the attributes
for the update functionality.
• name: the attribute name in Teamcenter.
• export: true to use the Attribute.
• readonly: true to set the attribute value to readonly
• v6name: the 3DEXPERIENCE attribute name
With the MetaFormAttributes attached forms with attributes can be used for the meta update. the
formtype defines the type of the form and the relationname defines the relation name between the
Revision and the Form.
3.3.2.2.3 Other Pdm settings
<TemplateProductImport enabled="true">TemplateProduct.CATProduct</TemplateProductImport>
The location of the template product file to use on import. The product file will be added on the fly in
Teamcenter imports. The location may be relative to the TCI_HOME directory or an absolute path.
The format of the template file to be used must be defined in the V6 to TC file type mapping at
/XCISettings/Conversion/V6TcFileType as V6FileFormat.
If the created product is required to get the same status as the parent object, this needs to be
configured in /XCISettings/Conversion/StatusUpdateHandling like
<AdditionalStatusUpdate sourceType="F_GenericObj Revision" targetRelationType="IMAN_specification" targetObjectType="CATProduct" />.
<ReallyRemoveExistingNotProvided enabled="true" />
Setting whether to remove unknown occurrences in Teamcenter or not.
Default setting is “false”.

TCI Release 3.7 - Installation Manual 25
<OverwriteOriginal enabled="true" />
Set enabled to “true” to allow overwriting of data originating from Teamcenter (after CLOC).
Default setting is “false”.
<FileUploadChunkSize>1</FileUploadChunkSize> <FileDownloadChunkSize>1</FileDownloadChunkSize>
Optional definition of the chunk sizes to be used to up- and download files using the Teamcenter
FCS.
The default settings are “1” each.
<GetPropertiesChunkSize>1000</GetPropertiesChunkSize> <ExpandChunkSize>1000</ExpandChunkSize> <RefreshChunkSize>1000</RefreshChunkSize>
Optional definition of the maximal chunk sizes to use when requesting metadata from the
Teamcenter server.
The default settings are “1000” each.
Warning: Modifying these settings can affect the performance of the tool and die utilization of the
Teamcenter server.
<DocumentRelations>
<Relation>IMAN_specification</Relation>
<Relation>IMAN_Rendering</Relation>
</DocumentRelations>
Defines the relation types to be followed to documents when the export functionality of TCI is used.
<CreateItemClass>Item</CreateItemClass>
Name of the Teamcenter Item type to use.
The default class is “Item”. This behavior can be changed by overwriting the
com.tsystems.xci.customization.CustomPartType class.
<CreateFastenerItemClass>WeldPoint</CreateFastenerItemClass>
Name of the Teamcenter Item type to use for Fastener items.
The default is “WeldPoint”. This behavior can be changed by overwriting the
com.tsystems.xci.customization.CustomItemType class.
<LinkedDrawingHandling enabled="true">
<LinkedDrawingDocumentType>CATDrawing</LinkedDrawingDocumentType>
<LinkedDrawingDocumentRelationType>IMAN_external_object_link</LinkedDrawingDocu
mentRelationType>
</LinkedDrawingHandling>

TCI Release 3.7 - Installation Manual 26
Defines a list of Teamcenter drawing Document types which should be searched as referenced at
Item Revisions. The TCIC integration uses links for the drawing handling in Teamcenter. If the
LinkedDrawingHandling is enabled the integration searches for referenced drawings and transfers
these drawings to 3DEXPERIENCE.
Default setting is “false”.
<LinkedRevisionHandling enabled="true">
<LinkType>IMAN_external_object_link</LinkType>
</LinkedRevisionHandling>
Defines a list of Teamcenter link types which should be used to search for referenced Item Revisions
related to Documents. The TCIC integration uses links for the drawing handling in Teamcenter. If
the LinkedRevisionHandling is enabled the integration searches for referenced Item Revisions and
transfers these Item Revisions to 3DEXPERIENCE.
Default setting is “false”.
<Dispatchers> <Dispatcher enabled="true"> <DocumentType>CMI2Part</DocumentType>
<FileType>CATPart</FileType> <Provider>TSYSTEMS</Provider> <Priority>3</Priority> <Servicename>cmitojt</Servicename> <Type>ONDEMAND</Type> </Dispatcher> <Dispatcher enabled="true"> <DocumentType>CMI2Drawing</DocumentType> <FileType>CATDrawing</FileType> <Provider>TSYSTEMS</Provider> <Priority>3</Priority> <Servicename>cmitopdf</Servicename> <Type>ONDEMAND</Type> </Dispatcher> </Dispatchers>
Definitions for optional dispatchers to use. Each dispatcher can be enabled separately.
<RevisionQuerySettings> <RevisionTypes> <!-- Use empty RevisionType for search all types. --> <RevisionType/> <RevisionType>ItemRevision</RevisionType> <RevisionType>Design Revision</RevisionType> <RevisionType>Part Revision</RevisionType> </RevisionTypes> <!-- The RevisionAttributeName must be the "User Entry Name" in the Query definition --> <!-- of the Teamcenter Query Builder application. --> <!-- for the item_id attribute e.g.: "Item ID" --> <RevisionAttributeNames> <RevisionAttributeName display="Item ID" >Item ID</RevisionAttributeName> <RevisionAttributeName display="Item Revision" >Revision</RevisionAttributeName> <RevisionAttributeName display="Name" >Name</RevisionAttributeName> <RevisionAttributeName display="Description" >Description</RevisionAttributeName>

TCI Release 3.7 - Installation Manual 27
</RevisionAttributeNames> <!-- if ResultAttributeNames tag does not exist, then all not empty attributes are returned. --> <ResultAttributeNames> <ResultAttributeName>item_id</ResultAttributeName> <ResultAttributeName>item_revision_id</ResultAttributeName> <ResultAttributeName>sequence_id</ResultAttributeName> <ResultAttributeName>creation_date</ResultAttributeName> <ResultAttributeName>owning_user</ResultAttributeName> <ResultAttributeName>owning_group</ResultAttributeName> <ResultAttributeName>last_mod_user</ResultAttributeName> <ResultAttributeName>last_mod_date</ResultAttributeName> <ResultAttributeName>checked_out_user</ResultAttributeName> </ResultAttributeNames> <MaxResultToReturn>25</MaxResultToReturn> </RevisionQuerySettings>
RevisionTypes defines the settings for the Teamcenter Item Query.
Use empty RevisionType for search all types.
The RevisionAttributeName must be the “User Entry Name” in the Query definition of the Teamcenter Query Builder application. Example:
The “item_id” attribute “Item ID”
If the ResultAttributeNames tag does not exist, then all not empty attributes are returned.
MaxResultToReturn sets a specified maximum number of matches to be returned. It has default “0”,
which means no limit.
<GetMetadataSettings>
<!-- used as default for all ItemRevision with subclasses -->
<ResultAttributeNames pdmType="ItemRevision">
<ResultAttributeName>item_id</ResultAttributeName>
<ResultAttributeName>item_revision_id</ResultAttributeName>
<ResultAttributeName>creation_date</ResultAttributeName>
<ResultAttributeName>last_mod_date</ResultAttributeName>
<ResultAttributeName>object_type</ResultAttributeName>
<ResultAttributeName>object_name</ResultAttributeName>
<ResultAttributeName>object_desc</ResultAttributeName>
<ResultAttributeName>owning_user</ResultAttributeName>
<ResultAttributeName>owning_group</ResultAttributeName>
<ResultAttributeName>owning_site</ResultAttributeName>
</ResultAttributeNames>
<!-- used as default for all Document with subclasses -->
<ResultAttributeNames pdmType="Dataset">
<ResultAttributeName>creation_date</ResultAttributeName>
<ResultAttributeName>last_mod_date</ResultAttributeName>
<ResultAttributeName>object_type</ResultAttributeName>
<ResultAttributeName>object_name</ResultAttributeName>
<ResultAttributeName>object_desc</ResultAttributeName>
<ResultAttributeName>owning_user</ResultAttributeName>
<ResultAttributeName>owning_group</ResultAttributeName>
<ResultAttributeName>owning_site</ResultAttributeName>
</ResultAttributeNames>

TCI Release 3.7 - Installation Manual 28
<!-- used for CMI2Part class -->
<ResultAttributeNames pdmType="CMI2Part">
<ResultAttributeName>last_mod_date</ResultAttributeName>
<ResultAttributeName>object_name</ResultAttributeName>
<ResultAttributeName>object_desc</ResultAttributeName>
<ResultAttributeName>owning_user</ResultAttributeName>
<ResultAttributeName>owning_group</ResultAttributeName>
</ResultAttributeNames>
</GetMetadataSettings>
GetMetadataSettings defines the attributes which are returned from the Show Teamcenter Attributes
command in the TCI 3DEXPERIENCE Rich Client.
<SendJobNotifications enabled="true"/>
If the SendJobNotifications is enabled, the User receives a Message in the Teamcenter Mail system
after the Job is finished.
<ExportWithStateFilter enabled="true">Frozen,Released</ExportWithStateFilter>
If enabled only objects with the configured state are exported from Teamcenter. The value is a
comma separated list of allowed states.
3.3.2.3 Teamcenter
In the following chapters the configuration options for the tag Teamcenter are described.
3.3.2.3.1 Teamcenter Server definitions
<Server> <Url>http://my.tc-server.url:8080/tc</Url> <Username>myTCIUser</Username> <Password plainText="true">myTCIPassword</Password> <Group></Group> <Role></Role> </Server>
Definition of the Teamcenter server and the login credentials of the TCI user.
The Username and the Password belong to an existing Teamcenter user. You can also specify the
Group and Role in which the user will act. An optional element is Locale to define the required locale
for the user. Another optional element is UseBypass, set it to true to set the bypass to the user.
3.3.2.3.2 Server Password
The password in the XCISettings.xml (/XCISettings/Teamcenter/Server/Password) can be
stored as plain text or encrypted.
<Password plainText="true">myTCIPassword</Password>
To encrypt the password for TCI the following script can be used:
set XCI_HOME=C:\XCI\XCI_HOME
set WEBAPPS_FOLDER=C:\XCI\apache-tomcat-8.5.50\webapps
set WEB_APP_NAME=XCI
set TC_SOA_LIBS=C:\TC11\soa_client_1120\java\libs
set JAVA_HOME=C:\Program Files\Java\jre8
set JAVA_OPTS=%JAVA_OPTS% -Djlicman.platform="Windows_2003_amd64"

TCI Release 3.7 - Installation Manual 29
set
CLASSPATH=%TC_SOA_LIBS%\*;%TC_SOA_LIBS%\com.teamcenter.rac.external_1100
0.2.0\*;%WEBAPPS_FOLDER%\%WEB_APP_NAME%\WEB-
INF\lib\*;%WEBAPPS_FOLDER%\%WEB_APP_NAME%\WEB-INF\classes
java com.tsystems.xci.Main --encryptPassword
pause
TCI will prompt the user to enter the password. The password will only be written out to the standard
output and must be copied to the configuration file manually.
The command will generate a file named passwordKey and the encrypted password, that is printed
to the command line.
Note:
If the passwordKey file exists it will not be overwritten.
The encrypted password may differ after each execution of the encryption. It can be set as follows.
<Password plainText="false">INdlaJZMaTQO0MblX+/C1Q==</Password>
3.3.2.3.3 Teamcenter SessionPool settings
<SessionPool enabled="true">
<Login enabled="false" />
<DiscardOnFailedLogin enabled="false" />
<Logout enabled="false" />
<!-- 60 min session timeout (3600000) -->
<DiscardIdle enabled="true">3600000</DiscardIdle>
<DiscardUsed enabled="false">100</DiscardUsed>
</SessionPool>
Defines the Session Pool handling. The session pool holds connections to Teamcenter open and
uses this connection to login and logout with the Teamcenter Server.
▪ Sessions are created as needed.
▪ If Login is not enabled logins will only be issued on new created connections, but not on
previously suspended connections. The default setting is “true”.
▪ If Logout is not enabled logouts without discarding the session are suppressed. The default
setting is “true”.
▪ If DiscardOnFailedLogin is enabled connections will be discarded when a TC session login
fails on them otherwise not. The default setting is “true”.
▪ When a new session (using the same server, user, group and role) is needed the dormant
connection will be reused.
▪ If DiscardIdle is enabled a cyclic check will be executed to log out sessions that are idle for
the timeout defined in the setting. The default setting is “false”.
▪ If DiscardUsed is enabled connection will be discarded after the defined number of virtual TC
sessions has used the connection. The default setting is “false”.
3.3.2.3.4 Teamcenter FileManagement settings
<FileManagement useFsc="true"> <!-- ClientIPAddress is empty -->

TCI Release 3.7 - Installation Manual 30
<AssignedFSCURIs>http://fschost:fsc-port/</AssignedFSCURIs> <!-- BootstrapFSCURIs is empty --> </FileManagement>
If the useFsc is set to true, the tccs is not used, but the direct connection to the fsc is used.
Define FileManagementUtility to use with parameters:
• ClientIPAddress: This client's address which can be optionally used to determine the FSC
assignments.
• AssignedFSCURIs: Optional array of FSCs assigned to this client. These are passed in the
form {"http://192.168.1.1:1234", "http://192.168.1.2:1234"}. These are configured in
fmsmaster.xml as fscid and clientmap.
• BootstrapFSCURIs: An array of bootstrap FSCs to get FSC assignments from. These are
passed in the form {"http://192.168.1.1:1234", "http://192.168.1.2:1234"}. These are set as
values for the preference FMS_Bootstrap_Urls and can be listed by running the command
line utility backup_xmlinfo.
This initialization can be a direct assignment of assigned FSCs URIs, or via a bootstrap procedure
that queries the FMS system to find assigned FSCs based on the supplied client IP. Direct
initialization is invoked by passing assignedFSCURIs. The FMS system is not queried for assigned
FSCs. Bootstrap initialization is invoked by passing bootstrapFSCURIs and clientIPAddress. The
bootstrap FSCs will be queried to get assigned FSCs for the given client IP. If the client IP is null or
an empty string, the bootstrap servers will use the client address off the connection. Assigned FSCs
are kept in the proxy and used by default on all other APIs. Optionally, specific FSCs to be used for
a given API call by passing them in fscServerURIs.
3.3.2.3.5 Other Teamcenter settings
<WorkingGroup>V6Group</WorkingGroup>
Name of TCI working group in Teamcenter. Item Revisions owned by 3DEXPERIENCE will be
moved to this group.
<MinimizeLoadProperties enabled="true" />
Set enabled to “true” to aggressively minimize loadProperties calls.
Default setting is “false”.
<ReportReceiverList enabled="false">
<Receiver>myTCIUser1</Receiver>
<Receiver>infodba</Receiver>
</ReportReceiverList>
Defines a list of Teamcenter users to receive reports on TCI actions. The reports will be delivered
through Teamcenter to the mailbox of the defined users. The dataset type and the named reference
for the report Document can be configured with the following settings.
Default setting is “true”.
<ReportDatasetType>Text</ReportDatasetType>
<ReportDatasetNamedRef>Text</ReportDatasetNamedRef>

TCI Release 3.7 - Installation Manual 31
Defines the dataset type to be used for the report functionality.
Default settings are “Text” each.
<ExportDatasetType>Text</ExportDatasetType>
<ExportDatasetNamedRef>Text</ExportDatasetNamedRef>
Defines the dataset type to be used for the export functionality.
Default settings are “Text” each.
The Teamcenter policy can be loaded by Server policy or a local file path.
<PolicyPath>TCI_Policy</PolicyPath>
Optional definition of the Teamcenter server policy to load.
<PolicyLocalPath>C:\TCI\TCI_PolicyFile.xml</PolicyLocalPath>
Optional local file definition for the Teamcenter policy to load.
<LatestRevisionRuleUid>da12b3d4ef54gt</LatestRevisionRuleUid>
The revision rule uid used to get the latest Revision.
3.3.2.3.6 TcIC compatibility
To support as most as possible environments TCI can be configured to run in TcIC compatibility
mode. This will modify the default behavior to match some specialties of the environment.
To switch on the TcIC compatibility mode the following configurations must be set in the TCI
configuration file in the Teamcenter section.
<Teamcenter>
…
<TcICCompatibility enabled="true"/>
…
</Teamcenter>
Additionally, the following optional settings can be set:
▪ OccurrenceProperty: default is “bl_occurrence_name”
▪ OccurrenceNote: default is “catiaOccurrenceName”
▪ BomLineOccurrenceProperty: default is “catiaOccurrenceName”
▪ BomViewRevisionType: default is “catia”
3.3.2.3.7 CMI RII compatibility
To support as most as possible environments TCI can be configured to run in CMI RII compatibility
mode. This will modify the default behavior to match some specialties of the environment.
To switch on the TcIC compatibility mode the following configurations must be set in the TCI
configuration file in the Teamcenter section.
<Teamcenter>
…
< CMIRIICompatibilityenabled="true"/>

TCI Release 3.7 - Installation Manual 32
…
</Teamcenter>
Additionally, the following optional settings can be set:
▪ HandleAuxForms: true to handle aux files for CMI RII, default is true
3.3.2.4 Enovia
In the following chapters the configuration options for the tag Enovia are described.
3.3.2.4.1 3DEXPERIENCE Server definition
The 3DEXPERIENCE connection for the 3DEXPERIENCE property information is defined in the
Server section.
<Server> <Url>https://enovia-server.url:port/3dspace</Url> <Username>user</Username> <Password>XXX</Password> <Role>ctx::VPLMAdmin.Company Name.Default</Role> <Vault>vplm</Vault> <Use3DPassport>true</Use3DPassport> </Server>
Definition of the 3DEXPERIENCE server URL and the login credentials of the TCI user.
The Username and the Password belong to an existing 3DEXPERIENCE user. You can also specify
the Role and the Vault. Set Use3DPassport, if the login uses the 3DPassport service.
The encryption of the password is described in section Server Password in chapter 3.3.2.3.2.
3.3.2.4.2 General 3DEXPERIENCE settings
<FileCache enabled="true"> <XciFcUrl>http://my.tci-integration-server.url:port/XCI_FC</XciFcUrl> </FileCache>
Is only used if the TDXExportMode is set to “ExportFiles”.
Defines the File Cache URL used to cache files for the export files mode.
Default setting is “false”.
<MappingContextName>XPDM<MappingContextName>
The mapping context name to use, used to find the correct mapping in 3DEXPERIENCE.
<ReceiveInterval>4000</ReceiveInterval>
Optional definition in which interval the events should be received in milliseconds (ms).
Default setting is “5000” (5 seconds).
<SchemaPath>...\resources\xsd\XPG\XPDMXML.xsd</SchemaPath>
Definition of the schema to be used to validate XPDM messages. If the file path is not defined or
incorrect, the incoming and outgoing XPDMXML files will not be validated but processed.
TCI Release 3.7 - Installation Manual 33
<Customization>DefaultCustomization</Customization>
Definition of the customization to use in XPDM events. This customization must be defined in the
pdm-cust-config.xml in the 3DEXPERIENCE installation.
The com.tsystems.xci.customization.CustomTypeMapping customization class can
overwrite this setting.
<GetMetadataSettings> <ProductObject enoviaType="VPMReference"> <AttributeName display="Type">type</AttributeName> <AttributeName display="Name">name</AttributeName> <AttributeName display="Revision">revision</AttributeName> <AttributeName display="Vault">vault</AttributeName> <AttributeName display="Policy">policy</AttributeName> <AttributeName display="State">current</AttributeName> <AttributeName display="Created">originated</AttributeName> <AttributeName display="Modified">modified</AttributeName> <AttributeName display="Owner">owner</AttributeName> <AttributeName display="Organization">organization</AttributeName> <AttributeName display="Project">project</AttributeName> <AttributeName display="External ID">attribute[PLMEntity.PLM_ExternalID]</AttributeName> <AttributeName display="Title">attribute[PLMEntity.V_Name]</AttributeName> <AttributeName display="">attribute[PLMEntity.V_description]</AttributeName> </ProductObject>
</GetMetadataSettings>
GetMetadataSettings defines the attributes which are returned from the “Show 3DEXPERIENCE
Properties” command in the TCI Teamcenter Rich Client.
<EnableNonCatiaExpand>false</EnableNonCatiaExpand>
Is only relevant if the TDXExportMode is set to “ExportFiles”.
If set to “true” all geometries are exported, else only 3DPart geometries are exported.
Default setting is “false”.
<VPMReferenceDisplayPattern>{attribute[PLMEntity.PLM_ExternalID]} {majorrevision}</VPMReferenceDisplayPattern>
Display pattern for VPMReferences (Physical Products).
Default setting is “{attribute[PLMEntity.PLM_ExternalID]} {revision}
{attribute[PLMEntity.V_Name]}”.
<FolderDisplayPattern>{attribute[PLMEntity.PLM_ExternalID]}</FolderDisplayPattern>
Display pattern for Folder.
Default setting is “{attribute[PLMEntity.PLM_ExternalID]}”.
<RootFolderDisplayPattern>{attribute[PLMEntity.PLM_ExternalID]}</RootFolderDisplayPattern>
Display pattern for Root Folder.
Default setting is “{attribute[PLMEntity.PLM_ExternalID]}”.

TCI Release 3.7 - Installation Manual 34
<FolderConnectionDisplayPattern>{attribute[PLMEntity.PLM_ExternalID]}</FolderConnectionDisplayPattern>
Display pattern for FolderConnections.
Default setting is “{attribute[PLMEntity.PLM_ExternalID]}”.
<ChildObjectExpandPattern>VPMReference</ChildObjectExpandPattern>
Optional expand pattern for child part objects. Comma separated list of types.
Default setting is “VPMReference”.
<ChildRelationExpandPattern>VPMInstance</ChildRelationExpandPattern>
Optional expand pattern for child relations. Comma separated list of relation types.
Default setting is “VPMInstance”.
<RepObjectExpandPattern>VPMRepReference</RepObjectExpandPattern>
Optional expand pattern for representation objects. Comma separated list of types.
Default setting is “VPMRepReference”.
<RepRelationExpandPattern>VPMRepInstance</RepRelationExpandPattern>
Optional expand pattern for representation relations. Comma separated list of relation types.
Default setting is “VPMRepInstance”.
<CatiaV5ExportVersion>V5R28</CatiaV5ExportVersion>
The CATIA V5 version used to store the info in Teamcenter.
<UsePowerByImport>false</UsePowerByImport>
Enable to activate 3DEXPERIENCE import in PowerBy mode. Data will be imported in native V5
format into 3DEXPERIENCE and can then be loaded using the Dassault PowerBy Integration of
3DEXPERIENCE and V5.
Default is false, i.e. data will be imported in V6 mode.
3.3.2.4.3 3DEXPERIENCE Query definition
The TCI integration inside Teamcenter provides an online query in 3DEXPERIENCE without
changing the application. Based on the query result a data transfer from 3DEXPERIENCE to
Teamcenter can be initiated. For the configuration of the data transfer please refer to chapter
3.3.2.4.4.
The corresponding configurations for the query in 3DEXPERIENCE are defined in the QuerySettings
section.
<QuerySettings> <DefaultEnoviaRole>VPLMCreator</DefaultEnoviaRole>
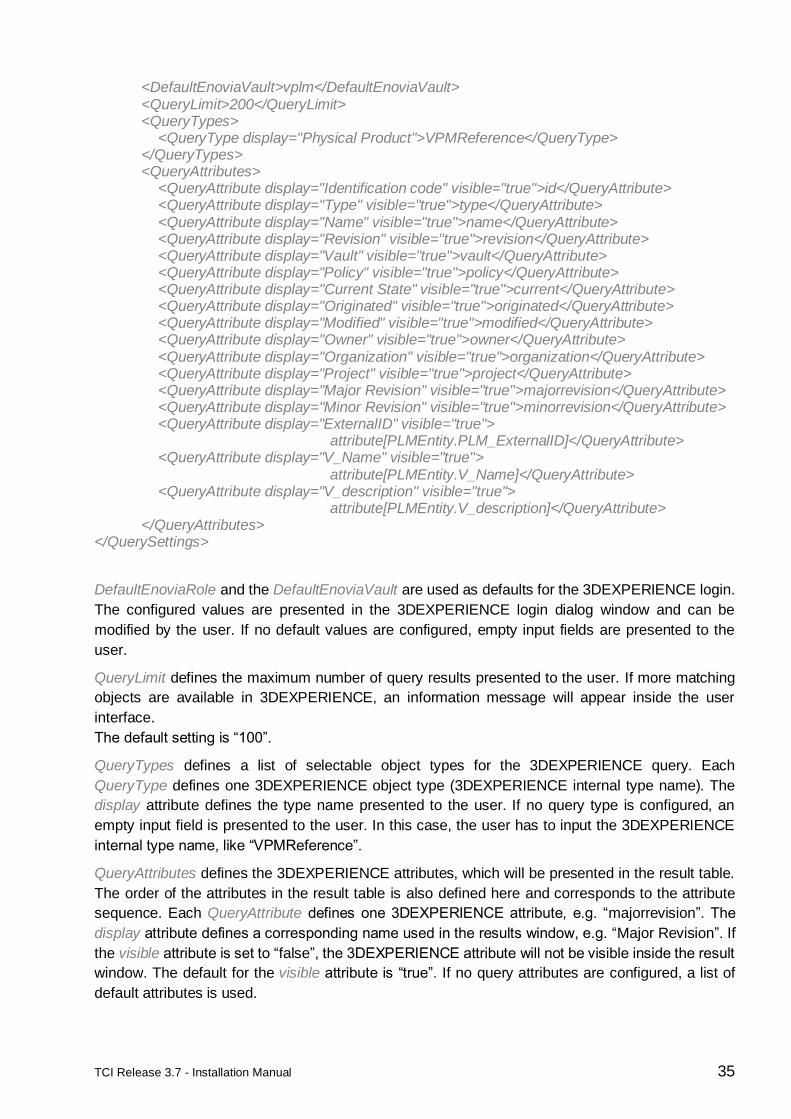
TCI Release 3.7 - Installation Manual 35
<DefaultEnoviaVault>vplm</DefaultEnoviaVault> <QueryLimit>200</QueryLimit> <QueryTypes> <QueryType display="Physical Product">VPMReference</QueryType> </QueryTypes> <QueryAttributes> <QueryAttribute display="Identification code" visible="true">id</QueryAttribute> <QueryAttribute display="Type" visible="true">type</QueryAttribute> <QueryAttribute display="Name" visible="true">name</QueryAttribute> <QueryAttribute display="Revision" visible="true">revision</QueryAttribute> <QueryAttribute display="Vault" visible="true">vault</QueryAttribute> <QueryAttribute display="Policy" visible="true">policy</QueryAttribute> <QueryAttribute display="Current State" visible="true">current</QueryAttribute> <QueryAttribute display="Originated" visible="true">originated</QueryAttribute> <QueryAttribute display="Modified" visible="true">modified</QueryAttribute> <QueryAttribute display="Owner" visible="true">owner</QueryAttribute> <QueryAttribute display="Organization" visible="true">organization</QueryAttribute> <QueryAttribute display="Project" visible="true">project</QueryAttribute> <QueryAttribute display="Major Revision" visible="true">majorrevision</QueryAttribute> <QueryAttribute display="Minor Revision" visible="true">minorrevision</QueryAttribute> <QueryAttribute display="ExternalID" visible="true">
attribute[PLMEntity.PLM_ExternalID]</QueryAttribute> <QueryAttribute display="V_Name" visible="true"> attribute[PLMEntity.V_Name]</QueryAttribute> <QueryAttribute display="V_description" visible="true"> attribute[PLMEntity.V_description]</QueryAttribute> </QueryAttributes> </QuerySettings>
DefaultEnoviaRole and the DefaultEnoviaVault are used as defaults for the 3DEXPERIENCE login.
The configured values are presented in the 3DEXPERIENCE login dialog window and can be
modified by the user. If no default values are configured, empty input fields are presented to the
user.
QueryLimit defines the maximum number of query results presented to the user. If more matching
objects are available in 3DEXPERIENCE, an information message will appear inside the user
interface.
The default setting is “100”.
QueryTypes defines a list of selectable object types for the 3DEXPERIENCE query. Each
QueryType defines one 3DEXPERIENCE object type (3DEXPERIENCE internal type name). The
display attribute defines the type name presented to the user. If no query type is configured, an
empty input field is presented to the user. In this case, the user has to input the 3DEXPERIENCE
internal type name, like “VPMReference”.
QueryAttributes defines the 3DEXPERIENCE attributes, which will be presented in the result table.
The order of the attributes in the result table is also defined here and corresponds to the attribute
sequence. Each QueryAttribute defines one 3DEXPERIENCE attribute, e.g. “majorrevision”. The
display attribute defines a corresponding name used in the results window, e.g. “Major Revision”. If
the visible attribute is set to “false”, the 3DEXPERIENCE attribute will not be visible inside the result
window. The default for the visible attribute is “true”. If no query attributes are configured, a list of
default attributes is used.

TCI Release 3.7 - Installation Manual 36
Each line in the result window represents one 3DEXPERIENCE object. The user can select each
line and initiate the data transfer from 3DEXPERIENCE to Teamcenter. To perform the transfer, the
configured TDXExportMode will be used. See chapter 3.3.2.1.24 for detailed information.
3.3.2.4.4 Export and Import Definitions
The following tags are used in the import and export definitions below:
▪ CatStartPath defines the path to the batch tool CATSTART.exe.
▪ CatStartDirEnv defines the directory, where the CATSTART environment is located.
▪ CatStartEnv defines the CATSTART environment.
▪ ServerUrl defines the 3DEXPERIENCE server URL.
▪ Environment defines the 3DEXPERIENCE environment.
▪ Username defines the 3DEXPERIENCE user name, used to initiate the data transfer.
▪ Password defines the 3DEXPERIENCE user password for the 3DEXPERIENCE user.
▪ FileFormat2D defines the 2D export file format.
▪ FileFormat3D defines the 3D export file format.
▪ GeometryType3D defines the 3D type of geometry.
▪ SecurityCtx defines the 3DEXPERIENCE security context (Role.Organization.Project).
▪ SiteId defines PLM Mapping Context for the target site.
▪ WithFiles used for XPDMExport:
o Yes (default): Export files with XPDMExport.
o No: do not export files with the XPDMExport (use FileExportConfiguration).
o IfModified: only export Modified Files. (Missing files are exported based on the
FileExportConfiguration)
▪ WithDocuments used for XPDMExport:
o Yes (default): Export non cad documents with XPDMExport.
o No: do not export non cad documents with the XPDMExport.
▪ WithPLMParams used for XPDMExport:
o Yes (default): Export PLM Parameter with XPDMExport.
o No: do not export PLMParameter with the XPDMExport.
▪ MappingInfoResult used for mapping info export:
o All (default): Export mapping info result to one file.
o Each: one result file for each mapping info entry in the input file.
▪ MappingInfoExposed used for mapping info export.
o TRUE (default): export only exposed mapping.
o FALSE: export exposed and internal mapping.
The following attributes are used for the processing definitions:
▪ usecs: Set to “true” to use the Converter Server.
▪ tdsUrl: TCI directory service URL (http://my.tci-integration-server.url:port/XCI/XCI_TDS).
▪ csTimeout: Converter Server timeout in seconds used to wait for free Converter Server host.
Default setting is “7200”.
▪ resource: Name of the resource (see chapter 3.3.2.1.36).
The following tags are used in the Host definition:
▪ Url: The URL to the processing application.
▪ Command: The command used on the processing host (see Url).
Optional tags are:

TCI Release 3.7 - Installation Manual 37
▪ Timeout: The timeout in seconds. Default setting is “7200”.
▪ MaxParallel: The maximum number of parallel conversions running on the host.
The following attributes are used for the host definitions:
▪ local: Set to “true” will skip the file transfer via Converter Server and directly work in the
persistent directory (must be accessible from the hosts). Default setting is “false”.
▪ cleanupWorkdir: Set to “true” will clean the Converter Server work directory after result files
have been transferred to TCI. Default setting is “true”.
The TDXExportMode defines the 3DEXPERIENCE export mode; the TDXImportMode defines the
3DEXPERIENCE import mode.
In the following sections export and import definitions are described.
3.3.2.4.4.1 SetFilter definition
Set Filter in 3DEXPERIENCE using the 3DEXPERIENCE Batch utility.
<SetFilter> <CatStartPath>C:\enoviaV6R2018x\B420\win_b64\code\bin\CATSTART.exe</CatStartPath> <CatStartEnv>TSI_3DX_EXP_Env</CatStartEnv> <CatStartDirEnv>C:\TCI\TSI_3DX_EXP_R2018x\config</CatStartDirEnv> <ServerUrl>https://enovia-server.url:port/3dspace</ServerUrl> <Environment>UnifiedTyping</Environment> <Username>LoginTicket</Username> <Password>XXX</Password> </Cloc >
Set Filter without the Converter Server.
The configurations are defined in the Export and Import Definitions section.
<SetFilterProcessingusecs="true" tdsUrl="http://my.tci-integration-server.url:port/XCI/XCI_TDS"> <SetFilterHostlocal="false"> <Url>http://my.tci-integration-server.url:port/XCI_CS</Url> <Command>XPDMExportCommand</Command> </SetFilterHost> <SetFilterCommandcommandName="XPDMExportCommand"> <CatStartPath>C:\enoviaV6R2018x\B420\win_b64\code\bin\CATSTART.exe</CatStartPath> <CatStartEnv>TSI_3DX_EXP_Env</CatStartEnv> <CatStartDirEnv>C:\TCI\TSI_3DX_EXP_R2018x\config</CatStartDirEnv> <ServerUrl>https://enovia-server.url:port/3dspace</ServerUrl> <Environment>UnifiedTyping</Environment> <Username>LoginTicket</Username> <Password>XXX</Password> </SetFilterCommand> </SetFilterProcessing>
Set Filter with the use of the Converter Server.
The configurations are defined in the Export and Import Definitions section.
3.3.2.4.4.2 ClocProcessing definition
Process CLOC in 3DEXPERIENCE using the 3DEXPERIENCE Batch utility.
<Cloc > <CatStartPath>C:\enoviaV6R2018x\B420\win_b64\code\bin\CATSTART.exe</CatStartPath> <CatStartEnv>TSI_3DX_EXP_Env</CatStartEnv>

TCI Release 3.7 - Installation Manual 38
<CatStartDirEnv>C:\TCI\TSI_3DX_EXP_R2018x\config</CatStartDirEnv> <ServerUrl>https://enovia-server.url:port/3dspace</ServerUrl> <Environment>UnifiedTyping</Environment> <Username>LoginTicket</Username> <Password>XXX</Password> <ContextName>XPDM</ContextName> </Cloc >
Process CLOC without the Converter Server.
The configurations are defined in the Export and Import Definitions section.
<ClocProcessing usecs="true" tdsUrl="http://my.tci-integration-server.url:port/XCI/XCI_TDS"> <ClocHost local="false"> <Url>http://my.tci-integration-server.url:port/XCI_CS</Url> <Command>XPDMExportCommand</Command> </ClocHost > <ClocCommand commandName="XPDMExportCommand"> <CatStartPath>C:\enoviaV6R2018x\B420\win_b64\code\bin\CATSTART.exe</CatStartPath> <CatStartEnv>TSI_3DX_EXP_Env</CatStartEnv> <CatStartDirEnv>C:\TCI\TSI_3DX_EXP_R2018x\config</CatStartDirEnv> <ServerUrl>https://enovia-server.url:port/3dspace</ServerUrl> <Environment>UnifiedTyping</Environment> <Username>LoginTicket</Username> <Password>XXX</Password> <ContextName>XPDM</ContextName> </ClocCommand > </ClocProcessing >
Process CLOC with the use of the Converter Server.
The configurations are defined in the Export and Import Definitions section.
3.3.2.4.4.3 MappingInfo definition
Retrieve Mapping information from 3DEXPERIENCE using the 3DEXPERIENCE Batch utility.
<MappingInfo> <CatStartPath>C:\enoviaV6R2018x\B420\win_b64\code\bin\CATSTART.exe</CatStartPath> <CatStartEnv>TSI_3DX_EXP_Env</CatStartEnv> <CatStartDirEnv>C:\TCI\TSI_3DX_EXP_R2018x\config</CatStartDirEnv> <ServerUrl>https://enovia-server.url:port/3dspace</ServerUrl> <Environment>UnifiedTyping</Environment> <Username>LoginTicket</Username> <Password>XXX</Password> <ContextName>XPDM</ContextName> </MappingInfo >
Retrieve Mapping information without the Converter Server.
The configurations are defined in the Export and Import Definitions section.
<MappingInfoProcessing usecs="true" tdsUrl="http://my.tci-integration-server.url:port/XCI/XCI_TDS"> <MappingInfoHost local="false"> <Url>http://my.tci-integration-server.url:port/XCI_CS</Url> <Command>XPDMExportCommand</Command> </MappingInfoHost > <MappingInfoCommand commandName="XPDMExportCommand">

TCI Release 3.7 - Installation Manual 39
<CatStartPath>C:\enoviaV6R2018x\B420\win_b64\code\bin\CATSTART.exe</CatStartPath> <CatStartEnv>TSI_3DX_EXP_Env</CatStartEnv> <CatStartDirEnv>C:\TCI\TSI_3DX_EXP_R2018x\config</CatStartDirEnv> <ServerUrl>https://enovia-server.url:port/3dspace</ServerUrl> <Environment>UnifiedTyping</Environment> <Username>LoginTicket</Username> <Password>XXX</Password> <ContextName>XPDM</ContextName> </MappingInfoCommand > </MappingInfoProcessing >
Retrieve Mapping information with the use of the Converter Server.
The configurations are defined in the Export and Import Definitions section.
3.3.2.4.4.4 XPDM Export definition
Direct export of a structure from 3DEXPERIENCE using the XPGClientBatch utility.
<XPDMExport> <CatStartPath>C:\enoviaV6R2018x\B420\win_b64\code\bin\CATSTART.exe</CatStartPath> <CatStartEnv>TSI_3DX_EXP_Env</CatStartEnv> <CatStartDirEnv>C:\TCI\TSI_3DX_EXP_R2018x\config</CatStartDirEnv> <ServerUrl>https://enovia-server.url:port/3dspace</ServerUrl> <Environment>UnifiedTyping</Environment> <Username>LoginTicket</Username> <Password>XXX</Password> <FileFormat3D>CATIAV5-6R2018</FileFormat3D> <GeometryType3D>AsSpecifications</GeometryType3D> <FileFormat2D>CATIAV5-6R2018</FileFormat2D> <SiteId>XPDM</SiteId> <WithFiles>No</WithFiles> </XPDMExport>
Export without the Converter Server.
The configurations are defined in the Export and Import Definitions section.
<XPDMExportProcessing usecs="true" tdsUrl="http://my.tci-integration-server.url:port/XCI/XCI_TDS"> <XPDMExportHost local="false"> <Url>http://my.tci-integration-server.url:port/XCI_CS</Url> <Command>XPDMExportCommand</Command> </XPDMExportHost> <XPDMExportCommand commandName="XPDMExportCommand"> <CatStartPath>C:\enoviaV6R2018x\B420\win_b64\code\bin\CATSTART.exe</CatStartPath> <CatStartEnv>TSI_3DX_EXP_Env</CatStartEnv> <CatStartDirEnv>C:\TCI\TSI_3DX_EXP_R2018x\config</CatStartDirEnv> <ServerUrl>https://enovia-server.url:port/3dspace</ServerUrl> <Environment>UnifiedTyping</Environment> <Username>LoginTicket</Username> <Password>XXX</Password> <FileFormat3D>CATIAV5-6R2018</FileFormat3D> <GeometryType3D>AsSpecifications</GeometryType3D> <FileFormat2D>CATIAV5-6R2018</FileFormat2D> <SiteId>XPDM</SiteId> <WithFiles>No</WithFiles> </XPDMExportCommand> </XPDMExportProcessing>

TCI Release 3.7 - Installation Manual 40
Export with the use of the Converter Server.
The configurations are defined in the Export and Import Definitions section.
3.3.2.4.4.5 XPDM Import definition
Direct import of a structure to 3DEXPERIENCE using the XPGClientBatch utility.
<XPDMImport> <CatStartPath>C:\enoviaV6R2018x\B420\win_b64\code\bin\CATSTART.exe</CatStartPath> <CatStartEnv>TSI_3DX_EXP_Env</CatStartEnv> <CatStartDirEnv>C:\TCI\TSI_3DX_EXP_R2018x\config</CatStartDirEnv> <ServerUrl>https://enovia-server.url:port/3dspace</ServerUrl> <Environment>UnifiedTyping</Environment> <Username>LoginTicket</Username> <Password>XXX</Password> <SiteId>XPDM</SiteId> </XPDMImport>
Import without the Converter Server.
The configurations are defined in the Export and Import Definitions section.
<XPDMImportProcessing usecs="true" tdsUrl="http://my.tci-integration-server.url:port/XCI/XCI_TDS"> <XPDMImportHost local="false" cleanupWorkdir="false"> <Url>http://my.tci-integration-server.url:port/XCI_CS</Url> <Command>XPDMImportCommand</Command> </XPDMImportHost> <XPDMImportCommand commandName="XPDMImportCommand"> <CatStartPath>C:\enoviaV6R2018x\B420\win_b64\code\bin\CATSTART.exe</CatStartPath> <CatStartEnv>TSI_3DX_EXP_Env_XPP</CatStartEnv> <CatStartDirEnv>C:\TCI\TSI_3DX_EXP_R2018x\config</CatStartDirEnv> <ServerUrl>https://enovia-server.url:port/3dspace</ServerUrl> <Environment>UnifiedTyping</Environment> <Username>LoginTicket</Username> <Password>XXX</Password> <SiteId>XPDM</SiteId> </XPDMImportCommand> </XPDMImportProcessing>
Import with the use of the Converter Server.
The configurations are defined in the Export and Import Definitions section.
3.3.2.4.4.6 Folder Export definition
Direct export of a root folder from 3DEXPERIENCE.
<FolderExport> <CatStartPath>C:\enoviaV6R2018x\B420\win_b64\code\bin\CATSTART.exe</CatStartPath> <CatStartEnv>TSI_3DX_EXP_Env</CatStartEnv> <CatStartDirEnv>C:\TCI\TSI_3DX_EXP_R2018x\config</CatStartDirEnv> <ServerUrl>https://enovia-server.url:port/3dspace</ServerUrl> <Environment>UnifiedTyping</Environment> <Username>LoginTicket</Username> <Password>XXX</Password> <SecurityCtx/> </FolderExport>

TCI Release 3.7 - Installation Manual 41
Export without the Converter Server.
The configurations are defined in the Export and Import Definitions section.
<FolderExportProcessing usecs="true" tdsUrl="http://my.tci-integration-server.url:port/XCI/XCI_TDS"> <FolderExportHost local="false"> <Url>http://my.tci-integration-server.url:port/XCI_CS</Url> <Command>FolderExportCommand</Command> </FolderExportHost> <FolderExportCommand commandName="FolderExportCommand"> <CatStartPath>C:\enoviaV6R2018x\B420\win_b64\code\bin\CATSTART.exe</CatStartPath> <CatStartEnv>TSI_3DX_EXP_Env</CatStartEnv> <CatStartDirEnv>C:\TCI\TSI_3DX_EXP_R2018x\config</CatStartDirEnv> <ServerUrl>https://enovia-server.url:port/3dspace</ServerUrl> <Environment>UnifiedTyping</Environment> <Username>LoginTicket</Username> <Password>XXX</Password> </FolderExportCommand> </FolderExportProcessing>
Export with the use of the Converter Server.
The configurations are defined in the Export and Import Definitions section.
3.3.2.4.4.7 Folder Import definition
Direct import of a folder to 3DEXPERIENCE.
<FolderImport> <CatStartPath>C:\enoviaV6R2018x\B420\win_b64\code\bin\CATSTART.exe</CatStartPath> <CatStartEnv>TSI_3DX_EXP_Env</CatStartEnv> <CatStartDirEnv>C:\TCI\TSI_3DX_EXP_R2018x\config</CatStartDirEnv> <ServerUrl>https://enovia-server.url:port/3dspace</ServerUrl> <Environment>UnifiedTyping</Environment> <Username>LoginTicket</Username> <Password>XXX</Password> <SecurityCtx/> </FolderImport>
Import without the Converter Server.
The configurations are defined in the Export and Import Definitions section.
<FolderImportProcessing usecs="true" tdsUrl="http://my.tci-integration-server.url:port/TCITCI_TDS"> <FolderImportHost local="false"> <Url>http://my.tci-integration-server.url:port/XCI_CS</Url> <Command>FolderImportCommand</Command> </FolderImportHost> <FolderImportCommand commandName="FolderImportCommand"> <CatStartPath>C:\enoviaV6R2018x\B420\win_b64\code\bin\CATSTART.exe</CatStartPath> <CatStartEnv>TSI_3DX_EXP_Env</CatStartEnv> <CatStartDirEnv>C:\TCI\TSI_3DX_EXP_R2018x\config</CatStartDirEnv> <ServerUrl>https://enovia-server.url:port/3dspace</ServerUrl> <Environment>UnifiedTyping</Environment> <Username>LoginTicket</Username> <Password>XXX</Password> </FolderImportCommand>

TCI Release 3.7 - Installation Manual 42
</FolderImportProcessing>
Import with the use of the Converter Server.
The configurations are defined in the Export and Import Definitions section.
3.3.2.4.4.8 File Export definition
Direct export of a structure from 3DEXPERIENCE using the Downward Compatibility (DWC) utility.
<FileExport> <CatStartPath>C:\enoviaV6R2018x\B420\win_b64\code\bin\CATSTART.exe</CatStartPath> <CatStartEnv>TSI_3DX_EXP_Env</CatStartEnv> <CatStartDirEnv>C:\TCI\TSI_3DX_EXP_R2018x\config</CatStartDirEnv> <ServerUrl>https://enovia-server.url:port/3dspace</ServerUrl> <Environment>UnifiedTyping</Environment> <Username>LoginTicket</Username> <Password>XXX</Password> <SecurityCtx/> <FileFormat3D>CATIAV5-6R2018</FileFormat3D> <GeometryType3D>AsSpecifications</GeometryType3D> <FileFormat2D>CATIAV5-6R2018</FileFormat2D> </FileExport>
Export without the Converter Server.
The configurations are defined in the Export and Import Definitions section.
<FileExportProcessing usecs="true" tdsUrl="http://my.tci-integration-server.url:port/XCI/XCI_TDS"> <FileExportHost local="false"> <Url>http://my.tci-integration-server.url:port/XCI_CS</Url> <Command>Command2</Command> </FileExportHost> <FileExportCommand commandName="Command2"> <CatStartPath>C:\enoviaV6R2018x\B420\win_b64\code\bin\CATSTART.exe</CatStartPath> <CatStartEnv>TSI_3DX_EXP_Env</CatStartEnv> <CatStartDirEnv>C:\TCI\TSI_3DX_EXP_R2018x\config</CatStartDirEnv> <ServerUrl>https://enovia-server.url:port/3dspace</ServerUrl> <Environment>UnifiedTyping</Environment> <Username>LoginTicket</Username> <Password>XXX</Password> <SecurityCtx/> <FileFormat3D>CATIAV5-6R2018</FileFormat3D> <GeometryType3D>AsSpecifications</GeometryType3D> <FileFormat2D>CATIAV5-6R2018</FileFormat2D> </FileExportCommand> </FileExportProcessing>
Export with the use of the Converter Server.
The configurations are defined in the Export and Import Definitions section.
3.3.2.4.4.8.1 File Export configuration
The configuration for the FileExport (TDXExportMode is set to ExportFiles) can be configured with
FileExportConfiguration settings.
<FileExportConfiguration> <Source type="3DShape"> <CATPart enableExport="false"/> <Thumbnail enableExport="true" viewableSize="300">PNG</Thumbnail>

TCI Release 3.7 - Installation Manual 43
<XCAD enableExport="false" xCadFormat="wrl">VRML</XCAD> <XCAD enableExport="false" >JT_COMFOX</XCAD> </Source> <Source type="VPMReference"> <TDXML enableExport="false" /> <CustomAttributes enableExport="true"> <CustomAttribute xName="cusXname">attrName</CustomAttribute> </CustomAttributes> </Source> <Source type="Drawing"> <CATDrawing enableExport="false"/> <Thumbnail enableExport="true" viewableSize="300">PNG</Thumbnail> <Print enableExport="true"/> </Source> </FileExportConfiguration>
The FileExportConfiguration can be used to disable the CATPart or CATDrawing export. Also,
Thumbnails or neutral formats can be exported. For detailed information about the configuration see
the documentation of the Export batch in the “Readme_TSI3DXBatch.txt” file.
For each source a set of custom attributes can be defined with the attribute name and the name in
the XPDMXML file.
The ignoreError flag can be set to true to ignore error at file export.
The 3DXML export and the XCAD export can set the disable3dPartCaching attribute to true to disable
the 3DPart file caching at export.
The 3DXML export and the XCAD export can set the enableAssemblyCaching attribute to true to
enable the Assembly file caching at export.
<ExportWithStateFilter enabled="true">FROZEN,RELEASED</ExportWithStateFilter>
If enabled only objects with the configured state are exported from 3DEXPERIENCE. The value is a
comma separated list of allowed states.
<RemoveNon3DPartRep3D>false</RemoveNon3DPartRep3D>
True to remove Rep3D/Rep3DInst and Rep3DAggr from the xpdm export which are not connected
with a 3DPart.
3.3.2.4.4.9 Revise in V6 configuration
Trigger a revise in V6 from Teamcenter. Location of Control must be 3DEXPERIENCE. The object
must have been transferred to 3DEXPERIENCE previously
Direct revise without ConverterServer:
<ReviseInV6> <CatStartPath>path-to\B419\win_b64\code\bin\CATSTART.exe</CatStartPath>
<CatStartEnv>TSI_3DX_EXP_XPP_XCI</CatStartEnv> <CatStartDirEnv>path-to-cat-env</CatStartDirEnv> <ServerUrl>https://enovia-server-and-enovia-port/3dspace</ServerUrl> <Environment>UnifiedTyping</Environment> <Username>LoginTicket</Username> <Password plaintext="true">XXX</Password> </ReviseInV6>
Revise with ConverterServer:
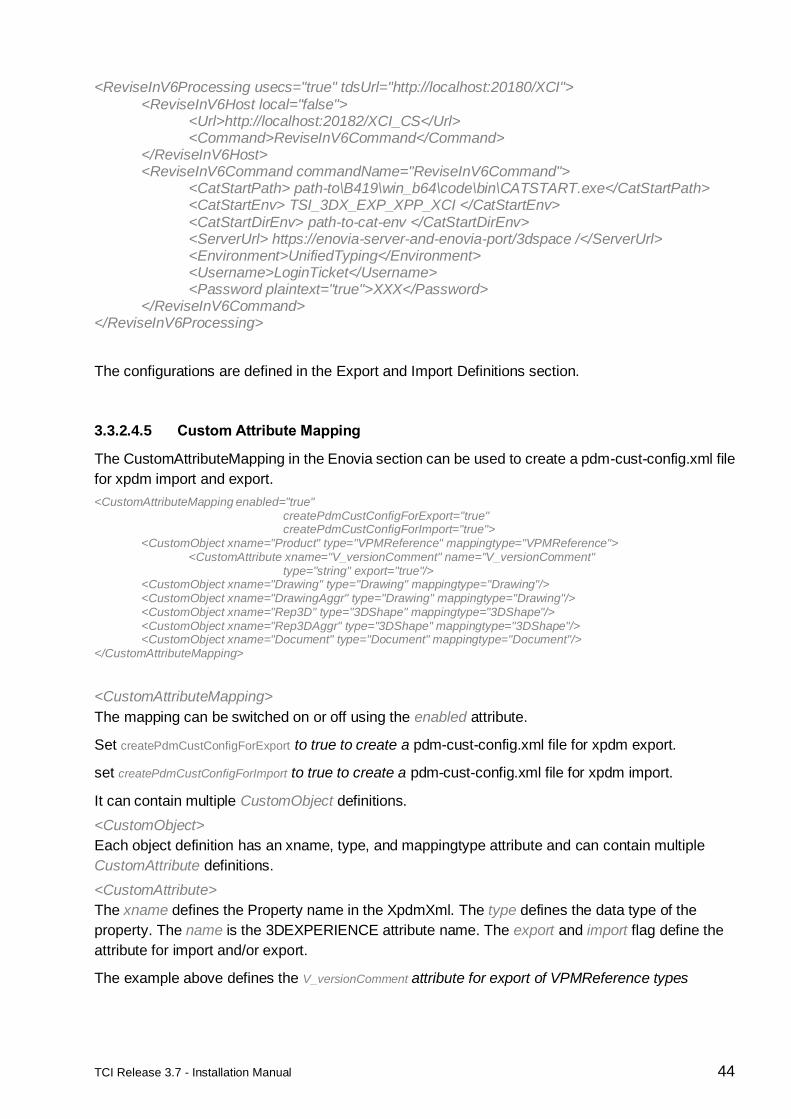
TCI Release 3.7 - Installation Manual 44
<ReviseInV6Processing usecs="true" tdsUrl="http://localhost:20180/XCI"> <ReviseInV6Host local="false">
<Url>http://localhost:20182/XCI_CS</Url> <Command>ReviseInV6Command</Command> </ReviseInV6Host> <ReviseInV6Command commandName="ReviseInV6Command"> <CatStartPath> path-to\B419\win_b64\code\bin\CATSTART.exe</CatStartPath> <CatStartEnv> TSI_3DX_EXP_XPP_XCI </CatStartEnv> <CatStartDirEnv> path-to-cat-env </CatStartDirEnv> <ServerUrl> https://enovia-server-and-enovia-port/3dspace /</ServerUrl> <Environment>UnifiedTyping</Environment> <Username>LoginTicket</Username> <Password plaintext="true">XXX</Password> </ReviseInV6Command> </ReviseInV6Processing>
The configurations are defined in the Export and Import Definitions section.
3.3.2.4.5 Custom Attribute Mapping
The CustomAttributeMapping in the Enovia section can be used to create a pdm-cust-config.xml file
for xpdm import and export.
<CustomAttributeMapping enabled="true" createPdmCustConfigForExport="true" createPdmCustConfigForImport="true"> <CustomObject xname="Product" type="VPMReference" mappingtype="VPMReference"> <CustomAttribute xname="V_versionComment" name="V_versionComment" type="string" export="true"/> <CustomObject xname="Drawing" type="Drawing" mappingtype="Drawing"/> <CustomObject xname="DrawingAggr" type="Drawing" mappingtype="Drawing"/> <CustomObject xname="Rep3D" type="3DShape" mappingtype="3DShape"/> <CustomObject xname="Rep3DAggr" type="3DShape" mappingtype="3DShape"/> <CustomObject xname="Document" type="Document" mappingtype="Document"/> </CustomAttributeMapping>
<CustomAttributeMapping>
The mapping can be switched on or off using the enabled attribute.
Set createPdmCustConfigForExport to true to create a pdm-cust-config.xml file for xpdm export.
set createPdmCustConfigForImport to true to create a pdm-cust-config.xml file for xpdm import.
It can contain multiple CustomObject definitions.
<CustomObject>
Each object definition has an xname, type, and mappingtype attribute and can contain multiple
CustomAttribute definitions.
<CustomAttribute>
The xname defines the Property name in the XpdmXml. The type defines the data type of the
property. The name is the 3DEXPERIENCE attribute name. The export and import flag define the
attribute for import and/or export.
The example above defines the V_versionComment attribute for export of VPMReference types

TCI Release 3.7 - Installation Manual 45
3.3.2.5 XciWeb
In the following chapters the configuration options for the tag XciWeb are described.
3.3.2.5.1 AdminPassword
<AdminPassword plaintext="true">XXX</AdminPassword>
Admin password for “xci-admin” user.
Default setting for plaintext is “false”.
3.3.2.5.2 SessionTimeout
<SessionTimeout>2000</SessionTimeout>
The session timeout in seconds used for the TCI web interface.
Default setting for SessionTimeout is “1800”.
3.3.2.5.3 MaxQueryReturnNumber
<MaxQueryReturnNumber>50</MaxQueryReturnNumber>
The maximum number of objects returned for the 3DX and PDM queries.
Default setting for MaxQueryReturnNumber is “25”.
3.3.2.5.4 MaxDBReturnNumber
<MaxDBReturnNumber>50</MaxDBReturnNumber>
The maximum number of objects returned for the DB queries.
Default setting for MaxDBReturnNumber is “25”.
3.3.2.5.5 Other XciWebsettings
<DetailsEnabled>true</DetailsEnabled>
True to enable the Tools->Details menu in the XciWeb UI.
<FileCacheInfoEnabled maxReturn="500">true</FileCacheInfoEnabled>
True to enable the Tools->File Cache menu in the XciWeb UI.
<ShowMetaUpdate3DXEnabled>true</ShowMetaUpdate3DXEnabled>
True to enable the “update properties in 3DEXPERIENCE” Button in the PdmInfo View.
<ShowRevise3DXEnabled>true</ShowRevise3DXEnabled>
True to enable the “revise in 3DEXPERIENCE” Button in the PdmInfo View.
3.3.2.6 Scheduler
The Scheduler functionality must be enabled with the enabled flag set to true.
<Scheduler enabled="true"> … </Scheduler
In the following chapters the configuration options for the tag Scheduler are described.

TCI Release 3.7 - Installation Manual 46
3.3.2.6.1 ThreadPoolSize
The ThreadPoolSize setting initializes the size of the Scheduler thread pool. The default is 5,
minimum is 3. A restart is needed to use the new value.
<Scheduler enabled="true"> <ThreadPoolSize>5</ThreadPoolSize> …
3.3.2.6.2 StartupDelay
The StartupDelay setting defines the startup delay for tasks without startTime setting in seconds.
The default is 60 seconds.
<Scheduler enabled="true"> <StartupDelay>120</StartupDelay> …
3.3.2.6.3 TaskList
The TaskList contains a list of Task objects to be run with the scheduler.
<Scheduler enabled="true"> <startupDelay>20</startupDelay> <TaskList> <Task name="PDM-Released" period="300" …>…
The Task object is the definition of the Tasks to be scheduled. The Task contains a list of
TaskSettings. The Task has the following attributes:
• enabled – true to run the task.
• name – the unique name of the Task.
• loadClass – the class to use which implements the java interface TaskRunnable
• startTime – the start time of the task, e.g. "14:12:00".
• period – the period in seconds to wait for next start of the task.
• type – the scheduler type FixedRate or FixedDelay
o FixedRate: enabled first after the given initial delay, and subsequently with the given
period.
o FixedDelay: enabled first after the given initial delay, and subsequently with the given
delay between the termination of one execution and the commencement of the next.
The two standard implementations are com.tsystems.xci.scheduler.HandleReleasedPdmObjects
and com.tsystems.xci.scheduler.HandleReleasedEnoviaObjects.
3.3.2.6.3.0.1 HandleReleasedPdmObjects
The HandleReleasedPdmObjects task queries for objects with a defined state in Teamcenter. If the
found revision is a new version of a formerly transferred object a new Transfer Job is initiated for this
revision.
The following TaskSetting are supported.
• initialStartTime – the initial start time if no further run of this task is known.
• objectType – the Item Revision types to search for.
• objectName – the object name to search for
TCI Release 3.7 - Installation Manual 47
• itemId – the item id pattern.
• statusList – list of status to search for.
• projectId – list of project ID’s to search for.
• revRuleName, revRuleUid, force, removeExistingNotProvided, and
withGeometricalConversion, are the settings for the created Jobs.
o revRuleName – Revision Rule name, empty for default.
o revRuleUid – Revision Rule UID, empty for default.
o force – true to disable skip functionality
o removeExistingNotProvided – true to remove existing children in 3DEXPERIENCE.
o withGeometricalConversion – true to convert the imports to 3DEXPERIENCE.
• waitForDesignJobs – true to wait for the Jobs to finish.
• writeReport – true to write a report in the persistent directory
The objectType, objectName, itemId, statusList, and projectId can contain multiple entries with the
configured delimiting character in Teamcenter (Teamcenter default “;”).
Example Task setting for HandleReleasedPdmObjects, start the task at 2:00 AM and repeat the task
every 24 h.
<Task name="PDM-Released" startTime="2:00:00" period=" 86400" loadClass="com.tsystems.xci.scheduler.HandleReleasedPdmObjects" type="FixedRate"> <TaskSetting name="initialStartTime">2020-11-09T00:00:00.000Z</TaskSetting> <TaskSetting name="objectType">ItemRevision;Design Revision</TaskSetting> <TaskSetting name="itemId"></TaskSetting> <TaskSetting name="statusList">TCM Released;Frozen </TaskSetting> <TaskSetting name="revRuleName">Any Status; No Working</TaskSetting> <TaskSetting name="revRuleUid">QoU5$iOt5wQEgB</TaskSetting> <TaskSetting name="force">false</TaskSetting> <TaskSetting name="removeExistingNotProvided">true</TaskSetting> <TaskSetting name="withGeometricalConversion">true</TaskSetting> <TaskSetting name="waitForDesignJobs">false</TaskSetting> <TaskSetting name="writeReport">true</TaskSetting> </Task> …
3.3.2.6.3.0.2 HandleReleasedEnoviaObjects
The HandleReleasedEnoviaObjects task queries for objects with a defined state in
3DEXPERIENCE. If the found revision is a new version of a formerly transferred object a new
Transfer Job is initiated for this revision.
The following TaskSetting are supported.
• initialStartTime – the initial start time, if not provided the time of the first run is used.
• objectType – the revision types to search for (comma separated to search for multiple types).
• objectName – the title (V_Name) search pattern.

TCI Release 3.7 - Installation Manual 48
• plmExternalId – the part number (PLMExternalId) search pattern.
• statusList – list of status to search for (comma separated to search for multiple types).
• collaborativeSpace – list of collaborative spaces to search for (comma separated to search
for multiple types).
• force, and removeExistingNotProvided, are the settings for the created Jobs.
o force – true to disable skip functionality
o removeExistingNotProvided – true to remove existing children in Teamcenter.
• waitForDesignJobs – true to wait for the Jobs to finish.
• writeReport – true to write a report in the persistent directory
Example Task setting for HandleReleasedEnoviaObjects, start the task at 2:00 AM and repeat the
task every 24 h.
<Task name="TDX-Released" startTime="2:00:00" period=" 86400" loadClass="com.tsystems.xci.scheduler.HandleReleasedEnoviaObjects" type="FixedRate"> <TaskSetting name="initialStartTime">2020-11-09T00:00:00.000Z</TaskSetting> <TaskSetting name="objectType">VPMReference</TaskSetting> <TaskSetting name="objectName"></TaskSetting> <TaskSetting name="plmExternalId"></TaskSetting> <TaskSetting name="statusList">FROZEN,RELEASED</TaskSetting> <TaskSetting name="collaborativeSpace">Common Space</TaskSetting> <TaskSetting name="force">false</TaskSetting> <TaskSetting name="waitForDesignJobs">false</TaskSetting> <TaskSetting name="writeReport">true</TaskSetting> </Task> …
3.3.3 3DEXPERIENCE Environment File
The following environment variables can be set in the environment file used by the 3DEXPERIENCE.
XPG_ACTIVATE_3DPART=1 activate the 3D Part support
XPG_ACTIVATE_NONCADDOC=1 activate the Non-CAD document support
XPG_ACTIVATE_MAPPED_REVISIONFAMILY=1 activate the mapped Revision Family support
XPG_ACTIVATE_V5NATIVE_IMPORT=1 activate the V5 native import
ENABLE_DETAILED_REPORT=1 enable a detailed report
For more information about the environment configuration please refer to the 3DEXPERIENCE
documentation.
3.3.4 3DEXPERIENCE Custom Configuration
In the 3DEXPERIENCE batch server environment of the XPG Client Service Batch a
pdm-cust-config.xml configuration file must be installed:

TCI Release 3.7 - Installation Manual 49
<CATIA install path>\win_b64\reffiles\XPG\config\client\pdm-cust-
config.xml
The following sample shows a sample configuration for the PDM custom configuration:
<?xml version="1.0" encoding="UTF-8"?>
<XPGCustConfig SchemaVersion="V6R2013x" xmlns:xsi="http://www.w3.org/2001/XMLSchema-instance"
xsi:noNamespaceSchemaLocation="..\..\XSD\XPG\pdm-cust-config.xsd">
<ObjectsConfig >
<Object XPGXMLType="Product" V6Type="VPMReference" MappingType="DefaultCustomization" />
<Object XPGXMLType="ProductInst" V6Type="VPMInstance" MappingType="DefaultCustomization" />
<Object XPGXMLType="Rep3D" V6Type="3DShape" MappingType="DefaultCustomization" />
<Object XPGXMLType="Rep3DAggr" V6Type="3DShape" MappingType="DefaultCustomization" />
<Object XPGXMLType="Rep3DInst" V6Type="VPMRepInstance" MappingType="DefaultCustomization" />
<Object XPGXMLType="Drawing" V6Type="Drawing" MappingType="DefaultCustomization" />
<Object XPGXMLType="DrawingAggr" V6Type="Drawing" MappingType="DefaultCustomization" />
<Object XPGXMLType="DrawingInst" V6Type="VPMRepInstance" MappingType="DefaultCustomization" />
</ObjectsConfig>
</XPGCustConfig>
For more information about the 3DEXPERIENCE custom configuration please refer to the
3DEXPERIENCE documentation.

TCI Release 3.7 - Installation Manual 50
4 Installing the TCI Teamcenter Rich Client Plugin
4.1 Installation
The TCI Teamcenter Rich Client Plugin extends the Teamcenter functionality to communicate with
3DEXPERIENCE.
You should perform the following steps with your Teamcenter administrator.
Download the software from http://www.cmi-support.com/. Choose “Download” → “TCI” → “TCI
Teamcenter Rich Client Plugin” and select the appropriate version (e.g. Package for Teamcenter
11.2).
Locate the downloaded archive file (TCI_TC_UI_[xxxx]_V[xxx].zip). Extract the content of the
archive file to a temporary location, e.g. C:\temp\TCI_TC_UI_1120_V320.
Inside the temporary installation location, locate the folder
TCI_TC_UI_[xxxx]_R[xxxxx]_V[xxx]\install\windows for an installation on a client with
Windows 32-bit or the folder TCI_TC_UI_[xxxx]_V[xxx]\install\windows_64 for an
installation on a client with Windows 64-bit.
Start the installation by double-clicking Setup.exe.
The “TCI Teamcenter Rich Client Plugin” wizard appears. Click Next:
Figure 2: Setup – Start page
The License Agreement page displays the link to the general terms and conditions of software
purchase and maintenance of T-Systems International GmbH. You have to click “I Agree” to get to
the next page:
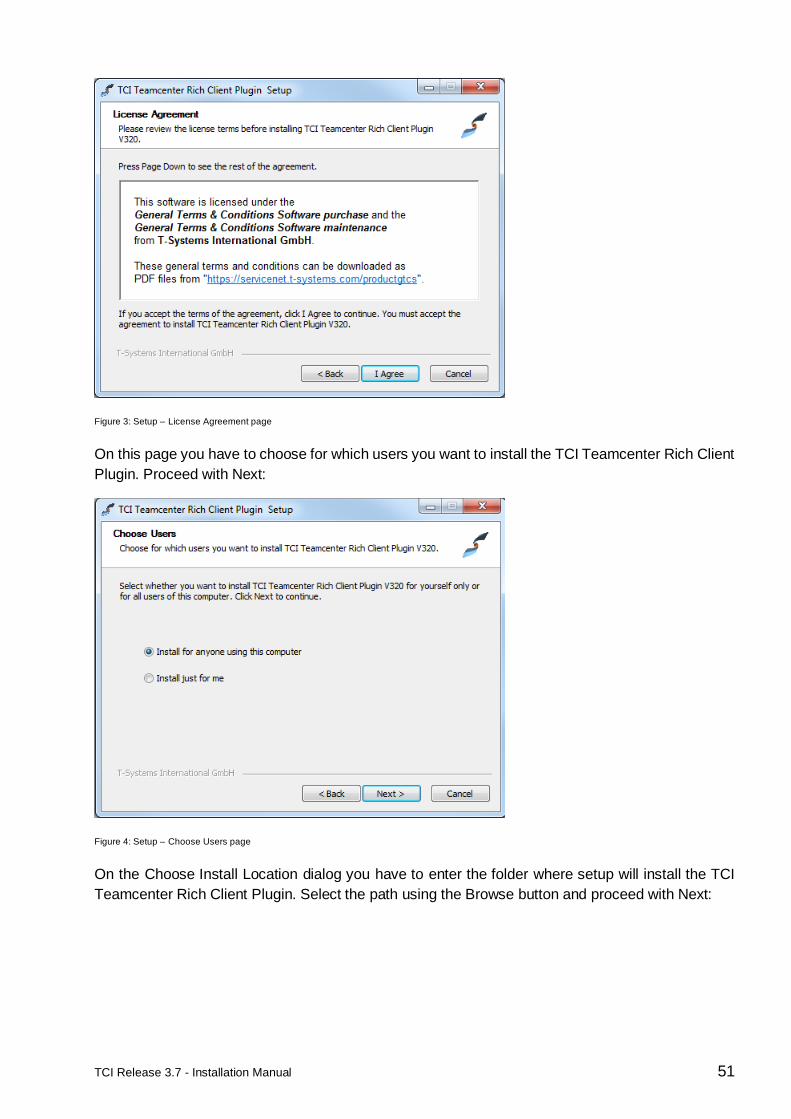
TCI Release 3.7 - Installation Manual 51
Figure 3: Setup – License Agreement page
On this page you have to choose for which users you want to install the TCI Teamcenter Rich Client
Plugin. Proceed with Next:
Figure 4: Setup – Choose Users page
On the Choose Install Location dialog you have to enter the folder where setup will install the TCI
Teamcenter Rich Client Plugin. Select the path using the Browse button and proceed with Next:

TCI Release 3.7 - Installation Manual 52
Figure 5: Setup – Choose Install Location page
On the next page you will be asked for the folder, where the Teamcenter Rich Client resides
(TC_PORTAL_ROOT). The Rich Client folder is usually named “portal” and contains also the Rich
Client start script “portal.bat”.
Please contact your Teamcenter system administrator to make sure that the selected path is correct.
Select the folder using the Browse button and proceed with Next:
Figure 6: Setup – Choose Teamcenter Directory page
Select the Teamcenter Rich Client start file. This is a batch script that is located in the Rich Client
folder (the one you have selected in the previous step). The file is usually named “portal.bat”.
Please contact your Teamcenter system administrator to make sure that you have selected the
correct file. Select the file using the Browse button and proceed with Next:

TCI Release 3.7 - Installation Manual 53
Figure 7: Setup – Choose Rich Client start file page
On the next page you have to define the TCI settings. Enter the correct value and proceed with Next:
Figure.8: Setup – TCI settings page
The Check Setup Information page lists all information which you have entered. If you detect some
wrong information, please use the Back button to enter correct information, otherwise start the
installation with click on the Next button:

TCI Release 3.7 - Installation Manual 54
Figure.9: Setup – Subsumption page
For Teamcenter the registry will be generated.
Figure 10: Setup – Installation Complete page
Once the wizard has successfully completed, click Finish:

TCI Release 3.7 - Installation Manual 55
Figure 11: Setup – Finished page
4.2 Silent Installation
It is possible to use a silent installation for the client installation.
4.2.1 Parameters
The following parameters are available for the silent installation:
Parameter Name Example Value Description
/S Activates the silent mode.
/User= value Admin Installation only for yourself
(“User”) or for all users of the
computer (“Admin”). Default is
the highest possible value.
/TeamcenterInstDir= (Directory path) C:\Program
Files\Siemens\Teamc
enter1120_64\portal
The directory of the Teamcenter
Rich Client installation.
<must be set>
/TeamcenterPortalFile= (File full path) C:\Program
Files\Siemens\Teamc
enter1120_64\portal\p
ortal.bat
The full path of the portal.bat
start script file.
<must be set>
/TciServerURL= (URL) http://my.tci-
integration-
server.url:port/XCI
The TCI Server URL.
<must be set>
/D=(Directory path) C:\TCI\TCI_TC_UI_11
20_V320
The target directory of the
installation.
Table 5: Silent installation parameters for TCI Teamcenter Rich Client Plugin

TCI Release 3.7 - Installation Manual 56
The parameter /S, the both values for the Teamcenter installation are required.
The parameter /User is optional. The highest possible value will be used as default value.
The parameter /D is optional. A part of the value will be taken from the current directory. It must be
the last parameter used in the command line and must not contain any quotes, even if the path
contains spaces. Only absolute paths are supported.
If one value is not given and it is not possible to fetch a value from the system the installation process
will be stopped and the error message can be found in the file install.log.
4.2.2 Usage
For the silent installation please open a command line window as administrator.
Inside the temporary installation location, locate the folder
TCI_TC_UI_[xxxx]_R[xxxxx]_V[xxx]\install\windows for an installation on a client with
Windows 32-bit or the folder TCI_TC_UI_[xxxx]_R[xxxxx]_V[xxx]\install\windows_64
for an installation on a client with Windows 64-bit.
Start the silent installation with a command line like this example:
Setup.exe /S /User= Admin /TeamcenterInstDir= "C:\Program
Files\Siemens\Teamcenter1120_64\portal" /TeamcenterPortalFile= "C:\Program
Files\Siemens\Teamcenter1120_64\portal\portal.bat" /TciServerURL= http://my.tci-
integration-server.url:port/XCI /D=C:\TCI\TCI_TC_UI_1120_V320
The log file install.log of the installation will be stored in the current directory. There you can
find the information about the installation process.
When the installation ended successful you will find the success message in this file.
4.3 Environment variables
The installation creates the start script TCI_TC_UI_Start.bat.
Here you can find an overview of the possible environment variables in this start script.

TCI Release 3.7 - Installation Manual 57
Environment Variable Example Value Description
XCI_SERVER_URL http://my.tci-
integration-
server.url:port/XCI
The TCI Server URL.
<mandatory>
XCI_TCIC_COMPATIBILITY false Use TcIC compatibility mode.
See section 3.3.2.3.6
XCI_SEND_OBJ_MGR_AS_STRING true true: use only event custom
attributes and not the export
document
Default value is “true”.
XCI_EXPORT_TYPE Text Document type for complex
export data
XCI_EXPORT_NAMED_REF Text The named reference type for
complex export data
Table 6: TCI Teamcenter Rich Client Plugin - environment variables
TCI Release 3.7 - Installation Manual 58
5 Installing the TCI Teamcenter Active Workspace
Enhancement
5.1 Installation
The TCI Teamcenter Active Workspace Enhancement extends the Teamcenter functionality to
communicate with 3DEXPERIENCE.
To install the Active Workspace Enhancement of TCI on the server the following steps have to be
performed.
Locate the downloaded archive (e.g. TCI_AWS_TC13.0_V350.zip). Unpack the archive to a
directory, for example to “C:\temp\server\aws”. Inside this you will find several sub-directories, which
contain the TCI enhancement for Active Workspace.
Copy the directory tci-module to the src directory in the stage directory of your Teamcenter Active
Workspace installation, e.g. “C:\TC1300\aws2\stage\src”.
Copy the image of the image directory to the src\image directory in the stage directory of your
Teamcenter Active Workspace installation, e.g. “C:\TC1300\aws2\stage\src\image”.
Add the string “tci-module” to the existing file kit.json in the solution directory of your Teamcenter
Active Workspace installation, e.g. “C:\TC1300\aws2\stage\src\solution\kit.json”.
Open a console window as administrator.
Change to the stage directory of your Teamcenter Active Workspace installation, e.g.
“C:\TC1300\aws2\stage”.
Publish the new Active Workspace system including TCI with the command “awbuild.cmd” to the
gateway.
Your gatewayURL is defined in the file tem.properties in the stage directory of your Teamcenter
Active Workspace installation, e.g. “C:\TC1300\aws2\stage\tem.properties”.
Configure the Teamcenter Preference XCI_SERVER_URL matching the variable in Chapter 4.3,
e.g. “http://my.tci-integration-server.url:port/XCI”.

TCI Release 3.7 - Installation Manual 59
6 Installing the TCI 3DEXPERIENCE Rich Client
Extension
6.1 Installation
The TCI 3DEXPERIENCE Rich Client Extension extends the 3DEXPERIENCE functionality with TCI
commands.
You should perform the following steps with your 3DEXPERIENCE administrator.
Download the software from http://www.cmi-support.com/. Choose “Download” → “TCI” → “TCI
3DEXPERIENCE Rich Client Extension” and select the appropriate version (e.g. Package for
R2018x).
Locate the downloaded archive file (TCI_3DX_UI_R[xxxxx]_V[xxx].zip). Extract the content
of the archive file to a temporary location, e.g. C:\temp\TCI_3DX_UI_R2018x_V350.
Inside the temporary installation location, locate the folder
TCI_3DX_UI_R[xxxxx]_V[xxx]\install\windows for an installation on a client with Windows
32-bit or the folder TCI_3DX_UI_R[xxxxx]_V[xxx]\install\windows_64 for an installation
on a client with Windows 64-bit.
Start the installation by double-clicking Setup.exe and follow the instructions. The
3DEXPERIENCE values will be received from the registry if possible.
6.2 Silent Installation
It is possible to use a silent installation for the extension installation.
6.2.1 Parameters
The following parameters are available for the silent installation:

TCI Release 3.7 - Installation Manual 60
Parameter Name Example Value Description
/S Activates the silent mode.
/User= value Admin Installation only for yourself
(“User”) or for all users of the
computer (“Admin”). Default is
the highest possible value.
/3DXInstDir= (Directory path) C:\Program
Files\Dassault
Systemes\B420
The directory of the
3DEXPERIENCE installation.
/3DXEnvFile= (File full path) C:\Program
Files\Dassault
Systemes\B420\CATE
nv\Env.txt
The full path of the
3DEXPERIENCE environment
file.
/D=(Directory path) C:\TCI\TCI_3DX_UI_
R2018x_V350
The target directory of the
installation.
Table 7: Silent installation parameters for 3EXPERIENCE Rich Client Extension
The parameter /S is required.
The parameter /User is optional. The highest possible value will be used as default value.
The both values for the 3DEXPERIENCE installation are optional; the values can be fetched from
the Windows registry.
The parameter /D is optional. A part of the value will be taken from the current directory. It must be
the last parameter used in the command line and must not contain any quotes, even if the path
contains spaces. Only absolute paths are supported.
If one value is not given and it is not possible to fetch a value from the system the installation process
will be stopped and the error message can be found in the file install.log.
6.2.2 Usage
For the silent installation please open a command line window as administrator.
Inside the temporary installation location, locate the folder
TCI_3DX_UI_R[xxxxx]_V[xxx]\install\windows for an installation on a client with Windows
32-bit or the folder TCI_3DX_UI_R[xxxxx]_V[xxx]\install\windows_64 for an installation
on a client with Windows 64-bit.
Start the silent installation with a command line like this example:
Setup.exe /S /User= Admin /3DXInstDir= "C:\Program Files\Dassault Systemes\B420"
/3DXEnvFile= "C:\Program Files\Dassault Systemes\B420\CATEnv\Env.txt"
/D=C:\TCI\TCI_3DX_UI_R2018x_V350
The log file install.log of the installation will be stored in the current directory. There you can
find the information about the installation process.
When the installation ended successful you will find the success message in this file.

TCI Release 3.7 - Installation Manual 61
6.3 Environment variables
The installation creates the start script TCI_3DX_UI_Start.bat.
Here you can find an overview of the possible environment variables in this start script.
Parameter Name Example
Value
Description
XCI_DEBUG ON Enable the TCI debug
XCI_ENABLE_OPENINPDMCMD ON Enable the Command to open the selected
Product in the Teamcenter Rich Client or
Web Client
XCI_TEAMCENTER_PORTAL See sample
below.
Optional: Path to Teamcenter Rich Client
portal.bat, if more than one client is
installed. By default, will connect to the
Teamcenter client that is associated with
the *.ugs file extension.
XCI_WEBBROWSER See sample
below.
Optional: Path to the web browser
executable to be used for the open URL
command.
XCI_TEAMCENTER_WEBCLIENT_URL See sample
below.
The webclient url used to open the
referenced object in a Teamcenter
Webclient. This will disable the open in
Teamcenter Rich Client functionality.
Table 8: TCI 3DEXPERIENCE Rich Client Extension environment variables
Samples for Environment variables:
XCI_TEAMCENTER_PORTAL:
D:\Teamcenter12\portal\portal.bat
XCI_WEBBROWSER:
C:\Program Files\Internet Explorer\iexplore.exe
XCI_TEAMCENTER_WEBCLIENT_URL (Teamcenter 11 Webclient):
open default:
http://tcserver:11080/tc/webclient#argument=
open in Teamcenter Navigator app:
http://tcserver:11080/tc/webclient#appCode=Navigator&argument=
open in Product Structure app
http://tcserver:11080/tc/webclient#appCode=PSE&argument=
XCI_TEAMCENTER_WEBCLIENT_URL (Active Workspace):
open default:
http://tcserver:3000/#/com.siemens.splm.clientfx.tcui.xrt.showObject?uid=
open the content page:
http://tcserver:3000/#/com.siemens.splm.clientfx.tcui.xrt.showObject?page=Content&uid=

TCI Release 3.7 - Installation Manual 62
6.4 Client extensions configuration
The client must be configured using the 3DEXPERIENCE options dialog.
The TCI configuration dialog under Options → General → Compatibility shows some version
information of the integration and the server URL can be configured to connect to the TCI integration
server. The client supports the encryption of the communication channel using SSL. To enable this
feature, the client must be configured to connect a https URL.
Examples:
http://my.tci-integration-server.url:port/XCI
https://my.tci-integration-server.url:port/XCI
To verify the connectivity to the configured server the Check Server button can be used. A message
will be shown to indicate successful or unsuccessful connections.
TCI Release 3.7 - Installation Manual 63
7 Installing the XCI 3DEXPERIENCE Batch
The XCI 3DEXPERIENCE Batch must be installed on any host that you configure to export or import
from 3DEXPERIENCE.
As a prerequisite the 3DEXPERIENCE Rich Client needs to be installed.
The XCI 3DEXPERIENCE Batch utility requires licman20 as its license manager.
For detailed information about installation and configuration of the XCI 3DEXPERIENCE Batch also
see the XCI3DXBatch Installation & Operations Manual.
7.1 Installation
You should perform the following steps with your 3DEXPERIENCE administrator.
Download the software from http://www.cmi-support.com/. Choose “Download” → “TCI” → “XCI
3DEXPERIENCE Batch” and select the appropriate version (e.g. Package for R2019x).
Locate the downloaded archive file (XCI_3DX_BATCH_R[xxxxx]_V[xxx].zip). Extract the
content of the archive file to a temporary location, e.g.
“C:\temp\XCI_3DX_BATCH_R2019x_V350”.
Inside the temporary installation location, locate the folder
“XCI_3DX_BATCH_R[xxxxx]_V[xxx]\install\windows_64” for the installation.
Start the installation by double-clicking “Setup.exe” and follow the instructions. The
3DEXPERIENCE values will be received from the registry if possible.
In the installation directory the file Report.txt is stored. It describes where the customized
3DEXPERIENCE environment for the batch can be found.
Make sure that the %JAVA_HOME% in your 3DEXPERIENCE environment is set correctly and
points to a valid Java runtime.
You should add the following best practice settings to the environment:
XPG_ACTIVATE_3DPART=1 activate the 3D Part support
XPG_ACTIVATE_NONCADDOC=1 activate the Non-CAD document support
XPG_ACTIVATE_MAPPED_REVISIONFAMILY=1 activate the mapped Revision Family support
ENABLE_DETAILED_REPORT=1 enable a detailed report
7.2 Additional Configuration for Post Processing for XPDM
Additional configuration steps are required if you import any files to 3DExperience or export via
XPDM.
7.2.1 Copy required library from the 3DEXPERIENCE environment
This is only needed if "Set Maturity of Rep Children", "Set Maturity of Rep" or "Add configured
material" is configured.

TCI Release 3.7 - Installation Manual 64
Copy the file eMatrixServletRMI.jar to
...\XCI_3DX_BATCH_R<XXXX>_V<XXX>\win_b64\fromServer\docs\java
You can find this file on the 3DEXPERIENCE server host: <3DEXPERIENCE installation
directory>\server\win_b64\docs\java
In some cases the following files in
...\XCI_3DX_BATCH_R<XXXX>_V<XXX>\win_b64\fromServer\code\bin may have to be
replaced with updated files from your 3DX Server installation after installation of a 3DX Fix Pack
(you can check the installation with CheckServerConnection.bat):
mxUtil.dll, vgalaxy7k.dll
You can find these files on the 3DEXPERIENCE server host: <3DEXPERIENCE installation
directory>\studio\win_b64\code\bin)
eMatrixMqlU.dll
You can find this file on the 3DEXPERIENCE server host: <3DEXPERIENCE installation
directory>\adk\win_b64\code\bin).
7.2.2 Configuration of the TSI 3DEXPERIENCE xPDM Post Process
behavior
TSI 3DEXPERIENCE xPDM Post Process comes with the configuration file
...\XCI_3DX_BATCH_R<XXXX>_V<XXX>\win_b64\reffiles\TCIXpgConfig.xml
The TCI Server URL must be configured in TCIXpgConfig.xml file. The
TCIXpgPostProcess_SERVERURL attribute must point to the TCI installation:
<?xml version="1.0" encoding="UTF-8" standalone="yes"?>
<TCIXpgConfig>
<Attribute name="TCIXpgPostProcess_SERVERURL"
value="http://my.tci-integration-server.url:port/XCI"/>
</TCIXpgConfig>
The following connectivity information for the Enovia server must be provided is specific options are
used (eg. TCIXpgPostProcess_REPAIRINSTANCE=ON):
Server URL of 3DEXPERIENCE server (https://enovia-server.url:port/3dspace)
TCIXpgPostProcess_ENOVIASERVERURL=<3DEXPERIENCE Server URL>
3DEXPERIENCE user name
This 3DEXPERIENCE user has to be ENOVIA business and system administrator. You should use
the same 3DEXPERIENCE user that is used for the XPDM import.
TCIXpgPostProcess_ENOVIAUSER=<3DEXPERIENCE user name>
Encrypted 3DEXPERIENCE password
TCIXpgPostProcess_ENCRYPTEDENOVIAPASSWORD=<encrypted password>
3DEXPERIENCE Vault (optional)
TCIXpgPostProcess_ENOVIAVAULT=<3DEXPERIENCE Vault>

TCI Release 3.7 - Installation Manual 65
If 3DPassport is used to check the 3DEXPERIENCE credentials:
TCIXpgPostProcess_USE3DPASSPORT=ON
7.2.3 Create an encrypted password for the TSI 3DEXPERIENCE xPDM
Post Process
This step is only required if "Repair Instance" or "Set Maturity of Rep Children" is configured
in the TSI 3DEXPERIENCE xPDM Post Process.
The TSI 3DEXPERIENCE xPDM Post Process needs a direct (MQL) login to the 3DEXPERIENCE
server. To use the post-processing it is necessary to store the login information in the environment.
As it is not allowed to store a plain password, TSI 3DEXPERIENCE xPDM Post Process uses an
encrypted password.
Use the script "EncryptPassword.bat" to encrypt the 3DEXPERIENCE password. If you use the
3DEXPERIENCE environment file <Your Path>\XCI_3DX_BATCH_<3DX-version>_<XCI-
version>\config\XCI_3DX_BATCH_Env.txt (created during the installation of this batch utility
collection) you can just double click the batch file. If you use a different environment file you drag
and drop your environment file on the script "EncryptPassword.bat", or use a command window:
C:\<Your Path>\XCI_3DX_BATCH_<3DX-version>_<XCI-
version>\config\EncryptPassword.bat <path>\<your env-file.txt>
You have to encrypt the password using the same Windows OS user that runs the XPDM
import/export (XPGClientBatch service, or TSI3DXBatch). The encrypted password can be used on
different hosts, as long as the import uses the same Windows user.
You will be asked for the password to encrypt:
Encrypt 3DEXPERIENCE password
type password:
After typing in your password the encryption is executed:
starting encryption ...
Encrypting password: ***************************************************
Encrypted password: <26e5d4eencrpted331846533ppassworddcbe21975ssample>
Insert encrypted password in TCIXpgConfig.xml
Press any key to continue . . .
Insert the password in the configuration file TCIXpgConfig.xml.
7.2.4 Test the TSI 3DEXPERIENCE xPDM Post Process environment
This step is only required if "Repair Instance" or "Set Maturity of Rep Children" is configured
in the TSI 3DEXPERIENCE xPDM Post Process!
Use the script "CheckServerConnection.bat" to test your installation.
If you use the 3DEXPERIENCE environment file <Your Path>\TCI_3DX_XPP_<3DX-
version>_<XCI-version>\config\XCI_3DX_BATCH_Env.txt (created during the
installation of this batch utility collection) you can just double click the batch file. If you use a different

TCI Release 3.7 - Installation Manual 66
environment file you drag and drop your environment file on the script "EncryptPassword.bat",
or use a command window:
C:\<Your Path>\XCI_3DX_BATCH_<3DX-version>_<XCI-
version>\config\EncryptPassword.bat <path>\<your env-file.txt>
You will get a warning if a needed library could not be loaded, or if one of the following settings is
missing in the TCIXpgConfig.xml
▪ TCIXpgPostProcess_ENOVIASERVERURL
▪ TCIXpgPostProcess_ENOVIAUSER
▪ TCIXpgPostProcess_ENCRYPTEDENOVIAPASSWORD
If you get the message "login: Cannot get instance of matrix/db/Context", please check the following
settings:
▪ wrong setting TCIXpgPostProcess_ENOVIASERVERURL
▪ wrong TCIXpgPostProcess_ENOVIAUSER /
TCIXpgPostProcess_ENCRYPTEDENOVIAPASSWORD combination
▪ wrong / missing certificate (in case of https)
▪ wrong setting TCIXpgPostProcess_USE3DPASSPORT
This command also warns if the 3DEXPERIENCE user does not have the 3DEXPERIENCE
privileges "system administrator" and "business administrator". These 3DEXPERIENCE privileges
are required to repair an instance and to set the maturity of an imported object to a specified state:
TCIMQL Library build: Mar 31 2016 16:18:16
3DEXPERIENCE server version: 3DEXPERIENCE R2015x HotFix 5
!!! User MigratUsr does not have required ENOVIA business privileges !!!
!!! User MigratUsr does not have required ENOVIA system privileges !!!

TCI Release 3.7 - Installation Manual 67
8 Installing the license manager
8.1 Remarks
The TCI requires licman20 as its license manager.
Licman20ptf19 is recommended.
For the installation of Licman please refer to the Licman documentation.
http://www.cmi-support.com/ftp_pub/download/licman/licman20.pdf
During the installation of the Licman, you have to specify a temporary working directory. Choose a
directory where the user has full access rights.
8.2 Running Licman as a regular executable on Windows
If you install Licman with the setup program on Windows, it will be run as a service and require
administrator rights. Beginning with ptf19, it is possible to launch Licman as a regular executable
when the TCI is started.
You need to set the license path variable:
SET LICMAN_LICENSE_PATH=<port>@<host>
Then call licman20_lld.exe as a regular executable.
No execution of the setup routine is required in this case.
For more information, see Licman User Manual.

TCI Release 3.7 - Installation Manual 68
9 Installing the COMReconV5 package
If V5ToV6Preprocessing or V6ToV5Postprocessing is enabled, the COMReconV5 package must be
installed.
9.1 Installation
The COMReconV5 package is delivered as an zip file (e.g. COMReconV5_R28.zip).
9.1.1 Unzip the COMReconV5 package
Unzip the package to disk (e.g. C:\TCI\COMReconV5_R28 see Figure 12: COMReconV5 package
content) at the TCI install host (where the TCI web application is installed).
Figure 12: COMReconV5 package content
9.1.2 Create CATIA V5 environment file
Copy the CATIA V5 environment file to the config folder. Open the copied Environment file and
enhance the PATH variable with the win_b64 folder as shown in the following example.
PATH=C:\TCI\COMReconV5_R28\win_b64;C:\Program Files\Dassault
Systemes\B28\win_b64\code\bin;…
9.1.3 Configuration
Then open the go\COMReconV5.bat file for edit and customize the 4 environment variables to your
environment and save the file.
rem ---------------------------------------------------------------------------
rem Please customize following variables for your environment.
rem
rem Installation directory of COMReconV5.
rem Example: C:\TCI\COMReconV5_R28
set COMRECONV5_INSTALL_DIR=C:\TCI\COMReconV5_R28
rem
rem Installation directory of CATIA.
rem Example: C:\Program Files\Dassault Systemes\B28
set CATIA_BASEDIR=C:\Program Files\Dassault Systemes\B28
rem
rem Directory where to find CATIA env-files.
rem Example: C:\TSI\CATEnv
set CONVERTER_ENVDIR=C:\TCI\COMReconV5_R28\config
rem
TCI Release 3.7 - Installation Manual 69
rem Filename (without extension) that will be used by CATIA batch client.
rem Example: COMReconV5_R28
set CONVERTER_ENVFILE=COMReconV5_R28
…
9.1.4 Install Microsoft Visual C++ Redistributable Packages
Login as user with administrative rights and install all the Microsoft Visual C++ Redistributable
Packages from the vcredist folder.


![La rivista del Turismo TCI Febbraio[1]](https://static.fdokumen.com/doc/165x107/631b01c3d5372c006e03bf8c/la-rivista-del-turismo-tci-febbraio1.jpg)