Sybase Control Center for Sybase Unwired Platform
420
Sybase Control Center for Sybase Unwired Platform Sybase Unwired Platform 2.2 SP02
-
Upload
khangminh22 -
Category
Documents
-
view
0 -
download
0
Transcript of Sybase Control Center for Sybase Unwired Platform

Sybase Control Center for Sybase UnwiredPlatform
Sybase Unwired Platform 2.2SP02

DOCUMENT ID: DC01092-01-0222-01LAST REVISED: January 2013Copyright © 2013 by Sybase, Inc. All rights reserved.This publication pertains to Sybase software and to any subsequent release until otherwise indicated in new editions ortechnical notes. Information in this document is subject to change without notice. The software described herein is furnishedunder a license agreement, and it may be used or copied only in accordance with the terms of that agreement.Upgrades are provided only at regularly scheduled software release dates. No part of this publication may be reproduced,transmitted, or translated in any form or by any means, electronic, mechanical, manual, optical, or otherwise, without the priorwritten permission of Sybase, Inc.Sybase trademarks can be viewed at the Sybase trademarks page at http://www.sybase.com/detail?id=1011207. Sybase andthe marks listed are trademarks of Sybase, Inc. ® indicates registration in the United States of America.SAP and other SAP products and services mentioned herein as well as their respective logos are trademarks or registeredtrademarks of SAP AG in Germany and in several other countries all over the world.Java and all Java-based marks are trademarks or registered trademarks of Oracle and/or its affiliates in the U.S. and othercountries.Unicode and the Unicode Logo are registered trademarks of Unicode, Inc.All other company and product names mentioned may be trademarks of the respective companies with which they areassociated.Use, duplication, or disclosure by the government is subject to the restrictions set forth in subparagraph (c)(1)(ii) of DFARS52.227-7013 for the DOD and as set forth in FAR 52.227-19(a)-(d) for civilian agencies.Sybase, Inc., One Sybase Drive, Dublin, CA 94568.

Contents
Get Started .............................................................................1About Sybase Control Center for Unwired Platform .......1
Documentation Roadmap for Unwired Platform...........................................................................1
Unwired Platform Administration by Node .............2Cluster Administration ............................................3Server Administration ............................................5Application and User Management Overview ........5Domain Management ............................................7MBO Package Management Overview ..................8Hybrid App Package Management Overview ......10Security Administration Overview ........................10System Monitoring Overview ...............................11
Starting and Stopping Sybase Control Center inUnwired Platform ......................................................12
Cleaning Up the Flash Player Cache ............................13Copying and Pasting Properties ...................................13Getting Started with Production Clusters .....................14
Getting Started After Installing .............................14Configuring Memory Usage .................................16Configuring the Automatic Logout Timer .............18Manually Opening the Unwired Platform
Console ...........................................................19Adding or Updating Unwired Server Registration
Properties ........................................................20Understanding the Sybase Control Center Interface ....21
User Interface Overview ......................................21Perspectives ........................................................23Views ...................................................................25Repository ...........................................................27Sybase Control Center Console ..........................32
Sybase Control Center for Sybase Unwired Platform iii

Sybase Control Center Security ..........................36Platform Administration Roles and Tasks .....................36
SUP Platform Administrator .................................36Platform Administration Tasks .............................37SUP Domain Administrator ..................................38Domain Administration Tasks ..............................38SUP Helpdesk .....................................................39Help Desk Operator Tasks ...................................39
Administer ............................................................................41Clusters .........................................................................41
Cluster-Affecting Configuration Changes .............41Cluster Properties ................................................41Configuring Asynchronous Operation Replay
Queue Count ...................................................62Viewing Cluster Information .................................62Checking System Licensing Information ..............63Checking Cluster Status ......................................64Sharing Cluster Information With SAP Servers ...64
Relay Server .................................................................69Configuring Unwired Server to use Relay Server
.........................................................................69Managing Configured Relay Servers ...................77Relay Server Tab Reference ................................80
Unwired Server .............................................................81Server List ............................................................82Configuring Unwired Server General Properties
.........................................................................84Configuring Unwired Server to Securely
Communicate With an HTTP Proxy .................85Relay Server Outbound Enabler .........................86Server Log ...........................................................95
Domains ........................................................................99Creating and Enabling a New Domain ...............100Deleting a Domain .............................................101Registering a Domain Administrator User .........102
Contents
iv Sybase Unwired Platform

Assigning Domain Administrators to a Domain . 103Viewing Applications for a Domain ....................104Viewing Application Connections for a Domain . 104Scheduling Accumulated Data Cleanup for
Domains ........................................................106Domain Logs ......................................................110Checking Client Application Logs ......................155Connections .......................................................156Configuring Domain Security .............................179
Security Configurations ...............................................183Creating a Security Configuration ......................185Assigning a Security Configuration to a Domain
.......................................................................231Viewing Security Configuration Usage ..............231Anonymous Access Security Configuration .......232SiteMinder Authentication with Sybase Unwired
Platform .........................................................232Applications ................................................................238
Activating and Maintaining Applications ............239Defining Applications .........................................239Maintaining Activated Applications ....................242Transporting Applications Between
Environments Using Export and Import ........256Application Connections ....................................258Application Connection Templates .....................266Application Connection Properties ....................269
Deploy .................................................................................279MBO Packages ...........................................................279
Deploying MBO Packages .................................279MBO Package Management ..............................288MBO Subscription Management ........................297Reviewing MBO History .....................................303Reviewing Operation History .............................303
DOE-C Packages ........................................................304Deploying and Configuring DOE-C Packages . . .304
Contents
Sybase Control Center for Sybase Unwired Platform v

Viewing and Changing Package ConnectionProperties ......................................................304
Setting the Bulk Load Timeout Property ............305Checking and Resolving DOE-C User Failures . 306Package Subscription Properties .......................306
Hybrid App Packages .................................................307Deploying Hybrid App Packages .......................307Enabling and Configuring the Notification
Mailbox ..........................................................310Configuring a Hybrid App Package ....................311
Monitor ................................................................................321Monitoring Usage .......................................................321System Monitoring Overview ......................................322Monitoring Configuration .............................................324
Configuring Monitoring Performance Properties.......................................................................324
Monitoring Profiles ......................................................326Creating and Enabling a Monitoring Profile .......326
Monitoring Data ..........................................................328Reviewing System Monitoring Data ...................328Purging Monitoring Data ....................................329Exporting Monitoring Data .................................329Searching Monitoring Data ................................330Viewing Package-Level Cache Statistics ...........331Monitoring Data Categories ...............................331
Troubleshoot Sybase Control Center ..............................353Using Sybase Control Center to Troubleshoot Unwired
Platform ..................................................................353Collecting Administration Performance Data for
Troubleshooting ......................................................354Sybase Control Center Management Tier Issues .......355
Launching Sybase Control Center Results inRounded Rectangle Box or Empty ConsoleScreen ...........................................................356
Contents
vi Sybase Unwired Platform

Sybase Control Center Console ContinuallyRefreshes ......................................................357
Sybase Control Center Windows Service Failsto Start ...........................................................357
Sybase Control Center Windows ServiceDeleted ..........................................................359
Sybase Control Center Fails to Start .................359Second Sybase Control Center Fails to Start .... 361Login Invalid in Sybase Control Center ..............362Login Fails in Sybase Control Center ................363Login to Sybase Control Center Forces Ending
Existing Session ............................................364Administrator Account is Locked ........................365Browser Refresh (F5) Causes Logout ...............366Stale Version of Sybase Control Center After
Upgrade .........................................................366Sybase Control Center Reports Certificate
Problem .........................................................368Previous Administrator Credentials Used ..........369Security Error Triggered When Connecting to
Sybase Control Center from Remote Browser.......................................................................370
Administrator Login Passes When Provider IsNot Available ..................................................370
Host Name of Registered Resource ChangedBut Is Not Updated ........................................371
Management Issues with Clustered Data Tiers.......................................................................372
Poor Sybase Control Center Performance afterUpgrade .........................................................373
Sybase Control Center Communication withUnwired Server Fails .....................................374
Platform Component Monitoring Issues ......................375Monitoring Data Does Not Appear in History Tab
.......................................................................376
Contents
Sybase Control Center for Sybase Unwired Platform vii

Domain Log Data Does Not Appear in HistoryTab .................................................................376
Previously Existing Monitoring Data No LongerAppears .........................................................377
Previously Existing Domain Log Data No LongerAppears .........................................................378
Server Tier Administration Issues ...............................378Server List Not Retrieved ...................................379Unwired Server Fails to Start .............................381Error in Listing Application Connections and
ADMIN_WEBSERVICE_INVOCATION_ERROR in gateway.log ..........................................381
Starting or Restarting a Remote Server fromSybase Control Center Fails ..........................382
Port Conflict Issues ............................................384Unexpected Listener Startup or Connection
Errors .............................................................385Refreshing Server Configuration Displays Only
Partial Updates ..............................................385Users Connect with Old Credentials ..................387AuthorizationException Displays Instead of
Status ............................................................388Increasing Messaging Queue Counts Degrades
Performance ..................................................388Saving Server Configuration Fails Due to
Certificate Validation Error .............................389Unknown Server Error Message ........................389
Package Deployment and Management Issues .........390Exporting or Deploying Large Packages Fails ...390Invalid DOE-C User Error for an SAP Server
Connection ....................................................391Troubleshoot CTS Imports .................................392
Application and Application User Management Issues................................................................................395
Wrong Application for Code Error ......................395
Contents
viii Sybase Unwired Platform

User Name of Registered ApplicationConnection Not Displayed .............................396
Internal Server Error When Clicking Applications.......................................................................396
Index ................................................................................399
Contents
Sybase Control Center for Sybase Unwired Platform ix

Contents
x Sybase Unwired Platform

Get Started
Set up Sybase® Control Center.
About Sybase Control Center for Unwired PlatformSybase Control Center provides a single comprehensive Web administration console toconfigure and manage Sybase products and their components.
Sybase Control Center combines a modular architecture, a rich administrative console,agents, common services, and tools for managing and controlling Sybase products. UnwiredPlatform is one of many Sybase products that use Sybase Control Center as it's managementand administrative tool.
As part of an Unwired Platform installation, Sybase Control Center can be used in three ways:
• In a personal development environment, developers may act as administrators to set up apersonal testing environment. Development administrators use Sybase Control Center todeploy and configure packages, register messaging devices, and so on. No other additionalconfiguration or administration may be required.
• In a distributed or shared development environment, administrators use Sybase ControlCenter to set up an Unwired Server, manage packages, manage devices, configure HybridApp packages, as well as review server and domain logs, and monitoring-related data.
• In a production environment, administrators use Sybase Control Center on a regular basisto perform the same tasks described for a shared development environment. They alsoconfigure the operation of Unwired Servers, and administer day-to-day activities of theproduction environment. Administrators must also routinely monitor the overall healthand performance of the system, which may include clusters and domains.
Documentation Roadmap for Unwired PlatformSybase® Unwired Platform documents are available for administrative and mobiledevelopment user roles. Some administrative documents are also used in the development andtest environment; some documents are used by all users.
See Documentation Roadmap in Fundamentals for document descriptions by user role.
Check the Sybase Product Documentation Web site regularly for updates: http://sybooks.sybase.com/sybooks/sybooks.xhtml?id=1289&c=firsttab&a=0&p=categories , then navigate to the most currentversion.
Get Started
Sybase Control Center for Sybase Unwired Platform 1
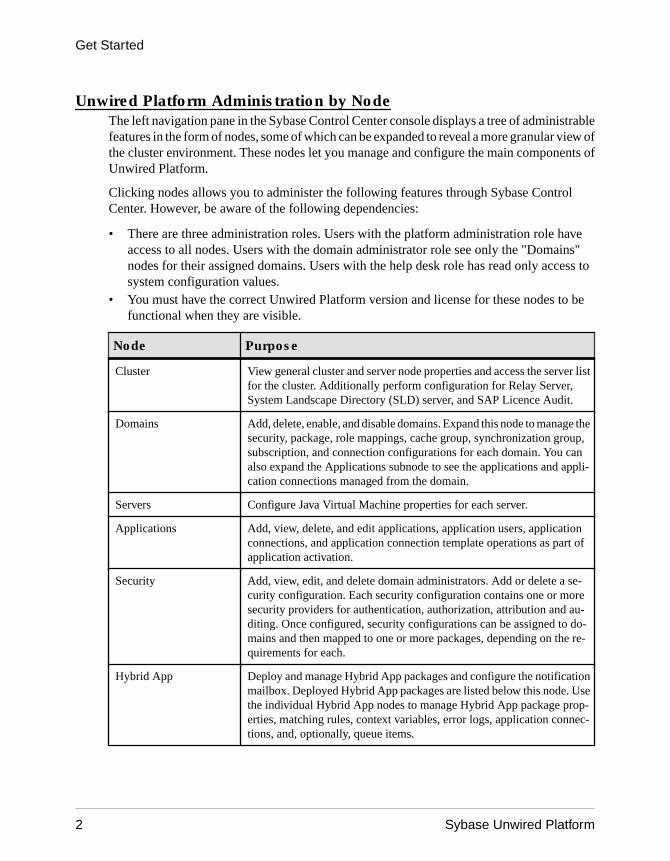
Unwired Platform Administration by NodeThe left navigation pane in the Sybase Control Center console displays a tree of administrablefeatures in the form of nodes, some of which can be expanded to reveal a more granular view ofthe cluster environment. These nodes let you manage and configure the main components ofUnwired Platform.
Clicking nodes allows you to administer the following features through Sybase ControlCenter. However, be aware of the following dependencies:
• There are three administration roles. Users with the platform administration role haveaccess to all nodes. Users with the domain administrator role see only the "Domains"nodes for their assigned domains. Users with the help desk role has read only access tosystem configuration values.
• You must have the correct Unwired Platform version and license for these nodes to befunctional when they are visible.
Node Purpose
Cluster View general cluster and server node properties and access the server listfor the cluster. Additionally perform configuration for Relay Server,System Landscape Directory (SLD) server, and SAP Licence Audit.
Domains Add, delete, enable, and disable domains. Expand this node to manage thesecurity, package, role mappings, cache group, synchronization group,subscription, and connection configurations for each domain. You canalso expand the Applications subnode to see the applications and appli-cation connections managed from the domain.
Servers Configure Java Virtual Machine properties for each server.
Applications Add, view, delete, and edit applications, application users, applicationconnections, and application connection template operations as part ofapplication activation.
Security Add, view, edit, and delete domain administrators. Add or delete a se-curity configuration. Each security configuration contains one or moresecurity providers for authentication, authorization, attribution and au-diting. Once configured, security configurations can be assigned to do-mains and then mapped to one or more packages, depending on the re-quirements for each.
Hybrid App Deploy and manage Hybrid App packages and configure the notificationmailbox. Deployed Hybrid App packages are listed below this node. Usethe individual Hybrid App nodes to manage Hybrid App package prop-erties, matching rules, context variables, error logs, application connec-tions, and, optionally, queue items.
Get Started
2 Sybase Unwired Platform
Node Purpose
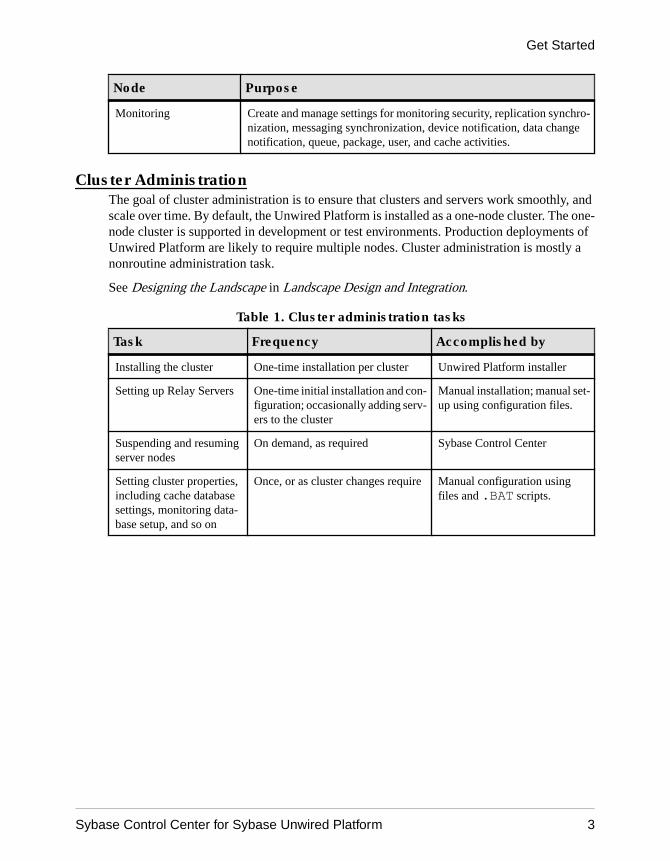
Monitoring Create and manage settings for monitoring security, replication synchro-nization, messaging synchronization, device notification, data changenotification, queue, package, user, and cache activities.
Cluster AdministrationThe goal of cluster administration is to ensure that clusters and servers work smoothly, andscale over time. By default, the Unwired Platform is installed as a one-node cluster. The one-node cluster is supported in development or test environments. Production deployments ofUnwired Platform are likely to require multiple nodes. Cluster administration is mostly anonroutine administration task.
See Designing the Landscape in Landscape Design and Integration.
Table 1. Cluster administration tasks
Task Frequency Accomplished by
Installing the cluster One-time installation per cluster Unwired Platform installer
Setting up Relay Servers One-time initial installation and con-figuration; occasionally adding serv-ers to the cluster
Manual installation; manual set-up using configuration files.
Suspending and resumingserver nodes
On demand, as required Sybase Control Center
Setting cluster properties,including cache databasesettings, monitoring data-base setup, and so on
Once, or as cluster changes require Manual configuration usingfiles and .BAT scripts.
Get Started
Sybase Control Center for Sybase Unwired Platform 3

Task Frequency Accomplished by
Configuring the cluster to:
• Set the configurationcache properties
• Set the solution man-ager URL
• Set the replicationports and properties
• Set the messaging syn-chronization ports
• Set the managementports for communica-tion requests fromSybase Control Center
• Configure the clientdispatcher
• Set how applicationshandle DCN requestssent though an HTTPGET operation
• Create security pro-files for secure com-munication
• Set up secure synchro-nization
• Tune server perform-ance
Post installation configuration withinfrequent tuning as required
Setting cluster log file set-tings for Unwired Serversystem components
Once, unless log data requirementschange
Administering the runtimedatabases
Routine to ensure that the databaseserver is monitored and backed up,that there is sufficient space for Un-wired Platform metadata and cacheddata tables, and that performance iswithin acceptable limits (perform-ance tuning)
Established processes and com-mand line utilities. Consult withyour database administrator.
Reviewing licensing infor-mation, including total li-censed devices and cur-rently used licenses count
Occasional, or as device user regis-tration and deregistration occurs
Sybase Control Center.
Get Started
4 Sybase Unwired Platform

Server AdministrationThe goal of server administration is to ensure that Unwired Server is running correctly and thatit is configured correctly for the environment in which it is installed (development orproduction). Server administration is mostly a one-time or infrequent administration task.
There are two types of server nodes that can be installed:
• Application Server node – (mandatory) runs all services.• Scale Out node – (optional) specifically designed to allow the stateless request/response
HTTP and synchronous message services to be horizontally scaled.
Table 2. Server administration tasks
Task Frequency Accomplished by
Installing the server One-time installa-tion per server
Unwired Platform installer.
Tuning the server performance. Post installation withinfrequent tuning asrequired
Sybase Control Center.
Manage the outbound enabler configura-tion for Relay Server.
• Configure Relay Server properties• Manage certificates• View logs• Configure proxy servers for outbound
enabler
Post installation Sybase Control Center
Application and User Management OverviewThe goal of application management is to register an application to Unwired Server as anentity, create an application template that specifies application connection details for a user,and activate application connections either manually or automatically.
Developers must invoke registration (manual or automatic) for native applications. Fordevelopment details, see the Developer Guide for your application API and device platformtype. For application, connection, registration details, see Administer > Applications inSybase Control Center for Sybase Unwired Platform.
Get Started
Sybase Control Center for Sybase Unwired Platform 5

Table 3. Application and user management tasks
Task Frequency Accomplish by using
Create new applications to register applica-tion entities with Unwired Server. A defaultapplication template is created automatical-ly. Modify and delete applications as part ofapplication life cycle.
As required Sybase Control Center for Un-wired Platform with Applica-tions node, and Applicationstab.
Create or modify application connectiontemplates to specify details for native, Hy-brid App, and proxy application connec-tions.
As required Sybase Control Center for Un-wired Platform, with Applica-tion node, and Application Con-nection Templates tab.
Create one or more push configurations forapplications.
As required Sybase Control Center for Un-wired Platform, with Applica-tion node, and Properties button.
For applications that need to be registeredmanually, register an application connectionto associate an application connection with auser. This is not necessary for applicationsthat are registered automatically.
As required Sybase Control Center for Un-wired Platform, with Applica-tion node, and Application Con-nections tab.
View activated users, once they have loggedin with the activation code. Users must eithersupply the activation code manually, or thedevice client supplies the activation codeautomatically as coded.
As required Sybase Control Center for Un-wired Platform with the Appli-cation node, and ApplicationUsers tab.
Create a new activation code for a userwhose code has expired.
As required Sybase Control Center for Un-wired Platform, with Applica-tion node, and Application Con-nections tab.
Review registered application connectionsand users, delete application connections tofree licenses, delete application connectionsto remove users from the system.
As required Sybase Control Center for Un-wired Platform with the Appli-cations node.
Change logical roles or modify role map-pings for a security configuration to preventusers from accessing the application.
As required Sybase Control Center for Un-wired Platform with the Securi-ty node
Manage subscriptions As required Sybase Control Center for Un-wired Platform with the Pack-ages node.
Information and guidelines:
• Application templates hold default connection properties that can be assigned to anapplication during the connection registration process. However, these templates are
Get Started
6 Sybase Unwired Platform
configured differently depending on what type of connection registration you enable forapplications. See the recommendations documented in Creating Application ConnectionTemplates in the Mobile Application Life Cycle guide.When a client application connects to Unwired Server its application ID is used to look upa matching template. If that template allows automatic registration (the AutomaticRegistration Enabled property is set to true), then the security configuration in the templateis used to authenticate the user and establish an identity against which the connection isregistered. If the template also specifies a logical role, then user is authorized using themapped physical role(s) of the logical role in the security configuration. When there aretemplates with different logical roles for the same application id and securityconfiguration, the priority of the template determines the order of evaluation of theassociated logical roles.
Note: If no templates are detected, the registration request fails. If multiple templates aredetected, the client application registers using the template with the highest priority. Ifthere is more than one template with the highest priority, the application registers usingone of the templates with the highest priority, selected at random. For details on how usernames and security configuration names are processed when an email address is used, seeConsiderations for Using E-mail Addresses as User Names in the Security guide.
See also• Applications on page 238
Domain ManagementThe goal of domain management is to create and manage domains for one specific tenant. Usemultiple domains for multiple tenants sharing the same Unwired Server cluster.
Multiple domains in a cluster allow tenants' administrators (that is, domain administrators) toeach manage their own application components. Domain administration for the platformadministrator is typically an infrequent administration task that occurs each time a newdomain needs to be added to support a change in the tenancy strategy used or need to makechanges to an existing domain.
Domains give you the means to logically partitioning environments, thereby providingincreased flexibility and granularity of control over domain-specific applications.Administration of multiple customer domains takes place within the same cluster.
• An platform administrator adds and configures domains, creates security configurationsfor customer applications, and assigns those security configurations to the domain so theycan be mapped to packages in the domain.
• One or more domain administrators then perform domain-level actions within theirassigned domains.
In a development environment, domains allow developers from different teams to share asingle cluster without disrupting application deployment. Administrators can facilitate thisby:
Get Started
Sybase Control Center for Sybase Unwired Platform 7

1. Creating a domain for each developer or developer group.2. Granting domain administration privileges to those users so they can perform deployment
tasks within their assigned domains.
Table 4. Domain management tasks
Task Frequency Administrator
Create domains Once for each customer Unwired Platform admin-istrator
Create and assign securityconfigurations, and map rolesat package or domain levels
Infrequent, as required Unwired Platform admin-istrator
Assign and unassign domainadministrators
Infrequent, as required Unwired Platform admin-istrator
Configure and review do-main logs
Routine Unwired Platform admin-istrator and domain ad-ministrator
Deploy MBO and DOE-Cpackages
Routine Unwired Platform admin-istrator and domain ad-ministrator
Manage server connectionsand templates
Infrequent, as required Unwired Platform admin-istrator and domain ad-ministrator
Manage subscriptions andscheduled tasks
As required Unwired Platform admin-istrator and domain ad-ministrator
Review client log and MBO/operation error history
As required Unwired Platform admin-istrator and domain ad-ministrator
MBO Package Management OverviewThe goal of mobile business object (MBO) package management is to make MBOs availableto device users. MBO package management typically requires a one-time deployment andconfiguration, except for ongoing subscription management for messaging and DataOrchestration Engine connector (DOE-C) packages.
Packages contain MBOs that are deployed to Unwired Server to facilitate access to back-enddata and transactions from mobile devices. Package types include UNIFIED packages, andSAP® DOE-C packages.
A package, along with its current settings for cache groups, role mappings, synchronizationgroups, connections, and security configuration, can be exported to an archive and imported
Get Started
8 Sybase Unwired Platform

back into Sybase Control Center for backup or to facilitate a transition from a test environmentto a production environment.
Table 5. MBO package management tasks
Task Packagetype
Frequency Accomplish by using
Deploy packages to a develop-ment or production UnwiredServer
UNIFIED Once, unlessa new versionbecomesavailable
Sybase Control Center for Un-wired Platform with the domain-level Packages node
Control user access by assign-ing security configurations foreach package, and mappingroles if fine-grained authoriza-tion is enforced through logicalroles
UNIFIED Once, unlesssecurity re-quirements ofthe packagechange
Sybase Control Center for Un-wired Platform with the domain-level Packages node
Set up the package cache inter-val and cache refresh schedule(for getting data updated on theUnwired Server from the datasource)
UNIFIED Once, unlessdata refreshesneed to betuned
Sybase Control Center for Un-wired Platform with the domain-level Packages node
Manage subscriptions (UNI-FIED, and DOE-C), synchroni-zation groups (UNIFIED), anddevice notifications (UNI-FIED) to customize how upda-ted data in the cache is deliv-ered to the device user
Varies Periodic, asrequired
Sybase Control Center for Un-wired Platform with the domain-level Packages node
Export or import an MBOpackage
UNIFIED On-demand,as required
Sybase Control Center for Un-wired Platform with the domain-level Packages node
Review current/historical/per-formance metrics
All Routine Sybase Control Center for Un-wired Platform with the Monitornode (available only to adminis-trators)
View asynchronous operationreplays for the selected package
Replication,UNIFIED
Periodic, asrequired
Sybase Control Center for Un-wired Platform with the domain-level Packages node. However,asynchronous operation replaysmust first be enabled at the clusterlevel. See Viewing AsynchronousOperation Replays .
Get Started
Sybase Control Center for Sybase Unwired Platform 9

Hybrid App Package Management OverviewThe goal of Hybrid App package management is to make Hybrid Apps available from theUnwired Server to device users. Hybrid App package management typically requires a one-time deployment and configuration, except for ongoing package maintenance.
The Hybrid App application is a simple business process application that deliversfunctionality, such as sending requests and approvals through an e-mail application, to mobiledevice clients on supported device platforms, including Windows Mobile, iOS.
Table 6. Hybrid App package management
Task Frequency Accomplish by using
Deploy Hybrid App pack-ages
Once, unless a new version becomesavailable
Sybase Control Center for Un-wired Platform with the HybridApp node
Assign or unassign a Hy-brid App to an applicationconnection template
When a new Hybrid App package isdeployed
Sybase Control Center for Un-wired Platform with the HybridApp node
Hybrid App configurationthat includes e-mail match-ing rules and context vari-ables
Once Sybase Control Center for Un-wired Platform with the HybridApp node
Device registration anduser assignments to HybridApp packages
Routine when new users or new de-vices are added
Sybase Control Center for Un-wired Platform with the HybridApps><Hybrid AppName>node
Monitor users and errors Routine Sybase Control Center for Un-wired Platform with the Monitornode
Security Administration OverviewPerform security administration tasks to establish rules for the protection of enterprise andadministrative data and transactions.
Unwired Server coordinates data between enterprise information server (EIS) data sourcesand device clients, meaning that transferred information is often proprietary, confidential, orprivate. Therefore, the data and communication streams that carry information from UnwiredServer to other components in the Unwired Platform must be protected.
Unwired Platform has several security layers that protect data and transactions.Administrators manage system and application authentication and authorization securityconfigurations at the cluster level, and perform role mapping at the domain and package levels.By default, the 'admin' security configuration is used to authenticate and authorize all
Get Started
10 Sybase Unwired Platform

administrative users, including domain administrators. All domain administrator logins mustbe valid in the security repository configured for the 'admin' security configuration.
Platform administrators register domain administrators at the cluster level, and then assignthem to a domain from the domain-level Security Configurations tab. Security configurationsare assigned when domains are created, or subsequently, from the Domains node. Packagesmust also be mapped to a security configuration at deployment; role mapping can beconfigured at a later time.
Roles are used for MBOs and operations during development to indicate authorizationrequirements. These roles are enforced by Unwired Server. At deployment or afterdeployment, these logical roles can be mapped to physical roles to restrict which users haveaccess to MBOs and operations. Roles assigned at the MBO level are separate from operation-level roles. However, package-level role mapping overrides domain-level role mapping. If thesame package is deployed to multiple domains and associated with the same securityconfiguration, then the domain-level role mapping is shared.
System Monitoring Overview(Not applicable to Online Data Proxy) The goal of monitoring is to provide a record ofactivities and performance statistics for various elements of the application. Monitoring is anongoing administration task.
Use monitoring information to identify errors in the system and resolve them appropriately.This data can also be shared by platform and domain administrators by exporting and savingthe data to a .CSV or .XML file.
The platform administrator uses Sybase Control Center to monitor various aspects of UnwiredPlatform. Monitoring information includes current activity, historical activity, and generalperformance during a specified time period. You can monitor these components:
• Security log• Replication synchronization• Messaging synchronization• System messaging queue status• Data change notifications• Device notifications (replication)• Package statistics (replication and messaging)• User-related activity• Cache activity
To enable monitoring, platform administrators must set up a monitoring database, configure amonitoring data source or create a new one, and set up monitoring database flush and purgeoptions. By default the installer created a monitoring database, however you can use anotherone if you choose.
To control monitoring, platform administrators create monitoring profiles and configurations,which define the targets (domains and packages) to monitor for a configured length of time. A
Get Started
Sybase Control Center for Sybase Unwired Platform 11

default monitoring profile is created for you by the installer. Monitoring data can be deleted bythe platform administrator as needed.
Table 7. System monitoring tasks
Task Frequency Accomplished by
Create and enable monitor-ing profiles
One-time initial configuration withinfrequent tuning as required
Sybase Control Center for Un-wired Platform with the Moni-toring node
Enable domain logging One-time setup with infrequent con-figuration changes, usually as issuesarise
Sybase Control Center for Un-wired Platform with the Do-mains > <DomainName> >Log node.
Review current/historical/performance metrics
Routine Sybase Control Center for Un-wired Platform with the Moni-toring node
Identify performance is-sues
Active Sybase Control Center for Un-wired Platform with the Moni-toring node
Monitor application anduser activity to check forirregularities
Active Sybase Control Center for Un-wired Platform with the Moni-toring node
Troubleshoot irregularities Infrequent Reviewing various platformlogs
Purge or export data On demand Sybase Control Center for Un-wired Platform with the Moni-toring node
Starting and Stopping Sybase Control Center in UnwiredPlatform
Sybase Unified Agent is used to start and stop Sybase Control Center.
There are two ways to start and stop the Sybase Control Center in an Unwired Platformenvironment.
• By default, SybaseControlCenterX.X is installed to run as a Windows service, and is set bythe installer to start automatically.
• You can also use a command-line script as required.
• Start or stop from the Windows Control Panel; change automatic start and restart:
a) Open the Windows Control Panel.
Get Started
12 Sybase Unwired Platform

b) Select Administrative Tools > Services.c) Locate SybaseControlCenterX.X. If the service is running, the status column displays
“Started.”d) To start or stop the service, right-click the service and choose Start or Stop.e) Double-click the service.f) To set the service to automatically start when the system starts, change the Startup
type to Automatic.g) To restart the service in case of failover, choose the Recovery tab and change the First,
Second, and Subsequent failures to Restart Service.Click Apply to save the modifications before closing the dialog.
• Manually starting Sybase Control Center by command-line script:
a) Enter the start command:
<UnwiredPlatform_InstallDir>\SCC-X_X\bin\scc.bat• Manually stopping Sybase Control Center by command-line script:
a) Enter the stop command:
<UnwiredPlatform_InstallDir>\SCC-X_X\bin\scc.bat -stopNote: You can use scc.bat -stop only to stop an SCC that was manually started with"scc.bat"; it cannot stop the SCC windows service.
Cleaning Up the Flash Player CacheSybase recommends you clean up the Flash Player cache, after upgrading to the latest versionof Sybase Control Center. This is needed if you have used a previous version of SybaseUnwired Platform on the same machine. This cleanup is only required once.
1. Navigate to C:\Documents and Settings\username\Application Data\Macromedia\Flash Player\#SharedObjects .
2. Delete all files under this folder.
Note: Alternatively, go to the following link from a browser: http://www.macromedia.com/support/documentation/en/flashplayer/help/settings_manager07.html. Use the WebsiteStorage settings panel to change storage capacity, or delete Websites to clean up the cache.
Copying and Pasting PropertiesValues displayed in property tables in Sybase Control Center can be copied and pasted.
Tables that support copying and pasting include monitoring properties, device properties, userproperties, registration templates, domain log properties, and sever log properties.
Get Started
Sybase Control Center for Sybase Unwired Platform 13
1. To copy a value, right click the cell, then select Copy from the context menu.
2. To paste what you have copied, go to the property table you require, click the cell inquestion, then select Paste from the context menu. You cannot paste in a table cell that isread only, by you can copy a value from a table cell and paste it elsewhere (for example,copy text input for a search).
Getting Started with Production ClustersGet started using Sybase Control Center in production clusters of Unwired Platform. Followsteps to configure and prepare Sybase Control Center for Unwired Platform use.
1. Getting Started After InstallingPerform postinstallation testing and configuration.
2. Configuring Memory Usage(Optional) Determine whether you need to configure how much memory Sybase ControlCenter uses, and if so which configuration method to use.
3. Configuring the Automatic Logout Timer(Optional) Set Sybase Control Center to end login sessions when users are inactive for toolong.
4. Manually Opening the Unwired Platform ConsoleIf the Unwired Platform administration console does not appear automatically, you mayneed to manually open it in Sybase Control Center (SCC). Once open, you can then use theUnwired Platform administration console to manage the Unwired Server enabled mobileenvironment.
5. Adding or Updating Unwired Server Registration PropertiesBy default a Sybase Control Center detects and registers clusters and Unwired Servernodes as managed resources of Sybase Control Center automatically: the resource entrynamed 'localhost' is created for the local server upon installation. However, you may needto manually register other new clusters or nodes or modify existing entries under specificconditions.
Getting Started After InstallingPerform postinstallation testing and configuration.
PrerequisitesStart Sybase Control Center.
Task
1. Install Adobe Flash Player 10.1 or later in the Web browser you will use to connect toSybase Control Center.
Get Started
14 Sybase Unwired Platform
Flash Player is a free plug-in. You can download the latest version from http://get.adobe.com/flashplayer/.
If Flash Player is already installed but you are not sure which version you have, go to theAdobe test site at http://adobe.com/shockwave/welcome. Click the link that says Testyour Adobe Flash Player installation. The version information box on the next page thatappears displays your Flash Player version.
2. To connect to Sybase Control Center, direct your browser to:
https://<scc_server_hostname>:8283/sccNote: If you changed the default HTTPS port during installation, use the new port numberinstead of 8283.
3. If you see an error about the security certificate, add Sybase Control Center to yourbrowser’s trusted sites zone (Internet Explorer) or add a security exception (Firefox).
4. Log in. Use the login account (supAdmin) and password that you set up during installation.This account can be used for both SCC login, and SUP login.
5. Learn about Sybase Control Center. To open the help system, click ? in the upper-rightcorner of the screen, or select Help > Online Documentation.
See also• Configuring Memory Usage on page 16
Setting Up Browser Certificates for Sybase Control Center ConnectionsTo avoid security exceptions when launching Sybase Control Center, set up securitycertificates correctly.
This task is required when:
• The browser session starts from a host computer that is remote from the Sybase ControlCenter installation.
• The browser session starts on the same computer as Sybase Control Center and reports aCertificate Error. The installer automatically sets up a local security certificate, but thecertificate installed for https in the web container keystore is a self-signed root certificate,which is not recognized b the client browser.
• The host computer does not have Visual Studio Certificate Manager SDK installed.
Alternatively, follow browser-specific instructions to accept the certificate into the Windowscertificate store.
1. Change the default shortcut to use the full host name of the computer on which SybaseControl Center has been installed.
The host name is required because the default self-signed generated certificate the installerissues cannot be assigned to “localhost.”
For example, change the shortcut URL to something similar to:
Get Started
Sybase Control Center for Sybase Unwired Platform 15

"%ProgramFiles%\Internet Explorer\iexplore.exe" https://SCChost.mydomain.com:8283/scc
2. Add the certificate to the Windows certificates store.
a) Extract the self-signed certificate:<UnwiredPlatform_InstallDir>\JDKX.X.X_XX\bin\keytool.exe -exportcert -alias jetty -keystore <UnwiredPlatform_InstallDir>\SCC-X_X\services\EmbeddedWebContainer\container\Jetty-X.X.XX\keystore -file cert.crt
b) Click Start > Run, type mmc, and then click OK to import the cert.crt file into thehost computer’s Windows store with the Windows Certificate Manager. The defaultpassword for both the keystore and the alias is "changeit".
Logging Into Sybase Control Center with an Installer-Defined PasswordThe person acting as platform administrator logs in to Sybase Control Center for the first timeafter installation.
During installation, the person installing Unwired Platform defines a password for thesupAdmin user. This password is used to configure the Preconfigured login module thatperforms the administrator authentication.
Note: This installer-defined password is not intended to be a permanent administratorcredential. You must replace this module with a production-grade authentication module,typically LDAP.
1. Launch Sybase Control Center.
2. Enter supAdmin for the user name and type the <supAdminPwd> for the password.Note that the user name is case sensitive.
3. Click Login.
Logging out of Sybase Control CenterLog out of a cluster when you finish your administration session.
In order to protect system security, Sybase recommends that you log out of Sybase ControlCenter when you are not using the console.Choose one of these methods:
• Click the Logout link at the top right corner of the console.• From the Sybase Control Center menu, select Application > Logout.
Configuring Memory Usage(Optional) Determine whether you need to configure how much memory Sybase ControlCenter uses, and if so which configuration method to use.
It is not usually necessary to configure memory usage for Sybase Control Center. This tablelists memory options you can set and circumstances under which you should considerchanging them.
Get Started
16 Sybase Unwired Platform

Modify this value When Guidelines
Maximum memory
• jvmopt=-Xmx – if
you are running SCC asa Windows service
• SCC_MEM_MAX – ifyou are starting SCCfrom the command line
• You need to prevent Sybase Con-trol Center from using more than agiven amount of memory
• SCC fails to start and may displayan error: Could not cre-ate the Java Virtualmachine.
• An OutOfMemory error saysSCC is out of heap space
• A warning message about systemmemory appears during the startprocess
• The machine where SCC is instal-led has less than 4GB of memory.(Starting SCC on a machine withless than 4GB of memory triggersthe startup warning messageabout system memory.)
On machines with less than 4GB ofmemory, set maximum memory to256MB or more.
Default value: none. (On machineswith 4GB or more of memory, maxi-mum memory is set dynamically andis effectively limited only by theamount of system memory available.)
Permanent memory
• jvmopt=-XX:MaxPerm-Size – if you are run-
ning SCC as a Win-dows service
• SCC_MEM_PERM –if you are starting SCCfrom the command line
An OutOfMemory error says SCC isout of permanent generation space
Increase by 32MB increments. If youreach a value equal to twice the de-fault and still see the OutOfMemoryerror, contact Sybase technical sup-port.
Default value: 128MB
You can change memory options in two ways:
• For Sybase Control Center started from the command line – execute commands to set oneor more environment variables before executing the scc command to start Sybase ControlCenter. When you use this method, your changes to the memory options last only as long asthe current login session. This method is useful for testing new option values.
• For the Sybase Control Center service – modify a file used by the SCC service. When youuse this method, your changes to the memory options persist—Sybase Control Center usesthem every time it starts as a service.
See also• Getting Started After Installing on page 14
Get Started
Sybase Control Center for Sybase Unwired Platform 17
• Configuring the Automatic Logout Timer on page 18
Changing a Memory Option on the Command LineBefore you start Sybase Control Center from the command line, you can issue a command tochange the value of a memory option temporarily.
Changes made using this method last only as long as the current login session. This method isuseful for testing new option values.
1. If Sybase Control Center is running, shut it down.
2. Set the environment variable. Specify a size in megabytes but do not indicate the units inthe command.> set SCC_MEM_MAX=512
3. Use the scc command to start Sybase Control Center.
Changing a Memory Option for an SCC Windows ServiceAdd a jvmopt command to the scc.properties file to change a memory option (-Xmx or-XX:MaxPermSize) for a Sybase Control Center Windows service.
When you use this method to set memory options, your changes are permanent—SybaseControl Center uses them every time it starts as a service.
1. If Sybase Control Center is running, shut it down.
2. Open the SCC properties file:
<SCC-install-directory>\SCC-3_2\bin\scc.properties3. Add (or modify, if it already exists) a jvmopt line specifying the memory size in Java
format. Use m for megabytes or g for gigabytes.
For example:jvmopt=-Xmx512m
4. Save the file and start the Sybase Control Center Windows service.
Configuring the Automatic Logout Timer(Optional) Set Sybase Control Center to end login sessions when users are inactive for toolong.
PrerequisitesLaunch Sybase Control Center and log in using an account with administrative privileges.(The login account or its group must have sccAdminRole.)
Task
1. From the application’s menu bar, select Application > Administration.
2. Select General Settings.
Get Started
18 Sybase Unwired Platform

3. Click the Auto-Logout tab.
4. Enter the number of minutes after which an idle user will be automatically logged out.
Enter 0 or leave the box empty to disable automatic logout.
5. Click OK (to apply the change and close the properties dialog) or Apply (to apply thechange and leave the dialog open).
See also• Configuring Memory Usage on page 16
Manually Opening the Unwired Platform ConsoleIf the Unwired Platform administration console does not appear automatically, you may needto manually open it in Sybase Control Center (SCC). Once open, you can then use the UnwiredPlatform administration console to manage the Unwired Server enabled mobile environment.
PrerequisitesBefore managing a cluster, ensure that the login has SCC administration privileges.
Task
1. In the SCC menu, select View > Open > Resource Explorer.
2. From the list of resources, select the cluster you want to manage.
3. From the Resource Explorer menu bar, click Resources > Add Resources toPerspective.The Unwired Server is added to the Perspective Resources window.
4. In the Perspective Resources window, mouse over the cluster you want to manage, clickthe down arrow, and select Authenticate.
5. To authenticate against the cluster, select one of these:
• Use my current SCC login – SCC uses the administrator's initial SCC logincredentials to establish a connection to the Unwired Platform cluster. Use this option ifyou have already mapped the SCC administrator role to the SUP administrator role.
• Specify different credentials – enter a new user name and password specifically forlogging in to this cluster. Use this option if SCC and Unwired Platform use differentauthentication repositories. Using different credentials in this step is unnecessary ifSCC and Unwired Platform use the same security provider.
6. Click OK.
7. Mouse over the cluster you want to open, click the down arrow, and select Manage.
If you are successfully authenticated, the Unwired Platform console appears. If authenticationfails, see Sybase Control Center Issues in the Troubleshooting guide.
Get Started
Sybase Control Center for Sybase Unwired Platform 19

Adding or Updating Unwired Server Registration PropertiesBy default a Sybase Control Center detects and registers clusters and Unwired Server nodes asmanaged resources of Sybase Control Center automatically: the resource entry named'localhost' is created for the local server upon installation. However, you may need to manuallyregister other new clusters or nodes or modify existing entries under specific conditions.
For information on these conditions, see When Manual Managed Resource Property ChangesAre Needed.
1. Choose your action:
• To register a new resource, on the Sybase Control Center menu, select Resource >Register.
• To update the resource properties, on the Sybase Control Center menu, select View >Select > Perspective Resources view. Then in the Name column, click EntryName >Properties.
2. Configure any of these properties, depending on you initial action:
• the resource name and type• a description• host name and port of the server
The host name and port must match those configured for the Unwired Servermanagement port.
3. If you changed hostname, reauthenticate the server:
a) Click EntryName > Clear Authentication to remove currently validated credentialsto the previous host values.
b) Click EntryName > Authenticate to reauthenticate with the current host values.
4. Once authenticated, you can now manage it from Sybase Control Center: clickEntryName > Manage to launch the Unwired Platform management console.
See also• Configuring Management Port Properties on page 42
• Sybase Control Center Communication with Unwired Server Fails on page 374
When Manual Managed Resource Property Changes Are NeededUnderstand the conditions under which managed resource properties need to be manuallyedited or added
These are the conditions under which you must manually create a new registration entry:
• If a cluster or node is not located within your network.• If it is not automatically detected and registered in the Sybase Control Center Resource
Explorer
Get Started
20 Sybase Unwired Platform

These are the conditions under which you must manually update an existing registration entry:
• If you modify the Unwired Server configuration to change the management port, you needto update these resource properties to match those values.
Note: When modifying the hostname of the resource, you need to reauthenticate theresource.
Understanding the Sybase Control Center InterfaceManipulate Sybase Control Center interface elements to set up the console according to yourrequirements and preference.
User Interface OverviewThis illustration labels important elements of the Sybase Control Center user interface so youcan identify them when they appear in other help topics.
Figure 1: Sybase Control Center User Interface
See also• Perspectives on page 23
• Views on page 25
• Repository on page 27
• Sybase Control Center Console on page 32
• Sybase Control Center Security on page 36
Get Started
Sybase Control Center for Sybase Unwired Platform 21

Toolbar IconsDescribes the icons in the Sybase Control Center toolbar for launching and managing views.
Table 8. Toolbar icons
Icon Name Description
Show/Hide Perspective ResourcesView
Displays or minimizes the Perspective Resour-ces view, which lists registered resources in thisperspective.
Launch Resource Explorer Opens the resource explorer, which lists reach-able resources (both registered and unregis-tered).
Launch Heat Chart Opens the perspective heat chart, which gives astatus overview of the registered resources inthis perspective.
Close All Open Views Closes all open and minimized views.
Minimize All Views Minimizes all open views.
Restore All Minimized Views Returns all minimized views to their originalsize.
Cascade All Open Views Arranges open views to overlap each other.
Tile All Open Views Vertically Arranges open views in a vertical manner.
Tile All Open Views Horizontally Arranges open views in a horizontal manner.
Sybase Control Center Functionality Not Applicable to Unwired PlatformSybase Control Center is a standard management framework used by multiple products,including Sybase Unwired Platform. Certain standard functions that appear in the userinterface cannot be used to administer Unwired Platform.
The following Sybase Control Center features can be disregarded in the context of SybaseUnwired Platform:
• Alerts• Schedules• Heat charts
Get Started
22 Sybase Unwired Platform

• Historical performance monitoring• Logging
These features either do not apply to Sybase Unwired Platform or are redundant due to customfunctionality implemented in place of standard functions. The inapplicable Sybase ControlCenter functionality cannot be removed, as it may be required by other Sybase product serversalso using Sybase Control Center.
Accessibility FeaturesThis document is available in an HTML version that is specialized for accessibility. You cannavigate the HTML with an adaptive technology such as a screen reader, or view it with ascreen enlarger.
The Sybase CEP Option R4 documentation complies with U.S. government Section 508Accessibility requirements. Documents that comply with Section 508 generally also meetnon-U.S. accessibility guidelines, such as the World Wide Web Consortium (W3C) guidelinesfor Web sites.
For information about accessibility support in the Sybase IQ plug-in for Sybase Central™, see“Using accessibility features” in Chapter 1, “Introducing Sybase IQ” in Introduction toSybase IQ. The online help for Sybase IQ, which you can navigate using a screen reader, alsodescribes accessibility features, including Sybase Central keyboard shortcuts.
Note: You might need to configure your accessibility tool for optimal use. Some screenreaders pronounce text based on its case; for example, they pronounce ALL UPPERCASETEXT as initials, and MixedCase Text as words. You might find it helpful to configure yourtool to announce syntax conventions. Consult the documentation for your tool.
For information about how Sybase supports accessibility, see Sybase Accessibility athttp://www.sybase.com/accessibility. The Sybase Accessibility site includeslinks to information on Section 508 and W3C standards.
Sybase Control Center Accessibility InformationSybase Control Center uses the Adobe Flex application.
For the most current information about Adobe Flex keyboard shortcuts, see http://livedocs.adobe.com/flex/3/html/help.html?content=accessible_5.html.
Note: To use Sybase Control Center with JAWS for Windows screen reading softwareeffectively, download and install the appropriate Adobe scripts. See www.adobe.com.
PerspectivesA perspective is a named container for a set of one or more managed resources. You cancustomize perspectives to provide the information you need about your environment.
As the main workspaces in the Sybase Control Center window, perspectives let you organizemanaged resources. You might assign resources to perspectives based on where the resourcesare located (continents, states, or time zones, for example), what they are used for, which
Get Started
Sybase Control Center for Sybase Unwired Platform 23
group owns them, or which administrator manages them. Perspectives appear as tabs in themain window.
Every perspective includes a Perspective Resources view, which lists the resources in thatperspective and provides high-level status and descriptive information. Use the View menu toswitch from detail view to icon view and back.
You can open additional views as needed to manage the perspective’s resources. The views ina perspective display information only about resources in that perspective.
One resource can appear in many perspectives.
See also• User Interface Overview on page 21
• Views on page 25
• Repository on page 27
• Sybase Control Center Console on page 32
• Sybase Control Center Security on page 36
Creating a PerspectiveCreate a perspective in which you can add and manage resources.
1. From the application menu bar, select Perspective > Create.
2. Enter a name for your perspective. The name can contain up to 255 characters.
3. Click OK.
See also• Removing a Perspective on page 24
• Renaming a Perspective on page 25
Removing a PerspectiveDelete a perspective window.
1. Select the perspective tab you want to delete.
2. In the main menu bar, select Perspective > Delete.The selected perspective disappears. If there are other perspectives, Sybase Control Centerdisplays one.
See also• Creating a Perspective on page 24
• Renaming a Perspective on page 25
Get Started
24 Sybase Unwired Platform

Renaming a PerspectiveChange the name of your perspective.
1. Select the perspective tab you want to rename.
2. From the main menu bar, select Perspective > Rename..
3. Enter the new name for your perspective.
4. Click OK.
See also• Creating a Perspective on page 24
• Removing a Perspective on page 24
ViewsUse views to manage one or more resources within a perspective.
In Sybase Control Center, views are the windows you use to monitor and manage aperspective’s resources. You can re-arrange, tile, cascade, minimize, maximize, and generallycontrol the display of the views in your perspective.
Each perspective includes these views:
• Perspective Resources• Administration Console
Note: SCC views are not related to database views; they serve a completely different purpose.
See also• User Interface Overview on page 21
• Perspectives on page 23
• Repository on page 27
• Sybase Control Center Console on page 32
• Sybase Control Center Security on page 36
Managing a ViewOpen, close, minimize, maximize, or restore a view in the current perspective.
You can:
Get Started
Sybase Control Center for Sybase Unwired Platform 25

Task Action
Open a view Do one of the following:
• In the Perspective Resources view, select a resource, click the drop-down arrow to the right of the resource name, and select the view toopen.
• In the application menu bar, select View > Open and choose a view.
Close a view Select the view to close. In the application menu bar, select View > Close.You can also click the X in the view’s upper right corner.
Maximize a view Click the box in the view’s upper right corner. The view enlarges to fill theentire perspective window. Click the box again to return the view to itsformer size.
Minimize a view Click the _ in the view’s upper right corner. The view shrinks to a smalltab at the bottom of the perspective window.
Minimize all views In the application menu bar, select View > Minimize All Views.
Restore a view Click the box on the minimized tab to maximize the view. Click the boxagain to return the view to its former (smaller) size so you can see otherviews at the same time.
Bring a view to the front In the application menu bar, select View > Select and choose the view youwant from the submenu.
See also• Arranging View Layout in a Perspective on page 26
Arranging View Layout in a PerspectiveUse the view layout options to manage your perspective space.
Click one of these icons in the Sybase Control Center toolbar:
Icon Action
Close All Open Views
Minimize All Open Views
Restore All Minimized Views
Cascade All Open Views
Get Started
26 Sybase Unwired Platform

Icon Action
Tile All Open Views Vertically
Tile All Open Views Horizontally
In a cascade, views overlap; in tiling arrangements, they do not.
Alternatively, you can arrange view layouts from the Sybase Control Center menu bar. Fromthe menu bar, select Perspective > Arrange and select your view layout.
See also• Managing a View on page 25
RepositoryThe Sybase Control Center embedded repository stores information related to managedresources, as well as user preference data, operational data, and statistics.
You can back up the repository database on demand, schedule automatic backups, restore therepository from backups, and configure repository purging options. Full and incrementalbackups are available. A full backup copies the entire repository. An incremental backupcopies the transaction log, capturing any changes since the last full or incremental backup.
By default, Sybase Control Center saves backups as follows:
• Each full backup is stored in its own subdirectory in <SCC-install-directory>/backup.
• Each incremental backup is stored in a file in <SCC-install-directory>/backup/incremental.
Sybase recommends that you periodically move backup files to a secondary storage locationto prevent the installation directory from becoming too large.
See also• User Interface Overview on page 21
• Perspectives on page 23
• Views on page 25
• Sybase Control Center Console on page 32
• Sybase Control Center Security on page 36
Get Started
Sybase Control Center for Sybase Unwired Platform 27

Scheduling Backups of the RepositoryConfigure full and incremental backups of the repository to occur automatically.
PrerequisitesDetermine your backup strategy, including when to perform full backups and incrementalbackups. For example, you might schedule incremental backups every day and a full backupevery Saturday.
You must have administrative privileges (sccAdminRole) to perform this task.
Task
A full backup copies the entire repository. An incremental backup copies the transaction log,capturing any changes since the last full or incremental backup.
1. From the main menu, select Application > Administration.
2. In the left pane, select Repository.
3. Click the Full Backup tab.
4. (Optional) To change the directory in which backups will be stored, click Browse andnavigate to the desired directory.
5. Select Schedule a Regular Backup.
6. Specify the day you want scheduled backups to begin. Enter a Start date or click thecalendar and select a date.
7. (Optional) Use the Time and AM/PM controls to specify the time at which backups occur.
8. Specify how often backups occur by setting the Repeat interval and selecting hours, days,or weeks.
9. (Optional) To purge the repository after each backup, select Run a repository purge afterthe backup completes.
10. If you include purging in the backup schedule, go to the Size Management tab andunselect Automatically purge the repository periodically to disable automatic purging.
11. Click Apply to save the schedule.
12. Click the Incremental Backup tab and repeat the steps above to schedule incrementalbackups to occur between full backups.
NextSet purging options on the Size Management tab.
See also• Modifying the Backup Schedule on page 29• Forcing an Immediate Backup on page 29• Restoring the Repository from Backups on page 30
Get Started
28 Sybase Unwired Platform

• Configuring Repository Purging on page 31
Modifying the Backup ScheduleSuspend or resume repository backups or change the backup schedule.
PrerequisitesYou must have administrative privileges (sccAdminRole) to perform this task.
Task
1. From the main menu, select Application > Administration.
2. In the left pane, select Repository.
3. Choose the type of backup to modify:
• Click the Full Backup tab, or• Click the Incremental Backup tab.
4. (Optional) To suspend or resume the backup schedule, select or unselect Schedule aRegular Backup.When you unselect (uncheck) this option, the scheduling area is grayed out and scheduledbackups no longer occur. However, the schedule is preserved and you can reinstate it at anytime.
5. To change the backup schedule, edit the Start date, Time, Repeat interval, or units. Youcan also select or unselect Run a repository purge after the backup completes.
6. Click Apply to save the schedule.
See also• Scheduling Backups of the Repository on page 28
• Forcing an Immediate Backup on page 29
• Restoring the Repository from Backups on page 30
• Configuring Repository Purging on page 31
Forcing an Immediate BackupPerform an unscheduled full or incremental backup of the repository.
PrerequisitesYou must have administrative privileges (sccAdminRole) to perform this task.
Task
1. From the main menu, select Application > Administration.
2. In the left pane, select Repository.
Get Started
Sybase Control Center for Sybase Unwired Platform 29
3. Choose the type of backup to run:
• Click the Full Backup tab, or• Click the Incremental Backup tab.
4. Click Back up Now.
Sybase Control Center saves the backup to the directory shown in the Location field.
See also• Scheduling Backups of the Repository on page 28
• Modifying the Backup Schedule on page 29
• Restoring the Repository from Backups on page 30
• Configuring Repository Purging on page 31
Restoring the Repository from BackupsLoad backup files into the repository database to revert undesirable changes or to recover froma catastrophic failure.
If you configured Sybase Control Center to store backups somewhere other than the defaultlocation, change the source directory in the copy commands in this procedure.
1. Shut down Sybase Control Center.
2. Copy the most recent full backup from <SCC-install-directory>/backup/<generated_directory_name> to <SCC-install-directory>/services/Repository. For example:
copy C:\sybase\SCC-3_2\backup\repository.270110161105\scc_repository.db C:\sybase\SCC-3_2\services\Repository
3. If you have no incremental backups to load,
a) Also copy the log file from <SCC-install-directory>/backup/<generated_directory_name> to <SCC-install-directory>/services/Repository. For example:
copy C:\sybase\SCC-3_2\backup\repository.270110161105\scc_repository.log C:\sybase\SCC-3_2\services\Repository
b) Skip to step 5 on page 31.
4. Start the repository database using the -ad option, which directs it to load transaction logs(incremental backups) from the incremental directory. (The database loads fullbackups automatically.) For example:cd <SCC-install-directory>\services\Repository
..\..\bin\sa\bin_<platform>\dbsrv11.exe scc_repository -ad <SCC-install-directory>\backup\incremental
Get Started
30 Sybase Unwired Platform

The repository database loads the full backup and any subsequent incremental backupspresent in the incremental directory. Incremental backups are loaded in date order.After loading and saving, the database shuts down.
5. Start Sybase Control Center.If you loaded incremental backups, SCC starts normally (that is, no further recoveryoccurs). If you copied a full backup to the Repository directory, the database recoversthe repository from the full backup.
Example: Loading incremental backups into the repository database
These commands start SQL Anywhere® on a 32-bit Windows machine:
% cd C:\sybase\SCC-3_2\services\Repository% ..\..\bin\sa\bin_windows32\dbsrv11.exe scc_repository -ad C:\sybase\SCC-3_2\backup\incremental
See also• Scheduling Backups of the Repository on page 28
• Modifying the Backup Schedule on page 29
• Forcing an Immediate Backup on page 29
• Configuring Repository Purging on page 31
Configuring Repository PurgingChange repository purging options.
PrerequisitesYou must have administrative privileges (sccAdminRole) to perform this task.
Task
As you decide how to purge your repository, consider that:
• Purging keeps the repository from absorbing too much disk space.• By default, purging is enabled. It occurs once a day and purges data older than one day.• Statistics and alert history can help you detect trends in server performance and user
behavior. The Sybase Control Center statistics chart can graph performance data over aperiod of a year or more if the data is available. If you have enough disk space, considersaving data for a longer period of time or disabling the purging of statistics or alert history.
• Changing the purge frequency and other options might affect Sybase Control Centerperformance.
Note: If you configure purging as part of a scheduled backup of the repository, disableautomatic purging on the Size Management tab.
Get Started
Sybase Control Center for Sybase Unwired Platform 31

1. From the main menu bar, select Application > Administration.
2. Select Repository.
3. Click the Size Management tab.
4. To turn automatic purging on or off, click Automatically purge the repositoryperiodically.
Turn this option off if purging is configured as part of your scheduled full or incrementalbackups.
5. Click purge options to turn them on or off:
• Purge statistics• Purge alert history
6. In Purge data older than, enter the number of days after which to purge repository data.
7. Click Apply, then OK.
See also• Scheduling Backups of the Repository on page 28
• Modifying the Backup Schedule on page 29
• Forcing an Immediate Backup on page 29
• Restoring the Repository from Backups on page 30
Sybase Control Center ConsoleThe console is a command-line interface for displaying details about the status of the SybaseControl Center server and its subsystems.
When you use the scc command to start Sybase Control Center, it displays start-up messagesand then displays the console prompt.
Note: The console prompt does not appear if you start Sybase Control Center as a service, ifyou direct the output of scc to a file, or if you start Sybase Control Center in the background.
See also• User Interface Overview on page 21
• Perspectives on page 23
• Views on page 25
• Repository on page 27
• Sybase Control Center Security on page 36
Console CommandsUse the Sybase Control Center console to get status information on Sybase Control Center andits ports, plug-ins, and services.
Get Started
32 Sybase Unwired Platform
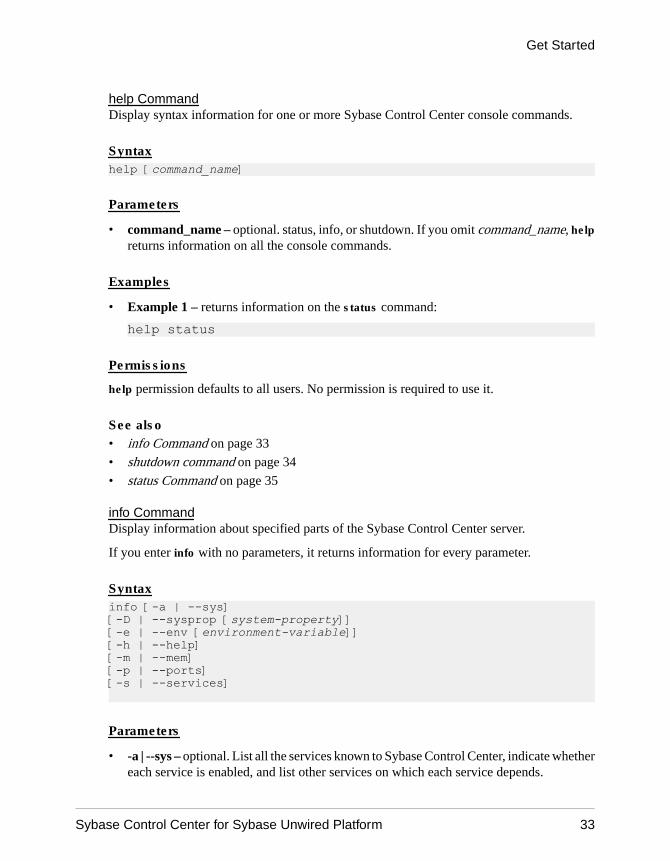
help CommandDisplay syntax information for one or more Sybase Control Center console commands.
Syntaxhelp [command_name]
Parameters
• command_name – optional. status, info, or shutdown. If you omit command_name, helpreturns information on all the console commands.
Examples
• Example 1 – returns information on the status command:
help status
Permissions
help permission defaults to all users. No permission is required to use it.
See also• info Command on page 33
• shutdown command on page 34
• status Command on page 35
info CommandDisplay information about specified parts of the Sybase Control Center server.
If you enter info with no parameters, it returns information for every parameter.
Syntaxinfo [-a | --sys] [-D | --sysprop [system-property]] [-e | --env [environment-variable]][-h | --help][-m | --mem][-p | --ports][-s | --services]
Parameters
• -a | --sys – optional. List all the services known to Sybase Control Center, indicate whethereach service is enabled, and list other services on which each service depends.
Get Started
Sybase Control Center for Sybase Unwired Platform 33

• -D | --sysprop [system-property] – optional. Display information about the specified Javasystem property. Omit the system-property argument to return a list of all Java systemproperties and their values.
• -e | --env [environment-variable] – optional. List all the environment variables in theSybase Control Center Java VM process environment. Omit the environment-variableargument to return a list of environment variables and their values.
• -h | --help – optional. Display information about the info command.• -m | --mem – optional. Display information about the server’s memory resources.• -p | --ports – optional. List all the ports on which the Sybase Control Center agent and its
services listen, indicate whether each port is in use, and show the service running on eachport.
• -s | --services – optional. List all Sybase Control Center services, indicate whether eachservice is enabled, and list other services on which each service depends.
Examples
• Example 1 – displays information about ports on this Sybase Control Center server:
info -p
Permissions
info permission defaults to all users. No permission is required to use it.
See also• help Command on page 33
• shutdown command on page 34
• status Command on page 35
shutdown commandStop the Sybase Control Center server if it is running.
Syntaxshutdown
Examples
• Example 1 – shuts down Sybase Control Center:
shutdown
Permissions
shutdown permission defaults to all users. No permission is required to use it.
Get Started
34 Sybase Unwired Platform

See also• help Command on page 33
• info Command on page 33
• status Command on page 35
status CommandDisplay the status of the SCC agent, plug-in, or service components of Sybase Control Center.
Syntaxstatus [-a | --agent] [-h | --help] [-p | --plugin [plugin-name]] [-s | --service [service-name]]
Parameters
• -a | --agent – display the status of the Sybase Control Center agent component.• -h | --help – display information about the info command.• -p | --plugin [plugin-name] – display the status of the specified Sybase Control Center
plug-in (for example, ASEMap, the Adaptive Server® management module). Omit theplugin-name argument to return a list of plug-ins.
• -s | --service [service-name] – display the status of the specified Sybase Control Centerservice (for example, the Alert service or the Messaging service). Omit the service-nameargument to return a list of services.
Examples
• Example 1 – displays status information on the Repository service:
status --service Repository
Permissions
status permission defaults to all users. No permission is required to use it.
See also• help Command on page 33
• info Command on page 33
• shutdown command on page 34
Get Started
Sybase Control Center for Sybase Unwired Platform 35

Sybase Control Center SecurityUser access to Sybase Control Center is controlled by configuring a security provider.Security providers are configured with the Unwired Platform management console.
By default, Sybase Control Center delegates user access control to providers configured forUnwired Server. Consequently, the login and group management features for Sybase ControlCenter (that is, those available when you click Application > Administration > Securityfrom the Sybase Control Center menu) do not apply to the Unwired Platform use case. SeeSecuring Platform Administration in the Security guide.
See also• User Interface Overview on page 21
• Perspectives on page 23
• Views on page 25
• Repository on page 27
• Sybase Control Center Console on page 32
Platform Administration Roles and TasksBy default, there are three logical administration roles for Unwired Platform, each with aspecific set of tasks to perform.
To enable role-based access to the Sybase Control Center interface, configure mapping of thelogical roles to roles that exist in the security repository used for administrative authenticationand authorization. For details, see the Security guide.
SUP Platform AdministratorPlatform administrators interact with Unwired Platform to perform high-level, cluster-widemanagement.
A platform administrator can perform all administrative operations in the Unwired Platformadministration console, including domain administration for all domains.
Note: The terms "Unwired Platform (platform) administrator" is used in all documentation torefer to the user with "SUP Administrator" role.
Get Started
36 Sybase Unwired Platform
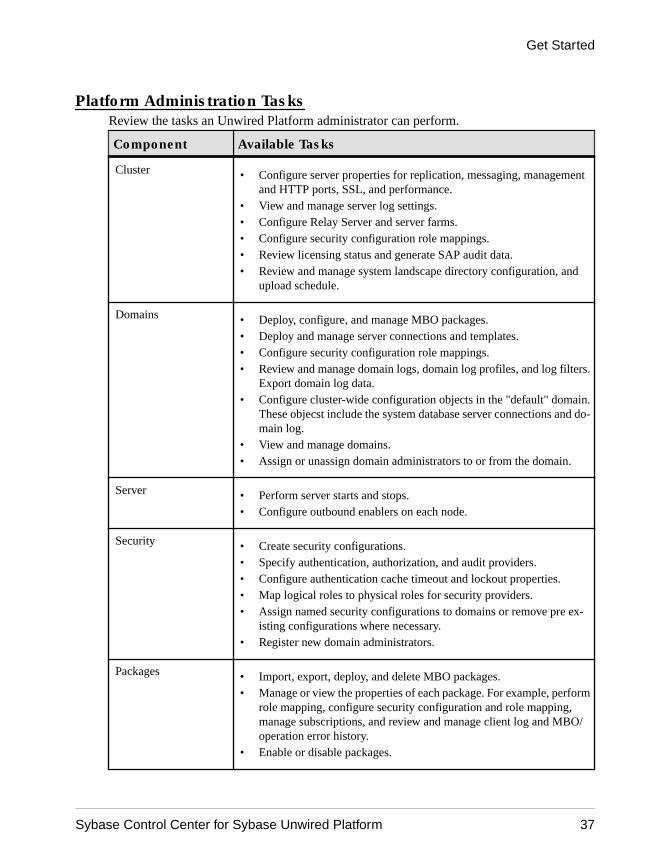
Platform Administration TasksReview the tasks an Unwired Platform administrator can perform.
Component Available Tasks
Cluster • Configure server properties for replication, messaging, managementand HTTP ports, SSL, and performance.
• View and manage server log settings.• Configure Relay Server and server farms.• Configure security configuration role mappings.• Review licensing status and generate SAP audit data.• Review and manage system landscape directory configuration, and
upload schedule.
Domains • Deploy, configure, and manage MBO packages.• Deploy and manage server connections and templates.• Configure security configuration role mappings.• Review and manage domain logs, domain log profiles, and log filters.
Export domain log data.• Configure cluster-wide configuration objects in the "default" domain.
These objecst include the system database server connections and do-main log.
• View and manage domains.• Assign or unassign domain administrators to or from the domain.
Server • Perform server starts and stops.• Configure outbound enablers on each node.
Security • Create security configurations.• Specify authentication, authorization, and audit providers.• Configure authentication cache timeout and lockout properties.• Map logical roles to physical roles for security providers.• Assign named security configurations to domains or remove pre ex-
isting configurations where necessary.• Register new domain administrators.
Packages • Import, export, deploy, and delete MBO packages.• Manage or view the properties of each package. For example, perform
role mapping, configure security configuration and role mapping,manage subscriptions, and review and manage client log and MBO/operation error history.
• Enable or disable packages.
Get Started
Sybase Control Center for Sybase Unwired Platform 37

Component Available Tasks
Hybrid Apps • Deploy and configure Hybrid Apps.• Assign and unassign Hybrid Apps to users.• Review queue status and errors.• Import and export Hybrid Apps.
Applications Import and export applications.
Monitoring • Configure monitoring settings and review monitoring data.• Review captured monitoring data and KPIs .
SUP Domain AdministratorDomain administrators interact with Unwired Platform to manage packages, serverconnections, security configurations, and role mappings in specific domains. A domain is alogical partition used to isolate and manage runtime artifacts for a particular tenant.
The domain administrator can administer only the domain to which he or she is assigned. Thedomain administrator is granted access on a per-domain basis by the platform administrator.
The logical role for the domain administrator is "SUP Domain Administrator." The term"domain administrator" is used in all documentation to refer to the user with the "SUP DomainAdministrator" role.
Domain Administration TasksReview the tasks a domain administrator can perform.
Component Available Tasks
Domain • Manage the domain.• Enable or disable managed domain.• Deploy, configure, and manage MBO packages.• Deploy and manage server connections and templates.• Configure security configuration role mapping.• Review and manage domain logs, domain log profiles, and log filters.
Export domain log data.• Configure cluster-wide configuration objects in the "default" domain.
These objects include the system database server connections and do-main log.
Log • Review and manage domain logs, domain log profiles, and log filters.• Export domain log data.
Get Started
38 Sybase Unwired Platform
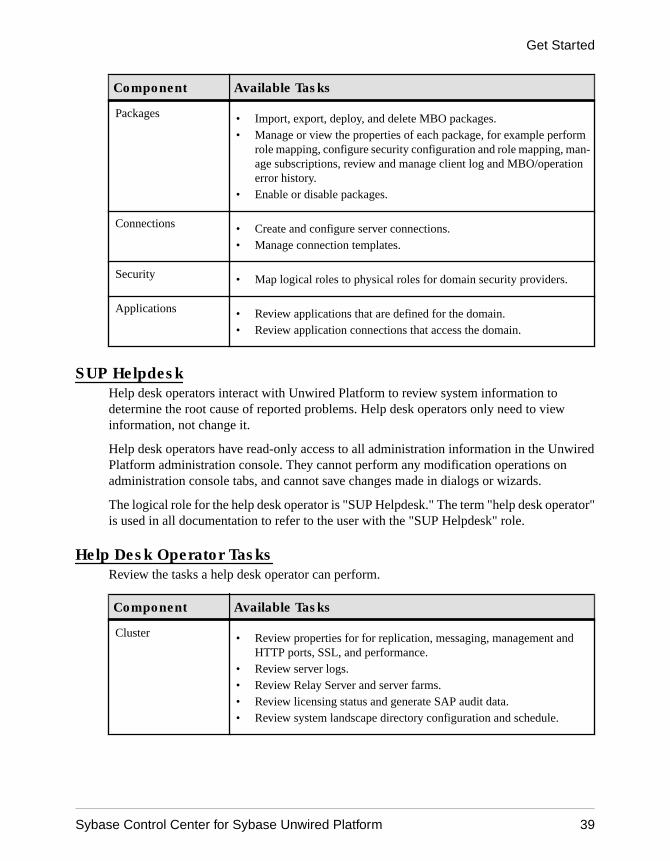
Component Available Tasks
Packages • Import, export, deploy, and delete MBO packages.• Manage or view the properties of each package, for example perform
role mapping, configure security configuration and role mapping, man-age subscriptions, review and manage client log and MBO/operationerror history.
• Enable or disable packages.
Connections • Create and configure server connections.• Manage connection templates.
Security • Map logical roles to physical roles for domain security providers.
Applications • Review applications that are defined for the domain.• Review application connections that access the domain.
SUP HelpdeskHelp desk operators interact with Unwired Platform to review system information todetermine the root cause of reported problems. Help desk operators only need to viewinformation, not change it.
Help desk operators have read-only access to all administration information in the UnwiredPlatform administration console. They cannot perform any modification operations onadministration console tabs, and cannot save changes made in dialogs or wizards.
The logical role for the help desk operator is "SUP Helpdesk." The term "help desk operator"is used in all documentation to refer to the user with the "SUP Helpdesk" role.
Help Desk Operator TasksReview the tasks a help desk operator can perform.
Component Available Tasks
Cluster • Review properties for for replication, messaging, management andHTTP ports, SSL, and performance.
• Review server logs.• Review Relay Server and server farms.• Review licensing status and generate SAP audit data.• Review system landscape directory configuration and schedule.
Get Started
Sybase Control Center for Sybase Unwired Platform 39

Component Available Tasks
Domain • Review existing domains.• Review MBO packages and their configuration.• Review server connections and templates properties.• Review security configurations and role mapping.• Review domain logs, domain log profiles, and log filters. Export domain
log data .
Server • Review outbound enablers on each node.
Applications • Review applications, application push configurations, application usersand connections, and application connection templates.
Security • Review security configurations, their authentication, authorization, at-tribution, and audit provider properties, and their logical role mappings.
• Review authentication cache timeout and lockout properties.• Review security configurations assigned to.• Review currently registered domain.
Hybrid Apps • Review currently deployed Hybrid Apps, their configuration settings,assigned application connections, application connection templates,queue status, and errors.
Monitoring • Review monitoring settings and monitoring data.• Review captured monitoring data and KPIs.
Get Started
40 Sybase Unwired Platform

Administer
Use Sybase Control Center for Unwired Platform to administer and configure components ofa cluster registered as a managed resource. When you configure cluster components you aresetting up the elements required to mobilize your data. Once configured you perform ongoingadministration tasks to maintain the environment.
ClustersAs an organization grows, Unwired Platform administrators need to create a scalable ITinfrastructure using clusters. Clustering creates redundant Unwired Platform components onyour network to provide a highly scalable and available system architecture.
Organizations can seamlessly achieve high availability and scalability by adding more orredundant instances of core components. Redundant instances of critical components providetransparent failover.
In a production environment, the Unwired Platform deployment typically uses at least onerelay server. The connections to relay servers can be configured within a cluster instance fromSybase Control Center.
Cluster-Affecting Configuration ChangesBefore you configure Unwired Servers in a cluster, ensure you understand how changes aresynchronized to cluster members.
When you make a cluster-affecting change on the primary Unwired Server, those changes aresynchronized to all secondary servers in the cluster. This ensures that servers are configuredthe same way and behave consistently within the cluster.
Cluster-affecting changes include:
• cluster configuration• monitoring setup• security configuration
Cluster PropertiesCluster properties let administrators manage server configuration settings for all nodes in thecluster to ensure smooth data exchange between the server and client.
Note: .
Cluster property changes that do not require a server restart will be automaticallysynchronized to all nodes in the cluster. A message is displayed for any changes that require aserver restart. Servers that require a restart are also flagged in the Server List.
Administer
Sybase Control Center for Sybase Unwired Platform 41

See also• Server List on page 82• Unwired Server on page 81• Server Log on page 95
Configuring Management Port PropertiesManagement ports in Unwired Server process incoming administration connection requestsfrom Sybase Control Center. Management ports use IIOPS by default, though IIOP can beconfigured as well.
Note: If you are using Sybase Control Center in a development/test environment, you mustalso configure the Sybase Unwired WorkSpace on all development computers accessing thedevelopment Unwired Server to also save the required certificates to the java keystore.SybaseMutual authentication for the IIOPS management port is not supported.
1. In the left navigation pane, select Configuration.
2. In the right administration pane, click the General tab.
3. From the menu bar, select Components.
4. Select Management, then click Properties.
5. To configure the IIOP management port, enter the port number (default is 2000).
6. To configure the IIOPS secure management port:
• Enter the port number (default is 2001).• Select the security profile used for the secure port.
See also• Replication on page 42• Messaging on page 46• Configuring a Client Dispatcher on page 47• Upgrade: Configuring Data Change Notification Components on page 47• Configuring Cluster Performance Properties on page 48• Configuring SSL Properties on page 49• Configuring Web Container Properties on page 54• Configuring the Configuration Cache on page 56• Configuring SAP Solution Manager URL on page 57• Configuring Server Log Settings on page 57• Adding or Updating Unwired Server Registration Properties on page 20• Sybase Control Center Communication with Unwired Server Fails on page 374
ReplicationReplication synchronization involves synchronization between Unwired Server and areplication-based mobile device application. Synchronization keeps multiple variations of the
Administer
42 Sybase Unwired Platform

data set used by a device application in coherence with one another by reconciling differencesin each. Reconciling differences before writing updates back to the enterprise informationserver (EIS) maintains data integrity.
For replication synchronization, configure the corresponding port to receive incomingsynchronization requests from devices, as well as set up configuration to enable pushnotification messages to the device when data changes in CDB. In a typical environment,client applications running on devices will connect to the synchronization port via RelayServer and Relay Server Outbound Enabler (RSOE). In those cases, the HTTP port will beused.
See also• Configuring Management Port Properties on page 42
• Messaging on page 46
• Configuring a Client Dispatcher on page 47
• Upgrade: Configuring Data Change Notification Components on page 47
• Configuring Cluster Performance Properties on page 48
• Configuring SSL Properties on page 49
• Configuring Web Container Properties on page 54
• Configuring the Configuration Cache on page 56
• Configuring SAP Solution Manager URL on page 57
• Configuring Server Log Settings on page 57
Configuring a Replication Listener(Not applicable to Online Data Proxy)Configure the port to receive synchronization requestsfrom client devices.
PrerequisitesA secure synchronization stream uses SSL or TLS encryption. Both TLS and SSL requireproduction-ready certificates to replace the default ones installed with Unwired Server.Ensure that you possess digital certificates verified and signed by third-party trustedauthorities. See Encrypting Synchronization for Replication Payloads in Security.
Task
1. In the left navigation pane, select Configuration .
2. In the right administration pane, click the General tab.
3. From the menu bar, select Components.
4. Select Replication and click Properties.
5. Select the protocol and port you require:
Administer
Sybase Control Center for Sybase Unwired Platform 43

• If you do not require SSL encryption, choose Port. Sybase Unwired Platformrecommends this option if you do not require a secure communication stream forsynchronization. By default, the port for HTTP is 2480.
• To encrypt the HTTP stream with SSL, choose Secure port. By default, the port forHTTPS is 2481. The "Secure Sync Port" properties can be used to review and set theserver identity and public certificate for the secure synchronization port. See below.
6. (Optional) Configure additional properties for E2EE with TLS, HTTPS with SSL, andsynchronization server startup options:
Note: Leave E2E Encryption values blank to disable end-to-end encryption.
• E2E Encryption Certificate – specify the file containing the private key that acts as theidentity file for Unwired Server.
• E2E Encryption Certificate Password – set the password to unlock the encryptioncertificate.
• E2E Encryption Public Key – specify the file containing the public key for UnwiredServer.
• E2E Encryption Type – specify the asymmetric cipher used for key exchange for end-to-end encryption. You can only use RSA encryption.
• Secure Sync Port Certificate – identifies the location of the security certificate used toencrypt and decrypt data transferred using SSL.
• Secure Sync Port Certificate Password – is used to decrypt the private certificate listedin certificate file. You specify this password when you create the server certificate forSSL.
• Secure Sync Port Public Certificate – specify the file containing the SSL public keythat acts as the identity file for synchronization port.
• Trusted Relay Server Certificate – if Relay Server trusted certificate is configured forHTTPS connections encrypted with SSL, identifies the public security certificatelocation.
• User Options – sets the command line options for starting the synchronization server.These options are appended the next time the synchronization server starts. These arethe available user options:
Option Description
@ [variable | fil-ePath]
Applies listener options from the specified environment var-iable or text file.
-a <value> Specifies a single library option for a listening library.
-d <filePath> Specifies a listening library.
-e <deviceName> Specifies the device name.
-f <string> Specifies extra information about the device.
Administer
44 Sybase Unwired Platform
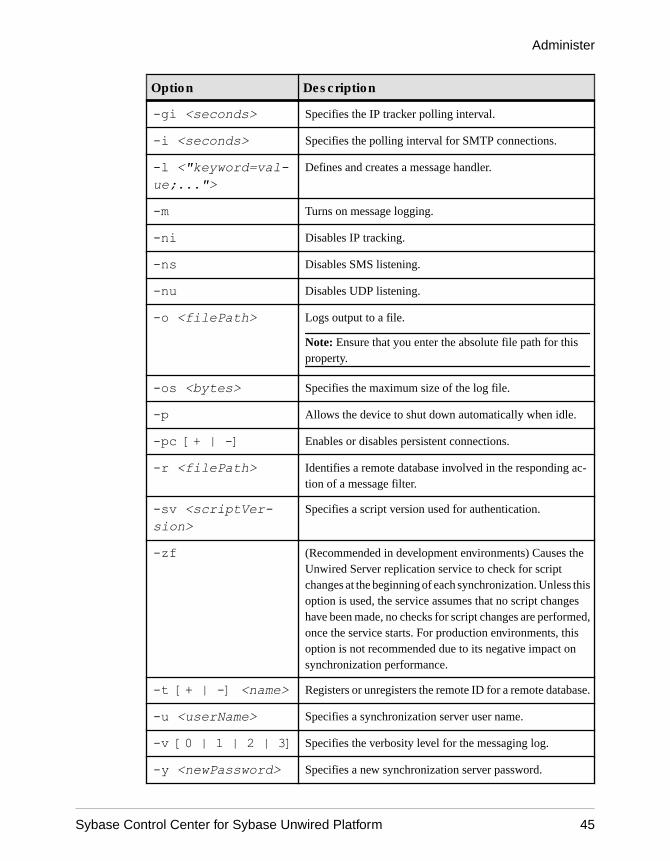
Option Description
-gi <seconds> Specifies the IP tracker polling interval.
-i <seconds> Specifies the polling interval for SMTP connections.
-l <"keyword=val-ue;...">
Defines and creates a message handler.
-m Turns on message logging.
-ni Disables IP tracking.
-ns Disables SMS listening.
-nu Disables UDP listening.
-o <filePath> Logs output to a file.
Note: Ensure that you enter the absolute file path for thisproperty.
-os <bytes> Specifies the maximum size of the log file.
-p Allows the device to shut down automatically when idle.
-pc [+ | -] Enables or disables persistent connections.
-r <filePath> Identifies a remote database involved in the responding ac-tion of a message filter.
-sv <scriptVer-sion>
Specifies a script version used for authentication.
-zf (Recommended in development environments) Causes theUnwired Server replication service to check for scriptchanges at the beginning of each synchronization. Unless thisoption is used, the service assumes that no script changeshave been made, no checks for script changes are performed,once the service starts. For production environments, thisoption is not recommended due to its negative impact onsynchronization performance.
-t [+ | -] <name> Registers or unregisters the remote ID for a remote database.
-u <userName> Specifies a synchronization server user name.
-v [0 | 1 | 2 | 3] Specifies the verbosity level for the messaging log.
-y <newPassword> Specifies a new synchronization server password.
Administer
Sybase Control Center for Sybase Unwired Platform 45

Do not use the User Options property in Sybase Control Center to pass in these options:-c, -lsc, -q, -w, -x, -zs.
For more information on synchronization server command line options, see MobiLinkListener options for Windows devices (http://infocenter.sybase.com/help/topic/com.sybase.help.sqlanywhere.12.0.1/mlsisync/ms-listener-s-3217696.html) in theSQL Anywhere® 12.0.1 online help.
7. Click OK.
MessagingMessaging is a synchronization method used to maintain data integrity on device clientapplications. It uses a JMS service to upload and download data changes to and from theUnwired Server cache database. Messaging-based synchronization ports implement astrongly encrypted HTTP-based protocol using a proprietary method.
Configure messaging in the Messaging tab of the Server Configuration node for the particularserver you are administering.
See also• Configuring Management Port Properties on page 42
• Replication on page 42
• Configuring a Client Dispatcher on page 47
• Upgrade: Configuring Data Change Notification Components on page 47
• Configuring Cluster Performance Properties on page 48
• Configuring SSL Properties on page 49
• Configuring Web Container Properties on page 54
• Configuring the Configuration Cache on page 56
• Configuring SAP Solution Manager URL on page 57
• Configuring Server Log Settings on page 57
Configuring Messaging PropertiesConfigure a port to receive service requests from devices.
1. In the left navigation pane, select Configuration.
2. In the right administration pane, click the General tab.
3. From the menu bar, select Components.
4. Select Messaging, then click Properties.
5. Enter the synchronization port number. The default is 5001.
6. (Optional) Configure the BES response portioning value.
There are limits on the amount of data that can be downloaded through an HTTPconnection using the BlackBerry MDS. The BES response portioning limit determines theamount of HTTP traffic the BES MDS server accepts from Unwired Server. For
Administer
46 Sybase Unwired Platform

BlackBerry MDS, this limit is set in BlackBerry Manager using the Maximum KB/Connection setting.
7. Click OK.
Configuring a Client DispatcherConfigure the dispatcher for Sybase Unwired Platform client traffic.
1. In the left navigation pane, select Configuration.
2. In the right administration pane, click the General tab.
3. From the menu bar, select Components.
4. Select Client Dispatcher and click Properties.
5. Configure the thread count for the replication and messaging client dispatchers.
Note: The replication client dispatcher is not currently used.
6. Configure the maximum number of messaging client dispatcher connections allowed perhost configuration.
7. Click OK.
See also• Configuring Management Port Properties on page 42
• Replication on page 42
• Messaging on page 46
• Upgrade: Configuring Data Change Notification Components on page 47
• Configuring Cluster Performance Properties on page 48
• Configuring SSL Properties on page 49
• Configuring Web Container Properties on page 54
• Configuring the Configuration Cache on page 56
• Configuring SAP Solution Manager URL on page 57
• Configuring Server Log Settings on page 57
Upgrade: Configuring Data Change Notification ComponentsConfigure the behavior of Data Change Notification (DCN) components in the cluster. Youcan configure DCN to accept HTTP GET and POST requests to support applicationsdeveloped with versions previous to Unwired Platform 2.2. By default, the current version ofUnwired Server only accepts HTTP POST requests for DCN.
1. In the left navigation pane, select Configuration.
2. In the right administration pane, click the General tab.
3. From the menu bar, select Components.
Administer
Sybase Control Center for Sybase Unwired Platform 47

4. If you want Unwired Server to be backward compatible with DCN code written previous toversion 2.2., select Data Change Notification and click Properties.
5. Select the Enable HTTP GET method text box.
By setting this property, developers do not need to update the code of existing applications.
See also• Configuring Management Port Properties on page 42
• Replication on page 42
• Messaging on page 46
• Configuring a Client Dispatcher on page 47
• Configuring Cluster Performance Properties on page 48
• Configuring SSL Properties on page 49
• Configuring Web Container Properties on page 54
• Configuring the Configuration Cache on page 56
• Configuring SAP Solution Manager URL on page 57
• Configuring Server Log Settings on page 57
Configuring Cluster Performance PropertiesTo optimize Unwired Server performance across the cluster, configure the thread count andpool size, web service connection counts and timeout, inbound and outbound messagingqueue counts, and proxy connection pool and synchronization cache size.
1. In the left navigation pane, select Configuration.
2. In the right administration pane, click the General tab.
3. From the menu bar, select Performance.
4. Configure these properties, as required:
• Inbound messaging queue count – number of message queues used for incomingmessages from the messaging-based synchronization application to the server. Sybaserecommends you choose a value that represents at least 10% of active devices.
• Maximum count of total webservice connections – maximum number of web serviceconnections allowed overall.
• Maximum count of webservice connections per host – maximum number of webservice connections allowed per host configuration.
• Maximum number of in memory messages – maximum allowable number of inmemory messages.
• Maximum proxy connection pool size – maximum size for the replication protocolserver memory cache.
• Outbound messaging queue count – number of message queues used for outboundmessages from the server to the messaging-based synchronization application. Sybase
Administer
48 Sybase Unwired Platform

recommends a value that represents at least 50% of active devices. However, if you arerunning 32-bit operating system, do not exceed a value of 100% of active devices.
• Subscribe bulk load thread pool size – maximum number of threads allocated to initialbulk load subscription operations. The default value is 5 Setting the thread pool size toohigh can impact performance.
• Synchronization cache size – maximum size for the replication protocol servermemory cache.
• Thread count – MobiLink thread count. This value should be lower than the threadcount for the SQL Anywhere database.
• Webservice connection timeout – length of time, in seconds, until a web serviceconnection is established. A value of 0 (zero) means no timeout.
5. Click Save.
See also• Configuring Management Port Properties on page 42• Replication on page 42• Messaging on page 46• Configuring a Client Dispatcher on page 47• Upgrade: Configuring Data Change Notification Components on page 47• Configuring SSL Properties on page 49• Configuring Web Container Properties on page 54• Configuring the Configuration Cache on page 56• Configuring SAP Solution Manager URL on page 57• Configuring Server Log Settings on page 57
Configuring SSL PropertiesConfigure SSL certificates and security profiles to facilitate Secure Sockets Layer (SSL)encryption for communication ports in Unwired Server.
PrerequisitesEnsure you have set up the server environment before you configure a security profile as partof the server configuration. For more information, see Encrypting Synchronization with SSLfor Replication in the Security guide.
Task
1. Defining Certificates for SSL EncryptionSpecify keystore and truststore certificates to be used for SSL encryption of UnwiredServer communication ports. All security profiles use the same keystore and truststore.
2. Creating an SSL Security Profile in Sybase Control CenterSecurity profiles define the security characteristics of a client/server session. Assign asecurity profile to a listener, which is configured as a port that accepts client connection
Administer
Sybase Control Center for Sybase Unwired Platform 49
requests of various protocols. Unwired Server uses multiple listeners. Clients that supportthe same characteristics can communicate to Unwired Server via the same port defined inthe listener.
3. Enabling OCSP
(Optional) Enable OCSP (Online Certificate Status Protocol) to determine the status of acertificate used to authenticate a subject: current, expired, or unknown. OCSPconfiguration is enabled as part of cluster level SSL configuration. OCSP checking mustbe enabled if you are using the CertificateAuthenticationLoginModule and have setEnable revocation checking to true.
See also• Configuring Management Port Properties on page 42
• Replication on page 42
• Messaging on page 46
• Configuring a Client Dispatcher on page 47
• Upgrade: Configuring Data Change Notification Components on page 47
• Configuring Cluster Performance Properties on page 48
• Configuring Web Container Properties on page 54
• Configuring the Configuration Cache on page 56
• Configuring SAP Solution Manager URL on page 57
• Configuring Server Log Settings on page 57
Defining Certificates for SSL EncryptionSpecify keystore and truststore certificates to be used for SSL encryption of Unwired Servercommunication ports. All security profiles use the same keystore and truststore.
1. In the left navigation pane, select Configuration
2. In the right administration pane, select the General tab.
3. From the menu bar, select SSL Configuration.
4. To configure SSL encryption for all security profiles, complete these fields:
• Keystore Location – the relative path name indicating the location where the keys andcertificates are stored. Certificates used for administration and data change notificationports are stored in the keystore. The path should be relative to <UnwiredPlatform_InstallDir>\UnwiredPlatform\Servers\UnwiredServer.
• Keystore Password – the password that secures the key store.• Truststore Location – therelative path name for the public key certificate storage file.
The Certificate Authority (CA) certificates used to sign certificates store their publickeys in the truststore. The path should be relative to <Unwired
Administer
50 Sybase Unwired Platform

Platform_InstallDir>\UnwiredPlatform\Servers\UnwiredServer.
• Truststore Password – the password that secures the truststore.
Note: If at any point you have changed the password for the keystore and truststore withkeytool, then you must remember to update the password here as well. The password mustbe used with all aliases as well. To update the alias, use a command similar to this one:
keytool -keypasswd -alias sample1 -keypass changeit -newchangeit2 -keystore keystore.jkskeytool -keypasswd -alias sample2 -keypass changeit -newchangeit2 -keystore keystore.jks
5. Click Save.
NextCreate an SSL security profile that uses the selected certificates.
Creating an SSL Security Profile in Sybase Control CenterSecurity profiles define the security characteristics of a client/server session. Assign a securityprofile to a listener, which is configured as a port that accepts client connection requests ofvarious protocols. Unwired Server uses multiple listeners. Clients that support the samecharacteristics can communicate to Unwired Server via the same port defined in the listener.
Note: A security profile can be used by one or more servers in a cluster, but cannot used bymultiple clusters.
1. In the left navigation pane, select Configuration
2. In the right administration pane, select the General tab.
3. From the menu bar, select SSL Configuration.
4. In the Configure security profile table:
a) Enter a name for the security profile.b) Enter a certificate alias. This is the alias of a key entry in the keystore. Make sure the
key password of this key entry is the same as the keystore password.c) Select an authentication level:
If the security profile authenticates only the server, then only the server must provide acertificate to be accepted or rejected by the client. If the security profile authenticatesboth the client and the server, then the client is also required to authenticate using acertificate; both the client and server will provide a digital certificate to be accepted orrejected by the other.
Administer
Sybase Control Center for Sybase Unwired Platform 51

Profile Authenticates Cipher suite(s)
intl server • SA_EX-PORT_WITH_RC4_40_MD5
• RSA_EX-PORT_WITH_DES40_CBC_SHA
intl_mutual client/server • RSA_EX-PORT_WITH_RC4_40_MD5
• RSA_EX-PORT_WITH_DES40_CBC_SHA
simple server RSA_WITH_NULL_MD5RSA_WITH_NULL_SHA
simple_mutual client/server RSA_WITH_NULL_MD5RSA_WITH_NULL_SHA
strong server • RSA_WITH_3DES_EDE_CBC_SHA
• RSA_WITH_RC4_128_MD5• RSA_WITH_RC4_128_SHA
strong_mutual client/server
For example, this isthe required optionfor mutual authenti-cation of UnwiredPlatform and Gate-way.
• RSA_WITH_3DES_EDE_CBC_SHA
• RSA_WITH_RC4_128_MD5• RSA_WITH_RC4_128_SHA
domestic server • RSA_WITH_3DES_EDE_CBC_SHA
• RSA_WITH_RC4_128_MD5• RSA_WITH_RC4_128_SHA• RSA_WITH_DES_CBC_SHA• RSA_EX-
PORT_WITH_RC4_40_MD5• RSA_EX-
PORT_WITH_DES40_CBC_SHA
• TLS_RSA_WITH_NULL_MD5
• TLS_RSA_WITH_NULL_SHA
Administer
52 Sybase Unwired Platform

Profile Authenticates Cipher suite(s)
domestic_mutual client/server • RSA_WITH_3DES_EDE_CBC_SHA
• RSA_WITH_RC4_128_MD5• RSA_WITH_RC4_128_SHA• RSA_WITH_DES_CBC_SHA• RSA_EX-
PORT_WITH_RC4_40_MD5• RSA_EX-
PORT_WITH_DES40_CBC_SHA
• RSA_WITH_NULL_MD5• RSA_WITH_NULL_SHA
5. Click Save.
6. From the Components menu, assign the security profile to the desired management orcommunication ports.
Enabling OCSP(Optional) Enable OCSP (Online Certificate Status Protocol) to determine the status of acertificate used to authenticate a subject: current, expired, or unknown. OCSP configuration isenabled as part of cluster level SSL configuration. OCSP checking must be enabled if you areusing the CertificateAuthenticationLoginModule and have set Enable revocation checking totrue.
Enable OCSP for a cluster when configuring SSL.
1. In the left navigation pane, select Configuration.
2. In the right administration pane, select the General tab.
3. From the menu bar, select SSL Configuration.
4. To enable OCSP when doing certificate revocation checking, check Enable OCSP.
5. Configure the responder properties (location and certificate information):
Responder Property Details
URL A URL to responder, including its port.
For example, https://ocsp.exam-ple.net:80.
Administer
Sybase Control Center for Sybase Unwired Platform 53

Responder Property Details
Certificate subject name The subject name of the responder's certificate.By default, the certificate of the OCSP res-ponder is that of the issuer of the certificatebeing validated.
Its value is a string distinguished name (definedin RFC 2253), which identifies a certificate inthe set of certificates supplied during cert pathvalidation.
If the subject name alone is not sufficient touniquely identify the certificate, the subjectvalue and serial number properties must be usedinstead.
When the certificate subject name is set, thecertificate issuer name and certificate serialnumber are ignored.
For example, CN=MyEnterprise,O=XYZCorp.
Certificate issuer name The issuer name of the responder certificate.
For example, CN=OCSP Responder,O=XYZCorp.
Certificate serial number The serial number of the responder certificate.
Configuring Web Container PropertiesConfigure and tune HTTP ports and some general properties.
1. In the left navigation pane, select Configuration.
2. In the right administration pane, click the Web Container tab.
3. Configure the following web server properties, as required:
• Max form content size – amount of data that can post back from a browser or otherclient to the server. The default is 10000000 (10MB), with a maximum of 100000000(100MB).
• Perform server side compression – enables HTTP compression in a productionenvironment when client demand becomes high and affects server performance forODP applications.
Note: If you enable server compression, notify developers that client behavior mustaccommodate compression: namely, the client needs to use the Encoding parameter forHTTP headers and set the value to GZIP Information is available on the Internet if
Administer
54 Sybase Unwired Platform

more information is required. See ODPRequest class in Developer Guide: ODataSDK.
4. To create a new HTTP/HTTPS port, click New.
5. Configure the port properties, as required:
• Port – port number where the server listens for requests.• Enabled – whether the port is enabled.• Protocol – communication protocol. When Protocol is set to https, the Security
Profile drop down is displayed to allow selection of a security profile.• Maximum threads – maximum number of active threads that the server allows for this
listener. This value must be less than or equal to the allowed number of connections.• Maximum idle time – the length of time, in seconds, that a socket is idle before it
disconnects.• So linger time(s) – the length of time, in seconds, that a socket lingers before it
disconnects to enable a graceful shutdown.• Acceptors number – number of acceptor threads to be run.• Acceptor priority – priority of the acceptor threads relative to the other threads. The
priority is adjusted by the value you enter here (the default 0) to either favor theacceptance of new threads and newly active connections, or to favor the handling ofalready dispatched connections.
• Response buffer size (k) – size of the content buffer for sending responses. Thesebuffers are used only for active connections that are sending responses with bodies thatdo not fit within the header buffer.
• Request buffer size (k) – size of the content buffer for receiving requests. These buffersare used only for active connections that have requests with bodies that do not fit withinthe header buffer.
• Header buffer size (k) – size of the buffer to be used for request and response headers.An idle connection has a maximum of one buffer of this size allocated.
• Listen backlog – maximum backlog for incoming connections.• Statistics on – enables statistics collection on connections.• Low resources connections – number of connections, which if exceeded, places this
connector in a low resources state. This is not an exact measure, as the connectioncount is averaged over the select sets. When in a low resources state, different idletimeouts can apply on connections as specified in the low resources maximum idletime property.
• Low resources maximum idle time(s) – period, in milliseconds, that a connection isallowed to be idle when there are more connections than the number set for the lowresources connections property. This allows the server to rapidly close idleconnections to gracefully handle high load situations.
• Include server info in session – includes the server's IP address and port in the HTTPsession ID. This is required when using the Web redirectors for load balancing toensure sticky sessions.
Administer
Sybase Control Center for Sybase Unwired Platform 55

6. Click OK.
7. Click Save.
See also• Configuring Management Port Properties on page 42• Replication on page 42• Messaging on page 46• Configuring a Client Dispatcher on page 47• Upgrade: Configuring Data Change Notification Components on page 47• Configuring Cluster Performance Properties on page 48• Configuring SSL Properties on page 49• Configuring the Configuration Cache on page 56• Configuring SAP Solution Manager URL on page 57• Configuring Server Log Settings on page 57
Configuring the Configuration CacheUse the configuration cache to configure the distributed memory used by all cluster nodes.
1. In the left navigation pane, select Configuration.
2. In the right administration pane, click the Configuration Cache tab.
3. Configure these properties, as required:
• Auto increase port number – set to true to increment the cache port number.
• Core pool size – core number of threads for the executor service.• Encrypt configuration cache network – set to true to encrypt data at the transport layer.• Keep alive time(s) – length of time, in seconds, that threads can remain idle before
being terminated.• Maximum pool size – maximum allowed number of threads for the executor service.• Port – port number for the configuration cache.
4. Click Save.
See also• Configuring Management Port Properties on page 42• Replication on page 42• Messaging on page 46• Configuring a Client Dispatcher on page 47• Upgrade: Configuring Data Change Notification Components on page 47• Configuring Cluster Performance Properties on page 48• Configuring SSL Properties on page 49• Configuring Web Container Properties on page 54
Administer
56 Sybase Unwired Platform

• Configuring SAP Solution Manager URL on page 57• Configuring Server Log Settings on page 57
Configuring SAP Solution Manager URLThe Admistrator can define and maintain a URL definition associated with an SAP SolutionManager instance for each application in the landscape. This endpoint is used to upload thebusiness transaction XML generated by the client device platforms in an end-to-end tracesession.
1. In the left navigation pane, select Configuration.
2. In the right administration pane, click the General tab.
3. From the menu bar, select Components.
4. Select Solution Manager and click Properties.
5. In the Solution Manager Component Property dialog, enter the URL associated with theappropriate SAP Solution manager.
See also• Configuring Management Port Properties on page 42• Replication on page 42• Messaging on page 46• Configuring a Client Dispatcher on page 47• Upgrade: Configuring Data Change Notification Components on page 47• Configuring Cluster Performance Properties on page 48• Configuring SSL Properties on page 49• Configuring Web Container Properties on page 54• Configuring the Configuration Cache on page 56• Configuring Server Log Settings on page 57
Configuring Server Log SettingsServer logs collect data that enables you to monitor system health. Configure the server logsettings to specify the amount of detail that is written to the log.
See also• Configuring Management Port Properties on page 42• Replication on page 42• Messaging on page 46• Configuring a Client Dispatcher on page 47• Upgrade: Configuring Data Change Notification Components on page 47• Configuring Cluster Performance Properties on page 48• Configuring SSL Properties on page 49
Administer
Sybase Control Center for Sybase Unwired Platform 57

• Configuring Web Container Properties on page 54
• Configuring the Configuration Cache on page 56
• Configuring SAP Solution Manager URL on page 57
Configuring Unwired Server Log SettingsUnwired Server logs collect data on Unwired Server health and performance by component.Configure Unwired Server log properties to specify the amount of detail that is written to thelog, as well as the duration of the server log life cycle.
Additionally, you should always use Sybase Control Center to configure server logs. If youmanually edit the configuration file, especially on secondary servers in a cluster, the serversmay not restart correctly once shut down.
1. In the Sybase Control Center left navigation pane, click Configuration.
2. In the right administration pane, click the Log Setting tab and select Unwired Server..
3. The option "Start a new server log on server restart" is set by default. When selected, thisoption means a new version of the log file is created after server restart, and the old one isarchived.
4. Set the MMS server log size and backup behavior that jointly determine the server log lifecycle.
a) Set the Maximum file size, in kilobytes, megabytes, or gigabytes, to specify themaximum size that a file can reach before a new one is created. The default is 10MB.
Alternatively, select No limit to log all events in the same file, with no maximum size.b) Set the Maximum backup index to determine how many log files are backed up
before the oldest file is deleted. The index number you choose must be a positiveinteger between 1 and 65535. The default is 10 files.
Alternatively, select No limit to retain all log files.
5. Set the HTTP log settings.
a) Select Enable HTTP request log to generate an HTTP request log in the logssubdirectory. The generated log file name is server-name-http.log.
Note: HTTP logging is off by default. Enabling HTTP logging can cause aperformance impact and possible logging of sensitive data.
b) Set the Maximum file size of the log file.c) If you want to back up the log file when it reaches the limit, select Perform rotation.
The backup file is saved as server-name-http.log.backup-number.
d) If you want to continue to use the current log file when the server restarts, selectReuse.If you do not select this option, when the server restarts the current log file iscopied to the .\old subdirectory and a new log file is created.
e) If you want to archive the log file select Archive, then specify the Archive file name. Ifyou want to compress the archive log file select Compress.
6. For each component, choose a log level:
Administer
58 Sybase Unwired Platform

Component Default Log Level
MMS Info
PROXY Info
Cluster Info
MSG Info
Security Info
PUSH Info
Mobilink Info
DataServices Info
Other Warn
DOEC Info
Log level Messages logged
All Complete system information
Trace Finer-grained informational events than debug
Debug Very fine-grained system information, warnings, and all errors
Info General system information, warnings, and all errors
Warn Warnings and all errors
Error Errors only
Console Messages that appear in the administration console only (when UnwiredServer is running in non-service mode)
Off Do not record any messages
7. Click Save.Log messages are recorded as specified by the settings you choose. The log file is locatedin: <UnwiredPlatform_InstallDir>\UnwiredPlatform\Servers\UnwiredServer\logs\<hostname>-server.log.
Log life cycle default example
If you keep the default maximum file size and default index, an Unwired Server writes to thelog file until 10MB of data has been recorded. As soon as the file exceeds this value, a newversion of the log file is created (for example, the first one is <hostname>-server.log.1). The contents of the original log are backed up into this new file. When the <hostname>-server.log file again reaches its limit:
Administer
Sybase Control Center for Sybase Unwired Platform 59

1. The contents of <hostname>-server.log.1 are copied to <hostname>-server.log.2.
2. The contents of <hostname>-server.log are copied to <hostname>-server.log.1.
3. A new copy of <hostname>-server.log is created.
This rollover pattern continues until the backup index value is reached, with the oldest logbeing deleted. If the backup index is 10, then <hostname>-server.log.10 is the fileremoved, and all other logs roll up to create room for the new file.
Configuring Messaging Server Log SettingsMessaging Server logs create trace configurations for messaging modules, and retrieve tracedata for all or specific messages. Configure trace configuration properties for modules tospecify the amount of detail that is written to the log. You can configure trace settings for theprimary server cluster in Sybase Control Center for each module. The settings are available tocluster servers through the shared data folder.
Note: The default settings may only need to change in case of technical support situationswhere, for diagnostic reasons, a request is made to configure the specific module(s) settings,and provide the request log. In all other cases, the administrator or developer should not needto change the settings.
Additionally, you should always use Sybase Control Center to configure server logs. If youmanually edit the configuration file, especially on secondary servers in a cluster, the serversmay not restart correctly once shut down.
1. In the Sybase Control Center left navigation pane, click Configuration.
2. In the right administration pane, click the Log Setting tab and select MessagingServer.
3. Select Default, or one or more of the messaging service modules. Click Show All to showall modules.
Module Description
Default Represents the default configuration. The de-fault values are used if optional fields are leftblank in a module trace configuration. Re-quired.
Device Management Miscellaneous functions related to device reg-istration, event notification, and device admin-istration. Enable tracing for problems in theseareas.
Administer
60 Sybase Unwired Platform

Module Description
JMSBridge This module handles communications from theUnwired Server to the messaging server. Ena-ble tracing to view the detailed messaging ex-change.
MO This module handles the delivery of messagesbetween the client and server, including syn-chronous function calls from client to server.Enable tracing for MO errors and message de-livery issues.
SUPBridge This module handles communications from themessaging server to the Unwired Server. Ena-ble tracing to view the detailed messaging ex-change.
TM This module handles the wire protocol, includ-ing encryption, compression, and authentica-tion, between the messaging server and clients.All communication between the client and themessaging server passes through TM. Enabletracing for authentication issues, TM errors,and general connectivity issues.
WorkflowClient The WorkflowClient module.
4. Click Properties.
a) Enter trace configuration properties. If you selected multiple modules, a string ofasterisks is used to indicate settings differ for the selected modules. You can select theoption to view or change the property value for any module.
Property Description
Module Display only. Default, module name, or list ofmodule names selected.
Description (Optional) Custom description of the servermodule.
Level Trace level for the module - DISABLED,ERROR, WARN, INFO, DEBUG, DE-FAULT. If the default trace level is specifiedfor the module, the module uses the tracelevel defined for Default. Required.
Max trace file size (Optional) Maximum trace file size in MB. Ifthe trace file size grows larger than the speci-fied value, the trace file data is backed upautomatically.
Administer
Sybase Control Center for Sybase Unwired Platform 61

Property Description
User name (Optional) Only data for the specified username is traced.
Application Connection ID (Optional) Only data for the specified Appli-cation ID is traced.
b) Click OK.Log files for each module are stored in folders of the same name located in:<UnwiredPlatform_InstallDir>\UnwiredPlatform\Servers\UnwiredServer\logs.
Configuring Asynchronous Operation Replay Queue CountConfigure properties of a cluster to control whether asynchronous operation replays areenabled for all cluster packages.
1. In Sybase Control Center navigation pane, click the name of the cluster.
2. In the administration view, click General.
3. Configure the queue limit for asynchronous operation replays in Asynchronousoperation replay queue count. The minimum acceptable queue count is 1 and the defaultis 5.
See also• Viewing Asynchronous Operation Replays on page 296
Viewing Cluster InformationView cluster information to determine the name and size of the cluster.
1. In Sybase Control Center navigation pane, click the name of the cluster.
2. Review information for general properties:
• The name of the cluster. By default the cluster name is mysupcluster.
• The number of servers that are members of the cluster.• The name of servers that have outbound enablers configured.• The cluster sync data shared path, if enabled.• The asynchronous operation replay queue count. See Configuring Asynchronous
Operation Replay Queue Count.
See also• Viewing Asynchronous Operation Replays on page 296
Administer
62 Sybase Unwired Platform

Checking System Licensing InformationReview licensing information to monitor available and used device licenses, license expirydates, and other license details. This information allows administrators to manage license useand determine whether old or unused device licenses should be transferred to new devices.
1. In the left navigation pane, select the top-level tree node.
2. In the right administration pane, select the General tab, and click Licensing.
3. Review the following licensing information:
• Server license type – the type of license currently used by Unwired Platform. For moreinformation on license types, see Sybase Unwired Platform Licenses in SystemAdministration.
• Production edition – the edition of the software you have installed.• Server license expiry date – the date and time at which the server license expires. When
a server license expires, Unwired Server generates a license expired error and UnwiredServer is stopped.
• Overdraft mode – allows you to generate additional licenses in excess of the quantity oflicenses you actually purchased. This enables you to exceed your purchased quantityof licenses in a peak usage period without impacting your operation. This mode iseither enabled or disabled, as specified by the terms of the agreement presented whenyou obtain such a license.
• Total device license count – the total number of device licenses available with yourlicense. This count limits how many devices can connect to your servers. See SybaseUnwired Platform Licenses topics in System Administration for licensinginformation.
• Used device license count – the total number of unique devices associated with theusers currently registered with the server. If all of your available device licenses are inuse, you can either upgrade your license or manually delete unused devices to makeroom for new users:• For workflow and Online Data Proxy client devices, delete the Application
Connections that are no longer in use.• For native replication-based applications, delete Package Users on the respective
Package.• For native messaging-based applications, delete the Application Connections
associated with the clients not in use.See System Administration for licensing information.
• Device license expiry date – the date and time at which the device license expires.When a device license expires, Unwired Server generates a license expired error andconnection requests from registered devices are unsuccessful.
• Used mobile user license count – the number of mobile user licenses currently in use. Amobile user is a distinct user identity—username and associated security configuration
Administer
Sybase Control Center for Sybase Unwired Platform 63

—that is registered in the server. As such, the used mobile user license count representsthe total distinct user identities registered on the server. One mobile user may access:• Multiple applications and different versions of the same application.• The same or different versions of an application from multiple devices.
• Used application user license count – the number of all registered application users ofall applications. This value represents the cumulative total of the distinct user identitiesregistered for each application. The same user identity using:• Multiple versions of the same application counts as one application user.• Two different applications count as two application users.
4. Click Close.
Note: Unwired Platform licensing is configured during installation. However, if necessary,license details can be changed at a later time. See Manually Updating and Upgrading LicenseFiles in System Administration.
Checking Cluster StatusVerify that a cluster is running.
In the left navigation pane, check the status (in brackets) beside the cluster name.
Sharing Cluster Information With SAP ServersIf your Unwired Platform deployment is part of a larger SAP® landscape, review the SLDservers with which cluster information can be shared.
To share cluster information requires one of these SAP servers. Depending on the server type,you must either register the server, or export information to it.
SLD Server RegistrationSystem Landscape Directory (SLD) is a central repository of system landscape informationused to manage the software lifecycle.
SLD describes the systems and software components that are currently installed. SLD datasuppliers register the systems on the SLD server, and keep the information up-to-date. SybaseUnwired Platform is a third-party system that must be registered with SLD.
To prepare the SLD server environment for Unwired Platform, ensure the following pre-requisites:
• The installed version of SLD is for SAP NetWeaver 7.0 (2004s) SPS07 or higher.• The SLD server is running.• The SLD is configured to receive data. For more information, see the Post-Installation
Guide and the User Manual for your SAP NetWeaver version on SDN: http://www.sdn.sap.com/irj/sdn/nw-sld.
Administer
64 Sybase Unwired Platform

• You contact the SLD administrator and determine the connection values to the SLD server,including its host name, protocol (HTTP or HTTPS), HTTP(S) port and the SLD useraccount.
• The SLD to which you register Sybase Unwired Platform must be the latest CommonInformation Model version (currently 1.6.30).
Registering or Reregistering SLD Server DestinationsRegistering an SLD destination identifies the connection properties needed to deliver thepayload. You can register multiple destinations as required by your SAP environment. If yourSLD server properties change, you must update properties as required and reregister the serverwith new values.
For information about SLD, see Configuring, Working with and Administering SystemLandscape Directory on http://www.sdn.sap.com/irj/sdn/nw-sld.
1. In the navigation pane of Sybase Control Center, select the cluster name.
2. In the administration pane, click the System Landscape Directory tab.
3. Click Servers.
4. Choose one of the following:
• If you are creating a new destination, click New.• If you are updating an existing destination, select the destination name in the table, and
click Properties.
5. Configure the connection properties:
User Name User name for the SLD server.
Password andRepeatPassword
The user account password used to authenticate the user nameentered. Password and Repeat Password must match for thepassword to be accepted.
Host The host name or the IP address of the SLD server.
Port The HTTP(S) port on which the SLD server is running. Enter avalid port number in the range of 0-65535.
Use secure Select if you are using HTTPS protocol.
6. To validate the configuration, click Ping.
7. To accept validated configuration properties, click OK.
This registers the SLD destination.
Administer
Sybase Control Center for Sybase Unwired Platform 65
Deleting a Registered SLD Server DestinationDelete an SLD server to unregister it from Unwired Platform. Deleting an SLD server removesit from Sybase Control Center and you can no longer use it as a payload destination.
1. In the navigation pane of Sybase Control Center, click the cluster name.
2. In the administration pane, click the System Landscape Directory tab.
3. Click Servers.
4. Select one or more servers then click Delete.
5. In the confirmation dialog, click Yes.
Uploading Payloads with Sybase Control CenterUse Sybase Control Center to register the SLD server, and then either upload generatedpayloads on-demand or with a configured (and enabled) schedule.
1. Manually Uploading or Exporting Payloads On-Demand
Run an SLD payload generation task manually to generate and upload a payload ondemand. Alternatively, export the payload to an XML file to archive SLD payload contentsor to troubleshoot the cluster.
2. Configuring and Enabling Scheduled Payload Generation and Uploads
Configure a schedule to automatically generate a new payload that uploads to an SLDserver once cluster information is aggregated from all cluster members. For informationon how cluster information is aggregated and held, see SLD and Unwired PlatformArchitecture in System Administration.
Manually Uploading or Exporting Payloads On-DemandRun an SLD payload generation task manually to generate and upload a payload on demand.Alternatively, export the payload to an XML file to archive SLD payload contents or totroubleshoot the cluster.
1. In the navigation pane of Sybase Control Center, select the name of the cluster for whichyou want to immediately upload an SLD payload.
2. In the administration pane, click the System Landscape Directory tab.
3. From the menu bar of the System Landscape Directory page, click Schedule.
4. Click Run Now.The payload generation process begins.
5. Upon completion, review the contents of the payload and choose an action:
• To export and save the contents to a file as XML, click Save to File and choose your fileoutput name and location.
• To upload the contents, select the target SLD servers and click Finish.
Administer
66 Sybase Unwired Platform

Configuring and Enabling Scheduled Payload Generation and UploadsConfigure a schedule to automatically generate a new payload that uploads to an SLD serveronce cluster information is aggregated from all cluster members. For information on howcluster information is aggregated and held, see SLD and Unwired Platform Architecture inSystem Administration.
1. In the navigation pane of Sybase Control Center, select the name of the cluster for whichyou want to schedule an SLD payload upload.
2. From the menu bar of the System Landscape Directory page, click Schedule.
3. To edit an existing schedule for a selected SLD server, click Edit.
a) Configure the schedule:
• Schedule repeat – select how often the schedule should run. Options are monthly,weekly, daily, hourly, and custom.• If you select monthly or weekly, specify:
• Start date – select the date and time the automated upload should begin.Use the calendar picker and 24-hour time selector.
• End date – select the date and time the automated upload should end.• If you select daily or hourly, specify:
• Start date – select the date and time the automated upload should begin.Use the calendar picker and 24-hour time selector.
• End date – select the date and time the automated upload should end.• Days of the week – select each day the automated upload schedule should
run.• Select custom, to specify the interval granularity in seconds, minutes, or hours,
as well as other date and time parameters.b) Click OK.
4. To enable the schedule, click Enable.
Disabling a ScheduleYou can disable a schedule that is currently enabled. Disabling a schedule prevents thepayload generation process from running so that no new data is aggregated in the clusterdatabase, nor can any current data be uploaded.
1. In the navigation pane of Sybase Control Center, click the cluster name.
2. From the menu bar of the System Landscape Directory page, click Schedule.
3. Click Disable.
Audit Measurement for SAP License AuditFor SAP built applications, administrators can generate an XML file that contains usage auditdata that is then sent manually to SAP License Audit. The generated XML file is compatiblewith the License Audit infrastructure. The audit data in the file includes counts of application
Administer
Sybase Control Center for Sybase Unwired Platform 67

users for the entire cluster as well as for each SAP built application that is deployed to theSybase Unwired Platform cluster.
Use Sybase Control Center for Unwired Platform to generate an audit measurement XML filefor export to SAP License Audit. See Sharing Application Data with SAP License Audit,Generating the SAP Audit Measurement File, and Uploading the SAP Audit MeasurementFile. Also see SAP License Audit in Developer Guide: Unwired Server Runtime >Management API.
Sharing Application Data with SAP License AuditGenerate an audit measurement file that includes usage data for Sybase Unwired Platform andusage data for SAP applications deployed to the server.
Generate an audit measurement file that includes license data related to application usage.
1. Generating the SAP Audit Measurement File
Use Sybase Control Center to generate an audit measurement file.
2. Uploading the SAP Audit Measurement File
Upload the audit measurement file to SAP License Audit by sending the file to SAP.
Generating the SAP Audit Measurement FileUse Sybase Control Center to generate an audit measurement file.
Using Sybase Control Center, generate a audit measurement file that can be sent to SAP foruploading to SAP License Audit.
1. In Sybase Control Center, select the Unwired Platform cluster and click the General tab.
2. Click SAP Auditing Export.
3. In the Export SAP Auditing Measurement window, enter the user name and click Next.
4. After Sybase Control Center generates the file, click Finish.
5. Select a save location for the file and click Save.
Note: For information on uploading the audit measurement file to SAP License Audit, seesupporting SAP documentation at https://websmp108.sap-ag.de/licenseauditing. Also seeUploading the SAP Audit Measurement File.
Uploading the SAP Audit Measurement FileUpload the audit measurement file to SAP License Audit by sending the file to SAP.
To upload the file to SAP License Audit, send the audit measurement file to SAP using theemail address included in the measurement request from SAP. Included in this SAP-providedemail is a link to the documentation for the SAP measurement process. See supporting SAPdocumentation at https://websmp108.sap-ag.de/licenseauditing .
Administer
68 Sybase Unwired Platform
Relay ServerRelay Server acts as a reverse proxy for client devices communicating with the UnwiredServer cluster, and it provides load balancing for the Unwired Server cluster.
Relay Servers are deployed on the DMZ subnet. With a corresponding Outbound Enabler(RSOE), Relay Server enables communication from the Unwired Server cluster to clientdevices, via the Internet, without opening an inbound port on the internal firewall.
Each Unwired Server instance is supported by one or more RSOEs. Each RSOE opensoutbound connections to the Relay Server, to handle both inbound and outboundcommunication channels, on behalf of the Unwired Server. Connections between the RSOEand Relay Server use HTTPS protocol.
Relay Server also provides load balancing for the Unwired Server cluster by forwardingrequests from client devices to Unwired Servers in the cluster, by round-robin distribution.However, in most production deployment environments, multiple Relay Servers are used witha third-party load balancer, which provides complete load balancing and failover capability. Inthis case, Relay Servers are deployed as a farm, and you need to perform additional steps at theend of the file generation task.
You must configure Unwired Server to use Relay Server, using these high-level steps::
1. Use Sybase Control Center to configure an Unwired Server cluster with Relay Serverfarms, nodes and their tokens, as needed, and with Relay Server connection information.
2. Generate the Relay Server configuration file from Sybase Control Center, and use it toupdate the Relay Server configuration (manually transfer the generated file to the RelayServer node and use rshost.exe utility to update the configuration). Refer to Adding RelayServers or Reverse Proxies in the Landscape Design and Integration guide, or visit http://infocenter.sybase.com/help/index.jsp?topic=/com.sybase.help.sqlanywhere.12.0.1/relayserver/relayserver12.html for Relay Server installation and configurationinformation.
3. Set up Outbound Enablers on each Unwired Server node.
Configuring Unwired Server to use Relay ServerChoose a method for configuring Unwired Server to use Relay Server, then generate a RelayServer configuration file. Copy the file to the Relay Server host, and distribute the sameconfiguration file to multiple Relay Server nodes.
This task applies only to a Relay Server installed on the LAN. It does not apply to the SybaseHosted Relay Service.
Note: If you are creating a custom Relay Server configuration, go to Creating a Custom RelayServer Configuration on page 71.
Administer
Sybase Control Center for Sybase Unwired Platform 69

If you are using a quick configuration, continue with Creating a Quick Configuration on page70.
1. Configuring Relay Server Properties
There are two methods of configuring Relay Server properties.
2. Generating the Relay Server Outbound Enabler Configuration File
To quickly and easily replicate a common outbound enabler (RSOE) configuration tomultiple hosts, generate an RSOE configuration file.
3. Generating and Modifying the Relay Server Configuration File
Generate all or part of a Relay Server configuration file. Then transfer the generated file toall Relay Server hosts.
4. Setting Up RSOE
Set up one or more RSOEs for each Unwired Server identified in a Relay Serverconfiguration. The configured values are saved in the cluster database.
Configuring Relay Server PropertiesThere are two methods of configuring Relay Server properties.
Choose from one of these methods. Once completed, transfer the resulting configuration fileto all hosts upon which Relay Server has been installed. For installation details, see Installing aRelay Server in Landscape Design and Integration.
See also• Generating the Relay Server Outbound Enabler Configuration File on page 74
Creating a Quick ConfigurationCreate a Relay Server configuration primarily with system defaults, and create OutboundEnabler (OE) processes for each Unwired Server.
1. In the navigation pane, click the Unwired Server cluster name.
2. In the administration pane, click the Relay Servers tab.
3. Click Quick Configure.
4. Specify these property values:
Values vary for load balanced environments. If you do not configure load balancer values,Outbound Enablers bypass the load balancer and high availability is compromised if adirect Relay Server connection fails.
• Host – for Relay Server farms that use a load balancer, the host name or IP address ofthe load balancer. Otherwise, the host name or IP address of a single Relay Server.
• Http port – for Relay Server farms that use a load balancer, the port of the loadbalancer. Otherwise, the Relay Server HTTP port.
Administer
70 Sybase Unwired Platform
• Https port – for Relay Server farms that use a load balancer, the port of the loadbalancer. Otherwise, the Relay Server HTTPS port.
• URL suffix – the URL suffix used by the Outbound Enabler to connect to a RelayServer. The value you set depends on whether Relay Server is installed on IIS orApache hosts. For IIS, use /ias_relay_server/server/rs_server.dll . For Apache use/srv/iarelayserver/.
• Replication or Messaging or Web Service (for scale-out nodes) farm token – thesecurity token used by the Outbound Enabler to authenticate its connection with theRelay Server. Assign a token string (up to 2048 characters); one token can be shared byall farm types. The replication and messaging farm token values can be the same.
• (Optional) Description – a user-definable description of the Relay Server.
5. (Optional) Select Advanced settings and specify these property values:
• Http user name – user name for OE authentication on the Web server (Relay Serverhost).
• Http password – password for OE authentication on the Web server.
6. (Optional) Configure connection values to required Internet proxy servers:
• Proxy server host – host name of the Internet proxy server.• Proxy server port – connection port on the Internet proxy server.• Http proxy user – user name for OE authentication on the Internet proxy server.• Http proxy password – password for OE authentication on the Internet proxy server.
7. Click OK to generate a Relay Server configuration file, and the OE processes for eachUnwired Server.
Properties in the [backend_farm] and [backend_server] sections are populatedautomatically, based on the Unwired Server cluster name and host name.
Multiples of Outbound Enabler instances (three for each protocol configured) areautomatically created for each Unwired Server host, but they are not started.
Next
Review the values in the Relay Server configuration file, and edit if necessary.
Continue with Generating and Modifying Relay Server Configuration File on page 75.
Creating a Custom Relay Server ConfigurationCreate a Relay Server configuration by specifying all configuration property values.
1. Launching the Relay Server Configuration Wizard
Launch the Relay Server Configuration wizard to create a configuration file withcustomized property values.
2. Setting Relay Server General Properties
Administer
Sybase Control Center for Sybase Unwired Platform 71

Set basic connection properties for the Relay Server.
3. Defining Server Farms and Cluster Nodes
Set connection properties for the Unwired Server cluster and its constituent nodes.
4. Reviewing Configured Relay Server Properties
Confirm the Relay Server property values before you generate the configuration file.
Launching the Relay Server Configuration WizardLaunch the Relay Server Configuration wizard to create a configuration file with customizedproperty values.
1. In the navigation pane, click the Unwired Server cluster name.
2. In the administration pane, click the Relay Servers tab.
3. Click New.
Setting Relay Server General PropertiesSet basic connection properties for the Relay Server.
PrerequisitesLaunch the Relay Server configuration wizard.
Task
1. Specify property values.
Values vary for load balanced environments. If you do not configure load balancer values,Outbound Enablers bypass the load balancer and high availability is compromised if adirect Relay Server connection fails.• Host – for Relay Server farms that use a load balancer, the host name or IP address of
the load balancer. Otherwise, the host name or IP address of a single Relay Server.• Http port – for Relay Server farms that use a load balancer, the port of the load
balancer. Otherwise, the Relay Server HTTP port.• Https port – for Relay Server farms that use a load balancer, the port of the load
balancer. Otherwise, the Relay Server HTTPS port.
For IIS, the value identifies the relative path for rs_client.dll. If your IISdirectory structure is different, modify this value accordingly.
Note: If Relay Server uses HTTPS and certificates, clients other than those usingreplication-based synchronization may not be able to connect: messaging applicationssupport only HTTP, and Hybrid Workflow Container applications for iOS supportHTTPS, but not certificates.
• URL suffix – the URL suffix used by the Outbound Enabler to connect to a RelayServer. The value you set depends on whether Relay Server is installed on IIS or
Administer
72 Sybase Unwired Platform

Apache hosts. For IIS, use /ias_relay_server/server/rs_server.dll . For Apache use/srv/iarelayserver/.
For IIS, the value identifies the relative path for rs_client.dll. If your IISdirectory structure is different, modify this value accordingly.
Note: For IIS, the value identifies the relative path for rs_client.dll. If your IISdirectory structure is different, modify this value accordingly.
Note: The value used in the client application connection for the URL suffix mustmatch what the administrator configures in the URL suffix. Otherwise, the connectionfails. Use the Diagnostic Tool command line utility to test these values. See DiagnosticTool Command Line Utility (diagtool.exe) Reference in System Administration.
• (Optional) Description – a user-definable description of the Relay Server.
2. Add or remove HTTP credentials as required:
a) Select Configure relay server HTTP credentials.b) To add new credentials, specify these property values and click +:
• User name – user name for RSOE authentication on the Web server (Relay Serverhost).
• Password – password for RSOE authentication on the Web server.c) To remove credentials from the list, select the corresponding user name, then click
X.
3. Click Next.
Defining Server Farms and Cluster NodesSet connection properties for the Unwired Server cluster and its constituent nodes.
1. Define the Unwired Server cluster.
a) Specify these property values:
• Farm ID – a string that identifies the Unwired Server cluster for which the RelayServer manages requests. This property is case-sensitive, and must match the valuein the Outbound Enabler configuration.
• Type – the type of request managed by the Relay Server: Replication, Messagingor Webservice protocol. When configuring Relay Server Outbound Enablerproperties for a scale-out node, you can select only the Webservice farm type.
• (Optional) Description – user-defined description for the Unwired Server cluster.b) Click +.c) Repeat steps 1 and 2 to add multiple Unwired Server clusters.d) To delete a configured Unwired Server cluster, select it in the list, then click the X
button.
2. Identify each Unwired Server instance in the cluster.
a) Select an existing Unwired Server cluster.
Administer
Sybase Control Center for Sybase Unwired Platform 73

b) Specify these property values:
• Node ID – a string that identifies the Unwired Server in the cluster. This property iscase-sensitive, and it must match the value in the RSOE configuration.
• Token – the security token used by the Outbound Enabler to authenticate itsconnection with the Relay Server. Assign a token string (up to 2048 characters);one token can be shared by all farm types.
c) Click +.d) Repeat steps 1 and 2 to add Unwired Server cluster nodes.e) To delete a configured Unwired Server node, select it in the list and click X.
3. Click Next to review your settings, or click Finish to exit the wizard.
Note: After you exit the wizard, generate the Relay Server configuration file, and copy it toeach Relay Server instance to update configuration for multiple Relay Servers.
Reviewing Configured Relay Server PropertiesConfirm the Relay Server property values before you generate the configuration file.
1. Review property values to ensure that:
• No errors exist.• All Unwired Server clusters are defined, and assigned the correct type.
2. Click Finish.
The Relay Server is registered with Sybase Control Center, and it can be managed from theRelay Servers tab for the Unwired Server cluster.
Generating the Relay Server Outbound Enabler Configuration FileTo quickly and easily replicate a common outbound enabler (RSOE) configuration to multiplehosts, generate an RSOE configuration file.
Administrators can use Sybase Control Center to configure an initial RSOE for development.Once a configuration proves valid and stable, the administrator can generate the RSOEconfiguration file, then use regRelayServer.bat to apply it to Unwired Server hosts.
1. In the navigation pane, click the Unwired Server cluster name.
2. In the administration pane, click the Relay Servers tab.
3. Click Generate.
4. Choose Outbound enabler configuration XML file, then click Next.
5. Click Finish.
6. Select an output target for the file.
See also• Configuring Relay Server Properties on page 70
Administer
74 Sybase Unwired Platform

Generating and Modifying the Relay Server Configuration FileGenerate all or part of a Relay Server configuration file. Then transfer the generated file to allRelay Server hosts.
Generating a configuration file extracts the property values stored in the cluster databaseduring the configuration process, and writes them to a file. You may still need to edit this file.
1. In the navigation pane, click the Unwired Server cluster name.
2. In the administration pane, click the Relay Servers tab.
3. Click Generate.
4. Choose Relay server configuration file.
5. Select the parts of the file to generate:
• The entire Relay Server configuration• A server node definition• A farm definition
6. Click Next, then click Finish.
7. Select an output target for the file.
8. Manually edit the file if necessary, and save the changes.For details on other manual edits that you can perform, see the Relay Serverdocumentation at http://infocenter.sybase.com/help/index.jsp?topic=/com.sybase.help.sqlanywhere.12.0.1/relayserver/relayserver12.html.
9. To configure a Relay Server farm, apply the same changes to the configurations ofremaining farm members. The configuration among all members must be identical.
Setting Up RSOESet up one or more RSOEs for each Unwired Server identified in a Relay Server configuration.The configured values are saved in the cluster database.
Configuring RSOE General PropertiesSet general RSOE configuration properties to define the context in which the RSOE processoperates.
1. In the navigation pane, click Servers > <ServerNode> > Server Configuration.
2. In the administration pane, select the Outbound Enabler tab, then click New.
3. Specify these property values:
• Farm type – select the type of request managed by the Relay Server: Replication,Messaging or Webservice protocol. When configuring Relay Server OutboundEnabler properties for a scale-out node, you can select only the Webservice farm type.
• Unwired Sever port – select the port on which RSOE manages requests.
Administer
Sybase Control Center for Sybase Unwired Platform 75
• Relay Server host – for Relay Server farms that use a load balancer, the host name orIP address of the load balancer. Otherwise, the host name or IP address of a singleRelay Server.
• Relay Server port – for Relay Server farms that use a load balancer, the port of the loadbalancer. Otherwise, the Relay Server HTTP or HTTPS port.
• Unwired Server farm – select the string that identifies the Unwired Server cluster, forwhich the Relay Server manages requests. This property is case-sensitive, and it mustmatch the value in the Relay Server configuration.
• Server node ID – select the string that identifies the Unwired Server in the cluster. Thisproperty is case-sensitive, and must match the value in the Relay Server configuration.
4. Click Next.
Configuring RSOE Connection SettingsSet connection configuration properties for an RSOE. These properties define the RSOEconnection to the Relay Server.
1. Specify these property values:
• Http user name – select the user name for RSOE authentication on the Web server(Relay Server host).
• Http password – enter the password for RSOE authentication on the Web server.
2. If RSOE connections to the Relay Server must pass through an Internet proxy server,specify these property values:
• Proxy server – select the Internet proxy server.• Http proxy user – select the user name for RSOE authentication on the proxy server.• Http proxy password – type the password for RSOE authentication on the proxy
server.
3. Specify these property values:
• Certificate file – select this option and choose the .CRT file used to authenticate theRSOE to Relay Server. You can choose this file only if you have already loaded it intothe Unwired Server certificate store and your Relay Server Port selection is HTTPS:443 in General Properties.
Configuring RSOE Start OptionsConfigure start options for RSOE.
1. Enable an option:
a) Select the box that corresponds to each name.b) Set a value. If you click a box and do not enter a value, the default is used.
2. Click OK.
3. Ensure the process starts by viewing the Status column of the Outbound Enablers tab.
Administer
76 Sybase Unwired Platform
Managing Configured Relay ServersRelay Servers configured with Sybase Control Center are registered in the Unwired Servercluster database. Administrators can view or edit configuration properties, and delete RelayServers in Sybase Control Center when they are displayed in the Relay Server tab.
Viewing or Editing Relay Server PropertiesView or edit configuration properties for a selected Relay Server.
1. Relaunching the Relay Server Configuration Wizard
Relaunch the Relay Server Configuration wizard to create a new Relay Serverconfiguration file, with customized property values.
2. Setting Relay Server General Properties
Set basic connection properties for the Relay Server.
3. Defining Server Farms and Cluster Nodes
Set connection properties for the Unwired Server cluster and its constituent nodes.
4. Reviewing Configured Relay Server Properties
Confirm the Relay Server property values before you generate the configuration file.
See also• Deleting a Relay Server Configuration on page 80
• Refreshing the Relay Server List on page 80
Relaunching the Relay Server Configuration WizardRelaunch the Relay Server Configuration wizard to create a new Relay Server configurationfile, with customized property values.
1. In the navigation pane, click the Unwired Server cluster name.
2. In the administration pane, click the Relay Server tab.
3. Select a Relay Server.
4. Click Properties.
Setting Relay Server General PropertiesSet basic connection properties for the Relay Server.
PrerequisitesLaunch the Relay Server configuration wizard.
Administer
Sybase Control Center for Sybase Unwired Platform 77
Task
1. Specify property values.
Values vary for load balanced environments. If you do not configure load balancer values,Outbound Enablers bypass the load balancer and high availability is compromised if adirect Relay Server connection fails.• Host – for Relay Server farms that use a load balancer, the host name or IP address of
the load balancer. Otherwise, the host name or IP address of a single Relay Server.• Http port – for Relay Server farms that use a load balancer, the port of the load
balancer. Otherwise, the Relay Server HTTP port.• Https port – for Relay Server farms that use a load balancer, the port of the load
balancer. Otherwise, the Relay Server HTTPS port.
For IIS, the value identifies the relative path for rs_client.dll. If your IISdirectory structure is different, modify this value accordingly.
Note: If Relay Server uses HTTPS and certificates, clients other than those usingreplication-based synchronization may not be able to connect: messaging applicationssupport only HTTP, and Hybrid Workflow Container applications for iOS supportHTTPS, but not certificates.
• URL suffix – the URL suffix used by the Outbound Enabler to connect to a RelayServer. The value you set depends on whether Relay Server is installed on IIS orApache hosts. For IIS, use /ias_relay_server/server/rs_server.dll . For Apache use/srv/iarelayserver/.
For IIS, the value identifies the relative path for rs_client.dll. If your IISdirectory structure is different, modify this value accordingly.
Note: For IIS, the value identifies the relative path for rs_client.dll. If your IISdirectory structure is different, modify this value accordingly.
Note: The value used in the client application connection for the URL suffix mustmatch what the administrator configures in the URL suffix. Otherwise, the connectionfails. Use the Diagnostic Tool command line utility to test these values. See DiagnosticTool Command Line Utility (diagtool.exe) Reference in System Administration.
• (Optional) Description – a user-definable description of the Relay Server.
2. Add or remove HTTP credentials as required:
a) Select Configure relay server HTTP credentials.b) To add new credentials, specify these property values and click +:
• User name – user name for RSOE authentication on the Web server (Relay Serverhost).
• Password – password for RSOE authentication on the Web server.c) To remove credentials from the list, select the corresponding user name, then click
X.
Administer
78 Sybase Unwired Platform

3. Click Next.
Defining Server Farms and Cluster NodesSet connection properties for the Unwired Server cluster and its constituent nodes.
1. Define the Unwired Server cluster.
a) Specify these property values:
• Farm ID – a string that identifies the Unwired Server cluster for which the RelayServer manages requests. This property is case-sensitive, and must match the valuein the Outbound Enabler configuration.
• Type – the type of request managed by the Relay Server: Replication, Messagingor Webservice protocol. When configuring Relay Server Outbound Enablerproperties for a scale-out node, you can select only the Webservice farm type.
• (Optional) Description – user-defined description for the Unwired Server cluster.b) Click +.c) Repeat steps 1 and 2 to add multiple Unwired Server clusters.d) To delete a configured Unwired Server cluster, select it in the list, then click the X
button.
2. Identify each Unwired Server instance in the cluster.
a) Select an existing Unwired Server cluster.b) Specify these property values:
• Node ID – a string that identifies the Unwired Server in the cluster. This property iscase-sensitive, and it must match the value in the RSOE configuration.
• Token – the security token used by the Outbound Enabler to authenticate itsconnection with the Relay Server. Assign a token string (up to 2048 characters);one token can be shared by all farm types.
c) Click +.d) Repeat steps 1 and 2 to add Unwired Server cluster nodes.e) To delete a configured Unwired Server node, select it in the list and click X.
3. Click Next to review your settings, or click Finish to exit the wizard.
Note: After you exit the wizard, generate the Relay Server configuration file, and copy it toeach Relay Server instance to update configuration for multiple Relay Servers.
Reviewing Configured Relay Server PropertiesConfirm the Relay Server property values before you generate the configuration file.
1. Review property values to ensure that:
• No errors exist.• All Unwired Server clusters are defined, and assigned the correct type.
Administer
Sybase Control Center for Sybase Unwired Platform 79

2. Click Finish.
The Relay Server is registered with Sybase Control Center, and it can be managed from theRelay Servers tab for the Unwired Server cluster.
Deleting a Relay Server ConfigurationDelete a Relay Server configuration to remove all defined Unwired Server clusters, servernodes, and RSOEs that connect to the Relay Server.
1. In the navigation pane, click the Unwired Server cluster name.
2. In the administration pane, click the Relay Server tab.
3. Select a Relay Server.
4. Click Delete.
See also• Viewing or Editing Relay Server Properties on page 77
• Refreshing the Relay Server List on page 80
Refreshing the Relay Server ListRefresh the Relay Server list to display current information about deployed and configuredRelay Servers.
1. In the navigation pane, click the Unwired Server cluster name.
2. In the administration pane, click the Relay Server tab.
3. Select a Relay Server.
4. Click Refresh.
See also• Viewing or Editing Relay Server Properties on page 77
• Deleting a Relay Server Configuration on page 80
Relay Server Tab ReferenceConfiguration property values that appear in the Relay Server tab for an Unwired Platformcluster.
Column Description
Host for Relay Server farms that use a load balancer, the host name orIP address of the load balancer. Otherwise, the host name or IPaddress of a single Relay Server.
Administer
80 Sybase Unwired Platform

Column Description
Http port for Relay Server farms that use a load balancer, the port of theload balancer. Otherwise, the Relay Server HTTP port.
Https port for Relay Server farms that use a load balancer, the port of theload balancer. Otherwise, the Relay Server HTTPS port.
URL suffix the URL suffix used by the Outbound Enabler to connect to aRelay Server. The value you set depends on whether Relay Serveris installed on IIS or Apache hosts. For IIS, use /ias_re-lay_server/server/rs_server.dll . For
Apache use/srv/iarelayserver/.
Unwired ServerThe Unwired Platform runtime server is called Unwired Server. Unwired Server is an instanceof Unwired Server installed as the application server to manage resource intensive traffic/communication/transactions, such as PUSH payload and synchronization, between the scale-out nodes and the data server cluster. Unwired Server can be installed as a cluster. In aproduction environment, the Unwired Server must be installed on a 64-bit host.
There are two types of server nodes that can be installed:
• Application Server node – (mandatory) runs all services.• Scale Out node – (optional) specifically designed to allow the stateless request/response
HTTP and synchronous message services to be horizontally scaled.
Unwired Server features include:
• Data services – supports connections to back-end data resources using these standardtechnologies: enterprise databases with JDBC™ connections and Web Services (SOAP-style and REST-style) . Also supports connections to enterprise applications such asSAP®.
• Data virtualization – introduces a layer called a mobile business object (MBO) betweenyour enterprise databases or applications, and the remote database on the device client.Utilizes a cache database (CDB) to optimize device client access and minimize back-endresource utilization.
• Device connection services – (does not apply to Scale Out nodes) supports connectionsfrom various different platforms and operating systems with different communicationstyles.• Replication-based synchronization – A synchronization method where cached data is
downloaded to and uploaded from client database to server via replication. Typically,mobile replication-based synchronization is used in occasionally connected scenarios.
Administer
Sybase Control Center for Sybase Unwired Platform 81

• Messaging-based synchronization – In flight messages are queued in a messagingcache. Synchronization occurs as messages are delivered to the device. Typically,mobile messaging-based synchronization is used in always available and occasionallydisconnected scenarios.
See also• Server List on page 82
• Cluster Properties on page 41
• Server Log on page 95
Server ListDepending on the license you purchase and the type of environment you install, you maydeploy multiple Unwired Servers in a cluster.
There are two types of server nodes that can be installed:
• Application Server node – (mandatory) runs all services.• Scale Out node – (optional) specifically designed to allow the stateless request/response
HTTP and synchronous message services to be horizontally scaled.
If you have installed multiple servers as part of a clustered architecture, you must register theseservers first. Only servers that are installed on the same host as Sybase Control Center areregistered automatically. Once registered, remote servers also appear in the server list.
Servers are listed according to their cluster role (that is, primary or secondary servers). SybaseControl Center automatically identifies the primary server and lists it first, followed bysecondary servers.
The Server Type column indicates whether the server is an Application Server node or a ScaleOut node.
The Need Restart column indicates if a server restart is required due to configurationchanges,
See also• Unwired Server on page 81
• Cluster Properties on page 41
• Server Log on page 95
Stopping and Starting a ServerStop and start a server to perform maintenance or to apply changes to server settings. You canperform this action as a two-step process (stop and start) or as a single restart process.
You can stop and start a server from Sybase Control Center for servers that are installed on thesame host as Sybase Control Center, as well as servers that are installed on different hosts.
Administer
82 Sybase Unwired Platform

Note: If someone manually shuts the server down, this action triggers multiple errors inSybase Control Center for Unwired Server until the console determines that the server is nolonger available. This takes approximately 30 seconds to detect. When this occurs you mightsee multiple Runtime API throws exception errors logged. Wait for the server tocome online and log into the server again to resume your administration work.
Note: Sybase Control Center requires at least one Application Server node running to workproperly. If all Application Server nodes are stopped, the Sybase Control Center console treewill be collapsed automatically and the following error message will display: The clusteris unavailable because of no running primary server found.
Note: You cannot start a Scale-out node from Sybase Control Center. If you stop a Scale-outnode, you must start it manually.
1. In the Sybase Control Center navigation pane, click Servers to display the servers list.
2. Select a server in this list.
3. Choose an appropriate process:
• To stop the server, click Stop. You can then perform the administration actions yourequire that might require the server to be started. To then restart the server, clickStart.
Note: If you have selected a Scale-out node server type, the Start button is disabled.
• If you perform an administration action that requires a restart to take effect, clickRestart. This shuts the server down and restarts it in a single process.
As the server stops and starts, progress messages display in the Server Console pane.
Suspending and Resuming a ServerSuspend and resume a server to temporarily disallow clients to access the specific server forroutine maintenance. While the server is suspended, it remains running and available for alladministrative actions.
PrerequisitesConfigure the Relay Server Outbound Enabler (RSOE) for Unwired Server in order to enablethe suspend and resume server functions.
Task
1. In the Sybase Control Center navigation pane, click Servers to display the servers list.
2. Select one or more servers in this list.
3. Choose an appropriate process:
Administer
Sybase Control Center for Sybase Unwired Platform 83
• To suspend the server, click Suspend. Wait for about 1 minute, and click Refresh. TheSuspend button is now disabled. You can perform the administration actions yourequire.
• To resume the server, click Resume.
As the server suspends and resumes, progress messages display in the Server Console pane.
Pinging a ServerPing a server to test the availability of backend server connectivity and verify the server state(for example, started or stopped). By default ping uses whichever Internet Inter-ORB Protocolcall you configured (IIOPS by default) to test if a server's connection is available.
1. In the left navigation pane, expand the Servers folder and select a server.
2. Select the General tab.
3. Click Ping.
The result displays in the console area.
Checking Unwired Server StatusVerify whether a server is running, stopped, or suspended.
1. In the left navigation pane, select Servers.
2. In the right administration pane, select the General tab.
3. In the Status column, check the server status corresponding to the server you areadministering: running or stopped.
4. Use the controls in the administration console to start, stop, or restart the server, asrequired.
Configuring Unwired Server General PropertiesTo optimize Unwired Server performance, configure the thread stack size, maximum andminimum heap sizes, and user options such as enabling trace upload to SAP® SolutionManager.
1. In the left navigation pane, expand the Servers folder and select a server.
2. Select Server Configuration.
3. In the right administration pane, select the General tab.
4. Configure these replication payload properties, as required:
• Host Name – the name of the machine where Unwired Server is running (read only).• Maximum Heap Size – the maximum size of the JVM memory allocation pool. Use K
to indicate kilobytes, M to indicate megabytes, or G to indicate gigabytes. For
Administer
84 Sybase Unwired Platform

production recommendations on this value, see Unwired Server Replication TuningReference in System Administration.
• Minimum Heap Size – the minimum size of the JVM memory allocation pool, inmegabytes. For production recommendations on this value, see Unwired ServerReplication Tuning Reference in System Administration.
• Thread Stack Size – the JVM -Xss option.
• User Options (in Show optional properties) – other JVM options. For example, you canenable JVM garbage collection logging by setting -XX:+PrintGCDetails. Oryou can set the permanent space which is allocated outside of the Java heap with theDJC_JVM_MAXPERM environment variable (in SUP_HOME\Servers\UnwiredServer\bin\usersetenv.bat); the maximum perm size must befollowed by K, M, or G, for example, -XX:MaxPermSize=512M. Note thatDJC_JVM_MAXPERM is not visible to Sybase Control Center. If you are in an SAPenvironment and want to define the Solution Manager URL into which trace files canbe uploaded, use this user option: -Dcom.sap.solutionmanager.url=<SolutionManager_URL>.
5. Click Save.
Configuring Unwired Server to Securely Communicate With an HTTPProxy
If you want Unwired Server connect to an HTTP Proxy, you can set connection properties forit when you optimize Unwired Server performance.
1. In the left navigation pane, expand the Servers folder and select a server.
2. Select Server Configuration.
3. In the right administration pane, select the General tab.
4. In the User Options row, enter command-line options to control the startup behavior.
Enter options as a series of Java system property and value pairs, using this syntax:-DpropertyName=value
Supported properties include:• -dhttp.proxyHost – for the the host name of the proxy server.
• -dhttp.proxyPort – for the port number. The default value is 80.
• -dhttps.protocol – for the SSL protocol used by the proxy server. Use this to controlwhich protocols are accepted. For example, if your server is using SSLv2 and yourequire a stronger level of SSL encryption, you may configure this value as:-Dhttps.protocols=SSLv3,TLS,TLSv1
• -dhttp.nonProxyHosts – for the list of hosts that should be reached directly,thereby bypassing the proxy. Separate multiple entries with |.
Administer
Sybase Control Center for Sybase Unwired Platform 85

The patterns may start or end with a * for wildcards. A host name that matches thewildcard pattern can bypass the proxy. For example, to use command-line options toconfigure a proxy and other non-proxy hosts (including those on local computers):-Dhttp.proxyHost=proxy.myDomain.com –Dhttp.proxyPort=8080 –Dhttp.nonProxyHosts=*.myOtherDomain1.com|localhost|*.myOtherDomain2.corp
5. Click Save.
Relay Server Outbound EnablerThe Outbound Enabler (RSOE) runs as an Unwired Server process and managescommunication between the Unwired Server and a Relay Server.
Each RSOE maintains connections to each Relay Server in a Relay Server farm. The RSOEpasses client requests to the Unwired Server on its Replication or Messaging port. UnwiredServer sends its response to the RSOE, which forwards it to the Relay Server, to be passed tothe client.
As an Unwired Server process, the RSOE always starts when Unwired Server starts. UnwiredServer monitors the process to ensure it is available. If an RSOE fails for any reason, UnwiredServer restarts it automatically.
Note: Sybase recommends three RSOE processes each, for both Replication and Messagingports.
Loading and Unloading HTTPS Certificates for RSOELoad HTTPS certificates for the RSOE to add it to the Unwired Server node .
Note: You must use only RSA certificates.
If the Web server (Relay Server host) already uses a certificate signed by a CA for HTTPSconnections, you do not need to perform this task.
1. In the navigation pane, click Servers > ServerNode > Server Configuration.
2. In the administration pane, select the Outbound Enabler tab, then click CertificateFiles.
3. Choose the action you want to perform:
• To add a new certificate, click +. Browse and select the .CRT file to upload, then clickOpen.
• To replace a certificate in the store, select Replace the certificate file. Verify thecertificate file name, then click +.
• To delete a certificate from the store, select the filename and click X.
4. When certificate management tasks are complete, click OK.
Administer
86 Sybase Unwired Platform

Setting Up RSOESet up one or more RSOEs for each Unwired Server identified in a Relay Server configuration.The configured values are saved in the cluster database.
1. Configuring RSOE General Properties
Set general RSOE configuration properties to define the context in which the RSOEprocess operates.
2. Configuring RSOE Connection Settings
Set connection configuration properties for an RSOE. These properties define the RSOEconnection to the Relay Server.
3. Configuring RSOE Start Options
Configure start options for RSOE.
Configuring RSOE General PropertiesSet general RSOE configuration properties to define the context in which the RSOE processoperates.
1. In the navigation pane, click Servers > <ServerNode> > Server Configuration.
2. In the administration pane, select the Outbound Enabler tab, then click New.
3. Specify these property values:
• Farm type – select the type of request managed by the Relay Server: Replication,Messaging or Webservice protocol. When configuring Relay Server OutboundEnabler properties for a scale-out node, you can select only the Webservice farm type.
• Unwired Sever port – select the port on which RSOE manages requests.• Relay Server host – for Relay Server farms that use a load balancer, the host name or
IP address of the load balancer. Otherwise, the host name or IP address of a singleRelay Server.
• Relay Server port – for Relay Server farms that use a load balancer, the port of the loadbalancer. Otherwise, the Relay Server HTTP or HTTPS port.
• Unwired Server farm – select the string that identifies the Unwired Server cluster, forwhich the Relay Server manages requests. This property is case-sensitive, and it mustmatch the value in the Relay Server configuration.
• Server node ID – select the string that identifies the Unwired Server in the cluster. Thisproperty is case-sensitive, and must match the value in the Relay Server configuration.
4. Click Next.
Configuring RSOE Connection SettingsSet connection configuration properties for an RSOE. These properties define the RSOEconnection to the Relay Server.
Administer
Sybase Control Center for Sybase Unwired Platform 87

1. Specify these property values:
• Http user name – select the user name for RSOE authentication on the Web server(Relay Server host).
• Http password – enter the password for RSOE authentication on the Web server.
2. If RSOE connections to the Relay Server must pass through an Internet proxy server,specify these property values:
• Proxy server – select the Internet proxy server.• Http proxy user – select the user name for RSOE authentication on the proxy server.• Http proxy password – type the password for RSOE authentication on the proxy
server.
3. Specify these property values:
• Certificate file – select this option and choose the .CRT file used to authenticate theRSOE to Relay Server. You can choose this file only if you have already loaded it intothe Unwired Server certificate store and your Relay Server Port selection is HTTPS:443 in General Properties.
See also• Updating Common Properties for Multiple RSOEs Concurrently on page 90
• Outbound Enabler Start Options Reference on page 89
Configuring RSOE Start OptionsConfigure start options for RSOE.
1. Enable an option:
a) Select the box that corresponds to each name.b) Set a value. If you click a box and do not enter a value, the default is used.
2. Click OK.
3. Ensure the process starts by viewing the Status column of the Outbound Enablers tab.
Administer
88 Sybase Unwired Platform
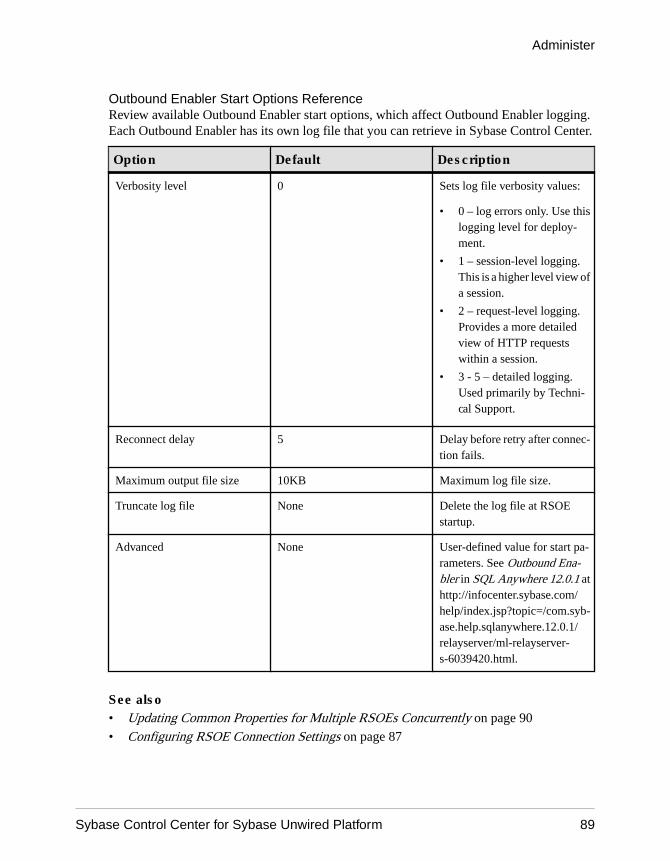
Outbound Enabler Start Options ReferenceReview available Outbound Enabler start options, which affect Outbound Enabler logging.Each Outbound Enabler has its own log file that you can retrieve in Sybase Control Center.
Option Default Description
Verbosity level 0 Sets log file verbosity values:
• 0 – log errors only. Use thislogging level for deploy-ment.
• 1 – session-level logging.This is a higher level view ofa session.
• 2 – request-level logging.Provides a more detailedview of HTTP requestswithin a session.
• 3 - 5 – detailed logging.Used primarily by Techni-cal Support.
Reconnect delay 5 Delay before retry after connec-tion fails.
Maximum output file size 10KB Maximum log file size.
Truncate log file None Delete the log file at RSOEstartup.
Advanced None User-defined value for start pa-rameters. See Outbound Ena-bler in SQL Anywhere 12.0.1 athttp://infocenter.sybase.com/help/index.jsp?topic=/com.syb-ase.help.sqlanywhere.12.0.1/relayserver/ml-relayserver-s-6039420.html.
See also• Updating Common Properties for Multiple RSOEs Concurrently on page 90
• Configuring RSOE Connection Settings on page 87
Administer
Sybase Control Center for Sybase Unwired Platform 89
Generating the Relay Server Outbound Enabler Configuration FileTo quickly and easily replicate a common outbound enabler (RSOE) configuration to multiplehosts, generate an RSOE configuration file.
Administrators can use Sybase Control Center to configure an initial RSOE for development.Once a configuration proves valid and stable, the administrator can generate the RSOEconfiguration file, then use regRelayServer.bat to apply it to Unwired Server hosts.
1. In the navigation pane, click the Unwired Server cluster name.
2. In the administration pane, click the Relay Servers tab.
3. Click Generate.
4. Choose Outbound enabler configuration XML file, then click Next.
5. Click Finish.
6. Select an output target for the file.
Managing Configured RSOEsManage RSOE instances you have configured.
Retrieving RSOE LogsYou can retrieve one RSOE log at a time, from the Unwired Server host, and copy it to anotherlocation. You cannot retrieve an empty RSOE log file.
1. In the navigation pane, click Servers > <ServerNode> > Server Configuration.
2. In the administration pane, select the Outbound Enabler tab, and select the RSOE instance.
3. Click Retrieve Log, then Next, then Finish to save the log and choose the target locationfor the file.
See also• Updating Common Properties for Multiple RSOEs Concurrently on page 90
• Deleting RSOE Configurations on page 91
• Refreshing the RSOE List on page 91
• Configuring Proxy Server Settings for an Outbound Enabler on page 92
Updating Common Properties for Multiple RSOEs ConcurrentlyTo avoid setting common RSOE properties repeatedly, configure common propertiessimultaneously for selected RSOEs already deployed. This streamlines the number of timesthey would otherwise need to be set.
1. In the navigation pane, click Servers > <ServerNode> > Server Configuration.
2. In the administration pane, select the Outbound Enabler tab.
Administer
90 Sybase Unwired Platform

3. Select two or more RSOE instances in the list of configured RSOEs, then clickProperties.
4. Modify common settings for multiple RSOEs, including:
• Startup options. See Outbound Enabler Start Options Reference.• Proxy settings. See step 2 in Configuring RSOE Connection Settings.
See also• Retrieving RSOE Logs on page 90• Deleting RSOE Configurations on page 91• Refreshing the RSOE List on page 91• Configuring Proxy Server Settings for an Outbound Enabler on page 92• Configuring RSOE Connection Settings on page 87• Outbound Enabler Start Options Reference on page 89
Deleting RSOE ConfigurationsDelete an RSOE configuration to remove the configuration properties from the clusterdatabase.
1. In the navigation pane, click Servers > <ServerNode> > Server Configuration.
2. In the administration pane, select the Outbound Enabler tab, and select the RSOEinstances.
3. Stop the RSOE instances and click Delete.
4. Click OK.
See also• Retrieving RSOE Logs on page 90• Updating Common Properties for Multiple RSOEs Concurrently on page 90• Refreshing the RSOE List on page 91• Configuring Proxy Server Settings for an Outbound Enabler on page 92
Refreshing the RSOE ListRefresh the RSOE list to display current information about deployed and configured RSOEinstances.
1. In the navigation pane, click Servers > <ServerNode> > Server Configuration.
2. In the administration pane, select the Outbound Enabler tab, and click Refresh.
See also• Retrieving RSOE Logs on page 90• Updating Common Properties for Multiple RSOEs Concurrently on page 90• Deleting RSOE Configurations on page 91
Administer
Sybase Control Center for Sybase Unwired Platform 91

• Configuring Proxy Server Settings for an Outbound Enabler on page 92
Configuring Proxy Server Settings for an Outbound Enabler(Applies only to Online Data Proxy) Configure an Outbound Enabler to work with an Internetproxy server, when connections to the Relay Server must pass through a proxy server.
1. In the navigation pane, click Servers><ServerNode> > Server Configuration.
2. In the administration pane, select the Outbound Enabler tab.
3. Click Proxy .
4. Define a list of required proxy servers:
a) To add a new server connection, type Host and Port values, then click +.b) To remove an existing connection, select the server, then click X.c) To edit an existing connection, click an appropriate cell and re-enter or modify the
current value.
5. Define a proxy user for a selected server:
a) Select a server from the list.b) To add a new user, enter a User name and password then click +.c) To remove an existing user, select the name, then click X.d) To edit an existing user, click an appropriate cell and re-enter or modify the current
value.
6. Click OK.
See also• Retrieving RSOE Logs on page 90
• Updating Common Properties for Multiple RSOEs Concurrently on page 90
• Deleting RSOE Configurations on page 91
• Refreshing the RSOE List on page 91
Outbound Enabler Tab ReferenceUnderstand the columns of data displayed in the Outbound Enabler tab for an Unwired Servernode.
Column Name Displays
Server Node ID the string that identifies the Unwired Server in the cluster. This property iscase-sensitive, and must match the value in the Relay Server configuration.
Unwired Server Port the port on which Outbound Enabler manages requests.
Administer
92 Sybase Unwired Platform

Column Name Displays
Farm Type the type of request managed by the Relay Server: Replication, Messaging orWebservice protocol. When configuring Relay Server Outbound Enablerproperties for a scale-out node, you can select only the Webservice farm type.
Unwired ServerFarm
the string that identifies the Unwired Server cluster, for which the Relay Servermanages requests. This property is case-sensitive, and it must match the valuein the Relay Server configuration.
Relay Server Host for Relay Server farms that use a load balancer, the host name or IP address ofthe load balancer. Otherwise, the host name or IP address of a single RelayServer.
Status current state of the Outbound Enabler process: stopped, running, or error.
Administer
Sybase Control Center for Sybase Unwired Platform 93

Column Name Displays
Status Description additional details on the state of the Outbound Enabler. If you receive one ofthese messages, follow the documented recommendation:
• Unknown error state – Check the log for additional details.
• Failed to connect Unwired Server, retrying... – Check the UnwiredServer port managed by the Outbound Enabler.
• Unauthorized. – Check the security token of Outbound Enabler.
• Unrecognized farm or server node ID. – The string that identifies theUnwired Server cluster or server node in the Outbound Enabler configu-ration does not match the Relay Server configuration.
• Please check the relay server host and port or Failed to create I/Ostream to the relay server – If you use HTTPS port, check to see if thecertificate file is valid.
• Relay server service unavailable. – Check if the Relay Server is properlyconfigured, or if any internal errors are logged.
• Relay server not found. – Either the Relay Server is not yet deployed, orthe URL suffix is wrong.
• Bad request. – Check the syntax of the URL suffix.
• Error writing HTTP headers – Check if the trusted certificate is valid,and verify the URL suffix syntax. Something may be misformatted.
Note:
Sometimes when the Status column shows "Running" the Status Descriptionshows:
Relay Server outbound enabler is running. Please check the log file to confirm the status.In these cases, the console may detect that an RSOE is running, even thoughthe RSOE is actually in an error state.
• The RSOE log level is set too high (4 or 5). Sybase Control Center cannotdetect the status from scanning the RSOE log.
• The RSOE enters an unrecognized error condition. For example, whenRSOE connects to Relay Server through an Internet proxy server, if theproxy server shuts down, the RSOE is effectively in an error state. TheRSOE may continue to retry the connection indefinitely, and produce nolog message recognized as an error.
Certificate File the certificate file uploaded to the Unwired Server certificate store.
Administer
94 Sybase Unwired Platform

Column Name Displays
Log File the name and location of the Outbound Enabler log file. The syntax of thisfilename is <nodeName>.RSOE<n>.log. <n> is the primary key of
the Outbound Enabler database record in the cluster database used by UnwiredPlatform.
Server LogServer logs enable you to monitor system health at a high level, or focus in on specific issuesby setting up filtering criteria using Sybase Control Center.
These server logs are available:
• Unwired Server logs – collect data on Unwired Server health and performance bycomponent, and retrieve data for all or specific searches. You can save and archive systemlogs.
• Messaging Server logs – retrieve trace data for all or specific messages. Export data forarchive or further analysis.
See also• Server List on page 82
• Unwired Server on page 81
• Cluster Properties on page 41
Unwired Server Runtime LoggingUnwired Server logs collect runtime information from various embedded runtimecomponents.
You can change default log levels for different components as required from Sybase ControlCenter.
You can view logs from:
• Sybase Control Center – click Servers > primaryServer > Log in the left pane.The first 150 entries initially appear in the console area, so you may need to incrementallyretrieve more of the log as required, by scrolling down through the log events.
• Text editor – browse to and open one or more of the<UnwiredPlatform_InstallDir>\UnwiredPlatform\Servers\UnwiredServer\logs\<hostname>-server.log files. These files may beindexed, depending on how you configure the life cycle for the server's log file.
See also• Messaging Server Runtime Logging on page 97
Administer
Sybase Control Center for Sybase Unwired Platform 95

Viewing the Unwired Server LogIn text or grid view, use the vertical scroll bar to retrieve additional segments of the log file in150-line increments. In grid view, up to 10 pages of the server log data is loaded in one request.
You can navigate to any page by using the First, Prev, Next, and Go to controls. Use ViewDetails open the actual log file and find the corresponding line.
Note: Last is disabled -- use Next to advance to the final page in the list.
There are also two search options you can use:
• Basic search – search by keyword, log level, first/last X number of lines in the log file.• Advanced search – search by specific subcomponents, log level, exception, time range,
and so on.
You can include backup logs in your search or retrieval. The option is not selected by default.
Searching Unwired Server Log DataFilter server log data according to the criteria you specify.
1. In the Sybase Control Center left navigation pane, click Servers > primaryServer > Log,and in the right pane click Unwired Server.
2. Select Show filter criteria to display the search pane.
3. Select Include backup logs to display backup logs.
4. Select Text view or Grid view to specify how to display the logs.
5. Select Basic search to filter your search according to the specific string you enter in thesearch field. (Optional) You may also specify:
• Show – specify first lines, last lines, or a keyword. If you are searching by first or lastlines, you can enter any value up to a maximum of 1000 lines in the log. However,Sybase recommends that you provide a more manageable value to avoid severeperformance degradation associated with this upper limit.
• Log level – search only messages logged by the particular log level you select.
6. Select Advanced search to enter more specific search criteria, including:
• Component – identify which component the log data belongs to: MMS, Proxy, MSG,Security, MobiLink™, DataServices, Other or DOEC.
Note: Set the log level for each component in the Setting tab. See ConfiguringUnwired Server Log Settings.
• Log level – search only messages logged by the particular log level you select.• Thread ID – specify the ID name of the thread that logs the message you are searching.• Logger name – indicate the class name and instance of the logged component.• Keyword – indicate a value, file name, or other keyword by which to filter your search.
Administer
96 Sybase Unwired Platform

• Time period – specify a start date, start time, end date, and end time.
7. Click Retrieve.
8. To begin a new query, click Reset in the search panel and enter new search criteria.
Retrieving the Unwired Server LogUpdate the information in the log console window.
1. In the Sybase Control Center left navigation pane, click Servers > primaryServer > Log,and in the right pane click Unwired Server.
2. To display the latest log data collected in the log file if time has elapsed since you lastopened the log, click Retrieve.
3. (Optional) Select a row to view a single record in the detail pane. Additional columns maybe available.
Deleting the Unwired Server LogClear old or unrequired server log data from the log file.
1. In the Sybase Control Center left navigation pane, click Servers > primaryServer > Log,and in the right pane click Unwired Server.
2. To delete all data from the log file and all backup log files, click Delete, then OK.
Messaging Server Runtime Logging(Does not apply to Scale Out server nodes) Messaging Server logs collect data that enablesyou to trace message handling from the cluster database to the device user, based on varioustrace settings.
See also• Unwired Server Runtime Logging on page 95
Viewing the Messaging Server LogYou can view results for one or more modules, or the Default. You can navigate to any page byusing the First, Prev, Next, Last, and Go to controls.
Searching Messaging Server Log DataFilter server log data according to the criteria you specify.
1. In the Sybase Control Center left navigation pane, click Servers > primaryServer > Log,and in the right pane click Messaging Server.
2. Click Show filter, and then select the search criteria:
• Max level – search only messages logged by the particular log level you select. Allmessages up to that level are retrieved.
Administer
Sybase Control Center for Sybase Unwired Platform 97

• Thread ID – specify the ID name of the thread that logs the message you are searching.• Contains – enter a search string.• Users – select one or more users.• Application connections – select one or more application connections.• Modules – select one or more modules.• Time period – specify a start date, start time, end date, and end time.
3. Click Retrieve.
4. To begin a new query, click Reset.
Retrieving the Messaging Server LogUpdate the information in the log console window.
1. In the Sybase Control Center left navigation pane, click Servers > primaryServer > Log,and in the right pane click Messaging Server.
2. To display the latest log data collected in the log file if time has elapsed since you lastopened the log, click Retrieve.
3. (Optional) Select a row to view a single record in the detail pane. Additional columns maybe available.
Exporting Messaging Server LogExport retrieved trace information for archive or further analysis.
1. In the Sybase Control Center left navigation pane, click Servers > primaryServer > Log,and in the right pane click Messaging Server.
2. To display the latest log data collected in the log file if time has elapsed since you lastopened the log, click Retrieve.
3. Click Export to launch the Export Trace Log Wizard.
Trace LogThe trace logs capture messaging server data for cluster level database to mobile device useractivities. Using the trace logs you can trace obtain detailed information using a variety ofsearch criteria.
• Time – the date and time when the current trace entry was logged on Unwired Server. Thereturned date and time is the Unwired Server time without time zone information.
• Module – the module to which the current trace entry belongs.• Description – detailed trace information.• Level – the trace level of the current trace entry. The possible trace level values (from high
to low) are: ERROR, WARN, INFO, and DEBUG.• User – the user name of the current trace entry.• Application Connection ID – the application connection ID of the current trace entry.
Administer
98 Sybase Unwired Platform

• Thread ID – the thread ID when the trace entry was logged.• Node – the server that created the trace entry.
DomainsDomains provide a logical partitioning of a hosting organization's environment that achievesincreased flexibility and granularity of control in multitenant environments. By default, theinstaller creates a single domain named "default."
Administrators use different domains within the same Unwired Platform installation.Domains enable the management of application metadata within a partition, including serverconnections, packages, role mappings, domain logs, and security, so that changes are visibleonly in the specific domain.
Considerations when implementing domains in a multitenant environment include:
• Create and manage domains using Sybase Control Center from the Unwired Platformadministration perspective of Sybase Control Center.
• You can support multiple customers inside the same Unwired Platform cluster.• You can configure security specifically for individual domains by creating one or more
security configurations in the cluster, and then assigning those security configurations to adomain. You can then map the security configurations to one or more packages. A useraccessing the package from a device application is authenticated and authorized by thesecurity provider associated with the package.
• Customers may require their own administrative view on their portion of the UnwiredPlatform-enabled mobility system. By granting domain administration access to yourcustomers, you can allow customers to customize their deployed applications packagesand perform self-administration tasks as needed.
The "default" domainThe "default" domain is a special domain where critical runtime configuration artifacts exist.These artifacts include:
• An "admin" security configuration – this security configuration is mapped to the "default"domain and is used to authenticate and authorize administrative users. For this reason,administrators are not allowed to unassign the "admin" security configuration from the"default" domain.
• Cache database (CDB) data source connections – for the "default" CDB data source, userscan configure the Pool Size property in the "default" domain according to theirrequirements. This setting allows the maximum number of open connections to the SQLAnywhere database server hosting the CDB.
• Monitor database data source connections – the customer can modify the existingmonitoring data source properties according to their configuration requirements, or createa new monitoring datasource in the "default" domain.
Administer
Sybase Control Center for Sybase Unwired Platform 99
• Domain log database data source connections – the customer can modify the existingdomain log data source properties according to their configuration requirement, or create anew domain log data source in the "default" domain. By default, the name of domain logdata source is "domainlogdb".
Since these critical runtime-related artifacts are located in the "default" domain,administrators are not allowed to delete this domain. Sybase recommends creating newdomains to facilitate tenants according to their application requirements.
Creating and Enabling a New DomainCreate and configure multiple domains within a single Unwired Platform installation. Adomain must be enabled for application users to access the packages deployed in the domain.Enabling a domain also triggers synchronization of the domain changes to the secondarynodes in the cluster. Application users who attempt to access a disabled domain receive anerror message.
PrerequisitesCreate a security configuration for the domain and register the domain administrator.
Task
1. In the left navigation pane, select the Domains folder.
2. In the right administration pane, select the General tab, and click New.
3. In the Create Domain dialog, enter a name for the domain and click Next.
4. Select a security configuration for the domain by checking an option from the list ofavailable configurations. You must select at least one security configuration. The securityconfigurations you select are then available for use in validating users accessing thepackages. If you select multiple security configurations, the first one you select becomesthe default security configuration for the domain.
5. Click Next.
6. Optional. Select one or more domain administrators for the domain.
7. Click Finish.The new domain appears in the General tab.
8. Click the box adjacent to the domain name, click Enable, then click Yes to confirm.
See also• Deleting a Domain on page 101• Registering a Domain Administrator User on page 102• Assigning Domain Administrators to a Domain on page 103• Viewing Applications for a Domain on page 104• Viewing Application Connections for a Domain on page 104• Scheduling Accumulated Data Cleanup for Domains on page 106
Administer
100 Sybase Unwired Platform

• Domain Logs on page 110
• Checking Client Application Logs on page 155
• Connections on page 156
• Configuring Domain Security on page 179
Deleting a DomainRemove a domain and its contents from the cluster when you no longer require the partition.
When a domain is deleted, all referenced artifacts, such as domain administrators and securityconfigurations, are retained. However, all contained artifacts, including packages,subscription templates, device subscriptions, MBO and operation historical data, package-level role mapping, cache group settings, server connections, and domain-level role mappingsfor security configurations independent of any other domain, are also deleted.
To preserve a deployed package before deleting a domain, export the package to an archivefile.
Note: You cannot delete the "default" domain since it contains critical runtime-relatedartifacts.
1. In the left navigation pane, select Domains.
2. In the right administration pane, click the General tab and select the domain you want todelete.
3. Click Delete.
4. In the confirmation dialog, click Yes.
See also• Creating and Enabling a New Domain on page 100
• Registering a Domain Administrator User on page 102
• Assigning Domain Administrators to a Domain on page 103
• Viewing Applications for a Domain on page 104
• Viewing Application Connections for a Domain on page 104
• Scheduling Accumulated Data Cleanup for Domains on page 106
• Domain Logs on page 110
• Checking Client Application Logs on page 155
• Connections on page 156
• Configuring Domain Security on page 179
Administer
Sybase Control Center for Sybase Unwired Platform 101

Registering a Domain Administrator UserA platform administrator can add domain administrators, so these users can administerdomains to which they are assigned. This process registers an administrator with the cluster, sothe user can be assigned as an administrator for a domain.
PrerequisitesCreate the user entry and map the physical role to the SUP Domain Administrator logical rolein the security provider repository used to authenticate administrators in Sybase ControlCenter (SCC).
Task
1. In the left navigation pane, click the Security node.
2. In the right administration pane, click the Domain Administrators tab and click New.
3. To configure user properties for the administrator, enter:
• Login name – the user name assigned to the administrator. For example, if you areusing LDAP to authenticate administrators, the UID is typically used as the loginname.
Note: The login name can't be longer than 36 characters.
• (Optional) Company name – the name of the organization the administrator belongsto. Sybase recommends you supply this information if you are setting up UnwiredPlatform in a hosted environment and using domains to distinguish between differenthosted solutions for different organizations.
• (Optional) First name – the administrator's first name. The first name must match theone assigned to the login name in the security repository.
• (Optional) Last name – the administrator's last name. The last name must match theone assigned to the login name in the security repository.
4. Click OK to register the administrator.The domain administrator can now log in with his or her user login credentials (user nameand password).
NextAssign the domain administrator role to this user.
See also• Creating and Enabling a New Domain on page 100• Deleting a Domain on page 101• Assigning Domain Administrators to a Domain on page 103• Viewing Applications for a Domain on page 104• Viewing Application Connections for a Domain on page 104
Administer
102 Sybase Unwired Platform
• Scheduling Accumulated Data Cleanup for Domains on page 106
• Domain Logs on page 110
• Checking Client Application Logs on page 155
• Connections on page 156
• Configuring Domain Security on page 179
Assigning Domain Administrators to a DomainAssign domain administration privileges to a domain administrator. You must be a platformadministrator to assign and unassign domain administrators.
PrerequisitesEnsure the user is already registered as a domain administrator in the Domain Administratorstab.
Task
1. In the left navigation pane, expand the Domains folder, and select the domain for which toassign domain administration privileges.
2. Select the domain-level Security folder.
3. In the right administration pane, select the Domain Administrators tab, and clickAssign.
4. Select one or more administrator users to assign to the domain by checking the boxadjacent to the user name.
5. Click OK.A message appears above the right administration pane menu indicating the success orfailure of the assignment. If successful, the new domain administrator appears in the list ofusers.
See also• Creating and Enabling a New Domain on page 100
• Deleting a Domain on page 101
• Registering a Domain Administrator User on page 102
• Viewing Applications for a Domain on page 104
• Viewing Application Connections for a Domain on page 104
• Scheduling Accumulated Data Cleanup for Domains on page 106
• Domain Logs on page 110
• Checking Client Application Logs on page 155
• Connections on page 156
• Configuring Domain Security on page 179
Administer
Sybase Control Center for Sybase Unwired Platform 103

Viewing Applications for a DomainView applications registered for a specific domain.
1. In the left navigation pane, expand the Domains folder, and select a domain.
2. Within the domain, select Applications.
3. In the right pane, select the domain-level Applications tab.
4. Click Refresh to view a list of Applications IDs, and their display names anddescriptions.
5. Alternatively, search for one or more application IDs.
a) Provide the search criteria for Application ID by adding a search string.b) Click Go.
All the applications that match the search criteria provided for the selected domain arepopulated in the table.
See also• Creating and Enabling a New Domain on page 100
• Deleting a Domain on page 101
• Registering a Domain Administrator User on page 102
• Assigning Domain Administrators to a Domain on page 103
• Viewing Application Connections for a Domain on page 104
• Scheduling Accumulated Data Cleanup for Domains on page 106
• Domain Logs on page 110
• Checking Client Application Logs on page 155
• Connections on page 156
• Configuring Domain Security on page 179
Viewing Application Connections for a DomainView application connection information for a specific domain. Optionally select the relevantcolumns of information to display.
Note: The association of application connections to a domain is based on the "domain" settingvalue in the application connections. Therefore, when registering application connections, theapplication template must be registered either using a template, where the domain value isappropriately configured, or in the registration wizard of the Sybase Control Center userinterface.
1. In the left navigation pane, expand the Domains folder, and select a domain.
2. Within the domain, select Applications.
3. In the right pane, select the domain-level Application Connections tab.
Administer
104 Sybase Unwired Platform

4. Click Refresh to view a list of Users.
5. Alternatively, search for one or more users.
a) Provide the search criteria for Users by adding a search string.b) Click Go.
All the users that match the search criteria provided for the selected domain arepopulated in the table.
6. (Optional) Select the columns to display (all columns, or specific columns) from the drop-down list.
See also• Creating and Enabling a New Domain on page 100
• Deleting a Domain on page 101
• Registering a Domain Administrator User on page 102
• Assigning Domain Administrators to a Domain on page 103
• Viewing Applications for a Domain on page 104
• Scheduling Accumulated Data Cleanup for Domains on page 106
• Domain Logs on page 110
• Checking Client Application Logs on page 155
• Connections on page 156
• Configuring Domain Security on page 179
Managing Connection Pools for Unwired Server ConnectionsConnection pools are used by Unwired Server to improve performance between the server andinternal databases, which include cache database, cluster database, domainlog database,messaging database, monitor database and sampledb. These values are synchronized amongall servers in the cluster when the primary server values change.
Configure the maximum pool size to determine the how large of a pool is used for these JDBCdatabase connections.
1. In the left navigation pane, expand the Domains folder, and select the domain for whichyou want to modify the connection.
2. Select Connections.
3. In the right administration pane:
• To edit the properties of a connection pool, click the Connections tab.• To edit the properties of a connection pool template, click the Templates tab.
4. Select a connection pool or template from the list.
5. Select JDBC as the Connection pool type, and click Properties.
6. Change the Max Pool Size value (and any other values you choose). The default value is150, and 0 indicates no limit. The Max Pool Size value should not be a negative value.
Administer
Sybase Control Center for Sybase Unwired Platform 105

See Creating Connections and Connection Templates in Sybase Control Center for SybaseUnwired Platform and JDBC Properties.
7. Click Save to save the changes.
Scheduling Accumulated Data Cleanup for DomainsPeriodically clean up accumulated data maintenance items in cache that are no longer needed,by creating a data purge schedule. The schedule should be set to perform the clean upprocesses run when system usage is low.
However, you can also manually purge accumulated data items at any time; however note thatfor domain logs, if the number of domain log data is very large (one with hundreds ofthousands of entries for example) then Unwired Server must purge domain log dataasynchronously.
Note: You can use the Administration API to automate clean up at the package level.
1. In the Sybase Control Center left navigation pane, expand the Domains tab and select adomain.
2. In the right pane, select the Scheduled Task tab.
3. Under Task, select one of the options you want to schedule, and then select Properties toset up its automatic schedule:
Option Description
Subscription Cleanup Removes subscriptions that are not active for the 'numberof inactive days' in the schedule task configuration. Note,subscription is considered active as follows:• Replication – last synchronization request time-
stamp.• Messaging – last synchronization message time-
stamp.
Note: If a casual user accesses the system infrequently,for example three to four times a year, the user falls out-side the specified time frame and is removed from SybaseUnwired Platform. The user will then have to reinstallSybase Unwired Platform and initiate a sync to re-activatesubscription.
Error History Cleanup Removes historical data on MBO data refresh and oper-ation replay failures, which result from system or appli-cation failures. System failures may include networkproblems, credential issues, and back-end system failure.Application failures may include invalid values, and non-unique data.
Note: Only error messages are removed.
Administer
106 Sybase Unwired Platform
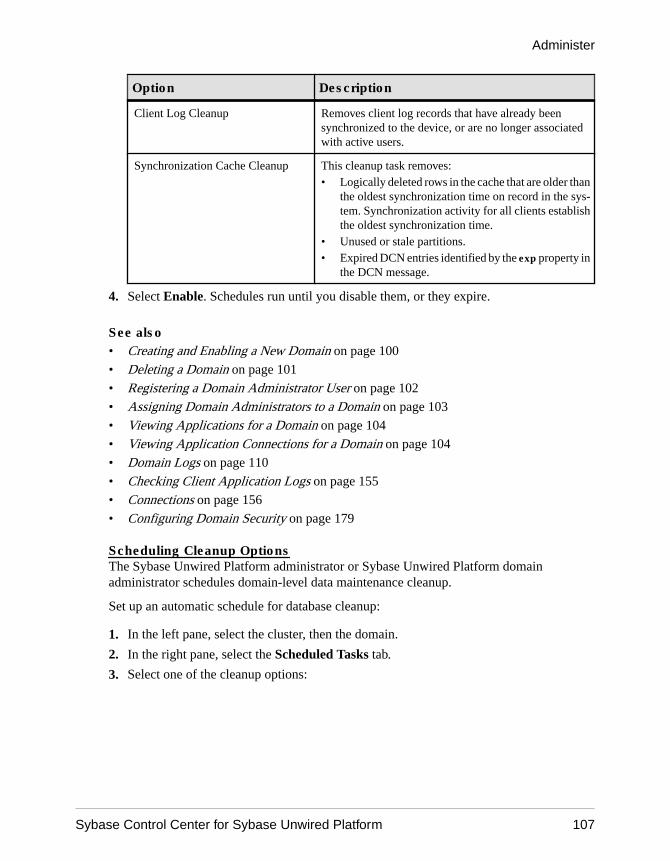
Option Description
Client Log Cleanup Removes client log records that have already beensynchronized to the device, or are no longer associatedwith active users.
Synchronization Cache Cleanup This cleanup task removes:• Logically deleted rows in the cache that are older than
the oldest synchronization time on record in the sys-tem. Synchronization activity for all clients establishthe oldest synchronization time.
• Unused or stale partitions.• Expired DCN entries identified by the exp property in
the DCN message.
4. Select Enable. Schedules run until you disable them, or they expire.
See also• Creating and Enabling a New Domain on page 100
• Deleting a Domain on page 101
• Registering a Domain Administrator User on page 102
• Assigning Domain Administrators to a Domain on page 103
• Viewing Applications for a Domain on page 104
• Viewing Application Connections for a Domain on page 104
• Domain Logs on page 110
• Checking Client Application Logs on page 155
• Connections on page 156
• Configuring Domain Security on page 179
Scheduling Cleanup OptionsThe Sybase Unwired Platform administrator or Sybase Unwired Platform domainadministrator schedules domain-level data maintenance cleanup.
Set up an automatic schedule for database cleanup:
1. In the left pane, select the cluster, then the domain.
2. In the right pane, select the Scheduled Tasks tab.
3. Select one of the cleanup options:
Administer
Sybase Control Center for Sybase Unwired Platform 107

Option Description
Subscription Cleanup Removes subscriptions that are not active for the 'numberof inactive days' in the schedule task configuration. Note,subscription is considered active as follows:• Replication – last synchronization request time-
stamp.• Messaging – last synchronization message time-
stamp.
Note: If a casual user accesses the system infrequently,for example three to four times a year, the user falls out-side the specified time frame and is removed from SybaseUnwired Platform. The user will then have to reinstallSybase Unwired Platform and initiate a sync to re-activatesubscription.
Error History Cleanup Removes historical data on MBO data refresh and oper-ation replay failures, which result from system or appli-cation failures. System failures may include networkproblems, credential issues, and back-end system failure.Application failures may include invalid values, and non-unique data.
Note: Only error messages are removed.
Client Log Cleanup Removes client log records that have already beensynchronized to the device, or are no longer associatedwith active users.
Synchronization Cache Cleanup This cleanup task removes:• Logically deleted rows in the cache that are older than
the oldest synchronization time on record in the sys-tem. Synchronization activity for all clients establishthe oldest synchronization time.
• Unused or stale partitions.• Expired DCN entries identified by the exp property in
the DCN message.
4. Click Properties, then in the Task Properties dialog, select the Schedule tab.
5. Configure the required schedule:
• Schedule repeat – select how often the schedule should run. Options are monthly,weekly, daily, hourly, and custom.• If you select monthly or weekly, specify:
• Start date – select the date and time the automated upload should begin. Usethe calendar picker and 24-hour time selector.
• End date – select the date and time the automated upload should end.• If you select daily or hourly, specify:
Administer
108 Sybase Unwired Platform

• Start date – select the date and time the automated upload should begin. Usethe calendar picker and 24-hour time selector.
• End date – select the date and time the automated upload should end.• Days of the week – select each day the automated upload schedule should run.
• Select custom, to specify the interval granularity in seconds, minutes, or hours, aswell as other date and time parameters.
6. In the Task Properties dialog, select the Options tab, set the number of inactive days forwhich to purge.
Note: This step is unnecessary for Synchronization Cache Cleanup.
7. Click OK to save the schedule properties and purge options.
Note: If a casual user accesses the system infrequently, for example three to four times ayear, the user falls outside the purging time frame and is removed from Sybase UnwiredPlatform. The user will then have to reinstall Sybase Unwired Platform and initiate a sync.
Enabling Domain CleanupThe SUP Administrator or SUP Domain Administrator must enable the schedule as a separatetask.
You can set up the schedule, and enable it at a later time. Once enabled, the cleanup runsautomatically until is changed, disabled, or expires. You can check the current enabled ordisabled status on the Scheduled Tasks tab.
1. In the left pane, select the cluster, then the domain.
2. In the right pane, select the Scheduled Task tab.
3. Select one of the cleanup options, and verify the value in the Status column is set todisabled.
4. On the Scheduled Task tab, click Enable.
5. Click OK to confirm. The value in the Status column changes to enabled. The cleanupschedule runs automatically for the selected option.
Disabling Domain CleanupThe SUP Administrator or SUP Domain Administrator can disable, or reenable, a scheduledcleanup option at any time.
If you disable the cleanup option while it is running, the current process continues. Futureaction is disabled, unless you reenable the option.
1. In the left pane, select the cluster, then the domain.
2. In the right pane, select the Scheduled Task tab.
3. Select one of the cleanup options, and verify the value in the Status column is set toenabled.
Administer
Sybase Control Center for Sybase Unwired Platform 109

4. On the Schedule tab, click Disable.
5. Click OK to confirm. The value in the Status column changes to disabled.
Running Manual Purge by DomainAt any time the SUP Administrator or SUP Domain Administrator can manually run cleanupoptions. The processes run asynchronously on Unwired Server using the current settings.
As much as reasonable, use manual purge when system load is light.
1. In the left pane, select the cluster, then the domain.
2. In the right pane, select the Scheduled Tasks tab.
3. Select one of the cleanup options.
4. Click Run Now, then optionally specify the number of days for which to preserve data.Artifacts that fall outside of the time period are purged.
5. Click OK to confirm. The request is sent immediately, and the task runs asynchronouslyon Unwired Server.
Domain LogsThe domain log enables an administrator to monitor application activities throughout thesystem. Detailed views of application activities are available by subsystem. The administratorcan review activities in a specific subsystem log view, view correlated data in multiplesubsystems, or view a unified log across all subsystems. The administrator must enablelogging, and then use log filters to view data of interest.
By default, only error messages are recorded in each domain's log. To enable domain logging,you must create a log profile. See Creating and Enabling Domain Logging in Sybase ControlCenter for Sybase Unwired Platform.
See also• Creating and Enabling a New Domain on page 100
• Deleting a Domain on page 101
• Registering a Domain Administrator User on page 102
• Assigning Domain Administrators to a Domain on page 103
• Viewing Applications for a Domain on page 104
• Viewing Application Connections for a Domain on page 104
• Scheduling Accumulated Data Cleanup for Domains on page 106
• Checking Client Application Logs on page 155
• Connections on page 156
• Configuring Domain Security on page 179
Administer
110 Sybase Unwired Platform

Enabling Application LoggingEnable domain-level logging to help you trace and monitor application activities, and reviewthe resulting logs for troubleshooting.
1. Creating and Enabling Domain Logging
Create logging profile definitions and enable the log profile.
Creating and Enabling Domain LoggingCreate logging profile definitions and enable the log profile.
1. In the left navigation pane of Sybase Control Center, select Domains.
2. Under the domain node, select Log.
3. In the right administration pane, select the Settings tab.
4. Click New.
5. In the Profile Definition dialog, enter a Name and Description for the log profile.
6. Add the necessary profile definitions.
7. Select Enable after creation.
8. Click OK.
Note: To ensure the domain logs are populated immediately after enabling the log profile,do the following:a. Under the Settings tab, click Configuration.b. Check Enable flush threshold.
1. Creating the Profile Definition
Create profile definitions belonging to multiple categories.
2. Enabling the Created Profile
Enable the profile you have created to monitor the log profile definitions.
3. Enabling and Configuring Domain Logging
Configure auto purge, flush threshold, and flush batch size settings to determine how longdomain log data is retained, how frequently it is written to database from server nodes, andset a domain log database connection to configure where domain log data is stored.
Creating the Profile DefinitionCreate profile definitions belonging to multiple categories.
You can add profile definitions by selecting applications, security configurations, users,connections, applications connections or payloads of your choice.
See also• Enabling the Created Profile on page 117
Administer
Sybase Control Center for Sybase Unwired Platform 111
Adding or Removing Applications to the ProfileAdd applications to the log profile that are currently deployed in the selected domain.
Note: If a logging profile includes both package related and payloads criteria, you mayexperience a serious performance impact. Make sure you include additional criteria such asusers or application connections.
1. In the Profile Definition dialog, select Package related.
2. Select Applications, then click the button to add application to the profile.The Applications dialog is displayed with the list of applications currently deployed in thisdomain.
3. To search for the application you want to add to the profile, select the search criteria fromthe Search drop-down list and enter a value for this criteria.
4. Click Go.
5. You can do any of the following:
• To add an application to a new or existing profile, select the check-box adjacent to theapplication entry in the list.
• To remove an application from the profile, uncheck the check-box adjacent to theapplication entry in the list.
6. Click OK.
See also• Adding or Removing Packages to the Profile on page 112
• Adding or Removing MBOs to the Profile on page 113
• Adding or Removing Operations to the Profile on page 114
• Adding or Removing Security Configurations or Users to the Profile on page 114
• Adding or Removing Package Users to the Profile on page 115
• Adding or Removing Connections to the Profile on page 115
• Adding or Removing Application Connections to the Profile on page 116
• Adding or Removing Payloads to the Profile on page 116
Adding or Removing Packages to the ProfileAdd one or more packages to the profile.
Note: If a logging profile includes both package related and payloads criteria, you mayexperience a serious performance impact. Make sure you include additional criteria such asusers or application connections.
1. In the Profile Definition dialog, select Package related.
2. Select Packages, then click the button to add packages to the profile.
Administer
112 Sybase Unwired Platform

3. Select one or more packages to include.
4. Click OK.
Note: To remove a selection, click View selection, select the item, then click Remove.
See also• Adding or Removing Applications to the Profile on page 112
• Adding or Removing MBOs to the Profile on page 113
• Adding or Removing Operations to the Profile on page 114
• Adding or Removing Security Configurations or Users to the Profile on page 114
• Adding or Removing Package Users to the Profile on page 115
• Adding or Removing Connections to the Profile on page 115
• Adding or Removing Application Connections to the Profile on page 116
• Adding or Removing Payloads to the Profile on page 116
Adding or Removing MBOs to the ProfileAdd MBOs from one or more packages to the profile.
Note: If a logging profile includes both package related and payloads criteria, you mayexperience a serious performance impact. Make sure you include additional criteria such asusers or application connections.
1. In the Profile Definition dialog, select Package related.
2. Select MBOs, then click the button to add MBOs to the profile.
3. Navigate to a package in the left pane.
4. Select the MBO in the right pane.
5. Identify another MBO, or click OK.
Note: To remove a selection, click View selection, select the item, then click Remove.
See also• Adding or Removing Applications to the Profile on page 112
• Adding or Removing Packages to the Profile on page 112
• Adding or Removing Operations to the Profile on page 114
• Adding or Removing Security Configurations or Users to the Profile on page 114
• Adding or Removing Package Users to the Profile on page 115
• Adding or Removing Connections to the Profile on page 115
• Adding or Removing Application Connections to the Profile on page 116
• Adding or Removing Payloads to the Profile on page 116
Administer
Sybase Control Center for Sybase Unwired Platform 113

Adding or Removing Operations to the ProfileAdd operations to the log profile for MBOs that are currently deployed in the selected domain.You can select operations for one or more MBOs.
Note: If a logging profile includes both package related and payloads criteria, you mayexperience a serious performance impact. Make sure you include additional criteria such asusers or application connections.
1. In the Profile Definition dialog, select Package related.
2. Select Operations, then click the button to add operations to the profile.
3. Navigate to a package in the left pane, and select an MBO.
4. Identify the create, delete, or update operations to include for the MBO in the right pane.
5. Select another MBO and its operations, or click OK.
Note: To remove a selection, click View selection, select the item, then click Remove.
See also• Adding or Removing Applications to the Profile on page 112• Adding or Removing Packages to the Profile on page 112• Adding or Removing MBOs to the Profile on page 113• Adding or Removing Security Configurations or Users to the Profile on page 114• Adding or Removing Package Users to the Profile on page 115• Adding or Removing Connections to the Profile on page 115• Adding or Removing Application Connections to the Profile on page 116• Adding or Removing Payloads to the Profile on page 116
Adding or Removing Security Configurations or Users to the ProfileAdd one or more domain security configurations to the profile.
1. In the Profile Definition dialog, select Security related.
2. Select Security configuration, then click the button to add packages to the profile.
3. Select one or more security configuration to include.
4. Click OK.
Note: To remove a selection, click View selection, select the item, then click Remove.
See also• Adding or Removing Applications to the Profile on page 112• Adding or Removing Packages to the Profile on page 112• Adding or Removing MBOs to the Profile on page 113
Administer
114 Sybase Unwired Platform

• Adding or Removing Operations to the Profile on page 114
• Adding or Removing Package Users to the Profile on page 115
• Adding or Removing Connections to the Profile on page 115
• Adding or Removing Application Connections to the Profile on page 116
• Adding or Removing Payloads to the Profile on page 116
Adding or Removing Package Users to the ProfileAdd one or more domain package users to the profile to include security configurations.
1. In the Profile Definition dialog, select Security related.
2. Select Users, then click the button to add packages to the profile.
3. Select one or more user name to include.
4. Click OK.
Note: To remove a selection, click View selection, select the item, then click Remove.
See also• Adding or Removing Applications to the Profile on page 112
• Adding or Removing Packages to the Profile on page 112
• Adding or Removing MBOs to the Profile on page 113
• Adding or Removing Operations to the Profile on page 114
• Adding or Removing Security Configurations or Users to the Profile on page 114
• Adding or Removing Connections to the Profile on page 115
• Adding or Removing Application Connections to the Profile on page 116
• Adding or Removing Payloads to the Profile on page 116
Adding or Removing Connections to the ProfileAdd connections of a particular connection type to the profile.
1. In the Profile Definition dialog, select Connections.
2. Click the button to add connections to the profile.The Connections dialog is displayed with the list of applications currently deployed in thisdomain.
3. You can do any of the following:
• To add a connection to a new or existing profile, select a Connection Type entry in thelist and select the connection names.
• To remove an application from the profile, select the View selection check-box. Selectthe connection type and click Remove.
4. Click OK.
Administer
Sybase Control Center for Sybase Unwired Platform 115
See also• Adding or Removing Applications to the Profile on page 112• Adding or Removing Packages to the Profile on page 112• Adding or Removing MBOs to the Profile on page 113• Adding or Removing Operations to the Profile on page 114• Adding or Removing Security Configurations or Users to the Profile on page 114• Adding or Removing Package Users to the Profile on page 115• Adding or Removing Application Connections to the Profile on page 116• Adding or Removing Payloads to the Profile on page 116
Adding or Removing Application Connections to the ProfileAdd application connections to the profile. This enables you to list current applicationconnections to Unwired Server.
1. In Profile Definition, select Application connections.
2. Click the button to add application connections to the profile.
3. In Application Connections, select Application Connections, and the data columns toinclude
4. Click OK.
See also• Adding or Removing Applications to the Profile on page 112• Adding or Removing Packages to the Profile on page 112• Adding or Removing MBOs to the Profile on page 113• Adding or Removing Operations to the Profile on page 114• Adding or Removing Security Configurations or Users to the Profile on page 114• Adding or Removing Package Users to the Profile on page 115• Adding or Removing Connections to the Profile on page 115• Adding or Removing Payloads to the Profile on page 116
Adding or Removing Payloads to the ProfileAdd a subsystem to the profile for payload logging. This enables you to identify one or morespecific subsystems where payload data will also be included with the logged activity. Ifspecified, payload is enabled for the selected subsystems.
The payload corresponds to the information of one request serviced by the Unwired Server.Example: For an administrator to keep track of granular details such as request headers sent toGateway through the proxy server, payload is enabled for a profile.
Note: If a logging profile includes both package related and payloads criteria, you mayexperience a serious performance impact. Make sure you include additional criteria such asusers or application connections.
Administer
116 Sybase Unwired Platform

1. In the Profile Definition dialog, select Payloads.
2. Click the button to add payloads to the profile.The Payloads dialog is displayed.
3. You can do any of the following:
• Select the check-box adjacent to the subsystem you want to add to the profile.• Uncheck the check-box that you want to remove from the profile.
4. Click OK.
See also• Adding or Removing Applications to the Profile on page 112
• Adding or Removing Packages to the Profile on page 112
• Adding or Removing MBOs to the Profile on page 113
• Adding or Removing Operations to the Profile on page 114
• Adding or Removing Security Configurations or Users to the Profile on page 114
• Adding or Removing Package Users to the Profile on page 115
• Adding or Removing Connections to the Profile on page 115
• Adding or Removing Application Connections to the Profile on page 116
Enabling the Created ProfileEnable the profile you have created to monitor the log profile definitions.
1. In the Profile Definition dialog, select Enable after creation to enable the logging profileonce you have created it.
2. Click OK.
You can alternatively enable the log profile by doing the following:
a. In the Settings tab, select the log profile you have created.b. Click Enable.c. Click OK on the confirmation dialog.
See also• Creating the Profile Definition on page 111
Enabling and Configuring Domain LoggingConfigure auto purge, flush threshold, and flush batch size settings to determine how longdomain log data is retained, how frequently it is written to database from server nodes, and seta domain log database connection to configure where domain log data is stored.
If you do not configure the auto-purge schedule, you can purge data manually with the Purgebutton. If you are manually purging logs with hundreds of thousands of entries, note thatUnwired Server removes these entries asynchronously to avoid negatively impacting runtime
Administer
Sybase Control Center for Sybase Unwired Platform 117

performance. For smaller logs, the purge action tends to be more instantaneous. To avoid largelogs, use the auto purge schedule.
1. In the left navigation pane of Sybase Control Center, select Domains.
2. Under the domain node, select Log.
3. In the right administration pane, select the Settings tab. These settings are used for alldomains.
4. Click Configuration.
5. Configure auto purge settings.
Auto purge clears obsolete data from the database once it reaches the specified threshold.
a) Select Enable auto purge configuration to activate auto purge functionality.b) Enter the length of time (in days) to retain monitoring data before it is purged.
6. Configure flush threshold settings:
The flush threshold indicates how often data is flushed from memory to the database. Thisallows you to specify the size of the data saved in memory before it is cleared. Alternately,if you do not enable a flush threshold, data is immediately written to the domain logdatabase as it is captured.
a) Select Enable flush threshold configuration to activate flush threshold functionality.
Note: Enabling flush configuration is a good practice for performance considerations.Be aware there may be a consequent delay in viewing data, until data is stored in thedatabase.
b) Select one of:
• Number of rows – domain log data that surpasses the specified number of rows isflushed from memory. Enter the desired number of rows adjacent to Rows.Disabled by default.
• Time interval – domain log data older than the specified time interval is flushedfrom memory. Enter the desired duration adjacent to Minutes. The default is 5.
• Either rows or time interval – domain log data is flushed from memory accordingto whichever value is reached first: either the specified number of rows or thespecified time interval. Enter the desired rows and duration adjacent to Rows andMinutes, respectively.
7. If you enabled a flush threshold, enter a Flush batch row size by specifying the size ofeach batch of data sent to the domain log database. The row size must be a positive integer.
The batch size divides flushed data into smaller segments, rather than saving all datatogether according to the flush threshold parameters. For example, if you set the flushthreshold to 100 rows and the flush batch row size to 50, once 100 rows are collected in theconsole, the save process executes twice; data is flushed into the database in two batches of50 rows. If the flush threshold is not enabled, the flush batch row size is implicitly 1.
Administer
118 Sybase Unwired Platform

Note: By default, the domain log database flushes data every 5 minutes. Alternatively, youcan flush data immediately by removing or decreasing the default values, but doing soimpacts performance.
8. Optional. To change the data source, select an available database from the Domain logdatabase endpoint drop down list.
Available databases are those with a JDBC server connection type (SQL Anywhere)created in the default domain. To create a new database, a platform administrator must setup a database by running the appropriate configuration scripts and creating a serverconnection for the database in the default domain. The database server connection thenappears as an option in the Domain Log Database Endpoint drop down list.
9. Optional. Change the maximum length of the payload data logged in the payloadcolumn(s) of each sub-system. Large payload content is truncated to the length specifiedas that value. The default max size is 12K (in bytes) which is configured in the 'default'domain and applicable for all domains. Increasing the domain payload size should betested to identify proper configuration for the server's JVM memory settings.
10. Click OK.
Reviewing Domain Log DataAn administrator reviews logged data by creating log filters. The filters enable you to retrievedata logged for a specific thread, application, user, connection, among other options.
You can retrieve log data without using any filters, however, when there is large number ofactivities being logged, it may be advisable to filter the results to a more manageable size byspecifying search conditions in the log filter (user, application, or thread-id).
You can combine multiple log filters that are common with sub-system specific filters whenviewing in a sub-system view, and combine multiple sub-system filters in the ALL tab toretrieve the data of interest.
Supported Log SubsystemsLog subsystems provide categories that enable you to filter and correlate application data at amore granular level. Understanding these subsystems enables you to formulate more specificfilters for tracking application activities throughout the system.
Subsystem Description
All Provides a unified view of all subsystems, enabling you to look for activities,trends, and symptoms across multiple subsystems.
Synchronization Provides a view of synchronization activities. Within this subsystem, addi-tional categories include data synchronization, operation replay, subscription,result checker, cache refresh, and data services (DS) interface.
Device Notification Provides a view of device notification activities.
Administer
Sybase Control Center for Sybase Unwired Platform 119

Subsystem Description
DCN Provides a view of data change notification (DCN) activities. Within thissubsystem, additional categories include general DCN, and Hybrid App DCN.
Security Provides a view of security-related activities.
Error Provides a view of errors.
Connection Provides a view of connection activities. Within this subsystem, additionalcategories include DOE, JDBC, RES, SAP®, and SOAP connections.
Push Provides a few of push notification activities.
Proxy Provides a view of Online Data Proxy connection-related activities.
Server Provides a view of server-related activities.
Dispatcher Provides a view of dispatcher activities. Within this subsystem, categoriesinclude Replication, Messaging, and Service.
Application Provides a view of application activities. Within this subsystem, categoriesinclude Registration and Setting.
.
See also• Setting Up a Pool of Log Filters on page 121
• Retrieving Unified View Logs on page 123
• Retrieving Synchronization Logs on page 124
• Retrieving Device Notification Logs on page 125
• Retrieving Data Change Notification Logs on page 126
• Retrieving Security Logs on page 127
• Retrieving Error Logs on page 128
• Retrieving Connection Logs on page 129
• Retrieving Push Logs on page 130
• Retrieving Proxy Logs on page 131
• Retrieving Server Logs on page 132
• Retrieving Dispatcher Logs on page 132
• Retrieving Application Logs on page 134
• Correlating Log Data Across Subsystems on page 135
• Exporting Log Data on page 136
Administer
120 Sybase Unwired Platform
Setting Up a Pool of Log FiltersSet up a pool of log filters to filter out unwanted application activities, and provide a view ofspecific activities. Use Sybase Control Center to create and manage your filters.
See also• Supported Log Subsystems on page 119
• Retrieving Unified View Logs on page 123
• Retrieving Synchronization Logs on page 124
• Retrieving Device Notification Logs on page 125
• Retrieving Data Change Notification Logs on page 126
• Retrieving Security Logs on page 127
• Retrieving Error Logs on page 128
• Retrieving Connection Logs on page 129
• Retrieving Push Logs on page 130
• Retrieving Proxy Logs on page 131
• Retrieving Server Logs on page 132
• Retrieving Dispatcher Logs on page 132
• Retrieving Application Logs on page 134
• Correlating Log Data Across Subsystems on page 135
• Exporting Log Data on page 136
Reusable Log FiltersCreate reusable log filters that you can use as a base. One strategy is to create a base log filterfor each of the supported log subsystems, and for significant categories within subsystems.Another strategy is to create common log filters (useful across subsystems) on specificcriteria, such as thread ID, user, package, and so forth.
You can modify these base log filters as needed for more specific searches, or clone the logfilter and modify it for a specific search.
See also• Creating Log Filters on page 121
• Deleting Filters on page 122
• Updating Filters on page 122
Creating Log FiltersFilter the log data by creating filters across subsystems that define the appropriate searchcriteria.
1. In the left navigation pane of the Sybase Control Center, select theDomains node.
Administer
Sybase Control Center for Sybase Unwired Platform 121
2. Select the domain node and select the Log node.
3. In the right administration pane, select the General tab.
4. Select + to add a filter definition to a subsystem.
5. In the Filter Definition dialog, enter the Name and Description of the filter.
6. Select the Sub System.
7. Select the filter criteria and assign values to the criteria selected. You can use the logicaloperations to compose the criteria.
Note: You use the 'AND' logical operator to highlight filter relations belonging to the samesubsystem. Filter definitions among multiple subsystems use the 'OR' logical operator.
8. Click OK.
See also• Reusable Log Filters on page 121
• Deleting Filters on page 122
• Updating Filters on page 122
Deleting FiltersDelete the filters created for sub systems
1. In the left navigation pane of the Sybase Control Center, select theDomains node.
2. Select the domain node and select the Log node.
3. In the right administration pane, select the General tab.
4. Select the filter from the list.
5. Click Delete.
See also• Reusable Log Filters on page 121
• Creating Log Filters on page 121
• Updating Filters on page 122
Updating FiltersUpdate filters as needed to fine tune log file filtering.
1. In the left navigation pane of the Sybase Control Center, select theDomains node.
2. Select the domain node and select the Log node.
3. In the right administration pane, select the General tab.
4. Select the filter from the list.
5. Click the properties icon to review or modify the filter.
Administer
122 Sybase Unwired Platform

Note: Alternatively, click the clone icon to clone the filter, then proceed to modify it.
6. In Filter Definition, modify the description, and set up the filter criteria.
7. Click OK.
See also• Reusable Log Filters on page 121• Creating Log Filters on page 121• Deleting Filters on page 122
Retrieving Unified View LogsRetrieves logging data across the domain to provide a unified view.
1. Display the General tab for Domain Logs.
In the navigation pane, click Domain > <domainName> > Log, then select General fromthe administration pane.
2. Select the All tab.
3. To filter the display, select Show filter and either:
• Use an existing filter by checking the box adjacent to the filter name.• Create a new filter by clicking + and choosing a starting date and time, and ending date
and time.
To customize the display, select the view type (grid or text), or click >> to show onlyselected columns. To export the filtered results, click Export and select an appropriateoutput destination.
4. Click Retrieve to retrieve the logs.The table is populated with the list of logs.
See also• Supported Log Subsystems on page 119• Setting Up a Pool of Log Filters on page 121• Retrieving Synchronization Logs on page 124• Retrieving Device Notification Logs on page 125• Retrieving Data Change Notification Logs on page 126• Retrieving Security Logs on page 127• Retrieving Error Logs on page 128• Retrieving Connection Logs on page 129• Retrieving Push Logs on page 130• Retrieving Proxy Logs on page 131• Retrieving Server Logs on page 132• Retrieving Dispatcher Logs on page 132
Administer
Sybase Control Center for Sybase Unwired Platform 123
• Retrieving Application Logs on page 134• Correlating Log Data Across Subsystems on page 135• Exporting Log Data on page 136
Retrieving Synchronization LogsRetrieves logging data related to different aspects of data synchronization, including data,subscriptions, operations, result checker, cache refresh and the data service and UnwiredServer interface. Using data in these logs and the correlation tool, you can follow the data pathbetween the enterprise information system (EIS), Unwired Server, cache database, and userapplication connection.
1. Display the General tab for Domain Logs.
In the navigation pane, click Domain > <domainName> > Log, then select General fromthe administration pane.
2. Select the Synchronization tab.
3. Select a synchronization subsystem:
• Data Sync – view data synchronization details.• Operation Replay – view MBO operational replay details.• Subscription – view subscription details.• Result Checker – view result checker details.• Cache Refresh – view cache database interaction details.• DS Interface – view requests entering data services that result in interaction with cache
database and EIS.
4. To filter the display, select Show filter and either:
• Use an existing filter by checking the box adjacent to the filter name.• Create a new filter by clicking + and choosing a starting date and time, and ending date
and time.
To customize the display, select the view type (grid or text), or click >> to show onlyselected columns. To export the filtered results, click Export and select an appropriateoutput destination.
5. (Optional) Select the columns to display from the drop down list, such as Application ID,Application Connection Id, and User.
6. Click Retrieve to retrieve the logs.
7. (Optional) Select a specific row to view additional columns in the detail area.
See also• Supported Log Subsystems on page 119• Setting Up a Pool of Log Filters on page 121• Retrieving Unified View Logs on page 123• Retrieving Device Notification Logs on page 125
Administer
124 Sybase Unwired Platform

• Retrieving Data Change Notification Logs on page 126
• Retrieving Security Logs on page 127
• Retrieving Error Logs on page 128
• Retrieving Connection Logs on page 129
• Retrieving Push Logs on page 130
• Retrieving Proxy Logs on page 131
• Retrieving Server Logs on page 132
• Retrieving Dispatcher Logs on page 132
• Retrieving Application Logs on page 134
• Correlating Log Data Across Subsystems on page 135
• Exporting Log Data on page 136
Retrieving Device Notification LogsRetrieves logging data for server-initiated synchronization notifications between UnwiredServer and devices.
1. Display the General tab for Domain Logs.
In the navigation pane, click Domain > <domainName> > Log, then select General fromthe administration pane.
2. Select the Device Notification tab.
3. To filter the display, select Show filter and either:
• Use an existing filter by checking the box adjacent to the filter name.• Create a new filter by clicking + and choosing a starting date and time, and ending date
and time.
To customize the display, select the view type (grid or text), or click >> to show onlyselected columns. To export the filtered results, click Export and select an appropriateoutput destination.
4. (Optional) Select the columns to display from the drop down list, such as Application ID,Application Connection Id, and User.
5. Click Retrieve to retrieve the log data.
6. (Optional) Select a specific row to view additional columns in the detail area.
See also• Supported Log Subsystems on page 119
• Setting Up a Pool of Log Filters on page 121
• Retrieving Unified View Logs on page 123
• Retrieving Synchronization Logs on page 124
• Retrieving Data Change Notification Logs on page 126
• Retrieving Security Logs on page 127
Administer
Sybase Control Center for Sybase Unwired Platform 125

• Retrieving Error Logs on page 128• Retrieving Connection Logs on page 129• Retrieving Push Logs on page 130• Retrieving Proxy Logs on page 131• Retrieving Server Logs on page 132• Retrieving Dispatcher Logs on page 132• Retrieving Application Logs on page 134• Correlating Log Data Across Subsystems on page 135• Exporting Log Data on page 136
Retrieving Data Change Notification LogsRetrieves logging data for data change notifications (DCN) between an enterprise informationsystem (EIS) and an MBO package, for general and Hybrid App DCN.
1. Display the General tab for Domain Logs.
In the navigation pane, click Domain > <domainName> > Log, then select General fromthe administration pane.
2. Select the DCN tab.
3. Select the DCN type:
• General DCN• Hybrid App DCN
4. To filter the display, select Show filter and either:
• Use an existing filter by checking the box adjacent to the filter name.• Create a new filter by clicking + and choosing a starting date and time, and ending date
and time.
To customize the display, select the view type (grid or text), or click >> to show onlyselected columns. To export the filtered results, click Export and select an appropriateoutput destination.
5. (Optional) Select the columns to display from the drop down list, such as Application ID,Application Connection Id, and User.
6. Click Retrieve to retrieve the logs.
7. (Optional) Select a specific row to view additional columns in the detail area.
See also• Supported Log Subsystems on page 119• Setting Up a Pool of Log Filters on page 121• Retrieving Unified View Logs on page 123• Retrieving Synchronization Logs on page 124• Retrieving Device Notification Logs on page 125
Administer
126 Sybase Unwired Platform

• Retrieving Security Logs on page 127
• Retrieving Error Logs on page 128
• Retrieving Connection Logs on page 129
• Retrieving Push Logs on page 130
• Retrieving Proxy Logs on page 131
• Retrieving Server Logs on page 132
• Retrieving Dispatcher Logs on page 132
• Retrieving Application Logs on page 134
• Correlating Log Data Across Subsystems on page 135
• Exporting Log Data on page 136
Retrieving Security LogsRetrieves security details for specific applications.
1. Display the General tab for Domain Logs.
In the navigation pane, click Domain > <domainName> > Log, then select General fromthe administration pane.
2. Select the Security tab.
3. To filter the display, select Show filter and either:
• Use an existing filter by checking the box adjacent to the filter name.• Create a new filter by clicking + and choosing a starting date and time, and ending date
and time.
To customize the display, select the view type (grid or text), or click >> to show onlyselected columns. To export the filtered results, click Export and select an appropriateoutput destination.
4. (Optional) Select the columns to display from the drop down list, such as Application ID,Application Connection Id, and User.
5. Click Retrieve to retrieve the logs.
See also• Supported Log Subsystems on page 119
• Setting Up a Pool of Log Filters on page 121
• Retrieving Unified View Logs on page 123
• Retrieving Synchronization Logs on page 124
• Retrieving Device Notification Logs on page 125
• Retrieving Data Change Notification Logs on page 126
• Retrieving Error Logs on page 128
• Retrieving Connection Logs on page 129
• Retrieving Push Logs on page 130
Administer
Sybase Control Center for Sybase Unwired Platform 127

• Retrieving Proxy Logs on page 131
• Retrieving Server Logs on page 132
• Retrieving Dispatcher Logs on page 132
• Retrieving Application Logs on page 134
• Correlating Log Data Across Subsystems on page 135
• Exporting Log Data on page 136
Retrieving Error LogsRetrieves logging data for domain errors. Note that error logging is always on, and any errorthat occurs for any application activity is logged.
1. Display the General tab for Domain Logs.
In the navigation pane, click Domain > <domainName> > Log, then select General fromthe administration pane.
2. Select the Error tab.
3. To filter the display, select Show filter and either:
• Use an existing filter by checking the box adjacent to the filter name.• Create a new filter by clicking + and choosing a starting date and time, and ending date
and time.
To customize the display, select the view type (grid or text), or click >> to show onlyselected columns. To export the filtered results, click Export and select an appropriateoutput destination.
4. (Optional) Select the columns to display from the drop down list, such as Application ID,Application Connection Id, and User.
5. Click Retrieve to retrieve the logs.
See also• Supported Log Subsystems on page 119
• Setting Up a Pool of Log Filters on page 121
• Retrieving Unified View Logs on page 123
• Retrieving Synchronization Logs on page 124
• Retrieving Device Notification Logs on page 125
• Retrieving Data Change Notification Logs on page 126
• Retrieving Security Logs on page 127
• Retrieving Connection Logs on page 129
• Retrieving Push Logs on page 130
• Retrieving Proxy Logs on page 131
• Retrieving Server Logs on page 132
• Retrieving Dispatcher Logs on page 132
Administer
128 Sybase Unwired Platform

• Retrieving Application Logs on page 134
• Correlating Log Data Across Subsystems on page 135
• Exporting Log Data on page 136
Retrieving Connection LogsRetrieves logging data for domain connections for specific connection types to backend datasources, including DOE, JDBC, REST, SAP, and SOAP if enabled.
1. Display the General tab for Domain Logs.
In the navigation pane, click Domain > <domainName> > Log, then select General fromthe administration pane.
2. Select the Connection tab.
3. Select a connection type, such as DOE, JDBC, REST, SAP, or SOAP.
4. To filter the display, select Show filter and either:
• Use an existing filter by checking the box adjacent to the filter name.• Create a new filter by clicking + and choosing a starting date and time, and ending date
and time.
To customize the display, select the view type (grid or text), or click >> to show onlyselected columns. To export the filtered results, click Export and select an appropriateoutput destination.
5. (Optional) Select the columns to display from the drop down list, such as Application ID,Application Connection Id, and User.
6. Click Retrieve to retrieve the data.
7. (Optional) Select a specific row to view additional columns in the detail area.
See also• Supported Log Subsystems on page 119
• Setting Up a Pool of Log Filters on page 121
• Retrieving Unified View Logs on page 123
• Retrieving Synchronization Logs on page 124
• Retrieving Device Notification Logs on page 125
• Retrieving Data Change Notification Logs on page 126
• Retrieving Security Logs on page 127
• Retrieving Error Logs on page 128
• Retrieving Push Logs on page 130
• Retrieving Proxy Logs on page 131
• Retrieving Server Logs on page 132
• Retrieving Dispatcher Logs on page 132
• Retrieving Application Logs on page 134
Administer
Sybase Control Center for Sybase Unwired Platform 129

• Correlating Log Data Across Subsystems on page 135• Exporting Log Data on page 136
Retrieving Push LogsRetrieves the log data for all push notifications.
Once you have traced a connection under the Applications node, you can retrieve the logsunder the Domains node.
1. Display the General tab for Domain Logs.
In the navigation pane, click Domain > <domainName> > Log, then select General fromthe administration pane.
2. Select Push.
3. To filter the display, select Show filter and either:
• Use an existing filter by checking the box adjacent to the filter name.• Create a new filter by clicking + and choosing a starting date and time, and ending date
and time.
To customize the display, select the view type (grid or text), or click >> to show onlyselected columns. To export the filtered results, click Export and select an appropriateoutput destination.
4. (Optional) Select the columns to display from the drop down list, such as Application ID,Application Connection Id, and User.
5. Click Retrieve to retrieve the data.
6. (Optional) Select a specific row to view additional columns in the detail area.
See also• Supported Log Subsystems on page 119• Setting Up a Pool of Log Filters on page 121• Retrieving Unified View Logs on page 123• Retrieving Synchronization Logs on page 124• Retrieving Device Notification Logs on page 125• Retrieving Data Change Notification Logs on page 126• Retrieving Security Logs on page 127• Retrieving Error Logs on page 128• Retrieving Connection Logs on page 129• Retrieving Proxy Logs on page 131• Retrieving Server Logs on page 132• Retrieving Dispatcher Logs on page 132• Retrieving Application Logs on page 134• Correlating Log Data Across Subsystems on page 135
Administer
130 Sybase Unwired Platform

• Exporting Log Data on page 136
Retrieving Proxy LogsRetrieves the log data for all requests and responses made from the Proxy server.
Once you have traced a connection under the Applications node, you can retrieve the logsunder the Domains node.
1. Display the General tab for Domain Logs.
In the navigation pane, click Domain > <domainName> > Log, then select General fromthe administration pane.
2. Select the Proxy.
3. To filter the display, select Show filter and either:
• Use an existing filter by checking the box adjacent to the filter name.• Create a new filter by clicking + and choosing a starting date and time, and ending date
and time.
To customize the display, select the view type (grid or text), or click >> to show onlyselected columns. To export the filtered results, click Export and select an appropriateoutput destination.
4. (Optional) Select the columns to display from the drop down list, such as Application ID,Application Connection Id, and User.
5. Click Retrieve to retrieve the log data.
6. (Optional) Select a specific row to view additional columns in the detail area.
See also• Supported Log Subsystems on page 119• Setting Up a Pool of Log Filters on page 121• Retrieving Unified View Logs on page 123• Retrieving Synchronization Logs on page 124• Retrieving Device Notification Logs on page 125• Retrieving Data Change Notification Logs on page 126• Retrieving Security Logs on page 127• Retrieving Error Logs on page 128• Retrieving Connection Logs on page 129• Retrieving Push Logs on page 130• Retrieving Server Logs on page 132• Retrieving Dispatcher Logs on page 132• Retrieving Application Logs on page 134• Correlating Log Data Across Subsystems on page 135• Exporting Log Data on page 136
Administer
Sybase Control Center for Sybase Unwired Platform 131

Retrieving Server LogsRetrieves logging data for domain servers.
1.
2. Display the General tab for Domain Logs.
In the navigation pane, click Domain > <domainName> > Log, then select General fromthe administration pane.
3. Select the Server tab.
4. To filter the display, select Show filter and either:
• Use an existing filter by checking the box adjacent to the filter name.• Create a new filter by clicking + and choosing a starting date and time, and ending date
and time.
To customize the display, select the view type (grid or text), or click >> to show onlyselected columns. To export the filtered results, click Export and select an appropriateoutput destination.
5. (Optional) Select the columns to display from the drop down list, such as Application ID,Application Connection Id, and User.
6. Click Retrieve to retrieve the logs.
See also• Supported Log Subsystems on page 119• Setting Up a Pool of Log Filters on page 121• Retrieving Unified View Logs on page 123• Retrieving Synchronization Logs on page 124• Retrieving Device Notification Logs on page 125• Retrieving Data Change Notification Logs on page 126• Retrieving Security Logs on page 127• Retrieving Error Logs on page 128• Retrieving Connection Logs on page 129• Retrieving Push Logs on page 130• Retrieving Proxy Logs on page 131• Retrieving Dispatcher Logs on page 132• Retrieving Application Logs on page 134• Correlating Log Data Across Subsystems on page 135• Exporting Log Data on page 136
Retrieving Dispatcher LogsRetrieves logging data related to different aspects of the dispatcher, including replication,messaging, and service data. Using data in these logs and the correlation tool, you can follow
Administer
132 Sybase Unwired Platform
the data path between the enterprise information system (EIS), Unwired Server, cachedatabase, and user application connection.
1. Display the General tab for Domain Logs.
In the navigation pane, click Domain > <domainName> > Log, then select General fromthe administration pane.
2. Select the Dispatcher tab.
3. Select a dispatcher subsystem: Replication, Messaging, or Service.
4. To filter the display, select Show filter and either:
• Use an existing filter by checking the box adjacent to the filter name.• Create a new filter by clicking + and choosing a starting date and time, and ending date
and time.
To customize the display, select the view type (grid or text), or click >> to show onlyselected columns. To export the filtered results, click Export and select an appropriateoutput destination.
5. (Optional) Select the columns to display from the drop down list, such as Application ID,Application Connection Id, and User.
6. Click Retrieve to retrieve the logs.
7. (Optional) Select a specific row to view additional columns in the detail area.
See also• Supported Log Subsystems on page 119
• Setting Up a Pool of Log Filters on page 121
• Retrieving Unified View Logs on page 123
• Retrieving Synchronization Logs on page 124
• Retrieving Device Notification Logs on page 125
• Retrieving Data Change Notification Logs on page 126
• Retrieving Security Logs on page 127
• Retrieving Error Logs on page 128
• Retrieving Connection Logs on page 129
• Retrieving Push Logs on page 130
• Retrieving Proxy Logs on page 131
• Retrieving Server Logs on page 132
• Retrieving Application Logs on page 134
• Correlating Log Data Across Subsystems on page 135
• Exporting Log Data on page 136
Administer
Sybase Control Center for Sybase Unwired Platform 133

Retrieving Application LogsRetrieves application logging data, including registration and setting information. Using datain these logs and the correlation tool, you can follow the data path between the enterpriseinformation system (EIS), Unwired Server, cache database, and user application connection.
1. Display the General tab for Domain Logs.
In the navigation pane, click Domain > <domainName> > Log, then select General fromthe administration pane.
2. Select the Application tab.
3. Select a application subsystem: Registration or Setting.
4. To filter the display, select Show filter and either:
• Use an existing filter by checking the box adjacent to the filter name.• Create a new filter by clicking + and choosing a starting date and time, and ending date
and time.
To customize the display, select the view type (grid or text), or click >> to show onlyselected columns. To export the filtered results, click Export and select an appropriateoutput destination.
5. (Optional) Select the columns to display from the drop down list, such as Application ID,Application Connection Id, and User.
6. Click Retrieve to retrieve the logs.
7. (Optional) Select a specific row to view additional columns in the detail area.
See also• Supported Log Subsystems on page 119
• Setting Up a Pool of Log Filters on page 121
• Retrieving Unified View Logs on page 123
• Retrieving Synchronization Logs on page 124
• Retrieving Device Notification Logs on page 125
• Retrieving Data Change Notification Logs on page 126
• Retrieving Security Logs on page 127
• Retrieving Error Logs on page 128
• Retrieving Connection Logs on page 129
• Retrieving Push Logs on page 130
• Retrieving Proxy Logs on page 131
• Retrieving Server Logs on page 132
• Retrieving Dispatcher Logs on page 132
• Correlating Log Data Across Subsystems on page 135
• Exporting Log Data on page 136
Administer
134 Sybase Unwired Platform

Correlating Log Data Across SubsystemsCorrelation mode enables you to retrieve domain log data in multiple subsystems, using thesame search condition. The same condition is combined by common type filters and timerange. This provides a tool for correlating activity across subsystems, useful for analyzing andtroubleshooting.
For example, you could create a common filter for Application ID (such as Application ID =appid); select the ProxyRequestResponse tab and enter the filter information; retrieve thedata; then select Correlated mode, and switch to another tab such as ProxyPush.
1. In the left navigation pane of Sybase Control Center, select Domain.
2. Under the domain node, select Log.
3. In the right administration pane, select the General tab.
4. Select the subsystem tab, such as Synchronization.
5. To select or set up a special filter, select Show filter.
6. To filter based on the date and time, enter a Start date, End date, Start time, Endtime.
7. (Optional) Select the columns to display from the drop down list, such as Application ID,Application Connection Id, User, and Thread.
8. Click Retrieve to retrieve the logs.The table is populated with log data.
9. Select Correlated mode and select the common type of log filters to use.
10. Switch to another subsystem tabs. The data is refreshed using the same criteria from thecommon type of log filters and time range specified.
11. Use the data to trace application activity across subsystems.
See also• Supported Log Subsystems on page 119• Setting Up a Pool of Log Filters on page 121• Retrieving Unified View Logs on page 123• Retrieving Synchronization Logs on page 124• Retrieving Device Notification Logs on page 125• Retrieving Data Change Notification Logs on page 126• Retrieving Security Logs on page 127• Retrieving Error Logs on page 128• Retrieving Connection Logs on page 129• Retrieving Push Logs on page 130• Retrieving Proxy Logs on page 131• Retrieving Server Logs on page 132• Retrieving Dispatcher Logs on page 132
Administer
Sybase Control Center for Sybase Unwired Platform 135

• Retrieving Application Logs on page 134• Exporting Log Data on page 136
Exporting Log DataExport data to a file for archive, or to analyze and troubleshoot problems.
Note:
• Depending on the amount of data being exported, the log export can take a long time.Sybase recommends using log filters and time ranges to filter out and export specific logentries of interest.
• You can also use the management API if there is a need to export domain log contents if thedata set is large, or to refrain from blocking the user interface.
1. In the left navigation pane of Sybase Control Center, select Domain.
2. Under the domain node, select Log.
3. In the right administration pane, select the General tab.
4. Select the subsystem tab, such as Synchronization.
5. To select or set up a special filter, select Show filter.
6. To filter based on the date and time, enter a Start date, End date, Start time, Endtime.
7. Click Retrieve to retrieve the logs.The table is populated with log data.
8. Click Export and specify the file name and location.
See also• Supported Log Subsystems on page 119• Setting Up a Pool of Log Filters on page 121• Retrieving Unified View Logs on page 123• Retrieving Synchronization Logs on page 124• Retrieving Device Notification Logs on page 125• Retrieving Data Change Notification Logs on page 126• Retrieving Security Logs on page 127• Retrieving Error Logs on page 128• Retrieving Connection Logs on page 129• Retrieving Push Logs on page 130• Retrieving Proxy Logs on page 131• Retrieving Server Logs on page 132• Retrieving Dispatcher Logs on page 132• Retrieving Application Logs on page 134• Correlating Log Data Across Subsystems on page 135
Administer
136 Sybase Unwired Platform

Purging Domain LogsA manual purge request is submitted to the primary server. It is a background task is initiated toperform batched clean-up of the data from the domain log database.
Note: Do not stop the primary server while the purge task is executing. Otherwise, you willneed to submit the manual purge request again.
1. In the left navigation pane of Sybase Control Center, select Domains.
2. Under the domain node, select Log.
3. In the right administration pane, select the Settings tab.
4. Click Purge.
5. Enter the date and time within which you want the data to be purged.
6. Click OK.
The purge completion time is dependent on the amount of the log data being purged.Therefore, domain log data may still be seen during this time.
Domain Log CategoriesDomain log data provides detailed statistics for all aspects of device, user, application,domain, and data synchronization related activities.
Synchronization LogSynchronization logs include data related to different aspects of data synchronization,including data, subscriptions, operations, result checker, cache refresh and the data serviceand Unwired Server interface. Using data in these logs and the correlation tool, you can followthe data path between the enterprise information system (EIS), Unwired Server, cachedatabase, and user application connection.
To find out about See
Data synchronization transactions Data Sync statistics
Data services requests made to the Enterprise in-formation system (EIS)
DS Interface statistics
Cache database (CDB) activities Cache refresh statistics
EIS error codes or failures resulting from MobileBusiness Object operations against the EIS data-source
Result Checker statistics (coding required)
Moving MBO operations from a mobile device tothe CDB
Operation replay statistics
Administer
Sybase Control Center for Sybase Unwired Platform 137

To find out about See
Moving data between a mobile device and theCDB
Subscription statistics
Data SyncSynchronization logs include data related to different aspects of data synchronization,including data and Unwired Server interface.
Data Sync – basic statistics for individual data synchronizations:
• Time – the time and date stamp for the log entry.• Application ID – the unique identifier assigned to the registered application. Values may
include a number, blank, or HWC, depending on the client type.• Application Connection ID – the unique identifier for a user application connection.• User – the name of the user associated with the application ID.• Stage – the current stage of processing - START or FINISH.• Package – the name of the package to which the subscription belongs.• MBO – the mobile business object used.• Sync Group – the synchronization group associated with the request.• Thread ID – the identifier for the thread used to process the request.• Node ID – the server node on which the request is received.• Error – the error message if any.• Transaction ID – a unique ID that represents a transaction (one cycle of request-response)
performed by the client or application.• Root Context ID – a unique ID that represents a client/server session. A session can be
thought of as a block that includes multiple requests from the client to the server.
Note: Additional detail columns:
• Payload
Operation ReplaySynchronization logs include data related to different aspects of data synchronization,including operations and Unwired Server interface.
Operation Replay – statistics for moving MBO operations (typically create, update, anddelete) from the device cache to the cache database cache on Unwired Server:
• Time – the time and date stamp for the log entry.• Application ID – the unique identifier assigned to the registered application. Values may
include a number, blank, or HWC, depending on the client type.• Application Connection ID – the unique identifier for a user application connection.• User – the name of the user associated with the application ID.
Administer
138 Sybase Unwired Platform

• Stage – the current stage of processing - START or FINISH.• Package – the name of the package to which the subscription belongs.• MBO – the mobile business object used.• Operation – the MBO operation.• Thread ID – the identifier for the thread used to process the request.• Node ID – the server node on which the request is received.• Error – the error message if any.• Transaction ID – a unique ID that represents a transaction (one cycle of request-response)
performed by the client or application.• Root Context ID – a unique ID that represents a client/server session. A session can be
thought of as a block that includes multiple requests from the client to the server.
Note: Additional detail columns:
• Payload
SubscriptionSynchronization logs include data related to different aspects of data synchronization,including subscriptions and Unwired Server interface.
Subscription – statistics for transferring data between mobile devices and the cache databaseon Unwired Server:
• Time – the time and date stamp for the log entry.• Application ID – the unique identifier assigned to the registered application. Values may
include a number, blank, or HWC, depending on the client type.• Application Connection ID – the unique identifier for a user application connection.• User – the name of the user associated with the application ID.• Stage – the current stage of processing - START or FINISH.• Package – the name of the package to which the subscription belongs.• Subscription Type – the type of subscription used, including SUBSCRIBE,
UNSUBSCRIBE, RECOVER, SUSPEND, and RESUME.• Subscription ID – the identifier associated with the subscription.• Sync Group – the synchronization group associated with the request.• Thread ID – the identifier for the thread used to process the request.• Node ID – the server node on which the request is received.• Error – the error message if any.• Transaction ID – a unique ID that represents a transaction (one cycle of request-response)
performed by the client or application.• Root Context ID – a unique ID that represents a client/server session. A session can be
thought of as a block that includes multiple requests from the client to the server.
Note: Additional detail columns:
Administer
Sybase Control Center for Sybase Unwired Platform 139

• Payload
Result CheckerSynchronization logs include data related to different aspects of data synchronization,including result checker and Unwired Server interface.
Result Checker – EIS error codes or failures resulting from Mobile Business Objectoperations against the EIS datasource (requires coding):
• Time – the time and date stamp for the log entry.• Application ID – the unique identifier assigned to the registered application. Values may
include a number, blank, or HWC, depending on the client type.• Application Connection ID – the unique identifier for a user application connection.• User – the name of the user associated with the application ID.• Stage – the current stage of processing - START or FINISH.• Package – the name of the package to which the subscription belongs.• Class – the class used for the result checker.• Thread ID – the identifier for the thread used to process the request.• Node ID – the server node on which the request is received.• Error – the error message if any.• Transaction ID – a unique ID that represents a transaction (one cycle of request-response)
performed by the client or application.• Root Context ID – a unique ID that represents a client/server session. A session can be
thought of as a block that includes multiple requests from the client to the server.
Note: Additional detail columns:
• None
Cache RefreshSynchronization logs include data related to different aspects of data synchronization,including cache refresh and Unwired Server interface.
Cache Refresh – statistics for cache database activities:
• Time – the time and date stamp for the log entry.• Application ID – the unique identifier assigned to the registered application. Values may
include a number, blank, or HWC, depending on the client type.• Application Connection ID – the unique identifier for a user application connection.• User – the name of the user associated with the application ID.• Stage – the current stage of processing - START or FINISH.• Package – the name of the package to which the subscription belongs.• MBO – the mobile business object used.
Administer
140 Sybase Unwired Platform
• Cache Group – the cache group name.• CacheRow Count – the number of cached rows.• EIS Row Count – the number of rows retrieved from the enterprise information system
(EIS).• Insert Count – the number of rows inserted in the cache.• Update Count – the number of rows updated in the cache.• Delete Count – the number of rows deleted from the cache.• Thread ID – the identifier for the thread used to process the request.• Node ID – the server node on which the request is received.• Error – the error message if any.• Transaction ID – a unique ID that represents a transaction (one cycle of request-response)
performed by the client or application.• Root Context ID – a unique ID that represents a client/server session. A session can be
thought of as a block that includes multiple requests from the client to the server.
Note: Additional detail columns:
• Refresh Type• Virtual Table Name• Partition Key• Pre Update Cache Image (payload)• Post Update Cache Image (payload)
DS InterfaceSynchronization logs include data related to different aspects of data synchronization,including data service and Unwired Server interface.
DS Interface – statistics for data services requests made to the Enterprise information system(EIS):
• Time – the time and date stamp for the log entry.• Application ID – the unique identifier assigned to the registered application. Values may
include a number, blank, or HWC, depending on the client type.• Application Connection ID – the unique identifier for a user application connection.• User – the name of the user associated with the application ID.• Stage – the current stage of processing - START or FINISH.• Package – the name of the package to which the subscription belongs.• MBO – the mobile business object used.• Operation – the MBO operation.• Thread ID – the identifier for the thread used to process the request.• Node ID – the server node on which the request is received.• Error – the error message if any.
Administer
Sybase Control Center for Sybase Unwired Platform 141
• Transaction ID – a unique ID that represents a transaction (one cycle of request-response)performed by the client or application.
• Root Context ID – a unique ID that represents a client/server session. A session can bethought of as a block that includes multiple requests from the client to the server.
Note: Additional detail columns:
• Operation Type• Virtual Table Name• Input Attributes (payload)• Input Parameters (payload)
Device Notification LogDevice notification logs include logging data for server-initiated synchronizationnotifications between Unwired Server and devices.
• Time – the time and date stamp for the log entry.• Application ID – the unique identifier assigned to the registered application. Values may
include a number, blank, or HWC, depending on the client type.• Application Connection ID – the unique identifier for a user application connection.• User – the name of the user associated with the application ID.• Package – the name of the package to which the subscription belongs.• MBO – the mobile business object used.• Sync Group – the synchronization group associated with the request.• Thread ID – the identifier for the thread used to process the request.• Node ID – the server node on which the request is received.• Error – the error message if any.• Transaction ID – a unique ID that represents a transaction (one cycle of request-response)
performed by the client or application.• Root Context ID – a unique ID that represents a client/server session. A session can be
thought of as a block that includes multiple requests from the client to the server.
Note: Additional detail columns:
• Payload
Data Change Notification LogData Change Notification (DCN) logs include logging data for data change notificationsbetween an enterprise information system (EIS) and an MBO package, for general and HybridApp DCN.
Administer
142 Sybase Unwired Platform

General Data Change NotificationProvides logging data for general data change notifications between an enterprise informationsystem (EIS) and an MBO package.
• Time – the time and date stamp for the log entry.• User – the name of the user associated with the application ID.• Stage – the current stage of processing - START or FINISH.• Package – the name of the package to which the subscription belongs.• MBO – the mobile business object used.• Thread ID – the identifier for the thread used to process the request.• Node ID – the server node on which the request is received.• Error – the error message if any.• Transaction ID – a unique ID that represents a transaction (one cycle of request-response)
performed by the client or application.• Root Context ID – a unique ID that represents a client/server session. A session can be
thought of as a block that includes multiple requests from the client to the server.
Note: Additional detail columns:
• Payload
Hybrid App Data Change NotificationProvides logging data for Hybrid App data change notifications between an enterpriseinformation system (EIS) and an MBO package.
• Time – the time and date stamp for the log entry.• Hybrid App ID – the unique identifier associated with a Hybrid App.• Application Connection ID – the unique identifier for a user application connection.• User – the name of the user associated with the application ID.• Package – the name of the package to which the subscription belongs.• Thread ID – the identifier for the thread used to process the request.• Node ID – the server node on which the request is received.• Operation – the MBO operation.• Subject – the Hybrid App DCN request subject line.• From – the "From" value for the Hybrid App DCN request.• To – the "To" value for the Hybrid App DCN request.• Body – the message body for the Hybrid App DCN request.• Error – the error message if any.• Transaction ID – a unique ID that represents a transaction (one cycle of request-response)
performed by the client or application.
Administer
Sybase Control Center for Sybase Unwired Platform 143

• Root Context ID – a unique ID that represents a client/server session. A session can bethought of as a block that includes multiple requests from the client to the server.
Note: Additional detail columns:
• Payload
Security LogSecurity logs provide security details for individual applications, application connections, andusers. Logs capture authentication failures and errors, and provide supporting informationthat identifies request-response messaging, package and MBO details, security configuration,and the thread and node that attempted to process an authentication request.
• Time – the time and date stamp for the log entry.• Application ID – the unique identifier assigned to the registered application. Values may
include a number, blank, or HWC, depending on the client type.• Application Connection ID – the unique identifier for a user application connection.• User – the name of the user associated with the application ID.• Correlation ID – the unique ID associated with every request-response message pair.• Package – the name of the package to which the subscription belongs.• MBO – the mobile business object used.• Security Configuration – the associated security configuration.• Method – the MBO operation used.• Thread ID – the identifier for the thread used to process the request.• Node ID – the server node on which the request is received.• Outcome – the authentication outcome for the security check.• Reason – the reason for authentication failure.• Error – the error message if any.• Transaction ID – a unique ID that represents a transaction (one cycle of request-response)
performed by the client or application.• Root Context ID – a unique ID that represents a client/server session. A session can be
thought of as a block that includes multiple requests from the client to the server.
Error LogErrors log data includes domain-level errors.
• Time – the time and date stamp for the log entry.• Application ID – the unique identifier assigned to the registered application. Values may
include a number, blank, or HWC, depending on the client type.• Application Connection ID – the unique identifier for a user application connection.• User – the name of the user associated with the application ID.• Correlation ID – the unique ID associated with every request-response message pair.
Administer
144 Sybase Unwired Platform

• Package – the name of the package to which the subscription belongs.• MBO – the mobile business object used.• Operation – the MBO operation.• Thread ID – the identifier for the thread used to process the request.• Node ID – the server node on which the request is received.• Error – the error message if any.• Transaction ID – a unique ID that represents a transaction (one cycle of request-response)
performed by the client or application.• Root Context ID – a unique ID that represents a client/server session. A session can be
thought of as a block that includes multiple requests from the client to the server.
Connection LogConnections log data includes domain connections for specific connection types to backenddata sources, including DOE, JDBC, REST, SAP, and SOAP, if enabled. Check the detail panefor additional columns that may be available. Enable Payload to see payload data that may beavailable.
DOE ConnectionConnections log data includes domain connections for DOE connection types, if enabled.Check the detail pane for additional columns that may be available. Enable Payload to seepayload data that may be available.
• Time – the time and date stamp for the log entry.• Application ID – the unique identifier assigned to the registered application. Values may
include a number, blank, or HWC, depending on the client type.• Application Connection ID – the unique identifier for a user application connection.• User – the subscription user for the package.• Event Type – the DOE-C event type, such as Acknowledged, Duplicate Ignored, Exclude,
No Response (from client or server), Packet Dropped, Registration Response, Resend(from client), Status Request (from client or server), DOE-C Subscription, and DOE-CData Import.
• Package – the name of the package to which the subscription belongs.• MBO – the mobile business object used.• Operation – the MBO operation.• Connection – the managed connection used. Its value is DOE for DOE-C logs.• Client ID – the identifier for the DOE-C client.• Physical ID – the DOE-C generated physical identifier registered with DOE at
subscription.• Subscription ID – the DOE-C generated subscription identifier registered with DOE at
subscription.• Logical Device ID – the DOE-C logical device identifier, generated by DOE and provided
to DOE-C upon successful subscription.
Administer
Sybase Control Center for Sybase Unwired Platform 145

• Message Direction – the DOE-C message direction, either client to Unwired Server, orUnwired Server to client.
• Thread ID – the identifier for the thread used to process the request.• Node ID – the server node on which the request is received.• Error – the error message if any.
Note: Payload and detail columns:
• Device ID – the core and administrative (MMS) device ID.• Domain – the core and administrative (MMS) domain name.• JSON Message Content – the messaging synchronization JSON message (payload). This
is the SUP-specific representation of the incoming DOE XML message in JSON format.DOE-C receives XML the payload from DOE in response, which is then parsed andconverted to a JSON string and sent to the client.
• XML Message Content – the DOE SOAP messages (payload). This represents either anXML request in a format for sending to DOE by DOE-C, or an XML payload responsereceived from DOE as applicable.
• Endpoint Name – the core and administrative (MMS) endpoint name.• DOE server message ID – the SAP DOE reliable messaging server message ID.• DOE client message ID – the SAP DOE reliable messaging client message ID.• DOE-C server message ID – the DOE-C client-side SAP DOE reliable messaging server
message ID.• DOE-C client message ID – the DOE-C client-side SAP DOE reliable messaging client
message ID.• DOE-C method name – the DOE-C method being executed.• DOE-C action name – the DOE SOAP action.• Push to – the messaging asynchronous response queue.• Address – the remote URL of the DOE server for this subscription (for example,
http://saphost:50015/sap/bc/DOE_ESDMA_SOAP?sap-client=600).
• Log – the DOE-C subscription-specific log level.• Extract Window – the DOE extract window for a subscription. This value determines the
maximum number of unacknowledged "in-flight" messages allowed by the DOE reliablemessaging protocol.
• PBI – the messaging synchronization "piggy backed import" setting for the subscription.• Boolean property – indicates whether replay after-images can be piggy-backed onto
replayResult and replayFailed messages (default is false).
Administer
146 Sybase Unwired Platform

JDBC ConnectionConnections log data includes domain connections for JDBC connection types to backenddata sources, if enabled. Check the detail pane for additional columns that may be available.Enable Payload to see payload data that may be available.
• Time – the time and date stamp for the log entry.• Application ID – the unique identifier assigned to the registered application. Values may
include a number, blank, or HWC, depending on the client type.• Application Connection ID – the unique identifier for a user application connection.• User – the name of the user associated with the application ID.• Stage – the current stage of processing - START or FINISH.• Package – the name of the package to which the subscription belongs.• MBO – the mobile business object used.• Operation – the MBO operation.• Connection – the managed connection used.• Thread ID – the identifier for the thread used to process the request.• Node ID – the server node on which the request is received.• Error – the error message if any.• Transaction ID – a unique ID that represents a transaction (one cycle of request-response)
performed by the client or application.• Root Context ID – a unique ID that represents a client/server session. A session can be
thought of as a block that includes multiple requests from the client to the server.
Note: Payload and detail columns:
• Input Parameters – the parameters used in a JDBC endpoint operation (payload). This willvary by operation.
• Query – the SQL statement used in a JDBC endpoint operation (payload). This will vary byoperation.
• Device ID – the core and administrative (MMS) device ID.• Domain – the core and administrative (MMS) domain name.• Endpoint Name – the core and administrative (MMS) endpoint name.• Database Product Name – the remote database product name, such as "SQL Anywhere".• Database Product Version – the remote database version, such as "11.0.1.2044".• Driver Name – the database driver used, such as: "jConnect™ for JDBC™".• Driver Version – the database driver version, such as "jConnect™ for JDBC™/7.07
GA(Build 26666)/P/EBF19485/JDK 1.6.0/jdbcmain/Wed Aug 31 03:14:04 PDT 2011".• Database User Name – the database user account.
Administer
Sybase Control Center for Sybase Unwired Platform 147

REST ConnectionConnections log data includes domain connections for REST connection types to backenddata sources, if enabled. Check the detail pane for additional columns that may be available.Enable Payload to see payload data that may be available.
• Time – the time and date stamp for the log entry.• Application ID – the unique identifier assigned to the registered application. Values may
include a number, blank, or HWC, depending on the client type.• Application Connection ID – the unique identifier for a user application connection.• User – the name of the user associated with the application ID.• Stage – the current stage of processing - START or FINISH.• Package – the name of the package to which the subscription belongs.• MBO – the mobile business object used.• Operation – the MBO operation.• Connection – the managed connection used.• URL – the URL associated with the managed connection.• Action – the GET, POST, PUT, or DELETE action.• Response Status – the response status code for the invocation.• Thread ID – the identifier for the thread used to process the request.• Node ID – the server node on which the request is received.• Error – the error message if any.• Transaction ID – a unique ID that represents a transaction (one cycle of request-response)
performed by the client or application.• Root Context ID – a unique ID that represents a client/server session. A session can be
thought of as a block that includes multiple requests from the client to the server.
Note: Payload and detail columns:
• Response – the message returned by the EIS system in response to a request (payload).• Device ID – the core and administrative (MMS) device ID.• Domain – the core and administrative (MMS) domain name.• Endpoint Name – the core and administrative (MMS) endpoint name.• HTTP Header Parameters – "Accept-Encoding: gzip, Accept-Encoding: compress".
SAP ConnectionConnections log data includes domain connections for SAP connection types to backend datasources, if enabled. Check the detail pane for additional columns that may be available. EnablePayload to see payload data that may be available.
• Time – the time and date stamp for the log entry.
Administer
148 Sybase Unwired Platform

• Application ID – the unique identifier assigned to the registered application. Values mayinclude a number, blank, or HWC, depending on the client type.
• Application Connection ID – the unique identifier for a user application connection.• User – the name of the user associated with the application ID.• Stage – the current stage of processing - START or FINISH.• Package – the name of the package to which the subscription belongs.• MBO – the mobile business object used.• Operation – the MBO operation.• BAPI – the SAP BAPI used as the data source.• Connection – the managed connection used.• Properties – the list of name:value pairs.• Thread ID – the identifier for the thread used to process the request.• Node ID – the server node on which the request is received.• Error – the error message if any.• Transaction ID – a unique ID that represents a transaction (one cycle of request-response)
performed by the client or application.• Root Context ID – a unique ID that represents a client/server session. A session can be
thought of as a block that includes multiple requests from the client to the server.
Note: Payload and detail columns:
• Parameters – input that was supplied to the operation; this will vary per request andoperation (payload).
• Device ID – the core and administrative (MMS) device ID.• Domain – the core and administrative (MMS) domain name.• Endpoint Name – the core and administrative (MMS) endpoint name.• SAP Host – the remote system hostname (if available).• SAP User – the SAP user for the operation.
SOAP ConnectionConnections log data includes domain connections for SOAP connection types to backenddata sources, if enabled. Check the detail pane for additional columns that may be available.Enable Payload to see payload data that may be available.
• Time – the time and date stamp for the log entry.• Application ID – the unique identifier assigned to the registered application. Values may
include a number, blank, or HWC, depending on the client type.• Application Connection ID – the unique identifier for a user application connection.• User – the name of the user associated with the application ID.• Stage – the current stage of processing - START or FINISH.• Package – the name of the package to which the subscription belongs.
Administer
Sybase Control Center for Sybase Unwired Platform 149
• MBO – the mobile business object used.• Operation – the MBO operation.• Connection – the managed connection used.• Service Address – the service address URL.• Action – the SOAP action.• Thread ID – the identifier for the thread used to process the request.• Node ID – the server node on which the request is received.• Error – the error message if any.• Transaction ID – a unique ID that represents a transaction (one cycle of request-response)
performed by the client or application.• Root Context ID – a unique ID that represents a client/server session. A session can be
thought of as a block that includes multiple requests from the client to the server.
Note: Payload and detail columns:
• Request (payload) – SOAP messages sent to the remote SOAP service.• Response (payload) – SOAP messages received from the remote SOAP service.• Device ID – the core and administrative (MMS) device ID.• Domain – the core and administrative (MMS) domain name.• Endpoint Name – the core and administrative (MMS) endpoint name.• Connection Timeout – the response timeout window, in milliseconds.• Authentication Type – the authentication type, either "None", "Basic", "SSO2", or
"X509".
Push LogPush logs include log data for all push notifications.
• Time – the time and date stamp for the log entry.• Application ID – the unique identifier assigned to the registered application. Values may
include a number, blank, or HWC, depending on the client type.• Application Connection ID – the unique identifier for a user application connection.• User – the name of the user associated with the application ID.• Source - the source of the log if its from the server or client.• Correlation ID - the unique id associated with every request-response message pair.• URN - not relevant.• Log Level - not relevant.• Thread ID – the identifier for the thread used to process the request.• Node ID – the server node on which the request is received.• Error – the error message if any.• Transaction ID – a unique ID that represents a transaction (one cycle of request-response)
performed by the client or application.
Administer
150 Sybase Unwired Platform

• Root Context ID – a unique ID that represents a client/server session. A session can bethought of as a block that includes multiple requests from the client to the server.
• Device Type – device type from which the push message originated.• Notification Type – type of notification. For example Native.• Received Time – a time stamp indicating when the message was received by the server.• Processing Started Time – a time stamp indicating when the server started processing the
message.
Proxy LogProxy logs all data made to and from the Proxy server.
• Time – the time and date stamp for the log entry.• Application ID – the unique identifier assigned to the registered application. Values may
include a number, blank, or HWC, depending on the client type.• Application Connection ID – the unique identifier for a user application connection.• User – the name of the user associated with the application ID.• Source - the source of the log if its from the server or client.• Correlation ID - the unique id associated with every request-response message pair.• Request Type - the request type of the message.• Request URL - the Gateway URL.• HTTP Endpoint - the Gateway URL.• Response Code – the response status code for the invocation.• Log Level - not relevant.• Thread ID – the identifier for the thread used to process the request.• Node ID – the server node on which the request is received.• Transaction ID – a unique ID that represents a transaction (one cycle of request-response)
performed by the client or application.• Root Context ID – a unique ID that represents a client/server session. A session can be
thought of as a block that includes multiple requests from the client to the server.
Note: Additional detail columns:
• Post Data• Request Header Fields• Response Body• Response Header Fields
Server LogServer logs include logging data for Unwired Server.
• Time – the time and date stamp for the log entry.
Administer
Sybase Control Center for Sybase Unwired Platform 151

• Application ID – the unique identifier assigned to the registered application. Values mayinclude a number, blank, or HWC, depending on the client type.
• Application Connection ID – the unique identifier for a user application connection.• User – the name of the user associated with the application ID.• Package – the name of the package to which the subscription belongs.• Correlation ID – the unique id associated with the correlated data. see Correlating Log
Data Across Subsystems for details. For example, root context id and Transaction idappear in every trace entry, and contain the values used to correlate trace entries fromdifferent subsystems (buckets).
• Log Level – indicates the log level, if any, set on the client that controls what and how muchshould be logged.
• Thread ID – the identifier for the thread used to process the request.• Node ID – the server node on which the request is received.• Bucket – the subsystem from which the logging data originates. For example Security or
Data Services (DS).• Category – the category or type of information under which the data is logged.• Transaction ID – a unique ID that represents a transaction (one cycle of request-response)
performed by the client or application.• Root Context ID – a unique ID that represents a client/server session. A session can be
thought of as a block that includes multiple requests from the client to the server.
Dispatcher LogDispatcher log data includes various dispatcher specific messages, including Replication,Messaging, and Service.
Replication LogReplication log data includes data for all replicated application data routed by the dispatcher.
• Time – the time and date stamp for the log entry.• Application ID – the unique identifier assigned to the registered application. Values may
include a number, blank, or HWC, depending on the client type.• Application Connection ID – the unique identifier for a user application connection.• User – the name of the user associated with the application ID.• Source - the source of the log if its from the server or client.• Request URL - the Gateway URL.• Response Code – the response status code for the invocation.• Log Level – indicates the log level, if any, set on the client that controls what and how much
should be logged.• Thread ID – the identifier for the thread used to process the request.• Node ID – the server node on which the request is received.
Administer
152 Sybase Unwired Platform

• Transaction ID – a unique ID that represents a transaction (one cycle of request-response)performed by the client or application.
• Root Context ID – a unique ID that represents a client/server session. A session can bethought of as a block that includes multiple requests from the client to the server.
• Request Header Fields - the HTTP request header field contained in the application. Forexample, used by REST API-based application to create an application connection.
• Response Header Fields - the HTTP response header field communicated to the devicefrom the server.
Messaging LogMessaging log data includes data for all message-based application data routed by thedispatcher.
• Time – the time and date stamp for the log entry.• Application ID – the unique identifier assigned to the registered application. Values may
include a number, blank, or HWC, depending on the client type.• Application Connection ID – the unique identifier for a user application connection.• User – the name of the user associated with the application ID.• Source - the source of the log if its from the server or client.• Request URL - the Gateway URL.• Response Code – the response status code for the invocation.• Log Level – indicates the log level, if any, set on the client that controls what and how much
should be logged.• Thread ID – the identifier for the thread used to process the request.• Node ID – the server node on which the request is received.• Transaction ID – a unique ID that represents a transaction (one cycle of request-response)
performed by the client or application.• Root Context ID – a unique ID that represents a client/server session. A session can be
thought of as a block that includes multiple requests from the client to the server.• Request Header Fields - the HTTP request header field contained in the application. For
example, used by REST API-based application to create an application connection.• Response Header Fields - the HTTP response header field communicated to the device
from the server.
Service LogService log data includes application service data routed by the dispatcher.
• Time – the time and date stamp for the log entry.• Application ID – the unique identifier assigned to the registered application. Values may
include a number, blank, or HWC, depending on the client type.• Application Connection ID – the unique identifier for a user application connection.• User – the name of the user associated with the application ID.
Administer
Sybase Control Center for Sybase Unwired Platform 153

• Source - the source of the log if its from the server or client.• Response Code – the response status code for the invocation.• Log Level – indicates the log level, if any, set on the client that controls what and how much
should be logged.• Thread ID – the identifier for the thread used to process the request.• Node ID – the server node on which the request is received.• Transaction ID – a unique ID that represents a transaction (one cycle of request-response)
performed by the client or application.• Root Context ID – a unique ID that represents a client/server session. A session can be
thought of as a block that includes multiple requests from the client to the server.• Request Header Fields - the HTTP request header field contained in the application. For
example, used by REST API-based application to create an application connection.• Response Header Fields - the HTTP response header field communicated to the device
from the server.
Application LogApplication log data includes application specific messages, including Registration andSetting.
Registration LogRegistration log data includes registration-related application data.
• Time – the time and date stamp for the log entry.• Application ID – the unique identifier assigned to the registered application. Values may
include a number, blank, or HWC, depending on the client type.• Application Connection ID – the unique identifier for a user application connection.• User – the name of the user associated with the application ID.• Source - the source of the log if its from the server or client.• Log Level – indicates the log level, if any, set on the client that controls what and how much
should be logged.• Thread ID – the identifier for the thread used to process the request.• Node ID – the server node on which the request is received.• Transaction ID – a unique ID that represents a transaction (one cycle of request-response)
performed by the client or application.• Root Context ID – a unique ID that represents a client/server session. A session can be
thought of as a block that includes multiple requests from the client to the server.• Auto Registraton - the automatic connection registration setting of the application, as
determined by the autoreghint provisioning property.
• Security Configuration - the security configuration assigned to the application.• Template - the application template used by the application.
Administer
154 Sybase Unwired Platform

Setting LogSetting log data includes application settings information.
• Time – the time and date stamp for the log entry.• Application ID – the unique identifier assigned to the registered application. Values may
include a number, blank, or HWC, depending on the client type.• Application Connection ID – the unique identifier for a user application connection.• User – the name of the user associated with the application ID.• Source - the source of the log if its from the server or client.• Log Level – indicates the log level, if any, set on the client that controls what and how much
should be logged.• Thread ID – the identifier for the thread used to process the request.• Node ID – the server node on which the request is received.• Transaction ID – a unique ID that represents a transaction (one cycle of request-response)
performed by the client or application.• Root Context ID – a unique ID that represents a client/server session. A session can be
thought of as a block that includes multiple requests from the client to the server.• Operation – the MBO operation.• Request Body - the application's HTTP request body field.• Response Body - the server's HTTP response body field.
Checking Client Application LogsReview data about client application operations for all devices subscribed to a package inorder to track errors and identify performance issues.
1. In the left navigation pane, expand the Packages folder and select the package you want tomanage.
2. In the right administration pane, select the Client Log tab.
3. Review this information to monitor client application activity:
• User – the name of the user that activates the device.• Application Connection ID – the unique identifier for a user application connection.• MBO – the mobile business object that the client is synchronizing with.• Operation – the operation that the client is performing.• Code – the result of server-side operations; either 200 (successful) or 500 (failed).• Level – the log level for the application; either FATAL, ERROR, WARN, INFO,
DEBUG, or TRACE.• Timestamp – the date and time at which the operation took place.• Message – the log message associated with the operation.
4. Select a row from the table and click Details to see a detailed view of data for the selectedclient log event.
Administer
Sybase Control Center for Sybase Unwired Platform 155

5. Click Close to return to the Client Log summary view.
See also• Creating and Enabling a New Domain on page 100• Deleting a Domain on page 101• Registering a Domain Administrator User on page 102• Assigning Domain Administrators to a Domain on page 103• Viewing Applications for a Domain on page 104• Viewing Application Connections for a Domain on page 104• Scheduling Accumulated Data Cleanup for Domains on page 106• Domain Logs on page 110• Connections on page 156• Configuring Domain Security on page 179
Cleaning the Client LogClears client application log data from the SCC administration page.
1. In the left navigation pane, expand the Packages folder and select the package you want tomanage.
2. In the right administration pane, select the Client Log tab.
3. Click Clean.
4. Enter a time frame to indicate which client log data you want to erase, and click OK.The data is removed from the Client Log tab.
ConnectionsConnections allow Unwired Server to communicate with data sources. To facilitate theconnection process, define a set of properties for each data source. Establish connections andconnection pools for each domain.
A connection is required to send queries to mobile business objects, and to receive answers.The format in which data is communicated depends on the type of data source; for example,database data sources use a result set, while Web services data sources provide XML files, andSAP data sources use tables.
Establish connections by supplying an underlying driver and a connection string. Together,the driver and string allow you to address the data source, and provide you a mechanism bywhich to set the appropriate user authentication credentials and connection properties thatdescribe the connection instance. Once a connection is establish, Unwired Server can openand close it as required.
Connection PoolsUnwired Server maintains database connections in a connection pool, which is a cachedatabase connections for the cache database or any other database data source.
Administer
156 Sybase Unwired Platform

A connection can be reused when the database receives future requests for data, therebyimproving Unwired Server performance. If all the connections are being used, and themaxPoolSize value you configured for a connection pool has been reached, a new connectionis added to the pool. For Unwired Server, connection pools are based on an existing templatecreated for a specific data source type.
See also• Creating and Enabling a New Domain on page 100
• Deleting a Domain on page 101
• Registering a Domain Administrator User on page 102
• Assigning Domain Administrators to a Domain on page 103
• Viewing Applications for a Domain on page 104
• Viewing Application Connections for a Domain on page 104
• Scheduling Accumulated Data Cleanup for Domains on page 106
• Domain Logs on page 110
• Checking Client Application Logs on page 155
• Configuring Domain Security on page 179
Connection TemplatesA connection template is a model or pattern used to standardize connection properties andvalues for a specific connection pool type so that they can be reused. A template allows you toquickly create actual connections.
Often, setting up a connection for various enterprise data sources requires each administratorto be aware of the mandatory property names and values for connecting to data sources. Onceyou create a template and add appropriate property names and corresponding values (forexample user, password, database name, server name, and so on), you can use the template toinstantiate actual connection pools with predefined property name and value pairs.
See also• EIS Data Source Connection Properties Reference on page 159
• Creating Connections and Connection Templates on page 157
Creating Connections and Connection TemplatesCreate a new connection or connection template that defines the properties needed to connectto a new data source.
1. In the left navigation pane, expand the Domains folder, and select the domain for whichyou want to create a new connection.
2. Select Connections.
3. In the right administration pane:
Administer
Sybase Control Center for Sybase Unwired Platform 157

• To create a new connection – select the Connections tab, and click New.• To create a new connection template – select the Templates tab, and click New.
4. Enter a unique Connection pool name or template name.
5. Select the Connection pool type or template type:
• JDBC – choose this for most database connections.• Proxy - choose this if you are connecting to a proxy endpoint; for example, an Online
Data Proxy data source or other proxy endpoint.• WEBSERVICE – choose this if you are connecting to a Web Services (SOAP or
REST) data source.• SAP – choose this if you are connecting to an SAP (JCO) data source.
6. Select the appropriate template for the data source target from the Use template menu. Bydefault, several templates are installed with Unwired Platform; however, a productionversion of Unwired Server may have a different default template list.
7. Template default properties appear, along with any predefined values. You can customizethe template, if required, by performing one of:
• Editing existing property values – click the corresponding cell and change the valuethat appears.
• Adding new properties – click the <ADD NEW PROPERTY> cell in the Propertycolumn and select the required property name. You can then set values for any newproperties.
Note: In a remote server environment, if you edit the sampledb Server Name property, youmust specify the remote IP number or server name. Using the value "localhost" causescluster synchronization to fail.
8. Test the values you have configured by clicking Test Connection. If the test fails, eithervalues you have configured are incorrect, or the data source target is unavailable. Evaluateboth possibilities and try again. Only the SAP and JDBC connection pool types can test theconnection. The Proxy and WEBSERVICE pool types cannot test the connection.
9. Click OK to register the connection pool.The name appears in the available connection pools table on the Connections tab.Administrators can now use the connection pool to deploy packages.
See also• Application Connections on page 258
• Connection Templates on page 157
• EIS Data Source Connection Properties Reference on page 159
Editing Connection Pools and TemplatesEdit the properties and values assigned to connection pools and templates.
Administer
158 Sybase Unwired Platform

1. In the left navigation pane, expand the Domains folder, and select the domain for whichyou want to create a new connection.
2. Select Connections.
3. In the right administration pane:
• To edit the properties of a connection pool, click theConnections tab.• To edit the properties of a connection pool template, click theTemplates tab.
4. Select a connection pool or template from the list.
5. Click Properties.
a) Edit the property and value.
a) Click Save to save the changes.
Testing a ConnectionTest connection properties of a data source to validate the connection values.
1. In the left navigation pane, click the Connections icon.
2. Select the Connection Pool Name you want to validate.
3. Click Properties.
4. Click Test Connection.
If the connection test is not successful, see Connection Test Errors in theTroubleshootingguide.
Deleting a Connection Pool and TemplateDelete a connection pool or template.
1. In the left navigation pane, expand the Domains folder, and select the domain for whichyou want to create a new connection.
2. Select Connections.
3. In the right administration pane:
• To delete a connection pool, click theConnections tab.• To delete a connection pool template, click theTemplates tab.
4. Select the connection pool or template you want to delete.
5. Click Delete.
EIS Data Source Connection Properties ReferenceName and configure connection properties when you create connection pools in SybaseControl Center to enterprise information systems (EIS) .
Administer
Sybase Control Center for Sybase Unwired Platform 159

See also• Application Connections on page 258
• Connection Templates on page 157
• Creating Connections and Connection Templates on page 157
JDBC PropertiesConfigure Java Database Connectivity (JDBC) connection properties.
This list of properties can be used by all datasource types. Sybase does not document nativeproperties used only by a single driver. However, you can also use native driver properties,naming them using this syntax:
<driver_type>:<NativeConnPropName>=<SupportedValue>Note: If Unwired Server is connecting to a database with a JDBC driver, ensure you havecopied required JAR files to correct locations. See Installation Guide for Runtime.
Name Description Supported values
After Insert Changes the value to into if a da-
tabase requires insert intorather than the abbreviated into.
into
Batch Delimiter Sets a delimiter, for example, a sem-icolon, that can be used to separatemultiple SQL statements within astatement batch.
<delimiter>
Blob Updater Specifies the name of a class that canbe used to update database BLOB(long binary) objects when theBLOB size is greater than psMaxi-mumBlobLength.
<class name>The class must implement thecom.sybase.djc.sql.Blo-bUpdater interface.
Clob Updater Specifies the name of a class that canbe used to update database CLOB(long string) objects when theCLOB size is greater than psMaxi-mumClobLength.
<class name>The class must implement thecom.sybase.djc.sql.Clo-bUpdater interface.
Administer
160 Sybase Unwired Platform
Name Description Supported values
Code Set Specifies how to represent a reper-toire of characters by setting the val-ue of CS_SYB_CHARSET for thisdatasource. Used when the data inthe datasource is localized. If you donot specify the correct code set,characters may be rendered incor-rectly.
[server]If the value is server, the value of thecurrent application server’s defaultCo-deSet property is used.
Commit Protocol Specifies how Unwired Server han-dles connections for a datasource atcommit time, specifically when asingle transaction requires data frommultiple endpoints.
If you use XA, the recovery log isstored in the tx_manager data-source, and its commit protocolmust be optimistic. If tx_manager isaliased to another datasource (thatis, one that is defined with the alias-For property), the commit protocolfor that datasource must be optimis-tic. A last-resource optimization en-sures full conformance with the XAspecification. The commit protocolfor all other datasources should beXA_2PC. Alternately, a transactionthat accesses multiple datasourcesfor which the commit protocols areoptimistic is permitted.
[optimistic| pessimis-tic | XA_2PC]Choose only one of these protocols:
• Optimistic – enables connections tobe committed without regard forother connections enlisted in thetransaction, assuming that the trans-action is not marked for rollback andwill successfully commit on all re-sources. Note: if a transaction ac-cesses multiple data sources withcommit protocol of "optimistic",atomicity is not guaranteed.
• Pessimistic – specifies that you donot expect any multi-resource trans-actions. An exception will be thrown(and transaction rolled back) if anyattempt is made to use more than one"pessimistic" data source in thesame transaction.
• XA_2PC – specifies use of the XAtwo phase commit protocol. If youare using two phase commit, thenthe recovery log is stored in the"tx_manager" data source, and thatdata source (or the one it is aliasedto) must have the commit protocol of"optimistic" or "pessimistic". Allother data sources for which atom-icity must be ensured should havethe "XA_2PC" commit protocol.
Administer
Sybase Control Center for Sybase Unwired Platform 161

Name Description Supported values
Datasource Class Sets the class that implements theJDBC datasource.
Use this property (along with thedriverClass property) only if you donot have a predefined database-typeentry in Unwired Server for the kindof SQL database you are connectingto. For example, you must use thisproperty for MySQL database con-nections.
You can implement a datasourceclass to work with a distributedtransaction environment. BecauseUnwired Server supports distributedtransactions, some datasources mayrequire that a datasource class beimplemented for Unwired Server tointeract with it.
For two-phase transactions, use thexaDataSourceClass connectionproperty instead.
<com.mydata-source.jdbc.Driver>
Database Command Echo Echoes a database command to boththe console window and the serverlog file.
Use this property to immediately seeand record the status or outcome ofdatabase commands.
When you enable this property, Un-wired Server echoes every SQLquery to ml.log, which may help
you debug your application.
[true|false]Set a value of 1 to echo the databasecommands like databaseStart-Command, and databaseStop-Command.
Otherwise, do not set this property, oruse a value of 0 to disable the echo.
Administer
162 Sybase Unwired Platform

Name Description Supported values
Database Create Com-mand
Specifies the operating system com-mand used to create the database forthis datasource. If this command isdefined and the file referenced by ${databaseFile} does not exist, thecommand is run to create the data-base when an application compo-nent attempts to obtain the first con-nection from the connection pool forthis datasource.
<command>Example: <UnwiredPlat-form_InstallDir>\Serv-ers\SQLAny-where11\BIN32\dbinit -q${databaseFile}
Database File Indicates the database file to loadwhen connecting to a datasource.
Use this property when the path tothe database file differs from the onenormally used by the database serv-er.
If the database you want to connectto is already running, use the data-baseName connection parameter.
<string>Supply a complete path and file name.The database file you specify must be onthe same host as the server.
Administer
Sybase Control Center for Sybase Unwired Platform 163
Name Description Supported values
Database Name Identifies a loaded database withwhich to establish a connection,when connecting to a datasource.
Set a database name, so you can re-fer to the database by name in otherproperty definitions for a data-source.
If the database to connect to is notalready running, use the database-File connection parameter so the da-tabase can be started.
Note: For Unwired Server, you typ-ically do not need to use this prop-erty. Usually, when you start a data-base on a server, the database is as-signed a name. The mechanism bywhich this occurs varies. An admin-istrator can use the DBN option toset a unique name, or the server mayuse the base of the file name with theextension and path removed.
[DBN|default]If you set this property to default, thename is obtained from the DBN optionset by the database administrator.
If no value is used, the database name isinherited from the database type.
Database Start Command Specifies the operating system com-mand used to start the database forthis datasource. If this command isdefined and the database is not run-ning, the command is run to start thedatabase when the datasource is ac-tivated.
<command>Example: <UnwiredPlat-form_InstallDir>\Serv-ers\SQLAny-where11\BIN32\dbsrvXX.exe
Database Stop Command Specifies the operating system com-mand used to stop the database forthis datasource. If this property isdefined and the database is running,this command executes during shut-down.
<command>For a SQL Anywhere® database, wherethe user name and password are the de-faults (dba and sql), enter:
<UnwiredPlatform_In-stallDir>\Servers\SQLA-ny-where11\BIN32\dbsrvXX.exe
Administer
164 Sybase Unwired Platform

Name Description Supported values
Database Type Specifies the database type. <database type>Database URL Sets the JDBC URL for connecting
to the database if the datasource re-quires an Internet connection.
Typically, the server attempts toconstruct the database URL fromthe various connection propertiesyou specify (for example, portNum-ber, databaseName). However, be-cause some drivers require a specialor unique URL syntax, this propertyallows you to override the server de-faults and instead provide explicitvalues for this URL.
<JDBCurl>The database URL is JDBC driver ven-dor-specific. For details, refer to thedriver vendor's JDBC documentation.
Driver Class Sets the name of the class that im-plements the JDBC driver.
Use this property (along with thedataSourceClass property) only ifyou do not have a predefined data-base-type entry in Unwired Serverfor the kind of SQL database you areconnecting to. For example,MySQL database connections re-quire you to use this connectionproperty.
To create a connection to a databasesystem, you must use the compatibleJDBC driver classes. Sybase doesnot provide these classes; you mustobtain them from the database man-ufacturer.
<Class.for-Name("foo.bar.Driver")>Replace <Class.forName("foo.bar.Driv-er")> with the name of your driver.
Driver Debug Enables debugging for the driver. [true|false]Set to true to enable debugging, or falseto disable.
Driver Debug Settings Configures debug settings for thedriver debugger.
[default|<setting>]The default is STATIC:ALL.
Administer
Sybase Control Center for Sybase Unwired Platform 165

Name Description Supported values
Initial Pool Size Sets the initial number of connec-tions in the pool for a datasource.
In general, holding a connectioncauses a less dramatic performanceimpact than creating a new connec-tion. Keep your pool size largeenough for the number of concurrentrequests you have; ideally, your con-nection pool size should ensure thatyou never run out of available con-nections.
The initialPoolSize value is appliedto the next time you start UnwiredServer.
<int>Replace <int> with an integer to preal-locate and open the specified number ofconnections at start-up. The default is 0.
Sybase suggests that you start with 0,and create additional connections asnecessary. The value you choose allowsyou to create additional connections be-fore client synchronization requires theserver to create them.
Is Download Zipped Specifies whether the driver filedownloaded from jdbcDriverDown-loadURL is in .ZIP format.
This property is ignored if the valueof jdbcDriverDownloadURL con-nection is an empty string.
[True|False]The default is false. The file is copied,but not zipped to <UnwiredPlat-form-install>\lib\jdbc.
Set isDownloadZipped to true to savethe file to <UnwiredPlatform-install>\lib\jdbc and unzip
the archived copy.
JDBC Driver DownloadURL
Specifies the URL from which youcan download a database driver.
Use this property with isDownload-Zipped to put the driver in an archivefile before the download starts.
<URL>Replace <URL> with the URL fromwhich the driver can be downloaded.
Administer
166 Sybase Unwired Platform

Name Description Supported values
Language For those interfaces that support lo-calization, this property specifiesthe language to use when connect-ing to your target database. Whenyou specify a value for this property,Unwired Server:
• Allocates a CS_LOCALE struc-ture for this connection
• Sets the CS_SYB_LANG valueto the language you specify
• Sets the Microsoft SQL ServerCS_LOC_PROP connectionproperty with the new locale in-formation
Unwired Server can access Unicodedata in an Adaptive Server® 12.5 orlater, or in Unicode columns inAdaptive Server 12.5 or later. Un-wired Server automatically convertsbetween double-byte character set(DBCS) data and Unicode, providedthat the Language and CodeSet pa-rameters are set with DBCS values.
<language>Replace <language> with the languagebeing used.
Max Idle Time Specifies the number of seconds anidle connection remains in the poolbefore it is dropped.
<int>If the value is 0, idle connections remainin the pool until the server shuts down.The default is 60.
Administer
Sybase Control Center for Sybase Unwired Platform 167
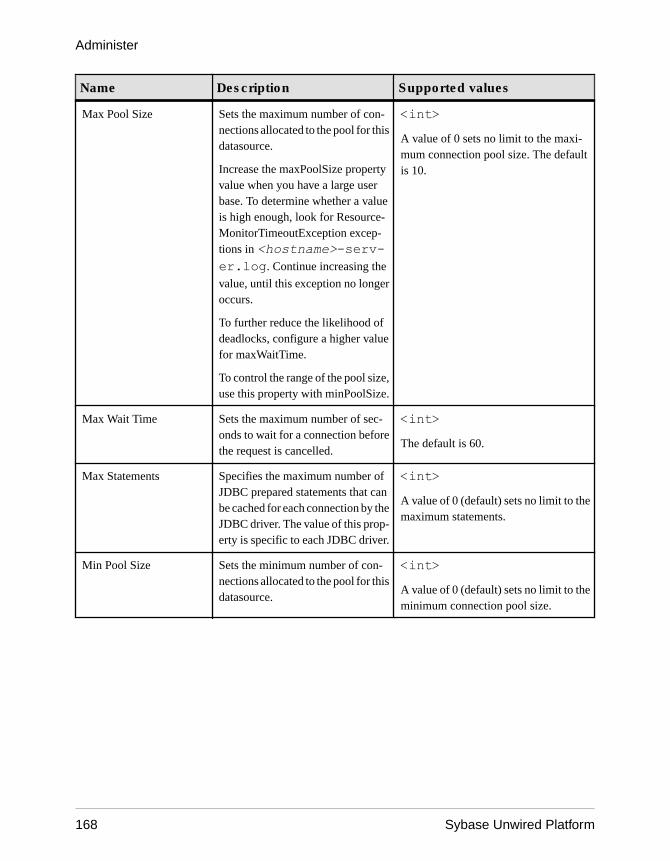
Name Description Supported values
Max Pool Size Sets the maximum number of con-nections allocated to the pool for thisdatasource.
Increase the maxPoolSize propertyvalue when you have a large userbase. To determine whether a valueis high enough, look for Resource-MonitorTimeoutException excep-tions in <hostname>-serv-er.log. Continue increasing the
value, until this exception no longeroccurs.
To further reduce the likelihood ofdeadlocks, configure a higher valuefor maxWaitTime.
To control the range of the pool size,use this property with minPoolSize.
<int>A value of 0 sets no limit to the maxi-mum connection pool size. The defaultis 10.
Max Wait Time Sets the maximum number of sec-onds to wait for a connection beforethe request is cancelled.
<int>The default is 60.
Max Statements Specifies the maximum number ofJDBC prepared statements that canbe cached for each connection by theJDBC driver. The value of this prop-erty is specific to each JDBC driver.
<int>A value of 0 (default) sets no limit to themaximum statements.
Min Pool Size Sets the minimum number of con-nections allocated to the pool for thisdatasource.
<int>A value of 0 (default) sets no limit to theminimum connection pool size.
Administer
168 Sybase Unwired Platform

Name Description Supported values
Network Protocol Sets the protocol used for networkcommunication with the datasource.
Use this property (along with thedriverClass, and dataSourceClassproperties) only if you do not have apredefined database-type entry inUnwired Server for the kind of SQLdatabase you are connecting to. Forexample, you may be required to usethis property for MySQL databaseconnections.
The network protocol is JDBC drivervendor-specific. There are no predefinedvalues.
See the driver vendor's JDBC documen-tation.
Password Specifies the password for connect-ing to the database.
[default|<password>]
Ping and Set Session Auth Runs the ping and session-authori-zation commands in a single com-mand batch; may improve perform-ance. You can only enable the Pingand Set Session Auth property if youhave enabled the Set Session Authproperty so database work runs un-der the effective user ID of the client.
[True|False]Set to true to enable, or false to disable.
Ping Connections Pings connections before attempt-ing to reuse them from the connec-tion pool.
[True|False]Set to true to enable ping connections, orfalse to disable.
Ping SQL Specify the SQL statement to usewhen testing the database connec-tion with ping.
[default|<statement>]Replace <statement> with the SQLstatement identifier. The default is "se-lect 1".
Port Number Sets the server port number wherethe database server listens for con-nection requests.
[default|<port>]Replace <port> with the TCP/IP portnumber to use (that is, 1 – 65535).
If you set the value as default, the defaultprotocol of the datasource is used.
Administer
Sybase Control Center for Sybase Unwired Platform 169

Name Description Supported values
PS Maximum BlobLength
Indicates the maximum number ofbytes allowed when updating aBLOB datatype using Prepared-Statement.setBytes.
[default|<int>]Replace <int> with the number of bytesallowed during an update. The default is16384.
PS Maximum ClobLength
Indicates the maximum number ofcharacters allowed when updating aCLOB datatype using Prepared-Statement.setString.
[default|<int>]Replace <int> with the number of bytesallowed during an update. The default is16384.
Role Name Sets the database role that the usermust have to log in to the database.
[default|<name>]If you set this value to default, the de-fault database role name of the data-source is used.
Server Name Defines the host where the databaseserver is running.
<name>Replace <name> with an appropriatename for the server.
Service Name Defines the service name for the da-tasource.
For SQL Anywhere servers, use thisproperty to specify the database youare attaching to.
<name>Replace <name> with an appropriatename for the service.
Set Session Auth Establishes an effective databaseidentity that matches the currentmobile application user.
If you use this property, you mustalso use setSessionAuthSystemIDto set the session ID.
Alternately you can pingAndSet-SessionAuth if you are using thisproperty with pingConnection. ThepingAndSetSessionAuth propertyruns the ping and session-authoriza-tion commands in a single commandbatch, which may improve perform-ance.
[true|false]Choose a value of 1 to use an ANSI SQLset session authorization command atthe start of each database transaction.Set to 0 to use session-based authoriza-tions.
Administer
170 Sybase Unwired Platform

Name Description Supported values
Set Session Auth SystemID
If Set Session Authorization is ena-bled, specifies the database identityto use when the application serveraccesses the database from a trans-action that runs with "system" iden-tity.
<database identity>Replace <database identity> with thedatabase identifier.
Start Wait Sets the wait time (in seconds) be-fore a connection problem is repor-ted. If the start command completessuccessfully within this time period,no exceptions are reported in theserver log.
startWait time is used only with thedatabaseStartCommand property.
<int>Replace <int> with the number of sec-onds Unwired Server waits before re-porting an error.
Truncate Nanoseconds Sets a divisor/multiplier that is usedto round the nanoseconds value in ajava.sql.Timestamp to a granularitythat the DBMS supports.
[default|<int>]The default is 10 000 000.
Use Quoted Identifiers Specifies whether or not SQL iden-tifiers are quoted.
[True|False]Set to true to enable use of quoted iden-tifiers, or false to disable.
User Identifies the user who is connectingto the database.
[default|<user name>]Replace <user name> with the databaseuser name.
XA Datasource Class Specifies the class name or libraryname used to support two-phasecommit transactions, and the nameof the XA resource library.
<class name>Replace <class name> with the class orlibrary name.
• SQL Anywhere database:com.syb-ase.jdbc3.jdbc.SybXA-DataSource
• Oracle database: ora-cle.jdbc.xa.client.Or-acleXADataSource
Administer
Sybase Control Center for Sybase Unwired Platform 171

See also• SAP Java Connector Properties on page 172
• SAP DOE-C Properties on page 173
• Web Services Properties on page 176
• Proxy Properties on page 178
SAP Java Connector PropertiesConfigure SAP Java Connector (JCo) connection properties.
For a comprehensive list of SAP JCo properties you can use to create an instance of a clientconnection to a remote SAP system, see http://help.sap.com/javadocs/NW04/current/jc/com/sap/mw/jco/JCO.html#createClient(java.util.Properties).
This list of properties can be used by all datasource types. Sybase does not document all nativeendpoint properties. However, you can add native endpoint properties, naming them using thissyntax:
<NativeConnPropName>=<SupportedValue>
Table 9. General connection parameters
Name Description Supported values
Enable ABAP Debugging Enables or disables ABAP debug-ging. If enabled, the connection isopened in debug mode and the in-voked function module can be step-ped through in the debugger.
For debugging, an SAP graphical userinterface (SAPGUI) must be installedon the same machine the client pro-gram is running on. This can be eithera normal Windows SAPGUI or a JavaGUI on Linux/UNIX systems.
Not supported.
Do not set this parameter or leave it setto 0.
Remote GUI Specifies whether a remote SAPgraphical user interface (SAPGUI)should be attached to the connection.Some older BAPIs need an SAPGUIbecause they try to send screen outputto the client while executing.
Not supported.
Do not set this parameter or leave it setto 0.
Administer
172 Sybase Unwired Platform

Name Description Supported values
Get SSO Ticket Generates an SSO2 ticket for the userafter login to allow single sign-on. IfRfcOpenConnection() succeeds, youcan retrieve the ticket with RfcGet-PartnerSSOTicket() and use it for ad-ditional logins to systems supportingthe same user base.
Not accessible by the customer.
Do not set this parameter or leave it setto 0.
Use X509 Unwired Platform sets this propertywhen a client uses an X509 certificateas the login credential.
If an EIS RFC operation is flagged forSSO (user name and password person-alization keys selected in the authenti-cation parameters) then Sybase Un-wired Platform automatically sets theappropriate properties to use X.509,SSO2, or user name and password SSOcredentials.
The corresponding properties shouldnot be set by the administrator on theSAP endpoint.
Additional GUI Data Provides additional data for graphicaluser interface (GUI) to specify theSAProuter connection data for theSAPGUI when it is used with RFC.
Not supported.
GUI Redirect Host Identifies which host to redirect theremote graphical user interface to.
Not supported.
GUI Redirect Service Identifies which service to redirectthe remote graphical user interface to.
Not supported.
Remote GUI Start Pro-gram
Indicates the program ID of the serverthat starts the remote graphical userinterface.
Not supported.
See also• JDBC Properties on page 160• SAP DOE-C Properties on page 173• Web Services Properties on page 176• Proxy Properties on page 178
SAP DOE-C PropertiesConfigure Sybase SAP® Data Orchestration Engine Connector (DOE-C) properties. Thistype of connection is available in the list of connection templates only when you deploy a
Administer
Sybase Control Center for Sybase Unwired Platform 173

Sybase SAP® Data Orchestration Engine Connector package. No template exists for thesetypes of connections.
Note: If you change the username or password property of a DOE-C connection, you mustreopen the same dialog and click Test Connection after saving. Otherwise the error stateof this DOE-C package is not set properly, and an error message is displayed. This will notwork if you click Test Connection before saving the properties.
Name Description Supported values
Username Specifies the SAP user account ID. TheSAP user account is used during inter-action between the connected SAP sys-tem and client for certain administra-tive activities, such as sending ac-knowledgment messages during day-to-day operations or "unsubscribe"messages if a subscription for this con-nection is removed.
This account is not used for messagescontaining business data; those typesof messages are always sent within thecontext of a session authenticated withcredentials provided by the mobile cli-ent.
The technical user name and passwordor certificateAlias must be set to per-form actions on subscriptions. The cer-tificateAlias is mutually exclusive withand overrides the technical user nameand password fields if set. The techni-cal user name and password fields canbe empty, but only if certifica-teAlias is set.
Valid SAP login name for the DOEhost system.
Password Specifies the password for the SAPuser account.
Valid password.
DOE SOAPTimeout
Specifies a timeout window duringwhich unresponsive DOE requests areaborted.
Positive value (in seconds).
The default is 420 (7 minutes).
Administer
174 Sybase Unwired Platform

Name Description Supported values
DOE ExtractWindow
Specifies the number of messages al-lowed in the DOE extract window.
Positive value (in messages).
The minimum value is 10. The maxi-mum value is 2000. The default is 50.
When the number of messages in theDOE extract window reaches 50% ofthis value, DOE-C sends a Status-ReqFromClient message, to ad-
vise the SAP DOE system of the cli-ent's messaging status and acknowl-edge the server's state.
Packet Drop Size Specifies the size, in bytes, of the larg-est JavaScript Object Notation (JSON)message that the DOE connector pro-cesses on behalf of a JSON client.
The packet drop threshold size shouldbe carefully chosen, so that it is largerthan the largest message sent from theDOE to the client, but smaller than themaximum message size which may beprocessed by the client.
Positive value (in bytes).
The default is 1048576 bytes (1MB).
Do not set lower than 4096 bytes; thereis no maximum limitation.
Service Address Specifies the DOE URL. Valid DOE URL.
If you are using DOE-C with SSL:
• Modify the port from the standardhttp://host:8000 to
https://host:8001/.
• Add the certificate being used asthe technical user and DOE-C end-point security profile certificate tothe SAP DOE system's SSL Servercertificate list by using theSTRUST transaction. See yourSAP documentation for details.
Listener URL Specifies the DOE-C server listenerURL.
Valid DOE-C listener URL, for exam-ple http://<sup_host-name>:8000/doe/publish.
Administer
Sybase Control Center for Sybase Unwired Platform 175

Name Description Supported values
SAP TechnicalUser CertificateAlias
Sets the alias for the Unwired Platformkeystore entry that contains the X.509certificate for Unwired Server's SSLpeer identity.
If you do not set a value, mutual au-thentication for SSL is not used whenconnecting to the Web service.
If you are using DOE-C with SSO usethe "SAP Technical User CertificateAlias" only for configurations whichrequire the technical user to identifyitself using an X.509 certificate; itspecifies the Certificate Alias to beused as the technical user. This over-rides the "Username" and "Password"settings normally used.
Valid certificate alias.
Login Required Indicates whether authentication cre-dentials are required to login. The de-fault value is true.
For upgraded packages, "login-re-quired=false" gets converted to "login-required=true" and a No-Auth securityconfiguration "DOECNoAuth" is as-signed to the upgraded package.
A read-only property with a value oftrue.
See also• JDBC Properties on page 160
• SAP Java Connector Properties on page 172
• Web Services Properties on page 176
• Proxy Properties on page 178
Web Services PropertiesConfigure connection properties for the Simple Object Access Protocol (SOAP) andRepresentational State Transfer (REST) architectures.
Name Description Supported Values
Password Specifies the password for HTTP basicauthentication, if applicable.
Password
Administer
176 Sybase Unwired Platform

Name Description Supported Values
Address Specifies a different URL than the portaddress indicated in the WSDL docu-ment at design time.
HTTP URL address of the Web service
User Specifies the user name for HTTP ba-sic authentication, if applicable.
User name
Certificate Alias Sets the alias for the Unwired Platformkeystore entry that contains the X.509certificate for Unwired Server's SSLpeer identity.
If you do not set a value, mutual au-thentication for SSL is not used whenconnecting to the Web service.
Use the alias of a certificate stored inthe Unwired Server certificate key-store.
authentication-Preemptive
When credentials are available and thisproperty is set to the default of false,this property allows Unwired Server tosend the authentication credentials on-ly in response to the receipt of a servermessage in which the HTTP status is401 (UNAUTHORIZED) and theWWW-Authenticate header is set. Inthis case, the message exchange pat-tern is: request, UNAUTHORIZED re-sponse, request with credentials, serv-ice response.
When set to true and basic credentialsare available, this property allows Un-wired Server to send the authenticationcredentials in the original SOAP orREST HTTP request message. Themessage exchange pattern is: requestwith credentials, a service response.
False (default)
True
Socket Timeout The socket timeout value controls themaximum time in milliseconds after aweb service operation (REST orSOAP) is allowed to wait for a re-sponse from the remote system; if theEIS system doesn't respond in thattime, the operation fails and the SUPthread is unblocked.
Time in milliseconds (default: 6000).
Range of [0 – 2147483647], where 0 isinterpreted as infinity.
Administer
Sybase Control Center for Sybase Unwired Platform 177
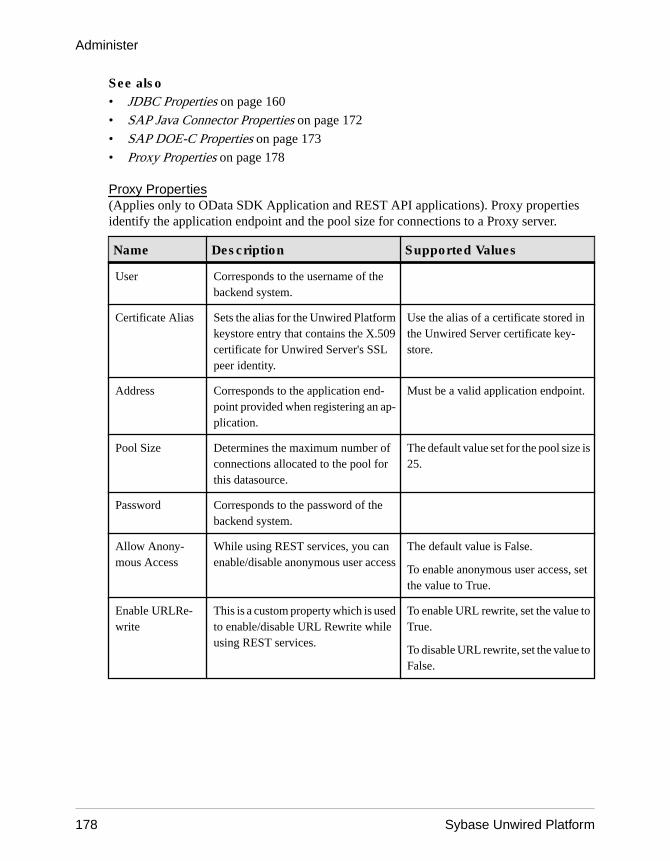
See also• JDBC Properties on page 160
• SAP Java Connector Properties on page 172
• SAP DOE-C Properties on page 173
• Proxy Properties on page 178
Proxy Properties(Applies only to OData SDK Application and REST API applications). Proxy propertiesidentify the application endpoint and the pool size for connections to a Proxy server.
Name Description Supported Values
User Corresponds to the username of thebackend system.
Certificate Alias Sets the alias for the Unwired Platformkeystore entry that contains the X.509certificate for Unwired Server's SSLpeer identity.
Use the alias of a certificate stored inthe Unwired Server certificate key-store.
Address Corresponds to the application end-point provided when registering an ap-plication.
Must be a valid application endpoint.
Pool Size Determines the maximum number ofconnections allocated to the pool forthis datasource.
The default value set for the pool size is25.
Password Corresponds to the password of thebackend system.
Allow Anony-mous Access
While using REST services, you canenable/disable anonymous user access
The default value is False.
To enable anonymous user access, setthe value to True.
Enable URLRe-write
This is a custom property which is usedto enable/disable URL Rewrite whileusing REST services.
To enable URL rewrite, set the value toTrue.
To disable URL rewrite, set the value toFalse.
Administer
178 Sybase Unwired Platform
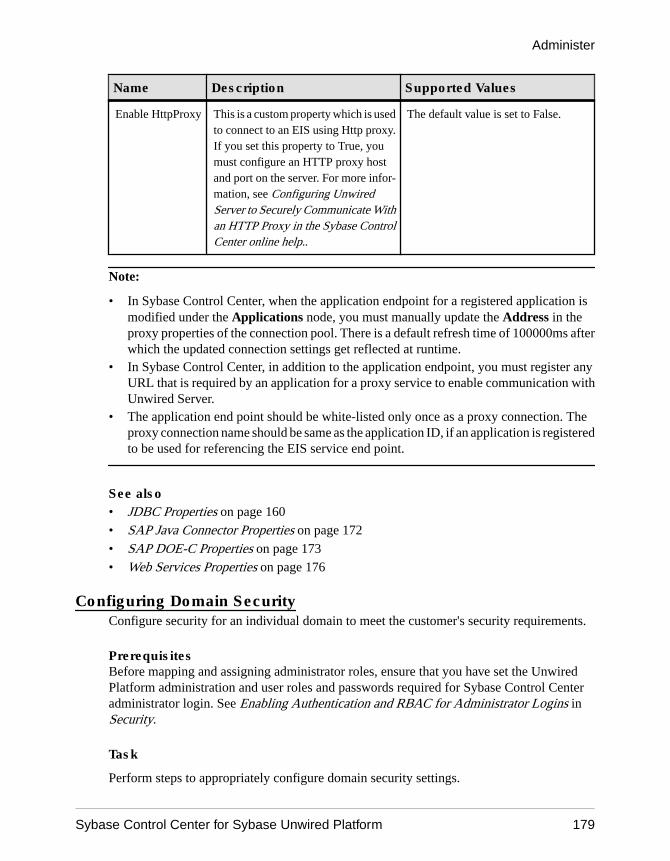
Name Description Supported Values
Enable HttpProxy This is a custom property which is usedto connect to an EIS using Http proxy.If you set this property to True, youmust configure an HTTP proxy hostand port on the server. For more infor-mation, see Configuring UnwiredServer to Securely Communicate Withan HTTP Proxy in the Sybase ControlCenter online help..
The default value is set to False.
Note:
• In Sybase Control Center, when the application endpoint for a registered application ismodified under the Applications node, you must manually update the Address in theproxy properties of the connection pool. There is a default refresh time of 100000ms afterwhich the updated connection settings get reflected at runtime.
• In Sybase Control Center, in addition to the application endpoint, you must register anyURL that is required by an application for a proxy service to enable communication withUnwired Server.
• The application end point should be white-listed only once as a proxy connection. Theproxy connection name should be same as the application ID, if an application is registeredto be used for referencing the EIS service end point.
See also• JDBC Properties on page 160• SAP Java Connector Properties on page 172• SAP DOE-C Properties on page 173• Web Services Properties on page 176
Configuring Domain SecurityConfigure security for an individual domain to meet the customer's security requirements.
PrerequisitesBefore mapping and assigning administrator roles, ensure that you have set the UnwiredPlatform administration and user roles and passwords required for Sybase Control Centeradministrator login. See Enabling Authentication and RBAC for Administrator Logins inSecurity.
Task
Perform steps to appropriately configure domain security settings.
Administer
Sybase Control Center for Sybase Unwired Platform 179

1. Choosing a Security Configuration
Select a security configuration that provides authentication and optionally authorization,attribution, or auditing services. You can assign as many security configurations as neededto a domain.
2. Assigning Domain Administrators to a Domain
Assign domain administration privileges to a domain administrator. You must be aplatform administrator to assign and unassign domain administrators.
3. Mapping Roles for a Domain
Map logical roles to physical roles for a domain by setting the mapping state. Domainadministrators map roles for the domains they control. Role mappings performed at thedomain level are automatically applied to all domains that share the same securityconfiguration. Domain-level role mapping overrides mapping set at the cluster level by theplatform administrator.
See also• Creating and Enabling a New Domain on page 100
• Deleting a Domain on page 101
• Registering a Domain Administrator User on page 102
• Assigning Domain Administrators to a Domain on page 103
• Viewing Applications for a Domain on page 104
• Viewing Application Connections for a Domain on page 104
• Scheduling Accumulated Data Cleanup for Domains on page 106
• Domain Logs on page 110
• Checking Client Application Logs on page 155
• Connections on page 156
Choosing a Security ConfigurationSelect a security configuration that provides authentication and optionally authorization,attribution, or auditing services. You can assign as many security configurations as needed to adomain.
Only super administrators have privileges to create security configurations. Domainadministrators can view a security configuration only after a super administrator has assignedit to the domain.
1. In the left navigation pane, navigate to Cluster > Domains > <DomainName> >Security.
2. In the right administration pane, select the General tab and click Assign.The Assign Security Configurations dialog appears.
3. Select one or more security configurations to assign to the domain by checking the boxadjacent to the configuration name.
Administer
180 Sybase Unwired Platform

4. Click OK.A message appears above the right administration pane menu indicating the success orfailure of the assignment. If successful, the new security configuration appears in the list ofsecurity configurations.
5. To set the default security configuration for the domain, check the box adjacent to theconfiguration name and click Set Default.
6. To remove a security configuration, check the box adjacent to the configuration name andclick Unassign.
You cannot remove a security configuration if:• it is mapped to one or more MBO packages• it is the default security configuration for the domain.
Assigning Domain Administrators to a DomainAssign domain administration privileges to a domain administrator. You must be a platformadministrator to assign and unassign domain administrators.
PrerequisitesEnsure the user is already registered as a domain administrator in the Domain Administratorstab.
Task
1. In the left navigation pane, expand the Domains folder, and select the domain for which toassign domain administration privileges.
2. Select the domain-level Security folder.
3. In the right administration pane, select the Domain Administrators tab, and clickAssign.
4. Select one or more administrator users to assign to the domain by checking the boxadjacent to the user name.
5. Click OK.A message appears above the right administration pane menu indicating the success orfailure of the assignment. If successful, the new domain administrator appears in the list ofusers.
Mapping Roles for a DomainMap logical roles to physical roles for a domain by setting the mapping state. Domainadministrators map roles for the domains they control. Role mappings performed at thedomain level are automatically applied to all domains that share the same securityconfiguration. Domain-level role mapping overrides mapping set at the cluster level by theplatform administrator.
Administer
Sybase Control Center for Sybase Unwired Platform 181

PrerequisitesUnwired Platform cannot query all enterprise security servers directly; to performauthentication successfully know the physical roles that are required.
Task
1. In the left navigation pane of Sybase Control Center, expand Domains > Domain name. >Security and select the security configuration to map roles for.
2. In the right administration pane, click the Role Mappings tab.
3. Select a logical role and select one of the following in the adjacent list:
State Description
AUTO To map the logical role to a physical role of the same name.
NONE To disable the logical role, which means that the logical role is not authorized.
MAP To manually map the logical role when the physical and logical role names do not match.See Mapping a Physical Role Manually.
Mapping a Physical Role ManuallyUse the Role Mappings dialog to manually map required physical roles for a logical role whenphysical and logical role names do not match. If names do not match, the AUTO mapping statedoes not work.
PrerequisitesUnwired Platform cannot query all supported enterprise security servers directly; forsuccessful authentication, you must know the physical roles your back-end systems require.
Task
You can map a logical role to one or more physical roles. You can also map multiple logicalroles to the same physical role. If a role does not exist, you can also add or delete names asneeded.
1. Review the list of existing physical role names that you can map to the logical role youhave selected. If the list retrieved is too long to locate the name quickly, either:
• Click the banner of Available Roles list to sort names alphanumerically.• Start typing characters in the box, then click the Search button to filter the available
list.
2. If a role that you require still does not appear, enter the Role name and click the + button.The role name appears in the Available roles list with an asterisk (*). This asteriskindicates that an available role was added by an administrator, not a developer.
Administer
182 Sybase Unwired Platform

3. To remove a role you no longer require from the Available roles list, select the name andclick the x button adjacent to the Role name field.The role is removed and can no longer be mapped to a logical role.
4. To map a logical role that appears in the text area of the Role Mappings dialog to a physicalrole:
a) Select one or more Available roles.b) Click Add.
5. To unmap a role:
a) Select one or more Mapped roles.b) Click Remove.
The roles are returned to the Available roles list.
6. Click OK to save these changes.
Once a logical role has been manually mapped, the mapping state changes to MAPPED. Theroles you have mapped appear in the active Physical Roles cell for either a package-specific orserver-wide role mappings table.
Mapping State ReferenceThe mapping state determines the authorization behavior for a logical name instance.
State Description
AUTO Map the logical role to a physical role of the same name. The logicalrole and the physical role must match, otherwise, authorization fails.
NONE Disable the logical role, which means that the logical role is not au-thorized. This mapping state prohibits anyone from accessing theresource (MBO or Operation). Carefully consider potential conse-quences before using this option.
MAPPED A state that is applied after you have actively mapped the logical roleto one or more physical roles. Click the cell adjacent to the logical rolename and scroll to the bottom of the list to see the list of mappedphysical roles.
Security ConfigurationsSybase Unwired Platform does not provide proprietary security systems for storing andmaintaining users and access control rules, but delegates these functions to the enterprise’sexisting security solutions.
A security configuration determines the scope of user identity, performs authentication andauthorization checks, and can be assigned multiple levels (domain or package). Applicationsinherit a security configuration when the administrator assigns the application to a domain viaa connection template.
Administer
Sybase Control Center for Sybase Unwired Platform 183

Users can be authenticated differently, depending on which security configuration is used. Forexample, a user identified as "John" may be authenticated different ways, depending on thenamed security configuration protecting the resource he is accessing: it could be an MBOpackage, a DCN request, use of Sybase Control Center .
The anonymous security configuration provides unauthenticated user access, and are targetedto applications that do not require tight security.
Security configurations aggregate various security mechanisms for protecting UnwiredPlatform resources under a specific name, which administrators can then assign. Each securityconfiguration consists of:
• A set of configured security providers. Security provider plug-ins for many commonsecurity solutions are included with the Sybase Unwired Platform.
• Role mappings (which are set at the domain and package level) that map logical roles toback end physical roles.
A user entry must be stored in the security repository used by the configured security providerto access any resources (that is, either a Sybase Control Center administration feature or anapplication package that accesses data sets from a back-end data source). When a userattempts to access a particular resource, Unwired Server tries to authenticate and authorize theuser, by checking the security repository for:
• Security access policies on the requested resource• Role memberships
1. Creating a Security ConfigurationCreate and name a set of security providers and physical security roles to protect SybaseUnwired Platform resources.
2. Assigning a Security Configuration to a DomainAssign security configurations to one or more domains. This allows the supAdmin to offera security repository for application user authentication and authorization, as well as toshare security providers across domains in case one tenant uses mutiple domains.
3. Viewing Security Configuration UsageYou can view the security configurations and logical roles used to access applications.This enables you to assess the impact of changing a security configuration or logical role.
4. Anonymous Access Security ConfigurationAllow unauthenticated users access to application data, for example, applications thatallow users to browse a read-only product catalog without logging in by assigning theanonymous security configuration to the application.
5. SiteMinder Authentication with Sybase Unwired PlatformConfigure your SiteMinder environment for authentication in Sybase Unwired Platform.
See also• Configuring Domain Security on page 179
Administer
184 Sybase Unwired Platform

• Creating Logical Roles for a Security Configuration on page 226
• Mapping a Physical Role Manually on page 228
Creating a Security ConfigurationCreate and name a set of security providers and physical security roles to protect SybaseUnwired Platform resources.
Only platform administrators can create security configurations. Domain administrators canonly view after the platform administrator creates and assigns them to a domain.
1. In the left navigation pane of Sybase Control Center, select Security.
2. In the right administration pane, click New.
3. Enter a name for the security configuration and click OK.
4. In the left navigation pane, under Security, select the new security configuration.
5. In the right administration pane, select the Settings tab, and set values for these propertiesas required:
• Authentication cache timeout – determines how long authentication results shouldbe cached before a user is required to reauthenticate. For details, see AuthenticationCache Timeouts in Security. Set the cache timeout value in seconds. The default is3600. To force re-authentication, change this value to 0.
• Maximum allowed authentication failure – determines the maximum number oflogin attempts after which the user is locked.
• Authentication lock duration – determines how long the user is locked after themaximum login attempts is reached.
6. Click Save.
7. Select the tab corresponding to the type of security provider you want to configure:Authentication, Authorization, Attribution or Audit.
8. To edit the properties of a preexisting security provider in the configuration:
a) Select the provider, and click Properties.b) Configure the properties associated with the provider by setting values according to
your security requirements. Add properties as required. For more information aboutconfiguring security provider properties, see the individual reference topics for eachprovider.
c) Click Save.
9. To add a new security provider to the configuration:
a) Click New.b) Select the provider you want to add.c) Configure the properties associated with the provider by setting values according to
your security requirements. Add properties as required. For more information aboutconfiguring security provider properties, see the individual reference topics for eachprovider.
Administer
Sybase Control Center for Sybase Unwired Platform 185
d) Click OK.The configuration is saved locally, but not yet committed to the server.
Note: When you create a new security configuration, Sybase Unwired Platform sets theNoSecurity provider by default. Sybase recommends that after you add, configure, andvalidate your providers, you remove the NoSecurity provider. For more information on theNoSecurity provider, see NoSecurity Configuration Properties.
10. To remove the NoSecurity provider:
a) In the left navigation pane, select Security.b) In the right administration pane, within the Authenticationtab, select
NoSecLoginModule and click Delete.c) In the right administration pane, within the Authorization tab, select
NoSecAuthorizer and click Delete.d) In the right administration pane, within the Attribution tab, select NoSecAttributer
and click Delete.e) In the General tab, click Apply then click Save.
11. To map roles for the security configuration, select the Role Mappings tab. Create logicalroles and map them to physical roles in the security provider.
12. Select the General tab, and click Validate to confirm that Unwired Server accepts the newsecurity configuration.A message indicating the success of the validation appears above the menu bar.
13. Click Apply to save changes to the security configuration, and apply them across UnwiredServer.A message indicating the success of the application appears above the menu bar.
See also• Assigning a Security Configuration to a Domain on page 231
Security ProvidersConfigure one or more security providers as part of a named security configuration. There aredifferent types of providers you can use, and these can be ordered and flagged according to therequirements of your production environment.
Configure security providers for Unwired Server by logging in to the server in Sybase ControlCenter and clicking Security > Configuration.
For third-party providers or providers you have created with the CSI SDK, save related JARfiles or DLLs in the <UnwiredPlatform_InstallDir>\UnwiredPlatform\Servers\UnwiredServer\lib\ext folder.
• Authentication modules – verify the identity of a user accessing a network with the mobileapplication, typically via a login form or some other login or validation mechanism.Authentication in Unwired Server is distinct from authorization. You must have at least
Administer
186 Sybase Unwired Platform
one authentication module configured in a production deployment of Unwired Server. Youcan stack multiple providers so users are authenticated in a particular sequence.
• Authorization modules – check the access privileges for an authenticated identity. Sybaserecommends that you have at least one authorization module configured in a productiondeployment of Unwired Server.
• Attribution modules – when a user is authenticated, a custom attribution provider can addmore information about the authenticated user. Attribution modules are only available ifyou have created a custom provider with the CSI SDK and saved to the correct folder.
• Auditing modules – report all audit events to allow you to evaluate the security systemimplementation for Unwired Server. Auditing provides you a record of all the securitydecisions that have been made. Each successful authentication creates a session key thatshows up in subsequent security checks for that user. Unsuccessful authentications are alsologged. Each authorization records what roles were checked, or what resource wasaccessed. Audit filters determine what events get recorded, the audit format determineswhat the audit records look like, and the audit destination specifies where audit records aresent. Use the audit trail to identify who did what and when, with respect to objects securedby your providers. Auditing modules are optional.
In most cases, each security module requires a unique set of configuration properties.However, there are some cases when modules require a common set of properties, and theseproperties are configured once for each module on a tab created for that purpose.
You can configure different security providers for administrator authenticaton and device userauthentication. For more information on configuring security providers depending on the typeof user, see either Enabling Authentication and RBAC for User Logins or EnablingAuthentication and RBAC for Administrator Logins in the Security guide.
Stacking Providers and Combining Authentication ResultsOptionally, implement multiple login modules to provide a security solution that meetscomplex security requirements. Sybase recommends provider stacking as a means of elicitingmore precise results, especially for production environment that require differentauthentications schemes for administrators, DCN, SSO, and so on.
Stacking is implemented with a controlFlag attribute that controls overall behavior when youenable multiple providers. Set the controlFlag on a specific provider to refine how results areprocessed.
For example, say your administrative users (supAdmin in a default installation) are not alsousers in an EIS system like SAP. However, if they are authenticated with just the defaultsecurity configuration, they cannot also authenticate to the HttpAuthenticationLoginModuleused for SSO2Token retrieval. In this case, you would stack a second login modules with acontrolFlag=sufficient login module for your administrative users.
Or, in a custom security configuration (recommended), you may also find that you are using atechnical user for DCN who is also not an SAP user. This technical user does not need SSObecause they will not need to access data. However, the technical user still needs to be
Administer
Sybase Control Center for Sybase Unwired Platform 187

authenticated by Unwired Server. In this case, you can also stack another login module so thisDCN user can login.
1. Use Sybase Control Center to create a security configuration and add multiple providers asrequired for authentication.
2. Order multiple providers by selecting a login module and using the up or down arrows at toplace the provider correctly in the list.
The order of the list determines the order in which authentication results are evaluated.
3. For each provider:
a) Select the provider name.b) Click Properties.c) Configure the controlFlag property with one of the available values: required,
requisite, sufficient, optional.
See controlFlag Attribute Values for descriptions of each available value.d) Configure any other common security properties as required.
4. Click Save.
5. Select the General tab, and click Apply.
For example, say you have sorted these login modules in this order and used these controlFlagvalues:
• LDAP (required)• NT Login (sufficient)• SSO Token (requisite)• Certificate (optional)
The results are processed as indicated in this table:
Pro-vider
Authentication Status
LDAP pass pass pass pass fail fail fail fail
NT Log-in
pass fail fail fail pass fail fail fail
SSO To-ken
* pass pass fail * pass pass fail
Certifi-cate
* pass fail * * pass fail *
Overallresult
pass pass pass fail fail fail fail fail
Administer
188 Sybase Unwired Platform

Stacking LoginModules in SSO Configurations(Not applicable to Online Data Proxy) Use LoginModule stacking to enable role-basedauthorization for MBOs and data change notifications (DCNs).
controlFlag Attribute Values(Not applicable to Online Data Proxy) The Sybase implementation uses the same control flag(controlFlag) attribute values and definitions as those defined in the JAAS specification.
If you stack multiple providers, you must set the control flag attribute for each enabledprovider.
Control Flag Value Description
Required The LoginModule is required. Authentication proceeds down the Log-inModule list.
Requisite The LoginModule is required. Subsequent behavior depends on theauthentication result:
• If authentication succeeds, authentication continues down theLoginModule list.
• If authentication fails, control returns immediately to the applica-tion (authentication does not proceed down the LoginModule list).
Sufficient The LoginModule is not required. Subsequent behavior depends on theauthentication result:
• If authentication succeeds, control returns immediately to the ap-plication (authentication does not proceed down the LoginModulelist).
• If authentication fails, authentication continues down the Logi-nModule list.
Optional (default) The LoginModule is not required. Regardless of success or failure,authentication proceeds down the LoginModule list.
Example
Providers are listed in this order and with these controlFlag:
1. CertificateAuthenticationLoginModule (sufficient)2. LDAP (optional)3. NativeOS (sufficient)
A client doing certificate authentication (for example, X.509 SSO to SAP) can authenticateimmediately. Subsequent modules are not called, because they are not required. If there areregular user name and password credentials, they go to LDAP, which may authenticate them,
Administer
Sybase Control Center for Sybase Unwired Platform 189

and set them up with roles from the LDAP groups they belong to. Then NativeOS is invoked,and if that succeeds, Sybase Unwired Platform picks up roles based on the Windows groupsthey are in.
LDAP Stacking and Configuration SharingLDAP login and attribution modules can sometimes share a common configuration.LDAPAttributer can share the configuration properties from the configured LDAP loginmodules only if no configuration properties are explicitly configured for LDAPAttributer.
If stacking these modules, be aware that authorizers do not inherit configuration propertiesfrom the login modules you configure. Configurations must be explicit. In the case where bothLDAPLoginModule and LDAPAuthorizer are separately configured:
• Matching configuration – LDAPAuthorizer simply skips the role retrieval.• Differing configuration – LDAPAuthorizer proceeds with the role retrieval from the
configured backend, and performs the authorization checks using the complete list of roles(from both the login module and itself).
Only one attributer instance needs to be configured even when multiple login moduleinstances are present in the security configuration. The LDAPAttributer attributes anauthenticated subject using the LDAP configuration that was used to authenticate the subject.However, the list of available roles is computed by the LDAPAttributer by iterating through allavailable LDAP configurations.
Regarding LDAPAttributer stacking and configuration:
• LDAPAttributer has maximum functionality when combined with the LDAPauthentication provider; the LDAPAttributer can be configured completely standalone orwith alternate authentication providers.
• If you do not configure an LDAPLoginModule, you must define the configure allproperties in the attributer.
• If explicit configuration properties are specified for the attributer, then the properties fromthe login module are not used for attributer functionality, including retrieving attributes forauthenticated subjects, listing roles, and more. Sybase recommends you shareconfiguration rather than try to maintain separate ones.
Configuring an LDAP Provider to use SSLIf your LDAP server uses a secure connection, and its SSL certificate is signed by anonstandard certificate authority, for example it is self-signed, use the keytool utility(keytool.exe) to import the certificate into the truststore.
1. Run the following console command: keytool.exe -import -keystoreSUP_HOME\Servers\UnwiredServer\Repository\Security\truststore.jks -file <LDAP server cert file path> -aliasldapcert -storepass changeit.
Administer
190 Sybase Unwired Platform

2. Restart Sybase Unwired Platform services.
3. Log in to Sybase Control Centerfor Sybase Unwired Platform.
4. In the navigation pane of Sybase Control Center, expand the Security folder and select thedesired security configuration in which to add the LDAP provider.
5. In the administration pane, click the Authentication tab.
6. Add an LDAPLoginModule, configuring the ProviderURL, Security Protocol,ServerType, Bind DN, Bind Password, Search Base, and other properties determined byyou and the LDAP administrator. Choose one of the two methods below to secure aconnection to the LDAP server:
a) Use ldaps:// instead of ldap:// in the ProviderURL.b) Use ssl in the Security Protocol.
7. In the General tab, select Validate then Apply.
8. Click OK.
Reordering Configured ProvidersList stacked security providers for a security configuration to identify them as primary orauxiliary providers. Providers are used in the order configured.
1. In the left navigation pane, expand the Security folder.
2. Select the security configuration you want to administer.
3. In the right administration pane, select the tab corresponding to the type of securityprovider you want to configure: Authentication, Authorization, Attribution, or Audit.
4. Select a provider from the list, then use the up and down arrows to the right of the table toachieve the desired placement.
5. Click Save.
6. Select the General tab, and click Apply.A notification message appears if a server restart is required for changes to take effect.
Security Provider Configuration PropertiesSecurity providers implement different properties, depending on the type of provider you areconfiguring.
Platform administrators can configure application security properties in the Sybase ControlCenter. These properties are then transcribed to an XML file in the<UnwiredPlatform_InstallDir>\Servers\UnwiredServer\Repository\CSI\ directory. A new section is created for each provider you add.
LDAP Configuration PropertiesUse these properties to configure the LDAP provider used to authenticate Sybase ControlCenter administration logins or to configure the LDAP provider used to authenticate deviceapplication logins. If you are configuring an LDAP provider for device application logins inSybase Control Center, then Unwired Platform administrators use Sybase Control Center
Administer
Sybase Control Center for Sybase Unwired Platform 191

these properties are saved to the SUP_HOME\Servers\UnwiredServer\Repository\CSI\<security configuration name file.
The Java LDAP provider consists of three provider modules.
• The LDAPLoginModule provides authentication services. Through appropriateconfiguration, you can enable certificate authentication in LDAPLoginModule.
• (Optional) LDAPAuthorizer or RoleCheckAuthorizer provide authorization service inconjunction with LDAPLoginModule. LDAPLoginModule works with either authorizer.The RoleCheckAuthorizer is part of every security configuration but does not appear inSybase Control Center.Use LDAPAuthorizer only when LDAPLoginModule is not used to perform authentication,but roles are still required to perform authorization checks against the LDAP data store. Ifyou use LDAPAuthorizer, always explicitly configure properties; for it cannot share theconfiguration options specified for the LDAPLoginModule.
• (Optional) LDAPAttributer is used to retrieve the list of roles from the LDAP repository.These roles are displayed in the role mapping screen in Sybase Control Center. The LDAPattributer is capable of sharing the configuration properties from the LDAPLoginModules.If no configuration properties are explicitly specified, then the attributer iterates throughthe configured LDAPLoginModules and retrieves the roles from all the LDAP repositoriesconfigured for the different LDAPLoginModules.
Use this table to help you configure properties for one or more of the supported LDAPproviders. When configuring modules or general server properties in Sybase Control Center,note that properties and values can vary, depending on which module or server type youconfigure.
Note: The following characters have special meaning when they appear in a name in LDAP: ,(comma), = (equals), + (plus), < (less than), > (greater than), # (number or hash sign), ;(semicolon), \ (backslash), / (forward slash), LF (line feed), CR (carriage return), " (doublequotation mark), ' (single quotation mark), * (asterisk), ? (question mark), & (ampersand), anda space at the beginning or end of a string. LDAP providers do not handle these specialcharacters in any of the names or DNs, in any of the configuration properties. Additionally,some of the properties, as identified below, cannot use these special characters in commonnames.
Administer
192 Sybase Unwired Platform

Property Default Value Description
ServerType None Optional. The type of LDAP server you are con-necting to:
• sunone5 -- SunOne 5.x OR iPlanet 5.x
• msad2k -- Microsoft Active Directory,
Windows 2000
• nsds4 -- Netscape Directory Server 4.x
• openldap -- OpenLDAP Directory Server
2.x
The value you choose establishes default valuesfor these other authentication properties:
• RoleFilter
• UserRoleMembership
• RoleMemberAttributes
• AuthenticationFilter
• DigestMD5Authentication
• UseUserAccountControl
ProviderURL ldap://local-host:389
The URL used to connect to the LDAP server.Without this URL configured, Unwired Servercannot contact your server. Use the default valueif the server is:
• Located on the same machine as your productthat is enabled with the common security in-frastructure.
• Configured to use the default port (389).
Otherwise, use this syntax for setting the value:
ldap://<hostname>:<port>
Administer
Sybase Control Center for Sybase Unwired Platform 193

Property Default Value Description
DefaultSearchBase None The LDAP search base that is used if no othersearch base is specified for authentication, roles,attribution and self registration:
1. dc=<domainname>,dc=<tld>For example, a machine in sybase.com do-main would have a search base of dc=syb-ase,dc=com.
2. o=<company name>,c=<coun-try code>For example, this might be o=Sybase,c=us fora machine within the Sybase organization.
Note: When you configure this property in the"admin" security configuration used to authenti-cate the administrator in Sybase Control Center,the property value should not contain any specialcharacters, as listed above, in any of the commonnames or distinguished names.
SecurityProtocol None The protocol to be used when connecting to theLDAP server. The specified value overrides theenvironment property java.naming.security.pro-tocol.
To use an encrypted protocol, use SSL instead ofldaps in the URL.
AuthenticationMethod Simple The authentication method to use for all authen-tication requests into LDAP. Legal values aregenerally the same as those of the java.naming.se-curity.authentication JNDI property. Choose oneof:
• simple — For clear-text password authenti-cation.
• DIGEST-MD5 — For more secure hashedpassword authentication. This method re-quires that the server use plain text passwordstorage and only works with JRE 1.4 or later.
Administer
194 Sybase Unwired Platform

Property Default Value Description
AuthenticationFilter For most LDAP servers:(&(uid={uid})(ob-jectclass=per-son))or
For Active Directory e-mail lookups: (&(userPrincipal-Name={uid})(object-class=user))[ActiveDirecto-ry]For Active DirectoryWindows user namelookups: (&(sAMAccount-Name={uid})(ob-ject-class=user))
The filter to use when looking up the user.
When performing a user name based lookup, thisfilter is used to determine the LDAP entry thatmatches the supplied user name.
The string "{uid}" in the filter is replaced with thesupplied user name.
Note: When you use this property to authenticatea user in Sybase Control Center:
• The property value should not contain anyspecial characters, as listed above, in any ofthe common names or distinguished names.
• Do not use Chinese or Japanese characters inuser names or passwords of this property.
AuthenticationScope onelevel The authentication search scope. The supportedvalues for this are:
• onelevel• subtreeIf you do not specify a value or if you specify aninvalid value, the default value is used.
AuthenticationSearchBase None The search base used to authenticate users. If thisproperty is not configured, the value for Default-SearchBase is used.
Note: When you configure this property in the"admin" security configuration used to authenti-cate the administrator in Sybase Control Center,the property value should not contain any specialcharacters, as listed above, in any of the commonnames or distinguished names.
Administer
Sybase Control Center for Sybase Unwired Platform 195

Property Default Value Description
BindDN None The user DN to bind against when building theinitial LDAP connection.
In many cases, this user may need read permis-sions on all user records. If you do not set a value,anonymous binding is used. Anonymous bindingworks on most servers without additional config-uration.
BindPassword None The password for BindDN, which is used to au-thenticate any user. BindDN and BindPasswordseparate the LDAP connection into units.
The AuthenticationMethod property determinesthe bind method used for this initial connection.
Sybase recommends that you encrypt passwords,and provides a password encryption utility. If youencrypt BindPassword, include encryp-ted=true in the line that sets the option. For
example:
<options name="BindPassword" en-crypted="true" value="1snjikf-wregfqr43hu5io..."/>If you do not encrypt BindPassword, the optionmight look like this:
<options name="BindPassword" value="s3cr3T"/>
Administer
196 Sybase Unwired Platform

Property Default Value Description
RoleSearchBase None The search base used to retrieve lists of roles. Ifthis property is not configured, the value for De-faultSearchBase is used.
Note: Setting the RoleSearchBase to the root inActive Directory (for example "DC=exam-ple,DC=com") results in a PartialResultsExcep-tion error when validating the configuration orauthenticating a user. To confirm, verify that ex-ample.com:389 is reachable. The DNS lookupmay successfully resolve example.com to an IPaddress but port 389 may not be open with anActive Directory server listening on that port. Inthis case, adding an entry to the systemroot\system32\drivers\etc\hosts(typically, C:\WINDOWS\sys-tem32\drivers\etc\hosts) file on
the machine where Sybase Unwired Platform isinstalled resolves any communication error.
Note: When you configure this property in the"admin" security configuration used to authenti-cate the administrator in Sybase Control Center,the property value should not contain any specialcharacters, as listed above, in any of the commonnames or distinguished names.
Administer
Sybase Control Center for Sybase Unwired Platform 197

Property Default Value Description
RoleFilter For SunONE/iPlanet:(&(object-class=ldapsuben-try) (object-class=nsrolede-finition))For Netscape DirectoryServer: (|(object-class=groupof-names) (object-class=groupofu-niquenames))For ActiveDirectory: (|(object-class=groupof-names) (object-class=group))
The role search filter. This filter should, whencombined with the role search base and rolescope, return a complete list of roles within theLDAP server. There are several default values,depending on the chosen server type. If the servertype is not chosen and this property is not initial-ized, no roles are available.
Note: When you use this property to authenticatea user in Sybase Control Center:
• The property value should not contain anyspecial characters, as listed above, in any ofthe common names or distinguished names.
• Do not use Chinese or Japanese characters inuser names or passwords of this property.
RoleMemberAttributes For Netscape DirectoryServer and OpenLDAPServer: member,unique-member
A comma-separated list of role attributes fromwhich LDAP derives the DNs of users who havethis role.
These values are cross-referenced with the activeuser to determine the user's role list. One exampleof the use of this property is when using LDAPgroups as placeholders for roles. This propertyhas a default value only when the Netscape servertype is chosen.
RoleNameAttribute cn The attribute of the role entry used as the rolename in Unwired Platform. This is the role namedisplayed in the role list or granted to the authen-ticated user.
RoleScope onelevel The role search scope. Supported values include:
• onelevel• subtreeIf you do not specify a value or if you specify aninvalid value, the default value is used.
Administer
198 Sybase Unwired Platform

Property Default Value Description
SkipRoleLookup false Set this property to true to grant the roles lookedup using the attributes specified by the propertyUserRoleMembershipAttributes without cross-referencing them with the roles looked up usingthe RoleSearchBase and RoleFilter.
LDAP configuration validation succeeds evenwhen an error is encountered when listing all theavailable roles. The error is logged to the serverlog during validation but not reported in SybaseControl Center, allowing the configuration to besaved. This has an impact when listing the phys-ical roles for role mapping as well as in SybaseControl Center. To successfully authenticate theuser, set the SkipRoleLookup property to true.
UserRoleMembershipAttri-butes
For iPlanet/SunONE:nsRoleDN
For Active Directory:memberOf
For all others: none
Defines a user attribute that contains the DNs ofall of the roles a user is a member of.
These comma-delimited values are cross-refer-enced with the roles retrieved in the role searchbase and search filter to generate a list of user'sroles.
If SkipRoleSearch property is set to true, thesecomma-delimited values are not cross-referencedwith the roles retrieved in the role search base androle search filter. See Skipping LDAP Role Look-ups (SkipRoleLookup).
Note: If you use nested groups with Active Di-rectory, you must set this property to to-kenGroups. See LDAP Nested Groups and Rolesin LDAP.
UserFreeformRoleMem-bershipAttributes
None The freeform role membership attribute list.Users who have attributes in this comma-delimi-ted list are automatically granted access to roleswhose names are equal to the attribute value. Forexample, if the value of this property is depart-ment and user's LDAP record has the followingvalues for the department attribute, { sales, con-sulting }, then the user will be granted roles whosenames are sales and consulting.
Administer
Sybase Control Center for Sybase Unwired Platform 199
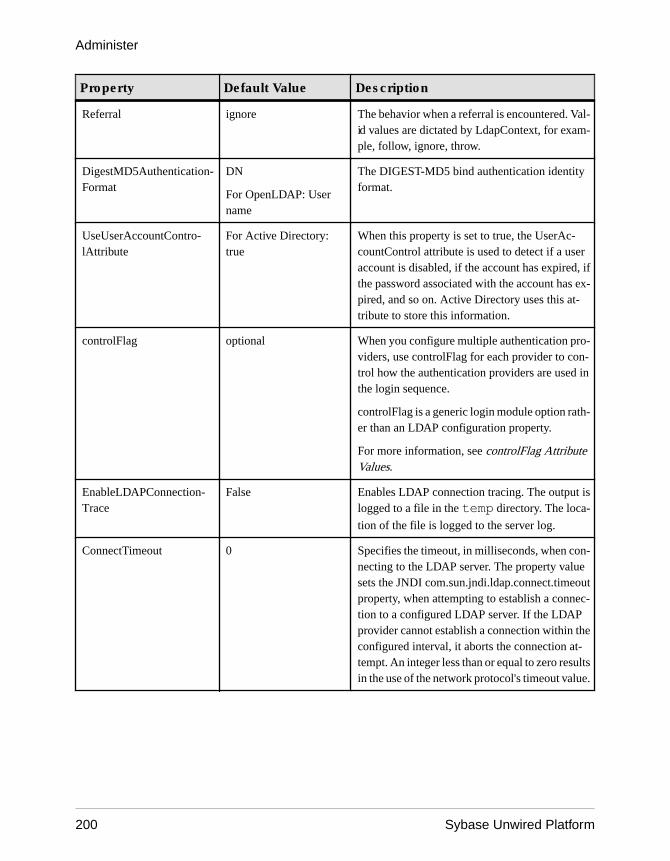
Property Default Value Description
Referral ignore The behavior when a referral is encountered. Val-id values are dictated by LdapContext, for exam-ple, follow, ignore, throw.
DigestMD5Authentication-Format
DN
For OpenLDAP: Username
The DIGEST-MD5 bind authentication identityformat.
UseUserAccountContro-lAttribute
For Active Directory:true
When this property is set to true, the UserAc-countControl attribute is used to detect if a useraccount is disabled, if the account has expired, ifthe password associated with the account has ex-pired, and so on. Active Directory uses this at-tribute to store this information.
controlFlag optional When you configure multiple authentication pro-viders, use controlFlag for each provider to con-trol how the authentication providers are used inthe login sequence.
controlFlag is a generic login module option rath-er than an LDAP configuration property.
For more information, see controlFlag AttributeValues.
EnableLDAPConnection-Trace
False Enables LDAP connection tracing. The output islogged to a file in the temp directory. The loca-
tion of the file is logged to the server log.
ConnectTimeout 0 Specifies the timeout, in milliseconds, when con-necting to the LDAP server. The property valuesets the JNDI com.sun.jndi.ldap.connect.timeoutproperty, when attempting to establish a connec-tion to a configured LDAP server. If the LDAPprovider cannot establish a connection within theconfigured interval, it aborts the connection at-tempt. An integer less than or equal to zero resultsin the use of the network protocol's timeout value.
Administer
200 Sybase Unwired Platform

Property Default Value Description
ReadTimeout 0 Controls the length of time, in milliseconds, theclient waits for the server to respond to a readattempt after the initial connection to the serverhas been established. The property values sets theJNDI com.sun.jndi.ldap.read.timeout property,when attempting to establish a connection to aconfigured LDAP server. If the LDAP providerdoes not receive an LDAP response within theconfigured interval, it aborts the read attempt. Theread timeout applies to the LDAP response fromthe server after the initial connection is establish-ed with the server. An integer less than or equal tozero indicates no read timeout is specified.
LDAPPoolMaxActive 8 Caps the number of concurrent LDAP connec-tions to the LDAP server. A non-positive valueindicates no limit. If this option is set for multipleLDAP providers, the value set by the first LDAPprovider loaded takes precedence over all theothers. When LDAPPoolMaxActive is reached,any further attempts by the LDAP providerclasses to borrow LDAP connections from thepool are blocked indefinitely until a new or idleobject becomes available in the pool.
Connection pooling improves the LDAP provid-er's performance and resource utilization by man-aging the number of TCP connections establishedwith configured LDAP servers. A separate pool isassociated with different Sybase Unwired Plat-form security configurations, ensuring that theLDAP connections in the connection pool for aparticular security configuration are isolated fromany changes occurring outside this security con-figuration. A separate pool also ties the connec-tion pool life cycle to that of the security config-uration.
NTProxy Configuration Properties(Not applicable to Online Data Proxy) Configure these properties to allow the operatingsystem's security mechanisms to validate user credentials using NTProxy (Windows Native
Administer
Sybase Control Center for Sybase Unwired Platform 201

OS). Access these properties from the Authentication tab of the Security node in SybaseControl Center.
Table 10. Authentication properties
Properties Default Value Description
Extract Domain From User-name
true If set to true, the user name cancontain the domain in the formof <username>@<domain>. Ifset to false, the default domain(described below) is alwaysused, and the supplied username is sent to through SSPIuntouched.
Default Domain The domain for the host com-puter of the Java Virtual Ma-chine.
Specifies the default host name,if not overridden by the a spe-cific user name domain.
Default Authentication Server The authentication server forthe host computer of the JavaVirtual Machine.
The default authentication serv-er from which group member-ships are extracted. This can beautomatically determined fromthe local machine environment,but this property to bypass thedetection step.
useFirstPass false If set to true, the login moduleattempts to retrieve only the username and password from theshared context. It never calls thecallback handler.
tryFirstPass false If set to true, the login modulefirst attempts to retrieve the username and password from theshared context before attempt-ing the callback handler.
clearPass false If set to true, the login moduleclears the user name and pass-word in the shared context whencalling either commit or abort.
storePass false If set to true, the login modulestores the user name and pass-word in the shared context aftersuccessfully authenticating.
Administer
202 Sybase Unwired Platform

NoSecurity Configuration PropertiesA NoSecurity provider offers pass-through security for Unwired Server, and should betypically be reserved for devlopment or testing. Sybase strongly encourages you to avoidusing this provider in production environments — either for administration or device userauthentication.
• The NoSecLoginModule class provides open authentication services• The NoSecAuthorizer class provides authorization services• The NoSecAttributer provides attribution services
You need to configure only the authentication properties for the NoSecurity provider.
Table 11. Authentication Properties
Property Default Value Description
useUsernameAsIdentity true If this option is set to true, the user namesupplied in the callback is set as thename of the principal added to the sub-ject.
identity nosec_identity The value of this configuration option isused as the identity of the user if either ofthese conditions is met:
• No credentials were supplied.
• The useUsernameAsIdentity optionis set to false.
useFirstPass false If set to true, the login module attemptsto retrieve only the user name and pass-word from the shared context. It nevercalls the callback handler.
tryFirstPass false If set to true, the login module first at-tempts to retrieve the user name andpassword from the shared context be-fore attempting the callback handler.
clearPass false If set to true, the login module clears theuser name and password in the sharedcontext when calling either commit orabort.
Administer
Sybase Control Center for Sybase Unwired Platform 203

Property Default Value Description
storePass false If set to true, the login module stores theuser name and password in the sharedcontext after successfully authenticat-ing.
Note: When you create a new security configuration, Sybase Unwired Platform sets theNoSecurity provider by default. Sybase recommends that after you add, configure, andvalidate your providers, you remove the NoSecurity provider. For more information, seeCreating a Security Configuration.
Certificate Authentication PropertiesAdd and configure authentication provider properties forCertificateAuthenticationLoginModule, or accept the default settings.
Note: This provider cannot be used for administrative security (in the "admin" securityconfiguration).
Table 12. CertificateAuthenticationLoginModule properties
Property Description
Implementation class The fully qualified class that implements the login module.com.sybase.security.core.CertificateAu-thenticationLoginModule is the default class.
Provider type LoginModule is the only supported value.
Control flag Determines how success or failure of this module affects the overallauthentication decision. optional is the default value.
Clear password (Optional) If true, the login module clears the user name and pass-word from the shared context. The default is false.
Store password (Optional) If true, the login module stores the user name and pass-word in the shared context. The default is false.
Try first password (Optional) If true, the login module attempts to retrieve user nameand password information from the shared context, before using thecallback handler. The default is false.
Use first password (Optional) If true, the login module attempts to retrieve the username and password only from the shared context. The default isfalse.
Administer
204 Sybase Unwired Platform

Property Description
Enable revocation checking (Optional) Enables online certificate status protocol (OCSP) certif-icate checking for user authentication. If you enable this option, youmuse enable OCSP in Unwired Server. This provider uses the valuesdefined as part of the SSL security profile. Revoked certificatesresult in authentication failure when both of these conditions aremet:
• revocation checking is enabled
• OCSP properties are configured correctly
Regex for username certificatematch
(Optional) By default, this value matches that of the certificatescommon name (CN) property used to identify the user.
If a mobile application user supplies a user name that does not matchthis value, authentication fails.
Trusted certificate store (Optional) The file containing the trusted CA certificates (import theissuer certificate into this certificate store). Use this property andStore Password property to keep the module out of the sys-
tem trust store. The default Unwired Server system trust store isSUP_HOME\Servers\UnwiredServer\Reposi-tory\Securitytruststore\truststore.jks. If
you do not specify a store location::
• Unwired Server checks to see if a store used by the JVM (that is,the one defined by the javax.net.ssl.trustStor-eType system property.
• If the system property is not defined, then this value is used: ${java.home}/lib/security/jssecacerts
• If that location also doesn't exist, then this value is used: ${java.home}/lib/security/cacerts
Note: This property is required only if Validate certificate path is setto true.
Administer
Sybase Control Center for Sybase Unwired Platform 205

Property Description
Trusted certificate store pass-word
(Optional) The password required to access the trusted certificatestore. For example, import the issuer of the certificate you are tryingto authenticate into the shared JDK cacerts file and specify thepassword using this property.
Note: This property is required only if Validate certificate path is setto true. However, you do not need to configure this value if thedefault is used.
The default value is the value of the jav-ax.net.ssl.trustStorePassword property.
Trusted certificate store pro-vider
(Optional) The keystore provider. For example, "SunJCE."
Note: This property is required only if Validate certificate path is setto true. However, you do not need to configure this value if thedefault is used.
The default value is the value of the jav-ax.net.ssl.trustStoreProvider property. If it is
not defined, then the most preferred provider from the list of regis-tered providers that supports the specified certificate store type isused.
Trusted certificate store type (Optional) The type of certificate store. For example, "JKS."
Note: This property is required only if Validate certificate path is setto true. However, you do not need to configure this value if thedefault is used.
The default value is the value of the jav-ax.net.ssl.trustStore property. If this value is not de-
fined, then default value is the keystore type as specified in the Javasecurity properties file, or the string "jks" (Java keystore) if no suchproperty exists.
Administer
206 Sybase Unwired Platform

Property Description
Validate certificate path If true (the default), performs certificate chain validation of thecertificate being authenticated, starting with the certificate beingvalidated. Verifies that the issuer of that certificate is valid and isissued by a trusted certificate authority (CA), if not, it looks up theissuer of that certificate in turn and verifies it is valid and is issued bya trusted CA. In other words, it builds up the path to a CA that is in thetrusted certificate store. If the trusted store does not contain any ofthe issuers in the certificate chain, then path validation fails. Forinformation about adding a certificate to the truststore, see UsingKeytool to Generate Self-Signed Certificates and Keys in Security.
Certificate Validation PropertiesAdd and configure provider properties for CertificateValidationLoginModule, or accept thedefault settings. CertificateValidationLoginModule can be used in conjunction with otherlogin modules that support certificate authentication (for example, LDAPLoginModule) byconfiguring CertificateValidationLoginModule before the login modules that supportcertificate authentication.
You can only use this provider to validate client certificates when an HTTPS listeners isconfigured to use mutual authentication.
Table 13. CertificateValidationLoginModule properties
Property Description
Implementation class The fully qualified class that implements the login module.
com.sybase.security.core.CertificateVa-lidationLoginModule is the default class.
crl.[index].uri Specifies the universal resource identifier for the certificate revoca-tion list (CRL). Multiple CRLs can be configured using differentvalues for the index. The CRLs are processed in index order. Forexample:
crl.1.uri=http://crl.verisign.com/ThawtePer-sonalFreemailIssuingCA.crlcrl.2.uri=http://crl-server/
Provider type LoginModule is the only supported value.
Administer
Sybase Control Center for Sybase Unwired Platform 207

Property Description
Validated certificate is identity (Optional) Determines if the certificate should be set the authenti-cated subject as the user ID. If the CertificateValidationLoginMod-ule is used in conjunction with other login modules that establishuser identity based on the validated certificate, set this value tofalse. If you are implementing this provider with a DCN security
configuration, and it's also not used with SSO, then set this propertyto true.False is the default value.
Enable revocation checking (Optional) Enables online certificate status protocol (OCSP) certif-icate checking for user authentication. If you enable this option, youmuse enable OCSP in Unwired Server. This provider uses the valuesdefined as part of the SSL security profile. Revoked certificatesresult in authentication failure when both of these conditions aremet:
• revocation checking is enabled
• OCSP properties are configured correctly
Trusted certificate store (Optional) The file containing the trusted CA certificates (import theissuer certificate into this certificate store). Use this property andStore Password property to keep the module out of the sys-
tem trust store. The default Unwired Server system trust store isSUP_HOME\Servers\UnwiredServer\Reposi-tory\Securitytruststore\truststore.jks. If
you do not specify a store location::
• Unwired Server checks to see if a store used by the JVM (that is,the one defined by the javax.net.ssl.trustStor-eType system property.
• If the system property is not defined, then this value is used: ${java.home}/lib/security/jssecacerts
• If that location also doesn't exist, then this value is used: ${java.home}/lib/security/cacerts
Note: This property is required only if Validate certificate path is setto true.
Administer
208 Sybase Unwired Platform
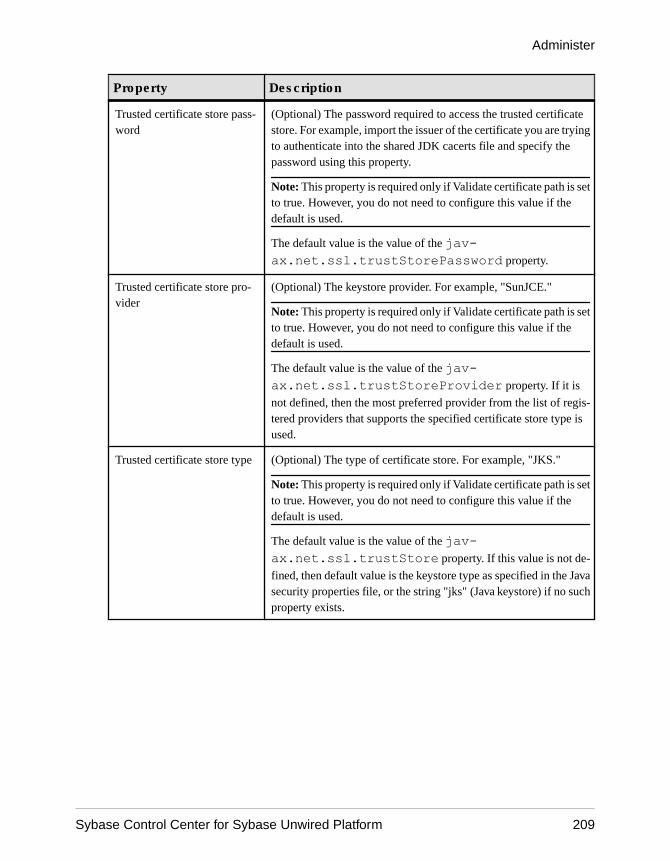
Property Description
Trusted certificate store pass-word
(Optional) The password required to access the trusted certificatestore. For example, import the issuer of the certificate you are tryingto authenticate into the shared JDK cacerts file and specify thepassword using this property.
Note: This property is required only if Validate certificate path is setto true. However, you do not need to configure this value if thedefault is used.
The default value is the value of the jav-ax.net.ssl.trustStorePassword property.
Trusted certificate store pro-vider
(Optional) The keystore provider. For example, "SunJCE."
Note: This property is required only if Validate certificate path is setto true. However, you do not need to configure this value if thedefault is used.
The default value is the value of the jav-ax.net.ssl.trustStoreProvider property. If it is
not defined, then the most preferred provider from the list of regis-tered providers that supports the specified certificate store type isused.
Trusted certificate store type (Optional) The type of certificate store. For example, "JKS."
Note: This property is required only if Validate certificate path is setto true. However, you do not need to configure this value if thedefault is used.
The default value is the value of the jav-ax.net.ssl.trustStore property. If this value is not de-
fined, then default value is the keystore type as specified in the Javasecurity properties file, or the string "jks" (Java keystore) if no suchproperty exists.
Administer
Sybase Control Center for Sybase Unwired Platform 209

Property Description
Validate certificate path If true (the default), performs certificate chain validation of thecertificate being authenticated, starting with the certificate beingvalidated. Verifies that the issuer of that certificate is valid and isissued by a trusted certificate authority (CA), if not, it looks up theissuer of that certificate in turn and verifies it is valid and is issued bya trusted CA. In other words, it builds up the path to a CA that is in thetrusted certificate store. If the trusted store does not contain any ofthe issuers in the certificate chain, then path validation fails. Forinformation about adding a certificate to the truststore, see UsingKeytool to Generate Self-Signed Certificates and Keys in Security.
HTTP Basic Authentication PropertiesThe HttpAuthenticationLoginModule provider authenticates the user with given credentials(user name and password) against the secured Web server using a GET against a URL thatrequires basic authentication, and can be configured to retrieve a cookie with the configuredname and add it to the JAAS subject to facilitate single sign-on (SSO).
Configure this provider to authenticate the user by:
• Using only the specified user name and password.• Using only the specified client value or values.• Attempting token authentication. If that fails, revert to basic authentication using the
supplied user name and password. You may find this helpful when using the same securityconfiguration for authenticating users with a token, such as device users hitting thenetwork edge, and when DCN requests from within a firewall present a user name andpassword but no token.
Note: The HttpAuthenticationLoginModule allows token validation by connecting to anHTTP server capable of validating the token specified in the HTTP header and cookie set inthe session.
Table 14. HttpAuthenticationLoginModule Configuration Options
Configuration Option Default Value Description
URL None The HTTP or HTTPS URL thatauthenticates the user. For SSO,this is the server URL fromwhich Unwired Server acquiresthe SSO cookie/token.
Administer
210 Sybase Unwired Platform

Configuration Option Default Value Description
Disable certificate validation False (Optional) The default is false.If set to true, this property disa-bles certificate validation whenestablishing an HTTPS connec-tion to the SWS using the con-figured URL. Set to true only forconfiguration debugging.
SSO cookie name None (Optional) Name of the cookieset in the session between theLoginModule and the securedWeb server, and holds the SSOtoken for single sign-on. Theprovider looks for this cookie inthe connection to the securedWeb server. If the cookie isfound, it is added to the authen-ticated subject as a named cre-dential.
The authentication provider ig-nores the status code when anSSO cookie is found in the ses-sion; authentication succeedsregardless of the return statuscode.
Roles HTTP header None (Optional) The name of anHTTP header that the servermay return. The header valuecontains a comma-separated listof roles to be granted.
Successful connection statuscode
200 HTTP status code interpreted assuccessful when connection isestablished to the secured Webserver.
Administer
Sybase Control Center for Sybase Unwired Platform 211

Configuration Option Default Value Description
HTTP connection timeout inter-val
60 seconds The value, in seconds, afterwhich an HTTP connection re-quest to the Web-based authen-tication service times out. If theHTTP connection made in thismodule (for either user authen-tication or configuration valida-tion) does not have a timeout set,and attempts to connect to aWeb-based authentication serv-ice that is unresponsive, the con-nection also becomes unrespon-sive, which could potentiallycause Unwired Server to be-come unresponsive. Setting thetimeout interval ensures that au-thentication failure is reportedwithout waiting indefinitely forthe server to respond.
SendClientHttpValuesAs None Comma-separated list of stringsthat indicate how to send Cli-entHttpValuesToSend to theHTTP server. For example:
SendClientHttpVa-luesAs=head-er:header_name,cookie: cookie_nameThis property does not apply ifthe user is to be authenticatedusing only the supplied username and password .
Administer
212 Sybase Unwired Platform

Configuration Option Default Value Description
ClientHttpValuesToSend None A comma-separated list of cli-ent HTTP values to be sent tothe HTTP server. For example:
ClientHttpValues-ToSend=client_per-sonalization_key,client_cookie_name
Set this property if you are usingtoken authentication.
Setting this property triggers to-ken authentication. Only tokenauthentication is attempted, un-less TryBasicAuthIfToke-nAuthFails is configured to truein conjunction with ClientHttp-ValuesToSend.
This property does not apply ifthe user is to be authenticatedusing only the supplied username and password .
Administer
Sybase Control Center for Sybase Unwired Platform 213

Configuration Option Default Value Description
SendPasswordAsCookie None Deprecated. Use only for back-ward compatibility. New con-figurations should configure to-ken authentication using Send-ClientHttpValuesAs and Cli-entHttpValuesToSend.
Sends the password to the URLas a cookie with this name. If notspecified, the password is notsent in a cookie. This property isnormally used when there is acookie-based SSO mechanismin use (for example, SiteMind-er), and the client has put anSSO token into the password.The token can be propagatedfrom the personalization keysand HTTP header and cookiesto the secured Web server with-out impacting the passwordfield.
TryBasicAuthIfTokenAuth-Fails
False Specifies whether the providershould attempt basic authenti-cation using the specified username and password credentialsif token authentication is con-figured and fails. This propertyis applicable only if token au-thentication is enabled.
This property does not apply ifthe user is to be authenticatedusing only the supplied username and password .
Administer
214 Sybase Unwired Platform

Configuration Option Default Value Description
UsernameHttpHeader None HTTP response header namereturned by the HTTP serverwith the user name retrievedfrom the token. Upon successfulauthentication, the retrieveduser name is added as a SecNa-mePrincipal.
This property does not apply ifthe user is to be authenticatedusing only the supplied username and password .
regexForUsernameMatch None Regular expression used formatching the supplied username with the user name re-turned by the HTTP server inthe UsernameHttpHeader. Thestring "{username}" in the re-gex is replaced with the speci-fied user name before using it. Ifspecified, it matches the username retrieved from the User-nameHttpHeader to the username specified in the callbackhandler. If the user names do notmatch, authentication fails. Ifthe user names match, both thespecified user name and the re-trieved user name are added asSecNamePrincipals to the au-thenticated subject.
This property does not apply ifthe user is to be authenticatedusing only the supplied username and password .
Administer
Sybase Control Center for Sybase Unwired Platform 215

Configuration Option Default Value Description
TokenExpirationTimeHtt-pHeader
None HTTP response header namethat is returned by the HTTPserver with the validity period ofthe token in milliseconds sincethe start of January 1, 1970. Ifthe header is returned in theHTTP response from the se-cured Web server, the token iscached for the duration it re-mains valid unless TokenExpir-ationInterval is also configured.If this response header is not re-turned with the token, it mightresult in unintended use of thetoken attached to the authenti-cated context even after it hasexpired.
This property does not apply ifthe user is to be authenticatedusing only the supplied username and password .
Administer
216 Sybase Unwired Platform
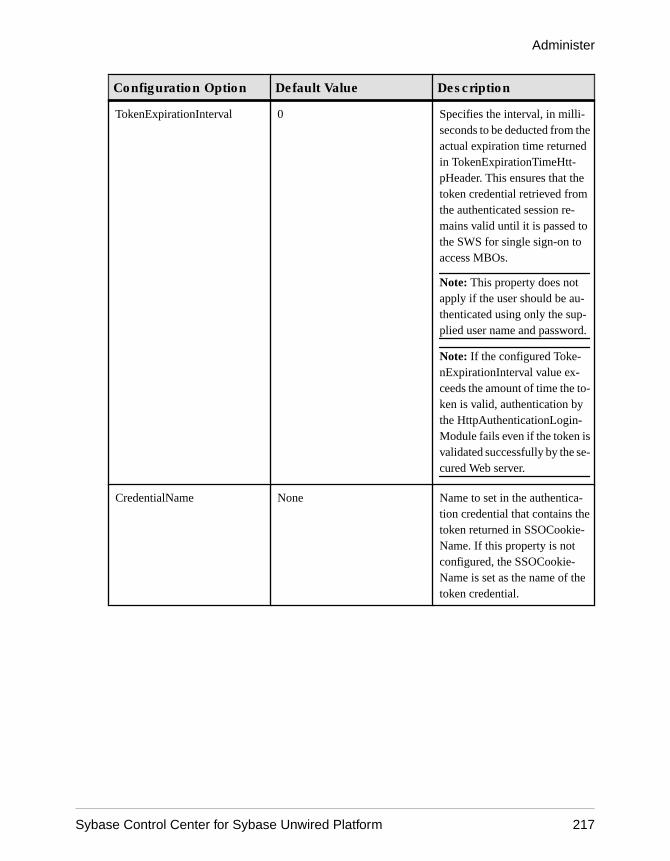
Configuration Option Default Value Description
TokenExpirationInterval 0 Specifies the interval, in milli-seconds to be deducted from theactual expiration time returnedin TokenExpirationTimeHtt-pHeader. This ensures that thetoken credential retrieved fromthe authenticated session re-mains valid until it is passed tothe SWS for single sign-on toaccess MBOs.
Note: This property does notapply if the user should be au-thenticated using only the sup-plied user name and password.
Note: If the configured Toke-nExpirationInterval value ex-ceeds the amount of time the to-ken is valid, authentication bythe HttpAuthenticationLogin-Module fails even if the token isvalidated successfully by the se-cured Web server.
CredentialName None Name to set in the authentica-tion credential that contains thetoken returned in SSOCookie-Name. If this property is notconfigured, the SSOCookie-Name is set as the name of thetoken credential.
Administer
Sybase Control Center for Sybase Unwired Platform 217

SAP SSO Token Authentication PropertiesThe SAPSSOTokenLoginModule has been deprecated, Use theHttpAuthenticationLoginModule when SAP SSO2 token authentication is required. Thisauthentication module will be removed in a future release.
Table 15. SAPSSOTokenLoginModule properties
Property Description
Implementation class (Required) – the fully qualified class that implements thelogin module. com.sybase.securi-ty.sap.SAPSSOTokenLoginModule is the de-
fault class.
Provider type (Required and read-only) – LoginModule is the only
supported value.
Control flag (Required) – optional is the default value. Determines
how success or failure of this module affects the overall au-thentication decision.
SAP server URL (Required) – the SAP server URL that provides the SSO2token. This may or may not be the same server that authen-ticates the user. If providing and authenticating servers aredifferent, you must import the SAP Token provider servercertificate or one of its CA signers into the Unwired Servertruststore in addition to that of the authenticating server toenable HTTPS communication. In environments where theservers are different, the basic flow is:
1. Unwired Server passes credentials over HTTPS to thetoken granting service.
2. An SSO2Token cookie is returned to Unwired Server.
3. The SSO2Token flows to the authenticating server, whichcould be an SAP EIS or a server that hosts a Web servicebound to SAP function modules.
Note: The SAP Server URL must be configured to requireBASIC authentication, not just FORM based authentication.
Clear password (Optional) – if set to True, the login module clears the
username and password in the shared context.
Administer
218 Sybase Unwired Platform

Property Description
Disable server certificate validation (Optional) – the default is False. If set to True, disables
certificate validation when establishing an HTTPS connec-tion to the SAP server using the configured URL. Set toTrue only for configuration debugging.
SAP server certificate (Optional) – name of the file containing the SAP certificate'spublic key in .pse format. This is required only when token
caching is enabled by setting a SAP SSO token persistencedata store value.
SAP server certificate password (Optional) – password used to access the SAP server certif-icate.
SAP SSO token persistence data store (Optional) – JNDI name used to look-up the data source topersist the retrieved SSO2 tokens.
Set to "jdbc/default" to store tokens in the Unwired ServerCDB. If unconfigured, some caching is still done based on the"Authentication cache timeout interval" property associatedwith the security configuration setting.
If you use the default setting, you do not need to set SAP SSOtoken persistence data store, SAP server certificate, SAPserver certificate password, or Token expiration intervalproperties.
To enable token caching through the SAPSSOTokenLogin-Module:
1. Set the SAP SSO token persistence data store value to"jdbc/default."
2. Download and install the SAP SSO2 token files. SeeInstalling the SAP Cryptographic Libraries in the Secur-ity guide.
3. Specify the correct value for the SAP server certificate,SAP server certificate, SAP server certificate passwordand Token expiration interval properties.
Store password (Optional) – if set to true, the login module stores the user-name/password in the shared context after successfully au-thenticating the user.
Administer
Sybase Control Center for Sybase Unwired Platform 219

Property Description
Token expiration interval (Optional) – this property is ignored when the SAP SSOtoken persistence data store property is not configured. Itspecifies the token validity period, after which time a newtoken is retrieved from the SAP EIS. The default value is 120seconds.
Keep in mind that:
• The "Token expiration interval" cannot exceed the "To-ken validity period", which is the amount of time definedin the back-end SAP server for which the token is valid.
• The "Authentication cache timeout" property must beless than the "Token expiration interval" property value.
Try first password (Optional) – if set to True, the login module attempts to
retrieve the username/password from the shared context, be-fore calling the callback handler.
Use first password (Optional) – if set to True, the login module attempts to
retrieve the username/password only from the shared context,and never calls the callback handler.
HTTP connection timeout interval The value, in seconds, after which an HTTP(s) connectionrequest to the EIS times out. If the HTTP connection made inthis module (for either user authentication or configurationvalidation) does not have a time out set, and attempts to con-nect to an EIS that is unresponsive, the connection hangs,which could potentially cause Unwired Server to hang. Set-ting the timeout interval ensures authentication failure is re-ported without waiting for ever for the server to respond.
Preconfigured User Authentication PropertiesThe PreConfiguredUserLoginModule authenticates the Unwired Platform Administratoruser whose credentials are specified during installations.
This login module is recommended only to give the Platform administrator access to SybaseControl Center so it can be configured for production use. Administrators are expected toreplace this login module immediately upon logging in for the first time.For details on how tosetup administrator authentication in a production deployment, see Enabling Authenticationand RBAC for Administrator Logins in the Security guide.
The PreConfiguredUserLoginModule:
Administer
220 Sybase Unwired Platform

• Provides role based authorization by configuring the providercom.sybase.security.core.RoleCheckAuthorizer in conjunction with this authenticationprovider.
• Authenticates the user by comparing the specified username/password against theconfigured user. Upon successful authentication, the configured roles are added asPrincipals to the Subject.
Table 16. PreConfiguredUserLoginModule properties
Property Description
User name A valid user name. Do not use any of these restricted specialcharacters: , = : ' " * ? &.
Password The encoded password hash value.
Roles Comma separated list of roles granted to the authenticateduser for role-based authorization. Platform roles include"SUP Administrator", "SUP Domain Administrator", and"SUP Helpdesk".
Roles are mandatory for "admin" security configuration. Forexample, if you define "SUP Administrator" to this property,the login id in the created login module has Platform admin-istrator privileges.
The "SUP Helpdesk" role has the fewest privileges. If mul-tiple roles are defined for this property, a role with moreprivileges ("SUP Administrator" or "SUP Domain Adminis-trator") is used for authorizing users.
Note: If you use other values, ensure you map Unwired Plat-form roles to the one you define here.
Audit Provider PropertiesThe security configuration for Sybase Unwired Platform includes an audit provider with threecomponents: audit filter, audit formatter, and audit destination.
An auditor consists of one destination, one filter, and one formatter.
• The supported value for destination iscom.sybase.security.core.FileAuditDestination. Optionally, you candevelop a custom provider and configure it as the audit destination, formatter, and filter.See CSI Audit Generation and Configuration.
• The only supported value for the filter iscom.sybase.security.core.DefaultAuditFilter.
Administer
Sybase Control Center for Sybase Unwired Platform 221

• The only supported value for the formatter iscom.sybase.security.core.XmlAuditFormatter.
For information on developing a custom provider and configuring it as the audit destination,formatter, and filter, see Security API in Developer Guide: Unwired Server Runtime.
For detailed information on the audit packages, see Security Configuration in DeveloperGuide: Unwired Server Runtime > Management API.
DefaultAuditFilter PropertiesThe audit filter component configures the resource classes for which the audit records shouldbe routed to the associated destination.
Filter resource classes require a specific syntax. The audit token identifies the source for coreaudit requests of operations, such as auditing the results for authorization and authenticationdecisions, in addition to placing information such as active provider information into the audittrail. The audit records have their resource class prefixed by the prefix core. The CSI core isable to audit multiple items.
DefaultAuditFilter Configuration Properties
The property name default value description is:
(1)caseSensitiveFiltering false set to true to use case sensitivity when matching resource classes and actions(2)filter default value="(ResourceClass=core.subject,Action=authorization.role)(ResourceClass=core.subject,Action=authorization.resource)(ResourceClass=core.subject,Action=authentication)(ResourceClass=core.subject,Action=logout)(ResourceClass=core.profile)(ResourceClass=providers.*)(ResourceClass=clients.*)"description = the filter string that determines whether an audit record should be written out to the audit destination.
Syntax
Filter resource classes consist of one or more filter expressions that are delimited byparenthesis ( () ). Square brackets ([]) denote optional values. The syntax is:
[key1=value [,key2=value...]].The allowed keys are: ResourceClass, Action, or Decision.
This table describes core auditable items:
Administer
222 Sybase Unwired Platform

Resource Class Action Description Attributes
provider activate Called when a provid-er is activated by CSI.The resource ID is theprovider class name.
Generated unique pro-vider identifier.
subject authentication.provider The result of a provid-er's specific authenti-cation request. De-pending on the otherproviders active, theactual CSI request forauthentication maynot reflect this samedecision.
This resource class isnot a provider-gener-ated audit record. CSIcore generates this au-dit record automatical-ly after receiving theprovider's decision.The resource ID is notused.
• Provider identifier• Decision (yes or
no)• Failure reason (if
any)• Context ID
subject authentication The aggregate deci-sion after consideringeach of the appropriateprovider's authentica-tion decisions. This re-cord shares the samerequest identifier asthe corresponding au-thentication providerrecords. The resourceID is the subject iden-tifier if authenticationis successful.
• Decision (yes orno)
• Context ID
Administer
Sybase Control Center for Sybase Unwired Platform 223

Resource Class Action Description Attributes
subject authorization.role.pro-vider
The result of a provid-er's specific role au-thorization request.The resource ID is thesubject ID.
• Provider identifier• Decision (yes, no
or abstain)• Role name• Supplied subject
identifier, if differ-ent from contextsubject
• Context ID
subject authorization.role The result of a re-source-based authori-zation request. The re-source ID is the sub-ject ID.
• Resource name• Access requested• Decision (yes or
no)• Supplied subject
identifier, if differ-ent from contextsubject
• Context ID
subject logout Generated when anauthenticated contextis destroyed. The re-source ID is the sub-ject ID.
• Context ID
subject create.provider Provider-level recordissued for anonymousself-registration re-quests. The resourceID is the subject iden-tifier.
• Provider identifier• Decision• Subject attributes
subject create Aggregate, generatedwhen an anonymousself-registration re-quest is made. The re-source ID is the sub-ject identifier.
• Decision• Subject attributes
Administer
224 Sybase Unwired Platform
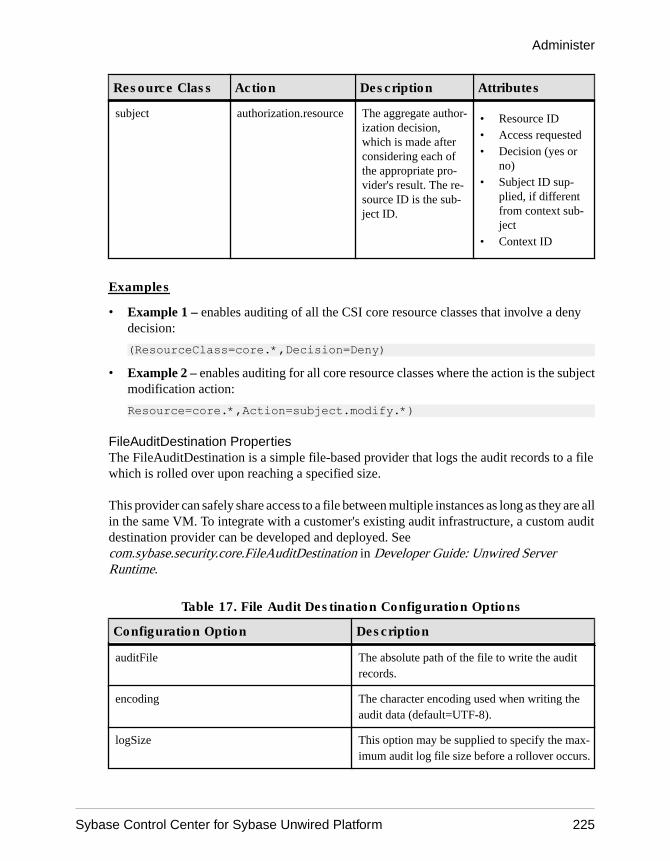
Resource Class Action Description Attributes
subject authorization.resource The aggregate author-ization decision,which is made afterconsidering each ofthe appropriate pro-vider's result. The re-source ID is the sub-ject ID.
• Resource ID• Access requested• Decision (yes or
no)• Subject ID sup-
plied, if differentfrom context sub-ject
• Context ID
Examples
• Example 1 – enables auditing of all the CSI core resource classes that involve a denydecision:
(ResourceClass=core.*,Decision=Deny)• Example 2 – enables auditing for all core resource classes where the action is the subject
modification action:
Resource=core.*,Action=subject.modify.*)
FileAuditDestination PropertiesThe FileAuditDestination is a simple file-based provider that logs the audit records to a filewhich is rolled over upon reaching a specified size.
This provider can safely share access to a file between multiple instances as long as they are allin the same VM. To integrate with a customer's existing audit infrastructure, a custom auditdestination provider can be developed and deployed. Seecom.sybase.security.core.FileAuditDestination in Developer Guide: Unwired ServerRuntime.
Table 17. File Audit Destination Configuration Options
Configuration Option Description
auditFile The absolute path of the file to write the auditrecords.
encoding The character encoding used when writing theaudit data (default=UTF-8).
logSize This option may be supplied to specify the max-imum audit log file size before a rollover occurs.
Administer
Sybase Control Center for Sybase Unwired Platform 225

Configuration Option Description
compressionThreshold This option may be supplied to specify the num-ber of uncompressed audit log rollover files thatare created, before compression is used to archivethe audit data.
deleteThreshold This option may be supplied to specify the num-ber of audit log files that will be preserved. Thisvalue includes the main audit log, so a value of "3"allows an audit.log, audit.log.0 and audit.log.1before deleting old logs.
errorThreshold This option may be supplied to specify the max-imum number of audit log files that are allowed.When this threshold is reached, an error occursand all auditing fails. For example, with this valueset to "3", audit.log, audit.log.0 and audit.log.1will be created according to the maximum logsize value. If another audit log rollover is trig-gered, then all audit operations will fail until oneof the rollover files is removed. This value is mu-tually exclusive with the deletion threshold, andthe smallest value of the two takes effect.
XMLAuditFormatter PropertiesThe audit formatter component formats an audit record from its component parts. An auditformatter is supplied to the active audit destination upon initialization, where the auditdestination can use the formatter if required.
The default provider com.sybase.security.core.XmlAuditFormatter formats audit data into anXML record. The audit records generated by this provider are of the format<AuditRecord Action="[action]" Decision="[decision]" When="[timestamp]"> <Resource Class="[resource classname]" ID="[resource id]" /> <Attribute Name="[attribute1 name]" Value="[attribute1 value]" /> <Attribute Name="[Map attribute name]" Key="[Map Key1 name]" Value="[Map value associated with the key1]" /> <Attribute Name="[Map attribute name]" Key="[Map Key2 name]" Value="[Map value associated with the key2]" /> <Attribute Name="[List attribute name]" Value="[List value1]" /> <Attribute Name="[List attribute name]" Value="[List value2]" /> </AuditRecord>
Creating Logical Roles for a Security ConfigurationYou can use logical roles to control access and/or group a large number of users who use thesame security configuration. You create the required logical roles and map them to one ormore physical role, then assign both a security configuration and a logical role to an
Administer
226 Sybase Unwired Platform
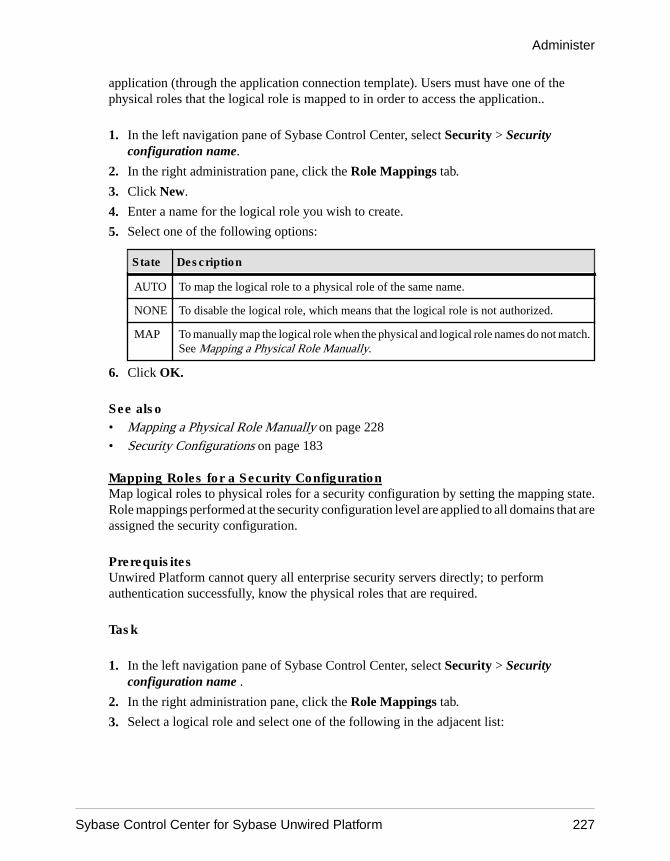
application (through the application connection template). Users must have one of thephysical roles that the logical role is mapped to in order to access the application..
1. In the left navigation pane of Sybase Control Center, select Security > Securityconfiguration name.
2. In the right administration pane, click the Role Mappings tab.
3. Click New.
4. Enter a name for the logical role you wish to create.
5. Select one of the following options:
State Description
AUTO To map the logical role to a physical role of the same name.
NONE To disable the logical role, which means that the logical role is not authorized.
MAP To manually map the logical role when the physical and logical role names do not match.See Mapping a Physical Role Manually.
6. Click OK.
See also• Mapping a Physical Role Manually on page 228
• Security Configurations on page 183
Mapping Roles for a Security ConfigurationMap logical roles to physical roles for a security configuration by setting the mapping state.Role mappings performed at the security configuration level are applied to all domains that areassigned the security configuration.
PrerequisitesUnwired Platform cannot query all enterprise security servers directly; to performauthentication successfully, know the physical roles that are required.
Task
1. In the left navigation pane of Sybase Control Center, select Security > Securityconfiguration name .
2. In the right administration pane, click the Role Mappings tab.
3. Select a logical role and select one of the following in the adjacent list:
Administer
Sybase Control Center for Sybase Unwired Platform 227

State Description
AUTO To map the logical role to a physical role of the same name.
NONE To disable the logical role, which means that the logical role is not authorized.
MAP To manually map the logical role when the physical and logical role names do not match.See Mapping a Physical Role Manually.
Mapping a Physical Role ManuallyUse the Role Mappings dialog to manually map required physical roles for a logical role whenphysical and logical role names do not match. If names do not match, the AUTO mapping statedoes not work.
PrerequisitesUnwired Platform cannot query all supported enterprise security servers directly; forsuccessful authentication, you must know the physical roles your back-end systems require.
Task
You can map a logical role to one or more physical roles. You can also map multiple logicalroles to the same physical role. If a role does not exist, you can also add or delete names asneeded.
1. Review the list of existing physical role names that you can map to the logical role youhave selected. If the list retrieved is too long to locate the name quickly, either:
• Click the banner of Available Roles list to sort names alphanumerically.• Start typing characters in the box, then click the Search button to filter the available
list.
2. If a role that you require still does not appear, enter the Role name and click the + button.The role name appears in the Available roles list with an asterisk (*). This asteriskindicates that an available role was added by an administrator, not a developer.
3. To remove a role you no longer require from the Available roles list, select the name andclick the x button adjacent to the Role name field.The role is removed and can no longer be mapped to a logical role.
4. To map a logical role that appears in the text area of the Role Mappings dialog to a physicalrole:
a) Select one or more Available roles.b) Click Add.
5. To unmap a role:
a) Select one or more Mapped roles.b) Click Remove.
The roles are returned to the Available roles list.
Administer
228 Sybase Unwired Platform

6. Click OK to save these changes.
Once a logical role has been manually mapped, the mapping state changes to MAPPED. Theroles you have mapped appear in the active Physical Roles cell for either a package-specific orserver-wide role mappings table.
Mapping State ReferenceThe mapping state determines the authorization behavior for a logical name instance.
State Description
AUTO Map the logical role to a physical role of the same name. The logicalrole and the physical role must match, otherwise, authorization fails.
NONE Disable the logical role, which means that the logical role is not au-thorized. This mapping state prohibits anyone from accessing theresource (MBO or Operation). Carefully consider potential conse-quences before using this option.
MAPPED A state that is applied after you have actively mapped the logical roleto one or more physical roles. Click the cell adjacent to the logical rolename and scroll to the bottom of the list to see the list of mappedphysical roles.
Mapping Logical Roles to a Technical User in a RepositoryMapping the SUP Push User or SUP DCN User logical role binds it to another physical useridentity rather than a role.
1. In the navigation pane of Sybase Control Center, select the security configuration that isassigned to the Push or DCN domain.
2. Locate the logical role.
3. Select Map Role.
4. In the Role Mapping dialog, enter the technical role name in the Role name box.user:supuser, where supuser is the technical user in the repository.
5. Click Add (+).
6. Select the newly added technical role.
Technical role can be based on basic authorization or certificate (client).
7. Click Add.
If you are using ActiveDirectory, and are using an e-mail address for the technical usernames, the definition appears asusername@myaddress@DomainSecurityConfigName.
The logical role now shows the mapping state changes to MAPPED. In the Physical Rolesdrop-down, verify that the new technical role is added.
Administer
Sybase Control Center for Sybase Unwired Platform 229

SUP Roles to Support EIS Operations: SUP DCN User and SUP Push UserSUP DCN User SUP Push User roles are the mechanisms by which illicit EIS DCN or pushnotification operations are prevented. Like other built-in platform roles, SUP DCN User andSUP Push User are logical roles that are available to all new security configurations.
Before any DCN event is submitted, the person or group mapped to this role must beauthorized (after first being authenticated) by a security provider you define as part of a namedsecurity configuration. Submitted DCN events that require authorization include:
• Cache updates• Operation performance
The SUP Push user role is mandatory; with this role the EIS cannot deliver push notificationsto Unwired Server for a registered application connection. Before any push event is submittedby the EIS, the authenticated user performing the push must be authorized by being in the SUPPush User logical role. Push events that require authorization include:
• Triggering a Hybrid App package
You can choose different physical role mapping targets to authorize, or authenticate andauthorize EIS events using the logical roles. Depending the authorization method used, theimplementation varies:
• Certificate authorization – Sybase recommends that you useCertificateValidationLoginModule for maximum security.CertificateValidationLoginModule validates the user certificate passed during mutualcertificate authentication. Unlike other methods, it confers no physical roles; therefore, theplatform administrator must create a logical role mapping. Typically, the user has acertificate that includes a Subject distinguished name containing a common name(cn=TechnicalUser), so creates a logical role mapping between the logical role anduser:TechnicalUser in the CN. To implement certificate authorization, see SettingUp Authorization with Certificate Validation in Security.
Note: While explicitly mapping a certificate user name for SUP Push User role in \SybaseControl Center, ensure there is a space after every comma. Example: user:CN:PushTest, OU=SSL Server, O=SAP-AG, C=DE” . Further more, if you areusing push notification with strong mutual authentication, you can only use the “Admin”security configuration. Ensure you add a CertificateValidationLoginModule to the Adminsecurity configuration and and us it as the default security configuration in the push-enabled domain. If any other security configuration is used, a user not inRequired role error is generated in the client log.
• Technical user authorization – if the role cannot be mapped to a real user in the securityrepository of the configured security provider used by the security configuration, you mayneed to create a new technical user or use an existing technical user for EIS operation rolemappings. In this case, no authentication is required as the user is not a real user in thetraditional sense. To implement technical user authorization, Sybase recommends that you
Administer
230 Sybase Unwired Platform

create a security configuration that includes an LDAP provider. To implement technicaluser authentication, see Setting Up Authorization with a Technical User Role Stored in aRepository in Security.
• Real user authorization – (Applies only to DCN) if the role must be mapped to a real user,you can authenticate and authorize the user mapped to the SUP DCN User role. You canalso use PreconfiguredUserLogin module to perform HTTP Basic authentication, wherethe module extracts the user information from the request parameter in a URL. Toimplement real user authentication, see Setting Up Authorization withPreConfiguredUserLogin Values in Security
Once you have multiple providers configured, especially when implementing authorizationwith single sign-on, you can stack them so they are processed in correct order. See StackingProviders to Authenticate using SSO Before Authorizing in Security.
Assigning a Security Configuration to a DomainAssign security configurations to one or more domains. This allows the supAdmin to offer asecurity repository for application user authentication and authorization, as well as to sharesecurity providers across domains in case one tenant uses mutiple domains.
PrerequisitesA supAdmin must already have created one or more security configurations in the Securitynode of Sybase Control Center.
Task
1. In the left navigation pane, navigate to ClusterName > Domains > DomainName >Security
2. In the right administration pane, select the Security Configurations tab and clickAssign.
3. From the list of available security configurations, select the appropriate configuration fordomain security, and click OK.If successful, an Assigned successfully message appears, and the newly added securityconfiguration is listed in the domain-level Security node.
See also• Creating a Security Configuration on page 185
Viewing Security Configuration UsageYou can view the security configurations and logical roles used to access applications. Thisenables you to assess the impact of changing a security configuration or logical role.
Administer
Sybase Control Center for Sybase Unwired Platform 231

1. In the left navigation pane of Sybase Control Center select Security > Securityconfiguration name.
2. In the right administration pane, click the Role Mappings tab.
• To view the applications that the security configuration provides access to, click Usageand review the information on the Domains and Packages and ApplicationConnection Templates tabs.
• To view the applications that a specific role in a security configuration provides accessto, select a roles, click Usage, and review the information on the ApplicationConnection Templates tab.
Note: The Domains and Packages tab lists all MBO packages that the securityconfiguration provides access to, no matter what logical role is selected.
Anonymous Access Security ConfigurationAllow unauthenticated users access to application data, for example, applications that allowusers to browse a read-only product catalog without logging in by assigning the anonymoussecurity configuration to the application.
The anonymous security configuration:
• Is a preconfigured user name/password login module that accepts the user name"anonymous" and the password "anonymous". User name is not case sensitive, butpassword is.
• Cannot be modified.• Can be enabled when manually creating an application with anonymous access or when
setting anonymous access for an existing application by creating an applicationconnection template for it that uses the anonymous security configuration.
SiteMinder Authentication with Sybase Unwired PlatformConfigure your SiteMinder environment for authentication in Sybase Unwired Platform.
CA SiteMinder enables policy-based authentication and single sign-on with Sybase UnwiredPlatform. You can configure SiteMinder and Sybase Unwired Platform integration in anumber of ways, depending on your environment. For detailed examples focusing onSiteMinder-specific configurations for Sybase Unwired Platform, see How-To: Set up SUPwith SiteMinder at http://scn.sap.com/docs/DOC-29574.
SiteMinder Client AuthenticationSiteMinder provides various client authentication options for Sybase Unwired Platform,including single sign-on (SSO), tokens, and Network Edge.
SiteMinder client authentication includes:
• Network Edge – when a reverse proxy or Relay Server in the DMZ is protected bySiteMinder, the Sybase Unwired Platform client is challenged for basic authenticationcredentials. If the credentials are valid, an SMSESSION cookie is issued and the client is
Administer
232 Sybase Unwired Platform

allowed through to the Sybase Unwired Platform server. The client begins a session (RBS,MBS, or OData) by sending an HTTP(S) request to the reverse proxy. The reverse proxydetects the unauthenticated request, and challenges using basic authentication. After the401 challenge, the client may already have network credentials configured, or executes acallback to prompt for credentials.
• Non-Network Edge – the Network Edge (reverse proxy or Relay Server) is not protected.The client’s request is allowed to flow to Sybase Unwired Platform, where a LoginModulepresents the basic credentials to a SiteMinder-protected Web server on behalf of the client.Sybase Unwired Platform server retains the SMSESSION cookie and credentials for theclient.
• External tokens – the Sybase Unwired Platform client application obtains anSMSESSION cookie external to the Sybase Unwired Platform libraries using customapplication processing. This SMSESSION token passes into the Sybase Unwired Platformlibraries as a cookie. Sybase Unwired Platform libraries add the cookie to subsequentHTTP requests to Sybase Unwired Platform server. The cookie may or may not be checkedat the Network Edge.
• SAP SSO2 integration – the Sybase Unwired Platform user is initially authenticated bySiteMinder, resulting in an SMSESSION for the user. This SMSESSION is forwardedalong with the SAP user ID to a SiteMinder SAP agent running inside of NetWeaver as aLoginModule. The SMSESSION is revalidated, and the TokenIssuingLoginModule isallowed to issue an SSO2 ticket for the specified SAP user ID. This ticket returns to SybaseUnwired Platform as an MYSAPSSO2 cookie. Sybase Unwired Platform now has both anSMSESSION and an SSO2 ticket to use for SSO purposes with various EIS depending onwhich SSO mechanism the EIS requires.
Note: In any of these authentication patterns, you can add the SMSESSION token as acredential to the authenticated Sybase Unwired Platform subject for use in single sign-on toSiteMinder-protected systems.
Single Sign-on to a SiteMinder-protected EISSiteMinder single sign-on (SSO) provides integration between a SiteMinder-protected EISand Sybase Unwired Platform.
Table 18. SiteMinder Single Sign-on Integration
Accessed Service Details
SiteMinder-protected Web service When an EIS Web service is protected by Site-Minder, Sybase Unwired Platform sends the cur-rent Sybase Unwired Platform user’s SMSES-SION cookie when executing the Web service.For more information on sending the SMSES-SION cookie to the SiteMinder-protected Webservice, see Single Sign-on Using NamedCre-dential in the Security guide.
Administer
Sybase Control Center for Sybase Unwired Platform 233

Accessed Service Details
SSO2-protected JCo RFC or SAP Web service The SAP server is configured to use SSO2 ticketsfor single sign-on. Sybase Unwired Platformsends the user’s current MYSAPSSO2 ticketalong with the request. SAP validates that theSSO2 ticket is valid and was issued by a trustedpeer, and executes the request as that user.
Note: You must have a SiteMinder agent for SAPinstalled in a NetWeaver server. Sybase UnwiredPlatform sends the SMSESSION cookie to Net-Weaver, the SAP SiteMinder agent validates thecookie, and then the TokenIssuingLoginModulegenerates an SSO2 ticket and returns it to SybaseUnwired Platform as a MYSAPSSO2 cookie.
Web service hosted on NetWeaver requiring bothSSO2 and SMSESSION
Sybase Unwired Platform sends both SSO cre-dentials when executing the Web service call.
Authentication Cache Timeout and Token AuthenticationTo reduce the load, Sybase Unwired Platform uses an authentication cache to reduce the load itplaces on your back-end identity management and security systems. Depending on yoursecurity configuration, you can adjust the authentication cache timeout to avoid authenticationfailures and errors.
By default, the authentication cache holds a user’s subject, principals, and credentials used forsingle sign-on to an EIS for 3600 seconds (one hour). If the user name and password containedinside subsequent Sybase Unwired Platform requests are unchanged, the request is consideredauthenticated and uses the cached security information for access control and single sign-on toEIS operations.
Note: When using token-based authentication, clients should use a hash code of the token asthe password, so Sybase Unwired Platform proceeds through the login modules and replacesthe cached token credential. This prevents using an expired token in single sign-on to an EIS.
If you cache an SMSESSION for a user and the token expires before the cache entry, you getauthentication failures during the single sign-on EIS operations. This leads to eithersynchronization errors or operation replay errors.
Configure the authentication cache to avoid errors and failures. If needed, you can disable theauthentication cache entirely by setting the cache timeout to 0. Every Sybase UnwiredPlatform request is reauthenticated. For non-Network Edge basic authentication, you can setthe cache interval to slightly less than the Idle Timeout for your SiteMinder session policy.
For Network Edge authentication, you must set the authentication cache timeout to 0. If theURL configured to validate the SMSESSION token also returns an HTTP header with the
Administer
234 Sybase Unwired Platform

expiration time for the token expressed in milliseconds since the epoch (1/1/1970), theHttpAuthenticationLoginModule can use that value to adjust the authentication cacheexpiration for this subject’s entry so it expires at an appropriate time. Use theTokenExpirationTimeHttpHeader to specify the name of the header containing this expirationvalue. Additionally, you can use TokenExpirationInterval property to reduce time from theexpiration so it does not expire while Sybase Unwired Platform is processing a request.
For detailed examples, including how to configure the timeout in the SiteMinder Admin, seeHow-To: Set up SUP with SiteMinder at http://scn.sap.com/docs/DOC-29574.
SiteMinder Web Agent Configuration for Sybase® Unwired PlatformWhen integrating with Sybase Unwired Platform, SiteMinder uses default settings for theWeb agent to stop cross-site scripting cross-site scripting (XSS) attacks. The SiteMinderdefault settings do not allow use of special characters and can lead to integration issues withSybase Unwired Platform.
By default, the Web agent does not allow certain characters, often seen in XSS attacks, to beincluding in the URLs it processes. The Web agent allows only legal characters, according tothe defined HTTP standard.
Native HTTP OData applications, typically use, and sometimes require, URLs that containcharacters within a left and right parenthesis ( ) and within single quotes ' '. The left and rightparenthesis and single-quotes characters are prohibited.
The SiteMinder administrator must modify the Web agent configuration in the policy server toeither disable XSS filtering entirely or change the default forbidden characters.
Security Configuration to a SiteMinder-protected EISWith Sybase Unwired Platform, SiteMinder authentication is used in Network Edge and non-Network Edge configurations to authenticate the client of a Web service, SAP JCo, orNetWeaver service.
In your security configuration that integrates with SiteMinder applications, you need aClientValuePropagatingLoginModule so you can save your SMSESSION cookie as acredential for EIS single sign-on. if the SiteMinder agent adds an sm_user header to clientrequests, use that header in the ClientValuePropagatingLoginModule to set a user Principal. Ifthe SiteMinder agent does not add an sm_user header, then disable impersonization checking.
You should also have an HttpAuthenticationLoginModule configured for a SiteMinder-protected URL where Sybase Unwired Platform can verify the validity of the user'sSMSESSION cookie.
For a detailed example focusing on SiteMinder specific configurations for Sybase UnwiredPlatform, see How-To: Set up SUP with SiteMinder at http://scn.sap.com/docs/DOC-29574.
Administer
Sybase Control Center for Sybase Unwired Platform 235

Configuring Security for SiteMinder Token and Basic AuthenticationUse Sybase Control Center to create a security configuration for your single sign-on (SSO)applications.
1. In Sybase Control Center, navigate to the Unwired Platform Cluster pane and selectSecurity.
2. In the General tab, click New and name your security configuration.
3. Open the Security folder and select your configuration. In the Authentication tab, clickAdd to add a LoginModule.
4. Choose the ClientValuePropagatingLoginModule and add these properties:
• Implementation Class –com.sybase.security.core.ClientValuePropagatingLoginModule
• ClientHttpValuesAsPrincipals – sm_user• ClientHttpValuesAsNamedCredentials – smsession:SMSESSION2• Control Flag: optional
Note: ClientHttpValuesAsNamedCredentials ensures that if the client application pickedup an SMSESSION cookie either using Network Edge authentication or an external token,it is saved as a credential named SMSESSION2 on the subject so it can be used for SSO to aSiteMinder-protected EIS. Therefore, the credential.a.name property is SESSION2. Also,ClientHttpValuesAsPrincipals uses the sm_user HTTP header if the client has usedNetwork Edge authentication and enables you to perform impersonation checking.
5. Click OK.
6. In the Authentication tab, select the default NoSecLoginModule and click Delete.LoginModule allows logins without credentials, and you must remove it for securityintegrity.
7. In the Authentication tab, click New to add a provider.
8. Select and configure the HttpAuthenticationLoginModule:
a) Select com.sybase.security.http.HttpAuthenticationLoginModule and click Yes inthe Duplicate Authentication Provider warning.
b) Configure the module's properties so the SiteMinder-protected URL has the samepolicy server that issued the SMSESSION cookie to the client.
• ClientValuesToSend = SMSESSION• SendClientValuesAs = cookie:SMSESSION
This causes Sybase Unwired Platform to forward the cookie to the specifiedSiteMinder-protected URL. If the HTTP status response code is 200, then theSMSESSION cookie is valid and the user is considered authenticated.
9. In the Authorization tab, select the NoSecAuthorizer provider type and click Delete.
10. In the Settings tab, adjust the properties as follows:
Administer
236 Sybase Unwired Platform

• Authentication cache timeout(seconds) – 0• Maximum number of failed authentications – 5• Authentication lock duration(in seconds) – 600
11. Click Apply.
12. In the General tab, click Validate to check your configuration.
13. With successful validation, click Apply to save all changes.
For detailed examples focusing on SiteMinder specific configurations for Sybase UnwiredPlatform, see How-To: Set up SUP with SiteMinder at http://scn.sap.com/docs/DOC-29574.
Configuring Network Edge Authentication with a SiteMinder-Protected Web ServiceConfigure the SMSESSION cookie for Network Edge authentication to a SiteMinder Webservice.
Network Edge authentication for SiteMinder requires the Web service endpoint to be changedin Sybase Control Center to use the SMSESSION cookie for single sign-on. By default, theapplication connection template is configured with the server name set to your SiteMinder-protected server.
1. In the left navigation pane, select Cluster, then expand Domains, and select the domainfor which you want to create a new connection.
2. Select Connections.
3. In the right administration pane, select the Connections tab.
4. Select the EIS connection pool that is a Web service connection for the SiteMinder-protected service, and click Properties.
5. In the Edit Connection Pool pane, configure these properties:
Property Value
credential.a.mapping Cookie:SMSESSION
credential.a.name SMSESSION
6. Click Save.
For detailed examples focusing on SiteMinder specific configurations for Sybase UnwiredPlatform, see How-To: Set up SUP with SiteMinder at http://scn.sap.com/docs/DOC-29574.
Configuring Non-Network Edge Authentication with a SiteMinder-Protected WebServiceConfigure the SMSESSION cookie and application connection template for non-NetworkEdge authentication to a SiteMinder-protected Web service.
Similar to Network Edge authentication for SiteMinder, non-Network Edge authenticationrequires the Web service endpoint to be changed in Sybase Control Center to use theSMSESSION cookie for single sign-on. However, for non-Network Edge authentication, by
Administer
Sybase Control Center for Sybase Unwired Platform 237

default the application connection template is configured with the server name set to theSybase Unwired Platform server or a reverse proxy, depending on your configuration.
1. In the left navigation pane, select Cluster, then expand Domains, and select the domainfor which you want to create a new connection.
2. Select Connections.
3. In the right administration pane, select the Connections tab.
4. Select the EIS connection pool that is a Web service connection pointing to theSiteMinder-protected service, and click Properties.
5. In the Edit Connection Pool pane, configure these properties:
Property Value
credential.a.mapping Cookie:SMSESSION
credential.a.name SMSESSION
6. Click Save.
For detailed examples focusing on SiteMinder specific configurations for Sybase UnwiredPlatform, see How-To: Set up SUP with SiteMinder at http://scn.sap.com/docs/DOC-29574.
ApplicationsAn application consists of two parts: the software user interface that consumes enterprise datafrom one or more data sources, and the definition created in Sybase Control Center that allowsthe mobile application to be recognized by the runtime. The application definition on theserver establishes the relationship among packages used in the application, the domain that theapplication is deployed to, the activation code for the application, and other applicationspecific settings.
A native application is the single client binary provisioned then installed to the device. It isassociated with one or more MBO packages. The native Hybrid App is a collection of HybridApp packages and typically constitutes one application. A non-native application uses nopackages and therefor requires no package association.
While developers create the client application using either a native development tool forUnwired Platform or a third-party tool for non-native application types, applications must bedefined, then managed and monitored by administrators in Sybase Control Center.
See also• Application and User Management Overview on page 5
• Considerations for Application Connection Registration on page 262
• Application ID and Template Guidelines on page 241
Administer
238 Sybase Unwired Platform

Activating and Maintaining ApplicationsThe activation stage defines all activities that relate to the startup of and formal entry of anapplication and a known or anonymous user into the Unwired Platform runtime. It ties allentities together by associating a user with the application and its resources (connections,customizations, and packages).
The activation of applications is essential to their functionality. It is critical that youunderstand this activation process. Sybase encourages you to read Understanding theActivation Process in Mobile Application Life Cycle Once you understand what activation isand how it works, follow the administrator workflow in Enabling Application Activation withSybase Control Center of this same document.
Defining ApplicationsApplications are recognized by Unwired Server by the properties that define them.Administrators define applications with a unique application ID and other key applicationproperties, such as domain, packages, security configuration, and connection templates.
An application cannot register a connection unless a definition has been created for it. If yourdevelopment team has not yet set these application properties, administrators must do sobefore the application connection can be registered.
1. Launching the Application Creation Wizard
Use the Application Creation wizard to register an application.
2. Setting General Application Properties
Provide general application properties such as the application ID, description, securityconfiguration and domain details while registering the application.
See also• Application Connection Properties on page 269
Launching the Application Creation WizardUse the Application Creation wizard to register an application.
1. In the left navigation pane of Sybase Control Center, click the Applications node andselect the Applications tab in the right administration pane.
2. To register an application, click New.The Application Creation wizard is displayed.
Administer
Sybase Control Center for Sybase Unwired Platform 239

Setting General Application PropertiesProvide general application properties such as the application ID, description, securityconfiguration and domain details while registering the application.
1. In the Application Creation Wizard, enter a unique Application ID.
Note:• Sybase recommends that application IDs contain a minimum of two dots ("."). For
example, the following ID is valid: com.sybase.mobile.app1.
• Application IDs cannot start with a dot ("."). For example, the following ID isinvalid: .com.sybase.mobile.app1.
• Application IDs cannot have two consecutive dots ("."). For example, the following IDis invalid: com..sybase.mobile.app1.
2. Enter a Display name and Description for the application.
3. Select the appropriate security configuration from the Security Configuration drop-down list.
For applications that do not require authentication, select the anonymous securityconfiguration or the Anonymous access checkbox.
4. Select the appropriate domain from the Domain drop-down list.
5. (Optional) Assign one or more packages as desired.
Note: When an application ID is intended for use by Online Data Proxy, packages do notneed to be assigned. .
6. (Optional) Modify application connection template settings.
a) Select Configure additional settings, and click Next.b) To reuse the configuration of an existing template, select a Base template from the
drop-down list.c) Configure the application connection template properties as required.
Note: ODP applications require a proxy type connection endpoint. When modifyingapplication connection template settings for an ODP application, you canautomatically create the proxy connection endpoint by entering an OData URL as theApplication Endpoint value in the connection template Proxy properties. This creates aproxy connection endpoint with the same name as the Application ID. If the ODPapplication uses an anonymous security configuration, the newly created connectionendpoint will have the Allow Anonymous Access property set to True and the Address(URL) property set to the Application ID. If you want to create the proxy connectionendpoint manually, leave the Application Endpoint property empty. You manuallycreate the proxy connection endpoint through the Sybase Control Center Domainsnode.
7. Click Finish to register the application with the configured settings.
Administer
240 Sybase Unwired Platform

See also• Application ID and Template Guidelines on page 241
• Application Connection Properties on page 269
Application ID and Template GuidelinesChoose an appropriate application ID while registering application connection for use bynative MBO, Hybrid App, or Online Data Proxy clients. Using an incorrect application IDresults in failure when the client tries to activate itself.
Application Type Guidelines
Hybrid App • 2.0.1 or earlier – leave the application ID empty.
• 2.1 or later – use preexisting HWC template, or, ifyou are using your own template, make sure thatHWC is set as the application ID in the template.
• iOS sample container 2.1 or later – use the templateyou have created. The application ID used by the iOSsample container should match the application IDspecified in registration.
Native MBO application • Previous to 2.1.2 – leave the application ID empty.This applies to native messaging-based applicationclients.
• 2.1.2 or later – (recommended) use the applicationconnection template that is automatically created forthe application. Otherwise, ensure you register theapplication connection with the correct template byverifying that application ID matches, and that thecorrect security configuration and domain are selec-ted. Also, if using replication, set other templateproperties (such as synchronization-related proper-ties in Connection category) as required. For Androidnative MBO applications, this recommendation ap-plies starting with version 2.1.1.
Online Data Proxy Register the application connection using the templatecreated for the application. Existing templates can befound in the Applications > Application ConnectionTemplate tab.
See also• Setting General Application Properties on page 240
• Registering or Reregistering Application Connections on page 258
Administer
Sybase Control Center for Sybase Unwired Platform 241

• Considerations for Application Connection Registration on page 262
Maintaining Activated ApplicationsActivated applications can be managed and have usage monitored.
Viewing Assigned ConnectionsView the properties of the connections assigned to an application.
1. In the right administration pane, select the Applications tab.
2. Select the application from the list.
3. Click Application Connections.
4. Click Refresh to refresh the list that displays the application connections.
5. To filter the list, click Show filter and add filters.
6. To define a filter.
a) Select the type of information you want to filter on.b) Enter the filter criteria.c) Click +.
a) Repeat for additional filters, as required.b) When you have defined all your filters, click Refresh.
Different types of filters are combined using a logical AND. If the same type of filter isadded multiple times with different criteria, the filters are combined using a logical OR
If you defined the following filters:• Security Configuration = Security1• User = User1• User = User2The filtered list would return results that matched both Security1 and either User1 orUser2.
See also• Viewing Assigned Application Users on page 243
• Viewing Correlated Application Details on page 243
• Refreshing the Application View on page 244
• Deleting Applications on page 244
• Modifying Application Properties on page 245
• Searching for Applications on page 253
• Monitoring Users of Applications on page 254
Administer
242 Sybase Unwired Platform
Viewing Assigned Application UsersView the list of the users assigned to an application
1. In the right administration pane, select the Applications tab.
2. Select the application from the list.
3. Click Application Users.
4. Click Refresh to refresh the list that displays the
5. To define a filter.
a) Select the type of information you want to filter on.b) Enter the filter criteria.c) Click +.
a) Repeat for additional filters, as required.b) When you have defined all your filters, click Refresh.
Different types of filters are combined using a logical AND. If the same type of filter isadded multiple times with different criteria, the filters are combined using a logical OR
If you defined the following filters:• Security Configuration = Security1• User = User1• User = User2The filtered list would return results that matched both Security1 and either User1 orUser2.
See also• Viewing Assigned Connections on page 242
• Viewing Correlated Application Details on page 243
• Refreshing the Application View on page 244
• Deleting Applications on page 244
• Modifying Application Properties on page 245
• Searching for Applications on page 253
• Monitoring Users of Applications on page 254
Viewing Correlated Application DetailsSelect one or more applications, then view correlated application details in several categories,including packages, application users, and application connections.
1. In the left navigation pane, click the Applications node.
2. In the right administration pane, click the Application tab.You can view the list of registered applications.
Administer
Sybase Control Center for Sybase Unwired Platform 243
3. Select one or more applications from the list.
4. Select on of the buttons to view related packages, application users, or applicationconnections.
• Packages – view correlated domains and packages.• Application Users – view correlated applications.• Application Connections – view correlated applications.
5. In Review Assignment, check the information.
6. Click OK.
See also• Viewing Assigned Connections on page 242
• Viewing Assigned Application Users on page 243
• Refreshing the Application View on page 244
• Deleting Applications on page 244
• Modifying Application Properties on page 245
• Searching for Applications on page 253
• Monitoring Users of Applications on page 254
Refreshing the Application ViewRefresh the list of all available applications registered through the Sybase Control Center.
1. In the right administration pane, select the Applications tab.
2. To view the list of registered applications, click Refresh.
See also• Viewing Assigned Connections on page 242
• Viewing Assigned Application Users on page 243
• Viewing Correlated Application Details on page 243
• Deleting Applications on page 244
• Modifying Application Properties on page 245
• Searching for Applications on page 253
• Monitoring Users of Applications on page 254
Deleting ApplicationsDelete an application to remove all the registered users, connections, and subscriptionsassociated with those connections. Delete an application to remove all associated runtimeartifacts on the server. Deleting applictions removes application definitions, application usersand connections associated with the application, and package-level subscriptions of theapplication connections. Delete applications with care to avoid adversely impacting users.
Administer
244 Sybase Unwired Platform

1. In the left navigation pane of Sybase Control Center, click the Applications node andselect the Applications tab in the right administration pane.
2. Select the application and click Delete.
See also• Viewing Assigned Connections on page 242
• Viewing Assigned Application Users on page 243
• Viewing Correlated Application Details on page 243
• Refreshing the Application View on page 244
• Modifying Application Properties on page 245
• Searching for Applications on page 253
• Monitoring Users of Applications on page 254
Modifying Application PropertiesAssociate the application with one or more domains and packages. (Optional for OData SDKAndroid and iOS clients) Associate the application with one or more customization resourcebundles.
1. In the left navigation pane of Sybase Control Center, click the Applications node, and, inthe right administration pane, select the Applications tab.
2. Select an application, and click Properties.
3. Click the Domains and Packages tab.
a) Select the domains to associate with the application.
To see more domains, click +. In Available Domains, select one or more domains fromthe list.
a) Select the packages to associate with the application.
To see more packages, click +. In Available Packages, select one or more packagesfrom the list.
4. (Optional: For OData applications) Click the Customization Resource Bundles tab.
a) Select the customization resource bundles to associate with the application.
To see more customization resource bundles, click +. In Select File to Upload, select aJAR file.
5. Click the Push Configurations tab.
Select the native notifications to associate with the application.
6. Click the Application Connection Templates tab.
If there is more than one application connection template associated with the application,you can re-order the connection templates using the arrow buttons. The first applicationconnection template in the list will be the first one used to authorize application access. If
Administer
Sybase Control Center for Sybase Unwired Platform 245

authorization fails, the next application connection template in the list will be used, and soon.
7. Click OK.
See also• Viewing Assigned Connections on page 242• Viewing Assigned Application Users on page 243• Viewing Correlated Application Details on page 243• Refreshing the Application View on page 244• Deleting Applications on page 244• Searching for Applications on page 253• Monitoring Users of Applications on page 254
Application Customization Resource Bundles(Applies only to Object API SDK clients and OData SDK (Android and iOS) clients) Forsupported application types, customization resource bundles enable you to associate deployedclient applications with different versions of customization resources.
A customization resource bundle is a JAR file that includes a manifest file of name and versionproperties. The customization resource bundle does not contain any information that binds orhelps bind to applications; it can be uploaded or exported during the definition of anapplication with Sybase Control Center. A deployed customization resource bundle is read-only.
Implementing a customization resource bundle requires the coordination of various roles:
1. (Application developer) Invokes the SDK API that downloads the customization resourcebundle. Use the onCustomizationBundleDownloadComplete (in theApplication Callback API) andBeginDownloadCustomizationBundle (in the SUPApplication class) methodsto pair the application with the device, and reach the client application. See DeveloperGuide: OData SDK or any of the Object API Developer Guides.For example, for an application called Sybase.Mobile.Application, you mightimplement the customization resource bundle invocation as follows: /// <summary> /// start downloading default resource bundle associated with the application.The resource bundle would be saved into writer stream provided by user. ///an application only bundle an resource ///</summary> ///&! lt;param name="writer">a writer stream provided by user ///</param> public void BeginDownloadCustomizationBundle(System.IO.Stream writer) { } /// <summary> /// start downloading resource bundle named customizationBundleID. The resource bundle would be saved into writer stream provided by user.
Administer
246 Sybase Unwired Platform

///</summary> ///<param name="customizationBundleID">the resource bundle name ///</param> ///<param name="writer">a writer stream provided by user ///</param> public void BeginDownloadCustomizationBundle(string customizationBundleID, System.IO.Stream writer) { } Sybase.Mobile.IApplicationCallback
/// <summary> /// Invoked when download resource bundle complete. /// </summary> /// <param name="customizationBundleID">! the resource bundle name. if null, application default resource bundle is downloaded /// </param> void OnCustomizationBundleDownloadComplete(string customizationBundleID, int errorCode, string errorMessage);
2. (Developer) Generates the JAR with the MANIFEST.MF, which includes these requiredproperties:• Customization-Resource-Bundle-Name• Customization-Resource-Bundle-Version
3. (Administrator) Uses Sybase Control Center to upload the customization resource bundleto Unwired Server then assign it to an application connection.
4. Once the application activation process completes, the application is directed to theappropriate version of the resource bundle.
Application Customization Resource Bundle RecommendationsThere are a variety of recommendations for working with customization resource bundles.
• You can use customization resource bundles only for Object API SDK clients and ODataSDK (Android and iOS) clients.
• The expected format of the customization resource bundle is a JAR archive that containsMANIFEST.MF.
• The manifest file must include these properties:• Customization-Resource-Bundle-Name• Customization-Resource-Bundle-Version
• Property values cannot include a colon (":").• File size should not exceed 5MB. File size is not enforced, but the larger the file, the
slower the performance, and can be subject to device platform hardware capabilities.See Managing Application Customization Resource Bundles in Developer Guide:Unwired Server Runtime for information about the administration API that allowsprogrammatic access to this functionality.
• You can assign the same customization resource bundle to different applicationconnections, and it is treated independently for each application that is paired with theconnection template that identifies the bundle and version. The primary key is: applicationID, customization resource bundle name, and version.
Administer
Sybase Control Center for Sybase Unwired Platform 247

• Each customization resource bundle:• Belongs to one and only one application. If you delete an application, all associated
customization resource bundles are deleted as well. This implies that the actual binaryis stored twice when assigned to two application IDs.
• Is applicable only to:• The application to which it belongs.• The application connections that have the same application ID.• The application connection templates that have the same application ID.
• Takes effect only when it is assigned to one or more application connections.• Is by default, not assigned to either application connections or application connection
templates.• Must be assigned explicitly by configuring an application connection or application
connection template to use a customization resource bundle.
Note: The application connection assignment configuration overrides that of theapplication connection template.
• Can be exported to the same JAR file being uploaded to Unwired Server, meaning theformat does not change.
• Can upload more than one customization resource bundles, as long as the name andversion combination is unique.
• Can assign only one primary customization resource bundle in an application definition.However, any uploaded customization resource bundle is accessible to any applicationconnection.
• You can delete a customization resource bundle only if it is not assigned to any applicationconnection and application connection template with the same application.
Uploading Application Customization Resource BundlesBefore you can assign application customization resource bundles, you must upload them toUnwired Server with Sybase Control Center.
Only platform administrators can upload bundles to Unwired Server.
1. In the left navigation pane, click the cluster-level Applications node, and, in the rightadministration pane, select the Applications tab.
2. Select one application, and click Properties. In the dialog, select the CustomizationResource Bundles tab.
3. (Optional) Click Refresh to update the list of deployed customization resource bundles forthis application.
4. (Optional) Add another customization resource bundle to the list.
a) Click Add.
Administer
248 Sybase Unwired Platform

b) In the file dialog, navigate to and select the customization resource bundle JAR file, andclick OK. The name and version of the newly deployed customization resource bundleis added to the list.
c) (Optional) In the Confirm dialog, select one or more check boxes to assign the newlyuploaded bundle to application connections or application connection templates withthe same application ID. If no check boxes are selected, there is no automaticassignment.
Note: You can make these assignments at a later time.
5. (Optional) Add another customization resource bundle to the application.
6. Click OK.
Assigning an Application Customization Resource Bundle to a Connection andTemplateAssign a customization resource bundle to an individual application connection andapplication connection template.
1. In the left navigation pane, click the cluster-level Applications node, and, in the rightadministration pane, select the Applications tab.
2. Select the Application Connections or Application Connection Templates tab.
3. Select an application connection (user) or application connection template, depending onthe tab selected, and click Properties.
4. Select Application Settings.
5. Select a value from Customization Resource Bundles. These are customization resourcebundles that are deployed to the selected application identifier. To unselect a customizationresource bundle, select an empty item.
6. Click OK.
Assigning an Application Customization Resource Bundle to All ConnectionsAssociated with an ApplicationAssign a customization resource bundle to all application connections and applicationconnection templates associated with a specific application identifier.
1. In the left navigation pane, click the cluster-level Applications node, and, in the rightadministration pane, select the Applications tab.
2. Select one application, and click Properties. In the dialog, select the CustomizationResource Bundles tab.
3. (Optional) Click Refresh to update the list of deployed customization resource bundles forthis application.
4. Select one customization resource bundle to enable the Assign and Unassignbuttons.
5. Click Assign to launch the dialog. The list of assignable application connections andapplication connection templates appears in the respective tabs.
Administer
Sybase Control Center for Sybase Unwired Platform 249

Click OK to confirm the assignment for the customization resource bundle, then Yes.
Unassigning Application Customization Resource BundlesUnassign a customization resource bundle from an application.
1. In the left navigation pane, click the cluster-level Applications node, and, in the rightadministration pane, select the Applications tab.
2. Select one application, and click Properties. In the dialog, select the CustomizationResource Bundles tab.
3. (Optional) Click Refresh to update the list of deployed customization resource bundles forthis application.
4. Click Unassign to launch the dialog. The list of unassignable application connections andapplication connection templates appears in the respective tabs.
Click Yes to confirm the unassignment for the customization resource bundle.
Managing Deployed Application Customization Resource BundlesUse Sybase Control Center to view deployed customization resource bundles, and to exportand delete customization resource bundles.
Viewing Deployed Application Customization Resource BundlesView the customization resource bundles deployed to an application.
1. In the left navigation pane, click the cluster-level Applications node, and, in the rightadministration pane, select the Applications tab.
2. Select one application, and click Properties. In the dialog, select the CustomizationResource Bundles tab.
3. You can view the list of deployed customization resource bundles (if any) for the selectedapplication.
4. (Optional) Click Refresh to update the list.
Exporting Application Customization Resource BundlesExport a customization resource bundle from an application.
1. In the left navigation pane, click the cluster-level Applications node, and, in the rightadministration pane, select the Applications tab.
2. Select one application, and click Properties. In the dialog, select the CustomizationResource Bundles tab.
3. (Optional) Click Refresh to update the list of deployed customization resource bundles forthis application.
4. Select a single customization resource bundle in the list and click Export.
5. Click Next, and then Finish.
Administer
250 Sybase Unwired Platform

6. In the file dialog, enter a file location and click OK to create a customization resourcebundle JAR file.
7. (Optional) Export another customization resource bundle JAR file for the application.
Deleting an Application Customization Resource BundleDelete a customization resource bundle from an application. You cannot delete acustomization resource bundle if it is assigned to an application connection or applicationconnection template; you must unassign it first.
Note: You may have multiple versions of an application in use at once, so it is acceptable tohave multiple customization resource bundle versions in the repository. However it is goodpractice to delete customization resource bundles once you know they are not used.
1. In the left navigation pane, click the cluster-level Applications node, and, in the rightadministration pane, select the Applications tab.
2. Select one application, and click Properties. In the dialog, select the CustomizationResource Bundles tab.
3. (Optional) Click Refresh to update the list of deployed customization resource bundles forthis application.
4. Select a single customization resource bundle in the list and click Delete.
5. Click Yes to confirm deletion.
6. If the customization resource bundle JAR file is not assigned, it is deleted from the filerepository. Otherwise, you must unassign the customization resource bundle first.
Configuring Native NotificationsConfigure a new or edit an existing native notification properties for an application based onapplication ID and domain.
1. In the left navigation pane, select Applications.
2. In the right pane, select the Applications tab.
3. Select the application ID for which you are configuring native notification and selectProperties.
4. Select the Push Configurations tab and click Add.
5. Configure the native configuration settings:
a) Name - name of the configuration.b) Domain - the domain to which the configuration applies. A domain can have only one
configuration for Apple (APNS) or Google (GCM) type notifications, but can havemultiple Blackberry (BES) type configurations. .
Note: You must specify a domain when configuring push notifications for a HybridWeb Container application.
Administer
Sybase Control Center for Sybase Unwired Platform 251

c) Type - the type of notification service determines the other configuration properties.
6. Configure native notification properties for the type of notification service you areenabling and click OK.
7. Define the notification mode for the application.
• To set the notification mode for a specific application connection template of theapplication, select the Application Connection Templates tab, and select theapplication connection template.
• To set the notification mode for a specific application connection, select theApplication Connections tab, and select the application connection.
a) Select Properties.b) Select Application Settings.c) Select a value for Notification Mode that determines the way in which the
notifications are delivered to the device:
• Only native notifications - send notifications through native third party channelsonly (APNS for Apple devices, GCM for Android devices, BES for BlackBerrydevices, and so on).
• Only online/payload push - send reliable push messages (with business data aspayload) through Sybase Unwired Platform messaging channel only when thedevice is online.
• Online/payload push with native notification - send reliable push messages (withbusiness data as payload) through Sybase Unwired Platform messaging channelwhen the device is online, and use native notification through third party channelsonly if the device is off-line.
APNS Native Notification PropertiesSet Apple Push Notification Service (APNS) native notification properties to allow delivery ofnotifications through an Unwired Server HTTP listener to Apple devices.
Note: When configuring the Apple Push Notification Service native notification properties,change the push notification server, push notification port, feedback server, and feedback portvalues only when configuring notifications in a development environment. To enable Applepush notifications, the firewall must allow outbound connections to Apple push notificationservers on default ports 2195 and 2196.
Property Description
Server The push notification server.
Port Push notification server port.
Feedback server If a feedback service is enabled, the server to which APNS routes feedbackinformation.
Administer
252 Sybase Unwired Platform
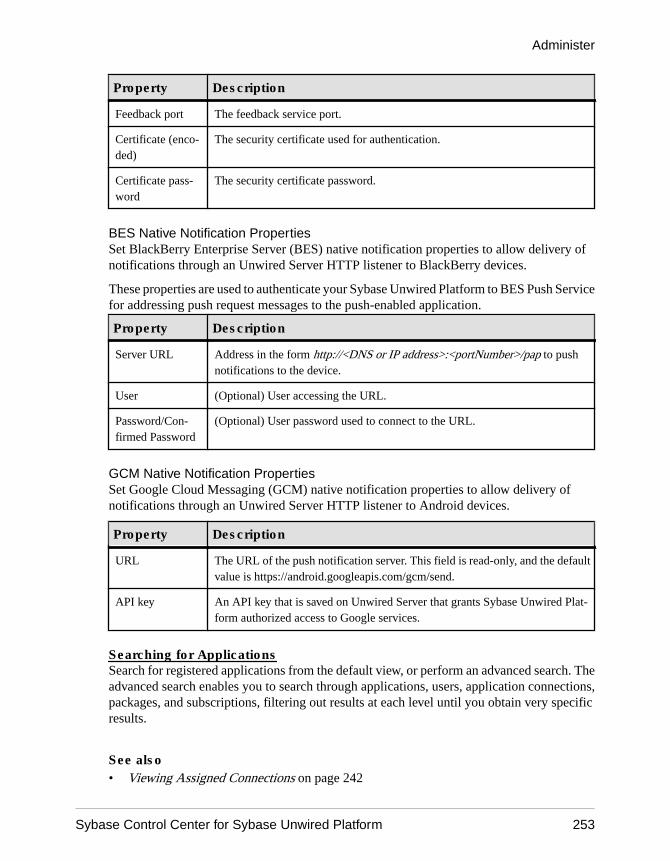
Property Description
Feedback port The feedback service port.
Certificate (enco-ded)
The security certificate used for authentication.
Certificate pass-word
The security certificate password.
BES Native Notification PropertiesSet BlackBerry Enterprise Server (BES) native notification properties to allow delivery ofnotifications through an Unwired Server HTTP listener to BlackBerry devices.
These properties are used to authenticate your Sybase Unwired Platform to BES Push Servicefor addressing push request messages to the push-enabled application.
Property Description
Server URL Address in the form http://<DNS or IP address>:<portNumber>/pap to pushnotifications to the device.
User (Optional) User accessing the URL.
Password/Con-firmed Password
(Optional) User password used to connect to the URL.
GCM Native Notification PropertiesSet Google Cloud Messaging (GCM) native notification properties to allow delivery ofnotifications through an Unwired Server HTTP listener to Android devices.
Property Description
URL The URL of the push notification server. This field is read-only, and the defaultvalue is https://android.googleapis.com/gcm/send.
API key An API key that is saved on Unwired Server that grants Sybase Unwired Plat-form authorized access to Google services.
Searching for ApplicationsSearch for registered applications from the default view, or perform an advanced search. Theadvanced search enables you to search through applications, users, application connections,packages, and subscriptions, filtering out results at each level until you obtain very specificresults.
See also• Viewing Assigned Connections on page 242
Administer
Sybase Control Center for Sybase Unwired Platform 253

• Viewing Assigned Application Users on page 243
• Viewing Correlated Application Details on page 243
• Refreshing the Application View on page 244
• Deleting Applications on page 244
• Modifying Application Properties on page 245
• Monitoring Users of Applications on page 254
Searching from the Default ViewSearch for applications that are registered in the Sybase Control Center.
1. In the right administrations pane, select the Applications node.
2. To set the search criteria, select the criteria from the Search drop-down list.
3. Add a search string.
4. Click Go.All the applications that match the search criteria provided are populated in the table.
See also• Performing an Advanced Search on page 254
Performing an Advanced Searchsearch through applications, users, application connections, packages, and subscriptions,filtering out results at each level until you obtain very specific results.
1. In the right administrations pane, select the Applications node.
2. Select Advanced Search.
3. In Advanced Search, enter an application ID, then click Go, or click Go to display a list ofapplications.
4. Select an application, and click Search.The Users, Application Connections, Packages, and Subscriptions tabs remain.
5. Select one of the remaining tabs, select the search criteria, and click Search.
6. Continue this process until you have the information you seek. Each time you search in aone of the categories, the tab is removed. In this way you refine your search.
See also• Searching from the Default View on page 254
Monitoring Users of ApplicationsTrack and modify application usage by user, and maintain application users as required.
Administer
254 Sybase Unwired Platform

See also• Viewing Assigned Connections on page 242
• Viewing Assigned Application Users on page 243
• Viewing Correlated Application Details on page 243
• Refreshing the Application View on page 244
• Deleting Applications on page 244
• Modifying Application Properties on page 245
• Searching for Applications on page 253
Deleting Application UsersDelete a user to remove the entry as well as personalization data from the cache database.
1. In the left navigation pane of Sybase Control Center, click the Applications node andselect the Application Users tab in the right administration pane.
2. Select the user and click Delete.
The user entry and data are removed.
Checking Application User AssignmentsCheck which applications are used by registered users.
1. In the left navigation pane of Sybase Control Center, click the Applications node andselect the Application Users tab in the right administration pane.
2. Select an application user and click Applications.
All applications used by the user are listed in the dialog.
Searching for Application UsersSearch for application users according to the criteria you specify.
1. In the right administration pane, select the Applications Users node.
2. Choose the criteria from the Search drop-down list for which you want to search for therequired user.
3. Click Go.The user information is populated according to the criteria you have specified.
Refreshing the Application Users ViewRefresh the application user list to display current information about registered users.
1. In the right administration pane, select theApplications node, then the Application Userstab.
Administer
Sybase Control Center for Sybase Unwired Platform 255

2. Click Refresh to view the current information of all users.
Transporting Applications Between Environments Using Export andImport
You can transport applications between different server environments by exporting them fromone server before importing them into another one. This sequence of events is typicallyperformed by administrators when transporting applications from a development local serverenvironment to a test network environment, or from a test or pilot environment to a productioncluster environment.
Exporting ApplicationsExport applications to create a deployment archive that can be used to transport applicationsbetween Unwired Servers.
PrerequisitesBefore beginning, review import requirements and best practices.
Task
1. In the left navigation pane of Sybase Control Center, select Applications.
2. In the right navigation pane, click the Applications tab.
3. Select the box adjacent to the application and click Export.
4. Click Next.
5. Click Finish.
6. Select the file system target for the exported contents and click Save.
Note: Ensure that you do not hide the file type extension when you name the exportarchive; otherwise, the *.zip extension becomes invisible, which adversely affects theoutcome of the export process.
A status message indicates the success or failure of the export transaction. If thetransaction succeeds, a ZIP file is created in the location you specified. You can thenimport this file on another Unwired Server.
NextDeliver the file to the appropriate person, or deploy or transport the exported application to theappropriate server.
Importing ApplicationsImport applicatiions after they have been exported from another Unwired Server.
PrerequisitesReview import requirements and best practices before beginning.
Administer
256 Sybase Unwired Platform
Task
Note: Only platform administrators can import applications at the cluster level.
1. In the left navigation pane of Sybase Control Center, select Applications .
2. In the right administration pane, click the Applications tab and click Import..
3. Click Browse to navigate to the file.
4. Click Import.
5. After the import is complete, check the import details and click OK.
NextIf the application connection template does not exist on the target server, it is imported. Youmay need to change the connection and proxy settings to match the target server configuration.If the application connection template aready exists on the target server, connection and proxysettings are not imported; the target server template settings are used for connection and proxysettings.
Import Requirements and Best PracticesImport is typically used to move a package or application from a development environment toa test environment, and after testing to a production environment.
MBO Package Imports
• Domain requirements – all server connections and security configurations referenced bythe MBO package must exist in the target domain.
• Versioning recommendations – if a developer has updated the package version number:
1. (Required) Verify that this new package version is added to the application.2. (Recommended) Whenever possible, use the update instead of import. Otherwise,
delete the existing package first, to remove all runtime data for the package includingcached data, registered subscriptions, subscription templates, client log, MBO andoperation histories, and registered package users. Delete these items only after seriousconsideration.
Application ImportsMake sure the target system has resources that match those referenced in the export archivefile:
• Domains, security configurations, logical roles assigned to application connectiontemplates, proxy endpoint connections (used by ODP applications)
• If MBO packages are included, the domains, security configurations and connectionsreferenced by the MBO package archives
Administer
Sybase Control Center for Sybase Unwired Platform 257

Hybrid App ImportsIf MBO packages are referenced in the export archive file, make sure that the MBO packageshave already been deployed to the target system.
Note: If the Hybrid App has matching rules, all matching rule search expressions are importedas regular expression types. Other expresssion types such as Begins with or Equals areimported as Regular expression.
Application ConnectionsApplication connections define the manner in which the application connects to UnwiredServer and interacts with the runtime services the application requires. Connections aredefined by the properties that are configured for it, frequently saved as a reusable template.
The connection registration process is either manual or automatic. Without successfulregistration, a connection is not activated, and an application cannot consume the data, thecustomizations, or the packages it requires.
Sybase recommends that you use templates to store and reuse connections. At minimum, youshould create one template per security configuration.
See also• EIS Data Source Connection Properties Reference on page 159
• Creating Connections and Connection Templates on page 157
Registering or Reregistering Application ConnectionsRegistering an application connection groups the user, device, and application to create aunique connection in Sybase Control Center, so the registered connection activity can bemonitored. Use Sybase Control Center to manually register an application connection. Youcan also reregister an application connection when the association between the user, deviceand application breaks or requires a different pairing.
For more information on registering and reregistering application connections, see HowConnections Are Registered in Mobile Application Life Cycle.
1. In the left navigation pane, click the Applications node.
2. In the right administration pane, click the Application Connections tab.
3. Choose an action:
• Click Register to register a new application connection. Using the Activation Code,this application is then paired with a user and a device.
• Click Reregister to associate the application with a new device and user pairing. Forexample, reregister the application connection if someone loses their device. Byreregistering the application connection, the user then receives the same applicationsand workflows as the previous device.
Administer
258 Sybase Unwired Platform

Note: If the client application does not support reregistration, you cannot reregister theapplication connection. To determine if the client application supports reregistration,review the Capabilities properties for the application connection. If the ApplicationSupports Client Callable Components property has a value of False, reregistrationis not supported.
4. In the Register Application Connection or the Reregister Application Connection dialog.
a) For new device registration only, type the name of the user that will activate andregister the device. For reregistrations or clones, the same name is used and cannot bechanged.
b) (Not applicable to reregistration.) Select the name of the template for initial applicationconnection registration. The template you use supplies initial values in the subsequentfields.
• Default – a default template that you can use as is, or customize.• HWC – a default template for Hybrid Web Container. Use as is, or customize. If you
use the HWC template, Application ID must be set to HWC.• Custom - customized templates are listed.
Note: You cannot change the application connection template for an applicationconnection after registration.
5. Change the default field values for the template you have chosen.
If you are using Relay Server, ensure the correct values are used.• Application ID- the application ID registered for the application. The value differs
according to application client type - native application, Hybrid App, or Online DataProxy client. See Application ID Overview for guidelines.
Note: If the template you have chosen supplies the Application ID, then this field isread-only.
• Security Configuration- select the security configuration relevant for the applicationconnection.
• Logical Role- (not applicable to reregistration) select the logical role that users mustbelong to in order to access the application.
• Domain- select the domain for which you want to register the application connectionwith. A domain is not required for registering application connections for Hybrid WebContainer applications.
Note: This value is sent to and used by the device application, and is automaticallyderived from the application ID you select. Therefore, you must set this value correctlywhen using a domain with an application ID.
• Activation code length - the number of characters in the activation code. If you arereregistering or cloning a device, this value cannot be changed.
• Activation expiration- the number of hours the activation code is valid.
Administer
Sybase Control Center for Sybase Unwired Platform 259

6. (Optional) Select the check box adjacent to Specify activation code to enter the code sentto the user in the activation e-mail. This value can contain letter A - Z (uppercase orlowercase), numbers 0 - 9, or a combination of both. Acceptable range: 1 to 10 characters.
7. Click OK
The application is registered or reregistered. SAP applications that have connectionsregistered with Unwired Server, can also have licenses counted by SAP License Audit service.For a list of SAP applications for which licenses are counted, see SAP Applications Trackedwith SAP License Audit in System Administration..
See also• Application ID and Template Guidelines on page 241
• Considerations for Application Connection Registration on page 262
• Application Connection Properties on page 269
Assigning and Unassigning Hybrid Apps to Application ConnectionsAssign Hybrid App packages to application connections to make them available to deviceusers.
1. In the left navigation pane of Sybase Control Center, click Applications.
2. In the right administration pane, click the Application Connections tab.
3. Select the application connection to assign a Hybrid App package to.
4. Click Hybrid Apps.
5. Select the Hybrid App package or packages that you want to assign to the applicationconnection.
6. Click Assign.
Note: If the client application does not support Hybrid Apps , you cannot assign a HybridApp to the application connection. To determine if the client application supports HybridApps, review the Capabilities properties for the application connection. If theApplication Supports Hybrid App property has a value of False , Hybrid Apps are notsupported.
7. To set a Hybrid App package as the default application for the application connection,select the package and click Set default.
Set a Hybrid App package as the default to run that application on the device as a single-purpose application. Single-purpose applications launch automatically when the useropens the Hybrid Web Container. You can only select one default per applicationconnection.
8. To unassign a Hybrid App package, select the package and click Unassign.
Administer
260 Sybase Unwired Platform
Note: If you unassign the Hybrid App package that is set as the default for the applicationconnection, you may want to select a new default package.
9. Click OK.
Maintaining Registered ConnectionsConnections that are registered can be maintained and managed. Perform any connectionmaintenance tasks as needed.
Searching for Application ConnectionsSet search criteria to filter connections viewed in the Application Connections tab
1. In the right navigation pane, click the Applications node.
2. In the right administration pane, click the Application Connections tab.
3. To set the search criteria, configure these search elements:
• Choose the connection information column name you want to enter a search value for.• Type or choose the value for the column name you selected.
4. To search based on multiple filter criteria, select Multi filters and add filters.
5. To define a filter:
a) Select the type of information you want to filter onb) Enter the filter criteria.c) Click +.d) Repeat for additional filters, as required.
You can define only one filter criteria for each type of information. The filters arecombined using a logical AND.
6. To define a filter.
a) Select the type of information you want to filter on.b) Enter the filter criteria.c) Click +.
a) Repeat for additional filters, as required.b) When you have defined all your filters, click Refresh.
Different types of filters are combined using a logical AND. If the same type of filter isadded multiple times with different criteria, the filters are combined using a logical OR
If you defined the following filters:• Security Configuration = Security1• User = User1• User = User2The filtered list would return results that matched both Security1 and either User1 orUser2.
Administer
Sybase Control Center for Sybase Unwired Platform 261

Considerations for Application Connection RegistrationAn application connection can be registered automatically, manually or anonymously.
Information and guidelines:
• Application templates hold default connection properties that can be assigned to anapplication during the connection registration process. However, these templates areconfigured differently depending on what type of connection registration you enable forapplications. See the recommendations documented in Creating Application ConnectionTemplates in the Mobile Application Life Cycle guide.When a client application connects to Unwired Server its application ID is used to look upa matching template. If that template allows automatic registration (the AutomaticRegistration Enabled property is set to true), then the security configuration in the templateis used to authenticate the user and establish an identity against which the connection isregistered. If the template also specifies a logical role, then user is authorized using themapped physical role(s) of the logical role in the security configuration. When there aretemplates with different logical roles for the same application id and securityconfiguration, the priority of the template determines the order of evaluation of theassociated logical roles.
Note: If no templates are detected, the registration request fails. If multiple templates aredetected, the client application registers using the template with the highest priority. Ifthere is more than one template with the highest priority, the application registers usingone of the templates with the highest priority, selected at random. For details on how usernames and security configuration names are processed when an email address is used, seeConsiderations for Using E-mail Addresses as User Names in the Security guide.
• Supported device client activation options:
Device ClientType
Automatic Reg-istration
Manual Registra-tion
AnonymousRegistration
Workflow X X X
Native X X
Online Data Proxy X X X
See also• Registering or Reregistering Application Connections on page 258
Deleting Application ConnectionsDelete an application connection to remove a user assignment to an application connection.
1. In the left navigation pane of Sybase Control Center, click the Applications node andselect the Application Connections tab in the right administration pane.
Administer
262 Sybase Unwired Platform

2. Select the application connection and click Delete.
Editing the Application Connection PropertiesModify or update the properties of an application connections
1. In the left navigation pane, click the Applications node.
2. In the right administration pane, click the Applicaton Connections tab.
3. Select an application connection from the list.
4. Click Properties.
a) In the Application Connection Properties dialog, select the category from the left pane.b) Update or modify the property and its value.
Note:• You cannot update or modify the Capabilities properties. These properties are set
by the client application.• If the client application does not support a password policy, you cannot update or
modify the Password Policy properties. To determine if the client applicationsupports a password policy, review the Application Supports Password Policyproperty under Capabilities. A value of False means a password policy is notsupported.
c) Click OK.
Note: When the application end-point for a registered application is modified underthe Proxy property, you have to manually update the Address in the proxy propertiesof the connection pool.
Cloning Application ConnectionsCreate a duplicate copy of an application connection configuration settings. This allows you toretain user information and pair it with a different device in the event that a user gets a new oralternate device.
1. In the left navigation pane, click the Applications node.
2. In the right administration pane, click the Application Connections tab.
3. Check the box adjacent to the connection you want to clone and click Clone.
Note: If the client application does not support cloning, you cannot clone the applicationconnection. To determine if the client application supports cloning, review theCapabilities properties for the application connection. If the Application SupportsClient Callable Components property has a value of False, cloning is not supported.
4. Edit the configuration settings associated with the application connection.
• Application ID- the application ID registered for the application.
Administer
Sybase Control Center for Sybase Unwired Platform 263
• Security Configuration- select the security configuration relevant for the applicationconnection.
• Domain- select the domain for which you want to register the application connectionwith.
• Activation expiration- the number of hours the activation code is valid.
5. (Optional) Select the check box adjacent to Specify activation code to enter the code sentto the user in the activation e-mail. This value can contain letter A - Z (uppercase orlowercase), numbers 0 - 9, or a combination of both. Acceptable range: 1 to 10 characters.
6. Click OK
Viewing Package Users for Application ConnectionsView users of packages associated with a registered application connection.Users can only beviewed following connection registration. Connection registration creates a pairing betweenthe user, the application ID, and the connection.
1. In the left navigation pane, click the Applications node.
2. In the right administration pane, click the Application Connections tab.
3. Check the box adjacent to the connection you want to review package users for and clickPackage Users.
Note: If the client application does not support package users, you cannot review packageusers for the application connection. To determine if the client application supportspackage users, review the Capabilities properties for the application connection. If theApplication Supports Client Callable Components property has a value of False ,package users are not supported.
4. View package user information. Select and delete users if required.
5. Click OK.
Locking and Unlocking Application ConnectionsLock or unlock connections to control which users are allowed to synchronize data. Lockingan application connection is an effective way to disable a specific user without makingchanges to the security profile configuration to which he or she belongs. Locking anapplication connection blocks delivery of generated data notifications to the replication-basedsynchronization clients.
1. In the left navigation pane, select the Applications node.
2. In the right administration pane, select the Application Connections tab.
3. Select the application connection you want to manage, and:
• If the connection is currently unlocked and you want to disable synchronization, clickLock.
Administer
264 Sybase Unwired Platform

• If the connection is currently locked and you want to enable synchronization, clickUnlock.
4. In the confirmation dialog, click OK.
Tracing Application ConnectionsSend a request to Unwired Server to retrieve log files for an application connection.
1. In the left navigation pane, select the Applications node.
2. In the right administration pane, click Application Connections tab.
3. Select an application connection, and click Get Trace.
Note: If the client application does not support tracing, you cannot trace the applicationconnection. To determine if the client application supports tracing, review theCapabilities properties for the application connection. If the Application SupportsClient Callable Components property has a value of False, tracing is not supported.
The application connection status must be "online" to retrieve the logs.
4. Click OK.
5. When the application connection is online, check the application connection log. Thedefault location for single node and cluster installations is<UnwiredPlatform_InstallDir>\UnwiredPlatform\Servers\UnwiredServer\logs\ClientTrace .
Viewing Default Hybrid AppsSet a Hybrid App package as the default application for an application connection to run on thedevice as a single-purpose application. A single-purpose application launches automaticallywhen the user opens the Hybrid Web Container and is the only Hybrid App available on thedevice.
1. In the left navigation pane of Sybase Control Center, click Applications.
2. In the right administration pane, click the Application Connections tab.
3. Select the application connection you want to view the default Hybrid App for.
4. Click Hybrid Apps.The Hybrid Apps assigned to the connection are listed. The default application isidentified with a check mark in the Default column.
5. To change the default, select the current default Hybrid App and click Unset default, thenselect the new default Hybrid App and click Set default.
You can only select one default per application connection.
6. Click OK.
Administer
Sybase Control Center for Sybase Unwired Platform 265

Setting Anonymous Access for ApplicationsTo provide anonymous access to a manually created or existing application, select theanonymous security configuration and the Anonymous access checkbox.
1. To set anonymous access for an existing application, select the application and create anapplication connection template with the Anonymous security configuration.
2. For either new or existing ODP applications, you must also manually create a connectionfor the application where the:
• connection pool name is the application ID• connection pool type is Proxy• Allow Anonymous Access property = true
Application Connection TemplatesAn application connection template is a model or pattern used to standardize properties andvalues for application connections. When application share many of the same connectionproperties and values save them to a connection template. The application connectiontemplate assigned during application connection registration sets the default connection withcommon properties and values. You can then override the default template properties andspecific values.
You can also assign Hybrid App packages to an application connection template. When youassign Hybrid App packages to an application connection template, all applicationconnections that use the template are automatically assigned the Hybrid App packages.
Commonly used application properties include: application ID, security configuration, andlogical role (used for automatic application connection registration for role based access), anddomain. Together, the application ID, security configuration, and logical role form a uniquekey. An application may have multiple templates that use the same security configuration butdifferent logical roles. During the course of automatic registration and application activation,the Template Priority property of in template's Application Settings defines the order inwhich the logical roles are evaluated for user authorization.
Use the built-in templates or create new ones as dictated by your deployment environment.You can also use these built-in templates to customize templates beyond those created fromdevelopment property values:
• Default – Registers application connections without an application ID. Use this option forbackward compatibility scenarios, or with previous versions of client runtime for nativemessaging clients.
• HWC – Registers application connections for Hybrid Web Container clients only.• $diagtool – Registers application connections to verify a valid end-to-end configuration.
Administer
266 Sybase Unwired Platform
Creating Application Connection TemplatesCreate application connection templates by setting appropriate properties and values.
1. In the left navigation pane, click the Applications node.
2. In the right administration pane, click the Application Connection Templates tab.
3. Click New.
4. Enter the Template name and Description for the application connection template.
5. Select the Base template from the drop-down list.
6. You can configure any of the following profiles. See Application Connection Properties:
• Apple Push Notifications• Application Settings• BlackBerry Push Notifications• Android Push Notifications• Connection• Custom Settings• Device Advanced• Device Info• Password Policy• Proxy• Security Settings• User Registration
7. Click OK.
See also• Application Connection Properties on page 269
• Application Settings on page 271
Assigning and Unassigning Hybrid Apps to Application Connection TemplatesWhen you assign Hybrid App packages to an application connection template, all registeredapplication connections are automatically assigned Hybrid App packages.
You can also assign Hybrid App packages directly to an application connection. The set ofpackages assigned to an application connection will be a combination of packages assignedindirectly through the application connection template and directly through the applicationconnection..
1. In the left navigation pane, select Applications .
2. In the right navigation pane, click the Application Connection Templates tab.
All the application connection templates are listed.
Administer
Sybase Control Center for Sybase Unwired Platform 267
3. Select a template and click Hybrid Apps.
Note: The selected template must have an application ID.
4. Select one or more Hybrid App packages that you want to assign to the template.
5. To set a Hybrid App package as the default for the application connection template, selectthe Hybrid App package and click Set default.
Set a Hybrid App package as the default to if you want it to launch automatically when theuser opens the Hybrid Web Container. This will be the only Hybrid App available on thedevice. You can only select one default per application connection template.
Note: If the same application connection has a default Hybrid App package assigned to itdirectly (not through the application connection template), the direct assignment defaulttakes precedence.
6. To unassign a Hybrid App, select the Hybrid App and click Unassign.
Note: If you unassign the default Hybrid App, you may want to select a new default HybridApp.
Changing Properties of Application Connection TemplateChange existing propert values used in application connection templates.
Note: Changes made to application connection template properties are applied to allapplication connections that use that template, except where the properties have beenoverridden for a specific application connection.
1. In the left navigation pane, click the Applications node.
2. In the right administration pane, click the Application Connection Templates tab.
3. Select the application connection template from the list and click Properties.
4. In the Template dialog, select the category you want to edit and modify the property andvalue.
Note: Some properties are read-only and cannot be changed by the administrator. Someread-only properties are set by the application developer or the device. Other read-onlyproperties are set by the administrator but cannot be changed after the template has beenused to register an application connection.
5. Click OK.
Deleting an Application Connection TemplateWhen an application connection template is no longer needed, delete the template.
Understand the risks and outcomes of this action before proceeding:
Administer
268 Sybase Unwired Platform

• If an application was defined using a template targeted for deletion, then deleting atemplate prevents future connections from registering. Therefore, before you delete atemplate, always ensure it is not used in any existing application definition.
• If the application connection template is used by a registered application connection, youcannot delete the template.
1. In the left navigation pane, click the Applications node.
2. In the right administration pane, click the Application Connection Templates tab.
3. Select the application connection template from the list and click Delete.
4. Click OK on the confirmation dialog.
Application Connection PropertiesApplication connection properties are used to define the values used for an registeredapplication connection. You can create a set of single-use properties or save a base set ofdefaults for an application connection templates if you have a set of values used by manyapplications.
See also• Setting General Application Properties on page 240
• Registering or Reregistering Application Connections on page 258
• Application Settings on page 271
• Creating Application Connection Templates on page 267
• Defining Applications on page 239
Native Notification PropertiesThe Unwired Server HTTP listener provides a notification interface through which delivery ofboth native notifications and payload push notifications is configured for a connection.Configure each set of properties accordingly.
Use native notifications to allow third-party applications or an EIS to deliver notifications/payload directly through the Unwired Platform HTTP notification channel to the device. Forexample, BlackBerry (BES), Apple (APNS), or Android (GCM). Do not confuse nativenotifications with Unwired Server initiated push notifications.
Administer
Sybase Control Center for Sybase Unwired Platform 269
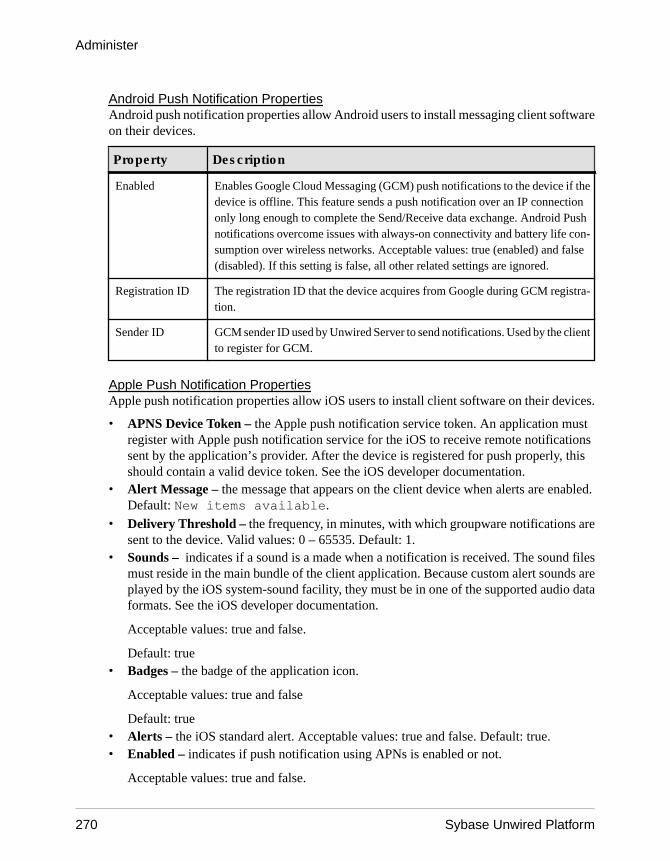
Android Push Notification PropertiesAndroid push notification properties allow Android users to install messaging client softwareon their devices.
Property Description
Enabled Enables Google Cloud Messaging (GCM) push notifications to the device if thedevice is offline. This feature sends a push notification over an IP connectiononly long enough to complete the Send/Receive data exchange. Android Pushnotifications overcome issues with always-on connectivity and battery life con-sumption over wireless networks. Acceptable values: true (enabled) and false(disabled). If this setting is false, all other related settings are ignored.
Registration ID The registration ID that the device acquires from Google during GCM registra-tion.
Sender ID GCM sender ID used by Unwired Server to send notifications. Used by the clientto register for GCM.
Apple Push Notification PropertiesApple push notification properties allow iOS users to install client software on their devices.
• APNS Device Token – the Apple push notification service token. An application mustregister with Apple push notification service for the iOS to receive remote notificationssent by the application’s provider. After the device is registered for push properly, thisshould contain a valid device token. See the iOS developer documentation.
• Alert Message – the message that appears on the client device when alerts are enabled.Default: New items available.
• Delivery Threshold – the frequency, in minutes, with which groupware notifications aresent to the device. Valid values: 0 – 65535. Default: 1.
• Sounds – indicates if a sound is a made when a notification is received. The sound filesmust reside in the main bundle of the client application. Because custom alert sounds areplayed by the iOS system-sound facility, they must be in one of the supported audio dataformats. See the iOS developer documentation.
Acceptable values: true and false.
Default: true• Badges – the badge of the application icon.
Acceptable values: true and false
Default: true• Alerts – the iOS standard alert. Acceptable values: true and false. Default: true.• Enabled – indicates if push notification using APNs is enabled or not.
Acceptable values: true and false.
Administer
270 Sybase Unwired Platform

Default: true
See also• Configuring Messaging Subscription Settings on page 299
BlackBerry Push Notification PropertiesBlackBerry push notification properties enable the server to send notifications to BlackBerrydevices using Blackberry Enterprise Server (BES).
Property Description
Enabled Enables notifications to the device if the device is offline. This feature sends apush notification over an IP connection only long enough to complete the Send/Receive data exchange. BlackBerry Push notifications overcome issues withalways-on connectivity and battery life consumption over wireless networks.Acceptable values: true (enabled) and false (disabled). If this setting is false, allother related settings are ignored. Default: true
Delivery threshold The minimum amount of time the server waits to perform a push notification tothe device since the previous push notification (in minutes). This controls themaximum number of push notifications sent in a given time period. For example,if three push notifications arrive 10 seconds apart, the server does not send threedifferent push notifications to the device. Instead they are sent as a batch with nomore than one push notification per X minutes (where X is the delivery thresh-old). Acceptable values: 0 – 65535. Default: 1
BES Push Listen-er Port
The listener port for BES notifications. The port is discovered and set by theclient, and is read-only on the server.
Device PIN Every Blackberry device has a unique permanent PIN. During initial connectionand settings exchange, the device sends this information to the server. UnwiredServer uses this PIN to address the device when sending notifications, by sendingmessages through the BES/MDS using an address such as: Device="DevicePIN" + Port="Push Listener port". Default: 0
BES NotificationName
The BES server to which this device's notifications are sent. In cases where thereare multiple BES servers in an organization, define all BES servers.
Application SettingsApplication settings display details that identify the Application Identifier, Domain, SecurityConfiguration, and Customization Resource of an application connection template
• Automatic Registration Enabled – set to True to automatically register the applicationusing a connection template. Be sure you understand the security ramifications of settingthis value to true. See Registering Applications, Devices, and Users in the Security guide.
• Application Identifier – the application identifier registered on SCC.
Administer
Sybase Control Center for Sybase Unwired Platform 271

• Customization Resource Bundles – the application configuration (customizationresource bundles) associated with the application. Values include:
• A single name, such as Appmc:1.2.1, indicates a single customization resourcebundle.
• Blank means no customization resource bundles are assigned.
Note: Application configuration is only used for OData SDK clients (Android and iOS),and is not used for Hybrid Web Container connections.
• Domain – the domain selected for the connection template.
The domain is not required when automatic registration is enabled.• Notification Mode – the notification mode through which native notifications and
payload push notifications to registered devices are delivered:
• Only native notifications – allows third party applications or EIS to deliver nativenotifications directly through the HTTP notification channel: BlackBerry (BES),Apple (APNS), or Android (GCM) to the device.
• Only online/payload push – allows third party applications or EIS to deliver datapayload push notifications to an online device.
• Online/payload push with native notifications – allows both payload and nativenotifications to be delivered to the device.
Note: Apple and Google do not recommend payload delivery over their systems:
• Data may not be delivered.• Data is delivered out of sequence.• If enabled, the actual payloads must be small.
For example, GCM makes no guarantees about delivery or order of messages. Whileyou might use this feature to inform an instant messaging application that the user hasnew messages, you probably would not use it to pass actual messages.
RIM supports guaranteed delivery, including callbacks to notify Unwired Server that themessage was delivered or when it failed. However, this is a different message format. RIMmessaging has many limitations including packet size, number of packets for a single userthat BES keeps, number of packets BES keeps for all users, and so on. Therefore, BESshould also only be used to send the notification, but not to send payloads.
Refer to the appropriate platform documentation (APNS, BES, or GCM) for additionalinformation.
• Security Configuration – the security configuration defined for the connection template.
The security configuration of the application connection template is used to authenticateusers when automatic registration is enabled. The user name for authentication can beincluded in the security configuration, for example, supAdmin@admin. If a securityconfiguration is provided, the server looks for the application connection templateaccording to both the appId and security configuration. If a security configuration is not
Administer
272 Sybase Unwired Platform

provided, the server looks for the unique application connection template according to theappId. If there are multiple templates with different security configurations for the sameappId, the server reports an exception, as it does not know which template should be usedto authenticate the user.
• Logical Role – the logical role that users must belong to in order to access the application.• Template Priority – the priority in which the application connection template will be used
by the application, if the application has more than one application connection templateassociated with it.
See also• Application Connection Properties on page 269• Creating Application Connection Templates on page 267
Connection PropertiesConnection properties define the connection information for a client application so it canlocate the appropriate Unwired Server synchronization service.
Typically, production client applications connect to the synchronization server via RelayServer or some other third-party intermediary reverse proxy server. In those cases, the settingsfor the synchronization host, port, and protocol need to use Relay Server property values. Formore information on how these properties are used in a synchronization environment, seeReplication in System Administration.
• Activation Code – (not applicable to replication clients) the original code sent to the userin the activation e-mail. Can contain only letters A – Z (uppercase or lowercase), numbers0 – 9, or a combination of both. Acceptable range: 1 to 10 characters.
• Farm ID – a string associated with the Relay Server farm ID. Can contain only letters A –Z (uppercase or lowercase), numbers 0 – 9, or a combination of both. Default: 0.
• Server Name – the DNS name or IP address of the Unwired Server, such as"myserver.mycompany.com". If using Relay Server, the server name is the IP address orfully qualified name of the Relay Server host.
• Server Port – the port used for messaging connections between the device and UnwiredServer. If using Relay Server, this is the Relay Server port. Default: 5011.
• Synchronization Server Host – the server host name used for synchronization.• Synchronization Server Port – the port used for synchronization.• Synchronization Server Protocol – the synchronization protocol - HTTP or HTTPS.• Synchronization Server Stream Parameters – the synchronization server stream
parameters that are used to explicitly set client-specific values. After the client applicationsuccessfully registers with the Unwired Server, it receives the trusted certificateconfigured in the Server configuration (either the Secure Sync Port Public Certificate orTrusted Relay Server Certificate). If you are using Relay Server, ensure the Trusted RelayServer Certificate property is configured to point to a file that has the server's publiccertificate.
You can configure these parameters as one or morename=value entries.
Administer
Sybase Control Center for Sybase Unwired Platform 273

• trusted_certificates – the file containing trusted root certificate file.• certificate_name – the name of the certificate, which is used to verify certificate.• certificate_unit – the unit, which is used to verify certificate.• certificate_company – the name of the company issuing the certificate, which is used
to verify certificate.
For more information about certificates, see Security.• Synchronization Server URL Suffix – the server URL suffix. For Relay Server, suffixes
vary depending on the Web Server used. For example, /cli/iarelayserver/FarmName for Apache, or ias_relay_server/client/rs_client.dll/FarmName for IIS.
See also• Configuring Messaging Subscription Settings on page 299
Custom SettingsDefine one of four available custom strings that are retained during reregistration and cloning.
Change the property name and value according to the custom setting you require. The customsettings can be of variable length, with no practical limit imposed on the values. You can usethese properties to either manually control or automate how Hybrid App-related messages areprocessed:
• Manual control – an administrator can store an employee title in one of the custom fields.This allows employees of a specific title to respond to a particular message.
• Automated – a developer stores the primary key of a back-end database using a customsetting. This key allows the database to process messages based on messaging device ID.
See also• Configuring Messaging Subscription Settings on page 299
Device Advanced PropertiesAdvanced properties set specific behavior for messaging devices.
• Relay Server URL Prefix – the URL prefix to be used when the device client isconnecting through Relay Server. The prefix you set depends on whether Relay Server isinstalled on IIS or Apache. For IIS, this path is relative. Acceptable values include:
• For IIS – use/ias_relay_server/client/rs_client.dll.
• For Apache – use /cli/iasrelayserver.
Note: The value used in the client application connection for the URL suffix must matchwhat the administrator configures in the URL suffix. Otherwise, the connection fails. Use
Administer
274 Sybase Unwired Platform

the Diagnostic Tool command line utility to test these values. See Diagnostic ToolCommand Line Utility (diagtool.exe) Reference in System Administration.
• Allow Roaming – the device is allowed to connect to server while roaming. Acceptablevalues: true and false. Default: true.
• Debug Trace Size – the size of the trace log on the device (in KB). Acceptable values: 50 to10,000. Default: 50.
• Debug Trace Level – the amount of detail to record to the device log. Acceptable values: 1to 5, where 5 has the most level of detail and 1 the least. Default: 1.
• 1: Basic information, including errors• 2: Some additional details beyond basic• 3: Medium amount of information logged• 4: Maximum tracing of debugging and timing information• 5: Maximum tracing of debugging and timing information (currently same as level 4)
• Device Log Items – the number of items persisted in the device status log. Acceptablevalues: 5 to 100. Default: 50.
• Keep Alive (sec) – the Keep Alive frequency used to maintain the wireless connection, inseconds. Acceptable values: 30 to 1800. Default: 240.
See also• Configuring Messaging Subscription Settings on page 299
Device Info PropertiesInformation properties display details that identify the mobile device, including InternationalMobile Subscriber identity (IMSI), phone number, device subtype, and device model.
• IMSI – the International Mobile Subscriber identity, which is a unique number associatedwith all Global System for Mobile communication (GSM) and Universal MobileTelecommunications System (UMTS) network mobile phone users. To locate the IMSI,check the value on the SIM inside the phone.
• Phone Number – the phone number associated with the registered mobile device.• Device Subtype – the device subtype of the messaging device. For example, if the device
model is a BlackBerry, the subtype is the form factor (for example, BlackBerry Bold).• Model – the manufacturer of the registered mobile device.
See also• Configuring Messaging Subscription Settings on page 299
Password Policy PropertiesCreate a password policy for device application logins. Only passwords that meet the criteriaof the policy can be used to access the sensitive artifacts secured inside a device's data vault.
You can create a password policy as part of an application connection template. Ensure yourdevelopers add enforcement code to the application's data vault.
Administer
Sybase Control Center for Sybase Unwired Platform 275

• Enabled – Set this value to True to enable a password policy for device applications. Bydefault, this property is set to True.
• Default Password Allowed – Set this value to True to allow default passwords. If adefault password is allowed in the policy, developers can create the vault using with adefault password, by specifying null for both the salt and password arguments. By default,this value is set to False
• Expiration Days – Sets the number of days the existing password can be used before itmust be changed by the user. By default, this value is set to 0, or to never expire.
• Has Digits | Lower | Special | Upper – Determines what combination of characters mustbe used to create a password stringency requirements. The more complex the password,the more secure it is deemed to be. Set the value to True to enable one of these passwordstringency options. By default they are set to false.
• Lock Timeout – Determines how long a successfully unlocked data vault will remainopen. When the timeout expires, the vault is locked, and the user must re-enter the vaultpassword to resume using the application. Use this property in conjunction with the RetryLimit.
• Minimum Length – Sets how long the password chosen by the user must be. By default,this value is set to 8.
• Minimum Unique Characters – Determines how many unique characters must be usedin the password. By default this property is set to 0. For example, if set that the passwordhas a minimum length of 8 characters, and the number of unique characters is also 8, thenno duplicate characters can be used. In this instance a password of Sm00the! would fail,because two zeros were used. However, Smo0the! would pass because the duplicationhas been removed.
• Retry Limit – Sets the number of times an incorrect password can be retried before thedata vault is deleted. A deleted vault means that the database encryption key is lost, and alldata in the application is rendered irretrievable. As a result the application becomesunusable. By default this value is set to 20.
Proxy Properties(Applies only to Online Data Proxy) Proxy properties display details that identify theapplication and push endpoints.
• Application Endpoint – the URL pointing to the EIS.• Push Endpoint – the Sybase Unwired Platform URL used by EIS to forward
notifications.
Note: The application end point should be whitelisted only once as a proxy connection. Theproxy connection name should be same as the application ID, if an application is registered tobe used for referencing the EIS service end point.
Administer
276 Sybase Unwired Platform
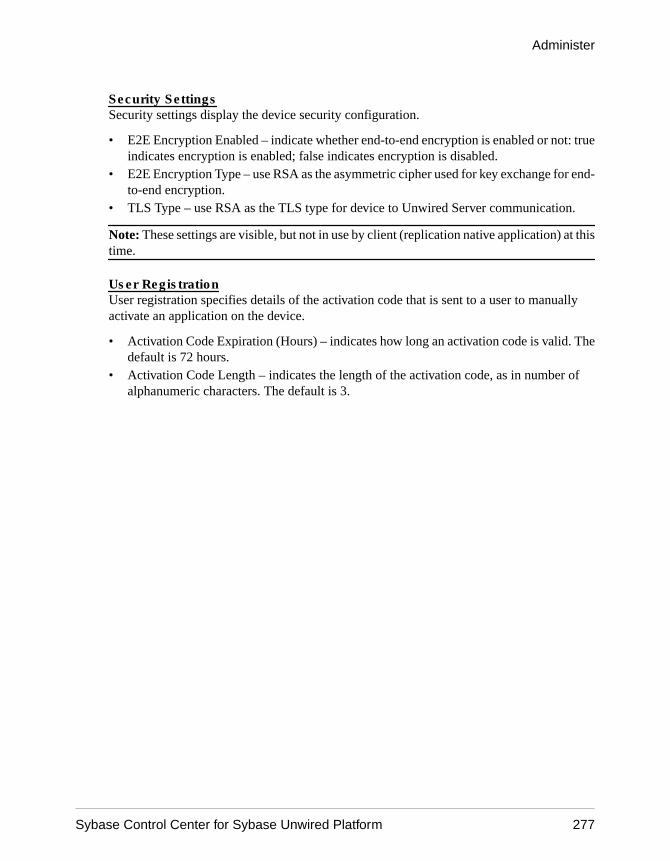
Security SettingsSecurity settings display the device security configuration.
• E2E Encryption Enabled – indicate whether end-to-end encryption is enabled or not: trueindicates encryption is enabled; false indicates encryption is disabled.
• E2E Encryption Type – use RSA as the asymmetric cipher used for key exchange for end-to-end encryption.
• TLS Type – use RSA as the TLS type for device to Unwired Server communication.
Note: These settings are visible, but not in use by client (replication native application) at thistime.
User RegistrationUser registration specifies details of the activation code that is sent to a user to manuallyactivate an application on the device.
• Activation Code Expiration (Hours) – indicates how long an activation code is valid. Thedefault is 72 hours.
• Activation Code Length – indicates the length of the activation code, as in number ofalphanumeric characters. The default is 3.
Administer
Sybase Control Center for Sybase Unwired Platform 277

Administer
278 Sybase Unwired Platform

Deploy
Deployment is a routine administration task that manages the life cycle of a mobile businessobject (MBO) package on the Unwired Server. Deployment makes a package available to theruntime environment, so that it can be administered or accessed by client devices. Deploymentis similar to, but not the same as, exporting and importing packages between multiple clusterenvironments.
Unwired Platform supports the development and subsequent deployment of:
• Package archives• Hybrid App archives
Depending on the package type, the deployment steps can vary.
MBO PackagesMBO packages are collections of MBOs that are related by application use and authorship andgrouped according to maintenance or distribution. Packages are initially created bydevelopers, but are deployed and maintained on a production Unwired Server byadministrators.
Administrators cannot change the name of a package if one has been defined by thedevelopment team. You can, however, create new package versions when you make anupwardly incompatible change to an existing application. In this case, leave both versions ofthe package running until every one of the remote client applications has been upgraded to thelatest version; only then should you delete the old package version.
Although each mobile business object (MBO) type has unique properties and data sources,MBOs within a package used by an application may be of different types.
Note: You must deploy a package before you can configure or manage it. Packageadministration tasks vary, depending on the type of package you deploy.
See also• DOE-C Packages on page 304• Hybrid App Packages on page 307
Deploying MBO PackagesDeploying is the process whereby whole or part of a mobile package is loaded onto anUnwired Server as one or more deployment units. Unwired Server can then make these unitsaccessible to users via a client application that is installed on a mobile device. There a differentmethods you can use to deploy an MBO package to Unwired Server.
Deploy
Sybase Control Center for Sybase Unwired Platform 279

PrerequisitesIf your developers have created a custom filter for the mobile business object you aredeploying, you must copy class files to the primary server before you deploy the package thatuses those filters. If you copy the filters to a slave server by mistake, they are deleted when youdeploy the package to the primary server.
To locate the name of the master, look at the server list in Sybase Control Center. If a particularserver is the master server of a cluster, it will be labeled as "primary" in the left navigationpane.
Task
Because the deployment unit file contains package name and other information, you do notneed to select a package from the list of available packages; Unwired Server creates thepackage automatically according to what has been defined in the deployment file.
1. Deploying with the Deploy Wizard
Use the Deploy wizard when packages have already been created for a known domain in aparticular development or runtime environment, or when you want Unwired Server tocreate a package for you from a deployment unit file for that known domain.
2. Transporting Packages Between Environments with Export and Import
If you are trying to transfer deployment packages among disparate server environments,you can export packages from one server environment before importing them into anotherone. This sequence of events is typically performed by administrators when transportingpackages from a development local server environment to a test network environment, orfrom a test or pilot environment to production cluster environment.
Deploying with the Deploy WizardUse the Deploy wizard when packages have already been created for a known domain in aparticular development or runtime environment, or when you want Unwired Server to create apackage for you from a deployment unit file for that known domain.
Prerequisites
Note: If the connection properties of an MBO or operation use credentials that have beencustomized manually by a developer, the back-end data sources connection properties of theseMBOs and operations cannot be updated by an administrator when using the Deploy Wizard.
Instead, the adminstrator can update these properties after the MBO or operation is deployedto an Unwired Server. When the server connection is created on Unwired Server, theadministrator can then change connection properties in Sybase Control Center by clicking onthe Connections node in the left navigation pane.
Deploy
280 Sybase Unwired Platform

Task
1. In the left navigation pane, expand the Domains folder.
2. Choose a domain name, then select Packages.
3. In the right administration pane, click the General tab.
4. Click Deploy.Follow the instructions in the wizard to configure a package so it can be deployed.
See also• Transporting Packages Between Environments with Export and Import on page 286
Configuring Deployment PropertiesSet the properties for packages being deployed on Unwired Server.
A deployment file and an optional deployment descriptor file are created by developers inUnwired Workspace. These files are typically delivered for deployment to a productionversion of the Unwired Server by an administrator.
Note: If the package is deployed to the primary server, it is cluster-level operation.
1. When the Deploy wizard loads, click Next.
2. Review the Deployment File name, or click Browse to navigate to the appropriate file.
You can select either a single deployment unit (.XML) or an archive file (.JAR).
The name of the Package Name appears. If this package does not already exist, the wizarddisplays a message that indicates the new package will be created. The name cannotexceed 64 characters or include any periods (".").
3. Select a Deployment Mode.
The deployment moe determines how the deployment process handles the objects in adeployment unit and package. The value you choose depends on whether or not a packageof the same name exists on Unwired Server. Allowed values are:
• UPDATE – updates the target package with updated objects. After deployment, objectsin the server's package with the same name as those being deployed are updated. Bydefault, deploymentMode is UPDATE.
• NOCLOBBER – deploys the package only if there are no objects in the target server'spackage that have the same name as any of those objects being deployed.
• REPLACE – replaces any of the target objects with those in the package. Afterdeployment, the servers package contains only those objects being deployed.
• VERIFY – do not deploy package. Only return errors, if any. Used to determine theresults of the <codeph>UPDATE</codeph> deploy mode.
If the deployment mode is specified both in the descriptor file and the Deploy wizard, theDeploy wizard deploymentMode option overrides the deployment mode specified in thedescriptor file.
Deploy
Sybase Control Center for Sybase Unwired Platform 281

4. If you did not choose a deployment archive as your deployment file, you can browse andselect an optional deployment Descriptor File.
5. Click Next.
6. Select a Domain to deploy the package to.
7. Select a Security Configuration for the package.
8. Click Next.The Configure Role Mapping page appears.
Deployment ArchivesAn archive is produced after a developer creates a package profile and executes a build on apackage. This archive can only be created in the Eclipse edition of Unwired WorkSpace.
In Unwired WorkSpace, a developer executes a build process so that it creates a .jar archivefile, which contains both a deployment unit and a corresponding descriptor file. A deploymentarchive can be delivered to an administrator for deployment to a production version of theUnwired Server.
Deployment DescriptorsA deployment descriptor is an XML file that captures changes to the deployment unit duringdeployment. Those changes are then used when a package is redeployed.
A deployment descriptor is not required to deploy the deployment unit.
A deployment descriptor is created either after a developer creates a package profile andexecutes a build on a package, or when the developer deploys a package to a developmentedition server from Unwired WorkSpace. The file contains this information:
• The deployment mode• The target package that descriptor applies to• The endpoint information that overrides specific endpoints defined for MBOs or
operations in the deployment unit• The domain and named security that the package applied to• Role mappings
This information is specific to each deployment unit; therefore, you cannot apply a descriptorfrom another package to a deployment unit.
Mapping Roles for a PackageUnwired Platform uses a role mapper to map logical and physical roles during an accesscontrol check. This allows developers to create applications that incorporate a logical accesscontrol policy. When the application is deployed, a security administrator can work with thedeveloper to understand what the logical roles in the application were intended to do and mapthese logical roles to physical roles that exist in the real security system. Role mappingsperformed at the package level override the mappings set at the global level. Package-levelrole mappings apply to all packages that use the same security configuration, even if the
Deploy
282 Sybase Unwired Platform

package is deployed in multiple domains. You can set the mapping state either when managingroles, or after package deployment.
PrerequisitesUnwired Platform cannot query all enterprise security servers directly; to performauthentication successfully, know the physical roles that are required.
Task
1. For package-specific role mapping, select and deploy an available package. Follow thewizard prompts until you reach the Configure Role Mapping page for the target package.
2. Select a logical role and select one of the following in the adjacent list:
State Description
AUTO To map the logical role to a physical role of the same name.
NONE To disable the logical role, which means that the logical role is not authorized.
MAP To manually map the logical role when the physical and logical role names do not match.See Mapping a Physical Role Manually.
3. Click Next.
The Server Connection page appears.
Deployment-time role mapping is done at the package level. Once the package is deployed,you can change the role mapping by going to the Role Mapping tab for the desired package.
Mapping a Physical Role ManuallyUse the Role Mappings dialog to manually map required physical roles for a logical role whenphysical and logical role names do not match. If names do not match, the AUTO mapping statedoes not work.
PrerequisitesUnwired Platform cannot query all supported enterprise security servers directly; forsuccessful authentication, you must know the physical roles your back-end systems require.
Task
You can map a logical role to one or more physical roles. You can also map multiple logicalroles to the same physical role. If a role does not exist, you can also add or delete names asneeded.
1. Review the list of existing physical role names that you can map to the logical role youhave selected. If the list retrieved is too long to locate the name quickly, either:
Deploy
Sybase Control Center for Sybase Unwired Platform 283

• Click the banner of Available Roles list to sort names alphanumerically.• Start typing characters in the box, then click the Search button to filter the available
list.
2. If a role that you require still does not appear, enter the Role name and click the + button.The role name appears in the Available roles list with an asterisk (*). This asteriskindicates that an available role was added by an administrator, not a developer.
3. To remove a role you no longer require from the Available roles list, select the name andclick the x button adjacent to the Role name field.The role is removed and can no longer be mapped to a logical role.
4. To map a logical role that appears in the text area of the Role Mappings dialog to a physicalrole:
a) Select one or more Available roles.b) Click Add.
5. To unmap a role:
a) Select one or more Mapped roles.b) Click Remove.
The roles are returned to the Available roles list.
6. Click OK to save these changes.
Once a logical role has been manually mapped, the mapping state changes to MAPPED. Theroles you have mapped appear in the active Physical Roles cell for either a package-specific orserver-wide role mappings table.
Mapping State ReferenceThe mapping state determines the authorization behavior for a logical name instance.
State Description
AUTO Map the logical role to a physical role of the same name. The logicalrole and the physical role must match, otherwise, authorization fails.
NONE Disable the logical role, which means that the logical role is not au-thorized. This mapping state prohibits anyone from accessing theresource (MBO or Operation). Carefully consider potential conse-quences before using this option.
MAPPED A state that is applied after you have actively mapped the logical roleto one or more physical roles. Click the cell adjacent to the logical rolename and scroll to the bottom of the list to see the list of mappedphysical roles.
Deploy
284 Sybase Unwired Platform

Updating Server Connection PropertiesConfigure the production version of server connection properties. Typically, the endpoint androle mapping a developer would use are not the same for a production system. Administratorsmust reset these properties accordingly.
This step allows you to change connection profiles used for development (design time) to anappropriate server-side connection. For example, your development environment mightpermit access to certain systems that the Unwired Server prohibits.
Note: If the connection properties of an MBO or operation use credentials that have beencustomized manually by a developer, the back-end data sources connection properties of theseMBOs and operations cannot be updated by an administrator when using the Deploy Wizard.
1. Review the connection properties.
2. Depending on how the properties are configured, choose an appropriate option:
• If the properties are configured by the developer as a set of connection properties, youcan edit properties as needed. To edit a property, click a field in the Value column andchange the value as required.
• If the properties are configured as an endpoint, choose an existing server connection touse. You cannot alter any of these properties.
3. If you want the changes to apply to operations only, click the corresponding check box atthe bottom of the table.
4. Click Next.
The connection properties are updated. The changes you make are displayed in the Summarypage in the Endpoint Updates section.
Reviewing the Deployment SummaryReview the properties you have supplied before deploying the package to Unwired Server.This allows you to change errors before making the deployment units available via thepackage created for that purpose.
1. Review all three sections of the deployment summary. If anything is incorrect, click Backand correct errors.
2. To create a deployment descriptor:
a) Click Create deployment descriptor.b) Browse to the location you want to save the file and change the default name if
required.c) Click OK.
You can use the deployment descriptor to redeploy the deployment unit without having torepeat these steps in the deployment wizard.
3. Click Finish to deploy the file and create the package on Unwired Server.
Deploy
Sybase Control Center for Sybase Unwired Platform 285

Deploying to the server may take some time to complete. However, a status messageappears above the General tab indicating the success or failure of the attempt.
Transporting Packages Between Environments with Export and ImportIf you are trying to transfer deployment packages among disparate server environments, youcan export packages from one server environment before importing them into another one.This sequence of events is typically performed by administrators when transporting packagesfrom a development local server environment to a test network environment, or from a test orpilot environment to production cluster environment.
See also• Deploying with the Deploy Wizard on page 280
Exporting MBO PackagesExport an MBO package to bundle one or more MBOs and package options to create a newinstance of a deployment archive. Use the deployment archive to transport the packagebetween Unwired Servers.
PrerequisitesBefore beginning, review import requirements and best practices.
Task
1. In the left navigation pane of Sybase Control Center, expand Domains > Domain name >Packages.
2. In the right administration pane, select the box adjacent to the name of the package andclick Export.
3. Click Next.
4. Click Finish.
5. Select the file system target for the exported contents and click Save.
Note: Ensure that you do not hide the file type extension when you name the exportarchive; otherwise, the *.zip extension becomes invisible, which adversely affects theoutcome of the export process.
A status message indicates the success or failure of the export transaction. If thetransaction succeeds, a ZIP file is created in the location you specified. You can thenimport this file on another Unwired Server.
Next
Deliver the file to the appropriate person, or deploy or transport the exported package to theappropriate server.
Deploy
286 Sybase Unwired Platform

See also• Importing MBO Packages on page 287
• Import Requirements and Best Practices on page 287
Importing MBO PackagesImport MBO packages after they have been exported from another Unwired Server.
PrerequisitesReview import requirements and best practices before beginning.
Task
1. In the left navigation pane of Sybase Control Center, expand Domains > Domain name >Packages .
2. In the right administration pane, click Import
3. Click Browse to navigate to the file.
4. Click Import.
5. After the import is complete, check the import details and click OK.
See also• Exporting MBO Packages on page 286
• Import Requirements and Best Practices on page 287
Import Requirements and Best PracticesImport is typically used to move a package or application from a development environment toa test environment, and after testing to a production environment.
MBO Package Imports
• Domain requirements – all server connections and security configurations referenced bythe MBO package must exist in the target domain.
• Versioning recommendations – if a developer has updated the package version number:
1. (Required) Verify that this new package version is added to the application.2. (Recommended) Whenever possible, use the update instead of import. Otherwise,
delete the existing package first, to remove all runtime data for the package includingcached data, registered subscriptions, subscription templates, client log, MBO andoperation histories, and registered package users. Delete these items only after seriousconsideration.
Application ImportsMake sure the target system has resources that match those referenced in the export archivefile:
Deploy
Sybase Control Center for Sybase Unwired Platform 287

• Domains, security configurations, logical roles assigned to application connectiontemplates, proxy endpoint connections (used by ODP applications)
• If MBO packages are included, the domains, security configurations and connectionsreferenced by the MBO package archives
Hybrid App ImportsIf MBO packages are referenced in the export archive file, make sure that the MBO packageshave already been deployed to the target system.
Note: If the Hybrid App has matching rules, all matching rule search expressions are importedas regular expression types. Other expresssion types such as Begins with or Equals areimported as Regular expression.
See also• Exporting MBO Packages on page 286
• Importing MBO Packages on page 287
MBO Package ManagementThere are common package management activities used by all package types: replication,messaging, unified, DOE-C, or ODATA.
These activities include:
See also• DOE-C Packages on page 304
Deleting a PackageDelete a package when you want to permanently remove all elements deployed on an UnwiredServer. If you do not want to permanently prohibit access by removing these files, considerdisabling the package instead.
Deleting a package removes all runtime data for the package including cached data, registeredsubscriptions, subscription templates, client log, MBO/Operation history, and registeredpackage users. All clients must re-sync as a result. Therefore, deletion action should be takenafter careful consideration.
1. In the left pane, click the Unwired Server you are currently logged in to.This expands the list of Unwired Platform components you can manage, provided that youhave the correct permissions to do so.
2. Click Domains > DomainName > Packages.
3. To delete a package from the this list, select one or more packages and click Delete.A confirm dialog box appears.
4. Click OK to confirm the deletion.
Deploy
288 Sybase Unwired Platform

The package is removed from Unwired Server.
Enabling and Disabling a PackageEnable or disable a package to allow or prohibit device access to the package. Disabledpackages are still available to Sybase Control Center for Unwired Server. By default, allpackages are enabled.
When you disable a package, the server unloads all of its elements from memory. Disabling apackage prevents the Unwired Server from loading that package at start-up.
Note: You cannot disable a SAP Data Orchestration Engine Connector (DOE-C) package.
1. In the left navigation pane, click Packages.
2. In the right administration pane, select the General tab.
3. Select the box adjacent to the package you want to enable or disable.
You can select more than one package to apply the same change to multiple components.
4. Depending on the current status of the package, perform one of:
• Enable – if the package listed shows a status of disabled, click Enable.• Disable – if the package listed shows a status of enabled, click Disable. The package
remains disabled until you or another administrator enables it; restarting UnwiredServer does not enable the package.
Configuring Synchronization GroupsConfigure a synchronization group when a collection of MBOs must be synchronized at thesame time.
The synchronization group defines both the logical unit of synchronization, and generationfrequency for data notifications. The latter influences the synchronization frequency forreplication synchronization applications, which usually need to perform a synchronizationevent to download the changes associated with the data notification event.
The synchronization group properties jointly determine the frequency with which datachanges are detected, and notifications are generated. The actual data notification delivery tothe application is determined by this equation:delivery of data notification = cache schedule repeat value or data change notification arrival time + synchronization group change detection interval value + device's subscription push interval setting
There may be an additional 10 second delay, because the internal thread for performing thechange detection runs every 10 seconds.
1. In the left navigation pane, expand the Packages folder and select the package containingthe sync group you want to configure.
2. Select the desired sync group and click Properties.
Deploy
Sybase Control Center for Sybase Unwired Platform 289

3. Select a change detection interval. This value determines how frequently Unwired Serverlooks for changes to MBOs, and generates push notifications. The default is 1 hour.
If you set the Change detection interval to 0, the change detection task is disabled and theSUP server does not push changed messages or data to the client device.
4. Click OK.
Configuring a Cache GroupSelect and configure a cache group. The cache is part of the Unwired Server cache database(CDB) that is used to store data that is uploaded and downloaded from EIS servers and mobileclients during synchronization.
Cache group configuration differs depending on whether the cache group is defined as "ondemand" or "scheduled" during development.
MBO Data in the CDBA data cache is a copy of MBO data that is stored in a specific area of the cache database(CDB). It is used as the data repository for replication and messaging MBOs that are deployedto Unwired Server. "CDB" and "cache" and "MBO data" can sometimes used interchangeably,even though the CDB includes runtime data as well.
When cache data is updated (either with an on-demand or scheduled cache refresh), the remoteclient database eventually retrieves the updated data from the server's copy of MBO data in theCDB by synchronization.
By giving applications a normalized and uniform view of corporate data, organizations can:
• Lower the barrier to data behind corporate firewalls• Support development of mobile applications that interact with multiple enterprise back-
ends• Reduce back-end load caused by device client requests
Configuring On Demand Cache Group PropertiesSpecify the duration of cache data validity by configuring Unwired Server updates to mobilebusiness object (MBO) data for an on demand cache group.
PrerequisitesYou can configure on demand updates for a cache only if the developer enables the cachegroup as "on demand" during development. Otherwise, the Cache tab is not configurable in theCache Group Properties dialog.
Task
1. In the left navigation pane, expand the Packages folder, and select the package for whichyou want to configure cache settings.
2. In the right administration pane, click the Cache Group tab.
Deploy
290 Sybase Unwired Platform

3. Select the cache group you want to configure and click Properties.
4. In the Cache Properties dialog, enter an expiry for the Cache Interval in seconds,minutes, or hours.
The cache interval determines how frequently Unwired Server updates the cache databasewith changes to enterprise data. See On Demand Cache Refreshes in the list of links below.
5. Click OK.
On Demand Cache RefreshesCache groups designated as "on demand" during development use cache intervals to balancehow frequently the object updates enterprise data with the amount of network traffic requiredto maintain that data.
Unwired Server keeps a local copy of enterprise data in the cache database (CDB), and uses anintricate mechanism to manage updates between the CDB and the EIS servers. When data isupdated, the remote client database eventually gets updated data from this local copy in theCDB. The caching mechanism allows MBOs to retrieve updated data even if back-end serversfail.
You must choose an appropriate cache interval for your system, since this value determineshow frequently the CDB is udpated with data from the EIS. The cache interval must beconfigured according to business needs. A higher value for the cache may retain stale data,however, a lower value increases the backend EIS load and may impede the client application'sperformance, because Unwired Server queries the back-end information servers morefrequently to look for changes and possibly update the CDB copy.
Frequent queries typically put a higher load on the servers, as well as use more networkbandwidth on the server side. While the cache interval does not affect the bandwidth requiredbetween the synchronization server and device client applications, nor the performancecharacteristics of the client applications, the interval you choose can delay synchronization ifUnwired Server must first update many records in the CDB.
For example, if the cache interval is 0, each time a client application synchronizes, there is apause while the Unwired Server rereads data from the EIS and updates the CDB. If, however,the cache interval is greater than 0, then the wait time depends on how long ago the data wasrefreshed. If the synchronization falls within a recent cache update, synchronization is almostimmediate.
Configuring Scheduled Cache Group PropertiesSpecify the duration of cache data validity by configuring Unwired Server updates to mobilebusiness object (MBO) data for a scheduled cache group.
PrerequisitesYou can configure a schedule refresh for a cache only if the developer enables the cache groupas "scheduled" during development. Otherwise, the Schedule tab is not configurable in theCache Group Properties dialog.
Deploy
Sybase Control Center for Sybase Unwired Platform 291

Task
1. In the left navigation pane, expand the contents of the Packages folder and select thepackage for which you want to display properties.
2. In the right administration pane, click the Cache Group tab.
3. Select the cache group you want to configure and click Properties.
4. In the Schedule tab of the Cache Properties dialog, set the frequency of the refresh byselecting an appropriate Schedule Repeat: hourly, daily or custom.
This property determines what other schedule properties you must configure. Each optionis documented in a seperate topic which further discusses the details for each frequencytype. For more details, see the corresponding topic.
Scheduling an Hourly or Daily RefreshScheduling an hourly or daily cache refresh means that information is fetched from theenterprise information server (EIS) and populated into the cache on either of these hourly ordaily frequencies according to the schedule and range of time you configure.
The Schedule tab in the Cache Property dialog displays options appropriate for configuringthis type of schedule.
1. Select either Hourly or Daily as the Schedule Repeat criteria.
2. (Optional) If you want to set a range to control which days the schedule refresh runs,configure a start date and time, an end date and time, or day of week (if applicable).
• Select Start Date to set a date for which the first execution of the scheduled refresh isperformed. To be more specific, you can also select Start Time to specify a start time.If you do not set a start date and time, then, by default, the date and time that UnwiredServer starts is used.
• Select End Date to set a date that ends the repeating refresh transactions for a package.To be more specific, you can also select End Time to specify an end time. An end dateand time are exclusive. This means that a refresh transaction runs up to, but does notinclude, the end time.If you do not set an end date and time, then, by default, the date and time that UnwiredServer stops is used.
• Select Specify Week Days to select the days of the week that the refresh transactionruns. This means that for the days you select, the refresh runs every week on the day ordays you specify. A weekday is inclusive. This means that any day you choose isincluded in the frequency. All others are excluded.
For example, if a schedule has a start time of 13:00 and an end time of 16:00 and repeatsevery hour, the refresh task would execute between 13:00 and 16:00 as determined for acustom schedule (based on the interval expiry). For an hourly or daily schedule, the refreshis triggered in that time range on an hourly or daily basis.
Deploy
292 Sybase Unwired Platform

When the schedule expires, the automatic refresh you configured terminates, unless theend user initiates a refresh.
3. Click Save.
See also• Scheduling a Custom Refresh on page 293
• Scheduled Cache Refreshes on page 294
Scheduling a Custom RefreshScheduling a custom cache refresh is the most flexible of all cache refresh schedules. Thismeans that information is fetched from the enterprise information system (EIS) according tothe schedule repeat interval you specify.
The Schedule tab in the Cache Property window displays options appropriate for configuringthis type of schedule.
1. Select Custom as the schedule repeat criteria.
2. Specify a repeat Interval, in minutes or seconds, to determine how often the cache refreshoccurs.
This interval determines how frequently Unwired Server updates the cache database withchanges to enterprise data. The default is 0 seconds, which means the mobile businessobject retrieves the data from the enterprise information server (EIS) on every playbackrequest. If you choose something other than 0 seconds, the data is held by the cache for theduration of the specified interval.
3. (Optional) To set a range to control which days the schedule refresh runs, configure a startdate and time, end date and time, or day of week (if applicable).
• Select Start Date to set a date for which the first execution of the scheduled refresh isperformed. To be more specific, you can also select Start Time to specify a start time.In this case, the refresh cannot begin until a given time on a given day has been reached.A start date and time are inclusive.If you do not set a start date and time, then, by default, the date and time that UnwiredServer starts is used.
• Select End Date to set a date that ends the repeating refresh transactions for a package.To be more specific, you can also select End Time to specify an end time. An end dateand time are exclusive. This means that a refresh transaction runs up to, but does notinclude, the end time. For example, if a schedule has a start time of 13:00 and an endtime of 16:00 and repeats every hour, it runs at 13:00, 14:00, and 15:00, but not at16:00.If you do not set an end date and time, then, by default, the date and time that UnwiredServer stops is used.
• Select Specify Week Days to select the days of the week that the refresh transactionruns. This means that for the days you select, the refresh runs every week on the day or
Deploy
Sybase Control Center for Sybase Unwired Platform 293

days you specify. A weekday is inclusive. This means that any day you choose isincluded in the frequency. All others are excluded.
When the schedule expires, the automatic refresh you configured terminates, unless theend user initiates a refresh.
4. Click Save.
See also• Scheduling an Hourly or Daily Refresh on page 292
• Scheduled Cache Refreshes on page 294
Scheduled Cache RefreshesA schedule-driven cache refresh is a background task that runs between a configured start andendpoint at scheduled intervals during normal server operation.
A schedule-driven cache refresh defines a contract between Unwired Server and back-endinformation servers. Normally, data is retrieved from a server (for example, a database, and anSAP repository, or a Web service) when a device user synchronizes. If the administrator wantsthe data to be preloaded, he or she configures the Unwired Server repeat interval to expeditedata updates on the device.
Two properties configure the cache refresh schedule, which is used with a subscription tosynchronize data for mobile business objects (MBOs).
• Schedule repeat – determines the time frame when data is refreshed. If you set up aschedule to repeatedly refresh data, information is always refreshed. Set the schedule tomeet business application requirements for data consistency.As an administrator, you may also use a schedule repeat to look for data changes and alertsubscribed clients to synchronize when there are changes. Keep in mind, however, that theactual detection of changes and sending of data (for messaging payloads) or notifications(for replication payloads) depends on the:• Change detection interval property of the synchronization group for the package.• Notification threshold property of subscriptions for replication payloads.• Push related device settings for messaging payloads.
• Repeat interval – determines how often Unwired Server updates the cache with changes tobackend data.
See also• Scheduling an Hourly or Daily Refresh on page 292
• Scheduling a Custom Refresh on page 293
Deploy
294 Sybase Unwired Platform

Online Refresh PolicyMBOs that use an Online refresh policy indicates that the MBOs are to be used only in HybridApp applications where access to real-time enterprise information system (EIS) data isrequired (cache validity is zero).
Data is valid in the Unwired Server cache only until delivery and immediately invalid. Youcannot modify the cache or schedule of the Online policy. Expired data is purged from thecache based on a schedule at the domain level.
DCN Refresh PolicyThe cache refresh and schedule options are disabled for DCN (data change notification)policy, since data never expires and is not refreshed based on client demand or a schedule.
Cache data does not expire until a cache invalidate operation is invoked or a data changenotification request is received from the enterprise information system (EIS).
Purging a Cache GroupPhysically delete data that has been logically deleted from the cache. Cached data is marked aslogically deleted when certain activities occur in the client application or back end.
1. In the left navigation pane of Sybase Control Center, expand the Packages folder andselect the package to configure.
2. In the right administration pane, select the Cache Group tab.
3. Click OK.
Purging the Synchronization Cache ManuallyYou can manually purge the synchronization at the package level. Mobile business objects(MBOs) contained in a cache group using the online policy are deleted.
1. In the left navigation pane, expand the Domains folder and select a domain.
2. Navigate to the Packages folder, and select a package.
3. In the right pane, select the Cache Group tab.
4. On the Cache Group tab, click Purge.
5. Click OK to purge immediately based on your selections.
Assigning Package-Level SecurityAssign security configurations at the package level to override those set at the domain-level.
1. Selecting a Security Configuration for a Package
Designate a security configuration for a package in Sybase Control Center. This is arequired step during package deployment, but you can later change the securityconfiguration.
Deploy
Sybase Control Center for Sybase Unwired Platform 295
Selecting a Security Configuration for a PackageDesignate a security configuration for a package in Sybase Control Center. This is a requiredstep during package deployment, but you can later change the security configuration.
The administrator must create a security configuration in the cluster and assign it to thedomain where the package is deployed before the deployer can assign the securityconfiguration to the package.
1. In the left navigation pane, expand the Packages folder, and select the package toconfigure.
2. In the right administration pane, click the Settings tab.
3. Select a security configuration.
The security profiles that appear in this list have been created by a platform administratorand assigned to the domain.
4. Click Save.
Viewing Asynchronous Operation ReplaysView pending asynchronous operation replays for unified or replication packages alreadydeployed to Unwired Server.
PrerequisitesAsynchronous operation replays are only available if the feature has been enabled as part ofthe cluster properties. See Configuring Asynchronous Operation Replay Queue Count.
Task
1. In the left navigation pane, expand the Packages folder and select the deployed package.
2. In the right administration view, click the Asynchronous Operation Replay tab.
3. Review the requests displayed in the table for this package.
The number of replays are ordered in sequence along with:• The user name that performed the operation.• The name of the operation.• The name of the MBO.
4. If the list is long, you can search for a particular entry:
a) Select the field you want to search for: user, operation, or MBO name.b) Type the text string in the adjacent field.
This file allows the use of wildcards (that is, *). For example, if you selected a username search, and you want to return replays for all users that start with A, you type A*as the search string.
Deploy
296 Sybase Unwired Platform

See also• Configuring Asynchronous Operation Replay Queue Count on page 62
• Viewing Cluster Information on page 62
Viewing and Changing Package Connection PropertiesView and edit connection properties for deployed MBO and DOE-C packages.
1. In the left navigation pane, expand the Packages folder, select the package whoseconnection properties you want to view or change, and select the mobile business object.
2. In the right navigation pane, click the Connection tab.
3. If you wish to change any of the settings:
a. In the left navigation pane, click the Connections icon.b. Select the checkbox for the Connection Pool Name that matches the name of the
package whose connection properties you were just viewing.c. Click Properties.d. Make desired changes and click Save.
Note: For DOE-C connections, you must save the connection properties first, then testconnection. For other connection types, you can test connection without saving.
e. Click Test Connection.If the connection test is not successful, see Connection Test Errors in theTroubleshooting guide
MBO Subscription ManagementManage subscriptions for MBO packages.
Subscription management activities include:
Configuring Package SubscriptionsConfigure subscriptions and subscription templates to allow the device user to be notifiedwhen information is available, depending on the subscription properties configured for apackage. Subscription templates allow you to configure predefined properties for asynchronization group. A client's first synchronization for a specified synchronization groupresults in subscription creation using both the template and client-specified properties.
Creating Replication Subscription TemplatesCreate a subscription template to specify synchronization targets and behavior for subscribedusers. A template is useful to create a set of predefined values that are used frequently.
Deploy
Sybase Control Center for Sybase Unwired Platform 297

Otherwise, a subscription is still automatically created for each client upon explicit indicationof interest for a device notification.
This is an optional step; it is only required if an administrator wants to establish presetsubscription properties. The subscription properties can be modified from device application,but only if the Admin lock property is disabled.
1. In the left navigation pane, expand the Packages folder and select the replication basedsync package you want to configure.
2. In the right administration pane, click the Subscriptions > Replication tab.
3. From the menu bar, select Templates.
4. Click New.
5. In the New Template dialog, select settings for these options:
• Synchronization Group – the group of MBOs that a client receives data changenotifications for when data changes occur.
• Notification Threshold – the length of time that must pass since a client's lastsynchronization before another notification is sent.
• Admin Lock – (enable or disable) prevents device users from modifying the pushsynchronization state or sync interval value configured in the subscription. If the adminlock is disabled, the device client user can change these properties, and these changestake effect the next time the client user synchronizes the package to which thesubscription applies.
• Push – (enable or disable) if enabled, automatic server-initiated notifications arepushed to users when changes occur in the cache. If disabled, device users performclient-initiated synchronizations when they receive an outbound notification.
Note: If you intend to use push synchronization with BlackBerry devices, enable pushsynchronization in the BlackBerry server. See the BlackBerry server documentation fordetails.
6. Click OK.The new subscription template appears in the list of templates.
Notifications are delivered to BlackBerry device clients using push-based notification settingsand to Windows Mobile device clients using pull-based notification settings. The "poll every"setting determines the notification delivery behavior. See in Sybase Control Center onlinehelp.
Configuring Replication Subscription PropertiesView and configure subscription properties for replication device users subscribed todeployed synchronization packages.
1. In the left navigation pane, expand the Packages folder and select the replication-basedsynchronization package you want to configure.
Deploy
298 Sybase Unwired Platform
2. In the right navigation pane, click the Subscriptions > Replication tab.
3. From the menu bar, select Devices.
4. Check the box adjacent to a device user and click Properties to view these subscriptionproperties:
• Application Connection ID – the unique identifier for a user application connection.• User – the name of the user associated with the application ID.• Package Name – the name of the package to which the subscription belongs.• Sync Counts – the total number of synchronizations for the subscription since the
synchronization history was last cleared.• Notification Threshold – the length of time that must pass since a client's last
synchronization before another notification is sent.• Last Sync Time – the date and time that the last synchronization for the subscription
occurred.• Synchronization Group – the group of MBOs that a client receives data change
notifications for when data changes occur.• Admin Lock – (enable or disable) prevents device users from modifying the push
synchronization state or sync interval value configured in the subscription. If the adminlock is disabled, the device client user can change these properties, and these changestake effect the next time the client user synchronizes the package to which thesubscription applies.
• Push – (enable or disable) if enabled, automatic server-initiated notifications arepushed to users when changes occur in the cache. If disabled, device users performclient-initiated synchronizations when they receive an outbound notification.
5. Check the box adjacent to Clear sync history in order to erase stored synchronizationdetails for the subscription.
6. If you made changes to subsciption properties, click Save. Otherwise, click Cancel toreturn to the Subscriptions tab.
Configuring Messaging Subscription SettingsView and edit user properties for messaging packages that allow you to manage messagingbetween Unwired Server and application users.
1. In the left navigation pane, expand the Packages folder, and select the package you want toconfigure.
2. In the right navigation pane, click Subscriptions > Messaging .
3. Check the box adjacent to an application connection and click Device Settings.
4. Configure these property categories, as required:
• Connection• Custom Settings• Device Advanced
Deploy
Sybase Control Center for Sybase Unwired Platform 299

• Device Info• User Registration• Apple Push Notifications (iPhone only)• BlackBerry Push Notifications• Proxy' 'Security Settings• Application Setting
See also• Connection Properties on page 273
• Custom Settings on page 274
• Device Advanced Properties on page 274
• Device Info Properties on page 275
• Apple Push Notification Properties on page 270
Managing SubscriptionsManage subscriptions to control the messages that application connections receive.
Subscription management tasks include pinging, unsubscribing, recovering, suspending,resuming, resynchronizing, and logging subscriptions. Subscription tasks vary by the packagetype.
These subscription management tasks apply only to the package types specified in the tablebelow. Perform each task in the Subscriptions tab of the deployed package you are managing.
Table 19. Subscription management tasks
Subscrip-tion task
Description Summary Packagetype
Ping Ensure that push information auser provides for a device isconfigured correctly.
If the ping is successful, notifi-cations and subsequent datasynchronizations occur as de-fined by each subscription. Ifthe ping fails, open the log andcheck for an incorrect hostname or port number.
Select the box adjacent to the de-vice ID, and click Ping.
UNIFIED(replicationsubscrip-tions)
Deploy
300 Sybase Unwired Platform

Subscrip-tion task
Description Summary Packagetype
Subscribe|Un-subscribe
Add or remove a subscriptionfrom Unwired Server.
Select the box adjacent to the de-vice ID, and click Unsubscribefor UNIFIED packages, messag-ing packages, and DOE-C pack-ages.
For Windows Mobile, the deviceapplication must include the Da-tabaseClass.CleanAllData();method for data to be unsubscri-bed correctly. If this method is notused, Unsubscribe and Sub-scribe could work unpredictably.
All
Recover Reestablish a relationship be-tween the device and UnwiredServer. Perform recovery undersevere circumstances when adevice is unable to successfullysynchronize data.
During subscription recovery,Unwired Server purges all en-terprise data on the device. Itretains the device ID and sub-scription information so that alldata can then be resynchronizedand loaded onto the device.
Check the box adjacent to the sub-scription ID of the device, andclick Recover.
UNIFIED(messagingsubscrip-tions)
Suspend/re-sume
Control the deactivation and re-activation of package subscrip-tions:
• Suspend – temporarilyblock data synchronizationfor a device subscribed to aparticular package.
• Resume – reactivate a pack-age subscription after it hasbeen suspended.
Select the box adjacent to the sub-scription ID of the device, andclick either Suspend or Resume.
UNIFIED(messagingsubscrip-tions)
DOE-C
Deploy
Sybase Control Center for Sybase Unwired Platform 301

Subscrip-tion task
Description Summary Packagetype
Resynchron-ize
Reactivate subscriptions to adeployed package.
If a DOE-C subscription doesnot respond to the SAP DOEquickly enough, the DOE maymark that subscription's queuesas "blocked" and stop sendingmessages to the DOE-C. Re-synchronize to resume commu-nication from the DOE to theDOE-C subscription.
Check the box adjacent to the sub-scription ID of the device, andclick ReSync.
DOE-C
Purge Removes subscriptions that areno longer referenced by any ac-tive users.
Select the subscription, clickPurge, and then select the criteria.
UNIFIED(messagingsubscrip-tions)
UNIFIED(replicationsubscrip-tions)
Purging Inactive Package Subscriptions ManuallyPurge subscriptions for that have been inactive and remove them from the cache database aswell as Sybase Control Center's management view.
Note: Devices for which you have purged subscriptions cannot perform any operations. Onlypurge those subscriptions that are inactive for a long period of time.
1. In the left navigation pane, expand the Domains folder and select a domain.
2. Navigate to the Packages folder, and select a subscription.
3. In the right pane, select the Subscriptions tab.
4. Select the application payload used: replication or messaging.
5. Search for inactive subscriptions for that payload type:
a) From Search, select Number of Inactive Days.b) Type a positive integer, then click Go.
6. Select all inactive subscriptions retrieved, then click Purge.
7. Click OK. The subscriptions that match the purging criteria are physically deleted fromcache database.
8. Repeat the step for the alternate payload protocol in a mixed application environment.
Deploy
302 Sybase Unwired Platform

Reviewing MBO HistoryView or clear the error history of a mobile business object (MBO).
1. In the left navigation pane, expand the Packages folder and select the package thatcontains the MBO you want to view.
2. Select the MBO.
3. In the right administration pane, click the History tab.
4. To view MBO data from a specific time period, select a Start date and End date and clickGo.
5. Review the following data for the MBO:
• Data refresh time – the time of this data refresh's failure.• Failed data refresh counts – the number of failed data refreshes that occurred during the
specified time period.• Last successful data refresh – the date and time of the most recent successful data
refresh of this MBO before this refresh failure.
6. To clean MBO history data, click Clean.Data is removed from the cache database.
Reviewing Operation HistoryView the error history of a mobile business object (MBO) create, delete, or update operation.
1. In the left navigation pane, expand the Packages folder and select the package thatcontains the MBO operation you want to view.
2. Expand the desired MBO and select the operation for which you want to view the errorhistory: create, delete, or update.
3. In the right administration pane, click the History tab.
4. To view operation data from a specific time period, select a Start date and End date andclick Go.
5. Review the following data for the operation:
• Operation replay time – time of this operation replay's failure.• Number of failed operation replays– the number of failed operation replays that
occurred during the specified time period.• Last successful operation replay – the date and time of the most recent successful
replay of this operation before this operation replay failure.
6. Click Clean to remove operation history data.The lines are removed from the cache database.
Deploy
Sybase Control Center for Sybase Unwired Platform 303

DOE-C PackagesSybase Hybrid App for SAP Business Suite and Sybase Mobile Sales for SAP CRM workwith Unwired Platform to make parts of SAP Workflow available on your mobile device usingSAP Data Orchestration Engine connector (DOE-C) packages.
DOE-C packages implement the messaging payload protocol, so package management thatrelate to messaging packages also apply to DOE-C packages. The activities listed here onlyapply to DOE-C.
See also• MBO Packages on page 279
• Hybrid App Packages on page 307
• MBO Package Management on page 288
Deploying and Configuring DOE-C PackagesUnlike Hybrid App or MBO packages that use Sybase Control Center to deploy packages toUnwired Server, you must deploy the DOE-C package to specific domain using the DOE-Ccommand line utility (CLU). Once deployed, the DOE-C package is visible and manageablefrom Sybase Control Center.
1. Start the command line utility console. See Starting the Command Line Utility Console inSystem Administration.
2. Deploy the DOE-C package. During deployment, you can set the domain and securityconfiguration using the setPackageSecurityConfiguration command with -d and -scoptions. After deployment, you can set the security configuration using thesetPackageSecurityConfiguration command, or perform this task later from SybaseControl Center.
See SAP DOE Connector Command Line Utility in the System Administration guide.
NextVerify or set the security configuration for the domain or package.
Viewing and Changing Package Connection PropertiesView and edit connection properties for deployed MBO and DOE-C packages.
1. In the left navigation pane, expand the Packages folder, select the package whoseconnection properties you want to view or change, and select the mobile business object.
2. In the right navigation pane, click the Connection tab.
3. If you wish to change any of the settings:
Deploy
304 Sybase Unwired Platform

a. In the left navigation pane, click the Connections icon.b. Select the checkbox for the Connection Pool Name that matches the name of the
package whose connection properties you were just viewing.c. Click Properties.d. Make desired changes and click Save.
Note: For DOE-C connections, you must save the connection properties first, then testconnection. For other connection types, you can test connection without saving.
e. Click Test Connection.If the connection test is not successful, see Connection Test Errors in theTroubleshooting guide
Setting the Bulk Load Timeout PropertyThe Subscribe bulk load timeout property is a package level property targeted to BlackBerryclients for initial server-side subscription operations.
Server-side subscription improves performance and is enabled on the client if the device has asecure digital (SD) memory card enabled. The timeout allows you to set an initial subscriptionpush timeout period. If the timeout period is reached, Unwired Server sends the database fileto the device, whether the initial subscribe is complete or not. The timeout window signals thatthe device has received sufficient import messages to send the server-built database to theclient.
Note: This option is only available for Sybase SAP Data Orchestration Engine Connector(DOE-C) packages.
1. In the left navigation pane of Sybase Control Center, expand the Packages folder and selectthe package to configure.
2. In the right administration pane, select the Settings tab.
3. Set the timeout value. The default value is 3600 seconds.
In addition to the timeout value, you can define the Subscribe Bulk Load Thread PoolSize – the maximum number of threads allocated to initial server-side subscriptionoperations. The default value is 5. Setting the thread pool size too high can impactperformance. This is a server-side setting that can be set:
a) In the left navigation pane, select Configuration.b) In the right administration pane, select the General tab.c) From the menu bar, select Performance .d) Restart Unwired Server if you change the Subscribe Bulk Load Thread Pool Size
value for it to take effect.
Deploy
Sybase Control Center for Sybase Unwired Platform 305
Checking and Resolving DOE-C User FailuresIf the General tab of a DOE-C package displays an invalid user account error for the ErrorState property, you must resolve the issue by reconfiguring the username and password in theConnection Pool configured for the SAP package connection.
1. In the default domain, expand the Packages folder and click the DOE-C package name.
2. Check the Error State property in the General tab.
3. Validate the username and password configured, by clicking the Connection tab.
4. Correct the user credentials used by editing the corresponding connection pool properties:
a) In the navigation pane, click Connections.b) In the administration pane, click the Connections tab.c) Select the connection for the DOE-C package, then click Properties.d) Set the username and password so that it matches the user account credentials.
Note: If you change the username or password property of a DOE-C connection, youmust reopen the same dialog and click Test Connection after saving. Otherwisethe error state of this DOE-C package cannot be cleaned up. If you do not click TestConnection, the username or password is correct, but the error state of the DOE-Cpackage cannot be cleaned up.
Package Subscription PropertiesReview information on SAP Data Orchestration Engine connector (DOE-C) packagesubscriptions in order to manage the synchronization data that device users receive.
Package subscription properties include:
• Application Connection ID – the unique identifier for a user application connection.• User – the name of the user associated with the application ID.• Last Server Response Time – the date and time that the last outbound response was sent
from Unwired Server to the client.• Client ID – the device application ID, which identifies the package database for the
application.• Application Name – the name of the device application used by the subscription.• Status – the current status of a device. The possible values are: Running, Suspended,
Pending Activation, Online, Offline, and Expired.• Packet Dropped – the current packet dropped state of a device. The values are true or
false.
Select Advanced to view these properties:
• Subscription ID – the unique identifier of the subscription.
Deploy
306 Sybase Unwired Platform

• Logical ID – the unique identifier of a registered device that is generated and maintainedby Unwired Server.
Hybrid App PackagesHybrid App packages support occasionally connected users and solve the replication andsynchronization issues such users present with respect to data concurrency. Hybrid Apppackages are similar to other package types in that an administrator must deploy the packageto Unwired Server so that it can be configured and made available to client devices.
See also• MBO Packages on page 279
• DOE-C Packages on page 304
• Deploying a Hybrid App Package with the Deploy Wizard on page 307
• Configuring a Hybrid App Package on page 311
• Enabling and Configuring the Notification Mailbox on page 310
Deploying Hybrid App PackagesUse Sybase Control Center to deploy Hybrid App packages created by developers, and toperform the configuration tasks required to make them available to application users onmessaging devices.
PrerequisitesIf a Hybrid App is needed for a domain, then a developer must configure the context variablefor a known domain. The administrator then only needs to change the context variable if thedeveloper defined variable in the Hybrid App is not using the same domain as a named MBOpackage.
Deploying a Hybrid App Package with the Deploy WizardUse the Deploy wizard to make Hybrid App packages available on Unwired Server.
If you are deploying to a target domain, replicate the value in the context variable. The domaindeployment target must match the context variable defined. If the developer has used anincorrect context variable (for example, one used for testing environments), you can changethe value assigned to one that is appropriate for production deployments.
1. In the left navigation pane of Sybase Control Center, click Hybrid Apps.
2. From the General tab, click Deploy.
3. Click Browse to locate the Hybrid App package.
4. Select the file to upload and click Open.
5. Select the deployment mode:
Deploy
Sybase Control Center for Sybase Unwired Platform 307

• New – deploys an Unwired Server package and its files for the first time.If the uploaded file does not contain an Unwired Server, or an Unwired Server with thesame name and version is already deployed to Unwired Server, you see an errormessage.
• Update – installs a new Unwired Server package with the original package name andassigns a new, higher version number than the existing installed Unwired Serverpackage. Sybase recommends that you use this deployment mode for major newchanges to the Unwired Server package.During the update operation, Unwired Server:• Acquires a list of assigned application connections from the original package.• Installs and assigns the package a new version number.• Prompts the administrator to specify application connection assignments from the
acquired list of assigned application connections.• Preserves existing notifications.• Preserves the previous Unwired Server package version.
• Replace – replaces an existing Unwired Server package with a new package, butmaintains the same name and version. Sybase recommends that you use the replacedeployment mode for minor changes and updates to the Unwired Server package, orduring initial development.During the replace operation, Unwired Server:• Acquires a list of assigned application connections for each user of the original
package.• Uninstalls the original package.• Installs the new package with the same name and version.• Assigns the original application connections list to the new package, thus
preserving any application connection assignments associated with the originalpackage.
The package is added to the list of deployed packages, which are sorted by Display Name.
NextConfigure the deployed package if you want it to have a different set of properties in aproduction environment.
See also• Configuring a Hybrid App Package on page 311
• Hybrid App Packages on page 307
Transporting Packages Between Environments with Export and ImportIf you are trying to transfer deployment packages among disparate server environments, youcan export packages from one server environment before importing them into another one.This sequence of events is typically performed by administrators when transporting packages
Deploy
308 Sybase Unwired Platform

from a development local server environment to a test network environment, or from a test orpilot environment to production cluster environment.
Exporting Hybrid AppsExport Hybrid Apps to create a deployment archive that can be used to transport Hybrid Appsbetween Unwired Servers.
1. In the left navigation pane of Sybase Control Center, select Hybrid Apps.
2. In the right navigation pane, click the General tab.
3. Select the box adjacent to the Hybrid App and click Export.
4. Click Next.
5. Click Finish.
6. Select the file system target for the exported contents and click Save.
Note: Ensure that you do not hide the file type extension when you name the exportarchive; otherwise, the *.zip extension becomes invisible, which adversely affects theoutcome of the export process.
A status message indicates the success or failure of the export transaction. If thetransaction succeeds, a ZIP file is created in the location you specified. You can thenimport this file on another Unwired Server.
NextDeliver the file to the appropriate person, or deploy or transport the exported Hybrid App to theappropriate server.
See also• Importing Hybrid Apps on page 309• Import Requirements and Best Practices on page 310
Importing Hybrid AppsImport Hybrid Apps after they have been exported from another Unwired Server.
1. In the left navigation pane of Sybase Control Center, click Hybrid Apps.
2. In the right administration pane, click the General tab.
3. Click Browse to navigate to the file.
4. Click Import.
5. After the import is complete, check the import details and click OK.
See also• Exporting Hybrid Apps on page 309• Import Requirements and Best Practices on page 310
Deploy
Sybase Control Center for Sybase Unwired Platform 309
Import Requirements and Best PracticesImport is typically used to move a package or application from a development environment toa test environment, and after testing to a production environment.
MBO Package Imports
• Domain requirements – all server connections and security configurations referenced bythe MBO package must exist in the target domain.
• Versioning recommendations – if a developer has updated the package version number:
1. (Required) Verify that this new package version is added to the application.2. (Recommended) Whenever possible, use the update instead of import. Otherwise,
delete the existing package first, to remove all runtime data for the package includingcached data, registered subscriptions, subscription templates, client log, MBO andoperation histories, and registered package users. Delete these items only after seriousconsideration.
Application ImportsMake sure the target system has resources that match those referenced in the export archivefile:
• Domains, security configurations, logical roles assigned to application connectiontemplates, proxy endpoint connections (used by ODP applications)
• If MBO packages are included, the domains, security configurations and connectionsreferenced by the MBO package archives
Hybrid App ImportsIf MBO packages are referenced in the export archive file, make sure that the MBO packageshave already been deployed to the target system.
Note: If the Hybrid App has matching rules, all matching rule search expressions are importedas regular expression types. Other expresssion types such as Begins with or Equals areimported as Regular expression.
See also• Exporting Hybrid Apps on page 309
• Importing Hybrid Apps on page 309
Enabling and Configuring the Notification MailboxConfigure the notification mailbox settings that allow Unwired Server to transform e-mailmessages into Hybrid App.
The notification mailbox configuration uses a listener to scan all incoming e-mail messagesdelivered to the particular inbox specified during configuration. When the listener identifies
Deploy
310 Sybase Unwired Platform

an e-mail message that matches the rules specified by the administrator, it sends the messageas a Hybrid App to the device that matches the rule.
Note: Saving changes to the notification mailbox configuration deletes all e-mail messagesfrom the account. Before proceeding with configuration changes, consult your e-mailadministrator if you want to back up the existing messages in the configured account.
1. In the left navigation pane, click Hybrid Apps.
2. In the right administration pane, click Notification Mailbox.
3. Select Enable.
4. Configure these properties:
• Protocol – choose between POP3 or IMAP, depending on the e-mail server used.• Use SSL – encrypt the connection between Unwired Server and the e-mail server in
your environment.• Server and Port – configure these connection properties so Unwired Server can
connect to the e-mail server in your environment. The defaults are localhost and port110 (unencrypted) or 995 (encrypted).
• User name and Password – configure these login properties so Unwired Server canlog in with a valid e-mail user identity.
• Truncation limit – specify the maximum number of characters taken from the bodytext of the original e-mail message, and downloaded to the client duringsynchronization. If the body exceeds this number of characters, the listener truncatesthe body text to the number of specified characters before distributing it. The default is5000 characters.
• Poll seconds – the number of seconds the listener sleeps between polls. During eachpoll, the listener checks the master inbox for new e-mail messages to process. Thedefault is 60 seconds.
5. If you have added at least one distribution rule, you can click Test to test yourconfiguration. If the test is successful, click Save.
See also• Hybrid App Packages on page 307
Configuring a Hybrid App PackageConfigure Hybrid App properties for you production environment.
PrerequisitesYou must deploy a package before you can configure properties for it.
1. Configuring General Hybrid App Properties
Deploy
Sybase Control Center for Sybase Unwired Platform 311

Configure general properties for a Hybrid App, including display name and icon. Alterthese settings to change development environment values to production environmentequivalents.
2. Configuring Matching Rules
Define the parameters and matching rules that determine whether an e-mail message is aregular e-mail, or a Hybrid App e-mail at runtime.
3. Configuring Context Variables for Hybrid App Packages
The administrator can change some of the values of a selected variable, should the design-time value need to change for a production environment.
4. Assigning and Unassigning a Hybrid App to an Application Connection
Assign a Hybrid App package to an application connection to make it available to a deviceuser. Unassign the Hybrid App package when it is no longer required.
See also• Deploying a Hybrid App Package with the Deploy Wizard on page 307
• Hybrid App Packages on page 307
Configuring General Hybrid App PropertiesConfigure general properties for a Hybrid App, including display name and icon. Alter thesesettings to change development environment values to production environment equivalents.
1. In the left navigation pane, click Hybrid Apps and select the Hybrid App for which toconfigure the properties.
2. In the right administration tab, click General.
Only an administrator can change the general properties. All others are configured by theHybrid App developer and cannot be modified.
• Display name – sets the name that appears for the Hybrid App package.• Display icon – select from the list of built-in icons. Any custom icons contained in the
Hybrid App package can be viewed but not selected.
Note: The Hybrid App package may contain custom icons to accommodate thedifferent image resolutions required by different devices. The use of custom icons isdetermined by individual devices. The built-in icon is only used if the device cannotdisplay any of the custom icons; for example, if the device does not support the iconimage type.
3. Click Lock/Unlock to lock or unlock a Hybrid App.
You cannot modify or deploy a locked Hybrid App.
4. Click Save.
Deploy
312 Sybase Unwired Platform

Configuring Matching RulesDefine the parameters and matching rules that determine whether an e-mail message is aregular e-mail, or a Hybrid App e-mail at runtime.
PrerequisitesThe developer must have created an object query and added an E-mail Subscription startingpoint when the Hybrid App was designed.
Task
When a multiplexer, which a user configures for a Notification mailbox, retrieves e-mailsfrom the e-mail server, the "Matching rules" are used to determine if an e-mail is a regular e-mail or a Hybrid App e-mail. If the "matching rules" match, then the e-mail is processed as aHybrid App e-mail. The e-mail is processed for "Extraction rules" (this processing is notvisible in SCC) to extract values from the e-mail. This determines further processing, such ascalling MBO object queries, and so forth. Then, a Hybrid App message is constructed with thenecessary data of the object query result, and sent to device(s) according to the "Distributionrules" (which determine the devices to which the message should be sent).
You can configure a matching rule at one of two levels:
• At the inbox level to route e-mails for all Hybrid Apps• At the package level to route e-mails only for a specific Hybrid App
1. In the left navigation pane, click Hybrid AppsHybrid AppName.
2. In the right administration pane, click the Matching Rules tab.
3. Configure matching rules by either:
• Clicking Add to create a new rule, or,• Selecting an existing rule name and clicking Properties.
4. In the Matching Rules dialog:
a) Select the field in the e-mail from which the parameter value is extracted. For example,if you choose From, the parameter value is extracted from the line of the e-mailmessage that indicates the name of the sender of the message.
You can also select one of the custom parameter values. When registering Hybrid Appdevices, an administrator can choose one of four device settings. The customer thenpopulates the settings with whatever values they like. Custom parameters can also beset programmatically through Web services.
Note: If you are editing properties of a rule created by a developer, you cannot modifythe matching rules.
b) Choose the type of search expression:
• Equals – the field must exactly match the text in the label.
Deploy
Sybase Control Center for Sybase Unwired Platform 313

• Begins with – the field must begin with the text in the label.• Ends with – the field must end with the text in the label.• Contains – the text in the label must exist somewhere in the field.• Regular expression – search for text that matches the pattern defined by the regular
expression. You can create an expression with Boolean operators, groups, orwildcards like "?" or "*". Unwired Platform uses the Boost regular expressionengine. See the Boost documentation on regular expression syntax at http://www.boost.org/doc/libs/1_40_0/libs/regex/doc/html/boost_regex/syntax.html.
c) Configure the text to search against, or define a regular expression in the Value field.
NextTest all new and changed rules to ensure they work as designed.
See also• Configuring Context Variables for Hybrid App Packages on page 314
Testing Configured Matching RulesTest a new or modified matching rule to ensure it is configured correctly.
1. In the Matching Rules tab for a selected Hybrid App package, click Test.
2. Populate the fields to create a sample e-mail message against which the rule configurationis tested. Review the results:
• If a pattern for a corresponding field in the rule matches, the word Pass appearsadjacent to the field.
• If a pattern for a corresponding field in the rule does not match, the word Fail appearsadjacent to the field.
• Otherwise, No Rule appears, indicating that no rule was created for thiscorresponding e-mail field.
Configuring Context Variables for Hybrid App PackagesThe administrator can change some of the values of a selected variable, should the design-timevalue need to change for a production environment.
Which values are configurable depends on whether the developer hard-coded a set of usercredentials or used a certificate.
1. In the left navigation pane, click Hybrid Apps<Hybrid App_Package>:<HybridApp_Version>.
2. In the right administration pane, click the Context Variables tab.
3. Select the context variable to configure, then click Modify.
Deploy
314 Sybase Unwired Platform
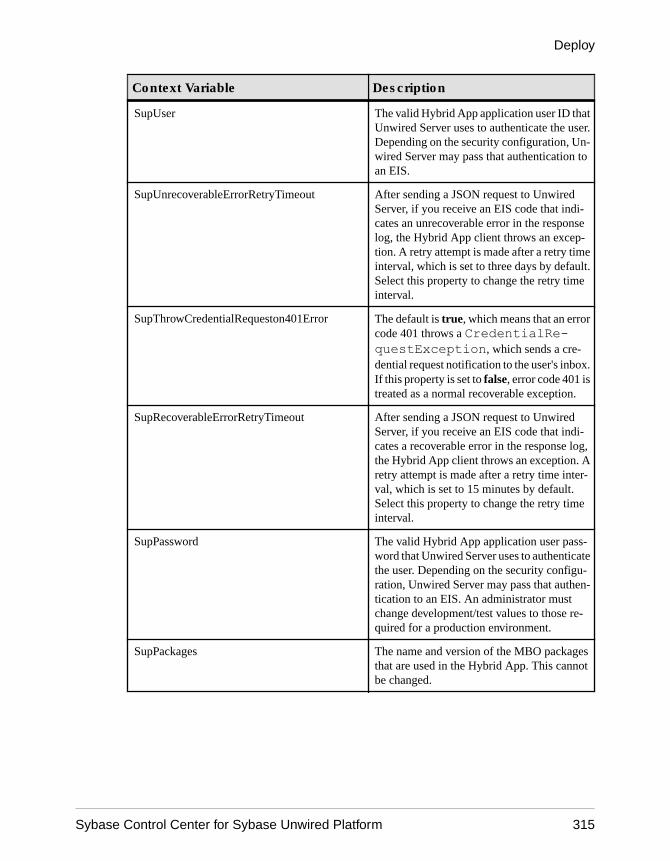
Context Variable Description
SupUser The valid Hybrid App application user ID thatUnwired Server uses to authenticate the user.Depending on the security configuration, Un-wired Server may pass that authentication toan EIS.
SupUnrecoverableErrorRetryTimeout After sending a JSON request to UnwiredServer, if you receive an EIS code that indi-cates an unrecoverable error in the responselog, the Hybrid App client throws an excep-tion. A retry attempt is made after a retry timeinterval, which is set to three days by default.Select this property to change the retry timeinterval.
SupThrowCredentialRequeston401Error The default is true, which means that an errorcode 401 throws a CredentialRe-questException, which sends a cre-dential request notification to the user's inbox.If this property is set to false, error code 401 istreated as a normal recoverable exception.
SupRecoverableErrorRetryTimeout After sending a JSON request to UnwiredServer, if you receive an EIS code that indi-cates a recoverable error in the response log,the Hybrid App client throws an exception. Aretry attempt is made after a retry time inter-val, which is set to 15 minutes by default.Select this property to change the retry timeinterval.
SupPassword The valid Hybrid App application user pass-word that Unwired Server uses to authenticatethe user. Depending on the security configu-ration, Unwired Server may pass that authen-tication to an EIS. An administrator mustchange development/test values to those re-quired for a production environment.
SupPackages The name and version of the MBO packagesthat are used in the Hybrid App. This cannotbe changed.
Deploy
Sybase Control Center for Sybase Unwired Platform 315
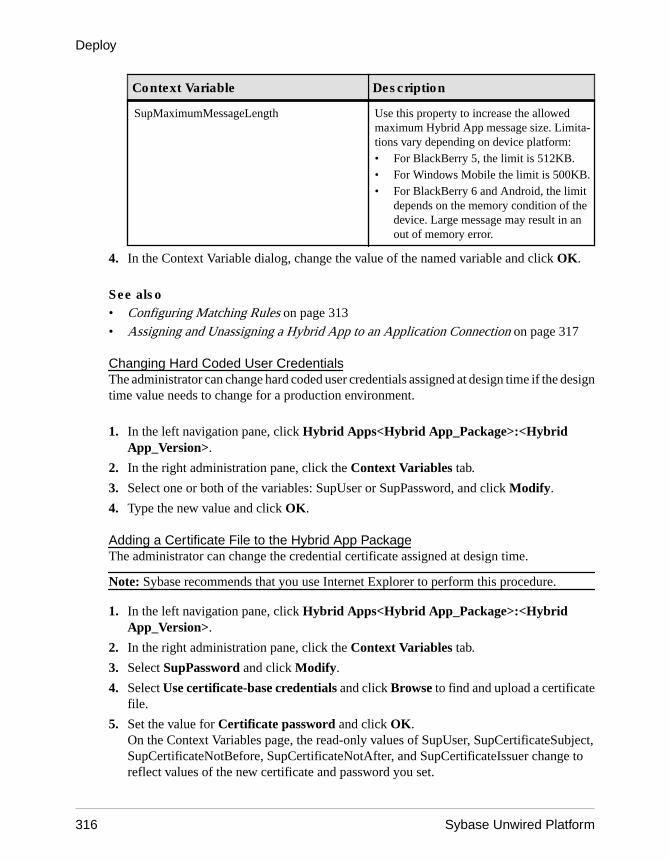
Context Variable Description
SupMaximumMessageLength Use this property to increase the allowedmaximum Hybrid App message size. Limita-tions vary depending on device platform:• For BlackBerry 5, the limit is 512KB.• For Windows Mobile the limit is 500KB.• For BlackBerry 6 and Android, the limit
depends on the memory condition of thedevice. Large message may result in anout of memory error.
4. In the Context Variable dialog, change the value of the named variable and click OK.
See also• Configuring Matching Rules on page 313
• Assigning and Unassigning a Hybrid App to an Application Connection on page 317
Changing Hard Coded User CredentialsThe administrator can change hard coded user credentials assigned at design time if the designtime value needs to change for a production environment.
1. In the left navigation pane, click Hybrid Apps<Hybrid App_Package>:<HybridApp_Version>.
2. In the right administration pane, click the Context Variables tab.
3. Select one or both of the variables: SupUser or SupPassword, and click Modify.
4. Type the new value and click OK.
Adding a Certificate File to the Hybrid App PackageThe administrator can change the credential certificate assigned at design time.
Note: Sybase recommends that you use Internet Explorer to perform this procedure.
1. In the left navigation pane, click Hybrid Apps<Hybrid App_Package>:<HybridApp_Version>.
2. In the right administration pane, click the Context Variables tab.
3. Select SupPassword and click Modify.
4. Select Use certificate-base credentials and click Browse to find and upload a certificatefile.
5. Set the value for Certificate password and click OK.On the Context Variables page, the read-only values of SupUser, SupCertificateSubject,SupCertificateNotBefore, SupCertificateNotAfter, and SupCertificateIssuer change toreflect values of the new certificate and password you set.
Deploy
316 Sybase Unwired Platform

Configuring Client Variables for Hybrid AppsClient variables are defined for Hybrid Apps by Hybrid App developers. Administrators canmodify client variable values or add new client variables for the production environment.
1. In the left navigation pane, click Hybrid Apps and select the Hybrid App to configure theproperties for.
2. In the right administration tab, click Client Variables.
3. Select the client variable that you want to configure and click Modify.
4. Enter the production value for the client variable.
If you want to push the modified value to deployed clients, click Send notification todeployed client.
Click OK.
To add a new client variable, click New and enter the name and value. If you want to pushthe new property to deployed clients, click Send notification to deployed client and clickOK.
To delete a client variable, select it and click Delete. If you want to push the deletion todeployed clients, click Send notification to deployed client and click Yes .
Assigning and Unassigning a Hybrid App to Application ConnectionTemplatesWhen you assign a Hybrid Apppackage to an application connection template, all applicationconnections that use that template are automatically assigned the Hybrid App package.
1. In the left navigation pane, expand Hybrid Apps and select a Hybrid App.
2. Click the Application Connection Templates. tab.
All application connection templates that the Hybrid App package is assigned to are listed.
3. Click Assign.
All available application connection templates are listed.
4. Select one or more application connection templates and click OK.
Note: The selected templates must have an application ID.
5. To unassign a Hybrid App from an application connection template, select the template inthe Application Connection Templates tab and click Unassign.
Assigning and Unassigning a Hybrid App to an Application ConnectionAssign a Hybrid App package to an application connection to make it available to a deviceuser. Unassign the Hybrid App package when it is no longer required.
You can also assign Hybrid App packages indirectly through the application connectiontemplate. The set of packages assigned to an application connection will be a combination ofpackages assigned indirectly through the application connection template and directlythrough the application connection.
Deploy
Sybase Control Center for Sybase Unwired Platform 317
1. In the left navigation pane of Sybase Control Center, click Hybrid Apps and select theHybrid App to assign.
2. In the right administration pane, click the Application Connections tab.
3. Select the application connection to assign a Hybrid App package to.
4. Click Assign.
5. List the activation users to assign the Hybrid App package to.
By default, there are no users listed. Search for users by selecting the user property youwant to search on, then selecting the string to match against. Click Go to display the users.
6. Select the user or users from the list that you want to assign the Hybrid App package to.
7. Click OK.
8. To set the Hybrid App package as the default application for an application connection,select the connection and click default.
Set a Hybrid App package as the default to run that application on the device as a single-purpose application. Single-purpose applications launch automatically when the useropens the Hybrid Web Container. This will be the only Hybrid App available on the device.You can select only one default per application connection.
9. To unassign a Hybrid App package, select the application connection and clickUnassign.
Note: If you unassign the Hybrid App package that is set as the default, you may want toselect a new default package.
10. Click OK.
See also• Configuring Context Variables for Hybrid App Packages on page 314
Setting and Unsetting a Default Hybrid AppSet a Hybrid App package as the default application for an application connection to run it onthe device as a single-purpose application. A single-purpose application launchesautomatically when the user opens the Hybrid Web Container and is the only Hybrid Appavailable on the device.
1. In the left navigation pane of Sybase Control Center, click Applications.
2. In the right administration pane, click the Application Connections tab.
3. Select the application connection to set the default for.
4. Click Hybrid Apps.
5. Select the Hybrid App package to set as the default and click Set default.
You can select only one default per application connection.
Deploy
318 Sybase Unwired Platform

To remove a Hybrid App package as the default, select the package and click Unsetdefault.
6. Click OK.
Checking Hybrid App Users and QueuesCheck Hybrid App application users and review pending activities for a Hybrid Appapplication.
1. In the left navigation pane, expand the Hybrid Apps folder and select the Hybrid App youwant to administer.
2. To check Hybrid App users:
a) In the right administration pane, select the Application Connections tab.b) Review data about Hybrid App device users:
• User – the name of the user that activates the device.• Application Connection ID – the unique identifier for a user application
connection.• Errors – the total number of errors on the device.• Transform Items – the total number of items in the transform queue. The transform
queue contains items that Unwired Server has transformed from e-mail messagesinto Hybrid App messages to be sent to clients.
• Response Items – the total number of items in the response queue. The responsequeue contains Hybrid App messages that are sent from the device to UnwiredServer.
• Transform Queue Status – the current status of the transform queue: active,awaiting credentials, or awaiting retry.
• Response Queue Status – the current status of the response queue: active, awaitingcredentials, or awaiting retry.
3. To view pending activities for a Hybrid App:
a) Select the Queue Items tab.b) Review data about pending Hybrid App activities:
• User – the name of the user that activates the device.• Queue Type – the type of Hybrid App queue: response or transform.• Application Connection ID – the unique identifier for a user application
connection.• Device Number – the unique identifier for a registered mobile device that is
generated and maintained by Unwired Server.• Queue ID – the unique identifier of the queued item.• State – the status of the Hybrid App queue: active, awaiting credentials, or awaiting
retry.• Creation Date – the date the queue item was created.
Deploy
Sybase Control Center for Sybase Unwired Platform 319

• Retry Date – the date that the processing of the queue item is scheduled to be retried(if applicable).
4. To manage the Hybrid App queue in the event of non-recoverable errors:
a) Select the Queue Items tab.b) Identify a Hybrid App queue item that requires you to unblock it or delete it.
Errors affecting Hybrid App queue items are either recoverable (where a retry isapplicable) or unrecoverable/unknown (where no automatic retry occurs, or there isvery long retry interval).
To recover from a long retry interval, an administrator can unblock a queue currently inretry state, so the next work schedule can pick up the blocked item immediately, insteadof waiting for the retry timeout.
c) Select one of more of the queue items from the same queue type (the queue type for allthe selected items must be either Transform or Retry).
d) Select one of the following actions:
• Delete – deletes the selected Hybrid App queue item(s).• Unblock – unblocks the selected Hybrid App queue item(s) that are currently in a
retry state.e) Click OK to confirm the action.
Deploy
320 Sybase Unwired Platform

Monitor
Monitor availability status, view system and performance statistics, and review system datathat allow administrators to diagnose the health and security of the runtime.
Monitored operations include security, replication-based synchronization, messaging-basedsynchronization, messaging queue, data change notification, device notification, package,user, and cache activity. These aspects of monitoring are important to ensuring that therequired data is collected.
The critical aspects of monitoring include:
1. Setting up a monitoring configuration. A monitoring configuration sets the serverbehavior for writing data to database, automatic purge, and data source where themonitoring data is stored.
A default configuration is created for you, however you will likely want to customize thisconfiguration for your environment. By default, monitoring data is flushed every 5minutes. In development and debugging scenarios, you may need to set the flush behaviorto be immediate. Set the Number of rows and Batch size properties to a low number. Youcan also disable flush, which results in immediately persisting changes to monitoringdatabase. If you are setting up immediate persistence in a production environment, youmay experience degraded performance. Use persistence with caution.
2. Creating a monitoring profile. A monitoring profile defines one or more domains andpackages that need to be monitored.
You can either use the default profile to capture monitoring data for all packages in alldomains or create specific profiles as required. Otherwise, disable the default profile ormodify it as needed.
3. Reviewing the captured data. An administrator can review monitoring data (current,historical, and performance statistics) from Sybase Control Center.
Use the monitoring tabs to filter the data by domain, package, and time range. You can alsoexport the data into a CSV or XML file and then use any available reporting or spreadsheettool to analyze the data.
Monitoring UsageMonitoring information reflects current and historical activity, and general performanceduring a specified time period.
Monitoring allows administrators to identify key areas of weakness or periods of high activityin the particular area they are monitoring. Access to this data helps administrators makedecisions about how to better configure the application environment to achieve a higher levelof performance.
Monitor
Sybase Control Center for Sybase Unwired Platform 321

The historical data is preserved in the monitor database. Performance data (KPIs forReplication, Messaging, Package Statistics, User Statistics, and Cache Statistics) for thespecified time period is calculated upon request using the historical data available for thatperiod. If monitoring data is purged for that time period, the performance data calculationswill not factor in that data. It is recommended to purge monitoring data after putting in placemechanisms to export the required historical and/or performance data as needed. By default,monitoring data is automatically purged after seven days.
Also note that the processing times are calculated based on the time the request (or message)arrives on the server, and the time it took to process the request (or message) on the server. Theclient-side time (request origin time, and time taken to deliver to the server) are not factoredinto that data.
See also• System Monitoring Overview on page 322• Monitoring Configuration on page 324• Monitoring Profiles on page 326• Monitoring Data on page 328
System Monitoring Overview(Not applicable to Online Data Proxy) The goal of monitoring is to provide a record ofactivities and performance statistics for various elements of the application. Monitoring is anongoing administration task.
Use monitoring information to identify errors in the system and resolve them appropriately.This data can also be shared by platform and domain administrators by exporting and savingthe data to a .CSV or .XML file.
The platform administrator uses Sybase Control Center to monitor various aspects of UnwiredPlatform. Monitoring information includes current activity, historical activity, and generalperformance during a specified time period. You can monitor these components:
• Security log• Replication synchronization• Messaging synchronization• System messaging queue status• Data change notifications• Device notifications (replication)• Package statistics (replication and messaging)• User-related activity• Cache activity
To enable monitoring, platform administrators must set up a monitoring database, configure amonitoring data source or create a new one, and set up monitoring database flush and purge
Monitor
322 Sybase Unwired Platform

options. By default the installer created a monitoring database, however you can use anotherone if you choose.
To control monitoring, platform administrators create monitoring profiles and configurations,which define the targets (domains and packages) to monitor for a configured length of time. Adefault monitoring profile is created for you by the installer. Monitoring data can be deleted bythe platform administrator as needed.
Table 20. System monitoring tasks
Task Frequency Accomplished by
Create and enable monitor-ing profiles
One-time initial configuration withinfrequent tuning as required
Sybase Control Center for Un-wired Platform with the Moni-toring node
Enable domain logging One-time setup with infrequent con-figuration changes, usually as issuesarise
Sybase Control Center for Un-wired Platform with the Do-mains > <DomainName> >Log node.
Review current/historical/performance metrics
Routine Sybase Control Center for Un-wired Platform with the Moni-toring node
Identify performance is-sues
Active Sybase Control Center for Un-wired Platform with the Moni-toring node
Monitor application anduser activity to check forirregularities
Active Sybase Control Center for Un-wired Platform with the Moni-toring node
Troubleshoot irregularities Infrequent Reviewing various platformlogs
Purge or export data On demand Sybase Control Center for Un-wired Platform with the Moni-toring node
See also• Monitoring Usage on page 321
• Monitoring Configuration on page 324
• Monitoring Profiles on page 326
• Monitoring Data on page 328
Monitor
Sybase Control Center for Sybase Unwired Platform 323

Monitoring ConfigurationThe monitoring configuration identifies the monitoring database endpoint and determineshow long data is stored in the database.
The configurable monitoring properties are:
• Auto-purge – configures an automatic purge of the monitoring database to occur on aregular basis.
• Flush threshold – determines how often monitoring data is flushed from the servermemory for storage in the monitoring database.
• Flush batch size – divides flushed data into smaller segments, rather than saving all datatogether according to the flush threshold parameters.
• Monitor database endpoint – sets the database to be used for storage of monitoring data.
See also• Monitoring Usage on page 321
• System Monitoring Overview on page 322
• Monitoring Profiles on page 326
• Monitoring Data on page 328
Configuring Monitoring Performance PropertiesConfigure auto-purge, flush threshold, and flush batch size settings to determine how longmonitoring data is retained, and set a monitoring database to configure where data is stored.
Prerequisites
Depending on the expected level of monitoring activity, ensure that the monitoring database isadequately prepared to store monitoring data.
Task
1. In the left navigation pane of Sybase Control Center, select Monitoring.
2. In the right administration pane, select the General tab.
3. Click Configuration.
4. Configure auto purge settings.
Auto purge clears obsolete data from the monitoring database once it reaches the specifiedthreshold.
a) Select Enable auto purge configuration to activate auto purge functionality.b) Enter the length of time (in days) to retain monitoring data before it is purged.
Monitor
324 Sybase Unwired Platform

5. Configure flush threshold settings.
The flush threshold indicates how often data is flushed from memory to the database. Thisallows you to specify the size of the data saved in memory before it is cleared. Alternately,if you do not enable a flush threshold, data is automatically written to the monitoringdatabase as it is captured.
a) Select Enable flush threshold configuration to activate flush threshold functionality.b) Select one of:
• Number of rows – monitoring data that surpasses the specified number of rows isflushed from memory. Enter the desired number of rows adjacent to Rows. Thedefault is 100.
• Time interval – monitoring data older than the specified time interval is flushedfrom memory. Enter the desired duration adjacent to Minutes. The default is 5.
• Either rows or time interval – monitoring data is flushed from memory accordingto whichever value is reached first: either the specified number of rows or thespecified time interval. Enter the desired rows and duration adjacent to Rows andMinutes, respectively.
6. If you enabled a flush threshold, enter a Flush batch row size by specifying the size ofeach batch of data sent to the monitoring database. The row size must be a positive integer.
The batch size divides flushed data into smaller segments, rather than saving all datatogether according to the flush threshold parameters. For example, if you set the flushthreshold to 100 rows and the flush batch row size to 50, once 100 rows are collected in themonitoring console, the save process executes twice; data is flushed into the database intwo batches of 50 rows. If the flush threshold is not enabled, the flush batch row size isimplicitly 1.
Note: By default, the monitoring database flushes data every 5 minutes. Alternatively, youcan flush data immediately by removing or decreasing the default values, but doing soimpacts performance and prevents you from using captured data.
7. Optional. To change the data source, select an available database from the Monitordatabase endpoint drop down list.
Available databases are those with a JDBC server connection type created in the "default"domain. To create a new monitor database, a platform administrator must set up a databaseby running the appropriate configuration scripts and creating a server connection for thedatabase in the default domain. The database server connection then appears as an optionin the Monitor Database Endpoint drop down list.
8. Click OK.
Monitor
Sybase Control Center for Sybase Unwired Platform 325

Monitoring ProfilesMonitoring profiles specify a monitoring schedule for a particular group of packages. Theseprofiles let administrators collect granular data on which to base domain maintenance andconfiguration decisions.
A default monitoring profile is automatically created in disabled state on Unwired Server.Administrators can enable or remove the default profile, and enable one or more newmonitoring profiles as required.
The same monitoring schedule can be applied to packages across different domains; similarly,you can select individual packages for a monitoring profile.
See also• Monitoring Usage on page 321
• System Monitoring Overview on page 322
• Monitoring Configuration on page 324
• Monitoring Data on page 328
Creating and Enabling a Monitoring ProfileSpecify a monitoring schedule for a group of packages.
PrerequisitesDepending on the expected level of monitoring activity, ensure that the monitoring database isadequately prepared to store monitoring data.
Task
1. In the left navigation pane, select Monitoring.
2. In the right administration pane, select the General tab.
3. Click New to create a monitoring profile.
4. Enter a name for the new profile.
5. Select the Domains and Packages tab and choose packages to be monitored according tothese options:
• Monitor all domains and packages – select All Domains and Packages.• Monitor all packages from one or more domains – select a domain, then click Select
All Packages. Perform this step for each domain you want to monitor.• Monitor specific packages from one or more domains – select a domain, then select the
particular packages you want to monitor from that domain. Perform this step for eachdomain you want to monitor.
Monitor
326 Sybase Unwired Platform

6. Select View my selections to view the packages you selected for the monitoring profile.Unselect this option to return to the package selection table.
7. Select Enable after creation to enable monitoring for the selected packages immediatelyafter you create the profile. By default, this option is selected. Unselect this option toenable the monitoring profile later.
8. On the Schedule tab, select a schedule to specify when monitoring takes place:
• Always On – this schedule requires no settings. Package activity is continuallymonitored.
• Run Once – specify a length of time during which monitoring occurs, in either minutesor hours. Package activity is monitored for the duration specified for one time only.
• Custom – specify start and end dates, start and end times, and days of the week.Package activity is monitored according to the time frame specified. See Setting aCustom Monitoring Schedule.
9. Click OK.A status message appears in the administration pane indicating the success or failure ofprofile creation. If successful, the profile appears in the monitoring profiles table.
10. To enable a profile that you did not enable during creation, select the monitoring profileand click Enable.
Setting a Custom Monitoring ScheduleCustomize the monitoring schedule for packages within a monitoring profile. Setting acustom schedule is the most flexible option; monitoring information is provided according tothe time frame you specify.
PrerequisitesBegin creating a monitoring profile in the New Monitor Profile dialog.
Task
1. In the New Monitor Profile dialog, select the Schedule tab.
2. Select Custom as the monitoring schedule criteria.
3. To set a range to control which days the custom schedule runs, configure a start date andtime, end date and time, or day of week (if applicable).
• Select Start Date to set a date for when monitoring of package activity begins. To bemore specific, you can also enter a Start Time. In this case, monitoring cannot beginuntil a given time on a given day has been reached.
• Select End Date to set a date that ends the monitoring of package activity. To be morespecific, you can also enter an End Time.
• Select the days of the week that package monitoring runs. This means that for the daysyou select, the schedule runs every week on the day or days you specify.
Monitor
Sybase Control Center for Sybase Unwired Platform 327

If you do not indicate a time frame, Unwired Server uses the default custom schedule,which is equivalent to Always On monitoring.
4. Click OK.
Monitoring DataMonitoring data is aggregated in the Monitoring node of Unwired Server and organized byactivity, including security, replication-based synchronization, messaging-basedsynchronization, messaging queue, data change notifications, device notifications, packages,users, and cache. The data for each activity is further broken down into current, historical, andperformance-related information. View data for each monitored activity to track theperformance and health of the system.
You can selectively view data accrued during a specific time period to see a snapshot of systemperformance during specific periods. The export function allows you to save data to a fileoutside of Sybase Control Center for reference or logging purposes.
See also• Monitoring Usage on page 321
• System Monitoring Overview on page 322
• Monitoring Configuration on page 324
• Monitoring Profiles on page 326
Reviewing System Monitoring DataReview data for monitored activities. The monitoring data is retrieved according to thespecified time range. Key Performance Indicators (KPIs) are also calculated for the specifiedtime range.
1. In the left navigation pane, select Monitoring.
2. In the right administration pane, select one of the following tabs according to the type ofmonitoring data you want to view:
• Security Log• Replication• Messaging• Queue• Data Change Notifications• Device Notifications• Package Statistics• User Statistics• Cache Statistics
Monitor
328 Sybase Unwired Platform

See also• Purging Monitoring Data on page 329
• Exporting Monitoring Data on page 329
• Searching Monitoring Data on page 330
• Monitoring Data Categories on page 331
Purging Monitoring DataClear old data from the monitoring database.
Using the Purge function in Sybase Control Center allows you to perform an ad hoc purge ofmonitoring data.
1. In the left navigation pane, select Monitoring.
2. In the right administration pane, select the General tab.
3. Click Purge.
4. Indicate the time period for which you want to delete data by specifying a Start Date,Start Time, End Date, and End Time.
All monitoring data collected from the start time and date to the end time and date isdeleted from the database. If you do not specify a start date, all data acquired prior to theend date and time is purged. Similarly, if you do not specify an end date, all data collectedfrom the start date until the present time is purged. To save the data to file before purging it,see Exporting Monitoring Data.
5. Click OK.
A status message appears in the right administration pane indicating that the data purge wassuccessfully completed.
See also• Reviewing System Monitoring Data on page 328
• Exporting Monitoring Data on page 329
• Searching Monitoring Data on page 330
• Monitoring Data Categories on page 331
Exporting Monitoring DataSave a segment of monitoring data to a location outside of the monitoring database. Exportdata to back up information, particularly before purging it from the database, or to performcloser analysis of the data in a spreadsheet application.
This option is especially useful when you need to share monitoring data with otheradministrators and tenants. Since this task can be time-consuming, depending upon the size ofthe data being exported, Sybase recommends that you export the data in segments or performthe export at a time when Sybase Control Center is not in use.
Monitor
Sybase Control Center for Sybase Unwired Platform 329

Note: The time taken to export the requested data is dependent on the time range specified, andthe amount of data in the monitoring database. If the export is taking too long, or the userinterface is blocked for too long, another option is to export the monitoring data using themanagement APIs provided for exporting monitoring data. Please see Developer Guide:Unwired Server Runtime > Unwired Server Management API for further details.
1. In the left navigation pane, select Monitoring.
2. In the right administration pane, select the tab corresponding to the monitoring data youwant to view.
3. Perform a search using the appropriate criteria to obtain the desired monitoring data.
4. Click Export.
5. Select a file type for the exported data (CSV or XML), and click Next.
6. Click Finish.
7. In the file browser dialog, select a save location and enter a unique file name.
8. Click OK.All monitoring data retrieved by the search is saved to the file you specify in step 7.
See also• Reviewing System Monitoring Data on page 328
• Purging Monitoring Data on page 329
• Searching Monitoring Data on page 330
• Monitoring Data Categories on page 331
Searching Monitoring DataFilter monitoring data according to a specified date and time range.
Filter options vary depending upon the type of monitoring data you search.
1. In the left navigation pane, select Monitoring.
2. In the right administration pane, select the tab corresponding to the monitoring data youwant to view.
3. In the Search pane, indicate the time period for which you want to view data by specifyinga date range to search within (that is, Start Date, Start Time, End Date, and End Time) .
Note: You do not need to specify a time period if you are performing a search on Currentdate.
4. Filter the system components to include in the search.
a) Select Show filter.b) Specify the components to include in your search.
If a domain or package does not appear in the search list (for example, if it has beendeleted), enter the name and click Add.
Monitor
330 Sybase Unwired Platform

5. From the Sort By drop-down list, select a category by which to sort search results.
Note: This field is disabled for some categories.
6. To view the domains and packages you included in the search, select View myselections.
7. Click Retrieve.
Monitoring data for the time period specified appears in the administration console.
See also• Reviewing System Monitoring Data on page 328
• Purging Monitoring Data on page 329
• Exporting Monitoring Data on page 329
• Monitoring Data Categories on page 331
Viewing Package-Level Cache StatisticsUse the package tree to view cache statistics at the package, cache group, or mobile businessobject (MBO) level.
The package tree allows for a granular view of data in all cache statistic categories except fordomain-level data. Domain-level data instead uses the Filter by Domain search functionality.
1. In the left navigation pane, select Monitoring.
2. In the right administration pane, select Cache Statistics.
3. From the cache feature drop-down list, select one of the following, depending on the typeof data and level of granularity you require:
• Domain level• Package level• Package level cache group• Package level MBO
4. Select Show Package Tree.The tree view appears on the left side of the right administration pane.
5. In the tree view, click the package, cache group, or MBO for which you want to viewmonitoring data.The monitoring data displays in the monitoring console. You can further filter data byspecifying a time period in the search panel (for package-level cache performance andpackage-level MBO status only).
Monitoring Data CategoriesMonitoring data is organized according to object type, allowing administrators to performfocused data analysis on specific activities and Unwired Platform components. Current,
Monitor
Sybase Control Center for Sybase Unwired Platform 331

historical, and performance-based statistics facilitate user support, troubleshooting, andperformance tracking for individual application environments.
The replication and messaging categories are the primary sources of data relating toapplication environment performance. The remaining tabs present detailed monitoring datathat focuses on various aspects of replication-based applications, messaging-basedapplications, or both.
See also• Reviewing System Monitoring Data on page 328• Purging Monitoring Data on page 329• Exporting Monitoring Data on page 329• Searching Monitoring Data on page 330
Security Log StatisticsThe security log reflects the authentication history of users either across the cluster, or filteredaccording to domain, during a specified time period. These statistics allow you to diagnoseand troubleshoot connection or authentication problems on a per-user basis. Security logmonitoring is always enabled.
User security data falls into these categories:
Category Description
User The user name
Security Configuration The security configuration to which the device user belongs
Time The time at which the authentication request took place
Result The outcome of the authentication request: success or failure
Application Connection ID The application connection ID associated with the user
Package The package the user was attempting to access
Domain The domain the user was attempting to access
See also• Replication Statistics on page 333• Messaging Statistics on page 337• Messaging Queue Statistics on page 341• Data Change Notification Statistics on page 342• Device Notification Statistics on page 344• Package Statistics on page 346• User Statistics on page 348
Monitor
332 Sybase Unwired Platform

• Cache Statistics on page 350
Replication StatisticsReplication statistics reflect replication synchronization activity for monitored packages.Current statistics monitor the progress of real-time synchronizations, while historicalstatistics present data from completed synchronizations on a per-package basis. Performancemonitoring uses key performance indicators to produce data about synchronization efficiency.
Through statistics that report on the duration and scope of synchronizations, as well as anyerrors experienced during synchronization, replication monitoring allows you to identify therate at which synchronizations happen during specified time periods, which users synchronizedata, and which mobile business objects are affected.
See also• Security Log Statistics on page 332
• Messaging Statistics on page 337
• Messaging Queue Statistics on page 341
• Data Change Notification Statistics on page 342
• Device Notification Statistics on page 344
• Package Statistics on page 346
• User Statistics on page 348
• Cache Statistics on page 350
Current Replication StatisticsCurrent statistics for replication synchronization provide real-time information about in-progress synchronizations.
Unwired Server monitors replication requests using these statistical categories:
Category Description
Application ID The ID associated with the application.
Package The package name.
Phase The current synchronization activity: upload or download. Duringthe upload phase, a client initiates operation replays to executemobile business object (MBO) operations on the back-end system.During the download phase, a client synchronizes with UnwiredServer to receive the latest changes to an MBO from the back-endsystem.
Entity During the download phase, the name of the MBO with which theclient is synchronizing. During the upload phase, the name of theoperation that the client is performing.
Monitor
Sybase Control Center for Sybase Unwired Platform 333
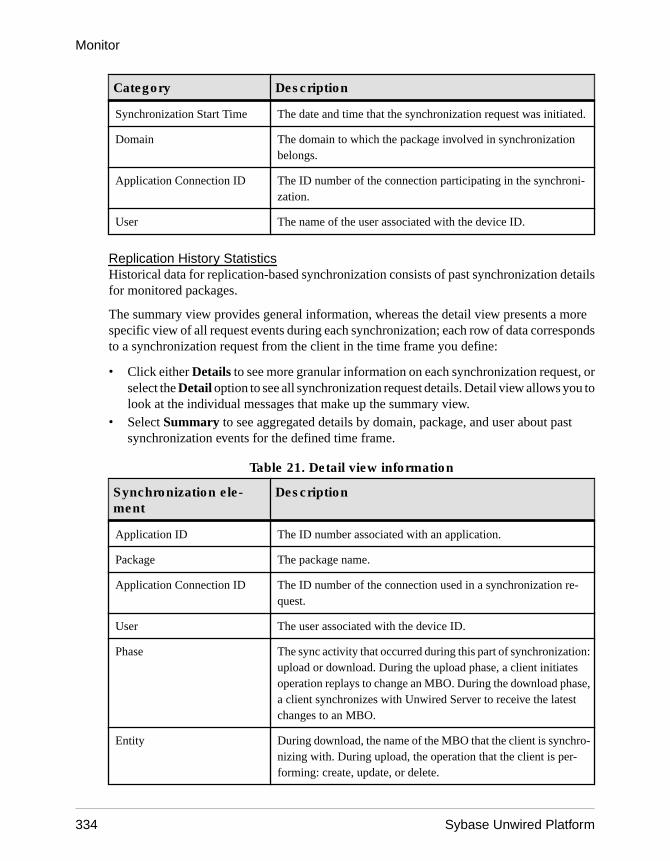
Category Description
Synchronization Start Time The date and time that the synchronization request was initiated.
Domain The domain to which the package involved in synchronizationbelongs.
Application Connection ID The ID number of the connection participating in the synchroni-zation.
User The name of the user associated with the device ID.
Replication History StatisticsHistorical data for replication-based synchronization consists of past synchronization detailsfor monitored packages.
The summary view provides general information, whereas the detail view presents a morespecific view of all request events during each synchronization; each row of data correspondsto a synchronization request from the client in the time frame you define:
• Click either Details to see more granular information on each synchronization request, orselect the Detail option to see all synchronization request details. Detail view allows you tolook at the individual messages that make up the summary view.
• Select Summary to see aggregated details by domain, package, and user about pastsynchronization events for the defined time frame.
Table 21. Detail view information
Synchronization ele-ment
Description
Application ID The ID number associated with an application.
Package The package name.
Application Connection ID The ID number of the connection used in a synchronization re-quest.
User The user associated with the device ID.
Phase The sync activity that occurred during this part of synchronization:upload or download. During the upload phase, a client initiatesoperation replays to change an MBO. During the download phase,a client synchronizes with Unwired Server to receive the latestchanges to an MBO.
Entity During download, the name of the MBO that the client is synchro-nizing with. During upload, the operation that the client is per-forming: create, update, or delete.
Monitor
334 Sybase Unwired Platform

Synchronization ele-ment
Description
Total Rows Sent The total number of rows sent during package synchronization.This data type is not supported at the MBO level.
Bytes Transferred The amount of data transferred during the synchronization request.
Start Time The date and time that the synchronization request was initiated.
Finish Time The date and time that this part of synchronization completed.
Error The incidence of errors during this request: true or false.
Domain The domain to which the package involved in synchronizationbelongs.
Table 22. Summary view information
Category Description
Application ID The ID number associated with an application.
User The name of the user associated with the device ID.
Package The package name.
Total Rows Sent The total number of rows sent during package synchronization.
Total Operation Replays The total number of operation replays performed by clients duringsynchronization.
Total Bytes Sent The total amount of data (in bytes) downloaded by clients fromUnwired Server during synchronization.
Total Bytes Received The total amount of data (in bytes) uploaded to Unwired Server byclients during synchronization.
Start Time The date and time that the synchronization request was initiated.
Total Synchronization Time The amount of time taken to complete the synchronization.
Total Errors The total number of errors that occurred for the package duringsynchronization.
Domain The domain to which the package involved in synchronizationbelongs.
Monitor
Sybase Control Center for Sybase Unwired Platform 335

Replication Performance StatisticsReplication performance statistics consist of key performance indicators (KPIs) that reflectthe overall functioning of the application environment.
Performance monitoring highlights key totals and identifies average, minimum, andmaximum values for primary activities. These calculations are dynamic, and are based on thedata currently available in monitoring database for the specified time period.
All values in this table (totals, averages, maximums, minimums) apply to the specific timeperiod you indicate:
KPI Description
Total Distinct Package Syn-chronization
The total number of packages subject to synchronization.
Total Distinct Users The total number of users who initiated synchronization requests.This value comprises only individual users, and does not countmultiple synchronizations requested by the same user.
Average/Minimum/MaximumSync Time
The average, minimum, or maximum amount of time UnwiredServer took to finish a complete synchronization.
Time at Minimum/MaximumSync Time
The time of day at which the shortest or longest synchronizationcompleted.
Package with Minimum/Maxi-mum Synchronization Time
The name of the package and associated MBO with the shortest orlongest synchronization time.
Average/Minimum/MaximumMBO Rows Per Synchroniza-tion
The average, minimum, or maximum number of MBO rows of datathat are downloaded when synchronization completes.
Average/Minimum/MaximumOperation Replays per Sync(records received)
The average, least, or greatest number of operation replays persynchronization received by Unwired Server from a client.
Total Bytes Sent The total number of bytes downloaded by clients from UnwiredServer.
Total Bytes Received The total number of bytes uploaded from clients to Unwired Server.
Total Operation Replays The total number of operation replays performed on the EIS.
Total Errors The total number of errors that took place across all synchroniza-tions.
Average/Minimum/MaximumConcurrent Users
The average, least, or greatest number of users involved in con-current synchronizations.
Monitor
336 Sybase Unwired Platform

KPI Description
Time at Minimum/MaximumConcurrent Users
The time at which the least or greatest number of users were in-volved in concurrent synchronizations.
Messaging StatisticsMessaging statistics report on messaging synchronization activity for monitored packages.
• Current monitoring data tracks the progress of messages from device users presentlyperforming operation replays or synchronizing MBOs.
• Historical data reveals statistics indicating the efficiency of completed transactions.• Performance monitoring provides an overall view of messaging payload activity intended
to highlight areas of strength and weakness in the application environment.
Messaging historical data captures messages such as login, subscribe, import, suspend,resume and so on. The Import type message is a data payload message from server to client(outbound messages), while rest of the messages (login, subscribe, replay, suspend, resume)are sent from the client to server (inbound messages).
See also• Security Log Statistics on page 332
• Replication Statistics on page 333
• Messaging Queue Statistics on page 341
• Data Change Notification Statistics on page 342
• Device Notification Statistics on page 344
• Package Statistics on page 346
• User Statistics on page 348
• Cache Statistics on page 350
Current Messaging StatisticsCurrent statistics for messaging synchronization provide real-time information about in-progress synchronizations. Because messaging synchronizations progress rapidly, there istypically little pending messaging data available at any given time.
Unwired Server monitors messagin requests using these categories:
Category Description
Application ID The ID associated with the application.
Package The package name.
Message Type The type of message sent by the client to Unwired Server, indicat-ing the current sync activity; for example, import, replay, sub-scribe, suspend, resume, and so on.
Monitor
Sybase Control Center for Sybase Unwired Platform 337

Category Description
Entity During the import process, the name of the mobile business object(MBO) with which the client is synchronizing. During replay, theoperation that the client is performing. For all other message types,the cell is blank.
Start Time The date and time that the initial message requesting synchroni-zation was sent by the client.
Domain The domain to which the package involved in synchronizationbelongs.
Application Connection ID The ID number of the application participating in the synchroni-zation.
User The name of the user associated with the device ID.
Messaging History StatisticsHistorical data for messaging synchronization consists of past synchronization details formonitored packages.
The summary view provides general information, whereas the detail view presents a morespecific view of all request events during each synchronization; each row of data correspondsto a synchronization request from the client in the time frame you define:
• Click either Details to see more granular information on each synchronization request, orselect the Detail option to see all synchronization request details. Detail view allows you tolook at the individual messages that make up the summary view.
• Select Summary to see aggregated details by domain, package, and user about pastsynchronization events for the defined time frame.
Table 23. Detail view information
Data type Description
Application ID The ID number associated with an application.
Package The package name.
Application Connection ID The ID number of the connection that participated in the synchro-nization request.
User The name of the user associated with the device ID.
Message Type The type of message sent by the client to Unwired Server, indicat-ing the sync activity; for example, import, replay, subscribe, sus-pend, resume, and so on.
Monitor
338 Sybase Unwired Platform
Data type Description
Entity During the import process, the name of the mobile business object(MBO) that the client is synchronizing with. During replay, theoperation that the client is performing. For all other message types,the cell is blank.
Payload Size The size of the message (in bytes).
Start Time The date and time that the message for this sync request is received.
Finish Time The date and time that the message for this sync request is pro-cessed.
Processing Time The total amount of time between the start time and the finish time.
Error The incidence of errors during this request; either true or false.
Domain The domain to which the package involved in synchronizationbelongs.
Table 24. Summary view information
Category Description
Application ID The ID number associated with an application.
User The name of the user associated with the device ID
Package The package name
Total Messages Sent The total number of messages sent by Unwired Server to clientsduring synchronization
Total Messages Received The total number of messages received by Unwired Server fromclients during synchronization
Total Payload Size Sent The total amount of data (in bytes) downloaded by clients fromUnwired Server during synchronization
Total Payload Size Received The total amount of data (in bytes) uploaded to Unwired Server byclients during synchronization
Total Operation Replays The total number of operation replays performed by clients duringsynchronization
Last Time In The date and time that the last inbound request was received
Last Time Out The date and time that the last outbound response was sent
Monitor
Sybase Control Center for Sybase Unwired Platform 339

Category Description
Subscription Commands Count The total number of subscription commands sent during synchro-nization; for example, subscribe, recover, suspend, and so on
Total Errors The number of errors that occurred for the package during syn-chronization
Domain The domain to which the package involved in synchronizationbelongs
Messaging Performance StatisticsMessaging performance statistics consist of key performance indicators (KPIs) that reflect theoverall functioning of the application environment.
Performance monitoring highlights key totals and identifies average, minimum, andmaximum values for primary activities. These calculations are dynamic, and are based on thedata currently available in monitoring database for the specified time period.
All values in this table (totals, averages, maximums, minimums) apply to the specific timeperiod you indicate:
KPI Description
Total Messages The total number of messages sent between the server and clientsduring synchronization.
Total Distinct Devices The total number of devices involved in synchronization. Thistotal includes the same user multiple times if he or she has multipledevices. The value comprises individual devices, and does notcount multiple synchronizations requested by the same device.
Total Distinct Users The total number of users who initiated synchronization requests.This value comprises individual users, and does not count multiplesynchronizations requested by the same user if he or she usesmultiple devices.
Average/Minimum/MaximumConcurrent Users
The average, minimum, or maximum number of users involved insimultaneous synchronizations.
Time at Minimum/MaximumConcurrent Users
The time at which the greatest or least number of users wereinvolved in concurrent synchronizations.
Average/Minimum/MaximumProcessing Time
The average, minimum, or maximum amount of time UnwiredServer took to respond to a sync request message.
Time at Minimum/MaximumMessage Processing Time
The time of day at which the shortest or longest message pro-cessing event completed.
Monitor
340 Sybase Unwired Platform

KPI Description
MBO for Maximum/MinimumMessage Processing Time
The name of the package and associated mobile business object(MBO) with the shortest or longest message processing time.
Average/Minimum/MaximumMessage Size
The average, smallest, or largest message sent during synchroni-zation.
Total Inbound Messages The total number of messages sent from clients to Unwired Server.
Total Outbound Messages The total number of messages sent from Unwired Server to clients.
Total Operation Replays The total number of operation replays performed by clients onMBOs.
Total Errors The total number of errors that took place across all synchroni-zations.
Average/Minimum/MaximumConcurrent Users
The average, least, or greatest number of users involved in con-current synchronizations.
Note: Reporting of KPIs related to concurrent users is based on a background task that takes aperiodic snapshot of the messaging activities. Depending on the nature and length of theprocessing of a request, the background snapshot may not always see all the requests.
Messaging Queue StatisticsMessaging queue statistics reflect the status of various messaging queues. The data does notreveal any application-specific information, but provides a historical view of messagingactivities that communicates the efficiency of messaging-based synchronization, as well asthe demands of device client users on the system.
Based on this data, administrators can calculate the appropriate inbound and outboundmessage queue counts for the system (configurable in the Server Configuration node ofSybase Control Center).
See also• Security Log Statistics on page 332
• Replication Statistics on page 333
• Messaging Statistics on page 337
• Data Change Notification Statistics on page 342
• Device Notification Statistics on page 344
• Package Statistics on page 346
• User Statistics on page 348
• Cache Statistics on page 350
Monitor
Sybase Control Center for Sybase Unwired Platform 341

Messaging Queue StatusMessaging queue status data provides historical information about the processing ofmessaging-based synchronization requests by Unwired Server. The data indicates areas ofhigh load and times of greatest activity. This data can help administrators decide how to handlequeue congestion and other performance issues.
These key indicators monitor messaging queue status:
Statistic Description
Name The name of the messaging queue.
Current Queued Items The total number of pending messages waiting to be processed byUnwired Server.
Average/Minimum/MaximumQueue Depth
The average, minimum, or maximum number of queued messages.For minimum and maximum queue depth, this value is calculatedfrom the last server restart.
Time at Minimum/MaximumQueue Depth
The time and date at which the queue reached its minimum ormaximum depth.
Type The direction of message flow: inbound or outbound.
Total Messages The total number of messages in the queue at one point since thelast server reboot.
Bytes Received The total number of bytes processed by the queue since the lastserver reboot.
Last Activity Time The time at which the most recent message was added to the queuesince the last server reboot.
Data Change Notification StatisticsData change notification (DCN) statistics monitor notifications that are received by UnwiredServer from the enterprise information server. Specifically, DCN monitoring reports whichpackages and sync groups are affected by notifications, and how quickly these are processedby the server.
Monitoring DCN statistics allows you to troubleshoot and diagnose performance issues if, forexample, the cache is not being updated quickly enough. These statistics help to identifywhich packages took longest to process data changes, as well as times of peak performance orstrain on the system.
See also• Security Log Statistics on page 332
• Replication Statistics on page 333
Monitor
342 Sybase Unwired Platform

• Messaging Statistics on page 337
• Messaging Queue Statistics on page 341
• Device Notification Statistics on page 344
• Package Statistics on page 346
• User Statistics on page 348
• Cache Statistics on page 350
Data Change Notification History StatisticsHistorical information for data change notifications (DCNs) consists of past notificationdetails for monitored packages. Detailed data provides specific information on pastnotification activity for packages, and identifies which server data was affected.
Details about past notification events are organized into these categories:
Category Description
Domain The domain to which the package affected by the DCN belongs.
Package The name of the package containing data changes.
MBO The name of the MBO to which the notification applied.
Notification Time The date and time that Unwired Server received the DCN.
Processing Time The time that Unwired Server used to process the DCN.
Data Change Notification Performance StatisticsData change notification (DCN) performance statistics consist of key performance indicatorsthat reflect the efficiency of notification processing by Unwired Server.
Performance monitoring highlights key totals and identifies average, minimum, andmaximum values for primary activities. These calculations are dynamic, and are based on thedata currently available in monitoring database for the specified time period.
All values in this table (totals, averages, maximums, minimums) apply to the specific timeperiod you indicate:
Key performance indica-tor
Description
Total Notifications The total number of notifications sent by the enterprise informationsystem to Unwired Server.
Average/Minimum/MaximumProcessing Time
The average, minimum, or maximum amount of time UnwiredServer took to process a DCN.
Time at Minimum/MaximumMessage Processing Time
The time of day at which the shortest or longest DCN processingevent completed.
Monitor
Sybase Control Center for Sybase Unwired Platform 343

Key performance indica-tor
Description
Time of Last Notification Re-ceived
The time at which the most recent DCN was received by UnwiredServer.
MBO with Minimum/Maxi-mum Notification ProcessingTime
The name of the package and associated mobile business object(MBO) with the shortest or longest notification processing time.
Device Notification StatisticsDevice notification statistics provide data about the occurrence and frequency of notificationssent from Unwired Server to replication synchronization devices.
Historical device notification monitoring reports on the packages, synchronization groups,and devices affected by replication payload synchronization requests in a given time frame.Performance-related device notification data provides a general indication of the efficiency ofnotification processing and the total demand of synchronization requests on the system.
See also• Security Log Statistics on page 332
• Replication Statistics on page 333
• Messaging Statistics on page 337
• Messaging Queue Statistics on page 341
• Data Change Notification Statistics on page 342
• Package Statistics on page 346
• User Statistics on page 348
• Cache Statistics on page 350
Device Notification History StatisticsHistorical information for device notifications provides specific information on past devicenotifications, indicating which packages, synchronization groups, and devices were involvedin synchronization requests.
Details about past device notification events fall into these categories:
Category Description
Application ID The ID associated with the application.
Domain The domain to which the package affected by the device notifica-tion belongs.
Package The name of the package containing data changes.
Monitor
344 Sybase Unwired Platform

Category Description
Synchronization group The synchronization group that the package belongs to.
Application Connection ID The ID number of the connection participating in the synchroni-zation request.
Generation time The date and time that Unwired Server generated the device noti-fication.
User The name of the user associated with the device ID.
Device Notification Performance StatisticsDevice notification performance statistics provide a general indication of the efficiency ofnotification processing and the total demand of synchronization requests on the system.
Performance monitoring highlights key totals and identifies average, minimum, andmaximum values for primary activities. These calculations are dynamic, and are based on thedata currently available in monitoring database for the specified time period.
All values in this table (totals, averages, maximums, minimums) apply to the specific timeperiod you indicate:
KPI Description
Synchronization Group forMaximum Notifications
The synchronization group for which the maximum number ofnotifications were sent.
Package for Maximum Notifi-cations
The package for which the greatest number of device notificationswere sent.
Total Notifications The total number of device notifications sent from Unwired Serverto devices.
Total Distinct Users The total number of users that received device notifications. Thisvalue comprises only individual users, and does not count multiplesynchronizations requested by the same user.
Total Distinct Devices The total number of devices that received device notifications. Thisis distinct from Total Distinct Users, because a single user namecan be associated with multiple devices.
Enabled Subscriptions The total number of replication subscriptions for which notifica-tions are generated.
Time at Last Notification The time at which the last device notification was sent by UnwiredServer.
Monitor
Sybase Control Center for Sybase Unwired Platform 345
KPI Description
Outstanding Subscriptions The total number of replication subscriptions, both enabled anddisabled.
Package StatisticsPackage statistics reflect response times for replication-based and messaging-basedsynchronization packages.
This type of monitoring uses key performance indicators to provide data on the efficiency ofresponse by Unwired Server to synchronization requests. These calculations are dynamic, andare based on the data currently available in monitoring database for the specified time period.
See also• Security Log Statistics on page 332
• Replication Statistics on page 333
• Messaging Statistics on page 337
• Messaging Queue Statistics on page 341
• Data Change Notification Statistics on page 342
• Device Notification Statistics on page 344
• User Statistics on page 348
• Cache Statistics on page 350
Replication Package StatisticsReplication package statistics consist of key performance indicators (KPIs) that reflect theoverall function of the application environment at the cluster or domain level. The statisticshighlight key totals and identify average, minimum, and maximum values for primaryactivities.
These key indicators monitor replication packages:
Note: These KPIs are not applicable at the MBO level.
• Total Bytes Received• Total Bytes Sent• Total Operation Replays
Monitor
346 Sybase Unwired Platform
KPI Description
Total Devices The total number of devices involved in synchronization.This total includes the same user multiple times if he or shehas multiple devices. The value comprises individual devi-ces, and does not count multiple synchronizations requestedby the same device.
Total Rows Sent The total number of rows sent during package synchroniza-tion.
Total Rows Received The total number of rows received during package synchro-nization.
Total Errors The total number of errors that took place across all syn-chronizations.
Total Bytes Received The total number of bytes uploaded from clients to UnwiredServer.
Total Bytes Sent The total number of bytes downloaded by clients from Un-wired Server.
Average/Minimum/Maximum Syn-chronization Time
The average, minimum, or maximum amount of time Un-wired Server took to finish a complete synchronization.
Time at Minimum/Maximum Syn-chronization Time
The time at which the shortest or longest synchronizationcompleted.
Total Synchronization Requests The total number of sync requests initiated by a client.
Total Operation Replays The total number of operation replays performed by clientson MBOs.
Messaging Package StatisticsMessaging package statistics consist of key performance indicators (KPIs) that reflect theoverall function of the application environment at the cluster or domain level. The statisticshighlight key totals and identify average, minimum, and maximum values for primaryactivities.
Note: These KPIs are not applicable at the MBO level:
• Total Subscription Commands• Total Devices
These key indicators monitor messaging packages:
Monitor
Sybase Control Center for Sybase Unwired Platform 347

KPI Description
Total Subscription Commands The total number of subscription commands sent from clients to theserver.
Total Devices The total number of devices involved in synchronization. This totalincludes the same user multiple times if he or she has multipledevices. The value comprises individual devices, and does notcount multiple synchronizations requested by the same device.
Average/Minimum/MaximumMessage Processing Time
The average, minimum, or maximum amount of time UnwiredServer took to respond to a synchronization request message.
Time at Minimum/MaximumProcessing Time
The time at which the shortest or longest response time completed.
Total Inbound Messages The total number of messages sent from clients to Unwired Server.
Total Outbound Messages The total number of messages sent from Unwired Server to clients.
Total Operation Replays The total number of operation replays performed by clients onmobile business objects (MBOs).
Total Errors The total number of errors that took place across all synchroniza-tions.
Total Data Push The total amount of data transmitted from the server to clients.
User StatisticsUser statistics consist of key performance indicators that reflect the overall activity ofapplication users.
User statistics can be filtered to include users who belong to a particular securityconfiguration. This type of monitoring highlights key totals and identifies average, minimum,and maximum values for primary user activities. These calculations are dynamic, and arebased on the data currently available in monitoring database for the specified time period.
Note: These statistics are not supported for Sybase Mobile CRM and Sybase Hybrid App forSAP application users.
See also• Security Log Statistics on page 332• Replication Statistics on page 333• Messaging Statistics on page 337• Messaging Queue Statistics on page 341• Data Change Notification Statistics on page 342• Device Notification Statistics on page 344• Package Statistics on page 346
Monitor
348 Sybase Unwired Platform

• Cache Statistics on page 350
Replication User StatisticsReplication user statistics reflect the synchronization activity of a group of replication-basedsynchronization users belonging to a specified security configuration. These statistics includegeneral activity-related information on a per-user basis.
These key indicators monitor replication users:
KPI Description
Total Synchronization Requests The total number of sync requests initiated by a client.
Total Rows Received The total number of rows received during package synchroniza-tion.
Total Rows Sent The total number of rows sent during package synchronization.
Total Bytes Received The total number of bytes uploaded from clients to Unwired Server.
Total Bytes Sent The total number of bytes downloaded by clients from UnwiredServer.
Average/Minimum/MaximumSynchronization Time
The average, minimum, or maximum amount of time UnwiredServer took to complete a synchronization request.
Time at Maximum/MinimumSynchronization Time
The time at which the fastest or slowest synchronization is com-pleted.
Total Operation Replays The total number of operation replays performed by user of mobilebusiness objects (MBOs).
Total Errors The total number of errors that took place across all synchroniza-tions.
Total Devices The total number of devices involved in synchronization. This totalincludes the same user multiple times if he or she has multipledevices. The value comprises individual devices, and does notcount multiple synchronizations requested by the same device.
Messaging User StatisticsMessaging user statistics reflect the synchronization activity of a group of messaging-basedsynchronization users belonging to a specified security configuration. These statistics includegeneral activity-related information on a per-user basis.
These key indicators monitor messaging users:
Monitor
Sybase Control Center for Sybase Unwired Platform 349
KPI Description
Total Devices The total number of devices involved in synchronization. This totalincludes the same user multiple times if he or she has multipledevices. The value comprises individual devices, and does notcount multiple synchronizations requested by the same device.
Average/Minimum/MaximumMessage Processing Time
The average, minimum, or maximum amount of time UnwiredServer took to respond to a sync request message.
Time at Minimum/MaximumMessage Processing Time
The time of day at which the shortest or longest message process-ing event completed.
Total Inbound Messages The total number of messages sent from clients to Unwired Server.
Total Outbound Messages The total number of messages sent from Unwired Server to clients.
Total Operation Replays The total number of operation replays performed by clients onmobile business objects (MBOs).
Total Errors The total number of errors that took place across all synchroniza-tions.
Total Subscription Commands The total number of subscription commands sent from clients to theserver.
Total Data Push The total number of import data messages.
Cache StatisticsCache statistics provide a granular view of cache activity eithr at the domain or package level,particularly in the areas of cache performance, mobile business object (MBO) status, andcache group status.
Cache statistics report on performance at the domain, package, MBO, and cache group levelsto allow administrators to obtain different information according to the level of specificityrequired. These calculations are dynamic, and are based on the data currently available inmonitoring database for the specified time period.
Note: These statistics are not supported for Sybase Mobile CRM and Sybase Hybrid App forSAP application users.
See also• Security Log Statistics on page 332• Replication Statistics on page 333• Messaging Statistics on page 337• Messaging Queue Statistics on page 341• Data Change Notification Statistics on page 342• Device Notification Statistics on page 344
Monitor
350 Sybase Unwired Platform

• Package Statistics on page 346
• User Statistics on page 348
Cache Performance StatisticsCache performance statistics report on key totals and identify average, minimum, andmaximum values for primary cache activities. View cache performance data at the domain orpackage level.
Select either Domain level or Package level to view the following key performanceindicators:
Key performance in-dicator
Description
Domain The domain to which the package affected by the cache activity be-longs.
Package The name of the package associated with this cache activity.
Minimum/Maximum CacheMisses
The minimum or maximum number cache misses and the MBO namefor which it was generated.
Minimum/Maximum CacheHits
The minimum or maximum number of scheduled cache queries for allof the MBOs in the package in the specified date range.
Minimum/Maximum/Aver-age % Cache Hits
The minimum or maximum percentage of scheduled cache queries forthe supplied date range and the MBO name for which it was generated.
Minimum/Maximum Aver-age Wait Time
The minimum or maximum average wait time for a scheduled cachequery and the MBO name for which it was generated.
Minumum/Maximum Aver-age Refresh Time
(Package-level only)The minimum or maximum average refresh timefor an on-demand or scheduled refresh.
MBO StatisticsMobile business object (MBO) status monitoring reports on cache activity at the MBO level,and thus, reflects activity for single mobile business objects.
Select Package level MBO to view the following key performance indicators:
Key performance indi-cator
Description
Cache Group The name of the group of MBOs associated with this cache activity.
MBO The name of the single mobile business object associated with thiscache activity.
Number of Rows The number of rows affected by the cache refresh.
Monitor
Sybase Control Center for Sybase Unwired Platform 351

Key performance indi-cator
Description
Cache Hits The number of scheduled cache queries that occurred in the supplieddate range.
Cache Misses The number of on-demand cache or cache partition refreshes thatoccurred in the supplied date range.
Access Count The number of cache queries that occurred in the supplied date range.
Minimum/Maximum/Aver-age Wait Time
The minimum, maximum, or average duration of cache queries in thesupplied date range. This time does not include the time required torefresh the cache in a cache “miss” scenario. Instead Minimum/Maximum/Average Full Refresh Time exposes this data.
Minimum/Maximum/Aver-age Full Refresh Time
The minimum, maximum, or average duration of on-demand andscheduled full refresh activities in the supplied date range.
Cache Group Status StatisticsCache group status statistics provide monitoring data about cache activity at the cache grouplevel. The data reflects activity for all mobile business objects (MBOs) belonging to a cachegroup.
Select Package level cache group to view the following key performance indicators (KPIs):
KPI Description
Package The name of the package to which the associated cache group be-longs
Cache Group The name of the group of MBOs associated with the cache activity
Number of Rows The number of rows in the cache table of the MBO
Last Full Refresh Time The last time the cache or cache partition was fully refreshed
Last Update Time The last time a row in the cache was updated for any reason (row-levelrefresh, full refresh, partitioned refresh, or data change notification)
Last Invalidate Time The last time the cache was invalidated
Cache Coherency Window The data validity time period for the cache group, in seconds. Canspan any value in this range:
• 0 shows that data is always retrieved on-demand for each client.
• 2049840000 shows that the cache never expires. This occurswhen you set the on-demand cache group to NEVER expire orscheduled cache group to NEVER repeat.
Monitor
352 Sybase Unwired Platform

Troubleshoot Sybase Control Center
Troubleshoot issues that arise in Sybase Control Center.
Using Sybase Control Center to Troubleshoot UnwiredPlatform
Problem: Unwired Platform is not functioning properly or exhibits abnormal behaviour.
Consult these Sybase Control Center sources to find useful information to help youtroubleshoot Unwired Platform issues:
1. Review the server log – view server errors, warnings, and general information to identifyproblems. Access the Server node in the left navigation tree of Sybase Control Center toview server log data.
2. Review domain logs – if domain logging is enabled, view domain logs in each Domains ><DomainName> > Log node of Sybase Control Center. Aggregated log data in the consolemakes domain information readily accessible and actionable.
3. Review monitoring data – access the Monitoring node in the left navigation tree of SybaseControl Center to view monitoring data on the following components of UnwiredPlatform: replication synchronization, messaging synchronization, messaging queue, datachange notifications, device notifications, packages, users, and cache. See SystemMonitoring Overview in System Administration.
4. Review Application Connection status – access the Applications node in the leftnavigation pane of Sybase Control Center to view application connection information inthe right pane.
Note: You can also view domain-level Application Connection status – navigate to thedomain then select Applications in the left navigation pane, and view applicationconnection information in the right pane.
5. Review package client logs – access the Client Log tab of the Packages > <PackageName>node in Sybase Control Center to view data about client application operations for alldevices subscribed to a package. This information allows you to track errors and identifyperformance issues.
6. Review MBO and operation history – access the History tab for both the MBO andoperation nodes of a package in Sybase Control Center to review error history duringsynchronizations and operation replays.
See also• Collecting Administration Performance Data for Troubleshooting on page 354
Troubleshoot Sybase Control Center
Sybase Control Center for Sybase Unwired Platform 353

• Sybase Control Center Management Tier Issues on page 355• Platform Component Monitoring Issues on page 375• Server Tier Administration Issues on page 378• Package Deployment and Management Issues on page 390• Application and Application User Management Issues on page 395
Collecting Administration Performance Data forTroubleshooting
Problem: You need to collect performance data to troubleshoot performance issues in SybaseControl Center for Unwired Platform administrative options.
Solution: Set up the SCC_HOME\log\executionTime.log, which providesinformation on the length of time taken to complete operations in Sybase Control Center.Sybase Product Support and Engineering teams can use this information to diagnose thesource of your performance issues. To set up this log file:
1. Open SCC_HOME\plugins\com.sybase.supadminplugin\agent-plugin.xml.
2. Add the following line to the file under the <properties> element:
<set-property property="log_MO_method_execution_time" value="enable_log_mo_method_execution_time" />
3. Open SCC_HOME\conf\log4j.properties.
4. If you are experiencing log truncation issues, edit the following lines to change the defaultvalues for maximum file size (default: 25MB) and maximum backup index (default: 20files) to the values shown in this example:
## file appender (size-based rolling)log4j.appender.executionTime=org.apache.log4j.RollingFileAppenderlog4j.appender.executionTime.File=${com.sybase.ua.home}/log/executionTime.loglog4j.appender.executionTime.layout=org.apache.log4j.PatternLayoutlog4j.appender.executionTime.layout.ConversionPattern=%d [%-5p] [%t] %c.%M(%L) - %m%nlog4j.appender.executionTime.MaxFileSize=50MBlog4j.appender.executionTime.MaxBackupIndex=20## log MO method execution timelog4j.logger.com.sybase.uep.sysadmin.management.aop=INFO,executionTime
5. Restart Sybase Control Center.The executionTime.log file now appears in the SCC_HOME\log folder.
Use this log file to diagnose and analyze performance problems. For more information onconfiguring the agent-plugin.xml configuration file, search for Agent PluginProperties Reference in the System Administration guide.
Troubleshoot Sybase Control Center
354 Sybase Unwired Platform

You can also use the Adobe Flex log to track performance in Sybase Control Center. To accessFlex-side logging, highlight the resource in the Perspective Resources view and select ViewLog to show the user interface time for each activity. Alternately:
1. Modify the SCC_HOME\plugins\com.sybase.supadminplugin\agent-plugin.xml file as indicated in step 2, above.
2. Restart Sybase Control Center.3. Log in and perform your regular administrative tasks.4. View the execution time indicators for these operations in the cookie file
supatcookie.sol. The location of this file varies depending on your operatingsystem:
Operating System Location
Windows XP C:\Documents and Settings\<username>\Application Data\Macromedia\FlashPlayer\#SharedObjects
Windows Vista C:\Users\<username>\AppData\Roaming\Macromedia\Flash Player\#SharedOb-jects
Macintosh OS X /Users/<username>/Library/Preferen-ces/Macromedia/Flash Player/#Share-dObjects
Linux /home/<username>/.macromedia/Flash_Player/#SharedObjects
5. Analyze the log using your preferred method of data analysis.
See also• Using Sybase Control Center to Troubleshoot Unwired Platform on page 353
• Sybase Control Center Management Tier Issues on page 355
• Platform Component Monitoring Issues on page 375
• Server Tier Administration Issues on page 378
• Package Deployment and Management Issues on page 390
• Application and Application User Management Issues on page 395
Sybase Control Center Management Tier IssuesReview this list of documented general issues for Sybase Control Center and its servermanagement-related services.
Troubleshoot Sybase Control Center
Sybase Control Center for Sybase Unwired Platform 355
See also• Using Sybase Control Center to Troubleshoot Unwired Platform on page 353
• Collecting Administration Performance Data for Troubleshooting on page 354
• Platform Component Monitoring Issues on page 375
• Server Tier Administration Issues on page 378
• Package Deployment and Management Issues on page 390
• Application and Application User Management Issues on page 395
Launching Sybase Control Center Results in Rounded Rectangle Boxor Empty Console Screen
Problem: When you launch Sybase Control Center, a rounded rectangular box appears insteadof the administration console, or the console displays a gray or empty screen.
Explanation: The Adobe Flash Player version is older than the minimum version supported bySybase Control Center.
Solution: Upgrade your Flash Player version to the latest version. For more information onsoftware prerequisites, see Supported Hardware and Software.
See also• Sybase Control Center Console Continually Refreshes on page 357
• Sybase Control Center Windows Service Fails to Start on page 357
• Sybase Control Center Windows Service Deleted on page 359
• Sybase Control Center Fails to Start on page 359
• Second Sybase Control Center Fails to Start on page 361
• Login Invalid in Sybase Control Center on page 362
• Login Fails in Sybase Control Center on page 363
• Login to Sybase Control Center Forces Ending Existing Session on page 364
• Administrator Account is Locked on page 365
• Browser Refresh (F5) Causes Logout on page 366
• Stale Version of Sybase Control Center After Upgrade on page 366
• Sybase Control Center Reports Certificate Problem on page 368
• Previous Administrator Credentials Used on page 369
• Security Error Triggered When Connecting to Sybase Control Center from RemoteBrowser on page 370
• Administrator Login Passes When Provider Is Not Available on page 370
• Host Name of Registered Resource Changed But Is Not Updated on page 371
• Management Issues with Clustered Data Tiers on page 372
• Poor Sybase Control Center Performance after Upgrade on page 373
• Sybase Control Center Communication with Unwired Server Fails on page 374
Troubleshoot Sybase Control Center
356 Sybase Unwired Platform

Sybase Control Center Console Continually RefreshesProblem: Every 8-10 minutes, the left navigation pane of the Sybase Control Center consolecollapses and expands.
Explanation: This occurs when using Firefox or Chrome browers.
Solution: Use Internet Explorer as your browser.
See also• Launching Sybase Control Center Results in Rounded Rectangle Box or Empty ConsoleScreen on page 356• Sybase Control Center Windows Service Fails to Start on page 357• Sybase Control Center Windows Service Deleted on page 359• Sybase Control Center Fails to Start on page 359• Second Sybase Control Center Fails to Start on page 361• Login Invalid in Sybase Control Center on page 362• Login Fails in Sybase Control Center on page 363• Login to Sybase Control Center Forces Ending Existing Session on page 364• Administrator Account is Locked on page 365• Browser Refresh (F5) Causes Logout on page 366• Stale Version of Sybase Control Center After Upgrade on page 366• Sybase Control Center Reports Certificate Problem on page 368• Previous Administrator Credentials Used on page 369• Security Error Triggered When Connecting to Sybase Control Center from RemoteBrowser on page 370• Administrator Login Passes When Provider Is Not Available on page 370• Host Name of Registered Resource Changed But Is Not Updated on page 371• Management Issues with Clustered Data Tiers on page 372• Poor Sybase Control Center Performance after Upgrade on page 373• Sybase Control Center Communication with Unwired Server Fails on page 374
Sybase Control Center Windows Service Fails to StartProblem: When starting the Sybase Control Center X.Xservice, it takes a long time beforefailing, and the service manager displays a message that the service startup has timed out.
The SCC_HOME\log\agent.log shows the failure message.
Explanation: This problem usually occurs when the Sybase Control Center repositorydatabase log file is out of sync with the repository database. A related symptom is the messageSQL Login Failure in the Sybase Control Center repository log file.
Solution 1: Review SCC_HOME\services\Repository\scc_repository.loglog for any issues with the database transaction log file during startup. If the transaction log
Troubleshoot Sybase Control Center
Sybase Control Center for Sybase Unwired Platform 357
could not be processed, the database cannot start, and consequently nor can the SybaseControl Center service. Resolve this error by:
1. Creating a backup of SCC_HOME\services\Repository\scc_repository.log.
2. Deleting the SCC_HOME\services\Repository\scc_repository.log fileand restarting the Sybase Control Center service.
Solution 2: Review SCC_HOME\services\Repository\scc_repository.loglog for any failures in database transaction and/or recovery. Resolve this error by temporarilyconfiguring the repository database (-f) to start without a transaction log:
1. Log out of Sybase Control Center and then shutdown Sybase Control Center service.2. Open command prompt window, and run the following command:
SCC_HOME\services\SccSADataserver\sa\bin_windows32\dbsrv11.exe -n scc_repository -o C:\Sybase\SCC-3_2\services\Repository\scc_repository.slg -f -m -qi -qw -sb 0 -gn 100 -gm 500 -zl -zp -x TCPIP{port=3638} C:\Sybase\SCC-3_2\services\Repository\scc_repository.db
3. Delete the SCC_HOME\services\Repository\scc_repository.log fileusing Windows Explorer.
4. Restart the Sybase Control Center service.
See also• Launching Sybase Control Center Results in Rounded Rectangle Box or Empty ConsoleScreen on page 356• Sybase Control Center Console Continually Refreshes on page 357• Sybase Control Center Windows Service Deleted on page 359• Sybase Control Center Fails to Start on page 359• Second Sybase Control Center Fails to Start on page 361• Login Invalid in Sybase Control Center on page 362• Login Fails in Sybase Control Center on page 363• Login to Sybase Control Center Forces Ending Existing Session on page 364• Administrator Account is Locked on page 365• Browser Refresh (F5) Causes Logout on page 366• Stale Version of Sybase Control Center After Upgrade on page 366• Sybase Control Center Reports Certificate Problem on page 368• Previous Administrator Credentials Used on page 369• Security Error Triggered When Connecting to Sybase Control Center from RemoteBrowser on page 370• Administrator Login Passes When Provider Is Not Available on page 370• Host Name of Registered Resource Changed But Is Not Updated on page 371
Troubleshoot Sybase Control Center
358 Sybase Unwired Platform

• Management Issues with Clustered Data Tiers on page 372
• Poor Sybase Control Center Performance after Upgrade on page 373
• Sybase Control Center Communication with Unwired Server Fails on page 374
Sybase Control Center Windows Service DeletedProblem: the Sybase Control Center X.X windows service was inadvertently deleted, soSybase Control Center is unavailable.
Solution: Re-create the Windows service with the following command:
SCC_HOME\utility\ntautostart\release\sccservice.exe -install
See also• Launching Sybase Control Center Results in Rounded Rectangle Box or Empty ConsoleScreen on page 356
• Sybase Control Center Console Continually Refreshes on page 357
• Sybase Control Center Windows Service Fails to Start on page 357
• Sybase Control Center Fails to Start on page 359
• Second Sybase Control Center Fails to Start on page 361
• Login Invalid in Sybase Control Center on page 362
• Login Fails in Sybase Control Center on page 363
• Login to Sybase Control Center Forces Ending Existing Session on page 364
• Administrator Account is Locked on page 365
• Browser Refresh (F5) Causes Logout on page 366
• Stale Version of Sybase Control Center After Upgrade on page 366
• Sybase Control Center Reports Certificate Problem on page 368
• Previous Administrator Credentials Used on page 369
• Security Error Triggered When Connecting to Sybase Control Center from RemoteBrowser on page 370
• Administrator Login Passes When Provider Is Not Available on page 370
• Host Name of Registered Resource Changed But Is Not Updated on page 371
• Management Issues with Clustered Data Tiers on page 372
• Poor Sybase Control Center Performance after Upgrade on page 373
• Sybase Control Center Communication with Unwired Server Fails on page 374
Sybase Control Center Fails to StartProblem: The Sybase Control Center server does not start.
This problem occurs when the host name cannot be resolved or the IP address of the machinehas changed since the product installation. This troubleshooting topic applies only wheneither of these scenarios is true.
Troubleshoot Sybase Control Center
Sybase Control Center for Sybase Unwired Platform 359

Solution 1: Change the host name to its IP address in the Sybase Control Center service-config.xml file:
1. From the command line, verify the host name by running nslookup<hostname >.
2. If the DNS server cannot resolve the host name, edit the collocated SCC_HOME\services\RMI\service-config.xml file:
a. Log out of Sybase Control Center.b. Stop the Sybase Control Center X.X service.c. Open SCC_HOME\services\RMI\service-config.xml.
d. Locate this line: <set-property property="address"value="<hostname>" />.
If the line does not exist, add it under the <properties></properties>element in the file.
e. Change the value from the host name to the IP address of the host computer. If the IPaddress is already used, ensure it is valid (especially if the IP address has recently beenchanged).
f. Restart the Sybase Control Center X.X service.g. Log in to Sybase Control Center and proceed with your administrative tasks.
See also• Launching Sybase Control Center Results in Rounded Rectangle Box or Empty ConsoleScreen on page 356
• Sybase Control Center Console Continually Refreshes on page 357
• Sybase Control Center Windows Service Fails to Start on page 357
• Sybase Control Center Windows Service Deleted on page 359
• Second Sybase Control Center Fails to Start on page 361
• Login Invalid in Sybase Control Center on page 362
• Login Fails in Sybase Control Center on page 363
• Login to Sybase Control Center Forces Ending Existing Session on page 364
• Administrator Account is Locked on page 365
• Browser Refresh (F5) Causes Logout on page 366
• Stale Version of Sybase Control Center After Upgrade on page 366
• Sybase Control Center Reports Certificate Problem on page 368
• Previous Administrator Credentials Used on page 369
• Security Error Triggered When Connecting to Sybase Control Center from RemoteBrowser on page 370
• Administrator Login Passes When Provider Is Not Available on page 370
• Host Name of Registered Resource Changed But Is Not Updated on page 371
• Management Issues with Clustered Data Tiers on page 372
• Poor Sybase Control Center Performance after Upgrade on page 373
Troubleshoot Sybase Control Center
360 Sybase Unwired Platform

• Sybase Control Center Communication with Unwired Server Fails on page 374
Second Sybase Control Center Fails to StartProblem: Cannot start a second co-existing Sybase Control Center in a deploymentenvironment.
Explanation: When multiple versions of Sybase Control Center co-exist on a single machine,if the older version is already using the default port number, the new version of Sybase ControlCenter uses another port number, such as 8285. If the configuration files have not beenupdated, this may cause port conflicts.
Solution: Check the port numbers, and check the configuration files to make sure theconfiguration is correct. See the topic Port Number Reference in the System Administrationguide. If the configuration is correct, you may need to start the second version of SybaseControl Center manually.
See also• Launching Sybase Control Center Results in Rounded Rectangle Box or Empty ConsoleScreen on page 356
• Sybase Control Center Console Continually Refreshes on page 357
• Sybase Control Center Windows Service Fails to Start on page 357
• Sybase Control Center Windows Service Deleted on page 359
• Sybase Control Center Fails to Start on page 359
• Login Invalid in Sybase Control Center on page 362
• Login Fails in Sybase Control Center on page 363
• Login to Sybase Control Center Forces Ending Existing Session on page 364
• Administrator Account is Locked on page 365
• Browser Refresh (F5) Causes Logout on page 366
• Stale Version of Sybase Control Center After Upgrade on page 366
• Sybase Control Center Reports Certificate Problem on page 368
• Previous Administrator Credentials Used on page 369
• Security Error Triggered When Connecting to Sybase Control Center from RemoteBrowser on page 370
• Administrator Login Passes When Provider Is Not Available on page 370
• Host Name of Registered Resource Changed But Is Not Updated on page 371
• Management Issues with Clustered Data Tiers on page 372
• Poor Sybase Control Center Performance after Upgrade on page 373
• Sybase Control Center Communication with Unwired Server Fails on page 374
Troubleshoot Sybase Control Center
Sybase Control Center for Sybase Unwired Platform 361

Login Invalid in Sybase Control CenterProblem: Logging in to Sybase Control Center generates an Invalid Login message.
Solution:
• Verify Sybase Control Center session validity – ensure that the current Sybase ControlCenter session is active. If the session is frozen or expired, refresh the page or close thebrowser and try again.
• Verify server-side configuration by trying to connect to Unwired Server from SybaseUnwired WorkSpace (requires creating Unwired Server Connection Profile with properuser name and password among other things).
• Check SCC_HOME\log\agent.log to see if the authentication failed. If so, check thesecurity configuration. By default, Sybase Control Center shares the same configurationas the one used on the local Unwired Server. Ensure that the correct login and password isprovided (one that has administrative privilege). See Enabling Authentication and RBACfor Administration Logins in the Security guide.
• If all services are running, check the SCC_HOME\log\agent.log for an errormessage containing text similar to the following:Failed to authenticate user 'supAdmin' (Failed to connectto service:jmx:rmi:///jndi/rmi://eas3w03.sybase.com:9999/agent, probably because the agent is protected and requirescredentials.Security Service Error. Agent serviceexception.)• Ensure that the Sybase Control Center authentication provider configuration is correct,
and points to the correct server. See Enabling Authentication and RBAC forAdministration Logins in the Security guide.
See also• Launching Sybase Control Center Results in Rounded Rectangle Box or Empty ConsoleScreen on page 356
• Sybase Control Center Console Continually Refreshes on page 357
• Sybase Control Center Windows Service Fails to Start on page 357
• Sybase Control Center Windows Service Deleted on page 359
• Sybase Control Center Fails to Start on page 359
• Second Sybase Control Center Fails to Start on page 361
• Login Fails in Sybase Control Center on page 363
• Login to Sybase Control Center Forces Ending Existing Session on page 364
• Administrator Account is Locked on page 365
• Browser Refresh (F5) Causes Logout on page 366
• Stale Version of Sybase Control Center After Upgrade on page 366
• Sybase Control Center Reports Certificate Problem on page 368
Troubleshoot Sybase Control Center
362 Sybase Unwired Platform

• Previous Administrator Credentials Used on page 369• Security Error Triggered When Connecting to Sybase Control Center from RemoteBrowser on page 370• Administrator Login Passes When Provider Is Not Available on page 370• Host Name of Registered Resource Changed But Is Not Updated on page 371• Management Issues with Clustered Data Tiers on page 372• Poor Sybase Control Center Performance after Upgrade on page 373• Sybase Control Center Communication with Unwired Server Fails on page 374
Login Fails in Sybase Control CenterProblem: Removed the PreconfiguredUser login module from the "admin" securityconfiguration. Now, logins to Sybase Control Center fail.
Solution: Verify server-side configuration by trying to connect to Unwired Server fromSybase Unwired WorkSpace (requires creating Unwired Server Connection Profile withproper username and password among other things). If that works but the Sybase ControlCenter login still fails, check for error messages ins inagent.log can offer further clues onthe
See also• Launching Sybase Control Center Results in Rounded Rectangle Box or Empty ConsoleScreen on page 356• Sybase Control Center Console Continually Refreshes on page 357• Sybase Control Center Windows Service Fails to Start on page 357• Sybase Control Center Windows Service Deleted on page 359• Sybase Control Center Fails to Start on page 359• Second Sybase Control Center Fails to Start on page 361• Login Invalid in Sybase Control Center on page 362• Login to Sybase Control Center Forces Ending Existing Session on page 364• Administrator Account is Locked on page 365• Browser Refresh (F5) Causes Logout on page 366• Stale Version of Sybase Control Center After Upgrade on page 366• Sybase Control Center Reports Certificate Problem on page 368• Previous Administrator Credentials Used on page 369• Security Error Triggered When Connecting to Sybase Control Center from RemoteBrowser on page 370• Administrator Login Passes When Provider Is Not Available on page 370• Host Name of Registered Resource Changed But Is Not Updated on page 371• Management Issues with Clustered Data Tiers on page 372• Poor Sybase Control Center Performance after Upgrade on page 373• Sybase Control Center Communication with Unwired Server Fails on page 374
Troubleshoot Sybase Control Center
Sybase Control Center for Sybase Unwired Platform 363
Login to Sybase Control Center Forces Ending Existing SessionProblem: If you login to Sybase Control Center when there already is a session running usingthe same login, you are forced to end the pre-existing session before proceeding.
Explanation: Sybase Control Center allows only one session at a time for each administrativeuser.
Sybase Control Center remembers the UI layout of each user’s screen so that the next time youlogin your screen layout is the same as you last left it. If Sybase Control Center allowedmultiple concurrent sessions from the same user, the screen layout information could becomecorrupted.
Solution:
• Recommended: Configure the "admin" security configuration to integrate with yourcompany identity management systems so that Sybase Unwired Platform administratorscan login to Sybase Control Center using their own accounts.
• Development Environment Only: For a development environment, you can addPreconfiguredUserLoginModules for each of the administrators to the "admin" securityconfiguration. Make sure to set the "SUP Adminstrator" or "SUP Domain Administrator"role in each PreConfiguredUserLoginModule.
Note: It is never recommended to use the PreconfiguredUserLoginModule in a productioninstallation of Sybase Unwired Platform.
See also• Launching Sybase Control Center Results in Rounded Rectangle Box or Empty ConsoleScreen on page 356• Sybase Control Center Console Continually Refreshes on page 357• Sybase Control Center Windows Service Fails to Start on page 357• Sybase Control Center Windows Service Deleted on page 359• Sybase Control Center Fails to Start on page 359• Second Sybase Control Center Fails to Start on page 361• Login Invalid in Sybase Control Center on page 362• Login Fails in Sybase Control Center on page 363• Administrator Account is Locked on page 365• Browser Refresh (F5) Causes Logout on page 366• Stale Version of Sybase Control Center After Upgrade on page 366• Sybase Control Center Reports Certificate Problem on page 368• Previous Administrator Credentials Used on page 369• Security Error Triggered When Connecting to Sybase Control Center from RemoteBrowser on page 370• Administrator Login Passes When Provider Is Not Available on page 370
Troubleshoot Sybase Control Center
364 Sybase Unwired Platform
• Host Name of Registered Resource Changed But Is Not Updated on page 371• Management Issues with Clustered Data Tiers on page 372• Poor Sybase Control Center Performance after Upgrade on page 373• Sybase Control Center Communication with Unwired Server Fails on page 374
Administrator Account is LockedProblem: An administrator tried logging into Unwired Server from Sybase Control Centermultiple times. After receiving multiple instances of the message Wrong username andpassword errors, the message The account is currently locked.Please contact your server administrator. is finally displayed.
Explanation: The user has exceeded the threshold for failed login attempts. The platformadministrator sets the properties that control the login failure account lock threshold, and thetimeout period. When a user exceeds the threshold value, the account is locked for the timeoutperiod.
Solution: A user must wait for the lock timeout value to pass, and then log in again.
For details, see Creating a Security Configuration in Sybase Control Center for SybaseUnwired Platform online help.
See also• Launching Sybase Control Center Results in Rounded Rectangle Box or Empty ConsoleScreen on page 356• Sybase Control Center Console Continually Refreshes on page 357• Sybase Control Center Windows Service Fails to Start on page 357• Sybase Control Center Windows Service Deleted on page 359• Sybase Control Center Fails to Start on page 359• Second Sybase Control Center Fails to Start on page 361• Login Invalid in Sybase Control Center on page 362• Login Fails in Sybase Control Center on page 363• Login to Sybase Control Center Forces Ending Existing Session on page 364• Browser Refresh (F5) Causes Logout on page 366• Stale Version of Sybase Control Center After Upgrade on page 366• Sybase Control Center Reports Certificate Problem on page 368• Previous Administrator Credentials Used on page 369• Security Error Triggered When Connecting to Sybase Control Center from RemoteBrowser on page 370• Administrator Login Passes When Provider Is Not Available on page 370• Host Name of Registered Resource Changed But Is Not Updated on page 371• Management Issues with Clustered Data Tiers on page 372• Poor Sybase Control Center Performance after Upgrade on page 373
Troubleshoot Sybase Control Center
Sybase Control Center for Sybase Unwired Platform 365

• Sybase Control Center Communication with Unwired Server Fails on page 374
Browser Refresh (F5) Causes LogoutProblem: Pressing the F5 key to refresh your browser logs you out of Sybase Control Center.
Solution: Do not use F5 when you are logged in to Sybase Control Center. Browser refreshdoes not refresh data inside Sybase Control Center, but refreshes the loaded application orpages in the browser—in this case, the Adobe Flash on which Sybase Control Center is built.Consequently, pressing F5 logs you out of any servers you are currently logged in to, includingSybase Control Center.
See also• Launching Sybase Control Center Results in Rounded Rectangle Box or Empty ConsoleScreen on page 356
• Sybase Control Center Console Continually Refreshes on page 357
• Sybase Control Center Windows Service Fails to Start on page 357
• Sybase Control Center Windows Service Deleted on page 359
• Sybase Control Center Fails to Start on page 359
• Second Sybase Control Center Fails to Start on page 361
• Login Invalid in Sybase Control Center on page 362
• Login Fails in Sybase Control Center on page 363
• Login to Sybase Control Center Forces Ending Existing Session on page 364
• Administrator Account is Locked on page 365
• Stale Version of Sybase Control Center After Upgrade on page 366
• Sybase Control Center Reports Certificate Problem on page 368
• Previous Administrator Credentials Used on page 369
• Security Error Triggered When Connecting to Sybase Control Center from RemoteBrowser on page 370
• Administrator Login Passes When Provider Is Not Available on page 370
• Host Name of Registered Resource Changed But Is Not Updated on page 371
• Management Issues with Clustered Data Tiers on page 372
• Poor Sybase Control Center Performance after Upgrade on page 373
• Sybase Control Center Communication with Unwired Server Fails on page 374
Stale Version of Sybase Control Center After UpgradeProblem: after upgrading Sybase Unwired Platform and relaunching Sybase Control Centerthrough a Web browser, a stale version of Sybase Control Center loads in the browser.
Explanation: Adobe® Flash® Player caches the earlier version of Sybase Control Centerlocally, preventing you from logging in to the correct version of Sybase Control Center whenaccessing the browser.
Troubleshoot Sybase Control Center
366 Sybase Unwired Platform
Solution 1: Clear the Adobe Flash Player cache:
1. In Windows Explorer, navigate to C:\Documents and Settings\<username>\Application Data\Macromedia\Flash Player\#SharedObjects,and delete all files in this folder.As an alternative to manually deleting files, you can also access the Adobe Flash PlayerCache Cleanup URL: http://www.macromedia.com/support/documentation/en/flashplayer/help/settings_manager07.html
Solution 2: Only perform this solution if Solution 1 does not solve the problem. Clear browserhistory:
1. In Microsoft Internet Explorer, select Tools > Internet Options > General > Delete... anddelete all temporary files, history, cookies, saved passwords, and Web form information.
See also• Launching Sybase Control Center Results in Rounded Rectangle Box or Empty ConsoleScreen on page 356
• Sybase Control Center Console Continually Refreshes on page 357
• Sybase Control Center Windows Service Fails to Start on page 357
• Sybase Control Center Windows Service Deleted on page 359
• Sybase Control Center Fails to Start on page 359
• Second Sybase Control Center Fails to Start on page 361
• Login Invalid in Sybase Control Center on page 362
• Login Fails in Sybase Control Center on page 363
• Login to Sybase Control Center Forces Ending Existing Session on page 364
• Administrator Account is Locked on page 365
• Browser Refresh (F5) Causes Logout on page 366
• Sybase Control Center Reports Certificate Problem on page 368
• Previous Administrator Credentials Used on page 369
• Security Error Triggered When Connecting to Sybase Control Center from RemoteBrowser on page 370
• Administrator Login Passes When Provider Is Not Available on page 370
• Host Name of Registered Resource Changed But Is Not Updated on page 371
• Management Issues with Clustered Data Tiers on page 372
• Poor Sybase Control Center Performance after Upgrade on page 373
• Sybase Control Center Communication with Unwired Server Fails on page 374
Troubleshoot Sybase Control Center
Sybase Control Center for Sybase Unwired Platform 367

Sybase Control Center Reports Certificate ProblemWhen attempting to bring up Sybase Control Center by clicking the Sybase Control Centerlink after installation , this message appears: There is a problem with thiswebsite's security certificate.
Explanation: This can occur when the browser session starts on the same computer as SybaseControl Center. The installer automatically sets up a local security certificate, but thecertificate installed for HTTPS in the web container keystore is a self-signed root certificate,which is not recognized b the client browser.
Solution: Follow browser-specific instructions to accept the certificate into the Windowscertificate store. Once the certificate is accepted, you may also need to change the SybaseControl Center Web URL to include the network domain name <yourco.com> in addition tothe host name. That host name in the Web URL must match with the "Issued To" property ofthe certificate.
See also• Launching Sybase Control Center Results in Rounded Rectangle Box or Empty ConsoleScreen on page 356
• Sybase Control Center Console Continually Refreshes on page 357
• Sybase Control Center Windows Service Fails to Start on page 357
• Sybase Control Center Windows Service Deleted on page 359
• Sybase Control Center Fails to Start on page 359
• Second Sybase Control Center Fails to Start on page 361
• Login Invalid in Sybase Control Center on page 362
• Login Fails in Sybase Control Center on page 363
• Login to Sybase Control Center Forces Ending Existing Session on page 364
• Administrator Account is Locked on page 365
• Browser Refresh (F5) Causes Logout on page 366
• Stale Version of Sybase Control Center After Upgrade on page 366
• Previous Administrator Credentials Used on page 369
• Security Error Triggered When Connecting to Sybase Control Center from RemoteBrowser on page 370
• Administrator Login Passes When Provider Is Not Available on page 370
• Host Name of Registered Resource Changed But Is Not Updated on page 371
• Management Issues with Clustered Data Tiers on page 372
• Poor Sybase Control Center Performance after Upgrade on page 373
• Sybase Control Center Communication with Unwired Server Fails on page 374
Troubleshoot Sybase Control Center
368 Sybase Unwired Platform

Previous Administrator Credentials UsedProblem: You cannot use new credentials to authenticate against a resource in Sybase ControlCenter. When an administrator enters credentials with the Remember these credentials forfuture sessions option, Sybase Control Center uses those credentials until they are cleared.
Solution: Clear credentials so that Sybase Control Center does not use them for futuresessions:
1. Open the Perspective Resources window.2. Select the resource you want to log in to.3. From the menu bar, select Resource > Clear Authentication Parameters and click
OK.
You can now authenticate against the resource using new administrator credentials.
See also• Launching Sybase Control Center Results in Rounded Rectangle Box or Empty ConsoleScreen on page 356
• Sybase Control Center Console Continually Refreshes on page 357
• Sybase Control Center Windows Service Fails to Start on page 357
• Sybase Control Center Windows Service Deleted on page 359
• Sybase Control Center Fails to Start on page 359
• Second Sybase Control Center Fails to Start on page 361
• Login Invalid in Sybase Control Center on page 362
• Login Fails in Sybase Control Center on page 363
• Login to Sybase Control Center Forces Ending Existing Session on page 364
• Administrator Account is Locked on page 365
• Browser Refresh (F5) Causes Logout on page 366
• Stale Version of Sybase Control Center After Upgrade on page 366
• Sybase Control Center Reports Certificate Problem on page 368
• Security Error Triggered When Connecting to Sybase Control Center from RemoteBrowser on page 370
• Administrator Login Passes When Provider Is Not Available on page 370
• Host Name of Registered Resource Changed But Is Not Updated on page 371
• Management Issues with Clustered Data Tiers on page 372
• Poor Sybase Control Center Performance after Upgrade on page 373
• Sybase Control Center Communication with Unwired Server Fails on page 374
Troubleshoot Sybase Control Center
Sybase Control Center for Sybase Unwired Platform 369

Security Error Triggered When Connecting to Sybase Control Centerfrom Remote Browser
Problem: Connecting to Sybase Control Center from a browser that is remote triggers asecurity exception.
Solution: Ensure you have a security certificate installed in the Windows security store. SeeSetting Up Browser Certificates for Sybase Control Center Connections in Sybase ControlCenter for Sybase Unwired Platform.
See also• Launching Sybase Control Center Results in Rounded Rectangle Box or Empty ConsoleScreen on page 356
• Sybase Control Center Console Continually Refreshes on page 357
• Sybase Control Center Windows Service Fails to Start on page 357
• Sybase Control Center Windows Service Deleted on page 359
• Sybase Control Center Fails to Start on page 359
• Second Sybase Control Center Fails to Start on page 361
• Login Invalid in Sybase Control Center on page 362
• Login Fails in Sybase Control Center on page 363
• Login to Sybase Control Center Forces Ending Existing Session on page 364
• Administrator Account is Locked on page 365
• Browser Refresh (F5) Causes Logout on page 366
• Stale Version of Sybase Control Center After Upgrade on page 366
• Sybase Control Center Reports Certificate Problem on page 368
• Previous Administrator Credentials Used on page 369
• Administrator Login Passes When Provider Is Not Available on page 370
• Host Name of Registered Resource Changed But Is Not Updated on page 371
• Management Issues with Clustered Data Tiers on page 372
• Poor Sybase Control Center Performance after Upgrade on page 373
• Sybase Control Center Communication with Unwired Server Fails on page 374
Administrator Login Passes When Provider Is Not AvailableProblem: The configured authentication provider is unavailable but administration credentialsare still accepted.
Explanation: The administrator login credentials may be cached by Unwired Server.
Solution: If this behavior is undesired, reduce the cache timeout value used by the UnwiredServer security domain instance. For details, search for Authentication Cache Timeouts inSecurity.
Troubleshoot Sybase Control Center
370 Sybase Unwired Platform

See also• Launching Sybase Control Center Results in Rounded Rectangle Box or Empty ConsoleScreen on page 356
• Sybase Control Center Console Continually Refreshes on page 357
• Sybase Control Center Windows Service Fails to Start on page 357
• Sybase Control Center Windows Service Deleted on page 359
• Sybase Control Center Fails to Start on page 359
• Second Sybase Control Center Fails to Start on page 361
• Login Invalid in Sybase Control Center on page 362
• Login Fails in Sybase Control Center on page 363
• Login to Sybase Control Center Forces Ending Existing Session on page 364
• Administrator Account is Locked on page 365
• Browser Refresh (F5) Causes Logout on page 366
• Stale Version of Sybase Control Center After Upgrade on page 366
• Sybase Control Center Reports Certificate Problem on page 368
• Previous Administrator Credentials Used on page 369
• Security Error Triggered When Connecting to Sybase Control Center from RemoteBrowser on page 370
• Host Name of Registered Resource Changed But Is Not Updated on page 371
• Management Issues with Clustered Data Tiers on page 372
• Poor Sybase Control Center Performance after Upgrade on page 373
• Sybase Control Center Communication with Unwired Server Fails on page 374
Host Name of Registered Resource Changed But Is Not UpdatedProblem: An administrator changes the host name property of a registered resource; but inSybase Control Center, the old host name is still used and the management console forUnwired Platform does not appear.
Description: If you modify the resource properties for an Unwired Server in Sybase ControlCenter, the new host name or IP address is not used in establishing a connection to the server.
Solution: After changing the host name property of the resource, in the Perspective Resourcesview, right-click the resource and select Authenticate to update resource connectionproperties. You can then launch the management console successfully.
See also• Launching Sybase Control Center Results in Rounded Rectangle Box or Empty ConsoleScreen on page 356
• Sybase Control Center Console Continually Refreshes on page 357
• Sybase Control Center Windows Service Fails to Start on page 357
• Sybase Control Center Windows Service Deleted on page 359
Troubleshoot Sybase Control Center
Sybase Control Center for Sybase Unwired Platform 371

• Sybase Control Center Fails to Start on page 359
• Second Sybase Control Center Fails to Start on page 361
• Login Invalid in Sybase Control Center on page 362
• Login Fails in Sybase Control Center on page 363
• Login to Sybase Control Center Forces Ending Existing Session on page 364
• Administrator Account is Locked on page 365
• Browser Refresh (F5) Causes Logout on page 366
• Stale Version of Sybase Control Center After Upgrade on page 366
• Sybase Control Center Reports Certificate Problem on page 368
• Previous Administrator Credentials Used on page 369
• Security Error Triggered When Connecting to Sybase Control Center from RemoteBrowser on page 370
• Administrator Login Passes When Provider Is Not Available on page 370
• Management Issues with Clustered Data Tiers on page 372
• Poor Sybase Control Center Performance after Upgrade on page 373
• Sybase Control Center Communication with Unwired Server Fails on page 374
Management Issues with Clustered Data TiersProblem: if you install Unwired Platform and the cache database on Microsoft Cluster, youwill receive errors when trying to manage the cluster in Sybase Control Center. This is becauseMicrosoft Cluster uses node switches.
Solution: Replace the current entry for the cluster with a new entry that uses the computernode's hostname or IP address, rather than Unwired Platform cluster's hostname (the default).
See also• Launching Sybase Control Center Results in Rounded Rectangle Box or Empty ConsoleScreen on page 356
• Sybase Control Center Console Continually Refreshes on page 357
• Sybase Control Center Windows Service Fails to Start on page 357
• Sybase Control Center Windows Service Deleted on page 359
• Sybase Control Center Fails to Start on page 359
• Second Sybase Control Center Fails to Start on page 361
• Login Invalid in Sybase Control Center on page 362
• Login Fails in Sybase Control Center on page 363
• Login to Sybase Control Center Forces Ending Existing Session on page 364
• Administrator Account is Locked on page 365
• Browser Refresh (F5) Causes Logout on page 366
• Stale Version of Sybase Control Center After Upgrade on page 366
• Sybase Control Center Reports Certificate Problem on page 368
Troubleshoot Sybase Control Center
372 Sybase Unwired Platform

• Previous Administrator Credentials Used on page 369
• Security Error Triggered When Connecting to Sybase Control Center from RemoteBrowser on page 370
• Administrator Login Passes When Provider Is Not Available on page 370
• Host Name of Registered Resource Changed But Is Not Updated on page 371
• Poor Sybase Control Center Performance after Upgrade on page 373
• Sybase Control Center Communication with Unwired Server Fails on page 374
Poor Sybase Control Center Performance after UpgradeProblem: After upgrading to the latest version of Sybase Unwired Platform, Sybase ControlCenter performance is poor.
Explanation: This may indicate that Flash Player cache from the previous version of SybaseControl Center is filled and slowing down performance.
1. Navigate to C:\Documents and Settings\username\Application Data\Macromedia\Flash Player\#SharedObjects .
2. Delete all files under this folder.
Note: Alternatively, go to the following link from a browser: http://www.macromedia.com/support/documentation/en/flashplayer/help/settings_manager07.html. Use the WebsiteStorage settings panel to change storage capacity, or delete Websites to clean up the cache.
See also• Launching Sybase Control Center Results in Rounded Rectangle Box or Empty ConsoleScreen on page 356
• Sybase Control Center Console Continually Refreshes on page 357
• Sybase Control Center Windows Service Fails to Start on page 357
• Sybase Control Center Windows Service Deleted on page 359
• Sybase Control Center Fails to Start on page 359
• Second Sybase Control Center Fails to Start on page 361
• Login Invalid in Sybase Control Center on page 362
• Login Fails in Sybase Control Center on page 363
• Login to Sybase Control Center Forces Ending Existing Session on page 364
• Administrator Account is Locked on page 365
• Browser Refresh (F5) Causes Logout on page 366
• Stale Version of Sybase Control Center After Upgrade on page 366
• Sybase Control Center Reports Certificate Problem on page 368
• Previous Administrator Credentials Used on page 369
• Security Error Triggered When Connecting to Sybase Control Center from RemoteBrowser on page 370
Troubleshoot Sybase Control Center
Sybase Control Center for Sybase Unwired Platform 373

• Administrator Login Passes When Provider Is Not Available on page 370• Host Name of Registered Resource Changed But Is Not Updated on page 371• Management Issues with Clustered Data Tiers on page 372• Sybase Control Center Communication with Unwired Server Fails on page 374
Sybase Control Center Communication with Unwired Server FailsProblem: While using Sybase Control Center, a Communication with UnwiredServer failed appears.
Explanation: Sybase Control Center cannot connect to the Unwired Server and displays thiserror message. To confirm this issue, open the Sybase Control Center SCC_HOME\log\gateway.log and look for org.omg.CORBA.COMM_FAILURE,com.sybase.djc.rmi.iiop.BadMagicException, ororg.omg.CORBA.MARSHAL entries.
Solutions:
1. Ensure the protocol and port used by both the Unwired Server management port and theSybase Control Center managed resource registration entry match. For information aboutvalidating and changing these properties, see Adding or Updating Unwired ServerRegistration Properties in Sybase Control Center for Sybase Unwired Platform.
2. Validate that the configured port is the Unwired Server management port of 2000 or 2001.Sybase recommends that you not change these default values. If you have changed themand the connection fails, update the managed resource connection property to use thedefault.For more information about ports, see Port Number Reference in System Administration.For more information about validating and changing this port, see Registering a Resourceas an SCC Managed Resource in Sybase Control Center for Sybase Unwired Platform.
3. If the management security profile now uses SSL mutual authentication, validate that youhave installed certificates for mutual authentication into both Sybase Control Center's andUnwired Server's keystore. If each component does not have the opposite set ofcertificates, mutual authentication fails. Either install the missing certificates if mutualauthentication is required, or use the following procedure to recover from this scenario:a. If Unwired Server also has a standard management (non-secure) port available, you
can connect to that port by updating the Sybase Control Center resource (localhost)port number property and setting secure to "No". See Adding or Updating UnwiredServer Registration Properties in Sybase Control Center for Sybase UnwiredPlatform.
b. If Unwired Server does not have the standard management port enabled, then updatethe securityProfile property value in the SUP_HOME\Servers\UnwiredServer\Repository\Instance\com\sybase\djc\server\SocketListener\{ServerName}_iiops1.propertiesfile to use the"default" profile, and restart Unwired Server.
For information about installing certificates, see Changing Installed Certificates Used forUnwired Server and Sybase Control Center HTTPS Listeners, in the Security guide. For
Troubleshoot Sybase Control Center
374 Sybase Unwired Platform

information about changing the authentication method used by the security profile, seeCreating an SSL Security Profile in Sybase Control Center in Sybase Control Center forSybase Unwired Platform online help.
See also• Launching Sybase Control Center Results in Rounded Rectangle Box or Empty ConsoleScreen on page 356• Sybase Control Center Console Continually Refreshes on page 357• Sybase Control Center Windows Service Fails to Start on page 357• Sybase Control Center Windows Service Deleted on page 359• Sybase Control Center Fails to Start on page 359• Second Sybase Control Center Fails to Start on page 361• Login Invalid in Sybase Control Center on page 362• Login Fails in Sybase Control Center on page 363• Login to Sybase Control Center Forces Ending Existing Session on page 364• Administrator Account is Locked on page 365• Browser Refresh (F5) Causes Logout on page 366• Stale Version of Sybase Control Center After Upgrade on page 366• Sybase Control Center Reports Certificate Problem on page 368• Previous Administrator Credentials Used on page 369• Security Error Triggered When Connecting to Sybase Control Center from RemoteBrowser on page 370• Administrator Login Passes When Provider Is Not Available on page 370• Host Name of Registered Resource Changed But Is Not Updated on page 371• Management Issues with Clustered Data Tiers on page 372• Poor Sybase Control Center Performance after Upgrade on page 373• Adding or Updating Unwired Server Registration Properties on page 20• Configuring Management Port Properties on page 42
Platform Component Monitoring IssuesReview this list of documented issues for platform components monitored by Sybase ControlCenter.
See also• Using Sybase Control Center to Troubleshoot Unwired Platform on page 353• Collecting Administration Performance Data for Troubleshooting on page 354• Sybase Control Center Management Tier Issues on page 355• Server Tier Administration Issues on page 378
Troubleshoot Sybase Control Center
Sybase Control Center for Sybase Unwired Platform 375

• Package Deployment and Management Issues on page 390
• Application and Application User Management Issues on page 395
Monitoring Data Does Not Appear in History TabProblem: Monitoring data does not appear immediately in the History tab.
Explanation: The monitoring data is stored in memory to optimize database access, andperiodically flushed to the monitoring database.
Solution: Try either of these options:
• Wait for the data to be flushed. The default time period is five minutes.• Change the flush interval to a smaller value in Sybase Control Center:
1. In the left navigation pane, select Monitoring.2. In the right administration pane, select the General tab.3. Click Configuration.4. In the flush threshold section, ensure that Enable flush threshold configuration is
selected.5. Select one of:
• Number of rows – monitoring data that surpasses the specified number of rows isflushed from the console display. Enter the desired number of rows adjacent toRows. The default is 100.
• Time interval – monitoring data older than the specified time interval is flushedfrom the console display. Enter the desired duration adjacent to Minutes. Thedefault is 5.
• Either rows or time interval – monitoring data is flushed from the console displayaccording to whichever value is reached first: either the specified number of rowsor the specified time interval. Enter the desired rows and duration adjacent to Rowsand Minutes, respectively.
6. Retrieve the results list using the Sybase Control Center monitoring node.
See also• Domain Log Data Does Not Appear in History Tab on page 376
• Previously Existing Monitoring Data No Longer Appears on page 377
• Previously Existing Domain Log Data No Longer Appears on page 378
Domain Log Data Does Not Appear in History TabProblem: Domain log data does not appear immediately in the History tab.
Explanation: The domain log data is stored in memory to optimize database access, andperiodically flushed to the domain log database.
Solution: Try either of these options:
Troubleshoot Sybase Control Center
376 Sybase Unwired Platform

• Wait for the data to be flushed. The default time period is five minutes.• Change the flush interval to a smaller value in Sybase Control Center:
1. In the left navigation pane, expand the Domains folder and select the default domain.2. Select Log.3. In the right administration pane, select the Settings tab.4. Click Configuration.5. In the flush threshold section, ensure that Enable flush threshold configuration is
selected.6. Select one of:
• Number of rows – domain log data that surpasses the specified number of rows isflushed from the console display. Enter the desired number of rows adjacent toRows. The default is 100.
• Time interval – domain log data older than the specified time interval is flushedfrom the console display. Enter the desired duration adjacent to Minutes. Thedefault is 5.
• Either rows or time interval – domain log data is flushed from the console displayaccording to whichever value is reached first: either the specified number of rowsor the specified time interval. Enter the desired rows and duration adjacent to Rowsand Minutes, respectively.
7. Retrieve the results list using the Sybase Control Center domain log node.
See also• Monitoring Data Does Not Appear in History Tab on page 376
• Previously Existing Monitoring Data No Longer Appears on page 377
• Previously Existing Domain Log Data No Longer Appears on page 378
Previously Existing Monitoring Data No Longer AppearsProblem: Monitoring data that displayed previously no longer appears.
Explanation: By default, monitoring data is preserved in the database for seven days. Afterthat period, the data is removed.
Solution: Change the auto purge setting value in Sybase Control Center. Auto purge clearsobsolete data from the monitoring database once it reaches the specified threshold.
1. In the left navigation pane, select Monitoring.2. In the right administration pane, select the General tab.3. Click Configuration.4. In the auto purge section, ensure that Enable auto purge configuration is selected.5. Enter the length of time (in days) to retain monitoring data before it is purged.6. Restart the server.7. Retrieve the results list using the Sybase Control Center monitoring node.
Troubleshoot Sybase Control Center
Sybase Control Center for Sybase Unwired Platform 377

See also• Monitoring Data Does Not Appear in History Tab on page 376
• Domain Log Data Does Not Appear in History Tab on page 376
• Previously Existing Domain Log Data No Longer Appears on page 378
Previously Existing Domain Log Data No Longer AppearsProblem: Domain log data that displayed previously no longer appears.
Explanation: By default, domain log data is preserved in the database for seven days. Afterthat period, the data is removed.
Solution: Change the auto purge setting value in Sybase Control Center. Auto purge clearsobsolete data from the domain log database once it reaches the specified threshold.
1. In the left navigation pane, expand the Domains folder and select the default domain.2. Select Log.3. In the right administration pane, select the Settings tab.4. Click Configuration.5. In the auto purge section, ensure that Enable auto purge configuration is selected.6. Enter the length of time (in days) to retain domain log data before it is purged.7. Restart the server.8. Retrieve the results list using the Sybase Control Centerdomain log node.
See also• Monitoring Data Does Not Appear in History Tab on page 376
• Domain Log Data Does Not Appear in History Tab on page 376
• Previously Existing Monitoring Data No Longer Appears on page 377
Server Tier Administration IssuesReview this list of documented issues for Unwired Server or its internal synchronizationservices configured and administered by Sybase Control Center.
See also• Using Sybase Control Center to Troubleshoot Unwired Platform on page 353
• Collecting Administration Performance Data for Troubleshooting on page 354
• Sybase Control Center Management Tier Issues on page 355
• Platform Component Monitoring Issues on page 375
• Package Deployment and Management Issues on page 390
• Application and Application User Management Issues on page 395
Troubleshoot Sybase Control Center
378 Sybase Unwired Platform

Server List Not RetrievedProblem: No list of Unwired Server displays in Sybase Control Center. Instead, an ErrorRetrieving Server List message appears in the left navigation pane.
Scenario 1: No other error message appears.
If this is the case, one of the following explanations may apply:
• You are attempting to connect to a remote server that is not properly registered in SybaseControl Center.Solution: Manually register the remote server. By default, only Unwired Servers installedto the same host computer are automatically registered with Sybase Control Center. SeeGetting Started with Unwired Server Administration in the Sybase Control Center onlinehelp. If you have recently made changes to the environment, for example, by modifyingserver resource properties (login, password, host name, IP address, or port number),ensure that you reauthenticate after making the changes.
• Jetty caching in Sybase Control Center prevents the console from displaying the servertree. This is indicated by 404 errors in both the console URL and SCC_HOME\services\EmbeddedWebContainer\log\http-service.log (the HTTP access log).
Solution:1. Close Sybase Control Center.2. Stop Sybase Control Center X.X Service.3. Delete the contents of: SCC_HOME\services\EmbeddedWebContainer
\container\Jetty-X.X.XX\work.
4. Restart Sybase Control Center X.X service.
Scenario 2: The right administration pane shows an Authentication has failederror message.
If this is the case, one of the following explanations may apply:
• You have not performed the "Authenticate" step in Sybase Control Center after registeringthe resource or changing their credentials.Solution: In the Perspective Resources view, right click the server name and selectAuthenticate. In the default configuration, if you have used "supAdmin" to log in toSybase Control Center, select Use my current SCC login.
• The server IP may have changed.Solution: Update server resource properties, and repeat the "Authenticate" step describedabove. See the topic Sybase Control Center Fails to Start.
Scenario 3: The right administration pane shows a Connection unknown. EnsureServer is running.... message.
If this is the case, one of the following explanations may apply:
Troubleshoot Sybase Control Center
Sybase Control Center for Sybase Unwired Platform 379

• Unwired Server responded with an exception indicating a problem on the server.Solution: Check SUP_HOME\Servers\UnwiredServer\logs\<hostname>-server.log for details.
• The Sybase Control Center security provider is down or a system condition preventsSybase Control Center from authenticating the user for administration access.Solution: Ensure that the security provider is running and that its host is reachable from theSybase Control Center host.
Scenario 4: In some rare cases, the connection between Sybase Control Center and UnwiredServer cannot be established after trying the previous recommendations.
Solution: You may need to stop and restart the Sybase Control Center X.X windows service.After stopping the window service, make sure the process uaservices.exe is not running(or stop it from Windows task manager). Then log in to Sybase Control Center again.
Scenario 5: This may happen if you upgraded Sybase Unwired Platform to a newer version,and changed the server host name.
Solution: You need to complete some extra steps:
1. Change the listener prefix of httpListeners and iiopListeners for the new hostname in thenew server's properties file:Repository\Instance\com\sybase\djc\server\ApplicationServer\default.properties, <new_hostname>.properties
2. In Repository\Instance\com\sybase\djc\server\SocketListner\*.properties, rename all the<old_hostname>_<protocol>.properties into<new_hostname>_<protocol>.properties.
3. Use dbisqlc to update the table: cluster_installation in clusterdb,update cluster_installation set hostname='<new_hostname>'where hostname='<old_hostname>'.
See also• Unwired Server Fails to Start on page 381
• Error in Listing Application Connections andADMIN_WEBSERVICE_INVOCATION_ERROR in gateway.log on page 381
• Starting or Restarting a Remote Server from Sybase Control Center Fails on page 382
• Port Conflict Issues on page 384
• Unexpected Listener Startup or Connection Errors on page 385
• Refreshing Server Configuration Displays Only Partial Updates on page 385
• Users Connect with Old Credentials on page 387
• AuthorizationException Displays Instead of Status on page 388
• Increasing Messaging Queue Counts Degrades Performance on page 388
• Saving Server Configuration Fails Due to Certificate Validation Error on page 389
Troubleshoot Sybase Control Center
380 Sybase Unwired Platform

• Unknown Server Error Message on page 389
Unwired Server Fails to StartProblem: Starting Unwired Server from Windows services or the desktop shortcut fails.
Solution:
1. Ensure that the server license is valid and has not expired.2. Open Windows services to check that the services Unwired Server depends on for start-up
are running properly. Identify dependencies by right-clicking the service and selectingProperties.
3. Check SUP_HOME\Servers\UnwiredServer\log\serverName-server.log for error messages indicating the nature of Unwired Server start-up issues.
4. Check SUP_HOME\Servers\UnwiredServer\log\bootstrap**.log forpossible license errors.
See also• Server List Not Retrieved on page 379
• Error in Listing Application Connections andADMIN_WEBSERVICE_INVOCATION_ERROR in gateway.log on page 381
• Starting or Restarting a Remote Server from Sybase Control Center Fails on page 382
• Port Conflict Issues on page 384
• Unexpected Listener Startup or Connection Errors on page 385
• Refreshing Server Configuration Displays Only Partial Updates on page 385
• Users Connect with Old Credentials on page 387
• AuthorizationException Displays Instead of Status on page 388
• Increasing Messaging Queue Counts Degrades Performance on page 388
• Saving Server Configuration Fails Due to Certificate Validation Error on page 389
• Unknown Server Error Message on page 389
Error in Listing Application Connections andADMIN_WEBSERVICE_INVOCATION_ERROR in gateway.log
Problem: This message may indicate that an Unwired Server administrative component is notrunning.
If users report a problem listing application connections in Sybase Control Center, check forthis error message in the Sybase Control Center gateway.log file:
com.sybase.uep.sysadmin.management.mbean.UEPAdminException: com.sybase.uep.admin.client.AdminException: ADMIN_WEBSERVICE_INVOCATION_ERROR:java.security.PrivilegedActionException: com.sun.xml.internal.messaging.saaj.SOAPExceptionImpl: Message send failedjavax.management.MBeanException:
Troubleshoot Sybase Control Center
Sybase Control Center for Sybase Unwired Platform 381

Explanation: Usually this occurs when there is a conflict on the currently configured port forthe administration web service or a component of Unwired Server service went down for somereason.
One way to verify availability of the Web service is by accessing the following URL from thehost where Sybase Unwired Platform is installed: http://localhost:5100/MobileOffice/Admin.asmx.
Note: This link works from the host where Sybase Unwired Platform is installed, using thecorrect Messaging port. The default Messaging port is 5100, but this may vary depending onyour configuration.
Solution 1: Check Windows Application Event log for any error reported there. If the serviceis configured to run with a domain account and the password has been changed, you will needto update the password.
Solution 2: Make sure the administration Web service is up and running, and correctlyconfigured. Review Cannot Access Applications Tab and Web Service Error inTroubleshooting to reconfigure the port in case of conflict with existing port.
See also• Server List Not Retrieved on page 379• Unwired Server Fails to Start on page 381• Starting or Restarting a Remote Server from Sybase Control Center Fails on page 382• Port Conflict Issues on page 384• Unexpected Listener Startup or Connection Errors on page 385• Refreshing Server Configuration Displays Only Partial Updates on page 385• Users Connect with Old Credentials on page 387• AuthorizationException Displays Instead of Status on page 388• Increasing Messaging Queue Counts Degrades Performance on page 388• Saving Server Configuration Fails Due to Certificate Validation Error on page 389• Unknown Server Error Message on page 389
Starting or Restarting a Remote Server from Sybase Control CenterFails
Problem: After you have registered a remote server in Sybase Control Center, you cannot startor restart the server.
If the DNS server cannot resolve the host name of the machine on which the remote UnwiredServer is installed, or if the host has no internal DNS server, you cannot start, stop, or restartthat Unwired Server using your local instance of Sybase Control Center. Because this networkcommunication relies on name resolution, you must ensure that DNS is set up properly tosuccessfully control a remote Unwired Server.
Before attempting the following solutions, verify that:
Troubleshoot Sybase Control Center
382 Sybase Unwired Platform

1. Sybase Control Center is running on the remote host.2. A network connection can be established between your Sybase Control Center host and
the Sybase Control Center agent on the remote server's host.
If the DNS server cannot establish a connection, try the following:
Solution 1: Repair the network DNS server setup. If you or your network administrator cannotmodify the DNS, use solution 2.
Solution 2: Change the host name to its IP address in the Sybase Control Center service-config.xml file:
• If you cannot resolve the local host name, modify the file on the local instance of SybaseControl Center.
• If you cannot resolve the remote host name, modify the file on the remote instance ofSybase Control Center.
• If you cannot resolve both the remote and local host names, modify both files.
1. From the command line, verify the host name by running nslookup<hostname >.
2. If the DNS server cannot resolve the host name, edit the collocated SCC_HOME\services\RMI\service-config.xml file:
a. Log out of Sybase Control Center.b. Stop the Sybase Control Center X.X service.c. Open SCC_HOME\services\RMI\service-config.xml.
d. Locate this line: <set-property property="address"value="<hostname>" />.
If the line does not exist, add it under the <properties></properties>element in the file.
e. Change the value from the host name to the IP address of the host computer. If the IPaddress is already used, ensure it is valid (especially if the IP address has recently beenchanged).
f. Restart the Sybase Control Center X.X service.g. Log in to Sybase Control Center and proceed with your administrative tasks.
If the DNS server resolves the host name, but the problem persists, check that both:
• The remote host on which Unwired Platform and Sybase Control Center are installed canreceive UDP multicasts from the local host on which Sybase Control Center is installed,and
• The remote instance of Sybase Control Center uses RMI port 9999.
Solution 3: Make sure the hosts file includes complete entries for each node in the UnwiredServer cluster.
1. On each Unwired Server host, edit the hosts file, located at:C:\WINDOWS\system32\drivers\etc
Troubleshoot Sybase Control Center
Sybase Control Center for Sybase Unwired Platform 383

2. Add entries to identify the IP address and fully qualified network name of every other nodein the Unwired Server cluster.
See also• Server List Not Retrieved on page 379
• Unwired Server Fails to Start on page 381
• Error in Listing Application Connections andADMIN_WEBSERVICE_INVOCATION_ERROR in gateway.log on page 381
• Port Conflict Issues on page 384
• Unexpected Listener Startup or Connection Errors on page 385
• Refreshing Server Configuration Displays Only Partial Updates on page 385
• Users Connect with Old Credentials on page 387
• AuthorizationException Displays Instead of Status on page 388
• Increasing Messaging Queue Counts Degrades Performance on page 388
• Saving Server Configuration Fails Due to Certificate Validation Error on page 389
• Unknown Server Error Message on page 389
Port Conflict IssuesProblem: You have identified a Sybase Control Center X.X service port conflict.
Solution:
1. Identify the service with the port conflict in SCC_HOME\log\agent.log.
2. Use a text editor to open SCC_HOME\Services\Servicename\service-config.xml.
3. Change the port to an available port number.4. Save and close the file.
Search for Port Number Reference in System Administration for more information.
See also• Server List Not Retrieved on page 379
• Unwired Server Fails to Start on page 381
• Error in Listing Application Connections andADMIN_WEBSERVICE_INVOCATION_ERROR in gateway.log on page 381
• Starting or Restarting a Remote Server from Sybase Control Center Fails on page 382
• Unexpected Listener Startup or Connection Errors on page 385
• Refreshing Server Configuration Displays Only Partial Updates on page 385
• Users Connect with Old Credentials on page 387
• AuthorizationException Displays Instead of Status on page 388
• Increasing Messaging Queue Counts Degrades Performance on page 388
Troubleshoot Sybase Control Center
384 Sybase Unwired Platform

• Saving Server Configuration Fails Due to Certificate Validation Error on page 389• Unknown Server Error Message on page 389
Unexpected Listener Startup or Connection ErrorsProblem: You encounter unexpected listener startup or connection errors for UnwiredPlatform components. This is usually seen when Unwired Server is installed on a host in DMZ(De-Militarized Zone) within the internal and external firewalls.
Solution:
1. Verify that the TCP/IP filtering restriction is not in effect on the host machine.
To do so on Windows XP, navigate to: Control Panel > Network Connections > LocalArea Connection 1 > Properties > General tab > Internet Protocol (TCP/IP) >Properties > General tab > Advanced > Options tab > TCP/IP filtering > Properties
2. In TCP/IP Filtering, check to make sure the Enable TCP/IP Filtering (All Adopters)checkbox is not selected. This enables all Sybase Unwired Platform infrastructure ports.
If you do choose to select it, be sure to select Permit All for TCP Ports to enable all SybaseUnwired Platform infrastructure ports. These ports are documented in the Port NumberReference in the Installation Guide for Runtime.
3. Click OK to close each window and save your changes.
4. You can change “Local Area Connection 1” to the network connection name being used onthe machine.
5. Make sure users are not using third party port blockers, like McAfee Antivirus.
See also• Server List Not Retrieved on page 379• Unwired Server Fails to Start on page 381• Error in Listing Application Connections andADMIN_WEBSERVICE_INVOCATION_ERROR in gateway.log on page 381• Starting or Restarting a Remote Server from Sybase Control Center Fails on page 382• Port Conflict Issues on page 384• Refreshing Server Configuration Displays Only Partial Updates on page 385• Users Connect with Old Credentials on page 387• AuthorizationException Displays Instead of Status on page 388• Increasing Messaging Queue Counts Degrades Performance on page 388• Saving Server Configuration Fails Due to Certificate Validation Error on page 389• Unknown Server Error Message on page 389
Refreshing Server Configuration Displays Only Partial UpdatesProblem: The Refresh button in the Server Configuration node does not display correctproperties or values, despite changes being made and saved. Updates consequently appear to
Troubleshoot Sybase Control Center
Sybase Control Center for Sybase Unwired Platform 385
have been lost. In some scenarios, when you save the Server Configuration, it fails with themessage Save Failed.
Scenario 1: After restarting Unwired Server, refreshing the server configuration displays thefirst saved change, but not subsequent saved updates. The message Save Failed appears inthe administration console after you attempt to save an update.
In this scenario, the second save was likely unsuccessful. The message Save Failedindicates a conflict with the first set of updates.
Cumulative saved changes are applied successfully upon server restart only if these updates donot conflict. Attempting to save two conflicting sets of changes fails.
Solution: Inject a server restart in between each saved change to ensure that the requiredupdates are propagated across the server.
Scenario 2: After restarting Unwired Server, refreshing the server configuration displays thefinal saved update, but not previous ones.
The refresh action following saved configuration changes must be used in conjunction with anUnwired Server restart. Refreshing the server configuration displays the latest successfullysaved configuration information.
If you click Refresh in between two sets of saved changes, only the most recent saved updatesare applied during a server restart, as in the following workflow:
1. Make the first change.2. Save the configuration.3. Refresh the configuration.4. Make the second change.5. Save the configuration.6. Restart the server.7. Refresh the configuration.
In this sequence, only the second set of changes in step 4 are committed and consequentlydisplayed as the current set of properties used by Unwired Server.
Solution: If you refresh the configuration after saving updates to it, restart Unwired Serverimmediately to apply those changes before making another set of updates. Otherwise, the firstset of configuration changes will be lost. The Refresh button allows you to then validate thatthose changes are applied and used by Unwired Server. For details on how to refresh the serverin the correct sequence, see Saving and Refreshing an Unwired Server Configuration in theSybase Control Center for Sybase Unwired Platform online help.
See also• Server List Not Retrieved on page 379
• Unwired Server Fails to Start on page 381
Troubleshoot Sybase Control Center
386 Sybase Unwired Platform

• Error in Listing Application Connections andADMIN_WEBSERVICE_INVOCATION_ERROR in gateway.log on page 381
• Starting or Restarting a Remote Server from Sybase Control Center Fails on page 382
• Port Conflict Issues on page 384
• Unexpected Listener Startup or Connection Errors on page 385
• Users Connect with Old Credentials on page 387
• AuthorizationException Displays Instead of Status on page 388
• Increasing Messaging Queue Counts Degrades Performance on page 388
• Saving Server Configuration Fails Due to Certificate Validation Error on page 389
• Unknown Server Error Message on page 389
Users Connect with Old CredentialsProblem: A user changes password in the backend security system, but can still authenticatewith the previous password when connecting to Unwired Server.
Description: Unwired Server securely caches authenticated login credentials (1 hour bydefault), so that subsequent connection requests using the same credentials are not sent to theunderlying security provider until the login cache timeout is reached. However, if the sameuser uses changed credentials, the authentication request is sent to the underlying securityprovider. The authorization outcome is not cached and always delegated to the securityprovider in the security configuration.
Solution: To reduce the cache period, decrease the default authentication cache timeout for asecurity configuration using Sybase Control Center (go to the Cluster > Security > <securityconfigurationname> > Settings tab). Setting the property to 0 results in disabling theauthentication caching (not recommended for performance reasons).
See also• Server List Not Retrieved on page 379
• Unwired Server Fails to Start on page 381
• Error in Listing Application Connections andADMIN_WEBSERVICE_INVOCATION_ERROR in gateway.log on page 381
• Starting or Restarting a Remote Server from Sybase Control Center Fails on page 382
• Port Conflict Issues on page 384
• Unexpected Listener Startup or Connection Errors on page 385
• Refreshing Server Configuration Displays Only Partial Updates on page 385
• AuthorizationException Displays Instead of Status on page 388
• Increasing Messaging Queue Counts Degrades Performance on page 388
• Saving Server Configuration Fails Due to Certificate Validation Error on page 389
• Unknown Server Error Message on page 389
Troubleshoot Sybase Control Center
Sybase Control Center for Sybase Unwired Platform 387

AuthorizationException Displays Instead of StatusThe SCC administration console left-pane tree structure is not complete, and anAuthorizationException is reported..
Explanation: This may happen if the SCC administration console internal networkcommunications are not working properly.
Solution:
1. Close the Internet Explorer session.
2. Relaunch the SCC administrative console.
3. Log in as usual.
The internal network connection is resumed by restarting, so the tree displays informationand status properly.
See also• Server List Not Retrieved on page 379
• Unwired Server Fails to Start on page 381
• Error in Listing Application Connections andADMIN_WEBSERVICE_INVOCATION_ERROR in gateway.log on page 381
• Starting or Restarting a Remote Server from Sybase Control Center Fails on page 382
• Port Conflict Issues on page 384
• Unexpected Listener Startup or Connection Errors on page 385
• Refreshing Server Configuration Displays Only Partial Updates on page 385
• Users Connect with Old Credentials on page 387
• Increasing Messaging Queue Counts Degrades Performance on page 388
• Saving Server Configuration Fails Due to Certificate Validation Error on page 389
• Unknown Server Error Message on page 389
Increasing Messaging Queue Counts Degrades PerformanceProblem: Both inbound and outbound messaging queue counts were increased, however,performance degraded as a result.
Description: After increasing inbound and outbound message queue count, the defaultmaxThreads of IIOP socket listener is insufficient.
Solution: Increase the maxThreads of IIOP socket listener by editing thehostname_iiop1.properties file (located in SUP_HOME\Servers\UnwiredServer\Repository\Instance\com\sybase\djc\server\SocketListener\), and restart Unwired Server. The maxThread of IIOP socketlistener must be larger than the sum of all nodes needed IIOP thread counts.
Troubleshoot Sybase Control Center
388 Sybase Unwired Platform

See also• Server List Not Retrieved on page 379• Unwired Server Fails to Start on page 381• Error in Listing Application Connections andADMIN_WEBSERVICE_INVOCATION_ERROR in gateway.log on page 381• Starting or Restarting a Remote Server from Sybase Control Center Fails on page 382• Port Conflict Issues on page 384• Unexpected Listener Startup or Connection Errors on page 385• Refreshing Server Configuration Displays Only Partial Updates on page 385• Users Connect with Old Credentials on page 387• AuthorizationException Displays Instead of Status on page 388• Saving Server Configuration Fails Due to Certificate Validation Error on page 389• Unknown Server Error Message on page 389
Saving Server Configuration Fails Due to Certificate Validation ErrorProblem: Saving the server configuration after property updates yields this error:"[com.sybase.sup.admin.server.configuration.RuntimeServerConfigurationHandler] Invalidconfiguration object for: SyncServerConfiguration. Message : 'certificate validation failed.Update did not happen.'"
Solution: The message suggests that the server certificate has expired. Update the certificatefile to a non-expired version, and try to save again.
See also• Server List Not Retrieved on page 379• Unwired Server Fails to Start on page 381• Error in Listing Application Connections andADMIN_WEBSERVICE_INVOCATION_ERROR in gateway.log on page 381• Starting or Restarting a Remote Server from Sybase Control Center Fails on page 382• Port Conflict Issues on page 384• Unexpected Listener Startup or Connection Errors on page 385• Refreshing Server Configuration Displays Only Partial Updates on page 385• Users Connect with Old Credentials on page 387• AuthorizationException Displays Instead of Status on page 388• Increasing Messaging Queue Counts Degrades Performance on page 388• Unknown Server Error Message on page 389
Unknown Server Error MessageProblem: An internal server error occurs.
Solution: Check the logs for more details. Start by looking at the SCC log file SCC_HOME\log\gateway.log for the error message that occurred when user interface displayed the
Troubleshoot Sybase Control Center
Sybase Control Center for Sybase Unwired Platform 389

message. In most cases, the error is an unexpected failure condition in the server, and furtherdetails can be obtained by reviewing the SUP_HOME\Servers\UnwiredServer\logs\{ServerName}-server.log. If that does not help, contact your SybaseUnwired Platform technical support representative.
See also• Server List Not Retrieved on page 379
• Unwired Server Fails to Start on page 381
• Error in Listing Application Connections andADMIN_WEBSERVICE_INVOCATION_ERROR in gateway.log on page 381
• Starting or Restarting a Remote Server from Sybase Control Center Fails on page 382
• Port Conflict Issues on page 384
• Unexpected Listener Startup or Connection Errors on page 385
• Refreshing Server Configuration Displays Only Partial Updates on page 385
• Users Connect with Old Credentials on page 387
• AuthorizationException Displays Instead of Status on page 388
• Increasing Messaging Queue Counts Degrades Performance on page 388
• Saving Server Configuration Fails Due to Certificate Validation Error on page 389
Package Deployment and Management IssuesReview this list of documented issues for packages deployed or managed from Sybase ControlCenter.
See also• Using Sybase Control Center to Troubleshoot Unwired Platform on page 353
• Collecting Administration Performance Data for Troubleshooting on page 354
• Sybase Control Center Management Tier Issues on page 355
• Platform Component Monitoring Issues on page 375
• Server Tier Administration Issues on page 378
• Application and Application User Management Issues on page 395
Exporting or Deploying Large Packages FailsProblem: You used Sybase Control Center to export or deploy a large package, and it fails.
You can troubleshoot this error by opening the Sybase Control Center SCC_HOME\log\agent.log file and checking for a message tsimilar to:
exception:java.lang.IllegalStateException: Form too large
Troubleshoot Sybase Control Center
390 Sybase Unwired Platform

Explanation: This message means that the package, not the form, is too large. The Web serverthat hosts Sybase Control Center cannot manage the data. A number such as 273310 indicatesthe size of the package in kilobytes (that is, 273,310).
1.2. Use a text editor to open SCC_HOME\services\EmbeddedWebContainer
\service-config.xml.
3. Set the jetty.maxFormContentSize to a value larger than the default. The defaultis 10000000. For example: <set-property property="jetty.maxFormContentSize" value="2000000" />
4. Save the file.
See also• Invalid DOE-C User Error for an SAP Server Connection on page 391
• Troubleshoot CTS Imports on page 392
Invalid DOE-C User Error for an SAP Server ConnectionProblem: The General tab of a DOE-C package displays an invalid user account error for theError State property.
Explanation: SAP servers could not authenticate this user with the Username and Passwordconfigured for this package.
User names and passwords configured for the connection pool cannot be tested before they areused. Errors are only reported after the connection fails. Errors typically occur during anadministrative operation (such as unsubscribing a subscription), or in response to anasynchronous message for a subscription from DOE. On a system with existing DOE-Csubscriptions, the initial resynchronization at startup would implicitly test the technical user.
Solution: Check the username and password configured for this user in the Connection Poolconfigured for the package. If it is incorrect, edit the properties used.
Note: If you change the username or password property of a DOE-C connection, you mustreopen the same dialog and click Test Connection after saving. Otherwise the error stateof this DOE-C package cannot be cleaned up. If you do not click Test Connection, theusername or password is correct, but the error state of the DOE-C package cannot be cleanedup.
See also• Exporting or Deploying Large Packages Fails on page 390
• Troubleshoot CTS Imports on page 392
Troubleshoot Sybase Control Center
Sybase Control Center for Sybase Unwired Platform 391

Troubleshoot CTS ImportsWhen using a CTS transport request to import a package or application, a return code anddeployment message is recorded in the CTS detail log.
Table 25. Import MBO Package Return Codes
Return Code Meaning Possible Causes
0 The import has beensuccessfully comple-ted.
The MBO package is imported suc-cessfully into the target UnwiredServer.
8 Content errors occur-red when importing.
• The imported archive is not avalid MBO package archive.Create a new transport requestand import it.
• The specified import domaindoes not exist in the target Un-wired Server. Create the re-quired import domain in thetarget system or specify a dif-ferent domain, then retry theimport.
• The target Unwired Server doesnot have the security configu-ration used by the package, orthe security configuration is notassigned to the specified do-main. Create the required se-curity configuration in the tar-get system and retry the import.
• The target Unwired Server doesnot have the server connectiondefinition that is used by theMBO package in the specifieddomain. Create the requiredserver connection in the targetsystem and retry the import.
Troubleshoot Sybase Control Center
392 Sybase Unwired Platform

Return Code Meaning Possible Causes
12 A tool issue occurredduring the import. Re-solve the problem andimport the sametransport requestagain.
• The target Unwired Server isdown.
• The deployment method prop-erties are not set correctly in thetarget system in CTS. For ex-ample, the Deploy URI is notcorrect.
• The provided user name orpassword is incorrect, or theuser does not have authoriza-tion to perform the import op-eration.
Table 26. Import Hybrid App Return Codes
Code Meaning/Action Possible Causes
0 The import has been successful-ly completed.
The Hybrid App package is im-ported successfully into the Un-wired Server.
8 Content errors occurred whenimporting.
The archive is not a valid HybridApp archive. Create a new trans-port request and import it.
12 A tool issue occurred during theimport. Resolve the problemand import the same transportrequest again.
• The target Unwired Serveris down.
• The provided user name orpassword is ncorrect, or theuser does not have authori-zation to perform the importoperation.
Table 27. Import Application Return Codes
Code Meaning Return Error
0 The import has beensuccessfully completed.
The application is imported suc-cessfully into the target UnwiredServer.
Troubleshoot Sybase Control Center
Sybase Control Center for Sybase Unwired Platform 393

Code Meaning Return Error
8 Content errors occurredwhen importing.
• The imported archive is not avalid application archive. Cre-ate a new transport request andimport it.
• The specified import domaindoes not exist in the target Un-wired Server. Create the re-quired import domain in the tar-get system, or specify a differentdomain, then retry the import.
• The archive does not include theMBO package archive used bythe application. Create a newtransport request and retry theimport .
• The security configuration inthe application connection tem-plate does not exist on the targetUnwired Server. Create the re-quired security configuration inthe target system and retry theimport.
12 A tool issue occurredduring the import. Re-solve the problem andimport the same trans-port request again.
The target Unwired Server is down.
13 A tool issue occurredduring the import. Re-solve the problem andimport the same trans-port request again.
The provided user name or pass-word is incorrect, or the user doesnot have authorization to performthe import operation.
Note: If the application archive includes the MBO package archive used by the application,the codes may indicate the failure conditions listed for MBO packages.
See also• Exporting or Deploying Large Packages Fails on page 390
• Invalid DOE-C User Error for an SAP Server Connection on page 391
Troubleshoot Sybase Control Center
394 Sybase Unwired Platform

Application and Application User Management IssuesReview this list of documented issues for applications or application users managed by SybaseControl Center.
See also• Using Sybase Control Center to Troubleshoot Unwired Platform on page 353• Collecting Administration Performance Data for Troubleshooting on page 354• Sybase Control Center Management Tier Issues on page 355• Platform Component Monitoring Issues on page 375• Server Tier Administration Issues on page 378• Package Deployment and Management Issues on page 390
Wrong Application for Code ErrorProblem: Application registration using a Windows Mobile emulator appears successful inSybase Control Center, but the application log shows a Wrong Application for Codeerror when the application attempts to connect to Unwired Server.
This error occurs when you:
• Hard reset a Windows Mobile device emulator,• Close an emulator without saving the emulator state, or• Uninstall and reinstall the Unwired Server client software on the device.
Explanation: Because emulators do not generate unique application IDs, the Unwired Servermessaging software on the device creates an application ID during installation and stores it inthe emulator application registry. After registration, this permanent link between the emulatorand the application ID must remain.
Hard resetting the emulator, closing the emulator without saving the emulator state, oruninstalling and reinstalling the Unwired Server client software purges the device registry andbreaks the link between Unwired Server and the device software. When you attempt toreconnect, Unwired Server creates a new application ID for the device. Without the originalapplication ID, the server cannot identify the device emulator, and therefore, cannot establisha relationship between the application and the activation code.
To avoid this problem so that the emulator and server remain synchronized, always save theemulator state before you close the emulator, and refrain from hard resetting the emulator, oruninstalling and reinstalling the client software.
Note: Before saving the state of an emulator, always uncradle the emulator using the DeviceEmulation Manager. This allows the device emulator to be cradled when the save image isloaded and used in the future.
Troubleshoot Sybase Control Center
Sybase Control Center for Sybase Unwired Platform 395

Solution: Reconnect the emulator by either:
1. Deleting the original application from Unwired Server, then reregister the application,or
2. Reregistering the application
See also• User Name of Registered Application Connection Not Displayed on page 396
• Internal Server Error When Clicking Applications on page 396
User Name of Registered Application Connection Not DisplayedProblem: The configured user name of a registered application connection is not displayedwhen you later review the properties for a device in Sybase Control Center. The ApplicationConnections tab shows other properties but not the user name.
Explanation: The user name used for a application connection registration is not stored orhandled as an application property.
Solution: To view the user name of the registered application in Sybase Control Center:
1. In the left navigation pane, click the Applications node.2. In the right administration pane, click the Application Users tab.3. In the table of registered users, for the user.4. You can also select the Application Connections tab, and check the users properties.
See also• Wrong Application for Code Error on page 395
• Internal Server Error When Clicking Applications on page 396
Internal Server Error When Clicking ApplicationsProblem : Once logged into Sybase Control Center, the administrator clicks Applications inthe navigation pane, and an Internal server error message is displayed.
After receiving this error, the administrator is further unable to register any applicationsbecause the OK button remains disabled.
Solution:
1. Validate the error:a. Open SCC_HOME\log\gateway.log.
b. Look for this error: Caused by:com.sybase.uep.sysadmin.management.exception.ImoWsException: An error occurred loading a configuration file:
Troubleshoot Sybase Control Center
396 Sybase Unwired Platform
Attempted to read or write protected memory. This isoften an indication that other memory is corrupt.
2. Validate that the Sybase Unwired Server service is running and there are no errors beingreported in the Windows Application event log by that service.
3. Validate that the Messaging Server Administration Web Service is running:a. Open a Web browser.b. Open http://localhost:5100/MobileOffice/admin.asmx.c. Select the GetDeviceList2 method, then click Invoke.d. Check whether a valid XML response returns.
4. If anything in steps 1-3 is unexpected, you may have an installation or configuration issue.Confirm this by:a. Restarting the Sybase Unwired Server service.b. Once available, repeat steps 2-3.
• Otherwise, open Sybase Control Center, and click Applications to try registeringan application again.
5. If you still get the same error and same behavior, contact Sybase Support.
See also• Wrong Application for Code Error on page 395
• User Name of Registered Application Connection Not Displayed on page 396
Troubleshoot Sybase Control Center
Sybase Control Center for Sybase Unwired Platform 397

Troubleshoot Sybase Control Center
398 Sybase Unwired Platform

Index-Xmx maximum memory option 18-XX:MaxPermSize permanent memory option 18
Aaccessibility 23administration
core administration nodes 2administration performance 354administration perspective
empty Sybase Control Center console screen356
gray Sybase Control Center console screen356
rectangular box instead of Sybase ControlCenter console 356
administration tasksdomain administrator 38help desk operator 39platform administrator 37
administration usersconfiguring 103, 181maintaining 103, 181
administratorsdomain administrator role 38help desk role 39login accepted when authentication provider
unavailable 370platform administrator role 36
Adobe Flex 23agent.log file 357Alert Message property 270alerts
effects of repository purging on history 31Alerts property 270alias, certificate 176Allow Roaming property 274Apache
Relay Server configuration 75APNS Device Token property 270Apple push notification properties 270application 240application connection
activation options 262application connection template 266–268
application connection templatesadministration overview 5
application connectionsadministration overview 5assigning Hybrid Apps to 260reviewing package users for 264
application creation wizard 239application ID
guidelines 241application log 154
registration log data 154setting log data 155
application management issues 395application settings 271application user management issues 395application users 243applications 238, 239, 253
administration overview 5Appliction Connection properties 263audit destination 225audit filter 222audit formatter 226authentication
provider unavailable but administrator can login 370
authentication cache timeout 185authentication failure 144authorization
DCNs 230Push notifications 230
AuthorizationException 388auto purge
monitoring data 324removing domain log data 378removing monitor data 377
automated message processing 274automatic registration 271
Bbackups
about 27changing the schedule 29forcing 29restoring from 30scheduling 28
Index
Sybase Control Center for Sybase Unwired Platform 399
suspending and resuming 29Badges property 270
Ccache 290cache database server pool size 105cache group
configuring 290purging 295status statistics 352
cache intervalreal time 295
cache monitoring 350cache performance statistics 351cache refresh
custom 293daily 292hourly 292never schedule 295on demand 291scheduling 291
cache statisticsviewing 331
cache timeout, setting 185caching of login credentials 387cannot start Unwired Server 381CDB 290certificate alias 176certificate problems 368CertificateAuthenticationLoginModule
authentication modulefor SAP single sign-on and X.509 204
certificatesfor context variables 314managing for RSOE 86
changingcache database server pool size for Unwired
Platform 105cleaning up the Flash Player cache 13, 373client application logs
checking 155cleaning 156
Client dispatcherconfiguring for HTTP client connections 47
client variablesconfiguring for Hybrid Apps 317
cluster configurationconfiguration cache properties 56performance properties 48
web container properties 54cluster properties 62clusters 41
administration overview 3affected by configuration changes 41cluster properties 41status, checking 64
communication portssecurity configuration 49SSL encryption 49, 51
configuration cache properties, configuring 56configuration changes
effect on clusters 41configuration files
Relay Server 69connection errors 385connection templates, creating 157Connections 115connections, creating 157console
about 32commands 32
context variables 316configuring 314
control flag 189controlFlag 189correlating log data across subsystems 135credentials
old, ability to authenticate with 387CTS+
troubleshooting 392custom settings for messaging devices 274customization resource bundle
deleting from applications 251customization resource bundles
assigning to all existing applicationconnections 249
assigning to application connections 249deploying for applications 248description for applications 246exporting from applications 250guidelines and recommendations for
applications 247managing for applications 250unassigning from applications 250viewing for an application 250
Index
400 Sybase Unwired Platform

Ddata cache
cache 290data change notification monitoring
histories 343performance statistics 343
data change notification statistics 342databases
monitoring 324DCN log data
general DCN 142, 143Hybrid App DCN 142, 143
Debug Trace Level property 274Debug Trace Size property 274degrading performance 388deleting 268Delivery Threshold property 270deploy failure for large packages 390deploying Hybrid App packages 307deployment
Hybrid App archives 279package archives 279
deployment issues for packages 390device log error 395Device Log Items property 274device notification
history statistics 344performance statistics 345
device notification log data 142device notification monitoring 344, 345device notifications
configuring 297statistics 344
Device Subtype property 275device user name not displayed 396device users
assigning Hybrid App packages 317devices
Apple push notification properties 270user assignments 255
dispatcher log 152dispatcher log data 153replication log data 152service log data 153
DNS server failure 359documentation roadmap 1DOE-C
invalid user 306, 391DOE-C packages 304
domain 104security configuration, choosing 180security, assigning security configuration 231security, configuring 179
domain administrator 38domain administrators
registering 102domain log data
DOE connections 145JDBC connections 147not displayed 378REST connections 148SAP connections 148SOAP connections 149
domain logs 110domain role mapping 181domains 99
administration overview 7creating 100deleting 101enabling 100
E
e-mailredirecting with matching rules 313
editing an application connection 263EIS
connection properties 159Push operations 230
Enable property 270enabling log profile 117enterprise information systems
See EISenvironment variables
SCC_MEM_MAX 16, 18SCC_MEM_PERM 16, 18
error messageslogging levels 58server logs 95
errorsuser account failure 306, 391
errors log data 144export failure for large packages 390exporting log data 136
Index
Sybase Control Center for Sybase Unwired Platform 401

F
F5 (browser refresh)logging out of Sybase Control Center 366
Flash Player 14cleaning up the cache after upgrade 13, 373
flush batch size for monitoring data 324flush threshold for monitoring data 324full backups 28
G
gateway.log file 381general application properties 240getting started after installing 14GZIP 54
H
hard coded credentials 316heat chart
launch icon 22help command (console) 33help desk 39help system, accessing 15History tab is blank 376host name changes not reflected in Sybase Control
Center 371host name resolution failure 359HTTP
configuring client dispatcher properties for 47HTTP compression 54HTTPS
RSOE certificates 86Hybrid App 307
setting defaults 318viewing default 265
Hybrid App packagesassigning device users 317configuring 311configuring notification mailbox 310deploying 307deploying and managing 307
Hybrid Appsassigning to application connections 260checking users and queues 319configuring client variables 317configuring display name and icon 312Hybrid App packages administration 10
Iicons
in SCC toolbar 22IIS
Relay Server configuration 75IMSI property 275incremental backups 28info command (console) 33invalid login 362iOS push notification properties 270
JJava system properties
displaying information about 33JDBC properties 160jvmopt memory options for Windows services 16,
18
KKeep Alive (sec) property 274keyboard shortcuts for Adobe Flex 23keytool.exe 190
Llayout for SCC views 26LDAP
configuration properties 191processes 362stacking providers 190startup 362
LDAP SSL configuration 190licenses
servers, reviewing 63listener startup errors 385log files
agent.log file 357scc_repository.log 357server logs 58
log filters 121log profile 117log, server
refreshing 97logging in to Sybase Control Center
clearing authentication parameters 369
Index
402 Sybase Unwired Platform

logging in to Sybase Control Center - first user 14logging levels 58logging out of a server 16logging out of Sybase Control Center
unintentionally, using F5 browser refresh 366logical roles
DCNs 230Push notifications 230
login accounts, defaultabout 14
login invalid 362login session timeout
setting 18login troubleshooting
Sybase Control Center 369logs
application 134application logs 134client application 155dispatcher 132dispatcher logs 132DOE connections 129domain-level 110general DCN 126Hybrid App DCN 126JDBC connections 129life cycles 58outbound enabler 90REST connections 129SAP connections 129server 95server, configuring 58SOAP connections 129synchronization 124synchronization logs 124Unwired Server 95
Mmanagement console unavailable 371management issues for packages 390managing Hybrid App packages 307Managing properties 268manual control of message processing 274Manual registration 239mapping roles
domain-level 181mapping roles for a package 282matching rules for redirecting e-mail
configuring 313
testing 314MBO create error history 303MBO data
See cacheMBO delete error history 303MBO error history 303MBO operation error history 303MBO packages
contents, exporting 286MBO status statistics 351MBO update error history 303memory
configuring 16displaying information about 33
messaging 46configuring properties 46configuring subscriptions 299
messaging device advanced properties 274messaging device connection properties 273messaging devices
custom settings 274information properties 275
messaging history monitoringdetail view 338summary view 338
messaging monitoringhistory 338performance statistics 340request statistics 337
messaging packagesstatistics 347
messaging queue counts 388messaging queues
statistics 341status data 342
messaging statistics 337messaging synchronization
monitoring 338messaging users
monitoring 349Microsoft Cluster issues 372mobile business objects
cache group status statistics 352clearing error history 303reviewing error history 303
mobile devicesproperties identifying 275
Model property 275
Index
Sybase Control Center for Sybase Unwired Platform 403

monitoring 328cache 350cache group status 352cache performance 351data change notification statistics 342database, configuring 324device notification history 344device notification performance 345device notifications 344issues for platform components 375MBO status 351messaging queue statistics 341messaging statistics 337messaging synchronization 338messaging user statistics 349replication statistics 333replication user statistics 349replication-based synchronization 334statistic categories 331user security 332user statistics 348
monitoring data 328auto purge 324exporting 329flush batch size 324flush threshold 324not displayed 377purging 329reviewing 328searching 330
monitoring profiles 326creating and enabling 326
monitoring schedulecustom 327
monitoring setupeffect on clusters 41
monitoring Unwired Platform 321overview 11, 322
N
named security configurationdomain, selecting 180
Navigating applications 242notification mailbox 310
O
onboarding 5
operation error history 303Outbound Enabler 86
configuring 75, 76, 87deleting configuration 91downloading log files 90generate configuration file 74, 90information in SCC 92list of 91loading certificates 86logging options 89managing 90setting up 75, 87startup options 76, 88, 89
Ppackage deployment and management issues 390package role mapping 282package statistics 346package subscriptions
configuring 298managing 300pinging 300recovering 300resuming 300resynchronizing 300suspending 300unsubscribing 300
package usersreviewing for an application connection 264
packagesadministration overview 8cache properties 290contents, importing 287enabling and disabling 289, 305Hybrid App administration overview 10replication based synchronization 288security 296
passwordsold, ability to authenticate with 387
payloads 116performance
Sybase Control Center 13, 373performance data
administration 354performance degradation 388performance properties
configuring for cluster 48performance properties, configuring for server 84,
85
Index
404 Sybase Unwired Platform
Perspective Resources viewabout 23show/hide icon 22
perspectivesabout 23creating 24removing 24renaming 25
Phone Number property 275pinging a server 84platform administrators 36platform component monitoring issues 375port conflicts
among multiple Sybase Control Centerversions 361
with Sybase Control Center X.X 384port numbers 362ports
displaying information about 33postinstallation tasks 14problems starting Sybase Control Center services
357problems with application and application user
management 395production edition 63profile definitions 111properties
advanced, of messaging devices 274connection reference 159custom settings for messaging devices 274Hybrid Apps 312, 317information on messaging devices 275monitoring database 324package subscriptions, configuring 298push notification for iOS 270security provider configuration 191
proxy 131Proxy 130proxy log
proxy log data 151proxy properties 178purging a cache group 295purging domain logs 137Push 130push log data 150push notification properties for iOS 270
Qqueue counts 388
queuesHybrid App, checking 319messaging, status data 342
RRefreshing application view 244registered application 104reinstalling Sybase Control Center service 359Relay Server
configuration properties in Relay Server tab80
custom configuration 77deleting configuration 80generate RSOE configuration 74, 90information in SCC 80managing 77outbound enabler 86properties, viewing or editing 77
Relay Server installationconfiguring outbound enabler connection
settings 76, 87configuring outbound enabler general
properties 75, 87configuring outbound enabler start options 76,
88configuring Unwired Server to use Relay
Server 69custom configuration 71defining server farms and cluster nodes 73, 79generating outbound enabler configuration file
74, 90generating Relay Server configuration file 75launching Relay Server configuration wizard
72modifying Relay Server configuration file 75outbound enabler start options reference 89quick configuration 70reviewing configured Relay Server properties
74, 79setting Relay Server general properties 72, 77
Relay Server Outbound Enabler 75, 86, 87configuring 75, 76, 87deleting configuration 91downloading log files 90generate configuration file 74, 90information in SCC 92list of 91loading certificates 86logging options 89
Index
Sybase Control Center for Sybase Unwired Platform 405

managing 90setting up 75, 87startup options 76, 88, 89
Relay Server URL Prefix property 274Relay Servers 69replication history monitoring
detail view 334summary view 334
replication monitoringhistory 334performance statistics 336request statistics 333
replication packagesconfiguring subscriptions 297statistics 346
replication statistics 333replication subscription templates 297replication synchronization 42replication users
monitoring 349replication-based synchronization
monitoring 334repository 27
backing up 29changing backup schedule 29configuring purging 31restoring from backup 30scheduling backups 28
Request Response 131resource explorer
launch icon 22resources
remote, registering manually 20restarting a remote server
unsuccessful 382restarts, configuring in Windows 12retrieving logs 119role mapping
domain-level 181package 282
RSOE 75, 87rules for redirecting e-mail
configuring 313testing 314
SSAP
user account error 306, 391SAP audit measurement file 67, 68
SAP connection properties 173SAP License Audit 67, 68SAP single sign-on
deploying packages and bundles 304SAPSSOTokenLoginModule authentication
properties 218stacking login modules 189
SAP single sign-on with X.509CertificateAuthenticationLoginModule
authentication module 204SAP Sybase SAP® Data Orchestration Engine
Connector connections 173SAP Sybase SAP® Data Orchestration Engine
Connector properties 173SAP/R3 properties 172SAPSSOTokenLoginModule authentication
moduleproperties 218
SCC console tree is not complete 388SCC_MEM_MAX 16, 18SCC_MEM_PERM 16, 18scc_repository.log file 357searching 253, 255Secure Sockets Layer encryption
communication ports 49secure synchronization port 43security
administration overview 10domain, assigning security configuration 231domain, configuring 179monitoring 332
security certificatesSee SSL certificates
security configurationchoosing 180effect on clusters 41packages 296removing 180
security configuration, creating 185security configurations
overview 183security error when connecting to Sybase Control
Center 370security log data 144security profile
communication port 49management port 49SSL certificates 50
Index
406 Sybase Unwired Platform

security profiles 51communication port 51management port 51
security provider configuration properties 191security providers, reordering 191server
status 84server compression 54server configuration
effect on clusters 41system performance properties 84, 85
server licensing 63server log
deleting 97searching 96
server log data 151server tier administration issues 378servers
log, refreshing 97logging out of 16logs, configuring 58pinging 84stopping and starting 82suspending and resuming 83
serviceslisting 33
services, Windowsconfiguring SCC memory options for 18running Sybase Control Center as 12
shutdown command (console) 34SiteMinder authentication 232SiteMinder authentication cache timeout 234SiteMinder security configuration 235SiteMinder single sign-on 233SiteMinder SSO 233SiteMinder Web agent 235SLD: uploading payloads with SCC 66SOAP Web Services properties 176Sounds property 270SSL
mutual authentication 176RSOE certificates 86
SSL certificates 15, 50error when missing 370setting up 15
SSL encryptioncommunication ports 49security profile 51
SSL keystore 50
SSL truststore 50stacking LDAP modules 190stacking login modules
for SAP single sign-on 189start up, automatic, configuring in Windows 12starting a remote server
unsuccessful 382starting servers 82statistics
application connection security 144for messaging packages 347for replication packages 346
statistics charteffects of repository purging on 31
status command (console) 35stopping a remote server
unsuccessful 382stopping servers 82subscription templates
configuring for replication packages 297creating 297
subscriptions, DOE-Creviewing 306
SUP DCN User 230SUP Push User 230SupCertificateIssuer 316SupCertificateNotAfter 316SupCertificateNotBefore 316SupCertificateSubject 316SupPassword 316
for context variables 314SupUser 316
for context variables 314Sybase Control Center
about 1accessibility 23connecting a browser to 14console commands 32dependence on Sybase Control Center X.X 12failure to start 359functionality not applicable to Unwired
Platform 22logging out unintentionally with F5 366management tier issues 355reinstalling the service 359second version fails to start 361security error when connecting 370service port conflicts 384setting up SSL certificates 15
Index
Sybase Control Center for Sybase Unwired Platform 407
starting in Windows 12starting in Windows as a service 12stopping in Windows 12Windows service fails to start 357
Sybase Control Center performance 13, 373Sybase Control Center service 362sync group
configuring 289synchronization
configuring general properties 43synchronization listener properties 43synchronization log
cache refresh 140data services interface 141data sync 138operation replay 138result checker 140subscription 139
synchronization log datacache refresh 137data services interface 137data synchronization 137operation replay 137result checker 137subscription 137
synchronization port 43synchronization problems 381system data, reviewing 328System Landscape Directory (SLD)
registering destinations for 65system licensing 63system properties
displaying information about 33
TTCP/IP filtering causing errors 385timeout
setting for login sessions 18toolbar icons 22troubleshooting
authentication failure 144Outbound Enabler 90Relay Server Outbound Enabler 90Sybase Control Center problems 353Unwired Server problems 381Unwired Server startup 381user account failure 391
troubleshooting Microsoft Cluster 372troubleshooting performance issues 354
troubleshooting Unwired Platform with SCC 353
U
uafshutdown.bat 12uafstartup.bat 12Unwired Platform
configuring 41monitoring 11, 322
Unwired Platform administrators 36Unwired Platform console
opening 19Unwired Platform management console unavailable
371Unwired Server
checking status 84configuration changes unsuccessful 385extended session 362importing package contents 287list does not appear in Sybase Control Center
379logging 95logging out of 16moving Hybrid App package contents from or
to 286moving MBO package contents from or to
286pinging 84refresh after changing configuration 385server list 82services provided by 81startup failure 381stopping and starting 82suspending and resuming 83
Unwired Serversadministration overview 5
user interface, about 21users 255
able to connect with old password 387administration overview 5administration, configuring 103, 181administration, maintaining 103, 181deleting 255devices used by 255Hybrid App, checking 319messaging statistics 349monitoring 348not displayed for registered devices 396security statistics 332
Index
408 Sybase Unwired Platform

Vvariables, context
configuring 314view layouts, SCC
cascade 26close all 26horizontal tiling 26minimize all 26restore all 26vertical tiling 26
Viewing applications 242views
icons for managing 22views, SCC
about 25bringing to front of perspective 25
closing 25maximizing 25minimizing 25opening 25restoring 25
W
web container properties, configuring 54Windows
starting, stopping Sybase Control Center 12
X
XML audit file 67, 68
Index
Sybase Control Center for Sybase Unwired Platform 409

Index
410 Sybase Unwired Platform