
summer waves® elite rectangular frame pool - Cash Piscines
15
OWNER′S MANUAL DISTRIBUTED BY: Polygroup ® Trading Limited Unit 606, 6th Floor, Fairmont House, No.8 Cotton Tree Drive, Central, Hong Kong SUMMER WAVES ® ELITE RECTANGULAR FRAME POOL FOR ABOVE GROUND SWIMMING POOLS 13' - 32' (3.96 m - 9.75 m) Models Elite Rectangular Frame Pool_EU_EN Should you encounter a problem with your Polygroup ® product, please DO NOT return the product to the place of purchase. All warranty claims must be made directly to Polygroup ® . For any setup and troubleshooting issues, please visit support.polygroupstore.com. You may be asked to return all or parts of the product for inspection and/or repair. Do not return any products to Polygroup ® without a Return Merchandise Authorization number. READ AND KEEP THESE INSTRUCTIONS FOR FUTURE REFERENCE © 2020
-
Upload
khangminh22 -
Category
Documents
-
view
1 -
download
0
Transcript of summer waves® elite rectangular frame pool - Cash Piscines
OWNER′S MANUAL
DISTRIBUTED BY: Polygroup® Trading LimitedUnit 606, 6th Floor, Fairmont House, No.8 Cotton Tree Drive, Central, Hong Kong
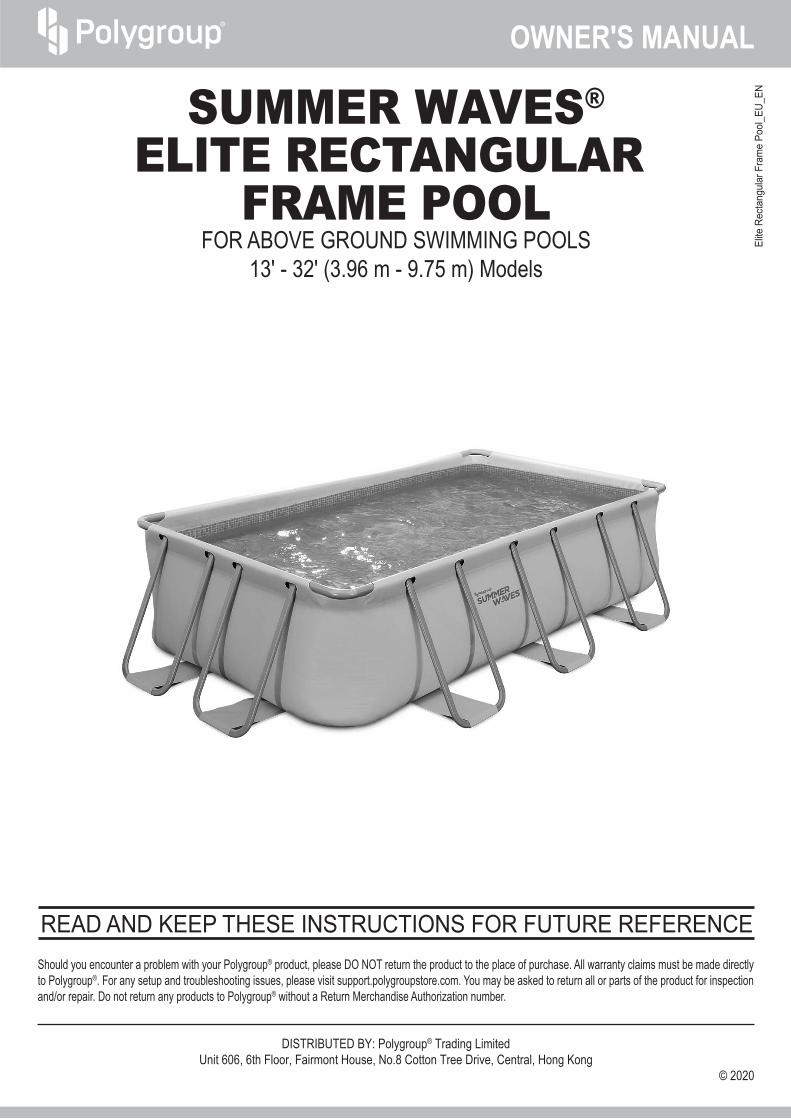
SUMMER WAVES®
ELITE RECTANGULAR FRAME POOL
FOR ABOVE GROUND SWIMMING POOLS13' - 32' (3.96 m - 9.75 m) Models
Elite
Rec
tang
ular
Fra
me
Pool
_EU_
EN
Should you encounter a problem with your Polygroup® product, please DO NOT return the product to the place of purchase. All warranty claims must be made directly to Polygroup®. For any setup and troubleshooting issues, please visit support.polygroupstore.com. You may be asked to return all or parts of the product for inspection and/or repair. Do not return any products to Polygroup® without a Return Merchandise Authorization number.
READ AND KEEP THESE INSTRUCTIONS FOR FUTURE REFERENCE
© 2020
2
Polygroup® Trading Limited (hereinafter “Polygroup®”) makes products at the best quality we are able to offer. All Polygroup® products have been inspected against defects in materials and workmanship prior to leaving factory. Polygroup® is happy to offer warranty for the repair or replacement of pool products for 90 days from the date of purchase. The provisions of this Limited Warranty only apply to the original purchaser. Please keep your original store sales receipt, as this proof of purchase will be required and must accompany warranty claims to Polygroup® or its designated agents. This Limited Warranty does not apply without proof of purchase; or should the purchaser modify or repair the product themselves or by unauthorized people; use non-Polygroup® parts or accessories with the product; use the product in contravention of the manufacturer’s instructions; use improper voltage; abuse the product in any way; or through accident or negligence. This Limited Warranty will not cover consequential damages, including claims for loss of water, pool chemicals, damage, or labor, normal wear-and-tear; nor acts of God outside the control of Polygroup®. Non-manufacturing defects, such as grasses that may grow through the ground cloth and/or pool liner are examples of which Polygoup® cannot be held responsible for.IN NO EVENT SHALL Polygroup®, ITS AUTHORIZED AGENTS, RELATED ENTITIES, OR EMPLOYEES BE LIABLE TO THE BUYER OR ANY OTHER PARTY FOR DIRECT OR CONSEQUENTIAL DAMAGES. Some states or countries, or other jurisdictions, do not allow the exclusion or limitation of incidental or consequential damages, so the above limitation or exclusion may not apply to you.This Limited Warranty is not extended to close-outs, factory seconds, or resold products (i.e. garage sales, online auctions, or online retailers not purchased directly from Polygroup®). Any issues with items purchased from these types of vendors / sellers will need to be addressed through these stores. Items purchased from seasonal stores will be treated with an “All Sales Final” Policy instead.
Limited Warranty
TABLE OF CONTENTS
Warnings
Parts List
Setup Instructions
Maintenance & Drainage
Storage & Winterising & Pool Safety Sign
Pool Cover Safety
Customer Service Contacts
3 ~ 5
6
7 ~ 10
11 ~12
13
14
15
OWNER′S MANUAL
3
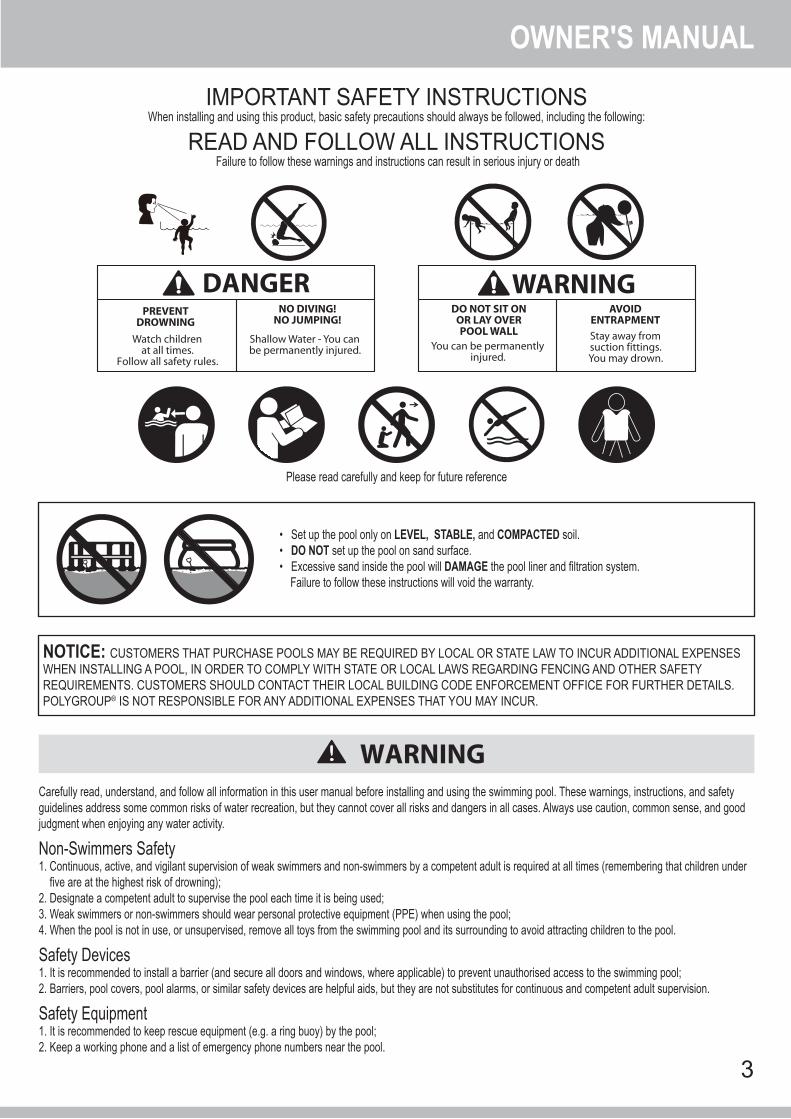
IMPORTANT SAFETY INSTRUCTIONSWhen installing and using this product, basic safety precautions should always be followed, including the following:
READ AND FOLLOW ALL INSTRUCTIONS Failure to follow these warnings and instructions can result in serious injury or death
NOTICE: CUSTOMERS THAT PURCHASE POOLS MAY BE REQUIRED BY LOCAL OR STATE LAW TO INCUR ADDITIONAL EXPENSES WHEN INSTALLING A POOL, IN ORDER TO COMPLY WITH STATE OR LOCAL LAWS REGARDING FENCING AND OTHER SAFETY REQUIREMENTS. CUSTOMERS SHOULD CONTACT THEIR LOCAL BUILDING CODE ENFORCEMENT OFFICE FOR FURTHER DETAILS. POLYGROUP® IS NOT RESPONSIBLE FOR ANY ADDITIONAL EXPENSES THAT YOU MAY INCUR.
• Set up the pool only on LEVEL, STABLE, and COMPACTED soil.• DO NOT set up the pool on sand surface.• Excessive sand inside the pool will DAMAGE the pool liner and filtration system. Failure to follow these instructions will void the warranty.
WARNING
Please read carefully and keep for future reference
Carefully read, understand, and follow all information in this user manual before installing and using the swimming pool. These warnings, instructions, and safety guidelines address some common risks of water recreation, but they cannot cover all risks and dangers in all cases. Always use caution, common sense, and goodjudgment when enjoying any water activity.
Non-Swimmers Safety1. Continuous, active, and vigilant supervision of weak swimmers and non-swimmers by a competent adult is required at all times (remembering that children under five are at the highest risk of drowning); 2. Designate a competent adult to supervise the pool each time it is being used; 3. Weak swimmers or non-swimmers should wear personal protective equipment (PPE) when using the pool; 4. When the pool is not in use, or unsupervised, remove all toys from the swimming pool and its surrounding to avoid attracting children to the pool.
Safety Devices 1. It is recommended to install a barrier (and secure all doors and windows, where applicable) to prevent unauthorised access to the swimming pool; 2. Barriers, pool covers, pool alarms, or similar safety devices are helpful aids, but they are not substitutes for continuous and competent adult supervision.
Safety Equipment 1. It is recommended to keep rescue equipment (e.g. a ring buoy) by the pool; 2. Keep a working phone and a list of emergency phone numbers near the pool.
DO NOT SIT ONOR LAY OVERPOOL WALL
AVOIDENTRAPMENT
You can be permanentlyinjured.
Stay away fromsuction fittings.You may drown.
WARNINGPREVENT
DROWNINGNO DIVING!
NO JUMPING!
Watch childrenat all times.
Follow all safety rules.
Shallow Water - You canbe permanently injured.
DANGER

4
Safe Use of Pool1. Encourage all users especially children to learn how to swim; 2. Learn Basic Life Support (Cardiopulmonary Resuscitation - CPR) and refresh this knowledge regularly. This can make a life-saving difference in the event of an emergency; 3. Instruct all pool users, including children, what to do in case of an emergency; 4. Never dive into any shallow body of water. This can lead to serious injury or death;5. Do not use the swimming pool when using alcohol or medication that may impair your ability to safely use the pool; 6. When pool covers are used, remove them completely from the water surface before entering the pool; 7. Protect pool occupants from water-related illnesses by keeping the pool water treated and practising good hygiene. Consult the water treatment guidelines in the user’s manual; 8. Store chemicals (e.g. water treatment, cleaning or disinfection products) out of the reach of children; 9. Removable ladders shall be placed on a horizontal surface (if applicable).10. Selection of appropriate location to prevent the hazard of drowning of young children, install the mini-pool in a place where it is possible for the supervision to be constant.
Ladder (if applicable)1. Check all nuts and bolts for tightness and tighten when required (if applicable).2. Maximum allowable weight: 150 kg.3. Ladder shall not be used for other purposes.
Safety Care for Children1. Assign an adult to be responsible for watching children in the pool.2. Pool presents a drowning hazard even during filling and draining of the pool. Maintain constant supervision of children and do not remove any safety barriers until the pool is completely empty and stowed away.3. Children, especially children younger than five years, are at high risk of drowning. Drowning occurs silently and quickly and can occur in as little as 2 in (5 cm) of water.4. Keep children in your direct sight, stay close, and actively supervise them when they are in or near this pool and when you are filling and emptying this pool.5. When searching for a missing child, check the pool first, even if child is thought to be in the house.6. Do not leave toys inside pool when finished using, since toys and similar items might attract a child to the pool. Position furniture (for example, tables, chairs) away from pool, so that children cannot climb on it to gain access to the pool. After using pool, remove water to a level of 1/2 in (1 cm) or less.7. Locate pumps and filters in such a way that children cannot climb on them and gain access to the pool.
Swimming Pool Awareness1. Assembled by adults only; care should be taken in unpacking and assembling the pool; this pool may contain accessible potentially hazardous sharp edges or points that are necessary for the pool.2. The floor of the pool shall be visible at all times from the outside perimeter of the pool.3. Never allow horseplay, diving, or jumping into or around the pool. Serious injury, paralysis, or death could result when this rule is disregarded. DO NOT ALLOW anyone to swim alone without supervision.NOTE: This pool has a maximum water fill level marked on the inside wall. Do not overfill; drain to proper level.NOTE: 1. Pool can be cleaned with mild soap and lukewarm water only. 2. Make sure pool is completely dry before storing to help prevent mildew from forming. 3. Store all parts in a dry heated area where temperatures do not go below 0ºC (32ºF).
WarningTO AVOID DANGER OF SUFFOCATION: Keep the plastic bag used in this product away from babies and children; do not use the bag in cribs, beds, carriage, or playpens. The plastic bag could block nose and mouth and prevent breathing. The plastic bag is not a toy.1. Only for domestic use.2. Do not install the paddling pool over concrete, asphalt or any other hard surface.3. Place the product on a level surface at least 2 m from any structure or obstruction such as a fence, garage, house, overhanging branches, laundry lines or electrical wires.4. One person needed to install the product. 5. Installation time is around 15 minutes to 45 minutes (excluding earthworks and filling).6. Prohibit running and lively games around the swimming pool.7. Always maintain clear, healthy water.8. Do not leave the drained pool outside. The empty pool is liable to become deformed and/or displaced due to wind.
Diving RiskDo not dive into this pool. Diving into shallow water can result in a broken neck, paralysis, or death.
Electrocution Risk1. Keep all electrical lines, radios, speakers, and other electrical appliances away from the pool. 2. Do not place pool near or under overhead electrical lines.
OWNER′S MANUALOWNER′S MANUAL
5
Special Warning1. Local building codes may require obtaining a building or electrical permit. Users should follow regulations on setback, barriers, devices, and other conditions.2. DO NOT attempt to assemble this pool in adverse weather conditions, windy conditions, or when the temperature is below 16ºC (60ºF). 3. This is a storable pool, which should be disassembled and stored when temperatures are expected to fall below 0ºC (32ºF).4. For filtration, the safety instructions shall indicate that the pool must not be used when the filtration system(s) is/are damaged (if applicable).
Ensure that you have an accessible telephone close to the pool so that you do not have to leave your children unattended while you phone.In the event of an accident;1. Remove the child from the water as quickly as possible;2. Immediately call the emergency services and follow the instructions they give you;3. Replace wet clothing with warm blankets;4. Memorise emergency phone numbers and display them near the swimming pool:5. Fire brigade;6. Emergency medical service;7. Poison control centre.
As the pool owner, you are responsible for those persons who use your pool. Therefore:1. Never leave your children and other non-swimmers unattended in and around the pool;2. Ensure that the water is hygienically clean;3. Refresh your knowledge of first-aid measures at regular intervals;4. Store water treatment media out of the reach of children;5. Discuss the rules of conduct with your children prior to them using the swimming pool and explain the risks that can arise when around water once they are of a sufficient age;6. Contact your pool installer if you have any questions regarding safe use of the swimming pool.
The following items of equipment can provide additional pool safety. Your swimming pool specialist can advise you on: • Safety cover; • Fencing around the pool with a lockable gate; • Pool alarm system; • Enclosure.
The general safety information cannot account for all circumstances in individual cases. You are best aware of the swimming abilities and the conduct of your children and of other guests using your pool, as well as the site particulars. You should therefore employ further measures to ensure safety at the pool if necessary. Such measures may for example include additional supervisory persons if the pool is being used by a number of non-swimmers at the same time.
Pool Maintenance1. Empty pool completely after each use and store the empty pool in such a way that it does not collect water from rain or any other source.2. After using pool, remove water to a level of 1/2 in. (1 cm) or less.3. Carrying out checks and maintenance of the main parts every hour.4. These checks are not carried out the product could overturn or otherwise become a hazard.5. Check all nuts and bolts for tightness and tighten when required (if applicable).6. Check all coverings for bolts and sharp edges and replace when required (if applicable).7. Replace defective parts in accordance with the manufacturer's instructions.8. Change the water of product frequently (particularly in hot weather) or when noticeably contaminated.

6
PARTS LIST
Rectangular Frame Pool
Pool Size Qty.Part # Part # Qty. Part # Qty.Qty.Qty. Part # Qty.Part #Part # Qty.Qty.Part # Part #
Pool Liner U-Shaped Pipe Corner Piece Short Tube Long Tube U-shape Pipe Cap(with 2 extra)
O-shape Spring Pin(with 1 extra)
V-shape Spring Pin(with 1 extra)
13.1'X6.5'X39" (399x198x99) cm P41307390A99 P5A4B0003C01- - - - 1 10 P5A5A0001C01 P5A1B0009C01 P5A1B0011C01 P5ANPF089E01 P5APF1180E01 P5ANPF088E014 4 6 22 11 21
1 2 3 4 5 6 7 8
EXPLODED VIEW
4
2
3
5
2
3 2
4
3
2
51
3
C-11-213391

OWNER′S MANUAL
7
10~21’
55
5Swedged End
Swedged End
Site Preparation1. Select a level area, and completely remove all debris, twigs, stones, etc. DO NOT select an area under overhead electrical lines, trees, or within 15ft (4.57m) of a house, building, etc.2. The pool shall be located a minimum distance of 6ft (1.83m) from any electrical receptacle.3. Contact your local utilities, checking that no underground cables, telephone lines, gas lines, etc. run beneath the area you have selected.
Setup Instructions1. Locate a level and flat area to set up the pool. Make sure the ground is free from sharp objects, as they may puncture the pool.2. Carefully unfold the pool liner in the area selected and inspect the seams for manufacturing defects.3. It is recommended to let the pool sit out in direct sunlight for about 2 hours prior to installation (see TIP above).4. LIFT the pool liner across the ground. DO NOT drag the liner from one location to another location.
5
5
SETUP INSTRUCTIONSBefore assembling your product, please take a few minutes to check the contents and become familiar with all the parts.
WARNING - DO NOT overfill the pool and/or allow people to lay over or sit on pool wall - DOING SO CAN CAUSE PERMANENT INJURY!DRAIN pool to the proper level after a heavy rain.TIP: It will be much easier to install your pool if you unfold it and let it lay in direct sunlight for about 2 hours prior to installation. This will help to ensure a wrinkle-free fit because the pool material will be more pliable, allowing it to form into shape during installation.WARNING - VERY IMPORTANT! SITE MUST BE LEVEL, STABLE, COMPACTED SOIL.• The pool must be assembled on a smooth and level site of firm soil that is free of stones, gravel, sticks, blacktop or other oil-based compounds.• Before setting up your pool, it is recommended that you clear the area of hardy grasses. Certain types of vigorous grasses such as St. Augustine and Bermuda can grow through the liner. A ground cloth or tarp may be helpful in preventing this from occurring. Grass growing through the liner is not covered under warranty.• Do not install pool on a wooden deck or any type of wooden surface. You cannot use sand and/or uncompacted soil to provide a level surface for this pool; it will only wash out.• FAILURE TO FOLLOW THESE INSTRUCTIONS WILL CAUSE POOL TO COLLAPSE AND WILL VOID THE WARRANTY!
5. Connect the Long Tubes 5 . 6. Carefully slide the connected Long Tubes 5 into the sleeves on the long sides of the pool.
NOTE: Refer to the Parts List (p. 6-7) for the exact quantity of Long Tubes 5 . Connect half the total quantity to form the horizontal beams on the long sides of the pool.
8
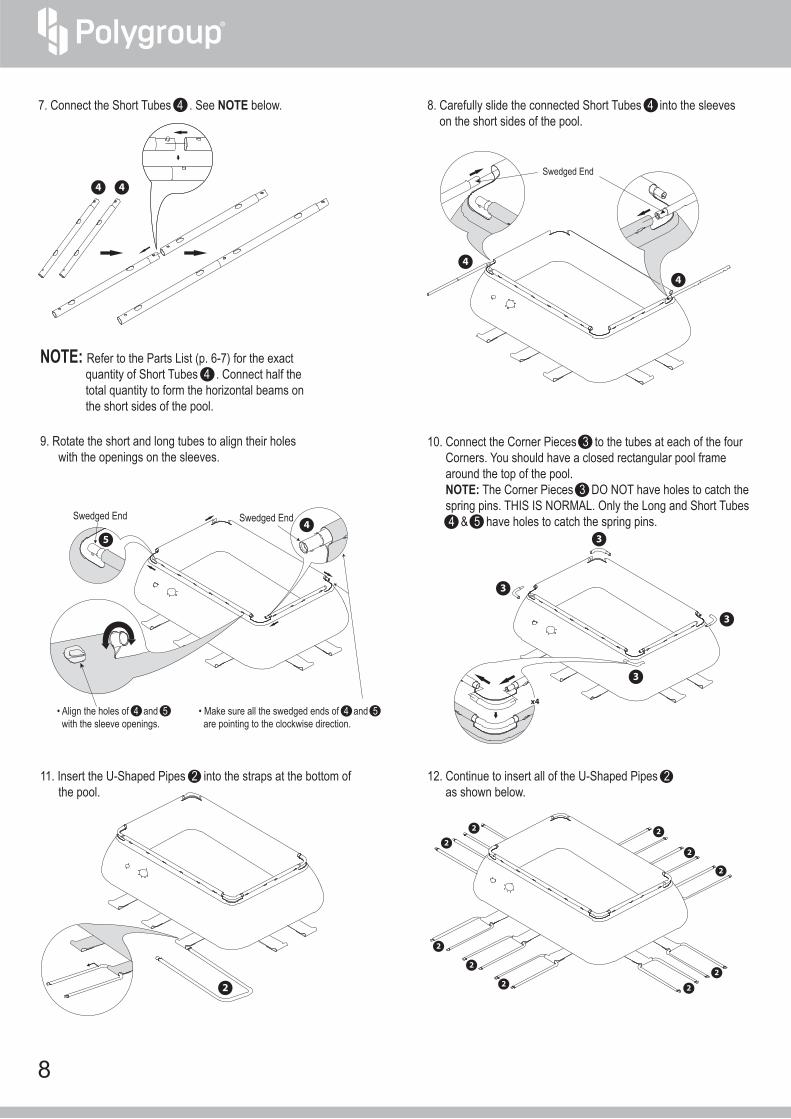
9. Rotate the short and long tubes to align their holeswith the openings on the sleeves.
Swedged End
Swedged End Swedged End
x4
2
2
2
2
2 2
2
2
2
2
4 4
7. Connect the Short Tubes 4 . See NOTE below.
NOTE: Refer to the Parts List (p. 6-7) for the exact quantity of Short Tubes 4 . Connect half the total quantity to form the horizontal beams on the short sides of the pool.
8. Carefully slide the connected Short Tubes 4 into the sleeveson the short sides of the pool.
4
4
• Align the holes of 4 and 5with the sleeve openings.
• Make sure all the swedged ends of 4 and 5are pointing to the clockwise direction.
45
3
3
3
3
10. Connect the Corner Pieces 3 to the tubes at each of the fourCorners. You should have a closed rectangular pool framearound the top of the pool.NOTE: The Corner Pieces 3 DO NOT have holes to catch thespring pins. THIS IS NORMAL. Only the Long and Short Tubes4 & 5 have holes to catch the spring pins.
2
11. Insert the U-Shaped Pipes 2 into the straps at the bottom ofthe pool.
12. Continue to insert all of the U-Shaped Pipes 2as shown below.
OWNER′S MANUAL
9
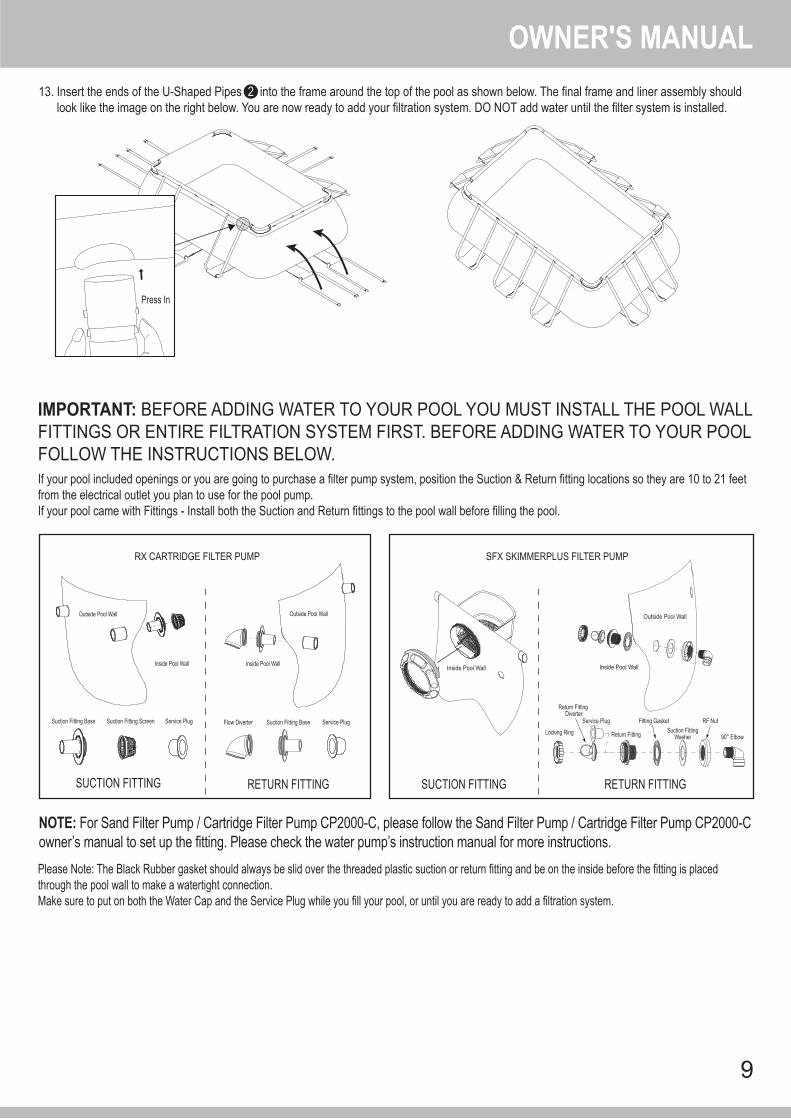
13. Insert the ends of the U-Shaped Pipes 2 into the frame around the top of the pool as shown below. The final frame and liner assembly should look like the image on the right below. You are now ready to add your filtration system. DO NOT add water until the filter system is installed.
Press In
IMPORTANT: BEFORE ADDING WATER TO YOUR POOL YOU MUST INSTALL THE POOL WALL FITTINGS OR ENTIRE FILTRATION SYSTEM FIRST. BEFORE ADDING WATER TO YOUR POOL FOLLOW THE INSTRUCTIONS BELOW.If your pool included openings or you are going to purchase a filter pump system, position the Suction & Return fitting locations so they are 10 to 21 feet from the electrical outlet you plan to use for the pool pump.If your pool came with Fittings - Install both the Suction and Return fittings to the pool wall before filling the pool.
RX CARTRIDGE FILTER PUMP SFX SKIMMERPLUS FILTER PUMP
SUCTION FITTING
Suction Fitting Base Suction Fitting Screen Service Plug
SUCTION FITTINGRETURN FITTING RETURN FITTING
Inside Pool Wall
Outside Pool Wall
Inside Pool Wall
Outside Pool Wall
Inside Pool Wall
Outside Pool Wall
Inside Pool Wall
Flow Diverter Suction Fitting Base Fitting GasketService Plug
Return Fitting Suction Fitting Washer
RF Nut
90° ElbowLocking Ring
Return Fitting Diverter
Service Plug
Please Note: The Black Rubber gasket should always be slid over the threaded plastic suction or return fitting and be on the inside before the fitting is placed through the pool wall to make a watertight connection.Make sure to put on both the Water Cap and the Service Plug while you fill your pool, or until you are ready to add a filtration system.
NOTE: For Sand Filter Pump / Cartridge Filter Pump CP2000-C, please follow the Sand Filter Pump / Cartridge Filter Pump CP2000-C owner’s manual to set up the fitting. Please check the water pump’s instruction manual for more instructions.

10
• IF YOUR POOL INCLUDES A FILTRATION SYSTEM, INSTALL THE ENTIRE SYSTEM BEFORE FILLING YOUR POOL TO AVOID WATER LOSS.• FOLLOW THE OWNER'S MANUAL OF YOUR SYSTEM TO INSTALL THE POOL WALL FITTINGS, HOSES AND CLAMPS CORRECTLY BEFORE FILLING YOUR POOL.
14. Make sure the liner drain fitting is plugged securely and the cap is in place. Then start filling the pool with water until about one inch (2.54cm) of water is on the bottom. AFTER ABOUT 1 INCH OF WATER IS ON THE BOTTOM, STOP FILLING AND COMPLETELY SMOOTH OUT ALL THE WRINKLES OF THE POOL FLOOR, WORKING OUTWARDS FROM THE CENTER. MAKE SURE THE POOL FLOOR IS COMPLETELY FLAT SO THAT THE POOL FILLS EVENLY.
IMPORTANT: IF MORE THAN 1-2 INCHES OF WATER COLLECTS ON ANY ONE SIDE BEFORE THE POOL STARTS FILLING IN THE CENTER, THE POOL IS NOT LEVEL ENOUGH, AND MUST BE CORRECTED.
ADDITIONAL NOTE: THE WEIGHT OF THE WATER WILL PREVENT ADJUSTMENT AFTER THIS POINT.
NOT FOLLOWING THE STEP ABOVE WILL MAKE THE POOL FILL UNEVENLY AND THE POOL MAY LEAN TO ONE SIDE AND COLLAPSE. THE WATER IN YOUR POOL SHOULD FILL EVENLY. IF YOUR POOL IS LEANING AT ALL; THE GROUND MAY NOT BE LEVEL AND YOU WILL NEED TO START OVER.
• FAILURE TO FOLLOW THE INSTRUCTIONS ABOVE WILL CAUSE POOL TO COLLAPSE AND WILL VOID THE WARRANTY!
15. When the water is approximately half filled, the top frame will tend to bend down at the middle as shown below. THIS IS ABSOLUTELY NORMAL. Continue to fill with water up to the fill line printed on the inside of the liner wall, the frame will restore to its normal shape.
IMPORTANT: FOR POOLS THAT INCLUDE A COMPLETE FILTRATION SYSTEM

OWNER′S MANUAL
11
CAUTION: ALWAYS FOLLOW THE CHEMICAL MANUFACTURER'S DIRECTIONS, AND THE HEALTH AND HAZARD WARNINGS.
POOL MAINTENANCE & DRAINAGE
Do not add chemicals if the pool is occupied. This can cause skin or eye irritation. Concentrated chlorine solutions can damage the pool liner. In no event is Polygroup®, the buyers/retailers, or any other party liable for costs associated with the loss of pool water, chemicals, or water damage. Keep spare filter cartridges on hand. Replace cartridges every two weeks. We recommend the use of Polygroup® Filter Pump with all of our aboveground pools. To purchase a Polygroup® Filter Pump or other accessories, visit our website at support.polygroupstore.com or call Polygroup® Consumer Services.EXCESSIVE RAIN: To avoid damage to the pool and overfilling, drain out the rainwater immediately so the water level stays below the Fill Line.
How to Drain Your Pool and Long-Term Storage1. Check local regulations for specific directions regarding disposal of swimming pool water.2. Remove the protective foam ring on the drainage cap.3. Follow these steps for water drainage:
4. Place the other end of the garden hose in an area where the water can be safely drained away from the house and other nearby structures.5. When the water stops draining, start lifting the pool from the side opposite to the drain valve to drain any remaining water and empty the pool completely.6. After drainage, lock the drain valve and close the drain cap.
1
2
a) Turn the drain cap counterclockwise
a) Flip the drain cap and reinsert it to the drain valve
c) Close the drain capb) Push and turn the drain cap counterclockwise for about a quarter turn (90o) to lock
b) Return the drain cap from the valve
c) Flip the drain cap and reinsert it to the drain valve
e) The drain valve is now open, water will begin to flow out.
f) Attach a 5/8” garden hose to the drain valve
d) Push and turn the drain cap clockwise for about a quarter turn (90o) to unlock
1
2
12
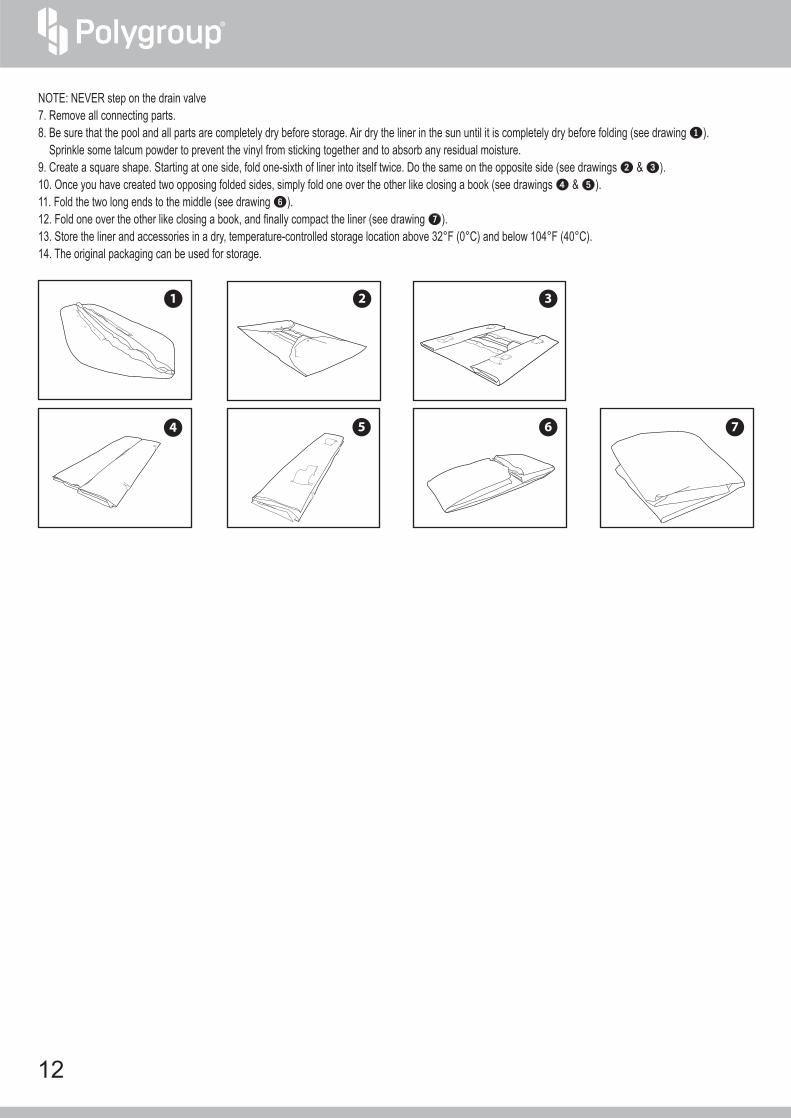
NOTE: NEVER step on the drain valve7. Remove all connecting parts.8. Be sure that the pool and all parts are completely dry before storage. Air dry the liner in the sun until it is completely dry before folding (see drawing 1). Sprinkle some talcum powder to prevent the vinyl from sticking together and to absorb any residual moisture.9. Create a square shape. Starting at one side, fold one-sixth of liner into itself twice. Do the same on the opposite side (see drawings 2 & 3).10. Once you have created two opposing folded sides, simply fold one over the other like closing a book (see drawings 4 & 5).11. Fold the two long ends to the middle (see drawing 6).12. Fold one over the other like closing a book, and finally compact the liner (see drawing 7).13. Store the liner and accessories in a dry, temperature-controlled storage location above 32°F (0°C) and below 104°F (40°C).14. The original packaging can be used for storage.
1
5 6 74
2 3

OWNER′S MANUAL
13
STORAGE & WINTERISING
POOL SAFETY SIGN
NO DIVING OR JUMPINGSHALLOW WATER
DIVING MAY RESULT IN PERMANENT INJURY OR DEATH
• Be Safe. Swim with a friend.• Children must be accompanied by an adult.
• Don’t swim when using alcohol or drugs.• Be familiar with the pool before swimming.
• No running, jumping, or horseplay in or around pool.• No glass in pool area.
TO AVOID SERIOUS INJURY ALL POOL USERS MUST KNOW AND FOLLOW THESE SAFETY RULES.
WARNING!POST THIS WARNING NEAR YOUR POOL
This above ground pool cannot be winterised and must be drained, disassembled, and properly stored if you live in an area where the temperature dropsbelow 0ºC (32ºF). If you are in a warmer environment, please follow the instructions below. After usage, you can easily empty and store away your pool in a safe place (see Long-Term Storage on p. 12). Some pool owners, in warmer climates however, may choose to leave their pool up all year round. In cold areas, where freezing temperatures occur, there can be a risk of ice damage to your pool. Leaving your above ground pool set up in areas where the temperature drops below 0ºC (32ºF) voids the warranty.
Winterising Your Above Ground Pool1. Clean the pool water thoroughly.2. Remove the skimmer (if applicable) or any accessories attached to the threaded strainer connector. Replace strainer grid if necessary. Be sure all accessories parts are clean and completely dry before storage.3. Unplug the Suction and Return Fittings from the inside of the pool.4. Remove the ladder (if applicable) and store in a safe place. Be sure the ladder is completely dry before storage.5. Remove the hoses that connect the pump and filter to the pool.6. Add the appropriate chemicals for the winter period. Consult your local pool dealer as to which chemicals you should use and how to use them. This can vary greatly by region.7. Cover the pool with Polygroup® Pool Cover. IMPORTANT NOTE: Polygroup® POOL COVER IS NOT A SAFETY COVER.8. Clean and drain the pump, filter housing, and hoses. Remove and discard the old filter cartridge. Keep a spare cartridge for the next season.9. Bring pump and filter parts indoors and store in a safe and dry area, preferably between 0ºC (32ºF) and 40ºC (104ºF).

14
POOL COVER WARNING / SOLAR COVER WARNING / SOLAR BLANKET WARNING
! WARNING
POOL COVER SAFETY
VERY IMPORTANTDO NOT USE A POOL COVER, SOLAR COVER, OR SOLAR BLANKET ON THIS
POOL IF IT DOES NOT HAVE THIS TYPE OF WARNING LABEL ON THE COVER.
DANGER:Competent supervision and knowledge of the safety requirements are the
only ways to prevent drowning or permanent injury in the use of this product!Never leave young children unattended.
IF YOU ARE GOING TO USE A POOL COVER, SOLAR COVER, OR SOLARBLANKET, PLEASE READ THIS INFORMATION.
AVOID DROWNING RISKSTAY OFF THE COVER AND BLANKET - IT WILL NOT SUPPORT WEIGHT.KEEP CHILDREN AWAY. CHILDREN OR OBJECTS CAN NOT BE SEEN UNDER COVER AND BLANKET.REMOVE STANDING WATER - CHILDREN CAN DROWN ON TOP OF COVER.REMOVE COVER AND BLANKET COMPLETELY BEFORE ENTRY OF SWIMMERS - ENTRAPMENT POSSIBLE.NON-SECURED OR IMPROPERLY SECURED COVER AND BLANKET ARE A HAZARD.FAILURE TO FOLLOW ALL INSTRUCTIONS MAY RESULT IN INJURY OR DROWNING.THIS IS NOT A SAFETY COVER.INSTALL COVER AND BLANKET WITH LABELS FACING UP.USE DRAWSTRING TO SECURE COVER TO POOL. THIS COVER MEETS REQUIREMENTS DESCRIBED IN SPECIFICATION F-1346 (ASTM).

OWNER′S MANUAL
15
UK
FR
ES
IT
DE
AU
US CA
MX
+44 (0) 330 090 [email protected]
+33 (0) 969 360 [email protected]
900 905 [email protected]
+39 (0) 332 730 [email protected]
+49 (0) 621 845 [email protected]
+61 (3) 989 70 [email protected]
+1 (888) [email protected]
support.polygroupstore.com
WWW
WWW
WWW
+1 (800) [email protected]
CUSTOMER SERVICE CONTACTS
Accessible du lundi au vendredi de 9h00 à 18h00
Pour une demande plus rapide, nous vous conseillons de poser votre réclamation directement sur notre site dédié au SAV : www.polygroupsummerwaves.eu
Nous vous demanderons les éléments suivants : - Nom- Adresse- Email- Téléphone portable- Date d'achat + ticket de caisse (ou preuve d'achat)- 3 Photos format (JPEG,JPG) : 1 prise de loin dans son environnement; 1 de prés; 1 de détails (zoom)