Summary of - VRay-like interior renders with mental ray
200
Summary of VRay-like interior renders with mental ray Summary by Klaus Würtenberger aka Starsoul (24.07.2006)
-
Upload
khangminh22 -
Category
Documents
-
view
3 -
download
0
Transcript of Summary of - VRay-like interior renders with mental ray

Summary of
VRay-like interior renders
with mental ray
Summary by Klaus Würtenberger aka Starsoul
(24.07.2006)

Instructions Pages are indicated with:
PAGE …
Headline of the next passage Instructions are marked with this sign (step by step): - ….. Conclusions or reasons are characterized with: � ….. When a user added a post within a topic I added the username with an arraw like this: � username Maxim: ……. And a completion to a topic is marked with: Additional: Note: At the end of this summary I added a list of every file which was contributed within this thread and further CG-Talk-links!

PAGE 1
slipknot 66: Rendering + Setting Well.. if you stop and look at the v-ray light, it is just a - point light converted into an area light, after checking the Vray forum, i tried to recreate one of those renders, i - create 1 pointlight + converted into a mentalray area light with a square projection for each window, just as you do with v-ray, then i created a - spotlight for the sun, - you need to find the ritght settings with photons , GI, FG etc.. and you can create some Beautiful images with Mentalray. floze: Lighting with IBL Below is an image I rendered few weeks before. I was testing the - 'area-light-in-each-window' technique - but ended up in using a photon emitting ibl node (standard emission) - in conjunction with a directional light. Its a bit dark and needs some refining, but hey: its a test!

Additional-Link: Aneks vfx compositor www.tahlniran.com
PAGE 2
ya3: Vray for Maya these people are aparently selling VRay for Maya http://www.stormfx.com.au/stormfx-n..._rendering.html Alot of the stuff on the site is max stuff from some of the guys who were working at Animal Logic which has been on display on the vray site for a while. Nothingness Render-Test
=> floze: Nothingness: Im curious if - finalGatherView could have positive impact on your rendering times. I havent seen much posts/reactions on this topic and wasnt able to test it well by myself. - Its described here how to apply it (not how to use it!). - Basically this technique reduces final gather points that are more distant to the camera by sampling the points in screen space rather than in world space. Now about the lighting solution you chose. I think using just one (directional-) light as daylight simulation � could lead you on the wrong way . The greatest part of all the light we see in the daytime is emitted/scatterd by the sky, not the sun. So, - putting one area light in each window to get diffuse incoming illumination would be the 'natural' way indeed. Also, you have to consider - the different color temperature of the two different lightsources (sun and sky), - which would be a: - grayish light red for the sun and a grayish blue for the sky if you go for a outdoor color balance - or grayish light blue for the sun and darker blue for the sky for an indoor color balance. I hope Jeremy Birn doesnt mind I link his colortemp image here

slipknot 66: Render Test with Exterior Lighting Here is a simple test,
- using Blurry Reflections.
- 1 point light converted into a mentalray area light, and
- 1 spotlight for the sun.
All lights are emitting photons, the default values.
FG 250 rays, min/max 0

francescaluce Render-Test (Teapot Room) + Path Material used a brute force approach (=Path Material) � for further information look here http://www.jozvex.com/tutorials/glossy.html Without tweaks or anything.. it tooks around an hour.. but tweaking we should stay under 45mins.
� jozvex
It uses - photons and Final Gather and rendered in 4 minutes. I just though I'd post that one before I render a less artifacty one.

PAGE 4
� jozvex
But it's only slightly better and took 30 minutes. All I did was - increase the number of FG rays from 100 to 750 and also - lower the FG radius settings. I think it must be the photons instead that aren't good enough. There are 3 million photons currently. - The lack of contact shadows is probably because my photons are too large, so they don't gather under the teapots. I wouldn't say FG: - is a total fake or cheat, it's just a helper. - It's intended for smoothing out GI, which it definitely does in my case. The Dirtmap shader: - would definitely add contact shadows under the teapots but - it would also darken the corners of the room which would look wrong. Besides, we should try and do it through GI features alone! Hehe. VRay's Irradience Mapping seems like a multi-pass adaptive Final Gather type thing. Basically a more advanced FG I guess. � Oh and here's my scene file: http://www.jozvex.com/temp/teapot_joz.zip � slipknot 66 Area Light Setting + Hint about Post Work Jozvex, the - contact shadows are created by the area lights, which create some softshadows, if you look at the v-ray lights you will see that there is an option to render as area light or not. - If you increase the values of the samples in the area light of mentalray, you will get more softshadows, but i think the render time will increase a lot.What i noticed is the problem is not mentalray, but how mentalray is integrated inside maya. � Anoter thing that ppl need to be aware, is that all those "beautiful" renders created with v-ray, are not only v-ray, most ppl uses Photoshop to adjust the light.Here is a link to a tutorial for v-ray, you will noticed that all those renders, are not 100% v-ray http://www.osmosis.com.au/info/tutorials.htm

� digidim
this one (800x600; AA 1/2) took 24 min to render on a 2 Ghz Machine...just some
- cc and Grain added in Photoshop for better matching the "original render"...what you think ?
- GI: 100000 Photons
- FG: 100 Rays
- 1 MR AreaLight (6/3)
- misss_simple_occlusion Shader

Jozvex Explanation about: Mental Ray Shaders + RenderGlobalSe ttings Hi, I haven't worked on the scene any further yet because I only just woke up! But to answer some questions:
Quote:
Originally Posted by raph3d what I noticed right away is that you're using a mental ray shader, instead of a maya shader -- that was a big help -- now I know where to connect!
Yes, I chose to use a DGS material simply - because all I needed was diffuse illumination. I could have used a - Maya lambert but they have sooo many attributes that probably all get calculated, possibly slowing things down.
Quote:
Originally Posted by raph3d curious: why are you using a mitchell filter for antialiasing?
The mitchell filter is (as far as I know) generally considered the best for most purposes because it's balanced between sharp and smooth. From the help files: "The Mitchell and Lanczos filters are both approximations of the theoretically ideal sinc filtering function, cut off after its second lobe. In most cases, the Mitchell filter gives better results."
Quote:
Originally Posted by raph3d is your image rendering so fast because you're using a photon map? I guess I'll find out.. oh wait, you have the rebuild option checked -- that forces a new calc, right?
Yes it forces a new calculation. I saved a photon map when I first started on the scene but no that's not why it's fast.
Quote:
Originally Posted by raph3d do the photon reflection/refration/depth settings have anything to do with this scene, or do they only apply to scenes w/reflection/refraction? could we turn those settings down then?
Those settings are important for all scenes with global illumination. In that scene I chose to have a photon reflection depth of 5 which means that the photons will be allowed to bounce off surfaces 5 times and then they'll stop/vanish. With lower bounces it would probably be faster but the scene would be darker as less light bouncing would occur. You ask whether they're only important for scenes with reflection, but really every scene is full of reflection! It just might be diffuse reflection rather than specular reflection. That scene is lit through diffuse reflection. My refraction depth is 0 simply because nothing is refractive. The total depth is 5 because 5 + 0 = 5.

Quote:
Originally Posted by raph3d is it perhaps your min/max radius settings that cause this image to render so fast? how did you choose those numbers? was is just a guess from experience, or do you make some measurements?
Hmm, I don't think the photon radius setting makes too much speed difference. All it decides is how sharp or smooth the GI will look. But, saying that if you have the radius setting too small so that your photons are bright dots, Mental Ray probably spends a lot more time anti-aliasing them, so that would be slower. Final Gather min/max radius settings make a big difference though! Basically the smaller the slower. One thing I forgot to mention yesterday is that I'm using the Final Gather View mode. I've been using that a lot lately and it seems much easier to use except slightly slower I think. - I added the boolean attribute finalGatherView to the miDefaultOptions node and - then turned it on. - You can see the attribute in the 'extra' settings group of the miDefaultOptions node. � That changes your radius settings to mean pixel-distance rather than world space distance. The way I choose my photon radius setting isn't by measuring. What I do is firstly set the radius to something small like 0.1, then if you render (no final gather by the way) you can see each photon blob in the scene. That way I can see if there are enough photons or not. I leave the radius at 0.1 and just keep increasing the number of photons until the scene looks like it's pretty well covered. It can be tricky though because in this scene for example, the side of the really close teapot that faces the camera gets way less photons than everything else because they just don't bounce there much, so I kept increasing the number of photons until the front of that teapot had at least quite a few photons on it. Once I think it looks like - there's enough photons, - I turn off the rebuild option (this whole time I've had a name typed into the photon map slot to save it) and - start increasing the radius setting. It goes really fast because you don't need to rebuild to change the radius. I usually set the accuracy to something like 500 by the way. � The accuracy is saying how many other photons should be smooshed together (technical term!) within the radius you set. I keep rendering and increasing the radius until things look balanced between smooth and detailed enough. Also, you can have your anti-aliasing samples on like 0/0 to make these test renders much faster. Some people think that setting the accuracy to a huge number like 2000 is really good, but unless there are 2000 photons inside the radius you set (the radius is from each sample I think) it just doesn't matter. Some other things I should mention are that the BSP settings made a difference in my version of the scene! Without even starting on the GI, when I first rendered the scene with the default BSP settings it took 12 seconds. After I lowered the BSP Depth down to 20 (I think?) it only took 8.5 seconds. So that's nearly 4 seconds of free time just be optimizing the memory. Hmm, I think that's all I was going to say. More questions are fine if you have them!

PAGE 5
floze: Render Test (Teapot Room) + Settings + Scene File - A dgs shader (both mat and photon)
- with a gray diffuse value of 0.5 and an
- area light with the incredible high amount of 10.000.000 (in words: ten million) photons.
Thats it. No fancy stuff, no final gather. I think the simulation is overall a more ore less good
copy of that what vray and maxwell did.
I tried several final gather attempts but all of them failed;
� final gathering eliminates all of the gi shadows. Which lets me think that final gathering
needs to be revisited at all, specially in indoor situations.
Here's the slightly modified scene: teapot_floze.zip
edit: Rendering this scene within maya is not recommended. Do a batch instead. Everything
above the magic marker of 8.000.000 photons led to crashes on my machine.
� memory cache: RAM / 2 +…. other Render Global Setting

Jackdeath: Advantages of Render in Passes Hmmmm, time to jump into this one with my fire retartant suit... I think way too many of you people are missing the main point of lighting in 3D. If you spend all of your time trying to get a "perfect" render directly out of a whatever render engine that you are using, then I really think that you are wasting most of your time. The best looking renders out there usually don't look like much when you see the raw layers. They key is to light in passes, and use 2D compositing as final part of the pipeline that makes everything look perfect. There is no "cheating," and you can make things look better, faster, by knowing how to use ALL of the tools out there to get the result that you want. Most of my renders look a bit funky to the naked eye because I tune the renders knowing that they will be heavily processed in 2D. I can't tell you the last time I didn't ever render a shot out that wasn't broken down in passes. That way an Inferno Artists have room to improve to work, and if there is changes you might not have to re-render everything... thus speeding up the pipeline. Not to mention, where this is a will, there is a way. Back in the day people were doing amazing renders without GI, FG, or even Raytracing. On the X-files movie I used almost 2000 volume lights in PowerAnimtor for the big interior spaceship shots because rendering with shadows would have been too slow, so instead I "modeled" the lighting by placing the lights in a smart way to create the illusion of shadows. So don't get hung up on one button render techniques. There is always more than 1 way to skin a cat...... And on that note, I'm hungry and I'm going to cook some tacos. mmmmmmmm floze: Rendering with FG + AO The 'hardcore-photon-only-job' seems up to me and here's my conclusion on this: Even using higher photon amounts (up to 15.000.000) and using higher photon radii didnt lead to the desired results - only to incredible memory consumption and one crash after the other. The blotches still remained as well: So this solution went down the drain. Using ambient occlusion shaders in conjunction with final gather is the way to follow, right?

drubster Render Test + Usage of dirtmap in a mix20layer shading network FG and GI - in combination with the dirtmap works fine for me. If you don't want very high render times you can't use to much FG rays. When you use a low number of rays the contrast in your image almost disappears, this is where the dirtmap comes in. - If you use the mix20layer node and - connect the dirtmap to layer1 and - set it to multilply you can play around with the dirt colour, dirtspread etc until you get good results. I've been rendering interiors with mental ray for a while now and i can say i'm pleased. Vray renders are often not the kind of look i'm looking for. Vray may be very easy but i like to be able to tweak my settings for diifferent results. 1 mr area light shooting 30000 photons in the exterior 1 point light shooting 30000 photons in interior ( no intensity ) 200 FG rays GI accuracy 300 dirtmap and dgs materials

floze Hints about photon radius - Increasing the photon radius leads to unacceptable loss of detail imho and washes out the shading particularly of small objects. But the main disadvantage of this method is the great number of photons/memory you have to spare. I'll give the eye-ray based solution (dirtmap) a shot tonight if I find the time. bjoern: It took about 20 minutes to calculate the photons and 5 to 10 minutes to render the actual frame (640x480). No final gathering. The photon calculation strongly depends on memory speed I think since a full gig of them was blocking my ram. The time to render the frame depends on 1.) photon radius (the smaller, the faster, since mr does no interpolation if the photons dont overlap) and 2.) photon accuracy (set to 4000). digidim New light dependent occlusion shader Now to the interesting part...we build somewhat like a light dependent occlusion shader (LDOS)! That means the "Dirt" is only visible in the darker areas of the room...very bright surfaces or areas directly hit by light got no "Dirt" at all. Just take a look at the scene file...you´ll get the point. Unfortunatly the Shader takes no photon brightnes into account - only direct light...but i think it´s a good starting point. There is a lot room for improvements...let´s get it on... http://www.digidim.info/potroom.rar (mix8layer shader needed; if you don´t have misss_simple_occ - just replace it with Dirtmap) � Aneks (tahlniran) hi really interested in this new shader you have cooked up. I have used dirtmap and toLight but have not used misss_simple_occ is this part of the alias mi_sss set or do I get from somewhere else ?!?! � floze � the misss_simple_occ with a dirtmap which is available here in the 'stuff' section. lazzhar Render Test with FG and ctrl_irradiance shader + Set tings Well here is another try, I - used the ctrl_irradiance shader from francescaluce to boost the FG. Nothing more than - FG. - The second picture is post processed in PS.

PAGE 7
� lazzhar Yes freshNfunky, I - used more than 1 light as I mentioned. And you're right, I - just used FG without GI. - In fact I prefer starting simulating GI (or radiosity as we used to say) by putting spot lights here and there according to the brightest areas in the scene after -of course- setting up the main key light the and overall fill one. in this kitched I just used - 2 spot lights under the bright area that represents the sun light on the floor. - Those 2 spot lights are casting soft shadow maps after. Overall I can get good results with a very low rendering time(useful for animation) But I turned on FG to see what happens. floze Render Test (Teapot Room) + Scene File Get the scene here. Needs francesca luce's - ctrl_irradiance (THANK you so much for this francesca! ). - 4.000.000 photons, - GI only, - no final gather, - no dirtmap:

dagon1978 Render Test (Teapot Room) + Link 1) this is my little test with teapot scene fg200 gi512 two light: mr_arealight+physical mr_arealight no dirtmap http://www.treddi.com/forum/index.p...pe=post&id=1523 2) this is my new test
render 1
gi with 9milions photon's
time: 8m 30s
render 2
fg+gi (like my previous render
but too qualitative)
time: 43m
� http://www.treddi.com/forum/index.p...pe=post&id=1548 compositing in photoshop total time: 51m 30s

floze PATH_MATERIAL + basic workflow + Scene File After doing a little research I bumped over this (=>“what is a "Path_material" ?”-THREAD) thread and gave it a shot. And guess what! Heureka! � The 'push-the-beauty-button-no-matter-how-long-it-renders' became alive! I really felt like Jack Skellington in Nightmare Before Christmas: the solution was always right in front of me, I just didnt realize it. - No GI, no FG, - pure raytracing. It is actually the way I was always searching for but which I never found - the so called Monte Carlo brute force approach . The basic workflow: - turn off any GI or FG, - apply a path_mat (from the mentalray materials) to your objects, - set up your light as you would do in a non-GI environment. - Boost your samples up to min/max 2/4 or even 4/4. - Render. - No tweaking, no hassles. => The number of 'light bounces' is handled by the 'Raytracing> Reflections' value in the render globals. Get the scene from over here

� Jozvex While the path shader is great (I used it way back on my first post of this test scene) - the idea is really just to use it to determine how your FG/GI should try and look. - Unless you have tons of fast computers you're not going to find much use for it besides perhaps rendering important stills. � Though one potentially handy thing about it is that you can selectively apply it to perhaps just one object that you really need good quality GI on. That way you don't slow down the whole scene. A much better method (that both VRay and Brazil can use) is Quasi Monte Carlo computation which is basically where they do the same as the path material only....less. The take less samples and then have methods to smooth out the results. Final Gather in Mental Ray is more or less Quasi Monte Carlo computation except that (at least in Maya) it only gives us one bounce of illumination.
PAGE 8
=> Jozvex path_material appendix with oversampling_lens shader + Basic workflow Ok, for anyone being interested in using path_material: Use it in conjunction with the oversampling_lens shader. Basic workflow for this: - Leave your min/max sampling on a usual value, like 0/2 or even lower for previewing purposes. - Select your camera and apply a 'oversampling_lens' shader from the 'mental ray> lenses' tab. - IMPORTANT: Turn OFF scanline in the 'render globals> raytracin g' section. If you dont, you'll get screwed results. - Increase the 'Samples' value of the lens shader until youre satisfied. Whoah. � This eliminates the need for ridiculous high sampling levels like 4/4 for the whole scene. Update: Alternatively you could use per object anti-aliasing, e.g. if you plan to use single path_materialed objects in your scene. Grab the how tos and explanations on this from over here (“Maya 6 Extra Attributes Tips”) and here (“mental ray for maya”)

floze PATH_MAT with PHYSICAL_LIGHT_NODE Sorry for turning this into a path_mat thread.. is anyway anyone interested in this? Dont get much feedback on this.. anyhow; I did some research on this and found out: - Use it in conjunction with the physical_light node. - You can do this by clicking next to 'Light Shader' under the 'Custom Shaders' tab of your lightshape and - assigning it from the 'mental ray> Lights' section of the 'Create Render Node' window. - Be aware that the photon intensity you would use under normal circumstances is equivalent to the value of your physical_light's HSV color. - Additionaly you can specifiy a threshold, which has the effect that illumination which is less than the threshold is discarded and no further shadow rays need to be cast - in a nutshell: shadow ray optimization. - Further a 'Cos_exp' can be utilized, which seems to soften the area light's edges - works for rectangle and disc only. NB: If no physical_light is used, some glitches seem to occur, e.g. light penetrates all surfaces without causing proper shadow. I hope anyone is interested in that whole caboodle I babble.
francescaluce path_material, to cut it out.. � is a DUMMY mat to test your GI scene. Quote:
Originally Posted by Jackdeth One bounce of FG is already slow enough, I couldn't imagine how painful it would be with more bounces in it's current state.
hehe.. interesting thread here, but I really have to thank Mr. Jackdeth! I just remembered a thread I didn't bookmarked, and now, weeks later, I found out that Mr. Paolo Berto himself has replied to this 'multi-bounce' issue the next day.. quiet funny � http://www.cgtalk.com/showthread.ph...d=1#post1827524
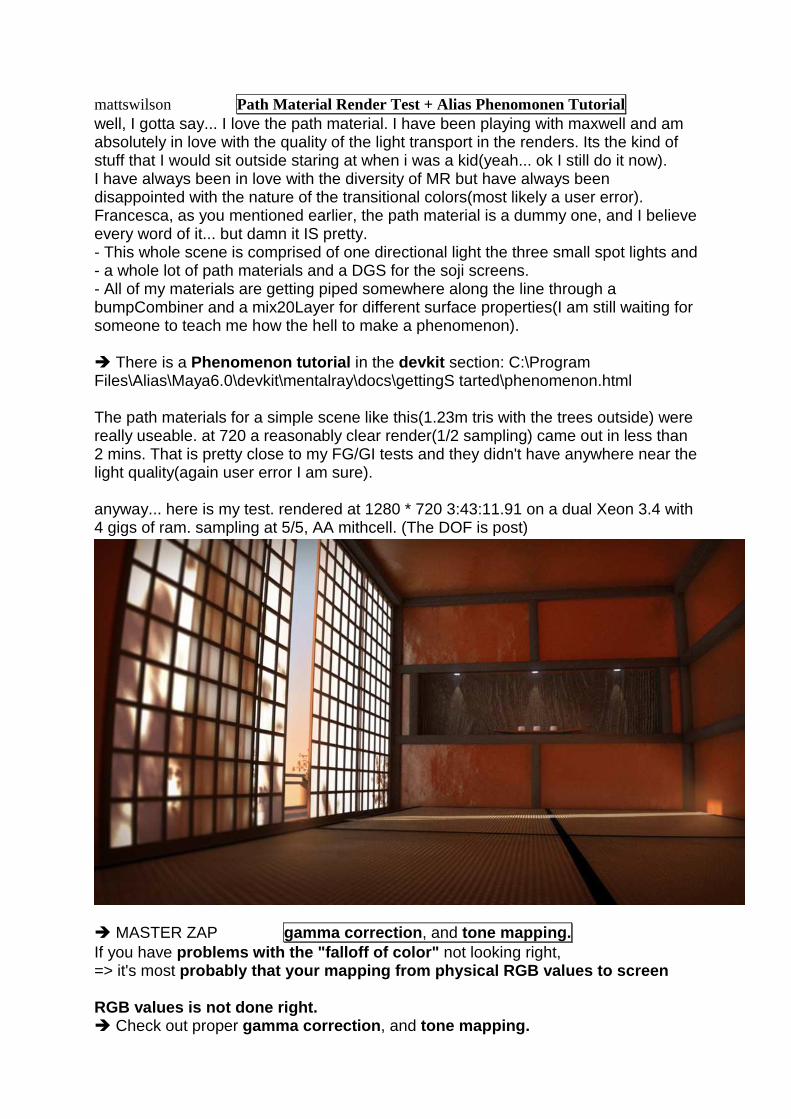
mattswilson Path Material Render Test + Alias Phenomonen Tutorial well, I gotta say... I love the path material. I have been playing with maxwell and am absolutely in love with the quality of the light transport in the renders. Its the kind of stuff that I would sit outside staring at when i was a kid(yeah... ok I still do it now). I have always been in love with the diversity of MR but have always been disappointed with the nature of the transitional colors(most likely a user error). Francesca, as you mentioned earlier, the path material is a dummy one, and I believe every word of it... but damn it IS pretty. - This whole scene is comprised of one directional light the three small spot lights and - a whole lot of path materials and a DGS for the soji screens. - All of my materials are getting piped somewhere along the line through a bumpCombiner and a mix20Layer for different surface properties(I am still waiting for someone to teach me how the hell to make a phenomenon). � There is a Phenomenon tutorial in the devkit section: C:\Program Files\Alias\Maya6.0\devkit\mentalray\docs\gettingS tarted\phenomenon.html The path materials for a simple scene like this(1.23m tris with the trees outside) were really useable. at 720 a reasonably clear render(1/2 sampling) came out in less than 2 mins. That is pretty close to my FG/GI tests and they didn't have anywhere near the light quality(again user error I am sure). anyway... here is my test. rendered at 1280 * 720 3:43:11.91 on a dual Xeon 3.4 with 4 gigs of ram. sampling at 5/5, AA mithcell. (The DOF is post) � MASTER ZAP gamma correction , and tone mapping. If you have problems with the "falloff of color" not looking right, => it's most probably that your mapping from physical RGB values to screen RGB values is not done right. � Check out proper gamma correction , and tone mapping.

PAGE 9
Floze Forget about Path_Material => “Flozebounce” + Setting s Well guys, I cant quit bothering you. Yesterday night (almost in my dreams) I had an idea and tried it out this morning. And guess what! It just worked out! If I am the very first guy using this technique and there's no name for it, I proudly introduce you the 'flozebounce'. The idea was to get multiple diffuse bounces out of the final gathering. Using diffuse only doesnt work since the first diffuse fg hit is usually the last one. But what if we used glossy reflection with a very low 'shiny' value as a diffuse compensation? Final gathering offers reflective trace depth, so the light bounce amount would be just that. It's really as simple as that! Virtually any shader that offers glossy (blurred) reflection can be utilized to get the effect. My tests are restricted to dgs shaders � because its the most simple way to get it done. The diffuse value matches the - glossy value (0.6), - shininess is at 1. - Samples are at 1/3, - final gather at 512 rays and - min/max radius 1/10 and - a tracedepth of 3. Ah, before I forget: no lights can (or may?) be used. Dont know if this an advantage or disadvantage � because virtually any object can be used as a lightsource by applying appropriate shaders to it - in my case, - a surface shader - with a HSV value of 16. This is my very first test render, dont be afraid of the blotches and the grain - just a matter of settings. Feel free to download the scene from over here. rockin'!

Think of all the possibilities! Multi bounced (flozebounced ) HDRI:
For comparsion, single bounced HDRI:
Dielectrified HDRI:

Quote:
Originally Posted by florianw Hey great idea namebrother, hehe.. ok, here is one for you
Ever tried final gathering with high raytrace-/fg trace reflection depth, but zero raytrace reflections with 50% diffuse/50% specular dgs? Well, I can't confirm it yet, but.. ..IT REALLY LOOKS LIKE THIS HIDDEN FG MULTI-BOUNCE FEATURE IN MAYA 6.0
!!!
Yeah, thats almost the same I did – - only you used the specular channel and - eliminated raytrace reflections by fully suppressing them. - Although I'd use the glossy channel to achieve the effect because specular can produce strong caustics - glossy is almost diffuse. Well, I'm blown away by the simplicity and beauty of this technique. You can seamlessly integrate it in your existing shader networks. I hope this is all true and we didnt forget anything? Or am I still dreaming?! Could someone pinch me to wake me up? Floze - Hint - When Maya Crashes If maya crashes:
- do a batch of the problem scene,
- wait till it crashes and
- look after the 'mayaRenderLog.txt' (..if you use windows).
� The last lines should tell something about the error.

PAGE 10
floze Render Test with Multibounces in Mental Ray 3.3 (NOT FG Multibounce!!) I'll post 'till either you guys seriously need some barf bags or an admin kicks me out.
My latest test, 4x final gather bounced, 4x glossy reflected, 2/4 sampled, and note: - - - No lights have been used, the - scene is illuminated by the camera's environment color only. Guess what you'd be able to with some serious HDRIs. Geeeee! Minor blotches and major grain remained though, but you should see this in action
with some artsy textures.. The scene.. About 15min for final gather cache (! you could reuse/freeze it) and about 45min for the rest on a 2xAMD2600+(~2.1GHz)/1GB RAM machine. Isnt too much, is it (The rendering time, not the machine )?

PAGE 11
floze Production Proove + How to Allright guys, I think I finally did it (though it needs to get production prooved and will be obsolete with mr 3.4). Lets have a look. The rendering time isnt worth mentioning.. almost just like a usual fg scene at that complexity would rush through (512 rays, 0/0 radii, -2/1 samples). Now about the how to : - I assigned a RayType shader to my objects, - plugged a dgs with diffuse 0.6 into 'Eye' and - another dgs with both diffuse and glossy 0.6 into 'Reflection' and 'Finalgather'. Thats it. � Fg tracedepth is controlled by fg globals. But: you could plug a reflection blurred phong instead of a dgs into 'Reflection' and 'Finalgather' and control the fg depth by the 'Reflection Limit' in the phong's 'Raytrace Options'. Cool, isnt it? No need to turn off raytracing at all. � However, using exclusively dgs seems to speed up final gathering significantly. Cant wait for mr 3.4! PS: The teapot scene didnt work out well because the geometry is a bit f**d up and not very suitable for final gathering. Gonna clean that up.

PAGE 11
floze Render Test (Teapot Room) I keep repeating myself, but whatever.. Here's a little test from last night. Somewhat crazy 10x fg bounce, rendered in 3h, where 2h and 45min have been wasted for fg and (you guessed it) 15min for the rest. Usually a 3x or 4x bounce should be way enough. 3000 fg rays, 1/10 min/max radii, 0/2 min/max samples.
PAGE 13
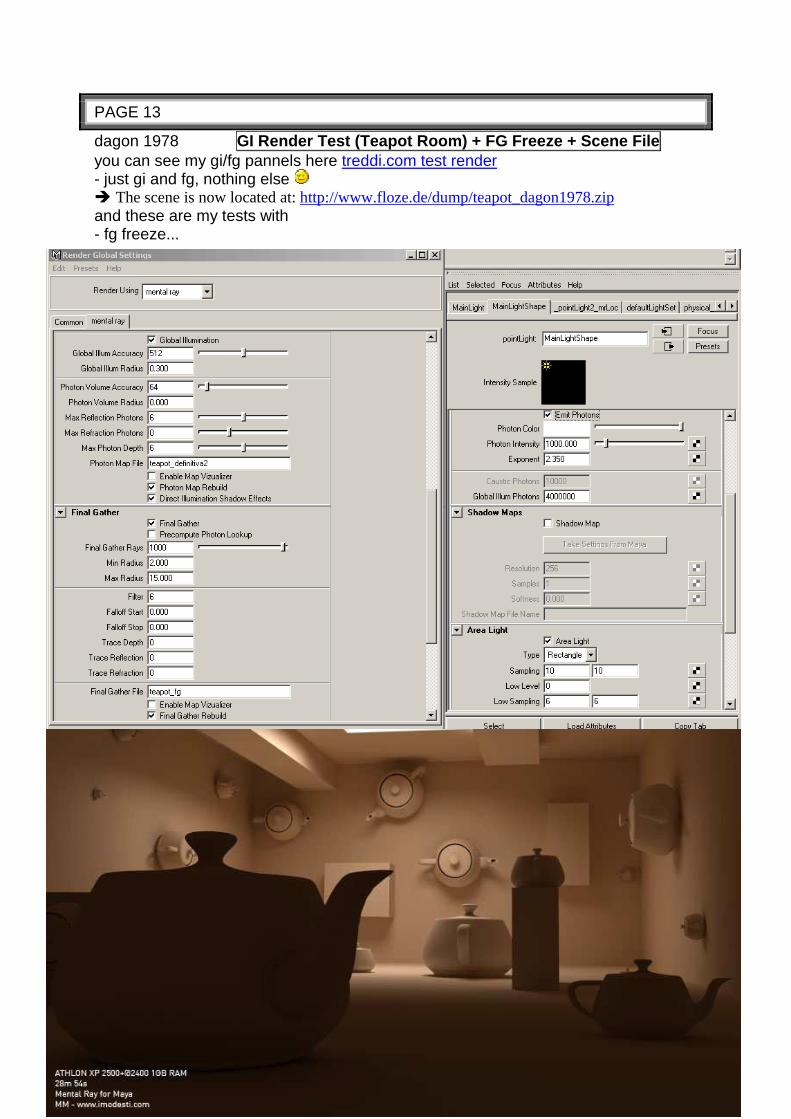
dagon 1978 GI Render Test (Teapot Room) + FG Freeze + Scene Fil e you can see my gi/fg pannels here treddi.com test render - just gi and fg, nothing else � The scene is now located at: http://www.floze.de/dump/teapot_dagon1978.zip and these are my tests with - fg freeze...

floze Render Test (Teapot Room) In the meanwhile, have a look at my latest test: - True 2x fg/reflection bounced (100 fg rays) and - physical dof, 26 minutes distributed over 3x approx. 2GHz (imho the same - or even slower - as a dual 3.2GHz/2GB RAM). The result is comparable to the path traced solution - only with standard dgs shaders .
Look at my test , combinating 2x fg bounce with usual photonmapping:

floze HDR Render Test Here's some little HDRI test using one of debevec's light probes. I set that up within minutes. The 'shiny' parameter is somewhat sensitive.. - the box has shiny=1 applied and - the skull has shiny=1.5.. - tracedepth is at 3, - samples at 3/4, - fg rays 128 with a - fg filter of 2. floze Some notes on sampling values.. Applying appropriate sampling values is crucial to get bearable rendering times with this technique. - Using 0/3 samples - with RGB contrast 0.060 � led to faster and better results than - 2/4 and - contrast 0.100 � but of course this might vary from scene to scene and needs to be reevaluated for each setup. However, using gaussian filter type smoothens the noise additionaly (and unfortunately everything else..).
PAGE 14
� dagon 1978 i think the only way to remove it are - incrase fr rays, and => incrase rendering time... maybe it was a fg filter problem... or a geometry problem... i can make some other test in these days � slipknot 66 About the FG artifact, i think the best way to resolve that, its - using the FG view.

dagon 1978 Problem WHEN RECREATING LIGHTING (Hint when importing a obj file) Quote:
Originally Posted by romeu i can´t seem to reproduce the settings that dagon1978 used. I download his scene and render it, it look´s fine, but when i start from scratch using exactly his settings. The soft shadows from the teapots in the dark areas disapear when i use FG. like the first render post by jozvex. Now, with only GI it looks good, but i need FG to smooth it a bit, how can i do that without loosing the soft shadows creaed by GI? thanks!
are u using the 3ds import scene? make sure that the attribute "visible in reflection" is checked in the render stats pannel � (maya 3ds import uncheck this attribute by default ) sorry for my english � romeu works fine now, by the way your renders are realy nice.
dagon 1978 finalgather diffuse bounce (workaround)=> with MR 3.3 I found a workaround to get a diffuse bounce out of finalgather:
- Apply a dgs shader with glossy color set to same as diffuse color
- Set the dgs' shiny value to 1.
- Set the finalgather's trace/reflection depth to the desired value (e.g. 3)
- Set the general raytrace/reflection depth to the same value (3) or higher
- Render the scene's finalgather solution, but:
- Abort the render when fg is finished and the actual rendering is starting
- Turn off finalgather rebuild
- Turn on finalgather freeze (learn here how to do this)
- Set the dgs' glossy color to black to avoid the reflections
- Render your scene
This definitely works. However, test this out please and tell me if we can proclaim this the unofficial workaround for finalgather diffuse bounce until mr 3.4 comes out.

andronikos916 Maxwell Render Test here is a maxwell test guys... slipknot FG/GI Render Test FG/GI..Maya/Mentalray.. and Gimp..
� 20minutes to render the scene, AthlonXP 1.6...512ram, - FG 180 min 0.3 max3, - GI accuracy 150 radius 3, - 3 lights, 2 pointlights converted into a MR area light with a square projection, and 1 spot light, all lights emitting 25000 photons (Page 15)

PAGE 15
ThomasAn AIR Rendering (it’s a Renderman Renderer) Quote:
What software are you using to intregrate AIR ?
Since Rhino is my main app, I use Rhinoman as the plugin. Rhinoman is shaping up very well. It is still in beta, but it is ripe enough to use for work. Here is one of the earliest attempts with true displacement and texturing:
� bjoern you can use Air with Mayaman from animalLogic But I think after so much renderer inklusive PRman (RenderMan® for Maya) building there own "X toMaya translator" it's just a matter of time that sitexgraphics does the same :-) because they have to. (PAGE 19) � Thomas An Quote:
Originally Posted by romeu Does anybody know if air can be used with maya? It would be nice to try it out.
Yes it is possible... but you are not lucky ..... Myaman costs $1990 on top of AIR. In Rhino we get Rhinoman for free. So it is more viable. => Thomas (PAGE 20)

AlexisS Render Test (Teapot Room) It's basicly just FG and GI, I'll post detailed settings once I get something which looks better and about 20min render time, but here is the rough: - 1 Area light, 1'000'000 photons, shadow and umbra = 0, photon intensity about 500, and 100% intensity. - FG accuracy 100 or 200, don't remember, radius is on auto-compute - GI accuracy is 10'000, doesn't have that much effect though. photon size = 0.8
PAGE 17
slipknot 66 Render Test (Chair Room) with FG + IBL Well, i dont think its hard to duplicate this kind of image with MR, here is just an example - using just FG, - no GI, no area lights, - just the IBL sphere with a white color and - FG 450 rays. I really dont see the difference between the MR and Air or even Maxwell, its just a matter of tweaking the scene and the Render.Also, its kinda difficult to compare Teapots or a simple chair , with some high level models.Im sure most ppl will say that this render its not the same as the one with Air or Maxwell, but honestly i cant see the difference.

slipknot 66 Render Test with Dirtmap Here is a render i did, with Maya and MR, this one using the help of Dirtmap, to enhance the contact shadows.
dagon 1978 GI/FG Render Test (Chair Room) + Settings + Scene Fil e this is my little test, 1) - gi+fg (color bleed, diffuse multibounce ecc ecc) look at the time and the pc specs
Settings: - just a spot/mr area light - 12000 photons - gi 512 - 2 - fg 1100 0.9 - 8 (fg view)

� dagon 1978 2) Quote:
Originally Posted by mouser100 @dagon1978: I like the result and the rendertime. On my puter (Athtlon XP 2000) it takes 15 min to get similar results. Any chance you post the scene? Thank you.
Scene File: � sedia airlike nothing special... Settings � just two things: - I'v used an IBL with a jpg (u can use what u want, i think isn't important) - for the plastic i'v used the DGS_fresnel material that's all!
ouch!! another thing... if u have downloaded my scene, => Turn off the glossy reflection of the plane (lambert material) this is a test that i make later... i forget it sorry now the scene is right (i hope...)
dagon 1978 DGS Fresnel (Download) Quote:
where can I find the 'DGS_fresnel' material
http://www.bmcaff.com/shaders/UsefulPhenM6.zip and don't forget to take a look at the bmcaff website http://www.bmcaff.com � dagon 1978 mouser u can use DGS or DGS_Fresnel for the chair... the difference is a metal chair or a plastic chair , nothing else � mouser100 Thank you Popol. After adding another missing one (ReflectionUtility 1.3), � I finally managed to produce a similar result. Thanks for all your kind help.

PAGE 19
dagon 1978 Plastic Material (Chair Room))
Quote:
Originally Posted by Bunny
Sorry guys...a little off subject
The green chair on page 17 created by dagon1978...
how is the reflection utility connected to the shader or is it connected somewhere else?
vbmenu_register("postmenu_1923712", true);
I think isn't too important what shader do u use for this render
I've simply used a dgs_fresnel to make a plastic-like shader, nothing else
� slipknot 66
yea, you could use a simple phong shader ,
� but the advantage of using the DGS is speed of render.
I’ve heard something that with the Maya 6.5 things are faster specially with MR

andronikos916 Maxwell Render (Classroom) some more renderings with maxwell that I did... not finished yet...but you can understand the overall illumination.

floze FinalGather Multibounce Workaround Example Scene + Settings My two cents on the chair rendering.. - IBL (galileo probe), - dgs and - finalgather (3x) only (= bruteforce reflection raytracing) � using the technique I mentioned earlier in this thread !!! - No lights have been used. 49min on distrib. 2x AMD ~2GHz:
PS: Sorry, this comes some days too late. I bought me a new GF6600 GT and had huge probs getting the drivers to work... literally went through hell the whole last week.

PAGE 22
floze Render Test (diff.ball.room) + Main Trick + Scene Fi le I bumped over this page and asked myself how it would look in mr.. well, here's what I got: Traditional gi+fg, 24min for the finalgather and 12min for the rest on a AMD2600+/1GB RAM.
Here you go guys: diff.ball.room.zip. � The main 'trick' in this scene is to - keep the area light's sampling values at 1/1, because higher area light sampling causes blown out direct illumination. - Therefore the overall sampling is at 3/3 (64 samples per pixel) to compensate the shadow artifacts.

dagon 1978 Render Test (Teapot Room) + (Chair Room) gi+fg
fg multibounce
the chair
PAGE 23
dagon 1978 Notes about Mental Ray 3.4 Quote:
Originally Posted by Atomman i think that he is using Maya 6.5 - is that the case dagon?
yeah mray 3.4 is very very fast but 24 minutes (12+24 a think) are for another render... i'm trying to make it faster right now Reason for MR 3.4 is so fast: mray3.4 it's very fast... because u can use low quality fg (100-200) and haven't artifacts like in mray3.3

PAGE 25
dagon 1978 Render Test (Chair Room)
u're right i like to push myself to otptimize mray!
ok... the chair, with softness shadows, color bleed, ecc ecc
seems that mray dont love the soft shadows too much (and i think those aren't so realistic...
but... right, very nice for the eyes )

dagon 1978 Ambient Occlusion Quote:
Originally Posted by ThomasAn. Hi Dagon1978, The render time looks prety good now The antialiasing also looks better ! In regards to shadows. Does MR have an occlusion mode ? (read: not lightdome) (http://www.neilblevins.com/cg_educa...t_occlusion.htm) It seems you already have indirect illumination turned on (I see the colorbleeding) but is there an occlusion mode as well ? Those two go well hand in hand. (Right now I see only the raytraced shadows from the arealight). - Thomas P.S. Here is a sample with Occlusion+Indirect lighting. There are absolutely *NO* light objects on the scene.
in mray you can use an ambient occlusion shader (in mray3.4 is integrated in the shaders panel) or you can use fgather to make occlusion... i can do the same render without raytrace shadows, but the AO shadows dont follow the direction of the light (in the render that you has posted the palaces have AO shadows, but without a direction...) maybe i can use an hdri or an image in the ibl (without raytrace area light shadows) to have soft directional shadows sorry for my english, is too much difficult to write therefore many things ___________________________________________________________________ Quote:
Originally Posted by Splin Of course you can do that, play around a bit with hypershade. I dont know how versitale this so called Ambient Occlusion shader is in Maya 6.5 but in XSI tree: To left side add Incidence node and pipe it through dirtmap. This way you can make dirtmap effect stronger or weaker in areas you like, it just has to be light dependant. In maya I guess Facing ratio node should do the same job as Incidence in XSI. I used dirtmap as an example for AO shader
thanx for the tip!

Additional for AO Pass with FG Ctrl Irradience mmhh. basic stuff here.. the ctrl.ir returns a color struct.. you need let's say a
luminance node to get it in a scalar term then plug it as blend factor for the blender..
there's a very basic scene in the above link.
set to black the input and to white the radiance diffuse color.. and b/w also the blend colors.
should be an occlusion pass (no other colors, no other materials).
enable finalgather in the globals and set to fg.rebuild if the first frame of the anim.. for next frames
you could (freeze or) append the solution by decheking that option.. using the fgocclusion cache.
6.25mins (firstframe) 4.38 (append) 2.59 (freeze)

PAGE 26
floze FG vs. Dirtmap Quote:
Originally Posted by slipknot66 here is an explanation about the difference between FG and an Occlusion pass, but
yes you can use FG for that, but not sure if the result will be the same http://www.cgtalk.com/showthread.php?t=206109
PS: floze, check that link...lol
Lol, yeah. I think the results are pretty much the same, though dirtmap is more customizeable and straight forward since it was designed for doing an occlusion pass. The guy in the thread you mentioned wanted to know the difference between 'usual'
FG and dirtmap I think... but what the heck. dagon 1978 Explanation of caustics with FG only Technique floze, just a question: can u explain me this technique to use caustics with fg only? � http://www.floze.de/pics/cgtalk/gifg/room12.jpg " used the backdoor actually. It's similar to a monte-carlo method (like the technique vray uses). The caustics are caused by a ray shot from the viewer, not from light. This is effective and accurate and somehow the 'real' caustics of mr become a bit obsolete this way imho." I want to test this scene with the new fg multibounces
� flozes Explanation: Well, it's as simple as that: - raise the fg trace/refractiondepth to something higher than 2 (1 for entry and 1 for exit) and � the fg will take the dielectrics with it's refraction value into account. - Also, the fg reflectiondepth should be set to 1 or 2 � to get some nice colorbleeding around the dielectric.

� lazzhar Well, it's just the way to try to give the AO some light directions - by changing the basis vector for dirtmap if you find this useful. � But it appears that the rounded surfaces like spheres starts to look really badly faceted. � But I fint it very interesting to render contact shadows instead of the slow area lights.
dagon 1978 Render Test (diff.ball.room) ok, this is a test - with standard mr_arealight+physical and - increasing the threshold value (something like 4) - samples of area light are 3-3 2-2 (default) - AA 0 - 2 � very fast render (maybe the quality isn't so great)

dagon 1978 Dielectric Material Test + Settings + Scene File Quote:
Originally Posted by floze Have you really tried using a (mr custom) dielectric material?
it doesen't work for me Settings: raytrace depth 5-5-10 fg depth 5-5-10 mr_dielectric shader raytrace shadows this is a simple test scene

� floze
The last image (panel with incandescence) was actually what I meant.
Think of it as a reflection ray, needing some stuff to reflect.
- This one is pure raytracing, visible area light as illumination source and
- a dgs groundplane (diffuse/glossy=0.6, shiny=1.0):
� If you use lights targeting the caustic generating object very distinctly
- you'd better use standard caustics,
since sampling the caustic photons wouldnt be a hard job.

floze EXPLANATION ABOUT DGS, PHYSIKAL_LIGHT, LIGHT_LINKING Quote:
Originally Posted by mimo8 theoretical of course but let me ask you some questions to the diff.ball.room-scene: - you use dgs materials and the specular and shiny values are not turned down. still I see no reflections and highlights in the image ?
That's probably a maya bug. � The dgs' defaults have some strange values assigned to it. - I have set this defaults to all black in the physics.mi file because it gets annoying. Just turn them down to zero glossy/specular. Quote:
Originally Posted by mimo8 - what does the physical light node that you connected to the area lightdo? are the photons not allready physik enough
Physical light has several advantages. - The color's HSV value component matches the photon intensity, - you can assign a threshold which prevents shadow rays from being cast if they fall below the threshold and - you can assign a cos_exp value which softens out direct illumination of rect./disc arealights. Quote:
Originally Posted by mimo8 - also you have light linked the shaders as it seems, but isnt this unecessary since maya 6 or does this change something. actually I dont get the light linking in this scene, because when I create a new point light and try to rebuild the light as you made it there is something missing, and when I hit the in and output connections in he hypershade I dont see any connections ... where your area light is having connections to the light linker thnx for answering my basic questions
Uhmm.. that's one of my bad habits... - I always do strict and rigid lightlinking (via the lightlinker ) - by binding the lights to the transform nodes - not the shading groups, which I all disconnect. => This is because mr seems to have problems with linking lights if you assigned another shader to like only one face of your object (like subobject material).

Thomas An. ABOUT LIQUID - Maya to RenderMan Translator Quote:
Originally Posted by Dr. Ira Kane
What version of AIR are you using ? I visited their webste but they don't have a demo
online now. Is MayaMan the best for using with AIR ? I'm really curious about that
renderer.
Yes the demo is in a transiton stage right now. Actually I like it this way, because the
demo is updated freequently (it refreshes every 2months I think)
Yes Mayaman is the best, but it is the most expensive; which I do not understand.
Mayaman is 4.4x more expensive than the AIR engine itself ... why .... don't know.
There is also the open source Liquid project which is free for commercial (and
personal) use.
PAGE 28
floze DELETE FLICKERING IN ANIMATION
Quote:
Originally Posted by Osaires
Hi, thanks guys this treath is realy helpfull.
But how about animasjon, i tryed making a animasjon where the key light moves, but
the result is a bit flickering.
the light is emitting photons and i also use fg, i try everything frome extreme values to
low values of fg rays and photones but nothing delete the flickering totaly.
got any tips?
Try this:
http://www.lamrug.org/resources/flickertips.html

dagon 1978 3 DGS SHADERS USED + SETTINGS (LightingSetup next Page)
- fg multibounce + caustics � MORE DETAIL look at PAGE 34 � i've used dirtmap only for the hi-fi and the clock (the occlusion is a render region, the time are included
___________________________________________________________________ � this is the original one in this render only fg and caustics photons � without AO (look for differences at the clock)
2 light: � 1 direct + 1 physical (with caustic photons) at the window - only FG - rays 80 - min/max radius 0.1/1 (view = little Mel Script found at Lamrug = it’s time saver) � another script is FG Freeze (which was not used = also a timesaver) - depth 2 (1-1) - multibounces on PAGE 29 � chromo is a simply DGS material: 0,1 diffuse, 0,9 specular, nothing else
i like DGS, DGS fresnel and DGS bump

PAGE 29
� dagon 1978 LIGHTING_SETUP EXPLANATION by dagon 1978 (with mib_cie_d_Node) 1 direct light (same lighting setup to both renders) - with the new mib_cie_d node (5200 K) (� Maya 6.5) � no ibl, no hdri, no skydome... mib_cie_d node Explanation: = it's simply a node to specify your light color with a temperature color you can take the settings in this table
Quote:
Originally Posted by ajsfuxor Ray traced shadows or shadow maps for your light? How do you connect up the CIE D Illuminant utility shader to your light source?
Further Lighting Settings - mib_cie_d node => i have connected it in the color node, - raytrace shadows with a little light angle (0,3) - no caustics for the glass, - only dielectric with transparent_shadows FG Settings the fg settings are very basilar, min max/radius 2-15 (view) depth=3 (2-1) multibounces on 200 rays for the exterior 300 rays for the interior

PAGE 30
dagon 1978 USAGE OF mib_cie_d - apply the mib_cie_d to the color node of your light... � you can use direct, spot, point, whatever you want, � the decay is specified in the light not in the mib_cie_d node PS: i've many problems too with mib_cie_d and physical node... � i haven't found a way to use physical and mib_cie_d in the same light... “Sphere♥” „mverta“ got Problemes by using dagons Light_Setup Quote:
Originally Posted by mverta [...]It's a white lambert sphere on a white lambert plane.[...]
I think if you want proper physical light / photon behavior - you need to utilize appropriate MR shaders on your objects. � For example a dgs_material in your MR material shader along with a dgs_material_photon in your MR photon shader. As it is I don't think any photons are showing in your image. That being said, as you pointed out, I think � there might be a problem with using cie temperatures for lights along with photons since it doesn't appear that you can attach the cie temperatures to the photon color dagon 1978 Multibounce switch inside FG Globals ??? Quote:
Originally Posted by rwijaya hey dragon, where is this multibounce switch inside FG globals ? i only found a check box stating for secondary illumination light. where to set the multi bounce and setup the number of bounces ? thx a bunch regards,
diffuse depth (diff bounces) = reflection depth � in the miDefault u can control directly the maximum diffuse depth for the scene es: reflection depth = 4 diffuse depth = 100 (default) u have 4 bounces in diffuse reflection depth = 4 diffuse depth = 2 u have only 2 bounces in diffuse

floze More about mib_cie_d node For you guys being curious about the mib_cie_d node: The 1976 CIE Chromaticity Diagram: http://hyperphysics.phy-astr.gsu.ed...on/cie1976.html The CIE color space in general: http://hyperphysics.phy-astr.gsu.ed...vision/cie.html Some standard illuminants (white sources) and explanations: http://hyperphysics.phy-astr.gsu.ed...ion/source.html The mib_cie_d node uses 6500K (D65, natural daylight) as a so called 'white source', which means a value of 6500 in the 'Temperature' field is white, everything below is more redish, everything above more bluish. This is the pendant to an 'outdoor' white balanced film I guess. Valid values range from 4000 to 25000. Some values you may take as a reference for your lightsources:

PAGE 31
GaryHaus LIGHT ONLY CASTING SHADOWS SETUP 1) If you are going to continue the route of directonal light, - just duplicate the directional. Once duplicated - turn off its shadow cast and then - give it an EXACT negative intensity to cancel out the light cast by the positive valued directional light. Then you will have a shadow casting light without any intensity. joie 2) You´d better - create a light with intensity at 1 but 0,0,0 in color - and -1,-1,-1 in the shadow color, � that way you have a shadow only light but with only ONE light instead of two, I think is a better way since MAYA doesn´t have to compute two lights. starsoul 3) - turn down the intensity to 0 � light turned into a Shadow Maker!!! � (Vgl Highend3d.com Tutorial about Modeling and Lighting a Metallobject) Slipknot Render Test using multi bounce, - just FG no GI, - 1 area ligh and - 1 directional light

PAGE 32
dagon 1978 USAGE of miDefault the andronikos scene with some materials test *no pic anymore* Quote:
Originally Posted by mathes It's looking very good Dagon, are you only using mi materials for your scene? Also, when you mentioned earlier about creating 4 diffuse bounces in miDefault, where can I find miDefault? I'm probably missing something incredibly simple here, but I cannot seem to find those settings. And thanks to everyone for contributing to this thread, I've learnt a lot from it.
i've used only dgs and dgs_fresnal in my scene for the mi def, go in the Quick Selection, write miDef* and Enter dagon 1978 Render Test (Teapot Room) with multibounces + Settin gs Settings: - 1 physical light at the window - raytrace shadows - samples 8-8 4-4 (or something like that) i've posted this scene in this thread if i remeber, the light is never changed

PAGE 33
yashu oversampling_lens does anyone knows how the oversample_lens work? It has only one attribute and I don't know exaclty how to set it :( Does that attribute sum to the global antialiasing settings? � floze Yashu, you'd better use per-object antialiasing which is well implemented in 6.5 now. The oversampling_lens has been discussed in this thread some pages earlier. �It has been developed for the path_material to support the special technique it uses (monte carlo GI). Maybe I find the time later to explain this in detail with some examples.. � yashu Oh yeah, finally managed to set per object samples in my good ol' maya 6 ) All you have to do is - adding some dynamic attributes to miDefaultSettings and your shape. � check paulo berto's link for details. PS. If I have time I could modify the AEtemplate for the shape nodes, so you don't have to add these manually.
PAGE 34
� dagon 1978 per-object AA doesn't work properly in maya 6.5
this is an italian thread of paolo berto, there is a bug in maya implementation http://www.renderglobal.org/forum/showthread.php?t=6241 ___________________________________________________________________ � paolo berto: "il problema e' che il 'min per-obj samples' e' passato anche come 'max per-obj samples'. se i tuoi object samples sono settati per esempio a (0, 1), in Maya saranno interpretati come (0, 0), mentre nello standalone (0, 1), cioe' come dovrebbe essere." the problem is - that the "min per-obj samples" is passed to " max per-obj samples" � if your obj samples are (0,1), Maya use (0,0), instead the standalone use properly (0,1) ___________________________________________________________________ � ronaldomiranda Now i know why you, dagon1978 knows a lot about MR, you reading all Paolo Berto writes! => dagon 1978 i'm waiting masterclasses

PAGE 34
bgawboy EXPLANATION OF object min max samples issue in Maya 6 & 6.5 I'll try to explain the object min max samples issue in Maya 6 and Maya 6.5. When rendering from within Maya, the object max samples value takes on the min samples value. Ex. case: Say you wanted to increase the minimum samples value for a certain object. Your whole scene is samples -1 2 (min max), and you wanted to increase your samples on this object to 1 2 (min max). Well, from within Maya, it would be passed to an interactive render as 1 1. Typically, this would mean that your object won't get enough samples in its higher contrast parts. However, if you wrote out to mi file, and rendered standalone, it would use the correct values. If rendering interactively, I'd recommend fixing the object samples (eg, 2 2) until this is remedied. When you are learning about this stuff, its always useful to use some simple objects and the diagnostic samples flag. Also, see the Object Samples section at the end of this tips page on samples: http://www.lamrug.org/resources/samplestips.html dagon 1978 LIGHTING_SETUP with Multibounce for the multibounces, if u - turn on the GI � the multibounces doesn't work , - but only the diffusive multibounces � the bounces in reflection and in refraction works fine ... in this render i've - used only caustics photons and - fg multibounces, - not gi for the multibounces exponent , i think u have to increase the ray depth of your raytrace light (in the attribute of the light and in the renderglobal) � to balance the diffuse depth of fg

PAGE 35
dagon1978 MAXWELL SCENE FILE dagon 1978 posted the link http://www.treddi.com/forum/index.php?showtopic=2608 to this Thread: “Mental Ray Test Render 2 - Treddi_com”html => Maxwell Test Scene File Ze PilOt Diffence between blurry and glossy reflection and s hininess Quote:
Originally Posted by ThomasAn. But where are the glossy reflections that are supposed to be *different* than the floor surface in the AIR image ? I honestly like to know the distinction.
in real world, excepts only mirrors surface are sharps.. - a glossy reflection is blurred by the distance of the reflection rays => (the more depth you go inside the reflection, the more blurry it is, you've got a more diffuse reflection).. => you can call that glossy, blurry or diffuse reflection, it's all the same LINKS http://www.jozvex.com/tutorials/glossy.html http://www.the123d.com/tutorial/gen...ctions2-1.shtml (by the way, the dgs shader is really not the fastest to do blurry/glossy reflection � floze I can’t clearly see the point, I guess by glossy we all mean - non-specular, non-perfect, non-mirror but diffunded and raytraced reflections. => This implies blurriness of the reflected environment. Both of your pictures were glossy/blurry/whatever by this definition. But lets not fall too much into semantics. edit: Oh, and I guess we forgot the third one for the party: shininess . That's actually the one to argue about. posted by Thomas An.

PAGE 36
dagon 1978 Blurry refraction/reflection shaders
Quote:
Originally Posted by Splin
hey Ze PilOt, why not and what would you reccomend for that kind of job?
thx!
because dgs haven't a sampler for glossy reflections
- if u use maya shaders with blurry refraction/reflection
� u can control locally the blur sampling
by the way, i dont like too much the maya shaders in mental ray
dagon 1978 per object sampling
maya 6.5 have per object sampling... but it doesnt work properly
Zusatz: Maya 6 support it properly
� jozvex
Why do you say it doesn't work? It seems to work ok for me.
I've attached an image of a single render. The left sphere has -2, -2 settings and the
one on the right has 2, 2.
� dagon 1978
but if u use (0, 2) maya take (0, 0) not properly (0, 2)
this is very problematic for the rendertimes
� joxvez
I see, it doesn't do it adaptively per object.

PAGE 37
dagon 1978 TONEMAPPING METHOD + Question about Maxwell Scene + Fil e Quote:
Originally Posted by yashu woops.. I allways thought you're nick is dragon1978 . thanx for the scene, it really helps PS. what does the framebuffer gamma setting do?
2 Methods for tonemapping 1) i usually use rgba 32x4 ->> exr and postprocessing my rendering with gamma correction (in photoshop or hdrshop) 2) but in this test i'm using gamma correction in rendering (=Framebuffer gamma setting) to lighting better the interior... this is because mental ray haven't a really tonemapping utility (ala vray > dark/bright multiplier) dagon 1978 Quote:
Originally Posted by ronaldomiranda Hey Dagon, i just rendered the scene, without change any settings and i get a very blured image. Any clue what i did wrong? :(
use the camera1 for rendering this is the camera and i've forgot the output pysical_dof attached � look here http://www.jozvex.com/tutorials/dof.html Additional Scene File: ok, i'm uploading my scene at my domain http://www.imodesti.com/mies_test/m...dagon_white.rar (not available anymore) yashu Multibounce I`m not having problems with the decay anymore, � that shadow raytrace depth did the job. thanx again. � dagon 1978 for the interior renders i think multibounces is very very simple and the quality also is great

PAGE 38
yashu Flicker free FG with Mental Ray 3.4
- the FG in 3.4 doesn't create artifacts anymore - with a low number of rays you get 'photon-like noise', but with 300 rays you get pretty clear results. francescaluce Multibounce Settings – How many bounces are needed? Quote:
today i've done some tests with 10, 25 and 50 and the rendertime seemed to grow a lot at 50 bounces but the quality wasn't a lot better
- multibounce is not related to quality. and - NEVER put more than 2/3 bounces, � it is already wasteful enough + use photon mapping instead. and consider that if you need so many bounces you have something wrong in your scene.. � dagon i agree for the bounces, i usually use 2 (1-1), 3 (2-1) or max 4 (2-2) diffuse bounces this is another test with mies scene (pic no more available) - in this scene i'm using 3 diffuse bounces � yashu yeah, after i tested with 50 - i've decided to set it to 5-8 in my defaults � cuz it provided good quality and also pretty fast rendering times. One thing about photons i don't like is that they use a LOT of memory and you need about 100.000*k photons to get good results. bgawboy � FG rays go backward from the eyepoint. � GI/photons go forward from the light sources. [some folks reverse the terms forward and backward] There is some overhead to GI and setting up a photon map, but with raytracing, the backwards context will always be in place. � The choices are supplied for optimizing the speed for the look you want. � Anyway, after about 2-3 bounces FG is less effecient than GI, and a combo approach is recommended. mathes Adjusting the amount of diffuse bounces in 6.5 Quote:
Originally Posted by ajsfuxor How do you adjust the amount of diffuse bounces in 6.5?' I cant find the setting in the render globals?
Type miD* in the quick select box and it'll select the mental ray defaults node.

floze Explanation about mib_cie_d 'Temperature' ranges between exactly 4000K and 25000K. Anything below or above this values will probably result in invalid output. Additional: ...they should have built in a softmin/softmax for this shader.
PAGE 39
� Pixero You can easily try to see if it works with softmin and softmax by just editing the mi file. Example: scalar "temperature", #: default 5000.0 softmin 4000.0 softmax 25000.0 � ALWAYS make a backup copy before editing!!! bloop FG (IBL) Render Test with FG Multibounces !!! Test thats an interior in progress (actually exterior lightning) MentalRay 3.4 Maya6.5 .... increadibly fast...... - FG (ibl) - m_bounces.
dagon 1978 First Tutorial GI+FG first tutorial (in italian language sorry :( ) GI+FG - Tutorial http://www.treddi.com/forum/index.php?showtopic=4858

popol A mib_cie_D tutorials a mib_cie_D tutorials (in spanish) http://www.deathfall.com/modules.ph...thread&tid=2287
PAGE 40
craggers How to make a curtain with translucency effect The curtains are just a lambert with high some translucence and a little transp. (the huge number of photons burns right through them!
PAGE 41
floze physical Light if you're using physical light, try lowering the exponent down to 1 (the exponent affects the physical light's 'direct illumination' as well as the photons). - A physical light is handier because => you are able to set the decay via a floating point scalar (which simply means a number that can be set quite accurately). - In spite of a standard maya light, � which is only able to decide between none, linear, quadratic and cubic. dagon 1978 FRAMEBUFFER THREAD / WORKFLOW i think you have some aliasing problem in the overexposed areas, are u using 16/32bit in the framebuffer? look at this thread � http://www.cgtalk.com/showthread.php?t=228917 dagon 1978 Adjusting Exposure without changing Lighting_Setup Quote:
Originally Posted by craggers Hey, fixed the artifact issues - got a little better result with the over exposed areas - thanks Floze and Dagon... Anyone any thoughts about the dynamic camera exposure issue?
� make a search about the aperture_lens shader , it's a great shader with physical dof and exposure control , like in the real cameras

Sorath Render Test GI/FG/AO maya 6.0 - gi + fg + ao rendertime 17 hours because samples 1/3 - lanczos fg r: 1024 1 spot on the outside 1 point on the inside
� BillSpradlin C&C
Look into using the ctrl_iradiance shader to fine tune those over exposed hot areas
bmcaff Workflow
Woah, can't believe I missed this thread.. Some fab interiors and info..
Nice results there Sorath, rendertimes are a bit crazy though...
� I usually budget less than 7 hours for rendering interiors at 3500x2000 or
sometimes up to 4500x3000. Lots of compromises and PS though.
� I did recently complete an interior which did take 17hrs to render but there was a
lot of polys and about 70 area light. Thing is, we have frequent power outages here
so I was sweating it, that and any changes could have been disasterous. Luckily
neither occured.

PAGE 42
dagon 1978 mies van der roe scene
hi pixel i think you mean the mies van der roe scene... i've change many times the settings, because this is a test (i'm testing this scene in here http://www.treddi.com/forum/index.php?showtopic=3425) Scene at page6 It’s a very simple setup... - i'm not using photons, - just fg and multibounces, � i think multibounces is a very good choice in interior scenes http://www.imodesti.com/mies_test/mies_scene.rar (no more available) � you have to download dgs_fresnel / reflection_utility / l_glass for some materials bgawboy Secondary Diffuse Bounces (SDB) Secondary Diffuse Bounces are Diffuse bounces after the primary FG rays have been sent out in the hemisphere above the FG point. When a primary FG ray hits an object, its material dictates whether there will be specular, glossy, or diffuse reflections/refractions. The FG trace depth can specify how many levels of reflection, refraction, diffuse (6.5/3.4) secondary rays may be spawned. There is also a sum count like in regular ray tracing. When GI is on, the photons in the photon map will be used instead of secondary diffuse rays. If the rays were not turned off, there would be duplicate light contribution. So when GI is on, its like turning off the secondary diffuse switch. Instead, the indirect diffuse contribution, for the point where primary FG rays hit objects, will come from the photon map. � floze I strongly recommend going through Paolo Berto's Advanced Final Gathering paper: � http://www.jupiter-jazz.com/wordpre...hapter1-FG.html Cant link that often enough, it's absolutely worth reading. It's an easy to understand final gathering compendium. Just great.

� floze you can download the whole support files for Paolo's masterclass (50MB) over here: http://www.alias.com/eng/products-s...s/updates.shtml Additional Paolo Berto's BLOG => http://blog.jupiter-jazz.com/
PAGE 43
Dankish Lighting Settings + BSP SETTINGS Credits here to slipknot66 about the scene he posted some time ago => Rendertime: 1h:14min. The render before tuning took 5h:06min (FIVE HOURS. God bless BSP settings:)
The idea came from a photograph in magazine

Lighting Settings I've got 3 lights generally. 1) The sun (directional) with - no decay. - Point light converted to mental ray area light at the window. - 3000 photons, - 1.9 exponent. => Two of them have the mib_cie_d mentalray shader. 2) The third light is - slightly behind the camera, - set to 0 => Shadow Maker - photons settings I left as they are, default. 3) Third light placed there because of the lack of details in some dark areas.) - Final Gather rays: 50; - min radius: 60, max: 600. - Secondary Diffuse Bounces turned on (I don't know if using it along with GI has no effect, as some people say but I believe them I just haven't tried rendering without it yet About BSP. I am sure it's already been commented, but here's what I've done. After the unsuccsessful render I did (in a manner of render speed) - I took the output window to see the so called BSP Section. - The values I used are the average depth and average leaf size. And I think that's pretty much it . Quote:
RCI 0.2 info : main bsp tree statistics: RCI 0.2 info : max depth : 49 RCI 0.2 info : max leaf size : 128 RCI 0.2 info : average depth : 28 RCI 0.2 info : average leaf size : 9 RCI 0.2 info : leafnodes : 32140 RCI 0.2 info : bsp size (Kb) : 1605
These values are just for example. They are different than the ones I used for my scene. As far as I know it's a memory set up so => It depends on different computers. I don't pretend to be good, so I might be wrong. Here's the lights concept

PAGE 44
Splin QUESTION: How to use a half spheres HDRI Maps Paul Debevecs light probe's link was floating around in this thread. It was possible to download light samples from there. Over 60Mb or something. Really neat stuff and great idea but once I opened the package I didnt know anymore what to do. Those hdr's are not full spheres but half spheres, how should one use them? � T_R The file is called skyprobes.zip at the bottom of the page http://www.ict.usc.edu/graphics/skyprobes/ � starsoul look at http://www.jupiter-jazz.com/wordpre...hapter1-FG.html nearly at the bottom of the page, for help about usage � floze Quote:
Originally Posted by Splin Sry if I am talking pure insanity here...if so just scream out loud RTFM Have you used yourself yet those sky samples to light you renderings?
- The scene is lit by an photon emitting IBL containing the skyprobe HDR images and using an interval of approximately 1h. - The sunlight on the other hand is a directional light � generated by the LightGen plugin (http://www.ict.usc.edu/~jcohen/lightgen/lightgen.html) for hdrshop (http://www.ict.usc.edu/graphics/HDRShop/). To 'extract' the sun out of the HDRI, - I made a threshold of 1000 pixel values, - converted the format from light probe to latitude/longitude (LightGen requires this) - - configured the plugin to generate only 1 lightsource. As you can see the detail of global illumination is not superior, but this is due to the fact I used only 25000 photons - raise this value sufficiently, � and the detail will be satisfying. - Also, the finalgathering could be optimized, but what the heck: 10-10 11-30 12-40 13-40 14-40 15-50 16-40 17-20

� floze � SCENE FILE It's absolutely not perfect, but I think you get the idea behind it. The lack of a southern hemisphere is only noticeable in the lower part of the left window. � If I did some serious renderings, I'd compose the background anyway. Here's a refined render of the 16-40 probe, - using a hint of ambient occlusion and - a bit depth of field:
floze ABOUT THE SCENE FILE SETTINGS Quote:
Originally Posted by Synthesizer Looking good Floze Just wondering, you have the final gather colour gain set to 0, how come? Would this be the same as turing it off, or does it still do something? It'd be cool to see an animation of this, maybe I'll try setting one up an letting it render overnight.
Thx Synthesizer and dagon! Good question Synthesizer. Finalgather color gain of the IBL node is set to black, because: Quote:
Originally Posted by ms_thesis_stumpfel.pdf The captured lighting presented here could be used to render any outdoor scene, providing realistic illumination and a sky backdrop. However, due to the extreme contrast between the sun and sky, standard monte-carlo illumination algorithms will produce a large amount of noise, as they will have difficulty sampling the small disc of the sun reliably and sufficiently.[...]
If I used the IBL to contribute to the finalgathering process, � I'd have (among others) another source of noise. � So I simply switched the IBL's fg contribution off.

� This does not affect the rest of the scene, since I'm using photontracing as source of indirect illumination, and finalgathering smoothens it out. But: 1) I could use the IBL to contribute to fg, - I only needed to set a fg filter of at least 1. � But I tend to avoid this filter strictly because eliminating the real source of error is imho the better choice. 2) - Another solution would be to take the HDRI, - make a threshold of something between 1000 and 2000 pixel values, and - subtract this result from the original image via the 'Calculate' operation in hdrshop. � This way you could 'subtract' the sun from your HDRI, � resulting in a similar fg calculation like with filter set to 1 or greater. I guess Paul Debevec used a similar method in his examples, dont know exactly though. Funny enough this technique was intended to be used for outdoors only. - Well, with photons set to rebuild-off and - a frozen or rebuild-off irradiance cache, � rendering the scene is a piece of cake. � Emitting the photons naturally takes some time because the whole IBL sphere needs to be sampled all over, only letting photons into the special cage I built. But the rest is a piece of cake.
PAGE 45
floze ABOUT FG SETTINGS for flicker free AVI Quote:
Originally Posted by Splin OMG Floze! Thank you very much for rendering out ani. I love MR 3.4..or well, will love it if it arrives to xsi! What were FG settings , same as mentioned above? Is FG map rebuilt in every frame or frozen(as in some corners flickering appears I guess it is rebuilt)? thx!
The fg quality is a bit lower than in the refined 16-40 rendering. - I used 256 rays and min/max radii 10/64 => (I tend to use power-of-two numbers though it is useless in most cases.. bad habbit). The photon settings are also a little bit coarser than in the refined pic: - 100.000 photons with - radius 64 and - accuracy 256. And yes, you're right, it's rendered with - rebuild off (only rebuilding necessary fg points). But with a little more effort you could render out a proper - fg cache,

- freeze (MEL Script at Lamrug.org) it, and � enjoy a complete flickerfree (and faster rendered) animation. starsoul look at http://www.jupiter-jazz.com/wordpre...hapter1-FG.html � Solution for FG animation T_R Multiple FG bounces are useless if you have GI turned on (To my understanding) Multiple FG bounces are useless if you have GI turned on. They are actually ignored. This was bugging me for a while as I couldnt see the difference in renders when the secondary diffuse bounces was toggled on and off (FG alone was ok), but now it makes sense. I found this information posted from Bart the site admin in the LAmrUG forum. Quote:
- When you turn on GI - while you have FG on, � any secondary diffuse FG rays are not performed and � instead the indirect illumination calculation uses the photon map lookup from GI. This means that the setting of the third argument of FG trace depth becomes 0 whenever you turn on GI. This is just GI photons, not caustic photons. You can use seccondary diffuse FG rays with caustics. This is recommended for scenes where you don't need more than a couple of diffuse bounces. After that, GI becomes more efficient. � In other words, after the third argument to FG trace depth becomes greater than 2, � try some GI to see if you get desired results faster.
Info is in the last post but the whole thread is great. Thread is here: http://forum.lamrug.org/viewtopic.php?t=78 digones First attempt on "virtual environments" + Settings This is not perfect, but I like the results since it's my first attempt on "virtual environments"... PS: ups, I almost forgot: - no GI, - just FG with - 100 rays - (multibounce with 2 bounces), - min/max radius 10/1 and time to render: aprox. 1:20 on my humble 1ghz powerbook with 1gb of RAM - photoshop for post production (overall color correction, diffuse reflection on the floor and some details on the plasma TV)

PAGE 46
dagon 1978 Some new test with multibounces + Settings a) direct+ibl b) direct+arealight+ibl c) direct+arealight+ibl 4) direct+arealight+ibl (pics are no more available) the scene isn't mine, it's a test scene (sorry but i dont know the author) i'm using IBL with a simple color (blue) Settings: 1) - direct + ibl direct (orange) int 7 fg rays2000 min/max rad 20/300 falloff 1-1400 trace depth 2-1-1 multibounces depth 1 ibl color gain 3 2) - direct + ibl direct (orange) 3 area light (orange) 300 (decay linear) ibl color gain 1 (default) fg rays 300 min/max rad 20/300 falloff 1-1400 trace depth 2-1-1 multib depth 1 dagon 1978 Multibounces – 2 Lamrug Presentations about it multibounces is a new mr 3.4 feature for details take a look at these fg presentations at the lamrug “LAmrUG_April_2005”.pdf “LAmrUG_March_2005_v2”.pdf � bgawboy BTW Mat, Tolgahan also made a contribution to the March presentation, in the AO section. And, thanks to both of you. For those following this thread, � 'Multibounces' is a nickname for diffuse secondary FG rays, � enabled with a check box at the bottom of the FG section of mr Render Globals.

floze Activating FG Diffuse Bounces Quote:
Originally Posted by benke76 Can someone tell me how "Secondary Diffuse Bounce" settings work? According to the "LAmrUG"-document there are 4 settings for it. It says "FG trace depth:2 0 2 2" All I can find in Maya is: Trace Depth: Int Trace Reflection: Int Trace Refraction: Int (Secondary Diffuse Bounce: Bolean) Since it is an Bolean you can't count it as an value in the FG trace depth?! Where do I set the Diffuse Trace Depth level (Dagon1978 wrote "multibounces depth 1", wich I assume is the same as Diffuse Trace Depth). Where do I find this in Renderglobals? Dagon1978, great work! it keeps me upp all night trying to find your magic settings!
The FGDiffuseBounces attribute is 'hidden' in the miDefaultOptions node. All trace-depths are exposed in this node. 1) If 'Secondary Diffuse Bounces' (the boolean one) is OFF, � the FGDiffuseBounces is 0. 2) If it's ON, � FGDiffuseBounces change to 100. However the diffuse bounces never exceed the 'Trace Reflection', => and respectively of course the 'Trace Depth' value in your fg settings. Quite strange implementation imho.. � mathes - Type miD* into the quick-select area in the top right. That'll select the Mental Ray Defaults node for you

BillSpradlin IBL "Image Based Lighting AKA rendering with HDRI" � IBL does not require you to use HDRI. � You can use LDR images with the IBL node and you don't even need to use Final Gather to light a scene with IBL. dagon 1978 Test of replicating a vray non-lambertian model for diffusion Quote:
Originally Posted by mathes Type miD* into the quick-select area in the top right. That'll select the Mental Ray Defaults node for you.
now i'm trying to replicate a vray test... i think, vray use a non-lambertian model for the diffusion...
the oren-nayar diffusion seems closest to the vray one � dagon 1978 this is a simple test with mr and vray vray: direct multipl 1 (orange) env multipl 1 (white) irradiance map + QMC (1 bounce) vrymat diffuse (white) no refl mray: direct int 1 ibl (white) fg multibounce (1 bounce) dgs diffuse (white) no refl mray: direct int 1 ibl (white) fg multibounce (1 bounce) oren-nayar diffuse (white) no rough � floze Quote:
Originally Posted by dagon1978 this is a simple test with mr and vray
It's because the dgs is 3.14159.... times darker than the oren-nayar, which probably doesnt divide the computed radiance by pi. http://www.cgtalk.com/showthread.php?t=228118 (= ”DGS exploited” THREAD) edit: An oren-nayar without roughness is a lambert, isnt it?

PAGE 47
� floze Quote:
Originally Posted by dagon1978 ok, undestood the problem but why the vray one have this problem? isn't phisically correct? and... another question, if i use a direct with 3.14159 intensity i can achive the same results?
You always have to consider the relation between radiance and irradiance. With dgs the irradiance color is 1 and radiance is 1/pi. - So you either have to multiply irradiance by pi, - or you have to divide radiance (color) by pi to get the same result. � I guess vray isnt bypassing this to the user, simply 'forcing' physical correctness maybe (like a dgs) , but I dont know anyway how it gathers the irradiance. � bgawboy physical correctness in mental ray depends on the shading and light models you use. Maya allows you to mix and match any type, physically correct or not. Hence, we have lots of adjusting factors. In addition, these factors could be used to get a non -physically correct, but visually-desired look. If you think about it, truly physically correct would mean all trace depths are infinite, but how often is that used? At a certain depth, the contribution may be insignificant. Or, maybe one could get by with a slight factor adjustment, which would just push up the average indirect energy collected. Quote:
Originally Posted by dagon1978 yeah, i'm happy with maya&mantal ray shaders, one thing that i envy to vray is the vraymat, it's all you want... diffuse/reflection/glossy/transparency/sss... it's a great help for basic users (specially for interiors)... i hope Alias think to implement some
preset shader for us
One could do a phenomenon that does this. dgs + sss. The sss skin shaders are phenomena, so the simplistic way is to copy one of those and add a dgs into the new phenomenon. Lots of overlapped functionality, but some parameters could be zeroed out.

dagon 1978 About classroom scene: - Rendering Time, Settings, - ctrl_shading for optimised glossy reflection for what i can understand in my tests with vray, � the problem right now isn't the fg calculation (or irradiance or lightcache for vray), u make nearly the same results with both... � the problem is the refinement phase (raytracing, AA, ecc), in mental ray � if i use the quality that i want i cant control rendertimes... times are exponential (especially with high resolution renders), and i've refined all that i know in the scene (AA, contrast threshold, bsp, raytracing depth, fg depth/bounces, glossy samplig with reflection utility...) this render is made with a 750x400 fg map and 1500x800 final render... this save render times Light & Shader Setup: BTW this is a - multibounces render, - i'm using an area light for the windows (saving 1 bounce) - i'm using only 3 shaders for this scene, => dgs, dgs_fresnel and oren-nayar Settings for FG trace depth for reflections fg trace depth 2 fg reflection depth 1 fg refraction depth 1 if i use only 1 sample for glossy i don't have a good result... too much noise , i wonder if reflection utility does adaptive sample for glossy? � francescaluce try the ctrl_shading I sent you, � it can optimize glossy reflections either in fg precomputing (optimizeFG), or in fg tiling with the Depth param.
this is the shader http://www.cgtalk.com/showthread.ph...599#post2314599 Additional or you can look at http://yashu.go.ro/ for downloading other MR_Shaders and further help about their usage

=> Addtitional: why the adaptive sample is slower than fixed francescaluce Quote:
i wonder if reflection utility does adaptive sample for glossy?
adaptive sampling is most of the time slower than fixed sampling. well with a good tweaking could be faster. but really it isn't. begin to consider: 1) adaptive sample need at least three parameters min, max and a threshold, while fixed need only one. 2) to obtain visually a good result you'll have to use something very close fixed samples. => that's why no one implement adaptive sampling for blurry reflection or even occlusion shaders. also remember that one can ctrl samples based on any condition, in a way that seam adaptive, but always fixed it is; - you simply supply more or fewer samples based on any condition � you can elaborate and apply in the hypershade by pluggin something into the sample slot drived by maybe a state or a probed distance or what you wanna and then sized with a set range node to allow a valid reliable value. lazzahr Adding a specular pass to enhance the render I just used
- FG of 200 rays with
- 1 secondary bounce.
- The rest is just regular lights and shaders.
- The sampling 0:2 with mitchell filter.
I had to cheat and render a specular pass again to enhance it a bit.
It renders quickly then I added it on the top of the original rendering.
I guess the jpeg compression affected the quality a bit.

dagon 1978 3 Phases of rendering + Settings 1h 02m for this rendering (17m fg map , 42m raytracing , 3m ao pass ) (pic no more available) Settings: - fg rays 100 - min/max radius 12 / 300 - 1 direct light - 1 area light (8 -8)
PAGE 50
� dagon 1978 Quote:
Originally Posted by Synthesizer Great pic dagon1978! Your link appears to be broken though P.s. Why is your FG max radius so high?
mmm, it's working for me... i'm using very low samples and high max radius + ao pass => to lower the render times, in this scene the mr raytrace is slow :( � bmcaff best approach for doing high res interiors with MR => This is probably the best approach for doing high res interiors with MR. With some hand editing of the AO pass you can get really good results with really low render times. I routinely do interior renderings at between 3500x2000 and 5000x3000 pixels and the render times rarely exceed 3 to 4 hours. => Using the usual approach yeilded huge render times. => Additional: About AO Pass Usage bmcaff
AO pass is the way
- but it really needs to be hand edited to avoid the slapped on top looks and also
- if you are using a simple Black to white then the layer opacity would need to be
about 50-60%.
- Then a layer mask to lighten the effect further in wall and ceiling corners.

floze Other solutions to HDR/Environment map importance sa mpling? Quote:
Originally Posted by azshall Does anyone have other solutions to HDR/Environment map importance sampling? ... Lightgen does this, but.. I'm curious if that is the ONLY solution? .. There has to be otherwise to achieve this... Not directly for a MEL script output like Lightgen does.. but .. At least to generate a lightmap of sort...
Yes. You could try blasting caustics through a refracting window, using for example the dielectric_photon shader . � This would give you some sort of direct illumination. � azshall Banty's Toolkit Have you seen or messed with Banty's Toolkit at all? .. He's got another lightGen type sampling plugin. � It's called MedianCut ... Does the same thing as lightGen but with a different algorithim. Only problem is, it doesn't spit out text data you can directly use with maya. It spits out something that has the info, which is for example .. a directional value (output in radians) and a light color value (which is output as RGB). � dagon 1978 Quote:
Originally Posted by dekkard Are you using the ao pass as a separate render and comping it with the final image . . or are you doing a single go renders .
yeah i'm using a separate pass for the ao but i've discovered that i'm mistaking something... and � now i'm trying to have the ao look with the fg... maybe it's possible without extreme rendertimes... � with the ctrl_shading by francesca luce i'm solving the glossy grainy too dagon 1978 ctrl_shading another test with the classroom 1) without AO (2h 06m) (pic no more available) 2) with ao (2h06m + 3m ao pass) (pic no more available) � i've replaced almost all the materials with the ctrl_shading by francesca luce
its pimp!!

PAGE 51
� dagon 1978 DGS vs. Ctrl_Shading Quote:
Originally Posted by dekkard wow . . again dagon . great render . finally mental ray is showing so much promise . .though im not happy with the dgs shader . . so do you think ctrl_shading can fully replace it ??? and i would love to see a night version of the class .. with interior lighting . . as ure day renders have been awesome !! . . waiting for yet another surprise .
yeah, i think that the ctrl_shading can definitely replace the dgs (i like the dgs phenomena of bmcaff too) � ctrl_shading can do what dgs do and more... the glossy reflections are the best available for mental ray, the specular and diffuse models are very nice (especially for interiors) too dagon 1978 Night version + Settings my first try with a night version 34minutes - 8 area light cylindrical (visibles) - samples 7-7 - 5000 photons for each one - GI acc 64 - rad 0 - FG rays 10 - radius 8-100 (pxl) AA: - Lanczos 4 4 -1 2 - c.t. 0,06

rygoody How to prevents samples with extreme brightness and here is my attempt, took 18 minutes to render - FG bounces 5 - mix/max .5/10 - FG rays 700 - AA samples 0/2 mitchell - 1 physical area light and cie 7000 in front of window - 1 mib infinite area light with cie 6000 making the bright sun - 1 interior area light with cie 5000 � everything is purely light grey DGS diffuse, � then there is a little bloom added in PS
any tips on how to take down the burn? BTW it was already burned that bad before I added bloom => Additional by starsoul FG filter =>“ Advanced Final Gathering“ by Paolo Berto "Final gathering uses an speckle elimination filter that prevents samples with extreme brightness from skewing the overall energy stored in a finalgather hemisphere. This is done by filtering neighboring samples such that extreme values are discarded in the filter size. By default, the filter size is 1. Setting this to 0 disables speckle elimination, which can add speckles but will better converge towards the correct total image brightness for extremely low accuracy settings. Size values greater than 1 eliminate more speckles and soften sample contrasts. Sizes greater than 4 or so are not normally useful."

PAGE 52
� dagon 1978 � color mapping or gamma correction or tonemapping it's the same ... 1) for the gamma correction => you can try with the ctrl_irradiance (by francesca luce) 2) i think there are also some camera-shader (like wurp said) => like aperture_lens_shader for this kind of works 3) - but i suggest to use a 16/32 bit output format for the rendering and - make the gamma correction in post , � you have much more flexibility � dagon 1978 Quote:
Originally Posted by wurp Its a tool that helps to scale the values of the rendering so they land in the 0-1 range, basically it prevents having large overblown areas. Im sure you could do this in post if you rendered out as for example .map files, but it would be good to be able to see the result as you render in mental ray directly. I guess you have to try vray out for yourself to see what the colormapping thing does.
� rygoody Dagon, another question about the openEXR. I have got it mostly worked out. I found this photoshop plugin http://www.theorphanage.com/tech/OrphEXR/ I don't know if you know about it, but in case you don't, it appears to be alot better than the one on the official oEXR page. It puts actual native 4x32 support in PS and alot more exr options, which brings me to my question. I got rid of a lot of the burn in my original image http://stu.aii.edu/%7Ermg382/interiortest4.jpg except for the actual window lining. It has way to much expsoure to actually unburn and still keep the ideal illumination in the rest of the image. Do you know if any of the special OpenEXR functions would be able to get rid of the burn on the window lining while keeping the rest of the image at the proper illumination? � floze Quote:
Originally Posted by rygoody any tips on how to take down the burn? BTW it was already burned that bad before I added bloom
Try - applying a mib_lens_clamp to your camera. - Leave it in non-luminance mode and - set the floor value to 0.0 and - the ceiling to something between 1.2 and 2.0; � it acts like an exposure control. => The drawback is that you get put into scanline-off mode. I guess vray is doing that internally by default, isnt it?
� slipknot 66 or.. use the Md_aperture lens shader .. � http://www.lightengine3d.com dagon 1978 (was on PAGE 51) Render Test – cleaning it up ok, maybe i'm trying a way to clean the render 1h 33m + 3m (ao pass) (pic no more available) - fg rays 150 - fg radius 20-300 - fg trace depth 2-1-1-1 - aa filter lanczos 4 4 - aa samples -1 2 - c.threshold 0,06 - 1 direct - 1 area light (samples 14 -14, no low samples) dagon 1978 FG+GI Turorial – Treddi.com finally i have an english translation for my tutorial http://www.treddi.com/forum/index.php?showtopic=8436 u need a free registration _________________________________________________________________________________ devrim DGS Usage came across your TUT. Thanks. You mentioned to use DGS instead of Maya lambert. "The advantages you’ll get by using these materials are mainly of two types: a) shorter rendering times and b) better light behaviour. If you started this tutorial using a lambert shader, - simply assign a DGS material (without glossy reflections) to every object in your scene and - do a rendering test to see the difference between the two shaders. Remember that, as for other Mental Ray shaders, if you wish to use a DGS material => you must set the dgs_photon or the mib_photon_basic into the “photon shader”." Otherwise rendertimes will increase . I assume it happened cause I missed to connect the min_photon_basic or the dgs_photon to the "photon shader"(???).

� starsoul you also have to link your Lights to the dgs_shader: either by drag and drop your lights in the slots or by typing in their exact names of the lights or you could use the lightlinker (floze method), to prevent problems of a linked light to more than one object � (search this file for “EXPLANATION ABOUT DGS, PHYSIKAL_LIGHT, LIGHT_LINKING” for further explanation) � or go to http://www.jozvex.com/tutorials/glossy.html in the middle of the tutorial yashu did u guys tried francesca's ctrl_shading material? it's AMAISING... i'm not using DGS anymore since this shader come to me . � Now i only use 3 materials with mentalray: ctrl_shading, l_glass and physical_subsurface devrim Ambient Occlusion (AO)
Another Issue:
If I want to use a dirtmap shader in your scene...how would you use the dirtmap in
your scene?
� starsoul
You can render eg. the AO in one rendering process, by using the mix8layer
or you can do it as a separate pass. For this way I know 3 Methods
- use the dirtmap plugin
- or the raydiffuse shader � www.lightengine3d.com
- or Fake it with Final Gather � look at this one “ Advanced Final Gathering“ by
Paolo Berto

francescaluce Render Test + Setting (Pic) hi. I coded a basic photon shader to attach to the ctrl_shading... not finished yet but here the first test scene. a simple one. my goal was just to obtain a smooth solution with a mild color bleeding and a consistent white point but without overexposed areas... vray like. here what I got... totally ctrl_shading (+simbiontMaya for the floor), an hour or so to setup the scene, 43mins the first image, 37mins the second, 35 the third (3Ghz*2). really no postproduction. Settings:

PAGE 54
francescaluce vertex painting, mentalrayVertexColor shader
ehy, last test here for this gi sunday. I used a simple technique with the ctrl.irrad.. - it involves a vertex painting over the mesh where the fg solution has problems to bring more accuracy => just there using the new mentalrayVertexColor shader, infact this took just 24mins. � brogh this is what i was looking for, waiting for your update, is this an application of this tutorial http://www.claus-figuren.de/tutorials/radiosity/ ported to maya ? � francescaluce Quote:
this is what i was looking for, waiting for your update
brogh this is mentalray. not our shaders. at least since mr3.x you can 'easily' achive this kind of images. mr3.4 makes some powerful refinements to an impressive tool. stop wait. start exp.

francescaluce White balance – How to Quote:
The white balance on those images is perfect. Waiting for developments on this technique.
well, thanks. but not really any special technique - just photon mapping with finalgathering. a little trick on the walls is that I - supply an off white to the diffuse shading while a pure white to the photon shader, any little adds or subs from that will have really a great impact on the final result. - also I use photons bounces as a contrast parameter => so I tend to use few bounces to not over smooth the whole thing => and fg to get luminance and tone to the image. to get a smooth solution but detailed => for finer refinements I use a big gi.radius while really small generally view.dependant fg.radii. a rule of thumb: I force myself to follow is that I - first supply a zero value to the gi.radius => letting mr suppling its value based on the scene, and - then looking at the setting once the render started - I divide by four (don't ask..). - also I use the diagnostic mode to get a visual feedback from the photon map, => not really looking at how it looks before be gathered by fg in the beauty render. a) fg to be fast (using less accuracy as there're fewer areas with great contrast) and b) reliable must be used on a constant homogeneous solution => so never try to get big contrasts with photon mapping: the light for its color parameter ctrl how fg will react and the photon energy will ctrl how photons will react.. That is - leave a low photon energy - and a high color intensity, - while using however a quadratic falloff. => (oh, take all of this as maybe guide lines not really as knoweledges).

francescaluce PaintVertexColor Technique Quote:
interesting solution francesca, can u explain more details of this technique
this can be done easily only on maya7. PaintVertexColor Technique - Step by Step: - I paint a simple vertex color map. - select obj, EditPoly->Color->PaintVertexColor tool => I use some cares while doing this. - I first <flood> the map with a 0.5grey. - I then set the brush to 1.0white. => I paint only on areas which require more accuracy in this example, as those in shadow or those in corner or where there're small details. - I then fire up the hypershade and with selected the obj I get its shader. - I use a ctrl_irradiance with overwrited fg settings. - I also use the mrVC from the texture rollout, - I plug it into a color_math input2 node - and setting the input1 to the full fg.accuracy like here 480, - I set the operation to multiply.. => that simply means that the value is multiplied by 0.5 all over the obj except on those areas we painted with white that will get a full accuracy of 480. that's it. => you could do abs the same with radii params. => francescaluce Shading Network here a net you should be able to reconstruct also only with maya shaders probably.

� yashu � this can speed-up still renderings a lot! tolga What happened when using FG Multibounce (MBS) while using GI - Explanation secondry diffuse bounces and global illumination both selections are open I dont understand. � francescaluce when gi is enabled.. => fg does only one bounce. it is a left over of the first approach I was trying.. Tip: FG Multibounces. � don't use it for interior renderings.. it takes 10x and you'll never get rid of flickering .
� /*jupiter jazz*/
Quote:
Originally Posted by Splin well if not multibunches for interior rendering...ungh..I think I have misunderstood something. In earlier pages dagon made various tests with fg multibounche and got good results..kida made everyone reccomend to use it that way. Sure the stuff was looking cool. Now there are couple firms doing commercial tuts with especcialy multibounce & interior lighting...I understood like it is big think coming to MRay. But if
it is not good for interior renders...what for would you use it then? If at all
francesca has a point. Although FG multibounce seems a one-button-solution, � FG mono bounce + GI is still the most flexyble solution. � It also depends on what you do and differentiate from stills to animations. In compositing you might consider to layer some occlusion coming from a properly tweaked AO pass. Remember: � also that photon tracing is not viewdependent as FG tracing. Once you render a photonmap you can reuse it for the following frame.

PAGE 55
� dagon 1978
well, it's just a matter of setup i think i made various tests with GI and multibounces for interior rendering, both have some advantage/disadvantage a) this is a test i made with a scene similar to the rygoody's scene - multibounces 10m (pic no more (available) - GI+FG 12m (pic no more (available) b) this is the classroom test with 3d max - multibounces 20m (pic no more (available) - GI+FG 27m (pic no more (available)
� here u can see more and more tests with multibounces for interior renders http://www.treddi.com/forum/index.php?showtopic=5956 � francescaluce Disadvantages of using FG Multibounce
I still prefer photons.. for example:
=> look at the dark areas.. how they are too dark because fg cannot easily bounce
on them,
=> and in the classroom how the windows are a bit overexposed while the under
desk is a bit still too dark...
=> or look near the radiator under the window how the corner is unnaturally black..
=> also the color bleeding is milder with photons than with mbs where it looks
more cgish.

dagon 1978 Advantages of FG Multibounces
i prefer the multibounces, because i'm a bit slacker � it's easier to setup but, you're right, the GI quality it's a bit better... � what i dont like are the washed areas (especially the corners) this is an example of washed areas with the photon map a) FG Multibounces 7m50s (24 samples for the glossy teapot)
GI+FG 8m (12 samples for the glossy teapot)
� I like the dark corners in the multibounce solution

� francescaluce Tip - Getting rid of dark corners while using FG Mu ltibounce You could get them anyway with photons with a little add of occlusion. but about mbs: I'm trying to get a shader where the secondary bounces (all the other bounces after the first one) could be controlled by an intensity factor.. the problem is that I don't see a way to catch those secbounces for the moment. need to make some tests and too bad I have not the time right now. keep up the good work! � dagon 1978 yeah, this is what i want paolo berto said that the secondary bounces control will be added in the next releases http://www.treddi.com/forum/index.p...pic=9197&st=140 francescaluce XP theme Quote:
can you tell me what OS do you use? or what XP theme u use if it's the case
I use a theme I got from xsibase really some years ago. it was by wurp, I also changed the whole color profile in maya to suite better my taste. � wurp
OT, but the theme I made http://www.themexp.org/preview.php?...=&name=wurp.zip hope it still works

PAGE 56
francescaluce Settings of WIP
ctrl.studio.wip
Settings:
- 2 arealights:: 1680-580int , both quadratic decay, - 250000phts, - 8200-6800energy, - 12-10scale - ctrl_shading with mib_photon_basic - a dome sphere gi: 2048, radius 2, 5-5reflect/refract fg: 640rays, 1.0maxradius, pixel.radii aa: 2-1, 0.1contrast 1h.12mins (1200x720) dagon 1978 Explanation of translation ERROR in MR Tutorial Quote:
Originally Posted by Stahlberg Dagon - great tutorial. But I don't understand this part at the end: What do you mean by 'solar light', 'light spread' and 'physical' here? IMO the renders with the word 'physical' in the description were the best ones, I'd like to
duplicate that.
In my tutorial i have subdivided the lights in a) sunlight => (directional, spot) and b) "diffuse" light => (point+arealight, point+area light+mr_physical, spot+arealight)
i think that's an error in the eng translation, i have to correct it, sorry

dagon 1978 A test with MR & IES profiles + IES Download LINKS 1h 15m
Settings Settings: - 13 lights in the scene (1 area light and 12 IES) - GI+FG - GI acc 512 - radius 0 - 13x50.000 photons - FG rays 50 - FG Radius: - min 0 (3) - max 30 Additional by starsoul IES download links look at those links: 1) IES Profiles Download + IES Profile Viewer (software) by andrey.legotin http://forums.cgsociety.org/showthread.php?t=300617&highlight=ctrl+shaders 2) Bullit posted: IESviewer v2.9 is here http://maxcadproductions.com.sapo.pt/ies29.zip It has RT rendering. 3) go to http://www.erco.com/download/en/en_index_download.htm => under “Design data: luminaries” (on the left side ) click at either IES data or Eulumdat data (on the right side) => both Formats does MR support 4) francescaluce posted: => you can draw your own profiles. => http://www.tom-schuelke.com/ies-gen3.exe Tipp: Maya provides an IES-Tutorial . It can be found in your “devkit” folder called “Light Shader”

dagon 1978 l_glass shader + IES USAGE Quote:
Originally Posted by JasonA Yes they look really good Is that glass the dialectric material or did you use l_glass? Also, how did you go about using the IES profiles in your scene? I'd love to give that a try but the help files seem a bit cryptic on how to actually implement them.
i'm using the l_glass shader with glossiness and 8 samples you have 2 way: a) - attach a mib_light_photometric to the "mr>light_shader" of a point and - than attach a IES profile (u have to set the v color of your mib_light_photometric) b) - attach a IES profile directly to the "mr>light profile" of your point light (adjust the intensity of your point light) NOTE: the second one is the best way, with the first one you can't use the multibounces dagon 1978 Comparison – with and without Ambient Occlusion (AO ) this is an old version of the classroom, unfortunately i dont have the original one but this is the last rendering i made with AO (pic no more available) without AO
� yeah, this is a multibounces test, without photons

dagon 1978 Method of choice Quote:
Originally Posted by maxwater hi dagon.. so after doing all your rendering test for interiors... which method do you prefer for stills ? FG multibounce or the GI + FG. i mean as you told for animations you prefer the GI method, because it only needs to be calculated once (not view dependent) personally i liked the FG multibounce pics more (classroom, barcelona-house) ...but maybe its because i dont like that japan-style interior that much there. so... which is "THE" method of your choice now ?
for stills � I prefer the FG multibounces solution if i have to compare rendertimes � the photon solution is better in all situations i think (i mean better results in less rendertime), but (for me) it's hard to setup a good scene with photons... otherwise the mbc setup � it's easier and u can reach better results in less setup time so, because i'm a little slacker, i like to use mbc i hope that mental image can introduce a compensation system for the secondary fg rays (like the vray lightcache or the maxwell bounce control), this will be another step to speed up setup times with multibounces azshall Specifying the number of total bounces – 2 Ways desc riped How exactly are you defining the number of bounces in Maya 7? I see the checkbox to do a secondary diffuse bounce in the Final Gather settings, but am unclear on how you're specifying the number of total bounces. � Jozvex You use the reflection trace number. => And make sure the trace depth is at least as high as that reflection trace value. � slipknot 66 - Or, you can open the outliner window, - uncheck the Display--DAG objects Only, - scroll down and select the miDefault Options, - press ctrl-a, go to the Final Gather tab, and - check the FG Diffuse Bounces the number you want. I know.. its the hard way..hehe

� jozvex Quote:
Originally Posted by azshall Does this cause rendertimes to go up due to higher values?
Yes, but by how much seems to => depends a lot on the scene. a) If you just use, say 3 bounces then it shouldn't be too much slower, b) although if you have any shaders with blurry reflections it will be much slower because blurry reflections and FG are from opposing gangs who hate each other.

PAGE 58
���� Addition by floze Quote:
Originally Posted by Jozvex Yes, but by how much seems to depend a lot on the scene. If you just use, say 3 bounces then it shouldn't be too much slower, although if you have any shaders with blurry reflections it will be much slower because blurry reflections and FG are from opposing gangs who hate each other.
Thank god there is ctrl_shading to bring them to peace.. look at http://yashu.go.ro/ (� there are more MR Shaders to download from) dagon 1978 Quote:
Originally Posted by Ozren I have a problem with FG. I am rendering a room with GI/FG and everything is ok, but when i render reflective/glosy object i always get INFO like : 10000 additional finalgather points for tile xy...and it goes ..and it goes... Ofcourse my rendering times go sky high for something simple. how can i get around this?
make a fg diagnostic to see the fg samples positions
red dots are additional points added in rendering, this message (10000 additional finalgather points) is not a problem, just a feedback added in maya 7 - u can decrease your fg presample density (miDef > extra attributes) - and increase your fg rays � to concentrate your fg points at the edges Tip: oh! and for glossy and hard bump use the francesca luce's ctrl_rays, it's great!

HowardB HowardB Test Rendering I’ve been watching the great work that everyone has done here, and its time I take a shot at it. This room is highly detailed; I modeled it a couple months ago made mostly with polys and some nurbs. Modeling time took about 3 weeks. As you can see I’ve just started out. - 1 point light with physical_light emitting 5,000,000 photons int 4000 exp 2 - GI accuracy 500 - FG rays 100 0,50 pix radius - AA min 0 max 2 Mitchell - AO pass
Rendertimes: - GI calc takes about 2 min - Rendering takes 30min - AO pass is around 3min I’ve found that the key for me has been - massive amounts of photons and - as few FG rays as possible. Yet still I’m having problems with artifacts all over the place! I started off with only 1,000,000 photons and was finding myself needing to compensate more on FG with renders exceeding 300 rays which were killing render times. So maybe even more photons are better? Also what do you think the optimal radius for photons should be.. do you try to get them totally smoothed out? Or 80%-90% there… I’ve keeped mine to be about 80% smoothed out. I’ve tested out francesca’s ctrl_shading with blurry reflections in a simple scene and found it fantastic, but when I try using it on this scene I gets bogged down after computing final gather.

dagon 1978 Exterior Rendering Tips Quote:
Originally Posted by Ozren thx for the info, downloading ctrl_rays now. Also, i am very heppy to see this post up again, i hope people will continiue to test and post their expiriences with Mray. Right now i am trying to get some interior renderings that look good whit acceptable render times. Looking good is not a problem, render times are Also, can someone explain some exterior rendering settings/options i can use to get some realistic lightning of my arhitectual models. I have made this, but i know that it can be much better. [img=http://img233.imageshack.us/img233/727/40nu.th.jpg]
Tips for the exteriors: - use the fg without gi - add a direct light with a mib_cie_d plugged in the color slot - possibly, use the dgs or dgs like shaders (search the dgs exploited by floze) - use the ibl with a good sky map (or try to simulate the physical sky ) - dont force too much the fg, if u want perfect contact shadows make a fast AO pass

dagon 1978 HowardB Test Rendering
my attempt GI+FG 40min
- 2 area lights + direct - GI acc 256 - rad 0 - 20000 photons - FG rays 100 - rad 0,5 - 8 - falloff 1-250 � some material isn't so good, but right now i don't have too much time for test

dagon 1978 Test Renderings with different Area Light Sample Set tings Quote:
Originally Posted by yashu …is there a way to speed up the rendering without lowering the samples too much? thanx!
there's not a magic formula, i think is scene dependant here's some tests: 1) AA -1 2 c.t. 0,1 AL (=Area Light) samples 3 3 26s
2) AA -1 2 c.t. 0,1 AL samples 20 20 4m05s

3) AA -1 2 c.t. 0,04 AL samples 16 16 4m59s
4) AA 1 2 c.t. 0,1 AL samples 6 6 8m27s

5) AA 0 2 c.t. 0,1 AL samples 6 6 2m19s
6) AA 0 2 c.t. 0,06 AL samples 8 8 3m57s

dagon 1978 Test Rendering of HowardB Scene + Settings and here's a better quality test of the HowardB scene
1h 40m Settings: - 2 area lights + direct - GI acc 256 - rad 0 - 20000 photons - FG rays 200 - rad 0,5 - 8 - falloff 1-250

HowardB Textures for HowardB Scene I’ve uploaded some textures you can download them HERE (=> Link is broken) if anyone needs any. There all converted jpg to keep the size to a minimal. Hope it helps yashu Test Rendering of HowardB Scene + Settings Quote:
edit : btw, you say 9 mins for the render? it takes my FG about twice much not to mention rendering, can you tell me your secret ? thx. i have P4 HT 3.2 / 1GB-ram
- I only used FG with one bounce, - setted the framebuffer gamma to 0.455 (1/2.2) to match monitor's gamma, - then atached a HDRi to the IBL node for the environment. - and i used only ctrl_shading + another ctrl color utilities. dagon thanx for the explanations (=> , but those "computed 18000 additional finalgather points for tile blabla" are still bugging me... it seems mr 3.4 doesn't like reflective surfaces in combination with Final Gather that much. anyway here's an update:
Settings: - 0-2, 0.05 sampling - 100 FG rays (for some reflective surfaces the FG rays is set to 10), 0-15 pixel size, 1 bounce - 1 Area light, 8-8 sampling rendertime: 45minutes => btw the textures are all procedural darktree ones

HowardB Download of HowardB Scene File Hey people I’ll work on making different versions of the scene. Maya also can convert to obj but it seems to export the entire scene into 1 massive mesh, I’ll see if I can find a way around that. EDIT: New Maya 6 scene (let me know ASAP of there are any problems with it for 6.5) LINK New OBJ scene (let me know ASAP of there are any problems with it) LINK
PAGE 60
yashu Usage of ctrl_shader to use this shader, - plug its Compound attribute into the input of an passtrough shader and - then assign the last to your objects (for example, assign an mix8layers shader to your objects and then plug the ctrl_shading.Compound into the mix8layers.f_colorLayer_0. - Also set the n.layers on the mux8layers to 0.). - Then just play with ctrl_shading options. Additional by starsoul look at http://yashu.go.ro/ you will find further information about under the “help” section of ctrl_shader yashu Installing scripts properly Quote:
The control_shading material should be installed properly. Let me know if I have still left something out. A shot of my script directory. I get the same interface like the one I posted earlier. I haven't installed the mix8layers yet. EDIT: Here is a complete shot of the control_shading window.
nope, do not copy the scripts directly in maya_install_dir\scripts\ � cuz it has no effect. copy them either in maya_install_dir\scripts\AEtemplate or better in C:\documents and settings\_user_name_\my documents\maya\6.5\scripts EDIT: Also don't forget to restart maya after you copy the scripts. (or type rehash in the command line) dagon 1978 Framebuffer (1/gamma e.g. 1.22) + Tonemapping in post this is the scene http://www.imodesti.com/mies_test/s...za_semplice.rar i'm cutting framebuffer (like in the yashu render #879), but if u want a better contrast (a la vray) � U have to tonemap your scene without cutting the fb (in post, with a 16/32bit format or with a tonemap shader), I think that MR need a good tonemap shader to simplify the interiors setup

PAGE 61
CiaranM Tonemapping with ctrl_irradiance Quote:
Originally Posted by Matadŏr Tonemapping shader in Mental ray
that would be great
I believe the shader from ctrl studio called ctrl_irradiance contains tonemapping functions. � dagon 1978 Quote:
Originally Posted by CiaranM I believe the shader from ctrl studio called ctrl_irradiance contains tonemapping functions.
yeah, linear tonemapping, and - you have to apply it to all your shaders in the scene :( � dagon 1978 Quote:
Originally Posted by yashu about the FG + mr_aperture noise: it seems that if you set a too high fStop the noise apears,
but if you make it too low, the DOF apears... arghh it would be very nice to have such a shader, but i have one question: is it possible to achieve the same effect in postprocess with PhotoshopCS2 for ex? if yes, how?
yeah, i think that the physical camera isn't optimized for this kind of use :( a) it's possible to do tonemapping in photoshop, with - hdr or exr or tiff16, b) but in rendering - u can set your materials to look good with the tonemap control, � in post isn't so simple... and with a good tonemap (like in vray) u can exclude automatically the environment... � francescaluce Tonemapping with ctrl_buffers dunno what are you doing, but ctrl_buffers has a tone mapping function to be applied to framebuffers, you can also output a double main rgba so you'll get a normal image and thesame one but tonemapped. as you're dealing with fbs, you can put the environment in another buffer to be not involved in tonemapping.

here the MR tonemap functions that comes with the buffer_write shader:: performs a tone mapping on the provided input image and stores the result in the given output image. Tone mapping is commonly performed from an output shader. The input and output image pointer may refer to the same image. The behaviour of the tone mapper is determined by the provided parameters. ref gives a reference intensity. The input color will be scaled by this value before any transformation is performed. Unless there is a specific reaason to the contrary the default value of 1 should be used. tolerance gives an error tolerance for the tone-mapping calculations. A good value is 0.01. low_out gives the lowest non-black intensity to be contained in the output image. hi_out gives the highest intensisty to be contained in the output image. low_in gives the highest intensity of the input image on which the color transformation is to be based. All greater intensities are mapped to white. hi_in gives the lowest intensity in the input image to be considered. All intensities below are mapped to black. lum_weight gives the weights used to compute luminance from a color. n_bins gives the number of bins into which color intensity values of an image are to be sorted. If the number of bins is 1, then a linear mapping of color intensities is performed, which is local and does not involve information from neighboring pixels. For non-local tone mapping values of around 100 are a good choice. x_res, y_res gives the size of a rectangle over which the color values are averaged before they are tone mapped. The default values of zero for both fields is a good choice for most cases. linear . If this flag is set, then local linear tone mapping is performed. desaturate flags whether the resulting tone-mapped color values should be desaturated such that no color component is above the hi_out value. map is a reference to a one-dimensional scalar array decribing how color intensities are mapped for tone mapping. This field allows overriding the internal mapping calculations of the tone map routines and is optional. The default value is a null tag.

� floze HSV Mapping via log. Curve controlled by a Shader Quote:
Originally Posted by wurp In this case Im using the "Lens_effects" shader as a dummy shader, it wont affect the rendering at all since its disabled but I need it to be able to plug my other nodes in there. what i've done is - to extract the H, S and V, and on the V - I put this logarithmic curve, so it will smoothly scale down the overbright areas for me, from what I can understand this is exactly what the HSV colormap thing does in vray? correct me if Im wrong. I would like to be able to put my own curve on the V channel but I’m not sure how to do that yet, maybe someone can write a shader?
Aah, it's so clear now. I've been trying this before, but never got my head around it. Now it's working though. I neither know if what I'm doing is 'HSV mapping' nor if it's correct at all, but I can tell � it's brightening dark spots and smoothening bright spots. � If you dont like the distribution, - simply edit the curve at your own gusto - it's a simple animation curve. - Just graph the persp camera in the hypershade, - select the animCurveUU from the graph and - go to 'Windows> Animation Editors> Graph Editor' and play with it. Right now it's bell shaped: http://individual.floze.de/fileadmi...appedColors.zip � floze Quote:
Originally Posted by wurp I had a look at your scene, it seems you only boost the midtones really, what you want is for the curve to be linear and as it reaches something like 0.8 you start to flatten it out, with the curve you have now renders will still burn out just as easily as without this shader.
Yeah, the curve isnt ideal.. here's some simpler test with a more exponential like looking curve: http://individual.floze.de/fileadmi...pedColors_2.zip
PAGE 62
� floze Quote:
Originally Posted by yashu just gave it a try and all i get is a black render. But if i reverse the curve's shape along y, the lighting changes but it doesn't look right... it gets very diffuse no mather i do . still waiting, maybe Mark Davies will do an easy to use tonemapping shader
If you're on maya 7, - you need to reconnect the lens shader (actually the hsvToRgb node in our case) - to the in maya 7 newly introduced lens shader slot. It definitely works.

dagon 1978 How to save rendertime by minimalizing red FG point s Quote:
Originally Posted by rygoody Do these "additional finalgather points" hurt rendertime at all? Would it be ideal to try and minimalize them? I'm rendering a scene and it's claiming that it's adding like 80,000 additional points at rendertime, is this correct? Also are these new finalgather points added at rendertime saved into the FGmap?
yeah, it's ideal to minimalize the red fg points to save rendertime, - try to use the fg presample density, � it work very well with GI+FG (less with multibounces) � floze Quote:
Originally Posted by yashu it seems mentalray adds those finalgather point even if you set FG mode to Freeze and also their number depends on the AA sampling level . who knows, maybe that's the lacking side of the new 3.4 FG algorithm. And, as dagon said, the only way to reduce their number is to lower the FG Presample Density option
I'm not quite sure about mr 3.4 in maya 7 (still on 6.5 here, sigh...), � but there should be an option called 'Deep Freeze'. Paolo Berto mentioned it in the masterclasses. With deep frozen fg there shouldnt be added anything at rendertime. � T_R From the maya doc's... Quote:
Final Gather Freeze This is the same as Final Gather Rebuild off, except that the Final Gather file (once created by reading it from a file or building it for the first frame) is not modified (unless the Final Gather File name or Final Gather Rays is changed). In other words, extra Final Gather points created during rendering are appended, and the Final Gather file on disk is not modified. This attribute is useful if multiple concurrent renderers share the file. Make sure that the Final Gather file matches the scene and viewpoint in an animation
So even with freeze on FG will still add points only it wont save it to the FG file like it would with rebuild off. So then the deep freeze that floze was talking about would be good to access. It doesnt seem to be out in the open in the render settings or miDefaultOptions. Anyone know how to call it up?

� T_R How to launch Final Gather Deep Freeze ok I found final gather deep freeze! just put this in the command line addAttr -ln finalGatherDeepFreeze -at bool miDefaultOptions; - and then select the MR's globals - select -r mentalrayGlobals ; � and its under the extra attributes.
EDIT: I also tried this in Maya 6.0 and it works, so the deep freeze should be available from Maya 6 to 7. � floze Nah, that doesnt work. I think deep freeze is available for standalone only. It's flag is '-finalgather_rebuild deepfreeze'... FuriousD How to set your Presample Density Setting Quote:
Originally Posted by HowardB Hey how do you go about deciding what Presample Density to use on a scene. It seems just as important as setting the max/min and number of rays. Also anyone know a command for adding it to the render globals permanently?
I think presampling is like - doubling your FG Rays, In the XSI manual thats what it looks like. - Turn on diagnostics and do a test. quote from the XSI manual Quote:
Pre-Sampling Density The final gathering pre-sampling density is a multiplier for the final gathering points that are computed during pre-rendering. This can help to smooth out the final gathering effect a little bit, but is not a substitute for tweaking the accuracy and radius values.

dagon 1978 Rendering Test with Floze Shadernode A test with the floze shadernode looks good, but it's very difficult to control the contrast
tonight i will try the francesca ctrl_buffer

bgawboy FG radii and presampling density On FG radii and presampling density... 1) The min and max FG radii � control the radius of inclusion for averaging FG point radiance. Within the max radius, mental ray will test the FG point to see if it is OK to include in the average. It follows a heuristic to prevent light that doesn't belong from leaking into the average. Within the min radius, the heuristic is relaxed so that all FG points are used, except for ones which have normals facing obviously the wrong way. At pre-processing time, the FG points are distributed by projecting them from a screen space view onto your scene. In order to ensure that at least a few FG points are included at any point, it must consider max radius. � If max radius is small, the pre-processing step has to add more FG points, � increase the density of FG points across your scene. However, the average number of FG points within the max radius will stay roughly the same. It could be quite low, because it tries to ensure you have at least one or two points after the heuristic has been applied. Now at render time, if your search using the heuristic within max radius returns no FG points, an FG point must be added. Those are the red points in the FG diagnostics image. 2) Presample density All of the above supports an understanding that the density of FG points within your max radius stays about the same. Even when there is more density of FG in your screen view. � So, in order to increase or decrease the density of FG points on average used for computing within the max radius, - use the 'Presample Density' factor which is a mulitplier for this density. Again, this actually increases the number of FG points used at each sample location to compute the average illumination. In mi shader speak, mi_compute_avg_radiance. 3) Density with respect to FG rays (accuracy) Finally, in its simplest sense, FG accuracy is the number of FG rays coming out of each FG point. However, when there are large numbers, it also adds more FG points to a given screen area to get the same effective number of rays to that area. � So, in a sense, at high values it appears to add more screen density, but it doesn't really have that number of rays coming out at each FG point you see in the FG diagnostics. I believe that you should still increase Presample Density if you want more samples in a given area, and treat FG rays in its conceptual ideal, as the number of rays coming out of each FG point. � So, by multiplying accuracy by presample density, you get a number that corresponds to how many incoming FG rays are averaged around a sample point. � By decreasing accuracy and increasing presample density, you are spreading the rays around more within that max radius.

PAGE 63
yashu Rendering Test with HowardB Scene update to the HowardB scene: 1 hour 57 minutes on A64 [email protected], only 512MB ram damn! it renders so slow and it still has some artifacts (mainly FG issues). � I'll do some tests with different presample density settings these days, maybe i'll cut the render time a bit. Oh and one last thing i've noticed... Does the Final Gather Object Override works in maya 7? � It doesn't seem to have any effect � dagon 1978 here's my test 25 minutes
GI+FG bazuk HowardB Scene Files here are the files people hope you will make some nice renders Maya 7 http://rapidshare.de/files/8278338/..._maya7.zip.html Obj http://rapidshare.de/files/8278071/scenes_obj.zip.html Fbx http://rapidshare.de/files/8278190/scenes_fbx.zip.html 3D Studio Max 8 http://rapidshare.de/files/8278563/scenes_max8.zip.html Xsi (hope it's ok) http://rapidshare.de/files/8278749/scenes_xsi.zip.html

PAGE 64
Hey FuriousD Kitchen OBJ Scene File � I have made an OBJ version of the room some time ago, go here LINK and just look for the correct download. dagon 1978 HowardB Rendering Test + Settings just some adjustment... quality improved 32 m
2h 39m
GI+FG - GI acc 128 - rad 0 - photons 200.000 - FG rays 400 - rad 0,5 - 7 px - presample density 0,3

dagon 1978 HowardB – Dagon’s Maya File + Problem solving + ctrl_irradiance hi all! thanx for your comments! i dont have the time (and the knowledge) to make a DVD... i'm trying to write another tutorial, but, maybe it's just a matter of time... i'm waiting mr3.5 and some good new features (vray 1.5 have many interesting new features...) so, this is the white scene... i've made a test with another camera in first and this is a bit overexposed (we need an hsv exponential tonemap!) and some photon artifacts
dont forget to do tonemap in post with exr � CiaranM Really nice renders! a) I might suggest - that you increase your photon map density and/or accuracy and - reduce photon size as you are getting some very unrealistic bounced light (lower side of headphones for example). � Of course, this will come at the expense of render time . b) Perhaps use ctrl_irradiance to give those troublesome objects their own photon density?

PAGE 65
HowardB Maxwell Render beta for comparison Here are two renders done with Maxwell beta for comparison. Render time for each were about 14 hours reaching a sampling level of 17+. I’m still rendering the bottom one, I’ll repost it when most of the noise is gone. It could take a long time however EDIT: This is my result after 21h 30m 8s, current sampling level : 18.75 I don’t think I’ll have much more improvement if I keep it going... they say the max samples people can reach is just shy of 25 and that’s over 1000+ hours of rendering and the images that are produced still have noise in some areas. This is only the beta so hopefully the final version of Maxwell will have this issue solved.

Ze PilOt Lighting in logarithmic space For better results, lighting in logarithmic space give a way better results than in linear space.. That can be done with a little lens shader... � found one : http://www.lightengine3d.com/downlo...re1.0_docs.html use the exposure option... dont sure of the correct setting for it btw
PAGE 67
HowardB Maxwell – Mental Ray Comparison => Gamma Alright I tested out the path material in Mental Ray to see how it stands up to Maxwell. Time to render in mental ray was 12.5 hours, for Maxwell it was 21.5 hours
Mental Ray Samples 3,3 12.5 hours
Maxwell Sample Level 18.75 21.3 hours

� MasterZap How to edit differences in gamma Looks like mainly a difference in gamma between the images, and a gauss-ish filter on the maxwell one...? A tip is to use mr's oversampling lens for stuff like this. � floze The difference in gamma as you mention is probably the built-in tonemapping in maxwell - shouldnt be hard to achieve in mentalray; - rendering out in floating point and - doing it afterwards with the image editor of your choice would do the trick. Or - by using the builtin tonemapping functions. � CiaranM How about repeating with the lightengine3d aperature lens in Mental Ray. � That way you could reproduce exactly the same settings for f-stop, exposure, etc. as you have in Maxwell. HowardB Oversampling lens + U sing 2 lens shaders on the same camera?
• Alright I need some answers before I can go further how come when I apply the oversampling lens my floating pointing renders come out flat (turning to 8bit) how do I fix it because id much rather do the tonemapping after.
� floze That's not because of the framebuffer, � it's because oversampling_lens does not turn off scanline automatically by default , which it should do though. - Turn off scanline manually in the renderglobals
• is there a way of using 2 lens shaders on the same camera? If not is there something in Aperture http://www.lightengine3d.com/index2.html like the “Samples” attribute that can do the same thing as the oversampling lens?
� jozvex When you use the Aperture shader it unfortunately seems to modify Final Gather calculation. I don't know in what way, but I'll go from having good FG to not so good FG simply by - attaching the lens shader. Currently for stills - I freeze a good un-Apertured FG map and - then use it with the lens shader on. It'd be great if there's way to have FG ignore the lens shader? Maybe it needs to be built into Aperture itself, in which case I'll email the creator.

PAGE 68
floze Oversampling_lens_Shader Quote:
Originally Posted by HowardB I don’t know what I’m doing wrong, I’m still getting low dynamic range images when rendering with oversampling and scanline off my buffer is set and I’m rendering in HDR format so I can check the results in hdr-shop with the tonemapping plugin. And as soon as I remove it I’ll then get a much higher range. See attachment Attached Files
path_material.zip Not quite sure why they're averaging the color in the oversampling lens... it sure has some reason. Anyway, here's a recompiled version of it without the averaging: http://individual.floze.de/fileadmi...ng_lens_flz.zip Since I'm a complete n00b at shader writing, it might not work for you. Also you might need the new c runtime library (msvcr80.dll), which you should copy into your systems32 folder. Get it from over here: http://www.dll-files.com/dllindex/d...s.shtml?msvcr80 FuriousD Article about Linear colour space Heres an interesting article on linear colour space for XSI. http://www.xsi-blog.com/?p=45 I've tried it, but I don't seem to be able to view the final result as I'm rendering. I'll open up the final image and its all blown out. Take it into photoshop and adjust the gamma and its back to normal. I'll do some more tests with it. Just thought you guys might be interested in it.

� floze Oversampling_lens_Shader - Updates Quote:
Originally Posted by HowardB So I wonder when Francesca is going make ctrl_lens for us. I think that would make a lot of
peoples days/weeks for them or can mix8layer be used?
I updated the oversampling_lens, should work now.. I had linked against too new runtime libraries I guess... http://individual.floze.de/fileadmi...ng_lens_flz.zip Not the mix8layer, but the new buffer_write could be used for tonemapping, yes. - You need to turn on 'also RGBA' (or 'only RGBA') for it to work on the primary buffer. However, - you need to turn on RGBA float or RGBA half to get it properly operating on your framebuffer � else it's using the low dynamic range for tonemapping. The key attribute is the 'lum_weights'. The defaults for the buffer_write are not too good for floating point imho though, because high_in is defaulting to 1 which assumes a low dynamic range input which is not desirable – - so it should be set to 0 instead. => Basically it's using the builtin (for some reason never published) mentalray tonemapping functions described in the manual at the bottom of 'IMG Functions' (http://localhost:4448/Maya6.5/en_US...de/node144.html or do a search on IMG Functions). I compiled my own version which is simply operating on the main framebuffer: http://individual.floze.de/fileadmi...out_tonemap.zip I hope it's working. PS: A thing to note is that the buffer_write as well as the out_tonemap work as output shaders. => This means output shaders needs to be enabled in the globals and the tonemapping process starts after the regular rendering is finished - so you need to wait till the frame (region) is fully rendered. If you render regions you'll get different results though, since the tonemapping takes the whole image into account, like a´human eye readjusts itself under different conditions. PPS: - You need 'Preview Convert Tiles' set to ON and - 'Preview Tonemap Tiles' set to OFF for it to preview correctly � this will introduce some artifacting. PPPS: Here's the most simple sample scene one could think of: http://individual.floze.de/fileadmi...sample_ma65.zip Note that the light intensity is somewhere above 10000 or something.. the tonemapper re-maps the values into visible range. => Try to render without the tonemapping and it'll completely blow up.

HowardB Rendering w/ Path_Material + Relationship between depth of field What is the relationship between depth of field (aperture shader or maya camera) and samples? I’ve tried doing 2 large renders with path material and they take about 19hours to reach 5% …without DOF the render time takes about 12hours to render out 1024x768. => So apparently the level of sampling increases with dof. But is that increase comparable to the max and min settings, or the oversampling lens? Attachment images shows what is happening. Only difference between them is the first image has DOF turned off. Setting are: - Samples 1,1 - Mitchell filter - reflections, max trace depth: 6,6 - oversampling lens value 2 � MasterZap Quote:
Originally Posted by HowardB What is the relationship between depth of field (aperture shader or maya camera) and samples?
If it's based on the physics_dof lens shader, � that shader shoots 4 rays per pixel sample rather than normally one, so it would be 4 times as much. So if you are also using oversample_lens - you can turn it's number down... � HowardB Hey Floze. I’m messing around with the tonemapping shader and I’ve been able to get the high values under control but, I find all my low values are being increased. I think the tonemapping shader would benefit from an addition of ramps and/or graphs similar to those already used in the volume light’s attributes. It would greatly benefit non-programming folks like me in a sense that it would a much more intuitive way of adjusting the variables. Attached Files
sample_scene_tonemapping.zip (19.2 KB, 101 views

HowardB Vignetting Article bit OT. Its funny how so backwards everything in cg is compared to the real world. In the real world vignetting is a bad thing, but in cg it is good? a) One thing I realized about Maxwell is the vignetting that is apparent in just about every image that’s rendered. I dug alittle more and it sounds like its an automatic post effect that you have little control over, especially for panoramic renders where its effect on the image would be much more visible. You can easily have much more control over this in Photoshop, and would be much smarter thing to do. b) So we do our image rendering then bring it into Photoshop for the burning/blooming to the bright parts and the vignetting on the sides and we have our self’s a very close Maxwell render with Mental Ray. I was reading up more about it here http://www.vanwalree.com/optics/vignetting.html and there is a way of telling the difference from a real camera vignette and digital fake. => Its called “the cats eye effect” and you can see it in action in Figure 3 midway down that web page. I just wonder how much of Maxwell’s camera is truly accurate to the real thing (as they say) and if so, that cats eye should easily show up with a wideangle lens beiing used to render with. HowardB Mental Ray vs. Maxwell testing Hey everyone, I’m done with my Mental Ray vs. Maxwell testing, here’s my results. The Maxwell render has no post work done to it. The Mental Ray has the vignetting and bloom/burn added, I couldn’t get the tone mapping or fast enough depth of field working well, but is entirely possible. Both renders were rendered in 8bit, no adjusting of the exposure, levels, or gamma was done. I don’t know the time it took for mental ray to render (rendered on 4 dual xeons) but it worked out to be excruciatingly slow compared to Maxwell which took 21 hours on a single P4 2.8. If I rendered using GI and FG instead the path material, it would have taken a fraction of the time and also none of the noise… Mental Ray Maxwell __________________ BRYAN HOWARD

PAGE 69
Tora_2097 Maxwell Render Thanks a lot for sharing the scene, I lit and rendered it in maxwell beta 1.2.2.a with the following results. Each image rendered for approx. 10h on a Dual Xeon 3.2 GHz with 2 GB Ram except the flaslight one which rendered in 7 hours. Sampling level 19-20 has been reached in the given time, the flashlight render reached SP level 17, while still producing the fewest noise just as one would expect. All images has been denoised i Neat image afterwards and colorcorrected in Photoshop.

PAGE 70
Banty Banty's Toolkit Importer for 3DStudioMax / Maya Quote:
.. Interesting .. Have you seen or messed with Banty's Toolkit at all? .. He's got another lightGen type sampling plugin. It's called MedianCut ... Does the same thing as lightGen but with a different algorithim. Only problem is, it doesn't spit out text data you can directly use with maya. It spits out something that has the info, which is for example .. a directional value (output in radians) and a light color value (which is output as RGB). Would anyone know of a way to write a script or MEL importer to parse this data?
DaForce Obj Import Notes (Settings) I've updated the Median Cut plugin, now creates an ASCII file that makes possibile to import lights in 3DStudioMax, as soon as possible the Maya version will be ready: http://www.banterle.com/francesco/download.html And as for your importing the OBJ into max problem... when you get the "OBJ Importer" window... just untick Unify (just next to normals) and that will import all the faces the correct way

DivineRAiN Test Rendering + Settings (Pic) k.. don't know if it'll help but - I set the anti-aliasing quality to min 1 and max 3 and mitchell filter. - Pointlight in the room 0.400 intensity, no shadows, photon intensity 1, gi photons 1500. - The Area light infront of the glass is 0.500 intensity, ray trace shadows.. - the rest the same as the pointlight. - Spotlight 2.5 intensity, cone angle 58, 4807976.0 photon intensity, ray trace shadows, 1500 gi photons. Didn't use fg for this render but used gi

BooMer86 Problem Solving - Noise
no matter how i tweaked and set..
� i always got this kind of problem when i finish my rendering
INFO: i got a plane shaped light a the window thr but not exactly at the window. It is
like
window ---->[ | <--- light
btw: althought i have turned off GI, my render always have noise like M~W
PAGE 71
� yashu
increase the UV sampling level of your mentalray area light to higher values to get
smoother results (select the light, then Attribute Editor > mentalray section > Area
Light > Samples [U - V])
btw if i got it right... if the area light is in the interior of the room, then the corner is darker than the rest
of the scene because the area light is to far away from the wall, so it doesn't cast light in it's back...
hope this is what you mean to say with the sketch

box1126 Problem Solving - Lighting
Hello dargon you are a really a good render man, I learned a lots form you I did some test in my work,but ,it not good,I need you help ,can you help me? thanks alot
ps ,I come from china ,and my English is very bad,sorry Attached Files
001.zip (71.0 KB, 61 � dagon 1978 here's mine
002 hope it help Attached Files
002.zip (68.7 KB, 242 views)

dagon 1978 Glass Setup Quote:
Originally Posted by bazuka yo dragon ma man, can u tell how can i make shadows to go thru the glass, coz i wanna have ref. at the same time!?
- use a l_glass shader (dielectric works good) and - apply a mib_shadow_transp in the "shadow shader" slot of your glassSG take a look at this thread http://forums.cgsociety.org/showthr...38&page=1&pp=15 there's a problem with FG and glass/transparent shaders Matadŏr MR Rendering – Using BSP It's a library on Mosteiro de Tibães an old monastery on the north of Portugal that is currently under rebuild and reconstruction work. I tried to fill the (large) room with a soft and diffuse light, good for lecture sessions... This, of course, was rendered in MR on Maya 7.0 at 2000*1500 pixels. The scene contains 3.210.225 triangles and took almost for rendering!!! This rendertime could be explained by - the lack of proper optimization and - the large BSP i used so i could render this image without memory problems.

PAGE 73
bgawboy BSP Explanation Matador, I'd love to help optimize the parameters to make this render faster. What was your task size, and bsp depth? Do you still have a render report? Just to be clear, large bsp, means: � a bsp that flushes tesselated primitives when necessary. It is only a minor overhead that is noticed on small scenes. � For scenes with lots of polys, it makes them faster because of memory efficiency. You still may want to increase bsp depth if portions of the scene can get very dense geometry. Also, a smaller task size reduces the tile region. During rendering, memory is used on a per tile basis. All the samples for a given tile are rendered per task (tile) and saved in memory. withego Lighting with only Maya 7 Materials + Light Setup (HowardB Room / Classroom) I just post an update of the classroom and HowardB test done using only Mental Ray for Maya7 materials! Lighting with: - IBL hdri, - FG, - GI Spotlight for the sun and - pointlight for the diffuse light on the windows! - Open EXR format with tonemapping in Photoshop! Alex

PAGE 74
HoH How to avoid different render result after applying shaders/textures You are realy good. I learned a lot from you. Thank you for all your files. They where very helpful for me, to study the lightning. But I still have a problem with a shaders/textures. When I apply them, => the interior seems to be darker or the mood is different. It looks very artificial. (also with DGS shaders the surface is green and I can not see the textures - is there any options to change that?) I would be very grateful if you will say something about this topic. � starsoul a) - use ctrl_shading1.2 to avoid darker results or - connect the gamma node to the textures to control their brightness b) to see the textures, apply them to Surface Material too (e.g. when you use a lambert shader, apply the textures to them, after that apply the MR shader in the custom shader tab (as usual) ) Silkey Lighting Setup I rendered this last one - using lanczos (=Filter). - Area lights, - a direct for the streaming sun light and - omni's for the down lighters.

PAGE 75
ajsfuxor Quick lighting test.+ Lighting Setup Mental ray all the way. - FG, no GI. - Some post work. 29mins on dual 3.4ghz.
The image itself was just a test. The gray boxes i just chucked in there, as the other objects. - The soft lighting is achieved in post using Digital Fusion. => A lot of the time you really only need to get 80% of the way there with a straight render, and post gets you the rest of the way there. The lighting setup was a little bit werid, but essentially,: - I have Maya Area lights for the windows, - a directional light for the sunlight, - and abour 5 other directional lights with very little intensity for fill lights. I did find it hard not to get blowouts with the area lights around the windows and FG, � but essentially, if you keep tinkering away, you get a nice balance. The image could use a lot more finese, eg a rug, but the point of the exercise was lighting, so i just threw some objects in there.

floze Blown-out-areas Quote:
Originally Posted by ajsfuxor I did find it hard not to get blowouts with the area lights around teh windows and FG, but essentially, if you keep tinkering away, you get a nice balance.
The blown-out-areas problem is mainly => a tonemapping/high dynamic range problem. If you - render out in floating point and - apply some tonemapping in post - (or via lens or output shader), � you'll get super-soft area light distribution. � floze Quote:
Originally Posted by ajsfuxor Sounds interesting Floze. I have heard alot of buzz about tone mapping lately, but haven't had time to give it a try in post. Have you had much success with it?
I did have success, yes. a) I used my own output shader though, � which is simply enough using the mentalray builtin tonemapping functions. b) But I suggest - rendering in floating point and - doing it the post way as you already suggest, � e.g. with the reinhard tonemapper for hdrshop.(=> it’s a plugin for HdrShop) � slipknot 66 Here is a render i did - using the HDR file format, and - then adjusted in Photoshop the way i wanted. There are a few things i want to change, like the chair.. and the displace map for the rug.

PAGE 76
� Banty Quote:
I did have success, yes. I used my own output shader though, which is simply enough using the mentalray builtin tonemapping functions. But I suggest rendering in floating point and doing it the post way as you already suggest, e.g. with the reinhard tonemapper for hdrshop.
If you are interested I'm implementing some tone mappers from HDRShop, now I'm working on GregWard Tone mapper. � Silkey - I used different exposures and - duplicated the layers using different layer modes in Photoshop � in order to "Tone Map" the image! Your thoughts on this technique are all apreciated. � slipknot 66 Thanks Silkey, nice render too.Yea - i used Photoshop => to adjust the Gamma and exposure . Here is a new version of the scene, i changed a few things.

yashu How to avoid different render result after applying shaders/textures Pt. 2 Quote:
Originally Posted by bazuka people i have question for all: i know how to generate fg with dgs shader to get nice lightning in the scene, that's ok but i have problem with texturing same scene! what shaders should i use mr or maya? coz when i use maya shaders with texture i'm not getting same lightning in the scene! can any1 tell how to fix that or what should i use to get nice textured scene with nice lightning? yes i need shader that can support everything (specular, bump, etc...) if we are talking about mr shaders! plz help!
ctrl_shading1.2 is the answer
PAGE 77
slipknot 66 Shaders used for Final Render Hey bazuka, - well were all maya shaders, - the only mr shader was ctrl_rays on the floor � to separate the blurry reflection from the FG calculation. wilsimar MR Renderings maya 7 + mentalray - paintFx for plants - FG only
amd 2600 (2.13ghz), 1.5gb ddr, gforce 5200 average time per frame/image.. 33min (1200x900)

floze Render of Lighting Challenge I've done this piece for the current lighting challenge hosted by Jeremy Birn: � http://forums.cgsociety.org/showthread.php?t=322159
All modeling credits go to Jeremy Birn. - Textured using Photoshop and mostly mayang's great texture library. Lit and shaded with:
- mentalray for maya,
- using three are lights,
1. one in the visible window,
2. one in the other rooms window on the same side, and
3. one at the far left side.
- Photontracing + finalgathering, another action-test of my EI03 and HLS shaders.
- Not too much fancy post touch-up, since I only had one single day to complete the scene..
� I'll improve it when I find the time, maybe with the other scripts of the challenge too.

PAGE 79
dagon 1978 Different Size ���� Different Settings + Workflow Quote:
Originally Posted by Fireantz Few question ask to every one here...hehe.(Hope u all can help me) 1. isnt different size for the interior , need different of setting in rendering ? 2. isnt have any more right way to Rendering in MR? what i mean is : i'm always do the test of the GI 1st, then 2nd FG. Am i right? My result hope is for realistic appoach.
1- yes, you need to specify different values for radius (GI and FG, if u dont use the radii in pixel), intensity of lights, shader parameters (like the dielectric absorption) ecc ecc 2- in mental ray 3.4 you have the FG multibounces, it's a good choice for a fast scene setup... and can produce very nice renders... but it's a bit slow... � starsoul if you’re using GI+FG: - first setup GI, - after them FG � to smooth the photon artefacts for final results HowardB HowardB Scene File - Download Quote:
Originally Posted by Hitori Hanzo PS. Howard B scene still needed though
You can find them at the bottom of this page => http://www.bryan-howard.com/demoreel.html Fireantz Questions: physical light + FG Multibounce + Adding bump + Tip / Tricks I had download some of ur scene file to analyze it. 1.) I found that some of ur scene add the physical in light shader but some of it use light intensity. � I have try this both, n get different result too. � So, how u depending which one u use? in what purpose?
2.) I found that u like FG multibounces. I try it, it was awesome and give Gi look,
� the different with GI is the Color blend. Am i right ? (shoot me if i wrong..thanks) 3.) How can i add a bump map into DGS material? 4.) So, can u share some tips n tricks with us? In term of ,how to make ur MR rendering faster? Any plug in or script u use ?

� dagon 1978 ANSWERS: 1] I like the physical shader, => it's more realistic for me... => and is simple to setup, because is "phisically correct" by default... but => someone told me that it is an old-old shader ('96?) and has some bugs (the visible parameter,...) � so, sometimes i use the maya lights... but it's a question of feeling i think 2] a) There are a couple of differences with GI: � simplicity and the rendertimes, especially if u have many light bounces... but b) with the FG multibounces � u can reach a fast setup and u can make some good renders with few bounces (with some tricks) 3] bump_combiner or dgs_bump 4] I have some tricks for some specific scenes... no many universal tricks
btw in Mental Ray the guidelines are: - dont shoot too many rays especially with area light: - if u have some object too close to the area light disable "cast shadows" (if u can), => because area lights in mental ray produce very high noise -if u have more than 1 area light don’t exceed with samples => (remember that MR usa a QMC system for AA, so your AA samples and the c. threshold influence the samples of all your QMC in the scene area light/glossy/FG ecc) - use only the bounces you need (for raytrace/GI/FG) - don’t use glossy if u don’t need it and use ctrl_shading or ctrl_rays (with mib_glossy) => to reduce the FG time with glossy - dont use maya direct light with photons - optimize your BSP settings (lamrug ) - optimize FG (this is a very large theme, so maybe in the future i can write a tutorial) - dont use radius too small with glossy - optimize FG presample - make a prepass with high rays value only in the difficult areas (corners or so on...) and then a low rays value one with fg off - dont use more then 3 bounces with multibounces (usually i use 1 in combination with area lights at the windows) - if u want details for little areas use an AO pass and don’t force the FG - with shaders the Vcolor sum must be < 1 - dont force the GI to reach a pure white color, but make the tonemapping in post (with exr) - dont use different type of shaders (maya with mr) or take a look at the floze thread (= it’s called: „DGS exploited”

� slipknot 66 Quote:
Originally Posted by dagon 1978 …dont use different type of shaders (maya with mr) or take a look at the floze thread ?
Ive never had problems with this, - i always use a phong shader for window glass, and - all the other shaders were a mix of mr shaders and Maya shaders I agree that some of the Maya shaders are slow compared to mr shaders, � thats because well.. mr needs to "translate" those shaders, so better use the mr shader version. � dagon 1978 yeah, no problem for me too, � but for the beginners it's difficult to control different type of shaders, � but maybe I'm wrong dagon 1978 Further Tips by dagon 1978 Quote:
Originally Posted by -tolga- hi DAGON it would be good to know and will tricks will be appreciate soo much about this white tone and will tricks XXXX and tricks
- use exr or hdr (=File Formats to render out) and - make it in photoshop / hdrshop / artizen I have no tricks for that, there are some commercial plugins to make tonemap, right now I dont have a preferred one... artizen plugins seem interesting, � i'm waiting for the exr support... but maybe soon we have an help from mental images for this? i will appreciate wizlon Maya Articles + MR Phenomenon’s � http://www.bmcaff.com/ or there are other ways also. Cobra1979 MR Test Renders Hello, could you tell me what do you think about my work in progress, - this is FG + GI

PAGE 80
dagon 1978 Exponential Tonemapping Plugins Quote:
Originally Posted by Gal dagon i got a Q' for you if you dont mind, tonemapping.. like vray's post effect. what do u use externally to do it and what function? - I would render to 16bit and - use levels on it but it affects the entire render not just lighting unless u do an illumination pass just for this. i tried using an output lens exposure shader to do the same thing in 3d but again this takes into account everything u render like reflections,colors and etc'..which you dont want. have you found a way to mimic vray's function of tonemapping purely on illumination values and not the whole image?
- you can do it with an exponential tonemap plugin (like the artizen ones), there are also some commercial plugins to correct highliths/middletones/shadows, � like this one , but is a 16bit plugin but right now I don’t have an optimal choice :( (maybe the final version of artizen with exr support?)
Quote:
Originally Posted by Gal also.. have you tried using fg_mib_ambient_occ yet? Ii've been messing with it trying to get AO clipped off by direct illumination => so you wont get contact shadows in a directly lit area on the surface (like FG tracing i guess) but it seems it's not that simple to get.
Why dont u use the regular FG for this? � floze I agree.. the main purpose of mib_fg_occlusion probably was � to spit out a separate, regular occlusion pass, though it is 'accelerated' because � it re-uses info which already has been calculated by the finalgathering. to make it clear: when doing the finalgathering, � mentalray already stores the occlusion information (what you consider as ambient occlusion, rendered by a dirtmap or mib_amb_occlusion shader) in the finalgathering solution – and � the mib_fg_occlusion shader simply is capable to re-use that information so you dont have to compute it twice. To cut it down: mib_fg_occlusion does 'accelerated' ambient occlusion, � only in conjunction with finalgathering though.

Cobra1979 MR Render + Instruction for Post Effect + Workflow/ Settings Hello, just a small update and others views. Comments and critics really appreciated Rendertime 6 min for FinalGather Multibounce 3 Bounces. Rendertime 12 min for Fine antialiasing and Dof. The first one is straight out of mentalray and I've played with the others in photoshop. Thanks. Instruction for Post Effect: If i remember well I've done it this way : - desaturate, - gradient map, - add grain, - tuned the levels and - applied a radial blur. Nothing really special.

PAGE 81
� Cobra1979 I think there is nothing special in my setup, for the white shader - I've used the control shading from francesca luce, - model oren-Nayar, - diffuse 0.7 and - a white color of 0.95. For the lights, - two arealights above each windows with physical light shader and - in the color of the physical light I've connected a mib_cie_d node. (=> MR 6.5) - Intensity 1000. - I've also added an IBL node set to texture with the color of the sky. Most of the time - I Render to open EXR RGBA (float) 4*32 bit and - Gamma 0.8 color clip raw. Then in photoshop I adjust by hand - the gamma and - burn values when converting from 32 to 16 bit and - do some adjustement of saturation and - contrast but not on this one, forgot to mention it, I was too tired last night Camera: I've used a lens shader but only for the dof, it's the physical lens dof. floze Photoshop and OpenExr Quote:
Originally Posted by Gal hey for anyone who didnt know about this: http://www.openexr.com/index.html openexr also allows an exr importer for photoshop which will let you keep 16bit images and do all the photoshop functions,layers as it would do with 8bit. very very useful. also shake3 support.
Uhm... actually not. Maybe with 16bit integer (short), but not with a 16bit floating point exr. - You can import the exposed/gamma-corrected exr, � but you wont be able to get it back in floating point. � Neither Photoshop CS2 let's you do layers or add any effect beside a few, not even using the brush is supported on floating point images - which makes Photoshop to nothing more than a huge and oversized exr viewer.

Cobra1979 Hdr-Test-File for Tonemapping + leather material I've added a link to an hdr image rendered in Mentalray, � could someone do the tonemapping on it and explain me how he do it? It would be great. http://perso.wanadoo.fr/3dfs/Test01.hdr and here i'm trying to do a leather material with the ctrl.shading. Does it look ok?
Cobra1979 Usage of ctrl_shading material - You have to install the mix8layer node and � use it as a passtrough node. - Plug the ctrl_shading node in the base layer of the mix8layer. - Connect the coumpound attribute of the ctrl_shading to the layer 0 of the mix8layer when the connection editor appears. - Don't forget to assign the mix8layer to your models and � not directly the ctrl_shading or maya will crash. Quote:
Originally Posted by Ozren When i render to exr and set in Mray Globals RGBA (Float) 4x32 Bit, i get a dark image in render preview. When i put that same test.exr image into After Effects i get a nice bright image.

Chris-TC EXR in Render Preview with wrong gamma applied - When you load a .EXR into After Effects � it will automatically apply a gamma of 2.2, � thus making the image brighter. This is correct because by default .HDR and .EXR files should have a gamma of 1.0. The way you see it in After Effects is correct, the way you see it in the render preview is incorrect. A while back I've explained my technique for properly applying a gamma of 2.2 to all renders => in order to get correct illumination while setting up the scene. I don't remember the thread though. � floze AE applies a gamma of 2.2 � because it presumes sRGB correction of 32bit footage. - Disable this behavior by switching off 'Import/Export 32bit as linear light' under File> Project Settings> Color Settings (AE 7.0 only). - You might want to generally enable 32bit in this menu too.
PAGE 82
� Chris-TC Only AE Professional has 16/32 Bit support. A quick way of setting a higher bit depth for your project is - to Alt click on the little 8bpc button in your project window. - Or, as floze suggested, specify it in the preferences. Ozren Gamma Issue Ok i opened EXR in PS CS2 (supports 32bit EXR) without plugin. I dont know if i am dooing something wrong, i render an : - EXR (4x32 float) - Gamma 0.8 - Preview Convert Tiles to OFF - Preview Tonemap ON - Tonemap scale 1.000 and open it in PS, but my image looses contrast , and gets realy bright, => i dont know if its soposed to do so? a) first one is EXR (bright one); b) another one is how i see it in Maya preview. Another Q is, how can someone control textures, colours etc when they all get another colours after i open EXR in PS or AE. � floze - Set the gamma value in the 32bit Preview Options under the View menu to 2.2, (= 1/Gamma, e.g. 1/ 2.2 = 0,455) this should get you the look you have in maya.

� Chris-TC Explanation of Gamma Curve Yes, it gets you the look you have in Maya. But on that note: hasn't the gamma issue ever been discussed in this gigantic thread? It's really important and shouldn't be neglected. If you keep rendering images with the default 1.0 gamma � all your illumination will look less natural and more CG � because linear space is not what we're used to seeing in photographs. Images with a gamma of 1.0 also tend to have oversaturated colors � which often results in a "cartoony" look. Let me give you a quick example using a simple Cornell Box: A red wall, a green wall, a white floor, ceiling and back wall. Two white boxes and an area light. The first image is a default FG rendering:
Now let's see what happens if I add a lens shader that applies a gamma of 2.2 to this image:
Well, that looks way too bright.

But it's very simple to bring down the intensity of the area light and get this:
Now compare the original rendering and the Gamma 2.2 rendering: It's obvious that the Gamma 2.2 image looks more natural and more realistic. � The colors are less saturated and you don't get unrealistic contrasts. � look at the areas where the walls meet � loot at the front side of the cube in the foreground

� MasterZap It's a sad and horrible fact that most software out there default their rendered view to gamma=1.0, � which is physically *completely* useless. Color Space: Computer screens as a color space which is perceptually linear, i.e. a grayscale looks to be "even". But that isn't actual linear at all! It's somewhere around gamma 2.2, give or take a hair. A true linear ramp doesn't LOOK linear at all to the eye! The eye perceives it as going bright "very quickly" and then staying "fairly bright". Ever consider why "middle gray" in photography is called 18% gray? It's because 18% as much light is perceived as "half as bright" by the eye. It isn't - it's 18% as bright (our eyes are extremely logarighmic!). But a computer screen is perceptually linear. So the max color (255) looks twice as bright as the "half" color (128) but it is actually more like only 18% of real intensity. Unfortunately, way too much software does this wrong, and insists on defaulting to gamma 1.0 for legacy reasons. It's a tough hurdle, � since many shaders and tools have been written to take this "wrong" into account. Because a shader made "special" to look "nice" on a normal screen � (i.e. do "wrong" things) may look like crap when you do the RIGHT thing! If at least apps could come out-of-the-box with gamma 2.2 as a default..... � yashu in maya the gamma setting is in the Render Settings window > Framebuffer > Gamma. You need to set it to 1/2.2 ( = 0.455) to make it look correct Splin Gamma, Linear Color Space and HDR - Article That may be helpful for many maybe...3 part article about that gamma crazyness: http://www.xsi-blog.com/?p=41

Chris-TC Tonemapping via Lens Shader Technique Quote:
Originally Posted by machuca woah some great new stuff going on in here chris, thanks for your explanation on gamma, but if you could kindly specify the lens shader which changes gamma, that woul be great! cause im doing some tests here in maya but found nothing that got the same result.
Well, I'm using XSI so I can't tell you off the top of my head which lens shader works for Maya. Kim Aldis actually mentioned this trick a few months back, it works like this: - you take a dummy lens shader ���� that does absolutely nothing, such as a stereoscopic lens shader with all offsets set to 0. - Then you take the output of this lens shader and - plug it into a color correction node. - In the color correction node you specify a gamma of 2.2. - The result of that finally plugs into the camera. This is what the render tree (hypershade in Maya) looks like: Stereoscopic Lens Shader --> Color Correction --> Camera Lens Shader Input Keep in mind that - you need to also apply color corrections to your textures � if you use this technique. � All your textures need to be color corrected to a gamma of 0.455 or ���� they will end up looking too bright. More info on this can be found in the link Splin posted above.

royterr Setup Principles ? Rendering realistic scenes "Vray style", with MR hase always been a challenge for me. It just seems you have to go a step further when learning MR. Anyway if I get it right from the 82 pages, to achieve high quality renders in MR vray style, you have to follow 4 principles: 1- Use Gi and FG by nowing what to tweak, so they can work well together. Or use only FG with multibounce. 2- For a better light behavior threw materials, use ctrl_shading, AO pass, ctrl-irradiance and company 3- nodes sush mib_cie_d node for lights 4- and finally tonemapping for burned areas or very dark ones Do tou agree guys? � Gal u dont need gi all the time, � only when you need more than 1 bounce of indirect illumination(btw, objects with incadensence are infact indirect illumination and light from them will NOT bounce unless u have multibounce, nor will it generate photos) i managed to get somewhat close even lit interior scenes by limiting the photon bounce to 2 and faking the decay rate like it. plus high high exponet like 3.5 and high photon intensity, this provides good illumination and also good fast decay (relative to your scene scale) and let FG fill in the blanks. but it's not there yet. plus to take off the burn areas a good tone mapping function needs to be available. now tone mapping, like someone else showed here: http://www.spot3d.com/vray/help/VRa...gbuffer.htm#ex1 see how all the values are kept except the bright areas above 1.0 in hsV? with openexr there are no level functions or exposure functions that allow you doing this and not just take the WHOLE exposure down or offset it. that does not do the job. unless someone writes the same tone mapping functions for afx/shake or pohotoshop, i dont see this being done easily. � slipknot 66 Well, i never used decay with area lights placed in front of the windows. � Thats i think is the better way to go to simulate an interior illumination. Theres no secret, - put some area lights in fornt of the windows, - turn on GI, and FG, - adjust the photon intensity, � to get the softshadows, and � to avoid those washed surfaces, and thats it, the - rest of the process its in post , with photshop or any other comp software you like.

PAGE 83
Chris-TC Gamma - How mental ray's base shader handle this ? Quote:
Originally Posted by Saturn So the obvious question coming to me is : How mental ray's base shader handle this ? � Are they assuming we use only linear images and then do the shading right ? � Or are they just look nice and do it wrong ? That s funny because I ve always played with gamma and saturation in comp to get look nice.
The shaders don't care what gamma you apply � because the gamma adjustment is really just a post "effect" and has nothing to do with the light distribution in the scene itself. There's no right or wrong. If you take a photo with a digital camera, afaik � all the internal processing will also be done in linear space � while the gamma is applied afterwards to make things look good on your computer screen. Now, the thing is this: If you apply a 2.2 gamma things will normally get a lot brighter due to the non-linearity of the brightness curve. So if you preview your lighting setups with a 1.0 gamma � you will practically always over crank your lights (because they appear darker to you than they should) which is not good.

yashu Lens Shader Technique Usage Quote:
Originally Posted by Kabab I can't get this network to work anyone know the exact setup in Maya?
in hypershade - create a gammaCorrect node and - a mib_lens_clamp node, - then plug gammaCorrect.message � into yourRenderCameraShape.mentalRayControls.miLensShad er and - finaly plug the mib_lens_clamp � into gammaCorrect.value and - then set the gamma on the gammaCorrect to 2.2 2.2 2.2 a graph would look like this:
Framebuffer Technique Usage: btw i tested the gamma setting in the Render Settings window, (under framebuffer Attributes)
and indeed, - you need to set that to 0.455 (= 1 / Gamma, e.g. 1 / 2.2 = 0.455) � to make it look correct. A 2.2 value makes the images darker than default 1.0... � so, the gamma in render settings is reversed ehe � floze This way you trash your mentalray custom alphas though. A cleaner approach would be => to write some sort of actual gamma-correction lens shader.. or using the framebuffer solution. (PAGE 84) � floze Quote:
Originally Posted by machuca oooo i got real close to that too ganna test this right now and post my results here.
Didnt we discuss that a few pages earlier? We even found a way to plug a custom curve into
the lens (for either r, g, b or h, s, v or altogether...).

aadams Lose this shader slot in your camera? but then you lose this shader slot in your camera...is there a way to piggy back camera shaders in mental ray?? � floze You can stack lenses over each other in Maya 7. machuca Render Tests with different Gamma Techniques I made some renders with some different settings to see what i would get, and here are my results: (ALL renders have the exact same ligthing and shader settings) Original - rendered image a) without the lens gamma b) and default framebuffer on the render settings. Framebuffer � I placed 0.445 on the gamma option. Usage: on mental ray render setings tab (where you find the gi/caustics final gather options) - go to framebuffer all the way down. � There is a gamma value which by default it set to 1.0 - set it 0.455 (1.0/2.2). Lens - using the exact same technique said above. You can notice the main difference between the lens and framebuffer is the � different reactions to the reflective surface, and the marble texture. **I havent done any gamma changes on the individual textures** how could I aprouch this?

PAGE 84
� floze Gamma Correcting Textures - Explanation and Usage a) framebuffer technique You should pipe your file textures through a gamma-correct node with value 2.2 � to get the right look for the framebuffer solution. � Procedural textures like the checker and marble ones in your rendering, and even ramps seem to be corrected automagically. b) lens shader technique If youre going the lens shader way, it all gets linearized regardless. I guess I prefer the framebuffer way though. NOT RIGHT � LOOK AT PAGE 92 Summarize of Gamma Correction by jozvex � Ozren Quote:
Originally Posted by Lamster Whoa wait a minute, why is there such a disparity in the framebuffer version of the render and the lens shader version when essentially all we're doing is to raise the gamma to 2.2? How is it that the floor can actually get darker when the boxes and the walls are similar Terence
Well, there is a topic about new updates http://forums.cgsociety.org/showthread.php?t=345772, and it states : Maya 7.0.1P01 Fixed a problem with Photoshop/After Effects being unable to read .iff files created with mental ray rendering.[242548] Fixed a problem with frame buffers being ignored with mental ray rendering.[239472] Fixed a problem with mental ray userdata nodes causing Maya to crash.[243546] Fixed a problem with MPxNode::inheritAttributesFrom.[243548] Maybe thats the answer. yashu How to gamma correcting textures Quote:
Originally Posted by machuca how can i aproach this?! connecting the texture to a gamma correct ant then it to the shader?
- you need to know what gamma the texture has ( G ) - then apply a 1/G gamma to it (either in maya as you said either in other image editing package) Should the texture node be gamma corrected or the shader or both? And if your on an Apple isn't the default gamma 1.8 instead of 2.2? � LOOK AT PAGE 92 Summarize of Gamma Correction by jozvex

Cobra1979 HowardB Render + Settings Thanks Francesca for the comment on the leather. This is another work in progress to improve my skills, thanks to Howard.B for sharing this really great scene. Settings:
- All maya shaders except
- DGS for the chrome and
- Ctrl.shading for the walls.
- GI+FG,
� the rendertimes were around 23 min for the one with reflection floor and
� 40min for the other.
- Sampling 0-2 lanczos
- 1 arealights.
- 1 spotlight.
- 100 FG rays
- 50 000 photons
Can you tell me if there are things that don't look right? And wich one you prefer?

I've added grain to the last one, i'll remove that. For the first one the dots are due to
the bump maps on the wall because it's overexposed.
Without noise + ambient occlusion :

Fireantz My first mentalray's interior test~! 1st, thanks my master, Dagon1978. ,my friend Jinwei provide the modeling scene,And all of you had shared the way use mentalray® this my little test, sorry that is havent got texture inside. All done use Dgs metarial aa 1~2 one arealight with mray_area one direct light 300fg rays 200 000 photon render time : 12~14min occlusion pass :3~4 min p4 2.6ghz 1.0bg ram res: 600x600 (sorry, i have no bigger version) c&c is welcome
added effect by AfterEffect.

� Fireantz Quote:
Originally Posted by Cobra1979 Nice pic Fireantz , could you explain what you did in AfterEffects?
The effect call " Magic Bullet Suite's" . � it’s a plugin for AdobeAfterEffect. This plugin got fews effect, n I was use "look suite" effect.

Lvcifart Setting the shadow trace depth right – when using glass material hi 2 all, does anybody know why I get this error after rendering an image using ctrl_shading when you look throuh a glass the material seems to be way brighter than orginal? � Kako It's probably because of the shadow trace depth. - Try increasing it in the render globals and - also in the light attributes.

PAGE 85
Fireantz MR FG/GI/AO Render Test My updated test with FG+GI + AO pass aa -1,2 render time: 14 min
� MasterZap Tips for rendering an animation Try this, just for kicks: Tips for rendering an animation: final gather rays (accuracy) = 50 (yes, only 50!) final gather min radius = 25 (yes, a lot) final gather max radius = 25 (yes, the same!) Use view dependent radius (i.e. in pixels) Let me know the speed and result/quality. Also, for a flythrough animation, you should turn off "rebuild" and the FG will only be calculated for the 1st frame and re-used for the others. � slipknot 66 Fireantz, try what MasterZap said, also - try to use a low value for the fg presampling. - something around 0.5 or 0.6 => I can get some nice results with these values, => and the FG process gets faster. francescaluce Painting FG values Quote:

but how do you paint fg rays with cpv ?
no no.. you don't paint fg rays, you paint fg values. => until ctrl.irradiance simply implement the mentalray fg structure on a per shader basis.. instead to supply fixed values to the shader.. - well you can plug color maps, cpv and whatever. there's an example to illustrate this at page 54 of this very thread. � http://forums.cgsociety.org/showthr...2&page=54&pp=15
PAGE 86
Jozvex Ctrl Irradiance Explanation Quote:
Originally Posted by pixelmonk so what's this ctrl.irrad thingie? Eh? I searched the forums and nothing.
If you search for Ctrl Irradiance (full name) you should get lots of results. It's one of Francesca & Co's many great shaders, � it lets you control everything about the indirect illumination on the shader. You can get it from Yashu's website: � http://yashu.go.ro/

dagon 1978 Thought about MR Quote:
Originally Posted by FuriousD Anyway for fly throughs I'd go with vray, not just the simple light caching technique, or the interperlated glossie reflections.
the interpolated glossy in vray isn't useful at all, the glossy in vray is slower than mray, we have just some problems in interior renderings => due to the FG settings and the FG points added at rendertime, this is the real problem of mray glossy right now, => but for an exterior scene the mr glossy is very fast! (like all raytracing in mray)
Quote:
Originally Posted by FuriousD Mental ray also has a problem getting light through glass/transparent objects. The FG seems to be noiser around glass/tranparent objects too.
this is a bug... Francesca posted a workaround for this problem
Quote:
Originally Posted by FuriousD Mental Ray likes to keep adding FG points to frozen maps
mr 3.4 have a deep freeze, the OEM integrations not... isn't a mr problem, just use the standalone for this Quote:
Originally Posted by FuriousD Vrays simple material is great, it basically covers most materials for Arch vis, no need to go into complex render trees, but I do like the render tree for somethings.
this is a good point, the vray shader is really well designed, i have to agree... with mray u have to search the good solution for each problem u have, maybe some shader writer can take cue... Quote:
Originally Posted by FuriousD Cool I didn't know it was an intergration problem with XSI, I just couldn't afford a standalone version right now, I can't even afford any extra lics of Mental Ray batch I just want to clarifiy if Mental Ray standalone adds extra FG points to Glossie materials at AA time or not ?
no FG point at rendertime with deep freeze

Chris-TC Glass Problem Workaround Quote:
Originally Posted by FuriousD I tried this and it didn't seem to work for me, Jarno and I did some tests and the only work around was - to hide the glass during FG, - load up the frozen map, - unhide glass and render. It seems to do the trick. Just a pain though, you come in the morning and you still have to render the AA pass.
Just curious: if you're on XSI then why don't you make use of the pass system? Setting up two separate passes for FG and beauty pass is a matter of seconds: - Throw all your glass objects into a partition and put a visibility override on it. - Then open up a multi PPG for both your FG and your beatuy pass and set up all your render options like you normally would (don't forget to specify an FG map). - Finally, open up a PPG for only the FG pass and set anti-aliasing to -5/-5. - Hit Render All Passes and � you won't have to manually do the AA pass when you wake up in the morning. lazzhar Irradiance Parameter and FG Quote:
Originally Posted by Fireantz This is a vray GI test by duration 17sec
1.Can anybody have tip n trick how to get the darken area (bottom of teapot) easily? I had test for it, but always got a bright light at there in Mray. I hope the answer is not add a multiply occlusion layer on it. 2. At vray setting a call "Secondary bounces Multiplier". Could mray got this similar setting?
You mean Secondary Diffuse Bounces?

� francescaluce Quote:
you mean Secondary Diffuse Bounces?
no, he means "Secondary bounces Multiplier". � that is a parameter to ctrl the strength of the bounces � as you do with the irradiance parameter in your usual materials for the whole irradiance computation. there's a way � to ctrl the secondary 'bleed' or if you want 'emission' of the material but not a way afaik to ctrl the whole irradiance after the first bounce.
PAGE 87
v-reality MR Render (kitchen) with ctrl_occ Hi, i discovered this thread 5days ago , very interesting ,I wanna thank everybody here so after many tests the render times took 6 and 7 hours , but now after trying francesca's ctrl_occ i come up with this
45mn Settings: - fg:150 - min/max:10/100 - aa:0/2 2mn for the ctrl_occlusion pass cpu:athlon xp 2500+ that may be i have to change as soon as possible

v-reality MR FG Render (kitchen2) w/o Occlusion you said white ? another vray like render without occlusion , - FG only - FG rays 600 - min/max: 2/30 - mbc (=FG Multibounce): 2 - aa:0/3 fg time: 45mn rendertime : 47 xp2500+
BooMer86 Light Problem
� royterr think this is a light leak problem. to resolve it: - rase your photon number - decrease the radius - try combining FG also

� T_R Modeling tip to prevent light problems You should prob start a new thread for this. - Just add more geometery outside the window � where the light leak occurs. Throw a cube scaled accordingly. If you make an interior its a good idea - to give it ample subdivisons and - extrude it � so the walls have volume . floze Matching color with "mib_cie_d" node Quote:
Originally Posted by royterr when using the "mib_cie_d" node, people refer to that board: � http://www.3drender.com/glossary/index.htm but when using values below 4000 or more than 12000 (temperature), � results don't match the board values. Has anyone found another source for using this node properly?
Yep, the manual: Quote:
CIE D Illuminant The Comission Internationale de l'Eclairage (CIE) has standardized several illuminants. The most well known of these is called D65, but there is an entire range of CIE D illuminants. The number 65 refers to the associated color temperature of 6500 Kelvin. This illuminant describes the color of daylight with an overcast sky. This specific illuminant is widely used to define the color white, and indeed its sRGB coordinates are (1,1,1). The other CIE D illuminant differ from D65 by the associated color temperature. This implementiation supports color temperatures from 4000 Kelvin to 25000 Kelvin. color "mib_cie_d" ( scalar "temperature", scalar "intensity") temperature gives the associated color temperature of the CIE D illuminant in degrees Kelvin. The allowed range is from 4000 to 25000 Kelvin with a default value of 6500 Kelvin. intensity determines the intensity of returned color. By default the intensisty is set to 1.
The upper limit of the mib_cie_d is not 12000 but 25000 Kelvin. If you want to simulate bulbs maybe try the mib_blackbody shader.

� royterr Hey floze, what I meant to say is that � the difference between 4000 or 6500 and 13000K is much greater and noticeable � than the difference between 13000 and 25000K (where you can only see a change in light's color saturation but not the hue). So what I concluded is that: - 6500K is the value of a white color (or a cloudy day): - values above that, have cold colors � which can correspond to an early early morning or a late late night. In other words � when there is no sun, but only a weak blue atmosphere. - values beneath that, have worm colors � witch can correspond to an early morning or a late night. � where the sun is partially visible. Correct if I am wrong. royterr USAGE of mib_blackbody shader By the way, what’s the story with the blackbody node I attached to the light's color and played with the values, nothing happened. � Elvis75k the blackbody must be - assigned to a mesh around a pointlight � i.e. as a shadermaterial (i think: just like in maxwell you (not you) simulate a lamp bulb)
PAGE 88
� floze Quote:
Originally Posted by Elvis75k the blackbody must be assigned to a mesh around a pointlight i.e. as a shadermaterial (i think: just like in maxwell you (not you) simulate a lamp bulb) -e
Actually it is used � as color source of the light, i.e. - you should plug it into the light color slot. If you are using GI, � you cannot assign it to the photon color though, which kinda sucks..

� dagon 1978 Quote:
Originally Posted by floze Actually it is used as color source of the light, i.e. you should plug it into the light color slot. If you are using GI, you cannot assign it to the photon color though, which kinda sucks..
yeah, the mib_cie_d too, � it's a strange implementation... and, one more time, almost without documentation Jozvex Differences in FG only / FG Multibounces Quote:
Originally Posted by royterr 1 - Unlike V-ray, in MR, I now that when it comes to photon tracing, the calculation doesn't take into acount the primary illumination. Is it the same with FG? or there is a way to let it take into account the primary illumination?
Final Gather (at least without photons helping it) � is entirely based on the primary illumination. � It looks at all the surfaces in their current state (directly lit by lights) and � then sends out rays to add more light based on those surfaces. If you programmed lights to use photons for their direct illumination you would get more or less the same result as you get now with normal lights, only blotchier. � floze
Originally Posted by royterr i didn't get it? sorry
You can turn (caustic) photons into direct illumination - by using some refracting object in front of the lightsource. The broken relation between direct/indirect illumination is a big issue in mental ray. To get correct results with diffuse bounced finalgathering: - you should set your shadow trace depth both in the light - and the renderglobals to reflection depth +1. And yes, provided that the trace depth is high enough, � the result will be similar to photon traced indirect illumination. � The biggest issue imo is the usage of shaders that treat the irradiance the correct way. DGS do this natively, but you can modify any maya shader to get the same result: http://forums.cgsociety.org/showthread.php?t=228118 http://forums.cgsociety.org/showthread.php?t=293775 � Jozvex Quote:
Originally Posted by royterr i didn't get it? sorry
On the topic of skylights and photons, - you could perhaps use ctrl.objectlights � to create an optimised photon emitting skydome mesh that would be faster than using the IBL feature? By optimised I mean - you could create the dome/hemisphere and then delete the areas that you know will cast unneeded photons?

dagon 1978 little test to compare a FG solution with a multibounce solution FG no multibounce FG with 1 diffuse bounce � in an interior scene u can see better the difference... � loran both renders have the same light, just bounces are added. Setting the max depth when using Multibounces: don t forget to increase the max depth as much you add bounces. FG no bounces
FG 4 bounces

royterr Turn (caustic) photons into direct illumination+Exterior Rendering Quote:
Originally Posted by floze You can turn (caustic) photons into direct illumination - by using some refracting object in front of the lightsource. � The broken relation between direct/indirect illumination is a big issue in mental ray.
I totally agree with you. In my opinion, this is the advantage of FG multibounce (at least it takes into account the primary illumination, unlike photon tracing). As for shaders: http://www.pixero.com/ http://yashu.go.ro/ http://www.puppet.cgtalk.ru/download/shaders_p_e.shtml I just don't now what to choose anymore for my interiors.....But thanks to this forum i am using DGS and ctrl_shading and they are work fine. Dagon an Ioran: thanks a lot for the examples. a) So trace depth: �should be grater than 1, and b) the sum of trace reflec./refrac.: � should not exceed the trace depth value. PLZ correct me if I am wrong. Quote:
Originally Posted by Jozvex On the topic of skylights and photons, - you could perhaps use ctrl.objectlights � to create an optimised photon emitting skydome mesh that would be faster � than using the IBL feature? By optimised I mean - you could create the dome/hemisphere and - then delete the areas that you know will cast unneeded photons?
Seems like an interesting technique, I will try it. But so far, for exteriors, - I always used IBL and a directional light for shadows and - highlights, with some good texturing worked very good so far. But I don't like relying to much on the IBL technique, because it is easy but not that flexible, especially if you have a room with one small window to render.

PAGE 89
Jozvex Differences of direct Lighting and Photon Mapping Quote:
Originally Posted by dagon1978 but, is really so different the photon bouncing for an emispherical area light and a (for example) spot light directed to the windows? (i mean just the photon part, not the raytraced one)
No there's probably not much difference and I've never tried the objectlight-dome-technique. I just thought that � if you wanted to be "correct" like Vlado is saying, you could try it, hehe. I'm not sure why you want to be able to use FG multibounce and photons at the same time? Wouldn't it just give you the same result as you get using normal FG with photons? Also, I don't see how FG multibounce could be as physically correct as photons. Am I wrong? Is it the same?
Quote:
Originally Posted by floze & royterr You can turn (caustic) photons into direct illumination - by using some refracting object in front of the lightsource. � The broken relation between direct/indirect illumination is a big issue in mental ray. I totally agree with you. In my opinion, this is the advantage of FG multibounce (at least it takes into account the primary illumination, unlike photon tracing).
Except I don't think there actually is an advantage, because: � the irradiance (what FG looks at, based on direct lighting) is mis-converted with Maya shaders. � So you still get the wrong result unless: - you follow floze's fixing-maya-shaders thread or - you use DGS-like materials. It's just all wrong! AHHHHHHHHHHH! Ehem.
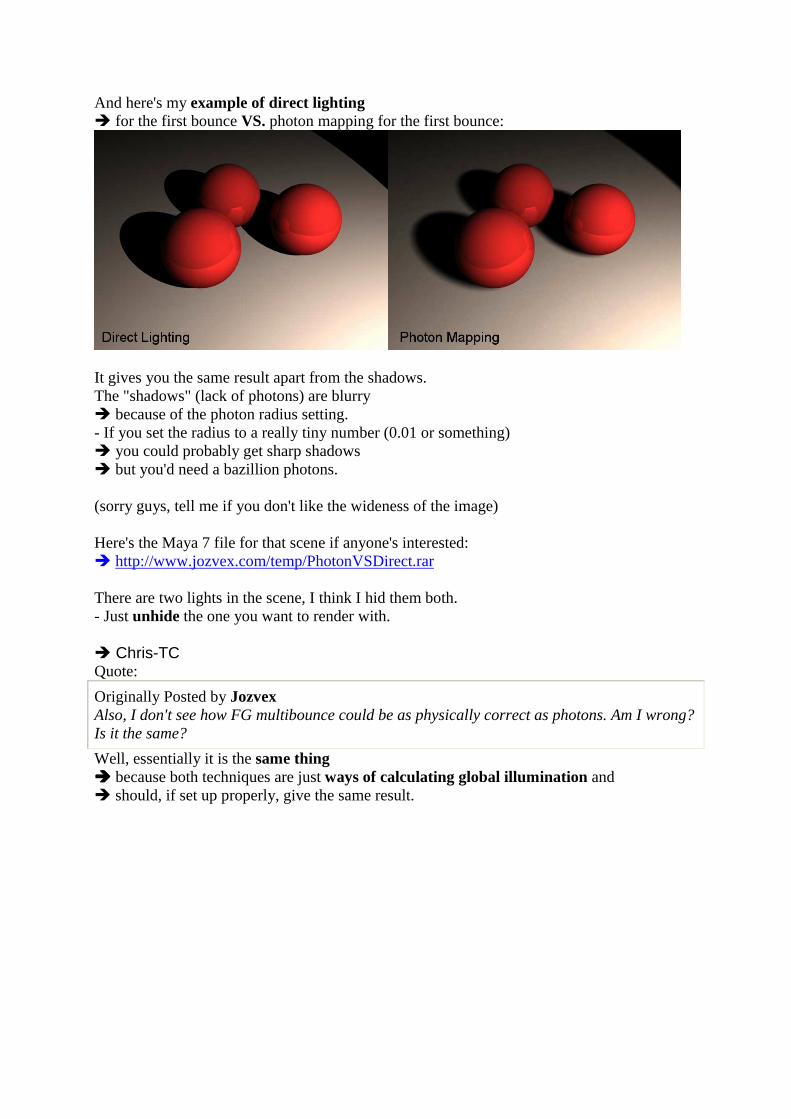
And here's my example of direct lighting � for the first bounce VS. photon mapping for the first bounce:
It gives you the same result apart from the shadows. The "shadows" (lack of photons) are blurry � because of the photon radius setting. - If you set the radius to a really tiny number (0.01 or something) � you could probably get sharp shadows � but you'd need a bazillion photons. (sorry guys, tell me if you don't like the wideness of the image) Here's the Maya 7 file for that scene if anyone's interested: � http://www.jozvex.com/temp/PhotonVSDirect.rar There are two lights in the scene, I think I hid them both. - Just unhide the one you want to render with. � Chris-TC Quote:
Originally Posted by Jozvex Also, I don't see how FG multibounce could be as physically correct as photons. Am I wrong? Is it the same?
Well, essentially it is the same thing ���� because both techniques are just ways of calculating global illumination and � should, if set up properly, give the same result.

� dagon 1978 Quote:
Originally Posted by Jozvex I'm not sure why you want to be able to use FG multibounce and photons at the same time? Wouldn't it just give you the same result as you get using normal FG with photons? Also, I don't see how FG multibounce could be as physically correct as photons. Am I wrong? Is it the same?
right now, with multibounces u can't control many things: 1) u can't give a decay for the multibounce solution, � the multibounce assume it to the primary light decay (for example, with a direct light, u wont have a decay) my suggestion is: � a panel to control the multibounce per-light, like the photon map, - so u can decide what light contribute to the FG multibounce. 2) The FG multibounces+photons right now is not possible, � is disabled by default to prevent user errors, i think but i think technically is possible to use both methods togheter, - so u can control the FG bounces of your ibl sky and, at the same time, control the photon bounces to the other lights in the scene... maybe this can introduce some misunderstanding (if u forget a light with both FG mbc and photons active, ecc), but in the interior scenes, like the vlado's test, � u will be able to do the "correct" result without an "ibl photons shooting" maybe another possibility is to have this option (multibounce+photonmap) only for IBL Quote:
Originally Posted by Jozvex And here's my example of direct lighting � for the first bounce VS. photon mapping for the first bounce:
interesting theme, i will try it tomorrow... but, for what i know vray use raytracing for the first bounce like mray... the only different thing in vray is � the "store with irradiance map" in the vraylights, this option let u use the irradiance to generate the first bounce... and in some scenes is helpful to have a completely neat image, without area light shadows artifacts � royterr Quote:
Originally Posted by dagon1978 right now, with multibounces u can't control many things. u can't give a decay for the multibounce solution, the multibounce assume it to the primary light decay (for example, with a direct light, u wont have a decay)
so the only way to use � multibounce for interiors with an accurate (or physicaly correct solution) is: - to use a light with a decay feature.

MasterZap Description of implementation of Lights Quote:
Originally Posted by floze I dont know why they didnt implement it correctly in the first place. What's confusing me is the fact that the regular maya shaders are totally screwed by default.
Not really. All is relative in the world of "correctness". Here's the skinny; To be completely "correct" in a 100% totally physical manner, the diffuse component (which is a cosine integration over the hemisphere) � should always be divided by pi - regardless of "direct" or "indirect" light, � because that's what a cosine integration over a hemisphere gets ya. Problem is, nobody on the planet does this in CGI (outside of some minor special cases, like the physics library's DGS shader). � Because traditional CGI simply took the light, � multiplied by the diffuse and the cosine of the angle between the normal and the light, and was happy. Nobody added the "divide by pi" which is actually technically "needed". Nobody. In no renderer program I know of. (Except maybe Radiance, but don't quote me on that). However, as one can read in the 'rendering with mental ray book', for direct light, this doesn't really matter. It just becomes a virtual scale factor of the light. � So a shader that does not divide the direct light with pi, simply means: � that a light with intensity 1.0 would "really" have indensity 3.14. Who cares; what you are after is that when you light your white sphere with this light it should be white, not blown out, or gray, right? Right. And it's easier to set your light to 1.0, rather than 3.14 - right? HOWEVER, for indirect light, it matters quite a bit, since it bounces more than once. If the divide-by-pi doesn't happen, you get a build-up of light, and things work badly. (THAT, unfortunately, is the case in most of the mib_* base shaders, which are considered "legacy shaders", and still has this flaw for "old times sake" ) Anyway, this causes a "hybrid" model, which is what everyone is using; ���� divide indirect light by PI (because you have to) but don't divide direct light (out of tradition, and because "it doesn't really matter"). All maya shaders, all max shaders, all XSI shaders, and all newer shaders from mental images work in this hybrid model (as does all other renderers I know of). Good o'ld DGS stands out as "in principle correct but in practice wrong". Some integrations (such as 3ds max) solves this by using a custom DGS that is rewritten not to divide direct light by PI. That's the reality of the situatoin, odd as it is.

� floze Quote:
Originally Posted by MasterZap Not really. All is relative in the world of "correctness". [...] All maya shaders, all max shaders, all XSI shaders, and all newer shaders from mental images work in this hybrid model (as does all other renderers I know of). Good o'ld DGS stands out as "in principle correct but in practice wrong". Some integrations (such as 3ds max) solves this by using a custom DGS that is rewritten not to divide direct light by PI. That's the reality of the situatoin, odd as it is.
Gotcha, and I can clearly see your point about leveling it rather to 1.0 than 3.14. But that's just one aspect, the other aspect is the de facto non existing relation in the light/photon emitting shaders themselves – � which makes it even more and guessing game in the end, doesnt it? I mean, it's not a problem for me personally anymore, since I more or less got the theory behind that stuff, at least to a certain extent. But many people I know struggle when starting to learn mental ray � because they have no idea of that relationship between direct and indirect illumination. And on the other hand, many people are happy with e.g. vray because it masks out most of this technical stuff. In the end it's not about flexibility (because mental ray rules that place ) or general capabilities, it's about the machine-to-human interface I guess. Everytime I think about that I feel like re-writing the maya shader and maya light AE templates and putting together some phenomenons for them... maybe I should get into that.

� MasterZap Quote:
Originally Posted by floze Gotcha, and I can clearly see your point about leveling it rather to 1.0 than 3.14. But that's just one aspect, the other aspect is the de facto non existing relation in the light/photon emitting shaders themselves – � which makes it even more and guessing game in the end, doesnt it?
Yes, the fact is that the photon-to-light balancing is also implemented � with various quality of "user experience" depending on platform. As an example, in Max, if you stick to the "photometric" lights, this is all handled for you, you never bother, care, or even think. Your lights are "right" right out of the box. But since CG people are pretty "used" to using good old "point lights with no decay", which are inherently non-physical... well.. � how do you match the photon decay to a non-decaying light? You "can't", really. (Sure, playing with the falloff is a hack-around, but not a pretty one).
Quote:
I mean, it's not a problem for me personally anymore, since I more or less got the theory behind that stuff, at least to a certain extent. But many people I know struggle when starting to learn mental ray � because they have no idea of that relationship between direct and indirect illumination.
Agreed; even myself stayed far far away from photons in the beginning, especially since back then, the implementation in various apps wasn't as "mature" as it is today, it's much easier today. Also, as said in the previous paragraph, reconciling photons with "non-physical" lights (that don't decay) doesn't really work. And people don't like decaying lights because they look bad when one is not using a tone mapper (or even the proper gamma).
So first people must start using proper gamma and tonemapping, then start using real lights, then photons "really work" out-of-the-box in such a workflow. Luckily, there is FG multibounce. "Same thing" at slightly higher rendering cost, � but "you dont need to think". The beauty of FG multibounce is � that it is only concerned with the surface-to-surface bouncing, and the light that got there got there however the light decided to get the light there, physical or not. So for most beginners it's easier to say "forget photons, just turn on FG multibounce and be merry".

� MasterZap Quote:
And on the other hand, many people are happy with e.g. vray because it masks out most of this technical stuff.
Yep, that's true. Also it's a mindset thing. I've worked with rendering users in the movie industry, and I've worked with rendering users within architecture, and it's like two different worlds. The movie people wants - total control of every reflection, glint, highlight, whatnot, � to "get the picture the director wants". Which means "1000 knobs" shading and building complex shading graphs. The architects wants - something more like "If I put this light here which has this IES profile, and I put this polished marble here, and that wood there, � I want to be able to tell exactly how much light would fall on this work area over here, in lux, by clicking the pixel. The "polished marble" and "wood" would have NO knobs because they should work exactly like "polished marble" and "wood" in the real world, and all light interaction should be absolutely physically correct. Ideally, there should be zero knobs."
The above is sort of achievable, but then some people tends to add "also, this image, which I am lighting only with the sun outside this tiny window, should, immediately after I hit 'render', look exactly like this fantastic studio-shot, perfectly exposed photo I see in this brochure (which was done by a $1M photo studio using tons of bounce cards and fill lights and was touched up in photoshop , but I am ignoring that)"
Quote:
In the end it's not about flexibility (because mental ray rules that place )
Word.
Quote:
Everytime I think about that I feel like re-writing the maya shader and maya light AE templates and putting together some phenomenons for them... maybe I should get into that.
That's not a half-bad idea, for now.

PAGE 90
MasterZap Quote:
Originally Posted by dagon1978 yeah i agree, we need to start using a tonemapping, and stop to use decay!
START using decay on lights, STOP fiddlign with decay on photons (keep 'em physical). wedge Making a great shader - It’s a question of playing with Settings Quote:
Originally Posted by Jozvex Yes it's quite difficult to please everybody, hehe! I find the Maxwell material editor really straight forward and... there's only 1 material type to choose from! With less parametres than a Maya lambert too I think.
i wonder why people are so confused with maxwell materials... like you say, there's only one material to play with. it seems strange to me that people want a "make leather" or "make wood table" button, because there's dull wood, shiny wood, flat wood, dull leather, shiny leather... � I mean, c'mon! all you really have to do is play with the roughness and reflectivity... it's not that hard - and I only get to tinker with maxwell a couple times a week. Lvcifart Summary of: implementation of Lights Basically what I understood here is that - we should use light decay and - leave the photons as they are. Q: what type of decay (linear, qubic and quadratic) is more accurate ( may be stupid qustion , but...). And when I test with tone mapping I get too dark images ( for my crt) when using 1.8 ( sugested by MasterZap) and when I use .556 i get brighter image. Which is physically correct? What tone mapping is used with Vray...when I look at images they seem correct with no bothering on exr or changing the gamma. I suppose that in Vray there is a default set for tonemapping and nobody bothers about changing it ( don`t know if they Vray have option for it at all)

Lvcifart ctrl.shading for the leather btw ...Cobra1979 did you use ctrl.shading for the leather ? I think that the leather of Cobra looks like this by tweaking the reflecton of ctrl.shader...dont see even bump...may be reflection is about 15-20 . � Cobra1979 Lvcifart is right there is nothing really special, - i've just tried to match the color, - the level of reflection of the leather and - the amount of blur � based on the observation of some references. - I've used ctrl.shading because it's faster that's all.
PAGE 91
Cobra1979 FG Multibounce Render Test Little test with multibounce. - And some color correction done in PS with my old scene. - All DGS.

pow Render Test with l_glass + Settings but as you can notice , despite the low resolution , I have troubles with my water , - used the l_glass beta 2 shader and it seems that it doesn't do what i wanted , lol n e one can help with a good water shader ?
So if n e one has a tip to make good pool water ... please notice me .. by memory .... my settings : - 4 lights : 1 spotlight for the sun : raytrace shadows m_cie 5500 °K - 3 spotlights ( one in front of each window ) : area lights m_cie 6200 °K - all casting illumination and caustics photons - GI accuracy :512 - Caustics accuracy :512 - FG 150 rays plus lots of things i don't have the time right now to check , will update l8er in the day

2xbo Render Test Hi. I didnt read at all this thread but i began today to ride it (just 91 Pages ), because i have some Problems when i reder out my Scene. I’m having a good time but a small areas that are really bad. Somebody can help me?. - Im using MR Emit Photons and no the normal Emit Photons for the PointLight. - Also the AreaLight settings are: - Sampling = 10 10 - Low Level = 0 - Low Sampling = 2 2 Every single critic, sugestion and opinion are welcome.
Thx for your support.

yashu Searching for Workaround of high rendertimes with FG +Glossy also 1 question that's bothering me for a long time and still didn't find an workaround: anyone knows that a scene with many glossy surfaces and FG makes the rendertimes go crazy. So i tried - to use ctrl_rays � to make the glossy surfaces only reflective for the fg/fgprecomp phases... � well the rendertime was a bit better but not much. - Then i made the surfaces look only diffuse for the FG and, � still, no luck either, damn :\. hell, why's that? is the FG ignoring ctrl_rays, or maybe the 'during-rendering red-FG-points computing phase' is ignoring the fg/fgprecomp slots? Is there an workaround for this or maybe how should one setup a fg pass for physical results? i know that probably mr3.5 will probably solve this but that's still 2 months away

francescaluce How to - gamma changes on the individual textures Quote:
Originally Posted by machuca hmmmm ... here are my results: (ALL renders have the exact same ligthing and shader settings) Original - rendered image without the lens gamma and default framebuffer Framebuffer - i placed 0.445 on the gamma option. Lens - using the exact same technique said above.
… **I havent done any gamma changes on the individual textures** how could I aprouch this?
Quote:
Originally Posted by floze You should pipe your file textures through a gamma-correct node with value 2.2 to get the right look for the framebuffer solution. ...If youre going the lens shader way, it all gets linearized regardless.
ehy floze, it's the inverse. it's in the lens shader scene you should linearize the texture. any texture you have on your computer, if you actually see it on your monitor as it should look like, has to be considered in sRGB ..

� francescaluce - if you paint a color texture in psd and you're pleasing with it when you see it on your monitor it has necessary a gamma of 2.2 applied. the correct image is the framebuffer one as mentalray automatically linearize any 8bit texture, while it's not for any floating point format ... you can test it on the fly: - open any 8bit texture with the imf_disp, - save it in openexr format ... - obviously you have not linearized the texture only � because it is now a floating point image ... So - if you put the frame buffer gamma to 1 / 2.2 - switching from the 8bit version to the fp one � you'll get a too bright text when with the fp version and � that's because mr is not linearizing it and � so you are not appling a linear texture (darker). so when you work with 8bit framebuffers - you have not to take care about your textures when you are linearizing your scene. � but this lead obviously more to problems than anything else. For example: what about your bump maps ? and your displacement ones ? => they'll be linearized too. but that's actually what you want? nope. - you painted values and � they have not to look pleasing but just remain the same. - you could use floating point textures to prevent mr gammifing them or floating point framebuffers where mr will consider already all in linear space, which means also that - you'll have to linearize manually your 8bit color textures. � because what we want is all in linear space as computation (as it is internally for mr hence the color and proc shaders remain the same from render to render) and - then we'll encode it with a 2.2gamma to look nice on our monitor, that means - if you're doing a gamma correction with a lens shader - you should already have all of your textures linear - or they will look like too bright as they have to be considered already encoded, � even if you did them manually and you'd bet even the t-shirt of your world cup team that you never applied a gamma correction. and for what you can do right now with a germany t-shirt ... 0 -

� MasterZap Francesca is 101% right. How to - gamma changes on the individual textures: - If you set a gamma in MR, � MR will indeed try to linearize all incoming 8 bit images, � which CAN wreak havoc on your displacement maps and bumps. Hence if you want "control", do this manually. - Do output gamma in a lens shader, - and manually (by a gamma shader) do the removal-of-gamma-2.2 on the input of your textures. � francescaluce Quote:
Originally Posted by lamster Would that mean to increase the gamma of a picture via a Lens Shader to a value of 2.2, and then applying Gamma Correction Nodes to all your file textures with values of 1/2.2?
Quote:
Originally Posted by Chris-TC Yes, in fact, I already explained this in detail
that's the point. the answer is NO. and this misunderstading comes from the fact that you did not explain this in detail, of course. you don't need to linearize greyscale 'value' images � because they have to be considered already linear as they are properties/value maps and a value of 0.1 in a bump map must be considered exactly ten times smaller than 1, as bump computation acts linear ... ie mathematically. instead - you need to un-encode all the color textures � because if they're looking pleasing on you monitor � even if you did them manually in a paint apz without applying anything � they need to be considered sRgb gamma 2.2, as if it is not they'd look darker and wrong on your monitor, generally as the output from the renderer � if you did not encode it. the way we want the color textures in linear space is 'coz all in mentalray is of course linear, so we will supply also linear color texture and then, better at the last end of the compositing phase we will encode them with gamma 2.2. that means also that a lens shader solution should be used only for tweak and previz as also compositing should be in linear space. in that matter, best pro solution is to output the whole in floating point (either 32bit or 16bit openexr) where previously all the color textures were un-encoded with 1/2.2 gamma while greyscale textures are left as they are, then encode the output image with gamma2.2 or just output in openexr that by spec is considered linear so the 2d apz will probably automatically apply a gamma correction (not the imf_disp, though).

another misconception I read recently is that all HDR image are linear. that's not. they are considered linear and they should be probably linear. but it is up to you making them linear. in the above example if you encode the 32bit exr output with a lens shader gamma2.2 the hdr exr will not be linear so open it in photoshop you'll get a brigther image as psd will apply again a 2.2 correction as it consider openexr to be linearly stored. � bgawboy Yes. If you are using a gamma, � mental ray will apply the inverse to your integer-component texture maps. - Adding a node that does the same on your textures will double (mathematically square) the effect.
PAGE 92
� jozvex Quote:
Originally Posted by MasterZap which CAN wreak havoc on your displacement maps and bumps.
So that's why I've been needing to set my bump depth to like 0.003 lately! � MaNdRaK18 So, all in all, let me try to summonize all things being said on this topic, and perhaps include some tonemapping in [bare in mind that I just came in from recreative football and I'm on 1 'tequilla sunrise' and one 'swimming pool' ]: So - 'LENS SHADER' approach: 1. lens shader gamma set to 2.2 (needed or not?!) 2. color textures color corrected back to 1/2.2 (needed or not?!) 3. gamma in Render Globals set to 1/2.2 (needed or not?!) 4. what's the tonemapping role in this approach? Are the steps above (or some of them) needed with tonemapping or the tonemapping replaces them? I'm just trying to get the final answers in one post, guys - don't crucify me pls - alcohol is taking over my smashed body � jozvex Summarize of Gamma Correction Take out step 3 MaNdRaK18 and usually step 4 too. Adjusting the gamma in the Render Settings will change the gamma of the Framebuffer, which will come after (on top of) the effect of the Lens Shader, giving you a double gamma boost. Mental Ray doesn't "think about" what your Lens Shader(s) are doing because it could be anything.....DOF, gamma adjustment, a warpy effect etc. That's why when you change the built-in Gamma attribute Mental Ray "thinks about" it and adjusts all your texture nodes, while with the Lens Shader method it doesn't. I think you would usually choose between *either* tonemapping or a gamma adjustment. I suppose you could tonemap and then adjust the gamma later in post but it would be too confusing to do both in Mental Ray. Both tonemapping and gamma are trying to do the same thing, "make stuff look nice on a display", tonemapping is just the more complicated version that can give nicer results.

I guess you could say this: Making Things Look Pretty 101 a) Leave everything the way it is by default if you like the results you've always gotten before hearing about all this gamma/tonemapping stuff. b) Use the Lens Shader approach � if you don't mind having to de-gamma your colour (non value) textures. c) Use the Framebuffer approach � if you don't mind having to *potentially" de-gamma your value type maps (spec, bump, displace) � depending on if they're used as a colour or integer input to the shader? d) Use Tonemapping (via the Framebuffer, using ctrl_buffers etc) � if you want even more pleasing results with more control. � Tonemapping is trickier on whether you need to gamma adjust your colour textures or not.....most of the time probably not. d2) Because Tonemapping "thinks about* how the resulting image looks visually, then makes the adjustment, if you have large objects (in screen size) with a colour texture that ends up too bright or too dark, adjusting their gamma may not help ���� because the next time you render the Tonemapper will *think about* the different/new render image � and apply different Tonemapping which may look better or worse than before. Most of the time this won't happen though because by default, file textures in Maya have a Low Dynamic Range and � so their influence on the total dynamic range of the render (which is High Dynamic Range internally for Mental Ray) will be small. For example: your darkest floating point pixel might be a value of 0.0025 and your brightest might be 124000....... � a file texture that only has a value range of 2 isn't really going to affect the scheme of things too much. If you have procedurals or remapped textures that are expanded in range � because you told them to be (or real HDR textures) � their effect may influence the Tonemapping result. e) Forget about everything above and just render to 16bit or 32bit images and make them look pretty however you like in compositing. Oooookay so I intended to write something tiny and then I went too far. I'm sure people will tell me if anything is wrong or silly. EDIT: Well, now that I think about it all the different Tonemapping algorithms look at different things when deciding what to do, not just the dynamic range. So who knows!!

Quote:
Originally Posted by francescaluce that's the point. the answer is NO. and this misunderstading comes from the fact that you did not explain this in detail, of course. you don't need to linearize greyscale 'value' images because they have to be considered already linear as they are properties/value maps and a value of 0.1 in a bump map must be considered exactly ten times smaller than 1, as bump computation acts linear ... ie mathematically.
� Chris-TC Workflow of Gamma Correcting Explanation (already described by jozvex in the last post) Okay, maybe the explanation wasn't that in-depth, but I did say "Keep in mind that you need to also apply color corrections to your textures if you use this technique. All your textures need to be color corrected to a gamma of 0.455 (...)" I talked about textures not about bump/reflection/whatever maps. � I think it's pretty obvious that those should not be modified. But yes, should have made that clearer. Workflow of Gamma Correcting I usually go by the workflow you already described: ->linearize all textures (and by textures I mean diffuse maps, NOT any other maps) ->do all render previews with the lens shader gamma correction @ 2.2* ->remove the lens shader for the final render ->render to EXR 32 Bit Float ->apply all post effects and do the gamma correction *right now I'm rendering a big scene and I forgot to remove the lens shader, so I'll end up with a gamma corrected EXR. But that's really no big deal because I can obviously linearize the image in post (set a gamma of 0.455) before applying any effects.

francescaluce Workflow Explanation of: Tonemapping + Gamma Correct ion jozvex !!! a) tonemapping is trying � to reduce the dinamic range of the input to a low dinamic range just for displaying. as most of the tonemappers take as reference the human visual system we can say that they try to do what they do perceptually. b) gamma correction on another side try also to make pleasing your imgs on a display � by making them perceptually uniform or linear as is the hvs. but that does not mean both do the same thing. being said that,
- you first make your scenes linear
� (by reverse gamma your color textures).
- you then apply tonemapping and
- afterwards you'll gamma correct your output.
this should be also clear from the statement above that says � that hdr are considered linear, well tonemappers op to get engaged correctly needs high dinamic ranges, and � so generally also linear inputs. when working with tonemappers you have to discard the framebuffer gamma correction. � that does not work with hdr. � MasterZap Quote:
Originally Posted by francescaluce jozvex !!! being said that, you first make your scenes linear(by reverse gamma your color textures). you then apply tonemapping and afterwards you'll gamma correct your output. this should be also clear from the statement above that says that hdr are considered linear, well tonemappers op to get engaged correctly needs high dinamic ranges, and so generally also linear inputs.
This depends on the toneop. Some are indeed "intended" to be blasted straight-to-screen (i.e. their "color muckery" includes the gamma-ish thinga-ma-bob (don't you just love my technical terms? ) ) � francescaluce Quote:
This depends on the toneop.
yep. I was speaking about the main one in ctrlbuffes.

PAGE 93
Silkey MR FG Render + Settings I've been getting better and better results from Mental Ray recently so I thought I'd post an example for your viewing scrutiny.
� q_vazk to Silkey: may I ask what settings/tehnique did you use? i mean: FG, FG+GI, area lights vs. direct lights vs. point lights, what AA filter, and at last how long did it take to render? � Silkey Here is another camera angle from the same scene, same settings, - Box 4/16, - FG, No GI, - 1000 FG rays. Forgive the slightly boring subject matter, blame my boss.

Cobra1979 hi, this is my new wip, I've done all the modelling this time, hope to finish it by the end of the week. C&C welcomed.
� slipknot66 Nice Render Cobra1979. Area Ligths are the secret to get those softshadows. � CiaranM Soft Shadow Fake with ctrl_occlusion Quote:
Originally Posted by q_vazk aha, but don't they take ages to render? i haven't read every little thing on the forum so i might have missed this - but has there been a release of a shader that optimizes rendering of SoftShadows with MR area lights or anything else that might speed things up?
They don't take that long to render. Sure they're slower than shadow mapped or hard raytraced shadows, but you shouldn't even consider those techniques when dealing with contact shadows in a soft lighting environment. However, the shader ctrl.occlusion does allow you to fake area shadows using occlusion techniques. Check it out here:http://forums.cgsociety.org/showthread.php?t=358296

� slipknot 66 Quote:
Originally Posted by CiaranM but you shouldn't even consider those techniques when dealing with contact shadows in a soft lighting environment.
mmmm ,why not? Thats the only way i see you can get some nice softshadows. I think i mentioned this on page 3 or 4 of this Thread , � if you look at the v-ray lights: they are just an area light with a square projection . � Thats the secrete. � dagon 1978 Quote:
Originally Posted by slipknot66 mmmm ,why not? Thats the only way i see you can get some nice softshadows. I think i mentioned this on page 3 or 4 of this Thread , if you look at the v-ray lights, they are just an area light with a square projection. Thats the secrete.
the vray light is much more similar to the MR_physical (with some optimization), but i agree, � area light are the best choice for soft shadows slipknot 66 Quote:
Originally Posted by dagon1978 the vray light is much more similar to the mr_physical (with some optimization), but i agree, area light are the best choice for soft shadows
Well, you have some optimizations with mr areal lights too. � Also you can have physical behavior using decay rates with area lights. But i know you know that already CiaranM Quote:
Originally Posted by slipknot66 mmmm ,why not? Thats the only way i see you can get some nice softshadows. I think i mentioned this on page 3 or 4 of this Thread , if you look at the v-ray lights, they are just an area light with a square projection. Thats the secrete.
I think you misunderstand me. I agree that area lights are the only way to go. My post was intended to discourage the use of shadow maps as a realistic alternative to area lights.

q_vazk GI + FG Problem hello... doing some tests on lighting setups and i came across something strange... I'm used to light only with photons, so that's where i start... now only gi gives me (at least that's what my eye is telling me) everything requiered to make an image look 'photoreal' (without burnt out areas) but lately i've been hearing more and more voices stating that: FG, in combination with GI might be better AND faster.. I've tried and ended up with two situations: 1. it darkens everything and takes a billion years to calculate even at low settings such as 50 rays (i've also set up trace depth to a higher value but i feel i'm missing something) 2. i get those 'great balls of fire' renders near the light source which in my case was geometry with high incandescence... so i'm left with asking here if maybe there's smth i'm overlooking, or what ratios should i take into consideration when using both GI and FG? oh and: Thanks CiaranM, but i can't figure out how to use it... i mean i render out a separate pass and composite it over in post, or should i plug it somewhere ? � yashu generaly use less photons / lower the photon map quality settings and also try Zap's magic FG settings - FG rays 50-100 - FG Max Radius and - Min Radius = 25 (yep both equal 25) - FG View (Pixel) set to ON - oh and increase FG Filter to 1 or 2 to remove FG splotches � these settings are ok for most of the scenes (no matter the size of them)... Big thanks to MasterZap for founding these Also another tip is � to use a tonemapper (such as ctrl_buffers one) � to get correct colors and cool images

PAGE 95
� victor Quote:
Originally Posted by q_vazk hey! thanks for the tip... just one more thingy: what about Falloff start/stop and trace depth? I remember all sort of contradictory info on that matter (like scene size divided by/multiplied by etc)... is there a rule to be followed as a guideline?...
Scene size is irrelevant if you check the view (pixel size) box. � victor Quote:
Originally Posted by q_vazk hmm... so you guys get better/faster results using pixel values instead of scene units?
I prefer to use scene units. � It's more predictable, and � allows for setting up multiple views with one setting while keeping a consistent look. � It also lets you easily test at lower resolutions or check details from different angles or zoomed in. The only time I can understand using pixel values is � when there is a lot of detail at various distances or scales or when you use values low enough for it to not matter. � Otherwise, I just see it as a shortcut. � MasterZap Quote:
Originally Posted by victor I prefer to use scene units. It's more predictable, and allows for setting up multiple views with one setting while keeping a consistent look. It also lets you easily test at lower resolutions or check details from different angles or zoomed in.
But it doesn't, really, does it? Since FG rays are inherently shot in a screen-related "grid" (hexagonal, but anyway), doing the interpolation related to screen space pixels not only makes sense, � it makes a ton more sense than doing it in the largely-unrelated world space.
Quote:
The only time I can understand using pixel values is when there is a lot of detail at various distances or scales or when you use values low enough for it to not matter. Otherwise, I just see it as a shortcut.
Ok, if it works for you, that's fine! I have different experiences, but I am rendering in a slightly different way, perhaps.

bgawboy Min/Max Settings - Discussion q_vazk, I'm not understanding why you made the min/max so large . I've never gone above a 25 pixel radius FG filter. That is a 50 pixel diameter (wide) area on your image used to interpolate for each point. Please think of the FG radii values like the size of a filter. The max radius gives you the radius of that filter, which is shaped like a circle. To me, � it is much easier to think about this size in terms of pixel units rather than in scene units. a) When min = max, � all the FG points within this radius will be used to interpolate a value for average radiance. b) When min is smaller, � all the FG points within the small radius will be used, � and only those that fit a heuristic are used between the min and max radius. That heuristic is used to throw out points which may not be appropriate to include in the interpolation. � That is why I asked the question about model detail; for that, I might recommend � a min radius smaller than a max radius, - starting with 5/25 or so. I have found use for going smaller , but that increases render time, and there should be a good justification. BTW, I'm also assuming Maya 7. Is that your version? � bgawboy Chris-TC, There must be some other issue if you are adding that many points at render time. Is that the report you get for each tile, coming out line by line? Is your FG diagnostic full of red points? What are your samples settings, or are you using the rasterizer (scanline rapid)? What are your FG settings, besides view 25/25? I like to use a higher presample density, like something between 1-2. Are your surfaces almost perpendicular to the view plane? � bgawboy Explanation of - view dependent (pixel) units The point of using view dependent (pixel) units is � to match the amount of processing with the desired quality. So to me, using scene units makes it difficult to set up multiple views (and multiple shots) at once.


List of files and their appropriated pages: page 04 > teapot_joz.rar
page 07 > teapot2_floze.rar
page 07 > teapot3_floze.rar
page 09 > teapot.flozebounce.rar
page 10 > teapot.flozebounce.2.rar
page 11 > teapot.gifg.rar
page 13 > teapot_dagon1978.rar
page 13 > teapot.gifg.2.rar
page 13 > teapot.photonfg
page 14 > teapot_Blank.rar => clear teapot scene
page 17 > sedia_air => von dagon 1978 (Chair Scene (I think))
page 17 > UsefulPhenM6 => 'DGS_fresnel' by http://www.bmcaff.com !!!
page 22 > diff.ball.room.rar
page 26 > ao_dir_mb_501.rar => AO Test by lazzhar, AO shadow w/ direction by
changing vectors
page 26 > diff.ball.room1.3.rar => for Maya 6.5
page 27 > test_caustiche.rar => not working caustic_Test by dagon 1978
page 33 > maya6[1].0_perObj => MEL for perObjectsampling for Maya 6 Setup
page 34 > Link to threddi.com - there was this scene available
"maxwell_testroom.rar"
=> http://www.treddi.com/forum/index.php?showtopic=2608
Thread name: Mental Ray Test Render 2, Illuminazione d'interni:maxwell room
page 44 > tut_jap_ibl.rar => setup by floze
page 44 > tut_jap_ibl.AVI => by floze
page 49 > classroom_2.rar => posted by dagon 1978 => MAX Scene File

page 49 > classe.rar => Maya Scene File (no more available)
page 61 > curveMappedColors.rar by floze
page 61 > curveMappedColors_2.rar by floze
page 63 > scenes_mb_maya7.zip by bazuka => HowardB scene,
=> additional Files for Obj, Fbx, Max, Xsi available
page 64 > test1GIwhite.rar by dagon 1978 => HowardB scene
page 68 > path_material.rar by HowardB
page 68 > oversampling_lens_flz.zip by floze
oversampling_lens_flz.zip <= updated one by floze
out_tonemap.rar by floze.zip
out_tonemap_sample_ma65.rar by floze
sample_scene_tonemapping.rar by HowardB
page 71 > 001.rar => Test Scene by box1126
001.rar => updated by bazuka
002.rar => updated Test Scene by dagon 1978
page 75 > out_tonemap.rar => output shader by floze for tonemapping
page 81 > Test01.hdr by Cobra1979
page 89 > PhotonVSDirect.rar by jozvex

Additional CG-Talk-LINKS:
� Rendering: a test in interior lighting http://forums.cgsociety.org/showthread.php?t=109035&page=1&pp=15&highli ght=Rendering%3A+test+interior+lighting
� VRay-like interior renders with mental ray http://forums.cgsociety.org/showthread.php?t=190232&page=1&pp=15&highli ght=vray
� M~R to MR: Getting the Maxwell look in Mental Ray http://forums.cgsociety.org/showthread.php?t=364576&page=9&pp=15&highli ght=maxwell+render+interior