STRIPE PAYMENT IN WEB APPLICATIONS - Theseus
49
Thang Ho STRIPE PAYMENT IN WEB APPLICATIONS
-
Upload
khangminh22 -
Category
Documents
-
view
0 -
download
0
Transcript of STRIPE PAYMENT IN WEB APPLICATIONS - Theseus
Thang Ho
STRIPE PAYMENT IN WEB APPLICATIONS

STRIPE PAYMENT IN WEB APPLICATIONS
Thang Ho Stripe Payment In Web Applications Autumn 2019 Degree of Information Technology Oulu University of Applied Sciences

3
ABSTRACT
Oulu University of Applied Sciences Degree Program of Information Technology Author: Thang Ho Title of the bachelor’s thesis: Stripe Payment In Web Applications Supervisor(s): Lasse Haverinen Term and year of completion: Autumn 2019 Number of pages: 49 The purpose of this thesis was to develop Stripe payment function into a web application using Firebase as a back-end service. Stripe provides the API for creating the payment system. Firebase is the place where functions are stored and it is also used for the authentication process. The aim of the thesis was to create multiple functions which are related to sub-scriptions, billing information. The design of the UI was constructed in Visual Studio Code, Node.js, ReactJS, Semantic UI. The result of the thesis project is an early prototype system which has a sub-scription process and an official payment system which is available in Tictok Manager Application developed by Finlabs Oy. The payment system was de-signed by the author and his project manager in Finlabs Oy since the applica-tion requires a monthly subscription.
Keywords: Firebase, Stripe, Subscriptions, Visual Studio, Node.js, ReactJS, Se-mantic UI, API, Finlabs Oy.

4
PREFACE
The basis of this research started with my work in searching for ways to make a payment in web applications. The first online payments took place when the concept of web pages and sites that could be linked together by hyperlinks (the World Wide Web) in 1989, so that digital payment has become a more realistic proposition. Previously, on the first days of online payments, they were not con-venient and the user interface was not user-friendly. Throughout the thesis, the definition, history, strengths and weaknesses of online payment will be dis-cussed so that we will have a general look at this subject with Stripe Payment. In truth, without the help from support groups I could not have achieved the cur-rent level of success. First of all, I want to say thanks to Finlabs Oy and spe-cially Mr Niko Rehnbäck for helping me construct and polish the code. During the time in Finlabs Oy I constructed the prototype and built the payment func-tions for TicTok Application, I have gained my own experience to create the pro-totype which has similar functions for thesis. Secondly, my friends and also teachers, who have provided advice and also let me know about their experi-ence in this field. Thank you all for your unwavering support. Oulu, 15.9.2019 Thang Ho

5
Table of Contents
1 INTRODUCTION 7
1.1 INTRODUCTION 7
1.2 FINLABS OY 8
1.3 MAIN GOAL 9
2 DEVELOPMENT TOOLS 12
2.1 ReactJS 12
2.1.1 ReactJS Components 12
2.1.2 JSX (Javascript eXtension) & Virtual DOM (Document Object
Model) 13
2.1.3 Props and States 14
2.2 Firebase 15
2.3 Stripe API 16
2.4 Version Control 17
3 FIREBASE INTERACTION 18
3.1 Interacting with Firebase 18
3.2 Firebase Authentication 19
3.3 Cloud Firestore (Database) 21
3.4 Cloud Storage 22
3.5 Cloud Functions 23
4 SOLUTIONS FOR PAYMENT FUNCTION 25
4.1 Checkout Session and Subscribe to the plan 25
4.2 Downgrading (Unsubscribing from the plan) 30
4.3 Restoring Subscription 33
4.4 Checking Subscription 35
4.5 Getting Upcoming Invoices 36
4.6 Getting Payment History 38
4.7 Getting Payment Card 40
5 USER INTERFACE (TESTING RESULTS) 43
6 CONCLUSION 46

6
VOCABULARY
API Application Programming Interface
GCP Google Cloud Platform
UI User Interface
PR Pull Request
GCS Google Cloud Storage
UID User Unique ID
CF Cloud Firestore

7
1 INTRODUCTION
1.1 INTRODUCTION
Online payment is a technology which is used in web applications. This can be
established when customers would like to start a subscription or pay for a prod-
uct as one-time service. Online payment in web application consists of various
processes when a customer demands in buying a product such as making pay-
ment requests, then the application will then provide a route that asks the cus-
tomer to fill credit card details and it confirms the payment from bank or credit
card company. After that, a record will be created while the transaction is being
made and finally the customer will receive the product as desired.
During 30 years of development in online payment, the system is now more
convenient and providing more secure steps in order to make the customers
feel safe when paying for a product or starting a subscription. Because of that,
many payment services were invented and among them Stripe is considered to
be one of the best choices. Throughout this thesis, Stripe will be discussed
deeply and it will provide a wide look in online payment process. Stripe com-
bines a payments platform with applications that put revenue data at the heart
of business operations with its cloud-based infrastructure which provides scala-
bility, reliability, and security. (1)
The reasons why Stripe is more preferred more than other payment solutions
are:
• Fast access: It is easy to create an account in Stripe with test data, de-
velopers can test the payment function without any risks. Futhermore,
test data is fully separated from real data but there is no big differences
between test data and real data, which means: if the payment function
works flawlessly in test data, it will be the same when it comes to the real
data.

8
• Easy integration: The Stripe Checkout is easy to integrate to any existing
web application through many programming languages such as:
NodeJS, Ruby, Python, PHP, Java, cURL, Go, .NET. The Checkout UI
features 14 available languages, and it is updated to support Strong Cus-
tomer Authentication (SCA) for European payments to reduce fraud
since 14.9.2019. Stripe has designed SCA-ready payment APIs and
products to help developers minimize the impact of SCA on Checkout
conversion.
• Low pricing: Stripe just takes 2.9% + €0.25 for every successful transac-
tion for non-European cards, 1.4% + €0.25 for European cards. So it is a
good choice for any companies which are looking for payment system.
1.2 FINLABS OY
Finlabs Oy is a company which has offices in Oulu, Helsinki and New York. At
Finlabs, difficult requests from multiple clients are identified and tackled. Fin-
labs’ mission is to collaborate closely to craft, plan, and execute on transforma-
tive ideas that push businesses into their next phase of digital evolution.
Finlabs team has extensive knowledge in a wide variety of topics commonly as-
sociated with product software development and experience design. This allows
them to lead their clients in product thinking, helping them to workshop new
ideas, to develop proof of concept products and to implement ongoing mainte-
nance and evolutions to keep products ahead of technology curve. (2)
The motivation for me in order to do this thesis is to develop prototype and pay-
ment function for TicTok Application, as our company decided to use Stripe as
our main technology to create the subscription system. If the prototype is work-
ing fluently, it will be integrated into our main application – TicTok.
9
1.3 MAIN GOAL
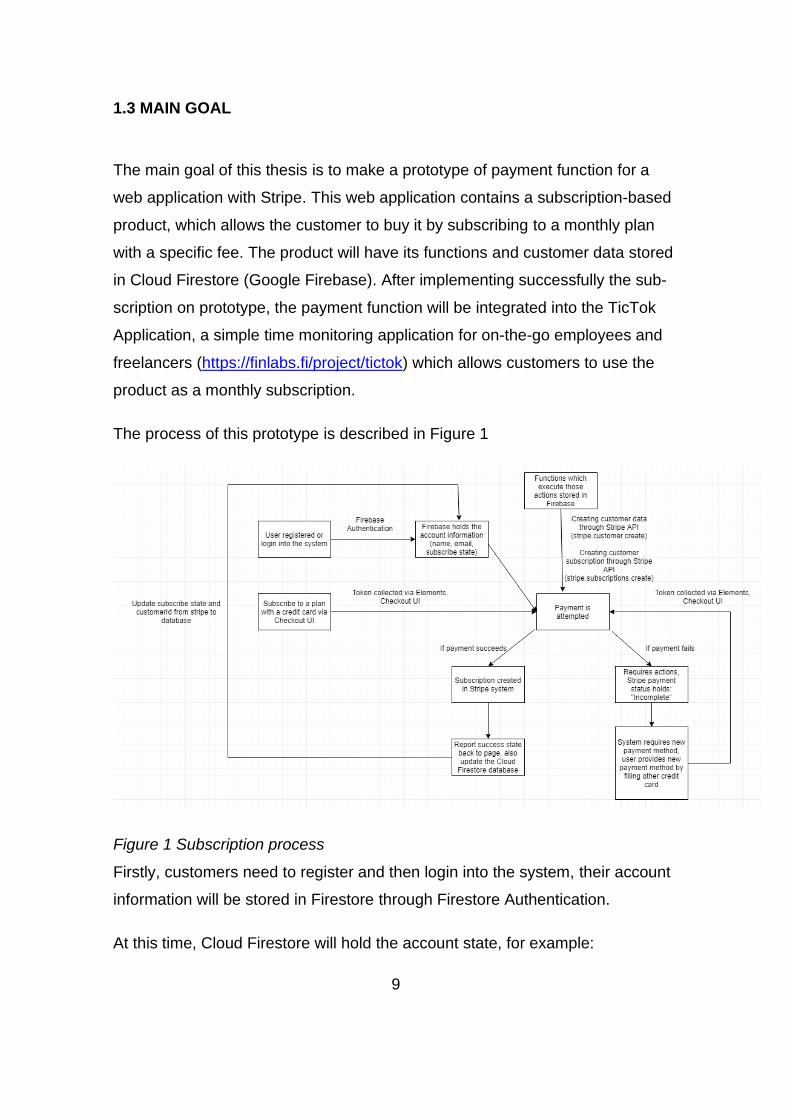
The main goal of this thesis is to make a prototype of payment function for a
web application with Stripe. This web application contains a subscription-based
product, which allows the customer to buy it by subscribing to a monthly plan
with a specific fee. The product will have its functions and customer data stored
in Cloud Firestore (Google Firebase). After implementing successfully the sub-
scription on prototype, the payment function will be integrated into the TicTok
Application, a simple time monitoring application for on-the-go employees and
freelancers (https://finlabs.fi/project/tictok) which allows customers to use the
product as a monthly subscription.
The process of this prototype is described in Figure 1
Figure 1 Subscription process
Firstly, customers need to register and then login into the system, their account
information will be stored in Firestore through Firestore Authentication.
At this time, Cloud Firestore will hold the account state, for example:

10
• Username
• User ID (Cloud Firestore will generate those IDs when user registered to
the system)
• Subscribe state (Not subscribed or Subscribed)
• Stripe information (Specific CustomerId in Stripe system)
Whenever a customer subscribes to a specific plan on the application, a pay-
ment panel (created by Stripe) will appear which requires the user to fill in
Credit card details, which is the Checkout UI shown in Figure 2
Figure 2 Stripe Checkout UI
After filling this the Stripe itself will create the token through Elements, this to-
ken will be accessed through Stripe later to subscribe to the plan. If no errors
were reported, the customer will be subscribed to monthly plan and the next
time payment will be the same date the following month. An alert such as pay-
ment successful will be called back into the UI to report that this payment was
successful. If the payment fails, it will require the user to provide a new payment
method in order to subscribe to the plan, and then it will repeat the process
when the user fill in his/her credit card details, tokenize it and then send the
card token to Stripe system in order to process to payment again.

11
The aim of this prototype is to make a successful payment subscription, provide
a clear and understandable explanation of all possible functions and the pro-
cess in more detailed way.

12
2 DEVELOPMENT TOOLS
Stripe is an online payment processing platform for internet businesses. It al-
lows entrepreneurs and individuals to create and receive payments over the In-
ternet. It provides the technical, fraud prevention, and banking infrastructure re-
quired to operate online payment systems (3).
Stripe provides an API reference, which is served in various client libraries such
as Ruby, Python, PHP, Java, Node.js, Go, .NET. When Stripe API is used in
test mode, it will not affect live data or interact with the banking networks. (4)
2.1 ReactJS
ReactJS (also known as React.js or ReactJS) is a Javascript library which is
used to build user interfaces (UI). UIs are collection of on-screen menus, search
bars, buttons, modals when someone interacts with a website or an application.
It is maintained by Facebook and a community of developers and companies
(5). React allows users to create a web application, which can interact with the
data without reloading the page and it is known for its simplicity and scalability.
(6)
2.1.1 ReactJS Components
A component is a Javascript class that accept inputs such as constructors,
states, functions, dispatch then it will return back React elements which can be
selected from many UI libraries (for example Semantic UI for React) which de-
scribes how a section of the UI should appear. (7)
Any projects can contain various components which depend on how compli-
cated the application system is.
A simple example to show the structure of ReactJS component is presented in
Figure 3.

13
class Home extends Component {
constructor(props) {
super(props);
this.state = {
user: {},
UsersQuantity:'',
price:''
};
}
handleChange(e) {
this.setState({ UsersQuantity: e.target.value});
}
render() {
return (
<div> Content
</div>
)
}
}
Figure 3 ReactJS Component Example
2.1.2 JSX (Javascript eXtension) & Virtual DOM (Document Object Model)
Web browsers read HTML documents to display them on devices such as com-
puter, phones, tablets as web pages. In this process, browser creates DOM
(Document Object Model), a represent tree of how the web page is arranged.
Developers can add dynamic content to their projects by modifying the DOM
with languages like Javascript (7). Figure 4 is an example of DOM which is
shown below:

14
<TABLE>
<ROWS>
<TR>
<TD>1234</TD>
<TD>123</TD>
</TR>
<TR>
<TD>1234567</TD>
<TD>123456778</TD>
</TR>
</ROWS>
</TABLE>
Figure 4 DOM Example on creating a Table
JSX (Javascript eXtension) is a React extension that helps the developers to
modify DOM by using HTML-style code. JSX supports almost all modern brows-
ers nowadays so it is compatible with any platform that developers are working
with (7).
Virtual DOM is a copy of the site’s DOM. ReactJS uses this copy to check what
parts of the actual DOM need to change when events happen (user clicking a
button, functions execute). After that, it selectively updates that section of the
DOM only. This is called selective updating since it does not require the page to
fully reload in order to update with its new states. Without Virtual DOM, it will
take a lot of time if there is just a small part in DOM which has changes but the
webpage has to fully refresh although there are no changes in the rest of the
content.
2.1.3 Props and States
When the information is transferred from a component to another component, it
is called props (stand for properties). Component’s props is an object, which
contains information about any specific part. In order to access in props, this
line of code can be called:

15
import React from 'react';
export class example extends React.Component {
render() {
return <h1>My name is {this.props.name}!</h1>;
}
}
Figure 5 Props Example
Unlike props, state of the Component cannot be used outside the Component, it
can be managed only within the Component. In order to access to state, it
should be mentioned as this.state.name-of-State. If we want to change the
state, this.setState() should be called in Figure 6.
class example extends React.Component {
constructor(props) {
super(props);
this.changeNumber = this.changeNumber.bind(this);
this.state = { numberOne: 1 };
}
changeNumber(){
this.setState({numberOne: 'one'});
}
render() {
return <div>Number one is : {this.state.numberOne}</div>;
<Button onClick={this.state.changeNumber} />
}
}
Figure 6 State and this.setState() example
2.2 Firebase
Firebase is a Backend-as-a-service (BaaS) that started as a YC11 start-up and
grew up into a next generation app-development platform on Google Cloud

16
Platform (GCP). By using Firebase, customers find it more convenient in man-
aging servers, writing API since they are mostly done from the server side and
small modification is needed to suit customer’s need. (8)
Firebase offers two types of database solutions: Cloud Firestore and Realtime
Database. Cloud Firestore is the Firebase’s newest database for application de-
velopment. It has faster queries and scales further than Realtime Database be-
cause it uses simple data which is similar to JSON, and requires less denormal-
ization and data flattening.
Firebase is the place where the database will be held. Furthermore, it is also the
place where functions are stored and given back as an address for the back-
end side. Logs will be seen in Firebase console which is opened through brows-
ers.
2.3 Stripe API
API stands for Application Programming Interface. An API is a software interme-
diary that allows two applications to interact with each other. It is a messenger
that delivers request to the providers and responses are delivered back to the
sender. (9)
The Stripe API is organized around REST. Its API has predictable resource-ori-
ented URLs, accepts form-encoded request bodies, returns JSON-encoded re-
sponses, and uses standard HTTP response codes, authentication and verbs.
(10)
Stripe API is available for 7 client libraries: Ruby, Python, PHP, Java, Node.js,
Go, .NET. Stripe API can be used in test mode which does not have any effect
on real data and banking networks. API keys can be acquired from the Stripe
dashboard when the account is created, they hold many privileges so that they
should be kept secretly. API keys for test mode have the prefix sk_test_ and live
mode secret keys have the prefix sk_live_. (10)

17
2.4 Version Control
In order to track the version of the application which can have several changes
every day, Sourcetree and Bitbucket are used. Branches are created so that
changes could be happening in the branches that member is working on so they
will not create any conflicts or damage to the main develop branch. Every time
an update is made with new files and changes, a pull request (PR) is created
through Bitbucket so that the project leader could track what were the changes
to the files and make sure it does not damage the develop branch. Discussions
are made whenever a pull request is created so any new lines were added to
the files will be shown totally in Bitbucket.

18
3 FIREBASE INTERACTION
3.1 Interacting with Firebase
Firebase is the place which contains the authentication for users, the database,
storage, hosting, functions for the web application. In order to initialize Firebase
in the application, the project should be first configured in Firebase dashboard.
By creating a config file in a project allows developers to use all available ser-
vices provided by Firebase.
import firebase from 'firebase';
const config = {
apiKey: "api-key",
authDomain: "stripeprototype.firebaseapp.com",
databaseURL: "https://stripeprototype.firebaseio.com",
projectId: "stripeprototype",
storageBucket: "stripeprototype.appspot.com",
messagingSenderId: "msg-sender-Id"
};
const fire = firebase.initializeApp(config);
export default fire;
Figure 7 Example of Firebase configuration file (taken from prototype)
Firebase is the main source for holding almost everything:
• Firebase Authentication holds the data about users (customers) and their
sign-in method, account creation time as well as User UID (User Unique
Identification).
• Cloud Firestore (Firebase Database) holds the data about users from the
web application such as customerId, email, subscription status, subscrip-
tion ID, customer UID for Stripe.
• Firebase Storage holds the data of the customer which is related to the
web application such as images.

19
• Firebase Functions holds the functions for the applications.
3.2 Firebase Authentication
Firebase authentication takes the responsibility for registering, logging in re-
quests, provides many sign-in methods such as Email/Password, Phone,
Google, Google Play Games, Facebook, Twitter, GitHub, Yahoo, Microsoft. It
intergrates tightly with other Firebase services such as Realtime Database,
Cloud Firestore, Hosting, Cloud Functions, and it also leverages industry stand-
ards like OAuth 2.0 and OpenID Connect, so it can be easily integrated into
customized backend. (11)
Figure 8 below is an example for how account information is stored in Firebase
Dashboard:
Figure 8 Firebase Authentication Dashboard (12)
After adding the Firebase configuration file for the project, the login and signup
functions are easily created by several line codes.

20
login(e) {
e.preventDefault();
fire.auth().signInWithEmailAndPassword(this.state.email,
this.state.password).then((u)=>{
}).catch((error) => {
console.log(error);
});
}
signup(e){
e.preventDefault();
fire.auth().createUserWithEmailAndPassword(this.state.email,
this.state.password).then((u)=>{
}).then((u)=>{/* console.log(u) */})
.catch((error) => {
console.log(error);
})
fire.firestore().collection("users").add({
email: this.state.email,
plan: "free",
subscribed: false,
})
Figure 9 Login and Signup by Firebase Authentication
Figure 9 is an example of how user accounts are created.
A form is created which allows new users (customers) to register into our appli-
cation using their email address and password. When customers finish the
form, their provided information (email address and password) are validated
and passed with createUserWithEmailAndPassword method.
With existing users, a form is also created which allows the users to sign in us-
ing their email address and password. The information is also passed with
signInWithEmailAndPassword method.
In a subscription-based web application, creating a new user means adding
their information such as email, a “free” plan because they have not paid for any

21
subscription fee yet. A boolean value called “subscribed” will be stated as false
if they are free users and true if the customers have subscribed to the plan
which is in the web application.
Customer’s information is added by fire.firestore().collection(“users”).add. This
allows the new user information to be added to the Cloud Firestore (the data-
base) in “users” collection, and all new users have their own User Unique ID.
3.3 Cloud Firestore (Database)
Cloud Firestore is a flexible, scalable database for web, mobile, server develop-
ment from Firebase and Google Cloud Platform (GCP). It keeps the data sync
across the client apps throughout realtime listener and offers offline support for
mobile and web so that responsive applications work regardless of network la-
tency or Internet connectivity. Cloud Firestore also offers seamless integration
with other Firebase and GCP products, including Cloud Functions (13).
Unlike a SQL database, there are no tables or rows. Instead, data is stored in
documents, which are organized into collections. Collections contain docu-
ments, which consist of subcollections and a nested object, both of which can
include fields such as strings or objects which are complicated like lists. Collec-
tions and documents are created implicitly in Cloud Firestore. (13)
Figure 10 below is an example of database for subscription-based application.

22
Figure 10 Example for Cloud Firestore database (12)
It can be seen from the Figure 10 that in a project, “users” collection is the place
where all the user information such as email, uid, currency, companyName
(name) are stored as fields.
Every user’s document which stands for every user in the system has his/her
own UID. As Stripe is used as payment method, the document field of every
user’s UID contains stripe. “stripe” holds the customer Stripe information and
customerId, lastStatus.
3.4 Cloud Storage
Cloud Storage is built for app developers who need to store and serve user-
generated content such as photos and videos.
The Firebase SDKs for Cloud Storage add Google security to file uploads and
downloads for Firebase apps, regardless of network quality. You can use Fire-
base SDKs to store image, audio, videos and user-generated content. On the
server, Google Cloud Storage (GCS) can be used to access the same files.
Cloud Storage stores files in a GCS bucket, making them accessible through
Firebase and Google Cloud. (14)

23
3.5 Cloud Functions
Cloud Functions allow the administrators to run backend code in response to
events triggered by Firebase features and HTTPS requests. The code is stored
in Google Cloud and it is running in a managed environment. (15)
When a function is written and deployed, Google’s servers begin to manage the
function immediately. Functions can be fired with an HTTP request, or Google’s
servers will listen for events and run the function whenever they are triggered.
(15)
Figure 11 Cloud Functions example from Firebase Dashboard (12)
In Figure 11, it can be seen when a function is deployed, they are listed in the
dashboard, providing the HTTP request link for the administrator. When they
are triggered, the functions will run and the logs can be seen in Logs tab which
is also available in Firebase’s dashboard. Figure 12 is an example which pre-
sents the Logs tab, which can show logs, possible errors during the test and
function triggering.

24
Figure 12 Logs tab for Cloud Functions (12)
In the Logs tab, it can be seen that every function which is in Cloud Functions
will have its own event message whenever it is triggered. Logs can be seen
more obviously if console.log is included in the code, otherwise it will just return
with the status code. The most common status codes are:
• 200: The request has succeeded.
• 202: Accepted. The request has been received but not yet acted upon.
• 204: No Content. There is no content to send for this request.
• 400: Bad Request. The server could not understand the request.
• 401: Unauthorized.
• 500: Internal Server Error. The server has encountered a situation it
doesn’t know how to handle.

25
4 SOLUTIONS FOR PAYMENT FUNCTION
This chapter introduces the core functions which are required in order to create
a payment page powered by Stripe API. These functions are implemented in
Visual Studio Code and then uploaded to Firebase Functions.
4.1 Checkout Session and Subscribe to the plan
A Checkout Session represents the details of customer’s intent to purchase.
Checkout Session is created whenever a customer wants to start a subscrip-
tion. After being directed to a Checkout Session, Stripe will present a payment
form where customers can complete their purchase. Once the purchase is fin-
ished, they will be directed back to the site where it is customized the suc-
cess/failure URL in case the payment succeeded/failed. See Figure 2 for
Checkout UI. (16)
Before going into Checkout Session, Products and Plans should be first created
since they determine the pricing. Creating a product and plan can be done
through the API or through the Stripe Dashboard.
Figure 13 is an example of a plan which is created in Stripe Dashboard:

26
Figure 13 Plan Created through Stripe Dashboard (17)
In Stripe Dashboard, navigating into Products / New help developers to create a
plan as they demand. Moreover, a trial period is also supported if developers
want the product to have a trial phase. The product represents a web applica-
tion, and the pricing plans represent the plans for the web application, so that
products can have multiple pricing plans. Every product and plan have their own
unique ID, starting with:
• Products: prod_abcdefghikl1234
• Plan: plan_abcdefghikl4321
Once plan ID is ready, Checkout Session creation should be the next step.

27
const { idToken, token } = JSON.parse(request.body.data);
if (idToken) {
try {
const verifiedToken = await admin.auth().verifyIdToken(idToken);
const userId = verifiedToken.uid;
const user = await admin
.firestore()
.collection('users')
.doc(userId)
.get();
// Subscribe to premium plan
let sessionData;
try {
const session = await stripe.checkout.sessions.create({
customer_email: user.data().email,
client_reference_id: userId,
payment_method_types: ['card'],
subscription_data: {
items: [
{
plan: SUBSCRIPTION_CONFIG.subscriptionPlanId,
},
],
},
success_url: SUBSCRIPTION_CONFIG.successUrl,
cancel_url: SUBSCRIPTION_CONFIG.cancelUrl,
});
sessionData = {
session: session,
};
} catch (e) {
console.warn(e);
return response.sendStatus(HttpStatus.INTERNAL_SERVER_ERROR);
}
Figure 14 Checkout Session Creation and Subscribing to a plan Function
Figure 14 represents the function SubscribePlan, this is the core function which
allows the customer to subscribe to a specific plan which was created through
the Dashboard. It will create a checkout session so that session.id can be ac-
cessed through ProceedToCheckout later on in front-end side. This part can be
clearly seen as:
const session = await stripe.checkout.sessions.create({
idToken is the token which was used to authenticate the customer in Cloud
Firestore database. After it is authenticated by admin.auth().verifyIdToken, it is

28
able to get the user data from the database. This database was already created
when the customer registered and logged in into the web application, in this
case their email will be generated as user.data().email.
The Client reference ID will be generated as customer’s document unique ID
(Figure 10).
Subscription_data is the place which the plan ID is put in so that when the cus-
tomer subscribes to the specific plan, it will be recognized by its own plan
unique ID (plan_abcdefghikl4321). For security reasons, it is recommended that
the plan ID and product ID should be hidden as config so that they will be confi-
dential and they are simply known as SUBSCRIPTION_CONFIG.subscription-
PlanId.
Success_url and cancel_url are navigations after the payment is processed. If
the payment is successful, success_url will be given and the customer is di-
rected to the specific page which displays the success message. Otherwise,
cancel_url will be given and the customer is directed to the specific page which
displays the failure message.
When the checkout session API is ready in the backend, it is suggested that
Redirect to Checkout should be created in front-end. In order to use Checkout
on the web application, Session ID should be ready for redirectToCheckout ac-
cording to Figure 15.

29
proceedToCheckOut = () => {
if (this.props.session !== null) {
const stripe = window.Stripe(config.STRIPE_PUBLIC_KEY);
const checkOut = stripe
.redirectToCheckout({
sessionId: this.props.session.id,
})
.then(function(result) {
this.props.dispatch(
paymentActions.sessionCheckoutCleared(this.props.session),
);
});
}
};
Figure 15 Redirect to Checkout
The function proceedToCheckOut can be activated by pressing the button Sub-
scribe so that when the sessionId (session.id from session above) is already
generated, redirectToCheckOut will direct the customer to the Checkout UI for
the product subscription. (see Figure 2).
In order to keep the session secure, paymentActions.sessionCheckoutCleared
will clear the session information, which include the ID and other information
about the session right after the session.id is generated and used for redi-
rectToCheckOut.
If the Checkout session is successful, the customer will be brought back to the
previous site with the success message. Otherwise, if the card inputs were
failed, the Checkout will report wrong credit card detail when the customer is fill-
ing with card. Upon the success message, the developer’s Stripe Dashboard
will display the customer’s subscription. Figure 16 below will be an example of
customer’s subscription in Stripe Dashboard.

30
Figure 16 Customer Subscription on Stripe Dashboard (17)
4.2 Downgrading (Unsubscribing from the plan)
Customers can unsubscribe from their plan if they are not willing to continue
their subscription. This process of unsubscribing also means downgrading from
subscribed state, which requires developers to work with the subscription ob-
ject. Figure 17 is an example of Subscription object which has many attributes.
One of the main attributes to make the downgrading function is cancel_at_pe-
riod_end. Cancel_at_period_end is the boolean value which determines

31
whether a subscription that has a status of active is scheduled to be cancelled
at the end of the current period. (18)
Figure 17 Subscription Object (18)

32
Figure 18 Downgrading Function (Cancelling Subscription)
Figure 18 is a function which degrades (unsubscribes) the customer from the
subscription. After the authentication and subscription process, the Cloud Fire-
store (CF) database will have customer’s additional information which belongs
to Stripe such as Stripe customerId.

33
Firstly, the function gathers the Stripe customerId from the customer database
in CF and then it will search for customer’s subscription information from Stripe
subscription database by listing all possible subscriptions from that specific cus-
tomer. After searching for the subscription data, the subscription update API will
be called:
const canceledSubscription = await stripe.subscriptions.update(
This function will change the boolean attribute cancel_at_period_end from false
to true since the subscription will stay active until the end of the cycle. After the
expiration date, the customer’s subscription will be disabled so that no further
charge will be applied to the customer. If the customer would like to continue
the subscription again, cancel_at_period_end will be set to false so that the
subscription will continue to charge when it comes to the new cycle. The sub-
scription value which contains id, cancelAtPeriodEnd, status will update the new
information from canceledSubscription and display them in front-end side.
4.3 Restoring Subscription
This function was created in order to restore the subscription when customer
would like to continue with their subscription again.

34
Figure 19 Restoring Subscription
According to Figure 19, this function has similar logic as Downgrading Function
(4.2). After going through the authentication in CF database and the customer’s
stripe UID is provided, the subscription information will be updated again
through:
35
By changing the boolean value cancel_at_period_end to false, the subscription
will not be stopped at the end of the month and it will charge the customer when
it comes to the next billing cycles.
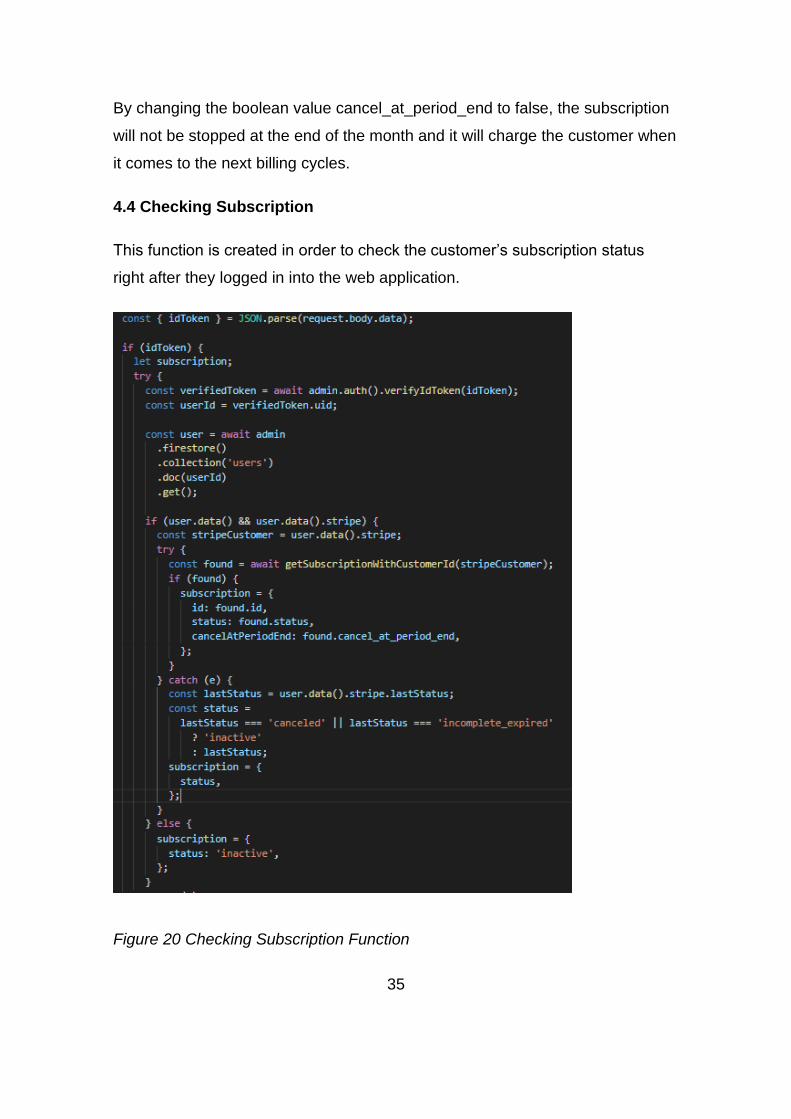
4.4 Checking Subscription
This function is created in order to check the customer’s subscription status
right after they logged in into the web application.
Figure 20 Checking Subscription Function

36
It can be seen from Figure 20 that CheckingSubscription function is partly simi-
lar to the two above functions in the authentication part which must go through
the CF database.
If the customer has subscribed to the plan, he/she will have their additional
Stripe value in CF database. Those values will be called in order to get the sub-
scription status so that they can be updated in the front-end side. The value
“subscription.status” can be different based on the customer’s susbcription pro-
cess so that it has multiple values.
• Incomplete: Credit cards input is true but there was no funds in the card.
• Incomplete_expired: Credit cards input is true but there was no funds in
the card. Stripe attempts to recharge again in the next 23 hours but still
unable to charge the customer.
• Trialing: Customer is in trial phase for the product, the subscription status
will be changed to active when the period is over.
• Active: Customer subscription is active.
• Past_due: The subscription was active until the next cycle when the re-
charge process is failed.
• Inactive: The customer has not subscribed to the plan.
4.5 Getting Upcoming Invoices
This function is created in order to gather information about the next charge in
the following month.

37
Figure 21 Get Upcoming Invoices function
It can be seen in Figure 21 that the authentication in CF database, customer’s
stripe UID will be gathered so that the information about the next invoice will
also be updated through:
const upcoming = await stripe.invoices.retrieveUpcoming({

38
This function will show all the charges that are pending, including subscription
renewal charges, invoice item charges, etc. This is not considered to be an in-
voice since it is just a preview of the next billing cycle so that the upcoming in-
voice will not show up in invoice listing calls, and thus developers cannot use
the API to pay or edit the invoice. (19)
The GetUpcomingInvoice function will bring back value UpcomingInvoice which
is an object with four properties:
• next_payment_attempt: The time at which payment will next be at-
tempted in Unix time.
• amount_due: the amount of money which will be charged when it comes
to the next cycle.
• currency: currency.
• items: the information of the subscription which customer has been pay-
ing to.
This function will return null if the customer has not subscribed to any plans of
the product or the customer has cancelled the subscription.
4.6 Getting Payment History
This function is created in order to list payment history if the customer sub-
scribed to the plan.

39
Figure 22 Getting Payment History Function
It can be seen in Figure 22 that after the authentication in CF database, the
function will list an object called PaymentIntents when the customer’s stripe UID
is provided through: (20)

40
const paymentIntent = await stripe.paymentIntents.list({
customer: customerId,
A PaymentIntent guides developers through the process of collecting a payment
from your customer. It is made in order to replace the Charges API and it is
ready for Strong Customer Authentication (SCA), which requires businesses in
Europe to request additional customer authentication for online payments since
September 2019. (21)
When the object PaymentIntent is gathered, some of its properties will be cho-
sen in order to provide necessary information for listing customer’s payment his-
tories such as:
• Date: the date which payment has been done
• Brand: the brand of the credit card (Visa, MasterCard, American Ex-
press, etc…)
• expMonth: the expiration month of customer’s credit card (in two digits)
• expYear: the expiration year of the customer’s credit card (in two digits)
• last4: the last four digit of the customer’s credit card
• amount: the amount of money which has been charged for subscription.
• currency: the currency of the charge (USD, EUR, etc…)
• status: the status of the payment (succeeded, failed, etc…)
• receiptUrl: the Stripe receipt navigation link
4.7 Getting Payment Card
This function is created in order to show the customer’s billing information.

41
Figure 23 Getting Payment Card Function
It can be seen in Figure 23 that after authentication in CF database, the cus-
tomer’s billing information will be gathered by listing the paymentMethod
through:

42
const paymentMethod = await stripe.paymentMethods.list({
customer: customerId,
type: 'card',
});
The paymentMethod objects represent the customer’s payment instruments.
They can be used with PaymentIntents (4.6) to collect payments or saved to
Customer objects to store instrument details for future payments. (22)
After gathering the paymentMethod objects, some of its properties will be cho-
sen in order to provide data for billing information such as:
• Id: paymentMethod pbject’s id
• Brand: the brand of the credit card (Visa, MasterCard, American Ex-
press, etc…)
• expMonth: the expiration month of customer’s credit card (in two digits)
• expYear: the expiration year of the customer’s credit card (in two digits)
• last4: the last four digit of the customer’s credit card
• ownerUid: the customer’s user ID
• name: email/name of the customer

43
5 USER INTERFACE (TESTING RESULTS)
Based on the mentioned functions in the previous chapters, an UI is ready with
all necessary information related to the subscription: Subscribed State, Billing
Information and Payment History.
There are two different figures, Figure 24 is the image of the payment page
when the customer has not subscribed to the plans, Figure 25 is the image of
the payment page when customer has subscribed to the plan. These figures
were taken from TicTok Manager with Stripe integrated from Finlabs Oy.
Figure 24 Unsubscribed state (23)
According to Figure 24, after creating account, the customer’s current plan will
be set in default as Basic (Free) with unavailable next billing date. Moreover,
customer’s billing information and payment history will be blank since they have

44
not subscribed to the application. When they click on Upgrade to premium but-
ton, checkout UI will be shown so that customer can fill in their information,
which can be seen in Figure 2.
Figure 25 Subscribed State (23)
According to figure 25, after subscribing to the system, the customer’s current
plan will be set as Premium with available next billing date. Customer’s credit
card will be shown in Billing information, which was also the credit card used to
subscribe to TicTok Application. Customer’s payment history will also be availa-
ble with a receipt which can be downloaded when the customer clicks the
Download button.
Furthermore, if the customer chooses to degrade (cancel) the subscription by
clicking Downgrade, customer’s current plan will be set to Premium (Canceled),

45
so that the plan will stay premium until the next billing cycle then it will turn into
Basic (Free) as default. Details of this process can be seen in figure 26 below.
Figure 26 Downgraded State (23)

46
6 CONCLUSION
Ater 3 months of study and research, a payment function using Stripe as the
process platform has been fully constructed and verified by Finlabs’ developer
team. It is now ready so that customers can subscribe to the plan when they
start using the Tictok Application.
(Link to the application: https://timetracker-manager-dev.web.app/login)
It can be stated that Stripe is a good choice for companies because of its simple
use and integration when it comes to payment. With the support for Strong Cus-
tomer Authentication (SCA) since September 2019, European countries can as-
sure that payments made with Stripe are secure and safe. The Stripe API is
easily understandable, it supports multiple programming languages and it has
step-by-step introduction so that developers will not find it difficult to get used to.
By using Google Firebase combined with Stripe, the payment system becomes
a simple solution when a product or web application requires customers to pay
for it. Eventually, this reduces the developers’ workload since the application it-
self mostly uses cloud-based system.

47
REFERENCES
1. A brief history of digital payments – 31 January 2019 – Epayments Blog –
Date of Retrieval 17.9.2019
https://blog.epayments.com/a-brief-history-of-digital-payments/
2. Finlabs Oy – Date of Retrieval: 17.9.2019
https://finlabs.fi/
3. Stripe Payment – Date of Retrieval: 19.9.2019
https://stripe.com/en-fi/about
4. Stripe (Company) – Wikipedia – Date of Retrieval 20.9.2019
https://en.wikipedia.org/wiki/Stripe_(company)
5. Scott Morris. 4.6.2019. Tech 101: What is ReactJS – Date of Retrieval:
20.9.2019
https://skillcrush.com/2019/05/14/what-is-react-js/
6. React (web framework) – Wikipedia – Date of Retrieval: 20.9.2019
https://en.wikipedia.org/wiki/React_(web_framework)
7. John Kagga. 14.5.2018 – Understanding React Components – Date of Re-
trieval 20.9.2019
https://medium.com/the-andela-way/understanding-react-components-
37f841c1f3bb
8. Chris Esplin. 24.10.2016 – What is Firebase ? – Date of retrieval 20.9.2019
https://howtofirebase.com/what-is-firebase-fcb8614ba442
9. Shana Pearlman. 7.9.2016. Mulesoft Blog: What are APIs and how do APIs
work? – Date of retrieval: 20.9.2019
https://blogs.mulesoft.com/biz/tech-ramblings-biz/what-are-apis-how-do-
apis-work/
10. Stripe API Document – Date of Retrieval: 20.9.2019
https://stripe.com/docs/api?lang=node

48
11. Google - Firebase Authentication Get Started – Date of retrieval: 10.10.2019
https://firebase.google.com/docs/auth/web/start
12. Google Cloud Firebase Dashboard/Console – Author’s Developer Account
for Tictok Manager Application – Date of Retrieval 10.10.2019 (thang@fin-
labs.fi)
13. Google – Cloud Firestore – Date of retrieval: 10.10.2019
https://firebase.google.com/docs/firestore
14. Google – Cloud Storage – Date of retrieval: 10.10.2019
https://firebase.google.com/docs/storage
15. Google - Firebase Functions – Date of retrieval: 10.10.2019
https://firebase.google.com/docs/functions
16. Stripe – Stripe Checkout – Starting a Subscription – Date of Retrieval:
16.10.2019
https://stripe.com/docs/payments/checkout/subscriptions/starting
17. Stripe Dashboard – Author’s Developer Account – Testing Data – Date of
Retrieval 16.10.2019 ([email protected])
18. Stripe – Subscription Object – Date of Retrieval: 17.10.2019
https://stripe.com/docs/api/subscriptions/object
19. Stripe – Retrieve the Upcoming Invoices – Date of Retrieval 24.10.2019
https://stripe.com/docs/api/invoices/upcoming
20. Stripe – The PaymentIntents Object – Date of Retrieval 24.10.2019
https://stripe.com/docs/api/payment_intents
21. Stripe – The Payment Intents API – Date of Retrieval 24.10.2019
https://stripe.com/docs/payments/payment-intents
22. Stripe – The PaymentMethod Object – Date of Retrieval 24.10.2019
https://stripe.com/docs/api/payment_methods
23. TicTok Application – Payment Function Page – Date of Retrieval: 5.11.2019

49