Smartpoint 9.1 - Flex Windows Navigation Quick Reference
32
1 | Page Smartpoint 9.1 - Flex Windows Navigation Quick Reference Last Update 20210107 How to change FLEX Windows in Smartpoint? [Classic] Window: From Menu choose Application Application Settings Select ‘Theme’ with Flex Windows [Flex] Window: Application Settings button
-
Upload
khangminh22 -
Category
Documents
-
view
0 -
download
0
Transcript of Smartpoint 9.1 - Flex Windows Navigation Quick Reference

1 | P a g e
Smartpoint 9.1 - Flex Windows Navigation Quick Reference Last Update 20210107
How to change FLEX Windows in Smartpoint?
[Classic] Window: From Menu choose Application Application Settings Select ‘Theme’ with Flex Windows
[Flex] Window: Application Settings button

2 | P a g e
Once click [SAVE], system prompt message to restart Smartpoint
Note: Remind to change Font, Font Weight and Font Size before Save and apply change to Flex window
Flex window display, buttons show differently compare with Classic window

3 | P a g e
1. Navigation Buttons on the left panel Search with 5 options Air, Hotel, Car, Flight Shopping and Smartpanel
When choose Air, Car, Hotel and Flight Shopping Search option, system pop up with ‘Search Panel’
Click + or – icon to add or delete, up to 5 airlines
be selected upon Air Availability Search screen
Choose [Pin] button
Choose [Collapse] button
4 | P a g e
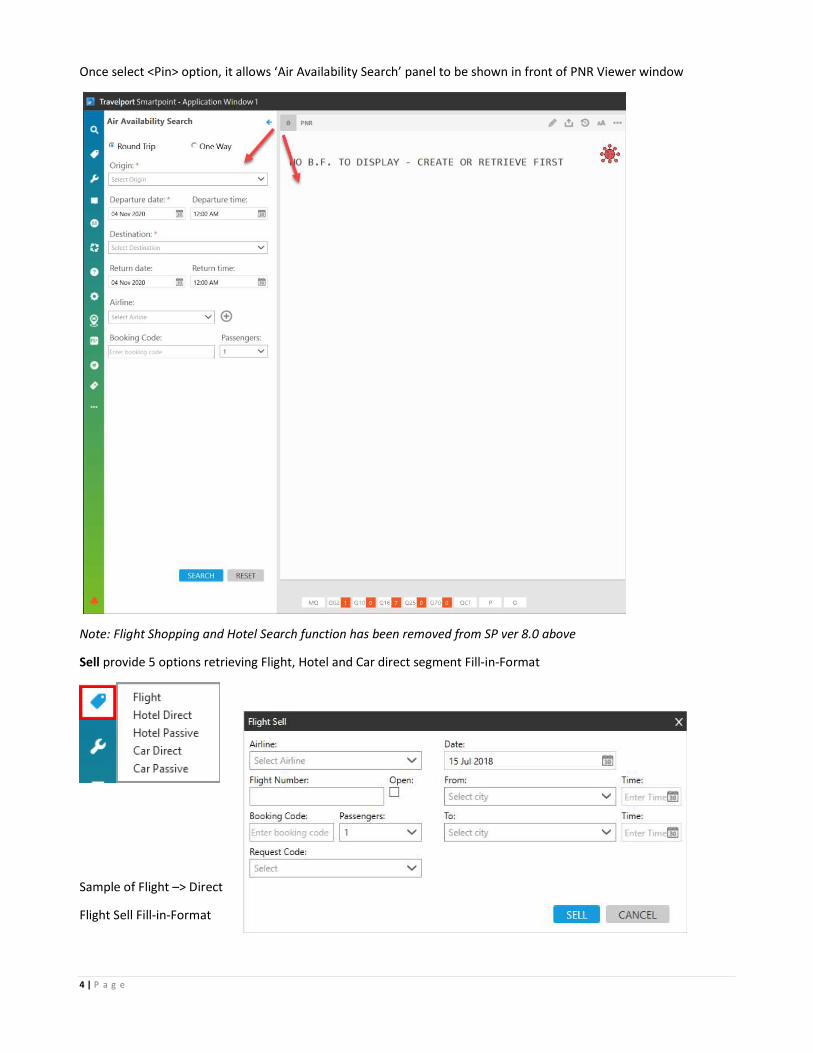
Once select <Pin> option, it allows ‘Air Availability Search’ panel to be shown in front of PNR Viewer window
Note: Flight Shopping and Hotel Search function has been removed from SP ver 8.0 above
Sell provide 5 options retrieving Flight, Hotel and Car direct segment Fill-in-Format
Sample of Flight –> Direct
Flight Sell Fill-in-Format

5 | P a g e
Tools with menus option
Replay Entries ALT + Q
a/ Press ‘CTRL’ Key to select multiple entries and click ‘SEND button
b/ Double click entry to adjust before click ‘SEND’
c/ Choose button
Set up Entries replay limit
Or select [Replay Entries] button

6 | P a g e
Change Password
Reference Data Updater
System pop up with message as below, ensure answer with ‘Yes’ to proceed
Proceed to complete download by restart the application and click ‘Yes’
Not required to take action if you receive following message.

7 | P a g e
Smartpoint Assisted Ticketing
- Smartpoint Assisted Ticketing provides a user interface to manage a variety of ticket-related tasks in Galileo.
Or select [Smartpoint Assisted Ticketing] button
Calendar CTRL +M
Day calculator function
Steps:
1. Select a Show Date 2. Input no. of days in
‘Plus/Minus Days’ box
E.g.
3. Click ‘Show’ button review the day being calculated

8 | P a g e
Automatic Update Options
Programmable Keys Editor ALT + G
Sample of Pkeys setup for PNR creation with agency phone number
9 | P a g e
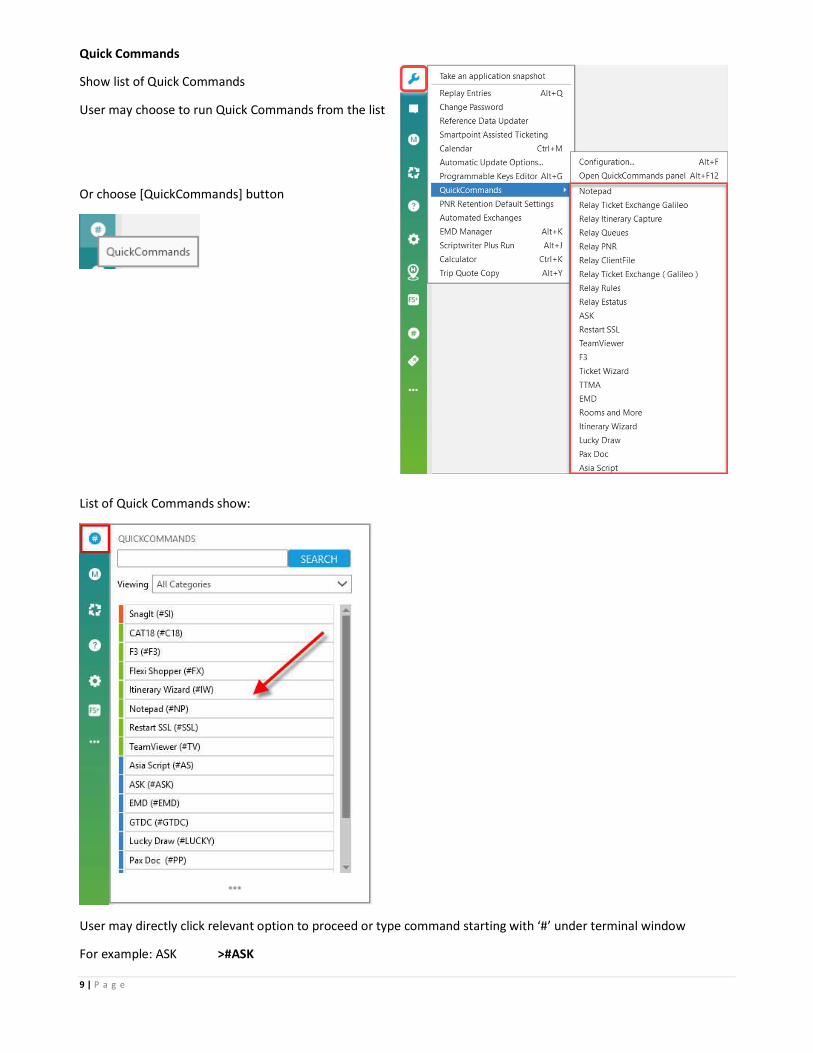
Quick Commands
Show list of Quick Commands
User may choose to run Quick Commands from the list
Or choose [QuickCommands] button
List of Quick Commands show:
User may directly click relevant option to proceed or type command starting with ‘#’ under terminal window
For example: ASK >#ASK

10 | P a g e
Access ‘Travelport Training Manual’ link shows different training manuals available for download

11 | P a g e
EMD Manager ALT +K
- A tool for EMD document issuance and basic requirement with a PNR with service segment being created
Trip Quote Copy ALT + Y
- Copying and Sending Itinerary Information with Trip Quote Copy Trip Quote Copy copies itinerary information into a table format that can be edited, copied and pasted into emails or documents
Note: Refer Trip Quote Copy shared documents for more details

12 | P a g e
Trip Quote
- Trip Quote allows you to send itinerary information and quotes from your agency to travelers. Trip Quote provides the details of their trip itineraries to travelers.
Fare Shopping pricing options appears after fare shopping with indicated numbers
Marketplace
- Marketplace provide access the latest travel software created by Travelport and our Travelport Developer Network members. www.Travelportmarketplace.com
Note: User may also log in www.My.Travelport.com to access Marketplace under Products and do not require sign in

13 | P a g e
Help with menu options
User Guide - Help links for supporting content
Training Demonstrations – various of shared training video can be found from here

14 | P a g e
Intro to Flex Windows
What’s New in Smartpoint – Latest version of enhancement in Smartpoint
Click ‘Learn More’ will redirect to www.travelport.com/products
15 | P a g e
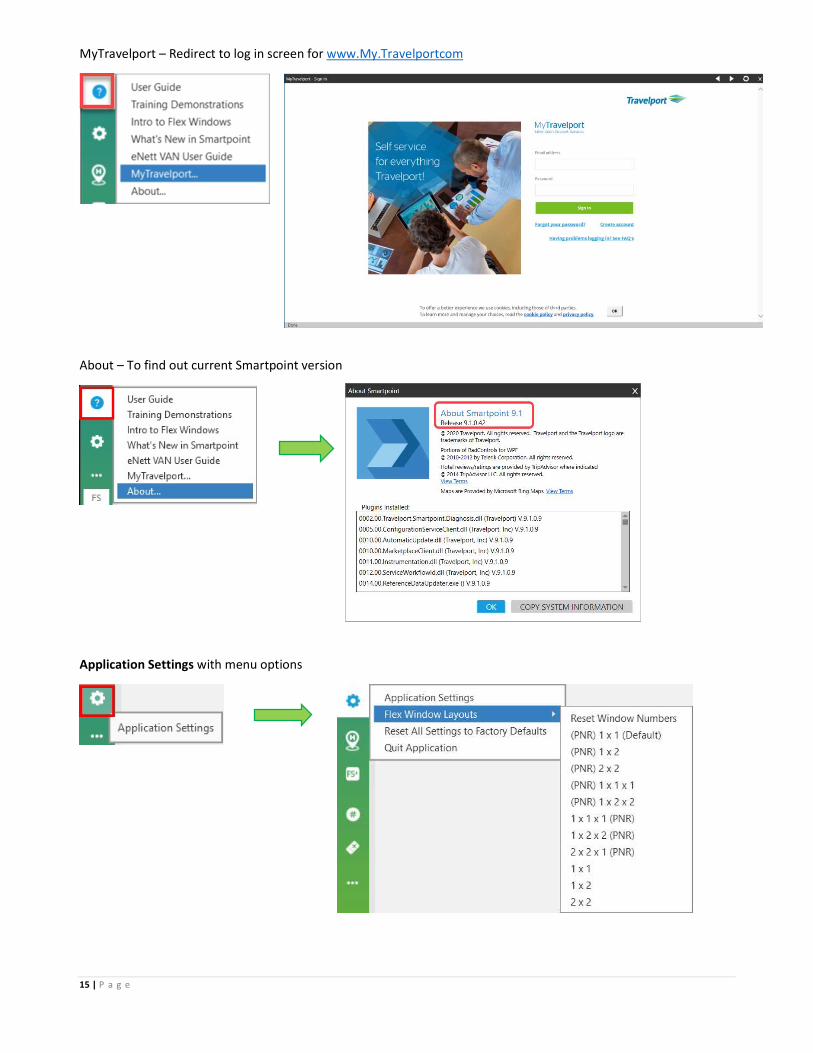
MyTravelport – Redirect to log in screen for www.My.Travelportcom
About – To find out current Smartpoint version
Intro to Flex Windows
Application Settings with menu options

16 | P a g e
Flex Window Layouts with different options
Sample (PNR) 2 x 2
Sample 1 x 1 x 1 (PNR)
Sample 2 x 2

17 | P a g e
Points to Note:
(PNR) option will display ‘PNR Viewer Window, without (PNR) will NOT show ‘PNR Viewer Window’ which only display Terminal Window only
User may encounter window selection with scroll bar pop up, in order to view full display user can scroll moving from left to right hand side
Smartpanel – Provides advanced options to request flight shopping itinerary/pricing options for booked or unbooked itineraries
Air Search with Flight Shopping or Air Availability options
Air Pricing tab will be activated if a PNR exist, it allows quoting fare with different options. Thus Air Search tab will auto populate itinerary form PNR
Agent Alerts with agent alerts function, system automatically pop up with message shown

18 | P a g e
2. Navigation Buttons under PNR Viewer window
Edit PNR - PNR creation menu with Fill-in-format
View Trip - System brings user directly into Viewtrip.Travelport.com with email fill in form screen
Note: If no PNR exist, click this button system return response ‘COMPLETED PNR NOT PRESENT’
[History] button menu with 2 options:
1/ Recent PNRS or Alt + I Retrieve Recent PNRS list
Note: You may add your favorite and set up Recent PNRs list

19 | P a g e
2/ PNR History Retrieve PNR history with entry *H
Note: If no PNR exist and click this button, system returns response ‘Either no booking file has been created or the booking file has not been end transacted. Cannot show history.’
Font - Font size enlarge in PNR Viewer Window
More Options with More Options menu
Find Text

20 | P a g e
Refresh PNR
PNR Settings
Menu selection – PNR Settings
There are 2 major types of PNR settings
1/ Select items you wish to view
Different options to show or hide buttons in PNR Viewer window Adding Custom Buttons offer up to 5 only. The custom buttons are associated to the specific agent
and will be remembered and shown in every PNR.
Sample of PNR settings – Turn off any ‘Show Buttons’ options as below

21 | P a g e
Sample of PNR settings – Turn on ‘Show Buttons’ options as below
Sample of PNR settings – Turn on ‘Show Buttons’ options and add Custom button
Note: Host entries can be combined with + characters. Do not add # character within the entry

22 | P a g e
2/ Select the PNR Components to always be displayed
Sample of PNR settings – Select PNR components to always be displayed Refer below example selection with Form of Payment, Phone & Filed Fare have chosen
Change Window Color
Note: Each newly add terminal window allow to change color individually

23 | P a g e
Copy content as image – Allow to copy PNR Viewer window as image file, thus press ‘CTRL + V’ to paste
Copy content as text – Allow to copy text show under PNR Viewer window, thus press ‘CTRL + V’ to paste
Print this window

24 | P a g e
Add Window – Allow to add terminal window
Delete Window – Delete PNR Viewer window
25 | P a g e
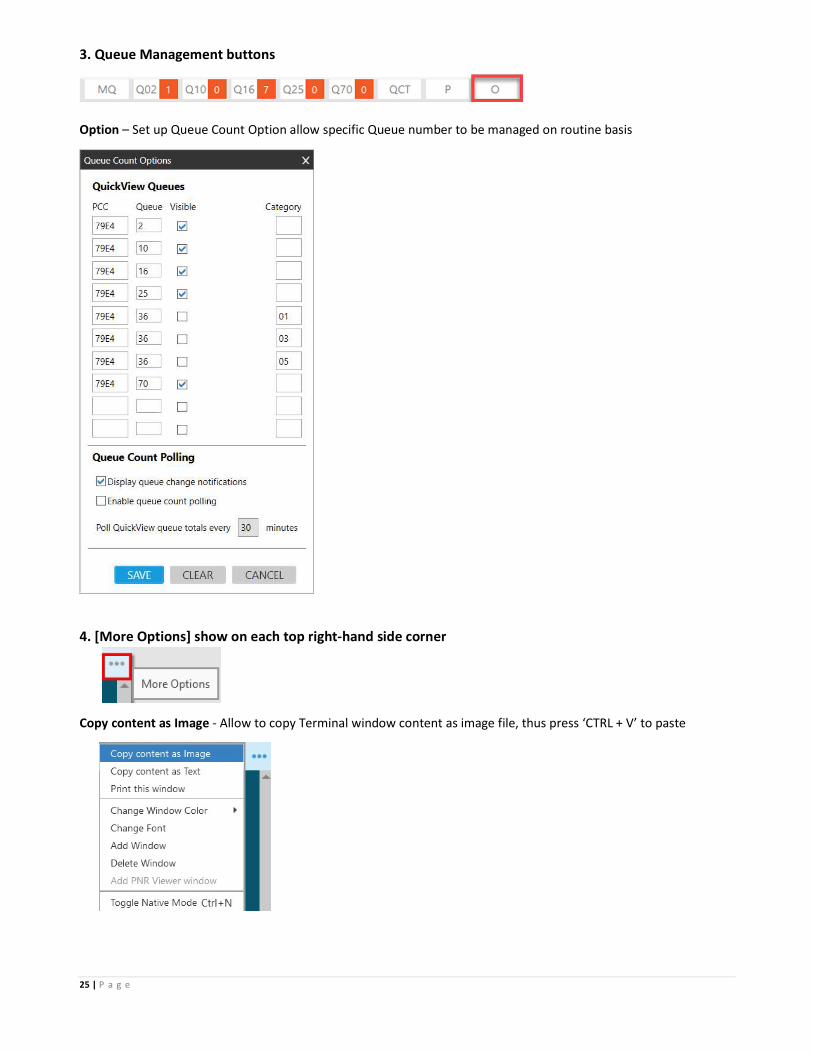
3. Queue Management buttons
Option – Set up Queue Count Option allow specific Queue number to be managed on routine basis
4. [More Options] show on each top right-hand side corner
Copy content as Image - Allow to copy Terminal window content as image file, thus press ‘CTRL + V’ to paste

26 | P a g e
Copy content as Text - Allow to copy text show under Terminal window or press ALT + C, then press ‘CTRL + V’ to paste in anywhere such as Notepad, Word, Excel…etc
Print this window – Print Terminal window content to printer
Change Window Color
Note: Each newly add terminal window allow to change color individually

27 | P a g e
Change Font – To adjust font in Terminal window
Note: Once adjust Font for any one Terminal window, it applies to all Terminal windows.
Add Window – To add additional Terminal window
28 | P a g e
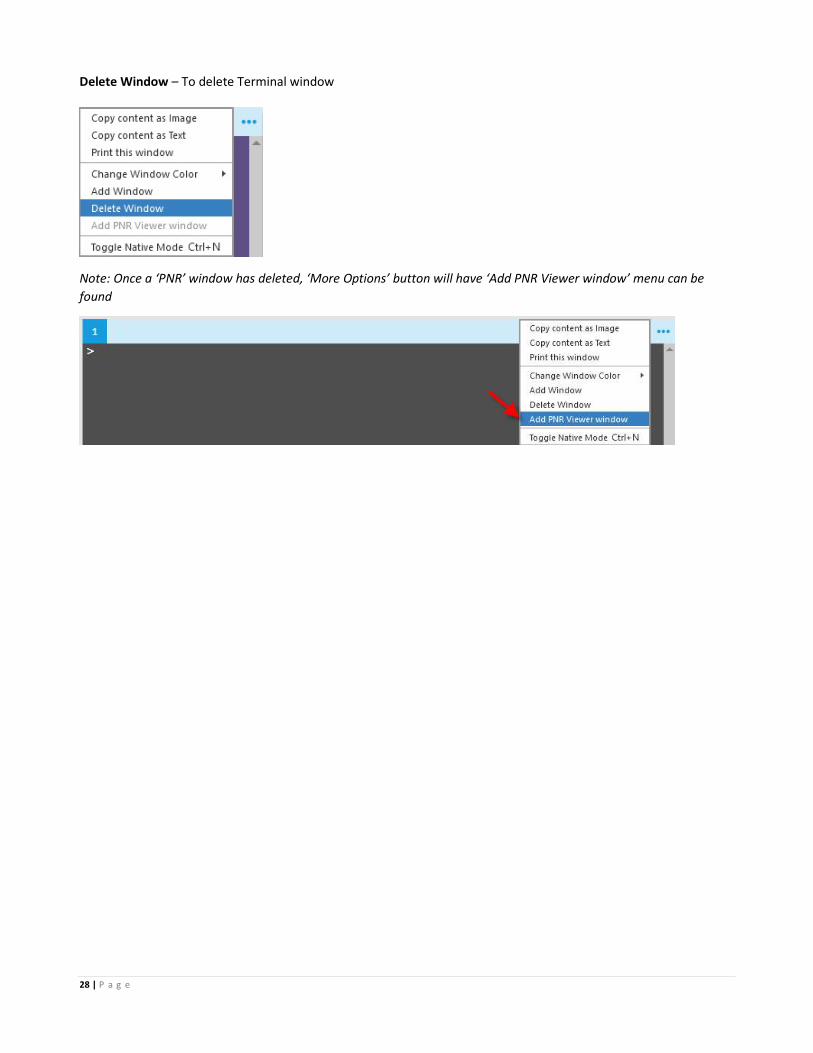
Delete Window – To delete Terminal window
Note: Once a ‘PNR’ window has deleted, ‘More Options’ button will have ‘Add PNR Viewer window’ menu can be found

29 | P a g e
Miscellaneous
1/ Switching Work Areas
There are total 5 Work Area - A, B, C, D, E, system by default under Work Area A once login
Click on desired work area in Smartpoint if attempts switching to other work area
Note:
Active area highlighted in Grey color e.g. Work Area A
In Smartpoint click on Area e.g. ‘E’ switch to Work Area E or you can also use entry SE in Terminal window
Note:
An orange color underscore under the work area letter identifies that area is active and contains data.
A blue color underscore under the work area letter identifies that area is active but contains no data.
2/ Emulation
In Smartpoint if click work area e.g. SE, system detected Service Bureau sign code and pop up ‘Emulate’ fill in box
Fill in PCC you wish to access.
Use entry: SEM/74D9/AG
OP/W* View all work areas with PCCs reference

30 | P a g e
3/ Set up Default PCC and Sign-On
4/ GDS cryptic language translation
MY CONNECTION – Select Secondary Cryptic Language for e.g. Amadeus / Sabre (GDS Language translation)
Choose Keyboard Mapping with ‘SabreKeyboard’ if Secondary Cryptic Language choose with Sabre

31 | P a g e
Other Function
1/ Expanding and Collapsing Window
To expand a window, double-click the title bar of the window
The window expands to the full height of the column and other windows in the column are minimized.
2/ Redirect Window Response
Under Window 1 input entry >A10JUNHKGTPE*BR, press ‘ALT +2’ redirecting system response show on Window 2
To collapse a window, double-click the ttile bar of an expanded window.

32 | P a g e
3/ Combined entries to go into different windows
Send desired entry separated by a semi-colon For example >A10JUNHKGBKK;*-LAU Results are seen in the current window and the next sequential window
Note: Replay entries will be recorded separately instead combining together