Sinterit SANDBLASTER User Manual - Ponto Z
12
Sinterit SANDBLASTER USER GUIDE Read the instruction manual before using the device Version 1/2020
-
Upload
khangminh22 -
Category
Documents
-
view
1 -
download
0
Transcript of Sinterit SANDBLASTER User Manual - Ponto Z

Sinterit SANDBLASTERUSER GUIDE
Read the instruction manual before using the device
Version 1/2020

2 | Sinterit SANDBLASTER User Manual
Table of contents
1. Marking text conventions used in a document .................................................................................................................... 2
2. Safety Information ................................................................................................................................................................. 3
3. Contents of the Sinterit SANDBLASTER pack ...................................................................................................................... 4
4. Sinterit SANDBLASTER .......................................................................................................................................................... 5
A. Description ........................................................................................................................................................................ 5
B. Specification ...................................................................................................................................................................... 6
5. Initial startup of the Sinterit SANDBLASTER after delivery ................................................................................................. 7
6. Sandblasting of printouts ...................................................................................................................................................... 8
7. Maintenance of the Sinterit SANDBLASTER ........................................................................................................................ 8
A. The glass of the Sandblaster’s lid .................................................................................................................................... 8
B. Replacement of the Abrasive material ............................................................................................................................ 9
C. Replacement of the ceramic nozzle ................................................................................................................................ 9
8. Problem Solving ..................................................................................................................................................................... 9
9. General legal information .................................................................................................................................................... 10
10. Disclaimer .......................................................................................................................................................................... 10
11. Trademarks ........................................................................................................................................................................ 10
12. Terms of warranty .............................................................................................................................................................. 11
The SANDBLASTER is designed for cleaning, polishing and finishing of printouts, using dry abrasive material only. Sinterit SANDBLASTER does not include an air compressor. The requirements for the compressor are at the bottom of page number 6.
1. Marking text conventions used in a document Listed below are descriptions of symbols used on the device. They constitute a warning or convey the information to protect the user, other individuals or surrounding objects and ensure the correct and safe use of the device.
WARNING!An inevitably dangerous situation which can result in serious injury or even death. Initiation, the omission of a specific procedure or inattention can cause severe physical injury to the user.
ATTENTION!Initiation or omission of a specific procedure can cause physical damage to the equipment or the user.
ATTENTION!Risk of electric shock. Electrocution may be painful. Wear leather or rubber soles or shoes andstand on the ground to avoid electrocution. An earthed wire attached to the SANDBLASTER gun will safely remove electrostatic charges.
ATTENTION! It is necessary to wear the Protective dust mask. Mendatory when working with powder.
Sinterit SANDBLASTER User Manual | 3
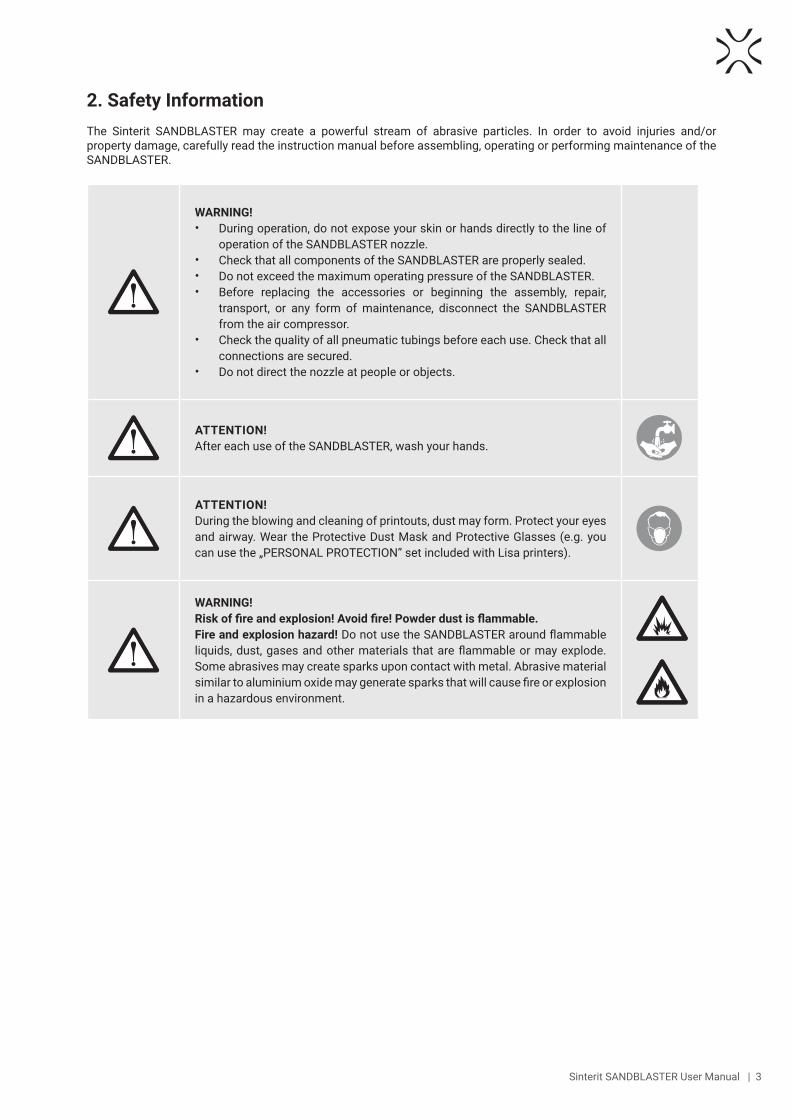
2. Safety InformationThe Sinterit SANDBLASTER may create a powerful stream of abrasive particles. In order to avoid injuries and/or property damage, carefully read the instruction manual before assembling, operating or performing maintenance of the SANDBLASTER.
WARNING!• During operation, do not expose your skin or hands directly to the line of
operation of the SANDBLASTER nozzle.• Check that all components of the SANDBLASTER are properly sealed. • Do not exceed the maximum operating pressure of the SANDBLASTER.• Before replacing the accessories or beginning the assembly, repair,
transport, or any form of maintenance, disconnect the SANDBLASTER from the air compressor.
• Check the quality of all pneumatic tubings before each use. Check that all connections are secured.
• Do not direct the nozzle at people or objects.
ATTENTION!After each use of the SANDBLASTER, wash your hands.
ATTENTION!During the blowing and cleaning of printouts, dust may form. Protect your eyes and airway. Wear the Protective Dust Mask and Protective Glasses (e.g. you can use the „PERSONAL PROTECTION” set included with Lisa printers).
WARNING!Risk of fire and explosion! Avoid fire! Powder dust is flammable. Fire and explosion hazard! Do not use the SANDBLASTER around flammable liquids, dust, gases and other materials that are flammable or may explode. Some abrasives may create sparks upon contact with metal. Abrasive material similar to aluminium oxide may generate sparks that will cause fire or explosion in a hazardous environment.

4 | Sinterit SANDBLASTER User Manual
3. Contents of the Sinterit SANDBLASTER pack• The Sinterit SANDBLASTER;• A package containing additional equipment.
Sinterit SANDBLASTERSHORTENED USER GUIDE
Read the instruction manual before using the device
Version 1/2019
A
N
B
C
I
F
D
O
E
G
D D
H
K
L M
J
Image 1. Contents of the Sinterit Sandblaster pack.A. Power supply / B. Nozzle lock nut with ceramic nozzle / C. Replaceable ceramic nozzle (3 pcs.) /
D. Replaceable PE foil for SANDBLASTER viewing window (3 pcs.) / E. Adjustable mounting feet (4 pcs.) / F. Pneumatic nipple / G. Air blow gun / H. T-type push-in pneumatic fitting / I. Control pedal’s pneumatic tubings (red and blue) / J. Control pedal / K. Wrench (for
SANDBLASTER’s nozzle) / L. Compressor pneumatic tubing / M. Air blow gun pneumatic tubing / N. Abrasive Material (4 kg container) / O. Sinterit SANDBLASTER User Manual
Sinterit SANDBLASTER User Manual | 5
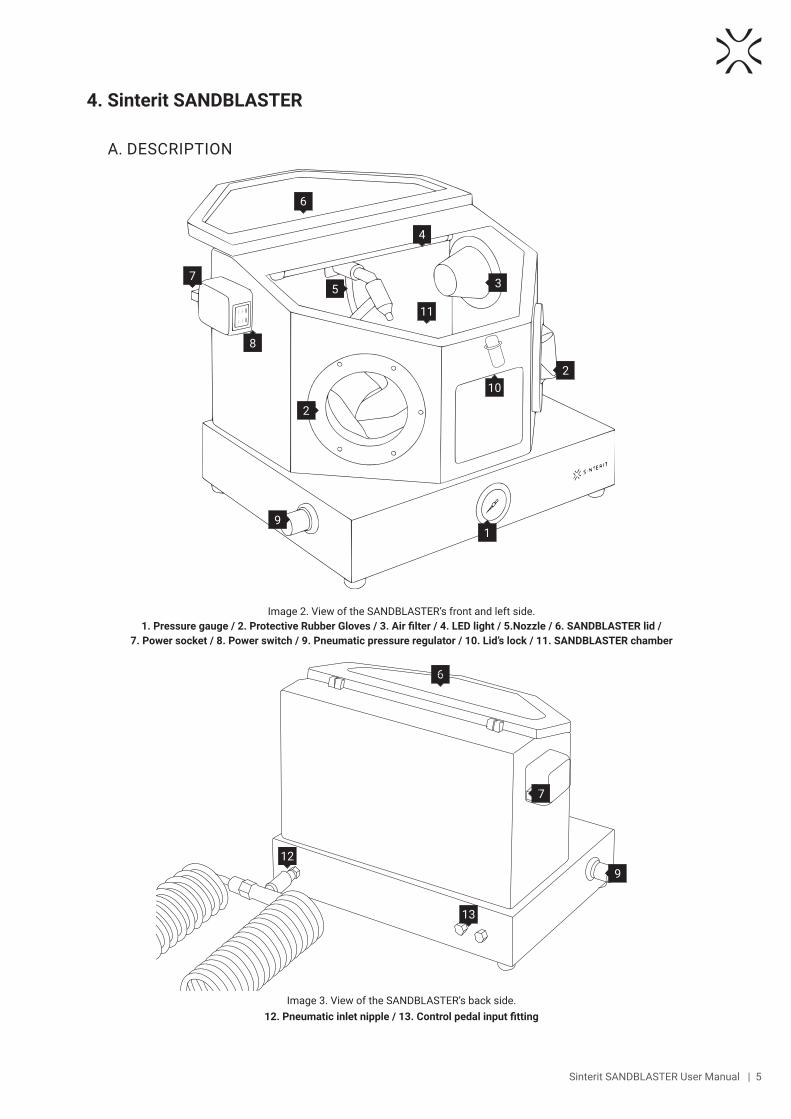
4. Sinterit SANDBLASTER
A. DESCRIPTION
5
2
9
4
11
6
7
2
3
1
10
8
Image 2. View of the SANDBLASTER’s front and left side.1. Pressure gauge / 2. Protective Rubber Gloves / 3. Air filter / 4. LED light / 5.Nozzle / 6. SANDBLASTER lid /
7. Power socket / 8. Power switch / 9. Pneumatic pressure regulator / 10. Lid’s lock / 11. SANDBLASTER chamber
6
13
12
7
9
Image 3. View of the SANDBLASTER’s back side.12. Pneumatic inlet nipple / 13. Control pedal input fitting
6 | Sinterit SANDBLASTER User Manual
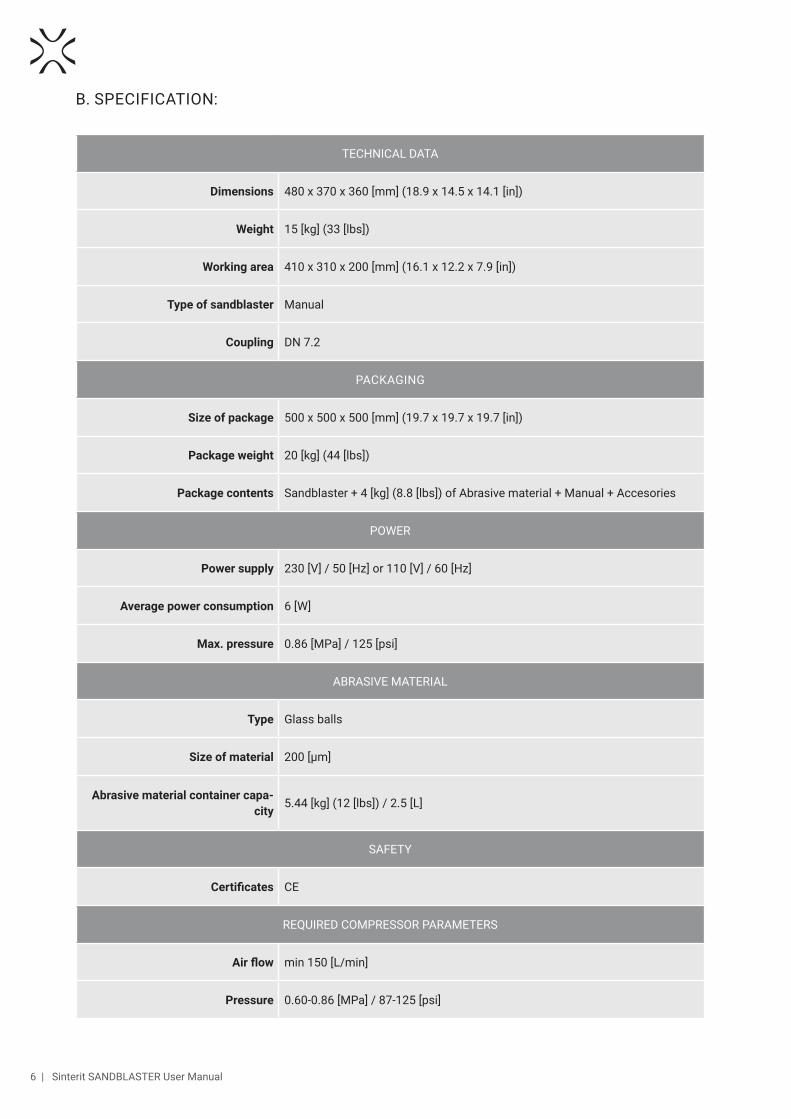
B. SPECIFICATION:
TECHNICAL DATA
Dimensions 480 x 370 x 360 [mm] (18.9 x 14.5 x 14.1 [in])
Weight 15 [kg] (33 [lbs])
Working area 410 x 310 x 200 [mm] (16.1 x 12.2 x 7.9 [in])
Type of sandblaster Manual
Coupling DN 7.2
PACKAGING
Size of package 500 x 500 x 500 [mm] (19.7 x 19.7 x 19.7 [in])
Package weight 20 [kg] (44 [lbs])
Package contents Sandblaster + 4 [kg] (8.8 [lbs]) of Abrasive material + Manual + Accesories
POWER
Power supply 230 [V] / 50 [Hz] or 110 [V] / 60 [Hz]
Average power consumption 6 [W]
Max. pressure 0.86 [MPa] / 125 [psi]
ABRASIVE MATERIAL
Type Glass balls
Size of material 200 [μm]
Abrasive material container capa-city
5.44 [kg] (12 [lbs]) / 2.5 [L]
SAFETY
Certificates CE
REQUIRED COMPRESSOR PARAMETERS
Air flow min 150 [L/min]
Pressure 0.60-0.86 [MPa] / 87-125 [psi]

Sinterit SANDBLASTER User Manual | 7
5. Initial startup of the Sinterit SANDBLASTER after delivery
1. Remove all the solid protective packaging.2. Gently pull out the SANDBLASTER and accessories.3. Remove the bubble wrap and place the machine on a
stable surface. 4. Screw the Adjustable mounting feet E (4 pieces) to
the SANDBLASTER’s base and place the machine at its working destination.
5. Screw the Pneumatic nipple F to the Pneumatic inlet nipple 12 in the SANDBLASTER (side with thead and Teflon tape).
6. Connect the T-type push-in pneumatic fitting H to the Pneumatic nipple F and then, on both sides, the Pneumatic tubings L , M .
7. Plug the Control pedal’s pneumatic tubings (red and blue) I and the Control pedal J into the Control pedal input fitting 13 in the SANDBLASTER. Make sure that the pneumatic tubings are well connected (suitable colours under the SANDBLASTER).
8. Plug the Air blow gun G into the left tubing L and the compressor into the right tubing M (the compressor is not included in the Sinterit SANDBLASTER set).
9. Unlock the SANDBLASTER lid 6 with the lid lock 10 and open it. Remove the transport protective elements inside the machine.
10. Check the fitting and tightness of the Protective Rubber Gloves 2 , the Nozzle 5 and the Air filter 3 .
11. Put on the Protective Dust Mask and Protective Glasses (e.g. you can use the „PERSONAL PROTECTION” set included with Lisa printers).
12. Pick up the two parts of the grille at the bottom of the SANDBLASTER’s chamber 11. To raise the grille, look for the hole marked with an arrow. It is located on the left side of the SANDBLASTER chamber. Insert your finger into the hole, pick up the grille and pull it out of the SANDBLASTER. Gently add the Abrasive Material N (add not more than 4.53 [kg]/ 10 [lbs]). Insert the grille back into its place.
13. Remove all the stickers inside the chamber 11 before first use.
14. Check that the PE protective foil D of the SANDBLASTER viewing window 6 is installed (it is on default), clean it with a soft cloth if necessary.
15. Close the SANDBLASTER lid 6 firmly.16. Plug the Power supply A into the SANDBLASTER
Power socket 7 . Plug it into the electric outlet.17. Turn on the SANDBLASTER with the Power switch 8 .
BLUE
RED
Image 4. Correct connection of the Control pedal pneumatic tubings to the Sinterit SANDBLASTER
(blue and red).
Image 5. Correct connection of all tubings and cables in the Sinterit SANDBLASTER.
18. Check that the LED light 4 is working.19. Turn on the compressor. Check all pneumatic tubings and joints for leaks.20. If there are any leaks, tighten the Pneumatic nipple F to the SANDBLASTER with the included wrench K .

8 | Sinterit SANDBLASTER User Manual
6. Sandblasting the printouts
1. Turn on the compressor and the Sinterit SANDBLASTER.
2. Check all the pneumatic tubings and joints for leaks. If they appear, replace the element or seal it with Teflon tape.
3. Put on the Protective Dust Mask and Protective Glasses (e.g. you can use the „PERSONAL PROTECTION” set included with Lisa printers).
4. Open the SANDBLASTER lid 6 and insert the printout into the chamber 11, under the Nozzle 5 .
5. Close the SANDBLASTER’s lid 6 firmly.6. Use the Pneumatic pressure regulator 9 and the
Pressure gauge 1 to set the desired pressure in the range of 0.8-0.6 [MPa] (87-116 [Psi]). In order to adjust the cleaning intensity, unlock the regulating device by pulling the Pneumatic pressure regulator, and use the indications of the Pressure gauge to select an appropriate value. After performing the adjustment, lock the Pneumatic pressure regulator by pressing the knob.
Image 6. Unblocking the Pneumatic pressure regulator.
ATTENTION! Adjust the sandblasting intensity appropriately, depending on the type of the object to be cleaned.• For solid, thick-walled objects, the pressure may be near the maximum, which
is 0.8 [MPa] (116 [Psi]). • For objects with an openwork structure, it is recommended to lower the pressure
to 0.6 [MPa] (87 [Psi]). If, despite lowering the pressure, the object becomes damaged, se-lect a lower pressure value empirically, as appropriate.
7. Put your hands into the Protective Rubber Gloves 2 , grab the printout and begin cleaning by pressing the Control pedal J .
8. Sandblast the printout with a continuous stream of air, moving the printout in circular motions until all unnecessary powder is removed.
9. After cleaning the printout, wait a moment, for the dust to fall. Open the lid and take out the sandblasted object. Close the lid.
10. All remaining powder and abrasive material can be blown out from the printout with the Air blow gun G . 11. When the work is finished, turn off the pressure to 0 [MPa] (0 [Psi]) and switch off the SANDBLASTER.
7. Maintenance of the Sinterit SANDBLASTER
• There is no need for maintenance after each use. All replacements on need. • Before performing the maintenance of the device, disconnect the power and the compressed air.• Clean the lid and the parts of the SANDBLASTER with a soft cloth. Do not use any solvents for cleaning!• Avoid allowing moisture into the abrasive material, as it may cause clogging of the Nozzle.
A. THE VIEWING WINDOWOF THE SANDBLASTER LID
• Use a soft cloth or paper towels to clean the SANDBLASTER viewing window.• When the PE protective foil D becomes matt (fogged), which makes it impossible to see the SANDBLASTER
chamber 11, the foil should be replaced with a new one (the three spare PE protective foils are available in additional accessories of the SANDBLASTER).- Remove the old PE protective foil. - Clean the inside of the SANDBLASTER lid 6 and the viewing window with a soft cloth (it is best to soak it with
alcohol). - Wait until all it dries and carefully place the new PE protective foil D .

Sinterit SANDBLASTER User Manual | 9
B. REPLACEMENT OF THE ABRASIVE MATERIAL
• Disconnect the SANDBLASTER from the Power supply 7 and the compressor 12.
• Tilt the SANDBLASTER to the back and pull out the plastic cork 14 from the bottom.
• Gently transfer the whole contents of the SANDBLASTER into the sealed container. Treat it as industrial waste. Dispose it in accordance with local waste management policy.
• Insert the plastic cork back into the place. • Place the SANDBLASTER back onto a stable surface. • Add the new Abrasive Material N (according to
subpoint 11-12 in chapter 4).
14
Image 7. The position of the plastic cork for removing used abrasive material (bottom view).
C. REPLACEMENT OF THE CERAMIC NOZZLE
• Disconnect the SANDBLASTER from the Power supply 7 and the compressor 12.• Unlock the SANDBLASTER lid 6 with the lid lock 10 and open it.• Unscrew the Nozzle lock nut B and pull the ceramic nozzle C out of it. Use the Wrench K .• Clean the Nozzle 5 of any possible dirt and powder. • Insert the new ceramic nozzle C into the Nozzle lock nut B (the three spares ceramic nozzle are available in
additional accessories of the SANDBLASTER).• Mount the nozzle 5 back into the SANDBLASTER.
8. Problem Solving
Fault symptoms Possible Causes Remedial actions
Excessive dust in the Sinterit SANDBLASTER.
Blocked vent or airflow.Clean the vent and keep it away from the wall.
Leakage at the pneumatic connections.
Tighten up the connections and check that they are all correct.
Too much abrasive material in the SANDBLASTER.
Remove the excessive abrasive material.
Inconsistent effects of the abrasive material.
Moisture in the SANDBLASTER. See the Safety Information.
Incorrect speed or inefficient sand-blasting.
Abrasive material running out. Replace the Abrasive Material.
Pressure too low.Increase the inlet pressure and check that the Pneumatic pressure regulator is fully open.
The Nozzle does not turn off.
Incorrectly connected control pneumatic tubings. Connect the control pneumatic
tubing properly.Lack of integrity in the control pneu-matic tubings.
A flow of abrasive is too weak. The Nozzle is clogged.
1. Remove the Nozzle and clean it with compressed air from Air blow gun.
2. Install it back.
10 | Sinterit SANDBLASTER User Manual
A flow of abrasive is to week and the Nozzle has been cleaned.
1. Remove the Nozzle, close the SANDBLASTER and start the abrasive flow.
2. This process should remove every object that is in the air flowing duct.
3. Install the Nozzle back.
Any other problems not described in this manual should be reported to Sinterit Support by contacting through:• email: [email protected], [email protected]• www: sinterit.com/support-page/• phone: +48 570 702 886.
9. General legal information
Where this manual refers to Sinterit or the Company, this means Sinterit sp. z o.o. with its legal seat in Krakow, registered by the District Court for Kraków-Śródmieście in Krakow, XI Commercial Division of the National Court Register under number: 535095, NIP (tax number): 6793106416, with the share capital for a date of publication of this manual of PLN 83,750 (say: eighty-three thousand seven hundred fifty).
This document contains material protected under copyright and industrial property laws. This means that the document may not be, including but not limited to, reproduced or modified without the consent of Sinterit.This manual serves to assist in the correct use of the device, perform basic maintenance and, if necessary, to solve simple problems, allowing to maintain the device in a good condition.
This manual contains content exclusively for the provision of information and the use by individuals professionally trained and engaged in the operation and maintenance of the equipment described below.The information contained in this document is intended for use only with the product called Sinterit Sandblaster. Due to the constant development of Sinterit’s products the information contained in this manual, specifications and markings are subject to change without notice.
10. Disclaimer
Sinterit is not responsible for any use of this information in relation to other products.
Sinterit is not liable for any damages, including but not limited to losses or lost profits, resulting from the use of any materials (consumables) other than those provided to the purchaser by Sinterit.
Sinterit is not liable to the purchaser of the product or any third party for any damages, including but not limited to losses or lost profits resulting from improper use of the product, particularly not in accordance with this manual, or modifications or repairs unauthorised by Sinterit or improper maintenance.
Although every effort has been taken to provide accurate information about the product, Sinterit assumes no responsibility for any incorrect information or omission. Sinterit reserves the right to correct any errors and disclaims any liability in situations resulting from these errors.
Further limitations or exclusions of Sinterit`s liability may result from the applicable laws or agreements entered into with the purchaser of the products.
11. Trademarks
SINTERIT name and logo, as well as Sinterit SANDBLASTER name, are registered trademarks of the Company (or necessary motions have been filled to register the trademarks).

Sinterit SANDBLASTER User Manual | 11
12. Terms of warranty
The terms of the warranty are set forth in the agreement between the buyer and the Company.
In case of a purchase made in the Sinterit online shop, the terms of the guarantee are specified in the Terms and Conditions, subject to the acceptance of the Customer before placing an order.
In case of purchases made outside the Sinterit online store, the warranty terms may be specified in the offer, or in another form chosen by the Company to provide the customer with relevant information before making a purchase decision.
Sinterit’s warranty does not cover including but not limited to:• damages, abnormalities or malfunction caused by a client or any third party,• damages, abnormalities or malfunction caused by inappropriate use, effects of force, insufficient or inappropriate
maintenance, abnormal operating conditions, incorrect installation or inadequate servicing,• damages, abnormalities or malfunction caused by dismantling, alterations, tuning or other changes of the product
by a client or any third party made without written consent of Sinterit,• damages, abnormalities or malfunction caused by or related to use of consumables other than those being supplied
by Sinterit,• damages, abnormalities or malfunction caused by or related to use of product against instructions/manuals or
safety regulations,• damages or abnormalities Sinterit is not liable for, according to the applicable law,• damages exceeding the price paid by the client,• costs incurred by the client in connection with the conclusion of the product sale agreement as well as storage and/
or insurance of products,• damages of property caused by the defect of the product,• loss of profits,• incidental, indirect, consequential damages.
The abovementioned exclusions of warranty apply as well to any other liability of Sinterit, to the widest extent permitted by the applicable law.
Terms of liability of sellers others than Sinterit as distributor or resellers shall be regulated by them in separate documents.

SINTERIT Sp.z o.o. ul. Kalwaryjska 69/9 30-504 Krakow, Poland
www.sinterit.comContact: +48 570 967 854