
Cisco 300 Series Managed Switches Administration Guide 1.4 ...
Upload
khangminh22Category
view
1download
0
i
Series 300
knittingpatterns
free

Cleo Kitty Slippers EASY AND QUICK TO MAKE, THESE LITTLE SLIPPERS ARE KNITTED BACK AND FORTH
ON TWO NEEDLES, THEN SEWN INTO DARLING LITTLE MARY JANES WITH WEE KITTEN EARS. THESE WILL TURN
OUT EQUALLY WELL IN WOOL OR COTTON; IF YOUR LITTLE ONE IS WALKING, BE SURE TO USE
SOMETHING TIGHTLY SPUN FOR DURABILITY AND MAKE SURE SHE STAYS ON NON-SLIPPERY SURFACES. A PAIR
ONLY REQUIRES 125 TO 150 YARDS OF YARN AND CAN BE WHIPPED UP IN AN EVENING OR TWO.
SIZES
6-12 (12-24) monthsShown in size 12-24 months
FINISHED MEASUREMENTS
4½ (5)" [11.5 (12.5) cm] long
YARN
Rowan Yarns 4-Ply Cotton (100% cotton; 186 yards [170 meters] / 50 grams): 1 ball #133 Cheeky Odd scraps of yarn for embroidering eyes, whiskers, and nose
NEEDLES
One pair straight needles size US 2 (2.75 mm)Change needle size if necessary to obtain correct gauge.
NOTIONS
Two 3/8" (10 mm) buttons; embroidery needle
GAUGE
14 sts and 28 rows = 2" (5 cm) in Garter st (Knit every row)
NOTES
The Slipper is cast on at one side of the sole, and is then worked across the sole, up one side of the “Upper”, across the front, and down the opposite side of the “Upper”. The bound-off edge of the second side is then sewn to the cast-on edge of the sole, and the two sides of the heel are sewn together.
SLIPPER
SOLE
CO 21 (24) sts. Begin Garter st (knit every row). Work even for 1 row.
Vintage Baby Kni tsM O R E T H A N 4 0 H E I R LO O M PAT T E R N S F R O M T H E 1 9 2 0 s TO T H E 1 9 5 0 s
Kristen Rengren
Available wherever books are sold.
find out more at

Shape SoleIncrease Row (RS): Increase 1 st each side this row, then every other row 3 (4) times, as follows: K1, M1, knit to last st, M1, k1–29 (34) sts. Work even for 1 row.Decrease Row (RS): Decrease 1 st each side this row, then every other row 3 (4) times, as follows: K1, ssk, knit to last 3 sts, k2tog, k1–21 (24) sts remain.
UPPER
Shape First Side of Upper (WS): Using Cable CO (see Special Techniques, page 158), CO 6 (7) sts, knit across CO sts, work to last st, M1, k1–28 (32) sts. Work even for 1 row.Increase Row (WS): Increase 1 st at end of this row, then every other row 4 (5) times, as follows: Knit to last st, M1, k1–33 (38) sts. Work even for 1 row.Shape Top of Upper (WS): BO 19 (23) sts, work to end–14 (15) sts remain. Work even for 13 (15) rows. Shape Second Side of Upper (WS): Using Cable CO, CO 19 (23) sts, knit across CO sts, work to last 3 sts, k2tog, k1–32 (37) sts. Work even for 1 row.Decrease Row (WS): Decrease 1 st at end of this row, then every other row 4 (5) times, as follows: Knit to last 3 sts, k2tog, k1–27 (31) sts remain. BO all sts.
EARS (make 4) CO 9 sts. Begin Garter st. Work even for 6 rows.
Shape EarsRow 1: K3, k3tog, k3–7 sts remain. Work even for 1 row.Row 3: K2, k3tog, k2–5 sts remain. Work even for 1 row.Row 5: K1, k3tog, k1–3 sts remain. BO all sts.
FINISHING
Sew CO edge of Sole to BO edge of second side of Upper. Sew back of heel together, then sew base of
heel to Sole. Sew toe to Sole, easing excess fabric at toe. Sew Ears to front (see photo).
ANKLE STRAPS (make 2) Place marker 6 (7) sts to either side of heel seam. Using Cable CO, CO 12 (13) sts, knit across CO sts, pick up and knit 12 (14) sts between markers, turn, using Cable CO, CO 12 (13) sts, knit across CO sts, knit 14 sts to end–36 (40) sts. Begin Garter st. Work even for 4 rows.
BO all sts. Sew button to one end of Strap (sew to opposite end on each Slipper). Using crochet hook, work crochet chain (see Special Techniques, page 158) long enough to fit snugly around button. Sew to Strap opposite button.
Using scrap yarn, embroider eyes, nose, and whiskers (see photo).
Copyright © Vintage Baby Knits by Kristen Rengren, published by STC Craft | Melanie Falick Books, an imprint of Stewart, Tabori & Chang, 2009.
Copyright Interweave Press LLC. Not to be reprinted. All rights reserved.
-----------------------
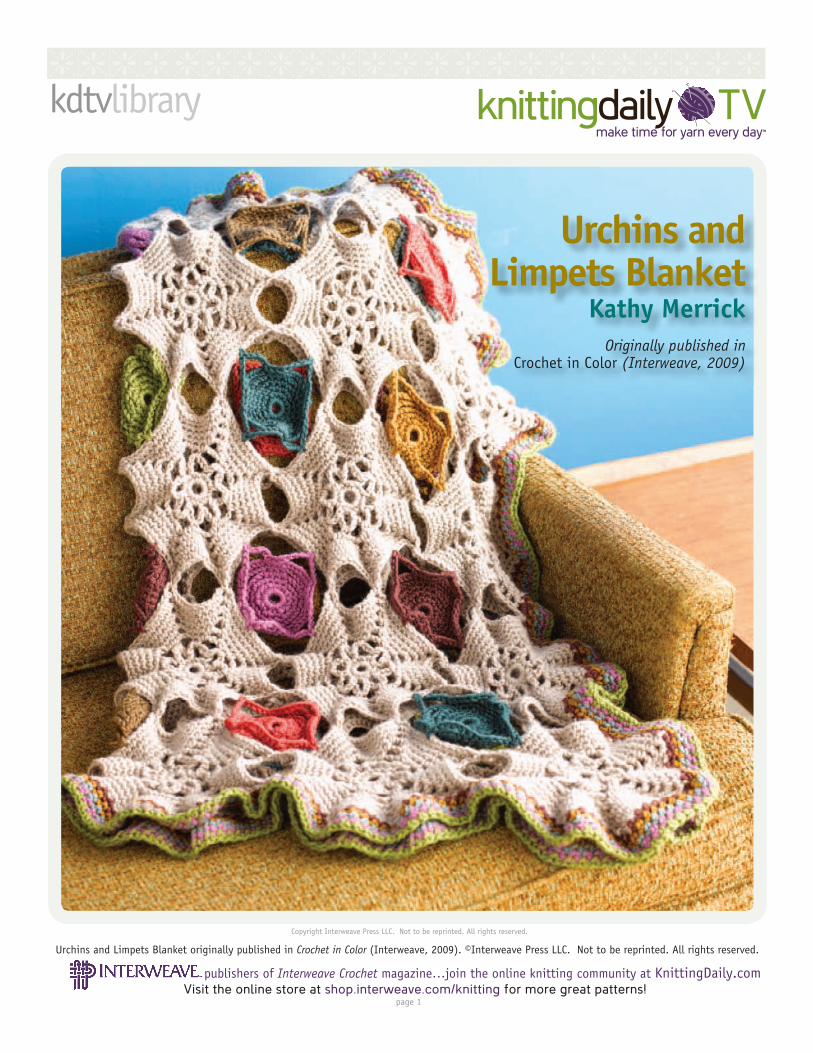
kdtvlibrary
Urchins and Limpets Blanket
Kathy MerrickOriginally published in
Crochet in Color (Interweave, 2009)
publishers of Interweave Crochet magazine…join the online knitting community at KnittingDaily.comVisit the online store at shop.interweave.com/knitting for more great patterns!
Urchins and Limpets Blanket originally published in Crochet in Color (Interweave, 2009). ©Interweave Press LLC. Not to be reprinted. All rights reserved.
page 1
make time for yarn every day™
publishers of Interweave Crochet magazine…join the online knitting community at KnittingDaily.comVisit the online store at shop.interweave.com/knitting for more great patterns!
Urchins and Limpets Blanket originally published in Crochet in Color (Interweave, 2009). ©Interweave Press LLC. Not to be reprinted. All rights reserved.
page 2
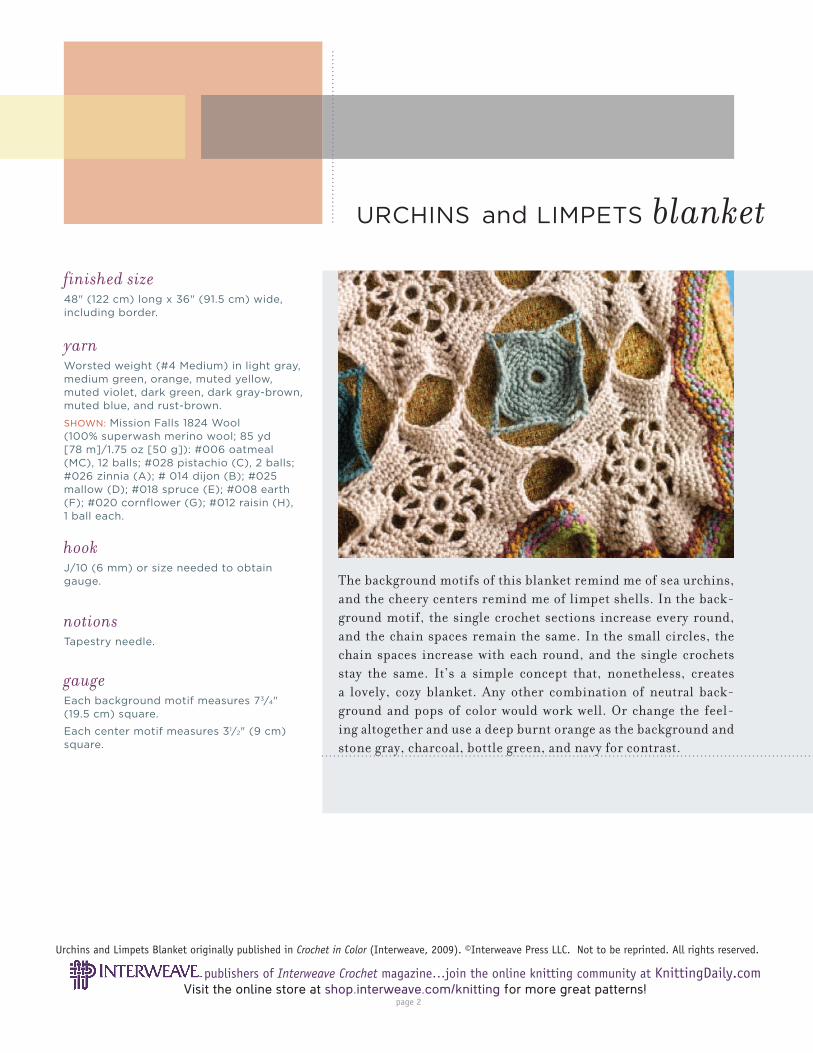
The background motifs of this blanket remind me of sea urchins, and the cheery centers remind me of limpet shells. In the back-ground motif, the single crochet sections increase every round, and the chain spaces remain the same. In the small circles, the chain spaces increase with each round, and the single crochets stay the same. It’s a simple concept that, nonetheless, creates a lovely, cozy blanket. Any other combination of neutral back-ground and pops of color would work well. Or change the feel-ing altogether and use a deep burnt orange as the background and stone gray, charcoal, bottle green, and navy for contrast.
finished size48" (122 cm) long x 36" (91.5 cm) wide, including border.
yarnWorsted weight (#4 Medium) in light gray, medium green, orange, muted yellow, muted violet, dark green, dark gray-brown, muted blue, and rust-brown.
SHOWN: Mission Falls 1824 Wool (100% superwash merino wool; 85 yd [78 m]/1.75 oz [50 g]): #006 oatmeal (MC), 12 balls; #028 pistachio (C), 2 balls; #026 zinnia (A); # 014 dijon (B); #025 mallow (D); #018 spruce (E); #008 earth (F); #020 cornflower (G); #012 raisin (H), 1 ball each.
hookJ/10 (6 mm) or size needed to obtain gauge.
notionsTapestry needle.
gaugeEach background motif measures 73⁄4" (19.5 cm) square.
Each center motif measures 31⁄2" (9 cm) square.
URCHINS and LIMPETS blanket
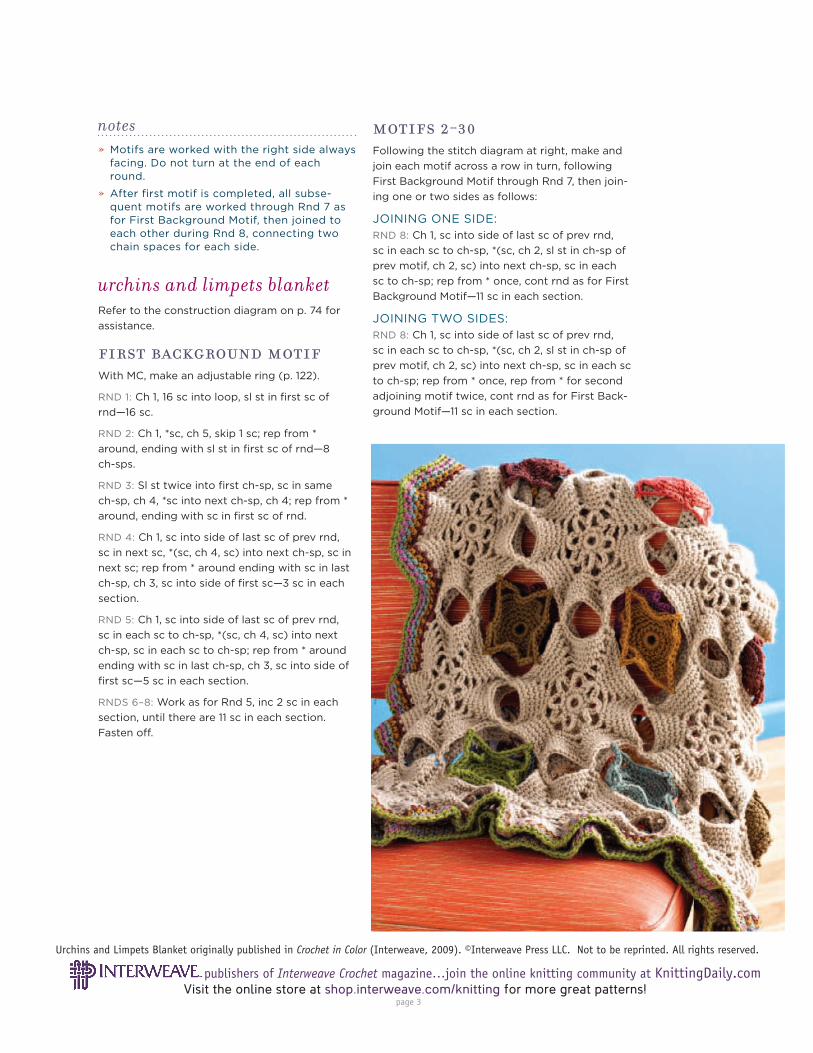
notes» Motifs are worked with the right side always
facing. Do not turn at the end of each round.
» After first motif is completed, all subse-quent motifs are worked through Rnd 7 as for First Background Motif, then joined to each other during Rnd 8, connecting two chain spaces for each side.
motifs 2-30
Following the stitch diagram at right, make and
join each motif across a row in turn, following
First Background Motif through Rnd 7, then join-
ing one or two sides as follows:
JOINING ONE SIDE: RND 8: Ch 1, sc into side of last sc of prev rnd,
sc in each sc to ch-sp, *(sc, ch 2, sl st in ch-sp of
prev motif, ch 2, sc) into next ch-sp, sc in each
sc to ch-sp; rep from * once, cont rnd as for First
Background Motif—11 sc in each section.
JOINING TWO SIDES: RND 8: Ch 1, sc into side of last sc of prev rnd,
sc in each sc to ch-sp, *(sc, ch 2, sl st in ch-sp of
prev motif, ch 2, sc) into next ch-sp, sc in each sc
to ch-sp; rep from * once, rep from * for second
adjoining motif twice, cont rnd as for First Back-
ground Motif—11 sc in each section.
urchins and limpets blanketRefer to the construction diagram on p. 74 for
assistance.
first background motif
With MC, make an adjustable ring (p. 122).
RND 1: Ch 1, 16 sc into loop, sl st in fi rst sc of
rnd—16 sc.
RND 2: Ch 1, *sc, ch 5, skip 1 sc; rep from *
around, ending with sl st in fi rst sc of rnd—8
ch-sps.
RND 3: Sl st twice into fi rst ch-sp, sc in same
ch-sp, ch 4, *sc into next ch-sp, ch 4; rep from *
around, ending with sc in fi rst sc of rnd.
RND 4: Ch 1, sc into side of last sc of prev rnd,
sc in next sc, *(sc, ch 4, sc) into next ch-sp, sc in
next sc; rep from * around ending with sc in last
ch-sp, ch 3, sc into side of fi rst sc—3 sc in each
section.
RND 5: Ch 1, sc into side of last sc of prev rnd,
sc in each sc to ch-sp, *(sc, ch 4, sc) into next
ch-sp, sc in each sc to ch-sp; rep from * around
ending with sc in last ch-sp, ch 3, sc into side of
fi rst sc—5 sc in each section.
RNDS 6–8: Work as for Rnd 5, inc 2 sc in each
section, until there are 11 sc in each section.
Fasten off.
publishers of Interweave Crochet magazine…join the online knitting community at KnittingDaily.comVisit the online store at shop.interweave.com/knitting for more great patterns!
Urchins and Limpets Blanket originally published in Crochet in Color (Interweave, 2009). ©Interweave Press LLC. Not to be reprinted. All rights reserved.
page 3
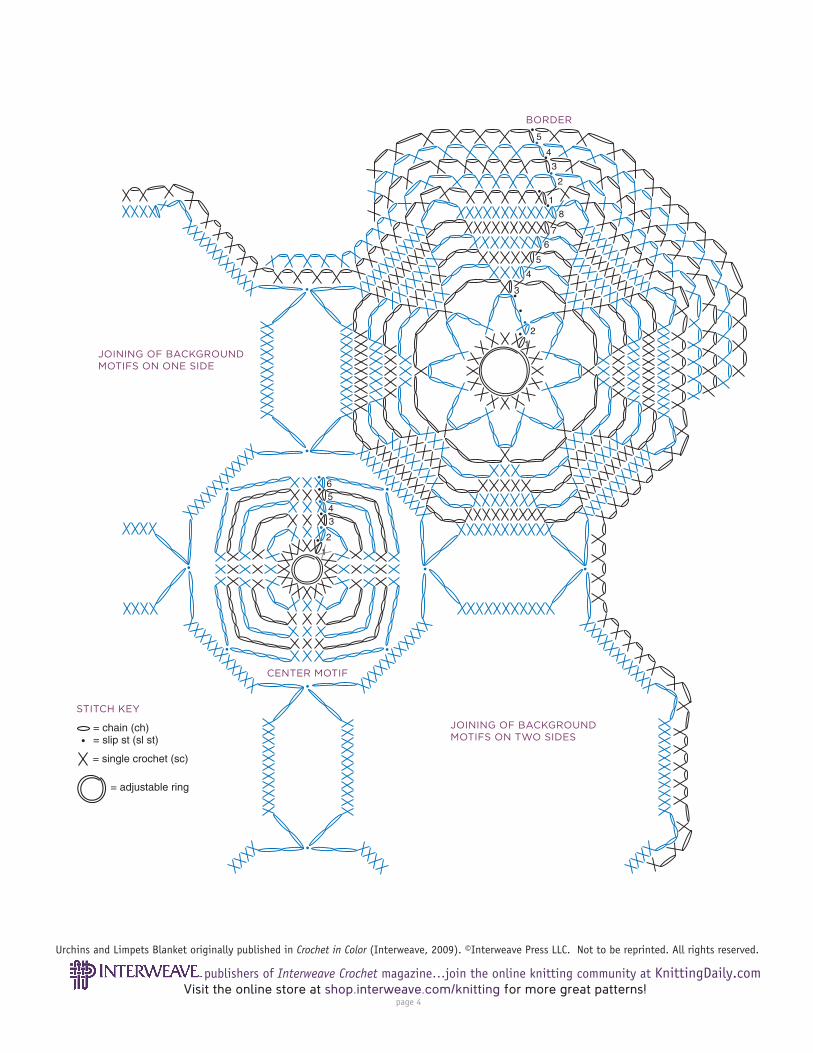
12
3
4
5
6
7
8
1
2
3
4
5
1
2
3456
= chain (ch)
= adjustable ring
= slip st (sl st)
= single crochet (sc)
STITCH KEY
JOINING OF BACKGROUND MOTIFS ON TWO SIDES
JOINING OF BACKGROUND MOTIFS ON ONE SIDE
CENTER MOTIF
BORDER
publishers of Interweave Crochet magazine…join the online knitting community at KnittingDaily.comVisit the online store at shop.interweave.com/knitting for more great patterns!
Urchins and Limpets Blanket originally published in Crochet in Color (Interweave, 2009). ©Interweave Press LLC. Not to be reprinted. All rights reserved.
page 4
first center motif
With E, make an adjustable ring.
RND 1: Ch 1, 16 sc into loop, sl st in fi rst sc to
join—16 sc.
RND 2: Ch 1, sc in fi rst 3 sc, ch 2, skip next sc, *sc
in next 3 sc, ch 2, skip next sc; rep from * around,
sl st in fi rst sc to join—4 ch-2 sps.
RND 3: Ch 1, *sc in each sc to next ch-sp, ch 4;
rep from * around, sl st in fi rst sc to join—4 ch-4
sps.
RNDS 4–5: Work as for Rnd 3, inc 2 ch in each
corner on every rnd ending with 4 ch-8 sps.
RND 6 (JOINING RND): Ch 1, *sc in each sc to
next ch-sp, ch 5, sl st in 6th sc of one side of
a background motif, ch 5; rep from * around,
attaching each side of First Center Motif to one
side of surrounding background motifs.
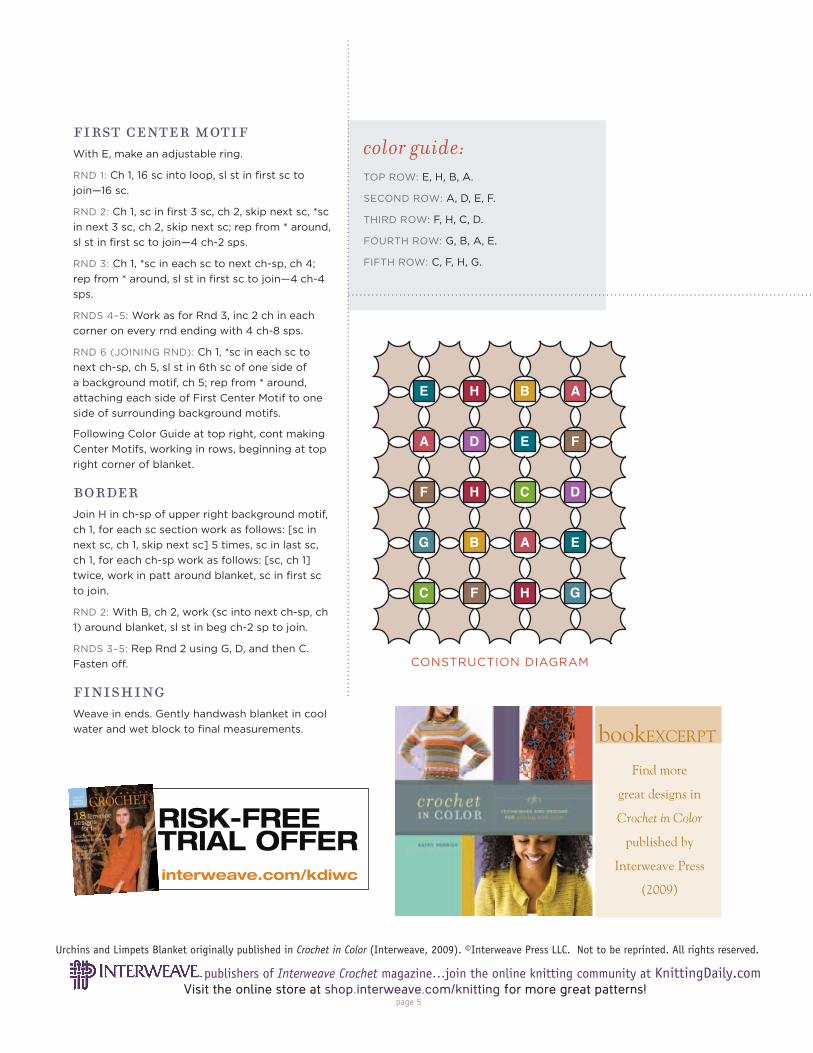
Following Color Guide at top right, cont making
Center Motifs, working in rows, beginning at top
right corner of blanket.
border
Join H in ch-sp of upper right background motif,
ch 1, for each sc section work as follows: [sc in
next sc, ch 1, skip next sc] 5 times, sc in last sc,
ch 1, for each ch-sp work as follows: [sc, ch 1]
twice, work in patt around blanket, sc in fi rst sc
to join.
RND 2: With B, ch 2, work (sc into next ch-sp, ch
1) around blanket, sl st in beg ch-2 sp to join.
RNDS 3–5: Rep Rnd 2 using G, D, and then C.
Fasten off.
finishing
Weave in ends. Gently handwash blanket in cool
water and wet block to fi nal measurements.
CONSTRUCTION DIAGRAM
E H B A
A D E F
F H C D
G B A E
C F H G
color guide: TOP ROW: E, H, B, A.
SECOND ROW: A, D, E, F.
THIRD ROW: F, H, C, D.
FOURTH ROW: G, B, A, E.
FIFTH ROW: C, F, H, G.
publishers of Interweave Crochet magazine…join the online knitting community at KnittingDaily.comVisit the online store at shop.interweave.com/knitting for more great patterns!
Urchins and Limpets Blanket originally published in Crochet in Color (Interweave, 2009). ©Interweave Press LLC. Not to be reprinted. All rights reserved.
page 5
Find more
great designs in
Crochet in Color
published by
Interweave Press
(2009)
bookEXCERPT
interweave.com/kdiwc

MONTANA FELTED ECO-TOTE designed by John Brinegar
SIZE One Size KNITTED MEASUREMENTS Pre-Felted 23" tall x 21" wide Felted 14" tall x 18" wide MATERIALS • 5 hanks Yarns Terra Collection MONTANA, 100% pure new wool (3.5oz/100g; 130yds/120m) in color #12 coffee • One size 15 (10mm) circular knitting needle, 24"/60 cm OR SIZE TO OBTAIN GAUGE
All of the yarns in the Tahki Yarns Terra Collection are all-natural fibers, either in the colors which Nature gave them or in colors created using low-impact dyes that respect our planet’s resources and our environment. Look for the new 4th Edition Terra Collection booklet, featuring 17 garments and accessories to knit in LANA, MONTANA and RIO at your LYS – August 1st or sooner. MATERIALS (continued) • One set size 13 (9mm) double-pointed knitting needles • Stitch markers • Yarn needle GAUGE 10 sts and 13 rows = 4"/10 cm in Stockinette stitch using larger needle unfelted 10 sts and 18 rows = 4"/10cm in Garter stitch TAKE TIME TO CHECK GAUGE PATTERN STITCHES Garter Stitch (Garter st) Stockinette Stitch (St st)
with Tahki’s
eco-friendly
Terra Collection

BAG BOTTOM Using larger needle, cast on 50 sts. Work in Garter stitch for 28 rows or until piece measures 6½" from beginning, end with a wrong side row. BAG BODY Turn BOTTOM to work along side edge and pick up and knit 18 sts along side edge, turn and pick up and knit 50 sts along opposite edge of cast-on row, turn and pick up and knit 18 sts along opposite side edge – 136 sts. Join to work in rounds. Place marker for beginning of round. Work in St st until BODY measures 23". Bind off. HANDLES With right side facing and smaller needles, count 10 sts from both corners along wider edge of BODY and mark next 5 sts towards center. Pick up and knit 5 marked sts from right corner. Work in Garter st for 15 rows or 3½". Change to work in I-Cord for 12". Change to Garter st and work for 3½" more. *Pick up next marked st from left corner and bind off with next st on needle; repeat from * until 5 stitches have been bound off. Repeat to make a second handle along opposite wide edge of BODY. Weave in ends. TO FELT BAG: Set washing machine for hot wash, cold rinse. Place bag in a pillowcase and baste shut to keep fibers from clogging washing machine. Set water level at low; use the hottest possible water. Place pillowcase in washer with a small amount of soap and an old towel, a pair of old jeans or a few rubber balls to help felting process. Set washer for maximum agitation. Check every few minutes for desired fulling. REMEMBER, piece(s) can be fulled more, but if fulled too much, it cannot be undone. After approx. 10-15 minutes, run through rinse cycle on cold rinse. If not fulled enough, repeat hot and cold cycle. Spin dry carefully on gentle, if at all – creases are difficult to remove. Lay piece(s) flat on a drying rack or towels. The finished size will be determined by the amount of fulling, and/or shaping done after the piece(s) are removed from washer. Drying time will vary with thickness of fabric – it may take 2-3 days.

Staggered Rib Sox
Designed for a 9” circular needles - Mary Moran ©2009 for HiyaHiya-USA
Requirements: 2 skeins/100g fingering weight yarn. Approximately 440 yards
Needles: 9” HiyaHiya Steel Circular needle size 1-1.5US (2.25 mm-2.5mm to obtain gauge)
An extra 9” circular or a single double point of the same size is helpful when turning the heel
Size: Woman's medium.
Gauge: 8 stitches/inch in stockinette.
This stitch pattern is very stretchy and will fit most size legs. The staggered rib pattern really helps the socks fit snugly and not slip down your leg.
Pattern:
Ribbing and Leg:
Cast on 68 stitches. Join in a ring being careful not to twist. Place a marker to show the beginning of the round. Knit circularly in K2, P2 ribbing for approximately 2 inches. Knit one round.
Using Staggered Rib stitch pattern on the right, knit in rounds until the desired leg height is reached. Transfer 34 instep stitches to a double point needle or to a second 9” circular needle. These stitches will rest until you have completed your heel. Begin Heel: NOTE: Heel is worked in rows on your 9” circular over 34 stitches. Heel Pattern: Row 1 *Slip 1, k1 repeat across from * Row 2 Slip 1, purl across Knit in heel pattern until you have 34 heel flap rows or desired length (I usually knit my heel flap to a length of 2.75”. End with a purl row, turn your work.
Staggered Rib Stitch Pattern:
Multiple of 2 sts
Use chart at right or the instructions below
Rnds 1-4: K1, p1 Rnds 5-8: P1, k1
Turn Heel as follows: Row 1: Sl 1, K17 sts, K2 tog, K1 turn Row 2: Sl 1, P5 sts, P2 tog, P1, turn Row 3: Sl 1, K6, K2 tog, K1, turn Row 4: Sl 1, P7, P2 tog, P1, turn Repeat rows 3 and 4, increasing 1 additional K or P stitch after the Sl 1 until all side stitches are consumed. End with a purl row, turn your work. Gusset: Rnd 1: Knit across heel flap. Pick up and knit 16 stitches from the side of the heel flap plus knit one stitch in the gusset corner. Place Marker. Knit the instep stitches off your second 9” circular or double point needle. Place Marker. Next, pick up one stitch in the gusset corner and 16 stitches from the side of the heel flap. Knit the remaining stitches of your round. Be sure you have 2 markers placed at the beginning and end of your instep stitches. Gusset Decrease and Sock Foot: Rnd 1: K1, SSK, knit until 3 stitches before your marker, k2 tog, k1, knit around. Rnd 2: Knit. Repeat these 2 rounds until total stitches equal 64. Sock Foot: Continue knitting until you are approximately 1 1/2 to 2 inches from the tip of your longest toe. Shape Toe: Transfer your instep stitches to a second 9” circular or a double point needle. Rnd 1: Needle 1: K1, SSK, knit until the last 3 sts, K2 tog, K1 Needle 2: K1, SSK, knit until the last 3 stitches, k2 tog, k1. Rnd 2: Knit around Continue in this manner until you have approximately 24 stitches remaining or until sock has your desired toe shape. Graft toe closed. Enjoy! Mary
Copyright 2009 Mary Moran For personal use only. This pattern may not be sold or otherwise distributed without the express permission of The KnittingZone Inc.

Copyright Interweave Press LLC. Not to be reprinted. All rights reserved.
-----------------------
kdtvlibrary
publishers of Interweave Knits magazine…join the online knitting community at KnittingDaily.comVisit InterweaveStore.com/knittingpatterns for more great patterns!
page 1
make time for yarn every day™
doug + gordo dolls originally published in Crochet Me (Interweave, 2007). ©Interweave Press LLC. Not to be reprinted. All rights reserved.
doug + gordo dollsKim Werker
Originally published in Crochet Me
(Interweave, 2007)

publishers of Interweave Knits magazine…join the online knitting community at KnittingDaily.comVisit InterweaveStore.com/knittingpatterns for more great patterns!
page 2
doug + gordo dolls originally published in Crochet Me (Interweave, 2007). ©Interweave Press LLC. Not to be reprinted. All rights reserved.
finished size
13” (33 cm) high and 7” (18 cm) diameter at the base.
yarn
Lion Brand Yarns Wool-Ease Thick & Quick (80% acrylic, 20% wool; 106 yd [97 m]/170 g). Gordo (blue): #106 sky blue (MC), #99 fi sherman (CC1), #112 raspberry (CC2), 1 ball each. Doug (green): #132 lemongrass (MC), #99 fi sherman (CC1), #133 pumpkin (CC2), 1 ball each.
substitution: About 100 yd (91 m) bulky-weight (Super Bulky #6) yarn for MC and small amounts of bulky-weight yarn for contrast colors.
hook
Size L/11 (8 mm) and size D/3 (3.25 mm) (optional). Change hook size if necessary to obtain correct gauge.
notions
Yarn needle; eyes; sewing needle; 1 yd (1 m) sewing thread; contrast yarn/thread for facial features; polyfi ll stuffi ng, 1 bag for each doll; 5 yd (5 m) size 10 white crochet thread (optional) for eyes.
gauge
10 sc and 10 rows = 4” (10 cm) with larger hook .
Gauge is not critical in this pattern, but make sure your stitches are tight so the stuffi ng doesn’t bleed through.
head
With MC, wrap yarn twice around the fi rst two fi ngers of your nondominant hand, leaving a 2” (5 cm) tail (Figure 1). Remove the ring from your fi ngers, keeping hold of the tail to keep the ring intact. Insert larger hook through the center of the ring and pull up a lp (Figure 2). Ch 1.
RND 1: Work 6 sc into the ring. Pm in last sc to mark the end of the round. Pull tail end to tighten ring—6 sc.
RND 2: Work 2 sc in each st around—12 sc.
RND 3: *Sc in next st, 2 sc in next st; rep from * around—18 sc.
RND 4: *Sc in each of next 2 sts, 2 sc in next st; rep from * around—24 sc.
RND 5: *Sc in each of next 3 sts, 2 sc in next st; rep from * around—30 sc.
RND 6: *Sc in each of next 4 sts, 2 sc in next st; rep from * around—36 sc.
RNDS 7–8: Sc in each st around.
RND 9: *Sc in each of next 5 sts, 2 sc in next st; rep from * around—42 sc.
RNDS 10–18: Sc in each st around.
doug + gordo dollsKim Werker
I have a short attention span, which is why my favorite things to crochet are scarves and dolls. I can finish them up before I get bored and start thinking about the next thing I want to make. For the book, I wanted to jack things up a little and make big dolls. One is the loneliest number, so I had to make two. Also, I’m an American expat living in Canada and continue to be enamored with all things stereotypically Canadian. So these dolls are Canucks, through and through. Gordo and Doug like curling, peameal, hockey, poutine, and—to the dismay of hosers—grits. With a luxe exoskeleton of bulky yarn crocheted on a small hook, these guys are terrific for cuddling or for just hanging around looking good.
concentration rating
KIM’S INSPIRATION
1 2 3 4

publishers of Interweave Knits magazine…join the online knitting community at KnittingDaily.comVisit InterweaveStore.com/knittingpatterns for more great patterns!
page 3
doug + gordo dolls originally published in Crochet Me (Interweave, 2007). ©Interweave Press LLC. Not to be reprinted. All rights reserved.
PATTERN NOTES • All work in the round is done in a spiral,
so do not join stitches at the end of each round. Place a marker in the last stitch of the round. When you reach the marker remove it, work the stitch(es), and replace it to mark the last stitch of the round.
figure 2
figure 1
RND 19: *Sc2tog over next 2 sts, sc in each of next 5 sts; rep from * around—36 sc total.
Sl st in next st. Fasten off, leaving a 24” (61 cm) tail.
body
With MC, begin with a double ring as for Head, ch 1.
RND 1: Work 8 sc into the ring. Pm in last sc to mark the end of the round. Pull tail end to tighten ring—8 sc.
RND 2: Work 2 sc in each st around—16 sc.
RND 3: *Sc in next st, 2 sc in next st; rep from * around—24 sc.
RND 4: *Sc in each of next 2 sts, 2 sc in next st; rep from * around—32 sc.
RND 5: *Sc in each of next 3 sts, 2 sc in next st; rep from * around—40 sc.
RND 6: *Sc in each of next 4 sts, 2 sc in next st; rep from * around—48 sc.
RND 7: *Sc in each of next 5 sts, 2 sc in next st; rep from * around—56 sc.
RND 8: Start shaping the pot belly. Sc in each of next 25 sts, (work 2 sc in next st) twice, sc in each of next 2 sts, (work 2 sc in next st) twice, sc in each st to end of round—60 sc.
RND 9: Sc in each st around.
RND 10: Sc in each of next 25 sts, *work 2 sc in next st, sc in next st, work 2 sc in next st*, sc in each of next 4 sts, rep from * once, sc to end of round—64 sc.
RND 11: Sc in each of next 5 sts, sc2tog over next 2 sts, sc in each st to 7 sts before end of round, sc2tog over next 2 sts, sc in each of next 5 sts—62 sc.
RND 12: *Sc2tog over next 2 sts, sc in each of next 5 sts, [sc2tog over next 2 sts, sc in each of next 6 sts] 3 times; rep from * once—54 sc.
RND 13: *Sc2tog over next 2 sts, sc in each of next 7 sts; rep from * around—48 sc total.
RNDS 14–15: Sc in each st around.
RND 16: Sc in each of next 18 sts, sc2tog over next 2 sts, sc in each of next 8 sts, sc2tog over next 2 sts, sc in each st to end of round—46 sc.
RND 17: Sc in each st around.
RND 18: Sc in each of next 19 sc, [sc2tog over next 2 sts] 4 times, sc in each st to end of round—42 sc.
RND 19: *Sc2tog over next 2 sts, sc in each of next 5 sts; rep from * around—36 sc.
RND 20: Sc in each st around.
RND 21: Sc in each of next 13 sts, hdc in each of next 10 sts, sc in each st to end of round. Sl st in next st. Fasten off.
Find more
great designs in
Crochet Me
published by
Interweave Press
(2007)
bookEXCERPT

publishers of Interweave Knits magazine…join the online knitting community at KnittingDaily.comVisit InterweaveStore.com/knittingpatterns for more great patterns!
page 4
doug + gordo dolls originally published in Crochet Me (Interweave, 2007). ©Interweave Press LLC. Not to be reprinted. All rights reserved.
arms
Work the arms in the following stripe patterns. Always change color by working the last st of the round until 2 lps remain on the hook, complete the st with the new yarn. Because the inside of the arm will be hidden from view, don’t cut the yarn if the color will be used again. Simply drop it and pick it up when it’s needed again.
stripe pattern 1—gordo (blue)
ROWS 1-2: CC1.
ROWS 3–7: CC2.
ROW 8: MC.
ROWS 9–11: CC2.
ROWS 12–13: MC.
ROWS 14–15: CC2.
ROWS 16–18: MC.
ROW 19: CC2.
ROWS 20–24: MC.
stripe pattern ii—doug (green)
ROWS 1–2: CC1.
ROWS 3–8: MC.
ROWS 9–21: CC2.
ROWS 22–24: MC.
Begin with a double ring as for Head, ch 1.
RND 1: Work 6 sc into the ring. Pm in last sc to mark the end of the round. Pull tail end to tighten ring—6 sc.
RND 2: Work 2 sc in each st around—12 sc.
RND 3: *Sc in each of next 2 sts, 2 sc in next st; rep from * around—16 sc.
RND 4: Sc in each st around.
RND 5: *Sc2tog over next 2 sts; rep from * around—8 sc.
Stuff the hand just enough so that you’re still comfortable working the next round of stitches.
RNDS 6–24: Sc in each st around. Sl st in next st. Fasten off, leaving a 10” (25.5 cm) tail.
eye backings (Make 2, optional)
With size 10 crochet thread and smaller hook, begin with a double ring as for Head, ch 1.
RND 1: Work 8 sc into the ring. Pm in last sc
to mark the end of the round. Pull tail end to tighten ring—8 sc.
RND 2: Work 2 sc in each st around—16 sc.
RND 3: *Sc in next st, 2 sc in next st; rep from * around—24 sc.
Fasten off, leaving an 8” (20.5 cm) tail.
finishing
If you’re using eyes that having a fastener on them, attach them to the head or back-ing before stuffi ng. Stuff the head and body; do not stuff the arms beyond the hands (this allows them to be nice and fl exible). When you think you’re done stuffi ng, stuff some more. The head and body use almost an entire bag of stuffi ng. With yarn needle and long tail from head, line up the sl st from the head and body and whipstitch them together. Using the tail ends, sew the arms to the neck area. If you’re not using eyes with a fastener, sew eyes to the head. Using yarn or thread, embroider the mouth and any other facial features. If you’re so inclined, crochet your happy Canadians a toque. Or hair. Or, you know, ears.
Note that small parts are not baby- or toddler-friendly. If you’re willing to part with your doll by putting it into the hands of a being who will drool on it, make sure you use only embroi-dery and no embellishments that can be swallowed. The same goes for older children who might be inclined to shove small parts up their nose or in their ear. And for grown-ups who are, um, immature.

Copyright Interweave Press LLC. Not to be reprinted. All rights reserved.
publishers of Interweave Knits magazine…join the online knitting community at KnittingDaily.comVisit InterweaveStore.com/knittingpatterns for more great patterns!
page 5
make time for yarn every day™
doug + gordo dolls
doug + gordo dolls originally published in Crochet Me (Interweave, 2007). ©Interweave Press LLC. Not to be reprinted. All rights reserved.
Interweave Crochet is a must-have for those who love to crochet! Every issue includes scrumptious yarns, the latest resources, detailed how-to’s, new tech-niques and exclusive contemporary crochet patterns. You’ll find lots of exciting new designs you can wear, use in your home or give as gifts. Or, maybe you’ll find so many exciting crochet projects, you won’t know where to start!
interweave.com/kdiwc
RISK FREETRIAL OFFER

Copyright Interweave Press LLC. Not to be reprinted. All rights reserved.
-----------------------
kdtvlibrary
publishers of Interweave Knits magazine…join the online knitting community at KnittingDaily.comVisit InterweaveStore.com/knittingpatterns for more great patterns!
page 1
make time for yarn every day™
Swirling Bag originally published in Crocheted Gifts (Interweave, 2009). ©Interweave Press LLC. Not to be reprinted. All rights reserved.
Swirling BagKathryn MerrickOriginally published in Crocheted Gifts (Interweave, 2009)
publishers of Interweave Knits magazine…join the online knitting community at KnittingDaily.comVisit InterweaveStore.com/knittingpatterns for more great patterns!
page 2
Swirling Bag originally published in Crocheted Gifts (Interweave, 2009). ©Interweave Press LLC. Not to be reprinted. All rights reserved.
designer kathryn merrick
Inspired by a funny patchwork bag with panels swirl-ing up its sides, this crocheted bag is worked from the
bottom up, beginning with four pieces that are seamed to form the base. The same colors are worked up in playful concentric rings, and the closure is a matching drawstring. Resulting is a colorful bag that would not only make a nice gift in itself but wrapping for a nice gift as well.
FINISHED SIZE 27" (69 cm) in circumference at widest part, 12" (31 cm) from center bottom to top of bag.
YARN DK weight (Light #3) cotton, about 115 yd (105 m) in each of 4 colors.
Shown here: Rowan Cotton Glace (100% cotton; 125 yd [115 m]/50 g):
heather #828 (purple; A), shoot #814 (green; B), pier #809 (blue; C), #832 persimmon (orange; D), 1 ball each.
HOOK Size E/4 (3.5mm). Adjust hook size if necessary to obtain the correct gauge.
NOTIONS Tapestry needle.
GAUGE 20 sts and 25 rows = 4" (10 cm) in sc.
NOTES
+ Bag is made of four shaped pieces that are sewn together to make the bottom. Stitches are then worked in the round from the bottom piece to form the upper part of the bag.
+ Turning chain (tch) does not count as a stitch throughout.
Find more
great designs in
Crocheted Gifts
published by
Interweave Press
(2009)
bookEXCERPT
swirling BAG

publishers of Interweave Knits magazine…join the online knitting community at KnittingDaily.comVisit InterweaveStore.com/knittingpatterns for more great patterns!
page 3
Swirling Bag originally published in Crocheted Gifts (Interweave, 2009). ©Interweave Press LLC. Not to be reprinted. All rights reserved.
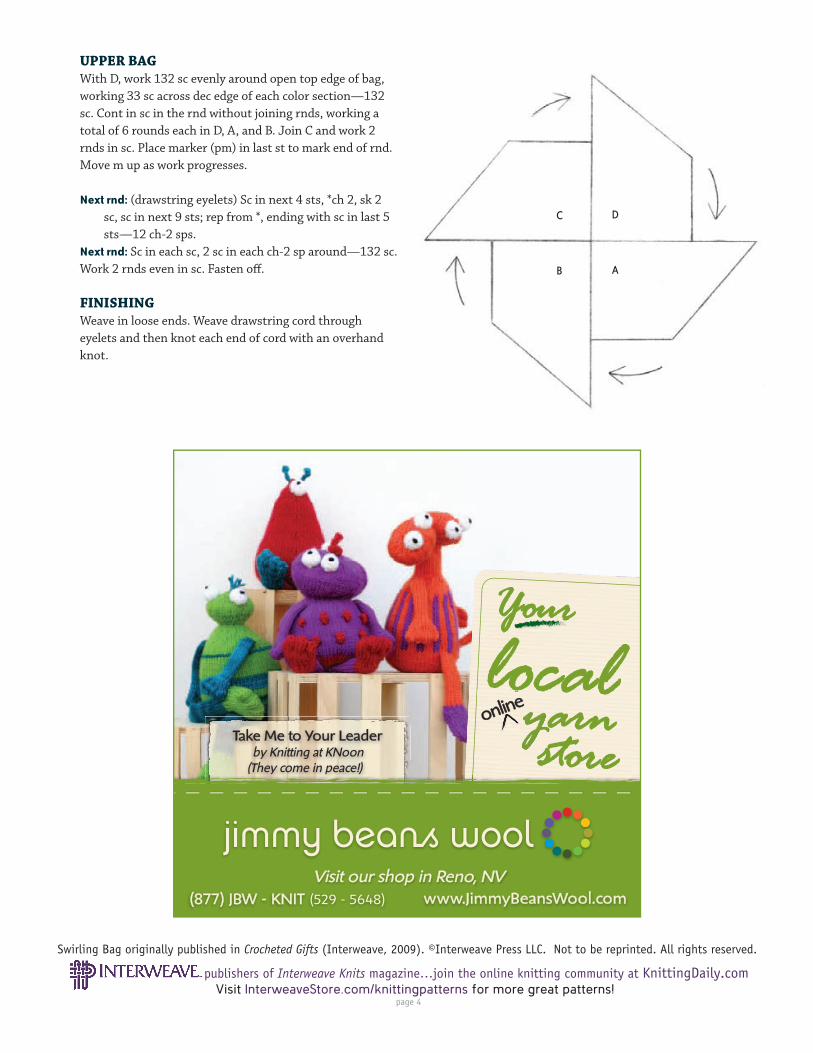
BAGFirst SectionWith A, ch 33.
Row 1: Sc in 2nd ch from hook and in each ch across,
turn—32 sc.
Row 2: Ch 1, sc in each st across, turn.
Rows 3–32: Rep Row 2.
Begin shaping
Row 1: Ch 1, sc in first st, sc2tog (see Glossary), sc to end,
turn—31 sc rem.
Row 2: Ch 1, sc to last 3 sts, sc2tog, sc in last st, turn—30
sc rem.
Rep Rows 1–2 until 1 st rem. Fasten off , leaving a long tail
for sewing.
Second SectionRow 1: With B, work 32 sc along longest side of first section
placing 1 sc in each row-end of first 32 rows, turn—32 sc.
Cont as for fi rst section.
Th ird SectionWith C, work as for second section.
Fourth SectionWith D, work as for second section.
AssemblyWith long tail at point of section threaded on a tapestry
needle, sew sections tog as foll: With tail of A and using a
woven seam (see Glossary), sew from point on section A
to beg row of section B, leaving dec edges unattached. Rep
for rem sections, using tail of B to attach it to section C,
using tail of D to attach it to section D, and using tail of D
to attach it to section A (see diagram).
DRAWSTRINGWith D, ch 50, drop D and draw up lp of C for next ch,
ch 50, drop C and join B, ch 50, drop B and join A, ch 50,
turn. *With A, sl st in each ch of A, fasten off A; rep from *
using B, then C, then D—200 sts.
publishers of Interweave Knits magazine…join the online knitting community at KnittingDaily.comVisit InterweaveStore.com/knittingpatterns for more great patterns!
page 4
Swirling Bag originally published in Crocheted Gifts (Interweave, 2009). ©Interweave Press LLC. Not to be reprinted. All rights reserved.
UPPER BAGWith D, work 132 sc evenly around open top edge of bag,
working 33 sc across dec edge of each color section—132
sc. Cont in sc in the rnd without joining rnds, working a
total of 6 rounds each in D, A, and B. Join C and work 2
rnds in sc. Place marker (pm) in last st to mark end of rnd.
Move m up as work progresses.
Next rnd: (drawstring eyelets) Sc in next 4 sts, *ch 2, sk 2
sc, sc in next 9 sts; rep from *, ending with sc in last 5
sts—12 ch-2 sps.
Next rnd: Sc in each sc, 2 sc in each ch-2 sp around—132 sc.
Work 2 rnds even in sc. Fasten off .
FINISHING Weave in loose ends. Weave drawstring cord through
eyelets and then knot each end of cord with an overhand
knot.
B A
C D
online
Take Me to Your Leaderby Knitting at KNoon
(They come in peace!)
www.JimmyBeansWool.com(877) JBW - KNIT (529 - 5648)
Visit our shop in Reno, NV

publishers of Interweave Knits magazine…join the online knitting community at KnittingDaily.comVisit InterweaveStore.com/knittingpatterns for more great patterns!
page 5
Swirling Bag originally published in Crocheted Gifts (Interweave, 2009). ©Interweave Press LLC. Not to be reprinted. All rights reserved.
WOVEN SEAMPlace pieces side by side on a fl at surface, right sides facing
you and the edges lined up row by row or stitch by stitch.
Step 1: Secure seaming yarn on wrong side of piece A at
start of seam. Pass needle to right side at bottom of fi rst
stitch.
Step 2: Put needle through bottom of fi rst stitch of piece
B and pass it up to right side again at top of stitch (or in
stitch above, if you’re working in single crochet).
Step 3: Put needle through bottom of fi rst stitch of piece A,
exactly where you previously passed needle to right side,
and bring needle to right side at top of same stitch.
Step 4: Put needle through piece B where you previously
passed needle to right side, and bring needle to right side
at the top of same or next stitch.
Step 5: Put the needle through piece A, where you previ-
ously passed needle to right side, and bring needle through
to right side at top of stitch.
Repeat Steps 4 and 5, gently tightening seam as you go,
being careful not to distort fabric. Allow rows to line up but
don’t make seam tighter than edges themselves. Edges will
roll to the wrong side of work. Secure end of seaming yarn.
SINGLE CROCHET 2 TOGETHER SC2TOGInsert hook into next stitch, yarn over, pull up a loop
(2 loops on hook); insert hook into next stitch, yarn over,
pull up a loop (3 loops on hook). Yarn over and draw
yarn through all 3 loops on hook (Figure 1). Completed
sc2tog—1 stitch decreased (Figure 2).
Figure 1 Figure 2

www.prismyarn.com
KNITTING WITH STRIPES TIPS & TRICKS LAURA BRYANT©2009
Stripes can be bold or subtle, and add fun, drama and interest to your knitting. Wide stripes assert themselves and should be done in yarns whose gauges are extremely close; narrow stripes create over‐all textured or colored fabric and can be done with yarns of differing gauges and textures. Here are some ideas for stripes:
• I prefer knitting stripes flat and seaming later with an invisible stitch, so stripes can be matched exactly. Circular knitting with stripes produces either spirals or a slight jog that can be detected.
• For most stripes, simply carry non‐working yarn up the side edge, wrapping working yarn around carried yarn every other row. This equals burying the ends later in seam allowances (which is always a better idea than burying into the fabric itself, as ends won’t pop out or distort fabric). When working wider stripes, leave a long tail that can be used to seam that stripe later.
• One row A, B, C stripes will blend different gauges and textures into one over‐all fabric. To work one row stripes, simply cast on with A, drop A and attach B; work across with B, drop B and attach C; work across with C and A is waiting for you. Choose a needle size appropriate to the middle size of yarn. Any gauge and/or texture differences will even out automatically. Great for using up odd balls of yarn!
• Try stripes in a Fibonacci sequence. Fibonacci numbers are found often in nature and have been used by artists, architects and designers for millennia. The sequence begins with 0 and 1, and each successive number is generated by adding the previous pair: 0 + 1=1: 0, 1, 1. After the two starting values, each new number is the sum of the two preceding numbers. 1 + 1=2: 0, 1, 1, 2. 1 + 2=3: 0, 1, 1, 2, 3. 3 + 2=5: 0, 1, 1, 2, 3, 5, 8, 13, 21, etc. Take any section and apply the value to a color for exciting, out of the ordinary stripes that look random but aren’t really, like our sample with 3 solids and 1 multi color:
1 A (fuchsia); 2 B (dark green); 3 C (lime green); 5 D (multi green/violet/turquoise) You can control how much of one color is in the fabric by which value is assigned it. To work odd numbers of rows in this case, work on circular needles and slide back and forth as each color is needed. Now non‐working yarn will be carried up both sides of the work, making seams less bulky.

#3300 TONALITA BOXED M.P. CARDIGANDesigned By: Barry Klein Copyright: Jan 2006
TRENDSETTER YARNS USED: STITCHES USED:Tonalita #2357-7(8,9,10,11,12)/50gr. Stock St.:Trendsetter Needles #8,9. Row 1: (RS) Knit across the row.
Row 2: Purl across the row.SIZES: Pet(32”), Sm(35”), Med(38”), Lg(41”), XL(44”),1x(47”). Finished size is about 2” larger. Rev. Stock St.:
Row 1: (RS) Purl across the row.GAUGE: With #9 needle and Tonalita in Row 2: Knit across the row.Stock St.; 16sts = 4”.

#3300 Tonalita Boxed M.P. Cardigan – Knitting Instructions
BACK: With #8 needle and Tonalita, Cast on 68(74,80,86,92,98)sts. Work in Rib St. for 1 ½”. Change to #9 needleand Rev. Stock St. until 9(9 ½,9 ½,10,10,10 ½)” from the cast on. Change to Stock St. and continue until 17(17 ½,18,18 ½,19,19 ½)” from the cast on. Bind off all stitches.
RT. FRONT: With #8 needle and Tonalita, Cast on 35(38,41,44,47,50)sts. Work in Rib St. for 1 ½”. Change to #9needle and Rev. Stock St. until 9(9 ½,9 ½,10,10,10 ½)” from the cast on. Change to Stock St. and continue until 17(17 ½,18,18 ½,19,19 ½)” from the cast on. Bind off all stitches.
LEFT FRONT: With #8 needle and Tonalita, Cast on 35(38,41,44,47,50)sts. Work in Rib St. for 1 ½”. Change to #9needle and Stock St. until 9(9 ½,9 ½,10,10,10 ½)” from the cast on. Change to Rev. Stock St. and continue until 17(17 ½,18,18 ½,19,19 ½)” from the cast on. Bind off all stitches.
LEFT SLEEVE: With #8 needle and Tonalita, Cast on 30(30,32,32,34,34)sts. Work in Rib St. for 1 ½”. Change to #9needle and Stock St., Increasing 1 stitch each end every 6(6,5,5,4,4)rows- 13(15,16,18,19,19)x. Continue on56(60,64,68,72,72)sts until the sleeve is 20” from the cast on. Bind off all stitches evenly in pattern.
RT. SLEEVE: With #8 needle and Tonalita, Cast on 30(30,32,32,34,34)sts. Work in Rib St. for 1 ½”. Change to #9needle and Rev. Stock St., Increasing 1 stitch each end every 6(6,5,5,4,4)rows- 13(15,16,18,19,19)x. Continue on56(60,64,68,72,72)sts until the sleeve is 20” from the cast on. Bind off all stitches evenly in pattern.
FINISHING: Sew the shoulder seams closed, working from the outside edge towards the center neck, leaving 3 ½” open on each front and a total of 7” open along the center back neck. Set the sleeves to the body by centering thesleeve to the shoulder seam and working down each side. Sew the remaining underarm and side seams closed. With#G Crochet hook and Tonalita, work 1 row of Single Crochet along the front edges and complete neck edge to finishoff.
Adj-8/06
TRENDSETTER YARNS ~ LANE BORGOSESIA ~ FRONT & CENTER BUTTONS AND ACCESSORIESFAYLA REISS COLLECTION ~ JANE SLICER SMITH SIGNATUR COLLECTION
16745 Saticoy St. #101. Van Nuys, CA. 91406 www.Trendsetteryarns.com

www.prismyarn.com [email protected]
MORE FEARLESS KNITTING: ON THE BIAS, FOR DIAGONAL FABRIC LAURA BRYANT©2009
Beginning at one corner and increasing at each edge produces a fabric that has diagonal direction to stitches and rows. I consider this truly fearless knitting as all work is done to a measurement, so gauge considerations are not as important and fit is almost guaranteed (although you must still pay attention!). Diagonal knitting is a wonderful way to use up odds and ends, as gauges don’t need to match exactly and neither do back, front and sleeves. Our sample shell uses lots of different size 3 yarns for a fun, gradated look. Here are some hints for succesfully knitting on the diagonal:
Garter stitch is the easiest, because the stitch to row ratio is • 1:2. A typical garter stitch gauge might be 4 sts and 8 rows per inch. To make a square (90⁰) angle, one stitch at each end should be increased every two rows (every other row).
Stockinette is tougher, as the stitch to row ratio is closer to • 2:3. A typical stockinette stitch gauge might be 4 sts and 6 rows per inch. If increases were made every other row as for garter, the angle would be wider than 90⁰, and any seam would twist around the body instead of being vertical. So for stockinette stitch, increase at each edge for two consecutive rows, then work one row even with no shaping. That gives a six row repeat: Row 1: K and increase. Row 2: P and increase. Row 3: K. Row 4: P and increase. Row 5: K and increase. Row 6: P and increase.
Make increases in the first stitch, and in the next to last stitch • to balance them. Make increases by knitting in the front, then in the back of each stitch.
Always measure along the selvedge edge, not from the corner • to the needle.
Once you have reached the dimension you want, shape • the other corners by decreasing: work ssk or ssp at beg of appropriate rows and k 2 tog or p 2 tog at end of appropriate rows, depending on whether you are working garter or stockinette stitch.
If you want a piece that is longer than it is wide, work to • the width, then continue to increase at one end while you decrease at the other end. Do this for as long as the piece needs to be, then begin decreasing at both ends. Once you begin to increase at one end and decrease at the other, even if you are working stockinette stitch you can work every other row without throwing the corners out of square. Whether you increase or decrease at the beginning or end will determine what direction the stripes will run, which becomes important when trying to match fronts and backs.
We used here a variety of Prism size 3 & 4 yarns, including:
Dazzle Super Dazzle Tulle Trieste Frost Azalea Bon Bon Tencel Pinot Flirt Cleo Sushine
In colors that include:
Harvest Blue Lagoon Captiva Orchard Mojave Arroyo
www.prismyarn.com [email protected]
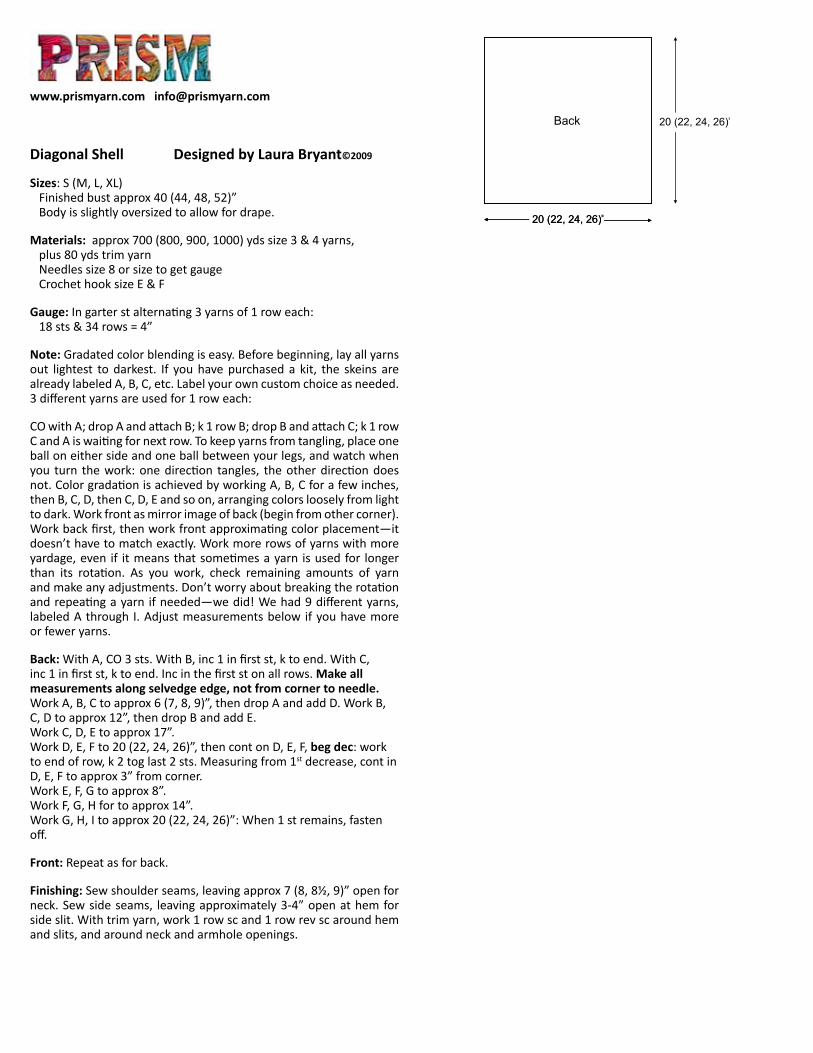
Diagonal Shell Designed by Laura Bryant©2009
Sizes: S (M, L, XL) Finished bust approx 40 (44, 48, 52)” Body is slightly oversized to allow for drape.
Materials: approx 700 (800, 900, 1000) yds size 3 & 4 yarns, plus 80 yds trim yarn Needles size 8 or size to get gauge Crochet hook size E & F
Gauge: In garter st alternating 3 yarns of 1 row each: 18 sts & 34 rows = 4”
Note: Gradated color blending is easy. Before beginning, lay all yarns out lightest to darkest. If you have purchased a kit, the skeins are already labeled A, B, C, etc. Label your own custom choice as needed. 3 different yarns are used for 1 row each:
CO with A; drop A and attach B; k 1 row B; drop B and attach C; k 1 row C and A is waiting for next row. To keep yarns from tangling, place one ball on either side and one ball between your legs, and watch when you turn the work: one direction tangles, the other direction does not. Color gradation is achieved by working A, B, C for a few inches, then B, C, D, then C, D, E and so on, arranging colors loosely from light to dark. Work front as mirror image of back (begin from other corner). Work back first, then work front approximating color placement—it doesn’t have to match exactly. Work more rows of yarns with more yardage, even if it means that sometimes a yarn is used for longer than its rotation. As you work, check remaining amounts of yarn and make any adjustments. Don’t worry about breaking the rotation and repeating a yarn if needed—we did! We had 9 different yarns, labeled A through I. Adjust measurements below if you have more or fewer yarns.
Back: With A, CO 3 sts. With B, inc 1 in first st, k to end. With C, inc 1 in first st, k to end. Inc in the first st on all rows. Make all measurements along selvedge edge, not from corner to needle. Work A, B, C to approx 6 (7, 8, 9)”, then drop A and add D. Work B, C, D to approx 12”, then drop B and add E. Work C, D, E to approx 17”. Work D, E, F to 20 (22, 24, 26)”, then cont on D, E, F, beg dec: work to end of row, k 2 tog last 2 sts. Measuring from 1st decrease, cont in D, E, F to approx 3” from corner. Work E, F, G to approx 8”. Work F, G, H for to approx 14”. Work G, H, I to approx 20 (22, 24, 26)”: When 1 st remains, fasten off.
Front: Repeat as for back.
Finishing: Sew shoulder seams, leaving approx 7 (8, 8½, 9)” open for neck. Sew side seams, leaving approximately 3-4” open at hem for side slit. With trim yarn, work 1 row sc and 1 row rev sc around hem and slits, and around neck and armhole openings.
20 (22, 24, 26)II
20 (22, 24, 26)II
Back
20 (22, 24, 26)II
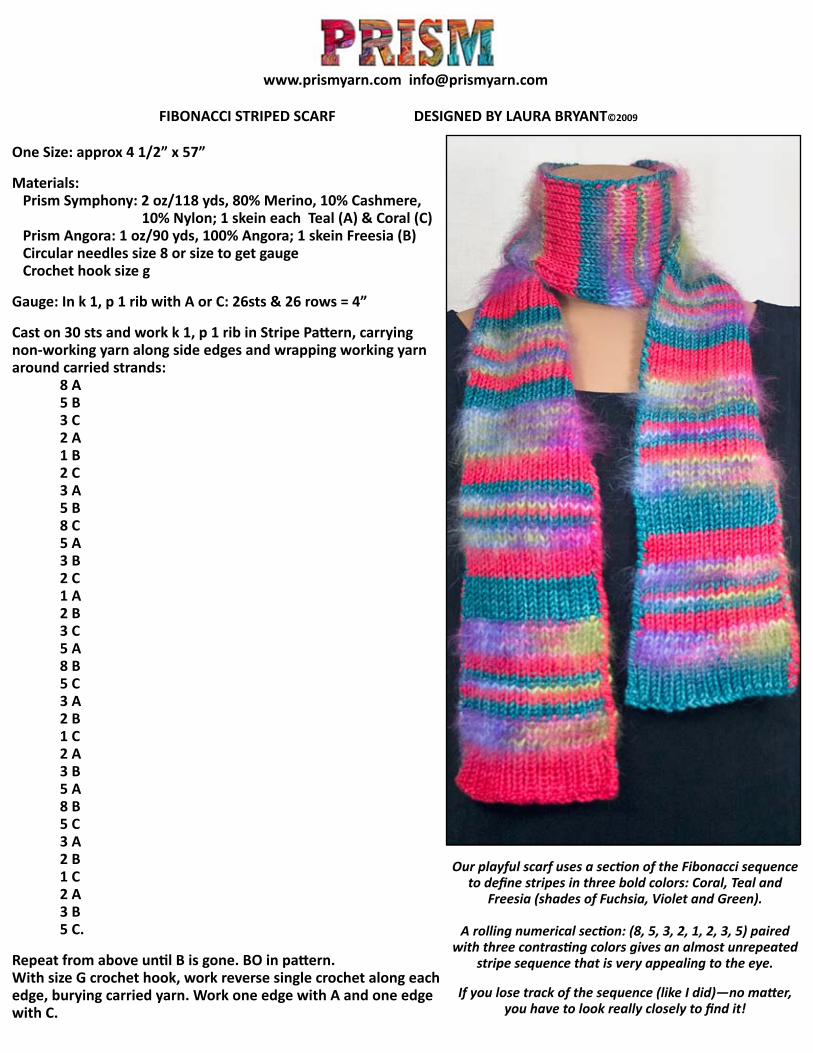
FIBONACCI STRIPED SCARF DESIGNED BY LAURA BRYANT©2009
One Size: approx 4 1/2” x 57”
Materials: Prism Symphony: 2 oz/118 yds, 80% Merino, 10% Cashmere, 10% Nylon; 1 skein each Teal (A) & Coral (C) Prism Angora: 1 oz/90 yds, 100% Angora; 1 skein Freesia (B) Circular needles size 8 or size to get gauge Crochet hook size g
Gauge: In k 1, p 1 rib with A or C: 26sts & 26 rows = 4”
Cast on 30 sts and work k 1, p 1 rib in Stripe Pattern, carrying non-working yarn along side edges and wrapping working yarn around carried strands: 8 A 5 B 3 C 2 A 1 B 2 C 3 A 5 B 8 C 5 A 3 B 2 C 1 A 2 B 3 C 5 A 8 B 5 C 3 A 2 B 1 C 2 A 3 B 5 A 8 B 5 C 3 A 2 B 1 C 2 A 3 B 5 C.
Repeat from above until B is gone. BO in pattern. With size G crochet hook, work reverse single crochet along each edge, burying carried yarn. Work one edge with A and one edge with C.
Our playful scarf uses a section of the Fibonacci sequence to define stripes in three bold colors: Coral, Teal and
Freesia (shades of Fuchsia, Violet and Green).
A rolling numerical section: (8, 5, 3, 2, 1, 2, 3, 5) paired with three contrasting colors gives an almost unrepeated
stripe sequence that is very appealing to the eye.
If you lose track of the sequence (like I did)—no matter, you have to look really closely to find it!
www.prismyarn.com [email protected]
Valley Yarns ©2006
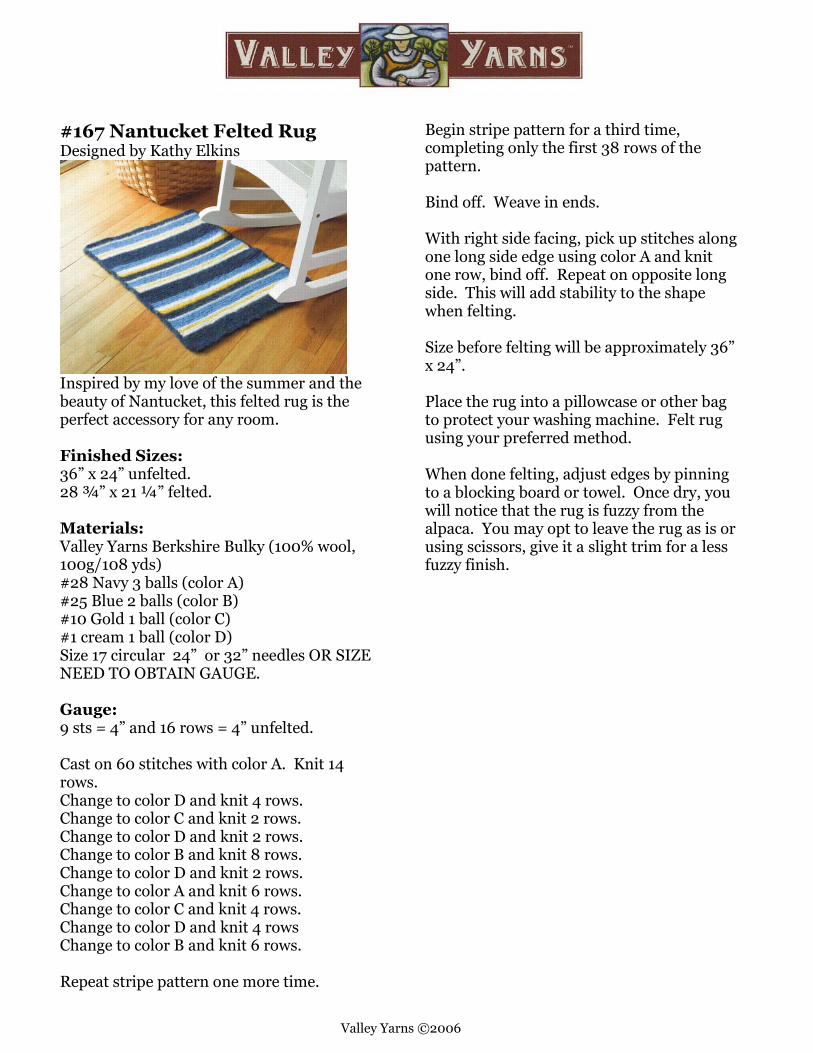
#167 Nantucket Felted Rug Designed by Kathy Elkins
Inspired by my love of the summer and the beauty of Nantucket, this felted rug is the perfect accessory for any room. Finished Sizes: 36” x 24” unfelted. 28 ¾” x 21 ¼” felted. Materials: Valley Yarns Berkshire Bulky (100% wool, 100g/108 yds) #28 Navy 3 balls (color A) #25 Blue 2 balls (color B) #10 Gold 1 ball (color C) #1 cream 1 ball (color D) Size 17 circular 24” or 32” needles OR SIZE NEED TO OBTAIN GAUGE. Gauge: 9 sts = 4” and 16 rows = 4” unfelted. Cast on 60 stitches with color A. Knit 14 rows. Change to color D and knit 4 rows. Change to color C and knit 2 rows. Change to color D and knit 2 rows. Change to color B and knit 8 rows. Change to color D and knit 2 rows. Change to color A and knit 6 rows. Change to color C and knit 4 rows. Change to color D and knit 4 rows Change to color B and knit 6 rows. Repeat stripe pattern one more time.
Begin stripe pattern for a third time, completing only the first 38 rows of the pattern. Bind off. Weave in ends. With right side facing, pick up stitches along one long side edge using color A and knit one row, bind off. Repeat on opposite long side. This will add stability to the shape when felting. Size before felting will be approximately 36” x 24”. Place the rug into a pillowcase or other bag to protect your washing machine. Felt rug using your preferred method. When done felting, adjust edges by pinning to a blocking board or towel. Once dry, you will notice that the rug is fuzzy from the alpaca. You may opt to leave the rug as is or using scissors, give it a slight trim for a less fuzzy finish.
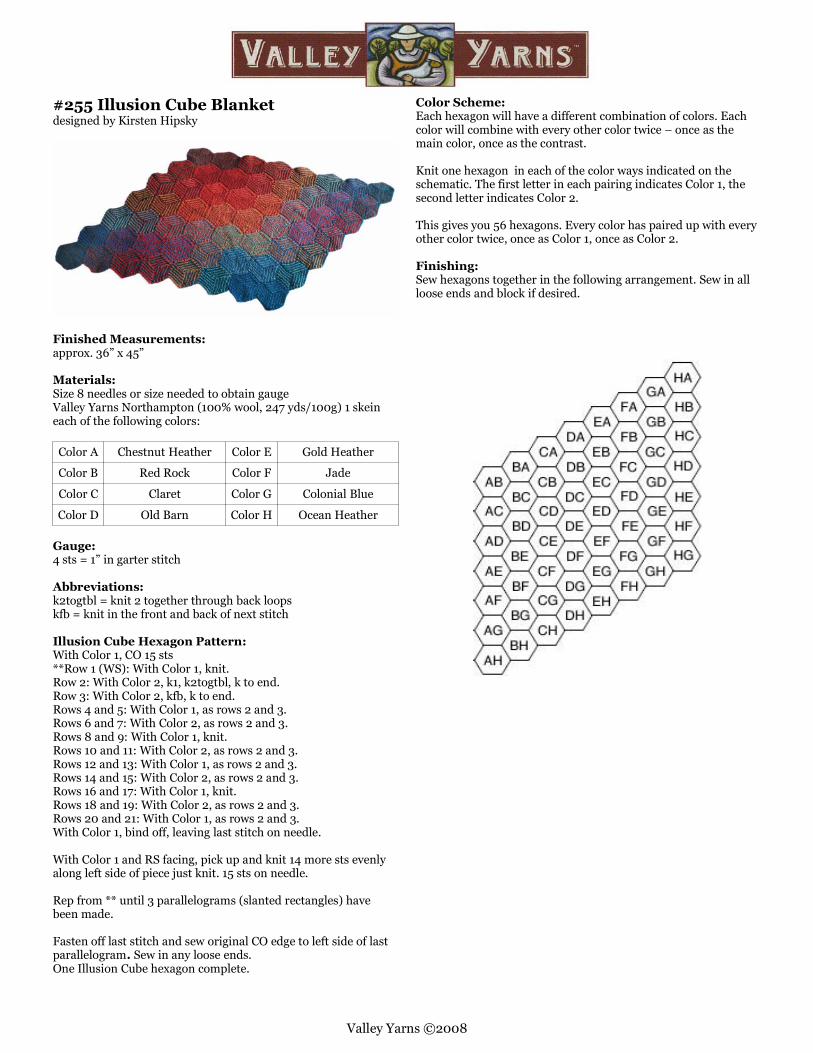
#255 Illusion Cube Blanketdesigned by Kirsten Hipsky
Finished Measurements:approx. 36” x 45”
Materials: Size 8 needles or size needed to obtain gaugeValley Yarns Northampton (100% wool, 247 yds/100g) 1 skeineach of the following colors:
Color A Chestnut Heather Color E Gold Heather
Color B Red Rock Color F Jade
Color C Claret Color G Colonial Blue
Color D Old Barn Color H Ocean Heather
Gauge:4 sts = 1” in garter stitch
Abbreviations:k2togtbl = knit 2 together through back loopskfb = knit in the front and back of next stitch
Illusion Cube Hexagon Pattern:With Color 1, CO 15 sts**Row 1 (WS): With Color 1, knit.Row 2: With Color 2, k1, k2togtbl, k to end.Row 3: With Color 2, kfb, k to end.Rows 4 and 5: With Color 1, as rows 2 and 3.Rows 6 and 7: With Color 2, as rows 2 and 3.Rows 8 and 9: With Color 1, knit.Rows 10 and 11: With Color 2, as rows 2 and 3.Rows 12 and 13: With Color 1, as rows 2 and 3. Rows 14 and 15: With Color 2, as rows 2 and 3.Rows 16 and 17: With Color 1, knit.Rows 18 and 19: With Color 2, as rows 2 and 3.Rows 20 and 21: With Color 1, as rows 2 and 3.With Color 1, bind off, leaving last stitch on needle.
With Color 1 and RS facing, pick up and knit 14 more sts evenlyalong left side of piece just knit. 15 sts on needle.
Rep from ** until 3 parallelograms (slanted rectangles) havebeen made.
Fasten off last stitch and sew original CO edge to left side of lastparallelogram. Sew in any loose ends.One Illusion Cube hexagon complete.
Color Scheme:Each hexagon will have a different combination of colors. Eachcolor will combine with every other color twice – once as themain color, once as the contrast.
Knit one hexagon in each of the color ways indicated on theschematic. The first letter in each pairing indicates Color 1, thesecond letter indicates Color 2.
This gives you 56 hexagons. Every color has paired up with everyother color twice, once as Color 1, once as Color 2.
Finishing:Sew hexagons together in the following arrangement. Sew in allloose ends and block if desired.
Valley Yarns ©2008
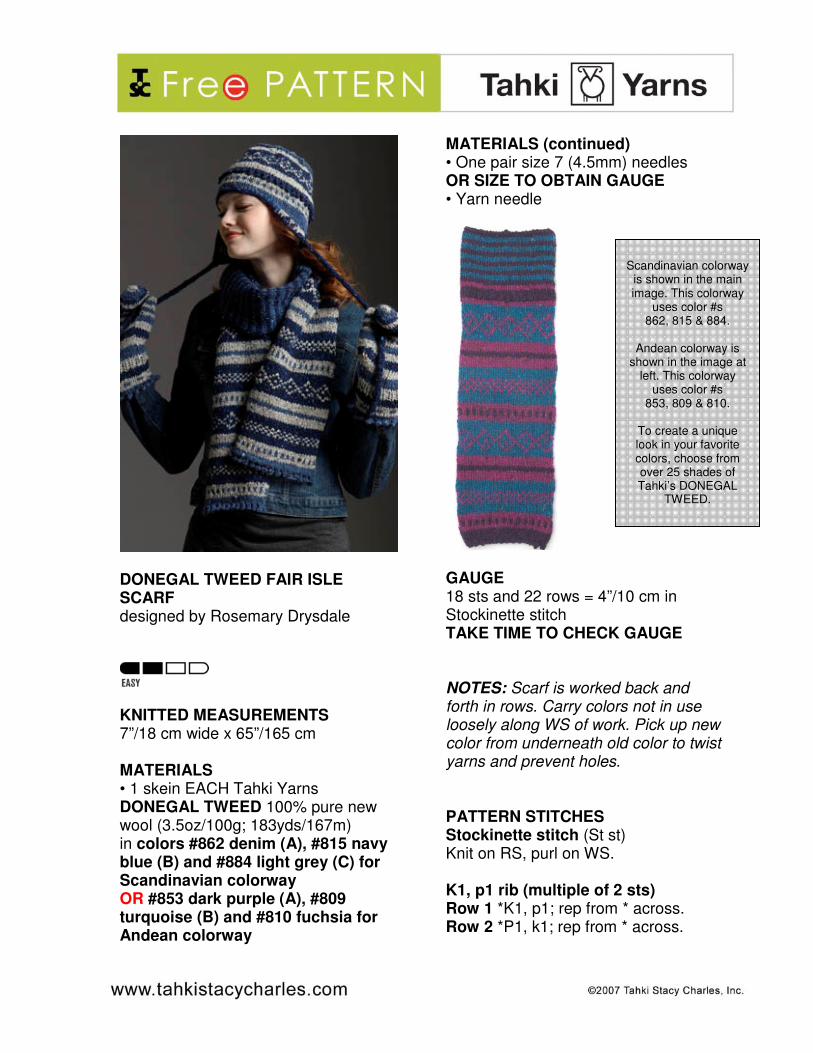
DONEGAL TWEED FAIR ISLE SCARF designed by Rosemary Drysdale
KNITTED MEASUREMENTS 7”/18 cm wide x 65”/165 cm MATERIALS • 1 skein EACH Tahki Yarns DONEGAL TWEED 100% pure new wool (3.5oz/100g; 183yds/167m) in colors #862 denim (A), #815 navy blue (B) and #884 light grey (C) for Scandinavian colorway OR #853 dark purple (A), #809 turquoise (B) and #810 fuchsia for Andean colorway
MATERIALS (continued) • One pair size 7 (4.5mm) needles OR SIZE TO OBTAIN GAUGE • Yarn needle
GAUGE 18 sts and 22 rows = 4”/10 cm in Stockinette stitch TAKE TIME TO CHECK GAUGE NOTES: Scarf is worked back and forth in rows. Carry colors not in use loosely along WS of work. Pick up new color from underneath old color to twist yarns and prevent holes. PATTERN STITCHES Stockinette stitch (St st) Knit on RS, purl on WS. K1, p1 rib (multiple of 2 sts) Row 1 *K1, p1; rep from * across. Row 2 *P1, k1; rep from * across.
Scandinavian colorway
is shown in the main image. This colorway
uses color #s 862, 815 & 884.
Andean colorway is
shown in the image at left. This colorway
uses color #s 853, 809 & 810.
To create a unique look in your favorite colors, choose from over 25 shades of Tahki’s DONEGAL
TWEED.

SCARF With A, cast on 31 sts. Knit first and last st of every row for selvedge st. Picot Row (RS) K1, *cast on 3 sts in next st, bind off same sts, k1; rep from * across row. Work 3 rows in St st. Fair Isle Pattern I **Begin Chart I (RS) Change to C and work Chart I for 6 rows. Begin Chart II (RS) Change to B and work Chart II for 12 rows. Stripe Section I (RS) Working in St st, work 4 rows with C, 2 rows with A, 4 rows with C. Begin Chart III (RS) Change to B and work Chart III for 12 rows. ** Repeat from ** to ** once more. (RS) Change to C and work 2 rows. Change to A and work 2 rows. Picot Row (RS) K1, *cast on 3 sts in next st, bind off same sts, k1; rep from * across row. Purl 1 row. (RS) Change to C and work 2 rows. Stripe Section II (RS) Working in St st, work 2 rows with A, 2 rows with B. Repeat 4 rows of Stripe Section II for 42 more times. (RS) Work 2 rows with A. (RS) Change to C and work 2 rows. Change to A and work 2 rows. Picot Row (RS) K1, *cast on 3 sts in next st, bind off same sts, k1; rep from * across row. Purl 1 row. Change to C and work 2 rows.
Fair Isle Pattern II **Begin Chart III (RS) Change to B and work Chart III for 12 rows. Stripe Section I (RS) Working in St st, work 4 rows with C, 2 rows with A, 4 rows with C. Begin Chart II (RS) Change to B and work Chart II for 12 rows. Begin Chart I (RS) Change to C and work Chart I for 6 rows. ** Repeat from ** to ** once more. (RS) Change to A and work 2 rows. Picot Row (RS) K1, *cast on 3 sts in next st, bind off same sts, k1; rep from * across row. Purl 1 row. Bind off.
For matching hat and mitten pattern, look for Tahki Yarns Tweed Collection 2nd edition
ABBREVIATIONS k knit rep repeat st(s) stitch(es) p purl RS right side WS wrong side
OTHER IDEAS FOR CHANGING COLORS TO SUIT YOUR STYLE OR TASTE FROM TAHKI YARNS “BOOK SMART” Tweed Collection, 3rd Edition
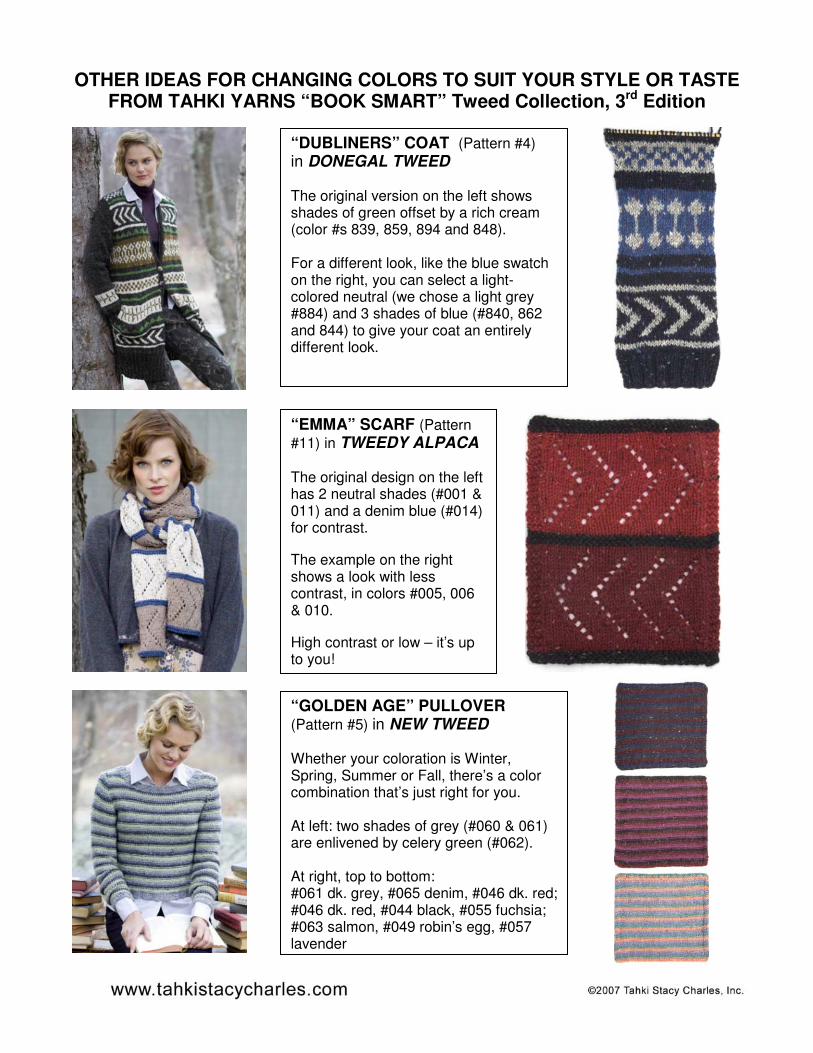
“DUBLINERS” COAT (Pattern #4)
in DONEGAL TWEED The original version on the left shows shades of green offset by a rich cream (color #s 839, 859, 894 and 848). For a different look, like the blue swatch on the right, you can select a light-colored neutral (we chose a light grey #884) and 3 shades of blue (#840, 862 and 844) to give your coat an entirely different look.
“EMMA” SCARF (Pattern
#11) in TWEEDY ALPACA The original design on the left has 2 neutral shades (#001 & 011) and a denim blue (#014) for contrast.
The example on the right shows a look with less contrast, in colors #005, 006 & 010.
High contrast or low – it’s up to you!
“GOLDEN AGE” PULLOVER (Pattern #5) in NEW TWEED Whether your coloration is Winter, Spring, Summer or Fall, there’s a color combination that’s just right for you. At left: two shades of grey (#060 & 061) are enlivened by celery green (#062). At right, top to bottom: #061 dk. grey, #065 denim, #046 dk. red; #046 dk. red, #044 black, #055 fuchsia; #063 salmon, #049 robin’s egg, #057 lavender
Copyright Interweave Press LLC. Not to be reprinted. All rights reserved.
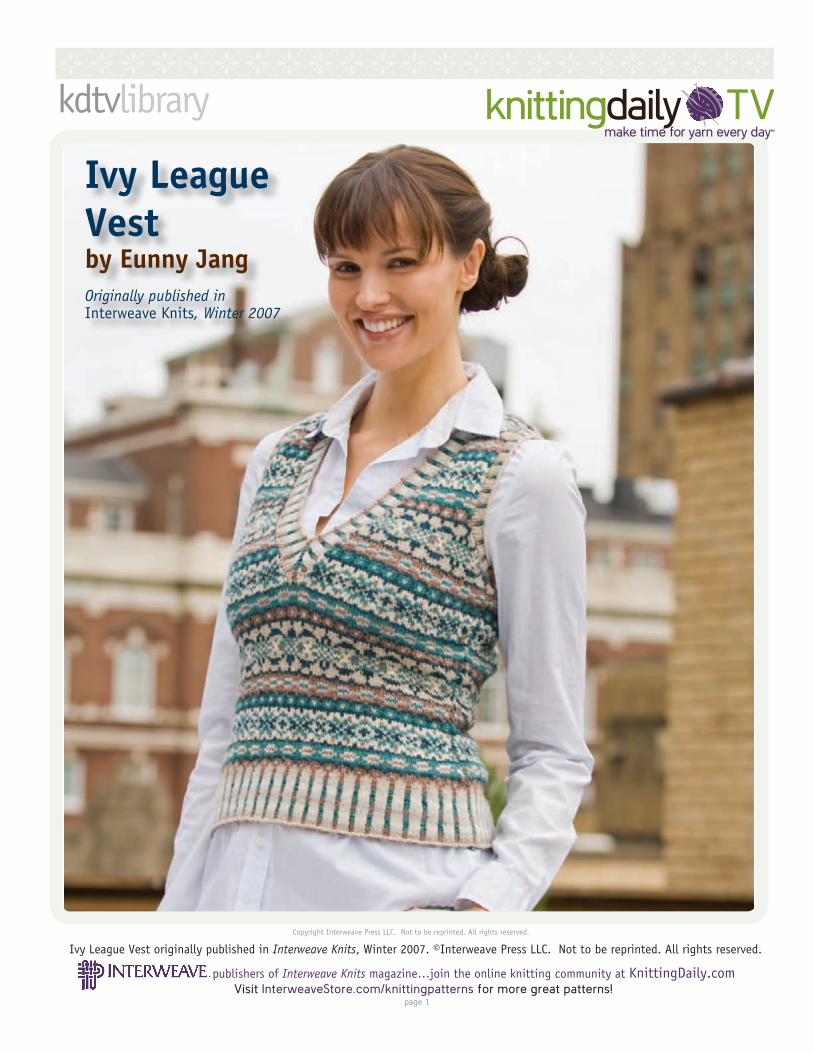
Ivy League Vestby Eunny JangOriginally published in Interweave Knits, Winter 2007
-----------------------
kdtvlibrary
publishers of Interweave Knits magazine…join the online knitting community at KnittingDaily.comVisit InterweaveStore.com/knittingpatterns for more great patterns!
Ivy League Vest originally published in Interweave Knits, Winter 2007. ©Interweave Press LLC. Not to be reprinted. All rights reserved.
page 1
make time for yarn every day™

VEST
Rib: With larger cir needle and MC, CO 192 (208, 240, 256, 272) sts. Place marker (pm) and join for working in the rnd. Join CC. Set-up rnd: *[K3 with MC, k1 with CC] 23 (25, 29, 31, 33) times, k3 with MC, pm for side “seam,” k1 with CC, pm; rep from * to end.Rnd 1: *K3 with MC, p1 with CC; rep from * to end.Rep last rnd 23 more times, changing colors as foll: Rnd 4: Change MC to pearl. Rnd 5: Change CC to woodsmoke. Rnd 7: Change MC to white. Rnd 8: Change CC to loden. Rnd 9: Change CC to woodsmoke. Rnd 10: Change MC to pearl. Rnd 12: Change CC to sandalwood. Rnd 13: Change MC to oatmeal. Rnd 14: Change MC to pearl. Rnd 15: Change CC to woodsmoke. Rnd 17: Change MC to white. Rnd 18: Change CC to loden. Rnd 19: Change CC to woodsmoke. Rnd 20: Change MC to pearl. Rnd 22: Change CC to san-dalwood. Rnd 23: Change MC to oatmeal. Body: Work chart as foll: *Beg and ending as indicated for your size, work to m, p1
with background color, sl m; rep from * once more. Work through Row 4 (4, 4, 4, 5) of chart. Shape waist: Dec rnd: (Row 5 [5, 5, 5, 6] of chart) *K2tog, work in patt to 2 sts before m, ssk (see Glossary), sl m, p1 with background color, sl m; rep from * to end—4 sts dec’d. Cont in patt, work Dec rnd every 4 (4, 4, 4, 5)th rnd 5 (5, 1, 6, 5) more time(s), then every 3rd rnd 0 (0, 6, 0, 0) times—168 (184, 208, 228, 248) sts rem: 83 (91, 103, 113, 123) sts each for front and back, plus 2 seam sts. Work 7 rnds even in patt. Shape bust and front neck: Inc rnd: *FI inc (see Stitch Guide), work in patt to m, FI inc, sl m, p1 in background color, sl m; rep from * to end—4 sts inc’d. Cont in patt and work Inc rnd every 7 (6, 6, 6, 5)th rnd 2 (7, 7, 7, 10) more times, then every 8 (7, 7, 7, 0)th rnd 4 (1, 1, 1, 0) time(s)—28 (36, 36, 36, 44) sts total added for bust shaping. Work 7 (6, 6, 6, 5) rnds even, ending last rnd 9 (9, 10, 10, 10) sts before end of rnd in preparation for beg of armhole shaping. At
the same time, beg front neck shaping on Rnd 59 (62, 63, 67, 70) of body as foll: Work to
IVY LEAGUE VEST
“I like pieces that use traditional techniques in modern contexts. Here, I’ve combined traditional Fair Isle border and peerie pat-terns with a body-conscious silhouette,” says designer Eunny Jang.
Finished Size 28 (311⁄2, 343⁄4, 373⁄4, 413⁄4)" bust circumference. Vest shown measures 311⁄2". Note: Deep V-neck accomodates a bust size up to 5" larger than fi nished size.Yarn Harrisville Designs New England Shet-land (100% wool; 197 yd [180 m]/ 50 g): #46 oatmeal (MC), #41 sandalwood (CC), #14 woodsmoke (light blue-green), and #44 white, 2 skeins each; #45 pearl (gray), 1 skein; #15 loden (dark green-blue), 1 (2, 2, 2, 2) skein(s).Needles Size 4 (3.5 mm): 24" circular (cir). Size 2 (2.75 mm): 16" cir. Adjust needle size if necessary to obtain the correct gauge.Notions Markers (m); stitch holders; tapestry needle.Gauge 28 sts and 32 rnds = 4" in Fair Isle patt on larger needle.
E U N N Y J A N G
STITCH GUIDE
Striped Steeks: Work 8 steek sts in vertical stripes every rnd as foll: [K1 background color, k1 patt color] 2 times, [k1 patt color, k1 background color] 2 times. This provides a clear 2-st centerline in patt color for cutting the steeks open and a clear, unobtrusive edge in background color for picking up armhole edging and neckband sts.
Fair Isle Increase (FI inc): Yo in patt (with the color called for by the pattern). On the next rnd, knit the yo through the back loop to prevent a hole from forming. This results in a nearly invisible inc in the Fair Isle patt.
NOTES
This vest is worked entirely in the round from the bottom up, with steeks used to form front and back neck openings and armholes. The vest shown used no reinforcement before cutting the steeks. Neck and armhole ribbed edges are picked up and worked in the round after the openings have been cut.
The front neck shaping begins after the bust shaping begins and continues through the armhole shaping and the beginning of the back neck shaping. The armhole and back neck shaping begin before the front neck shaping ends. Read through the entire pattern before beginning to knit.
One side stitch is purled throughout at either side of the vest body as a faux “seam.”
publishers of Interweave Knits magazine…join the online knitting community at KnittingDaily.comVisit InterweaveStore.com/knittingpatterns for more great patterns!
Ivy League Vest originally published in Interweave Knits, Winter 2007. ©Interweave Press LLC. Not to be reprinted. All rights reserved.
page 2
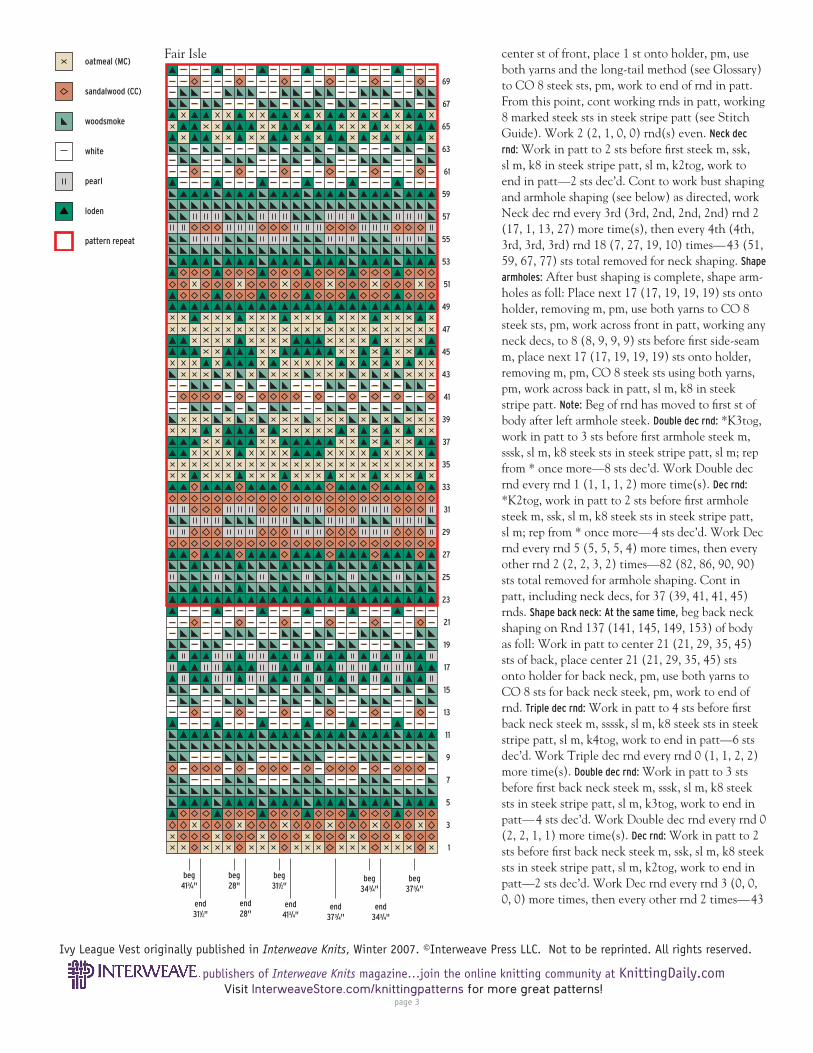
center st of front, place 1 st onto holder, pm, use both yarns and the long-tail method (see Glossary) to CO 8 steek sts, pm, work to end of rnd in patt. From this point, cont working rnds in patt, working 8 marked steek sts in steek stripe patt (see Stitch Guide). Work 2 (2, 1, 0, 0) rnd(s) even. Neck dec
rnd: Work in patt to 2 sts before fi rst steek m, ssk, sl m, k8 in steek stripe patt, sl m, k2tog, work to end in patt—2 sts dec’d. Cont to work bust shaping and armhole shaping (see below) as directed, work Neck dec rnd every 3rd (3rd, 2nd, 2nd, 2nd) rnd 2 (17, 1, 13, 27) more time(s), then every 4th (4th, 3rd, 3rd, 3rd) rnd 18 (7, 27, 19, 10) times—43 (51, 59, 67, 77) sts total removed for neck shaping. Shape
armholes: After bust shaping is complete, shape arm-holes as foll: Place next 17 (17, 19, 19, 19) sts onto holder, removing m, pm, use both yarns to CO 8 steek sts, pm, work across front in patt, working any neck decs, to 8 (8, 9, 9, 9) sts before fi rst side-seam m, place next 17 (17, 19, 19, 19) sts onto holder, removing m, pm, CO 8 steek sts using both yarns, pm, work across back in patt, sl m, k8 in steek stripe patt. Note: Beg of rnd has moved to fi rst st of body after left armhole steek. Double dec rnd: *K3tog, work in patt to 3 sts before fi rst armhole steek m, sssk, sl m, k8 steek sts in steek stripe patt, sl m; rep from * once more—8 sts dec’d. Work Double dec rnd every rnd 1 (1, 1, 1, 2) more time(s). Dec rnd: *K2tog, work in patt to 2 sts before fi rst armhole steek m, ssk, sl m, k8 steek sts in steek stripe patt, sl m; rep from * once more—4 sts dec’d. Work Dec rnd every rnd 5 (5, 5, 5, 4) more times, then every other rnd 2 (2, 2, 3, 2) times—82 (82, 86, 90, 90) sts total removed for armhole shaping. Cont in patt, including neck decs, for 37 (39, 41, 41, 45) rnds. Shape back neck: At the same time, beg back neck shaping on Rnd 137 (141, 145, 149, 153) of body as foll: Work in patt to center 21 (21, 29, 35, 45) sts of back, place center 21 (21, 29, 35, 45) sts onto holder for back neck, pm, use both yarns to CO 8 sts for back neck steek, pm, work to end of rnd. Triple dec rnd: Work in patt to 4 sts before fi rst back neck steek m, ssssk, sl m, k8 steek sts in steek stripe patt, sl m, k4tog, work to end in patt—6 sts dec’d. Work Triple dec rnd every rnd 0 (1, 1, 2, 2) more time(s). Double dec rnd: Work in patt to 3 sts before fi rst back neck steek m, sssk, sl m, k8 steek sts in steek stripe patt, sl m, k3tog, work to end in patt—4 sts dec’d. Work Double dec rnd every rnd 0 (2, 2, 1, 1) more time(s). Dec rnd: Work in patt to 2 sts before fi rst back neck steek m, ssk, sl m, k8 steek sts in steek stripe patt, sl m, k2tog, work to end in patt—2 sts dec’d. Work Dec rnd every rnd 3 (0, 0, 0, 0) more times, then every other rnd 2 times—43
beg28"
beg311/2"
beg343/4"
beg373/4"
beg413/4"
end28"
end311/2"
end343/4"
end373/4"
end413/4"
69
67
65
63
61
59
57
55
53
51
49
47
45
43
41
39
37
35
33
31
29
27
25
23
21
19
17
15
13
11
9
7
5
3
1
Fair Isleoatmeal (MC)
sandalwood (CC)
woodsmoke
white
pearl
loden
pattern repeat
publishers of Interweave Knits magazine…join the online knitting community at KnittingDaily.comVisit InterweaveStore.com/knittingpatterns for more great patterns!
Ivy League Vest originally published in Interweave Knits, Winter 2007. ©Interweave Press LLC. Not to be reprinted. All rights reserved.
page 3

(51, 59, 67, 77) sts total removed for back neck shaping. Next rnd: Work in patt and BO all steek sts—28 (36, 40, 40, 48) sts rem; 7 (9, 10, 10, 12) sts for each front shoulder and each back shoulder. Cut patt color. Turn garment inside out. With RS tog and back-ground color, use the three-needle BO (see Glossary) to join shoulders.
FINISHING
If desired, use sewing machine or hand-sew-ing to reinforce steeks. Cut all steeks care-fully down center lines. Armhole edgings: With smaller cir needle and MC, pick up and knit 95 (99, 101, 105, 109) sts evenly spaced around armhole, between body and steek sts,
then k17 (17, 19, 19, 19) held sts—112 (116, 120, 124, 128) sts total. Pm and join for working in the rnd. Join CC. Next
rnd: *K3 with MC, p1 with CC; rep from * to end. Cont in rib, chang-ing colors as foll: On next rnd, change CC to woodsmoke. On foll rnd, change CC to loden. On foll rnd, change CC to woodsmoke. On next rnd, change CC to san-dalwood. Cut CC. With MC, BO all sts kwise. Neck edging: With smaller cir needle and MC, beg at left shoulder, pick up and knit 71 (71, 75, 75, 75) sts evenly spaced down left side of front neck between body and steek sts, pm, knit held st
at center front, pm, pick up and knit 71 (71, 75, 75, 75) sts evenly spaced up right side of front neck, then 37 (41, 49, 53, 61) sts evenly spaced across back neck—180 (184, 200, 204, 212) sts total. Pm and join for working in the rnd. Join CC. Next rnd: *K3 with MC, p1 with CC; rep from * to end. Cont in rib, dec 1 st at each side of center-front neck st every rnd and change colors as foll: Rnd 3: Change CC to woodsmoke and MC to pearl. Rnd 5: Change CC to loden and MC to white. Rnd 7: Change CC to woodsmoke and MC to pearl. Rnd 9: Change CC to sandalwood and MC to oatmeal. Work 1 more rnd—10 rnds total.
Cut CC. With MC, BO all sts pwise. Weave in loose ends. Trim waste steek sts neatly and fold to WS. Tack down if desired with a whipstitch or blanket st. Wet-block vest carefully. -
Body
271⁄2 (293⁄4, 341⁄4, 361⁄2, 383⁄4)"70 (75.5, 87, 92.5, 98.5) cm 24
(261 ⁄4
, 293 ⁄4
, 321 ⁄2
, 351 ⁄2
)"61
(66.
5, 7
5.5,
82.
5, 9
0) c
m
28 (3
11 ⁄2, 3
43 ⁄4, 3
73 ⁄4, 4
13 ⁄4)"
71 (8
0, 8
8.5,
96,
106)
cm
131 ⁄4
(131 ⁄2
, 133 ⁄4
, 14,
1411 ⁄4
)"33
.5 (3
4.5,
35,
35.
5, 3
6) c
m73 ⁄4
(8, 8
1 ⁄4, 8
1 ⁄2, 8
3 ⁄4)"
19.5
(20.
5, 2
1, 21
.5, 2
2) c
m
1 (11 ⁄4
, 11 ⁄2
, 11 ⁄2
, 13 ⁄4
)"2.
5 (3
.2, 3
.8, 3
.8, 4
.5) c
m
61 ⁄4 (7
1 ⁄4, 8
1 ⁄2, 9
1 ⁄2, 1
1)"
16 (1
8.5,
21.5
, 24,
28)
cm
Front neck drop: 111⁄4 (111⁄4, 113⁄4, 113⁄4, 113⁄4)"28.5 (28.5, 30, 30, 30) cm
Slip two stitches knitwise one at a time (Figure 1). Insert point of left needle into front of two slipped stitch es and knit them together through back loops with right needle (Figure 2).
Figure 2Figure 1
Ssk Decrease
Place stitches to be joined onto two separate needles. Hold them with right sides of knitting facing together. Insert a third needle into fi rst stitch on each of the other two needles and knit them together as one stitch. *Knit next stitch on each needle the same way. Pass fi rst stitch over second stitch. Repeat from * until one stitch remains on third needle. Cut yarn and pull tail through last stitch.
Three-Needle Bind-Off
Discover knitwear designs that will capture your imagination.
Take advantage of this special risk-free offer today!
interweave.com/go/kdiwk
Continental (Long-Tail) Cast-OnLeaving a long tail (about 1⁄2” to 1” for each stitch to be cast on), make a slipknot and place on right needle. Place thumb and index fi nger of left hand between yarn ends so that working yarn is around index fi nger and tail end is around thumb. Secure ends with your other fi n-gers and hold palm upwards, making a V of yarn (Figure 1). Bring needle up through loop on thumb (Figure 2), grab fi rst strand around index fi nger with needle, and go back down through loop on thumb (Figure 3). Drop loop off thumb and, placing thumb back in V confi guration, tighten resulting stitch on needle (Figure 4).
Figure 2Figure 1
Figure 3 Figure 4
publishers of Interweave Knits magazine…join the online knitting community at KnittingDaily.comVisit InterweaveStore.com/knittingpatterns for more great patterns!
Ivy League Vest originally published in Interweave Knits, Winter 2007. ©Interweave Press LLC. Not to be reprinted. All rights reserved.
page 4
Copyright Interweave Press LLC. Not to be reprinted. All rights reserved.
-----------------------
kdtvlibrary
publishers of Interweave Knits magazine…join the online knitting community at KnittingDaily.comVisit InterweaveStore.com/knittingpatterns for more great patterns!
page 1
make time for yarn every day™
Baby Booties to Knit in the Portuguese StyleAndrea WongOriginally published in PieceWork, January/February 2009
Baby Booties to Knit originally published in PieceWork, January/February 2009. ©Interweave Press LLC. Not to be reprinted. All rights reserved.
publishers of Interweave Knits magazine…join the online knitting community at KnittingDaily.comVisit InterweaveStore.com/knittingpatterns for more great patterns!
page 2
Baby Booties to Knit originally published in PieceWork, January/February 2009. ©Interweave Press LLC. Not to be reprinted. All rights reserved.
Baby Booties to Knit in the Portuguese Style
A N D R E A W O N G
These booties use garter stitch, stocki-
nette stitch, garter ribbing, and yarn over
increases. Th ey are knitted fl at and seamed
down the back of the leg, then along the cen-
ter of the sole. Th is easy project will make a
sweet gift . If you do not have any expectant
mothers in your circle of family and friends,
make several pairs for charity.
INSTRUCTIONS
Notes: The two halves of the cast-on edge will be
seamed together along the center of the sole, and
the selvedges of the fi nished piece will be joined at
the seam up the back of the leg. To make a yarnover
using the Portuguese style of knitting, use your left
thumb to fl ick the yarn over the right needle without
working a stitch.
CO 39 sts.
Row 1 (RS): K1, yo, k18, yo, k1, yo, k18, yo, k1—
43 sts.
Rows 2, 4, 6, 8: P.
Row 3: K1, yo, k20, yo, k1, yo, k20, yo, k1—47 sts.
Row 5: K1, yo, k22, yo, k1, yo, k22, yo, k1—51 sts.
Row 7: K1, yo, k24, yo, k1, yo, k24, yo, k1—55 sts.
Row 9: *K1, p1; rep from * to last st, k1.
Row 10: P.
Rows 11–16: Rep Rows 9 and 10 three more times.
Work short rows to shape top of instep as foll:
Row 17: *[K1, p1] 11 times, k10, ssk, turn.
M A T E R I A L S
-Crystal Palace Yarns Panda Superwash, 51% bam-boo/39% wool/10% nylon yarn, fi ngering weight, 186 yards (170 m)/50 g skein, 1 skein of #2209 Saffron
Needles, size 2 (2.75 mm) or size needed to obtain gauge
Tapestry needle
Materials are available at yarn stores or from mail-order or online resources.
Finished size: About 3½ inches (9 cm) foot length, to fi t newborn to 3 months
Gauge: 7½ sts and 15 rows = 1 inch (2.5 cm) in gar-ter st
See page 42 for Abbreviations
Andrea Wong’s
baby booties
worked in the
Portuguese
style of knitting.Photograph by Joe Coca.
publishers of Interweave Knits magazine…join the online knitting community at KnittingDaily.comVisit InterweaveStore.com/knittingpatterns for more great patterns!
page 3
Baby Booties to Knit originally published in PieceWork, January/February 2009. ©Interweave Press LLC. Not to be reprinted. All rights reserved.
Row 18: Sl 1 as if to p, p9, p2tog, turn.
Row 19: Sl 1 as if to p, k9, ssk, turn.
Rows 20–28: Rep Rows 18 and 19 four more
times, then work Row 18 once more.
Row 29 (RS): Sl 1 as if to p, k10, [p1, k1] 8
times—43 sts.
Row 30: P.
Rows 31–47: Work in garter st for 17 rows, beg
and ending with a RS row.
Row 48 (WS): *K1, p1; rep from * to last st, k1.
Row 49 (RS): P.
Rows 50–57: Rep Rows 48 and 49 four more
times; the RS of the garter rib patt corre-
sponds to the WS of the bootie for this sec-
tion so the RS of the patt will show on the
outside when the cuff is folded down.
BO all sts in patt.Finishing
Sew seam down back of leg and along cen-
ter of sole to toe. Fold cuff to outside. Weave in
ends. Make second bootie.
A B O U T T H E A U T H O R A N D D E S I G N E R . Andrea Wong teaches knitting and crochet weekly in Powell, Ohio, and travels throughout the United States and Canada for classes and workshops. She is the author of two DVDs: The Portuguese Style of Knitting and All about Socks Portuguese Style. Visit her website at www.andreawongknits.com.
beg—begin(s); beginningBO—bind offCC—contrasting colorch—chaincir—circularcn—cable needleCO—cast oncont—continue(s); continuingdec(s) (’d)—decrease(s); decreased; decreasingdc—double crochetdpn—double-pointed needle(s)foll—follow(s); followinginc(s) (’d)—increase(s); increased; increasingk—knitk1f&b—knit into the front and back of the same
stitch—1 stitch increasedkwise—knitwise; as if to knitk2tog—knit 2 stitches togetherk3tog—knit 3 stitches togetherk5tog—knit 5 stitches togetherlp(s)—loop(s)m(s)—marker(s)MC—main colorM1—make one (increase)p—purlp2tog—purl 2 stitches togetherp3tog—purl 3 stitches togetherp7tog—purl 7 stitches togetherpatt—pattern(s)pm—place markerprev—previouspsso—pass slipped stitch overpwise—purlwise; as if to purlrem—remain(s); remainingrep(s)—repeat(s); repeatingrnd(s)—round(s)RS—right sidesc—single crochet
sc2tog—insert hook in next stitch, yarn over, pull loop through stitch (2 loops on hook); insert hook in next stitch, yarn over, pull loop through stitch (3 loops on hook); yarn over and draw yarn through all 3 loops on hook; completed sc2tog—1 stitch decreased
sk—skipsl—slipsl st—slip(ped) stitchsp(s)—space(s)ssk—slip 1 knitwise, slip 1 knitwise, knit 2
slipped stitches together through back loops (decrease)
ssp— slip 1 knitwise, slip 1 knitwise, purl 2 slipped stitches together through back loops (decrease)
st(s)—stitch(es)St st—stockinette stitchtbl—through back looptog—togetherWS—wrong sidewyb—with yarn in backwyf—with yarn in frontyo—yarn over*—repeat starting point( )—alternate measurements and/or instructions[ ]—work bracketed instructions a specifi ed
number of times
A B B R E V I A T I O N S

publishers of Interweave Knits magazine…join the online knitting community at KnittingDaily.comVisit InterweaveStore.com/knittingpatterns for more great patterns!
page 4
Baby Booties to Knit originally published in PieceWork, January/February 2009. ©Interweave Press LLC. Not to be reprinted. All rights reserved.
Set UpTake needle with stitches in your left hand (LHN) and the empty needle in your right hand (RHN). Pass the yarn coming from the work through the knitting pin, or around your neck, from left to right, and then around your right middle fi nger.
The Purl StitchImportant: The yarn always is below the right-hand needle (RHN) as the starting position for working the purl stitch. 1) Insert RHN from right to left as if to purl, into the front loop
of the stitch on LHN—the RHN is in front of the LHN as when purling in the conventional manner. See Figure 1.
2) Using your left thumb, wrap the yarn over the top of RHN (counterclockwise). See Figure 2.
3) Pull stitch through the loop away from you and off the LHN. See Figure 3.
The Knit StitchImportant: The yarn is always on top of the right-hand needle as the starting position for working the knit stitch. 1) Insert the RHN from left to right as if to knit into the front
loop of the stitch on LHN—the RHN is in front of the LHN as when knitting in the conventional manner. See Figure 4.
2) Using your left thumb, wrap the yarn over the top of RHN (counterclockwise). See Figure 5.
3) Pull the stitch through the loop toward you and off LHN. See Figure 6.
Figure 4
Figure 5 Figure 6
Figure 1
Figure 3
Portuguese Style of Knitting Basics
Figure 2

www.prismyarn.com [email protected]
COLOR TRICKS LAURA BRYANT©2009
Here is a fun way to look at color. Most knitter’s stash looks like our first photo: disorganized and hard to imagine using all those colors together.
Instead of trying to put like colors together (say, all blues and greens), look instead at the relative lightness and/or darkness of colors, and arrange according to that.
One could actually imagine using these colors in one project, if it were large enough! And, every color below is also in the arrangement above—honest!

If you can’t decide where a color goes, try putting it at one end. If it sticks out, it doesn’t belong there. The reddish-orange ball next to the blue is too bright and light. Notice that it looks both more orange and brighter on the dark colors here than it does in the photo at right.
Try it at the other end. If it sticks out, it doesn’t belong there, either. Here the orange-red ball looks dull and is too dark for the pale colors around it. The color also looks rustier, instead of bright and pure like at left.
Once it is in the right place, it blends in. We see its true color a bit more clearly, medium reddish-orange.
Once you have arranged colors this way, you can safely choose colors from any quadrant of the arrangement and they will look good together—even if you don’t think so! Look carefully at the photo. Notice that muddy neutrals and olive sit happily next to pure bright colors like orange, turquoise and fuchsia.
The rule of thumb is that if you want a color story, use colors from the same area of this scale. If you want pattern to show, you must have some contrast or the colors will blend too much, so pick colors that are about half way or more apart. Get too far apart, though, and you might as well use black and white as the colors will kill each other.

Size: Women's medium (finished circumference approx. 20") Materials:1 sk Manos Silk Blend (70% merino, 30% silk, 50 g, 150 yds) in each of the following colors:300M Bing Cherry, 3019 Dove, 300G Coffee, 3044 Briar, 3008 Black16" circular and dpn, US #4 or size to obtain gaugestitch marker Gauge: 24 sts = 4"/10 cm over fairisle pattern Using circular needle and Bing Cherry, cast on 112 sts. Join, being careful not to twist, and work 8 rndsin corrugated rib as follows: *Using Coffee, k2; using Dove, p2; rep from * to end of rnd. Next rnd: Cut Dove. Using Coffee, (k1, inc in next st) around -- 168 sts. Work 1 rnd even.Rejoin Bing Cherry and work 22 rnds from Tam Body chart, joining in and breaking off colors asnecessary. Work 24 rnds of Tam Decrease chart -- 7 sts remain after final rnd. Cut yarn, thread through rem sts, and fasten off.Weave in ends. To block, wet hat in cool water, then let dry over a 10"-diameter dinner plate.

Tam Body Chart
Tam Decrease Chart
Key
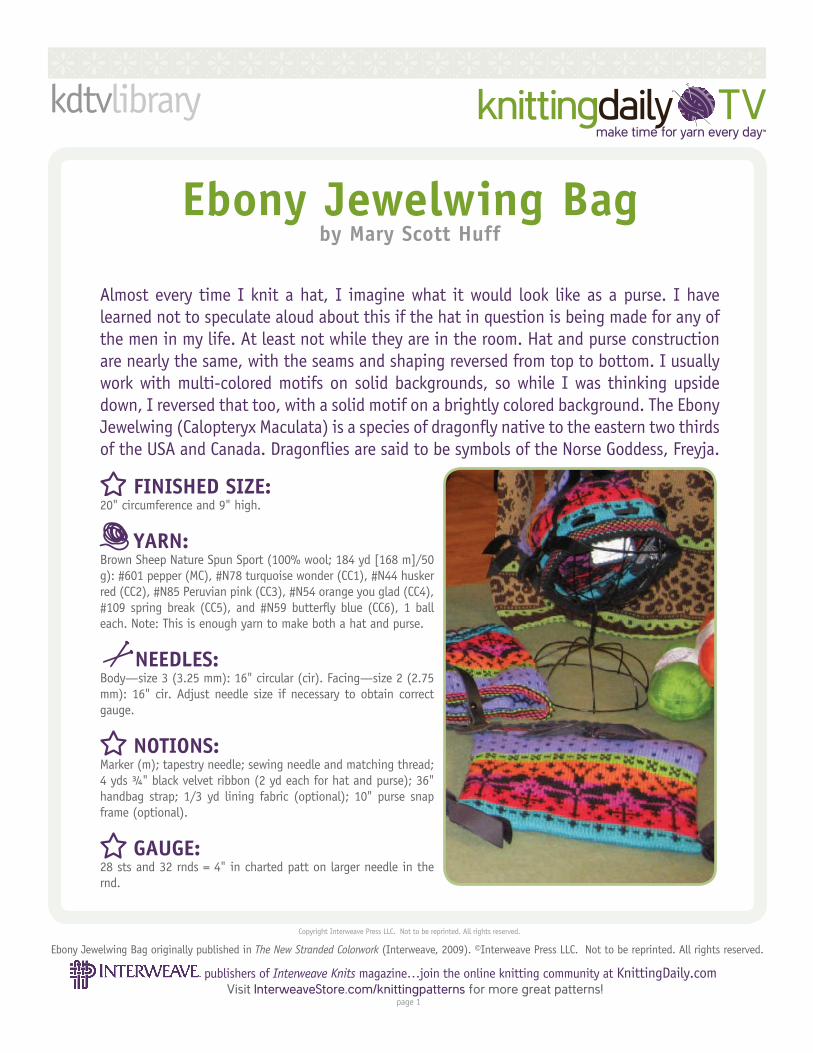
-----------------------
Ebony Jewelwing Bagby Mary Scott Huff
Almost every time I knit a hat, I imagine what it would look like as a purse. I have learned not to speculate aloud about this if the hat in question is being made for any of the men in my life. At least not while they are in the room. Hat and purse construction are nearly the same, with the seams and shaping reversed from top to bottom. I usually work with multi-colored motifs on solid backgrounds, so while I was thinking upside down, I reversed that too, with a solid motif on a brightly colored background. The Ebony Jewelwing (Calopteryx Maculata) is a species of dragonfly native to the eastern two thirds of the USA and Canada. Dragonflies are said to be symbols of the Norse Goddess, Freyja.
FINISHED SIZE:20" circumference and 9" high.
YARN:Brown Sheep Nature Spun Sport (100% wool; 184 yd [168 m]/50 g): #601 pepper (MC), #N78 turquoise wonder (CC1), #N44 husker red (CC2), #N85 Peruvian pink (CC3), #N54 orange you glad (CC4), #109 spring break (CC5), and #N59 butterfly blue (CC6), 1 ball each. Note: This is enough yarn to make both a hat and purse.
NEEDLES: Body—size 3 (3.25 mm): 16" circular (cir). Facing—size 2 (2.75 mm): 16" cir. Adjust needle size if necessary to obtain correct gauge.
NOTIONS:Marker (m); tapestry needle; sewing needle and matching thread; 4 yds ¾" black velvet ribbon (2 yd each for hat and purse); 36" handbag strap; 1/3 yd lining fabric (optional); 10" purse snap frame (optional).
GAUGE:28 sts and 32 rnds = 4" in charted patt on larger needle in the rnd.
Copyright Interweave Press LLC. Not to be reprinted. All rights reserved.
kdtvlibrary
publishers of Interweave Knits magazine…join the online knitting community at KnittingDaily.comVisit InterweaveStore.com/knittingpatterns for more great patterns!
Ebony Jewelwing Bag originally published in The New Stranded Colorwork (Interweave, 2009). ©Interweave Press LLC. Not to be reprinted. All rights reserved.
page 1
make time for yarn every day™

Copyright Interweave Press LLC. Not to be reprinted. All rights reserved.
publishers of Interweave Knits magazine…join the online knitting community at KnittingDaily.comVisit InterweaveStore.com/knittingpatterns for more great patterns!
page 2
make time for yarn every day™
Ebony Jewelwing Bag originally published in The New Stranded Colorwork (Interweave, 2009). ©Interweave Press LLC. Not to be reprinted. All rights reserved.
Ebony Jewelwing Bag
Copyright Interweave Press LLC. Not to be reprinted. All rights reserved.
SKILL LEVEL:Intermediate.
HATWith MC and smaller needle, CO 140 sts. Pm and join in the rnd. Facing: Work 7 rnds in k1, p1 rib. Picot rnd: *K2tog, yo; rep from * around. Change to larger needle. Work Rnds 1–8 of Jewelwing Band chart. Change to CC1 and knit 3 rnds. Eyelet rnd: K3, *k2tog, yo, k5; rep from * around, end last rep, k2. Work Rows 1–56 of Ebony Jewelwing chart, changing colors as indicated. Turn piece inside out, using CC6 and the three-needle BO (see Glossary), join sts. Weave in loose ends. Turn facing to WS along picot rnd and use MC to sew in place. Turn hat right side out. Block to measurements. Beg at center front of hat, weave ribbon through eyelets. Try on hat to adjust ribbon to fit, then tie in a bow and trim ends. Corner Trims: Cut 4 strips of ribbon, each 7" long, angling the ends. Lay two pieces tog, crossing at centers, pinch centers together to gather and wrap with a piece of sewing thread, then tie thread, leaving 12" ends. Use ends to stitch securely to corner of top seam. Rep for other side. Adjust ribbon ends, if necessary, as shown in photo.
PURSEWith CC1 and larger needle, CO 140 sts. Pm and join in the rnd. Knit 1 rnd. Work Rows 1–56 of Ebony Jewelwing chart. Eyelet rnd: Cont with CC6 only, k3, *k2tog, yo; rep from * around, end last rep, k2. Knit 3 rnds. Work Rows 1–8 of Jewelwing Band chart. Picot rnd: Cont with MC only, *k2tog, yo; rep from * around. Change to smaller needle. Facing: With MC, knit 7 rnds. Loosely BO all sts. Turn piece inside out. With CC1, sew bottom seam. Weave in loose ends. Block to measurements. Make fabric lining if desired. Measure purse and cut a piece of lining fabric, allowing 1/2" for seams. Note: Upper edge of lining should reach to picot row; it will be enclosed in facing. Sew seams, leaving upper edge open. Insert lining in purse so that WS of lining faces WS of purse and so that to edge of lining is even with picot rnd. Place snap frame even with picot turning row and turn facing to WS (inside of purse). With sharp-point sewing needle and matching thread, sew facing in place over frame and through lining. Weave ribbon through eyelets, make and attach ribbon corner trims as for hat. Attach purchased handbag strap. -
Place stitches to be joined onto two separate needles. Hold them with right sides of knit-ting facing together. Insert a third needle into first stitch on each of the other two needles and knit them together as one stitch. *Knit next stitch on each needle the same way. Pass fi rst stitch over second stitch. Repeat from * until one stitch remains on third needle. Cut yarn and pull tail through last stitch.
Three-Needle Bind-Off
Illus
trat
ions
by
Gayl
e Fo
rd
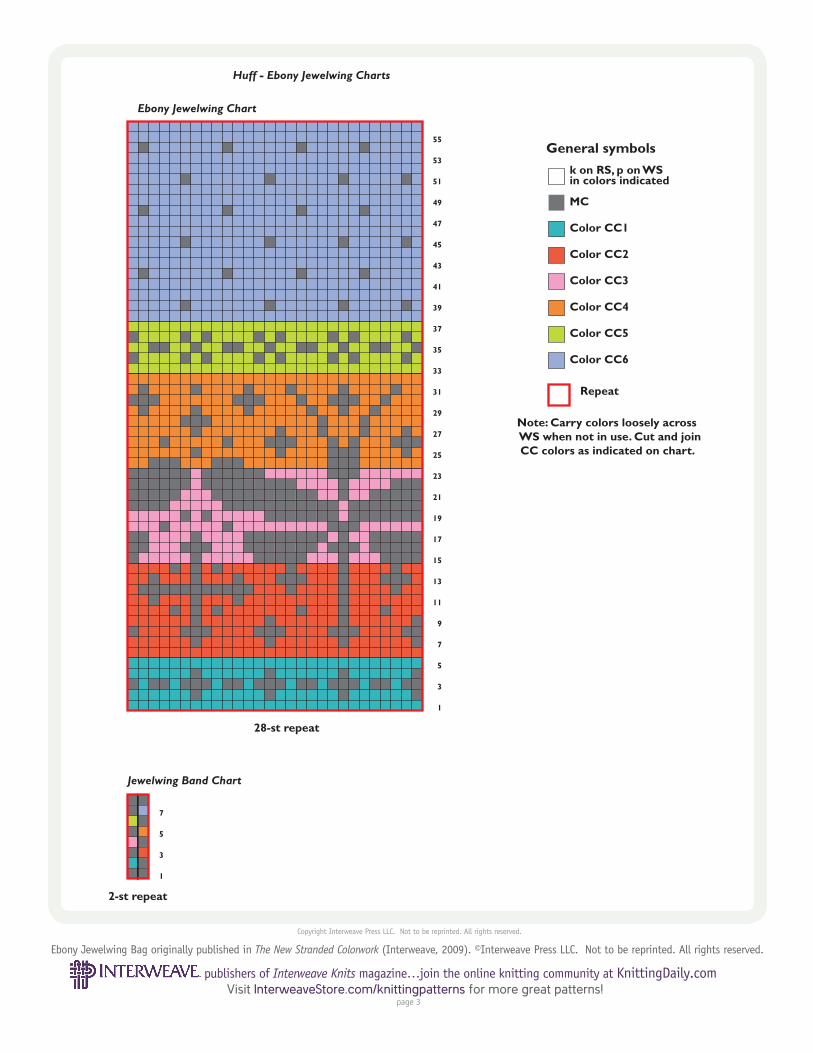
Copyright Interweave Press LLC. Not to be reprinted. All rights reserved.
publishers of Interweave Knits magazine…join the online knitting community at KnittingDaily.comVisit InterweaveStore.com/knittingpatterns for more great patterns!
page 3
Ebony Jewelwing Bag originally published in The New Stranded Colorwork (Interweave, 2009). ©Interweave Press LLC. Not to be reprinted. All rights reserved.
28-st repeat
2-st repeat
Note: Carry colors loosely across WS when not in use. Cut and join CC colors as indicated on chart.
55
53
51
49
47
45
43
41
39
37
35
33
31
29
27
25
23
21
19
17
15
13
11
9
7
5
3
1
7
5
3
1
Ebony Jewelwing Chart
General symbols
Huff - Ebony Jewelwing Charts
Jewelwing Band Chart
Repeat
k on RS, p on WS in colors indicated
Color CC2
Color CC1
Color CC4
Color CC3
Color CC6
Color CC5
MC
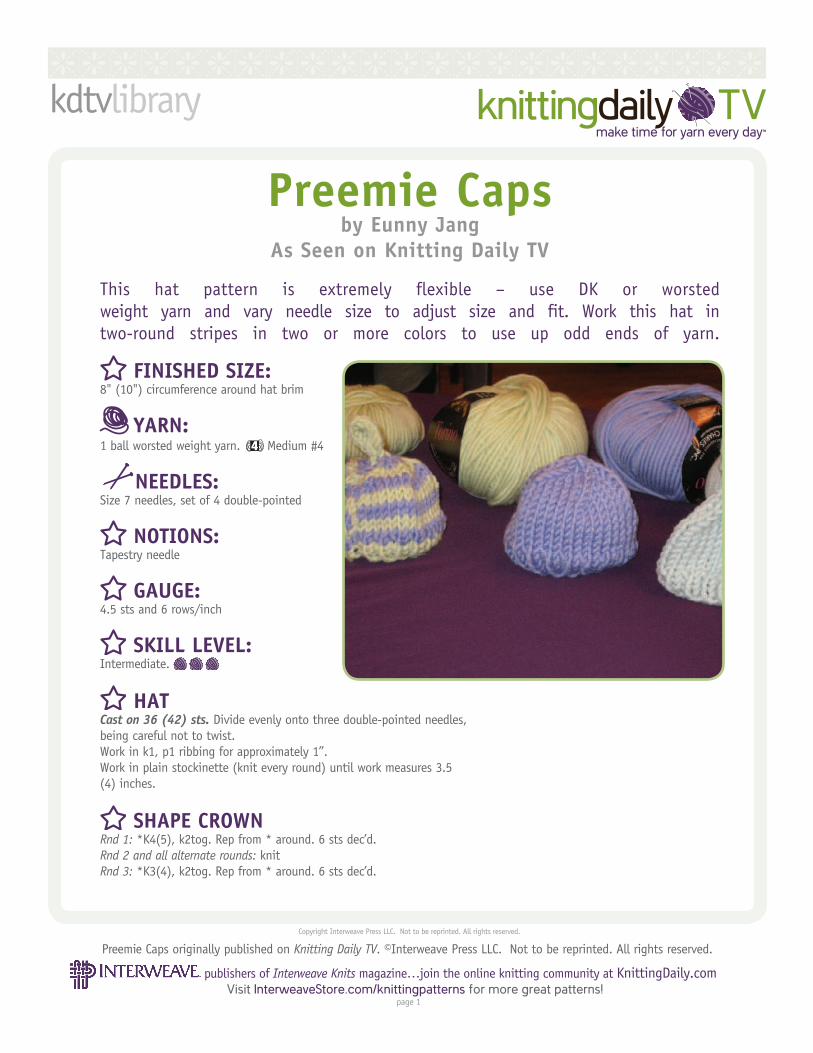
-----------------------
Preemie Capsby Eunny Jang
As Seen on Knitting Daily TV
This hat pattern is extremely flexible – use DK or worsted weight yarn and vary needle size to adjust size and fit. Work this hat in two-round stripes in two or more colors to use up odd ends of yarn.
FINISHED SIZE:8" (10") circumference around hat brim
YARN:1 ball worsted weight yarn. Medium #4
NEEDLES: Size 7 needles, set of 4 double-pointed
NOTIONS:Tapestry needle
GAUGE:4.5 sts and 6 rows/inch
SKILL LEVEL:Intermediate.
HATCast on 36 (42) sts. Divide evenly onto three double-pointed needles, being careful not to twist.Work in k1, p1 ribbing for approximately 1”. Work in plain stockinette (knit every round) until work measures 3.5 (4) inches.
SHAPE CROWNRnd 1: *K4(5), k2tog. Rep from * around. 6 sts dec’d.Rnd 2 and all alternate rounds: knitRnd 3: *K3(4), k2tog. Rep from * around. 6 sts dec’d.
Copyright Interweave Press LLC. Not to be reprinted. All rights reserved.
kdtvlibrary
publishers of Interweave Knits magazine…join the online knitting community at KnittingDaily.comVisit InterweaveStore.com/knittingpatterns for more great patterns!
Preemie Caps originally published on Knitting Daily TV. ©Interweave Press LLC. Not to be reprinted. All rights reserved.
page 1
make time for yarn every day™

Copyright Interweave Press LLC. Not to be reprinted. All rights reserved.
publishers of Interweave Knits magazine…join the online knitting community at KnittingDaily.comVisit InterweaveStore.com/knittingpatterns for more great patterns!
page 2
make time for yarn every day™
Preemie Caps originally published on Knitting Daily TV. ©Interweave Press LLC. Not to be reprinted. All rights reserved.
Preemie Cap
Copyright Interweave Press LLC. Not to be reprinted. All rights reserved.
Continue working this way, working 1 fewer st between decs, until 12 sts rem.Final dec rnd: K2tog around. 6 sts rem.
FINISHINGPLAIN – cut tail; thread on a tapestry needle and run trhough live loops remaining. Draw tight; draw tail to back side and secure.
I-Cord - K2tog 3 times. 3 sts rem. *Slide sts back to opposite end of needle; without turning work, draw working yarn tight and k3 sts. Rep from * until i-cord is approximately 2” long. BO all sts; cut tail. Tie a knot in the cord, or use the tail to tack free end of cord down to form a loop.
Weave in all ends. Wash and block. -
publishers of Interweave Knits magazine…join the online knitting community at KnittingDaily.comVisit InterweaveStore.com/knittingpatterns for more great patterns!
page 2
make time for yarn every day™
Discover knitwear designs that will capture your imagination.
Take advantage of this special risk-free offer today!
interweave.com/go/kdiwk
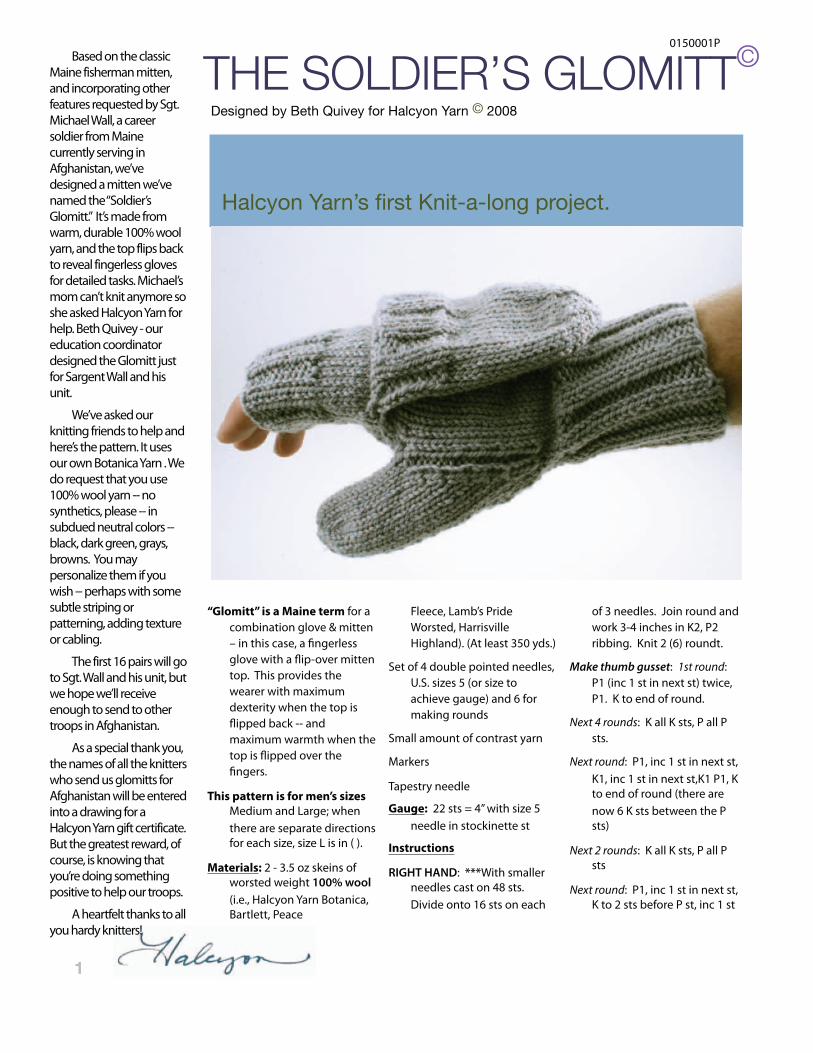
1
“Glomitt” is a Maine term for a
combination glove & mitten
– in this case, a fingerless
glove with a flip-over mitten
top. This provides the
wearer with maximum
dexterity when the top is
flipped back -- and
maximum warmth when the
top is flipped over the
fingers.
This pattern is for men’s sizes Medium and Large; when
there are separate directionsfor each size, size L is in ( ).
Materials: 2 - 3.5 oz skeins of worsted weight 100% wool(i.e., Halcyon Yarn Botanica, Bartlett, Peace
Fleece, Lamb’s Pride
Worsted, Harrisville
Highland). (At least 350 yds.)
Set of 4 double pointed needles,
U.S. sizes 5 (or size to
achieve gauge) and 6 for
making rounds
Small amount of contrast yarn
Markers
Tapestry needle
Gauge: 22 sts = 4” with size 5
needle in stockinette st
Instructions
RIGHT HAND: ***With smaller needles cast on 48 sts.
Divide onto 16 sts on each
of 3 needles. Join round and
work 3-4 inches in K2, P2
ribbing. Knit 2 (6) roundt.
Make thumb gusset: 1st round:
P1 (inc 1 st in next st) twice,
P1. K to end of round.
Next 4 rounds: K all K sts, P all P
sts.
Next round: P1, inc 1 st in next st,
K1, inc 1 st in next st,K1 P1, Kto end of round (there are
now 6 K sts between the P sts)
Next 2 rounds: K all K sts, P all P sts
Next round: P1, inc 1 st in next st,K to 2 sts before P st, inc 1 st
Halcyon Yarn’s first Knit-a-long project.
THE SOLDIER’S GLOMITT Designed by Beth Quivey for Halcyon Yarn © 2008
Based on the classicMaine fisherman mitten,and incorporating otherfeatures requested by Sgt.MichaelWall, a careersoldier from Mainecurrently serving inAfghanistan, we’vedesigned a mitten we’venamed the“Soldier’sGlomitt.” It’s made fromwarm, durable 100% woolyarn, and the top flips backto reveal fingerless glovesfor detailed tasks. Michael’smom can’t knit anymore soshe asked HalcyonYarn forhelp. Beth Quivey - oureducation coordinatordesigned the Glomitt justfor SargentWall and hisunit.
We’ve asked ourknitting friends to help andhere’s the pattern. It usesour own BotanicaYarn .Wedo request that you use100% wool yarn -- nosynthetics, please -- insubdued neutral colors --black, dark green, grays,browns. You maypersonalize them if youwish -- perhaps with somesubtle striping orpatterning, adding textureor cabling.
The first 16 pairs will goto Sgt.Wall and his unit, butwe hope we’ll receiveenough to send to othertroops in Afghanistan.
As a special thank you,the names of all the knitterswho send us glomitts forAfghanistan will be enteredinto a drawing for aHalcyonYarn gift certificate.But the greatest reward, ofcourse, is knowing thatyou’re doing somethingpositive to help our troops.
A heartfelt thanks to allyou hardy knitters!
©0150001P
2
in next st, K1, P1. Knit to end of
round (8 K sts between P sts)
Next 2 rounds: K all K sts, P all P sts
Continue in this manner, increasing 2
sts at either end of gusset every 3rd
round, until there are 14 sts
between the P sts. You should now
have 60 sts in total. Work 2 rounds,
knitting all K sts and purling all P
sts.
Next round: Cast on 4 sts at the
beginning of the round, TURN work, slip 16 sts onto a thread, and
leave for thumb. Knit to the end of round (48sts).***
Next round: (marking round). K 24.Place marker. Change to larger
needles and K to end of round.Place marker. (Hint: thread a
length of contrasting yarn throughthe sts between the markers that
you’ve knit with larger needle).
Change to smaller needles, Knit 10 (12)
rounds. Work 8 rounds in K2, P2 ribbing. Cast off in ribbing.
Make thumb: K 16 thumb sts. Pick up and K 4 sts at thumb base (20 sts).
Divide these 20 sts onto 3 needles, K 15 (17) rounds.
Next round: (K3, K2tog) 4 times
Next round: (K2, K2tog) 4 times
Next round: (K1, K2tog) 4 times
Cut yarn, leaving a 6” tail. Use large
tapestry needle to thread yarn through the remaining 8 sts, draw
up and fasten securely.
Mitten flap: Beginning at marker, pick
up 24 sts across the loosely knit sts
of the marked round. Remove
marking yarn. Cast on 24 sts for
total of 48 sts. Divide these 48 sts
onto 3 needles and join in round.
Next 10 rounds: K24, (P2, K2) 6 times
Next round: K
K15 (17) rounds even.
Begin top shaping:
Round 1: (K4, K2tog), repeat to end of
round (40 sts)
Rounds 2 & 3: K
Round 4: (K3, K2tog), repeat to end of round (32 sts)
Rounds 5 & 6: K
Round 7: (K2, K2tog), repeat to end of
round (24 sts)
Rounds 8 & 9: K
Round 10: (K1, K2tog), repeat to end of round (16 sts)
Round 11: (K2tog), repeat to end of round (8 sts)
Cut yarn, leaving a 6” tail. Use a large tapestry needle to thread yarn
through the remaining 8 sts, draw up and fasten securely
LEFT HAND: Work from *** to *** as for Right Hand.
Next round: (marking round). Place marker. Change to larger needles
and K24. Place marker. (Hint:thread a length of contrasting yarn
through the sts between the
markers that you’ve knit with larger
needle).
Knit 10 (12) rounds. Work 8 rounds in
K2, P2 rib. Cast off in ribbing.
Work remainder of Left Hand glomitt as
for Right Hand.
FINISHING:
Weave in all loose ends on the inside of
glomitt.
If desired, fasten Velcro or snaps to top
of flap & on cuff to hold the flap in place when fingers are exposed.
Try making a button hole near top of thumb so thumb can be exposed
when necessary.
SO
LDIE
R’S
GLO
MIT
T
School Street Bath Maine
••• wwwhalcyonyarncom
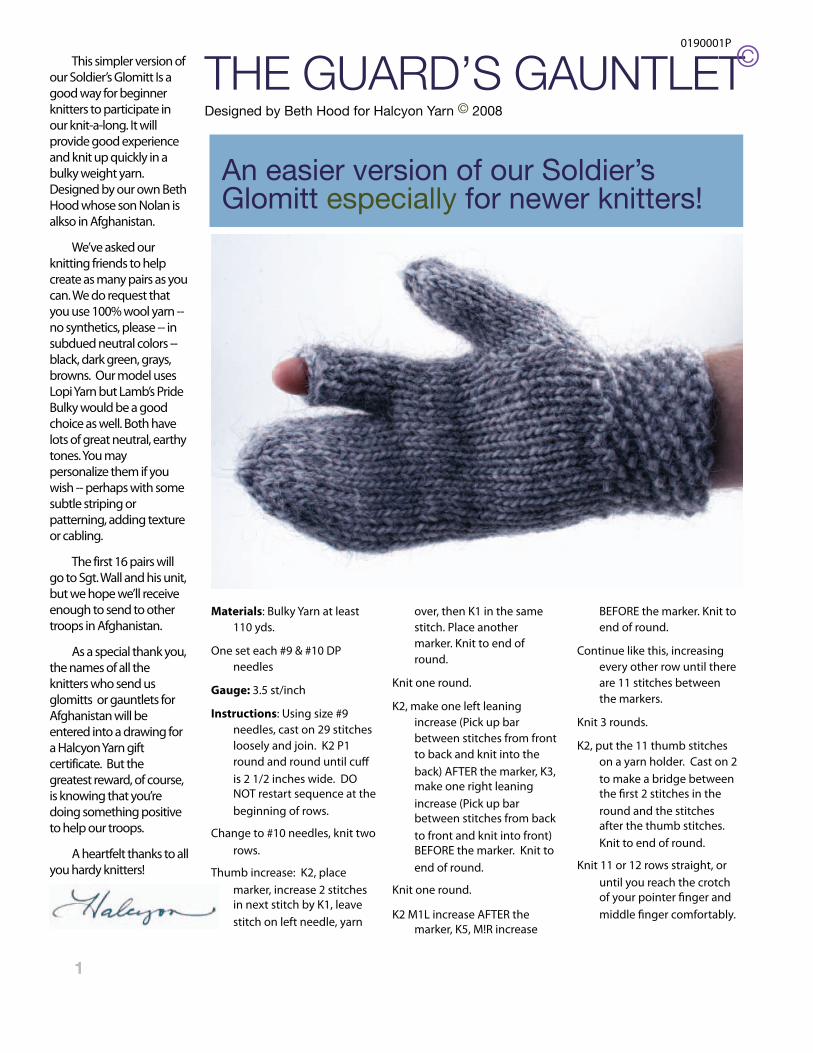
1
Materials: Bulky Yarn at least
110 yds.
One set each #9 & #10 DP
needles
Gauge: 3.5 st/inch
Instructions: Using size #9
needles, cast on 29 stitches
loosely and join. K2 P1
round and round until cuff
is 2 1/2 inches wide. DO NOT restart sequence at the
beginning of rows.
Change to #10 needles, knit two
rows.
Thumb increase: K2, place
marker, increase 2 stitches in next stitch by K1, leave
stitch on left needle, yarn
over, then K1 in the same
stitch. Place another
marker. Knit to end of
round.
Knit one round.
K2, make one left leaning
increase (Pick up bar
between stitches from front
to back and knit into the
back) AFTER the marker, K3, make one right leaning
increase (Pick up bar between stitches from back
to front and knit into front) BEFORE the marker. Knit to
end of round.
Knit one round.
K2 M1L increase AFTER the marker, K5, M!R increase
BEFORE the marker. Knit to
end of round.
Continue like this, increasing
every other row until there
are 11 stitches between
the markers.
Knit 3 rounds.
K2, put the 11 thumb stitches
on a yarn holder. Cast on 2
to make a bridge between the first 2 stitches in the
round and the stitches after the thumb stitches.
Knit to end of round.
Knit 11 or 12 rows straight, or
until you reach the crotch of your pointer finger and
middle finger comfortably.
THE GUARD’S GAUNTLETDesigned by Beth Hood for Halcyon Yarn © 2008
An easier version of our Soldier’s Glomitt especially for newer knitters!
This simpler version ofour Soldier’s Glomitt Is agood way for beginnerknitters to participate inour knit-a-long. It willprovide good experienceand knit up quickly in abulky weight yarn.Designed by our own BethHood whose son Nolan isalkso in Afghanistan.
We’ve asked ourknitting friends to helpcreate as many pairs as youcan.We do request thatyou use 100% wool yarn --no synthetics, please -- insubdued neutral colors --black, dark green, grays,browns. Our model usesLopiYarn but Lamb’s PrideBulky would be a goodchoice as well. Both havelots of great neutral, earthytones.You maypersonalize them if youwish -- perhaps with somesubtle striping orpatterning, adding textureor cabling.
The first 16 pairs willgo to Sgt.Wall and his unit,but we hope we’ll receiveenough to send to othertroops in Afghanistan.
As a special thank you,the names of all theknitters who send usglomitts or gauntlets forAfghanistan will beentered into a drawing fora HalcyonYarn giftcertificate. But thegreatest reward, of course,is knowing that you’redoing something positiveto help our troops.
A heartfelt thanks to allyou hardy knitters!
©0190001P
2
Pointer Finger: You are at the beginning
of the round, go back 1 stitch, rip it
out and replace it on the left needle.
Place that stitch and the next 7 on
a stitch holder. The point is to
center the pointer finger above the
thumb, this is an ambidextrous
mitten, good on either hand.
Cast on 2 new stitches to form another
bridge, as you did for the thumb
and knit 10 or 11 rounds ON THE MAIN BODY or as many as you
need to reach the top of the pinkie.
Close the top of the main body: *K2together, K2* for one round.
Knit two rounds.*K2 together, K1* for one round
Knit one roundCut yarn, leaving at least an 8”tail. Put
the tail on a yarn needle, run itthrough the stitches, and gather
tightly, run it through the stitches afew more times to lock it in, and cut.
Knit the thumb: Evenly distribute thestitches on the yarn holder onto the
#10 needles. Pick up another 4stitches from the base of the thumb
and main body (the 2 cast-onstitches, and one loop on each side.
Be consistent regarding the loopyou pick up).
Knit one round beginning with one ofthe loop stitches.
Knit each cast-on stitch together withthe picked-up loop next to it,
reducing those 4 stitches to 2. Knitthe rest of the round.
Knit 8 more rounds, or as many as you
need to reach the top of the thumb.
Bind off loosely leaving“thumb tip”
open.
Knit the Pointer Finger: Put the stitches
back on your double point needles
and pick-up/knit-together the 4
stitches the same way you did for
the thumb.
Knit 11 rounds or as many rounds asyou need to get to the top of the
pointer finger.Bind off LOOSELY. Leave pointer finger
tip open.
Knit another just like it!
GU
AR
D’S
GA
UN
TLE
T
School Street Bath Maine
••• wwwhalcyonyarncom


Copyright Interweave Press LLC. Not to be reprinted. All rights reserved.
-----------------------
kdtvlibrary
Rivulet ScarfRebecca L. Daniels
Originally published in Interweave Knits, Fall 2009
publishers of Interweave Knits magazine…join the online knitting community at KnittingDaily.comVisit the online store at shop.interweave.com/knitting for more great patterns!
Rivulet Scarf originally published in Interweave Knits, Fall 2009. ©Interweave Press LLC. Not to be reprinted. All rights reserved.
page 1
make time for yarn every day™
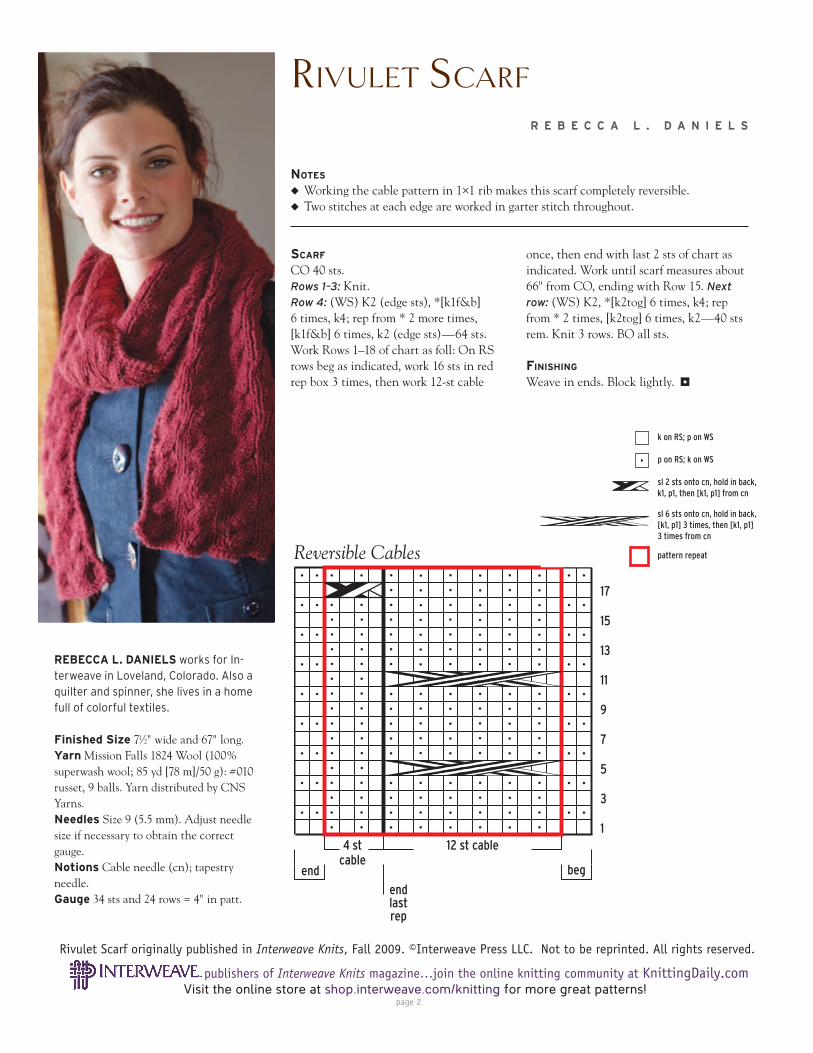
publishers of Interweave Knits magazine…join the online knitting community at KnittingDaily.comVisit the online store at shop.interweave.com/knitting for more great patterns!
Rivulet Scarf originally published in Interweave Knits, Fall 2009. ©Interweave Press LLC. Not to be reprinted. All rights reserved.
page 2
NOTES
Working the cable pattern in 1×1 rib makes this scarf completely reversible. Two stitches at each edge are worked in garter stitch throughout.
SCARF
CO 40 sts. Rows 1–3: Knit. Row 4: (WS) K2 (edge sts), *[k1f&b] 6 times, k4; rep from * 2 more times, [k1f&b] 6 times, k2 (edge sts)—64 sts. Work Rows 1–18 of chart as foll: On RS rows beg as indicated, work 16 sts in red rep box 3 times, then work 12-st cable
once, then end with last 2 sts of chart as indicated. Work until scarf measures about 66" from CO, ending with Row 15. Next
row: (WS) K2, *[k2tog] 6 times, k4; rep from * 2 times, [k2tog] 6 times, k2—40 sts rem. Knit 3 rows. BO all sts.
FINISHING
Weave in ends. Block lightly.
REBECCA L. DANIELS works for In-terweave in Loveland, Colorado. Also a quilter and spinner, she lives in a home full of colorful textiles.
Finished Size 71⁄2" wide and 67" long.Yarn Mission Falls 1824 Wool (100% superwash wool; 85 yd [78 m]/50 g): #010 russet, 9 balls. Yarn distributed by CNS Yarns.Needles Size 9 (5.5 mm). Adjust needle size if necessary to obtain the correct gauge. Notions Cable needle (cn); tapestry needle.Gauge 34 sts and 24 rows = 4" in patt.
RIVULET SCARFR E B E C C A L . D A N I E L S
Reversible Cables
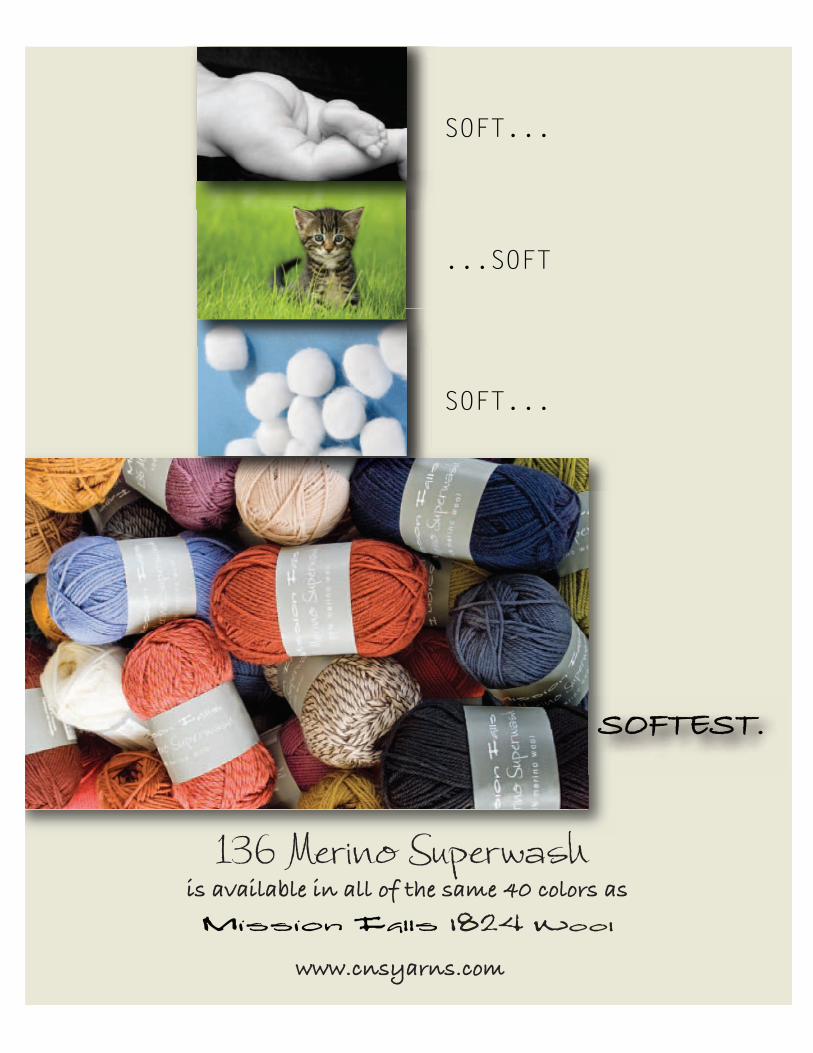
136 Merino Superwash is available in all of the same 40 colors as
www.cnsyarns.com
SOFT...
...SOFT
SOFT...
SOFTEST.

Copyright Interweave Press LLC. Not to be reprinted. All rights reserved.
-----------------------
Visit InterweaveStore.com/knittingpatterns for more great patterns!page 1
Kat
hryn
Mar
tin
Manchester Jacket originally published in Interweave Knits, Winter 2008. ©Interweave Press LLC. Not to be reprinted. All rights reserved.
publishers of Interweave Knits magazine…join the online knitting community at KnittingDaily.com
Manchester Jacket Alice HalbeisenOriginally published in Interweave Knits, Winter 2008
kdtvlibrarymake time for yarn every day™

Visit InterweaveStore.com/knittingpatterns for more great patterns!page 2
publishers of Interweave Knits magazine…join the online knitting community at KnittingDaily.com
Manchester Jacket originally published in Interweave Knits, Winter 2008. ©Interweave Press LLC. Not to be reprinted. All rights reserved.
A L I C E H A L B E I S E N
STITCH GUIDE
Mock I-cord: Set-up row: (WS) Purl. Work 4 rows in rev St st. Joining row: (RS) *With left-hand needle, pick up the purl bump of st in set-up row directly below st on needle, k2tog (purl bump and fi rst st on left-hand needle); rep from * across, joining sts on needle to sts of set-up row.
Attached I-cord: Sl sts on the WS rows; knit on the RS.
Double Seed Stitch: (multiple of 2 sts)Row 1: *K1, p1; rep from * to end. Rows 2 and 4: Work sts as they appear (knit the knit sts and purl the purl sts).Row 3: *P1, k1; rep from * to end.Rep Rows 1–4 for patt.
NOTES
To pick up two stitches per one bound-off stitch for collar, pick up fi rst stitch through both loops of the edge stitch; pick up second stitch through front loop only.
Applied I-cord: For a rounded corner that will lie fl at at the start of the I-cord edging and collar points, knit the three stitches without attaching them to a picked up stitch for one row, transfer them back to left-hand needle, work one row attaching them, then one more row without attaching them; continue with edging as established.
For a more prominent cord, when picking up stitches, lift the back loop only (as the work faces you) along the neckline and the front loop only when you come to the col-lar. There is a defi nite right side when stitches are picked up from the front loop.
BACK
With larger needle, CO 90 (100, 110, 120, 130, 140, 150) sts. Lower edging: Work double seed st (see Stitch Guide) for 4 rows. Body: Beg with a WS row, work 5 rows in St st. Shape waist: Dec row: (RS) Dec 1 st each end of needle—2 sts dec’d. Rep Dec row every 6th row 11 times—66 (76, 86, 96, 106, 116, 126) sts rem. Work even in St st until piece measures 12" from CO, ending with a RS row. Change to smaller needle and work mock I-cord (see Stitch Guide), ending with RS joining row. Cont with smaller needle, change to dou-ble seed st, beg Row 2 of patt; work even for 8 (8, 8, 8, 10, 10, 10) rows, ending with a RS row. Next row: Work mock I-cord, ending with RS joining row. Change to larger needle and purl 1 WS row. Shape
bust: Inc row: (RS) Inc 1 st each end of needle—2 sts inc’d. Rep Inc row every 4th
row 2 times—72 (82, 92, 102, 112, 122, 132) sts. Work even until piece measures 3 (3, 31⁄2, 31⁄2, 4, 4, 4)" from mock I-cord. Shape armholes: BO 3 (4, 5, 7, 8, 9, 10) sts at beg of next 2 rows, then 0 (2, 3, 4, 5, 6, 8) sts at beg of foll 2 rows—66 (70, 76, 80, 86, 92, 96) sts rem. Dec 1 st each end on every RS row 3 (2, 4, 5, 7, 9, 10) times—60 (66, 68, 70, 72, 74, 76) sts rem. Work even until armholes measure 7 (71⁄2, 71⁄2, 8, 8, 81⁄2, 9)", ending with a WS row. Shape neck and shoulders: Mark center 22 (24, 24, 26, 26, 28, 28) sts—19 (21, 22, 22, 23, 23, 24) sts each side for shoulders. BO 6 (6, 7, 7, 7, 7, 8) sts at beg of next 2 rows and at the same time on second BO row (WS), purl to 1 st past m, join new yarn, BO 20 (22, 22, 24, 24, 26, 26) sts (1 st before 2nd m), purl to end. Working each side separately at the same time, BO 6 (6, 7, 7, 7, 7, 8) sts at each armhole edge once
ALICE HALBEISEN lives in Lowell, Massachusetts, home of Classic Elite Yarns, where she works one day a week.
Finished Size 311⁄2 (36, 40, 45, 49, 54, 58)" bust circumference. Sweater shown measures 36", modeled with about 2" positive ease. Yarn Alpaca With A Twist Highlander (45% baby alpaca, 45% merino, 8% micro-fi ber, 2% viscose; 145 yd [133 m]/100 g): #2011 heather in bloom (purple tweed), 8 (8, 9, 9, 10, 10, 11) skeins. Needles Size 6 (4 mm): 24" circular (cir) and double-pointed (dpn). Size 5 (3.75 mm): 24" cir. Adjust needle size if necessary to obtain the correct gauge.Notions Six 11⁄8" (27 mm) buttons; removable markers (m); tapestry needle.Gauge 18 sts and 24 rows = 4" in St st on larger needles.
MANCHESTER JACKET

publishers of Interweave Knits magazine…join the online knitting community at KnittingDaily.comVisit InterweaveStore.com/knittingpatterns for more great patterns!
page 3
Manchester Jacket originally published in Interweave Knits, Winter 2008. ©Interweave Press LLC. Not to be reprinted. All rights reserved.
and at the same time dec 1 st at each neck edge (eliminating the sts before the markers). BO rem sts.LEFT FRONT
With larger needle, CO 66 (71, 76, 81, 86, 91, 96) sts. Lower edging and I-cord front
band: (WS) (Sl 3 sts pwise with yarn in front [wyf], k1) for front band, work to end in double seed st. Next row: (RS) Work in patt to last 4 sts, (p1, k3) for front band. Rep last 2 rows once more—4 rows in double seed st. Cont working front band as established to beg of neck shaping; work all other sts in St st. Work 5 rows even, ending with a WS row. Shape waist: Dec
row: (RS) Dec 1 st at beg of row, work to end—1 st dec’d. Rep Dec row every 6th row 11 times—54 (59, 64, 69, 74, 79, 84) sts rem. Work even until piece measures 12" from CO, ending with a RS row. Change to smaller needle. Maintain front band as established and work mock I-cord on all other sts, ending with RS joining row. Cont with smaller needle, change to double seed st beg with Row 2 of patt. Work 8 (8, 8, 8, 10, 10, 10) rows total in double seed st, ending with a RS row. Work mock I-cord, ending with RS joining row. Change to larger needle and purl 1 WS row. Shape bust: Inc row: (RS) Inc 1 st at beg of row, work to end—1 st inc’d. Rep Inc row every 4th row 2 times—57 (62, 67, 72, 77, 82, 87) sts. Work even until piece measures 3 (3, 31⁄2, 31⁄2, 4, 4, 4)" from last mock I-cord, ending with a WS row. Shape armhole: At beg of RS rows, BO 3 (4, 5, 7, 8, 9, 10) sts once, then 0 (2, 3, 4, 5, 6, 8) sts once—54 (56, 59, 61, 64, 67, 69) sts rem. Work 1 row even. Dec 1 st at armhole edge on every RS row 3 (2, 4, 5, 7, 9, 10) times—51 (54, 55, 56, 57, 58, 59) sts rem. Work even until armhole measures 51⁄2 (6, 6, 61⁄2, 61⁄2, 7, 71⁄2)", ending with a RS row. Shape neck: (WS) Sl 3 front-band I-cord sts onto a large removable m or holder and BO the next 16 (17, 17, 18, 18, 19, 19) sts, purl to end—32 (34, 35, 35, 36, 36, 37) sts rem. Pm 18 (20, 21, 21, 22, 22, 23) sts in from armhole edge for shoulder. At neck edge, BO 3 sts once, then dec 1 st every row 11 times, ending at marked sts and at the same time, when armhole mea-sures 7 (71⁄2, 71⁄2, 8, 8, 81⁄2, 9)", end with a WS row and shape shoulder as foll: At beg
of RS rows, BO 6 (6, 7, 7, 7, 7, 8) sts twice, then BO rem sts. Buttonhole placement: Along center front, pm 1⁄2" down from neck-edge BO and in center of double seed st band between 2 mock I-cords. Place 3rd m halfway between these two markers.
RIGHT FRONT
With larger needle, CO 66 (71, 76, 81, 86, 91, 96) sts. Lower edging and I-cord front
band: (WS) Work in double seed st to last 4 sts, (k1, sl 3 sts wyf) for front band. Next
row: (RS) (K3, p1) for front band, work in patt to end. Rep last 2 rows once more—4 rows in double seed st. Cont working front band as established to beg of neck shaping; work all other sts in St st. Work 5 rows even, ending with a WS row. Shape waist: Dec row: (RS) Dec 1 st at end of row. Rep Dec row every 6th row 11 times—54 (59, 64, 69, 74, 79, 84) sts rem. Work even until piece measures 12" from CO, ending with a RS row. Change to smaller needle. Main-tain front band as established and work mock I-cord on all other sts, ending with RS joining row. Cont with smaller needle, change to double seed st beg with Row 2 of
patt. Work 8 (8, 8, 8, 10, 10, 10) rows total in double seed st and at the same time work a buttonhole over center of double seed st band as foll: 6 sts in from front edge, BO 3 sts, work to end. On foll row, use the backward-loop method to CO 3 sts over hole. Rep buttonhole at rem markers as you come to them. When 8 (8, 8, 8, 10, 10, 10) rows total have been worked in double seed st, end with a RS row. Work mock I-cord, ending with RS joining row. Change to larger needles and St st, cont front band. Work 1 WS row. Shape bust: Inc row: (RS) Inc 1 st at end of row—1 st inc’d. Rep Inc row every 4th row 2 times—57 (62, 67, 72, 77, 82, 87) sts. Work even in St st until St st section measures 3 (3, 31⁄2, 31⁄2, 4, 4, 4)", ending with a RS row. Shape armholes: At beg of WS rows, BO 3 (4, 5, 7, 8, 9, 10) sts once, then 0 (2, 3, 4, 5, 6, 8) sts once—54 (56, 59, 61, 64, 67, 69) sts rem. Dec 1 st at armhole edge every RS row 3 (2, 4, 5, 7, 9, 10) times—51 (54, 55, 56, 57, 58, 59) sts rem. Work even until armhole measures 5 (51⁄2, 51⁄2, 6, 6, 61⁄2, 7)", ending with a WS row. Work last buttonhole over next 2 rows. Work even until armhole measures 51⁄2 (6, 6, 61⁄2, 61⁄2, 7, 71⁄2)", ending with a WS row. Shape
neck: (RS) Sl 3 I-cord sts onto a large removable m or holder and BO the next 16 (17, 17, 18, 18, 19, 19) sts, work to end—32 (34, 35, 35, 36, 36, 37) sts rem. Pm 18 (20, 21, 21, 22, 22, 23) sts in from armhole edge for shoulder. At neck edge, BO 3 sts once, then dec 1 st every row 11 times, ending at marked sts and at the same time, when armhole measures 7 (71⁄2, 71⁄2, 8, 8, 81⁄2, 9)", end with a RS row and shape shoulder as foll: At beg of WS rows, BO 6 (6, 7, 7, 7, 7, 8) sts twice. BO rem sts.
SLEEVES
With smaller needle, CO 38 (38, 42, 42, 44, 48, 48) sts. Work mock I-cord, ending with RS joining row by picking up one side of the CO sts. Cont with smaller needle, work in double seed st, beg with Row 2 of patt. Work 12 rows, ending with a RS row. Work mock I-cord, ending with RS joining row. Change to larger needle and St st and work 7 rows even. Shape sleeve: Inc row: (RS) Inc 1 st each end of needle—2 sts inc’d. Rep Inc row every 10th row 7 (0, 0,

publishers of Interweave Knits magazine…join the online knitting community at KnittingDaily.comVisit InterweaveStore.com/knittingpatterns for more great patterns!
page 4
Manchester Jacket originally published in Interweave Knits, Winter 2008. ©Interweave Press LLC. Not to be reprinted. All rights reserved.
0, 0, 0, 0) times, then every 8th row 0 (9, 8, 2, 2, 2, 0) times, then every 6th row 0 (2, 4, 13, 13, 14, 14) times, every 4th row 0 (0, 0, 0, 0, 0, 4) times—54 (60, 66, 72, 74, 80, 84) sts. Work even until sleeve measures 18 (18, 18, 181⁄2, 19, 191⁄2, 19)" from CO.
Shape cap: BO 3 (4, 5, 7, 8, 9, 10) sts at beg of next 2 rows, then 0 (2, 3, 4, 5, 6, 8) sts at beg of foll 2 rows—48 (48, 50, 50, 48, 50, 48) sts rem. Work 4 rows even, ending with a WS row. Dec 1 st each end of next row, then every RS row until cap measures 41⁄2 (5, 5, 51⁄2, 51⁄2, 6, 6)" from beg of shaping, ending with a WS row. BO 4 (4, 4, 2, 2, 2, 2) sts at beg of next 2 rows. BO rem sts.
FINISHING
Sew shoulder seams. Set in sleeves, sew sleeve and side seams. Collar: With RS facing, smaller needle, and beg after initial BO sts on right-front neck, alternately pick up and knit 1 and 2 sts for every other BO st (see Notes) evenly along right-front neck shaping, across back neck, and down left front, ending before the BO sts on left front. Work 2 rows in double seed st, ending with a RS row. Shape collar: Inc 1 st each end of foll row, then every 6th row 4 times—10 sts inc’d. Change to larger needle and work even until collar measures 31⁄2" from pick-up row. BO all sts in patt. Applied I-cord
edging: With WS of left front facing, transfer the 3 held sts to a dpn, ready to work across BO sts of neck. Next row: (WS) K2, sl 1 (sts from holder), pick up and knit 1 st from neck edge and place picked-up st on right-hand needle, insert left-hand needle into front loops of last 2 sts on right-hand needle (slipped st and picked up st) and k2tog-tbl (the slipped st and picked up st)—3 sts rem on right-hand needle. Transfer 3 sts to left-hand needle; with a second strand of yarn, pick up more sts along neck edge, using opposite (left) end of dpn that is holding the 3 sts. Note: Pick up 12 sts at a time, or as many as will fi t comfortably on the dpn. *K2, sl 1, sl next picked-up st to right-hand needle, k2tog-tbl—3 sts rem; transfer rem sts to left-hand needle. Rep from * for I-cord edging; work across front neck, around collar, and across right-front neck to sts on holder. Graft I-cord edging to sts on holder (see Notes). Sew 3 buttons to left front to correspond with buttonholes. Sew 3 buttons on right front, 3" to the right of each buttonhole. Weave in ends.
RISK-FREE TRIALOFFERDiscover knitwear designs that will capture your imagination.
You don’t have to be a designer or a knitting pro to makebeautiful knitted garments and accessories, and you don’thave to hunt all over for inspiring designs.
From cover to cover, Interweave Knits magazine gives yougreat projects, from the beginner to the advanced. Everyissue is packed full of captivating smart designs, step-by-step instructions, easy-to-understand illustrations, pluswell-written, lively articles sure to inspire.
Take advantage of this special risk-free offer today!
interweave.com/go/kdiwk

publishers of Interweave Knits magazine…join the online knitting community at KnittingDaily.comVisit InterweaveStore.com/knittingpatterns for more great patterns!
page 5
Manchester Jacket originally published in Interweave Knits, Winter 2008. ©Interweave Press LLC. Not to be reprinted. All rights reserved.
right front
back
20 (221⁄4, 241⁄2, 263⁄4, 29, 31, 331⁄4)"51 (56.5, 62, 68, 73.5, 79, 84.5) cm
143 ⁄4
(153 ⁄4
, 17,
18, 1
9, 2
01 ⁄4, 2
11 ⁄4)"
37.5
(40,
43,
46,
48.
5, 5
1.5, 5
4) c
m
141 ⁄ 2
(163 ⁄4
, 19,
211 ⁄ 4
, 231 ⁄2
, 253 ⁄4
, 28)
"37
(42.
5, 4
8.5,
54,
59.
5, 6
5.5,
71)
cm
16 (1
81 ⁄4, 2
01 ⁄2, 2
23 ⁄4, 2
43 ⁄4, 2
7, 2
91 ⁄4)"
40.5
(46.
5, 5
1.5, 5
8, 6
3, 6
8.5,
74.
5) c
m
fron
t nec
k de
pth:
21 ⁄2"
(6.5
cm
)
161 ⁄2
(161 ⁄2
, 17,
17, 1
71 ⁄2, 1
71 ⁄ 2, 1
71 ⁄2)"
41 (4
1, 43
, 43,
44.
5, 4
4.5,
44.
5) c
m
7 (7
1 ⁄ 2, 7
1 ⁄ 2, 8
, 8, 8
1 ⁄2, 9
)"18
(19,
19, 2
0.5,
20.
5, 2
1.5, 2
3) c
m
1"2.5 cm
41⁄4 (43⁄4, 5, 5, 5, 5, 51⁄4)"11 (12, 12.5, 12.5, 12.5, 12.5, 13.5) cm 5
(51 ⁄4
, 51 ⁄4
, 53 ⁄4
, 53 ⁄4
, 61 ⁄4
, 61 ⁄4
)"12
.5 (1
3.5,
13.5
, 14.
5, 14
.5, 1
6, 16
) cm
Note: Front shoulder is slightly narrower than back shoulder.
sleeve
81⁄2 (81⁄2, 91⁄2, 91⁄2, 93⁄4, 101⁄2, 101⁄2)"21.5 (21.5, 24, 24, 25, 26.5, 26.5) cm
12 (1
31 ⁄4, 1
43 ⁄4, 1
6, 16
1 ⁄2, 1
73 ⁄4, 1
81 ⁄2)"
30.5
(33.
5, 3
7.5,
40.
5, 4
1, 45
, 47)
cm
18 (1
8, 18
, 181 ⁄ 2
, 19,
191 ⁄ 2
, 19)
"46
(46,
46,
47,
48.
5, 4
9.5,
48.
5) c
m41 ⁄ 2
(5, 5
, 51 ⁄2
, 51 ⁄ 2
, 6, 6
)"11
.5 (1
2.5,
12.5
, 14,
14, 1
5, 15
) cm
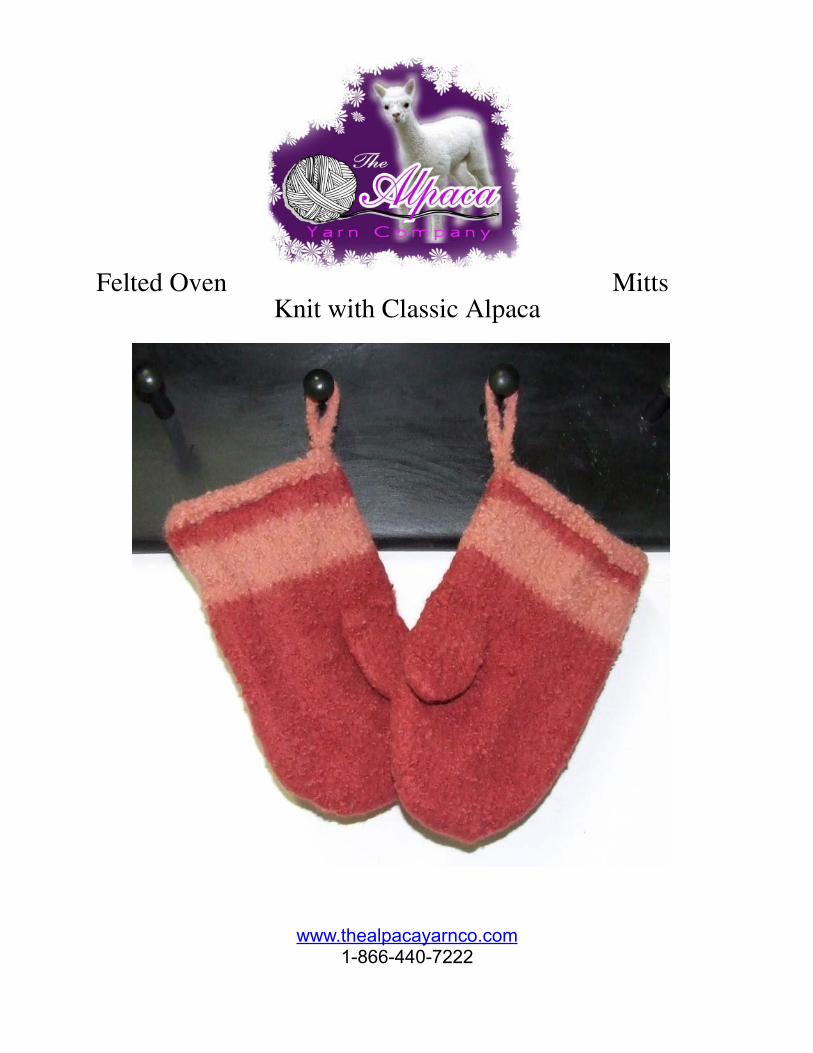
Felted Oven MittsKnit with Classic Alpaca
www.thealpacayarnco.com1-866-440-7222

SIZEOne Size to fit an Adult Hand
Designed especially for The Alpaca Yarn Company by Beth Lutz
LEVEL OF EXPERIENCEAdvanced Beginner
MATERIALSCLASSIC ALPACA by The Alpaca Yarn Company 100% superfine alpaca 1.75 oz (50g) ball = 110 yds Main Color (MC) – 4 balls; Color (A) – 1 ball; This is enough for 2 mitts.Shown in #1629 (MC), #0100 (A).Needles: US #11 (8.0 mm) double pointed needlesNotions: Stitch Markers, Tapestry NeedleGauge is not important on this project
Techniques & Special Stitch Instructions:
I-CordCO required number of sts onto DP needles. [Knit sts, do not turn needles. Slide sts to right side of needle and put needle in left hand.] Repeat between [ ].
Grafting (Kitchener Stitch)Arrange stitches on two needles. Hold needles with points facing the same direction, wrong sides of fabric together. Thread a tapestry needle with matching yarn (approximately 1” per stitch). Working from right to left and RS facing, proceed as follows:Front needle: yarn through 1st stitch as if to purl, leave stitch on needle.Back needle: yarn through 1st stitch as if to knit, leave on needle. Then continue as follows:* Front needle: through 1st stitch as if to knit, slip off needle; through next stitch as if to purl, leave on needle.Back needle: through 1st stitch as if to purl, slip off needle; through next stitch as if to knit, leave on needle. * Adjust tension to match rest of knitting and continue between * * until all stitches are worked in this fashion.
MITT* worked with a double strand throughoutCast on 46 sts with (A) and divide onto 3 dpn’s. Join and work 3 rounds of reverse st st. (purl every round).Join MC and work 5 rounds in st st. Switch to (A) and work 10 rounds. Switch back to MC and work another 10 rounds. With a piece of waste yarn, knit next 5 sts. Slide the 5 sts just worked back to the LH needle and picking up the MC yarn, continue for another 20 rounds. Note: For second mitt, work the waste yarn at the last 5 sts of the round. Proceed with 2nd mitt as for first.Place marker at the beginning of the round and between st 23 & 24. Work decreases at the top of the mitten as follows:Round 1: * [ SSK, k until 2 sts remain before marker, K2tog. ], repeat once for second side of mitt.Round 2: Knit all sts. Repeat these 2 rounds until a total of 20 sts remain. Divide sts onto 2 needles and work kitchner st to join at top of mitt. Fasten yarn and weave in ends.
THUMBRemove the waste yarn and place the 5 sts at the bottom of the opening onto one DPN and put the 5 sts at the top of the opening on another DPN. Knit 5 sts from first needle, pu 3 sts on side between needles, k5 from second needle, pu 3 sts between needles. Disburse 16 sts between the 3 needles. Work 12 rounds.
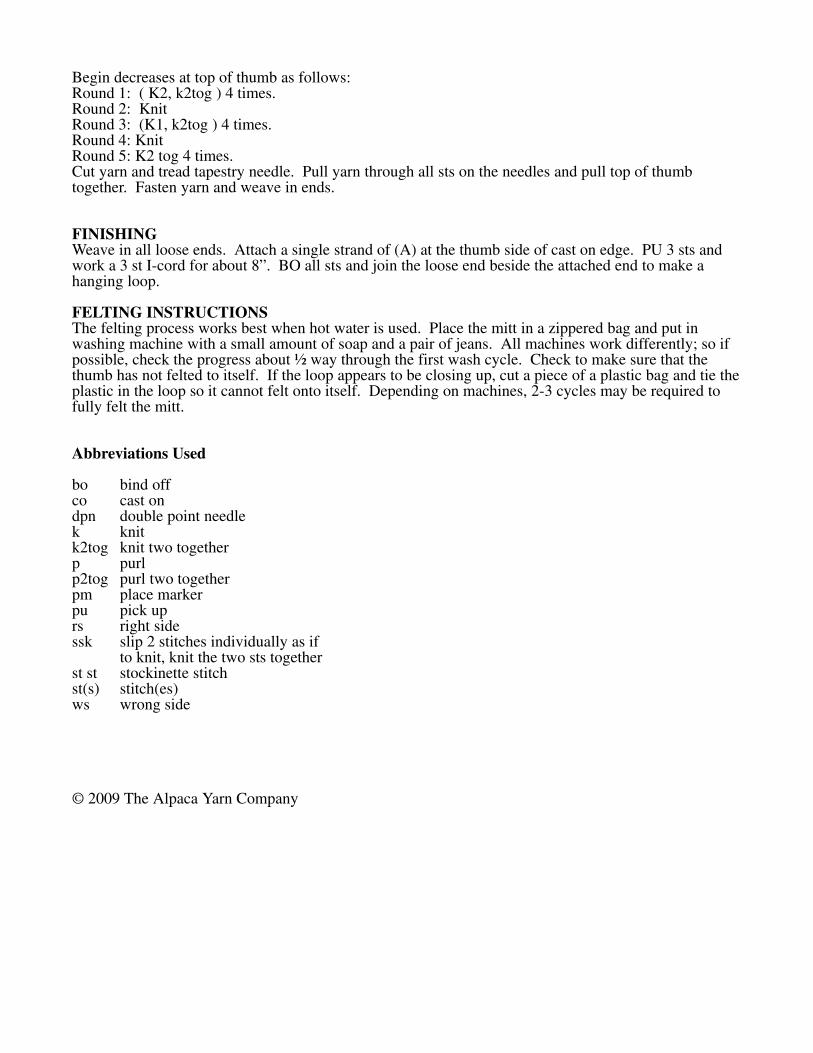
Begin decreases at top of thumb as follows:Round 1: ( K2, k2tog ) 4 times.Round 2: KnitRound 3: (K1, k2tog ) 4 times.Round 4: KnitRound 5: K2 tog 4 times.Cut yarn and tread tapestry needle. Pull yarn through all sts on the needles and pull top of thumb together. Fasten yarn and weave in ends.
FINISHINGWeave in all loose ends. Attach a single strand of (A) at the thumb side of cast on edge. PU 3 sts and work a 3 st I-cord for about 8”. BO all sts and join the loose end beside the attached end to make a hanging loop.
FELTING INSTRUCTIONSThe felting process works best when hot water is used. Place the mitt in a zippered bag and put in washing machine with a small amount of soap and a pair of jeans. All machines work differently; so if possible, check the progress about ½ way through the first wash cycle. Check to make sure that the thumb has not felted to itself. If the loop appears to be closing up, cut a piece of a plastic bag and tie the plastic in the loop so it cannot felt onto itself. Depending on machines, 2-3 cycles may be required to fully felt the mitt.
Abbreviations Used
bo bind offco cast ondpn double point needlek knitk2tog knit two togetherp purlp2tog purl two togetherpm place markerpu pick uprs right sidessk slip 2 stitches individually as if
to knit, knit the two sts togetherst st stockinette stitchst(s) stitch(es)ws wrong side
© 2009 The Alpaca Yarn Company

The Big SoftieDesigned by Becca Smith
Page 1 The BagSmith © 2008 www.bagsmith.com 888.879,7224
Finished Measurements:35” W x 53” L
Yarn and Materials:2 bumps (125 yds/40oz. per bump) of Bag-Smith’s Big Stitch Yarn in Crème and 1Bump in Grey (125 yds/40 oz per bump)70% alpaca, 15% wool, 15% nylon
Tools:Size U, 24” or 30” Big Stitch TunisianCrochet Hook and Size U Big Stitch regularcrochet hook
Gauge:4TFS / 4 inches; 3TFS rows / 4 inches
Skill Level:Intermediate
Becca’s Notes:This rug is worked using three Tunisian stitches: Tunisian Simple Stitch, Tunisian Purl Stitch andTunisian Full Stitch. The grey bump is used as an accent both within the main body of the rug andalong the edges. For the initial cast on or chain and rows of single crochet, it is easier to use theregular size U hook. You can also chain with the Tunisian Hook, alrhough it is a little awkward.
The Big SoftieBecca Smith
Page 2 The BagSmith © 2008 www.bagsmith.com 888.879,7224
Stitch Glossary:Tunisan Simple Stitch (Tss ):The Tunisian Simple Stitch is commonly known as the afghan stitch. It requires a longhook, preferably with a knob at the end to hold the stitches on the hook. Tunisian stitchesstart with a crochet chain (the same number needed for the first row plus one.) Each rowhas a forward and a reverse. In the forward part of the row, you are leaving stitches on thehook. On the reverse part of the row you are taking stitches off the hook. You do notturn your work at the end of any rows.
Foundation Row Forward:Insert hook into 2nd ch from hook, yo draw loop through and leave on hook, *insert hookinto next ch, yo, draw loop through and leave on hook*, rep to end. Do not turn. This isthe start row that creates the vertical threads that are used in other stitches.
Foundation Row Reverse:YO, draw 1 through loop; *yo draw through 2 loops and continue from * until only 1 loopremains on hook. Do not turn.
Tunisian Simple Stitch (Forward):* With yarn behind the hook, insert hook from right to left behind single vertical thread,yo, draw through and leave on hook.* Repeat to end, leaving all sts on hook. Do not turn.Use the Foundation Row Reverse on the return.
Tunisian Purl Stitch (TPS) (Forward):Sk the first lp. *Move the yarn in front of the hook. Insert hook behind the verticalthread of next st, YO and draw loop from behind the vertical thread and leave on hook.*Repeat to end.Use the Foundation Row Reverse on the return. NOTE: When working TFS – for everyother row, sk the first space between the edge and the first vertical bar and eliminate thelast space. This will give you a more even edge. Apply this to all rows of TFS.
Tunisian Full Stitch (TFS) Forward:*With yarn in back, insert the hook under the horizontal bar and between the vertical bars,YO and draw loop through and leave on hook. * Repeat to end.Use the Foundation Row Reverse on the return.

The Big SoftieBecca Smith
Page 3 The BagSmith © 2008 www.bagsmith.com 888.879,7224
Rug Pattern:
Begin with grey yarn, ch 28. Sk first lp and sc across. (26 sts).
Work Tunisian Simple Stitch (TSS) into 26 sts in forward and reverse for one row.
Cut yarn leaving a 5” tail.
Attach crème yarn and continue with Tunisian Full Stitch (TFS) for 5 complete rows (for-ward and reverse). Do not cut yarn.
NOTE: When working TFS – for every other row, sk the first space between the edge andthe first vertical bar and eliminate the last space. This will give you a more even edge.
Apply this to all rows of TFS.
Attach grey yarn and Tunisian Purl Stitch (TPS) for one complete row (forward and re-verse) and cut yarn leaving a 5” tail.
Pick up crème yarn and resume TFS for 10 complete rows. Do not cut yarn.
Attach grey yarn and TPS for one complete row and cut yarn leaving 5” tail.
Pick up crème yarn and resume TFS for 10 complete rows. Do cut yarn.
Attach grey yarn and TPS for one complete row and cut yarn leaving 5” tail.
Pick up crème yarn and resume TFS for 5 complete rows. Cut yarn leaving 5” tail.
Change to grey yarn and TSS for one row.
Finishing:SC across the edge and down the side. Cut yarn leaving 5” tail. Attach grey yarn to otherside and sc down the edge.
Weave in all ends.
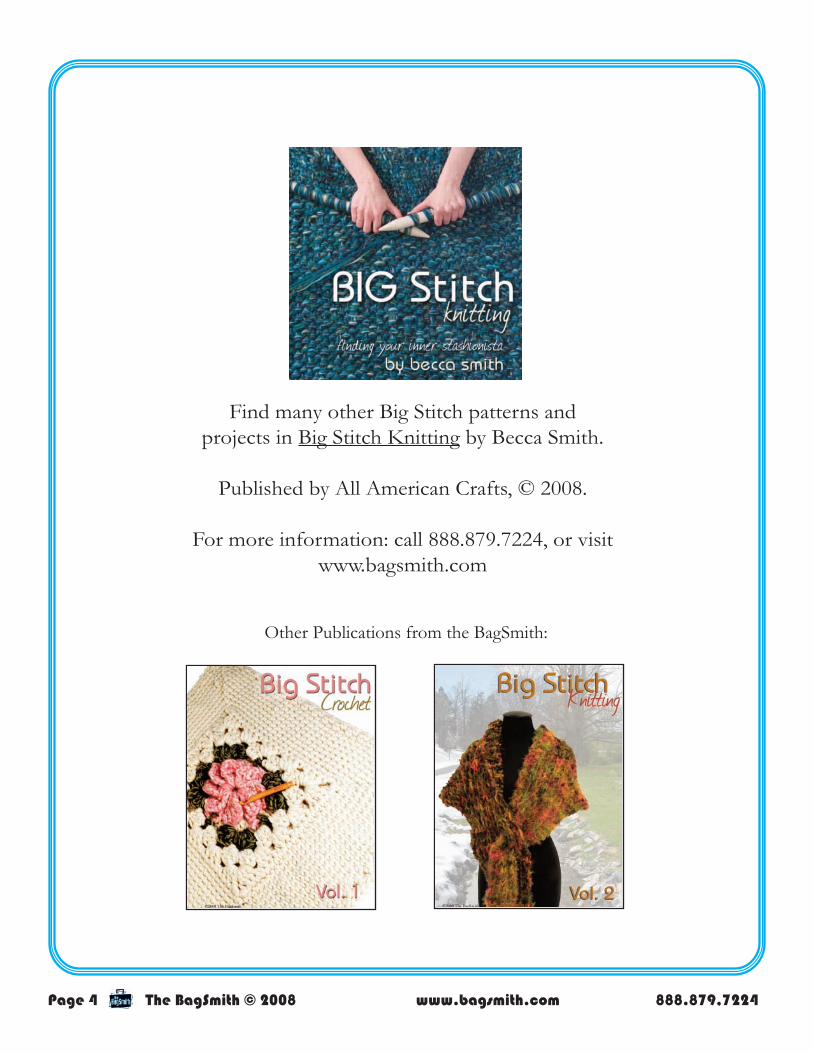
Page 4 The BagSmith © 2008 www.bagsmith.com 888.879,7224
Find many other Big Stitch patterns andprojects in Big Stitch Knitting by Becca Smith.
Published by All American Crafts, © 2008.
For more information: call 888.879.7224, or visitwww.bagsmith.com
Other Publications from the BagSmith:
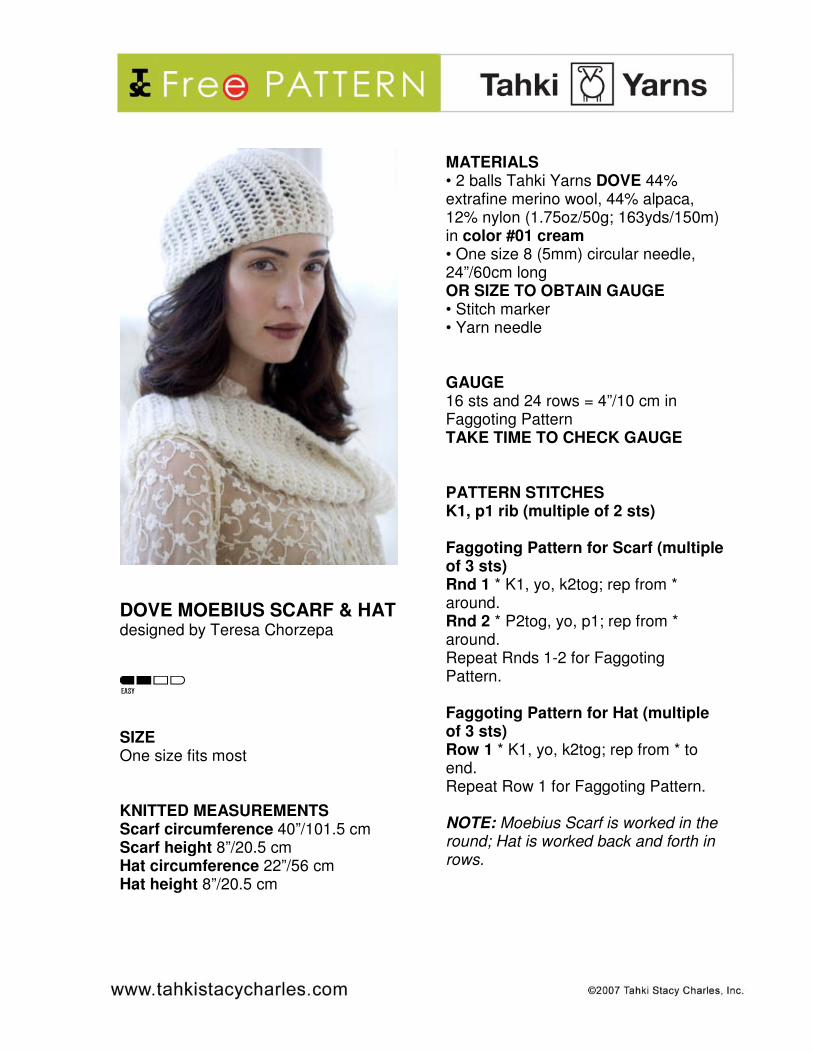
DOVE MOEBIUS SCARF & HAT designed by Teresa Chorzepa
SIZE One size fits most KNITTED MEASUREMENTS Scarf circumference 40”/101.5 cm Scarf height 8”/20.5 cm Hat circumference 22”/56 cm Hat height 8”/20.5 cm
MATERIALS • 2 balls Tahki Yarns DOVE 44% extrafine merino wool, 44% alpaca, 12% nylon (1.75oz/50g; 163yds/150m) in color #01 cream
• One size 8 (5mm) circular needle, 24”/60cm long OR SIZE TO OBTAIN GAUGE • Stitch marker • Yarn needle GAUGE 16 sts and 24 rows = 4”/10 cm in Faggoting Pattern TAKE TIME TO CHECK GAUGE PATTERN STITCHES K1, p1 rib (multiple of 2 sts) Faggoting Pattern for Scarf (multiple of 3 sts) Rnd 1 * K1, yo, k2tog; rep from * around. Rnd 2 * P2tog, yo, p1; rep from * around. Repeat Rnds 1-2 for Faggoting Pattern. Faggoting Pattern for Hat (multiple of 3 sts) Row 1 * K1, yo, k2tog; rep from * to end. Repeat Row 1 for Faggoting Pattern. NOTE: Moebius Scarf is worked in the round; Hat is worked back and forth in rows.
SCARF Cast on 159 sts. Place marker and join for working in the round, adding a twist to start moebius. (RS) Begin Faggoting Pattern for Scarf; work even until piece measures 8” from beginning. Bind off all sts. Weave in ends. HAT Cast on 90 sts. Row 1 * K1, p1; rep from * to end. Repeat this row twice more. (RS) Begin Faggoting Pattern for Hat; work even until piece measures 5½" from beginning. Shape Top Row 1 (RS) * (K1, yo, k2tog) twice, k1, k2tog; rep from * to end – 80 sts rem. Row 2 (WS) * K2, (k1, yo, k2tog) twice; rep from * to end. Row 3 * (K1, yo, k2tog) twice, k2tog; rep from * to end – 70 sts rem. Row 4 * K1, (k1, yo, k2tog) twice; rep from * to end.
Row 5 * K1, yo, k2tog, k1, yo, k3tog; rep from * to end – 60 sts rem. Row 6 * K1, yo, k2tog; rep from * to end. Row 7 * K1, yo, k2tog, k1, k2tog; rep from * to end – 50 sts rem. Row 8 * K3, yo, k2tog, ; rep from * to end. Row 9 * K1, yo, (k2tog) twice; rep from * to end – 40 sts rem. Row 10 * K2, yo, k2tog; rep from * to end. Row 11 * K1, yo, k3tog; rep from * to end – 30 sts rem. Row 12 * K1, yo, k2tog; rep from * to end. Row 13 * K1, k2tog; rep from * to end – 20 sts rem. Row 14 Knit. Row 15 * K2tog; rep from * to end – 10 sts rem. Cut yarn leaving a long tail, draw through remaining sts and fasten securely in place. Sew back seam. Weave in ends.
ABBREVIATIONS k knit RS right side k2tog (k3tog) knit 2 (3) sts together st(s) stitch(es) p purl WS wrong side rem remain(ing) yo yarn over rep repeat(ing)

©2009 Artyarns. This pattern may not be reproduced for any reason without the written permission of the copyright holder.
Reversible Hat Designed by Iris Schreier, author of Reversible Knits (2009)
Experience Level: Beginner/Intermediate
Abbreviations:
Ssk—slip one, slip one, knit two together through back loop, a decrease of one stitch
Ssp—slip one, slip one, purl two together through front loop, a decrease of one stitch
Sl1wyib—slip one stitch with yarn in back
Sl1wyif—slip one stitch with yarn in front
Stripe Pattern (the Slip Stitch option is recommended for beginners)
Slip Stitch Stripe Option (Round 1 is worked twice, once with one yarn and then with the other)
Round 1a: With B, *k1, sl1wyif; repeat from * to marker. Slip marker.
Round 1b: With A, *sl1wyib, p1; repeat from * to marker. Slip marker.
Double Knit Stripe Option (Both yarns are carried together and worked separately)
Round 1: *K1B, p1A; repeat from * to marker, slip marker.
Materials:
Total 184 yds
Yarn A: 1 skein Artyarns Supermerino in Maroon,
color #295
Yarn B: 1 skein Artyarns Beaded Pearl & Sequins in
multi-color, 198 Silver
Size 8 circular knitting needle, 16” long.
Size 8 double pointed needles.
Stitch marker.
Tapestry needle
Gauge: 26 sts and 20 rows = 4”/10cm in pattern
stitch
Finished Measurements: 17” circumference x 8-
1/2” height unstretched
NOTE: For larger hat, switch to larger needle size to
increase gauge.

©2009 Artyarns. This pattern may not be reproduced for any reason without the written permission of the copyright holder.
Solid Pattern
Round 1: With A, *k1, p1; repeat from * to marker. Slip Marker
Instructions
With A, co 96 sts and place marker.
Join and work [2 rounds of Stripe Pattern (using either Slip Stitch or Double Knit Option), followed by 2 rounds of
Solid Pattern] a total of 3 times. Continue to work just Stripe Pattern.
When brim measures 5-1/2” (7” for upturned brim) decrease for top of hat as follows
switching to double-pointed needles when there are too few stitches to knit in the round on the circular needles. If
you are comfortable with 2-stranded double-knitting, work Option 2; otherwise work Option 1.
Option 1: Slip Stitch Method
Rounds 1, 4, 7, 10, 13, 16: With B, *k1, sl1wyib; repeat from * to marker. Slip marker.
Rounds 2, 5, 8, 11, 14, 17: With A, *sl1wyib, p1; repeat from * to marker. Slip marker.
Round 3: With A, *[k1, p1]5 times, [reorder next 4 sts transposing them so 2 knit sts are followed by 2 purl sts, and
ssk, ssp—decrease of 2 sts]; repeat across round. Slip marker.
Round 6: With A, *[k1, p1]4 times, [reorder next 4 sts transposing them so 2 knit sts are followed by 2 purl sts, and
ssk, ssp—decrease of 2 sts]; repeat across round. Slip marker.
Round 9: With A, *[k1, p1]3 times, [reorder next 4 sts transposing them so 2 knit sts are followed by 2 purl sts, and
ssk, ssp—decrease of 2 sts]; repeat across round. Slip marker.
Round 12: With A, *[k1, p1]2 times, [reorder next 4 sts transposing them so 2 knit sts are followed by 2 purl sts,
and ssk, ssp—decrease of 2 sts]; repeat across round. Slip marker.
Round 15: With A, *[k1, p1]1 time, [reorder next 4 sts transposing them so 2 knit sts are followed by 2 purl sts, and
ssk, ssp—decrease of 2 sts]; repeat across round. Slip marker.
Round 18: With A, *[ reorder next 4 sts transposing them so 2 knit sts are followed by 2 purl sts, and ssk, ssp—
decrease of 2 sts]; repeat across round. Remove marker.—12 sts
Option 2: Double-knit Method
Rounds 1, 3, 5, 7, 9, 11: Work Double-Knit Stripe Pattern
Round 2: With A, *[k1, p1]5 times, [reorder next 4 sts transposing them so 2 knit sts are followed by 2 purl sts, and
ssk, ssp—decrease of 2 sts]; repeat across round. Slip marker.
Round 4: With A, *[k1, p1]4 times, [reorder next 4 sts transposing them so 2 knit sts are followed by 2 purl sts, and
ssk, ssp—decrease of 2 sts]; repeat across round. Slip marker.
Round 6: With A, *[k1, p1]3 times, [reorder next 4 sts transposing them so 2 knit sts are followed by 2 purl sts, and
ssk, ssp—decrease of 2 sts]; repeat across round. Slip marker.
Round 8: With A, *[k1, p1]2 times, [reorder next 4 sts transposing them so 2 knit sts are followed by 2 purl sts, and
ssk, ssp—decrease of 2 sts]; repeat across round. Slip marker.
Round 10: With A, *[k1, p1]1 time, [reorder next 4 sts transposing them so 2 knit sts are followed by 2 purl sts, and
ssk, ssp—decrease of 2 sts]; repeat across round. Slip marker.
Round 12: With A, *[ reorder next 4 sts transposing them so 2 knit sts are followed by 2 purl sts, and ssk, ssp—
decrease of 2 sts]; repeat across round. Remove marker.—12 sts
Finishing:
Cut the yarn. Thread the tail onto a yarn needle and draw it through the remaining 12 sts. Pull to tighten, secure,
and weave in ends.

TRENDSETTER YARNS
www.prismyarn.com www.trendsetteryarns.com KNITTING FOR CHILDREN TIPS & TRICKS LAURA BRYANT & BARRY KLEIN ©2009
• Choose easy care yarn, but don’t necessarily default to 100% acrylic. While machine washable and dryable, many acrylics can look quite worn and lifeless after several washings. Instead, look for machine washable wool or wool blended with acrylic or nylon. Wool stays lively and bouncy throughout its life, adding dimension, resilience and body to garments that very well may become heirlooms. Cotton and nylon yarns are good alternatives also—hypo‐allergenic, soft and easy to care for. Machine washable wools have been pre‐treated so that they will not shrink or felt. Italian wools will be marked “Irristringibile” if they have been pretreated.
• Sleeve cuffs and neck openings must be larger than you think. Even for a garment intended as a pullover, consider making cardigan shaping with front buttons, otherwise shoulder buttons might be needed for a neck opening that will fit over a child’s head—or, make a V‐neck. Cuffs might want to be large enough that an adult’s hand can fit through, to assist in dressing the child.
• Any child and parent will appreciate a snuggly blanket or knitted Teddy Bear, which negates sizing issues, offers long‐term use, and can be passed down through generations.
• Children’s items are a great place to choose bright, cheery colors. Primary colors can work well for either boys or girls if gender is unknown.
• Simple knits with strong graphic statements in bold stripes or color blocks appeal to children of all ages.
• Consider knitting a size or two larger so the child can grow into the garment.
• Fun embellishments like buttons, beads and even appliques can add a great deal of interest to a child’s garment, and will capture the imagination of the wearer.
• Always remember that you are making something with love and your own two hands, so buy the best yarn you can afford and make sure you have enough. With love and luck, your work will be passed from generation to generation.
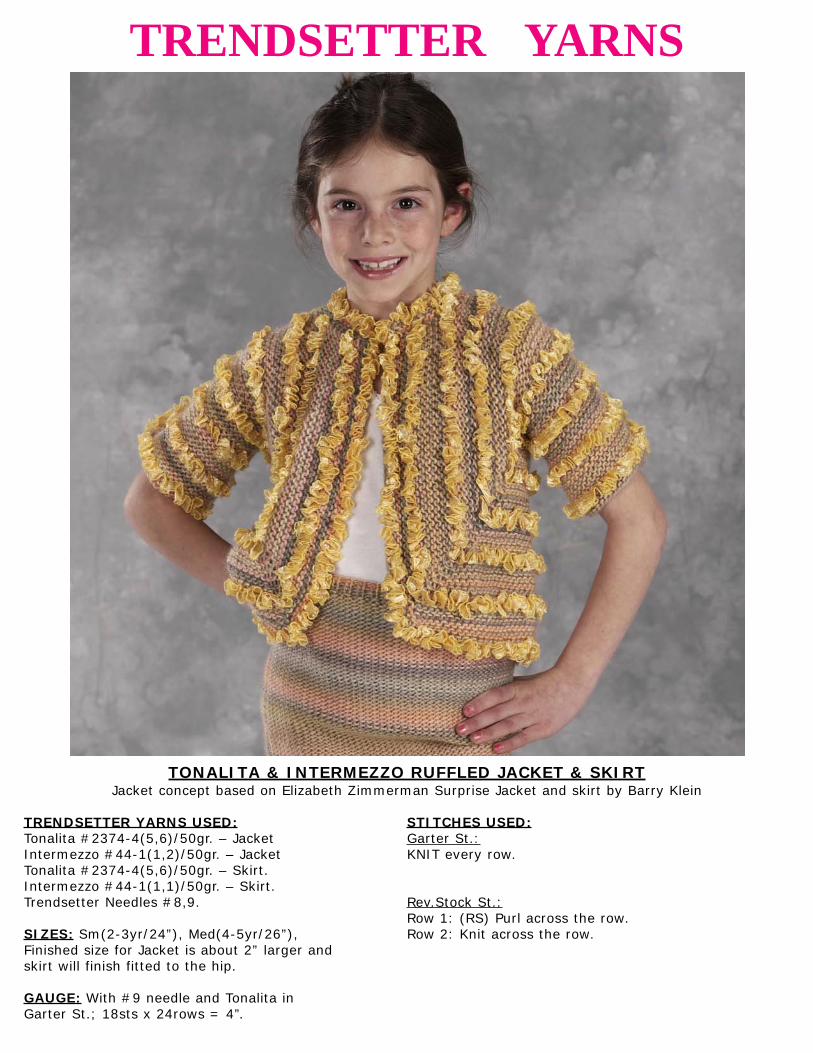
TRENDSETTER YARNS
TONALITA & INTERMEZZO RUFFLED JACKET & SKIRTJacket concept based on Elizabeth Zimmerman Surprise Jacket and skirt by Barry Klein
TRENDSETTER YARNS USED: STITCHES USED:Tonalita #2374-4(5,6)/50gr. – Jacket Garter St.:Intermezzo #44-1(1,2)/50gr. – Jacket KNIT every row.Tonalita #2374-4(5,6)/50gr. – Skirt.Intermezzo #44-1(1,1)/50gr. – Skirt.Trendsetter Needles #8,9. Rev.Stock St.:
Row 1: (RS) Purl across the row.SIZES: Sm(2-3yr/24”), Med(4-5yr/26”), Row 2: Knit across the row.Finished size for Jacket is about 2” larger andskirt will finish fitted to the hip.
GAUGE: With #9 needle and Tonalita in Garter St.; 18sts x 24rows = 4”.
KNITTING INSTRUCTIONS
JACKET: (Worked in one piece. Knitting looks interesting but please follow instructions from start to finish asknitting will fall into place and look like a jacket when you are done.)
With #9 needle and Tonalita, Cast on 162(171,180)sts. On the next row and all rows, Slip the first stitch as if topurl. Jacket will be worked in stripes as follows:
9 rows Tonalita, 1 row Tonalita through Intermezzo following Intermezzo Knit Join.At the same time, on the next row (WS), knit 36(38,40)sts and place a marker (A). Continue knitting across therow and place a marker (B) when 36(38,40)sts remain on the left needle. Place marker and finish the row.Begin decreasing before and after markers in full fashion every RS row until you have 90(95,100)sts on the nee-dle by working decreases as follows:
Work until 2sts before marker,SSK. Move marker, K2-tog after marker. Repeat for marker B.On the next RS row, begin increasing before and after markers in desired increase method until original numberof stitches are back on the needle.
Work 5sts. Turn and place them on a stitch holder. Work until 5sts remain at end of row and place final 5sts ona holder. Continue in Ruffled Garter St., Increasing before and after markers as before until the number ofstitches between markers A and B are 108(114,120)sts and ending ready for a WS row. Break yarn.
Place stitches at the beginning of the row up to marker A on a separate stitch holder. Place stitches at the endof the row up to marker B on a separate stitch holder. Remove markers. The stitches on the holders are nowyour center fronts.
Continue in pattern on remaining stitches, slipping the first stitch of every row until 1” less than desired finishedlength on the body. Our piece is 10(11,12)”. End with a WS row. Break yarn and place remaining stitches on astitch holder or spare needle.
FRONT BAND: With right side facing and beginning at left front neck edge, knit the stitches from the holder.Pick up and knit a stitch from each Garter ridge along the horizontal left front neck edge. Place a marker. Pickup a stitch in the outside corner and place a marker. Knit stitches from left front holder. Pick up and knit a stitchfrom each ridge along the remainder of the left front and place a marker. Pick up a stitch in the outside cornerand place a marker. Knit stitches along the bottom of band. Knit stitches from spare needle. Continue picking upand placing markers until stitches from right front holder are on the needle. Knit the next row.
Knit the next row. At the marker outside corners,M1,slip marker,K1,slip marker,M1. Continue, making a button-holes along the right or left front depending on needs and button size. Work 1 row of Intermezzo on next RSrow. Bind off on next row. Sew sleeve seam to top shoulder seam to create the jacket.
SKIRT: With #8 needle and Tonalita, Cast on 56(62,68)sts. Work 1 row of Intermezzo Purl Join on the next
row. Continue to work in stripes as follows, decreasing 1 stitch in full fashion each end every 10th row 7x:
9 rows Tonalita in Rev. Stock St., 1 row Tonalita/Intermezzo in Purl Join method
Repeat for a total of 3 or 4 Intermezzo stripes as desired. Continue in Tonalita only until 11(12,13)” from thecast on. Change to K1,P1 Rib St. for 1”. Bind off. Make another piece exactly the same.
FINISHING: Sew side seams closed. Run thin cord elastic through top rib to adjust for fit as needed.

#3035 SCOUBIDU HEARTS & CABLES BABY BLANKETDesigned By: Peggy Yao & Barry Klein Copyright: October 2004
TRENDSETTER YARNS USED: STITCHES USED:Scoubidu #654-8/50gr. Seed St.:Needles #11 Row 1: *K1,P1*. Rep *to* across.
Row 2: Work stitches opposite as set.SIZE: Approx 32” x 48” or desired length.
Stock St.:GAUGE: With #11 needle and Scoubidu in Row 1: (RS) Knit across the row.Seed St.; 4sts = 1”. Row 2: Purl across the row.
#3035 KNITTING INSTRUCTIONS
BLANKET: With #11 needle and Scoubidu, Cast on 132sts. Work in Seed St. for 5 rows.Change to work as follows on next row (RS row).
4sts Seed St.,4sts Stock St.,K9 (Heart St.),4sts Stock St.,4sts Seed,82sts Eyelet Cable,4stsSeed,4sts Stock St.,K9 (Heart St.),4sts Stock St.,4sts Seed St.
HEART ST.: EYELET CABLE:Row 1,3: K9. Row 1: *P2,K3*. Rep *to* end P2.Row 2,4: P9. Row 2: *K2,P3*. Rep *to* end K2.Row 5: K4,P1,K4. Row 3: *P2, wyib Sl.1,K2,Pass Sl stitch over K2*Row 6: P3,K3,P3. Rep *to* end P2.Row 7: K2,P5,K2. Row 4: *K2,P1,Yo,P1*. Rep *to* end K2.Row 8: P2,K5,P2.Row 9: K1,P7,K1.Row 10: P1,K7,P1.Row 11: P9.Row 12: K9.Row 13: P4,K1,P4.Row 14: P1,K2,P3,K2,P1.Repeat rows 1-14.
Work in patterns as established. You may wish to put ring markers between each of the stitchpatterns to help in establishing them and keeping them separate. Continue to work until 48”and ending with a heart pattern ending on row 2 or 4 so blanket will be the same at bothends. Change all stitches to Seed St. for 5 rows. Bind off in pattern on next row.
FINISHING: Block blanket carefully so that all stitch patterns are visible and open and blan-ket remains flat. If desired, work 1 row of Single Crochet around the blanket and fringe theends for extra texture.
CARE: Scoubidu is a baby yarn made in Cotton and Acrylic. The is yarn can be washed in themachine if blanket is put in a lingerie bag. Wash in cool water with very mild detergents with-out bleach. Run through complete cycle. Place lingerie bag in low heat dryer for 15 minutes.Open bag and place blanket on flat dry surface. Smooth out all edges and allow blanket todry completely.
Rev: 12/06
TRENDSETTER YARNS ~ LANE BORGOSESIA ~ FRONT & CENTER BUTTONS/ACCESSORIESFAYLA REISS COLLECTION ~ JANE SLICER-SMITH SIGNATUR COLLECTION16745 Saticoy St. #101. Van Nuys, CA. 91406 www.Trendsetteryarns.com
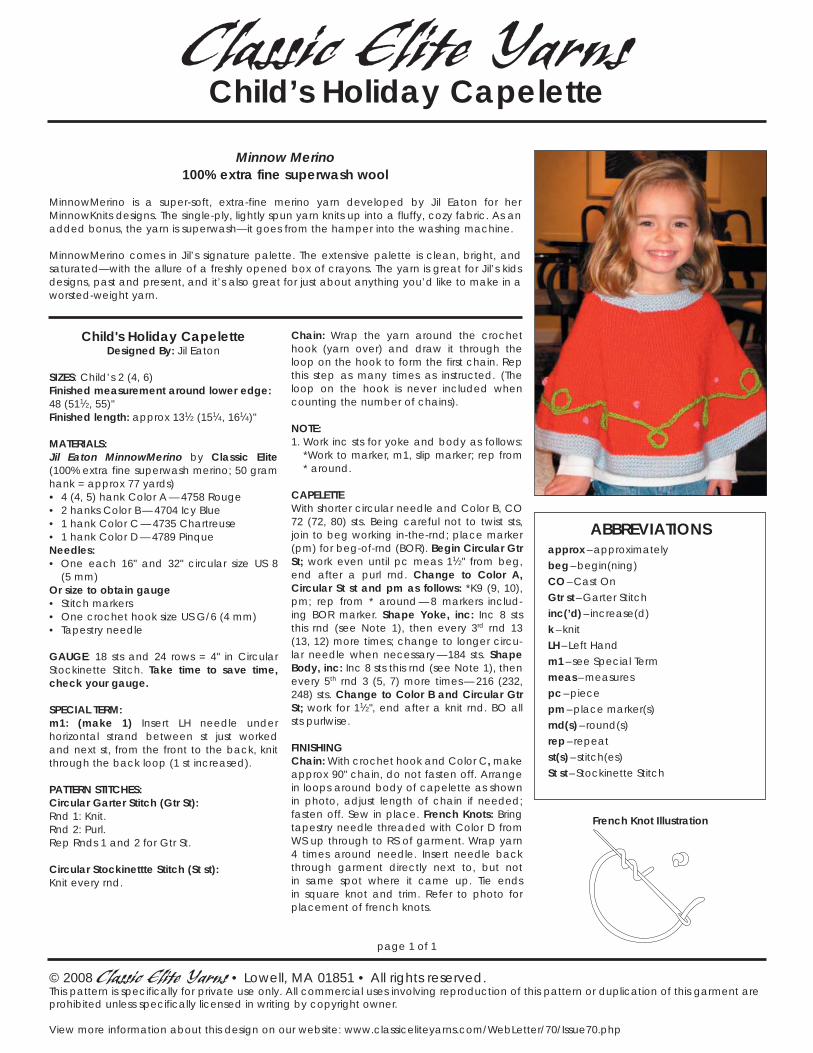
Classic Elite YarnsChild’s Holiday Capelette
Child's Holiday CapeletteDesigned By: Jil Eaton
SIZES: Child’s 2 (4, 6)Finished measurement around lower edge:48 (511⁄2, 55)"Finished length: approx 131⁄2 (151⁄4, 161⁄4)"
MATERIALS:Jil Eaton MinnowMerino by Classic Elite (100% extra fine superwash merino; 50 gram hank = approx 77 yards)• 4 (4, 5) hank Color A — 4758 Rouge• 2 hanks Color B — 4704 Icy Blue• 1 hank Color C — 4735 Chartreuse • 1 hank Color D — 4789 PinqueNeedles:• One each 16" and 32" circular size US 8 (5 mm)Or size to obtain gauge• Stitch markers• One crochet hook size US G/6 (4 mm)• Tapestry needle
GAUGE: 18 sts and 24 rows = 4" in Circular Stockinette Stitch. Take time to save time, check your gauge.
SPECIAL TERM: m1: (make 1) Insert LH needle under horizontal strand between st just worked and next st, from the front to the back, knit through the back loop (1 st increased).
PATTERN STITCHES:Circular Garter Stitch (Gtr St): Rnd 1: Knit.Rnd 2: Purl.Rep Rnds 1 and 2 for Gtr St.
Circular Stockinettte Stitch (St st):Knit every rnd.
© 2008 Classic Elite Yarns • Lowell, MA 01851 • All rights reserved.This pattern is specifically for private use only. All commercial uses involving reproduction of this pattern or duplication of this garment are prohibited unless specifically licensed in writing by copyright owner.
View more information about this design on our website: www.classiceliteyarns.com/WebLetter/70/Issue70.php
page 1 of 1
ABBREVIATIONS approx – approximately
beg – begin(ning) CO – Cast On
Gtr st – Garter Stitch inc(’d) – increase(d) k – knit
LH – Left Hand m1 – see Special Term
meas – measures
pc – piece
pm – place marker(s)
rnd(s) – round(s)
rep – repeat st(s) – stitch(es)
St st – Stockinette Stitch
Chain: Wrap the yarn around the crochet hook (yarn over) and draw it through the loop on the hook to form the first chain. Rep this step as many times as instructed. (The loop on the hook is never included when counting the number of chains).
NOTE:1. Work inc sts for yoke and body as follows: *Work to marker, m1, slip marker; rep from * around.
CAPELETTEWith shorter circular needle and Color B, CO 72 (72, 80) sts. Being careful not to twist sts, join to beg working in-the-rnd; place marker (pm) for beg-of-rnd (BOR). Begin Circular Gtr St; work even until pc meas 11⁄2" from beg, end after a purl rnd. Change to Color A, Circular St st and pm as follows: *K9 (9, 10), pm; rep from * around — 8 markers includ-ing BOR marker. Shape Yoke, inc: Inc 8 sts this rnd (see Note 1), then every 3rd rnd 13 (13, 12) more times; change to longer circu-lar needle when necessary —184 sts. Shape Body, inc: Inc 8 sts this rnd (see Note 1), then every 5th rnd 3 (5, 7) more times — 216 (232, 248) sts. Change to Color B and Circular Gtr St; work for 11⁄2", end after a knit rnd. BO all sts purlwise.
FINISHINGChain: With crochet hook and Color C, make approx 90" chain, do not fasten off. Arrange in loops around body of capelette as shown in photo, adjust length of chain if needed; fasten off. Sew in place. French Knots: Bring tapestry needle threaded with Color D from WS up through to RS of garment. Wrap yarn 4 times around needle. Insert needle back through garment directly next to, but not in same spot where it came up. Tie ends in square knot and trim. Refer to photo for placement of french knots.
French Knot Illustration
Minnow Merino100% extra fine superwash wool
MinnowMerino is a super-soft, extra-fine merino yarn developed by Jil Eaton for her MinnowKnits designs. The single-ply, lightly spun yarn knits up into a fluffy, cozy fabric. As an added bonus, the yarn is superwash—it goes from the hamper into the washing machine.
MinnowMerino comes in Jil’s signature palette. The extensive palette is clean, bright, and saturated—with the allure of a freshly opened box of crayons. The yarn is great for Jil’s kids designs, past and present, and it’s also great for just about anything you’d like to make in a worsted-weight yarn.
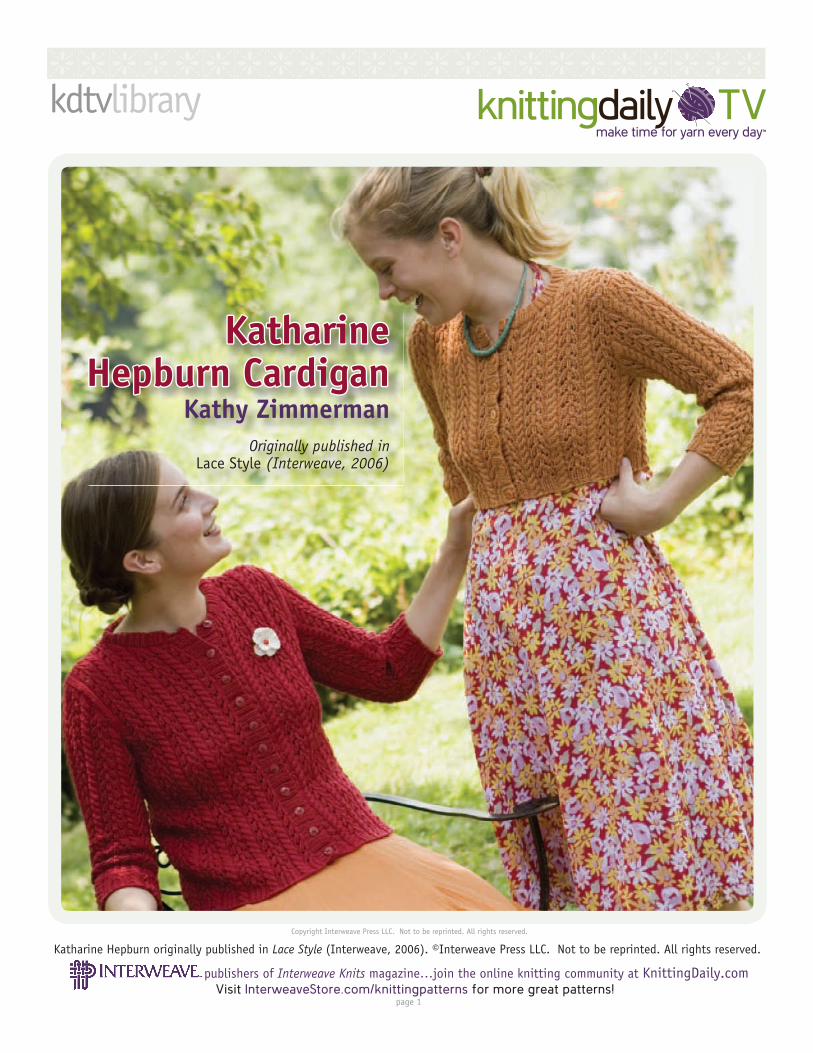
Copyright Interweave Press LLC. Not to be reprinted. All rights reserved.
-----------------------
kdtvlibrary
publishers of Interweave Knits magazine…join the online knitting community at KnittingDaily.comVisit InterweaveStore.com/knittingpatterns for more great patterns!
page 1
make time for yarn every day™
Katharine Hepburn originally published in Lace Style (Interweave, 2006). ©Interweave Press LLC. Not to be reprinted. All rights reserved.
Katharine Katharine Hepburn CardiganHepburn Cardigan
Kathy ZimmermanOriginally published in
Lace Style (Interweave, 2006)

publishers of Interweave Knits magazine…join the online knitting community at KnittingDaily.comVisit InterweaveStore.com/knittingpatterns for more great patterns!
page 2
Katharine Hepburn originally published in Lace Style (Interweave, 2006). ©Interweave Press LLC. Not to be reprinted. All rights reserved.
Lace and cables. Cables and lace. However you pair the two, you’re bound to come
up with a winning combination. Kathy Zimmerman interpreted this classic combo in
two lengths—cropped and hip—in this year-round cardigan. For both versions, Kathy
followed typical 1950s styling, including a narrow fi t, high round neckline, and three-
quarter-length sleeves with set-in shoulders. Lots of buttons keep the fronts closed without
gaps. Both versions shown here are knitted in a soft merino yarn in rich jewel tones.
Choose softer shades for a more subdued look.
K ATHAR INE HEPBURN C ARD IGANK ATHY Z I M MER M A N
F I N I S H E D S I Z E
32 (361⁄2, 401⁄2, 46, 51)” (81.5 [92.5, 103, 117, 129.5] cm) chest/bust circumfer-ence, buttoned. Sweaters shown measure 32” (81.5 cm) in short version and 361⁄2” (91.5 cm) in long version.
YA R N
Sportweight (CYCA #2 Fine).
Shown here: Louet Sales Gems Opal (100% merino wool; 225 yd [206 m]/100 g): #62 citrus orange, 4 (5, 6, 7, 8) skeins for short version; #11 cherry red, 6 (7, 8, 9, 10) skeins for long version.
N E E D L E S
Body and sleeves—size 5 (3.75 mm). Ribbing—size 4 (3.5 mm). Adjust needle size if necessary to obtain the correct gauge.
N O T I O N S
Cable needle (cn); tapestry needle; seven (seven, seven, eight, eight) 5⁄8” (1.5 cm) buttons for short version; eleven (eleven, eleven, twelve, twelve) 5⁄8” (1.5 cm) buttons for long version.
G A U G E
29 stitches and 34 rows = 4” (10 cm) in cables and lace pattern from charts.
BACKWith smaller needles, CO 115 (133, 147, 167, 185) sts. Set-up row: (WS) K1 (selvedge st; knit every row), beg as indicated for your size, work set-up row of Back chart (see page 4) over center 113 (131, 145, 165, 183) sts, k1 (selvedge st; knit every row). Knitting selvedge sts every row, work through WS Rib Row 8 of chart—piece measures about 1” (2.5 cm) from CO. Change to larger needles. Next row: (RS) Rep Rows 1–12 of Back chart (do not rep set-up or rib rows) until piece measures 6 (6, 6, 61⁄2, 7)” (15 [15, 15, 16.5, 18] cm) from CO for short version or 131⁄2 (131⁄2, 14, 141⁄2, 15)” (34.5 [34.5, 35.5, 37, 38] cm) from CO for long version ending with a WS row.
N O T E S
When decreasing or increasing, maintain the established pattern as much as possible. If there are not enough stitches available as a result of shaping to work every yarnover with its companion decrease, work the stitches in stockinette instead until the stitch count can accom-modate working in pattern again.
Knit the fi rst and last stitch of every row for selvedge stitches; these stitches are not shown on the charts.
Find more
great designs in
Lace Style
published by
Interweave Press
(2006)
bookEXCERPT

publishers of Interweave Knits magazine…join the online knitting community at KnittingDaily.comVisit InterweaveStore.com/knittingpatterns for more great patterns!
page 3
Katharine Hepburn originally published in Lace Style (Interweave, 2006). ©Interweave Press LLC. Not to be reprinted. All rights reserved.
Shape ArmholesBO 6 (8, 8, 9, 10) sts at beg of next 2 rows—103 (117, 131, 149, 165) sts rem. BO 2 sts at beg of next 0 (0, 4, 6, 8) rows, then dec 1 st each end of needle every RS row 5 (7, 5, 5, 5) times—93 (103, 113, 127, 139) sts rem. Cont in patt as established until armholes measure 7 (71⁄2, 8, 81⁄2, 9)” (18 [19, 20.5, 21.5, 23] cm), ending with a WS row.
Shape ShouldersKeeping in patt, BO 5 (7, 7, 9, 10) sts at beg of next 4 rows, then BO 6 (7, 8, 9, 11) sts at beg of foll 2 rows, then BO 6 (6, 8, 10, 11) sts at beg of foll 2 rows—49 (49, 53, 53, 55) sts rem. BO all sts.
R I G HT FRO NTWith smaller needles, CO 55 (64, 71, 81, 90) sts. Set-up row: (WS) K1 (selvedge st; knit every row), beg and ending as indicated for your size, work set-up row of Right Front and Right Sleeve chart (see page 5) over center 53 (62, 69, 79, 88) sts, k1 (selvedge st; knit every row). Knitting selvedge sts every row, work through WS Rib Row 8 of chart. Change to larger needles. Next row: (RS) Rep Rows 1–12 of Right Front and Right Sleeve chart (do not rep set-up or rib rows) until piece measures 6 (6, 6, 61⁄2, 7)” (15 [15, 15, 16.5, 18] cm) from CO for short version or 131⁄2 (131⁄2, 14, 141⁄2, 15)” (34.5 [34.5, 35.5, 37, 38] cm) from CO for long version, ending with a RS row.
3 (33⁄4, 41⁄4, 5, 53⁄4)"7.5 (9.5, 11, 12.5, 14.5) cm
63⁄4 (63⁄4, 71⁄4, 71⁄4, 71⁄2)"17 (17, 18.5, 18.5, 19) cm
1"2.5 cm
7 (71⁄2, 8, 81⁄2, 9)"18 (19, 20.5, 21.5, 23) cm
6 (6, 6, 61⁄2, 7)"15 (15, 15, 16.5, 18) cm
71⁄2 (71⁄2, 8, 8, 8)"19 (19, 20.5, 20.5, 20.5) cm
21⁄2"6.5 cm
short version
long version
16 (181⁄4, 201⁄4, 23, 251⁄2)"40.5 (46.5, 51.5, 58.5, 65) cm
Fronts & Back
21⁄2 (21⁄2, 23⁄4, 3, 31⁄4)"6.5 (6.5, 7, 7.5, 8.5) cm
4 (41⁄2, 5, 51⁄2, 6)"10 (11.5, 12.5, 14, 15) cm
12 (121⁄2, 13, 131⁄2, 14)"30.5 (31.5, 33, 34.5, 35.5) cm
91⁄2 (91⁄2, 91⁄2, 111⁄4, 111⁄4)"24 (24, 24, 28.5, 28.5) cm
Sleeve
12 (121⁄2, 13, 133⁄4, 141⁄4)"30.5 (31.5, 33, 35, 36) cm
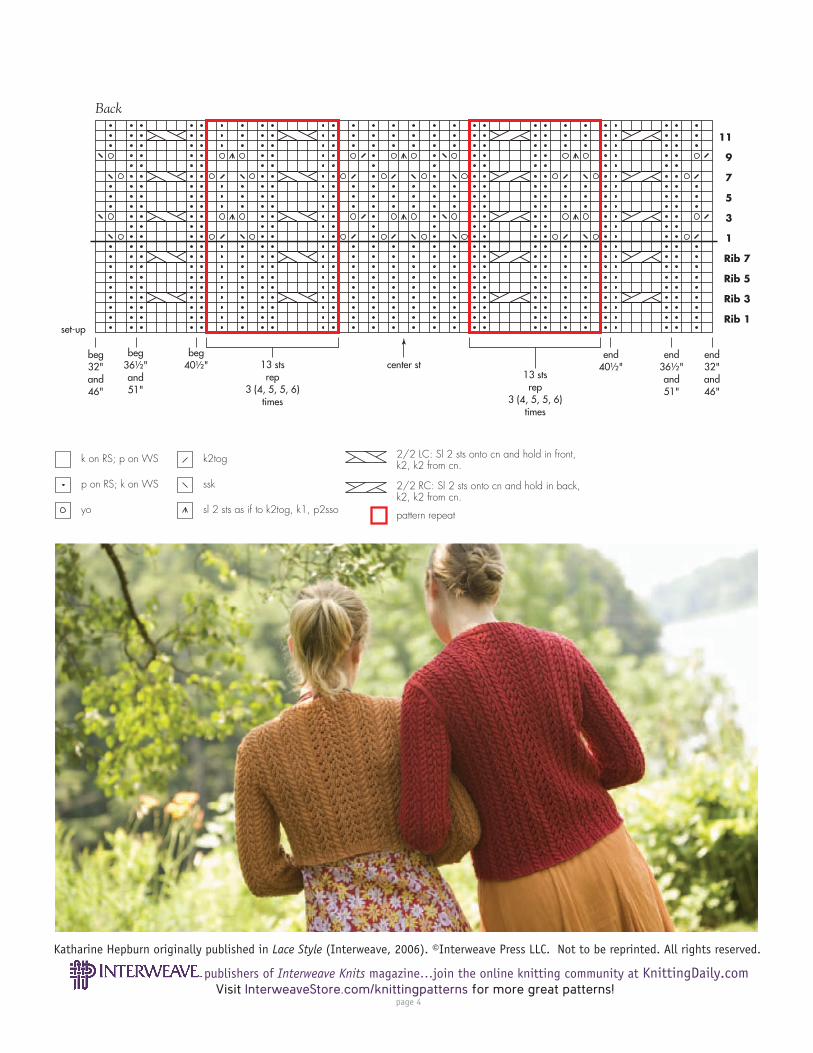
publishers of Interweave Knits magazine…join the online knitting community at KnittingDaily.comVisit InterweaveStore.com/knittingpatterns for more great patterns!
page 4
Katharine Hepburn originally published in Lace Style (Interweave, 2006). ©Interweave Press LLC. Not to be reprinted. All rights reserved.
k on RS; p on WS
p on RS; k on WS
yo
k2tog
ssk
sl 2 sts as if to k2tog, k1, p2sso
2/2 LC: Sl 2 sts onto cn and hold in front,k2, k2 from cn.
2/2 RC: Sl 2 sts onto cn and hold in back,k2, k2 from cn.
pattern repeat
Rib 7
Rib 5
Rib 3
Rib 1
11
9
7
5
3
1
set-up
13 stsrep
3 (4, 5, 5, 6)times
13 stsrep
3 (4, 5, 5, 6)times
center stbeg32"and46"
beg36½"and51"
beg40½"
end32"and46"
end36½"and51"
end40½"
Back

publishers of Interweave Knits magazine…join the online knitting community at KnittingDaily.comVisit InterweaveStore.com/knittingpatterns for more great patterns!
page 5
Katharine Hepburn originally published in Lace Style (Interweave, 2006). ©Interweave Press LLC. Not to be reprinted. All rights reserved.
Shape ArmholeBO 6 (8, 8, 9, 10) sts at beg of next WS row—49 (56, 63, 72, 80) sts rem. BO 2 sts at beg of next 0 (0, 2, 3, 4) WS rows, then dec 1 st at end of next 5 (7, 5, 5, 5) RS rows—44 (49, 54, 61, 67) sts rem. Cont in patt as established until armhole measures 41⁄2 (5, 51⁄2, 6, 61⁄2)” (11.5 [12.5, 14, 15, 16.5] cm), ending with a WS row.
Shape NeckKeeping in patt, at neck edge (beg of RS rows) BO 7 (7, 8, 8, 9) sts once, then BO 3 sts once, then BO 2 sts 4 (4, 5, 5, 5) times—26 (31, 33, 40, 45) sts rem. Dec 1 st at beg of next 4 (4, 3, 3, 3) RS rows—22 (27, 30, 37, 42) sts rem. Cont even in patt until armhole measures same as back to beg of shoulder shaping, ending with a RS row.
Shape ShouldersKeeping in patt, BO 5 (7, 7, 9, 10) sts at beg of next 2 WS rows, then BO 6 (7, 8, 9, 11) sts at beg of foll WS row, then BO 6 (6, 8, 10, 11) sts at beg of foll WS row—no sts rem.
L EF T FRO NTWith smaller needles, CO 55 (64, 71, 81, 90) sts. Set-up row: (WS) K1 (selvedge st; knit every row), beg and ending as indicated for your size work, set-up row of Left Front and Left Sleeve
The classic combination
of lace and cables is
always in style.
k on RS; p on WS
p on RS; k on WS
yo
k2tog
ssk
sl 2 sts as if to k2tog, k1, p2sso
2/2 LC: Sl 2 sts onto cn and hold in front,k2, k2 from cn.
2/2 RC: Sl 2 sts onto cn and hold in back,k2, k2 from cn.
pattern repeat
Rib 7
Rib 5
Rib 3
Rib 1
11
9
7
5
3
1
set-up
13 stsrep
3 (4, 5, 5, 6) timesfor fronts;
rep4 (4, 4, 5, 5) times
for sleeves
beg32"and46"
front;all sizessleeves
beg36½"and51"front
beg40 "front
endall sizes
frontand
sleeves
½ ½
Right Front and Right Sleeve
Rib 7
Rib 5
Rib 3
Rib 1
11
9
7
5
3
1
set-up
13 stsrep
3 (4, 5, 5, 6) timesfor fronts;
rep4 (4, 4, 5, 5) times
for sleeves
end32"and46"
front; all sizessleeves
end36½"and51"front
end40½"front
begall sizes
frontand
sleeves
Left Front and Left Sleeve
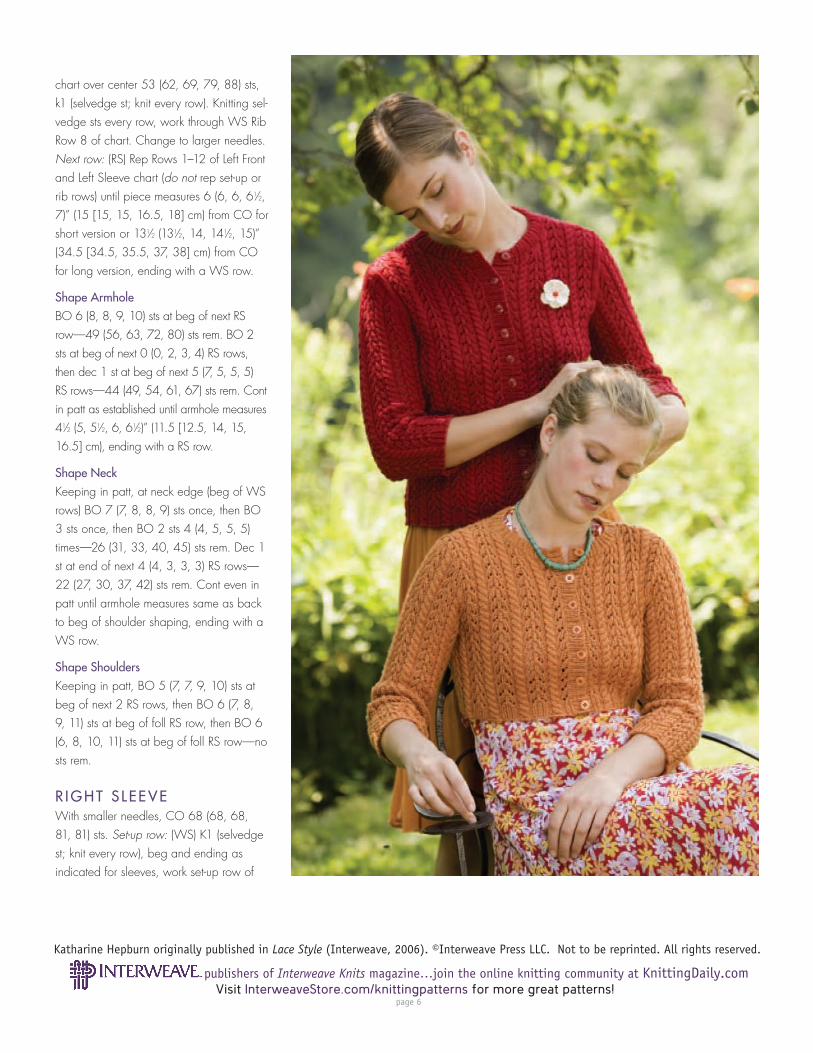
publishers of Interweave Knits magazine…join the online knitting community at KnittingDaily.comVisit InterweaveStore.com/knittingpatterns for more great patterns!
page 6
Katharine Hepburn originally published in Lace Style (Interweave, 2006). ©Interweave Press LLC. Not to be reprinted. All rights reserved.
chart over center 53 (62, 69, 79, 88) sts, k1 (selvedge st; knit every row). Knitting sel-vedge sts every row, work through WS Rib Row 8 of chart. Change to larger needles. Next row: (RS) Rep Rows 1–12 of Left Front and Left Sleeve chart (do not rep set-up or rib rows) until piece measures 6 (6, 6, 61⁄2, 7)” (15 [15, 15, 16.5, 18] cm) from CO for short version or 131⁄2 (131⁄2, 14, 141⁄2, 15)” (34.5 [34.5, 35.5, 37, 38] cm) from CO for long version, ending with a WS row.
Shape ArmholeBO 6 (8, 8, 9, 10) sts at beg of next RS row—49 (56, 63, 72, 80) sts rem. BO 2 sts at beg of next 0 (0, 2, 3, 4) RS rows, then dec 1 st at beg of next 5 (7, 5, 5, 5) RS rows—44 (49, 54, 61, 67) sts rem. Cont in patt as established until armhole measures 41⁄2 (5, 51⁄2, 6, 61⁄2)” (11.5 [12.5, 14, 15, 16.5] cm), ending with a RS row.
Shape NeckKeeping in patt, at neck edge (beg of WS rows) BO 7 (7, 8, 8, 9) sts once, then BO 3 sts once, then BO 2 sts 4 (4, 5, 5, 5) times—26 (31, 33, 40, 45) sts rem. Dec 1 st at end of next 4 (4, 3, 3, 3) RS rows—22 (27, 30, 37, 42) sts rem. Cont even in patt until armhole measures same as back to beg of shoulder shaping, ending with a WS row.
Shape ShouldersKeeping in patt, BO 5 (7, 7, 9, 10) sts at beg of next 2 RS rows, then BO 6 (7, 8, 9, 11) sts at beg of foll RS row, then BO 6 (6, 8, 10, 11) sts at beg of foll RS row—no sts rem.
R I G HT S LEE VEWith smaller needles, CO 68 (68, 68, 81, 81) sts. Set-up row: (WS) K1 (selvedge st; knit every row), beg and ending as indicated for sleeves, work set-up row of

publishers of Interweave Knits magazine…join the online knitting community at KnittingDaily.comVisit InterweaveStore.com/knittingpatterns for more great patterns!
page 7
Katharine Hepburn originally published in Lace Style (Interweave, 2006). ©Interweave Press LLC. Not to be reprinted. All rights reserved.
Right Front and Sleeve chart over center 66 (66, 66, 79, 79) sts, k1 (selvedge st; knit every row). Knitting selvedge sts every row, work through WS Rib Row 8 of chart. Change to larger needles. Next row: (RS) Rep Rows 1–12 of Right Front and Right Sleeve chart (do not rep set-up or rib rows), and at the same time inc 1 st each end of needle every 6th row 0 (0, 6, 0, 0) times, then every 8th row 8 (11, 7, 0, 5) times, then every 10th row 2 (0, 0, 6, 6) times, then every 12th row 0 (0, 0, 3, 0) times, working new sts into es-tablished patt—88 (90, 94, 99, 103) sts. Work even in patt until piece measures 12 (121⁄2, 13, 131⁄2, 14)” (30.5 [31.5, 33, 34.5, 35.5] cm) from CO, ending with a WS row.
Shape CapBO 6 (8, 8, 9, 10) sts at beg of next 2 rows, then BO 2 sts at beg of next 0 (0, 4, 6, 8) rows—76 (74, 70, 69, 67) sts rem. Dec 1 st each end of needle every RS row 7 (11, 15, 17, 19) times—62 (52, 40, 35, 29) sts rem. BO 2 sts at beg of next 12 (10, 0, 0, 0) rows, then BO 3 sts at beg of next 4 (2, 4, 2, 2) rows, then BO 4 sts at beg of next 2 (2, 2, 2, 0) rows—18 (18, 20, 21, 23) sts rem. BO all sts.
L EF T S LEE VEWork as for right sleeve, substituting Left Front and Sleeve chart.
F IN ISH IN GWith yarn threaded on a tapestry needle, sew shoulder seams.
NeckbandWith smaller needles, RS facing, and beg at center right front, pick up and knit 7 (7, 8, 8, 9) sts along BO section of right front

publishers of Interweave Knits magazine…join the online knitting community at KnittingDaily.comVisit InterweaveStore.com/knittingpatterns for more great patterns!
page 8
Katharine Hepburn originally published in Lace Style (Interweave, 2006). ©Interweave Press LLC. Not to be reprinted. All rights reserved.
neck, 20 sts along shaped neck edge, 48 (48, 53, 53, 58) sts across back neck, 20 sts along shaped neck edge, and 7 (7, 8, 8, 9) sts along BO section of left front neck—102 (102, 109, 109, 116) sts total. Work as foll:Row 1: (WS) K1 (selvedge st; knit every row), *k2, [p1, k1] 2 times, p1; rep from * to last 3 sts,
k2, k1 (selvedge st; knit every row).Row 2: K1 (selvedge st), *p2, [k1, p1] 2 times, k1; rep from * to last 3 sts, p2, k1 (selvedge st).Rep Rows 1 and 2 until neckband measures 1” (2.5 cm) from pick-up row. Loosely BO all sts in patt.
ButtonbandWith RS of left front edge facing and beg at BO edge of neckband, pick up and knit 81 (81, 81, 88, 88) sts for short version or 123 (123, 123, 130, 130) sts for long version. Work in rib patt as for neckband for 9 rows. Loosely BO all sts patt. Mark position of 7 (7, 7, 8, 8) buttons for short version or 11 (11, 11, 12, 12) buttons for long version, evenly spaced along button-band.
Buttonhole BandWith RS of right front edge facing and beg at CO edge of right front, pick up and knit 81 (81, 88, 88) sts for short version, or 123 (123, 123, 130, 130) sts for long version. Work in rib patt as for neckband for 3 rows. Buttonhole row: (RS) Cont in patt, work (yo twice, k2tog) buttonholes opposite each marked button position on buttonband. Next row: Work in patt, dropping extra wrap of each yo in previous row to maintain original stitch count. Next row: *Work in patt to buttonhole of previous row, insert needle tip into hole either kwise or pwise as required by the rib patt, and work 1 st in buttonhole; rep from * until last buttonhole has been worked, work in patt to end of row. Work 3 rows even in patt. Loosely BO all sts in patt.
With yarn threaded on tapestry needle, sew sleeve caps into armholes, matching shaping. Sew sleeve and side seams. Weave in loose ends. Sew buttons onto buttonband, opposite buttonholes. Lightly block to measurements.
Copyright © 2022 FDOKUMEN