shaving kit dental kit shoe shine strip shoe polish box shampoo
Upload
khangminh22Category
view
3download
0
School in a Box Kit Guidance
UNICEF Education Kit Handbook

UNICEF Education Kit Handbook
School in a Box Kit Guidance


iii
UNICEF Education Kit Handbook
School in a Box Kit Guidance
INTRODUCTION
The UNICEF Education in Emergencies (EiE) Handbook is a tool that provides training and curricular guidance in support of UNICEF pre-packaged education kits. This is the first version of the handbook and it has only been partially field tested. As such, all feedback is critical and welcome to help inform the planned revision. Please contact the Education Unit at UNICEF Supply Division with all relevant input, criticism and suggestions.
The handbook is available in French and English. Each education kit shipped from Supply Division will contain the relevant module. Module One, the overall guidance module, is available upon request, or on the UNICEF website, along with all the other modules.
ACKNOWLEDGEMENTS The Handbook was developed over eighteen months by UNICEF staff from the Programme Education sections in New York and Geneva and from Supply Division in Copenhagen. This document was developed through a consultative process led by a consultant that was guided by a reference group composed of UNICEF staff from Country Offices, Regional Offices and HQ locations. It was also independently reviewed at various stages by other UNICEF staff. A special thank you goes to all those who supported this project.
Project Managers: Ms Pilar Aguilar, Senior Education Adviser, UNICEF Geneva and Mr Chris Cormency, Chief, Water, Sanitation and Education Centre (WSEC), Supply Division, UNICEF CopenhagenWriter: Ms Miresi BusanaEdited, produced and distributed by WSEC. First Edition 2013
iv
UNICEF Education Kit Handbook
School in a Box Kit Guidance
KEY TERMINOLOGY
Definition of Child: The terms child and children refer to all children and young people from birth to 18 years of age, as specified in the UN Convention on the Rights of the Child. If a particular age group of children is intended, this will be made clear in the text.
Age groups: It is important to highlight that age groups can vary according to context and culture. Indicatively the Handbook targets the age groups below:
1) Infants, toddlers and pre-school children approximately from birth to seven/eight years. 2) Young adolescents between ten and fourteen years. 3) Older adolescents between fifteen and nineteen years. 4) Youths are adolescents and young adults between the ages of fifteen and twenty-four years (Reference: United Nations definitions)
Definition of Pupil(s) and Student(s): Terms pupil(s) and student(s) refer to children taught by a teacher. They are interchangeable.
Definition of Instructor(s), Caregiver(s) and Teacher(s): The term instructor(s) refers to the personnel implementing the semi-structured recreational activities (Module Two). The term caregiver(s) refers to the personnel implementing early childhood education activities (Module Three). The term teacher(s) refers to the personnel implementing basic primary education and primary mathematics and science education (Module Four, Module Five and Module Six). NOTE Volunteers are non-paid members of the local community who voluntarily help
in the implementation of the activities. They are not members of staff but they should sign a Code of Conduct.
Definition of Trainer(s): The term trainer(s) refers to the personnel delivering the training to instructors, caregivers and teachers (Module One).
Definition of Trainee(s): The term trainee(s) refers to those who receive training. They can be (1) the trainers during the Training of Trainers (TOT) or (2) the instructors, caregivers and/or teachers receiving the training from the trainers.
Definition of Child-Friendly Spaces/Environment(s): The term Child-Friendly Spaces/Environment(s) (CFS/Es) is used in a broad sense. It is important to highlight that there is a broad and developing literature on the definition(s) of CFS/Es that involves different disciplines. Also the terminology used to indicate CFS/Es can vary among agencies. In the Handbook the term CFS/Es can refer to:
• CFS/Es,whichare‘placesdesignedandoperatedinaparticipatorymanner,wherechildrenaffectedbynatural disasters or armed conflict can be provided with a safe environment, where integrated programming including play, recreation, education, health, and psychosocial support can be delivered and information about services/supports is provided. Generally Child-Friendly Spaces refer to relatively short to medium term programme responses. They are very often operated from tents and/or temporary structures (e.g. in schools, under a tree or a vacant building).’ UNICEF, 2009, ‘A Practical Guide for Developing Child-Friendly Spaces’, p.9.

v
UNICEF Education Kit Handbook
School in a Box Kit Guidance
• TemporaryLearningSpaces(TLS),whicharesetupintheimmediateaftermathofanemergency.• AlternativeLearningSpaces(ALS),whichcanbe‘setupjustaboutanywhereaccordingtothecontext.
Alternative learning spaces can be churches, mosques, temples, community halls, rooms within the community chief’s office, libraries, a compound, allocated land and an unused room in a private house or even a boat’. UNICEF, 2009, ‘Child Friendly Schools Manual’, Chapter 4, p.22.
• Existingorrehabilitatedschools.• ChildFriendlySchools(CFS)asdefinedintheUNICEF,2009,‘Child Friendly Schools Manual’.
Three key reference documents, which can be downloaded via the UNICEF website, provide further information on Child Friendly Spaces: (1) ‘A Practical Guide for Developing Child-Friendly Spaces’, UNICEF, 2009; (2) ‘Guidelines for Child Friendly Spaces in Emergencies’, 2011, Field-testing version developed and reviewed by the Global Education Cluster, Global Protection Cluster, INEE and IASC; (3) ‘Child Friendly Schools Manual’, UNICEF, 2009, New York.
KEY GRAPHIC MARKS:
The following icons aim at facilitating the comprehension of the text:
1. KEY MESSAGE summarises important learning content in a nutshell.
2. TRAINING provides indications on how to convey the KEY MESSAGES during the training session.
3. NOTE indicates a suggestion, tip, encouragement, clarification and idea.
4. THINK invites readers to reflect on their own experience and context.
5. LEARNING OUTCOMES
indicates what is expected to be learned. It can help in monitoring and evaluating the progress of learning.
6. TABLES are lists of items.
7. PICTURES are visual examples of key concepts described in the text.
8. BOX summarises general contents and helps to visualise them all together.
9. SAMPLES are examples of what teachers and caregivers are expected to do.
10. YOUR ROLE summarises what is expected from the trainer in Module One and from the instructors, caregivers and teachers in Modules Two, Three, Four, Five and Six.
11. CASE STUDY are examples of education interventions already implemented.
12. CHECK LIST indicates important points to consider before and during the implementation of the activities.
13. ACTIVITY indicates the beginning of a new chapter in a unit.
NOTE
vi
UNICEF Education Kit Handbook
School in a Box Kit Guidance
INTRODUCTION TO TEXT
1. Rationale of the EiE Handbook
The right to education is most at risk during emergencies and during the transition period following a crisis. In conflict-affected countries, 28 million children of primary school age were out of school in 2011 – 42 per cent of the world total. Only 79 per cent of young people are literate in conflict-affected countries, compared with 93 per cent in other poor countries. Moreover, children living in conflict are twice as likely to die before their fifth birthday as children in other poor countries.
The Core Commitments for Children in Humanitarian Action – the CCCs – constitute UNICEF’s central humanitarian policy to uphold the rights of children affected by humanitarian crisis. They are a framework for humanitarian action, around which UNICEF seeks to engage with partners. The updated CCCs continue to promote predictable, effective and timely collective humanitarian action and to clearly outline the areas in which UNICEF can best contribute to results including education.
In addition, the Inter-Agency Network for Education in Emergencies (INEE) has developed the Minimum Standards Handbook. The Handbook is designed to give governments and humanitarian workers the tools they need to address the Education for All movement and the UN Millennium Development Goals (MDGs). It is the first step toward ensuring that education initiatives in emergency situations provide a solid and sound basis for post-conflict and disaster reconstruction. Both instruments have been complementary and critical in the preparedness and response of the Inter-Agency Standing Committee (IASC) Humanitarian Reform launched in 2005 that established the education cluster approach.
UNICEF believes that education is not only a basic human right; it is an instrumental strategy for supporting recovery. It not only restores schooling and all its related benefits to affected people, it also helps countries transform and rebuild the institutions and systems destroyed during the emergency. Re-establishing education after an emergency not only safeguards children’s fundamental right to education, it also plays a critical role in normalising their environment. This helps them overcome the psychosocial impact of disasters and conflict.
Back-to-School (BTS) Initiatives: a strategy to put into action the CCCsUNICEF and partners coordinate with Ministries to provide safe temporary learning spaces; teaching and learning materials; and training of teachers, parents, education officials and others to provide quality education, reduce drop-out and promote student retention. In essence, the BTS initiative offers a way to put the CCCs into practice.
With the introduction of the first UNICEF-supported BTS Initiative after the Rwandan genocide in 1994, these initiatives have become a powerful first response and strategy in facilitating access to protective learning environments for approximately 27 million children affected by conflict and natural disasters. These initiatives have been implemented with great success in over 55 countries in the period 1994-2012, including Afghanistan, Côte d’Ivoire, Haiti, Lebanon, the State of Palestine, South Sudan, and Uganda. BTS Initiatives are characterised by 1) the establishment of robust targets for numbers of children to return to some form of education as quickly as possible after the onset of the emergency, 2) rapid deployment of education supplies in the form of kits as well as teaching and learning materials to aid in resumption of education, 3) establishment of some form of temporary learning infrastructure as needed, combined with the rapid

vii
UNICEF Education Kit Handbook
School in a Box Kit Guidance
repair of damaged schools, and 4) intensive advocacy, communication and social mobilisation efforts with governments, communities, donors and partner organizations.
The Handbook aims at providing training and curricular guidance related to existing pre-packaged materials or kits. It is intended to strengthen the impact of UNICEF from the initial first response of pedagogical supplies to one of fostering learning, growth and development. With the Handbook, the education kits, and proper teacher training, it will be possible to extend the utility of the individual kits, improving the quality of the initial education response in BTS initiatives.
2. Objectives of the Handbook
a) To provide curricular guidelines and instructions on how to use the teaching aids contained in the kits for teachers, caregivers and instructors working in emergency contexts. A printed copy of each curriculum is contained in the related kit.
b) To provide training guidelines for the trainers involved in the emergency response.
The complete Handbook is available for download via the UNICEF website.
3. Overview of the Handbook
BOX 1: Overview
MODULE CURRICULUM KIT TARGET GROUP(S)
Module One Guidelines for Training of Trainers No specific kit Trainers
Module Two Recreation Kit Guidance Recreation Kit Instructors
Module Three Early Childhood Development Kit Guidance
Early Childhood Education (ECD) Kit
Caregivers
Module Four School in a Box Kit Guidance School-in-a-Box (SiB) Kit Teachers
Module Five Mathematics Kit Guidance Primary Mathematics Kit (PMK)
Teachers
Module Six Science Kit Guidance Primary Science Kit (PSK) Teachers
4. Target groups of the Handbook
The Handbook targets three groups:
a) The actors involved in the preparedness and coordination of the education response to emergencies. These actors are responsible for purchasing the teaching aids, identifying and setting up the learning spaces and providing the training of trainers and of teachers, caregivers and instructors according to the contextual needs and priorities. They are UNICEF personnel from HQ, Regional and/or Country Offices and Focal Points and representatives of the Ministry of Education (MOE) or other Education Authorities involved in the preparedness and coordination of the education response in emergencies. They can be members of staff of Implementing Partners (IP) such as International Non-Governmental Organizations (INGOs), National Non-Governmental Organizations (NGOs) and local Community Based Organizations (CBOs) and/or practitioners.
viii
UNICEF Education Kit Handbook
School in a Box Kit Guidance
b) The trainers involved in the training of teachers, caregivers and instructors before (pre-service training) and possibly also during (in-service training) the response to the emergency according to the specific contextual needs. Usually the EiE/C trainers are trained in advance and are strategically positioned, for example in Regional Offices, in order to provide a rapid response to emergencies.
c) The teachers, the caregivers and the instructors who directly implement the EiE curricula with the support of the teaching aids contained in the related education kit.
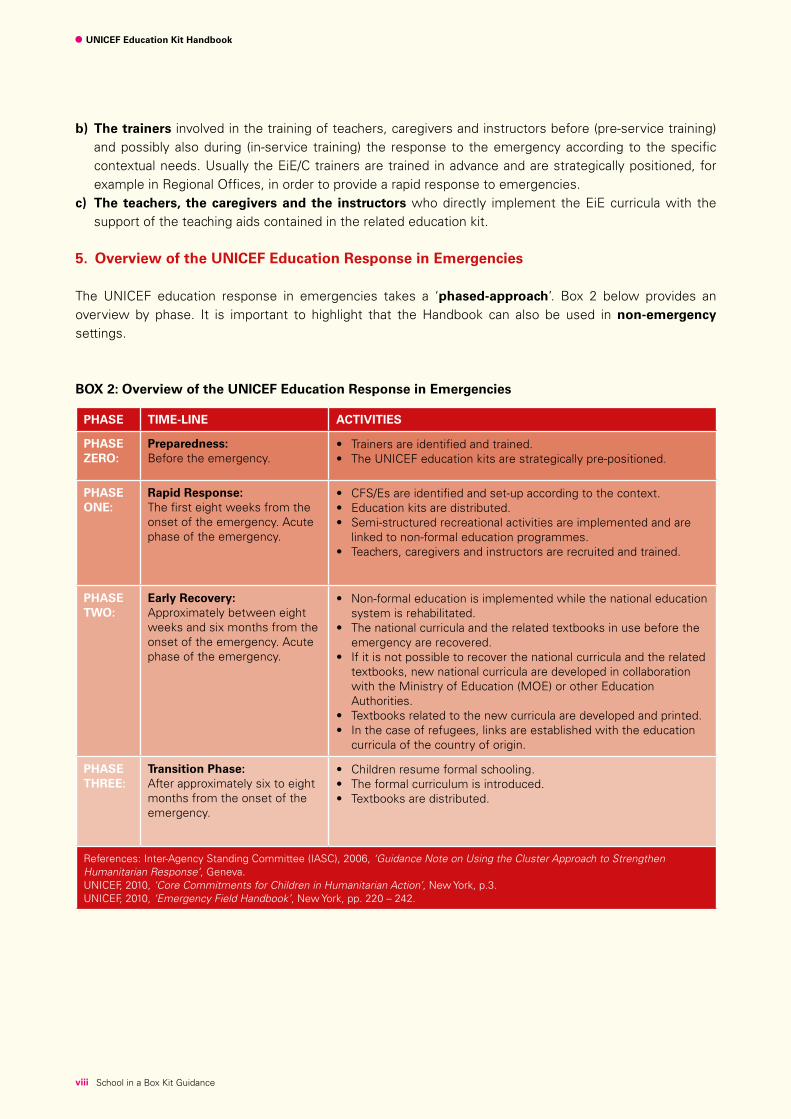
5. Overview of the UNICEF Education Response in Emergencies
The UNICEF education response in emergencies takes a ‘phased-approach’. Box 2 below provides an overview by phase. It is important to highlight that the Handbook can also be used in non-emergency settings.
BOX 2: Overview of the UNICEF Education Response in Emergencies
PHASE TIME-LINE ACTIVITIES
PHASE ZERO:
Preparedness:Before the emergency.
• Trainersareidentifiedandtrained.• TheUNICEFeducationkitsarestrategicallypre-positioned.
PHASE ONE:
Rapid Response:The first eight weeks from the onset of the emergency. Acute phase of the emergency.
• CFS/Esareidentifiedandset-upaccordingtothecontext.• Educationkitsaredistributed.• Semi-structuredrecreationalactivitiesareimplementedandare
linked to non-formal education programmes.• Teachers,caregiversandinstructorsarerecruitedandtrained.
PHASE TWO:
Early Recovery: Approximately between eight weeks and six months from the onset of the emergency. Acute phase of the emergency.
• Non-formaleducationisimplementedwhilethenationaleducationsystem is rehabilitated.
• Thenationalcurriculaandtherelatedtextbooksinusebeforetheemergency are recovered.
• Ifitisnotpossibletorecoverthenationalcurriculaandtherelatedtextbooks, new national curricula are developed in collaboration with the Ministry of Education (MOE) or other Education Authorities.
• Textbooksrelatedtothenewcurriculaaredevelopedandprinted.• Inthecaseofrefugees,linksareestablishedwiththeeducation
curricula of the country of origin.
PHASE THREE:
Transition Phase:After approximately six to eight months from the onset of the emergency.
• Childrenresumeformalschooling.• Theformalcurriculumisintroduced.• Textbooksaredistributed.
References: Inter-Agency Standing Committee (IASC), 2006, ‘Guidance Note on Using the Cluster Approach to Strengthen Humanitarian Response’, Geneva.UNICEF, 2010, ‘Core Commitments for Children in Humanitarian Action’, New York, p.3. UNICEF, 2010, ‘Emergency Field Handbook’, New York, pp. 220 – 242.
ix
UNICEF Education Kit Handbook
School in a Box Kit Guidance
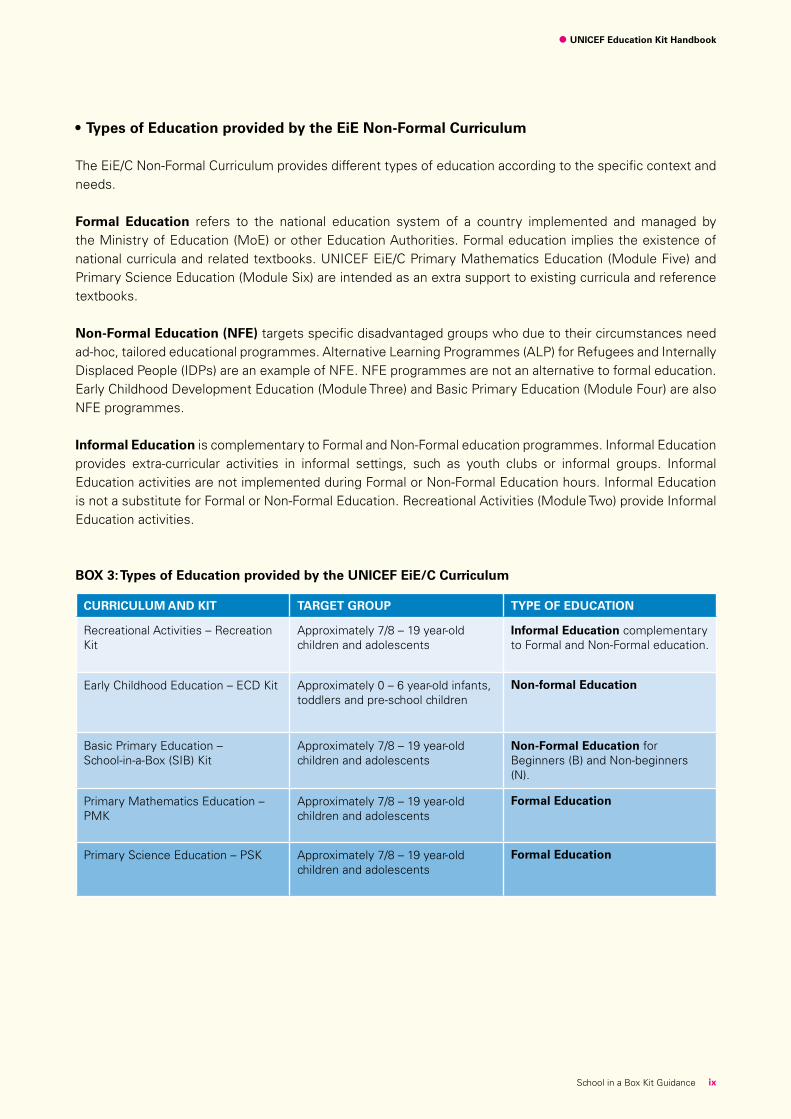
•TypesofEducationprovidedbytheEiENon-FormalCurriculum
The EiE/C Non-Formal Curriculum provides different types of education according to the specific context and needs.
Formal Education refers to the national education system of a country implemented and managed by the Ministry of Education (MoE) or other Education Authorities. Formal education implies the existence of national curricula and related textbooks. UNICEF EiE/C Primary Mathematics Education (Module Five) and Primary Science Education (Module Six) are intended as an extra support to existing curricula and reference textbooks.
Non-Formal Education (NFE) targets specific disadvantaged groups who due to their circumstances need ad-hoc, tailored educational programmes. Alternative Learning Programmes (ALP) for Refugees and Internally Displaced People (IDPs) are an example of NFE. NFE programmes are not an alternative to formal education. Early Childhood Development Education (Module Three) and Basic Primary Education (Module Four) are also NFE programmes.
Informal Education is complementary to Formal and Non-Formal education programmes. Informal Education provides extra-curricular activities in informal settings, such as youth clubs or informal groups. Informal Education activities are not implemented during Formal or Non-Formal Education hours. Informal Education is not a substitute for Formal or Non-Formal Education. Recreational Activities (Module Two) provide Informal Education activities.
BOX 3: Types of Education provided by the UNICEF EiE/C Curriculum
CURRICULUM AND KIT TARGET GROUP TYPE OF EDUCATION
Recreational Activities – Recreation Kit
Approximately 7/8 – 19 year-old children and adolescents
Informal Education complementary to Formal and Non-Formal education.
Early Childhood Education – ECD Kit Approximately 0 – 6 year-old infants, toddlers and pre-school children
Non-formal Education
Basic Primary Education – School-in-a-Box (SIB) Kit
Approximately 7/8 – 19 year-old children and adolescents
Non-Formal Education for Beginners (B) and Non-beginners (N).
Primary Mathematics Education – PMK
Approximately 7/8 – 19 year-old children and adolescents
Formal Education
Primary Science Education – PSK Approximately 7/8 – 19 year-old children and adolescents
Formal Education
x
UNICEF Education Kit Handbook
School in a Box Kit Guidance
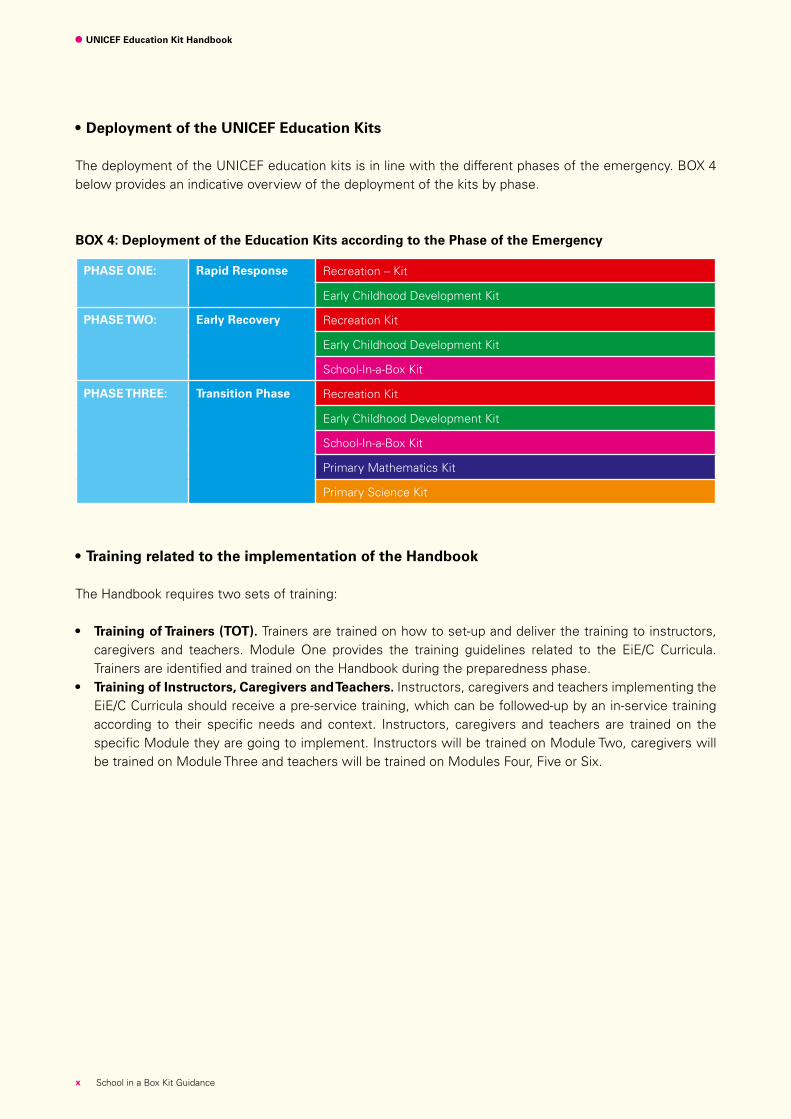
•DeploymentoftheUNICEFEducationKits
The deployment of the UNICEF education kits is in line with the different phases of the emergency. BOX 4 below provides an indicative overview of the deployment of the kits by phase.
BOX 4: Deployment of the Education Kits according to the Phase of the Emergency
PHASE ONE: Rapid Response Recreation – Kit
Early Childhood Development Kit
PHASE TWO: Early Recovery Recreation Kit
Early Childhood Development Kit
School-In-a-Box Kit
PHASE THREE: Transition Phase Recreation Kit
Early Childhood Development Kit
School-In-a-Box Kit
Primary Mathematics Kit
Primary Science Kit
•TrainingrelatedtotheimplementationoftheHandbook
The Handbook requires two sets of training:
• TrainingofTrainers(TOT).Trainers are trained on how to set-up and deliver the training to instructors, caregivers and teachers. Module One provides the training guidelines related to the EiE/C Curricula. Trainers are identified and trained on the Handbook during the preparedness phase.
• TrainingofInstructors,CaregiversandTeachers.Instructors, caregivers and teachers implementing the EiE/C Curricula should receive a pre-service training, which can be followed-up by an in-service training according to their specific needs and context. Instructors, caregivers and teachers are trained on the specific Module they are going to implement. Instructors will be trained on Module Two, caregivers will be trained on Module Three and teachers will be trained on Modules Four, Five or Six.
1
UNICEF Education Kit Handbook
School in a Box Kit Guidance
BASIC PRIMARY EDUCATION
Welcome to Module Four of the UNICEF Education in Emergencies (EiE) Handbook. In this module you will learn how to plan and implement the learning activities for a group of about 40 primary level students using the materials and curriculum of the UNICEF School-in-a-Box (SIB) Kit in a context of emergency and crisis or in a setting with limited educational resources.
You are about to play a major role in the life of many children who find themselves in difficult and new circumstances, either because they are living in conflict areas or because they have survived a natural disaster. Many of these children have experienced traumatic and distressing events that suddenly changed their lives. It is highly likely that you have experienced the same events.
You may already have some experience in working with large numbers of children, or you may be new to it. This module aims at providing practical guidelines and tools that can help you in your tasks as a teacher. However, the success of the activities provided will be determined by your engagement with the families, the local community and authorities, your capacity to deal positively with that challenges you will be facing, and your dedication to the well-being of the children in your care.
You will be working closely with other teachers, and with parents, community members, local authorities and other support staff, to facilitate the good management of a Child-Friendly Space/Environment (CFS/E). In addition, you will be collaborating with UNICEF personnel and/or the Implementing Partners (IPs) appointed by UNICEF.
Please use the following guidelines in your best capacity and use your best judgment in applying them to your context. Thank you for your valuable contribution!
NOTE IPs can be local Non-Governmental Organizations (NGOs), Community-Based Organizations (CBOs) and/or representatives of the local education authorities that collaborate with UNICEF in the implementation of the primary education interventions.
NOTE UNICEF personnel can be part of the education, protection, water and sanitation (WASH) and shelter programs. It is likely that many of the challenges you encounter will not be solved immediately—therefore, your patience, creativity and initiative will go a long way toward ensuring that your efforts are successful.
NOTE This module is part of the UNICEF EiE Handbook and requires your participation in a teachers’ training workshop.
At the end of Module Four you will be able to:
1. Identify the contents of the UNICEF School-in-a-Box (SIB) Kit
2. Demonstrate how to implement psychosocial activities
3. Demonstrate how to implement basic primary education activities through project-based methodology
4. Convey context and culturally relevant lifesaving messages
5. Implement child-protection activities
LEARNING OUTCOMES

2 School in a Box Kit Guidance
INTRODUCTION ........................................................................................................................................ iiiMODULE FOUR: BASIC PRIMARY EDUCATION ...................................................................................... 1
UNIT ONE: DESCRIPTION OF THE PEDAGOGICAL MATERIALS CONTAINED IN THE SCHOOL-IN-A-BOX (SIB) KIT ..................................................................................................................... 5 ACTIVITY ONE: What teaching and learning materials can I find in the UNICEF SIB Kit? ...................... 6 •StorageoftheUNICEFSIBKit ..................................................................................................... 10 •MaintenanceandrestockoftheSIBKitmaterials ........................................................................ 10 ACTIVITY TWO: How can I use the materials of the UNICEF SIB Kit in the implementation
of activities?............................................................................................................................................ 11
UNIT TWO: PSYCHOSOCIAL ACTIVITIES ................................................................................................. 15 ACTIVITY ONE: Art and Craft (A&C) Psychosocial Activities ................................................................... 17 ACTIVITY TWO: Play, Relax and Assurance (PRA) Psychosocial Activities .............................................. 23
UNIT THREE: BASIC PRIMARY EDUCATION CURRICULUM .................................................................. 27 ACTIVITYONE:‘Allaboutmeandmyfamily’ ......................................................................................... 31 ACTIVITYTWO:‘Allaboutmeandmyfriends’ ........................................................................................ 35 ACTIVITYTHREE:‘TheRightsoftheChild’ ........................................................................................... 41 ACTIVITYFOUR:‘Child-Protection’ ......................................................................................................... 46 ACTIVITYFIVE:‘MyHistoryandtheHistoryofmyCommunity’ ........................................................... 52 ACTIVITYSIX:‘CulturalfestivitiesandritualsofmyCommunity’ .......................................................... 56 ACTIVITYSEVEN:‘PeaceandreconciliationprocessesinmyCommunity’ ........................................... 60 ACTIVITYEIGHT:‘ThegeographyofmyCommunity’ ............................................................................ 64 ACTIVITYNINE:‘NutritionandLivelihoodinmyCommunity’ ................................................................ 66 ACTIVITYTEN:‘HealthPromotioninmyCommunity’ ............................................................................ 70 ACTIVITYELEVEN:‘Water,SanitationandHygieneinmyCommunity’ ................................................. 74 ACTIVITYTWELVE:‘DisasterRiskReduction(DRR)inmyCommunity’ ................................................ 79
UNIT FOUR: BASIC LITERACY CURRICULUM ........................................................................................ 85 ACTIVITY ONE: Activities that promote literacy ..................................................................................... 86 ACTIVITY TWO: Basic Literacy Minimum Learning Achievements (MLA) ............................................. 87 ACTIVITY THREE: Overview of literacy programs................................................................................... 88 ACTIVITY FOUR: Literacy activities ........................................................................................................ 91 ACTIVITY FIVE: Basic Literacy Minimum Learning Achievement (MLA) ................................................ 93
UNIT FIVE: BASIC NUMERACY CURRICULUM ...................................................................................... 94 ACTIVITY ONE: Basic numeracy activities ............................................................................................. 95 ACTIVITY TWO: Basic Numeracy Minimum Learning Achievements (MLA) .......................................... 99
TABLE OF CONTENTS School in a Box Kit Guidance
3School in a Box Kit Guidance
TABLE OF FIGURESFIGURE 1: Pre-cut hands ............................................................................................................................. 17FIGURE 2: Seating of learning groups (Prototype already developed for Module One) .............................. 30FIGURE 3: My identification card ................................................................................................................ 32FIGURE 4: Finger print ................................................................................................................................ 32 FIGURE 5: Family tree ................................................................................................................................ 33 FIGURE 6: Spider diagram .......................................................................................................................... 40FIGURE 7: Words that make me feel safe or unsafe ................................................................................... 47
TABLE OF TABLESTABLE 1: List of the materials contained in the UNICEF SIB kit ................................................................. 6TABLE 2: The Convention of the Rights of the Child made simple .............................................................. 43TABLE 3: Finding out more about the rights of children in my community ................................................. 44TABLE 4: Basic guidelines on literacy .......................................................................................................... 87TABLE 5: Overview of the literacy programme ........................................................................................... 89TABLE 6: Phonic script ................................................................................................................................ 90TABLE 7: Ideographic script ........................................................................................................................ 91
TABLE OF CHECK LISTSCHECKLIST 1: Involving parents and/or guardians ...................................................................................... 16CHECKLIST 2: Tips on how to positively interact and talk to children about their drawings ........................ 22CHECKLIST 3: Health promotion activities in the community ..................................................................... 71CHECKLIST 4: Assess disasters in your context ......................................................................................... 82
TABLE OF BOXESBOX 1: Learning ........................................................................................................................................... 27BOX 2: How to develop an education project .............................................................................................. 28BOX 3: Life-skills overview .......................................................................................................................... 29BOX 4: Test. Are you a good friend? ............................................................................................................ 36BOX 5: Letters to Auntie Annet ................................................................................................................... 37BOX 6: Some facts about HIV/AIDS ............................................................................................................ 38BOX 7: Some facts about girls. .................................................................................................................... 39 BOX 8: Some facts about children with disabilities ..................................................................................... 39BOX 9: What is child-abuse? ........................................................................................................................ 48BOX 10: Stories of children .......................................................................................................................... 48BOX 11: The touch chart ............................................................................................................................... 50BOX 12: Halima's story ................................................................................................................................ 51BOX 13: Article 19 and Article 34 for the Convention on the Rights of the Child ........................................ 51BOX 14: The river of my life ......................................................................................................................... 52BOX 15: My memory book .......................................................................................................................... 55BOX 16: Examples of different types of calendar ........................................................................................ 57
TABLE OF CONTENTS School in a Box Kit Guidance
4 School in a Box Kit Guidance
BOX 17: The right to a legal name, identity and nationality.......................................................................... 58BOX 18: Sara, the daughter of a lioness ...................................................................................................... 58BOX 19: Different perceptions ..................................................................................................................... 61BOX 20: Planets at war ................................................................................................................................ 63BOX 21: The continents’ quiz ....................................................................................................................... 66BOX 22: Background information on worms ............................................................................................... 71BOX 23: Background information on diarrhoea ............................................................................................ 72BOX 24: How to make the special drink ...................................................................................................... 73BOX 25: Background information on safe water .......................................................................................... 75BOX 26: Background information on sanitation ........................................................................................... 76BOX 27: Facts about young children and sanitation .................................................................................... 78BOX 28: How do disasters happen? ............................................................................................................ 81BOX 29: Examples of drills and instructions for emergencies ..................................................................... 82BOX 30: Saul’s story .................................................................................................................................... 84BOX 31: Outline of Basic Literacy Minimum Learning Achievements ......................................................... 93BOX 32: Example of drawing and counting ................................................................................................. 96BOX 33: Outline of Basic Numeracy Minimum Learning Achievements ..................................................... 99
EDUCATIONAL PROJECTS:EDUCATIONAL PROJECT THEME ONE (T1): My family tree ..................................................................... 31EDUCATIONAL PROJECT THEME TWO (T2): How can I become a better friend? ..................................... 35EDUCATIONAL PROJECT THEME THREE (T3): The Convention on the Rights of the Child ....................... 40EDUCATIONAL PROJECT THEME FIVE (T5): Investigating history: the life of my grandparents ................ 50EDUCATIONAL PROJECT THEME TEN (T10): How can we tell our friends how to prevent getting worms? ............................................................................................................................... 68 EDUCATIONAL PROJECT THEME ELEVEN (T11-1): How can we tell our friends and family how to drink safe water? ............................................................................................................................. 70 EDUCATIONAL PROJECT THEME ELEVEN (T11-2): Child friendly latrines ................................................. 74EDUCATIONAL PROJECT THEME TWELVE (T12): What can we do to prevent disasters in our community? ....................................................................................................................................... 76
TABLE OF CONTENTS School in a Box Kit Guidance
5School in a Box Kit Guidance
DESCRIPTION OF THE MATERIALS CONTAINED IN THE SCHOOL-IN-A-BOX (SIB) KIT
UNIT ONE:
At the end of Unit One you will be able to:
1. Identify the materials contained in the UNICEF SIB Kit
2. Explain how to store and restock the UNICEF SIB Kit
3. Demonstrate how to use the UNICEF SIB Kit aids in the implementation of the learning activities
LEARNING OUTCOMES
In this Unit you will learn to identify the different pedagogical materials contained in the UNICEF SIB Kit, and how to use them in the implementation of the activities. Some of these materials may be new to you—therefore, it is very important that you take the necessary time to familiarize yourself with them.
YOUR ROLE is to familiarize yourself with the items contained in the UNICEF SIB Kit, and understand how to use them in the implementation of the activities.
The objective of Unit One is to provide an overview of the teaching aids contained in the UNICEF SIB Kit, and to provide practical examples of their use in the implementation of the learning activities.
6
UNICEF Education Kit Handbook
School in a Box Kit Guidance
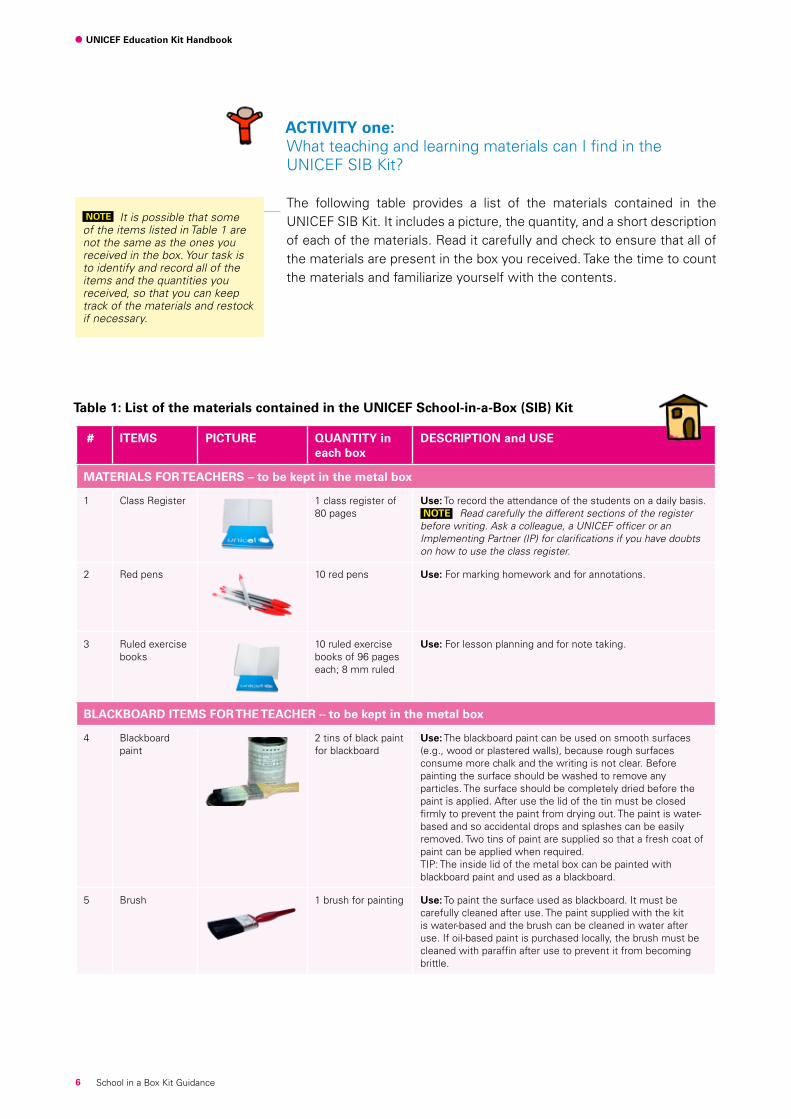
ACTIVITY one: What teaching and learning materials can I find in the UNICEF SIB Kit?
The following table provides a list of the materials contained in the UNICEF SIB Kit. It includes a picture, the quantity, and a short description of each of the materials. Read it carefully and check to ensure that all of the materials are present in the box you received. Take the time to count the materials and familiarize yourself with the contents.
NOTE It is possible that some of the items listed in Table 1 are not the same as the ones you received in the box. Your task is to identify and record all of the items and the quantities you received, so that you can keep track of the materials and restock if necessary.
Table 1: List of the materials contained in the UNICEF School-in-a-Box (SIB) Kit
# ITEMS PICTURE QUANTITY in each box
DESCRIPTION and USE
MATERIALS FOR TEACHERS – to be kept in the metal box
1 Class Register 1 class register of 80 pages
Use: To record the attendance of the students on a daily basis. NOTE Read carefully the different sections of the register before writing. Ask a colleague, a UNICEF officer or an Implementing Partner (IP) for clarifications if you have doubts on how to use the class register.
2 Red pens 10 red pens Use: For marking homework and for annotations.
3 Ruled exercise books
10 ruled exercise books of 96 pages each; 8 mm ruled
Use: For lesson planning and for note taking.
BLACKBOARD ITEMS FOR THE TEACHER – to be kept in the metal box
4 Blackboard paint
2 tins of black paint for blackboard
Use: The blackboard paint can be used on smooth surfaces (e.g., wood or plastered walls), because rough surfaces consume more chalk and the writing is not clear. Before painting the surface should be washed to remove any particles. The surface should be completely dried before the paint is applied. After use the lid of the tin must be closed firmly to prevent the paint from drying out. The paint is water-based and so accidental drops and splashes can be easily removed. Two tins of paint are supplied so that a fresh coat of paint can be applied when required. TIP: The inside lid of the metal box can be painted with blackboard paint and used as a blackboard.
5 Brush 1 brush for painting Use: To paint the surface used as blackboard. It must be carefully cleaned after use. The paint supplied with the kit is water-based and the brush can be cleaned in water after use. If oil-based paint is purchased locally, the brush must be cleaned with paraffin after use to prevent it from becoming brittle.

7
UNICEF Education Kit Handbook
School in a Box Kit Guidance
6 Assorted colored chalk
300 pieces of colored chalk (100 per box)
Use: To write and draw on the blackboard or on the painted surface. Teachers should take care when handling the chalk as it is soft and can break easily.7 White chalk 300 pieces of
white chalk(100 per box)
8 Duster/wiper for blackboard
2 duster/wipers Use: To removes chalk markings from the blackboard or painted surface. or playing activities for 1 to 2 year old children.
Geometry and mathematics items for the blackboard – to be kept in the metal box
9 Blackboard set square
1 set square to draw 30-60-90˚ angles
Use: To draw and demonstrate 30, 60 and 90 degree angles. Teachers should hold the handle for stability when drawing lines on surfaces.
10 Blackboard set square
1 set square to draw 45-45-90˚ angles
Use: To draw and demonstrate 45, 45 and 90 degree angles. Teachers should hold the handle for stability when drawing lines on surfaces.
11 Blackboard ruler
1 ruler for the blackboard 100 cm long
Use: To draw extended lines and measure distances. Teachers should hold the handle for stability when drawing lines on surfaces. The two parts of the ruler should be attached together.
12 Compass 1 compass for blackboard
Use: To draw and demonstrate the range of angles and to draw circles and curves.
Art and craft items for teachers
13 Scissors 1 scissor Use: To cut paper or carton. The scissors are sharp and should NOT be used by pupils.
14 Adhesive tape 40 pieces of adhesive tape
Use: To tape paper and in general art and craft activities as well as attaching posters on the walls.
Items to be used in the classroom
15 Wind-up solar radio
1 radio The radio has four bandwidths (AM, FM, SW1, SW2) and is provided with a solar panel, a wind up handle and a flexible antenna. The radio can be powered by the solar panel (a detachable – up to 2 m from the radio) or by winding it up (in both directions). The solar panel can be placed in the sun while the radio and the users are in the shade.Winding the handle at 120 rpm (for 30-40 seconds) should generate 30 minutes of playing at moderate volume. Charged fully, the radio should be able to give approximately 24 hours playing time, depending on the volume Use: To listen to specifically designed broadcasts as part of the curriculum like inter-active radio education programmes or other specially designed radio programming.
UN
IT O
NE
8
UNICEF Education Kit Handbook
School in a Box Kit Guidance
16 Cubes 100 wood cubes of assorted colors
Use: To teach counting 1 to 100 and arithmetic operations: multiplication, addition, subtraction and division.
17 Clock 1 plastic or wood clock
Use: To learn to tell the time. NOTE The teacher can adapt the learning of the time according to the local context and culture. The clock can also be used to learn fractions. One day is divided into 24 hours; each hour is divided into 60 minutes.
18 Inflatable globe 1 inflatable globe The globe needs to be blown up (by blowing into the valve) and the cap put on the valve. The globe shows continents, oceans, rivers, mountains, deserts, forests etc.; political boundaries are printed in dotted lines. NOTE In areas where political boundaries are contested, the teacher should explain that the marked boundaries are not affiliated to any side of the conflicting parties.English language place names are shown; continents and towns printed in black; country names in red. 2 rings are provided so that the globe can be hung for demonstration purposes. A repair kit is provided. Use: To learn political (cities and states) and physical geography (mountains, lakes, deserts, continents, oceans, seas etc.) of the globe. It can also be used in science to learn the tilted axe of the earth.
19 Markers 8 markers of assorted colors
Use: To write on the posters. A damp cloth removes the ink from the surface of the poster. The markers should not be used on the blackboard.
20 Posters 3 plasticized posters
There are 3 different types of posters:Poster 1: Alphabet and linesFront: The letters of the Roman alphabet in upper and lower case, with space below in which the teacher can write local alphabet characters.Reverse side: Horizontal lines on which the teacher/pupils can write.Poster 2: Numbers 0-100 and squaresFront: The numbers from 0-100, with space below in which to write the numbers in the local script.Reverse side: A grid of 100 squares, in which the teacher/pupils can write/draw.Poster 3: Times table and world map, physicalFront: The multiplication tables from 1 x 1 to 12 x 12, in squared format. Reverse side: The world physical, showing continents, seas, rivers, mountains, but no political borders or place names. The teacher can write on the map in the local language.The posters can be written on, using the marker pens provided in this kit, then wiped clean with a damp cloth and re-used as appropriate. Adhesive tape is provided for attaching the posters to a surface.
21 Module Four: Basic Primary Education
1 booklet UNICEF EiE Handbook Module Four: Basic Primary Education. Use: To plan and implement Basic Primary Education activities.
22 Metal box 1 lockable metal box
Use: To keep the education materials safe and to easy the transport. 2 padlocks are provided to lock the metal box. The instructions for setting the codes on the 2 padlocks are given with the padlocks.
23 UNICEF stickers
2 UNICEF round decal stickers
Use: To be applied to the front of the box. NOTE The stickers should not be used for purposes not related to the School in a Box. In places where such branding would be considered a security risk, then the stickers should not be displayed.

9
UNICEF Education Kit Handbook
School in a Box Kit Guidance
MATERIALS FOR STUDENTS/PUPILS NOTE The student’s materials should be distributed to the students. Students are expected to look after the materials with care. NOTE Prepare the plastic bag with each item and distribute it to the pupils. Involve members of the Steering Committee to ensure accountability and transparency. Make sure that younger students understand how to take care of the items. If students fear to lose the items, you can store the plastic bags in the metal box. Ask the pupils to write their name on each plastic bag.
24 Wax colored crayons
32 assorted colored wax crayons (4 boxes with 8 colored crayons each)
The crayons contain 8 different colors and should be used on paper surfaces (they should not be used on the slate or blackboard). Care should be taken when handling the crayons as they can break easily. The crayons have paper sleeves to protect the hands of children and should not be removed completely. Use: The crayons should be stored in the metal box and distributed to students during the activities.
25 Scissors 40 safety scissors (blunt end)
The scissors are fitted with a protective cover made of hard plastic, which cannot be removed accidentally. The scissors should only be used for cutting paper. Use: the scissors should be stored in the metal box and distributed to students during the activities.
26 Erasers for pencils
80 soft erasers for pencils (4 boxes with 20 erasers each)
Use: To remove pencil markings from paper. They are not suitable for slate pencils, crayons, pens or chalk. They should be distributed to the students.
27 Sharpeners for pencils
40 sharpeners for pencils
Use: To sharpen pencils only, not crayons or chalk. They should be distributed to the students.
28 Rulers 40 plastic rulers of 30 cm
Use: To draw and measure geometric figures and lines. Rules should not be bent as this will cause damage to the structure. They should be distributed to the students.
29 HB Pencils for paper
80 pencils for paper (8 boxes of 10 pencils each)
Use: To draw and write on paper surfaces. The pencils should not be used on slates. They should be distributed to the students
30 Exercise books - square
40 square lined exercise books of 48 pages each
Use: To draw and write. Indicated for writing numbers. They should be distributed to the pupils
31 Exercise books - ruled
40 ruled exercise books of 48 pages each
Use: To draw and write. Indicated for language classes. They should be distributed to the pupils
32 Pencils for slates
40 white pencils for slates
Use: To draw and write. Slates are very useful when pupils need to repeat activities, for example when learning to write new words and numbers. White pencils marking can be wiped with a dry cloth and the slates can be thoroughly cleaned with a wet cloth. Teachers can assess when it is the case to allow children to use the slates at home. In alternative the slates and pencils should be stored in the metal box.33 Double-sided
slate40 double-sided slates
34 Carrier bag 40 plastic carrier bags
Use: To carry learning aids like exercise books and pencils. NOTE Do not use the bags if there are security concerns about the branding.
UN
IT O
NE

10
UNICEF Education Kit Handbook
School in a Box Kit Guidance
MATERIALS FOR TEACHERS AND STUDENTS
35 Black pens 80 black pens Use: To write on paper and exercise books. 1 black and 1 blue pen should be distributed to the pupils.
36 Blue pens 80 blue pens
•StorageoftheUNICEFSchool-in-a-Box(SIB)KitThe metal box is designed to store the SIB Kit materials safely. It is recommended to store the box with all of the contents in a safe place when the activities are over. Sometimes teachers do not use the SIB Kit materials for fear of spoiling the new items and prefer to keep them in the head teacher’s office or in the store. UNICEF SIB materials are intended to support the learning processes of children—therefore, they are expected to be available to students at all times. Please make sure that you use the SIB education materials in the implementation of the activities. YOUR ROLE is to make sure that the SIB Kit materials are used in the education and psychosocial activities regularly, that they are available to all children, and that they are not lost, stolen or intentionally damaged.
•MaintenanceandrestockoftheSIBKitmaterialsSIB Kit materials must be properly maintained to ensure safe play as well as long use. The consumable items (e.g., pencils and exercise books) of the SIB Kit are expected to last approximately 3 months. SIB Kits can be restocked through:
1. External restock. When learning materials are not available locally, they are purchased externally, usually with the support of the UNICEF Supply Office or through the Implementing Partners (IPs).
2. Local restock. Learning materials are purchased in the local market, usually through the IPs or with the support of the local community. In this case make sure that the materials meet universal standards of good quality and safe use. Local restock encourages community participation and sustainability of the kits.
3. Recycle local materials. Use your imagination and initiative to identify local available materials like empty plastic bottles, bottle lids, pieces of wood, stones, shells, leaves, flowers and other materials that can be used in the development of learning activities. Recycling local materials reduce costs and it encourages children to use their creativity in building their own toys.
NOTE Not all SIB Kits come in a metal box; occasionally SIB materials are contained in a carton box to speed the distribution.
NOTE Responsibility for the safe storage and transport of the SIB box can be shared among the volunteers and the caregivers.
NOTE Generally offices are very happy to give you scrap paper to recycle. Local shops are also very happy to give away packaging containers. Ask the shopkeeper to keep the materials for you.
11
UNICEF Education Kit Handbook
School in a Box Kit Guidance
To prolong the lifespan of the SIB Kits and enjoy them for a longer time, make it a routine to check the items and keep a record of them. If something is missing, ask the students if they know where the items are located. Sometimes it is easy to misplace things, especially if you are in a hurry to tidy up the place. Make it a routine to ask students to return the SIB materials to the box after use.
ACTIVITY TWO: How can I use the materials of the UNICEF SIB Kit in the implementation of activities?
The aim of the SIB Kit is to provide essential teaching materials that can assist you in creating learning, psychosocial and child-protection activities and communicate lifesaving messages to the children in your care. Below you can find some general ideas on how to involve the students in learning activities that are creative and participatory. In Unit Three of this module you will find further ideas on how to develop educational projects.
YOUR ROLE is to implement participatory and creative learning activities.
ART AND CRAFT ACTIVITIES
In the SIB Kit there are some materials that support the implementation of art and craft activities, such as crayons, scissors, pencils and glue (See Table 1 above). Below you can find some suggestions on how to develop art and craft activities. See Unit Three for further ideas on the use of art and craft activities in the development of education projects.
Drawing by theme. Each week you can select a theme—for example: the seasons; domestic and wild animals; members of the family; and the natural environment. These themes will guide the drawing activities.
Drawing by message. Identify important lifesaving messages that are relevant in your context, and use drawing sessions as a way to convey these messages. For example: What should you do in case of a fire? Ask the pupils to draw the fire drill procedures.
Collages and mosaics. Use colorful leaves, flowers, paper, cloth, and cut out figures from magazines and newspapers to create stories, by sticking them on a poster and writing around them.
NOTE Remember NOT to leave materials outdoors, as rain, high temperatures and dew can cause damage.
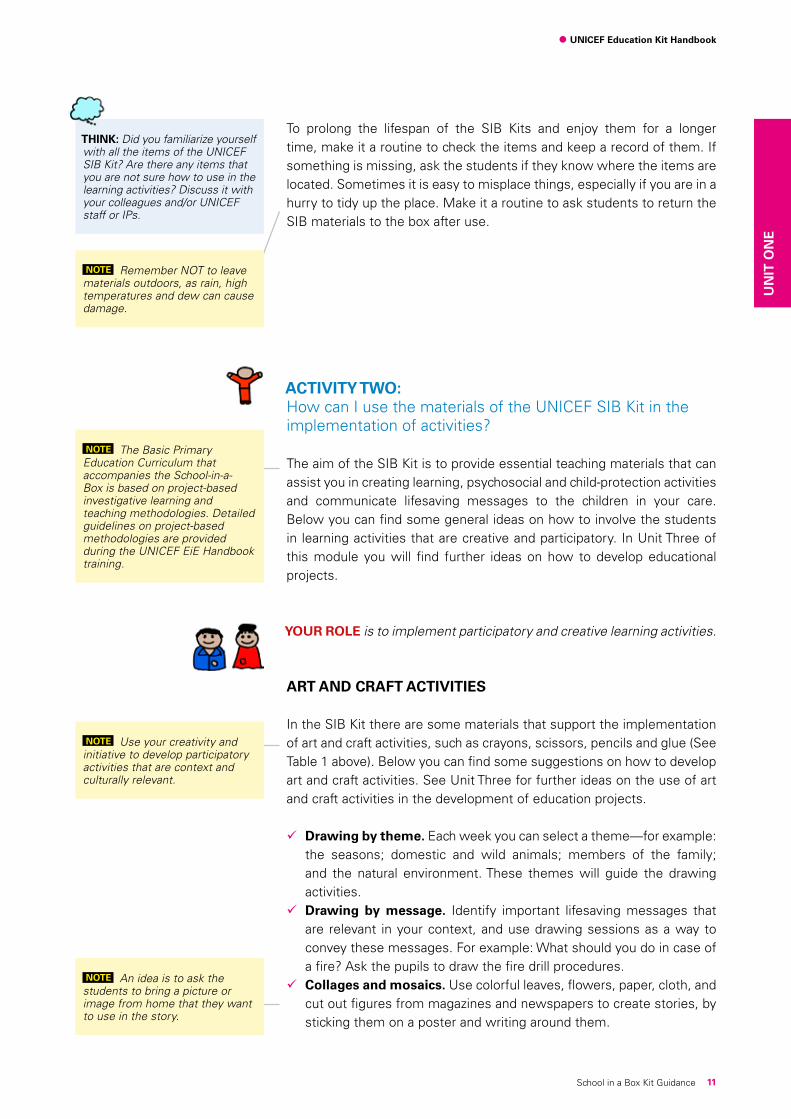
THINK: Did you familiarize yourself with all the items of the UNICEF SIB Kit? Are there any items that you are not sure how to use in the learning activities? Discuss it with your colleagues and/or UNICEF staff or IPs.
NOTE The Basic Primary Education Curriculum that accompanies the School-in-a-Box is based on project-based investigative learning and teaching methodologies. Detailed guidelines on project-based methodologies are provided during the UNICEF EiE Handbook training.
NOTE Use your creativity and initiative to develop participatory activities that are context and culturally relevant.
NOTE An idea is to ask the students to bring a picture or image from home that they want to use in the story.
UN
IT O
NE
12
UNICEF Education Kit Handbook
School in a Box Kit Guidance
You can also use old magazines to make collages by cutting out and sticking different pictures together.
Festivities. Celebrate cultural festivities involving the children to write good wishes cards or by drawing the celebrations rituals. You can arrange a birthday poster for the children.
Photography. If you have access to digital cameras you can use them in developing materials for project work. You will need a colour printer for printing the pictures too. You should plan the activities carefully before initiating the photography project. It is important that you make sure that students understand how to use the camera before starting the project work. Develop a specific lesson on the use of the camera.
Also make sure that the camera is not misused, lost or stolen. It is useful to develop a contract with the students for the use of the camera. Project working-groups can use the camera on alternative days if there is only one camera available.
EXPRESSIVE ACTIVITIES YOUR ROLE is to use your creativity and initiative to develop expressive activities that are relevant in your context and culture.
Dramatization: Involve the students in representing characters of stories or events of the community history and develop a drama piece. Develop specific lessons that aim at creating dialogues for the drama script. It is a creative way to deliver literacy classes. Drama can be used to convey important lifesaving messages or in psychosocial activities. Drama can also be used in science projects—for example, in the reproduction of natural phenomena, such as the wind, the sea, or a storm, or in representing animals’ lives. Role-plays are a specific type of dramatization. In role-plays actors/students perform the typical roles of the characters involved in a situation. The objective of role-plays is to analyse a situation from the different points of view of the characters involved in it.
Music: Music is a powerful and universal mean of expression and communication. Music is particularly popular with adolescents. You can use traditional musical instruments or create your own musical instruments for example by using empty plastic bottles and containers as drums. Music can be used also to accompany drama pieces, dance or storytelling.
Dance: There are several types of dancing styles. Traditional or contemporary dancing pieces can be developed following the preference of the students. Dance can be used also to accompany drama pieces or storytelling.
Storytelling: You can invite an elderly person or one of the parents to tell stories about the community Follow up the storytelling sessions with art and craft or drama sessions where the children can draw some of the characters or can dramatize some of the most important events of the stories. This will help the children to re-elaborate what
NOTE Some of the children may not know their birthdays. If so, just ask them to pick a date that they like as a birthday date. The aim is to celebrate a special day for each child and make her/him feel important and cherished. Remember to sing a song too!
NOTE Use the manufacturing instructions as guidance. They should be inside the packaging box.
NOTE Make sure that the stories are suitable for the age group. Agree the theme of the story with the guest speaker beforehand.
13
UNICEF Education Kit Handbook
School in a Box Kit Guidance
they have learned from the story in their own words and images. Poetry: Poetry can be used to accompany dramatizations and dance
or as inspiration for developing visual materials. Poems are very good sources of traditional knowledge. Poetry is common in oral and written forms among cultures. A project idea could be to collect local/traditional poems and rhymes on specific themes and later develop a poetry-competition among the students. For example: you can ask the pupils if they know any poems or rhymes about seasonal event e.g. harvest or about historical event or about rituals. You can ask the pupils to collect (write on their exercise book) poems from their family members or elderly people like neighbours or family friends and share them with the class. You can also develop a poster using the poems and drawing pictures related to the poems.
READING and WRITING ACTIVITIES
Books: Primary education pupils can enjoy reading books or materials on their own or in peer-groups. You can also have a regular reading session per week, when you read chapters to the pupils from a selected book. Reading together with children is a fun way to stimulate learning processes and strengthen the adult-child relationship. Pause when there are difficult or new words and ask the pupils for their meaning. Use different voices to represent the different characters of the story. Older children can enjoy reading stories to younger children. The availability of suitable reading books might be a challenge. You can try to make your own books through project-work. Below you can find an example.
Project-based book writing: Step 1: Discuss with the pupils the theme of the story they want to develop. Step 2: You can use an exercise book as book and write the different chapters of the story as they are developed. Keep the chapters short and clear. A good measure is 2 or 3 pages per chapter according to the literacy level of the pupils.Step 3: Divide the class in groups for the writing of the book. One pupil with clear handwriting from each group can be assigned to write the final version of each chapter in the exercise book. Groups can also develop pictures and illustrations to represent relevant passages of the story. Step 4: Books can be exchanged among classes and used for reading activities. Step 5: A good idea is to have a book competition and invite different classes to create books. A panel of teachers, parents and students should select the winning book. A ceremony can be organized to present a prize to the winning class.
Newsletters: Newsletters can be developed to communicate important information about the CFS/E and the community. Newsletters usually
NOTE This is a great activity that reinforces literacy and stimulates the creativity and builds teamwork.
NOTE It is a great activity to reinforce students’ participation in their community and develop students’ critical thinking.
UN
IT O
NE
14
UNICEF Education Kit Handbook
School in a Box Kit Guidance
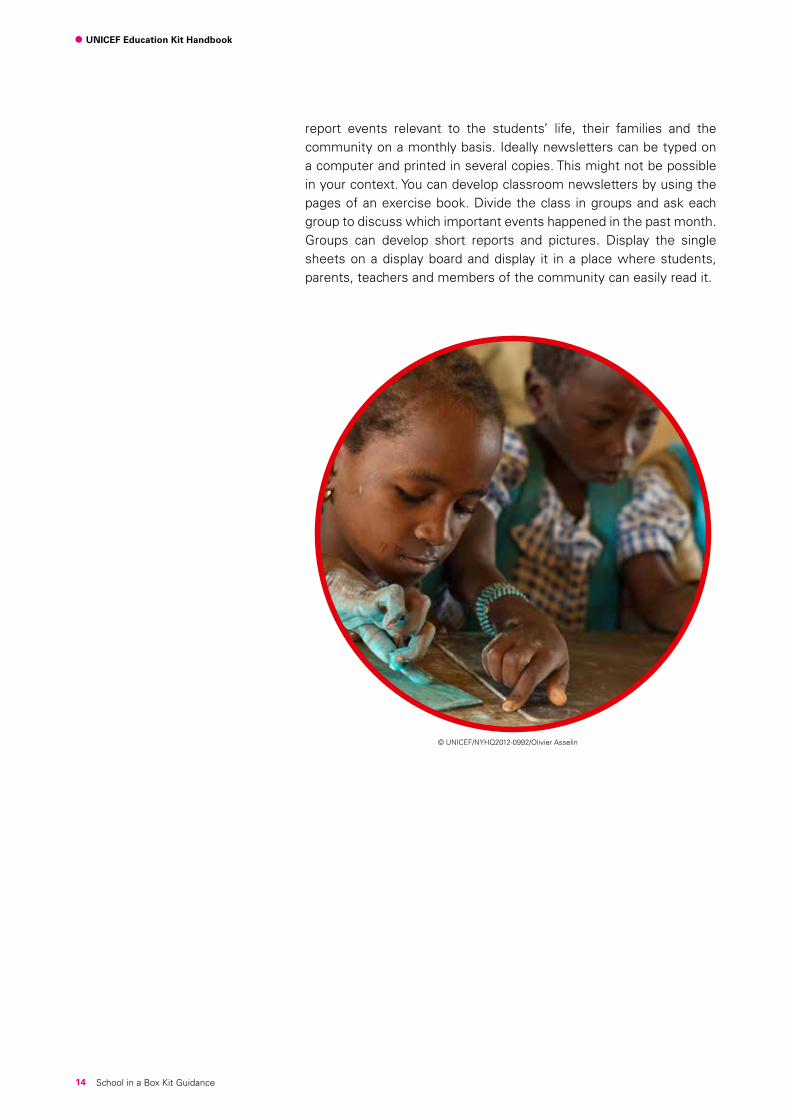
report events relevant to the students’ life, their families and the community on a monthly basis. Ideally newsletters can be typed on a computer and printed in several copies. This might not be possible in your context. You can develop classroom newsletters by using the pages of an exercise book. Divide the class in groups and ask each group to discuss which important events happened in the past month. Groups can develop short reports and pictures. Display the single sheets on a display board and display it in a place where students, parents, teachers and members of the community can easily read it.
© UNICEF/NYHQ2012-0992/Olivier Asselin
15School in a Box Kit Guidance
UNIT TWO:
PSYCHOSOCIAL ACTIVITIES
At the end of Unit Two you will be able to:
1. Use art and play to establish safety, build community and interact with each other
2. Feel safe to play and express any thoughts, feelings, and memories
3. Understand how to positively support learning during an emergency
LEARNING OUTCOMES
In emergency contexts and crises, in which children have experienced distressing events, psychosocial activities can provide children with additional, focused opportunities to express and understand the events that they experienced. These activities also help build community, emphasize strengths, and implement structures and routines, all essential for children to feel safe and stable after an emergency and crisis.
Psychosocial well-being is about the child’s feelings, thoughts and perceptions, as well as his/her positive relationships and connections with individuals in his/her family, school or Child-Friendly Space/Environment (CFS/E), and community. These connections provide support and help the child to feel safe, healthy, protected, respected, heard, and happy. In emergencies, conflict situations and crises, psychosocial support helps children to adjust to changes in their lives. It can help rebuild their confidence, sense of belonging, self-esteem and hopefulness about the future.
YOUR ROLE is to focus on being especially patient and understanding with the children. Each child reacts differently in an emergency and their reactions are out of their control. It helps to remind children that what they are experiencing after a traumatic event is a normal reaction to an abnormal situation.
NOTE Guidelines on psychosocial support are provided during the UNICEF EiE Handbook training.
NOTE Remember! Some children may require more specialized support than can be provided in a psychosocial activities group. If you notice that a child is severely withdrawn and separate from her/his peers, has rapid mood changes, or behaves very aggressively, this child might need specialized support and should be referred for specialized counselling and care.
© U
NIC
EF/
UG
DA
2013
0018
7/M
iche
le S
ibilo
ni
16
UNICEF Education Kit Handbook
School in a Box Kit Guidance
Checklist 1: Involving parents and guardians
• Get to know the parents/guardians of the students.
• Whenspeakingtoparents/guardiansfocusonthestrengthsandpositive qualities of the child.
• Encourageparents/guardianstocontinue supporting their child’s play and expression at home. Explain that it is normal for the child to display changes in behavior after a stressful event. Children might experience difficulties sleeping, have bad dreams, become more attached to the parent, or reject them and display anger.
• Encourageparents/guardiansto be supportive by showing understanding and patience, listen to their child’s concerns and confusion, allow them to cry and feel sad, and take time to explain to their child why there are changes in their lives and what to expect next.
• Youcanalsoinvitetheparents/guardianstoameetingorworkshopwhereyou teach them relaxation exercises and discuss as a group how to help their children at home. The parents/guardians will also have experienced the emergency and will benefit from parent/guardian psychosocial activities too. Consider activities like inviting them to trace and decorate a hand and make a Circle of Parents/Guardians Hands.
• Speaktoparents/guardiansaboutthe importance of routines and customs at home.
Psychosocial Activities contribute to build safety, trust and teamwork in the class; they promote free expression and facilitate learning processes by supporting the creation of a friendly and relaxed learning atmosphere.
Psychosocial activities should be implemented according to age-groups: 7 to 14 year old children and young adolescents and 15 to 18 year old adolescents.
THINK: What are other ways you can include parents/guardians in psychosocial support? How can you and your colleagues also provide psychosocial support for each other?
NOTE The following activities are very sensitive. It is important that you have attended the train-ing on psychosocial activities and know what to do and what not to do when developing psychosocial activities. It is important that par-ents/guardians know that psycho-social activities are implemented in class.
YOUR ROLE is to ensure that the psychosocial activities are culturally appropriate, gender-sensitive and agreed upon through participation from girls and boys. Your role is to adapt the activities to your context and culture.
The objective of Unit Two is to provide guidance on how to conduct simple and practical psychosocial activities that are beneficial to the students.
THINK: Do you remember what it was like for you to play as a child? What helped you to feel stronger and happier? When working with children, it is beneficial for you to also participate in the group activities. You are encouraged to be humorous and playful in your interactions with the children.
© UNICEF/NYHQ2013-0562/Shehzad Noorani
17
UNICEF Education Kit Handbook
School in a Box Kit Guidance
ACTIVITY ONE: Art and craft (a&c) psychosocial activities
ART AND CRAFT (A&C) PSYCHOSOCIAL ACTIVITIES
# Activity Age-groups
1 Our Circle of Hands 7 - 14 years and 15 - 18 years
2 Free Drawing 7 - 14 years and 15 - 18 years
3 Drawing with Themes 7 - 14 years and 15 - 18 years
4 Helping Hands 7 - 14 years and 15 - 18 years
5 Classroom Container of Worries 7 - 14 years and 15 - 18 years
A&C – Psychosocial Activity One: Our Circle of Hands
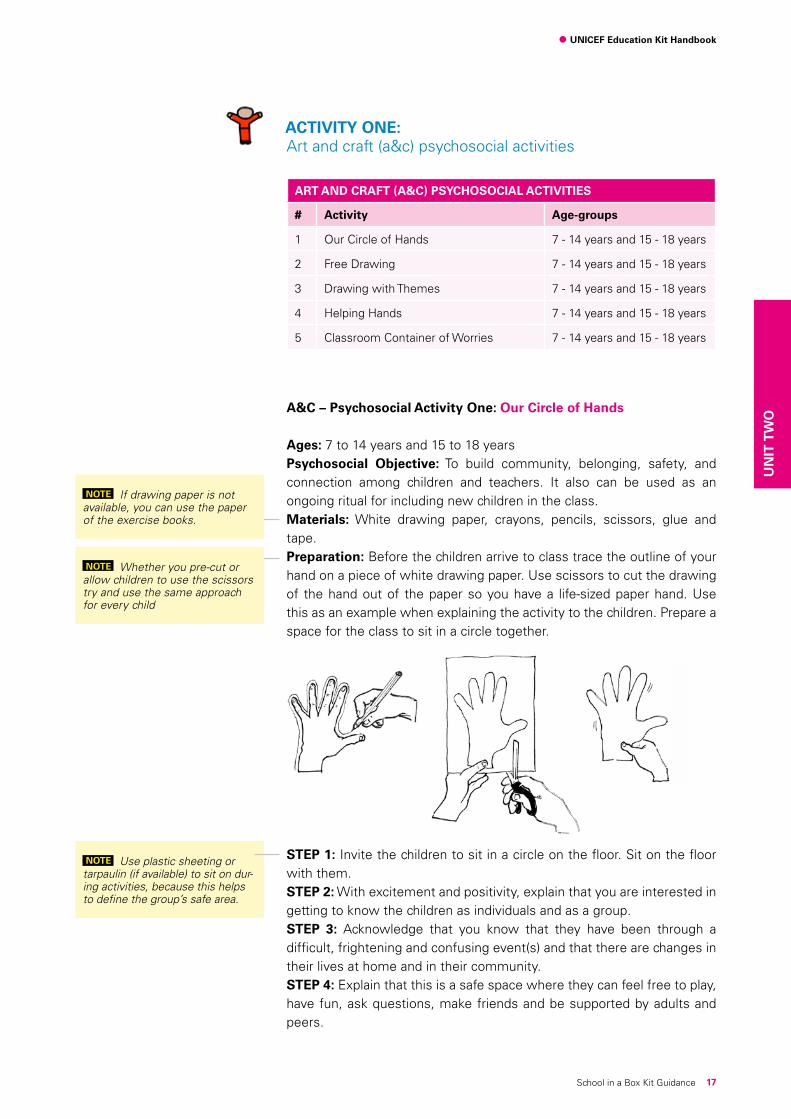
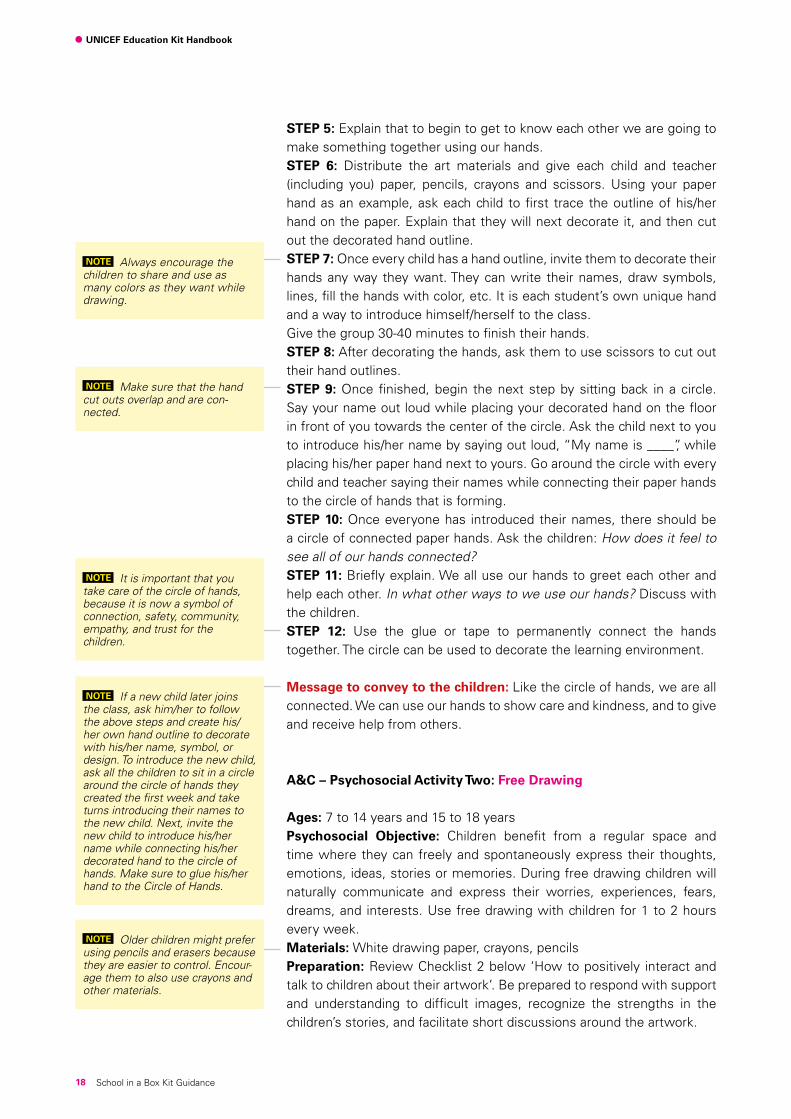
Ages: 7 to 14 years and 15 to 18 years Psychosocial Objective: To build community, belonging, safety, and connection among children and teachers. It also can be used as an ongoing ritual for including new children in the class.Materials: White drawing paper, crayons, pencils, scissors, glue and tape. Preparation: Before the children arrive to class trace the outline of your hand on a piece of white drawing paper. Use scissors to cut the drawing of the hand out of the paper so you have a life-sized paper hand. Use this as an example when explaining the activity to the children. Prepare a space for the class to sit in a circle together.
FIGURE 1: PRE-CUT HANDS
STEP 1: Invite the children to sit in a circle on the floor. Sit on the floor with them. STEP 2: With excitement and positivity, explain that you are interested in getting to know the children as individuals and as a group.STEP 3: Acknowledge that you know that they have been through a difficult, frightening and confusing event(s) and that there are changes in their lives at home and in their community. STEP 4: Explain that this is a safe space where they can feel free to play, have fun, ask questions, make friends and be supported by adults and peers.
NOTE If drawing paper is not available, you can use the paper of the exercise books.
NOTE Whether you pre-cut or allow children to use the scissors try and use the same approach for every child
NOTE Use plastic sheeting or tarpaulin (if available) to sit on dur-ing activities, because this helps to define the group’s safe area.
UN
IT T
WO
18
UNICEF Education Kit Handbook
School in a Box Kit Guidance
STEP 5: Explain that to begin to get to know each other we are going to make something together using our hands.STEP 6: Distribute the art materials and give each child and teacher (including you) paper, pencils, crayons and scissors. Using your paper hand as an example, ask each child to first trace the outline of his/her hand on the paper. Explain that they will next decorate it, and then cut out the decorated hand outline. STEP 7: Once every child has a hand outline, invite them to decorate their hands any way they want. They can write their names, draw symbols, lines, fill the hands with color, etc. It is each student’s own unique hand and a way to introduce himself/herself to the class. Give the group 30-40 minutes to finish their hands. STEP 8: After decorating the hands, ask them to use scissors to cut out their hand outlines. STEP 9: Once finished, begin the next step by sitting back in a circle. Say your name out loud while placing your decorated hand on the floor in front of you towards the center of the circle. Ask the child next to you to introduce his/her name by saying out loud, “My name is ____”, while placing his/her paper hand next to yours. Go around the circle with every child and teacher saying their names while connecting their paper hands to the circle of hands that is forming.STEP 10: Once everyone has introduced their names, there should be a circle of connected paper hands. Ask the children: How does it feel to see all of our hands connected? STEP 11: Briefly explain. We all use our hands to greet each other and help each other. In what other ways to we use our hands? Discuss with the children. STEP 12: Use the glue or tape to permanently connect the hands together. The circle can be used to decorate the learning environment.
Message to convey to the children: Like the circle of hands, we are all connected. We can use our hands to show care and kindness, and to give and receive help from others.
A&C – Psychosocial Activity Two: Free Drawing
Ages: 7 to 14 years and 15 to 18 yearsPsychosocial Objective: Children benefit from a regular space and time where they can freely and spontaneously express their thoughts, emotions, ideas, stories or memories. During free drawing children will naturally communicate and express their worries, experiences, fears, dreams, and interests. Use free drawing with children for 1 to 2 hours every week. Materials: White drawing paper, crayons, pencils Preparation:ReviewChecklist2below‘Howtopositively interactandtalk to children about their artwork’. Be prepared to respond with support and understanding to difficult images, recognize the strengths in the children’s stories, and facilitate short discussions around the artwork.
NOTE Always encourage the children to share and use as many colors as they want while drawing.
NOTE Make sure that the hand cut outs overlap and are con-nected.
NOTE It is important that you take care of the circle of hands, because it is now a symbol of connection, safety, community, empathy, and trust for the children.
NOTE If a new child later joins the class, ask him/her to follow the above steps and create his/her own hand outline to decorate with his/her name, symbol, or design. To introduce the new child, ask all the children to sit in a circle around the circle of hands they created the first week and take turns introducing their names to the new child. Next, invite the new child to introduce his/her name while connecting his/her decorated hand to the circle of hands. Make sure to glue his/her hand to the Circle of Hands.
NOTE Older children might prefer using pencils and erasers because they are easier to control. Encour-age them to also use crayons and other materials.
19
UNICEF Education Kit Handbook
School in a Box Kit Guidance
STEP 1: Use a short relaxation or physical exercise to calm and focus the children.STEP 2: Distribute paper and drawing materials to each child. The children can sit in a circle on the floor, sit at desks, or find their own space in the room or learning environment to sit and draw. STEP 3: Explain to the children that they can draw anything they want. Encourage them to spend 40 minutes drawing anything that comes to their minds. Explain that there is no right or wrong thing or way to draw, and that this is a time for them to enjoy drawing freely.STEP 4: When the children are finished, place the drawings in a circle on the floor, or hang them on the wall and ask the children to walk around and look at their classmates’ drawings.STEP 5: Begin by asking the children if anyone would like to share a story about their drawing. If children draw images from the emergency or conflict situation, use it as an opportunity to explore any fears, confusion or questions the class might have about the distressing events. Always end discussions by refocusing on positive strengths.
A&C – Psychosocial Activity Three: Drawing With Themes and Directions
Ages: 7 to 14 years and 15 to 18 yearsPsychosocial Objective: Using themes and directions for drawings is a way of encouraging the children to recognize their individual community strengths, stories of survival, and positive interactions. Materials: White drawing paper, crayons, pencilsPreparation:ReviewChecklist2‘Howtopositivelyinteractandtalktochildren about their artwork’ below. Choose a theme for the children to draw that will encourage them to recognize their individual and community strengths, stories of survival, and positive interactions. Distribute art materials to each child and then introduce the theme for the drawing activity. Spend a few minutes first exploring the theme and asking questions that encourage their imaginations and ideas. Give the children 30-40 minutes for their drawings. Bring the drawings together in a circle or display on the wall and facilitate a class reflection and story sharing about the drawings.
Examples of Themes for the children to draw:• Myself as really strong. Include what helps me to stay strong.
Example: food, family, friends.• Myfavoritethingaboutmyself.Example: I am really good at dancing/
playing football/singing. • MyfavoritethingaboutsomeoneIlike/love.• Myfavoritegame/animal/friend/food.• Someoneorsomethingthathelpedme.• HowIcanhelpsomeone.Example: I can hold my friend’s hand when
she is sad.
NOTE Use ideas from the check-list to encourage children to talk about their artwork.
NOTE Sometimes children do not want to share or talk about their artwork. This is fine. The act of drawing helps them even if they do not talk about it. Make sure you or the child writes the child’s name on the back of every drawing. This helps the children to recognize their ownership of the artwork and builds their self-esteem.
UN
IT T
WO
20
UNICEF Education Kit Handbook
School in a Box Kit Guidance
• Drawa line inthemiddleofthepaper.On1sidedrawapictureofa sad memory or experience. On the other side draw a picture of a happy memory of experience.
• Myfavoriteplace.What does my favorite place look like? How do I feel when I am there?
• AplacewhereIfeelsafe. How does the place where I feel safe smell? What is the weather there like?, What sounds do I hear when I’m there? What do I see? Who or what is with me? Where is the safe place located?
• Drawapicture toachildsomewhereelse in theworldwho isalsogoing through a difficult time in his/her life because of an emergency. What advice or support can I give to that child? What helped me through the most difficult day? Are there any people,
• What my life was like before and after an emergency event. Folda piece of paper in half and label 1 column “Before” and 1 column “After”. Make a list using words or drawings of the way things were before the event. Then, fill out the other side with the way things have been after the event. The “After” list may be long and sad. Help the children think of positive outcomes from the event, such as people helping each other, and making new friends. This helps the children to process the event and realize what they still have.
A&C – Psychosocial Activity Four: Helping Hands
Ages: 7 to 14 years and 15 to 18 yearsPsychosocial Objective: This activity invites children to explore and reflect how they can make a positive difference during a difficult and painful time. It encourages them to see that they are playing an active role in helping their family and community. Through the activity they will see how they have been helped and how they can help others.Materials: Paper, pencils, pens, and crayons.Preparation: Each child will need 2 pieces of paper. Ask students to think of examples of how they have both received and given help to others during the emergency.
STEP 1: Begin by briefly discussing with the children how everyone needs and offers helping hands to one another, especially in troubled times. Ask the students: Can you give an example of how you received or offered a ‘helping hand’ to someone?STEP 2: Invite the students to draw the outline of 1 of their hands. STEP 3: Explain: Inside each finger of your hand you can use symbols, drawings or words to represent the name of a person, thing, or organization that has helped you through the crisis. Each finger represents 1 example. STEP 4: Next, invite the children to make a 2nd helping hand outline. Inside each finger, have the children draw or write 5 ways that they have helped or will help others.
NOTE It can be a real or imagined space. If children have difficulty identifying a safe space, the teacher can help them think of qualities they would like to have in a safe space to help trigger their imaginations.
NOTE The teacher should emphasize that the children are survivors and have important advice to share with the world about their experiences.
NOTE The teacher should also encourage the children to be aware of what things stayed the same.
NOTE As a child shares a story about his/her drawing or speaks to you, be aware of the expression on his/her face and body language, and then help him/her find the words to describe the feeling experienced. Use words to label the emotion for the child. Hold group conversations about emotions and encourage the children to ask questions and give their peers advice. For example: “When do you feel sad? What does it feel like? What helps you to feel happy?”
NOTE Younger children can be helped by older children to draw the outlines of their hands.
NOTE If no materials are available, the children can be placed in pairs or in smaller groups and can take turns using their hands and fingers to describe the help they have received and given to others.

21
UNICEF Education Kit Handbook
School in a Box Kit Guidance
A&C – Psychosocial Activity Five: Classroom Container of Worries
Ages: 7 to 14 years and 15 to 18 yearsPsychosocial Objective: Children in emergencies have worries that may have solutions, as well as bigger worries that are not easily resolved. This activity helps children identify things that are troubling them, while also encouraging and providing them a way to remember what to do to feel better. It also builds community and trust.
YOUR ROLE is to provide a safe container for their worries. It helps the children to know that their worries and fears are being heard and acknowledged, and that an adult they trust is holding their worries for them.
Materials: Colored or white paper, scissors, pens, pencils, and a container like a small box or bag. Preparation: Cut the colored paper into smaller pieces.
STEP 1: Begin a discussion with the children about sharing things that they are worried about. You can start the conversation by giving an example of a less severe worry, like being late for school. Ask the class: If you are worried about being late for school, what can you do to solve the problem? For example: I can wake up a bit earlier in order to have more time, or I can talk with my teacher and explain why I am late. STEP 2: Ask the children to draw the problem on 1 side of the paper, and the solution on the other side. STEP 3: Before each child puts their worry inside the container, discuss their worry and solution as a group. Explain: Some worries are bigger than others and not easily solved, but the container can take the worry away from you and do the worrying for you. STEP 4: Take the container you have, and as you put the paper with the worry inside the container, explain to the group that the worry and solution is now going to be kept safe inside the Class Worry Container. Have the class choose where in the learning environment to keep the Worry Container for safekeeping.
Message to convey to the children: It is normal to have difficult thoughts, feelings and emotions, and it is important to be able to express them and think of solutions to feel better. Your worries and solutions are being heard and are being kept safe by an adult. Let them know that every week they can add a worry/solution to the class container—or whenever needed, as some might have urgent worries that arise. The children can also choose to take past worries out of the container.
NOTE Ideally, use a container that can be closed and kept permanently in the learning environment to be returned to on a weekly basis.
NOTE Keep the pieces just large enough for the children to have space to draw or write with pencils and pens.
NOTE Do not force students to tell their worries to the rest of the class. If they prefer, they can simply draw their worries and solutions and put them in the container.
NOTE Serious issues may come up as children express their worries that might need adult intervention (e.g., protection or health issues). Also, while children are expressing their worries it may appear that some children may need further psychosocial counseling and care. It is important to report these issues and ensure that they are dealt with. Be tactful.
UN
IT T
WO
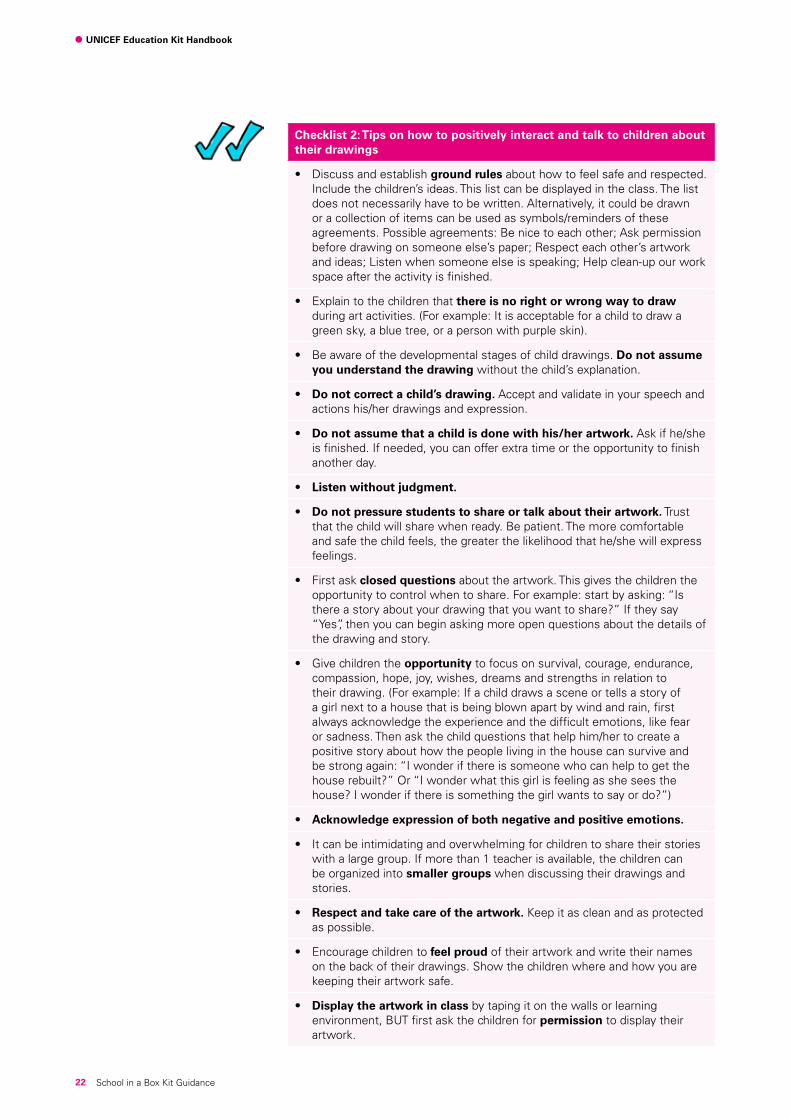
22
UNICEF Education Kit Handbook
School in a Box Kit Guidance
Checklist 2: Tips on how to positively interact and talk to children about their drawings
• Discussandestablishground rules about how to feel safe and respected. Include the children’s ideas. This list can be displayed in the class. The list does not necessarily have to be written. Alternatively, it could be drawn or a collection of items can be used as symbols/reminders of these agreements. Possible agreements: Be nice to each other; Ask permission before drawing on someone else’s paper; Respect each other’s artwork and ideas; Listen when someone else is speaking; Help clean-up our work space after the activity is finished.
• Explaintothechildrenthatthere is no right or wrong way to draw during art activities. (For example: It is acceptable for a child to draw a green sky, a blue tree, or a person with purple skin).
• Beawareofthedevelopmentalstagesofchilddrawings.Do not assume you understand the drawing without the child’s explanation.
• Do not correct a child’s drawing. Accept and validate in your speech and actions his/her drawings and expression.
• Do not assume that a child is done with his/her artwork. Ask if he/she is finished. If needed, you can offer extra time or the opportunity to finish another day.
• Listen without judgment.
• Do not pressure students to share or talk about their artwork. Trust that the child will share when ready. Be patient. The more comfortable and safe the child feels, the greater the likelihood that he/she will express feelings.
• Firstaskclosed questions about the artwork. This gives the children the opportunity to control when to share. For example: start by asking: “Is there a story about your drawing that you want to share?” If they say “Yes”, then you can begin asking more open questions about the details of the drawing and story.
• Givechildrentheopportunity to focus on survival, courage, endurance, compassion, hope, joy, wishes, dreams and strengths in relation to their drawing. (For example: If a child draws a scene or tells a story of a girl next to a house that is being blown apart by wind and rain, first always acknowledge the experience and the difficult emotions, like fear or sadness. Then ask the child questions that help him/her to create a positive story about how the people living in the house can survive and be strong again: “I wonder if there is someone who can help to get the house rebuilt?” Or “I wonder what this girl is feeling as she sees the house? I wonder if there is something the girl wants to say or do?”)
• Acknowledge expression of both negative and positive emotions.
• Itcanbeintimidatingandoverwhelmingforchildrentosharetheirstorieswith a large group. If more than 1 teacher is available, the children can be organized into smaller groups when discussing their drawings and stories.
• Respect and take care of the artwork. Keep it as clean and as protected as possible.
• Encouragechildrentofeel proud of their artwork and write their names on the back of their drawings. Show the children where and how you are keeping their artwork safe.
• Display the artwork in class by taping it on the walls or learning environment, BUT first ask the children for permission to display their artwork.
23
UNICEF Education Kit Handbook
School in a Box Kit Guidance
ACTIVITY TWO: Play, relax and assurance (pra) psychosocial activities
PLAY, RELAX AND ASSURANCE PSYCHOSOCIAL ACTIVITIES
# Activity Age-groups
1 Web of Connections 7 - 14 years and 15 - 18 years
2 Exercises to Relax, Calm and Comfort 7 - 14 years and 15 - 18 years
3 Rituals and Routines 7 - 14 years and 15 - 18 years
PRA – Psychosocial Activity One: Web of Connections
Ages: 7 to 14 years and 15 to 18 years Psychosocial Objective: Distressing experiences can cause children to feel uncomfortable or trapped in their bodies. They may also find it difficult to interact with people and their environment. This activity frees and loosens the energy in the learning environment, and helps promote the connection between children and teachers. It also provides an opportunity to learn and remember names.Materials: A ball or a soft object that can be tossed or rolled, and space to sit or stand as a group.
STEP 1: Sit or stand together in a circle. Include yourself and any other teachers present. STEP 2: While holding the ball say your name out loud. Then toss the ball to any child in the circle while saying his/her name out loud. STEP 3: That child will then repeat his/her name while holding the ball. The child will next toss or roll it to another child while saying the other child’s name out loud. Repeat this until every child has caught the ball—with each child only receiving the ball once—until the ball has been returned to you. STEP 4: Do the exercise again—in the same order. Ask the children to try to repeat the pattern; to try to move the ball from child to child in the same order, while saying the names out loud.STEP 5: Repeat the exercise a few more times, staying with the pattern. You can also add emotions or feelings to the ball, such as it is a slow, fast, hot, cold, sad, or happy ball.
PRA – Psychosocial Activity Two: Exercises to Relax, Calm and Comfort
Ages: 7 to 14 years and 15 to 18 years Psychosocial Objective: To facilitate and encourage children to feel present in their bodies and learn activities that will help them to feel relaxed, calm and comforted. You can teach children to use these techniques when they feel scared, anxious, sad, angry, or worried.
UN
IT T
WO
24
UNICEF Education Kit Handbook
School in a Box Kit Guidance
Teach 1 of these exercises to the children each week, and use at least 1 relaxation exercise every day. They can be used before an art activity or when you notice that the children need to lower their energy or anxiety levels. You and the children can also choose 1 relaxation activity with which to end the day as a comforting ritual and to help them go home relaxed. Materials: Open space within which to lie down or stand as a group. It can be done indoors or outdoors. If available, use plastic sheeting, a tarpaulin, or mats when lying on the floor.
Exercise A: Deep BreathsSTEP 1: Teach children how to become aware of their breath and to breathe deeply while also using their imaginations. Use this quick deep breathing exercise daily with the children. STEP 2: While sitting or standing, ask each child to make a fist with his/her right hand and imagine it is holding a sweet smelling flower, fruit, or favorite food. STEP 3: Next ask each child to make a fist with his/her left hand and pretend it is holding a candle or fire. STEP 4: Direct the children to inhale deeply the smell of the flower/fruit/food in their left hands and then blow out the candle and fire in their right hands. Continue deeply breathing in the sweet smell through the nose and breathing out the fire from the mouth. Repeat the cycle of breathing in and out at least 3 times.
Exercise B: Tense and Release STEP 1: Let each child chooses whether they want to stand, sit or lie down for this activity. It works best when the child chooses where they most feel comfortable. STEP 2: Explain that you are going to do an exercise for 10 minutes and that it is fine to stop at any time. STEP 3: Demonstrate to the children how to tense and release the muscles in your body. Show them how when parts of the body are tense the muscles get as tight as you can make them. Then, when muscles are released, they get loose and relaxed. STEP 4: Ask the children to first notice if any part of their bodies feels more tight or stiff than other parts. Invite them to pay attention to their breath going in and out and let go of thoughts and worries. STEP 5: Guide the children through their bodies by beginning at their toes. Focus their attention by saying in a calm voice: “Notice your toes and how they are feeling, take a deep breath and tense up your toes as hard as you can…hold it for a moment…and now, let go of the tension in your toes as you breathe out.” Continue this direction for the feet, calves, knees, thighs, fingers, hands, arms, shoulders, back, necks, mouth, eyes, and top of their heads. Once you reached the top of the head, guide the children back down through each body part ending with the toes.STEP 6: Talk with the children about how they felt before the exercise and how they feel now. Discuss times and places the children can use this activity on their own—for example, when they are falling asleep.
THINK: It is a good idea to try the exercises out with your colleagues and volunteers, and discuss how best to implement them with the children. Do these exercises help when feeling stress or anxiety? Why?

25
UNICEF Education Kit Handbook
School in a Box Kit Guidance
Exercise C: Butterfly Hugs STEP 1: Cross your arms across your chest as if you were holding yourself, so your left hand is on your right shoulder and right hand on your left shoulder. Ask the students to imitate you. STEP 2: Keep your arms crossed and alternately tap each of your hands on the shoulder it is touching: tap the left hand on the right shoulder; then tap the right hand on the left shoulder; then continue to repeat this pattern. Tapping 1 side at a time is the most important part of this exercise. STEP 3: You can tell the children that the tapping of their hands is like the wings of a butterfly or bird moving up and down. One wing moves up and comes down, and then the other wing moves up and comes down. Ask the children to tap for 1 minute, and then stop, take a breath, and notice how they are feeling. Ask the students: How do you feel? STEP 4: Continue tapping. You can do this exercise for as much or as little time as you and the children find comfortable, and as many times a day as needed.
Exercise D: Belly BreathingSTEP 1: Have the children lie on their backs and put their hands on their stomachs. STEP 2: Direct the children to take a slow deep breath in through the nose and let it out through the mouth with a gentle “a-h-h-h-h-h-h” sound. Tell them they should feel and see the hand on the stomach move up and down as they breathe in and out. Direct them to breathe in slowly through the nose and out through the mouth like they are trying to move a feather up in the air. STEP 3: Breathe in slowly to the count 2, 3, 4, and out 2, 3, and 4. Repeat several times.STEP 4: Ask the children how the exercise makes them feel. Practice the technique with them regularly. Talk to them about when to use it—for example, when they feel worried, angry or frightened. Encourage them to use this technique at home when going to sleep.
Exercise E: LaughterLaughter is a way that children can naturally release stress, and relax. Think of games or ways to make the children laugh. For example, sit or stand in a circle with the children and have them take turns trying to make each other laugh by making funny sounds or expressions with their faces and bodies.
PRA – Psychosocial Activity Three: Rituals and Routines
Ages: 7 to 14 years and 15 to 18 years Psychosocial Objective: During emergency and conflict situations, the familiar rituals and routines of children at home and in school are disrupted. It is important to introduce the structure of rituals and routines into their learning environment. The more predictable their day, the safer
NOTE You can also do this exercise standing.
NOTE Children and adults of any age can benefit from these relaxation activities. Use these techniques for yourself when you are feeling stressed or overwhelmed. You can also teach the skills to a child’s parent/guardian and encourage using them at home to release anxiety and stress.
UN
IT T
WO
26
UNICEF Education Kit Handbook
School in a Box Kit Guidance
and more protected the children will feel. Help them to identify rituals or routines in their day at school or at home. Ask them to think of old and new rituals, customs, and routines that are meaningful, enjoyable and important to them.
Examples: • Ask the children to decide on a ritual to begin and end the day at
school. It can be a special song or game they sing or play together at the start of the day, and a relaxation activity before they go home.
• Childrenarefullofenergyandmightfinditdifficulttofocusonanartactivity or class lesson.
Start a new 2-minute ritual to release energy before doing a sitting activity or lesson. This could be dancing in a circle, stretching their arms towards the sky, tensing and releasing muscles, passing or rolling a ball to each other, or any other culturally relevant games. End the 1-2 minutes of physical activity with the children taking 2 deep breaths all together. By doing this you will help the children to release energy, as well as calm their bodies. Next ask them to sit while you explain the art activity or lesson. This routine sequence of activities is a way of providing comfort and an understanding of the learning environment.
• Every time the children complete an art activity ask for theirpermission to put the artwork on the wall or in a circle on the floor before inviting them to spend a minute walking around and looking at their classmates’ artwork.
• Establishritualsaroundclean-upafterartandplayactivities,suchaswhere to put back games and materials.
• Speak to parents/guardians about the importance of routines andcustoms at home.
• Havediscussionswiththechildrenaboutritualsandroutinesathomethat make them feel happy or safe. Ask the students: What time do you go to sleep? What are your morning or bedtime rituals and routines? What are your religious or cultural customs or rituals?
THINK: What are other rituals and routines you can implement in the learning environment?
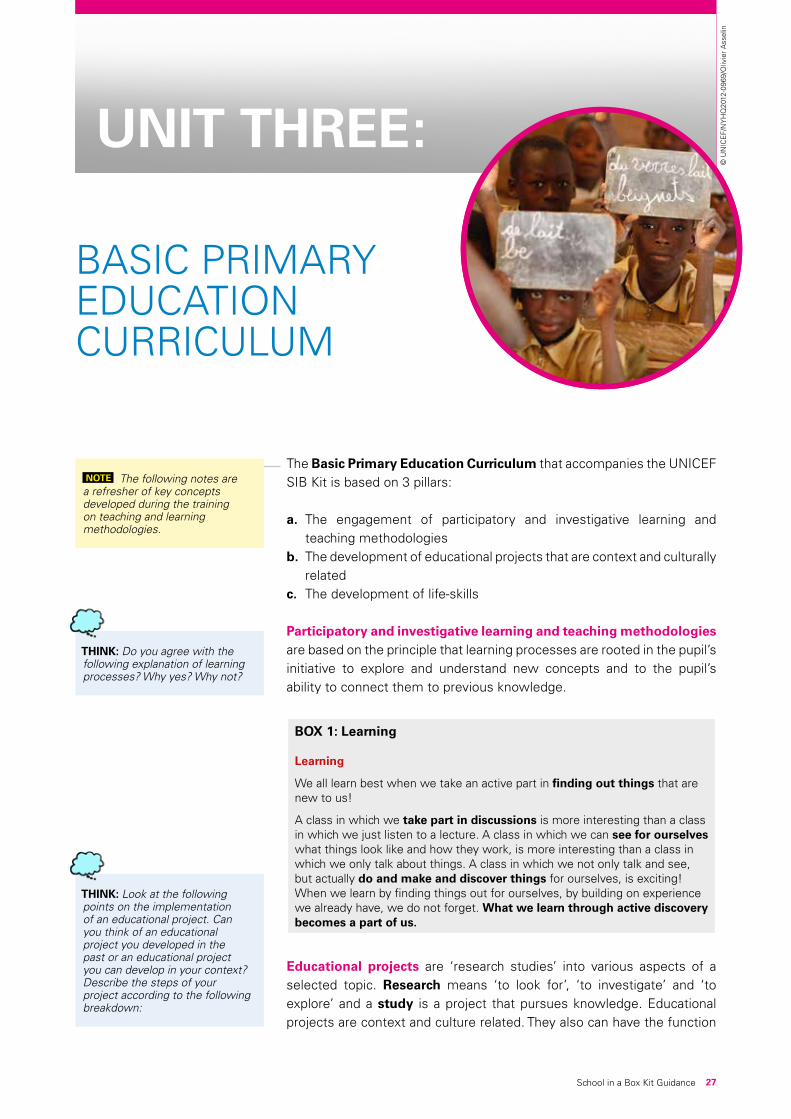
27School in a Box Kit Guidance
UNIT THREE:
BASIC PRIMARY EDUCATION CURRICULUM
The Basic Primary Education Curriculum that accompanies the UNICEF SIB Kit is based on 3 pillars:
a. The engagement of participatory and investigative learning and teaching methodologies
b. The development of educational projects that are context and culturally related
c. The development of life-skills
Participatory and investigative learning and teaching methodologies are based on the principle that learning processes are rooted in the pupil’s initiative to explore and understand new concepts and to the pupil’s ability to connect them to previous knowledge.
BOX 1: Learning
Learning
We all learn best when we take an active part in finding out things that are new to us!
A class in which we take part in discussions is more interesting than a class in which we just listen to a lecture. A class in which we can see for ourselves what things look like and how they work, is more interesting than a class in which we only talk about things. A class in which we not only talk and see, but actually do and make and discover things for ourselves, is exciting! When we learn by finding things out for ourselves, by building on experience we already have, we do not forget. What we learn through active discovery becomes a part of us.
Educational projects are ‘research studies’ into various aspects of aselected topic. Research means ‘to look for’, ‘to investigate’ and ‘toexplore’ and a study is a project that pursues knowledge. Educational projects are context and culture related. They also can have the function
NOTE The following notes are a refresher of key concepts developed during the training on teaching and learning methodologies.
THINK: Do you agree with the following explanation of learning processes? Why yes? Why not?
THINK: Look at the following points on the implementation of an educational project. Can you think of an educational project you developed in the past or an educational project you can develop in your context? Describe the steps of your project according to the following breakdown:
© U
NIC
EF/
NY
HQ
2012
-096
9/O
livie
r Ass
elin
28
UNICEF Education Kit Handbook
School in a Box Kit Guidance
to convey important lifesaving messages that are particularly important in contexts of emergencies and crisis.
BOX 2: How to develop an educational project
How to develop an educational project:
1. Select the topic of the project: what is the project going to investigate and why?
For example: an increasing number of children refer to exploiting and abusive situations that are happening in the refugee camp. The research studyaimsatinvestigating‘children’shumanrights’inthecontextoftherefugee camp in order to develop children’s knowledge and awareness on their rights.
2. Plan how to develop the project: which steps?
For example:
Step 1: Understanding the issue. What are the rights of children? According to whom?
(a.) the local community, (b.) the international law...
Step 2: Finding out more about the issue. How does the issue affect our lives? Who implement children’s rights? a) In the refugee camp? b) In the household? c) In the school?
Step 3: Taking action. What can children do to strengthen their rights?
(a.) a sensitization campaign (b.) invite relevant community leaders to the school and/or CFS/E and share their concerns
3. Implement the project. Implement the steps of the plan.
4. Evaluate the project: What did we learn?
For example: at the end of the project, children discuss what they liked and what they did not like, what they found easy and what they found difficult during the implementation of the project and how they can do it better next time
Reference:‘TheRiverofHope’:Aresourcemanualforworkingwithchildrenandtheircommunities, Child-to-Child Trust and Healthlink, 2006
Life-skills are a set of skills that can help pupils to cope better with their life circumstances by making informed decisions, by communicating effectively with others, by increasing self-esteem and confidence and by planning their futures.
NOTE The following steps should be developed together with the children
NOTE Remember, children already have an asset of life-skills when they join education programmes. Build on them!
THINK: Look at the following overview of life-skills. Think of your experience as teacher or parent or sibling or mentor. Can you give an example of how you supported the development of some of the following life-skills?
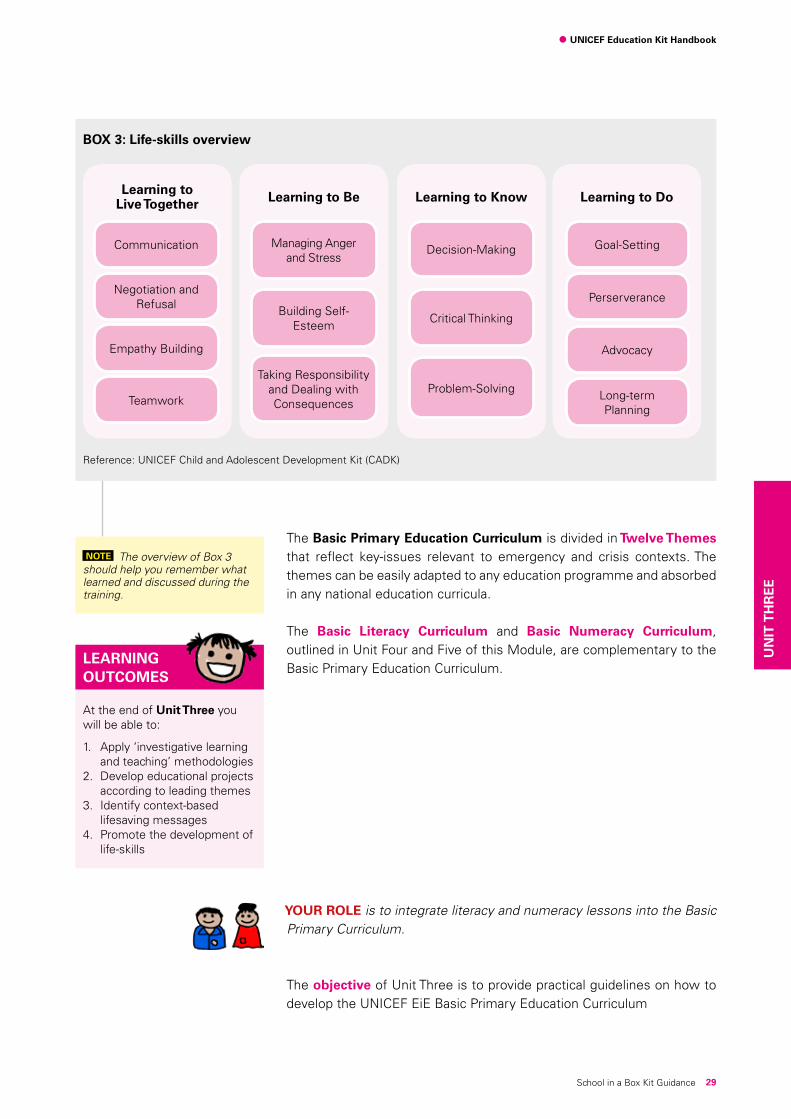
29
UNICEF Education Kit Handbook
School in a Box Kit Guidance
The Basic Primary Education Curriculum is divided in Twelve Themes that reflect key-issues relevant to emergency and crisis contexts. The themes can be easily adapted to any education programme and absorbed in any national education curricula.
The Basic Literacy Curriculum and Basic Numeracy Curriculum, outlined in Unit Four and Five of this Module, are complementary to the Basic Primary Education Curriculum.
YOUR ROLE is to integrate literacy and numeracy lessons into the Basic Primary Curriculum.
The objective of Unit Three is to provide practical guidelines on how to develop the UNICEF EiE Basic Primary Education Curriculum
Learning to Be
Managing Anger and Stress
Building Self-Esteem
Taking Responsibility and Dealing with Consequences
Learning to Live Together
Communication
Negotiation and Refusal
Empathy Building
Teamwork
Learning to Do
Goal-Setting
Perserverance
Advocacy
Long-term Planning
Learning to Know
Decision-Making
Critical Thinking
Problem-Solving
BOX 3: Life-skills overview
NOTE The overview of Box 3 should help you remember what learned and discussed during the training.
Reference: UNICEF Child and Adolescent Development Kit (CADK)
At the end of Unit Three you will be able to:
1. Apply‘investigativelearningand teaching’ methodologies
2. Develop educational projects according to leading themes
3. Identify context-based lifesaving messages
4. Promote the development of life-skills
LEARNING OUTCOMES
UN
IT T
HR
EE
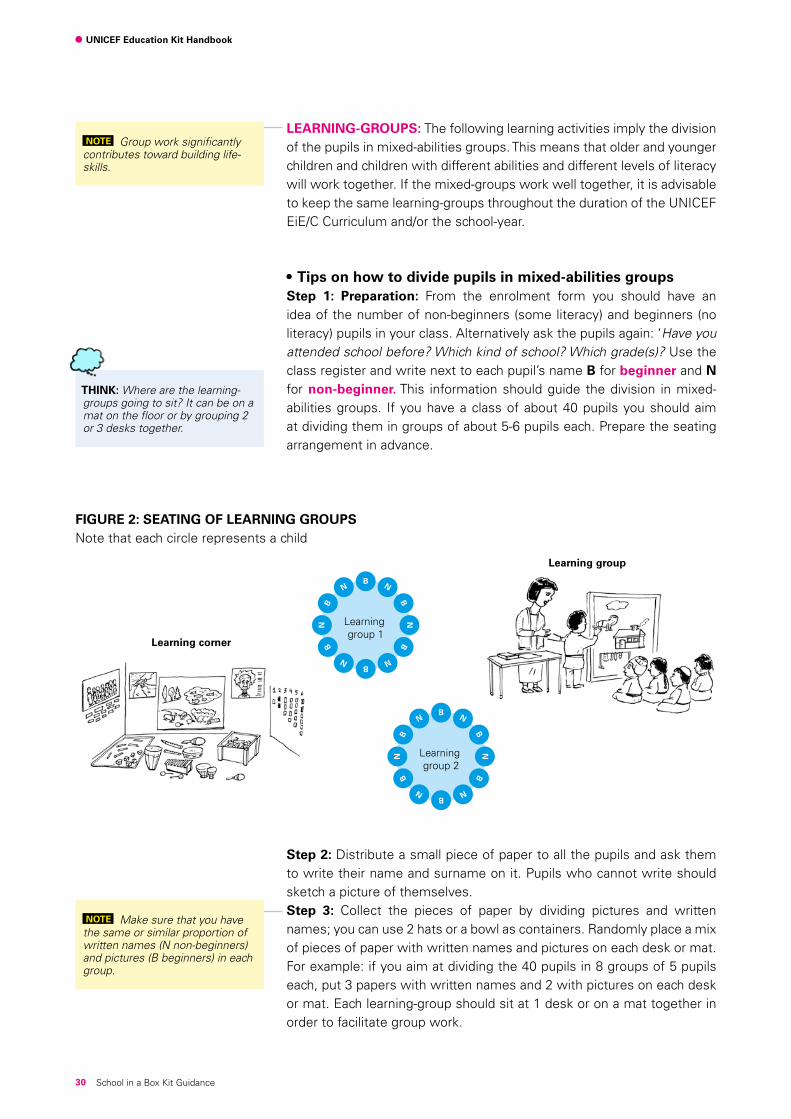
30
UNICEF Education Kit Handbook
School in a Box Kit Guidance
LEARNING-GROUPS: The following learning activities imply the division of the pupils in mixed-abilities groups. This means that older and younger children and children with different abilities and different levels of literacy will work together. If the mixed-groups work well together, it is advisable to keep the same learning-groups throughout the duration of the UNICEF EiE/C Curriculum and/or the school-year.
•Tipsonhowtodividepupilsinmixed-abilitiesgroupsStep 1: Preparation: From the enrolment form you should have an idea of the number of non-beginners (some literacy) and beginners (no literacy)pupilsinyourclass.Alternativelyaskthepupilsagain:‘Have you attended school before? Which kind of school? Which grade(s)? Use the class register and write next to each pupil’s name B for beginner and N for non-beginner. This information should guide the division in mixed-abilities groups. If you have a class of about 40 pupils you should aim at dividing them in groups of about 5-6 pupils each. Prepare the seating arrangement in advance.
NOTE Group work significantly contributes toward building life-skills.
THINK: Where are the learning-groups going to sit? It can be on a mat on the floor or by grouping 2 or 3 desks together.
Learning corner
FIGURE 2: SEATING OF LEARNING GROUPSNote that each circle represents a child
Step 2: Distribute a small piece of paper to all the pupils and ask them to write their name and surname on it. Pupils who cannot write should sketch a picture of themselves.Step 3: Collect the pieces of paper by dividing pictures and written names; you can use 2 hats or a bowl as containers. Randomly place a mix of pieces of paper with written names and pictures on each desk or mat. For example: if you aim at dividing the 40 pupils in 8 groups of 5 pupils each, put 3 papers with written names and 2 with pictures on each desk or mat. Each learning-group should sit at 1 desk or on a mat together in order to facilitate group work.
NOTE Make sure that you have the same or similar proportion of written names (N non-beginners) and pictures (B beginners) in each group.
Learning group
BN
BN
B
N BN
BN
B
N
Learning group 1
BN
BN
B
N BN
BN
B
N
Learning group 2
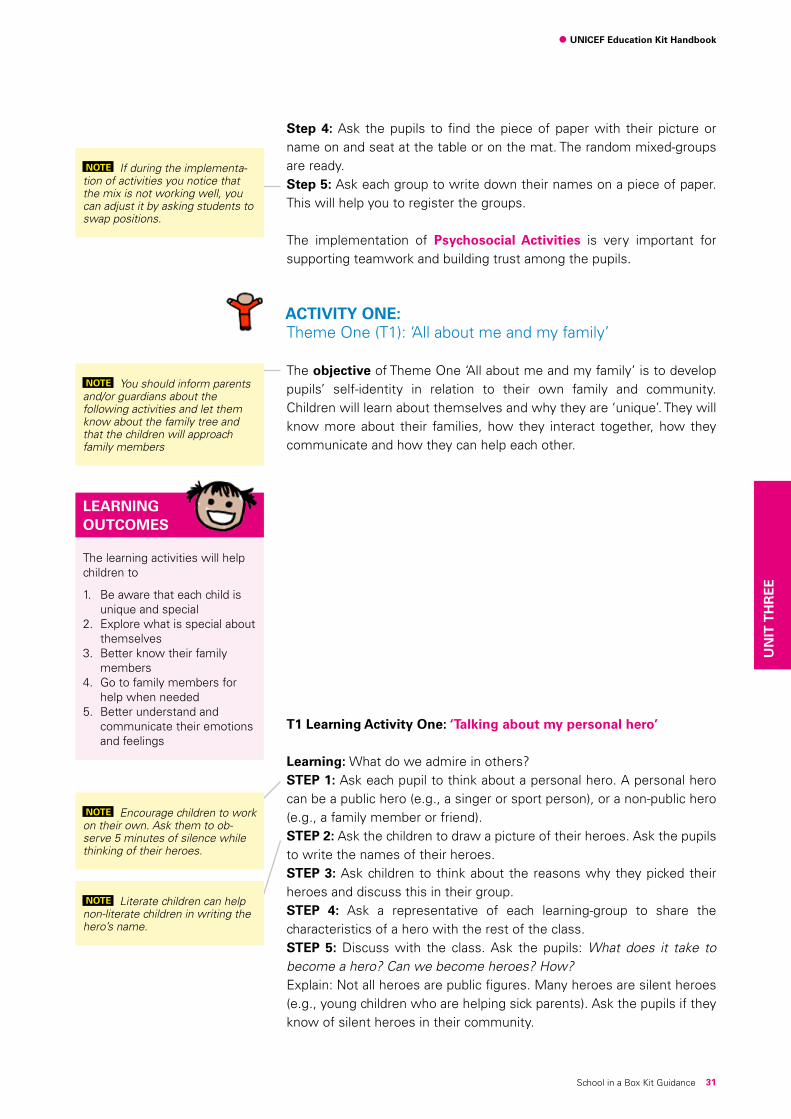
31
UNICEF Education Kit Handbook
School in a Box Kit Guidance
Step 4: Ask the pupils to find the piece of paper with their picture or name on and seat at the table or on the mat. The random mixed-groups are ready. Step 5: Ask each group to write down their names on a piece of paper. This will help you to register the groups.
The implementation of Psychosocial Activities is very important for supporting teamwork and building trust among the pupils.
ACTIVITY ONE: ThemeOne(T1):‘Allaboutmeandmyfamily’
The objectiveofThemeOne‘Allaboutmeandmyfamily’istodeveloppupils’ self-identity in relation to their own family and community. Childrenwilllearnaboutthemselvesandwhytheyare‘unique’.Theywillknow more about their families, how they interact together, how they communicate and how they can help each other.
T1 Learning Activity One: ‘Talking about my personal hero’
Learning: What do we admire in others? STEP 1: Ask each pupil to think about a personal hero. A personal hero can be a public hero (e.g., a singer or sport person), or a non-public hero (e.g., a family member or friend). STEP 2: Ask the children to draw a picture of their heroes. Ask the pupils to write the names of their heroes. STEP 3: Ask children to think about the reasons why they picked their heroes and discuss this in their group. STEP 4: Ask a representative of each learning-group to share the characteristics of a hero with the rest of the class. STEP 5: Discuss with the class. Ask the pupils: What does it take to become a hero? Can we become heroes? How? Explain: Not all heroes are public figures. Many heroes are silent heroes (e.g., young children who are helping sick parents). Ask the pupils if they know of silent heroes in their community.
NOTE If during the implementa-tion of activities you notice that the mix is not working well, you can adjust it by asking students to swap positions.
NOTE You should inform parents and/or guardians about the following activities and let them know about the family tree and that the children will approach family members
NOTE Encourage children to work on their own. Ask them to ob-serve 5 minutes of silence while thinking of their heroes.
NOTE Literate children can help non-literate children in writing the hero’s name.
The learning activities will help children to
1. Be aware that each child is unique and special
2. Explore what is special about themselves
3. Better know their family members
4. Go to family members for help when needed
5. Better understand and communicate their emotions and feelings
LEARNING OUTCOMES
UN
IT T
HR
EE

32
UNICEF Education Kit Handbook
School in a Box Kit Guidance
T1 Learning Activity Two: ‘Talking about myself’
Learning:Whatmakesmeunique?‘MyIdentificationCard’STEP 1: Preparation: Draw on a flip-chart or on the blackboard the following:‘FIGURE 3: My Identification Card’. STEP 2:Askthepupilstocopythe‘identificationcard’pictureontheirexercise book. Ask the pupils to draw their picture and fill in the details. STEP 3: Discuss with the pupils: What is an ‘identification card’? When do we need an ‘identification card’? Can you find ‘identification cards’ that are exactly the same? Why not? Look at the identification card of the person next to you, what do you have in common? What is different?
FIGURE 3: MY IDENTIFICATION CARD
MY IDENTIFICATION CARD
Name:_____________
Nickname:__________
Family name:________
Place of birth:________
Date of birth: ________
Place of residence: (place where you live)_____________
Nationality:______________________
Profession: ______________________
Ideal profession (who would you like
to become in the future?): _________
Which special talents do you have? (Drawing, singing, cooking, summersets...)
What is your favorite school subject?______________________
What are your favorite drink and food? ________________________
What makes you happy? ________
What makes you sad? __________
Whatmakesyou‘unique’?______
FINGERPRINT
(thumb of right hand)
STEP 4: Discuss with the pupils: Why do we have fingerprints on identification cards? Ask the pupils to observe their fingerprints. Ask the pupils: Can you find a fingerprint that is the same as yours? Explain. Each person has different fingerprints; this is why they are used on identification cards. Another way to identify people is through the scan of their eye’s retina, which is also unique in every human being.
FIGURE 4: FINGERPRINT
STEP 5: Explain. Each of us is unique, not only physically, but also as person. We all have special talents and we all have different likes and dislikes.
NOTE If children do not know all their personal details ask them to make up fictitious (imaginary) details.
NOTE If pupils want, they can create either a learning-group or class-group poster using the iden-tification cards.
NOTE Start to develop a display—it can either be a zigzag board or a wall display—where the classwork of themes one, two, three and four can be aggregated.
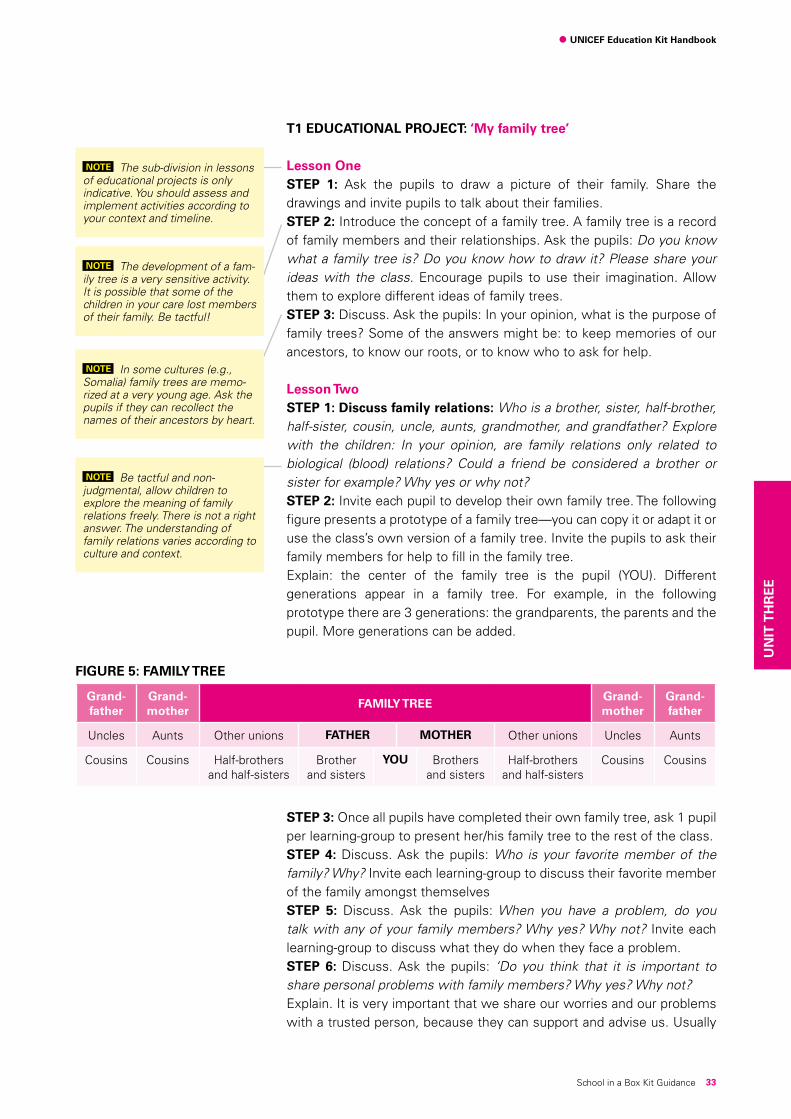
33
UNICEF Education Kit Handbook
School in a Box Kit Guidance
T1 EDUCATIONAL PROJECT: ‘My family tree’
Lesson One STEP 1: Ask the pupils to draw a picture of their family. Share the drawings and invite pupils to talk about their families.STEP 2: Introduce the concept of a family tree. A family tree is a record of family members and their relationships. Ask the pupils: Do you know what a family tree is? Do you know how to draw it? Please share your ideas with the class. Encourage pupils to use their imagination. Allow them to explore different ideas of family trees. STEP 3: Discuss. Ask the pupils: In your opinion, what is the purpose of family trees? Some of the answers might be: to keep memories of our ancestors, to know our roots, or to know who to ask for help.
Lesson TwoSTEP 1: Discuss family relations: Who is a brother, sister, half-brother, half-sister, cousin, uncle, aunts, grandmother, and grandfather? Explore with the children: In your opinion, are family relations only related to biological (blood) relations? Could a friend be considered a brother or sister for example? Why yes or why not? STEP 2: Invite each pupil to develop their own family tree. The following figure presents a prototype of a family tree—you can copy it or adapt it or use the class’s own version of a family tree. Invite the pupils to ask their family members for help to fill in the family tree. Explain: the center of the family tree is the pupil (YOU). Different generations appear in a family tree. For example, in the following prototype there are 3 generations: the grandparents, the parents and the pupil. More generations can be added.
NOTE The sub-division in lessons of educational projects is only indicative. You should assess and implement activities according to your context and timeline.
NOTE The development of a fam-ily tree is a very sensitive activity. It is possible that some of the children in your care lost members of their family. Be tactful!
NOTE In some cultures (e.g., Somalia) family trees are memo-rized at a very young age. Ask the pupils if they can recollect the names of their ancestors by heart.
NOTE Be tactful and non-judgmental, allow children to explore the meaning of family relations freely. There is not a right answer. The understanding of family relations varies according to culture and context.
FIGURE 5: FAMILY TREE
Grand-father
Grand-mother
FAMILY TREEGrand-mother
Grand-father
Uncles Aunts Other unions FATHER MOTHER Other unions Uncles Aunts
Cousins Cousins Half-brothers and half-sisters
Brother and sisters
YOU Brothers and sisters
Half-brothers and half-sisters
Cousins Cousins
STEP 3: Once all pupils have completed their own family tree, ask 1 pupil per learning-group to present her/his family tree to the rest of the class.STEP 4: Discuss. Ask the pupils: Who is your favorite member of the family? Why? Invite each learning-group to discuss their favorite member of the family amongst themselves STEP 5: Discuss. Ask the pupils: When you have a problem, do you talk with any of your family members? Why yes? Why not? Invite each learning-group to discuss what they do when they face a problem. STEP 6: Discuss. Ask the pupils: ‘Do you think that it is important to share personal problems with family members? Why yes? Why not?Explain. It is very important that we share our worries and our problems with a trusted person, because they can support and advise us. Usually
UN
IT T
HR
EE
34
UNICEF Education Kit Handbook
School in a Box Kit Guidance
the persons who most care for us are family members. It is also important that we share our happiness, and that we let family members know that we care for them.
Lesson ThreeSTEP 1: Introduce the theme: caring for family members. Ask the pupils: In your opinion, how can you tell your parents or siblings that you care for them? How can you tell them when you do not like how they behave? Can you give examples? Some answers might be: bring flowers, share a hug, or cry. STEP 2: Discuss with the whole class and agree on 3 actions that the pupils will implement at home to improve the communication with their family members in the next 2 weeks. Write on a flip-chart paper: Three actions that will help me to express when I am happy and when I feel sad or worried or hurt with my family. For example, you could hug your mom before leaving the house for school or write a letter to your older brother and explain that you feel very hurt when he goes out to play and he leaves you alone in the house. Post the flip-chart paper on the wall or display it in a place where the pupils can easily read it. Pupils can copy the 3 action points in their exercise books.STEP 3: Explain. An easy way to express that we care for our siblings or other family members is to help them in their tasks and chores. For example, help to fetch water or help younger siblings doing their homework. Discuss with the pupils: What do you do to help your family members? STEP 4: Explain. Receiving support and help from our family members is a way to feel cherished and valued. Discuss with the pupils: Would you like to get more help from your family members? How can you ask for help? Please give an example. For example, pupils might want more help in their morning chores so that they don’t arrive late at school, or to advice on how to deal with a bully at school.
Lesson FourDramatization. Ask 2 people from each learning-group to dramatize a situation when they ask for help to a family member. Discuss the dramatization with the pupils.
Lesson FiveEvaluate. After 2 weeks from the end of the ‘family tree’ project,discuss with the pupils how it worked. Ask the pupils: Were you able to implement the 3 actions? Use the flip-chart paper as reference. Discuss with the pupils: What worked well? What did not work? Why? What can you do to do it better next time? How did you feel?
NOTE You can prepare a short script (guidelines) for the dramati-zation in advance, using fictitious names and characters.
35
UNICEF Education Kit Handbook
School in a Box Kit Guidance
ACTIVITY TWO: ThemeTwo(T2):‘Allaboutmeandmyfriends’
The objective ofThemeTwo‘Allaboutmeandmyfriends’istoexplorethe role of friends in your own life and in other people’s lives. True friends support us in good and bad times. Children need to understand how they can be a good friend to others and how to identify good friends. Pupils will explore issues related to gender roles, children with special needs, and children affected by HIV/AIDS
T2 Learning Activity One: ‘Good and false friends’
Learning: Identify who is a good friend and who is not a good friend STEP 1: Preparation: Select a local story or make up a new story that tells about good and bad friends. An example is the story of Pinocchio, in which the character of the ‘talking cricket’ is the good friend, whoadvisesPinocchioandforgiveshiscruelty,andthecharactersof‘theFoxand the Cat’ are the bad friends, who deceive Pinocchio and lead him onto a bad path. STEP 2: Read the story to the class and discuss the good and bad characters with the pupils. STEP 3: Ask each learning-group to make a list of the qualities of a good friend and a list of the characteristics of a false friend. For example: a good friend listens to you, gives sound advice, forgives shortcomings, makes you laugh, shares secrets, helps with school work, and stands up for you in front of others. A false friend deceives you, pressures you into doing bad things, teases you and others, bullies you and others, tells lies, criticizes you, and talks behind your back. STEP 4: Ask a representative of each learning-group to share the characteristics of good and false friends with the rest of the class. STEP 5: Ask if there is a volunteer who wants to share an experience of a good friend or of a false friend. Thank the volunteer for sharing with the class.STEP 6: Additional activities: Draw the good and false friends of the story and/or dramatize the story.
T2 Learning Activity Two: ‘Are you a good friend?’
Learning: Reflect on own capacity to be a good friend STEP 1: Read out the questions below in BOX 4: TEST: Are you a good friend? STEP 2: Ask the pupils to write down the number of each question on a piece of paper or on the exercise book like this: Question 1 = __, Question 2 = __, Question 3 = __ and Question 4 = __STEP 3: Ask the pupils to count how many As, Bs, or Cs they scored (for the example of Q1 =A, Q2 = B, Q3 =C and Q4 = B, the total is 2Bs, 1A
NOTE Select a well-known story or make one up or refer to tradi-tional stories that talk about good and false friends.
The learning activities will help children to
1. Better understand who is a good friend
2. Be a better friend 3. Be more understanding
of other children and their feelings
4. Take action in including other children
LEARNING OUTCOMES
UN
IT T
HR
EE
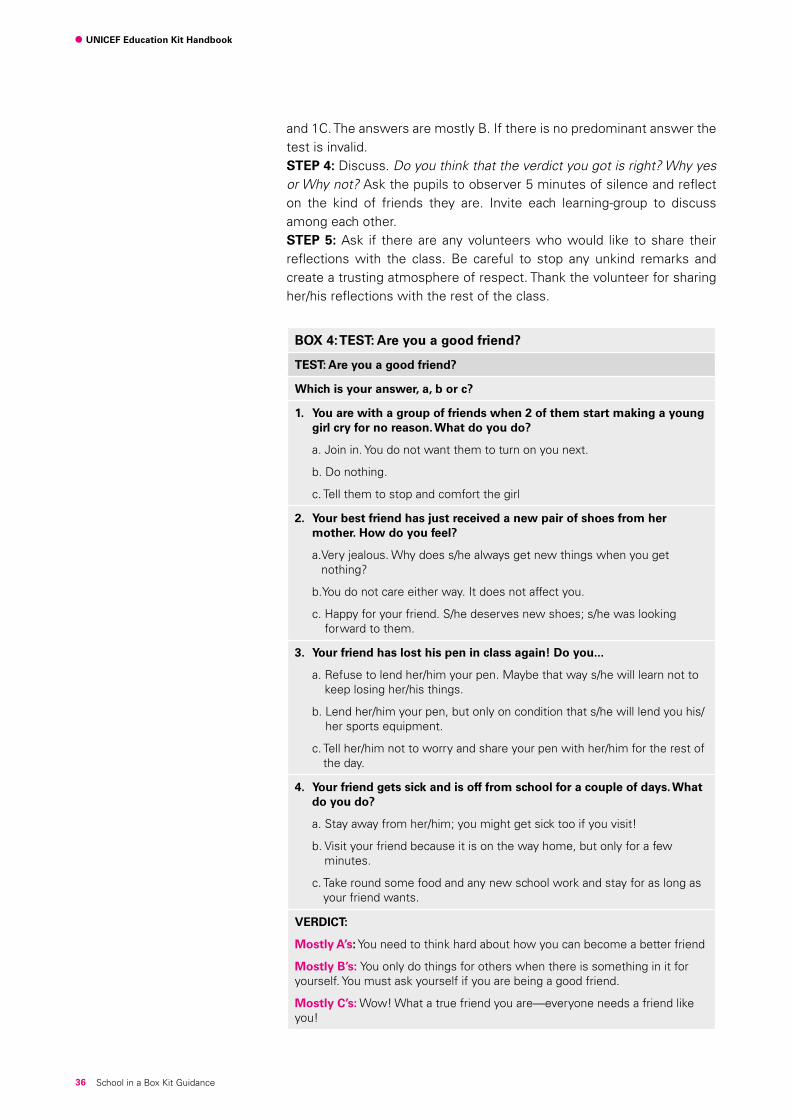
36
UNICEF Education Kit Handbook
School in a Box Kit Guidance
and 1C. The answers are mostly B. If there is no predominant answer the test is invalid. STEP 4: Discuss. Do you think that the verdict you got is right? Why yes or Why not? Ask the pupils to observer 5 minutes of silence and reflect on the kind of friends they are. Invite each learning-group to discuss among each other.STEP 5: Ask if there are any volunteers who would like to share their reflections with the class. Be careful to stop any unkind remarks and create a trusting atmosphere of respect. Thank the volunteer for sharing her/his reflections with the rest of the class.
BOX 4: TEST: Are you a good friend?
TEST: Are you a good friend?
Which is your answer, a, b or c?
1. You are with a group of friends when 2 of them start making a young girl cry for no reason. What do you do?
a. Join in. You do not want them to turn on you next.
b. Do nothing.
c. Tell them to stop and comfort the girl
2. Your best friend has just received a new pair of shoes from her mother. How do you feel?
a. Very jealous. Why does s/he always get new things when you get nothing?
b.You do not care either way. It does not affect you.
c. Happy for your friend. S/he deserves new shoes; s/he was looking forward to them.
3. Your friend has lost his pen in class again! Do you...
a. Refuse to lend her/him your pen. Maybe that way s/he will learn not to keep losing her/his things.
b. Lend her/him your pen, but only on condition that s/he will lend you his/her sports equipment.
c. Tell her/him not to worry and share your pen with her/him for the rest of the day.
4. Your friend gets sick and is off from school for a couple of days. What do you do?
a. Stay away from her/him; you might get sick too if you visit!
b. Visit your friend because it is on the way home, but only for a few minutes.
c. Take round some food and any new school work and stay for as long as your friend wants.
VERDICT:
Mostly A’s: You need to think hard about how you can become a better friend
Mostly B’s: You only do things for others when there is something in it for yourself. You must ask yourself if you are being a good friend.
Mostly C’s: Wow! What a true friend you are—everyone needs a friend like you!
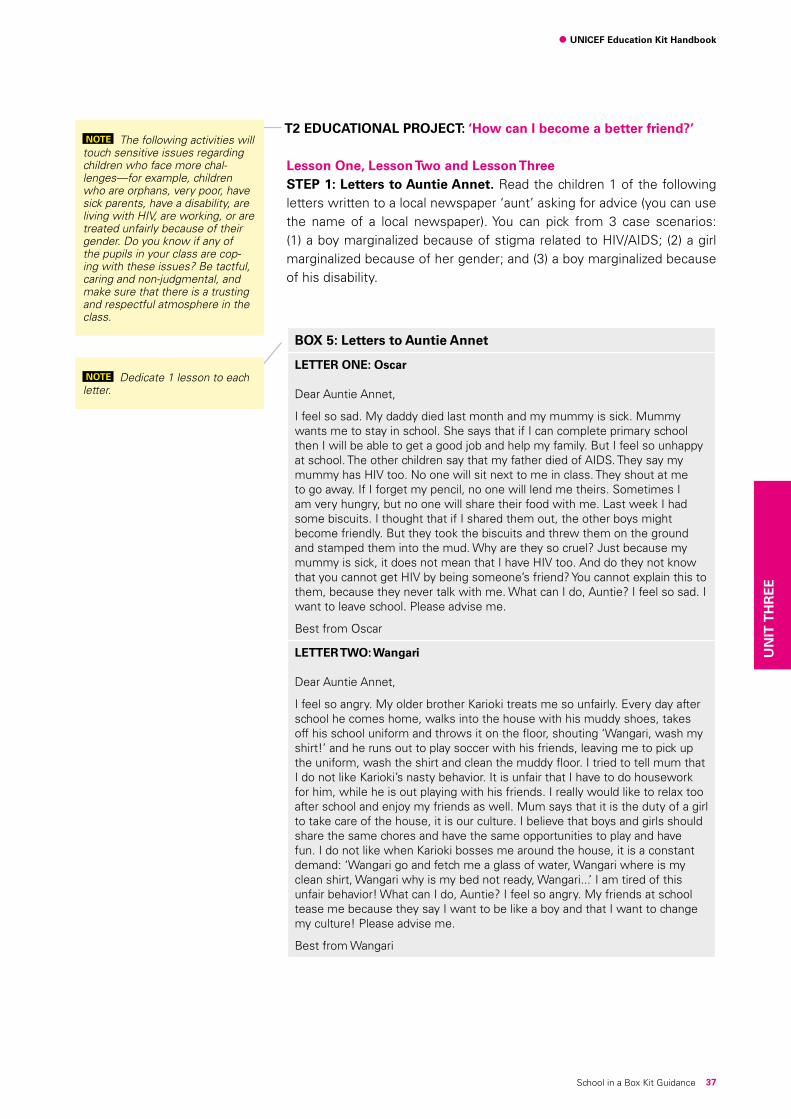
37
UNICEF Education Kit Handbook
School in a Box Kit Guidance
T2 EDUCATIONAL PROJECT: ‘How can I become a better friend?’
Lesson One, Lesson Two and Lesson ThreeSTEP 1: Letters to Auntie Annet. Read the children 1 of the following letterswrittentoalocalnewspaper‘aunt’askingforadvice(youcanusethe name of a local newspaper). You can pick from 3 case scenarios: (1) a boy marginalized because of stigma related to HIV/AIDS; (2) a girl marginalized because of her gender; and (3) a boy marginalized because of his disability.
BOX 5: Letters to Auntie Annet
LETTER ONE: Oscar Dear Auntie Annet,
I feel so sad. My daddy died last month and my mummy is sick. Mummy wants me to stay in school. She says that if I can complete primary school then I will be able to get a good job and help my family. But I feel so unhappy at school. The other children say that my father died of AIDS. They say my mummy has HIV too. No one will sit next to me in class. They shout at me to go away. If I forget my pencil, no one will lend me theirs. Sometimes I am very hungry, but no one will share their food with me. Last week I had some biscuits. I thought that if I shared them out, the other boys might become friendly. But they took the biscuits and threw them on the ground and stamped them into the mud. Why are they so cruel? Just because my mummy is sick, it does not mean that I have HIV too. And do they not know that you cannot get HIV by being someone’s friend? You cannot explain this to them, because they never talk with me. What can I do, Auntie? I feel so sad. I want to leave school. Please advise me.
Best from Oscar
LETTER TWO: Wangari Dear Auntie Annet,
I feel so angry. My older brother Karioki treats me so unfairly. Every day after school he comes home, walks into the house with his muddy shoes, takes offhisschooluniformandthrowsitonthefloor,shouting‘Wangari,washmyshirt!’ and he runs out to play soccer with his friends, leaving me to pick up the uniform, wash the shirt and clean the muddy floor. I tried to tell mum that I do not like Karioki’s nasty behavior. It is unfair that I have to do housework for him, while he is out playing with his friends. I really would like to relax too after school and enjoy my friends as well. Mum says that it is the duty of a girl to take care of the house, it is our culture. I believe that boys and girls should share the same chores and have the same opportunities to play and have fun. I do not like when Karioki bosses me around the house, it is a constant demand:‘Wangarigoandfetchmeaglassofwater,Wangariwhereismyclean shirt, Wangari why is my bed not ready, Wangari...’ I am tired of this unfair behavior! What can I do, Auntie? I feel so angry. My friends at school tease me because they say I want to be like a boy and that I want to change my culture! Please advise me.
Best from Wangari
NOTE The following activities will touch sensitive issues regarding children who face more chal-lenges—for example, children who are orphans, very poor, have sick parents, have a disability, are living with HIV, are working, or are treated unfairly because of their gender. Do you know if any of the pupils in your class are cop-ing with these issues? Be tactful, caring and non-judgmental, and make sure that there is a trusting and respectful atmosphere in the class.
NOTE Dedicate 1 lesson to each letter.
UN
IT T
HR
EE

38
UNICEF Education Kit Handbook
School in a Box Kit Guidance
LETTER THREE: Mohamed Dear Auntie Annet,
I feel so lonely. This year for the first time I am able to attend school, after my teacher encouraged my parents to send me to school with the other children of my community. Some years ago, while I was playing near the house, I saw an attractive colorful object. I picked it up and it exploded. It was a landmine. In the accident I lost my right leg and part of my left arm. I am very lucky to be alive. I now have a wheelchair but I cannot move without the help of someone else. Mum takes me to school in the morning. I like my teacher and my school, but I find it very difficult to interact with my school mates. I am left in the class on my own very often. At break time they go out and play, but I need someone to help me. I do understand that it is very difficult to involve me in all their games, but if they played catch ball softly, I could play too. I am very good with my right arm; I practice my catching skills when I am at home.
It is almost a year that I go to school. I improved my reading skills well, but I feel very lonely. Nobody plays with me. Mum says that she does not know for how long she will be able to accompany me to school, she starts a new job next month and she will have to leave home very early in the morning.
I do not know what to do! Please advise me.
Best from Mohamed
STEP 2: Ask each learning-group to discuss the letter: In your opinion, what is the problem that Oscar or Wangari or Mohamed is experiencing? Why is Oscar or Wangari or Mohamed sad or angry or lonely? STEP 3: (a) Explain: The case of Oscar. Children often face stigma and discrimination because other children do not understand how HIV is and is not spread, and they are afraid they might catch HIV. Plan a lesson on HIV/AIDS using posters and other local materials to explain the facts about HIV and AIDS. The contents should be relevant to the age group. You can invite an experienced health worker to deliver the lesson on HIV/AIDS, if you feel that you need support.
BOX 6: Some facts about HIV/AIDS
Some facts about HIV/AIDS: HIV is not transmitted by touching and shaking hands, sharing cups and plates, sharing clothes, hugging, sneezing and coughing, sharing toilets—nor is it transmitted from mosquitoes and other insects.
STEP 3: (b) Explain: The case of Wangari. Girls often face discrimination. Many girls are asked to take up housework at a very young age and very often they have to care for younger siblings too. They are expected to do the washing for older brothers and to fetch wood and water very early in the morning. In many cultures, girls are prevented from going to school because they have to support their mothers at home, and because many parents believe that the only relevant education for a girl is to know how to take care of the house and the family.

39
UNICEF Education Kit Handbook
School in a Box Kit Guidance
BOX 7: Some facts about girls
Some facts about girls
1. Girls have fewer opportunities to attend school than boys. Worldwide, 70% of the 130 million out-of-school youth are girls. (Source: www.girleffect.org)
2. Girls have more housework duties than boys. Do a quick survey among the pupils. Ask them:
(a.) Who washes clothes at home? (b.) Who cooks at home? (c.) Who keeps the house clean?
How many are boys? How many are girls?
3. More girls have child care duties than boys. Do a quick survey among the pupils. Ask them:
Who among you looks after a younger sibling at home?
How many are boys? How many are girls?
STEP 3: (c) Explain: The case of Mohamed. Children with disabilities can experience very serious discrimination. In many contexts they are kept at home and do not attend school. When they are able to attend school, they are often not involved in playing and are often left on their own. Children with disabilities are ridiculed and experience verbal abuse and isolation.
BOX 8: Some facts about children with disabilities
Some facts about children with disabilities: In the United Kingdom, the Equality Act 2010 has strengthened the discrimination laws that protect people against unfair treatment. Schools in the UK cannot refuse admission to disabled applicants because they are disabled.
(Source: www.direct.gov.uk)
STEP 4: Ask each learning-group to reply to Oscar or Wangari or Mohamed, advising them on what to do. STEP 5: Ask a representative from each learning-group to share the suggestions they wrote in the reply letter with the rest of the class.
Lesson Four STEP 1: What can we do to become better friends in our school? Ask each learning-group to think of a child they know at school or in the community who may feel left out. Each learning-group should discuss what they can do to ensure that the child feels included and welcomed in the school. For example: talk with the child and find out how the learning-group can support him/her, the learning group can decide to constitute a playground-friends group that ensures that no child is left out during playtime, or the learning-group can visit a child who is not in school and invite him/her to come to school. STEP 2: Ask each learning group to share what they are going to do (1 clear action for each learning-group is enough). Briefly discuss the activity. Write each learning-group’s action on the flip-chart or blackboard and
NOTE Keep the action to a simple practical activity—for example, visit a child who is not in school or help to push a wheelchair.
UN
IT T
HR
EE
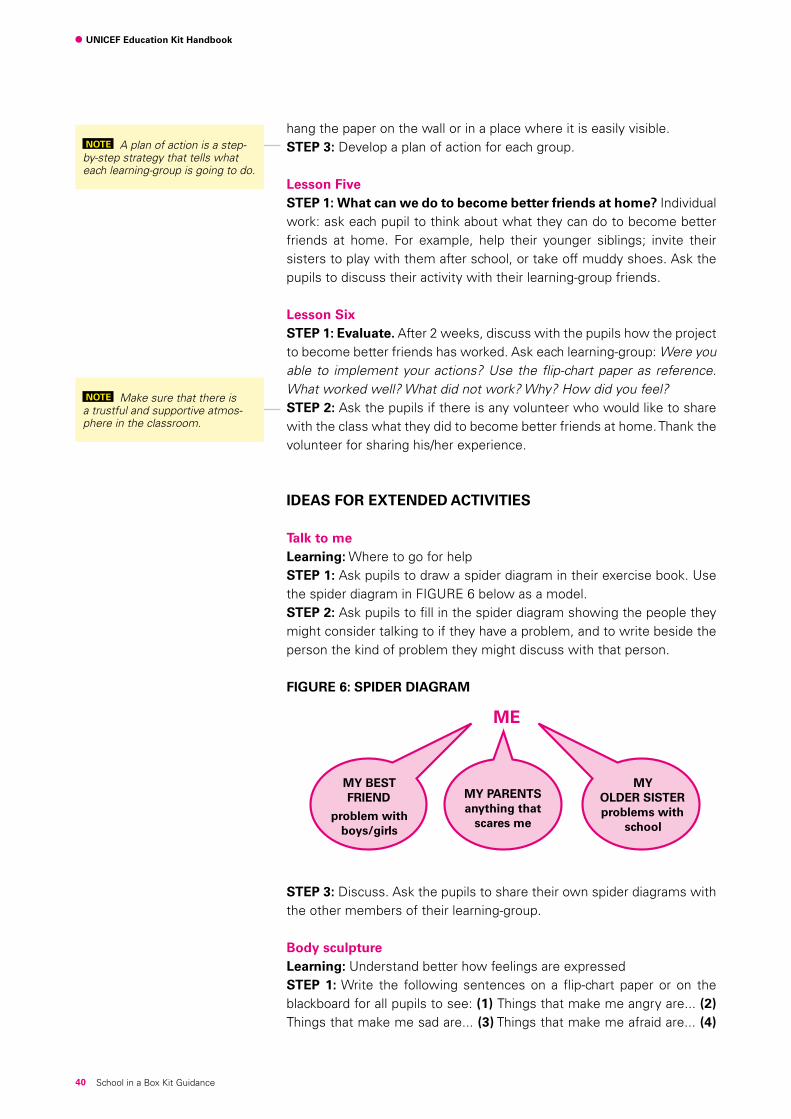
40
UNICEF Education Kit Handbook
School in a Box Kit Guidance
hang the paper on the wall or in a place where it is easily visible.STEP 3: Develop a plan of action for each group.
Lesson FiveSTEP 1: What can we do to become better friends at home? Individual work: ask each pupil to think about what they can do to become better friends at home. For example, help their younger siblings; invite their sisters to play with them after school, or take off muddy shoes. Ask the pupils to discuss their activity with their learning-group friends. Lesson SixSTEP 1: Evaluate. After 2 weeks, discuss with the pupils how the project to become better friends has worked. Ask each learning-group: Were you able to implement your actions? Use the flip-chart paper as reference. What worked well? What did not work? Why? How did you feel? STEP 2: Ask the pupils if there is any volunteer who would like to share with the class what they did to become better friends at home. Thank the volunteer for sharing his/her experience.
IDEAS FOR EXTENDED ACTIVITIES
Talk to meLearning: Where to go for help STEP 1: Ask pupils to draw a spider diagram in their exercise book. Use the spider diagram in FIGURE 6 below as a model. STEP 2: Ask pupils to fill in the spider diagram showing the people they might consider talking to if they have a problem, and to write beside the person the kind of problem they might discuss with that person.
FIGURE 6: SPIDER DIAGRAM
ME
MY BEST FRIEND
problem with boys/girls
MY PARENTS anything that
scares me
MY OLDER SISTER problems with
school
STEP 3: Discuss. Ask the pupils to share their own spider diagrams with the other members of their learning-group.
Body sculptureLearning: Understand better how feelings are expressed STEP 1: Write the following sentences on a flip-chart paper or on the blackboard for all pupils to see: (1) Things that make me angry are... (2) Things that make me sad are... (3) Things that make me afraid are... (4)
NOTE A plan of action is a step-by-step strategy that tells what each learning-group is going to do.
NOTE Make sure that there is a trustful and supportive atmos-phere in the classroom.

41
UNICEF Education Kit Handbook
School in a Box Kit Guidance
Things that make me happy are... (5) When I am angry, I... (6) When I am sad, I... (7) When I am happy, I... STEP 2: Ask each learning-group to complete the sentences by either writing it down in their exercise books or discussing it with the members of their learning-group. STEP 3: Ask each learning-group to make body sculptures to show different feelings, such as anger, happiness, sadness, fear, and loneliness.STEP 4: Ask each learning-group to add sounds or words to the body sculptures.STEP 5: Ask each learning-group to add sounds or words that express the opposite of what the body sculpture is saying. For example, if you make a body sculpture showing anger, the words you say should be calm. STEP 6: Discuss. Ask pupils to talk about situations when they say the opposite of what they feel and ask them to talk about why they do so. Has it ever happened that you said the opposite thing of what you were feeling? Why do you think some people behave like this?
ACTIVITY THREE: ThemeThree(T3):‘TheRightsoftheChild’
The objective ofThemeThree‘TheRightsoftheChild’istoensurethatchildren know that they have certain rights and that there are international laws that protect those rights.
T3 Learning Activity One: ‘The well-being of children’
Learning: Identify children’s needs. STEP 1: Ask the pupils: In your opinion, what makes a child happy and healthy? For example, nutritious food and safe water make a child healthy, playing makes a child happy, a safe home makes a child healthy and happy, because a shelter protects children from harsh weather and also in a home children live with their loved ones... Prompt the children: Does going to school make children happy and healthy? (e.g., going to school helps a child to develop her talents, to make new friends with whom to play and have fun, and to know better how to keep healthy). Does having a caring and trusting person to talk to make children happy? Children need to be listened to, comforted and supported.STEP 2: Explain. The well-being of a child depends on many factors. In order to be happy and healthy a child needs good food, safe water and proper medication when s/he sick... but children also need ‘invisible things’ like being listened to, being cared for, being included, being considered... STEP 3: Askthepupilstohelpyoumakingalistofthe‘invisiblethingsthat make children happy and healthy and discuss. In your opinion what
NOTE Body sculptures are a means by which to express a feel-ing using the body (e.g., opening wide your mouth and eyes to ex-press surprise).
The learning activities will help children to
1. Reflect on their well-being 2. Understand the concept of a
‘right’3. Know their rights as
expressed in the Convention on the Rights of the Child
4. Promote the rights of children in their communities
LEARNING OUTCOMES
UN
IT T
HR
EE
42
UNICEF Education Kit Handbook
School in a Box Kit Guidance
makes a child happy? What makes a child healthy? Why? STEP 4: Ask the pupils to draw a picture of a happy and healthy child in their exercise books. STEP 5: Ask for volunteers to share their work with the rest of the class and explain their drawings of healthy and happy children. Thank the volunteer for sharing his/her work. STEP 6: Ask the children to create a poster entitled ‘the well-being of children’. Ask each learning-group to develop their own poster, and either write or draw the visible and invisible things that make children happy and healthy and glue their pictures on it.
T3 Learning Activity Two: ‘The rights of children’
Learning: Understanding the meaning of rights.STEP 1: Preparation. Look at TABLE 2 The Convention on the Rights of the Child made simple. Select 1 article for each learning-group and write it on a flashcard. You can also photocopy and cut out the articles or use manila paper (hard paper) and markers, or simply write them using the exercise book paper. STEP 2: Distribute 1 or 2 flashcards to each learning-group. You can distribute the same flashcard to more than 1 group. Explain: Each flashcard reproduces 1 of the rights written in the Convention on the Rights of the Child. STEP 3: Group-work. Ask each learning-group to read the flashcards they received and discuss together. In your opinion, what is a right? Why do we talk about ‘children’s rights’? Some answers might look like: a right is something that children should have, because children are not as strong as adults and because children need the care and protection of adults to grow happy and healthy. Prompt children: Do all the children around the world have the same rights? Why yes, or why not? Can you give some examples of children who do not have rights? Can you give some examples of children who have rights? STEP 4: Ask 1 spokesperson from each learning-group to report the group discussion to the rest of the class. STEP 5: Explain. The purpose of the Convention on the Rights of the Child is to make sure that all the children around the world are protected and receive proper care. The Convention is an agreement signed by most heads of state around the world, who have committed themselves to protect and care for children.
T3 EDUCATIONAL PROJECT: ‘The Convention on the Rights of the Child’
Lesson One STEP 1: The Convention on the Rights of the Child made simple. Preparation: Table 2 is a simplified version of the main articles of the Convention on the Rights of the Child. Photocopy Table 2 and distribute 1
NOTE The posters can be posted in the learning corner.
NOTE Encourage children to ex-plore the notion of a ‘right’ with their own words.
NOTE This activity aims at devel-oping pupils’ ability to discuss and summarize key points. Ask the children to be concise and clear.
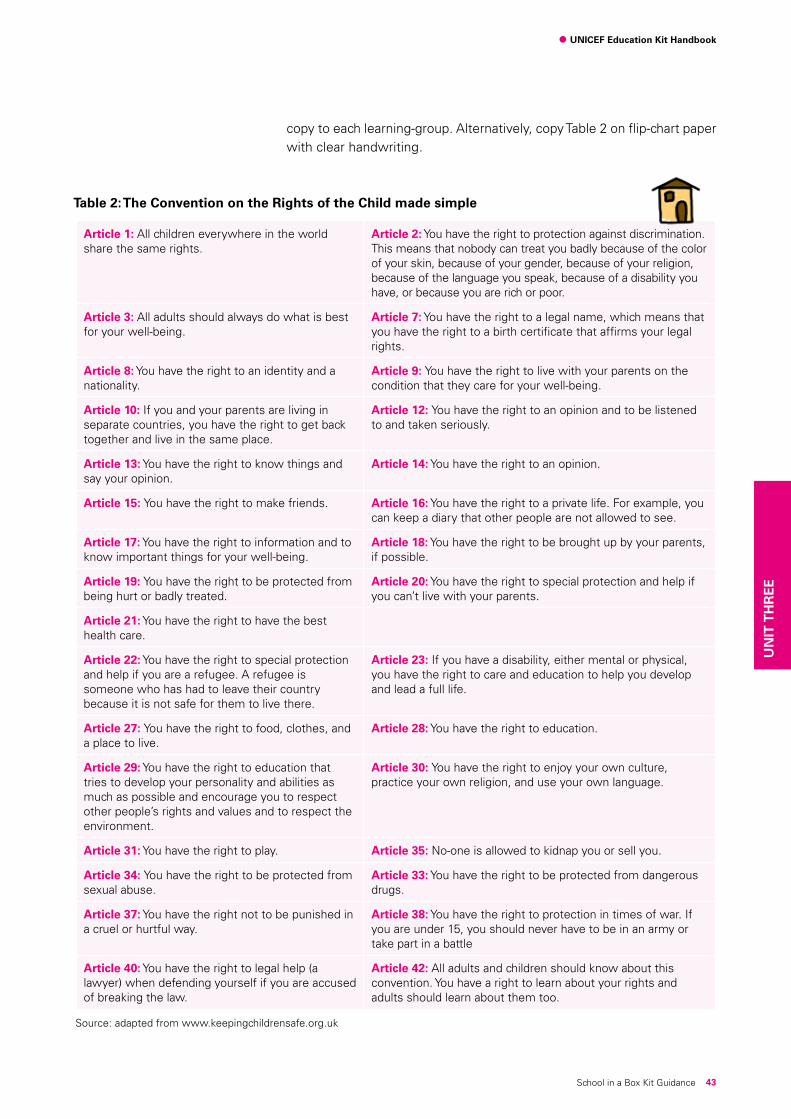
43
UNICEF Education Kit Handbook
School in a Box Kit Guidance
copy to each learning-group. Alternatively, copy Table 2 on flip-chart paper with clear handwriting.
Table 2: The Convention on the Rights of the Child made simple
Article 1: All children everywhere in the world share the same rights.
Article 2: You have the right to protection against discrimination. This means that nobody can treat you badly because of the color of your skin, because of your gender, because of your religion, because of the language you speak, because of a disability you have, or because you are rich or poor.
Article 3: All adults should always do what is best for your well-being.
Article 7: You have the right to a legal name, which means that you have the right to a birth certificate that affirms your legal rights.
Article 8: You have the right to an identity and a nationality.
Article 9: You have the right to live with your parents on the condition that they care for your well-being.
Article 10: If you and your parents are living in separate countries, you have the right to get back together and live in the same place.
Article 12: You have the right to an opinion and to be listened to and taken seriously.
Article 13: You have the right to know things and say your opinion.
Article 14: You have the right to an opinion.
Article 15: You have the right to make friends. Article 16: You have the right to a private life. For example, you can keep a diary that other people are not allowed to see.
Article 17: You have the right to information and to know important things for your well-being.
Article 18: You have the right to be brought up by your parents, if possible.
Article 19: You have the right to be protected from being hurt or badly treated.
Article 20: You have the right to special protection and help if you can’t live with your parents.
Article 21: You have the right to have the best health care.
Article 22: You have the right to special protection and help if you are a refugee. A refugee is someone who has had to leave their country because it is not safe for them to live there.
Article 23: If you have a disability, either mental or physical, you have the right to care and education to help you develop and lead a full life.
Article 27: You have the right to food, clothes, and a place to live.
Article 28: You have the right to education.
Article 29: You have the right to education that tries to develop your personality and abilities as much as possible and encourage you to respect other people’s rights and values and to respect the environment.
Article 30: You have the right to enjoy your own culture, practice your own religion, and use your own language.
Article 31: You have the right to play. Article 35: No-one is allowed to kidnap you or sell you.
Article 34: You have the right to be protected from sexual abuse.
Article 33: You have the right to be protected from dangerous drugs.
Article 37: You have the right not to be punished in a cruel or hurtful way.
Article 38: You have the right to protection in times of war. If you are under 15, you should never have to be in an army or take part in a battle
Article 40: You have the right to legal help (a lawyer) when defending yourself if you are accused of breaking the law.
Article 42: All adults and children should know about this convention. You have a right to learn about your rights and adults should learn about them too.
Source: adapted from www.keepingchildrensafe.org.uk
UN
IT T
HR
EE

44
UNICEF Education Kit Handbook
School in a Box Kit Guidance
STEP 2: Read the Articles together with the class and explain the content of each article. STEP 3: Explain. The Convention on the Rights of the Child is a complex document. There are 3 important points that you should remember:1. Non-discrimination. All children around the world have rights. You
too! (Point at the pupils). 2. Best interests. When decisions are made about children, the best
interest of the child should be considered. 3. The child’s opinion. Children have a right to say what they think
about anything that affects them. They should be listened to carefully and have their views taken into account.
STEP 4: Ask each learning-group to select 1 of the articles and prepare a 2 minute talk about it. Each learning-group should appoint a spokesperson. STEP 5: Extended activity. Ask the groups to choose 3 articles of the Convention on the Rights of the Child and represent each of them with a picture. For example, Article 31: the right to play can be represented by a picture of children playing together.
Lesson Two STEP 1: Find out more about the rights of children in your community. Develop a survey. Ask each learning group to select 5 articles from TABLE 2: The Convention on the Rights of the Child made simple. Write the 5 articles down on an exercise book in clear handwriting. STEP 2: Ask to write in a different exercise book: TABLE 3: SURVEY: Finding out more about the rights of children in my community. STEP 3: Explain: A survey is an investigation, a research. You should behave like a detective and find out important information about children’s rights in your community. Explain what the pupils should write in each box. Article Number... Here you write the number of the article you are going to read to the child interviewed. Gender of the child interviewed, if the child is male write M; if the child is female write F. Question 1 = In your opinion, is Article number.... (here you read the article from the exercise book) respected in our community? Why Yes, or why Not? Question 2 = In your opinion what can we do to make sure that this right is respected in our communities?
NOTE You can discuss the Articles of the Convention on the Rights of the Child over several lessons. For example, you can select 5 Articles for each lesson.
NOTE Make sure that all of the groups have the same amount of time to speak.
NOTE Make sure that all of the articles in Table 2 are covered.
NOTE Make sure that all of the members of the learning-group are involved in the activities.
Table 3: SURVEY: Finding out more about the rights of children in my community
SURVEY: Finding out more about the rights of children in my community
NAME OF THE LEARNING-GROUP: DATE:
Article Number
Gender of the child interviewedM = male F = female
Question 1: In your opinion, is Article number.... respected in our community? YES? NO? WHY YES, OR WHY NOT?
Question 2: In your opinion, what can we do to make sure that this right is respected in our community?
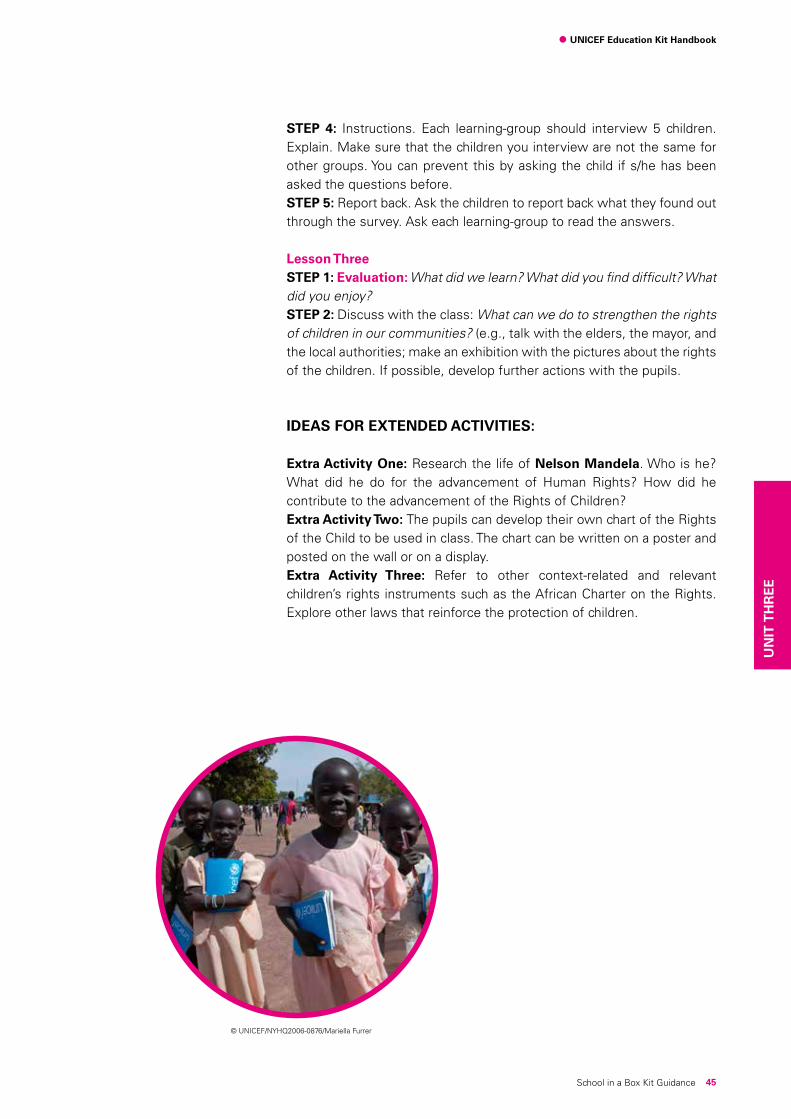
45
UNICEF Education Kit Handbook
School in a Box Kit Guidance
STEP 4: Instructions. Each learning-group should interview 5 children. Explain. Make sure that the children you interview are not the same for other groups. You can prevent this by asking the child if s/he has been asked the questions before. STEP 5: Report back. Ask the children to report back what they found out through the survey. Ask each learning-group to read the answers.
Lesson Three STEP 1: Evaluation: What did we learn? What did you find difficult? What did you enjoy?STEP 2: Discuss with the class: What can we do to strengthen the rights of children in our communities? (e.g., talk with the elders, the mayor, and the local authorities; make an exhibition with the pictures about the rights of the children. If possible, develop further actions with the pupils.
IDEAS FOR EXTENDED ACTIVITIES:
Extra Activity One: Research the life of Nelson Mandela. Who is he? What did he do for the advancement of Human Rights? How did he contribute to the advancement of the Rights of Children? Extra Activity Two: The pupils can develop their own chart of the Rights of the Child to be used in class. The chart can be written on a poster and posted on the wall or on a display. Extra Activity Three: Refer to other context-related and relevant children’s rights instruments such as the African Charter on the Rights. Explore other laws that reinforce the protection of children.
© UNICEF/NYHQ2006-0876/Mariella Furrer
UN
IT T
HR
EE
46
UNICEF Education Kit Handbook
School in a Box Kit Guidance
ACTIVITY FOUR: ThemeFour(T4):‘Child-Protection’
The objective of Theme Four ‘Child-Protection’ is to know whatconstitutes child abuse, and to know that there are laws that protect children from abuse, exploitation and neglect, and that children can help to keep themselves and others safe. The activities of this session have been adapted from www.keepingchildrensafe.org.uk.
T4 Learning Activity One: ‘Learn about feeling safe and feeling unsafe’
Learning: Help children understand what is safe and what is not safe.STEP 1: Preparation: A glass and water. Catch the interest of the pupils by putting a glass of water in the middle of the table (or on a chair or a surface where it can fall down). Move the glass to the edge of the table so it nearly falls off. Ask the pupils: Is the glass of water safe or unsafe? STEP 2: Discuss. Ask the pupils: What makes people feel safe? What makes children feel safe? (e.g., having a place where to sleep or knowing my brother will protect me if I am in trouble). STEP 3: Draw a map. Ask each learning-group to draw a map of their way to school or the Child-Friendly Space/Environment (CFS/E) from their homes. Allow about 30 min. STEP 4: Ask the children to draw a circle on the map where they may feel safe (e.g., at school or at home). Ask the children to draw a cross on the map where they may feel unsafe (e.g., at the bus station or crossing the road). STEP 5: Ask each learning-group to show its map to the rest of the class.STEP 6: Discuss with the pupils. Do you all agree about the places that were circled as safe? Do you all agree about the places that were crossed as unsafe? Is feeling safe always a good thing? (e.g., feeling unsafe near a busy road makes a person aware of the need to be careful). STEP 7: Explain. Not all children might agree on the places where they feel safe or where they feel unsafe. Children should always feel and be safe. If children do not feel safe, they should talk to an adult they trust about what is causing them to feel unsafe (e.g., some children might feel unsafe walking to school and the CFS/E or walking back home in the evening, some children might feel unsafe when they are in crowded places, and some children might feel unsafe in the presence of certain adults).
NOTE The following activities are very sensitive. It is important that you have attended the UNICEF EiE Handbook teachers’ training workshop, and know what to do in case a child discloses a case of abuse. It is important that parents/guardians know that child-protec-tion issues are discussed in class.
The learning activities will help children to:
1. Know what is child abuse
2. Understand the difference between good touches and bad touches
3. Know what to do to keep safe
LEARNING OUTCOMES

47
UNICEF Education Kit Handbook
School in a Box Kit Guidance
T4 Learning Activity Two: ‘Words for safe and unsafe’
Learning: Help children to develop words to express safe and unsafe. STEP 1: Discuss with the pupils: What other words do you think of when you hear the word safe or unsafe? Think about places, locations, people, the way people speak, emotions, etc.STEP 2: Ask each learning-group to draw 2 bubbles and fill them with words for things that make them feel safe and unsafe. See FIGURE 7: WORDS THAT MAKE ME FEEL SAFE OR UNSAFE, for reference.
FIGURE 7: WORDS THAT MAKE ME FEEL SAFE OR UNSAFE
FEEL SAFE:
FEEL UNSAFE
COMFORTABLE, PROTECTED, WARM, FED,
HAPPY, HOME, SCHOOL, CFS/E, KNOW-WHAT-TO-DO, WHEN-MY-FRIENDS-ARE-
WITH-ME
AFRAID, DANGER, LONELY, COLD, HUNGRY,
HITTING, VIOLENCE, PAIN, CRY, SAD, CANNING-BOYS, SCARY FACES,
BAD WORDS
STEP 3: Ask each learning-group to share their bubbles with the class. STEP 4: Use a ball or make 1 by cramping scrap paper together. Gently throw the ball to each pupil and ask him/her to complete your sentence:I feel safe when..........., or I do not feel safe when............ After a pupil has completed the sentence, that pupil should throw the ball back to you. STEP 5: Use some examples to prompt children’s answers (e.g., I don’t feel safe when I see a poisonous spider; I do not feel safe when I cross the busy road to school; I do not feel safe when I see an elephant).
T4 Learning Activity Three: ‘Understanding child abuse’
Learning: Understand child abuse.STEP 1: Preparation. Ask each learning-group to develop traffic light cards: use colored crayons, pencils or markers. If available, use manila paper (hard paper)—alternatively, use paper from the exercise books. Red light cards have an X and green light cards have an OK!
NOTE Make sure that all of the pupils participate in the activity.
UN
IT T
HR
EE
48
UNICEF Education Kit Handbook
School in a Box Kit Guidance
BOX 9: What is child abuse? Reference for the teacher.
PHYSICAL ABUSE: Hurt or violence to a child’s body (e.g., hitting, beating, cutting).
SEXUAL ABUSE: Any sexual contact or threat of sexual contact with a child.
WHAT IS CHILD ABUSE?
EMOTIONAL ABUSE: Saying and doing things to a child or in front of a child that makes that child feel afraid, unhappy or worthless.
NEGLECT: Denying children basic needs or rights (e.g., food, shelter, warmth, education, or health care) when these can be prevented or avoided.
STEP 2: Introduce the topic. We explored what feeling safe and feeling unsafe means. In this activity we will talk about other children’s experiences when they felt safe or unsafe. In this activity we will talk about abuse towards children. STEP 3: Ask the pupils. What does the word ‘abuse’ mean? When do we use it? Some answers might be: abuse is when something bad is done to a child; abuse is used to say that a child suffered because of a wrong action. STEP 4:Explain.Therearedifferent typesof ‘bad things’ thatchildrenmight experience. These include physical violence, neglect, and emotional or sexual abuse. Use Box 9 as a reference for the explanation. STEP 5: Ask each learning-group to discuss and give an example of child-abuse. Can you think of an example of child abuse? STEP 6: Ask each group to share their examples. STEP 7: Activity. Ask the pupils to have their red and green light cards ready. Explain that you are going to read some stories about children. The task of each learning-group is to show a red card if they think that the child experienced abuse or a green card if they think that the child did not experience abuse. STEP 8: Read the stories in BOX 10: Stories of children one by one and slowly. Stop to vote and discuss after each story.
BOX 10: Stories of children.
Scenario 1: Ali is a very energetic, talkative boy who finds it hard to sit still and listen to his teachers and parents. He is always in trouble. He goes to the mosque on Fridays with his father. One Friday a family friend notices that Ali has a lot of bruises on his arms and face and he is very quiet. When asked, Ali says that he got the bruises by falling down stairs.
For the teacher: Possible physical abuse. Ali’s quiet behavior is out of character—and it is not plausible that he got the bruises from merely falling down some stairs.
Scenario 2: Sikina has special needs. She cannot walk properly and her speech is very slow. She does not go to school, and she spends much of her day tied by the ankle to a table in her house so that she cannot harm herself by wandering about outside.
For the teacher: Neglect and emotional abuse. Sikina should be able to attend school and have someone who takes care of her and values her talents.
49
UNICEF Education Kit Handbook
School in a Box Kit Guidance
Scenario 3: Pablo is 8 and his sister is 3. During the week, Pablo’s mother has to go out to work at night. She leaves the children with her sister, Aunt Penninah. Pablo and his sister usually wait some time on their own while Aunt Penninah returns from work. They like Aunt Penninah. She cooks for them and reads bedtime stories, and they feel safe when she is around.
Scenario 4: Alex and Thomas were playing football with their friends. Thomas scored a goal. Then Alex, a much stronger boy, said the goal did not count. Alex started to yell at Thomas, calling him names like Softy and Girly and started to kick him and push him hard, making him cry.
For the teacher: Physical and emotional abuse.
Scenario 5: Halima goes to her uncle’s house each weekend. She used to like going, but now she does not. When she is alone with her uncle, he touches her body in a way that she does not like. It feels wrong and frightening.
For the teacher: Sexual abuse.
Scenario 6: On Sundays, Emma goes to the local kiosk to read the comics of the Sunday newspaper. Mrs. Motokoi is very nice. She allows Emma to read the comics without paying for the newspaper. One day, Mrs. Motokoi got sick and her husband took over the kiosk. When Emma asked to read the comics, Mr. Motokoi told her that if she wanted to read the comics, she should do his washing and clean the floor first. He went on saying that Emma took advantage of his wife’s good heart.
For the teacher: Emotional abuse.
STEP 9: Discuss. What do you think these stories tell us? STEP 10: Ask the pupils if they have any questions or clarifications. Invite each learning-group to say 1 thing they have learned from the lesson.
T4 Learning Activity Four: ‘Good touches and bad touches’
Learning: Raise children’s awareness of sexual abuse STEP 1: Introduce the topic: Today we are going to talk about good and bad touches. Ask the pupils: Can you give an example of a good touch? Can you give an example of a bad touch?Discuss with the pupils. Refer to the stories in BOX 10. Some examples are: Babies are happier when they are cuddled. When we are sad, a friendly hug helps to feel better. However, sometimes being touched can make us feel uncomfortable—such as when a stranger touches us. There are parts of our bodies that are private. STEP 2: Explain. We are going to develop a ‘touch chart’, that will allow us to identify good touches and distinguish them from bad touches. STEP 3: Preparation.Prepareinadvance‘BOX11:TheTouchChart’onflip chart paper or on a blackboard. STEP 4: Ask the learning-groups to copy the Touch Chart in their exercise books.
NOTE The term Girly implies that boys should never cry. This is a bad stereotype. Crying expresses emotions, and it is a normal reac-tion in scary situations for both boys and girls.
NOTE An idea is to have 1 exer-cise book for each learning-group that is used only for group-work
NOTE Walk around the groups and help them in drawing the chart.
UN
IT T
HR
EE

50
UNICEF Education Kit Handbook
School in a Box Kit Guidance
BOX 11: The Touch Chart
The Touch Chart
CODE:
A = always
N = never
S = sometimes Pare
nts
guar
dian
s
Gra
ndm
othe
rs
Gra
ndfa
ther
s
Aun
ts
Unc
les
Bro
ther
s
Teac
her
Youn
g fr
iend
Fam
ily f
riend
s
tran
gers
Touch
Hug A
Kiss
Pat
Squeeze
Tickle
Pinch
STEP 5: Explain. Fill in the Touch Chart. For example, if you always feel good about a hug from your parents or guardians put an A in the square for parents and hug. See example above. STEP 6: Group work. Ask the pupils to discuss the different kinds of touches and fill in the chart. Are touches always good? For example a hug from your mum is good. Which touches are always bad? For example a kiss or a touch from a stranger is bad. STEP 7: Ask each learning-group to share their chart with the class. Discuss. What should you do if you are touched in a way you do not like? STEP 8: Explain. When children are touched in a way they do not like, they should report it immediately to an adult they trust. Explain that if all children were able to report bad touches immediately and if everyone knew that all children have the power and the voice to tell about bad touches, this would help to stop people touching children in a way they do not like.
IMPORTANT MESSAGE TO CHILDREN: Always tell an adult you trust when you experience a touch you do not like.
T4 Learning Activity Six: ‘Scream fire!’
Learning: If you experience a bad touch scream fire and run away to a safe place. STEP 1: Read Halima’s story.
NOTE Encourage children to come up with their own ideas.

51
UNICEF Education Kit Handbook
School in a Box Kit Guidance
BOX 12: Halima’s story
Every school holiday, Halima went to stay with her aunt and uncle in the city. When she was small, Halima liked her uncle. He used to buy toys for her and carry her on his shoulders. One holiday he started to touch her private parts when they were alone. Halima was frightened and upset. Her uncle said it was their secret and that she must not tell anyone.
STEP 2: Ask each learning-group to discuss what Halima should do. What do you think Halima should do? Some answers might look like: Halima should not go to stay with her aunt and uncle; Halima should tell her mum about her uncle; Halima should avoid being alone with her uncle. STEP 3: Ask each learning-group to share with the class their solutions to Halima’s problem.STEP 4: Explain. If children are approached in a way they do not like, if they are asked to touch someone in a way they do not like, or if they feel afraid for any reason they should:1. SCREAM as loud as possible2. SHOUT‘fire,fire,fire’asloudaspossible3. RUN away to a safe place as fast as possibleIMPORTANT MESSAGE TO CHILDREN: People will take more notice ofachildindangerifthechildshouts‘fire,fire,fire’.Thechildmusttellsomeone they trust why they were afraid and shouted fire. STEP 5: Role-play. Ask children in pairs to act out the scene of a stranger approachingachildandachildrunningawayshouting‘fire,fire,fire’.STEP 6: Recap Theme Four Rights of the Child. Look at Articles 19 and 34 of the Convention on the Rights of the Child. Discuss with the class
BOX 13: Articles 19 and 34 of the Convention on the Rights of the Child
Article 19: You have the right to be protected from being hurt or badly treated.
Article 34: You have the right to be protected from sexual abuse.
EXTENDED ACTIVITIESInvite a social worker to talk about child abuse with the children and how they can get help. Set up time for the children to meet with a counsellor if they need to talk.
NOTE Coordinate the activities on child-protection with the UNICEF education and child-protection team or the implementing part-ners, the local community and the families of the children.
UN
IT T
HR
EE

52
UNICEF Education Kit Handbook
School in a Box Kit Guidance
ACTIVITY FIVE: ThemeFive(T5):‘MyHistoryandtheHistoryofmyCommunity’
The objective ofTheme Five ‘The History of my Community’ is todevelop an understanding of chronological events and build a sense of present, past and future.
T5 Learning Activity One: ‘My river of life’
Learning: The chronological line of one’s own life. STEP 1: Introduce the topic. Today we are going to draw ‘the river of our lives’. Ask the pupils to draw a line in their exercise books and explain. Our life is like a river that runs and moves through several events. STEP 2: Ask the pupils to place the year of their births and the different events that happened during their lives on the line. siblings. STEP 3: Ask each pupil to draw a dot on the line. This represents the year in which s/he was born.STEP 4: Ask the pupils to think of important events in their lives individually. For example: when they went to school; when their baby brother or sister was born; when their grandfather died; when they moved home; when the‘emergencyevents’happened.STEP 5: ‘Myriveroflife’mightlooklikeBOX14.Explain.The timeline is like a river that flows from one place to another.
NOTE If the children do not know their dates of birth, help them to establish approximate dates and choose birthdays. For example, try to establish their ages in compari-son to siblings.
NOTE Ask the pupils to observe silence while they are working.
NOTE It might be that emergency events like earthquakes or floods or typhoon or droughts happened more than once. Record them on the timeline as children remember them.
BOX 14: My river of life
PAST present FUTURE
_______0________0__________________0_______0_______0______0__0___NOW________________0___
Birth 2000 my baby brother was born first earthquake emergency
We moved home second earthquake
mother got sick completed primary education
STEP 6: Ask the pupils to share the important events in their life with other members of their learning-group. Compare the events and discuss. STEP 7: Ask for volunteers to share their river of life with the rest of the class. Thank the volunteers after sharing.
NOTE Pupils might recall difficult or happy events. Like a river, life has its up-moments and down-moments.
The learning activities will help children to
1. Understand the chronological line: before, now and after
2. Place events on a chronological line
3. Research historical events4. Record events5. Plan for their own futures
LEARNING OUTCOMES
53
UNICEF Education Kit Handbook
School in a Box Kit Guidance
EXTENSION
STEP 1: You can extend this activity and say that life is like a river—at times it goes up and at times it goes down. Ask the pupils to draw the ups and downs in their lives. For example: the birth of a baby brother is an up event; moving house can be either an up or down; the sickness of a mother is a down; the earthquakes and the emergency are downs; and the completion of primary education is an up. STEP 2: Explain. The ‘river of life’ talks about our personal history. Our past is made up of events that shaped our present. Our future will be made up of events that we can plan in our present. For example, staying in school now will help us to learn important skills and knowledge for our future as adults.
T5 EDUCATIONAL PROJECT: ‘Investigating history: The lives of my grandparents’
Learning: Understand how to investigate history and explore history through the memories of elderly people. STEP 1: Introduce the topic. The river of life represents the history of our lives from our births to the present moment. Ask the pupils: How can we know about events that happened before we were born? Who should we ask? STEP 2: Discuss with the pupils. Encourage the pupils to come up with their own ideas. Some answers might look like: we can know past events by reading history books; we can know past events by reading old copies of newspapers; we can know past events by asking our parents and grandparents. STEP 3: The life of my grandparents. Ask the pupils to prepare a list of questions (a questionnaire) for their grandparents. What do you want to know about the life of your grandfather? For example: When and where was he born? Did he go to school? What did he do at school? Has he ever visited a foreign country? Has he ever experienced an emergency? What happened during the emergency? What did he and his family do? Has he ever been to war? If so, what does he remember of the war? STEP 4: Ask pupils to interview their grandfathers using the lists of questionstheyprepared.Askpupilstodevelopthe‘riveroflife’oftheirgrandfathers on a timeline similar to what they did for their own lives.STEP 5: Report back the ‘river of life’ of the grandfathers. Ask forvolunteers to present the ‘river of life’ of their grandfathers. Make ahistory-line on a flip chart or a blackboard and register events according to the memories of different grandfathers. STEP 6: Ask each learning-group to compare events. Do different grandfathers remember the same events? Have they experienced similar emergency events? What did they talk about?
NOTE Drawing the ‘river of life’ is a very sensitive activity. Make sure that there is a trusting and non-judgemental atmosphere in the class. Do not force pupils to talk about events.
NOTE If children do not have living grandparents, they can ask an elderly person in their family or neighborhood
UN
IT T
HR
EE
54
UNICEF Education Kit Handbook
School in a Box Kit Guidance
Lesson Two STEP 1: A different point of view. Ask the pupils: In your opinion, do you think you would find out about different events, if you repeated the same exercise with your grandmother? Why yes, or why not? STEP 2: Ask the pupils to interview their grandmothers and compare events as grandfathers and grandmothers remember. Explain. Historical events are experienced and remembered differently. For example: grandmothers might not have been to war; grandfathers might not have supported their families during the war. When we investigate history, it is important to know whose point of view we are taking into consideration. STEP 3: Evaluate: What did you find difficult? What did you enjoy? Why?
T5 Learning Activity Three: ‘Recording history’
Learning: Understand the job of historians, how they record events and why.STEP 1: Explain. History talks about past events. If available show a history book to the pupils. Read the table of contents, as it gives an idea of the events that are presented in the history book. History books collect events from the past. However, not all cultures use history books to record important events. Many cultures record events through songs, music and rhymes and they pass on their history from generation to generation by memorizing events. STEP 2: Ask the pupils: How does our community record events? Discuss with the pupils and make a list of history sources: for example, elders know the history of our community, we sing about important events of our community, we have poems about important events of our community, we write books ... etc... STEP 3: Ask each learning-group to work together and choose a means to report the events of the recent emergency event (e.g., write a poem or draw a picture). Lesson Two STEP 1: Exercise. Invite each learning-group to record events to recall one day to their own future grandchildren. Ask the pupils: What do you think your grandchildren will want to know? What do you think is important to record for your grandchildren? Invite each learning-group to write a list of events in their exercise books. STEP 2: Ask each learning-group to report back to the rest of the class and discuss together what was reported and how it was reported.STEP 3: Ask each learning-group to prepare a poster with the chronological emergency events (according to a timeline) to post in the learning corner.
T5 Learning Activity Four: ‘My memory book’
Learning: Reflect on own history. STEP 1: Explain. A memory book is a history book about our lives. Ask the pupils: What do you think is important to record in a memory book?
NOTE This lesson can be linked to Theme Seven ‘Peace and Reconciliation in my Community’.
NOTE This is a sensitive activity. Remind pupils that they are reporting events at a community level and not at a personal level.
NOTE These events can be either personal or general.
55
UNICEF Education Kit Handbook
School in a Box Kit Guidance
(e.g., when I was born, my name, why I was given my name, where I lived). STEP 2: Ask the pupils to make a list of what they want to record about their life. Each pupil will develop his/her own memory book. STEP 3: BOX 15 provides an example of a memory book. Pupils can adapt the memory book to their preferences.
BOX 15: My memory book
I was born on ...................................................at.................................... (Time)
in the village/town of...........................................................................................
I was named.............................by.......................................................................
because..............................................................................................................
My name means.................................................................................................
(if possible, pupils can add their own pictures of when they were born)
My home is….....................................................................................................
I have … sister(s) and …brother(s), their names are…......................................
Important people in my life are..........................................................................
My hopes for my future are…............................................................................
When I grow up I would like to be…..................................................................
STEP 4: Discuss with the pupils. Where can we find information about our own lives? Who can talk about us? Ask the pupils to develop their own memory books. STEP 5: Ask for volunteers to share their memory books. Thank the volunteers.STEP 6: Evaluate. What did we learn about historical events? For example, we learned that events are reported differently by different people. Historical events can be recorded in different ways. It is important to record memories to share knowledge with future generations.
LEARNING CORNER: ‘My Community’
STEP 1: Investigate important figures in the history of the community (e.g., Nelson Mandela in South Africa). Discuss with the pupils. Who are the important people in the history of our community? What did they do? Why are they remembered? STEP 2: Investigate important events in the history of the community. Discuss with the pupils: What important events marked our history? Important events can be wars, but also peace treaties and community achievements (e.g., in Kenya, the community of Iten in the Rift Valley Province is called the village of the golden medallists, because it gave birth to several world champion runners. Important events can be positive changes, such as new roads, availability of power in houses, new latrines that contributed to better health and sanitation, or improved access to water.
NOTE Beginner students can draw some pictures of their memories (e.g., the places where they have lived, the friends they have had, and their schools).
NOTE Keep the activity as simple as possible. Help pupils to write short and clear sentences that report events.
NOTE Make sure that you in-vestigate both male and female figures.
UN
IT T
HR
EE
56
UNICEF Education Kit Handbook
School in a Box Kit Guidance
STEP 3: Prepare posters about figures and events that marked the history of your community and post them in the Learning Corner. Arrange exchanges with other classes using the learning corners.
ACTIVITY SIX: ThemeSix(T6):‘CulturalfestivitiesandritualsofmyCommunity’.
The objective of Theme Six ‘Cultural festivities and rituals of myCommunity’ is to build a cultural identity based on positive cultural practices, celebrations and rituals.
T6 Learning Activity One: ‘A calendar of festivities’
Learning: Understand what a calendar is and how to produce a calendar of festivities. STEP 1: Explain. Festivities are days or periods we celebrate. Ask the pupils: Can you give an example of festivities we celebrate in our community? (e.g., Christmas, Id El Fitter, and Diwali). Write on a flip chart or blackboard the list of festivities celebrated in the community. STEP 2: Ask the pupils to list festivities that they celebrate in their families (e.g., birthdays, graduation, and school achievements).STEP 3: Explain. Festivities can be related to religion (e.g., Christmas), political events (e.g., Independence Day), or they can be personal events (e.g., birthdays, weddings, rites of passage, and graduations). Different cultures have different festivities. Many cultures celebrate natural events, such as the return of light or the rainy season or the bounty of harvest. This is to mark important periods for the livelihood of the community. STEP 4: Explain. A calendar is a system for organizing days and counting time. Internationally, time is counted according to the Gregorian calendar, which is divided into 12 months—which are sub-divided approximately into 4 weeks of 7 days each. Each of the 12 months has 30 or 31 days except February—the 2nd month of the calendar year—which has 28 days. In the Gregorian calendar, there is a leap day every four years. On leap years, February counts 29 days. The Gregorian calendar starts in the month of January. Ask the pupils to list the 12 months of the Gregorian calendar. In the Gregorian calendar, days are counted in 24 hours. The school year is also a calendar. It is a system for organizing days according to school holidays and school events such as examinations, graduations, and enrolments.
NOTE Remember! The objective of remembering historical events and figures is to build a positive understanding of people’s own history. People might have different points of views about what happened in the past. Pupils should learn to respect different points of views and analyze the facts on which they are based
NOTE Link this activity to numeracy. Count months, weeks, days, hours and minutes.
The learning activities will help children to
1. Know their own cultures better
2. Understand positive and negative cultural practices
3. Express cultural identity
LEARNING OUTCOMES
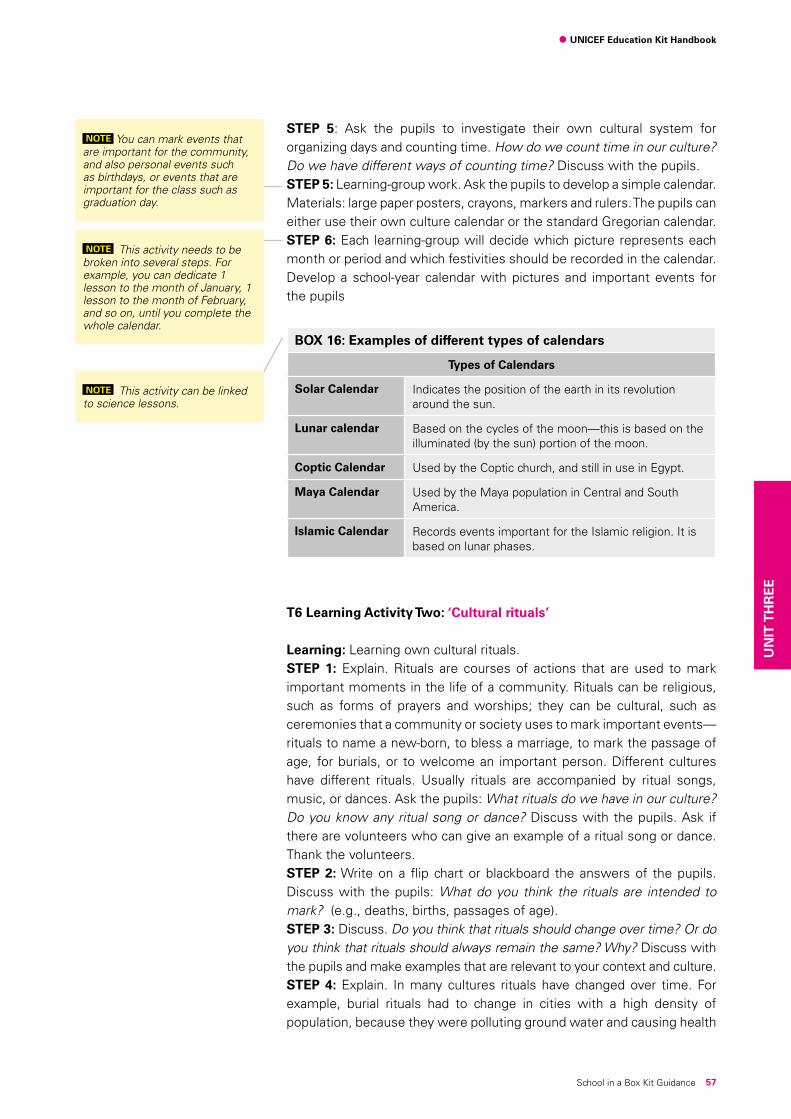
57
UNICEF Education Kit Handbook
School in a Box Kit Guidance
STEP 5: Ask the pupils to investigate their own cultural system for organizing days and counting time. How do we count time in our culture? Do we have different ways of counting time? Discuss with the pupils. STEP 5: Learning-group work. Ask the pupils to develop a simple calendar. Materials: large paper posters, crayons, markers and rulers. The pupils can either use their own culture calendar or the standard Gregorian calendar.STEP 6: Each learning-group will decide which picture represents each month or period and which festivities should be recorded in the calendar.Develop a school-year calendar with pictures and important events for the pupils
BOX 16: Examples of different types of calendars
Types of Calendars
Solar Calendar Indicates the position of the earth in its revolution around the sun.
Lunar calendar Based on the cycles of the moon—this is based on the illuminated (by the sun) portion of the moon.
Coptic Calendar Used by the Coptic church, and still in use in Egypt.
Maya Calendar Used by the Maya population in Central and South America.
Islamic Calendar Records events important for the Islamic religion. It is based on lunar phases.
T6 Learning Activity Two: ‘Cultural rituals’
Learning: Learning own cultural rituals. STEP 1: Explain. Rituals are courses of actions that are used to mark important moments in the life of a community. Rituals can be religious, such as forms of prayers and worships; they can be cultural, such as ceremonies that a community or society uses to mark important events—rituals to name a new-born, to bless a marriage, to mark the passage of age, for burials, or to welcome an important person. Different cultures have different rituals. Usually rituals are accompanied by ritual songs, music, or dances. Ask the pupils: What rituals do we have in our culture? Do you know any ritual song or dance? Discuss with the pupils. Ask if there are volunteers who can give an example of a ritual song or dance. Thank the volunteers. STEP 2: Write on a flip chart or blackboard the answers of the pupils. Discuss with the pupils: What do you think the rituals are intended to mark? (e.g., deaths, births, passages of age).STEP 3: Discuss. Do you think that rituals should change over time? Or do you think that rituals should always remain the same? Why? Discuss with the pupils and make examples that are relevant to your context and culture. STEP 4: Explain. In many cultures rituals have changed over time. For example, burial rituals had to change in cities with a high density of population, because they were polluting ground water and causing health
NOTE You can mark events that are important for the community, and also personal events such as birthdays, or events that are important for the class such as graduation day.
NOTE This activity needs to be broken into several steps. For example, you can dedicate 1 lesson to the month of January, 1 lesson to the month of February, and so on, until you complete the whole calendar.
NOTE This activity can be linked to science lessons.
UN
IT T
HR
EE

58
UNICEF Education Kit Handbook
School in a Box Kit Guidance
threats. In many cultures, wedding rituals are now accompanied by legal ceremonies and name rituals for new-borns have been integrated with birth registrations. The Rights of the Child declares that children have the right to an identity, which means that new-borns should be registered and obtain a birth certificate that affirms their legal rights everywhere in the world.
BOX 17: The right to a legal name, identity and nationality.
Article 7: You have the right to a legal name, which means that you have the right to a birth certificate that affirms your legal rights.
Article 8: You have the right to an identity and a nationality.
STEP 5: Culture is an important part of our identity. Culture gives us the means by which to appreciate the richness of human expression. Usually, it is when we come into contact with other cultures, that we appreciate our own culture even more. Ask the pupils: Can you think of artists, songwriters, dancers, and musicians who express their cultures proudly and positively in their art? For example, jazz is a music genre that was born from the fusion of different cultural traditions. STEP 6: Activity. Ask each learning-group to draw pictures of musical instruments, musicians, dancers, etc. They can be posted on the LEARNING CORNER: My Community
T6 Learning Activity Three: ‘Sara, the daughter of a lioness’
Learning: Cultural practices can and should change if harmful. STEP 1: Tell the pupils that you are going to read a story about a rite of passageforgirlsandthatyouaregoingtotalkabout‘circumcision’.Readthestoryof‘Sara,thedaughterofa lioness’totheclass.Keepaslowpace and a clear voice while reading.
BOX 18: Sara, the daughter of a lioness
Sara, the daughter of a lioness
Juma and Sara are school friends. One day while they are doing their homework, Zingo (Sara’s pet monkey) suddenly jumps down from the roof and begins screeching very loudly. As soon as Sara hears Zingo, she runs away and hides. Juma is surprised by Sara’s behavior and follows her, but Sara tells Juma to stay, while she hides behind a tree. Sara’s uncles are discussing: ‘Mother is in town. She insists Sara must be circumcised this time! She is the right age. She cannot refuse. She must go through the cultural rites.’ For a long time Sara’s grandmother has been insisting that she must be circumcised.
That evening while cooking dinner, grandmother again brought up circumcision and the cultural rites. ‘Circumcision is the way of our people. Sara, it is time you accept to become a whole woman’ grandmother told Sara and her mother yet again. Sara is puzzled and asks inquisitively ‘But grandma, how can you become whole by having something cut off?’
NOTE This discussion should take place only if a non-judgmental and open atmosphere has been established in the class. The aim of the discussion is to recognize and appreciate the richness of each culture.
59
UNICEF Education Kit Handbook
School in a Box Kit Guidance
Grandmother is surprised by Sara’s clever reply and simply closes the conversation: ‘Sara, it is our culture and I know this is the best for you’.
The day after during school break, Sara is attacked by her schoolmates: ‘Sara is against our customs, she does not want to be circumcised. Who do you think you are Sara? Do you think you are very modern with your behavior?’, a million voices shout at her. Sara is frightened. Boys and girls are pushing her and calling her names, while Juma and Amina, Sara’s friend, try to defend Sara.
Ms. Maathai, Sara’s teacher, intervenes: ‘Leave Sara alone, no one is against our customs here!’ One of the bullying boys enquires: ‘But isn’t it true that girls who refuse to be circumcised will be cursed and die in childbirth?’ ‘On the contrary, Ms. Maathai replies: ‘Circumcised women have more problems in childbirth and can get infections more easily’. Amina sadly reminds the group: ’Do you remember what happened to Sofia last year? She died from bleeding after circumcision.’ ‘I heard one can get AIDS from the circumciser’s blade too!’ another girl adds. Ms. Maathai confirms: ‘Certainly, if the blade is not sterilized properly. These are scientific facts about the dangers of circumcision. Each girl should know the facts and make her own decision. The consequences of circumcision will have painful and irreversible bearing in the life of a woman.’
That same day, on the way back home from school, Sara is kidnapped by a group of women who bring Sara to the campsite, where the circumciser is operating, by force. Sara is frightened and does not know what to do. She is locked in a room on her own; she cries and feels powerless and unfairly treated by her own community. But Zingo comes to her rescue! Sara gives him a letter asking for help to bring to Juma.
Juma’s clever mind puts a plan together immediately. He gathers other friends and together with Amina and the help of sticks and stones start to make a lot of noise from the bush where they are hiding close to the houses. The men of the community are immediately alerted and run off with spears to fight the lion they think is threatening them. The women also run out to rescue children and animals. While the whole community is busy finding protectionfromthesupposed‘lion’,JumaandAminatakeadvantageoftheconfusion to free Sara from her prison and escape to Amina’s house nearby.
A big crowd gathers around Sara. Sara’s uncles, the circumciser, the elders, the women, the other girls and Sara’s mother and grandmother. One of the communitywomenasks:‘So, why did you try to escape Sara?’ Meanwhile, the circumciser signals to the women to grab Sara, but Sara’s mother steps in and shouts ‘Stop! Maybe Sara is right!’ ‘You do not know what you are talking about’, says the circumciser. ‘I do! But I was afraid of what other people would think. How many of us are afraid of others? How many of us really want our daughters to be cut? Sara has opened my eyes. Cowardice will lead us nowhere.’ Sara’s uncle is very angry at Sara’s mother: ‘I always knew you were the one who is making Sara so stubborn!’ said the uncle with a harsh voice. ‘Who is stubborn? When did you ever listen to women?’ Sara’s mother politely but firmly replied. ‘You must not question our ways!’ grandmother quickly added looking at Sara’s mother. ‘But our customs should bring life not death’ said Sara’s mother with sadness in her voice. Another woman fervently added, ‘It is not good trying to silence the truth. Sara’s mother speaks for all of us women. It is time the issue is discussed openly in the community’. Finally the chief, who was listening attentively, spoke: ‘We have to decide what is good for us and face our problems. Some things must change!’
Grandmother, who stood pensive (thinking) in silence for a long time, eventually said: ‘Yes, Sara knows her will and it is right for us to listen. She is a courageous young girl, the daughter of a lioness’.
Adaptedfrom‘ThedaughterofaLioness’Sara’sseriesUNICEF
UN
IT T
HR
EE

60
UNICEF Education Kit Handbook
School in a Box Kit Guidance
STEP 2: Discuss the events and the characters of the story with the pupils: Did you like the story? Can someone tell us briefly what the story is about? Who are the characters in the story? In your opinion, who is the main character of the story? Why? Which characters did you like best in the story? Why? Which characters did you not like? Why? STEP 3: Discuss harmful cultural rituals. Do you think that Sara’s behavior in the story was appropriate? Why yes, or why not? Do you think that the solution in this story was realistic? What would you do if you were Sara? Do you think that the community chief’s decision after listening to Sara’s mother and the other women was right? Should things in our culture change? Why? STEP 4: Ask the pupils to discuss in learning-groups and agree on 1 thing that they believe should change in their culture. What do you think should change in our culture? STEP 5: Invite pupils to draw pictures about Sara and about the other characters of the story. Post the pictures on the LEARNING CORNER: My Community.
EXTENDED ACTIVITIES: Activity One: Each learning-group selects a traditional song, a dance, and/or a poem from their own cultural heritage and stages a small festival of cultures in the CFS/E. Activity Two: Invite an elderly person or a representative from the local community to the Child-Friendly Space/Environment to talk about positive rituals of the different cultures.
ACTIVITY SEVEN: ThemeSeven(T7):‘Peaceandreconciliationprocessesinmy Community’
The objective ofThemeSeven ‘Peace and reconciliationprocesses inmy Community’ is to build awareness about stereotypes and prejudice, about effective communication skills and positive conflict resolution and peace-building.
T7 Learning Activity One: ‘How do we see things?’
Learning: Become aware of prejudice. STEP 1: Preparation: Draw 2 lines like in BOX 19 on a flip chart paper or blackboard.
NOTE This is a sensitive activity. Allow pupils to explore positive and negative aspects of cultural rituals and attitudes. Make sure that there is a non-judgemental investigative attitude in the classroom and all opinions are respected.
NOTE You can transform this activity into an event. Invite parents and community members to attend to the show.
NOTE It is important that all the cultural minorities present in the class are represented. It is your duty to make sure that all children feel included and have a voice.
The learning activities will help children to
1. Be aware of stereotypes and prejudice
2. Reflect on communication skills
3. Understand concepts of peace and reconciliation related to positive conflict resolution and peace-building
LEARNING OUTCOMES
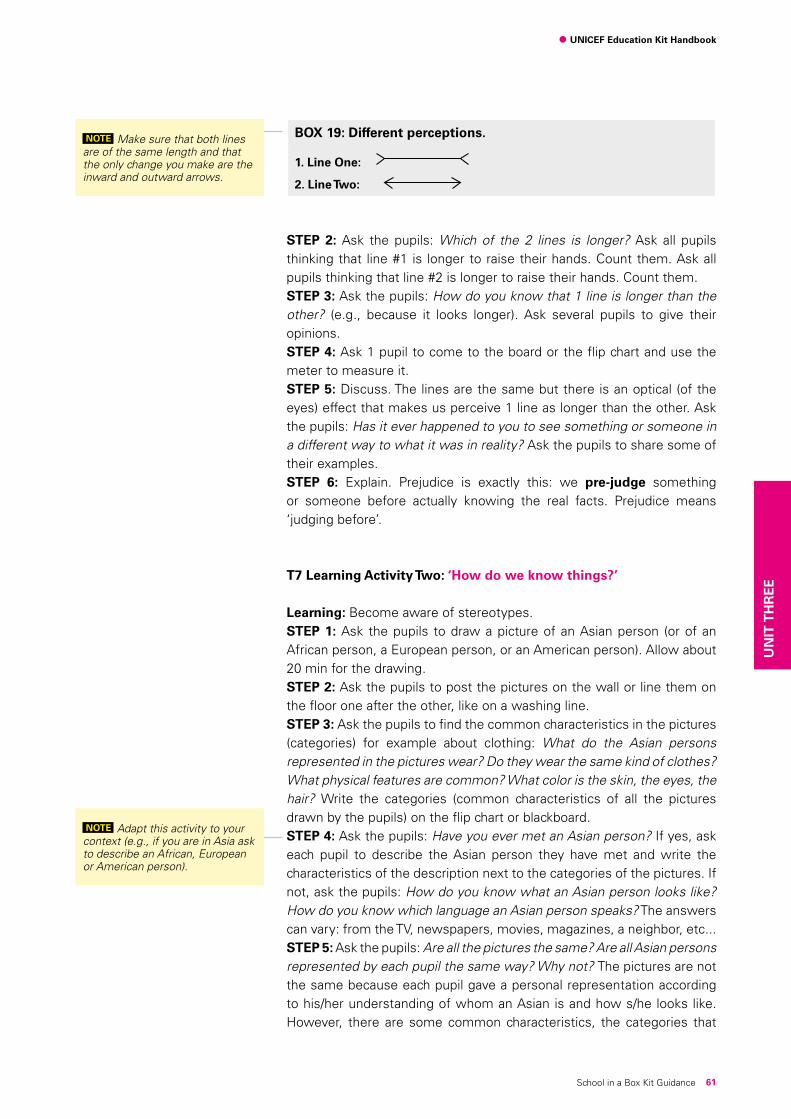
61
UNICEF Education Kit Handbook
School in a Box Kit Guidance
BOX 19: Different perceptions.
1. Line One:
2. Line Two:
STEP 2: Ask the pupils: Which of the 2 lines is longer? Ask all pupils thinking that line #1 is longer to raise their hands. Count them. Ask all pupils thinking that line #2 is longer to raise their hands. Count them. STEP 3: Ask the pupils: How do you know that 1 line is longer than the other? (e.g., because it looks longer). Ask several pupils to give their opinions.STEP 4: Ask 1 pupil to come to the board or the flip chart and use the meter to measure it.STEP 5: Discuss. The lines are the same but there is an optical (of the eyes) effect that makes us perceive 1 line as longer than the other. Ask the pupils: Has it ever happened to you to see something or someone in a different way to what it was in reality? Ask the pupils to share some of their examples. STEP 6: Explain. Prejudice is exactly this: we pre-judge something or someone before actually knowing the real facts. Prejudice means ‘judgingbefore’.
T7 Learning Activity Two: ‘How do we know things?’
Learning: Become aware of stereotypes. STEP 1: Ask the pupils to draw a picture of an Asian person (or of an African person, a European person, or an American person). Allow about 20 min for the drawing. STEP 2: Ask the pupils to post the pictures on the wall or line them on the floor one after the other, like on a washing line. STEP 3: Ask the pupils to find the common characteristics in the pictures (categories) for example about clothing: What do the Asian persons represented in the pictures wear? Do they wear the same kind of clothes? What physical features are common? What color is the skin, the eyes, the hair? Write the categories (common characteristics of all the pictures drawn by the pupils) on the flip chart or blackboard. STEP 4: Ask the pupils: Have you ever met an Asian person? If yes, ask each pupil to describe the Asian person they have met and write the characteristics of the description next to the categories of the pictures. If not, ask the pupils: How do you know what an Asian person looks like? How do you know which language an Asian person speaks? The answers can vary: from the TV, newspapers, movies, magazines, a neighbor, etc... STEP 5: Ask the pupils: Are all the pictures the same? Are all Asian persons represented by each pupil the same way? Why not? The pictures are not the same because each pupil gave a personal representation according to his/her understanding of whom an Asian is and how s/he looks like. However, there are some common characteristics, the categories that
NOTE Make sure that both lines are of the same length and that the only change you make are the inward and outward arrows.
NOTE Adapt this activity to your context (e.g., if you are in Asia ask to describe an African, European or American person).
UN
IT T
HR
EE
62
UNICEF Education Kit Handbook
School in a Box Kit Guidance
all the pupils used to represent an Asian person. Read the categories written on the flip chart or board. STEP 6: Explain: the categories used to represent an Asian person are stereotypes. They are general characteristics that we attribute to a group of people: Asian. Asia is a large continent, and Asians speak different languages (e.g., Arabic, Chinese, Indonesian, Japanese); they have different features (e.g., color of the skin, eyes, and hair). Also, their clothing can be very different (e.g., Indian female traditional clothing—sari, and Mongolian traditional clothing—deer or kaftan). STEP 7: Discuss with the pupils: In your opinion, what are the consequences of using stereotypes? Can you give an example related to your context?
T7 Learning Activity Three: ‘How do we say things?’
Learning: Become aware of how we communicate. STEP 1: Start the activity with an exercise: the human mobile-phone. Step 2: Ask the players to form a circle by holding hands.Step 3: Ask the pupils to release their hands and sit on the ground or on chairs facing the middle of the circle.Step 4: Appoint a pupil to be the sender of the message (start-point). The sender of the message should think of a message, usually one meaningful sentence, to send to the receiver of the message. The receiver of the message is the person at the end of the human circle or chain. For example, the sender sends the message by whispering it into the ear of the person on her/his left, who in turn whispers the same message—as understood—to the person sitting on his/her left, and so on until the message arrives to the ear of the receiver. Step 5: Play: The sender should pretend to dial a number and talk to an imaginary mobile-phone. The receiver should repeat the message loudly for the rest of the group to hear. Step 6: Discuss. Ask the pupils: Did you enjoy communicating through the human mobile-phone? Was the end message the same as the start message? What do you think did not work? How do you think communication can be improved? Step 7: Good communication is based on good listening skills and on how we say things. If a message is not communicated clearly, the receiver cannot understand it clearly. This causes miscommunication and the end-message becomes something very different from the start message. Very often miscommunication causes conflicts. Ask the pupils if they can think of an example of conflict based on miscommunication with, for example, their peers at school or their siblings at home. Can you give an example of a conflict caused by miscommunication?
NOTE Pupils can whisper the message only once.
63
UNICEF Education Kit Handbook
School in a Box Kit Guidance
T7 Learning Activity Four: ‘Planets at war’
Learning: Become aware of conflict-dynamics and conflict-resolution. STEP 1: Introduce the activity by saying that there is a war between planet Mars and planet Venus. Each learning-group has been assigned with a peace-building mission. How can the peace-building mission help Mars and Venus regain peace? Step 2: Role play. Read the following scenario to the learning-groups. If possible print it out or prepare it pre-written on a flip-chart where all the pupils can see it.
BOX 20: Planets at war
Peace-building mission. A terrible war started between planet Venus and planet Mars a year ago. Many civilians died and many people are suffering the terrible consequences of the war.
Background: Planet Venus needs new resources of water. The supplies of water available on planet Venus are shrinking. Planet Mars has plenty of water. Planet Venus attacked planet Mars with the intention of subduing the population and gaining control of the water resources. Planet Mars is a very peaceful planet, but engaged the army to protect it from the attack.
Step 3: The task of the peace-building mission from planet Earth is to find a solution to the conflict. How can the conflict be solved?Prompt suggestions. Should the water resources be shared? Why yes, or why not? How could the two planets find a good solution for sharing resources? What should planet Venus do to solve the problem of water? (e.g., use water wisely, stop misusing precious water resources, harvest water during the rainy season). Step 4: Ask each learning-group to make a list of the possible steps to solve the conflict. What should the peace-building mission suggest to planet Mars and planet Venus? Encourage each learning-group to discuss.Step 5: Ask each learning-group to read their solutions. Discuss with the class.Step 6: Role play. Invite 1 learning-group to be the peace-building mission, 1 group to be planet Venus and 1 group to be planet Mars, and enact the peace-building mission. Step 7: If appropriate you can repeat a similar exercise using real experiences from your context. Make sure that the focus is on peace-building.
NOTE Learning from Theme Five ‘The History of my Community’ can be linked here. The investiga-tion and understanding of history contribute to a better insight into conflicts.
UN
IT T
HR
EE
64
UNICEF Education Kit Handbook
School in a Box Kit Guidance
ACTIVITY EIGHT: ThemeEight(T8):‘ThegeographyofmyCommunity’
The objective ofTheme Eight ‘The geography of my Community’ isto explore basic concepts in physical geography (the environment) and political geography (countries/nations), starting with pupils’ own community.
T8 Learning Activity One: ‘Drawing the map of my community’
Learning: Draw a map of pupils’ own community. STEP 1: Explain. How to draw a map of your community by hand: (1) Establish the area you want to cover in the map—for example, the school and the houses of all the pupils in the class. (2) Write the cardinal points (North, South, East, and West) on the map: North on the top; East on the right hand side; West on the left hand side; and South on the bottom. (3) ask the students to identify which buildings or landmarks are in the North, South, East or West. (4) Establish a central building or landmark from which distances between buildings are established (e.g., the school or the CFS/E). Ask the pupils geographical questions (e.g., Is the school further or nearer than the community hall?) STEP 2: Discuss with the pupils: What should we draw on the map? (e.g., shops, kiosks, bus stations, and religious buildings). Write a list of what should be on the map. STEP 3: If you do not find large posters, simply use the back of a carton box or any other large paper you find. You can also stick pages of the exercise book together with adhesive tape. STEP 4: Go around the learning-groups to support the drawing process. STEP 5: At the end of the exercise ask each learning-group to present their map to the rest of the class. Post the map in the LEARNING CORNER: My Community
T8 Learning Activity Two: ‘Physical map of my community’
STEP 1: Explain. The purpose of a physical map is to show landforms such as deserts, mountains, plains, lakes, seas, oceans, and rivers. A physical map represents the physical aspects of the terrain. STEP 2: Show the physical geography map that is in the SIB Kit. Look it over with the pupils. For example, ask the pupils: What do the green areas represent? What do the light brown areas represent? What do the blue areas represent? Give each learning-group the opportunity to explore the physical map carefully. STEP 3: Make a list of all the physical realities that are represented in a physical geography map. Explain: physical maps generally show things like mountains, rivers and lakes; water is always shown as blue. Mountains and elevation changes are usually shown with different colors and shades to show relief. Normally on physical maps, green indicates
NOTE Use the art and craft mate-rials and the blackboard materials (e.g., compass and square set) to help with the drawing.
NOTE The community map will be used in the activities of Themes Nine, Ten, Eleven and Twelve.
NOTE You can also use the in-flated globe to identify the differ-ent colors used to represent the physical terrain.
The learning activities will help children to
1. Know how to draw a map by hand
2. Identify the main continents3. Know the states/nations of
own continent
LEARNING OUTCOMES
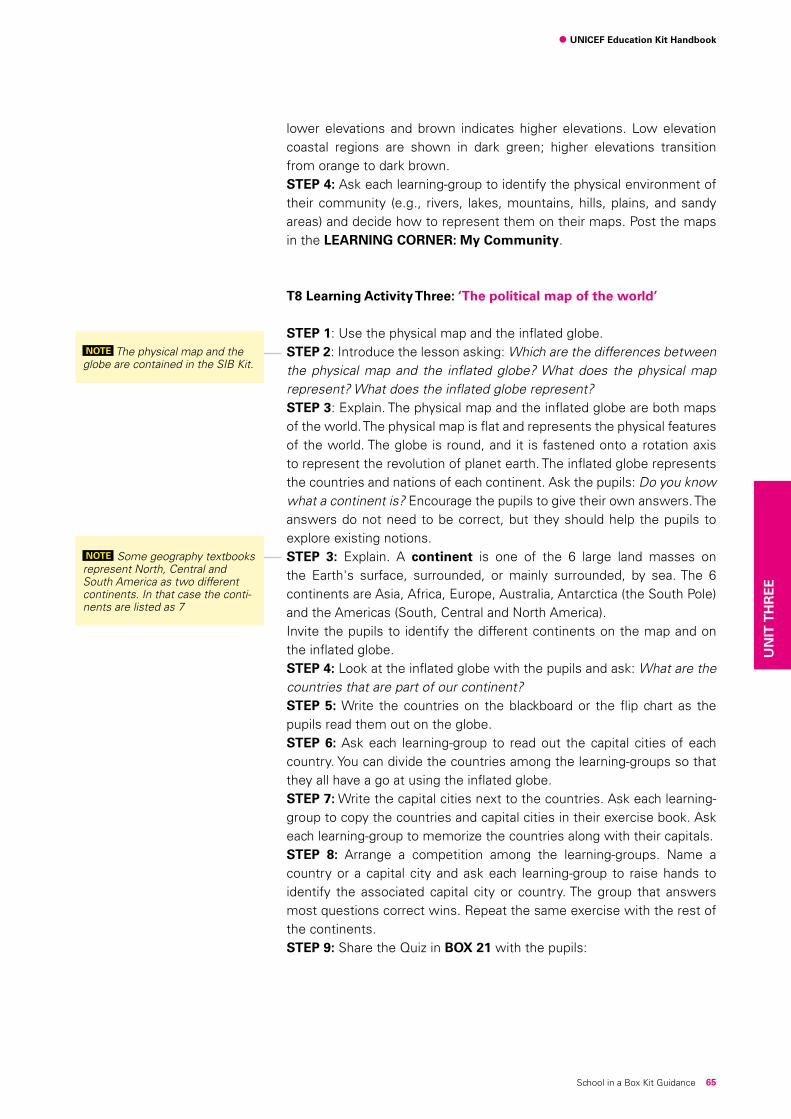
65
UNICEF Education Kit Handbook
School in a Box Kit Guidance
lower elevations and brown indicates higher elevations. Low elevation coastal regions are shown in dark green; higher elevations transition from orange to dark brown.STEP 4: Ask each learning-group to identify the physical environment of their community (e.g., rivers, lakes, mountains, hills, plains, and sandy areas) and decide how to represent them on their maps. Post the maps in the LEARNING CORNER: My Community.
T8 Learning Activity Three: ‘The political map of the world’
STEP 1: Use the physical map and the inflated globe.STEP 2: Introduce the lesson asking: Which are the differences between the physical map and the inflated globe? What does the physical map represent? What does the inflated globe represent? STEP 3: Explain. The physical map and the inflated globe are both maps of the world. The physical map is flat and represents the physical features of the world. The globe is round, and it is fastened onto a rotation axis to represent the revolution of planet earth. The inflated globe represents the countries and nations of each continent. Ask the pupils: Do you know what a continent is? Encourage the pupils to give their own answers. The answers do not need to be correct, but they should help the pupils to explore existing notions. STEP 3: Explain. A continent is one of the 6 large land masses on the Earth's surface, surrounded, or mainly surrounded, by sea. The 6 continents are Asia, Africa, Europe, Australia, Antarctica (the South Pole) and the Americas (South, Central and North America). Invite the pupils to identify the different continents on the map and on the inflated globe. STEP 4: Look at the inflated globe with the pupils and ask: What are the countries that are part of our continent? STEP 5: Write the countries on the blackboard or the flip chart as the pupils read them out on the globe.STEP 6: Ask each learning-group to read out the capital cities of each country. You can divide the countries among the learning-groups so that they all have a go at using the inflated globe. STEP 7: Write the capital cities next to the countries. Ask each learning-group to copy the countries and capital cities in their exercise book. Ask each learning-group to memorize the countries along with their capitals. STEP 8: Arrange a competition among the learning-groups. Name a country or a capital city and ask each learning-group to raise hands to identify the associated capital city or country. The group that answers most questions correct wins. Repeat the same exercise with the rest of the continents.STEP 9: Share the Quiz in BOX 21 with the pupils:
NOTE The physical map and the globe are contained in the SIB Kit.
NOTE Some geography textbooks represent North, Central and South America as two different continents. In that case the conti-nents are listed as 7
UN
IT T
HR
EE
66
UNICEF Education Kit Handbook
School in a Box Kit Guidance
BOX 21: The continents’ quiz
THE CONTINENTS’ QUIZ
Question: Do you know why the symbol of the International Olympic Games has 5 rings?
Answer: Because each ring represents a continent that is inhabited by people; Antarctica is uninhabited.
Question: Do you know why rings are represented interlocking?
Answer: To represent the connection of all nations/countries of the world; the colors of the rings represent the colors of all the flags of the world. The white color of the background is also considered part of the Olympic Flag.
STEP 10: Ask the pupils to draw the symbol of the Olympic Games.
T8 Learning Activity Four: ‘Read the physical map of the world’
STEP 1: Explain. The purpose of a physical map is to show landforms like deserts, mountains, plains, lakes, seas, oceans, and rivers. A physical map represents the physical aspects of the terrain/land. STEP 2: Look at the features of the physical map and focus on your continent. Ask the pupils: What are the major physical geographic features? (e.g., mountains, lakes, deserts, or forests).STEP 3: Repeat the exercise for each continent. STEP 4: Prepare a quiz. Name the major physical features of each of the continents randomly and ask each learning-group to identify the correct continent. The group with the most correct answers wins.
ACTIVITY NINE: ThemeNine(T9):‘ThelivelihoodofmyCommunity’
The objective ofTheme Nine ‘The livelihood of my Community’ is toexplore basic concepts of livelihood and resources of a community. This theme prepares the foundations for discussions on conservation of natural resources and on employment opportunities in the local community.
T9 Learning Activity One: ‘Exploring the concept of livelihood’
Learning: Understand basic concepts on livelihood and sources of income. STEP 1: Brainstorm. Ask the pupils: Do you know the meaning of the word ‘livelihood’? What comes to your mind when you hear the word ‘livelihood’? Discuss the answers with the pupils. STEP 2: Explain. Livelihood is the means of support and subsistence. Livelihood indicates the source of food and/or of income (money). Usually we talk about the livelihood of a household (a family) to indicate the
The learning activities will help children to
1. Understand the concept of livelihood
2. Understand the concept of natural resources
3. Map community livelihood
LEARNING OUTCOMES
67
UNICEF Education Kit Handbook
School in a Box Kit Guidance
sources of income (either monetary or in terms of food items) that can sustain the family. For example: agriculture is a means of subsistence, because a farmer can either eat or sell the products of his/her garden. The garden is the livelihood of a farmer. Ask the pupils: Can you give some examples of livelihoods? (e.g., selling eggs, grazing goats that can be eaten or sold). Write the examples on the flip chart or blackboard. STEP 3: Explain. The livelihood of a community is based on the business opportunities or income generating activities (IGA) available in the community. There are 4 main kinds of businesses:
(a) MANUFACTURING (making things). Manufacturing involves the ability and skill to transform raw materials into finished products. For example, a bakery transforms flour, salt, water, yeast and oil/fat into bread.
(b) SERVICE. Providing a service to customers involves the ability and skill to do some particular task that people desire. For example, a hairdresser provides hairstyling and a taxi company provides transportation.
(c) RETAIL. Retail is a business that sells already made products. For example, shops and kiosks are retail businesses.
(d) AGRICULTURE. Agriculture produces goods by working the land and/or through animal husbandry (breeding and raising livestock). Fishing is also part of this business group.
STEP 4: Ask the pupils: Looking at the examples of Income Generating Activities present in your community, can you group the examples into the categories of manufacturing, service, retail and agriculture? Write the answers on a blackboard or flip chart. STEP 5: Ask the pupils: Think about our community, which types of business can we find? (e.g., fishing, barber shop, taxis, buses, shops, and agriculture).STEP 6: Ask the pupils: Take the example of teachers, nurses, doctors, and people working for the government—in your opinion, what kind of business are they in? (e.g., teachers and school personnel, and doctors and hospital or dispensary personnel, are in Service). Usually these services are called ‘public services’, which means that they are important services for the good of the whole community. STEP 7: Ask the pupils: In your opinion, who should pay for ‘public services’? In many countries, access to primary education and to health facilities is free and compulsory for the population—for example: China, several European countries, including Italy, Sweden, Spain, France, and Venezuela and Argentina. Why do you think that these countries provide free and compulsory primary education (families must make sure that children attend primary school) and free access to basic health services? Discuss these issues with the pupils. STEP 8: Ask the pupils: In your opinion, what type of businesses are singers, footballers and musicians in? Popular musicians work for the music industry and earn an income (livelihood) from their talents. Popular
UN
IT T
HR
EE
68
UNICEF Education Kit Handbook
School in a Box Kit Guidance
footballers are in a similar business, the sport industry. Both popular musicians and footballers are supported by the media (communication like TV and radio) industry. STEP 9: Ask the pupils: What profession would you like to have when you grow up? Why? Ask the pupils to discuss this in their learning-groups, and have them draw pictures of the profession they would like to have when they grow up.
EXTENSION: Activity One: You can talk about the influence of mass media(e.g.,TV,theInternet,andradioinfluencepeoplein‘consuming’products like music and football). You can observe how advertisements are used in marketing products in your community. Activity Two: You can explore role models. For example, many children look up to rich men because they have shiny cars, shiny clothes, and big houses.
T9 Learning Activity Two: ‘Exploring the concept of natural resources’
Learning: Understand basic concepts about the natural resources of the pupils’ own community and country.STEP 1: Ask the pupils: In your opinion, is there a difference between livelihood and natural resources? Discuss with the pupils and build on what was learned in Activity One. STEP 2: Explain. Natural resources of a community provide the basic subsistence for the community to survive. For example, water is a very important natural resource. Without water there is no life. No food can be grown without water and no human can survive without water. Fertile land is also a natural resource. No food can be grown without fertile land. Grazing pastures are another important natural resource. Livestock cannot survive without grazing and water. Lakes and rivers are important natural resources that provide water and also food (e.g., fish) to the community. Oil, gold, diamonds, and other minerals are natural resources. Forests are natural resources for humans and animals. Forests produce oxygen (a natural element vital for life on Earth) through photosynthesis. Fresh and unpolluted air is also an important natural resource. STEP 3: Ask the pupils: Can you list some of the resources that are present in our community? Write the pupil’s answers on the flip chart or blackboard.STEP 4: Ask the pupils. In your opinion who should own the resources of a community? For example, should water be owned by only 1 person in the community? Should you pay for accessing water? Who owns the water of the river? Open a forum with the pupils and discuss openly. Draw examples from your own context. STEP 5: Using the list of resources and livelihood as a reference, ask each working group to draw the resources and the livelihood of their community on the map. Ask the pupils: Where do people of our community take the livestock to graze? Where do we go to fetch wood?
NOTE Prompt the pupils to iden-tify successful business women too. Ask the pupils: In your opin-ion, how can we define success? Why? Does being successful mean having a lot of money? Who are your role models? Why?
NOTE You can link the explana-tion of oxygen and photosynthesis to science lessons.
NOTE The aim of the discussion is to highlight the importance of collective ownership of communi-ty resources in order to guarantee that all the community members have access to vital natural re-sources. What other resources should be a collective responsibil-ity? In your opinion, who should manage the collective resources?
NOTE The objective of this activ-ity is to raise awareness about the vital resources present in the pupils’ own community and on the proper management of those resources in order for all of the community members to benefit from them.
NOTE Post the resources and livelihood map in the LEARNING CORNER: My Community.
69
UNICEF Education Kit Handbook
School in a Box Kit Guidance
Where do we go to fetch water? Are there mines in your community? What is extracted from the soil?
EXTENSION: Invite an elderly person to talk to the class about the community resources and about the management of the community resources. Decide with the speaker in advance what will be the purpose of the talk and what to focus on.
T9 Learning Activity Three: ‘Map the livelihood of the pupils’ own community’
Learning: Understand the link between natural resources and livelihood. STEP 1: Explain. We are going to explore the livelihood and natural resources of our community. Ask the pupils: How can we find out more about the livelihood of our community? Discuss with the pupils and consider different options. For example, each learning-group can walk through a defined area of the community (e.g. around their homes or in their neighborhoods) and simply write in their exercise books the different types of businesses they see. The pupils can also investigate the most common forms of employment present in the area. STEP 2: Explain. Surveys can also help us to find out more information. Surveys are investigations and their scope is to ask relevant questions to key people in order to find out reliable information. When you carry out a survey you become like a detective, and your task is to find more information. Ask each learning-group to develop a list of questions for its survey. STEP 3: Ask the learning-groups to share their lists with the class. Discuss and select the most relevant questions to use in the survey. STEP 4: Explain. The goal of our investigations is to map (make a list) the livelihood of our community. Discuss with each learning-group how to best conduct the survey. STEP 5: Feedback from the survey. Ask each learning-group to share their findings with the class. What types of business did you observe in the area you surveyed? What types of jobs do people do to earn an income? Discuss with the pupils the different types of businesses and professions that are present in the community. STEP 6: Ask the pupils to draw the different sources of livelihood present in their community. Post the drawings in the LEARNING CORNER: My Community.STEP 7: Evaluate. Ask the pupils: What did you learn from this activity? What did you enjoy? What did you find difficult? Why?
NOTE Refer to the survey on in-clusive education Theme Two
NOTE This exercise needs prepa-ration and also consent from the parents. Make sure you prepare this activity well in advance.
UN
IT T
HR
EE
70
UNICEF Education Kit Handbook
School in a Box Kit Guidance
ACTIVITY TEN: ThemeTen(T10):‘HealthPromotioninmyCommunity’
The objectiveofThemeTen‘HealthPromotioninmyCommunity’istoinvestigatethe‘healthrisks’presentinone’sowncommunityandidentifyimportant lifesaving messages that can be shared among children and the community.
(The following activities are adapted from Child-to-Child-Trust and Children living in camps, ed. Clare Hanbury. You can download free materials on safe water and sanitation at www.child-to-child.org/resources/stories.htm)
Preparation of activities: ‘Planning health promotion activities in the pupils’ own community’
Learning: Planning of health promotion activities. STEP 1: Preparation: Organize a meeting with relevant stakeholders: representatives of children parents/guardians, Steering Committee of the CFS/E and/or school, teachers, caregivers, volunteers and health workers working in the community. They will be the advisory group for the development and implementation of health promotion activities in the community. STEP 2: List health topics that adults and children feel (1) Are important to them, their siblings and their families (2) They can do something about (3) Are fun and interactive STEP 3: Discuss with the advisory group: Are there existing health projects in the community? What are they about? Who is implementing them? Can you coordinate your activities with them? STEP 4: Decide: Which topics can be implemented? Make a list and discuss how the advisory group can contribute to the development of these topics. How are the learning-groups going to be organized? Will the children all be doing the same thing, or will some groups be doing some activities while other groups do others? Important considerations: activities should be important for the health of children, relevant to their contexts, easy enough for them to understand, simple enough for them to do well, and be interesting and fun.
NOTE It is important that children enjoy the activities and that they take ownership.
The learning activities will help children and teachers to
1. Learn how to plan health promotion activities in the pupils’ own community
2. Understand how to prevent and treat worms
3. Understand how to prevent and treat diarrhoea
LEARNING OUTCOMES
71
UNICEF Education Kit Handbook
School in a Box Kit Guidance
Checklist 3: Health promotion activities in the community
• HastheAdvisoryGroupensuredthatlocalauthoritiesareawareandapprove of the activities?
• Arealloftheresourcesneededfortheactivitiesavailable?
• Haveyouworkedouttheobjectivesoftheactivities?
• Doyouhaverelevantknowledgeofthetopic?Ifnot,haveyouinvolvedavailable experts (e.g., health workers)?
• Haveyouplannedtheactivitiesstep-by-stepinordertopreventpossibleproblems?
• Doyouhaveenoughsupporttodeveloptheactivities?
• Howwilltheexperiencegainedfromtheactivitieshelpthechildren?
T10 Learning Activity One: ‘WORMS’
BOX 22: Background information on worms
WORMS: Worms are parasites. A parasite is something that gets its food from our body. They get into our body in many ways. They can make us ill, stop children from growing well, and sometimes even kill them. Worms can be prevented by simple hygiene and sanitation practices and can be cured by inexpensive medicine. They can cause many problems for people living in unfamiliar places such as camps or, in emergency contexts in which health and sanitary conditions are poor. There are many different kinds of worms—some large, and some so small that we cannot see them. Sometimes the ones that we cannot see are worse than the bigger ones. Children get even more worms than adults.
How do we get worms?
Worms can multiply rapidly: 1 worm can lay thousands of tiny eggs that we cannot see. When a worm is inside the body, it lays thousands of eggs that pass out of the body in the stools/feces.
If the stools are left where we sit, walk, play and eat, the eggs in the stools can get onto things that we touch like furniture, water, soil, and dust. Flies can move from the stools and carry the eggs onto our plates and cups, or onto the food we eat. We swallow the eggs without knowing, and they grow into worms inside us. Then they travel through the different parts of our body until they find a good place to grow, usually in our intestines where they eat our food.
How can we prevent worms?
Good hygiene is the best way to prevent worms. Making sure to drink enough water helps to improve hygiene. Dispose stools/feces safely (in a latrine); wash hands and bottoms; keep fingernails short; keep clothes and bedclothes clean; if possible, wear shoes or flip-flops (to prevent touching the soil); if possible, use plenty of water for cleaning; reduce flies; keep food and water covered; create a clean safe place where babies and children can play.
Symptoms of worms.
Itching anus, sleeping badly, restlessness, bad-temper, pale, stomach ache, not hungry, and the presence of worms in the stools.
Good hygiene is the best way to prevent worms.
NOTE The following activities have been selected for guidance because they represent the most widespread health threats for children. Health promotion ac-tivities should be adapted to your context.
NOTE Health workers can pro-vide simple, cheap treatment for worms. It is often a ‘once only’ treatment. Children should take de-worming tablets regularly.
UN
IT T
HR
EE

72
UNICEF Education Kit Handbook
School in a Box Kit Guidance
STEP 1: Explain. What are worms? Have you ever experienced worms? Invite the children to give some answers. See background information and explain. STEP 2: Discuss. How can children help to prevent worms from spreading? See background information and explain. Worms can be prevented by: (1) killing flies; (2) burying stools or using latrines; (3) cutting nails; (4) wearing shoes/flip-flops; and (5) washing hands with soap regularly. STEP 3: Ask each learning-group to prepare a poster with pictures about ‘HowIcanpreventthespreadofwormsinmycommunity’.
T10 EDUCATIONAL PROJECT: ‘How can we tell our friends how to prevent getting and spreading worms?’
STEP 1: Discuss with the children: How can we tell our friends how to prevent getting and spreading worms? STEP 2: Ask each learning-group to develop a list of practical and simple activities (e.g., I will talk about the prevention of worms with my siblings and my mom and dad, or as a learning-group we are going to prepare a dramatization to show during the school break or at the health clinic). STEP 3: Ask each learning-group to share its action points. Write the action points of each learning-group on a flip chart or an exercise book. You will need the action points for the evaluation of the project. STEP 4: Evaluate. After one or two weeks, check how the activities went. Look at the action points of each learning-group and discuss challenges and successes with the rest of the class. What worked well? What did you find difficult? How can we make it better next time?
T10 Learning Activity Two: ‘DIARRHEA’
BOX 23: Background information on diarrhea
DIARRHEA. Diarrhea is dangerous because it can kill and cause malnutrition. It can be prevented by improving personal hygiene, by drinking safe water, and by eating safe food. Children who get diarrhea may die because they become dehydrated. Dehydration happens when children (and adults) lose too much liquid (water and salts) from their bodies. The liquid that they lose must be put back into their bodies. Special drinks can be prepared by children to help replace the lost water when a child has diarrhea. This special drink—known as Oral Rehydration Solutions (ORS)—can prevent dehydration.
What is diarrhea?
Diarrhea means frequent, watery stools. Often children with diarrhea also vomit and have severe pains in their abdomens or tummies. The stools may smell strongly and also pass noisily. Diarrhea is caused by swallowing germs that can live in dirty food and water, and human or animal stools. The body is trying to get rid of the bad germs through the diarrhea.
What to do when a child has diarrhea
Act immediately! Do not wait for signs of dehydration. Prevent dehydration by giving the child plenty to drink to replace the water that is lost, as soon as the diarrhea starts. Also, give the child enough food to keep him/her strong.
NOTE Repeat this project with the prevention of diarrhoea or with other health topics relevant to your context
NOTE Make sure that the ac-tivities are practical and safe to implement in your context. Involve the advisory group to support the learning groups.
NOTE Children, who have con-sistent diarrhea for more than 2 days, need to be taken to the clinic or to a health worker. Keep giving safe (uncontaminated) wa-ter to the child.
73
UNICEF Education Kit Handbook
School in a Box Kit Guidance
How can we prevent diarrhea?
Diarrhea can be prevented by keeping good standards of hygiene in the household and with the children—by eating a variety of food that is safe and nutritious and by drinking safe water. Dirt, rubbish, stools and urine contain germs that can cause diarrhea. These germs can be carried by flies as well as on dirty hands. Keep these germs away from food and drinking water.
WASH YOUR HANDS AND CHILDREN’S HANDS WITH SOAP REGULARLY!
Hands should be washed with particular attention after passing stools; after cleaning children who have urinated or defecated; before cooking or eating; before feeding children. Remember to wash the children’s hands too. Use a latrine or bury the stools immediately in a safe place away from homes and water sources.
STEP 1: Explain. What is diarrhea? Have you ever experienced diarrhea? Can you describe the symptoms? Invite the children to give some answers. See background information and explain. STEP 2: Discuss: How can children help to prevent diarrhea? Invite the children to give some answers. See background information and explain. You can prevent diarrhea by: (1) keeping good personal hygiene; (2) keeping good hygiene in the house, its surroundings, and at school; (3) drinking safe water; (4) eating safe food (uncontaminated); (5) washing your hands with soap regularly. STEP 3: Ask each learning-group to draw a poster about ‘How I canprevent diarrhea’.STEP 4: Explain. When someone gets diarrhea, the most important thing to do is to keep him/her hydrated, which means that they need to drink safe water frequently to replace the water that they lose through stools. There is a special drink that you can make to keep children and adults hydrated. The drink is called Oral Rehydration Solution (ORS). It can be purchased from the clinic or pharmacy, or you can make a similar drink called Special Drink. See BOX 24.
BOX 24: How to make the Special Drink
HOW TO MAKE THE SPECIAL DRINK. In a liter of safe water, put ½ level teaspoon of salt, 4 level teaspoons of sugar, and mix well. Give the special drink to children and adults each time a stool is passed. A child under 2 requires half a cup each time. An older child requires a full cup each time. If diarrhea lasts for more than 2 days, visit a clinic or doctor.
STEP 4: Discuss with the children: How can we tell our friends how to prevent diarrhea? See T10 EDUCATIONAL PROJECT above.
IDEAS FOR EXTENDED ACTIVITIES: Health promotion activities can be implemented in the Child-Friendly Space/Environment and/or school with the help of the local health services. Invite external speakers—such as nutritionists, midwives, nurses, doctors, and health workers—to give talks to the parents/guardians, children and community members. It is an easy and effective way to promote health in the CFS/E and the community. Invite the learning-groups to draw on the community map the clinics and hospitals where children and their families can have direct access.
NOTE Remember! Small chil-dren’s stools are more dangerous than adults’ ones. They are more infectious.
NOTE Engage health workers in supporting children in understand-ing important health issues.
NOTE Use the same map devel-oped in the previous activities. Post the map in the LEARNING CORNER: My Community.
UN
IT T
HR
EE

74
UNICEF Education Kit Handbook
School in a Box Kit Guidance
ACTIVITY ELEVEN: ThemeEleven(T11):‘Water,SanitationandHygieneinmyCommunity’
The objective ofTheme Eleven ‘Water, Sanitation and Hygiene in myCommunity’istoinvestigatethe‘waterandsanitationrisks’presentinown community and identify important lifesaving messages that can be shared among children and the community.
(The following activities are adapted from Child-to-Child-Trust and Children living in camps, ed. Clare Hanbury. You can download free materials on safe water and sanitation at www.child-to-child.org/resources/stories.htm)
T11 Learning Activity One: ‘Safe water’
Learning: Understand basic concepts about safe water.STEP 1: Introduce the topic. Ask the pupils: In your opinion, what is safe water? Why do we talk about safe water? Can you describe safe water? Discuss with the pupils. STEP 2: Explain. Safe water to drink is water that is not contaminated with germs that can make you sick. Discuss with the pupils. Where does your family get its drinking water? Is it a clean source? Are there animals drinking in the same place? Are there latrines nearby? STEP 3: Ask the pupils: What can we do to keep water safe to drink? Discuss with the pupils and encourage them to come up with their own answers.STEP 4: Explain. We can keep sources of water safe by preventing animals and humans from bathing, do the washing, urinating or throwing rubbish in the source of water that we use for drinking. Water is a natural resource and it belongs to the community. Everyone is responsible for keeping the water safe. Animals should have an allocated site where to drink, far from water sources used by people. At home, we can keep water in clean containers and use a clean ladle or cup to take water from the container, making sure that we do not touch the water with our hands. Use the information in BOX 25 as a reference. STEP 5: Ask each learning-group to draw a picture that shows how to keep water safe in its own community. Encourage the pupils to discuss what should be represented in the picture.
T11 EDUCATIONAL PROJECT – 1: ‘How can we tell our friends and family how to drink safe water?’
STEP 1: Discuss with the children. How can we tell our friends how to drink safe water?How can we communicate these important messages? For example: we can attend a community meeting and explain these important points; we
NOTE Look at the Preparation Ac-tivity of Theme Ten ‘Preparation of activities: ‘Planning health promotion activities in the pu-pils’ own community’
NOTE Encourage pupils to give their own examples of how to keep water safe.
NOTE Encourage the children to come up with their own ideas. Help them to keep practical and simple.
The learning activities will help children to
1. Know basic principles on how to access safe water
2. Understand basic principles of sanitation
3. Share key messages with family, friends and community
LEARNING OUTCOMES
75
UNICEF Education Kit Handbook
School in a Box Kit Guidance
can tell our moms and dads how to keep water clean and safe; we can help in the house to ensure that water is kept clean and safe to drink. STEP 2: Ask each learning-group to develop a list of practical and simple activities (e.g., I will talk about safe drinking water with my siblings and my mom and dad; our learning-group is going to prepare a dramatization to show during the school break or at the health clinic). STEP 3: Ask each learning-group to share their action points. Write the action points of each learning-group on a flip chart or an exercise book. You will need the action points for the evaluation of the project.STEP 4: Evaluate. After 1 or 2 weeks, check how the activities have gone. Look at the action points of each learning-group and discuss challenges and successes with the rest of the class. What worked well? What did you find difficult? How can we make it better next time?
BOX 25: Background information on safe water
SAFE WATER
Every living thing needs water to live. Water is our best friend. Without water there is no life. Water is always precious, and we must use it carefully and keep it clean and safe at all times. Contaminated water causes diseases, such as diarrhea, dysentery, cholera, typhoid, jaundice, worms—and in some countries, bilharzia. These are called waterborne diseases.
Bad germs can get into water at the source (where water is collected), while we collect the water and carry it, or when we store and use it in the house. IF BAD GERMS ARE IN THE WATER, THE WATER IS NOT SAFE.
What can we do in our community to keep water safe?
We get water from many sources. Water comes from springs, rivers, ponds, and wells. It is collected from these places as well as from tanks or taps. In order to keep water clean we should:
STOP people or animals from bathing, urinating or passing stools in or near water. STOP people from washing clothes in water that is for drinking. STOP people from throwing rubbish into the water. STOP people from using a dirty container to draw water from a safe source.
How can you keep drinking water safe?
Store water in a safe place and use a clean container. You should stream water carried from the well through a cloth to remove dirt, dust and insects. If the water is allowed to stand for awhile, many impurities will sink to the bottom. Strong sunlight will destroy many germs in water stored in a transparent container. Drinking water can be made safe by purifying it with special tablets. Keep water safe by covering the containers and by using only clean ladles or cups to pour water from the safe container. Do not touch drinking water with your hands. Stop children from touching the water with their hands.
T11 Learning Activity Two: ‘Keep clean and use a latrine’
Learning: Understand basic concepts of sanitation. STEP 1: Introduce the topic. Today we are going to talk about sanitation. Ask the pupils: In your opinion, what is sanitation? Why do we talk about sanitation? Discuss with the pupils and encourage them to come up with their own examples.
NOTE Make sure that the ac-tivities are practical and safe to implement in your context. Involve the advisory group in supporting the learning-groups.
UN
IT T
HR
EE
76
UNICEF Education Kit Handbook
School in a Box Kit Guidance
STEP 2: Explain. Sanitation involves personal hygiene (e.g., what to do when we pass stools), and also the hygiene of our environment. See BOX 26. STEP 3: Ask the pupils: What do you do when you need to pass stools? Do you always use a latrine? Where do you go to pass the stools when you are at home or at school? Do you wash your hands with soap afterwards? What if water is not available? Where do you go to wash your hands? Discuss with the pupils and encourage them to come up with their own answers. STEP 3: Explain: Stool/feces are dangerous, because they can make us sick if they are not properly disposed. See BOX 26. We must use a latrine, keep our hands and bodies clean, and also keep the places where we live, play and learn clean.STEP 4: Ask each learning-group to draw a picture about sanitation messages relevant in their context. STEP 5: Ask each learning-group to share their messages with the rest of the class.
BOX 26: Background information on sanitation
SANITATION.
Diarrhea, typhoid, cholera, polio and some other diseases are caused by bad germs present in stools/feces. These germs can pass from 1 person to another on the hands, in dust, in food and drinks, and through flies. Getting rid of stools/feces in a safe way, and washing after defecation and before eating can help prevent the spread of these diseases. Diarrhea is a frequent cause of death in young children.
KEY MESSAGE: the most important way we can help to prevent diarrhea and other dangerous diseases is by keeping ourselves and the places where we live, play and learn clean.
Stools/feces are dangerous!
Diarrhea, worms, cholera, typhoid and polio are spread when germs are passed from our stools to hands and clothes, to the water we drink and the food we eat, making us ill. Children’s stools are more dangerous than adults’ stools!
How can we prevent the spread of bad germs from stools?
We can prevent the spread of germs from stools by: (1) being careful when we pass stools; (2) keeping our hands and bodies clean after being in the toilet; (3) cleaning up any stools that have been dropped in places where we live and play; and (4) remembering that animals’ stools are also dangerous.
USE A LATRINE
Whenever possible use a latrine for defecating. Help younger children to use a latrine properly. Keep latrines clean. When a latrine is not available, stools should be buried to keep off flies.
KEEP HANDS AND BODY CLEAN
Use water and soap or ash to wash your hands after using the latrine. If leaves have been used for wiping the bottom, bury them or throw them in the latrine. Do not use stones to wipe the bottom! Clean a child’s bottom and hands if they are dirty with soap and water. Wash your hands after cleaning the child.
NOTE Post the pictures in the LEARNING CORNER: My Community.
77
UNICEF Education Kit Handbook
School in a Box Kit Guidance
KEEP THE PLACE CLEAN
Clean up and bury stools dropped on the floor or in the yard. As often as possible (even 4 times a day) check to see that the places where young children play, crawl and sit are clean. Wash spoons, dishes and things with which young children have played. Prevent children from putting dirty hands in their mouths.
T11 Learning Activity Three: ‘Young children hygiene!’
Learning: Understand basic concepts of sanitation with young children. STEP 1: Introduce the topic. Ask the pupils: How many of you take care of younger siblings? What do you do when they need to go to the toilet? Discuss with the pupils. STEP 2: Ask each learning-group to discuss and make a list of what they do when taking care of younger children.STEP 3: Ask the learning-groups to share their lists with the rest of the class. STEP 4: Explain. Use BOX 27 as a reference. When taking care of young children we should: (1) teach them how to use a latrine or a safe place away from sources of water or play field and the house; (2) teach them how to clean their bottom using water and soap and encourage them to do it regularly; (3) teach them to always wash their hands using soap or ash and water after using the latrine; and (4) teach them to cover the latrine after use or bury the stools. STEP 4: Discuss. How can we help younger children at home? How can we improve the hygiene of our younger siblings or family members? STEP 5: Ask each learning-group to come up with 2 or 3 action points and discuss. STEP 6: Ask each learning-group to share its action points. Write the action points of each learning-group on a flip chart or an exercise book. You will need the action points for the evaluation of the project. STEP 7: Evaluate. After 1 or 2 weeks, check how the activities went. Look at the action points of each learning-group and discuss challenges and successes with the rest of the class. What worked well? What did you find difficult? How can we make it better next time?
NOTE Make sure that the activities are practical and safe to implement in your context. Involve the advisory group in supporting the learning-groups.
UN
IT T
HR
EE
78
UNICEF Education Kit Handbook
School in a Box Kit Guidance
BOX 27: Facts about young children’s hygiene and sanitation
Facts about young children’s hygiene and sanitation:
1. Many people think that children’s stools are harmless, but this is wrong. A child’s stool has perhaps 5 or 6 times as many germs as the stool of an adult. When a small child has diarrhea, the stool is especially dangerous.
2. Babies and toddlers do not have control over their bowels and may pass their stools in many different places both inside and outside of the house. This is not only dirty, but dangerous, because germs from these stools can spread easily to others.
3. When they are older (from about 2 years) toddlers have learned control of their bowels, and they will copy what they see others doing. If they see others defecate in the open they will copy them. Make sure that you teach children how to use a latrine or a potty.
4. Young children spend a lot of time crawling and sitting on the ground. They often put things into their mouths. In this way, they pick up germs in the dust from any stools that are lying on the ground around them. Make sure that the place where children play is clean at all times.
5. It is easy for anyone taking care of a young child to spread germs from the stools. Germs can be spread on our hands from wiping a child’s bottom—they can then pass to food and water, dishes, clothing, and the hands of other people. These germs can end up getting into the mouth of another child or an adult, and make them ill.
T11 EDUCATIONAL PROJECT – 2: ‘Child-friendly latrines’
STEP 1: Introduce the topic. Ask the pupils: What does your latrine look like? Do you find it easy to use it? Why? Discuss with the pupils. STEP 2: Discuss. What do you think a ‘child-friendly latrine’ should look like? Encourage children to come up with their own ideas. STEP 3: Group work. Ask each learning-group to discuss what they would like in a latrine, and to come up with their own design of a child-friendly latrine. For example: the hole should be reduced to make it easy for children to use the latrine; soap and water should be available to make sure that children wash their hands after they use the latrine. Invite the pupils to pretend that they are architects and designers and draw their ideal child-friendly latrine. STEP 4: Ask each learning-group to present their drawings of a child-friendly latrine to the rest of the class. Each learning-group should explain all of the characteristics of the child-friendly latrine in detail. STEP 5: Ask the class to vote for the best child-friendly latrine design.STEP 6: Invite the children to discuss how to have child-friendly latrines built in the CFS/E or school, and in their community. They might decide to bring the design to the Community Elders or local authorities, or invite agencies implementing water and sanitation activities to take their design into consideration. STEP 7: Evaluate. Ask the pupils: Did you enjoy this activity? Why? Do you think that it is important to have ‘child-friendly latrines? Why? Did adults listen to you? What can you do to get adults to listen to you?
NOTE Involve the advisory group to support the learning-groups.
NOTE Post the child-friendly la-trine prototypes in the LEARNING CORNER: My Community.
79
UNICEF Education Kit Handbook
School in a Box Kit Guidance
EXTENSION: Invite a guest speaker. You can ask the UNICEF WASH team or representatives from the Implementing Partners to give a child-friendly talk about personal hygiene, the proper use of latrines, and safe water. Invite representatives of the community and local authorities, and arrange for the pupils to promote the construction of their CHILD-FRIENDLY LATRINE designs.
ACTIVITY TWELVE: ThemeTwelve(T12):‘DisasterRiskReduction(DRR)inmyCommunity’
The objective ofThemeTwelve ‘Disaster Risk Reduction (DRR) in myCommunity’ is to identify and develop lifesaving messages regarding mine awareness, and safety plans for the CFS/E or school.
T12 Learning Activity One: ‘Group Environment Project’
Learning: Encourage children to explore and familiarize themselves with their surrounding environment. Develop problem solving skills. Preparation: Introduce the theme: natural disasters. Talk about what happened during the emergency. Spend time with the children walking outside the learning environment. Encourage them to observe how their environment changed after the disaster. Encourage them to pick up objects that they want to use for a group project. It can be sticks, leaves, stones, wood, pieces of plastic or metal, paper, cloth, or anything else they find and want to use. STEP 1: Divide the pupils into learning-groups. Ask each learning-group to discuss together what they observed. STEP 2: Discuss: What happened during the natural disaster that hit our community? Can you give some examples about how we can prevent natural disasters from happening in the future? STEP 3: Explain. The environment we live in is a very dear and delicate friend. If we do not take care of it properly, natural disasters will occur.STEP 4: Ask the pupils to build or create a picture of the natural disaster that hit their community using the objects they collected. Pupils can glue things onto paper, make a toy, create a game, or tell a story using the different objects. STEP 5: Ask the pupils to share their projects with the rest of the class.
T 12 Learning Activity Two: ‘Move Like Nature’
Learning: Learn about nature. This activity is especially useful after natural disasters. Nature can cause destruction, but it is also resilient and repairs itself.
NOTE If it is not possible to organize an outdoor activity, discuss in class instead. Ask the pupils to bring objects related to the natural disaster from home.
NOTE Adapt the activities to your context and emergency setting.
The learning activities will help children to
1. Understand key issues about disasters and risk reduction
2. Understand key issues about mines and explosives
3. Implement and strengthen safety in the learning environment
LEARNING OUTCOMES
UN
IT T
HR
EE
80
UNICEF Education Kit Handbook
School in a Box Kit Guidance
Preparation: Write the words for different forces or qualities of nature on different pieces of paper. Write each 1 on a separate piece of paper. Choose words from nature based on the age group and the nature setting with which the children are familiar. Some suggestions are wind, rain, sunshine, hurricanes, cyclones, thunderstorms, rocks, tornados, droughts, earthquakes, tides, waves, soft wind/rain, strong rain/wind, volcanoes, growing trees, monsoons, floods, tall grass moving on a windy day, and loud rain/wind. Put the pieces of paper inside a container.STEP 1: Ask the pupils to stand in a circle or sit on the floor together. STEP 2: Explain. We are going to be playing a game about nature. Have a brief discussion about different forces in nature, focusing on the words that you wrote. STEP 3: Invite the children to take turns reaching into the container and picking out a piece of paper.STEP 4: After a child has picked out a piece of paper, s/he should use her/his body to act out her/his understanding of the word to the group. STEP 5: Explain that they can use their arms and legs to move like the word, and use their feet, hands and voice to make sounds. For example, the sound of soft rain or wind can be made by quickly rubbing your hands together. STEP 6: The other children can try and guess what the word is. They can also volunteer to help their peer, if needed. Encourage the children to work together to understand the word. STEP 7: Have a discussion as a group after each child has performed her/his word. What do the children know about that word from nature? Have they ever seen or experienced it? Do they have ideas about why it happens?STEP 8: Contextualize this activity within your emergency context. Talk about what happened during the natural disaster. Work with the children and identify relevant risk reduction actions that children can implement (e.g., having fire drills, finding shelter under a table, and moving away from windows).
T12 Learning Activity Three: ‘Disasters!’
Learning: Understand what disasters are and what can be done to prevent or mitigate them.STEP 1: Ask the pupils: Can you describe what a disaster is? What happens during a disaster? Discuss with the pupils. STEP 2: Ask the pupils to draw a situation of disaster. Allow pupils to draw freely.STEP 3: Ask for 1 or 2 volunteers to explain their pictures and describe what they have drawn. STEP 4: Explain. Disasters can be prevented and/or mitigated. Prevention and mitigation are all of those actions we can take to make sure that a disaster doesn't happen, and if it does happen, that it doesn't cause as much harm as it could have.
NOTE It is very important to include both positive natural forces as well as frightening and destructive ones.
NOTE Be ready to help the pupils read the word quietly, so that the other children don’t hear what it is.
NOTE Describe different natural disasters or situations of conflicts and wars, famines, droughts and floods. Do not make the discussion personal.
81
UNICEF Education Kit Handbook
School in a Box Kit Guidance
Prevention of disasters is about taking measures in order to avoid an event turning into a disaster. For example, planting trees helps prevent erosion and landslides. Mitigation of disasters is about taking measures that reduce vulnerability to hazards. For example, there are building techniques that ensure that houses, schools or hospitals will not be knocked down by an earthquake or a hurricane. Preparedness for disasters is about taking measures that prepare people to respond to disasters when they occur. For example, developing emergency plans in schools and preparing emergency kits at home. (Reference:adaptedfromINEEToolKitandfromUNICEF,‘Let’slearntopreventdisasters:
Games and Projects’)
T12 EDUCATIONAL PROJECT: ‘What can we do to prevent disasters in our Community?’
Lesson OneSTEP 1: Introduce the topic. Ask the pupils: Do you know the difference between hazards and disasters? Can you give an example? Encourage the pupils to come up with their own ideas and give their own answers.
BOX 28: How do disasters happen?
How do disasters happen?
There are 2 factors that trigger disasters: hazards and vulnerability.
Hazards are phenomena or processes—either natural or manmade—that can endanger a group of people, their belongings and their environment, if they do not take precautions. Earthquakes, volcano eruptions, plagues, droughts, landslides and mudslides, floods, tsunamis, wild fires, tornados and hurricanes are natural hazards. Conflicts, wars, chemical substances, deforestation and environmental degradation are manmade hazards.
Vulnerability is the inability to resist a hazard or to respond when a disaster has occurred. For example, people who live on plains are more vulnerable to floods than people who live higher up. There are many factors that contribute to vulnerability—for example, people’s age and state of health, environmental and sanitary conditions, as well as the quality, location, and state of local buildings. Economic vulnerability is related to poverty. Families with low incomes often live in high-risk areas around cities, because they can't afford to live in safer (and more expensive) places. Physical vulnerability refers to the quality and type of materials used in construction. For example, a wooden house is sometimes less likely to collapse in an earthquake, but it may be more vulnerable in the event of a fire or a hurricane. Old buildings badly maintained are more likely to collapse than newly constructed earthquake-resistant buildings.
The risk of a disaster happening depends on the intensity of the hazard, and on the vulnerability of the community affected.
Reference:adaptedfromINEEToolKitandfromUNICEF,‘Let’slearntopreventdisasters: Games and Projects’.
NOTE At this stage, it is not important that answers are correct. The objective is to trigger children’s imaginations and understanding.
UN
IT T
HR
EE
82
UNICEF Education Kit Handbook
School in a Box Kit Guidance
STEP 2: Explain. Use BOX 28 as a reference. Hazards are natural or manmade threats. When high vulnerability is combined with high intensity hazards, they become disasters. STEP 3: Discuss with the pupils: How can we gather relevant information about the risks that our community runs? Make a list of the pupils’ ideas, and decide together where to look for information. Look at Checklist 4 for ideas. STEP 4: Invite an expert as guest speaker and discuss how to develop a ‘keep safe plan’ for the CFS/E or school.
Checklist 4: Assess disasters in your context.
• Hasanynaturaldisasterhityourcommunityinthepast?Ifyes,whichones?
• Whathappenedwhenthedisasteroccurred?
• WhichhazardsarepresentintheCFS/E?Forexample,isitlikelythatafirecan start in the kitchen? Is the playground free from hazards?
• DoestheCFS/Ehaveasafeplacewherethechildrencangoincaseofanemergency?
• Whocanyoucallforhelpincaseofanemergency?
Lesson TwoSTEP 1: Develop a ‘keep safe plan’. Ask each learning-group to draw a picture of what they should do in case of an emergency. STEP 2: Invite the learning-groups to share the pictures with the rest of theclassanddiscusshowtodevelopthe‘Keepsafeplan’.STEP 3: Involve an expert. ‘BOX 29: Examples of drill instructions’provides some suggestions in case of emergencies. Use it as a reference.
BOX 29: Examples of drills and instructions for emergencies
Emergency What should children do in case of a fire?
Fires
•Assoonastheyhearthefiredrill,walktothenearestexitwithout rushing or pushing other children
•WalktothemeetingpointoutsidetheCFS/E
•Ifthereisalotofsmoke,theyshouldcovertheirmouthsand crawl along
Emergency What should children do in case of an earthquake?
Earthquakes
•Findasafeplaceandcrouchdown—forexample,hideunder a table or door frame
•Covertheirheadsandnecks
•Stayawayfromwardrobesorheavyfurniturethatcouldfallon them and cause harm
•Holdontosomethingsecure
•Oncetheyareinasafeplace,staywheretheyare,andnotmove until the shaking stops
•Staycalmandsingasongwhiletheyarewaitingforrescue
NOTE The following guidelines are for reference only. You should involve an expert. Ask the UNICEF team or the Implementing Part-ners to help you develop a risk preparedness plan for the CFS/E or school.
NOTE Children can understand and memorize simple directions to safe places or meeting points. Repeat them regularly to facilitate the memorization of key instruc-tions.
83
UNICEF Education Kit Handbook
School in a Box Kit Guidance
Lesson ThreeRole-play. Enact a possible emergency situation. Who should do what? When? How?
T12 Learning Activity Four: ‘Mines and explosives remnant from war (ERW) activities’
Introduction: Mines and explosives are usually found in contexts in which armed conflict has taken place. Mined fields are a tactic of war, and they are aimed at killing people. It is a fact that the majority of mines and explosives kill civilians—and in particular children who happen to play in areas that have not been cleared. Mines and explosives can have different shapes and colors.
Mines Activity One: ‘Do not touch dangerous objects!’
Materials: Familiar objects that can be found around the household: for example, glasses, cups, pots, soda bottles and soda bottle caps, leaves, andpiecesofwaste;minesandexplosiveprototypesusedfor‘mineriskeducation’, or pictures of them. STEP 1: Explain: Tell the pupils that in your area there are some dangerous objects that can cause terrible consequences—like losing a limb or death—to children who touch them. Show the dangerous objects to the children. STEP 2: Play: Place the familiar objects and the prototypes or pictures of mines randomly on the floor. Ask 1 pupil at a time to pick up the safe objects from theground.Every timeachildpicksup the ‘mineor theexplosive’ or inadvertently touches it, make a big noise and ask the pupil to lie down on the ground, close his/her eyes and stay still. STEP 3: Discuss. What happened to … (say the name of the pupil)? What should (say the name of the pupil) have done? Repeat the message again: do not touch unfamiliar objects even if they look attractive and call your attention! You may die or be injured.
Message to convey to the children: Do not touch mines and explosives. Do not touch any unusual object that you may find on the ground. Keep away from dangerous areas. Always play in safe areas and walk on safe paths and roads. If you see a suspicious object, tell an adult—do not try to touch or remove it.
Mines Activity two: Saul’s story
STEP 1: Ask a pupil to read Saul’s story to the rest of the class.
NOTE Involve an expert in mines and explosives. Ask the UNICEF team or Implementing Partners to help you identify one.
NOTE During the activity and in the presence of the children, do NOT touch the prototypes or pictures representing mines and explosives. This should help to reinforce the NEVER touch mes-sage.
UN
IT T
HR
EE
84
UNICEF Education Kit Handbook
School in a Box Kit Guidance
BOX 30: Saul’s story.
Saul’s story. One sunny day, Saul and his friends left their village to collect honey in the forest. The children followed the path through bushes and fields. On the way, Saul came across a strange object about the size of a tennis ball. He was very curious and decided to investigate. He picked up the object and began throwing it at a big rock. His friends were frightened and ran away. With Saul’s 2nd throw, the object exploded. From the explosion, Saul suffered deep wounds all over his body. He lost his left leg and had internal injuries. Saul survived after spending many weeks in the hospital, but he cannot run and play like he did before because he lost his leg.
STEP 2: Ask the pupils to draw pictures about Saul’s story. What happened to Saul? STEP 3: Ask the pupils to share their pictures with the rest of the class and discuss. What did Saul do? What were the consequences? What should have Saul done instead?
to the children: do not touch unfamiliar objects. NOTE You can change the name of the character of the story and use local names and local places to make the story more relevant. What is important is that children understand not to touch or pick up unidentified objects.
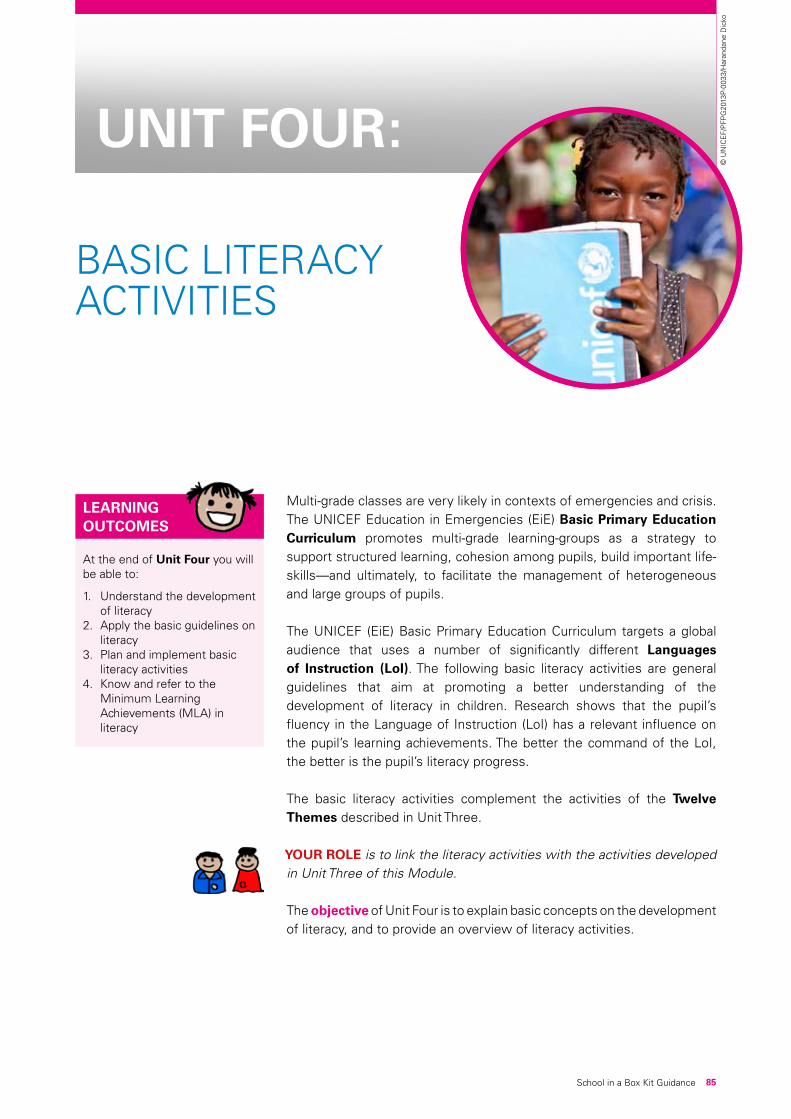
85School in a Box Kit Guidance
UNIT FOUR:
BASIC LITERACY ACTIVITIES
At the end of Unit Four you will be able to:
1. Understand the development of literacy
2. Apply the basic guidelines on literacy
3. Plan and implement basic literacy activities
4. Know and refer to the Minimum Learning Achievements (MLA) in literacy
LEARNING OUTCOMES
Multi-grade classes are very likely in contexts of emergencies and crisis. The UNICEF Education in Emergencies (EiE) Basic Primary Education Curriculum promotes multi-grade learning-groups as a strategy to support structured learning, cohesion among pupils, build important life-skills—and ultimately, to facilitate the management of heterogeneous and large groups of pupils.
The UNICEF (EiE) Basic Primary Education Curriculum targets a global audience that uses a number of significantly different Languages of Instruction (LoI). The following basic literacy activities are general guidelines that aim at promoting a better understanding of the development of literacy in children. Research shows that the pupil’s fluency in the Language of Instruction (LoI) has a relevant influence on the pupil’s learning achievements. The better the command of the LoI, the better is the pupil’s literacy progress.
The basic literacy activities complement the activities of the Twelve Themes described in Unit Three.
YOUR ROLE is to link the literacy activities with the activities developed in Unit Three of this Module. The objective of Unit Four is to explain basic concepts on the development of literacy, and to provide an overview of literacy activities.
© U
NIC
EF/
PFP
G20
13P-
0033
/Har
anda
ne D
icko
86
UNICEF Education Kit Handbook
School in a Box Kit Guidance
ACTIVITY ONE: The development of literacy
The main purpose of literacy is to remember, record, and represent reality, thoughts, and ideas—and to communicate them across space and time. The acquisition of speech is part of the developmental process of humans. A child without hearing impairments living around speaking adults and children almost inevitably learns to speak with a good level of command by the age of 4 or 5. Unlike speaking, reading and writing are not universal or natural human activities. They are instead cultural adaptations of the natural activity of speaking.
Cultures have responded differently to the need to give permanence to speech (to enable it to last for a long time). Some cultures have adopted an oral tradition, by which speech is constructed in stories, songs, rhymes, poems, cloth patterns, and oral histories that are easy to memorize and pass on to other people and generations. Some cultures have adopted the strategy of representing the sounds of speech into permanent visual figures, like in the case of ideographic languages such as Chinese or Japanese, or tactile (of the fingers) alphabets such as the braille alphabet for visually impaired people.
Written languages use letters or ideographs to translate sounds into written text.
Very often we wrongly label non-literate people as ignorant, mistaking the lack of formal literacy as a lack of knowledge and skills. Similarly when a child enters formal or non-formal education, it is often incorrectly assumed that s/he does not know anything because s/he cannot read or write. On the contrary, a child has a wide range of skills and knowledge acquired through interaction with her/his environment and culture. These are important assets that the learner uses as reference of meaning. New knowledge makes sense only if the learner can relate it to his/her own reality.
YOUR ROLE is to recognize and understand the existing assets of the pupils and build upon them new knowledge and skills.
NOTE Ask pupils about the reasons why they want to learn literacy. You will be surprised. The motivations that drive pupils to learn how to read and write are very diverse.
NOTE Ideographs are the script used in languages like Chinese or Japanese. Their meaning is literally ideas (ideo) and images (graphs) = images of ideas.
87
UNICEF Education Kit Handbook
School in a Box Kit Guidance
ACTIVITY TWO: Basic Literacy Guidelines
There are several factors that need to be considered when starting a literacy program. TABLE 4 gives an overview of what you need to consider when implementing a literacy program.
YOUR ROLE is to reflect on the basic guidelines before starting the literacy program, and adapt them to your own context.
Paulo Freire—a world-renowned Brazilian educationist—wrote the following in his milestone book ‘The Pedagogy of the Oppressed‘:”Literacy is no longer understood as a simple skill or competency, but rather as a complex process built on the meaningful interaction between what is learned outside the school and what is learned inside the school. Curricula and textbooks are no longer understood as ‘given or transmitted knowledge’, but rather learners are encouraged to become active actors in building meaningful knowledge. Literacy is a social process of giving meaning to one’s own environment and to the larger world.” (Reference: Freire, P., 1972, The Pedagogy of the Oppressed, London, Penguin Books).
NOTE Ideographs are images used in, for example, the Chinese or Japanese script. Literally, ideo-graph means ideas (ideo) and im-ages (graphs) = images of ideas.
Table 4: Basic guidelines on literacy
THE CONCEPT THINK! YOUR ROLE!
THE PRINCIPLE OF LITERACY
Pupils should understand the idea that letters or ideograms represent the sounds in spoken words.
The acquisition of literacy is a process. Make constant reference to the connection of sounds to letters or ideographs. Connect written words to real objects that are familiar to the pupil. For example, if you write the word banana, have a real banana to peel, cut and eat. At the beginning, as pupils are building the relationship between speech and written images, they might not be using real letters or ideographs—they might instead be using lines or symbols that apparently do not resemble any system of writing. If so, allow for this process to take place, and do not correct children, even if what they write does not make sense to you.
THE LANGUAGE OF INSTRUCTION (LoI)
What levels of competency do the pupils have in the Language of Instruction (LoI)? Is the LoI their first language (L1; mother tongue) or second language (L2)?
Pupils who do not speak the LoI at home have more difficulties in acquiring literacy. Pupils should first learn reading and writing in their own language (L1) and gradually move to the second language (L2). After developing good foundations in reading and writing in L1, pupils can gradually move to L2.
BUILD MEANING – COMPREHENSION
The potential for comprehending a written text is set by the ability to comprehend that same text when it is spoken.
Buildingmeaningmeanstoteachthe‘whole-language’.Researchshows that pupils can understand better the link between written andspokenlanguageifthe‘textpassages’usedtoteachreadingand writing have a relevant meaning for the pupils. Do not use single words out of context. Use whole sentences with a clear meaning instead.
UN
IT F
OU
R
88
UNICEF Education Kit Handbook
School in a Box Kit Guidance
THE CONCEPT THINK! YOUR ROLE!
ACCURACY Accuracy refers to the capacity to break each word into small units—for example, into consonants and vowels, into syllables, or into ideograms.
Accuracy refers to the acquisition of competence in writing and reading properly and precisely. An example of accuracy is the processof‘decoding’and‘recoding’inalphabetic scripts.
The acquisition of competence in reading and writing is based on thecapacityto‘decode’(breakdownwordsandtextintosmallunitslikelettersandideograms)and‘recode’(buildwordsandtext). Accuracy depends on the language system. For example:(1) Languages based on alphabetic systems like English, Russian, Italian, French, and Korean use consonants and vowels to represent units of sounds (phonemes).(2) Languages that use modified alphabetic systems in which vowels can be omitted, use syllables as units. For example, Arabic, Hebrew and Persian are syllabic languages.(3) Languages that use units of meaning like Chinese and Japanese, use ideographs—literally, ideas (ideo) and images (graphs) = images of ideas.
Naturally, the learner will go through different phases of accuracy in reading and writing. Encourage and praise pupils and allow them to acquire new levels of accuracy at their own pace. NOTE Pupils who already master accuracy are a great source of support for pupils who are learning to master their reading and writing skills. This is a great advantage of multi-level/grade set-ups. Encourage peer-support!
DRAWING Drawing pictures of words builds the capacity to relate objects and people to written words.
Drawing builds dexterity—it develops the ability to hold pencils and/or pens. Drawing also builds the capacity to connect objects and people to written words. It is important that pictures are meaningful to the pupils and relate to their culture and context.
(References:‘Twotrackapproach.ReadingandWritinginStudents’FirstLanguage,SusanandDenisMalone,2010.‘Reflect:MotherManual’, David Archer and Sara Cottingham, 2012.)
ACTIVITY THREE: Overview of literacy programs
Competence (ability) in a language requires competence in 4 linguistic areas: speaking, comprehending what is said, writing, and reading. Literacy programs should focus on learning to speak, to comprehend, to write, and to read.
There are 2 main approaches to teaching literacy: the ‘alphabet-oriented approach’ and the ‘whole language approach’.The‘alphabet-orientedapproach’ has been in use for a long time. It is based on the idea that in order to be able to read and write, pupils simply need to know how to break down words according to the letters of the alphabet. Teachers using this approach only focus on the identification of letters in words, without considering the meaning of the word. This approach on its own has not been very successful, especially for pupils who do not speak the LanguageofInstruction(LoI)athome.The‘wholelanguageapproach’isamore recent approach to teaching literacy. It focuses on learning words in a context of meaning. For example, if you want to teach how to read and writewordsabout‘cooking’,youfirstinvitethepupilstodrawapictureabout cooking. Then you ask each pupil to talk about his/her picture: What
THINK: Imagine that you have to learn a foreign language: what do you think you should learn in order to be able to functionally use that language? Take some minutes to reflect.
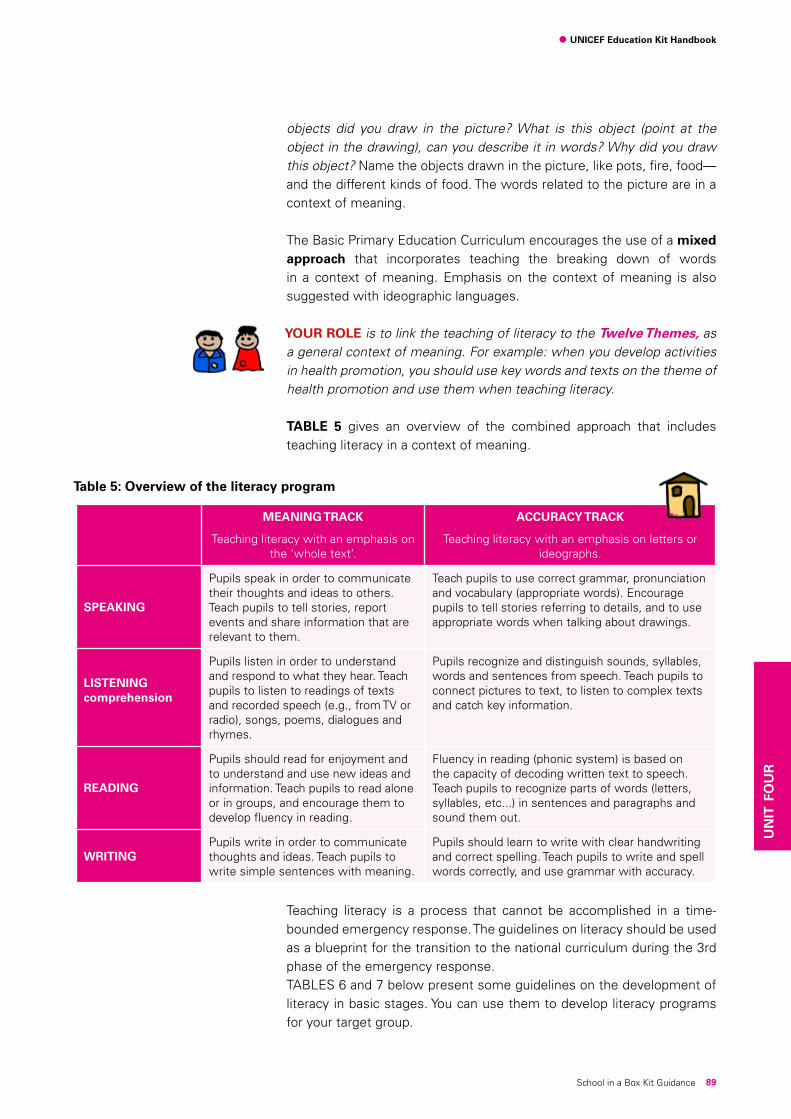
89
UNICEF Education Kit Handbook
School in a Box Kit Guidance
objects did you draw in the picture? What is this object (point at the object in the drawing), can you describe it in words? Why did you draw this object? Name the objects drawn in the picture, like pots, fire, food—and the different kinds of food. The words related to the picture are in a context of meaning.
The Basic Primary Education Curriculum encourages the use of a mixed approach that incorporates teaching the breaking down of words in a context of meaning. Emphasis on the context of meaning is also suggested with ideographic languages.
YOUR ROLE is to link the teaching of literacy to the Twelve Themes, as a general context of meaning. For example: when you develop activities in health promotion, you should use key words and texts on the theme of health promotion and use them when teaching literacy.
TABLE 5 gives an overview of the combined approach that includes teaching literacy in a context of meaning.
Table 5: Overview of the literacy program
MEANING TRACK
Teaching literacy with an emphasis on the‘wholetext’.
ACCURACY TRACK
Teaching literacy with an emphasis on letters or ideographs.
SPEAKING
Pupils speak in order to communicate their thoughts and ideas to others. Teach pupils to tell stories, report events and share information that are relevant to them.
Teach pupils to use correct grammar, pronunciation and vocabulary (appropriate words). Encourage pupils to tell stories referring to details, and to use appropriate words when talking about drawings.
LISTENINGcomprehension
Pupils listen in order to understand and respond to what they hear. Teach pupils to listen to readings of texts and recorded speech (e.g., from TV or radio), songs, poems, dialogues and rhymes.
Pupils recognize and distinguish sounds, syllables, words and sentences from speech. Teach pupils to connect pictures to text, to listen to complex texts and catch key information.
READING
Pupils should read for enjoyment and to understand and use new ideas and information. Teach pupils to read alone or in groups, and encourage them to develop fluency in reading.
Fluency in reading (phonic system) is based on the capacity of decoding written text to speech. Teach pupils to recognize parts of words (letters, syllables, etc...) in sentences and paragraphs and sound them out.
WRITINGPupils write in order to communicate thoughts and ideas. Teach pupils to write simple sentences with meaning.
Pupils should learn to write with clear handwriting and correct spelling. Teach pupils to write and spell words correctly, and use grammar with accuracy.
Teaching literacy is a process that cannot be accomplished in a time-bounded emergency response. The guidelines on literacy should be used as a blueprint for the transition to the national curriculum during the 3rd phase of the emergency response.TABLES 6 and 7 below present some guidelines on the development of literacy in basic stages. You can use them to develop literacy programs for your target group.
UN
IT F
OU
R

90
UNICEF Education Kit Handbook
School in a Box Kit Guidance
The literacy stages of the ideographic script are similar to the phonic script, with the difference being that they do not involve activities related to the use of the alphabet.
Table 6: Phonic script (languages that use an alphabet)
STAGE COMPETENCES ACTIVITIES
STA
GE
ON
E
• Holdingapen/pencilandmovingitonpaperwith the proper pressure.
• Copyingwordsandassociatingthemwitha meaning (e.g., own name, name of family members).
• copyingwordsassociatedwithfiguresorobjects (e.g., drawing a banana and writing the word banana).
• Associatingsoundswithletters. NOTE Do not teach letters by their names but by their sounds.
• Recognizingthelettersofthealphabet.
Drawing: Drawing is an excellent activity that supports the development of literacy. Pupils learn to hold and control a pen/pencil and to connect words to real objects while drawing.
Alphabet Chart: Together with the pupils you can develop alphabet charts or mobile alphabets (see Activity Four)—they are very useful tools. You can also use the alphabet poster from the SIB Kit.
STA
GE
TW
O
• Distinguishingconsonantsfromvowels,andcreating syllables (generative words).
• Readingandwritingfrequentlyusedwords.• Exercisingexpression.Youshouldencourage
the pupils to express their ideas freely and to express what they have learned in their own words.
• Listeningattentivelytocomplexspeech(e.g.,from the radio or from other pupils telling stories), and learning to summarize what they have understood
Develop syllable boxesandplaythe‘makewords’game.Develop flashcards with whole words.Readandplay‘themissingwordgame’. Encourage pupils to explain concepts in their own words. Ask pupils to bring their own reading texts about topics they want to know more about and use those texts for reading exercises. Pupils will put an extra effort into activities that they are interested in.
See Activity Three: Literacy Activities
STA
GE
TH
RE
E
• Developingfamiliaritywithmorecomplexunits of speech, and being able to compose sentences using familiar words.
• Usingspacingbetweenwords.• Recognizingpunctuationmarks,suchasfull
stops and question marks. • RecognizingandusingUPPERCASE(BIG)
letters of the alphabet.• Readingsentencescontainingfamiliarwords.• Continuingtodeveloplisteningand
comprehension competences.
Develop sentences with the words learned.
Use the UPPER CASE (BIG) letters of the alphabet.
Repeat activities from previous stages.
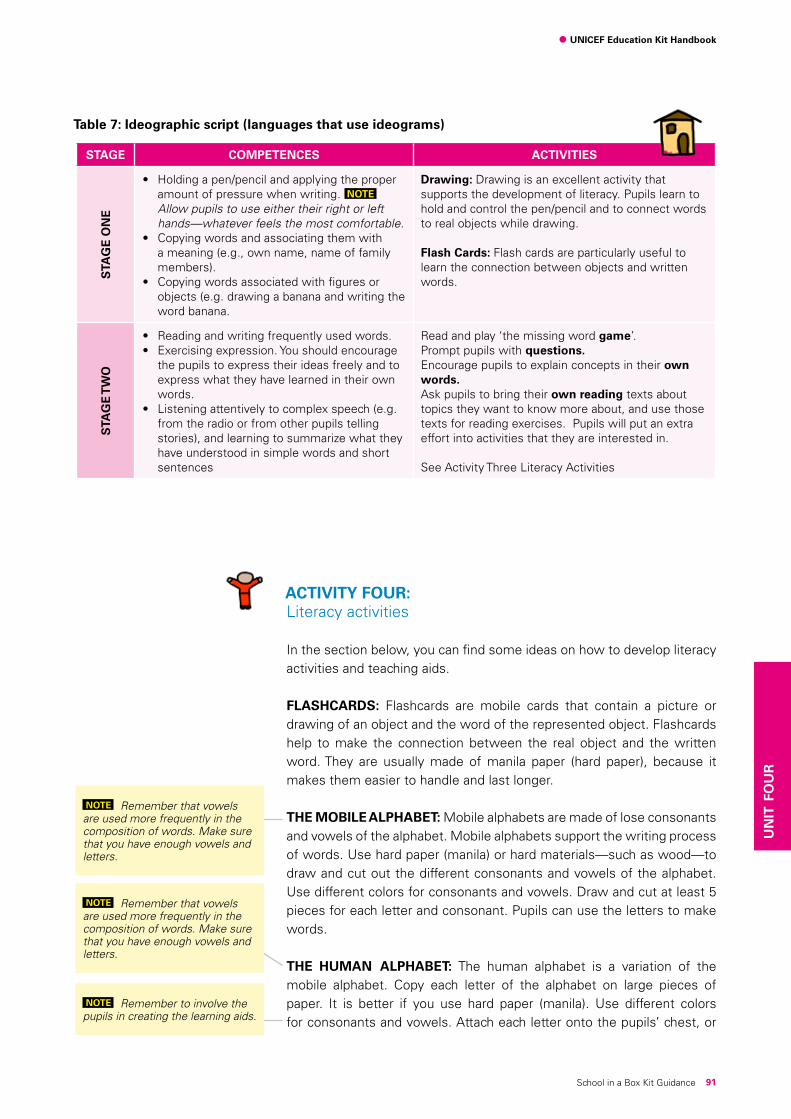
91
UNICEF Education Kit Handbook
School in a Box Kit Guidance
Table 7: Ideographic script (languages that use ideograms)
STAGE COMPETENCES ACTIVITIES
STA
GE
ON
E
• Holdingapen/pencilandapplyingtheproperamount of pressure when writing. NOTE Allow pupils to use either their right or left hands—whatever feels the most comfortable.
• Copyingwordsandassociatingthemwitha meaning (e.g., own name, name of family members).
• Copyingwordsassociatedwithfiguresorobjects (e.g. drawing a banana and writing the word banana.
Drawing: Drawing is an excellent activity that supports the development of literacy. Pupils learn to hold and control the pen/pencil and to connect words to real objects while drawing.
Flash Cards: Flash cards are particularly useful to learn the connection between objects and written words.
STA
GE
TW
O
• Readingandwritingfrequentlyusedwords.• Exercisingexpression.Youshouldencourage
the pupils to express their ideas freely and to express what they have learned in their own words.
• Listeningattentivelytocomplexspeech(e.g.from the radio or from other pupils telling stories), and learning to summarize what they have understood in simple words and short sentences
Readandplay‘themissingwordgame’.Prompt pupils with questions. Encourage pupils to explain concepts in their own words. Ask pupils to bring their own reading texts about topics they want to know more about, and use those texts for reading exercises. Pupils will put an extra effort into activities that they are interested in.
See Activity Three Literacy Activities
ACTIVITY FOUR: Literacy activities
In the section below, you can find some ideas on how to develop literacy activities and teaching aids.
FLASHCARDS: Flashcards are mobile cards that contain a picture or drawing of an object and the word of the represented object. Flashcards help to make the connection between the real object and the written word. They are usually made of manila paper (hard paper), because it makes them easier to handle and last longer.
THE MOBILE ALPHABET: Mobile alphabets are made of lose consonants and vowels of the alphabet. Mobile alphabets support the writing process of words. Use hard paper (manila) or hard materials—such as wood—to draw and cut out the different consonants and vowels of the alphabet. Use different colors for consonants and vowels. Draw and cut at least 5 pieces for each letter and consonant. Pupils can use the letters to make words.
THE HUMAN ALPHABET: The human alphabet is a variation of the mobile alphabet. Copy each letter of the alphabet on large pieces of paper. It is better if you use hard paper (manila). Use different colors for consonants and vowels. Attach each letter onto the pupils’ chest, or
NOTE Remember that vowels are used more frequently in the composition of words. Make sure that you have enough vowels and letters.
NOTE Remember that vowels are used more frequently in the composition of words. Make sure that you have enough vowels and letters.
NOTE Remember to involve the pupils in creating the learning aids.
UN
IT F
OU
R
92
UNICEF Education Kit Handbook
School in a Box Kit Guidance
simply ask the pupils to hold the card with the letter. Ask the pupils to take turns to create words using the human alphabet.
THE SYLLABLE BOX: Identify a ‘generative word’ (a word from which other words originate)—for example, the word ‘kiti’. Explain that thesyllables ki and ti are made up with the consonants K and T and the vowel I. Use the rest of the vowels to create new syllables, as in the example below.
ki, ke, ka, ku, ko
ti, te, ta, tu, to
Pupils should be able to form new words with the syllables written in the box. For example, the words kite and take.
THE MISSING WORD: Read a story and pick out a simple sentence. Write the sentence on the blackboard or on a flip chart. Cover one word and read the sentence again. Ask the pupils which word was missing. Repeat the ‘missing word’ exercise with other words and sentencesrelated to the story.
THE MOTHER WORD: STEP 1: Preparation. Identify long words—the mother word (e.g., watermelon). Write the mother word on the blackboard or on a flip chart for all of the pupils to see. STEP 2: Give the pupils a time limit—generally of about 10 minutes—to write down as many words as possible using the letters contained in the mother word. For example, using the letters of watermelon you can write the following words: late, mate, rat, war, name, and male. STEP 3: The pupil with the largest number of words wins. STEP 4: Ask the pupils to read the words to the rest of the class and write them on the blackboard.
THE WORDS SOUP:STEP 1: Preparation. Identify 2 sentences created during the class. Write the sentences on a carton or hard paper. Cut out each word of the 2 sentences and mix all of the words on the table. STEP 2: Ask each learning-group to rebuild whole sentences from the soup of words on the table. Give a time limit of 10 or 15 minutes, according to the literacy level of the pupils. STEP 3: Each learning-group earns 10 points for each complete sentence with a correct meaning.STEP 4: Prepare at least 3 rounds of words soup. The learning-group with most points at the end of the 3 rounds wins.
ANAGRAM: STEP 1: Preparation. Select a new word that has been covered during the activities (e.g., SANITATION).STEP 2: Mix up the letters and write them randomly on the blackboard
NOTE Make sure to include pu-pils with a lower level of literacy. You can arrange separate group competitions for pupils of the same level of literacy.
NOTE You will need 2 sentences for each learning-group.
NOTE It might happen that pupils compose different sentences from the original ones. As long as the sentences have a correct mean-ing, it is not a mistake.
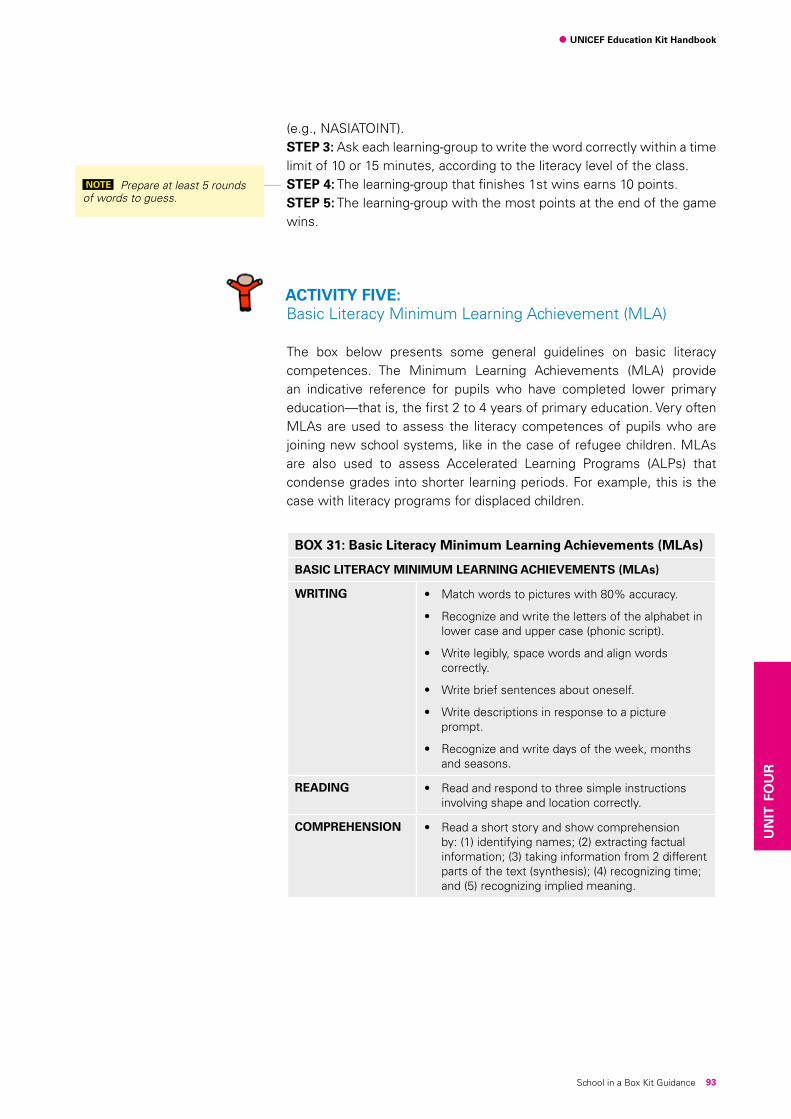
93
UNICEF Education Kit Handbook
School in a Box Kit Guidance
(e.g., NASIATOINT). STEP 3: Ask each learning-group to write the word correctly within a time limit of 10 or 15 minutes, according to the literacy level of the class. STEP 4: The learning-group that finishes 1st wins earns 10 points. STEP 5: The learning-group with the most points at the end of the game wins.
ACTIVITY FIVE: Basic Literacy Minimum Learning Achievement (MLA)
The box below presents some general guidelines on basic literacy competences. The Minimum Learning Achievements (MLA) provide an indicative reference for pupils who have completed lower primary education—that is, the first 2 to 4 years of primary education. Very often MLAs are used to assess the literacy competences of pupils who are joining new school systems, like in the case of refugee children. MLAs are also used to assess Accelerated Learning Programs (ALPs) that condense grades into shorter learning periods. For example, this is the case with literacy programs for displaced children.
BOX 31: Basic Literacy Minimum Learning Achievements (MLAs)
BASIC LITERACY MINIMUM LEARNING ACHIEVEMENTS (MLAs)
WRITING • Matchwordstopictureswith80%accuracy.
• Recognizeandwritethelettersofthealphabetinlower case and upper case (phonic script).
• Writelegibly,spacewordsandalignwordscorrectly.
• Writebriefsentencesaboutoneself.
• Writedescriptionsinresponsetoapictureprompt.
• Recognizeandwritedaysoftheweek,monthsand seasons.
READING • Readandrespondtothreesimpleinstructionsinvolving shape and location correctly.
COMPREHENSION • Readashortstoryandshowcomprehensionby: (1) identifying names; (2) extracting factual information; (3) taking information from 2 different parts of the text (synthesis); (4) recognizing time; and (5) recognizing implied meaning.
NOTE Prepare at least 5 rounds of words to guess.
UN
IT F
OU
R
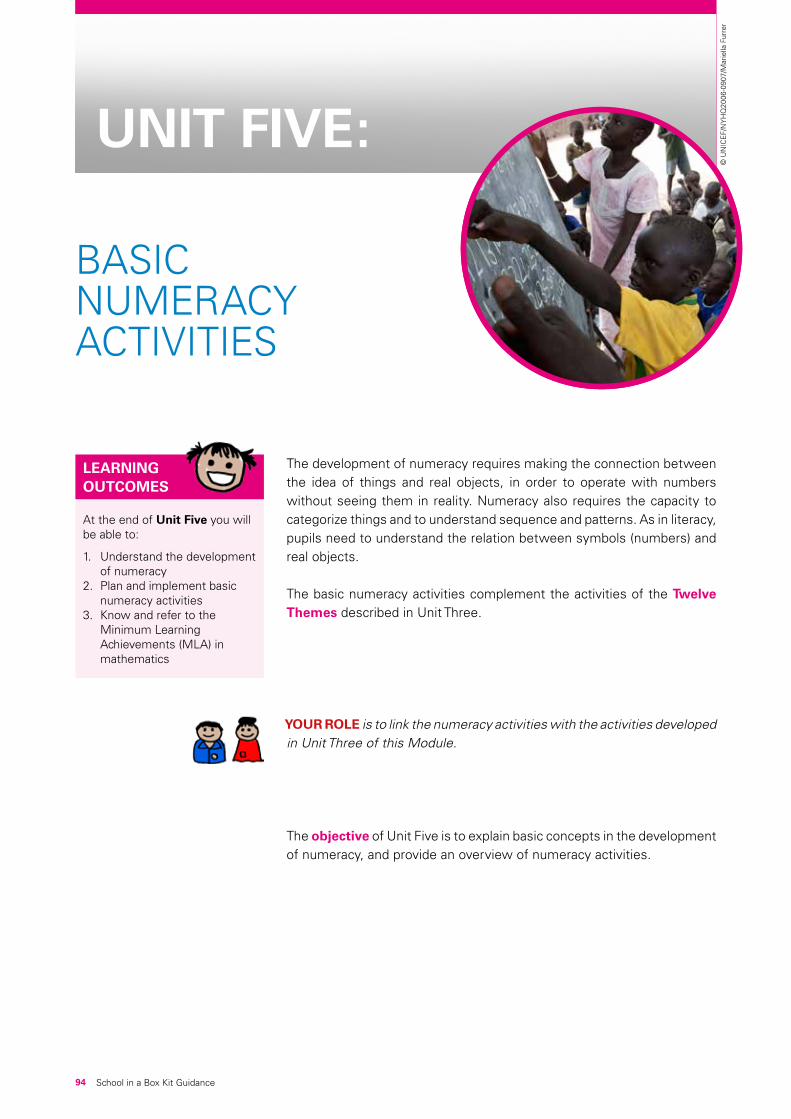
94 School in a Box Kit Guidance
UNIT FIVE:
BASIC NUMERACY ACTIVITIES
At the end of Unit Five you will be able to:
1. Understand the development of numeracy
2. Plan and implement basic numeracy activities
3. Know and refer to the Minimum Learning Achievements (MLA) in mathematics
LEARNING OUTCOMES
The development of numeracy requires making the connection between the idea of things and real objects, in order to operate with numbers without seeing them in reality. Numeracy also requires the capacity to categorize things and to understand sequence and patterns. As in literacy, pupils need to understand the relation between symbols (numbers) and real objects.
The basic numeracy activities complement the activities of the Twelve Themes described in Unit Three.
YOUR ROLE is to link the numeracy activities with the activities developed in Unit Three of this Module.
The objective of Unit Five is to explain basic concepts in the development of numeracy, and provide an overview of numeracy activities.
© U
NIC
EF/
NY
HQ
2006
-090
7/M
arie
lla F
urre
r
95
UNICEF Education Kit Handbook
School in a Box Kit Guidance
ACTIVITY ONE: Basic numeracy activities
The basic numeracy activities developed below are divided into 2 stages: stage one, which aims at developing the understanding of a numbers system; and stage two, which focuses on larger numbers and on practical real life experiences with numbers (e.g., handling currency). These activities are general guidelines. You should use your creativity to develop new numeracy activities that are relevant in your context.
BASIC NUMERACY ACTIVITIES – STAGE ONE (S1):
S1 – Activity One: numbers.
Learning: Decimal system. Materials: Colored cubes, pebbles and sticks. STEP 1: Distribute 10 cubes to each learning-group.STEP 2: Ask the pupils: Who can write numbers among you? Invite a volunteer to the blackboard or flip chart. STEP 3: Ask the volunteer to write a number between 0 and 10 on the blackboard or flip chart. Make sure that the number is written big enough for the rest of the class to see.STEP 4: Ask each learning-group to select the number of cubes corresponding to the written number as fast as possible (e.g., number 1 corresponding to 1 cube, number 2 corresponding to 2 cubes, and so on). STEP 5: Repeat this activity with different objects (e.g., pencils, exercises books, or chairs—or pupils).
S1 – Activity Two: addition.
Learning: Operations with numbers: addition. Materials: Colored cubes or pebbles or sticks.STEP 1: Distribute 10 cubes to each learning-group.STEP 2: Explainthesymbol‘+: plus’,andexplainthesymbol‘=; equal to’ STEP 3: Ask each learning-group to demonstrate: How many cubes do I have if I add 2 cubes plus 3 cubes? Write the operation on the blackboard 2 + 3 = ___STEP 4: Repeat the same operation with different numbers (always in the range of 0 to 10) and different objects.
S1 – Activity Three: subtraction.
Learning: Operations with numbers: subtraction. Materials: Colored STEP 1: Distribute 10 cubes to each learning-group.STEP 2:Explainthesymbol‘–: minus’
NOTE Pupils should develop arithmetic skills that allow them to count and make operations with-out the support of external aids like calculators.
NOTE This activity aims at linking numbers to real objects.
NOTE You can link this activity to the activities of Theme One. Ask the pupils to count the members of their family: How many family members are in your family? How many children? How many adults?
NOTE The aim of this activity is to connect symbols (2 + 3 =) to operations with real objects.
NOTE Use your imagination to identify real objects that are avail-able to the pupils in your context. U
NIT
FIV
E
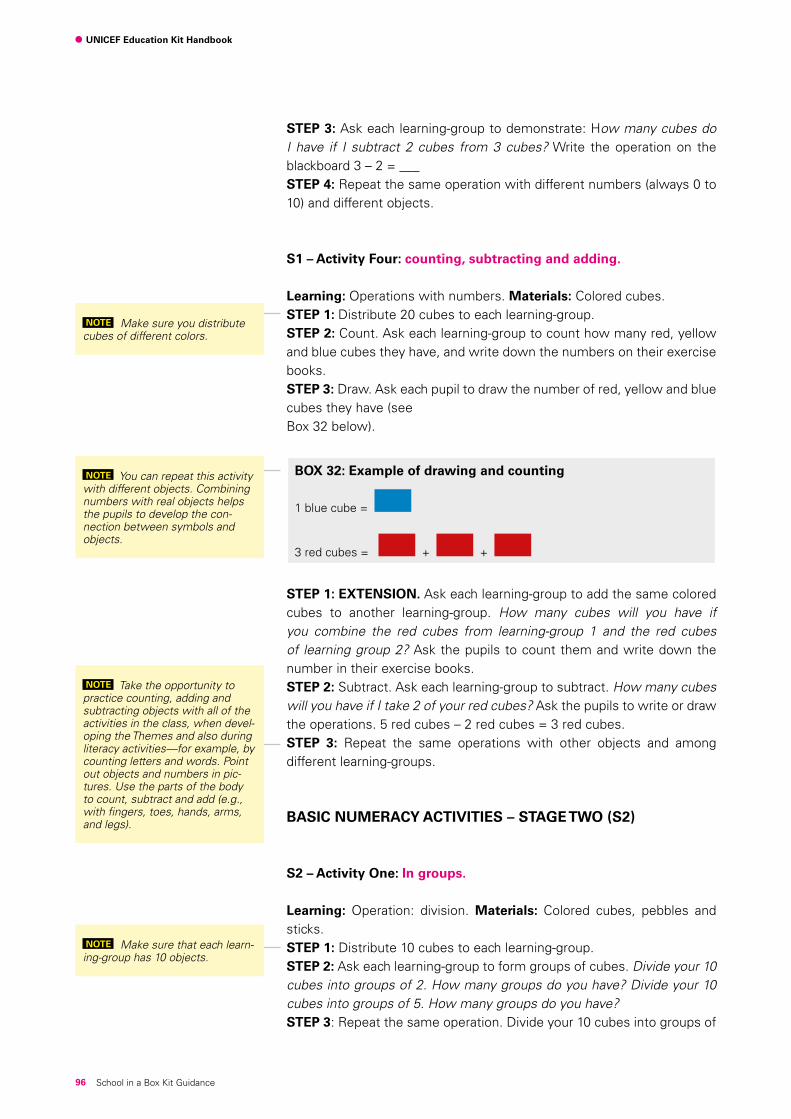
96
UNICEF Education Kit Handbook
School in a Box Kit Guidance
STEP 3: Ask each learning-group to demonstrate: How many cubes do I have if I subtract 2 cubes from 3 cubes? Write the operation on the blackboard 3 – 2 = ___STEP 4: Repeat the same operation with different numbers (always 0 to 10) and different objects.
S1 – Activity Four: counting, subtracting and adding.
Learning: Operations with numbers. Materials: Colored cubes. STEP 1: Distribute 20 cubes to each learning-group.STEP 2: Count. Ask each learning-group to count how many red, yellow and blue cubes they have, and write down the numbers on their exercise books. STEP 3: Draw. Ask each pupil to draw the number of red, yellow and blue cubes they have (see Box 32 below).
BOX 32: Example of drawing and counting
1 blue cube =
3 red cubes = + +
STEP 1: EXTENSION. Ask each learning-group to add the same colored cubes to another learning-group. How many cubes will you have if you combine the red cubes from learning-group 1 and the red cubes of learning group 2? Ask the pupils to count them and write down the number in their exercise books. STEP 2: Subtract. Ask each learning-group to subtract. How many cubes will you have if I take 2 of your red cubes? Ask the pupils to write or draw the operations. 5 red cubes – 2 red cubes = 3 red cubes. STEP 3: Repeat the same operations with other objects and among different learning-groups.
BASIC NUMERACY ACTIVITIES – STAGE TWO (S2)
S2 – Activity One: In groups.
Learning: Operation: division. Materials: Colored cubes, pebbles and sticks. STEP 1: Distribute 10 cubes to each learning-group. STEP 2: Ask each learning-group to form groups of cubes. Divide your 10 cubes into groups of 2. How many groups do you have? Divide your 10 cubes into groups of 5. How many groups do you have? STEP 3: Repeat the same operation. Divide your 10 cubes into groups of
NOTE Make sure you distribute cubes of different colors.
NOTE You can repeat this activity with different objects. Combining numbers with real objects helps the pupils to develop the con-nection between symbols and objects.
NOTE Take the opportunity to practice counting, adding and subtracting objects with all of the activities in the class, when devel-oping the Themes and also during literacy activities—for example, by counting letters and words. Point out objects and numbers in pic-tures. Use the parts of the body to count, subtract and add (e.g., with fingers, toes, hands, arms, and legs).
NOTE Make sure that each learn-ing-group has 10 objects.
97
UNICEF Education Kit Handbook
School in a Box Kit Guidance
3. How many groups do you have? Emphasize that the number 10 can be divided by the number 3 with 1 remaining. Repeat the division with numbers 4, 6, 7, 8 and 9. STEP 4: Repeat the same operations using different objects (e.g., 10 chairs or 10 sticks).STEP 5: Explain the symbol of division: We can write the operation with groups in the following way: 10: groups of 1 = 10; 10: groups of 2 = 5; 10: groups of 3 = 3, but in this case you will have 1 cube remaining; 10: groups of 4 = 2, with 2 cubes remaining; 10: groups of 5 = 2. STEP 6: Encourage children to make their own observations about the operation. STEP 7: EXTENSION: Divisible and indivisible numbers. Use the example of number 2. Ask the pupils: Can we divide the number 5 by the number 2? What happens? Repeat the operation with the number 4. Can we divide the number 4 by the number 2? What happens? Encourage pupils to make their own deductions.
S2 – Activity Two: In ‘the land of plenty’.
Learning: Operation: multiplication. Materials: Colored cubes.STEP 1: Introducetheactivitybydescribing‘the landofplenty’. It isaplacewheretherearemanythings,becausetheinhabitantsofthe‘landof plenty’ multiply everything. STEP 2: Show how the inhabitants of the land of plenty multiply things. Show the number 2, and say that Ms. Ludovica has 2 cubes and she wants to multiply them by 2. Show 2 cubes and add 2 more cubes. Ask the pupils: How many cubes does Ms. Ludovica have? Ms. Ludovica has 4 cubes, because she has multiplied her 2 cubes by 2. Repeat the operations with other numbers and colors. STEP 3: Ask for a volunteer to describe in words what Ms. Ludovica did with the cubes. Allow the pupil to express the operation with his/her own words. STEP 4: Repeat the same operations using 10 pupils, 10 chairs, 10 sticks, and so on.STEP 5: Explain the symbol of multiplication ‘X’. We can write theoperation of Ms. Ludovica in the following way: 2 x 2 = 4. STEP 6:Askthepupils:Whydowetalkaboutthe‘landofplenty’whenwe use multiplications?STEP 7:Askthepupilstodrawpicturesofthe‘landofplenty’.
S2 – Activity Three: operations with money.
Introduce this activity once you have covered the numbers 1 to 100, and 1,000, and 10,000. Prepare copies of the different notes and coins of the local currency. Ideally you should be able to use photocopies of real money and current notes to make the operations as realistic as possible. Alternatively, you can make paper money—making pretend currency out
NOTE Keep it simple and make sure that all of the pupils under-stand what you are doing.
NOTE Multiplications make num-bers bigger. It is called the land of plenty because its inhabitants have many things because they multiply them. Encourage pupils to come up with their own ideas and theories. Stimulating pupils’ creativity helps them to make sense of concepts of numbers.
NOTE As a follow-up activity, you can use the poster showing the times contained in the SIB Kit.
NOTE Use your creativity to re-produce situations that children might experience in real life (e.g., at the shop, at the market, or pay-ing their bus fare). U
NIT
FIV
E
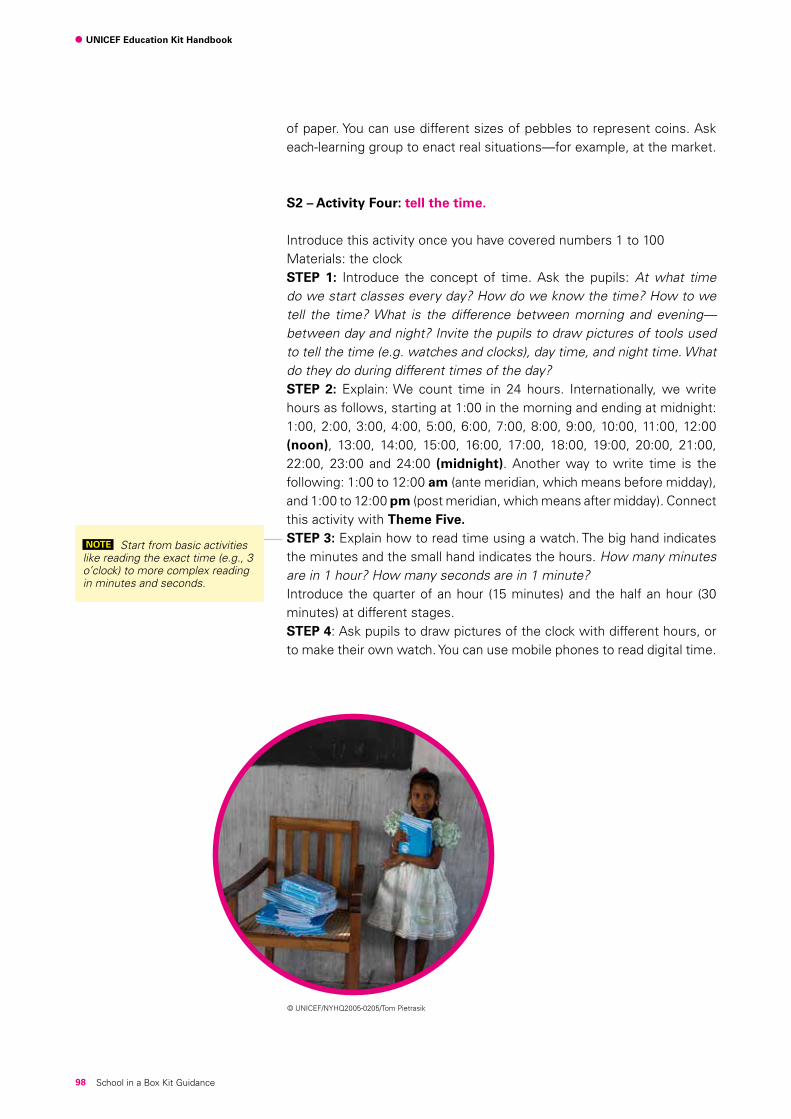
98
UNICEF Education Kit Handbook
School in a Box Kit Guidance
of paper. You can use different sizes of pebbles to represent coins. Ask each-learning group to enact real situations—for example, at the market.
S2 – Activity Four: tell the time.
Introduce this activity once you have covered numbers 1 to 100Materials: the clock STEP 1: Introduce the concept of time. Ask the pupils: At what time do we start classes every day? How do we know the time? How to we tell the time? What is the difference between morning and evening—between day and night? Invite the pupils to draw pictures of tools used to tell the time (e.g. watches and clocks), day time, and night time. What do they do during different times of the day? STEP 2: Explain: We count time in 24 hours. Internationally, we write hours as follows, starting at 1:00 in the morning and ending at midnight: 1:00, 2:00, 3:00, 4:00, 5:00, 6:00, 7:00, 8:00, 9:00, 10:00, 11:00, 12:00 (noon), 13:00, 14:00, 15:00, 16:00, 17:00, 18:00, 19:00, 20:00, 21:00, 22:00, 23:00 and 24:00 (midnight). Another way to write time is the following: 1:00 to 12:00 am (ante meridian, which means before midday), and 1:00 to 12:00 pm (post meridian, which means after midday). Connect this activity with Theme Five. STEP 3: Explain how to read time using a watch. The big hand indicates the minutes and the small hand indicates the hours. How many minutes are in 1 hour? How many seconds are in 1 minute? Introduce the quarter of an hour (15 minutes) and the half an hour (30 minutes) at different stages. STEP 4: Ask pupils to draw pictures of the clock with different hours, or to make their own watch. You can use mobile phones to read digital time.
NOTE Start from basic activities like reading the exact time (e.g., 3 o’clock) to more complex reading in minutes and seconds.
© UNICEF/NYHQ2005-0205/Tom Pietrasik
99
UNICEF Education Kit Handbook
School in a Box Kit Guidance
BOX 33: Basic Numeracy Minimum Learning Achievements (MLAs)
BASIC NUMERACY MINIMUM LEARNING ACHIEVEMENTS (MLAs)
COUNTING • Howtomatchnumbertonumberconceptfornumbers1to999.
• Howtocountforwardsandbackwardsfromnumbers1to1000.
• Understandthenumberconceptofzero(0).
NUMBER SEQUENCE
• Ranknumbersinsequencefromnumbers1to999.
• Recognizeandcompletenumberpatterns.
ARITHMETIC OPERATIONS
• ADDITION:addnumbersupto3digits.
• SUBTRACTION:subtractnumbersupto3digits.
• MULTIPLICATION:multiplynumbersupto2digits.
• DIVISION:dividenumbersupto1digit.
WORD PROBLEMS
• Solvebasicwordproblemsusingnumbers.
SHAPES • Recognizebasicshapes:square,triangle,rectangleandcircle.
FRACTIONS • Recognizefractionsandmatchgraphicrepresentationstosymbols.
MONEY • Recognizeallofthefractionsofthecurrencyusedlocally.
• Howtocalculatechange.
TIME • Howtotelltimeaccordingtothe24-hourinternationalsystem.
ACTIVITY TWO: Basic Numeracy Minimum Learning Achievements (MLA)
The Basic Numeracy Minimum Learning Achievements (MLAs) are minimum standards that establish mathematic competencies among different education systems. For example, this is the case with refugee pupils who pass to a new education system in the host country.
The Basic Numeracy Minimum Learning Achievements (MLAs) are summarized in BOX 33 below.
UN
IT F
IVE


Copyright © 2022 FDOKUMEN