
Redesign of Managerial Tasks: A Requisite for Successful Decision Support Systems
Upload
khangminh22Category
view
2download
0
SAP SRM Advanced CCM Cookbook: Requisite Catalog and SAP CCM Configuration and Management by Jim Stewart and Shaz Khan
Edited by Farrah Cooksey
Please visit our website at
www.sapcookbook.com

Jim Stewart and Shaz Khan
- 2 -
© 2005 Equity Press all rights reserved.
All rights reserved. No part of this publication may be reproduced, stored in a retrieval system, or transmitted in any form or by any means, electronic, mechanical, photocopying, recording or otherwise, without either the prior written permission of the publisher or a license permitting restricted copying in the United States or abroad.
The programs in this book have been included for instructional value only. They have been tested with care but are not guaranteed for any particular purpose. The publisher does not offer any warranties or representations not does it accept any liabilities with respect to the programs.
Trademark notices
SAP, SAP EBP, SAP SRM, Netweaver, and SAP New Dimension are registered trademarks of SAP AG. This publisher gratefully acknowledges SAP permission to use its trademark in this publication. SAP AG is not the publisher of this book and is not responsible for it under any aspect of the law.

SAP SRM Advanced CCM Cookbook
- 3 -
SAP SRM Advanced CCM Cookbook: Requisite Catalog and SAP CCM Configuration and Management 1
Forward ................................................................... 7 ABOUT THE AUTHORS ....................................... 9
Part 1: Supplier Enablement 12 Supplier Enablement Introduction ........................... 13 Overview of Supplier Involvement.......................... 14
Supplier involvement in a typical e-procurement process is organized in the five areas listed below ................................. 14 Step by Step Overview of Supplier Enablement ...................................................... 15 OCI Sample Catalog ......................................... 16 PO and Invoice Document Transfer ............... 18 For Invoice Document Transfer....................... 18 Tips for a Successful Implementation ............ 20 Round Trip Catalog Configuration in EBP..... 23 OCI catalogs configured in EBP IMG in the external web services node and then in the ‘Attributes’ area of the organizational structure (TCODE: ppoma_bbp) .................................................... 23 Replicating Vendors from R/3 to EBP Configuration Set Up.................................... 23 OCI Catalog Configuration............................... 23 Results of OCI Catalog Configuration ............ 27 Examples of Initial Go Live Suppliers............. 28 Main Screen of Catalog Configuration for all Suppliers ..................................................... 28
Configuration: ..................................................... 31

Jim Stewart and Shaz Khan
- 4 -
Replication of Vendors (Suppliers) from R/3 to EBP .............................................................31
Adopting Customizing Data: .............................35 1. In EBP, execute transaction BBPGETVC .........................................................36 2. In the System field, enter your back-end system ............................................36 3. Choose Start transmission..............36 Notes for Vendor Replication ...........................37
Part 2: Requisite Catalog 38 User Administration Overview.................................39 Manage Catalog Users ..............................................41
Create a Purchasing Organization ..................43 Configuration .......................................................56
View Definition ................................................60 Attribute Types................................................70
Attribute Visibility ....................................................72 Attribute Actions (Characteristics) ...........................74 Attribute Sequence Numbers ....................................77 Attribute Length........................................................79 Key Values and Name Values ..................................80 Notes .........................................................................88 Create and Edit Approval Role .................................95 Assign Approval Roles to Users .............................109
Show Workflow .............................................112 Producing a Schema Template................................113
Microsoft Excel .................................................115 Format Text Files....................................................119 Load Content From Multiple File Formats.............121
Select File ..........................................................121 Loader Options .................................................122
Adding New Products to a Catalog.........................141 Edit an Existing Product .........................................145 Edit a Product..........................................................146

SAP SRM Advanced CCM Cookbook
- 5 -
Item Count Log ............................................ 167 Export Log ...................................................... 169 Report Summary ......................................... 170
Automated Jobs Scheduler..................................... 175 Create a Job................................................... 177 Set Job Execution Time............................. 178 Notification & Scheduler Action ............. 179 Activity Buttons ................................................ 180 Understanding rights ownership and views. 181
Manage Background Jobs ...................................... 183 Product Editor ........................................................ 185 Manage SAP OCI................................................... 186 Manage SAP OCI................................................... 186
SAP OCI........................................................... 186 Users ................................................................. 188 Views ................................................................. 189 Approval Roles................................................. 189 Suppliers ........................................................... 190 Attributes ........................................................... 191 Category Defaults............................................ 192 Rules ................................................................ 193 Actions............................................................... 194 Descriptions...................................................... 194 Currencies ........................................................ 194 UOM .................................................................. 195 SAP OCI Mappings ......................................... 195
Part 3: Catalog Content Management 197 Introduction to CCM.............................................. 199 Basis Setup Activities for CCM............................. 202
XI Configuration ............................................... 202 Catalog Authoring Tool (CAT) Settings ....... 202 TREX and Catalog Search Engine (CSE) ... 208 Generate Master Catalog ............................... 210

Jim Stewart and Shaz Khan
- 6 -
SAP Exchange Infrastructure (XI) and CCM Requirements ..........................................................212 Predefined Characteristics and Content Format .....215
CCM Characteristics ........................................215 CCM File Formats ............................................220
Organize and Upload Content.................................223 Upload Master Catalog Schema ....................223 Upload Supplier Catalog .................................227 Create Procurement Catalogs........................233
Manage Content ......................................................236 Map Categories and Items..............................236 Catalog Data Enrichment ................................239 Manual Enrichment ..........................................239 Automatic Enrichment .....................................240 Approval and Rules..........................................240
Publish Catalog .......................................................245 Define Views .....................................................245 Publish Catalogs ..............................................247
Search Catalog ........................................................249 EBP – Define External Web Services and Catalog IDs.................................................................................252 Define External Web Services ................................252
Settings for the EBP Organizational Structure.............................................................................256 Frequently Asked Questions ..........................258
ABOUT THE AUTHORS ......................................265

SAP SRM Advanced CCM Cookbook
- 7 -
Forward
Very soon after publishing the SAP SRM Advanced EBP Cookbook in April 2005, I realized that there is a great need for easy to access, easy to read information about SAP SRM’s Catalog management tools. This book is the answer to the many requests for information about catalog content management tool from SAP and also requests for information about the software from Requisite, which is probably the most widely used piece of software to manage catalog content management on SRM projects today.
As such, this book will be broken into three major parts. Part One will provide background and introductory materials for supplier enablement, offering the reader a view of the landscape from 10,000 feet. Part one will provide the details you need to connect any supplier with an external catalog to the SRM system. Part one will also offer some much needed strategy information about the SRM product.
Part two is a complete reference to the Requisite Catalog content management software. This reference includes materials from several projects, sample external catalog scenarios, configuration information, sample blueprint, and everything you will need to configure and maintain the Requisite Catalog Content Management software for use with SRM inside your organization.

Jim Stewart and Shaz Khan
- 8 -
Part three will serve as a reference to the new SAP SRM CCM software. This will include the SAP Catalog Authoring tool, initial configuration and setup, and it will walk through several “live” scenarios of the software in use today.
We realize that the Requisite catalog software and SAP SRM CCM are pretty much mutually exclusive in their deployment – and so this book can serve several purposes. If you’re evaluating each of these suites, this book should provide a sneak peek under the hood so to speak. If you already have one of these components installed, this book will allow you to make a quick evaluation of the other piece of software. Either way, I believe that this is the right book at the right time, and I know that the content of this book has been invaluable to me and other people who I have shared the content with.
Jim Stewart
From 34,000ft

SAP SRM Advanced CCM Cookbook
- 9 -
ABOUT THE AUTHORS
Jim Stewart Jim Stewart (Los Angeles, CA) has over 10 years of experience as an information systems professional, during which time he has served as a technical analyst, lead developer, and programming team lead. He has implemented SAP at DirecTV, Texas Instruments, Hewlett Packard, and other Fortune 100 clients. Mr. Stewart is the founder of Equity Technology Group, an SAP consulting partner, and continues to practice as a consultant in the area of SAP SRM/EBP, Workflow, Web programming, and UNIX systems administration.
Jim can be reached at [email protected]
Shaz Khan Shaz Khan has been implementing SAP ERP eProcurement and Supply Chain applications for over 8 years. Shaz began his career as a Senior Information Technology Consultant with Ernst & Young and immediately obtained SAP R/3 certification in the Materials Management module. He has implemented SAP Supplier Relationship Management (SRM)/Enterprise Buyer Professional (EBP) projects focused on operational self-service and services procurement, contract management, content management, and spend analysis. He has extensive experience in project management, software development and systems implementation methodologies, and strategic consulting services. In 1999, Shaz helped launch Above Commerce, an electronic catalog company focused on helping

Jim Stewart and Shaz Khan
- 10 -
businesses establish private procurement exchanges over the Internet. He has managed and implemented SAP and SRM supply chain and operational procurement projects for numerous Fortune 500 clients in the Media, Chemical, Oil, and Financial Services industries including Dow Chemical/Union Carbide, Warner Bros., and Disneyland. He has recently launched his new consulting firm Ciena Partners, Inc. and is currently implementing SRM 4.0 at a major Fortune 100 client. Shaz received his B.A. in Computer Science and a B.A. in Economics from the University of California at Berkeley.
Shaz can be reached at [email protected]

SAP SRM Advanced CCM Cookbook
- 11 -

Jim Stewart and Shaz Khan
- 12 -
Part 1: Supplier Enablement

Supplier Enablement Introduction The first part of this book, Supplier Enablement, could also be subtitled, “Supplier Enablement for External Catalogs and Vendors in SRM.” The book will outline and provide all of the detail that you will need to connect external vendors to the SRM system using so called “punch out” or “round trip” catalogs. The goals of Part 1 are: 1. Provide an overview of supplier’s involvement in
an e-procurement initiative. 2. Outline preparation activities that must be
executed to order from a supplier’s roundtrip catalog and to exchange purchase orders and invoices electronically.
3. Supply important information to be aware of during the preparation activities.
4. Exhibit the catalog configuration. Note: Document transfer configuration is highly technical and can be found in an XI or EDI reference.
5. Show initial Go Live supplier configuration.

Jim Stewart and Shaz Khan
- 14 -
Overview of Supplier Involvement
Supplier involvement in a typical e-procurement process is organized in the five areas listed below
1. Supplier Activation Process of activating selected suppliers to be used in the e-Procurement. 2. OCI/Roundtrip Catalog This area doesn’t describe a process per se; rather it describes the catalog and its standards required for compatibility with SRM. The roundtrip catalog from which the shopper will order product must be Open Catalog Interface (OCI) compliant in order to enable the data in the catalog fields to cleanly transfer into the shopping cart. 3. Processing Catalog Shopping Cart to R/3 Backend Documents Process by which shopping carts with product chosen from roundtrip catalogs (“catalog” shopping carts) are converted into R/3 backend documents. 4. Sending Purchasing Orders to Supplier and Receiving PO Receipt Notification Process by which a catalog purchase order is transmitted to the suppliers and supplier confirms receipt back to shopper of catalog purchase orders. 5. Receiving Invoice from Supplier Process by which we receive supplier invoices electronically into our R/3 system.

SAP SRM Advanced CCM Cookbook
- 15 -
Step by Step Overview of Supplier Enablement
Below are the steps that must be followed in order to engage the supplier in e-procurement activities: 1. Confirm that there is a corporate procurement
contract in place with supplier that you want to engage in an e-procurement initiative. - E-procurement initiative means that the
supplier is able to provide an OCI (open catalog interface) compliant roundtrip catalog, to accept electronic purchase orders and to send invoices back electronically (EDI, through XI, etc).
- Corporate contract means that your company and the supplier have negotiated prices.
2. Must also have trading partner agreements signed by each supplier. Procurement should be responsible for these. This doesn’t necessary have to be done in the 2nd step.
3. Provide supplier with the Preliminary Planning Questionnaire provided in the appendix. - Document should be completed and returned
prior to any implementation discussions. - Responses to questionnaire will enable you to
assess the supplier’s e-procurement “readiness” in the areas of OCI catalog and document transfer areas and will highlight any non-standard situations/data elements/technology that may be required by the supplier in order to execute the e-procurement process.
4. Review results of completed questionnaire with all team members:

Jim Stewart and Shaz Khan
- 16 -
-EBP functional person responsible for the OCI catalog
-SAP resource responsible for SAP PO document transfer in relation to XI mappings.
-Resource responsible for invoice document transfer into the SAP system. 5. Carry out “kick off” calls with supplier to review
information collected in survey. - Best to split calls between catalog discussions
and Document transfer (PO and Invoice). Usually the suppliers have separate departments responsible for those areas.
- OCI catalog calls should review: Supplier catalog implementation process OCI roundtrip field standards Supplier functional deficits/abnormal
protocol Testing and Go Live schedules Delivery date of first OCI roundtrip
sample catalog. - XI/Document Transfer Discussions should
review: Introduction of XI Types of document messaging protocol
that could be utilized for the document exchanges (i.e.: SAP IDOC, xCBL, XML, EDI)
Supplier functional deficits/abnormal protocol
Testing and Go Live schedules. 6. Activities Post Conference Calls Testing
OCI Sample Catalog
- Receive sample catalog from supplier. This catalog does not have to have the look and feel required for Go Live.
- Sample catalog at this point is solely to test connectivity from EBP to the roundtrip catalog and

SAP SRM Advanced CCM Cookbook
- 17 -
to test receiving data from the roundtrip catalog-shopping cart into EBP.
- SAP EBP catalog configuration required. Must also receive configuration data from supplier. See ‘Configuration’ section of this document for more information on this activity.

Jim Stewart and Shaz Khan
- 18 -
PO and Invoice Document Transfer
Should have determined what type of document format (messaging protocol) should be used to electronically transmit PO’s to the supplier and what type of document format should be used to electronically transmit invoices from the supplier to the SAP system.
For PO Document Transfer: ***XI resource will be responsible for the
mappings of PO documents from R/3 High level activities:
Review of source (standard) document format (xCBL, IDOC, etc.) that will be utilized and supplier’s sample (template) of this doc format.
Also review the SAP PO IDOC from the R/3 system in order to analyze the mapping of it to the document format agreed with the supplier.
Evaluate source document with supplier sample for gaps and mapping requirements.
Configure XI to map and route PO and invoice documents.
For Invoice Document Transfer
Need to determine if invoices will be received into R/3 via EDI or via XI (using XML format). If via EDI, EDI resource is responsible for document mappings. If via XI using a specific document format, the XI resource is responsible for document mappings.
High level activities:

SAP SRM Advanced CCM Cookbook
- 19 -
- If via XI, XI resource will be responsible for establishing messaging protocol/document format, such as XML, xCBL, etc.
- If via XI, XI resource will have to perform the same type of mapping activities for the invoices as done for the PO. Must map the supplier’s outbound invoice document (xCBL, XML, etc.) with what R/3 A/P system requires data-wise.
- If via EDI, EDI, resource should request an EDI implementation guide from the supplier in order to determine what standard data the supplier will provide in their EDI document.
- If via EDI, we must provide the supplier with its own EDI implementation guide in order to give the supplier a guideline as to what data it must pass to us through the EDI document. For the initial Go Live, we put together an implementation guide. See the documents, ‘General EDI Information’ and ‘EDI810’ located: F:\Enterprise Buyer Project\Supplier
- If via EDI, must determine if Grentran or XI will be utilized. For initial Go Live, Gentran will be utilize, however we may want to leverage XI and utilize it for future EDI or document transfers. If via XI, the XI resource should be involved with the mappings.
7. Formal Unit Testing Unit testing should occur once it is possible for EBP to connect with the supplier’s roundtrip catalog and to receive data from what was chosen to order in the catalog; once all document mappings and XI is configured. Formal unit test cases should be utilized.

Jim Stewart and Shaz Khan
- 20 -
Tips for a Successful Implementation
-Trading partner agreement should be place for all three aspects of e-procurement involvement with the supplier: OCI catalog, PO and Invoice document transfer. OCI Catalog Need to confirm that supplier’s utilized OCI fields are the exact ones required for EBP data transfer. Note: OCI field naming conventions can change among the different OCI versions. This will cause problems if the catalog’s name is different from what EBP is expecting. List of OCI fields can be found in the EBP Folder.
UOM and Currency: - Confirm all UOM’s that will be utilized by
supplier in the OCI catalog. If a non-SAP accepted
unit of measure or currency is utilized in the roundtrip catalog, then none of the catalog data will be placed into an EBP shopping cart. Shopper will receive an error. It is very important to compare the supplier’s unit of measures/currencies with your own for differences.
Field Requirements – Must review the specific OCI fields that the supplier will pass.
Supplier Specific Field Content Requirements Must identify non-SAP data that the supplier may require us to pass through from the catalog to the xCBL PO document. For example, Dell requires a Sequence ID. This is non-standard SAP data; so we had to create new customer fields in EBP and SAP in order for this number to be passed through the systems. See blueprint ‘Supplier Involvement’ in F:\Enterprise Buyer Project\Supplier for more examples or See technical specification ‘Tech Spec – Shopping Cart CUF’s in F:\Enterprise Buyer Project\Technical Specifications. Note though,

SAP SRM Advanced CCM Cookbook
- 21 -
just because the supplier specific data is in an OCI field, you need to make sure that it is getting passed to the EBP shopping cart. Since these may not be visible fields, you will need to create a shopping cart, go to SE37 in the EBP SAP GUI, execute BBP_PD_SC_GETDETAIL and enter in your SC #. You should see the supplier specific data in the OCI field that the supplier specified that it will be in.
Catalog Configuration: Supplier should provide all roundtrip details (ie: catalog URL, User ID and Password, etc.) for catalog configuration in EBP. Have supplier present an exact example of how the call structure in EBP configuration should look. Each supplier’s configuration is different. An example of this will be provided in the configuration section of this document.
Link Down - Error: Review supplier’s protocol for when link is down and EBP shopper is not able to get into the catalog.
Product Category: Check to see if supplier can place the product category in the catalog. If not, you will have to do a mapping in EBP from supplier UNSPSC code or supplier material number to Product Category. Configuration for the UNSPSC code to product category shown in the configuration section of this document.
PO Document Transfer PO Document Format: Obtain a copy of supplier’s document format that will be used (xCBL, cXML, IDOC, etc). Will need to also get a standard format (ie: standard format of xCBL downloaded from the web) and if possible, our format in order to compare and begin mapping exercises.
SAP IDOC SAMPLE: Obtain a sample of your IDOC format. The IDOC is the format that the PO document master data has to be transformed into before it can be routed to XI and turned into the PO format agreed upon (ie: xCBL) with the

Jim Stewart and Shaz Khan
- 22 -
supplier. For initial Go Live, our IDOC was type 04.
Supplier Specific Field Content Requirements: Supplier must provide instructions as to where non-SAP (supplier specific data) should be placed in the PO format.
Email Addresses for Order Acknowledgements/Shipping Notifications: Confirm with supplier where this information should be placed in the PO format.
Vendor Numbers: In order to configure output determination so that a PO for a specific supplier is routed in XI to that specific supplier, one vendor number must be specified in R/3 output determination configuration. Some times a supplier could have multiple SAP vendor numbers, so it needs to be decided which number will be the one utilized for document routing. The following vendor master record numbers will be utilized for the initial go live vendors:
Dell 509009 HP 610247 Boise 500410 Allied 501611
Invoice Document Transfer EDI: EDI resource must obtain supplier’s EDI implementation guide in order to analyze gaps, mappings, etc. Important to get supplier’s requirements.
Resource should also work with the invoicing group to identify data (i.e.; company code, vendor number) that the supplier must include on the EDI invoice; this info must be mapped in EDI and documented in your EDI implementation guide.
Once the invoicing data requirements are solidified, must put together an implementation guide to give to the suppliers.

SAP SRM Advanced CCM Cookbook
- 23 -
Round Trip Catalog Configuration in EBP
There are many configuration items that must occur to get the whole supplier involvement process to execute:
OCI catalogs configured in EBP IMG in the external web services node and then in the ‘Attributes’ area of the organizational structure (TCODE: ppoma_bbp)
Replicating Vendors from R/3 to EBP Configuration Set Up a. Vendor node created in org structure. b. Business Partner number range in EBP. c. Business Partner Groups d. Define Standard Industry Key e. Adopt customizing data (execute
replication from R/3 to EBP).
OCI Catalog Configuration
Below are the SAP EBP configuration steps for the OCI Roundtrip Catalog. Configuration activities for XI and EDI will be outlined in their specific blueprint and/or technical specification documents. There are two areas of configuration that we need to consider.
Configuration Area #1
1. Click on ‘Define External Web Services’
IMG Path: SPRO>>IMG>>Supplier Relationship Management>>SRM Server>>Master Data>>Define External Web Service (Catalogs, Vendor Lists, etc.)

Jim Stewart and Shaz Khan
- 24 -
Fig. 1 - Main IMG Menu from transaction SPRO
2. Click on ‘New Entries’ to enter a new supplier
Fig. 2 - Main Screen of Catalog Configuration from Define External Web Services

SAP SRM Advanced CCM Cookbook
- 25 -
3. Enter Name of New Catalog -The web service name entered here will be the link that shows up in the roundtrip catalog in EBP (picture shown later in doc).
Fig. 3 - Initial Screen to Name New Catalog 4. When finished, double click on ‘Standard Call Structure’ to input catalog structure details. This is the information that the supplier must provide. 5. Information for this table will be provided by supplier.
Fig. 4 - Main Page for Standard Call Structure Configuration for Specific Supplier

Jim Stewart and Shaz Khan
- 26 -
6. Click on ‘New Entries’ to configure the structure details. The supplier will provide these details to you. Every supplier can be different (examples shown later in this document). Note that in the ‘Type’ field, it depends on what you are entering. URL = URL; HOOK_URL = Return URL; All other values will have ‘Fixed Values’. This info is not provided by the supplier.
Fig. 5 - Page where structure details will be entered. 7. Once details are entered, click ‘Save’ icon at the top of the page and click SAP ‘Back’ button to get out of screen. You will be taken back to the main screen of catalog configuration (step #2) and ready to enter more catalogs if need be. Configuration Area #2 Catalog must also be added to the Organizational Structure 8. Enter transaction code PPOMA_BBP

SAP SRM Advanced CCM Cookbook
- 27 -
Fig. 6 - Transaction Box in Main Screen of IMG 9. Click on organizational line where catalogs need to be placed (i.e. US Company)>>Choose ‘Attributes’ tab under ‘Details for Organizational unit’>>Scroll to the description ‘Catalog ID’>>Click on the far right button next to ‘Catalog ID’ (it will be in green on screen) to enter in your new catalog>>Click the drop down button and choose your new catalog’s name.
Fig. 7 - Organizational Structure Screen 10. Click on the ‘Save’ button and back out of screen. You are done with configuration. Check to see if catalog is in EBP.
Results of OCI Catalog Configuration

Jim Stewart and Shaz Khan
- 28 -
11. Log into EBP and click on ‘Shop’. Your catalog should show up as a link. Click link and shop away!
Fig. 8 - Main Shop Page with New Catalog ‘Test Catalog’
Examples of Initial Go Live Suppliers
Note: Each supplier has different configuration details. This is to be expected.
Main Screen of Catalog Configuration for all Suppliers
To view a specific supplier’s standard call structure. -Highlight the supplier and double click on ‘Standard Call Structure button under ‘Dialog Structure’

SAP SRM Advanced CCM Cookbook
- 29 -
Fig. 9 - Allied Catalog Configuration Standard Call Structure
Fig. 10 - Boise Catalog Configuration Standard Call Structure

Jim Stewart and Shaz Khan
- 30 -
Fig. 11 - Dell Internal Catalog Configuration - Standard Call Structure
Fig. 12 - Dell Internal Catalog Configuration – Variant Call Structure There are 3 different Dell catalogs. The only difference in configuration is the user_id: Dell Federal: User_ID: COMP-FD-T Dell Commercial User_ID: COMP-CD-T

SAP SRM Advanced CCM Cookbook
- 31 -
Fig. 13 - Hewlett Packard Sample Catalog Configuration - Standard Call Structure Configuration:
Replication of Vendors (Suppliers) from R/3 to EBP
Vendors are required in both EBP and in the SAP R/3 back-end system for selecting a catalog item. They can be replicated from the back-end using the procedure described below.
a. Replication Set Up: Vendor Node in Organization Structure
SAP R/3 Back-End System The replicated vendors must be assigned to a purchasing organization in R/3 (i.e. vendors that have only the Accounting views cannot be replicated in EBP)
Enterprise Buyer System In the organizational plan (transaction PPOMA_BBP): • Create an organizational unit to which the
vendor(s) can be assigned (call it «Vendors»). This organizational unit can be created under a Purchasing Organization org.unit or can be alone. Does not have to be placed anywhere specific or strategic, just has to be there. When the vendor

Jim Stewart and Shaz Khan
- 32 -
creation process occurs in EBP, the vendors must be attached to an org node.
Fig. 14 – Vendor replicated to supplier organization. • Each purchasing organization in R/3 for which
vendors are going to be replicated must be related to a Purchasing Organization org.unit in Enterprise Buyer (check tab «Type»)
• In the «Check» tab must be green with no errors of both the «Vendors» org.unit and the Purchasing Organization org.unit.
b. Replication Set Up: Business Partner Number Range
Check the number ranges in EBP. It is best to opt for an internal EBP number range verses utilizing the R/3 number range. However, you can use an external R/3 number range. For our purposes, we will use an internal number range. This means that when replication occurs, you will click on a radio button, which specifies that an internal number range is to be used.

SAP SRM Advanced CCM Cookbook
- 33 -
Transaction Code: BUCF
1. In the Enterprise Buyer IMG, choose Cross-Application Components → SAP Business Partner → Business Partner → Basic Settings → Number Ranges and Groupings → Define Number Ranges
2. Choose Change Intervals and set the interval 01 for internal number range and then add another interval, 02 for external number to correspond with your vendor number range in the back-end system if you will be utilizing the R/3 number range. NOTE: To see the number range in the backend system, log into R/3 >/nSPRO>>TCODE: OSMJ. Need to look at the intervals for vendor.
In EBP:
The following number ranges are used during the vendor master replication from R/3 to EBP (for catalog vendors). Either EBP assigns an internal number (internal range) or it assigns the vendor master number in R/3 (external range). As mentioned previously, this rule is selected during the replication process.
Fig. 15 – Business Partner Number Ranges.

Jim Stewart and Shaz Khan
- 34 -
c. Replication Set Up:
Business Partner Groupings: (EBP - client dependent)
Transaction Code: SPRO
In the Enterprise Buyer IMG, choose Cross-Application Components → SAP Business Partner → Business Partner → Basic Settings → Number Ranges and Groupings → Define Groupings and Assign Number Ranges and make the following settings:
In this configuration, a number range is assigned to each type of grouping (internal and external). This will determine which number range is used by EBP when the vendor masters are replicated from R/3:
Fig. 16 – Assign number ranges to groupings configuration.
d. Replication Set Up:
Define Standard Industry Key (EBP - client dependent)
Transaction Code: SPRO

SAP SRM Advanced CCM Cookbook
- 35 -
Menu Path: Cross Application Components > SAP Business Partner > Business Partner > Organizations > Maintain Industry Solution Systems and Industries
****Configure this only if you have an industry key maintained on the R/3 vendor master (usually on one of the finance views)
Create the following standard industry key (this key is maintained on the vendor master records in R/3 and must be created in EBP to allow the vendor master replication):
Fig. 17 – Standard Industry Key Creation. e. Replication Execution:
Execution of Program
Adopting Customizing Data:
Note: run this transaction only once, when you first set up vendor replication in the client.

Jim Stewart and Shaz Khan
- 36 -
1. In EBP, execute transaction BBPGETVC 2. In the System field, enter your back-end system 3. Choose Start transmission
Adopting Vendor Master Records: 1. In EBP, execute transaction BBPGETVD
2. In the System field, enter your back-end system logical name (P51M100)
3. In the Object ID field enter 5XXXXXXX (ID of the organizational unit in the organizational structure under which the vendor(s) shall be created – i.e. 'Vendor root', usually placed under the Purchasing Organization unit)
4. If you want to keep the vendor numbers from the back-end system, select Transfer only R/3 numbers
5. To start replication, choose Start transmission
6. On the next screen choose Start transmission again
To display the Data Transfer Log:
1. Execute transaction SE37 2. In the Function module field, enter
APPL_LOG_DISPLAY and choose Function module → Test → Single Test
3. In the Object field, enter BBPGETVD and choose Execute
4. Check the date and time in the time restriction fields and choose Execute. The lights should be green. To display additional information about incorrect transfers, double-click on the lines with red lights

SAP SRM Advanced CCM Cookbook
- 37 -
Notes for Vendor Replication
Once a vendor master is replicated in EBP, log on as the Administrator to the web front-end and select transaction [Manage Business Partners]. Next to [Business Partner Data], enter the vendor number. Press [Edit], click on button [Display/Change] and delete the Jurisdiction Code on the “Company Data” screen. Maintain the [e-mail address] and the [Standard communications protocol] fields (“Send via e-mail”). Save your changes. f. Replication: See SAP Notes 315064 and 316335 to avoid problems when you update vendor replication. See SAP Note 309158 to avoid problems if the existence check finds an existing vendor during vendor replication.
If you receive the error message “R1218 Bank &2 for country &1 does not exist” during the initial download for customers, see SAP Note 317573. This explains how to download the post office bank branches from Table T018P.

Jim Stewart and Shaz Khan
- 38 -
Part 2: Requisite Catalog

User Administration Overview
See also: Manage Catalog Users, Manage Catalog Views.
The catalog uses a three-tier user management model. You can assign views, attribute security, languages, and various other rights and privileges at the Organization and/or Group level, then flow them down to the Group and/or User level. The top level has the highest level of rights; you can remove rights at the lower levels if desired.
Each of the following profiles defines the views, rights, attributes, approval roles, language and currency defaults that are ultimately assigned to an end user:
Organization: The organization is the umbrella profile for a supplier or buyer organization. Organization is the top level, and is required. An organization is tied to a view of the catalog (the entire catalog or a subset) and is responsible for creating groups and users for their specific view. An owner organization can grant other organizations read-only access to their organization’s views. In a marketplace, this allows a supplier organization to grant a buyer read-only access. Many of the catalog elements, such as items, views and rules, are owned at the organization.
Group: Optional sub-profile within the organization, allows you to create different group profiles for views, rights, language and currency, etc.
User: The profile assigned to the end user. User is the individual user, and is required. A user can only belong to one group, which in turn can only belong to one organization.

Jim Stewart and Shaz Khan
- 40 -
Configuration:
User Administration Process
1. Create restricted views into the catalog (optional)
2. Set up the organization (provided during install)
3. Create a group of users (optional)
4. Create individual users

SAP SRM Advanced CCM Cookbook
- 41 -
Manage Catalog Users
The catalog uses a three-tier user management model. You can assign views, attribute security, languages, and various other rights and privileges at the Organization and/or Group level, then flow them down to the Group and/or User level. The top level has the highest level of rights; you can remove rights at the lower levels if desired. Each of the following profiles defines the views, rights, attributes, approval roles, language and currency defaults that are ultimately assigned to an end user:
• Organization: The organization is the umbrella profile for a supplier or buyer organization. Organization is the top level, and is required. An organization is tied to a view of the catalog (the entire catalog or a subset) and is responsible for creating groups and users for their specific view. An owner organization can grant other organizations read-only access to their organization’s views. In a marketplace, this allows a supplier organization to grant a buyer read-only access. Many of the catalog elements, such as items, views and rules, are owned at the organization.
• Group: Optional sub-profile within the organization, allows you to create different group profiles for views, rights, language and currency, etc.
• User: The profile assigned to the end user. User is the individual user, and is required. A user can only belong to one group, which in turn can only belong to one organization.

Jim Stewart and Shaz Khan
- 42 -
Configuration:
To manage the creation and editing of users, the System Administrator has super user rights. The System Administrator uses the "administrator" login and has full access, with an emphasis on:
Interface Management (Look & Feel, Text Localization), Configuration (Approval, Security, etc.)
Creation of Organizations, Groups, and Users.
The "administrator" user has full rights to every area of the program. In addition, nearly all-new objects (rules, views, mappings, etc.) are automatically assigned to the "administrator" user (with the exception of approval roles).
Rights cannot be removed from the "administrator" user, since this user is considered the super-user and must have full access.

SAP SRM Advanced CCM Cookbook
- 43 -
Create a Purchasing Organization
Menu Path: Users & Views > Edit Users (create or edit an organization)
1. Go to Users & Views > Edit Users.
2. Click the New tab next to the Organization selection box.
3. Enter Acme Company in the Organization Name text box.
4. Enter a Description of the organization.
5. Select the Organization Type.
If you select Supplier, enter the Image Directory Path (optional) and the Logo (optional).
If you select Buyer, enter the billing and shipping information (optional).
6. Select an Image Directory.
[You can enter a directory in which to store this supplier's item images and logo. All images loaded by the supplier using Rich Content > Content Upload will be stored here. The value may be a complete URL or the name of a subdirectory under the directory specified in itemPicturePath (Administration/Interface Mgmt/Look & Feel/Paths).]

Jim Stewart and Shaz Khan
- 44 -
7. Select an Supplier Logo.
Enter the logo's file name and extension (e.g. logo.gif). Load this image into the supplier's image directory, as described above. If you are the supplier, you can load your logo with the Rich Content loader, and it will automatically be placed into your images directory. The logo will display in Item Details view for all products loaded into the catalog by users in this supplier organization.
8. Click Apply to save the organization an continue entering values by selecting one of the other tabs (i.e., Defaults, Rights, Attribute Security, etc.). Click Save to save the organization and close the window.
9. If desired, you can now create groups and users for that organization.
Fig. 18 – Create Purchasing Organization

SAP SRM Advanced CCM Cookbook
- 45 -

Jim Stewart and Shaz Khan
- 46 -
Create or Edit a Group
Menu Path: Users & Views > Edit Users (create or edit a group)
Group Info allows you to assign and manage the Name, Description, Organization, and Site Name for the Group.
To create a new group:
1. Enter a Group Name in text box.
2. Enter a Description in the text box (optional).
3. Select an Organization from the dropdown box.
Fig. 19 – Create a Group

SAP SRM Advanced CCM Cookbook
- 47 -
Create or Edit a User Profile
Menu Path: Users & Views > Edit Users (create or edit users)
To create a new user:
Fig. 20 – Create a User
1. Enter a Name in text box (unique to all users in an organization or group).
2. Enter a Password for the user.
3. Select an Organization to tie the user to from the dropdown box.
4. Select a Group to tie the user to from the dropdown box or select None (it is not necessary for a user to have a group affiliation).

Jim Stewart and Shaz Khan
- 48 -
5. Select a Site Name if an option is available or select None (it is not necessary for a user to have site affiliation).
6. Enter an e-mail address (optional). The address is used by the Scheduler for notification of failed actions.
7. Enable Account Active to activate the user account.
8. If you check Is Organization Administrator, the user will automatically receive rights assigned at the Organization level, even if you don't flow those rights to the user level. For other (non-administrator) users, you can flow rights down to the user level or selectively add rights at the group or user level. You can have more than one administrator for each organization. Organization Administrator users receive all rights that are assigned at the organizational level using the Defaults, Rights, Attribute Security, and Views tabs in Edit Users. This checkbox does not apply to the Approval tab in eMerge. See Note 1.
9. Click Apply to save the user and continue entering values by selecting one of the other tabs (i.e., Defaults, Rights, Attribute Security, etc.). Click Save to save the user and close the window.

SAP SRM Advanced CCM Cookbook
- 49 -
Fig. 21 – Create a User
About Account Status
Fig. 22 – Account Status
A user may have an active or deactivated status. An active account allows the user to login with all assigned privileges, whereas a deactivated account prevents login. Deactivation gives the catalog

Jim Stewart and Shaz Khan
- 50 -
administrator an alternative to deleting a user account, while saving the user profiles.
The Change Account Status button provides a convenient switch to turn the account off (when advantageous), and then to reinstate it at a later date, thus saving the labor cost in recreating a user profile.
To change account status (deactivate or reactivate a user):
Click Change Account Status.
To deactivate an account:
Select it from the Active Accounts selection box.
Click Deactivate.
To reinstate a deactivated account:
Select it from the Deactivated Accounts selection box.
Click Activate.
Click Close.
Special Note: Account status will automatically be deactivated if a user exceeds the number allowed failed logins (the number is configurable).
Note 1: Special Rights for Organizations
You can create an organization so that you can assign and manage catalog rights for a group of users. For
SAP SRM Advanced CCM Cookbook
- 51 -
example, in a marketplace catalog, each supplier or buyer member is an organization with specific rights. In a buyer or supplier catalog, there may not be a need to create any new organizations; the default Administrator organization along with Groups is often sufficient.
Here are some special rights for Organizations:
Only users in the Administrator organization have rights to edit global rules.
You can assign a supplier logo to an organization, which appears on all items loaded by members of that organization.
The Administrator of an organization automatically receives rights assigned to the organization in general, and can grant rights to other users.
What Rights Can Be Assigned to Organizations, Groups, and Users?
At each level, privileges become more restrictive. Rights given to an Organization can be further refined in the Group and User profiles. In other words, group rights are always a subset of organization rights and user rights are always a subset of the group rights.
Organization Information: Enter organization name, type, and image directory path and logo (for suppliers) or shipping and billing information (for buyers).
Defaults: Choose a catalog configuration and assign languages and currencies.

Jim Stewart and Shaz Khan
- 52 -
Rights: Set roles and rights that determine the tabs the Organization can view and access.
Attribute Security: Set constraints on which attributes the organization can view and/or edit.
Approval: Define the approval roles an organization may use.
Views: Determine the catalog content an organization can view and access as well search configurations (see Build Views).

SAP SRM Advanced CCM Cookbook
- 53 -
NOTE: 2 System Administrator The System Administrator uses the "administrator" login and has full access, with an emphasis on:
• Interface Management (Look & Feel, Text Localization), Configuration (Approval, Security, etc.)
• Creation of Organizations, Groups, and Users. The "administrator" user has full rights to every area of the program. In addition, nearly all-new objects (rules, views, mappings, etc.) are automatically assigned to the "administrator" user (with the exception of approval roles). Rights cannot be removed from the "administrator" user, since this user is considered the super-user and must have full access. Organization Administrator Organization administrators are created by the Site Administrator and have access to Administer Loads, View Logs, Scheduler, Background Jobs, Users & Views, Catalog Structure, Content Management, and Products, all within the constraints of the organization’s view. This means: An organization can only access loads performed within the organization. An organization can only access log information for its view. An organization can only access jobs scheduled by the organization. In Users & Views, the organization administrator user can:

Jim Stewart and Shaz Khan
- 54 -
Create and manage all views available to the organization. Assign search behavior and policies to the views. Create and manage Groups and Users. Groups and Users can have the same rights available for assignment. In Catalog Structure, the organization administrator can manage catalog structure that is visible to that organization. In Content Management, the organization administrator can: Manage access to rules created within the organization. Rules can only be applied to content within the organization's view. Manage access to mappings created within the organization. Mapping can only be applied to content within the organization's view. Manage any products within its view. Normal User The normal user is the average end user and is created by an Organization Administrator who gives the user access to specific tabs within the rights of the organization. Only categories and products within the user's granted views may be seen under any of the tabs.

Manage Catalog Views
A view is a way to limit the catalog content that can be seen by a user or group of users. View facts:
• You can create views based on categories, attribute values, organization, approval status, or a list of catalog items.
• You can constrain a view by date, for example
for seasonal items.
• Views are not used to control which attributes are visible to a user or group of users. Attribute Security manages this functionality.
• Views are owned at the Organization level.
• A user must be assigned at least one view. • A user, group, or organization may be
assigned more than one view. Users who have access to multiple views see a drop list of views on the search page.
• The default view shows all items in the catalog.

Jim Stewart and Shaz Khan
- 56 -
Configuration
• Views are owned by an Organization, and are
automatically enabled for the administrative user for that organization.
• After a view is assigned to an organization, it
can be enabled for specific groups and users in the organization using Users & Views/Edit Users.
• The administrative user of the Administrator
Organization has access to create, edit, assign, and delete views for all organizations.
• A view created by a user in the Administrator
Organization can be enabled for any organization. Other organizations can create and assign views for their organization only.
• Views for groups are a subset of the
organization views, and views for users are a subset of the views for the group.
• If viewing rights are removed at the
Organization or Group level (using Edit Users), they are also removed at all lower levels (Group and User).
To build a basic or extended view:
1. Click New. To edit a view:
1. Select a view. 2. Click Edit. 3. Change as desired. 4. Save or Cancel your changes.

SAP SRM Advanced CCM Cookbook
- 57 -
5. Go to the Policies tab and rebuild the search policy used for this view.
To delete a view:
1. Select a view. 2. Click Delete.
Fig. 23 – Create view
View Information
Menu Path: Users & Views > Build Views > New
Fig. 24 – Create view
View Name Enter a unique and descriptive name for this view (e.g., Supplier A to limit the view to a specific supplier).
View Description Optional. Enter a View Description that briefly explains the view's restrictions (e.g., Limits item searches to Supplier A).

Jim Stewart and Shaz Khan
- 58 -
View Type Choose either Basic or Extended.
1. A Basic View allows you to limit a user's access to content based on categories, attribute values, or organization. For example, many corporate users are authorized only to purchase office supplies. For these users, you can create a basic view that shows only your office supply vendors. If building a basic view, add constraints and optionally attach a search behavior.
2. In a Cascading Extended View, views
are searched in sequence until a result is found. In a Composite Extended View, multiple views are opened simultaneously during a search. If building an extended view, select a search type and one or more existing views.
Parent View Optional. Select a parent view if you want to base your new view on an existing view's settings (e.g., category or attribute constraints). Note that the parent's search constraints will be used in addition to those you select for the child view. Organization Only available to users in the Administrator Organization. Select the organization that will own this view.
Click Apply to save this view.
Go to the Policies tab and rebuild the search
policy used for this view.

SAP SRM Advanced CCM Cookbook
- 59 -
[Note: The view is now available for the selected organization and administrative users in that organization. It can be assigned to specific groups and users with the Edit Users tab. A view owned by the Administrator Organization can also be assigned to other organizations.]

Jim Stewart and Shaz Khan
- 60 -
View Definition
Menu Path: Users & Views > Build Views > New
Add or Edit Attribute Constraint When you add multiple values for the same attribute, for example multiple supplier names, the view is expanded (all items from all listed suppliers will be in the view). When you add values for different attributes, such as Manufacturer name, this will narrow the view (only items from the selected manufacturer sold by the listed suppliers will be included in the view). Add or Edit Category Constraint You can add one or more categories as a constraint. For example, the view might show only items in the "Computer Software" category. Add or Edit Organization Constraint Use this if you want an organization to see only the content they own. The organization that loads or adds items to the catalog owns those items. [Note: Only available when logged in as Administrator.] Add or Edit Approval Constraint You can build a view that shows only approved or unapproved items. Note that items must pass all approval roles before they have a status of approved. [This feature can be used to export approved items. Create the view, assign it to a specific user, and then log in as that user to export any or all approved items in the catalog.]

SAP SRM Advanced CCM Cookbook
- 61 -
Advanced Options The Advanced Options button allows you to change the search behavior and is optional. All views use the default search behavior and default search policy unless you change them.
Fig. 25 – Maintain Attributes

Jim Stewart and Shaz Khan
- 62 -
Constraint on an Attribute Value
Menu Path: Users & Views > Build Views > Add or Edit Attribute Constraint
First you choose a common attribute (the attribute must be set to be visible in wizards). Then you can choose one or more values for the selected attribute. For example, you might choose the Sup Num attribute, and then select specific supplier numbers for this view.
Fig. 26 – Choose Attributes

SAP SRM Advanced CCM Cookbook
- 63 -
Rebuild Search Strings
Menu Path: Users & Views > Build Views
The default search string is built from all the attributes in your catalog that you have set to be searchable.
The search string for all items in a particular view is rebuilt automatically whenever you edit that view. However, you need to manually rebuild the search strings after you:
1. change Attribute Security
2. edit the Stop List
3. create or edit a Morphological scheme
4. add a new searchable attribute or change the
searchability of any attribute, or
5. add or modify the view optimized flag for any attribute.
Be aware that search may be slower while the search strings are being rebuilt. To rebuild search strings:
1. For items in a specific view, select the view and click Rebuild Search String.
2. For items in all views, click Rebuild All Search Strings.

Jim Stewart and Shaz Khan
- 64 -
Fig. 26 – Rebuild Search String

SAP SRM Advanced CCM Cookbook
- 65 -
How Views Affect Search Performance
When an end user with a view restriction searches the catalog, his or her view rights must be checked in the database before the search results are presented. This takes time.
The fastest search is a search in the default view.
If you create many views based on a specific attribute, such as Sup Name, and search speed in these views is key, be sure that you have optimized these attributes for best search speed in Quick Search. However, do not optimize all attributes, only a few key ones.
It is advisable to minimize the number of restrictions you use to create views to keep views as simple as possible. For example, if you can create a view based on 2 suppliers or based on 20 categories, create it using the 2 suppliers.
The number of views does not affect search speed, but it is advisable to minimize the number of views to simplify view management. Try to create general views that you can apply to multiple organizations, rather than creating unique views for each organization.
Create and Manage Catalog Structure
The administrator is able to add, modify or delete common attributes when required and determine which attributes are visible on which screen and if they are searchable.
Creating an Attribute

Jim Stewart and Shaz Khan
- 66 -
Menu Path: Catalog Structure > Common Attributes
Fig. 27 – Common Attributes
1. Click New. 2. Type a name for the attribute in the Attribute
Name text box. This name will be used as the key value for the attribute, even if you later change the attribute's name.
3. Select a type from the Attribute Type drop-
down box (e.g., String, Numeric, etc.). Important! You cannot change this later. If you need to change the attribute type, you will have to first delete and then re-create the attribute.
Note: When creating a common attribute of Unit type, you must specify with which unit group name it should be associated.
4. Under Select Common Attribute's Behavior, select one or more visibility options from the Visibility list box.

SAP SRM Advanced CCM Cookbook
- 67 -
5. Set the attribute characteristics from the
Actions check boxes.

Jim Stewart and Shaz Khan
- 68 -
Fig. 28 (below) – Actions checkboxes
6. Optionally, type the default text in the Default Value text box. You can set a default value for all new entries for this attribute. For example, a supplier may want to automatically populate the Sup Name field with their company's name, rather than typing this for every new item in the catalog.
7. Click Apply to create the new attribute.
Deleting an Attribute
Menu Path: Catalog Structure > Common Attributes
1. Select an attribute from the Attributes selection
box. This will populate that attribute into all the

SAP SRM Advanced CCM Cookbook
- 69 -
text boxes, list boxes, and check boxes on the rest of the page.
2. Click Delete to delete the attribute. Warning: Certain types of common attributes, called system attributes, should never be deleted, as they are required by certain processes in eMerge or BugsEye. You may change the visibility of any of these attributes, however, if you do not want them to appear in certain catalog views. Warning: If you delete an attribute that has a rule attached to it, you will not be able to load content until you either delete any rules tied to that attribute or reassign those rules to an existing attribute. Use the same process to clean up any views, mappings, connnectors, approval roles, etc. that used the attribute you are deleting.
To change an attribute's name, properties, actions, sequence, or default value
Menu Path: Catalog Structure > Common Attributes
1. Select a common attribute from the Attributes
selection box. This will populate that attribute's current values into all the text boxes, list boxes, and check boxes on the rest of the page.
2. Make any or all desired changes:
• To change the attribute's visibility property, make the appropriate selection(s) from the Visibility list box. To deselect a visibility option, press Ctrl while clicking on the option.

Jim Stewart and Shaz Khan
- 70 -
• To rename the attribute, type the new name
into the text box on the right. Note: This changes the attribute's name, which is used for all catalog displays. However, the attribute's key cannot be changed. The key is used by underlying database processes and is used for certain mapping features.
• Change the attribute's actions and sequence
number if desired.
• To change the default value, type the new
value in the Change Default Value text box. Enable the Overwrite checkbox if you want to overwrite existing data in this attribute with the new default value.
3. Click Apply. 4. If you changed the "searchable" or "view
optimized" checkboxes for the attribute, you must rebuild the search strings in order for the change to take effect.
Attribute Types
The attribute types are as follows:
String -- Use this for alphanumeric text attributes that don't need to be translated, and will be shared by all the languages in your catalog. Examples include Supplier and Manufacturer names and part numbers.

SAP SRM Advanced CCM Cookbook
- 71 -
Note: String type is not available for category attributes; if you select string, the category attributes still behave as international string type.
• Numeric -- For numeric attributes (e.g., Unit of Measure), but not including Price.
• International String -- Use this for alphanumeric text attributes that will be translated, such as Description.
• Graphic -- Use this for Picture attributes. If the picture resides in the location given in the ItemPicturePath configuration, then the valid value is the image file name (e.g., calculator.gif). You can also link to an image using a fully qualified URL (e.g., http://www.website.com/pictures/calculator.gif).
• URL -- Use this for URL attributes, such as links to web sites.
• Date - Use this for Date type attributes. • Currency -- Used for the Price attribute. • Unit Data -- Use this type if you will be using
the Unit conversion features on this attribute. The unit group you wish to use must already exist before you create the unit type attribute.
• Specification -- Attributes with this type are typically used to capture incoming data that is more detailed than you are currently displaying in your catalog. You can store additional information in pipe-delimited format in a specifications type attribute, and later extract that data when moving the item to a different category.
• GUID is used only for the Global ID attribute; this cannot be selected or modified by the user.

Jim Stewart and Shaz Khan
- 72 -
Attribute Visibility When you create or edit a common or category attribute, you can assign or change the tags that determine where this attribute will be visible within the various search result and editing screens. Multiple selections are allowed. If a visibility option is not selected, then the attribute is set to hidden. The visibility options are as follows:
• Visible In Table Display -- Attribute and values are displayed in the standard table display of search results.
• Visible In Item Detail -- Attribute and
values are displayed in the Item Detail view.
• Visible In Compare -- Attribute and values are displayed in the Compare search result view.
• Visible in Shopping Cart -- Attribute and
values are displayed in the Shopping cart window.
• Visible in Advanced Search -- Attribute and
values are displayed on the Advanced Search tab. By default, all common attributes are not visible, whereas all category attributes are visible. The attribute will display in Advanced Search as a drop-down list option, allowing users to conduct a search by selecting any of the values for the attribute. An attribute enabled for Advanced Search must be Definable, therefore, when an attribute is enabled for Advance Search, the Definable check box is automatically enabled

SAP SRM Advanced CCM Cookbook
- 73 -
as well. However, if at a later date visibility in Advance Search is disabled, the Refinable check box will not automatically be disabled.
• Visible In Wizards -- Attribute and values
are displayed in attribute filtering for Wizard functionality, such as Reports.
• Visible In Editing -- Attribute and values are
displayed for editing in the Product Editor and other editing functions.
Visible In Approval -- Attribute and values are displayed for editing in the Approval functions.

Jim Stewart and Shaz Khan
- 74 -
Attribute Actions (Characteristics)
The following characteristics can be set for common or category attributes.
• Searchable: Renders the attribute searchable, which means that content in that attribute is automatically added to the search string used to find products. For optimal searching accuracy, check this box only for attributes that are essential to allow end users to easily find products (e.g., Description, Supplier Name, Sup Part Num, Mfg Name, Mfg Part Num). Long Description should not be set as searchable, because the database limitation for the search string is 4000 characters, and Long Description can contain 4000 characters. If you set too many attributes to be searchable, so that some of the content exceeds the 4000 character limit, some content will not be searched.
If you enable or disable the Searchable checkbox for any attribute, including a new attribute, you must rebuild the search strings.
o View Optimized: If checked, this attribute is optimized for searching for a user logged in with a view constraint.
o Quick Search performance is faster for a view built on an optimized attribute than a non-optimized attribute.
o Use this feature sparingly for best results; choose one or two catalog attributes to optimize.
o The attribute must also be set to searchable.
o Do not use for date type attributes.

SAP SRM Advanced CCM Cookbook
- 75 -
o If you enable or disable the View Optimized checkbox for any attribute, including a new attribute, you must rebuild the search strings.
• Required -- Requires that the attribute be
populated with a value. Check this box only if you are certain a value can be entered for every item that has this attribute.
• Refinable -- Renders the attribute refinable,
which allows for parametric refinement and is required for attributes that are visible on the Advanced Search tab. Checking this box allows for parametric refinement by displaying a button-style heading for the attribute in the search results table. End users can click this button to refine their search on values for that.
• Loggable -- Renders the attribute loggable,
so that changes to this attribute can be used for various functions. Loggable changes are displayed in the Change Log (Administration > View Logs > Change Log). If changes are made to a loggable attribute, the item will be extracted when you perform a delta difference export. Also, you can generate an Item History report showing changes made to an item's loggable attributes.
• Editable -- Renders the attribute editable, which allows its values to be changed. Commonly, this box is checked for most attributes.

Jim Stewart and Shaz Khan
- 76 -
Tip: You can create an attribute that always has the same value and cannot accidentally be modified. For example, if your company is a supplier, you could enter your company's name in the Sup Name attribute as the default value, and then deselect Editable, this will ensure that the Sup Name attribute cannot be modified.

SAP SRM Advanced CCM Cookbook
- 77 -
Attribute Sequence Numbers After attributes are created, they may be modified at any time by returning to the Common Attributes or Category Attributes tab. You have the option of renaming, deleting, changing the attribute's visibility and searching properties, or assigning the attribute a sequence number. The attribute's sequence number determines where that attribute's column will be displayed in the table display (e.g., first, second, or third column from the left). Note that the following columns don't have numbers: Category is always displayed in the far left
column. Since it does not have a number, so you can think of it as "0."
Details always appears between the second and third attributes. You can turn off Item Details if desired at Administration/Interface Management/Look & Feel/Look & Feel (UsingItemDetail).
By default, Accessories appears after the attribute with a sequence number of 4. You can change the name, sequence, or hide this column at Administration/Interface Management/Look & Feel/Look & Feel (extendedQueryColumnName, ExtendedQueryIndex).
If values are not assigned, the default value is
null or 0. Common attributes with null values are not displayed. Category attributes with null values are randomly displayed to the right of all attributes that have values.

Jim Stewart and Shaz Khan
- 78 -
When assigning numbers, you may want to employ some system of numeric padding between each attribute (e.g., 1, 10, 20, 30, etc.). This makes it possible at a future date to shift an attribute's column position in the table without having to change the sequence number for all the other attributes.

SAP SRM Advanced CCM Cookbook
- 79 -
Attribute Length The default attributes have a maximum length of 700 characters, except NRCA, which holds up to 2000, and Long Description, which can hold up to 4000 characters. Any new attributes you create have a limit of 700 characters (Oracle). If using eMerge, you can set rules to restrict the number of characters entered in each attribute.

Jim Stewart and Shaz Khan
- 80 -
Key Values and Name Values It is important to understand the difference between the name value and key value, because for certain catalog functions you will need to use the key value, which is English for the default attributes.
• All attributes installed in the catalog by default are in English. Both the key and the name are in English.
• The name can be translated and/or changed
as often as you wish. The name displays to end users in the catalog.
• The key cannot be changed.
• Once you enable another language, you can
rename the attributes in that new language. However, the keys remain in English.
• When you create a new attribute, the name is
used as the key. For example, if you create a new attribute with a French name, the key is also in French.
• To find an attribute's key value, select the
attribute, then, see the text box labeled Attribute Key.

SAP SRM Advanced CCM Cookbook
- 81 -
Content Rules Overview See also: Create and Edit Rules, Create and Edit Approval Role, Assign Approval Roles to Users, Sweep Catalog Content The Approval Process is to ensure that data that is added or modified on the staging server is verified prior to publishing it to the production server. Follow these steps for the initial setup of your approval process, or to add or modify Rules or Approval Roles.
1. Write Rules. • The Rules define minimum standards for content.
2. Create Approval Roles. • Each Role associates editing and approval responsibilities for specific common attribute(s).
3. Assign the Approval Roles to Users. • For example, when an item fails a rule that is associated with the Description, the user who has been assigned the Approval Role that includes the Description attribute is notified.
4. Sweep Catalog. • If the catalog contains content when a new Rule is created, it is necessary to Sweep existing items with the Rule.

Jim Stewart and Shaz Khan
- 82 -
Create Business Rules to Approve Product Information Also see: Content Rules Overview, Create and Edit Approval Role, Assign Approval Roles to Users, Sweep Catalog Content
To ensure the quality of the catalog’s content it is necessary to create and apply rules to attribute values of existing items, updated items, and new products entering the catalog. The Rules process provides automated tools to check, verify, flag, and alter incoming content against set requirements. Rules are created through Rules Management and then applied when adding, editing, loading or sweeping content. This validation process ensures that style guidelines are enforced and the integrity of the catalog is maintained.
Rules in eMerge are business rules that define minimum standards for content. In conjunction with the rest of the approval process, the rules prevent incomplete or inaccurate data from being published to the production server.
1. Rules are typically associated with common attributes, including those created by the customer.
2. “Load” rules are active during content loads and also when items are added or edited via the Product Editor. Load rules can also be used during a Sweep.
3. “Sweep” rules are not active, but are used to validate content already in the catalog.
4. Rules can be applied against all content or can be associated with the data for specific supplier(s).
5. Rules can be ordered to run in a certain sequence.

SAP SRM Advanced CCM Cookbook
- 83 -
6. An e-mail message can be sent to report on rejected items.
7. Three actions can be taken for items which fail rules
Do not load Load and reject Load and approve (rarely used)
Rule Name & Description
Menu Path: Content Mgmt > Rule Mgmt > Rules
1. Click the New button to reset the screen, if necessary. 2. Enter a name for the rule in the Rule Name text box.
• There is a limit of 64 characters; do not use “ (exclamation) in your rule name.
3. Enter a description for the rule in the Rule
Description field.
Fig. 30 – Create and Edit Rules entering Rule Name

Jim Stewart and Shaz Khan
- 84 -
Rule to Apply
4. Highlight a rule in the Rule to Apply drop-down menu.
• Rule explanation is automatically generated in the Rule Details box.
[See Note 1 below for a complete list of Rule to Apply drop-down menu listings.]
Fig. 31 – Rule to Apply and Details Listing
Attribute, Priority & Sup Name
Menu Path: Content Mgmt > Rule Mgmt > Rules
5. Highlight an attribute in the Attribute to Apply Rule to drop-down menu.
• All common attributes are listed.
6. If required, enter values in the Value 1 box.
• For most rules, the separator between multiple values is a comma, no space (i.e.,

SAP SRM Advanced CCM Cookbook
- 85 -
EA,GAL). The Rule Details box specifies that the separator is to be a pipe |.
7. Complete any other rule-specific fields, if they are presented. 8. If you wish to determine the order in which your rules are run, enter a value in the Rule Priority box.
• Note that the values do not have to be unique. If a group of rules should all be run before a second group of rules, you can number the first group 1 and number the second group 2.
9. Select the radio button for All Sup Name for Rule Applies to Sup Name. Or, to associate the rule with a specific supplier, highlight that supplier’s name, which changes the radio button selection to Select Sup Name.
Fig. 32 – Attribute to Apply to Rule

Jim Stewart and Shaz Khan
- 86 -
Load, Sweep, Global, When Item Fails & Email Notification
10. Selecting Load for Run rule at will make the rule active during loads and edits. Selecting Sweep will make the rule active only when selected for Sweep operations. 11. Check the box for the Global Rule option if you want this rule to apply to people associated with other Organizations in the staging catalog. [See Note 2 below for an explanation on who owns a rule.] 12. Highlight an action in the When item fails rule drop-down menu. This determines what happens to content that fails the rule.
• If Do not load is selected, items which fail rules are not loaded to the catalog, but written to the Error File.
• Load and reject is employed most often. This option allows items that fail the rule to be loaded to the catalog and flagged for editing.
• Load and approve is rarely used. Items that fail the rule are loaded and approved, and also written to the Error File.

SAP SRM Advanced CCM Cookbook
- 87 -
13. If desired, enter an email address in the E-mail Notification box, and select T (True) in order to receive an email with the items that failed the rule upon load.
Fig. 33 – Email notification indicator 14. Click the Save button.
• Reset will change the values on the screen back to the way they were since the last Save. • Delete (at the top of the screen) deletes the rule currently displayed.
Fig. 34– Save, Reset, and Load

Jim Stewart and Shaz Khan
- 88 -
Notes NOTE 1 A) The following rules can be applied for either Load or Sweep.
• Required: Tests whether the current value for the attribute is null (empty).
• Must equal the value in value 1: Tests
whether the attribute value equals Value 1. Valid values are numeric or string types. Multiple, comma-separated values may be entered into Value 1, such as a list of valid UOM values (e.g., EA,PK,PD,ST).
• Must be a numeric value: Tests whether the
attribute's value is numeric.
• Must be between Value 1 and Value 2: Tests whether the attribute's value is within the range of Value 1 and Value 2 (numeric values required).
• Must be greater than Value 1: Tests
whether the attribute value is greater than Value 1 (numeric value required).
• Must be less than Value 1: Tests whether
the attribute value is less than Value 1 (numeric value required).
• Character length must be less than Value
1: Test whether the attribute's character length is less than the number specified in Value 1 (numeric value required).

SAP SRM Advanced CCM Cookbook
- 89 -
• Spell Check: Applies a spell check to the value of the specified attribute.
• Value Must Match the Specified Pattern:
Checks the value of a specified attribute to ensure that it matches the pattern as defined by the Regular Expression syntax entered into the Expression to Compare field. A Regular Expression example:
• ^[0-9]{3}-[A-Z]{3}$ verifies that a Part
Number begins with three digits, and ends with three upper-case letters, with a dash between the two groupings.
• Validate URL: Tests whether the specified URL is valid. This can be used for any file path, for example if you want to use a sweep to check to be sure if all image file names are correct.
• Valid HTML: Validates all HTML syntax for the
specified attribute.
• Character length must be greater than Value 1: Tests whether the character length for the specified attribute is greater than the character length as defined in Value 1.
• Check Category Specific Attributes
against Common Attributes: This rule is used to assure that values in the category attributes (e.g. color, length, width, material, etc.) also exist in the product Description or Long Description. If the category attribute values are not in the common attribute you select (e.g. Description), the item will fail this rule.

Jim Stewart and Shaz Khan
- 90 -
• String Compares: Compares the attribute selected from Attribute to Apply Rule to to the entry in Attribute to Compare. Select the operator for the comparison in Operator (=, !=).
• Numeric Compares: Compares the attribute
selected from Attribute to Apply Rule to to the entry in Attribute to Compare. Select the operator for the comparison in Operator (=, !=, >=, <=, <, >).
• String type attributes must be populated:
Requires that all attributes of string type be populated. Items with string type attributes that are blank (have null values) will fail. You can apply this rule to all common or all category attributes.
• Numeric type attributes must be
populated: Requires that all attributes of numeric type be populated. Items that have numeric type attributes that are blank (have null values) will fail. You can apply this rule to all common or all category attributes.
B) The following rules are designed for use only with Load.
• Percentage increase must be less than Value 1: Tests whether an attribute's value (e.g., 22.95 for Price) is a value that falls within a permitted percentage increase defined in Value 1 (e.g., 10 for 10%, .5 for .5%, etc.) of the current price for that product. Valid values are numeric types.

SAP SRM Advanced CCM Cookbook
- 91 -
• Percentage decrease must be less than
Value 1: Tests whether an attribute's value (e.g., 22.95 for Price) is a value that falls within a permitted percentage decrease defined in Value 1 (e.g., 10 for 10%, .5 for .5%, etc.) of the current price for that product. Valid values are numeric types.
C) The following rules are designed for use only with Sweep.
• Item Must Not be a Duplicate: Checks for duplicate items, either in a specified category or across all categories in the catalog, based on selected attribute keys. The Attribute to Apply Rule to is used only to tie the rule to an approval role. Select attributes on which to perform the duplicate check in the Attribute Keys to Check field. To check for duplicates across all categories, enter a 'T' in the Check all Categories field, or enter 'F' to check for duplicates within a specified category. All duplicate items, including those found in other categories, will be marked as rejected. Caution: Do not use this rule when loading catalog items. Use the duplicate check function built into the loader instead.
• Unique values must match criteria: Use
this rule to perform a sweep of items to determine which ones have a unique occurrence of values for the specified attribute. Select one of the following relational symbols in Operator (=, !=, >=, <=, <, >) and enter a positive integer in Number of Unique Values. For example, the rule could be applied to the Price attribute for a group of items to flag those prices which occur ten or

Jim Stewart and Shaz Khan
- 92 -
more times. If Operator is specified as < and Number of Unique Values is specified as 10, then only those items being swept that have a price that occurs fewer than ten times will pass the rule.
• Unique value patterns must match
criteria: Use this rule to perform a sweep of items to determine which ones have unique value patterns for a specified attribute. Select one of the following relational symbols for Operator (=, !=, >=, <=, <, >) and enter a positive integer for Number of Unique Values.
• Example: When this rule is applied to
a group of items, the sweeper will construct patterns for the data in each field. For instance, the following Part Numbers -- 1235AB, 1538CD, and 6521QR -- have the following pattern -- [0-9] {4} [A-Z] {2}, whereas, part number AB53693 has a different pattern -- [A-Z] {2} [1-9] {5}. The rule may then be applied to the above Part Numbers to flag those items having a part number pattern with a rare occurrence. If Operator is specified as > and Number of Unique Pattern is specified as 10, then any items being swept having a pattern occurrence that occurs ten or fewer times will fail the rule.
• Length must be within n standard
deviations: Use this rule to sweep items and determine if the character length for a specified attribute value falls within the standard deviation of the mean (as defined in

SAP SRM Advanced CCM Cookbook
- 93 -
Value 1). This rule is useful in determining if the actual character length of a value for a specified attribute is excessively long or is truncated. Only whole numbers should be used in Value 1 (i.e., no fractions or other non-integers).
• Value must be within n standard
deviations: Use this rule to sweep items and determine if the numeric value for a specified attribute falls within the standard deviation of the mean (as defined in Value 1). This rule is useful in determining which values are either excessively high or excessively low. Only whole numbers should be used in Value 1 (i.e., no fractions or other non-integers).
NOTE 2 Who Owns a Rule? (Global Rules) A rule is owned and used by the organization of the user who created. In contrast, a global rule is used by the entire system, although it can only be created and edited by the Administrator organization. Currently active global rules are applied to all content added, loaded, or edited in the catalog, or they may be applied to the entire database by using the Sweep function. Users in the Administrator organization can create global rules that can be used for all content loads and all editing throughout the catalog. Rights to view, run, edit, and delete rules are applied at the Organization level, not by individual users. So you can run, view, edit, and delete any rules created

Jim Stewart and Shaz Khan
- 94 -
by other users in your organization. And if you are a member of the Administrator Organization, you can run, view, edit, and delete any rules created by any catalog user.
If you are in the Administrator organization and want to create a rule that will only be used and viewed by your organization, do not create it as a global rule.

SAP SRM Advanced CCM Cookbook
- 95 -
Create and Edit Approval Role Also see: Create and Edit Rules, Assign Approval Roles to Users, Sweep Catalog Content
Approval Configuration allows the Catalog Manager to create and manage approval roles and workflows. A role is a distinct configuration that gives groups or individual user’s rights to approve common attributes. The approval roles can be set up in a parallel or sequential workflow, or in a combination of the two.
Create an approval role for each common attribute that will have a rule associated with it. Approval roles can encompass more than one attribute. Before applying rules through loads, edits, or sweeps, ensure that every attribute that is associated with a rule is also associated with an approval role. Otherwise you will not receive notification when items fail rules.
Creating a new Approval Role
Menu Path: Administration > Configuration > Approval Configuration
1. Click the New button to reset the screen, if necessary. 2. Enter a name in the Approval Role Name text box. 3. Make a single or multiple selections from the Attributes to Approve selection box, for the attributes for which the role has approval rights. 4. Click the Add button to populate the selected attributes into the selected attributes box.

Jim Stewart and Shaz Khan
- 96 -
5. To set up an approval work flow sequence, from the Next in the Approval Workflow drop-down box you can choose which approval role must follow the newly created role. This feature is optional. 6. Select Yes for Auto approve items based on rules if you want items that pass the rules that are associated with this role to automatically receive an "Approved" status. Select No if you want items that pass rules to receive the status of "Rejected." This allows a separate validation step to be performed (workflow).
Fig. 35 Approval Confirmation

SAP SRM Advanced CCM Cookbook
- 97 -
Making changes or deleting an Approval Role
Menu Path: Administration > Configuration > Approval Configuration
To make changes to an approval role: 1. Select an approval role from the Current
Approval Roles dropdown box. 2. Click Save to commit the changes.
To delete an approval role:
1. Select an approval role from the Current Approval Roles dropdown box.
2. Click Delete. 3. At the prompt, click OK to delete the role.
To activate approval workflow: Ensure enforceWorkflow (at Administration>Interface Mgmt>Look & Feel>Approval) is set to Yes (the default) to enable role-based approval workflow.

Jim Stewart and Shaz Khan
- 98 -
Create and Edit Actions
Also see: Content Rules Overview, Sweep Catalog Content
Defines rules for creating a "cleansed" value of any common attribute for the purpose of improved search performance or to globally change a value (e.g., removing white space, removing specified characters, etc.)
You can define action rules that replace text on loading, for example replace IBM with International Business Machines or replace each with EA. You can also create a "cleansed" synonym of any common attribute for the purpose of improved search performance. A typical use of this feature is manufacturer or supplier part number compression. For example, a part number of #123/45-87 is rendered 1234587 for enhanced search performance.
• Actions can be enabled for Loads and Edits, or can be run against existing content in the catalog using the Sweep tab. • For the steps to create, edit, delete, export, load, or enable an action rule, see Working with Rules, Actions, and Descriptions.
• Please see the help file, Field Descriptions for Rules, for details on what to enter in each field as you create an action rule. Help is provided on the screen in the Action Details field for each action rule.

SAP SRM Advanced CCM Cookbook
- 99 -
Action Name & Description
Menu Path: Content Mgmt > Rule Mgmt > Rules 1. Click the New button to reset the screen, if necessary. 2. Enter a name for the action in the Action Name text box.
• There is a limit of 64 characters; do not use “ (exclamation) in your action name.
3. Enter a description for the action in the Action Description field.
Fig. 36 – Create Action and entering a desciption

Jim Stewart and Shaz Khan
- 100 -
Action to Apply
Menu Path: Content Mgmt > Rule Mgmt > Rules
4. Highlight a rule in the Action to Apply drop-down menu.
• Rule explanation is automatically generated in the Action Details box.
[See Note 1 below for a complete list of Action to Apply drop-down menu listings.]
Fig. 37 – Action details

SAP SRM Advanced CCM Cookbook
- 101 -
Attribute, Priority & Sup Name
Menu Path: Content Mgmt > Rule Mgmt > Rules
5. Highlight an attribute in the Attribute to Apply Rule to drop-down menu.
• All common attributes are listed.
6. If required, enter values in the Value 1 box.
• For most rules, the separator between multiple values is a comma, no space (i.e., EA,GAL). The Rule Details box specifies that the separator is to be a pipe |.
7. Highlight an attribute in the Put Action Result In drop-down menu.
• All common attributes are listed. 8. If you wish to determine the order in which your rules are run, enter a value in the Rule Priority box.
• Note that the values do not have to be unique. If a group of rules should all be run before a second group of rules, you can number the first group 1 and number the second group 2.
9. Select the radio button for All Sup Name for Rule Applies to Sup Name. Or, to associate the rule with a specific supplier, highlight that supplier’s name, which changes the radio button selection to Select Sup Name.

Jim Stewart and Shaz Khan
- 102 -
Fig. 37 – Attribute applies to and result destination

SAP SRM Advanced CCM Cookbook
- 103 -
Load, Sweep, Global Rule
Menu Path: Content Mgmt > Rule Mgmt > Rules
10. Selecting Load for Action run at will make the active active during loads. Selecting Sweep will make the action active only when selected for Sweep operations. 11. Check the box for the Global Rule option if you want this action to apply to people associated with other Organizations in the staging catalog. [See Note 2 below for an explanation on who owns an action.]
Fig. 38 – Global Rule Option 12. Click the Save button.
• Reset will change the values on the screen back to the way they were since the last Save. • Delete (at the top of the screen) deletes the action currently displayed.
Fig. 38 – Save, Reset, Load actions

Jim Stewart and Shaz Khan
- 104 -
Using Action Rules
Action: Remove White Space Description: Removes white space from the content value of a selected attribute (i.e., Attribute to Apply Rule to) and puts the result in a selected attribute (i.e., Put Action Result In). Example: The content values for Manufacturer Part Number might contain spaces for some items (e.g., NAT0 1688). To achieve catalog-wide consistency, you could create a sweep rule to remove the white space from the part number. When the rule is activated on sweep, NAT0 1688 is converted to NAT01688. Action: Remove Characters Listed in Value 1 Description: Removes all characters listed in Value 1 from the selected attribute (i.e., Attribute to Apply Rule to) and puts the result in another attribute (i.e., Put Action Result In). Case sensitive. All characters you list in Value 1 will be removed from the selected attribute. Example 1: The catalog might contain alphameric part number strings that have the prefix, NATO, and you wish to remove the prefix. Create a sweep rule using this action, and enter NATO in Value 1. When the rule is activated on sweep, NATO is removed from the part numbers (e.g., NATO1688 becomes 1688). However, be aware that any N, A, T, or O in the part number will also be removed (NATO13N6T becomes 136). Example 2: To remove -, $, s, and S from an attribute, enter the following in Value 1: (-,$,s,S).

SAP SRM Advanced CCM Cookbook
- 105 -
Results are as follows: • 23-40 becomes 2340 • $3.80 becomes 3.80 • ASDF becomes ADF • S-2240 becomes 2240 Action: Replace Value 1 with Value 2 Description: Replaces Value 1 for the selected attribute (i.e., Attribute to Apply Rule to) with Value 2 and puts the result in a selected attribute (i.e., Put Action Result In). You must enter the exact strings (case sensitive) in both values and do not enter commas. Numeric characters are allowed in Value 1 and Value 2. Example: If Value 1 = (Red) and Value 2 = (Burgundy) for a sweep action, the following will occur when the rule is run: • Available in Red, Blue, and White becomes Available in Burgundy, Blue and White Action: Replace Values from List Description: Similar to Replace Value 1 with Value 2, except it uses a list to define Value 1 and Value 2. Case sensitive. At the prompt, Affect whole words only(T/F)?, enter T to replace only when the whole word matches (replace EA if found as a whole word, but not when found within another word such as EACH). Note that this option does not apply to Asian languages; set to F if using an Asian language. Action: Truncate Description: Truncates the attribute value for the selected attribute (i.e., Attribute to Apply Rule to), based on the length specified in Value 1 field and places the result in a selected attribute (i.e., Put Action Result In). Example: Your catalog might contain part numbers that end with a four character, category-specific

Jim Stewart and Shaz Khan
- 106 -
string (e.g., 2344-0000 [Pens category], 2822-1111 [Audio Tapes category], etc.). If Value 1 = 5 for a sweep action, then the following will occur for the selected attribute when the rule is run: • 2344-0000 becomes 2344 • 2822-1111 becomes 2822 Action: Sequential Number Generator Description: This action rule will create sequential numbers in a database based on an evaluation of an item's content. It should be run as a Sweep. For example, you might want to use this rule to sequentially number all parts or products from a certain supplier. The rule can find all parts or products from a certain supplier, then, number each one sequentially. To use this rule: 1. First, your dba must create a database object (a sequence field) in your database and give it a name of your choice. 2. In Attribute to Apply Rule to, enter the name of the attribute that contains the text or number that you want to be used as a key to determine if a sequential number should be generated. For example, if you want to increment a number for every item from MySupplierA, the attribute would be Sup Name. 3. In Value 1, enter the text or number, that will cause a sequential number to be generated when found in the attribute you just specified. In our example, this value would be MySupplierA. 4. In Value 2, enter the name of the database sequence that was created by your dba. 5. In Put Action Result In, enter the name of the attribute where you want to put the sequential number. In our example, you might put the result in SupplierSequence.

SAP SRM Advanced CCM Cookbook
- 107 -
6. Run the action as a Sweep. It will populate the next number in the sequence for all items found in the catalog that meet your rule requirements, but that do not yet have a number. Action: Lower Case Description: Converts the value in the specified attribute (i.e., Attribute to Apply Rule to) to lower case characters and puts the result a selected attribute (i.e., Put Action Result In). Action: Upper Case Description: Converts the value in the specified attribute (i.e., Attribute to Apply Rule to) upper case characters and puts the result a selected attribute (i.e., Put Action Result In). Action: Title Case Description: Converts the value in the specified attribute (i.e., Attribute to Apply Rule to) title case characters and puts the result a selected attribute (i.e., Put Action Result In). Action: AutoClass Description: This action rule runs AutoClass™ technology, which suggests categories for your unclassified items. See AutoClass help file for complete details on how to create and use an AutoClass action. Action: Calculate Currency Attributes Description: Add, subtract, multiply, or divide two selected Currency type attributes (i.e., Attribute to Apply Rule to) and put the results in a selected Currency or Numeric attribute (i.e., Put Action Result In). Action: Calculate Date Attributes

Jim Stewart and Shaz Khan
- 108 -
Description: Subtract two selected Date type attributes (i.e., Attribute to Apply Rule to) and put the result (number of days) in a selected Numeric attribute (i.e., Put Action Result In). Action: Calculate Date Attributes Absolute Value Description: Add a Date type attribute to a numeric value or subtract a Date attribute from a numeric value. Put the results in a Date attribute (i.e., Put Action Result In). Action: Calculate Date and Numeric Value Description: Add a Date type attribute to a Numeric attribute or subtract a Date type attribute from a Numeric attribute. Put the results in a Date attribute (i.e., Put Action Result In). Action: Calculate Numeric Attribute Description: Add, subtract, multiply, or divide two selected Numeric type attributes (i.e., Attribute to Apply Rule to) and put the results in a Numeric or Currency attribute (i.e., Put Action Result In). Action: Calculate Numeric Attributes Absolute Value Description: Add, subtract, multiply, or divide a numeric attribute (i.e., Attribute to Apply Rule to) by an a numeric value. Put the results in a Numeric, Currency or String attribute (i.e., Put Action Result In).

SAP SRM Advanced CCM Cookbook
- 109 -
Assign Approval Roles to Users Also see: Create and Edit Rules, Create and Edit Approval Role, Sweep Catalog Content
When an item fails a rule that is associated with the Price, the user who has been assigned the Approval Role that includes the Price attribute is notified. The new Approval Role will first have to be associated with the Organization (and also with the Group, if appropriate). Assigning an approval role Menu Path: Users & Views > Edit Users > Edit > Approval 1. Select Administrator Organization from the Organization box and click the Edit button. 2. Click on the Approval tab. 3. Select the role(s) to be associated with users of this Organization from the Available Approval Roles box. 4. Click Add. 5. Click Save. 6. On the Add new rights to screen, select Users and Groups from the dropdown box. 7. Click Save.

Jim Stewart and Shaz Khan
- 110 -
The new Approval Role is automatically associated with everyone associated with this Organization.
8. To check that the Approval Role is associated with the administrator login, select administrator in the Users box and click the Edit button. 9. Click on the Approval tab. 10. If desired, enter an Email address for this user from the User Info tab. This facilitates communication among the people
working on the approval process. Users can select the icon on the Show Workflow screen to generate an email to another user.
11. Click the Save button.
Fig. 39 – Approval Roles

SAP SRM Advanced CCM Cookbook
- 111 -
View My Approval Menu Path: Content Mgmt > Approval > My Approval 1. Click on a link to view a list of the items that are rejected for that role. 2. Click the Select All button to view all items that are rejected (for any approval role).
Fig. 40 – Approval Rules

Jim Stewart and Shaz Khan
- 112 -
Show Workflow
Menu Path: Content Mgmt > Approval > Show Workflow 1. Click on the name of an approval role to view
whether the role is set to auto-approve and the users associated with the role.
• If a letter mail symbol appears next to a user name, you can generate an email to that person from this screen (if your email options have been configured).
2. To change the flow of rules, return to the Approval Configuration screen. 3. To change the users associated with a role, return to the Edit Users screen.
Fig. 41 – Return to Edit Users

SAP SRM Advanced CCM Cookbook
- 113 -
Producing a Schema Template
Also see: Load Content From Multiple File Formats, Create and Manage Catalog Structure
Schema Template facilitates the addition of new data to the catalog by downloading all attribute names for the selected categories into columns in an Excel spreadsheet. After items have been added to the template, it is saved as a text file and loaded into eMerge.
The Schema Template is derived from common and category attributes that describe a group of items within a specific category. If an attribute has not been created within eMerge, then it will also not appear within the Schema Template. An attribute can be added to the template during the course of being populated with suppliers data, and then the attribute will be created during the upload.
Select the Template Export Method
Menu Path: Products > Schema Template
1. Check the Select Category radio button. • Or, if you want every category downloaded to the spreadsheet, select All Categories.
2. Conduct a search for the category in which the new products belong.
• Categories can also be selected by clicking the Show All button and making selections from the resulting list.
3. Highlight the desired category in the category list.

Jim Stewart and Shaz Khan
- 114 -

SAP SRM Advanced CCM Cookbook
- 115 -
4. Click the Add button to select the category. • See the category populate the Add field.
5. If items will be added to additional categories, add them to the Add field in the same way. 6. Click OK. (Microsoft Excel will open).
Fig. 42 – Select Template Export
Microsoft Excel
Menu Path: Products > Schema Template > OK
1. If desired, delete any columns that will not be completed. 2. To complete the template, enter the item information into the spreadsheet fields.
• Do not make changes to the header rows. • Be sure that the category name is included with each row of data. • Maintain the blank line that precedes each header row, but do not leave any other lines in the spreadsheet, within a category.

Jim Stewart and Shaz Khan
- 116 -
3. To save the content in text format, select Save As from the File menu.
• If you’re using Internet Explorer version 5.5, selecting Save As from the File menu will not work properly. • The F12 key can also be used to save the spreadsheet.
4. Select Desktop from the Save in: drop-down box. Enter a name in the File name: field. Ensure that the Save as type: field contains Text (tab delimited) (*.txt). Click the Save button.
• Alternatively, the file could be saved in Excel’s (xls) format, however eMerge will not load Excel spreadsheets. The Excel file would need to be converted back to text prior to loading.
5. When Excel prompts you if you want to save only the active worksheet, click OK. 6. When Excel prompts that the worksheet may contain features that are not compatible with the Text format and asks you to confirm, click Yes.
Fig. 43 – Excel worksheet example

SAP SRM Advanced CCM Cookbook
- 117 -
Format Spreadsheet Files
A description of how the spreadsheet files are supposed to be formatted.
1. eMerge does not load spreadsheet files; they must be saved as tab delimited text.
2. To ensure that content files produced in a
spreadsheet program will load correctly, check the formatting both in the spreadsheet and in the text file you produce.
3. While still in the spreadsheet program (e.g.,
Microsoft Excel), check your file for the following elements.
4. There must be a blank line between categories
(unless the file does not contain category attributes). A blank line at the top of the file is optional.
5. There cannot be any blank lines within a
category section.
6. Each new category must start with a “header row” that contains the attribute names. Attribute names cannot be duplicated.
7. Each line must contain the category name at
the far left. (There are exceptions to this that will be discussed later.)
8. Category names may vary from those in the
catalog, if the appropriate options are chosen during the load or a Mapping Group is created.
9. Attribute names may vary from those in the
catalog, if they are mapped during the load.

Jim Stewart and Shaz Khan
- 118 -
10. There cannot be any carriage returns within cells (the text is truncated at the first carriage return).
11. Cells with leading zeros (e.g., Sup Part Num)
must be formatted as Text.
12. Cells with over 256 characters must be formatted as General (otherwise the text is truncated).
13. Cells with prices should be formatted as
Number, not Currency. (An item with "$" in the Price field will not load.)
14. Cells with dates that will be loaded into an
attribute that is a type of date must be formatted as required by your database. Refer to eMerge online Help for further information.

SAP SRM Advanced CCM Cookbook
- 119 -
Format Text Files A description for the formatting of text files
and the importance of maintaining the file correctly tab-delimited.
1. The text file must not contain any hidden characters.
2. After saving the spreadsheet as tab-delimited
text, use the following procedure to check that there are no tabs at end of lines or on blank lines.
3. Open your tab-delimited text file in a text
editor such as TextPad (www.textpad.com).
4. Position the cursor at the beginning of the file.
[In TextPad click the Ctrl-Home keys.]
5. If the option is available, choose to view the tabs and spaces in the file. [In TextPad select Visible Spaces from the View menu.]
6. Search for tabs at the end of lines. [In
TextPad select Replace from the Search menu.]
7. If your text editor supports regular
expressions, use the Replace feature to remove the tabs. [In TextPad complete the Replace dialog box with these values: • If you want to confirm that all tabs at the end of lines have been removed, click Replace All again and receive the following message: Cannot find regular expression • Close the Replace dialog box.]

Jim Stewart and Shaz Khan
- 120 -
8. If your text editor program does not support regular expressions, check for tabs manually. [Position your cursor at the end of each line and ensure that it touches a character to the left. If not, hit the Backspace key until it meets the last character in the line.]

SAP SRM Advanced CCM Cookbook
- 121 -
Load Content From Multiple File Formats Also see: Produce a Schema Template, Schedule Automated Jobs
Procedure to batch load content from various file formats into the eMerge staging catalog or BugsEye production catalog.
Select File
Menu Path: Products > Load
1. Select the File Type. a. BMEcat 1.2 b. cXML 1.1 c. xCBL 2.0 d. eCX XML e. xCBL 3.0 f. MSXML g. CIF 2.1 h. OEX 6.0 i. CIF 3.0 j. Text File k. cXML 1.0
2. Enter the name of the File to load or click
Browse… to select a file on the system. 3. Load into Catalog. You can load a file directly
into your catalog so that your adds, updates, and deletes display immediately in your staging and production environments.
Fig. 44 – Select file for loading

Jim Stewart and Shaz Khan
- 122 -
4. Save Catalog. You can save a file to the server so that your adds, updates, and deletes are displayed in your staging and production environments at a later time. Files that are saved to the server can later be loaded manually or automatically by the system.
Loader Options
Menu Path: Products > Load > Next
1. Handle items as updates? Select Yes if the file contains only updated values for existing products. 2. Does the second column hold the action? Select No if the second column does not contain an action, but instead is an attribute column. 3. Supplier Name Enter a supplier name for the catalog 4. Category options Select one of the following options to designate what happens during the load if your text file contains categories:
• If you want to load all items in the file to a single category, click Override Categories and conduct a category search to load all items in the load file into that category.
• Click No category specified if your file does not include a category or if you want the loader to ignore the categories in your load file.

SAP SRM Advanced CCM Cookbook
- 123 -
• Click Use Specified Categories to load using the categories in the text file.
5. Map Column Headings to Common Attributes This option allows you to map column headings from the load file common attributes in your catalog, without creating a mapping rule.
Fig. 45 – Map Column Headings

Jim Stewart and Shaz Khan
- 124 -
Menu Path: Products > Load > Next > Next
1. Create missing categories:
• If checked: Creates the category listed in the input file (if the category does not already exist in the catalog), and then loads the product into the newly-created category.
• If unchecked: Items in the file belonging to categories that do not already exist in your catalog are not loaded, unless you check Put Missing Category Items into UNCATEGORIZED.
2. Create missing attributes:
• If checked: Creates new attributes in your catalog if attributes are in the load file that does not already exist in your catalog.
• If unchecked: Items in your load file that contain attributes not in the catalog will fail to load, unless you check Store missing attributes in the below attribute.
3. Store missing attributes in the below attribute.
This option is relevant only if Create missing attributes is unchecked. Allows you to load a file without creating new attributes in your catalog.
• If checked: The values for attributes that are
in the file but not in your catalog are stored in the catalog attribute that you select from the

SAP SRM Advanced CCM Cookbook
- 125 -
drop-down list. The drop-down list contains all catalog attributes of Specification type.
• If unchecked: All items in your load file that contain attributes not in the catalog will fail to load.
4. Put Missing Category Items into UNCATEGORIZED.
Use this if you want to load all items in the load file but do not want an items loaded into categories that are not already in your catalog. If you check this option, the Create missing categories option is not available.
Fig. 46 – Missing Category Items Categorization

Jim Stewart and Shaz Khan
- 126 -
Select an option to control whether the loader checks for duplicates and what actions are taken when a duplicate item is encountered.
• If you don't want to check for duplicates,
select Initial load - disable duplicate checking. Use this when you know all items in the file are new. This is the fastest type of load, but it does allow duplicate items to be loaded. If you want to check for duplicates, select one of the following two options:
• If you want to load the new items in the file and not update matching items, select Load new Items only -- do not update matching items.
• If you want to load new items and update
existing items, select Update matching items, to prevent duplicate items in the catalog.
• If checking for duplicates, you need to tell the
loader how to find duplicates. At the prompt, Unique items defined by, select attributes that define an item as unique. Sup Name, Sup Part Num, and UOM define an item as unique. The selected attributes must also exist in the load file for the load to succeed. Press and hold Ctrl to select multiple items from the list box.

SAP SRM Advanced CCM Cookbook
- 127 -
Fig. 47 – Duplicate Items Categorization

Jim Stewart and Shaz Khan
- 128 -
Job Progress
Menu Path: Products > Load > Next > Next > Next
Request is being processed
Fig. 48 – Progress Monitor
Loader Statistics
Menu Path: Products > Load > Next > Next > Next
When the data load is complete, the Loader Statistics report displays, with details about the success of the load. In this case, one item has been added.

SAP SRM Advanced CCM Cookbook
- 129 -
Fig. 48 – Data Loader Results
Managing Currency Conversions
Also see: User Administration Overview, Manage Catalog Users
As exchange rates for currencies change updates for unit conversions are required.
Requirement for maintaining exchange rates for currencies is managed in Units. The exchange rate entered in Units is visible throughout the catalog. Required currencies are enabled at the Organization level in Edit Users. The number of currencies is a set number, and if a currency is not listed, then a request must be submitted to technical support for a script to load the new currency. Though a new currency cannot be manually added, a currency can be renamed.

Jim Stewart and Shaz Khan
- 130 -
Units Menu Path: Catalog Structure > Units
1. Select the Units tab.
2. Click 'Currency' from the list of unit categories.
Fig. 49 – Currency Units Setting
Unit Group Editor Menu Path: Catalog Structure > Units > Currency > Edit
3. Select the British Pound listing.
4. Click 'Edit' from Non-Primary Units.

SAP SRM Advanced CCM Cookbook
- 131 -
Fig. 50 – Currency Units Setting

Jim Stewart and Shaz Khan
- 132 -
Product Editor
Menu Path: Catalog Structure > Units > Currency > Edit > Edit 1. Enter Multiplier (0.55432) for British Pound valued
for 1 U.S. Dollar. 2. Click ‘Save’ to enable the Conversion rate.
Fig. 51 – Currency Units Setting

SAP SRM Advanced CCM Cookbook
- 133 -
Additional Configuration Topics 1. About Currency Unit Groups • A default Currency unit group is assigned by default
to the Price attribute. You can assign the Currency unit group to other common attributes created as Currency type attributes.
• You must enter values for currency conversions.
From the Units screen, choose a currency and click Edit to assign the currency conversion rate.
• Be aware that currencies behave differently than
the other unit groups, as follows:
• If you enable multiple currencies for a user, all currencies show at once; there is not a drop list for conversions.
• Unlike other unit groups, the editor does not allow you to add a new currency unit, add or edit currency aliases, or delete a currency. You may, however, rename the currencies.
• If a currency you need is not listed, contact technical support for a special script that will enable that currency in your catalog.
2. How Do I Enable Currency Conversion?
• From Users & Views > Edit Users, choose Edit, then choose the Defaults tab to assign the currency to the organization. Flow down to groups and users as desired. All enabled currencies will be displayed to the end user, but the currency at the top of the list is the default currency for the user and is the one that will be used in the shopping cart.

Jim Stewart and Shaz Khan
- 134 -
• At Catalog Structure > Units, choose the
Currency unit group, and follow the instructions to enter conversion factors.
3. How Do I Properly Format Prices?
• Enter prices in the currency listed in the Currency attribute. For example, if the item has a value of USD in the Currency attribute, enter the price in U.S. Dollars.
• Do not enter a currency symbol in the Price
attribute, and do not include currency symbols in a load file. The currency symbol will be displayed automatically based on the Currency code for the item.
• Spaces are not supported in the Price attribute.
If you are loading a file that contains spaces in the price, remove the spaces before loading the file. The Bulk Editor and Product > Add do not support entry or updating of prices that contain spaces.
• Be sure to use the delimiter appropriate to your
interface language. For example, if you are logged in using a German or French interface, use the comma delimiter (4,45). If you are logged in using English, use the decimal delimiter (4.45).
• When loading a text file and when creating a
SKU file to export content (e.g. contracted pricing), do not use spaces or commas in the price. Use this: 1100.50 Do not use these: 1,100.50 or 1 100.50.

SAP SRM Advanced CCM Cookbook
- 135 -
4. How Do I Set a Default Currency for the Catalog? •You can set a default currency to be used throughout your catalog for items that do not have a currency code. The currency code is used to ensures that prices are displayed using the format and symbol of your choice (e.g., $45.68 for USD and €45.68 for EUR).
1. Go to Administration > Interface Mgmt > Look & Feel and select the Admin tab.
2. Find the Default Currency (defaultCurrency) and change to something other than USD if desired.
3. You can override the default currency for any item in the catalog by entering a value in the Currency attribute for that item.
5. What Else Do I Need to Know About
Currency Formatting and Conversions? • For currencies to be formatted properly, use the ISO 4217 currency codes (e.g., “FRF” for the French franc and “USD” for U.S. Dollar). You can find a list of codes at http://www.xe.com/iso4217.htm or http://www.oanda.com/site/help/iso_code.shtml. • All currencies listed in the Unit Editor are automatically formatted correctly for the end user based on the currency code (USD, FRF, etc.). This includes the currency symbol (e.g., $ or €), commas, and other format requirements. • The Price attribute is associated with the Currency unit group to allow conversions.

Jim Stewart and Shaz Khan
- 136 -
• To enter conversion factors for currencies, see Catalog Structure > Units and choose Currency, then select Edit. • For conversion purposes, the default conversion is given as USD; you may change that if desired. All conversions are made based on the default currency. For example: If you use USD (U.S. dollars) as your default currency, and one dollar is currently worth 1.11 Euros, you would enter 1.11 as the conversion factor for the Euro. • To override the default currency for any item, for instance if your catalog contains products sold by suppliers in different countries, add the three-letter currency code in the Currency attribute. • If you want prices rounded to 2 digits when multiple quantities of items are added to the shopping cart, make sure the configuration called MaxPriceFractionDigits (Administration > Interface Mgmt > Look & Feel) is set to 2. This configuration controls the maximum number of decimal digits for currencies. If this setting is blank, no rounding or truncation will be performed on displayed currency values. Tip: In eMerge, you can use the Bulk Editor to assign currencies to products in bulk. Or, you can populate or modify the currency attribute when you load items into the catalog. 6. How Do I Enable Currencies for Users?
Currencies and languages are user rights that are set using the Users & Views > Edit Users tab. Note that currencies must first be enabled at the Organization level before they can be assigned to groups or users.

SAP SRM Advanced CCM Cookbook
- 137 -
Uploading Images Also see: Add a New Product to the Catalog, Edit an Existing Product, Load Content From Multiple File Formats Each item in your catalog can have one image associated with it. The images can be of any file format that your browser supports (e.g., gif, jpg). You can upload image files to the Web server by loading a single file or a *.zip file. If you are a member of a buyer organization, the graphic and item image files that you load are saved to the directory specified in the configuration called itemPicturePath (at Administration > Interface Mgmt > Look & Feel > Paths). If you are a member of a supplier organization, the Catalog Administrator may have set up a special subdirectory for your images (at Users & Views > Edit Users > Organization (Edit) > Organization Info). Your graphic and item image files are saved into that subdirectory.
• The Content Upload feature allows users to load image files to the web server.
• Multiple files can be uploaded at once by first zipping them together.
• Files will be saved into the directories configured by the Catalog Administrator. See the next section for more information.

Jim Stewart and Shaz Khan
- 138 -
Uploading Rich Content File(s) Menu Path: Products > Rich Content > Content Upload 1. Select the file type from the drop-down box.
• Select Graphic Image Files if the image is to be used by the interface, such as logos to be associated with extended queries. This option is also selected when uploading files to the server to be used with an extended query (link). • Select Item Image Files for files that will display with catalog items, such as a picture or diagram of the item as for our example.
Fig. 52 – Uploading Rich Content 2. Click the Load button to browse to the file to load. 3. Click the Browse button and locate the file and click Next.

SAP SRM Advanced CCM Cookbook
- 139 -
• The message “File has been successfully uploaded” will display.
Fig. 53 – Select rich content file 4. Click OK.
• The file name will be populated in the Rich Content File(s) * box.
5. Click Next to load the file to the server. • The number of files loaded will be indicated.
6. Click OK. Upload Complete Menu Path: Products > Rich Content > Content Upload > Next You can now link the images or rich content files to items in your catalog.
Fig. 54 – Rich content upload outcome

Jim Stewart and Shaz Khan
- 140 -

SAP SRM Advanced CCM Cookbook
- 141 -
Adding New Products to a Catalog Also see: Create and Manage Catalog Structure, Edit an Existing Product, Item History and Rollback, Create Reports on Catalog Content
The Product Editor allows you to add a new product or service to your catalog. Data entry boxes are provided for all product attributes (both common and category specific). The addition of new content requires that the desired category be set up prior to adding a new item. If common or category specific attributes are required for proper entry of new item, these attributes must exist and be created prior to adding new items. Add a single new item to the catalog Menu Path: Products > Add 1. The default selection is to add a Normal Product,
so leave this radio button selected. 2. You must select the category in which to enter
this product or service. The Category Search tab should already be selected; if it is not, select it.
3. Select Contains this text from the search
dropdown box. 4. Enter fuses into the search text box. 5. Click Search. 6. Click on Fuses in the return list box to open the
Product Editor, which will be populated with all the common and category attribute fields.

Jim Stewart and Shaz Khan
- 142 -
Fig. 55 – Rich content upload outcome Product Editor Menu Path: Products > Add > Product Index > Fuses 1. Type the product information into the text boxes. 2. The * indicates that the field is required. 3. To link a picture, you need to type the image
name in the picture attribute and make sure the images are loaded to the server. To load the images, use the Rich Content Viewer. Rich Content Viewer can also be used to create links from this product to associated products, for example link pens to pen refills.
4. If satisfied with the entry, click Apply 5. If the add is successful, you receive a message,
"Item Added OK."

SAP SRM Advanced CCM Cookbook
- 143 -
If you don't get this message, a yellow or red button appears at the top of the screen:
This means the item was added, but has been marked as rejected because it failed a rule. Click the button for details.
This means the item was not added to the catalog. Click the button for details. It may take a few minutes before the modified item can be found using Quick Search. This varies depending on how your database is configured to update the index (search policy). If you want to see the item immediately, go to Products > Edit and click on the category in the Product Index.
Fig. 56 – Product Attribute Editor

Jim Stewart and Shaz Khan
- 144 -

SAP SRM Advanced CCM Cookbook
- 145 -
Edit an Existing Product Also see: Load Content from Multiple File Formats, Add New Product to Catalog
Once a supplier item has been loaded and approved in to the catalog, a need may arise to modify the item because of updated or changed information as well an item failing to comply with rules that require corrections to be made. The Edit tab allows you to:
• modify common attributes for one or more products
• open the Rich Content Viewer to associate
rich content to a product (e.g. create links to graphics or other files or create queries to bring up associated products)
• open the Price Editor to edit or create volume
pricing, or delete products or groups of products, if you have rights.

Jim Stewart and Shaz Khan
- 146 -
Edit a Product Menu Path: Products > Edit > Product Index 1. Select the Product Index tab. 2. Click 'Fuses' from the list of categories.
Fig. 57 – Modify product

SAP SRM Advanced CCM Cookbook
- 147 -
Edit Selected Menu Path: Products > Edit > Product Index > Fuses 1. Locate the product you added in the table. 2. Select the item from the table. 3. Click Edit Selected to open the Product Editor. 4. Change a value in one of the fields. 5. Click Modify . You will be returned to the Item
Table, which will display the update.
Fig. 58 – Modify product via item table

Jim Stewart and Shaz Khan
- 148 -
Product Editor Menu Path: Products > Edit > Product Index > Fuses > Edit Selected 4. Change a value in one or more fields.
Fig. 59 – Product editor change view 2. Click Apply . You will be returned to the Item Table, which will display the update.
Fig. 60 – Click Apply

SAP SRM Advanced CCM Cookbook
- 149 -
Parametric Refinement Menu Path: Products > Edit > Product Index > Fuses The parametric editor provides a quick way to change a text string in the entire catalog or in a subset of the catalog, for example change all instances of RS Components to RS Components Inc. This can be a powerful tool to assure consistent, quality content in your catalog.
1. Use the usual methods to find one or more products to edit (quick search, index, etc.).
2. Click on an attribute header button (e.g., Sup
Name).
Fig. 61 – Parametric Editor
3. From the Set Value window, click on a value to
edit it.
4. Check the Change selected values to box, and enter the new value in the edit box.

Jim Stewart and Shaz Khan
- 150 -
5. Determine whether the value should be
changed for this Search Result only, or across the Entire Catalog, and select the corresponding radio button.
6. Click OK. You will see a message showing how
many items were changed.
7. Click the Close button. You will see that the items have been updated in the Table Display window.
Fig. 62 – Set value for Sup name

SAP SRM Advanced CCM Cookbook
- 151 -
Item History and Rollback Also see: Edit an Existing Product The Item Rollback Preview page allows you to compare the current state of the item with the older version you have selected for consideration. Attributes with values that differ between the selected state and the current state are highlighted with a contrasting red font and grey background color. During the approval and rollback process, you can view a report of changes that have been made to an item, as well as who made those changes. The report shows all changes made over the last 30 days to all of the item's common attributes that are set to loggable.

Jim Stewart and Shaz Khan
- 152 -
Item Rollback Preview Page Menu Path: Content Management > Approval > Browse Catalog > Item > Item Description After comparing the two states, you can roll the item back to the selected state, or you can click the Previous button to return to the Item History Report Fig. 63 – Item details view To view an Item History Report: 1. Go to Content Mgmt > Approval > Browse Catalog. 2. Click an Item Details icon.

SAP SRM Advanced CCM Cookbook
- 153 -
3. Click Item History, at the bottom of the item details screen.
Fig. 64 – Item history
Changes made to that item are displayed in descending order, with the current state of the item in the top row. If more than one change was made during a particular edit, typically all changes are shown on a single row. However, if changes were made to attributes of both string and international string type, the changes will display on two rows. Item History Menu Path: Content Management > Approval > Browse Catalog > Item > Item Description Rollback Preview
Fig. 65 – Item History 1. The Rollback Preview button at the bottom of the
Item History Report is used in the item rollback process:

Jim Stewart and Shaz Khan
- 154 -
5. Locate and select a row in the report that depicts
the item in its desired state. 6. Click the Rollback Preview button to open a screen
that compares the item's current values with the selected state.
7. See Item Rollback Preview Page for help in using
the Rollback button. Item Rollback Menu Path: Content Management > Approval > Browse Catalog > Item > Item Description To rollback the item to the selected state: 1. Click the Rollback button.
2. The following conditions may prompt error or warning messages:
• Previously deleted schema, including schema changes if an item was moved. • Active approval rules, including action and description. • Item move issues.

SAP SRM Advanced CCM Cookbook
- 155 -
3. If error messages are present, you can click Cancel to abandon the rollback or OK to continue.
4. If you continue the rollback, you will receive
confirmation of the rollback success.
Fig. 66 – Rollback Confirmation

Jim Stewart and Shaz Khan
- 156 -
Sweep Catalog Content Also see: Content Rules Overview, Create and Edit Approval Role, Assign Approval Roles to Users
Sweep allows selected rules to be applied to the entire catalog – or just the items from one supplier – with one sweep of the database. Check rejected items from the My Approval screen. If the Approved column records items as Rejected for a particular Approval Role, but there are no Reject Comments for some Rule(s), you need to Sweep to check the items against new Rule(s). Show Rules Menu Path: Content Mgmt > Quality Assurance > Sweep 1. Make a selection from the Show Rules Specific to Sup Name dropdown box and click the Search button.
• Selecting Show All Rules will generate a report on all rules for the entire catalog. • Selecting a supplier name will produce a report on rules specific to that supplier, in addition to any rules that are not tied to any supplier.
Fig. 67 – Supplier name

SAP SRM Advanced CCM Cookbook
- 157 -
Sweeper Options Menu Path: Content Mgmt > Quality Assurance > Sweep >Search
Fig. 68 – QA Sweep 2. Alternately, to sweep the items for a selected supplier only, click the View All button and select the supplier name from the drop-down list.
• Running Sweep against only a selected supplier’s items is faster than sweeping the entire catalog.
3. After the list of rules displays, use parametric refinement (e.g., sorting) to locate specific rules.
• Blue entries are Load rules (enabled) • White entries are Load rules that are associated with one or more suppliers • Gray entries are Sweep rules (not enabled)
4. Use the check box to select the rules that you wish to apply in the Sweep.

Jim Stewart and Shaz Khan
- 158 -
5. If you wish to run the Sweep against 100 items, click the Preview Sweep box.
• This is particularly useful for testing a new rule.
6. Click the OK button at the bottom right corner of the window to begin the sweep. 7. If desired, after the Sweeper Statistics display, click the Download Sweep Errors button to view the errors in XML format.
• The errors generated from the Sweep will also be displayed on the My Approval screen.

SAP SRM Advanced CCM Cookbook
- 159 -
Create Reports on Catalog Content View detailed information on the categories and attributes of the catalog and export the report into a spreadsheet if desired. There are two types of reports that can be generated.
• The Category Details Report provides category report summaries, which list the number of products in a category as well as the category specific attributes. Each report is displayed as a table and may be sorted in ascending or descending order by either category name or the number of items in the category. For help on generating this report, see the Category Details Report help file.
• The Attribute Details Report allows you to generate summary reports on common and category attributes. For help on generating this report, see the Attribute Details Report help file. The generation of specific reports can be programmed at certain intervals using the scheduler. Reports can also be generated manually using specific criteria during setup. Reports can be viewed on the screen or converted to html files for further processing.

Jim Stewart and Shaz Khan
- 160 -
Category Summary Report Menu Path: Products > Reports
Fig. 68 – Product Summary Report A general summary report of the catalog located on the top half of the Reports screen.

SAP SRM Advanced CCM Cookbook
- 161 -
Report on Categories Menu Path: Products > Reports > Search (All Categories) Offers category report summaries, listing the number of products in a category, and the relevant category attributes. Each report is displayed as a table and may be sorted in ascending or descending order by either category name or by the number of items in the category.
Fig. 69 – Product Category Report Selection

Jim Stewart and Shaz Khan
- 162 -
Click Search (…All Categories) to display Category Details for all items in the catalog.
Fig. 70 – Product Category Details
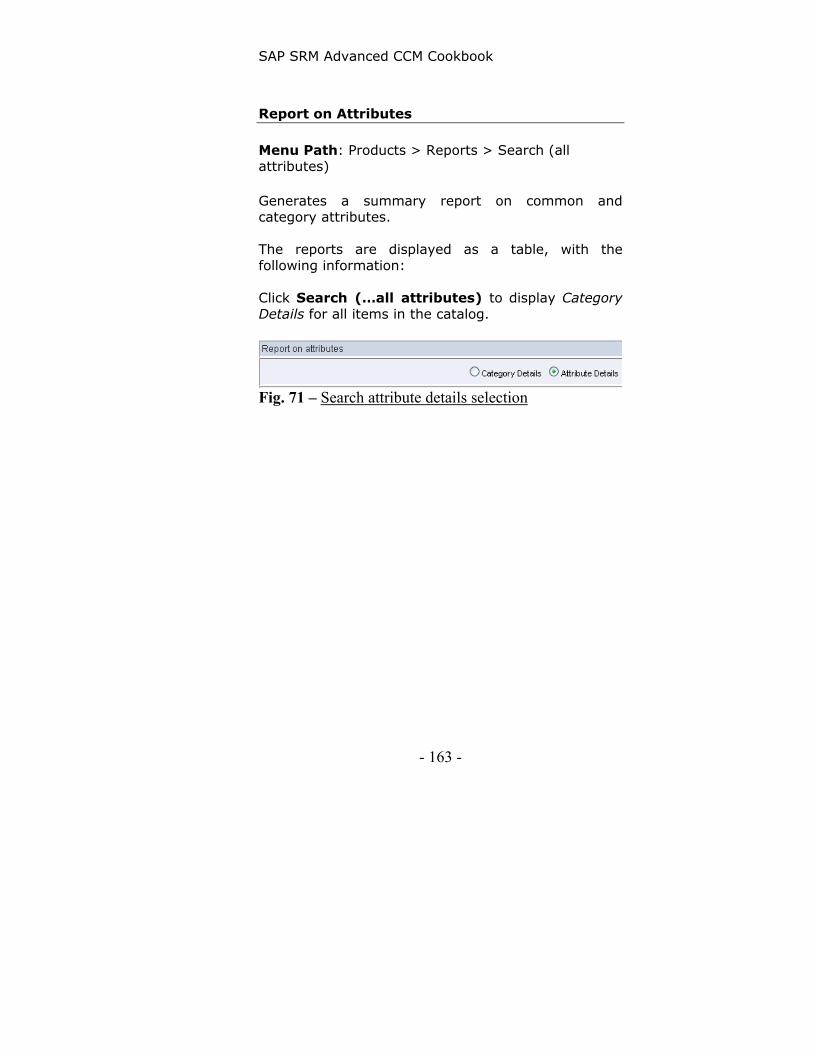
SAP SRM Advanced CCM Cookbook
- 163 -
Report on Attributes Menu Path: Products > Reports > Search (all attributes) Generates a summary report on common and category attributes. The reports are displayed as a table, with the following information: Click Search (…all attributes) to display Category Details for all items in the catalog.
Fig. 71 – Search attribute details selection

Jim Stewart and Shaz Khan
- 164 -
1. Attribute Name -- name of the attribute 2. # Items -- number of products for each category that employ a specific attribute 3. # Populated -- number of products for each category
that utilize the attribute and have a value assigned to it
4. % Populated -- percentage of products for that category that are populated with a value for a specific attribute
Fig. 72 – Report attributes

SAP SRM Advanced CCM Cookbook
- 165 -
5. # Unique -- the number of unique values for each attribute per category 6. Category -- the category containing the products
Fig. 73 – Report attributes

Jim Stewart and Shaz Khan
- 166 -
User Login Log Menu Path: Administration > View Logs > User Login Log > Results Produces a login report, listing all logins (successful and failed) for specified users and specified dates.
Fig. 74 – User login log

SAP SRM Advanced CCM Cookbook
- 167 -
Change Log Menu Path: Administration > View Logs > Change Log > Results Allows you to view all changes made to the catalog by selected users during a specified timeframe.
Fig. 75 – Change log selection example
Item Count Log
Menu Path: Administration > View Logs > Item Count Log > Next This is a logging and reporting feature that keeps a daily log of the number of line items (products or services) in the catalog. A report may be produced for a specified aggregate period (e.g., annually, monthly, weekly, or daily) on

Jim Stewart and Shaz Khan
- 168 -
the average number of items for a specified day or date range (e.g., August 1, 2000 -- August 7, 2000).
Fig. 76 – Restrict Change log selection

SAP SRM Advanced CCM Cookbook
- 169 -
Fig. 77 – Change log report results
Export Log
Menu Path: Administration > View Logs > Export Log > Results You can display an export log (history), delimited by user and date range. Export Log presents the specified history in a three-columned table, giving the Name (user), Date and Time, and Items (number of items exported). The history is ordered by date, from the oldest to the most recent exports.

Jim Stewart and Shaz Khan
- 170 -
Fig. 78 – Export log report results After the history is generated, the Export button allows the table to be exported into a spreadsheet for saving the record as a printable file.
Report Summary
eMerge and BugsEye give you the ability to generate the following reports and logs: 1. Category Details Report (Products > Reports
tab) Offers category report summaries, listing the number of products in a category, and that relevant category

SAP SRM Advanced CCM Cookbook
- 171 -
attributes. Each report is displayed as a table and may be sorted in ascending or descending order by either category name or by the number of items in the category. 2. Attribute Details Report (Products > Reports
tab) Generates a summary report on common and category attributes. The reports are displayed as a table, with the following information:
1) Attribute Name -- name of the attribute, 2) # Items -- number of products for each
category that employ a specific attribute, 3) # Populated -- number of products for
each category that utilize the attribute and have a value assigned to it,
4) % Populated -- percentage of products for that category that are populated with a value for a specific attribute,
5) # Unique -- the number of unique values for each attribute per category, and
6) Category -- the category containing the products.

Jim Stewart and Shaz Khan
- 172 -
3. User Login Log (Administration > View Logs > User Login Log tab Produces a login report, listing all logins (successful and failed) for specified users and specified dates. 4. Change Log (Administration > View Logs >
Change Log tab) Allows you to view all changes made to the catalog by selected users during a specified timeframe.
5. Item Count Log (Administration > View Logs
> Item Count Log tab) Logging and reporting feature that keeps a daily log of the number of line items (products) in the catalog. You can produce a report for a specified aggregate period (e.g., annually, monthly, weekly, or daily) on the average number of items for a specified day or date range (e.g., August 1, 2000 -- August 7, 2000). 6. Export Log (Administration > View Logs > Export Log tab) You can display an export log (history), delimited by user and date range. Export Log presents the specified history in a three-columned table, giving the Name (user), Date and Time, and Items (number of items exported). The history is ordered by date, from the oldest to the most recent exports. After the history is generated, the Export button allows the table to be exported into a spreadsheet for saving the record as a printable file. The online help provides detailed instructions for producing all of the above reports. For now, you will generate a Category Details report on a category.

SAP SRM Advanced CCM Cookbook
- 173 -
If you loaded the sample content file, then follow the directions below. Otherwise, adapt the following directions to fit the content in your catalog. 7. QA Report (Content Mgmt > Quality Assurance > Reports tab) Generates an item count analysis on unique category and attribute values (including null values) for the entire catalog or a subset of the catalog. This helps you find the catalog attributes for products that need to be populated with values. The process allows great flexibility in choosing catalog items to analyze, as well as which common and category attributes to include.
8. RUS Attribute Add Report (Content Mgmt > Quality Assurance > Reports tab)
Returns a date-delimited report on category attributes that have been added. This helps you find the new category attributes so they can be populated. This report provides a convenient way to determine which category attributes have been added to the catalog from a certain date forward. After this is determined, a QA Report can be run against the same constraints to identify the products missing values for the recently added attributes
9. Translation Report (Content Mgmt > Quality Assurance > Reports tab)
Reports the translation status of catalog content
for any enabled language. A guided process helps you generate a color-coded report to see which items have been translated in a multi-lingual catalog. Items requiring translation for a particular language branch (e.g., French, German, Spanish, etc.) are displayed in red. In addition, you can use the report to access

Jim Stewart and Shaz Khan
- 174 -
the Product Editor by clicking on links. This allows you to link directly to translate catalog content.

SAP SRM Advanced CCM Cookbook
- 175 -
Automated Jobs Scheduler Also see: Manage Background Jobs The scheduler allows users to create, store and update a specific process (i.e., load and export) within an easy-to-use template, called a Job Name. The template may be saved and run at a later time, either manually (use "Execute" button) or at pre-scheduled times and intervals.
• Ideal for loading or exporting processes that require repeated execution.
• Allows you to set up a schedule to extract approved items from the staging catalog and load into the production catalog.
• Save jobs that you run regularly, such as exports (specific content, specific file types) and reports.
Scheduler allows one or more actions, such as loading a file, to be initiated automatically at a specific date and time. The option is available to have the scheduled job occur on a daily, weekly, or monthly basis. In addition to setting the time and recurrence for a job, a job may be specified with one or more required predecessor jobs.

Jim Stewart and Shaz Khan
- 176 -
For example, you can define one job that needs to occur before another, such as loading a file before generating a report. Also, should a job ever fail to execute, Scheduler provides a means of assigning email notification. The actions that may be scheduled include:
• Load • Export • Reports • Sweep • Rebuild View • SKU Report for eMerge • Load, Export, and Rebuild View for
BugsEye

SAP SRM Advanced CCM Cookbook
- 177 -
Create a Job
Menu Path: Administration > Scheduler Step 1: Create Job
1. Click New. 2. Enter the Job Name into the text box. Enter a
new job name or edit an existing job name.
3. Enter a Job Description of the job.
Fig. 79 – Creating a job
4. If the job is to be preceded by another job, select one or more job(s) from the Job Predecessors selection box.
Important! The predecessor is designed for scheduling multiple jobs that you need to run on the same day in a certain order (e.g. run a report after an export or load is finished). Records of predecessor jobs are for 24 hours. So, this means that a job with predecessors

Jim Stewart and Shaz Khan
- 178 -
will execute only if all predecessor jobs have executed within the last 24 hours.
5. Click Save or proceed with Step 2.
Set Job Execution Time
Menu Path: Administration > Scheduler Step 2: Set Job Execution Time If this job is not a scheduled job, skip to Step 3.
1. Select the Start Date by choosing the month, day, and year from the dropdown boxes.
2. Select the Start Time by choosing the hour
and minute from the dropdown boxes. Hour values are shown using a 24 hour clock (international standard time format).
3. Enable the Recurrence check box if the job is
to occur on a regularly scheduled basis. Otherwise, click Save or proceed with Step 3.
Fig. 80 – Set job execution time
4. If you enable the Recurrence check box, Choose the Daily, Weekly, or Monthly radio

SAP SRM Advanced CCM Cookbook
- 179 -
button to define the frequency of the action. See the table above for details on the selections and recurrence options.
5. Click Save or proceed with Step 3.
Notification & Scheduler Action Menu Path: Administration > Scheduler
Notification & Scheduler Action
1. Enter an e-mail address for failure notification (optional).
2. Select the type of action (e.g. Load, Export, Reports, or Build View) from the Scheduler Action selection box.
3. Click Setup. This launches the interface for the selected action. For example, if Load is selected, you will be guided through each phase of the load process as if you were using the Load tab.
Important! If creating a scheduled load, you will check the "specify server side file" option. Be sure to provide the file extension for the load file (e.g. myloadfile.xml).
Fig. 81 – Notification for scheduler action

Jim Stewart and Shaz Khan
- 180 -
4. After completion of the steps, click the Job Scheduled button to return to the main page of the Scheduler. This also saves the job.
Activity Buttons
Menu Path: Administration > Scheduler 1. Save: Use this button to save a job. Save may be
clicked after completing Step 1, after combining Step 1 and Step 2, or after making modifications to an existing job (e.g., changing its name). A job is automatically saved (without clicking the Save button) if all three steps are completed, and Set Up is launched and successfully completed.
2. Execute: Select a Job and click Execute to run
the job manually. 3. Job Status: Click to receive a status report of all
scheduled jobs within your organization. 4. Display Settings: Click to display the job's
options (e.g., all the options you chose for the export while creating the job).

SAP SRM Advanced CCM Cookbook
- 181 -
Understanding rights ownership and views
To manage a scheduled job you need to understand how rights, ownership and catalog views affect your job. 1. Rights
• You must have Administration/Scheduler rights to author a scheduled job.
• You must have rights to any action you schedule (e.g., only users with Product/Load rights can schedule a load).
2. Ownership
• Your organization owns the scheduled job, not you, the author.
• Your scheduled job is visible to all members in your organization and to all members in any organization above yours who have Scheduler rights, regardless of their view of the catalog. Therefore, they can access, manage and edit any job you create. No organization below yours or lateral to yours can access, manage or view the job.
3. Views
• Your catalog view determines which catalog products you may load, export, sweep, etc. Therefore, you may only set up scheduled actions for products in your view.
• Your view determines the display visibility of a job's output. For example, you can view the job status of any scheduled job in your organization, but you can only view the job output for jobs that act on products in your view.
Notice: If another user with a different catalog view modifies your job's setup, the job's output may not

Jim Stewart and Shaz Khan
- 182 -
be visible to you if their view differs from yours. Also, if your view changes, you will not be able to view the job output you created before the view change.

SAP SRM Advanced CCM Cookbook
- 183 -
Manage Background Jobs
Also see: User Administration Overview, Schedule Automated Jobs
Background jobs are those operations that run in the background, such as a load, sweep, reports, or export. Since the job runs in the background, you can perform other tasks while the automated job is running. The Background Job Manager provides a table listing of current and past jobs that have not been removed. It allows you to do the following:
1. View a job's status (Complete, In Progress, Error, and Stop).
2. Select a job from the table and use one of the
following buttons: a. Terminate Job b. Remove Job Record c. Remove Completed Jobs d. Show Job Output e. Update Job Status
• Example of background job, when you wish to edit
items, while at the same time loading large XML file containing 80,000 SKUs. You can either schedule the load using the Scheduler tab or manually start the process with Products > Load.
• Regardless of method, you can take care of other
business while a job runs and periodically click the Background Jobs tab to view the job’s status and output with Background Job Manager.
Edit Selected Menu Path: Administration > Background Jobs

Jim Stewart and Shaz Khan
- 184 -
1. Select the desired Job from the table.
2. Click one of the buttons from the following list below
Fig. 82 – Edit Selected Background jobs

SAP SRM Advanced CCM Cookbook
- 185 -
Product Editor
Menu Path: Administration > Background Jobs
Terminate Job -- immediately ends the operation and gives a status of Stop. This should only be used in the most severe conditions. It is generally advisable to allow the job to finish and then delete the job's output. Remove Job Record -- deletes the selected job's record from the table. Remove Completed Jobs -- removes all jobs having a Complete status from the table. Show Job Output -- displays the output of a job, such as the Statistics page from a load or export and the actual output of a report. You can download the catalog export file from this screen if desired, for example if you have exports set up to run on a scheduled basis.

Jim Stewart and Shaz Khan
- 186 -
Manage SAP OCI SAP OCI Editor is used to construct the interface between the BugsEye Shopping Cart and the SAP Open Catalog Interface (OCI). SAP's Open Catalog Interface (OCI) Versions 3.0 and 2.0 are automatically supported by Requisite's SAP OCI Catalog Connector. OCI is the standard used to pass items from the BugsEye shopping cart out to ecommerce systems that use OCI, such as EBP. Attributes are mapped for you by default if you are using the standard Requisite attributes and standard OCI attributes. No setup is required to enable these features.
SAP OCI
Menu Path: Administration > Configuration > Catalog Connector > SAP OCI
1. From the "Attribute Name" drop list, choose Category Name or Category Key. This indicates that you are creating a category mapping instead of an attribute mapping.
2. Choose the OCI field to map the category key
to from the "OCI Name" drop list box. It is most appropriate to map the Category Key from your Requisite catalog to the NEW_ITEM_CATEGORY_ID OCI field, and Category Name to the NEW_ITEM_CATEGORY field. However, category information can be mapped to any OCI field if needed.
TABLE 1 lists a sample OCI mapping.

SAP SRM Advanced CCM Cookbook
- 187 -
Table 1 Attribute
Name OCI Name Default Value
Override Value
Group/Service Info
Service Value
Currency NEW_ITEM-CURRENCY <none> <none> <none> <none>
Description NEW_ITEM-DESCRIPTION <none> <none> <none> <none>
Price NEW_ITEM-PRICE <none> <none> <none> <none>
QTY NEW_ITEM-QUANTITY <none> <none> <none> <none>
Saleable Quantity
NEW_ITEM-PRICEUNIT <none> <none> <none> <none>
Service NEW_ITEM-SERVICE <none> <none> <none> <none>
Sup Num NEW_ITEM-VENDOR <none> <none> <none> <none>
Sup Part Num
NEW_ITEM-VENDORMAT <none> <none> <none> <none>
UNSPSC NEW_ITEM-MATGROUP <none> <none> <none> <none>
UOM NEW_ITEM-UNIT <none> <none> <none> <none>

Jim Stewart and Shaz Khan
- 188 -
Change Management Documents
Also see: Produce a Schema Template
To track and maintain setup data and configuration parameters, proper documentation is needed to be followed and data promptly entered as changes are made to eMerge and BugsEye. If this is not followed disorganization and confusion will paralyze the proper functioning of the content management system.
Users
eMerge Users.xls
BugsEye Users.xls

SAP SRM Advanced CCM Cookbook
- 189 -
Views
Approval Roles
eMerge Approval.xls
eMerge Views.xls
BugsEye Views.xls
eMerge Users.xls
BugsEye Users.xls

Jim Stewart and Shaz Khan
- 190 -
Suppliers
eMerge Supplier List.xls
Supplier Rule and Mapping Management.xls

SAP SRM Advanced CCM Cookbook
- 191 -
Attributes
eMerge Common Attributes.xls
BugsEye Common Attributes.xls
Requisite Catalog Fields v3.xls
Content Template v3.xls
Field Mapping v3.xls

Jim Stewart and Shaz Khan
- 192 -
Category Defaults
eMerge Category Defaults.xls

SAP SRM Advanced CCM Cookbook
- 193 -
Rules
eMerge Rules.xls
ISO Currency List.xls
ISO UOM List.xls
eMerge Supplier
(if Currency added)
(if UOM added)
(if Supplier added)
eMerge Approval.xls (if new Attribute Rule added)

Jim Stewart and Shaz Khan
- 194 -
Actions
Descriptions
Currencies
eMerge Description.xls
eMerge Actions.xls
eMerge Actions List.xls

SAP SRM Advanced CCM Cookbook
- 195 -
UOM
SAP OCI Mappings
BugsEye SAP OCI.xls
ISO UOM List.xls
ISO Currency List.xls

Jim Stewart and Shaz Khan
- 196 -

SAP SRM Advanced CCM Cookbook
- 197 -
Part 3: Catalog Content Management

Jim Stewart and Shaz Khan
- 198 -

SAP SRM Advanced CCM Cookbook
- 199 -
Introduction to CCM SAP’s CCM is SAP’s latest offering for managing catalog data from various sources and is tightly integrated with the SRM/EBP solution. CCM is composed of two components, the Catalog Authoring Tool (CAT) and the Catalog Search Engine (CSE). The Catalog Authoring Tool provides all of the functionality to upload, manage, enrich, and publish catalog data in the CCM tool. The CSE tool allows individuals to search for products within published catalogs through a variety of search mechanisms. SAP’s Catalog Content Management application contains five types of catalogs: Catalog Type Catalog Description Publishable Supplier Catalog
Catalog data from all of your different suppliers
No
Master Catalog Default catalog that is generated at the time of installation. The master catalog contains all of the supplier product information, which can be distributed to multiple procurement catalogs.
Yes
Procurement Catalog
A catalog that end-users can search and purchase from within EBP.
Yes

Jim Stewart and Shaz Khan
- 200 -
SRM Server Product Data
All of the material master records replicated from R/3 to EBP and then from EBP to CCM
No
Contract Catalogs
Contract data that exists in your SRM system
No
You can map multiple supplier catalogs to one master catalog and then distribute multiple procurement catalogs from the master catalog. Only master catalogs, procurement catalogs, and SRM product master catalogs can be published. CCM Data Flow Supplier A Catalog Procurement Catalog #1 Supplier B Catalog Master CatalogProcurement Catalog #2 … Supplier C Catalog Procurement Catalog #N Catalog content can be uploaded into the CCM tool in the following formats:
• CSV 1.0 (Comma-delimited file) • CSV 2.0 (Comma-delimited file) • BMEcat 1.2 (Special file format in XML) • XML

SAP SRM Advanced CCM Cookbook
- 201 -
Enterprise Buyer Professional 5.0
Replicated
SAP R/3
Catalog Content Management Catalog Authoring Tool (CAT)
Supplier Catalog – A CSV file of catalog data that has been provided by a supplier and uploaded into
the Catalog Authoring Tool (CAT)
SRM Product Masters – Material Master records
replicated from SAP R/3
Replicated into CAT Toolvia standard EBP programBBP_CCM_TRANSFER
Uploaded into CAT
CCM Catalog Data Process Flow
Load Schema
Approve CatalogData
Define Views
Publish Catalogs
Requisitioner within EBCatalog Search Engine (
Published Catalogs
Search Catalog
Map Source DataInto Master
Catalog
Map Master CatalogInto Many
Procurement Catalogs
SRM ProductMasters
R/3 Material Master Records
Supplier Product Data
Catalog Content Management 1.0
Exchange Infrastructure
3.0
*See Note Below
* Note Regarding SAP XI and CCM – XI is not needed if Supplier Catalogs will be uploaded in CSV 1.0 or CSV 2.0
format. XI is only required for BMECat or XML supplier catalog formats.
Fig. 82 – SAP CCM Data Process Flow

Jim Stewart and Shaz Khan
- 202 -
Basis Setup Activities for CCM In order to set up the CCM application, there are a number of configuration steps that need to be completed by your Basis team including. Please also reference the SAP CCM 1.0 Configuration Guide for additional CCM configuration information available at the SAP Service Marketplace: SAP XI configuration (Please read Section 3 for
additional information on what business scenarios require XI when installing CCM. If none of the business scenarios apply to your planned usage for CCM, you do not need to install XI)
Make appropriate settings for Catalog Authoring Tool (CAT)
Generating authorization profiles. Define RFC destination to TREX server
XI Configuration
A.) Define a RFC destination to HTTP Adapter of XI Server – Transaction Code: SM59
Note: When creating the RFC destination, make sure the path prefix is changed to /sap/xi/adapter_plain in the connection definition
Catalog Authoring Tool (CAT) Settings
Procedure Note: If the CCM CAT tool is installed on a separate server than the SRM Server, please log directly into the CAT client GUI to make these settings.
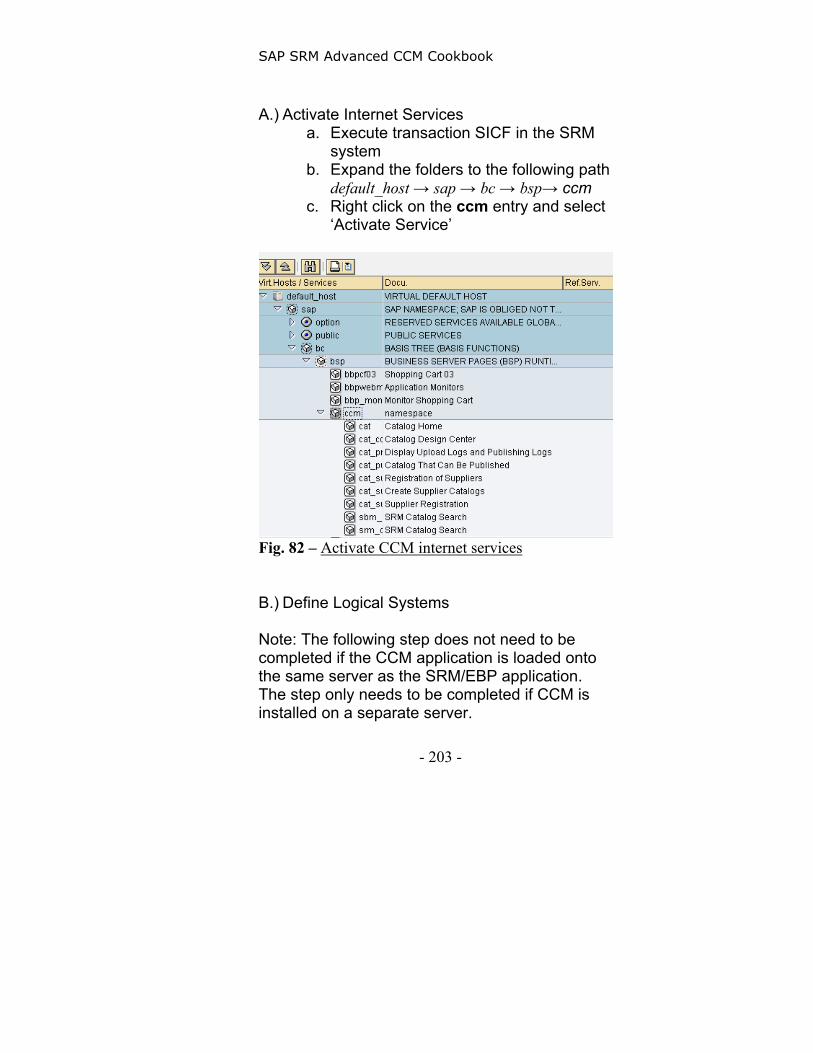
SAP SRM Advanced CCM Cookbook
- 203 -
A.) Activate Internet Services a. Execute transaction SICF in the SRM
system b. Expand the folders to the following path
default_host → sap → bc → bsp→ ccm c. Right click on the ccm entry and select
‘Activate Service’
Fig. 82 – Activate CCM internet services
B.) Define Logical Systems Note: The following step does not need to be completed if the CCM application is loaded onto the same server as the SRM/EBP application. The step only needs to be completed if CCM is installed on a separate server.

Jim Stewart and Shaz Khan
- 204 -
SAP SRM IMG Menu
SAP Web Application Server → SAP Web Application Server → IDoc Interface / Application Link Enabling (ALE) → Basic Settings → Logical Systems → Define Logical System
Transaction code
SPRO
a. Click on ‘New Entries’ b. Enter the ID of the Logical System for the
CCM application under ‘LogSystem’ and the fill in the description under ‘Description’
c. Click ‘Save’ Note: After defining the logical system, you can assign the CCM client number to the logical system through the configuration task ‘Assign Logical System to Client’. This step is optional and can be left up to your Basis team on whether the logical system needs to be assigned to the CCM client. C.) Standard Security Roles – Validate that
Authorization Profiles are Generated a. There are three standard security roles
provided by in the CCM application: i. /CCM/CATALOG_MANAGER – Users
who will upload and manage content (schema, products, catalogs) in the CCM tool need this role.
ii. /CCM/CATALOG_APPROVER – Users who will approve catalog entries need this role.
iii. /CCM/CATALOG_SEARCH – Users who search in the catalog need this role.

SAP SRM Advanced CCM Cookbook
- 205 -
b. To validate that the authorization profiles are generated, enter transaction code PFCG in the SRM system
c. Enter the affected CCM role and click ‘Display’
d. Click on the ‘Authorizations’ tab and verify that you have a message ‘Status profile has been generated’. If you do not have this message, inform your Security team to generate the authorization profile for this role.
Fig. 83 – Verify authorization has been generated
e. Repeat steps b-d for the other two CCM roles
Note: If you are uploading XI or BMEcat file formats, you will also have to validate that the authorization profiles have been generated for the following XI role SAP_XI_APPL_SERV_USER. Once this profile has been generated, you will need to assign this role to the defined XI user in your system (i.e., User: XICCMUSER)

Jim Stewart and Shaz Khan
- 206 -
D.) Publishing Catalog Settings SAP SRM IMG Menu
Cross-Application components → SAP Catalog Content Management → SAP Catalog Authoring Tool → Specify Settings for Publishing Catalogs
Transaction code
SPRO
a. If the CCM Catalog Authoring Tool (CAT)
and Catalog Search Engine (CSE) are installed on the same Web Application Server, click the ‘Publish Locally’ checkbox. If the CAT and CSE are on separate servers, leave the checkbox off.
b. Enter a number for the ‘Package Size’. This is the maximum amount of catalog items that will be published in one package. SAP recommends that you put a value between 1,000 and 10,000.
c. Click ‘Save’
Fig. 84 – Publish dialog
E.) Upload Catalog Settings (used only for XI) –

SAP SRM Advanced CCM Cookbook
- 207 -
If you are uploading XML or BMEcat supplier data files, please make the following settings. This step does not need to be completed if you are uploading CSV files only. SAP SRM IMG Menu
Cross-Application components → SAP Catalog Content Management → SAP Catalog Authoring Tool → Specify Settings for Uploading Catalogs
Transaction code
SPRO
a. Click on ‘New Entries’ b. Enter a number for the ‘Package Size’ (in
bytes). This is the maximum amount of bytes that will be uploaded in one package. If this field is left blank, the default maximum package size in bytes is set to 3 MB.
c. Enter the RFC destination created to connect to XI from CCM in the ‘RFC Destination’ field.
d. Click ‘Save’

Jim Stewart and Shaz Khan
- 208 -
TREX and Catalog Search Engine (CSE)
A.) Define a RFC destination to TREX Server –
Transaction Code: SM59 Select the RFC destination as a ‘Registered Server Program’ under ‘Technical Settings’ for the TREX Server. CCM 1.0 is only compatible with TREX Server 6.1 or higher. Earlier versions of TREX are not supported. B.) Create connection between Catalog Search Engine
and TREX SAP SRM IMG Menu
Cross-Application components → SAP Catalog Content Management → SAP Catalog Search Engine → Specify RFC Destination to TREX
Transaction code
SPRO
a.) Click on ‘New Entries’ b.) Enter the name of the TREX RFC
destination c.) Select the ‘Default’ checkbox d.) Click ‘Save’

SAP SRM Advanced CCM Cookbook
- 209 -
Fig. 85 – Change RFC Destination View

Jim Stewart and Shaz Khan
- 210 -
Generate Master Catalog
Once the configuration has been completed, the Master Catalog and the predefined characteristics in CCM must be generated. To do this, execute the program /CCM/INITIALIZE_CME
1. Run transaction SA38 in the CCM client. 2. Enter program /CCM/INITIALIZE_CME and
click ‘Execute’ 3. Once the program completes, a log will be
returned. (Note: the program might take some time to execute as the program is performing quite a few tasks including checking the customizing settings made in for CCM and unpacking all of the predefined characteristics)
4. Check to see if the CCM master catalog has been generated.
a. Go to the CCM Catalog Authoring Tool home page URL.
b. Click on ‘Edit Catalogs’ c. Check to see if there is an entry for
/CCM/MASTER_CATALOG

SAP SRM Advanced CCM Cookbook
- 211 -
Fig. 86 – CCM Initial Screen – Edit Catalogs
Fig. 87 – Validate MASTER_CATALOG entry
1.) Click on ‘Edit Catalogs’
2.) Validate that there is an entry for the /CCM/MASTER_CATALOG

Jim Stewart and Shaz Khan
- 212 -
SAP Exchange Infrastructure (XI) and CCM Requirements There are three CCM technical and business scenarios, which require SAP XI to be installed. Scenario #1: Replicating Material Master Records
from EBP to the CCM tool. Standard XI Content: MasterDataInclusionInCatalog
Scenario #2: Catalog Publishing – If the CCM CAT
tool and CCM CSE tool are installed on separate servers, you will need XI installed to communicate between both of these tools. Note: If CAT and CSE are installed on the same server, XI is not required. Standard XI Content: CatalogPublication
Note: If the CAT and CSE tool are installed on the same server, you will not require XI to publish catalog data.
Scenario #3: File Upload from Supplier in XML or BMECat format – If a supplier sends a XML or BMECat file of product data, the file will need to pass through XI in order to be available in the Catalog Authoring Tool (CAT). Supplier catalog files in CSV 1.0 or 2.0 formats do not require XI and can be uploaded directly into the Catalog Authoring Tool. Standard XI Content: CatalogUpload
Prerequisites XI is installed* Create RFC destination for the HTTP connection to
the HTTP adapter of the Integration Server Import business scenarios for CCM in XI

SAP SRM Advanced CCM Cookbook
- 213 -
*For further XI configuration information, please reference the XI Configuration Guide on the SAP Service Marketplace Procedure Scenario #1: Material Master Replication from SRM/EBP to CCM Note: Before replicating product masters from EBP to CCM, you must have replicated the material master records from SAP R/3 to EBP via the standard load object ‘MATERIAL’ in transaction code R3AS in EBP and the XI business content for Material Data replication must have been loaded.
1.) Execute SA38 in the SRM system 2.) Enter report BBP_CCM_TRANSFER_CATALOG
and click ‘Execute’ 3.) Select either a ‘Material Group’ or ‘Product
Subtype’ in the Category/Hierarchy dropdown. If you select ‘Material Group’, enter all of the material groups with product master records that you want to replicate to the CCM tool. If you selected ‘Product Subtype’, select all of the material types with product master records that you want to replicate over.
4.) To check the job for the replication, execute transaction SLG1.
Scenario #2: Catalog Publishing
1.) During the publishing process, catalog data is published to the Catalog Search Engine and the TREX server. If the CAT and CSE tool are loaded on separate servers, you will need XI installed to communicate and transfer data between CAT and CSE.

Jim Stewart and Shaz Khan
- 214 -
Scenario #3: File Upload from Supplier in XML or BMEcat format If you are uploading data in BMEcat or eCX XML format, the SAP Catalog Authoring Tool (CAT) will send the data package to XI*. The XI application will then convert the data to SAP Catalog XML format and transfer the data back to the SAP CAT. * The data will be broken up into packages based on the maximum package size configuration that you have performed in customizing. Steps to Upload a XML/BMEcat file:
1.) Click on ‘Edit Catalogs’ on the CCM home page. 2.) Highlight the supplier catalog in which you will
upload the schema and content 3.) Click the ‘Upload’ button at the bottom of the
screen. 4.) Click the ‘Browse’ button and locate the
supplier file containing the XML or BMECat schema.
5.) Click ‘Upload’. A message will be generated ‘Data is being uploaded in the background’
SAP SRM Advanced CCM Cookbook
- 215 -
Predefined Characteristics and Content Format The CCM tool comes loaded with a host of predefined characteristics and supports a number of file formats to upload supplier data and catalog schemas including:
• CSV 1.0 • CSV 2.0 • XML • BMEcat Version 1.2
It is extremely important to become conversant with the list of predefined characteristics supplied by CCM and learn the structure and content of any file format that you will be using to upload supplier product data. When a user orders items from a CCM catalog within EBP, the product data is transferred to the EBP shopping cart session from the CCM Catalog Search Engine via OCI.
CCM Characteristics
All catalogs (with the exception of supplier directories) in the SAP Catalog Authoring Tool contain the following predefined item characteristics on catalog level. There are two types of characteristics:
• Simple – A simple characteristic is not made up of other characteristics.
• Complex – A complex characteristic is made up of two or more simple
TIP

Jim Stewart and Shaz Khan
- 216 -
characteristics. For example, the /CCM/PRICE attribute below is a complex characteristic made up of Currency Code, Amount, and Lower Bound.
Characteristics can either be a single-value or multiple values. A single value characteristic can only contain one value, but a multiple-value characteristic can contain more than one value. For example, a simple characteristic can be defined for a software product indicating the type of media that the software is stored on called MEDIA TYPE. The simple characteristic can contain multiple values such as CD-ROM and DOWNLOAD. The following is a list of predefined characteristics in the CCM catalog:
Characteristic ID
Short Description
Description
OCI Field Equivalent
/CCM/BASE_UOM
Unit of Measure
Base Unit of Measure for Item (for example, bags or each)
/CCM/CONTRACT_ID
Contract ID
Contract ID which contains the item NEW_ITEM-CONTRACT
/CCM/CONTRACT_ITEM_ID
Contract Item Number
Line item of Contract ID which contains the item
NEW_ITEM-CONTRACT_ITEM
/CCM/HAS_DAILY_PRICE
Daily price available
Boolean value to determine if prices are determined dynamically
/CCM/HAS_PRICE
Price Available
Boolean value to determine if item has a price
/CCM/IS_SERVICE
Service item
Boolean value to determine if item is a service item NEW_ITEM-SERVICE
/CCM/LEAD_TIME
Delivery Time in Days
Time span between ordering requested item and delivery date NEW_ITEM-LEADTIME
/CCM/LOG_ Logical Original system of the

SAP SRM Advanced CCM Cookbook
- 217 -
SYS System item
/CCM/LONG_DESCRIPTION
Detailed Description
Long description of item.
NEW_ITEM-LONGTEXT_N:132
/CCM/MINIMUM_QUANTITY
Minimum purchase order quantity
Minimum quantity of the item that can be purchased. For example, you have to purchase a minimum of 10 bolts per order.
/CCM/QUANTITY_VALUE
Quantity
Sub-characteristic for minimum quantity indicating the minimum amount
/CCM/UNIT_CODE
Unit of Measure
Sub-characteristic for minimum quantity indicating the unit of measure
/CCM/MNFCTR_GUID
Reference to business partner data of manufacturer
Internal business partner ID for manufacturer of item
/CCM/MNFCTR_ID
External Manufacturer
External ID of manufacturer of item
NEW_ITEM-MANUFACTCODE
/CCM/MNFCTR_PART_NO
Manufacturer part number
Manufacturer part number
NEW-ITEM-MANUFACTMAT
/CCM/MPN
Concatenated manufacturer part number
Concatenated manufacturer part number
/CCM/ORDER_UNIT
Order unit
Unit of measure used to order item NEW_ITEM-UNIT
/CCM/PARTNER_GUID
Business partner GUID
Internal business partner ID of supplier of item
/CCM/PRICE
Price of the item Price of the item

Jim Stewart and Shaz Khan
- 218 -
/CCM/CURRENCY_CODE
Currency Indicator
Sub-characteristic for price indicating the currency of the item. NEW_ITEM-CURRENCY
/CCM/AMOUNT Amount
Sub-characteristic for price indicating the price (amount) of the item. NEW_ITEM-PRICE
/CCM/LOWER_BOUND
Scale Value
Sub-characteristic for price indicating price per scale value.
/CCM/PRICE_BASIS_QUANTITY
Base unit of measure
Quantity to which the price of the item refers (for example, the price refers to 20 bags)
/CCM/QUANTITY_VALUE
Quantity
Sub-characteristic for price basis quantity indicating quantity
/CCM/UNIT_CODE
Unit of Measure
Sub-characteristic for price basis quantity indicating UOM
/CCM/PRODUCT_GROUP
Product Group
Product group which item is assigned to in the backend system (this is your product group) NEW_ITEM-MATGROUP
/CCM/PRODUCT_GROUP_REBATE
Discount for product group
Discount on the product group to which the item belongs to in the backend system
/CCM/PRODUCT_GUID
Product GUID
Product GUID in the backend system
/CCM/PRODUCT_ID
Product ID in the backend system
Product ID in the backend system NEW_ITEM-MATNR
/CCM/QUANTITY_INTERVAL
Interval for quantity
Number indicating the quantity in which products can be ordered.
/CCM/SHORT_DESCRIPTION
Short description
Short description for item NEW_ITEM-DESCRIPTION
/CCM/STANDARD_ID
Default ID
Not relevant in current release

SAP SRM Advanced CCM Cookbook
- 219 -
/CCM/STANDARD_TYPE
Default type
Not relevant in current release
/CCM/SUPPLIER_ID
Supplier ID
Vendor Master Record Number or Supplier ID created NEW_ITEM-VENDOR
/CCM/SUPPLIER_NAME
Supplier name
Name of supplier of product
/CCM/SUPPLIER_PART_NO
Supplier Part Number
Item part number issued by the supplier NEW_ITEM-VENDORMAT
/CCM/VALID_FROM
Valid from
Not relevant in current release
/CCM/VALID_TO Valid to
Not relevant in current release
*The following characteristic is not available in the Master Catalog but can be uploaded as an additional characteristic in the Master Catalog Schema /CCM/ATTACHMENT – Image URL ****/CCM/ATTACHMENT is a complex characteristic that contains the sub-characteristics DESCRIPTION, URL, and MIME TYPE. This characteristic can be used to upload URLs where product images are stored.
When uploading supplier content, make sure you have values for the following characteristics maintained for each product, at a minimum:
• /CCM/BASE_UOM • /CCM/ORDER_UNIT • /CCM/PRICE (including sub-characteristics
AMOUNT and CURRENCY CODE) • /CCM/PRODUCT_GROUP (this represents your
product category/material group)
TIP

Jim Stewart and Shaz Khan
- 220 -
• /CCM/SHORT_DESCRIPTION • /CCM/SUPPLIER_ID • /CCM/SUPPLIER_NAME • /CCM/SUPPLIER_PART_NO – ***This is an
important characteristic as it serves as the index field for catalog items. Even if the supplier does not provide a supplier part number, enter a value in the file for this characteristic***.
CCM File Formats
SAP CCM supports the following file formats for uploading product data and catalog schemas:
• CSV 1.0 • CSV 2.0 • XML • BMEcat Version 1.2
Disclaimer: The guide contains screenshots of sample upload files in CSV 2.0 format. For specific information on the structure of CSV 1.0, CSV 2.0, BMEcat and XML file formats, please visit http://help.sap.com. The author can also be emailed at [email protected] to provide sample product catalog and schema formats in CSV 1.0 and CSV 2.0. Sample Master Catalog Schema Upload File in CSV 2.0 SAP CATALOG CSV 2.0 <,>
Defaults EN

SAP SRM Advanced CCM Cookbook
- 221 -
Model # Catalog Catalog
ID EN
Description Text
Catalog MasterCat
{EN}Company Master Catalog
# Data Type
Data Type ID
Basic Type ID
EN Description Text
Component ID 1
Component ID 2
# Component
Component ID
Data Type ID
Multi-value Indicator
Complex Data Type ID
EN Description Text
# Characteristic
Characteristic ID
Data Type
Multi-value Indicator
EN Description Text
# Schema
Schema ID
Characteristic ID
EN Description Text
Schema SCHEMA1
{EN}Company Master Schema
# Category
Category ID
Parent Category ID
EN Description Text
Characteristic ID
Category 0 {EN}Sample Software Catalog
Category 43230000
0 {EN}Software
Category 43231600
43230000
{EN}Finance Acctg and ERP Software
Category 43231601
43231600
{EN}Accounting Software

Jim Stewart and Shaz Khan
- 222 -
Category 43232200
43230000
{EN}Content Management Software
Category 43232202
43232200
{EN}Document Management Software

SAP SRM Advanced CCM Cookbook
- 223 -
Organize and Upload Content After the master catalog has been created in the CCM system, upload the catalog schema for the master catalog, supplier, and procurement catalogs. The catalog schema is a representation of the product categories as well as any additional characteristics that a supplier maintains for their catalog data which you would like to make available for your EBP users. The file format that we will use for uploading catalog schemas and supplier catalog content is CSV 2.0.
Upload Master Catalog Schema
Use After the master catalog has been created in the CCM system, you will need to upload a catalog schema for the master catalog. The schema is a representation of all of the product categories and additional characteristics that you want to maintain in your catalog. There can only be one master catalog for any CCM instance. Prerequisites
• Master catalog has been created in the CCM system.
• Schema for master catalog has been created. The sample schema below has been created in CSV 2.0 format and will create a hierarchal list of categories in the Master Catalog. Note: You can not create category hierarchies using CSV 1.0
Procedure

Jim Stewart and Shaz Khan
- 224 -
Step 1: Check /CCM/MASTER_CATALOG to determine if schema has been uploaded
1.) Click on the ‘Edit Catalogs’ link on the CCM home page.
2.) Highlight the catalog ID entry that says ‘/CCM/MASTER_CATALOG’ and click the ‘Edit’ button.
3.) A message will be displayed ‘No schema found for catalog /CCM/MASTER_CATALOG’
4.) Click ‘Back to Catalog Overview’ Step 2: Upload Schema for Master Catalog
1.) Click on the ‘Edit Catalogs’ link on the CCM home page.
2.) Highlight the catalog ID entry that says ‘/CCM/MASTER_CATALOG’ and click the ‘Upload’ button.
3.) Click the ‘Browse’ button and locate the file that contains your master catalog schema. Click ‘Open’.
Fig. 87 – Upload Schema for master catalog
4.) Click the ‘Upload’ button to begin the upload process. A message will be generated that the upload process has started.

SAP SRM Advanced CCM Cookbook
- 225 -
Note: Catalog Schemas must be uploaded for Master, Supplier, and Procurement catalogs. Any upload, mapping, or publishing process will generate a log file. The log file can be accessed through the Web or through transaction SLG1 in the CCM backend system. To view a log, please follow these steps:
1.) Go to the CCM home page and click on ‘Display Log’
2.) Select ‘Uploaded Catalogs’ option to view the status of the schema upload and select any other options to restrict the number of logs returned such as date range, catalog type, and status.
Fig. 88 – Display uploaded catalogs log 3.) Click the ‘Update’ button at the top of the
screen to refresh the log. 4.) If the file has been uploaded successfully, you
will receive a message that the ‘Catalog was successfully updated’.
TIP

Jim Stewart and Shaz Khan
- 226 -
Fig. 89 – Check that upload was successful
Step 3: Check Master Catalog in CCM 1.) Click on the ‘Edit Catalogs’ link on the CCM
home page. 2.) Highlight the catalog ID entry that says
‘/CCM/MASTER_CATALOG’ and click the ‘Edit’ button.
3.) The ‘Content’ tab will show the list of categories that you uploaded. In our example, you should see a hierarchal format of product categories similar to this:
Sample Master Catalog Category Structure Level 1: Software
Level 2: Finance Acctg and ERP Software Level 3: Accounting Software
Level 2: Content Management Software
Level 3: Document Management Software
4.) Click the ‘Schema’ tab. The schema name and description will be displayed as well as any additional characteristics that were uploaded into the catalog.
Check for this message in order to make sure your file upload was successful

SAP SRM Advanced CCM Cookbook
- 227 -
Upload Supplier Catalog
Use Once the master catalog has been initialized and the schema has been uploaded, you can create multiple supplier catalogs and upload supplier catalog data for these catalogs. Prerequisites
• Suppliers have provided catalog content. • Master schema has been uploaded.
Procedure Step 1: Create Supplier ID
1.) Click on ‘Edit Supplier Data’ on the CCM home page
2.) If you want to create a new Supplier ID, enter a Supplier ID (without spaces) and click the ‘Create’ icon. If the Supplier ID has already been replicated from the backend system, please read the TIP below.
3.) Enter the Supplier Name, DUNS Number (optional), and Supplier Description and click the ‘Back’ button

Jim Stewart and Shaz Khan
- 228 -
Fig. 90 – Display uploaded catalogs log
4.) You will see a message that the Supplier ID
has been created successfully in the CCM system.
If the CCM CAT and CSE tool are loaded onto the same server as the SRM system, all existing external business partners (vendor master records) on the SRM system will exist in the CCM CAT tool. Therefore, you will not be required to create new Supplier IDs. You can simply enter an existing vendor record number, click the ‘Display’ button to view the vendor name and description, and then skip to Step 2: Create Supplier Catalog directly. If the CAT and CSE tools are loaded separately from the SRM Server, you will have to create Supplier Ids manually for each vendor that you will receive a catalog from. Step 2: Create Supplier Catalog
TIP

SAP SRM Advanced CCM Cookbook
- 229 -
1.) Click on the ‘Create Supplier Catalog’ link on the CCM home page.
2.) Enter the Catalog ID, Catalog Description, and the Supplier ID that you created in Step 1
3.) Click ‘Save’. A message will be generated ‘Catalog XXXXX has been created’
Fig. 91 – Create Supplier Catalog
4.) Click on ‘Back’ button and the click on the ‘Edit Catalogs’ link on the CCM home page.
5.) In the ‘Catalog Type’ dropdown field, select the Supplier Catalogs
6.) The Supplier Catalog will be displayed in the log.
Step 3: Import/Upload Supplier Catalog Data The upload of supplier data can be separated into two files*. The first file will contain the supplier schema that will consist of the supplier product categories and any additional characteristics that a supplier might maintain in their catalog. For example, a supplier might maintain two additional characteristics for their computer hardware product data such as RAM and MB_SIZE. The second file consists of the supplier catalog content*.

Jim Stewart and Shaz Khan
- 230 -
* Note: The supplier catalog schema and product content can be combined into one file to upload as well. We are separating the schema and supplier product data for the purposes of this demonstration. A.) Upload Schema
1.) Click on the ‘Edit Catalog’ link on the CCM home page.
2.) In the ‘Catalog Type’ dropdown field, select Supplier Catalogs
3.) Highlight the catalog that you want to upload the schema for and click ‘Upload’
4.) Click the Browse button and locate the supplier file containing the schema.
Fig. 92 – Upload supplier catalog
5.) Click ‘Upload’. A message will be generated
‘Data is being uploaded in the background’ 6.) To check the status of the upload, go to the
CCM home page and click on ‘Display Log’ 7.) Once the catalog schema has been uploaded
successfully, click on ‘Edit Catalogs’ from the CCM home page. You should see a green light in the ‘Update’ column, which indicates that the upload was successful. To check the

SAP SRM Advanced CCM Cookbook
- 231 -
catalog schema, highlight the catalog entry and click the ‘Edit’ button. Click the ‘Schema’ tab. You will see the catalog structure of product categories on the left and the schema details on the right side of the screen.
Fig. 93 – Edit Catalog B.) Upload Supplier Content
1.) Click on the ‘Create Supplier Catalog’ link on the CCM home page.
2.) In the ‘Catalog Type’ dropdown field, select Supplier Catalogs
3.) Highlight the catalog that you want to upload the schema for and click ‘Upload’
4.) Click the Browse button and locate the supplier file containing the supplier catalog content.
5.) Click ‘Upload’. A message will be generated ‘Data is being uploaded in the background’
6.) To check the status of the upload, go to the CCM home page and click on ‘Display Log’
7.) Once the content has been uploaded, click ‘Edit Catalogs’ on the CCM home page, select

Jim Stewart and Shaz Khan
- 232 -
the supplier catalog within CCM, and click ‘Edit’.
8.) On the ‘Content’ tab of the supplier catalog, click the ‘Find Items’ link and select the ‘Start’ option to search for all of the items uploaded from the supplier file
9.) To display all of the characteristics uploaded for a product, click the ‘Supplier Product Number’ link. You will see the item detail as depicted in the screenshot below.
Click the ‘Supplier Product Number’ to view the item details

SAP SRM Advanced CCM Cookbook
- 233 -
Fig. 93 – Item Details Display
Create Procurement Catalogs
Use You can distribute supplier content from the master catalog to multiple procurement catalogs. To begin, create a procurement catalog ID and then upload a schema for the procurement catalog. Step 1: Create Procurement Catalog
1.) Click on the ‘Create Procurement Catalog’ link on the CCM home page.

Jim Stewart and Shaz Khan
- 234 -
2.) Enter the Catalog ID and Catalog Description for the Procurement catalog. Leave the ‘To be approved’ radio button selected on.
3.) Click ‘Save’. A message will be generated ‘Catalog XXXXX has been created’
Fig. 94 – Create Procurement Catalog
Step 2: Import/Upload Schema for Procurement Catalog Once the procurement catalog has been created, you must upload the schema for the procurement catalog, which includes the appropriate product categories and additional characteristics that you want to make available to the end-user during the shopping cart session. For our demonstration purposes, we will create a Procurement catalog for software items and upload a schema that is a subset of product categories from the master catalog schema. Note: Catalog Schemas must be uploaded for Supplier, Master, and Procurement catalogs. A.) Upload Schema

SAP SRM Advanced CCM Cookbook
- 235 -
1.) Click on the ‘Edit Catalogs’ link on the CCM home page.
2.) In the ‘Catalog Type’ dropdown field, select Procurement Catalogs.
3.) Highlight the Procurement catalog that you want to upload the schema for and click ‘Upload’
4.) Click the Browse button and locate the procurement catalog schema file containing the schema.
Fig. 95 – Upload Schema 5.) Click ‘Upload’. A message will be generated
‘Data is being uploaded in the background’ 6.) To check the status of the upload, go to the
CCM home page and click on ‘Display Log’ 7.) Verify that you receive a message ‘Catalog
was successfully updated’ in the log file.

Jim Stewart and Shaz Khan
- 236 -
Manage Content After the catalog schema and product data have been uploaded, you will need to map the content from a supplier catalog to a master catalog and then map data to the procurement catalog from the master catalogs.
Map Categories and Items
Use Map the product categories and product data from the supplier catalog to the master catalog and from the master catalog to 1 or many procurement catalogs. Prerequisites
• Schemas have been uploaded for all three catalogs: supplier, master, and procurement catalogs
• Supplier product content has been uploaded to a supplier catalog.
Procedure Step 1: Map Supplier Catalog to Master Catalog
1.) Click on ‘Edit Catalogs’ on the CCM home page 2.) Select the appropriate supplier catalog and
click ‘Edit’ 3.) Click the ‘Mapping’ tab for the supplier catalog 4.) On the left hand side will be the Source
Catalog (supplier catalog) and on the right hand side will be the Target Catalog (master catalog)
5.) Perform the following steps to begin the mapping process:

SAP SRM Advanced CCM Cookbook
- 237 -
a. Click on the category in the supplier catalog that you want to map to the master catalog
b. Now, click on the category in the master catalog which will be mapped to the supplier product category
c. Click the ‘Assign Category’ button to link the product category in the supplier and master catalog. If there are categories below the first level that you want to map to the designated product category in the master catalog, select the checkbox ‘Include Subcategories’
d. Click the ‘Save’ button. A message should appear stating ‘Data for XXXXX Catalog was Saved.’
e. Repeat this process for all other product categories in your supplier catalog. To view any unassigned product categories, simply click the ‘Display Unassigned Categories’ link.
6.) Once the product categories have been mapped, click on the ‘Map Content’ button to
Once you have selected the source catalog category and the target catalog category, click the ‘Assign Category’ button

Jim Stewart and Shaz Khan
- 238 -
begin the process of transferring the supplier product data to the master catalog.
Note: To exclude transferring certain items from the supplier catalog for a given product category to the master catalog, click on ‘Change Item Assignments’, highlight the Product/s on the left in the supplier catalog and select the radio button ‘Exclude from Mapping’
7.) Click ‘Save’
Step 2: Map Master Catalog to Procurement Catalog
1.) Click on ‘Edit Catalogs’ on the CCM home page 2.) Select the appropriate procurement catalog
and click ‘Edit’ 3.) Click the ‘Mapping’ tab for the procurement
catalog 4.) On the left hand side will be the Source
Catalog (master catalog) and on the right hand side will be the Target Catalog (procurement catalog)
5.) Perform the following steps to begin the mapping process:
Select ‘Exclude from Mapping’

SAP SRM Advanced CCM Cookbook
- 239 -
a. Click on the category in the procurement catalog that you want to map to the master catalog
b. Now, click on the category in the master catalog which will be mapped to the procurement product category
c. Click the ‘Assign Category’ button to link the product category in the supplier and master catalog. If there are categories below the first level that you want to map to the designated product category in the master catalog, select the checkbox ‘Include Subcategories’. The categories will now be mapped.
d. Click the ‘Save’ button. A message should appear stating ‘Data for XXXXX Catalog was saved.’
6.) Repeat this process for all other product categories in your procurement catalog.
7.) Once the product categories have been mapped, click on the ‘Map Content’ button to begin the process of transferring the content in the master catalog to the procurement catalog.
8.) Click ‘Save’
Catalog Data Enrichment
Once catalog data is available in the master or procurement catalog, you can edit the characteristic values for the supplier data directly in these catalogs.
Manual Enrichment

Jim Stewart and Shaz Khan
- 240 -
Manual enrichment is the process of manually changing/editing values for characteristics for a product. To do this:
1.) Click the ‘Content’ tab of the catalog 2.) Search for a product in a master or
procurement catalog by clicking ‘Find Items’ on the content tab
3.) Locate the item and click on the item’s ‘Supplier Product Number’. You can then edit the values for any characteristic.
Fig. 96 – Manual Enrichment for Product
Automatic Enrichment
Automatic enrichment provides for updates of supplier data via automatic file uploads.
Approval and Rules

SAP SRM Advanced CCM Cookbook
- 241 -
Use Before content can be transferred from the master catalog to the procurement catalog, you must approve the catalog items. Prerequisites
• Product categories and supplier content have been mapped from the supplier catalog to the master catalog.
Procedure Step 1: Add Approvers to Schema and/or Categories For our purposes, we will only add an approver for the catalog schema
1.) Click on ‘Edit Catalogs’ on the CCM home page 2.) Select the master catalog and click ‘Edit’ 3.) Click on the ‘Schema’ tab and select the
‘Manage Approvers’ link 4.) Click on ‘Add New Approver’ and enter the
User ID of the Approver 5.) Click ‘Assign’ at the bottom of the screen 6.) The approver is now added to the list 7.) Repeat Steps 4 and 5 for additional approvers
Note: You must also maintain approvers for all of your procurement catalogs. Repeat Steps 1 – 6 for each procurement catalog.

Jim Stewart and Shaz Khan
- 242 -
Fig. 97 – Approver Assignment
Step 2: Approve Catalog Items in Master Catalog
1.) Click on ‘Edit Catalogs’ on the CCM home page 2.) Select the Master catalog and click ‘Edit’ 3.) Click on the ‘Content’ tab and select the ‘Find
Items’ link. 4.) In the approval status drop down, select ‘To
Be Approved’

SAP SRM Advanced CCM Cookbook
- 243 -
Fig. 98 – Approval Status 5.) Select all of the items that you want to
approve and click the ‘Approve’ button. The status will change from ‘To Be Approved’ to ‘Approved’.
6.) Select the ‘Save’ button Step 3: Approve Catalog Items in Procurement Catalog
1.) Click on ‘Edit Catalogs’ on the CCM home page 2.) Select the Procurement Catalog and click ‘Edit’ 3.) Click on the ‘Content’ tab and select the ‘Find
Items’ link. 4.) In the approval status drop down, select ‘To
Be Approved’ 5.) Select all of the items that you want to
approve and click the ‘Approve’ button. The status will change from ‘To Be Approved’ to ‘Approved’.
6.) Select the ‘Save’ button Step 4: Approve Rules (Optional) Approval rules can be defined for master and procurement catalogs.
1.) Click on ‘Edit Catalogs’ on the CCM home page 2.) Select the master catalog and click ‘Edit’ 3.) Click on the ‘Schema’ tab and click the “Edit
Characteristics’ link next to the Catalog ID

Jim Stewart and Shaz Khan
- 244 -
4.) Click a characteristic that you want to define
an approval rule for. In our example, we will define a rule for /CCM/PRICE and it’s simple sub-characteristic /CCM/AMOUNT. Any item that has a price deviation of greater than or less than 5%, we will set as ‘To be Approved’.
5.) Select a type. In this case, we choose ‘Percentage Deviation’. Enter a value (in our example, we will enter 5). In the status, choose the radio button ‘To Be Approved’
6.) Click the ‘Save’ button
Fig. 99 – Create Characteristic Rule

SAP SRM Advanced CCM Cookbook
- 245 -
Publish Catalog
Define Views
Use You can define views for procurement catalogs to display a subset of items and characteristics to a select group of users. Once a view has been defined, it must be added to an appropriate requisitioning security role. Prerequisites
• Procurement catalog contains content ready to be published.
Procedure Step 1: Define View in CCM
1.) Go to the CCM home page 2.) Click on ‘Edit Catalogs’ 3.) Select the procurement catalog and click the
‘Edit’ button 4.) Click the ‘Views’ tab 5.) Click on the ‘Create’ button 6.) Enter the name of the view (no spaces) and a
description and click ‘Create’

Jim Stewart and Shaz Khan
- 246 -
Fig. 100 – Create Catalog View
7.) Once the view has been created, highlight the view and click ‘Edit’
8.) To control which characteristics are visible in the catalog, click the ‘Assign Characteristics’ link and deselect the characteristics that you do not want to display in the catalog.
9.) To control which items are included in the view, click the ‘Assign Items’ link. Navigate to the product category with the products that you want to include in the view and select the items that you want to add or remove from the view. Once you have selected the checkboxes for the items, click the button ‘Add All’ or ‘Remove All’
10.) Click ‘Save’ Step 2: Assign View to Role in EBP
1.) Execute transaction PFCG in the EBP GUI 2.) Enter the role that you want to add the view
to and click the ‘Change’ icon 3.) Click the ‘Personalization’ tab and locate the
personalization attribute /CCM/VIEW_ASSIGNMENTS
4.) Click the drop down for this attribute and select the appropriate view.

SAP SRM Advanced CCM Cookbook
- 247 -
5.) Click ‘Save’
Fig. 101 – Assign View to Role in EBP
Publish Catalogs
Use Once the procurement catalogs have been created, you will need to publish you catalog to the Catalog Search Engine (CSE) to make the catalog data available to order from in EBP. Prerequisites
• Procurement catalog contains content ready to be published.
Procedure
1.) Go to the CCM home page 2.) Click on ‘Edit Catalogs’ 3.) Locate the procurement catalog that you want
to publish and select the catalog 4.) Click the ‘Publish’ button 5.) To publish the entire catalog, select the
‘Publish Entire Catalog’ radio button and click ‘Start’. If you have updates to an existing published procurement catalog, select the ‘Publish Changes’ radio button. If you want to remove the catalog from the Catalog Search Engine, choose the ‘Undo Publishing’ radio button.

Jim Stewart and Shaz Khan
- 248 -
Fig. 102 – Publish Catalog
6.) Once the publishing job is initiated, you can
check the status of the job by viewing the display log. Go to the CCM home page and click ‘Display Logs’. In the ‘Logs For’ drop down, leave the selection defaulted as ‘Published Catalogs’ and click ‘Start’
• Only Master Catalogs and Procurement Catalogs can be published
• Any items that are in a ‘To Be Approved’ or ‘Do Not Publish’ status will not be published.
• At the time of publishing, the catalog is created both on the Catalog Search Engine and TREX Server
TIP

SAP SRM Advanced CCM Cookbook
- 249 -
Search Catalog Use Once the respective catalogs have been published to the Catalog Search Engine, a Shopper can log into EBP, browse the items in a catalog through a number of different search capabilities, and add items to their shopping cart session. Prerequisites
• Procurement catalog/s is published to the Catalog Search Engine (CSE)
• The External Web Services configuration has occurred as defined in Section 8 (next chapter)
Procedure An individual can search for catalog items while logged into EBP in the following ways:
• Hierarchal/Index Navigation • Simple Search • Advanced Search (Exact, Fuzzy, Linguistic)
Search Option #1: Hierarchal/Index Navigation

Jim Stewart and Shaz Khan
- 250 -
Fig. 103 – Display of Products Once you have located the product, you can view further details of the item by clicking the magnifying glass icon. If you want to add the product to the cart, simply click the shopping cart icon.
Fig. 104 – Display Product Details Search Option #2: Simple Search If you want to try to locate a product quickly, enter a text description of the product using wildcards (*) in the ‘Find’ field and click ‘Go’. For example, if you want to search for ‘Cables’ in your catalog, enter *cab* in the search.
Display of products can be hierarchy of categories or index of categories (in alphabetical order)
One click add to shopping cart

SAP SRM Advanced CCM Cookbook
- 251 -
Fig. 105 – Search for categories hierarchy using wildcard Search Option #3: Advanced Search The CCM tool comes equipped with Advanced Search capabilities including:
• Exact – Locates the exact search term • Fuzzy - Locates similar search terms • Linguistic – Locates items that are
linguistically similar to one another.
Fig. 106 – Search for catalog item in categories
Wildcard search for Cables

Jim Stewart and Shaz Khan
- 252 -
EBP – Define External Web Services and Catalog IDs Use Once the respective catalogs have been published to the Catalog Search Engine, an external web service link needs to be configured in EBP so that employees can search and add catalogs items to their shopping cart sessions. The section will cover how to define an external web service link to a CCM catalog as well as an OCI catalog.
Define External Web Services Procedure SAP SRM Menu
Supplier Relationship Management → SRM Server → Master Data → Define External Web Services
Transaction code
SPRO
You must define external web services to define the connection to:
1.) CCM Catalogs - the Catalog Ids must be defined in EBP for all of the CCM procurement catalogs.
2.) OCI Catalogs – All of the vendor catalogs, which will be connected via OCI must be defined within this transaction.
Settings for CCM catalogs:
1.) Click on ‘New Entries’ and enter a name for the catalog in the ‘Web Service ID’ field.
2.) Make the following settings:

SAP SRM Advanced CCM Cookbook
- 253 -
a. Description – Enter a general description for the catalog such as Technology Software Catalog.
b. Business Type – Select ‘Product Catalog’
c. In ‘Additional Functions in SRM Server’, select the ‘Do not check product’ checkbox.
d. In ‘Additional Functions in Product Catalog’, select the following checkboxes:
i. Display Product Data Again in Catalog
ii. Validate Product Data from SAP Enterprise Buyer
e. In ‘Technical Settings’ section i. Select the following checkbox
‘Use Error Log’ ii. In Logical System, enter EBP
logical system 3.) Double click on ‘Integrated Call Structure’
folder and make the following settings (NOTE: The Integrated Call Structure embeds the catalog in the shopping cart window as opposed to the ‘Standard Call Structure which displays a pop-up. The recommended structure for CCM is using the ‘Integrated Call Structure’.)
CALL PARAMETERS Seque
nce Parameter
Name Parameter Value Type
10 http://HOST/sap/bc/bsp/ccm/srm_cse/main.do
URL
20 CATALOGID CCM Procurement Catalog ID Fixed

Jim Stewart and Shaz Khan
- 254 -
30 SAP-CLIENT Client Number Fixed
40 SAP-LANGUAGE SY-LANGU SAP
Field 50 Locale EN Fixed 60 CCM-USER Default CCM User ID Fixed
70 CCM-PASSWORD
Default CCM User ID Password Fixed
4.) Click ‘Save’
Settings for OCI catalogs:
1.) Click on ‘New Entries’ and enter a name for the catalog in the ‘Web Service ID’ field.
2.) Make the following settings: a. Description – Enter a general
description for the catalog, which corresponds to the Vendor Catalog. For example ‘ASAP Technology Catalog’.
b. Enter the Vendor Number in the ‘Business Partner’ field (the vendor ID associated with the OCI catalog)
c. Business Type – Select ‘Product Catalog’
d. In ‘Additional Functions in SRM Server’, select the ‘Do not check product’ checkbox.
e. In ‘Additional Functions in Product Catalog’, select the following checkboxes:
i. Display Product Data Again in Catalog
ii. Validate Product Data from SAP Enterprise Buyer
f. In ‘Technical Settings’ section i. Select the following checkbox
‘Use Error Log’

SAP SRM Advanced CCM Cookbook
- 255 -
ii. In Logical System, enter EBP logical system
3.) Double click on ‘Standard Call Structure’ folder and make the following settings:
CALL PARAMETERS
Sequence
Parameter Name
Parameter Value Type
10 URL provided by supplier for OCI catalog
URL
20 USERNAME
Enter the username provided by the OCI vendor
Fixed
30 PASSWORD
(This parameter is required only if the OCI vendor supplies a password to you for the OCI catalog) Enter the password provided by the OCI vendor
Fixed
40 ~LANGUAGE EN Fixed
4.) Click ‘Save’
NOTE

Jim Stewart and Shaz Khan
- 256 -
In SRM 4.0/EBP 5.0, the following parameters are populated automatically during the OCI punch-out call and do not need to be defined in the call parameters of the OCI catalog: • HOOK_URL • ~OkCode • ~target • ~caller
Settings for the EBP Organizational Structure
Procedure SAP SRM IMG Menu
Supplier Relationship Management → SRM Server → Cross-Application Basic Settings → Organizational Management → Change Organizational Plan
Transaction code
PPOMA_BBP
1.) Locate the Organizational Unit or Position,
which you want to add the Catalog ID/s. 2.) Click the ‘Attributes’ tab and locate the CAT
attribute (Catalog ID). (If necessary, click the Add icon next to the description).
3.) Click the drop down in the value field and select the Catalog ID that you want to add for the specific organizational unit or user.
4.) Click ‘Save’ Select thdropdowvalue inC t l

SAP SRM Advanced CCM Cookbook
- 257 -
Fig. 107 – Assigning catalogs to user in org plan

Jim Stewart and Shaz Khan
- 258 -
Frequently Asked Questions
1.) Question: How can I display the OCI fields transferred from the CCM catalog to the EBP shopping cart? Answer: Please reference OSS note 847229. You will need to add another parameter to your external web service definition for the CCM catalog. 2.) Question: I mapped my product categories and product data from my master catalog to my procurement catalog, but I do not see the products in the procurement catalog. Answer: Validate that the products in the master catalog are in an ‘Approved’ status. Items in a ‘To be Approved’ state will not be transferred from the master catalog to the procurement catalog. 3.) Question: Can I add my own characteristics to a supplier catalo schema? Answer: Yes. You can define additional non-predefined characteristics (both simple and complex) for a supplier catalog schema in CSV 2.0, BMEcat, and XML file formats. You can only add simple non-predefined characteristics in a CSV 1.0 format (no complex, multi-value support in CSV 1.0) 4.) Question: How can I add an image characteristic to my catalog schema? Can I upload image files directly to the CCM application? Answer: Please see the sample upload file below to add the /CCM/ATTACHMENT characteristic to a product schema. No. You can not upload images

SAP SRM Advanced CCM Cookbook
- 259 -
directly into the CCM application. You have to define the URL where the image resides as well as the MIME type (JPEG, GIF) and DESCRIPTION.

Jim Stewart and Shaz Khan
- 260 -
GLOSSARY Approver User who reviews contents of Shopping Carts and either approves or rejects Shopping Carts Asset Master Holds all relevant information concerning a capital asset Capital Asset A capital asset is real or tangible property with a value exceeding a certain dollar threshold and having a useful life of at least two years. Purchase of a capital asset typically requires that the Requestor obtain a Capital Asset approval prior to ordering the Shopping Cart. Catalog Purchase An order that is placed through a seamless process where the Requestor travels from EZ Order to the supplier Web site and back to create a roundtrip catalog Shopping Cart. For our purposes we have an agreement with four suppliers: Dell, Hewlett Packard (HP), Boise, and Allied Electronics. Direct Purchase A direct purchase is one charged to a customer’s project budget Indirect Purchase An indirect purchase is one not chargeable to a customer’s project budget Non-catalog Purchase An order for services, subcontracts, and one-time purchases where there is not a catalog Punch-out or Roundtrip Automated process in e-procurement where the Requestor seamlessly travels from EZ Order to the supplier Web site and back to create a Shopping Cart Purchase Order (PO) A document used to order goods and services from the supplier in return for

SAP SRM Advanced CCM Cookbook
- 261 -
payment. Contains all information required by the supplier. A catalog Shopping Cart becomes a PO. Purchase Requisition (PR) A backend R/3 document authorizing the procurement of goods and services by a professional Buyer. A non-catalog Shopping Cart becomes a PR. The Buyer converts it to a PO. Reviewer Person or user who reviews contents of Shopping Carts but does not have approval authority Roundtrip Catalog A supplier’s list or itemized display including descriptive information or illustrations. These catalogs reside outside the company firewall and are maintained by the supplier. Suppliers, such as Boise, Hewlett Packard (HP), Allied Electronics, and Dell list items at pre-negotiated prices. Requestor The user or person who has access to SRM to create Shopping Carts for the organization. The Requestor must be familiar with the procurement policies and procedures and group and business unit processes. The Requestor must understand the financial data required to complete a Shopping Cart. Special Request Item A non-catalog item Supplier Vendor Vendor Supplier Workflow The automation of a business process, in whole or part, during which information or tasks are passed from one resource (human or machine) to another for action, according to a set of procedural rules.

Jim Stewart and Shaz Khan
- 262 -
A
a New Product to the Catalog · 143
Approval Requisite Catalog · 54
Approval Configuration Requisite Catalog · 117
Approval Roles Create and Edit Rules · 114
approve catalog items SAP CCM · 248
Attribute Actions Characteristics · 79
attribute types · 74 Automatic enrichment ·
247
B
Basis Setup Activities for CCM · 209
batch load Requisite catalog content ·
126 BBPGETVC · 37 BBPGETVD · 37, 38 BUCF · 34 BugsEye · 73, 126, 177, 183,
193, 195 Business Partner
Number Range · 33
C
Cascading Extended View · 62
CAT · 6, 206, 209, 210, 213, 219, 221, 235, 264
Catalog Authoring Tool · 206
Catalog Configuration · 3, 4, 21, 25, 28, 29, 30, 31, 32
Catalog Search Engine · 206
Catalog Structure · 55, 56, 70, 72, 73, 118, 136, 138, 140, 142, 147
Catalog Views · 59 CCM
SAP CCM · 206 CCM Catalog Authoring
Tool · 217 CCM Characteristics · 222 CCM Data Flow · 207 CCM File Formats · 227 Change Log · 174 characteristic ru · 251 Configuration
OCI Catalog · 23 Round Trip Catalog · 23
Constraint on an Attribute Value · 66
Content Rules Overview · 103, See Content Rules Overview
Content Upload · 143 create groups and users · 46
Requisite Catalog · 46 CSE · 6, 206, 213, 215, 219,
221, 235, 254, 257 CSV 2.0
and CCM · 222 currencies · 135 customizing
for SAP CCM · 217
D
Data Transfer Log

SAP SRM Advanced CCM Cookbook
- 263 -
for vendor master replication · 38
default currency · 141 Define External Web Services ·
6, 24, 25, 260
E
EBP Organizational Structure and SAP CCM · 264
eMerge · 50, 73, 84, 87, 118, 121, 122, 123, 126, 142, 177, 183, 195
Excel · 4, 118, 120, 121, 122 extended view · 60 External Catalogs · 13
F
Frequently Asked Questions SAP CCM · 266
G
Generate Master Catalog · 217
I
Item History · 160 Item Rollback · 158
L
Load Content From · 118 Load into Catalog · 126 Loader Statistics · 134
M
Manage Background Jobs · 182
Manual enrichment · 247 Master Catalog · 217
N
Notes for Vendor Replication · 39
number ranges checking · 33
number ranges to groupings configuration · 36
O
OCI OCI Sample Catalog · 17
Organization administrator Requisite Catalog · 55
P
parametric editor · 155 Parent View · 62 PO and Invoice Document
Transfer · 18 PPOMA_BBP · 32 Produce a Schema
Template · 195 Publish Entire Catalog
SAP CCM · 254 punch out · See External
Catalogs Purchasing Organization ·
32

Jim Stewart and Shaz Khan
- 264 -
Q
Quality Assurance · 164
R
replicating product masters to CCM · 220
reports · 166 Requisite
Manage Catalog Users · 43 Requisite Catalog · 1, 7, 40 roundtrip catalog · 25 Roundtrip Catalog · 14, See
External Catalog
S
SAP OCI Editor · 193 Schedule Automated Jobs
· 190 Schema Template · 118 Search Performance
Requisite Views and · 69 Settings for CCM catalogs · 260 Settings for OCI catalogs · 262 Show Workflow · 117 spreadsheet files · 122 Standard Call Structure ·
26 Standard Security Roles
SAP CCM · 211 Structure
Creating · 69 Sup Name · 106 supplier content
SAP CCM · 226 Supplier Enablement · 13
Step by step overview · 15 Supplier Involvement · 14 Supplier Logo · 46
Sweep · 164
T
technical and business scenarios · 219
text files · 124 trading partner
agreements · 15 TREX · 6, 209, 215, 216, 221,
256
U
User Administration Requisite Catalog · 41
User Administration Overview · 190
User Login Log · 173 Users & Views · 56 Using Action Rules · 109
V
vendor master · 22, 34, 36, 39, 235
Vendor Master Records · 37
Vendor Replication · 39 vendors
replicating · 33
X
xCBL · 18 XI · 5, 6, 13, 15, 16, 18, 19, 21,
22, 23, 209, 213, 214, 215, 219, 220, 221

SAP SRM Advanced CCM Cookbook
- 265 -
ABOUT THE AUTHORS
Jim Stewart Jim Stewart (Los Angeles, CA) has over 10 years of experience as an information systems professional, during which time he has served as a technical analyst, lead developer, and programming team lead. He has implemented SAP at DirecTV, Texas Instruments, Hewlett Packard, and other Fortune 100 clients. Mr. Stewart is the founder of Equity Technology Group, an SAP consulting partner, and continues to practice as a consultant in the area of SAP SRM/EBP, Workflow, Web programming, and UNIX systems administration.
Jim can be reached at [email protected]

Jim Stewart and Shaz Khan
- 266 -
Shaz Khan Shaz Khan has been implementing SAP ERP eProcurement and Supply Chain applications for over 8 years. Shaz began his career as a Senior Information Technology Consultant with Ernst & Young and immediately obtained SAP R/3 certification in the Materials Management module. He has implemented SAP Supplier Relationship Management (SRM)/Enterprise Buyer Professional (EBP) projects focused on operational self-service and services procurement, contract management, content management, and spend analysis. He has extensive experience in project management, software development and systems implementation methodologies, and strategic consulting services. In 1999, Shaz helped launch Above Commerce, an electronic catalog company focused on helping businesses establish private procurement exchanges over the Internet. He has managed and implemented SAP and SRM supply chain and operational procurement projects for numerous Fortune 500 clients in the Media, Chemical, Oil, and Financial Services industries including Dow Chemical/Union Carbide, Warner Bros., and Disneyland. He has recently launched his new consulting firm Ciena Partners, Inc. and is currently implementing SRM 4.0 at a major Fortune 100 client. Shaz received his B.A. in Computer Science and a B.A. in Economics from the University of California at Berkeley. Shaz can be reached at [email protected]

SAP SRM Advanced CCM Cookbook
- 267 -

Jim Stewart and Shaz Khan
- 268 -
Other Books from Equity Press SAP SRM Interview Questions, Answers, and Explanations by Jim Stewart This book can help solidify Your understanding of the entire SRM product. Please visit www.sapcookbook.com for more information.

SAP SRM Advanced CCM Cookbook
- 269 -
SAP SRM Advanced EBP Cookbook by Jim Stewart The best selling SAP SRM Reference – a must have for anyone Working SAP SRM today. Please visit www.sapcookbook.com for more information.

Jim Stewart and Shaz Khan
- 270 -

SAP SRM Advanced CCM Cookbook
- 271 -

Jim Stewart and Shaz Khan
- 272 -
Copyright © 2022 FDOKUMEN