SAP Concur Overview Guide
26
1 SAP Concur Overview Guide Rev. 3/8/22
-
Upload
khangminh22 -
Category
Documents
-
view
5 -
download
0
Transcript of SAP Concur Overview Guide

1
SAP Concur Overview
Guide
Rev. 3/8/22

2
Table of Contents
Contents
Table of Contents ........................................................................................................................................................................ 2
Resources .................................................................................................................................................................................... 3 Contact Information .................................................................................................................................................................. 3
Resource Pages ......................................................................................................................................................................... 3
Knowledge Base ........................................................................................................................................................................ 3
Company Notes ......................................................................................................................................................................... 4
Concur Training Site .................................................................................................................................................................. 4
New Concur User Check List ...................................................................................................................................................... 5
Concur Icon Reference Guide .................................................................................................................................................... 6
Concur Basic Training Manual ..................................................................................................................................................... 7 Introduction .............................................................................................................................................................................. 7
Getting Started .......................................................................................................................................................................... 8
Concur Pages ........................................................................................................................................................................... 10
User Profile .............................................................................................................................................................................. 12
Concur Mobile App ................................................................................................................................................................... 16 Setup ....................................................................................................................................................................................... 16
Navigation ............................................................................................................................................................................... 16
Concur Profile Guide ................................................................................................................................................................. 18 Introduction ............................................................................................................................................................................ 18
Finding the Profile Section ...................................................................................................................................................... 18
Request Settings ...................................................................................................................................................................... 21
Expense Settings...................................................................................................................................................................... 23
Other Settings ......................................................................................................................................................................... 24

3
Resources There are various sources available to users for reference, guidance, and assistance. This guide will contain all of the information needed to navigate Concur and complete travel tasks in the software. This resource section of the Master Guide will reference other resources, additional training, and general contact information. The resources covered include:
● Contact Information ● Resource Pages ● New User Checklist ● Concur Icon Reference List
Contact Information
Stephen F. Austin Contacts Travel Office: [email protected]
CTP Contacts Concur CTP Help Email: [email protected] Phone: 877-208-1396 CTP Full Service Email: [email protected] Phone: 855-456-4474 Group Travel Email: [email protected] Phone: 800-810-2695 CTP After-Hours Number Phone - 844-964-0088 *$16/ hour fee may apply for after-hours calls
Resource Pages
While this Master Guide contains much of the written information about Concur, there are additional resources users can utilize to find solutions and become better informed.
Knowledge Base
The knowledge base is a specially made area that includes valuable information about Concur and is probably the most helpful resource for SFA travel. From those with little to no knowledge of Concur to active users, there are materials here to help anyone. The knowledge base is divided between Concur Travel and P-Card. Within the Concur Travel category, there are guides, videos, past recordings and more. The knowledge base can be found by going to help.sfasu.edu then clicking on “Knowledge Base” at the top or towards the bottom of the home page.

4
Company Notes
A primary area to refer to and monitor is the “Company Notes” section of the Concur home page. This area will contain updates and changes to travel and travel policy as well as additional travel information and training and is maintained directly by SFA’s Travel Office. To find the Company Notes, login to Concur; the notes will be located near the middle of the page. Click “Read More” to view the resources available.
Concur Training Site
Once logged into Concur, go to the “Help” dropdown in the top right of the home page and choose “Training”. The user will be brought to the Concur Training Site. This site will include Guides in the center of the page and links for app assistance at the very bottom, but the most helpful area of this site is the far-left training videos. The training videos broken down into three sections: Expense, Request, and Travel. Click the plus to expand the video lists. Each section will contain multiple easy-to-watch, brief, Concur-made videos.
• Expense Section deals with expense reports, T-card charges, receipts, and other tasks that are completed on the expense report after the trip is completed.
• Request Section covers procedures and tasks on the request side of travel, before the trip occurs, before funds are spent, and before anything is booked.
• Travel Section covers the booking aspect of concur.
Once in the Knowledge Base, select “Concur” in the list of categories, then choose “Concur Travel”.

5
New Concur User Check List
Welcome to Concur! This checklist will cover what you need to get setup within Concur.
□ Login to Concur
o Located in mySFA under the Resource tab
o Use mySFA credentials to login
□ Go to your profile and confirm profile information
o Name, ID, basic contact information
o Add any desired information (phone number, alternate email, emergency contact, etc.)
o Activate e-receipts
□ Verify email address
o Your SFA email will automatically appear.
▪ Users must click “Verify” and follow the prompts sent to your email.
o Click yes for contact on the email you want to use for point of contact.
□ Complete Delegate Information
o If you are a user who wants a delegate, go to “Request Delegate”.
o Add your desired delegate (usually this is your departments’ admin).
o Select the desired permissions (prepare requests/reports & submit requests/reports).
▪ NOTE: Users can add their own delegates, but delegates cannot select their own users.
□ Complete booking preferences and contact
o In the profile, enter in home address, phone numbers, other contact info.
o Add a Travel Assistant or Travel Arranger to profile (allowing another user to book on your behalf).
o Enter any travel preferences (improves travel booking experience).
o Verify your name on your profile matches the name used to travel.
□ Concur Mobile Registration
o On the very bottom of the profile list you’ll find “Concur Mobile Registration”.
o Get started by going there and click “Get Started” .
If there is any issue with logging in or completing the above tasks, contact the travel office at [email protected]
6
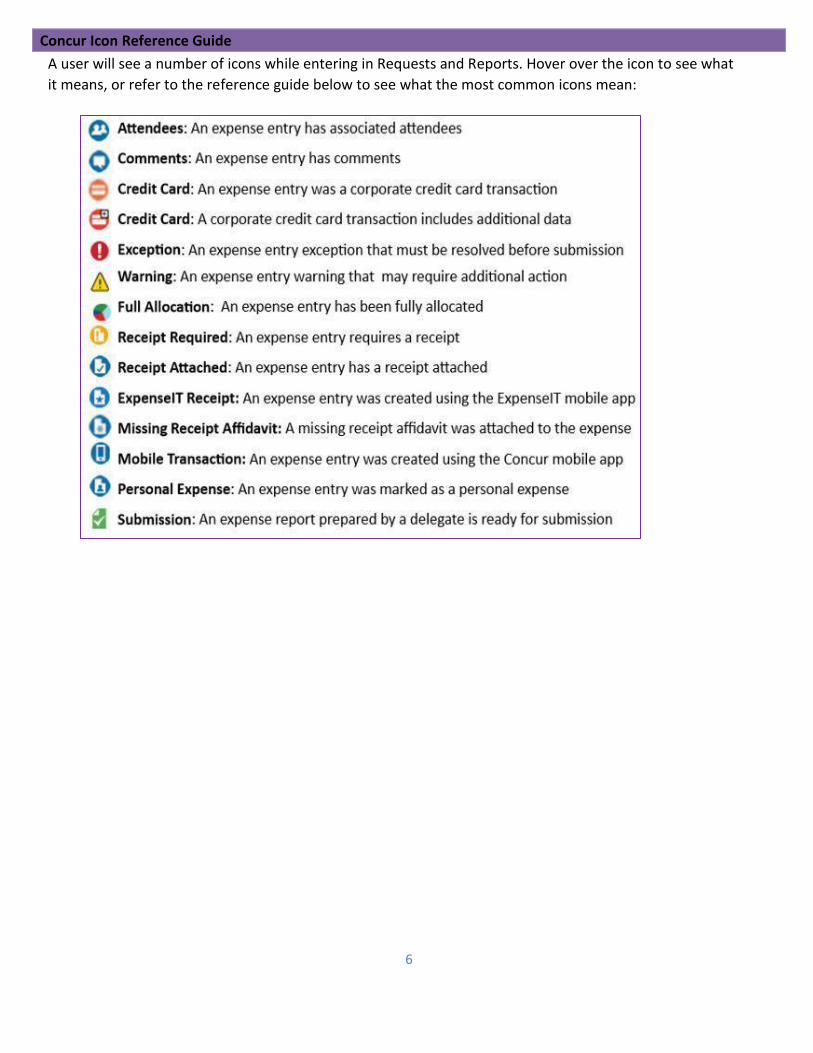
Concur Icon Reference Guide
A user will see a number of icons while entering in Requests and Reports. Hover over the icon to see what
it means, or refer to the reference guide below to see what the most common icons mean:

7
Concur Basic Training Manual Introduction
SAP Concur is a travel and expense module intended to streamline and improve Stephen F. Austin State
University’s travel reimbursement program.
This manual will provide a brief overview of Concur’s Travel and Expense module to introduce the user to
the travel software and its basic functionality. In this manual, we will cover the following:
● Signing in
● The Home Pages
● Additional Pages
● User profile and set up
● The Concur App
● Other resources
Terms
• Agency Booked - Travel booked through CTP. Requires contacting CTP after request is approved.
• Approver - Employee approving requests and reports in the workflow.
• CTP – Corporate Travel Partners; SFA travel management company.
• Delegate - Employees who are allowed to perform work on behalf of other employees. Delegates can create and prepare requests and reports, but they cannot submit the requests and reports on behalf of the traveler.
• ExpenseIt – A Concur Tool that uploads, reads, and processes receipts.
• Financial Manager – Employee in the workflow that approves for a specific FOAP.
• Paid By – Payment method.
o Paid by Traveler – cash, personal debit or credit card, check, or otherwise paid personally by the traveler and requires reimbursement to the traveler.
o Paid by University – Direct billing, University card, or otherwise paid by the University and does not require a reimbursement to the traveler.
• SAP Concur Travel and Expense Module (T&E) – The travel module where travel requests, travel reports, and travel booking can be prepared, submitted, and approved.
• Self-Booked through Concur – Travel booked through Concur Travel tab.
• Supervisor – Manager or department supervisor who reviews and approves travel for the department.
• Travel Report – Formally known as a Travel Report (TR), a report prepared and submitted after a trip to request reimbursement or payment of expenses incurred during the trip.
• Travel Request – Formally known as a Travel Authorization (TA), a request is the approval to travel and book as well as the encumbrance of funds for travel.
• Travel Segments - The airfare, auto rental, and lodging portions of the trip. These segments are entered in the request and then booked through Concur or by contacting CTP.

8
Getting Started
The basic flow of Concur:
Concur can be accessed through the link in mySFA under the Resources tab (use your mySFA
credentials to login)
Important Note
To comply with Texas Administrative Code Title 34, Section 5.61 travelers must submit their own travel requests and travel reports. Delegates can still prepare the Requests and Reports, but travelers must submit the Request and/or Report themselves. Instead of the “Submit” button, there will be a “Notify Employee” button as shown below. Clicking “Notify Employee” will send an email to the traveling employee with a link to access Concur and submit the Request or Report.
Signing in
Users should access Concur by logging into mySFA, then navigating to: Resources tab → Travel & P-Card heading → Concur link

9
The Home Page
A user’s home page appearance will vary based on the user’s permissions. Below is a general home page.
1. Along the top left of the screen, are the different Concur pages. a. “SAP Concur” will return the user to the homepage.
b. The “Request” tab will bring the user to the travel request page.
c. “Travel” will bring a traveler to the CTP portion of the module and allows users to search for
and book travel segments.
d. The “Expense” tab displays the travel reports.
e. “Approvals” will be where reports will go in workflow that need to be approved (if applicable).
f. App Center offers users the ability to search for and connect various travel apps such as
Uber, airfare, and other 3rd party apps.
2. The Quick Task Bar offers links to
quickly start a new request, open
reports and requests, and manage
available expenses. Additionally, it
offers a quick reference to view number
of requests, reports, and other expense
tasks.
3. The My Tasks portion of the home page
gives additional visibility to view
available expenses, open reports, and
approvals that may require the user’s
attention.
4. Company Notes is a section containing valuable information, tips, and resources from the SFA Travel Office.
5. Trip Search is where the user can search for and book travel segments such as airfare, rental, and lodging.
6. The “My Trips” portion lists upcoming
trips.

10
Concur Pages
This section of the manual will cover the Requests, Expense, and Receipts screens within Concur. These are
important sections to prepare travel, create reports, and assign charges.
Travel Requests
The Travel Requests screen displays the travel request reports that have been created and/or submitted. The
user would come to this screen to create a new request, review a request that has already been created, and
submit requests.
1. Across the top, there are three options:
a. Manage Request displays the following screen. This shows all active requests and allows the
user to search for requests, create new requests, and open requests.
b. The New Request option creates a new travel request.
c. The Quick Search allows the user to search and find a request.
2. Below those options lists the request for that traveler. The far left lists the name of the request and
additional details as well as the request ID and the status of the request.
3. The far right of the screen lists the trip dates, submitting date, the amount request and the amount
remaining from the request.

11
Travel Expenses
The expense screen will display the active travel reports that have been created, submitted, or are in process.
1. The top options allow the user to manage expenses (expense reports, T-card expenses, and
receipts) as well as view cash advances.
2. Below that are the active reports. There is an option to create a new report, but it also shows the
submitted reports, pending reports, and approved reports. The report box will display green if
there are no issues, yellow if there are issues to address, and red if there is a problem that needs to
be addressed or returned for correction.
NOTE: Each report box will include submission dates, total amount, status, as well as any exceptions
that need to be reviewed.
3. Clicking “report library” will show the expense reports in the manner the requests are – a long
lists with more details.
Expense and Receipt Library
Located under the expense section, the user can scroll below the expense reports and find the expenses
and receipts. The expenses are T-Card charges that have been loaded into Concur and available
expenses created from receipts.

12
Receipts are listed below. Receipts can be loaded into Concur from a number of ways:
1. By clicking the “Upload New Receipt” option.
2. Emailing receipts from your @sfasu.edu email to [email protected].
3. Through the Concur app.
Attachments must be 5 MB size or lower and must be one of the following file types: png, jpg, jpeg, pdf, tif,
or tiff. Receipts must be 300 DPI resolution or lower so it is recommended to be in black and white.
Once uploaded, Concur will scan and process the receipt and create an expense line with the name of the
vendor, transaction dates, amounts, and other information. These lines and receipt images can be
assigned to reports from this portion or from within the report.
User Profile
Every Concur user will have a user profile. This profile includes the user’s information, request settings,
expense settings, as well as email notification, app, and other configurations.
The user profile can be reached by clicking “profile” in the top right of the home page after logging in.
The following screen will display the various options and configurations available to the user.
The main sections and include Your Information, Request Settings, Expense Settings, and Other Settings.

13
Your Information
This section covers the personal, company, contact, and email information. The user also has the option to
change their profile picture and adjust the various information listed such as:
● Employee ID
● Work and Home address
● Contact information
● Email addresses (also the ability to verify your email)
● Emergency contact ● Passport and Visa information ● All required information is marked as so
Travel Settings
The Travel Settings sections is an extension of the Personal Information section and includes all information needed for travel booking through Concur:
● Travel Preferences - all information needed for booking through Concur ● International Travel - such as passport and visa information ● Frequent Traveler Programs ● Assistants/Arrangers - Where users can go to assign a Travel Arranger
Request Settings
The request section covers information regarding travel request reports. ● Request information – contains the default FOAP for the user.
NOTE: Will display as FundXX-OrgXX-PXX for default Fund, Org, and Program
● Requests delegates allows a user to assign someone else to prepare requests, view receipts,
receive emails, and approve reports (if applicable).
● Request preferences – Allows the user to choose when they receive emails regarding their request reports.

14
● Request approvers – Where the user can view their default approver (must be changes by the Admin).
● Favorite Attendees – This is an extremely useful tool for those who travel with groups of students or athletes.
This section allows a user to
create groups to add to
rosters. For example, if SFA
Baseball were going to play
games, it would be helpful to
come here and create that
roster for the current team so
when the meals are added;
the user can simply select this
attendee list.
Expense Settings
The expense section, much like the previous section, covers information regarding travel reports.
● Expense Information - Contains the default FOAP for the user (must be changed by the Admin).
● Expense Delegates – Allows a user to assign someone else to prepare and view expense
reports for them. Receiving emails and approving reports is also an option.
● Expense Preferences – Allows the user to choose when they receive email notifications regarding
their expense reports.
● Expense Approvers – Where a user can view their default approvers (must be changed by the Admin). ● Favorite Attendees – This is just like the request portion and allows the same option to create
favorite attendee lists.
Other Settings
These settings are primarily concerned with receipts and connected applications.
● E-Receipt Activation – Ability to enable or disable e-receipt availability. • It is recommended for users to have e-receipt enabled.
● System Settings - Covers default languages, number formats, and currency symbols displayed as
well as other date and time information.
● Connected Apps - Can be viewed and removed here.
● Concur Mobile Registration - When a traveler wants to start using the Concur app, they will
register at the “Concur Mobile Registration” option at the bottom of the list.

15
Approvers and Delegates
Concur users may want delegates to prepare travel
for them. While it is good to have other employees
designated as back-up travel preparers, Concur is a
user-friendly software and reports can be completed
easily. It is recommended that the individual traveler
prepare their own travel.
However, if one would like to set up a delegate, they
would go to their profile and click on Request
Delegates and add the delegate there and then go to
Expense Delegate and add them there as well. The
user will have to add the delegate for request as well
as expense to allow the delegate to create both
requests and expenses. If a user only wanted to
grant access to requests, then enable only in request.
The process will be the same for both request and expense delegates. The user will see a list of delegates
assigned and their permissions granted by the traveler or by the admin. To add a delegate, click on the
blue “add” button and then search for the employee they wish to be a delegate. Once located, select the
person and they will be added to the delegates listed.
Once they are on the list, the user must select their permissions to prepare requests, view receipts, receive
emails regarding those requests, approve reports (if applicable), as well as access to preview an approval
and receive approval emails. There is even an option to add dates to those approving permissions – a useful
tool if the normal approver is out or unable to approve for a span of time.
Once the delegate is added for the user, the
delegate can prepare reports and requests by
logging in under their own sign-in, and going
to the top right and clicking on the drop down
next to “profile”. There are new options
available that says “Acting as other user”. The
delegate can then select the traveler who set
them up and prepare reports for them.

16
Approvers can assign proxies to approve for them here too. They will go to Profile, then Profile Settings and find the same “Request Delegate” or “Report Delegate” section. The Approver will then search the name of the user they want to proxy and approve on their behalf. The access to be selected should be:
• “Can Approve” to grant access to approve indefinitely
• “Can Approve Temporary” to grant access to approve for a defined period
• “Can Preview For Approver” grants access for proxies to view requests and reports on behalf of the Approver and notify them when it is ready to approve
• “Receives Approval Emails” will allow proxies to receive the same email notifications to approve requests and reports the Approver receives NOTE: If the individual does not appear on the search, they may not have the permissions in Concur to approve. Please contact the Travel Office to add those permissions.
Concur Mobile App
The Concur mobile app is a great way to prepare travel while out of the office. The app can perform a
number of valuable tasks like create, submit, and approve request and expense reports. The app also
allows users to upload and prepare receipts and expenses on the road. Providing a much more efficient
way of keeping receipts and documentation.
If the user does not have the app or cannot get the app on their phone, they can always email those
receipts to [email protected] to upload and process receipts and expenses the same way.
Setup
To set up, the user will need to go to “Concur Mobile Registration” link in their profile.
This will send a link to your email to download the app and get started.
Alternatively, the user can just download the app and log in like they would with the
Concur website.
Navigation
Below is an example of the Concur Mobile homepage with brief explanations.

17
View, change, and assign expenses. These expenses include T-Card transaction as well as expenses created by uploaded receipts. If the user wanted to view and edit receipts, go here.
Create, view, change, and submit expense reports.
Review and approve items here (if applicable).
Create, view, change, and submit request reports.
Create a report for mileage calculated automatically within the app.
Create a travel expense. Capture receipts and create expense lines.

18
Concur Profile Guide Introduction
The Profile section within Concur offers numerous options, settings, preferences, and configurations that should be reviewed for accuracy by the traveler. This guide is meant for SFASU travel users and will cover the profile section, what it contains, and how to change the information including the following:
● Opening the Profile
● Personal Information
● Request Settings
● Expense Settings
● Default Account/ FOP Information
● Delegates and Approvers
● Activation Features
● System Settings
NOTE: Request reports and Expense reports have two separate sections. Settings made in the request side will only apply to the travel request (the report prior to the trip needed for approval to travel) and settings made in the expense side will only apply to the travel report (the report after the trip needed for reimbursement)
Finding the Profile Section
Once logged in, the user will see the Concur home page. The profile is in the top right corner of the home page. Click the Profile drop down to see the options for Profile Settings, Signing out, and (if applicable) the option to prepare travel as a delegate for another user. Click on “Profile Settings” to get to the Profile Section. The profile section will open to the “Profile Options” portion with important options listed below. A complete list of the profile configuration options are located on the left hand side.
Personal Information
The Personal Information section has several important settings that it is accessible in three places.
There is a lot of information here and it will be covered in the order it appears on the page. All required fields will be marked as so. Be sure to click save after each change .

19
Profile Picture
The option to change the profile picture is one of the first options at the top right of the page. Click “Change Picture” to upload a picture.
The picture must be JPEG (.jpg) picture under 100kb in size. The dimensions should be 260 pixels wide by 320 pixels tall. Pictures can be changed to fit these specifications in programs like Paint. At the top of this section, the user will find where their name, employee ID, work address, and home address. Some of these fields, such as first name, last name, and employee ID are not editable. If there is a mistake in these fields, please contact the Travel Office. Feel free to complete the middle name, nickname, work address, or home address – but it is not required.

20
Contact Information
In the contact information, users can enter work phone, extension, fax, pager, and other phone numbers but will only be required to enter either the work or home phone. NOTE: Work Phone should be a number that you have access to whilst traveling.
CTP recommends putting your mobile phone number here.
Immediately below that, the user can enter their email address. It is important to add at least one email address and verify is to receive important notifications regarding one’s travel requests and reports. Click on “add an email address” and enter the user’s email address. Also, verify the email address to enable notifications, ExpenseIt, and other features.
Other Options
Beneath the contact sections, you will find the Emergency Contact section, which is an optional portion where the traveler can include emergency contacts. The rest of the options are Travel Preferences that can be used by Corporate Travel Planners (CTP) when booking for the traveler. They include Air, Hotel, and Car Rental Preferences; Frequent travel and advantage programs; and passport/visa information. The last two portions allows a user to assign an assistant to work in lieu of the traveler and add a credit card to their profile.

21
Request Settings
The Request Settings are found on the left-hand side of the settings. Request settings only deals with the request-side of travel. Meaning, to change a preference or setting for all of Concur, it is important to make that change in the Request Settings and Expense Settings section. This guide will cover the options in the order they are listed.
Request Information/ Default FOP
The first section will contain a default FOP. This is normal and a universal configuration. The user will allocate expenses to the appropriate FOAP on the travel Requests or change the FOAP here on the Request Information section. NOTE: By changing the default FOAP in the profile, all future requests and reports will include that FOAP on the header and expense lines.
Request Delegates
This portion allows the user to view who has delegate abilities for them, who they are delegates for, and add/delete assigned delegates or their delegate privileges for others. Users can only add delegates to have someone else work as them, but can only view and delete whom they are a delegate for. Again, this would only add a delegate for the request portion of travel. Delegates still need to be added in the expense section to have delegates in expense as well. Click “Add” to begin adding a delegate then “Save” to save the information. The delegates and their permissions are listed below that.
Request Preferences
This portion allows users to select when they want Request-related emails and notifications. Check the box by which emails and notifications the user wants and click “Save”.

22
Request Approvers
This page allows a user to view who their request approver is. This cannot be changed by the user – Please contact the Travel Office if you have any questions.
Favorite Attendees
When travelling with groups or teams, a traveler may have group meals or group expenses. Rather than adding these attendees one-by-one in the report each time, users can create group lists here to be used when making the request or report.
• The first tab “Attendees” will include all the attendees already added. The user can search for, delete, or edit attendees.
• The second tab “Attendee Groups” allows the user to create a group and add attendees. Click “Attendee Groups” then “Add New” to begin. Add a group name and click “Save Group”.
International Travel
The last portion “International Travel” will bring the user back to the “Personal Information” section where you can enter passport or visa information. This information is not required.
Travel Settings
The Travel Settings sections is an extension of the Personal Information section. This section covers everything needed for travel booking through Concur and includes:
● Travel Preferences - All information needed for booking through Concur. ● International Travel - Such as passport and visa information. ● Frequent Traveler Programs. ● Assistants/Arrangers - Where users can go to assign a Travel Arranger.

23
Expense Settings
The expense list is found on the left-hand side of the profile listed beneath the personal information and request settings. It will include the same settings and configurations as the previous Request Portion, but for the Expense side. Settings made in the request side will only apply to the travel request (the report prior to the trip needed for approval to travel and fund encumbering) and settings made in the expense side will only apply to the travel report (the report after the trip needed for reimbursement).
Expense Information
The first option will display the traveler’s default FOP for expense reports. The default FOAP cannot be changed by the traveler - Please contact the Travel Office if there are any questions.
Expense Delegates
The following option allows users to add delegates to act on their behalf in the expense portion of the travel process. The second tab allows a user to see who they have delegate privileges for and delete those privileges if needed. To add a delegate, the user will click add and find the delegate they wish to add then click add. The privileges will be listed alongside that delegates name in the list below
Expense Preferences
This portion allows the user to add or remove emails and notifications relating to expense reports. The change the preferences, the user will simple check or uncheck the box they want to change and click save at the top.
Expense Approvers
The Approvers section shows the default approvers for the travelers expense reports and cash advances (if applicable). These fields are not editable by the user. Please contact the Travel Office with any questions.
Favorite Attendees
When travelling with groups or teams, a traveler may have group meals or group expenses. Rather than adding these attendees one-by-one in the report, users can create lists here to be used when making the request or report.
• The first tab “Attendees” will include all the attendees already added. The user can search for, delete, or

24
edit attendees.
• The second tab “Attendee Groups” allows the user to create a group and add attendees. Click “Attendee Groups” then “Add New” to begin. Add a group name and click “Save Group”.
Other Settings
The last portion of the Profile Settings is “Other Settings” and is at the bottom of the list on the left-hand side of the profile section.
E-Receipt Activation
This section allows a user to setup the E-Receipt feature in Concur. This important feature allows a user to email receipts into Concur making for easier receipt handling. It is highly recommended this be activated. Once activated the page will note that it is activated and offer an option to disable this setting.
System Settings
The System settings allows a user to change the language, number formats, dates, times, and other specific configurations. A user can change these at any time or reset to the default settings in this area.
Connected Apps
Apps can be views, added, or deleted in the App Center tab at the very top of the Concur page. These apps are primarily 3rd party connections that allow convenient services between the 3rd party and Concur. A user can browse the offered apps by going to the “App Center” tab at the very top.

25
If there are any venders you use frequently, you may want to connect with Concur in this section. In the Connected Apps Section of the Other Settings, users can view and remove these apps
Concur Connect
This link will show a user what applications have access to your Concur account. Concur Mobile and ExpenseIt are highly useful Concur features and it is recommended that these application’s access remain. Concur Mobile allows the Mobile App to submit reports to Concur and the ExpenseIt feature reads receipts uploaded, emailed, or loaded into Concur and created expense lines for them. If you have any questions about these features, please contact the Travel Office.
Concur Mobile Registration
This is a one-time registration to set up the Concur Mobile App. Enter in your email (the work email you will be using for travel) and click “get started” to send a link to the app to your phone. Alternatively, if the app was already downloaded, sign in using your SFA email address and click “Company Code Sign in” to sign in. Or, sign in with your SFA email and enter your mobile PIN. The PIN is set in this section.

26