Sage 100 Enhancements - DSD Business Systems
40
D D S S D D B B u u s s i i n n e e s s s s S S y y s s t t e e m m s s Sage 100 Enhancements SOMS MAS*Ship Version 6.10
-
Upload
khangminh22 -
Category
Documents
-
view
1 -
download
0
Transcript of Sage 100 Enhancements - DSD Business Systems

DDSSDD BBuussiinneessss SSyysstteemmss
Sage 100 Enhancements
SOMS
MAS*Ship
Version 6.10

Information in this document is subject to change without notice.
Copyright 1993-2019, DSD Business Systems All rights reserved.
MAS*Ship User's Manual Version 6.10 20 June, 2019
DSD Business Systems 8787 Complex Drive Suite 400 San Diego, CA 92123 858/550-5900 8:00am to 5:00pm PST 858/550-4900 Fax
Trademarks
ProvideX is a Trademark of Sage Software.
Windows is a trademark of Microsoft Corporation.
Sage 100 is a registered trademark of Sage Software.
PXPlus ® is a registered trademark of PVX Plus technologies
All other product names and brand names are service marks, and/or trademarks or registered trademarks of their respective companies.
This documentation and the software described herein, is prepared and published under license. Sage Software has not tested or verified either the software or any representation in this documentation regarding the software. Sage Software does not make any warranty with respect to either this documentation or the software described herein, and specifically disclaims any warranty, express or implied, with respect hereto, including the warranties of fitness for a particular purpose and merchantability.
Table of Contents

MAS * Ship 3
User's Manual Copyright © 1993-2019 DSD BUSINESS SYSTEMS
SECTION A: INTRODUCTION 4
WEB RESOURCES ......................................................................................................... 4
SUPPORT ..................................................................................................................... 4 MAS*SHIP FEATURES................................................................................................... 5
SECTION B: GETTING STARTED 6
REQUIRED LEVELS ........................................................................................................ 6 INSTALLATION ............................................................................................................... 6
DSD ENHANCEMENT CONTROL PANEL ........................................................................... 8
SECTION C: SETUP 10
ODBC SETUP ............................................................................................................ 10
FEDEX SHIP MANAGER – IMPORT/EXPORT SETUP ......................................................... 13
EXPORT DEFINITION FROM FEDEX ................................................................................ 22 UPS WORLDSHIP – IMPORT/EXPORT SETUP ................................................................ 23 SHIPPER ID MAINTENANCE .......................................................................................... 33
CUSTOMER MAINTENANCE .......................................................................................... 33 SHIPPING RATE MAINTENANCE .................................................................................... 34
SECTION D: SYSTEM OPERATIONS 35
SALES ORDER ENTRY ................................................................................................. 35
SHIPPING DATA ENTRY ............................................................................................... 36 PROCESSING SHIPMENTS ............................................................................................ 36
SECTION E: UNINSTALL DSD ENHANCEMENTS 37

4 MAS * Ship
User's Manual Copyright © 1993-2019 DSD BUSINESS SYSTEMS
Section A: Introduction
This manual contains a description and instructions for this DSD product. Operating instructions are included for the features added by this product to Sage 100. For instructions on using Sage 100, refer to the appropriate Sage 100 manual, or call your Sage 100 reseller. DSD Business Systems offers excellent Sage 100 support, at an hourly rate.
Web Resources
DSD web site: http://www.dsdinc.com
The Enhancement page contains:
Current Release Schedule Purchasing Information Installation Instructions Product Support Enhancement Links
SOMS MAS*Ship:
http://www.dsdinc.com/enh/pages/SOMS.htm
The product web page contains:
Product Description Web Links Current Product Version Table Product Installation File Download Product Manual in .pdf Format Revision History FAQ
Support
DSD provides product support through Sage 100 resellers. Support is provided for the current version. Older versions are supported at an hourly rate. DSD’s telephone number is 858-550-5900. Fax: 858-550-4900.
For a hard error, where the program displays an error dialog, report:
Error number. Program name. Line number. Program version. Exact sequence that caused the error, including menus and menu selections. Other pertinent information.

MAS * Ship 5
User's Manual Copyright © 1993-2019 DSD BUSINESS SYSTEMS
If leaving a message or faxing, please include:
Your name. Your phone number (and fax if applicable) and extension.
It is possible to be unable to duplicate a problem, because of data corruption or because we have not exactly duplicated a particular operating environment. In such circumstances, we can only continue to try to fix the problem if we can either access the system remotely or by some other to duplicate the system.
MAS*Ship Features
MAS*Ship is a link for the Sales Order Module to integrate Sage 100 with UPS Worldship® or FedEx ShipManager® applications. Reduce shipping errors and know exactly when your orders have shipped. MAS*Ship provides a significant savings in data entry time. KEY FEATURES Easy to Use and Easy to Learn Because you are still using the same program (UPS Worldship or FedEx Ship Manager) there are no new programs your warehouse users need to learn. However, with MAS*Ship UPS Worldship and FedEx Ship Manager can now integrate with Sage 100 Increased Accuracy Connecting Sage 100 with UPS Worldship and FedEx Ship Manager will reduce data entry mistakes, increase shipping and invoicing efficiency and provide accurate up-to-date shipping information in MAS 90. Example in UPS Worldship, if an address is incorrect, UPS Worldship will automatically correct it and now with the MAS*Ship that address correction will also flow automatically thru to Sage 100 along with tracking numbers freight dollars and weight (freight dollars is an optional setting and not required). Increased Efficiency Instead of accounting re-entering information received from shipping, accounting now will just need to review the shipment batch, make corrections and print invoices. No more trying to decipher the cryptic notes and marks from shipping because now it is all kept in electronically in Sage 100 along with who processed the shipment.

6 MAS * Ship
User's Manual Copyright © 1993-2019 DSD BUSINESS SYSTEMS
Section B: Getting Started
If you reinstall or upgrade one of the Sage 100 modules listed in the following table, you must also reinstall this Enhancement.
Enhancements from different Sage Developers are generally not designed to work together. If installed together, problems are likely to occur.
Check with DSD before installing more than one Enhancement.
Required Levels
Sage 100 Module
Module Required
Required Level
S/O Y 6.10
Installation
1. Back-up: Exit all Sage 100 sessions. Back-up existing Sage 100 data.
2. Check Levels: Sage 100 module levels must match those listed above.
3. Run Enhancement Setup Program: Save the executable installation program (sent to you or downloaded from our website) in a convenient location on the Sage 100 server. Launch the program from Windows Explorer or by selecting Start/Run, and then browse for the file in the location you saved it. Follow on-screen instructions.
4. Send your Sage Serial Number to your DSD Representative: Send your Sage Serial Number to your DSD representative in order for us to send you back the encrypted keys to unlock your system. This serial number can be found in Library Master\Setup\System Configuration, Tab 3. Registration as Serial Number.
5. Re-Start Sage 100: Sage 100 will be updated.
6. Unlock the Enhancement: DSD Enhancements must be unlocked to run. When any part of the Enhancement is run for the first time, the DSD Enhancement License Agreement and Activation window will appear. Follow the steps shown on that window. You can click the Help button for more detailed instructions.
Note: On the next page is a screenshot of the DSD Enhancement License Agreement and Activation window.
After accepting the License Agreement, you can then select the type of unlocking that you’d prefer. The choices are File, Web, Demo and Manual Entry.
File Unlock: After receiving your encrypted serial number key file from DSD, and placing that file in the MAS90/SOA directory, selecting this option will unlock all products keys contained in the file. This means you can unlock all enhancements at once using this option.

MAS * Ship 7
User's Manual Copyright © 1993-2019 DSD BUSINESS SYSTEMS
Web Unlock: If the system that is running the DSD Enhancement has web access and you have sent DSD your Sage Serial number, you can unlock the Enhancement without assistance using Web Unlock. When this option is selected, the program will attempt to download encrypted serial number key file from DSD and then proceed to unlock all enhancements contained in the file.
The Sage 100 system that is being used must have web access for this option to be effective.
You can send your Sage Serial Number to your DSD Enhancements sales representative.
Demo Unlock: If a Demo mode is available for the Enhancement you’re running, you will be able to Demo unlock the product without assistance from DSD for demo purposes.
Creating a Demo Unlock is a good way to temporarily unlock DSD Enhancements off-hours, if you do not have web or email access. Later, you can unlock the product fully, during business hours.
Manual Entry Unlock: If you want to unlock a single enhancement using a single encrypted key, you can select this option and enter the 64 character key you receive from DSD by copy and paste.
Note: You can also unlock a DSD Enhancement through the DSD Enhancement Control Panel found on the Library Master Utilities Menu. Then, select the Enhancement with your mouse from the list of Enhancements and click the Unlock Product button on the right side of the window.
7. Convert Data: After unlocking, the DSD Conversion Wizard will appear. Follow on-screen instructions to complete data conversion. You can exit the conversion program without converting data. The Enhancement will not proceed, however, until data is converted. If you enter an enhanced program and data has not been converted, the conversion program will run again.

8 MAS * Ship
User's Manual Copyright © 1993-2019 DSD BUSINESS SYSTEMS
DSD Enhancement Control Panel
Starting with version 3.61, all DSD Enhancement products include DSD’s Enhancement Control Panel. The DSD Enhancement Control Panel is accessed from the Library Master Utilities menu.
The DSD Enhancement Control Panel is a simple to use yet powerful system to help maintain DSD Enhancements installed on a Sage 100 system. To use it, select an Enhancement product from the list on the window and then click the button, on the right side of the window, which corresponds with the desired task.
View Manual: This button will display the product manual for the selected Enhancement using Adobe Acrobat. For this to be possible, the PDF file for the corresponding manual must be in the “MAS90/PDF” folder in the Sage 100 system. If the file is not present, and the system has web access, the correct PDF file will be automatically downloaded from the DSD website, put into the “MAS90/PDF” folder and then displayed.
Check the Web for Updates: This button will check the DSD website to see what the current build is the selected Enhancement and alert the user if a later version is available. This requires an internet connection on the Sage 100 system.
Unlock Product: This will cause the DSD Enhancement License Agreement and Activation window to appear. Using this window is described on the previous page. This button is disabled if the selected Enhancement is already unlocked or if unlocking is not required.
Unlock All Products: This will cause the DSD Enhancement All License Agreement and Activation window to appear. This window is similar to the one described on the previous page, but has only web and file as options to unlock. This button is never disabled.
Convert Data: After verification, the selected Enhancement’s data conversion program will run. Data conversion is non-destructive, and may be triggered any number of times. Sometimes this is required to fix data records imported or updated from a non-enhancement installation.

MAS * Ship 9
User's Manual Copyright © 1993-2019 DSD BUSINESS SYSTEMS
Multi-Convert Data: Multiple Companies can be converted at the same time for a given Enhancement. (If you have a large number of Companies to convert, please do in batches of 20 or fewer due to memory limitations.)
Help: The Help button, located at the bottom right of the window, opens an HTML help file.
Get Adobe Acrobat: Opens the Adobe Acrobat website to the page where Acrobat can be downloaded and installed.
Uninstall Enhancement If this option is available, then selecting this button will start the un-install process, removing the enhancement from the system. (for more information see Uninstall DSD Enhancements)

10 MAS * Ship
User's Manual Copyright © 1993-2019 DSD BUSINESS SYSTEMS
Section C: Setup
ODBC Setup
Note: The ODBC Data Source only needs to be setup once for FedEx and UPS. If you have all ready setup an ODBC Data Source for UPS you will not need to do it again for FedEx
To begin, go to the Windows ‘Start’ – ‘Control Panel’ – ‘Administrative Tools’ – ‘Data Sources’ From the ‘ODBC Data Source Administrator’ screen select ‘Add’
Select the MAS90 4.0 ODBC Driver and click ‘Finish’.
Click on ‘Finish’.

MAS * Ship 11
User's Manual Copyright © 1993-2019 DSD BUSINESS SYSTEMS
We will now need to fill in the options for the ODBC driver. Fill in the following fields for each ‘Tab’
BASIC Data Source Name: Type in SOTAMAS90_SHIP for the Data source name. Or if this is getting setup for multiple companies then make the data source name SOTAMAS90_XXX where XXX is the SAGE 100 company code. Description: Reference field only. Database Directory: This is the directory to your SAGE 100 installation. If this is a MAS200 install use a UNC path to the MAS90 directory.
LOGON Company Code: Type in the SAGE 100 Company code this is getting linked to. (make sure to use Capital letters) Default UserID: Type in the SAGE 100 user Id to login in as. Password: Enter the SAGE 100 password for the user (this password is case-sensitive)
OPTIONS Dirty Read: check this box on. Burst Mode: check this box on. Silent Mode: check this box on. Cache Size MB: Set to 4
After the ‘Options’ have been set click ‘Apply’.
12 MAS * Ship
User's Manual Copyright © 1993-2019 DSD BUSINESS SYSTEMS
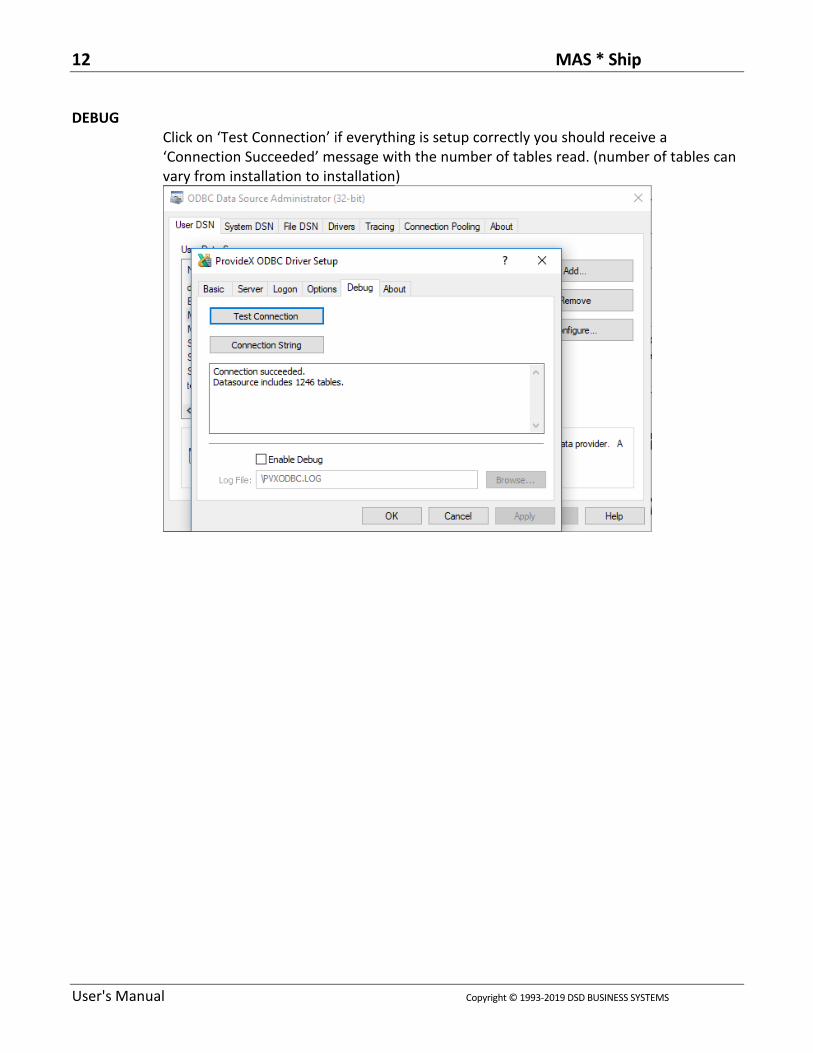
DEBUG
Click on ‘Test Connection’ if everything is setup correctly you should receive a ‘Connection Succeeded’ message with the number of tables read. (number of tables can vary from installation to installation)

MAS * Ship 13
User's Manual Copyright © 1993-2019 DSD BUSINESS SYSTEMS
Fedex Ship Manager – Import/Export Setup
NOTE: This setup must be repeated on each workstation that has FedEx Ship Manager loaded and must be done at the FedEx workstation not the server.
Launch FedEx Ship Manager. From the ‘Menu’ bar click on ‘Integration’ – ‘FedEx Integration Assistant’ The Integration Assistant Wizard should launch. Click through the following two welcome screens. FedEx Integration Wizard will now ask us what kind of integration we want to do. Select ‘Both Import and Export’ Select ‘Create a new profile’ and then click ‘Continue’.

14 MAS * Ship
User's Manual Copyright © 1993-2019 DSD BUSINESS SYSTEMS
We now come to the ‘Import’ section of the Wizard, select ‘ODBC’. SOURCE: Now select the ‘SOTAMAS90_SHIP (or if you are setting this up for multiple companies then select the ‘SOTAMAS90_XXX where XXX is the SAGE 100 company code.)
NOTE: if you are setting this up for multiple company codes then you will need to setup an integration profile for
each individual company code.
SHIPPING: Select ‘Single Edit’ option at the bottom of the screen. LOOKUP: we want to lookup and import our information ‘After I enter a Customer Reference’

MAS * Ship 15
User's Manual Copyright © 1993-2019 DSD BUSINESS SYSTEMS
INFORMATION: on the Information screen click on the ‘All Fields’ line and select the following fields
RECEPIENT
Address 1
Address 2
City
Company
Contact Name
Country
Phone
Postal Code
State/Province PACKAGE
Account Number
Bill Transportation to
Ground Invoice Number
P.O. Number
Package Type
Residential Delivery Flag
Service Type
Weight SPECIAL SERVICES
Amount (COD)
Delivery Flag (Saturday Services)
Recipient Shipment Notification
Recipient e-mail

16 MAS * Ship
User's Manual Copyright © 1993-2019 DSD BUSINESS SYSTEMS
MATCH: On the Match screen is where we will map each SAGE 100 field to the appropriate FedEx field. To begin select the ‘SO_InvoiceHeader’ table as the source and say ‘Yes’ to set all unselected tables as this table.
PACKAGE
FedEx Field SAGE 100 Field
Bill Transportation To D516FedExBilling
Ground Invoice Number InvoiceNo
P.O. Number CustomerPONo
Package Type Set as your default FedEx package Type
Residential Delivery Flag ResidentialAddress
Service Type D516FedExService
Weight Check the box ‘Scale’
RECEPIENT
FedEx Field SAGE 100 Field
Address 1 ShipToAddress1
Address 2 ShipToAddress2
City ShipToCity
Company ShipToName
Contact Name ConfirmTo
Country ShipToCountryCode (set default as US)
Phone D516ShipToPhone
Postal Code ShipToZipCode
State/Province ShipToState
Account Number D516ShippingAccount

MAS * Ship 17
User's Manual Copyright © 1993-2019 DSD BUSINESS SYSTEMS
SPECIAL SERVICES
FedEx Field SAGE 100 Field
Cash on Delivery Amount D516TotalValue
Saturday Services Delivery Flag D516SaturdayDelivery
Ship Alert Recipient e-mail EmailAddress
Ship Alert Recipient Shipment Notification
D516ShipmentNotification
INDEX – Once all the fields have been mapped click on the ‘Index’ button at the bottom and select SalesOrderNo as the Index value.
CONVERSION: To make sure fields convert correctly to the right value we need to match the SAGE 100 value to the FedEx value. The following fields need conversions set:
Residential Delivery
No/False = N
Yes/True = Y
Country – FedEx only has only a two character country code, SAGE 100 uses 3 characters. To make sure the FedEx and SAGE 100 values match up correctly you have two options.
Set your SAGE 100 country codes to match FedEx (If you only use 2 characters in SAGE 100 and set them up the same as FedEx they will come over correctly without conversion) or
Go into the conversion tables and assign the FedEx country code to the correct SAGE 100 three character value.
Ship Alert Recipient
No/False = N
Yes/True = Y
Saturday Services Delivery Flag
No/False = N
Yes/True = Y

18 MAS * Ship
User's Manual Copyright © 1993-2019 DSD BUSINESS SYSTEMS
EXPORT DESTINATION: Select the destination as a ‘Text File’ and then browse and select the ‘Manifest.csv’ found in the ..\MAS90\MAS_ABC\SOABC directory where ‘ABC’ is the SAGE 100 company code you are linking to.
NOTE: You may need to create a ‘Manifest.csv’ file, if you do type in 1 thru 19 with each number separated by a comma
EXPORT FORMAT: Select the following options for the text file format
Delimited
{comma} – the character used to separate the fields
‘No’ for field headings EXPORT METHOD: Select the Method for exporting the records processed in FedEx ship manager, select the following options.
When do you want to export to your data source? – Each time a shipment is completed.
How do you want to update your data source? – Insert a new record EXPORT INFORMATION: Select the information to be exported. On the Information screen click on the ‘All Fields’ line and select the following fields.
TRACKING
Tracking Number CHARGES
Gross Charge
Net Charge
PACKAGE
Ground Invoice Number
P.O. Number
Service Type
Weight

MAS * Ship 19
User's Manual Copyright © 1993-2019 DSD BUSINESS SYSTEMS
RECEPIENT
Address 1
Address 2
City
Company
Contact Name
Country
Postal Code
State/Province SPECIAL SERVICES
Recipient Delivery Notification
Recipient Shipment Notification
EXPORT MATCH: On the Match screen is where we will identify how each FedEx field will be sent back to SAGE 100. To begin follow the table mapping below.
CHARGES
FedEx Field Export Column
Customer Rates Gross Charge Field16 (Package charge – since FedEx does not export the package charge we fill it with the gross charge. This field currently does not get written back to SAGE 100)
Customer Rates Net Charge Field4 (Total Shipment and Handling charge – this values is used to write to the SAGE 100 Freight field if ‘Write freight back to Invoice’ is turned on)

20 MAS * Ship
User's Manual Copyright © 1993-2019 DSD BUSINESS SYSTEMS
PACKAGE
FedEx Field SAGE 100 Field
Ground Invoice Number Field1 (This is the SAGE 100 Invoice number and is used to match FedEx records to the appropriate SAGE 100 shipments)
P.O. Number Field19 (Reference field can be replaced by any other field, imports into the Package comment field in SAGE 100)
Service Type Field3 (Ship Via/Service Type)
Weight Field18
RECIPIENT
FedEx Field SAGE 100 Field
Address 1 Field7 (updates the ShipToAddress1)
Address 2 Field8 (updates the ShipToAddress2)
City Field10 (updates the ShipToCity)
Company Field5 (updates the ShipToName)
Contact Name Field6 (updates the ConfirmTo)
Country Field13 (Does not update the ShipToCountryCode)
Postal Code Field12 (updates the ShipToZipCode)
State/Province Field11 (updates the ShipToState)
SPECIAL SERVICES
FedEx Field SAGE 100 Field
Ship Alert Recipient Delivery Notification
Field2 (shipment Void Indicator – FedEx does not export the void indicator so we use this field to populate the value with a N)
Ship Alert Recipient Shipment Notification
Field14 (package Void Indicator – FedEx does not export the void indicator so we use this field to populate the value with a N)
TRACKING NUMBER
FedEx Field SAGE 100 Field
Tracking Number Field15 (writes the tracking number to the shipment)

MAS * Ship 21
User's Manual Copyright © 1993-2019 DSD BUSINESS SYSTEMS
EXPORT CONVERSION: There are two fields we need to convert to meet the export requirements, this is a very important step failure to do so will result in tracking numbers not updating to SAGE 100.
Ship Alert Recipient Delivery Notification
No/False = N
Yes/True = N
Ship Alert Recipient Shipment Notification
No/False = N
Yes/True = N
FINISH: We are about finished with the integration, there are two more screens that will summarize what we have done and then ask us to ‘Save’ our settings.
SUMMARY: the summary screen will summarize what we have setup and give you an opportunity to change anything that has been setup, by clicking on the ‘Edit’ link for the appropriate section. If you are satisfied click
on the ‘Continue’ button
INSTRUCTIONS: Please read this screen and when finished click on the ‘SAVE’ button at the bottom right-hand corner. After clicking on ‘Save’ click on the ‘FINISH’ button.
SAVE: Give your profile a name, you can type in anything that will make sense, if you are setting this up for multiple companies be sure to include the MAS90 company code that you set it up for.

22 MAS * Ship
User's Manual Copyright © 1993-2019 DSD BUSINESS SYSTEMS
Export Definition from Fedex
Fedex Ship Manager FIELD COLUMN
Shipment Info: Description of Goods\Reference 2
1
Shipment Info: Void Indicator 2
Shipment Info: Service Type 3
Shipment Info: Total Shipment and Handling Charges
4
Ship To: Company or Name 5
Ship To: Attention 6
Ship To: Street Address 7
Ship To: Room/Floor/Address2 8
Ship To: Department/Address3 9
Ship To: City 10
Ship To: State 11
Ship To: Postal/Zip Code 12
Ship To: Country 13
Package: Void Indicator 14
Package: Tracking Number 15
Package: Package Charge 16
Package: Package Type 17
Package: Weight 18
Package: Reference 1 19

MAS * Ship 23
User's Manual Copyright © 1993-2019 DSD BUSINESS SYSTEMS
UPS WorldShip – Import/Export Setup
From the WorldShip Import/Export Data Menu, choose Create/Edit Map On the lower portion of the window, in New Map, click the Import from ODBC Database, Select Shipment from the drop down, and enter a name for your Import Map. Click OK.
In the ODBC Tables column, select SO_InvoiceHeader

24 MAS*Ship
User's Manual Copyright © 1993-2019 DSD BUSINESS SYSTEMS
Map the SO_Invoice Header fields to the UPS fields as follows. The field numbers are listed for UPS WorldShip v15 (2012). The field numbers can change from version to version but typically the Table Name and Field Descriptions remain constant or at least similar enough to easily identify. From the ODBC Table column, select field 1 from the SO_InvoiceHeader. Then select Package, Reference 2 from the WorldShip Package, Reference 2 field. Click the Connect button. Repeat this procedure for each MAS 90 field listed.
Sage Field*
SO_InvoiceHeader Table UPS Field**
UPS ODBC Table
UPS Field Description
1 Invoice Number 6 Package Reference 2
19 ShipToName 52 Shipment Information
Notification Recipient 1 Company or Name
19 ShipToName 2 Ship To Company or Name
20 ShipToAddress1 5 Ship To Address 1
21 ShipToAddress2 6 Ship To Address 2
22 ShipToAddress3 7 Ship To Address 3
23 ShipToCity 10 Ship To City or Town
24 ShipToState 11 Ship To State/Province/County
25 ShipToZipCode 9 Ship To Postal Code
26 ShipToCountryCode 8 Ship To Country/Territory
32 CustomerPONo 5 Package Reference 1

MAS*Ship 25
User's Manual Copyright © 1993-2017 DSD BUSINESS SYSTEMS
35 ConfirmTo 53 Shipment Information
Notification Recipient 1 Contact Name
35 ConfirmTo 3 Ship To Attention
44 ResidentialAddress 18 Ship To Residential Indicator
71 EmailAddress 54 Shipment Information
Notification Recipient 1 Email
71 EmailAddress 14 Ship To Email Address
151 D516SaturdayDelivery 38 Shipment Information
Saturday Delivery Option
152 D516ShipmentNotification 49 Shipment Information
QVN Ship Notification 1 Op5io
153 D516ShippingAccount 16 Ship To Receiver UPS Account Number
155 D516ShipToPhone 12 Ship To Telephone
157 D516TotalValue 13 Package COD Amount
158 D516UpsBilling 5 Shipment Information
Billing Option
159 D516UpsService 3 Shipment Information
Service Type

26 MAS*Ship
User's Manual Copyright © 1993-2019 DSD BUSINESS SYSTEMS
There are some additional steps required to ensure that the correct information is imported from Sage 100. Highlight the connection between SO_InvoiceHeader_D516UpsService field and Shipment Information: Service Type, click the Edit button. Click the Translations Button, and select Service.
Select and rename the External Fields as listed below.

MAS*Ship 27
User's Manual Copyright © 1993-2017 DSD BUSINESS SYSTEMS
Highlight the SO_InvoiceHeader: ShipToCountryCode field linked to the WorldShip Ship to Country/Territory and click the Edit button.
Click the Edit button, then Translation, then Select Country.

28 MAS*Ship
User's Manual Copyright © 1993-2019 DSD BUSINESS SYSTEMS
In the External Field of the window Mapping Connections into Ship To: Country/Territory, enter the Country Code from the MAS 90 Country Code Listing.
In this example, MAS 90’s Country Code file lists United States as “USA.”

MAS*Ship 29
User's Manual Copyright © 1993-2017 DSD BUSINESS SYSTEMS
Highlight the SO_InvoiceHeader: D516UpsBilling field linked to the WorldShip Shipment Information:Billing Option, and click the Edit button.
There are no existing translations so it is necessary to create the list. In the External Field enter B, then in the WorldShip Field enter Prepaid then click the Add button. Repeat for C, Freight, and D, Consignee Billed.
30 MAS*Ship
User's Manual Copyright © 1993-2019 DSD BUSINESS SYSTEMS
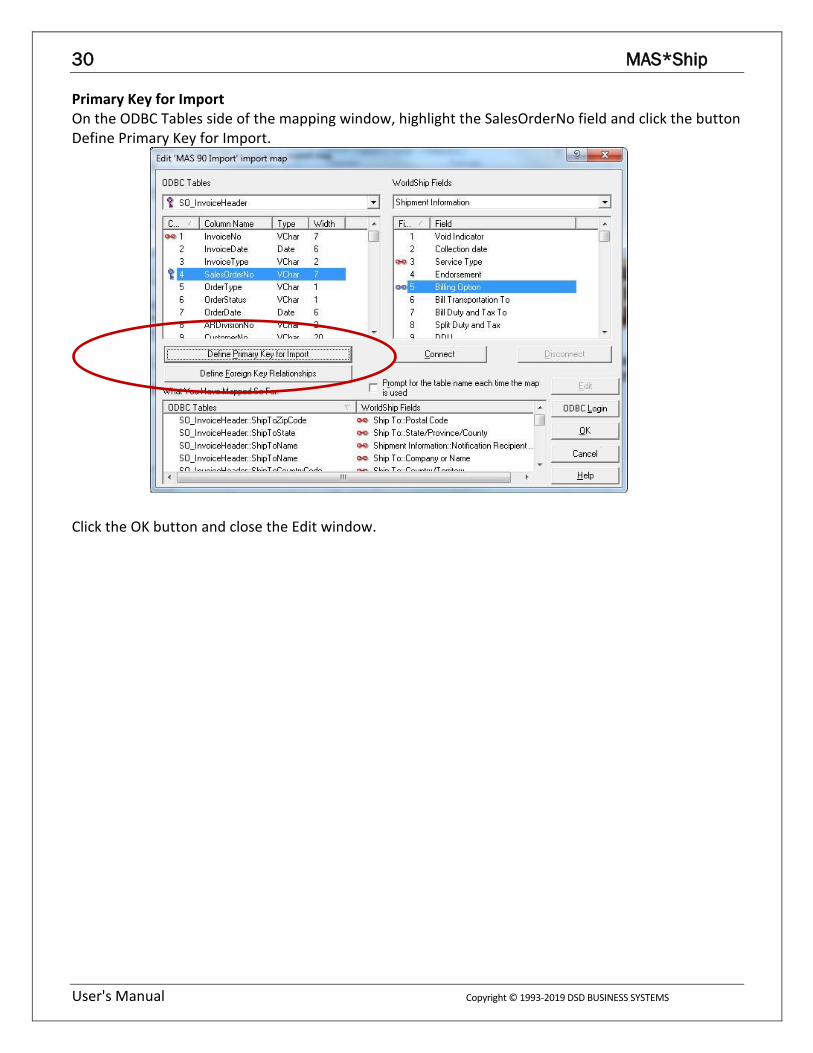
Primary Key for Import On the ODBC Tables side of the mapping window, highlight the SalesOrderNo field and click the button Define Primary Key for Import.
Click the OK button and close the Edit window.

MAS*Ship 31
User's Manual Copyright © 1993-2017 DSD BUSINESS SYSTEMS
Export back to MAS 90 From the UPS WorldShip Import/Export Data Menu, select Create/Edit Map.
In the New Map section of the lower portion of the window, check the radio button Export data from WorldShip, and check the box Export CSV. Use the drop-down to select Shipment. In the Name field, enter MAS 90 Export and click the Create button. Use the table below to create the Export Map by selecting the UPS Tab and Field Identified.

32 MAS*Ship
User's Manual Copyright © 1993-2019 DSD BUSINESS SYSTEMS
For example, Select the Package Tab, then highlight Field 19, Reference 2 and click the Add button. Continue until you have selected all the fields listed below and they are entered in the order listed.
Field No.** Field Name Column
19 Package: Reference 2 1
1 Shipment Info: Void Indicator 2
2 Shipment Info: Service Type 3
205 Shipment Info: Total Shipment and Handling Published Charges 4
2 Ship To: Company Name 5
3 Ship To: Attention 6
5 Ship To: Address 1 7
6 Ship To: Address 2 8
7 Ship To: Address 3 9
10 Ship To: City 10
11 Ship To: State 11
9 Ship To: Postal Code 12
8 Ship To: Country 13
1 Package: Void Indicator 14
15 Package: Tracking Number 15
3 Package: Package Published Charge 16
4 Package: Package Type 17
5 Package: Weight 18
18 Package: Reference 1 19
Finally, click the button Define CSV File Name, and enter the path to the SOCCC (where CCC is the Company Code) Manifest.csv file to which the shipment data will be exported.

MAS*Ship 33
User's Manual Copyright © 1993-2017 DSD BUSINESS SYSTEMS
Shipper ID Maintenance
Go To ‘Sales Order’ – ‘Setup’ – ‘Shipper ID Maintenance’ and you will notice a new field called “Auto Print Shipping Documents” . This check box, if enabled for a shipper ID, will automatically print the shipping documents upon the completion of a shipment to the users default printer.
Customer Maintenance
In ‘Accounts Receivable’ – ‘Customer Maintenance’. Bring up a customer and go to the ‘Ship To Address’ maintenance. You will notice two new fields; set them appropriately for each customer.
‘Saturday Delivery’
‘Shipping Account No’

34 MAS*Ship
User's Manual Copyright © 1993-2019 DSD BUSINESS SYSTEMS
Shipping Rate Maintenance
Go to ‘Sales Order’ – ‘Setup’ – ‘Shipping Rate Maintenance’. You will need to identify each Shipping Rate Code as either ‘UPS’ or ‘FedEx’ and identify the different shipping options you want to have. These options are changeable in Sales Order entry or Shipping Data Entry.
Handling Charges: Choose None if no handling charges are to be added to the freight exported from the Shipping Software to Shipping Data Entry. Choose Per Package if handling charges for each package in the shipment are to be added to the freight exported from the Shipping Software to Shipping Data Entry. Choose Flat Rate if handling charges for each complete shipment will be added to the freight exported from the Shipping Software to Shipping Data Entry. Enter the amount of the handling charges for each package.
Shipping Type: Choose the appropriate carrier for the Shipping Code. Choose None for all carriers other than UPS or FedEx.
FedEx / UPS Billing: Select the Billing method
FedEx / UPS Service Type: Select the Service type.
Add Freight to Invoice: Enable this option if the freight amount calculated in the Shipping Software should be written to the Freight field in Shipping Data Entry. This is appropriate if the Shipping Code is for Billing Type Prepaid. Clear the check box if the freight amount calculated in UPS should not be exported from the shipping software to the Freight field in Shipping Data Entry. This is appropriate if the Shipping Code is for Billing Type Freight Collect or Consignee Billed.

MAS*Ship 35
User's Manual Copyright © 1993-2017 DSD BUSINESS SYSTEMS
Section D: System Operations
Sales Order Entry
Sales Order Entry contains the following new fields. The value for these fields will need to be set for any Sales Orders that existed before the MAS * Ship enhancement was installed. • Shipping Account # • C.O.D • Saturday Delivery • Add Freight to Invoice • E-Mail Shipment Notification: The e-mail will be sent based on the e-mail address on the ‘Header’ tab.

36 MAS*Ship
User's Manual Copyright © 1993-2019 DSD BUSINESS SYSTEMS
Shipping Data Entry
The Shipping Data entry screen contains the following new fields. Note: these fields default from Sales Order Entry but can be changed during shipping data entry.
Saturday Delivery
E-Mail Shipment Notification
Processing Shipments
Enter Shipping Data Entry per standard operating procedures. When finished, leave the entry screen OPEN (do not hit ACCEPT). Open the Fedex Ship Manager or UPS Worldship Software and process the shipment. If you are using Fedex Ship Manager, type in the Sales order number in the ‘Customer Reference’ field. Your shipment information should appear in FedEx. Complete the shipment in FedEx. If you are using UPS Worldship, enter (or scan) the Sales Order number into the UPS Enter Import Key box. Process and Complete the shipment in UPS Worldship. At this point the UPS / Fedex Export Map will send all the mapped fields to the Manifest.csv file identified during map creation.

MAS*Ship 37
User's Manual Copyright © 1993-2017 DSD BUSINESS SYSTEMS
Return to the Sales Order Shipping Data Entry screen and click the Accept button to import the data into Shipping Data Entry and close the shipping window for this order. You will receive a message:
The Shipment Charge will be imported into the Freight field on the Totals Tab in Shipping Data Entry (if Shipping Rate Maintenance has the Add Freight to Invoice box checked.
In addition to the Shipment Charge, the Tracking Numbers are brought into Shipping Data Entry and can be viewed via the Tracking Button on the Shipping Tab.

38 MAS*Ship
User's Manual Copyright © 1993-2019 DSD BUSINESS SYSTEMS
Section E: Uninstall DSD Enhancements
A DSD Enhancements Uninstall Utility has been provided for the purposes of removing DSD Enhancements from your Sage 100 System. This utility may be accessed from the DSD Enhancement Control Panel menu option on the Library Master / Utilities menu.
When accessing the DSD Enhancement Control, select the enhancement that you wish to Uninstall, and then select the Uninstall Enhancement button. The following message box will appear:
Select No to exit the Uninstall Process. Select Yes to continue with the Uninstall Process.

MAS*Ship 39
User's Manual Copyright © 1993-2017 DSD BUSINESS SYSTEMS
The following message box will appear, to remind you that a complete backup of your entire Sage 100 system should be completed prior to uninstalling a DSD product.
Select No to exit the Uninstall Process. Select Yes to continue with the Uninstall Process. After the Uninstall of the DSD Enhancement, you MUST reinstall certain standard Sage 100 modules, followed by reinstallation of Product Updates and Hot Fixes, if applicable. A message box will appear, and will display which of those specific Sage 100 modules you must reinstall afterwards. Select No to exit the Uninstall Process. Select Yes to continue with the Uninstall Process. The following message box will appear, displaying the final warning message.
Select No to exit the Uninstall Process. Select Yes to continue with the Uninstall Process. At this point, the DSD Enhancement will be removed from the Sage 100 system.

40 MAS*Ship
User's Manual Copyright © 1993-2019 DSD BUSINESS SYSTEMS
After completion of the Uninstall, the following message box will appear. Select OK to continue.
Now that the Uninstall process is completed, you must:
Reinstall the applicable standard Sage 100 modules
Reinstall the latest Sage 100 Service Pack/Updates, if applicable.
Reinstall any other DSD Enhancements or Developer products that are affected from the reinstallation of the standard Sage 100 module(s).