RoboHelp 2020: The Essentials (2nd Edition) - IconLogic
36
-
Upload
khangminh22 -
Category
Documents
-
view
0 -
download
0
Transcript of RoboHelp 2020: The Essentials (2nd Edition) - IconLogic


Adobe RoboHelp 2020: The Essentials (Second Edition)
Kevin Siegel
v081421Page Count:2009781944607791 (Perfect-Bound Print Book)9781944607814 (Coil-Bound Print Book & PDF)9781944607807 (eBook)
™
Notice: Although IconLogic makes every effort to ensure the accuracy and quality of these materials, allmaterial is provided without any warranty.
Copyright: 2021 by IconLogic, Inc. This document, or any part thereof, may not be reproduced ortransmitted in any form or by any means, electronic or mechanical, including photocopying, recording,storage in an information retrieval system, or otherwise, without the prior written permission of IconLogic.
Trademarks: IconLogic, Inc., and the IconLogic logo are registered trademarks of IconLogic. Allcompanies and product names are trademarks or registered trademarks of their respective companies.They are used in this book in an editorial fashion only. No use of any trade name is intended to conveyendorsement or other affiliation with IconLogic books.

“Skills and Drills” Learning
Rank Your SkillsBefore starting this book, complete the skills assessment on the next page.

How This Assessment WorksBelow you will find 10 course objectives for learning Adobe RoboHelp 2020. Before starting this book,review each objective and rank your skills using the scale next to each objective. A rank of means NoConfidence in the skill. A rank of means Total Confidence. After you’ve completed this assessment,work through the entire book. After finishing the book, review each objective and rank your skills now thatyou’ve completed the book. Most people see dramatic improvements in the second assessment aftercompleting the lessons in this book.
Before Starting1. I can create topics.
2. I can create a table of contents.
3. I can create hyperlinks to topics.
4. I can create a cascading style sheet (css).
5. I can create a variable.
6. I can create conditional build expressions.
7. I can create a snippet.
8. I can customize a skin.
9. I can create a map file.
10. I can publish a project.
Now That I Am Finished1. I can create topics.
2. I can create a table of contents.
3. I can create hyperlinks to topics.
4. I can create a cascading style sheet (css).
5. I can create a variable.
6. I can create conditional build expressions.
7. I can create a snippet.
8. I can customize a skin.
9. I can create a map file.
10. I can publish a project.
IconLogic, Inc.www.iconlogic.com
Skills Assessment

“Skills and Drills” Learning
Contents

Adobe RoboHelp 2020: The Essentials (Second Edition)
ii © 2021, IconLogic. All Rights Reserved.
About This BookThe Author...........................................................................................................................viiiIconLogic .............................................................................................................................viiiBook Conventions ................................................................................................................ ixConfidence Checks .............................................................................................................. ixRoboHelp Updates and How They Affect This Book............................................................. xSoftware Requirements for This Book................................................................................... xDownloadable Book Assets (RoboHelp2020Data)................................................................ xProject Scenarios .................................................................................................................xiiContacting IconLogic............................................................................................................xii
Module 1: Introduction to RoboHelpRoboHelp’s History................................................................................................................2Exploring RoboHelp .............................................................................................................. 3
Guided Activity 1: Open an Existing Project ................................................................3Guided Activity 2: Set the RoboHelp Application Theme.............................................5Guided Activity 3: Explore Project Content ..................................................................6
Topics.................................................................................................................................... 8Guided Activity 4: Create, Edit, and Delete a Topic.....................................................8
Adding and Deleting Topics Confidence Check..................................................9Table of Contents and Indexes ........................................................................................... 10
Guided Activity 5: Explore a TOC and an Index ........................................................ 10Output Presets .................................................................................................................... 12
Guided Activity 6: Browse the Outputs ...................................................................... 12Guided Activity 7: Generate Frameless Output ......................................................... 13Guided Activity 8: Generate Responsive HTML5 Output........................................... 16Guided Activity 9: Create an eBook........................................................................... 17Guided Activity 10: Generate Microsoft HTML Help .................................................. 18
Module 2: Create a ProjectNew Projects ....................................................................................................................... 22
Guided Activity 11: Create a New Project.................................................................. 22Topics.................................................................................................................................. 25
Guided Activity 12: Create a New Topic .................................................................... 25Guided Activity 13: Rename and Delete Topics ........................................................ 27
Importing Content................................................................................................................ 29Guided Activity 14: Import HTML Files as Topics ...................................................... 29Guided Activity 15: Import Word Documents............................................................. 30
Importing Content Confidence Check ............................................................... 31Source View ........................................................................................................................ 32
Guided Activity 16: Edit Text Formatting in Source View........................................... 32Source View Confidence Check ....................................................................... 33
Module 3: Project Structure, TOCs, and StylesProject Structure.................................................................................................................. 36
Guided Activity 17: Create Project Folders ................................................................ 36Project Structure Confidence Check................................................................. 38
Table of Contents ................................................................................................................ 39Guided Activity 18: Create a TOC Section................................................................. 39
TOC Sections Confidence Check ..................................................................... 41Automatic TOCs.................................................................................................................. 42
Guided Activity 19: Auto-Create a TOC..................................................................... 42Guided Activity 20: Reorder TOC Section Topics...................................................... 43
Section Structure Confidence Check ................................................................ 43

Contents
© 2021, IconLogic. All Rights Reserved. iii
Style Sheets ........................................................................................................................44Guided Activity 21: Attach a Style Sheet to a Topic...................................................44Guided Activity 22: Apply Paragraph Styles ..............................................................46
Styles Confidence Check ..................................................................................48Custom Style Sheets ...........................................................................................................49
Guided Activity 23: Create a Style Sheet...................................................................49Guided Activity 24: Remove and Apply a Topic’s Style Sheet ...................................54
Edit Style Sheet Confidence Check ..................................................................55Character Styles ..................................................................................................................56
Guided Activity 25: Create and Apply a Character Style ...........................................56Character Style Confidence Check ...................................................................58
List Styles ............................................................................................................................59Guided Activity 26: Format a Bulleted List .................................................................59
List Style Confidence Check .............................................................................61
Module 4: LinksLinking to External Content .................................................................................................64
Guided Activity 27: Link to a Word Document ...........................................................64External Content Links Confidence Check........................................................69
Hyperlinks............................................................................................................................70Guided Activity 28: Insert Hyperlinks .........................................................................70
Links Confidence Check ...................................................................................72Bookmarks...........................................................................................................................73
Guided Activity 29: Insert Bookmarks ........................................................................73Bookmarks Confidence Check..........................................................................74
Popup Links.........................................................................................................................76Guided Activity 30: Insert Auto-Sizing Popups ..........................................................76
Popup Hyperlink Confidence Check .................................................................79
Module 5: Images and MultimediaImages.................................................................................................................................82
Guided Activity 31: Insert an Image ...........................................................................82Guided Activity 32: Add Alternate Text and an Image Title .......................................84
Images Confidence Check ................................................................................85Image Maps.........................................................................................................................87
Guided Activity 33: Add Hotspots to a Graphic..........................................................87Image Map Confidence Check..........................................................................89
eLearning Integration...........................................................................................................90Guided Activity 34: Import Captivate Demos into a Project .......................................90Guided Activity 35: Insert Captivate Demos into Topics ............................................91
eLearning Confidence Check............................................................................92Drop-down Text ...................................................................................................................93
Guided Activity 36: Create Drop-Down Text ..............................................................93Drop-Down Text and Images Confidence Check..............................................94
Module 6: Tags, Expressions, and VariablesCondition Tags ....................................................................................................................96
Guided Activity 37: Create a Condition Tag...............................................................96Guided Activity 38: Apply a Condition Tag to Topic Content .....................................98
Condition Tags Confidence Check....................................................................99Condition Expressions.......................................................................................................101
Guided Activity 39: Create a Condition Expression .................................................101Expressions Confidence Check ......................................................................103

Adobe RoboHelp 2020: The Essentials (Second Edition)
iv © 2021, IconLogic. All Rights Reserved.
Guided Activity 40: Apply a Condition Tag to a Topic.............................................. 106Dynamic Content Filters .................................................................................................... 107
Guided Activity 41: Create Dynamic Content Filters................................................ 107Dynamic Filters Confidence Check................................................................. 109
Variables ........................................................................................................................... 111Guided Activity 42: Create, Insert, and Edit a Variable............................................ 111
Snippets ............................................................................................................................ 114Guided Activity 43: Insert and Edit Snippets............................................................ 114
Snippets Confidence Check............................................................................ 115
Module 7: Tables, Indexes, Search, and GlossariesTables................................................................................................................................ 118
Guided Activity 44: Insert a Table............................................................................ 118Tables Confidence Check............................................................................... 119
Guided Activity 45: Edit a Table Style...................................................................... 120Tables Confidence Check............................................................................... 122
Indexes.............................................................................................................................. 123Guided Activity 46: Add Index Keywords from Within a Topic ................................. 123
Index Entries Confidence Check..................................................................... 124Guided Activity 47: Add Index Keywords on the Index Panel .................................. 125Guided Activity 48: Edit Multiple Topic Properties at One Time .............................. 127
Index Confidence Check................................................................................. 128See Also Links................................................................................................................... 129
Guided Activity 49: Create a See Also Keyword...................................................... 129Index Confidence Check................................................................................. 131
Guided Activity 50: Insert a See Also Placeholder into a Topic ............................... 132See Also Confidence Check ........................................................................... 133
Search ............................................................................................................................... 137Guided Activity 51: Add Custom Search Terms....................................................... 137Guided Activity 52: Add a Search Synonym ............................................................ 139
Glossaries ......................................................................................................................... 140Guided Activity 53: Add Glossary Terms ................................................................. 140
Glossary Confidence Check ........................................................................... 141Scripts ............................................................................................................................... 142
Guided Activity 54: Use the Glossary Term Converter Script .................................. 142
Module 8: Skins and Master PagesSkins.................................................................................................................................. 146
Guided Activity 55: Add a Favicon and Select a Default Topic................................ 146Guided Activity 56: Modify a Home Page Tile Image............................................... 150Guided Activity 57: Change the Logo Used on the Home Page.............................. 151
Skins Confidence Check................................................................................. 152Master Pages .................................................................................................................... 153
Guided Activity 58: Create a Master Page............................................................... 153Guided Activity 59: Edit a Master Page ................................................................... 157
Master Page Confidence Check ..................................................................... 158
Module 9: Windows, Browsing, and CSHHTML Help Windows......................................................................................................... 162
Guided Activity 60: Create a Custom Window......................................................... 162Help Window Confidence Check .................................................................... 165
Browse Sequences ........................................................................................................... 166Guided Activity 61: Create a Browse Sequence ...................................................... 166
Browse Sequences Confidence Check........................................................... 167
Contents
© 2021, IconLogic. All Rights Reserved. v
Application Help.................................................................................................................168Guided Activity 62: Test an API Call for Help ..........................................................168
Publishing..........................................................................................................................170Guided Activity 63: Publish an Output .....................................................................170
Publishing Confidence Check .........................................................................172Context Sensitive Help ......................................................................................................173
Guided Activity 64: Review CSH Source Code........................................................173Guided Activity 65: Create a Map File and Assign Map IDs ....................................175
Map IDs Confidence Check ............................................................................177

Adobe RoboHelp 2020: The Essentials (Second Edition)
vi © 2021, IconLogic. All Rights Reserved.

“Skills and Drills” Learning
About This BookThis Section Contains Information About:
• The Author, page viii
• IconLogic, page viii
• Book Conventions, page ix
• Confidence Checks, page ix
• RoboHelp Updates and How They Affect This Book, page x
• Software Requirements for This Book, page x
• Downloadable Book Assets (RoboHelp2020Data), page x
• Project Scenarios, page xii
• Contacting IconLogic, page xii

Adobe RoboHelp 2020: The Essentials (Second Edition)
viii © 2021, IconLogic, Inc. All Rights Reserved.
The AuthorKevin Siegel is a Certified Master Trainer (CMT), Certified Technical Trainer (CTT+), and Certified Online Training Professional (COTP). Following a successful tour of duty with the U.S. Coast Guard (where Kevin was twice decorated with the Coast Guard’s Achievement Medal), he has spent decades as a technical communicator, classroom and online trainer, eLearning developer, publisher, and public speaker. Kevin, who founded IconLogic, Inc., in the early 1990s, has written hundreds of training books for adult learners. Some of his best-selling books include “Adobe Captivate: The Essentials,” “Articulate Storyline: The Essentials,” and “TechSmith Camtasia: The Essentials.” Kevin has also been recognized by Adobe as one of the top trainers worldwide.
IconLogicFounded in 1992, IconLogic is a training, development, and publishing company offering services to clients across the globe.
As a training company, IconLogic has directly trained tens of thousands of professionals both on-site and online on dozens of applications. Our training clients include some of the largest companies in the world, including Adobe Systems, Inc., Urogen, Agilent, Sanofi Pasteur, Kelsey Seybold, FAA, Office Pro, Adventist Health Systems, AGA, AAA, Wells Fargo, Department of Veterans Affairs, American Express, Lockheed Martin, General Mills, Grange Insurance, Electric Boat, Michigan.gov, Freddie Mac, Fannie Mae, ADP, ADT, Federal Reserve Bank of Richmond, Walmart, Kroger, Duke Energy, USCG, USMC, Canadian Blood, PSA, Department of Homeland Security, and Department of Defense.
As a development company, IconLogic has produced eLearning and technical documentation for Duke Energy, World Bank, Heineken, EverFi, Bank of America, Fresenius Kabi, Wells Fargo, Federal Express, Fannie Mae, American Express, Microsoft, Department of For-Hire Vehicles, DC Child and Family Services, DCORM, Canadian Blood, Cancer.org, MLB, Archrock, NEEF, CHUBB, Canadian Natural Resources, and Hagerty Insurance.
As a publishing company, IconLogic has published hundreds of critically acclaimed books and created technical documents for both print and digital publication. Some of our most popular titles over the years include books on HTML, Dreamweaver, QuarkXPress, PageMaker, InDesign, Word, Excel, Access, Publisher, RoboHelp, iSpring Suite, RoboDemo, Presenter, Storyline, Captivate, Camtasia, and PowerPoint.

About This Book > Book Conventions
© 2021, IconLogic, Inc. All Rights Reserved. ix
Book ConventionsIn our experience, humans learn best by doing, not just by watching or listening. With this concept in mind, instructors and authors with years of experience training adult learners have created IconLogic books.
IconLogic books typically contain a minimal amount of text and are loaded with hands-on activities, screen captures, and challenge exercises to reinforce newly acquired skills. This book is divided into modules. Because each module builds on lessons learned in a previous module, we recommend that you complete each module in succession.
Lesson KeyInstructions for you to follow look like this:
choose File > Open
If you are expected to type anything or if something is important, it is set in bold type like this:
type 9 into the text field
If you are expected to press a key on your keyboard, the instruction looks like this:
press [shift]
Confidence ChecksAs you work through this book, you will come across the image at the right (which indicates a Confidence Check). Throughout each module, you are guided through hands-on, step-by-step activities. To help ensure that you are understanding the book’s content, Confidence Checks encourage you to complete a process or steps on your own (without step-by-step guidance). Because some of the book’s activities build on completed Confidence Checks, you should complete each of the Confidence Checks in order.

Adobe RoboHelp 2020: The Essentials (Second Edition)
x © 2021, IconLogic, Inc. All Rights Reserved.
RoboHelp Updates and How They Affect This BookWith each major update of RoboHelp, my intention is to provide a book to support that version and make it available within 30-60 days of the software being released by Adobe.
From time to time, Adobe releases updates for RoboHelp to fix bugs or add functionality. Usually, the updates are minor and have little or no impact on the lessons in this book. However, Adobe does sometimes make significant changes to the way RoboHelp looks or behaves, even with a seemingly minor update.
The specific version of RoboHelp referenced in this book is 2020.5.58 on the Mac and 2020.5.71 on the PC.
On the PC, you can check your version by choosing Help > About RoboHelp.
On the Mac, choose Adobe RoboHelp 2020 > About RoboHelp.
If something on your screen does not match what is shown in this book, please visit the RoboHelp 2020 book page on the IconLogic website for possible book updates or errata information (http://www.iconlogic.com/adobe-robohelp-2020-essentials-workbook.html) or email me at [email protected].
Software Requirements for This BookPrior to starting the lessons in this book, you will need Adobe RoboHelp 2020 installed on your computer. RoboHelp does not come with this book, nor can it be downloaded from the IconLogic website. You can purchase the program or download a free 30-day trial version from Adobe: www.adobe.com/products/robohelp.html.
Downloadable Book Assets (RoboHelp2020Data)You’re probably eager to dive into RoboHelp and begin creating awesome Help Systems. As you’ll learn as you work through this book, all you need to create Help Systems on your own is Adobe RoboHelp and some content.
Wait, content? What content?
You’ll need text files, images, multimedia... the list of supporting assets you’ll need to create even a basic Help System could go on and on.
If you have never used Adobe RoboHelp before, and this book assumes that you have not, you cannot be expected to learn how to use RoboHelp on-the-fly without content. Learning by discovery is fine, but that takes, and wastes, time.
I’ve got a deal for you. You provide the computer, the Adobe RoboHelp 2020 software (the free trial works great), and a willingness to learn. I’ll provide all of the project files and supporting assets (topic content, images, and videos) to get you started.
Here are the steps you need to download the free book assets from my website:
1. Start your web browser and go to the following web address: http://www.iconlogic.com/pc.htm
2. Click the Data Files link.
The first image above is the “About” screen for RoboHelp, Mac. The second image is for RoboHelp, PC.

About This Book > Downloadable Book Assets (RoboHelp2020Data)
© 2021, IconLogic, Inc. All Rights Reserved. xi
3. Choose your operating system (PC or Mac).
4. Select RoboHelp 2020: The Essentials.
5. Save the zip file to your computer. (It’s a good idea to note where the zip downloads so you can find it during the next step.)
6. After the RoboHelp2020Data.zip file has fully downloaded, you can close the browser.
7. Find the RoboHelp2020Data.zip file you just downloaded and unzip it. (On the Mac, the zip is typically unzipped automatically.)
Although you can unzip the assets anywhere on your computer, the desktop usually works well.
If you have an unzipped folder on your computer called RoboHelp2020Data and the Adobe RoboHelp 2020 software, you’re good to go. The first image below shows the unzipped RoboHelp2020Data folder for the Mac. The second image shows the same set of assets on a PC.

Adobe RoboHelp 2020: The Essentials (Second Edition)
xii © 2021, IconLogic, Inc. All Rights Reserved.
Project ScenariosDuring the activities that appear in this book, I’m going to ask you to use your imagination and pretend that you are a technical communicator for an awesome, but fictional, company called Super Simplistic Solutions. As a technical communicator, it is your job to create all of the documentation for the company’s products, services, and internal policies and procedures.
During the lessons presented in this book, you will use Adobe RoboHelp 2020 to create a Policies and Procedures guide that can be used by employees via a desktop computer, a laptop, smart phone, or tablet.
Although the information you create in the upcoming policies guide is fictional, the content will likely seem similar to information in most corporate policy guides. Nevertheless, none of the information in the guide is based on real people, events, or companies. Any similarities are purely coincidental.
Contacting IconLogicWeb: www.iconlogic.comEmail: [email protected]: 410.956.4949, ext 711

“Skills and Drills” Learning
Module 1: Introduction to RoboHelpIn This Module You Will Learn About:
• RoboHelp’s History, page 2
• Exploring RoboHelp, page 3
• Topics, page 8
• Table of Contents and Indexes, page 10
• Output Presets, page 12
And You Will Learn To:• Open an Existing Project, page 3
• Set the RoboHelp Application Theme, page 5
• Explore Project Content, page 6
• Browse the Outputs, page 12
• Generate Frameless Output, page 13
• Generate Responsive HTML5 Output, page 16
• Create an eBook, page 17
• Generate Microsoft HTML Help, page 18

Adobe RoboHelp 2020: The Essentials (Second Edition)
2 © 2021, IconLogic, Inc. All Rights Reserved.
RoboHelp’s HistoryAccording to Adobe, “RoboHelp is an easy-to-use authoring and publishing solution.” Adobe also says that RoboHelp allows you to “deliver content to tablets, smartphones, and desktops using output formats such as Responsive HTML5.”
Everything Adobe says about RoboHelp is true, and you’ll see that for yourself as you work with RoboHelp via the lessons in this book.
I started using RoboHelp when it was owned by a company called Blue Sky Software. That company re-branded itself as eHelp Corporation. Later, eHelp was absorbed by Macromedia (of Dreamweaver and Director fame), which was, in turn, gobbled up by Adobe.
There have been several versions of RoboHelp over the years (see the table below). RoboHelp versions have included names like RoboHelp 5, 6, 7, 2002, X3, X4, and X5. RoboHelp 6 was Adobe’s first RoboHelp version. However, eHelp Corporation also had a RoboHelp version 6. Yes, that’s right. There was once eHelp RoboHelp 6, and there was an Adobe RoboHelp 6, creating a bit of customer confusion.
Starting with RoboHelp 2015, Adobe changed RoboHelp’s naming convention again, this time using the year that the software version was released.
While this book focuses exclusively on RoboHelp 2020 and is titled, “Adobe RoboHelp 2020: The Essentials (Second Edition),” RoboHelp 2020 is really RoboHelp version 23.
Here is a list of RoboHelp versions and their release dates.
Version Release date Company/Note
1.0 January 1992 Blue Sky SoftwareFirst generally-available version of RoboHelp
2.0–12.0 1993–2003 Blue Sky Software/eHelp Corporation
13.0 January 2004 Macromedia
14.0 January 2007 Adobe Systems, Inc.
15.0 September 2007 Adobe Systems, Inc.
16.0 January 2009 Adobe Systems, Inc.
17.0 January 2011 Adobe Systems, Inc.
18.0 July 2012 Adobe Systems, Inc.
19.0 January 2014 Adobe Systems, Inc.
20.0 June 2015 Adobe Systems, Inc.
21.0 January 2017 Adobe Systems, Inc.
22.0 August 2018 Adobe Systems, Inc.
23.0 July 2020 Adobe Systems, Inc.

Module 1: Introduction to RoboHelp > Exploring RoboHelp > Open an Existing Project
© 2021, IconLogic, Inc. All Rights Reserved. 3
Exploring RoboHelpDuring the lessons in this module, I’m going to have you open a completed RoboHelp project, explore it a bit, and then generate outputs. As you work through subsequent modules in this book, you will learn how to build the completed project you’re about to see from scratch.
Note: To complete the first activity below, you will need the RoboHelp2020Data folder on your computer (also known as data files or assets). If you have not already downloaded the data files to your hard drive, see page x (in the About This Book section of this book) for instructions on the Downloadable Book Assets (RoboHelp2020Data). The RoboHelp 2020 software is not included with this book. If you do not have RoboHelp 2019 installed on your computer, you can purchase the software, or download a 30-day trial, from Adobe at www.adobe.com/products/robohelp.html.
Guided Activity 1: Open an Existing Project1. Start Adobe RoboHelp 2020.
After starting RoboHelp, the first thing you will see is the Starter Screen. From here, you can open recent projects, create new projects, and find additional resources. If the Starter is not on your screen, you can choose View > Starter Screen to view it.
2. Open an existing project from the RoboHelp2020Data folder.
on the Starter Screen, click Open Project
navigate to and open the RoboHelp2020Data folder
The RoboHelp2020Data folder contains several assets that support the lessons in this book, including images, HTML files, Word documents, and existing RoboHelp projects. You’ll be instructed when and how to use these assets as you work through the lessons in this book.
open the RoboHelpProjects folder and then open the completed_project folder
There are several subfolders within the completed_project folder. Cumulatively, all of the assets within those folders support the main RoboHelp project file (the project file’s name is completed_project.rhpj).
open completed_project.rhpj
When opening a project, you may see a message similar to what is shown at the right. The message appears if your version of RoboHelp is even slightly different than the one used to create the projects for this book. If you see the message shown at the right, click the Upgrade button.

Adobe RoboHelp 2020: The Essentials (Second Edition)
4 © 2021, IconLogic, Inc. All Rights Reserved.
The image below shows the Macintosh version of RoboHelp 2020. RoboHelp is nearly identical on the Mac and PC. Because the interfaces are so similar, I’ll randomly show one platform or the other throughout this book. Should there be significant differences between the Mac and PC version of RoboHelp, I’ll note those differences as appropriate.
The completed project is a corporate policies and procedures guide for a mythical company called Super Simplistic Solutions. During the activities presented throughout this book, you will learn how to create a similar project from scratch.
Before moving forward, I’d like to explain the role of the rhpj project file that you opened a moment ago. The image below shows the contents of the completed_project folder. Notice that the rhpj file is only 3 KB. Although it’s small and does not contain any project content, the rhpj file has a critical job. The project file keeps track of content, links, images, multimedia, table of contents, indexes, and other critical behind-the-scenes functions.
While it’s certainly important, the rhpj file is by no means the RoboHelp project. Everything you see in the image above is an important project component. When it’s time to back up your work (and I encourage you to back up the project folder at least once per day), copy the entire project folder instead of just some of the files within the folder.

Module 1: Introduction to RoboHelp > Exploring RoboHelp > Set the RoboHelp Application Theme
© 2021, IconLogic, Inc. All Rights Reserved. 5
Guided Activity 2: Set the RoboHelp Application Theme1. Ensure that the completed_project is still open. (If you’re not sure how to open the
RoboHelp project, see page 3.)
2. Change the Theme.
PC users, choose Edit > Preferences;Mac users, choose Adobe RoboHelp 2020 > Preferences
The Application Settings dialog box opens. Changes you make here will affect all RoboHelp projects created or opened on your computer.
at the left of the dialog box, select General
from the Theme drop-down menu, choose Dark
The RoboHelp interface instantly switches from a light interface to dark. There are four RoboHelp Themes ranging from light to very dark. Personally, I like the contrast offered with the Dark Theme. The color scheme you use in RoboHelp is, of course, up to you.
select any Theme that you like
ensure that the remaining General settings match what is shown in the image below
click the Done button

Adobe RoboHelp 2020: The Essentials (Second Edition)
6 © 2021, IconLogic, Inc. All Rights Reserved.
Guided Activity 3: Explore Project Content1. Ensure that the completed_project is still open. (If you’re not sure how to open a
RoboHelp project, see page 3.)
2. Explore the Author area.
from the upper left of the RoboHelp interface, notice three tabs: Author, Output, and Review
When you work in RoboHelp you create or import content while working in the Author area. When you’re done authoring, you’ll use the Output area to generate your content into a format appropriate for users who will not have Adobe RoboHelp on their computers or devices. The Review area is where you will set up your project content for internal review and feedback from your team members and stakeholders.
from the upper left of the RoboHelp interface, click Author
from the Author area, click Contents
The project contents open. If the Contents area is not open, click Contents again to display the Contents area.
from the Contents panel, double-click the General Office Information folder to expand the folder and view its content
Note: If you see file names in the Contents panel, such as Electronic.htm instead of Electronic Communications Policy, choose View > Show > Topics by Title.
3. Open a topic.
from the list of items in the General Office Information folder, double-click Mission Statement

Module 1: Introduction to RoboHelp > Exploring RoboHelp > Explore Project Content
© 2021, IconLogic, Inc. All Rights Reserved. 7
4. Open a second topic.
from the Contents panel, open the Drugs and Alcohol folder
double-click Alcohol Policy
Two topics are now open in the Authoring area.
5. Switch between open topics.
from just above either open topic, click the topic’s title tab to switch between the two topics
Note: While you can have multiple topics open at one time and quickly switch between them, you can only edit the content in the active topic. The active topic is denoted by the horizontal line beneath the topic’s title. In the image below, two topics are open: Mission Statement and Alcohol Policy. The Alcohol Policy topic is the active topic.
6. Close multiple topics.
choose File > Close All
7. Close all expanded folders.
on the Contents panel, right-click any folder and choose Collapse All

Adobe RoboHelp 2020: The Essentials (Second Edition)
8 © 2021, IconLogic, Inc. All Rights Reserved.
TopicsYou’ve likely heard the saying that content is king. It’s true. The heart of any Help System is its content and the information it provides. Most of the content in RoboHelp is contained within topics. Topics typically consist of text formatted with styles (page 43), images (page 82), hyperlinks (page 70), videos (page 90), tables (page 118), and more. In the next few activities, you’ll create a topic, edit it a bit, and then delete it.
Guided Activity 4: Create, Edit, and Delete a Topic1. Ensure that the completed_project is still open. (If you’re not sure how to open the
RoboHelp project, refer to page 3.)
2. Create a new topic.
on the Contents panel, right-click beneath the last folder
choose New > Topic
The New Topic dialog box opens.
change the Title to My First New Topic
from the bottom of the dialog box, click the Create button
The new topic appears on the Content panel and opens for editing.
3. Edit the new topic.
click in the white space below the heading “My First New Topic”
type: The best Help topic will contain only enough text to get my point across and no more. One paragraph or two is ideal, supported by an image or two.

Module 1: Introduction to RoboHelp > Topics > Adding and Deleting Topics Confidence Check
© 2021, IconLogic, Inc. All Rights Reserved. 9
Above your new topic, observe the asterisk to the right of the topic’s title.
The asterisk indicates an unsaved topic.
4. Save and close the topic.
choose File > Save
The asterisk is removed, indicating that changes made to the topic have been saved.
choose File > Close
5. Delete a topic.
on the Contents panel, right-click the My First Topic topic and choose Delete
You will be asked to confirm the action.
click the Yes button
Adding and Deleting Topics Confidence Check1. Create a new topic titled My Second Topic.
2. Change the title of the new topic to Delete Me.
3. Delete the Delete Me topic.
Adobe RoboHelp 2020: The Essentials (Second Edition)
10 © 2021, IconLogic, Inc. All Rights Reserved.
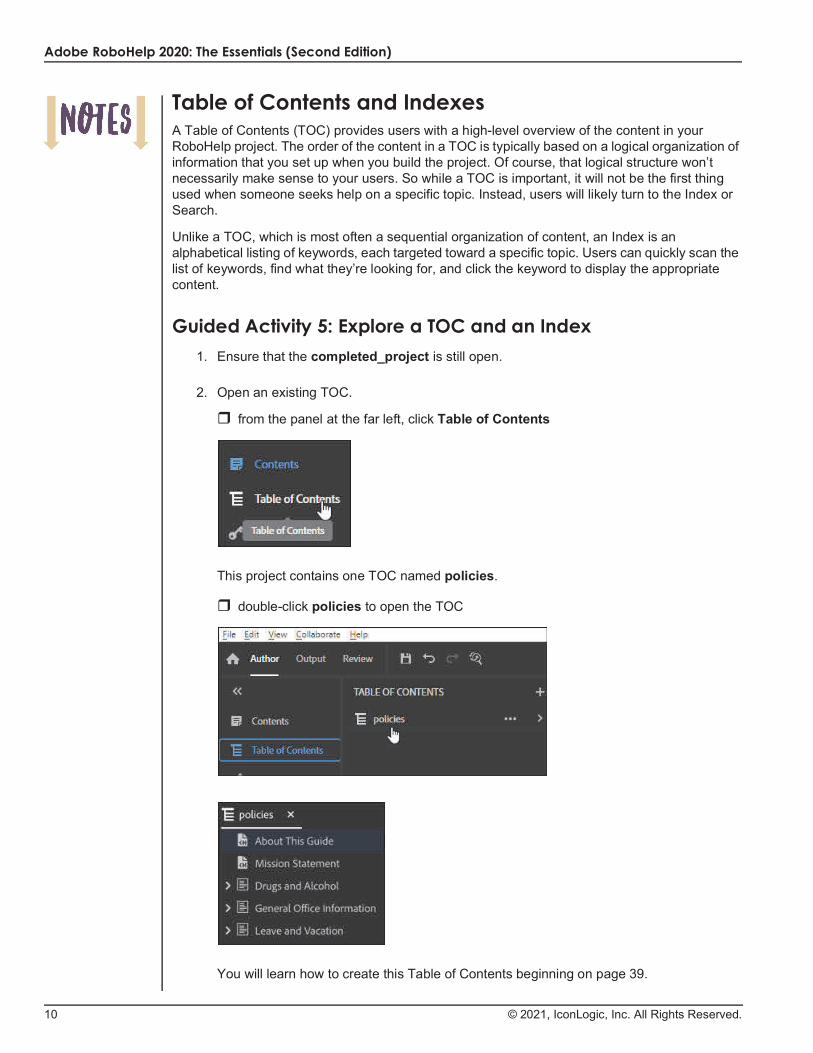
Table of Contents and IndexesA Table of Contents (TOC) provides users with a high-level overview of the content in your RoboHelp project. The order of the content in a TOC is typically based on a logical organization of information that you set up when you build the project. Of course, that logical structure won’t necessarily make sense to your users. So while a TOC is important, it will not be the first thing used when someone seeks help on a specific topic. Instead, users will likely turn to the Index or Search.
Unlike a TOC, which is most often a sequential organization of content, an Index is an alphabetical listing of keywords, each targeted toward a specific topic. Users can quickly scan the list of keywords, find what they’re looking for, and click the keyword to display the appropriate content.
Guided Activity 5: Explore a TOC and an Index1. Ensure that the completed_project is still open.
2. Open an existing TOC.
from the panel at the far left, click Table of Contents
This project contains one TOC named policies.
double-click policies to open the TOC
You will learn how to create this Table of Contents beginning on page 39.

Module 1: Introduction to RoboHelp > Table of Contents and Indexes > Explore a TOC and an Index
© 2021, IconLogic, Inc. All Rights Reserved. 11
3. Open an existing Index.
from the panel at the far left, click Index
You will learn how to create this Index beginning on page 123.

Adobe RoboHelp 2020: The Essentials (Second Edition)
12 © 2021, IconLogic, Inc. All Rights Reserved.
Output PresetsIf you’d like to get a sense of what your users will experience when accessing your finished RoboHelp content, you need to create output files from your project’s content. Your users do not need RoboHelp to open output you create with RoboHelp. However, depending upon the type of output you generate, the users’ hardware and software requirements will vary.
Guided Activity 6: Browse the Outputs1. Ensure that the completed_project is still open.
2. View the current outputs.
from the upper left of the RoboHelp window, click Output
from the list at the left, click Output Presets
This project has the following outputs: eBook, Policies, and Responsive HTML5. PC users have an additional output called Microsoft HTML Help. (The Microsoft HTML Help output is unique to PC users. Mac users cannot use or output this type of content.) You’ll explore the outputs during the next few activities.
3. View all of RoboHelp’s output formats.
to the right of Output Presets, click the plus sign
The New Preset dialog box opens.
click the Type drop-down menu
RoboHelp can output any or all of the following formats: Chatbot, Content Only, eBook, Frameless, Knowledge Base, Microhelp, Mobile App, PDF, Responsive HTML5, Microsoft HTML Help, Word, and more.
click on any of the Preset names to collapse the Type drop-down menu
click the Cancel button
Module 1: Introduction to RoboHelp > Output Presets > Frameless Output
© 2021, IconLogic, Inc. All Rights Reserved. 13
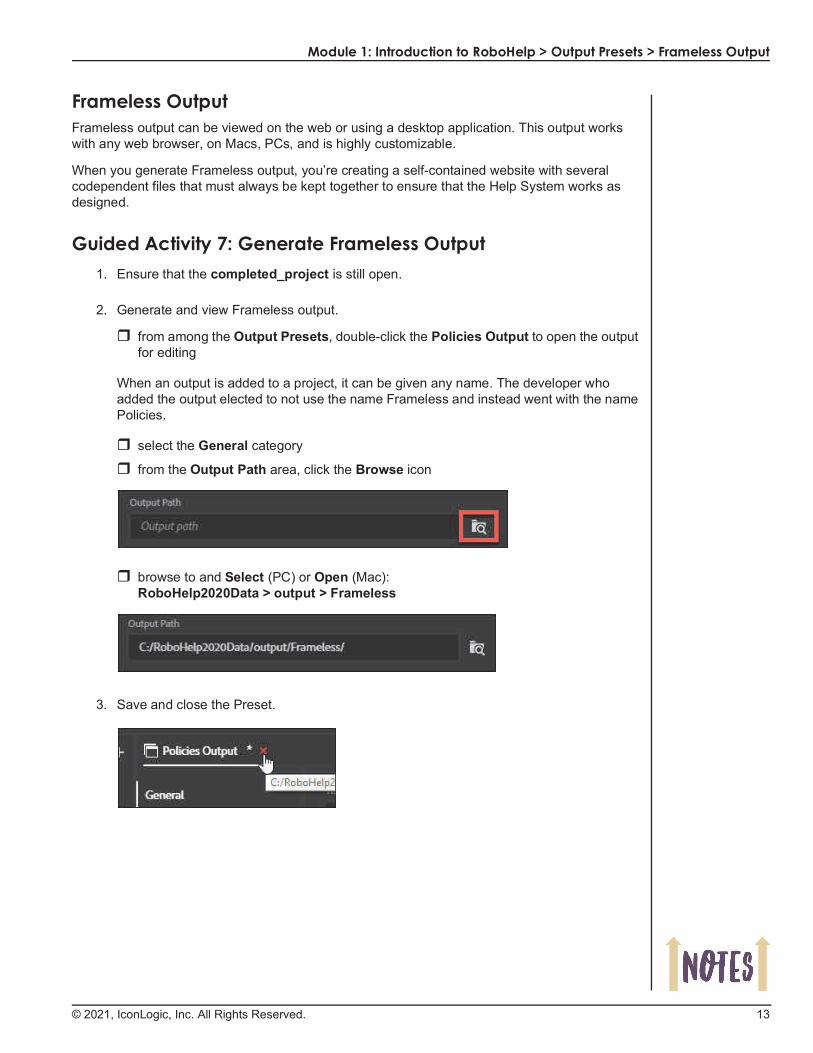
Frameless OutputFrameless output can be viewed on the web or using a desktop application. This output works with any web browser, on Macs, PCs, and is highly customizable.
When you generate Frameless output, you’re creating a self-contained website with several codependent files that must always be kept together to ensure that the Help System works as designed.
Guided Activity 7: Generate Frameless Output1. Ensure that the completed_project is still open.
2. Generate and view Frameless output.
from among the Output Presets, double-click the Policies Output to open the output for editing
When an output is added to a project, it can be given any name. The developer who added the output elected to not use the name Frameless and instead went with the name Policies.
select the General category
from the Output Path area, click the Browse icon
browse to and Select (PC) or Open (Mac): RoboHelp2020Data > output > Frameless
3. Save and close the Preset.

Adobe RoboHelp 2020: The Essentials (Second Edition)
14 © 2021, IconLogic, Inc. All Rights Reserved.
4. Generate Frameless output.
right-click Policies Output and choose Generate
You’ll see your Output Generation progress in the lower right of the RoboHelp window.
5. View the generated Frameless output.
from the Output presets area, right-click Policies Output and choose View Output

Module 1: Introduction to RoboHelp > Output Presets > Generate Frameless Output
© 2021, IconLogic, Inc. All Rights Reserved. 15
The Help System opens within your computer’s default web browser.
6. Spend a few minutes exploring the output by clicking the thumbnail images.
I personally love the look of the Frameless output, and it’s completely customizable. I also love how the page content reflows nicely as the browser window is resized.
7. When finished exploring the output, close the browser window and return to RoboHelp.

Adobe RoboHelp 2020: The Essentials (Second Edition)
16 © 2021, IconLogic, Inc. All Rights Reserved.
Responsive HTML5 OutputThe sale of smartphones is exceeding the sale of traditional phones; the sale of tablets exceeds those of desktop computers. This trend has led to a need for help authors to create content that can be accessed from both mobile devices and desktop computers.
When you output Responsive HTML5 with RoboHelp, just about everything in the Help window reflows, resizes, and adjusts to provide optimal viewing across a wide range of devices and screen sizes.
Guided Activity 8: Generate Responsive HTML5 Output1. Ensure that the completed_project is still open.
2. Generate and view Responsive HTML5 output.
from among the Output Presets, double-click Responsive HTML5 to open the layout
select the General category
from the Output Path area, click the Browse icon
browse to and Select (PC) or Open (Mac): RoboHelp2020Data > output > Responsive HTML5
save and close the Preset (via File > Save All and then File > Close All)
right-click the Responsive HTML5 output and choose Generate
3. View the Output.
4. Resize the browser window.
Similar to the Frameless output, observe how the appearance of the page changes (responds) as you resize the browser window.
5. Close the browser window and return to the RoboHelp project.

Module 1: Introduction to RoboHelp > Output Presets > eBooks
© 2021, IconLogic, Inc. All Rights Reserved. 17
eBooksDuring the last activity you created a print document out of a Help System. You could send the print documentation to your users, and using Adobe Reader, they could open the PDF, read it, and print it. Most mobile devices can open a PDF, but the small display common on smart phones and smaller tablets makes reading the PDF a challenge.
Instead of a PDF, you can use RoboHelp to generate an eBook (also known as an electronic publication) using your existing Help System. The advantage of the eBook format over PDF technology is mainly readability. When opened with an eBook reader, the text always wraps to fit the size of the user’s device or display, and the user can control the font, font size, and color. Although the eBook format is flexible, it does not currently support all of the bells and whistles that you can add to a RoboHelp project. For instance, eBook readers do not support expanding hotspots, glossaries, or interactive eLearning videos. (You’ll learn how to add these features later in this book.)
Note: In the steps that follow, you will use RoboHelp to generate an eBook file. After the eBook file has been created, you will need an eBook reader on your computer to open the eBook file. Although there are many eBook readers (some free, some not), Adobe has a free eBook reader called Adobe Digital Editions (http://www.adobe.com/products/digitaleditions). For more information on the eBook format, visit https://www.w3.org/publishing/.
Guided Activity 9: Create an eBook1. Ensure that the completed_project is still open.
2. Output an eBook.
from among the Output Presets, double-click eBook to open it
select the General category
from the Output Path area, click the Browse icon
browse to and open/select: RoboHelp2020Data > output > eBook
save and close the Preset
right-click the eBook Preset and choose Generate
3. View the eBook output.
The eBook opens in your computer’s default ePub reader. In the image at the right, you can see a page from the EPUB as it appears using the Books application on a Mac.
4. Close the eBook file.
5. Return to the RoboHelp project.
The last activity in this module involves outputting Microsoft HTML Help and is for PC users only. Mac users, you can close the project and then move on to the next module.

Adobe RoboHelp 2020: The Essentials (Second Edition)
18 © 2021, IconLogic, Inc. All Rights Reserved.
Microsoft HTML HelpMicrosoft HTML Help (HTML Help for short) is the oldest of the outputs and can be created and used only by PC users. When you generate HTML Help, RoboHelp outputs a single, compressed CHM file (pronounced “chum”).
A CHM file works great if your users are accessing the Help System with a Windows-based PC and if the CHM file is installed on the user’s hard drive. CHM files do not work if your users access the Help System with a computer or laptop running any other operating system, or if the user is on a mobile device, such as a tablet or smart phone. CHM files do not work well if opened by users over a server. And there are limits to how much you can customize the look and feel of the HTML Help window.
Given the limitations of a CHM file, you might think that HTML Help is an output that is best avoided. Not necessarily. There is much to like about this CHM files. For instance, HTML Help files are self-contained Help Systems, and your users won’t need other programs to use them outside of what is already installed on most PCs. And CHM files are typically smaller than any of the other outputs. The savings in size alone is one reason that many organizations still rely on CHM files, even given the inherent limitations of CHMs.
Guided Activity 10: Generate Microsoft HTML Help1. Ensure that the completed_project is still open.
2. Specify a destination for the Microsoft HTML Help output.
from among the Output Presets, double-click Microsoft HTML Help
The preset opens for editing.
select the General category
from the Output Path area, click the Browse icon
browse to RoboHelp2020Data > output > HTML_Help
click the Select Folder button
3. Save and close the Microsoft HTML Help preset.

Module 1: Introduction to RoboHelp > Output Presets > Generate Microsoft HTML Help
© 2021, IconLogic, Inc. All Rights Reserved. 19
4. Generate Microsoft HTML Help.
from among the Output Presets, right-click Microsoft HTML Help and choose Generate
Because the project is small, generating the layout takes only seconds.
5. View the Output.
from among the Output Presets, right-click Microsoft HTML Help
choose View Output
6. Open the General Office Information book.
7. Spend the next few moments selecting the pages you find inside the book.
8. Close the Help window and minimize RoboHelp.
9. Using Windows Explorer, open the RoboHelp2020Data folder.

Adobe RoboHelp 2020: The Essentials (Second Edition)
20 © 2021, IconLogic, Inc. All Rights Reserved.
10. Open the outputs folder.
11. Open the HTML_Help folder.
Within the HTML_Help folder, you’ll find the generated help file: policies.chm.
Everything the Help System needs to work on a PC user’s computer is included in this one compressed CHM file.
12. Double-click the CHM file to open the generated Help System.
13. Close the Help Window and return to the RoboHelp project.
14. Close the project.