Rhino rendering tutorial
13
Rhino tutorial (rendering) - Creating renders through V-ray/ Rhino renderer - Using the sun tool for shadows - Applying materials and textures to your models - Setting and saving views for renders V-ray: ● V-ray is a plugin for CAD software, including Rhino, Sketchup, MAya, Revit etc ● You will need to install v-ray onto your device; the uni computers already have it installed- there are limited numbers of licenses for nicai so there might be a shortage if high demand ● To turn on v-ray, open Rhino and go render---> current renderer ---> v-ray ● Open the v-ray asset editor by going v-ray ---> asset editor (you can also type 'vrayshowasseteditor' in the command bar)
-
Upload
khangminh22 -
Category
Documents
-
view
1 -
download
0
Transcript of Rhino rendering tutorial

Rhino tutorial (rendering)
- Creating renders through V-ray/ Rhino renderer- Using the sun tool for shadows- Applying materials and textures to your models- Setting and saving views for renders
V-ray:
● V-ray is a plugin for CAD software, including Rhino, Sketchup, MAya, Revit etc● You will need to install v-ray onto your device; the uni computers already have it
installed- there are limited numbers of licenses for nicai so there might be a shortageif high demand
● To turn on v-ray, open Rhino and go render---> current renderer ---> v-ray
● Open the v-ray asset editor by going v-ray ---> asset editor (you can also type'vrayshowasseteditor' in the command bar)
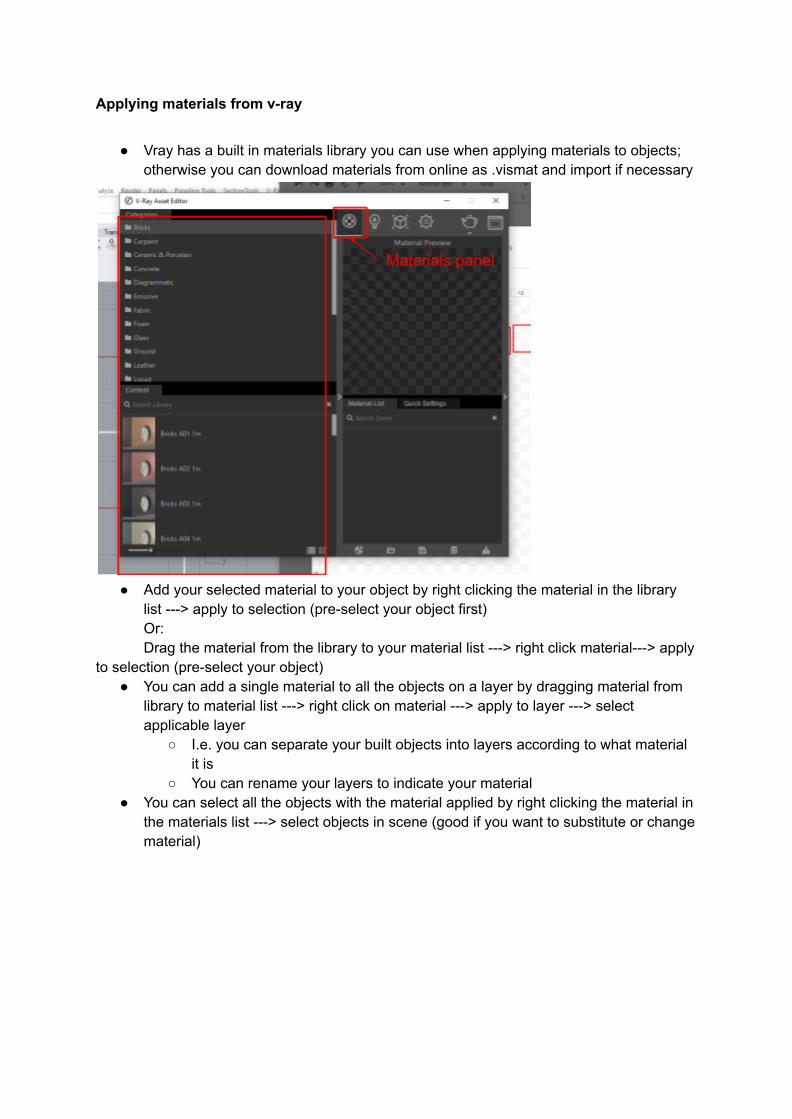
Applying materials from v-ray
● Vray has a built in materials library you can use when applying materials to objects;otherwise you can download materials from online as .vismat and import if necessary
● Add your selected material to your object by right clicking the material in the librarylist ---> apply to selection (pre-select your object first)Or:Drag the material from the library to your material list ---> right click material---> apply
to selection (pre-select your object)● You can add a single material to all the objects on a layer by dragging material from
library to material list ---> right click on material ---> apply to layer ---> selectapplicable layer
○ I.e. you can separate your built objects into layers according to what materialit is
○ You can rename your layers to indicate your material● You can select all the objects with the material applied by right clicking the material in
the materials list ---> select objects in scene (good if you want to substitute or changematerial)
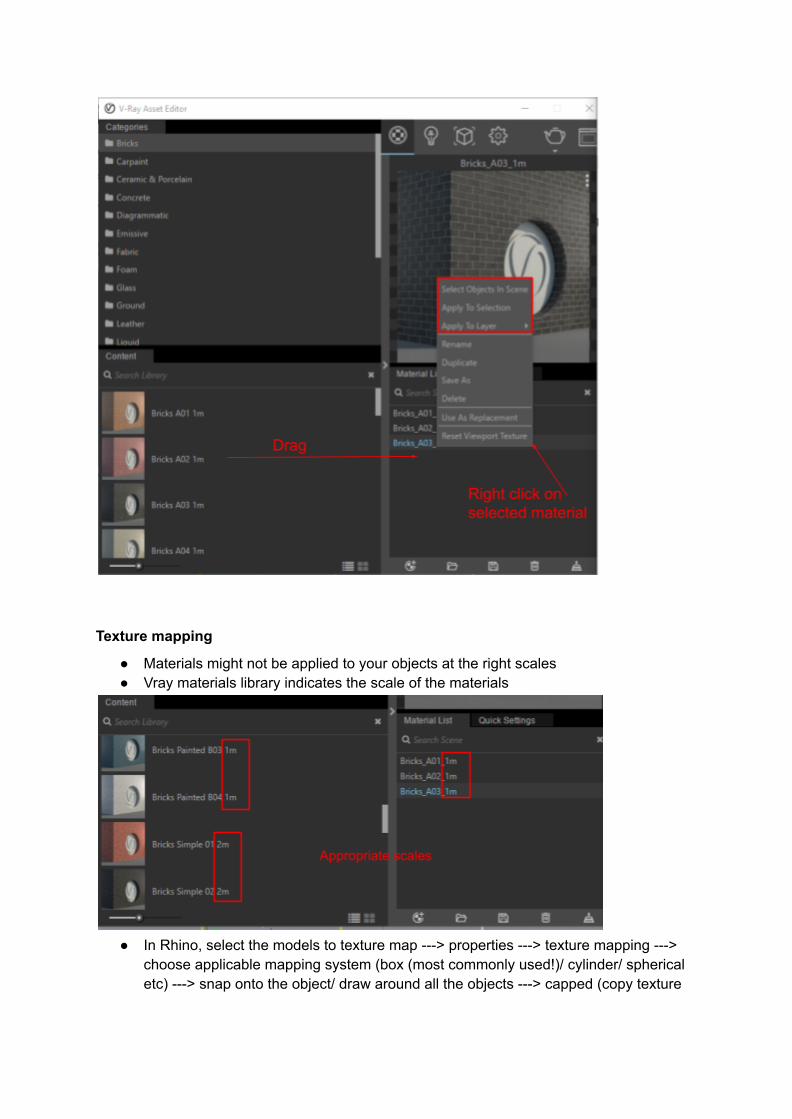
Texture mapping
● Materials might not be applied to your objects at the right scales● Vray materials library indicates the scale of the materials
● In Rhino, select the models to texture map ---> properties ---> texture mapping --->choose applicable mapping system (box (most commonly used!)/ cylinder/ sphericaletc) ---> snap onto the object/ draw around all the objects ---> capped (copy texture
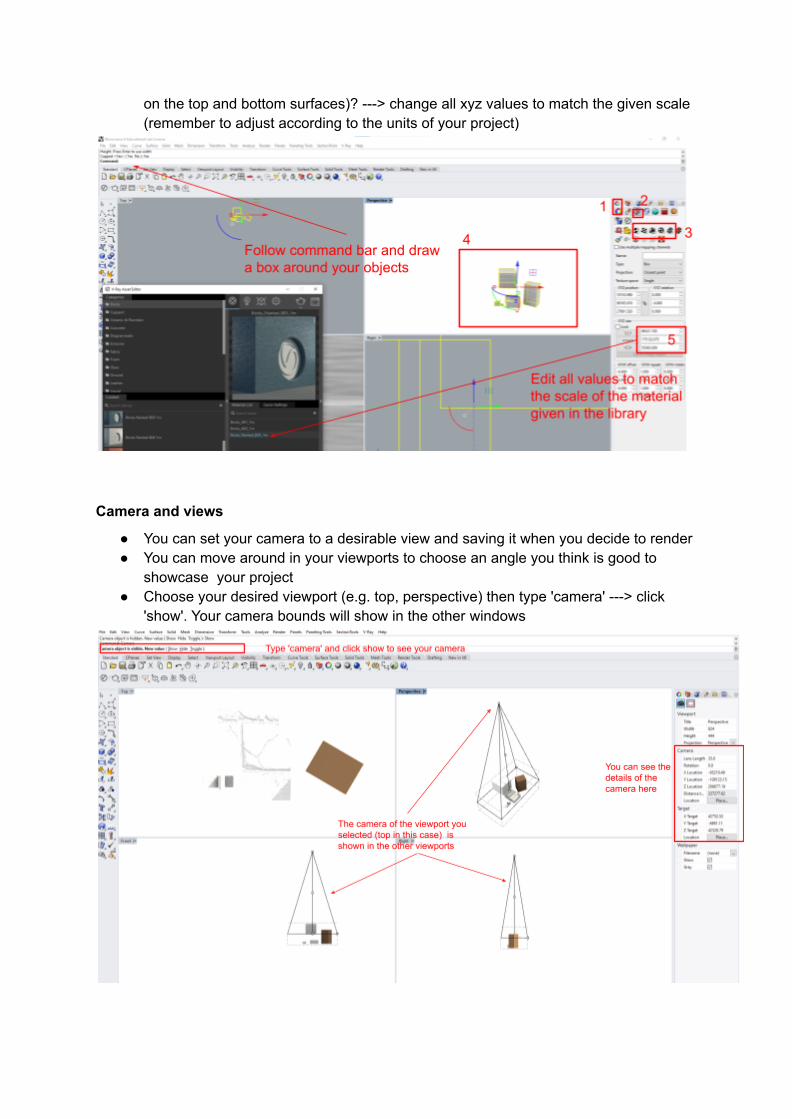
on the top and bottom surfaces)? ---> change all xyz values to match the given scale(remember to adjust according to the units of your project)
Camera and views
● You can set your camera to a desirable view and saving it when you decide to render● You can move around in your viewports to choose an angle you think is good to
showcase your project● Choose your desired viewport (e.g. top, perspective) then type 'camera' ---> click
'show'. Your camera bounds will show in the other windows
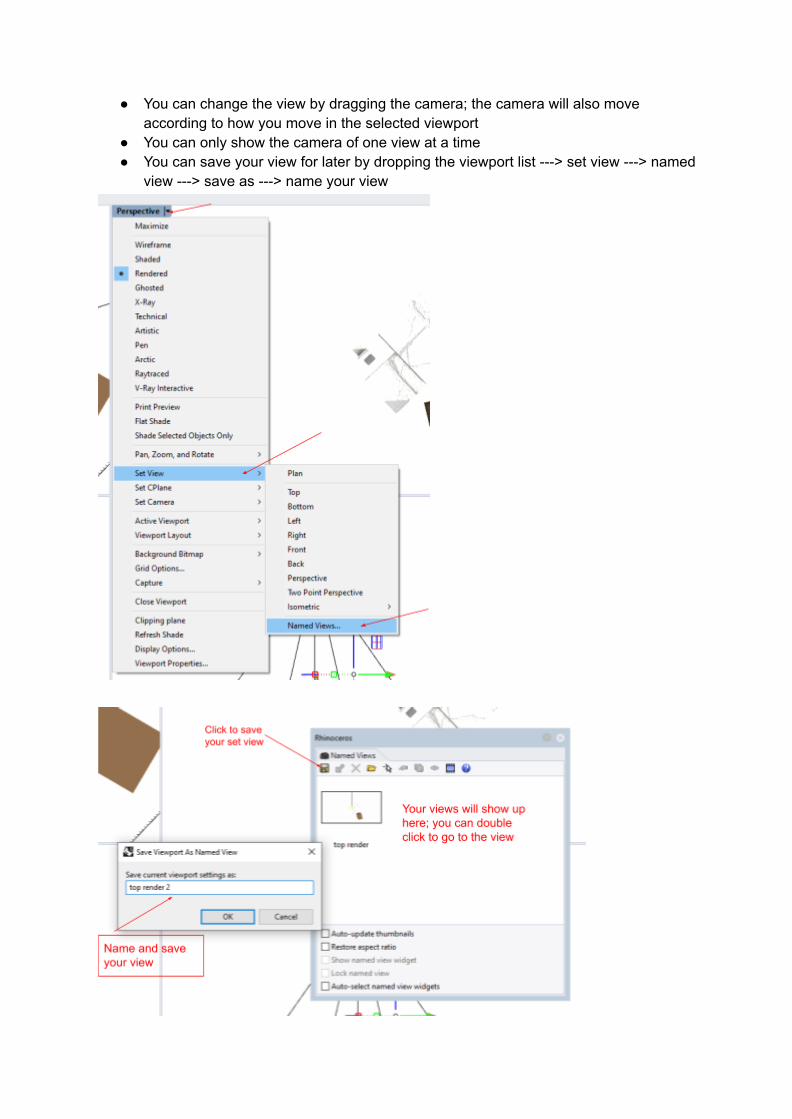
● You can change the view by dragging the camera; the camera will also moveaccording to how you move in the selected viewport
● You can only show the camera of one view at a time● You can save your view for later by dropping the viewport list ---> set view ---> named
view ---> save as ---> name your view
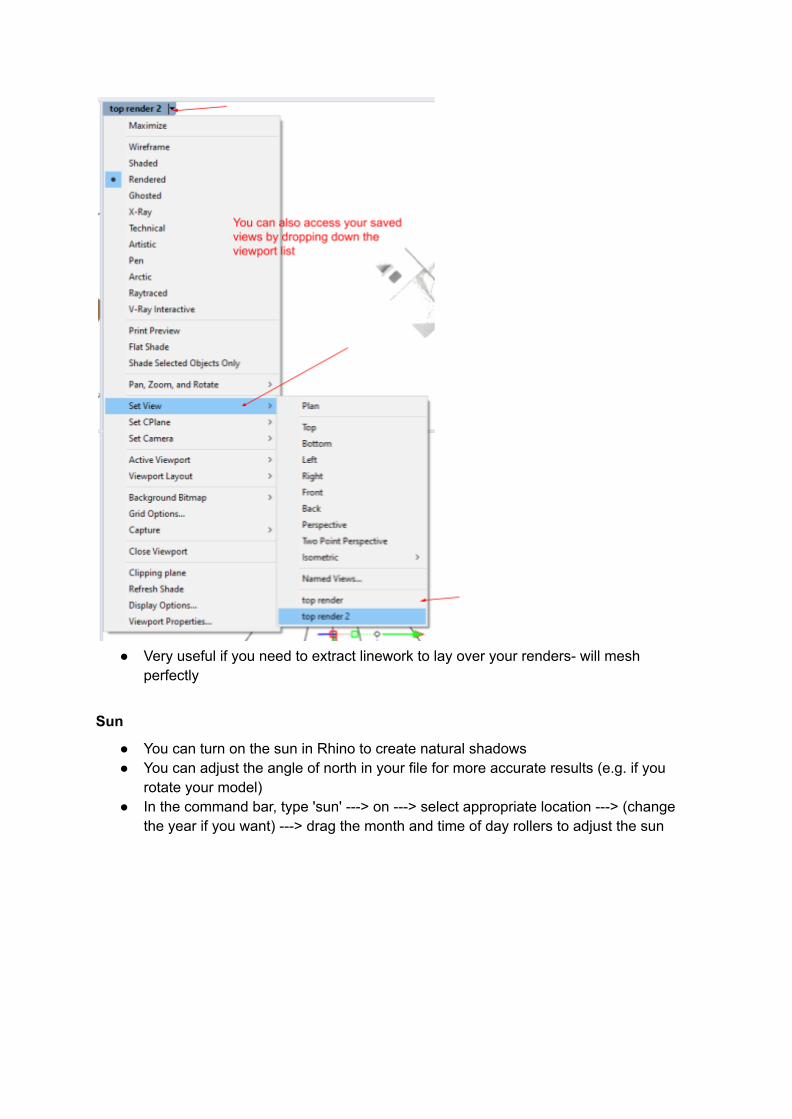
● Very useful if you need to extract linework to lay over your renders- will meshperfectly
Sun
● You can turn on the sun in Rhino to create natural shadows● You can adjust the angle of north in your file for more accurate results (e.g. if you
rotate your model)● In the command bar, type 'sun' ---> on ---> select appropriate location ---> (change
the year if you want) ---> drag the month and time of day rollers to adjust the sun

● You can see the different effects by going into render mode or setting a low-qualitytest render or using the interactive render mode in v-ray
● You can edit your sun/ sky/ environment settings:○ Change colour- warmer/ cooler light○ Intensity- intense vs softer○ Change sky○ Ground albedo- the reflectiveness of the ground

Lights
● You can add different types of light
● You can type in 'lights' to open the panel and click the plus sign and choose to add aspecific light
● Or type the specific type of light you wants (spotlight, directional light etc)● Place where you want the light to be- you can gumball it if necessary● Click the light icon to turn the light/ sun on/off
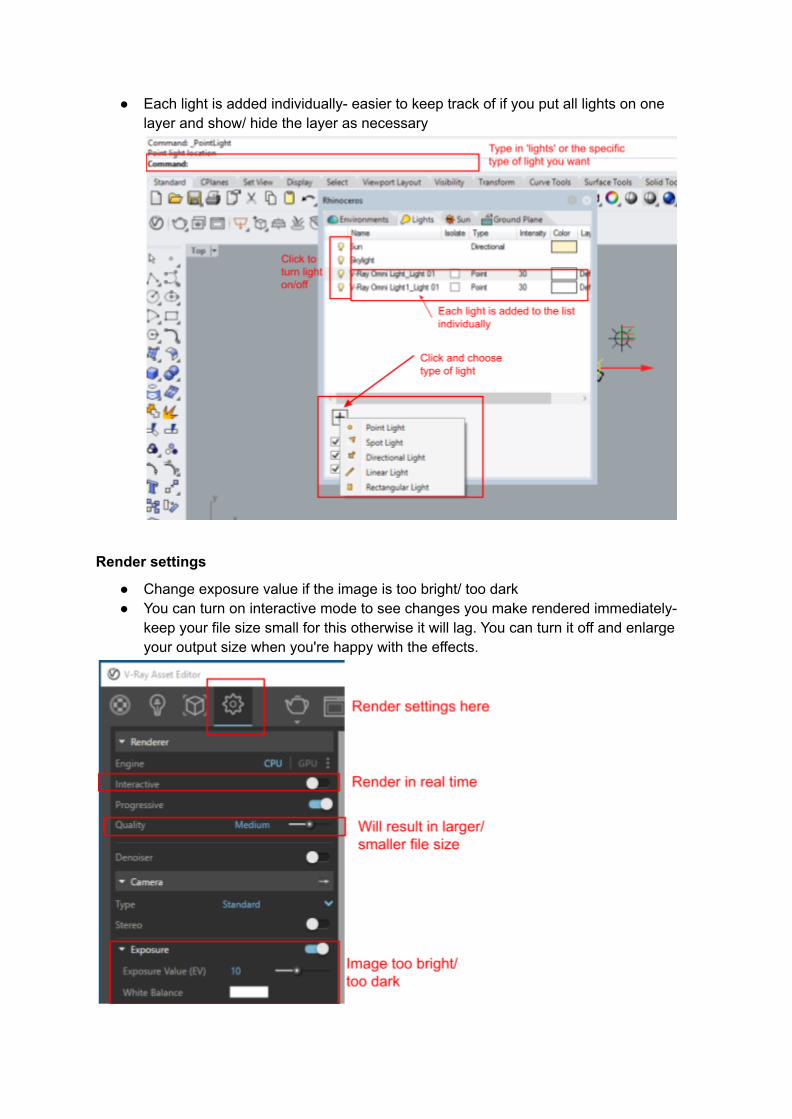
● Each light is added individually- easier to keep track of if you put all lights on onelayer and show/ hide the layer as necessary
Render settings
● Change exposure value if the image is too bright/ too dark● You can turn on interactive mode to see changes you make rendered immediately-
keep your file size small for this otherwise it will lag. You can turn it off and enlargeyour output size when you're happy with the effects.
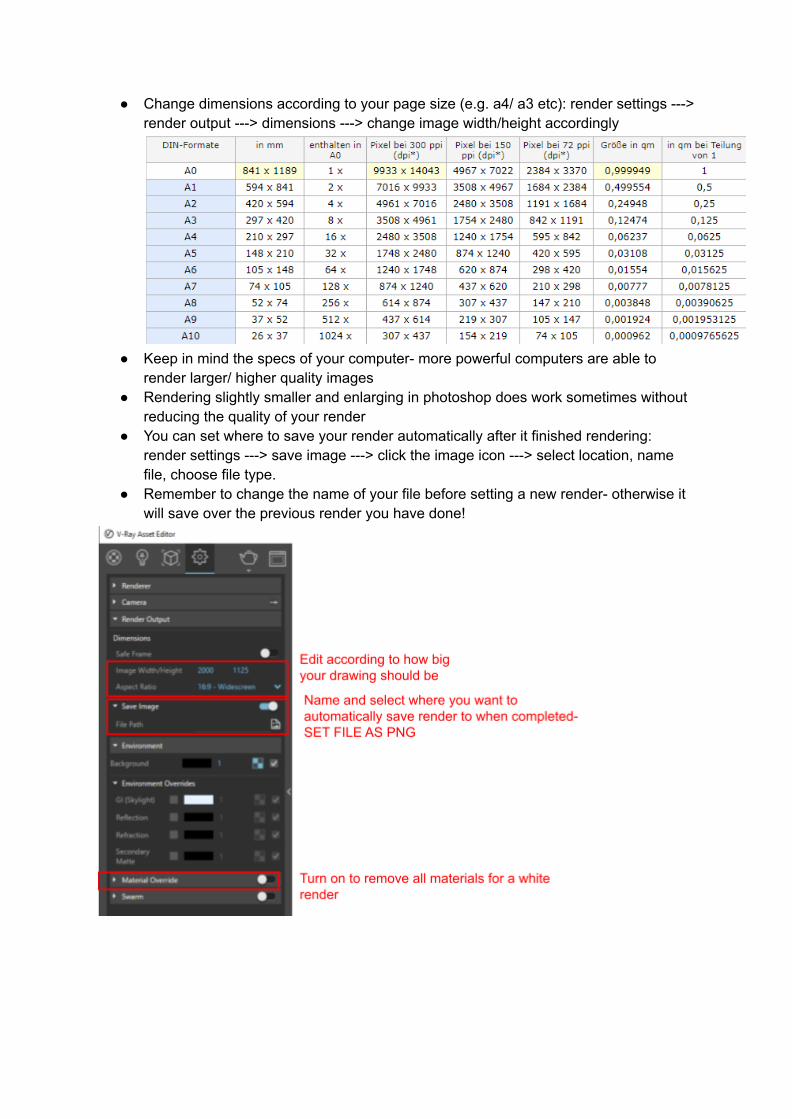
● Change dimensions according to your page size (e.g. a4/ a3 etc): render settings --->render output ---> dimensions ---> change image width/height accordingly
● Keep in mind the specs of your computer- more powerful computers are able torender larger/ higher quality images
● Rendering slightly smaller and enlarging in photoshop does work sometimes withoutreducing the quality of your render
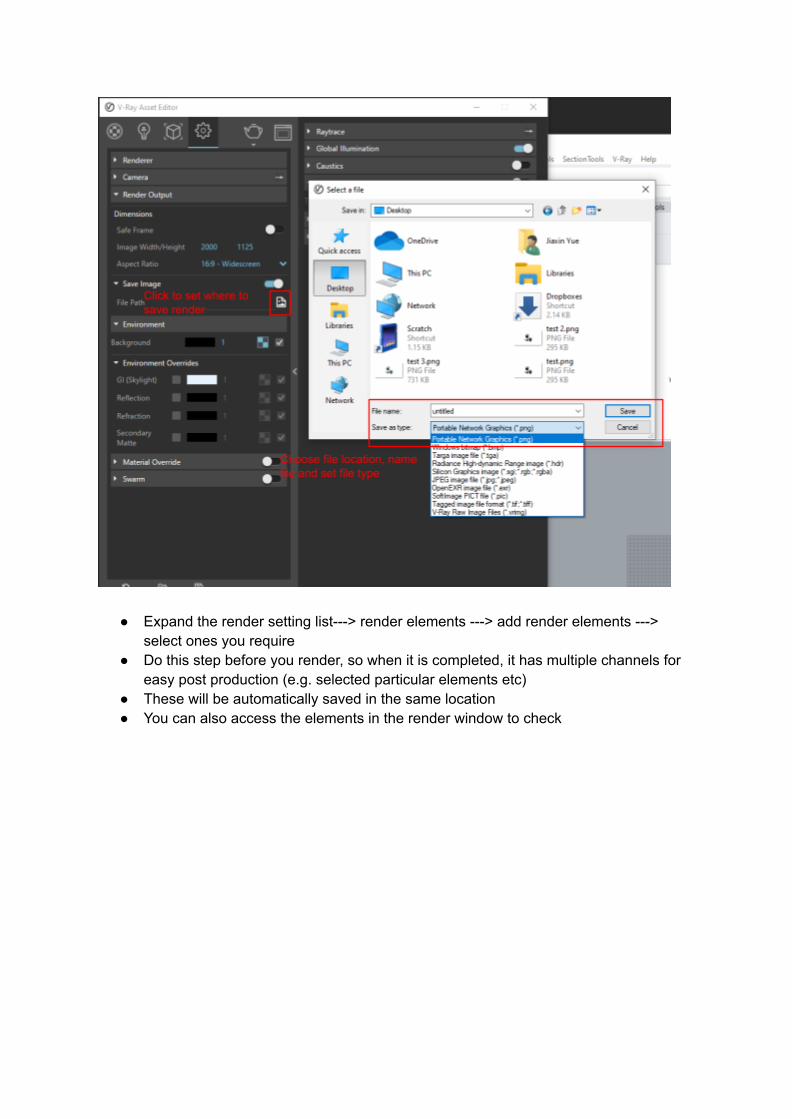
● You can set where to save your render automatically after it finished rendering:render settings ---> save image ---> click the image icon ---> select location, namefile, choose file type.
● Remember to change the name of your file before setting a new render- otherwise itwill save over the previous render you have done!
● Expand the render setting list---> render elements ---> add render elements --->select ones you require
● Do this step before you render, so when it is completed, it has multiple channels foreasy post production (e.g. selected particular elements etc)
● These will be automatically saved in the same location● You can also access the elements in the render window to check
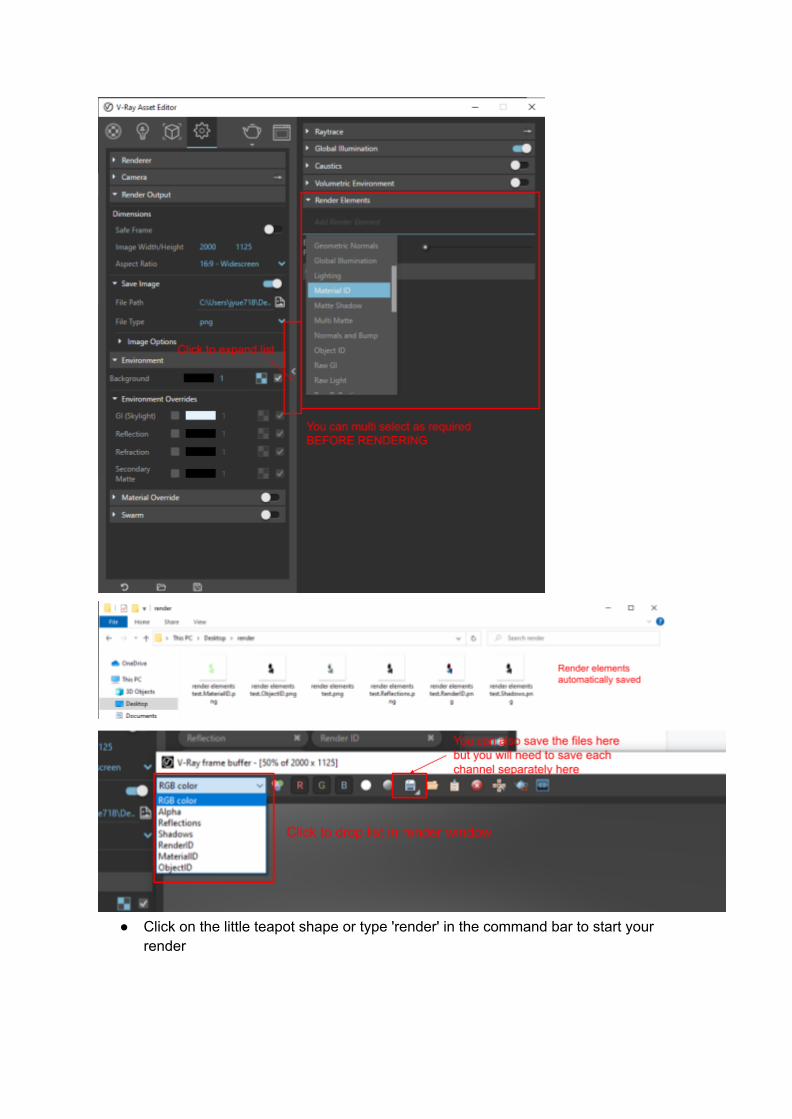
● Click on the little teapot shape or type 'render' in the command bar to start yourrender