restoration - Getty Center
318
-
Upload
khangminh22 -
Category
Documents
-
view
0 -
download
0
Transcript of restoration - Getty Center


THE
RESTORATION O F
ENGRAVINGS, DRAWINGS, BOOKS,
AND O T H E R W O R K S ON P A P E R

This page intentionally left blank

THE
RESTORATION OF
ENGRAVINGS, DRAWINGS, BOOKS,
AND O T H E R W O R K S ON P A P E R
MAX SCHWEIDLER
TRANSLATED, EDITED, AND WITH AN APPENDIX BY
ROY PERKINSON
THE GETTY CONSERVATION INSTITUTE | LOS ANGELES

THE GETTY CONSERVATION INSTITUTE
T imo thy P. Wha len Jeanne Mar ie Teu ton ico
Director Associate Director, Programs
The Get ty Conservat ion Inst i tute works in ternat ional ly t o advance conservat ion and to enhance and
encourage the preservat ion and unders tand ing o f the visual arts in all o f the i r d imens ions—objec ts ,
col lect ions, arch i tecture, and sites. The Inst i tute serves the conservat ion c o m m u n i t y t h rough
scienti f ic research; educat ion and t ra in ing; f ie ld projects; and the d isseminat ion o f the results o f bo th
its w o r k and the w o r k o f others in the f ie ld . In all its endeavors, the Inst i tute is c o m m i t t e d to address
ing unanswered quest ions and p r o m o t i n g the highest possible standards o f conservat ion pract ice.
© 2006 The J. Paul Get ty Trust
Second p r in t ing
Get ty Publ icat ions
1200 Get ty Center Dr ive, Suite 500
Los Angeles, Cal i fornia 90049-1682
w w w . g e t t y . e d u
Chris Hudson , Publisher
M a r k Green berg, Editor in Chief
Tevvy Ball, Editor
Sheila Berg, Manuscript Editor
Cather ine Lorenz, Designer
Pamela Heath, Production Coordinator
Typeset t ing by Diane Franco
Printed in China
Library o f Congress Cata log ing- in-Publ icat ion Data
Schweidler , Max , b. 1885.
[ Instandsetzung von Kupfers t ichen, Ze ichnungen, Buchern usw. English]
The restorat ion o f engravings, drawings, books, and o ther works on paper / M a x Schweid ler ;
t ranslated, ed i ted , and w i t h an appendix by Roy Perkinson.
p. cm .
Translat ion of: Instandsetzung von Kupfers t ichen, Ze ichnungen, Buchern usw.
Includes bib l iographical references and index.
ISBN-13: 978-0-89236-835-8
1. Prints —Conservat ion and restorat ion. 2. Draw ing—Conserva t ion and restorat ion. 3. Books
— Conservat ion and restorat ion. I. Perkinson, Roy L. II . Ti t le.
NE380.S3513 2005
76o .028 '8 -dc22
2005042449

To my mentors
w i th great appreciation and grati tude
F R A N C I S W . D O L L O F F ,
who patiently and generously led me into paper conservation,
and
C H R I S T A M . G A E H D E ,
w h o introduced me to Schweidler and much more

This page intentionally left blank

C O N T E N T S
ix Foreword
xi Preface
1 Editor's Introduct ion
19 The Restoration of Engravings, Drawings,
Books, and Other Works on Paper
207 Editor's Notes on the Text
219 Appendix | Eleven Case Studies
281 Glossary
285 References
289 Index
302 About the Editor

This page intentionally left blank

F O R E W O R D
Die Instandsetzung von Kupferstichen, Zeichnungen, Buchern usw. (The
Restoration of Engravings, Drawings, Books, etc.), originally published in
Germany in 1938 and long out of print, has generally been known to only a
few, even in Germany. To those who have heard of h im, the work 's author,
Max Schweidler, has often seemed a shadowy figure. He perhaps gained
notor iety because his surname is sometimes used as a verb—as in "this pr int
has been 'Schweidler ized'"—to describe extraordinarily skillful, virtually unde
tectable repairs of Old Master prints. Roy Perkinson, Head of the Virginia
Herrick Deknatel Paper Conservation Laboratory at the Museum of Fine Arts,
Boston, first brought Schweidler to our at tent ion in 2003 when he was a scholar
at the J. Paul Getty Museum. Roy's involvement w i th Schweidler's manual has
extended over more than three decades. The result is this volume, a wonder
fully readable translation of Schweidler's text, accompanied by a thorough
int roduct ion, copious notes, and an extensive appendix, which includes eleven
remarkable examples of deceptive, "Schweidlerized" repairs and alterations.
Given the tradi t ion of secrecy surrounding the practice of art restoration
dur ing Schweidler's era, it is remarkable to have a document so full of revela
tions of repair techniques, most of which had never been described in earlier
manuals, and to discover how extraordinarily effective these repairs can be.
Roy compares Schweidler's book to a magician's handbook "in which the
author pulls back the curtain and reveals the secrets of his most baffl ing tricks."
And as w i th magic, knowing how the trick is done helps the viewer to see
through the "magic" to the reality. W i th this knowledge comes awareness.
This book is unique in several ways —as a detailed compendium of res
torat ion procedures, as a remarkably substantive document of restoration
knowledge and practices in the early to mid- twent ie th century, and as a

X F O R E W O R D
thought-provok ing resource that wi l l likely change how one assesses the con
di t ion of works of art on paper. The Getty Conservation Institute has long been
commi t ted to publishing seminal texts in the field of conservation to broaden
and deepen understanding of the discipline's history, methodologies, and
philosophies. This volume wil l acquaint a much larger audience w i th the
extraordinary techniques advocated by Schweidler; and, perhaps even more
important , it wi l l enhance our abil ity to discern what may have been done to a
print or drawing after its original creation. Schweidler's discussions of chemical
processes, in particular, wi l l give us more informed knowledge of what a work
of art on paper has been subjected to throughout its history. We are pleased
that Max Schweidler's book is now available in English, and we are grateful to
Roy Perkinson for bringing this important work to our at tent ion and for creating
such a rich volume. We appreciate his efforts, which wi l l be of significant bene
f i t to those w h o care for and admire works of art on paper.
T IMOTHY P. W H A L E N
Director
The Getty Conservation Institute

P R E F A C E
One day in about 1967, after carefully scrutinizing an important pr int in the
Museum of Fine Arts, Boston, the curator of prints muttered, "I th ink it's been
'Schweidlerized'!" Overhearing this, I wondered what she meant. And who was
Schweidler? I had only recently begun my training in paper conservation, and
when I learned that it was a repair to which she had reacted, I was fascinated
that someone had attained such skilJ in the t reatment of prints that his repairs
were extraordinarily diff icult to detect. Clearly it could be disagreeable to dis
cover repairs in a print where one had thought none existed. But if the curator
found in her collections a print marred by an accidental hole, wou ld she not be
pleased to have it repaired as skillfully as that which she had just discovered?
After all, wasn't it often said that a goal of conservation t reatment is to have
the object seem to the viewer as if it had not been treated? Was the curator
chagrined simply because she had failed previously to detect an important
aspect of the condi t ion of the print? Or was there something about the nature
or extent of the repair to which she took exception? This was a fine introduc
t ion to the philosophical complexit ies of conservation, complexit ies
that wi l l probably cont inue as long as there is art that is in need of repair.
Christa Gaehde, widely respected as a conservator of great skill, sensitivity,
and experience, introduced me to Max Schweidler's book and to some of his
methods of repair. In the 1960s books and manuals on conservation or restora
t ion practices were few, and those that existed did not discuss the kinds of
repair techniques practiced by Schweidler. Since that t ime the field of conserva
t ion has developed enormously, w i th consequent growth in its l iterature. In the
past several years articles have also appeared on the history of conservation —
perhaps signaling that the field has attained maturity. I hope that this translation

xii P R E F A C E
wil l be seen not only as a useful and interesting addit ion to the literature in
English on conservation but also as an important historical document .
This book consists of four sections: background and commentary on Max
Schweidler's manual on paper restoration; a translation of the original German
text of the second edit ion (1950); an appendix, in which there are several
instances of what might be described as repairs, alterations, or reconstructions
that illustrate some of the practices described by Schweidler. It is my hope
that the examples presented in the latter wi l l help the reader to become more
adept at detect ing what are often referred to as "deceptive" or "extremely
skil lful" repairs or alterations. The four th section is a glossary of technical and
chemical terms.
Many people helped me to bring this book to publ icat ion. I am especially
grateful to Rugela Schweidler, who generously made available materials, memo
ries, and knowledge about her late husband, Gert Schweidler, his father, Kurt,
and his grandfather, Carl. She kindly opened her home to Olivier Masson
(himself a member of an illustrious family of conservators) and made it possible
for him to provide me wi th digital images, photocopies, and invaluable infor
mation relating to the Schweidler family, informat ion I could not have obtained
by any other means.
I wou ld like to express my grati tude to Marlies Comjean for her help w i th
many aspects of the translation. Her patience and skill in ferret ing out the pre
cise meanings.of Schweidler's words were exemplary. Similarly, I am indebted to
the editorial talents of Faith Smith, for unraveling knotted tenses and phrases
and transmuting them into plausible English for an early draft of the manuscript.
I also want to thank Christa and Joachim Gaehde for encouragement and for
put t ing up w i th my numerous questions. August Laube helped me to obtain
information on the formidable "copying-ink pencil," the marks of which are apt
to cause significant problems during conservation treatment.
W i thou t the generous support of the National Endowment for the
Humanities, this project wou ld not have begun. I wou ld like to thank Nancy
Yocco and Marc Harnly for facil i tating my Getty Scholar appointment , which
enabled me to resume work on this project after having had to set it aside
for many years. I owe enormous thanks to The J. Paul Getty Trust; my tenure
as a Getty Scholar gave me the uninterrupted t ime and extraordinary archival

P R E F A C E X i i i
resources needed to finish this work. I also recall w i th great fondness and
thanks all the wonder fu l staff at the Getty Research Institute w h o were unstint
ing in their patience and helpfulness.
The administrat ion of the Museum of Fine Arts, Boston, kindly al lowed
me leave f rom my ordinary responsibilities. A Kress Publications Fellowship
awarded by the Foundation of the American Institute for Conservation provided
indispensable funding that made release t ime f rom regular employment f inan
cially feasible. I am especially grateful to my colleague Annette Manick for
superbly managing the paper conservation laboratory in my absence and for
thought fu l ly protect ing me f rom the inevitable day-to-day issues that wou ld
have di luted my ability to focus on Schweidler during my work as a Getty
Museum Scholar. Deborah La Camera, w i th her usual cheerfulness and ebul
lience, has always been quick to help me. Gail English, whose get- i t -done
energy is legendary, also helped me in countless ways. Thea Burns and Judith
Walsh gave me many thought fu l and constructive comments on the manuscript
at an important stage of its development.
In addi t ion, I owe thanks to Clifford S. Ackley, Christiane Andersson,
Damon Beale, John Bidwell, Britta Bothe, Craigen Bowen, Peter Bower, Irene
Bruckle, Marjorie Cohn, Eva Dencker, Anne Driesse, James Druzik, Margaret
Holben Ellis, Debra Evans, Richard Field, Cynthia Godlewski, Greg Heins, Kristin
Kelly, Penley Knipe, John Krill, Tom Lang, Shelley Langdale, Brigitte Laube,
Danielle Laube, Elizabeth Limning, Alison Luxner, Rhona MacBeth, Timothy
Mayhew, T. K. McCl intock, Margo McFarland, George S. Nor ton , Tom Rassieur,
Mary Reinsch-Sackett, Sue Reed, Gary Ruuska, Ruth Schmutzler, Kristal
Smentek, Mar t in Sonnabend, Moyna Stanton, Marcia Steele, Stephanie
Stepanek, Carol Togneri, Mar tha Tedeschi, Nancy Turner, Bob Walker, Jeffrey
Warda, Stephan Welch, Thomas Wolk, and John Woolf .
Finally, I owe more than words can say to my wife, Jean, whose patience
and support throughout this project were boundless.

This page intentionally left blank

E D I T O R ' S I N T R O D U C T I O N
The first edit ion of Max Schweidler's book, Die Instandsetzung von Kupferstichen,
Zeichnungen, Buchern, usw., appeared in 1938. In 1941 he produced another
book, Sammeln und Sichten (Collecting and Picking ["Picking" in the sense used
by those who shop for antiques: rummaging, sorting, selecting, and classifying]),
which dealt solely w i th the ins and outs of collecting prints, their value, those
that are desirable to collect, and so on. Only once in the latter book does
Schweidler say anything about the care and preservation of prints, and this
merely describes a few dos and don'ts of framing. In 1950 he published a
revised and enlarged version of his earlier work on restoration, and it is this
edit ion that is presented here. I found no documentat ion as to whether
demand for the first edit ion was sufficient by itself to just i fy a second edi t ion,
but it is possible that the new edit ion was motivated by Schweidler's desire
(facilitated by his fr iendship w i th the publisher, Max Hettler) to clarify his text
and increase the number o f il lustrations. In his introduct ion to the second
edit ion he acknowledges that he had been asked repeatedly "to restrain [his]
somewhat patronizing, urgent and pedantically repetit ious presentation" and
to provide addit ional il lustrations, which his publisher agreed to do.
When I was first introduced to Schweidler's book by Christa Gaehde, I
learned that Schweidler had an elder brother, but both figures were always
shrouded in mystery. In some respects, the brothers seemed to occupy a
curious "Siamese t w i n " persona as legendary restorers who could (and wou ld)
do anything imaginable to transform a print f rom some state of disrepair into
something that looked perfect—unti l one looked very closely. One of the
pleasures of work ing on this project has been learning a litt le more about both
men, and also about their relationship (and difficulties) w i th each other.
In his book Max Schweidler states that he was born in Berlin on Apri l 18,

2 E D I T O R ' S I N T R O D U C T I O N
1885, but I have been unsuccessful in determining the date of his death. Max's
elder brother, Carl, was, according to some, the more skilled and experienced
restorer. 1 Carl Schweidler was born in 1884 and died in 1962 in Berlin. His son,
Kurt, was born in Berlin in 1910 and died in 1981 in Gockhausen, near Zurich,
Switzerland. Kurt was also wel l known as a restorer of prints. Kurt's son, Gerd,
was born in 1944. Kurt and Gerd left Berlin in the 1960s, at about the t ime the
Berlin Wall was erected, and settled in Toffen, near Bern, before moving to
Gockhausen. Gerd died in 1992 in Gockhausen. 2
Carl Schweidler's son-in- law gave him a copy of the first edit ion of Max's
book on August 5, 1938, inscribing it to "the other Schweidler—for his edif i
cation and instruct ion"—words that are loaded w i th irony. (This annotated
copy is in the possession of Regula Schweidler, the w i d o w of Gerd Schweidler.
The inscription is signed "your son-in-law," leading one to assume that Carl
Schweidler must have had a daughter, but whether she or her husband were
also involved in restoration is not known. This inscription is wr i t ten in a style
that is different f rom all the other annotations in the book, which are undoubt
edly by Carl, given their level of knowledge and detail about Max's life [see
note 5, below] and authoritat ive observations on the materials and techniques
of restoration.) Carl had already prepared a postcard to be mailed to his clients
in which he states emphatically that he and the author of the for thcoming book
on restoration are not one and the same. 3 According to Regula Schweidler, the
publication of. the book led to a permanent rupture in relations between Carl
and Max. Surely Carl never deigned to purchase a copy of his brother's book,
but when his son-in- law gave him one, he not only read it but made a number
of annotations as wel l , many in the form of exclamations about what he regard
ed as errors or misstatements. Some of the most interesting, amusing, or rele
vant of these notes have been appended as endnotes to the translation, w i th
the initials "C. S." to identify them as Carl 's. 4
When I first learned of the existence of a copy of Max's first edit ion w i th
Carl's annotations, I wondered what effect these comments might have on
my understanding and assessment of the text. I also wondered why the publ i
cation of the book had caused such animosity between the t w o brothers. Was
it simply that Carl was upset that Max had divulged "trade secrets"? From
Carl's annotations in the 1938 edi t ion, it is quite clear that he was critical of

E D I T O R ' S I N T R O D U C T I O N 3
and disagreed w i th some of Max's statements. Occasionally he articulated why
he disagreed, but usually he merely noted that he was of a different opinion
and did not elaborate. Carl was especially angered that his younger brother had
overstated his experience in restorat ion. 5 Rather than the th i r ty to f i f ty years of
experience claimed in the book, he notes that Max had worked as a restorer for
no more than eleven years prior to publication of the book. Carl writes that as
of 1927, Max began work ing as a restorer "at his instigation," although Max was
at the same t ime a dealer in art, engaged in political activities, and worked as a
"poet and writer, as his main profession." He also notes that in 1927-28 he had
allocated to Max a considerable amount of work f rom his own commissions but
subsequently mentions that he had had to "remove [from a Rembrandt print]
the spots that [his] brother messed up. " 6 It seems that Carl felt that Max, both
by asserting long experience and by publishing techniques that must have been
learned f rom him, had betrayed his trust, for which he could not forgive Max.
If Carl's assessment of the extent of Max's experience is accurate, it is rea
sonable to suppose that some, if not most, of the techniques and practices
described by Max were those of his brother, although it is also possible that
Max developed variations of his own , or that in some instances he might have
misunderstood the procedures of his more experienced brother. 7 It is unfor tu
nate that Carl's annotations are so brief and that he did not publish his own
version of his methods. For our purposes, however, it may be less useful to
know whether Carl or Max or both employed a specific technique than it is to
understand in what way that restoration procedure might affect the appearance
and condi t ion of a print or drawing, and to apply knowledge of such techniques
to the examination of works of art. For example, knowing that there is a way
to split a pr int or drawing into t w o layers (pp. 1 0 4 - 5 ) can be enormously useful
if one happens upon a print that has been delaminated and reassembled (see
Durer, Adam and Eve, in the Appendix), but w i thou t this knowledge such a print
might escape detect ion. 8
The dearth before the 1950s of substantive publications dealing w i th con
servation of prints and drawings makes Schweidler's book interesting as a his
torical document . Among the few scattered publications that existed in earlier
centuries, 9 one of the most significant is Essai sur la restauration des anciennes
estampes et des livres rares, by Alfred Bonnardot, which appeared in 1846 and is

4 E D I T O R ' S I N T R O D U C T I O N
ment ioned by Schweidler. 1 0 Bonnardot cites works f rom the early eighteenth
century. Nevertheless, serious, consistent attempts to compile knowledge based
on sound scientific principles and to assess the long-term effects of treatments
are not found unti l the twent ie th century. The 1930s saw important addit ions
to the scant literature on t reatment of works of art on paper. In 1932 the Fogg
Art Museum began publication of its Technical Studies in the Fine Arts series,
which included several articles on this subject. H. J. Plenderleith published The
Conservation of Prints, Drawings, and Manuscripts in 1937 (one year before the
first edit ion of Schweidler's book). There are a few other sources in English f rom
this period, but none of the importance of these t w o . 1 1
Readers wi l l hardly have begun The Restoration before encounter ing a tone
or manner like that of the stern schoolmaster w h o rewards infractions of the
rules or inept performance w i th a sharp rap on the knuckles. Schweidler
reserves his strongest words, however, for those bumbl ing entrepreneurs w h o
carry on restoration as a sideline but have neither the skill nor the experience
to see that they are causing more harm than good. This has always been the
lament of seasoned practitioners who recognize that j udgment and experience
are precious, hard-earned commodit ies. Warnings and notices of caution are
common throughout the book, as the author tries to reconcile his desire to
communicate w i th the fear that his words wi l l simply give courage to the
unskilled and thereby promote damage. Sometimes, however, one may wonder
whether a warning is a convenient means of avoiding a complete explanation,
or perhaps a technique to avoid confessing his own lack of knowledge.
Schweidler cautions against treating stains in colored prints unless the restorer
has the necessary expertise, yet he is reticent to explain what constitutes such
expertise or how one can attain it. Work on prints colored w i th gouache is
ment ioned, but rather than describe the relevant techniques, Schweidler
observes only that this requires great skill.
The fear that communicat ion about methods may spawn dangerous ama
teurs still exists among today's conservators, but the balance has swung away
f rom secrecy toward open communicat ion. In this regard the act of wr i t ing his
book is evidence that Schweidler is among those w h o hold a modern commi t
ment to promot ing knowledge and informat ion, though he is sometimes cagey.
He held the convict ion that only through fuller communicat ion could the

E D I T O R ' S I N T R O D U C T I O N 5
destruction of art objects in the name of restoration be curtai led. "It is high
t ime that these offenses are discussed openly so that something can be done
about them," he writes (p. 36). He describes taking a colored print (albeit one
of l itt le value) to a glazier's shop 1 2 and arranges to watch the proprietor subject
it to a t reatment that is ult imately disastrous. Schweidler then announces his
identi ty and revels in the chagrin of the merchant. Here we see the crusader
and stern schoolmaster, as well as a smug, obnoxious egotist. Those w h o share
his disapproval of those who damage artworks through their incompetence may
derive at least a litt le vicarious pleasure f rom this story, but his method is cer
tainly heavy-handed. Schweidler professes, however, to use the same yardstick
to measure his own performance, and it is this att i tude toward the demands of
his work that is interesting and even inspiring.
A recurrent image throughout the book is the restorer as physician.
Schweidler often refers to pictures as "patients," insists that pictures should
"recuperate" after t reatment, and indicates that removal of certain problems
requires "surgery." Mo ld stains are regarded as the outward manifestation
of a "contagious illness" of the paper. He even refers to the "skin" and "body"
or "flesh" of a sheet of paper. This image is related to how he views the mean
ing of "restoration." "In our field one may not create the new, but brings the
old into order" (p. 138). Though these words sound somewhat awkward in
English, their meaning is clear. The restorer is the healer, the physician. His
goal is that the patient should be good as new, w i thou t evidence that he was
ever il l.
A laudable goal in medicine, it sounds equally good when applied to
restoration. Yet art objects, unlike human beings, do not have inherent powers
of recuperation to assist the efforts of the "doctor." Should we try to make the
object look just as it did when it left the artist's hand? If not, how much evi
dence of age or disf igurement can we accept? Should we try to carry a treat
ment to the extent that no one can easily tell that damage has occurred?
Should we reconstruct missing parts to replicate the losses convincingly, or
should the viewer be al lowed to perceive, however subtly, these deficiencies in
the original? These are some of the most perplexing and endlessly fascinating
questions that arise in the t reatment of art objects. Opinions about goals and
techniques for treating artworks vary w i th t ime and w i th regard to the specific

6 E D I T O R ' S I N T R O D U C T I O N
object under discussion. 1 3
Some of Schweidler's own attitudes toward these issues can be gleaned
f rom his remarks: "A cleaned print should under no circumstances look as if it
had been treated. . . .The character, tone and warmth of the print have to be
preserved at all costs" (p. 109). Yet elsewhere he observes that if a pr int loses
its vividness in baths, "noth ing is to be done but to restore the beautiful and
pristine appearance by skillfully retouching" (p. 94). Even if replacing color ing
lost as a result of a t reatment could be done so well that it makes the print
look as if it were not treated, the fact is inescapable that some of the original
coloring has been lost.
Here we come up against a central problem in conservation. What if
achieving a specific goal requires compromises: the stain can be removed, but
a color might change, an ink might be diminished in intensity or—even more
subt ly—the strength or aging properties of the paper might be adversely affect
ed? It seems to me that in the past few decades, there is more will ingness on
the part of conservators, curators, and collectors to articulate the real compro
mises and risks of treatments at the same t ime that the benefits are considered.
Surely we wou ld agree that having to make such choices is one of the reasons
the field of conservation can be so demanding. One of the major achievements
in the field of conservation in the past several decades is that we have begun
to realize that certain procedures may result in improvements in the appearance
of an artwork but may promote deteriorat ion in the future. The use of the term
"conservation" is itself a manifestation of this awareness because it includes the
meaning of the older term "restoration" —denot ing action taken to ameliorate
damage or disf igurement—and also the need to ensure preservation of the
object, whether or not there is any at tempt to improve its outward appearance.
Making informed decisions that skirt disaster, control risks, and ult imately meet
the requirements of both preservation and aesthetics is a source of deep satis
faction for everyone involved, conservator and curator alike.
Schweidler often seems to the modern reader to go too far in carrying out
a desire to make a treated object look untreated. Should one, as Schweidler
suggests, refold a letter after t reatment so that it looks as if it had not been
treated? Should a book be dried such that the pages are caused to buckle in the
way that old books sometime do? If the plate mark on a print no longer seems

E D I T O R ' S I N T R O D U C T I O N 7
to stand in relief, should it be re-created w i th the point of an appropriate tool?
Or are these steps going beyond what is required and into a realm where
deception is the goal? All conservators take pleasure in being able to carry out
a t reatment in such a way that the viewer cannot detect it. There is magic in
making a whole out of the parts. Schweidler wou ld have been comfortable
w i th the image of the restorer as a magician who is capable of conjur ing up
the desired appearance. But what about the magician's audience? Wi l l it simply
acquiesce to the decept ion, or wi l l it cry "Fraud"? Or are the effects of such
magic likely to compromise another goal, that of long-term preservation?
Even if the question is l imited to what is permissible for the sake of visual
effect, where does one draw the line between skillful repair and deception? Is
the issue of deception inherent in the nature of the repair, or are there other
factors that must be considered? Schweidler was aware that a skillful repair had
the potential to deceive and professed concern to avoid deceit. In one instance,
he cautions that in the repair of stamps any addit ions have to be minor, or one
runs the risk of being considered a forger (p. 199). Elsewhere, in conjunct ion
w i th doing retouching after adding a margin, he says that even if one carries out
the retouching of the f ront w i th great care and delicacy, "you are still far f rom
having achieved a decept ion. The back wi l l betray the added margin" (p. 123). In
other words, one cannot be accused of forgery if by merely looking at the back
one can easily determine what has been added..
Having been fooled by a d'eceptive repair—that is, discovering that a pr int
has been "Schweidlerized" —is frustrating, especially if the price paid was that
for an object in perfect condi t ion. But if one day an artwork one owns sustains
damage through an accident, one wou ld surely want to make the evidence of
the damage as invisible as possible, provided that the long-term effects on the
object were not adverse. In this hypothetical circumstance, wou ld one insist
that the repair be done in such a way as to reveal its presence? Or wou ld one
prefer that the repair look virtually perfect and put the burden of honesty about
its presence on the wr i t ten and photographic documentat ion that ethical con
servators now routinely provide? The idea of a self-revealing repair is the basis
of the technique called "trateggio," in which the visual characteristics of the
retouching are designed specifically to give discrete indications of where por
tions of a paint ing have been lost. Depending on the nature of a loss and the

8 E D I T O R ' S I N T R O D U C T I O N
artwork itself, however, this approach may be unacceptable. 1 4
I still marvel at how good the Museum of Fine Art 's (MFA's) impression
of the Housebook Master print looks (see Appendix, f ig. A.7). And neither I
nor, I am sure, the curator wou ld be likely ever to propose that the repairs be
removed only because they are deceptive. Deceptive to whom? The visitor to
the MFA? This complicates the discussion somewhat, in that one could argue
that by not tel l ing the visitor that the art object he or she is v iewing is not as
perfect as it looks, a museum is being deceitful. To this one might counter that
it is a duty of a museum to present its objects so that the viewer is able to per
ceive them in a way that best conveys what the artist was trying to say and that
drawing attent ion to its flaws is like clutter ing the page of a novel w i th endless
footnotes. To push this analogy further, perhaps one could say that the repairs
should be like endnotes; they are there to be found as a matter of record but
do not stand in the way of the main text.
Perhaps in the end it is not a problem that a repair was done so wel l as to
be almost undetectable but rather that there was no disclosure of this fact.
When I first began my training in paper conservation, auction catalogs rarely
ment ioned any condi t ion problems, but they gradually began to introduce
phrases such as "skillfully repaired tear at lower left" or "a small loss at right has
been beautiful ly repaired." On balance, a virtually undetectable repair can
indeed be a good goal of a conservation treatment, provided that its presence is
appropriately documented. Having said this, discussion of the benefits and dis
advantages of a theoretical repair has to lead to practical issues. Is it acceptable,
for the sake of an excellent repair, to scrape away some of the fibers of the or ig
inal, as required in Schweidler's method? Or wou ld some other approach (paper
pulp, Japanese tissue, etc.) be good enough for this specific artwork? How wil l
the technique and material used be likely to age? And how much is one wi l l ing
to do to the original solely for the purpose of repairing a defect? At t imes the
forces of the marketplace have required that everything necessary be done to
create the illusion that a print was in perfect condi t ion: a tear in the sky of a
Rembrandt landscape wou ld be repaired by removing all of the sky and splicing
in another sheet of paper (see Appendix, pp. 230-31 and note 5). I wou ld hope
we never see those days again: respect for the integrity of a work of art
is reflected in today's conservation principles and practices by emphasis on

E D I T O R ' S I N T R O D U C T I O N 9
preserving as much as possible of the original material of the artwork.
Clearly this book raises many philosophical and practical issues; but to
return to the book itself, if one had to identify the most important aspect,
surely it wou ld be Schweidler's explication of the subject of structural repair of
works on paper. It was this technique for which he and, especially, his brother,
Carl (from w h o m Max probably learned the technique), became best known.
I know of no other author before Schweidler who had such an understanding
of the technique of chamfered repairs. 1 5 Schweidler indicates the importance
of this topic by introducing the subject w i th the heading, "Actual Mend ing or
True Restoration" (pp. 109-22) . He is obviously fascinated w i th the magical
effect achieved when a damaged sheet of paper once again appears whole.
To emphasize the demanding nature of the process of mending, he admonishes
the reader that one must practice for many long hours before undertaking
repair of an object of value and that one must be in the best of moods before
proceeding w i th the work. His at t i tude toward the work—his stringent require
ments of absolute cleanliness and extreme delicacy in the use of tools —might
seem in keeping w i th a textbook on surgery and wi l l probably f ind a sympa
thetic response among paper conservators today.
In describing the process of mending, Schweidler offers a number of observa
tions about paper that are still valid and are an indication of his famil iarity w i th
its properties. For example, he distinguishes between the color of paper as seen
in reflected light and its color as seen when the sheet is held against the light
(p. 110). Two papers may look quite similar under one kind of l ighting but may
appear radically different under another, and the implications of this difference
for the repair of paper cannot be ignored.
The specific method of repair advocated by Schweidler is sometimes
referred to as the "chamfered" or "inlay" repair technique, but there seems to
be no standard phrase. Schweidler simply uses the word repair. The basic
process is wel l known and requires the shaving down of the back of the picture
around the edges of the loss or tear. Typically the shaving begins t w o or three
mil l imeters f rom the edge of the tear or hole. As one approaches the edge, the
paper is shaved down more and more unti l finally, at the edge itself, the thick
ness is reduced to scarcely one layer of fibers. After selecting a piece of paper

10 E D I T O R ' S I N T R O D U C T I O N
that is as much like the original as possible and cutt ing it to the required size
and shape, the mend is fashioned by shaving down its edges in such a way that
wherever the original is thickest, the mend is thinnest, and wherever has been
shaved down to only a few fibers, the mend is not th inned at all. In theory,
when the mend is pasted into posit ion, the combined thicknesses of the origi
nal and the mend wi l l then be perfectly uni form and hence the repair wi l l be
unnoticeable, even when the sheet is held against the light.
Theory is one th ing; practice, another. Schweidler describes some of the
obstacles that might thwar t efforts to achieve a satisfactory repair. There may be
shiny places along the perimeter of the repair. Buckling of either the original or
the mend, or both, may occur. The reflectance, gloss, or texture of a mend may
differ f rom the original. Traces of dirt along a tear may be unnoticeable unti l
after the repair has been completed. Obviously, the patience, dexterity, and
attentiveness of a watchmaker are essential for this kind of work.
Also necessary is ah enormous supply of papers of every period, color,
texture, and condi t ion. Partly because of this daunt ing requirement, many con
servators today tend to rely more on the use of paper pulp when fi l l ing losses,
or to use Japanese papers to reinforce a tear. Another obstacle, however, is the
ethical consideration of whether it is permissible to remove any part of the or ig
inal at all in order to effect a repair that is virtually unnoticeable. Still another
object ion might be that it can be diff icult, if not impossible, to predict how a
specific repair.paper is likely to age in comparison w i th the original. Some years
ago, I saw a Meryon print on pale blue-green paper that had a fairly large
chamfered repair. The repair was now a cream color and immediately stood
out. Surely the person who selected the paper years ago was careful to select a
closely matching color before expending the amount of t ime and care required
to effect the repair.
There are other procedures interspersed in the text that are likely to raise
some eyebrows. For example, a long section concerns how to create false plate
marks and false margins. The description of how to split a banknote may give
pause to an agent of the United States Treasury, but the agent's alarm wil l be
matched by the print lover who encounters the suggestion that one could also
split a pr int to use it as a lampshade! 1 6
The reader w h o is schooled principally in restoration tradit ions published
E D I T O R ' S I N T R O D U C T I O N 11
in English may discover certain practices or techniques that are unfamiliar,
although most are less unsettl ing than those just ment ioned. A few wi l l be
ment ioned here, but space does not al low complete discussion of their possible
harm or benefit. The intent is to let the book stand on its own as a document
in the history of conservation and as a source book on what might have been
done over the years to prints, drawings, and books. Baths of wine vinegar are
often ment ioned as a remedy for stains or overall discoloration and as an "ant i
dote" for chlorinated bleach. A solution of a luminum subacetate ("essigsaure
Tonerde") is suggested as a means of protect ing pastel pictures (when sprayed
on the back of the picture) against recurrence of mold growth and as an addi
t ive to gelatin sizing applied prior to retouching. Sunlight is suggested for the
bleaching of discoloration or stains, and although Schweidler considers the
method quite satisfactory, he observes that the lack of constant availability of
sunlight is an obvious disadvantage. 1 7 Use of sunlight and artificial l ight to
reduce stains has recently attracted at tent ion in this country, and therefore
Schweidler's reference is interesting (see Keyes 1984:100-104; Van der Reyden
1988:73-106) .
Other materials used by Schweidler wi l l be familiar to today's practit ioners,
though the details or condit ions of their use wi l l likely be different. Both hydro
gen peroxide and calcium hypochlori te are employed for removal of a variety
of stains. A material that is no longer as familiar is so-called bleaching soda. 1 8
Initially I assumed that this must simply be another common name for calcium
hypochlor i te, in large part because in directions for using "bleaching soda" (as
on p. 55) it is clear that this is a dry material, like a powder. Thus one might
assume, as I d id, that "bleaching soda" is the same as "bleaching powder," that
is, calcium hypochlor i te. (The confusion is heightened by Schweidler's occa
sional use of the word bleach as shorthand for bleaching soda; e.g., p. 102.)
In fact, bleaching soda is a mixture of sodium carbonate and "water glass"
(sodium or potassium si l icate). 1 9 Schweidler is certainly quite aware that papers,
inks, and other media can be adversely affected, even destroyed by such sub
stances. He frequent ly cautions about the danger that chemicals present to
colored prints. At one point he suggests that it might be a good idea to have
a second copy of the print on hand, just in case (p. 75). And although he sug
gests certain "harmless cleaning agents" (p. 38), he cautions that even a "good,

12 E D I T O R ' S I N T R O D U C T I O N
familiar home remedy" can be remarkably powerful (p. 56).
Notable for their absence are references to methods for removing stains
caused by pressure-sensitive tapes, synthetic adhesives, and other products of
our modern era. Similarly, there is no substantial discussion of the deteriorat ion
caused by acidity or ground wood pulp papers and boards, w i th which we are
all too familiar today. In reading this book one might justi f iably become a litt le
nostalgic for an age in which many of the materials encountered .now had either
yet to be invented or were not yet recognized as injurious.
Some of the informat ion presented is useful to keep in mind when examin
ing a work of art on paper. For example, one of the first clues to the presence
of a skillful repair is an unexplained buckling of the paper. As Schweidler
observes, 2 0 buckl ing of a repair can be a problem for the restorer, but as an aid
in detect ing repairs such buckling can be important evidence. Gentle, overall
buckl ing is, of course, a common and normal feature of any sheet of paper, and
on occasion residues of adhesive may cause localized cockling or d istort ion;
however, when the buckling seems more pronounced in certain areas, or if the
area of buckl ing seems to have a discernible contour, close examination is in
order. Light f rom a small, high-intensity lamp directed at a very shallow angle
across the surface of the paper—"raking light" —is an invaluable aid for this
purpose. 2 1 Similarly, unexpected change in the surface texture —considered by
Schweidler a defect in the repair—may indicate the presence of a mend. It is
not unusual for the perimeter of a mend to be smoother than either the sur
rounding paper or the mending paper. This loss of texture is due to the bur
nishing caused by pressure of the knife edge used to shave down the paper.
Moreover, the texture of the paper selected for the mend may differ subtly
f rom that of the original. I l lumination alternately under raking light and
reflected light is helpful for discovering these textural differences. Incidentally,
Schweidler's description of how to create wire lines in paper where there are
none, and, by extension, false watermarks, may be disconcerting, but I should
point out that so far only two instances of a false watermark have been found
in the collection of the MFA (see Appendix, discussion of Urs Graf and
Schongauer). It is possible that this practice may be rather uncommon, given
that it involves scraping away paper fibers and that the scraping can be detected
w i th low-power magnif ication.

E D I T O R ' S I N T R O D U C T I O N 13
Schweidler describes a process for stretching prints in order to f latten them
after they have been repaired, to dry them after various aqueous treatments,
and to mount them on a support prior to framing. This technique involves, first,
attaching narrow strips of paper to all edges on the back of a print. Then, whi le
the print is slightly damp f rom treatment, these strips are attached to a rigid
support, and the print is al lowed to dry. As the print dries, it tends both to con
tract and to stretch somewhat, becoming flatter in the process. It is not surpris
ing, therefore, that the precise dimensions of prints often differ from impression
to impression, although some variation in size may also occur because of varia
tions in pr int ing pressure, differences in the moisture content of the paper at
the t ime of pr int ing, and other factors peculiar to the pr int ing process. This
stretching procedure may also explain why narrow remnants of paper are some
times found on the edges of the back of a print.
Schweidler's book is likely to stimulate a variety of reactions, including ant i
quarian curiosity, fascination, respect, surprise, and, occasionally, astonishment.
It deserves consideration as a document that grew out of a period when it was
becoming more widely understood that those who at tempt to treat problems
associated w i th works of art must accept broader responsibilities than in the
past. Conservation, as opposed to the narrower concept of restoration, soon
became useful as a term to convey these wider concerns. Schweidler indicates
that records of treatments should be kept. He stresses that those who wou ld
like to work in this field shduld first acquire proper training and not regard such
work as a mere sideline. Furthermore, he asserts that it is important , through
one's work, to save an art object, not just for decades, but for the future. The
book is evidence in itself of an important new at t i tude—that t reatment of art
works is too important to practice in secrecy and that open communicat ion
is essential.
Furthermore, there are other aspects of his book that are distinctly m o d
ern and in accord w i th current practice. Though it seems sometimes as if he
assumes that simply because a material is used in the home, its harmlessness is
ensured (e.g., pp. 38, 56), at other t imes he is aware that some materials may
indeed be harmful. He recommends testing inks and other media in advance of
t reatment to determine their solubil i ty and assess the risks of aqueous treat
ment (pp. 81, 94, 146). And although one can object today to his having carried

14 E D I T O R ' S I N T R O D U C T I O N
out more extensive restoration or reconstruction of a pr int than necessary in
order to achieve the illusion that nothing was done to it, he also stresses that
bleaching may not be necessary and that a simple water bath (although usually
containing vinegar) may be sufficient to achieve desired results (see the section
"Brightening and Cleaning," pp. 51-57) .
The second edit ion was used in this translation because it ampl i f ied, clari
f ied, and illustrated topics that were only touched on or were ignored in the
first edi t ion. In the initial stages of work, accuracy of translation was the goal,
but having done that, it became clear that most readers wou ld f ind the results
much too tedious and sti l ted. In subsequent stages, the approach has been to
try to enhance the readability of the text whi le not distort ing or corrupt ing the
information it contains. Nevertheless, the combinat ion of technical details and
Schweidler's pedantic tendencies are hard to ignore. Throughout the t ime I
have worked on this book, I have tr ied to remember to treat it as a document
in its own right, w i thou t gett ing bogged down in passing judgment on specific
methods, although f rom t ime to t ime I have added notes either to clarify con
fusing passages or to provide useful, relevant informat ion not contained in the
original. I hope that addit ional historically interesting works in other languages
wi l l eventually be brought to readers of English. In particular, I hope that some
one wi l l undertake the task of translating Bonnardot . 2 2 It wou ld be fascinating
to have a closer look at the practice of print restoration in the mid-nineteenth
century. There is a growing interest in the history of this f ield, and there are
several articles that wou ld be of interest to those who wish to pursue this
further (Clarke 2001:49-55; Donni thorne 1988:16-25; Kosek 1994:41-50;
Stevenson 1990:420-24; 1995:111-25; Walsh 2000 :383 -90 ) .

E D I T O R ' S I N T R O D U C T I O N 15
N O T E S
1 I am grateful to Jane MacAusland for having
given me a copy of the fol lowing obituary
which, according to Regula Schweidler, was
printed in the Frankfurter Allgemeine Zeitung,
February 7, 1962. The obituary was wr i t ten by
Erhard Goepel, a wel l -known art historian.
Carl Schweidler was born at a time in Berlin
where his name was still spelled with a "C."
His name had already become a legend in
the world of engraving while he was alive—
probably because publicity was not important
to him. In contrast to his brother who also
restored engravings, Carl never wrote a word
about his craft. Even in conversation, he never
mentioned a word about his small or big trade
secrets. Schweidler learned the craft of lithog
raphy like Menzel from the ground up in an
environment that is reminiscent of Glasbrenner.
After he was done with his apprenticeship he
became self-employed and invented processes
to clean and restore graphics. The peak of his
career came in the 1920s when the prices for
old graphics at the auctions of the C. G.
Boerner auction house in Leipzig tremendously
increased and the buyers and collectors were
therefore able to pay more for the restorations
of the graphics. For decades he was regarded
as the best in his field. He liked to work for
connoisseurs, who were able to fully appre
ciate his often complicated and crafty work
as well as his sensitivity—among them Gustav
Meyer, Hans Boerner, Richard Gutekunst,
August Klipstein, Heinrich Eisemann, Eduard
Trautscholdt. His success was based on his
deep artistic understanding of old graphics.
While restoring works by Durer and Schongauer
he was striving to reconstruct the brilliance of
the piece of art, and while restoring works by
Rembrandt he tried to recapture the richness
of the predominant colors. In his unassuming
manner, he used to say that the most impor
tant thing while in restoring a damaged
engraving etching was to find paper of that era
that had the same characteristics as the origi
nal. His extraordinary talent in drawing would
have put him in a place where he could have
done remarkable work on heavily damaged
sheets—but he knew not to exceed the ethical
limits in his work as a restorer. He always had
a folder at hand where he kept the leaves that
he had refused to restore because too much of
the original had been lost.
His fees were based on the amount of
work he had done and not on the increased
value of the graphic once the yellow or spotty
piece of paper had gone through his hands.
His extraordinary character, his loyalty, and
his ability to remain silent were tested during
the war when he did not declare the graphics
that he was entrusted with by foreign art
dealers as enemy property. He kept the art
work carefully wrapped in his basement in
crates, and there it survived the bombings.
These graphics were valued at several hundred
thousand German marks.
With the huge water containers, the
presses, and the shelves filled with very well
organized folders of old paper, his work space
in his apartment in the Flemingstrasse resem
bled a laboratory. Sometimes it seemed more
like the chamber of an alchemist when sulfur
or chlorine vapors would rise. It was facing the
commuter train track. Carl Schweidler used to
cut the damaged spot of an engraving where
a little corner or border was to be added with
an Exacto knife and hold it up against the
windowpane, so that the bright light would
illuminate the watermark and the texture of
the paper. Every time a train would go by
he would pause because the window would
shake and continue his work once the train
had passed.
The walls in the living room were deco
rated with works by Theodore Hosemann, who
had also started as a lithographer and whose
dry, anecdotal humor Schweidler appreciated
as much as his technically perfect paintings. In
the evening Carl Schweidler would sit down at
his piano, play, and sing songs of Berlin in his
high-pitched voice. He would serve his guests
a cold beer. To everybody's surprise, the old
gymnast would all of a sudden do a somersault
or stand on his hands. Even into his old age
he had a steady hand. After he had a stroke at
age seventy, he accepted engravings only for
cleaning. He could not live without doing
work. He lived to be seventy-eight years old.
His assistant and friend B. Drescher who had
emigrated to London and his son Kurt
Schweidler, who moved to Bern last year,
continue his craft in a virtuoso style.
2 Private correspondence from Regula
Schweidler, via Olivier Masson. I understand
that Kurt and his son were encouraged, and
perhaps aided, to come to Switzerland by
Kornfeld and Klipstein, dealers in fine prints.
[Private correspondence from Joachim Gaehde.]

16 E D I T O R ' S I N T R O D U C T I O N
3 The postcard says, "Based on a number of
inquiries, I would like to draw your attention
to the fact that I am not the author of the
soon to be published book, Die Instandsetzung
von Kupferstichen, usw. Carl Schweidler." Carl
underlined his own first name and also gives
his address as fol lows: Berlin NW40,
Flemingstrasse 11.
4 Because Carl's notes are in the 1938 edit ion
and because there are instances in which the
text has changed or is no longer present in the
1950 edit ion (the one presented here in trans
lation), there is no way to reproduce a few of
these notes when there is no corresponding
text. On the whole, however, only a few notes
had to be omi t ted. One such note, at the
beginning of the book, relates to a statement
that was no doubt especially infuriating to Carl.
Max says that fo l lowing service in the military,
it was he who introduced his brother (Carl) to
the business of restoration, "considering that he
was suited [to the profession]." In a marginal
note, Carl states, "I cannot say that about
'Uncle Max.'" In the margin at the bot tom of
this same page, Carl writes, "A person is suited
to become a restorer of antique prints when he
possesses craftsmanship and a broad knowledge
of the artwork that was given over to him in a
trusting manner." Clearly Carl felt that Max was
not such an individual.
5 On page 2 of the copy he had been given of
the 1938 edit ion, Carl wrote a chronological
outl ine of his brother Max's life. The obvious
impetus must have been Max's allusion on
that page to his "more than thir ty years of
experience," and this chronology was Carl's
demonstration that this claim was false. In the
1950 edit ion, Max alludes to his experience
indirectly, referring sometimes to his "years
of experience," and elsewhere (p. 89) says that
he had "been using hydrogen peroxide for
about thir ty years." On another page (p. 204),
he says, "My friends have a great advantage:
I have revealed to them the experiences of
my fifty years of professional life." Carl's brief
chronology of Max's life is as fol lows:
1885
born
1904 -6 [age 19-21]
military service
1907-11 [age 22-26]
wi th Carl ("was also barkeeper at the
Cafe Streng")
1912-14 [age 27-29]
a dealer (presumably in art)
1914-18 [age 23-29]
military service
1919-27 [age 3 4 - 4 0 ]
dealer, maker of silhouettes, and painter
of landscape views
1927-38 [age 42-53 ]
a restorer "at my [Carl's] instigation,"
dealer, party member, and poet-wr i ter
"as his main profession"
Carl states that he did restoration work for
Max from 1919 to 1927 and that it was he, not
Max, who was doing restoration work during
that period. He also notes that he handed over
to Max more than 6,100 marks' wor th (more
than $19,000 wor th , in 2002 U.S. dollars) of
"restoration work for which / [Carl] was respon
sible." Perhaps Carl is trying to make clear that
it was only through him that Max received
commissions for restoration. Perhaps he is also
trying to suggest that giving over to Max such
remunerative restoration projects was an act
of generosity.
6 See translation, note 84.
7 On p. 82, Max states that oxidized lead whi te
should be treated wi th either citric acid or
hydrochloric acid. Carl made an emphatic note
in his copy of Max's book that this is wrong,
and indeed Carl is correct in saying that dilute
hydrogen peroxide is the appropriate material
to use.
8 See Walsh 2000 :383 -90 for an interesting dis
cussion of examples of this practice that she has
found in the collection of the National Gallery,
Washington, D.C, and on related historical
information.
9 For more on earlier manuals and books on
treatment of prints, see Stevenson 1995:111-25.
10 Alfred Bonnardot (1808-84) published a
l imited edit ion of his book, Essai sur la restaura-
tion des anciennes estampes et des livres rares,
in 1846. A revised edit ion was published as
Essai sur I'art de restaurer les estampes et les
livres in 1858, and a German translation fo l
lowed in 1859 (Stevenson 1995:117).
11 Among the few that come most readily to mind
are Beaufort 1927; Gunn 1911; Scott 1921, 1923,
1926; and Buck 1918.
12 See glossary.
13 For a fascinating discussion of such opinions as
they apply to sculpture, see Podany 1994.

E D I T O R ' S I N T R O D U C T I O N V
14 One might achieve a "pure" means of repair
that in no way could be confused wi th the orig
inal, only to find that the materials employed
are aesthetically so alien that the result is self-
defeating. See Podany 1994. On the use of
"trateggio," see Hoeniger 1999.
15 In a survey of historical approaches to treat
ment of works on paper, Donnithorne (1988)
remarks that there seems to be less documen
tary information available on the subject of
repair than on any other aspect of treatment.
Most writers seem to be satisfied wi th suggest
ing that repairs of holes should be made by
cutt ing similar paper to f i t or, if part of an
image were missing, by using an appropriate
port ion of another print. Overall, "the preferred
method of repair was to apply an overall sec
ondary support (backing or l ining)" (Donni
thorne 1988:19).
16 As astonishing as this is to print lovers today,
in some respects this could be viewed as an
extension of one of the long-standing functions
of prints as decorative objects. Prints have been
used, for example, as the basis for a poor man's
"reverse glass painting" (Hinterglasmalerei), in
which one affixes a print to the reverse of a
glass pane in a clock case, thins it down by
removing much of the paper fibers so as to see
the design, and then finally paints the back
wi th oil paint to provide color, which can be
seen from the front side through the glass. M y
favorite and perhaps the most breathtaking
examples of the decorative uses of prints are
the "Print Rooms" of eighteenth-century
England, in which prints (having had their mar
gins removed) were glued onto the painted
walls of a sitting room in a country house, such
as at Uppark and Calke Abbey (see National
Trust 1995:76; Gore 1991:97; Colvin 1985:55).
I am grateful to Curt DiCamillo for directing
me to these examples.
17 See pp. 67 and 163 and note 55 in the trans
lated text.
18 See glossary.
19 See glossary.
20 See the section, "Actual Mending or True
Restoration," pp. 109-22, below.
21 See, for example, the discussion in the
Appendix about the print by Rembrandt,
Landscape with a Cottage and a Large Tree, and
the Raimondi, Massacre of the Innocents.
22 Our librarian at the MFA informed me that
an English translation was done in 1932 as a
thesis (Ann Arbor, Mich.) , but this is not avail
able except by requesting photocopies of
selected pages.

This page intentionally left blank

T H E R E S T O R A T I O N O F E N G R A V I N G S , D R A W I N G S , B O O K S , A N D O T H E R W O R K S O N P A P E R
Past Mistakes and New Methods in the Removal of Age-related Damage to Cultural Treasures in the Graphic Arts

This page intentionally left blank

DIE INSTANDSETZUNG
VON
KUPFERSTICHEN, ZEICHNUNGEN,
BtJCHERN USW.
Alte Fehler und neue Methoden bei der Beseitigung
von Altersschaden an graphischem Kulturgut
von
MAX SCHWEIDLER Restaurator in Berlin
BUCHBINDER-VERLAG MAX HETTLER, STUTTGART 1950

Fig. i .
Copy of an engraving depicting a
papermaker (from 1680)

C O N T E N T S
25 Foreword to the First Edition
27 Preface to the First Edition
28 Preface to the Second Edition
29 Subject Register
33 Various Thoughts about Restorers, Their Workshops,
and Their Work
37 Studio Room and Equipment
39 The History of Paper
41 Paper Manufacture
46 How to Obtain Old Paper
48 Handling Damp Paper
51 Brightening and Cleaning
58 Removing Prints from Backings
64 When May One Work with Chlorine? (General
Observations on the Treatment of Prints and Books
with Chlorine)
66 Antidotes for Chlorine
67 Treating Black-and-White Prints with Chlorine Water
72 The Cleaning of Colored Prints
78 The Chemical Treatment of Color Prints
81 The Cleaning of Drawings
84 The Cleaning of Books
89 Hydrogen Peroxide
91 The Treatment of Various Stains
93 The Removal of Spirit Varnish

96 Starch Paste
98 Strengthening Severely Damaged Prints
99 Tinting, Color Preparation
100 Examining and Preparing the Paper
104 Splitting Paper
106 General Remarks about Paper
109 Actual Mending or True Restoration
123 The Addition of a Margin
127 The Artificial Plate Mark
130 The Stretching of Prints
137 The Stretching of Drawings on Stretchers or Strainers
138 Retouching
143 The Treatment of China Prints Mounted on
Copperplate Papers
146 The Treatment of Manuscripts
147 The Treatment of Prints on Parchment
149 The Chemical Treatment of Painted Rice Paper
151 Restoration Work on Large-Size Paper
152 Tips
156 Chats about Old and New Restorations of Books
160 The Storage and Preservation of Engravings
168 The Storage and Preservation of Books
171 Important Printmaking Techniques
196 Additional Hints for the Restorer of Postage Stamps
204 Summary

F O R E W O R D T O T H E F I R S T E D I T I O N
It is with special pleasure that I write a few words as a foreword to this unique profes
sional book by my friend Max Schweidler. Over a period of many years I have admired
the art of the author, much in the same way as he has quietly admired my work. We
both worked, each in his own way, toward the same goal, the protection and con
servation of works of great cultural value. Our heavy workloads long prevented us
from establishing contact with each other, though we both longed to do so. Finally,
Schweidler's intention to put down in a book his extensive knowledge and expertise in
the field of copperplate restorations brought us together. I witnessed the creation of
his book with special interest since I myself had earlier worked in the same field in
which the author has achieved unsurpassed mastery over the course of many decades.
Despairingly, I had read during all these years many articles about restoration
work, in professional books and journals, which betrayed the incredible ignorance of
their authors and a sad, general lack of knowledge about the subject, and I longed
for the moment when, finally, a real expert in the field would find the time to end
this incredible nonsense. I knew that nobody was better equipped to do so than Max
Schweidler, and consequently I was overjoyed when about two years ago he surprised
me with a voluminous manuscript and the request to look it over sometime and to give
him my opinion. It was a real pleasure for me to follow Schweidler's statements, and
it was helpful to Schweidler when I, as an expert, would ask for more extensive expla
nations here and there. Mutual visits filled with interesting discussions were very
informative for me and brought the work to its completion.
Now that Schweidler is sharing his broad knowledge with the professional world,
he will certainly receive widespread appreciation there. But appreciation will also
come from the owners and the curators of collections of copper engravings and art
prints of all kinds, since his book is exactly what is needed to prevent a great deal
of damage.
I would like to point out here — emphatically—what the author himself also men
tions in his preface, namely, that this book is not to be considered an entertaining
piece of literature but rather is to be studied carefully and attentively if the user wants
to be successful in his work.
But not even the thorough study of this book alone will be sufficient to reach the
level of expertise in the restoration of copper engraving that can only be attained by
firm, unbending willpower and constant practice.

26 R E S T O R A T I O N O F E N G R A V I N G S , B O O K S , D R A W I N G S , A N D O T H E R W O R K S O N P A P E R
Many years of hard work and numerous disappointments, which, however, never
discouraged but rather stimulated him, have brought the author to the indisputable
mastery that he to this day strives to continually expand.
Thus I wish Schweidler's book complete success, a success that will first of all
benefit the conscientious user and will culminate in the preservation of great cul
tural treasures.
D R . H U G O I B S C H E R 1
Berlin-Klein-Machnow, July igs8

P R E F A C E T O T H E F I R S T E D I T I O N
Anyone who has only a small amount of time available and thinks he might be able to
finish my book on the streetcar, or somewhere else in between other activities, is bet
ter off leaving my book alone. It will not do him any good. It is not just an entertaining
piece of literature, a pleasant chat in more or less beautiful words.
I sat down, and from years of professional experience, I recorded facts that are
supposed to be of use to those who have, in the same way as I, set themselves the goal
of preserving cultural treasures. What I have written down has to be thought over and
studied. The processes have to be clarified. Repetitions in the text cannot be skimmed
over as boring; an attempt has to be made to follow each point.
That requires leisure and the most comfortable and quiet corner in the house and
peaceful hours. I would especially like to address discerning and ambitious young
people who have recognized the weaknesses and mistakes of earlier times.
But the contents of my book should also be of assistance to adults and should pro
vide them with many kinds of insights. The special literature in this field is still so
poor, so meager, that I think my statements may be considered a somewhat enriching
contribution. Unfortunately, the authors of many treatises, with the exception of
Bonnardot2 in Paris, are not real experts in the field. When a subject to be described
and explained is known only by hearsay, then — as one knows — a lot of damage can be
done. I certainly do expect that a lot will change in this field after my book has been
read in interested circles.
Numerous illustrations will clarify several hints better than the text alone could.
I had to be rather pedantic about the details of my descriptions so that no mis
understandings would occur.
Minutely detailed explanations seemed absolutely necessary to me in order to
finally put an end to the vandalism inflicted on precious cultural treasures. Whoever
follows my instructions and advice will certainly contribute to the goal of transmitting
these treasures in the best possible condition to future generations.
I hope that I have also provided some stimulus for my colleagues. I would be
happy if my work could lead to an exchange of ideas and arouse criticism, because
both can only lead us closer to the goal.
T H E A U T H O R

P R E F A C E T O T H E S E C O N D E D I T I O N
In the preface to the first edition of this book, I had asked my readers to supply me
with additional material about restoration methods that had not been discussed up to
then, with the intention of making them available to the readers of future editions. Up
to this day—the first edition of my book has now been out of print for several years —
from among the numerous letters I have not found one suggestion that could show me
and my readers new ways. However, I have been asked several times — maybe not quite
rightly so — to restrain my somewhat patronizing, urgent, and pedantically repetitious
presentation and to make my book clearer by adding more illustrations.
As far as it seemed possible and useful, I have incorporated these suggestions
into the new edition. I thank my friend and publisher Max Hettler, who in spite of
major time-related problems agreed to publish this second edition. He also made it
possible to satisfy the requests for an increase in picture material by including a num
ber of new illustrations.
In addition to numerous questions about restoration problems, a great many
works have been sent to me for evaluation. I was happy to take on this often somewhat
problematic special task with the hope that I might be able to give the younger, ambi
tious and enthusiastic friends of our sparsely populated restoration profession some
encouragement.
I would like to thank everyone very much for their interest and the manifold stim
ulating ideas in their letters.
T H E A U T H O R
Spring 1949

S U B J E C T R E G I S T E R
P A G E 33 VARIOUS THOUGHTS ABOUT RESTORERS, THEIR WORKSHOPS, AND
THEIR WORK
Earlier methods of treatment—Mistakes in glaziers' shops and bookbinder shops—
Instruction in trade schools —Influence of owners of color prints —Disadvantages of
alum paste —The mounting artist
P A G E 37 STUDIO ROOM AND EQUIPMENT
Furniture —Harmless cleaning agents—Tube poles —Hangers—Wood pulp
cardboard—Paper supplies
P A G E 39 THE HISTORY OF PAPER
Writing materials—Papyrus plant, papyrus—Animal skins and parchment—Paper
P A G E 41 PAPER MANUFACTURE
Manufacturers of paper—Raw materials —Pulp and vat—Forming the paper—Sizing
the surface — Sizing in the paper pulp — Couching— Stamper—Washing potcher—
Mold—Watermarks—Wire lines —Bleaching of rags —Bleaching machines
P A G E 46 HOW TO OBTAIN OLD PAPER
Visiting an antiquarian bookseller—Watermarks—Storing paper
P A G E 48 HANDLING DAMP PAPER
Obtaining valueless engravings—Yellowed and foxed papers—Engravings as
supports—Bathing a print—Removing damaged sheets from the tray—Damaged
margins—Using a tube pole
P A G E 51 BRIGHTENING AND CLEANING
Removing loose dust—Soft and hard erasers—Caution, copying-ink pencil! —The
cold bath—Submerging a sheet—Print and support on the tube pole—Small parts
of print floating off—Brightening of a water stain with slightly acidic water—Local
treatment of minor spots—Turning over a moist sheet—Removing dirt that resists
the eraser
P A G E 58 REMOVING PRINTS FROM BACKINGS
Dry cleaning—How to pour boiling water on a sheet—Removal on the tabletop—
Removal from backings—Dissolving glue and alum paste—Dissolving flour paste
with cold water—Cold paste, cold water—Warm paste, warm water—Removing
wooden strainer—Weighting down a sheet—Behavior of hard and soft paper during
removal—Removal of colored prints—Use of a glass pane—Flour paste and starch
paste as removal agents

30 R E S T O R A T I O N O F E N G R A V I N G S , B O O K S , D R A W I N G S , A N D O T H E R W O R K S O N P A P E R
P A G E 64 WHEN MAY ONE WORK W I T H CHLORINE? (GENERAL OBSERVATIONS
ON THE TREATMENT OF PRINTS AND BOOKS W I T H CHLORINE)
Harmful formulas — Preparation of chlorine water — Chlorine extract—Labels —
Storage
P A G E 66 ANTIDOTES FOR CHLORINE
Use of sodium hyposulfate and vinegar
P A G E 67 TREATING BLACK-AND-WHITE PRINTS W I T H CHLORINE WATER
Use only diluted chlorine water—Local treatment—Treat sheets only when moist—
Absorbent and nonabsorbent supports—Dabbing—Blending in with the
surrounding—Rinsing
P A G E 72 THE CLEANING OF COLORED PRINTS
Treatment of colored prints in the bath —Local treatment only—Immediate use of
an antidote—Glaze, tempera colors—Only treat one sheet at a time—Color sample
as model—Drawing of endangered areas—Description of colors—Ox gall as an aid—
Blotting paper—Treatment of gummed prints
P A G E 78 THE CHEMICAL TREATMENT OF COLOR PRINTS
Accumulate experience! — Use only weak agents! — Take special care with French
color prints —Each color print has sensitive colors—Treat sensitive parts later, bold
colors first! — Use antidotes undiluted—Once again, utmost caution!
P A G E 81 THE CLEANING OF DRAWINGS
Examining the drawing—Not every drawing can tolerate water—Drawings high
lighted with white —Do not use a paintbrush—Add small amounts of chlorine water—
Caution with chalk drawings! — Caution with drawings in pastel, pen-and-ink, and
watercolor!
P A G E 84 THE CLEANING OF BOOKS
Removing the binding—No chlorine baths—Local treatment the same as for engrav
ings—Strengthening the surrounding—Cleaning without unbinding—Cleaning
severely damaged books
P A G E 89 HYDROGEN PEROXIDE
Content of hydrogen peroxide solutions—Pure bath only 5 percent solution —
Hydrogen peroxide in combination with chlorine water—Treat when half-moist
P A G E 91 THE TREATMENT OF VARIOUS STAINS
Carbon tetrachloride for fresh grease spots —Bleaching soda for old oil spots —
Chlorine water for slight foxed marks and slight water stains — Chlorine extract for
severe foxed marks and severe water stains —Hydrogen peroxide for lightening—
Sorrel salt for ink writing—Hydrochloric acid combined with chlorine extract for
severe stains of any kind—In combination with bleaching soda for watercolors and
especially stubborn stains—Cleaning requires more than one procedure—After each
procedure, antidote and bath—Treat fresh grease stains on dry sheets—Moisten
sheets for all other stains —Bleaching soda affects printing! —Treatment of back side
P A G E 93 THE REMOVAL OF SPIRIT VARNISH
Cleaning while moist—Repetition of the spirit bath — Mottled patches—Shiny
patches—Removing the lining after removal of the varnish and sizing

R E S T O R A T I O N O F E N G R A V I N G S , B O O K S , D R A W I N G S , A N D O T H E R W O R K S O N P A P E R 31
P A G E 96 STARCH PASTE
Rice starch—Different preparation of paste for different uses
P A G E 98 STRENGTHENING SEVERELY DAMAGED PRINTS
Strength of sizing—Sizing on the stretching board
P A G E 99 TINTING, COLOR PREPARATION
Subtle tinting—Avoiding greenish or grayish shades—Tint prints while mo i s t -
Preventing spots—Dark shades require repeated tinting—Cleaning expertly
P A G E 100 EXAMINING AND PREPARING THE PAPER
Strength of paper—Expansivity of paper—Skin or texture—English papers—Papers
without wire lines — Examining mending papers — Buckling of pasted places —
Softening hard papers—The use of bleaching soda—Gelatin and aluminum sub-
acetate—Making soft papers colorfast
P A G E 104 SPLITTING PAPER
Examing paper before splitting i t
P A G E 106 GENERAL REMARKS ABOUT PAPER
Consider the upper surface — Shaving paper—Hard papers —Soft paper—Watch out
for impurities in the paper—Never stretch an engraving artificially
P A G E 109 ACTUAL MENDING OR TRUE RESTORATION
Six basic prerequisites —Paper pulp —Shaving of damaged parts —Use paper of
the same shade as the original—Tinting after repair—Utmost cleanliness—Breaklike
ridges — Shaving soft and hard papers — Shaving box—Windowpane — Implanting wire
lines —Handling the knife—Tearing the mending paper
P A G E 123 THE ADDITION OF A MARGIN
Work in accordance with diagram —Consider expansivity—Marking—Shaving is the
same as for a repair—The addition of a margin to book pages
P A G E 127 THE ARTIFICIAL PLATE MARK
Examining the paper—Examining the print—Weak proofs, weak plate marks —Sharp
proofs, sharp plate marks—Soft plate marks—Use a sample proof—Observe subtle
details —Positioning the plate mark
P A G E 130 THE STRETCHING OF PRINTS
Stretch when the print is more than half-dry — Sheet has to be wavy on the stretching
support—The edges of the sheet have to be fairly dry—Watch the guards—Testing the
tension —Never dry a sheet with heat—Moisten the back of colored sheets —Distorted
plate marks —Rub creases, breaks, restored places when tension starts—Watch the
plate marks —Let restored places and plate marks dry faster—Cover surrounding with
paper or moisten again —Use hot glue —Dry sheets horizontally—Forty-eight hours
of stretching—Cool room —Removal from the stretching support—Use protective
cardboard—Let the sheet rest
P A G E 137 THE STRETCHING OF DRAWINGS ON STRETCHERS OR STRAINERS
Stretching procedure the same as on the stretching board —Rub mended places
before stretching—Use protective cardboard—Holes in the cardboard—Distortion
of the frame

32 R E S T O R A T I O N O F E N G R A V I N G S , B O O K S , D R A W I N G S , A N D O T H E R W O R K S O N P A P E R
P A G E 138 RETOUCHING
Examine mended areas —Shape paintbrush —Light hand—Pen—Glass pane allows
looking through —Strengthening or diminishing retouching—Applying color half-
moist—Bleeding of color—Major retouching according to sample—The spraying
method—The pencil as retouching tool
P A G E 143 THE TREATMENT OF CHINA PRINTS MOUNTED ON COPPERPLATE
PAPERS
Work wet on wet—Thin paste — Remove blisters and creases working from the
center—Tears in China papers
P A G E 146 THE TREATMENT OF MANUSCRIPTS
Testing the ink—Caution when moistening—Strengthening—Restore the original
appearance
P A G E 147 THE TREATMENT OF PRINTS ON PARCHMENT
Cold treatment—Never use hydrochloric acid—Careful when stretching! — Double
guards
P A G E 149 THE CHEMICAL TREATMENT OF PAINTED RICE PAPER
P A G E 151 RESTORATION WORK ON LARGE-SIZE PAPER
P A G E 152 TIPS
Treatment of Japanese woodcuts—Posttreatment—Sandpaper—Rough linen—Do not
apply paste thickly—Remove shiny spots—Treatment of prints on Japanese paper-
Silk prints—Layering sheets to dry—Removal of breaks, creases, folds —Heavily
yellowed pages—Various procedures
P A G E 156 CHATS ABOUT OLD AND NEW RESTORATIONS OF BOOKS
Old mistakes—New methods —Simplified techniques —Closing of wormholes
P A G E 160 THE STORAGE AND PRESERVATION OF ENGRAVINGS
Protection of framed works on paper—Portfolio —Box—Attaching hinges-
Cardboard—Removal from the box—Preservation —Sun treatment—Strengthening-
Mounting—Stretching—Framing—A word to customers and framers — Stretching
under glass —Dust-free framing—Protective cardboard—Small creases —Hanging on
the wall—Attachments —Glass cleaning—Observe four basic rules —Prevention of
water stains —Protection from the wall
P A G E 168 THE STORAGE AND PRESERVATION OF BOOKS
Removing dust—Storage on shelves —Removal of larvae —Glass case —Partitions —
Museum air—The bookbinder's work—Notes —Card index
P A G E 171 IMPORTANT PRINTMAKING TECHNIQUES
P A G E 196 ADDITIONAL HINTS FOR THE RESTORER OF POSTAGE STAMPS
P A G E 204 SUMMARY

V A R I O U S T H O U G H T S A B O U T R E S T O R E R S , T H E I R W O R K S H O P S , A N D T H E I R W O R K
Before proceeding to a discussion of var
ious prints and engravings, I would like
to raise the question: Does every engrav
ing or print really have to be cleaned
when it shows a small spot or a faint water
stain? I refuse to treat individual deco
rative engravings when it is only these
problems or a faint yellowing that disturb
the alleged aestheticism of their owner.
Many collectors, I am certain, will share
my point of view.
In many cases I have been able to
convert the owners of colored prints to
my way of thinking. The treatment of
such prints holds absolutely no risk for
anyone who has made it his profession for
decades. But there are alleged experts
who gladly take on any commission and
enthusiastically follow the wishes of their
clients. That is an absolute disgrace!
These experts have very little under
standing of the real cultural value of any
work entrusted to them for cleaning, and
they do not care at all whether they deal
with a print by an Old Master or one that
is merely decorative. Frequently, the
owner himself does not have a proper
understanding of the valuable prints that
he might have inherited. What other
explanation could there be for the fre
quently indiscriminate distribution of
engravings from a big inheritance?
Often, a complete set will be divided
among three or four families and thus be
separated. If the new owners, the heirs,
were a little more sensitive to the real
value of these works or sought profes
sional advice, valuable sets would not be
broken and scattered in all directions. It
has even happened that a pair of engrav
ings that truly belong together have been
separated. If these prints had been kept
together or the heirs had made some
kind of special arrangement, a much big
ger sum would have fallen into their laps
upon the sale of the prints as a pair.
If the owner of such valuable engrav
ings gets together with a glazier3 who
is just as ignorant, of the prints, real
disaster will strike. It is hard to believe
that such vandalism of great cultural
treasures is still possible in the twen
tieth century.
While they are still in trade school,
young people should gain an understand
ing of these treasures. The basic values,
the fundamentals, should not be hidden
from them. A glazier does not only put in
windows; he likes to find other sources of
income. Often in a small glass shop, run
by a glazier, you see pictures and frames.
If you go into such a shop, you often find
portfolios filled with engravings, even
individual pictures specially displayed.
And that raises the question of
whether the glazier knows anything
about engravings or various kinds of
prints. I think that only in the rarest
instances does the owner of such a shop
have any general understanding of
graphics. A small shop certainly would
not carry any important works, but the
customer might be under the impression
that he is entering a picture shop.
Young people in specialized trade
schools should be taught the technique
of engraving. A young person who
devotes himself fully to his trade will

34 R E S T O R A T I O N O F E N G R A V I N G S , B O O K S , D R A W I N G S , A N D O T H E R W O R K S O N P A P E R
gladly accept such instruction. And then
valuable cultural treasures will no longer
be subjected to vandalism.
And if I may now indulge in a brief
backward glance to reveal earlier crimes,
it will become obvious how these
experts —I am referring to our dear
friends in the glass trade—have unwit
tingly destroyed precious cultural trea
sures because of carelessness or lack of
knowledge. I especially salute these
friends.
How often it has happened that
those pictures have had to be restored
again. Since I especially salute these
friends, it is only proper that I deal with
them specially too. Time must be made
for this, particularly since some open
accounting ought to be done. An
accounting that is seriously overdue!
What have these friends not done
in the area of bleaching! In particular, I
mention bleaching because the process
could not in most cases be called clean
ing. I cannot enumerate all the crimes
one by one since this would require too
long a paragraph. But let us look at some
random cases. Some workshops have
revealed their offenses to future genera
tions by putting their seal—a stamp with
the name of the workshop —on the back
of the print. Valuable old engravings as
well as fine color prints from the eigh
teenth century were entrusted to these
masters. And how did they treat them?
They cut off the margins if small mildew
stains or water stains happened to dis
turb them. Dark spots on the print were
made lighter with opaque white paint;
water stains and small stains were
smeared over as well; and finally the
print was mounted with alum paste!4
And if the margin had actually been
spared for once, a mat was pasted on with
heavy alum paste! Was there nobody
around who noticed? Nobody who would
sue? Was there not a soul in the shops
who had the smallest inkling of the trea
sures involved? Almost all of Europe was
blessed with this kind of expert, and
unfortunately, there are still many of
them busily at work today!
Often, I have been able to admire
such experts abroad, but, unfortunately,
I have also witnessed many things in
Germany which can only cause a real
expert to shake his head in sorrow. When
valuable pictures —now ruined—still
smell of chlorine, when white residues of
chlorine bleach make the pictures look
milky white, when several kinds of
opaque colors are applied even today,
then there is little evidence of the high
cultural standing of a nation. I have to
ask once again: Where are the trade
schools? Is there nobody who can teach
the young people? Does no understand
ing of such treasures exist?
Nobody should be allowed to clean
valuable engravings without at least a
minimum of previous experience! Once
an engraving has been made lily white by
means of the dangerous bath of chlorine
bleach, it has not only lost its intimate
charm, but print and paper have been
considerably endangered.
A dark corner in an untidy workshop
cannot possibly be the right work space.
The cleaning process can take a lot of
time and should, therefore, never be
undertaken after a day's work. Often, the
owners of color prints are themselves to
blame because they assert that an expert
would be too expensive. Frequently, the
owner agrees to the treatment of a print
by an amateur and is even happy with the
seemingly successful result. You can hear
remarks like, "The print is completely

R E S T O R A T I O N O F E N G R A V I N G S , B O O K S , D R A W I N G S , A N D O T H E R W O R K S O N P A P E R 35
white again, as if newly printed!" In 1934
an art dealer told me, "A new client just
bought four sporting prints that were
very well preserved, for fifteen hundred
marks [somewhat less than $5,000] " 5
When asked, "Can you also frame
them?" the art dealer said. "Of course I
can do the framing." "Well, then I would
like the margins cut off so that these
engravings will match my other prints!"
And that happened in 1934! There are a
few good frame shops in Berlin and other
major cities that you can trust implicitly.
These establishments will refuse to
undertake the repair of engravings, even
minor and less valuable ones, and will
refer them to a skilled expert.
I will now very briefly mention book
binders, who treat papers —I cannot
spare these friends altogether either,
for I am particularly annoyed with the
enormous importance they assign to
alum paste. What other "crimes" these
friends have committed will be evident
to everyone after a glance through my
book. Why the constant use of alum
paste, which is such an impediment to
restoration? After all, every work should
be treated according to its own needs.
And how many members of this noble
trade have come to me after it was too
late? Is it not possible to prepare a starch
paste specially for art prints? No, the
ready-made paste is easier.6 The paste
pot is filled to the rim and the paste must
be used. Wrong, dead wrong, and dan
gerous! Even if you tell me that all muse
ums and libraries abroad and at home
work in this way! It cannot be assumed
that everything that happens at these
places is right, unless a responsible
restorer is conscientiously minding his
duties. Since I would like to make a final
clean sweep, my remarks should be of
concern to anyone who uses too much
alum paste in his work.
The objection that a small amount of
alum protects the starch paste, prevents
it from spoiling, and makes it usable at all
times can only be considered valid for
mass productions that are exposed to air
a great deal. But when working with art
prints—unfortunately, often the basic
knowledge for a proper recognition is
lacking—please boil the starch paste
from scratch! Have you not perhaps
noticed on occasion that alum paste has
destroyed valuable prints?
It is often impossible to separate a
print that has been mounted to an under
lying layer with alum paste without dam
aging it. Alum paste is not water soluble.
Therefore, a number of manipulations
have to be employed so as not to damage
the valuable print.7 If the separation is
successful and the print must be
restored, it will be resistant to water. The
slippery part of the paste can be
removed, but the alum itself is very hard
to get out.
And even if one insists on using
deep window mats that cause old prints
to appear to be swallowed as into the
"depths of the sea," one should not apply
paste to two-thirds of the margins of the
prints as well. It is a bit more work, but a
little guard8 can be put around the print
and brushed with starch paste, and a
good deed will have been done.
And one more thing! If one worked
more wet on wet, many a disappointment
could be avoided.9
I would like to take this opportunity
to give a message to the mounting
artists.10 It is not part of the preservation
or embellishment of a valuable print to
prick it with a needle in order to put on
a face mat or a window mat. The print is

36 R E S T O R A T I O N O F E N G R A V I N G S , B O O K S , D R A W I N G S , A N D O T H E R W O R K S O N P A P E R
only placed on the cardboard for reasons
of ease, I do not want to say "laziness,"
and the area to be cut out is then marked
by puncturing the print with a needle,
instead of making a tracing of the print
and then treating the copy with needle
pricks to one's heart's content. This
involves about five minutes of extra
work, and the print will have not have
been ruined.
Only a little while ago an "artist"
produced a mat for a small oval print.
The value of the print: 1,500 marks
[somewhat less than $5,000].11 It so hap
pened that I was called to give an opinion
on the picture and found out at that time
that the so-called artist had put more
than twenty needle pricks in the stippled
margin. If the master had just taken ten
minutes to trace the oval print and had
then put the copy on the cardboard and
put the needle pricks into the cardboard
or the copy—a hundred of them, for all I
care—the print would not have lost any
of its value.
It is high time that these offenses
are discussed openly so that something
can be done about them. I only mention a
few cases here, but the attentive reader
will find in my later descriptions many
that could also be included. It is my
intention to make my colleagues aware of
the high degree of conscientious and
clean work that is necessary for each
restoration. Whoever is willing to rise
above his station should be conspicuous
not for "inexpensive" but for "good"
work. Again and again, one should
remember the old adage: "First think,
then begin!"

S T U D I O R O O M A N D E Q U I P M E N T
A cheerful room with a water supply is a
must. If you only occasionally clean a
small print, the bathroom or even the
kitchen will do. The tray that receives the
prints has to be positioned in such a way
that the water can flow over a spout into
a drain [in a sink]. The tray should be
custom-made by a plumber. Zinc is best
for this. A tray measuring about 60 x 75
cm will probably be sufficient. The bot
tom of the tray has to be completely flat,
and it should have a raised rim, about 5
cm high, so that it can hold enough
water. A 150 cm rubber hose is required
for the incoming water and for rinsing
off the prints.12 A second tray would be
appropriate if you have to work with
chemicals occasionally. The first tray
would then be used for rinsing and the
second for receiving the rinsed prints.
The 150 cm hose is long enough so that
the second tray can be put next to the
first one. A bucket should be placed
under the spout of the second tray if
its water outlet cannot be connected to
the drain.
A wooden pole can be used for hang
ing and manipulating the prints [see fig.
17]. (I bought an old jalousie13 that had
been used in the entrance door of a store.
The painted bars are slightly rounded.)
The rounded edges on the four corners of
the wooden pole and the small indenta
tion in the middle are important. If you
put a sheet of paper over wooden poles
with sharp edges, it is guaranteed to
break during rinsing! So do pay attention
to that! The size of the poles is optional,
depending on the size of the tray. The
poles will have to be beveled a little on
one side so that they can be inserted in
the slot of a hanger which is fastened to
the wall [see figs. 3,10].
The hanger consists of two separate
pieces of wood, 7 and 10 cm wide respec
tively and about 3 to 4 cm thick. The two
pieces are arranged in such a way that
the 7 cm wide piece is put on top. The
lower, 10 cm piece supports the pole
when it is put in the hanger, and the
upper piece provides resistance. The
clearance between both pieces of wood,
therefore, has to be just enough to allow
the insertion of the pole (see fig. 2).
The poles mentioned above are
absolutely necessary for all kinds of dif
ferent sheets. For prints on especially
Fig. 2.
(a) Hanger; (b) cross section
thick papers, however, even these poles
would not be sufficient. To prevent these
papers from breaking or folding, one
must construct the following: a card
board tube, from 60 to 75 cm long and
with a diameter of 6 to 8 cm has to be
made smooth with sandpaper or emery
paper. Its two open ends are covered by
cardboard lids into which a circular
opening has been cut. These openings

38 R E S T O R A T I O N O F E N G R A V I N G S , B O O K S , D R A W I N G S , A N D O T H E R W O R K S O N P A P E R
Fig. 3-
Tube pole fastened to the hanger
should only be large enough to allow a
broom handle to be pushed through eas
ily. The handle will then be glued tightly
to the cardboard lids so that no water can
penetrate. After gluing, the tube should
be well oiled all the way through to the
handle, and after several days it should
be covered with a layer of shellac or oil
paint. The handle is cut flat at the ends so
that the tube pole can be inserted in the
hanger. The tube ensures that even
thick, completely wet papers will not
break. I always recommend the use of
tube poles for the beginner because they
eliminate any small mistakes that might
occur during the rinsing process.
The inventory also includes a pail
and old, absorbent cleaning cloths. A
table with a flat top should be covered
with an oilcloth. This oilcloth should be
fastened on the sides with several thumb
tacks so that it cannot move or slide.
Oilcloth can also be used to support a
brittle sheet so that it does not get dam
aged when it is put on a pole for rinsing.
Additional equipment includes
wood-pulp cardboard on which damp
papers can be deposited, straw card
board as a substitute for a small press,
and several old, absorbent and nonab-
sorbent, yet well-preserved copperplate
printing papers on which to deposit dam
aged engravings. These sheets are often
needed and therefore should always be
on hand. It is also advisable to acquire
glass or enamel trays for smaller prints.
Harmless cleaning agents that
should always be on hand are plain or
cooking vinegar,14 liquid ammonia,15
carbon tetrachloride,16 spirit of wine,17
citric acid18 (in powder form) and bleach
ing soda.19
With the help of these simple clean
ing agents, remarkable results can be
achieved. Several flat bristle brushes and
a round brush are also necessary. The
different kinds of brushes can be seen
in later illustrations. A large grit-free
sponge20 is also recommended if you
want to be fully prepared.

T H E H I S T O R Y O F P A P E R
Quality paper, that is, paper made only
from the very best materials, is found in
the works and prints produced in the
period roughly between 1400 and 1600.
Paper, of course, has a much longer his
tory than that. To give our youth a very
condensed idea, I would like to talk
about it briefly.
The first writing paper was manu
factured in Egypt from papyrus plants.
Let us listen to Dr. Hugo Ibscher, who
saved many precious papyri from ancient
Egyptian, Greek, Roman, and Arab times,
and whose advice and support was sought
after by all foreign papyrus collectors:
The papyrus that has given today's paper
its name was an excellent writing mate
rial in the ancient cultures from the third
millennium before Christ to about A . D .
1000, and its quality equaled that of our
best handmade paper. Made from the
papyrus reed, a marsh plant which grew
wild in ancient Egypt but was later culti
vated on a large scale for better usage, i t
was one of the most important articles of
trade for the country of the pharaohs.
The manufacture of papyrus was very
simple. The stem of the plant, as thick as
an arm at the lower end, was freed from
its bark, and the core was then divided
into manageable pieces that were cut
lengthwise into thin strips. These strips
were put together vertically so that the
edges overlapped slightly, and then a
second layer was laid down horizontally
in the same manner. Both layers were
. bound together by hammering and
pressing, and after drying, the sheet
was rubbed slightly with pumice and
smoothed with shells or stones. Then i t
was ready for use. I f bigger surfaces were
required, the single sheets were pasted
together, overlapping only a little, thus
forming the papyrus roll which was the
book form in antiquity. Up to the second
century A . D . the book roll was predomi
nant but was then replaced by the codex,
our present-day book. The ancient peo
ples used incredible amounts of writing
material for writings of all kinds, much
in the same way as the world's people do
today. But while our writings of today are
subject to rapid decay, the conserving,
dry desert soil of Egypt has faithfully pre
served the papyri for us; they are still giv
ing us today, after five thousand years, a
vivid picture of the life and pursuits of
the peoples of the ancient cultures.2 1
Painting and writing on animal skins in
ancient Egypt fell into disuse because
papyri were more flexible and could be
carried rolled up and because leather was
heavy and hard to handle.
Animal skins (from donkeys, goats,
lambs) became accepted only when
essential improvements in their process
ing were achieved at Pergamon. From
that time on, the leather was called
"parchment." Parchment was often used
for writing and drawing but was not able
to fully replace papyrus. Only true paper,
introduced by the Arabs, perhaps
brought from the Far East via various
routes, slowly replaced papyrus at the
beginning of the ninth century. By then
the process of making paper had been
adopted on a large scale in Egypt. Since
the Egyptians were great merchants and

40 R E S T O R A T I O N O F E N G R A V I N G S , B O O K S , D R A W I N G S , A N D O T H E R W O R K S O N P A P E R
thought in a businesslike manner, most
countries were supplied by them with
this new material—paper. Gradually, the
whole civilized world adopted the paper-
making process and was able to go its
own way, no longer dependent on Egypt.
Only through the introduction of paper
did it become possible to manufacture
books—written and illustrated by hand.
Printing with movable or fixed type
might have been possible on papyrus,
but it was not suitable for copperplate
engravings.

P A P E R M A N U F A C T U R E
Earlier papermaking was very primi
tive compared to today's state of the art.
The early paper manufacturers were
small papermaking businesses which
employed the help of members of the
family. Rags from the best materials,
hemp and flax, were sorted carefully
according to texture and by tumbling22 or
beating were freed of all kinds of loose
impurities, dust, metal, and especially
small iron particles. Of the many kinds
of fabrics, very heavily dyed rags (blue
and brown) were removed first since
the bleaching process was not yet very
advanced.
Raw materials were used only rarely
for papermaking in Europe, even though
hemp and flax cultivation flourished
until the end of the eighteenth century.
Heavily worn pieces of clothing that
could not be used for any other pur
pose—tools for certain trades, such as
ropes, nets, and similar objects—were
used for paper. In China and Japan rags
were only used rarely for the manu
facture of paper. Of course, those papers
are, therefore, much more durable since
all their components were processed
new. In spite of the above shortcomings,
excellent paper was produced in Italy
and Spain because the earlier paper man
ufacturers were careful in examining
their materials.
After tumbling the rags and examin
ing them for dampness23 and color, the
early paper manufacturers shredded the
rags by tearing them. The heaviest dirt
and various stains were removed with an
ash solution. The solution not only took
out spots and colors but also made the
material pliable. The rags were ground
to a pulp in mortars. This traditional
method of beating had one advantage
compared to later methods: the fibers of
the fabric were not torn as much and
were not cut into as many pieces; instead
Fig. 4.
An eighteenth-century paper mill

42 R E S T O R A T I O N O F E N G R A V I N G S , B O O K S , D R A W I N G S , A N D O T H E R W O R K S O N P A P E R
Fig- 5-
Sorting and examining the rags
the fibers were crushed completely flat,
and yet they formed a uniform mass. The
matting of the fibers that were pressed
together in this way proved useful in the
subsequent processing of the paper. If
you try to tear such paper in order to use
small pieces for restoration purposes,
you have to use a little more strength
than with newer papers. The pulp in the
mortar was poured into a vat, mixed a lit
tle more with water, and was then ready
for forming into paper. Paper was sized
with plant and animal products after it
had dried completely, although after
1800 the sizing was mixed in with the
pulp itself.
Now, for forming the paper. The
vat man, the person performing this
process, used a device called a mold,
which consisted of two rectangular
frames, one on top of the other. The
lower frame was covered with a porous
fabric, whereas the upper one was com
pletely open. Both frames were put
together and dipped horizontally into
the vat of pulp, which had been stirred
vigorously beforehand. The vat man
moved the mold back and forth, lifted it
horizontally out of the vat, and shook the
pulp in the mold so that it was evenly dis
tributed while allowing the excess water
to drain off through the woven fabric.
During this process, a diligent vat man
would remove small particles of impuri
ties from the pulp.
After the pulp was distributed evenly
across the surface of the mold, it was
couched. "Couching" is the technical
term for putting the pulp onto a piece of
felt. To do this, the vat man took off the
upper frame (the "deckle"), turned the
lower one over, and put it quick as light
ning onto a piece of felt.24 A new piece of
felt was then put on top, and the dipping
of the mold was resumed to make the
next sheet. When about two hundred
sheets were assembled, they were put
under a hand press, together with the
felts, to further squeeze out the water. A
second pressing without felts followed.
The sheets were then hung over strings.
Drying outside during a heavy frost was
preferred by manufacturers because the
frost would turn the papers lighter in

R E S T O R A T I O N O F E N G R A V I N G S , B O O K S , D R A W I N G S , A N D O T H E R W O R K S O N P A P E R 43
Fig. 6.
Dipping the mold to form paper
(mid-eighteenth century)
color; that is, they became whiter. The
gradual drying outside resulted in much
greater cohesion and compacting of the
paper fibers than would have been the
case with faster drying in the heat.
Forming a sheet of paper looks so much
like child's play that it does not seem
to require much skill. I tried it for a
short while, and the master only smiled
watching me. The vat man has to attain
the absolute sureness necessary to get
exactly the right amount of pulp for one
sheet. Two hundred sheets from the same
batch must not have different weights
once they are dry. Years of experience are
necessary to get the weight of a single
sheet right every time.
The completed sheets of paper are
sorted; the best ones are taken out and
used for single prints. In the fourteenth
and especially in the fifteenth century,
papermaking had already become more
of a factory process because the demand
had increased enormously after the
invention of the printing press. Still, arti
sans' workshops continued to make
paper on a small scale, and anyone who
has engrossed himself in the study of
papers for many years can identify where
a specific paper was manufactured.
Water-powered mills took over beating
the rags. As a water-driven gear turned,
wooden blocks in the machinery ground
up the different kinds of fabric. In
Holland paper manufacturing had
advanced considerably toward the end of
the seventeenth century, since it was
here that so-called washing potcher25 was
put to use. The rags were cut simultane
ously with sharp and dull knives, which,
incidentally, tore the fibers too much. In
a second beater, the Hollander, the cut
rags were turned to pulp.
The porous fabric of the earlier
molds was only used by very small paper-
making shops and was soon replaced
altogether by a sievelike wire screen. In
this mold copper wire was stretched in
layers lengthwise and across; the wire
pattern cannot be easily recognized by
looking through the paper. A little later
the wire was stretched evenly; that is, the
wires ran in one direction, parallel and
close to each other, and were supported

44 R E S T O R A T I O N O F E N G R A V I N G S , B O O K S , D R A W I N G S , A N D O T H E R W O R K S O N P A P E R
Fig. 7.
Drying of the formed sheet
by other wires at right angles, 1 to 3 cm
apart.26 The watermark was the manufac
turer's signature and consisted of wire
shaped by hand and fastened to the wider
cross-wires with a fine wire or thread.
The marks left by the wires give
the paper a ribbed appearance and are
clearly visible when you look through it.
In the space between the wire lines, the
paper is darker, since there is a thicker
layer of paper. When I talk in this book
about "wire lines," I am talking about the
fainter lines.27
Of course, cotton rags and linen rags
were processed together but only at a
much later date. Paper made from pure
cotton is softer to the touch, more cloth
like, and was used later mainly for blot
ting paper. If you tear that kind of paper,
you find soft, fluffy fibers at the edges
of the tear.
Handmade papers up to the end of
the eighteenth century show a yellowish
tinge. There had been no bleaching of
papers in the earlier centuries since even
boiling-hot lye did not lighten the color
of the rags much. Only when chlorine
was used for bleaching did everything
change. The bleaching engine28 com
pletely cleaned all dirt, oil, and color
from the rags. The paper pulp now had a
milky white appearance, whereas before
it had been light or, often, dark yellow.
The chlorine activity was completely
neutralized by various acids and repeated
rinsing of the rags with clear water in the
bleaching machine. From this time on,
the sizing process changed. There was no
longer any surface sizing; instead, sizing
occurred—as already mentioned—in the
pulp itself. Rosin sizing with a dash of
alum was mixed into the pulp.
The earlier sizing methods were
more durable than the later rosin sizing.
The earlier papers have retained their
sizing up to this day, whereas papers with
alum rosin sizing lost a lot of their
strength when they were exposed to air
and light. Outline engravings from those
days, which were made for hand color
ing, were printed on nonabsorbent paper
because the color would otherwise have

R E S T O R A T I O N O F E N G R A V I N G S , B O O K S , D R A W I N G S . A N D O T H E R W O R K S O N P A P E R 45
Fig. 8.
Sizing paper
seeped through. Yet often one can
observe that these colored sheets take
up water when they are put into water
for several hours. Neither water stains
nor, especially, foxing, however, should
appear on these sheets if the paper has
been sufficiently protected against water
by the rosin sizing and a weak alum solu
tion. Why is it that colored etchings prior
to the end of the eighteenth century are
not susceptible to water damage?
Because the papers that were sized with
animal glue received a surface sizing.
Paper production by machine, a French
invention, has been known to us since
around 1800.29
Because of the great demand for
paper, lower-quality components were
used. Much later, about the middle of the
nineteenth century, wood fiber and cot
ton were processed together, and with
that the manufacture of high-quality
paper steadily declined.
The raw materials for today's news
print are obtained from pine trees after
the bark has been stripped off and the
logs have been shipped in wagons to the
paper mill. Even today, papers are man
ufactured that seem handmade to a non
professional but have nothing to do with
handmade processes. The edges of the
paper are torn by hand before the sheet
is fully dry; therefore, it may appear
handmade. But the edges are abrupt and
rough rather than wavy, thicker, and
rounded as with the handmade papers.
Today, individual paper mills still manu
facture handmade papers. These papers
are of a much finer quality than the
machine-made ones.
It has been my intention to present
the introduction and development of
paper in general terms so that our young
friends can gain at least a minimum
knowledge of the history of paper.

H O W T O O B T A I N O L D P A P E R
If you want to become a professional
restorer, it is absolutely necessary to look
for old papers early. You cannot refuse
any papers, not even newer ones,
because in the course of time you will
encounter sheets that need to be treated,
from many periods. The larger your sup
ply, the easier the search for the appro
priate paper.
A visit to the used-book shop and a
dealer in graphic arts can prove very
worthwhile. Just ask for old books that
are not complete, damaged single prints,
and so on. The main thing is that certain
parts of a sheet, say, half the margin, are
still in good condition or, in the case
of book pages, that greater parts of the
margin are still there. Do not assume that
three or four pages from a volume are
enough. No, a book of one hundred
pages—if it is an incunabulum (an early
printing) — consists of different kinds of
papers. Some papers may be thin and
cloudy when you look through; different
wire lines will be strong and clear, or
wavy and indistinct. Other sheets may be
firmer to the touch, the texture may vary,
and so on. Impurities in the paper as well
as on the surface have to be observed
(tiny hairs, particles, little brown spots)
and should be considered an asset to your
paper collection. Do not reject yellowed
or foxed paper, so that you can still treat
pictures requiring mending but not
cleaning. It is also recommended that
you pick up such papers in large
and small sizes for your first cleaning
attempts. The sheets may even have
blemishes, including writing in ink, so
that you have material that is suited for
cleaning and light washing.
When looking over papers from the
eighteenth and nineteenth centuries,
you will find many kinds that do not show
any wire lines and are quite varied in
their feel and absorbency. In such cases
you are dealing with English or possibly
French papers. Do not reject any paper,
no matter how recent it is! Your paper
supply has to be constantly replenished!
Almost every paper has a watermark
even if you cannot discover it imme
diately. If you can identify papers by their
watermarks, you have already made con
siderable progress in the recognition of
papers from different periods. And that
is extremely important! It enables you to
distinguish old prints from new prints, a
very interesting pursuit. Over the course
of the years, perhaps a million water
marks have been identified, often very
similar to one another. I only name a
few of this great number: stars, crosses,
symbols, towers, coats of arms, castles,
houses, swords, letters, anchors, ani
mals, flowers, pitchers, heads, hands,
papermakers' and farmers' tools, crowns,
names, and dates.
Another important point is the
storage of the paper supply. Diseased
papers —foxed and decaying ones —
should never be mixed with well-
preserved papers (see the discussion of
diseases of paper on pp. 162-63). Similar
papers, that is, papers of matching age
and color, are kept in folders with flaps or
in boxes. If you are to obtain very early
papers, it is an excellent idea to ask the

R E S T O R A T I O N O F E N G R A V I N G S , B O O K S , D R A W I N G S , A N D O T H E R W O R K S O N P A P E R 47
seller about the age of the individual
book pages, because he can give the
approximate date of the production of
the work—the year of publication is
often given at the beginning or the end.
Single prints give the year of publication
in the publishing address.
It would also be quite appropriate
to look for prints at this time so that
the different techniques can be distin
guished from one another. ("Important
Printmaking Techniques," pp. 171-95)
contains a number of hints on this
subject.)

H A N D L I N G D A M P P A P E R
It seems obvious—at least I assume it
is—that everyone will have to practice
often and diligently before attempts are
made on a good engraving. In any event,
practicing should be done daily in order
to attain a degree of confidence in the
treatment of damp papers.
After the sheet has been dry
cleaned—I discuss the cleaning procedure
Fig- 9-
Taking damp sheets out of the tray:
left: Wrong, the fingertips can damage
the print!
right: Right, only the surface of the
fingers touches the print!
later—it is put into a cold bath without
any support.30 The sheet then has to be
taken out of the bath and put over a pole
(see "Studio Room and Equipment,"
p. 37). How is this done? You will say,
"This is a simple matter." No, my dear
friends, it is not simple. On the contrary,
it is a complicated matter! The sheet has
to be held with both hands, and the hands
have to go far over the sheet, as can be
seen in the illustration. And why? The
damp state of the sheet will immediately
seem very disagreeable when you hold it
in your hands. The paper might be very
fragile; the plate mark, which is created
by the copper engraving plate and is
somewhat indented in the paper, may be
weak or separated. A tear, too, could cre
ate difficulties. These are the small and
big problems during the first moment.
Eight fingers on top and the thumb
underneath! Under no circumstances
should the sheet be touched only with
the fingertips. No, the sheet has to be
supported by at least two joints of each
finger. The fingertips alone would do
damage; they would dig into the soft
paper and could cause holes or severe
breaking. If the thin plate margin is close
to the edge of the paper, you have to go
far into the center of the paper with your
fingers, even—if possible—into the pic
ture itself! Why? The paper is stronger in
the printed part because the black color
was prepared with oil (carbon black and
linseed oil) and is therefore more durable
in this place when the sheet is taken out
of the tray. If there is a large tear in the
sheet, you have to coax it out by lifting
the print from the opposite edge. If the
edge with the tear were to be lifted first,

R E S T O R A T I O N O F E N G R A V I N G S , B O O K S , D R A W I N G S , A N D O T H E R W O R K S O N P A P E R 49
the tear would certainly increase. But if
you have already gained a little expertise,
so that your attempts are fun, and if you
enjoy your work, the sheet can also easily
be removed from the torn edge. Any kind
of work that is undertaken cheerfully
always succeeds. So what remains to be
done? Practice, practice, and practice
again! When you practice, it is essential
not to get nervous; the calmer, the bet
ter. I do not want to say that you should
become lazy—not at all—only that you
should think while working and take
your time in doing so. When for practice
you take on severely torn engravings on
very soft paper, you absolutely have to
have one or two supports on hand.
First, a healthy paper from your sup
ply is put into the tray as a support, and
on top of that the badly damaged sheet.31
When the sheet is ready to be taken out,
it is distributed on the support in such a
way that the patient can be lifted out
together with the support. Both parts
will then be hung temporarily over the
tube pole in order to drain. After that,
Fig. 10.
Taking a sheet out of the tray

50 R E S T O R A T I O N O F E N G R A V I N G S , B O O K S , D R A W I N G S , A N D O T H E R W O R K S O N P A P E R
both parts are carried to the table with
the help of the pole and are put down
nimbly, without accident. The sheet and
the support lie on the table or the draw
ing board, the sheet with the printed side
facing upward, the support underneath.
What do you do when you want to see the
reverse side? You take a second support,
put it into the bath, take it out of the tray,
and place it skillfully, without the pole,
onto the sheet. The sheet is now enclosed
by the two supports. If you want to see
the reverse, you have to hang all three
parts over a tube pole, lift the pole up,
and return the parts to the table in such
a way that the second support now rests
on the table. The first support is lifted
off carefully, and the sheet has been
turned over.
It would have been possible to turn
the sheet over without the second sup
port; however, because of the missing
support, the sheet could not have been
lifted off the table. If the work had been
started without thought, the sheet would
have had to stay on the table until it was
fully dry, which would have been espe
cially unfortunate if, to make matters
worse, the table had not been covered
with an oilcloth. Not every move can be
described here; you have to think for
yourself. Papers are much too diverse
and can bring all kinds of surprises. I can
only repeat: Practice, practice, and prac
tice again. Great sureness has to become
second nature.
If a young man is employed in a
frame shop, by a glazier or bookbinder,
by an art dealer, in a fine arts print shop,
or any other place where he has to work
with paper, the technical paragraphs can
give him many details and hints that he
can use all his life. Adults, too, could cer
tainly benefit from familiarizing them
selves with the above-mentioned meth
ods of treatment. How much damage has
been done by older teachers in the treat
ment of works of art! I see it as my task to
show young people the correct methods
for the restoration of prints and books.
The vandalism that has destroyed many
cultural treasures should become a thing
of the past. Today, altogether different
methods should be employed, and the
restoration itself should be considered
culturally valuable.32 Whoever works
toward this end is a friend of mine!

B R I G H T E N I N G A N D C L E A N I N G
This section deals with the slight bright
ening and cleaning of prints. I am very
interested in keeping the means as sim
ple as possible, yet achieving good results.
This should and must be our main task.
If the sheet to be treated is a black-
and-white print that is heavily covered
with soot or has become unsightly with
dust, the soot or dust can be removed
with soft bread or, often better, with a
soft eraser. When erasing, do not treat
the whole sheet in large streaks but only
clean as much at one time as there is
room between your thumb and extended
index finger (fig. n ) . 3 3 Care has to be
taken, of course, that the table is smooth
and completely dry. If you try to clean
large areas, the sheet will be creased,
broken, or demolished. If a soft eraser is
not sufficient to remove the loose dirt,
try one that is slightly firmer. Erasers
come in different degrees of hardness,
but never use a very hard one! Such an
eraser should not even be found in a stu
dio! Using a hard eraser could easily lead
to scratches, abrasions, or thin spots. If
the paper is very soft, only a soft eraser
should be used. When small areas of dirt
are left, the remaining traces can be
removed in another way described later.
When both sides of the sheet have
been cleaned off somewhat—be very
careful in the printed area itself, or do
not touch it at all—care has to be taken
that the copying-ink pencil markings are
completely removed from the reverse
side.34 In all cases this writing has to be
removed by a dry method, but the paper
should not be made thin by erasing.
Copying ink that is not removed while
dry can cause many problems in the
water bath. Its color will start to run,
and, even worse, in absorbent paper it
will sink in and appear on the front of the
print. If this is not taken into considera
tion and the copying-ink pencil marks
are not removed carefully, the whole
sheet will have to be treated with chemi
cals, whereas otherwise a water bath
alone would have brightened it suffi
ciently. Therefore, always pay attention
to those dangerous copying-ink pencil
markings! The copying-ink pencil should
be employed just as sparingly in a print
shop as in a bookbindery! Copying-ink
pencils in the office of such a business
should be specially marked, wrapped
in tinfoil, for example, so that they are
definitely conspicuous. And now the
water bath! The tray needs to hold just
Fig. i i .
Cleaning with an eraser. The area to
be treated with an eraser should be
no larger than the span between your
thumb and index finger.

enough water to cover the engravings or
sheets and have them floating lightly.
The bath has to be well acidified with
table vinegar (it has to have a slight taste
of vinegar),35 and a larger, worthless
print36 on firm paper has to be put in first
as a support for damaged sheets or sheets
with broken plate marks. This print is
immersed so that it lies on the bottom of
the tray. Now, the engraving which has
been cleaned of the loose dirt—once
again, look for the copying-ink mark
ings!—is placed in the tray and
immersed. It is best to immerse the print
beginning at one end. I consider it best to
start this bath at night so that the engrav
ing can bathe in peace.
When you visit your patient the next
morning, you will find that the acidified
bath has been beneficial. The slight
water stains have disappeared alto
gether, and the heavy yellowing has
decreased considerably. The brown color
of the water proves the strength of the
bath. The discolored water is drained
completely by lifting the tray up a little
on one side and putting a small wooden
block under it. The sheet remaining in
the tray is rinsed carefully with a hose.
The little patient receives a bath of cold,
clean water so that the vinegar smell dis
appears completely. A two-hour bath is
sufficient. After that, the print is put on
the tube pole with the help of the support
sheet. The tube pole is appropriate so
that no breaks occur, since in this case
the engraving has to be placed on the
pole together with the strong support.
To take the engraving out of the tray
without having the tube pole roll off, the
pole is put across the sides of the tray in
such a way that one end rests with the
52 R E S T O R A T I O N O F E N G R A V I N G S , B O O K S , D R A W I N G S , A N D O T H E R W O R K S O N P A P E R
Fig. 12.
Etching, English School, 1807,
J. Gillray fecit. The dirt was removed
by washing with a dilute soda solution.

R E S T O R A T I O N O F E N G R A V I N G S , B O O K S , D R A W I N G S , A N D O T H E R W O R K S O N P A P E R 53
flattened side on the edge of the tray. If
you have an assistant, let him hold the
pole. Next, both sheet and support are
pulled out of the water and only placed
far enough over the pole that about one-
third or one quarter lies on it. When the
tube pole is lifted, the two ends of the
print can be distributed by turning the
pole so that they hang down equally.
When the sheets are lifted out with
the help of a pole, care has to be taken
that they are not pulled; that is, no ten
sion may be created between the portion
in the tray and the portion that has been
hung over the pole. The tube has to be
turned a little bit or the pole has to be
lifted high enough so that the part that
is still in the water can be removed. If
you proceed this way, you will certainly
not have any disastrous experiences.
The tube pole with the sheet is now
moved to the hanger and once again
rinsed carefully. Since parts of the print
might come off, a small sieve should be
placed under the spout [of the tray]. This
little auxiliary device has saved me a lot
of trouble.
At this point, I would like to talk a
bit about floating off small parts of
prints. In earlier times, at the end of the
eighteenth century, there was a great
demand for illustrations, and large num
bers of engravings were needed. The
printers had plenty of work! A lot was
going on! At times, the work was done
hastily. The papers were prepared and
placed conveniently in such a way that
the printer could always take the damp
papers from a big pile. When the printer
placed a piece of paper under the intaglio
printing press in order to produce a print
and noticed in the process that the paper
Fig. 13-The same print during washing.
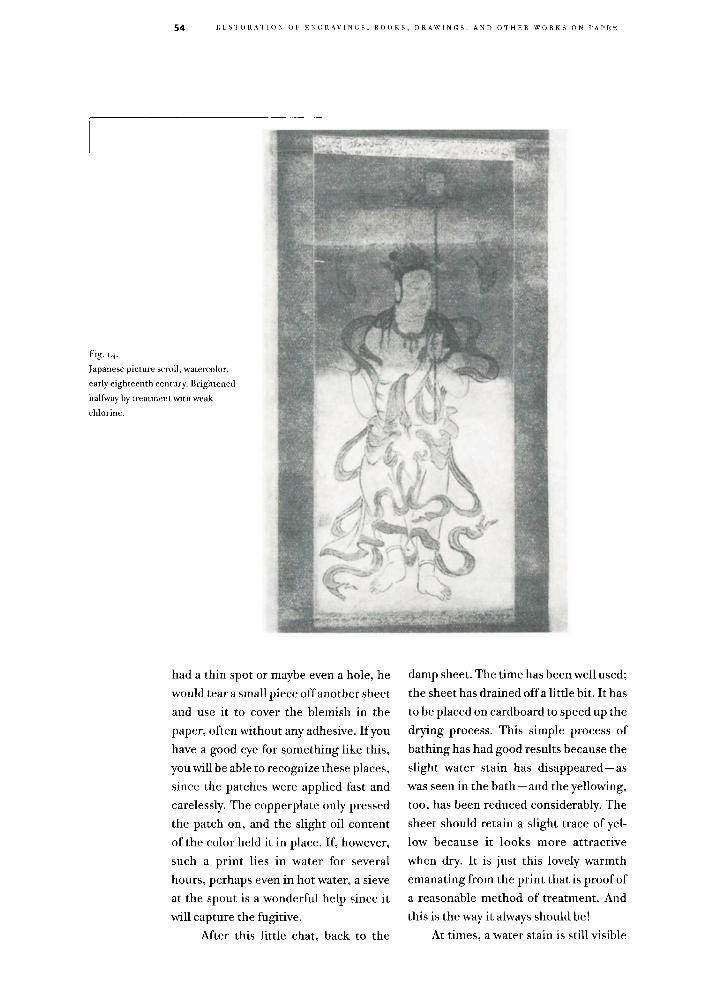
54 R E S T O R A T I O N O F E N G R A V I N G S , B O O K S , D R A W I N G S , A N D O T H E R W O R K S O N P A P E R
Fig. 14.
Japanese picture scroll, watercolor,
early eighteenth century. Brightened
halfway by treatment with weak
chlorine.
had a thin spot or maybe even a hole, he
would tear a small piece off another sheet
and use it to cover the blemish in the
paper, often without any adhesive. If you
have a good eye for something like this,
you will be able to recognize these places,
since the patches were applied fast and
carelessly. The copperplate only pressed
the patch on, and the slight oil content
of the color held it in place. If, however,
such a print lies in water for several
hours, perhaps even in hot water, a sieve
at the spout is a wonderful help since it
will capture the fugitive.
After this little chat, back to the
damp sheet. The time has been well used;
the sheet has drained off a little bit. It has
to be placed on cardboard to speed up the
drying process. This simple process of
bathing has had good results because the
slight water stain has disappeared—as
was seen in the bath—and the yellowing,
too, has been reduced considerably. The
sheet should retain a slight trace of yel
low because it looks more attractive
when dry. It is just this lovely warmth
emanating from the print that is proof of
a reasonable method of treatment. And
this is the way it always should be!
At times, a water stain is still visible

R E S T O R A T I O N O F E N G R A V I N G S , B O O K S , D R A W I N G S , A N D O T H E R W O R K S O N P A P E R 55
even after a twelve-hour bath. Still, that
often does not matter. The water stain
may disappear when the print is dry; it
may only be visible when the print is held
against the light; or it may be so hard to
see that it does not disturb anyone.
If the water stain or other stains are
still clearly visible, somewhat stronger
methods have to be employed. Another
attempt at removing them has to be
made, and the water stain and the blem
ishes have to be treated locally. A small
casserole dish or pan is filled with boiling
water, and a generous shot of vinegar is
added. A small round paintbrush with
hog's hair bristles is dipped into the solu
tion, and the water stain and other dis
turbing spots are brushed; this is done
until success is visible. It is best to treat
both the front and the reverse so that the
process is a little more effective. To treat
the reverse of a heavily damaged paper, a
second sheet has to be employed which is
given a quick bath and put over a pole to
drain off quickly. When it is still half
damp, this second support is placed over
the print. The print lies between two
sheets. All three parts are lifted up, and
the sheet is moved back to the table in
such a way that the second support lies
on the oilcloth. The first support is
removed and hung over a pole. The
reverse can be treated easily now. This
method was previously described, yet it
is always worthwhile to mention it again.
If the water stain has still not dis
appeared in spite of the hot vinegar water,
powdered citric acid should be sprinkled
on the water stain and the other blem
ishes. This can be accomplished with a
small, flat piece of wood or a small spoon.
The effort has to be repeated several
times. Finally, the damaged areas can be
treated with pure ammonia solution.37
This treatment will certainly be suc
cessful, and print and paper will not be
affected by it. This last point should and
must be our goal with every job!
After all these treatments, the sheet
has to be rinsed well. A water bath of
many hours follows. The last traces of
dirt that resisted the eraser have to be
removed. This work is done on the damp
print. The sheets are placed into a com
pletely fresh bath and stay there for sev
eral hours so that the dirt can dissolve
a little. The sheet is hung over a pole to
drain off quickly and is then placed on
the oilcloth-covered table. A flat bristle
brush is dipped into a pot of boiling
water, and the surface dirt is brushed off
very carefully, only enough so that the
paper does not get damaged. Of course,
small fibers will be raised up, but that is
not dangerous, since only a very thin
layer of the paper is affected in a harm
less way. If this treatment of a damp print
has been practiced often on worthless
sheets, nothing needs to be feared when
it is tried on good prints. The lighter the
movement of the wrist and hand, the
better the results. A heavy hand might do
a lot of damage.
If the dirt is heavily ingrained and it
becomes necessary to exert great force in
order to remove it, another method has
to be employed. Put one heaping tea
spoon of bleaching soda38 into a small,
one-pint casserole dish, and pour boiling
water over it. A strong soda solution
should only be used for the removal of oil
paints!39 Since the printing ink in the
engraving also consists of oil paint, you
have to proceed very cautiously when it is
necessary to use soda. You cannot touch
the printing; you have to be careful with
the title (legend) and should only try the
soda solution "miles away" from any

56 R E S T O R A T I O N O F E N G R A V I N G S , B O O K S , D R A W I N G S , A N D O T H E R W O R K S O N P A P E R
Iff" ;,' ,,
Fig-15.
Globe, ca. 1800. Brightened with
dilute soda solution.
print. I already mentioned this in the sec
tion "Paper Manufacture." There are
prints in which the color is a little more
resistant. Use common prints to find
out about this. -I advise you to practice
directly on the appropriate object so that
you become familiar with the enormous
danger of the addition of soda.40 You can
put a little more soda, maybe two heap
ing teaspoons, into the hot water and try
this solution on a damp copper engrav
ing. You will then comprehend the power
of a good, familiar home remedy.
I have to mention these dangers so
that this work is not undertaken lightly.
And if a reader thinks that his first
attempt with soda has been a success,
please believe me: A kind fate was on the
reader's side during his first attempt. A
second treatment might not quite meet
with his approval.41
For removing the dirt from a damp
print, take a wide, flat bristle brush. It is
advisable to take a somewhat worn brush
with slightly shorter bristles on the sides
and somewhat longer bristles in the cen
ter. When you have gained sufficient
experience, you can certainly try many
other methods. For instance, what good
is a clean margin when the print still is
dirty and margin and picture, therefore,
show a considerable contrast? In time,
practice and experience will allow you to
use the soda solution even on the printed
part. But I do not exaggerate when I say,
"It is absolutely necessary to practice a
thousand times beforehand." It is also
possible that someone is unable to
acquire the necessary skills because he
does not have the intuition and general
adaptability. Therefore: Practice, prac
tice, and practice again!

R E S T O R A T I O N O F E N G R A V I N G S , B O O K S , D R A W I N G S , A N D O T H E R W O R K S O N P A P E R 57
For very thin papers and prints you
should not use a large bristle brush but
rather a short and flat hair brush. The
soda process should be used only when
the top surface is soiled and no dirt is
visible on the reverse. Otherwise, rings
of dirt might be drawn from the back
through the paper, like a water stain, and
could never be removed damp or with an
eraser. This is where the "surgeon" can
show his skill. When this kind of dirt ring
is very disturbing but does not affect any
nobler parts, the blemish can be cut out
with a knife. This kind of work can only
be done when one is secure in the saddle.
For the time being, hands off! A margin
that has been treated with a soda solution
has to be dabbed well afterward with a
half-damp sponge, so that the soda solu
tion does not run across the print when
the sheet is lifted up.
Fig. 16.
(i) Flat bristle brush; (2) paste brush,
round bristle brush; (3) flat knife for
cutting prints off the stretching boards
R E M O V I N G P R I N T S F R O M B A C K I N G S
If the prints that are supposed to be
treated are mounted on cardboard or
other supports, they can be cleaned with
an eraser only if they do not lift up or
buckle anywhere.
The mounted sheet is placed in a
cold bath and left to its fate overnight.
It is always advisable to prepare the bath
at night so that no attempts to separate
the sheet are made from pure curiosity.
This kind of curiosity often carries a
severe punishment.
The print is put into the bath with
the printed side facing down. In the
morning it is checked; the water is
drained carefully, and a small corner is
lifted up to see whether it is possible to
separate it easily. If the corner is still
sticking very tightly, the sheet is left in
water for another twenty-four hours.
During this time, no further attempts at
separation should be made. After this
bath, the water is drained, and if the
sheet still has not separated from its sup
port, boiling water is poured on the card
board in such quantities that the sheet
swims in it. Let the boiling water take
its effect for several minutes and then
try the separation. If the print has come
off by itself in the hot bath and is swim
ming in the water, that is perfect. But if
the print is still very tightly attached to
its support, you have no choice but to
remove the support by force. Put the
engraving face down on the oilcloth,
with the support facing upward, and
attempt to pull the support off piece by
piece. When one corner of the support
has been removed without damaging the
back of the print, you can continue as
follows: with one hand, press down on
the part of the print that has been uncov
ered, and carefully follow the other hand,
which is pulling off the support. If the
front of the print were put on top, you
would try to pull it off. Then it certainly
would be damaged. This little hint should
always be observed.
After the forced removal of the
support, the sheet is put back into the
tray and is left in water for several hours.
The water is then drained, and just
enough hot water is poured on the bot
tom of the tray to lightly wash around the
engraving. I emphasize: Pour the hot
water on the bottom of the tray so that
the paper of the engraving cannot be
damaged! If water were poured on a very
soft paper with a certain amount of force
(for instance, if it were poured from a
spout), the paper could be harmed easily
and a hole could appear. Always remem
ber this!
The hot water only serves the pur
pose of making the layer of glue more
pliable. A sheet that is only glued is not
difficult to take off. Even if the glue does
not dissolve completely over twelve
hours, it will certainly not prove stub
born. A hot bath will make the glue dis
appear, and the reverse side will not have
to be treated specially. But what can be
done if a sheet, which is difficult to
remove, is not mounted with glue but
was firmly attached by a bookbinder with
the notorious alum paste?
It would be more than deplorable to
treat a valuable print in such a way. The

R E S T O R A T I O N O F E N G R A V I N G S , B O O K S , D R A W I N G S , A N D O T H E R W O R K S O N P A P E R 59
paste has to be removed mechanically,
since the hot water would not have any
effect. Take a worn flat bristle brush,
drain a little bit of water off, and start
working with the brush. Of course, the
washing has to be done very carefully and
skillfully. Do not treat the whole back
side at once, but wash it piece by piece.
This is done best by starting in the upper
left-hand corner and going to the right.
Touch the first spot that is freed from
paste with the fingers of the left hand,
and keep on working until all the paste
is removed. While the sheet is in the
tray, most of the paste is removed
mechanically with the brush; then the
sheet is put face down on the clean oil
cloth. Keep a container of hot water
handy, and proceed with the brush in the
same way as before. The very last traces
of paste must be removed. If any paste
is left in spots, these parts will buckle
considerably when the paper dries.
Therefore, you have no choice but to get
rid of the paste completely.
After this procedure, the sheet is put
back into the tray once again, and a copi
ous amount of hot water is poured on
top. The repeated treatment with hot
water42 in this case only serves the pur
pose of forcefully attacking the alum
paste one more time. The slippery part of
the paste will have been removed, but the
alum itself will not have been taken care
of properly. This alum penetrates the
paper deeply and renders it waterproof.
All these procedures sound a bit brutal
but cannot harm the paper of the print if
it has been treated expertly. If the print
had been pasted on because of severe
tears and has to be mounted again, it still
would not do any harm to pursue to a suc
cessful conclusion the efforts for the
removal of the alum paste. The tears will
have to be closed up skillfully later on,
and the edges especially will have to be
freed from tears. A prerequisite for this
is, however, that the sheet has been freed
previously of all harmful paste.
In earlier times —the fifteenth to
eighteenth century—flour paste was
used very often for mounting prints. If
you have an idea that the mounting
might be from this period, do not use hot
water. Rather, leave the sheet in cold
water for forty-eight hours; do not pay
any attention to it, and continue to work
with it then on the oilcloth. It is not a
mistake to leave the sheet in water for
a longer time even if the assumption
about the adhesive turns out to be wrong.
If the support is separated relatively fast,
flour paste will always leave a striated
pattern.43 If you run a knife over a small
area, you can scrape together some paste
that is easily recognizable as whitish or
brownish flour paste. If the described
indications do not apply, you are dealing
with a later mounting method and the
bonding agent may be glue, dextrin, or
starch. The last traces of the flour paste
are scraped off carefully with a blunt
knife. The sheet is then washed thor
oughly with a bristle brush. In this case,
hot water would make the paste harder
and the separation more difficult.
And something else should be taken
into consideration: Starch paste is mixed
cold and then boiled; it goes through a
heating process, just as glue. Flour paste,
as wallpaper hangers used it in earlier
days, was mixed cold and made ready for
use by adding cold water. If hot water
were used to thin out the flour paste,
lumps would appear. It is, therefore,
obvious: Paste that was mixed and
thinned out cold should never be treated
with hot water. Gold paste —cold water;

60 R E S T O R A T I O N O F E N G R A V I N G S , B O O K S , D R A W I N G S , A N D O T H E R W O R K S O N P A P E R
hot paste—hot water!
Prints that are stretched over a
wooden strainer are often not simple to
treat. Wood and paper have quite differ
ent properties of expansion and contrac
tion. In the past, a few, but unfortunately
not all, bookbinders or framers stretched
a thick sheet of paper over a strainer
before mounting an engraving. In this
case, removal is not difficult. If one is
skillful, even without using moisture
one can loosen a corner; that is, the
paper support can be separated from the
strainer. If it happens that the front side
of the strainer is located right at this
point, the incision maybe difficult.44 Gut
a little into the wood underneath the
support and try to create some space
between the paper support and the
strainer. Just a small corner will suffice.
This space is very important because
the sheet is later put into water to be loos
ened and is left there for twenty-four to
forty-eight hours in order to become sep
arated from the strainer. The strainer is
lying on top, the sheet face down. If the
sheet does not separate from the strainer
after the water has been drained, the
strainer, like a tray, will trap the water.
To prevent this water from forcing its way
out, a corner of the support should have
been loosened from the strainer so that
the water can drain. If you have taken
this small trouble, you will be a lot hap
pier in the morning. This procedure of
loosening a corner dry cannot be used in
all cases; you have to find different meth
ods. It is easy enough to say that the sheet
has to be separated at all costs. If you are
dealing with very hard sheets,45 that is,
engravings which have been printed on
Whatman papers, the separation would
not be very difficult, since such papers
cannot easily be stretched or deformed.
In this case, too, the sheet is put into the
tray with the strainer on top, and clear
water is poured in gradually. The strainer
has to be weighted beforehand so that the
sheet does not float. You have to allow
the sheet to be in the bath for forty-eight
hours if you expect any success. The
water is then drained, and you can check
to see whether the treatment has been
effective. If this is not the case, boiling
water must be used to assist the process.
If you are dealing with colored sport
ing prints, a much more time-consuming
process must be used. To avoid the for
mation of water stains, the back of the
print has to be dampened again with a
flat bristle brush. The edges on the front
are also brushed with water. This process
needs to be repeated every thirty min
utes. The print can also be put into the
tray vertically, maybe at a slight angle,
with just enough water added so that the
margin, up to the printed part, is under
water. Never forget to dampen the back,
though, since water stains can form very
easily. The margin is left in water for
about one to two hours, and then an
attempt is made to separate it further
with hot water on the oilcloth. Again, on
the front only the margin is dampened,
whereas the entire back is moistened. If
the margin previously soaked in water is
brushed with very hot water, small areas
will begin to swell, like blisters. Try to
reach these areas with a very flat knife so
that the separation can be undertaken
gradually. It is also advisable to pour
boiling water on the margin from the
front and to start the attempts on the oil
cloth only after that. If you want to suc
ceed, you have to try a variety of ways.
For the separation of very absorbent
papers from strainers, I recommend a
local procedure. However, the back may

R E S T O R A T I O N O F E N G R A V I N G S , B O O K S , D R A W I N G S , A N D O T H E R W O R K S O N P A P E R 61
not be dampened too much, since the
engraving could easily break along the
inner edge of the strainer.
If the separation is supposed to take
place in the tray, a somewhat larger glass
pane has to be put down first. The pur
pose of the glass pane will be discussed
again later, but it is also there to prevent
the strainer, which is only held together
by glue, from falling apart when the sheet
is lifted from the tray. To weight the
sheet, one small board is put across the
strainer and one lengthwise, and full bot
tles are placed on the boards. The sheet
can be observed easily through the space.
The tray is carefully filled with water, and
you may even risk a slight spurt onto the
back of the sheet so that no air bubbles
can form. I would recommend another
lengthy cold water bath. After the glue
has softened, the tray is emptied slowly
and the weights are taken off. Gradually
remove small amounts of water inside
the strainer by lifting the glass pane. Now
carry the glass pane with the strainer to
the table, and the print, held at a slight
angle, should be seen through the glass
pane. You will notice that a lot of bubbles
have formed in the margins, an indica
tion that further separation will be easy.
The glass pane is carefully placed back
on the oilcloth, and the separation is
attempted with warm water. (Never use
hot water since the glass might crack!)
This small task can also be done in the
tray. Now the separation should be suc
cessful. Do not move or lift the frame by
force because this will certainly tear the
sheet. If the strainer and the sheet still
cannot be separated, drain the water
slowly from the tray, bring the sheet to
the table—with the glass pane under
neath it—and wait for a while until the
print has somewhat dried off in the mid
dle. This drying can be accelerated
by frequently applying blotting paper to
the center of the print. When the print is
halfway dry, the sheet can be lifted up
slightly with the frame but without the
glass pane. Watch the front of the print
while doing this, to see whether the
whole margin is coming loose. If only a
few places come loose, let the print care
fully slide back onto the glass pane and
turn it over with the glass pane. You can
risk this since the dampness has for the
most part been removed from the sheet,
and the sheet can hardly break at the
inner edge of the strainer. Turning the
print would have been very dangerous
while it was damp, for it certainly would
have broken along the inside edges of the
wooden strainer because the absorbed
moisture would have made the paper too
heavy. The sheet is now lying on top, and
you can try to lift the margin with a flat
knife. After separating the sheet from the
strainer, place it in the tray so that the
last traces of paste can dissolve a little
more and the small water stains, which
have formed as a result of the local treat
ment with water, will disappear. Old
prints from around 1500, and so on,
which were colored to the outer edge of
the paper and have been mounted on
thick supports, are loosened this way:
The back of the sheet is rubbed carefully
with a sponge that is not too wet. This
work is done on a glass pane. Since these
prints were attached with flour paste, if
they were mounted at about the same
time as they were colored, they can—as
you already know—only be removed
cold. The slightly dampened back is then
covered with a starch paste that has not
been cooked too thick, or else with a rye
flour paste prepared cold, so that the
layer of paste is 5 to 10 mm thick. Do not

62 R E S T O R A T I O N O F E N G R A V I N G S , B O O K S , D R A W I N G S , A N D O T H E R W O R K S O N P A P E R
go all the way to the outer edge of the
sheet with this paste, since it could easily
damage the coloring. This damp, thick
layer of paste must now be allowed to
loosen the support slowly, which can
take twenty-four to forty-eight hours,
depending on the kind of support and
adhesive used. Cover the sheet with a box
lid, leaving only a small air space so that
the air does not dry out the paste on top.
The sheet can best be observed if a stool
is put upside down on the table so that
the glass pane can be placed on the legs.
When small dark spots appear on the front
of the print, the paste has done its work.
Remove the layer of paste very carefully
from just these places so that the addition
al moisture cannot do any harm.
After thirty-six to forty-eight hours,
maybe even sooner, the layer of paste has
to be removed in any case, and the sepa
ration is tried mechanically. This will
certainly bring the desired results. The
traces of paste will have to be scraped off
the back very carefully, maybe even
washed off with a flat brush if the color
ing permits such treatment.
The described methods of separa
tion can, of course, only be used by an
expert who has studied papers, with all
their strengths and weaknesses, for a
longtime.
If a print is attached to parchment,
only the cold separation method should
be used. A hot separation would cause
the parchment to buckle, and the print
might be damaged. Only a longer stay in
a cold bath can bring the desired results.
Separating prints or drawings that
have been mounted to the inner cover of
a book, while preserving the old binding,
can be a very tedious affair. Moreover, if
these drawings or prints are colored, and
therefore cannot be dampened, the sepa
ration must be done mechanically. Such
prints often have not been attached
directly to the cover but are glued to two
or three sheets of paper. If there is also
a layer of parchment—the prints have
often been added much later—the
mechanical separation is not quite as
dangerous. It has to be performed with
a flat, sharp knife; that is, the wood has
to be laid bare. Also, always remember
Fig. 17.
Wrong!
Engraving with a tear, incorrectly
placed across the pole; the tear will
increase because of the wetness and
softness of the paper.
Right!
Engraving with a tear, correctly placed
across the pole to drain—without
increasing the damage.

R E S T O R A T I O N O F E N G R A V I N G S , B O O K S , D R A W I N G S , A N D O T H E R W O R K S O N P A P E R 63
that the layers should not be damaged
during this mechanical work, since there
might be valuable parts in between.
When such a procedure of separation
does become necessary, it requires the
utmost patience. If you have already
made a little headway, that is, if one side
or corner has been lifted up 3 to 5 cm,
including small wood splinters, you can
continue working in another manner
with the help of a paintbrush. Dip the
brush in lukewarm water and very care
fully brush the back of the part that has
been lifted up at the place where it is still
attached. Wait a while for the water to
have an effect and cautiously try to lift
the loosened part. Of course, you have to
be aware that the dampened part is very
fragile and that you should be happy to
advance 1 to 2 cm an hour. When begin
ning this separation, you should let the
paper dry somewhat in this spot but only
just enough to be still a little clammy. (A
lot of thinking is necessary in all this
work so that no damage will be done. The
individual supporting layers often are
not attached uniformly; there are places
that have not been pasted or others
where the paste did not adhere.) When
all but one of the supporting layers have
been removed, cover this remaining layer
of paper with paste, allow it to become
loose, and remove it from the back of
the print.

W H E N M A Y O N E W O R K W I T H C H L O R I N E ? (General Observations on the Treatment of Prints and Books with Chlorine)
You hear quite often that the use of
chlorine is very harmful to books and
prints.46 I fully agree with this opinion,
and it is more than deplorable that so-
called time-tested remedies, which were
still recommended in 1929, unfortu
nately, are being used over and over
again. Among various other inferior rec
ommendations, such a procedure advis
ing the use of chlorine has even been
printed in a treatise. A Dr. X, a pure
theorist, is the author of this book, and
he tries to introduce his work to practic
ing restorers by referring to the "assis
tance of top experts and curators of state
museums."47 Verbatim you read there:
"Chlorinated lime can be sprinkled dry
on the back of the wet sheets of paper;
after using it, however, there will be
white lime spots on the print which look
like mold and can only be removed by
hydrochloric or nitric acids, which dis
solve lime easily, and by rinsing with
water."48 On the cover of the book you
can also read: "Revised according to the
most recent state of the art by Dr. . . .
[Hans Bohm]." And that was in 1929!49
If a person who has no firsthand
experience with the various methods of
treatment for engravings and books and,
just because paper is patient, starts writ
ing away, based on hearsay, it is high time
that an expert with long-standing practi
cal experience puts an end to such non
sense. This shall be done right here! I
would almost like to ask my dear friends
the glaziers and bookbinders to forgive
me for being so harsh on them! Unfor
tunately, though, there is no other way.
However, I have to say to this Dr. X:
"What do you think a color print would
look like if your recipes were to be used?"
You, dear doctor, though to seem
ingly disclose valuable advice, have done
just the opposite. And when one reads on
the title page the lovely words: "Com
plete guide to the maintenance, cleaning
and restoration, etc.," one wishes that
you had used your clever pen for another
kind of purpose. More than a hundred
years ago, chlorinated lime was already
in use for "bleaching" paper. However,
also over a hundred years ago, sprinkling
dry chlorinated lime on wet papers was
stigmatized as a great danger to papers.
Dissolved chlorinated lime, as I recom
mend it for use, has never harmed
any papers.50
Hands off dry chlorinated lime! My
long experience —not science over
heard! — gives me the right to say: This is
the way to do it! Whoever still thinks that
he has to use the "time-tested good rem
edy" is doing harm, and I hope that his
clients will hold him accountable.
PREPARATION OF CHLORINE 5 1
Carefully pour 500 g of chlorinated lime
into an earthenware pot with a spout.
Such a pot is perfect, since the spout is
very useful when the chlorine water is
poured out later. Add about 2 liters of
boiling water to the chlorinated lime,
and close the pot with a lid. After five
minutes the chlorine mixture should be
stirred well with a ladle or spoon, and

R E S T O R A T I O N O F E N G R A V I N G S , B O O K S , D R A W I N G S , A N D O T H E R W O R K S O N P A P E R 65
this stirring should be repeated three
times within the next two hours. If you
mix the chlorinated lime at night and
proceed as prescribed, it is advisable to
leave the mixture until the next morn
ing. The foam and the chlorine particles
that have not been dissolved are now
skimmed off with a skimming ladle or a
spoon. Wait a while until the chlorine
water has calmed down again after the
foam has been skimmed off, then pour
the chlorine water through a linen bag
into another container with a spout.
When pouring out the chlorine water,
make sure that the sediment of the chlo
rinated lime does not get into the linen
bag. Next, a supply of well-cleaned, dark
bottles is filled—not quite up to the
neck, with the help of a funnel, which is
also covered with a linen cloth —and
tightly corked. Store the bottles in the
dark. If you are very intent on saving, you
can pour boiling water over the chlorine
sediment in the pot again and proceed
as described. After that, the sediment is
discarded. The second solution is labeled
"Chlorine water, highly diluted." The
first solution is labeled "Extract."
The chlorine water is now ready
for use.
Pour very carefully when you use the
chlorine from the bottles, so that the
paper does not get "hurt" in the treat
ment if inadvertently any chlorine sedi
ment has passed through. At first, it is
advisable to use the extract for practicing
since the effect could easily be too severe.

A N T I D O T E S F O R C H L O R I N E "
Each paper that has been treated with
chlorine water needs a very special bath
after the first baths (see pp. 70-71). The
paper has to be "detoxified." The long
previous baths modified the effect of the
chlorine, but there is still a trace of chlo
rine left in the paper, which has to be
removed.
Table vinegar, for instance, is a
potent antidote for chlorine.53 If you
want to use it, first drain the water com
pletely from the tray until there is no
more foam left. The spout is closed
tightly, and a whole bottle of wine vine
gar54 is poured in. Thrift has no place
here, since you are dealing with valuable
prints. Let the vinegar take its effect for
a few minutes. After a short time, with
the vinegar still in the tray, let cold water
run in slowly until the papers are just
covered with water.
This antidote requires three to four
hours to remove the small remnants of
chlorine. The papers will no longer smell
like chlorine when they are dry. The pure
wine vinegar will also remove any lime
residue, in case some of it might have
passed through into the extract when the
chlorine was filtered. Diluted hydrochlo
ric acid is used only when absolutely nec
essary, such as when the chalky residue
from the chlorine is so strongly evident
that it must be removed.
Sodium hyposulfate (in small crys
tals), as photographers use it, also is an
excellent antidote. One should obtain
this sodium hyposulfate in any case,
since it is at the moment somewhat less
expensive than wine vinegar.
Take 1,000 g of the supply, pour
boiling water over the crystals in a 2-liter
earthenware dish, stir thoroughly, and
let the solution cool. Pour the solution
through a funnel and a linen bag into two
clean bottles. Under no circumstances
should the dirty residue of hyposulfate
come into contact with the paper.

T R E A T I N G B L A C K - A N D - W H I T E P R I N T S W I T H C H L O R I N E W A T E R
A severely yellowed sheet of paper with
unsightly mold stains, which has become
a little lighter through a simple water
bath, shall now be treated to improve
its appearance.
The paper can be treated in different
ways. The most natural and most beauti
ful method is exposing the paper to the
sun for many hours.55 The advantages of
the sun's rays are well known. However,
if you want to use this lightening
method, you have to have a lot of sun and
time. Such a treatment can last for days
and weeks. To reinforce the effect of the
beneficial rays of the sun, the paper has
to be put into a bath previously lightly
acidified with vinegar. After the bath is
completed, the paper is put on cardboard
and exposed to the sun. When the paper
starts to dry, it has to be sprinkled with a
weak vinegar solution from a watering
can. This procedure can take weeks, as
already mentioned. But will- you always
have the time and leisure to do this? 5 6
Will the sun shine that long?57 You could
and should try this once with an engrav
ing in black ink to see how truly powerful
the effect of the sun is.
If only one area is to be cleaned
(local treatment), a lot of patience is nec
essary. Put the thoroughly dampened
paper on oilcloth but never on card
board—a mistake that is often made,
unfortunately. Dry cardboard will absorb
the cleaning agent, creating pronounced
rings on the back of the print instead
of letting the weak chlorine water run
evenly over the paper. However, if the
paper is severely damaged, you certainly
want to use a well-saturated support for
it. This wet support will allow the slow
spreading of the chlorine water, since
only the dry and absorbent support cre
ates hard rings on the back.
To dab the print locally, take one
part extract and two parts water. An
eggcup will be big enough to hold this
solution. For dabbing, use a thin white
estompe58 or pieces of cardboard cut as
small as desired. Very unsightly but only
occasional mold stains or offensive water
stains should be dabbed with this solu
tion. The paper, is dampened in order to
(i) prevent it from being damaged at the
treated spots and (2) allow the chlorine
water to mix gradually with the moisture
present in the paper.
If you started to work right away
with the strong extract, the effect would
be very noticeable and the treated areas
would stand out sharply against the sur
rounding. This is avoided by using weak
chlorine water. After the spots have been
treated several times in this way, a moist
sponge is squeezed out over them so that
the water and chlorine solution can com
bine again and a slow blending in of the
chlorine water is assured. If the chlorine
water is too weak, the mold stain has to
be locally dabbed with a stronger solu
tion and only in its center. The stronger
solution then combines with the weaker
one, and the weaker solution in turn with
the surrounding dampness. Dabbing fre
quently with a wet sponge is advisable in
any case. If you have removed the stains
on the front, the paper should be treated
to a lengthy cold bath. After about two

68 R E S T O R A T I O N O F E N G R A V I N G S , B O O K S , D R A W I N G S , A N D O T H E R W O R K S O N P A P E R
Fig. 18.
Coat of Arms with Skull, German
School, Diirer, 1503, engraving.
Stained by modern ink; completely
cleaned through a water and
chlorine treatment.
hours, take the paper out of the tray and
place it wet, with the back facing upward,
on the oilcloth which has been cleaned in
advance. The spots might still be faintly
visible on the front, but they will com
pletely disappear once the paper is dry
or will just be faintly noticeable with
out being distracting. The back is treated
in the same manner as the front. When
you are able to clean a spot locally in such
a way that the surroundings of a mold
stain or water stain are not affected or
lightened as well, you will have been
quite successful.
If an engraving is still very brown
in spite of the preceding treatment with
the vinegar solution or if it still shows
unsightly spots, it has to be lightened as
described above. During this treatment,
the areas surrounding the spots are, of
course, also treated since the yellowing is
too severe. You start at first in the same
way: localized dabbing of the front, bath,
localized treatment of the back. After you
treat the back, the paper is left lying
there; it does not get another bath for
the time being. The back of the paper
is brushed with a weak chlorine water

R E S T O R A T I O N O F E N G R A V I N G S , B O O K S , D R A W I N G S , A N D O T H E R W O R K S O N P A P E R 69
Fig-19.
The same sheet after cleaning
solution. A wide flat bristle brush is
dipped into the weak solution, and the
solution applied with a full brush. Do not
rub the brush into the paper but move
the wet brush back and forth over the
paper like a painter painting a floor. As
soon as the paper becomes light enough
and its shade matches the locally cleaned
areas, the front can be treated. For this,
the paper is carefully turned over and
only the margins are covered with a weak
solution. Often, you do not have to cover
the printed part with the solution
because it already has been affected from
the back. However, if dark spots appear
on the front, especially in the lighter
parts of the print, a careful lightening
with chlorine water has to be attempted.
In the meantime, the appearance of the
margin has improved and its color again
corresponds to the pretreated areas. You
have thus been extremely cautious when
treating the paper with weak chlorine
water. If the localized pretreatment had
been omitted and the whole sheet treated
at once, the paper would have been
exposed to a longer treatment with
chlorine water and would have been

70 R E S T O R A T I O N O F E N G R A V I N G S , B O O K S , D R A W I N G S , A N D O T H E R W O R K S O N P A P E R
Fig. 20.
Jan Cornells Sylvius, Dutch School,
Rembrandt, ca. 1645, etching. Nearly
destroyed by fire, the picture was fully
restored by treating it with chlorine
and mending it.
weakened unnecessarily. Even though
the chlorine water will never damage the
paper and the print if it is used as previ
ously described, it seems unnecessary to
me to treat the entire paper in such away.
I would like to advise you once more,
strongly: Always treat the stains locally
first and then proceed to lighten the
whole sheet, and the latter only if it is
absolutely necessary.
After the treatment, rinse the paper
well on both sides and let it recover in a
cold bath. After about one hour, the bath
should be renewed and the old water,
which contains slight traces of chlorine,
should be drained off. The second bath
(the etching remains in the tray after the
first bath has been drained) will be very
good for the paper. After another two
hours, empty the tray completely, care
fully rinse off with the hose any foam that
might have formed, close the spout with
a cork, and pour a small amount of chlo
rine antidote into the tray. Slowly pour in
some water, just enough to have the solu
tion taste a little like the antidote and
to cover the paper well. If the solution is
too weak, add a little more antidote to

R E S T O R A T I O N O F E N G R A V I N G S , B O O K S , D R A W I N G S , A N D O T H E R W O R K S O N P A P E R 71
Fig. 2,1.
The same etching after treatment.
make it stronger. Allow this bath to work
for two to three hours, then drain it and
replace it with fresh water. The paper
remains in this water bath for four to five
hours and is then placed over a pole.
Never use a pure chlorine bath,
since print and paper could be damaged
by it.
If larger brown stains appear dur
ing the treatment with chlorine water, a
chemical process has taken place.5 9
These dark spots can be removed
instantly by applying a weak hydrochlo
ric acid solution (5 to 10 percent) with a
small round bristle brush or by sprin
kling pulverized citric acid on the spots.
Another dabbing with weak chlorine
water then causes these spots to disap
pear completely.

T H E G L E A N I N G O F C O L O R E D P R I N T S
This section deals with old colored
woodcuts as well as engravings and
lithographs.
It is surprising how hard it is to avoid
unintentional loss of color from prints in
the course of treatment. But my task,
which is to preserve the colors on paper,
is even more difficult. Early woodcuts
were colored for good reasons. First of
all, the less well modeled garments of
individuals would be made more expres
sive in order to give greater emphasis to
the figures themselves. A second reason
was to create a colorful book by portray
ing the religious images in imitation of
Egyptian picture sheets.60 The main pur
pose, however, lay in covering up draw
ing errors by means of rich color. The
early wood-cutters were not yet very
experienced, so that common carpenters
performed this kind of work. The wood
block was given to the cabinetmaker,
whose task it was to cut out the area
around the drawing precisely. The draw
ing itself remained, in relief. Of course, it
was possible for the carpenter to miss a
few folds in the garments because he was
not yet a master in this art. Looking at
woodcuts from the second half of the
fifteenth century, you can see that the
carpenters worked rather awkwardly.
And the artist who created the design
often was not the right man for this kind
of work either.
Coloring became less frequent after
the example set by Albrecht Diirer. Diirer
learned the art of woodcutting from his
master, Wohlgemut. If Diirer was not
able to cut every woodblock himself, the
work was at least done under his super
vision. The appearance of woodcuts
improved, images were executed more
artistically, more attention was paid to
details, and the garments pleased the
viewer even without color. After Diirer's
time, if any woodcuts were colored, it was
probably for the reasons mentioned in
the preceding paragraph.
The coloring consisted mainly of
four hues—blue, yellow, red, and brown.
Later, black was added. Because in earli
er times paper was prepared for coloring
with a gum or albumen solution, there is
a distinct danger of complete removal of
the old color even during a simple water
treatment. If the colored sheet were
placed in water, the colors could float
away because, as already mentioned, the
background was covered by a water-
soluble coating. Gum or honey solutions
were used as binding agents for colors
in earlier times.
A chlorine treatment can be used
only if the greatest possible precautions
are taken. And only a local treatment may
be applied. Especially disfiguring stains
can often be removed using a dry method
with a razor—for instance, wax stains,
the kind that are frequently found in
prayer books. Subsequent treatment
with carbon tetrachloride will often
bring good results. For a treatment with
chemicals, the sheet first has to be damp
ened from the back, and care has to be
taken that the water does not run onto
the color. Foxing or water stains imme
diately absorb water. Because of the
absorption, the spots can then also be

R E S T O R A T I O N O F E N G R A V I N G S , B O O K S , D R A W I N G S , A N D O T H E R W O R K S O N P A P E R 73
treated more easily. Local treatment with
chlorine has to be repeated often if the
stains are stubborn. After each chlorine
application, an antidote is used, and this
process is continued until the goal has
been reached. Do not treat stains in the
color itself if you do not have the neces
sary expertise. When the stains have
been removed to the extent that they are
not very visible anymore, the sheet
should be dampened frequently from the
back with clear water so that the effect of
the chlorine is gradually lessened. After
the treatment with chlorine water, the
paper, if it is not very absorbent, can also
be placed on a water surface. Water will
be absorbed at the places that have been
treated with chlorine, since the paper
has been made softer in those places. '
If the sheet is floated on water, with
the treated surface facing upward, care
has to be taken that no waves are created
by moving the tray. These waves could
run over the color and damage it.
Therefore, utmost caution! After the
treatment the individual spots are sized
with a gelatin solution.
Why does foxing only appear local
ized on a sheet? I think because the paper
is more susceptible to it in these places.
How often do we not see in an old book
only one or two sheets out of a hundred
covered with a few individual foxed
marks? The reason for this cannot be
that the book lay open. On the contrary,
a brief, dry airing would always be of
advantage to the book. It has to be
assumed, therefore, that these places did
not receive any sizing when the paper
was prepared or that other defects
existed in the material.
Colored engravings from the eigh
teenth century do not show foxing, water
stains, and overall browning as often as
prints from the nineteenth century.
When I specify colored prints from the
end of the eighteenth century to the
beginning of the nineteenth century, I
am thinking above all of the beautifully
colored Swiss prints.61 With what kind
of endless patience and exquisite colors
these great artists worked! You can liter
ally smell the fragrance; you can sense
the love and great care in their prints. I
do not think that I exaggerate when I
maintain that no other country in the
world was blessed with such great mas
ters in the art of coloring as Switzerland.
As a matter of principle, I also refuse to
treat Swiss prints when a spot does not
impair the impression as a whole. Often
a slight browning makes the paper espe
cially attractive. And this little bit of
browning should now be removed?
Never, hands off! One has to have some
idea of coloring if one wants to talk about
it. If a sheet has been treated anyway and
the color has been slightly affected, it
should be left to another hand to touch
up the exquisite colors! It is not easy to
find the right way to return the softness
and originality to the sheet. The collec
tors and dealers of Swiss prints know
coloring; they all know that no one can
match the original. And it is entirely
impossible to fool these experts.
I lingered a little longer over the
Swiss prints so that anyone who wishes or
has an inclination to treat such sheets
will think over carefully whether he can
finish this work successfully.
I do not exaggerate when I say that it
is often harder to treat a colored Swiss
print than a French aquatint print. For
this kind of treatment I cannot simply
say, This is how it is done; or, Take the
following. That is impossible! Empathy
is of the utmost importance here.

74 R E S T O R A T I O N O F E N G R A V I N G S , B O O K S , D R A W I N G S , A N D O T H E R W O R K S O N P A P E R
And, unfortunately, how often we
find these wonderful Swiss prints in a
deplorable condition! The dear framer
frequently did not understand the great
art of his compatriots; he just did the
framing! No thought was given; he just
put on a frame. Instead of cardboard as a
support, highly resinous boards were
used so that the grain of the wood is often
visible in dark brown on the front of the
sheet. And many framers did not put any
special barrier behind the sheets. The
green wood was simply placed on the
print, pinned down, and that was the
extent of it. This is how the exquisite
prints of the Swiss artists were treated
at the time.
To save such a print, of course, in
most cases you have to use chemicals,
even though it breaks your heart. Special
precautions have to be taken for this
treatment, since different hues can be
easily changed or disappear through a
chemical reaction. You should examine
the print carefully, therefore, before
beginning the work, study its fineness
and detail in coloring, and note its spe
cial characteristics. In addition, details
of the clouds should be copied and a
small color sample made. I would like to
point out especially that the shades of red
have to be determined so that you can
find the right hue again later.
If two or more prints need cleaning
at the same time, the color sample may
be unnecessary but never the drawing.
Only one print should be treated from
beginning to end so that there is always a
sample at hand. If the print has a black
borderline, it will have to be removed
while the sheet is wet. This kind of work
is done in the tray so that the water can
immediately distribute the colors when
the lines are washed off. A quick washing
would only cause the remaining color to
run later and to spread over the rest of
the paper. Only a faint trace of the line
should remain. If, after lying in water for
twenty-four hours, the sheet becomes a
little more absorbent, the task is no
longer quite as difficult. Great progress
has been made if the sheet is willing to
absorb water.
In this case, the chlorine solution
treatment is applied from the front. The
area surrounding the main colors is
brushed liberally with the chlorine solu
tion, and, of course, the sky area has to
be treated too. The delicate reddish tinge
will no doubt disappear, but that cannot
be helped. It will be possible to recon
struct everything by following the copy
and the notes. When I say that the area
surrounding the colors is brushed liber
ally with the chlorine solution, I mean
that care has to be taken so that the solu
tion does not run into the colors. It is
advisable to have a damp sponge at hand
to dab off any excess chlorine solution in
case it should spread. No liquid should be
allowed to stand on the paper.
The back must be treated a little
more forcefully since the effects of the
grain of the resinous board will be most
visible here. Yet here, too, one should be
very careful not to let the chlorine water
work too long on those places that corre
spond to the principal areas of color on
the front. As soon as the back becomes
considerably lighter—small remaining
traces can be ignored —the sheet is
rinsed thoroughly on both sides. After
the baths, the sheet is dried. Next, the
sheet is prepared for further treatment so
that the missing shades and the border
line can be restored. This procedure is
described in the section that deals with
the preparation of paper (see pp. 102,-3).

R E S T O R A T I O N O F E N G R A V I N G S , B O O K S . D R A W I N G S , A N D O T H E R W O R K S O N P A P E R 75
Before applying the tints with a
brush, when the color solution is well set
tled, you should mix in a small amount of
ox gall, which is available in pharmacies.
This addition is only necessary when the
paper, after having been prepared, does
not take up any color. You can also pour
pure sugar into the color solution to
make the blue watercolor for the sky run
better. The sugar water ensures a good
and even distribution of the color. Of
course, a sponge is also very useful for
achieving soft forms after the color has
been applied with a brush. The border
can be renewed with black drawing ink
and a drawing pen.
This kind of treatment applies to
prints with particular colors that are sol
uble in chlorine water. These colors are
generally known as transparent water-
colors. The majority of the Swiss prints
are decorated with colors of this type,
and only a fraction at the beginning of
the nineteenth century were painted
with opaque colors. These opaque colors
were either supplied from the factory
already mixed with white or combined
with white by the painter. In earlier times
really outstanding colors were mixed and
used in the artist's studio or workshop,
but, unfortunately, their composition is
often unknown to us. It would be beside
the point to give more detailed informa
tion about this. The colors combined
with white are called gouache, tempera,
or distemper. Whoever knows how to
use these colors expertly can certainly
achieve good results. The question arises,
however: Should such prints be treated
with chemicals? At first, one might think
that it would be quite impossible to
remove stains without repainting. And
yet such a treatment can be accomplished
with relative ease, although it may not be
the simplest task in the world.
It goes without saying that such a
method requires great skill and the abil
ity to work fast. A print painted with
opaque colors in earlier times can even
be completely immersed in water and left
floating, without any harm to the color.
The earlier colors were carefully mixed
and can easily withstand such a treat
ment. Of course, it is not advisable to try
this out in all cases; there might be times
when it does not work. At least I have to
give this little advance warning so that
disappointment may be prevented. If
such a print is to be treated, it might be
useful to have a second copy at hand.
Prints painted with opaque colors
often do not have any white paper visible
in the margin. The margin is covered
with a yellowish green or brown color,
and any writing has been added by hand.
A thick black borderline frames the pic
ture. Thus, the print has been completely
painted over. The sheets often are glued
to a strong backing, which makes them
even harder to treat.
When the colors have been affected
by superficial dirt or when dust has
begun to form in wavy patterns, the sheet
should first be treated with a soft eraser.
After erasing, try a localized razor treat
ment at a spot which is quite conspicuous
but is located somewhat on the side. This
razor treatment can be very useful on
occasion. The less that water is used, the
better! If the spot is too deep, it has to be
dabbed locally with a chlorine extract. In
this case, the sheet is not moistened.
Small water stains are not treated for the
time being because they might disappear
in the later water bath. When the extract
has done its work, the sheet is placed into
a bath. The sheet is immersed, that is,
pulled into the water so that the colors

76 R E S T O R A T I O N O F E N G R A V I N G S , B O O K S , D R A W I N G S , A N D O T H E R W O R K S O N P A P E R
are not touched by your fingers. The
colors will, of course, become soft in the
bath, and if they are touched a little too
roughly by your fingers, they will invari
ably come off. The sheet therefore has
to be treated with great care! The bath
will take a good hour so that the paper
can get well saturated. Before taking out
the wet sheet and putting it on the table,
you must pull a support under the sheet
so that the colors are not touched by
your fingers. The black border especially
may not be touched, or there will be
headaches. Those borders on prints that
have been painted with opaque colors
have to be regarded as the greatest "ene
mies," for they can cause a lot of trouble.
You will discover that the small
water stains have partially disappeared
and light areas have been left behind in
the locally treated spots. At this point a
chlorine water treatment can be applied
with a soft flat bristle brush, up to the
delicate borderline.
You should avoid—I have to empha
size this once again—going into the area
of principal coloring, for stains are not
very disturbing there, whereas they show
clearly in the sky. The flat bristle brush
has to be thoroughly saturated with chlo
rine water and applied lightly when the
sky is to be painted. Do not rub back and
forth with it as that will dissolve the col
ors. There should be no color adhering
to the paintbrush at all if the job has been
done properly.
Before the sheet is transferred to the
tray, all chlorine water has to be removed
to prevent damage. The sheet is dabbed
with blotting paper. Do not rinse it but
carefully slide it into the water again.
After an hour, the bath is renewed. After
emptying the tray completely, pour a
generous amount of table vinegar around
the sheet. The remaining baths follow as
has been previously explained.
If you have a good eye and have
acquired a certain amount of skill
through frequent practice, this job
should not give you too much of a
headache. All other colored engravings
and prints, regardless of their origin, are
treated like good Swiss prints.
Sporting prints—when you are deal
ing with later ones, after 1820 —occa
sionally show a certain gloss. This gloss,
especially in the shading of individual
horses, is supposed to heighten the pic
torial effect. Does this gloss disappear
when the sheet has been through a bath
of several hours? No! You will be amazed
at this answer, because I had the opposite
view of paint applied to old woodcuts. No
base coat was applied to the later prints
because nonabsorbent papers were used,
whereas in earlier centuries softer papers
were used more often. For this reason a
water bath does not pose any major
threat to prints after 1820 inasmuch as
the gloss that has been applied on top has
mixed with the colors and, therefore,
cannot swim off immediately. Still, I do
not think that these prints should stay in
water for several hours. Often, the gloss
is also caused by the colors themselves if
they have been thickened copiously with
eggwhite, gum, or honey. Chlorine water
should not spread to especially shiny
places; the chemical treatment therefore
has to be applied very carefully. The
sheets cannot lie on top of each other in
the tray, only next to each other so that
the gloss will not be damaged by contact.
When, for instance, several prints
with glossy areas are to be treated which
are not too valuable, I advise you to pro
ceed as follows: Slip one sheet carefully
into the water, and place the other one

R E S T O R A T I O N O F E N G R A V I N G S . B O O K S , D R A W I N G S , A N D O T H E R W O R K S O N P A P E R 77
on top. The second sheet will, without
doubt, curl, because the sizing of the
paper does not yield immediately. To pre
vent the sheet from curling into a roll,
however, several bars are put crosswise
or lengthwise on the rim of the tray. The
sheet will slowly relax and become entire
ly straight again. You will also have to be
careful that fingers of water do not
advance over the surface of this sheet, so
that waves or moving water will not
touch the shiny areas. However, if this
happens, the whole sheet should be sub
merged quickly, taken out, and put on
cardboard. Colored prints with shiny
coatings or opaque colors should never
be hung over a bar to drip dry, since the
colors can run easily. Of course, valuable
prints should only be treated this way
after you have gained great expertise.

T H E C H E M I C A L T R E A T M E N T O F C O L O R P R I N T S
Chemical treatment of color prints can
be covered only briefly here. Always
make sure that these prints are worked
on very carefully. Not all color prints can
be treated alike; above all, the colors
have to be examined first. It is hard to
write down general rules for this exami
nation, and even an hourlong chat would
create more confusion than enlighten
ment. One thing I would like to mention
in advance: English color prints can
endure a little more, since their colors
are stronger. German [prints], too, are
durable. Italian and certain Dutch color
prints are hardier by their nature. French
and Swiss [prints] have to be treated with
great care. Aquatint prints have espe
cially delicate colors; treatment with
even the weakest chlorine water solution
can cause them to disappear.
For the reasons just given, the
reader will find it understandable that I
only reluctantly offer advice on the treat
ment of color prints. With regard to the
last-mentioned French and Swiss color
prints, I can only give you this well-
meaning advice: Hands off! Whoever
heeds this advice avoids a lot of damage.
English color prints are, as already men
tioned, somewhat stronger, especially
stippled engravings. Mezzotint prints
generally represent a hard nut to crack.
The marvelous liquidity and especially
fine shading of the colors have to be pre
served at all costs. Do not try to remove
the warm tonality unless it is too brown
and darkens the lighter tints too much.
You know about the dispute of the
paintings experts: "Lighten the picture
here, leave the varnish there." For oil
paintings, this is a matter of dispute and
taste. And what about mezzotint prints?
An experienced restorer of engravings
can perform a 5 percent or a localized
lightening, but a restorer of paintings
can never do that. The lightening of mez
zotints may not be visible from the front
or the back. An experienced professional
will be able to perform such lightening
without any risk to the prints. Restorers
of engravings are thus better off in this
instance than their colleagues in the
other field.
I advise you to lighten color prints
only if they are seriously impaired. How
often I have refused to treat prints
because their owner only wanted to have
them lightened out of a mere whim.
No professional will be so ruthless as
to remove the golden warmth from a
valuable print solely because of profits
offered.
Let me now talk about the cleaning
of color prints. A color print is examined
and pretreated in the same way as mono
chrome prints. Can the color print be
put into a water bath? Not all of them;
stippled color prints can be put into
water, whereas mezzotint prints can only
be put on top of a water surface. Both
kinds should be treated with the lightest
means known. If disturbing stains are
found in fine and delicate parts, espe
cially in the reddish areas, you have to
work extremely carefully! Do not go
beyond the spot under any circum
stances! The surrounding color will cer
tainly suffer if you use a stronger remedy.

R E S T O R A T I O N O F E N G R A V I N G S , B O O K S , D R A W I N G S , A N D O T H E R W O R K S O N P A P E R 79
A weak solution will have to be used to
bring success. And you cannot get tired
of repeating the same procedure ten to
twenty times. Parts printed in blue, even
in French aquatint etchings, are a little
easier to treat because this color shows
more resistance. Since the sheets also
have to be treated from the reverse, I
advise you to treat that side first. After
soaking in water, the sheets have to be
dried lightly with blotting paper so that
the absorbed water will not combine too
much with the chlorine water. After that,
the treatment with light chlorine water
can begin.
I expressly advise you once again
to stay away from treatment of French
prints if they are aquatints. This warning
has to be given so that valuable prints
will not be ruined.
I was not eager to speak about the
treatment of color prints here as so much
harm can still be done because of lack of
knowledge and expertise, but I had to do
it to prevent recipes from being used that
are doomed to fail from the outset. Our
aim is to preserve the colors and not to
touch them up with a paintbrush. How
often we see such ruined prints, which
are not really color prints anymore. This
kind of work should not be allowed to
continue. And how often I have seen such
dabblers at work. To give one flagrant
example: I asked a glazier, "Do you clean
color prints, too?" His answer was, "But
of course." I said, "I would like to be
present, because I am interested in your
craft." At first, my presence was unwel
come, but when offered double the
money, he agreed. It was about seven
o'clock at night. I assumed he would ask
me to come back at a certain time the fol
lowing day. Far from it! The brave master
announced, "We can start the work right
away." The untidy workshop did not look
too enticing. He took out a dusty pane of
glass and started to put a rim of putty
around it to create a cheap substitute for
a zinc tray. (I strongly discourage you
from imitating anything like this.) He
took my color print and put it face down
on the dirty pane. He poured the well-
settled chlorine water on the reverse of
the sheet. It must have been a doubly
strong solution in which he left the print
soaking for more than an hour. During
this time, we talked forthrightly about
framing. Off and on he gave but a cursory
glance at my poor color print. Since only
the back could be seen, the print
remained in the chlorine bath until the
foxing no longer was noticeable. He
poured the chlorine water back into the
bottle and left the print in the homemade
tray. From a watering can he poured
water into the tray and renewed this bath
twice within the next hour. After that, he
took the familiar antidote to remove the
chlorine smell altogether. This bath took
five minutes. A new bath of approximate
ly the same duration followed. He placed
my print on a piece of cardboard, and the
cleaning process was completed, or so he
said. It is probably unnecessary to dwell
on the kind of applause and the enthusi
astic praise that the destruction of my
color print elicited from me. (Since it was
only a part of a color print, the pain was
not too severe.)
After the cleaning was accom
plished, I introduced myself to the mas
ter. I was not unknown to him. A long
discussion ensued, and the dear old gen
tleman may not have slept too well that
night. I have to discuss this kind of treat
ment to justify my complaints about
some dear friends in the glazier trade.
Color prints can only be cleaned in

8o R E S T O R A T I O N O F E N G R A V I N G S , B O O K S , D R A W I N G S , A N D O T H E R W O R K S O N P A P E R
steps. The more progress you make in
cleaning black-and-white prints, the
easier the transition to color prints.
Practice—frequent trials—leads to the
treatment of an occasional color print of
insignificant value. There are prints
today that can be bought for very little
money. A heavily damaged, cut sheet or a
part of a print can always be found and
is enough to practice on.
Yet these attempts should be made
with color prints only after you have
gathered enough experience with black-
and-white engravings. And that would
give the author inner peace!

T H E C L E A N I N G O F D R A W I N G S
The chemical treatment of any drawing
requires, first of all, a thorough examina
tion of the drawing materials used. A
water bath cannot do any harm to a sim
ple pencil drawing. But if other drawing
materials have been used, a water bath
can do a lot of damage. Pencil drawings
can also be treated with chemicals. They
are not damaged if the treatment is done
professionally. For this, it is absolutely
indispensable to find out whether you are
really dealing with pencil drawings, since
other materials similar to pencil may,
in rare instances, be able to withstand a
water bath but never a chemical treat
ment. Before I discuss examining the
drawing material any further, I would
like to discuss briefly the pencil.
The filling of the pencil used today
consists of graphite and clay. Its home is
England, where at the beginning of the
sixteenth century large stores of graphite
were discovered. In England "the pencil
was first manufactured and used in the
form of small round rods or slim square
strips that were covered with paper or set
in metal holders. The pencil as we know
it today, except for minor changes, was
introduced to and used in Germany at the
end of the eighteenth century. Yet not all
our artists used the new drawing tool;
several remained faithful to the old
implements they were accustomed to.
These were used especially when particu
larly fine and delicate lines had to be
drawn. This is the reason we find draw
ings executed with the old materials well
into the early Biedermeier period.62 The
old substances used for creating fine
strokes up to then consisted of lead,
silver, and often even tin. A piece of
metal was shaped and cut several times at
the drawing end so that—according to
wish and desire—two, three, and four
parallel lines could be drawn. A metal
piece with a particularly fine edge could
create incredibly delicate lines when
guided by the hand of a master.
Moreover, if the artist used paper spe
cially prepared with chalk, really out
standing works could be executed.63
After these general observations, I
have to confirm that pencil drawings
from the seventeenth century exist. And
works that show the characteristics of
this time should not be regarded as later
works or as forgeries.64
Before starting the chemical treat
ment of a pencil drawing, you should
check to see whether the drawing can
withstand the treatment. Using a sharp
ened matchstick that has been dipped in
chlorine water, apply a small drop to an
unimportant part of the drawing. If this
part of the drawing can withstand the
chlorine, that is, if it does not disappear,
repeat the same test in another place but
on a somewhat bigger area. If here, too,
the drawing does not become affected or
does not completely disappear but the
background is lightened by the chlorine
water, you can start cleaning the entire
drawing. If the drawing gives way in the
area treated with the chlorine water and
the line disappears, the chemical treat
ment of the entire drawing has to be
abandoned, and you can be assured that
even a water bath would most likely harm

82 R E S T O R A T I O N O F E N G R A V I N G S , B O O K S , D R A W I N G S , A N D O T H E R W O R K S O N P A P E R
the drawing. In such a case, it is best
to clean any stains locally as far as the
drawing permits, or to try to lessen the
spots with the help of a sharp knife.
To clean a pencil drawing com
pletely, it should be put first in a water
bath of the kind previously mentioned.
Severe stains are then treated by wetting
with a few drops of ammonia solution
after the sheet has dried off a little. After
this, the stained places are worked on
from the reverse with chlorine water.
The procedure, by the way, is the same
as for the cleaning of engravings. The
only difference in the cleaning is that in
treating the front with chlorine water,
you cannot rub with a bristle brush
because there is a danger that the draw
ing might be obliterated. Instead, the
chlorine water has to be sprinkled on the
drawing. This cleaning procedure only
applies to pure pencil drawings without
any coloring.
Drawings heightened with white —
that is, drawings in which the white has
been applied as liquid, not dry—often
show a dark instead of a white color in the
heightened places. Sometimes the white
has even turned black. The change in the
white coloring is caused by the effect of
light and air. The white lead has oxidized.
Oxygen has turned the color dark.65
Oxidation is a combustion process.
These black spots can usually be removed
very quickly. Just drip some citric acid
solution or a 10 to 2.0 percent hydrochlo
ric acid solution over the spot.66 Very
stubborn spots can be sprinkled addi
tionally with chlorine water. In spite of
this treatment, though, such drawings
will turn black again after a few years if
they are exposed to light and air after the
cleaning process.67
Chalk drawings should never be
placed in water, not even on the surface
of water. Colors that have been applied
dry can float off easily, especially those
dramatic white highlights. Also, I would
never recommend the use of fixatives on
chalk drawings or pastels in which the
paper has become foxed or severely dark
ened by age. The darkening is caused by
light, and the paper has lost some of its
sizing in the process. When the sizing is
lost, the paper becomes softer and is
more susceptible to outside influences.
The fixing process can easily cause stains,
even if the fixing agent is sprayed with
compressed carbon dioxide. If anyone
dares to take on the chemical cleaning of
a chalk drawing, he should have years of
experience. Instead, I would advise you to
desist from such a cleaning, since
unpleasant surprises can happen even if
you proceed with extreme caution.
To reduce the intensity of foxing
and to make it harmless for some time,
I would recommend that you expose
chalk drawings and pastels to chlorine
vapors. This procedure can be under
taken in a room with very little air move
ment. Chlorinated lime is boiled in a
container (see "Preparation of Chlorine,"
pp. 64-65), and the vapors are used to
treat the reverse of the sheet. Build an
appropriate frame and put the drawing
on it, the front facing upward. It is a good
idea to put a net of strings under the
drawing so that the paper is evenly
exposed to the vapors. The distance from
the vapor-producing container to the
paper has to be such that the vapors do
not hit the sheet instantly and cause
drops to form. It is also appropriate, but
not absolutely necessary, to use a box
without bottom or top so that the vapors

R E S T O R A T I O N O F E N G R A V I N G S , B O O K S , D R A W I N G S , A N D O T H E R W O R K S O N P A P E R 83
do not become ineffective because of
a draft. It is not absolutely necessary
to repeat this procedure. After the treat
ment, the sheet should be exposed to
fresh, dry air so that the chlorine smell
evaporates. Occasionally, foxing becomes
more noticeable and pronounced through
the vapor treatment. Do not worry about
this. After a short time it will fade again.
Since loose prints buckle during the
vapor bath and again after drying, I rec
ommend that before treatment the dry
prints be stretched over a pane of glass.
The side with the illustration, of course,
is facing the glass pane. If they have
severe foxing, the sheets can be strength
ened with a light solution of aluminum
sub acetate68 combined with gelatin after
the vaporizing and drying process. This
mixture, however, has to be applied very
moderately or else the foxing will strike
through. It might be appropriate to mist
this mixture with a spray nozzle.
Pen-and-ink drawings should only
be cleaned with chemicals if the colors
have a carbon or silver oxide base. These
inklike colors can withstand any chemi
cal. As with the pencil drawings, it is nec
essary to experiment on a small scale first
and then to start the work or to leave it
alone. All further treatments are the
same as for pencil drawings.

T H E C L E A N I N G O F B O O K S
The cleaning of books can be very sim
ple when a skilled bookbinder has
removed the binding. However, the mat
ter is more complicated when the pages
must be cleaned inside the book, as is
often the case.
It goes without saying that in the
first instance the pages are numbered. If
about one hundred pages out of a total of
two hundred are to be cleaned, all pages
are soaked. An acidified water bath pre
cedes the cleaning. After a twenty-four-
hour bath some success.shouldbe notice
able. If water stains are still visible, the
sheets will have to be placed into a bath
containing a generous amount of citric
acid. The water must have an acid taste.
The pages are soaked for three to four
hours. The citric acid bath is followed by
two more baths, which remove the acid
altogether. Take one sheet out as a sam
ple, put it on blotting paper to accelerate
the drying process, and make sure that
the water stains have disappeared. If a
chlorine water treatment is necessary,
the stains should only be dabbed locally.
Always proceed this way. Under no cir
cumstances should all the pages be sub
jected to a chlorine water bath.
A thousand voices may sound
against this and maintain that they have
always put their sheets into a chlorine
bath and no harm has ever come of it,
but I still insist on my opinion, which is
based on decades of experience.
I look at such a treatment as barbaric.
Even if older people cannot be convinced,
I ask the young under no circumstances to
engage in such maltreatment.
After all, I consider it my task to
preserve cultural treasures to the best of
my ability, not to vandalize them.
I am not an enemy of chlorine but
a friend!
Just think: If the pages still show
unsightly stains after the acid baths, how
strong the chlorine water must be to
remove these, too!
But what happens so often when the
desired effect has not been achieved?
Someone's fingers itch because the
stains have not disappeared in spite of
the strong chlorine solution. Stronger
and stronger agents are used, and the
paper is ruined. This should not be!
Hands off!
Book pages receive the same kind of
chlorine treatment as single prints. If
there is enough room in the laboratory,
ten to twenty sheets can be treated one
after another. The damp pages are put on
a wet support, and the stains are treated
locally with a weak chlorine solution. If
the solution is too weak, it can be con
centrated. Refer to the section on the
cleaning of engravings for this. Espe
cially conspicuous stains should be
treated with hydrochloric acid, 10 per
cent at the most; use chlorine and sorrel
salt69 for ink, but do not add any other
agents. The cleaning is sufficient if the
stains become lighter. These three
agents prevent the stains from spread
ing. The remaining color of the stain
does not do any harm. The main point is
that the evil has been eradicated.
The local treatment of stains inside
a bound book requires great patience.

R E S T O R A T I O N O F E N G R A V I N G S , B O O K S , D R A W I N G S , A N D O T H E R W O R K S O N P A P E R 85
Strong stains near the gutter mar
gins are not removed because their treat
ment would require bleaching several
times and in such quantity that the book
could be damaged. Any expert on books
is justified when he refuses cleaning pro
cedures that might be successful on the
treated spot but could harm the integrity
of other parts. This has to be emphasized
here, once and for all!
More conveniently located stains or
water stains are treated as follows: I rec
ommend that the areas around very stub
born stains, which probably have to be
subjected to a lengthy treatment, be satu
rated from both sides with a moderately
strong gelatin solution. This strengthen
ing agent should not run into the paper
suddenly but should gradually pass over
into the dry paper. To avoid the forma
tion of new water stains when doing this,
the area around the stain should be mois
tened lightly with a sponge that has been
squeezed almost dry. To start the treat
ment, place a colorfast piece of oiled
paper70 under the page and a slightly
moistened, absorbent piece of paper on
top. When a second page is treated, the
preceding one has to be protected in the
same way so that it does not come into
contact with any chlorine later on.
When the sizing solution has dried,
the chlorine water treatment can begin.
The surrounding areas are once again
moistened with a sponge that has been
squeezed out well, and the affected areas
are dabbed as in the case of the copper
engravings. First use a weak solution,
then a stronger one! After the cleaning
process —several pages of the book can
be treated at once—the treated areas are
dabbed with clear water. This is followed
by the antidote, undiluted if possible,
and clearwater then moderates the effect
of the antidote.
Light water stains have to be
removed in advance with vinegar water.
After the last localized water bath, sever
al layers of blotting paper are put
between the pages and left there to dry.
During the drying process, the book
should be placed upright and spread
open so that the pages that have not been
treated will not be affected. I would like
to mention here that the pads have to be
changed after the localized chlorine
water treatment as soon as the counter-
measures start.
If, in spite of all precautions, new
water stains have formed after the com
plete drying of the book, these have to be
removed by careful dispersion with a
firmly squeezed-out sponge. You can also
try to remove new water stains by
strengthening the affected areas with a
gelatin solution.
If you have used a lot of water, the
pages will probably slightly expand out of
their binding. Since the expanded paper
cannot be cut—the type area has to be
taken into consideration —it seems
advisable to slightly moisten the remain
ing pages also.
The special character of the book
pages has to be restored. Please refer to
the section "Actual Mending or True
Restoration" (pp. 109-22) for further
details on this process.
It is often quite difficult to take a
book out of its binding without damaging
the binding. However, an experienced
bookbinder, who knows all the secrets of
binding as well as various binding
agents, will have hardly any problems or
will be able to overcome them easily.
Above all, the owner of such a book
will have to trust the expert even when
he considers the removal of the pages

86 R E S T O R A T I O N O F E N G R A V I N G S , B O O K S , D R A W I N G S , A N D O T H E R W O R K S O N P A P E R
necessary but cannot guarantee that the
binding will remain unharmed. After all,
it is the main goal of any expert to pre
serve the binding, since the cleaned
pages are most attractive in their com
plete old setting.
I know some capable bookbinders
who are especially proud of performing
their work while preserving the charac
ter of an old book.
Of course, even among bookbinders
and restorers there are dabblers to whom
valuable works should not be entrusted.
No special advice can be given for
the separation of an entire book, since
every binding is different. After preserv
ing the binding, continue with the sepa
ration of the book, layer by layer. Water
should be used as sparingly as possible
because any absorbed water can cause
severe stains that are often very difficult
to remove. To avoid the formation of
water stains, I would suggest that after
separation the volume be placed under
a heavy press so that only the back pro
trudes a little. The volume could also
be put between strong boards and
pressed with iron or wood clamps.
Working lightly with cold or at the most
lukewarm water, do not brush it over the
entire back but leave i to 2 cm at both
ends of the back free so that the water
cannot seep into the sides of the book.
Trained book specialists do not need to
be reminded that the moistening of the
book has to be done very skillfully. I
would, however, like to avoid having
inexperienced people perform this kind
of work, believing they can blame my
pronouncements.
If the book can be divided into three
or more sections while dry, I recommend
that the sewing threads in each section
be cut. After this, place the sections
into water as follows: Find the middle of
the section, then submerge one-half,
page by page; treat the other half the
same way. When submerged in the acid
bath, each section will look like an open
book. After softening the paste with an
hourlongbath, the pages can be lifted up
one by one. The soaked paste is removed
with cold or warm water, depending on
its composition.
CLEANING SEVERELY
DAMAGED BOOKS
From many circles, including the book
binding trade here and abroad, I have
received inquiries and samples, with the
request to comment on one kind of treat
ment or another. I was not able to follow
up each request the way I would have
liked—although a short reply was always
given. I would therefore like to answer
here in a little more detail the questions
that have been put to me.
First, without great effort, it is hardly
possible to restore moldy books that are
excessively covered with fungi or bacteria,
the way they are sometimes found today,
and hope to be able to use them again.
When books have been left to deteriorate
so badly that the pages start to crumble
when they are turned, we can no longer
speak of a satisfactory restoration.
Many readers of the first edition of
my book thought that there must be a
procedure that could remedy such dam
age. There has been talk of hot air, with
or without chlorine vapors, of airtight
incubators, and so on, without any
thought given to the fact that heat might
make the damage even worse. Light and
heat combine with the enemies of the
paper and can completely destroy a cul-

R E S T O R A T I O N O F E N G R A V I N G S , B O O K S , D R A W I N G S , A N D O T H E R W O R K S O N P A P E R 87
tural treasure. When paper is so fragile
that even turning a page becomes dan
gerous, there is hardly anyway to save it,
especially if the pages have print on both
sides. If there is a special reason for risk
ing an attempt at restoration, I suggest
the following: Remove the pages from
the binding as best you can, the some
what sturdier ones first. A colorless,
strong sheet of paper is cut in such a way
that each piece is a little bigger than a
book page. This paper is saturated with
a strong solution of chlorinated lime, and
the fragile page is placed on top.
Sprinkling liquid chlorinated lime on the
page would harm it; therefore, a second
piece of paper saturated with chlorinated
lime is placed on top, enclosing the book
page between the two papers. Enough
solution of chlorinated lime is dribbled
onto the paper so that it begins to float.
The book page should be left alone for
about fifteen minutes. It would be per
fectly all right to perform this task in
a larger tray in which several pieces can
lie next to each other. After the fifteen
minutes have passed, lift the upper sheet
carefully, make sure that the book page
does not adhere to it, and examine the
page. If the cleaning has been somewhat
successful, leave it at that. The book page
with its support is now placed in a pure
water bath, but the sheet is not rinsed
because it could tear in the process.
Renew the clear water bath very fre
quently before applying an antidote.
When taking the page out of the water
bath and in the course of the various other
baths, use the supporting sheet. The fur
ther baths have already been discussed.
I would like to emphasize again that
only a person with the necessary exper
tise should attempt this kind of cleaning.
As with all tasks, only the person who
really applies himself will be successful.
All the procedures require the utmost
concentration. A good frame of mind, a
cheerful working space, undisturbed
working conditions, and excellent day
light are the first prerequisites for the
solution of such difficult problems.
If some stains remain quite conspic
uous and require a second cleaning, I rec
ommend that the pages be sized a little
more thoroughly when dry. After drying,
the cleaning process is the same as men
tioned before. Although this procedure is
very time-consuming, it can preserve for
several years many books that would sim
ply decay otherwise.
Second, why would mending paper,
which completely matched the original,
buckle once it dried, despite having been
applied in complete accordance with the
instructions? I have answered this ques
tion many times, either in writing or
orally, so that in more than a hundred
cases much better restoration work could
be performed. Before blaming the paste
alone, I first look at the preparations.
Has all preliminary work been per
formed satisfactorily? Has all prepara
tory shaving been done in such a way that
guarantees success?71
The shaving at a tear or corner may
be done only as forcefully or lightly as the
paper permits. When the shaving down
begins, it cannot be done so deeply that
when the paper is held against the light a
transparent area will be seen from the
starting point to the edge of the tear or
corner, as I have been told has happened
in many instances. This should never
happen! Many think that in being shaved
to fit the original, the mend would
require hardly any shaving because the
shaving of the original would be enough.
Of course, this is completely wrong. The

88 R E S T O R A T I O N O F E N G R A V I N G S , B O O K S , D R A W I N G S , A N D O T H E R W O R K S O N P A P E R
preliminary shaving of both parts is done
in such a way that it makes the original
only slightly thinner—hardly perceptibly
so—but never so much that the mend
merely has to be shaved a little bit. The
way in which both parts must join
together is such that you must use your
intuition as a guide in the shaving.
Certainly, when shaving the front, you
may touch only the thin inner edge of the
tear, never the entire width of the mend.
Also, if you shave the back of the original
extremely thin for the full width of the
patch, the paste—which often may not
be prepared correctly—will become evi
dent from the front as an area of trans
parency. If the shaving is done well
enough so that little shaving is left to do
after the mend is attached, the problem
of a good restoration will have been
solved in the best way. This requires
patience and the kind of intuition that
can only be acquired over the course of
many years.
This method is the best, but satisfac
tory results can also be obtained when
more shaving is done on both sides. The
main points are doing the shaving in
accordance with intuition and inserting
the mend in a methodical manner.
But let us look at paste one more
time. Paste, as I mentioned in the begin
ning of this section, is a foreign body.72
Since we cannot work without it, we have
to try to limit its power. As I mentioned
before, the preparation of the paste is
often to blame if the mend starts to
buckle or become noticeable in other
ways. Most restorers — I have been able to
observe them often—do not know how to
prepare paste properly. They may start
out correctly by stirring the paste cold.
Then they pour on boiling water, stir the
paste well, and—that is the end of it. If
you prepare paste this way, you should
not be surprised when the restoration
becomes problematic later on.
During the preparation of the paste,
it is most important that the kettle not
be immediately taken off the heat after
the boiling water has been added. For
restoration purposes the later swelling of
the paste has to be prevented at all costs.
And this is done by adding small amounts
of water while stirring constantly. Paste
only swells when it is boiled repeatedly.73
It is amazing how much boiling water has
to be added to make the paste usable for
restoration purposes. Paste that is pre
pared according to the first method can
be used for bookbinding work but never
for restoring. When especially thin
papers have to be mended, the paste is
diluted even more. Each mending proce
dure requires a special preparation of
paste. It is better to make fresh paste
more often than to try to renew old paste
by adding water.
Newly restored sheets should not
be placed under a press immediately—
that, too, can cause harm—but should
be weighted with books or cardboard.
Take the double moisture of the mended
area—which can become noticeable
after drying—into consideration. Rub
bing with a bone folder74 should not be
done too forcefully either, to avoid dam
aging the edges of the mended area on
the front of the paper. When the sheet is
almost dry, light pressure from the press
cannot do any harm.

H Y D R O G E N P E R O X I D E
Next to weak chlorine water, hydrogen
peroxide is an excellent cleaning agent. I
mention it in second place because it has
only become a household remedy over
the past fifty years. Although it was used
for all kinds of purposes almost ninety
years ago, for a long time it was much too
expensive for extended use.
I have been using hydrogen peroxide
for "only" about thirty years. During that
time, I have had only good results with it,
probably mainly because I had gained
sufficient experience in the treatment
of color prints and also with the use of
chlorine water. Practicing with weak
chlorine water, sometimes even using
chlorine extract combined with hydro
chloric acid, is absolutely essential.
Using chlorine and hydrogen in the right
amounts can bring excellent results.
When chlorine water is used, cleaning
should be done with the window open;
hydrogen peroxide, being odorless, may
be used in weak solutions even in a
closed room. At the most a 5 to 10 per
cent solution can be used. Never use
a stronger solution! Oxygen, the real
cleaning agent in hydrogen peroxide,
can burn the paper severely and make it
very brittle.
A dark bottle should be filled only
halfway with the 10 percent solution. If
it were filled all the way and not kept in
proper storage, the tightly fitted cork
would fly out of the bottle with a loud
pop. Hydrogen peroxide has to be stored
in a cool, dark place.
I have experimented with stronger
solutions and advise against them
because it is very hard to determine the
limits of usefulness.
And now a piece of personal advice,
which is designed to protect the techni
cian. Since oxygen is highly caustic, do
not wipe your eyes with moist hands
while working. Small burns on your
fingers, whitish spots, are not harmful
unless you have cuts. I mention these
minor dangers so that you do not handle
hydrogen peroxide carelessly.
Hydrogen peroxide, which is com
monly sold in drugstores and pharmacies
for household use, is at the most 3 per
cent and is too weak for the lightening
of sheets. Order a 10 percent solution,
maybe 200 g, and pour half of it immedi
ately into a dark bottle that is then filled
with an equal quantity of distilled water.
This is now a 5 percent solution, whereas
the first one is 10 percent.
The 5 percent solution can be used
to remove light browning and foxing. I
would like to mention, however, that
each sheet has to be subjected to the
same preparations as were made for the
chlorine water treatment —namely,
baths, a light local treatment with citric
acid, and so on—because often even the
weaker processes bring success.
When the sheet is half dry, not moist
as in the case of the chlorine water treat
ment, lightening with hydrogen peroxide
can be started. Brush the sheet from the
back with a saturated flat bristle brush,
let it dry a little, and repeat the proce
dure until the desired result is attained.
This kind of treatment does not
affect the paper or the print, but the

90 R E S T O R A T I O N O F E N G R A V I N G S , B O O K S , D R A W I N G S , A N D O T H E R W O R K S O N P A P E R
cleaning process is somewhat slower.
The 10 percent solution is needed
only when severe foxing refuses to dis
appear. Here, too, you will have to try to
create a harmonious transition to the
surrounding area so that the paper in the
vicinity of the foxing does not stand out
as considerably lighter. If the localized
treatment is not sufficient, give the sheet
a shorter water bath and treat any
unsightly stains with chlorine water.
When severely yellowed book pages
have to be treated in the binding, I rec
ommend the use of dilute chlorine water.
Cleaning the pages with hydrogen perox
ide for many hours would cause water
stains, and frequent dabbing would wear
away the paper.
A full bath of two to three hours in a
5 percent solution cannot harm the book
pages. When stronger solutions are used,
the danger exists that paper might
become brittle if it contains cotton or
mechanical wood pulp.
Before treating color prints with
hydrogen peroxide, you should practice
on monochrome sheets until you have
reached a certain expertise in lightening
them. Hydrogen peroxide, even in a weak
solution, affects colors when it is allowed
to work for hours. There are a number of
colors that cannot withstand extended
treatment with hydrogen peroxide. It is
impossible to list these colors because
individual combinations as well as their
oil content vary, and later prints, those
after 1820, have to be given special
consideration.
For localized treatment of unsightly
stains that have to be removed from
robust colors such as blue, brown, or
bistre, I prefer weak chlorine water. The
treatment is performed on moist paper.
A gradual transition to the surround
ing area can be achieved more easily
with dilute chlorine water than with
hydrogen peroxide.
After the treatment with weak chlo
rine water and an antidote, I recommend
a slight lightening of the sheet, done
from the reverse, with 5 percent hydro
gen peroxide.
For practicing, I recommend that
you apply a 10 percent solution to papers
from different epochs so that in each
instance you learn the effect of the oxy
gen contained in the hydrogen peroxide.
After treating the papers with hydro
gen peroxide, especially after a complete
cleaning, you place the sheets into pure
water baths. The clear water must be
renewed within four hours. Many of you
will not be aware of the fact that the
cleaning power of hydrogen peroxide
does not dissipate very fast. If you pour
into an eggcup a small quantity of hydro
gen peroxide and let it stand unpro
tected, the hydrogen peroxide is still
usable after thirty hours. Chlorine water,
on the other hand, cannot be used any
more. Hydrogen peroxide, therefore,
should never be regarded as a harmless
cleaning agent.
T H E T R E A T M E N T O F V A R I O U S S T A I N S
I do not want to present specific poisons
to you, even though I have to say that
there are quite "useful" poisons. But the
use of poisons often does more harm
than the stain itself. Therefore, I only
recommend the use of chlorine extract
combined with citric acid or 10 to 25 per
cent hydrochloric acid.75 The sheets have
to be well moistened even if the stains are
receiving only localized treatment.
Writing in ink can be removed with
the above-mentioned remedies. If some
remnants of the writing are still visible,
sorrel salt can help. For this purpose
boiling water is poured on half a tea
spoon of sorrel salt, creating a solution
that fills an eggcup halfway.
Fresh grease spots are removed with
carbon tetrachloride. Blotting paper is
placed under the grease spot, and the
spot is rubbed from the front with a swab.
Sometimes repeated dabbing is enough.
Do not limit the dabbing to the spot but
spread the remedy on the surrounding
area also.
If stubborn stains do not yield to
repeated treatments, lightly moisten
these spots with pure water. Since the
print and the paper have to be protected
by all means, it is advisable to repeat the
chlorine extract treatment three to four
times and to put the sheet into a bath
with an antidote after each attempt.
Never try to remove unsightly stains all at
once. I strongly recommend that you let
the sheet dry after each cleaning proce
dure and examine it to determine
whether further treatment is necessary.
If the stain is still faintly visible, the sur
rounding can be colored lightly to
achieve a harmonious impression.
Unfortunately, there is no set rule
for treating flyspecks, which often can
not be completely removed. At times
a bath is sufficient, however. While the
sheet is in the bath, try to remove the
flyspecks by rubbing with a round bristle
brush. If the flyspeck is in a heavily
printed area, the bristle brush can be
very efficient. Chlorine extract and
hydrochloric acid can considerably
modify such stains if they are dabbed
on frequently.
In stubborn cases flyspecks have to
be removed surgically, because the sur
rounding area has to be protected. The
cut-out places are repaired in the same
way as wormholes.
Superficial burns in the paper, which
are not too dark brown or too brittle, are
treated with pure chlorine water.
Stubborn oil stains can often be mod
ified, occasionally completely removed,
if they are located in the unprinted part
of the paper. A wide casserole dish or
enamel frying pan, half-filled with water,
is put over a small gas flame. Into the pan
pour two to three tablespoons of bleach
ing soda and let it dissolve. The print that
is about to be treated has been moistened
and placed between two nonabsorbent,
colorless sheets. One sheet covers the
front up to the oil stains to protect the
print from soda vapors.76 The lower sheet
supports the entire print. Shape the
print with the support into a wide roll,
and place this roll vertically or at an
angle into the dish. For the removal of oil

92 R E S T O R A T I O N O F E N G R A V I N G S , B O O K S , D R A W I N G S , A N D O T H E R W O R K S O N P A P E R
stains, it is best if they are reduced grad
ually. Therefore, never try to diminish or
remove an oil stain by direct treatment
in boiling soda water.77 Leave the print
in the dish for up to five minutes while
the soda solution is boiling. Remove the
print after this period of time, open it a
little, and check whether the oil stains
have started to absorb water. If they have,
the stains have lost their oil content. The
print is placed into a water bath so that
the soda is removed. The paper has been
subjected to a lot during this treatment,
but it has not been weakened so much
that it dissolves.
The surface of the soda water always
has to be at least 3 cm away from the
printed part; otherwise, the picture will
be adversely affected. It has to be taken
into consideration that the more the
paper has been moistened before the
treatment, the harder it is for the soda
solution to spread or soak into the paper.
In other words, the more moist a paper
is, the less harm can be done by the soda
solution. At the place where the effect of
the soda solution leaves off, a brown ring
is formed, which stems from the yellow
ing of the paper.78 Most of the time this
ring can be removed by means of a simple
water bath, but if it does not disappear, it
has to be treated with weak chlorine
water. The chlorine water treatment also
takes the color out of the stain, so that
two things are accomplished at the same
time. If the stains are still visible, sprin
kle a little hydrochloric acid on them.
Once you have gained a certain
expertise in the treatment of old oil
stains, you will be able to recognize
ahead of time whether a case is severe or
not. It is better for the paper if you do not
try beforehand to remove the stains by
chlorine water, because that would only
affect the area around the stains. It would
be a futile undertaking, and the paper
would be affected twice.
I have to repeat once again: This
method can only be used on those parts
of the paper that are free of print. Also,
the paper has to have a certain amount of
strength; it cannot be too fragile. Under
no circumstances should any of the Old
Masters be subjected to the soda method.

T H E R E M O V A L O F S P I R I T V A R N I S H
Varnished and mounted prints are imme
diately treated with spirit of wine, if pos
sible with 96 percent spirit. The latter is
more effective than the common methy
lated spirits.79
After removing the dust with a moist
sponge, put the mounted sheet in a bath
of pure spirit of wine. The tray has to be
rubbed dry before use. The sheet does
not have to be submerged in the bath, but
you cannot have too little spirit of wine
either. In order to have the spirit of wine
take effect, the tray should be rocked fre
quently back and forth. Through rocking
the tray, you inundate the varnish, which
runs off the sheet. After about twenty
minutes, the spirit of wine is drained off
and the spirit bath renewed. To prevent
the spirit of wine from evaporating too
quickly, cover the tray with cardboard or
a drawing board. Shortly before taking
the sheet out, rock the tray back and
forth a few more times and rhove a flat
bristle brush across the whole sheet.
Make sure that the spirit of wine has no
color when the bath is drained. If it shows
color, the bath has to be repeated. Only
when the spirit of wine is clear can you be
sure that the varnish has been removed
completely. The mounted engraving has
been freed from its varnish and is put
upright to dry completely, in such a way
that it does not touch any objects painted
in oil. If you observe several whitish areas
after the sheet has dried completely, the
spirit treatment will have to be repeated.
Usually, it is the presence of sizing
that causes the sheet to appear slightly
shiny or spotted when held at an angle
against the light. Because the sheet is
mounted but has to be separated, it
should stay in water for about twenty-
four hours. Since the sizing is paste, it
will be advantageous if the bath softens
the sizing a little. Do not attempt to sep
arate the sheet cold after the bath but
attack it immediately with sword and fire.
Pour boiling water on the print—of
course, not from a great height, so that
the impact of the water pressure cannot
harm the paper. I mentioned this danger
before. The next task is the removal of
the sizing. The hardened layer of paste,
the sizing, has to be covered with boiling
water. When the water has cooled off
somewhat, the tray is emptied com
pletely; the sheet remains in the tray, and
boiling water is poured over it again and
again. After repeating this three to four
times, take a somewhat worn flat bristle
brush and carefully move it across the
sheet, to loosen the remnants of paste.
These hot treatments have to be repeated
frequently; do not assume that one or two
baths will be sufficient.
The support will have become loose
in the meantime. The sheet is turned
over, the support is removed, and the
glue is washed off. After the sheet is
placed on a piece of oilcloth, any glue
remnants are removed; the sheet is
rinsed well from both sides and placed
into a recovery bath. After several hours
it is hung over a pole to dry.
Examine the sheet after it has dried,
and you will probably find some rem
nants of paste. These remnants—which
often appear only in the dark areas

94 R E S T O R A T I O N O F E N G R A V I N G S , B O O K S , D R A W I N G S , A N D O T H E R W O R K S O N P A P E R
because the heavily printed colors hold
the paste better—will have to be treated
locally with chlorine water. Vital parts
and beautifully colored parts especially
should not come into contact with chlo
rine water. In these instances the rem
nants have to be left on the sheet because
it requires great skill to remove them
completely. The print can lose some of its
vividness because of the frequent pour
ing of water. There is nothing to be done
but to restore the beautiful and pristine
appearance by skillfully retouching.
Varnished engravings are rare. In
all my years of work, I have treated at
the most one hundred fifty to two hun
dred sheets.
Occasionally a client will ask appre
hensively, "Do you have to use water?
Will the print not suffer from this kind
of treatment? I do not want the won
derful mellowness of the mezzotint
to disappear."
To that I can only answer, "Yes, you
are right, the danger is there. But your
print has already been varnished and has
lost its mellowness, so the water treat
ment cannot do any more harm."
Occasionally, the same question is asked
about prints that are not varnished:
"Does the print absolutely have to be put
into water?" My answer is, "Yes, obvi
ously. After all, the print is mounted.
Mounting can only be done when the
sheet is completely saturated from the
reverse! If you wanted to cover a sheet
with paste without moistening it before
hand from the back, the paste would have
to be packed on really thick. Naturally, by
its gloss the paste will be visible on the
front when the paper is soft, and the
paper will have lost its charm. The most
magnificent mezzotints were printed on
soft paper. If nonexperts have allegedly
done no harm to the print, it cannot
possibly suffer in a water bath under
expert care."
When you are dealing with precious
mezzotints, the sheets can be separated
dry in certain instances. But such a sepa
ration requires a lot of time. I myself own
a small collection of color prints and
know that every collector would like to
have untouched prints in his collection.
However, whether precious mellowness
will be lost during the treatment of var
nished prints is a question that does not
have to be raised at all, because the
owner never saw the print before it was
varnished. If the owner of a varnished
print were aware of the fact that this
sheet had to be sized with a heavy layer of
paste before being varnished, he would
consider this question superfluous.
Could there have been a compelling
reason for treating a print this way? I
think so. During the course of my work,
I have found that most color prints are
not first-class impressions. Before I start
treating them, I select one place that
seems to be suitable for testing to see
whether the print has any special charm.
If I find out that the print loses some
of its vividness in the especially color
ful parts or rich tones, I have to con
clude that the sizing and varnishing were
done to liven up the colors. One certain
ly does not have to varnish a print to
make the printing look livelier. A consci
entious retouching artist can easily
improve the appearance of a print by
adding minor details. A varnished pic
ture might not always be recognizable as
such had the "master varnisher" worked
with greater care.
I would like to mention, in closing,
that varnish can be successfully removed.
In only a small percentage of the prints

R E S T O R A T I O N O F E N G R A V I N G S , B O O K S , D R A W I N G S , A N D O T H E R W O R K S O N P A P E R 95
from which I removed the varnish was it
noticeable that they had been varnished
at all. In those cases the sizing would not
disappear entirely.
I have to point this out for the pro
tection of anyone who might want to pur
chase varnished prints. In spite of many
successes, no restorer can guarantee
work performed on varnished prints.

S T A R C H P A S T E
Hoffmann's rice starch, packed in a box
with the brand name Katzchen, is the
best and, therefore, most highly recom
mended adhesive. Different kinds of
preparations are selected for different
kinds of work. Although the starch goes
far, to be economical you should mix and
prepare only enough for two to three
days. Prepared with clear water without
any additives, the paste will certainly
keep four to five days if it is boiled until
it is somewhat thick. If stored in a cool
place, it might even keep a week. What
more can be expected? Never add alum to
paste that is used for restoration work or
for mounting valuable papers.
Bring a small kettle of water to a
boil. In the meantime (the water should
boil for at least fifteen minutes)80 dis
solve two teaspoons of starch in cold
water in a small casserole dish. A little
water is sufficient; the starch imme
diately absorbs the water, disperses into
particles, and is mixed thoroughly with
a spoon. Pour enough boiling water on
the starch to make a somewhat thick
mixture. Bring the paste once more to a
boil over a gas flame, stirring constantly;
after that, it is finished and can be
put aside.
When the paste is cold, it has to be
thick enough not to pour out instantly
when the dish is turned upside down. Is
the paste ready for use now? One hopes
so. Trying it on worthless sheets will
show whether the paste has been pre
pared too thick or too thin. If the mended
area starts to buckle or if the mend
becomes loose after having been pressed
down, it is not always certain that the
paste is to blame. The areas that were
covered with the paste might have been
too moist or, if the place is buckling,
too dry.
A soupy kind of paste that is used for
mounting China paper has to be mixed
in the same way, only more boiling water
has to be added. When cooled, this kind
of paste immediately pours out. Before
applying the prepared paste, it is advis
able to press it through a linen bag. It is
best to put as much paste in the bag as
you can use in a day.
For mounting on stronger supports,
boil the paste a little thicker than for
pure restoration work. To separate the
supports of earlier color prints, mix the
paste as usual, only it should be neither
thick nor soupy when cold.
Cold paste should never be diluted.
There is a possibility that lumps will
form. The adhesive strength, too, will
suffer. The preparation of paste is sim
ple, but using it properly requires a lot of
experience. I wish that success will be
denied to no one who has acquired
enough experience. If restorations go
well, then for the most part one must
thank the starch paste.
The paste has to be stored well so
that it does not get contaminated by dust;
it is best to put cardboard over the dish or
to place a carton over it.
For working with paste, I recom
mend the use of cardboard. For taking up
paste, small, clean pieces of cardboard
are used so that the water content of the
paste can be absorbed. Ten or twenty

R E S T O R A T I O N O F E N G R A V I N G S , B O O K S , D R A W I N G S , A N D O T H E R W O R K S O N P A P E R 97
pieces are cut from a big piece of card
board; they are stored carefully and pro
tected from dust. For a minor mending
job, a small amount of paste is put on
a piece of cardboard with a teaspoon
and is distributed with a small round
bristle brush.
As an alternative to rice or corn
starch, I recommend pure white potato
starch which you can make yourself.

S T R E N G T H E N I N G S E V E R E L Y D A M A G E D P R I N T S
It is a widely held opinion that paper will
lose its sizing even after a very short
water bath. This is not true. The sizing of
paper is not lost that quickly. Papers from
earlier times were often sized so heavily
that they hardly absorb any water at all.
Papers that were manufactured from
good materials and received heavy siz
ing, therefore, hardly ever show water
stains, foxing, or browning.81 Papers
from later periods, especially those man
ufactured from cotton, are more sus
ceptible to external influences. When
ordering papers, graphic artists and
printers distinguished between soft,
absorbent papers with little sizing and
hard, nonabsorbent papers with heavy
sizing. The first kind were especially
suited to mezzotints and aquatints,
whereas the latter were more frequently
used for heavily colored, contour prints.
Only in rare instances would color prints
be sized after leaving the press. The skill
of the painters in the eighteenth century
had already reached such a high level
that they worked successfully even on
soft paper. It is possible that papers from
about 1750 on will lose some of their
already weaker sizing,82 especially when
they are treated with chemical baths. It
is therefore advisable to examine the
texture of the paper before any treat
ment. An untreated print from the same
period makes it easier to decide whether
the entire treated sheet requires sizing.
You certainly have to be careful not to
destroy the special character of soft
paper through inept and unnecessary
sizing. Therefore, if you encounter heav
ily sized sheets that make rattling noises
when handled, you can invariably assume
an inexpert after-treatment. Heavy sizing
after a treatment is necessitated by high
ly caustic agents used during the clean
ing process. To revive colors that were
destroyed, the incompetent restorer—
lacking technical skill and the ability to
adapt—sizes the paper too heavily so
that watercolors can then be applied.
Even an expert will now and then
apply a weak sizing. He will not do it to
restore the colors —heavily damaged
areas of colors do not occur when the
treatment is done properly—but to pre
serve the character of the paper. If the
entire sheet has to be sized, perhaps
existing tears, breaks, folds, and worn
places will receive a special sizing
applied locally with a bristle brush.
Another reason for an expert to size
the whole sheet can be the fact that
larger mended areas, in spite of a good
match between the print and the mend
ing paper, need to be lightly sized
because they are rough and more suscep
tible to dust. If a strong sizing is applied
later, it spoils the engraver's work as well
as the restorer's.
How to dissolve the sizing agent—
white gelatin —has been discussed in
detail in a previous section.83 Such a
gelatin solution can be diluted as
needed. The solution is used for sizing a
dry sheet and is brushed on with a flat
bristle brush.

T I N T I N G , C O L O R P R E P A R A T I O N
Prints are tinted while they are moist.
Tinting should never be done dry
because the sheets can develop streaks
and there is a danger that the tints might
be too strong. The print is not put into
the water but just on top, so that it can
absorb a light tint more easily. The
reverse will absorb the water and distrib
ute it over the entire sheet. The sheet is
put over a pole to drain. Initially, the tint
ing is done from the back on an oilcloth.
The prepared, warm tint is mixed with a
dilute gelatin mixture and generously
applied overall with a flat bristle brush.
The front is colored in the margins but
in the printed area only if really neces
sary. The tint has to be subtle enough so
that it does not appear to be a real color
ing. For instance, if the book pages have
been treated individually, a tint has to be
chosen that matches the color of the
untreated pages. It is advisable to tint the
sheets two to three times to match them
gradually. Never try to attain a dark tone
in one attempt. I can tell you from experi
ence that such shortcuts do not work and
that the result is usually catastrophic.
If a great quantity of sheets is to be
treated, you can have special equipment
built for tinting. But this is not a neces
sity. A sheetmetal worker can make a tray
with an arched bottom, similar to a
butcher's tray but with vertical sides and
turned-down edges. Two feet, or braces,
hold and support it. The colored water is
poured in hot, and the sheets are pulled
through with some kind of tool. The col
ored water definitely has to be stirred
several times. Two small alcohol burners
can be employed to keep the colored
water, mixed with the gelatin solution,
warm at all times. Or the colored water
can be poured back into a big pot and
heated over a gas flame.
Licorice water, coffee, chicory, and
several kinds of tea are suitable for tint
ing. Prepare an extract of each of these
and let it settle for a while. When you are
ready for tinting, pour the extract
through a linen bag into a big pot in
which it can be heated. Three to four
sheets of gelatin dissolved in boiling
water will be enough for 3 to 4 liters of
color extract. The tinting itself has to be
preceded by several experiments. Find a
similar paper among your paper stock
and experiment with it. I would like to
mention specifically that the sheets
should never be tinted in such a way that
they appear greenish or grayish once
they are dry. On the whole, the color
should not be especially noticeable but
should merely improve the harmonious
impression of the sheet.
If you know how to clean a sheet or
how to treat it well in other ways, you will
not need the dyeing process at all, as can
be gathered from my previous remarks
on bleaching.

E X A M I N I N G A N D P R E P A R I N G T H E P A P E R
That water can be heated in a paper bag
is well known. Take paper with a good
amount of sizing—it has to have a certain
firmness—pull the sides of a small sheet
up a little, maybe 5 cm on all sides, pour
a little cold water into this container, and
hold it over a small gas flame. After a few
minutes the water will have reached the
desired temperature. This is only a little,
fun experiment. The paper cannot catch
fire because the container is filled with
water and the temperature necessary for
igniting the paper is never reached.
Old papers are occasionally so strong,
firm, and impervious to moisture that
the wonderful preservation and fresh
ness of these old books does not cease to
amaze us. Provided they have been kept
properly, not too many old books will
exhibit foxing, water stains, or browning.
The earlier, high-quality paper produc
tion not only has preserved invaluable
treasures up to the present, but will pre
serve them even for future generations.
The paper manufacturers of earlier cen
turies created perfection through the
use of good materials. In later times, as
already mentioned, manufacturers were
less particular about the processes and
use of ingredients involved because of
sharply increased demand. And, apart
from a few exceptions, I do not even want
to mention the present.
It is understandable that the large
volume and relatively low price make it
impossible to use higher-quality mate
rials. However, if we want to preserve
valuable works for the future, we have to
take the greatest pains in the manufac
ture of paper!
And how is the paper that is needed
for mending prepared or made ready so
that it becomes like, or at least similar to,
the paper to which it is to be added?
Please, take this paper preparation
seriously and follow my instructions
exactly.
The mending process, true resto
ration, requires utmost attention. If it
fails, you have only read my instructions
superficially. You cannot repeat the pro
cedure several times as may be possible
with a painting. The work has to be an
instant success for each sheet, or you will
do great damage.
The explanations about the use of
paper and the notes in the section
"Actual Mending or True Restoration"
(pp. 109 - 22) should be read carefully!
If the original paper, the print, is
from the fifteenth century, you will
find—as already mentioned—that the
paper does not absorb water easily. The
sheet, therefore, must have been sized
specially and consists of only the best
materials. If you find sheets from this
period that readily absorb water, the
papers or prints have probably experi
enced some less than expert treatment.
There is also the possibility that earlier
prints have been sized more than one
hundred years ago with a sizing solution
to restore a certain firmness. What do
you do then? You have to look at the print
to see whether the treatment was a radi
cal one. The treatment with chlorinated
lime, sprinkled on dry, was already
known more than one hundred years ago.

R E S T O R A T I O N O F E N G R A V I N G S , B O O K S , D R A W I N G S , A N D O T H E R W O R K S O N P A P E R 101
The lovely tone of the print, the softness,
would have been lost with this barbaric
type of treatment.
I would like to point out here that it
is sometimes impossible to restore a
sheet that has been treated by a layman
and has been heavily patched and
retouched.84 A restorer of paintings can
go a millimeter beyond the tear if there is
no other way. A restorer of paper simply
cannot do this!
I am digressing slightly from my
topic, but that has to happen occasion
ally. I want to and have to mention all
procedures. And since everything is
interconnected and the subject is diffi
cult, I want to make sure that the reader
completely understands my ideas and
practical advice. And I have to insist that
the reader follow me closely.
Let us assume that the sheet was not
treated previously but was torn by an
inexperienced hand, as often happens.
In this case, the paper will not be
absorbent. Since it has not been cleaned
yet either, the best possible match has to
be selected from the paper supply, and
the following points have to be consid
ered carefully:
1. The paper should not be
absorbent.
2. The color should be a very
good match.
3. The texture of the paper should
be the same.
4. The wire lines should match
the original when seen against
the light—fine, coarse, or
indistinct.85
If these four basic prerequisites are
met, the paper will be suitable for the
restoration.
Soft—that is, absorbent—papers or
prints are considerably more difficult to
treat because the matching repair paper
has to be examined more thoroughly.
Except for point 1, the above points also
have to be taken into consideration care
fully. Even if the mending paper is soft
and points 2, 3, and 4 seem to corre
spond, in many instances the paper still
may not be usable. It is not absolutely
necessary to test the expansivity of hard
mending papers when they are used for
minor repairs; they are strong and barely
absorbent.
Soft papers especially have to be
tested for their expansivity. The illustra
tion (fig. 22) will clarify my explana
tions.86 The print side is put on a sheet of
glass while dry. The mending paper is put
on the reverse of the print in the direc
tion of the wire lines, and small marks
are made with a soft pencil, extending
onto both the mending paper and the
original paper. Later, after an examina
tion of the paper, these pencil marks are
Fig. 2,2.
(a) Copper engraving (reverse side);
(b) plate mark; (c) edge of sheet;
(d) image size; (e-g) reverse of the
mends, top view; (h) registration
marks

102 R E S T O R A T I O N O F E N G R A V I N G S , B O O K S , D R A W I N G S , A N D O T H E R W O R K S O N P A P E R
carefully removed with a soft eraser.
After this has been done, the print
and the mending paper are placed in a
clean, cold bath and left to soak and be
saturated with water. Both parts are then
taken out and put on clean, white blot
ting paper, which will quickly absorb any
surplus water. The mending papers are
examined while moist by placing the
parts on the pencil marks. If the registra
tion marks match perfectly at this point,
the repair paper is suitable. A tenth of
a millimeter is important! Negligence
and carelessness—thinking, "Oh, never
mind, it will come out all right"—invari
ably produce disappointments. Later,
while still moist, the pieces of mending
paper are put together with the original
paper with the help of starch paste—that
is, the mends are implanted.87 If you do
not pay close attention to the expansivity
and go ahead with the restoration, this
place will immediately stand out after
drying. The pasted area will buckle and
develop slight puckering88 on the sides,
so that the purpose of doing a good job
will not have been fulfilled.89
When working, test two or three
mending papers at once. If you find out
later that one or the other cannot be used,
you will not have to repeat the test.90
Very hard, nonabsorbent sheets can
also be made soft or semisoft. The proce
dure is simple. The tray is filled with just
enough water so that the paper, which
always has to be plain—without print—
for this treatment, can be submerged.
Bleaching soda is dissolved in the water
at a ratio of i to 10, that is, 100 g of
bleaching soda to i liter of water. Stir the
soda into the water with a paintbrush or
your hand, and place the sheet into the
solution. You can also pour a small quan
tity of boiling water over the prescribed
amount of bleach to dissolve it faster.
The bath takes approximately twelve
hours. After this time, the soda solution
is drained off, the sheet is rinsed, very
hot water is poured on it, and it stays in
the bath for a short time longer. The
sheet is draped over a pole to dry. If the
treatment has not been successful, that
is, if the paper is not yet absorbent, the
process has to be repeated by pouring a *
boiling soda solution over the sheet.
After the solution has cooled and the
sheet has been rinsed, the paper is placed
in a cold bath. As I said before, use only
paper without printing for this proce- <
dure! Printed papers are damaged in
ninety out of one hundred cases. The
print starts to bleed, and the paper turns
a dirty gray. Also, never hang the sheet
on a painted pole immediately after the
soda bath; the paint on the pole could
come off.
An enamel pan, which is put on a
flame, can be used for small strips of
paper. First, pour boiling water into the
pan; add soda and put a somewhat bigger
piece of paper in, to protect the strips of
paper so that the rising bubbles of boil
ing water cannot cause any holes. A small
gas flame will create hardly any damage.
It is also not difficult to prepare soft
or absorbent papers in such a way that
they can be colored.
If you tried to make the paper dense
and impervious to ink with heavy sizing,
the paper would become as hard as a
bone, would crack easily, and could
break completely when rolled. However,
you want to preserve the flexibility and
shape of the paper.
To accomplish this, proceed as fol
lows: Soak a sheet of white gelatin for ten
minutes in cold water. Put the softened
gelatin into a small dish that holds about

R E S T O R A T I O N O F E N G R A V I N G S , B O O K S , D R A W I N G S , A N D O T H E R W O R K S O N P A P E R 103
half a liter and pour boiling water over it.
Before the solution cools off completely,
add two to three tablespoons of alu
minum subacetate, stir well, and—the
magic potion is complete. If the solution
is not strong enough, add another table
spoon of aluminum subacetate. Never
pour the aluminum subacetate into hot
water, or the liquid in combination with
the gelatin will turn cloudy.
If this agent is to be used for color
ing purposes, I advise you to proceed as
follows: As in most processes, work wet
on wet. The sheet should be well mois
tened from the back and only lightly blot
ted dry. It is then turned over, and the
solution is applied with a flat bristle
brush to the areas that are to be colored.
On large sheets it is not absolutely neces
sary91 to saturate the entire margin with
the liquid, only to go a little beyond the
print so that the color can be washed off
easily in case a brushstroke is mis
applied. Be very careful when wiping off
the color. Never wipe toward the margin
with the sponge but always toward the
print. The margin that is not saturated
has to be covered with a nonabsorbent
piece of paper so that the color does not
get smudged onto it.

S P L I T T I N G P A P E R S
This is not a difficult procedure either,
but it requires more patience. A sheet of
paper—printed or blank, heavy or thin —
can be split in such a way that you end
up with two sheets the size of the orig
inal sheet. Both sheets then have half
the thickness. This is not magic but a
simple manipulation.
Two uncolored pieces of wrapping
paper, not too strong, on each edge about
5 cm larger than the sheet or print that is
to be split, are placed into a cold bath so
that they can expand a little. The paper
that is to be split—it can be hard or soft—
is also placed in a bath. All three parts are
left in the water for at least one hour
because they may be of different compo
sition. They are then taken out of the
bath, drip dried briefly, and the parts
placed on cardboard or blotting paper for
quicker absorption of surplus moisture.
While this minor, undemanding
treatment is taking place, you can be
melting the best carpenter's glue, 9 3
which has no particles or other impuri
ties. The glue has to run readily off the
paintbrush because you have to brush
the very hot, liquid glue onto one side of
the sheet that is to be split. (Make sure
that the sheet is moist but not really wet.)
After that, a sheet of wrapping paper is
put on the glue-covered side, projecting
over all four sides. The second side of the
print is also brushed and is covered with
the second sheet of wrapping paper. The
two sheets of wrapping paper have now
hermetically sealed the entire sheet.
Since all three parts have been treated
while damp and are still moist, creases
and bubbles have to be removed so that
all parts look smooth and tight. They are
now weighted with light pressure, and
the parts are allowed to dry a little bit,
between absorbent pieces of cardboard.
After one to two hours, the pressure is
increased by the use of heavy books so
that the papers dry out completely and
become firmly attached to one another.
After this, the left, top and bottom
edges of the wrapping paper are cut just
up to the sheet in the middle. The tightly
enclosed sheet is visible through the
wrapping paper so that there is no dan
ger of cutting into the sheet when the
wrapping paper is being trimmed. The
paper has now been cut from two sides,
and you can try to split the sheet at the
point where the two cutting lines inter
sect. Use a sharp penknife to cut into the
corner of the sheet in such a way that
there is a little corner of the split print on
each of the cover papers, left and right.
As soon as you can grasp the two corners
with your fingertips, continue pulling
evenly and carefully from both sides, top
and bottom. If the sheet starts to tear,
turn it slightly, or change the pressure of
your fingertips to continue safely.
Sometimes a small penknife will help.
After the sheet is split, both parts
are placed into a cold bath and soaked for
an hour. Usually, this is long enough for
the separated sheet to float off the sup
port sheet. Remove the cold water and
pour very hot water over the sheets so
that the final traces of glue will be dis
solved completely. Take the sheets out
together with the support sheets.

R E S T O R A T I O N O F E N G R A V I N G S , B O O K S , D R A W I N G S , A N D O T H E R W O R K S O N P A P E R 105
Fig. 23.
A thousand-mark note, split
front from back
Yet a second attempt at splitting can
now be made.94 After placing the sheet
between two pieces of cardboard, to dry
better, take it out to dry completely and
now try to split it.
Occasionally you will be more suc
cessful if the sheet is not dried out com
pletely—like a board. As usual, you will
have to experiment with a sample first.
Once you are secure enough and have
experimented sufficiently with cover
paper and glue, the separation of the
papers is easy.
A sheet is usually split when there
are drawings on both sides95 or when a
print is supposed to be used for a lamp
shade but is not transparent enough
because the paper is too thick.96
It is also necessary to split the paper
when copper engravings or lithographs
have text printed on the reverse and are
to be mounted. The print would clearly
bleed through as soon as any glue was
applied and would render the front
unsightly.
It should also be mentioned that
paper for mending should never be split
because the unsplit side of each sheet
will have become somewhat harder
through the application of the glue.
Only paper that is free of small
lumps or pieces of metal is suitable for
splitting. (These pieces fall out and
leave small holes.) Each piece of paper
that is to be split has to be examined
first. Any irregularities will show up as
dark spots when the paper is held up
to light.

G E N E R A L R E M A R K S A B O U T P A P E R
Paper, as you know, consists of various
plant materials, which are processed into
pulp, then scooped onto a paper mold
and formed into a uniform mass. Paper is
created by fusing (felting) the fibrous
materials together, pressing lightly, dry
ing outside and subsequent sizing. Paper
has become a commodity and an item
that is used as a matter of course by
everyone. But the restorer and the book
binder working with paper know it a little
more intimately because they often have
to work for days on one piece of paper
and are able to appreciate its qualities,
good or bad.
The expert lives with paper and does
not consider it a dead material but feels
closely connected to it. He knows that
paper has an upper and lower surface
(skin) that holds the flesh, or interior, of
the paper. The upper surface is the side
that clearly shows the wire lines.97 All the
early printers printed their engravings
on the upper surface. The Swiss color
artists for the most part worked on
papers with pronounced wire lines,
rarely on smooth, wove papers. The
upper surface has to be looked at closely
because it shows the character of the
paper. Therefore, one should never dam
age the upper surface in the course of
a restoration.
When shaving a piece of paper, one
can make several small discoveries about
the flesh of the paper. One has to be espe
cially careful when shaving book papers
from the fifteenth or sixteenth century,
since they do not yet have any cotton
mixed in. The flesh is hard and proves
very unyielding. If such paper is shaved
to powder, it often becomes obvious that
primitive tools were used, and probably
the rags were not as finely processed as
one could wish in spite of sufficient care.
Unfortunately, the reason for poor pro
cessing is often also insufficient careful
ness. Consequently, iron particles, small
deposits of sand, and clumps of all kinds
are occasionally found in the paper.
These impurities generally do not
harm the paper, yet one has to be careful
when shaving it because there will be
brown spots here and there from iron
particles, which appear as discolorations
on both sides of the paper. Of course,
iron particles have to be removed by
going into the healthy flesh, whereas
other little clumps should remain, if pos
sible. If all irregularities were removed
at the places where the restoration is
to be carried out and the mending there
fore were done on smooth paper, the
repair would become obtrusive. The
harmless little clumps that have not dam
aged the paper over many centuries have
to be preserved at all costs, otherwise the
paper would lose an important part of
its character. These clumps often origi
nate from the sizing and are therefore
part of the paper. If a big job is supposed
to be performed on unprinted paper,
these impurities have to be taken into
consideration when choosing from the
paper stock.
I would like to discuss very briefly
the expansivity of paper. Mending papers
sometimes expand more or less than the
original once the work is in progress.

R E S T O R A T I O N O F E N G R A V I N G S , B O O K S , D R A W I N G S , A N D O T H E R W O R K S O N P A P E R 107
This occurs even if they look very much
like the original and are from almost
the same period. In such instances, the
mending paper has to be brought to
the same state of expansion. If a large
mending job is to be done on unprinted
paper or if a broad strip of paper is to be
inserted, and so on, the mend first has to
be examined for color and wire lines. If
the wider wire lines B (see fig. 24) are a
Fig. 24.
A sheet of white paper (looking through
the sheet) with watermark, horizontal and
vertical wire lines. (A) wire lines are not
always distinctly visible; (B) wire lines are
always visible.

108 R E S T O R A T I O N O F E N G R A V I N G S , B O O K S , D R A W I N G S , A N D O T H E R W O R K S O N P A P E R
little more closely spaced in the mend
and correspond to those of the moist
original paper only when both are wet,
the mending paper has to be stretched in
order for it to equal the original when
both are dry.
I strongly recommend that you do
not stretch the original, since the print
can become distorted. The original
paper definitely has to keep its size.
If you own two proofs of a copper
plate with a complete plate mark and
if the prints are not too valuable, I sug
gest the following test for one of the
engravings. (This test can also be done
on a single sheet, but the dimensions
of the plate have to be precisely deter
mined beforehand.)
Put the print into water for three to
four hours. During this time, the paper
expands fully in all directions. A longer
bath, for example, twenty-four hours,
would not cause the sheet to expand
another millimeter. Put the sheet on
cardboard in order to dry it completely.
When measuring the plate mark after
this, you will often find that it has
changed considerably. As a second exper
iment, if you were to stretch the sheet,
perhaps in a moister state than usual, its
expansion would be even greater.98 Now,
if the printer had moistened the papers
from monochrome prints slightly differ
ently from one another, half dry to moist,
the drier proof would be a little smaller in
comparison with the moister one. For
this reason, it is easily possible for two
seemingly identical proofs to show very
slight deviations. The more often a paper
is stretched, the bigger it gets. Of course,
there is a limit to this extensibility. Such
tests must be done frequently with the
mending paper in order to execute a
restoration. If the mending paper does
not have conspicuous wire lines, it 4
should be moistened thoroughly and
immediately placed between blotting
paper and under a press. The paper can
not shrink under the press. When it is
taken out later, the paper will shrink to
a negligible degree as soon as the press
is released. Repeat this process three to
four times; success is inevitable. When
you undertake this procedure, I recom
mend that you leave a piece of the same
paper of the same size untreated or trace
its original dimensions. You will then
be able to see the actual changes after
each trial.
Papers with distinct wire lines can
not be put under the press but have to be
stretched while they are very damp; oth
erwise, the upper surface will become
glossy. The stretching process has to be
repeated two or three times to make the
paper soft.
The frequent pressing and stretch
ing may weaken the mending paper
somewhat, but its texture will be retained
fairly well.

A C T U A L M E N D I N G O R T R U E R E S T O R A T I O N
The preparatory treatment of a tear or
other damage requires absolute neat
ness, utmost personal cleanliness, and
clean tools and an immaculate work
place. The glass pane on which the work
is done has to be cleaned several times
a day. The floor has to be washed daily
after all dust has first been thoroughly
removed with a vacuum cleaner. Good
results are obtained only when the above
conditions are met. Whoever is not used
to cleanliness or does not value clean
hands should and must refrain,from
restoration work!
To state it openly and clearly for
once, a restoration is not a subordinate
but, on the contrary, a technically
demanding and even artistic work. Each
kind of work deserves its reward, and
every customer, therefore, should under
stand that any restoration costs more or
less money depending on its extent. As a
rule, a restorer should and will not work
for nothing because the restoration of
artworks is his profession and he has to
be compensated for his expenses. Every
owner of a work of art should be aware of
this when at some point he makes his way
to a restorer to preserve his art treasures.
When the owner decides to go ahead
with the restoration, he can expect the
restorer to undertake the work with great
joy, I might even say with dedication. A
sympathetic understanding of the art
object has to be a prerequisite for the
restorer. I know from experience that a
collector only reluctantly parts with a
work of art he has come to love. And
there are the anxious questions: Will it
get into the right hands? Is the restorer
really an expert? Will no damage be
done? These doubts are dispelled easily
as soon as the owner meets the restorer
and learns to value his advice and work."
A friendly relationship of mutual trust
will develop which will make it easier to
work together.
A cleaned print should under no cir
cumstances look as if it had been treated
after all the particularly troubling spots
have been removed and only the insig
nificant ones remain. The character,
tone, and warmth of the print have to be
preserved at all costs. Once this work has
been completed successfully, unsightly
holes or tears have to be eliminated. I
mentioned how important extremely
accurate work is for the preliminary
treatment; it is even more vital for the
actual repair. This process requires not
only patience, love, and empathy but also
the best, the very best, of moods. No
print should be restored unless all these
prerequisites are fully met.
Once the restoration is complete
and the print is ready to go back to its
owner, it is a good idea to let it rest for a
while with the restorer. The print should
definitely have this rest period—we can
call it recuperation time. Just as in the
case of a seriously ill patient, there
should be an extended period of observa
tion after the cure. If work on a print has
been finished for several weeks, this rest
under expert monitoring will contribute
to the complete cure of all symptoms.

110 R E S T O R A T I O N O F E N G R A V I N G S , B O O K S , D R A W I N G S , A N D O T H E R W O R K S O N P A P E R
Some people will think that you hold the
print back for the obvious reason: to
increase the cost of the restoration.
Completely wrong!
The necessary and careful observa
tion and the interest of the restorer in
his work justify his saying to the owner,
especially in the case of an artistic
restoration, "You will have to wait!"
The work should not only please the
owner; far more important is that the
restorer is satisfied. It often happens that
the owner finds words of praise for a
work, whereas the restorer feels quite
differently.
At any rate, the success of a large
project depends on ample experience. I
say this beforehand. If a restorer under
takes a large restoration job based on my
explanation, he must ask himself: Will I
be able to meet the requirements? Thus,
he will be saved from many a bitter disap
pointment, according to the old saying,
"No man is born a master of his craft."
It certainly is not presumptuous to use
this proverb in connection with the
restoring profession.
A TEAR I N THE PAGE
A tear has to be closed. The mending
paper you have chosen matches the orig
inal in color, texture, softness, even
when held against the light. What hap
pens now? Now you examine the tear:
i. Is any part of the print
missing?
2,. Does the tear have dirty edges?
3. Does the tear have edges that
can be put together again?
4 Has the tear been treated
before?
5. Has old alum paste hardened
at the edge of the tear?
6. Has anyone applied watercolor
in a disagreeably obvious way
to the surroundings of the
tear?
I will answer these questions as if
these types of damage actually existed.
1. If the tear is open and you sup
pose that something has been cut out and
a gap exists when the tear is put together,
place the sheet into a water bath first,
since it is easier to find out how much is
missing of the print after the paper has
been expanded while damp. Often noth
ing is missing, and the sheet was only
distorted.
2. Are the edges dirty? Every tear
has dirty edges. They have to be com
pletely removed with a restoring knife.
The dirt has to be removed entirely from
the front; otherwise, the restoration will
not be successful. A black or gray line
will remain.
3. Can the edges of the tear be put
together again? New tears, if they remain
clean, can often be restored invisibly by
applying starch paste to the overlapping
edges. Unfortunately, many new tears get
dirty through touching, because the
owners of prints frequently try to put the
tears together to find out whether they
close properly. If the tears are dirty, they
must be shaved down.
4. Has the tear been treated before?
The back of an old tear, treated by a
skilled restorer, will have thin places that
become thinner toward the edge of the
tear. Be careful that these places do not
get damaged any further during a wet
treatment.
5. Has old alum paste hardened
along the edge of the tear? Horny [trans
lucent and hard] places, which appear
very light when you look through the

R E S T O R A T I O N O F E N G R A V I N G S , B O O K S , D R A W I N G S , A N D O T H E R W O R K S O N P A P E R 111
paper, are due to paste. If a hot bath does
not make these horny places disappear,
there is only one other way—"a surgical
procedure." The part is cut out with a
knife, close to the outer horny rim. This
little operation has to be performed if the
restoration is to be satisfactory.
6. Has anyone applied watercolor
around the tear in a disagreeably obvious
way? The surroundings of the tear are
hard to clean if watercolor has been
smeared on. The adjacent areas have to
be protected at all costs. Try to remove
the watercolor by washing it with a short
flat camel's hair brush. You need a weak
soda solution for this. The work should
be done on a damp sheet. I suggest that
you first make an attempt at cleaning
with clear, hot water. A surgical proce
dure is recommended only if you can do
a first-rate repair and are also a little
bit of a master in drawing.100 If you do
not meet these two prerequisites, hands
off the operation!
In answering the above questions, I
only want to give a few, tentative hints
to explain how important it is to think
carefully at the beginning of each task
and not to start any restoration with
out thought.
Before I come to the actual mending
process, allow me a few more remarks.
It is a bad habit to work with paper
pulp.1 0 1 There are people who pulverize
paper, saturate it with paste, and then
mend tears and holes with it. The powder
is produced by rubbing paper with sand
paper or emery paper to a fine dust or by
forming a ball of paper and scraping it
with a file. If you want to fill a tear with
paper pulp, you have to apply it thinly at
least 5 mm wide to the reverse of the tear
so that the paper pulp is held in place. If
the thick layer of pulp is lightly scraped
off after it has dried, so that the transi
tion to the original paper becomes less
noticeable, the pulp will still be visible as
a mending job. You cannot implant any of
the paper wire lines because the pulp is
too hard. The same is true for the mend
ing of wormholes. The thin outside walls
of such holes cannot support the paper
pulp, and here, too, a lot has to be
applied to the back side.
Fig- 25-
(a) Bone folder (worn toothbrush).
Has to be ground off to the dotted line.
(Use sandpaper to create a smooth,
flat surface.) (b) Erasing-shaving knife.
Has to be ground off to the dotted line
also so that one can work with the
short paring edge.
It is natural for the back side of a
print not to be immaculately clean
because, in spite of the most exacting
cleanliness, it will have been handled a
lot. Special attention has to be given to
this kind of dirt, which is hardly visible.
The sheet is treated once again from the
reverse. The dirt is removed from the
area around the tear or hole with a semi
hard eraser. The eraser particles are
removed with a clean brush. Be careful
not to create thin spots when erasing.
If the dirt is still somewhat visible and
the semihard eraser has not been able
to remove it sufficiently, without press
ing down too hard, the sheet has to be
treated further, while damp, with a soft

112 R E S T O R A T I O N O F E N G R A V I N G S , B O O K S , D R A W I N G S , A N D O T H E R W O R K S O N P A P E R
bristle brush. Most important, the area
immediately around the tear has to be
perfectly clean. As soon as this task is
completed, the sheet is rinsed and put
between two pieces of blotting paper in
order to dry completely.
When the sheet is dry, the area
around the tear has to be treated once
again with a semihard eraser, even
though it may seem to be clean.
Fig. 2,6.
(a) Grease-proof paper covers
one-half of the tear; (b) tear;
(c) reverse of the original.
A repair with less thorough prepara
tions can be done as an exercise, at best,
but never on a valuable print. Try it
with a dirty reverse; do not use the eraser
on the surrounding area or just use it
superficially, and you will find a gray
border around the patch. I highly recom
mend such experiments on worth
less prints.
The preparations are complete. The
best-suited mending paper is selected
from the paper supply. I already pointed
out how this is done in the section
"Examining and Preparing the Paper,"
pages 100-103. The mending paper
matches that of the original perfectly.
Now it must be pure delight to close the
tear! Of course, the mending paper has
to undergo the same cleaning process
so that here, too, no dirt rings will be cre
ated. To protect the clean mending paper
from dust, it is put between two clean
sheets of blotting paper. After the tear
and the mending paper are cleaned, the
sheet is put upside down and the shaving
begins. A piece of flawless grease-proof
or writing paper is put between the tear
in such a way that part of the original is
covered (fig. 26). The uncovered side of
the tear is then shaved down extremely
thin. Depending on the size of the tear,
the shaving is started about 4 to 10 mm
from the tear. At the outset, the shaving
is done extremely lightly, then progres
sively more forcefully until the edge of
the tear only has the strength of tissue
paper. The shaving follows the shape of a
wedge. Of course, the edge of the tear has
to be shaved very skillfully so that no
holes or small tears are created. The
more carefully this work is performed,
the more successful the overall result!
In addition, something has to be said
about hard paper. If the original paper is
hard and if tears, holes, and corners are
difficult to shave; the print has to be
soaked first, and the shaving has to be
done while the paper is semimoist. The
hard part of the paper—the surface or
skin—will absorb water, although this
may not be immediately obvious. Soft
paper, as you know, absorbs instantly and
changes because of the water absorption;
hard paper does not to seem to undergo
any changes. However, the areas that
have been mended should be shaved only
while dry.
When one edge of the tear has been

R E S T O R A T I O N O F E N G R A V I N G S , B O O K S , D R A W I N G S , A N D O T H E R W O R K S O N P A P E R 113
shaved down, the other has to be treated
the same way. The sheet has to be turned
to a more convenient position. After the
second edge is finished, the sheet is held
against a window to see if the wedgelike
transition is perfectly uniform. I would
like to emphasize that the transition
from the shaved area to the tear has to be
made with the preservation of the paper
in mind.1 0 2
Next, the mending paper is taken
out from its hiding place between the two
pieces of blotting paper and placed on
the tear in such a way that the wire lines
match perfectly when the paper is held
against the light. The shape of the tear
is carefully scratched into the mend
ing paper with the point of a knife. The
mending paper can be marked on the
worktable, but especially when larger
and wider tears are dealt with, it is often
advisable to perform this work on a clean
window pane.
The mend is separated from the rest
of the paper along the scratched lines by
peeling it away starting at the top. Turn
the scratch mark toward you so that it can
be followed exactly when the mend is
torn out. The mend should never be
cleanly cut out with a knife because the
cut would be too even. For the same rea
son, the scratching should not be done
too forcefully. The fine fibers or fuzz that
is created when the paper is torn is
important and should not be removed in
either smooth or wire-lined papers. The
fuzz has to be preserved for the melding
of the two parts.
The mend for the tear has now been
separated neatly and fits exactly over the
shaved part of the tear.
The mend also has two sides, one
which will be the back of the tear and the
other which is supposed to be implanted
into the paper. The side to be implanted
has to be shaved to a thickness that is
opposite that of the tear. That is, where
the tear has been shaved thin, the mend
has to keep its original thickness. The
edges or sides of the mend are not shaved
as extremely thin as the edges of the tear,
but enough is taken away from the edges
of the mend so that it, too, will have a
slightly wedgelike shape. The center of
the mend on the implant side is shaved
Fig. 27.
(a-e) Shaved area of repair, (c) The tear
itself, (b-d) Area to which paste
is applied, (a, b, d, e) Paste-free areas.
lightly so that no uncleanliness will be
noticeable later.
When both sides are well prepared,
the mend is placed on the tear in such a
way that all the shaved areas are covered.
Pencil marks are now made so that the
mend can be applied in exactly the right
spot later on (see fig. 22). If you do not
make any marks, you can be almost cer
tain that in larger tears, holes, or thin

114 R E S T O R A T I O N O F E N G R A V I N G S , B O O K S , D R A W I N G S , A N D O T H E R W O R K S O N P A P E R
places the shaved areas will not be cov
ered completely, and the result will be
less than perfect.
Place the two parts —print and
mending paper—in dust-free water to
saturate. Have clean blotting paper ready
for these papers after their stay in the
water so that any excess moisture can be
absorbed faster.
Place the parts on cardboard to
apply the paste. Apply starch paste very
thinly to the tear. But be careful when
doing this job, which is not easy on your
first attempts, and watch that the thin
areas of the tear do not fold over and
touch the print. Since the mend, too,
receives a thin layer of paste, it is impor
tant to make sure that the paste does not
cover the shaved areas completely—that
is, the mending paper can be totally cov
ered with paste, but not the original
paper (see fig. 27). If paste is thickly
applied to both parts, the excess will flow
out when the papers are pressed together
and spread over the area surrounding the
tear. This will cause a needless mess.
After the paste has been applied, the
print should b.e transferred to another
small piece of cardboard. This is
extremely important! If this is not done,
the small amount of excess paste, which
is left on the cardboard when the tear is
pasted, could damage the print. Now it is
time to take the pasted mending paper
and lightly press it down with blotting
paper and the heel of your hand. Turn the
print over and make sure that the tear
is well aligned from the front, too. If the
wire lines of the print do not match
where the tear has been closed, one side
of the tear has to be lifted. When this is
done, one-half of the tear—with the
mending paper—should be pressed
down firmly with the left finger, and the
other half of the tear—without the
mending paper—should be lifted with
the right hand. The tear is now open
again. Carefully pull to the left the side of
the tear that has been lifted, and try to
close the tear exactly. The printed lines
of the image should be matched perfect
ly. This little procedure can be per
formed only if you have made sure ahead
of time that the tear closed while damp
and that the dislocation or distortion is
only due to the application of the patch
and a gentle pressure of the hand.
In all restorations careful attention
has to be paid to the following: When the
damp back side of the sheet has been pre
pared to the extent that the mend can
be implanted to close the damaged part,
thinly cover the area to be repaired with
paste from the reverse. But apply paste to
the mend only where it will be covered by
the original paper. Apply no paste to that
part of the mend that is visible from the
front—because some of the original is
missing—and must be retouched later. If
you do not think of this, the blotting *>
paper can get stuck when pressed against
the mend and can damage the sheet when
the blotting paper is lifted.
The space between the two edges of
the tear—in which printing is missing—
will appear as a white gap after the mend
has been inserted. In this case, too, you
have to make sure that the printed lines
are arranged in such a way that in spite of
the gap a good continuation of the lines
is possible when the paper is later
retouched. When the edges of the tear
are properly positioned, press them
firmly with the aid of blotting paper,
from the front with your fingertips or the
ball of the thumb. After this, the paper
is left to rest.
As soon as the sheet starts to dry,

R E S T O R A T I O N O F E N G R A V I N G S , B O O K S , D R A W I N G S , A N D O T H E R W O R K S O N P A P E R 115
lightly dampen the back once again but
not the mend. This ensures a relatively
even distribution of moisture. Take into
consideration, though, that the patch
contains more than double the moisture
of the other parts of the sheet because of
its damp pretreatment and the applica
tion of paste. Uneven moisture content
can cause the sheet to buckle.
If the sheet does not buckle when it
is dried further, place it between blotting
papers and weight it down with card
board or books. However, if buckling
occurs, it must be removed by moisten
ing the buckling areas. Now the sheet can
be left unattended.
Let me once more briefly go over
the main points of this little restora
tion procedure.
Be exceedingly careful when apply
ing the paste. Too much is always harm
ful, too little is no good either; the
golden mean is the best. Do not damage
the sheet when pressing on it. Watch the
drying procedure carefully and remove
the buckling before weighing down the
sheet. And the most important prereq
uisite for success: Never forget to be
perfectly clean while doing the shaving
and mending.
If a larger hole in the engraving has
to be mended, even closer attention has
to be paid to the wire lines. The wire lines
in the mending paper and in the original
paper should never clash with each
other.
If a corner is missing, a few more
things have to be taken into consider
ation. If three of the corners still have the
original, deckled edges—in other words,
if the sheet is still its original size—the
corner that is to be restored has to be
shaped accordingly. (Better and simpler
would be to obtain a suitable deckled
edge from the paper stock.) Shape the
corner of a piece of well-matched mend
ing paper with a knife. Create the irregu
lar edges of a deckle by cutting or
scratching into the paper, remove the
excess paper, and try to achieve a soft
transition with sandpaper. Use the three
corners and deckled edges of the original
as a model. I would like to mention that
the outer edge of the mend must receive
Fig. 2,8.
A print, ready for stretching, being laid
onto the stretching support
its final shape after the mending process
has been completed, never before.
Not all engravings and prints should
be treated chemically before the mend
ing process. Do not remove the beautiful,
warm tone of a completely torn page of a
book, because it must again harmonize
with the adjacent pages. However, if such
a page has been treated chemically, out of
ignorance, a great deal of skill is required
to match the hue of the sheet to the other
pages.103 You only burden yourself with
additional work when you treat a page
chemically before mending it.
If a corner is missing from a book
page and the page does not require a
deckled edge, be careful to insert the new
page properly. The corners or sides of
an old book often have an appealing
warmth. To avoid later retouching,
always try to find corners that match
well. Be careful that the new corner is not

116 R E S T O R A T I O N O F E N G R A V I N G S , B O O K S , D R A W I N G S , A N D O T H E R W O R K S O N P A P E R
lighter than the rest when the book is
closed. Remember also that old books
can be worn and dirty at the corners from
frequent handling. This kind of smudg
ing has to be duplicated to make the new
corner match. It often happens that the
following or previous layers are wrinkled
or brittle. Consider all cases individually
and try to incorporate these signs of
aging into the restored page so that it can
harmoniously blend with the other parts.
This is also important for individually
restored engravings within a set.
Be especially careful to give the
treated book page —after it has been
made smooth for the restoration proce
dure—the character of the neighboring
pages. If the pages of the book buckle
a little, you cannot put the restored
page into the book dry. The page has to
be moistened a bit and inserted half
damp into the book. The book should
be weighted when the page is almost
dry. The page will now take on the
desired shape.
An old book has its history; when
you open it, the pages do not lie as even
ly as in a modern book. Sometimes, at
the center of the book, there is buckling,
which becomes increasingly weak until it
finally disappears toward the front and
back. These signs of age occasionally
appear as sharp ridges. When such a
book has to be treated in its entirety, the
really dangerous-looking ridges may be
removed but never the book's general
wavy character.
The buckling will disappear in the
water bath, and it has to be restored for
the book. Separate an old, incomplete
work that has ridges like this, and place
three to four sheets of the cleaned book
between pages of the incomplete volume.
Moisten the cleaned pages and place
them in consecutive order into the old
work, so that the first pages of the
cleaned book take on a slightly wavelike
character, the middle ones a stronger one,
and the last ones a weaker one again.
When treated this way, a book does
not show any traces of the restoration
when it leaves the restorer's workshop.
The character of the book is preserved.
Not all eventualities that might occur
during a restoration can be described in
such a way that you can say afterward,
"But that was covered in the instruc
tions, word for word." You have to put all
your thought and intuition into the
process. And if you have just started a
process that demands your undivided
attention, you should not be interrupted.
It is not worth it to start a job shortly
before the end of the workday. And it is
also completely wrong to start a big job
when you know that you will be disturbed
several times during the day. The timing
of a big restoration or retouching job has
to be well planned.
Let me resume the discussion of the
tear that you have mended. The paper
has dried well during this little chat and
should not show any buckling. This
would not happen anyway because the
paper matches very well in all details.
Examine the mend and make sure that
• the edges are firmly attached;
there is no buckling anyplace;
the surroundings of the mend
are not shiny; and
• no gray line indicates an
insufficiently cleaned edge
along the tear.
Remove the pencil marks or lines
with the aid of a soft eraser. Turn the
paper over and look at the mended tear
from the front. The lines fit together
well. No retouching is necessary because

R E S T O R A T I O N O F E N G R A V I N G S , B O O K S , D R A W I N G S , A N D O T H E R W O R K S O N P A P E R 117
the print was not damaged when it was
shaved. You have worked strictly accord
ing to my instructions.
If things do not go right—if the
tear and the mend do not adhere, if the
printed lines are uneven, if a gray line
runs along the tear, if the paper appears
rather wrinkled, if shiny places appear
around the tear—I say that my instruc
tions on the restoration of tears have not
been read carefully enough and that,
moreover, poor work has been performed.
It is not easy to rectify these mis
takes. The entire process has to be
repeated, and the danger exists that the
page will be damaged further when the
paste is washed off a previously shaved
tear. Repeating the process makes a suc
cessful outcome almost impossible.
Before making the mended area
thinner, you have to clean the front of the
tear. Since you have to go into the image
with a knife, you have to work very care
fully. In the white paper you can see,
first, whether the tear has been properly
closed and whether there are only slight
ridges along the edges of the tear. These
are disturbing and have to be removed
with the utmost care. When shaving off
the ridges, avoid creating small indenta
tions or furrows. A skilled hand will
guide the knife lightly to create a good
transition to the surrounding.
After shaving the front, you should
have made the tear completely invisible.
This work is done on a glass pane. If a
streak or a gray line appears in spite of
almost imperceptible shaving of the
raised areas, the preparations have not
been done satisfactorily. You would mag
nify the mistake greatly if you were to
cover the line with a thin, even though
well-matched, piece of paper on the
front. A tear should never be closed [i.e.,
mended] from the front if you want to
deliver excellent work! Every kind of
restoration is conspicuous when done
from the front, although it is hardly visi
ble when done from the back. If the tear
has been treated professionally, you only
have to shave off the small elevations, a
task that is child's play.
Placing a mend over the paper on
the front really leaves you with two larger
tears to take care of. It is impossible to
treat this kind of wide mend in such a way
that the restoration is invisible after
ward. It is better in the case of a gray line
to treat the tear all over again and to pay
utmost attention to cleanliness, because
a gray line can only be due to dirt.
Now I come to the shaving of the
mended tear.
If you want to thin down the paper
and do not own a box for shaving,104 a
clean window pane will do.
Holding the paper up to the window,
you can see that the mended tear is still
quite thick.105 That is natural since both
parts have not yet been shaved fine. It is
time to start the second shaving, that is,
the thinning. At first, shave away only
enough from the mend so that it is visible
as a slightly dark area. A complete scrap
ing of the mend—that is, rendering it
totally one with the surrounding area so
that the mend is no longer visible when
you look through the paper—should be
done only if there are no wire lines in
either part, the print or the mending
paper. For implanting wire lines, the
dark appearance has to remain.
When working on the sheet, take
it with your left hand, put it with the
printed side facing down on the pane,
and shave it down carefully with the
knife, centimeter by centimeter.106 This
shaving is done just as though you

118 R E S T O R A T I O N O F E N G R A V I N G S , B O O K S , D R A W I N G S , A N D O T H E R W O R K S O N P A P E R
Fig. 29.
Shaving box. (a) Wood; (b) cardboard
cover with circular window for shaving;
(c) glass pane; (d) light cord; (e) sup
port for the glass pane (wooden ledge)
wanted to erase a spot of dirt.
On pages in-15 , I discussed shav
ing the original paper and patches of
mending paper for tears, holes, and
edges. For that kind of shaving, the knife
was used in only one direction. Here, on
the other hand, when the mend is shaved
to thin it down, the knife is moved in two
directions—back and forth.
The mend is shaved carefully and
skillfully, and no thin spots should be
created during this process. An extreme
ly sharp knife is moved lightly across
the patch.
Before the wire lines are implanted,
the mend is examined thoroughly once
again. The small ridges at the sides of the
mend still need to be shaved off. Since
this kind of work cannot be done at the
window, the paper is put back on the
glass pane and the sides are shaved
completely smooth. If wire lines are to
be implanted into the mend, only these
lines are shaved out of the paper.
Otherwise, the mend should have the
same thickness as the original print. I
repeat once again: The general shaving
of the mend is carried out to such an
extent that, except for the shaving of the
wire lines, no other scraping of the sur
roundings is necessary.
IMPLANTING THE W I R E L I N E S 1 0 7
Magic or other secret means are not
involved. How often I hear, "The tear
is not visible at all; one wire line just
continues into the next. How do you do
it?" When I explain that it is really only

R E S T O R A T I O N O F E N G R A V I N G S , B O O K S , D R A W I N G S , A N D O T H E R W O R K S O N P A P E R 119
the little knife that does it all, almost
nobody wants to believe me, and yet it
is the truth!
Before I explain the implantation of
the wire lines, I have a few other things
on my mind.
Success does not come overnight.
Wire lines are difficult. You need more
than just skill and patience; a certain
amount of intuition is necessary. A repair
will immediately be obvious if the wire
lines are not implanted skillfully. Simply
scraping out light lines is no great
achievement. The blending of the sur
rounding wire lines with the implanted
ones has to be performed in such a way
that it is not noticeable. That does not
seem difficult at first glance. You think
that it cannot take long to scrape out a
few lines. But once you try it yourself, you
gain respect for those wire lines. Each
one has to run into the other evenly, and
the transition from the mend to the orig
inal paper has to be harmonious.
Above all, you should not be physi
cally or mentally exhausted before start
ing this kind of work. You need a steady
hand that is loose at the joint. It is impos
sible to perform a good job with a heavy
hand. The knife has to be like a toy in
your hand.
The tool for this kind of work is the
previously mentioned restoring knife.
Try the implantation of wire lines first on
a sample sheet at the window or at the
shaving box.
As in all exercises, the first attempts
betray an unskilled hand. Even later,
after minor successes, there are still
relapses, which should not discourage
you. The wire lines are not supposed to
be dug in but are to be lightly shaved in.
The knife has to be held so skillfully and
deftly that at first it is hardly perceptible
that the paper is being abraded faintly in
the form of lines. And yet a uniformly
flowing groove has to be perceptible.
Start with the knife at the left side of the
mend and begin to implant the artificial
wire line parallel to the original one,
working toward the right. The indenta
tion, which at first is extremely shallow
and hardly perceptible, is then rein
forced in the opposite direction. If you
only scraped from left to right, the shav
ing would be one-sided. It would immedi
ately be noticeable when the sheet was
moved into another position. The tiny
fibers that become raised are shaved off
from both directions—that is, from left
to right and vice versa—so that a slight
indentation will be visible regardless of
the angle from which the sheet is viewed.
How often the knife is moved back
and forth depends on the lightness of
the wire lines. Do not try to conjure
them into the paper all at once. This
would be completely wrong! Hard edges
would form. It is impossible to soften
wire lines afterward.
I do not consider it necessary for a
beginner to learn to implant wire lines.
Do not work too hastily and try to learn
everything at once. We can talk about
this again after a few years have passed. It
is best to work on papers without wire
lines first and then to try the ones with
wire lines. Our profession is not the easi
est in the world, and I am not telling you
a secret when I tell you that I have not
stopped learning either.
I do not want to end the section with
these brief remarks about the mending of
tears—which emphasize how necessary
the correct procedure is for the achieve
ment of successful results—without also
mentioning special mending processes.
For instance, I would like to men-

120 R E S T O R A T I O N O F E N G R A V I N G S , B O O K S , D R A W I N G S , A N D O T H E R W O R K S O N P A P E R
Fig. 30.
Pirckheimer, German School, Durer,
1524, engraving. The projecting paper
shows the restoration.
tion that thin spots in the original paper
are mended the same way as tears and
holes, even if the front of the print does
not show any damage. However, there is
a minor difference in the choice of paper.
To facilitate the process, choose weaker
paper that, nevertheless, in all other
respects such as expansivity, hue, and so
forth, matches the original paper. If pos
sible, select a thin sheet from the paper
supply and implant it on the weak spots
of the original. If you cannot find any
matching paper, you will have to move on
to the following procedure.
TEARING OR SEPARATING
THE MENDING PAPER
Tear the paper from the top right to the
bottom left in such a way that both edges
of the tear are quite thin. Turn the paper
while doing this and try to widen the thin
parts, moving down toward the left. You
can hold the paper vertically or horizon
tally, depending on its strength and com
position. Carefully extract thin parts of
the torn edge with a knife. When the
thin paper is implanted, paste is applied
very sparingly to the torn side. This

R E S T O R A T I O N O F E N G R A V I N G S , B O O K S , D R A W I N G S , A N D O T H E R W O R K S O N P A P E R 121
Fig. 31.
Tearing the paper
paper does not have to be cleaned with
an eraser because the torn side is com
pletely untouched and spotless.
The budding expert should use
paper sparingly when he is first learning
to tear it and not take the.best kind
either, especially if he has only a limited
supply of good mending papers.
And now a few hints for especially
difficult tasks.
When a print has been cut severely
on one side so that part of the image and
white paper is missing—for instance, in
the sky—use your intuition to decide
how much shaving needs to be done. It is
often easier to do a restoration when the
image is damaged by a tear. Mending
white paper is a tricky affair; it is hard to
describe all the incidentals that can
affect this kind of work.
Much can be done by force, but this
does not solve every problem. If the orig
inal can be treated deftly, many a task
becomes simpler. But the lovely hue of
the sheet has to be preserved, just as does
the softness or hardness of the paper, and
that means a great deal of thought has to
be applied. I will be very frank: This kind
of work can be undertaken only after
many years of the most intensive prepa
ration. As I mentioned before, if a tear
goes through the image, the printing
may help to disguise the damage.
However, even the smallest tear on blank
paper becomes a masterpiece when it has
been repaired invisibly.
If an almost invisible repair of, say,
10 cm width is to be performed on blank
paper, a great deal of thought has to
be invested beforehand. Often it is hard
to find the right paper to match the
missing piece. Even if matching paper is
found and applied perfectly, the wire
lines are connected well, and there is no

122 R E S T O R A T I O N O F E N G R A V I N G S , B O O K S , D R A W I N G S , A N D O T H E R W O R K S O N P A P E R
gray line discernible, the front can still
be a problem.
The plate tone, the very subtle gray
tone stemming from the copperplate,
has not been taken into account. If this
hue is transferred to the mend, you will
doubtlessly find that it has darkened the
paper when you hold it against the light.
If this is the case, all efforts have been in
vain. The paper, which seemed perfect,
was not the right one after all. The gray
plate tone, therefore, has to be looked
at closely, beforehand, and a paper has to
be chosen that is slightly lighter when
held against the light. Of course, all
other requirements—hue, expansivity,
wire lines, softness, and texture—have to
be fully considered, too.
Many clients even bring along their
own mending paper, believing that
as experienced collectors of the Old
Masters for many years they have found
the right thing. Unfortunately, these
supposedly well-matched papers are
almost never suitable. The clients are
usually mistaken in this regard. It would
be good if collectors were also connois
seurs of paper, if they were as well versed
in old papers as in the evaluation of
Old Masters.
A major restoration of unprinted
papers is nerve-racking. You will know
you have come a long way when such a
task is successful.

T H E A D D I T I O N O F A M A R G I N
It is desirable but not always necessary,
and certainly not possible in the begin
ning, to add a margin invisibly. And yet
many a beginner will add an artificial
margin in order to give a finished appear
ance to a print. And he can consider him
self successful if the overall impression
of the print is not disturbed, especially if
a well-preserved companion piece exists.
In spite of all difficulties, however, any
ambitious person tries to do his best. And
if after many years he is lucky enough to
add a margin almost invisibly, he will
have achieved something that is achieved
by only a few.
When you look at the front of a mez
zotint to which a margin has been added,
you should be able to spot the somewhat
hard edge at the transition from the print
to the new margin—if you have a trained
eye. To shave the transition part takes a
lot of time if you have the four sides of the
margin to deal with. Because of the weak
starch paste, the paper will become
somewhat hard at the places where it has
been pasted, and any shaving after the
repair is done will be very difficult. The
script, the "title," has to be matched with
the utmost precision to the original title.
Any little distortion or faulty position of a
letter definitely has to be taken into
account because otherwise the handwrit
ten script would be conspicuous when
compared with a well-preserved print.
Also, the paper intended for the writing
should not be sized too heavily. The sheet
has to have the same texture as the origi
nal engraving. Only use a pen for writing
if you are able to guide it lightly. Do not
press down, because the surface of the
paper may become scratched and the
color may bleed. A fine, moderately
long—about i cm—round brush with a
pointed tip is best suited for writing. Any
little hair protruding at the tip or the
sides has to be singed off. Put a small,
red-hot—but not burning—piece of
wood carefully to the small hairs that
have been slightly moistened by water,
with your lips shape the brush to a sharp
point, and singe off any little hairs that
protrude from the sides.
The brush has to be so light in the
hand of the restorer that he can create
almost invisible lines with it. Never simu
late more prominent lines or heavy pres
sure when writing with a pen; instead,
always use a brush.
Even if the writing has been done
perfectly by brush and looks precisely
like the original, you are still far from
having achieved a deception. The back
will betray the added margin.
Do not mount a print on thin paper
to hide defects. The place where the
artificial margin joins the print itself—
the area of transition on the back of the
original paper—will start to expand. The
added margin will then be recognizable,
because heavy paste, which cannot be
prevented from swelling, is used to
attach the shaved edges, which will
therefore stand out.
Of course, the paper chosen for the
added margin has to be right in every
respect. Since large, empty sheets are
hard to find, an engraving of little value
with a wide margin is usually selected. If

124 R E S T O R A T I O N O F E N G R A V I N G S , B O O K S , D R A W I N G S , A N D O T H E R W O R K S O N P A P E R
Fig. 32.
Adding a margin. I. Engraving, withits edges shaved down. 2. "L" with title(with tabs a and b). 3. Remaning "L."Remove c and d from the margin withthe title (2) because side 3 covers theseareas; e and/have to stay on the "L"
with the title and are shaved downbefore the remaining "L" (3) is added;(g) registration marks.

R E S T O R A T I O N O F E N G R A V I N G S , B O O K S , D R A W I N G S , A N D O T H E R W O R K S O N P A P E R 125
the print that needs the margin is
small—25 to 30 cm in length or width—
it is advantageous to add the margin in
one piece.
For larger sheets, the margin will
have to be divided; that means two to
four parts have to be put together to form
a margin. The margin with the title must
be one piece and like an "L" can have a
side piece on the left or right. Two "L's"
will have to be cut in this case. Figure 32
shows how this kind of work is done.
Since here, too, the work is done
moist on moist, it is advisable108 that the
sheet with the added margin be stretched
in semidry condition.109 Of course, the
added margin is carefully rubbed before
hand with a bone folder and blotting
paper. During the stretching process, the
added margin is rubbed once more on the
board or the glass pane, which helps to
ensure the success of the work. After
twenty-four hours, the sheet is cut off the
stretching board and finished on the
front. The transition from print to paper
has to be shaved almost imperceptibly,
just as the places where the sides have
been joined together.
When a margin is added, the prepa
rations are performed in the same way as
for all other restorations. The shaved
area on the original sheet is 8 to 12 mm
wide, depending on the size of the sheet.
Each "L" of the new margin has to be
added separately; this means that the two
"L's" should never be added one right
after the other but only after drying out
completely. As soon as one "L" has been
added, pressure is applied with the bone
folder to the sheet by putting it between
blotting paper and cardboard on both
sides. Before it dries completely, the
sheet is taken out one more time, pres
sure is applied from both sides with the
aid of a bone folder and blotting paper,
and the sheet is then weighted again
between dry cardboard.
The second " L " is cut out and pre
pared after the sheet has dried com
pletely. Shave down the back of the first
"L" well at the place where the new part
is supposed to be added; then join the
second "L." Soon to follow will be the
stretching. When the "L's" are joined,
care has to be taken that the new side is
free of any particles of dust at the places
where it is to be joined. After the shav
ing, the places where the sides come
together should not be visible under
any circumstances.
The preparations proceed differ
ently when a print that needs a new mar
gin still has a small margin of 1 to 2 mm,
or when the plate mark is close to the
image, or when one side of the margin
is torn off because the plate mark has
cut through.
At all costs the narrow remnant of
the margin has to be preserved, because
it facilitates all later work. If this small
margin is removed, the softness of the
sheet is also removed. And it is just this
softness at the transition from the image
to the new margin that is especially
attractive. It is not easy to conjure into
existence this soft, artificial transition
when the engraving has been sharply cut.
In such a case, shaving at the back
can only be done to the extent of the
width of the small margin. If you go
beyond this, you create useless work for
yourself. Careful shaving of the narrow
margin, where not the smallest particle
may be lost,1 1 0 is not that easy and has to
be done carefully. The small edge where
the dust has accumulated can only be
scraped lightly from the top because the
plate mark has to appear again in these

126 R E S T O R A T I O N O F E N G R A V I N G S , B O O K S , D R A W I N G S , A N D O T H E R W O R K S O N P A P E R
maybe 3 to 5 mm wide. To prepare the
strip, tear it on both front and back sides.
To do this, put a ruler on the strip and
use the point of a penknife to scratch in a
faint groove. The scratch should not be
made exactly where the strip is to meet
the edge of the print; rather, the strip is
torn a little farther in. After the margin
is added, the sheet is stretched. This is
done with the utmost care because the
margin added is very narrow.111
Fig. 33-
Adding a single border (close to the
plate mark) in combination with
repairing a simple tear, (a) Back of the
sheet; (b) plate mark; (c) width of the
margin; (d) unshaved edges; (e) back
of the shaved piece; (f) registration
marks. The missing border, including
the area of the tear, is prepared from
one piece of paper. Shaving of this
strip is done only on the ends and in
the middle.
places. The paper that is going to be
added in this case is not shaved after it
has been examined, only thoroughly
cleaned. Shaving is omitted because it is
too easy to scrape off tiny bits of paper.
Under no circumstances can the paper in
the margin be damaged. Any damage
would show up as a light spot when
looked at through the paper.
" L ' s " are not appropriate here.
Separate strips have to be added. To
ensure a better hold at the juncture, the
area of attachment has to be made wider,
T H E A D D I T I O N OF A MARGIN
TO BOOK PAGES
Adding a margin to book pages is not
quite so difficult, since the printed area
appearing on both sides of a sheet usu
ally does not coincide precisely; that is,
the printed text or image is not posi
tioned uniformly. The shaving is done on
the side, where the strip can be joined
more easily. Open areas in the printing
have to be utilized wherever possible in
order to give the margin a better hold. Of
course, sometimes margins must be
attached, one from the front and one
from the back, depending on the condi
tion of the sheet. Above all, the paper has
to be examined closely to find out
whether the hue matches. Shaving has to
be done with utmost accuracy to avoid
thick places.
If I have to do the shaving while
the book is in its binding, I use a pic
ture frame with glass, to which I add a
support so that it forms a stand. I insert
the frame into the book, open the page
that needs to be treated and put it over
the glass, and shave in the same way as
on a shaving box.

T H E A R T I F I C I A L P L A T E M A R K
Impressing a plate mark into paper is not
an easy task. Although the work is purely
mechanical, much thought must be
given during preparation. A plate mark
that is not imprinted properly clearly
shows that the work was done later on, as
a replacement.
If a plate mark is to be imprinted on
white112 paper, about 3 to 4 cm outside
the image, I would completely advise
against it. An artificial margin is espe
cially conspicuous if it is 5 to 6 cm wide.
If possible, only narrow margins should
be added because it is especially difficult
to get the paper between the image and
the plate mark smooth, and not every
restorer succeeds.113
First, the paper has to be examined
with regard to hardness or softness. That
soft paper is more suitable than hard
paper is certainly understandable. But
soft and forbearing paper also requires
more attention than hard paper. And
it cannot be ignored that the print qual
ity—the sharpness or depth of the
image—has to be taken into considera
tion when a plate mark is embossed. A
seldom-used copperplate has sharp
edges. Hard edges cause breaklike inden
tations in soft papers. As a plate is used,
its edges become less sharp. Weak proofs
without depth in the print lines also have
weak plate marks. I share this observa
tion so that the process of indenting a
plate mark is not taken lightly.
Above all, I advise against having
metal plates cut to the size of a print to
create artificial plate marks. An engrav
ing, in contrast to a woodcut or a litho
graph, is an intaglio print. A metal plate
would eliminate the beautiful relief of
the printed lines of the engraving. The
engraving would begin to look different.
Metal plates should not be used under
any circumstances! Someone might also
come up with the idea of giving the paper
a plate mark before implanting a new
margin. This would be possible, but the
subsequent treatment is very time-
consuming. Above all, the paper supply
has to be very large for such a procedure.
Still, I will describe this process for the
sake of completeness.
First, the engraving is placed on the
paper intended for the margin in such a
way that a well-proportioned margin is
created on all sides. After this, the plate
mark is measured; that is, the distance
from the print to the plate mark is
marked on the margin paper with a pen
cil. A complete second copy helps in
marking the correct distances. The mar
gin paper is then placed into water and
left to soak for a few hours. The bath will
cause the margin paper to expand some
what. After the bath, it is hung over a rod
so that it can drip dry quickly. Next, it is
put onto cardboard, and an accurate pat
tern of the new size of the plate mark is
drawn. After its exact size is determined,
the measurements are transferred to a
zinc plate. The zinc plate, which is sup
posed to imprint the plate mark, is cut
0.5 mm smaller all around so that it will
produce a plate mark of the required size.
The second copy should be at hand so
that the corners of the zinc plate can be
shaped in accordance with the original.

128 R E S T O R A T I O N O F E N G R A V I N G S , B O O K S . D R A W I N G S , A N D O T H E R W O R K S O N P A P E R
The corners of the plate mark may be
completely angular, or they may be
curved. The embossed edges of the plate
may also show variations. They may have
a sharp edge or may be rounded or
beveled. The zinc plate has to be cut
accordingly. If this is not too successful
in the beginning, repeated efforts will
bring the desired results.
I would not bevel the edges of a zinc
plate unless a sample proof taken from
the plate shows that it is necessary. I
would like to mention that this proce
dure can be used only when the margin
can be made of one piece, which is only
the case with small prints. Shaving of the
paper to which the margin is to be added
has to be done carefully, Before a margin
is added or implanted, the distance from
the picture to the plate mark must be
ascertained to be the same on all sides.
It often happens that the distance varies,
for instance, perhaps a few millimeters
greater on the right side than on the left.
The pattern will show this. The plate
mark is imprinted while the margin
paper is damp, and this is best done with
an intaglio printing press but can also
be done successfully with a large copy
ing press.
If you want to imprint a plate mark
while the paper is dry, I would recom
mend the following: Cut a pattern out of
strong ivory board.114 This pattern has to
be i mm smaller than the original plate
mark, but the rounded corners of the
plate mark—the edges —on the other
hand, must correspond exactly with the
original. Precisely measure the distance
from the picture to the plate mark with
a strip of paper and transfer this to the
front of the artificial margin. With a soft
pencil draw short lines in two places on
each side so that the pattern can be
adjusted with the help of these markings.
The pattern is attached to the artificial
margin with gummed paper. For this pur
pose, cut for each side two narrow strips
of gummed paper, about 2 cm long.
Moisten them only at the edges and put
them down to attach the pattern. When
the pattern is attached, turn the sheet
over. The back of the print is now on top,
and the lightly attached ivory-board pat
tern is underneath. The margin or the
edges of the pattern will become visible
when you run the palm of your hand
across the sheet. With your thumbnail
indent the edges of the ivory board into
the artificial margin. To avoid shiny
places when pressing down, put a sheet
of blotting paper on the back of the
paper. It goes without saying that the
ivory board provides the guide for the
movement of the thumbnail. If you want
to use this method, you have to practice
often beforehand, because a certain
amount of expertise is indispensable.
This process, too, is entirely a matter of
sensitivity. If you press down too hard,
the paper can easily tear.
I do not consider it advisable to
indent the plate mark from the front with
the aid of a bone folder. Small additions
to the plate mark, however, have to be
indented from the front with a bone
folder. That is the case, for instance,
when a tear that runs through the plate
mark has been mended. In this case, too,
blotting paper has to be placed between
the tool and the material to avoid shiny
places. The blotting paper should be nar
row so that the plate mark remains easily
visible on both sides.
The plate mark often runs close to
the image. In this case, too, a pattern has
to be made, or you can proceed as fol
lows: Put a sharp-edged ruler without

R E S T O R A T I O N O F E N G R A V I N G S , B O O K S , D R A W I N G S , A N D O T H E R W O R K S O N P A P E R 129
bevel or a metal ruler on the table. With
the print lying face up, place the margin
of the sheet far enough beyond the edge
of the ruler so that with your fingertips
you can fold the plate mark over from the
front. One side is now folded over.
However, be careful not to fold the side
margin over all the way; stop shortly
before it joins the other plate marks. The
paper can now be taken in the hand
and the side margin folded over sharply.
The paper is placed on the table, and
the folded-over side margin is rubbed
from the front with blotting paper and
bone folder. To create rounded edges,
Marienglas115 or transparent oiled paper
is put on the front and the corners are
pressed through this layer.
In individual cases certain subtleties
in the plate mark have to be taken into
consideration; these will not be men
tioned specifically here. You have to be
attuned to or look for all the special fea
tures of the original plate mark and try
to put them, as if by magic, into the
artificial plate mark.
Although the back of a paper will
always show that a margin has been
added, you still want to tidy up the front
somewhat, and the artificial plate mark
plays an important part in that.

T H E S T R E T C H I N G O F P R I N T S 1 1 6
Stretching requires the following materi
als: drawing boards in assorted sizes,
smoothly planed wooden boards, strong
glass panes, stone board,117 also glue,
starch paste, and guards of varying
widths and strengths.
When the stretching is done on pol
ished, painted, or smooth supports, one
should definitely apply starch paste to
the guards, since guards spread with glue
can easily become loose. In such an
instance, a i mm wide border of glue
is applied to the guard, which then has
to be half covered with a second guard
to secure it after the sheet is on the
stretching board.118 The rest of the guard
is then firmly rubbed down onto the
smooth support.
By "guards," I mean narrow strips of
paper, about 1V2 cm wide and about 50
cm long. They have to be nonabsorbent
and as pliable as possible. The strength of
the guard paper can vary. In time, you
will discover the most appropriate kind
of paper. You can also use packaging
tape, which has a strong adhesive and is
now being sold in rolls, if you work on
matte-surface stretching surfaces, for
example, drawing boards. The guards
can be cut to any length you choose and
moistened with a damp sponge. Since
these rolls of gummed paper come in dif
ferent strengths and widths, it seems
appropriate to have a small supply of dif
ferent widths and strengths on hand for
a variety of applications.
Glue has to be applied in liquid form
and very hot. Get an appropriate con
tainer so that the glue does not burn. The
glue pot has to be surrounded by hot
water so that the strength of the glue is
not diminished by burning. Use only the
best glue. Cakes of glue are chopped into
small pieces and are put into cold water
during the day. Glue in the form of beads
or small tablets is even better. To start,
put the pieces of glue into a container
and pour enough water over them so that
they are well covered. Over the course of
a few hours, stir the glue in the cold
water several times so that the particles
of glue do not stick to the bottom.
The stretching of etchings has to be
practiced often. The degree of dampness
necessary for stretching is of utmost
importance. If a paper is stretched when
it is too moist, either the plate marks can
disappear, in other words, the tension of
the paper can pull the plate marks out
ward and flatten the paper, or the plate
marks can open up, that is, tear and
thereby endanger the paper. Creases in
the image, which might have been
caused by inept preparation of the paper
during the printing process, can be
pulled apart during moist stretching.
Conspicuous white areas will appear in
the print and will be obvious because of
their precisely defined edges.
A number of questions arise before
one stretches a print: When is the paper
ready for stretching? When it is more
than half dry. The semidry state of the
paper makes one wonder, will it really
become flat? Is it not too dry?
If these doubts are realized, the mis
take is less severe than if the paper were
moistened again for stretching. A paper

R E S T O R A T I O N O F E N G R A V I N G S , B O O K S , D R A W I N G S , A N D O T H E R W O R K S O N P A P E R 131
is never in danger as long as it is half
moist and is watched carefully. When a
paper is stretched onto a drawing board,
it should not lie flat as a board immedi
ately but should still show some undula
tions. These undulations —let us say,
wavelike prominences —should be in the
center of the paper, never at the edges. If
the undulations extend from the center
of the paper to the edges of the margin,
the sheet will not become flat. You will
have to take it off the board and moisten
it again. Moistening is best done with a
flat bristle brush. A print without hand
coloring has to be dampened until it can
no longer hold water. Then it is allowed
to dry off a little in the air. It is best for
the paper if it dries slowly. If you try
to get the sheet to dry faster by apply
ing heat, the drying process will be
uneven. This has to be avoided. If a sheet
dries faster in some places, these places
have to be covered by paper or have to be
lightly moistened again. This will be the
case with areas that have not been
restored. You can recognize the dry parts
immediately by holding the sheet against
the light, since they appear somewhat
darker. Additional moistening is best
done with a sponge that has been
squeezed out, since the paper is sup
posed to be dampened only slightly. The
paper should not be rubbed but should
only be dabbed lightly with the slightly
damp sponge. If the sponge is more than
slightly damp, the paper could be dam
aged in many ways, especially if you are
dealing with soft paper. Rubbing would
cause tiny clumps of paper fibers to come
off, which, of course, would make the
paper thinner.
Monochrome prints that have not
been bathed in water have to be saturated
fully before stretching, to avoid the for
mation of water stains; discoloration will
often be present, even though it is not
immediately apparent. The side margins,
where the glue-covered guard has to be
applied in various stretching processes,
should be practically dry. It is the cen
ter of the sheet that has to be slightly
moist in order to make it stretchable. The
hardly noticeable dampness that still
exists in the margins is sufficient for the
sheet to become flat during the stretch
ing process.
I repeat once more: The right degree
of dampness is essential for the stretch
ing process. According to its quality,
paper will stretch more or less. Paper can
be stretched up to 3 cm, depending on
the size of the sheet. The expansivity of
the paper has to be taken into considera
tion when it is stretched.
To determine the expansivity of a
sheet, you have to measure the sheet
when it is dry and again when it is wet.
If you stretch a sheet while it is very wet
and attach it to a drawing board in such
a way that it cannot move, you will be
surprised to see how the paper behaves.
At the beginning of the drying process,
the paper tries to contract to its original
size. The stretching force works in pro
portion to the disappearance of the
moisture. Often the tension of the paper
during the stretching process is so great
that the sheet gets damaged. The plate
marks open up, and perhaps —even more
damaging—the sheet tears completely
in response to the tension.
If you stretch a damp sheet under
glass or on cardboard, the glass or the
cardboard has to be able to curve out
ward. 1 1 9 If the curving of the glass
becomes too pronounced, the pane will
crack. These examples show how impor
tant the correct degree of moisture is

132 R E S T O R A T I O N O F E N G R A V I N G S , B O O K S , D R A W I N G S , A N D O T H E R W O R K S O N P A P E R
for stretching.
Large prints have to be stretched
under glass. To prevent the glass from
bowing too much, the stretched print can
be put into the frame immediately but
should not be nailed in or covered with
a cardboard backing right away!120 The
sheet could take on a mildewy odor, and
there is also the danger that foxing will
develop. After being stretched, the sheet
cannot be stored upright (standing) but
has to be kept horizontal (lying) for a
while. In this position it is easier
to observe sheets and to take a number
of precautions.
Plate marks and restored places
need to dry faster. To make this possible,
the areas around the plate marks or the
mended areas can be covered with paper,
or these areas can be dabbed lightly with
a sponge. If the plate mark dries later
than the surroundings as tension devel
ops, the plate mark will lose its character,
which will lessen the attractiveness of the
print. This should never happen. The
sheet dries more evenly when it is stored
horizontally instead of vertically. In the
latter case, the moisture goes downward
and endangers the plate mark. Breaks,
creases—even printer's creases—can be
rubbed down more easily when the sheet
is lying flat; and, if necessary, you can
easily remoisten the healthy parts of the
paper with a sponge if they dry too soon.
Before stretching a print, look for print
er's creases. These creases have to be put
on top of a torn piece of absorbent paper
so that they do not open during the
stretching process. I emphasize once
again that you will have to use torn
paper; paper strips with straight, cut
edges would stand out on the front
because of their hard edges.
If for some reason it becomes neces
sary to remoisten a stretched print, do
not wipe or rub the printed side with a
sponge. First, test to see whether the
print gives off color. Some prints have
too little oil in their colors or were previ
ously treated inexpertly—for instance,
had dry chlorinated lime sprinkled on
them or were treated with chlorine water
while dry—so that the colors can come
off and soil the paper when you wipe
them with a sponge. As a test, find a dark
place in the print and rub a clean finger
over it. If only a slight trace of color
transfers to your finger, the color might
simply be deficient in oil, not damaged
from unskillful treatment. If the print
gives off more color, then I would advise
you to merely dab it with a moist sponge.
Prints colored with aniline dyes,
especially engravings from the end of the
nineteenth century, should not be mois
tened in the same way because the colors
are guaranteed to run. On the front the
margins are moistened up to the printed
image so that no water stains form
because of any slight yellowing of the
paper. The back is moistened completely
but lightly. The sheet is then left to dry.
Before the stretching process, the back is
lightly moistened once again.
Small prints especially have to be
carefully watched during stretching.
They are often printed on soft paper and
therefore show distinct plate marks. To
find the correct degree of moisture of
these sheets, experiment first with prints
of little value. A moistened plate mark, if
weak, has to be supported by thin paper.
Repaired places may be saturated with
water, but if the repairs are extensive,
they will have to be pressed down occa
sionally with blotting paper and a bone
folder before stretching.
One other question: Is it always

R E S T O R A T I O N O F E N G R A V I N G S , B O O K S , D R A W I N G S , A N D O T H E R W O R K S O N P A P E R 133
absolutely necessary to stretch a small
print? Stretching is done as a matter of
course when the sheet has undergone
major repairs or shows creases, breaks,
broken corners, and so on.
Unfortunately, the previously men
tioned expert gave the following advice
in 1929: "Sheets that should not be
stretched, but show breaks, creases, and
so on, can also be flattened with an iron."
I warn you never to use an iron in the
workshop of a restorer of engravings! I
committed this folly once when I was a
boy of fifteen, and never again. Nothing
damages the print, but above all the
paper, more than intense warmth, let
alone heat! I have mentioned this danger
in several places in my book.
If you want to remove small creases
or breaks without stretching, the weak or
frail places have to be strengthened with
a light gelatin solution. Dip a small
round bristle brush into the warm solu
tion and apply it to the back of the fragile
places. The entire sheet is then mois
tened with a sponge, and the gelatin
treatment is repeated on the damaged
places on the front. After the sheet has
dried somewhat, the creases or breaks
are pushed out as much as possible from
the back with blotting paper. This task
is performed on moderately hard card
board. If the print is comparatively flat
(there should not be any big buckles),
moderate weight can be put on it. If you
have available some large, heavy books
that cover the entire print, put the sheet
between blotting paper and use two or
three of the books to apply weight. The
moderate pressure will prevent the plate
mark from disappearing. If you were to
start out with a heavy load or put the
engraving under a press, the plate mark
would vanish. After two or three hours,
renew the blotting paper and double the
load. However, it is advisable to rub down
the brittle or fragile places once more
before this additional load is put onto
the sheet.
If an engraving with creases or
breaks is stretched on cardboard or a
drawing board, the creases and breaks
should be saturated with sizing solu
tion. The small creases and breaks are
rubbed or pressed as soon as the real ten
sion starts.
The following hints should also be
taken into consideration: Never try to
flatten a sheet when it shows buckling
while being stretched. This [buckling]
is actually necessary. It is a grave mistake
to think that you should pull on the sheet
from the sides. Pulling would change
the plate mark and make it look curved.
This cannot be done. Like all restora
tion processes, stretching has to be
carefully thought through in advance. A
sheet needs at least one hour, often
three, to become flat. It sometimes hap
pens that a sheet needs eight to ten hours
if the paper is very soft or if the print is
mounted. It is hardly worthwhile, there
fore, to stretch a sheet shortly before the
end of a workday, because you cannot
observe the drying process. However, if
the sheet does have to be stretched, it
must be covered with a clean cardboard
or a double layer of blotting paper. The
sheet can then dry in peace. It would also
be good, to safeguard the sheet against
any eventuality, to put a doubly thick
layer of paper on the area surround
ing the plate mark. If the sheet were
mounted shortly before the end of the
workday and were not to be stretched
until first thing the next day, it would
have to be prevented from completely
drying out. It would have to be covered

134 R E S T O R A T I O N O F E N G R A V I N G S , B O O K S . D R A W I N G S , A N D O T H E R W O R K S O N P A P E R
with moist blotting paper and several
pieces of clean cardboard. The sheet
would then still have the necessary
degree of dampness for stretching.
If one time you would like to investi
gate the expansivity of paper when it is
being stretched, try the following experi
ment. Make two small cuts in each of the
four guards. You should observe a certain
sequence when cutting the guards. The
cuts should be performed on opposite
guards; you can see right away how the
cuts widen. Of course, the sheet gives at
these places and starts buckling. And the
plate mark, too, loses its straight line.
I would also like to mention that
stretching small repaired sheets that
need more retouching should be done on
a glass pane. It is easier to observe the
depth of the retouching, therefore, the
effect of the color, when you are occa
sionally able to lift the paper to the light
during the course of the work.
After having discussed the prepara
tions and the most important considera
tions for the stretching process and after
having listed the materials necessary for
stretching, we can now take a closer look
at different stretching procedures.
If the margin of a sheet is wide and
can be reduced somewhat without chang
ing the overall impression [i.e., appear
ance or aesthetic effect], for stretching, it
should first be laid with the printed side
down, in such a way that the edges of the
sheet extend i to 2 cm over the right and
bottom edges of the cardboard. Glue, hot
enough to run off the brush easily, is
applied thinly to these two edges over an
area of 2 to 3 mm wide. As soon as this
has been done, the sheet is rotated and
the other two edges are also brushed with
glue. Next, take the sheet in both hands
so that the right hand grasps the nearest
right corner and the left hand the nearest
left corner and lift up the sheet. You have
to go well toward the center of the sheet
with your fingers so that you do not touch
the glue-covered edge. If the sheet is
lifted according to instructions, the glue-
covered edges will be on the side away
from you.
When you are ready to take the sheet
to the stretching board, first lay the sheet
against your chest, that is, against your
clean smock. Now let go with the left
hand and grasp the lower left corner.
Lightly swing the sheet away from your
body, holding it with your hands, and the
sheet will assume an arched shape.
This last procedure can be per
formed in other ways, and you can decide
which way you find more convenient. It is
even possible to immediately obtain an
arched shape by grasping the upper right
corner with the right hand, the lower left
corner with the left hand. Just lift up the
sheet and turn it with a slight swing—the
glue-covered edge will be on the outside
and the sheet will be curved. You must
attain this arched shape. It is then possi
ble for the sheet to touch the support
first only in two places. When the other
parts of the engraving are lowered, the
correct position is found by skillfully
adjusting the sheet. It is important to
mention that in this method of stretch
ing, the glue-covered edges of the mar
gin are sacrificed because, as a rule, they
are cut off after the stretching process.
There are exceptions, for example, a sup
port for stretching, to which the sheet
is supposed to remain permanently
attached. As soon as the sheet is posi
tioned the right way on the stretching
board, the edges are rubbed down firmly
with old blotting paper. Describing this
stretching procedure is more compli-

R E S T O R A T I O N O F E N G R A V I N G S , B O O K S , D R A W I N G S , A N D O T H E R W O R K S O N P A P E R 135
cated than the actual performance. This
procedure can actually be done quickly
and easily.
Another possibility for stretching
that involves the use of guard strips is
mentioned now. To retain a full margin,
which is definitely better, guard strips
are added; that is, the margin is extended
by a guard strip. Narrow lines of glue,
approximately i mm wide, are applied to
the guard strips, which are attached to
the back of the sheet so that the part of
the guard strips without glue extends
beyond the sheet. The sheet is laid onto
cardboard in such a way that it projects
on the right and on the bottom for i or
2 cm. After that, half the width of the
projecting guard strips is covered with
liquid glue; the guard strips on the other
two edges are placed in the same position
so that they, too, can be covered halfway
with glue. After this is done, the sheet is
lifted up and the remaining process is
performed as previously described.
I want to mention yet another
method of stretching with the aid of
guard strips. When the sheet has reached
the necessary degree of dampness, it is
put on the stretching board with the back
side down. The printed side is always
facing upward during this procedure.
From a roll of gummed packaging tape,
cut strips of the length required for
stretching and use them as guard strips.
Moisten the gummed sides with a damp
sponge and affix them to the edges of the
sheet, to a width of 2 to 4 mm, depending
on the width of the margin. The rest of
the guard strip is attached to the stretch
ing board.
When dealing with smaller engrav
ings, especially Old Masters, you have to
use a completely different guard strip. In
this case, the narrow guard strip consists
of a kind of tissue paper. You often find
this paper, which has the same wire lines
as the stronger handmade paper, in old
books, in which it is used to protect
engravings. Cut strips 1 cm wide and
about 2 0 cm long; thinly coat one edge of
the guard strip with a somewhat stiff
starch paste and position this narrow
guard strip carefully on the back of the
sheet. Immediately after positioning it,
rub the guard strip down with blotting
paper and a bone folder. After the narrow
guard strips have been attached to all
four sides of the sheet, the sheet is put on
a glass pane with the back side facing
down. Ordinary guard strips are then
coated well with starch paste and are
attached, half to the narrow tissue guard
strips and half to the glass pane. These
ordinary guard strips must be pressed on
securely with your fingers and, after a few
minutes, with blotting paper and bone
folder. You must be careful not to dis
locate the guards when rubbing them
and thereby endanger the print. The
stretched papers stay in an unheated
room until they have dried completely
and can then be brought into a warm
room. Never place a stretched engraving
near an oven or central heating unit to
accelerate the drying!
Stretched papers should not stay on
stretching supports for weeks. Unless
major retouching has to be performed,
take the sheets off the supports within
forty-eight hours. The rest of this para
graph describes how to do this. The
stretched sheet has to be taken off care
fully. The sheet can be easily damaged in
the process unless this work is performed
with the utmost caution. First, very near
to the edge of the picture, make a small
incision in the guard, through which the
knife can be inserted easily (see fig. 34).

136 R E S T O R A T I O N O F E N G R A V I N G S , B O O K S , D R A W I N G S , A N D O T H E R W O R K S O N P A P E R
Fig. 34-
Cutting a sheet off the stretching
support
Put your hand flat on the paper at the
place where the cut was made. The hand
has to continuously follow the knife
while the guard is being cut open. If you
do not put your hand on the paper but
just try to cut with the knife, the
stretched sheet could develop creases
when the tension lessens and the sheet
could be damaged by the knife. The pres
sure of the flat hand is only a precaution
ary measure. After the sheet has been
removed from the stretching board
according to the instructions, working
from the front of the print, immediately
cut off the projecting guard with scissors
so that the sheet does not get distorted.
Now, with the back side facing upward,
the sheet is put on a smooth support. The
remaining part of the guard still has to be
removed from the back. To do this, place
a smooth, clean, dry cardboard on the
back of the paper so that the narrow rem
nant of the guard projects at least a cen
timeter or two. Carefully shave off the
remainder of the guard with a restoring
knife. The cardboard serves as protec
tion. If you do not put down the card
board, your warm hand, resting on the
paper for a long time, will create buck
ling. After the remainder of the guard
has been shaved off, the sheet is covered
with cardboard so that it can recover fur
ther. Finally, it can and must rest.

T H E S T R E T C H I N G O F D R A W I N G S O N S T R E T C H E R S O R S T R A I N E R S
One cannot consider stretching engrav
ings on stretchers and strainers.121 If larg
er decorative drawings or blank sheets
need to be stretched on wooden frames
because they are going to be colored, it is
advisable to attach a durable support
sheet first. If this sheet is covered with
a solution of aluminum subacetate and
gelatin, the stretched drawings will have
very effective protection. The moisture
content of the paper should not be too
high for stretching in this case either,
because otherwise the frame will become
distorted. The drawings are stretched
only after the support sheet is com
pletely dry.
If the support sheet is 3 to 5 cm larg
er than the frame, the following proce
dure is applied. Put the wooden frame on
the support sheet, and apply hot glue to
the projecting border [of the paper].
Before the glue is applied, this sheet
should be cut diagonally at all four cor
ners. After this, fold the projecting edges
of the sheet upward, bend them over the
[back of the] frame, and press them down
firmly. If when folded over the edges do
not cover the sides of the frame com
pletely, glue broad strips of the same
kind of paper over them. This will pre
vent the frame from getting distorted in
the event that the support is too moist.
After the support has dried out com
pletely, you can also stretch a sheet over
the entire back. This creates a closed
space that is bordered by the two sheets
and the four sides of the frame. Such an
enclosed space would promote the for
mation of foxing if the sheet in the back
were put on too moist. To avoid this dan
ger, either you have to make absolutely
sure that the sheet has been put on as
dry as possible or you have to cut out
three to four round holes, the size of a
penny, for ventilation. After a while,
when the sheets or papers have dried
completely, these holes can be closed
with a patch. The support is supposed to
give the sheet additional strength and, as
much as possible, to guard against dam
age. The second sheet on the back offers
further protection and prevents the
frame from becoming distorted.

R E T O U C H I N G
Retouching always comes at the end of
a repair. Very often a sheet has to be
retouched even if it has had only a little
local cleaning. There maybe, for instance,
unsightly foxing, which had to be treated
a little more harshly, or a water stain,
which left a faint ring, or some fly blow,
which had to be taken off with a knife,
and so on. In such instances, of course, a
little touch-up is necessary.
Retouching is "work of the eye";
that is, you must look at the surround
ing areas and mix the color accordingly.
In the beginning a simple paint box
with watercolors is sufficient, to which
Chinese watercolors in solid form are
added.122 If you want to use Chinese
watercolors as liquid paint, you must dip
them in water123 and rub them on some
thing rough. You can mix them with ordi
nary watercolors, however you wish, if
the color of the print makes it necessary.
Before starting the retouching, you have
to examine the mended places. Make
sure that a tear that runs through the
print does not have any raised places.
Retouching is immediately visible if all
irregularities have not been removed
first. An expert takes this into considera
tion before he performs the repairs.
However, sometimes if the restored area
is large, it is impossible to remove all
irregularities right away. The edges of a
tear stand out a little more clearly when
the restored sheet has been moistened
and dried again, since dampness acti
vates the paper. An insignificant swelling
of the edges of the tear becomes visible
then. The new raised spots are carefully
shaved off with a sharp knife. After this
shaving, the spots are sized with a weak
gelatin solution.
A trained retouching artist and
painter must be able to work well even on
blotting paper. Of course, this is not an
easy task. In addition to other skills, a
light hand is important. This kind of
work is not done with a pen but with a
fine, well-pointed paintbrush. If you use
a pen, your hand has to be so light that it
just glides like a breath of air. As I men
tioned before, any pressing down would
damage the delicate surface of the paper
and make the color run. There also would
be ugly traces on the back. Of course,
these mistakes should not happen.
For practice, I advise you to take
prints as models and to copy individual
portions in minute detail. You must prac
tice precise copying, so it is inadvisable
to draw indiscriminately. Eye and hand
quickly become too willful when you try
to sketch out line drawings freely on blot
ting paper or stronger sheets. It is easier
to work freely than to follow a model.
Greater attention is required for copying,
and eye and hand become steadier. An
individual's touch should never be recog
nizable in a work, or it is not a restora
tion. A restorer "restores."124 In our field
one may not create the new but brings
the old into order.
A restorer of paintings has to recon
dition a painting in which a layman has
taken off the varnish while practicing
and has destroyed color and outline. In
such a case, the expert works according
to his own instinct, since paintings are

R E S T O R A T I O N O F E N G R A V I N G S , B O O K S , D R A W I N G S , A N D O T H E R W O R K S O N P A P E R 139
one of a kind. Engravings, however, exist
in several copies, and you have to obtain
another copy or a photograph to restore
everything that is missing.
I repeat once more that retouching
is eye work. You have to teach your eyes
to look closely. How often one thinks
that everything is just one black color.
Surely, the printer will not have used
much of a mixture, but time, dear time,
has been busily at work. If you have a
skillful hand and an eye that can see and
are able to adapt easily, then success
is certain. There are no other hints I
can give here, since each task will be
different.
The back of repaired engravings will
also have to be retouched in many
instances, because it is not always possi
ble to find matching papers, and the back
[of a print] and the mends have to corre
spond to each other.125
I would like to emphasize once again
that cleaning, mending, and retouching
should only be undertaken by an expert
of the highest order who is skilled in
these tasks. This kind of work requires a
certain amount of intuition and cannot
be explained in detail. You have to famil
iarize yourself with your work. Many
things have to be taken into considera
tion so that a mistake of a minute or two
does not destroy the work of days.
T H E SPRAYING METHOD
Order an 8 kg bottle of carbon dioxide
from a carbon dioxide factory, a mineral
water factory, or a restaurant. This bottle
should last for several months if it is
sealed properly. You will also need an
airbrush (with a cup to hold the liquid
color), a pressure gauge (manometer),
and a hose. Carbon dioxide is easy to
handle; there is no danger involved for
the user. I have been working with it
for about twenty years, and I think it
is appropriate now to report on my
experiences.
When the apparatus is set and the
cup is half full, press the little lever on
the airbrush, and a fine stream of color
will come out. If you want to increase the
stream, just keep pressing down the
lever. There is also a small device for reg
ulating the spray if you want to use the
same strength for a longer period.
Before you start to work, some tem
plates, or cutouts, have to be prepared to
cover the white paper margin. If sharp
contours have to be restored in the sheet,
you have to use a cardboard strip as a
mask so that the thin stream creates
these sharp contours. Since the stream
can be well regulated, I think it is advis
able to use the airbrush at a certain dis
tance from the picture —10 cm will
definitely be sufficient. The smallest and
most delicate places can easily be
touched up. For larger areas in the print,
a greater distance is recommended.
When using the spraying device, you will
be able to see for yourself how far away
the apparatus has to be held. The color
ing is done when the sheet is dry.
Any mezzotint whose splendid col
ors have been damaged, have faded, or
have suffered from rubbing or other cir
cumstances can be restored this way.126
If you know how to handle the airbrush
in a masterly fashion, you will achieve
excellent results. Even the transition
from distinct to diffuse forms or vice
versa is performed easily.
Only a mezzotint can be totally
reconstructed this way; such complete
restoration is not possible for other tech-

140 R E S T O R A T I O N O F E N G R A V I N G S , B O O K S , D R A W I N G S , A N D O T H E R W O R K S O N P A P E R
F i g - 35-
Lieutenant Colonel Tarleton, English
School, 1782, mezzotint by J. R. Smith.
Print before retouching. 1 2 7
niques. The stream that leaves the air
brush can only work on surface areas; it
cannot strengthen pure lines and points.
The apparatus can be used for many
other retouching purposes. If a cleaning
process has been too vigorous because
the sheet was heavily soiled, coloring can
be performed from both sides, even if
only locally. The margin, which is espe
cially important in this case, can be
worked on several times. If you are deal
ing with a single sheet, after the overall
coloring, the edges of the margin can be
gone over several times without a tem
plate, so that a harmonious transition
to the rest of the margin is possible.
Restored places on the reverse of the
sheet can be colored especially well with
the spray method.
Etchings often show a plate tone,
which can be applied only by the spray
method. I would like to repeat here

R E S T O R A T I O N O F E N G R A V I N G S , B O O K S , D R A W I N G S , A N D O T H E R W O R K S O N P A P E R 141
Fig. 36.
The same picture after being treated
with the spraying method
that an extensive mending job can be
retouched successfully only if the mend
ing paper was examined for lightness
before its actual use. Depending on the
coloring of the retouching later, the
paper has to be somewhat lighter when
held against the light. If the paper in
every way matches the original paper
before retouching, it will become too
dark after retouching. This should
not happen.
The paint used for coloring has to be
well settled; there should not be any
extraneous particles or small hairs in it.
To color the printed areas, take black
from a watercolor paint box and mix it,
perhaps with another color, until the
exact tone is obtained. The color base for
the margins is tea, to which other colors
from the paint box can be added. It must
be observed that coloring is not done in a
single process.

142 R E S T O R A T I O N O F E N G R A V I N G S , B O O K S , D R A W I N G S , A N D O T H E R W O R K S O N P A P E R
After coloring, the airbrush has to
be cleaned. This is done best by immers
ing it in clear water until the basin is
filled. Press the lever, and let the clear
water run through several times.
Afterward, dry the apparatus with a
woolen rag. It is also a good idea to take
the apparatus apart completely from
time to time. Unscrew all the parts and
put them down on the table in the right
order so that they can be reassembled in
the same order. The small leather gas
kets, which are put on in such a way that
they are hard to see, have to be replaced
with new, soft leather now and then. To
cut the rings, take the leather in your left
hand and turn it toward the scissors. The
scissors stay in the same position. (You
do this in the same way that an engraver
guides the copperplate with his left hand
when engraving a line.)
ASSEMBLY [OF THE AIRBRUSH]
Assembly is very easy. First, unscrew the
cap of the carbon dioxide bottle, then the
brass screw, which is recessed about 5 cm
below the head screw. Put both parts
aside. They will be needed again when a
new bottle is ordered. Take the hose and
attach the tip, which will receive the air
brush, to one end. After the tip has been
inserted and secured, a wire clip is added
so that no carbon dioxide can escape.
The other end of the hose is attached to
the foot of the gauge in the same way.
Firmly screw the gauge into the orifice of
the bottle at the place where the brass
screw was located before. After this, the
valve screw of the bottle is turned a little
to the left so that the carbon dioxide can
go into the gauge. The tap of the gauge is
opened a bit, and the carbon dioxide
enters the hose. Depressing the small
lever now will cause a thin stream of car
bon dioxide to be pushed through the air
brush. The assembly is complete. (If
there is any extraneous noise —carbon
dioxide escaping—the parts have to be
tightened again.)
If you can obtain a spraying device
with a motor, then, of course, you do not
need a carbon dioxide bottle. The appa
ratus can be attached to the motor.
T H E PENCIL AS RETOUCHING TOOL
A sharpened pencil—you should have
different degrees of hardness at hand—is
useful for a number of purposes. Above
all, it helps to eliminate minor damage,
especially when faint tones (plate tone)
have been rubbed off and white areas
of paper have become visible here and
there. Crayon lithographs, too —they
consist of countless black dots —can be
touched up beautifully. Rich, heavily
printed images, however, have to be
retouched with a paintbrush or pen. On
steel-plate proofs a pencil can often be
used successfully when the abraded areas
are not too large. To what extent such
damages can be touched up with a pencil
is a matter of sensitivity. The pencil, at
any rate, is a good retouching aid.
Removal or a slight lightening of
the retouching can be done with a soft
eraser. To reduce the sheen somewhat—
as seen at an angle — moisten a fingertip
with warm water and dab the retouching
with it. A very soft but finely sharpened
pencil hardly leaves a shiny spot.
Frequent sharpening is highly recom
mended.

T H E T R E A T M E N T O F C H I N A P R I N T S M O U N T E D O N C O P P E R P L A T E P A P E R S
Engravings in black ink, printed on
China papers, and mounted on copper
plate papers can be well saturated with
water. If little blisters start forming on
the China paper, they have to be pushed
out from the center of the paper to the
sides with the aid of blotting paper and a
bone folder. Blisters are removed only
when the sheet is half dry. When rubbing
the blisters, be careful not to harm the
soft paper. Do not rub too forcefully. If
the China paper becomes detached from
the sheet or falls off, the task becomes a
little harder. In this case, proceed as fol
lows. Put the dry China paper on a clean,
smooth, square table. The distance from
the edge of the table to the edge of the
China paper has to be such that the cop
perplate paper, after being moistened,
fits exactly when it is later rolled over
onto the China paper. That is, the plate
mark has to frame the China paper equal
ly on all sides. The distances are marked
on the table. Then, if the China paper-
it is positioned with the reverse side fac
ing upward—gets slightly dislocated
while it is being moistened, it can be
brought back into the previously marked
space. For saturating the sheet with
water, a broad flat bristle brush is used.
The brush is moved from the center of
the sheet to all edges; it is frequently
dipped into the water; in addition, a little
water is poured on the China paper, and
all blisters and creases are removed. The
China paper is then positioned along the
marks and dried thoroughly with blot
ting paper. This task, too, is done from
the center, and the edges are treated with
special care. The edges are dried, and the
blotting paper is changed, lifted up from
the center, and pulled off.128 The blotting
paper should not be lifted from the sides
because traces of glue [on the China
paper], often not even perceptible, could
stick to the blotting paper and damage
the margins. After the China paper has
been dried well, moisten the table 5 to
10 cm around the China paper. Cut some
strips of wrapping paper, smooth and not
too thick, and push them 2 to 3 mm
under the China paper. The wet border
prevents the strips from moving when
the China paper is brushed with a runny
starch paste and does not allow the paste
to get on the table. The starch paste is
applied evenly everywhere. The best way
to do this is to spread the paste from the
center of the paper to all edges. Any
impurities from the brush have to be
removed after the application. The strips
of wrapping paper are carefully taken
away. The China paper, thinly covered
with a layer of paste, is now positioned
within its markings.
Before the China paper is treated, its
support must be dampened well on both
sides, blotted, and evenly rolled up.
When rolling up the support, make sure
that the front faces outward and that the
rolling is done so evenly that no edges
project. The rolled support is put flush
against the lower edge of the table.
Do not completely unroll the sup
port on top of the China paper right
away; unroll it only as far as the edge of
the China paper. Make sure that the plate
mark frames the China paper evenly, and

144 R E S T O R A T I O N O F E N G R A V I N G S , B O O K S , D R A W I N G S , A N D O T H E R W O R K S O N P A P E R
if it does, the support can be carefully
unrolled over the China paper. If the side
margin does not frame the China paper
evenly, the support has to be shifted by
deft movements back and forth in such a
way that it fits properly. Of course, the
distance from the plate mark to the
China paper has to have been measured
beforehand. If you have a helper, he can
expedite the process by lightly pushing
Fig- 37-
China paper lifted up diagonally from
one corner
the support down. He has to follow the
process closely and always rub down the
last piece of support unrolled, going
from the center to the sides. For this, two
to three sheets of blotting paper are put
on the support. Then, using several
pieces of blotting paper, press the sup
port down firmly onto the China paper
with a flat hand. After this, slowly lift one
corner and make sure that the China
paper is firmly affixed to the support. If
the corner of the China paper stays on
the table, the corner has to be put back
and, after a little while, pressed down
again firmly with blotting paper. The lift
ing should be successful now. Lifting is
a feat in itself. You cannot lift the sup
port parallel to one of the sides of the
corner of the support but have to lift it
diagonally from one of the corners (see
fig. 37). As you lift further, you have to
perform a rolling motion, curving the
lifted corner downward toward the back
of the support while continuing slowly to
pull up the support with the attached
paper. If there are any holes or tears in
the China paper and you come to them
while you are lifting the support, the sup
port has to be pressed down firmly once
again at these places. If there is only a
single large tear in the China paper, it is
advisable to start working on the corner
opposite the tear; that is, first lift the side
that is not damaged by the tear. This way,
the tear will not cause a problem because
it will be lifted first not on its open end
but on its closed end.
If the work progresses satisfactorily,
the paper is placed on clean cardboard.
Now an attempt is made to close tears or
other damage in the China paper. This
work is done with the fingertips. Try to
close the narrow opening of the tear by
drawing together the edges of the tear
without lifting or damaging the damp
ened China paper. The tear has to be
slowly drawn together in a lateral direc
tion by lightly putting the fingertips on
the China paper.
If the support paper is soft, it should
first be laid diagonally over a tube pole.
Later, it should be laid onto cardboard,
and the China paper should be firmly
pressed down from the front with blot
ting paper.
I would like to briefly mention
another method that can be used with
small China papers. Put the moist paper,
including the support, on the pane of
glass or the table, and proceed as follows.
Let the China paper and the support float
in a tray with only a little water. The sup
port is under the China paper, which is
facing upward. Try to adjust the China
paper by pouring water over it so that it
is positioned correctly on the support.

R E S T O R A T I O N O F E N G R A V I N G S , B O O K S , D R A W I N G S , A N D O T H E R W O R K S O N P A P E R 145
Before the sheet is lifted out of the tray,
the water has to be drained carefully.
Gently press the China paper and the
support with your fingers so that they do
not change their position. Lift up the
paper with the support, put it face up on
a pane of glass or on the table, and cover
one-half with a white, nonabsorbent
sheet of paper. Carefully lift the uncov
ered half of the China paper and fold it
back onto the white sheet. Brush soupy
starch paste onto the half that has been
folded over.
After this, carefully lift the China
paper off the white paper, and have an
assistant insert a clean rod under the
lifted part. Take hold of the rod your
self, lift the pasted half of the. China
paper carefully and calmly from the
white paper, and return it precisely into
position on the support. This part of
the China paper now has to be rubbed
with blotting paper, while you watch for
the development of little bubbles and
creases. The other half is treated the
same way.
You can also use a broad strip of
paper to lift China paper, placing several
centimeters of it underneath.
If the support sheet for the China
paper is so heavily damaged that it must
be entirely replaced, the work is consid
erably easier because there is no plate
mark to take into consideration. The
preparations are the same as for the vari
ous other processes mentioned. As soon
as the support sheet has been rolled over
onto the China paper and the print
stretched and dried completely, the plate
mark is pressed in from the reverse. To
do this, the sheet is held against the light
so the China paper becomes visible.
Small marks are drawn onto the reverse
side, where the plate mark is supposed to
be formed. The sheet is placed on card
board and a ruler put to the markings.
The plate mark is pressed in with a bone
folder. The rounded parts of the margin
are done freehand.
The pressing of the plate mark has to
be done with great precision. The ruler
guiding the bone folder should not be
allowed to slip. Above all, the pressure of
the hand should not be so strong as to
damage the paper.

T H E T R E A T M E N T O F M A N U S C R I P T S
The mending of damaged manuscripts,
documents, letters, and similar papers
is performed in exactly the same way
described for engravings. Shaving may
be done only to a maximum width of
3 mm. If a tear runs through the writing,
no more than a small amount of shaving
may be performed in the spaces, and
these areas have to be thinly covered with
a paper of matching color. If there is
enough clear space at the edges of the
tear, these places have to be carefully
shaved and mended. The paper has to be
moistened cautiously, and, of course,
only the parts without writing can be
treated. In many instances, the ink or
pigments used for writing do not meet
requirements that we have today. They
are in part water soluble, but in most
cases they dissolve when treated chemi
cally. Before any treatment it is a good
idea to test to see if the ink is permanent.
It is obvious that a letter should be first
cleaned with an eraser. Rarely would I
suggest cleaning chemically, and even
then only if it would not affect the writ
ing. There are remedies that can revive
the remaining traces of writing in ink,
but I do not want to mention them
because I consider it very dangerous to
treat autographs chemically. It should
not be done!
When a letter is creased, I recom
mend the use of a weak gelatin solution.
Since a letter should be made to look like
an original, it has to be skillfully folded
after pressing.

T H E T R E A T M E N T O F P R I N T S O N P A R C H M E N T
Dusty and dirty parchments without any
coloring can be put into clear water for
cleaning purposes. The parchment is
cleaned with a flat bristle brush. Press
down a little with the brush when treat
ing areas without printing. Do stay away
from warm water, though, because the
parchment will shrink. To prevent the
parchment from rolling up in the bath,
weigh it down with filled bottles. If heavy
stains have to be removed, I suggest only
the use of chlorine water, because
hydrochloric acid can easily make the
parchment transparent.
Painted parchments have to be
treated from the reverse first, to make
them soft and pliable. For this purpose I
would suggest using no other means but
clear water. The work is done on a table.
Place the parchment with the back fac
ing up, cover it with moist cloths and
then with a flat board or a strong glass
pane. After a while, sprinkle a little water
on the cloths to keep them evenly moist,
and repeat this procedure several times.
When the parchment no longer
tends to roll up, the colored front can
be treated. The chemical treatment of
uncolored parchments is followed by
the previously mentioned chlorine anti
dote, whereas colored parchment can be
treated only locally with the antidote.130
So that you do not endanger the col
ors when flattening a painted parchment,
put a wide, flat frame on the parchment,
to cover much of the margins. When this
is done, it may be that the frame will
cover parts of the painting. Naturally,
this should not happen. In such a case
the parchment should be put on a draw
ing board or a flat tabletop, and thin
paper strips that extend over the edge of
the parchment should be placed on top of
those places on which the frame cannot
be put. The protruding part of these
paper strips is fastened to the board or
table. Thumbtacks are inserted in such a
way that they do not make holes in the
parchment but have one-half of their
heads covering the parchment.
After this is accomplished, a smooth
board is put on top and weighted with
books or cardboard. The air space cre
ated is sufficient to permit rapid dry
ing. Since parchments are of varying
strength, you have to allow between six
and twelve hours for the parchment to
dry enough to be stretched. Parchments
sometimes need twice that time to
become ready for stretching. Stretching
requires a great deal of attention. Even if
a plate mark does not have to be taken
into consideration here, the particular
degree of moisture is of major impor
tance. It is better to stretch the sheet
when it is somewhat drier rather than
when it is semimoist. A sheet will readily
tolerate being remoistened once it has
been stretched. Dab it with a semimoist
sponge as needed. As with engravings, a
guard is applied for stretching. The
guard used has to be a little stronger than
for engravings, and the area to which
glue is applied has to be wider, about 2, to
3 mm altogether. If the parchment has
been stretched on a drawing board, I
would recommend adding a broad guard
to the front. The guard should be wide

148 R E S T O R A T I O N O F E N G R A V I N G S , B O O K S , D R A W I N G S , A N D O T H E R W O R K S O N P A P E R
enough to overlap the parchment in the
same width as the guard attached to the
back and to extend onto the board 5 to
10 mm. The adhesive for the second
guard is starch paste. After the parch
ment has been stretched four to six days,
it is cut off the stretching board and put
between pieces of straw cardboard.

T H E C H E M I C A L T R E A T M E N T O F P A I N T E D R I C E P A P E R
Chinese rice paper131 is exceedingly frag
ile. If it is not treated skillfully, it can
crumble like puff pastry. It is therefore
advisable to use the utmost caution.
Painted rice papers are usually glued at
their edges to chalk-filled cardboard,132
and difficulties can begin even when they
are being loosened. They have to be loos
ened with a flat shaving knife. The knife
is steadily moved forward between the
paper and the edge of the cardboard
while being pushed down onto the card
board. If this process does not yield the
desired results, and provided there is no
coloring nearby, the front of the glued
edge is moistened with a soft paintbrush
that has been dipped into water. After
being loosened, the sheet will be buck
led. Hydrogen peroxide is applied care
fully to the area around the coloring.
Especially strong foxing is first treated
locally with chlorine water, as usual. If
the stains have faded considerably after
further local treatment, one should be
satisfied with the work. Of course, a chlo
rine water treatment can be used, too,
but it has to be done skillfully. Chlorine
water is more inimical than hydrogen
peroxide to areas colored in reddish
tones and colors mixed with brown. After
the chlorine treatment, the affected
areas are dabbed with clear water and the
familiar antidotes. The sheet is left out
in the air to dry a little. Once the sheet
is semidry, it is turned with the back
faceup. With a paintbrush the back of the
colored section is brushed thinly with
clean water. When the water has evap
orated a little, the local dabbing is
repeated. Under no circumstances
should this dabbing soften the colors! If
the cockling on the back of the color sec
tion appears to resemble that of the
cleaned parts of the sheet, the sheet has
been moistened evenly. It is imperative
to carry out this moistening evenly.
To flatten the sheet again, proceed
as follows. Put the sheet between two
smooth pieces of blotting paper; watch
that there are no small bumps in the
paper or the pressing boards, and weight
the sheet down with heavy books. After
half an hour, replace the blotting paper
and weight the sheet down with the same
load. This procedure is repeated three or
four times so that the sheet gradually
returns to its original size. After three
to four hours of drying under weights,
the sheet—without blotting paper—is
placed between smooth pressing boards
and weighted with a heavier load, or it is
put with the pressing boards into a press,
which is slightly tightened. After the
sheet is pressed for twenty-four hours, it
will be smooth.
If tears have to be treated, no shav
ing should be done. Just put thin
absorbent paper under the tear and rub
it carefully with the bone folder. Do not
use the round, flat tip of the bone folder
but only the smooth surface. If the tip is
used, irregularities may be rubbed in or
the sheet maybe torn. Since colored rice
papers must be put on cardboard again,
the sheets are stretched on cardboard.
Stretching is done only after repeated
light pressing, since even a hardly per
ceptible dampness has the ability to

150 R E S T O R A T I O N O F E N G R A V I N G S , B O O K S , D R A W I N G S , A N D O T H E R W O R K S O N P A P E R
create great tension. Stretching has to be
done because otherwise the mended
areas would buckle.
I repeat once again: For stretching,
the moisture content of the sheet has to
be so low that it is almost dry. With great
tension the cardboard would bow and the
paper would tear. As an adhesive for the
stretching process, one should use glue
that is liquid but not too hot.

R E S T O R A T I O N W O R K O N L A R G E - S I Z E P A P E R
If a colored map of a city or a general view
several meters long needs to be removed
from a support, the support has to be
examined beforehand to find out
whether it is able to absorb water. If a
droplet of water is applied and remains
standing, it is a sign that the support
will create problems during its removal.
The support has to be deprived of its
strength; that is, its resistance has to be
broken. We already know that the map
will have to be cleaned dry as far as possi
ble before the damp treatment. Since the
colors, especially red and blue, may run
during a moist treatment, the surround
ing area has to be brushed with a solution
of aluminum subacetate to prevent it
from absorbing any bleeding colors.
After this preparation, the support can
be treated. The resistance of the support
is broken when it is brushed with boiling
soda water.133 This procedure is repeated
until the support willingly absorbs the
soda water. However, in the process you
have to watch that the moisture does not
cause certain areas of the front to
become too dark. The soda solution
might then endanger the coloring or
the printing.
We are next concerned with remov
ing the support. This is accomplished
with repeated applications of cold water.
If the paste consists of rye flour, you
know that you cannot work with hot
water. If you are dealing with a coating
of glue, it is also better to try the separa
tion with cold water, since there is the
danger that the glue might dissolve too
fast with hot water. The hot water might
seep into the paper and endanger the
colors. If alum paste was used, further
separation can be undertaken with hot
water because the alum will have made
the paper bearing the design impervi
ous. The paste is then washed off in the
usual manner.
Whether it is advisable to com
pletely submerge a colored map in a bath
depends on its condition, especially on
the drawing and colors.
If the map consists of many compos
ite parts, it might be more advantageous
to take apart the map while dry. Try to
divide the combined parts with the shav
ing knife, not scissors. After opening up
a centimeter or less, attempt to cut with
the shaving knife. If a map shows breaks,
it is divided at those places, of course.
The overall cleaning of the map is done
with hydrogen peroxide, avoiding the
colored parts.

T I P S
TREATMENT OF JAPANESE WOODCUTS
Japanese woodcuts have to be treated
carefully, inasmuch as the colors do not
contain oil as in engravings, although
the paper itself withstands treatment
well. Watercolors were used; flesh colors
were mainly hand-colored; the silver
background was applied in powder form.
During wet treatment, especially when
using chemicals, you have to work with
special care because these colors, which
have been applied by hand, can easily
disappear.
I have not treated early woodcuts
from the eighth or ninth to the sixteenth
centuries. Therefore, I cannot make any
comments on their colors or paper.
When uninked blocks have been
used during printing, the woodcuts
should not, of course, be pressed since
the uncolored areas of embossing would
be destroyed.
TREATMENT OF PRINTS ON SILK
Early prints on silk can only be treated by
mild procedures. You have to note the
sheen of the silk and be careful during
stretching so that the weave of the silk
does not get distorted. If the print has
been done on a big piece, it is advisable
to cut off a sample diagonally—half a
centimeter wide —and to test chemicals
on it.
TREATMENT OF ENGRAVINGS
ON JAPANESE PAPER
Engravings on Japanese paper are
treated like other prints. Heavily
ingrained dust is removed by first wetting
the papers in water and then treating
them with a flat bristle brush, as I
recommended earlier for other papers.
Hot baths should be avoided as much
as possible. How much dust can be
removed without harming the paper
depends on the skill of the restorer.
Rubbing hard should always be avoided
since the surface of the paper can easily
be roughened. The prints themselves
should be washed only after all tests have
had good results.
Japanese paper should never be
treated with bleaching soda! Wetting is
done with a grit-free sponge. The paper
is dabbed, not rubbed.
REPAIRS ON PAPERS
WITHOUT W I R E LINES
For repairs on papers without wire
lines, in most cases posttreatment is
required after an extensive amount of
work has been done. After the mends
have been applied and shaved down,
many parts still look somewhat uneven.
These irregularities are removed with
fine sandpaper. But you have to work
very carefully and cannot press down.
There is no need for me to emphasize fur
ther that under no circumstances should
the surrounding area be lightened.

R E S T O R A T I O N O F E N G R A V I N G S , B O O K S , D R A W I N G S , A N D O T H E R W O R K S O N P A P E R 153
Cut small pieces of sandpaper to the
size of half a matchbox or even smaller,
and fold them one more time so that they
are manageable.
POSTTREATMENT OF PAPERS
WITH W I R E LINES
Only rarely can you use sandpaper to
treat papers that date from the end of the
eighteenth century to the present and
that have wire lines. And then, greatest
caution is required because these papers
are usually very soft.
For now, I advise you not to treat ear
lier prints with sandpaper because they
can be damaged too easily.
Sandpaper is used only after the
principal shaving, performed at the win
dow, and posttreatment on the table.
Smooth the mends before applying gel
atin, a weak sizing. After sizing, only
the knife may be used. A slight dabbing
locally with a semimoist sponge then
takes care of the shaving done by knife —
the roughened spots are made uniform
with the surrounding area. If some of the
restored parts are noticeably dull, soupy
paste applied with a brush helps. You dis
cover these dull places by holding the
sheet at eye level against the light. The
paste is applied very thinly.
Greatest caution should be exercised
when rubbing or pressing with blotting
paper and a bone folder! The thin layer of
paste should not stick to the blotting
paper. The sheet, therefore, must be
rubbed when it is dry rather than moist.
These procedures, too, first have to be
tried repeatedly on papers of minor
importance.
RESTORING TEXTURE
Now I would like to provide a few hints on
how to give the mended areas a certain
texture or surface from the reverse. Soft
paper can easily be given a slight texture
of wire lines or other characteristics
when it is specially treated while moist
or, even better, halfway dry. If a soft
paper is supposed to have a slight texture
of wire lines, put a nonabsorbent paper
with pronounced wire lines on top of it
and press it strongly with a bone folder
and blotting paper. This way, the wire
lines of the hard paper are transferred to
the soft paper. All kinds of material,
especially coarse linen, are useful for this
purpose. This kind of procedure, howev
er, should only be used when the sur
rounding of the restoration requires it.
CORRECT MEASUREMENT
OF MENDS FOR DAMAGED AREAS
It is important to know that mends for
damaged areas should not be too large.
An excess of mending paper has to be
avoided by all means. For example, if you
shave a tear to a width of 5 mm, you
should not apply a mend that is 7 mm
wide. These 2, mm can spoil the entire
job. Shaving down the 2 mm later would
create a shiny spot wherever there had
been an excess of paper. If you have made
the mistake, you have to put up with the
shiny spot. Shiny spots that are caused
not by paste but by the slight pressure of
the bone folder or by the work process
can be removed with a moist sponge.

154 R E S T O R A T I O N O F E N G R A V I N G S , B O O K S , D R A W I N G S , A N D O T H E R W O R K S O N P A P E R
REMOVING RESIDUES OF PASTE
Only in rare areas should the paste be
removed from the reverse of a sheet by
putting it into a tray of water.134 If dirt
and paste were removed with a paint
brush while the sheet was in the tray, the
waves created in the water by the move
ment of the brush would make it hard
to see the sheet. Therefore, to protect
the sheet from damage, drain all the
water from the tray or wash the sheet on
the table.
T H E CHOICE BETWEEN CUTTING OUT
OR CHEMICALLY TREATING
DISTURBING SPOTS
Spots that are especially obvious and that
cannot be removed completely by being
dabbed carefully with chlorine water in
combination with 10 percent hydrochlo
ric acid should not be eliminated by other
means. This would endanger the adja
cent areas if beautifully colored areas
surround the spots. It is more advisable
to leave the spot or to cut it out than to
damage a wider area by applying the
wrong treatment!
TREATMENT OF GRAPHICS
MOUNTED ON WOODEN BOARDS
Prints mounted on wooden boards
should never be weighted down with bot
tles or other weights if you want to
remove them from their mount in a cold
bath. The wooden boards would crack
and severely damage the mounted prints.
The sheet should be put on the water sur
face and the back of the board should be
rinsed. The curving of the board, which
appears in a short time, will recede again
after a few hours.1 3 5
T H E LAYERING OF SHEETS TO DRY
If you are forced to put moist sheets on
top of each other because of lack of
space, the image sides must always be
put face down on the cardboard. If this
advice is not heeded, the image sides can
be seriously damaged when someone
touches the stack of cardboard. Because
of the moisture in the sheets, the card
board will buckle. The buckled areas of
the cardboard will slightly lift the sheets
and touch the upper cardboard. If some
body should knock against the card
board, the areas that touch the upper
cardboard would start to rub. Although it
is not advantageous to damage the back
of the sheets, at least the damage will not
be as considerable.
OBSERVATIONS ON
VARIOUS PROCEDURES
When removing or ameliorating breaks,
creases, folds, and so on, take care that
no shiny places are created on the sheets.
The sheet, which has been well prepared
for stretching, is placed on a cardboard
or a double layer of blotting paper and
the break, and so on, is carefully rubbed
with the aid of blotting paper and a bone
folder. The bone folder should only be
guided over the break and should never
be pushed down too hard or vigorously.
Any movement of the support should be
avoided because the sheet will be dam
aged otherwise. Even if the sheet still
shows slight traces after being stretched,
it is better not to do any further rubbing.

R E S T O R A T I O N O F E N G R A V I N G S , B O O K S , D R A W I N G S , A N D O T H E R W O R K S O N P A P E R 155
The velvety tone of a mezzotint or
aquatint is very subtle and, therefore,
very delicate and has to be preserved by
every means. The same caution is
applied to French crayon-manner prints
and engravings with burr as well as to old
woodcuts with embossed ridges on the
back. All other techniques, if they can be
recognized as such—works performed
with a burin (engraving), crible, iron
etching, stippling, mixed method (dots
and lines), steel engraving, lithography,
wood engraving—also have to be treated
with care but are slightly less sensitive.
POINTS TO TAKE INTO CONSIDERATION!
Heavily damaged sheets, if they are
severely yellowed, must be cleaned quite
thoroughly before they are repaired. For
instance, it may be necessary to match
the color of one sheet from a series to
that of the other sheets. If only a slight
brightening is carried out, further recon
ditioning, and therefore mending or
"true" repair work, would not produce a
satisfactory result.
The reasons for this are as follows.
An insufficient cleaning lightens only the
skin of the paper but not its flesh at the
same time. Therefore, after the damaged
places have been closed, a yellow area of
the width of the area that was shaved
down will appear if one carries out addi
tional light shaving of the tear from the
front. This not so pleasant surprise is
caused by the fact that the brightening
has not reached the interior of the paper.
Even though this yellowing was not
visible during the preparations, it was
there. It also goes without saying that the
mend has to undergo the same kind of
thorough cleaning.
Color prints or hand-colored prints
are treated as follows. Tears or types of
other damage that run through the col
ored illustration are only brightened
slightly or, often better, are not cleaned
at all because any subsequent shaving of
the mended tear from the front must be
very limited. Only the edges of the paper,
including the title, are cleaned more
thoroughly.
If a damaged sheet shows more
intense yellowing that for certain reasons
cannot be removed or even reduced
through cleaning with bleaching agents,
the repair is preceded by at least a dry
cleaning and a bath in cold water, which
contains a small addition of table vinegar
at most.
In such a sheet—which is not being
treated any further, of course—the yel
lowing of the skin will naturally remain
stronger than that of the flesh of the
paper. Depending on the difference in
yellowing, after shaving down the tear,
evidence of a faint, light-colored area the
width of the shaved area may appear on
the front, where the lighter flesh of the
paper has been laid open by the shaving
knife. However, this trace can be
matched to the surrounding area with
relative ease by slight retouching.
Light, heat, and other influences —
as causes of the yellowing—chiefly affect
the skin of the paper. The flesh of the
paper is affected only later and less
severely by browning. Papers that were
manufactured after 1840 and have wood
fibers added are an exception. These
papers "age" quickly; they take on a
coloration that may extend to dark
brown, affecting the skin and the flesh
simultaneously.

C H A T S A B O U T O L D A N D N E W R E S T O R A T I O N S O F B O O K S
During my work as a restorer, I have fre
quently held in my hand old prints which
were restored over one hundred years
ago. Often it has been my task to improve
on the restoration. Such old restorations
are a joy to work with, books even more
so than engravings. You can draw many
valuable conclusions from the work of
the restorers of that time. In one case, for
instance, I was dealing with a major
restoration on a book in which about
twenty pages had to be worked on. The
work of the colleague who had restored
the book more than one hundred years
ago showed that he was a skilled expert.
I was especially interested in the adhe
sive that had been used. Since I could not
discover any change in the restored part
and found the surrounding parts in
order, too, no special agent could have
been added to the adhesive to protect it
against decay. Let me remind you that
more or less all agents that are mixed in
with paste in order to preserve it from
decay will develop acid and attack paper
in later years at the mended places. Since
the adhesive was colorless, I concluded it
might be starch paste and performed
appropriate experiments. First, I gave
the sheet a water bath and discovered
that the restored place readily absorbed
water. Yet, after more than a hundred
years, the quick water absorption was not
definite proof that the paste did not con
tain some kind of preserving agent.
There was the possibility that a weak
agent had lost its efficiency over the long
span of time, so much so that it could not
be readily recognized anymore. I there
fore gave a page of this book to a chemist
friend of mine, asking him to find out
whether the paste contained a special
agent. The chemist informed me that he
had not discovered any special agent and
that one of his tests had shown that the
adhesive was starch. I was very happy
with these findings, since they agreed
with my theory that it is not necessary to
add any special agent to an adhesive to
protect it against decay—a theory that,
by the way, has been proven by my work
of more than forty years also.
During my work, I have encountered
other cases in which the restorers or
bookbinders did not do their work neatly.
Although they had been entrusted with
the restoration of the entire book, they
did not spend any time deliberating. The
brittle binding was patched temporarily,
but the different layers were not put
together neatly. It has even happened
that guards have been glued right up to
the type area to strengthen the brittle
paper. One definitely must try to improve
on such repairs, and it is best to start by
removing the old mends.
A few years ago I read in a small pro
fessional publication that potassium per
manganate should be used for dyeing
mending papers if it is impossible to find
paper in the original hue. I caution you
not to use this agent. Instructions should
not list any chemicals unless their effects
have been tested. I do not think that the
author of that article could report actual
results. At the beginning of my career, I
used this agent too. I saw one such
restoration later, when the client at that

R E S T O R A T I O N O F E N G R A V I N G S , B O O K S , D R A W I N G S , A N D O T H E R W O R K S O N P A P E R 157
time informed me that the repaired
places were standing out in strong con
trast with their surroundings. I had to
admit to myself that the restored places
had changed so much that I would never
use this kind of dyeing again.
If the mending paper is somewhat
lighter in tone, there should not be any
dyeing until after all work is done.
Otherwise, because dye is easily dis
solved and only clings to the surface, one
might observe the following while con
tinuing to work: first, the easily soluble
dye might mix with the paste, making the
mending paper darker in color than
desired; and second, mottled spots might
appear when shaving.
The dear colleague who recom
mended this kind of coloring should have
asked himself what would happen if
someone dyed just any piece of paper
according to this method, perhaps using
paper manufactured at the end of the
nineteenth century as mending paper for
a print from the fifteenth century. I do
not want to deprive him of the answer.
The nineteenth-century paper, having
been manufactured with the addition of
a lot of wood, would turn darker and
darker over the course of time, whereas
the paper from the fifteenth century
would not change. This means that the
restored places would stand out more
and more distinctly. I mention this not
only to caution against the use of such
coloring but also because one should
use paper in the original tone and from
the appropriate time. The paper supply
must be refilled continually. Even today,
there is enough paper around if you just
keep looking.
To protect a work from decay, place
just as much value on whether your work
is appropriate as on whether it is artistic.
In other suggestions by the restorer
of books, mentioned above, I missed—as
an absolute requirement for success in
this kind of work—an urgent reference to
painstaking cleanliness. Above all,
repair of dusty sheets should not be
attempted. The sheet has to be cleaned
first, beginning with a dry method, that
is, using an eraser.
A special repair technique from the
writings of this expert should also be
mentioned. He writes verbatim: "If a tear
on a book page extends far into the print
ed part, apply paste to the tear in such a
way that the paper can be overlapped i
mm wide in the unprinted parts of the
paper to stick it together, even if the writ
ing appears slightly distorted this way."
This calls for two criticisms. First, the
mending will not hold when the edges of
the tear are overlapped so narrowly; and
second, everyone attaches great impor
tance to being able to read the print com
pletely. My suggestion would be to paste
finely torn paper, matching the original
in color, over the gaps between the writ
ing or to cover the entire tear from both
sides with extremely thin goldbeater's
paper. For the technique of working with
finely torn paper, see the section on tear
ing paper. The fine goldbeater's paper
allows the writing to be visible and the
tear to be closed in a simple way. This
type of work can be done in the book
itself even if the book is torn near the
back. To work more efficiently, put a
cardboard support under the tear so that
the thin paper can be rubbed down well.
For the closing of wormholes, this
"expert restorer" suggested verbatim
the following as the best method: "Small
pieces, slightly larger than the worm-
holes, are cut out of exactly matching
repair paper. This is best done by cutting

158 R E S T O R A T I O N O F E N G R A V I N G S , B O O K S , D R A W I N G S , A N D O T H E R W O R K S O N P A P E R
them out with a hole puncher; the hole
puncher for the Soennecken loose-leaf
binders is well suited for this. The small,
circular pieces are glued over the worm-
holes in such a way that they extend a lit
tle beyond the holes. One prerequisite is
secure gluing. When they are half dry,
the sheets are pressed separately
between two polished sheets of metal for
a longer period of time, and afterward
the little patches are pared off around the
edges with a sharp knife. This work
requires time and patience but is safe.
For larger damage, larger pieces of paper
are cut to size; the edges of the damaged
parts are 'smeared' [quotation marks are
mine] thinly and conscientiously with
glue; the cover piece is stuck on, pressed
when half-dry, and the edges around the
damaged parts are pared. Finally, each
Fig. 38.
The wormholes which have been
shaved down (2.), indicated by hatched
lines, have been cut out with the adja
cent ones so that a better treatment is
possible. The line around the worm-
holes (1) also extends into the healthy
paper and is supposed to indicate
that the restoration could also be
done in this size. The cutting of the
mends is done in exactly the same way
as in other restorations. If there are
many wormholes scattered over the
unprinted areas of the paper—which
are to be mended individually—I rec
ommend that you number every mend
and every small wormhole consecu
tively (3) so that the correct little
piece is taken if it is to be applied
while moist. 1 3 6

R E S T O R A T I O N O F E N G R A V I N G S , B O O K S , D R A W I N G S , A N D O T H E R W O R K S O N P A P E R 159
sheet is pressed separately for a longer
period of time between metal sheets."
I can hardly believe that my dear col
league from the book trade ever tried this
prescription. I have the impression that
he just imagined the method for closing
wormholes to be something like this.
Based on my experience, I suggest
the following process. First, the area sur
rounding the holes is cleaned, then some
shaving is done from the side on which
the hole does not go through the writing.
Unfortunately, it is often the case that
the wormhole goes through the writing
on both sides of the sheet or is at least in
close proximity to the writing. Then it
is better not to shave but to apply
finely torn paper equally to both sides so
that the thinly torn edges of the paper
hardly touch the writing. Tearing such
extremely thin mends does not present
any special problem to the expert. Small
mends of this kind, however, should
never be punched out because their
abrupt edges need to be shaved down—
posing a greater danger to the surround
ings of the mend to the extent that there
is writing. The small mends that are
needed to close wormholes are prepared
by scratching into a sheet of mending
paper with a fine knife and then tearing
them out. The tearing produces the
extremely thin edges that are really
needed. If you have not been able to
acquire this skill yet, the mends have to
be shaved down. Of course, the small
fibers and hairs at the edges have to be
left standing because they improve the
implanting of the mend.
My procedure does not endanger the
writing in the least, since after the prepa
rations the applied mend only occasion
ally has to be shaved down. In any case, it
is advantageous for the writing when the
preparatory work is carried out accu
rately instead of having to do shaving
in the book for hours. Since both proce
dures take the same amount of time, it is
unnecessary to say which method of clos
ing wormholes is to be preferred.
When there are several wormholes
in one sheet, it is not advisable to close all
of them from the same side. It is better to
close some of them from the front and
some from the back of the sheet. A one
sided restoration would be much more
conspicuous. Let me emphasize one
more time that when the surroundings of
the hole permit it, it is definitely advan
tageous for the success of the work to
shave down the edges of the wormholes.
If the restored book pages are not
brought back to the original thickness of
the paper, the book will not shut proper
ly once it is bound again.
I would not have included the spe
cialist on books with his suggestions or
given him considerable room in my
description if he himself had not called
his restoration methods "the best."

T H E S T O R A G E A N D P R E S E R V A T I O N O F E N G R A V I N G S
A work on paper is protected from dam
age by being mounted on cardboard and
kept in a tightly covered, dustproof box
or in a portfolio with wrappers. A good
frame, of course, also offers protection if
the sheet is not exposed to the sun too
much. Therefore, the room that is sup
posed to hold the works may certainly be
pleasant but not too sunny. Faded places
on the wallpaper can help you to deter
mine which walls get more sunlight.
A sheet is mounted on cardboard
with the aid of strips of gummed paper.
Strips 10 to 15 mm wide are cut from a
sheet of strong, white gummed paper and
divided into lengths of 2 to 3 cm. The
small strips, which are cut from the adhe
sive strips with scissors, are called
hinges. For mounting, the sheet is posi
tioned agreeably on a piece of cardboard;
that is, the distances from the edge of the
picture to the edge of the cardboard are
measured in such a way that the upper
and lower margins around the picture
correspond to the golden section137 and
equal margins are created on the left and
right. The cardboard has to be strong
enough to protect the sheet from break
ing and tearing. It must be large enough
that the viewer never has to touch the
sheet with his hands.
It us not advisable to glue the sheet
directly onto the cardboard at the upper
edge; it is better to attach the sheet by
means of hinges at its upper edge. These
hinges make it possible to lift the sheet
from the cardboard at any time; that is,
the hinges permit the sheet to be lifted
without being bent. If the margin were
glued on, breaks would be easily created
at the lower edge of the glued area.
When you are dealing with a small
sheet, draw a dot on the cardboard with a
pencil, just below each of the upper cor
ners. Then turn the sheet—as if it were
already fastened—and bring the corners
to the dots. After that, moisten the
hinges and attach them to the reverse of
the sheet, up to 2 mm wide.138 The hinges
should only be moistened lightly, since
the paper may become buckled and
transparent where they are attached. The
hinges must be attached so that they are
flush with the edge of the sheet. There
should be no distance between the edge
of the sheet and the hinge. If more dis
tance or space is left, the sheet can tear
easily when someone tries to lift it, that
is, wants to turn it, from the cardboard.
Smaller tears in the sheet in the vicinity
of the hinges occur only when inexperi
enced viewers try to turn the engraving
like a book page instead of first looking
to see to which side of the margin the
hinges have been attached. Viewers usu
ally assume that the hinges have been
attached to the left edge of the sheet or
margin. If the hinges are flush [with the
edges] on the right and left, the viewer
immediately knows that the sheet cannot
be turned in the desired way. More space
or distance will deceive the viewer.139
Larger sheets, especially those that have
much greater height than width, have to
be fastened on the cardboard with hinges
at the left margin, whereas smaller
sheets — also because they lie better—are
fastened to the cardboard at the upper

margin. For this reason, unfortunately,
no single system can be used. The larger
sheets can be turned like a book page
when the viewer wants to look at the
back of the sheet or see the watermark
by looking through the paper. The turn
ing is done with the left hand, while the
right holds the cardboard. Even for
larger sheets only two hinges should be
used, since the sheets could become
distorted otherwise.
I had to offer this little observation
in advance so that the work may be given
due consideration.
After the hinges have been attached
to the sheet according to the instruc
tions, press the protruding portion of the
hinges onto the cardboard with your
fingertips. Turn the sheet back—the
image is now on top1 4 0 —align it with the
dots, and carefully rub down the hinges
with a bone folder and blotting paper.
In addition, I would like to mention
that museum board141 is especially suited
as a support for prints, which lie as if set
into a frame and are therefore well pro
tected. Although such cardboard is
somewhat expensive, I consider it an
absolute necessity for pastels, chalk
drawings, and so on.
For further protection of prints, I
advise you to cover them with white, soft
blotting paper. Tissue paper should
definitely not be used because it cannot
protect especially delicate prints, for
example, mezzotints, chalk prints, or
aquatints. Tissue paper is shiny and also
too thin. If engravings are stored lying on
top of each other in boxes or in folders,
tissue paper does not offer any protec
tion. If you want to take a particular
engraving out of the box, the prints are
lifted from the right to the left until the
ful in removing a print, the one that is
underneath can be damaged by scratches
from the corners of the cardboard—even
if these have been rounded or
smoothed—because tissue paper does
not have enough resistance. Such a
scratch can cause a shiny line in a mezzo
tint, which in most cases cannot be
removed. I recommend blotting paper as
effective protection. It combines the
advantage of sufficient protection
against pressure and scratches with
another one —the ability to render mois
ture, even as may occur when talking,
ineffective.
PRESERVATION
Preservation cannot be compared to
restoration, nor is it necessary to do so.
The essential point is that the prints and
paper are protected from further deterio
ration. A blemish should be removed
only if it could become a source of danger
to the sheet.
Does foxing definitely have to be
removed? Yes and no. The complete
removal or destruction of a mold stain is
not always possible. Usually, its color can
be removed by chemical treatment so
that it is hardly visible. At the same time
this treatment also prevents the stain
from spreading for a while. The better
the composition of the paper—for exam
ple, early papers up to about 1650—the
easier it is to remove and even perma
nently eliminate mold stains. Occasional
mold stains in an early work are only
rarely due to defects in the material.
These spots might not have been covered
by the surface sizing, perhaps because
they had been made unreceptive by some
R E S T O R A T I O N O F E N G R A V I N G S , B O O K S , D R A W I N G S , A N D O T H E R W O R K S O N P A P E R 161
one desired appears. If You are not care- kind of substance. Later papers-after

162 R E S T O R A T I O N O F E N G R A V I N G S , B O O K S , D R A W I N G S , A N D O T H E R W O R K S O N P A P E R
1650 to about the middle of the nine
teenth century—were heavily mixed with
cotton and are therefore more suscepti
ble to outside influences. Papers after
1850, which were heavily mixed with
wood pulp, are even more susceptible
to outside influences and can show
brownish discoloration in addition to the
well-known foxing. Never apply strong
remedies to free mold stains from a paper
which has been mixed with cotton. If you
not only want to hide seriously disagree
able spots by removing their color but
also want to eliminate them completely,
you have to treat them with strong agents
while they are dry. It is not safe to assume
that sizing the paper will protect it from
further decay after the mold stains have
been treated. After sizing, the paper can
later become brittle and blistered. With
increasing decay, the paper becomes like
a piece of puff pastry. In such cases it will
have to be enough that the color of the
stains is reduced and their ability to
spread is temporarily checked. You have
to be aware of the fact, however, that
mold stains can reappear in ten to twenty
years, although in weaker form if proper
storage is provided. With such care, small
mold stains that are still in the beginning
stages will not reappear because they have
already been completely removed by the
thorough treatment methods mentioned
in earlier sections.
Papers after 1850 that are heavily
mixed with mechanical wood pulp and
have mold stains will also show good
results after chemical treatment. These
results, however, only extend to the sur
face, and unpleasant changes will often
occur before fewer than ten years have
passed. These changes are almost certain
to take place if the sheets are exposed
to light and air. In the past sheets were
covered with a coat of varnish to save
engravings and lithographs from decay
and to prevent yellowing or the forma
tion of mold stains. This measure did not
work; after the varnish was removed, the
decaying process was still visible.
Mold stains are the outward mani
festations of an illness of the paper
which, like many illnesses, spreads
because it is contagious. If you are
thoughtless and irresponsible enough to
keep papers with mold stains in a folder
with healthy papers, you will soon know
what you have done. You will have
enabled the illness to be transmitted to
a healthy sheet to work on its destruc
tion. In this regard, however, it has to be
made perfectly clear that the original
mold stains were produced on one or
another sheet by dampness. Since you
never know how the sheets were stored or
treated before you acquired them, it is
imperative that you examine the sheets
from time to time. This advice should be
followed even if the storage conditions
are perfect.
I do not intend to enumerate all
the different kinds of mold stains here
and explain their special characteristics.
This could be the subject of a scientific,
chemical treatise but can hardly be
incorporated into the framework of these
practical instructions.
I consider it more appropriate to
look at the mold stains that are caused by
the climatic conditions in central
Germany and to give a summary discus
sion of the methods for treatment of such
stains, rather than to give lengthy expla
nations and to categorize.
However, one kind of mold stain
that is especially worthwhile to mention
looks like flyspecks and develops espe
cially on the decaying, bluish-purplish

R E S T O R A T I O N O F E N G R A V I N G S , B O O K S , D R A W I N G S , A N D O T H E R W O R K S O N P A P E R 163
parts of the paper. These symptoms indi
cate severe deterioration, and surgery
cannot be avoided. The sick, rotting part
of the sheet must be removed up to the
upper skin of the paper.142 This is usually
a serious decision. It is also noteworthy
that these areas of decay are reluctant to
absorb water. In this case a bath of vine
gar water, in which the sheet is soaked for
twenty-four hours, is helpful. Since the
decaying parts are brittle, no attempt
should be made to clean them while dry.
After the vinegar bath, I have had good
experience with a sunbath. If this is
impossible for some reason, the sheet
should at least be dried in fresh, dry air.
I would like to add that chemical treat
ment of this kind of mold stain is totally
useless, since it does not yield any
results; on the contrary, it is very danger
ous because it would cause the paper
to disintegrate.
After the sheet has dried, the areas
of decay are sized with a weak but hot gel
atin solution. You can also use a soupy
starch paste if the paper can tolerate it,
that is, if the paper does not wear away.
The front can also be sized with a weak
gelatin solution. Stretching is to be
avoided in most cases because the paper
tears easily.
If the print shows whitish spots, you
are dealing with a fungus that is not dan
gerous and that has originated because
the engraving has been stored moist.
These fungi can be removed simply with
soft bread crumbs on the surface. A
strong, sour-tasting vinegar-and-water
bath will cause them to disappear.
Severe water stains definitely must
be reduced by treatment with water or
removed by means of local treatments
with warm vinegar. The dark brown color
of the water stain is caused by the fact
that all the dirt in the picture has been
drawn in one line from the edge of the
picture to the water stain. The sheet can
therefore be damaged at these spots.
Unfortunately, a water stain often does
more harm than a mold stain.
The following test, which, however,
takes a lot of time—even years—is useful
if you want to determine whether the for
mation of mold stains is spreading or has
been arrested. A sheet of no great value,
heavily covered with mold stains, is cut
into two pieces. To determine the condi
tion of both pieces and to have a basis for
comparison, a circle 5 cm in diameter is
drawn on the back of each piece. The
mold stains inside each circle are count
ed, the larger ones are circled by pencil
marks, and the color of the mold stains is
described in detail. One part is stored in
a dust-free folder; the other is put in a
dark place and protected by a glass pane.
After three to four months, the pieces are
compared with the aid of the notes, and,
if necessary, new notes are made. It is
also possible to put one piece in a twenty-
four-hour vinegar water bath and then
under glass after drying. Such compar
isons are interesting and can dispel any
doubts about the pros and cons of a treat
ment or a chemical cleaning procedure.
Old repairs must always be removed
completely and replaced by new ones,
expertly done even if they are only
temporary. In the past mostly rye flour
paste was used as an adhesive and was,
unfortunately, applied generously. Flies,
bugs, and bookworms found not only
nourishment in the rye flour paste but
also homes.
There may be reasons that force the
restorer to line a sheet. This is the case
when the sheet is affected too much by
areas of decay and there is no other way

164 R E S T O R A T I O N O F E N G R A V I N G S , B O O K S , D R A W I N G S , A N D O T H E R W O R K S O N P A P E R
to preserve it. Lining has to be done on
the same kind of paper. Papers that are
not the same — do not belong in the same
category—have to be avoided for reasons
mentioned earlier. For example, if you
line an absorbent print on a nonab-
sorbent support, the support will buckle
and distort the sheet. If we assume that
the paper is appropriate, the following
procedure is performed: Both sheets are
placed into water, drip-dried thoroughly,
and the back of the print covered with
starch paste. The drying can be acceler
ated by placing the lined sheet under a
pile of cardboard. The uniform weight
presses the mounted print down better,
and at the same time creases and small
bubbles disappear. Of course, lined
engravings and etchings always lose their
plate mark; that is, the plate mark is
visible, but the indentation is reduced.
When stretching a lined sheet, take care
that the sides of the sheet do not curve
inward. If you put a ruler on the edges
of the sheet, the edges should be parallel
to the ruler. If this is not the case, the
framer will encounter great difficulties.
The picture will be warped in the frame.
Books, engravings, autographs, and
so on are specially treated if they have
deteriorated so severely that even a
rather long water bath would harm them.
Place the item that is to be treated on a
glass pane while dry. Take light, trans
parent gauze, silk, fine China paper,
Japanese paper, or goldbeater's paper;
cut out a piece the size of the sheet and
cover it with the soupy starch paste. Lay
this piece on the deteriorated areas or
over the entire sheet.
This is done in the following man
ner. The cut piece of paper or silk is
placed on an absorbent or damp support
paper, moistened with a flat paintbrush,
dried lightly, and covered with soupy
starch paste. The piece is lifted with the
support and placed onto the deteriorated
sheet. Be careful when lifting the sup
port so as not to damage the brittle sheet.
If the piece of silk or paper is also lifted
up with the support, lay the support back
down and moisten it with a flat hog's
hair brush.
A few drops of turpentine and a little
white wax mixed into the starch paste
make the attached piece of paper or silk
even more transparent, which is impor
tant for papers with print or writing on
both sides, in order that the picture and
writing become clearly visible.
The transparent paste is prepared
according to the following recipe. Pour a
teaspoon of refined turpentine and a
piece of white wax the size of a white
bean into a small enamel kettle and heat
both over a low gas flame until the wax is
melted. Take a heaping tablespoon of
cold starch paste and mix it into the wax
mixture. Bring the paste to a boil several
times, stirring constantly with a stainless
steel spoon so that all three ingredients
mix together well. After cooling off,
press the paste through a linen bag or a
fine strainer. It is now ready for tasks
requiring a transparent adhesive.
FRAMING
A word to the framer and the customer:
Engravings of a size less than 60 to 80 cm
should never be stretched under glass.
There is a reason why I do not include
larger prints. They are generally done on
stronger papers and their plate marks are
not quite as sensitive. Also, usually we

R E S T O R A T I O N O F E N G R A V I N G S , B O O K S , D R A W I N G S , A N D O T H E R W O R K S O N P A P E R 165
are dealing with later prints that are not
as valuable.
A customer should never demand of
the framer that a framed sheet look as flat
as a board. If occasional slight cockling143
occurs, the customer should not criticize
too much and find fault with the framer.
Such grumbling only shows that the
customer has little knowledge of paper
and its treatment; otherwise, he would
understand that his whole argument is
useless. The formation of small wrinkles
is proof that the framer has worked care
fully. The customer must realize that
development of minor wrinkles is quite
important for the sheet. Is it really advan
tageous for a sheet to be tightly stretched
for decades? Is it not even more advanta
geous if it is possible for the tension from
the stretching to be reduced? I hardly
think that many will adopt the first point
of view, especially if they think of the
consequences. The tension can one day
become noticeable in an undesirable
way. A major change in temperature can
cause the plate marks to tear, through
increased tension. This damage is not
always immediately noticeable. It is not
always possible to determine the damage
from the front, since the plate mark first
opens up from the back and can still be
held together for a while by the thin
paper surface. Much depends also on
where the prints are hung. Often, dam
age remains unnoticed, because nobody
looks closely at a picture in its usual
place or because of the lighting condi
tions, until it becomes visible after a
change in location. Sheets that have a few
wrinkles, however, are different. The
paper still gives, and the wrinkles prove
that the tension is not too great. As far as
the plate marks are concerned, they are
not in danger. The framer, therefore,
deserves credit for acting deliberately,
and one should ignore minor perturba
tions in the interest of the preservation
of the picture. One should recall that
because the framer only has to moisten
the picture, he would have a much easier
time placing it under glass when it is as
straight as a board.
This leads to the question whether
excessive tension can cause further harm
to the paper. When the print is to be
stretched under glass, the framer has to
attach a guard of i to 2 cm width to the
back of the sheet. If the plate mark is
located near the opening of the frame, it
certainly cannot tear because it is com
pletely affixed to the guard. However, the
plate mark does lose its charm, and the
print does tend to look flat. The use of
adhesives is not beneficial to the print
either, since the guard has to be removed
when the frame or the glass is changed. If
the guard is not taken off carefully or if
the framer has added alum to the paste,
then —as we know—the sheet can be
harmed in many ways.
The rabbet should under no circum
stances be too narrow or too shallow. The
picture glass should not fill the entire
rabbet. Keep in mind that the frame and
the glass are not dead bodies! The pic
ture wire should, therefore, not be
attached too tightly. Between the glass
and the rabbet there should be a space at
least the width of a match. To achieve
this, put a strip of thin cardboard on the
cardboard backing. After nailing in the
brads, pull the cardboard strip out and
treat the other sides of the frame in the
same way. This permits some room for
play, and if the glass should bow—for
example, when a sheet has been

166 R E S T O R A T I O N O F E N G R A V I N G S , B O O K S , D R A W I N G S , A N D O T H E R W O R K S O N P A P E R
stretched inexpertly, excessively—the
danger of the glass shattering will have
been reduced.
What other dangers are there for
engravings mounted under glass?
If a framed engraving that has been
stretched under glass falls to the floor,
it can be destroyed because the tension
of the sheet at the moment the glass
breaks can tear the entire sheet.
Stretching under glass always poses a
threat to prints.
When framed engravings are sup
posed to be hung on the wall and no pic
ture railing is available to hold the chains
on which the frame is suspended, nails
have to be put into the wall. Who puts in
the nails? In many instances an inexpe
rienced person, since the master of the
house does not have time and there is no
money available to hire a carpenter. How
often is the load capacity of the nails
investigated? A nail does not get fastened
securely in the wall just because you say,
"It will hold all right, and the little pic
ture is not that heavy." Valuable engrav
ings are often entrusted to a totally inad
equate hanger! People spend thousands
of dollars on an engraving and then save
a fraction of a penny on the hanger.
Economy does not have a place here!
Obtain good hooks and steel nails, and
make sure that the wall will hold the
hook or nail without any further prepara
tion. After the nail is hammered in, it
should be examined carefully to find out
if it is really secure, and no valuable piece
should be entrusted to a loose one. Each
vibration of the house caused by passing
cars, each vibration of the room caused
by falling objects or the running and
jumping of a child, can cause consider
able damage.
Another hint at this point: If you
want to protect your picture—be it an
engraving, pastel, or oil painting—from
damage that might be caused by moisture
emanating from the wall, put several
pieces of cork between the frame and
the wall.
How should prints be framed? Prints
always have to lie loosely under the glass;
the print, having been stretched pre
viously,144 is fastened with two hinges to
cardboard the size of the rabbet, and
the clean glass is put on top. At the
same time, to frame the sheet in a dust-
resistant way, the glass and cardboard are
sealed to each other with a wide strip of
paper. The loosely framed print cannot
change; the plate mark stays the way it is;
and even major changes in temperature
cannot cause any harm. Minor wrinkles
will not be disturbing since a previously
stretched engraving does not show any
large wrinkles. This method of dust-free
framing is much more beneficial for the
print than stretching under glass. In the
latter case, the guard is under tension
because the moist sheet dries and
becomes taut at the same time as the
guard. You will have observed a number
of times that the guards at the edge of the
glass give over the course of time and
become loose. Dust penetrates and soils
the surface of the print. Of course, the
damage is less than if the plate mark is
harmed; in this case the tension affects
the guard, not the plate mark.
However, a guard is not under ten
sion if it is put onto dry cardboard and
affixed to the glass. If a framed print falls
down or if the glass is changed, there is
much less danger for the print that has
been placed loosely between the card
board and the glass, since tension
is absent.
A double cardboard backing is rec-

R E S T O R A T I O N O F E N G R A V I N G S , B O O K S , D R A W I N G S , A N D O T H E R W O R K S O N P A P E R 167
ommended as protection against exter
nal influences. To protect the print in all
circumstances, a double layer of grease
proof paper should be placed between
the cardboard and the print if the back
ing consists of wood pulp cardboard.145
Wood pulp cardboard absorbs moisture,
and the oxygen in the air renders it
fragile and brittle. Finally, sealing the
backing with a sheet of paper that does
not contain wood pulp is highly recom
mended. The most inexpensive material
is commonly used because it is generally
assumed that nobody will see the back
since it is facing the wall. This is a ter
rible mistake! The protective backing
needs a lot of attention, and the best
material should be used. One should bear
in mind that mold stains find their way
through the layers of cardboard. Gen
erally, it may be sufficient to soak the
cardboard with a tar preparation or var
nish. It is even better to use cardboard
that has been made without wood pulp.
And now to another unfortunate
matter: water stains. Their origin will be
known or understandable to many art
lovers. Water stains usually originate
when the glass is cleaned or polished.
The picture is hanging on the wall, and
the glass is wiped with a moist chamois or
a sponge. When pressure is applied,
excess water runs down the glass to the
lower edge of the frame. Moisture pene
trates through the guard into the engrav
ing and creates an ugly water stain. If the
cleaning water is dirty, water stains of a
dirty gray hue are created which cannot
be removed even by chemicals. Here, we
cannot simply recognize the creation of
such stains; we must also be emphatic
about their prevention.
Pictures to be cleaned should be
placed on an empty table. The chamois
or sponge should be dampened very
lightly and should never be dripping.
Also, no moisture should remain stand
ing on the surface of the glass during the
cleaning process. Methylated spirit is
often added to the cleaning water. This
procedure has the disadvantage of turn
ing the glass surface bluish if it is used
frequently.146 It should also be men
tioned that a generous amount of methy
lated spirit can affect the finish of the
frame. It is, therefore, better to add vine
gar to the water, which results in the
same cleaning power but without detri
ment to the glass or frame.
When cleaning glass, remember the
following rules:
1. Place the picture flat on an
empty table.
2. Wipe off any dust on the glass
while dry.
3. Add a shot of vinegar to the
cleaning water.
4. Polish the glass with a wrung-
out chamois or a well-squeezed
sponge.
(If you want to have a chamois
always ready for use, do not hang it on a
clothesline to dry but fold it several times
while moist or roll it up. This way the
chamois cannot break, since it will
always be a little moist.)
If you use this method, you protect
your pictures from water stains, save
your frames from damage, and avoid
loosening the picture nails in the wall
during cleaning. I certainly must not
overlook this last problem, since a loose
nail is a special source of danger for
works of art.

T H E S T O R A G E A N D P R E S E R V A T I O N O F B O O K S
The most ideal temperature for prints
and books is so-called museum air.
Overheated rooms pose a great danger
to books because they promote the prop
agation of bookworms. Also, when books
are kept on open shelves or in closed cab
inets, one seldom checks to see whether
the wood itself is in good condition. It
is imperative that valuable works be kept
cool and out of the sunlight. I have often
been asked whether the larvae could
be exterminated. Looking at valuable
works, I have found the question
justified. If someone owns greatly treas
ured books and has not yet had any bad
experiences, I advise him to consider
the following: Earlier collections were
usually stored in dry basements. If a book
was needed, it was fetched from a cool
basement and read in a warm room.
Therefore, it is advisable to turn off the
central heating in one's library or to pro
vide adequate ventilation. It is also not
good if books stand close together on the
shelves. To impede the progress of the
larvae, it is often sufficient to place a
small piece of wood between books.
Moreover, if the pieces of wood are
coated with a tar or petroleum prepara
tion, the larvae are further restricted.
Exactly fitting glass panes are also rec
ommended. The question mentioned
above — can larvae be exterminated com
pleted—does not have a simple answer.
I recommend several remedies,
which I have tried. A glass container, an
aquarium of any size, can easily be
obtained. The upper rims are covered
with window putty so that no vapors or
gases can escape when the container is
turned upside down on the table. Several
glass bowls or wide, bowl-shaped liqueur
glasses are filled with strong liquid
ammonia and positioned at different
heights on the inner walls of the glass
container. These are best attached by
means of suction-cup holders. The open
book is put upright under the glass cover
and left for the ammonia vapors to take
effect. A few hours later you can observe
the larvae emerging. If none appear, it
is possible either that they have suc
cumbed to the ammonia or that they are
only immobilized.
Before you start to exterminate the
larvae, to permit the vapors to work
much more intensely and achieve success
more quickly, the paper powder that is
left in the insect channels must be
removed completely. Depending on the
condition of the book, this can be
achieved by simply knocking the book
with a long or square ruler. If the binding
is severely weakened and only loosely
connected to the pages, the knocking has
to be done very carefully. After the exter
mination, the book is isolated. In four to
five weeks the book is tapped again to
determine whether any paper powder is
present. If more powder has appeared,
the ammonia has not been effective
enough. You must attempt to attack the
larvae in other ways. Experiments have
to be made with everything from spirit of
wine to gasoline to the foul-smelling
hydrogen sulfide.
Spreading camphor on the floor is
also highly recommended. Or you can

R E S T O R A T I O N O F E N G R A V I N G S , B O O K S , D R A W I N G S , A N D O T H E R W O R K S O N P A P E R 169
work with sulfur gases or T-gas, which in
recent days has also been used for the
extermination of insects.147 In this case
I recommend that you consult an expe
rienced exterminator. These gases do not
cause harm, and even valuable works with
precious bindings can tolerate this cure.
Another preventive method consists
of rubbing the inner sides of the cabinet
with kerosene. Small bowls filled with
kerosene and laid out in the cabinet can
also help to destroy the larvae. (It should
also be mentioned that moths cannot
tolerate the smell of kerosene.)
In addition, there are larvae that
cannot tolerate any sweet smells. In such
cases experiments can be made with
strong-smelling perfumes.
If these experiments for the exter
mination of larvae are made with three
or four glass containers, the most effec
tive preparation can be discovered in a
short time.
By using these simple methods of
extermination, collectors, librarians,
conservators, bookbinders, and so forth,
can contribute further to the preser
vation of valuable works so that they can
be passed on in better condition to future
generations.
A FEW SMALL OBSERVATIONS
AND HINTS REGARDING
THE PRESERVATION OF BOOKS
There are many experts on books who
occupy themselves with the conservation
of books and prints. Some of them have
the habit of stepping into the public light
now and then with small articles or with
the revelation of dubious recipes, per
haps because they feel the need to unbur
den themselves or perhaps because a
publisher has become interested in
them. As much as this is desirable in
itself, it can also be quite dangerous
because here —as anywhere else —quali
ty, not quantity, should be the deciding
factor.
I would never have moved my pen to
write about restoration and conservation
if the opinions and ideas of many of these
published experts had not been so
conflicting and often so dangerously far
from practice. For instance, it can be
read in many places that paper is more
vulnerable to decay when it is soaked in a
sizing solution made from animal prod
ucts. What does the proponent of this
opinion really mean? Does he want to
give instructions on how to prepare
paper for the printing process? Such
instructions are unnecessary. Our mod
ern paper factories prepare paper per
fectly. If, however, he is talking about old
papers, I have to answer him. Papers that
were manufactured hundreds of years
ago have survived well over time without
having been afflicted by decay in any way
in spite of their being sized with animal
substances. I have never heard that any
substances were added to animal sizing
to protect it from decay or spoiling. At
the end of the eighteenth century, paper
manufacturers occasionally used rosin
sizing—not an animal product—and
added a small amount of alum, thinking
that it would make the paper more
durable. This thought did not prove cor
rect since this kind of sizing, as men
tioned previously, dissipates within a few
years if the papers are exposed to air.
I now feel justified in asking the
question, Why should we not use, with
the same success as seven hundred years
ago, animal sizing without preservatives
to size restored sheets and the like? The

170 R E S T O R A T I O N O F E N G R A V I N G S , B O O K S , D R A W I N G S , A N D O T H E R W O R K S O N P A P E R
only secrets that I can divulge here are
the following useful suggestions:
1. Use utmost cleanliness.
2. Use only boiled water.
3. B oil the starch paste.
4. Boil the gelatin water.
These four innocuous but important
basic conditions have been proven over
the centuries to be correct. After all,
soaking a coating of gelatin and exposing
it to light and air is bound to turn it
quickly into a bacterial culture. But this
is not proof that animal sizing cannot be
used or that animal sizing in paper might
be subject to the same danger.
Unfortunately, there are experts
who do not deliberate before occasion
ally making their own adhesives. I
recently asked a master bookbinder how
he prepared his starch paste and learned
that he mixed it cold and, if he was in a
hurry, simply added boiling water. That
is, of course, totally wrong. It is right that
the paste should be started cold. But it is
wrong to pour boiling water into it. The
water that is going to be used for the
preparation of paste should have boiled
for at least fifteen minutes. And the
starch mixture should be brought to a
boil several times over a small flame
while being constantly stirred. If this is
done, you will always have a sterile adhe
sive handy. The preparation of starch
paste for repairs is not the work of an
apprentice but a task to which the master
should devote a few minutes. Not only
the immediate but also the long-term
success of the work depends on the qual
ity of the paste.
To what can the decay of books be
attributed? Is it the use of poor mate
rials? Did papermakers in the twelfth
century not consider that their products
were supposed to last over thousands of
years? Did the longevity of their products
not concern them? On the contrary, as
we can see in the many books and writ
ings that have survived seven hundred
years splendidly, the material is excel
lent. Poor storage and treatment are
mainly to blame for the decay of books.
Moisture is the greatest enemy of paper.
Oxygen, too, contributes to its decay.
The frequently used rye flour paste does
its part. I have already mentioned the
enemies of paper, so a short reminder
should suffice at this point.
The following should be added
regarding the storage of old books. From
time to time on dry days they should be
cleaned. The accumulation of dust con
tributes greatly to their decay. Use a hand
sweeper to brush every sheet individ
ually, or better yet, use a vacuum cleaner.
When using a vacuum cleaner, cover the
book pages with a fine-mesh wire screen
to prevent any damage through suction. I
would suggest to a bibliophile to have
this kind of work done by an experienced
bookbinder who can detect signs of dete
rioration in its beginning stages and
thereby prevent the book from being
destroyed. It is also recommended for
large collections of books that remarks
about the condition of the book and any
restorations be added on index or catalog
cards. It is important for the future
restorer to know what treatments the
book has undergone—if water baths or
chemical baths were used, if treatments
for insects were performed, and which
preparations were used.

I M P O R T A N T P R I N T M A K I N G T E C H N I Q U E S Excerpt from My Book Collecting and Picking1^
We distinguish between relief, intaglio,
and planographic printing. The early
woodcut, perhaps the oldest graphics
technique, is a relief printing process.
The lines of the image, left standing in
relief by the carving knife, are covered
with ink and impressed deeply into the
paper during printing. The term "relief
printing" is derived from the ridges on
the printing block (fig. 39).
In intaglio printing, it is the lines of
the print itself that are raised. After
dampening, the paper is printed and
absorbs the ink from the incised places
on the metal plate. The ink thus lies in
relief on the paper. If you run a finger
lightly over strongly printed areas of an
intaglio print, you can easily feel the
raised parts, whereas the woodcut print
will show indentations. The intaglio
printing process derives its name from
the incised places or engravings on the
metal plate (fig. 41).
Planographic printing is done
almost exclusively from slabs of stone.
The image in this case lies flat on the
paper, and the printing does not show
any raised or indented areas. The use of
stone permits production of as many
prints as desired because it does not get
worn by the printing process. Since stone
also is not subject to splitting, as is wood,
its period of use should be unlimited,
provided it is stored properly (fig. 42).
Before the graphic artist began to
work, it was necessary to prepare the
material that was to express his artistic
concepts. The printing surface was made
completely smooth and even and—
depending on the material and technique
chosen for the enterprise—was treated
specially, which is discussed in the indi
vidual paragraphs on techniques.
After the preparations, the image
chosen for graphic reproduction was
drawn onto the printing surface,
reversed as in a mirror. The graphic
artist usually needed two drawings for
this: one that showed only the outlines
of the picture (outline drawing) and
another—if he did not draw from the
original with a mirror—that was true to
detail but was a mirror image of the draw
ing. If the drawing was not a mirror
Fig- 39-
Relief printing; cross section through
printing block and paper

172 R E S T O R A T I O N O F E N G R A V I N G S , B O O K S , D R A W I N G S , A N D O T H E R W O R K S O N P A P E R
Fig. 40.
Woodcut by Lucas Cranach, 1509,
German School

R E S T O R A T I O N O F E N G R A V I N G S , B O O K S , D R A W I N G S , A N D O T H E R W O R K S O N P A P E R 173
Fig. 41.
Intaglio printing. Plate mark;
printed lines (showing the raised
texture of the ink)
Fig. 42.
Lithography. Cross section: stone
and paper with top view
image, the print would not correspond to
the original.
The outline drawing was placed on
the plate, with the picture side down, and
traced. The paper was oiled for this pur
pose to make it transparent. Sometimes
the oiled drawing was glued to the plate
with an easily removable adhesive and
the outline was scratched into the plate
through the paper.
The literature shows us that very
early on some engravers transferred the
outline drawing to the plate by etching—
the same method used in making etch
ings. If the outline was only traced, the
drawing on the grounded plate had to be
made resistant to wiping by means of a
fixing agent. Only after the main lines of
the picture were cut or engraved into the
plate was the ground washed off and
work started on the details, with the aid
of the second drawing.
T H E WOODCUT
Up to about the end of the eighteenth
century, primarily nut or pear trees pro
vided the material for woodblocks, which
were cut in lengthwise planks from the
trunk. About 1788 very hard boxwood
was used—for the first time by Thomas
Bewick in England—and planks were no
longer cut with but, rather, across the
grain (end-grain). The thickness of the
Fig- 43-
Tools of the woodcutter's craft:
(a) V-cutter; (b) gouge; (c) knife

174 R E S T O R A T I O N O F E N G R A V I N G S , B O O K S , D R A W I N G S , A N D O T H E R W O R K S O N P A P E R
Fig. 44.
Cutting with a knife
Fig- 45-
Cutting with a gouge
Fig. 46.
Clearing the wood from around the
printing surfaces with a flat chisel
early woodblocks varied according to the
size of the picture — somewhere between
2 to 8 cm. For larger pictures, several
blocks were joined together.
In the early woodcut, which —as
already mentioned—was done by relief
printing technique, the wood surround
ing the lines of the drawing was cut from
the woodblock with a wood-carving tool.
The lines of the drawing, which
remained standing, appeared as relief
like ridges (fig. 43). To achieve the clear
est possible image when printing, larger
blank areas were cut especially deeply
out of the woodblock with stronger,
chisel-like knives. To create softer tran
sitions, the ridges were sanded finely in
these places so that they lay under the
level of the other ridges when seen in
cross section (figs. 44, 45, 46).
In the beginning, and sometimes
even today, proofs of woodcuts were
pulled by hand. The edition could be
almost unlimited because of the low
mechanical stress on the woodcut.
Slightly dampened paper was placed
on the inked woodcut and covered with
several sheets of dry paper, and the sheet
was pressed down with the flat hand, a
brush, or a broad bone folder wrapped
with leather. If the printer was not
sufficiently skilled or careful, the proofs
showed breaks in the printed lines in
areas that had not been rubbed down
thoroughly. With the invention of mov
able type for book printing, the screw
press was also used more frequently for
woodcut prints. In the beginning, room
was left for woodcut illustrations when a
book was printed. But the woodblock was
printed together with the type in the
press (fig. 47).
Using the press for woodcut proofs,
however, had the disadvantage that the

R E S T O R A T I O N O F E N G R A V I N G S , B O O K S , D R A W I N G S , A N D O T H E R W O R K S O N P A P E R 175
woodblocks could split under the great
pressure, the cracks showing up as white
lines in the proof. This happened quite
frequently. The cracked woodblocks
were sometimes repaired again, and it
takes an exacting comparison to distin
guish between earlier proofs —made
from the undamaged woodblock—and
later ones made from the repaired block
(fig. 48). (It is very important to under
stand that the restorer should never
touch up these lines to imitate an ear
lier proof!)
As already mentioned, the relief
printing method described here was used
until the end of the eighteenth century.
Bewick, who was the first to use the box-
Fig. 47.
Gross section of a relief printing press:
(a) platen; (b) paper; (c) printing
block; (d) bed of the printing press
wood end-grain for his work, at the same
time went a step further, using the
engraver's burin instead of the usual
wood-carving tools. This afforded him
greater freedom —compared to the
severe restrictions of the older woodcut
ting techniques—in the creation of lines
and increased pictorial effects. The very
thin plaques of end-grain wood were
glued onto thick wooden boards to pro
tect them from damage.
Bewick's work was the start of the
development of more refined, or tonal,
woodcuts, which were to play a big part
around the middle of the nineteenth
century, especially in book illustrations
(fig. 49)-
Fig. 48.
Colored print from a repaired wood
block (from 1470)

176 R E S T O R A T I O N O F E N G R A V I N G S , B O O K S , D R A W I N G S , A N D O T H E R W O R K S O N P A P E R
Fig- 49-
Wood engraving by Adolf Menzel
ENGRAVING
Engraving techniques have changed very
little if at all. The plate consists of hard
copper, hammered and polished. If soft
copper were used, the wear on the plate
would be such that very few proofs could
be made.
Whether the work is successful or
not depends to a great degree on the
careful preparation of the plate and its
hardness and smoothness.
Fig. 50-Burin for metal engravings
Fig. 5 i -
Engraving straight lines
Fig. 52.
Engraving curves on the cushion
Using a burin, the engraver gouges
out the lines of the drawing from the cop
perplate. Depending on the work to be
done, he uses burins of different widths
(fig. 50). The burin is held flat (fig. 51);
only the handle of the burin, which rests
in the right hand, is lifted slightly. The
artist now digs into the copper at the
start of the line to be engraved and moves
the burin forward. To create straight
lines, the copperplate is put down flat.
Curved lines are engraved as follows.

R E S T O R A T I O N O F E N G R A V I N G S , B O O K S , D R A W I N G S , A N D O T H E R W O R K S O N P A P E R 177
Fig- 53-
Cross section of the individual engrav
ing techniques: (a) burin and burin
movement; (b) metal cuttings, taper
ing at the end of the groove; (c) begin
ning of the groove, increasing in
width; (d) grooves created with burin
Fig. 54-
Inking the plate on a hot plate pre
heated over charcoal
Fig- 55-
Cross section of an intaglio press: (a)
steel roller, adjustable up and down,
rotating in place, but otherwise not
movable; (b) printing felt; (c) damp
ened paper; (d) copperplate; (e) bed of
press, driven by a roller that moves the
printing plate, paper, and felt simulta
neously under the upper roller
Fig- 56.
Drypoint: (a) drypoint needle
and direction of movement;
(b) drypoint line with burr pushed
up from the metal
The plate is placed on an engraving cush
ion. The cushion is circular, firmly filled,
slightly flattened on both sides, and
covered with leather (fig. 52). The right
hand, which is holding the burin, stays in
position. The left hand guides the plate
toward the burin, following the lines of
the drawing. By the degree of penetra
tion and movement of the burin, finer
or wider copper cuttings are removed
(fig. 53). Depending on the pressure or
the movement of the burin, the line
gouged out runs flat, deep, narrow, or
wide until it tapers to a point, since the
engraver eventually has to guide the
burin up again to remove the cuttings.
The engraving created has sharp, promi
nent edges called burr that have to be
removed with a burnisher.
The deeper the engraving, the more
proofs of usable quality the plate can pro
duce. Properly prepared and completed,
a copperplate yields three hundred to
five hundred proofs. Since the copper is

178 R E S T O R A T I O N O F E N G R A V I N G S , B O O K S , D R A W I N G S , A N D O T H E R W O R K S O N P A P E R
Fig. 57-
Wolfgang Kilian, engraving on
copper, 1629
greatly affected by the application of
color and wiping and finally by the print
ing process itself, the first three hundred
proofs are sharper, the later ones less
distinct and softer.
To produce very fine lines, engrav
ers use a sharp needle called a drypoint,
with which the lines are not cut but
scratched into the copper. The disad
vantage of the drypoint is that during the
printing process the finely engraved
lines wear quickly and therefore have to
be rescratched repeatedly.
CRIBLE
Crible 1 4 9 began in the second half of
the fifteenth century but only survived
for a relatively short time. Technically,
it is a relief printing technique like the
woodcut. Soft metals, like copper, tin,
bronze, brass, and, very rarely, wood,
were commonly used as plate materials.
The drawing was chased into the plate
with punches of various shapes. It was
therefore not recessed in the plate but
raised like the woodcut (figs. 59, 60).
The high areas or lines are the ones
that print in the relief printing process.
In crible prints the drawing is recessed

R E S T O R A T I O N O F E N G R A V I N G S , B O O K S , D R A W I N G S , A N D O T H E R W O R K S O N P A P E R 179
Fig. 58.
Will , engraving on copper, ca. 172,0
into the plate and appears white; the sur
rounding, which remains high, appears
black (fig. 61).
Soon after the beginning of the six
teenth century this technique became
obsolete. The number of extant crible
prints1 5 0 is very small. Therefore, they
are difficult for the collector to obtain.
Fig- 59-
Punch hammer and punches
Fig. 60.
Punching technique: (a) punching
hammer with conical tip on a flexible
shaft; (b) indentation of the punch,
with raised burr; (c) with burr
removed; (d) scraper for removing
the burr

Fig. 61. Example of the crible technique
Fig. 62. Diirer, etching on iron, 1518; detail from The Canon
IRON ETCHING
Iron etchings were attempted for a short
time. Although this print medium was
used by famous graphic artists, it was
never successful because the proofs were
too coarse in comparison with copper
engravings. The following is worth men
tioning. Inscriptions, especially delicate
details of the image and ornamental bor
ders, were executed with a wax solution
on the etched iron plate. Since the wax
solution did not absorb the ink used
at that time, the places that had been
painted with wax stayed white when
printed (fig. 62).
180 R E S T O R A T I O N O F E N G R A V I N G S , B O O K S , D R A W I N G S , A N D O T H E R W O R K S O N P A P E R

R E S T O R A T I O N O F E N G R A V I N G S , B O O K S , D R A W I N G S , A N D O T H E R W O R K S O N P A P E R 181
ETCHING
Three methods are known to us from ear
lier times: drypoint,151 etchings on hard
ground, and etchings on soft ground. By
far the most common technique was
etching on hard ground. For this, the
copperplate was coated thinly with a
mixture of pitch, wax, asphaltum, and
rosin. After drying, the ground was
smoked with a pitch or wax taper. Care
had to be taken that the hard ground did
not melt, contract, or get scorched. After
this preparation, the principal outlines
of the drawing were transferred onto the
smoked ground. The image was then
scratched into this ground with the etch
ing needle. The needle was used in the
same way as a pencil is used for drawing a
sketch on paper—but with somewhat
more pressure. Wherever the needle
removed the hard ground, the bare
copper became visible against the black
ened ground. The parts of the plate not
protected by the ground—the back and
the edges—were covered with an acid-
resistant varnish, and after this dried,
the plate was placed into an acid bath.
The acid solution would bite into the
copper exposed by the etching needle,
the depth of the metal determined by
the strength and duration of the bath
(fig. 63). The plate was left in the water
for ten to twenty minutes, depending on
the strength of the acid solution, then
taken out and rinsed with clear water.
Since acid works uniformly, there had
to be certain gradations in the etching
process to create tonal values and soft
transitions. The etcher examined the
subtlest parts first. If he found that they
had been etched sufficiently, he coated
them with an acid-resistant varnish. He
then returned the plate to the acid
solution. This procedure was repeated
until all tones and shades reached the
desired depth.
These gradations were the source of
the special pictorial charm of an etching.
It was also possible to create the finer
lines after the main etching process.
Then, however, the etcher had to scratch
the fine lines into the hard ground. But at
the same time, undertaking this further
Fig. 63.
Cross section of the etching technique.
Etching plate coated with hard asphal
tum ground (etchingground), (a) Even
etching line, created by very dilute
acid; (b) uneven and underbitten etch
ing line, created by concentrated acid;
(c) etching needle, drawing through
the ground and revealing the copper.
work had the advantage that additional
lines could be created by the same tech
nique if examination of the plate indi
cated that this was necessary. After the
final etching, the hard ground was
removed from the plate. It was now ready
for the printing.
When looked at with a magnifying
glass, the etched line is completely differ
ent from the engraved line. There is no
thickening and thinning of the line;
instead, it appears as an even, one could
say monotonous, stroke with an equally
blunt beginning and end.
To give the end of the etched line
a finer point, several early etchers added
minor so-called corrections to their
work. With a drypoint needle or a rein
forced etching needle, they gave individ-

182 R E S T O R A T I O N O F E N G R A V I N G S , B O O K S , D R A W I N G S , A N D O T H E R W O R K S O N P A P E R
ual lines the appearance of an engraved
line. But only a small minority of etchers
undertook additional work of this sort.
Much more common was the execu
tion of new lines and the drawing of
details with drypoint in the etched plate.
Depending on whether the needle was
held vertically or at an angle, special
effects were created in the print. If held
vertically, the needle created rough
edges along the line. No cuttings were
removed as in the engraving process, but
the copper was slightly gouged and the
edges of the furrow were raised.
Only when the needle was held at
an angle was the well-known burr pro
duced, which collectors appreciate.
Again, the copper was gouged but was
raised up prominently only on the side on
which the needle formed a sharp angle,
while the other side was roughened only
very slightly.
The burr—which gave the shadows
of the etching not only a richer tone
but also almost the velvety depth of a
mezzotint—soon disappeared because
of the mechanical wear on the plate
during the application of ink and the
printing process. Depending on the
strength of the burr, ten, at the most
twenty, such first-quality proofs with
burr were produced.
The third and last etching technique
was soft ground etching (fig. 66). It was
certainly as old but not as frequently used
as the two other methods. The procedure
went as follows. The well-prepared plate
was coated with a ground consisting of
wax and tallow but was not blackened.
The image was drawn on textured paper,
put on the ground upside down, and
impressed into the wax ground by tracing
with a needle that was not too pointed.
Because the paper had prominent ridges,
the needle could not be drawn evenly
over the paper; therefore, the impres
sions from the paper were irregular. If
the paper was lifted after the drawing was
impressed, the soft ground was pulled
up, exposing the copper wherever the
needle had pressed the paper more force-
Fig. 64.
Etching of the grounded plate: (a) rim
formed with modeling wax around the
edge of the plate; (b) etching solution
(nitric acid, hydrochloric acid, or fer
rous chloride); (c) slow etching with
very dilute nitric acid (weak formation
of bubbles); (d) rapid etching with con
centrated nitric acid (vigorous forma
tion of bubbles)
Fig. 65.
Etching on hard ground; detail of a
print by Rembrandt

R E S T O R A T I O N O F E N G R A V I N G S , B O O K S , D R A W I N G S , A N D O T H E R W O R K S O N P A P E R 183
Fig. 66.
Working with a mattoir: pressing the
drawing and the paper texture into the
soft ground
Fig. 67.
Drypoint etching
fully into the ground.
This etching method, too, was car
ried out in stages to achieve different
tones and gradations. Small corrections
were made with drypoint.
The lines the acid bath bit into the
copper were not continuous but showed
many interruptions —similar to the
crayon manner. In the print they
appeared much softer than lines etched
into hard ground or created by drypoint
(fig. 67).
MEZZOTINT
Mezzotint was somewhat revolutionary
as a copperplate technique but less so
compared with the etching method than
with engraving. Surfaces that had previ
ously been represented only as systems of
lines with the burin suddenly could be
expressed in a completely different, tonal
manner. This possibility, of course, was
not unknown to the etcher who—like
Rembrandt—by this time had already
used burr to create the aesthetic effect of
surfaces. After all, it was the burr created
by the drypoint which, especially in areas
where the lines in the shaded parts were
close together, gave the first proofs the
velvety depth we admire so much in
prints by the Old Masters.
The smooth copperplate was made
rough by a rocker (fig. 68). If you look
through a strong magnifying glass at
the lighter print in a mezzotint, you can
still see the traces of the rocker. They are
all even, closely spaced, and visible as
short dashes. Since they also cross each
other, they form small diagonal squares
the size and distance of the rocker teeth
(figs.. 70,71).
After the plate was completely
roughened, the image was drawn or
painted on it, and the mezzotint was
worked out on the copper with the
Fig. 68.
(a) Rocker, with movement indicated;
(b) indentations from the rocker

184 R E S T O R A T I O N O F E N G R A V I N G S , B O O K S , D R A W I N G S , A N D O T H E R W O R K S O N P A P E R
Fig. 69.
Mezzotint, English School, ca. 1770
Fig. 71.
Rocker for one hand and scraper
Fig. 70.
Rocker and pattern of rocking

R E S T O R A T I O N O F E N G R A V I N G S , B O O K S , D R A W I N G S , A N D O T H E R W O R K S O N P A P E R 185
Fig. 72.
Scraping
Fig. 73-
Mezzotint, English School, ca. 1780
(proof before addition of writing).
Refined technique.
scraper. Where there was supposed to be
a deep, full tone—in the background and
especially in the dark, shaded parts (fig.
72)—the roughened areas remained. The
lighter the individual tones were sup
posed to be, the more the roughened
places were smoothed. Places that had
to stay entirely white were polished
completely smooth. A burnisher was
used for this (fig. 73).
Assuming that the plate was handled
extremely carefully by the printer—not
only when he applied the ink but also
when he pulled the plate through the
press—one mezzotint plate could yield
about one hundred to one hundred fifty
usable proofs.
T H E CRAYON MANNER
In the softness of its lines, the crayon or
chalk manner is similar to soft ground
etching. The technique originated from
attempts to reproduce chalk or crayon
drawings or pastels as closely as possible
in graphic form. Although in soft ground
etchings the line shows numerous inter
ruptions, in the crayon manner it con
sists entirely of finer or coarser points
applied next to each other. This tech
nique should not be confused with pure
stipple method in which all surfaces in
the image are characterized by countless
closely spaced dots. In the crayon man
ner, however, the sketchlike, linear char
acter is preserved.
The width and depth of the lines
were determined by the shape of the
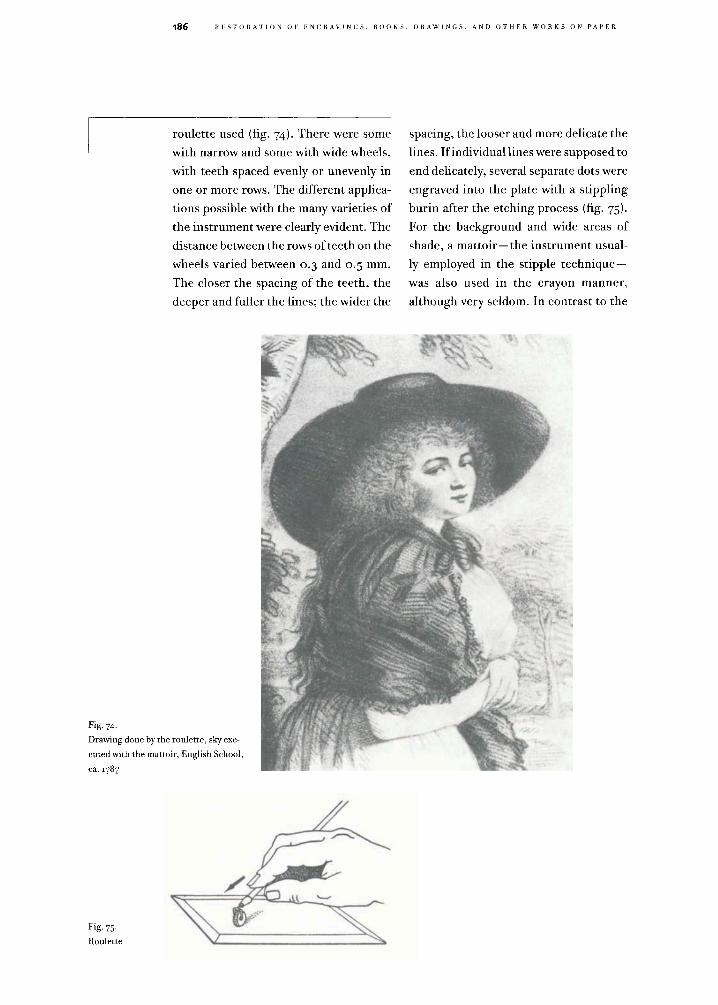
186 R E S T O R A T I O N O F E N G R A V I N G S , B O O K S , D R A W I N G S , A N D O T H E R W O R K S O N P A P E R
roulette used (fig. 74). There were some
with narrow and some with wide wheels,
with teeth spaced evenly or unevenly in
one or more rows. The different applica
tions possible with the many varieties of
the instrument were clearly evident. The
distance between the rows of teeth on the
wheels varied between 0.3 and 0.5 mm.
The closer the spacing of the teeth, the
deeper and fuller the lines; the wider the
spacing, the looser and more delicate the
lines. If individual lines were supposed to
end delicately, several separate dots were
engraved into the plate with a stippling
burin after the etching process (fig. 75).
For the background and wide areas of
shade, a mattoir—the instrument usual
ly employed in the stipple technique—
was also used in the crayon manner,
although very seldom. In contrast to the
Fig- 74-
Drawing done by the roulette, sky exe
cuted with the mattoir, English School,
ca. 1787
Fig. 75-
Roulette

R E S T O R A T I O N O F E N G R A V I N G S , B O O K S , D R A W I N G S , A N D O T H E R W O R K S O N P A P E R 187
roulette, the mattoir was shaped like a
ball and covered with irregularly spaced
teeth and, therefore, produced randomly
textured strokes.
The prepared plate was covered
with a hard ground and blackened with
smoke and the drawing was transferred
reversed, as in a mirror. The roulette was
then guided across the plate, making
strokes. The small teeth exposed the
copper in a pattern of dots. Since the
roulette was applied with more force
than the etching needle, the teeth not
only penetrated the ground but also left
more or less deep impressions in the
copper. The acid solution, therefore, had
much more of an effect on the dots pro
duced by the roulette than on the lines
drawn into the ground with the needle.
T H E STIPPLE TECHNIQUE
Originally, the dot puncher, an instru
ment which consisted of one needle or
a bundle of up to seven needles, was
employed for the stipple technique.
Over the course of time, the instruments
used for the crayon manner were also
employed (figs. 77-80).
By simply looking at the surface, you
can recognize the stipple print, because
on almost all sheets the dots cover the
entire area of the illustration, regard
less of whether it is a round, oval, or
square image. Even if the background is
depicted as light and transparent, there
are no areas without evidence of print
ing. The print in the crayon manner, on
the other hand, may show many areas in
which there is no trace of printing.
Whereas the sketchlike, linear technique
of the roulette was supposed to reflect
the character of a chalk drawing, the stip-
Fig. 76.
Punching
Fig. 77.
(a) Mattoir; (b) moulette; (c) roulette
Fig. 78.
Stipple engraving

188 R E S T O R A T I O N O F E N G R A V I N G S , B O O K S , D R A W I N G S , A N D O T H E R W O R K S O N P A P E R
Fig. 79-
Stipple engraving, English School,
ca. 1780. Larger areas worked with
mattoir and roulette, delicate parts
with a roulette, fine contours with a
drypoint (mixed technique). A roulette
was used for the dotted border.
Fig. 80.
Stippled work, German School,
ca. 1770. Same instruments as in
figure 79, only with stronger etching.

R E S T O R A T I O N O F E N G R A V I N G S , B O O K S , D R A W I N G S , A N D O T H E R W O R K S O N P A P E R 189
pie technique was intended to imitate
miniature paintings, which for the most
part provided the models for artists
working in this technique.
As another more frequently encoun
tered example of stipple technique, I
would like to mention the dotted border,
which was applied 1 to 2 mm from the
image as a frame around the picture.
It is assumed today—and certainly
not without justification —that artists
using the stipple technique generally
worked on hard ground. After the light
parts were covered, the plate was etched
in stages until the pictorial effect was
achieved. Small details were applied
"dry" to the exposed copper after the
etching process was finished.
T H E AQUATINT TECHNIQUE
The aquatint technique, also called the
watercolor or lav is technique, provided a
means of reproducing watercolor, sepia,
or bistre drawings in graphic form. Like
the older mezzotint process, aquatint
permitted treating large areas. As we
know, the tonal areas of mezzotint were
created by the formation of burrs with a
rocker. In aquatint this effect is cause by
a special kind of granular etching.
The following procedure was used.
The prepared plate was covered with
ground into which the outlines of the
drawing were scratched. The plate was
then etched in the acid (fig. 81).
After this preliminary etching, the
ground was removed and the plate was
covered with fine or coarse grains of
rosin. For this work, a series of the most
varied methods was developed over the
course of time. Of these, only the two
oldest ones, which dominated the field
from the time of their invention until
well into the nineteenth century, are
described here in detail. This limitation
is justified insofar as we are dealing only
with older graphics.
The bare copperplate, from which
the ground had been removed, was
dusted with a fine-grained, acid-resistant
rosin powder, which was then fused to
the plate by heating. One had to be care
ful to heat the plate only enough so that
the granular rosin became fused to it,
forming small droplets.
The finer and more evenly the rosin
powder could be distributed on the plate,
the more evenly and finer could the acid
bite the bare parts of the plate between
the granular rosin.
Another procedure was the follow
ing. Heated sea salt was sprinkled on a
plate coated with a ground that was not
too hard, and because of the heating,
the salt sank through the ground onto
the copper. When the plate had cooled,
the grains of salt were washed out to the
ground, leaving the copper exposed in
these places. The tone achieved through
etching with this method was much
coarser because salt particles have a
larger diameter than granular rosin.
Fig. 81.
(a) Large aquatint grain etched and
inked for printing; (b) large aquatint
grain before etching, fused to the plate
surface; (c) brushing asphaltum onto
the parts of the plate that are not sup
posed to be etched. These areas appear
blank in the final print.

190 R E S T O R A T I O N O F E N G R A V I N G S , B O O K S , D R A W I N G S , A N D O T H E R W O R K S O N P A P E R
Fig. 82,.
Aquatint, German School, ca. 1800

R E S T O R A T I O N O F E N G R A V I N G S , B O O K S , D R A W I N G S , A N D O T H E R W O R K S O N P A P E R 191
Fig. 83.
Print in the crayon manner,
French School, ca. 1770

192 R E S T O R A T I O N O F E N G R A V I N G S , B O O K S , D R A W I N G S , A N D O T H E R W O R K S O N P A P E R
The application of acid was done
in stages as in etching.
T H E LITHOGRAPH
The best stone for the various litho
graphic techniques is found in Solnhofen
in Bavaria. It comes in slabs of a thick
ness of up to 15 cm. There are light and
dark stones. The dark stone is harder and
is preferred in most instances.
For the crayon technique, the stone
must be prepared specially. Depending
on the type of image, the stone can have
a fine, medium, or coarse grain. The
greasy crayon used to draw the image on
the stone produces in its lines a certain
excitation caused by the grain of the
stone, in the same way as strokes drawn
lightly with a pencil on rough paper
appear indistinct and are interrupted by
many white dots (figs. 84, 85).
Once the illustration has been drawn
onto the stone, it is sprinkled lightly with
talcum and then etched. Acid is applied
to the stone with a broad paintbrush. To
etch delicate drawings, a wax edge is
placed around the stone and then the
acid solution is poured onto the stone.
The marks of the greasy crayon color are
acid resistant. However, all other parts
of the stone, where there is no drawing,
are affected.
When the printer rolls ink onto the
stone, the places where there is drawing
Fig. 84.
Crayon drawing on stone, by
Demanne, French School, somewhat
coarser technique
Fig. 85.
Crayon drawing on stone, French
School, more refined technique

R E S T O R A T I O N O F E N G R A V I N G S , B O O K S , D R A W I N G S , A N D O T H E R W O R K S O N P A P E R 193
Fig. 86.
Materials for drawing
Fig. 87.
Rolling ink onto the stone
will accept ink, whereas the etched parts
reject it. The entire process of lithogra
phy is based on the mutual repulsion of
grease and water.
If small light areas or highlights are
to be created, they must be done not with
a finger but with a scraper. The finger
leaves a little grease, just enough to
reduce the effect of the etching solution
at the places that were touched. In oppo
sition to the desired effect, these places
will take on ink, causing the print to have
shadows where there are supposed to
be lights.
For pen-and-ink lithographs, a
lighter color stone is used, and it has to
be ground especially smooth. After it has
been ground, it is covered with turpen
tine and rubbed dry with a linen cloth.
The lines of the drawing are applied with
a greasy ink or tusche with pen or paint
brush and, in contrast to the crayon tech
nique, form continuous strokes (fig. 90).
For this reason, the etching process for
Fig. 88.
Cross section of a flatbed press:
(a) scraper bar covered with leather,
adjustable up and down, otherwise
fixed; (b) tympan; (c) paper; (d) stone£
(e) gear-driven press bed that moves y
stone, paper, and tympan under the ;
scraper bar.
Fig. 89.
Dark-field manner lithograph, by Adolf
Menzel, with remarques on the margins.

194 R E S T O R A T I O N O F E N G R A V I N G S , B O O K S , D R A W I N G S , A N D O T H E R W O R K S O N P A P E R
Fig. 90.
Pen-and-ink drawing on stone,
German School
the pen-and-ink lithograph is a different
one too. After it has been etched, the
stone is rinsed with warm water—a soft,
grit-free sponge is used—and coated
with a gum solution. For the crayon
drawing, on the other hand, the etching
solution stays on the stone until it is
completely dry so that the lighter breaks
in the line can be thoroughly bitten.
For the dark-field technique, one
again uses the hard, dark stone (see fig.
89). The outlines of the image are drawn
in pencil, and the stone is coated with a
thin asphaltum varnish. The drawing
remains visible through the varnish. The
image is worked out with a scraper. The
etching solution has to be stronger than
in the other two techniques, but other
wise the etching process is the same as
for the crayon technique.

R E S T O R A T I O N O F E N G R A V I N G S , B O O K S , D R A W I N G S , A N D O T H E R W O R K S O N P A P E R 195
Fig- 9 i -
Proof from a steel plate
STEEL ENGRAVING
When working with a steel plate, one
applies the same methods used with a
copperplate (fig. 91). Mezzotint, dry-
point, etching, aquatint, and stipple
technique as well as diamond-tipped
needles and burins can be used. Before
the artist works with the plate, the steel
is annealed to make it easier to use.
After the work is completed, the plate
is hardened.

A D D I T I O N A L H I N T S F O R T H E R E S T O R E R O F P O S T A G E S T A M P S
Also included in the broad field of graph
ics is the postage stamp. I have not men
tioned this area of restoration up to this
point because other fields of graphic arts
have taken up my time. For this reason,
I have put more emphasis on collecting
recipes than on performing practical
work. The little knowledge that I have
accumulated over the course of many
years generally is not suitable for a pro
fessional book on graphics. Only in the
past few years have I been able to find
a number of guides, catalogs, and exten
sive treatises that, in my opinion, con
tain useful hints for the restoration of
stamps. I have tried the recipes I
received, selected the best ones, and put
forth new methods, hoping that I have
been of some service to both philatelists
and expert restorers of stamps.
In my view, cleaning is more impor
tant than pure restoration. The mending
of small margins and the addition of
parts present no problem to me as a
restorer of old prints, since that kind of
work is performed in the manner
described earlier in this book. (And I
would like to point out that these point
ers should be followed very closely.) I am
not going to give any special hints or
instructions because the restoration of
postage stamps is exactly the same as
that for the Old Masters. The following
remarks refer to special considerations
in this context.
Several advisers have recommended
that a mend should extend onto the
stamp i to 2 mm beyond the shaved area.
This advice betrays the dilettante. To put
more adhesive or mending paper than
necessary on the undamaged part of the
stamp is reprehensible. One should not
be surprised if the stamp buckles, espe
cially when it travels to exhibitions and
is exposed to different climates. The
more a stamp is exposed to daylight, the
faster it will deteriorate. Impregnating
the stamps with paste, too, will eventu
ally have rather unpleasant conse
quences. It is impossible for a stamp
saturated with paste to hold a mend over
many years. (Please read about the dam
age paste—a foreign body—can cause,
earlier in this book.) I will return to this
kind of treatment, which should not be
used under any circumstances.
The catalogs of the Michel and Senf
Brothers generally list separately the
stamps that were printed with water
soluble inks. 1 5 2 In addition, different
methods for cleaning and treating such
stamps are described. Among other
things in these instructions, I do not like
the suggestion of putting wet stamps on
towels. Moist stamps should be dried
between pristine blotting paper. Fur
thermore, the recommendation that
hydrogen peroxide be used to lighten
postage stamps is only correct within
limits; lighter stamps can become dis
colored again within a short span of time
or can become even darker. Cleaning
with potassium permanganate and a
subsequent bath in oxalic acid, which is
used by most restorers of stamps, is also
not a harmless cleaning and detoxi
fication procedure.153
How often a stamp has to be treated

R E S T O R A T I O N O F E N G R A V I N G S , B O O K S , D R A W I N G S , A N D O T H E R W O R K S O N P A P E R 197
with potassium permanganate depends
on the condition of the stain. But, and
this is important, if you follow every
cleaning attempt —no matter how
slight—with a bath of oxalic acid, there
is no telling what can happen. After all,
consider that you are working with two
potent poisons, oxalic acid being a
stronger cleaning agent than potassium
permanganate. Oxalic acid is used to
bleach straw and yellowed wicker fur
niture and to remove strong rust spots
from clothes and paper. Instead of oxalic
acid (also popularly called saccharic
acid), you should use potassium meta-
bisulfite.
All other instructions given in the
catalogs I can recommend.
Before you start to lighten them or
merely to remove small paper remnants,
the stamps should be sorted according to
colors. Never treat more than ten stamps
of one color at the same time. You should
always have a good view of the stamps
floating in a bath, to prevent one stamp
from losing color or bleeding and thus
endangering the others. It is a good idea
to place all stamps—only a small per
centage have to be omitted—into a bath
that tastes strongly of vinegar or table
salt. In many cases this bath prevents the
loss of color.
For cleaning or lightening stamps, I
use dissolved chlorinated lime. This
agent, which I have been using for more
than fifty years—I work with more than
ten different solutions—has never done
any harm or damage to a sheet.
Chlorinated lime in the right dosage is
an excellent cleaning agent. The weakest
solution should not even smell like chlo
rine. Cleaning French aquatints printed
in color, including stamps, presents
the most difficult restoration problem
among all graphic techniques. Even a
very minor mistake can cause the color
to fade. And what use is the application
or hydrogen peroxide—it is only a short-
term expedient—if it has not been pre
ceded with a mild chlorine treatment?
Even the adhesive coating, which in many
cases contains some coloring, can cause
yellowing that eats deeply into the paper.
Stamps that are not able to with
stand even water or benzine must be
excluded from any cleaning treatment.
After all, it is impossible to call those
stamps unique that have changed color.
Cleaning with the weakest chlorine
water is carried out from the reverse. The
picture side should be treated locally
with chlorine only when all other means
have failed. As an antidote, vinegar baths
should be used, followed in turn by fre
quent baths in fresh water. Only in one
case is it appropriate to go to a somewhat
stronger chlorine solution, and that is
when a change in color has been caused
by oxidized lead carbonate.
In an impressive book, whose
author—allegedly a serious collector—
maintains that he has occupied himself
for years with the restoration of stamps,
the following monstrous piece of advice
is given: Mold stains cannot be removed
unless one erases them with a knife, even
though a hole is scraped into the stamp
this way! Who can simply ignore this and
not raise his voice?
In all his suggestions I find lacking
the exhortation to use absolute cleanli
ness. And it is cleanliness that is the basis
for successful treatment. If a stamp has
been shaved down for repair, it should
not be put into a paper bag or container
until twenty or even thirty stamps have
accumulated to be treated. The treat
ment of the stamp —except for retouch-

198 R E S T O R A T I O N O F E N G R A V I N G S , B O O K S , D R A W I N G S , A N D O T H E R W O R K S O N P A P E R
Fig. 9a.
Tools for the restoration of stamps
ing—should be continued immediately.
If everything I have written about
restorations is followed, repairing
stamps should not be too difficult a task
for a sensitive restorer.
If you shave only 0.5 mm, the work
is bound to fail. This need not be. Each
shaved area should be 2 mm wide. After
mending, any additional shaving is done
strictly according to instructions.
A new procedure is the pasting of
thin paper onto the face of the mended
stamp, outside the stamp design. To
achieve a smooth transition from the
original paper to the restored parts of the
stamp, very thin, matte-finish paper is
pasted over the mended place on the side
with the design, precisely up to the edge
of the original. When doing this, take
into consideration (as mentioned earlier
in this book) that the moist treatment
revives all parts once again; that is,
because of the rice starch paste they swell
0.01 mm, although this swelling can
only be seen under a magnifying glass.
Therefore, to achieve an invisible junc
ture, the space from the beginning of this
swelling must be filled with the thin
paper. Subsequent shaving will be neces
sary in most instances. Again, look at
the front side and remove the fine fibers
along the edge of the thin paper, since
it was not cut with scissors but torn.
To make the pasting more efficient, a
slight roughening of the thin paper is
recommended.
If the stamp is damaged in such a
way that it shows many thin spots, shave
the entire stamp thin. The shaving can be
performed dry or moist, or the picture
side of the stamp can also be glued onto a
small glass pane with acid-free glue. As
with all other treatments, gluing is done
while the stamp is moist. (Shaving, of
course, is practiced first on stamps with
out any value.)
The paper used for backing should
be so thin that together with the stamp it

R E S T O R A T I O N O F E N G R A V I N G S , B O O K S , D R A W I N G S , A N D O T H E R W O R K S O N P A P E R 199
1
•If
Fig- 93-
Repairing stamps
equals the thickness of the original
stamp. Shaving is done in the usual man
ner. If a stamp that has been shaved thin
has a watermark, transfer the watermark
ahead of time, reversed, as in a mirror,
onto the inside of the backing paper.154
Restoration of the printed parts
(retouching) is difficult only if you are
not sufficiently experienced in using the
paintbrush or drawing pen. But you can
get help by finding, for use in restoration,
extra stamps that are healthy in those
parts in which the good stamp is sick.
When deliberating what shape and what
size of mend to cut out of the damaged
stamp, you should start by finding
a salient feature that might be useful. If
possible, choose a dark point in the
stamp design, a wider line in a letter, a
darker line in the drawing, or a similar
place. This facilitates the work of creat
ing a transition and saves you from more
extensive retouching. The additions
must be minor because otherwise you
run the danger of being considered a
forger. The less retouching, the better.
Depending on how the mend will be
set into the original, use the restoration
knife to cut the mend out of the extra
stamp so that it is a little larger than the
area to be mended, which has been
shaved down in advance. Go to a window
or the shaving box and put the original
stamp on it; take the little piece of the
extra stamp, put it exactly in place, and
with the back of the knife (edge facing
upward) carefully scratch out the part
that is to be added. The scratching must
be done cautiously (the wrist has to be
loose) and should under no circumstance
damage the original stamp. The excess,
projecting paper is removed, and the
mend is placed exactly onto the empty
area of the original stamp. It should fit
precisely. (If too much has been cut off,
there is no point in continuing.) The
mend is shaved exceedingly thin and
again placed into the empty space.

200 R E S T O R A T I O N O F E N G R A V I N G S , B O O K S , D R A W I N G S , A N D O T H E R W O R K S O N P A P E R
Fig. 94-
Well-known watermarks from the
early sixteenth century
Several drops of water are applied to the
stamp and the mend so that both float.
Should the mend become displaced a lit
tle, direct it back into a proper position
with a small, blunt wooden rod. This can
be done very easily while the stamp and
the mend are moist. To remove the
excess water, put blotting paper carefully
onto the stamp, first covering the side of
the glass pane with the blotting paper
and gradually lowering it onto the stamp.
A previously cut piece of blotting
paper, which is the full size of the glass
pane and, like the pane, is to be used for
positioning the mend, is dabbed with
water, lightly dried, and laid flat onto the
stamp. The front of the mend (stamp
design) has been dabbed with a weak
paste beforehand so that it can be trans
ferred to the blotting paper when the
blotting paper is put over it. To accom
plish this, press down on the blotter with
your finger directly over the location of
the mend, and the mend will adhere
to the blotting paper with the back side
facing upward. After applying a little

R E S T O R A T I O N O F E N G R A V I N G S , B O O K S , D R A W I N G S , A N D O T H E R W O R K S O N P A P E R 201
stronger paste to the mend, it is peeled
off the blotting paper, and the part is
returned to its place on the stamp. If the
mend does not fit within a hair's breadth,
drip a few more drops of water on it and,
with the aid of a magnifying glass, move
it into the right position again with a
small wooden rod. The stamp is put
between blotting paper under a copy
press [see Rhodes 1999], and the press is
tightened slightly. After two minutes the
paper is removed, and the stamp is again
placed under the press between new
sheets. The pressure of the press now has
be to be little greater.
This finishes the restoration.
In writing the above essay, it was my
intention to point out to the expert
restorer things he might have overlooked
that are essential. For this reason, the
essay is merely supposed to give certain
hints and not to be an exhaustive treatise
for future restorers. To explain all details
in the repair of damaged stamps, I would
have to write a special book, which would
take too much time at the moment.
The following are little, practical
hints.
A few remarks about paper pulp.
Paper pulp —recommended by many,
rejected by many—needs to be put in
its rightful place. In the section "Actual
Mending or True Restoration" (pp.
109 - 2,2), I rejected paper pulp because it
should not be used for restoration pur
poses. When I recommend paper pulp
here it is because pulp serves well for
the smallest repairs on stamps (needle
pricks, thin places, perforations, etc.)
when the shaving is done properly and
utmost cleanliness is observed. For
larger repairs follow my guidelines.
Paper pulp. Clean paper containing
no wood pulp is finely shaved, mixed with
a small amount of water, and stirred well.
Before using the pulp, the water is
drained off, the stamp is put on a clean
piece of linen, and the pulp is filled into
the places to be restored. When the pulp
has dried a little, the stamp is carefully
placed between blotting paper and both
parts are put under a press. The pressure
from the press should be light and last
two minutes. This procedure is repeated
until the pulp is as strong or thick as
the paper.
Long soaking in water. A stamp does
not lose its firmness through extended
soaking in water —five to ten hours.
Neither do paper fibers start to dissolve,
an impossibility even when hot water,
which now and then has to be employed
for removing a stamp, is used. Prolonged
boiling can endanger the colors but can
never cause the deterioration of paper if
the water does not contain any destruc
tive additives. The sizing of the paper,
which was weak and contained a small
addition of alum, is reduced through this
procedure or completely eliminated.
Sizing or strengthening. Each chemi
cal treatment (chlorinated lime, hydro
gen peroxide, potassium permanganate,
oxalic acid, eau de Javelle, strong vine
gar, or salt solutions) causes a sizing loss.
Often an old or new stamp that received
only a rosin sizing loses its sizing when it
has been exposed to wind and weather
even if it has not been treated with chem
icals. The lost sizing can and should
be refreshed by adding a small dash of
aluminum subacetate or the smallest
amount of alum. The stamp is soaked in
this solution before retouching and is
dried off immediately.
Removing the gum. The gum on
some stamps is firm and tenacious and
cannot be removed even after long soak-

202 R E S T O R A T I O N O F E N G R A V I N G S , B O O K S , D R A W I N G S , A N D O T H E R W O R K S O N P A P E R
ing in water. First, treat such a stamp in
a cold bath, then follow with lukewarm
to hot baths in short intervals. Place
the stamp on a glass pane, and try to lift
the gum with a bone folder and a restora
tion knife. Be careful in this process
not to damage the stamp and render
your work pointless. The gum has to be
pulled off the stamp, not the stamp off
the gum. If this cannot be done in one
procedure, put the stamp back into the
lukewarm water, wait a while, and con
tinue to work.
Dyeing of mending papers. Dyeing
can be done by mixing color into the
paper pulp or in stages by boiling in a
color solution. The more experience you
gain, the more successful you will be.
To be useful, each colored paper must
become thoroughly impregnated with
color. Before using the paper, you should
perform a tearing test. Tear the paper in
such a way that overlapping edges are
created (see fig. 31). If the interior of the
paper, as seen at the edges, is consider
ably lighter or even white, only the sur
face of the paper has been colored, and
it cannot be used for repairs.
Eau de Javelle consists of a certain
percentage of soda1 5 5 and is therefore
not a suitable cleaning agent. (Soda
affects colors.)
Removal of grease spots. Grease
spots can be removed by producing a
magnesium oxide poultice that is heavily
saturated with benzine or carbon tetra
chloride. The poultice is applied to the
back, and after evaporation of the liquid,
the magnesium oxide is removed by tap
ping. This procedure is repeated until
the spots are removed. Dipping the
stamps and soaking them for some time
in benzine, ether, and so on, is not good
for the stamps since the slight oil content
of the colors can be lost and the stamps
can become useless.
Removal of old oil stains. Dab the
stamps softly from the back with a small
linen cloth that is dampened again and
again with carbon tetrachloride. The
blotting paper —the stamp has been
placed onto it with the design facing
downward—takes up the old oil and turns
yellow. Repeated treatment is advisable.
Copying-ink pencil or similar crayon
lines can be removed by simple methy
lated spirit baths. Longer soaking is not
recommended since certain stamps can
not tolerate a bath of several hours. At
certain intervals — say, every ten min
utes—the stamps should receive a bath
in fresh water.
Removal of writing in ink. A major
part of writing in ink can be removed
completely when you go over the writing
with a 5 percent solution of hydrochloric
acid after local treatment with chlorine.
Immediately after treatment, even if the
writing is still visible, put the stamps into
a vinegar bath. Repeat this procedure
until the writing is removed. If the writ
ing has not faded at all after the first
attempt, do not continue with the treat
ment. Caution is called for!
Foxing is treated with chlorine
water.
Each chlorine bath requires an anti
dote—a bath in vinegar or sodium bicar
bonate (natron)156—which in turn is
followed by baths in fresh water.
Hydrogen peroxide. No more than
a 10 percent solution can be used even
if the cleaning process is slowed down
this way. A stronger solution could cause
the stamp to decompose and become
worthless.
Potassium permanganate can be
used up to almost 5 percent by volume.

R E S T O R A T I O N O F E N G R A V I N G S , B O O K S , D R A W I N G S , A N D O T H E R W O R K S O N P A P E R 203
Instead of oxalic acid use potassium
metabisulfite, which can be mixed for
you by a pharmacist, photographer, or
dentist.
Examining paperfor the presence of
mechanical wood pulp. Two percent
phloroglucinol should be mixed with 10
percent alcohol and well shaken. (Order
from the pharmacy.) To try it out, put a
drop of the phloroglucinol solution and
a drop of 10 percent hydrochloric acid,
which does not have to be pure, on a
piece of paper. The place immediately
turns dark red if the paper contains a
large amount of mechanical wood pulp.
A lighter color appears if the paper
contains only a little mechanical wood
pulp. Should a 10 percent solution of
hydrochloric acid not be sufficient, a
stronger solution, almost up to a concen
trated one, can be used.
Fifteen percent aluminum subac-
etate prevents colors from bleeding onto
restored places. After saturating the
stamps, dry them immediately with
blotting paper to prevent shiny spots
from appearing.
Waterproofing colors. Add a drop of
purified water glass to the retouching
color.157 Retouching should not be done
on papers containing wood pulp,
because they would develop a slightly
yellow tone.
Removal of dirt. Do not use benzine
to wash the stamps, since the slight oil
content of the stamps could be lost. Pure,
clean water is the best cleaning agent.
The paintbrush used for cleaning should
not be too soft or too hard. It can be
pressed down somewhat forcefully.
Starch paste. Starch paste used for
stamps may be prepared a little stronger
than for other repair work. The main
consideration here is that all pasting as
well as all lightening or cleaning proce
dures are done while moist. Adhesive
strength is not thereby reduced; on the
contrary, paste will adhere better to the
fibers of the original paper. The mois
ture—wetness—is immediately removed
with blotting paper in order to continue
further treatment.

S U M M A R Y
I have arrived at the end of my book but
certainly not at the end of all I could say
about restorations. Caution prevented
me from talking about some things. I
wanted to avoid making a bad situation
worse. My book should not be regarded
as a cookbook that contains instructions
for all circumstances. A restorer has to be
a very sensitive person who avoids harm
ful methods of treatment and knows how
to adapt useful treatments to his object.
This is how my remarks should be under
stood and used. The reader is free to try
other methods on his own. He should,
however, do this as a responsible con
noisseur and lover of the arts and experi
ment with his new methods first on
worthless things and try them over and
over again before he treats valuable
works and perhaps exposes them to
destruction. The reader will have noticed
that I took a similar road. My friends
have a great advantage: I have revealed to
them the experiences of my fifty years
of professional life. The responsibility of
the restorer to objects of cultural value is
the same as that of the physician to
human beings. My book cannot be a
cookbook, for the cook can throw out the
soup if it does not taste good. But when
the physician or the restorer has made an
error, frequently all is lost. And we
restorers often deal with a dangerously ill
patient and are happy when we succeed
in bringing it back to life again, when we
succeed in saving a culturally valuable
work of art not just for decades but for
the foreseeable future.
Some time ago, in a monthly pub
lication for bibliophiles, an article
appeared under the title "Clinics for
Antiquities." This is a title after my own
heart. The restorer should feel in his
workshop—his clinic —like a medical
chief of staff who recognizes with an
experienced eye whether treatment or an
operation is indicated. There is a certain
amount of basic knowledge that defi
nitely has to be followed by the physician;
this is also true of the restorer. In medi
cine much depends on the experience of
the physician and everything on the con
stitution of the patient, and the same
applies in restoration. The restorer has
to collect experience and possess it. His
success or lack of success often is
dependent on the object he is working
on. A lack of success is not always his
fault; it is also not a consequence of the
methods of treatment recommended
here but can depend on the treated mate
rial with its mortal weaknesses.
Only he can become a restorer who
enjoys his occupation, who treats the
objects of his work with love. This love of
the object caused me to write down my
experiences. It has forced me to explain
why I work a certain way and what dan
gers I have avoided, to help others and
to spare them lost efforts and destruc
tive methods.
I emphasized in the foreword that
I would like to exchange experiences. I
would be happy if in a later edition
I could distribute suggestions that others
have worked out and would like to make

R E S T O R A T I O N O F E N G R A V I N G S , B O O K S , D R A W I N G S , A N D O T H E R W O R K S O N P A P E R 205
them available to the public just as I have
done with mine. In the path toward the
preservation of works of cultural value
there should not be any professional
secrets, for we owe it to our nation and
mankind to preserve the few treasures
that have been handed down to us from
past times.
THE AUTHOR

This page intentionally left blank

E D I T O R ' S N O T E S O N T H E T E X T 207
E D I T O R ' S N O T E S O N T H E T E X T
1 Hugo Ibscher (1874-1943) was a restorer of
manuscripts and papyri. Trained as a book
binder, he entered the service of the Berlin
Museum in 1891, where he was entrusted wi th
the mount ing and restoring of the papyri, at
first under the direction of Ludwig Abel but
independently after 1894. He also undertook
private commissions for collections elsewhere.
For his work on restoration of parchments
and other manuscripts in the Vatican, he was
awarded the Order of Saint Gregory. See
Dawson and Uphill 1972.
2 A. Bonnardot, Essai sur la restauration des anci-
ennes estampes et des livres rares (Paris, 1846).
A second revised edit ion was printed in 1858,
t i t led Essai sur I'art de restaurer les estampes et
les livres, and a German translation appeared
in 1859 (Stevenson 1995:117).
3 See glossary.
4 See glossary.
5 In U.S. dollars as of 2002, this would be equiv
alent to approximately $4,786. This conversion
is based on the assumption that in 1934, about
4.20 German marks was equivalent to U.S.
$1.00 and that the value of U.S. $1.00 in 1934
is equivalent to $13.40 in 2002. Officer 2002;
Wil l iamson 2002.
6 Presumably it was possible in Schweidler's era
to purchase paste ready for use, and from the
context it seems likely that this paste contained
alum, but I have not found further information
about this kind of commercially prepared paste.
7 See the section "Removing Prints from
Backings," pp. 58 -63 .
8 See glossary. Although the method of attach
ment is not entirely clear here, the point seems
to be that a print should not be glued directly
to a mount but should instead be attached by
means of narrow strips of paper applied around
the margin of the print. Schweidler elaborates
on the mount ing of prints and the use of
guards in the section "The Stretching of Prints,"
pp. 130-36 .
9 Schweidler's reference is unclear.
10 I.e., those who prepare w indow mats for pic
tures, in conjunction wi th f i t t ing the matted
pictures into frames.
11 Approximately $4,786 in 2002 U.S. dollars. See
note 5.
12 The phrase zum Abspulen der Blatter is trans
lated here as "rinsing off the prints." To most
readers, the distinction between "rinsing" and
"washing" may seem trivial, but to paper con
servators the implications are important, espe
cially in the context of using water to remove
from paper any reagents or chemicals that
might have been used in treating a print and
that might damage the paper if not removed.
The verb abspulen connotes cleansing, as one
would do wi th one's dishes. If Schweidler had
wanted to imply a more thorough cleansing,
as in washing of one's clothes, he probably
would have used the word waschen. Schweidler
discusses rinsing and washing of paper in more
detail in the section "Brightening and Cleaning,"
pp. 51-57.
13 See glossary.
14 As stated on p. 66, by "vinegar," Schweidler
means wine vinegar (presumably whi te wine
vinegar, since it is essentially colorless).
Generally, the strength of the wine vinegar
sold for home use is approximately 6 percent.
15 See glossary.
16 [Author's footnote a] Carbon tetrachloride is
harmless, since it is not f lammable; it is a good
substitute for gasoline and a very good spot
remover for fresh grease spots. [Although the
author asserts that carbon tetrachloride is
harmless, it should be emphasized that this
solvent is now considered quite hazardous
and a potent carcinogen. —R.P.]
17 Distilled ethyl alcohol.
18 See glossary.
19 See glossary. In the text that fol lows,
Schweidler sometimes refers to a "soda
solution," by which one should understand
that it is a solution of "bleaching soda."
20 [Author's footnote b] A sponge is only usable
when the little stones found in it have been
completely removed. The sponge has to be

208 E D I T O R ' S N O T E S O N T H E T E X T
examined by touching it, and the stones have
to be removed one by one.
21 [Author's footnote c] Excerpt f rom Hugo
Ibscher, Das Papyrusblatt und seine
Wiederherstel lung nach funftausend Jahren,
Westermanns AAonatshefte, February 1935.
22 In the original, Schweidler uses the German
word Schleudern, which means "to fl ing, hurl,
or swing" but also "to centrifuge." In this con
text Schweidler must have in mind the device
sometimes called a "duster," which Labarre
([1952] 1969:83) defines as fol lows: "a mechan
ical contrivance, usually consisting of a revolv
ing drum of mesh wire f i t ted wi th teeth for
opening out and cleaning rags, books, waste-
paper, esparto grass, straw, etc." Also, in
Cutbush's American Artist's Manual: "The duster
is made in form of a cylinder, four and a half
feet in diameter, and five feet in l e n g t h . . . . A
convenient quantity of the rags after the selec
t ion are enclosed in the duster, and the rapidity
of its mot ion separates the dust f rom them, and
forces it through the wire" (Bidwell 1990:63).
23 Schweidler uses the word Feuchtigkeit, which
means "dampness," but perhaps he intends to
suggest that the rags would be inspected for
discoloration due to mold.
24 Schweidler's knowledge of papermaking is inac
curate. Usually, two paper molds were in use
alternately by the "vat man" and his assistant,
the "coucher," whose task was to take the pulp-
laden mold from the vat man and turn it upside
down onto a felt, thereby transferring the wet
pulp to the felt. The coucher would then cover
the pulp wi th another felt, in preparation for
receiving the next layer of pulp. Next, he would
place the empty mold wi th in easy reach of the
vat man, who, in the meantime, would have
been scooping up another layer of pulp on the
second mold. Thus, at any one t ime, one sheet
of paper is being formed by the vat man while
the previous sheet is being placed between
felts. Eventually, when many layers of paper
and felt had accumulated, the entire stack
would be pressed to remove excess water. Then
the wet, pressed sheets of paper would be sep
arated from each felt and hung up to dry.
25 See glossary.
26 Schweidler's description of the structure of
paper molds is vague if not incorrect. Here, for
example, he indicates that the chain stitches
that serve the important function of holding
all the wires in place are merely wires that are
used for support. In general, his explanations
of the materials, tools, and techniques of
papermaking are sometimes inaccurate. For
more reliable information, refer to Hunter 1947.
27 Current practice is to use the phrase "laid lines"
to refer to the closely spaced lines in laid paper.
The widely spaced lines—the "chain lines"—are
due to the chain stitches on the paper mold;
these serve to anchor the closely spaced wires
to the wooden ribs that lie beneath and give
support to the surface of the mold. Collectively,
all the lines in laid paper, whether formed by
the wires or the chain stitches, are usually
called "wire lines." For information on European
laid paper and the molds used to make it, see
Hunter 1947:114-38.
28 Bleichhollander, a machine used for bleaching
paper pulp (Labarre [1959] 1962:23).
29 This paragraph is confusing. In the first two
sentences Schweidler seems to recognize the
dangers of rosin sizing, compared to traditional
gelatin sizing, but the paragraph eventually
descends into a muddle of inaccurate infor
mation—alum-rosin sizing does not prevent
water stains and foxing—compounded wi th
lack of clarity.
30 Here he seems to assume that because the
paper is inherently strong enough, it wil l not
be necessary to have any additional support.
But on p. 49, he indicates that severely torn or
damaged sheets need the additional support of
a good piece of paper.
31 See note 30 about not requiring a support when
a sheet is strong enough not to require one.
32 Marginal note by C. S.: "That would be a self-
accusation."
33 Marginal note by C. S.: "Never erase wi th in the
printing, only on the margins and back of the
sheet."
34 See glossary.
35 The author does not offer a reason for using
a bath of dilute vinegar, but it may have a basis
in common household cleaning methods. The
use of a bath of dilute vinegar recurs through
out the book. When I was a fel low at the
J. Paul Getty Museum doing research on this
book, Mary Sackett, conservator at the Getty
Research Institute, made it possible to conduct
some simple experiments using scraps of four
old papers that showed slight signs of discol
oration. One paper was machine made, and
it may have been sized wi th alum-rosin sizing.
The other three were probably handmade, wi th
gelatin sizing. On a wh im, we brushed some
animal glue across the ends of two of the

E D I T O R ' S N O T E S O N T H E T E X T 209
papers to see what the effect would be after
bathing. Each of the scraps was cut into three
pieces. One piece was retained as a "control"
for comparison; the second was bathed in plain
water; the third was bathed in 5 percent dis
ti l led whi te vinegar, w i th a pH of approximately
2. Perhaps the most interesting result was that
all four kinds of paper wet ted more readily in
the vinegar bath than in plain water. Also, we
noted that more of the swaths of animal glue
were removed from the samples that had been
bathed in vinegar. After bathing the samples
for one hour at room temperature, they were
removed and air-dried on blotters. Wi th regard
to the overall appearance of the samples, those
that were bathed in vinegar were not dramat
ically different f rom those bathed in water,
although all those that were bathed looked
somewhat lighter than the controls. In short,
it is not clear what benefit if any might result
f rom bathing paper in vinegar, so it is not clear
why Schweidler would recommend this prac
tice. On the other hand, the effectiveness of
the vinegar in dissolving the animal glue sug
gests one possibility. To the extent that a water
stain on a gelatin-sized paper might consist of
deteriorated gelatin, perhaps the stain might be
reduced more in vinegar than in water. W i t h
out further study, this is merely speculation, so
Schweidler's reasons for recommending baths
of vinegar to remove stains remain uncertain.
Regarding vinegar as an "antidote" to be used
fo l lowing bleaching wi th a chlorinated bleach,
see p. 66.
36 Just imagine that one would have on hand
enough "worthless prints" of sufficient size to
use merely as a support whi le bathing a print!
37 Marginal note by C. S.: "Nonsense! That almost
always affects the print."
38 For more information on bleaching soda, see
glossary.
39 See glossary for more information on bleaching
soda ("soda solution").
40 Marginal note by C. S.: "Why soda, which is so
dangerous? Borax is also helpful."
41 Marginal note by C. S.: "Therefore, hands off
the soda 'medicine.'"
42 Marginal note by C. S.: "can destroy the sheet."
43 Schweidler probably means that if the paste
has not yet become sufficiently soft to permit
easy removal of the mounted print, attempts
to remove the print may leave residues of
incompletely dissolved paste on its back in a
pattern caused by the brush wi th which the
paste was applied. It is also possible that he
means that minute bits of the mount may be
left behind on the back of the print, and that
the pattern of these residues may result f rom
variations in the amount of paste brushed onto
the print during its mount ing.
44 Schweidler probably means to say that if the
wooden strainer is larger than the print, then it
is easy to cut through the secondary support,
which, in this instance, would extend out
beyond the edges of the print so that it would
be easy to cut through the support, thus freeing
both the print and its support f rom the strainer.
On the other hand, if the strainer is exactly the
size of the print, then there would be no mar
gin of the support beyond the print, and it
wou ld therefore be more diff icult to cut both
support and print off of the strainer.
45 I.e., papers that are dense and strongly sized.
Whatman papers were well known for these
characteristics.
46 The author often refers either to dry calcium
hypochlorite powder or to a solution of chlori
nated lime (calcium hypochlorite) as "chlorine,"
although technically the latter should apply
only to the element itself, which is a gas.
47 The "Dr. X" referred to is Dr. Hans Bohm, and
the book is Die Praxis des Restaurators. See
references. This book is Bdhm's update of a
much earlier book by Friederich Lucanus,
Vollstandige Anleitung zur Erhaltung, Reinigung
und Widerherstellung von Cemalden, Aquarellen,
Kupferstichen, etc., which was published in 1812
and has been described as "the first major tract
on print restoration" (Stevenson 1995:117).
48 The quote is from Bohm [1929] 1979:84.
49 That is, rather recently, considering that the
first edit ion of Schweidler's book was pub
lished only nine years after the publication of
Bohm's book.
50 Marginal note by C. S.: "So, chorine treatment
after all, you old racketeer!"
51 I.e., a solution of "chlorinated lime" (calcium
hypochlorite).
52 In this section, Schweidler mentions t w o "ant i
dotes," vinegar and sodium hyposulfate, but
later, on p. 202, in discussing treatment of
stamps, he suggests using sodium bicarbonate
as wel l .
53 The idea of using an acidic bath to remove
chlorinated bleach appeared two years before
the first edit ion of Schweidler's book in a publ i -

210 E D I T O R ' S N O T E S O N T H E T E X T
cation in English (Keck 1936:117-26). The theory
was that lowering the pH of the bath (making it
more acidic) would cause a shift in the equil ib
rium of the reactions in the solution so that any
residual chlorine wou ld be turned into chlorine
gas, which would eventually be expelled from
solution. In the fo l lowing decades, it was shown
that causing the pH of a chlorinated bleaching
solution to shift f rom an alkaline state (pH
higher than 7) to an acidic state causes more
disintegration of cellulose, and hence greater
loss of strength of paper, than if the pH of
the bleaching solution were to be kept some
what alkaline.
54 Marginal note by C. S.: "in a zinc tray?" Carl's
terse comment is hard to understand. Perhaps
he is questioning the fact that the tray is made
of zinc and suggesting that there could be an
undesired chemical reaction between the vine
gar and the zinc. Alternatively, he could be
questioning whether an entire bott le of vinegar
is an appropriate amount . ,
55 Schweidler's appreciation of sunlight as an
effective and desirable means of reducing or
removing discoloration from prints is in keeping
wi th a long tradit ion. "As print restoration
developed in the seventeenth and eighteenth
centuries, the use of the sun's rays to bleach
prints was repeatedly 'discovered' by individual
restorers before Robert Hecquet finally pub
lished his 'secret' in 1751. Until the develop
ment of chlorine bleaches and their application
to print restoration in the late eighteenth cen
tury, sun bleaching was the usual manner of
l ightening the paper of prints, and in some
circles, particularly among collectors who •
restored their own prints, it was still employed
into this century" (Stevenson 1990:422). Johann
Wolfgang von Goethe was a notable practi
t ioner of sun bleaching. In his autobiography
he describes how, wi th the help of his sister,
he "laid prints belonging to his father on
boards, wet ted them, and propped them in
the roof gutters so they could bleach in the
sun" (Stevenson 1995:124 n. 20). For more on
the use of light for bleaching, see also Keyes
1982:100-104; Van der Reyden 1988:73-106.
56 Marginal note by C. S.: "How profound!"
57 Marginal note by C. S.: "God only knows!"
58 See glossary.
59 The nature of this peculiar reaction is uncertain,
but it resembles an effect described by A. D.
Baynes-Cope (1977:3). He reported that brown
stains had developed during treatment of
paper wi th hypochlorite bleaches and discov
ered that this was probably the result of prior
treatment wi th potassium permanganate, a
chemical that can be employed either as a
bleach or as a means of t int ing paper a yel low
ish hue, depending on the circumstances of
its use. Certain colorless residues of the per
manganate, if present, may react to form man
ganese dioxide, a brown compound.
60 The reference is unclear. Perhaps the author is
trying to suggest that early colored woodcuts
were influenced by pictures on ancient
Egyptian papyrus.
61 Schweidler mentions "Swiss color prints" or
"Swiss color artists" several times in this section
of the book and elsewhere. He is probably
referring to delicately and decorative hand-
colored etchings that were made in Switzerland
in the late eighteenth and early nineteenth
century and often represented picturesque
views of various parts of Swiss scenery. A few
of the artists working in this vein were Gabriel
Ludwig Lory Pere (1763-1840), Heinrich Rieter
(1751-1818), Johann Jakob Biedermann
(1763-1830), and Carl Hackert (1740-96) .
62 See glossary.
63 In this paragraph the author must be referring
to the drawing technique called metalpoint, but
I am unaware of examples of such drawings in
which two to four parallel lines could be drawn
by special shaping of the metal. For metalpoint
drawings, it was customary to prepare the
paper not wi th chalk alone but w i th a coating
of chalk, ground or calcined bone, or other
whi te substances, which, when mixed wi th ani
mal glue and water, were applied to paper as
a ground on which the drawing would be exe
cuted. Colored pigments were also often added
to this mixture to produce a colored back
ground for the entire drawing. I am grateful
to Timothy Mayhew for sharing wi th me his
expertise about metalpoint drawings.
64 In other words, the author asserts that pencil
drawings were indeed made from as early as
the seventeenth century and that a drawing
that appears to be from that period should not
automatically be regarded as a forgery simply
because it is in pencil.
65 The darkening of whi te lead pigment is the
result of reaction w i th sulfur, not oxygen, light,
and air as the author suggests (although air pol
luted wi th gaseous sulfur compounds can cause
oxidation of whi te lead).

E D I T O R ' S N O T E S O N T H E T E X T 211
66 Marginal note by C. S. regarding this paragraph:
"Wrong! It must be treated wi th dilute hydro
gen peroxide." Carl is quite correct, in that the
usual treatment for oxidized whi te lead pig
ment is dilute hydrogen peroxide, not citric or
hydrochloric acid.
67 Marginal note by C. S.: " . . . then hardly possi
ble." He refers to his previous marginal note
indicating that hydrogen peroxide is the correct
means of treating oxidized whi te lead pigment.
68 See glossary. I know of no source for
Schweidler's use of this material. From the
chemical standpoint, given that aluminum ions
are trivalent, it is possible that aluminum subac
etate may harden gelatin and hence make gela
tin sizing more effective, but it also may make
it more acidic.
69 See glossary.
70 See glossary.
71 This section is likely to be confusing because
the author does not begin substantive descrip
t ion of the process of shaving down paper in
preparation for mending until the section
"Actual Mending or True Restoration," espe
cially pp. 112-14.
72 The location of this reference is unclear, but
considerable discussion of paste, especially
alum paste, occurs on p. 34 and in the section
"Removing Prints from Backings," especially
pp. 5 8 - 5 9 -
73 It is diff icult to interpret the assertion that paste
only swells when boiled repeatedly, or that
swelling of paste during cooking must be pre
vented. When the temperature of the water
and starch mixture is raised to a certain point,
the starch granules inevitably swell and burst,
forming a gel, regardless of how much water
is added during cooking. Perhaps the author
means that water should be gradually added
at a rate that keeps pace wi th the swelling and
that by continuous di lut ion in this manner the
paste wil l not become very thick.
74 A bone folder is a flat, smooth tool , tradit ional
ly fashioned from bone, although the author
suggests that one might use an old toothbrush
to make such a tool (see fig. 25). It is invalu
able, particularly in the practice of bookbinding,
and is often used for manipulating paper and
other materials.
75 See note 53 regarding using a hypochlorite
bleach in combination wi th an acid.
76 Technically, a solution of bleaching soda would
not be giving off anything as "vapors," but given
(as he says later) that the solution is actually
boil ing, it is certainly conceivable that minute
droplets from the boil ing solution could be
present in the steam just above the solution
and that it would be wise to cover those areas
of the print that one did not intend to expose
to the solution.
77 Although these directions are confusing, the
author seems to suggest that oil stains in the
margin of a print can be dissolved by rolling
the print as described and standing it in boil ing
bleaching soda solution, which is drawn up
into the margin.
78 It is likely that the effect described by
Schweidler is due to the dissolution and trans
port of water-soluble substances present in the
paper (these are responsible for the "yel low
ing") toward the perimeter of the area to which
the bleaching soda solution was applied. At the
center of this area, the bleaching soda would
certainly dissolve these substances and cause
them to move outward (and thereby lighten
the paper), but these very same dissolved sub
stances would be deposited at the perimeter,
thus creating a brownish ring. (An experiment I
carried out some years ago seemed to indicate
that sodium carbonate can also have a l ighten
ing effect on some of the discolored materials
in paper, perhaps due to the alkalinity of this
chemical.)
79 See glossary.
80 The author does not indicate why the water
should be boiled for this much t ime prior to
pouring it into the starch. Perhaps this is to kill
any bacteria that might be present; or if the
water contained high concentrations of mineral
carbonates, boil ing it would cause them to pre
cipitate and thus help to purify the water, but
it is not clear how this would improve paste
made wi th this water.
81 Schweidler seems to assume that the more
absorbent a paper is, the more likely it is to
have foxing. Today one may try to distinguish
foxing that is due to mold growth from those
stains that result f rom the presence of small
particles of metal. Given that mold grows so
readily on gelatin, surely it wou ld be more likely
for a paper that is heavily sized to grow mold,
and hence develop brown stains, than a paper
that has little or no sizing. Foxing that is due
to oxidation of small particles of metal would
be as likely to develop regardless of how much
gelatin sizing is present.

212 E D I T O R ' S N O T E S O N T H E T E X T
82 Schweidler is probably trying to say that papers
from about 1750 and later generally have less
sizing than earlier papers and therefore wil l eas
ily lose some of their "weaker sizing," especially
when treated wi th baths of chemicals.
83 The discussion of dissolving whi te gelatin actu
ally occurs a few pages later, on 102-3.
84 C.S. marginal note: "Like, for example, the
Rembrandt that I have here from Colnaghi
to remove the spots that my brother Max
messed up."
85 Marginal note by C. S.: "What about the
stretching that also takes place in nonabsorbent
paper and that has to be checked even more
thoroughly?"
86 C.S. marginal note next to fig. 22: "Wrong
placement of marks [falsche Zeichenstellung].
The marks were already erased." It is unfor tu
nate that Carl did not elaborate on his cryptic
remarks on the diagram, given the importance
of this subject in the book. Also, note that
figure 22 seems somewhat out of place, as it
is even more relevant to the section "Actual
Mending or True Restoration," especially
pp. 113-14, where he gives more specific
instructions for chamfering and inserting
mends into their precise positions.
87 The original reads: " . . . man pflanzt die Flicken
ein." Here and in many places in the fo l lowing
pages Schweidler uses the verb implant
(einpflanzen) to refer to the process of pasting
and inserting a repair into the area on the back
of a print that has been deliberately thinned
as part of the repair process. Later he uses the
same word to refer to the process of th inning
the repair paper in order to simulate the
appearance of the wire lines in paper. I have
tried other ways of translating this but ul t i
mately decided to leave it as simply the most
expressive choice, though it may at first sound
rather odd to the reader.
88 "Die geklebte Stelle wird sich wolben oder
seitlich ganz kleine Faltchen schlagen." In this
context, it seems best to translate kleine
Faltchen schlagen as "develop slight puckering."
For more on the translation of the word
Faltchen, see note 143.
89 Here Schweidler touches on an important
aspect of this repair technique. From the stand
point of the restorer, it is obvious that buckling
of the repair wi l l detract f rom its effectiveness.
On the other hand, f rom the standpoint of
anyone who needs to detect such repairs, it is
good to know that in my experience it is quite
unusual that chamfered repairs do not in t ime
become evident as result of buckling unless
they are rather small. (See Appendix: the splic
ing in the Altdorfer woodcut is only a few
inches long and yet is somewhat buckled,
whereas the repaired wormholes in the
Housebook Master drypoint are small and show
no signs of buckling.) Indeed, if one discerns
any buckling in a print or drawing, the area of
buckling should be scrutinized wi th great care,
as this might indicate the presence of a repair.
90 In this context, one might wonder if the author
is suggesting that one first cut and shape the
repairs and then check them for expansivity,
but that would of course be very labor inten
sive. He is instead suggesting that after one has
selected two or three papers that match the
original visually and therefore might be suitable
for making mends, these could be tested as a
group to see which of them might have expan
sivity characteristics that match the original. A
marginal note by Carl confirms this interpreta
t ion: "That's right, one must test not the repair
pieces but rather the papers [from which they
are made]."
91 Marginal note by C. S.: "It is absolutely
necessary."
92 It is interesting that in Schweidler's discussion
of how to split paper he says nothing about
its use in conjunction wi th adding margins.
For more on this application of the splitt ing
of paper, as well as information about notable
British practitioners of this technique in the
second half of the nineteenth century, see
Walsh 2000 :383 -90 . Also, see in the Appendix
the discussion of the splitt ing of a Durer
engraving.
As to historical precedents for splitt ing of
works of art on paper, I am indebted to Kristal
Smentek for directing me to an eighteenth-
century example. In 1775 a sale catalog was
published of the vast art collections of the
wel l -known collector Pierre-Jean Mariette
(1694-1774). In this catalog, i tem 116, by
Francesco Albani, is described as having origi
nally been double-sided, but either Mariette or
his assistant separated it into two layers so that
the two sides could be mounted and seen sep
arately. According to a recent catalog of the
work of Albani, the t w o drawings still exist and
are in the collections at Frankfurt and Dresden
(Puglisi 199972) .
Although paper splitt ing has generally been
regarded as an offensive and inappropriate
practice, in recent times this concept has been

E D I T O R ' S N O T E S O N T H E T E X T 213
revived as a means of preserving badly dam
aged archival materials. For more information,
see Bruckle and Dambrogio 2000:295-325.
93 Considering the date of Schweidler's book,
"carpenter's glue" must have been a gelatin-
based glue, made from animal by-products,
rather than the synthetic, polyvinylacetate
emulsion adhesives that are now more com
monly used in carpentry.
94 Probably Schweidler means that one should
practice this procedure by splitt ing another
sheet of paper. It is possible, however, that he
is suggesting that one could try to split one of
the two half-sheets that were just produced,
thus producing a sheet of only one quarter
the original thickness.
95 For a reference to splitt ing of a double-sided
drawing in the late eighteenth century, see
note 92.
96 For other breathtaking examples of the use
of prints for decorative purposes, see Edi-tor's
Introduct ion, note 16.
97 The author's terminology is not in accordance
wi th usual practice whereby the so-called bot
tom side of a sheet of paper shows the wire
pattern more clearly than the " top" side. It is
interesting that the word Senate, translated
here as "surface," has a more organic or bio
logical connotat ion than can be conveyed by
the English word . The German word refers
to "skin," "bark," "peel," or "shell," none of
which quite make sense in this context as
English equivalents. The author later speaks
directly of the "skin" and "flesh" of paper, and
although such terms may seem quaint or
strange in reference to paper, perhaps their
use is in keeping wi th Schweidler's image of
the restorer as a doctor.
98 Regarding the process of stretching a print, see
the section that begins on p. 130.
99 Marginal note by C. S.: "Oh, how nice!"
100 Marginal note by C. S.: "or a great one."
101 From Schweidler's description of the results
he had seen of the use of macerated pulp for
repair of holes, his antipathy to this approach
is understandable. In more recent times, how
ever, considerable skill and success have been
attained in using paper pulp for repairs not only
of small holes but also of large losses in sheets.
See, for example, the AIC Book and Paper
Croup catalog of treatment procedures relating
to paper repair, vol. 26. Also, note that
Schweidler himself is not entirely averse to the
use of paper pulp repairs as applied to stamps
(p. 201).
102 It may seem odd, having just described shaving
away some of the back of a picture, to empha
size preservation of the paper. I think that
Schweidler's point here is that one should be
careful during the process of shaving down
paper that one does not remove more of the
original than is really necessary to carry out
the repair.
103 Note that he does not specify by what means
the color matching can be done.
104 See figure 29.
105 The author's statement that the mended area
wil l be quite thick may come as a surprise.
It indicates that although the mending paper
has been thinned along its edges to give it
a wedge-shaped cross section (see p. 113),
nevertheless, the shaving of both the original
and the mend must have been done only to a
l imited extent, w i th the result that the com
bined thickness of the two papers when pasted
together wil l be greater than that of the origi
nal. Therefore, he instructs the reader that
further thinning down of the mend wil l be nec
essary. This additional shaving on the back of
the mend is likely to be much more noticeable
than if the previous amount of shaving had
been continued until the two papers were of
the required thickness when the mend was put
in place. In general, mends of this latter type
are much more diff icult to detect.
106 One might wonder if Schweidler really meant
to say "mil l imeter by millimeter."
107 The reader wil l probably realize that the proce
dure Schweidler describes for creating wire
lines can be applied for creating a watermark.
(See Appendix, Urs Graf and Schongauer.) On
p. 199, he alludes to creating a watermark in
a lining sheet that is to be affixed to the back
of a stamp.
108 Marginal note by C. S.: "Nonsense! Wi l l cer
tainly tear into pieces."
109 Regarding the procedure for stretching a print,
see pp. 130-36.
110 Given that he is discussing shaving away paper,
it may seem odd that he expresses concern that
one not lose the "smallest particle." I interpret
this to mean that one must be especially care
ful that in the process of shaving the paper
absolutely no more than necessary be removed,
otherwise the final effect—re-creating a margin

214 E D I T O R ' S N O T E S O N T H E T E X T
around the pr int—may not be appear to be
seamless and would therefore be less convinc
ing to the viewer.
m It may seem odd, considering all the effort
of adding a new margin, that one would not
have chosen to add a wide margin. I think that
Schweidler is well aware that even a very nar
row margin around an Old Master print can
enhance its value substantially and is thus
quite sufficient. Moreover, in my opinion, the
wider the margin one adds, the greater the
chance that buckling—in either the print or the
margin (or both)—wil l result from differential
tension between the original paper and the
added margin.
112 I.e., plain paper. See note 113, below.
113 This paragraph exemplifies Schweidler's fre
quent lack of clarity. Marlies Comjean, wi th
whom I collaborated on the initial translation,
observed, "Schweidler is no Thomas Mann."
The problem here stems from his use of the
word margin. When speaking of intaglio prints
(etchings and engravings), a margin is that
port ion of a sheet of paper that begins at the
plate mark, and thus bears no printed image,
and extends to the outer edge of the sheet.
Schweidler, however, refers to the "margin" in
this context as any paper that is added by the
restorer to compensate for whatever t r imming
was done. In many prints from former cen
turies, blank paper beyond the plate mark was
removed; in other instances, both the margins
and the plate mark were cut away. Schweidler's
instructions presuppose that if a print has been
t r immed the restorer wil l need to add paper
around the perimeter so that the print would
appear not to have been t r immed. From the
standpoint of the restorer, the ideal circum
stance is that very little if any of the original
plate mark wil l have been t r immed away, so
that it wi l l only be necessary to extend the
existing paper slightly beyond the plate mark.
If, however, the plate mark has been t r immed
away entirely, the restorer must add enough
paper (a new "margin" of paper) that one can
simulate a plate mark, as he goes on to
describe. The worst scenario is when not only
the plate mark but also some of the printed
image has been t r immed away. This is the situa
t ion he refers to in the first sentence of this
paragraph. In this instance it would be neces
sary to add "white paper," that is, plain paper,
around the printed image in effect to fill in the
gap between the t r immed image and the place
where the original plate mark would have
begun (it is assumed that the wid th of this gap
can be determined by looking at an example of
an untr immed impression). He advises under
taking such a restoration because if the added
paper "is 5 to 6 cm wide" it wou ld be "espe
cially conspicuous." Also, "because it is partic
ularly diff icult to get the paper between the
image and the [new, artificial] plate mark
smooth," given that the added paper wil l not
have been subjected to the pressure of print
ing. Regarding the textural differences between
an added repair paper and the paper that has
been smoothed by the process of intaglio print
ing, see the discussion of the Master of the
Housebook and the van Dyck in the Appendix.
114 See glossary.
115 See glossary.
116 Note that in the fo l lowing pages the assump
t ion is that stretching of prints is simply a nor
mal and expected part of the final stage of
treating prints. Schweidler does not explain
directly why stretching is necessary, but by the
end of this section several reasons emerge. On
p. 133, to the question of whether it is "always
absolutely necessary to stretch a small sheet,"
he answers that stretching is done "as a matter
of course when the sheet has undergone major
repairs or shows creases, breaks, broken cor
ners, and so on." From this, I assume that one
purpose of stretching is to help to flatten a
print and reduce any buckling or irregularities
it might have as a result of repairs, damage, or
aqueous treatments. He also implies, on p. 134,
that in some instances a print that has been
stretched may remain permanently attached to
its support, presumably in order to put it into
a frame. Indeed, on p. 132, he states that large
prints must be stretched as part of the framing
process; but this, too, seems ambiguous: on
p. 135, he says flatly that "stretched papers
should not stay on stretching supports for
weeks." Later he states that engravings "less
than 60 to 80 cm should never be stretched
under glass" (p. 164) and that "if a framed
engraving that has been stretched under glass
falls to the floor, it can be destroyed" (p. 166),
and for this reason stretching prints under glass
for purposes of framing is bad practice.
117 See glossary.
118 Considering his remark in the previous sen
tence, it is likely that this second guard is
coated wi th paste, rather than glue, but this
is unclear, as is most of this paragraph.

E D I T O R ' S N O T E S O N T H E T E X T 215
119 Schweidler is trying to say that as the stretched
print dries, it shrinks. Therefore, the glass or
cardboard needs to be somewhat flexible so
that it can bow outward, away from the print,
as the tension from shrinkage of the print
increases.
120 The author's suggestion here that a large print
can be stretched under glass seems to contra
dict advice later in the book, according to
which it is bad practice to attach a print to
the picture glass. In any case, it is not clear
why simply laying the stretched print into the
frame would help to prevent the glass from
becoming bowed.
121 Two types of rectangular wooden structures
have been employed as supports for pictures,
particularly for paintings on canvas but occa
sionally for works on paper. If the corners of
the support are glued or nailed together so
that they are permanently fixed in posit ion, the
support is called a strainer. If the corners can
be spread apart to permit changing the amount
of tension on the picture, the support is called
a stretcher.
122 Presumably Schweidler refers to paints of the
kind used by both Chinese and Japanese artists.
Typically, these consist of a pigment and a
water-soluble binder prepared in the form of
a hard stick or cake. For use, they must be
rubbed on a dish or flat surface wi th sufficient
water to dissolve enough color for the artist's
purposes. His remark, "If you want to use
Chinese watercolors as liquid paint," is puzzling
since such sticks cannot be used dry. Perhaps
he means to say that one might apply a wetted
brush to a stick of color to obtain just a small
amount of color but that it would be necessary
to rub the stick in water if one needed a
greater quantity. He does not explain whether
Chinese watercolors are in some way better or
more useful than European watercolors.
123 Marginal note by C. S.: "only distilled water."
124 The German phrase is stellt wieder her, which
has a connotat ion similar to that of the English
word "restorative": causing a return to good
health.
125 In other words, Schweidler is concerned that
even when one looks at the back of a print,
there should be no apparent difference
between the mends and the surrounding
areas of the original print. The Cleveland Art
Museum's impression of the Pollaiuolo engrav
ing, Battle of the Nudes, provides an example of
a concerted effort through retouching of the
mends to make the repairs resemble the
surrounding areas of the back of the print by
simulating the way that printing ink often pene
trates through to the back of a sheet of paper.
(See Appendix, Pollaiuolo.) See the Cleveland
Museum of Art web site regarding this print for
detail views of the retouching of the mends
(www.clevelandart.org/exhibcef/batt le/html).
126 Perhaps Schweidler is referring to hand-colored
mezzotints, but equally he may be speaking of
mezzotints in black ink, since they are so easily
damaged by abrasion or rubbing.
127 John Raphael Smith, b. Derby, 1752; d.
Doncaster, 1812. English printmaker, publisher,
and painter. He made numerous mezzotint
engravings after paintings by Romney,
Reynolds, and others.
128 This sentence resists comprehension. If
Schweidler means that the back of the China
paper is to be covered wi th one sheet of blot
t ing paper, it is hard to see how one would lift
the blott ing paper "from the center." Perhaps—
although I f ind this explanation rather forced —
he assumes that the back of the China paper
would be covered wi th four sheets of blott ing
paper, each covering one quadrant of the China
paper and arranged so that their edges are
butted together. Then it might be feasible to lift
the sheets of blott ing paper starting "from the
center" by lifting each one by the corner lying
nearest the center of the China paper.
129 In this illustration one corner of the support
sheet has been lifted to reveal a port ion of the
China paper, which is now affixed to the under
side of the support sheet.
130 By "chlorine antidote," Schweidler probably
means vinegar, although he sometimes uses
this word to refer to sodium hyposulfate
(p. 66) and, on one occasion, sodium carbonate
(p. 202).
131 It is likely that "Chinese rice paper" refers to
thin layers of pith, the soft, spongy interior of
certain woody plants. Cut into sheets, this
material was sometimes used instead of paper
as a support for watercolor paintings. Because
of its similarity to paper and its origin in China,
it was misnamed "rice paper," although it is
neither a true paper nor made from rice.
132 It is possible that by "chalk-fil led cardboard"
Schweidler may be referring to cardboard that
has some kind of coated or chalk-filled paper
on one or both sides, but this is uncertain. In
any case, if one can infer that the paintings on
"rice paper" usually encountered by Schweidler

216 E D I T O R ' S N O T E S O N T H E T E X T
are attached to cardboard of this kind, it is
not clear why this should be the case. Perhaps
this was the way in which they were typically
mounted before export f rom China.
133 Although the author uses the term "soda
water" here and in the fo l lowing sentence,
he later refers to "soda solution," and it is
clear that the material referred to is a solution
of bleaching soda, not simply carbonated
water. See my introduct ion and the glossary
for further discussion of "soda solut ion" and
bleaching soda.
134 Marginal note by C. S.: "Crazy! Must be treated
in a tray."
135 Schweidler means to say that a print that is
affixed to a wooden board should not be sub
merged face up in a tray of water because the
wooden board would absorb water, begin to
bow, and thus damage the print. (Weighting
wi th bottles relates to the fact that the wooden
board would of course be buoyant and would
impede wet t ing of the print unless one were
to weight down the board to keep the print
submerged.) Thus he recommends that the
print should be placed face down into the
water whi le applying water to the back of
the board to counteract any bowing of the
wooden board.
136 It may not be apparent, but this illustration
represents two adjacent book pages that have
been opened out flat to show the presence of
numerous wormholes. The location of the holes
in one page is therefore mirrored by those in
the other page. The author explains that for the
sake of more efficient treatment, contiguous
clusters of holes should be cut out, as has been
done on the page on the right, thereby reduc
ing the problem to that of repairing a few large
holes rather than many small ones. Note that
the numbers 1, 2, and 3 mentioned in the cap
t ion of this figure were omit ted in the actual
i l lustration.
137 In mathematics, the golden section is a geo
metric proport ion in which a line is divided
or sectioned into what are called mean and
extreme ratios. Since ancient times, the golden
section has intrigued many philosophers, artists,
and mathematicians. In practical terms, if a line
is divided into two segments, the length of the
larger of the two wil l be approximately three-
fifths the length of the entire line. Therefore, in
this case, the author suggests that the wid th of
the bot tom margin of the mat should be about
three-fifths of the combined widths of the top
and bot tom margins.
138 It wou ld have been helpful if Schweidler had
included an illustration of the hinging of a pic
ture. The key point is that one should attach
the top two corners of a picture to the back
board by means of folded, gummed paper
hinges of short strips of gummed paper, as
described above, and that the port ion of the
hinge affixed to the picture should extend onto
the back of the picture by "up to 2 mm." It is
interesting that his suggestion corresponds
essentially to current practice in the United
States (although he subsequently indicates that
large prints should be hinged at the sides),
except that gummed paper has been supplant
ed by Japanese paper and starch paste. Also, it
is interesting that he recognizes in the fol lowing
sentences that his suggestion for hinging is not
the norm and that it is usually assumed that the
hinges would be affixed along the left edge of
the picture.
139 Presumably he means that if the hinges are
placed so that they are flush wi th the left and
right edges, this might become apparent as
soon as the viewer tries to lift the sheet. By
observing that "more space or distance wil l
deceive the viewer," he means that placing
the hinges farther away from the edges (i.e.,
toward the center of the top edge) might per
mit the viewer to start turning the sheet w i th
out quickly encountering the resistance (and
hence a warning) that would occur if the hinge
were attached near the left and right sides,
near the top corners.
140 That is, the picture is now rotated on its hinges
so that it is turned wi th its front facing down.
141 I have been unable to determine exactly what
he means by "museum board" but assume that
then, as now, some kind of cardboard was
available that was regarded as being better in
quality than ordinary cardboard.
142 The author seems to suggest removing all the
deteriorated paper from beneath the upper
"skin" (surface) of the sheet, but steps for
replacing or repairing this port ion of the paper
are not given.
143 "Sollten sich gelegentlich kleine Faltchen
zeigen " The word Faltchen can mean "small
folds, pleats, creases, wrinkles, or puckering,"
all of which seem to suggest a surface quality
that, in the context of this sentence, seems too
abrupt or sharp. The verb fatten can mean "to
cockle," so it is this connotat ion that seems
most appropriate to convey here.

E D I T O R ' S N O T E S O N T H E T E X T 217
144 The reference to stretching pertains to the
procedure for drying and flattening prints
described in an earlier section (pp. 130-36) .
145 The author seems to be saying that two layers
of oilpaper wi l l provide sufficient protection
for a print if the oilpapers are put between the
print and the backboard, but obviously one
might worry whether oilpaper itself could harm
the print.
146 Marginal note by C. S.: "It also turns blue w i th
alcohol alone."
147 It is not clear which sulfur gases the author has
in mind, nor has it been possible to identify
"T-gas," but presumably the latter is a propr i
etary gaseous compound used for extermina
t ion of insects.
148 See Editor's Introduct ion, p. 1.
149 See glossary.
150 See glossary.
151 The inclusion of drypoint under the heading
"Etching" may be puzzling because it is properly
regarded as a method of engraving. In succeed
ing paragraphs, however, the author indicates
that the drypoint technique is often used as an
adjunct to the etching process in order to exe
cute new lines and add details.
152 The catalogs of the Michel company are still
widely known as resources for information on
stamps from countries throughout the wor ld ,
and the company also offers specialized cata
logs relating to Germany. The Senf Brothers,
in Leipzig, were active from around the 1870s
well into the twent ieth century. Thus far, I have
found no catalogs by either Michel or Senf
from Schweidler's era that contain information
about the price of stamps as well as directions
for cleaning them, as Schweidler indicates. As
to the activities of Louis and Richard Senf, how
ever, it is wor th not ing that they are included
in a book on forgers of stamps. It seems that
they were known for producing high-quality
facsimile reproductions of stamps that were
clearly marked as "falsch" or "facsimile," but
they also made and sold some forgeries as well
(Tyler 1991:115-16). I am grateful to George S.
Nor ton, Curator of Philatelic Collections,
Spellman Museum of Stamps and Postal
History, for his assistance wi th my inquiries.
153 Chemically, oxalic acid is a chelating agent; that
is, it is able to react wi th metal ions (such as
iron), thus effectively converting the metal ions
into a form that is more readily soluble. For this
reason it has long been mentioned as a reagent
that can remove iron stains from organic mate
rials such as paper.
154 That is, re-create the watermark on the backing
sheet by shaving away fibers so as to corre
spond exactly wi th that port ion of the original
watermark that remains on the front of the
stamp. The backing sheet, w i th its re-created
watermark, is then affixed to the stamp so that
both the original port ion of the watermark and
the re-created port ion coincide. For more on
how the shaving of paper is done to create
wire lines, see pp. 118-19.
155 This is incorrect. See glossary.
156 See also the section on "antidotes" for chlorine,
p. 66.
157 See glossary.

This page intentionally left blank

A P P E N D I X
Eleven Case Studi

In assessing the condi t ion of a pr int or drawing, the conservator, curator, or
collector must try to answer many questions, such as whether there is any
retouching, whether the color and the texture of the paper seem appropriate,
and whether there is evidence of former stains, or chemical t reatment to
remove them. Answering only these questions is challenging, but occasionally
one also may discover that the basic structure of the paper support has been
repaired or, in some instances, substantially altered. Sometimes these structural
changes may be fairly obvious, but they can also be so diff icult to detect that
their presence may go unnot iced for many years.
Al though there are many facets of Schweidler's book that are fascinating,
one of the most interesting and important is his detailed instructions on how
to execute structural repairs and alterations (sometimes, major reconstructions),
wh ich , if skillfully done, can be so effective as to be nearly invisible. It is thus
f i t t ing to include in this appendix several prints that illustrate such repairs or
alterations. I hope that these examples wi l l help readers to become more adept
at detect ing them. Structural changes in some of the prints described below
(Raimondi, Massacre of the innocents; Rembrandt, Landscape with a Cottage
and a Large Tree; Lucas van Leyden, Susanna and the Elders) are not especially
dif f icult to discern —provided that one knows in advance that the kinds of
alterations they illustrate were in fact performed on prints. Other prints illus
trate that some repairs or alterations can be extraordinarily diff icult to detect.
One print that is known to be an outr ight forgery (Urs Graf, Two Landsquenets
with a Maid and Death) is included as an example of a fake watermark (for
Schweidler's discussion of how to create wire lines in paper, and hence a water
mark, see the section " Implant ing the Wire Lines" (pp. 118-20). I regret that no
examples of false margins are included, but I could f ind no satisfactory means of

A P P E N D I X 221
communicat ing what they look like through photographic il lustrations. The task
of f inding false margins must be left as "an exercise for the reader," but exam
ples abound in virtually every large print col lect ion.
When they first entered the collections of which they are now a part, some
of the examples in the fo l lowing pages were not initially recognized as prints
bearing moderate to substantial changes or repairs to their paper supports.
This fact provided my initial mot ivat ion for this translation project: if one needs
to detect certain features in a print or drawing, it is helpful if one knows both
the kinds of things that could have been done and the techniques by which
they were done. The works on paper shown here serve to illustrate the meth
ods described in Schweidler's manual, but the main goal in assembling these
examples is to help acquaint the reader w i th ways in which one can discern
the presence of structural features of paper supports that might otherwise elude
detect ion. As ment ioned above, some of the examples show repairs or alter
ations that one can discern w i th relative ease; but even the most apparent of
these can be vexing if one has never encountered them before. In any event,
showing some of the simplest examples can be a useful foil against which to
compare the most challenging, in which the level of skill required to have
executed the repairs is quite remarkable. The Cleveland Pollaiuolo is such
an example.
The first encounter w i th a deceptive repair can generate paranoia—one
begins to see deceptive repairs everywhere —but one should not assume that
the examples given here are extremely common. Nevertheless, awareness of
what one may encounter can be a means to become a better conservator,
curator, or collector.
Tools and Techniques for Examination
For detect ing deceptive repairs, the best starting place is one's own eyes, aided
by excellent light; north light is especially helpful. I am often impressed w i th
how much one can see w i th these simple means, coupled w i th insistence on
understanding anomalous features of an ar twork and provided that one knows
what sorts of things one might f ind. When examining a print w i th light directed
across its surface at a low angle, why does the paper buckle where it does?
W h y does the surface texture of the paper change in a particular area? W h y is

222 R E S T O R A T I O N O F E N G R A V I N G S , B O O K S , D R A W I N G S , A N D O T H E R W O R K S O N P A P E R
the paper th inner in certain areas when examined w i th transmitted light? Why
is the paper somewhat stiffer than one might ordinari ly expect? When looking
at a picture w i th strong light bouncing off its surface, why are there variations
in the gloss or reflectivity of the paper? In t ry ing to obtain the best possible
photographic illustrations for this book, I have often been frustrated in trying to
capture in photographs those subtle features one's own eyes can discern. One
element of the process of examination is simply impossible to duplicate in a
photograph: the subtle ways in which color, texture, and reflectivity of paper
can change as one moves a print slightly or as one shifts v iewing posit ion in
relation to the print. I have often wished that instead of photographs I could
offer a video presentation of what the prints look like under varying condit ions
of l ighting. On the other hand, given that many of the prints shown here are in
the collection of the Museum of Fine Arts, perhaps the reader wi l l accept this
open invitat ion to see the originals in person. The other collections represented
are also open to the public and wou ld no doubt be wi l l ing to make their prints
available to visitors.
Whi le direct observation w i th one's own eyes is generally the best way to
begin examination of a print, special equ ipment can also provide useful supple
mentary informat ion. Auxiliary equipment and techniques include a binocular
microscope, ultraviolet light, betaradiography, x-radiography, and infrared imag
ing. Technical or scientific equipment is generally most useful in providing clues
one might have missed through direct visual examination and in conf i rming or
helping to provide photographic documentat ion of repairs or alterations. The
binocular microscope is of considerable value chiefly because it allows one to
magnify small features and to see them in three dimensions. It is especially
helpful for revealing minute variations in the finest details of paper texture,
microscopically fine ridges where one layer of a paper repair might overlap
onto the original, and evidence of scraping by a knife or retouching along a
j o i n . Fiber opt ic light sources for microscopes are now available in which the
l ight-emit t ing glass fibers are held in a flat, linear configuration that can be
especially effective in enhancing textural features of paper.
When examining a pr int or drawing w i th ultraviolet light, one may see
variations in paper color or residues of adhesive, or certain areas that look quite
normal under visible light may appear unexpectedly absorptive (dark) or fluores-

A P P E N D I X 223
cent (l ight). All such anomalies should be scrutinized by every means possible.
Betaradiography and x-radiography have been used for several decades to
record accurately details of watermarks (Kushel 1999:116-23; Stevenson 1967),
but because they are so effective at revealing minute features of paper structure,
they can be helpful in ferreting out the t ruth about a print (see the discussion
below about Durer's Adam and Eve and van Dyck's Portrait of Lucas Vorsterman).
The newest technique for discovering repairs in prints is infrared imaging.
Using infrared wavelengths f rom around 3.0 to 5.8 microns, 1 AAoyna Stanton
and her colleagues at the Cleveland Museum of Art have had notable success in
revealing and document ing repairs in their impression of Pollaiuolo's Battle of
the Nudes and have produced an informative web site w i th details and images
relating to their research. 2 They have kindly agreed to al low a few of these
images to be reprinted below. Infrared imaging has been in use for many years
to study underdrawing in paintings,- but its application to the study of repairs in
works on paper is so new that it is still unclear why it works. Indeed, it was sur
prising to f ind that infrared imaging wou ld be so useful in making repairs in
paper more visible. Infrared light has been widely used for the study of paint
ings and occasionally in research on works on paper because it is effective at
revealing underdrawing and other features that may ordinari ly be concealed
beneath layers of paint, but this is the first t ime that anyone has tr ied using this
particular port ion of the infrared spectrum to record and document repairs of
which it may be otherwise diff icult to capture images.

224 R E S T O R A T I O N O F E N G R A V I N G S , B O O K S , D R A W I N G S , A N D O T H E R W O R K S O N P A P E R
N I C O L A S L A N C R E T , THE SKATER
Figure A.1. Nicolas Lancret, The Skater (study
for Winter), ca. 1735-38. Red chalk on cream
laid paper. 20.6 x 12.9 cm. Fine Arts
Museums of San Francisco, Museum
Purchase, Achenbach Foundation for Graphic
Arts Endowment Fund, 1964.133.
Provenance: Jean Masson; Georges de
Batz (after 1953); Achenbach Foundation for
Graphic Arts purchase, 1967.
This drawing is included here to illustrate
two points: structural alterations are found
in drawings as well as prints; and when two
pieces of paper are jo ined, buckling often
results along the jo in (see the Altdorfer print
below) unless they are pasted or glued to
another sheet of paper or to cardboard.
When the drawing is viewed under il lumina
tion coming more or less from the front, as in
figure A.1, it is not immediately apparent that
a piece of paper has been added at the lower
left. Figure A.ra shows the line along which
the two sheets of paper are jo ined. The color,
texture, and presence of minute impurities in
the two sheets—the original and the added
paper—were chosen with considerable care,
and until I examined the drawing carefully in
conjunction wi th curatorial research for a cat
alogue (Hattis 1997), no one had noticed that
a piece of paper had been added, presumably
in order to repair the loss of the lower left
corner. Knowing that part of the original
sheet has been lost and that a piece of paper
has been added to the original has consider
able effect on one's understanding of the
drawing. The drawing might once have been
continued at the left—possibly a sketch of
the sled that the standing figure is pushing—
but the visual effect of the blank paper is to
deny this possibility. Figure A/i.b demon
strates how useful it can be to examine draw
ings and prints wi th raking light, which easily
reveals the buckling along the jo in and, in
turn, provides strong evidence of the repair.
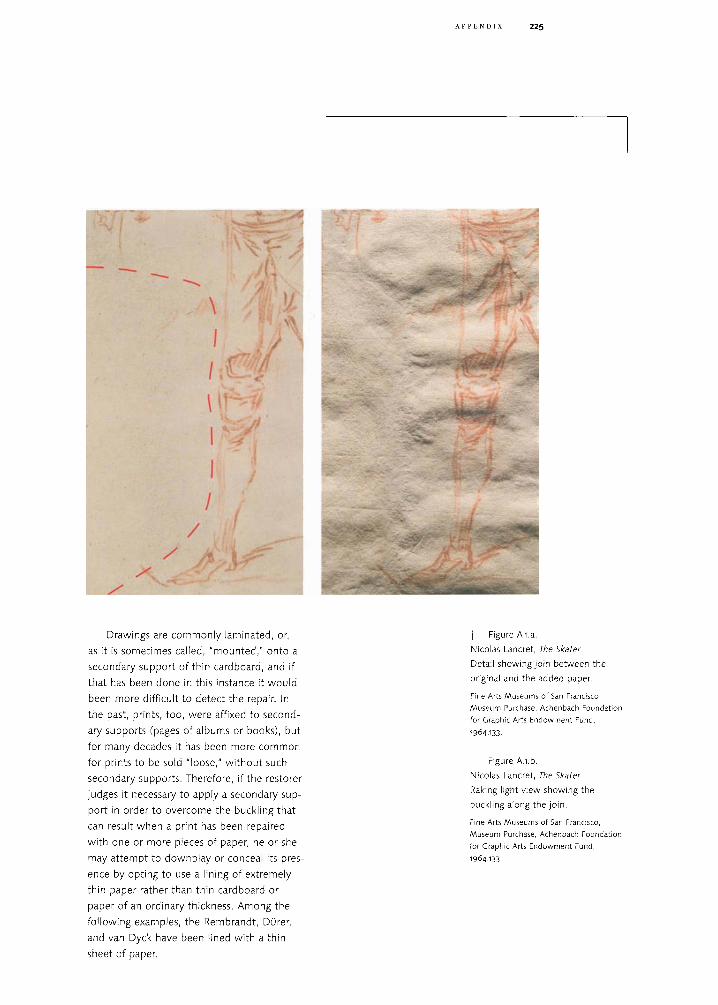
A P P E N D I X 225
Drawings are commonly laminated, or,
as it is sometimes called, "mounted," onto a
secondary support of thin cardboard, and if
that has been done in this instance it would
been more difficult to detect the repair. In
the past, prints, too, were affixed to second
ary supports (pages of albums or books), but
for many decades it has been more common
for prints to be sold "loose," without such
secondary supports. Therefore, if the restorer
judges it necessary to apply a secondary sup
port in order to overcome the buckling that
can result when a print has been repaired
with one or more pieces of paper, he or she
may attempt to downplay or conceal its pres
ence by opting to use a lining of extremely
thin paper rather than thin cardboard or
paper of an ordinary thickness. Among the
following examples, the Rembrandt, Durer,
and van Dyck have been lined with a thin
sheet of paper.
| Figure A.i.a.
Nicolas Lancret, The Skater.
Detail showing jo in between the
original and the added paper.
Fine Arts Museums of San Francisco,
Museum Purchase, Achenbach Foundation
for Graphic Arts Endowment Fund,
1964.133-
| Figure A.i.b.
Nicolas Lancret, The Skater.
Raking light view showing the
buckling along the jo in .
Fine Arts Museums of San Francisco,
Museum Purchase, Achenbach Foundation
for Graphic Arts Endowment Fund,
1964.133-

226 R E S T O R A T I O N O F E N G R A V I N G S , B O O K S , D R A W I N G S , A N D O T H E R W O R K S O N P A P E R
M A R C A N T O N I O R A I M O N D I ,
MASSACRE OF THE INNOCENTS
(WITH THE PINE TREE)
Figure A.2. AAarcantonio Raimondi, Massacre
of the Innocents (with the Pine Tree), 1511-12.
Engraving, Bartsch 18, first state. 28.3 x
43.31 cm. Museum of Fine Arts, Boston,
Harvey D. Parker Collection, P1217.
Photograph © 2005 Museum of Fine Arts,
Boston.
Provenance: Purchased by MFA,
November 1897, from the estate of Henry F.
Sewall (1816-96, New York, Lugt i309) ;
Louis Gallichon (Lugt 1060); Ambroise
Firmin-Didot (Lugt 119).
The repairs in this print, though extensive,
are relatively easy to detect, although if
framed behind glass, it might pass as a
print in fairly good condition. This is a good
illustration that buckling of paper can be an
important clue to the presence of structural
repairs and demonstrates that the simplest
techniques of examination —in this instance,
raking light—can be fruitful in detecting such
repairs. It is also interesting historically as an
example of a repair performed in the nine
teenth century.
The majority of the print is intact,
although it is somewhat rubbed and has
an overall grayish color. Approximately
V4 inch of the entire bottom edge has been
repaired by the addition of paper; from 3 A
to 1 3 A inches across the entire top have been
added; and there are numerous instances of
damage to the paper and image throughout,
which have been repaired by various fills
and retouching.

A P P E N D I X 227
Examination with raking light (figs. A.2.a,
A.2.d) easily reveals areas of buckling along
the top and bottom of the sheet, corres
ponding to where paper repairs were added.
Use of ultraviolet light (fig. A.2.b) shows that
the repairs fluoresce differently from the orig
inal paper, thus confirming the presence of
the repairs. We also examined the print wi th
infrared (see discussion below regarding the
Pollaiuolo), but in this instance this technique
yielded no additional information.
On the back of the print, the three col
lector's marks (see provenance information,
above) suggest the probable sequence of
owners: Ambroise Firmin-Didot (1790-1876),
Louis Galichon (1829-93), and Henry F.
Sewall (1816-95). It was acquired by the
Museum of Fine Arts in 1897 from the Sewall
| Figure A.2.a.
Marcantonio Raimondi, Massacre
of the Innocents (with the Pine Tree).
View wi th raking light.
Photograph © 2005 Museum of Fine
Arts, Boston.
collection through purchase funds provided
by Harvey David Parker. The stamp of Firmin-
Didot overlies the restorations along the bot
tom edge, which were probably done at the
same time as the more apparent restorations
along the top edge and elsewhere. Therefore,
it seems plausible that all the restorations
were done before Firmin-Didot's death in
1876. Considering that it was in three very
important private collections subsequent to
these restorations and prior to its acquisition
by the Museum of Fine Arts, one might
wonder whether experts in the nineteenth
century were less adept at discerning restora
tions; but the description in the catalogue

228 R E S T O R A T I O N O F E N G R A V I N G S , B O O K S , D R A W I N G S , A N D O T H E R W O R K S O N P A P E R
| Figure A.2.b.
AAarcantonio Raimondi, Massacre of
the Innocents (with the Pine Tree).
Detail, upper left, ultraviolet light
fluorescence.
Photograph © 2005 Museum of Fine
Arts, Boston.
I Figure A.2.c.
AAarcantonio Raimondi, Massacre of
the Innocents (with the Pine Tree).
Detail, upper left, normal l ighting.
Photograph © 2005 Museum of Fine
Arts, Boston.

A P P E N D I X 229
| Figure A.2.d.
Marcantonio Raimondi, Massacre
of the Innocents (with the Pine Tree).
Detail upper left, raking light.
Photograph © 2005 Museum of Fine
Arts, Boston.
for the 1877 sale of the Firmin-Didot collec
t ion states clearly that the print is restored. 3
Therefore, a more plausible assessment of
the print is that because it is quite rare
and because there was great demand for
Raimondi's prints in the late nineteenth
century, collectors were simply wil l ing to
overlook its defects for the sake of adding
a rarity to their collections.
The restorations of the print have led to
the kind of buckling that sometimes, but not
always, results from joining two different
papers (the original and the repair paper)
(figs. A.2a, A.2.d). Buckling such as this seems
to occur more often in instances where the
jo in extends for more than one or two cen
timeters and where both papers are more
than a few millimeters wide. (The addition of
narrow margins to prints can sometime cause
buckling, but often there is none, although
the length of the added margin may be sev
eral centimeters long. Remarkably, the Lucas
van Leyden print, discussed below, shows
virtually no buckling.) It is plausible that the
buckling now evident in the Raimondi was
not immediately apparent fol lowing the
restoration but only developed over t ime
as a result of differences between the expan
sion and contraction characteristics of each
paper. Buckling along a jo in is also seen in
the Altdorfer, discussed below. In prints
whose margins have been lost and where
extremely narrow margins ("thread margins")
have been added, buckling may not occur as
readily, presumably because the added paper
is so narrow that its own characteristics of
expansion and contraction wi th changing
humidity are overridden by the behavior of
the print itself.4

230 R E S T O R A T I O N O F E N G R A V I N G S , B O O K S , D R A W I N G S , A N D O T H E R W O R K S O N P A P E R
R E M B R A N D T HARAAENSZ.
VAN R U N , LANDSCAPE WITH A
COTTAGE AND A LARGE TREE
Figure A.3. Rembrandt Harmensz. van Rijn,
Landscape with a Cottage and a Large Tree,
1641. Etching, Hind 178. Harvard University
Art Museums, Gray Collection 3267. Courtesy
of the Fogg Art Museum, Harvard University
Art Museums. Gift of Will iam Gray from the
collection of Francis Calley Gray. Photo: Allan
Macintyre. © 2004 President and Fellows of
Harvard College.
Provenance: Francis Calley Gray, to
Harvard University, 1857.
At the first glimpse of this print, someone
familiar wi th Rembrandt's prints is likely to
be suspicious: the sky has none of the subtly
atmospheric veil of plate tone or subtle sug
gestions of cloudiness that one should see
in a good impression (see fig. A.3.a). Viewed
with nondirectional light, or if the light is
mostly from overhead, the back of the print
(fig. A.3.b) may look normal. I selected this
print, however, as an excellent example of
the power of raking light (light directed from
the side at a very low angle to the surface of
the paper) to reveal important information
that one might otherwise miss. Figure A.3.C
gives dramatic evidence that there is some
thing very odd about this print. There is a
long, irregularly linear pattern in the surface
horizontally across the middle of the back,
almost as if someone had creased the print
from the front and had caused the paper to
protrude upward on the back wherever the
front was creased. This anomalous feature
corresponds exactly to the location of the
contours of the horizon.
A similar pattern, toward the left side,
coincides on the front wi th the opening in
the branches and leaves of the copse of
trees next to the cottage. The reason for this
becomes clear when the print is examined
with transmitted light (fig. A.3.d). Note that
the spacing of the parallel wire lines in the
paper in the area of the sky (and in the open
ing in the trees) is farther apart than in the
bottom half of the print, although some
effort seems to have been made to try to
line up the chain lines of both papers. The
inescapable conclusion is that two separate

A P P E N D I X 231
pieces of paper have been spliced together.
There is no way to know why such extensive
"reconstruction" was undertaken. Was there
extensive damage in the sky? Were there
unsightly stains? Or was it simply an instance
where some blemish would have decreased
the price of the print in the marketplace? 5
With light coming through the print
(figs. A.3.d r A.3.e), small thinned areas are
also visible along the contours of the horizon,
the cottage, and around the opening in the
trees. If the two papers were joined by shav
ing down overlapping edges and then past
ing them together, the thinned areas must
be places where the restorer failed to match
the thickness of the overlapping edges so
that when pasted together their combined
thickness would have equaled the surround
ing paper.
Perhaps partly to conceal any flaws in the
joinery and perhaps to try to make the print
lie as flat as possible, at least initially, the
entire back of the print was lined with a
piece of paper. Measuring the present thick
ness of the lined print showed that the paper
| Figure A.3.a.
Rembrandt Harmensz. van Rijn,
Landscape with a Cottage and a
Large Tree, 1641. Etching, Hind 178.
Plate mark: 12.7 x 32.1 cm. Sheet:
13.7 x 33.8 cm.
Museum of Fine Arts, Boston. Harvey D.
Parker Collection, P609. Photograph
© 2005 Museum of Fine Arts, Boston.
used for this lining must be remarkably thin,
probably only about 0.002 to 0.003 inch
thick. Microscopic analysis of fibers in the
lining sheet showed that the paper is made
of linen. Given that this work must have
been done before 1857, when Francis Calley
Gray died and left his collection to Harvard,
there are several possibilities for the kind of
paper that could have been used for the lin
ing. One is "pottery transfer tissue," which
was used since the eighteenth century as a
means of transferring printed designs onto

232 R E S T O R A T I O N O F E N G R A V I N G S , B O O K S , D R A W I N G S , A N D O T H E R W O R K S O N P A P E R
I Figure A.3.b.
Rembrandt Harmensz. van Rijn,
Landscape with a Cottage and a
Large Tree. Harvard University
Art Museums.
View of back.
Photo: Allan Macintyre. Photograph
© 2004 President and Fellows of
Harvard College.
I Figure A.3 .C.
Rembrandt Harmensz. van Rijn,
Landscape with a Cottage and a
Large Tree. Harvard University
Art Museums.
View of back, raking light, showing
ridge that fol lows the main contours
of the image.
Photo: Allan Macintyre. Photograph
© 2004 President and Fellows of
Harvard College.

A P P E N D I X 233
I Figure A.3.d.
Rembrandt Harmensz. van Rijn,
Landscape with a Cottage and a
Large Tree. Harvard University
Art Museums.
View wi th transmitted light. Note
thinned areas along the contours
of the landscape, the cottage, and
the opening in the trees.
Photo: Allan Macintyre. Photograph
© 2004 President and Fellows of
Harvard College.
I Figure A.3.e.
Rembrandt Harmensz. van Rijn,
Landscape with a Cottage and a
Large Tree. Harvard University
Art Museums.
Detail view wi th transmitted light,
to show thinned areas along the
contours of the cottage and land
scape, which is evidence of the
joins between the original and the
added paper.
Photo: Allan Macintyre. Photograph
© 2004 President and Fellows of
Harvard College.
unfired pottery, prior to glazing and f i r ing. 6
Another is early-nineteenth-century cylinder
machine-made papers, such as those pro
duced by Gilpin, which were made to be
especially thin for the popular "gift" books of
the day. 7 A third possibility is that a sheet of
paper of the thickness of book paper (about
0 .005-0 .006 in. thick) could have been split
into two layers, as described by Schweidler.
This procedure would have produced two
sheets, each half the thickness of the original,
and either half could have been used as a
thin lining paper.

234 R E S T O R A T I O N O F E N G R A V I N G S , B O O K S , D R A W I N G S , A N D O T H E R W O R K S O N P A P E R
MARTIN S C H O N G A U E R ,
ST. JOHN THE BAPTIST
Figure A.4. Martin Schongauer, St. John
the Baptist, 1470-91. Engraving, Bartsch 54.
Plate mark: 15.5 x 9.9 cm. Museum of Fine
Arts, Boston. 23.894. Photograph © 2005
Museum of Fine Arts, Boston.
Provenance: O. Gerstenberg; Gift of
W. G. Russell Allen, 1923.
This print is a good example of a practice
known in the world of prints as "silhouet
ting." Prints to which this is most often done
are those in which the main part of the
image is visually distinct from a surrounding
of blank paper. The van Dyck Portrait of Lucas
Vorsterman (see below) is another example. 8
In this instance the print also has some
retouching wi th a shiny ink, and also recon
struction of some of the lines in the hair, the

A P P E N D I X 235
originals of which were lost in conjunction
with the silhouetting. Figure A.4.a shows
the boundaries between the original and the
added paper. Another feature of this print is
that it has evidence of scraping to create a
portion of a watermark. There was a water
mark in the original, but because of the sil
houetting, slightly more than half of this
watermark was lost. To simulate the missing
portion of the watermark in the surrounding
I Figure A.4.a.
Mart in Schongauer, St. John
the Baptist.
Detail of area around the head,
showing boundaries between the
original print and the added paper.
Photograph © 2005 Museum of Fine
Arts, Boston.

236 R E S T O R A T I O N O F E N G R A V I N G S , B O O K S , D R A W I N G S , A N D O T H E R W O R K S O N P A P E R
| Figure A.4 .D.
Mart in Schongauer, St. John
the Baptist.
View of back of print. Note bull's
head watermark (upside down) at
right. The half of the watermark on
the print is original. The half that
extends onto the surrounding paper
is false, having been created by
scraping away paper fibers.
Photograph © 2005 Museum of Fine
Arts, Boston.
• I Figure A.4 .C.
Mart in Schongauer, St. John
the Baptist.
View of back of print, wi th trans
mit ted light. Note bull's head water
mark (upside down) at right. The
port ion of the watermark on the
print is original. The port ion that
extends onto the surrounding paper
is false, having been created by
scraping away paper fibers.
Photograph © 2005 Museum of Fine
Arts, Boston.

A P P E N D I X 237
blank paper, the paper was carefully scraped
away on the front and, to a lesser degree, on
the back of the added paper (see figs. A.4.b,
A.4.C). Figure A.4.d shows the roughened
paper fibers where the false watermark was
produced, as well as some retouching in gray
ink or watercolor in order to simulate the
appearance of ink coming through the paper
from the printed image. For Schweidler's
directions for simulating wire lines (and
hence watermarks) by scraping away paper
fibers, see pages 118-20. Also see the discus
sion below about the Urs Graf print, in which
the entire watermark is false.
| Figure A.4.d.
Mart in Schongauer, St. John
the Baptist.
Microphotograph, showing the
roughening of paper fibers where the
paper was scraped to create a false
watermark (red). The microphoto
graph also shows retouching in the
form of minute, short strokes of gray
ink or watercolor, to simulate the
appearance of print ing ink coming
through the paper from the printed
image (blue).
Photograph © 2005 Museum of Fine
Arts, Boston.

238 R E S T O R A T I O N O F E N G R A V I N G S , B O O K S , D R A W I N G S , A N D O T H E R W O R K S O N P A P E R
LUCAS VAN L E Y D E N ,
SUSANNA AND THE ELDERS
Figure A.5. Lucas van Leyden, Susanna and
the Elders, ca. 1508. Engraving, Bartsch 33,
second state. Image: 19.8 x 14.5 cm. Sheet:
19.9 x 14.6 cm. Museum of Fine Arts,
Boston, 63.2829. Photograph © 2005
Museum of Fine Arts, Boston.
Provenance: Gift of Mrs. Lydia Evans
Tunnard in memory of W. G. Russell Allen,
1963.
Significant portions of this print have been
removed and replaced with portions of
another sheet, as with the Rembrandt and
Schongauer above. Unlike the Rembrandt,
however, it is not lined (fig. A.5.a), and unlike
the Schongauer, the contours along which
the original paper was cut away are much
more complex and irregular. In some places,
blank areas of the original paper were
removed from within the boundaries of

A P P E N D I X 239
the image proper, in effect creating holes that
then were filled in with the new paper. In a
few instances new ink lines had to be drawn
in to replace some of the original engraved
lines that were lost when the original paper
was cut away.
This is an excellent example of what can
be seen with the simple means of using spec
ular illumination. Figure A.5.b shows the
print lying on a table, with light reflecting
I Figure A.5.a.
Lucas van Leyden, Susanna and
the Elders.
View of back.
Photograph © 2005 Museum of Fine
Arts, Boston.

240 R E S T O R A T I O N O F E N G R A V I N G S , B O O K S , D R A W I N G S , A N D O T H E R W O R K S O N P A P E R
| Figure A.5.0.
Lucas van Leyden, Susanna and
the Elders.
Specular i l lumination. The original
portions of the paper of the original
print are noticeably glossier than the
added paper.
Photograph © 2005 Museum of Fine
Arts, Boston.
off its surface. This method of illumination
involves placing the print midway between
yourself and the source of illumination. Posi
tion your eyes so that you view the print at
an angle to the table (about 30 -45 degrees)
that is exactly equal to the angle between
the table and the lamp on the far side of the
print. (If the print were a mirror, you would
see the lamp's reflection on its surface, hence
the term "specular" illumination.) With the
print illuminated in this manner, one can see
a dramatic difference in the reflectivity of
the paper of the original print and that of the
added paper. The paper of the print itself is
much glossier, having been in contact with a
metal printing plate and under great pressure
during the printing process.
Using another simple method of exami
nation, transmitted light, it also becomes
clear (figs. A.5.C, A.5.e) that the laid lines in
the original are much finer than those of the
added paper—conclusive evidence of what
has been done to this print. Mismatched laid
lines were also a feature of the Rembrandt
mentioned above. Figure A.5.d shows the
boundary lines of all the areas where the
original and the new paper were joined.
I often wonder why someone felt that
it was necessary to do this work. Perhaps
there were some disfiguring stains in the
blank areas of paper, but this does not easily
explain why it also seemed important to
remove the smaller areas toward the interior
of the image, thereby creating holes that
would then have to be filled. In any case, we
in the paper conservation laboratory have
found this to be useful pedagogically, in part
because the "repairs" are remarkably exten
sive but also because it is, after all, relatively
easy to find them.

A P P E N D I X 241
| Figure A.5.C.
Lucas van Leyden, Susanna and
the Elders.
Transmitted light.
Photograph © 2005 Museum of Fine
Arts, Boston.
| Figure A.5.d.
Lucas van Leyden, Susanna and
the Elders.
Transmitted light. The purple lines
indicate the boundaries between the
original print and the added paper.
Photograph © 2005 Museum of Fine
Arts, Boston.
| Figure A.5.C
Lucas van Leyden, Susanna and
the Elders.
Detail, transmitted light.
Photograph © 2005 Museum of Fine
Arts, Boston.

242 R E S T O R A T I O N O F E N G R A V I N G S , B O O K S , D R A W I N G S , A N D O T H E R W O R K S O N P A P E R
A L B R E C H T A L T D O R F E R ,
ST. GEORGE AND THE DRAGON
Figure A.6 . Albrecht Altdorfer, St. George
and the Dragon, 1511. Woodcut, Bartsch 55.
Sheet: 19.5 x 15 cm. Museum of Fine Arts,
Boston, 55.481. Stephen Bullard Memorial
Fund. Photograph © 2005 Museum of Fine
Arts, Boston.
Provenance: Purchased from Richard H.
Zinser, 1955.
In the course of examining this print (figs.
A .6 , A.6.a) in conjunction with a request to
borrow it, my colleague Elizabeth Lunning
discovered that it had been repaired quite
deceptively. It took considerable time to
determine the extent of the repair, but it
now seems clear that approximately 1 to
1V2 inches of the top of the print have been
replaced with paper that is remarkably similar
to the original (fig. A.6.b) . Presumably this

A P P E N D I X 243
work was done to repair some kind of
damage or loss in the uppermost part of
the print.
The first clue to the existence of the
repair was the buckling (fig. A.6.c) across the
top part of the sheet. Careful scrutiny of this
buckling, both from the front and the back of
the print, revealed no signs of glue, paste, or
other adhesives that might otherwise have
explained the buckling. With transmitted
| Figure A.6.a.
Albrecht Altdorfer, St. George
and the Dragon.
View of back.
Photograph © 2005 Museum of Fine
Arts, Boston.

244 R E S T O R A T I O N O F E N G R A V I N G S , B O O K S , D R A W I N G S , A N D O T H E R W O R K S O N P A P E R
| Figure A.6.b.
Albrecht Altdorfer, St. George and
the Dragon.
Detail. The red line shows where
the added paper is jo ined to the top
of the original print.
Photograph © 2005 Museum of Fine
Arts, Boston.
I Figure A.6.C.
Albrecht Altdorfer, St. George and
the Dragon.
Detail of top of print, raking light.
Buckling of the paper extends in a
more or less horizontal line across
the wid th of the sheet. This buckling
was the first indication that a port ion
of the top of the print had been
replaced wi th added paper.
Photograph © 2005 Museum of Fine
Arts, Boston.

A P P E N D I X 245
| Figure A.6.6.
Albrecht Altdorfer, St. George and
the Dragon.
Transmitted light.
Note that, starting above the points
indicated by the arrows, the chain
lines in the top part of the print
(which was replaced wi th a paper
repair) lack the prominent shadows
on either side of the chain lines, as
are visible in the rest of the print.
Also note that the chain lines of the
repair are slightly more distinct than
those in the original.
Photograph © 2005 Museum of Fine
Arts, Boston.
light (fig. A.6.d) , however, one can see a
subtle difference between the two papers:
the shadows on either side of the chain lines
in the original are essentially absent in the
added paper, and the chain lines in the
added paper are slightly more distinct than
those in the original. Also, the paper that
was added across the top has very slightly
less texture than in the rest of the print.
Moreover, when viewed under a microscope,
there are a number of roughened fibers in
the area of the buckling, but these are so
difficult to discern that it was not possible
to obtain an adequate photograph of them.
Note that the provenance of this print
includes Richard H. Zinser, from whom the
MFA purchased the Housebook Master print
(below) and from whom the Cleveland
Museum of Art purchased its Pollaiuolo
(discussed below).

246 R E S T O R A T I O N O F E N G R A V I N G S , B O O K S , D R A W I N G S , A N D O T H E R W O R K S O N P A P E R
M A S T E R OF THE H O U S E B O O K ,
BEARDED MAN WITH BLANK
SHIELD
Figure A.7. Master of the Housebook,
Bearded Man with Blank Shield, ca. 1475-80.
Drypoint engraving, Lehrs 85. Plate mark:
9.3 x 7.3 cm. Museum of Fine Arts, Boston,
66.376. Katherine E. Bullard Fund in memory
of Francis Bullard. Photograph © 2005
Museum of Fine Arts, Boston.
Provenance: Purchased from Richard H.
Zinser (1966); Count von Maltzan (Castle
Militsch, Upper Silesia, 20th century).
This remarkable print (figs. A.7, A.7a) —one of
only five in existence —has long been enjoyed
as a great and beautiful work by the artist
who is often credited with inventing the
technique of drypoint engraving, but also
(and much less significantly from the art his
torical standpoint) for its place in the lore
of the Department of Prints, Drawings, and
Photographs at the Museum of Fine Arts.

A P P E N D I X 247
The print was acquired in 1966, and when I
began my apprenticeship with F. W. Dolloff
in 1967, the story surrounding its acquisition
was still fresh. Eleanor Sayre, assistant curator
at that time, said that when this print was
first presented to Henry Rossiter, the curator,
to consider for possible purchase, the dealer
(Mr. Zinser) had said that this impression
was from the prestigious collection of Count
Andreas von Maltzan. During study of the
| Figure A.7a.
Master of the Housebook, Bearded
Man with Blank Shield.
View of back.
Photograph © 2005 Museum of Fine
Arts, Boston.

248 R E S T O R A T I O N O F E N G R A V I N G S , B O O K S , D R A W I N G S , A N D O T H E R W O R K S O N P A P E R
| Figure A.y.b.
Nineteenth-century photographic
facsimile of Master of the
Housebook, Bearded Man with
Blank Shield.
The arrows indicate wormholes.
Courtesy Museum of Fine Arts, Boston.
print, Sayre consulted a large number of fac
similes of Old Master prints that the depart
ment had in its storerooms. Among these
facsimiles was an old photograph (fig. A.7b)
that was identified as being of this specific
impression, but immediately a discrepancy
was noticed. The photograph showed four
wormholes: two in the blank paper above
the back of the man, one on the plate mark,
and another (rather hard to see in this old
photograph) in the man's cloak. The problem
was that in the impression left by the dealer
there were only three wormholes, and none
was in the same location as those in the

A P P E N D I X 249
| Figure A.7.C.
Master of the Housebook, Bearded
Man with Blank Shield.
Specular i l lumination. Note that the
areas that correspond to the filled
wormholes are duller in appearance
than the surrounding paper, which
is burnished by the pressure of the
metal print ing plate.
Photograph © 2005 Museum of Fine
Arts, Boston.
photograph. The dealer had not disclosed the
fact that any repairs had been made. No one
was able to resolve this apparent problem.
As research continued, one day, accord
ing to Sayre, she was sitting in Rossiter's
office when she happened to glance toward
the print, which was lying face up on a work
surface near a window in the office. What
then happened is a good example of how the
simple technique of using effective lighting
can often yield useful results. Suddenly, in
the light of the window that was reflecting
off the surface of the print (probably rather
like the specular lighting mentioned above
with regard to the Lucas van Leyden print),
she saw three or four small areas on the print
that were slightly less shiny than the sur
rounding paper (fig. A.y.c) and realized that
these duller areas corresponded to the loca
tion of the wormholes as shown in the fac
simile photograph. This confirmed that the
print was indeed the one from the Maltzan
collection but left unresolved the means by
which the holes had been repaired, and why.
Several years later, I became interested in
Schweidler's book, having been introduced
to it by Christa Gaehde, and learned of his
technique of chamfered repairs. I examined
the print with transmitted light (fig. A j . d ) ,
but the places where the four old wormholes
had been filled looked quite good—scarcely
different from any of the surrounding paper.
With Schweidler's directions in mind (see the
section "Actual Mending or True Restoration,"
pp. 109-22 and pp. 157-59), I examined the
back of the print under very good natural
| Figure A.7.6.
Master of the Housebook, Bearded
Man with Blank Shield.
View wi th transmitted light.
Photograph © 2005 Museum of Fine
Arts, Boston.

250 R E S T O R A T I O N O F E N G R A V I N G S , B O O K S , D R A W I N G S , A N D O T H E R W O R K S O N P A P E R
light, with the aid of a magnifying glass, and
was able to see that the perimeter of each of
the four repairs (as seen from the back) was
slightly larger than the hole it filled and just
slightly—but subtly—darker than the sur
rounding paper. It is likely that the extremely
thin chamfered outer edge of the repair
paper has a minute amount of paste embed
ded in the fibers and that this causes a faint
difference in the color of the paper around
the circumference of the repair. On the front,
the only evidence of the fill is, as noted
above, that the repair is slightly less shiny
than the rest of the print, which is reason
able given that the surrounding paper would
have been burnished by the intaglio printing
process. Much more recently, having learned
of the work done by Moyna Stanton and her
colleagues in Cleveland on infrared imaging
(see the discussion of the Pollaiuolo, below),
we examined the print again. Using infrared
imaging, we obtained an image of the back
of the print, which provided useful photo
graphic documentation not only of the
repairs of the wormholes (fig. fKj.e) but
also—to our great surprise—a previously
undocumented repair in the right side of the
print (seen on the left in the image of the
back). Even now that we know of the pres
ence of this repaired tear, it is remarkable
how difficult it is to see any indication of the
repair: only a slight disturbance of the fibers
can be detected under ordinary light.
One puzzling aspect of the condition of
this print remains. It is not surprising that the
four wormholes were repaired, given their
prominent location, but it is curious that
there are now three additional wormholes,
none of which was visible in the nineteenth-
century facsimile, although because of the
close cropping of the facsimile it would have
been possible to see only the new wormhole
that slightly interrupts the plate mark at the
upper right. In his catalogue of the prints of
the Housebook Master, Lehrs (1893:7) states
that "the print at Militsch [i.e., in the collec
tion of Count Maltzan] has its full margins,
and is an excellent impression, with no draw
back but a few worm holes." The photo
graphic facsimile above (fig. A.7.0), which was
probably made around 1890-1910, shows
four wormholes—those that have since been
repaired—and it is likely that these are the
wormholes to which Lehrs refers. It seems
improbable that after having the repairs
done, the print would have been stored in
a place where it would have once again been
attacked by book worms. Instead, the more
likely scenario is that the repairs were done
in the late 1950s in preparation for its sale;
and if by that time there were seven worm-
holes, surely all of them might have been
filled. On the other hand, to have filled all of
them —especially having done the repairs so
that they were almost undetectable —could
have been problematic for possible pur
chasers who, on checking Lehrs's catalog,
would probably have uncovered the discrep
ancy between his description of the Maltzan
impression (with "several wormholes") and a
print that had none. Following this reasoning,
it is conceivable that three unfilled "worm-
holes" were created by the restorer—in a
position so as to be less disfiguring than the
original holes—to avoid the discrepancy that
otherwise would have arisen with Lehrs's
description. However, having now learned
of the previously unrecognized tear, I wonder
if it was not the wormholes and a desire for
their "relocation" and repair that precipitated
having the print taken to a restorer but rather
that their repair was merely occasioned by
the more immediate need to repair the tear
in the right edge.

A P P E N D I X 251
| Figure A.j.e.
Master of the Housebook, Bearded
Man with Blank Shield.
Infrared image of back. Note the
dark circular lines around the
perimeters of the four repaired
wormholes (red box) and the long
repair at the left (red arrow). The
four circles in the margins (blue
arrows) may be additional repaired
wormholes.
Photograph © 2005 Museum of Fine
Arts, Boston.

252 R E S T O R A T I O N O F E N G R A V I N G S , B O O K S , D R A W I N G S , A N D O T H E R W O R K S O N P A P E R
A L B R E C H T D U R E R ,
ADAM AND EVE
Figure A.8. Albrecht Durer, Adam and Eve.
Engraving. Harvard University Art Museums,
Harvard University, G1055. Courtesy of the
Fogg Art Museums, Gift of William Gray
from the collection of Francis Calley Gray.
Photograph by Allan Mclntyre. © 2004
President and Fel lows of Harvard
University.
Provenance: Francis Calley Gray
(1790-1856)
This fine impression (figs. A.8, A.8.a) of one
of Durer's masterpieces entered the collec
tion of the Fogg Art Museum, Harvard
University, soon after the death of the great
benefactor, Francis Calley Gray, in 1856. For
well over a century its condition, which is
good, albeit with a somewhat browner paper
tone than comparable impressions, raised no
questions. In 2002 Marjorie Cohn, curator of
prints, requested a betaradiograph in order

A P P E N D I X 253
to provide a clearer image of the watermark,
which is faintly visible on the back under
raking light (fig. A.8.b) , which is quite similar
to the bull's head watermark reproduced in
Meder's (1932, no. 62) catalog of the prints
of Durer (fig. A.8.c) . The betaradiograph
(fig. A.8.d) revealed a surprising feature. The
watermark was clearly visible running hori
zontally across the sheet; but in addition to
the set of wire lines associated with this
watermark, there was a second set of wire
| Figure A.8.a.
Albrecht Durer, Adam and Eve.
View of back.
Harvard University Art Museums, Harvard
University. Photograph by Allan Macintyre.
© 2004 President and Fellows of Harvard
College.

254 R E S T O R A T I O N O F E N G R A V I N G S , B O O K S , D R A W I N G S , A N D O T H E R W O R K S O N P A P E R
| Figure A.8.b.
Albrecht Durer, Adam and Eve.
View of back, w i th raking light. Note
bull's head watermark oriented hor i
zontally across the top of the sheet.
The red arrows point to the straight
lines that extend from the top and
bot tom of the bull's head; the blue
line indicates the triangular design.
Harvard University Art Museums,
Harvard University. Photograph by Allan
Macintyre. © 2004 President and Fellows
of Harvard College.
I Figure A.8.c.
Bull's head watermark, Meder 62.
This is quite similar to the watermark
found in Durer's Adam and Eve.
Reproduced from J. Meder, Durer-Katalog
(Vienna: Verlag Gilhofer & Ranschburg,
1932).

A P P E N D I X 255
I Figure A.8.d.
Betaradiograph of Albrecht Durer,
Adam and Eve.
Courtesy of Paper Conservation Laboratory,
Straus Conservation Center, Harvard
University. © 2004 President and Fellows
of Harvard College.
lines running perpendicular to the first.
Normally this suggests merely that there is a
lining on the back of the engraving and that,
for some unknown reason, the lining was
applied to the print with its wire lines at
ninety degrees to those of the print. 9
However, as seen in the lower left quadrant
of the betaradiograph, there is a prominent
diffuse white line that starts at the left edge,
runs about one-third of the way into the
print, then vertically downward, and eventu
ally slanting off to the right. Also, there are
four narrower white lines at the lower right,
not far from the more prominent line.
One should recall that the betaradiograph
is a negative and that thicker areas of the
paper are recorded as lighter, whereas thin
places —such as the watermark and wire
lines—are darker. This means that the white
lines just mentioned are thicker than the sur
rounding paper. When I first saw this print, I
did not understand why these thicker places
existed. When viewing the front of the print
with raking light, it appeared as though there
were four printer's creases near the bottom,
but when these "creases" were scrutinized
with a binocular microscope it was clear that
they were not creases but fine cracks. The
cracks did not continue all the way through
to the back. Looking down into these cracks
with very high magnification, a layer of paper
fibers could be seen, and this layer seemed
to be separate from the front of the print.
Recalling that the cracks corresponded
to white lines in the betaradiograph, which
indicated greater thickness of paper, it then
seemed clear that some additional paper
fibers had been put behind each of the four
cracks, in effect to repair them. Microscopic
examination of the area on the front of the
print that corresponded to the much longer
and more prominent white line revealed

256 R E S T O R A T I O N O F E N G R A V I N G S , B O O K S , D R A W I N G S , A N D O T H E R W O R K S O N P A P E R
subtle disturbance of the printed lines. As
with the cracks, the conclusion was that
some paper fibers must have been affixed to
the back of what was probably once a long,
irregular tear. Further, it was clear that the
lining had been applied to the back of the
print to conceal the added paper fibers and
also that the print had once been torn.
Viewed from the back, the paper appeared
perfectly intact.
It occurred to me that while the paper
seemed somewhat stiffer and less supple
than that usually encountered for this engrav
ing, it had not seemed as thick as one might
expect for the print and a lining paper.
Measurement of the paper showed it to be
only around five to six thousandths of an
inch —no more than the normal thickness
of the print alone. Suddenly I realized that
the only way to account for the thickness
would be to assume that the print had been
split and furthermore that the lining might
consist of another sheet of paper that had
also been split so that when the two sheets
were glued or pasted together the net result
would appear to be a normal thickness.
From all this, a likely scenario can be pro
posed. Somehow the engraving—a very fine,
early impression —became torn. Whoever
repaired it did so by splitting or delaminating
the print into two layers, discarding the back
(or saving it for other projects). 1 0 Consider
ing that printers' creases are generally never
found in any impressions of this print, it is
probable that the four cracks occurred as an
unfortunate by-product of the splitting pro
cess. Next, small quantities of paper fibers
(or very thin bits of paper) were pasted onto
the back of the tear and the cracks. A second
sheet of paper was also split to yield a thin
lining, which was then pasted onto the back
of the print.
It is reasonable to suppose that the print
and the lining paper were split using the
same technique described by Schweidler (see
the section "Splitting Paper," pp. 104-6).
Splitting of paper requires that some support
ing material, either paper or cloth, be affixed
to both sides of the item to be split. Conse
quently, one can expect that prints that have
been split may show some evidence of a
slight "fuzziness" of the printed surface, 1 1
probably due to both disruption of the sur
face of the print and the presence of rem
nants of fibers from the supporting material.
One might also find traces of residual adhe
sive. In this instance, no adhesive residues
are present, but the surface of the Durer
does have a fuzzy appearance, although this
is scarcely visible without high magnification.
It is tempting to speculate that the work
on this print might have been done by
Will iam A. Baldwin, who was employed in
London by Colnaghi's since 1836, or perhaps
by his successor, Mr. Crisbrook. 1 2 (There is no
record of any treatment of the print after it
was accessioned by the Fogg Art Museum
in 1857.) In the mid-nineteenth century, split
ting of prints must have been sufficiently
unusual that on learning that Baldwin had
split a print for Michel Hennin, Bonnardot,
who is sometimes regarded as the "first mod
ern paper conservator" (Stevenson 1995:117),
considered the feat remarkable (Hennin
1856:215-16). Walsh (2000:383) notes that
information on the method of performing
paper splitting was not published until 1883,
although as I have learned (see translation,
note 92), there is evidence that knowledge
of how to do this existed as early as the late
eighteenth century.
It is unsettling to find this done for pur
poses of repairing a print; it is equally unset
tling to know that splitting of prints was
practiced as a means of adding new margins.
During the course of a recent exhibition of
the work of Rembrandt, Annette Manick,
paper conservator at the Museum of Fine
Arts, found at least one instance in which it
was likely that margins had been added to a
print by splitting it and inlaying it into a
slightly larger sheet of paper, probably using
Orisbrook's method. As described by Tuer
(1882:1:92), to add new margins, Grisbrook

A P P E N D I X 257
would take a sheet of paper of the desired
size and quality and split it about two-thirds
of its length: "The print to be operated upon
is now split completely through, so as to
make it extremely thin, the edges having
been previously cut perfectly square and
close to the engraved work. A square piece,
corresponding exactly to the size of the print,
is then cut in its proper position (about the
center) from the face of the split portion of
the clean sheet of paper; the print is inserted
in its place, and the whole is carefully
mounted up, or pasted together, forming a
solid and homogeneous sheet. A print thus
treated naturally shows no marks of inlaying
at the back, which is a perfectly unbroken
sheet of paper, and the edges of the print
having been pared down to the substance
of tissue paper before mounting, the front
is equally unimpeachable." Considering that
Schweidler wrote about both paper splitting
and adding margins, it is surprising that he
did not at least indicate that the former could
be used as a means to carry out the latter.

258 R E S T O R A T I O N O F E N G R A V I N G S , B O O K S , D R A W I N G S , A N D O T H E R W O R K S O N P A P E R
URS G R A F , TWO LANDSQUENETS
WITH A MAID AND DEATH
Figure A.9. Urs Graf, Two Landsquenets with
a Maid and Death, 1524. Woodcut (deceptive
replica), His 280; Luthy 49. Sheet: 20.7 x
12.1 cm. Museum of Fine Arts, Boston,
61.1142. Katherine E. Bullard Fund in memory
of Francis Bullard. Photograph © 2005
Museum of Fine Arts, Boston.
Provenance: Purchased from William H.
Schab, 1961.
Although this print does not illustrate decep
tive repairs, it is an excellent example of a
technique Schweidler mentions briefly: how
to make a fake watermark. Also, it is interest
ing as a remarkable instance of a complete
forgery—one that illustrates how photo
mechanical processes can be used to produce
deceptive forgeries. Acquired in 1961 by the
Museum of Fine Arts, it was not until about
two decades later that it was determined to

A P P E N D I X 259
| Figure A.9.a.
Urs Graf, Two Landsquenets with
a Maid and Death.
Stamp applied to lower left corner
of the back of the print.
Photograph 2005 Museum of Fine
Arts, Boston.
be a fake. A curator at the National Gallery in
Washing-ton, D.C., was considering purchase
of another impression of this image and
brought it to the MFA for comparison with
ours. Cliff Ackley, curator of prints, drawings,
and photographs at the MFA, told me that he
had concerns about our impression, largely
because it seemed to his eye a bit too heav
ily inked. He recalled seeing another impres
sion that seemed clearer and somewhat more
delicately inked and asked for an opinion
from the paper conservation laboratory.
When I first examined this print, the
identity of the stamp at the lower left corner
on the back (fig. A.9.a) was puzzling; it is
not in Lugt's comprehensive catalogs of col
lectors' marks (Lugt 1975, 1988). Years later,
while doing research as a Getty Scholar, I
learned that the stamp may be bona fide
(although I still have doubts, considering
what else has been learned about the print).
After World War II, this mark was applied by
authorities in Germany to objects of cultural
| Figure A.9.b.
Urs Graf, Two Landsquenets with
a Maid and Death.
View of back.
Photograph © 2005 Museum of Fine
Arts, Boston.
importance before they were exported. 1 3
The back of the print (fig. A.9.b) looks
completely normal at first glance, and in
transmitted light the paper seems quite
consistent with what one would expect for
sixteenth-century paper. There is a watermark
that is difficult to see clearly with transmitted

260 R E S T O R A T I O N O F E N G R A V I N G S , B O O K S , D R A W I N G S , A N D O T H E R W O R K S O N P A P E R
| Figure A.9.C.
Urs Graf, Two Landsquenets with a
Maid and Death.
Microphotograph of watermark,
viewed from the back of the print,
w i th raking light.
Photograph © 2005 Museum of Fine
Arts, Boston.
light but easily seen when examining the
back with raking light. It is also easy to see
that the watermark is that of a bull's head. To
make the design of the watermark clearer, it
was photographed with raking light and sub
sequently enhanced with color, as shown in
figure A.9.C. Piccard's (1966) album of trac
ings of bull's head watermarks contains none
that is similar to this one. In a recent catalog
of Urs Graf drawings in Basel, Switzerland,
there are a number of images of bull's head
watermarks, but again, none is a good match
(AAuller 2001). Most marks of this type often
show at least the ears, eyes, and nostrils of
the bull, but these are missing in ours.
I recalled that Schweidler's book con
tained directions for how one could artifi
cially create wire lines in paper, and hence
a false watermark (see pp. 118-20). The tech
nique he described involves very carefully
and methodically scraping away the paper
with a sharp knife to create thin areas (just
like a real watermark) in whatever pattern or
design desired. Scrutiny of the watermark

A P P E N D I X 261
I Figure A.g.d.
Urs Graf, Two Landsquenets with a
Maid and Death.
AAicrophotograph of part of the false
bull's head watermark, showing
roughening and cutt ing of the paper
fibers.
Photograph © 2005 Museum of Fine
Arts, Boston.
under high magnification (fig. A.9.d) showed
that paper fibers had indeed been roughened
up and cut in order to create a semblance of
the bull's head
watermark.
Considering that the watermark is fake
and that the inking is atypical of the image,
I wondered if the entire print were bogus.
Among the facsimile reproductions at the
MFA there is one of this same image (fig.
A.9.e). It was made several decades ago by
photographing an original print in the muse
um in Basel. The facsimile was made from
the photograph, in exactly the same size as
the original, by first producing a metal relief
printing plate. That is, the image on the
metal plate consists of raised lines (just as in
the original woodblock used for Urs Graf's
print). The raised lines are inked, and the
plate is printed on a sheet of paper. The fac
simile was printed on modern, machine-
made paper, but it is obvious that if one were
to have printed it on sixteenth-century paper
the image might be difficult to distinguish

262 R E S T O R A T I O N O F E N G R A V I N G S , B O O K S , D R A W I N G S , A N D O T H E R W O R K S O N P A P
| Figure A.9.e.
Photomechanically produced
(metal relief print) facsimile of
Urs Graf print.
Courtesy Museum of Fine Arts, Boston.

A P P E N D I X 263
from an original. 1 4 To make the print seem
more convincing, it would be even better if
it had a bull's head watermark. I suggested
to the curator that it seemed likely that our
print was a fake.
Some years later, I happened to be
discussing this curious print with a highly
respected dealer in Old Master prints. I was
startled when he said, "I know who did this,
but I promised that I would never reveal his
name." This dealer has since died. His chil
dren, who now carry on the business, con
firmed that their father did indeed know
who did this but that all that could be said
is that he helped "a young man who had
made a terrible mistake." I suppose the
author of this fake will never be known.
Considering all this, I still wonder if the
stamp on the back of the print is real or
whether that, too, was made by the forger.
After all, such stamps are very easy to make
or buy. On the other hand, if the forgery
were done prior to the end of World War II,
the stamp itself could be genuine.

264 R E S T O R A T I O N O F E N G R A V I N G S , B O O K S , D R A W I N G S , A N D O T H E R W O R K S O N P A P E R
ANTHONY VAN D Y C K , PORTRAIT
OF LUCAS VORSTERAAAN
Figure A.10. Anthony van Dyck, Portrait of
Lucas Vorsterman, ca. 1630. Etching, engrav
ing, silhouetted and backed, with retouching
in pen and black ink. Wibiral 14. Catalogue
Raisonnee: NH 12. Probably second state
(possibly third) falsified to appear as a first
state. Sheet: 31.5 x 22.7 cm. Museum of Fine
Arts, Boston. 25.1143. Gift of Miss Ellen T.
Bullard. Photograph © 2005 Museum of Fine
Arts, Boston.
Provenance: Gift of Miss Ellen T. Bullard,
1925
Surely there must have been considerable
satisfaction and delight when this print was
acquired by the Museum of Fine Arts in 1925
After all, the first states of this print are rare,
and in this state all of the engraving was
done by van Dyck himself. Only a few are
known to exist, and in 1925 the MFA did
not own one. After completing his image of
the sitter, van Dyck had his assistants add
the background shading and legend at the
bottom, as seen in the fifth and final state
(fig. A/io.a). The later states are less valuable

A P P E N D I X 265
I Figure A.io.a.
Anthony van Dyck, Portrait of Lucas
Vorsterman, 1630s. Etching. Wibiral
14, f ifth state. Museum of Fine Arts,
Boston. Harvey D. Parker Collection,
P7564.
Photograph © 2005 Museum of Fine
Arts, Boston.
than the first state, as they do not represent
the work of van Dyck alone and are less rare.
It is not known when someone first
began to suspect that something was amiss
with this print, but it may have been some
thirty or forty years after its acquisition. If
one compares this impression with a first
state from the Art Institute (fig. A/io.b), there
are persuasive similarities, even though the
Art Institute's print has been trimmed across
the bottom, thereby removing the area
where the title would have been. In the
background of each there is the overall gray-
ness one associates with a film of ink left on
the plate —so-called plate tone. And because
a copper printing plate is easily scratched, it
is not surprising to see a long scratch just
above and to the right of the head. But
notice that some others scratches or abra
sions in the plate, present in the Art Institute
impression, are missing from the AAFA's print.
Other peculiarities can be found. For
instance, ordinarily the pressure of printing
will cause the paper to become much
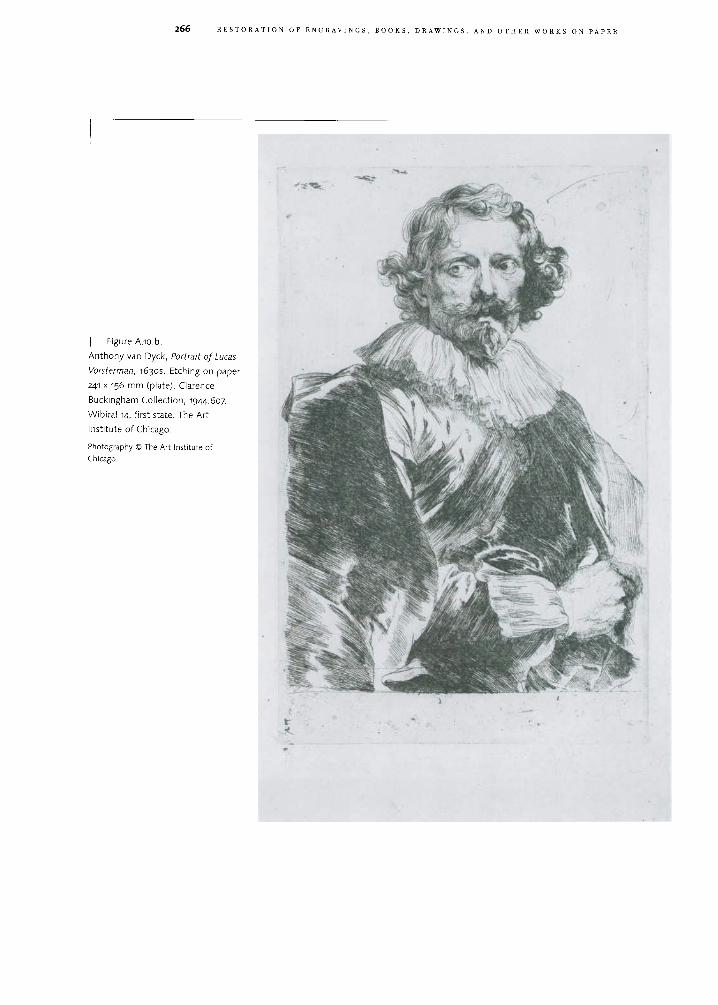
266 R E S T O R A T I O N O F E N G R A V I N G S , B O O K S , D R A W I N G S , A N D O T H E R W O R K S O N P A P E R
| Figure A.io.b.
Anthony van Dyck, Portrait of Lucas
Vorsterman, 1630s. Etching on paper.
241 x 156 mm (plate). Clarence
Buckingham Collection, 1944.607.
Wibiral 14, first state. The Art
Institute of Chicago.
Photography © The Art Institute of
Chicago.

A P P E N D I X 267
I Figure A.10.C.
Anthony van Dyck, Portrait of Lucas
Vorsterman. Museum of Fine Arts,
Boston.
Detail of false platemark. Note that
the paper above the "plate mark"
has the same texture as that below.
Photograph © 2005 Museum of Fine
Arts, Boston.
| Figure A.io.d.
Anthony van Dyck, Portrait of Lucas
Vorsterman. Museum of Fine Arts,
Boston.
Microphotograph, w i th raking light.
Note the ridgelike disjuncture in the
paper.
Photograph © 2005 Museum of Fine
Arts, Boston.
smoother where it was in contact with the
metal plate, but in this case there is virtually
no difference at all in the texture of the
paper in the margin, outside the plate mark,
and the area that should have been in con
tact with the printing plate. In figure A.10.C,
the "plate mark" runs horizontally across the
center of the illustration. If this were a true
plate mark, the paper above this line would
have been made much smoother by the pres
sure from the metal printing plate, but in this
instance there is no difference in the texture
of the paper above and below the line (in
what is supposed to be the margin). When
one examines the plate mark itself, it seems
to have been made not with a metal printing
plate but rather has been incised with some
thing like a metal stylus or other blunt tool.
Another anomaly is that the paper is some
what stiffer than normal, as is the case with
the Durer discussed previously.
There is a minute white line—an anom
alous juncture within the printed area—
across the bottom of the print just where the
printed image ends and the blank title area
begins, but this is hard to see, and I was
unable to obtain a satisfactory photograph of
it. Under the binocular microscope, with light
directed at a very low angle across the paper
to accentuate its texture, this line is resolved
as a very slight ridge, a peculiar disruption in
the paper (fig. A.io.d). There is, however, no

268 R E S T O R A T I O N O F E N G R A V I N G S , B O O K S , D R A W I N G S , A N D O T H E R W O R K S O N P A P E R
| Figure A.io.e.
Anthony van Dyck, Portrait of
Lucas Vorsterman. Museum of Fine
Arts, Boston.
View of back.
Photograph © 2005 Museum of Fine
Arts, Boston.
evidence of the ridge or discontinuity on the
back (fig. A.io.e), which appears quite normal
(although more about this later). There are a
few inscriptions in various hands and the
MFA stamp but nothing that immediately
raised suspicions.
We decided to make a betaradiograph,
in part to get a clearer image of the elaborate
watermark at the bottom of the sheet. Our
beta plate is not large enough to do the
entire print at once, so the top and bottom
half were radiographed separately and com
bined electronically into one digital image;
see figure A.io.f. (The dark line across the
center of this image is due to having to make
the radiographs separately, and the white
patches at the top corners are due to old
paper hinges on the back of the print and are
not part of the print itself.) Notice the elabo
rate watermark at the bottom of the sheet.
Also, in the top half of the radiograph (fig.
A.io.g) there are some unusual white areas
that seem to coincide more or less with the
contours of the head and shoulders of the
figure. It is as if there were a kind of ghostly
image of Lucas Vorsterman. And there are
rather strange dark blotches here and there
within the figure. On the other hand, the

A P P E N D I X 269
I Figure A.io.f.
Anthony van Dyck, Portrait of
Lucas Vorsterman. Museum of Fine
Arts, Boston.
Betaradiograph of entire print,
viewed from front.
Photograph © 2005 Museum of Fine
Arts, Boston.

270 R E S T O R A T I O N O F E N G R A V I N G S , B O O K S , D R A W I N G S , A N D O T H E R W O R K S O N P A P E R
| Figure A.io.g.
Anthony van Dyck, Portrait of Lucas
Vorsterman. Museum of Fine Arts,
Boston.
Betaradiograph of upper half of
print, viewed from the front.
Photograph © 2005 Museum of Fine
Arts, Boston.
I Figure A.io.h.
Anthony van Dyck, Portrait of Lucas
Vorsterman. Museum of Fine Arts,
Boston.
Detail, betaradiograph, digitally
enhanced, of watermark at the bot
tom of the print.
Photograph © 2005 Museum of Fine
Arts, Boston.

A P P E N D I X 271
paper as a whole looks fairly normal. Clearly
it is a laid paper, as it should be, and the
chain lines running horizontally at regular
intervals throughout the paper look normal.
To aid identification of the watermark, it
was enhanced using digital imaging software
(Adobe PhotoShop®) as shown in figure
A.io.h (in this illustration, the watermark is
oriented vertically, whereas in the actual
print it is horizontal, as seen in fig. A/ io. f ) .
Extensive study of numerous catalogs of
watermarks yielded nothing comparable,
and the effort to identify the mark was aban
doned for a number of years. Eventually,
I realized that because there is a rather pecu
liar discontinuity running down the middle
of the watermark it might be useful to ana
lyze the right and left sides of the design
separately. The right side of the watermark
is in that part of the sheet that is directly
behind the printed image. (The left side is
in the paper that is now blank, but in later
states it is where the title would have been
engraved.)
A recent catalog containing tracings of
watermarks found in the papers used in van
Dyck's prints shows the mythical Phoenix
(Mauquoy-Hendrickx 1991: pi. 180, no. 252),
which is repeatedly consumed by flames and
reborn from its own ashes (fig. A.io.i). Sur
rounding the Phoenix is a garland of laurel
leaves. Notice how similar this is to the right
side of the watermark in the MFA's van Dyck
print. It seems clear that the paper in this
portion of the van Dyck bears a fragment
of the Phoenix watermark, which is usually
I Figure A.10.L
Watermark of a Phoenix surrounded
by laurel leaves. This mark is fre
quently found in impressions of
van Dyck's Lucas Vorsterman.
Reproduced from Fr. Wibriral,
L'lconographie d'Antoine Van Dyck (1877).
| Figure A/io. j .
Watermark of the Arms of the
Medic i . Note the six disks (bezants),
which are commonly associated wi th
the Medici coat of arms.
Reproduced from E. Heawood,
Watermarks Mainly of the 17th and 18th
Centuries (Hilversum, Holland: The Paper
Publications Society, 1950).
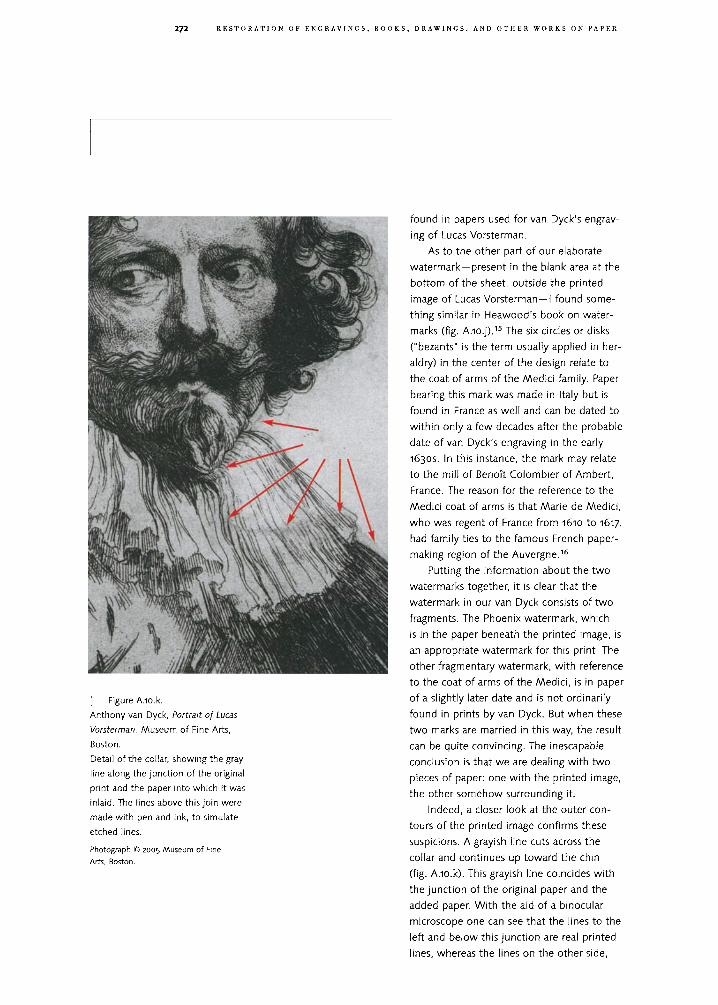
272 R E S T O R A T I O N O F E N G R A V I N G S , B O O K S , D R A W I N G S , A N D O T H E R W O R K S O N P A P E R
| Figure A/io.k.
Anthony van Dyck, Portrait of Lucas
Vorsterman. Museum of Fine Arts,
Boston.
Detail of the collar, showing the gray
line along the junct ion of the original
print and the paper into which it was
inlaid. The lines above this jo in were
made wi th pen and ink, to simulate
etched lines.
Photograph © 2005 Museum of Fine
Arts, Boston.
found in papers used for van Dyck's engrav
ing of Lucas Vorsterman.
As to the other part of our elaborate
watermark—present in the blank area at the
bottom of the sheet, outside the printed
image of Lucas Vorsterman —I found some
thing similar in Heawood's book on water
marks (fig. A.10.J). 1 5 The six circles or disks
("bezants" is the term usually applied in her
aldry) in the center of the design relate to
the coat of arms of the Medici family. Paper
bearing this mark was made in Italy but is
found in France as well and can be dated to
within only a few decades after the probable
date of van Dyck's engraving in the early
1630s. In this instance, the mark may relate
to the mill of Benoit Colombier of Ambert,
France. The reason for the reference to the
Medici coat of arms is that Marie de Medici,
who was regent of France from 1610 to 1617,
had family ties to the famous French paper-
making region of the Auvergne. 1 6
Putting the information about the two
watermarks together, it is clear that the
watermark in our van Dyck consists of two
fragments. The Phoenix watermark, which
is in the paper beneath the printed image, is
an appropriate watermark for this print. The
other fragmentary watermark, with reference
to the coat of arms of the Medici, is in paper
of a slightly later date and is not ordinarily
found in prints by van Dyck. But when these
two marks are married in this way, the result
can be quite convincing. The inescapable
conclusion is that we are dealing with two
pieces of paper: one with the printed image,
the other somehow surrounding it.
Indeed, a closer look at the outer con
tours of the printed image confirms these
suspicions. A grayish line cuts across the
collar and continues up toward the chin
(fig. A.io.k). This grayish line coincides with
the junction of the original paper and the
added paper. With the aid of a binocular
microscope one can see that the lines to the
left and below this junction are real printed
lines, whereas the lines on the other side,
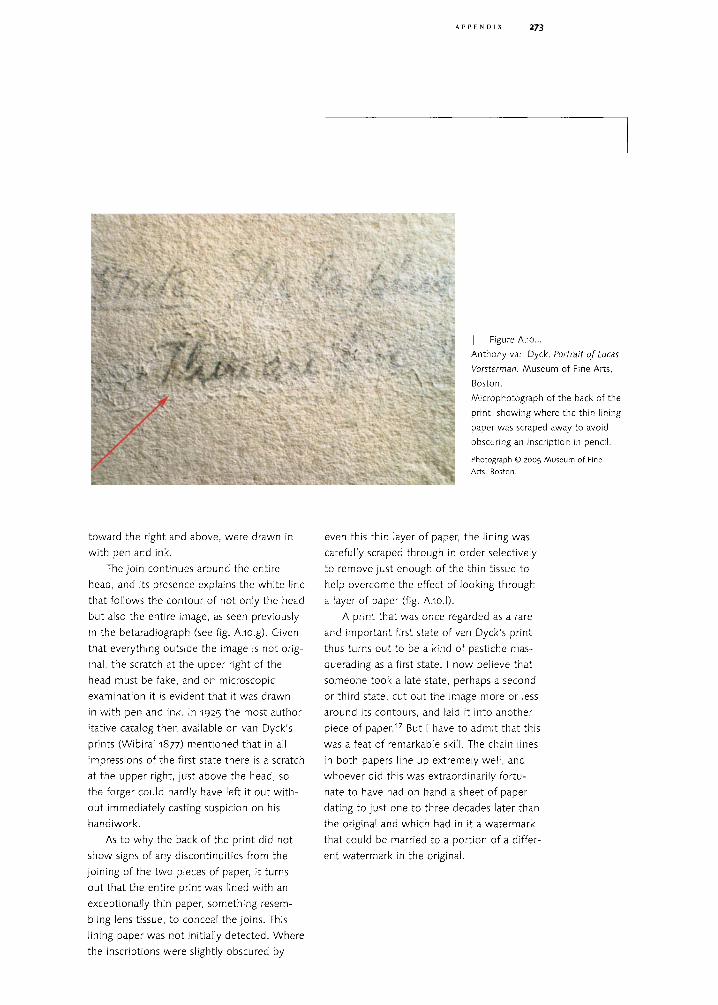
A P P E N D I X 273
| Figure A.10.I.
Anthony van Dyck, Portrait of Lucas
Vorsterman. Museum of Fine Arts,
Boston.
Microphotograph of the back of the
print, showing where the thin lining
paper was scraped away to avoid
obscuring an inscription in pencil.
Photograph © 2005 Museum of Fine
Arts, Boston.
toward the right and above, were drawn in
with pen and ink.
The join continues around the entire
head, and its presence explains the white line
that follows the contour of not only the head
but also the entire image, as seen previously
in the betaradiograph (see fig. A/io.g). Given
that everything outside the image is not orig
inal, the scratch at the upper right of the
head must be fake, and on microscopic
examination it is evident that it was drawn
in with pen and ink. In 1925 the most author
itative catalog then available on van Dyck's
prints (Wibiral 1877) mentioned that in all
impressions of the first state there is a scratch
at the upper right, just above the head, so
the forger could hardly have left it out with
out immediately casting suspicion on his
handiwork.
As to why the back of the print did not
show signs of any discontinuities from the
joining of the two pieces of paper, it turns
out that the entire print was lined with an
exceptionally thin paper, something resem
bling lens tissue, to conceal the joins. This
lining paper was not initially detected. Where
the inscriptions were slightly obscured by
even this thin layer of paper, the lining was
carefully scraped through in order selectively
to remove just enough of the thin tissue to
help overcome the effect of looking through
a layer of paper (fig. A.10.I).
A print that was once regarded as a rare
and important first state of van Dyck's print
thus turns out to be a kind of pastiche mas
querading as a first state. I now believe that
someone took a late state, perhaps a second
or third state, cut out the image more or less
around its contours, and laid it into another
piece of paper. 1 7 But I have to admit that this
was a feat of remarkable skill. The chain lines
in both papers line up extremely well , and
whoever did this was extraordinarily fortu
nate to have had on hand a sheet of paper
dating to just one to three decades later than
the original and which had in it a watermark
that could be married to a portion of a differ
ent watermark in the original.

274 R E S T O R A T I O N O F E N G R A V I N G S , B O O K S , D R A W I N G S , A N D O T H E R W O R K S O N P A P E R
A N T O N I O DEL P O L L A I U O L O ,
BATTLE OF THE NUDES
Figure A.11. Antonio Pollaiuolo, Battle of the
Nudes, 1470-75. First-state impression,
engraving, Hind 2. Florence, 15th century.
42.4 x 60.9 cm. J . H. Wade Fund, 67.127.
Overall view. Cleveland Museum of Art.
Courtesy of the Cleveland Museum of Art.
Photo credit: Gary Kirchenbauer.
Provenance: Prince of Liechtenstein;
Colnaghi, London; purchased by Richard
Zinser from Colnaghi in 1954; acquired by
Cleveland Museum of Art from Zinser, 1967. 1 8
This final example is included primarily to
direct the reader to more extensive informa
tion on the recent discoveries that have been
made about what is simultaneously one of
the most important prints in existence and
one of the most extraordinary instances
of the kinds of repairs described by
Schweidler. 1 9 It is also appropriate to include
here in that the restoration work may well
have been done by Carl Schweidler, Max's
brother.
As explained by Louise Richards in her
article on this print, all known examples of
this print show signs of having been creased,
abraded, and soiled over time, as well as
losses of the printed image (Richards
1968:64), yet this impression is of great
importance in that it is the only known first
state (Richards 1968:65). A careful examina
tion before it was acquired in 1967 revealed
that "areas at the right and left margins and
down the old center fold show pen restora
tion" (Richards 1968:70 n. 8). Since this

A P P E N D I X 275
original examination, however, it has been
learned that some of the missing areas may
have been restored by filling the losses with
collotype reproductions.
The focus here, however, is on structural
repairs and how to detect them. In this
instance, the most immediate clue to the
presence of repairs is the buckling that is
often caused by such repairs when they
extend for more than just a few millimeters.
(See the discussion about buckling in the
Altdorfer, above.) Once again, the simple
technique of using raking light to examine
the surface topography of a print yields
important information, as shown in this
photograph of the back of the Pollaiuolo
(fig. A.n.a). There is no indication in
Richards's article that anyone examined
| Figure A.n.a.
Antonio del Pollaiuolo (1431-98),
Battle of the Nudes, 1470-75.
First-state impression, engraving.
Florence, 15th century. 42.4 x
60.9 cm. J. H. Wade Fund 1967.127.
Modi f ied raking light, overall view,
verso.
Courtesy of the Cleveland Museum of Art.
Photo credit: Howard Agriesti, Gary
Kirchenbauer.
the print by this means, but even if this had
been done it is easily possible that no one
would have grasped the implications of the
buckling, inasmuch as knowledge of the
technique of chamfered repairs was not then
widely known; even less, there was virtually
no understanding then of how this technique
of repair might manifest itself over time. The
salient aspect of this buckling that points to
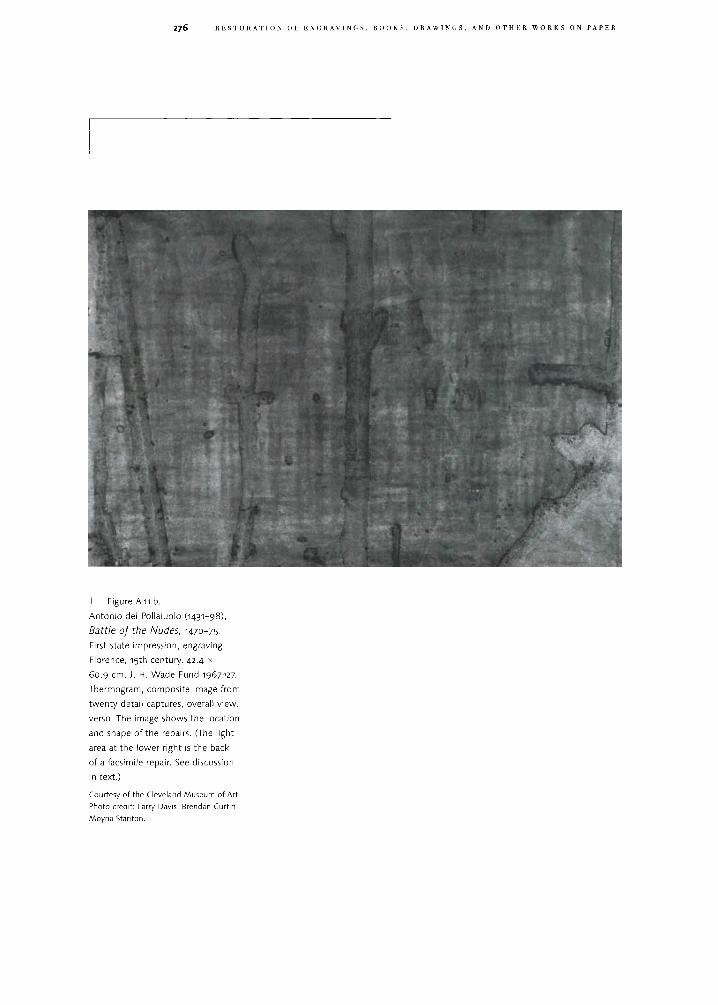
276 R E S T O R A T I O N O F E N G R A V I N G S , B O O K S , D R A W I N G S , A N D O T H E R W O R K S O N P A P E R
| Figure A.n.b.
Antonio del Pollaiuolo (1431-98),
Battle of the Nudes, 1470-75.
First-state impression, engraving.
Florence, 15th century. 42.4 x
60.9 cm. J. H. Wade Fund 1967.127.
Thermogram, composite image from
twenty detail captures, overall view,
verso. The image shows the location
and shape of the repairs. (The light
area at the lower right is the back
of a facsimile repair. See discussion
in text.)
Courtesy of the Cleveland Museum of Art.
Photo credit: Larry Davis, Brendan Curtin,
Moyna Stanton.

A P P E N D I X 277
the presence of repairs is its pattern or shape.
Often when paper buckles from exposure
to moisture or humidity changes, the result
may be somewhat more random. In this
instance, the buckling suggests a more or
less linear pattern, which, as should now be
apparent, corresponds to the perimeter of
the long repairs.
The location and contours of the repairs
are shown more clearly using infrared imag
ing equipment with the capability to detect
wavelengths from 3.0 to 5.0 microns, as has
been demonstrated by Stanton and her col
leagues at the Cleveland Museum of Art
(fig. A/n.b). Note that the configuration or
shape of the repairs is quite similar to the
diagram in Schweidler's book relating to
how to make repairs of tears (see translation,
fig. 27). For related images, as well as for fur
ther details about the restoration of the lost
portions of the image, the reader should con
sult the information presented on the inter
esting and informative Internet web site of
the Cleveland Museum of Art mentioned in
note 18 of this Appendix.
Given the remarkable craftsmanship of
the repairs, as well as their number and
extent, it is tempting to think that they were
done by either Carl or Max Schweidler.
According to information obtained by
Stanton, Christa Gaehde stated that the
Schweidlers carried out restorations for
Richard Zinser when he was in Germany.
If Carl's comments about his brother are to
be credited (see Editor's Introduction, note
5), and if the obituary about Carl is accurate
(see Editor's Introduction, note 1), it seems to
me more likely that Carl, rather than Max,
would have been the one who had the expe
rience and skill to have done this work. Carl
Schweidler's obituary states that he had a
stroke at age seventy and that thereafter he
did not undertake repairs of the kind for
which he had been so well known. Given
that he was born in 1884, he must have had
his stroke around 1954, the same year that
Zinser bought the print from Colnaghi . 2 0
Hence, if it was Carl who did the restoration,
it seems likely that his client would have
been Colnaghi, 2 1 which had purchased the
Liechtenstein collections, possibly in four
lots, between 1948 and 1952. 2 2 Of course,
it is also possible that he might have been
commissioned by Liechtenstein prior to the
sale to Colnaghi. No matter which lot con
tained the Pollaiuolo, this time frame would
probably have allowed Carl to do the restora
tion before the print was sold to Zinser in
1954, and this would accord with the fact
that the stamp of the Colnaghi firm is found
on top of one of the restorations.
The authorship of the restorations rests
on multiple suppositions, and other scenarios
can be proposed. Kurt Schweidler, Carl's son,
was born in 1910 and would have been in his
late thirties or early forties by the time the
work on the Pollaiuolo was done. Was he
sufficiently skilled by then to have carried out
such a remarkable feat of restoration? Per
haps father and son did the work together.
Or was it Max? Given the difficulty of finding
restorations that can be traced definitively to
the hand of either Carl or Max, perhaps the
authorship of the Pollaiuolo restoration will
never be known. 2 3 In any event, if the reader
ever has an opportunity to see the print first
hand, it will be worth it—first and foremost
because of its rarity and beauty, but also
because it will surely stand for years as one
of the most remarkable examples of a kind
of restoration that is an important part of
its history.

278 R E S T O R A T I O N O F E N G R A V I N G S , B O O K S , D R A W I N G S , A N D O T H E R W O R K S O N P A P E R
N O T E S
1 According to the Infrared Processing and
Analysis Center at the California Institute of
Technology, the infrared region of electromag
netic radiation is usually divided into three
spectral regions, near-, mid- , and far-infrared,
although there is no widespread agreement on
the precise boundaries between these regions.
www.ipac.caltech.edu/Outreach/Edu/Regions/
irregions.html.
According to Marcia Steele, conservator of
paintings at the Cleveland Museum of Art,
wavelengths of around 1.5 to 1.8 microns are
commonly used to study underdrawing in
paintings. In this instance, for capturing images
of the repairs in the Pollaiuolo, their Mitsubishi
IR imaging equipment was f i t ted wi th a germa
nium lens which transmits wavelengths of 3.0
to 5.8 microns.
2 www.clevelandart.org/exhrbcef/batt le/html/
3405295.html.
3 Catalogue des dessins et estampes composant la
collection de M. Ambroise Firmin-Didot, Sale
April 1 6 - M a y 12, 1877, at the Hotel Druot.
4 Schweidler refers often to the subject of buck
l ing—how to avoid it and how to eliminate it.
See the sections "Actual Mending or True
Restoration" (pp. 109-22) and "The Stretching
of Prints" (pp. 130-36).
5 This reminds me of a story I was told in the
1960s by a conservator who, in the early stages
of her career, worked for a dealer in fine prints.
One day someone came into the store wi th a
Rembrandt print that had a tear in the sky, and
he asked whether the tear could be mended
so that it would be invisible. After some dis
cussion, the dealer said that he expected that
although the extent of the service his f irm
could provide would probably not yield the
result the owner hoped for, it would be possi
ble to send it to someone he knew of in
Switzerland (probably Kurt Schweidler) who
was well known for doing "invisible repairs."
The owner agreed that the print be sent to the
individual suggested. Time passed, and eventu
ally the print was returned to the dealer. Eager
to see what had been accomplished, the dealer
and the young conservator were impressed that
there was no evidence whatsoever of the tear.
Then, after closer scrutiny, they were aston
ished to discern that the entire top half of the
pr int—where once there had been sky—had
been removed and replaced wi th another piece
of paper that matched the original w i th remark
able fidelity. Unfortunately, I never heard what
the original owner thought of the result.
6 "The problem of transferring a design engraved
on rigid copper-plate to the curved surface of
a pot was solved by the use of a thin sheet of
t i ssue . . . . The inventor of transfer paper and
precise details of its early development remain
uncertain. We do know . . . John Brooks[,] . . .
who came to England in the 1740s, played an
important role in the improvement of tech
niques" (Leary and Walton 1976:13-14).
According to Leary, John Brooks presented
patents in the 1750s, and it seems that the
1750s were a period of development of this
paper and technique of transferring designs.
7 I am grateful to John Krill for this information.
8 At the National Gallery, Washington, D.C., a
notable example of such si lhouetting is an
impression of Schongauer's The Censer, repro
duced in the catalog of f i f teenth-century
engravings at the National Gallery (see Shestack
i967. i tem 110). According to the catalog entry
about this print, about half of the forty known
impressions have been si lhouetted. According
to Richard Field, former curator at the Yale
University Art Gallery, an impression of this
same image at the Yale University Art Gallery
may also be si lhouetted. Another example of
a silhouetted Schongauer is at the Fitzwilliam
Museum (Clarke 2001:52, pis. 3, 4).
9 Walsh cites a print by Master E. S., St. Mark,
which as a result of its t reatment now consists
of four(!) split sheets in which at least two are
laminated together wi th the wire lines oriented
perpendicular to each other. For more on this
and on the subject of paper splitt ing, see Walsh
2000 :383 -90 .
10 In the late 1960s, soon after I obtained a copy
of Schweidler's book, the photograph of Max
tearing a sheet of paper in such as way as to
create a very wide overlap (translation, fig. 31)
motivated me to try this. I experimented wi th
a sheet of modern laid paper. Soon I noticed
something that I had not expected. When I
inspected each side of the tear I had produced,
it was apparent that half of the tear still showed
a laid pattern, whereas the other half seemed
to lack almost all of its laid pattern, as if it were
a wove paper. I then tr ied to split another piece
of this same laid paper, using the technique
suggested by Schweidler (by gluing t w o pieces
of strong paper on either side of the laid paper,
splitt ing the three-layer laminate so as to split
the laid paper—the middle layer—and then

A P P E N D I X 279
soaking off the strong papers to free the two
halves of the now split laid paper). This exercise
confirmed that one-half of the laid paper (the
wire side) retained its laid lines, whereas the
other half (the top or upper side of the paper)
had lost its laid pattern. Applying this observa
t ion to this Durer engraving, it seems clear that
the image was printed on the wire side of the
sheet, since the original bull's head watermark
is still present. I can imagine that the restorer
who carried out this nerve-racking procedure
must have been pleased to see that the water
mark was still present after splitt ing the print.
After all, in this instance having this specific
watermark may have translated into a higher
market price for the print.
11 As Walsh (2000:385) observes, the interior
of the split sheet would inevitably exhibit dis
rupted fibers—like the fuzzy side of suede
leather—but in this instance the interiors of
the split sheets are not visible, having been
pasted together.
12 Tuer (1882:1:92) indicated that whi le "Baldwin
had a great reputation amongst print collectors
and dea le rs . . . for very many years he person
ally seldom touched a print, leaving everything
to his manager, Mr. Grisbrook."
13 A similar stamp is reproduced in Bruckler 1999-
I am grateful to Carol Togneri for bringing this
information to my attent ion.
14 As observed by Eduard Trautscholdt, "Photo
mechanical reproductions are in this way dan
gerous, especially reproductions of rare w o o d
cuts" (in Bloch and Zick 1970:182; translation
by Britta Bothe). Coincidentally, Trautscholdt is
ment ioned in an obituary for Carl Schweidler
as having been one of the latter's clients. See
Editor's Introduct ion, note 1.
15 Heawood I950:pl. 708. The mark was found in
paper from J. G. Tavernier, Serrail du Grand
Seigneur, ^75^ Paris.
16 Gaudriault (1995:92) says that the example
given above in Heawood, no. 708, dates
f rom 1675 and is sometimes accompanied by
"B *P C" wi th in a cartouche, and that this
refers to Benoit Colombier of Ambert. Related
marks bearing the Medici coat of arms can be
found in French papers from the 1640s into
the early 1700s.
17 See also the discussion above about the print
by Mart in Schongauer.
18 Stanton 2002. Stanton's paper, "Finding the
Pieces to the Puzzle," reveals and describes the
print's extensive and historic repairs, makes a
strong case that one of the Schweidlers was
responsible for these restorations, and intro
duces thermal infrared imaging (thermography)
as a valuable analytical technique for detecting
and document ing repairs in works of art on
paper, www.clevelandart.org/exhibcef/
bat t le/html/3405295.html.
19 Extensive information about the recent exami
nation of this print is to be found on the web
site of the Cleveland Museum of Art,
www.clevelandart.org/exhibcef/batt le/html/340
5295.html. I am especially grateful to Moyna
Stanton, paper conservator at the Cleveland
Museum of Art, for sharing this information
wi th me, of which I only present a few high
lights.
20 "Provenance," Cleveland Museum of Art web
site.
21 From a marginal note by Carl in his copy of
Max's 1938 edit ion (see translation, note 84), it
is clear that Carl did work for Colnaghi. In that
note Carl indicates that Colnaghi had asked him
to try to correct or improve a restoration that
had been done by Max. Thus it is questionable
whether Max would have been doing any fur
ther work for Colnaghi after 1938.
22 "Provenance," Cleveland web site.
23 To my knowledge, the only documented
instance of Carl Schweidler's work dates from
1931 and relates to carrying out retouching of a
small scratch on a Rembrandt print belonging
to Lessing Rosenwald (Stevenson 1995:121).

This page intentionally left blank

G L O S S A R Y
Alum; Alum paste. Aluminum sulfate. Old
recipes for paste sometimes specified the
addition of alum, which enhanced the adhe
sive properties of the paste and may have
helped to preserve it. From the point of view
of someone trying later to dissolve or remove
the dried paste, a serious disadvantage of
adding alum to paste is that it causes chemi
cal changes that chemists refer to as "cross-
linking," with the result that the paste
becomes virtually insoluble in water. Another
serious drawback is that the addition of alum
to paste would cause the paste to become
more acidic. (In the paper industry, the term
"alum" often refers to potassium aluminum
sulfate — "papermaker's alum.")
Aluminum subacetate. Aluminum subacetate
solution (Essigsaure Tonerde) contains about 8
percent aluminum diacetate and is a clear,
colorless liquid, acidic to litmus. It is used as
a mordant in cotton dyeing, in printing fab
rics, and in water- and fireproofing tissues. It
is used medicinally as an astringent and anti
septic (Stecher 1968:47). I know of no source
for Schweidler's use of this material. From
the chemical standpoint, given that alumi
num ions are trivalent, it is possible that
aluminum subacetate may harden gelatin
and hence make gelatin sizing more effective,
but it may also make it more acidic.
Ammonia. A solution of ammonium hydrox
ide gas in water. Schweidler does not specify
the concentration of the ammonia solution
he suggests using. Presumably it is equivalent
to the strength commonly used for house
hold cleaning, that is, a dilute solution of 5
to 10 percent ammonia gas in water.
www.epa.gov/grtlakes/seahome/house-
waste/src/basics.htm.
Biedermeier. "Of or relating to a type of fur
niture developed in Germany during the first
half of the 19th century and modeled after
French Empire styles" (The American Heritage
Dictionary of the English Language, 3d ed.
[Boston: Houghton Mifflin, 1992]).
Bleaching soda; "soda solution." A mixture
of sodium silicate ("water glass") and sodium
carbonate. On September 26, 1876, Fritz
Henkel (1848-1930) founded the company
Henkel & Cie. in Aachen, Germany. In 1878
the company produced the first brand-name
detergent for washing clothes, Henkel's
Bleich-Soda (bleaching soda). 1 Note that
bleaching soda does not contain any chorine
compounds. (See the introduction regarding
the potential for confusing bleaching soda
with a chlorinated bleach, p. 11.) Schweidler
illustrates its effects as a cleaning agent in
figures 12, 13, and 15. Schweidler sometimes
refers to a "soda solution," by which one
should understand that it is a solution of
"bleaching soda."
Chlorinated lime. An old-fashioned name
for calcium hypochlorite. This chemical is
used as a bleaching agent but should not be
confused with bleaching soda (see above),
which contains no chlorine. Schweidler occa
sionally refers to the use of either dry calcium
hypochlorite or a solution of "chlorinated
lime" (calcium hypochlorite) as "chlorine,"
but properly speaking, this should apply only
to the element chlorine, which is a gas.

282 R E S T O R A T I O N O F E N G R A V I N G S , B O O K S , D R A W I N G S , A N D O T H E R W O R K S O N P A P E R
Citric acid. Naturally present in many fruits
such as oranges and lemons, its molecular
structure is such that it can act as a chelat
ing agent, readily combining with metallic
ions, which explains why both citric acid
and lemon juice have long been found in
books of recipes regarding how to remove
ink (iron gall ink) and rust stains. (See oxalic
acid, below.)
Collotype. "Based on a French discovery
patented in 1855, and in full commercial use
by the 1870s, collotypes remained an impor
tant element in fine printing until recent
y e a r s . . . . The process is based on the fact
that sensitized gelatin exposed to light will
harden and become non-absorbent, whereas
unexposed portions will remain soft and
receptive to water" (Gascoigne i986:def in i-
tion 40 [unpaginated]).
Copying-ink pencil. An indelible writing tool
containing a mixture of clay, earth color, and
aniline dye. These pencils were used princi
pally by clerical staff for making copies of
permanent records or accounts (by dampen
ing the original and transferring the writing to
a sheet of copy paper), but the purplish black
marks of these pencils are occasionally found
on the back of prints. (Both Max Beckmann
and Lovis Corinth sometimes signed their
prints with a pencil of this sort.) The author's
warning is well founded since the dyes used
in these pencils are readily soluble and
intensely colored. For further information,
see Dube 1998; also see Rhodes 1999.
Crible. A relief process of printmaking, in
which punches are used to stipple a plate
with numerous indentations to create
decorative patterns. Sometimes called
"dotted prints."
Eau de Javelle. A solution of potassium
hypochlorite. When freshly prepared, the
solution contains about 2.5 percent active
chlorine (Stecher 1968:595).
Estompe. The French word for a slender
cylinder of paper that tapers to a blunt point
at one end; it is used by artists to blend
tones in charcoal drawings.
Glazier's shop. The term refers to a store
that specializes in the sale of glass for frames,
windows, and so on, but it is clear that
prints, frames, glass, and mirrors were also
available for sale, rather like frame shops
today. On page 33, Schweidler says, "A glazier
does not only put in windows; he likes to
find other sources of income. Often in a
small glass shop, run by a glazier, you see
pictures and frames. If you go into such a
shop, you often find portfolios filled with
engravings, even individual pictures specially
displayed."
Guard. Ordinarily a bookbinding term that
refers to a narrow strip of paper sewn into
the binding and used as a means to attach a
loose sheet into the book, but Schweidler
uses the term to refer to a narrow strip of
paper used to attach a print to a mount. He
elaborates on the mounting of prints and the
use of guards in the section "Stretching of
Prints," on pages 130-36.
Ivory-board. Ivory-board (Elfenbeinkarton)
is a type of moderately stiff cardboard that
consists of one or more thicknesses of high-
quality paper and has an ivory tint. It is
sometimes finished with beeswax and has a
high degree of uniform transparency (Labarre
[1952] 1969:138).
Jalousie. "A blind or shutter having
adjustable horizontal slats for regulating the
passage of air and light" (American Heritage
Dictionary of the English Language, 3d ed.).
AAarienglas. The common name in German
for either mica or selenite, naturally occurring
minerals that can be separated into transpar
ent or translucent layers.
Methylated spirits. A denatured alcohol
consisting of a mixture of ethyl alcohol and
methyl alcohol. (American Heritage Dictionary
of the English Language, 3d ed.).
Oiled paper; oilpaper. Sometimes translated
as "grease-proof paper," the original word
in the text is Olpapier, which is paper made
somewhat transparent by treating it with oil,

G L O S S A R Y 2 8 3
usually boiled linseed oil, poppy seed oil,
olive oil, or a mixture of oil and turpentine.
Schweidler probably suggests it in this
instance because it would resist wetting and
therefore retain its strength when immersed
in water (Labarre [1952] 1969:175).
Soda; soda solution. When Schweidler refers
to either "soda" or "soda solution," he is
referring to bleaching soda (see above) or a
solution of bleaching soda. Note that this is
different from English popular usage, in
which the word soda often refers to carbon
ated water, although in a chemical context it
refers to sodium carbonate.
Sorrel salt. Potassium binoxalate. It is poi
sonous and occurs as white, odorless crystals.
It is soluble in forty parts of cold water and
slightly soluble in alcohol. The pH of a 0,1
molar aqueous solution is 2.7. It is used for
removing ink stains, scouring metals, cleaning
wood, and as a mordant in dyeing (Stecher
1968:852). For the latter purposes, it is simi
lar in its effect to oxalic acid and citric acid.
Its use is also mentioned in Buck's earlier
treatise on book repair as a reagent for
removing ink stains (Buck 1918:33).
Spirit of wine. An old-fashioned phrase for
distilled ethyl alcohol.
Stone board. Stone board (Steinpappe) is a
kind of papier-mache made from paper pulp,
whiting, and glue. It is made to imitate stone
or bronze and has also been used as a roofing
material (Labarre [1952] 1969:41).
Vinegar. As stated on page 66, by "vinegar,"
Schweidler means wine vinegar (presumably
white wine vinegar, since it is essentially
colorless). In his book, he employs vinegar
both as a cleaning agent and as an "antidote,"
following treatment with either bleaching
soda or chlorinated bleach. Chemically, vine
gar is a dilute form of acetic acid. Generally,
the strength of the wine vinegar sold for
home use is approximately 6 percent.
Washing potcher. "The potcher is a mixing,
bleaching, and washing 'engine' of the
Hollander type, has a roll fitted with wooden
paddles, a drum washer but no bed-plate.
Hence such combinations as Washing
Potcher, Mixing Potcher, Bleaching Potcher"
(Labarre [1952] 1969:204).
Water glass. "An aqueous solution of sodium
silicate that dries to a hard glasslike mass.
Sodium silicate is prepared by fusing silicon
dioxide (S i0 2 ) and sodium oxide (Na 2 0 ) in a
ratio that varies from 2 to 3.5. A water glass
solution is viscous and has little tack, so
when it is used as an adhesive, pressure must
be applied to hold materials together while
bonding. The dried product is brittle and
water sensitive. Aluminum salts can be added
to the formulation to improve water resis
tance. Water glass has been used to make
artificial stone. Most commonly, it is used
as an air-setting cement for bonding paper,
corrugated boxes and cartons, wood, glass,
porcelain, leather, and textiles. Water glass
is also used to fireproof textiles and wood.
It was tried unsuccessfully as a binder in the
19th century for fresco paint ings. . . . Potash
water glass is composed of potassium silicate.
Double water glass is a mixture of equal parts
potassium silicate and sodium s i l i ca te . . . .
Soluble in water forming strongly alkaline
solutions (pH = 11-12.5). Partially miscible
with primary alcohols and ketones." In
powder form, sodium silicate is one of the
constituents of bleaching soda (see above).
(Definition source: CAMEO [Conservation
and Art Materials Encyclopedia Online], the
online dictionary and database sponsored
by the Museum of Fine Arts, Boston,
www.mfa.org/_cameo/frontend/ [accessed
December 7, 2004].)

284 R E S T O R A T I O N O F E N G R A V I N G S , B O O K S , D R A W I N G S , A N D O T H E R W O R K S O N P A P E R
N O T E S
This material would have been a common
household i tem. To my knowledge, no one has
explored what the long-term effects of bleach
ing soda are on the properties of paper, but
perhaps this is not surprising given that this
material is, to my knowledge, no longer in use
for treatment of works of art on paper. Indeed,
aside f rom Schweidler's use of this chemical
mixture, I have found no other references to
its use in paper conservation. Whi le initially
soluble, after sodium silicate dries it becomes
extremely resistant to water (a method for pre
serving eggs is to apply a solution of sodium
silicate which, when dry, forms a moisture-
impenetrable coating around them), so I w o n
der whether any residue of sodium silicate in
paper might change its absorbency or other
properties. Schweidler illustrates the effect of
using a solution of bleaching soda in figs. 12,
13, and 15.
According to Thomas Wolk, Archivist of Henkel
Corporation, Henkel's Bleich-Soda was proba
bly packaged in paper bags, such as the one
shown here, until July 1911, at which t ime the
manner of packaging changed from bags to
cartons. In 1921 this product appeared under
another name, Henko, which continued in
product ion until 1998. Wolk stated that the
composit ion of the product was changed and
improved regularly over the decades.
Henkel's Bleich-Soda, introduced
in about 1878. This is one of the
original packages.
Photo courtesy of Henkel Corporation
Archives.

R E F E R E N C E S
Baynes-Cope, A. D. 1977. The effect of
residues of manganese compounds in
paper on the bleaching of prints, etc.
Paper Conservator 2:3.
Beaufort, T. R. 1926. Pictures and How to
Clean Them. New York: Stokes.
Bidwell, J . 1990. Early American Papermaking:
Two Treatises on Manufacturing Tech
niques, Reprinted from James Cutbush's
American Artist's Manual (1814). New
Castle, Del.: Oak Knoll Books.
Bohm, H. [1929] 1979. Die Praxis des
Restaurators, by Dr. Fr. C. H. Lucanus. 5th
ed. Rudolf Schonherr; reprint, Cologne:
Bohlau-Verlag.
Bonnardot, A. 1846. Essai sur la restauration
des anciennes estampes et des livres rares.
Paris: Deflorenne neveu.
. 1858. Essai sur I'art de restaurer les
estampes et les livres. 2d ed. Paris.
Bruckler, T., ed. 1999. Kunstraub,
Kunstbergung, und Restitution in Oster-
reich 1938 bis heute. Vienna: Bohlau
Verlag.
Bruckle, I., and J . Dambrogio. 2000. Paper
splitting: History and modern technology.
Journal of the American Institute for
Conservation 39 (3):295~325.
Buck, M. S. 1918. Book Repair and Restoration.
Philadelphia: Nicholas L. Brown.
Churchill, W. A. [1935] 1967. Watermarks
in Paper in Holland, England, France,
etc., in the XVII and XVII Centuries and
Their Interconnection. Amsterdam:
M. Hertzberger.
Clarke, B. 2001. Searching for evidence of
nineteenth-century print restoration.
British Museum Occasional Papers, no.
145, PP- 49 -55 -
Colvin, H. 1985. Calke Abbey, Derbyshire.
London: Antler Books.
Cumberland, G. 1827. An Essay on the Utility
of Collecting the Best Works of the Ancient
Engravers of the Italian School. London:
W. Nichol.
Dawson, W. R., and E. P. Uphill. 1972. Who
Was Who in Egyptology. 2d rev. ed.
London: Egypt Exploration Society.
Depauw, C , and G. Luijten, et al. 1999-
Anthony van Dyck as a Printmaker.
Amsterdam: Antwerpen Open;
Rijksmuseum.
Donnithorne, A. 1988. Early approaches to
the conservation of works of art on
paper: Cleaning, repair and restoration.
British Museum Occasional Papers, no. 65,
pp. 16-25.
Dube, L. 1998. The copying pencil:
Composition, history, and conservation
implications. Book and Paper Group
Annual (American Institute for
Conservation) 17:45-52.
Filedt Kok, J . P., et al. 1985. Livelier than Life:
The Master of the Amsterdam Cabinet, or,
The Housebook Master, ca. 1470-1500.
Amsterdam: Rijksmuseum.
Friar, S., ed. 1987. A Dictionary of Heraldry.
.New York: Harmony Books.
Gascoigne, B. 1986. How to Identify Prints.
London: Thames and Hudson.
Gaudriault, R. 1995. Filigranes et autres carac-
teristiques des papiers fabriques en France
aux XVIle et XVIIle siecles. Paris: CNRS
Editions.
Gore, A., and A. Gore. 1991. The History of
English Interiors. London: Phaidon Press.
Gunn, M. J . 1911. Print Restoration and Picture
Cleaning. London: L. Upcott Gill.
Hattis, P. 1977. Four Centuries of French
Drawings in the Fine Arts Museums of
San Francisco. San Francisco: Fine Arts
Museums of San Francisco.
Heawood, E. [1969] 1981. Watermarks Mainly
of the 17th and 18th Centuries. Hilversum:
Paper Publications Society.

286 R E S T O R A T I O N O F E N G R A V I N G S , B O O K S , D R A W I N G S , A N D O T H E R W O R K S O N P A P E R
Hecquet, R. 1751. Catalogue des estampes
gravees d'apres Rubens: Auquel on a joint
I'oeuvre de Jordaens & celle de Visscher.
Avec un secret pour blanchir les estampes
& en dter les taches d'huile. Paris: Chez
Briasson, Chez Charles-Antoine Jombert.
Hennin, M. 1856. Les monuments de I'histoire
de France: Catalogue des productions de la
sculpture, de la peinture, et de la gravure.
Paris.
Hoeniger, C. 1999. The restoration of the
early Italian "Primitives" during the 20th
century: Valuing art and its conse
quences. Journal of the American Institute
for Conservation 38 (2 ) : i44 -6 i .
Hunter, D. 1947. Papermaking: The History and
Technique of an Ancient Craft. 2d ed., rev.
and enl. New York: Alfred A. Knopf.
James, C. 1997. Old Master Prints and Draw
ings: A Guide to Preservation and Conser
vation. Translated and edited by Marjorie
B. Cohn. Amsterdam: Amsterdam
University Press.
Keck, S. 1936. A method of cleaning prints.
Technical Studies in the Field of Fine Arts 5
(2):117~26.
Keyes, K. 1984. Alternatives to conventional
methods of reducing discoloration in
works of art on paper. In Postprints from
the AlC Tenth Annual Meeting, Milwaukee,
Wisconsin, 26-30 May 1982, pp. •
100-104. Washington, D.C.: American
Institute for Conservation.
Kosek, J . AA. 1994. Restoration of art on
paper in the West: A consideration of
changing attitudes and values. British
Museum Occasional Papers, no. 99,
pp. 41-50.
Krill, J . 2001. English Artists' Paper:
Renaissance to Regency. 2d ed. New
Castle, Del.: Oak Knoll Press.
Kushel, D. 1999. Radiographic methods used
in the recording of structure and water
marks in historic papers. In Fresh Woods
and Pastures New, edited by F. W.
Robinson and S. Peck, pp. 116-23. Chapel
Hill: Ackland Art Museum.
Labarre, E. J . [1952] 1969. Dictionary and
Encyclopedia of Paper and Paper-Making.
2d. ed. rev. Amsterdam: Swets and
Zeitlinger.
Leary, E., and P. Walton. 1976. Transfer-
printed Worcester Porcelain at Manchester
City Art Gallery. Manchester: City of
Manchester Cultural Services.
Lehrs, M. 1893. The Master of the Amsterdam
Cabinet. London: International
Chalcographical Society.
Lugt, F. 1921. Les marques de collections de
dessins & d'estampes. Amsterdam:
Vereenigde Drukkerijen. Reprint, San
Francisco: Alan Wofsy Fine Arts, 1975.
. 1988. Les marques de collections de
dessins & d'estampes. Supplement. San
Francisco: Alan Wofsy Fine Arts.
Mauquoy-Hendrickx, M. 1991. L'iconographie
d'Antoine van Dyck. 2 vols. Catalogue
raisonne. Brussels: Bibliotheque Royale
Albert 1.
Meder, J . 1932. Durer-Katalog: Ein Handbuch
uber Albrecht Durers Stiche, Radierungen,
Holzschnitte, deren Zustande, Ausgaben
und Wasserzeichen. Vienna: Gilhofer &
Rauschburg.
Muller, C. 2001. Urs Graf: Die Zeichnungen im
Kupferstichkabinett Basel. Basel: Schwabe
& Co.
The National Trust. 1995. Uppark, West
Sussex. London: The National Trust,
Great Britain.
Officer, L. H. 2002. Exchange rate between
the United States dollar and forty other
countries, 1913-1999. Economic History
Services, EH.net. www.eh.net/hmit /
exchangerates/.
Piccard, G. 1966. Die Ochsenkopf-
Wasserzeichen. Findbuch II, pts. 1-3.
Stuttgart: Verlag W. Kohlhammer.
Plenderleith, H . J . 1937. The Conservation
of Prints, Drawings, and Manuscripts.
London: Oxford University Press.
Podany, J . 1994. Restoring what wasn't there:
Reconsiderations of the eighteenth-
century restorations to the Lansdowne

R E F E R E N C E S 2 8 7
Herakles in the collection of the J . Paul
Getty Museum. British Museum
Occasional Papers, pp. 9 -18 .
Puglisi, C. R. 1999- Francesco Albani. New
Haven: Yale University Press.
Richards, L. S. 1968. Antonio Pollaiuolo:
Battle of the Naked Men. Bulletin of the
Cleveland Museum of Art 55 (3): 63 -70 .
Rhodes, B. J . , and W. W. Streeter. 1999.
Before Photocopying: The Art & History
of Mechanical Copying, 1780-1938.
Newcastle, Del.: Oak Knoll Press.
Schweidler, M. 1941. Sammeln und Sichten:
Eine praktische Craphikkunde. Innsbruck:
Universitats-Verlag Wagner.
Scott, A. 1921, 1923, 1926. The Cleaning and
Restoration of Museum Exhibits. London:
His Majesty's Stationery Office.
Shestack, A. 1967. Fifteenth-Century
Engravings of Northern Europe from
the National Gallery of Art, Washington,
D.C Washington, D.C.: National Gallery
of Art.
Stanton, M. 2002. Finding the piece to the
puzzle. In Battle of the Nudes: Pollaiuolo's
Renaissance Masterpiece. Cleveland:
Cleveland Museum of Art. www.cleve-
landart.org/exhibcef/battle/html/
3405295.html.
Stecher, P. G., ed. 1968. The Merck Index.
8th ed. Rahway, N.J.: Merck and Co.
Stevenson, A. 1967. The Problem of the
Missale Speciale. London: Bibliographic
Society.
Stevenson, M. 1990. A seventeenth-century
manual for the restoration of prints. Print
Quarterly 7 (4):420-24.
• 1995. Print restoration in northern
Europe: Development, traditions, and
literature from the late Renaissance to
the 1930s. Conservation Research 1995,
pp. 111-25. Studies in the History of Art,
51, Monograph Series II. Washington,
D . C : National Gallery of Art.
Trautscholdt, E. 1970. Zu Nachahmungen
und Falschungen: Ein Beitrag aus der
Perspective eines Graphikhandlers. In
Festschrift fur Heinz Ladendorf edited
by P. Bloch and G. Zick, pp. 180-83 .
Cologne: Bohlau Verlag.
Tuer, A. W. 1882. Bartolozzi and His Prints.
2 vols. London: Field and Tuer.
Tyler, V. E. 1991. Philatelic Forgers: Their
Lives and Works. Sidney, Ohio: Linn's
Stamp News.
Van der Reyden, D., M. F. Mecklenburg,
M. Baker, and M. Hamill. 1988. Update
on current research into aqueous light
bleaching at the Conservation Analytical
Laboratory. Book and Paper Annual
(American Institute for Conservation)
7:73-106.
Walsh, J . 2000. The use of paper splitting
in Old Master print restorations. Print
Quarterly 17 (4):383~90.
Wibiral, F. 1877. L'iconographie d'Antoine van
Dyck, d'apres les recherches de H. Weber.
Leipzig: A. Danz.
Will iamson, S. H. 2002. What is the relative
value? Economic History Services. April.
www.eh.net/hmit/compare/.

This page intentionally left blank

I N D E X
Note: Italicized page numbers indicate
illustrations.
A
acid solution
in aquatint, 189, 192
in crayon manner, 187
in etching, 181, 182, 183
in lithography, 192
Ackley, Cliff, 259
Adam and Eve (Durer), 252-55, 252-57
adhesives. See also specific types
buckling caused by, 12
preparation of, 170
removal of, in baths, 58
and removing prints from backings,
58-60
stains caused by, 12
in stretching of prints, 130, 134
used in old restorations, 156
aging of paper, mending and, 10, 116
airbrush
assembly of, 142
in spraying method of retouching, 139-42
Albani, Francesco, 2i2n.92
Altdorfer, Albrecht, St. George and the
Dragon, 242-45, 242-45
alum paste
bookbinders' misuse of, 35
definition of, 281
glaziers' misuse of, 34
problems with, 35, 281
removal of, 58-59
Schweidler (Carl) on, 209^42
in starch paste, 35, 96
alum rosin sizing, in papermaking, 44,
208n.29
aluminum subacetate
definition of, 281
for large paper, 151
in mending process, 103
for stamps, 203
in stretching of drawings, 137
uses for, 11, 83, 21m.68, 281
aluminum sulfate. See alum paste
amateur restoration
communication curtailing, 4-5
warnings against, 4, 33
ammonia
cleaning drawings with, 82
definition of, 281
for extermination of bookworms, 168
Schweidler (Carl) on, 209^37
for water stains, 55
animal products. See also gelatin solution
sizing with, 169-70
skins as paper, 39
aquatint (printing technique), 189, 189-92
aquatint prints, 790
cleaning of, 78, 79
Art Institute of Chicago, 265
auction catalogs, disclosure of repairs in, 8
audience, and deception through repair, 8
B
backings
in framing prints, 166-67
mounting engravings on, for storage,
160-61
removing Chinese rice paper from, 149
removing prints from, 58-63, 93
wooden boards as, treatment with, 154,
2i6n.i35
Baldwin, Will iam A., 256, 279n.i2
baths
as antidotes to chlorine, 66, 70-71
in chlorine treatment, 66, 67-68, 70-71
cleaning books with, 84, 87

290 R E S T O R A T I O N O F E N G R A V I N G S , B O O K S , D R A W I N G S , A N D O T H E R W O R K S O N P A P E R
cleaning color prints with, 78
cleaning colored prints with, 75-77
cleaning drawings with, 81-82
cleaning parchment with, 147
cleaning prints with, 51-55, 52
cleaning stamps with, 197, 201
copying-ink pencil markings in, 51
duration of, 52
in mending process, 102
removing backings with, 58-62
removing spirit varnish with, 93
removing strainers with, 60-61
sieves for draining in, 53-54
in splitting of paper, 104
transferring damp paper from, 48-50, 49
wine vinegar in (See wine vinegar baths)
wooden boards in, prints on, 154,
2i6n.i35
Battle of the Nudes (Pollaiuolo), 21511.125, 223,
274-76, 274-77
Baynes-Cope, A. D., 2ion.59
Bearded Man with Blank Shield (Master of the
Housebook), 8, 246-49, 246-50, 257
benzine, cleaning stamps with, 202, 203
betaradiography, 222, 223, 252-55
Bewick, Thomas, 173, 175
Biedermeier style
definition of, 281
drawings in, 81
binocular microscope, 222
black-and-white prints
brightening and cleaning of, 51
chlorine treatment for, 67-71
bleaching
by glaziers, 34
in papermaking, 44
bleaching power. See calcium hypochlorite
bleaching soda
vs. calcium hypochlorite, 11
cleaning with, 55-57, 56, 151
composition of, 11, 281
dangers of, 55-56
definition of, 11, 281
with large paper, 151
long-term effects of, 284n.i
in mending paper, preparation for, 102
for oil stains, 91-92, 2nnn.76-78
Schweidler (Carl) on, 209nn.40-4i
Bleich-Soda, 281, 284, 284n.i
blisters, on China paper, 143
blotting paper
in mending of stamps, 200-201
in storage of engravings, 161
Bohm, Hans, 64, 20911.47
bone folder, 777, 21m.74
in addition of plate marks, 128
breaks removed with, 154
in mending of books, 88
Bonnardot, Alfred
Essai sur la restauration des anciennes
estampes et des livres rares, 3-4, i6n.io
expertise of, 27
on splitting of paper, 256
translation of, 14, vn.22
book covers, removing prints from, 62-63
book pages
chlorine treatment for, 84, 85
cleaning of, 84-88, 170
corners missing from, 115-16
hydrogen peroxide for, 90
margins of, addition of, 126
mending of, 115-16, 157-59
quality of paper used for, 100
removal from binding, 84, 85-86
severely damaged, 86-88
shaving paper of, 87-88, 126, 159
bookbinders
mistakes made by, 35
pages removed from binding by, 84,
85-86
books
cleaning of, 170
old paper from, 46
old restorations of, 156-59
preservation of, 168-70
storage of, 168-70
bookworms
extermination of, 168-69
storage conditions and, 168
borders. See also margins
on colored prints, 76
removal of, 74
restoring after treatment, 75
brightening, of prints, 51-57, 155. See also
lightening
Brooks, John, 278n.6
brown stains. See also foxing
from chlorine treatment, 71, 2ion.59
brushes, 57
recommendations on, 38
retouching with, 138, 142
writing with, 123
brushing
in chlorine treatment, 69

I N D E X 291
in cleaning dirt, 55-57, 57
in cleaning water stains, 55
buckling of paper
in books, 116
detecting repairs with, 12, 2i2n.89, 226,
229, 243-45, 275-77
in mending process, 102, 115, 2i2n.89
during stretching, 133
bull's head watermark, 253, 254, 260-62
burin
in engraving, 776, 176-77
in woodcut, 175
burns, treatment of, 91
burrs, in etching, 182, 183
C
calcium hypochlorite. See also chlorinated
lime
vs. bleaching soda, 11
as chlorine, 20911.46
for stains, 11
camphor, 168
The Canon (Diirer), 180
carbon dioxide, in spraying method of
retouching, 139, 142
carbon tetrachloride
cleaning colored prints with, 72
for grease stains, 91
harmlessness of, 207n.i6
cardboard
Chinese rice paper glued to, 149-50,
2i5n.i32
engravings mounted on, for storage,
160-61, 2i6nn.138-41
in framing of prints, 166-67
needed for studio, 37-38
in use of starch paste, 96-97
carpenters, woodcutting by, 72
carpenter's glue
definition of, 21311.93
in splitting of paper, 104
case studies, 219-77
catalogs
auction, disclosure of repairs in, 8
stamp, 196, 197, 2vn.i52
The Censer (Schongauer), 278n.8
chain lines, 2o8n.27, 245
chalk, paper prepared with, 81, 2ion.63
chalk drawings, cleaning of, 82
chalk manner. See crayon manner
chamfered repair, 9. See also mending
process
chemicals
cleaning color prints with, 78-80, 90
cleaning colored prints with, 72, 74, 75
cleaning drawings with, 81-83
cleaning rice paper with, 149-50
dangers to prints posed by, 11-12
before mending process, 115
China prints, on copperplate papers,
treatment of, 143-45, 144
Chinese rice paper, painted, 149-50, 21511.131
chemical treatment for, 149
mending of, 149
stretching of, 149-50
Chinese watercolors, retouching with,
12211.215, 138
chlorinated lime. See also chlorine
antidotes for, 66, 20911.52
books treated with, 87
as chlorine, 20911.46
dangers of using, 64
definition of, 281
dissolved vs. dry, 64
drawings treated with, 82-83
preparation of solution, 64-65
stamps treated with, 197
storage of, 65
chlorine, 64-65
antidotes for, 66, 70-71, 202, 20911.52
black-and-white prints treated with,
67-71
book pages treated with, 84, 85
brown stains from, 71, 2ion.59
•Chinese rice paper treated with, 149
color prints treated with, 79
colored prints treated with, 72-76
dangers of using, 64
drawings treated with, 81-83
glaziers' use of, 34
hydrogen peroxide and, 89-90
in papermaking, 44
parchment treated with, 147
preparation of, 64-65
spots left after treatment of, 154
stamps treated with, 197, 202
use of term, 20911.46
citric acid
definition of, 282
for oxidized white lead, 82
for water stains, 55, 84
clay, in pencils, 81
cleaning, 51-57. See also baths
of black-and-white prints, 51

292 R E S T O R A T I O N O F E N G R A V I N G S , B O O K S , D R A W I N G S , A N D O T H E R W O R K S O N P A P E R
of books, 84-88, 170
of Chinese rice paper, 149
of color prints, 78-80
of colored prints, 72-77
decision-making process for, 33
of drawings, 81-83
equipment needed for, 37-38
by glaziers, 34, 79
of Japanese paper, engravings on, 152
of Japanese woodcuts, 152
of large prints, 151
before mending, 111-12, 155
of parchment, prints on, 147
of prints, 51-57
of silk, prints on, 152
of stamps, 196-97 202-3
cleaning agents, 38. See also specific agents
Cleveland Museum of Art, 21511.125, 223
Coat of Arms with Skull (Durer), 68, 69
Cohn, Marjorie, 252-53 ,
Collecting and Picking (Schweidler), 1
excerpt from, 171-95
collector's marks, 227, 259
collotypes, 282
Colnaghi, 277 279n.2i
color of paper
and aging after repair, 10
lighting and, 9
tinting and, 99
color prints
chemical treatment for, 78-80, 90
chlorine treatment for, 79
cleaning of, 78-80
hydrogen peroxide treatment for, 90
lightening of, 78
removing varnish on, 94
colored prints
chemical treatment for, 72, 74, 75
chlorine treatment for, 72-76
cleaning of, 72-77
documenting colors before treatment, 74
removing backings from, 62
removing strainers from, 60-61
restoring colors after treatment, 75
Comjean, Marlies, 21411.113
conservation
definition of, 6
preservation in, 6
restoration in, 6
use of term, 6, 13
The Conservation of Prints, Drawings, and
Manuscripts (Plenderleith), 4
copperplate
aquatint on, 189
engraving on, 176-78
etching on, 181-83
gray tone on paper from, 122
mezzotint on, 183-85
copperplate papers, China prints on, treat
ment of, 143-45
copying-ink pencils
definition of, 282
removal of markings from, 51, 202
on stamps, 202
corners, missing, mending of, 115
cotton
and mold stains, 162
in papermaking, 44, 45
couching, in papermaking, 42
Cranach, Lucas, woodcut by, 772
crayon manner, 185-87, 186, 187
crayon manner prints, 186, 191
crayons, lithographic, 192, 192-94
creases, in stretching of prints, 130, 132, 133
crible, 178-79, 179, 180, 282
cylinder machine-made papers, 233
D
damp paper
cleaning of, 55-57
handling of, 48, 48-50, 49, 52-53, 62
stretching of, 130-32
tinting of, 99
daylight. See sunlight
deception, in restoration, 7-8, 221
decorative objects, prints used as, 10, 1711.16
diseased paper
mold stains on, 162-63
storage of, 46
documentation
of books, condition and treatment of, 170
of colors, before treatment of colored
prints, 74
of repairs, 7, 8
Dolloff, F. W., 247
Donnithorne, A., 1711.15
dot punchers, 187
double water glass, 283
drawing boards, in stretching of prints, 130
drawings
chemical treatment of, 81-83
cleaning of, 81-83
detecting repairs in, 224-25
materials used for, 81

I N D E X 293
stretching of, 137
drying
after baths, 54
in layers, 154
in papermaking, 42-43, 44
drypoint needles
in engraving, 777, 178
in etching, 181-83, 183, 21711.151
Durer, Albrecht
Adam and Eve, 252-55, 252-57
The Canon, 180
Coat of Arms with Skull, 68, 69
engraving of Pirckheimer by, 120
iron etchings by, 180
woodcutting by, 72
dusters, 2o8n.22
Dyck, Anthony van, Portrait of Lucas
Vorsterman, 234, 264-73, 264-73
dyeing of paper, in mending process, 156-57,
202
E
eau de Javelle, 202, 21711.155, 282
Egypt, papermaking in, 39-40
English color prints, cleaning of, 78
engraving (printing technique), 776, 176-78,
177
steel, 195
stipple, 185, 186, 187-89
training in, 33-34
engravings
vs. etchings, lines of, 181
framing of, 164-66
on Japanese paper, cleaning of, 152
mistreatment of, 33, 34
preservation of, 160-67
storage of, 160-61
understanding value of, 33
varnished, 94
equipment, recommendations on, 37-38
erasers
cleaning colored prints with, 75
cleaning prints with, 51, 51, 2o8n.33
hardness of, 51
in mending process, m , 112
in retouching, 142
Schweidler (Carl) on, 2o8n.33
Essai sur la restauration des anciennes
estampes et des livres rares (Bonnardot),
3-4, i6n.io
estompe
in chlorine treatment, 67
definition of, 282
etching (printing technique), 181, 181-83, 752,
183
vs. crayon manner, 185
iron, 180
etchings, vs. engravings, lines of, 181
ethyl alcohol, distilled. See spirit of wine
expansivity of paper
in mending process, 101, 102, 106-8
stretching prints and, 108, 131, 134
wire lines and, 107, 107-8
F
Field, Richard, 278n.8
Firmin-Didot, Ambroise, 227, 229
Fitzwilliam Museum, 278n.8
fixing process, in cleaning drawings, 82
flax, in papermaking, 41
flour paste
in old restorations, 163
removal of, 59, 209^43
flyspecks, treatment of, 91
Fogg Art Museum, 4, 252
forgery, 7
case study of, 261-63
of stamps, 199, 21711.152
foxing
caused by chlorine vapor treatment, 83
on Chinese rice paper, cleaning of, 149
on colored prints, cleaning of, 72-73
on drawings, cleaning of, 82, 83
hydrogen peroxide for, 89-90
sizing and, 73, 21m.81
on stamps, 202
framers, mistakes made by, 74
framing
cleaning glass after, 167, 21711.146
of engravings, 164-66
of prints, 166-67
French color prints, cleaning of, 78, 79
fungus, removal of, 163
C
Gaehde, Christa, xi, 1, 249, 277
Galichon, Louis, 227
Gaudriault, R., 279n.i6
gelatin solution
cleaning books with, 85
in mending process, 102-3
removing sizing with, 98
in sizing, 170
in tinting, 99

294 R E S T O R A T I O N O F E N G R A V I N G S , B O O K S , D R A W I N G S , A N D O T H E R W O R K S O N P A P E R
Gill ray, J . , etching by, 52, 53
glaziers
cleaning by, 34, 79
ignorance of, 33, 34
mistakes made by, 34-35
services offered by, 282
gloss, on sporting prints, 76
glossary, 281-83
glue. See also adhesives
removal of, in baths, 58
in stretching of prints, 130, 134
Goepel, Erhard, 1511.1
Goethe, Johann Wolfgang von, 2ion.55
goldbeater's paper, 157
golden section, 160, 2i6n.i37
Graf, Urs, Two Landsquenets with a Maid and
Death, 258-62, 258-63
graphite, in pencils, 81
Gray, Francis Calley, 231, 252
grease-proof paper
in framing prints, 167
in mending process, 112, 112
grease stains
on stamps, 202
treatment of, 91, 202
Grisbrook, Mr., 256-57, 279n.i2
ground, in aquatint, 189
guards
definition of, 130, 282
in stretching of prints, 130, 134, 135,
147-48
gum, on stamps, removal of, 201-2
H
hangers, 37, 37
hanging
of damp paper, equipment needed for,
37, 37-38, 38
of framed engravings, 166
Heawood, E., 272
Hecquet, Robert, 2ion.55
hemp, in papermaking, 41
Henkel & Cie., 281, 284, 28411.1
Hennin, Michel, 256
Hettler, Max, 1, 28
hinges, attaching engravings to cardboard
with, 160-61, 2i6nn.138-39
holes, repair of. See mending process
Holland, papermaking in, 43
Housebook Master. See Master of the
Housebook
hydrochloric acid
cleaning books with, 84
cleaning stamps with, 202
for oxidized white lead, 82
and wood pulp, 203
hydrogen peroxide, 89-90
Chinese rice paper treated with, 149
dangers of using, 89
for oxidized white lead, 2nnn.66-67
for stains, 11
stamps treated with, 196, 202
storage of, 89
strength of solution, 89-90, 202
I
Ibscher, Hugo, 207n.i
forward by, 25-26
on papermaking, 39
illumination, specular, 239-40
impurities, in paper, shaving with, 106
infrared imaging, detecting repairs with, 223,
250, 277, 278n.1
ink
on manuscripts, treatment of, 146
on stamps, treatment of, 202
ink stains, treatment of, 91
inlay repair, 9. See also mending process
insects, extermination of, 168-69
intaglio printing, 171, 773
iron, flattening creases with, 133
iron etching, 180, 180
iron particles, in paper, shaving with, 106
ivory board
in addition of plate marks, 128
definition of, 282
J
jalousie, 37, 282
Jan Cornells Sylvius (Rembrandt), 70, 71
Japanese paper, engravings on, treatment of,
152
Japanese picture scroll, brightening of, 54
Japanese woodcuts, treatment of, 152
l<
kerosene, 169
Kilian, Wolfgang, engraving by, 178
knife
implanting wire lines with, 119
second shaving (thinning) with, 117-18
L
laid lines, 2o8n.27

I N D E X 295
Lancret, Nicolas, The Skater, 224, 224-25, 225
Landscape with a Cottage and a Large Tree
(Rembrandt), 230-33, 230-33
large paper, restoration work on, 151
lavis technique. See aquatint
layering of paper, for drying, 154
Lehrs, M., 250
letters, treatment of, 146
Liechtenstein, prince of, 277
lightening. See also cleaning
of color prints, 78
before mending, 155
of stamps, 196-97
with sunlight, 67, 2ion.55
lighting. See also sunlight
and color of paper, 9
detecting repairs with, 12, 221-23
in specular illumination, 239-40
for stains, 11
transmitted, 230, 240
lines. See wire lines
lining sheets, 163-64
lithography, 173, 192, 192-94, 193, 194
Lucanus, Friederich, 209^47
Lucas van Leyden, Susanna and the Elders,
238-40,238-41
Lunning, Elizabeth, 242
AA
magnesium oxide, for grease stains, 202
Maltzan, Andreas von, 247, 249, 250
AAanick, Annette, 256
manuscripts, treatment of, 146
maps, large, restoration work on, 151
margins
addition of false, 10, 123-26, 124, 126,
213n.no, 214n.n1
of book pages, 126
cleaning with bleaching soda, 56-57
detection of false, 220-21, 256-57
in mending process, 103
and plate marks, 127-29
Schweidler (Carl) on, 2i3n.io8
in stretching of prints, 134, 135
use of term, 2i4n.H3
Marie de Medici, 272
AAarienglas
in addition of plate marks, 129
definition of, 282
Mariette, Pierre-Jean, 2i2n.92
Massacre of the Innocents (with the Pine Tree)
(Raimondi), 226-29, 226-29
Master E. S., St. Mark, 278ns
Master of the Housebook, Bearded Man with
Blank Shield, 8, 246-49, 246-50, 251
mats, mistakes made with, 35-36
mattoirs, 186-87, 187
Medici family, watermark of, 277, 272
mending process, 109-22
for books, 87-88, 157-59
buckling caused by, 102, 115, 2i2n.89
challenges involved in, 10
chemical treatment before, 115
for Chinese rice paper, 149
cleaning paper before, 111-12, 155
cost of, 109, 110
difficulty of, 9
examination of tear in, 110-11
importance of, 9
for manuscripts, 146
measurement in, 153
mistakes in, repeating process after,
117-18
names for method of, 9
paste in
application of, 773, 114
preparation of, 88
pencil marks in, 707, 101-2, 113, 773
preparation for, 101, 101-3, 110-12
properties of paper and, 9
replacement paper used in
cleaning of, 112
dyeing of, 156-57, 202
expansivity of, 101, 102, 106-8
selection of, 100-101, 112
shaving of, 113
for stamps, 199-201
tearing or separating, 120-22, 727
retouching after, 138
Schweidler (Carl) on, 2i2nn.85-86,
2i2nn.90-91
shaving in (See shaving of paper)
sizing and, 100
for stamps, 196-203, 198, 199
surface texture after, 12, 153
tools used in, 777
water resistance and, 100, 101
without wire lines, 152-53
wire lines in
alignment of, 113, 115
expansion of, 707, 107-8
implantation of, 118-19
posttreatment of, 153
yellowing treated before, 155

296 R E S T O R A T I O N O F E N G R A V I N G S , B O O K S , D R A W I N G S , A N D O T H E R W O R K S O N P A P E R
AAenzel, Adolf
lithograph by, 193
wood engraving by, 776
metal piece, used in drawings, 81, 2ion.63
metal plates, artificial plate marks made with,
127
metalpoint drawings, 2ion.63
methylated spirits
cleaning glass of frames with, 167
cleaning stamps with, 202
definition of, 282
vs. spirit of wine, 93
mezzotint (printing technique), 753, 183-85,
189
mezzotint prints
cleaning of, 78
lightening of, 78
margins added to, 123
removing backings from, 94
retouching of, 139-40, 2i5n.i26
AAFA. See Museum of Fine Arts
mica. See AAarienglas
Michel catalogs, 196, 217^152
microscope, binocular, 222
mold stains
chlorine treatment for, 67-71
framing methods and, 167
removal of, techniques for, 161-63
sizing and, 162, 163, 21m.81
spread of, 162, 163
on stamps, 197
molds, papermaking, 42-43, 43
mounting. See backings
mounting artists, mistakes made by, 35-36
museum air, 168
museum board, 161, 2i6n.i4i
Museum of Fine Arts (MFA)
case studies from, 8, 222, 227, 246, 258-59,
264
false margins in, 256
false watermarks in, 12, 258-59
N
National Gallery (Washington, D.C.), 259,
278n.8
newspapers, composition of paper used for,
45
O
oil paints, bleaching soda for removing, 55
oil stains
on stamps, 202
treatment of, 91-92, 202
oilcloth, 38, 67
oilpaper
in cleaning books, 85
definition of, 282-83
old paper
need for, 46
storage of, 46
water resistance of, 100
ways of obtaining, 46-47
old prints
removing backings from, 61-62
ways of obtaining, 46-47
old restorations
of books, 156-59
rye flour paste in, 163
opaque colors, cleaning with, 75-76
outline drawing, 171-73
ox gall, 75
oxalic acid, for cleaning stamps, 196-97, 203,
217^153
oxidation, of white lead, 82, 2ion.65, 21m.66
P
paintbrushes. See brushes
paper
absorbency of, 98
composition of, 39, 41, 45, 106
history of use, 39-40
impurities in, 106
properties of, 9, 106
surfaces of, 106, 213^97
paper mills, 47, 43, 45
papermaking, 22, 39-45
in Egypt, 39-40
history of, 39-45
sizing in, 169
techniques of, 41-45
papyrus, paper made from, 39, 40
parchment
cleaning of, 147
history of, 39
removing prints from, 62
stretching of prints on, 147-48
treatment of prints on, 147-48
Parker, Harvey David, 227
paste. See also alum paste; flour paste; starch
paste
preparation of, 88, 21m.73
problems with, 88
removing remnants of, 93-94. 154.
216 n.134

I N D E X 297
pastel drawings, cleaning of, 82
pen-and-ink drawings, chemical treatment of,
83
pen-and-ink lithographs, 193-94, 794
pencil drawings, cleaning of, 81
pencils
composition of filling in, 81
copying-ink, 51, 202, 282
retouching with, 142
pens
retouching with, 138, 142
writing with, 123
phloroglucinol, 203
Phoenix watermark, 277, 271-72
photography, of repairs, 222
physicians, restorers as, 5, 204
Piccard, C , 260
planographic printing, 171, 773
plate marks
addition of false, 10, 127-29
on China paper, 145
detection of false, 267
expansion of, 108
in framing, 165
lining sheets and, 164
stretching of prints and, 130, 132, 133
Plenderleith, H. J . , The Conservation of Prints,
Drawings, and Manuscripts, 4
poles, 37-38
placing damp paper over, 48-50, 52-53,
62
Pollaiuolo, Antonio del, Battle of the Nudes,
2i5n.i25, 223, 274-76, 274-77
Portrait of Lucas Vorsterman (Dyck), 234,
264-73. 264-73
postage stamps. See stamps
potash water glass, 283
potassium binoxalate. See sorrel salt
potassium hypochlorite solution. See eau de
Javelle
potassium metabisulfate, for cleaning stamps,
197, 203
potassium permanganate, 2ion.59
for cleaning stamps, 196-97, 202
for dyeing mending papers, 156-57
pottery transfer tissue, 231-33, 278n.6
preservation
of books, 168-70
in conservation, 6
of engravings, 160-67
vs. restoration, 161
printmaking techniques, 171-95. See also
specific types
prints. See also specific types
brightening and cleaning of, 51-57
framing of, 166-67
removing from backings, 58-63
strengthening severely damaged, 98
understanding value of, 33
pulp
and mold stains, 162, 167
paper repaired with, 111, 2i3n.ioi
in papermaking, 41-43
in stamps, 203
stamps repaired with, 201
R
rabbets, 165, 166
rags, in papermaking, 41, 42, 44, 2o8n.22
Raimondi, Marcantonio, Massacre of the
Innocents, 226-29, 226-29
raking light, detecting repairs with, 12, 224,
226-27, 230
razors, cleaning colored prints with, 72, 75
red, in colored prints, cleaning of, 74
relief printing, 171, 777. See also specific types
Rembrandt van Rijn
etchings by, 182, 183
false margins on works of, 256
Jan Cornells Sylvius, 70, 71
Landscape with a Cottage and a Large Tree,
230-33, 230-33
repainting, after cleaning colored prints, 75
repair(s). See also mending process
buckling as sign of, 12, 2i2n.89, 226, 229,
243-45, 275-77
case studies on, 219-77
deception in, 7-8, 221
disclosure of, 8
documentation of, 7, 8
invisibility of, 7-8, 220
tools and techniques for examining,
221-23
restoration
compromises in, 6
in conservation, 6
deception through, 7-8, 221
decision-making process for, 8-9
goals of, 5-6
imperceptibility of, 5-7
old techniques of, for books, 156-59
vs. preservation, 161
self-revealing, 7-8
sharing knowledge of, 4-5

298 R E S T O R A T I O N O F E N G R A V I N G S , B O O K S , D R A W I N G S , A N D O T H E R W O R K S O N P A P E R
of stamps, 196-203
true (See mending process)
The Restoration of Engravings, Drawings,
Books, and Other Works on Paper
(Schweidler)
Carl Schweidler's notes in copy of, 2-3,
i6nn.4-5, i6n.7
first edition of, 1
second edition of, 1, 14, 21
restorers
amateur, 4-5, 33
as physicians, 5, 204
retouching, 138-42
on back of prints, 139, 21511.125
deception through, 7
with pencils, 142
self-revealing, 7-8
spraying method of, 139-42
of stamps, 199
rice paper. See Chinese rice paper
Richards, Louise, 274, 275
rinsing. See also baths
equipment needed for, 37
vs. washing, 207n.i2
rockers, in mezzotint, 183, 183, 184
rosin, granular, in aquatint, 189
rosin sizing, in papermaking, 44-45, 169,
208n.29
Ross iter, Henry, 247, 249
roulettes, 185-87 186, 187
rye flour paste, in old restorations, 163
S
Sackett, Mary, 2o8n.35
St. George and the Dragon (Altdorfer), 242-45,
242-45
St. John the Baptist (Schongauer), 234-37,
234-37
St. Mark (Master E. S.), 278n.9
salt, in aquatint, 189. See also sorrel salt
sandpaper, 152-53
Say re, Eleanor, 247-49
Schongauer, Martin
The Censer, 278n.8
St. John the Baptist, 234-37, 234-37
Schweidler, Carl
on alum paste, 20911.42
on ammonia, 20911.37
on bleaching soda, 209nn.40-4i
on cleaning glass of frames, 21711.146
on erasers, 2o8n.33
on errors by Max, 2i2n.84
life of, 2
on margins, addition of, 2i3n.io8
on mending process, 2i2nn.85-86,
2i2nn.90-91
notes in copy of first edition by, 2-3,
i6nn.4-5, i6n.7
obituary of, 1511.1, 277
on oxidized white lead, 2 i inn.66-67
relationship with Max, 2-3
on removing paste, 2i6n.i34
restoration work by, 9, 274, 277, 27911.21,
27911.23
on sunlight lightening, 2ionn.56-57
on wine vinegar treatment, 2ion.54
Schweidler, Gerd, 2
Schweidler, Kurt, 2, 277
Schweidler, Max
family of, 2
life of, 1-2, i6n.5
mystery surrounding, ix, 1
relationship with brother Carl, 2-3
years of experience in restoration, 3,
1611.5
Schweidler, Regula, 2
Schweidlerized prints, meaning of term, ix, xi
screw press, for woodcuts, 174-75
selenite. See Marienglas
Senf Brothers, 196, 21711.152
severely damaged books, cleaning of, 86-88
severely damaged prints, strengthening of, 98
Sewall, Henry F., 227
shaving of paper, 9-10, 112-13
of book pages, 87-88, 126, 159
box for, 117, 118
of manuscripts, 146
for margins, addition of, 125-26, 213n.no
of mended tear (thinning), 117-18,
2i3n.i05
after mistakes in mending, 117
properties of paper and, 106
of stamps, 197-99, 2i7n.i54
sieves, for draining baths, 53-54
silhouetting, 234-35, 278n.8
silk, prints on, treatment of, 152
sizing
and absorbency, 98
with animal products, 169-70
in cleaning of books, 87
and foxing, 73, 21m.81
and mending process, 100
and mold stains, 162, 163, 21m.81
in papermaking, 42, 44-45, 45, 169,

I N D E X 299
20811.29
removal of, 93
of stamps, 201
strengthening severely damaged prints
with, 98
water resistance of, 98
The Skater (Lancret), 224, 224-25, 225
skies in prints, repairs to, 230-31, 27811.5
Smith, John Raphael, 140, 141, 21511.127
soda. See bleaching soda
soda solution. See bleaching soda
sodium carbonate, in bleaching soda, 11
sodium hyposulfate, as antidote for chlorine,
66
sodium silicate. See water glass
sorrel salt
for cleaning books, 84
definition of, 283
for ink stains, 91
specular illumination, 239-40
spirit of wine
definition of, 283
removing varnish with, 93
spirit varnish, removal of, 93-95
splitting paper, 104-5, 105
detection of, 256-57
reasons for, 105
technique for, 104-5, 256-57, 278n.io
splitting prints
historical examples of, 2i2n.92
problems with, 10
sponges
in chlorine treatment, 67, 85
preparation for use, 207n.20
stocking studio with, 38
in stretching prints, 131
sporting prints, gloss on, cleaning with, 76
spraying method, of retouching, 139-42
St. George and the Dragon (Altdorfer), 242-45,
242-45
St. John the Baptist (Schongauer), 234-37,
234-37
St. Mark (Master E. S.), 27811.9
stains, techniques for removing, 11-12, 91-92.
See also specific types of stains
stamps, postage, 196-203
cleaning of, 196-97, 202-3
forgery of, 199, 21711.152
mending of, 196-203, 198, 199
removing gum on, 201-2
retouching of, 199
Stanton, Moyna, 223, 250, 277, 279n.i8
starch paste, 96-97
alum paste in, 35, 96
in lining sheets, 164
in mending process, 113, 114
in old restorations, 156
preparation of, 35, 96, 170, 21m.80
proper use of, 96-97
in removing prints from backings, 59,
61-62
for stamps, 203
storage of, 96
in stretching of prints, 130
steel engraving, 195, 195
Steele, Marcia, 278n.i
stipple engraving, 187 187-89, 188
crayon manner compared to, 185, 186,
187
stone board
definition of, 283
in stretching of prints, 130
stones
in lithography, 192-94
in planographic printing, 171
storage
of books, 168-70
of chlorinated lime, 65
of diseased paper, 46
of engravings, 160-61
of hydrogen peroxide, 89
of old paper, 46
of starch paste, 96
strainers, wooden
definition of, 21511.121
removing prints from, 60-61, 20911.44
stretching of drawings on, 137
stretchers
definition of, 21511.121
stretching of drawings on, 137
stretching of drawings, 137
stretching of prints, 130-36
buckling during, 133
on Chinese rice paper, 149-50
dampness needed for, 130-32
expansivity of paper and, 108, 131, 134
in framing, 164-66
materials for, 130
on parchment, 147-48
reasons for, 13, 21411.116
technique for, 13, 130-32, 134-36
studio room, recommendations on, 37-38
sugar, 75
sulfur gases, 169

300 R E S T O R A T I O N O F E N G R A V I N G S , B O O K S , D R A W I N G S , A N D O T H E R W O R K S O N P A P E R
sunlight
detecting repairs wi th , 221-22
lightening prints wi th , 67, 2ion.55
for mold stains, 163
Schweidler (Carl) on, 2ionn.56-57
storage of engravings away from, 160
uses for, 11
supports
removing large prints from, 151
removing old prints from, 61-62
in stretching of prints, 130, 135-36, 136
Susanna and the Elders (Lucas), 238-40,
238-41
Swiss color prints, 2ion.6i
cleaning of, 73-74, 78
T
T-gas, 169
tearing paper, for use in mending, 120-22, 121,
202
tears
in damp paper, handling, 48-49, 62
examination of, 110-11
restoration of (See mending process)
temperature, ideal, 168
texture of paper
after mending, 12
restoration of, 153
thin spots, mending of, 120
t int ing of prints, 99
materials for, 99
technique for, 99
tips, 152-55
tissue paper, misuse of, 161
titles, addition of, 123
transmitted light, 230, 240
transparent watercolors, cleaning of, 75
trateggio technique, 7-8
Trautscholdt, Eduard, 279n.i4
trays, 37
for t int ing, 99
tube poles, 37-38, 38
placing damp paper over, 48-50, 52-53
Tuer, A. W., 256-57, 279n.i2
turpentine, in lining sheets, 164
Two Landsquenets with a Maid and Death
(Graf), 258-62, 258-63
U
ultraviolet light, detecting repairs wi th ,
222-23, 227
used-book shops, old paper from, 46
V
vacuum cleaner, cleaning books wi th , 170
vandalism, mistreatment of engravings as, 33,
34
varnish
in lithography, 194
and mold stains, 162
removal of, 93-95
vinegar. See wine vinegar
W
Walsh, J., 256, 279n.11
warnings
against amateur restoration, 4, 33
Schweidler's use of, 4
washing. See also baths
vs. rinsing, 207n.i2
washing potcher
definition of, 283
in papermaking, 43
water baths. See baths
water glass
definition of, 283
preparation of, 283
uses for, 203, 283
water resistance
and mending, 100, 101
of old paper, 100
of sizing, 98
water stains
on books, cleaning of, 84, 85
cleaning in baths, 54-55
on colored prints, cleaning of, 72-73, 75,
76
framing and, 167
on prints, cleaning of, 54~55
sizing as protection from, 45
watercolor technique. See aquatint
watercolors
around tears, removal of, 111
in Japanese woodcuts, 152
retouching wi th , 12211.215, 138
transparent, cleaning of, 75
watermarks
addition of false, 12, 2i3n.i07
bull's head, 253, 254, 260-62
detection of false, 235-37, 258-63, 268-73
examples of, 200
identification of, 46
on old paper, 46
in papermaking process, 44
Phoenix, 277, 271-72

I N D E X 301
on stamps, 199, 21711.154
wax stains, removal of, 72
wet paper. See damp paper
Whatman papers, removing prints from
strainers with, 60
white lead, darkening of, 82, 2ion.65,
2t inn. 66-67
white paper, mending of, 121-22
white wax, in lining sheets, 164
wine, spirit of, 93, 283
wine vinegar
cleaning glass of frames with, 167
stocking studio with, 38, 207n.i4
wine vinegar baths
as antidote for chlorine, 66, 202, 209^53
cleaning with, 11, 52, 55, 2o8n.35
definition of, 283
for mold stains, 163
Schweidler (Carl) on, 2ion.54
in sunlight lightening, 67
wire lines
addition of false, 12, 118-19
definition of, 44, 2o8n.27
in mending process
alignment of, 113, 115
expansion of, 107, 107-8
implantation of, 118-19
posttreatment of, 153
paper without, repairs on, 152-53
in papermaking process, 44
visibility on upper surface, 106, 213^97
wire screens, in papermaking, 43-44. 2o8n.26
Wolk, Thomas, 284n.i
wood fiber, in papermaking, 45
wood pulp
and mold stains, 162, 167
in stamps, 203
woodcut (printing technique), 72, 171, 173,
173-75,174, 175
woodcuts
colored, cleaning of, 72-77
errors in, 72
Japanese, treatment of, 152
wooden boards, prints on, treatment of, 154,
2i6n.i35
wooden strainers. See strainers
wormholes
detecting repairs of, 248-50
mending of, 111, 157-59, 75S, 2i6n.i36
wrinkles, in framing, 165
writing
addition of, 123
on manuscripts, treatment of, 146
X
x-radiography, 222, 223
Y
Yale University Art Gallery, 278n.8
yellowing
causes of, 155
chlorine treatment for, 67-71
cleaning before mending, 155
of handmade paper, 44
removal with bath, 52, 54
under surface of paper, 155
Z
zinc plates, in addition of plate marks, 127-28
Zinser, Richard H., 245, 277

A B O U T T H E E D I T O R
Roy Perkinson holds a B.S. in physics and phi losophy f rom the Massachusetts
Institute of Technology and an M.A. in art history f rom Boston University. He
received his conservation training at the Museum of Fine Arts, Boston, where
he held an apprenticeship under the direction of F. W. Dol lof f f rom 1967 to
1970. A member of the Print Council of America and a fe l low of the American
Institute for Conservation, Perkinson has published widely in the fields of paper
conservation and fine art. Since 1976 he has been Head of Paper Conservation
at the Virginia Herrick Deknatel Paper Conservation Laboratory, Museum of
Fine Arts, Boston.